Thought Spot Administration Guide 4.2
User Manual: Pdf
Open the PDF directly: View PDF ![]() .
.
Page Count: 320 [warning: Documents this large are best viewed by clicking the View PDF Link!]
- Contents
- Installation and setup
- Login credentials for administration
- Log in to the Linux shell using SSH
- Log in to ThoughtSpot from a browser
- Set your ThoughtSpot locale
- Software updates
- Test network connectivity between nodes
- Set the relay host for SMTP (email)
- Set up a fiscal calendar year
- About SSL (secure socket layers)
- Configure SAML
- About LDAP integration
- Mount a NAS file system
- Add a custom support contact
- Set up monitoring
- Connect to the ThoughtSpot Support file server
- Set up remote support access
- Enable the call home capability
- Network ports
- About load balancing and proxies
- Load and manage data
- Model, link, and tag your data for searching
- Model the data for searching
- Model data in the ThoughtSpot application
- Model data in bulk in the modeling file
- Data modeling settings
- Change the column name
- Add a column description
- Change the column type (ATTRIBUTE or MEASURE)
- Change the additive setting for a column
- Change the aggregation setting for a column
- Hide a column
- Create synonyms for a column
- Change the index type for a column
- Add a geographical data setting for a column
- Set the search suggestions priority for a column
- Set the format to use when showing numbers
- Set the format to use when showing dates
- Set the format to use when showing currencies
- Change the Attribution Dimension setting of a column
- Link tables using relationships
- About stickers
- Model the data for searching
- Simplify searching with worksheets
- Manage users, groups, and privileges
- Manage jobs
- About security
- System administration
- Backup and restore
- About troubleshooting
- Reference
- Contact ThoughtSpot
- Open source software
- Copyright

ThoughtSpot
Administration Guide
Version 4.2
February 2017

Table of Contents
ThoughtSpot Administration Guide Copyright © 2017 by ThoughtSpot. All Rights Reserved. 2
Contents
Chapter 1: Installation and setup............................................................ 8
Login credentials for administration........................................................................... 10
Log in to the Linux shell using SSH............................................................................ 10
Log in to ThoughtSpot from a browser......................................................................11
Set your ThoughtSpot locale..........................................................................................12
Software updates.................................................................................................................12
Test network connectivity between nodes............................................................... 12
Set the relay host for SMTP (email)............................................................................ 13
Verify that email is working.................................................................................13
Set up a fiscal calendar year..........................................................................................14
About SSL (secure socket layers)................................................................................ 15
Configure SSL for web traffic............................................................................. 15
Set the recommended TLS version.................................................................. 16
Configure SAML................................................................................................................... 17
About LDAP integration................................................................................................... 18
Configure OpenLDAP............................................................................................. 18
Configure LDAP for Active Directory............................................................. 20
Add the SSL certificate for LDAP.....................................................................22
Test the LDAP configuration...............................................................................23
Sync users and groups from LDAP..................................................................23
Mount a NAS file system.................................................................................................25
Add a custom support contact.................................................................................... 27
Set up monitoring..............................................................................................................29
Connect to the ThoughtSpot Support file server................................................. 30
Set up remote support access.......................................................................................31
Enable the call home capability...................................................................................32
Network ports......................................................................................................................33

Table of Contents
ThoughtSpot Administration Guide Copyright © 2017 by ThoughtSpot. All Rights Reserved. 3
About load balancing and proxies............................................................................. 40
Chapter 2: Load and manage data.....................................................43
About case configuration............................................................................................... 46
Generate CSV files with the data to be loaded..................................................... 46
Load data from a web browser....................................................................................47
Append data from a web browser............................................................................. 50
Plan the schema..................................................................................................................52
Data types..................................................................................................................54
Constraints..................................................................................................................57
Sharding......................................................................................................................60
Chasm traps...............................................................................................................63
Chasm trap limitations..........................................................................................64
Build the schema................................................................................................................66
About TQL, the SQL command line interface..............................................67
Connect to the database with the ThoughtSpot SQL Command Line
(TQL)....................................................................................................................... 67
Create the schema in TQL.................................................................................. 68
Write a SQL script to create the schema......................................................69
Schema creation examples................................................................................. 70
Import a schema (use the SQL editor).......................................................... 73
Change the schema...........................................................................................................75
Change the primary key for a table................................................................ 75
Change a relationship between tables........................................................... 76
Change sharding on a table............................................................................... 78
About data type conversion...............................................................................79
Load data with ThoughtSpot Loader.........................................................................83
Import CSV files with ThoughtSpot Loader.................................................84
Use a script to load data.....................................................................................85
Bulk load files in parallel......................................................................................86

Table of Contents
ThoughtSpot Administration Guide Copyright © 2017 by ThoughtSpot. All Rights Reserved. 4
Delete a data source.........................................................................................................88
Delete a data source from the browser.........................................................89
Delete or change a table in TQL...................................................................... 92
About the Schema Viewer............................................................................................. 93
Chapter 3: Model, link, and tag your data for searching............. 97
Model the data for searching........................................................................................98
Model data in the ThoughtSpot application................................................ 98
Model data in bulk in the modeling file....................................................... 100
Data modeling settings.......................................................................................104
Link tables using relationships.................................................................................... 123
Create a relationship............................................................................................ 124
Delete a relationship.............................................................................................128
About stickers.................................................................................................................... 129
Create stickers........................................................................................................ 130
Apply a sticker.........................................................................................................131
Filter by a sticker...................................................................................................132
Chapter 4: Simplify searching with worksheets........................... 134
Create a new worksheet................................................................................................ 137
Add sources and columns to a worksheet.................................................. 137
How the inclusion rule works............................................................................ 141
How the worksheet join rule works................................................................143
About formulas in worksheets.........................................................................150
Edit a worksheet............................................................................................................... 153
Rename a worksheet or table.......................................................................... 154
Change the inclusion or join rule for a worksheet....................................155
Delete a worksheet or table.........................................................................................157
Chapter 5: Manage users, groups, and privileges........................160

Table of Contents
ThoughtSpot Administration Guide Copyright © 2017 by ThoughtSpot. All Rights Reserved. 5
About privileges................................................................................................................ 162
Add a group and set security privileges.................................................................163
Edit or delete a group....................................................................................................166
Add a user........................................................................................................................... 167
Add multiple users to a group....................................................................................169
Edit or delete a user....................................................................................................... 170
Forgotten password..........................................................................................................171
Chapter 6: Manage jobs......................................................................... 172
About scheduled pinboards......................................................................................... 173
Schedule a pinboard job.....................................................................................175
Scheduled pinboards management................................................................178
Chapter 7: About security.....................................................................182
System security..................................................................................................................183
Get audit logs..........................................................................................................183
Security policies..................................................................................................... 185
Data security.......................................................................................................................186
Share tables and columns.................................................................................. 187
Share worksheets.................................................................................................. 190
Share a pinboard....................................................................................................192
Revoke access (unshare)....................................................................................194
Row level security................................................................................................. 196
Network security............................................................................................................... 212
Chapter 8: System administration...................................................... 213
System monitoring........................................................................................................... 214
About the Space Utilization chart................................................................. 220
Generate and send a log bundle............................................................................... 222
Send logs to the administrator...................................................................................222

Table of Contents
ThoughtSpot Administration Guide Copyright © 2017 by ThoughtSpot. All Rights Reserved. 6
Set up recording for Replay Search.........................................................................223
Chapter 9: Backup and restore.......................................................... 228
About backups..................................................................................................................230
Take a snapshot.....................................................................................................232
Configure periodic snapshots.......................................................................... 233
Take a backup of a snapshot...........................................................................235
Configure periodic backups............................................................................. 236
About restore operations..............................................................................................238
Chapter 10: About troubleshooting................................................. 240
Get logs.................................................................................................................................241
Upload logs to ThoughtSpot Support......................................................... 243
Network connectivity issues....................................................................................... 244
Change the timezone.....................................................................................................245
Browser untrusted connection error........................................................................245
Characters not displaying correctly.........................................................................246
Clear the browser cache...............................................................................................247
Cannot open a saved answer that contains a formula..................................... 249
Data loading too slowly................................................................................................. 251
Search results contain too many blanks.................................................................252
Chapter 11: Reference............................................................................. 254
TQL reference....................................................................................................................255
ThoughtSpot Loader flag reference.........................................................................266
tscli command reference.............................................................................................. 270
Formula reference........................................................................................................... 290
Date and time formats reference..............................................................................305
Row level security rules reference............................................................................307

Table of Contents
ThoughtSpot Administration Guide Copyright © 2017 by ThoughtSpot. All Rights Reserved. 7
Contact ThoughtSpot..............................................................................317
Open source software.............................................................................319
Copyright.....................................................................................................320

Installation and setup
ThoughtSpot Administration Guide Copyright © 2017 by ThoughtSpot. All Rights Reserved. 8
Chapter 1: Installation and setup
Installation and setup
Topics:
•Login credentials for
administration
•Log in to the Linux shell
using SSH
•Log in to ThoughtSpot
from a browser
•Set your ThoughtSpot
locale
•Software updates
•Test network connectivity
between nodes
•Set the relay host for
SMTP (email)
•Set up a fiscal calendar
year
•About SSL (secure socket
layers)
•Configure SAML
•About LDAP integration
•Mount a NAS file system
•Add a custom support
contact
•Set up monitoring
This ThoughtSpot Administrator Guide will walk
you through the basic steps required to set up and
configure ThoughtSpot. It will also assist you in
troubleshooting some common problems, finding
additional resources, and contacting ThoughtSpot.
ThoughtSpot enables you to access and analyze
your data through a search-based user interface. You
can create your searches on the fly by typing into a
search bar, like you do when using an internet search
engine. ThoughtSpot makes it easy to see your data,
get your questions answered, create interactive
graphs, and customize pinboards. You do not need to
understand how the data is stored or know SQL to do
these things.
ThoughtSpot gives administrators the ability to
modify data properties to meet business needs, for
example by providing search synonyms for common
terms, boosting the importance of a column in
search results, or formatting how the data appears.
Collaboration and security features make it easy for
you to protect sensitive data and for users to share
information safely with others.

Installation and setup
ThoughtSpot Administration Guide Copyright © 2017 by ThoughtSpot. All Rights Reserved. 10
Login credentials for administration
You will need administrative permissions to perform the actions discussed in this
guide. You can access ThoughtSpot via SSH at the command prompt and from a
Web browser.
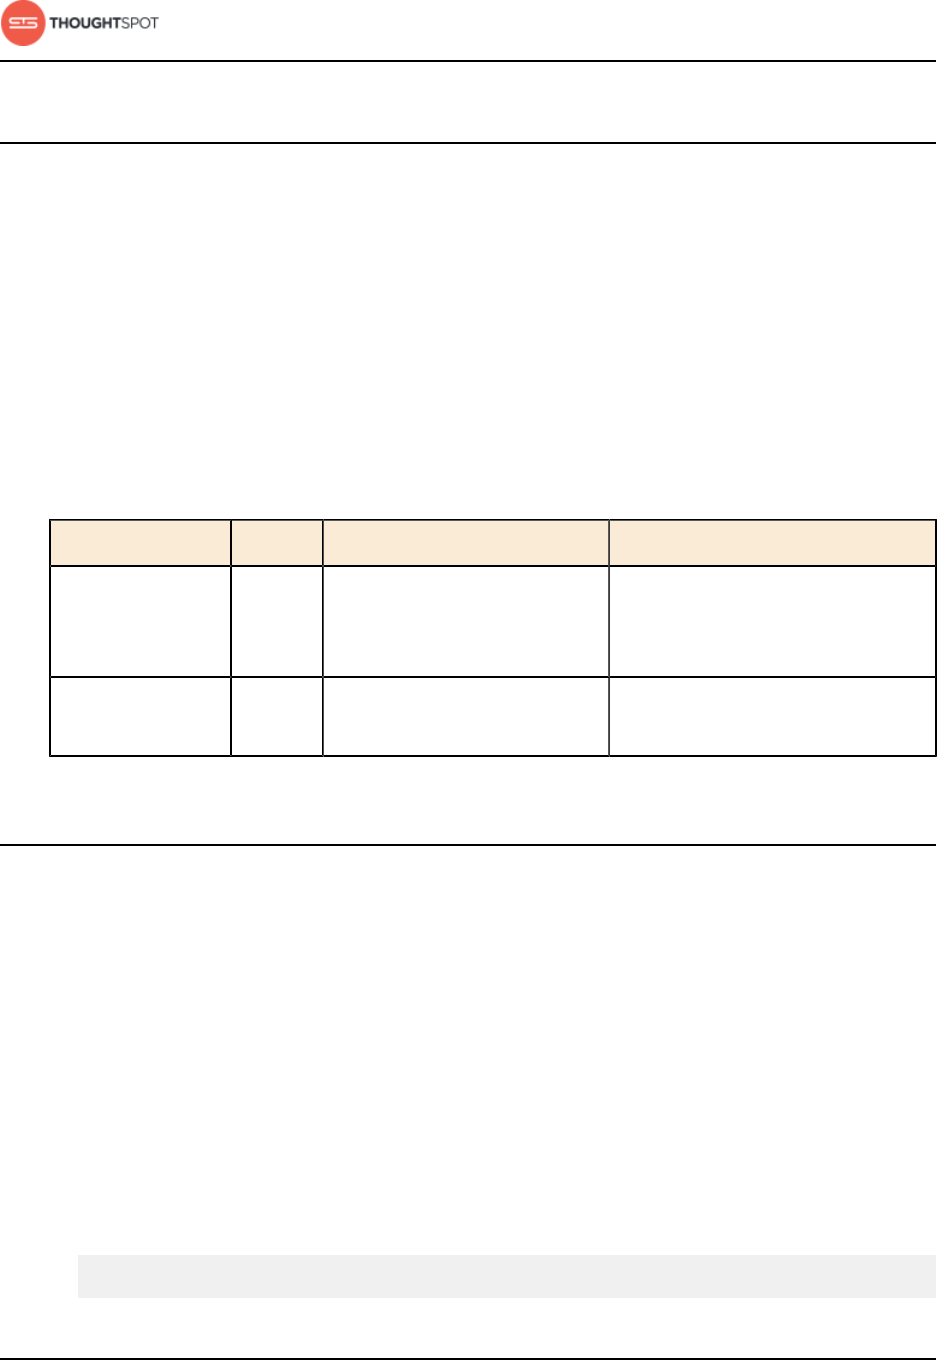
There are two separate default administrator users, an operating system user
that you type in at the Linux shell prompt, and an application user for access
through a browser. Make sure you use the correct login and password for the
method you are using to log in. Passwords are case sensitive.
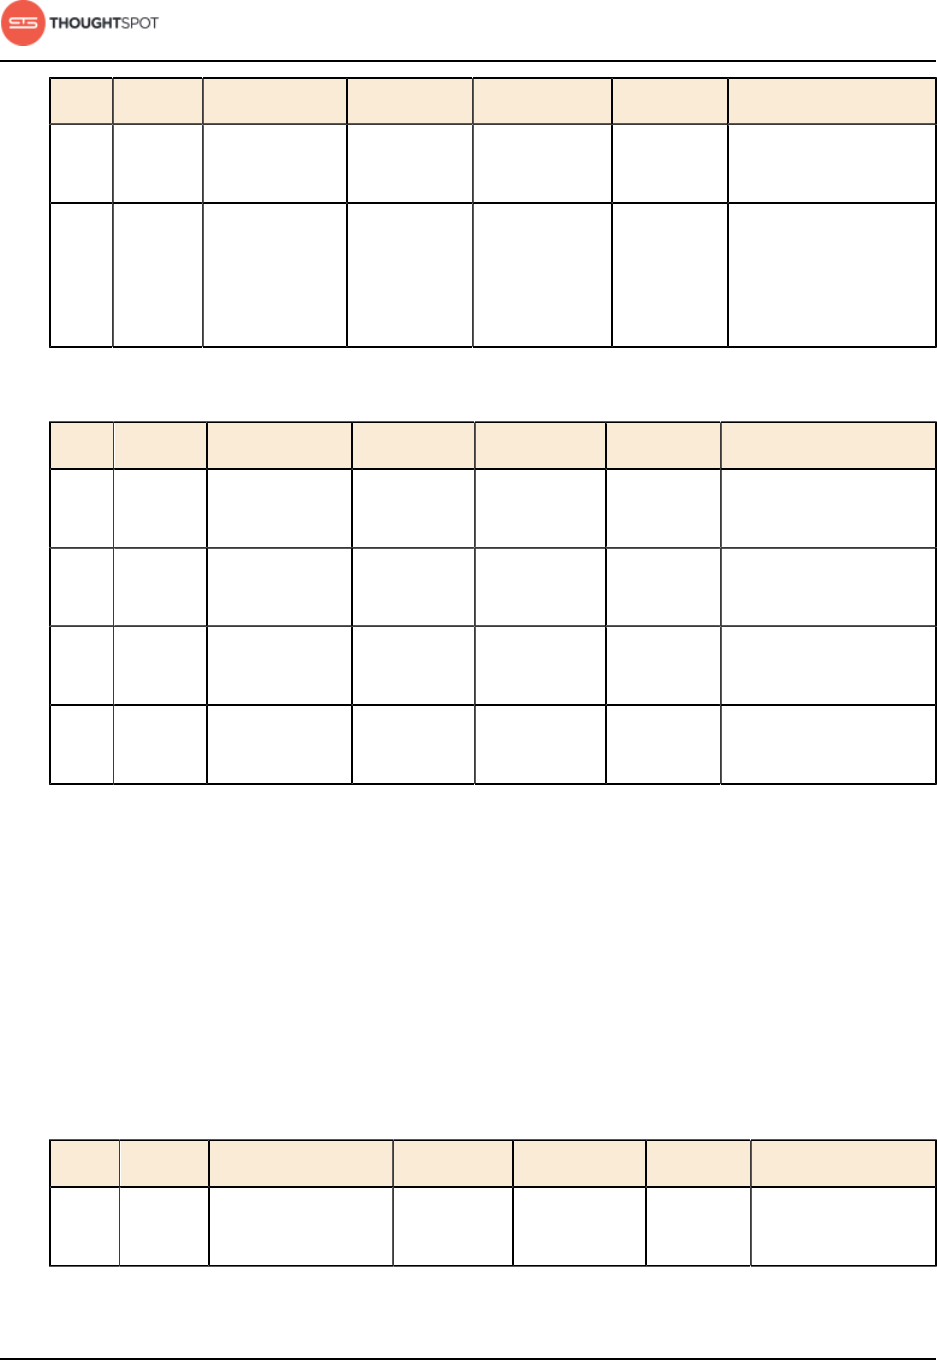
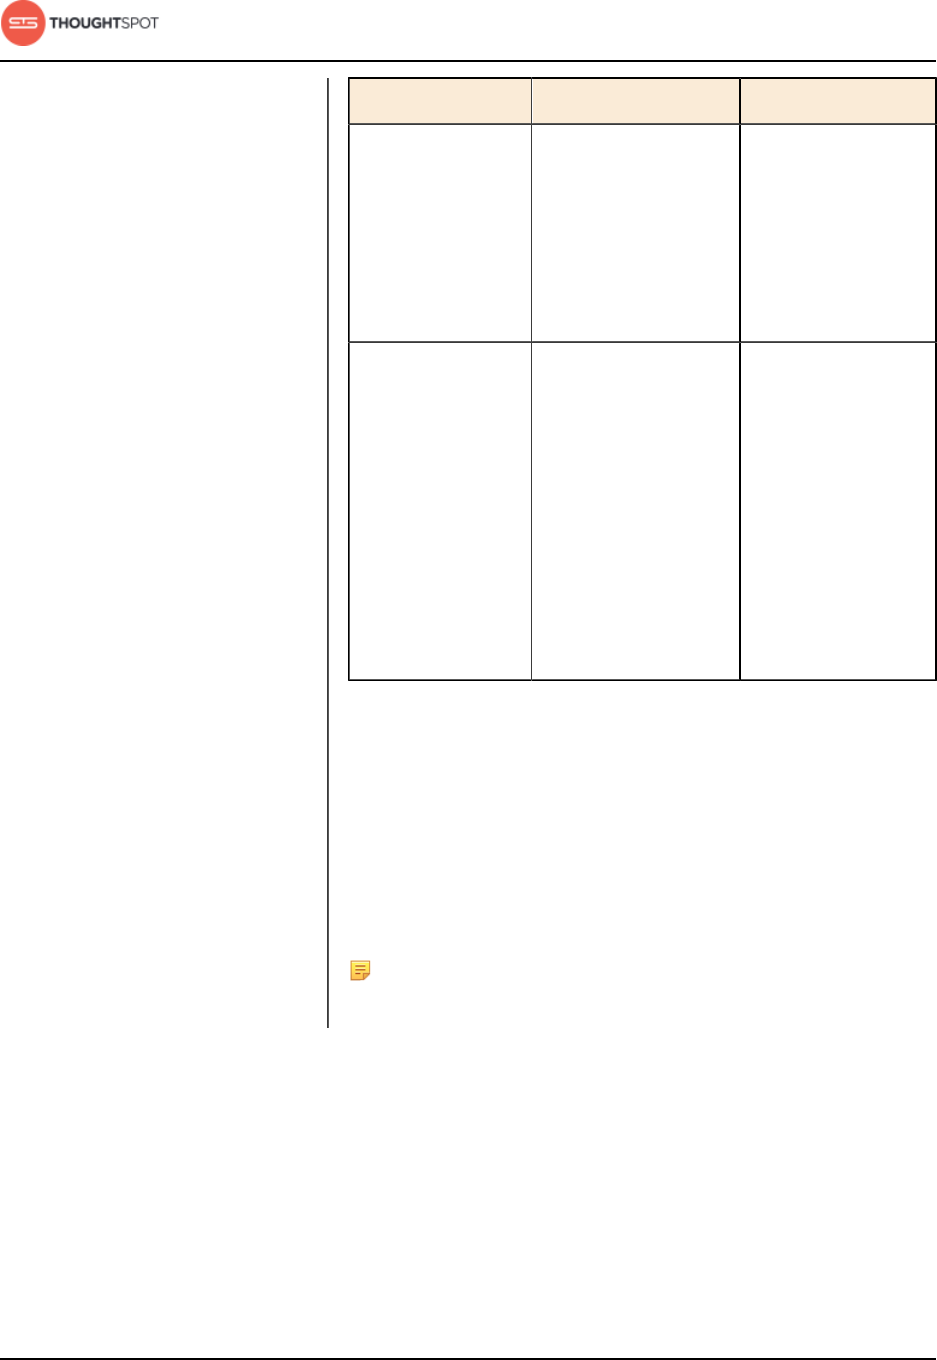
Table 1: Default administrative user credentials
Login Type User Access Method Password
OS user admin Access remotely via SSH from
the command prompt on a
client machine.
Contact ThoughtSpot to obtain
the default password.
Application user tsadmin Access through a Web
browser.
Contact ThoughtSpot to obtain
the default password.
Log in to the Linux shell using SSH
To perform basic administration such as checking network connectivity, starting
and stopping services, and setting up email, log in remotely as the Linux
administrator user "admin". To log in with SSH from a client machine, you can
use the command shell or a utility like Putty.
In the following procedure, replace <hostname_or_IP> with the hostname or IP
address of a node in ThoughtSpot. The default SSH port (22) will be used.
1. Log in to a client machine and open a command prompt.
2. Issue the SSH command, specifying the IP address or hostname of the
ThoughtSpot instance:
ssh admin@<hostname_or_IP>
Installation and setup
ThoughtSpot Administration Guide Copyright © 2017 by ThoughtSpot. All Rights Reserved. 11
3. Enter the password for the admin user.
Log in to ThoughtSpot from a browser
To set up and explore your data, access ThoughtSpot from a standard Web
browser using a username and password.
Before accessing ThoughtSpot, you need:
• The Web address (IP address or server name) for ThoughtSpot.
• A network connection.
• A Web browser.
• A username and password for ThoughtSpot.
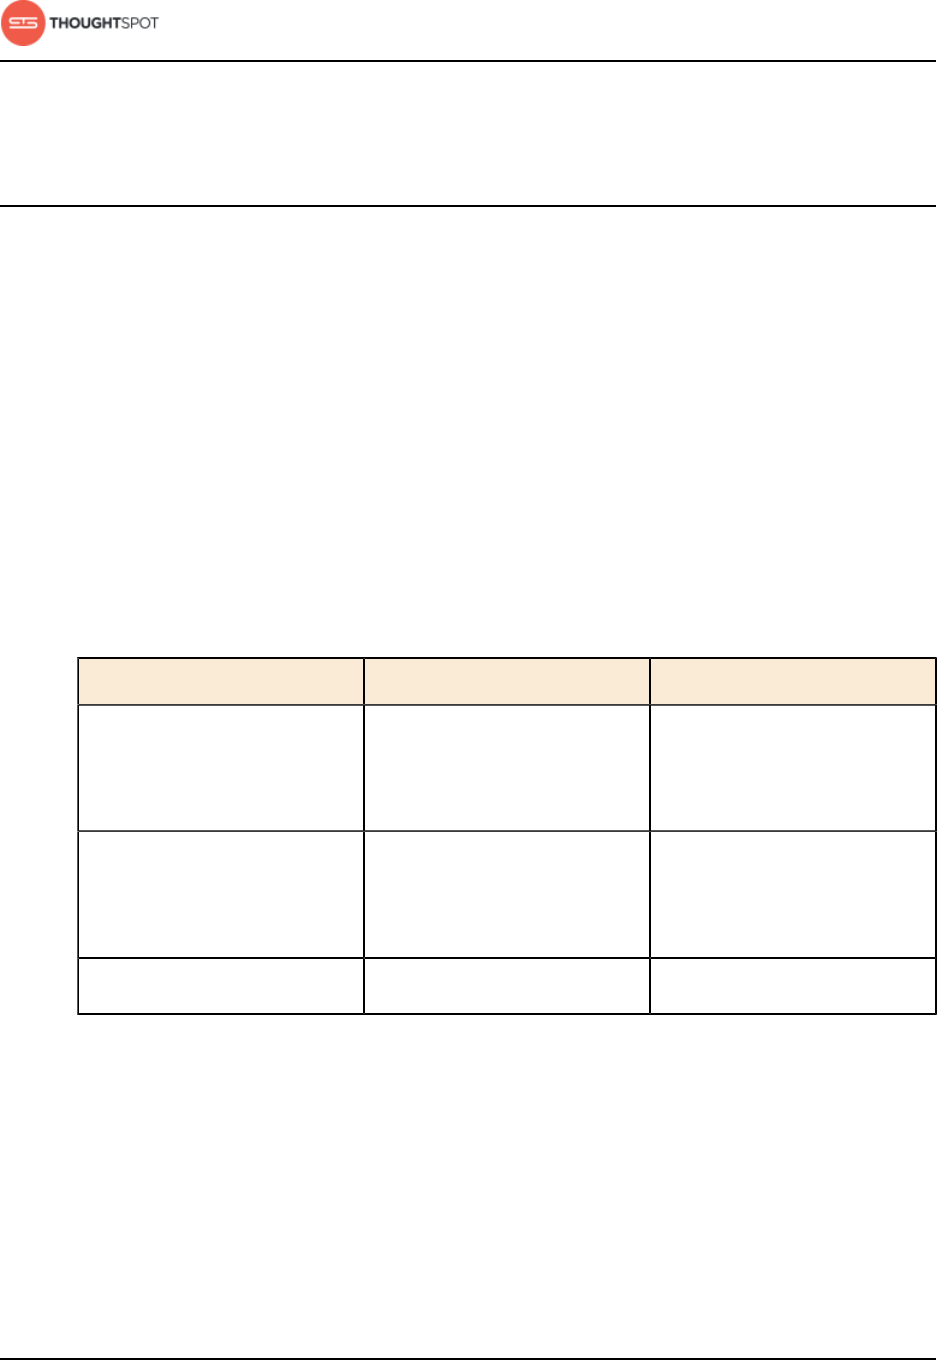
Supported Web browsers include:
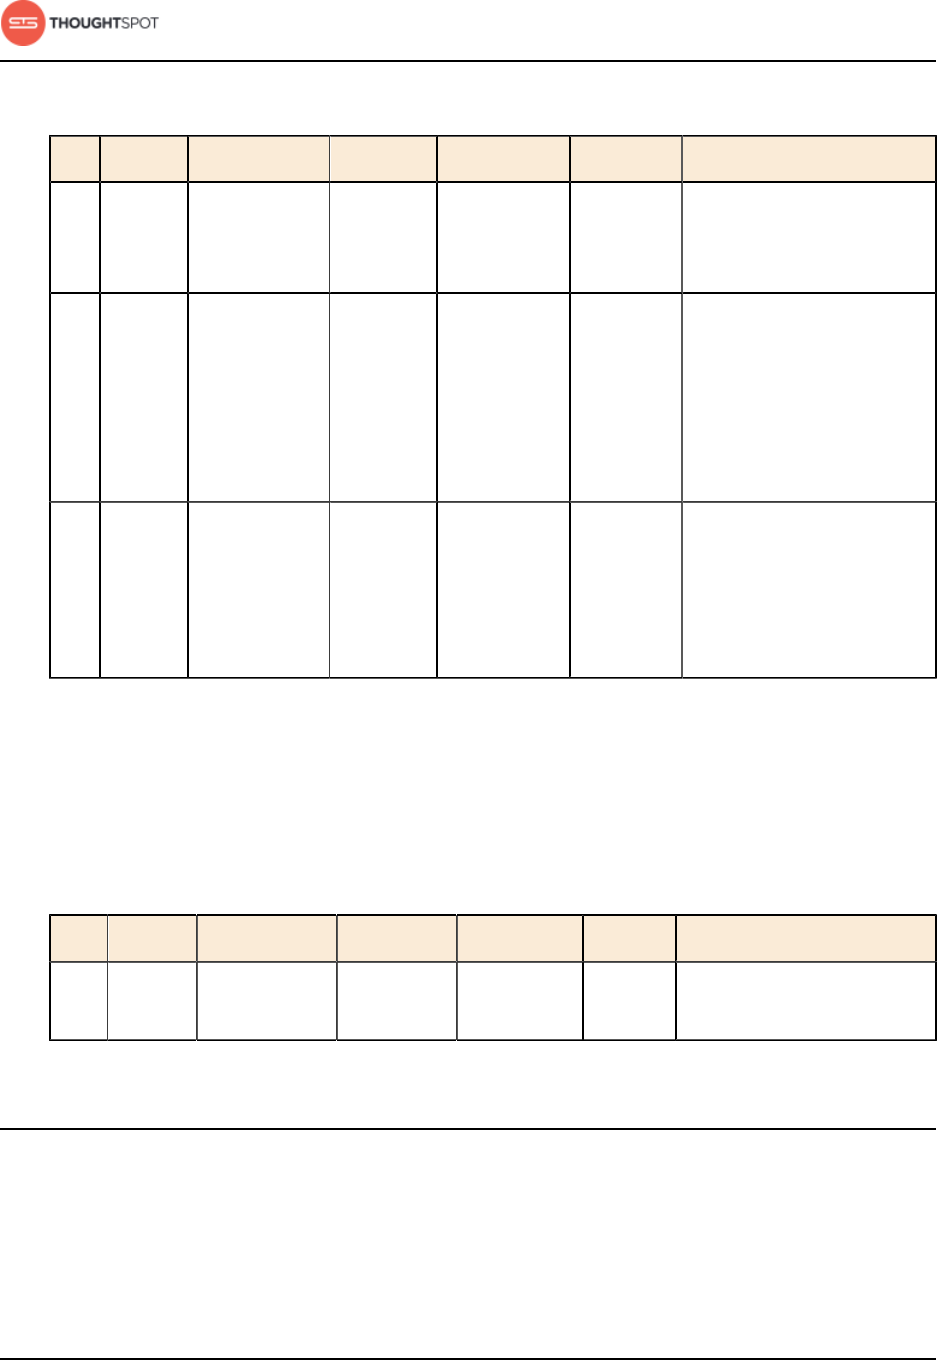
Table 2: Supported browsers
Browser Version Operating System
Google Chrome 20 and above • Windows 7 or greater
• Linux
• MacOS
Mozilla Firefox 14 and above • Windows 7 or greater
• Linux
• MacOS
Internet Explorer 11 • Windows 7 or greater
To log in to ThoughtSpot from a browser:
1. Open the browser and type in the Web address for ThoughtSpot:
http://<hostname_or_IP>
2. Enter your username and password and click Enter Now.
Installation and setup
ThoughtSpot Administration Guide Copyright © 2017 by ThoughtSpot. All Rights Reserved. 12
Set your ThoughtSpot locale
In addition to American English, ThoughtSpot also supports German and
Japanese.
The language displayed in ThoughtSpot is based off of your browser locale. So
if you set Japanese as your default language in your browser settings, then the
interface will update to reflect that after you refresh your page.
Keywords, operators, and error messages are included in the translated material.
Formulas, however, are not translated. Also, all metadata will remain as user
inputted.
This feature is supported on all browsers that support ThoughtSpot.
To set your ThoughtSpot locale:
1. Go to the settings page of your browser.
2. Change your default language to one that is supported by ThoughtSpot.
3. Save your settings.
4. Refresh your ThoughtSpot browser page.
Your ThoughtSpot interface should reflect your new chosen language.
Software updates
The ThoughtSpot software is updated by ThoughtSpot Support.
ThoughtSpot Support will contact you to schedule an update when one
becomes available.
Test network connectivity between nodes
This procedure tests the network connectivity between the ThoughtSpot nodes,
and to the LAN. If you can perform these steps successfully, the network settings
on ThoughtSpot are correct.
Installation and setup
ThoughtSpot Administration Guide Copyright © 2017 by ThoughtSpot. All Rights Reserved. 13
1. Log in to the Linux shell using SSH.
2. Ping each of the other nodes in the cluster.
3. Ping another machine that exists outside of the cluster, for example, a
machine that you will use to stage data to be loaded.
Note: If you cannot perform these tests successfully, there is a problem
with the network setup.
4. If the tests fail, check Network connectivity issues.
Set the relay host for SMTP (email)
To enable alert emails, you'll need to set up a relay host for SMTP traffic
from ThoughtSpot. This routes the alert and notification emails coming from
ThoughtSpot through an SMTP email server.
To set up a relay host:
1. Log in to the Linux shell using SSH.
2. Issue the setup command, providing the IP address of the relay host:
$ tscli smtp set-relayhost <IP_address>
3. Verify your settings:
$ tscli smtp show-relayhost
4. Verify that email is working.
Verify that email is working
Check if the email settings are working properly by using this procedure.
ThoughtSpot uses emails for sending critical notifications to ThoughtSpot
Support.
Installation and setup
ThoughtSpot Administration Guide Copyright © 2017 by ThoughtSpot. All Rights Reserved. 14
ThoughtSpot sends alerts to the email address specified during installation. If no
email address was entered, no alerts will be sent. But you can add an email to
receive alerts by issuing:
$ tscli monitoring set-config --email <your_email>
You can add a list of email addresses separated by commas, with no spaces.
To verify that the send email function is working correctly:
1. Log in to the Linux shell using SSH.
2. Try sending an email to yourself by issuing:
$ echo | mail -s Hello <your_email>
3. If you receive the email at the address you supplied, email is working correctly.
Set up a fiscal calendar year
Many companies start their fiscal calendar in a month other than January. If
this is the case in your company, setting a fiscal calendar quarter makes the
ThoughtSpot date searches reflect your fiscal year.
When you set a custom fiscal year, you will designate the month on which your
company's fiscal year begins. All the date language will then reflect your change,
so if someone searches for this quarter or q3, the answer will conform to the
fiscal quarter in use. When you make this change, existing pinboards also change
to reflect the custom fiscal calendar. Because of this, if you make this change
after your users have been using ThoughtSpot for any period of time, you should
alert them of the change you will be making and how it affects previous saved
searches.
Call ThoughtSpot Support, so they can help you set the custom fiscal year.

Installation and setup
ThoughtSpot Administration Guide Copyright © 2017 by ThoughtSpot. All Rights Reserved. 15
About SSL (secure socket layers)
You should use SSL (secure socket layers) for sending data to and from
ThoughtSpot. SSL provides authentication and data security. This section applies
to both SSL to enable secure HTTP and secure LDAP.
Many IT departments require SSL for their applications that access data. To use
SSL with ThoughtSpot, you'll need your company's own SSL certificate. The
certificate is issued per domain, so if you want to use SSL for both HTTP and
LDAP, you will need two separate certificates - one for the HTTP domain and one
for the LDAP domain.
If you do not have an SSL certificate:
• Check with your IT department to see if they already have an SSL certificate
you can use.
• If not, you will need to obtain the certificate from an issuing authority.
• Alternatively, you may disable SSL if you don't want the security it provides by
using the command tscli ssl off.
There are many SSL vendors to choose from. Check with your existing Web
hosting provider first, to see if they can provide the certificate for you.
When you apply for the SSL certificate, you may specify a SAN, wildcard, or
single domain certificate. Any of these can work with ThoughtSpot.
Configure SSL for web traffic
This procedure shows how to add SSL (secure socket layers) to enable secure
HTTP (HTTPS) in ThoughtSpot.
To set up SSL, you will need:
• The SSL certificate
• The private key
To install the SSL certificate:
Installation and setup
ThoughtSpot Administration Guide Copyright © 2017 by ThoughtSpot. All Rights Reserved. 16
1. Follow the instructions from your certifying authority to obtain the certificate.
This is usually sent via email or available by download.
2. Copy the certificate and key files to ThoughtSpot:
$ scp <key> <certificate> admin@<IP_address>:<path>
3. Log in to the Linux shell using SSH.
4. Change directories to where you copied the certificate:
$ cd <path>
5. Issue the tscli command to install the certificate:
$ tscli ssl add-cert <key> <certificate>
6. To test that the certificate was installed correctly, Log in to ThoughtSpot from
a browser.
You should see that the URL begins with https://.
Set the recommended TLS version
There are a couple of security vulnerabilities due to SSL certificates supporting
older versions of TLS (Transport Layer Security). This procedure shows you how
to set the recommended TLS version to avoid these vulnerabilities.
The PCI (Payment Card Industry) Data Security Standard and the FIPS 140-2
Standard require a minimum of TLS v1.1 and recommends TLS v1.2.
ThoughtSpot supports SSL v3, TLS v1.0, and TLS v1.1 for backwards compatibility.
However, the recommended version is TLS v1.2. Therefore, to set the
recommended TLS version:
1. Enable your web browser to support TLS v1.2. This can be done in your
browser's advanced settings.
2. Log in to the Linux shell using SSH.
3. Issue the following command:
tscli security set-min-version 1.2

Installation and setup
ThoughtSpot Administration Guide Copyright © 2017 by ThoughtSpot. All Rights Reserved. 17
This will block all usage of older versions.
Configure SAML
ThoughtSpot can use Security Assertion Markup Language (SAML) to
authenticate users. You can set up SAML through the shell on ThoughtSpot using
a tscli based configurator.
Before configuring SAML, you will need this information:
• IP of the server where your ThoughtSpot instance is running.
• Port of the server where your ThoughtSpot instance is running.
• Protocol, or the authentication mechanism for ThoughtSpot.
• Unique service name that is used as the unique key by IDP to identify the
client.
It should be in the following format: urn:thoughtspot:callosum:saml
• Allowed skew time, which is the time after authentication response is rejected
and sent back from the IDP. It is usually set to 86400.
• The absolute path to the idp-meta.xml file. This is needed so that the
configuration persists over upgrades.
• This configurator also checks with the user if internal authentication needs to
be set or not. This internal authentication mechanism is used to authenticate
tsadmin, so set it to true if you do not know what it does.
Use this procedure to set up SAML on ThoughtSpot for user authentication. Note
that this configuration persists across software updates, so you do not need to
reapply it if you update to a newer release of ThoughtSpot.
1. Log in to the Linux shell using SSH.
2. Execute the command to launch the interactive SAML configuration:
tscli saml configure
3. Complete the configurator prompts with the information you gathered above.

Installation and setup
ThoughtSpot Administration Guide Copyright © 2017 by ThoughtSpot. All Rights Reserved. 18
4. When the configuration is complete, open a Web browser and go to the
ThoughtSpot login page. It should now show the Single Sign On option.
About LDAP integration
Some companies use LDAP (Lightweight Directory Access Protocol) to manage
user authentication. Using LDAP provides security and makes user management
more centralized.
ThoughtSpot can be configured to authenticate users against an LDAP
server. You can choose to authenticate users against an LDAP server, against
ThoughtSpot, or both.
ThoughtSpot supports both anonymous and non-anonymous LDAP integration.
Non-anonymous LDAP binding is more rigorous than anonymous authentication,
but it should help you track what your users are querying and keep a log trace
for auditing purposes.
If you have been using ThoughtSpot with users you created manually, and you
now want to transition to LDAP, please contact ThoughtSpot Support. They can
assist you in migrating existing users to their LDAP equivalents.
ThoughtSpot supports these types of LDAP servers:
•OpenLDAP
•Active Directory
Configure OpenLDAP
Use this procedure to set up integration with LDAP using OpenLDAP.
Before configuring OpenLDAP, you will need this information:
• URL to connect to OpenLDAP
For example, ldap://192.168.2.48:389
• Distinguished Name template
Installation and setup
ThoughtSpot Administration Guide Copyright © 2017 by ThoughtSpot. All Rights Reserved. 19
The template for usernames, for example cn={0},ou=users,dc=thoughtspot,dc=com
• Automatically add LDAP users in ThoughtSpot?
If you choose 'yes' for this, when a user is authenticated against LDAP, if that
user does not exist in ThoughtSpot, the user is automatically created. When
users are created in this way, their passwords exist only in LDAP and are not
stored in ThoughtSpot.
If you choose 'no' for this, users who will authenticate against LDAP have to
be manually created with a dummy password as a placeholder in ThoughtSpot
before they can log in. In order to log in to ThoughtSpot, the user has to exist
in ThoughtSpot independent of whether that user is authenticated against
LDAP or against ThoughtSpot's internal authentication.
• Also use ThoughtSpot internal authentication?
If you choose 'yes' for this, when a user logs in, ThoughtSpot will first attempt
to authenticate the user against LDAP. If that attempt fails, it will then attempt
to authenticate the user against ThoughtSpot. If either of these succeed, then
the user is successfully logged in. This option is useful in scenarios where
some users are not in LDAP and are created only in ThoughtSpot.
You do not need to create a user called tsadmin on your LDAP server. Internal
authentication can be used for tsadmin. To configure LDAP for OpenLDAP:
1. Log in to the Linux shell using SSH.
2. Run the command to configure LDAP:
$ tscli ldap configure
3. Answer the prompts using the information you collected. For example:
Choose the LDAP protocol:
[1] Active Directory
[2] OpenLDAP
Option number: 2
Configuring Open LDAP

Installation and setup
ThoughtSpot Administration Guide Copyright © 2017 by ThoughtSpot. All Rights Reserved. 20
URL to connect to OpenLDAP (Example: ldap://192.168.2.100:389):
ldap://192.168.2.48:389
Distinguished name template (Example: cn={0},ou=users,dc=thoughtspot,dc=com):
cn={0},ou=users,dc=thoughtspot,dc=com
Automatically add LDAP users in ThoughtSpot (y/n): n
Also use ThoughtSpot internal authentication (y/n): y
4. If you are using SSL, Add the SSL certificate for LDAP.
5. If you want to remove the LDAP configuration, issue:
$ tscli ldap purge-configuration
Configure LDAP for Active Directory
Use this procedure to set up integration with LDAP using Active Directory.
Before you configure LDAP for Active Directory, collect this information:
• URL to connect to Active Directory.
For example, ldap://192.168.2.48:389
• Default LDAP domain.
The default domain is the domain under which users who want to be
authenticated against Active Directory reside. When a user logs in with a
username, the default domain is added to the username before sending it to
the LDAP server. If users reside in multiple domains, you can still designate
one of them as the default. Users belonging to a non-default domain will
have to explicitly qualify their username when they log in, for example:
username@ldap1.thoughtspot.com.
• Whether you will use SSL.
If yes, you'll need the certificate from the issuing authority.
• LDAP search base.
This prompt adds the search base information that allows ThoughtSpot to find
user properties such as email and displayname from LDAP.
• Automatically add LDAP users in ThoughtSpot?
Installation and setup
ThoughtSpot Administration Guide Copyright © 2017 by ThoughtSpot. All Rights Reserved. 21
If you choose 'yes' for this, when a user is authenticated against LDAP, if that
user does not exist in ThoughtSpot, then the user is automatically created.
When users are created in this way, their passwords exist only in LDAP and are
not stored in ThoughtSpot.
In order to log in to ThoughtSpot, the user has to exist in ThoughtSpot
independent of whether that user is authenticated against LDAP or against
ThoughtSpot's internal authentication. If you choose 'no' for this, users
who will authenticate against LDAP have to be manually created with a
dummy password as a placeholder in ThoughtSpot before they can log
in. The username you specify when creating the LDAP authenticated
user manually in ThoughtSpot has to be domain qualified, for example:
username@ldap1.thoughtspot.com.
• Also use ThoughtSpot internal authentication?
If you choose 'yes' for this, when a user logs in, ThoughtSpot will first attempt
to authenticate the user against LDAP. If that attempt fails, it will then attempt
to authenticate the user against ThoughtSpot. If either of these succeed, then
the user is successfully logged in. This option is useful in scenarios where
some users are not in LDAP and are created only in ThoughtSpot.
You do not need to create a user called tsadmin on your LDAP server. Internal
authentication can be used for tsadmin. To configure LDAP for OpenLDAP:
1. Log in to the Linux shell using SSH.
2. Run the command to configure LDAP:
$ tscli ldap configure
3. Answer the prompts using the information you collected. For example:
Choose the LDAP protocol:
[1] Active Directory
[2] OpenLDAP
Option number: 1
Configuring Active Directory
Installation and setup
ThoughtSpot Administration Guide Copyright © 2017 by ThoughtSpot. All Rights Reserved. 22
URL to connect to Active Directory. (Example: ldap://192.168.2.100:389):
ldap://192.168.2.100:389
Default domain (Example: ldap.thoughtspot.com): ldap.thoughtspot.com
Use SSL (LDAPS) (y/n): n
LDAP search base (Example: cn=Users): cn=Users
Automatically add LDAP users in ThoughtSpot (y/n): y
Also use ThoughtSpot internal authentication (y/n): y
4. If you are using SSL, Add the SSL certificate for LDAP.
5. If you want to remove the LDAP configuration, issue:
$ tscli ldap purge-configuration
Add the SSL certificate for LDAP
When you set up LDAP, you specified whether or not to use SSL for LDAP
(LDAPS). If using SSL, you must install the LDAP SSL certificate.
Before you can add the SSL certificate, you must LDAP using one of these
procedures:
•Configure OpenLDAP
•Configure LDAP for Active Directory
You must have the SSL certificate before you start. For more information on
obtaining an SSL certificate, see About SSL (secure socket layers).
To add the SSL certificate for LDAP:
1. Follow the instructions from your certifying authority to obtain the certificate.
This is usually sent via email or available by download.
2. Copy the certificate to ThoughtSpot:
$ scp <certificate> admin@<IP_address>:<path>
3. Log in to the Linux shell using SSH.
4. Change directories to where you copied the certificate:
$ cd <path>
Installation and setup
ThoughtSpot Administration Guide Copyright © 2017 by ThoughtSpot. All Rights Reserved. 23
5. Run the command to configure SSL for LDAP, designating an alias for this
certificate using the <name> parameter:
$ tscli ldap add-cert <name> <certificate>
Test the LDAP configuration
After configuring LDAP, you can test to make sure it is working by issuing a
command.
This procedure allows you to test the LDAP connection you created.
1. Log in to the Linux shell using SSH.
2. Issue the LDAP testing command, supplying the information for the LDAP
server you configured, as in this example:
$ ldapsearch -x -h 192.168.2.61 -p 389 -D "testuser@ldap.thoughtspot.com" -W
-b "dc=ldap,dc=thoughtspot,dc=com" cn
3. Supply the LDAP password when prompted.
4. If the connection works, you'll see a confirmation message.
Sync users and groups from LDAP
Use this procedure to synchronize your ThoughtSpot system with an LDAP
server.
Before synchronizing users and groups, you will need this information:
• IP address and port of the server where your ThoughtSpot instance is running.
This hostport is needed in the following format http(s)://<host>:<port> or
http(s)://<domain>.
• Administrator login username and password for your ThoughtSpot instance.
• URL of the LDAP server, or hostport.
For example, ldap://192.168.2.48:389
• Login username and password for the LDAP system.
An example username would be moo_100@ldap.thoughtspot.com
Installation and setup
ThoughtSpot Administration Guide Copyright © 2017 by ThoughtSpot. All Rights Reserved. 24
• Distinguished Name (DN) for the base to start searching for users in the LDAP
system.
For example, DC=ldap,DC=thoughtspot,DC=com
There are two ways for you to fetch users and groups from LDAP and populate
them into your ThoughtSpot system:
• Run the synchronization script in interactive mode, which will walk you
through the process (shown here).
• Create your own Python script by using the ThoughtSpot Python APIs. If you
need details on the Python APIs, contact ThoughtSpot Support. If you choose
this method, you can run the script periodically using a cron job.
To run the LDAP sync script in interactive mode:
1. Log in to the Linux shell using SSH.
2. Run the command to start the script:
python syncUsersAndGroups.py interactive
3. Answer the prompts using the information you collected above. For example:
Complete URL of TS server in format "http(s)://<host>:<port>":
http://10.77.145.24:8088
Disable SSL authentication to TS server (y/n): y
Login username for ThoughtSpot system: admin
Login password for ThoughtSpot system: 12345
Complete URL of server where LDAP server is running in format ldap(s)://
<host>:<port>: ldap://192.168.2.48:389
Login username for LDAP system: moo_100@ldap.thoughtspot.com
Login password for LDAP system: 12345
Syncs user and groups between LDAP and TS systems (y/n): y
Delete entries in ThoughtSpot system that are not currently in LDAP tree
being synced (y/n): n
Distinguished name for the base to start searching groups in LDAP System:
DC=ldap,DC=thoughtspot,DC=com
Scope to limit the search to (choice number)
0:base Searching only the entry at the base DN
1:one Searching all entries on level under the base DN - but not including
the base DN
2:tree Searching of all entries at all levels under and including the
specified base DN: 2
Filter string to apply the search to: (|(CN=TestGroupAlpha)
(CN=TestGroupBeta))
Installation and setup
ThoughtSpot Administration Guide Copyright © 2017 by ThoughtSpot. All Rights Reserved. 25
Answering this prompt is optional. If left blank, the default value of '(CN=*)'will
be used.
Apply sync recursively, i.e. Iterates through group members and creates
member groups, users and relationships in a recursive way. (y/n): n
This prompt is asking if you would like to include group members even if they
do not belong to the current sub tree that is being synced.
4. Alternatively, to input your own shorthand script commands:
1. Issue the Python script commands, supplying all of the above information,
following this format example:
python syncUsersAndGroups.py script \
–-ts_hostport <ts_hostport> \
--disable_ssl \
--ts_uname <ts_username> \
--ts_pass <ts_password> \
--ldap_hostport '<ldap_hostport>' \
--ldap_uname '<ldap_username>' \
--ldap_pass '<ldap_password>' \
--sync \
--purge \
--basedn 'DC=ldap,DC=thoughtspot,DC=com' \
--filter_str '(|(CN=TestGroupAlpha)(CN=TestGroupBeta))' \
--include_nontree_members
The bottom half of the above command example targets sub trees under
the DC called TestGroupAlpha and TestGroupBeta, and iterates through
them recursively to create/sync users, groups, and their relationships in
the ThoughtSpot system. It also deletes any other entities created in the
ThoughtSpot system from this LDAP system that are not currently being
synced.
Mount a NAS file system
Some operations, like backup/restore and data loading, require you to either
read or write large files. You can mount a NAS (network attached storage) file
system for these operations.
Installation and setup
ThoughtSpot Administration Guide Copyright © 2017 by ThoughtSpot. All Rights Reserved. 26
This procedure shows you how to mount a NAS file system for storing or
accessing large files. The file system will be mounted at the same location on
each node in the cluster automatically. When any node is restarted, the file
system will be mounted again automatically, if it can be found.
When supplying a directory for writing or reading a backup, you can specify
the mountpoint as the directory to use. Likewise, you can stage data there for
loading.
Note that backups are written by the Linux user "admin". If that user does not
have permission to write to the NAS file system, you could write the backups to
disk (for example /export/sdc1, /export/sdd1, /export/sde1, or /export/sdf1) and
then set up a cron job that executes as root user and copies the backup to the
NAS device every night, then deletes it from the directory.
Do not send the periodic backups or stage files on /export/sdb1 since it is a
name node. It is used internally by Hadoop Distributed File System (HDFS) and
if this drive fills up, it can cause serious problems. Do not allow backups or data
files to accumulate on ThoughtSpot. If disk space becomes limited, the system
will not function normally.
1. Log in to the Linux shell using SSH.
2. Mount the directory to the file system, by issuing the appropriate command:
• For an NFS (Network File System) directory:
tscli nas mount-nfs
--server <server_NFS_address>
--path_on_server <path>
--mount_point <target>
• For a CIFS (Common Internet File System) directory:
tscli nas mount-cifs
--server <server_CIFS_address>
--path_on_server <path>
--mount_point <target>
--username <user>
--password <password>
--uid <uid>
--gid <gid>
Installation and setup
ThoughtSpot Administration Guide Copyright © 2017 by ThoughtSpot. All Rights Reserved. 27
3. Use the mounted file system as you wish, specifying it by referring to its
mount point.
4. When you are finished with it, you may optionally unmount the NAS file
system:
tscli nas unmount --dir <directory>
Add a custom support contact
You can designate a support contact (email and phone number) at your
organization for first level technical support. That person can answer questions
about data and searching, and submit any system and software-related
questions to ThoughtSpot Support.
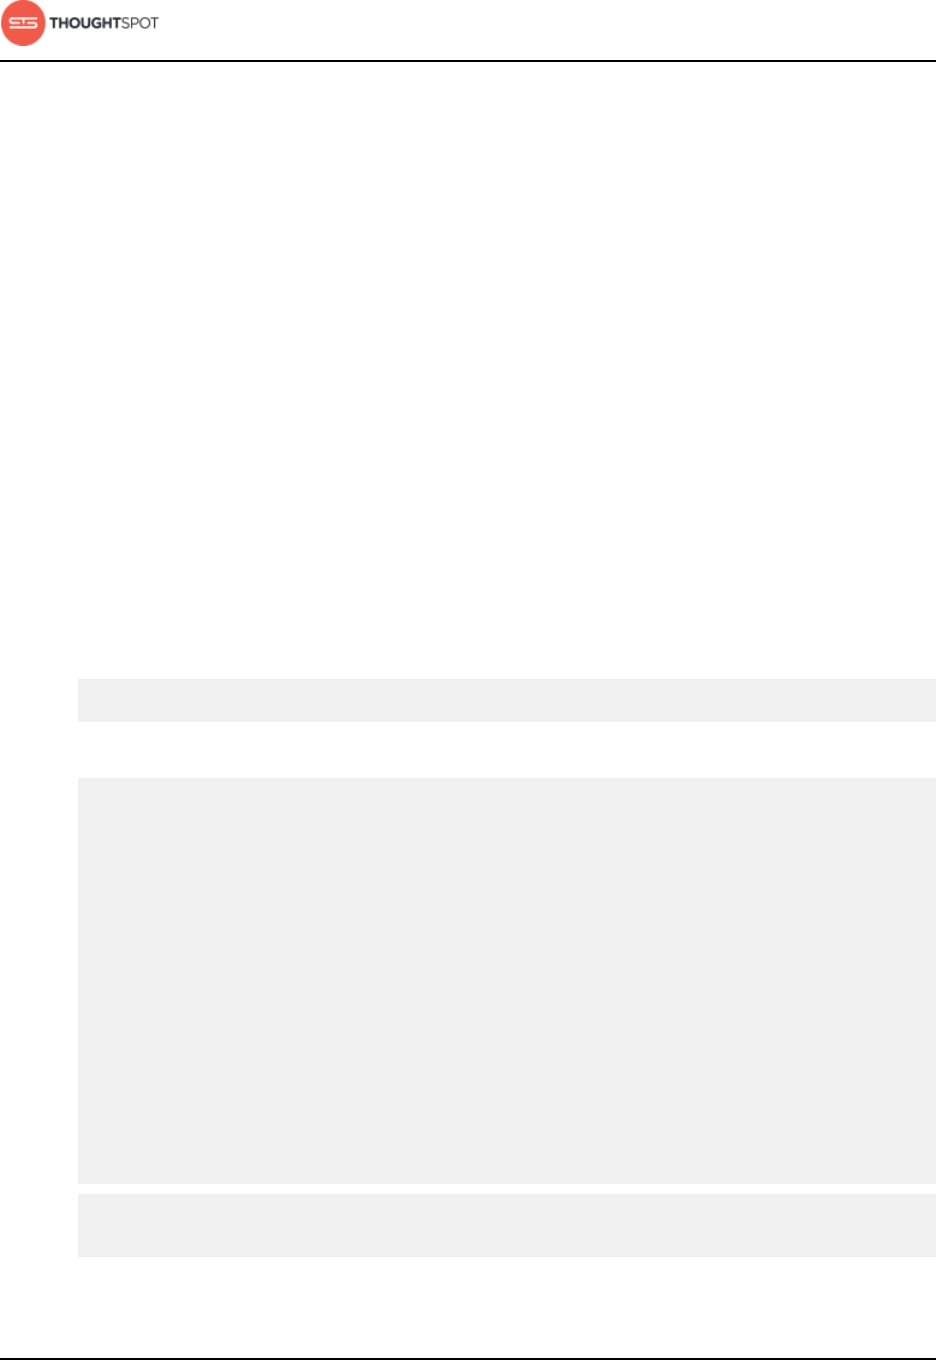
After you set the custom support contact information, here's where your users
will see it:
• In the Help Center, when they click Contact Support.
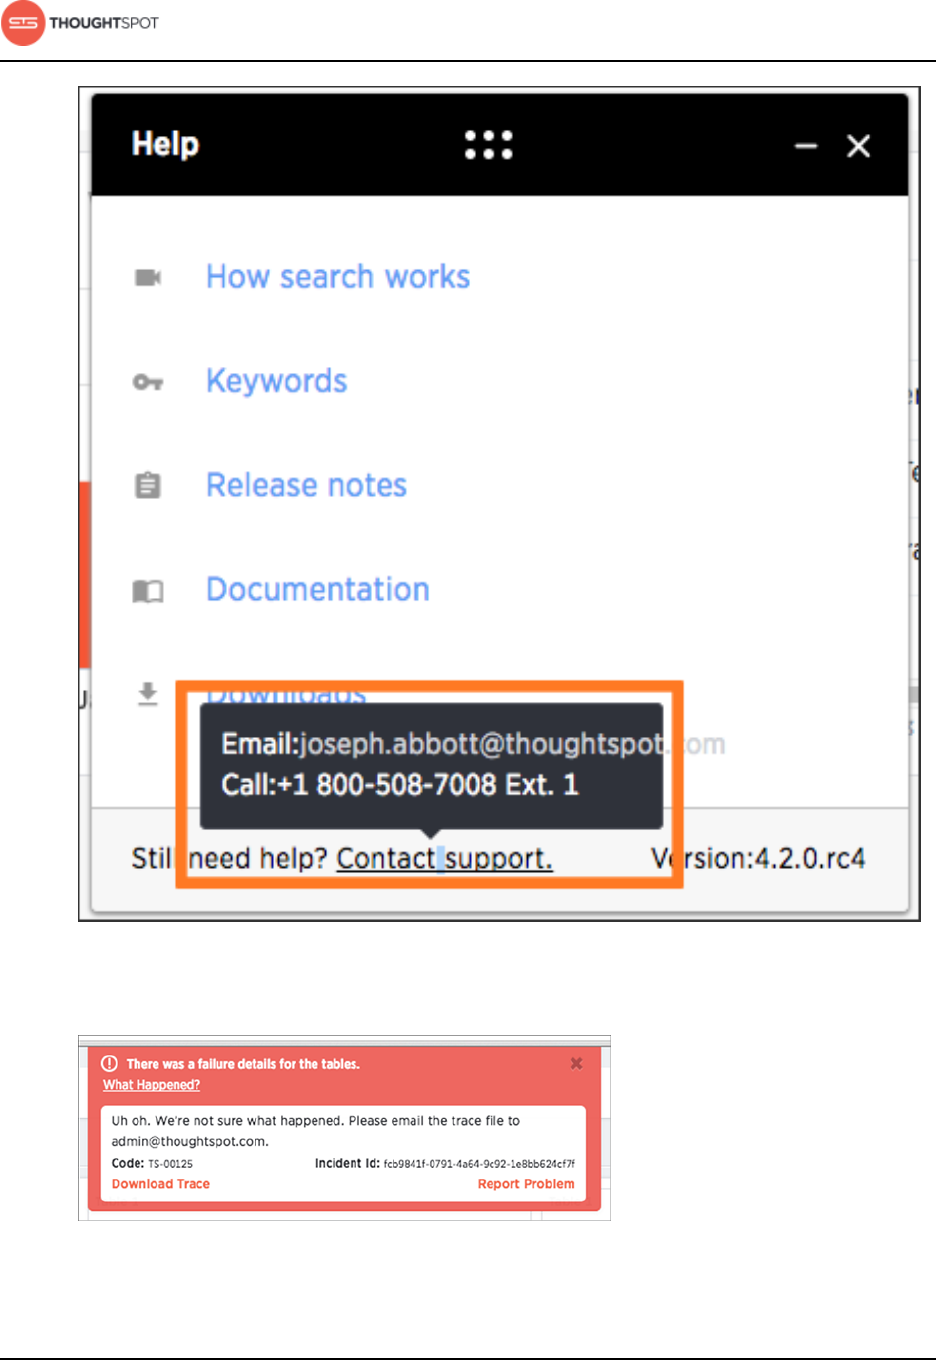
Installation and setup
ThoughtSpot Administration Guide Copyright © 2017 by ThoughtSpot. All Rights Reserved. 28
Figure 1: Help Center support contact
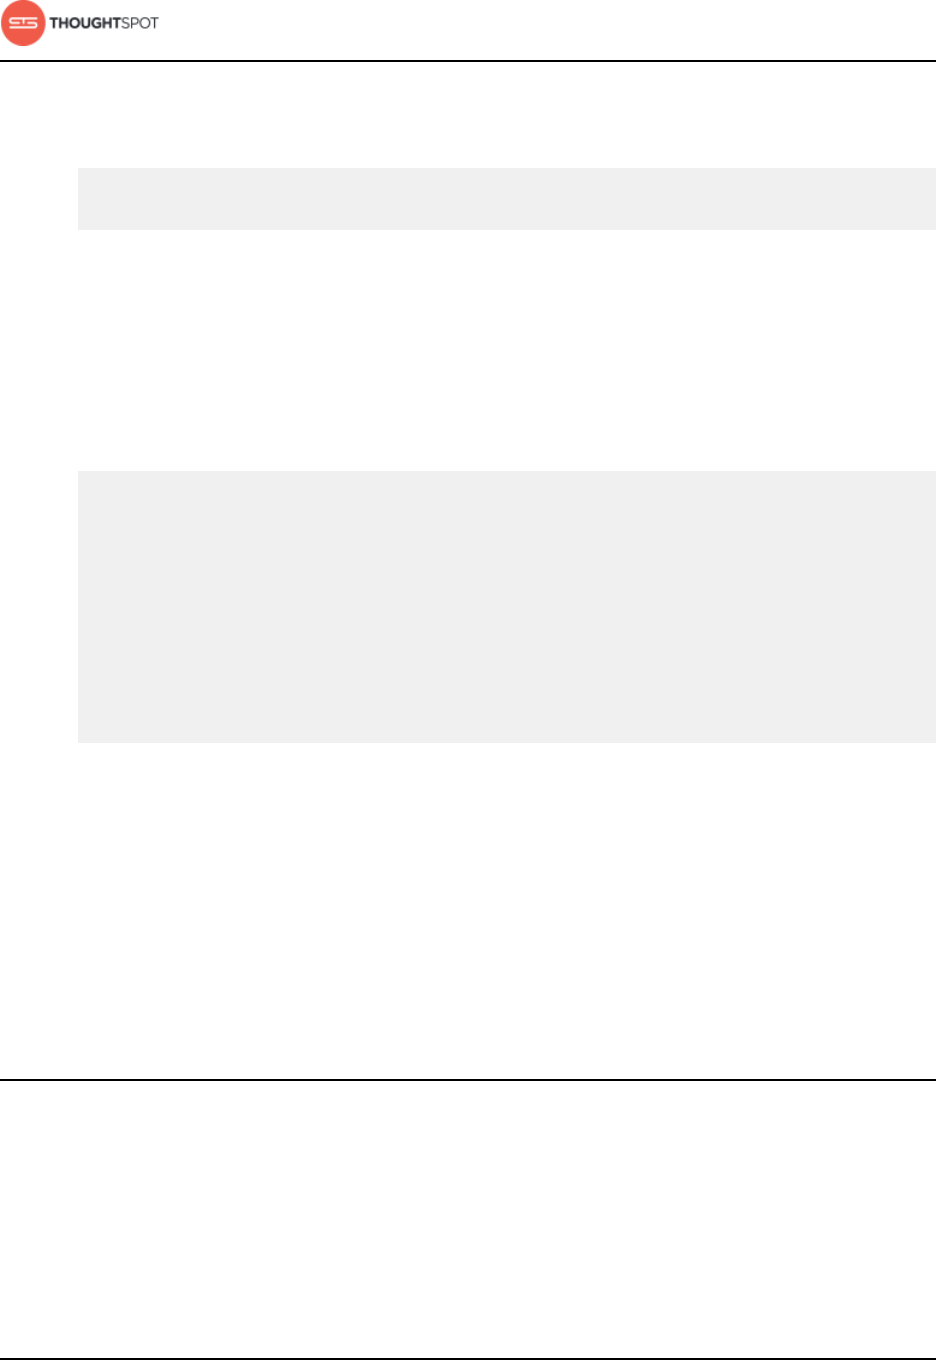
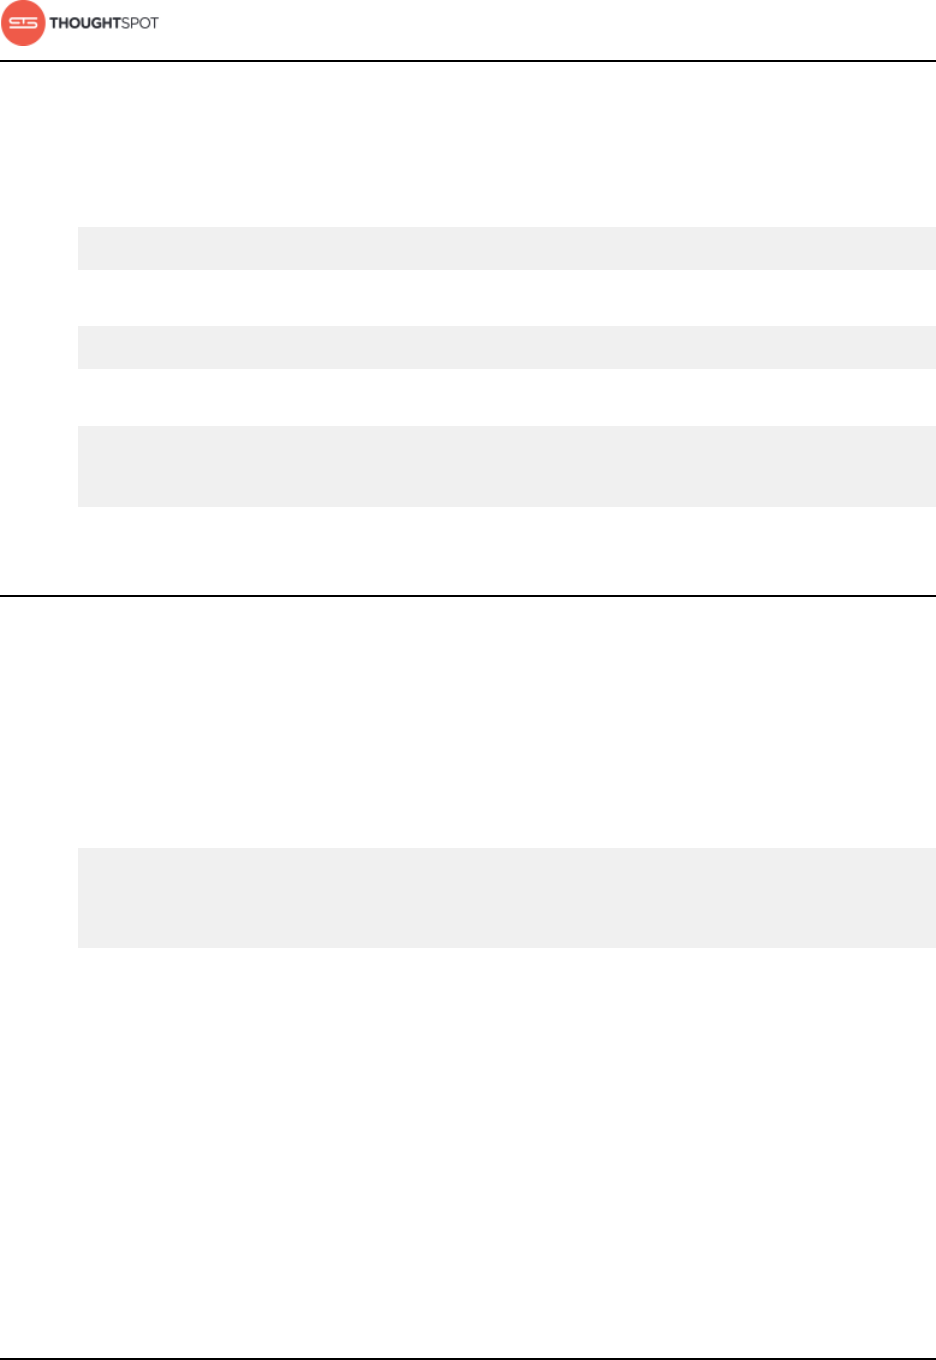
• In error messages, when they click What Happened?
Figure 2: Error message support contact
Installation and setup
ThoughtSpot Administration Guide Copyright © 2017 by ThoughtSpot. All Rights Reserved. 29
To designate the custom support contact:
1. Log in to the Linux shell using SSH.
2. Issue the tscli command to set the email address:
$ tscli support set-admin-email <email_address>
3. Issue the tscli command to set the phone number:
$ tscli support set-admin-phone <phone_number>
4. If you need to reset both of these to the default (ThoughtSpot Support), issue:
$ tscli support rm-admin-email
$ tscli support rm-admin-phone
Set up monitoring
To configure monitoring of your cluster, set up the frequency of heartbeat and
monitoring reports and an email address to receive them.
Use tscli to set up monitoring. This is a one time operation.
1. Log in to the Linux shell using SSH.
2. Issue the tscli command to set up monitoring:
tscli monitoring set-config
--email <email>
--heartbeat_interval <heartbeat_interval>
--report_interval <report_interval>
The parameters are:
•--email <email> is a comma separated list (no spaces) of email addresses
where the cluster will send monitoring information.
•--heartbeat_interval <heartbeat_interval> is the heartbeat email generation
interval in seconds. Must be greater than 0.
•--report_interval <report_interval> sets the cluster report email generation
interval in seconds. Must be greater than 0.
Installation and setup
ThoughtSpot Administration Guide Copyright © 2017 by ThoughtSpot. All Rights Reserved. 30
3. To view your settings and verify that they have been applied, issue:
tscli monitoring show-config
You should see information like:
Monitoring Configuration:
Alert Email: dev-alerts@thoughtspot.com
Heartbeat Interval: 900 sec
Report Interval: 21600 sec
4. After the heartbeat interval has passed, check your email to verify that emails
are being delivered.
5. If you don't receive any emails, Verify that email is working.
Connect to the ThoughtSpot Support file server
ThoughtSpot Support uses a secure file server to provide new releases and
to receive logs and troubleshooting files that you upload. The secure server
connection is also required if you want to enable the optional statistics collection
using the call home feature.
Before you can upload a file to the secure file server, obtain your user name
and password for logging in to the secure file server. You can get these from
ThoughtSpot Support.
Configuring the connection to the file server is a one time operation. You do not
need to reconfigure the connection unless your password changes. Note that
you can do a one time override of the user and password you used to configure
the connection. This is done by passing a different user and password on the
command line when uploading or downloading a file.
To configure the connection to the secure file server:
1. Log in to the Linux shell using SSH.
Installation and setup
ThoughtSpot Administration Guide Copyright © 2017 by ThoughtSpot. All Rights Reserved. 31
2. Issue the command to configure the file server:
$ tscli fileserver configure --user <user_name> [--password <password>]
Note that if you do not use the optional --password parameter, you will be
prompted to enter the password.
Set up remote support access
You can set up a reverse tunnel to allow ThoughtSpot Support to get access to
your ThoughtSpot instance, to perform support-related activities. This setup is
a much simpler, more secure, and scalable than the alternative option of using a
virtual meeting room.
Before you can do this procedure, your networking team needs to open port 22
in your firewall outgoing rules.
Granting remote support access can streamline troubleshooting activities,
since it enables your support agent to work directly on your in a secure setting.
The remote tunnel enables SSH and HTTP access to your by ThoughtSpot
Support. This access can be granted and revoked easily, so you can enable it for
a troubleshooting session, and then disable it again. Before doing this procedure,
make sure it is allowed by your internal security policies.
To enable remote support:
1. Contact ThoughtSpot to open a support ticket for making the appropriate
reverse tunnel settings on our end. Provide the cluster name of the cluster for
which you want to enable remote support.
2. When the ticket has been completed, continue with the remaining steps in this
procedure to make the settings on your side.
3. Log in to the Linux shell using SSH.
4. Issue the command to configure the destination for the remote tunnel.
Installation and setup
ThoughtSpot Administration Guide Copyright © 2017 by ThoughtSpot. All Rights Reserved. 32
You only need to do this once, when you are enabling the tunnel for the very
first time. After that, this setting persists when you start and stop the remote
tunnel.
$ tscli support set-remote --addr tunnel.thoughtspot.com --user ubuntu
5. Test that the setting has been applied:
$ tscli support show-remote
6. Enable the remote tunnel:
$ tscli support start-remote
7. Contact ThoughtSpot again, so you can test the setup with your ThoughtSpot
Support contact.
8. After your remote session with ThoughtSpot Support, you should turn the
remote tunnel off, until you need to use it again:
$ tscli support stop-remote
You can repeat the steps to start and stop the remote tunnel as needed for
future support operations.
9. Test that the remote tunnel has been disabled:
$ tscli support show-remote
Enable the call home capability
The optional "call home" capability sends usage statistics to ThoughtSpot
Support once a day via a secure file server.
Before you can enable the call home feature:
1. Configure the connection to the file server.
2. Obtain the customer name as recognized by the file server.
The customer name is formatted like this example: Shared/<customer_name>/stats. If
you do not know the customer name, contact ThoughtSpot Support.
Installation and setup
ThoughtSpot Administration Guide Copyright © 2017 by ThoughtSpot. All Rights Reserved. 33
This can be helpful when troubleshooting problems with ThoughtSpot Support,
because they will be able to see basic usage information over time for your
ThoughtSpot instance.
To set up the call home feature:
1. Log in to the Linux shell using SSH.
2. Enable the call home feature by issuing:
$ tscli callhome enable --customer_name <customer_name>
3. If you want to disable call home in the future, you can do so by issuing:
$ tscli callhome disable
Network ports
For regular operations and for debugging, there are some ports you will need to
keep open to network traffic from end users. Another, larger list of ports must be
kept open for network traffic between the nodes in the cluster.
Required ports for operations and debugging
The following ports need to be opened up to requests from your user
population. There are two main categories: operations and debugging.
Table 3: Network ports to open for operations
Port Protocol Service Name Direction Source Destination Description
22 SSH SSH bidirectional Administrators
IP addresses
All nodes Secure shell access.
Also used for scp
(secure copy).
80 HTTP HTTP bidirectional All users IP
addresses
All nodes Hypertext Transfer
Protocol for website
traffic.
Installation and setup
ThoughtSpot Administration Guide Copyright © 2017 by ThoughtSpot. All Rights Reserved. 34
Port Protocol Service Name Direction Source Destination Description
443 HTTPS HTTPS bidirectional All users IP
addresses
All nodes Secure HTTP.
12345 TCP Simba bidirectional Administrators
IP addresses
All nodes Port used by ODBC
and JDBC drivers
when connecting to
ThoughtSpot.
Table 4: Network ports to open for debugging
Port Protocol Service Name Direction Source Destination Description
2201 HTTP Orion master
HTTP
bidirectional Administrator
IP addresses
All nodes Port used to debug
the cluster manager.
2101 HTTP Oreo HTTP bidirectional Administrator
IP addresses
All nodes Port used to debug
the node daemon.
4001 HTTP Falcon worker
HTTP
bidirectional Administrator
IP addresses
All nodes Port used to debug
the data cache.
4251 HTTP Sage master
HTTP
bidirectional Administrator
IP addresses
All nodes Port used to debug
the search engine.
Required ports for inter-cluster operation
Internally, ThoughtSpot uses static ports for communication between services in
the cluster. Do not close these ports from inter-cluster network communications.
In addition, a number of ports are dynamically assigned to services, which
change between runs. The dynamic ports come from the range of Linux
dynamically allocated ports (20K+).
Table 5: Network ports to open between the nodes in the cluster
Port Protocol Service Name Direction Source Dest. Description
80 TCP nginx inbound All nodes All nodes Primary app HTTP
port (nginx)

Installation and setup
ThoughtSpot Administration Guide Copyright © 2017 by ThoughtSpot. All Rights Reserved. 35
Port Protocol Service Name Direction Source Dest. Description
443 TCP Secure nginx inbound All nodes All nodes Primary app
HTTPS port
(nginx)
2100 RPC Oreo RPC port bidirectional All nodes All nodes Node daemon RPC
2101 HTTP Oreo HTTP port bidirectional Admin IP
addresses
and all nodes
All nodes Node daemon
HTTP
2181 RPC Zookeeper servers
listen on this
port for client
connections
bidirectional All nodes All nodes Zookeeper servers
listen on this
port for client
connections
2200 RPC Orion master RPC
port
bidirectional All nodes All nodes Internal
communication
with the cluster
manager
2201 HTTP Orion master
HTTP port
bidirectional Admin IP
addresses
and all nodes
All nodes Port used to
debug the cluster
manager
2210 RPC Cluster stats
service RPC port
bidirectional All nodes All nodes Internal
communication
with the stats
collector
2211 HTTP Cluster stats
service HTTP port
bidirectional Admin IP
addresses
and all nodes
All nodes Port used to
debug the stats
collector
2230 RPC Callosum stats
collector RPC port
bidirectional All nodes All nodes Internal
communication
with the BI stats
collector
2231 HTTP Callosum stats
collector HTTP
port
bidirectional Admin IP
addresses
and all nodes
All nodes Port used to
debug the BI stats
collector

Installation and setup
ThoughtSpot Administration Guide Copyright © 2017 by ThoughtSpot. All Rights Reserved. 36
Port Protocol Service Name Direction Source Dest. Description
2240 RPC Alert manager bidirectional All nodes All nodes Port where
alerting service
receives alert
events
2888 RPC Ports used by
Zookeeper servers
for communication
between
themselves
bidirectional All nodes All nodes Ports used by
Zookeeper servers
for communication
between
themselves
3888 RPC Ports used by
Zookeeper servers
for communication
between
themselves
bidirectional All nodes All nodes Ports used by
Zookeeper servers
for communication
between
themselves
4000 RPC Falcon worker RPC
port
bidirectional All nodes All nodes Port used by
data cache for
communication
between
themselves
4001 HTTP Falcon worker
HTTP port
bidirectional Admin IP
addresses
and all nodes
All nodes Port used to
debug the data
cache
4021 RPC Sage metadata
service port
(exported by
Tomcat)
bidirectional Admin IP
addresses
and all nodes
All nodes Port where search
service contacts
metadata service
for metadata
4201 HTTP Sage auto
complete server
HTTP interface
port
bidirectional Admin IP
addresses
and all nodes
All nodes Port used to
debug the search
service

Installation and setup
ThoughtSpot Administration Guide Copyright © 2017 by ThoughtSpot. All Rights Reserved. 37
Port Protocol Service Name Direction Source Dest. Description
4231 HTTP Sage index server
HTTP port
bidirectional Admin IP
addresses
and all nodes
All nodes Port used to
debug the search
service
4232 RPC Sage index
server metadata
subscriber port
bidirectional All nodes All nodes Port used
for search
service internal
communication
4233 RPC Sage index server
RPC port
bidirectional All nodes All nodes Port used
for search
service internal
communication
4241 HTTP Sage auto
complete server
HTTP port
bidirectional Admin IP
addresses
and all nodes
All nodes Port used to
debug the search
service
4242 RPC Sage auto
complete server
RPC port
bidirectional All nodes All nodes Port used
for search
service internal
communication
4243 RPC Sage auto
complete server
metadata
subscriber port
bidirectional All nodes All nodes Port used for
search internal
communication
4251 RPC Sage master RPC
port
bidirectional All nodes All nodes Port used
for search
service internal
communication
4405 RPC Diamond
(graphite) port
bidirectional All nodes All nodes Port used for
communication
with monitoring
service

Installation and setup
ThoughtSpot Administration Guide Copyright © 2017 by ThoughtSpot. All Rights Reserved. 38
Port Protocol Service Name Direction Source Dest. Description
4500 RPC Trace vault service
RPC port
bidirectional All nodes All nodes Trace collection
for ThoughtSpot
services
4501 HTTP Trace vault service
HTTP port
bidirectional Admin IP
addresses
and all nodes
All nodes Debug trace
collection
4851 RPC Graphite manager
RPC port
bidirectional All nodes All nodes Communication
with graphite
manager
4852 HTTP Graphite manager
HTTP port
bidirectional Admin IP
addresses
and all nodes
All nodes Debug graphite
manager
4853 RPC Elastic search
stack (ELK)
manager RPC port
bidirectional All nodes All nodes Communication
with log search
service
4853 HTTP Elastic search
stack (ELK)
manager HTTP
port
bidirectional Admin IP
addresses
and all nodes
All nodes Debug log search
service
5432 Postgres Postgres database
server port
bidirectional All nodes All nodes Communication
with Postgres
database
8020 RPC HDFS namenode
server RPC port
bidirectional All nodes All nodes Distributed file
system (DFS)
communication
with clients
8080 HTTP Tomcat bidirectional All nodes All nodes BI engine
communication
with clients
8787 HTTP Periscope (UI)
service HTTP port
bidirectional All nodes All nodes Administration UI
back end

Installation and setup
ThoughtSpot Administration Guide Copyright © 2017 by ThoughtSpot. All Rights Reserved. 39
Port Protocol Service Name Direction Source Dest. Description
8888 HTTP HTTP proxy server
(tinyproxy)
bidirectional All nodes All nodes Reverse SSH
tunnel
11211 Mem-
cached
Memcached server
port
bidirectional All nodes All nodes BI engine cache
12345 ODBC Simba server port bidirectional All nodes All nodes Port used for ETL
(extract, transform,
load)
50070 HTTP HDFS namenode
server HTTP port
bidirectional All nodes All nodes Debug DFS
metadata
50075 HTTP HDFS datanode
server HTTP port
bidirectional All nodes All nodes Debug DFS data
Required ports for inbound and outbound cluster access
ThoughtSpot uses static ports for inbound and outbound access to a cluster.
Table 6: Network ports to open for inbound access
Port Protocol Service Name Direction Source Dest. Description
22 SCP SSH bidirectional ThoughtSpot
Support
All nodes Secure shell access.
80 HTTP HTTP bidirectional ThoughtSpot
Support
All nodes Hypertext Transfer
Protocol for website
traffic.
443 HTTPS HTTPS bidirectional ThoughtSpot
Support
All nodes Secure HTTP.
12345 TCP Simba bidirectional ThoughtSpot
Support
All nodes Port used by ODBC
and JDBC drivers
when connecting to
ThoughtSpot.
Installation and setup
ThoughtSpot Administration Guide Copyright © 2017 by ThoughtSpot. All Rights Reserved. 40
Table 7: Network ports to open for outbound access
Port Protocol Service Name Direction Source Destination Description
443 HTTPS HTTPS outbound All nodes 208.83.
110.20
For transferring files to
thoughtspot.egnyte.com
(IP address 208.83.110.20).
25
or
587
SMTP SMTP or
Secure SMTP
outbound All nodes
and SMTP
relay
(provided by
customer)
All nodes Allow outbound access
for the IP address of
whichever email relay
server is in use. This is
for sending alerts to
ThoughtSpot Support.
389
or
636
TCP LDAP or
LDAPS
outbound All nodes
and LDAP
server
(provided by
customer)
All nodes Allow outbound access
for the IP address of the
LDAP server in use.
Required ports for IPMI (Intelligent Platform Management Interface)
ThoughtSpot uses static ports for out-of-band IPMI communications between
the cluster and ThoughtSpot Support.
Table 8: Network ports to open for IPMI access
Port Protocol Service Name Direction Source Dest. Description
80 HTTP HTTP bidirectional ThoughtSpot
Support
All
nodes
Hypertext Transfer
Protocol for website traffic.
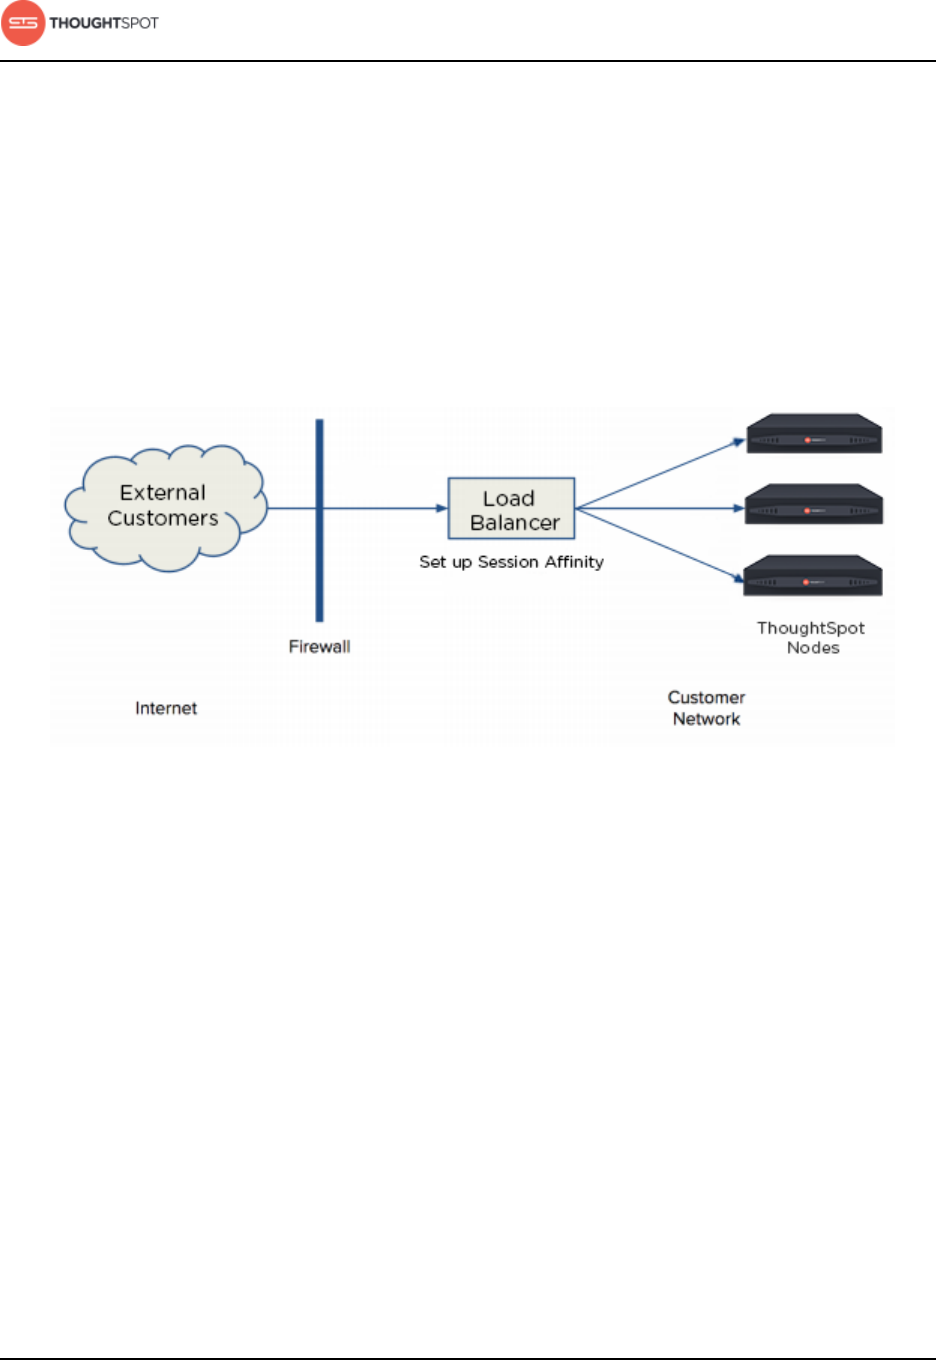
About load balancing and proxies
A load balancer is needed in front of a server group in order to direct traffic to
individual servers in a way that maximizes efficiency. Here are some of the best
practices and guidelines for a typical implementation with ThoughtSpot. Your
experience may differ depending on your environment and preference.

Installation and setup
ThoughtSpot Administration Guide Copyright © 2017 by ThoughtSpot. All Rights Reserved. 41
Load balance across ThoughtSpot nodes
The load balancer is an appliance in your infrastructure that routes traffic
automatically to nodes to provide failover. You can also place a load balancer or
proxy in front of the ThoughtSpot appliance if you'd like external network users
to access the system.
The best way to load balance across all ThoughtSpot nodes in a cluster is to map
one domain name (FQDN) to all the IPs in the cluster in a round robin fashion.
For example, if you want to use a DNS server based load balancing, then you can
define multiple "A" resource records (RR) for the same name.
Below is an example of how you could set that up
thoughtspot.customer.com IN A 69.9.64.11
thoughtspot.customer.com IN A 69.9.64.12
thoughtspot.customer.com IN A 69.9.64.13
thoughtspot.customer.com IN A 69.9.64.14
The example indicates that IP addresses for the domain
thoughtspot.customer.com are 69.9.64.11, 69.9.64.12, 69.9.64.13, and 69.9.64.14.
Session Affinity
Session Affinity refers to directing requests to the same application server for
the time it takes to complete a task.
In order for session affinity to work on ThoughtSpot, HTTPS (an SSL certificate)
has to be installed on the load balancer level. If it is installed outside of the load
balancer, session affinity may not occur and the ThoughtSpot system will fail.
Web proxies
You can access ThoughtSpot through any standard web proxy server. Web
proxies are fairly universal regardless of the application they are proxying.
However, ThoughtSpot doesn't use any new protocols, like SPDY or HTTP/2,
Installation and setup
ThoughtSpot Administration Guide Copyright © 2017 by ThoughtSpot. All Rights Reserved. 42
which may have a dependency on the proxy. Instead, ThoughtSpot is commonly
placed behind a web HTTP/HTTPS proxy.
Additionally, the proxy can round robin across multiple nodes in the
ThoughtSpot backend. You can essentially use the web proxy as a load balancer.
Therefore, your session will carry over if the proxy round robins between the
ThoughtSpot backends as long as the URL doesn’t change.
Network architectural diagram
ThoughtSpot Administration Guide Copyright © 2017 by ThoughtSpot. All Rights Reserved. 43
Chapter 2: Load and manage data
Load and manage data
Topics:
•About case configuration
•Generate CSV files with
the data to be loaded
•Load data from a web
browser
•Append data from a web
browser
•Plan the schema
•Build the schema
•Change the schema
•Load data with
ThoughtSpot Loader
•Delete a data source
•About the Schema Viewer
There are several methods of loading data into
ThoughtSpot. This section describes each method
and why you might choose it above the others.
The fastest and easiest way to load a new table is
by importing it using the Web browser. This is best
for one time data loads of small tables which do
not have complex relationships to other tables. This
method is limited to tables that are under 50 MB
(megabytes) in size.
Using ThoughtSpot Loader, you can script recurring
loads and work with multi-table schemas.
If your data already exists in another database with
the schema you want to use in ThoughtSpot, you can
pull the schema and data in using the ODBC or JDBC
driver.
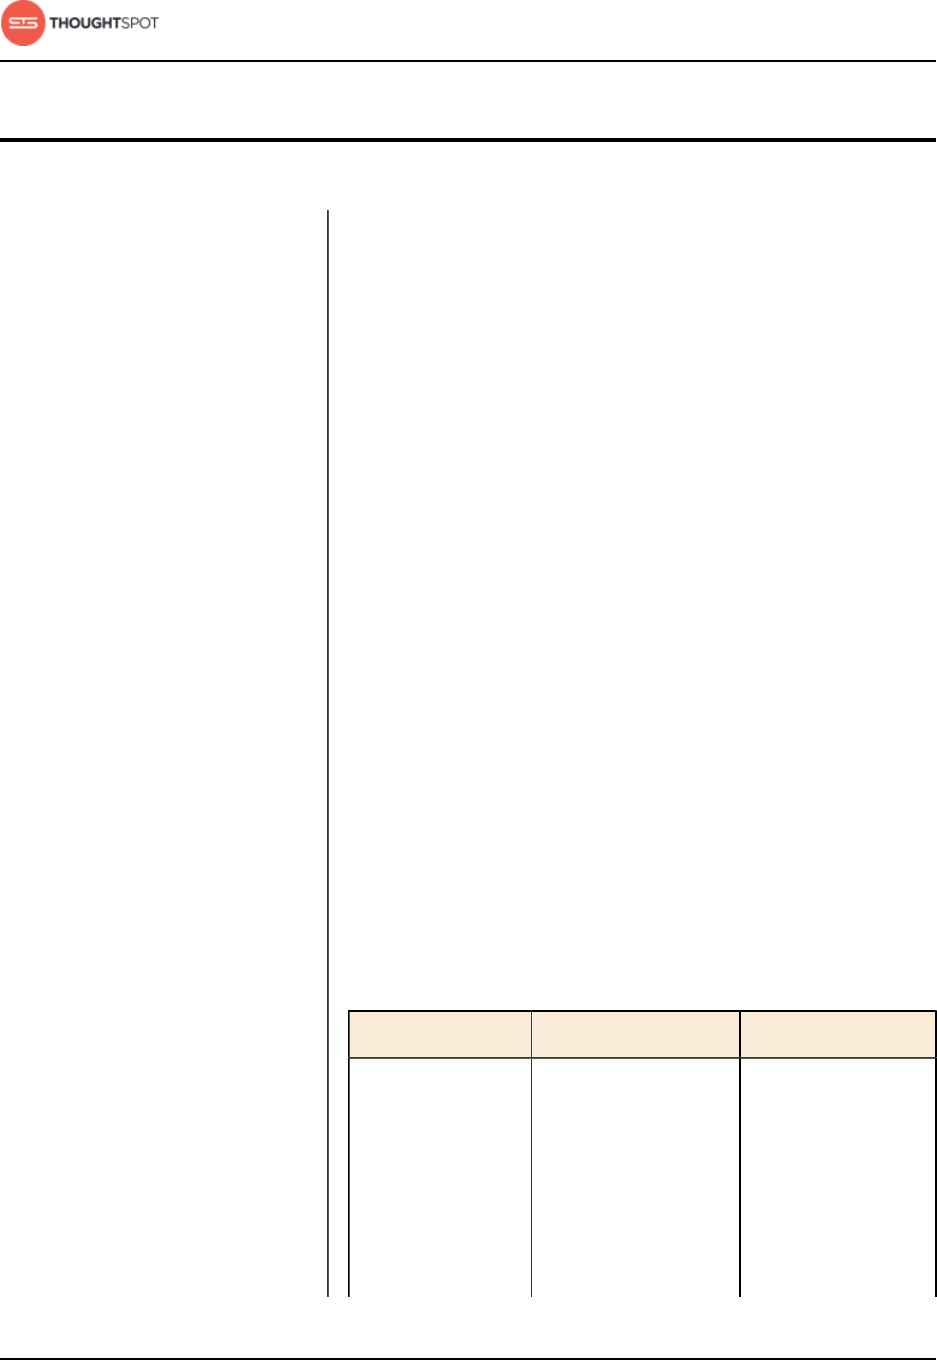
These are the methods you can use to load data,
along with the benefits of each method:
Table 9: Data loading methods
Method Description Benefits
Load data from a
web browser
Use the ThoughtSpot
Web interface to
upload an Excel
or CSV (comma
separated values)
file from your local
machine.
Easy way to do
a one-time data
load of a small file
(under 50MB).
End users can
upload their own

Load and manage data
ThoughtSpot Administration Guide Copyright © 2017 by ThoughtSpot. All Rights Reserved. 44
Method Description Benefits
data and explore it
quickly.
Use ThoughtSpot
Data Connect. For
details, see the
ThoughtSpot Data
Connect Guide
This is a premium
feature, available at
additional cost. Use
ThoughtSpot Data
Connect to connect
directly to external
data sources and pull
in tables and columns
from them. You can
also set up recurring
loads to keep the
data fresh.
Easy way to
connect to multiple
sources of data
directly and set
up recurring
loads. You won't
need to define a
schema to accept
the data loads,
because this is done
automatically for
you.
Load data with
ThoughtSpot
Loader
Use TQL and tsload
to load data directly
into the back end
database that
ThoughtSpot uses.
Best way to load
large amounts of
data or a schema
with multiple tables.
Can be scripted and
used for recurring
data loads, such
as monthly sales
results or daily logs.
Can be integrated
with an ETL
solution for
automation.
Use the ODBC/
JDBC driver
to connect to
ThoughtSpot
Use the ODBC or
JDBC client with
your ETL tool. For
information, see the
ThoughtSpot Data
Integration Guide.
Make use of an
established ETL
process and tool(s).
Connect to
ThoughtSpot using
Load and manage data
ThoughtSpot Administration Guide Copyright © 2017 by ThoughtSpot. All Rights Reserved. 45
Method Description Benefits
third party tools like
SSIS.
You don't need to
define a schema
to accept the data
load.
Use the
Informatica
Connector
Use the Informatica
Connector if
you already use
Informatica to
connect to your
other data sources.
For information, see
the ThoughtSpot
Data Integration
Guide.
Works with your
established data
migration processes
in Informatica.
If you're uploading data through the Web interface,
you can use a native Excel file. If you want to use a
CSV (comma separated values) or delimited file, or
you are loading using ThoughtSpot Loader, you'll
need to Generate CSV files with the data to be
loaded first.
Note: End users will almost always work with
worksheets and data they upload.

Load and manage data
ThoughtSpot Administration Guide Copyright © 2017 by ThoughtSpot. All Rights Reserved. 46
About case configuration
You can set the type of case sensitivity you would like to see reflected in the
ThoughtSpot display.
Before you load your data, you should consider the type of casing you would like
your data to reflect. The case sensitivity for source data strings is preserved in
the display. So, the visual display of results is identical to the input case that is
loaded.
Note: The casing will remain lowercase in other parts of the application,
such as when you ask a question or filter.
It is important to note that string casings aren’t applied globally, but by column.
So datasets will have different string casings as long as they're in different
columns. Tables that are already compacted will keep their lowercase format.
In these cases, in order to get the specific string case that you want, you would
have to truncate related tables and reload them.
To take advantage of case configuration, you need to have ThoughtSpot Support
enable it on your cluster for you. In addition, title casing should be disabled for
string casing to properly work.
Generate CSV files with the data to be loaded
The first step in loading data is to obtain or create one or more flat files that
contain the data to be loaded into ThoughtSpot.
Your data should be in a CSV (comma separated values) or delimited flat file
before you load it. A CSV file is a text file made up of data fields separated by
a delimiter and optionally enclosed with an enclosing character. If your data
contains multiple tables, you'll have a separate CSV for each table.
A CSV file contains:

Load and manage data
ThoughtSpot Administration Guide Copyright © 2017 by ThoughtSpot. All Rights Reserved. 47
• A delimiter that marks the separation between fields in the data. The delimiter
is usually comma, but it can be any character.
• Fields optionally enclosed with double quotes.
Use these guidelines when creating the CSV file:
• Columns in the CSV file must be in the same order as defined in the target
table.
• If the CSV contains column headers, they must match the column names in
the database exactly.
• Often a | (pipe) or tab is used as the delimiter, because it may be less likely to
occur within the data values.
• When a field contains a double quote, it must be escaped with the character
specified in the escape character argument in tsload.
• When a field contains the delimiter, the field must be enclosed in double
quotes.
For more information about CSV files and the rules for creating them, check
http://en.wikipedia.org/wiki/Comma-separated_values.
1. If your source is another database:
a) Connect to the source database.
b) Export each of the tables you wish to import into ThoughtSpot as a CSV
file, specifying a delimiter of comma, | (pipe) or tab.
2. If your source is an Excel spreadsheet, save it as a CSV file.
Load data from a web browser
The simplest way to load data is to upload a CSV or Excel file from the
ThoughtSpot Web interface. This method is recommended for small, one time
data loads. Using this method, the data schema is created for you automatically.

Load and manage data
ThoughtSpot Administration Guide Copyright © 2017 by ThoughtSpot. All Rights Reserved. 48
Loading data from a Web browser requires your data to be in a CSV (comma
separated values) or a native Excel file.
Any user who belongs to a group that has the privilege Has administration
privileges or Can upload user data will be able to upload their own data from
the browser.
CSV is a common format for transferring data between databases. Your ETL
(extract, transform, load) process will typically generate CSV files. You can also
create a CSV file from a Microsoft Excel spreadsheet by opening the spreadsheet
in Excel, choosing Save As and selecting CSV.
ThoughtSpot supports a wide range of date and timestamp formats in the CSV
file.
Loading data through the Web browser is recommended for smaller tables
(under 50MB) with simple relationships between them. If you are loading a fact
table that joins to dimension tables, you must load the fact table first, and then
the dimension tables. The joining key must be a single column of unique values in
the dimension table. NULL values in the fact table will not be able to be joined.
Blank values in user uploaded CSV files are interpreted as NULL values. These
include the values (case insensitive):
• NULL
• \N
• NA
• N/A
• [space]
To load the CSV or Excel file into ThoughtSpot:
1. Log in to ThoughtSpot from a browser.
2. Click on Data, on the top navigation bar.
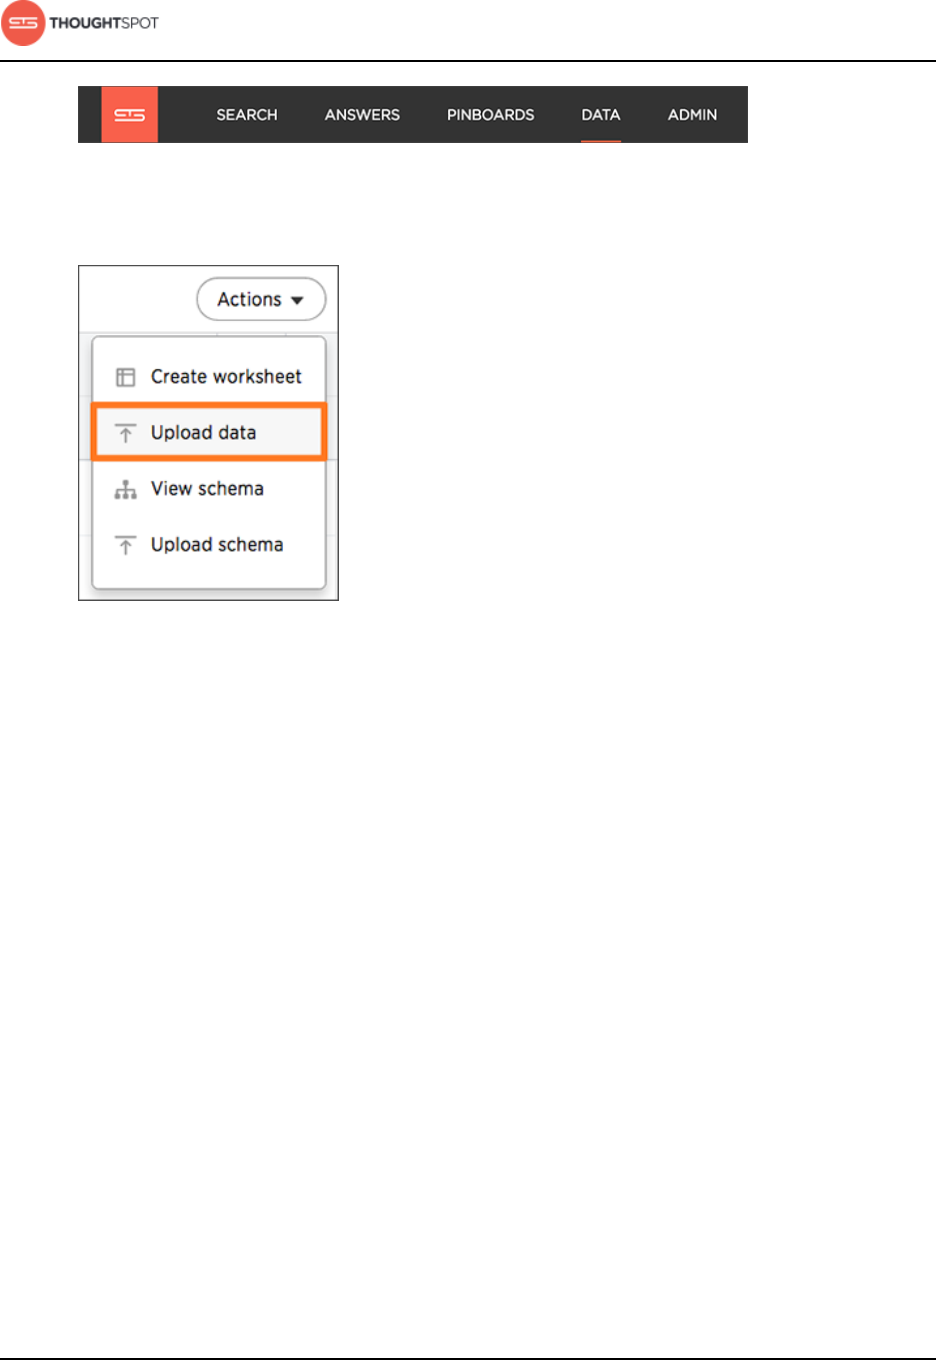
Load and manage data
ThoughtSpot Administration Guide Copyright © 2017 by ThoughtSpot. All Rights Reserved. 49
Figure 3: Data
3. Click the Actions button in the upper right corner, and select Upload Data.
Figure 4: Upload data
4. Upload the CSV or Excel file by doing one of these options:
• Click on Browse your files and select the file.
• Drag and drop the file into the drop area.
5. Answer the question Are the column names already defined in the file
header?
6. Answer the question Are the fields separated by? Click Next.
7. Click on the column header names to change them to more useful names, if
you'd like. Click Next.
8. Review the automatically generated data types for each column, and make
any changes you want. There are four data types: Text, Integer, Decimal, and
Date.
9. Click Import.

Load and manage data
ThoughtSpot Administration Guide Copyright © 2017 by ThoughtSpot. All Rights Reserved. 50
10.Click Link to Existing Data if you want to link the data you uploaded to the
data in another table or worksheet. Or click Search if you want to begin a new
search.
Append data from a web browser
You can append data to your existing system tables through the ThoughtSpot
application, even if the tables were initially loaded using Data Connect or tsload.
Loading data from a Web browser requires your data to be in a CSV (comma
separated values) or a native Excel file. The file must have the same structure as
the table it is being loaded into, including number and type of columns, in the
same order as the target table.
Any user who belongs to a group that has the privilege Has administration
privileges or Can upload user data will be able to upload their own data from
the browser.
CSV is a common format for transferring data between databases. Your ETL
(extract, transform, load) process will typically generate CSV files. You can also
create a CSV file from a Microsoft Excel spreadsheet by opening the spreadsheet
in Excel, choosing Save As and selecting CSV.
ThoughtSpot supports a wide range of date and timestamp formats in the CSV
file.
Loading data through the Web browser is recommended for smaller tables
(under 50MB) with simple relationships between them. If you are loading a fact
table that joins to dimension tables, you must load the fact table first, and then
the dimension tables. The joining key must be a single column of unique values in
the dimension table. NULL values in the fact table will not be able to be joined.
Blank values in user uploaded CSV files are interpreted as NULL values. These
include the values (case insensitive):
• NULL
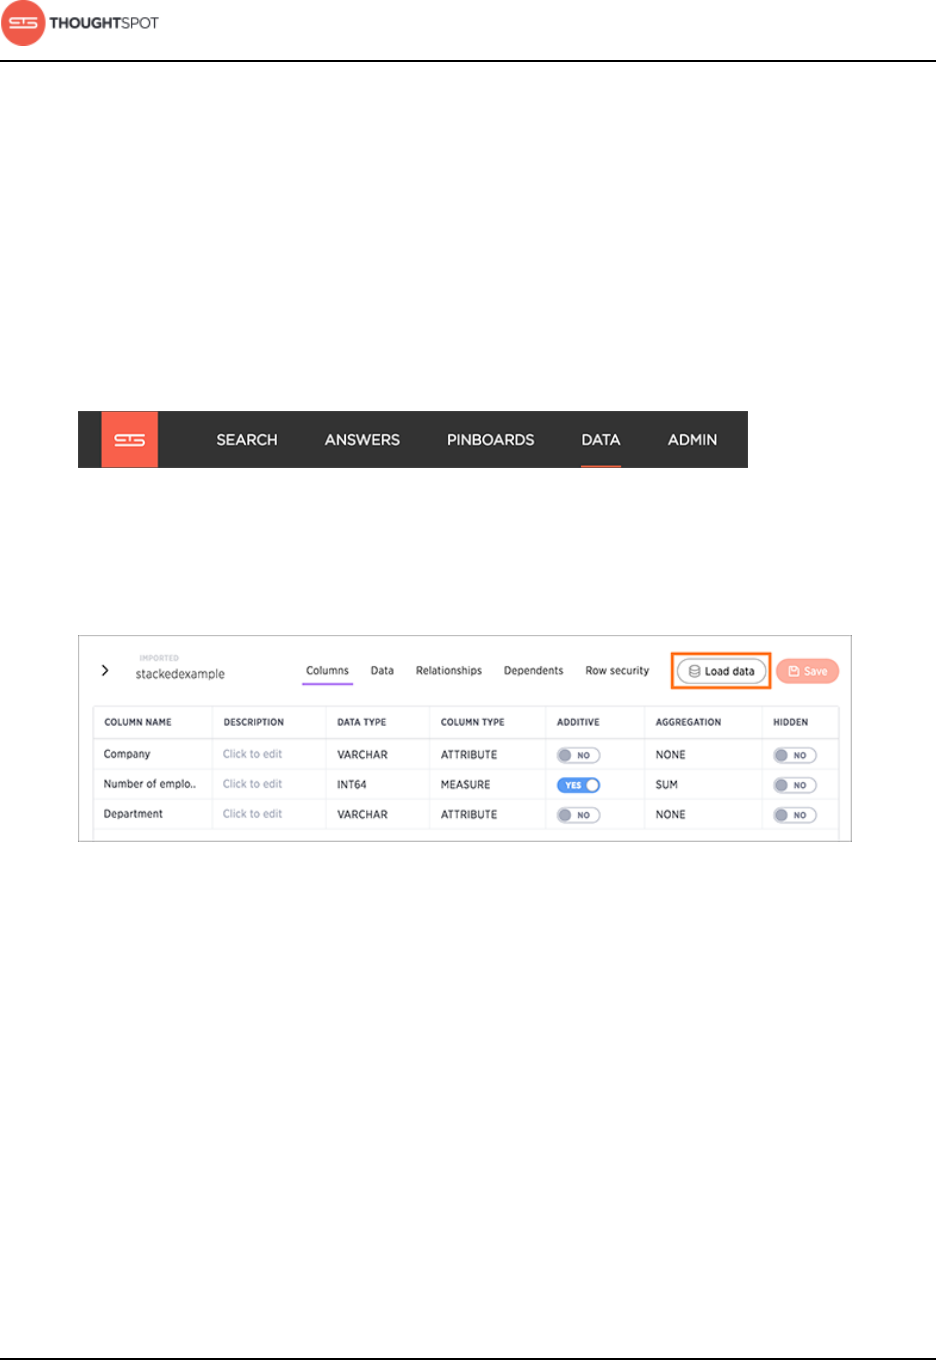
Load and manage data
ThoughtSpot Administration Guide Copyright © 2017 by ThoughtSpot. All Rights Reserved. 51
• \N
• NA
• N/A
• [space]
To append data into ThoughtSpot:
1. Log in to ThoughtSpot from a browser.
2. Click on Data, on the top navigation bar.
Figure 5: Data
3. Click the on the table you would like to append data to.
4. Click the Load data button.
Figure 6: Load data
5. Upload the CSV or Excel file by doing one of these options:
• Click on Browse your files and select the file.
• Drag and drop the file into the drop area.
6. Answer the question Are the column names already defined in the file
header?
7. Answer the question Do you want to append to the existing data or
overwrite it?
8. Answer the question Are the fields separated by? Click Next.
Load and manage data
ThoughtSpot Administration Guide Copyright © 2017 by ThoughtSpot. All Rights Reserved. 52
9. Click on the column header names to change them to more useful names, if
you'd like. Click Next.
10.Review the automatically generated data types for each column, and make
any changes you want. There are four data types: Text, Integer, Decimal, and
Date.
11. Click Import.
12.Click Link to Existing Data if you want to link the data you uploaded to the
data in another table or worksheet. Or click Search if you want to begin a new
search.
Plan the schema
Before you can load data with ThoughtSpot Loader, you must create a schema
to receive it, using the SQL command line interface (TQL).
The TQL syntax is similar to the SQL used in other relational databases, but
with some important differences. You'll use DDL (data definition language) to
create the schema into which you'll load the data. You'll probably want to put all
your DDL statements into a text file, which you'll use as a script for creating the
schema.
Before writing your TQL script, you need to understand some basic ThoughtSpot
concepts.
About databases and schemas
ThoughtSpot organizes objects in a hierarchical namespace. Databases contain
schemas, which contain tables.
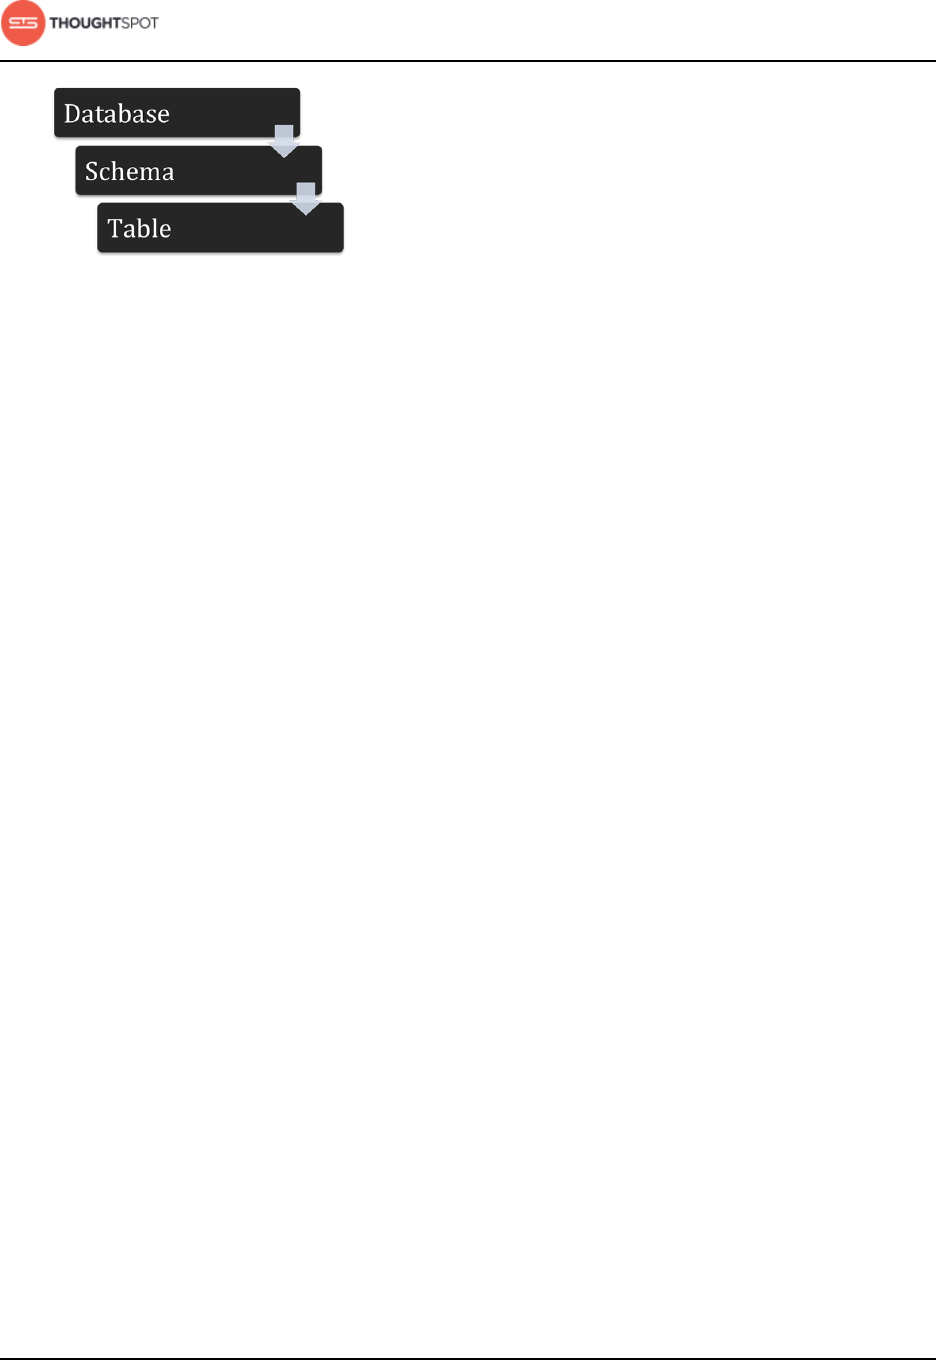
Load and manage data
ThoughtSpot Administration Guide Copyright © 2017 by ThoughtSpot. All Rights Reserved. 53
Figure 7: Namespace diagram
ThoughtSpot can contain one or more databases, and each database can
have multiple schemas. If you do not specify a schema, the default schema
(falcon_default_schema) is used automatically. This makes it easier to add tables
to the database without the need to explicitly create a schema.
If you do create an additional schema, you must refer to its objects using the
syntax <schemaname>.<objectname>. If you do not qualify the schema when
referencing its objects, the default schema (falcon_default_schema) will always
be assumed.
By default, ThoughtSpot creates an internal database to host tables
corresponding to data that is imported by users from a Web browser.
Review the structure of your data
The schema you create to hold the data needs to be a good fit for your data.
First, familiarize yourself with the tables you want to load, and understand their
structure. Make note of this information for each table:
• The column names and data types
• Type of table (fact or dimension)
• Primary key column(s)
• The size of the table on disk
• Any other tables it can be joined with (foreign keys)
Here's what you'll need to take into account in your TQL for creating each table,
based on these properties:
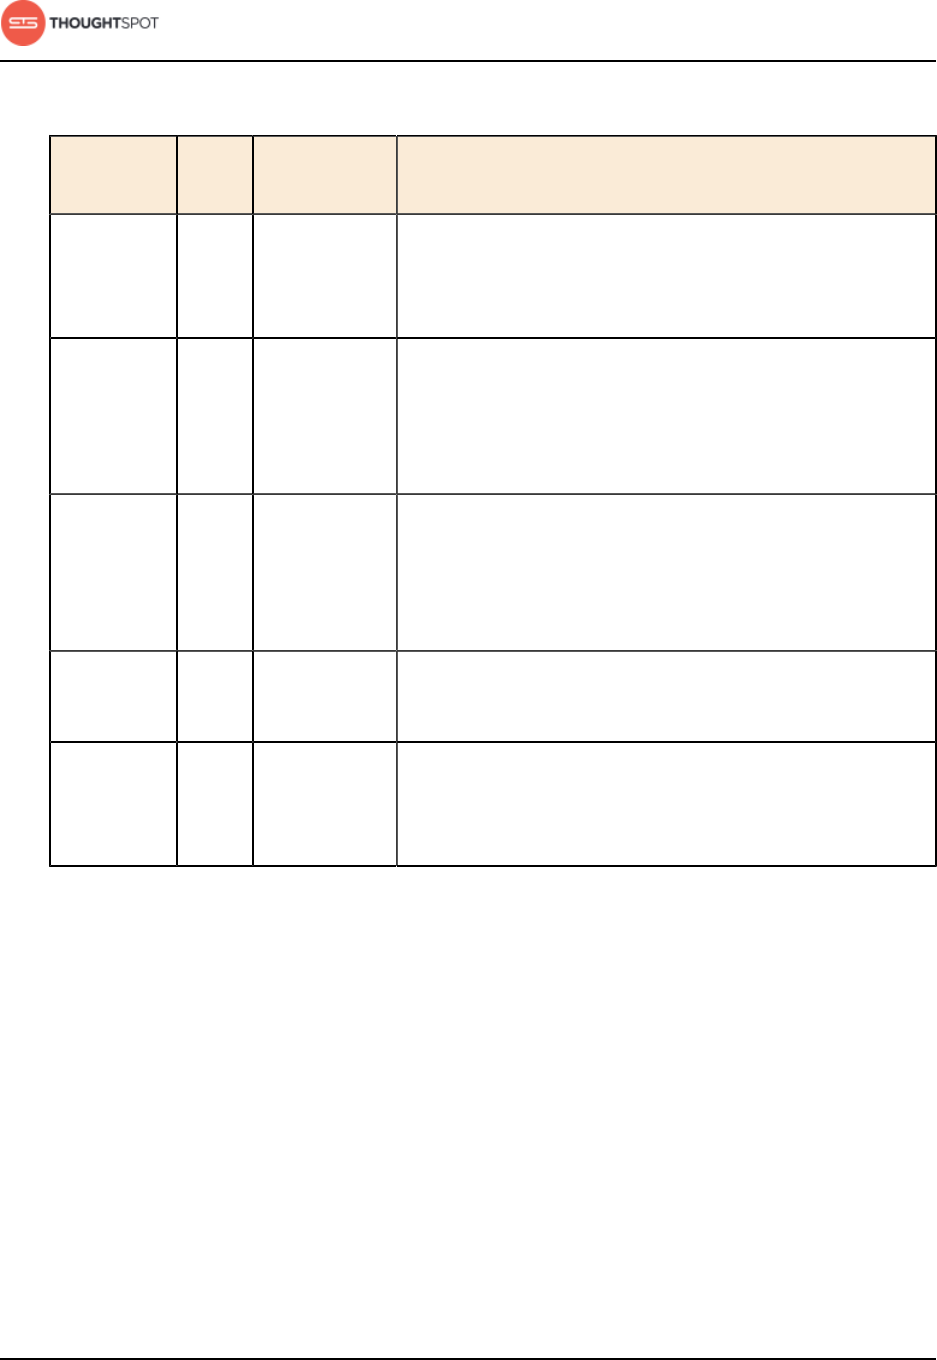
Load and manage data
ThoughtSpot Administration Guide Copyright © 2017 by ThoughtSpot. All Rights Reserved. 54
Table 10: Table properties that determine schema settings
Table type Table
size
To be joined
with
Schema recommendations
Fact Any Small
dimension
table(s)
• Sharded.
• Foreign key references the primary key in the
dimension table.
Fact Any Large
dimension
table(s)
• Sharded on the same distribution key as the dimension
table it will be joined with.
• Foreign key references the primary key in the
dimension table.
Fact Any Another fact
table
• Sharded on the same distribution key as the fact table
it will join with.
• Many-to-many relationship defines how the tables will
be joined.
Dimension under
50MB
Fact table(s) • Replicated (not sharded).
• Has a primary key.
Dimension over
50MB
Fact table(s) • Distributed dimension table, sharded on the same
distribution key as the fact table it will be joined with.
• Primary key must be the same as the distribution key.
Data types
ThoughtSpot supports the common data types. Compare these with the data
types you want to load, and do any necessary conversion ahead of loading the
data.
Supported data types
The tables you create to receive the data must have the same number of
columns and data types as the data you will be loading. Choose a data type for
each column from the list of supported data types:
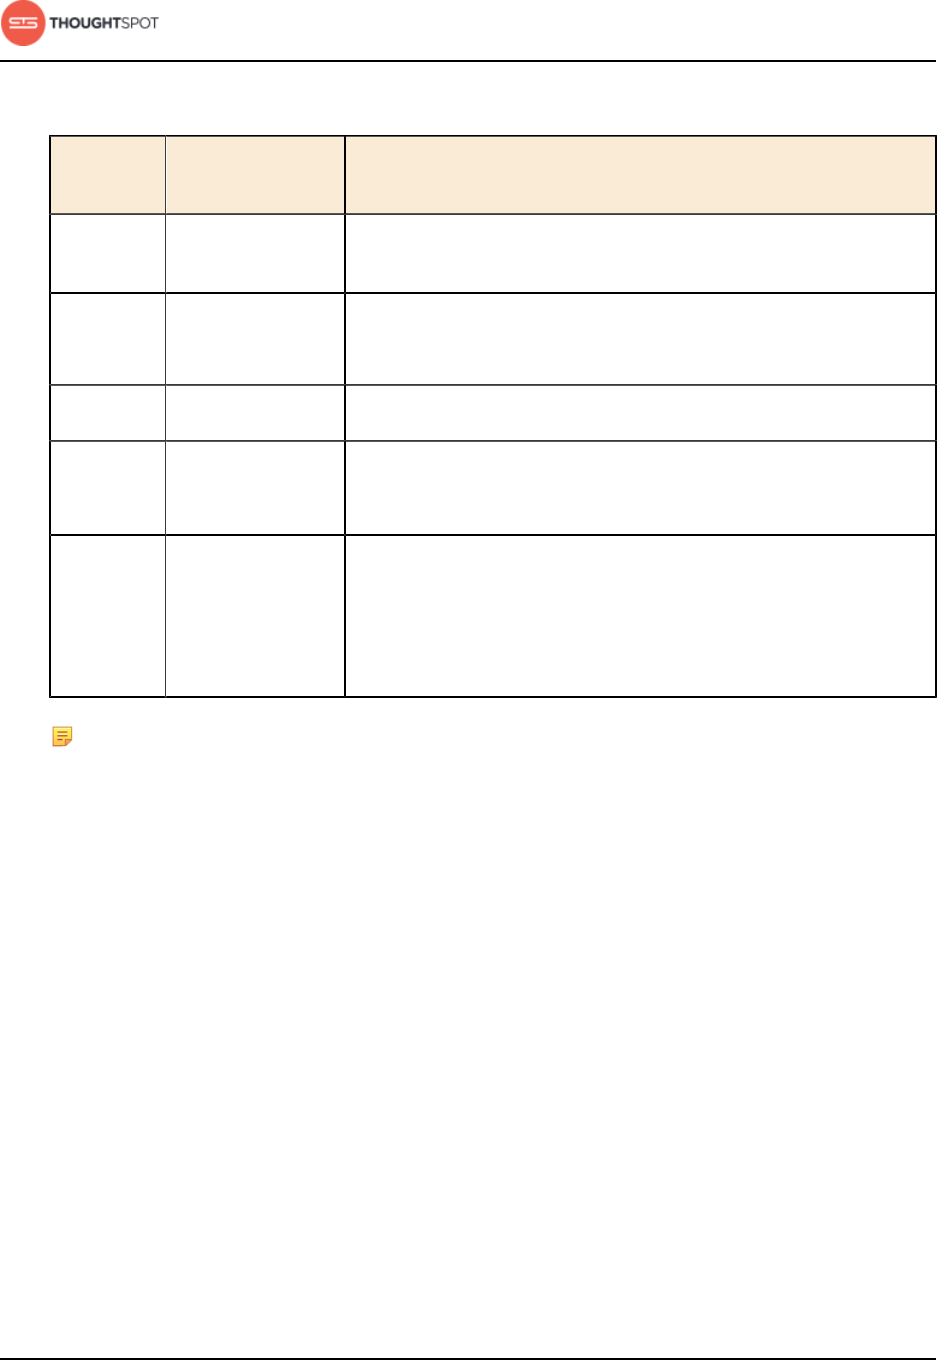
Load and manage data
ThoughtSpot Administration Guide Copyright © 2017 by ThoughtSpot. All Rights Reserved. 55
Table 11: Supported data types
Kind of
data
Supported data
types
Details
Character • VARCHAR(n) Specify the maximum number of characters, as in
VARCHAR(255). The size limit is 1GB for VARCHAR values.
Floating
point
• DOUBLE
• FLOAT
DOUBLE is recommended.
Boolean • BOOL Can be true or false.
Integer • INT
• BIGINT
INT holds 32 bits.
BIGINT holds 64 bits.
Date or
time
• DATE
• DATETIME
• TIMESTAMP
• TIME
DATETIME, TIMESTAMP, and TIME are stored at the granularity
of seconds.
TIMESTAMP is identical to DATETIME, but is included for syntax
compatibility.
Note: There is a 1GB limitation on the number of characters for VARCHAR.
If you have any VARCHAR data that exceeds this limit, the entire load will
fail.
Geographical data types
For geographical data types, use VARCHAR. For latitude and longitude, you
can use either VARCHAR or DOUBLE. After loading the data, designate it as
a geographical data type when you Model data in bulk in the modeling file.
Wherever abbreviations or codes are used, they are the same as what the USPS
(United States Postal Service) recognizes.
These types of data can be designated as geographical data, which enables
them to be visualized using the Geo chart types:

Load and manage data
ThoughtSpot Administration Guide Copyright © 2017 by ThoughtSpot. All Rights Reserved. 56
Table 12: Data that uses geo charts
GeoType Description Type: Example
COUNTRY_REGION Countries • name: United States
• long name: United States
• name_sort: United States of America
• abbreviation: U.S.A.
• adm0_a3: USA
• adm0_a3_is: USA
• adm0_a3_us: USA
• admin: United States of America
• brk_a3: USA
• brk_name: United States
• formal_en: United States of America
• iso_a2: US
• iso_a3: USA
• iso_n3: 840
COUNTY Counties in the
United States
• santa clara county
• pike county, ohio
• pike county, OH
STATE_PROVINCE States in the United
States
• name: California
• US Postal Service abbreviation: CA
LATITUDE Must be used with
LONGITUDE
• 37.421023
• 1.282911
LONGITUDE Must be used with
LATITUDE
•−122.142103
• 103.848865
ZIP_CODE Zip codes and zip
codes +4 in the
United States
• po_name: MT MEADOWS AREA
• ZIP: "00012"
• zip2: 12
Other Sub-nation Regions Administrative
regions found in
• bremen

Load and manage data
ThoughtSpot Administration Guide Copyright © 2017 by ThoughtSpot. All Rights Reserved. 57
GeoType Description Type: Example
countries other
than the United
States
• normandy
• west midlands
Note: You cannot upload your own custom boundaries.
Constraints
Constraints include primary keys, foreign keys, and relationships. Relationships
allow you to create a generic relationship for use when you want to join tables
that don't have a primary key/foreign key relationship.
Primary keys
When a primary key is selected for a table, it impacts data loading behavior.
When a new row is added:
• If another row already exists with same primary key, it is updated with the
values in the new row.
• If a row with the same primary key does not exist already, the new row is
inserted into the table.
This behavior is referred to as “upsert” because it does an INSERT or an UPDATE,
depending on whether a row with the same primary key already exists.
Note that ThoughtSpot does not check for primary key violations across
different shards of the table. Therefore, you need to shard the table on the
primary key columns if you require this “upsert” behavior.
Foreign key relationships
Foreign key relationships help ThoughtSpot with default schema modeling
by indicating a connection between two tables. These relationships are used
for joining the tables, and not for referential integrity constraint checking. The

Load and manage data
ThoughtSpot Administration Guide Copyright © 2017 by ThoughtSpot. All Rights Reserved. 58
foreign key relationship is defined on the fact table and references the primary
key(s) in the dimension table.
If you use primary and foreign keys, when users search the data from the search
bar, tables are automatically joined. For example, assume there are two tables:
• revenue, which is a fact table
• region, which is a dimension table
There is a foreign key on the fact table on regionid which points to the id in the
region dimension table. When a user types in "revenue by region", the two tables
will be joined automatically.
Foreign keys have to match the primary key of the target table they refer to. So if
there are multiple columns that make up the primary key in the target table, the
foreign key must include all of them, and in the same order.
Generic relationships (many-to-many)
You may have a schema where there is a fact table that you want to join with
another fact table. If there isn't a primary key/foreign key relationship between
the tables, you can use many-to-many to enable this. You can do this by using
the RELATIONSHIP syntax to add a link between them, that works similarly to
the WHERE clause in a SQL join clause.
This is a special kind of relationship, that applies to specific data models and use
cases. For example, suppose you have a table that shows wholesale purchases
of fruits, and another table that shows retail fruit sales made, but no inventory
information. In this case, it would be of some use to see the wholesale purchases
that led to sales, but you don't have the data to track a single apple from
wholesale purchase through to sale to a customer.
In a many-to-many relationship, the value(s) in a table can be used to join to
a second table, using an equality condition (required) and one or more range
conditions (optional). These conditions act like the WHERE clause in a SQL JOIN

Load and manage data
ThoughtSpot Administration Guide Copyright © 2017 by ThoughtSpot. All Rights Reserved. 59
clause. They are applied using AND logic, such that all conditions must be met
for a row to be included.
To use a many-to-many relationship, you need to follow a few rules:
• There must be one equality condition defined between the two tables.
• Each table must be sharded on the same key that will be used for the equality
condition.
• There can optionally be one or more range conditions defined.
This example shows the TQL statements that create the two fact tables and the
relationship between them.
TQL> CREATE TABLE "wholesale_buys" (
"order_number" VARCHAR(255),
"date_ordered" DATE,
"expiration_date" DATE,
"supplier" VARCHAR(255),
"fruit" VARCHAR(255),
"quantity" VARCHAR(255),
"unit_price" DOUBLE
) PARTITION BY HASH (96) KEY ("fruit");
TQL> CREATE TABLE "retail_sales" (
"date_sold" DATE,
"location" VARCHAR(255),
"vendor" VARCHAR(255),
"fruit" VARCHAR(255),
"quantity" VARCHAR(255),
"sell_price" DOUBLE
) PARTITION BY HASH (96) KEY ("fruit");
TQL> ALTER TABLE "wholesale_buys" ADD RELATIONSHIP WITH "retail_sales"
AS "wholesale_buys"."fruit" = "retail_sales"."fruit" and
("wholesale_buys"."date_ordered" < "retail_sales"."date_sold" and
"retail_sales"."date_sold" < "wholesale_buys"."expiration_date");
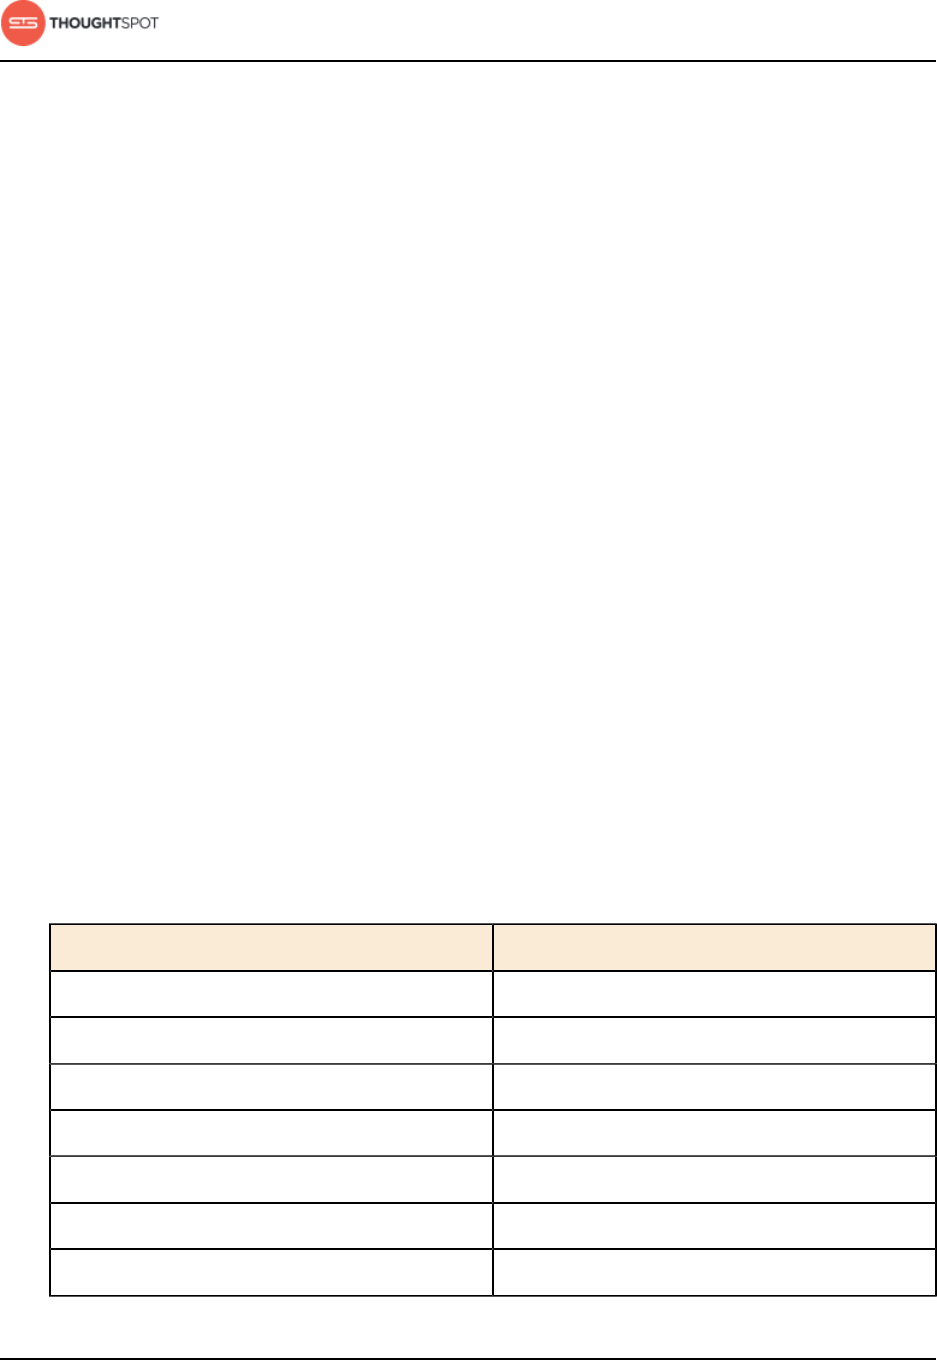
Load and manage data
ThoughtSpot Administration Guide Copyright © 2017 by ThoughtSpot. All Rights Reserved. 60
Note that this many-to-many implementation does not protect from over
counting in some searches. If you plan to use it, make sure your searches don't
include aggregation or count searches that will count one value multiple times,
because it satisfies the join condition for multiple rows.
Sharding
For the best performance, you should split (or shard) very large tables across
nodes. If you have a large dimension table, you might choose to co-shard it with
the fact table it will be joined with.
Sharding a fact table
Use sharding to split large tables into parts for distribution across nodes. This is
typically done with large fact tables, to provide optimal performance.
When sharding, you'll choose a column to be the distribution key. This column
should contain a value that has a good distribution (roughly similar number of
rows with each value in that column). This is typically the primary key, but it can
be any single column or a set of columns.
The recommended number or shards depends upon the number of nodes in your
cluster:
Table 13: Recommended number of shards based on number of nodes
Number of Nodes Number of Shards
3 96
4-12 128
13-24 256
25-36 384
37-48 512
49-60 640
61-72 768
Load and manage data
ThoughtSpot Administration Guide Copyright © 2017 by ThoughtSpot. All Rights Reserved. 61
To specify the number of shards, add PARTITION BY HASH ( ) to your CREATE
TABLE statement, specifying the number of shards and the sharding key. For
example:
TQL> CREATE TABLE ...
...PARTITION BY HASH (96) KEY ("customer_id");
If no sharding is specified or the number of shards specified is one, the table is
assumed to be unsharded (i.e. the table physically exists on each node).
If no sharding key is specified, but the number of shards is greater than one, the
table is assumed to be sharded randomly. The system does not use primary keys
as sharding keys by default.
If you want to use the primary key for sharding, you must specify that the table is
to be partitioned by hash on the primary key, as in this example:
TQL> CREATE TABLE "supplier" (
"s_suppkey" BIGINT,
"s_name" VARCHAR(255),
"s_address" VARCHAR(255),
"s_city" VARCHAR(255),
"s_phone" VARCHAR(255),
CONSTRAINT PRIMARY KEY ("s_suppkey")
) PARTITION BY HASH (96) KEY ("s_suppkey");
Sharded (distributed) dimension tables
In a typical schema, you'd have a sharded fact table with foreign keys to
replicated dimension tables (which exist on every node). This works best where
dimension tables are small (under 50MB). So if your dimension tables are small,
you should shard the fact tables and not shard the dimension tables they will be
joined with.
If you have a large dimension table, you can distribute it the same way as the
fact table it joins to. You might choose to use distributed dimension tables if:
Load and manage data
ThoughtSpot Administration Guide Copyright © 2017 by ThoughtSpot. All Rights Reserved. 62
• The dimension table is large (over 50MB).
• The tables are always joined using the same columns.
If all of these requirements for the distributed dimension table are met, the
tables are automatically co-sharded for you:
• The tables are related by a primary key and foreign key.
• The tables are partitioned on the same primary key/foreign key.
• The tables have the same number of regions (or shards).
If the dimension table will be joined to multiple fact tables, all of the fact tables
must be sharded in the same way as the dimension table. Self-joins are not
supported.
When a fact and its dimension table are co-sharded:
• The two tables will always be joined on the sharding key.
• Data skew can develop if a very large proportion of the rows have the same
sharding key.
This example shows the CREATE TABLE statements that meet the criteria for co-
sharding of a fact table and a distributed dimension table:
TQL> CREATE TABLE products_dim (
"id" int,
"prod_name" varchar(30),
"prod_desc" varchar(100),
PRIMARY KEY ("id")
)
PARTITION BY HASH (96) KEY ("id")
;
TQL> CREATE TABLE retail_fact (
"trans_id" int,
"product_id" int,
"amount" double,
FOREIGN KEY ("product_id") REFERENCES products_dim ("id")
)
PARTITION BY HASH (96) KEY ("product_id")
;
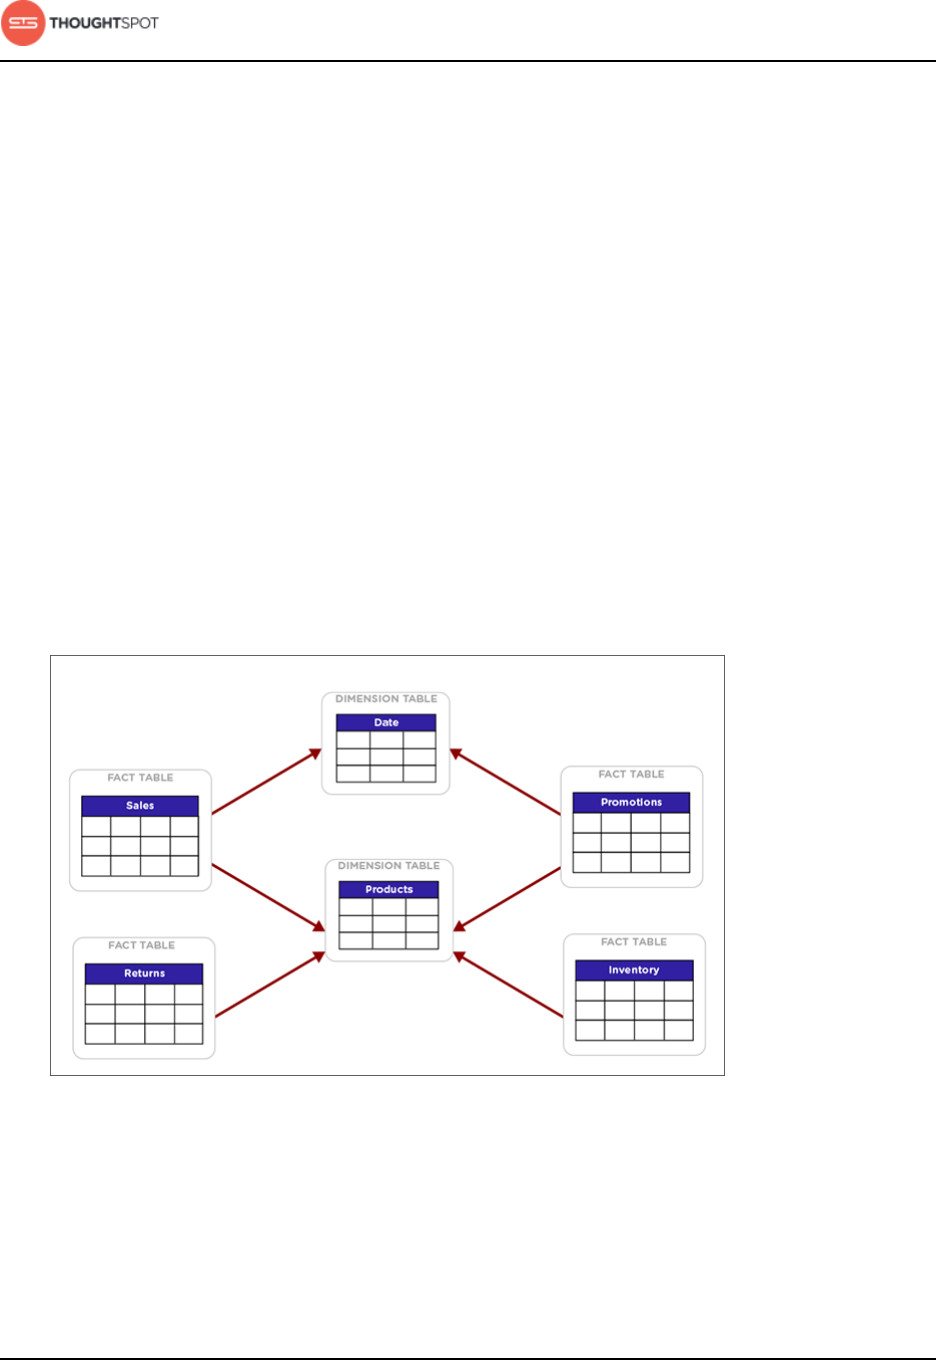
Load and manage data
ThoughtSpot Administration Guide Copyright © 2017 by ThoughtSpot. All Rights Reserved. 63
Sharded (distributed) face tables
You can also join two sharded fact tables with different shard keys, otherwise
know as non co-sharded tables. It may take a while to join two tables sharded
on different keys since a lot of data redistribution is required. Therefore,
ThoughtSpot recommends that you use a common shard key for two fact tables.
Chasm traps
In a complex schema, you may have a fact table with no relationship to another
fact table, except that each contains a foreign key to a shared dimension table.
This is known as a chasm trap, and ThoughtSpot can handle it!
A chasm trap in a data schema can introduce problems of over counting if you
join the two fact tables through their shared dimension table. This diagram
shows a typical complex schema with several tables that are related over a
chasm trap:
Figure 8: Complex schema with chasm traps
Examples of use cases where a chasm trap could occur are:

Load and manage data
ThoughtSpot Administration Guide Copyright © 2017 by ThoughtSpot. All Rights Reserved. 64
• Attribution analysis comparing campaign data with purchase data, where all
they have in common is that both contain a customer identifier which is a
foreign key to a customer dimension table.
• Cost of sales analysis when the wholesale orders data is only related to the
retail sales data through a shared products dimension table.
In many databases, joining tables across a chasm trap creates a Cartesian
product, such that each row from the first fact table is joined to each row from
the second table. This produces over counting when computing counts and
aggregates. But ThoughtSpot protects you from this kind of over counting.
There are still just a few things to look out for when using a schema that contains
chasm traps:
• The tables need to be joined to the dimension table via an equi-join (i.e. a
primary key/foreign key relationship). They cannot be joined using a range of
values.
• Review the column setting called Attribution Dimension. You may need to
change this setting if some of the columns in the shared dimension table
should not be used for attribution when combining fact tables.
• Tables that will be joined across a chasm trap do not need to be co-sharded.
They will be joined appropriately automatically in the most efficient way.
Chasm trap limitations
If your database schema contains any chasm traps, you may encounter these
limitations.
Operations that produce an error for chasm traps
The following limitations on chasm trap schemas will produce a red bar error in
the ThoughtSpot application:

Load and manage data
ThoughtSpot Administration Guide Copyright © 2017 by ThoughtSpot. All Rights Reserved. 65
•Show underlying data does not work for chasm trap searches, whether the
search is on a worksheet containing a chasm trap or on base tables that are
related over a chasm trap.
• When using the ThoughtSpot APIs, you cannot pass filter values via the URL
if the relevant searches occur on a worksheet containing a chasm trap or on
base tables that are related over a chasm trap.
•Legacy Row Level Security does not work with chasm trap schemas. The
newer Rule-Based Row Level Security must be used.
Behavior that is different for chasm traps
The following behavior is different for chasm traps than for schemas that do not
contain a chasm trap:
• There are no headlines (single facts based on the data) shown when a search
contains a worksheet containing a chasm trap or base tables that are related
over a chasm trap.
• Join information in What am I Looking At? does not appear for searches on
a worksheet containing a chasm trap or on base tables that are related over a
chasm trap.
• There are cases when attempting to configure certain charts on chasm trap
worksheets or tables will not work. If this happens, you will see the error Your
search needs to have unique y-axis values for each series of data shown on
the x-axis. The workaround is to remove all columns from the search, except
for those used in your chart.
Workarounds
In some cases, there is a workaround of saving an answer as a worksheet
(Aggregated Worksheet). See the ThoughtSpot User Guide for details on
how to do this. If you save a chasm trap search as a worksheet, it becomes a
materialized view of the answer. Effectively, it is then just a regular table (no

Load and manage data
ThoughtSpot Administration Guide Copyright © 2017 by ThoughtSpot. All Rights Reserved. 66
chasm trap). As such, most of the issues above will not affect searches on the
saved worksheet.
Build the schema
Before you can load data into ThoughtSpot, you must build a database schema
to receive it. You will do this by writing a SQL script, which creates the objects in
your schema.
Your SQL script can use any SQL statements that are supported in ThoughtSpot
SQL Command Line (TQL). The TQL syntax is similar to the SQL used in other
relational databases, but with some important differences. You'll use DDL (data
definition language) to create the schema into which you'll load the data. You'll
probably want to put all your DDL statements into a text file, which you'll use as
a script for creating the schema.
Uploading the SQL script through the browser
You can upload an existing SQL script directly through the browser in the
ThoughtSpot application. You can edit the script or add to it right within the
browser, too.
The steps to build a schema through the browser are:
1. Write a SQL script to create the schema
2. Import a schema (use the SQL editor)
Using TQL to create the schema
You can choose to run your SQL script within the Linux shell, instead of
uploading it through the browser.
The steps to build a schema using TQL include:
1. Connect to the database with the ThoughtSpot SQL Command Line (TQL).
2. Write a SQL script to create the schema.

Load and manage data
ThoughtSpot Administration Guide Copyright © 2017 by ThoughtSpot. All Rights Reserved. 67
About TQL, the SQL command line interface
ThoughtSpot provides the ThoughtSpot SQL Command Line (TQL) for creating,
viewing, and managing a schema using SQL. You can run TQL in interactive
command line mode, or you can write a script and use TQL to run it.
TQL basics
The SQL syntax in ThoughtSpot is called TQL for ThoughtSpot SQL. The
ThoughtSpot SQL Command Line (TQL) runs in an interactive mode. To invoke
TQL Log in to the Linux shell using SSH and type tql. At the prompt, type h or
help to see a list of supported commands.
Type your SQL commands on the command line, terminating each command
with a semicolon (;). Commands can span multiple lines. ThoughtSpot supports
a limited number of SQL commands, plus some custom SQL extensions. For
example, you can specify the number of shards and the distribution key as part
of the CREATE TABLE syntax. A full list of supported SQL in TQL is available in
the TQL reference.
You can also Write a SQL script to create the schema in TQL.
Connect to the database with the ThoughtSpot SQL Command Line (TQL)
To perform administrative tasks directly in the database, you will use the
ThoughtSpot SQL Command Line (TQL). TQL supports many, but not all,
common SQL commands.
Before connecting with TQL, you will need:
• Access to your ThoughtSpot instance Linux shell from a client machine.
• The administrator OS login.
To connect to TQL:
1. Log in to the Linux shell using SSH.
Load and manage data
ThoughtSpot Administration Guide Copyright © 2017 by ThoughtSpot. All Rights Reserved. 68
2. Invoke TQL:
$ tql
TQL>
3. Enter your SQL command, followed by a semicolon (;).
Create the schema in TQL
Having examined the structure of the data to be loaded and become familiar
with the ThoughtSpot SQL Command Line (TQL), you are now ready to create
the schema.
This method is a good way to get familiar with TQL and how to create database
objects, but when creating a schema in a production system, you will most likely
Write a SQL script to create the schema.
To create the schema directly in TQL:
1. Connect to the database with the ThoughtSpot SQL Command Line (TQL).
2. If the database you will be using does not exist, create it now:
TQL> CREATE DATABASE my_database;
3. Connect to the database:
TQL> USE my_database;
4. If you wish to use a schema other than the default one, create it now:
TQL> CREATE SCHEMA my_schema;
5. Issue a CREATE TABLE command for each table you will create, using the
information in Plan the schema.
Note: Foreign key declaration within a CREATE TABLE will show the
table created even if there are problems with the foreign key. Therefore,
it is good practice to also issue a separate ALTER TABLE ADD CONSTRAINT
FOREIGN KEY command.

Load and manage data
ThoughtSpot Administration Guide Copyright © 2017 by ThoughtSpot. All Rights Reserved. 69
Write a SQL script to create the schema
Using a SQL script to create your schema is a recommended best practice. This
makes it easier to adjust the schema definitions and recreate the schema quickly,
if needed.
The schema creation script is a text file that contains all the SQL commands to
create your schema. Comments should be enclosed in the comment tags /* and
*/.
It is recommended to enclose all object names (schema, table, and column) in
double quotes and any column values in single quotes in your scripts. Object
names that are also reserved words in SQL, or that contain special characters
(any character other than alphanumeric or _ ), must be surrounded by double
quotes. If you see the error message "Error parsing SQL. Check SQL input.", you
should check for object names without double quotes in your script.
If you are working in a schema other than the default schema, object names
must be fully qualified, as in "<schema_name>"."<object_name>".
If your schema includes constraints to define relationships between tables
(foreign key, or the RELATIONSHIP syntax), it is recommended that your script
first creates all the tables, and then at the end, creates the relationships between
them using the ADD CONSTRAINT syntax. This makes it easier to troubleshoot
the script and make changes.
If TQL is run using the flag --allow_unsafe, your statements will always execute
without this warning. Note that when running TQL from a script, you will
need to decide what behavior you want if the script contains changes that
affect dependent objects. If you want the script to run even if objects with
dependencies are afffected, run it using this flag, for example:
cat safest_script_ever.sql | tql --allow_unsafe
1. Open a new file in a text editor.
Load and manage data
ThoughtSpot Administration Guide Copyright © 2017 by ThoughtSpot. All Rights Reserved. 70
2. Type in the command to create the database, if it does not already exist:
CREATE database <db_name>;
3. Type in the command to specify the database to use:
USE database <db_name>;
4. Type in the command to create the schema, if you don't want to use the
default schema:
5. Type in each of the CREATE TABLE statements, with its column definitions,
primary key constraints, and sharding specification (if any).
6. At the end of your script, optionally type in the ALTER TABLE statements to
add foreign keys to use in joining the tables.
7. Save the file.
8. Run the script using one of these methods:
•Import a schema (use the SQL editor).
•Log in to the shell, copy your script to your ThoughtSpot instance using
scp, and pipe it to TQL:
$ cat create_schema.sql | tql
Schema creation examples
These examples demonstrate the steps involved in creating a schema using the
ThoughtSpot SQL Command Line (TQL). After the schema is created, you can
load data into it with ThoughtSpot Loader.
Simple schema creation example
The example creates a database (tpch) with two tables (customer, transaction).
The example does not create a schema explicitly. So it will use the default
schema (falcon_default_schema).
In this example:
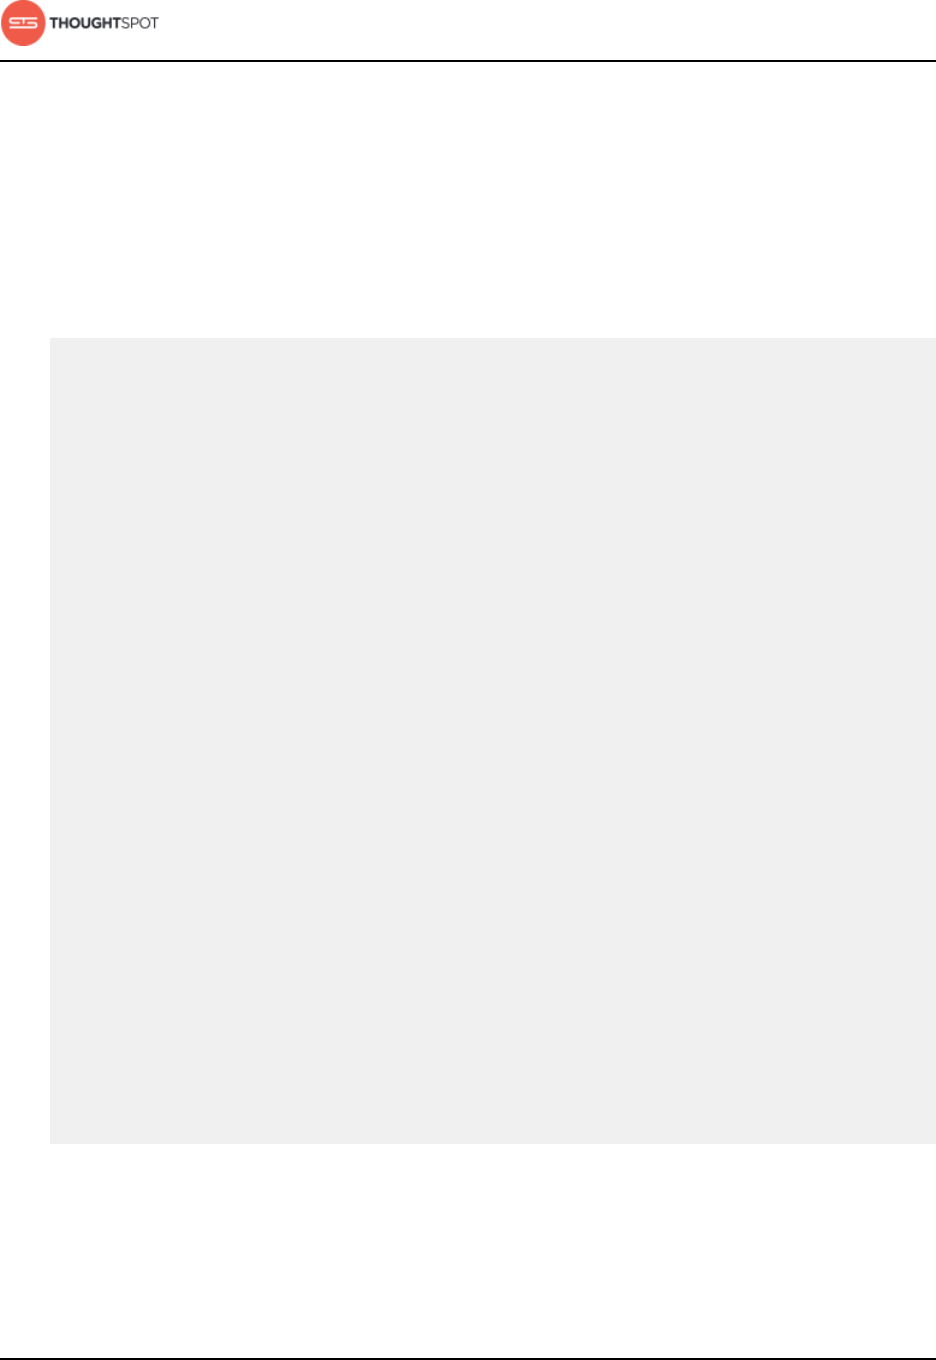
Load and manage data
ThoughtSpot Administration Guide Copyright © 2017 by ThoughtSpot. All Rights Reserved. 71
• The table customer has a primary key called customer_id. The table
customer_transactions has a primary key called transaction_id.
• The customer table is unsharded.
• The customer_transactions table is sharded into 96 shards using the
transaction_id column.
• Both tables have referential integrity on customer_id.
$tql
TQL> CREATE DATABASE tpch;
TQL> USE tpch;
TQL> CREATE TABLE customer (
name VARCHAR(100),
address VARCHAR(255),
zipcode INT,
customer_id INT,
CONSTRAINT PRIMARY KEY (customer_id)
);
TQL> CREATE TABLE customer_transactions (
transaction_id INT,
customer_id INT,
amount DOUBLE,
transaction_date DATETIME,
CONSTRAINT PRIMARY KEY (transaction_id),
CONSTRAINT FOREIGN KEY (customer_id) REFERENCES
customer(customer_id)
) PARTITION BY HASH (96) KEY (transaction_id);
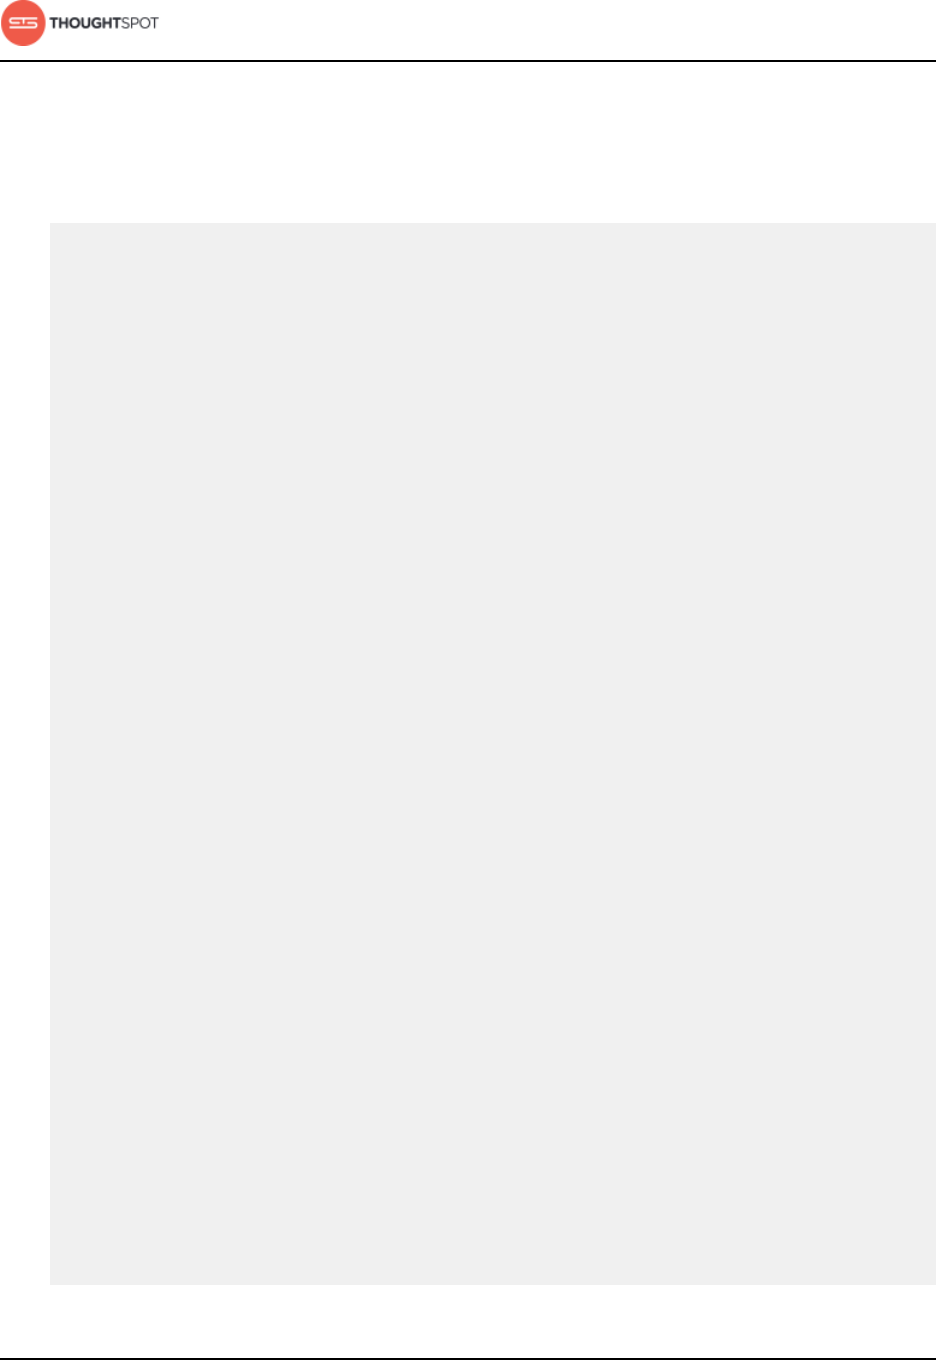
Load and manage data
ThoughtSpot Administration Guide Copyright © 2017 by ThoughtSpot. All Rights Reserved. 72
More complex schema creation example
The example uses a custom schema called sample_schema to hold the tables.
Because of this, every table reference has to be schema qualified.
$ tql
TQL> CREATE DATABASE "sample_db";
TQL> USE "sample_db";
TQL> CREATE SCHEMA "sample_schema";
TQL> CREATE TABLE "sample_schema"."customer" (
"c_custkey" BIGINT,
"c_name" VARCHAR(255),
"c_address" VARCHAR(255),
"c_city" VARCHAR(255),
"c_nation" VARCHAR(255),
"c_region" VARCHAR(255),
"c_phone" VARCHAR(255),
CONSTRAINT PRIMARY KEY ("c_custkey")
);
TQL> CREATE TABLE "sample_schema"."supplier" (
"s_suppkey" BIGINT,
"s_name" VARCHAR(255),
"s_address" VARCHAR(255),
"s_city" VARCHAR(255),
"s_nation" VARCHAR(255),
"s_region" VARCHAR(255),
"s_phone" VARCHAR(255),
CONSTRAINT PRIMARY KEY ("s_suppkey")
);
TQL> CREATE TABLE "sample_schema"."lineorder" (
"lo_orderkey" BIGINT,
"lo_linenumber" BIGINT,
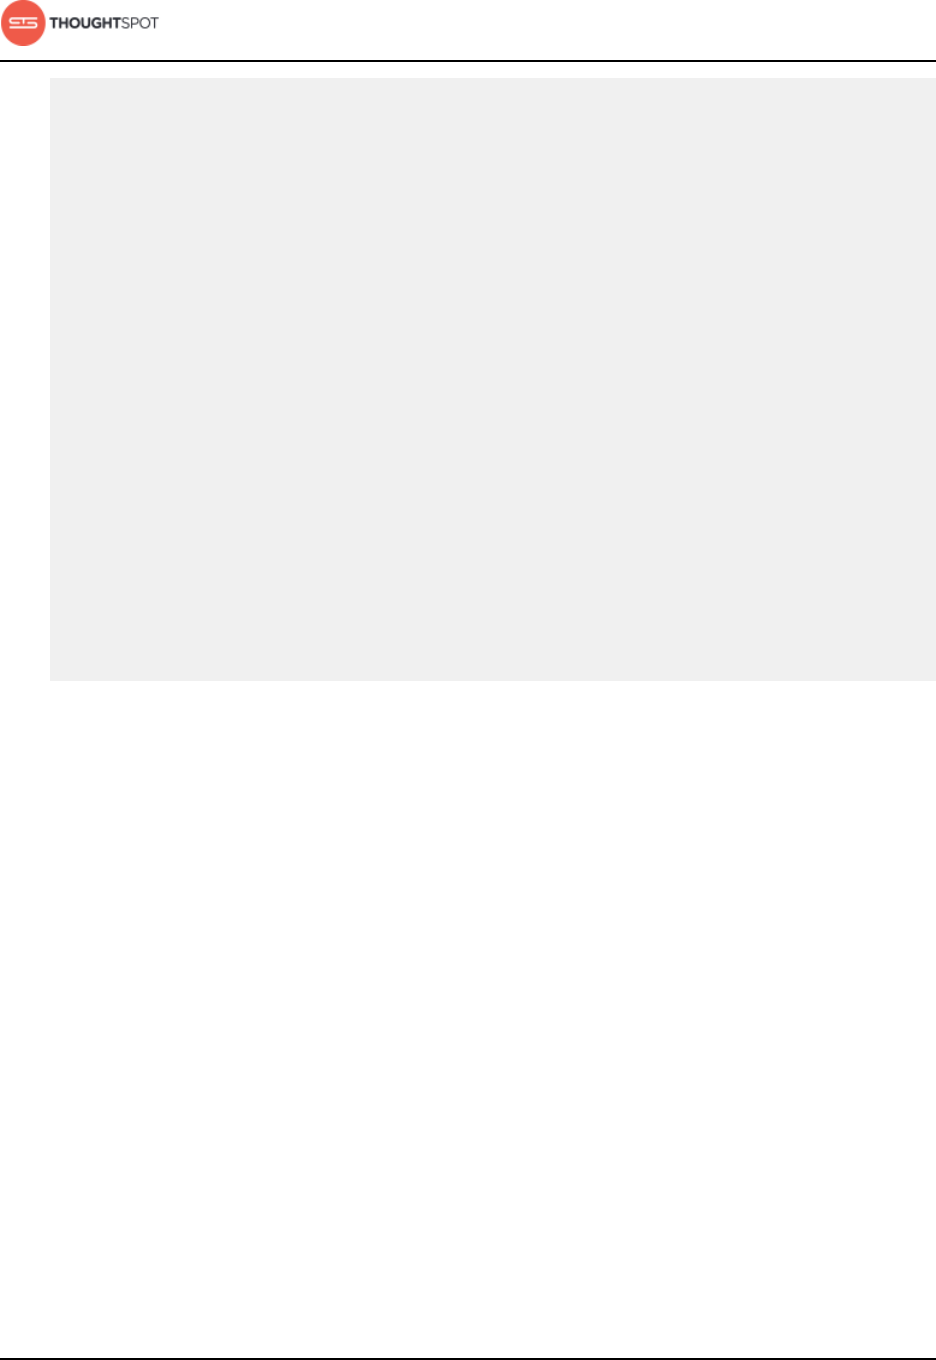
Load and manage data
ThoughtSpot Administration Guide Copyright © 2017 by ThoughtSpot. All Rights Reserved. 73
"lo_custkey" BIGINT,
"lo_partkey" BIGINT,
"lo_suppkey" BIGINT,
"lo_orderdate" DATE,
"lo_orderpriority" VARCHAR(255),
"lo_shippriority" VARCHAR(255),
"lo_quantify" BIGINT,
"lo_extendprice" BIGINT,
"lo_ordtotalprice" BIGINT,
"lo_discount" BIGINT,
"lo_commitdate" DATE,
CONSTRAINT PRIMARY KEY ("lo_orderkey","lo_linenumber"),
CONSTRAINT FOREIGN KEY ("lo_custkey") REFERENCES
"sample_schema"."customer" ("c_custkey"),
CONSTRAINT FOREIGN KEY ("lo_suppkey") REFERENCES
"sample_schema"."supplier" ("s_suppkey")
) PARTITION BY HASH (96) KEY (lo_orderkey);
Import a schema (use the SQL editor)
You can run a SQL script to create your database schema through the browser,
without having to log in to the shell on the ThoughtSpot instance. You can edit
the script and run it directly in the browser to create the schema.
Importing a schema through the Web browser makes it possible to run your SQL
script without needing to have a Linux login. You can use this capability in any of
these ways:
•Create the SQL script ahead of time, and use the browser to run it.
• Use the editor to type your SQL directly into the browser.
• Use the browser SQL interface as an interactive SQL editor, for example to
test an existing script or make changes to an existing schema.
1. Log in to ThoughtSpot from a browser.
2. Click on Data, on the top navigation bar.
Load and manage data
ThoughtSpot Administration Guide Copyright © 2017 by ThoughtSpot. All Rights Reserved. 74
Figure 9: Data
3. Click Actions and select Upload schema.
Figure 10: Upload schema
4. Drag and drop your SQL file into the browser, or choose Browse Your Files to
locate it.
5. You're now in the SQL editor. Use it to view your script and make any changes.
Figure 11: Import schema
6. When ready, run your script by clicking the Execute button.

Load and manage data
ThoughtSpot Administration Guide Copyright © 2017 by ThoughtSpot. All Rights Reserved. 75
7. If there are any errors, correct them and run the script again.
Change the schema
After you've created a schema and loaded data, you may find yourself wishing
you'd set things up a little differently. You can make changes to the schema, such
as changing the primary key, relationships to other tables, and sharding.
Making changes to a schema after data has been loaded and users have created
worksheets or pinboards on the tables requires care, so that you don't lose the
relationship between the objects created in ThoughtSpot and the underlying
tables. If you follow the procedures here, your tables will retain their relationships
to the objects created on top of them:
•Change the primary key for a table.
•Change a relationship between tables.
•Change sharding on a table.
Change the primary key for a table
Use this procedure to change the primary key for a table. But use it with caution,
particularly if you are changing to a primary key for which values are not unique.
You should always take a snapshot of your database before making any schema
changes. This will allow you to revert back to the prior state if you make an error,
or something doesn't work as you expected after the schema change.
You can change the primary key of a table without having to TRUNCATE it first
and reload the data. However, changing the primary key could result in data
deletion. This is because of the upsert behavior which is applied when multiple
rows have the same primary key. This is very important to understand ahead of
time, if you are considering changing to a primary key for which values are not
unique.
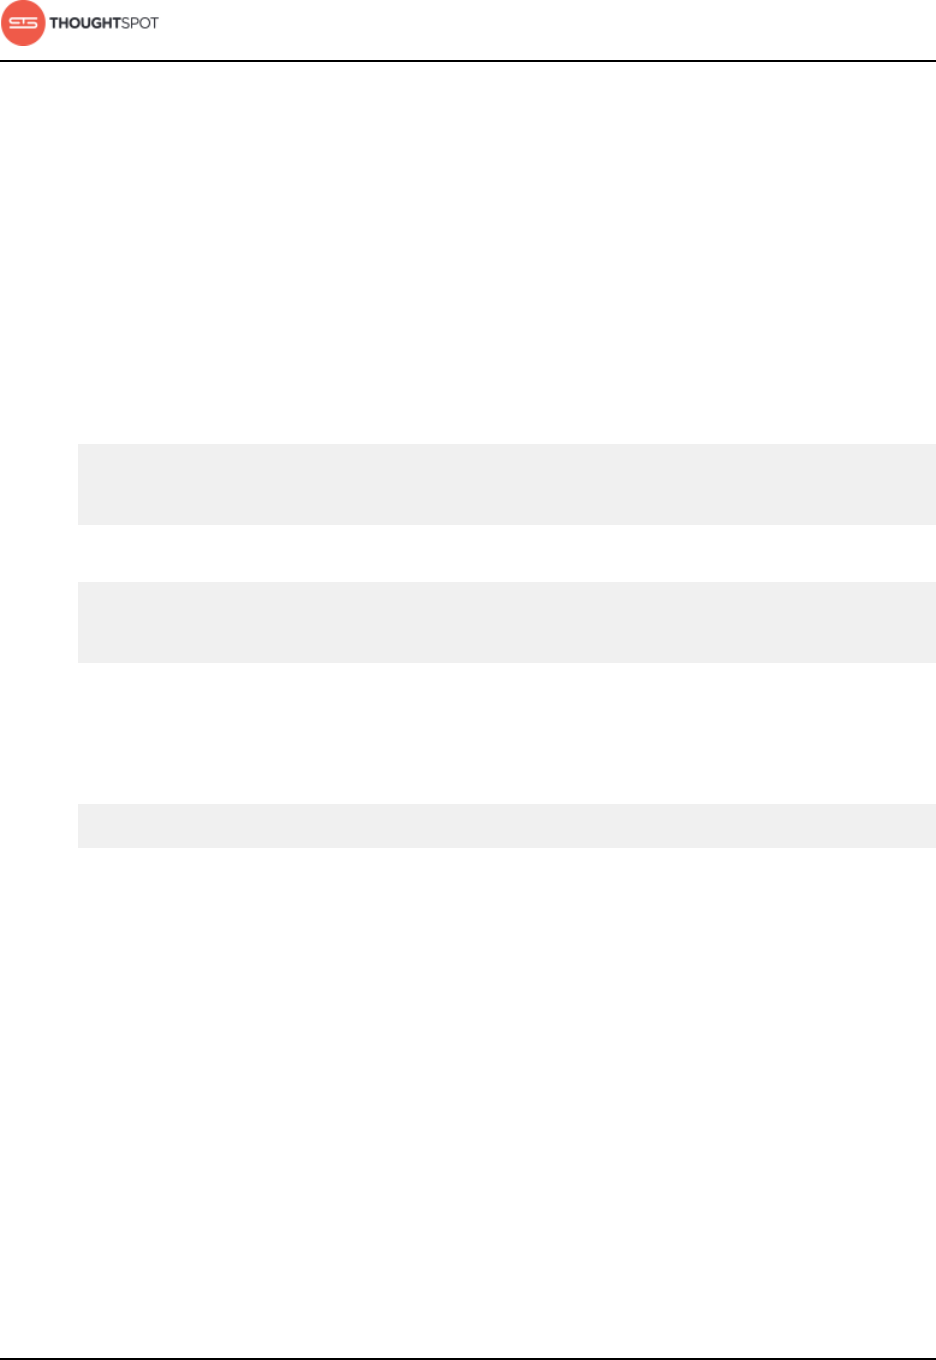
Load and manage data
ThoughtSpot Administration Guide Copyright © 2017 by ThoughtSpot. All Rights Reserved. 76
To change the primary key, first remove any existing primary key, and then define
a new one (if any). You do not need to truncate the tables to do this operation
beginning in version 3.2. Any dependent objects (pinboards or worksheets) will
remain intact.
To change the primary key of a table:
1. Take a snapshot.
2. Connect to the database with the ThoughtSpot SQL Command Line (TQL).
3. Drop the existing primary key (if any), by issuing a command like this example:
TQL> ALTER TABLE "cart"
DROP CONSTRAINT
PRIMARY KEY;
4. Add a new primary key, if desired:
TQL> ALTER TABLE "cart"
ADD CONSTRAINT
PRIMARY KEY ("owner_id");
5. Test that any dependent objects (pinboards, worksheets, etc.) are still working
correctly.
6. Delete the snapshot you created earlier using the command:
tscli snapshot delete <name>
Change a relationship between tables
Use this procedure to remove a relationship between tables or define a new
one. This operation works for both kinds of relationships: foreign key or generic
relationship.
You should always take a snapshot of your database before making any schema
changes. This will allow you to revert back to the prior state if you make an error,
or something doesn't work as you expected after the schema change.
To change a relationship between two tables, first remove any existing
relationship, and then define the new relationship (if any). You do not need to
Load and manage data
ThoughtSpot Administration Guide Copyright © 2017 by ThoughtSpot. All Rights Reserved. 77
truncate the tables to do this operation. Any dependent objects (pinboards or
worksheets) will remain intact.
To change the relationship between tables:
1. Take a snapshot.
2. Connect to the database with the ThoughtSpot SQL Command Line (TQL).
3. Issue the command to drop the existing relationship, by issuing a command
like one of these examples:
• Drop a foreign key by name, if it was given a name when it was defined:
TQL> ALTER TABLE
"sales_fact"
DROP CONSTRAINT
"FK_PO_number";
• Drop a relationship by name, if it was given a name when it was defined:
TQL> ALTER TABLE "fruit_dim"
DROP RELATIONSHIP "REL_dates";
• Drop the foreign key relationship explicitly, if it doesn't have a name, by
referencing the two tables that are joined. This drops all foreign keys
between the two tables:
TQL> ALTER TABLE "shipments"
DROP CONSTRAINT
FOREIGN KEY "orders";
• Drop all generic relationships between two tables:
TQL> ALTER TABLE "wholesale_buys"
DROP RELATIONSHIP
WITH "retail_sales";
4. Define a new relationship, if you want to, using ALTER TABLE...ADD
CONSTRAINT...
5. Test that any dependent objects (pinboards, worksheets, etc.) are still working
correctly.
Load and manage data
ThoughtSpot Administration Guide Copyright © 2017 by ThoughtSpot. All Rights Reserved. 78
6. Delete the snapshot you created earlier using the command:
tscli snapshot delete <name>
Change sharding on a table
You can change the sharding on a table or remove it altogether (creating a
replicated table) using this procedure. This procedure preserves the data within
the table.
You should always take a snapshot of your database before making any schema
changes. This will allow you to revert back to the prior state if you make an error,
or something doesn't work as you expected after the schema change.
This procedure reshards a table. This is also called redistributing or
repartitioning. You can use this method to reshard a table without losing its data
or metadata. This means that worksheets and pinboards built on top of the table
will continue to work.
You can use these steps to do any of these operations:
• shard a table that was previously replicated.
• change a replicated table to a sharded table.
• change the number of shards to use for a sharded table.
To change the sharding on a table:
1. Take a snapshot.
2. Connect to the database with the ThoughtSpot SQL Command Line (TQL).
3. Issue the command to change the sharding using this syntax:
TQL> ALTER TABLE <table>
[SET DIMENSION | SET FACT
[PARTITION BY HASH
[(<shards>)]
[KEY(<column>)]]]
For example:
Load and manage data
ThoughtSpot Administration Guide Copyright © 2017 by ThoughtSpot. All Rights Reserved. 79
• To make a sharded table into a dimension table (replicated on every node),
use:
ALTER TABLE "products"
SET DIMENSION;
• To make a dimension table into a sharded (fact) table or change the
number of shards, use:
ALTER TABLE "sales"
SET FACT PARTITION BY HASH (96)
KEY ("productID");
4. Test that any dependent objects (pinboards, worksheets, etc.) are still working
correctly.
5. Delete the snapshot you created earlier using the command:
tscli snapshot delete <name>
About data type conversion
You can convert the data in a column from one data type to another by issuing
a TQL command. There are some details you should be aware of when doing a
data type conversion.
Data type conversion behavior
When converting from one data type to another, any values that can not be
converted will be set to NULL. If errors occur during data type conversion, the
operation is aborted. However, you may choose to force the conversion despite
the errors. You can start TQL in allow_unsafe mode to continue with the data
conversion, at your own risk, of course! To start TQL in unsafe mode, issue this
command:
tql --allow_unsafe

Load and manage data
ThoughtSpot Administration Guide Copyright © 2017 by ThoughtSpot. All Rights Reserved. 80
Multiple columns of a single table can be converted using a single TQL
command. The behavior is transactional. So for example, you would issue a
command like this example:
ALTER TABLE products
MODIFY COLUMN product_id int,
MODIFY COLUMN supplier VARCHAR(4);
Also note that changing data type has implications on the primary key and
sharding enforcement. For example, changing the data type of a column that is
part of the sharding key would lead to a redistribution of data. Then imagine that
the sharding key column contained the text values "00100", "0100", and "100",
which all map to same integer value. If this type of a column is changed from a
VARCHAR to an INT, then it would be subject to the upsert behavior on primary
keys. So in this example, only one of the three rows would be preserved.
Be aware that data type conversion will preserve the data in the underlying
database table, but there is no guarantee that any objects built on top of it
(worksheets or pinboards) will be preserved. This is because you might make
a data type change that makes a chart built on top of the table invalid (for
example a growth chart would be invalidated if the date column it depends on
were changed to a varchar column).
Supported data type conversions
In general, the data type conversions that make logical sense are supported. But
there are a few nuances you should be aware of:
• When you convert from INT to BOOL, zero is converted to false, and all non-
zero values are converted to true.
• When you convert from BOOL to INT, true gets converted to 1, and false gets
converted to 0.
• When you convert from DOUBLE to INT, the value gets rounded.
• When you convert from INT to DOUBLE, the value gets rounded.
Load and manage data
ThoughtSpot Administration Guide Copyright © 2017 by ThoughtSpot. All Rights Reserved. 81
• When you convert from DATETIME to DATE, the date part of value is
preserved and the time part is dropped.
• When you convert from DATE to DATETIME, the time gets added as 00:00:00.
The date part of the value is preserved.
• When you convert from DATETIME to TIME, the time part of the value is
preserved.
• Conversion from TIME to DATETIME is not supported.
Date and time conversions
Some data type conversion require a format string. These include:
• conversion from DATE/TIME/DATETIME
• conversion to DATE/TIME/DATETIME
For these types of conversions, you'll use a special syntax using parsinghint and
the date format specifications supported in the strptime library function.
For the example, first create a table with a timestamp stored as a VARCHAR:
CREATE TABLE fruit_sales
(time_of_sale VARCHAR(32));
INSERT INTO fruit_sales
VALUES ('2015-12-29 13:52:39');
Now, convert the column from a VARCHAR to DATETIME, using the format %Y-
%m-%d %H:%M:%S:
ALTER TABLE fruit_sales
MODIFY COLUMN time_of_sale DATETIME
[parsinghint="%Y-%m-%d %H:%M:%S"]
Finally, convert the column back to VARCHAR:
ALTER TABLE fruit_sales
MODIFY COLUMN time_of_sale VARCHAR(32);
Load and manage data
ThoughtSpot Administration Guide Copyright © 2017 by ThoughtSpot. All Rights Reserved. 82
Boolean to string conversions
Boolean to string conversions have format strings, too. You'll use parsinghint as
you do for date and time conversions. You can choose among these approaches:
• Option 1: Specify string values for both true and false. Any non-matching
values get converted to null. In this example, "100" gets converted to true, and
"0" gets converted to false. "-1" gets converted to null.
ALTER TABLE db
MODIFY COLUMN s bool [parsinghint="100_0"];
• Option 2: Specify a string value for true. Any non-matching value gets
converted to false. In this example, "100" gets converted to true, "-1" and "0"
get converted to false.
ALTER TABLE db
MODIFY COLUMN s bool [parsinghint="100_"];
• Option 3: Specify a string value for false. Any non-matching value get
converted to true. In this example, "-1" and "100" get converted to true, and
"0" gets converted to false.
ALTER TABLE db
MODIFY COLUMN s bool [parsinghint="_0"];
String to boolean conversions
When converting from a string to a boolean, you must specify a string for true
and false. By default, a string to boolean conversion generates "true" for true,
"false" for false.
ALTER TABLE db
MODIFY COLUMN b varchar(32);
But you may override the default strings that get generated by using parsinghint,
as in this example:
ALTER TABLE db
MODIFY COLUMN b varchar(32) [parsinghint="tr_fa"];
Load and manage data
ThoughtSpot Administration Guide Copyright © 2017 by ThoughtSpot. All Rights Reserved. 83
Change the Data Type of a Column
When you issue the TQL command to convert a column from one data type to
another, the conversion is handled automatically. However, you'll need to ensure
that any visualizations built on top of the table display correctly.
You should always take a snapshot of your database before making any schema
changes. This will allow you to revert back to the prior state if you make an error,
or something doesn't work as you expected after the schema change.
When changing a data type in an existing table, be aware that answers and
pinboards created on top of that table (or worksheets that include it) may
change. This is because charts and aggregations depend upon the data type. So
for example changing from INTEGER to VARCHAR could break charts that used
the numeric data type INTEGER to calculate an average or a total. Because of
this, use caution, and check all dependent objects before and after changing the
data type, to ensure that they display as intended.
To change the data type of a column:
1. Connect to the database with the ThoughtSpot SQL Command Line (TQL).
2. Issue the command to change the data type using this syntax:
TQL> ALTER TABLE <table>
MODIFY COLUMN <column> <new_data_type>;
For example:
ALTER TABLE fact100
MODIFY COLUMN product_id int;
Load data with ThoughtSpot Loader
ThoughtSpot Loader (tsload) is a common way to import data. When using
tsload, you can load larger datasets and make the loading process repeatable
through scripting.
There are several steps to loading data using ThoughtSpot Loader:
Load and manage data
ThoughtSpot Administration Guide Copyright © 2017 by ThoughtSpot. All Rights Reserved. 84
1. Generate CSV files with the data to be loaded.
2. Build the schema.
3. Import CSV files with ThoughtSpot Loader.
Import CSV files with ThoughtSpot Loader
Use ThoughtSpot Loader (tsload) to load data from a CSV text file into
an existing table in ThoughtSpot. tsload accepts flags that enable you to
specify column and row separators, date or timestamp formats, null value
representations, and similar parameters. Many of these options have defaults
that you can override.
Before importing data, you need to Build the schema.
To use ThoughtSpot Loader, type the command tsload followed by the
appropriate flags. You can see the list of the flags it accepts in the ThoughtSpot
Loader flag reference or by issuing tsload -help.
tsload supports both full and incremental data loads. For incremental loads, an
upsert (insert or update) is performed. If an incoming row has the same primary
key as an existing row, it updates the existing row with the new values.
You can integrate tsload into your ETL environment for more automated data
loads. Most ETL tools provide the ability to write target data into files and
support scripted post-transformation actions that can include loading data into
ThoughtSpot. This procedure describes manually loading data, but the tsload
commands could be saved as a script:
1. Log in to the Linux shell using SSH.
2. Change to the directory where your CSV files are staged.
3. Invoke tsload, specifying the appropriate flags and your data source file:
$ tsload --target_database my_database
--target_table my_table --alsologtostderr
--empty_target --source_file my_file.csv --v 1
--field_separator "separator_char"
Load and manage data
ThoughtSpot Administration Guide Copyright © 2017 by ThoughtSpot. All Rights Reserved. 85
4. Repeat the data load for each of your CSV files.
This example imports the CSV file "ssbm_customer.csv" into the
table CUSTOMER:
$ tsload --target_database SAMPLE_DB
--target_table CUSTOMER --alsologtostderr
--empty_target --source_file ssbm_customer.csv
--v 1 --field_separator "|"
Use a script to load data
If you need to load data from multiple CSV files, create a script to automate the
process. You can also use a similar script to automate recurring data feeds.
The data loading script is a text file that contains all the calls to tsload for
loading the data from your CSV files.
The example script shown here uses the cat command to read the data file, and
pipes it to tsload. When creating and testing your script, you may wish to replace
each cat with cat -10, to load only the first ten lines of each file. This allows you
to quickly run a test of your script. When the test succeeds for all the data files,
you can then remove each -10, so the complete files will load when you run the
script again.
1. Log in to the Linux shell using SSH.
2. Navigate to the directory that contains your CSV files and open a new file in a
text editor.
3. Type in the commands to load the data. This example shows commands to
load three files:
cat Players.csv | tsload
--target_database baseball --target_table "players"
--empty_target --field_separator ","
--max_ignored_rows 10 --bad_records_file bad_records.txt
--has_header_row --alsologtostderr --null_value ""
cat AllstarFull.csv | tsload
--target_database baseball --target_table "allstarfull"
--empty_target --field_separator ","
--max_ignored_rows 10 --bad_records_file bad_records.txt

Load and manage data
ThoughtSpot Administration Guide Copyright © 2017 by ThoughtSpot. All Rights Reserved. 86
--has_header_row --alsologtostderr --null_value ""
cat Appearances.csv | tsload
--target_database baseball --target_table "appearances"
--empty_target --field_separator ","
--max_ignored_rows 10 --bad_records_file bad_records.txt
--has_header_row --alsologtostderr --null_value ""
4. Save the file.
5. Run the script:
$ ./load_baseball_data.sh
Bulk load files in parallel
If you have a very large data file that takes a long time to load, you can reduce
the load time by splitting it up into multiple files and loading them in parallel
using multiple invocations of tsload.
If the size of any of your data files is greater than 50 million rows, running tsload
in parallel can reduce the load time significantly. First, you'll split up your large
data file into multiple smaller files. Then create a script to load the files. You will
make your script multi-threaded by invoking multiple loader threads (between 1
and 5 are recommended).
Stage the data files in a location accessible to the node on which you'll run the
script. Usually you'll use an NAS mounted file system. Then run the script to load
the files.
If you want to optimize the load time even further, determine what the
bottleneck is and adjust your process accordingly:
• If the disk I/O for reading the data files is the bottleneck, you can stage
the data files on separate NAS mounted file systems and reference them
accordingly in your script.
• If the CPU on the machine you're using to run the load script is the bottleneck,
you can split the load script into the same number of parts as you have nodes
in your ThoughtSpot instance, place one script on each node, and run them
in parallel. Make sure the other nodes are able to access the data files where
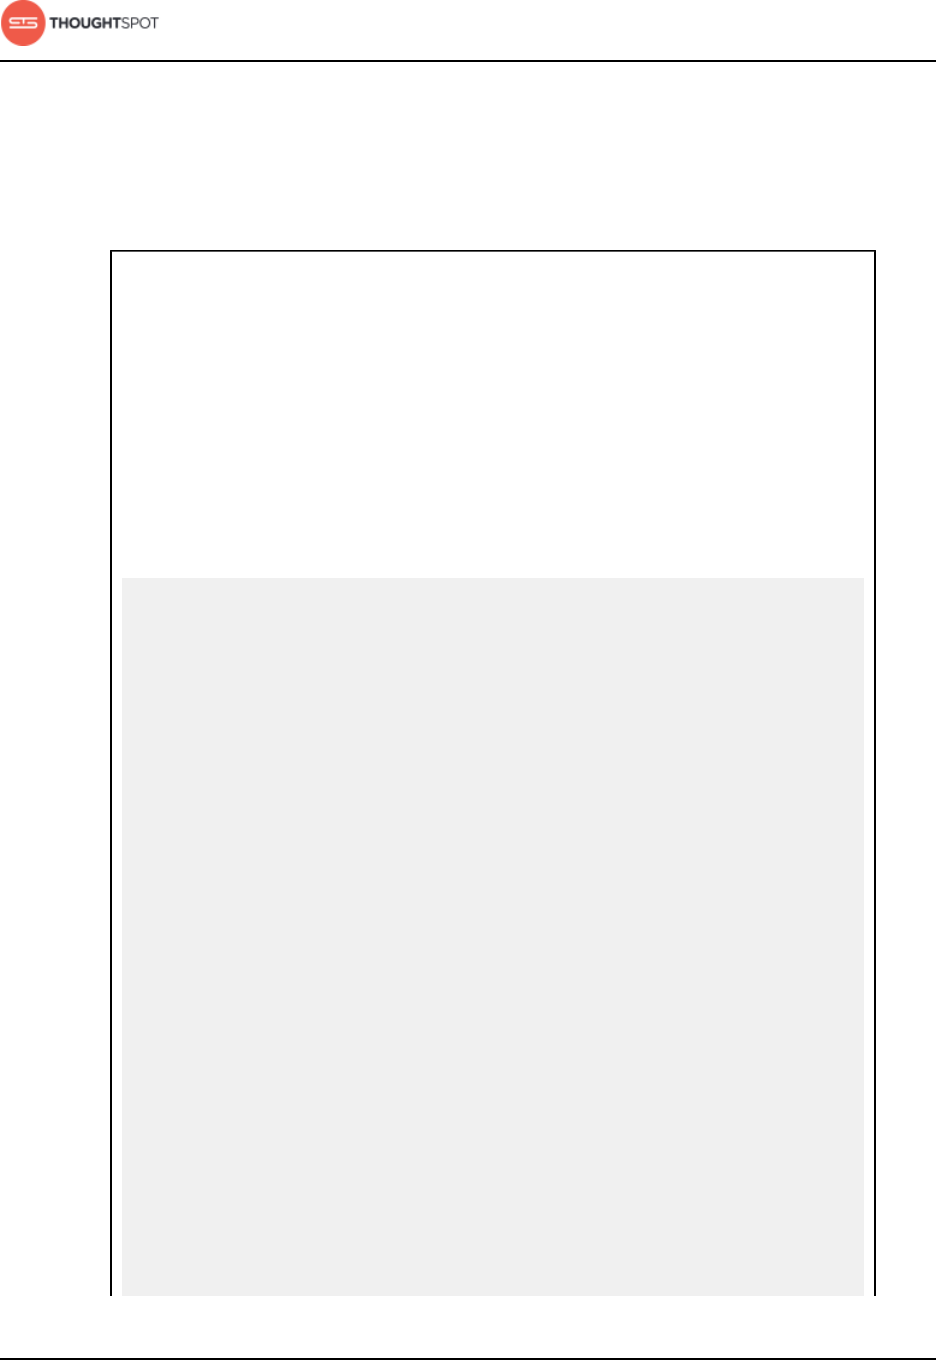
Load and manage data
ThoughtSpot Administration Guide Copyright © 2017 by ThoughtSpot. All Rights Reserved. 87
they are staged. Note that running the load script on separate nodes will
put the data on all the nodes, just as when you run the script on a single
node. Running the script on all the nodes at the same time just lets you take
advantage of CPU power of each node for hashing data files.
Let's say you have 30 days of data in 30 files, one for the data
collected on each day. Each day's data file contains 10 million rows,
for a total of 300 million rows of data. You want to load the whole
month of data. For this example we'll have 5 loader processes, each
one handling 6 days of data.
Here is a sample script you could use the load the data files in
parallel:
/* Script load_script.sh, loads 30 days of data in parallel */
#!/bin/bash
pidlist=""
cat day1.csv day2.csv day3.csv day4.csv day5.csv day6.csv | tsload
--target_database sales --target_table SALES_FACT --
max_ignored_rows 10
--bad_records_file ./SALES_FACT.bad --date_format %Y-%m-%d
--date_time_format "%Y-%m-%d %H:%M:%S" --source_data_format
delimited
--field_separator "|" --null_value "" --enclosing_character "\""
--boolean_representation 1_0 &
pidlist="$pidlist $!" &
cat day7.csv day8.csv day9.csv day10.csv day11.csv day12.csv |
tsload
--target_database sales --target_table SALES_FACT --
max_ignored_rows 10
--bad_records_file ./SALES_FACT.bad --date_format %Y-%m-%d
--date_time_format "%Y-%m-%d %H:%M:%S" --source_data_format
delimited
--field_separator "|" --null_value "" --enclosing_character "\""
--boolean_representation 1_0 &
pidlist="$pidlist $!" &
cat day13.csv day14.csv day15.csv day16.csv day17.csv day18.csv |
tsload
--target_database sales --target_table SALES_FACT --
max_ignored_rows 10
--bad_records_file ./SALES_FACT.bad --date_format %Y-%m-%d
--date_time_format "%Y-%m-%d %H:%M:%S" --source_data_format
delimited
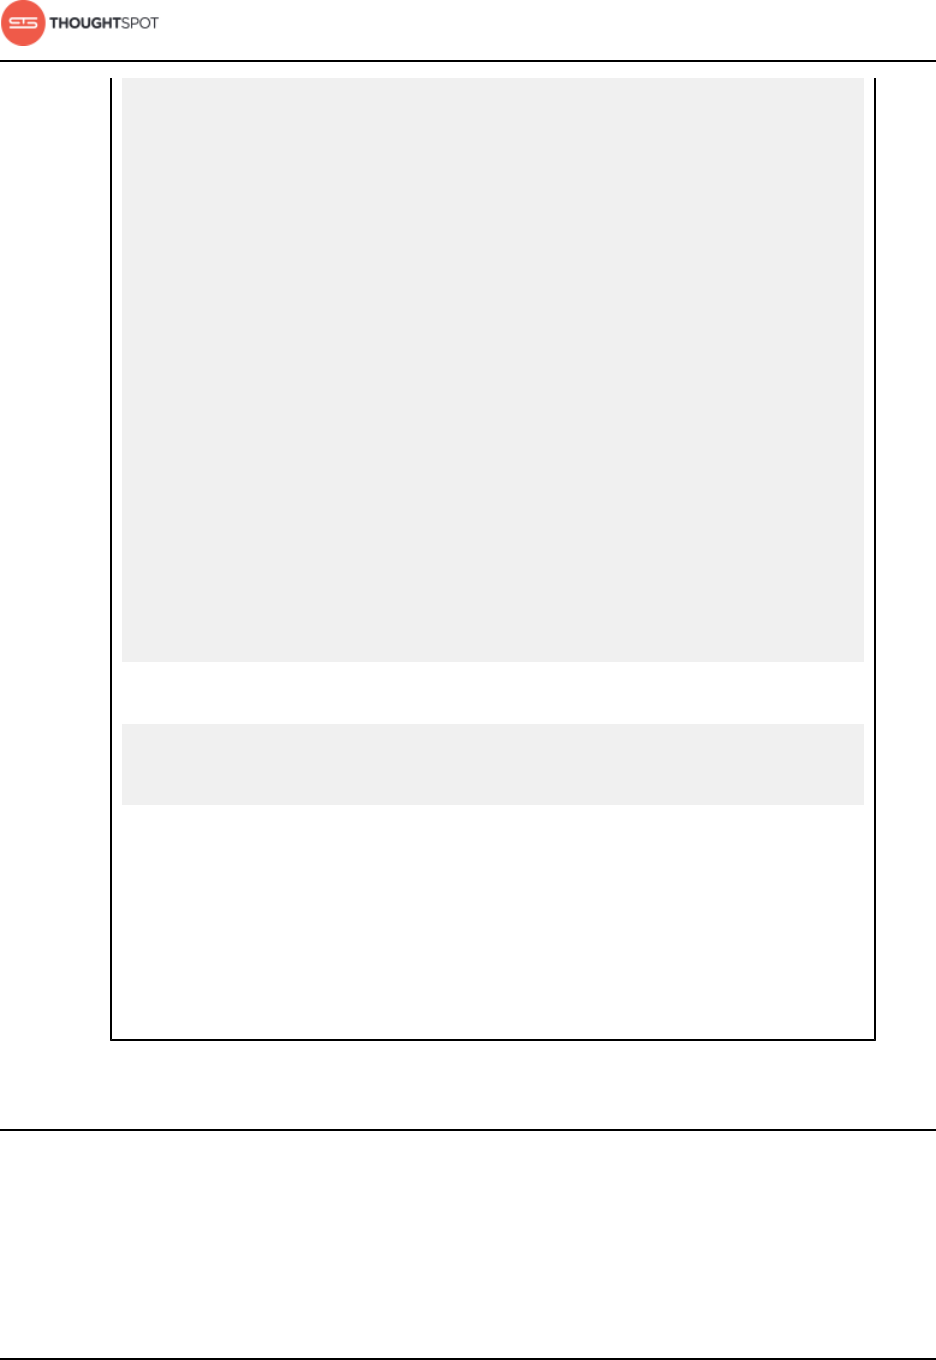
Load and manage data
ThoughtSpot Administration Guide Copyright © 2017 by ThoughtSpot. All Rights Reserved. 88
--field_separator "|" --null_value "" --enclosing_character "\""
--boolean_representation 1_0 &
pidlist="$pidlist $!" &
cat day19.csv day20.csv day21.csv day22.csv day23.csv day24.csv |
tsload
--target_database sales --target_table SALES_FACT --
max_ignored_rows 10
--bad_records_file ./SALES_FACT.bad --date_format %Y-%m-%d
--date_time_format "%Y-%m-%d %H:%M:%S" --source_data_format
delimited
--field_separator "|" --null_value "" --enclosing_character "\""
--boolean_representation 1_0 &
pidlist="$pidlist $!" &
cat day25.csv day26.csv day27.csv day28.csv day29.csv day30.csv |
tsload
--target_database sales --target_table SALES_FACT --
max_ignored_rows 10
--bad_records_file ./SALES_FACT.bad --date_format %Y-%m-%d
--date_time_format "%Y-%m-%d %H:%M:%S" --source_data_format
delimited
--field_separator "|" --null_value "" --enclosing_character "\""
--boolean_representation 1_0 &
pidlist="$pidlist $!" &
wait $pidlist
Call your script using a command like:
nohup bash ./load_script.sh > master_log.txt &
tail -f master_log.txt
Constructing your script in this way will execute all the commands
in the background, and output to the file master_log.txt. You'll
see a running status as the commands in the script execute.
After the script completes, you can check the log file for detailed
information, such as the number of rows that loaded successfully.
Delete a data source
When you want to delete a data source, you first need to handle any dependent
objects that have been built on top of it. You can easily see these dependencies,
and choose how to handle them before deleting the data source.
Load and manage data
ThoughtSpot Administration Guide Copyright © 2017 by ThoughtSpot. All Rights Reserved. 89
There are two separate ways to delete a data source. Both of these methods will
check for dependencies and warn if any are found:
•Delete or change a table in TQL describes the dependency checking that
occurs when deleting or changing a table using TQL.
•Delete a data source from the browser describes the dependency checking
that occurs when deleting a data source through the ThoughtSpot application.
You can also Check dependencies in the browser before attempting to delete a
data source.
Delete a data source from the browser
You can delete data sources from the browser, as long as they were not created
by an administrator through tsload or Data Connect.
You can delete data sources from the browser if they were created from the
browser. These types of data sources include:
• Data imported from the browser.
• Worksheets.
ThoughtSpot checks for dependencies whenever you try to delete a table or
worksheet.
1. Click on Data, on the top navigation bar.
Figure 12: Data
2. Check the box next to the name of the data source you want to delete.
3. Click the delete icon.
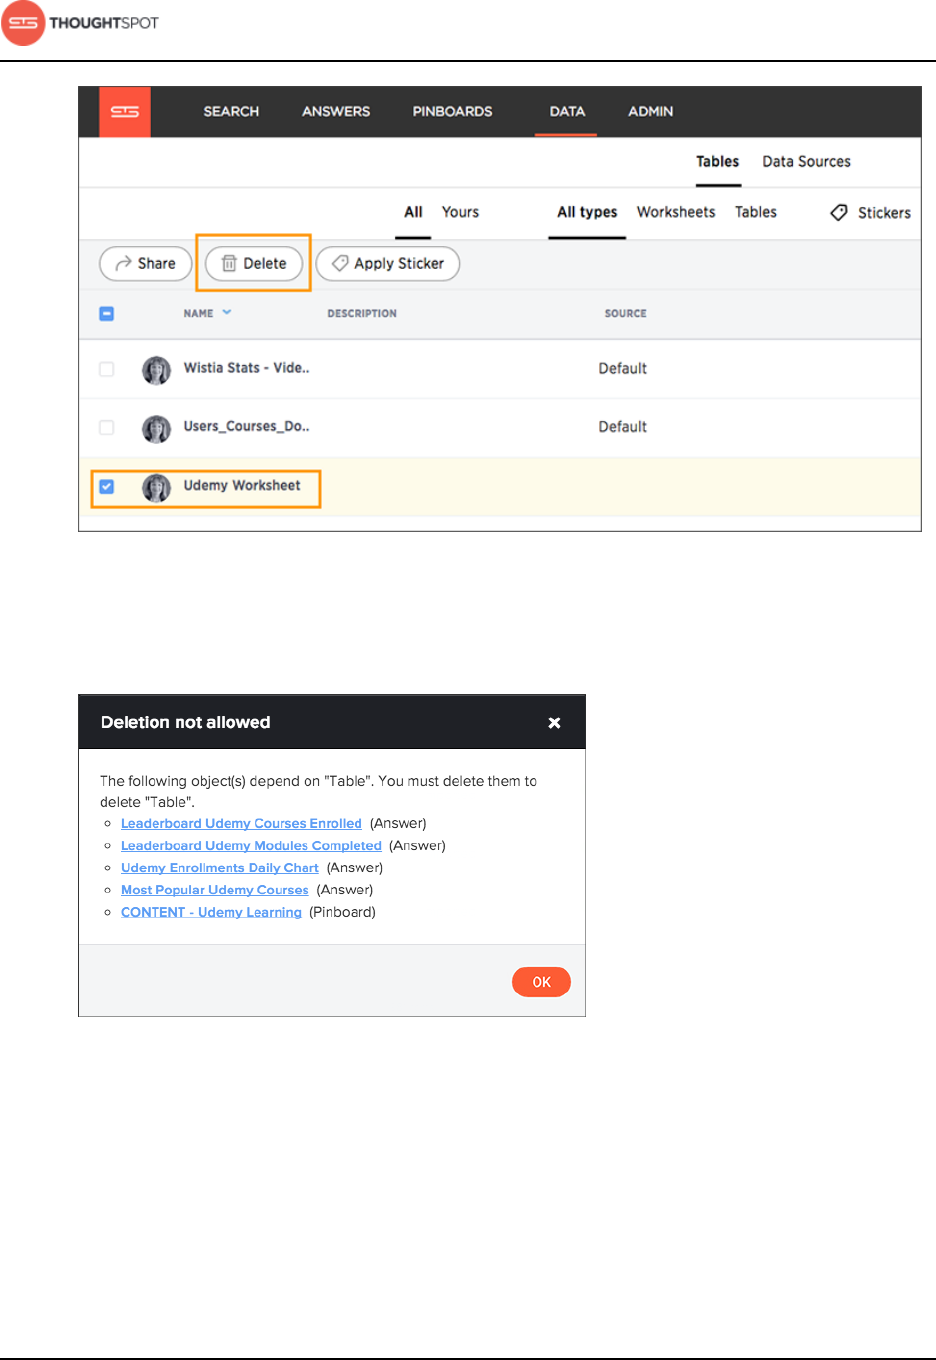
Load and manage data
ThoughtSpot Administration Guide Copyright © 2017 by ThoughtSpot. All Rights Reserved. 90
Figure 13: Delete a data source
4. If you attempt to delete a data source with dependent objects, the operation
will be blocked. You will see a list of dependent objects with links.
Figure 14: Warning message when trying to delete an object with
dependencies
5. Click on a dependent object to modify or delete it.
If you want to remove the dependency by modifying the dependent object,
you'll need to remove all search terms or columns that refer back to the data
source you are trying to delete.
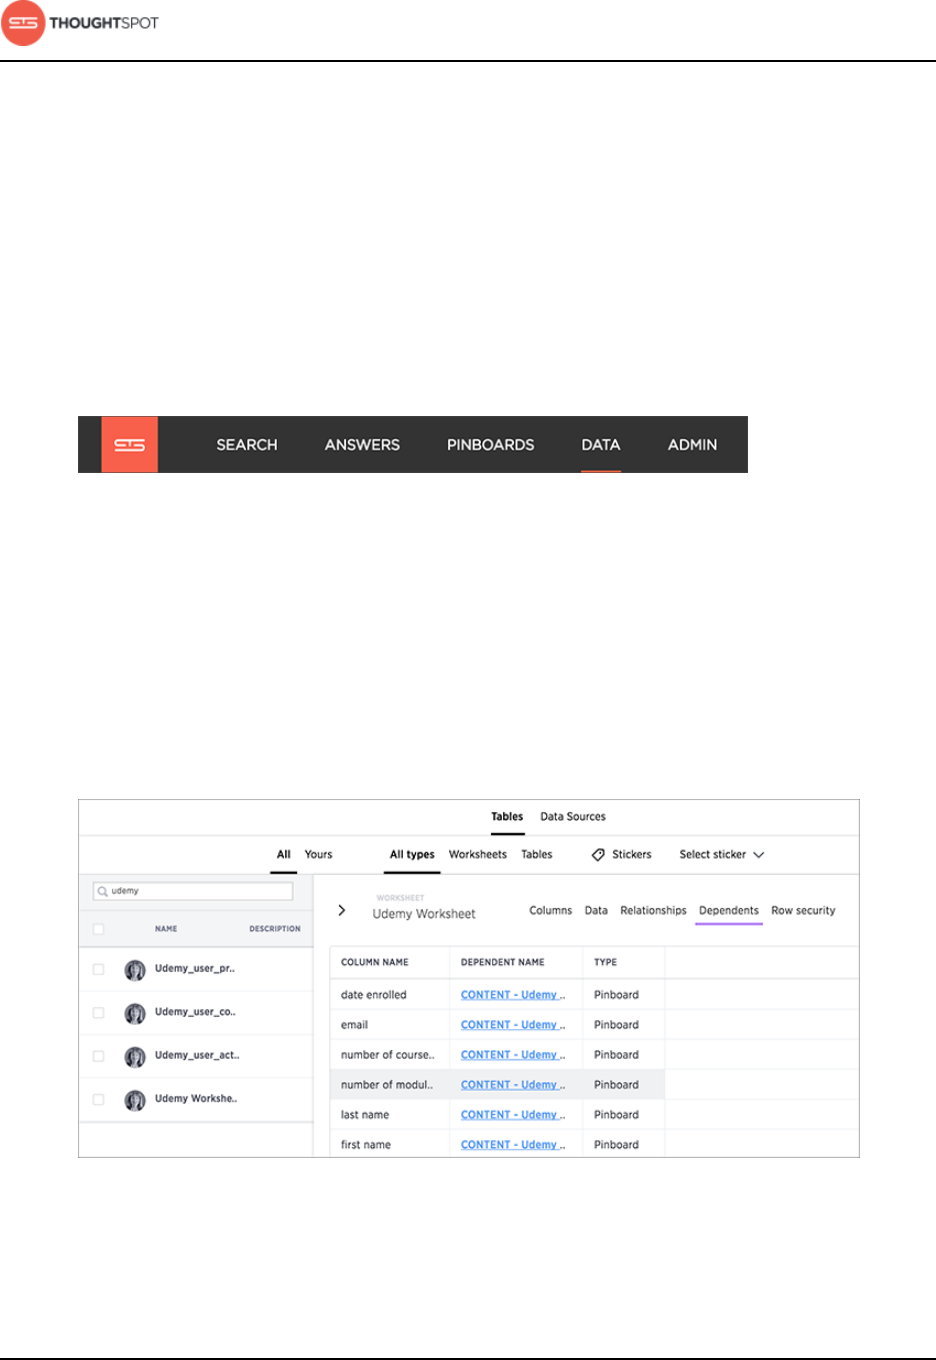
Load and manage data
ThoughtSpot Administration Guide Copyright © 2017 by ThoughtSpot. All Rights Reserved. 91
6. When all dependencies have been removed, you will be able to go back and
delete the data source.
Check dependencies in the browser
You can see all of the dependencies for any data source (worksheet or table) on
the Manage Data page.
To view dependent objects for a data source:
1. Click on Data, on the top navigation bar.
Figure 15: Data
2. Click the name of the data source whose dependencies you want to view.
3. Click Dependents.
You will see a list of the names of the dependent objects (worksheets and
pinboards), and the columns they use from that data source. You can use this
information to determine the impact of changing the structure of the data
source or to see how widely it is used.
Figure 16: List of dependent objects
4. Click on a dependent object to modify or delete it.
Load and manage data
ThoughtSpot Administration Guide Copyright © 2017 by ThoughtSpot. All Rights Reserved. 92
If you want to remove the dependency by modifying the dependent object,
you'll need to remove all search terms or columns that refer back to the data
source you are trying to delete.
5. When all dependencies have been removed, you will be able to go back and
delete the data source.
Delete or change a table in TQL
Just as attempting to delete an object in the web browser warns of any
dependencies, making changes using ThoughtSpot SQL Command Line (TQL)
that modify or delete tables warns of dependencies.
When you enter a TQL statement, you will be warned of possible dependency
consequences with a prompt asking if you’d like to proceed. This should make
you feel safe issuing TQL commands, even commands like dropping a table.
If TQL is run using the flag --allow_unsafe, your statements will always execute
without this warning. Note that when running TQL from a script, you will
need to decide what behavior you want if the script contains changes that
affect dependent objects. If you want the script to run even if objects with
dependencies are afffected, run it using this flag, for example:
cat safest_script_ever.sql | tql --allow_unsafe
If you do not run the script using the flag, it will fail if any of its commands might
cause problems with dependent objects.
TQL actions with possible dependency consequences include:
• Change, add, or remove a primary key.
• When changing or adding a primary key, if the key in question is not unique
in the data it may cause deletion of rows, because of upserts occurring
when duplicate primary keys are found.
• When changing or removing a primary key, incoming foreign key
relationships will be broken.
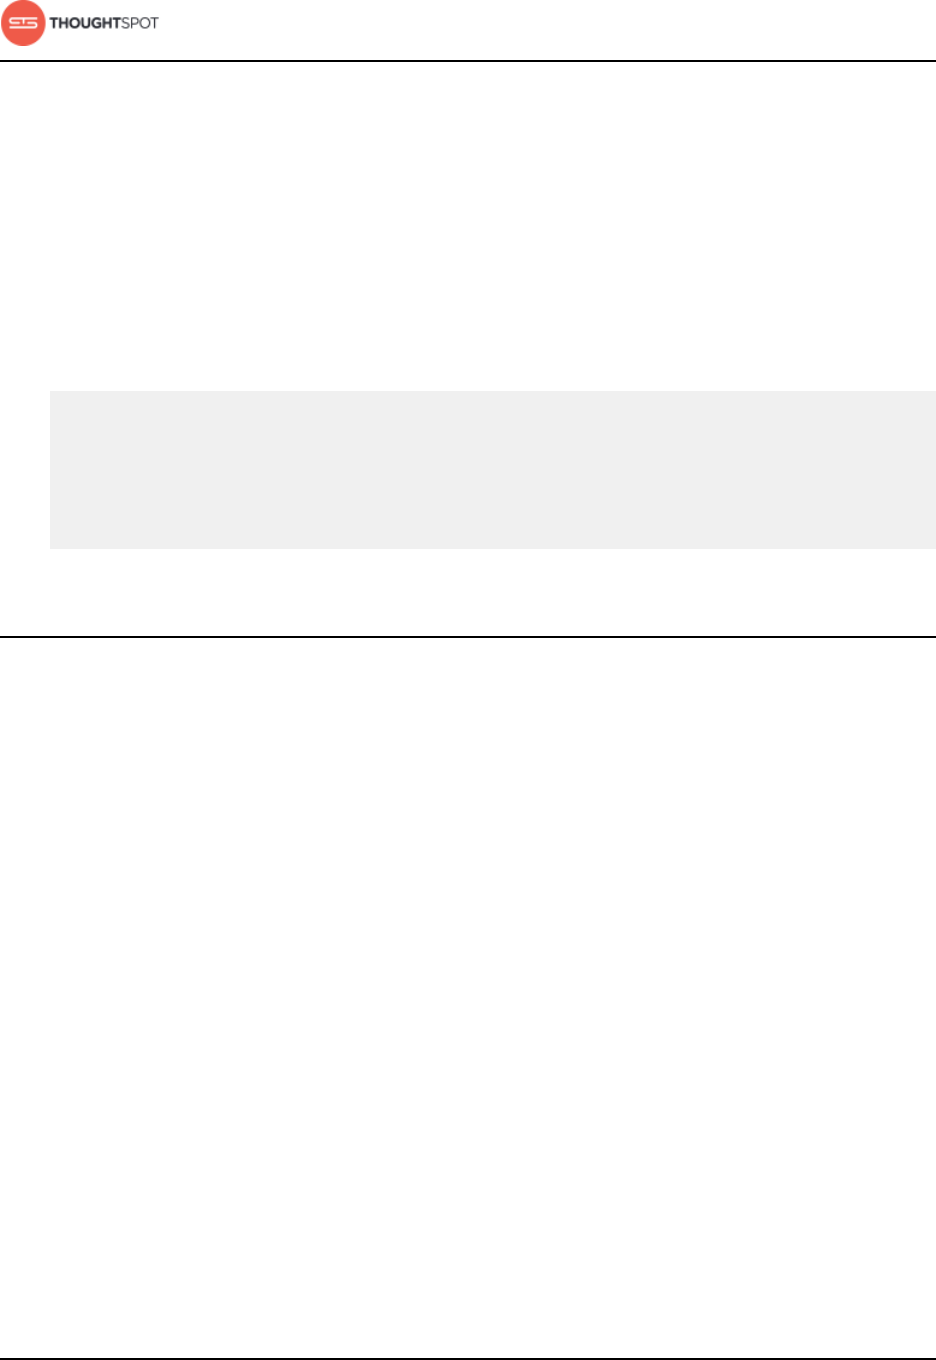
Load and manage data
ThoughtSpot Administration Guide Copyright © 2017 by ThoughtSpot. All Rights Reserved. 93
• Change a column datatype.
• Add a relationship or foreign key.
• Drop a relationship or foreign key constraint.
• Change or add a sharding key.
• Drop a table, schema, or database.
When issuing one of the above commands, you will see a warning message
similar to this:
TQL> ALTER TABLE table1
DROP CONSTRAINT PRIMARY KEY;
WARNING: This operation will break the Foreign Key relationship “products”
with table “sales”, which will break 34 user-visible visualizations and
2 Worksheets. We recommend taking a snapshot before performing this operation.
Do you wish to proceed? (yes/no).
About the Schema Viewer
There is a schema viewer in ThoughtSpot which lets you see your database
schema in the web browser. You can see tables and worksheets and their
relationships. The Schema Viewer is interactive, so you can configure it to show
just what you want to see.
Bringing up the Schema Viewer
You can access the Schema Viewer from the Manage Data screen by clicking
Actions, and selecting View Schema.
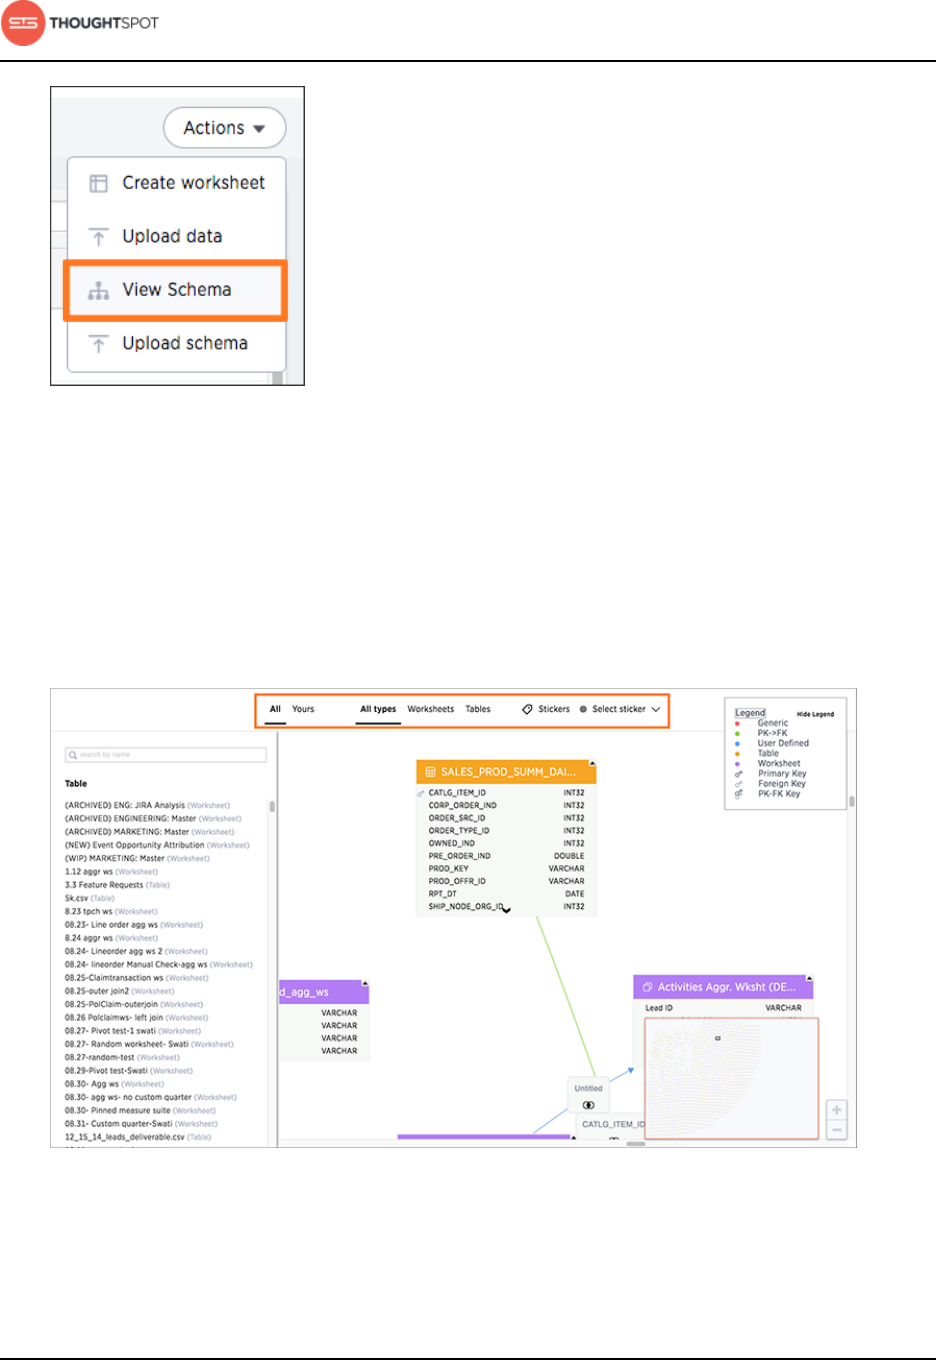
Load and manage data
ThoughtSpot Administration Guide Copyright © 2017 by ThoughtSpot. All Rights Reserved. 94
Figure 17: Access the Schema Viewer
When viewing the schema, you can filter the tables shown similarly to how you
filter data sources. The list of tables, worksheets, and imported data on the
left includes only those objects you want to see. Clicking on one of the objects
brings it to the middle of the viewer and highlights it. You can drag the objects
around in the viewer.
Figure 18: Schema Viewer filters
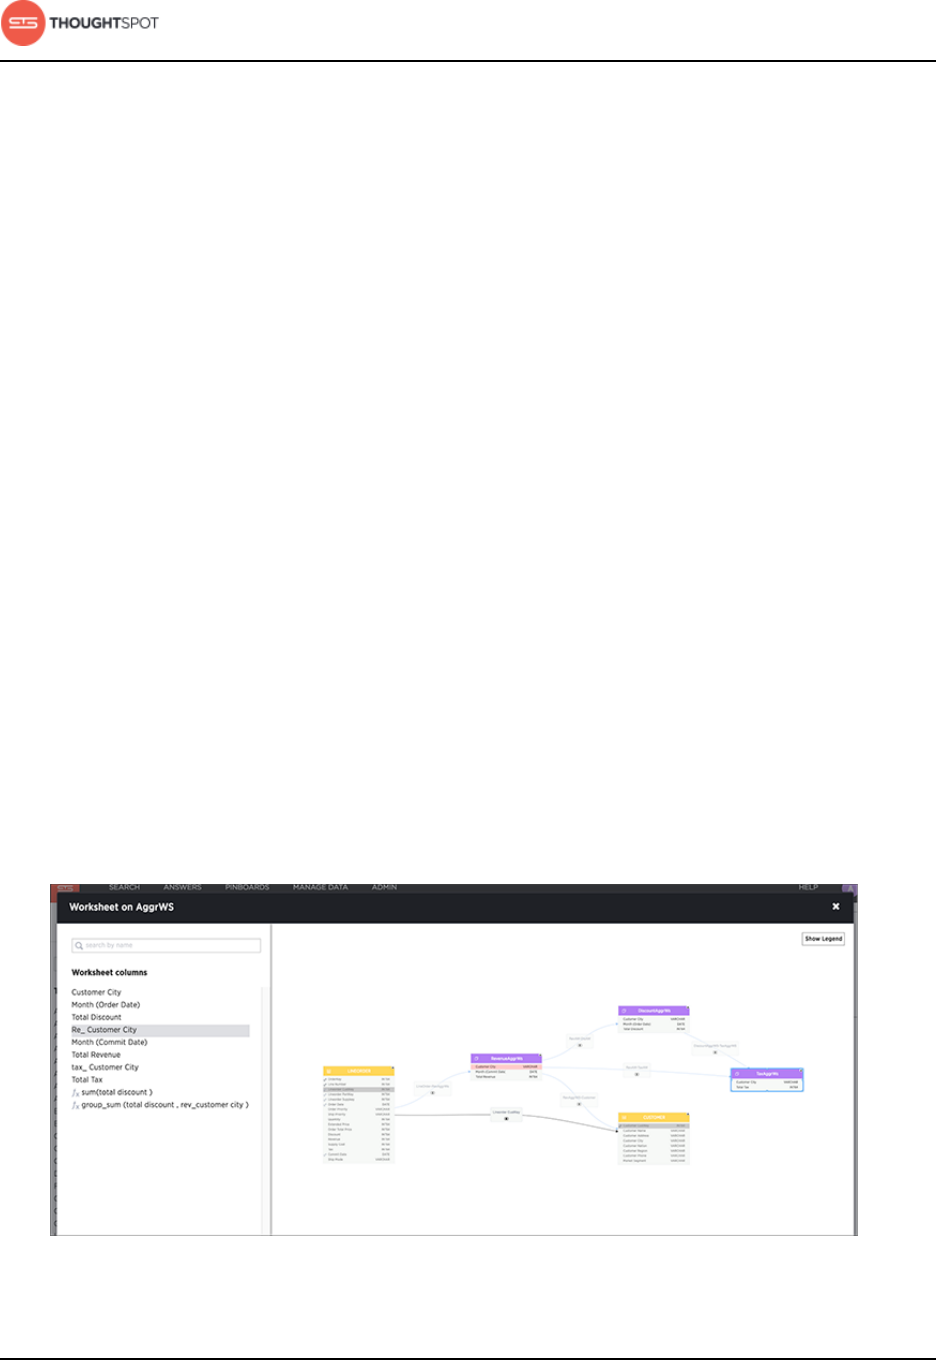
Load and manage data
ThoughtSpot Administration Guide Copyright © 2017 by ThoughtSpot. All Rights Reserved. 95
How to use the Schema Viewer
You can use the Schema Viewer to find out information like:
• What is the relationship between two tables?
• What tables make up this worksheet, and how are they joined?
The schema viewer shows joins between tables, join directionality, and join type
(whether they are Foreign Key > Primary Key, relationship joins, or joins defined
by users through the web interface). Use the Table list to find a specific table or
worksheet.
Worksheet view
For worksheets, you can also click on one to view the worksheet. The worksheet
view shows the following information:
• All tables in the worksheet, and the relationships between these tables.
• Source columns for all columns of a worksheet.
• Keys and definitions for each relationship, as well as join paths and types.
• Columns that are derived from formulas.
• Correct join paths for newly created chasm trap worksheets. Existing chasm
trap worksheets will not show the correct join paths.
Figure 19: Worksheet view example

Load and manage data
ThoughtSpot Administration Guide Copyright © 2017 by ThoughtSpot. All Rights Reserved. 96
The worksheet view does not work for aggregated worksheets, but does works
for worksheets built on top of aggregated worksheets.

ThoughtSpot Administration Guide Copyright © 2017 by ThoughtSpot. All Rights Reserved. 97
Chapter 3: Model, link, and tag your data for
searching
Model, link, and tag your data for searching
Topics:
•Model the data for
searching
•Link tables using
relationships
•About stickers
Modeling, tagging, and adding links between your
data sources can make the data even easier to
search.
You can start searching your data without doing
any modeling, creating relationships, or tagging. But
putting some thought into these will make the data
even easier and more intuitive to search for your end
users.

Model, link, and tag your data for searching
ThoughtSpot Administration Guide Copyright © 2017 by ThoughtSpot. All Rights Reserved. 98
Model the data for searching
After loading data, you will create the semantic data model that makes the data
easy to search. You can make these settings either through the Web interface or
by using the model file.
About data modeling
Data modeling is a very lightweight process compared to what you may have
experienced in other tools. It enables you to change some of the settings (or
properties) of the data so that it becomes more searchable.
You can change these settings in two ways, both of which have the same effect:
1. Model data in the Web interface.
2. Model data in bulk in the model file.
Choose the model file method if you want to make many changes in one bulk
operation.
Modeling the data allows you to give the columns more search friendly names or
predefine how they can be explored and aggregated. When you load data, most
of this data modeling metadata is set up for you automatically. However, since
you know your data best, you can adjust the modeling settings to improve the
experience for your users.
Model data in the ThoughtSpot application
To make modeling settings for a table you've just loaded, or to make a quick
change to existing settings, use the ThoughtSpot web interface. You can adjust
the Columns settings from the data management listing.
You can change all the same data model settings here as in the model file. This
method is easier and faster, unless you need to make many settings in bulk. In
that case, using the model file is recommended.
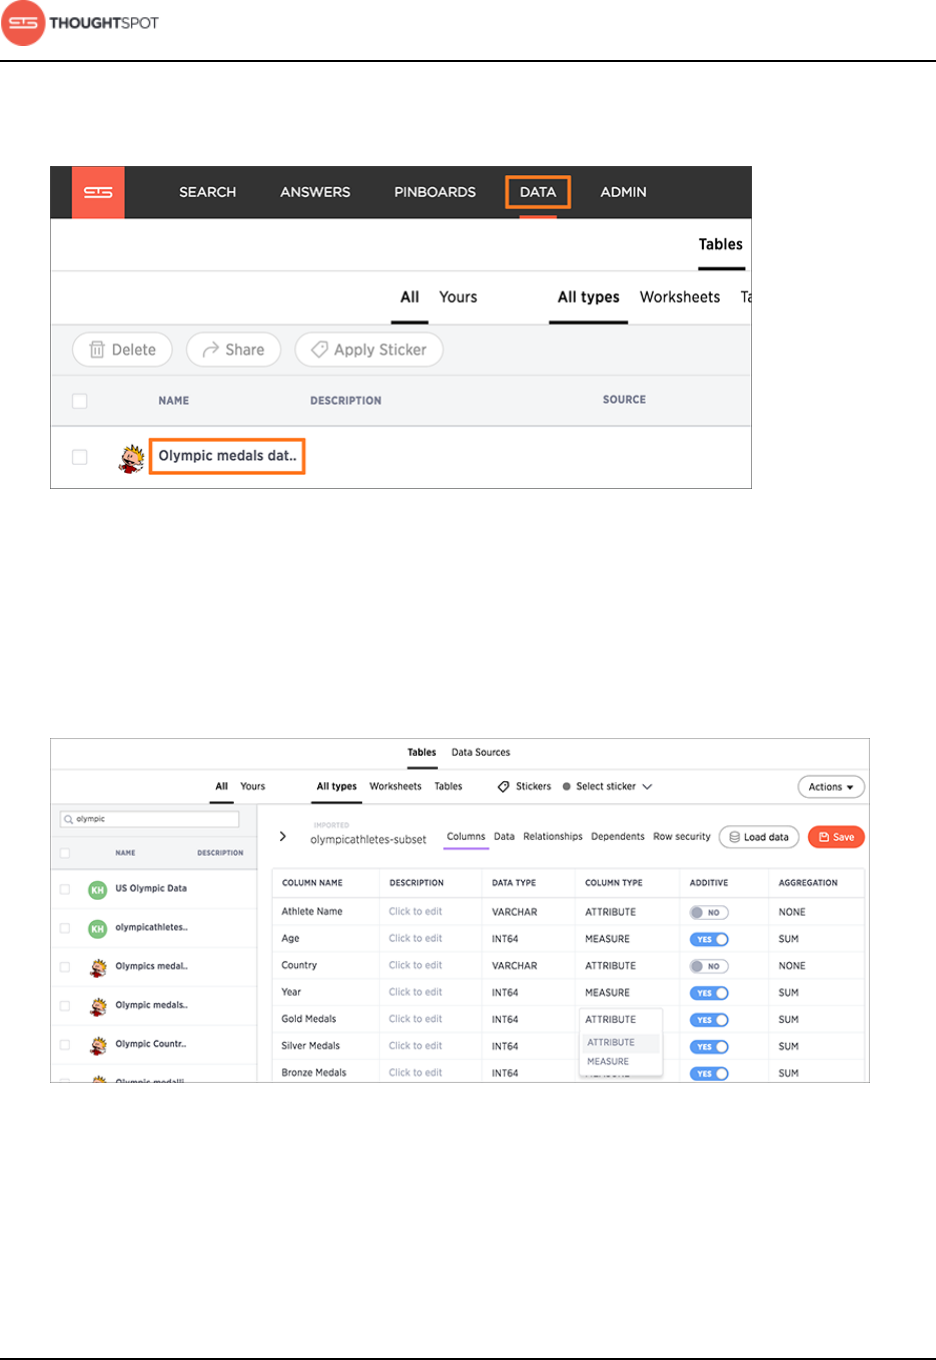
Model, link, and tag your data for searching
ThoughtSpot Administration Guide Copyright © 2017 by ThoughtSpot. All Rights Reserved. 99
Click on the Data icon, to get to the data management listing. Then click on the
name of your data source.
Figure 20: Select a data source
This brings up the Columns screen, where you'll make your modeling settings.
Modify the column settings by clicking on them, typing or selecting the setting
you want, and then saving your changes. Descriptions of the different settings
are listed in Data modeling settings.
Figure 21: Edit modeling settings in the Columns screen

Model, link, and tag your data for searching
ThoughtSpot Administration Guide Copyright © 2017 by ThoughtSpot. All Rights Reserved. 100
Model data in bulk in the modeling file
Properties of your data such as Column Names, Column Visibility, Column and
Data Definition, Column Rank, etc. are defined in the modeling file. Use the
model file when you want to edit these settings in bulk.
If you just want to make one or two quick changes, it will be faster to Model data
in the ThoughtSpot application instead.
Data modeling is a three steps process:
1. Download the model file.
2. Change settings in the model file.
3. Upload the edited model file.
You can edit the data modeling file using Microsoft Excel, vi/vim, or a compatible
tool. In each row of the modeling file, all the data properties corresponding to a
column from your data are listed. You can modify many of these properties by
typing in the new value.
Remember these important guidelines when editing the model file:
• Do not modify any value in a column which contains DoNotModify in the field
under the column heading.
• Make sure to keep the file in the same format as it had when you downloaded
it (CSV text file).
Download the model file
Before you can make changes to the model file, you need to download it. Then
you can edit it using Microsoft Excel, vi/vim, or a similar text editing tool.
First, you'll download the model file, and then make changes to the appropriate
Data modeling settings. To obtain the model file:
1. Log in to ThoughtSpot from a browser as an Administrator user.
2. Click on the Admin icon, on the top navigation bar.
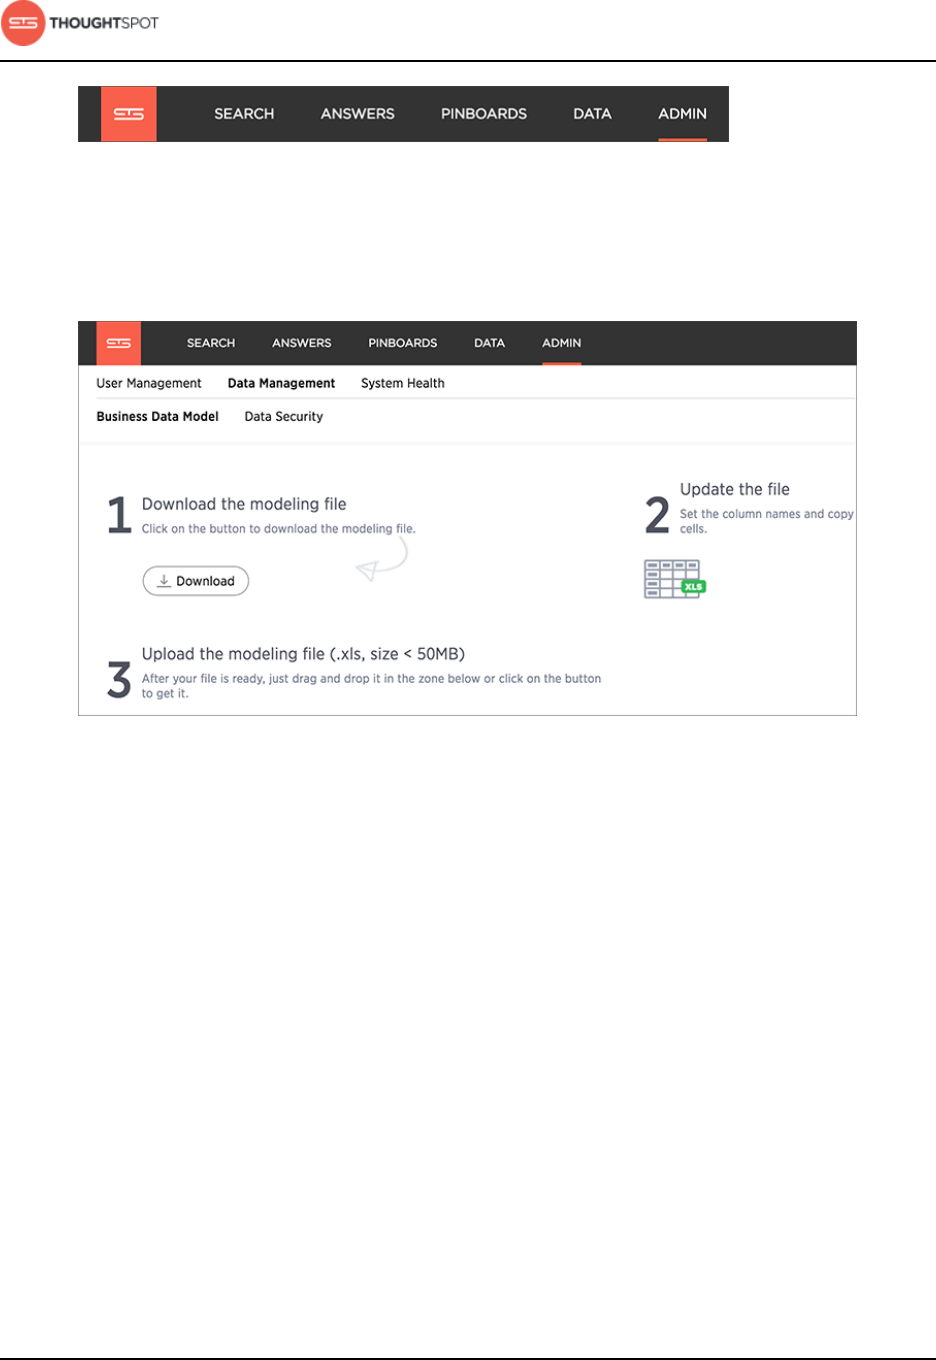
Model, link, and tag your data for searching
ThoughtSpot Administration Guide Copyright © 2017 by ThoughtSpot. All Rights Reserved. 101
Figure 22: The Admin icon
3. Click on Business Data Model.
4. Click Download model.xls.
Figure 23: Download the model file
Change settings in the model file
After downloading the model file, you'll make changes to the settings using this
procedure. Then you will upload the file again to apply your changes.
You can edit any of the values in the model file, except for those where the
words DoNotModify appear below the column header. To make changes in the
model file:
1. Open the model file you downloaded (model.xls) in Excel, vi/vim, or a text
editor.
• If you are using Excel, you may see a warning message. Click Yes to
proceed.
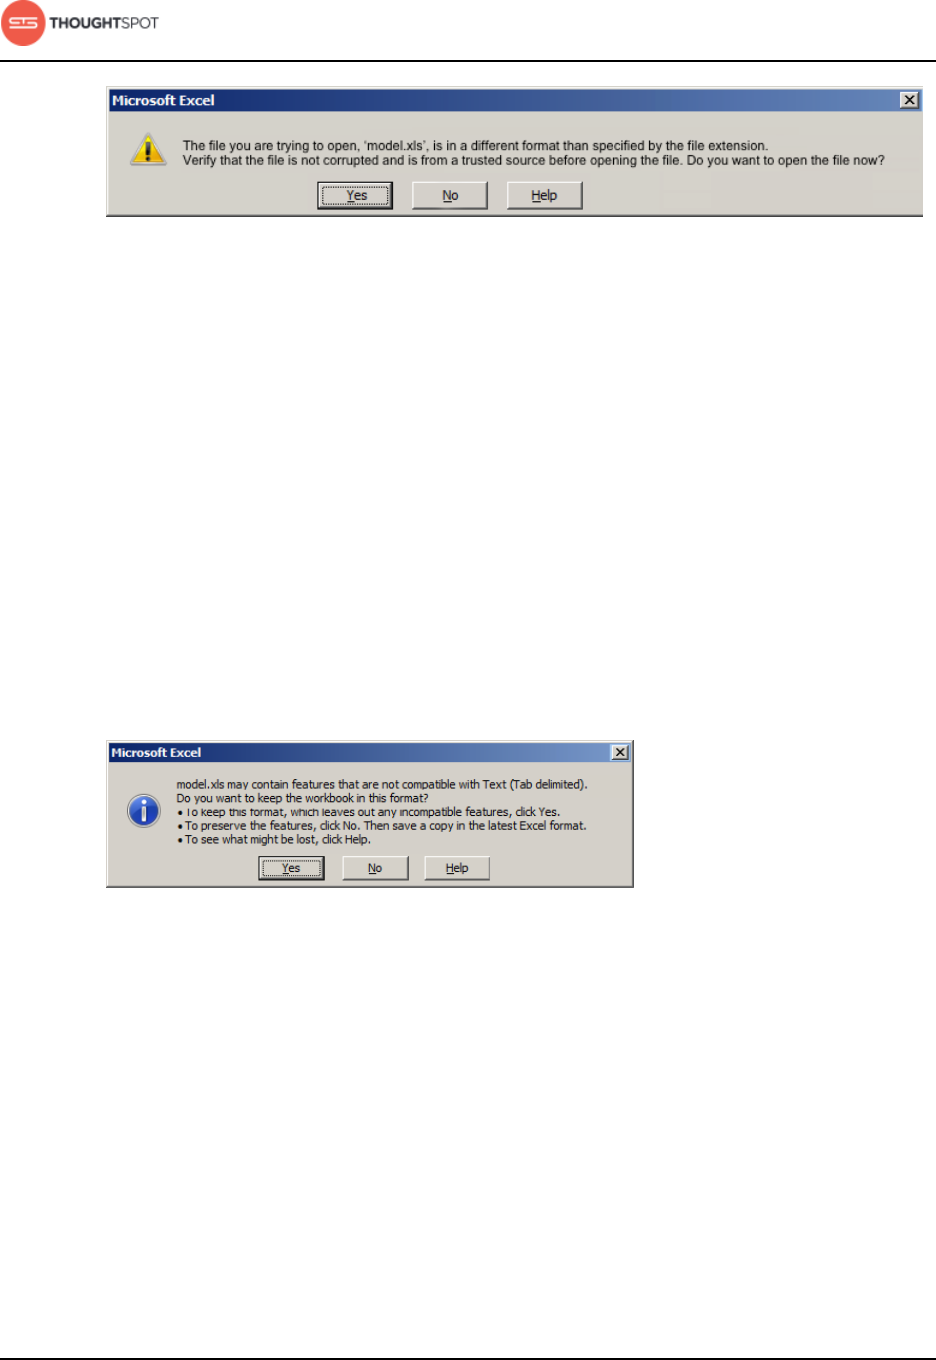
Model, link, and tag your data for searching
ThoughtSpot Administration Guide Copyright © 2017 by ThoughtSpot. All Rights Reserved. 102
Figure 24: Warning when opening the model file
• If your model file includes multi-byte characters, edit the file using vi or
vim. This is because model files containing multi-byte characters must be
saved as UTF-8 encoded. Otherwise you won't be able to upload them after
making your edits.
2. Find the column you want to modify. Descriptions of the meanings of the
columns are listed in Data modeling settings.
3. Select the value you want to change.
4. Type in the new value.
5. After making all your changes, save the model file.
• If you are using Excel, you will see a message. Click Yes to save the file.
Figure 25: Warning when saving the model file
• If your model file includes multi-byte characters, edit the file using vi or
vim. This is because model files containing multi-byte characters must be
saved as UTF-8 encoded. Otherwise you won't be able to upload them after
making your edits.
Upload the edited model file
After you have made changes to the modeling file, you must upload it back to
ThoughtSpot before the changes will take effect.
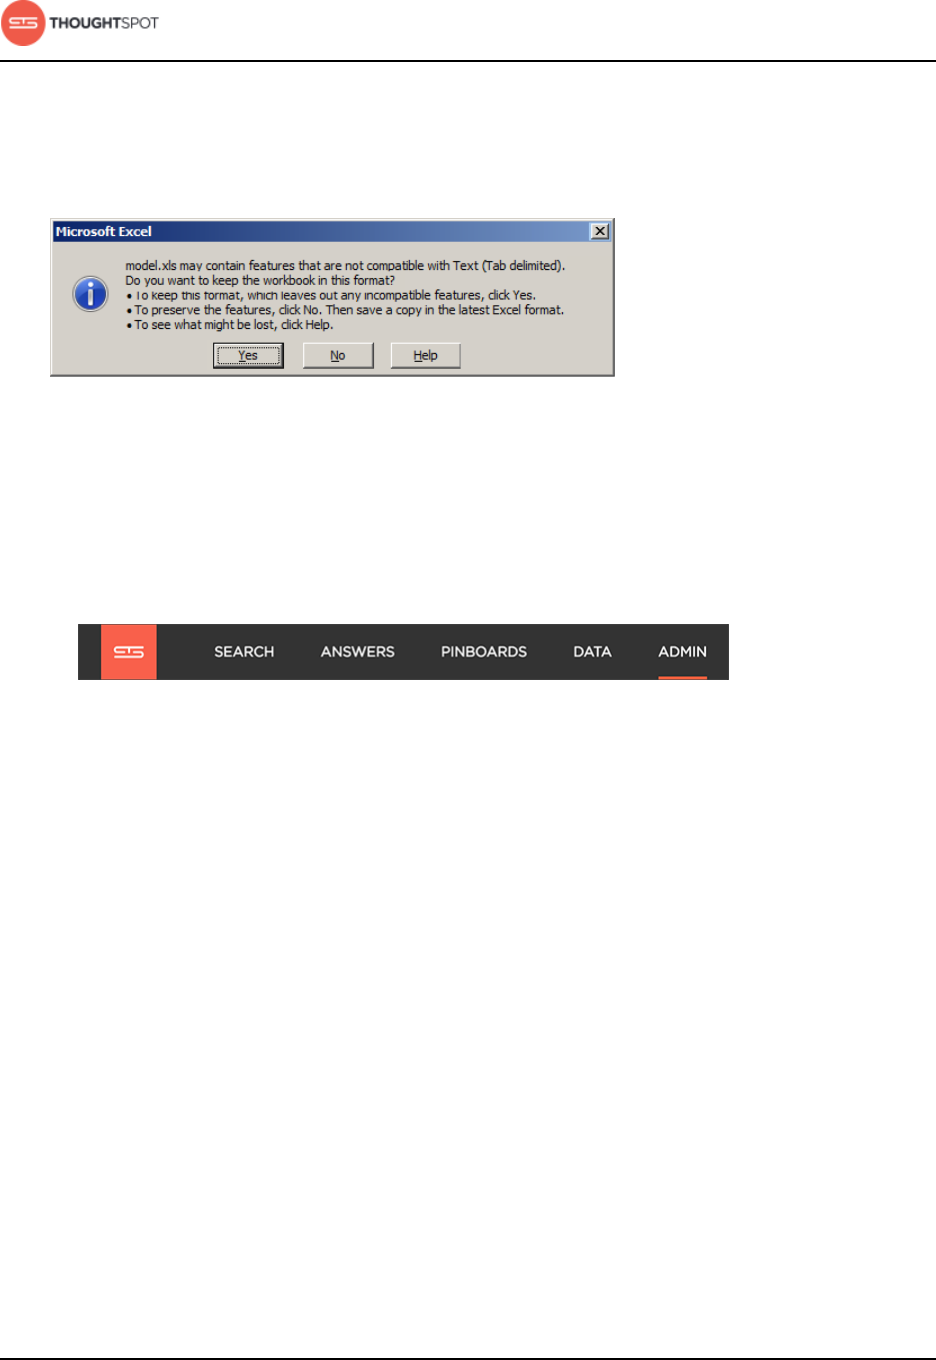
Model, link, and tag your data for searching
ThoughtSpot Administration Guide Copyright © 2017 by ThoughtSpot. All Rights Reserved. 103
Save the model file in the same format as it was when you downloaded it. If you
are using Microsoft Excel to edit the file, you will see a warning when attempting
to save it. Click Yes and save the file.
Figure 26: Warning message when saving the model file
To upload the model file:
1. Log in to ThoughtSpot from a browser as an Administrator user.
2. Click on the Admin icon, on the top navigation bar.
Figure 27: The Admin icon
3. Click on Business Data Model.
4. Click BROWSE YOUR FILES to upload the model.xls file, or drag and drop it in
the zone.
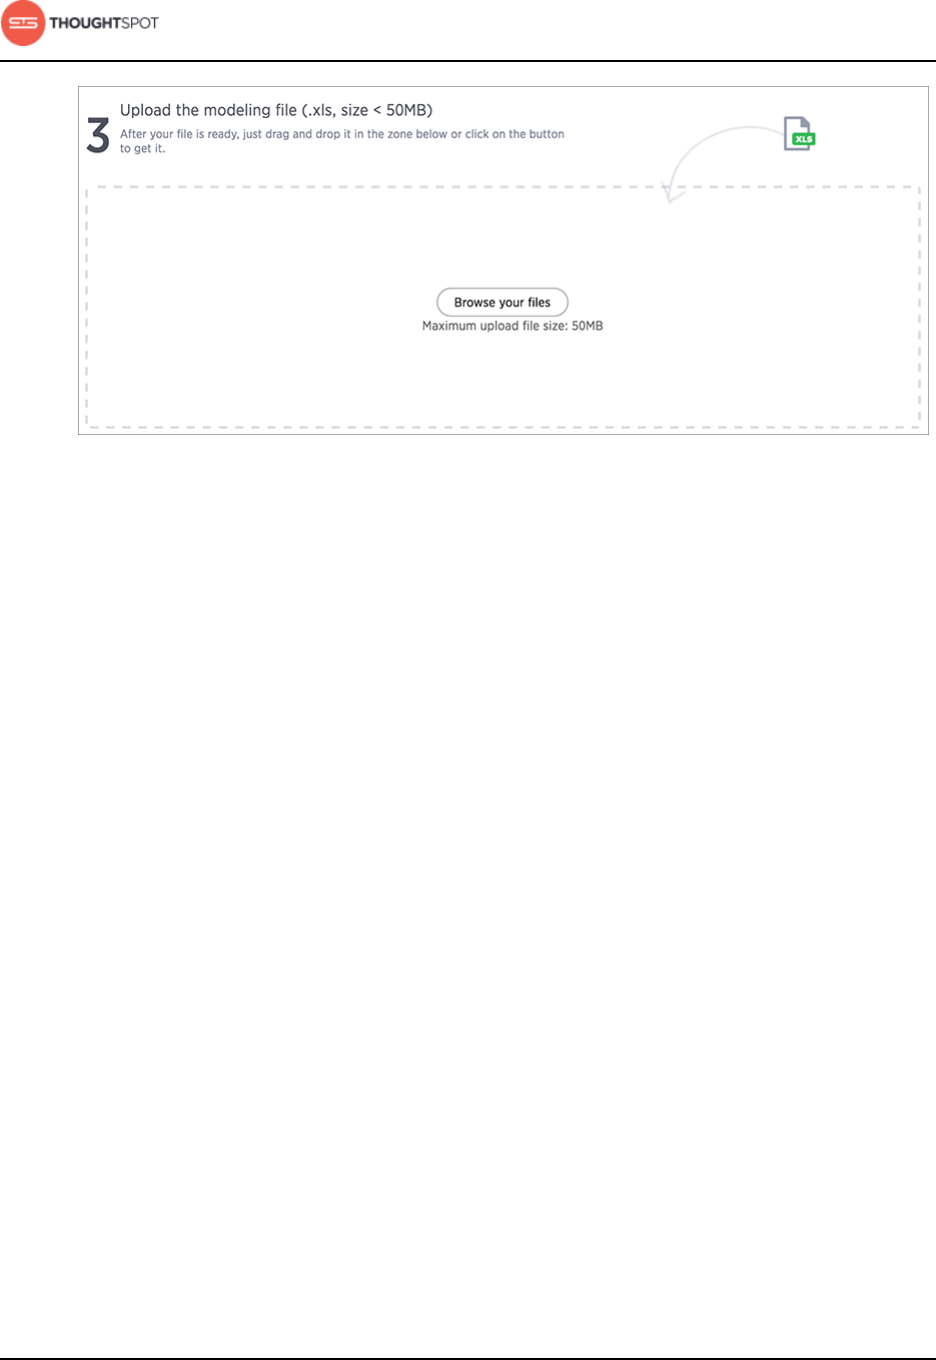
Model, link, and tag your data for searching
ThoughtSpot Administration Guide Copyright © 2017 by ThoughtSpot. All Rights Reserved. 104
Figure 28: Upload the model file
If you receive an error message upon uploading the file, check that it does not
include any multi-byte characters (i.e. Japanese or other multi-byte language
characters). If it does, you'll need to download the file again and make your
edits using vi or vim.
Note that you may choose to remove all the rows you have not changed from
the model file before uploading it. If you upload a model file that includes only
the changed rows, you won't lose any of the pre-existing model file settings.
This is a good option if your model file is causing an error on upload, but you
aren't sure where in the model file the problem is.
As soon as the file is uploaded, ThoughtSpot performs any necessary re-
indexing for you automatically. Your new settings will be reflected within a few
minutes.
Data modeling settings
Whether you are changing data modeling settings using the modeling file or the
Web interface, the settings and their accepted values are the same.
Modeling settings
You can change these settings in two ways, both of which have the same effect:
Model, link, and tag your data for searching
ThoughtSpot Administration Guide Copyright © 2017 by ThoughtSpot. All Rights Reserved. 105
1. Model data in the Web interface.
2. Model data in bulk in the model file.
Choose the model file method if you want to make many changes in one bulk
operation.
This index lists the editable data modeling settings:
Table 14: Modeling settings
Setting name Description Can be modeled in a
Worksheet
Column Name Sets the name of the column to
be used in searches.
Yes
Description Adds a text description of
what the column contains.
Yes
Data Type Read only. Shows the column's
data type.
Column Type Sets the type of column, either
ATTRIBUTE or MEASURE.
Additive Controls the type of
aggregations that will be
available for a column.
Aggregation Sets the default aggregation
type for MEASURE columns.
Hidden Sets the visibility of a column.
Synonyms Adds synonyms that can be
used in the search bar to refer
to a column.
Yes
Index Type Sets the type of index that will
be created for a column.
Geo Type Enables a column to be used in
GeoMap visualizations.
Model, link, and tag your data for searching
ThoughtSpot Administration Guide Copyright © 2017 by ThoughtSpot. All Rights Reserved. 106
Setting name Description Can be modeled in a
Worksheet
Priority Changes the priority of a
column in search suggestions.
Number Format Specifies the format to use
when showing a numeric value
in the column.
Date Format Specifies the format to use
when showing the dates in a
column.
Currency Format Specifies the format to use
when showing the currencies in
a column.
Attribution Dimension Only applies to tables that join
over a Chasm Trap. Designates
whether the tables depend on
this column for attribution.
Data modeling for worksheets
For worksheets, only some of the settings can be modified, whether you
are using the modeling file or the Web interface. The editable settings for
worksheets are:
• Name
• Description
• Synonyms
If you want to change any of the settings that cannot be modified in a
worksheet, you need to make your changes to the underlying table instead, and
they will be reflected in all worksheets that use the table.

Model, link, and tag your data for searching
ThoughtSpot Administration Guide Copyright © 2017 by ThoughtSpot. All Rights Reserved. 107
Change the column name
You can change the text that is shown for the column names in ThoughtSpot to
make the names more meaningful to users. The column name is what they will
type to add that column to their search.
Column Name is the name that will be displayed to users for that column in
ThoughtSpot. The default is the name you gave the column when you defined
the table in the database or imported the CSV file from the browser.
1. Find the Column Name for the column whose name you want to change.
2. Type in the new column name, as you want it to appear in ThoughtSpot.
3. Save your changes.
Add a column description
You can provide a description for a specific column, to provide additional
information for users about the data it contains.
Description contains an optional description for the corresponding column.
When a user hovers over the column, a tooltip will show this description.
To create a column description:
1. Find the column you want to add a description for, and select its Description.
2. Type in the column description, as you want it to appear in ThoughtSpot.
3. Repeat for all columns where you want to add a description.
4. Save your changes.
Change the column type (ATTRIBUTE or MEASURE)
Columns have a Column Type based on the kind of data they store. This is set
automatically upon defining the table, but in some cases, you may want to
change the type.
There are two types of columns:
•ATTRIBUTE contains a property, like name, address, or id number.

Model, link, and tag your data for searching
ThoughtSpot Administration Guide Copyright © 2017 by ThoughtSpot. All Rights Reserved. 108
•MEASURE contains a numeric value that can be compared in a meaningful
way using math, such as a count or measurement.
When a new table is created, the default column type is set according to the
data type defined for each column. By default, columns with the numeric data
types (FLOAT, DOUBLE, INT, or BIGINT) are assigned the type MEASURE.
Columns with VARCHAR, BOOL, or date/time data types are assigned the type
ATTRIBUTE.
Usually the default setting for column type works fine. But occasionally you'll
need to change a MEASURE to an ATTRIBUTE. Examples of numeric values for
which mathematical operations are not meaningful include:
• ID numbers
• Key values that are primarily used for joining tables
• Product number or SKU
• Sports team member jersey number
• Year, when separate from a date (e.g. 1999, 2000)
You can change the column type by modifying the Column Type setting.
1. Find the Column Type for the column whose type you want to change.
If you are editing the model file, use the setting Type.
2. Change it to either MEASURE or ATTRIBUTE.
3. Save your changes.
Change the additive setting for a column
Your data may contain a column with a numeric data type that you have
defined as an ATTRIBUTE rather than a MEASURE (such as age). You can allow
aggregations on the values by changing the value of the Additive setting.
The setting Additive only applies to columns that have both:
• A numeric data type (FLOAT, DOUBLE or INTEGER) or a date data type
(DATE, DATETIME, TIMESTAMP, or TIME).
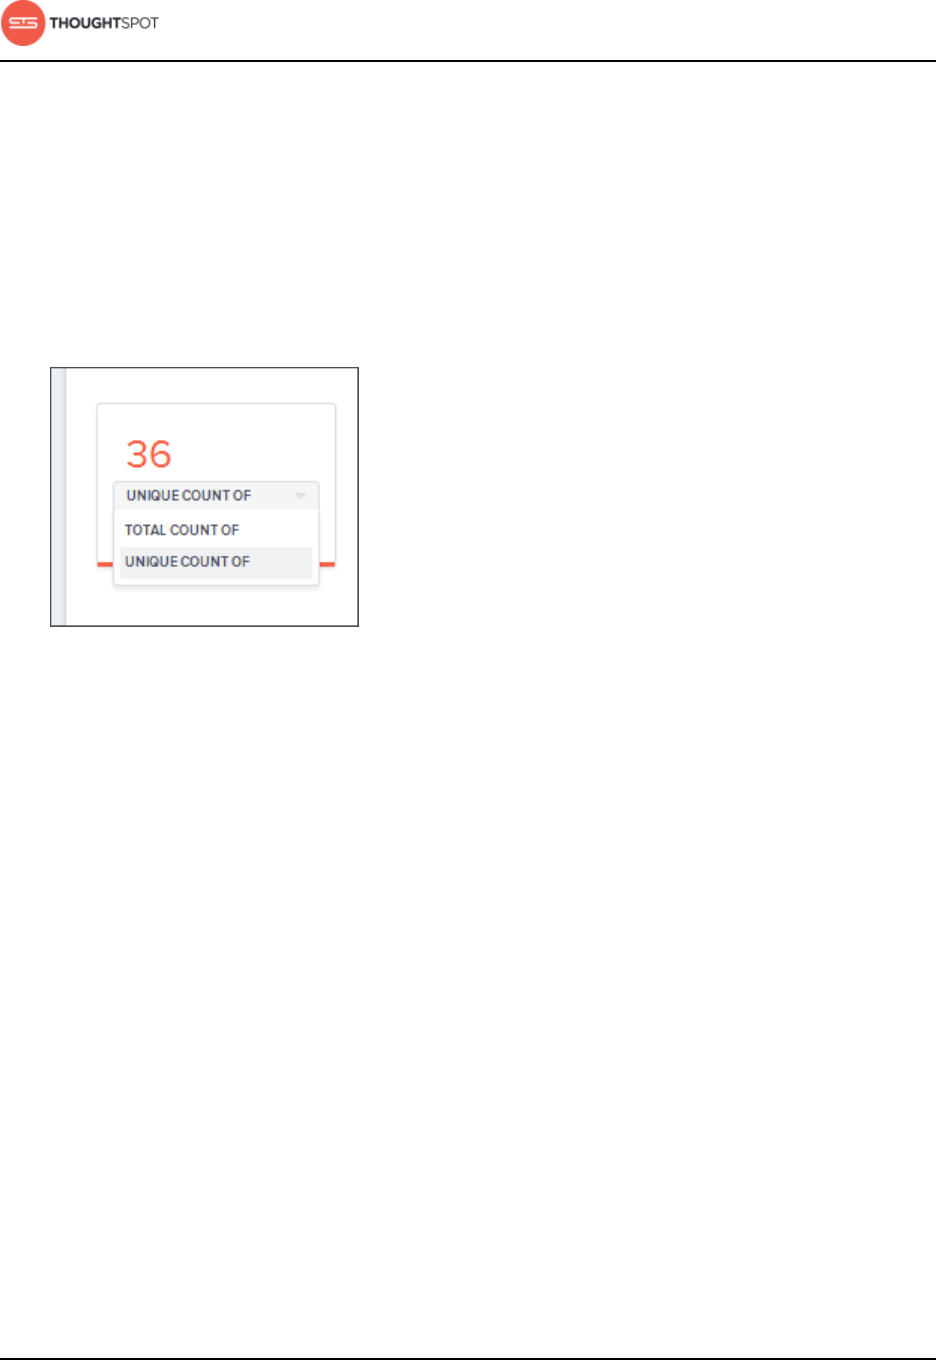
Model, link, and tag your data for searching
ThoughtSpot Administration Guide Copyright © 2017 by ThoughtSpot. All Rights Reserved. 109
• The type ATTRIBUTE in the modeling file.
When an result is returned from a search, you also get a list of options for each
column on the left side of the screen. For numeric columns with the Additive
setting of NO, the count listing includes:
•UNIQUE COUNT OF
•TOTAL COUNT OF
Figure 29: Default options with Additive set to “NO”
If you want aggregates to be added to the options for these columns, you
need to change the Additive setting to YES. After you make this change, these
options will be offered:
•TOTAL OF
•AVG OF
•STD DEVIATION OF
•VARIANCE OF
•TOTAL COUNT OF
•UNIQUE COUNT OF
•MIN OF
•MAX OF
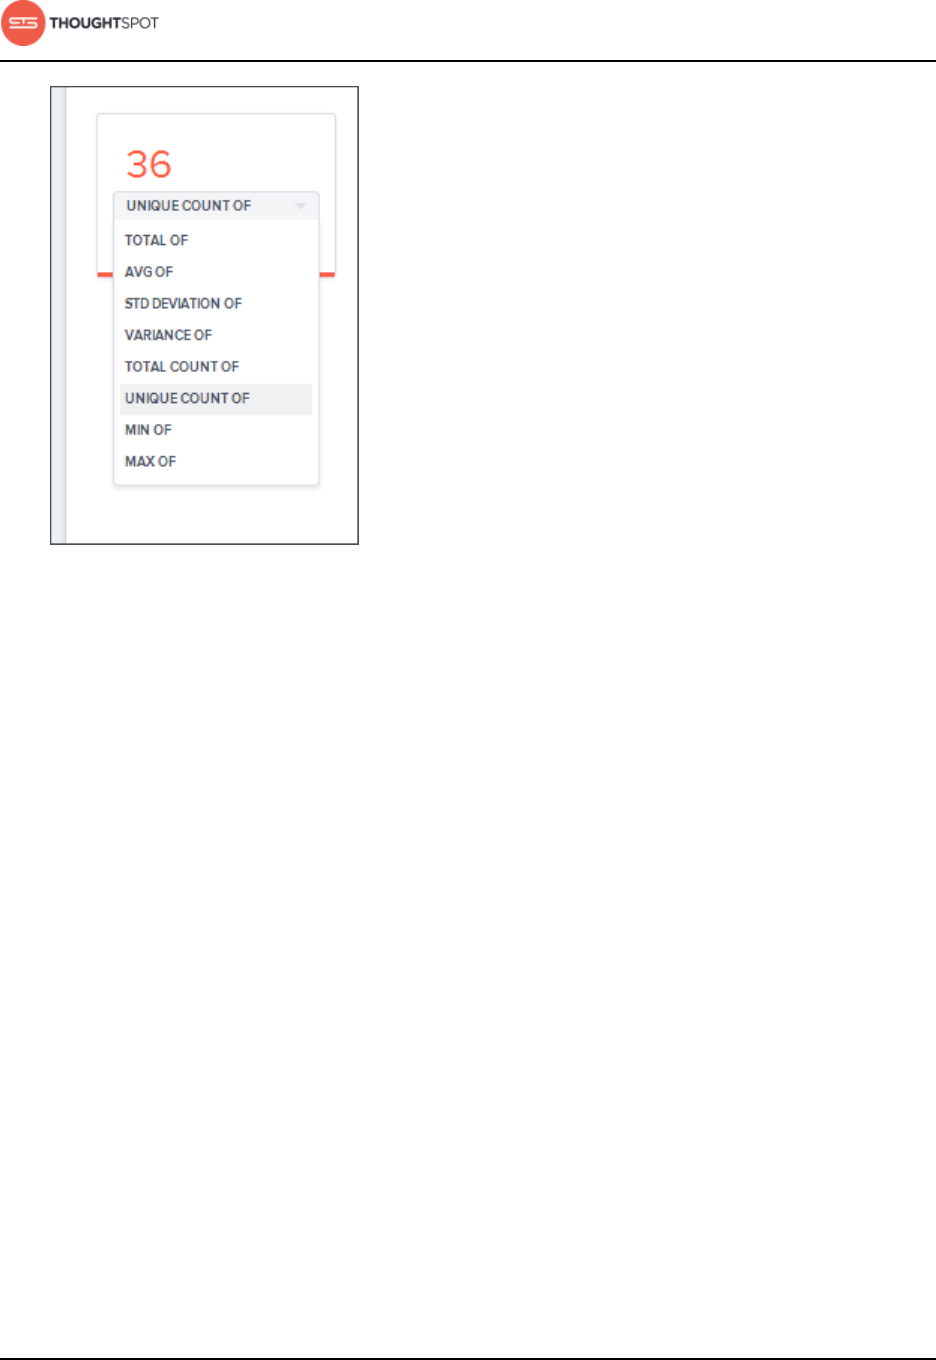
Model, link, and tag your data for searching
ThoughtSpot Administration Guide Copyright © 2017 by ThoughtSpot. All Rights Reserved. 110
Figure 30: Options for numeric columns with type ATTRIBUTE and Additive set
to YES
To change the Additive setting:
1. Find the column whose additive setting you want to change and select its
Additive value.
2. Change the value to one of these:
•YES or NO, if using the Web interface.
•TRUE or FALSE, if using the model file.
3. Save your changes.
Change the aggregation setting for a column
All types of aggregations can be performed on MEASURE columns, and some
aggregations can be done on ATTRIBUTE columns. You can change the default
aggregation type to make combining data more intuitive and faster.
To aggregate a column without having to enter the aggregation type explicitly
in your searches every time, you can set a default Aggregation for that column.
Note that any non-numeric columns (columns of type ATTRIBUTE) will have a
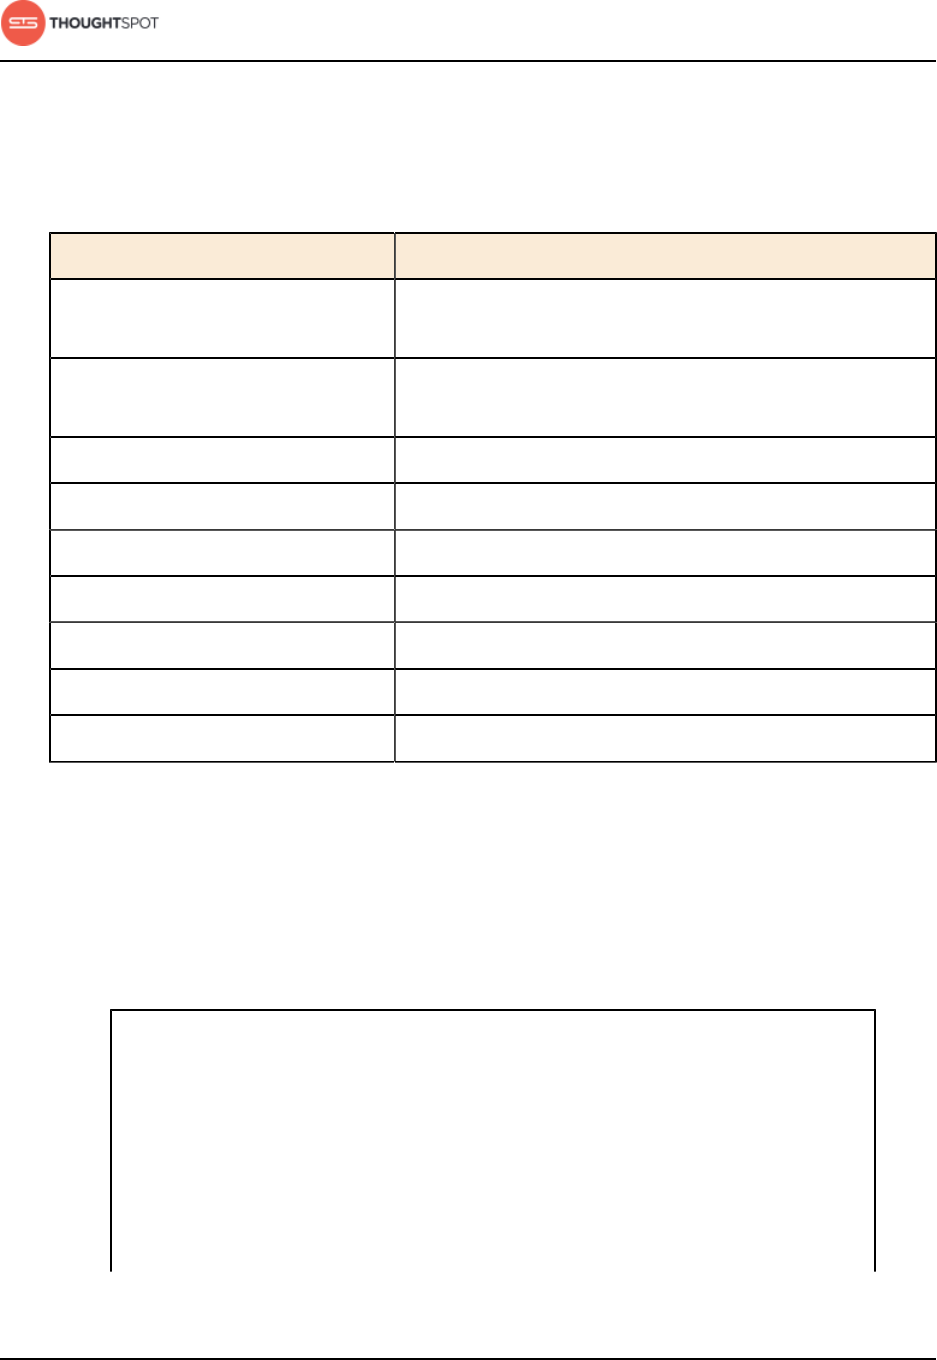
Model, link, and tag your data for searching
ThoughtSpot Administration Guide Copyright © 2017 by ThoughtSpot. All Rights Reserved. 111
default aggregate type of NONE, which you can change to one of the supported
aggregation types.
Table 15: Supported aggregate types
Aggregate type Description
NONE Does no aggregation. This is the default for ATTRIBUTE
type columns.
SUM Adds the values together and returns the total. This is the
default for MEASURE type columns.
AVERAGE Calculates the average of all the values.
MIN Calculates the minimum value.
MAX Calculates the maximum value.
STD_DEVIATION Calculates the standard deviation of all the values.
VARIANCE Calculates the variance of all the values.
COUNT Calculates the total number of values.
COUNT_DISTINCT Calculates the total number of distinct values.
1. Find the column whose default aggregation type you want to change, and
select its Aggregation.
If using the modeling file, use the AggregationType setting.
2. Select the new default aggregation type.
3. Save your changes.
Supposed there is a table containing data about athletes on a
sports team. The data contains some numerical values, including
points scored, salaries, and jersey numbers for each of the players.
Because jersey number is an INTEGER, it would become a column
of type MEASURE (not ATTRIBUTE). So it will aggregate, by
default. But you may want to make its aggregation type NONE

Model, link, and tag your data for searching
ThoughtSpot Administration Guide Copyright © 2017 by ThoughtSpot. All Rights Reserved. 112
instead. This ensures that search results that include jersey number
will not attempt to compare or aggregate those values in a way
that is not meaningful.
Hide a column
You can hide columns from users in ThoughtSpot without dropping them from
the database. This is common when the data contains identifier columns that are
used to join tables, but which do not have any meaning to users.
By default, all columns in a data source will be shown in ThoughtSpot. To hide
the column names, change the Hidden setting.
As the number of columns in the dataset increases, the search experience
requires more effort. Users have to navigate through larger numbers of columns
to choose the correct one. There might also be some columns in the dataset that
you don’t want to expose to the users. To hide these columns, you can set the
value of the Hidden column to YES.
1. Find the Hidden setting for the column you want to hide, and set its value to
YES.
If you are editing the model file, use the Hide setting, and set it to TRUE.
2. Save your changes.
Create synonyms for a column
If you want to allow searching using more than one name for a column, you can
create synonyms for it. This is helpful when different departments refer to the
data using different terminology, for example.
When users search a data source, they might try typing different words to try
to retrieve a particular column. This could be due to different groups in your
organization using different terms for the same data. Or maybe your users just
intuitively use different words when searching for that item. Using synonyms
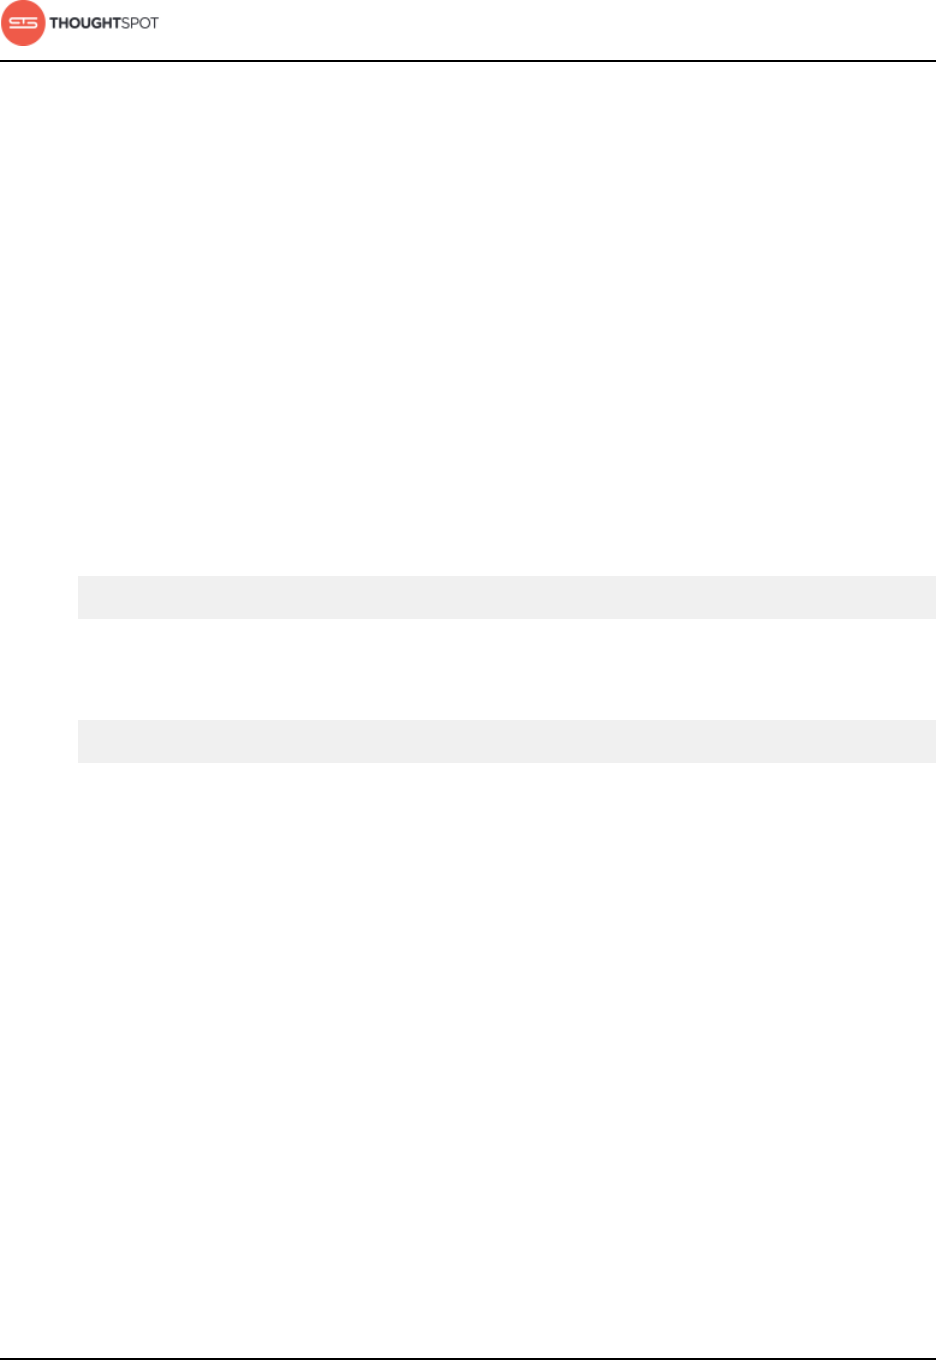
Model, link, and tag your data for searching
ThoughtSpot Administration Guide Copyright © 2017 by ThoughtSpot. All Rights Reserved. 113
allows them to access the data even if the term they choose isn't the same as the
actual column name.
You can set column synonyms for columns in tables, user imported data, and
worksheets. Note that the returned table or chart uses the actual column name,
but the search bar will still reflect the term the user typed in (the synonym).
To create a column description:
1. Find the column for which you want to add synonyms, and select its
Synonyms.
2. Type in a comma separated list of the synonyms you want to add. If a
synonym is more than one word, it must be enclosed in double quotes.
If you are using the Web interface, you would type:
profit,"gross profit"
If you are using the model file, the list of synonyms must be enclosed in
square brackets. For example:
[profit, "gross profit"]
3. Save your changes.
Change the index type for a column
ThoughtSpot indexes column names and unique column values. The indexes
are used to dynamically generate suggestions in the search bar when typing a
search.
You can change the way a column is indexed by modifying its Index value in the
modeling file, to influence the suggestions that will appear for that column. The
default behavior of indexing is as follows:
• All column names are indexed using their ColumnName value.
• Values for columns with the column type of MEASURE are not indexed.
• Values for columns with the data type of DATE are not indexed.
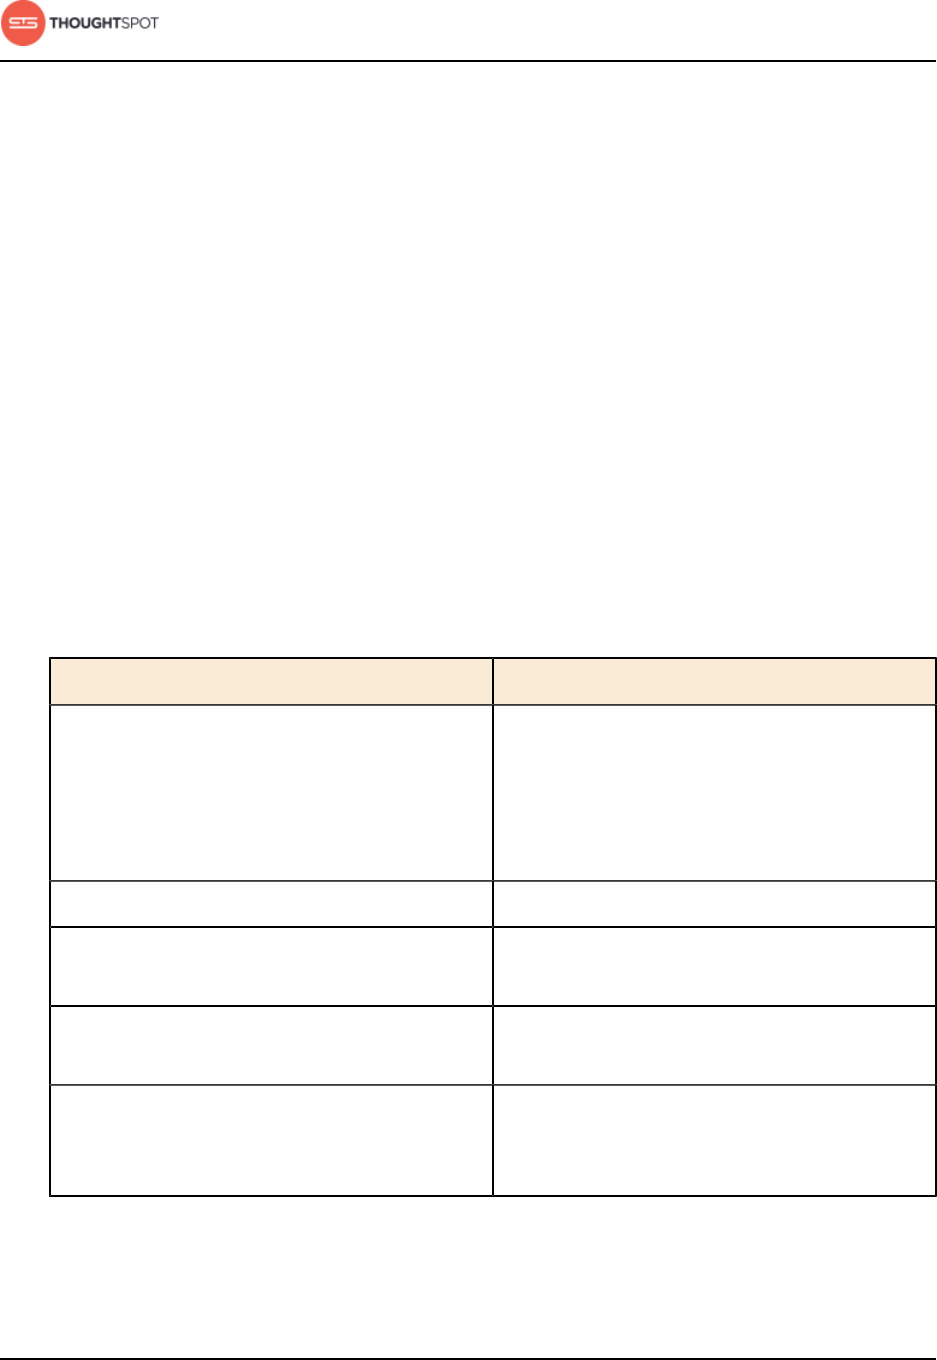
Model, link, and tag your data for searching
ThoughtSpot Administration Guide Copyright © 2017 by ThoughtSpot. All Rights Reserved. 114
• Columns that contain a large amount of free-form text (i.e. the number of
characters in more than a few of the fields is more than 50) are indexed as
PREFIX_ONLY by default.
• Short strings (like a firstname column) are indexed using
PREFIX_AND_SUBSTRING by default, which indexes both prefix and
substrings.
It is not recommended to change the indexing for columns with very large free
text values. These should not to be indexed, because indexing on these values is
not useful and may generate confusing suggestions.
You can override the default behavior by editing the modeling file to change the
Index value for any columns that should be indexed differently. There are several
different supported index types:
Table 16: Supported index types
Index type Description
DEFAULT This is the default value. The default indexing
behavior will apply to the column values,
depending on their type. PREFIX_AND
SUBSTRING for short values and PREFIX_ONLY
for long values and free-form text.
DONT_INDEX Prevents indexing on the column values.
PREFIX_AND_SUBSTRING Allows full indexing such that prefix and sub-
string search both work for the column values.
PREFIX_ONLY Allows indexing such that only prefix search
works for the column values.
PREFIX_AND_WORD_SUBSTRING Allows indexing such that only prefix search
works for each word of a multi-word string, for
the column values.
1. Find the column whose index type you want to modify, and set its Index Type.
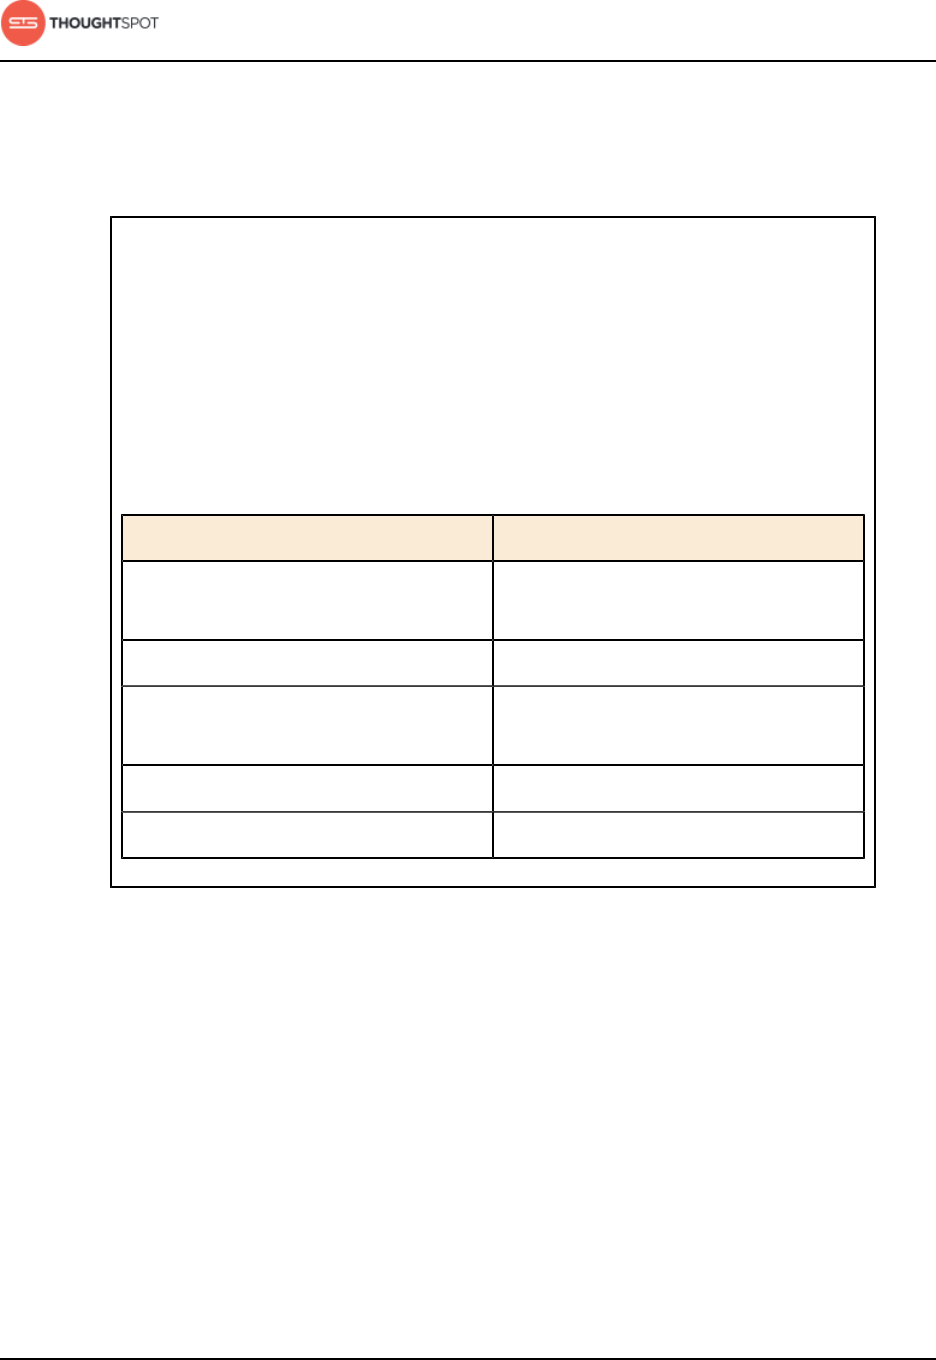
Model, link, and tag your data for searching
ThoughtSpot Administration Guide Copyright © 2017 by ThoughtSpot. All Rights Reserved. 115
If you are using the model file, double click in the Index cell, and type in the
index type you want to use.
2. Save your changes.
Consider a column in which there are four values “ThoughtSpot”,
“Thought”, “Spot” and “Thought Spot”. If you search for “sp”,
depending on the setting for indexing, the column value search
result suggestions will vary:
Table 17: Example of the effects of indexing on search bar
suggestions
Index field value Search bar suggestions
DEFAULT “ThoughtSpot”, “Spot” and “Thought
Spot”
DONT_INDEX No suggestions.
PREFIX_AND_SUBSTRING “ThoughtSpot”, “Spot” and “Thought
Spot”
PREFIX_ONLY “Spot”
PREFIX_AND_WORD_SUBSTRING “Spot” and “Thought Spot”
Add a geographical data setting for a column
Certain attribute columns that contain location data can be used to create
GeoMaps. ThoughtSpot supports Latitude, Longitude, Zip Code, US States, US
Counties, Countries, and select international sub-nation regions.
You can designate a column as "Geo" by editing the GeoType column in the
modeling file or the Columns setting screen.
Columns that can be designated as "Geo" columns need to contain text
(VARCHAR) data unless they contain latitude/longitude data. Latitude and
longitude columns can contain numeric data (DOUBLE) or text.

Model, link, and tag your data for searching
ThoughtSpot Administration Guide Copyright © 2017 by ThoughtSpot. All Rights Reserved. 116
If you are using a column with the data type DOUBLE for latitude and longitude,
you will also need to change the following settings for those columns:
•Set Column Type to ATTRIBUTE.
•Set Additive to NO.
•Set Aggregation Type to NONE.
1. Find the GeoType for the column that contains the geographical data.
2. Change the value to the appropriate GeoType, depending on the kind of data
the column contains.
Table 18: Data that uses geo charts
GeoType Description Type: Example
COUNTRY_REGION Countries • name: United States
• long name: United States
• name_sort: United States of America
• abbreviation: U.S.A.
• adm0_a3: USA
• adm0_a3_is: USA
• adm0_a3_us: USA
• admin: United States of America
• brk_a3: USA
• brk_name: United States
• formal_en: United States of America
• iso_a2: US
• iso_a3: USA
• iso_n3: 840
COUNTY Counties in the
United States
• santa clara county
• pike county, ohio
• pike county, OH
STATE_PROVINCE States in the
United States
• name: California
• US Postal Service abbreviation: CA
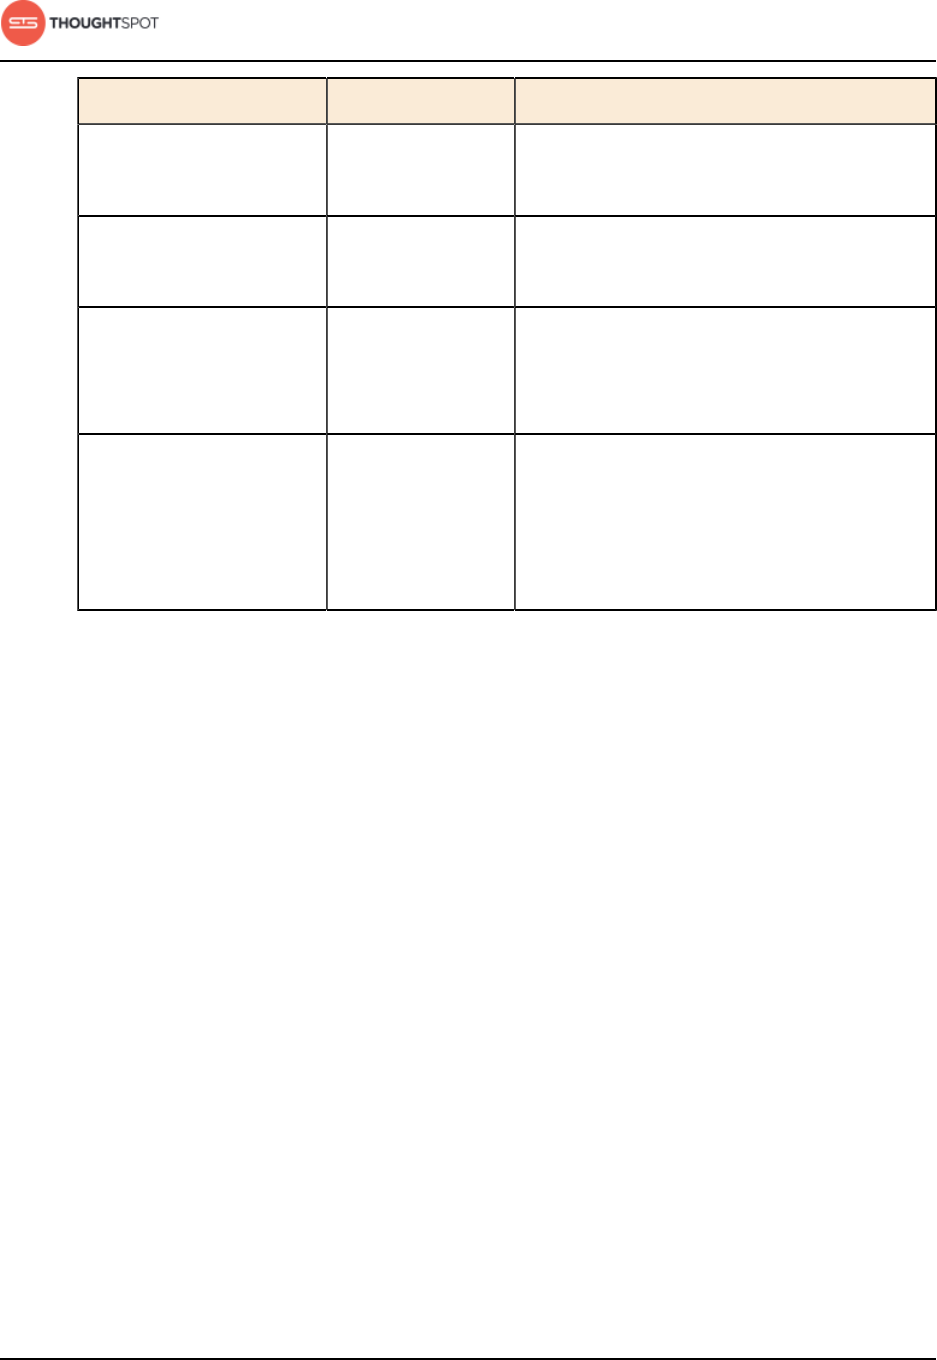
Model, link, and tag your data for searching
ThoughtSpot Administration Guide Copyright © 2017 by ThoughtSpot. All Rights Reserved. 117
GeoType Description Type: Example
LATITUDE Must be used with
LONGITUDE
• 37.421023
• 1.282911
LONGITUDE Must be used with
LATITUDE
•−122.142103
• 103.848865
ZIP_CODE Zip codes and zip
codes +4 in the
United States
• po_name: MT MEADOWS AREA
• ZIP: "00012"
• zip2: 12
Other Sub-nation Regions Administrative
regions found in
countries other
than the United
States
• bremen
• normandy
• west midlands
3. If your data includes latitude and/or longitude columns that are stored as a
numeric data type (DOUBLE), make these changes for those columns:
a) Change the Type or ColumnType to ATTRIBUTE.
b) Change Additive to NO/FALSE.
4. Save your changes.
Set the search suggestions priority for a column
You can change the priority that determines which columns are shown in search
suggestions and the order in which they appear.
The value of Priority determines the priority order (rank) in which a particular
column (and its values) appears in the search dropdown. You can push a column
up in the order (increase the rank) by increasing its Priority value. A higher value
(like 2) will cause the corresponding column and its values to appear higher up
in the search dropdown than columns with lower value (like 1). By default, the
Priority value is set to “1” for all columns.
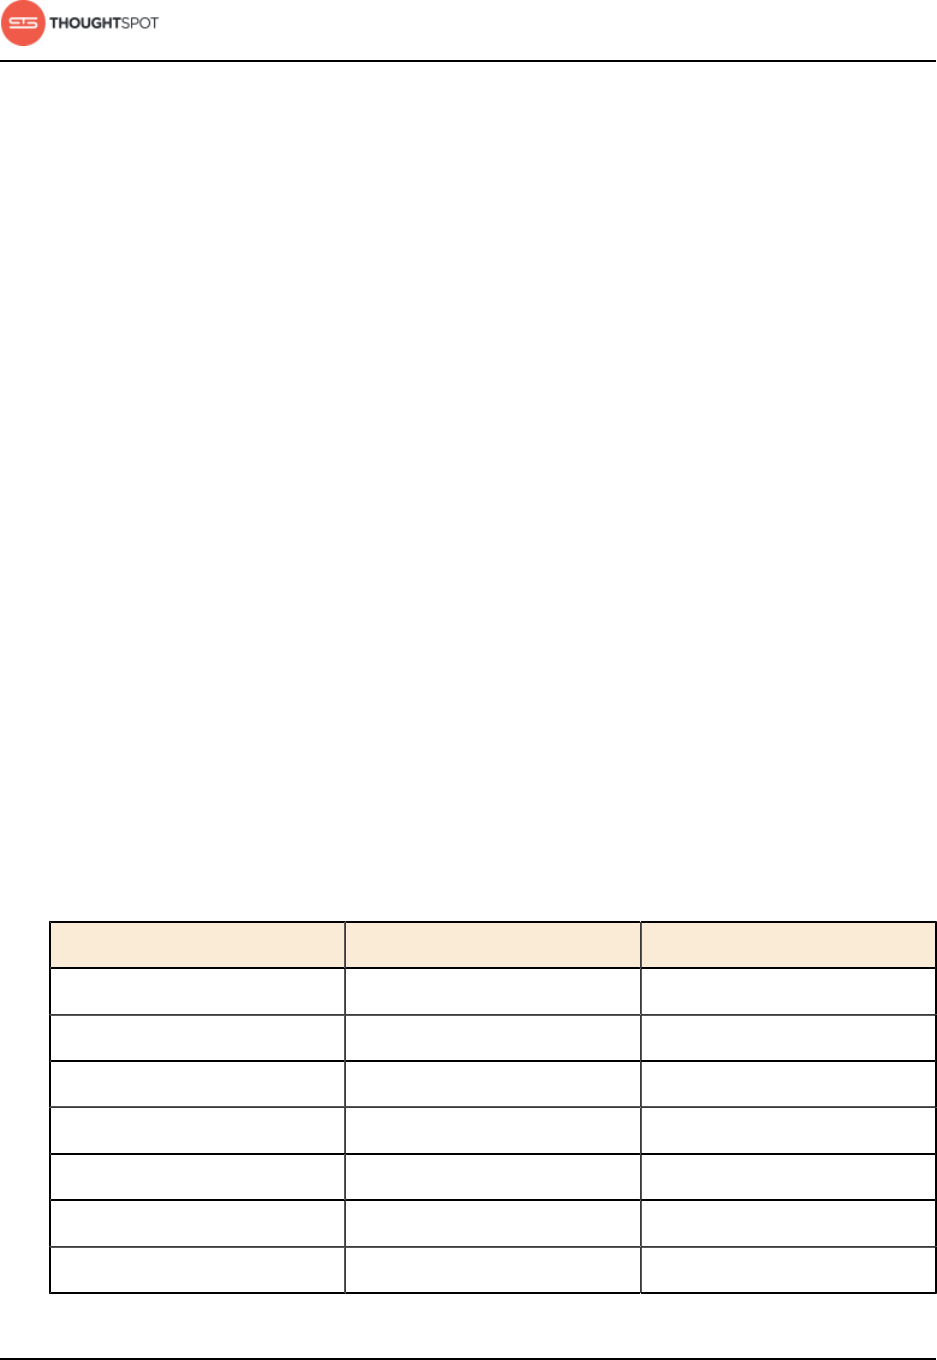
Model, link, and tag your data for searching
ThoughtSpot Administration Guide Copyright © 2017 by ThoughtSpot. All Rights Reserved. 118
You should only use numbers between 1-100 in this field. It is recommended to
assign values in increments of 5 or 10, to allow room to assign values to other
columns that may be inserted later on.
1. Change the value to a number between 1 and 100. Use a higher value if you
want to boost the search priority, and a lower value if you want to lower it.
2. Save your changes.
Set the format to use when showing numbers
You can set a format for how numbers are displayed in tables and charts. For
example, you can display numbers with a different number of digits after the
decimal point, based on the data modeling setting Format Pattern.
You can use any of the supported number formats for delimiters and number
of digits to show using Java Decimal Notation. Currency symbols are not
supported.
The default values are:
• #,### for integer data types (INT, BIGINT).
• #,###.00 for decimal data types (DOUBLE and FLOAT).
These are some examples of formats you can use:
Table 19: Number format examples
Stored Value Format Pattern Display Value
12345.6789 #,##0.## 12,345.68
12345.6789 #,##0.### 12,345.68
12345.6789 #,##0.00000 12,345.68
12345.6789 #,##0 12,345
12345.6789 #,##0.00 12,345.68
12345 #,##0.## 12,345
12345 #,##0.00 12,345.00

Model, link, and tag your data for searching
ThoughtSpot Administration Guide Copyright © 2017 by ThoughtSpot. All Rights Reserved. 119
To change the date format used to display a column's values:
1. Find the Format Pattern for the column whose display format you want to
change.
2. Change it to the format you want to use.
3. Save your changes.
Locale-based number formatting
Number formatting is set by default based on your browser locale setting. This
has been set in order to accommodate users in various geographical locations,
primarily in the US and Europe regions.
For example, if you are using ThoughtSpot in the US, the number formatting
should look like this: xxx,xxx.xx. And in Europe, it should look like this: xxx.xxx,xx.
Set the format to use when showing dates
You can set a format for how dates are displayed in tables and charts. For
example, you can display dates in a standard European or US format based on
the data modeling setting Format Pattern.
You can use any of the supported date formats listed in the Date and time
formats reference. These are some examples of formats you can use:
• MM/dd/yyyy
• MMM (for abbreviated month format)
• DD/mm/yyyy
• MM/dd/yyyy HH:mm
• DD/mm/yyyy HH:mm
To change the date format used to display a column's values:
1. Find the Format Pattern for the column whose display format you want to
change.
2. Change it to the format you want to use.
3. Save your changes.
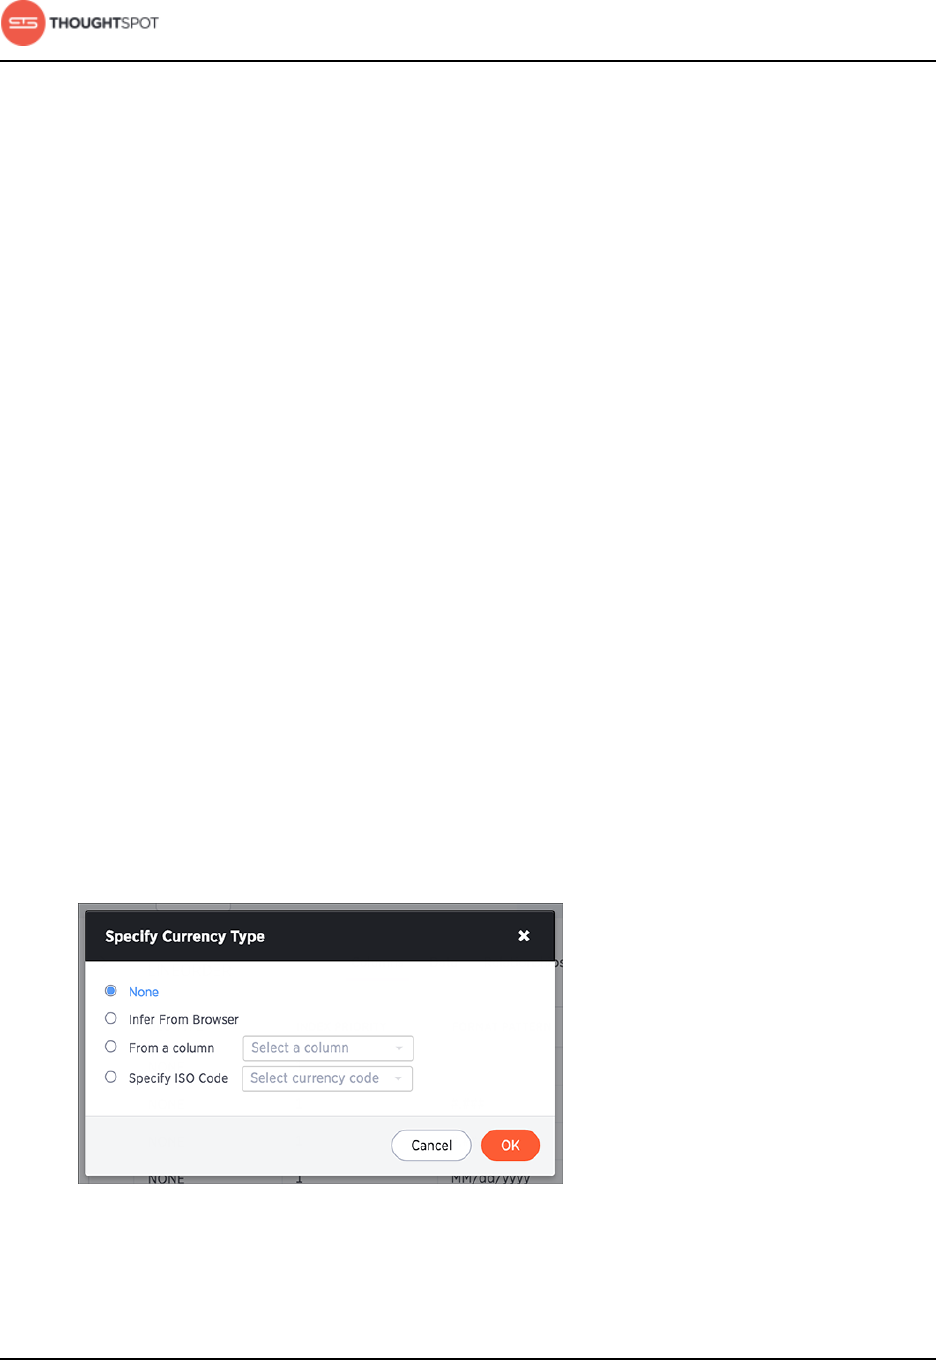
Model, link, and tag your data for searching
ThoughtSpot Administration Guide Copyright © 2017 by ThoughtSpot. All Rights Reserved. 120
Set the format to use when showing currencies
You can set a format for how currencies are displayed in tables and charts when
using the ThoughtSpot Data API or Embedding. For example, you can display
currencies in a standard European Euro or US Dollar format based on the data
modeling setting Currency Type.
When you specify the currency type of your data on the Manage Data page,
your currency data will only display the correct format and currency code in
the embedded use case. Currency specific symbols are available in the non-
embedded use case as well, but they are not localized. All users are treated as
if they are in en-US locale unless they are in embed mode and their browser
configuration tells ThoughtSpot that they are in some other locale. For example,
100 Polish Zloty appears as 100zł to a user in Poland, but without localization
enabled, it appears as PLN 100.
This subtle difference can be seen when you use the REST API. See the
ThoughtSpot Application Integration Guide for more information on the API.
To change the currency format used to display a column's values:
1. Find the Currency Type for the column whose display format you want to
change.
2. Click on it to open the Specify Currency Type menu.
Figure 31: Specify Currency Type
3. Select one of the following ways you would like to change the format.

Model, link, and tag your data for searching
ThoughtSpot Administration Guide Copyright © 2017 by ThoughtSpot. All Rights Reserved. 121
•Infer From Browser
Your currency data will be modeled upon the locale of your browser
setting.
•From a column
Your currency data will be modeled upon the existing currency information
in the selected column.
Note: This option is disabled if there is no VARCHAR column to
choose from.
•Specify ISO Code
Your currency data will be modeled upon your selection from the available
currency code choices.
4. Click Ok to save your changes.
Change the Attribution Dimension setting of a column
The Attribution Dimension setting applies only to tables that are related through
a chasm trap. If your schema does not include these, you can ignore this setting.
The Attribution Dimension setting only applies to tables that join over a Chasm
Trap. By default, the attribution dimension setting will be set to Yes, but you can
override that by setting the column's attribution dimension property to No, as
described here.
In the classic chasm trap two fact tables are related through a shared dimension
table. When the two fact tables are joined, the shared column(s) in the
dimension table are used to attribute rows in one fact table to match with rows
in the other fact table. Usually, all goes well using this method. But sometimes
an incorrect or illogical attribution can result, because the column chosen is not
meaningful for performing this attribution. If you are seeing unexpected results
in searches that include tables across a chasm trap, this setting is for you.
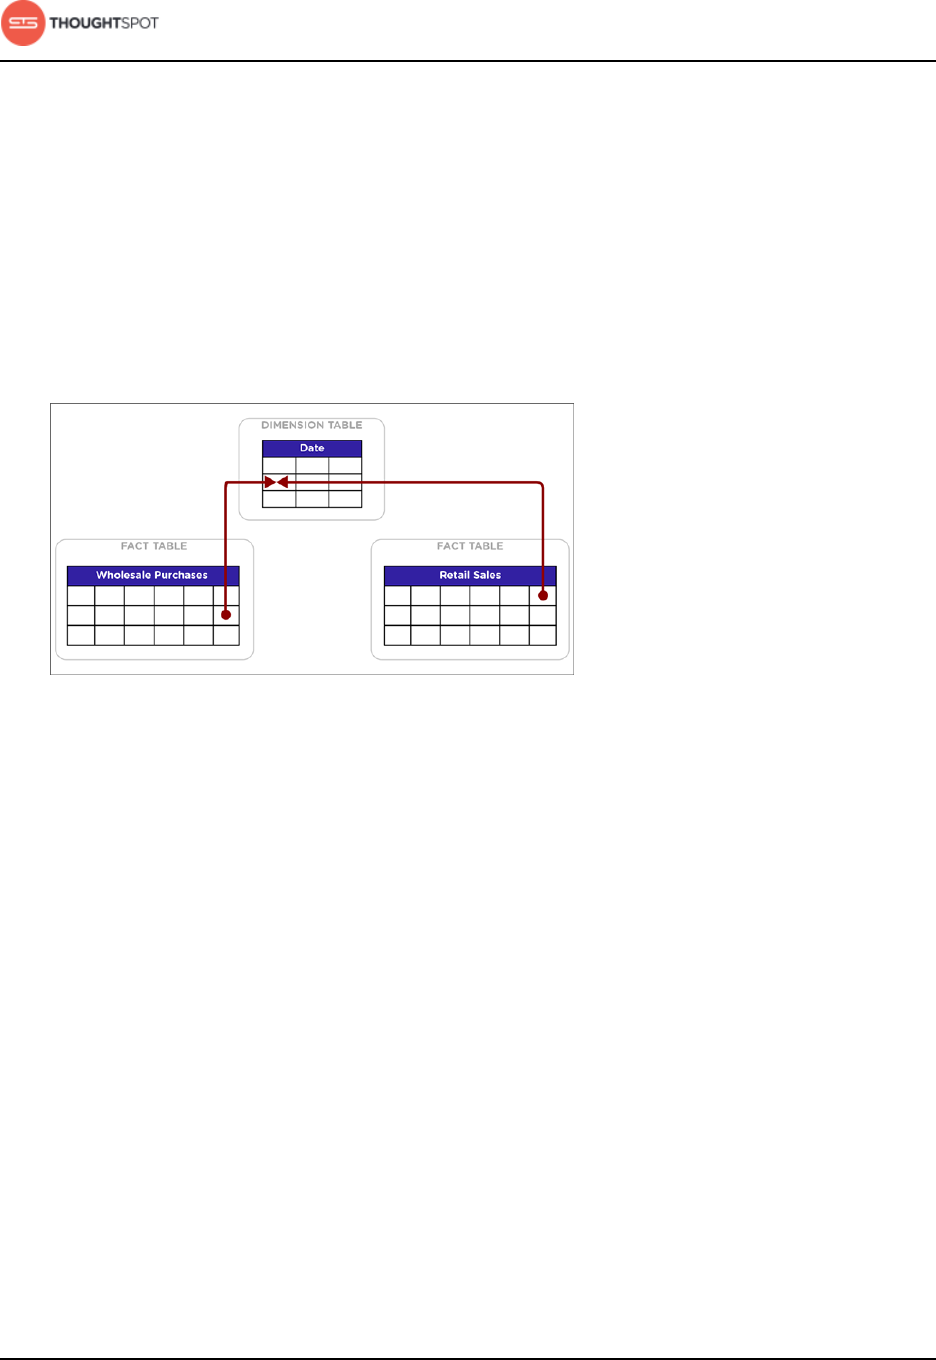
Model, link, and tag your data for searching
ThoughtSpot Administration Guide Copyright © 2017 by ThoughtSpot. All Rights Reserved. 122
Here is an example of a column that is not an attribution dimension. Suppose you
have two fact tables, Wholesale Purchases and Retail Sales, that share a common
dimension Date. In this case, the date column in the Date dimension should not
be used for attribution, since unrelated rows in both of the fact tables could
share the same row in the Date table. If I bought oranges wholesale on April
25, 2005 and made a retail sale of apples on the same day, there is no logical
relationship between those two events. Combining the two events using the date
they share will not create any meaningful information.
Figure 32: Example where a column is not an attribution dimension
If matching rows in two fact tables over a chasm trap depends on the values
in a column contained in a dimension table, that column is known as an
attribution dimension. In this example, the Product ID column in the Products
dimension table is an attribution dimension. For rows where the Product ID in
the Wholesale Purchases and in the Retail Sales tables is a match, those rows
are logically related in a meaningful way. They can be combined in charts and
reports to produce a logical, expected outcome.
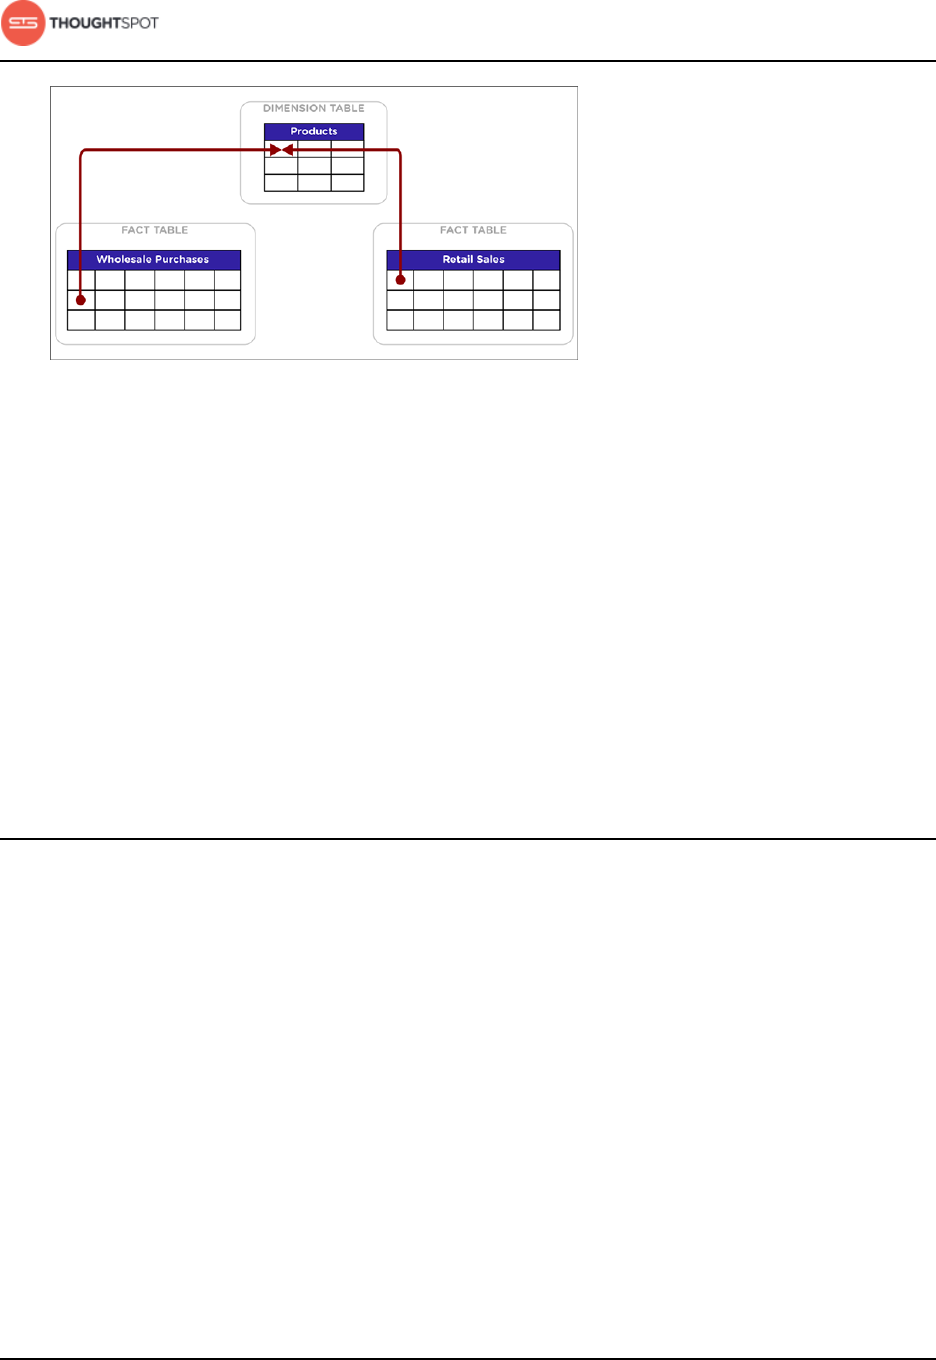
Model, link, and tag your data for searching
ThoughtSpot Administration Guide Copyright © 2017 by ThoughtSpot. All Rights Reserved. 123
Figure 33: Attribution dimension example
To designate a column as not being an attribution dimension (i.e. not producing
any meaningful attribution across a chasm trap):
1. Find the column that is not an attribution dimension and select its Attribution
Dimension.
2. Set the value to No.
If you're using the modeling file, set it to FALSE.
3. Save your changes.
Link tables using relationships
You can link tables by creating relationships between their columns. Linked
tables can be searched together or combined into a worksheet for easy
searching. Tables that have no relationship between their columns can not be
combined in a single search.
There are two ways to create relationships between tables:
1. Create a constraint using TQL.
2. Create a relationship through the web interface.
The two methods create the same kind of relationship both from an end user
perspective and an administrative perspective.

Model, link, and tag your data for searching
ThoughtSpot Administration Guide Copyright © 2017 by ThoughtSpot. All Rights Reserved. 124
Both types of relationships exist within the database. You can also generate a
script through TQL that contains all relationships, whether create via the web
interface or in TQL.
Relationships created through either method can be managed either via
TQL or by going to the Relationships page when viewing data in the Date
Modeling section in the ThoughtSpot application. You can view, modify, or delete
relationships in either place.
You may create relationships using a mixture of TQL and the web interface, but
the relationships you create cannot form a circular relationship, or "cycle". If
you attempt to create a relationship that would complete a cycle, you will see
a message saying that the relationship could not be added because it conflicts
with another existing relationship.
Create a relationship
You can quickly create a relationship (or link) between tables that allows you to
combine them in a single search. Choose a column to join on that both tables
contain (e.g. employee ID or product key).
You must have either administration privilege or modify access permission to the
columns to create a relationship.
When creating a link between the columns in two data sources, the columns
being linked must have the same data type, with the same meaning. That is, they
must represent the same data. Normally, you'll make this kind of link from a fact
table column to a column in a dimension table that uniquely identifies a logical
entity in your data such as Employee ID for a person, Product ID for a product, or
Date Key for a specific date in a date lookup table.
To create a relationship through the Web interface:
1. Click on Data, on the top navigation bar.
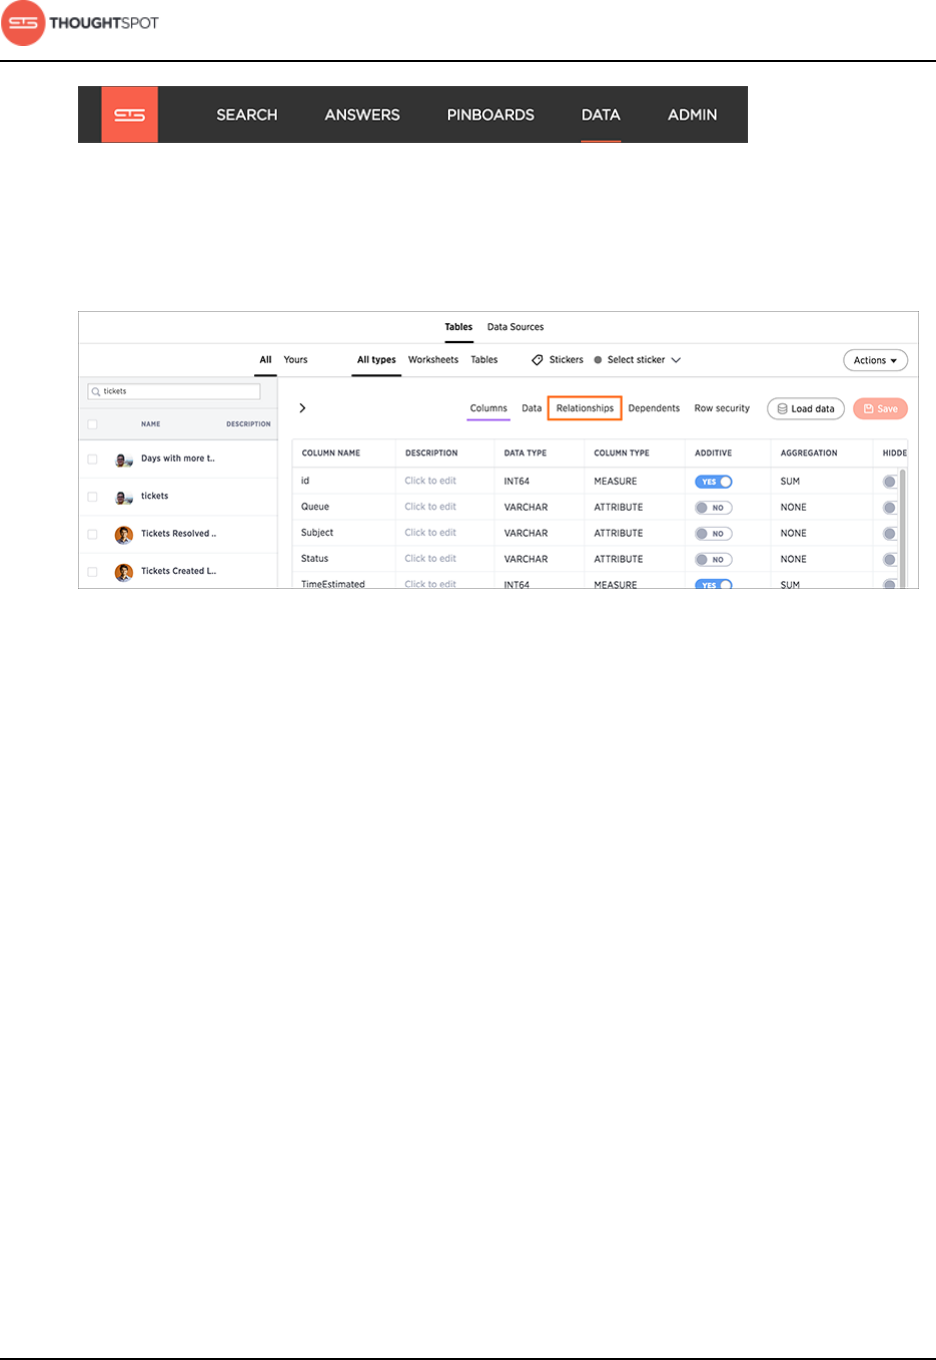
Model, link, and tag your data for searching
ThoughtSpot Administration Guide Copyright © 2017 by ThoughtSpot. All Rights Reserved. 125
Figure 34: Data
2. Click on the name of the data source you want to link from.
3. Select Relationships.
Figure 35: Select Relationships
4. If there are already some existing relationships, scroll down and click Add
Relationship. Otherwise, continue to the next step.
5. Click on Source Column and select the column you want to link in the source
table.
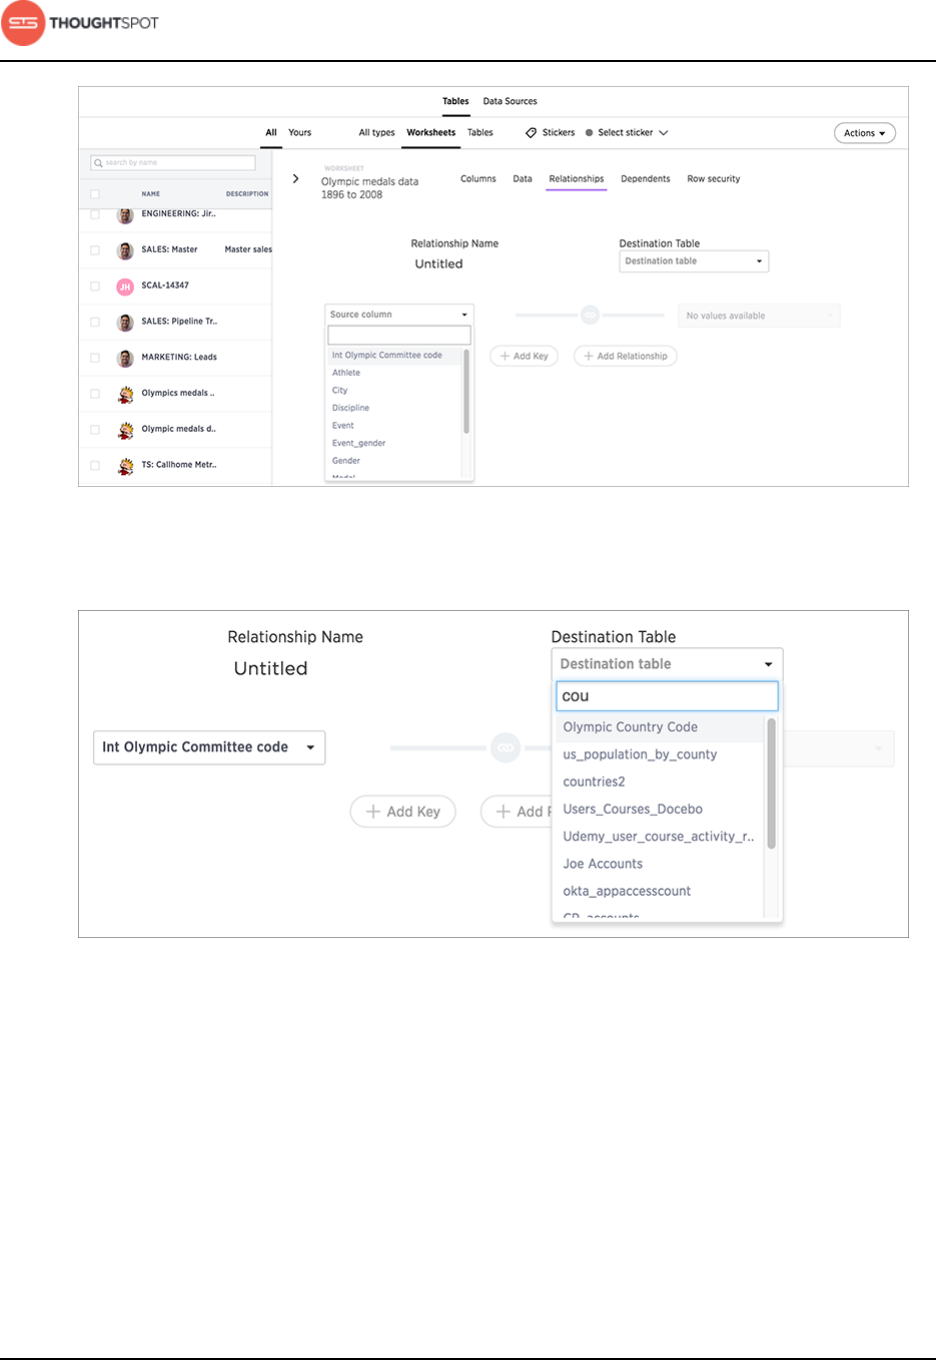
Model, link, and tag your data for searching
ThoughtSpot Administration Guide Copyright © 2017 by ThoughtSpot. All Rights Reserved. 126
Figure 36: Select a Source Column
6. Under Destination Table find and select the table that you want to link to.
Figure 37: Find and select a Destination Table
7. Click on Destination Column and select the column you want to link to in the
destination table.
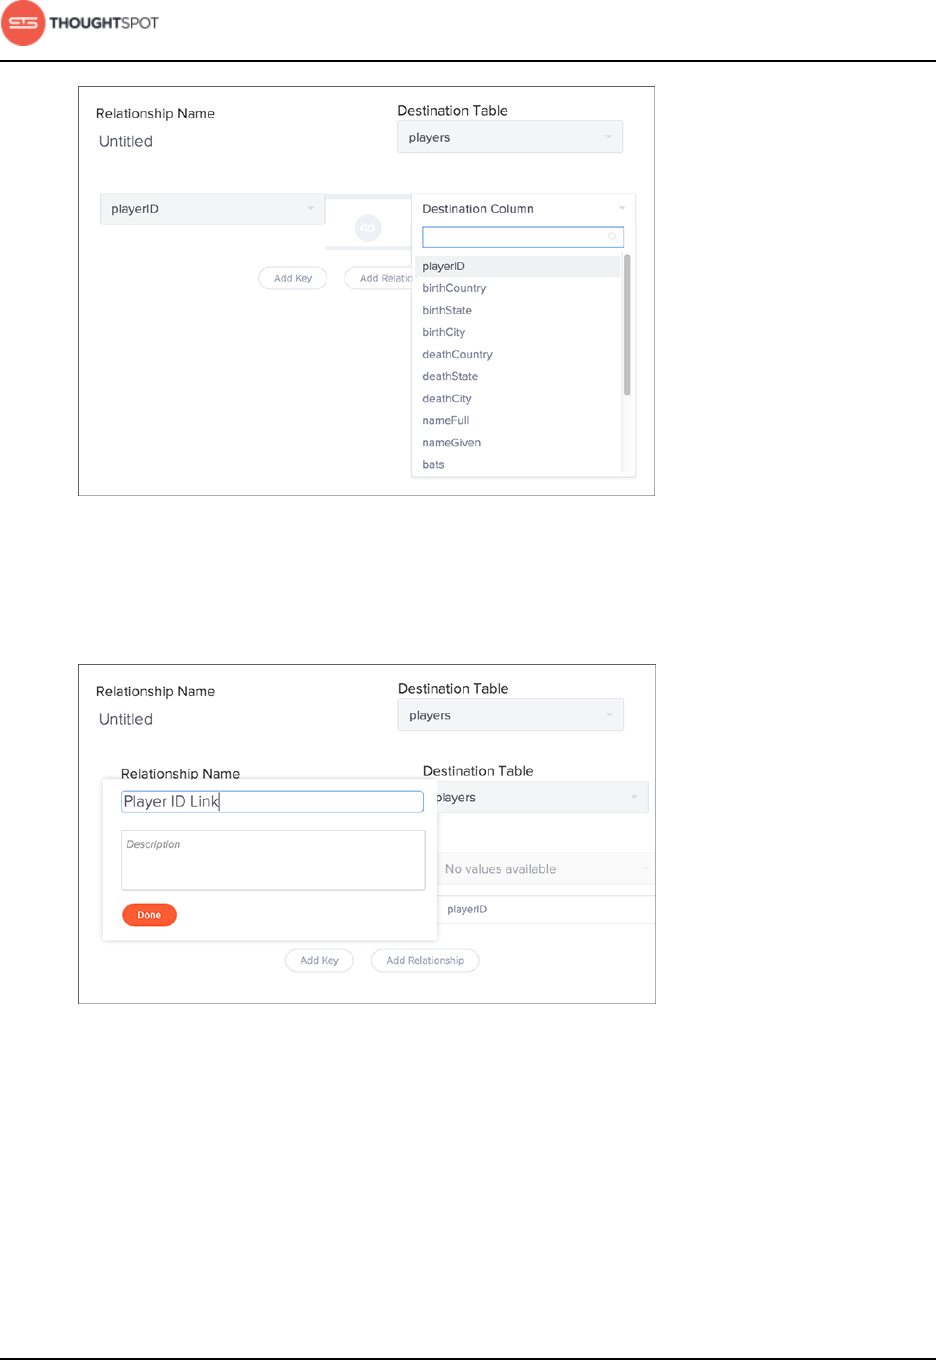
Model, link, and tag your data for searching
ThoughtSpot Administration Guide Copyright © 2017 by ThoughtSpot. All Rights Reserved. 127
Figure 38: Select the Destination Column
8. Click Add Key to add the link.
9. Name your relationship and optionally give it a description.
Figure 39: Name the Relationship
10.Click Add Relationship.
11. Repeat these steps for creating a link until all the links you want to make for
your table have been created.
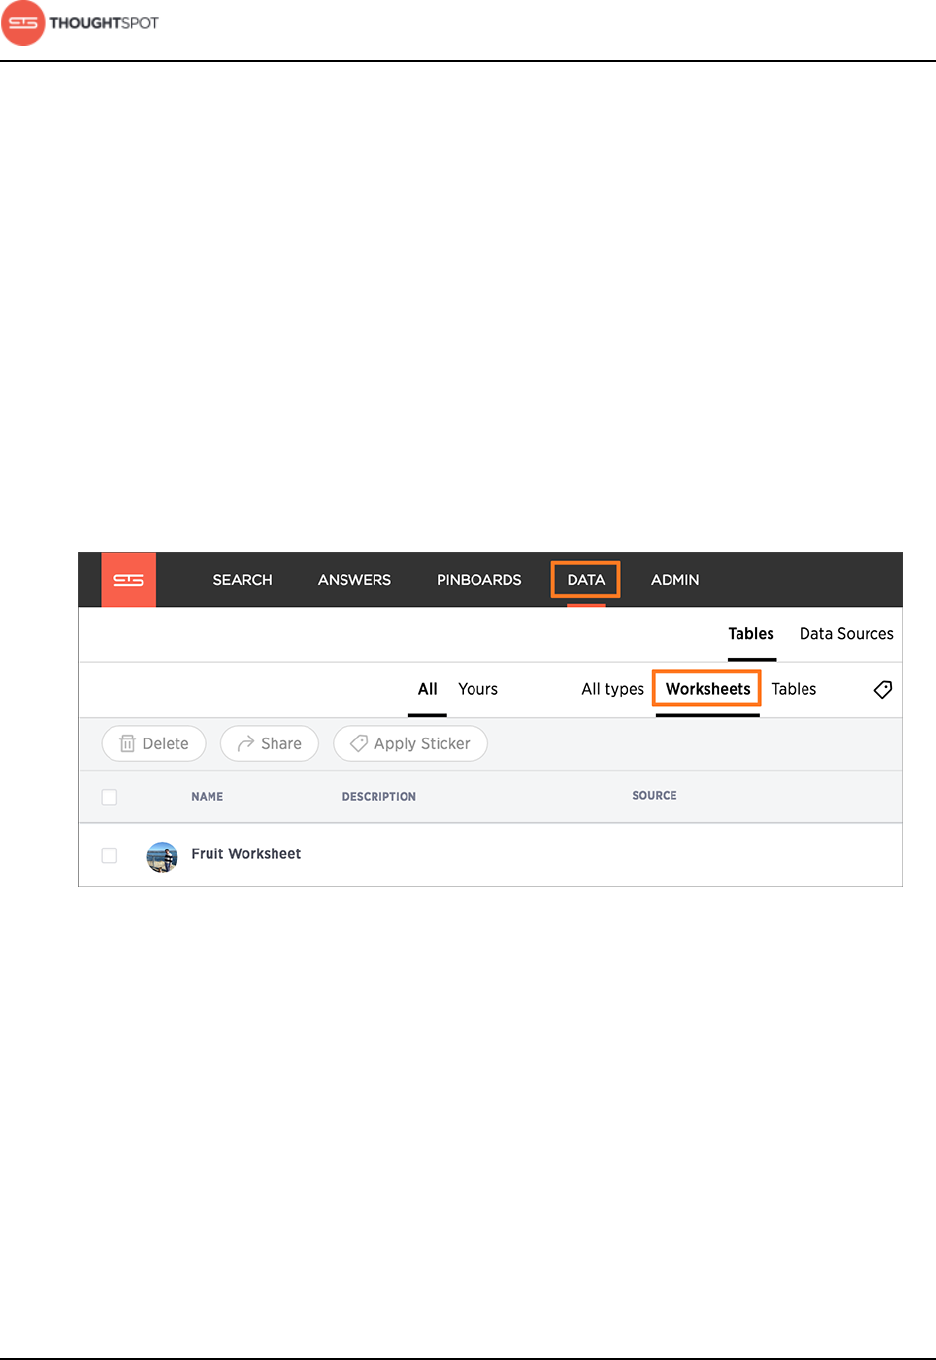
Model, link, and tag your data for searching
ThoughtSpot Administration Guide Copyright © 2017 by ThoughtSpot. All Rights Reserved. 128
Delete a relationship
If you created a relationship (link) between tables using the Web interface, you
can also delete it from the Web interface. But if the relationship was created
using TQL, you must also use TQL to delete it.
You must have either administration privilege or modify access permission to the
columns to delete a relationship.
To delete a relationship using TQL, use an ALTER TABLE...DROP FOREIGN KEY...
statement.
To delete a relationship from the Web interface:
1. Click on the Data icon on the top navigation bar and then on Worksheets.
Figure 40: Go to the worksheet list
2. Click on the name of the data source you from which you want to remove the
relationship.
3. Select Relationships.
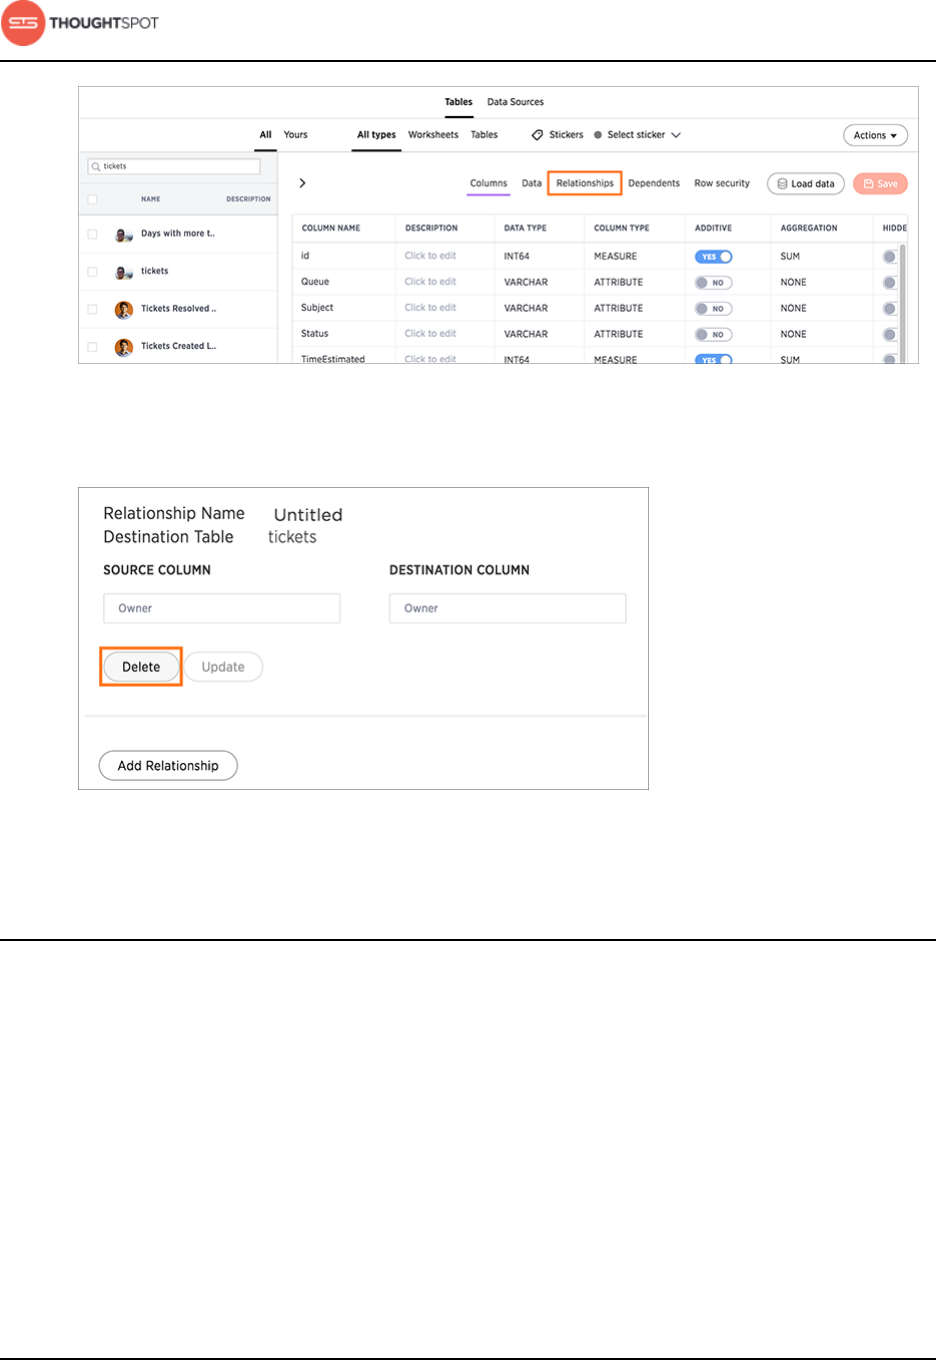
Model, link, and tag your data for searching
ThoughtSpot Administration Guide Copyright © 2017 by ThoughtSpot. All Rights Reserved. 129
Figure 41: Select Relationships
4. Find the relationship you want to delete, and click Delete.
Figure 42: Delete a relationship
About stickers
You can create stickers to make it easier for people to find data sources and
pinboards.
About stickers
Stickers enable you to create categories for classification of objects, including
pinboards, answers, data sources, and worksheets. Only administrators can
create stickers, and they are global in scope. This means that everyone can see
the stickers and use them to tag objects. They can also filter lists of objects by
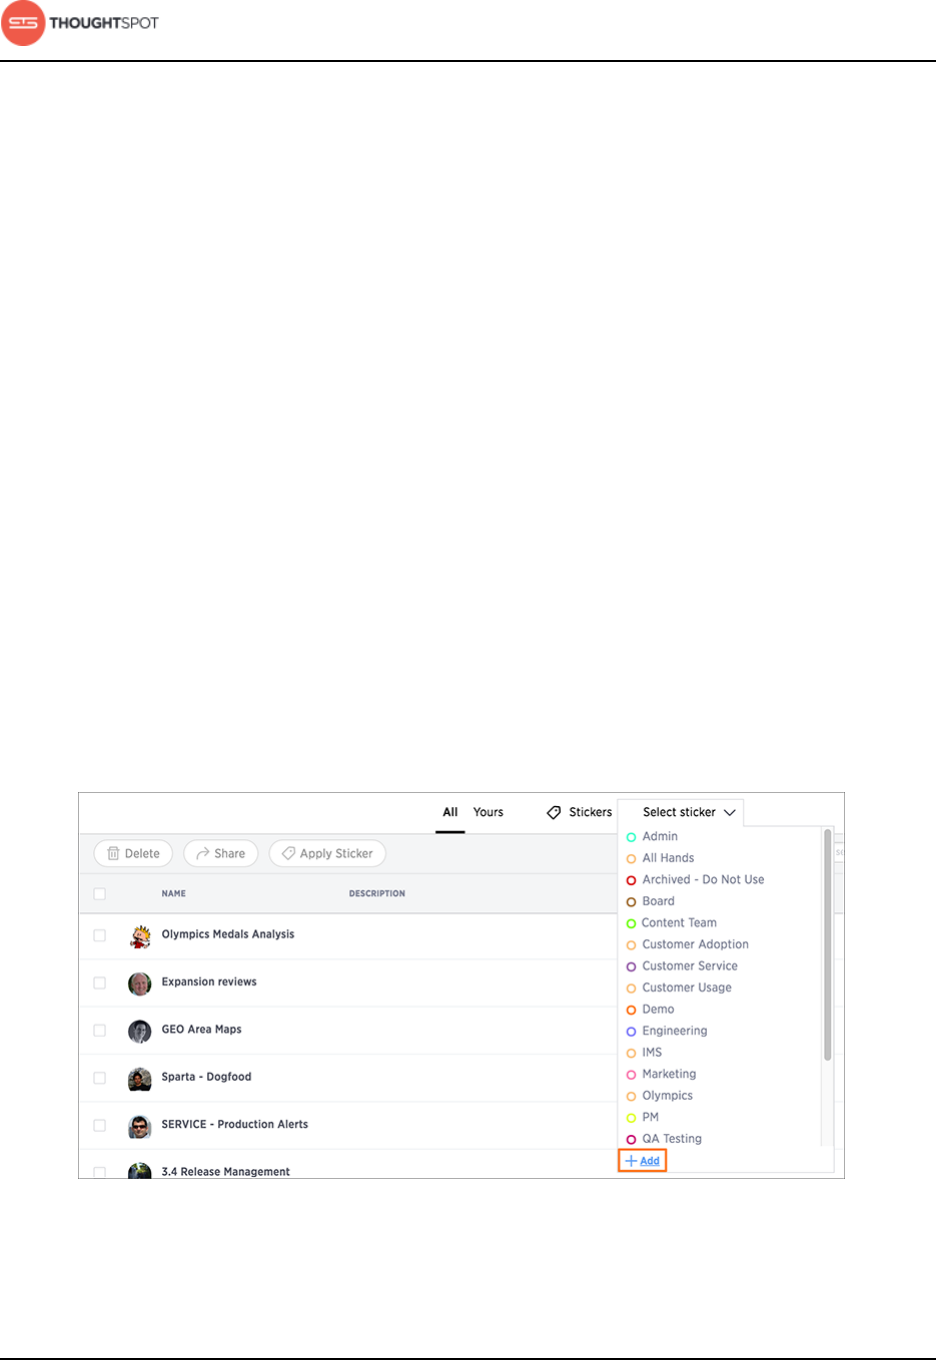
Model, link, and tag your data for searching
ThoughtSpot Administration Guide Copyright © 2017 by ThoughtSpot. All Rights Reserved. 130
sticker. Stickers are often used to designate subject areas, such as sales, HR, and
finance, but you can use them any way you like.
This is the workflow for using stickers:
1. Only administrators can create stickers.
2. Anyone can Apply a sticker.
3. Anyone can Filter by a sticker.
Create stickers
You can create stickers for use in tagging pinboards, worksheets, and data
sources.
Only administrator users can create stickers. Anyone can apply the stickers you
create, or use them as filters when selecting from a list of sources or pinboards.
To create a sticker:
1. Navigate to the Manage Data or Pinboards screen using the icons in the top
navigation bar.
2. Choose Select sticker, scroll to the bottom of the list, and click + Add.
Figure 43: Add a sticker
3. Type the name for the new sticker.
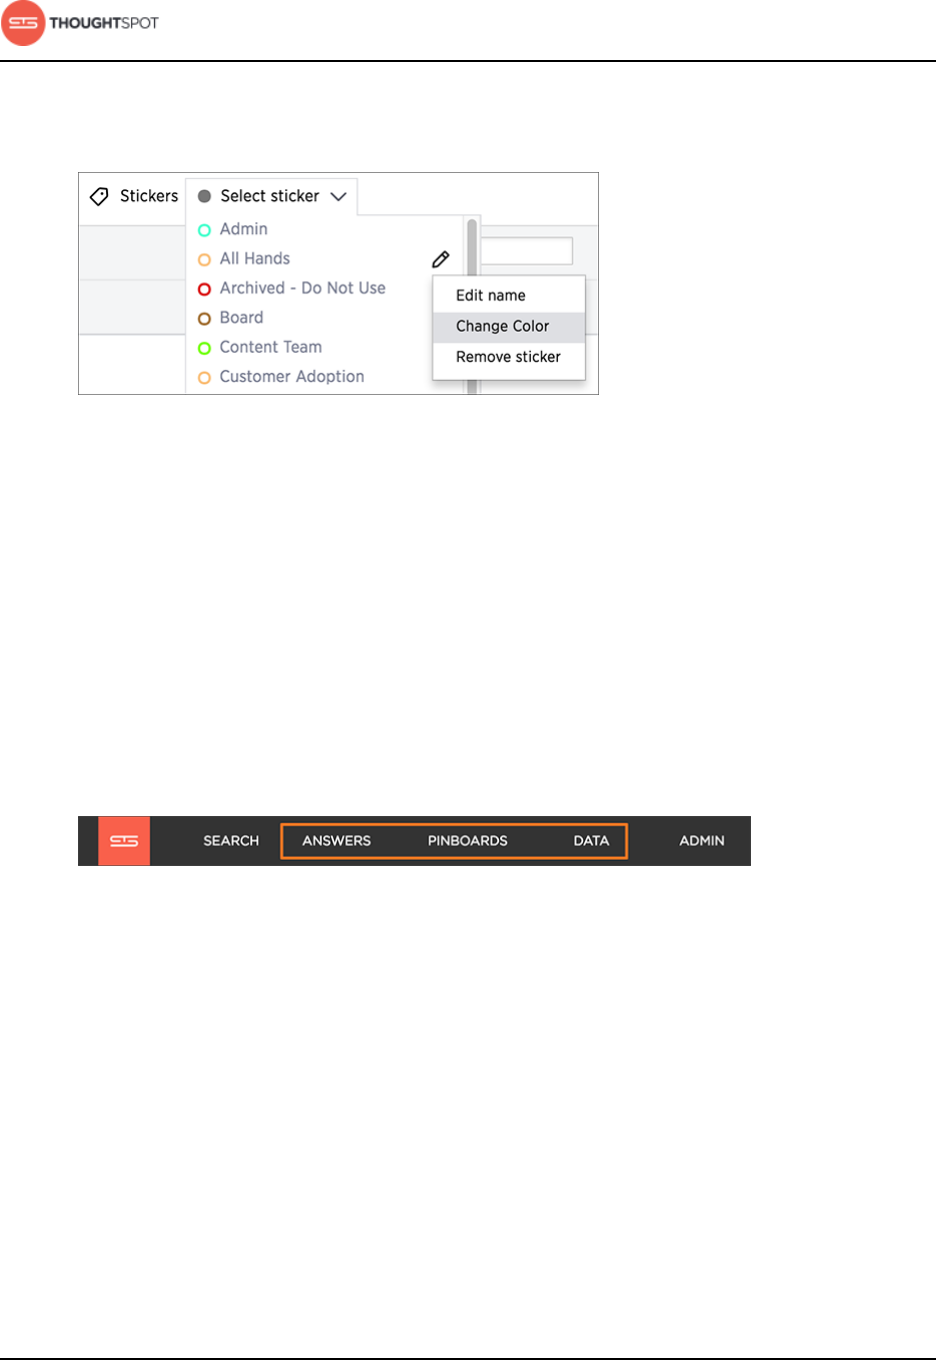
Model, link, and tag your data for searching
ThoughtSpot Administration Guide Copyright © 2017 by ThoughtSpot. All Rights Reserved. 131
4. You can change the name or color of a sticker by clicking the edit icon next to
its name.
Figure 44: Edit a sticker
Apply a sticker
Apply a sticker whenever you want to tag a data source, worksheet, or pinboard
to make it easier to find.
Only administrators create stickers, but anyone with edit privileges can tag an
object with a sticker.
To tag an object with a sticker:
1. From the top menu, choose Answers, Pinboards, or Data.
Figure 45: Choose Answers, Pinboards, or Data
2. Find the item(s) you want to tag in the list, and check the box next to its
name.
3. Click the apply sticker icon and choose one from the list.
You can apply as many stickers as you like to an object.
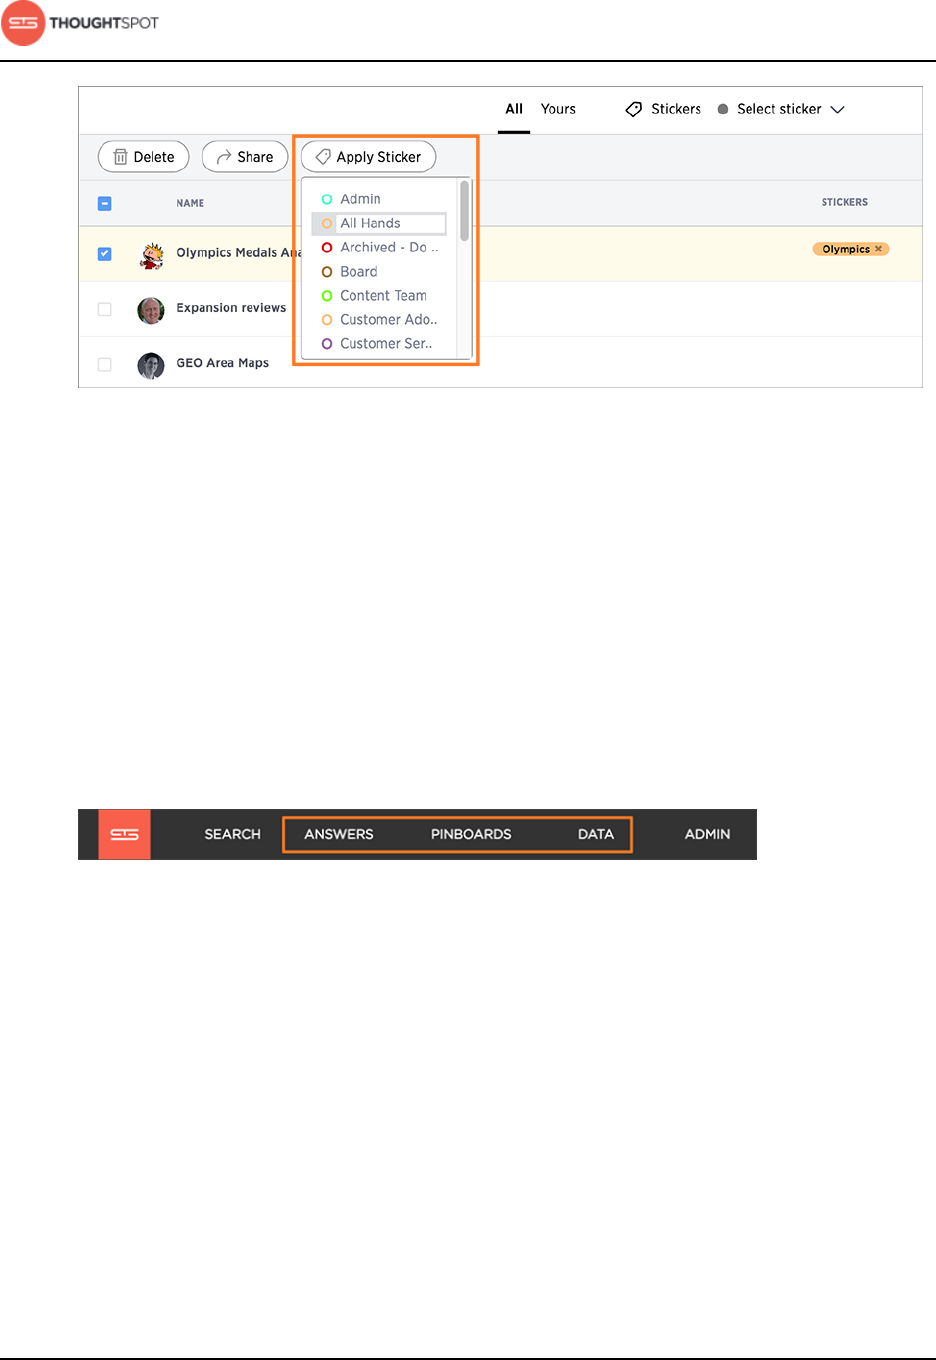
Model, link, and tag your data for searching
ThoughtSpot Administration Guide Copyright © 2017 by ThoughtSpot. All Rights Reserved. 132
Figure 46: Choose a sticker to apply
Filter by a sticker
Whenever you are selecting objects from a list, you can filter by sticker to find
what you're looking for.
Anyone can use stickers to filter lists of pinboards or data sources. You can also
filter by sticker when selecting data sources.
To filter by sticker:
1. From the top menu, choose Answers, Pinboards, or Data.
Figure 47: Choose Answers, Pinboards, or Data
2. Click on Select sticker, and select a sticker to filter by. Click on its name.
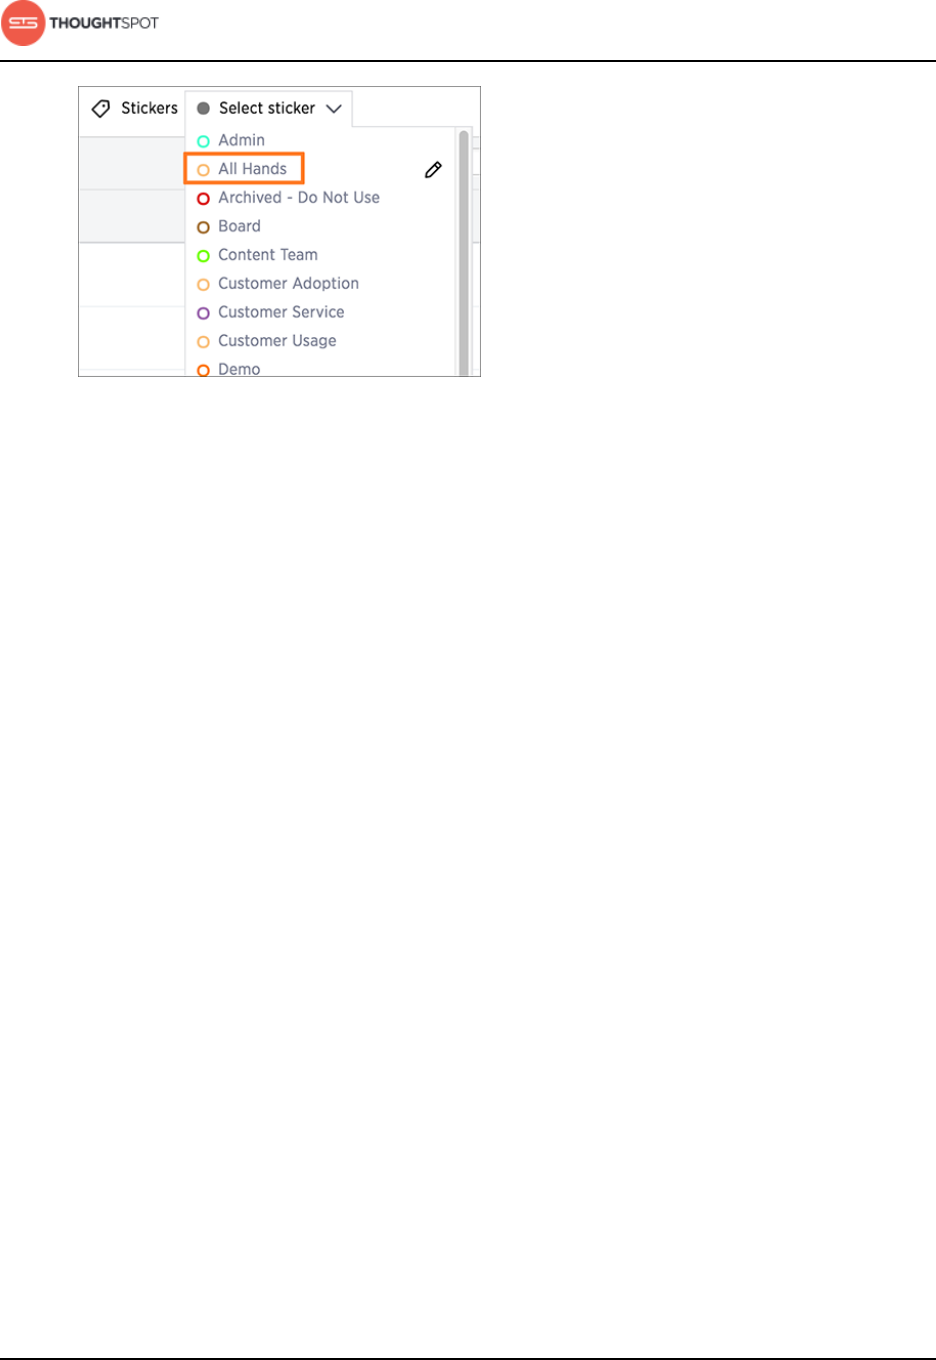
Model, link, and tag your data for searching
ThoughtSpot Administration Guide Copyright © 2017 by ThoughtSpot. All Rights Reserved. 133
Figure 48: Filter by a sticker

Simplify searching with worksheets
ThoughtSpot Administration Guide Copyright © 2017 by ThoughtSpot. All Rights Reserved. 134
Chapter 4: Simplify searching with worksheets
Simplify searching with worksheets
Topics:
•Create a new worksheet
•Edit a worksheet
•Delete a worksheet or
table
After modeling the data, create worksheets to make
searching easier. A worksheet groups multiple related
tables together in a logical way.
Worksheets are flat tables created by joining columns
from a set of one or more tables or imported
datasets. You might use a worksheet for these
reasons:
• To pre-join multiple tables together.
• To give a user or group access to only part of the
underlying data.
• To include a derived column using a formula.
• To rename columns to make the data easier to
search.
• To build in a specific filter or aggregation.
Users are often unfamiliar with tables and how they
are related to one another. For example, a sales
executive might need to search for information about
retail sales. The required data could be contained
in several tables (sales, customers, products, stores,
etc.), with foreign key relationships between them.
An administrator who is familiar with the data model
can create a retail sales worksheet, that combines
all of the related fact and dimension tables into a
single, easy-to-use view, and share it with the sales
executive. This provides access to the data without
requiring an understanding of how it is structured.
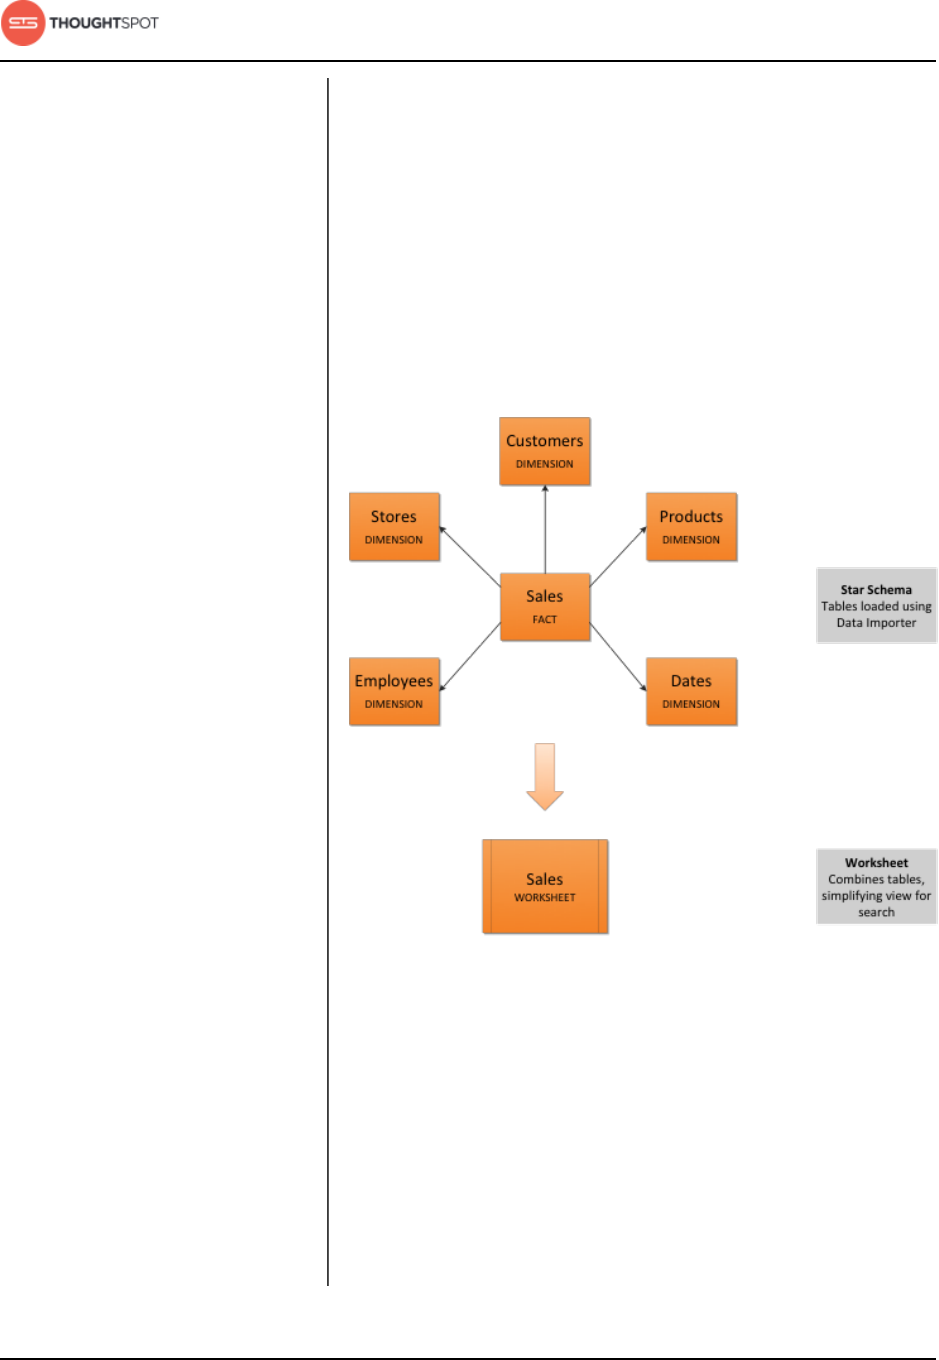
Simplify searching with worksheets
ThoughtSpot Administration Guide Copyright © 2017 by ThoughtSpot. All Rights Reserved. 135
You will typically create one worksheet for each set
of fact and dimension tables. For example, you may
have a sales fact table and an inventory fact table.
Each of these fact tables shares common dimensions
like date, region, and store. In this scenario, you
would create two worksheets: sales and inventory.
The following diagram depicts the workflow for
creating the sales worksheet.
Figure 49: Workflow for creating a sales worksheet
The process for creating a worksheet is:
1. Decide which tables to use for the worksheet.
2. Create a new worksheet.
3. Add sources (tables) to the worksheet.
4. Choose the inclusion rule to apply.
5. Choose the worksheet join rule.

Simplify searching with worksheets
ThoughtSpot Administration Guide Copyright © 2017 by ThoughtSpot. All Rights Reserved. 136
6. Select the columns to include.
7. Create formulas, if needed.
8. Save the worksheet.
9. Share the worksheet with groups or users.
An alternative way to create a worksheet is to
do a search and save it as a worksheet. See the
ThoughtSpot User Guide for details on how to do
this.
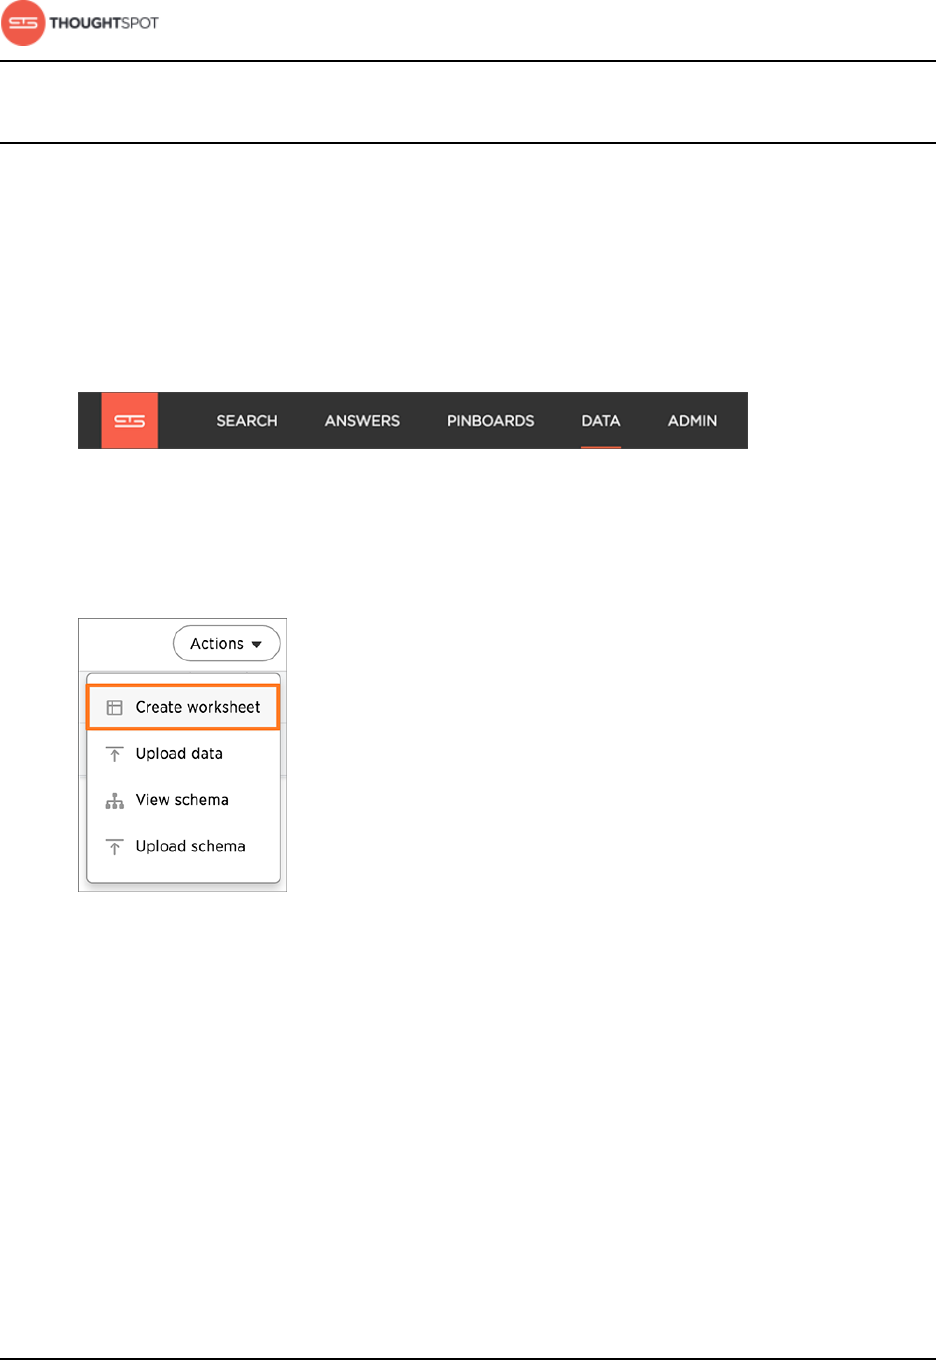
Simplify searching with worksheets
ThoughtSpot Administration Guide Copyright © 2017 by ThoughtSpot. All Rights Reserved. 137
Create a new worksheet
Create a worksheet to make the data easy for users to search. This process
includes adding a new worksheet, after which you will choose the data sources
to include in it.
To create a new worksheet:
1. Click on Data, on the top navigation bar.
Figure 50: Data
2. Click the Actions icon from the upper right side of the screen, and select
Create worksheet.
Figure 51: The Create worksheet icon
Add sources and columns to a worksheet
After creating a worksheet, you need to add the sources that contain the data.
Sources is another name for tables. The sources you choose are typically related
to one another by foreign keys.
To add the sources to the worksheet:
1. Click on the Choose Sources link.
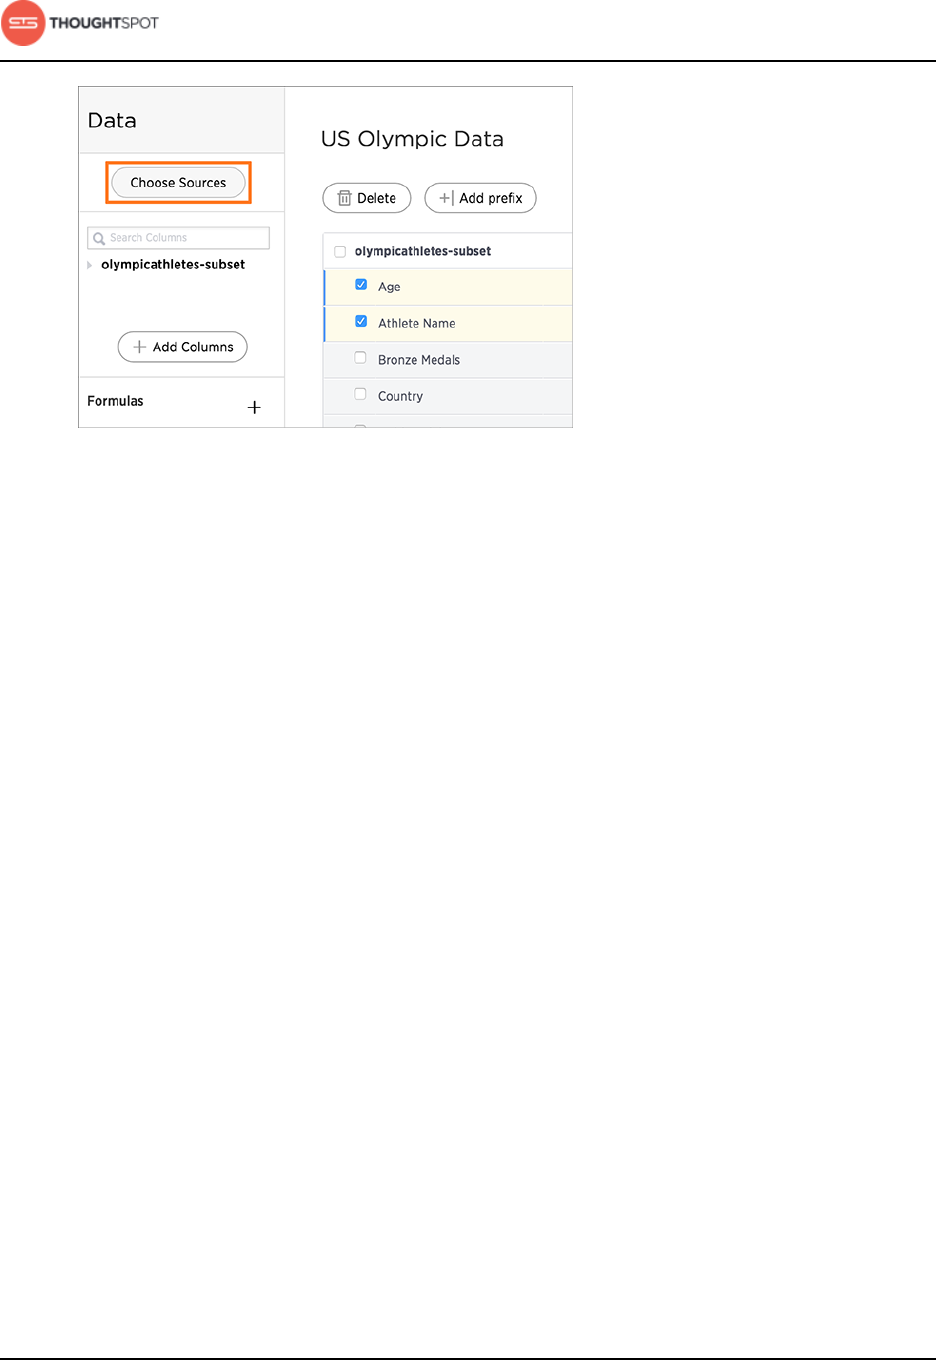
Simplify searching with worksheets
ThoughtSpot Administration Guide Copyright © 2017 by ThoughtSpot. All Rights Reserved. 138
Figure 52: The Choose Sources link
2. Check the box next to each of the sources you want to include in the
worksheet.
Note that the list of sources only shows the tables on which you have view
privileges.
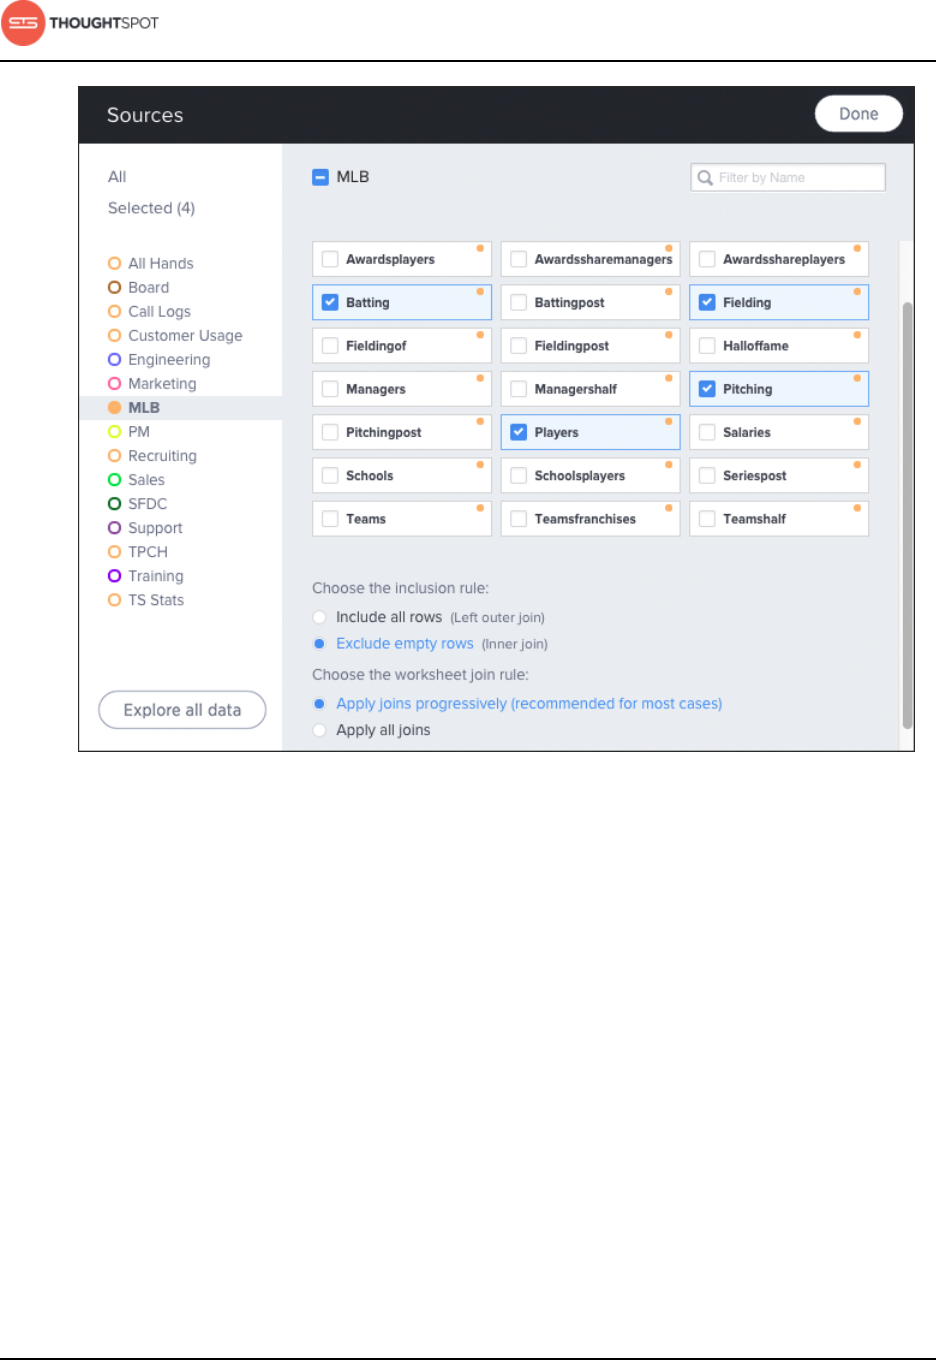
Simplify searching with worksheets
ThoughtSpot Administration Guide Copyright © 2017 by ThoughtSpot. All Rights Reserved. 139
Figure 53: Choose sources for a worksheet
3. If you want to see what the data inside the sources looks like, click Explore all
data.
4. Choose the inclusion rule.
5. Choose the worksheet join rule.
6. Click Done to save your changes.
7. Expand the table names under Columns to select the columns to add to the
worksheet.
a) To add all of the columns from a table, click on the table name and click +
Add Columns.
b) To add a single column, double click on its name.
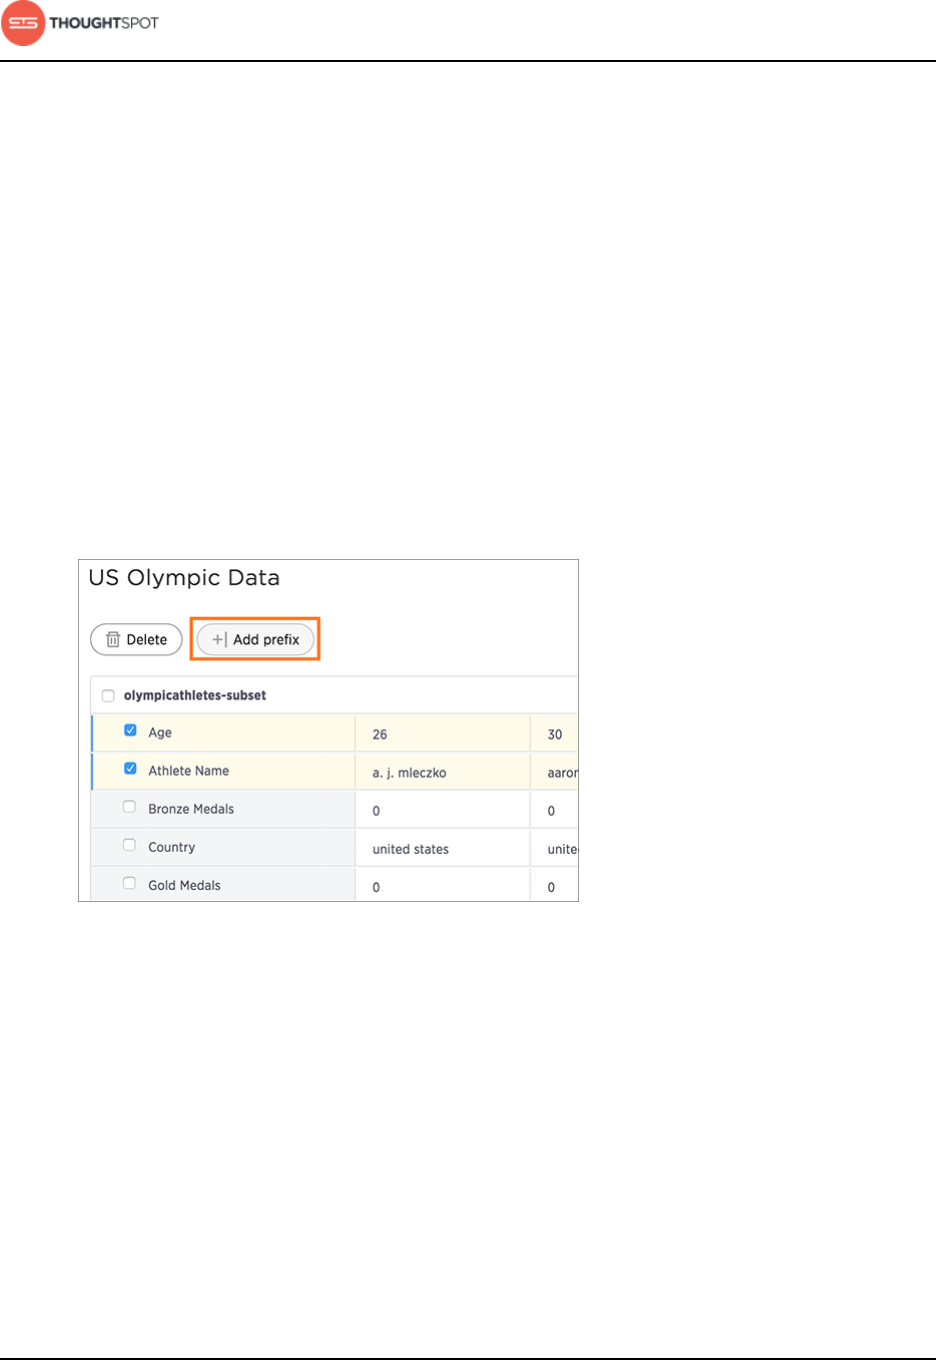
Simplify searching with worksheets
ThoughtSpot Administration Guide Copyright © 2017 by ThoughtSpot. All Rights Reserved. 140
c) To add multiple columns, Ctl+click on each column you want to add and
click + Add Columns.
Note that once you add a column, non-related tables (i.e. those without a
primary/foreign key relationship) become hidden. If you are working with two
tables that should be related, but are not, you can add a relationship between
them.
8. Click on the worksheet title to name it, and then Save it.
9. Click on each column name to give it a more user-friendly name for searching.
You can tab through the list of columns to rename them quickly.
10.If you want to add a prefix to the name of several columns, select them, click
the Add Prefix button, and type in the prefix.
Figure 54: Add a prefix to column names
11. Click Actions and select Save.
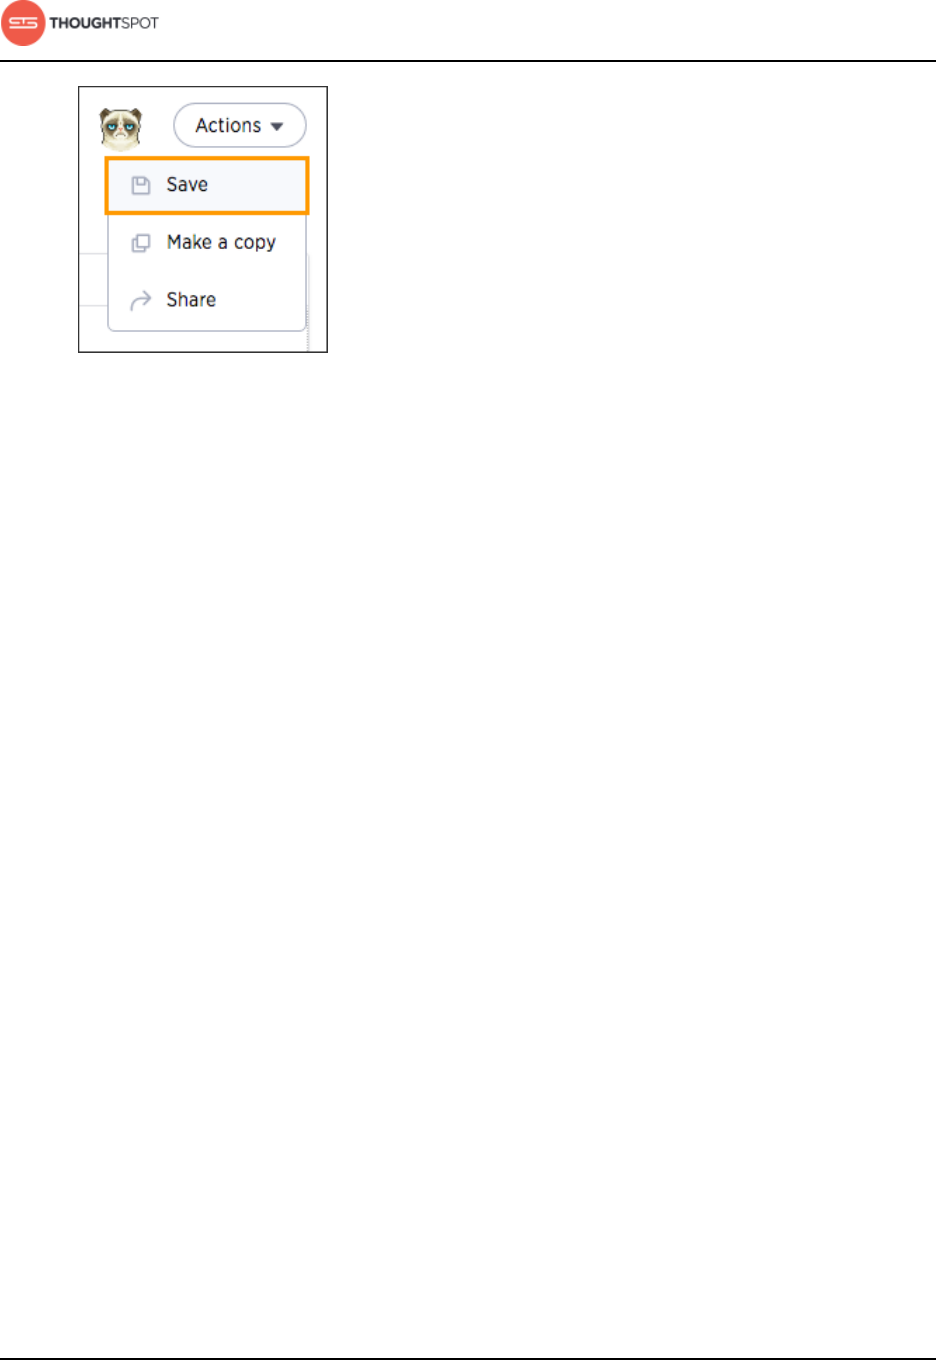
Simplify searching with worksheets
ThoughtSpot Administration Guide Copyright © 2017 by ThoughtSpot. All Rights Reserved. 141
Figure 55: Save a worksheet
12.Share your worksheet, if you want other people to be able to use it.
How the inclusion rule works
Use the inclusion rule to specify which data to include in a worksheet where two
or more tables are joined. If you are familiar with SQL, you might think of it as a
JOIN condition.
In the case where some of the rows in the fact table do not have a match in
one of the dimension tables, the inclusion rule determines whether or not they
will be shown. Because of this, the inclusion rule can affect the number of rows
the worksheet will contain. Setting the inclusion rule differently will affect the
number of rows in the worksheet if some of the values in a table are empty (or
NULL) or if some primary key column values in a fact table do not have a match
to a foreign key in the dimension table.
Only rows in the fact table (also known as the LEFT table) are affected by the
inclusion rule. It works like this:
• If you choose Apply full outer join (Full Outer Join), the results of both the
left and right outer joins are combined, and all matched or unmatched rows
from the tables on both sides are shown.
• If you choose Apply left outer join (Left Outer Join), all possible rows in
the fact table are shown, regardless of whether they have a match in the
dimension tables.

Simplify searching with worksheets
ThoughtSpot Administration Guide Copyright © 2017 by ThoughtSpot. All Rights Reserved. 142
• If you choose Apply right outer join (Right Outer Join), all possible rows in
the second table are shown, regardless of whether they have a match in the
dimension tables.
• If you choose Exclude empty rows (Inner Join), any rows that do not have a
match in one of the dimension tables, won't be shown in search results.
When using Exclude empty rows (Inner Join), the number of rows in the
resulting worksheet can differ from the number of rows in the table when
accessing it directly, because of the join condition. The worksheet acts like a
materialized view. This means that it contains the results of a defined query in
the form of a table.
If you find that the charts and tables built on a worksheet contain a large number
of null values (which display as {blank} in the web browser), you can fix this by
changing the inclusion rule for the worksheet.
The answer returned when searching using a worksheet as the source can be
different from the answer you get when using the table directly as a source.
When using a worksheet as a source, even if you were to select fields that come
from only one table in your search, any underlying joins to other tables will still
be active. When using the table directly as the source, you will see every value.
This is best understood through an example.
A typical sales fact table contains a column with the employee ID
of the person who made the sale. The employee ID column has a
foreign key in the employee dimension table. This is the relationship
used to join the two tables.
Sometimes a sale has been made directly or through a reseller,
without involving a sales person. In this case, the employee ID
value for the sale will be empty in the fact table. If you wanted the
worksheet to include all sales, regardless of whether or not they
were associated with a sales person, you would choose Include all

Simplify searching with worksheets
ThoughtSpot Administration Guide Copyright © 2017 by ThoughtSpot. All Rights Reserved. 143
rows (Left Outer Join). If you only want the worksheet to contain
sales made by employees, you would choose Exclude empty rows
(Inner Join).
How the worksheet join rule works
Use the worksheet join rule to specify when to apply joins when a search is done
on a worksheet. You can either apply joins progressively, as each search term is
added (recommended), or apply all joins to every search.
Often, a worksheet includes several dimension tables and a fact table. With
progressive joins, if your search only includes terms from the fact table, you'll
see all of the rows that satisfy your search. But as you add terms from dimension
tables, the total number of rows shown may be reduced, as the joins to each
dimension table are applied.
It works like this:
• If you choose Apply joins progressively (recommended for most cases), joins
are only applied for tables whose columns are included in the search.
• If you choose Apply all joins, all possible joins are applied, regardless of which
tables are included in the search.
When using Apply joins progressively, the number of rows in a search using the
worksheet depends on which tables are part of the search. The worksheet acts
like a materialized view. This means that it contains the results of a defined query
in the form of a table. So if a particular dimension table is left out of the search,
its joins are not applied.
About the worksheet join rule with Rule-Based Row Level Security
When working with worksheets and row level security, you need to understand
how joins are applied. This is especially important if your schema includes any
chasm traps.

Simplify searching with worksheets
ThoughtSpot Administration Guide Copyright © 2017 by ThoughtSpot. All Rights Reserved. 144
This section applies only to the newer Rule-Based Row Level Security. If you are
using the older, Legacy Row Level Security (not recommended), see About the
worksheet join rule with Legacy Row Level Security.
Rule-Based Row Level Security with worksheets
In the past, if you used the Legacy Row Level Security, you could depend
on the worksheet join rule to protect sensitive data, based on the row level
security settings on a single table. But now, with Rule-Based Row Level Security,
you need to protect every table that contains any sensitive data. To do this,
you'll grant access by creating explicit row level security rules on each of the
underlying tables which contain data that row level security should apply to.
When creating the row level security rules for a table that's part of a worksheet,
you aren't limited to referencing only the columns in that table. You can specify
columns from other tables in the worksheet as well, as long as the tables are
joined to the table you're creating the rule on. Then, when creating a worksheet
on top of them, the behavior is consistent regardless of the worksheet join rule
you choose. Users will never be able to see data they should not, regardless of
what their search contains.
Example of using Rule-Based Row Level Security to secure a table
Imagine you have a worksheet that contains a "Sales" fact
table, and "Customer" and "Product"dimensions that are joined
on "Customer SSN" and "Product Code" columns. In order to
secure the "Sales" table, you can use "Customer Name" from the
"Customer" column to create a row level secuirty rule.
Chasm Trap
This is particularly important with chasm trap schemas. For chasm trap schemas,
if row level security is only set on one of the tables, people could see data they

Simplify searching with worksheets
ThoughtSpot Administration Guide Copyright © 2017 by ThoughtSpot. All Rights Reserved. 145
should not see if the scope of their search does not include that table. (this
protects the from having people see the wrong things if they have chasm trap).
For any worksheets that include a chasm trap, you need to use the new Rule-
Based Row Level Security. In fact, starting in release 3.3, if you have existing
Legacy Row Level Security built on a chasm trap schema, you'll need to migrate
to the new row level security before you can use them anymore. If you were still
using Legacy Row Level Security, after upgrading to 3.3.x, you would not be able
to access any of those worksheets. You’d see a message advising you to migrate
to the newer Rule-Based Row Level Security.
Note also that for chasm trap worksheets, progressive and non-progressive joins
do not apply. There is an entirely different methodology for how worksheet joins
on a chasm trap schema work with row level security. So you can safely ignore
that setting.
About the worksheet join rule with Legacy Row Level Security
When working with worksheets and Legacy Row Level Security, you need to
understand how joins are applied. This section gives some examples to explain
the interaction between these two concepts.
This section applies only to the older Legacy Row Level Security. If you are
using the newer, Rule-Based Row Level Security (recommended), see About the
worksheet join rule with Rule-Based Row Level Security. If your schema includes
any chasm traps, you must use the newer Rule-Based Row Level Security.
Worksheet schemas and the root table
To understand how the worksheet join rule is applied, you first need to
understand worksheet schemas and the concept of root tables. When you create
a worksheet, you're effectively creating a self-contained schema made up of
the tables in the worksheet and the relationships (joins) between the tables.
The joins (represented by arrows in the diagram) reflect the primary key/foreign
key relationships between the tables in the underlying database schema. The
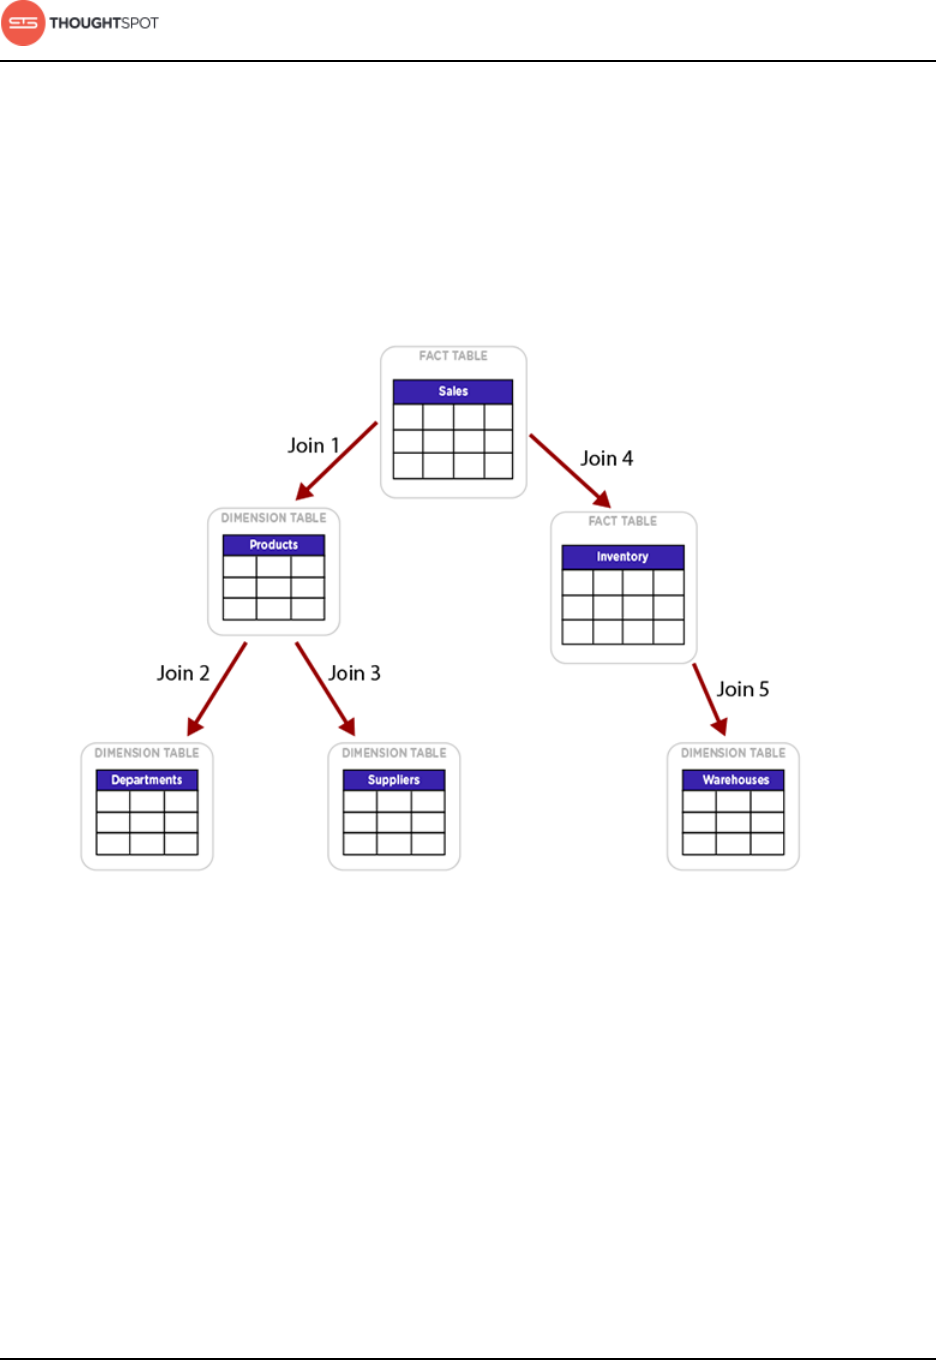
Simplify searching with worksheets
ThoughtSpot Administration Guide Copyright © 2017 by ThoughtSpot. All Rights Reserved. 146
concept of the "root" table in the worksheet schema becomes important for
understanding how the joins are applied when searching. In this context, the root
table is specific to the schema structure defined for that worksheet.
Suppose you created a worksheet with a schema like the example in the
diagram:
Figure 56: Example of a worksheet data schema
Imagine your schema as a tree, with a root, branches, and leaves. In this diagram,
the root table is the fact table Sales. The root table is typically a fact table. It
is the table that does not have a foreign key pointing to it. So if you draw out
the schema like the diagram, the tables at the bottom can be referred to as
the "leaves" in the schema. If the worksheet only included the tables Products,
Departments, and Suppliers, then the root table would be the Products table.

Simplify searching with worksheets
ThoughtSpot Administration Guide Copyright © 2017 by ThoughtSpot. All Rights Reserved. 147
Similarly, if the worksheet only included Inventory and Warehouses, the root
table would be Inventory.
Apply all joins
When you choose Apply all joins when creating a worksheet, all joins between
the tables get pre-applied, whether or not there is row level security present.
This is the simplest case.
Apply joins progressively without row level security
What if you choose Apply joins progressively when creating a worksheet, and
none of the tables in ThoughtSpot have row level security applied? In this case,
the joins will be applied using the worksheet schema as in these examples:
Example 1: Progressive join with tables from one branch
Joins are applied from the root table of the worksheet down to the
lowest leaf table involved in the search. If the worksheet includes
all of the tables in the diagram, but when doing a search we choose
only columns from Products and Departments, the joins get applied
starting at the root table and moving down to all of the tables
included in the search. That is, joins from Sales to Products to
Departments (Join 1 and Join 2) will be used.
Example 2: Progressive join with tables from different branches
Joins are applied from the root table of the worksheet, moving
down each branch, to the lowest leaf tables involved in the search.
If we searched on columns from only the Suppliers and Warehouses
tables, the join path would traverse down the tree to reach the
lowest leaf table in each branch. That is, the joins applied would be:
• Join 1

Simplify searching with worksheets
ThoughtSpot Administration Guide Copyright © 2017 by ThoughtSpot. All Rights Reserved. 148
• Join 3
• Join 4
• Join 5
Apply joins progressively with row level security
If any of the tables in ThoughtSpot have level security applied to them, the joins
used in your worksheet will be affected like this:
• If the row level security is applied only outside the scope of the worksheet
schema, the join behavior is the same as when there is no row level security in
the system.
• If the worksheet contains even a single table with row level security, non-
progressive joins (Apply all joins) will be used if the join path includes the
table with row level security. Remember that the join path begins at the root
table and moves down to each of the leaf tables included in the search. So a
table with row level security may occur in the join path even if its columns are
not included in the search.
Example 3: Progressive joins when a table outside of the join path
has row level security
Assume the table Departments has row level security applied,
so that department managers can only see the department they
manage. If we did a search on the tables Suppliers and Products,
progressive joins would be used. The join path would be Join 1, Join
3. The Department table row level security would not apply, since
the Departments table is not in the join path.
Simplify searching with worksheets
ThoughtSpot Administration Guide Copyright © 2017 by ThoughtSpot. All Rights Reserved. 149
Example 4: Progressive joins when a table in the join path has row
level security
Assume now that the table Products has row level security applied,
so that buyers could only see the products they order. If we did a
search on the tables Departments and Warehouses, Apply all joins
would be used, so the Products row level security would apply.
The join path would be Join 1, Join 2, Join 4, and Join 5. This join
path takes us through the Products table, which explains why its
row level security would affect the search results, even though no
columns from the Products table are included in the search.
Chasm trap
If you have a worksheet that includes a chasm trap, you cannot use the Legacy
Row Level Security. You must migrate your row level security settings to use
Rule-Based Row Level Security.
About aggregated worksheet and table joins
You have the ability to join an aggregated worksheet with a table.
Previously you could only join aggregated worksheets with other aggregated
worksheets. Now, you can join an aggregated worksheet with a system table by
creating a relationship. This means aggregated worksheets now behave similar
to tables, and they can be used in the same way as a table, excluding any TQL
manipulation.
You also have the capability to create a worksheet on top of an aggregated
worksheet. So aggregated worksheets can be included as tables in regular
worksheets.

Simplify searching with worksheets
ThoughtSpot Administration Guide Copyright © 2017 by ThoughtSpot. All Rights Reserved. 150
About formulas in worksheets
You can define formulas and use them to create derived columns in worksheets.
You create formulas by combining standard functions and operators, column
names, and constant values.
Anyone who can create a worksheet can add a formula to it. Formulas are not
reusable; the formula you create is associated only with the worksheet it belongs
to.
A complete list of available formulas and examples of each is available in the
Formula reference.
Create a formula in a worksheet
You can create a formula in a worksheet by using the Formula Builder. When you
do this, the result of the formula gets added to the worksheet as a column.
Use these steps to create a formula:
1. Create a new worksheet, or edit an existing one.
2. Click the + button next to Formulas.
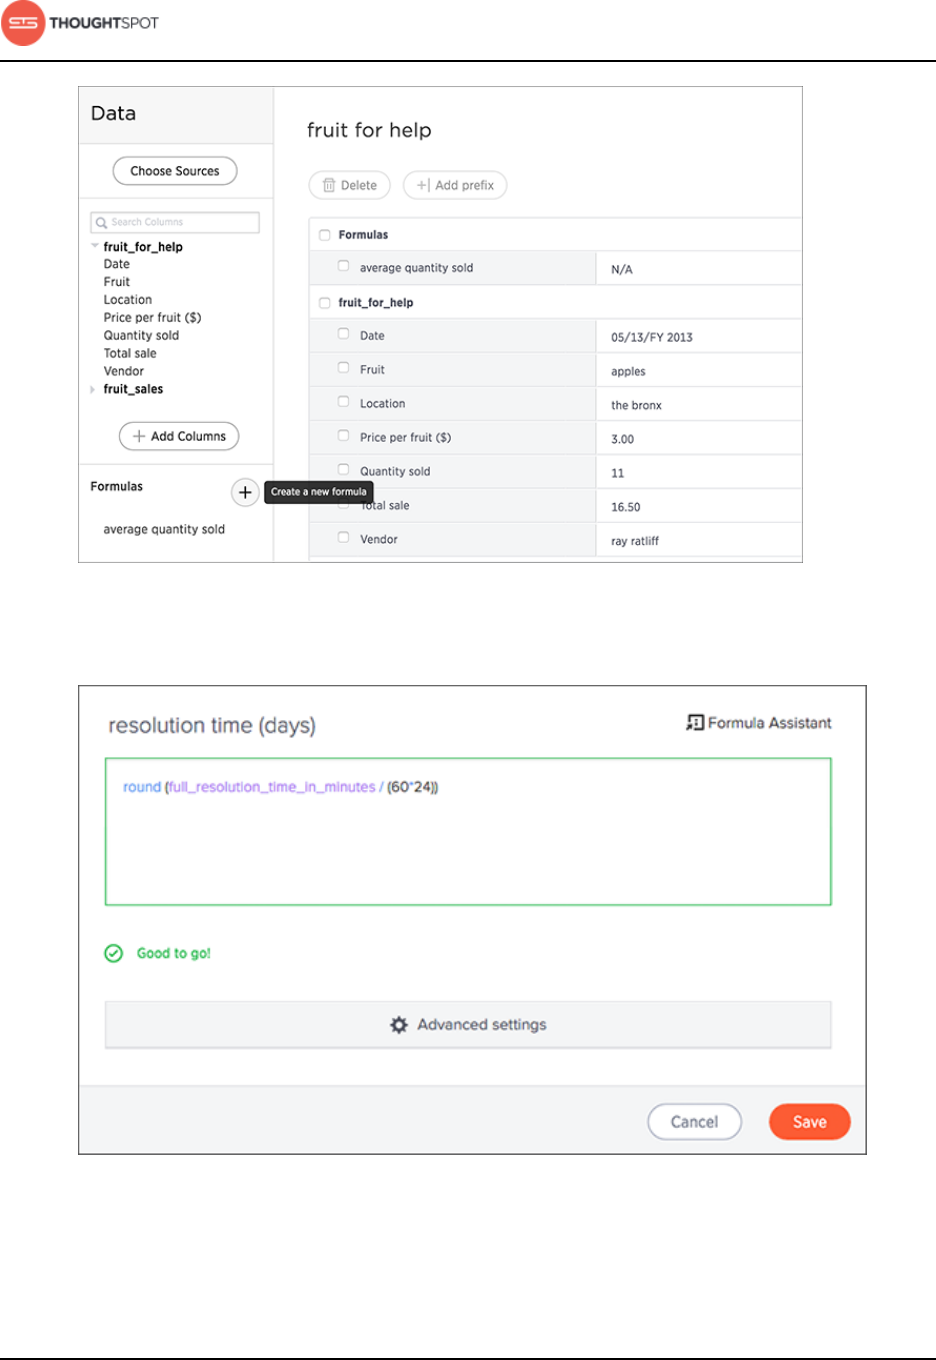
Simplify searching with worksheets
ThoughtSpot Administration Guide Copyright © 2017 by ThoughtSpot. All Rights Reserved. 151
Figure 57: Create a new formula in a worksheet
3. Type your formula in the Formula Builder.
Figure 58: Use the Formula Builder
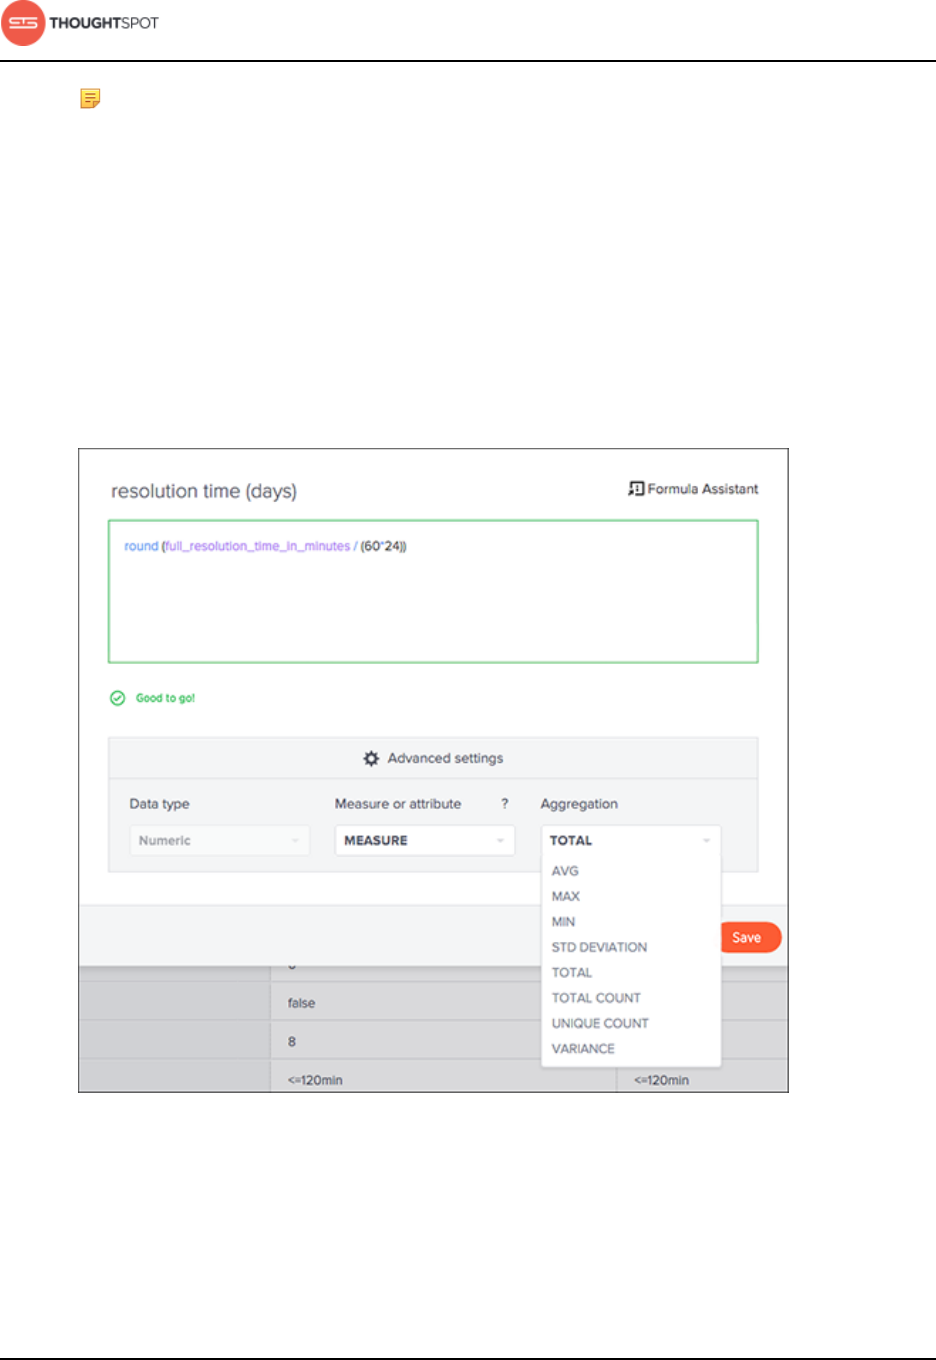
Simplify searching with worksheets
ThoughtSpot Administration Guide Copyright © 2017 by ThoughtSpot. All Rights Reserved. 152
Note: Formulas elements are color coded by type and can include the
formula operators and functions (blue), the names of columns (purple),
and/or constants (black).
4. If you want to change what your formula returns, use the Advanced settings.
Depending on your formula, you may be able to change:
• Data type
• ATTRIBUTE or MEASURE
• Aggregation type
Figure 59: Advanced settings in the Formula Builder
5. You can see a list of formula operators with examples by clicking on Formula
Assistant.
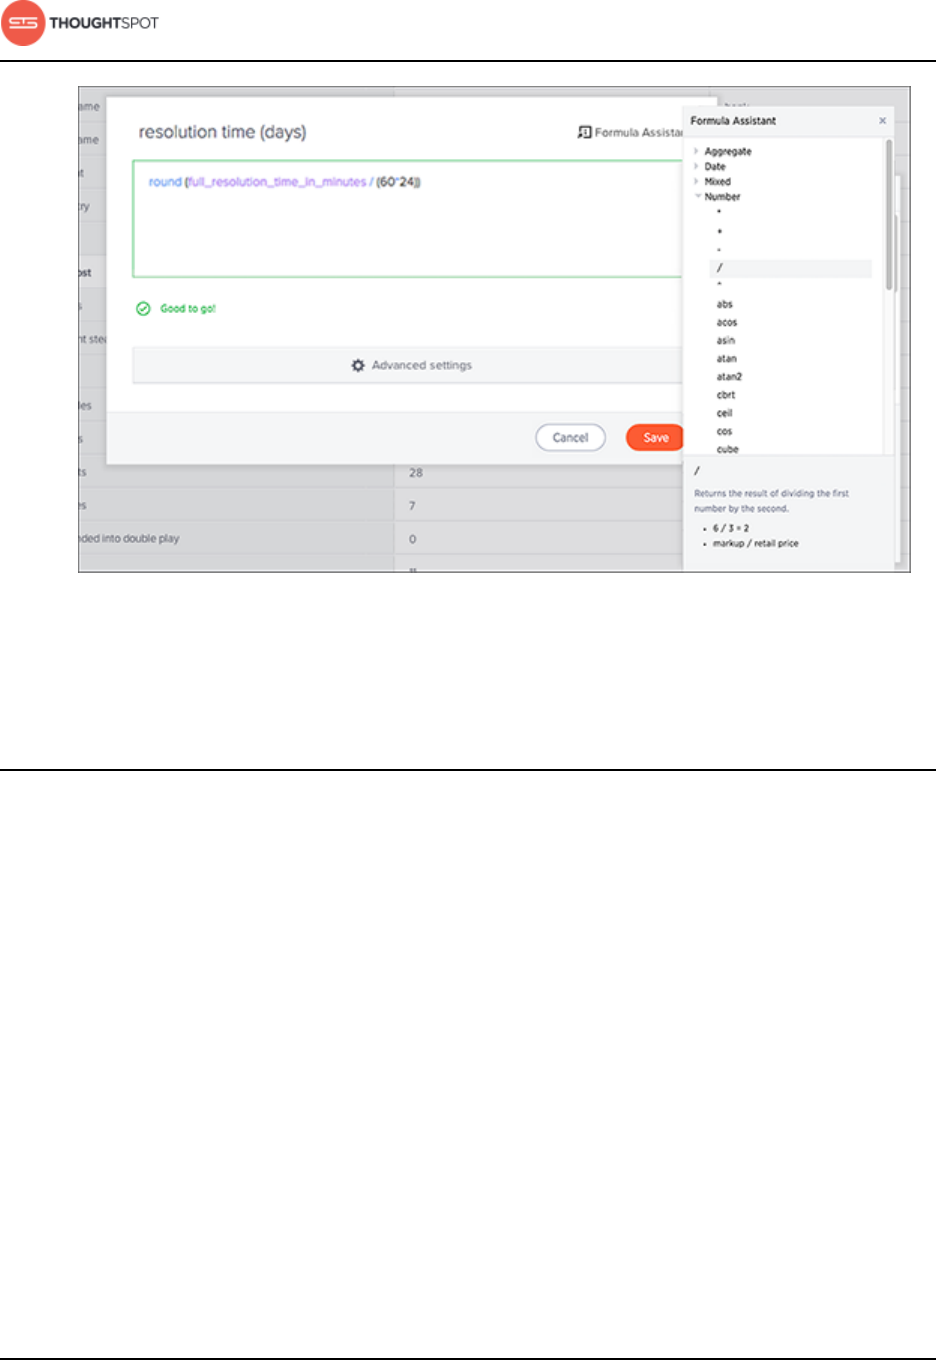
Simplify searching with worksheets
ThoughtSpot Administration Guide Copyright © 2017 by ThoughtSpot. All Rights Reserved. 153
Figure 60: Examples in the Formula Assistant
6. Name the formula by clicking on its title and typing the new name. Click Save.
Edit a worksheet
As long as you have permissions to edit a worksheet, you can always go into
it and make changes, such as adding sources and columns, adding or editing
formulas, and changing column names.
To edit a worksheet:
1. Click on the Data icon on the top navigation bar and then on Worksheets.
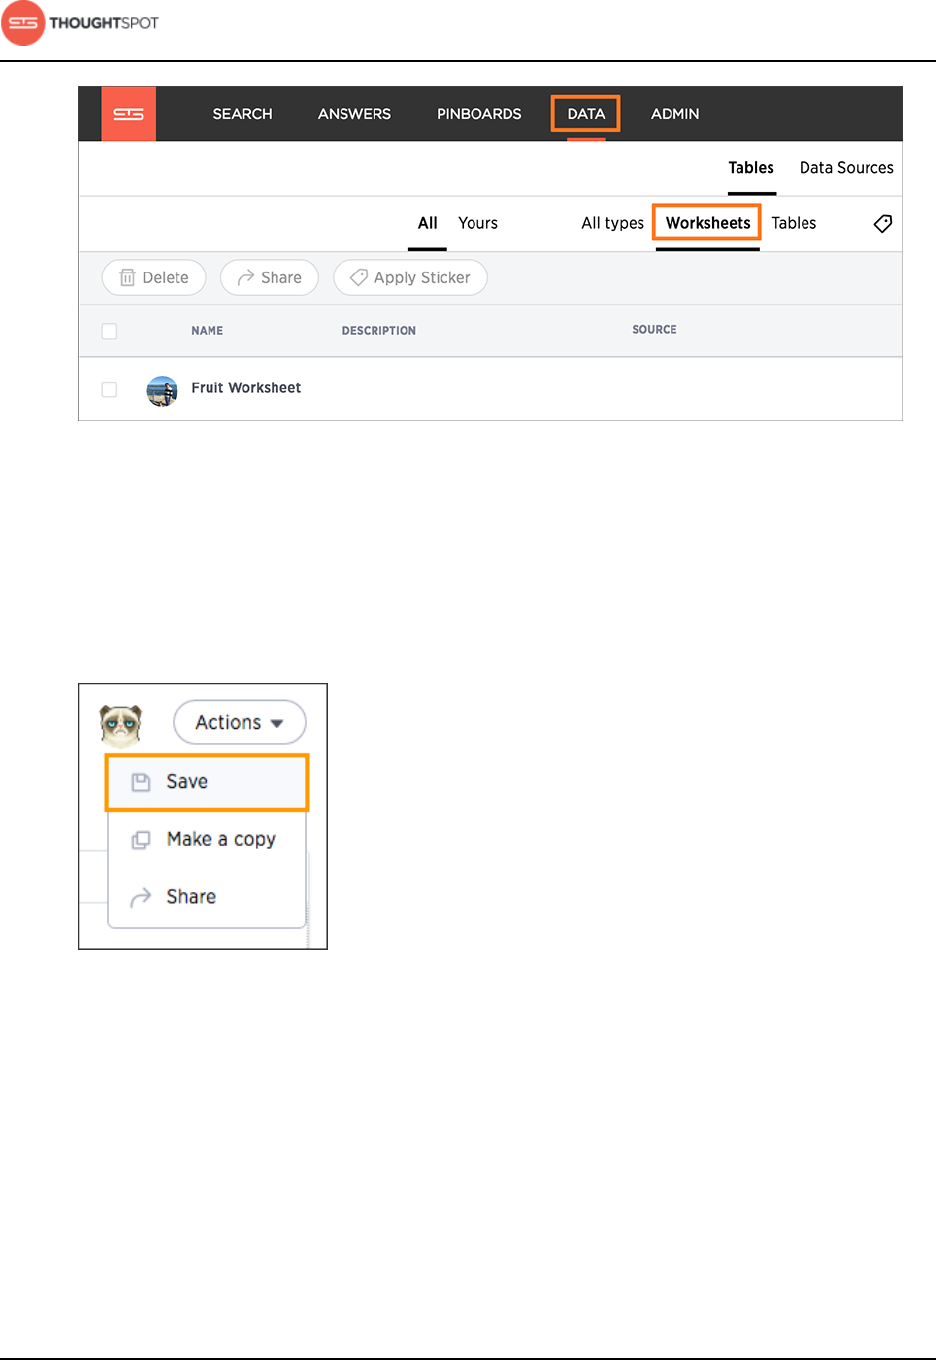
Simplify searching with worksheets
ThoughtSpot Administration Guide Copyright © 2017 by ThoughtSpot. All Rights Reserved. 154
Figure 61: Go to the worksheet list
2. Click on the name of the worksheet you want to edit from the list.
3. Click the Edit button in the upper right hand side of the screen.
4. Make your changes to the worksheet.
5. Click Actions and select Save.
Figure 62: Save a worksheet
Rename a worksheet or table
You can change a worksheet or table name from the ThoughtSpot application.
To change the name of a worksheet or table:
1. Click on Data, on the top navigation bar.
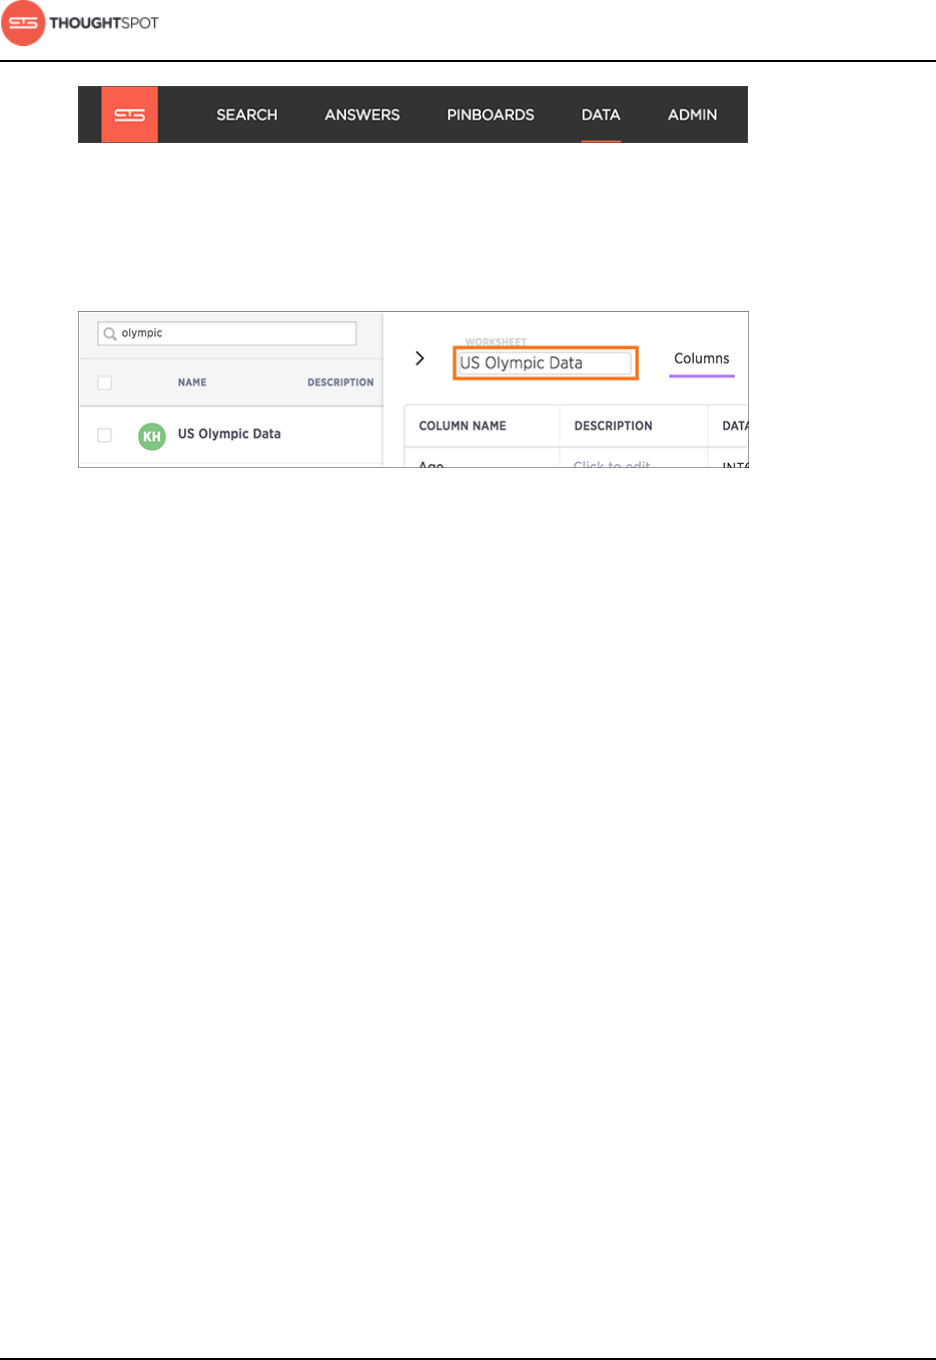
Simplify searching with worksheets
ThoughtSpot Administration Guide Copyright © 2017 by ThoughtSpot. All Rights Reserved. 155
Figure 63: Data
2. Find the worksheet or table you want to rename and click on its name.
3. On the right hand side, click the current name, and enter a new name.
Figure 64: Enter a new name
You can also edit column names and other details in the same way.
4. Click Done and Save.
Change the inclusion or join rule for a worksheet
As long as you have permissions to edit a worksheet, you can always go into it
and set a different inclusion rule or join rule.
If you find that the charts and tables built on a worksheet contain a large number
of null values (which display as {blank} in the web browser), you can fix this by
changing the inclusion rule for the worksheet.
To change the inclusion or join rule of a worksheet:
1. Click on the Data icon on the top navigation bar and then on Worksheets.
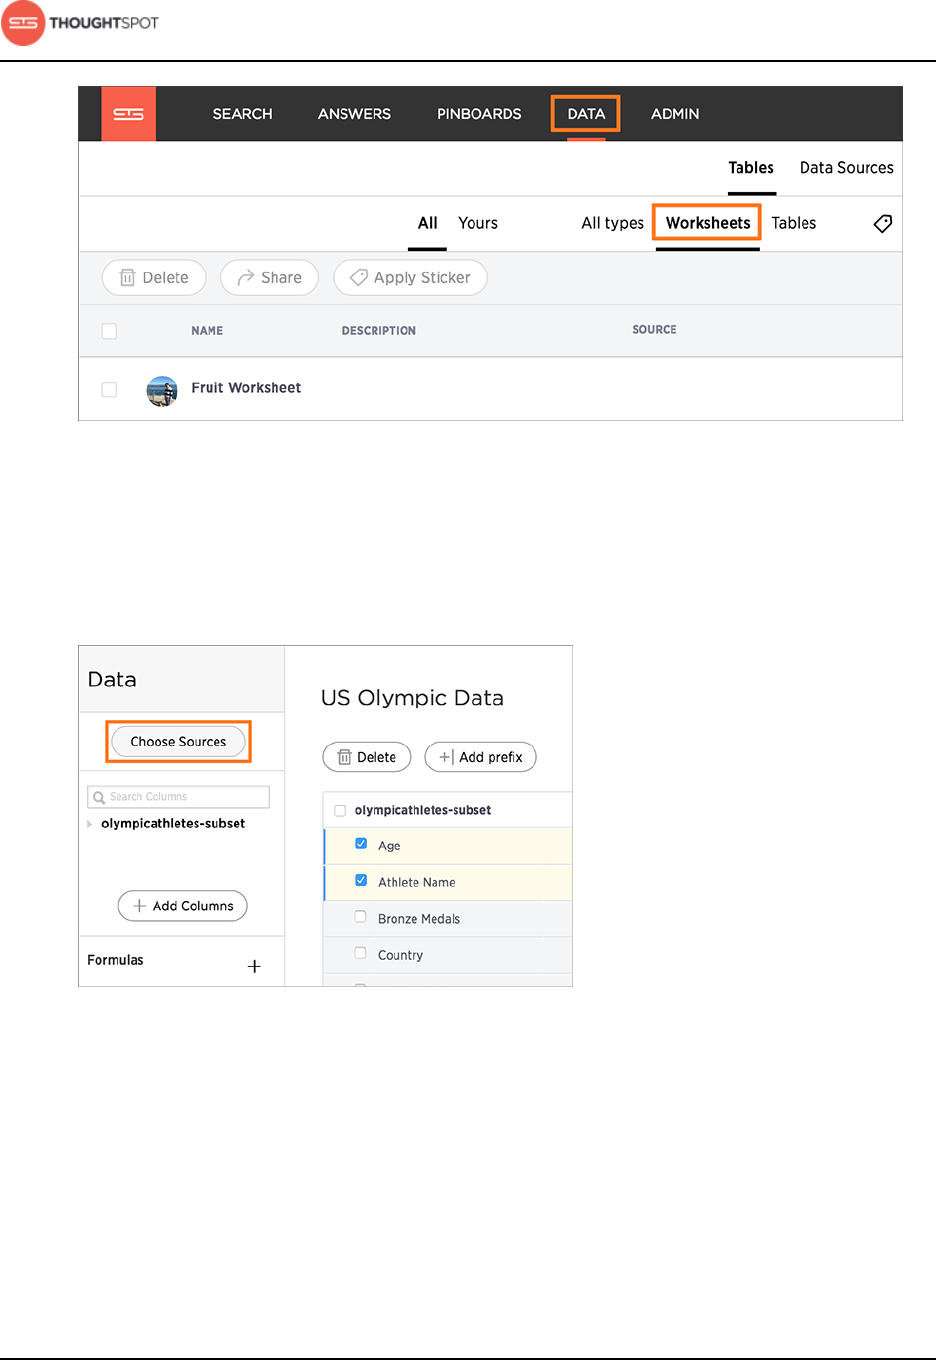
Simplify searching with worksheets
ThoughtSpot Administration Guide Copyright © 2017 by ThoughtSpot. All Rights Reserved. 156
Figure 65: Go to the worksheet list
2. Click on the name of the worksheet you want to edit from the list.
3. Click the Edit button in the upper right hand side of the screen.
4. Click on the Choose Sources link.
Figure 66: The Choose Sources link
5. Choose the inclusion rule and/or the worksheet join rule.
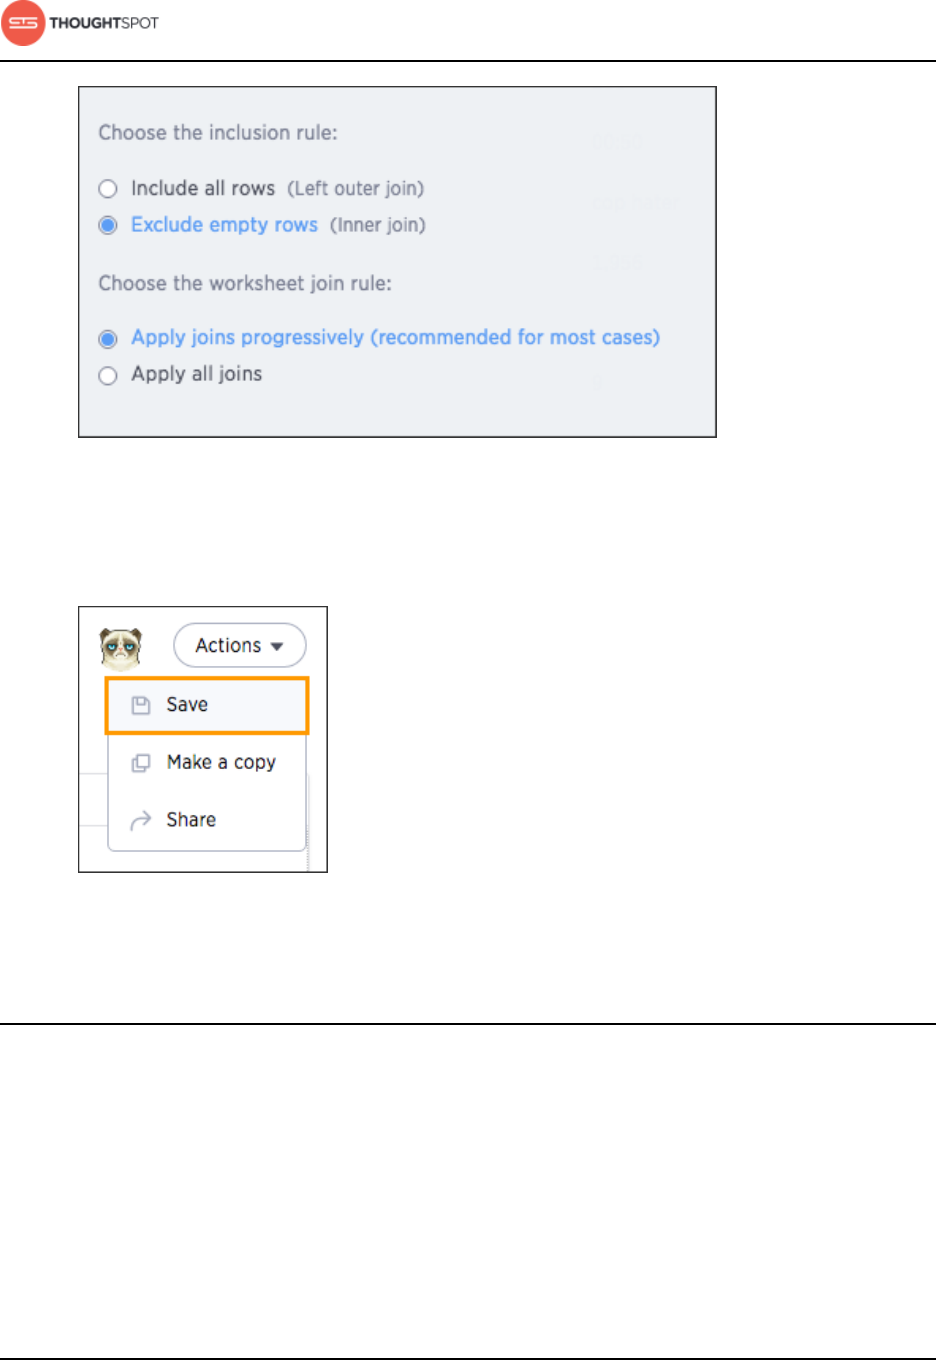
Simplify searching with worksheets
ThoughtSpot Administration Guide Copyright © 2017 by ThoughtSpot. All Rights Reserved. 157
Figure 67: The worksheet join rule and inclusion rule
6. Click Done.
7. Click Actions and select Save.
Figure 68: Save a worksheet
Delete a worksheet or table
When you try to delete a worksheet or table, you'll see a message listing any
dependent objects that must be removed first.
ThoughtSpot checks for dependencies whenever you try to remove a table or
worksheet. A list of dependent objects is shown, and you can click on them to
delete them or remove the dependency. Then you'll be able to remove the table
or worksheet.
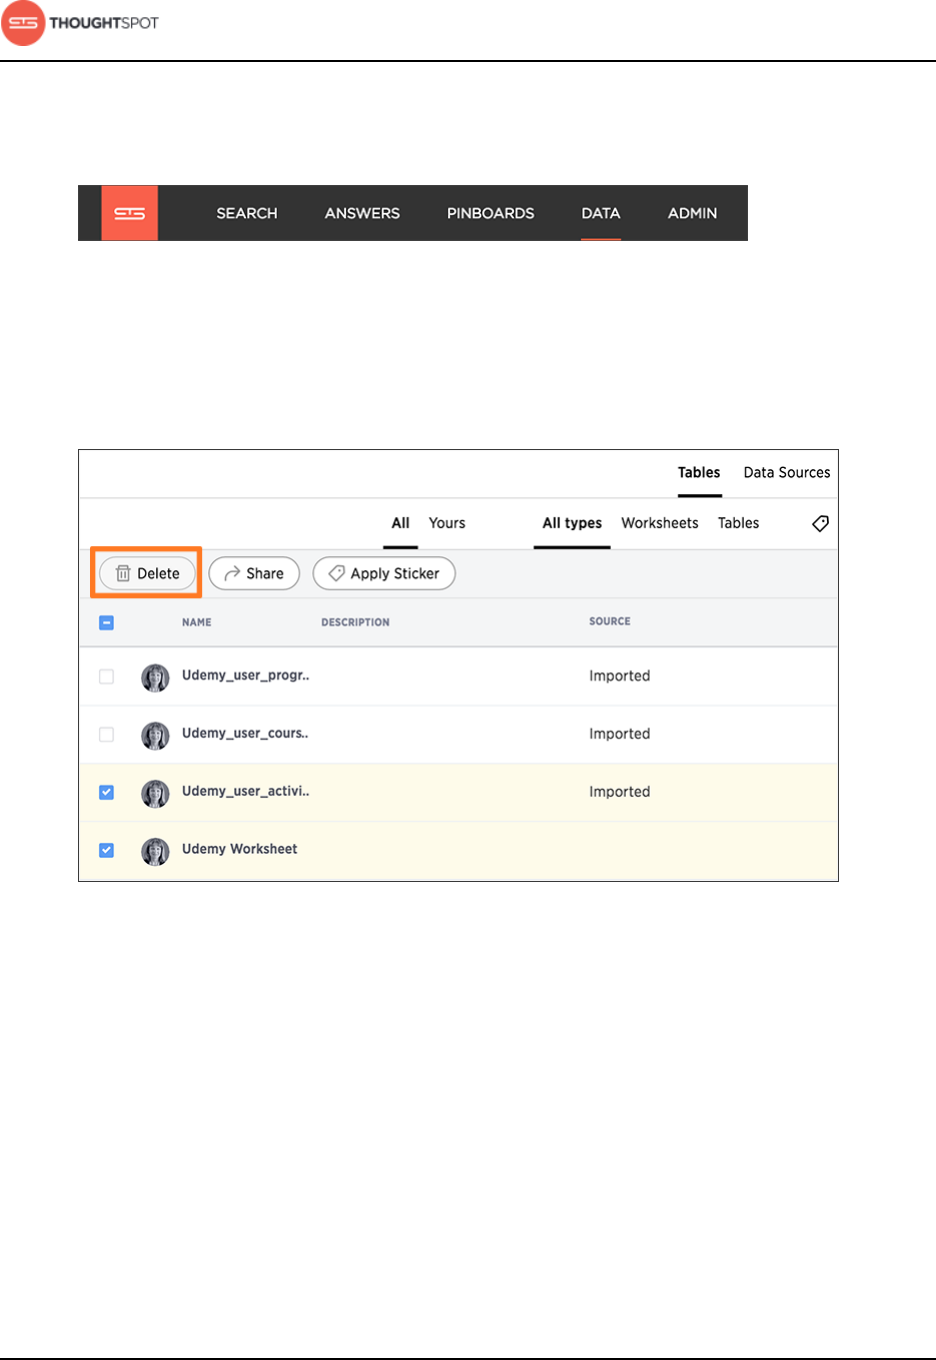
Simplify searching with worksheets
ThoughtSpot Administration Guide Copyright © 2017 by ThoughtSpot. All Rights Reserved. 158
To delete a worksheet or table:
1. Click on Data, on the top navigation bar.
Figure 69: Data
2. Find the worksheet or table you want to remove in the list, and check the box
next to its name.
3. Click the Delete icon.
Figure 70: The Delete icon
4. If you are attempting to delete a data source with dependent objects, the
operation will be blocked. You will see a warning, with a list of dependent
objects with links. Click on the link for an object to modify or delete it. When
all its dependencies are removed, you will be able to delete the data source.
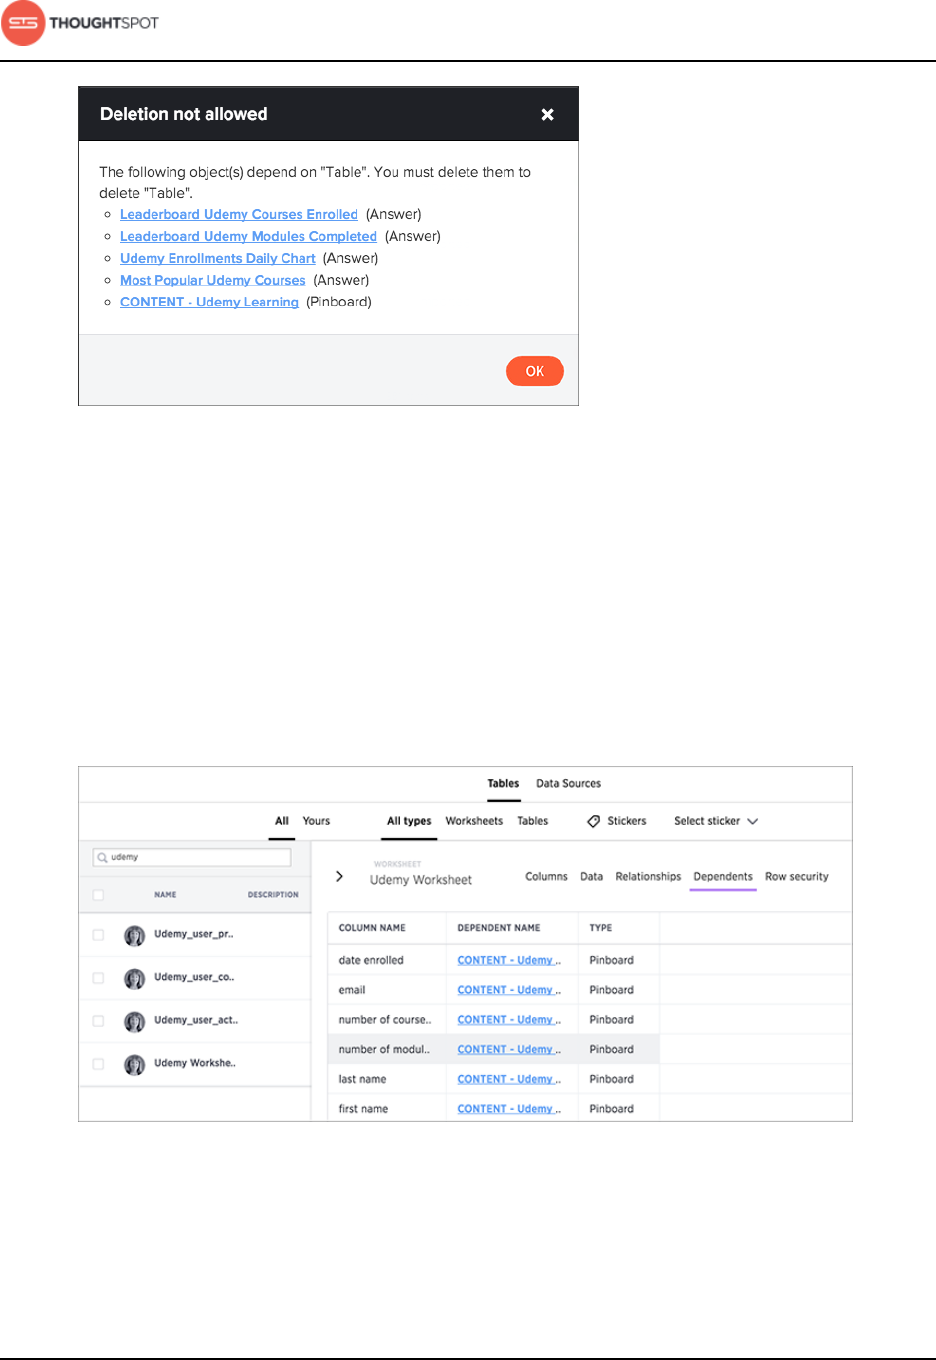
Simplify searching with worksheets
ThoughtSpot Administration Guide Copyright © 2017 by ThoughtSpot. All Rights Reserved. 159
Figure 71: Dependent objects warning
5. You can also click on the name of a worksheet or table and then click
Dependents, to see a list of dependent objects with links.
The Dependents list shows the names of the dependent objects (worksheets
and pinboards), and the columns they use from that source. You can use this
information to determine the impact of changing the structure of the data
source or to see how widely used it is. Click on a dependent object to modify
or delete it.
Figure 72: Dependent objects message

Manage users, groups, and privileges
ThoughtSpot Administration Guide Copyright © 2017 by ThoughtSpot. All Rights Reserved. 160
Chapter 5: Manage users, groups, and privileges
Manage users, groups, and privileges
Topics:
•About privileges
•Add a group and set
security privileges
•Edit or delete a group
•Add a user
•Add multiple users to a
group
•Edit or delete a user
•Forgotten password
Before people can log in and use ThoughtSpot,
you need to create a username, a password, and
a membership in one or more groups for them.
Creating groups and assigning users to them makes
privilege management easier.
Ways of managing users and groups
This section describes manual creation of users,
groups, and privileges, but you can also manage
users through LDAP or SAML. For information on
setting up SAML authentication, see the ThoughtSpot
Application Integration Guide.
The "All" group
There is a default group called All, which includes
every user in ThoughtSpot. When you create a
new user, they will be added to the All group
automatically. You cannot delete the All group or
remove members from it.
Privileges
Privileges determine what kinds of actions users are
allowed to do. Plan your groups so that you can use
them to assign a common set of privileges to multiple
users. Privileges are set at the group level. For more
information on the privileges you can assign and how
to assign them, see About privileges.

Manage users, groups, and privileges
ThoughtSpot Administration Guide Copyright © 2017 by ThoughtSpot. All Rights Reserved. 161
Nested groups (groups within groups)
You can also have a hierarchy of groups. That is,
groups can belong to (i.e. be children of) other
groups. When using group hierarchies, permissions
are inherited from the parent group. So if you're a
member of a sub-group, you would automatically
have the privileges of the parent group.
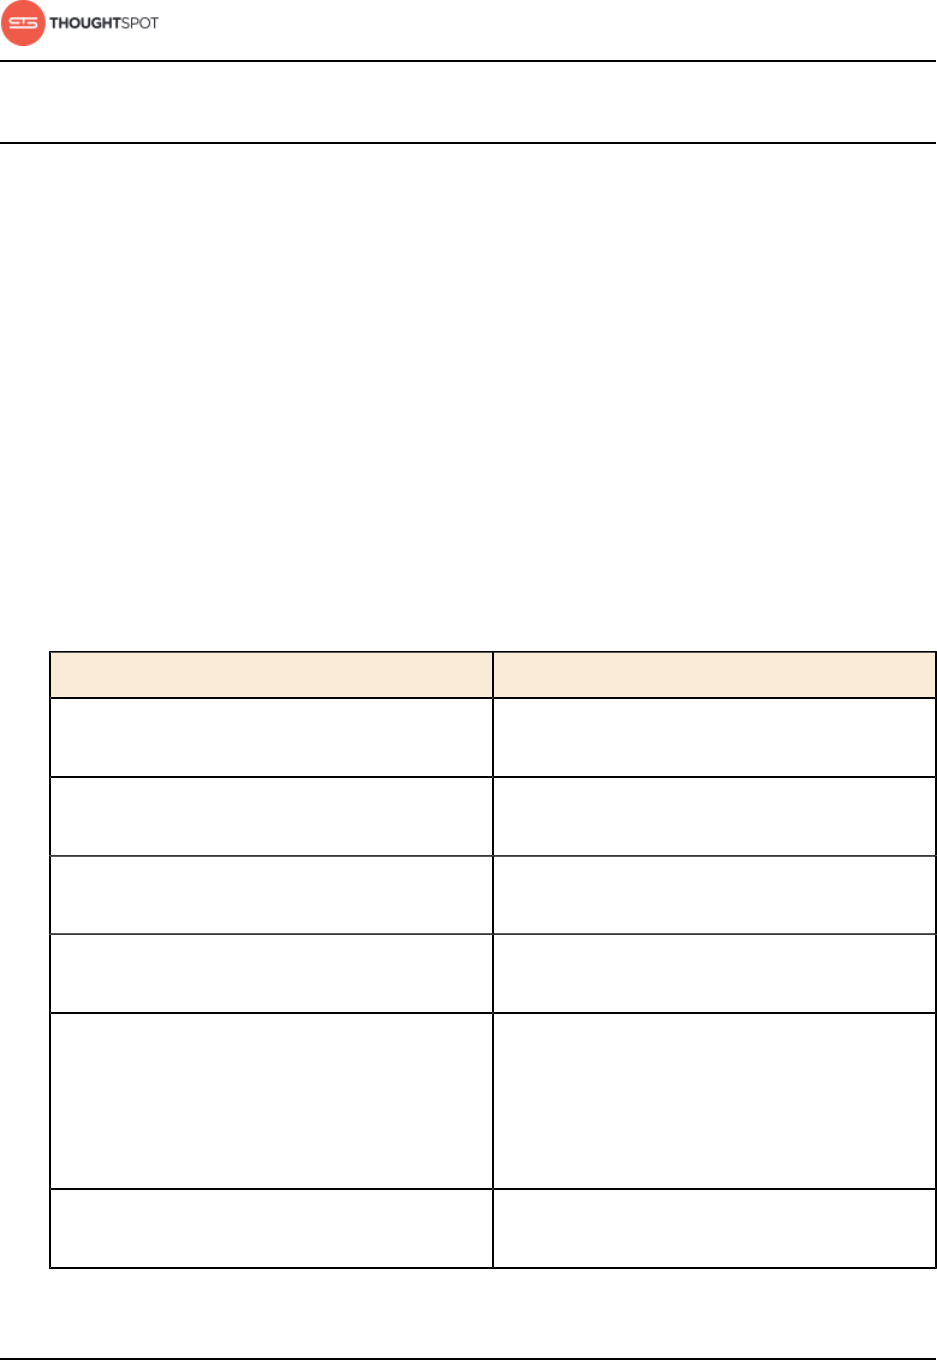
Manage users, groups, and privileges
ThoughtSpot Administration Guide Copyright © 2017 by ThoughtSpot. All Rights Reserved. 162
About privileges
You can assign privileges at the group level. Then you create users and assign
them to groups. This is how you grant users access to different capabilities in
ThoughtSpot.
Each group includes a set of privileges for its users. Good planning when
creating groups and assigning privileges will pay off in ease of administration
and a better search experience. The privileges a group has determine the actions
that its members are allowed to do. If a user belongs to more than one group,
they will have the highest level of the privileges from all the groups they belong
to.
Here are the different privileges, and the capabilities they enable:
Table 20: Group Permissions
Privilege Description
Has administration privileges Can manage Users and Groups and has view
and edit access to all data.
Can upload user data Can upload their own data from the browser
using Import Data.
Can download data Can download data from search results and
pinboards.
Can share with all users Can see the names of and share with users
outside of the groups the user belongs to.
Can manage data Can create a worksheet. Can also create an
aggregated worksheet from the results of a
search by selecting Save as worksheet. Can
also use ThoughtSpot Data Connect, if it is
enabled on your cluster.
Can schedule pinboards Can create pinboard schedules and edit their
own scheduled jobs.

Manage users, groups, and privileges
ThoughtSpot Administration Guide Copyright © 2017 by ThoughtSpot. All Rights Reserved. 163
Privileges are additive, meaning that if a user belongs to more than one group,
they will have the highest level of privileges from among the groups they are a
member of. They are also inherited from the parent, so that a sub-group gets all
the same privileges of its parent, all the way up the group hierarchy.
If you add the privilege Has administration privileges to a group, note
that all users in that group will be able to see all the data in ThoughtSpot.
Administrators can see all data sources, and Row level security does not apply to
them.
There is a default group called All, which includes every user in ThoughtSpot.
When you create a new user, they will be added to the All group automatically.
You cannot delete the All group or remove members from it. If you have a
common set of privileges you want every user to have (typically Can upload user
data and/or Can download data), add those privileges to the All group.
Permissions to see and edit tables, worksheets, and pinboards are set when you
share them with users and groups, as described in the topic Data security.
Add a group and set security privileges
Before adding users, create the groups they will belong to. Each group includes
a set of privileges for its users. Good planning when creating groups and
assigning privileges will pay off in ease of administration and a better search
experience.
To create a group and add privileges for the group:
1. Log in to ThoughtSpot from a browser.
2. Click on the Admin icon, on the top navigation bar.
Figure 73: The Admin icon
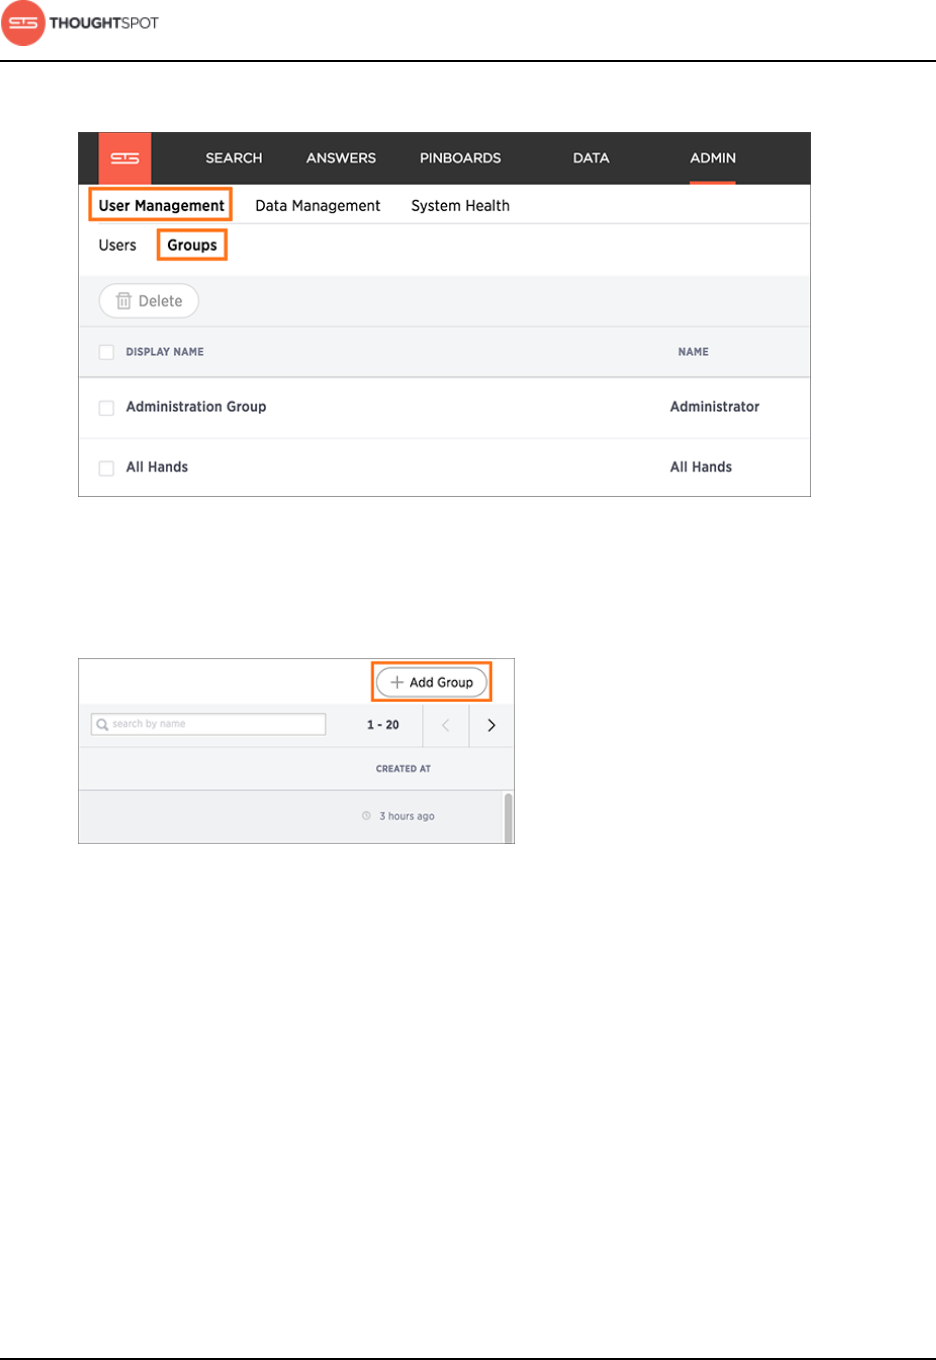
Manage users, groups, and privileges
ThoughtSpot Administration Guide Copyright © 2017 by ThoughtSpot. All Rights Reserved. 164
3. In the Admin panel, click on User Management and Groups.
Figure 74: Manage Groups
4. Click the + Add Group button on the upper right hand side of the list of
groups.
Figure 75: Add a new Group
5. Enter the details for the new group:
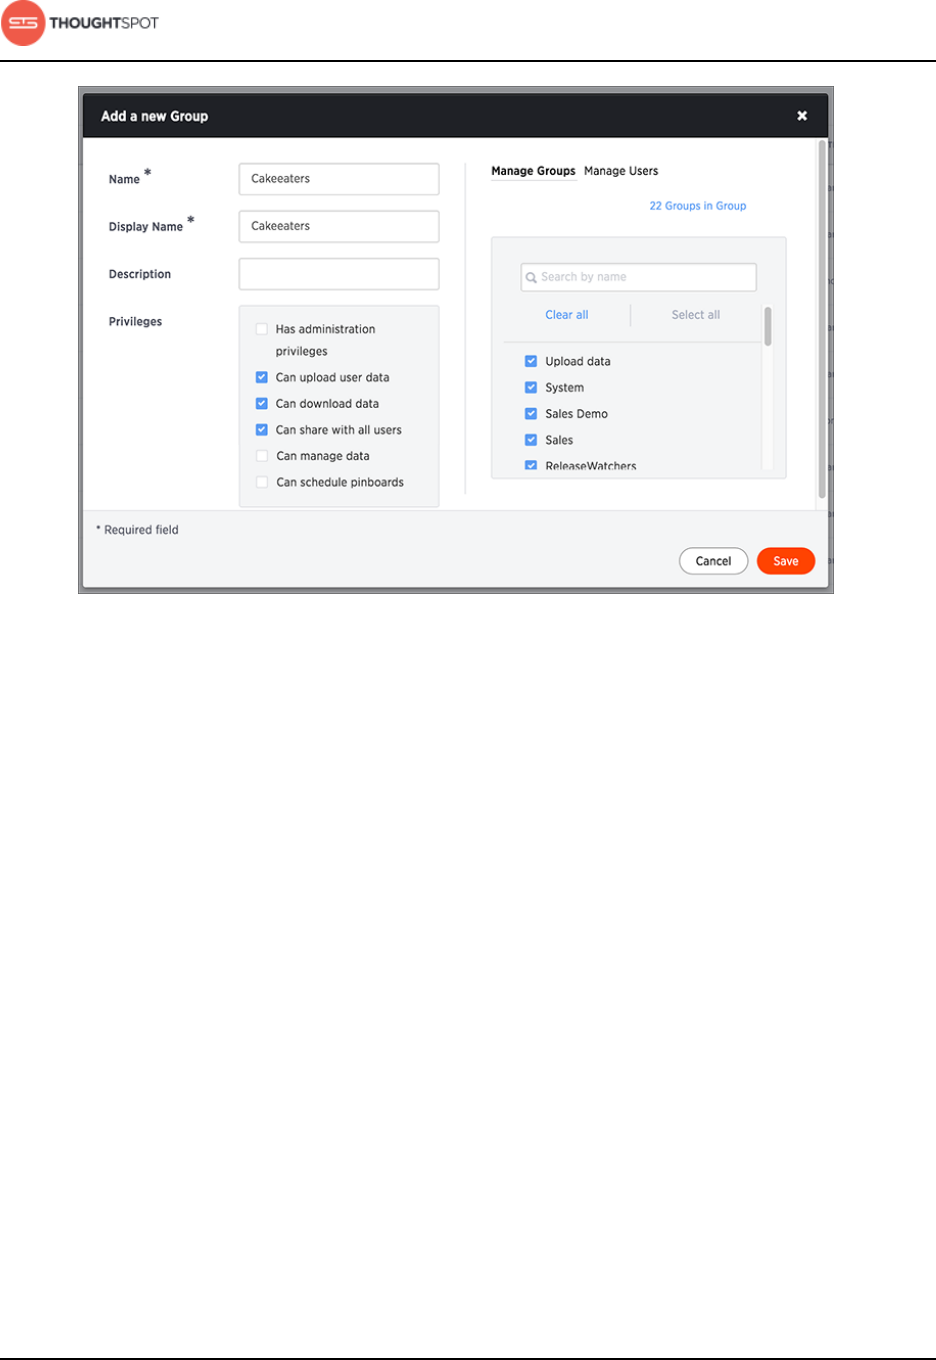
Manage users, groups, and privileges
ThoughtSpot Administration Guide Copyright © 2017 by ThoughtSpot. All Rights Reserved. 165
Figure 76: Enter Group details
a) Enter a unique name for the group.
b) Optionally enter a description.
c) Check the privileges you want to grant to the group.
If you add the privilege Has administration privileges to a group, note
that all users in that group will be able to see all the data in ThoughtSpot.
Administrators can see all data sources, and Row level security does not
apply to them.
d) Click the Manage Groups tab if you want to add sub-groups. Find the
groups you want to add in the list, or search for them by name. Check the
box next to each group you want to add to the group.
e) Click the Manage Users tab if you want to add users. Find the users you
want to add in the list, or search for them by name. Check the box next to
each user you want to add to the group.
6. Click Create to create the group.
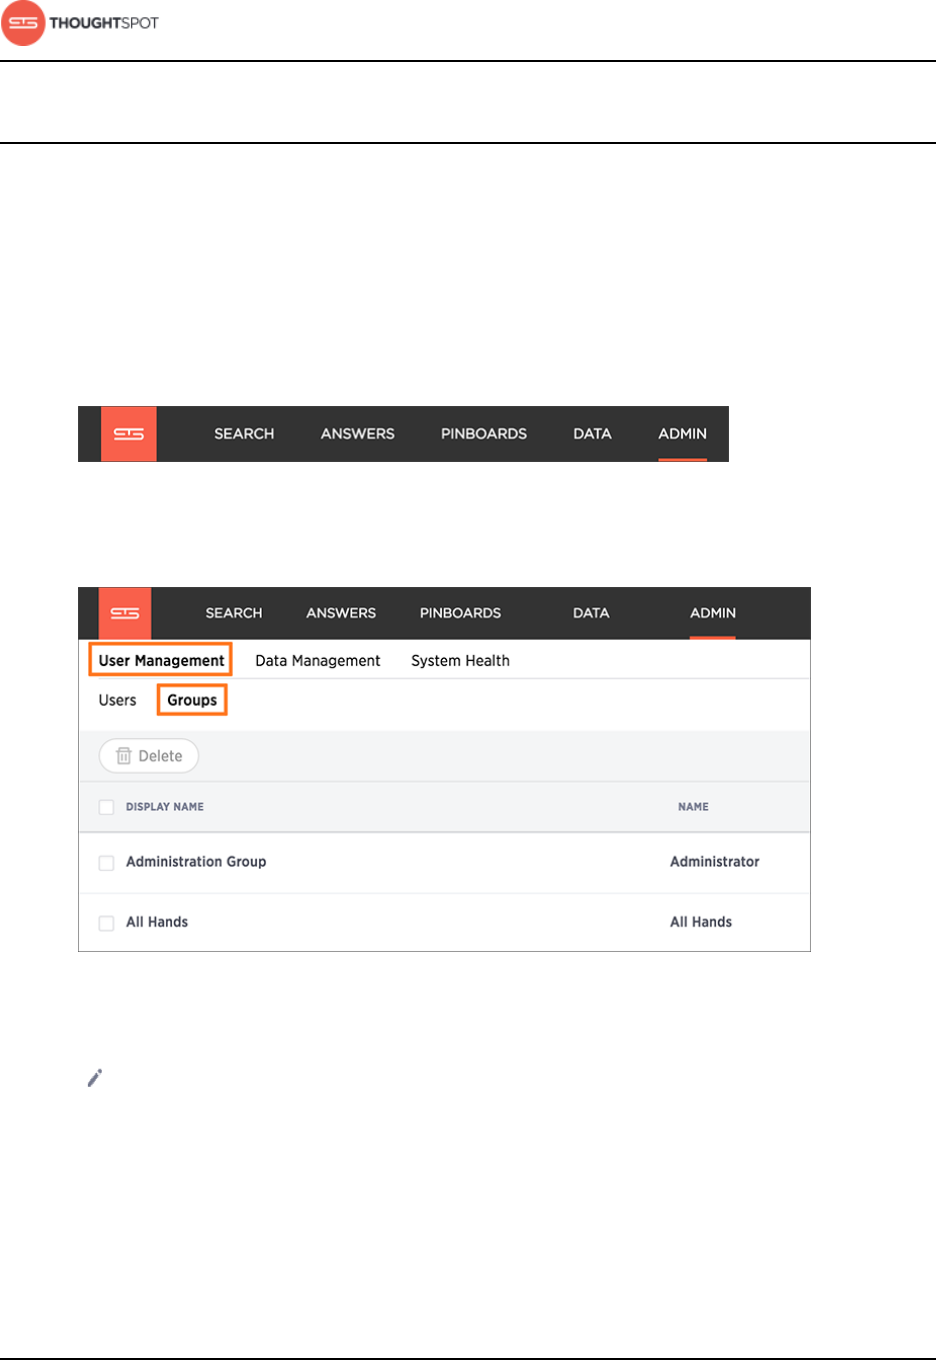
Manage users, groups, and privileges
ThoughtSpot Administration Guide Copyright © 2017 by ThoughtSpot. All Rights Reserved. 166
Edit or delete a group
After adding a group, you can always go in and change its settings to add or
revoke privileges. The new settings will apply to all the group members.
To edit or delete an existing group:
1. Log in to ThoughtSpot from a browser.
2. Click on the Admin icon, on the top navigation bar.
Figure 77: The Admin icon
3. In the Admin panel, click on User Management and Groups.
Figure 78: Manage Groups
4. Find the group you want to edit in the list and click its name, or the edit icon
. If you don't see the name of the group, try searching for it.
You can also delete a group from this page by clicking the Delete icon.
Deleting a group does not delete its users.
5. Make your changes and click Update.
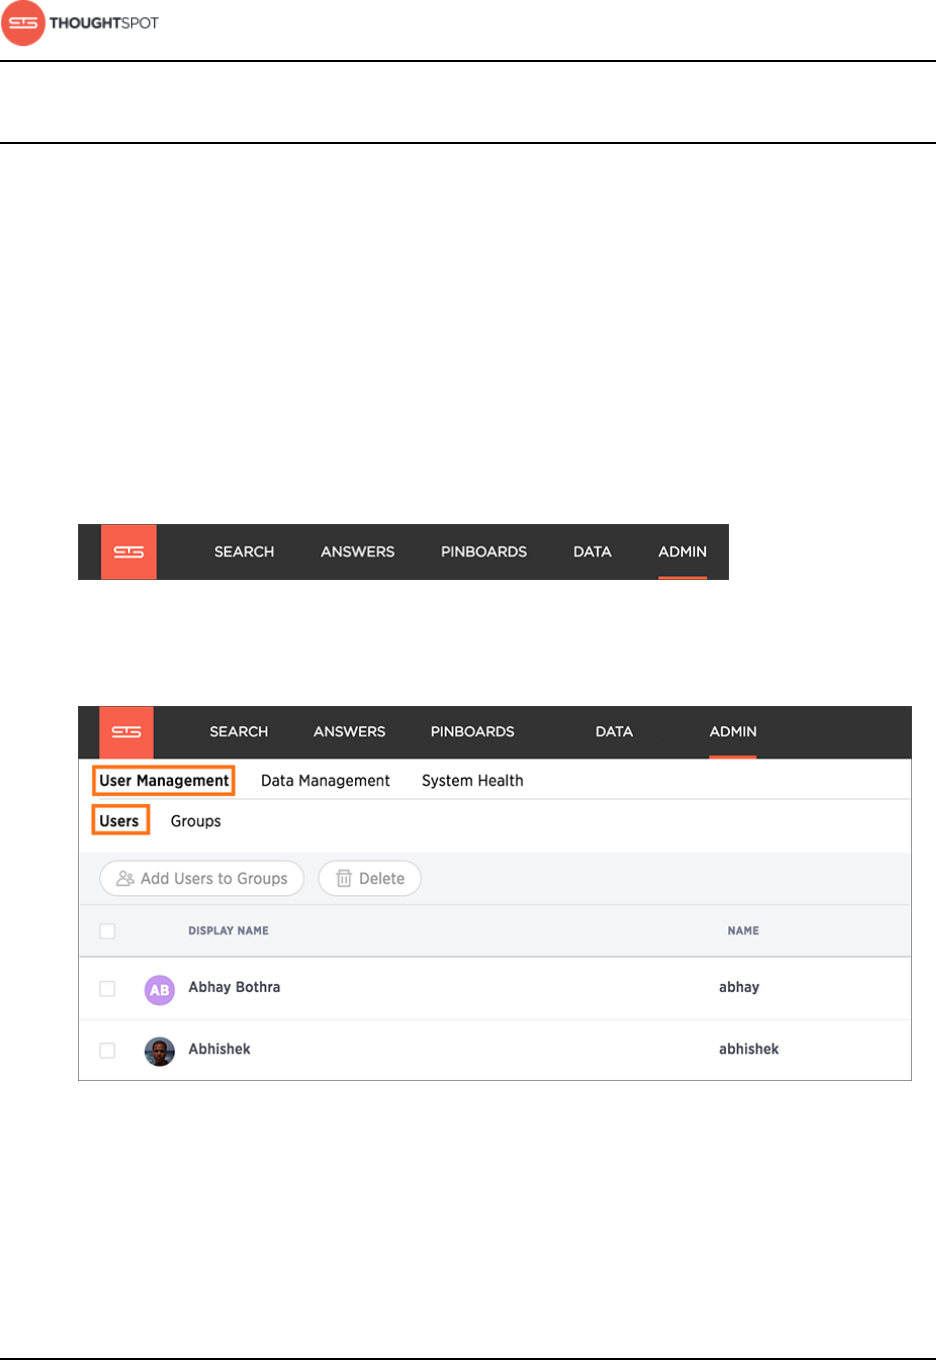
Manage users, groups, and privileges
ThoughtSpot Administration Guide Copyright © 2017 by ThoughtSpot. All Rights Reserved. 167
Add a user
You will create a user account for each unique person who will access
ThoughtSpot, either manually or through LDAP. This procedure shows how to
creating a user manually.
When you create a user, you can assign group memberships. The group's
privileges and permissions apply to all of its members. Any user you create will
be added to the group All automatically.
1. Log in to ThoughtSpot from a browser.
2. Click on the Admin icon, on the top navigation bar.
Figure 79: The Admin icon
3. In the Admin panel, click on User Management and Users.
Figure 80: Manage Users
4. Click the + Add User button on the upper right hand side of the list of groups.
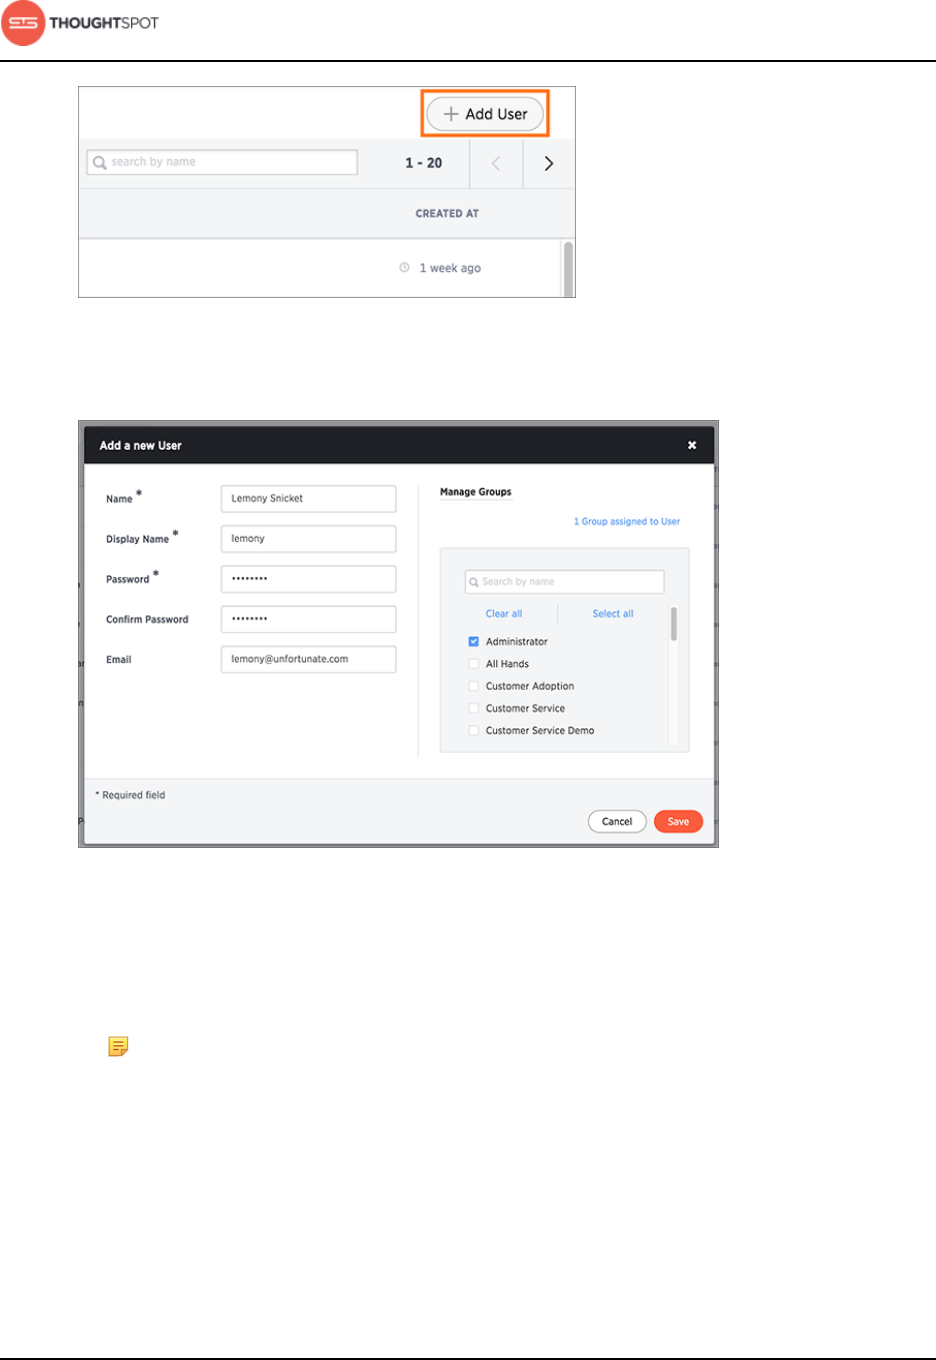
Manage users, groups, and privileges
ThoughtSpot Administration Guide Copyright © 2017 by ThoughtSpot. All Rights Reserved. 168
Figure 81: Add a new User
5. Enter the details for the new user:
Figure 82: Create a user manually
a) Name: A unique name for the user (usually their first and last name).
b) Username: A login name for the user.
Note: Usernames must be unique and lowercase.
If you are using Active Directory to authenticate users, and your
LDAP configuration requires users to be created manually (i.e. they
are not created automatically in ThoughtSpot upon authentication),
the username you specify has to be domain qualified (e.g.
username@ldap.thoughtspot.com), and you must enter a dummy password.
Manage users, groups, and privileges
ThoughtSpot Administration Guide Copyright © 2017 by ThoughtSpot. All Rights Reserved. 169
c) Password and Confirm Password: A temporary password.
d) E-mail Address: The user's email address. This is used for notification when
another user shares something with them.
e) Add to group: Select all the groups the user will belong to.
If you add the user to a group that has the privilege Has administration
privileges, note that they will be able to see all the data in ThoughtSpot.
Administrators can see all data sources, and Row level security does not
apply to them.
6. Click Save to create the user.
When you create a new user, the groups they belong to define the user's:
• Privileges - the actions they are allowed to do, which are defined when you
Add a group and set security privileges.
• Permissions - the data they can access and view, which is defined when you
Data security.
Add multiple users to a group
You can add multiple users to a group using one button.
To add multiple users to a group:
1. Log in to ThoughtSpot from a browser.
2. Click on the Admin icon, on the top navigation bar.
Figure 83: The Admin icon
3. In the Admin panel, click on User Management and Users.
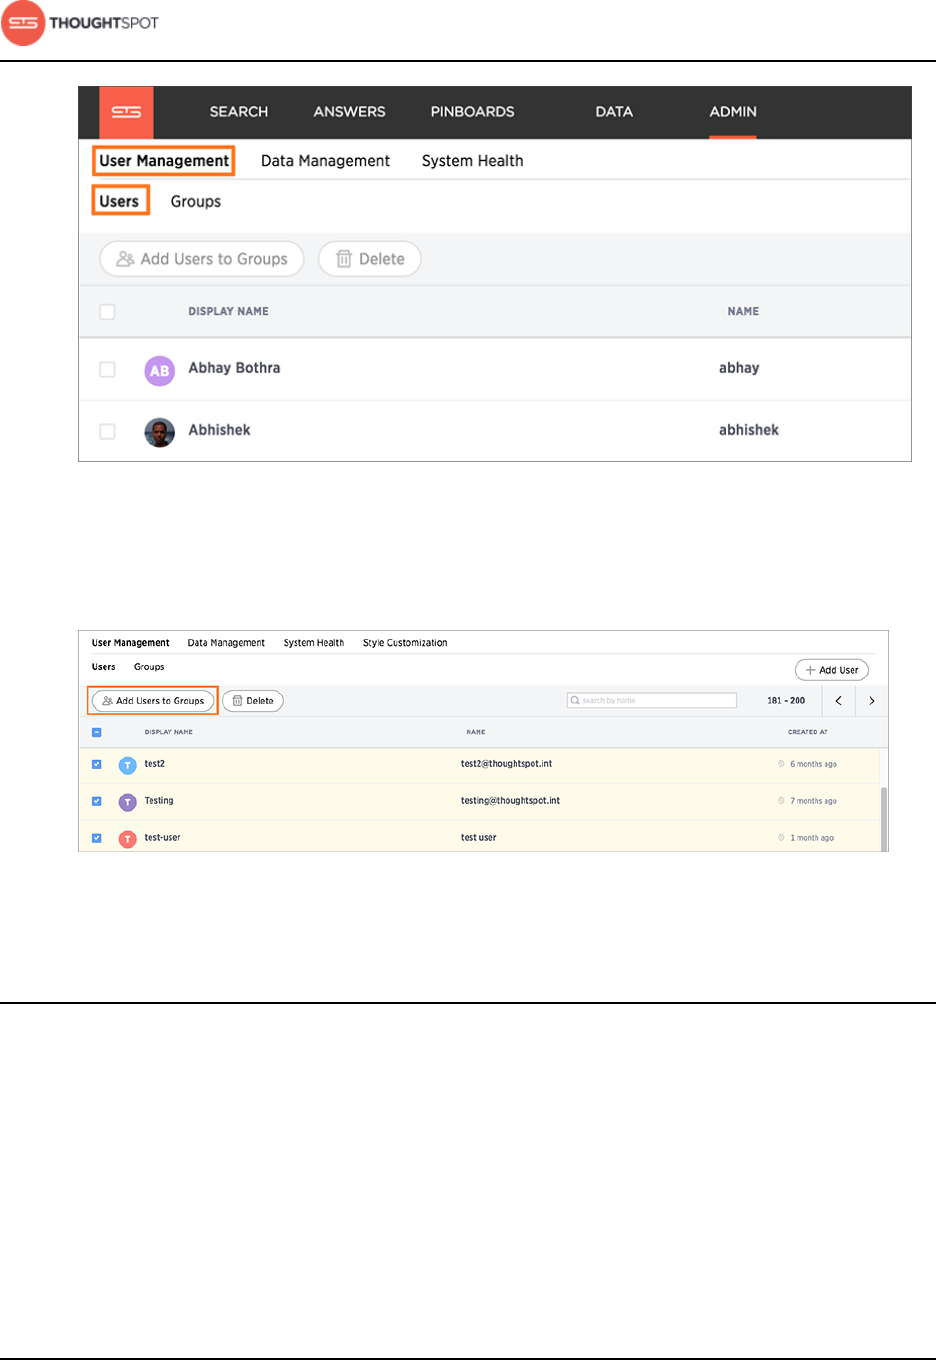
Manage users, groups, and privileges
ThoughtSpot Administration Guide Copyright © 2017 by ThoughtSpot. All Rights Reserved. 170
Figure 84: Manage Users
4. Select the users you would like to add to the same group from the list.
5. Click the Add Users to Groups button on the top of the list of users.
Figure 85: Add a new User
Edit or delete a user
After a user has been created, you can always go back and change their settings,
for example to change their group memberships or change their password.
As an administrator, you can edit a user and change the groups the user belongs
to. You can also edit a user to reset a user’s password by entering and confirming
the new password. This is useful if a user has forgotten their password, or to
effectively disable an account.
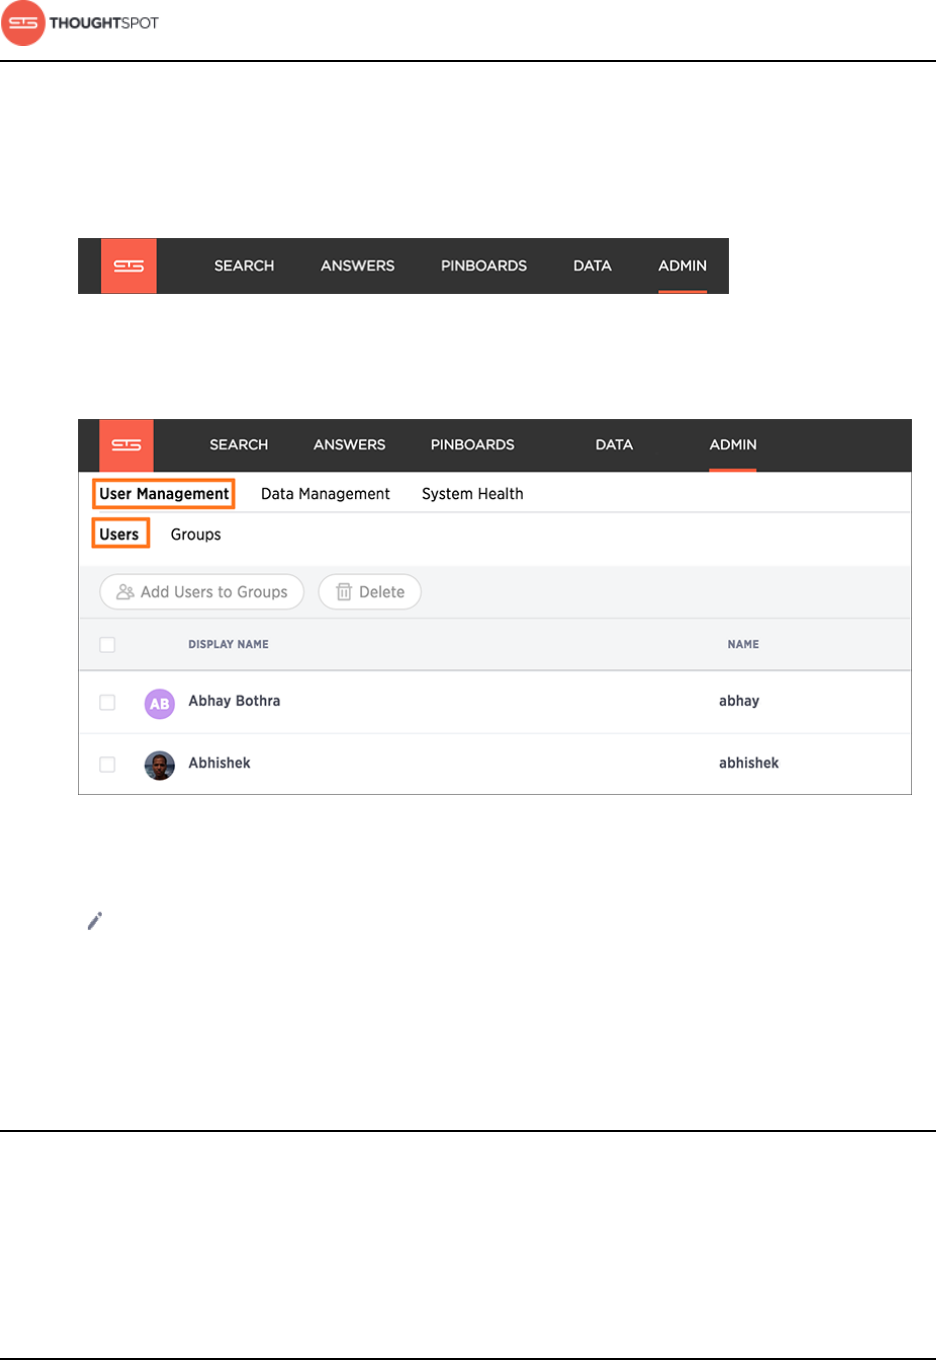
Manage users, groups, and privileges
ThoughtSpot Administration Guide Copyright © 2017 by ThoughtSpot. All Rights Reserved. 171
To edit an existing user:
1. Log in to ThoughtSpot from a browser.
2. Click on the Admin icon, on the top navigation bar.
Figure 86: The Admin icon
3. In the Admin panel, click on User Management and Users.
Figure 87: Manage Users
4. Find the user you want to edit in the list and click on its name or the edit icon
. If you don't see the name of the user, try searching for it.
You can also delete a user from this page by clicking the Delete icon.
5. Make your changes and click Save.
Forgotten password
If a user forgets their password, you can reset it by editing the user.
To reset a user's password, follow the procedure in Edit or delete a user.
If you have forgotten the admin password, please call ThoughtSpot Support.

Manage jobs
ThoughtSpot Administration Guide Copyright © 2017 by ThoughtSpot. All Rights Reserved. 172
Chapter 6: Manage jobs
Manage jobs
Topics:
•About scheduled
pinboards
The Jobs Management page found on the Admin
section in the ThoughtSpot web application allows
you to create and manage jobs, namely scheduled
pinboards.
All jobs on your cluster will appear on the Jobs
Management page. You can also view jobs for
individual pinboards under the pinboard Actions
dropdown.

Manage jobs
ThoughtSpot Administration Guide Copyright © 2017 by ThoughtSpot. All Rights Reserved. 173
About scheduled pinboards
You can get pinboards emailed to you on a regular basis and do analysis offline.
This introduces an additional format for you to consume and share pinboards
with others, including those who don’t have a ThoughtSpot account.
Scheduled pinboards should help with preparing for recurrent meetings, when
reviewing the same pinboard is necessary. They should also be useful when you
have metrics you want to monitor at a consistent interval, like daily or monthly
sales targets.
Contact ThoughtSpot Support if scheduled pinboards is not enabled on your
cluster, or you can run the command tscli scheduled-pinboards to enable it
yourself.
Scheduled pinboard creators
Administrators and users with can schedule pinboard privilege can schedule and
manage pinboard jobs. These scheduled pinboard creators must have at least
edit-only and view-only rights to the pinboard they want to share.
Caution: It is recommended that admins carefully choose who to give
can schedule pinboard privilege to, since there is a possible security hole
where a user with limited access can get a pinboard email with all access
data.
Row level security
The scheduled pinboards respect row level security rules. This means if the
recipients are users in ThoughtSpot, then they can only see data based on
their own access to the pinboard. If the user does not have at least view-only
access to the pinboard, then they will not see anything in the email. However, if
the recipients are from outside of the cluster, then they will have access to the
dataset of the pinboard based on the sender’s permissions.
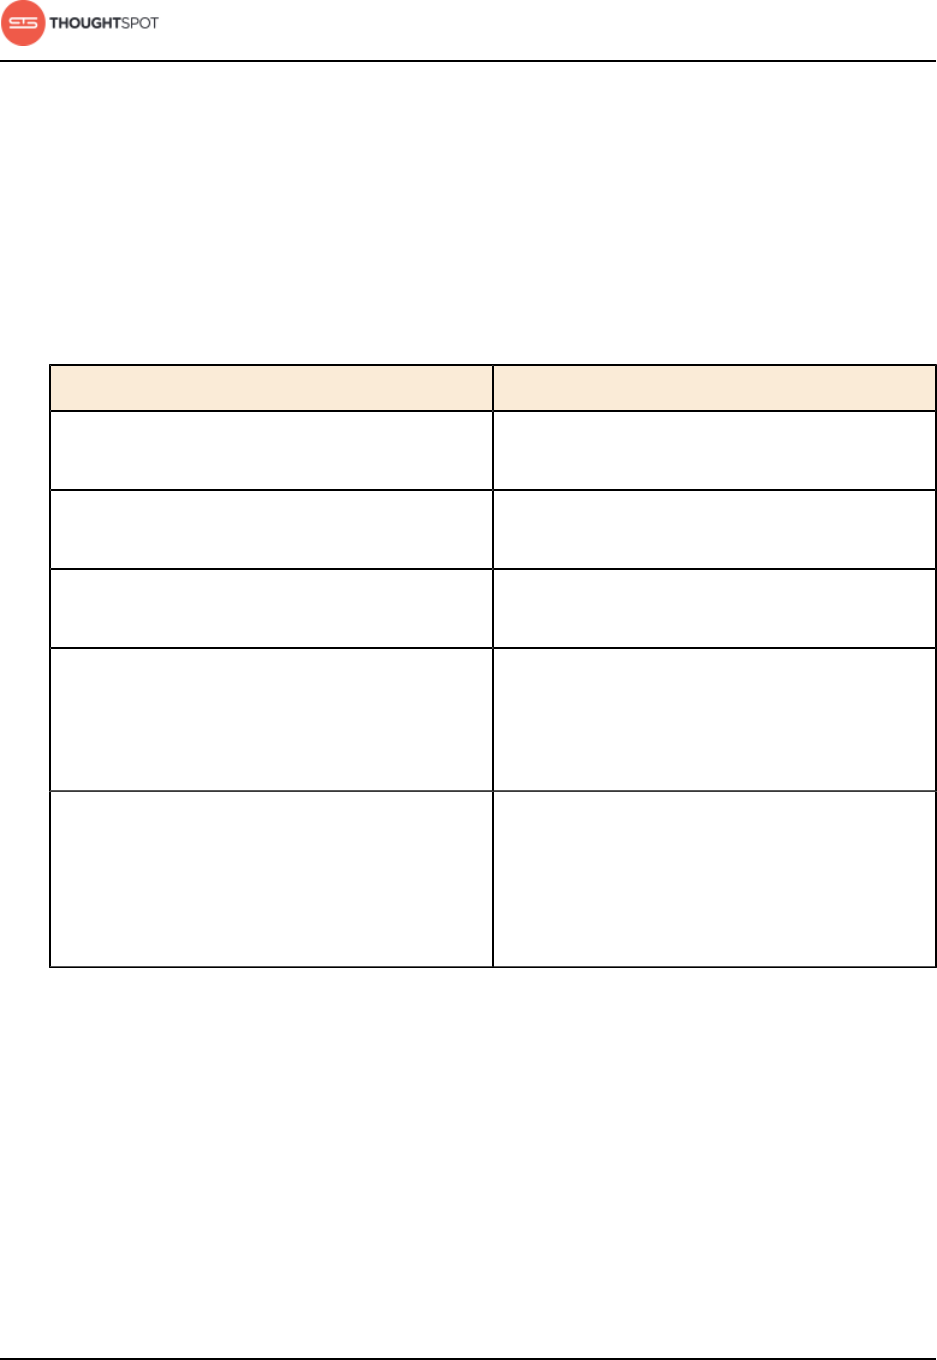
Manage jobs
ThoughtSpot Administration Guide Copyright © 2017 by ThoughtSpot. All Rights Reserved. 174
Scheduled pinboard formats
The pinboard visualizations are attached to the scheduled email as CSV or
PDF files. Saved configurations such as pinboard filters are applied to the
attachments. Refer to the table to see how the pinboard data is represented in
each file format.
Table 21: CSV - PDF report comparison
CSV PDF
The CSV file gets data only for table
visualizations.
The PDF file gets data for all visualizations.
The email has n CSV attachments, where there
are n table visualizations in the pinboard.
The email has only one attachment file, which
includes every visualization on its own page.
Table visualizations have all data rows that
they're supposed to have.
Table visualizations include only the first 100
rows.
In the case of a corrupted pinboard: no email
is sent. An error message indicating failure
to export data is visible on the Admin Jobs
Management page.
In the case of a corrupted pinboard: the PDF
attachment has empty/error screenshots.
In the case of a corrupted visualization: an
email with the visualizations whose data can be
exported is sent. An error message indicating
visualization export error is visible on the Jobs
Management page.
In the case of a corrupted visualization: the
PDF attachment has empty/error slots for the
corrupted visualizations.
The size of each email is limited to 25 MB, which matches most email services
size limitations.
And the total number of recipients for a scheduled pinboard job cannot exceed
the default of 1000.
Manage jobs
ThoughtSpot Administration Guide Copyright © 2017 by ThoughtSpot. All Rights Reserved. 175
Schedule a pinboard job
You can schedule a pinboard job for any pinboard by using the Add a schedule
prompt page.
You can add multiple schedules with different configurations for a single
pinboard. However, each job is limited to one pinboard schedule. In order to add
a schedule, you must have administrator or can schedule pinboard privilege, and
at least edit-only and view-only access to the pinboard.
To schedule a pinboard:
1. Log in to ThoughtSpot from a browser.
2. Click on Pinboards, on the top navigation bar.
Figure 88: Pinboards
3. Select the pinboard you would like to create a schedule for.
4. Click Actions and select Manage schedules to view all of the schedules set for
the pinboard.
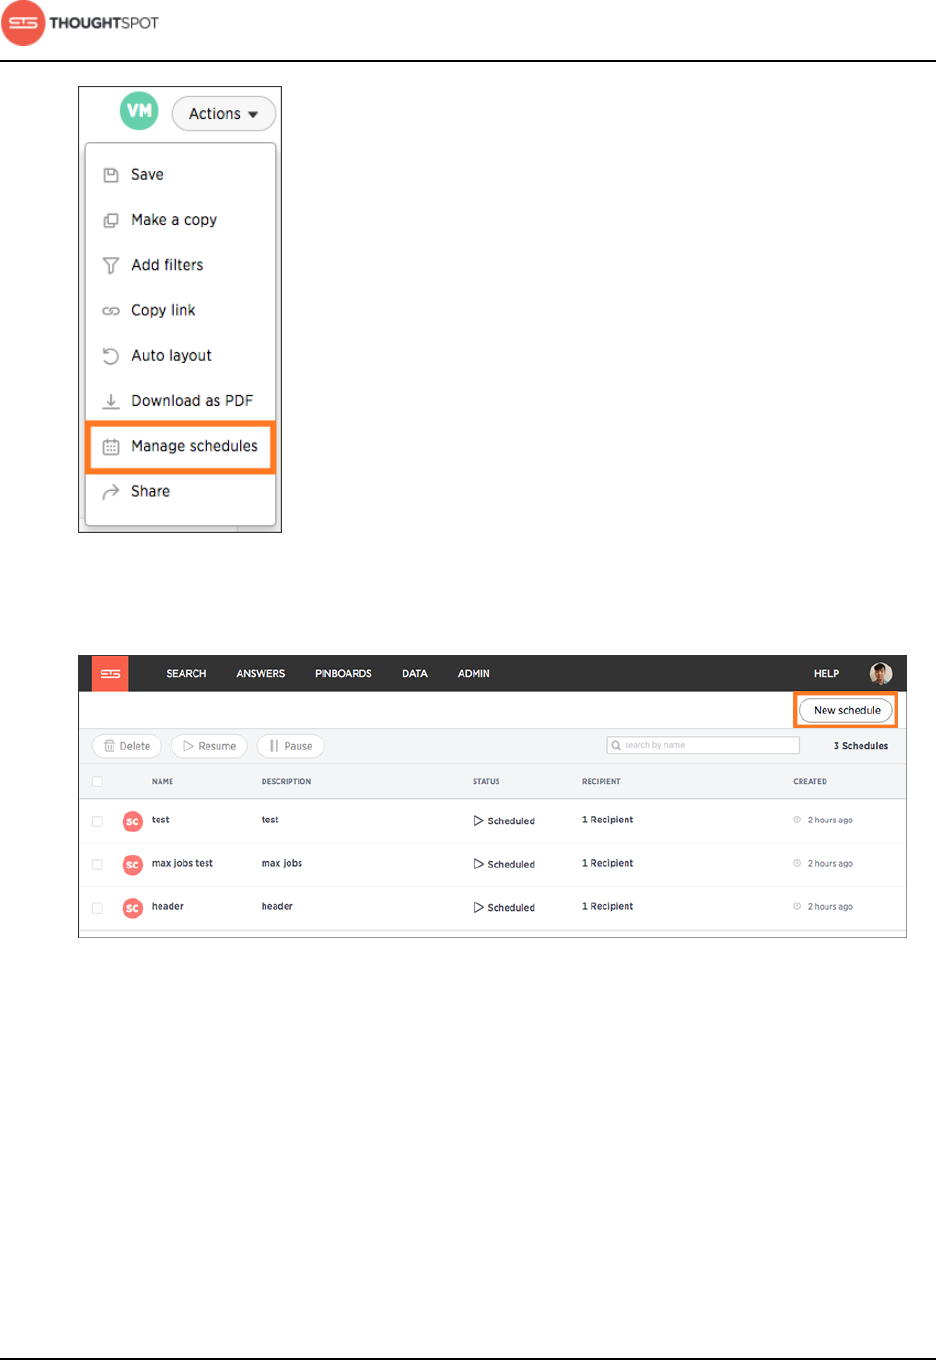
Manage jobs
ThoughtSpot Administration Guide Copyright © 2017 by ThoughtSpot. All Rights Reserved. 176
Figure 89: View pinboard schedules
5. Click New schedule to add a new pinboard schedule.
Figure 90: Add a new pinboard schedule
6. On the Add a schedule prompt page, set the times you would like to schedule
the pinboard for.

Manage jobs
ThoughtSpot Administration Guide Copyright © 2017 by ThoughtSpot. All Rights Reserved. 177
Figure 91: Set the pinboard schedule
Scheduled pinboards can be set to repeat every n minutes, hourly, daily,
weekly, or monthly. For some of these, you can also choose specific times of
the day or days of the week. Make sure to note the Server time zone which is
the timezone which will be used.
7. Enter the name and description of your schedule. Then select whether you'd
like to send the pinboard as CSV or PDF attachments.
Figure 92: Set the pinboard type
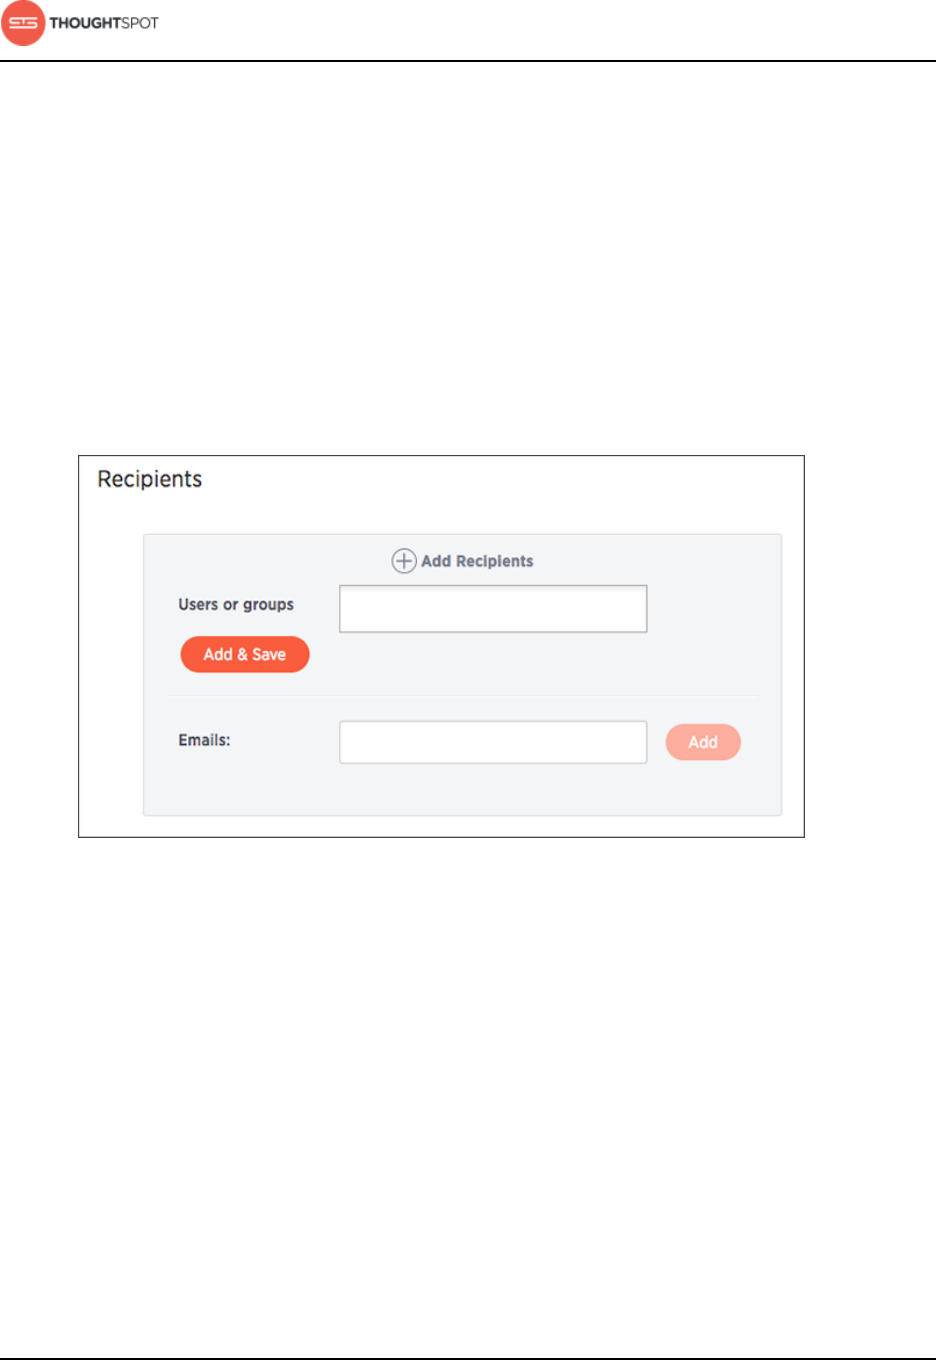
Manage jobs
ThoughtSpot Administration Guide Copyright © 2017 by ThoughtSpot. All Rights Reserved. 178
CSV files provide all data for tables, with one attachment per table. Use CSV
files to perform further analysis offline. PDF files show all visualizations in the
pinboard. Each chart takes up a whole page in the file, while only the first 100
rows of a table are included. Use PDF files to skim the data.
8. Add recipients by entering ThoughtSpot users or groups. Suggestions are
shown as you type. Click Add to add the selected users or groups. You
can also add recipients that are not ThoughtSpot users by entering their
email addresses. To do so, you must first set the whitelist domains. Contact
ThoughtSpot Support to set your whitelist domains.
Figure 93: Set the pinboard recipients
You are limited to 1000 recipients per job.
9. Click Schedule to save your scheduled pinboard.
Scheduled pinboards management
You can manage all scheduled pinboards on the Jobs Management page under
Admin.
Users who are not admins, but have can schedule pinboard privilege, can only
view pinboard schedules they've created. You can select specific jobs and

Manage jobs
ThoughtSpot Administration Guide Copyright © 2017 by ThoughtSpot. All Rights Reserved. 179
choose to pause, resume, edit, or delete them. You can have up to 50 scheduled
jobs on your cluster at time.
Figure 94: View Jobs Management page
Bulk actions
Select the scheduled pinboards and use the Delete, Resume, and Pause buttons
to perform these bulk actions. Deleting a pinboard will also delete any schedules
linked to it.
Job statuses
Clicking on the row of a job will open a detailed view of every generated update
of that job. You can see the start and end times of the job, as well as the status.
Clicking on a job will show more information about the status updates.
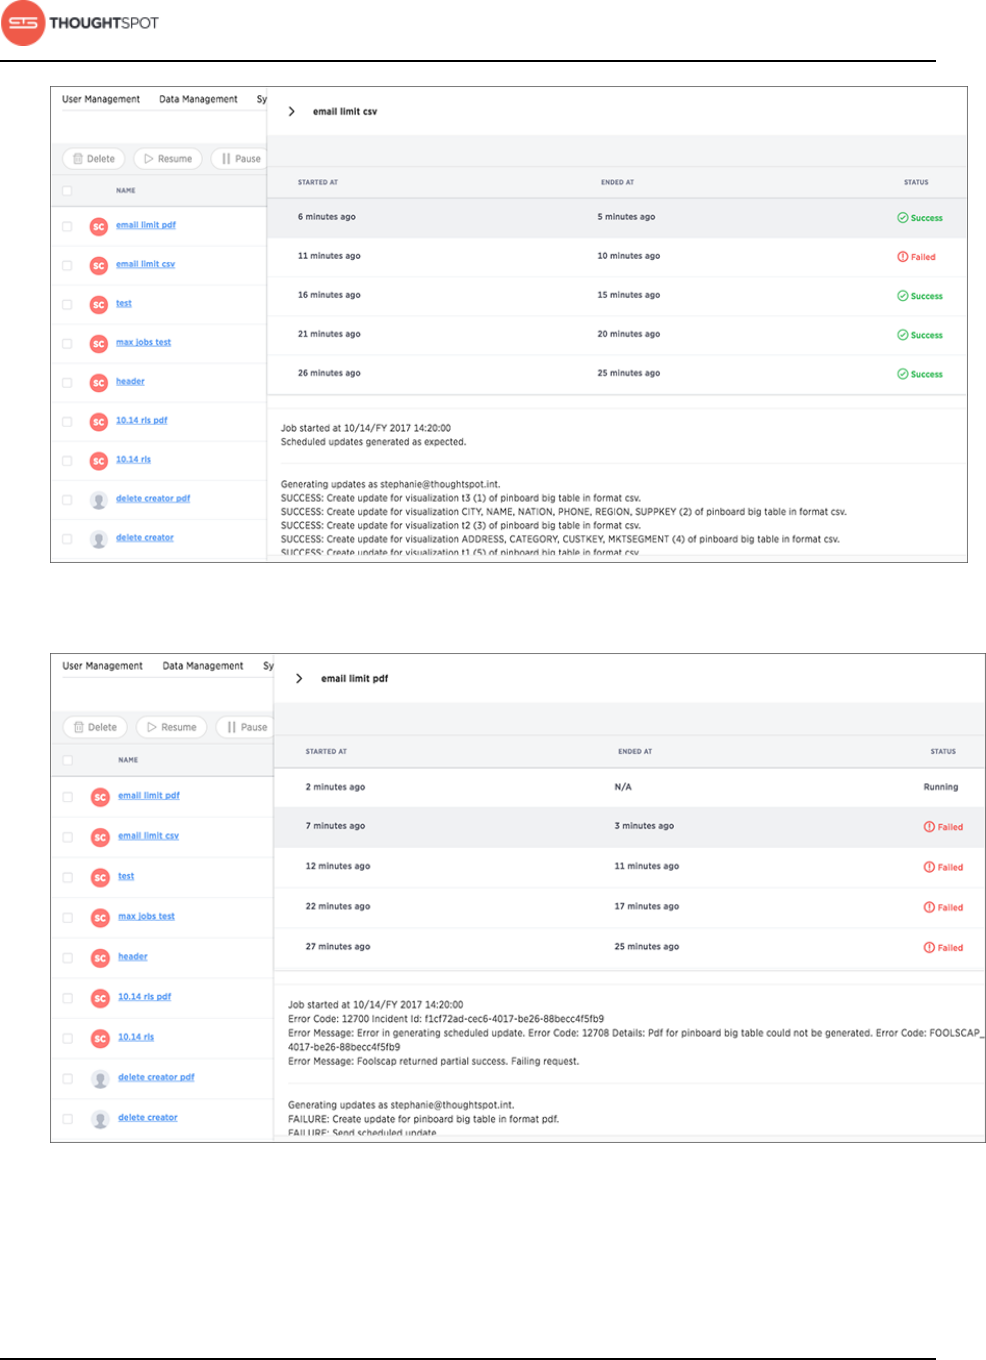
Manage jobs
ThoughtSpot Administration Guide Copyright © 2017 by ThoughtSpot. All Rights Reserved. 180
Figure 95: Success status updates
Figure 96: Failed status updates

Manage jobs
ThoughtSpot Administration Guide Copyright © 2017 by ThoughtSpot. All Rights Reserved. 181
Pinboard links
Click the scheduled pinboard name link to jump to a Edit schedule page, where
you can edit the schedule configurations.
You can also click on the pinboard link provided in the scheduled pinboard
emails to jump to the pinboard in ThoughtSpot. In order to have the link direct
you to the correct URL, you must first configure front end host and port access.
Contact ThoughtSpot Support to configure these settings.

About security
ThoughtSpot Administration Guide Copyright © 2017 by ThoughtSpot. All Rights Reserved. 182
Chapter 7: About security
About security
Topics:
•System security
•Data security
•Network security
This section is an overview of security in
ThoughtSpot. There are several aspects of security,
including access and permissions, data security and
privacy, and security from an IT perspective.
System Security
System security refers to the following:
•Audit logs
•Security policies
Network Security
Network security refers to the following:
•Network ports
Data Security
Data security refers to which users can see which
data in the ThoughtSpot application, and includes:
•Users and Groups
•Privileges
•Table and columns sharing
•Row level security
•Worksheet sharing
•Pinboard sharing
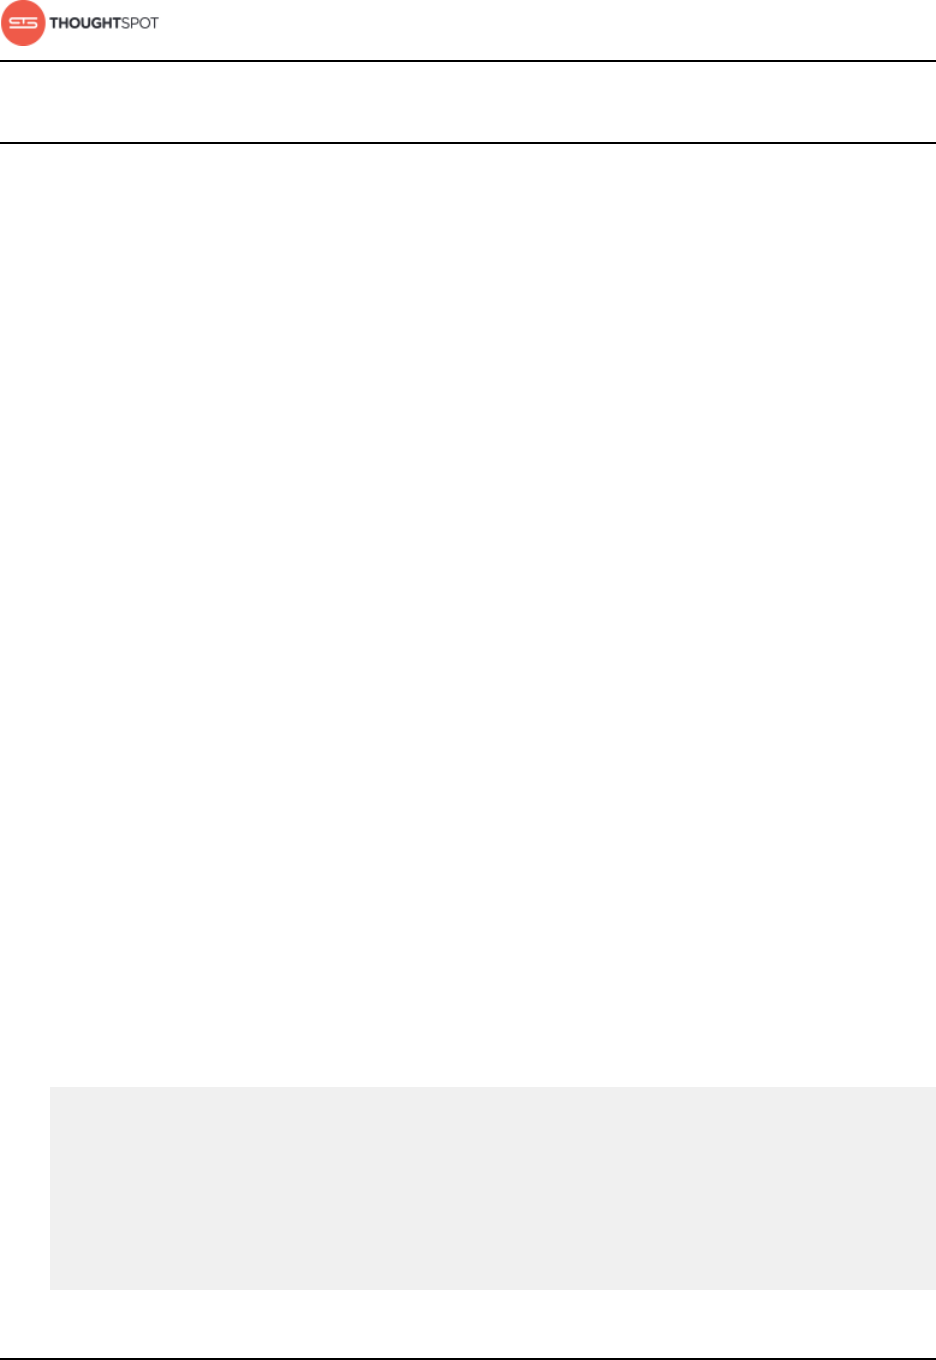
About security
ThoughtSpot Administration Guide Copyright © 2017 by ThoughtSpot. All Rights Reserved. 183
System security
ThoughtSpot includes a number of management tools, monitoring applications,
and automated processes to support system security. System security includes
managing access and privileges, audit logs, security policies, and Linux OS
installed package updates.
Audit logs
There are several ways you can view audit log information in ThoughtSpot. You
can see recent events in the Control Center or view more detailed audit logs
using tscli. Administrators can view audit logs of configuration changes users
have made to ThoughtSpot in these ways:
• View events from the Control Center.
•Generate audit log reports through tscli.
Security policies
Security policies are the principles and processes ThoughtSpot uses in
development to ensure a product that conforms to security standards.
Get audit logs
You can access an audit log of cluster events through tscli. You can also access
information on cluster updates, configurations, data loading and metadata
events.
Use the tscli event list command to return an audit list of events from the
cluster. The syntax is:
tscli event list
[--include <all|config|notification>]
[--since <hours,minutes,days>
| --from <yyyymmdd-HH:MM>
--to <yyyymmdd-HH:MM>]
[--detail]
[--summary_contains
<'string1'| 'string2' ...>]
[--detail_contains
<'string1'| 'string2' ...>]

About security
ThoughtSpot Administration Guide Copyright © 2017 by ThoughtSpot. All Rights Reserved. 184
[--attributes
<key1='value1'|
key2='value2' ...>]
Optional parameters are:
•--include specifies the type of events to include, and can be all, config, or
notification.
•--detail returns the events in a detail format rather than a tabular summary,
which is the default.
•--summary_contains <'string1'| 'string2' ...> specifies a string to check for
in the event summary. Enclose strings in single quotes, and separate multiple
strings with |. Events that match all specified strings will be returned.
•--detail_contains <'string1'| 'string2' ...> specifies a string to check for in
the detail. Enclose strings in single quotes, and separate multiple strings with
|. Events that match all specified strings will be returned.
•--attributes <key1='value1'| key2='value2' ...> specifies attributes to match
as key=value pairs. Separate multiple attributes with |. Events that match
all specified key/value pairs will be returned. Put single quotes around the
value(s).
And a time window made up of either:
•--since <hours,minutes,days> is a time in the past for where the event audit
begins, ending at the present time. Specify a human readable duration string,
e.g. 4h (4 hours), 30m (30 minutes), 1d (1 day).
Or both:
•--from <yyyymmdd-HH:MM> is a timestamp for where to begin the event audit. It
must be of the form: yyyymmdd-HH:MM.
•--to <yyyymmdd-HH:MM> is a timestamp for where to end the event audit. It must
be of the form: yyyymmdd-HH:MM.
To get audit logs:
1. Log in to the Linux shell using SSH.
About security
ThoughtSpot Administration Guide Copyright © 2017 by ThoughtSpot. All Rights Reserved. 185
2. Issue the tscli event list command, with the desired parameters, for example:
$ tscli event list
--include config
--since 24 hours
Security policies
ThoughtSpot has security policies in place to ensure a secure product with each
release.
When a release is in development, each build is tested using Qualys Network
Security and Vulnerability Management Suite. Issues and vulnerabilities are fixed
proactively, based on the results.
The ThoughtSpot Engineering and ThoughtSpot Support teams are notified of
Common Vulnerabilities and Exposures (CVEs), so they can patch OS packages
proactively as well. You can View installed packages along with their version
numbers at any time, in order to see if you require an update to ThoughtSpot.
Whenever a CVE is identified, and an OS package needs to be updated, the next
patch release will include the patch or update.
View installed packages
You can view installed Linux packages at any time, along with the version
numbers of the installed packages.
Use the command tscli os list-packages to see installed packages and their
version:
1. Log in to the Linux shell using SSH.
2. Issue the tscli os list-packages command to list installed packages:
$ tscli os list-packages
|Package |Version |
|------------------------------------------------------------------|
|accountsservice |0.6.15-2ubuntu9.7 |
|acpid |1:2.0.10-1ubuntu3 |
|adduser |3.113ubuntu2 |
|apache2 |2.2.22-1ubuntu1.10 |
|apache2-mpm-prefork |2.2.22-1ubuntu1.10 |
|apache2-utils |2.2.22-1ubuntu1.10 |
About security
ThoughtSpot Administration Guide Copyright © 2017 by ThoughtSpot. All Rights Reserved. 186
|apache2.2-bin |2.2.22-1ubuntu1.10 |
...
Data security
Sharing and security settings govern what data a user can access and what
they can do with the data. Admins can use these settings to regulate access to
information and provide a personalized user experience.
Users, groups, and privileges
Data security applies to users and groups. Users can be managed manually or
through LDAP. Each user can have membership in one or more groups.
Admins can make security settings that determine what users are allowed to do
in ThoughtSpot. These settings are applied at the group level.
Security model for sharing objects
You can share with groups and with individual users. Sharing of tables can be
defined at the table, column, or row level. This provides flexibility in modeling
your data security policy. Security and sharing settings apply to several different
types of objects, each of which has its own security default settings and rules.
Table 22: Security model by object type
Object type Description Default security model Sharing
procedure
Tables The source data
tables that have
been loaded using
ThoughtSpot Loader.
Administrator users have access to source
tables. They can share a table with other
users or groups.
Share
tables and
columns
Columns The columns in
the source data
tables that have
Administrator users have access to
columns in the source tables. They can
share selected columns with other users or
groups.
Share
tables and
columns

About security
ThoughtSpot Administration Guide Copyright © 2017 by ThoughtSpot. All Rights Reserved. 187
Object type Description Default security model Sharing
procedure
been loaded using
ThoughtSpot Loader.
Rows The rows in the
source data tables
that have been
loaded using
ThoughtSpot Loader.
All rows in the source tables are shared
with all users by default. You can hide rows
from groups based on the values they
contain.
Define
Legacy
Row Level
Security
Imported data Data that was
imported using a
Web browser.
Only the user who imported the data (and
any user with administrator privileges)
has access to it by default. They can share
a table (or selected columns) with other
users or groups.
Share
tables and
columns
Worksheets A worksheet created
using a Web browser.
Only the creator of the worksheet (and
any user with administrator privileges) has
access to it by default. They can share a
worksheet with other users or groups.
Share
worksheets
Pinboards A pinboard of saved
search results.
Anyone who can view a pinboard can
share it.
Share a
pinboard
Row level security
ThoughtSpot includes robust row level security, which allows you to filter all
objects users see based on conditions you set at the level of row values in base
data tables.
Share tables and columns
Administrators and owners can share Can View or Can Edit privileges on tables
with other users, who can further share them with others.
By default, when data is loaded using the ThoughtSpot Loader, ODBC, or JDBC,
it is only visible to administrators. Data imported from a Web browser is visible
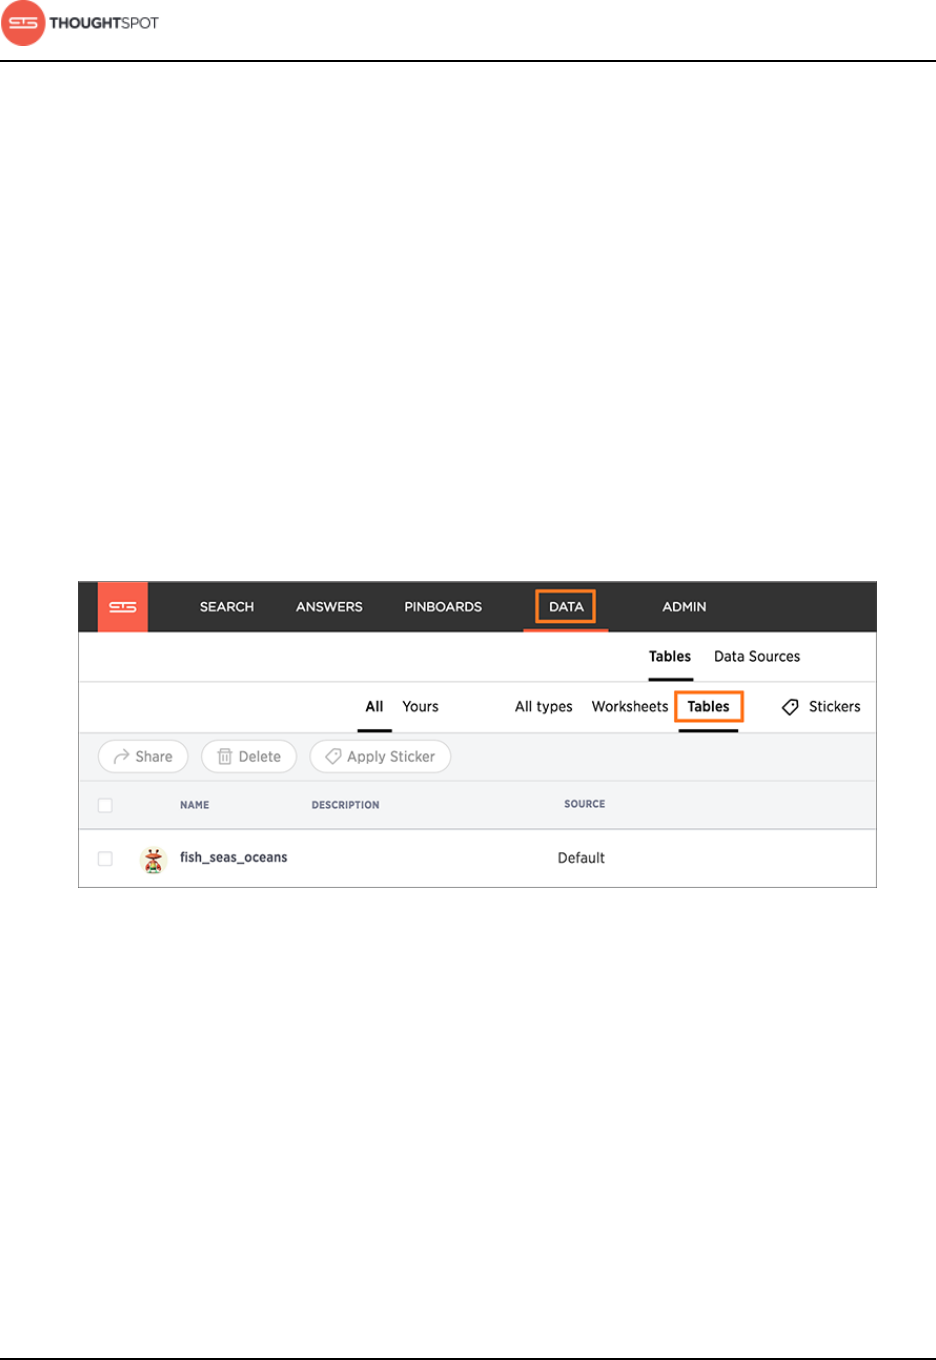
About security
ThoughtSpot Administration Guide Copyright © 2017 by ThoughtSpot. All Rights Reserved. 188
to administrators and the user who uploaded it. You can share an entire table, or
only some of its columns.
Use caution when sharing tables, because any objects created from them will
have dependencies on the tables and their underlying structure. Objects created
from tables can include worksheets, answers, and pinboards. This means that if
a user wants to drop or modify a table, any object that depends upon it must be
edited or removed first, to remove the dependency. For this reason, it is a best
practice to only grant the Edit permission on tables to a small number of users.
Share a table or imported data by following these steps:
1. Click on the Manage Data icon in the top navigation bar.
2. Click on Tables.
Figure 97: Tables in Manage Data
3. Select one or more tables to share, and click the Share icon.
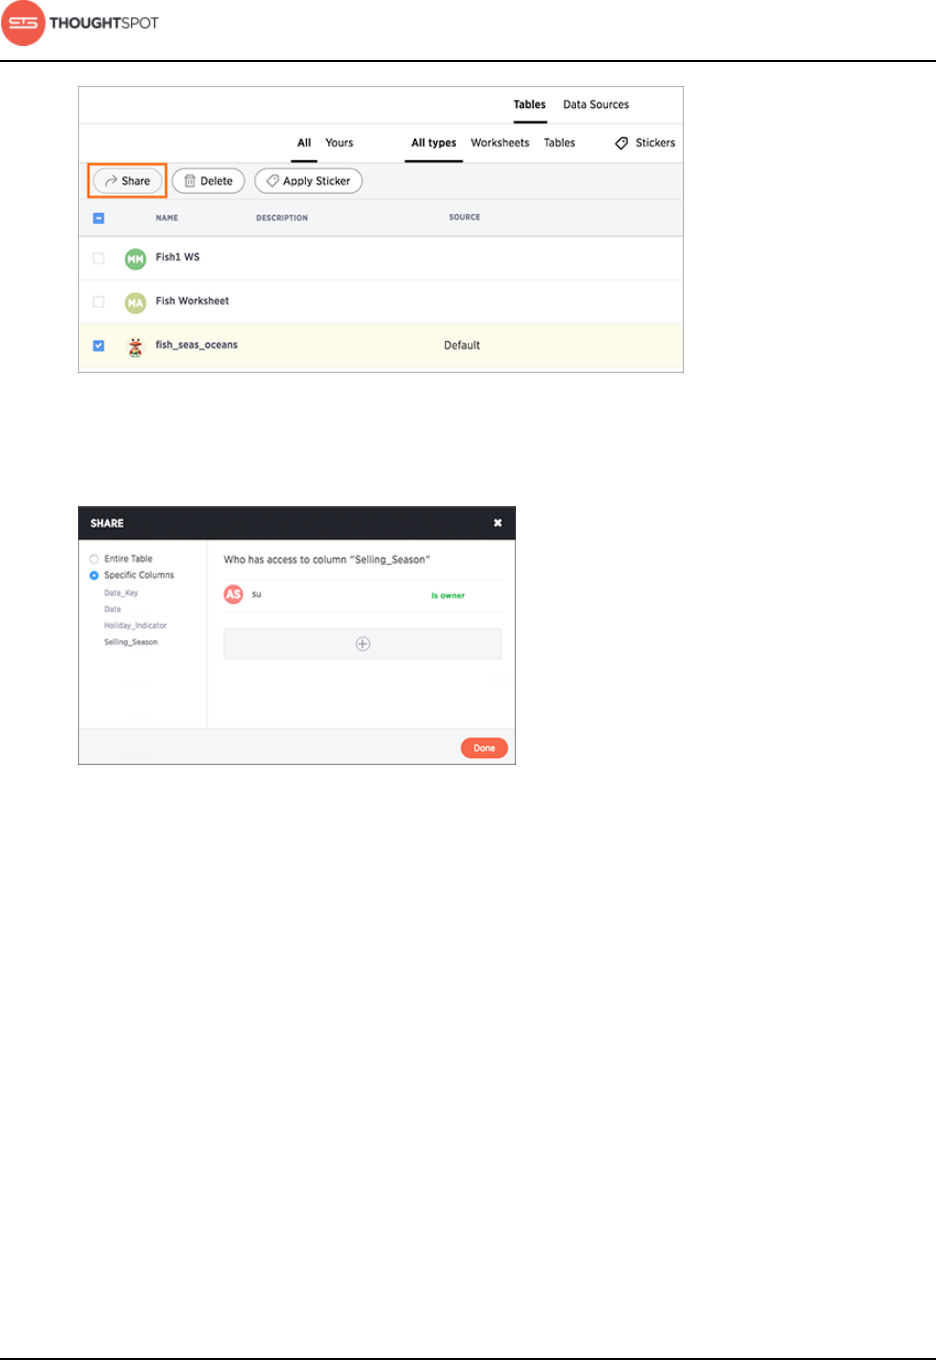
About security
ThoughtSpot Administration Guide Copyright © 2017 by ThoughtSpot. All Rights Reserved. 189
Figure 98: Select tables to share
4. Select Entire Table or Specific Columns.
Figure 99: Configure table sharing settings
5. If you selected Specific Columns, select the column to share.
6. Click + and select the users and groups that you want to share with.
7. Configure the level of access by selecting from the dropdown list. You can
select:
•Can View to provide read-only access. This enables viewing the table data
and defining worksheets on the table.
•Can Edit to allow modification. This enables renaming, modifying, or
deleting the entire table and adding or removing its columns.
8. Click Add and Save.
9. Click Done.
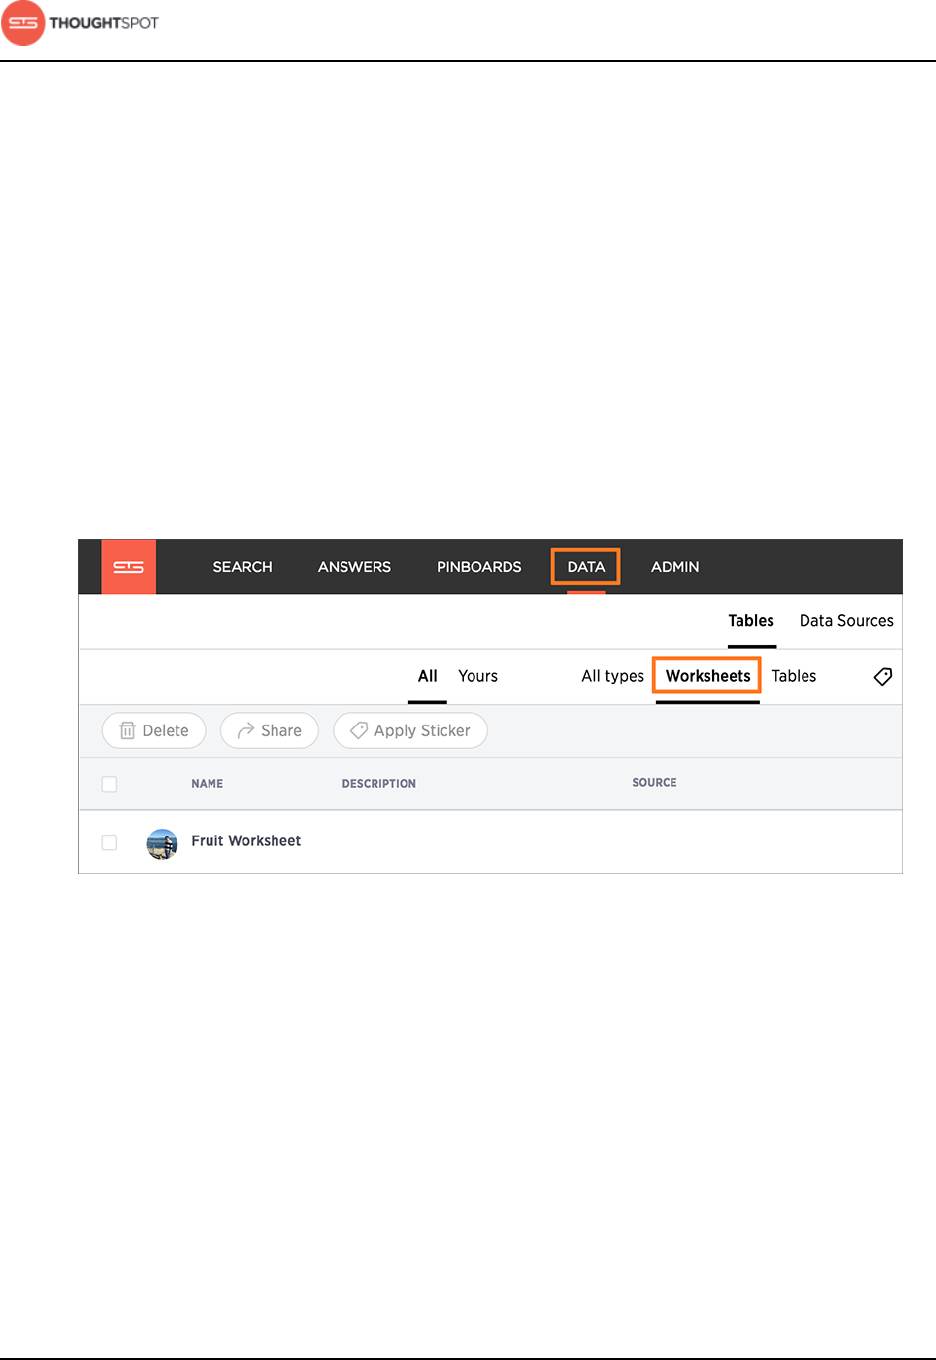
About security
ThoughtSpot Administration Guide Copyright © 2017 by ThoughtSpot. All Rights Reserved. 190
Share worksheets
You can share worksheets with users or with groups. Sharing a worksheet allows
users to select it as a data source and search it.
A worksheet can be shared by the owner of the worksheet, or by an
administrator. Users can start searching a worksheet as soon as the worksheet is
shared with them.
When you share a worksheet, all of its columns are shared. Sharing a worksheet
does not share the underlying tables. If you want to share the underlying tables,
see Share tables and columns.
1. Click on the Data icon on the top navigation bar and then on Worksheets.
Figure 100: Go to the worksheet list
2. Select one or more worksheets to share, and click the Share icon.
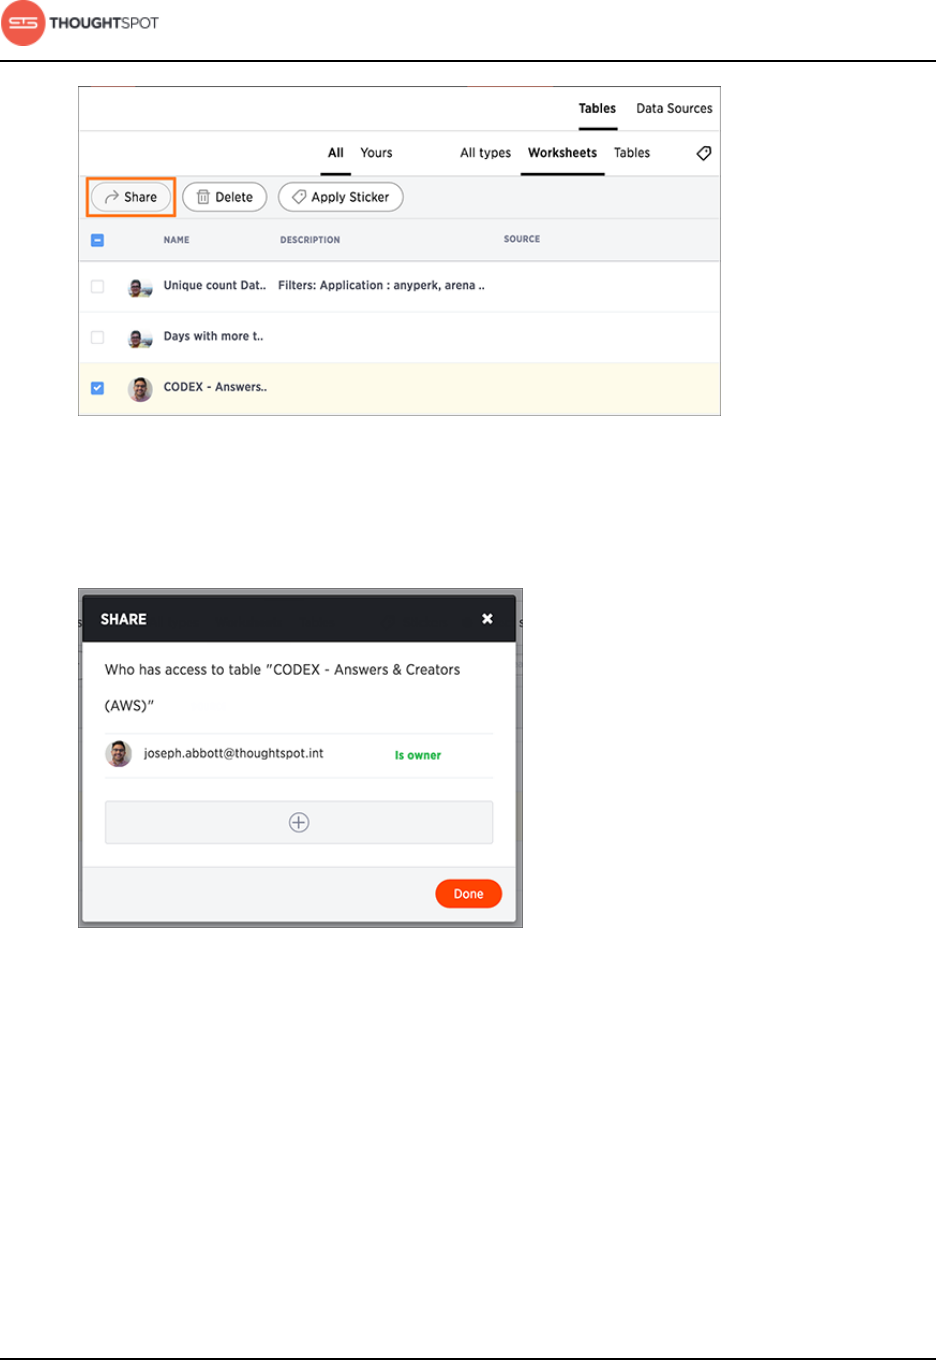
About security
ThoughtSpot Administration Guide Copyright © 2017 by ThoughtSpot. All Rights Reserved. 191
Figure 101: Select worksheets to share
3. Click + Add users or groups and select users or groups that you want to share
with.
Figure 102: Configure worksheet sharing settings
4. Configure the level of access by selecting from the dropdown list. You can
select:
•Can View to provide read-only access. Enables viewing the worksheet and
searching on it.

About security
ThoughtSpot Administration Guide Copyright © 2017 by ThoughtSpot. All Rights Reserved. 192
•Can Edit to allow modification. Enables renaming, modifying filters, or
deleting the worksheet and adding or removing its columns. To add
columns to a worksheet a user needs access to the underlying table.
5. Click Add and Save.
6. Click Done.
Share a pinboard
You do not have to be an administrator or the owner to share saved pinboards.
Any user can share them, based on the access levels the user has.
Whenever you view a pinboard you have the option of sharing it with others.
What you are really sharing is a live link to the pinboard, when you click Share
with.... So whenever someone else views it, they will see the most recently saved
version with the most recent data.
1. Configure the pinboard to look as you'll want it to appear when shared.
2. Click the Share icon.
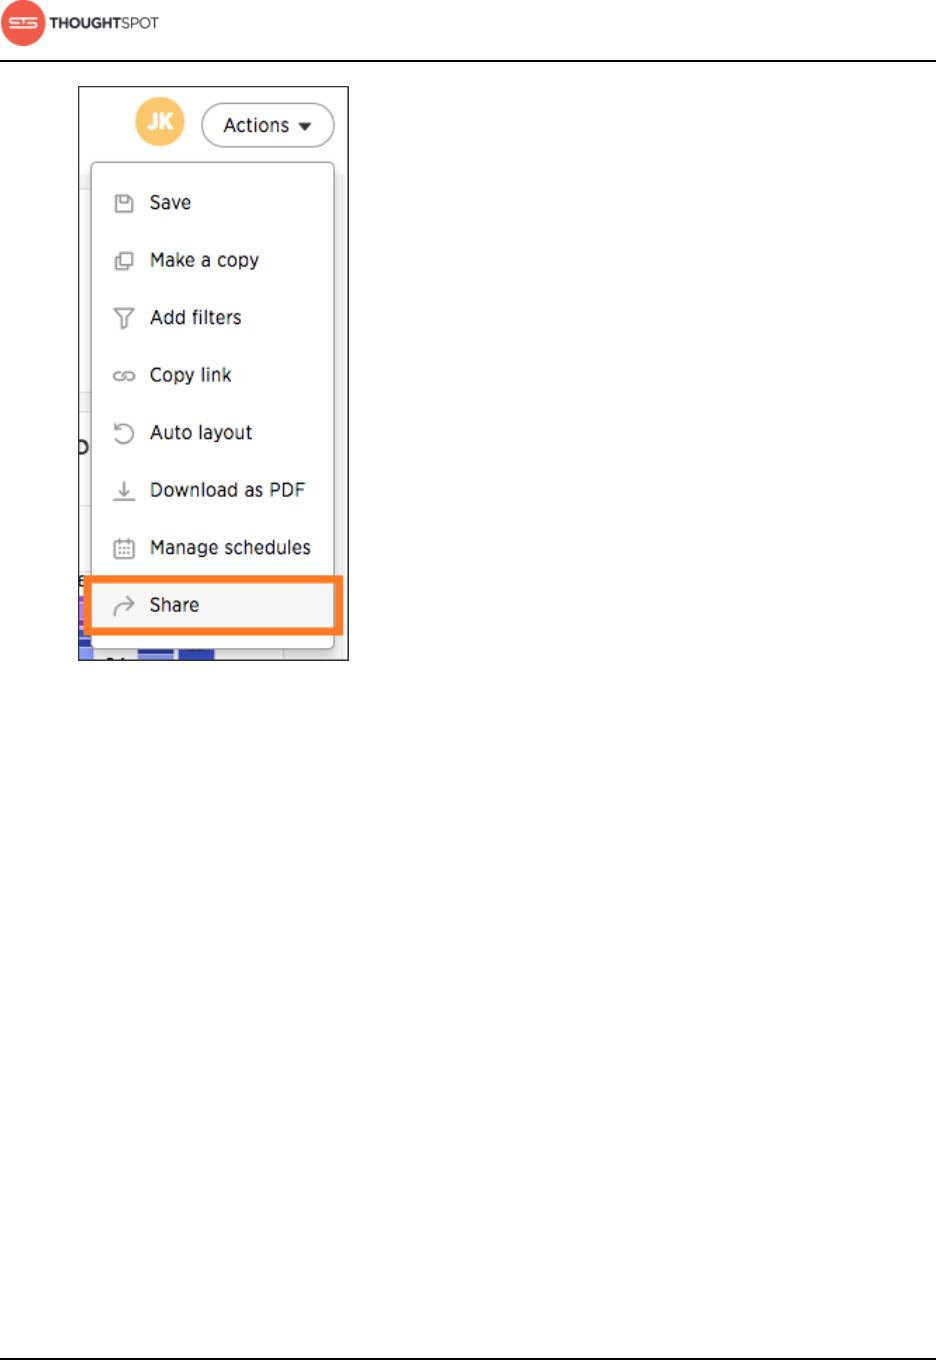
About security
ThoughtSpot Administration Guide Copyright © 2017 by ThoughtSpot. All Rights Reserved. 193
Figure 103: Share with option
3. Click + Add users or groups and select users or groups that you want to share
with.
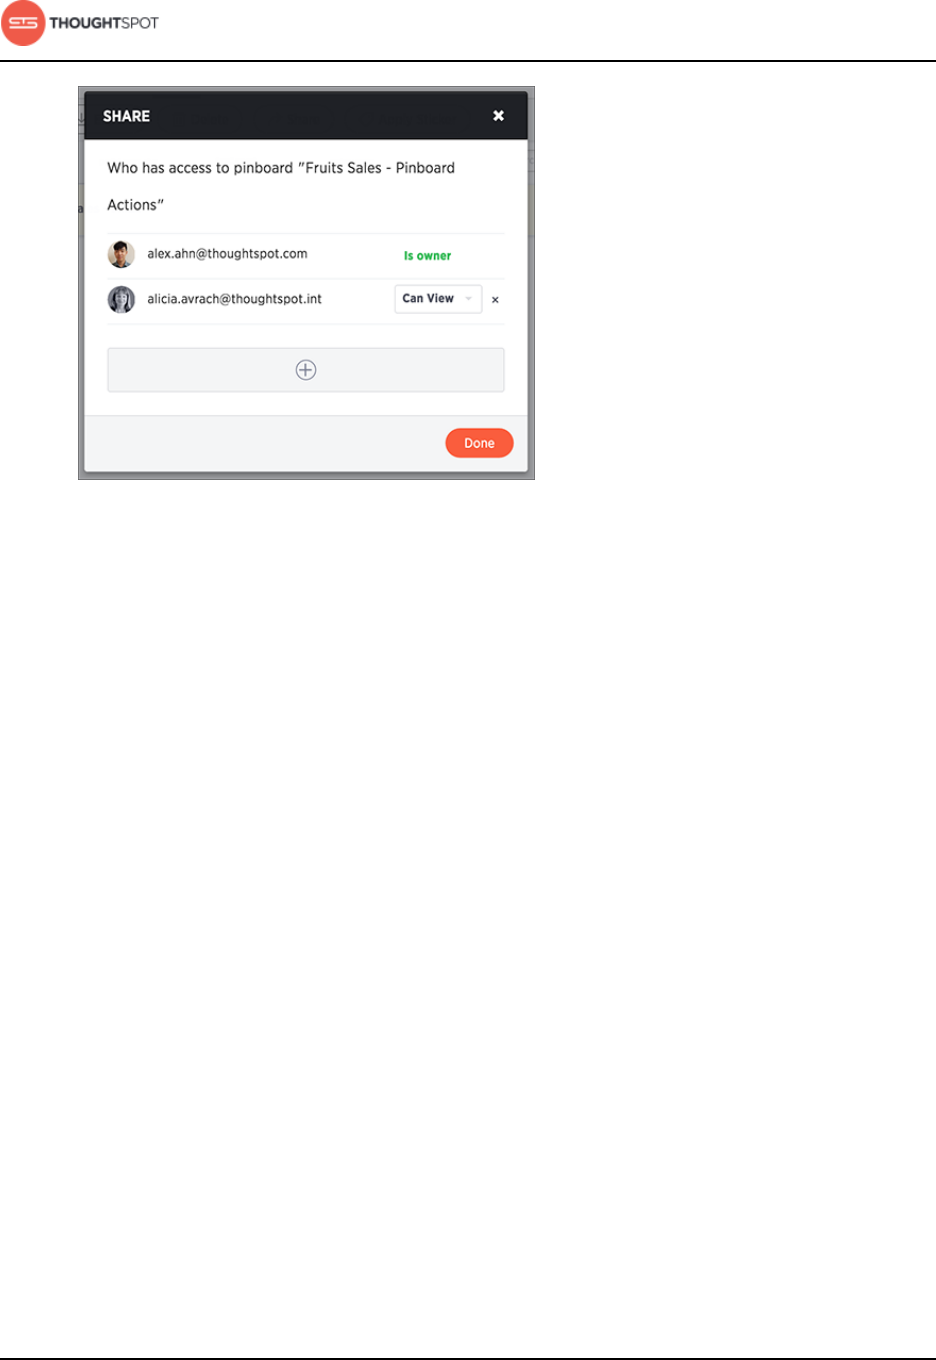
About security
ThoughtSpot Administration Guide Copyright © 2017 by ThoughtSpot. All Rights Reserved. 194
Figure 104: Configure sharing settings
4. Configure the level of access by selecting from the dropdown list. You will
only see options available, based on your own access level. For example, if you
have only View access, you cannot share as Edit. You can select:
•Can View to provide read-only access. If the person doesn't have access to
the underlying data, they can only view a shared pinboard. If they change
anything on the pinboard, their changes are not saved. In order to persist
the changes, the user would need to make a copy of the modified pinboard.
•Can Edit to allow modification. Enables renaming or deleting the shared
pinboard. If a person with edit privileges modifies a shared pinboard, their
changes will be saved to it.
5. Click Add and Save.
6. Click Add Permissions.
Revoke access (unshare)
You may need to revoke access to an object (table, worksheet, or pinboard) that
you have previously shared. Unsharing an object is very similar to sharing it.
To unshare one or more objects:
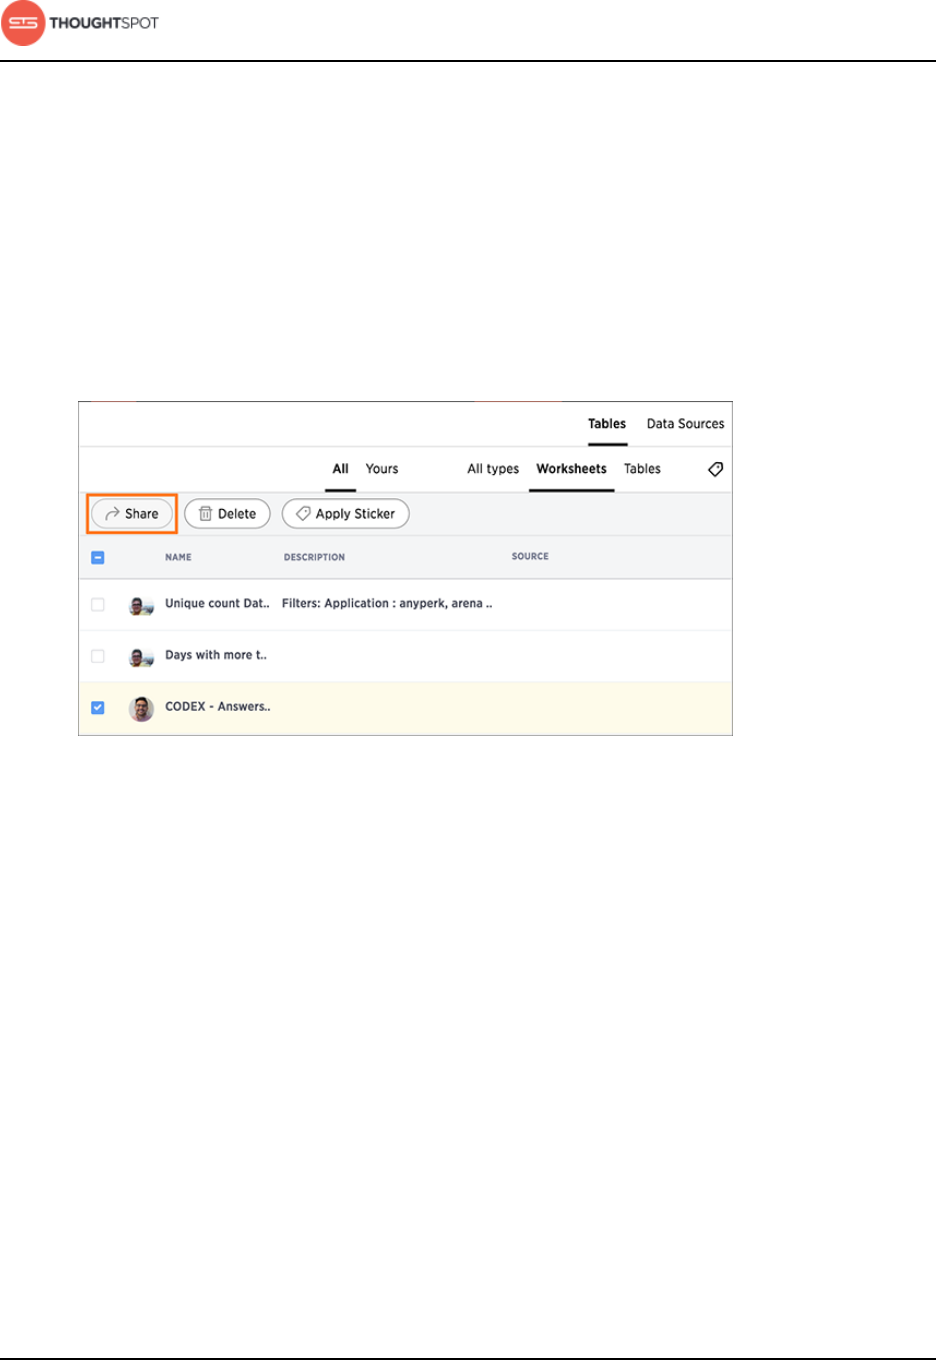
About security
ThoughtSpot Administration Guide Copyright © 2017 by ThoughtSpot. All Rights Reserved. 195
1. Go to the area where the object(s) you want to unshare is located. From the
top menu bar:
• If the object is a table or worksheet, click Data.
• If the object is a pinboard, click Pinboards.
• If the object is an answer, click Answers.
2. Find the object(s) in the list, and check the corresponding box(es).
3. Click the Share icon.
Figure 105: The Share icon
4. Click the X next to the users and groups that you want to remove from
sharing.
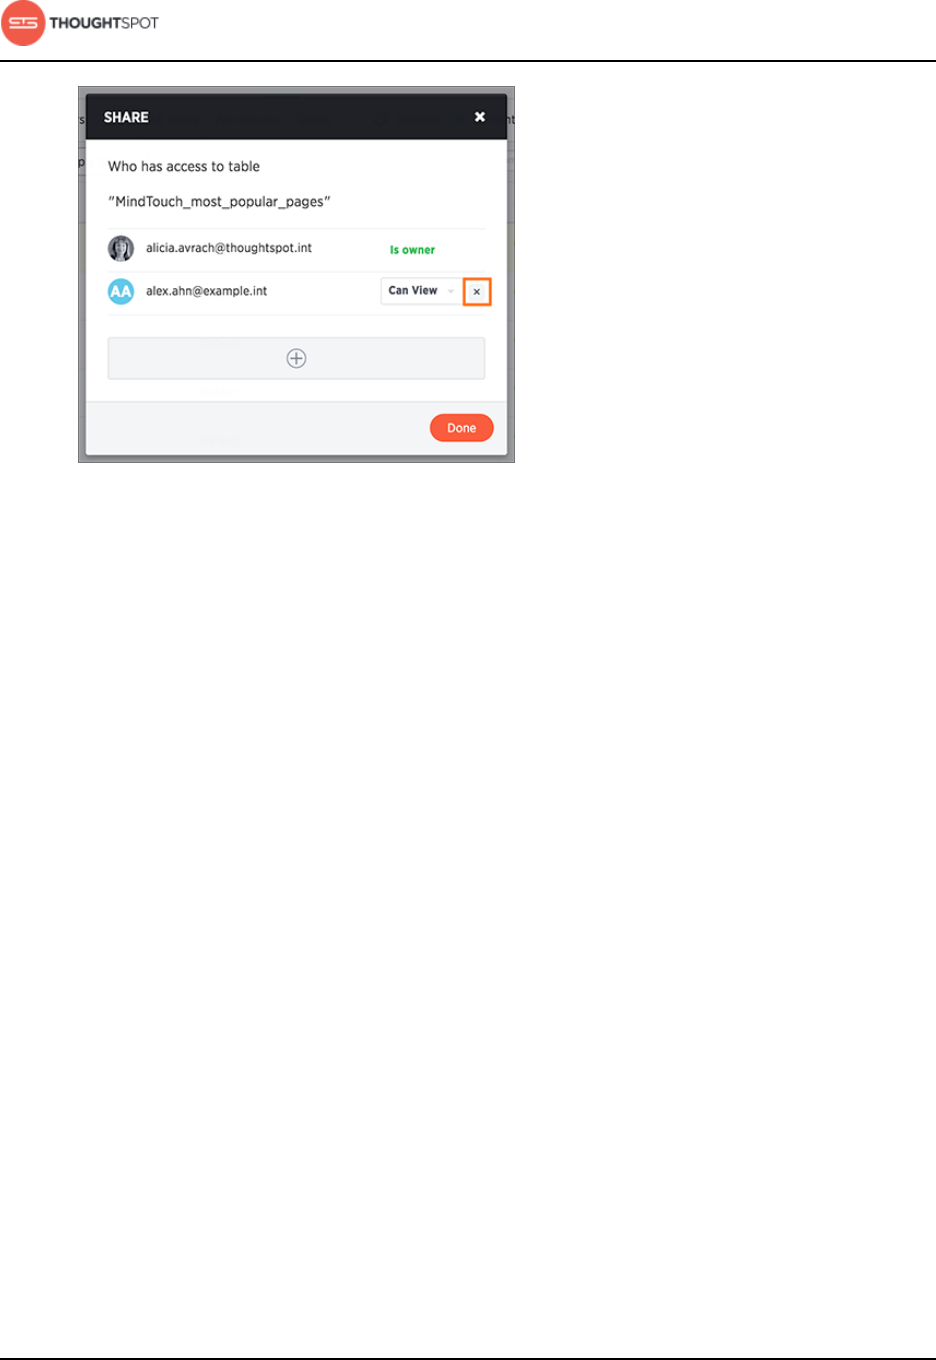
About security
ThoughtSpot Administration Guide Copyright © 2017 by ThoughtSpot. All Rights Reserved. 196
Figure 106: Click the X to unshare
5. Click Done.
Row level security
Row level security allows you to define which groups can see individual rows in
a table, based on the values in one of its columns. Using row level security, you
can effectively customize search results and pinboards for each group that views
them.
How row level security works
Row level security works at the group level, not the individual user level.
By default, all groups can see all rows for any table they can view. You can limit
the rows a group can see by setting conditions on column values. The row level
security rules you define on a table also apply to any worksheets and pinboards
based on that table.
There are several reasons you might want to use row level security:
About security
ThoughtSpot Administration Guide Copyright © 2017 by ThoughtSpot. All Rights Reserved. 197
Table 23: Row level security examples
Reason Example
Hide sensitive data from groups who should not
see it.
In a report with customer details, hide potential
customers (those who have not yet completed
their purchase) from everyone except the sales
group.
Filter tables to reduce their size, so that only
the relevant data is visible.
Reduce the number of rows that appear in a
very large table of baseball players, so that
players who are no longer active are not shown
except to historians.
Enable creation of a single pinboard or
visualization, which can display different data
depending on the group who is accessing it.
Create one sales pinboard that shows only
the sales in the region of the person who
views it. This effectively creates a personalized
pinboard, depending on the viewer's region.
Rules-Based Row Level Security vs. Legacy Row Level Security
There are two types of row level security in ThoughtSpot:
•Rule-based row level security
This is the newer, preferred method of setting row level security. It can handle
thousands of groups, and allows you to set up flexible rules that are self-
maintaining.
•Legacy row level security
This is the legacy method, where you download a security file, which you
edit in Excel to set up rules for row level security. This method is limited to
65 groups. You should not use this method, if you are setting up row level
security for the first time. In fact, if you are using legacy row level security, you
should consider migrating to the improved rule-based row level security for its
better scale, flexibility, and ease of maintenance.

About security
ThoughtSpot Administration Guide Copyright © 2017 by ThoughtSpot. All Rights Reserved. 198
Row level security and administrators
If a user is a member of a group that has the privilege Has administration
privileges, that user will be able to see all the data in ThoughtSpot.
Administrators can see all data sources, and no type of row level security applies
to them.
About Rule-Based Row Level Security
Rule-Based Row Level Security is the preferred way to protect your data so
that users see only those rows they are allowed to see based on their group
membership.
Beginning in ThoughtSpot version 3.3, you can set row level security directly in
the ThoughtSpot application. In past versions, you had to use the security file
(see About Legacy Row Level Security). If you are setting up row level security
for the first time, use the method shown in this section.
How Rule-Based Row Level Security works
Row level security works at the group level, not the individual user level.
By default, all groups can see all rows for any table they can view. You can limit
the rows a group can see by setting rules based on the data values contained
in one or more columns. The row level security rules you define on a table also
apply to any worksheets and pinboards based on that table.
For each data source (table or imported data), you will define one or more rules
that govern which groups can see which data. The rules take the form of an
expression which is evaluated for each row and group combination, to decide if
that group can see that row. If the expression evaluates to "true", for a particular
group, they will be able to see that row.

About security
ThoughtSpot Administration Guide Copyright © 2017 by ThoughtSpot. All Rights Reserved. 199
Row level security operators and functions
For a list of operators and functions you can use to build these expressions see
Row level security rules reference.
Best practices for using Rule-Based Row Level Security
Use these best practices for Rule-Based Row Level Security:
1. Contact ThoughtSpot Support to have them disable search suggestions based
on data values.
These are not hidden from users when you set row level security, so if you
don't want them to ever see a search suggestion from a row they are not
allowed to see, you'll need to disable the data value search suggestions.
2. Set up row level security on every table to which it applies.
It is always a possibility that a particular search will only include data from
a single table, and a user will see something they shouldn't. So protect your
data by setting row level security wherever you want to keep data secure.
3. Give users access to worksheets instead of tables.
This is a general best practice in all implementations. It makes things easier
for end users, because they only need to choose among a few sources, rather
than every table. Also they won't have to choose five separate tables to get
meaningful results. They can choose the single worksheet that combines the
tables.
4. Explicitly grant access for users that should see all rows.
As soon as you create a row level security definition on a table for one group,
all other groups are then blocked from seeing any rows in the table. You have
to specifically grant other groups access in order for them to see any rows.
If you want to ensure that a group can always see all rows in a table, use a rule
that always evaluates to "true" for that group. For example:

About security
ThoughtSpot Administration Guide Copyright © 2017 by ThoughtSpot. All Rights Reserved. 200
• if ts_groups = supergroup then 'true'
Row level security with multiple conditions
When multiple row level security rules apply, the permissions are additive. That
is, when there are multiple row level security conditions specified on a table, they
are applied using an OR operator. If any of the rules applied allow a user to see a
particular row, the row will be shown to that user.
If a user is a member of multiple groups, the user will be able to see all the rows
that are visible to all of the groups, so the most permissive policy is used.
Workflow for setting Rule-Based Row Level Security
Setting row level security is a three steps process:
1. Disable data value suggestions
2. Access the Rule Builder
3. Define Rule-Based Row Level Security rules
Disable data value suggestions
When you set Rule-Based Row Level Security, you need to first turn off search
suggestions on data values.
When Rule-Based Row Level Security is set, it protects users from seeing data
they shouldn't in worksheets and pinboards. However, the search suggestions are
not filtered using Rule-Based Row Level Security, so it is possible someone could
see a data value they should not in a search suggestion. Disabling suggestions
on data values corrects this. Be sure and do this procedure before setting up
Rule-Based Row Level Security.
1. Contact ThoughtSpot Support, and tell them that you will be setting up Rule-
Based Row Level Security. Ask them to disable data value suggestions for
you.
2. When this setting has been made, continue with Access the Rule Builder.
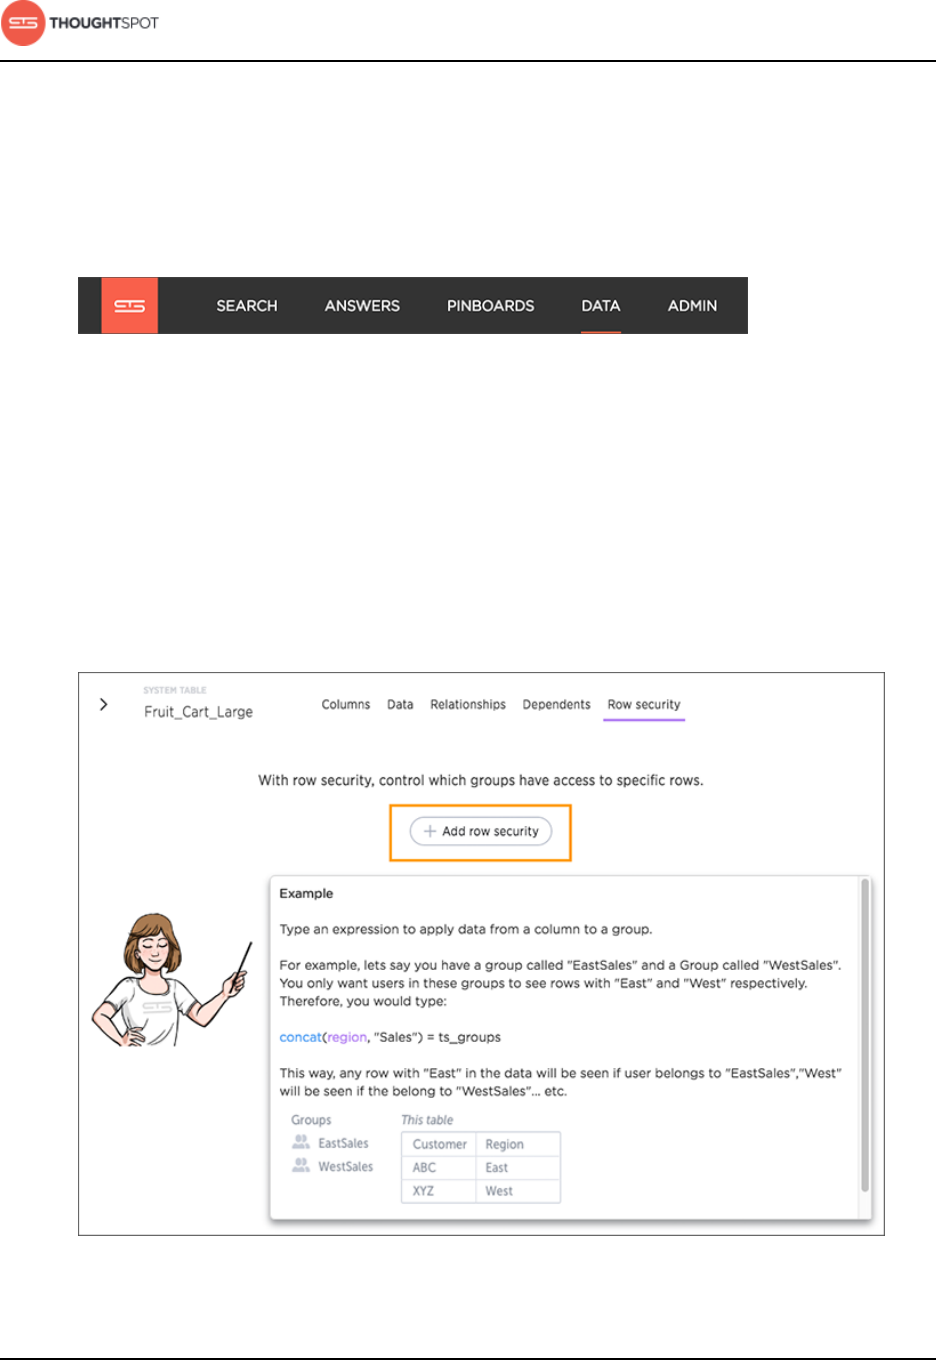
About security
ThoughtSpot Administration Guide Copyright © 2017 by ThoughtSpot. All Rights Reserved. 201
Access the Rule Builder
To set up rule-based row level security, you first need to access the Rule Builder.
To get to the Rule Builder:
1. Click on Data, on the top navigation bar.
Figure 107: Data
2. Select a table from the list by clicking on it.
Row level security can only be set on tables and imported data, not on
worksheets. The settings you make to the tables will automatically apply to
any worksheets or pinboards created on top of them.
3. Click Row security at the top right side of the page.
4. Click the + Add row security button.
Figure 108: Add row security
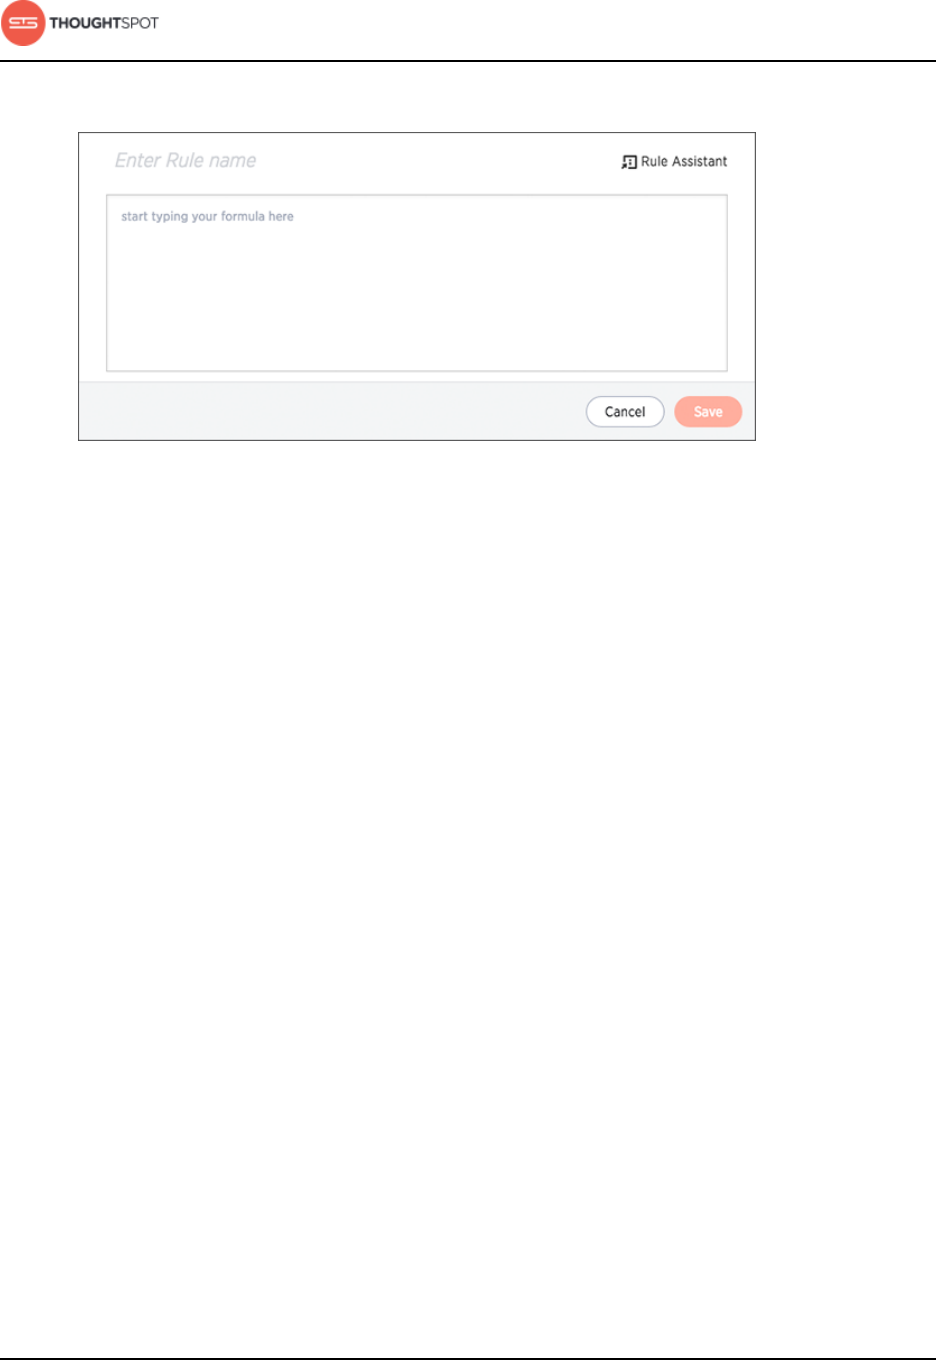
About security
ThoughtSpot Administration Guide Copyright © 2017 by ThoughtSpot. All Rights Reserved. 202
5. The Rule Builder will appear, where you can define row level security rules.
Figure 109: The Rule Builder
Define Rule-Based Row Level Security rules
You define row level security by creating an expression that gets evaluated for
every row and group combination. This powerful feature can be used with up to
thousands of groups.
To define a row level security rule:
1. Access the Rule Builder.
2. Use the Rule Builder window to enter a row security rule.
You'll type in an expression, which gets evaluated for every row and group
combination. If the rule evaluates to true for a particular row and group, that
group will be able to see that row. Use the variable ts_groups to refer to the
group name.
For example, the expression ts_groups = location would allow users to only
see rows where the value in the location column was the same as their group
name.
Notice how this type of security rule is self-maintaining. If you were to later
add additional locations, the rule will still work, as long as users are placed in
the group that matches their location.
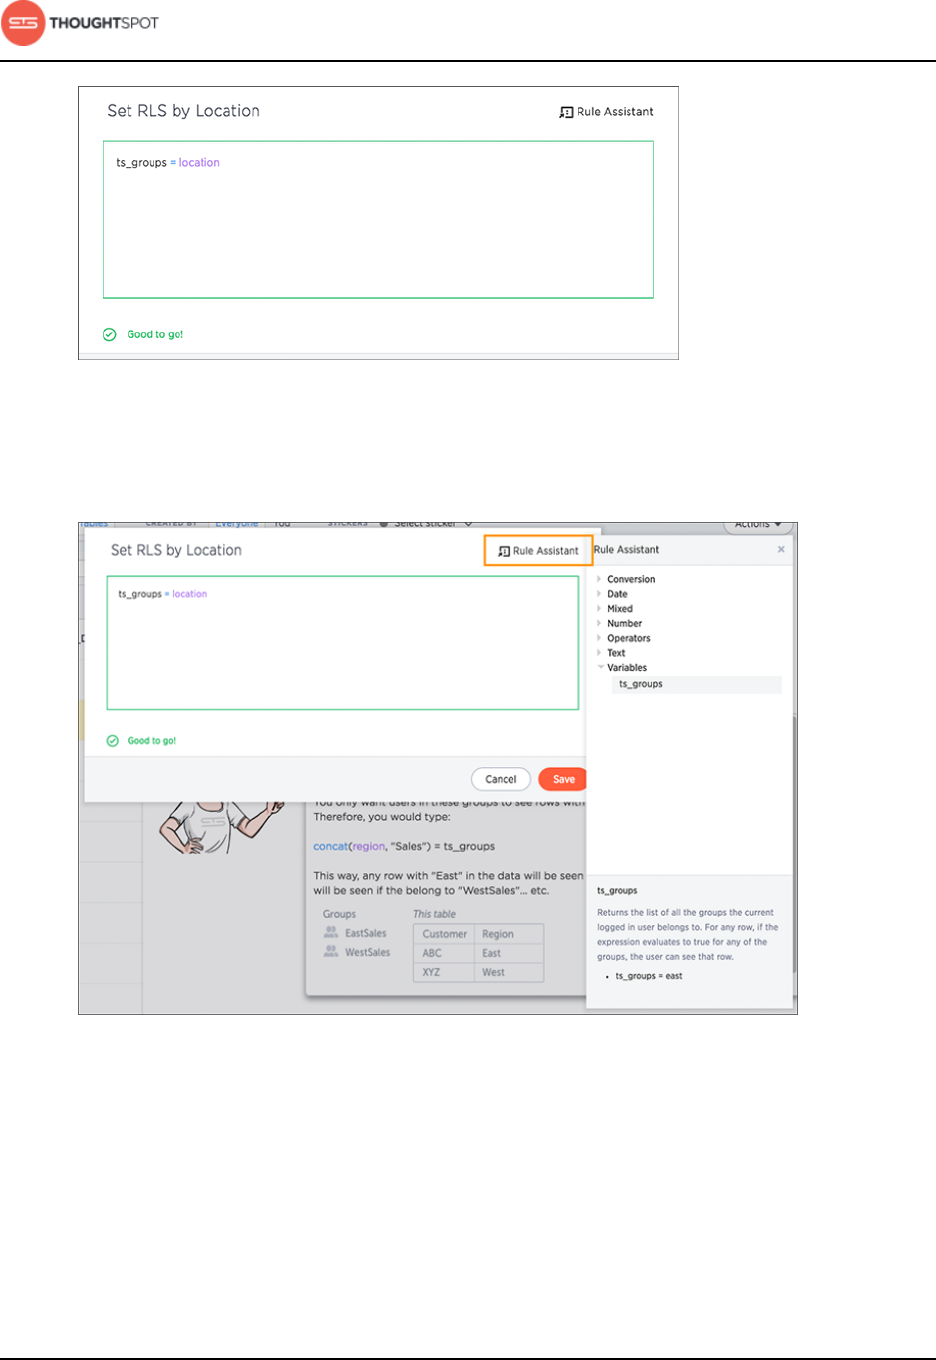
About security
ThoughtSpot Administration Guide Copyright © 2017 by ThoughtSpot. All Rights Reserved. 203
Figure 110: Enter an expression
3. Use formulas if you want to define more complex expressions. You can see a
list of available operators by clicking on Rule Assistant.
Figure 111: The Rule Assistant
4. Use the suggestions to build a valid expression. When the expression is valid,
you'll see a green indicator at the bottom of the Rule Builder.
As you type, you'll see suggestions for formula syntax, variables, and column
names. Using these suggestions can make defining an expression easier,
particularly when it comes to specific syntax, like enclosing parameters in
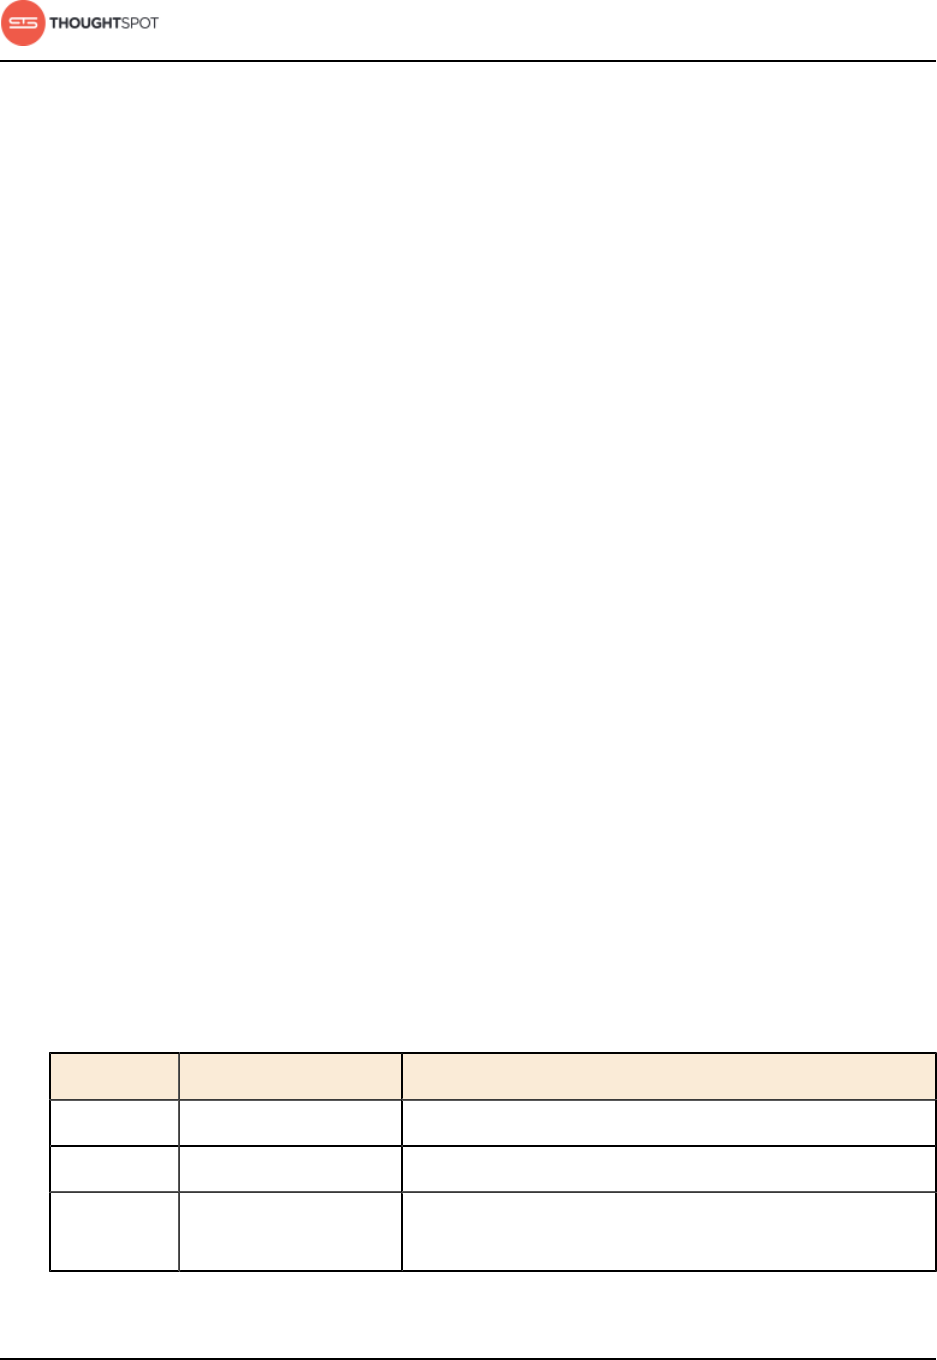
About security
ThoughtSpot Administration Guide Copyright © 2017 by ThoughtSpot. All Rights Reserved. 204
parenthesis. And if you can't remember the exact column name or variable
you want to use, the suggestions can help.
5. Click Save.
6. The rule you created will be shown in the list of rules. Click on its name to view
or edit the rule. You can also add more rules by clicking + Add.
7. To test your rule, create a search that includes the column(s) you used in your
expression, save it to a pinboard, and share it with all users. Log in as users in
different groups, and make sure they are seeing the appropriate rows in the
pinboard you created.
About Legacy Row Level Security
Legacy Row Level Security is no longer used. This documentation is retained to
support implementations that are already using this method.
If you're setting up row level security for the first time, see About Rule-Based
Row Level Security. That is the preferred method. It supports thousands of
groups, and is easier to set up and maintain then Legacy Row Level Security.
This legacy version of row level security allowed you to define which groups
could see individual rows in a table, based on the values in a column.
Legacy Row Level Security settings
You define the rules for row level security by editing the security file in Excel.
Each row in the file is a rule, consisting of:
Table 24: Columns in the security file
Value Security file heading Details
Group GroupName Group of users for which to apply this setting.
Table LogicalTableName TableName from the model file.
Table
identifier
LogicalTableGUID TableGUID from the model file.

About security
ThoughtSpot Administration Guide Copyright © 2017 by ThoughtSpot. All Rights Reserved. 205
Value Security file heading Details
Column ColumnName ColumnName from the model file.
Column
identifier
ColumnGUID ColumnGUID from the model file.
Operation Operation Supply one of these operators:
• BEGINS_WITH
• ENDS_WITH
• CONTAINS
• EQ (equals)
• NE (not equals)
• GE (greater than or equal to)
• GT (greater than)
• LE (less than or equal to)
• LT (less than)
• BW (between)
• BW_INC (between with both boundaries included)
• BW_INC_MIN (between with the lower boundary
included)
• BW_INC_MAX (between with upper boundary
included)
Column
value(s)
Value Column value(s) to apply the operator to. If multiple
values are used, as with the between operators, they are
separated by a pipe (|) character.
Best practices for using Legacy Row Level Security
Use these best practices when using Legacy Row Level Security:
1. Give users access to worksheets instead of tables.
For each table that uses row level security, you should create a worksheet
and share it, so that users can search it instead of the underlying table. The
worksheet must include the column(s) where the security rule(s) are defined.
Then remove access to the table where you applied the row level security.

About security
ThoughtSpot Administration Guide Copyright © 2017 by ThoughtSpot. All Rights Reserved. 206
This is the safest way to ensure that users never see any data from rows they
shouldn't see.
Row level security only applies in searches that include the column on which
the security rule is defined. So if a user has access to the tables directly, they
could do a search that omits the column that has the security rules applied,
and then see the data in the other columns. But a worksheet that includes the
column with the row level security definition will always hide all values from
rows that don't satisfy the row level security condition.
Because of this, it is a best practice to always use worksheets with row level
security, and remove access to the underlying tables. This will ensure that
groups can only see the data that is defined as visible to them.
2. Explicitly grant access for users that should see all rows.
As soon as you create a row level security definition on a table for one group,
all other groups are then blocked from seeing any rows in the table. You have
to specifically grant other groups access in order for them to see any rows.
If you want to ensure that a group can always see all rows in a table, grant
them NE (not equals) privileges on a dummy value that does not appear
in that row. For example, these settings would enable users in the group
Managers to see all rows in the Sales table:
• Managers Sales Region NE xxx
3. The operations GE (greater than or equal to), GT (greater than), LE (less than
or equal to), and LT (less than) are meant to be used with measures (numeric
values) and not with attributes. Though they technically can be used with
attributes, they would be applied based on alphabetical order, which could
return confusing results.
Row level security with multiple conditions
When multiple row level security rules apply, the permissions are additive. That
is, when there are multiple row level security conditions specified on a table, they
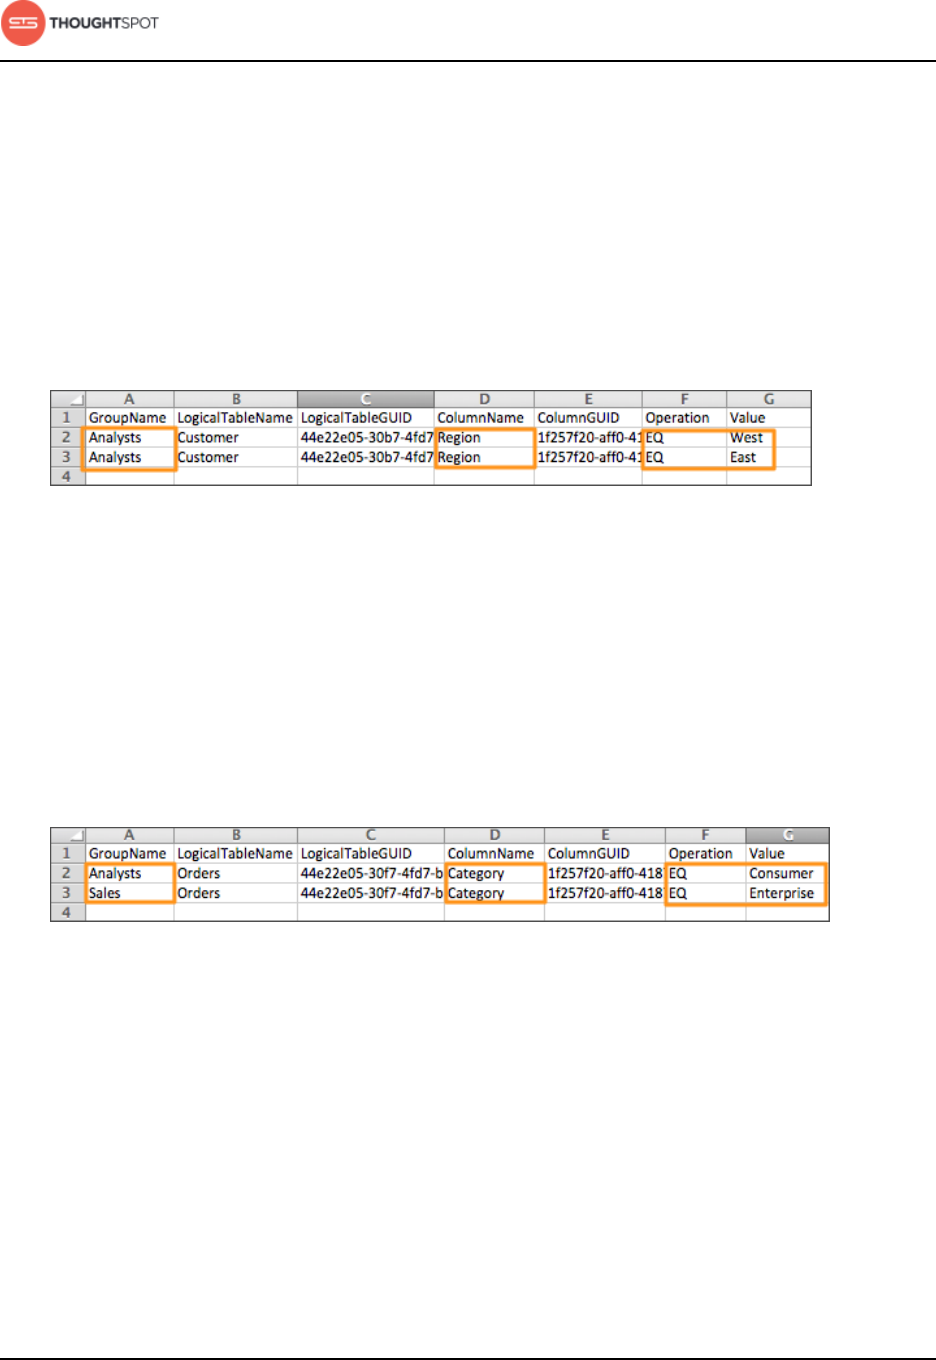
About security
ThoughtSpot Administration Guide Copyright © 2017 by ThoughtSpot. All Rights Reserved. 207
are applied using an OR operator. These examples will help you understand how
this works in practice:
In this example, the group Analysts has two separate security entries for the
Region column in the Customer table. One entry allows Analysts to see rows
where the Region is equal to West. The other allows them to see rows where the
Region is equal to East. So users in the Analysts group will be able to see all the
rows in either Region.
Figure 112: Multiple equality conditions in security file
In this example, a user is a member of two groups: Analysts and Sales. The
security file lists different permissions for each group based on the column
Category. Analysts can see rows where Category is equal to Consumer and
Sales can see rows where Category is equal to Enterprise. So the user who is a
member of both groups will be able to see all the rows where the Category is
equal to either Consumer or Enterprise.
Figure 113: Multiple group membership in security file
It works the same way with ranges and between operators as with equality. The
user will be able to see any row that fulfills any of the conditions.
Workflow for setting Legacy Row Level Security
Setting row level security is a three steps process:
1. Obtain the security file.
2. Define Legacy Row Level Security.
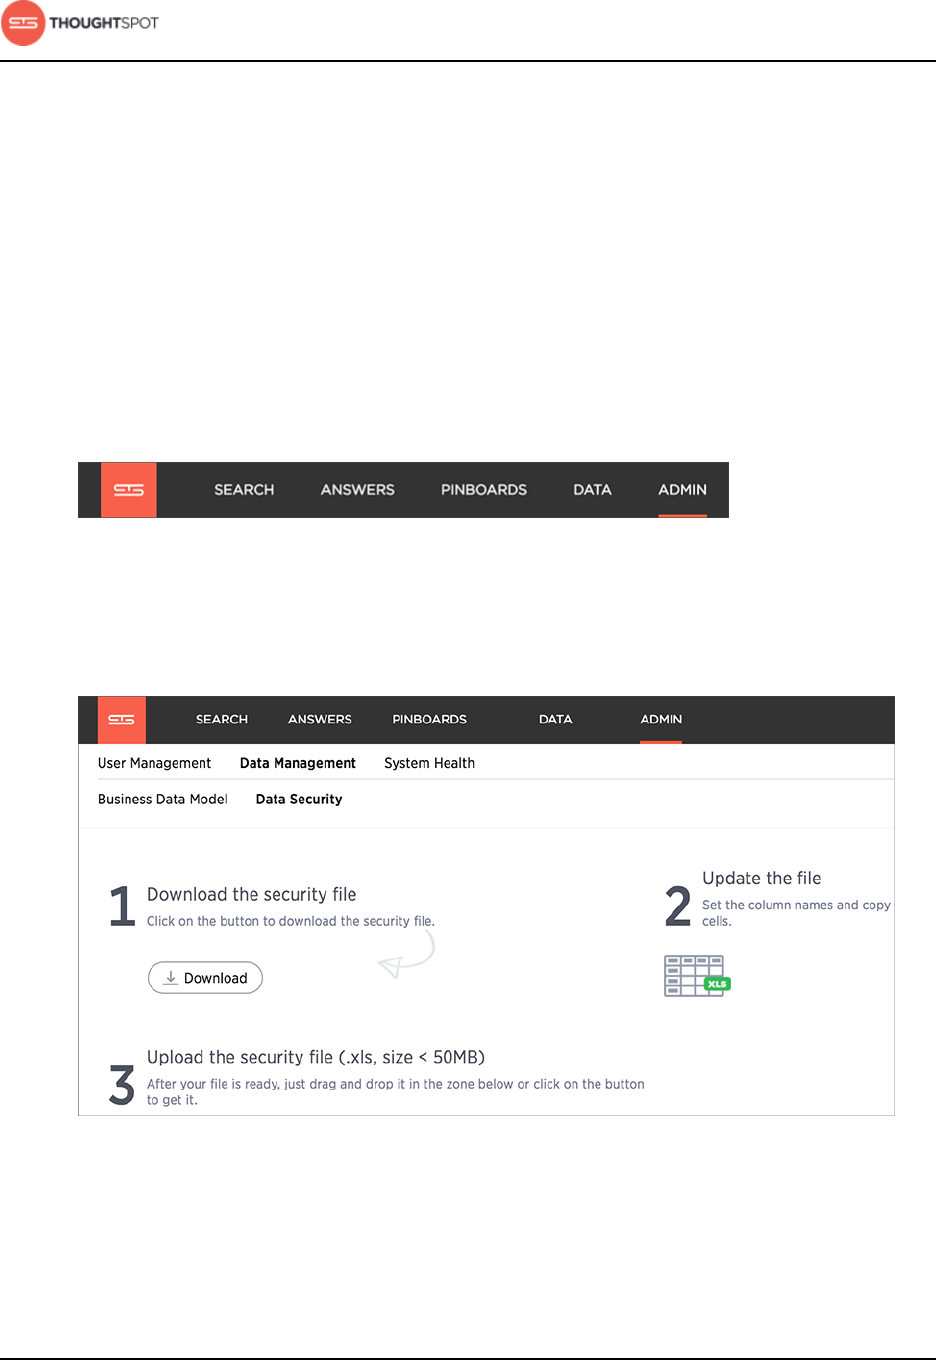
About security
ThoughtSpot Administration Guide Copyright © 2017 by ThoughtSpot. All Rights Reserved. 208
3. Upload the edited security file.
Obtain the security file
Before you can make changes to the security file, you need to download it using
the ThoughtSpot Web interface to access ThoughtSpot. Then you will be able to
edit it using Microsoft Excel or a similar spreadsheet editing tool.
To obtain the security file:
1. Log in to ThoughtSpot from a browser as the admin user.
2. Click on the Admin icon, on the top navigation bar.
Figure 114: The Admin icon
3. Click on Data Security.
4. Click Download security.xls.
Figure 115: Download the security file
5. Save it to your machine.
6. Open the security file in Excel or a text editor.
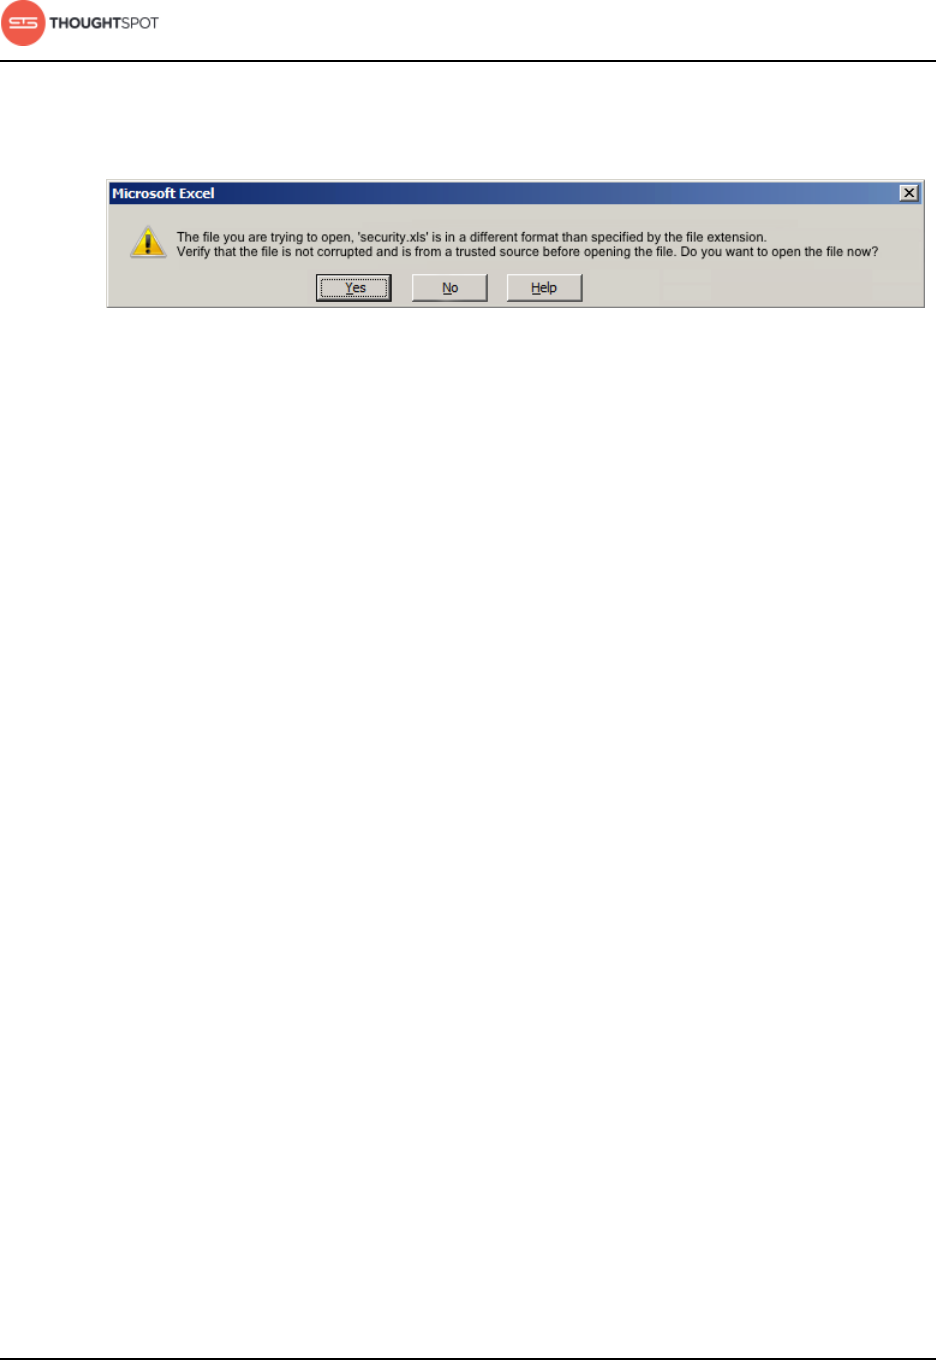
About security
ThoughtSpot Administration Guide Copyright © 2017 by ThoughtSpot. All Rights Reserved. 209
• If you are using Excel, you may see a warning message. Click "Yes" to
proceed.
Figure 116: Warning when opening the security file
• If your security file includes multi-byte characters, edit the file using vi or
vim. This is because security files containing multi-byte characters must be
saved as UTF-8 encoded. Otherwise you won't be able to upload them after
making your edits.
Define Legacy Row Level Security
Edit the security file to add row level security to tables.
Before you can add row level security:
•Download the model file.
•Obtain the security file.
• Create the appropriate groups within ThoughtSpot, if they don't already exist.
You can create groups and add users to them by following the procedures in
Manage users, groups, and privileges.
You can edit the security file using Microsoft Excel or a compatible tool. You will
need to copy and paste some of the required information from the model file.
1. In the model file, find the table for which you want to add row level security.
Then find the entry for the column you will use to define visibility criteria. You
will copy some of the values from this entry into the security file.
2. Enter the appropriate values into the security file in the first empty row.
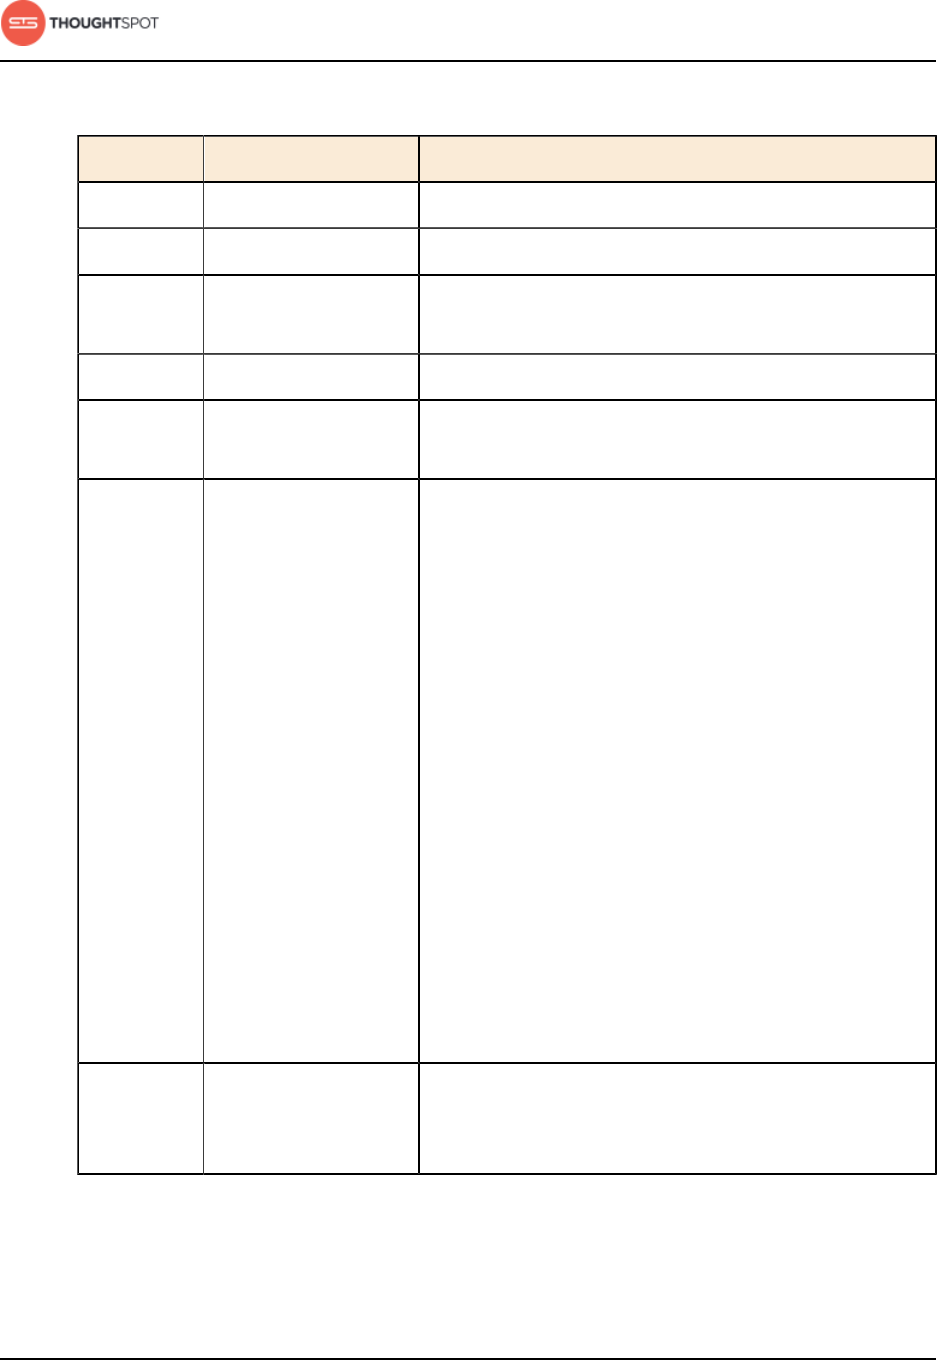
About security
ThoughtSpot Administration Guide Copyright © 2017 by ThoughtSpot. All Rights Reserved. 210
Table 25: Columns in the security file
Value Security file heading Details
Group GroupName Group of users for which to apply this setting.
Table LogicalTableName TableName from the model file.
Table
identifier
LogicalTableGUID TableGUID from the model file.
Column ColumnName ColumnName from the model file.
Column
identifier
ColumnGUID ColumnGUID from the model file.
Operation Operation Supply one of these operators:
• BEGINS_WITH
• ENDS_WITH
• CONTAINS
• EQ (equals)
• NE (not equals)
• GE (greater than or equal to)
• GT (greater than)
• LE (less than or equal to)
• LT (less than)
• BW (between)
• BW_INC (between with both boundaries included)
• BW_INC_MIN (between with the lower boundary
included)
• BW_INC_MAX (between with upper boundary
included)
Column
value(s)
Value Column value(s) to apply the operator to. If multiple
values are used, as with the between operators, they are
separated by a pipe (|) character.
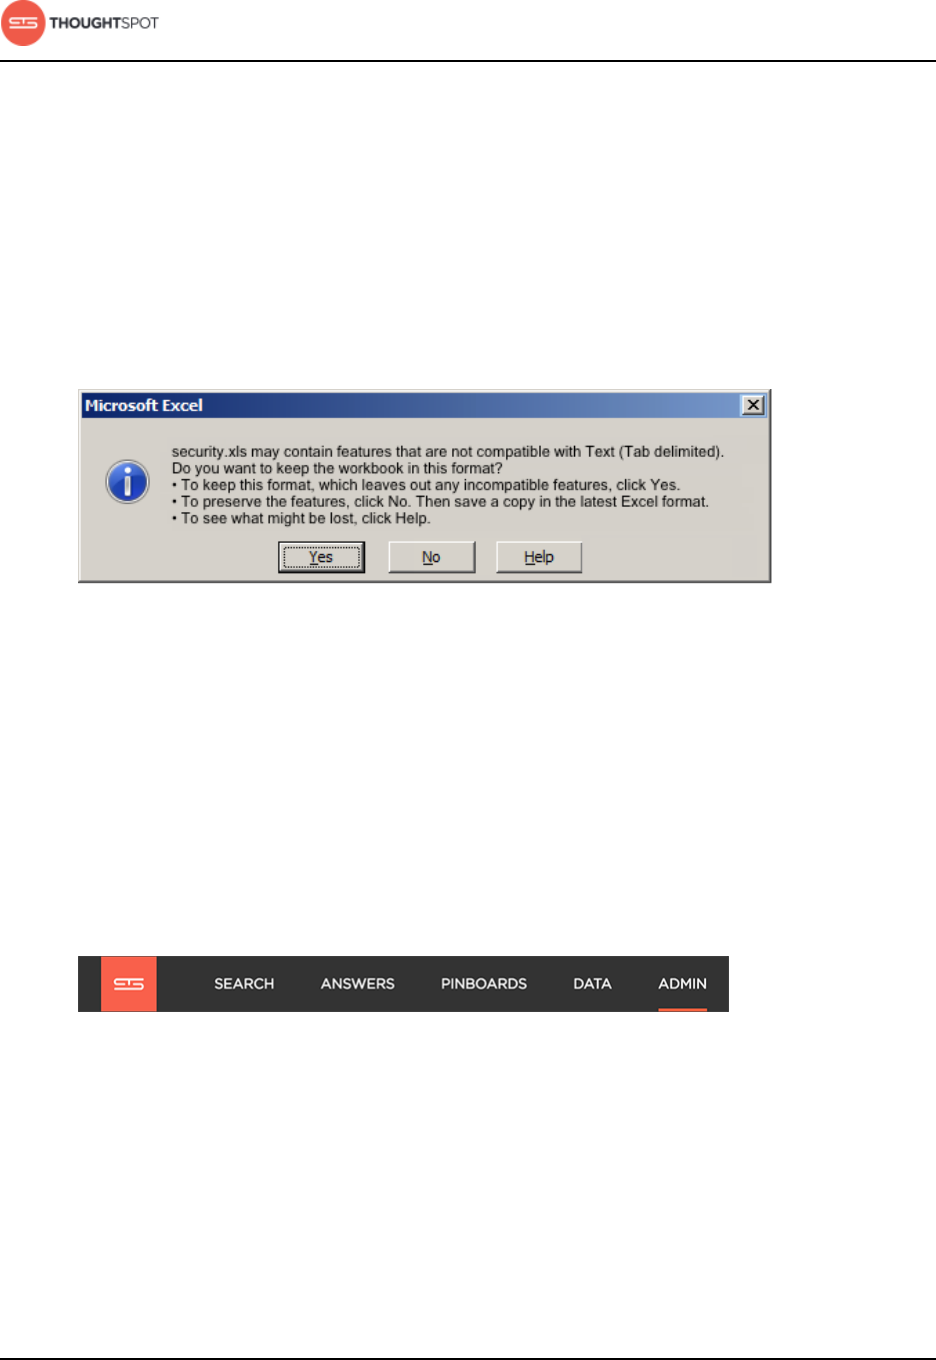
About security
ThoughtSpot Administration Guide Copyright © 2017 by ThoughtSpot. All Rights Reserved. 211
If the condition made up of the column, operator, and value combination
for a particular row is true, that row will be visible to the members of the
designated group.
3. Repeat this for each group, column, and condition you want to define.
4. Save the security file in the same format as it was when you downloaded it (as
a Microsoft Excel file with the name security.xls). You will see a warning when
attempting to save the file. Click "Yes" and save the file.
Figure 117: Warning message when saving the security file
Upload the edited security file
After you have made changes to the security file, you must upload it back to
ThoughtSpot before the changes will take effect.
To upload the security file:
1. Log in to ThoughtSpot from a browser as the admin user.
2. Click on the Admin icon, on the top navigation bar.
Figure 118: The Admin icon
3. Click on Data Security.
4. Click BROWSE YOUR FILES to upload the security.xls file, or drag and drop it
in the zone.
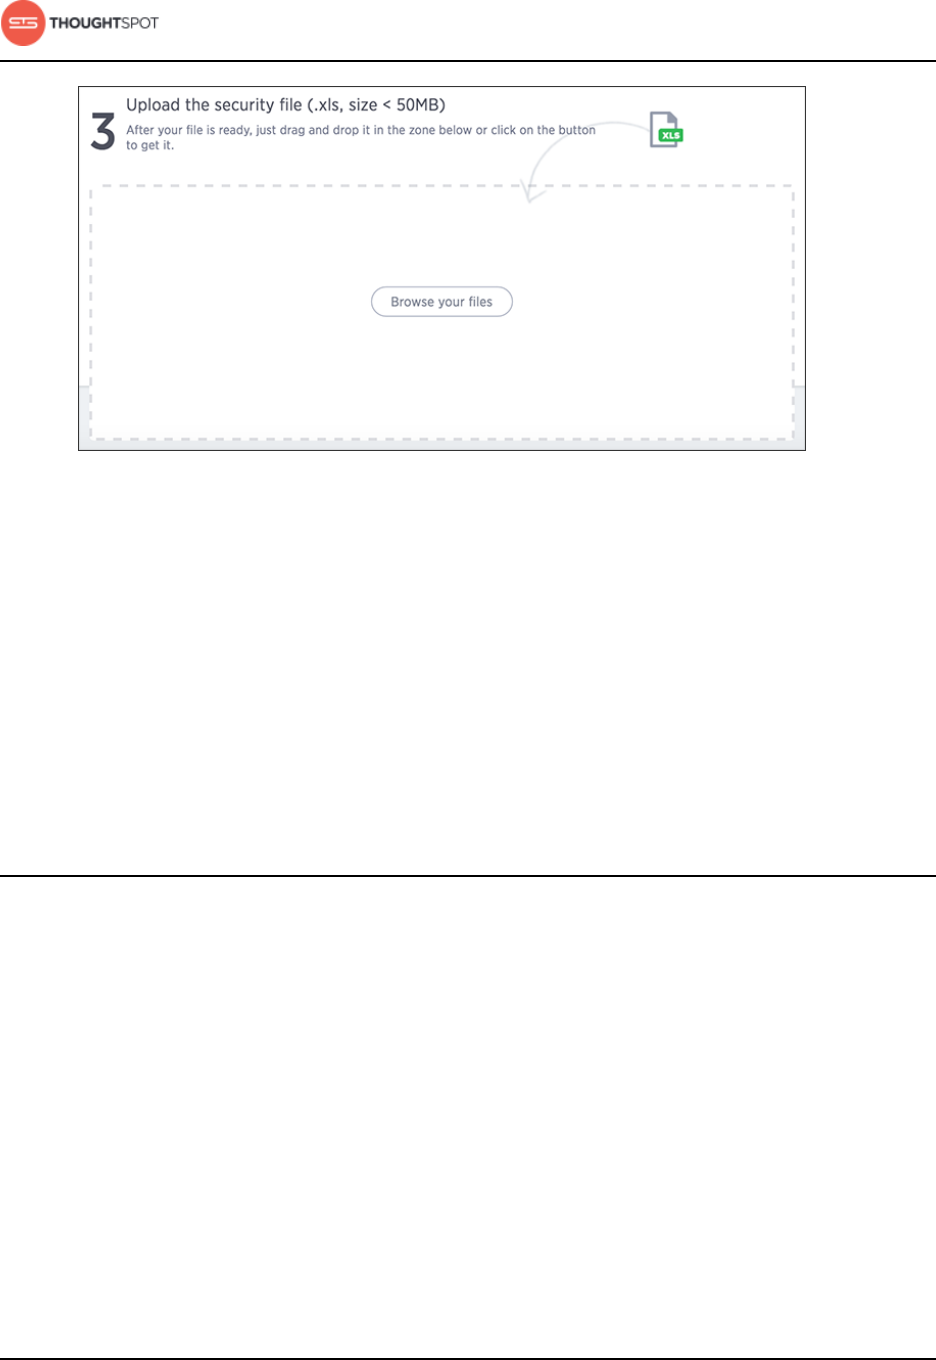
About security
ThoughtSpot Administration Guide Copyright © 2017 by ThoughtSpot. All Rights Reserved. 212
Figure 119: Upload the security file
If you receive an error message upon uploading the file, check that it does not
include any multi-byte characters (i.e. Japanese or other multi-byte language
characters). If it does, you'll need to download the file again and make your
edits using vi or vim.
After the file is uploaded, ThoughtSpot is updated and the row level security
changes are applied.
Network security
This section discusses setting up network security, both for external traffic and
traffic within the cluster.
Allowing External Requests
Some ports must remain open for handling network requests from outside the
ThoughtSpot instance. To see a list of network ports that must remain open to
outside traffic, and for inter-cluster communication, review the information in
Network ports.

ThoughtSpot Administration Guide Copyright © 2017 by ThoughtSpot. All Rights Reserved. 213
Chapter 8: System administration
System administration
Topics:
•System monitoring
•Generate and send a log
bundle
•Send logs to the
administrator
•Set up recording for
Replay Search
System administration includes applying upgrades,
backing up and restoring the cluster, snapshotting,
and adding or removing nodes.
Administration tools
Use these tools to perform administrative actions:
•tscli: an administrative command line interface.
•tsload: a command for loading data directly into
the database.
•TQL: a command line SQL interface to interact
with databases.
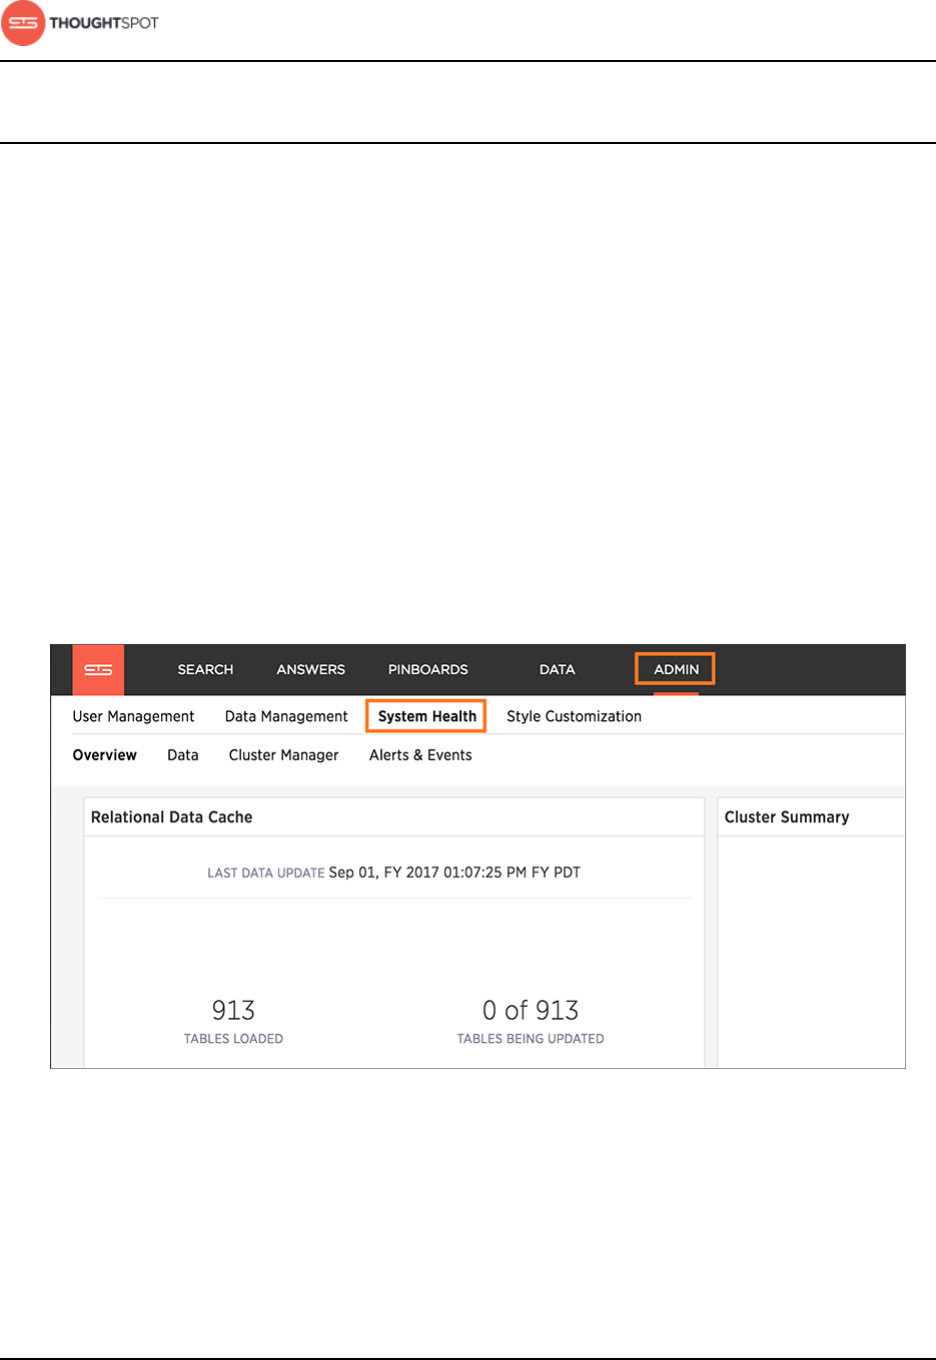
System administration
ThoughtSpot Administration Guide Copyright © 2017 by ThoughtSpot. All Rights Reserved. 214
System monitoring
System monitoring tools in ThoughtSpot include the Control Center, system log
files and out-of-the-box system monitoring pinboards.
System monitoring notifications
You can configure ThoughtSpot to send emails to addresses you specify
with monitoring reports and a cluster heartbeat. Follow these steps to Set up
monitoring.
System Health Center
The ThoughtSpot application includes a System Health Center, for easy
monitoring of usage and cluster health, including alerts. You can view the System
Health Center by clicking on the Admin icon and then clicking System Health.
Figure 120: Getting to the System Health Center
The System Health Center shows the following information:
The Overview section shows a summary of overall cluster status, usage and
capacity information, configuration changes, and critical alerts.
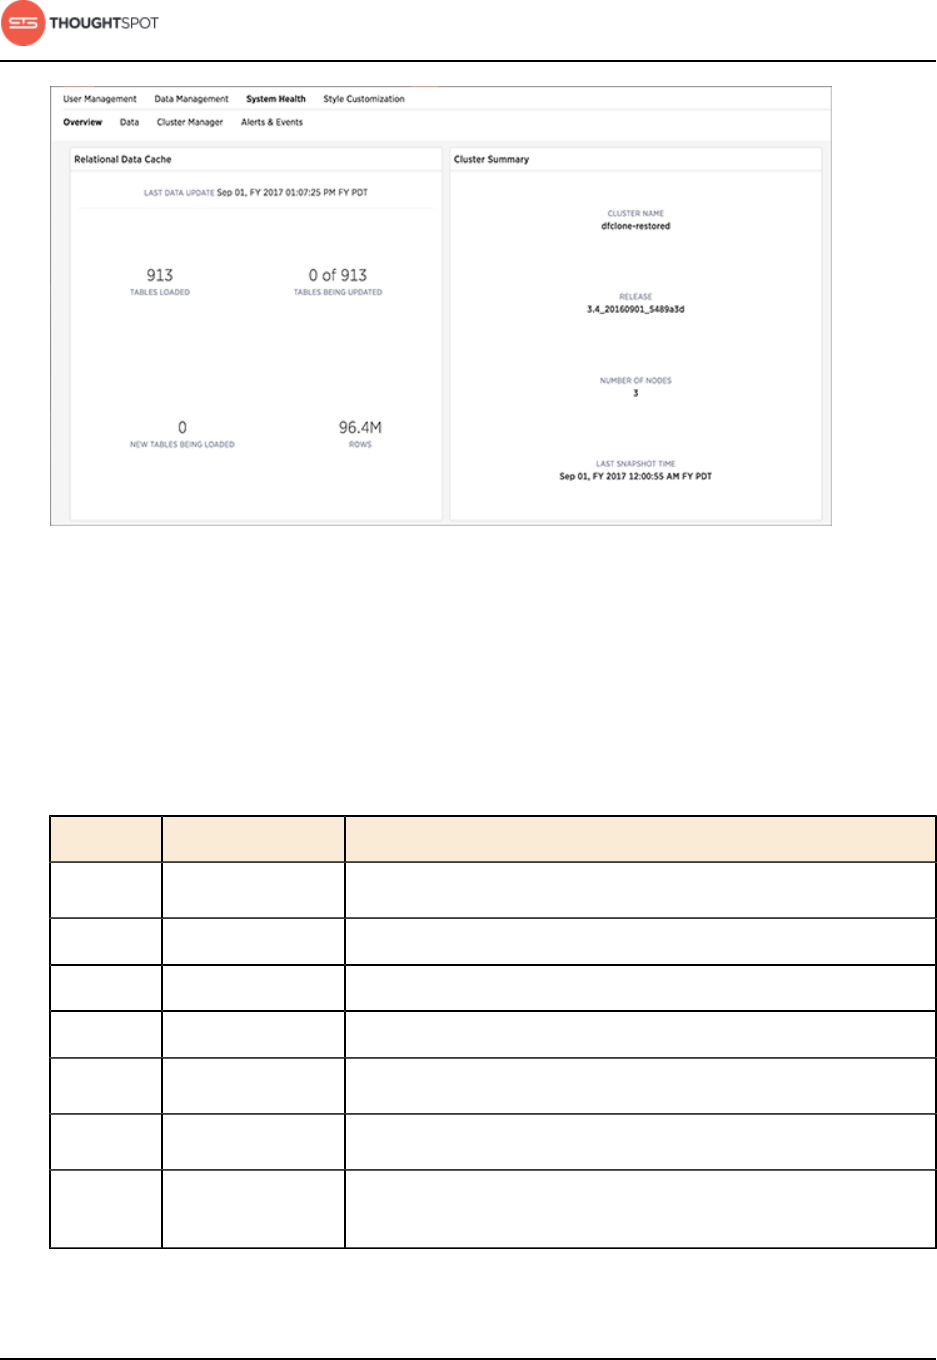
System administration
ThoughtSpot Administration Guide Copyright © 2017 by ThoughtSpot. All Rights Reserved. 215
Figure 121: Partial view of the System Health Center: Overview
The Data section shows all the stored tables with details on the last update time,
time taken for auto-indexing, number of rows, etc.
The status columns have these possible values and meanings:
Table 26: System Health Center: Data section statuses and meanings
Section Status Meaning
Database READY The data has been loaded.
IN PROGRESS The data is still being loaded.
STALE The data is not up to date.
ERROR The table is invalid. Call ThoughtSpot Support.
Search READY The data is up to date and searchable.
NOT READY The data is not ready to be searched.
DELETING INDEX The table has already been deleted, but the index still exists due
to the latency between the database and search engine.
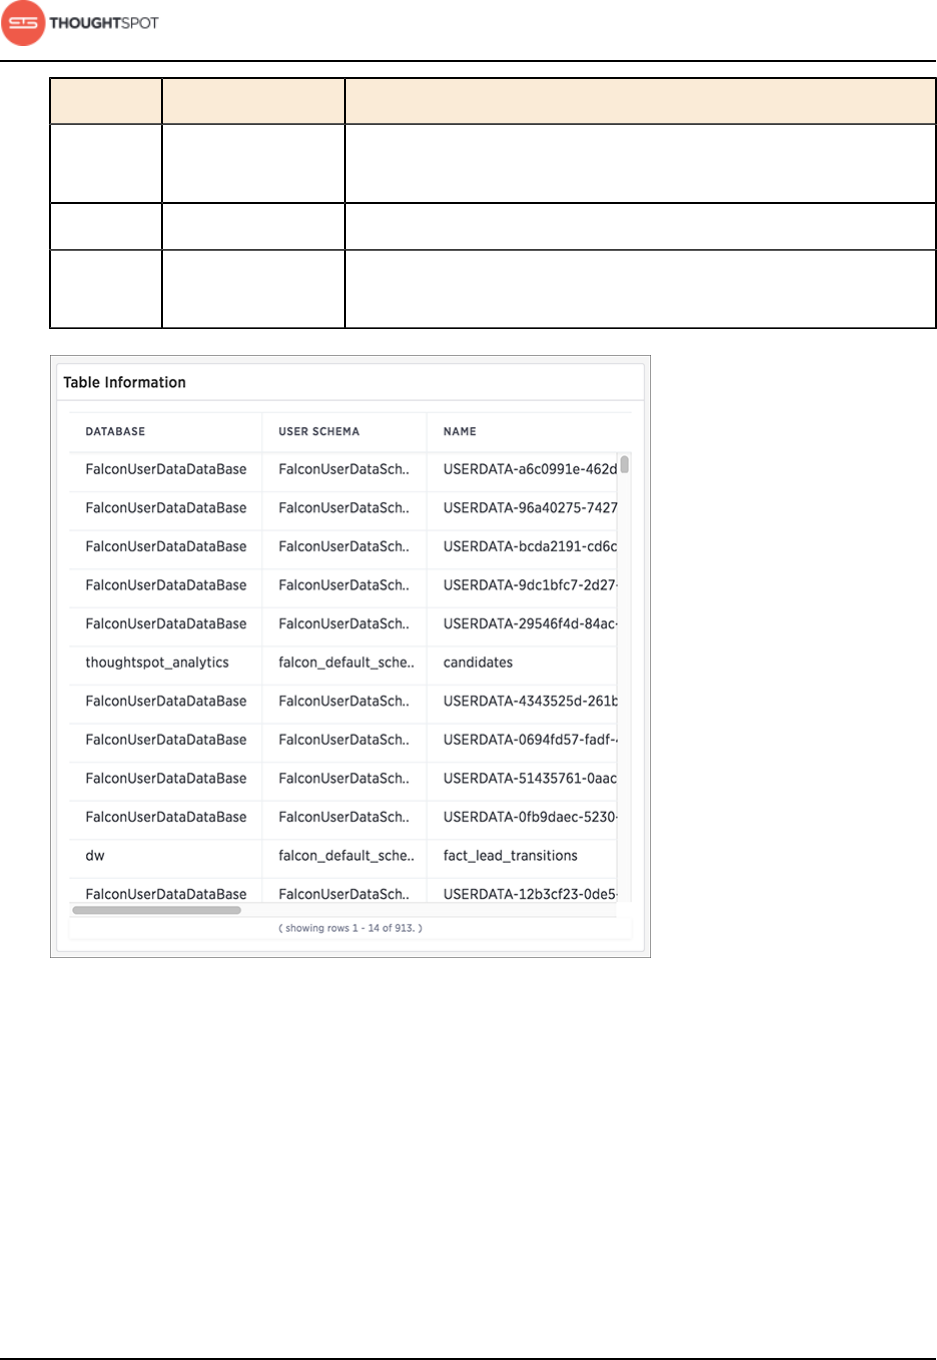
System administration
ThoughtSpot Administration Guide Copyright © 2017 by ThoughtSpot. All Rights Reserved. 216
Section Status Meaning
INDEXING
DISABLED
Either too many tokens exist in a column for it to be indexed, or
indexing has been disabled manually.
CREATING INDEX The index is being created.
UPDATING INDEX A change has been made to indexing or the data, and the index
is being updated to reflect it.
Figure 122: Partial view of the System Health Center: Data
The Cluster Manager section show detailed information about a cluster including
latency over time, snapshot status, installed release, node functions, and logs.

System administration
ThoughtSpot Administration Guide Copyright © 2017 by ThoughtSpot. All Rights Reserved. 217
Figure 123: Partial view of the System Health Center: Cluster Manager
The Events and Alerts section shows notifications, alerts, and an audit trail of
cluster configuration changes..
Figure 124: Partial view of the System Health Center: Events and Alerts
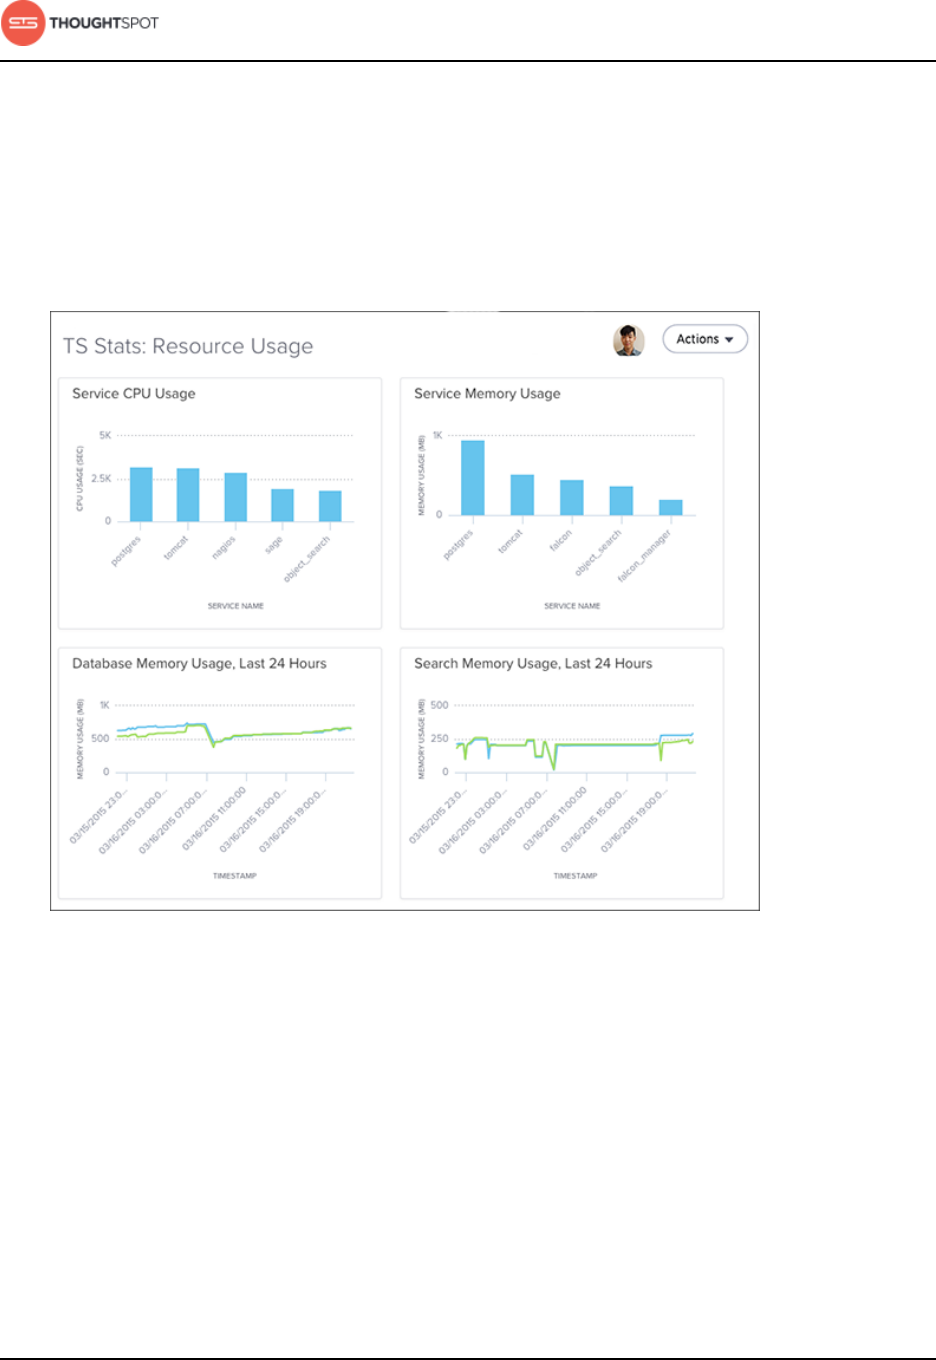
System administration
ThoughtSpot Administration Guide Copyright © 2017 by ThoughtSpot. All Rights Reserved. 218
System monitoring pinboards
There are several system monitoring pinboards in ThoughtSpot that include
information about the system status and resource usage. The information
in these pinboard is updated hourly from an internal database that collects
monitoring statistics.
Figure 125: Example of a system monitoring pinboard
The monitoring pinboards can only be viewed by users with the administrator
privilege. They are based on worksheets, which administrators can view, but
not modify. The underlying tables are protected system tables that cannot be
accessed directly. However, you can create new monitoring reports from the
worksheets.
The worksheets for system monitoring are:
• Ts: bi server

System administration
ThoughtSpot Administration Guide Copyright © 2017 by ThoughtSpot. All Rights Reserved. 219
• Ts: database
• Ts: loader
• Ts: search
• Ts: service resources
Here is a list of the system monitoring pinboards:
Table 27: Monitoring pinboards
Pinboard Description Examples
TS Stats: Usage Helps you see how much the
system is being used. Shows
search and pinboard activity
by user and by date.
• Questions asked by user
• Questions asked by date
• Pinboard impressions
TS Stats: Suggestions Helps you monitor the
performance statistics for the
suggestions provided in the
search bar. Shows the number
and latency of suggestions
given over time.
• Suggestion volume over
time
• Suggestion latency over
time
TS Stats: Queries Helps you monitor database
performance over time by
showing query volume, latency,
and any errors.
• Query latency by size of
response
• Average vs. maximum query
latency
• Database queries and errors
TS Stats: Resource Usage Helps you monitor cluster
resources by showing
memory and CPU usage per
component:
• Service
• Database
• Search
• Host
• Aggregate (all)
• CPU usage per component
over time
• Memory usage per
component over time
• Aggregate memory usage
over time

System administration
ThoughtSpot Administration Guide Copyright © 2017 by ThoughtSpot. All Rights Reserved. 220
Log files
Many of the administration commands output logging information to log files.
The logs get written into the fixed directory /export/logs, with a sub-directory
for each subsystem. The individual log directories are:
• /export/logs/orion
• /export/logs/oreo
• /export/logs/hadoop
• /export/logs/zookeeper
About the Space Utilization chart
The Space Utilization chart is one of the available charts for you to use when
checking the cluster overview.
You can find the chart in the Overview section of the System Health center. This
line chart displays the total used space, which consists of raw uncompressed
data, including replication.
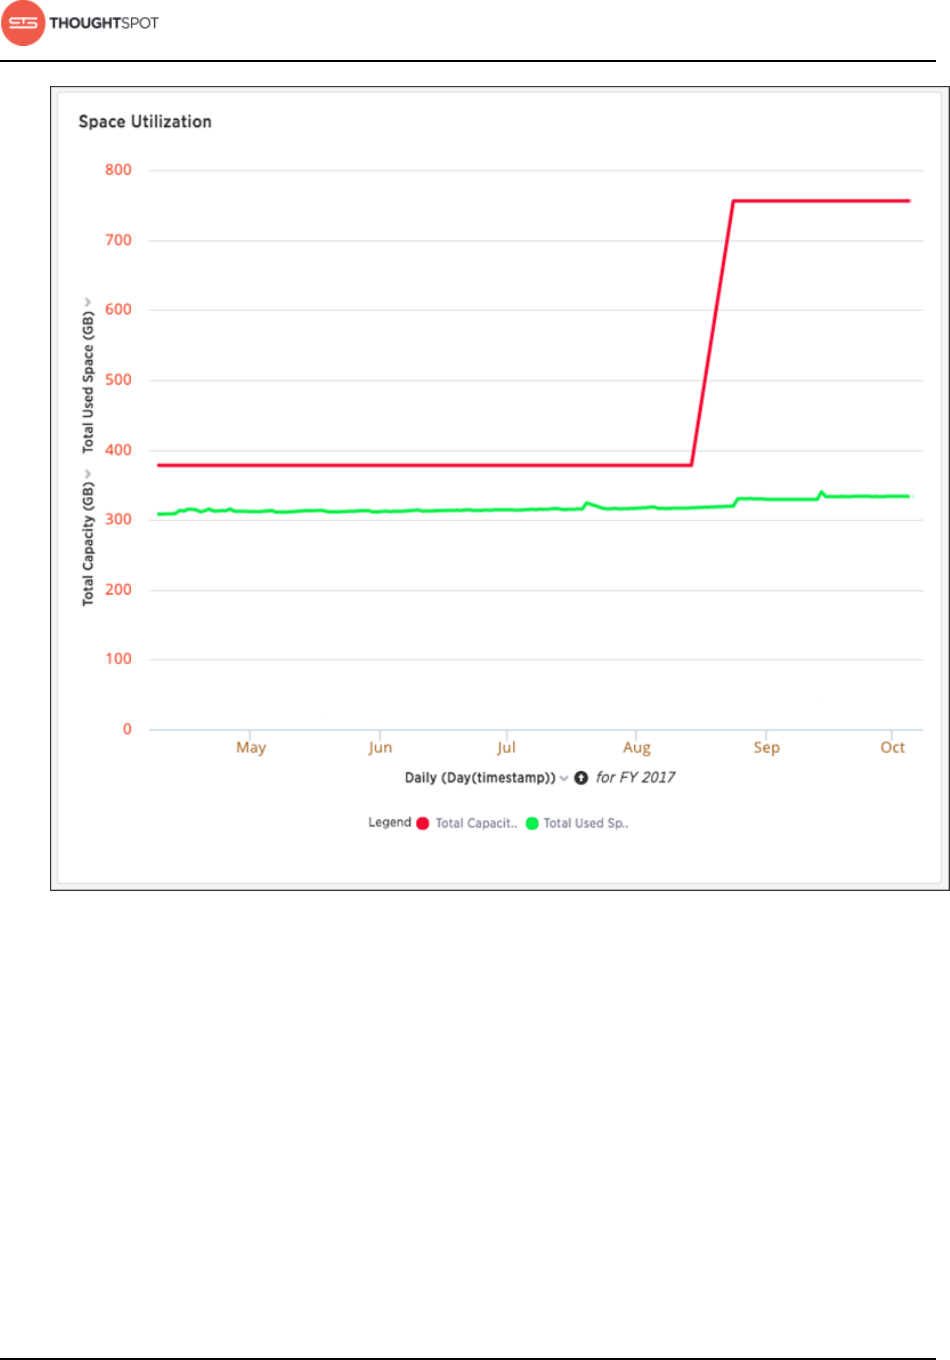
System administration
ThoughtSpot Administration Guide Copyright © 2017 by ThoughtSpot. All Rights Reserved. 221
Figure 126: Space Utilization chart example
The x-axis is by time. It allows you to zoom in and see daily or hourly data. The y-
axis measures the size in GB. So in the Space Utilization chart above, the green
line shows the amount of capacity in use in the system, while the red line shows
the total capacity. The increase in the red line at the end of the period indicates
the addition of extra hardware, resulting in increased capacity.
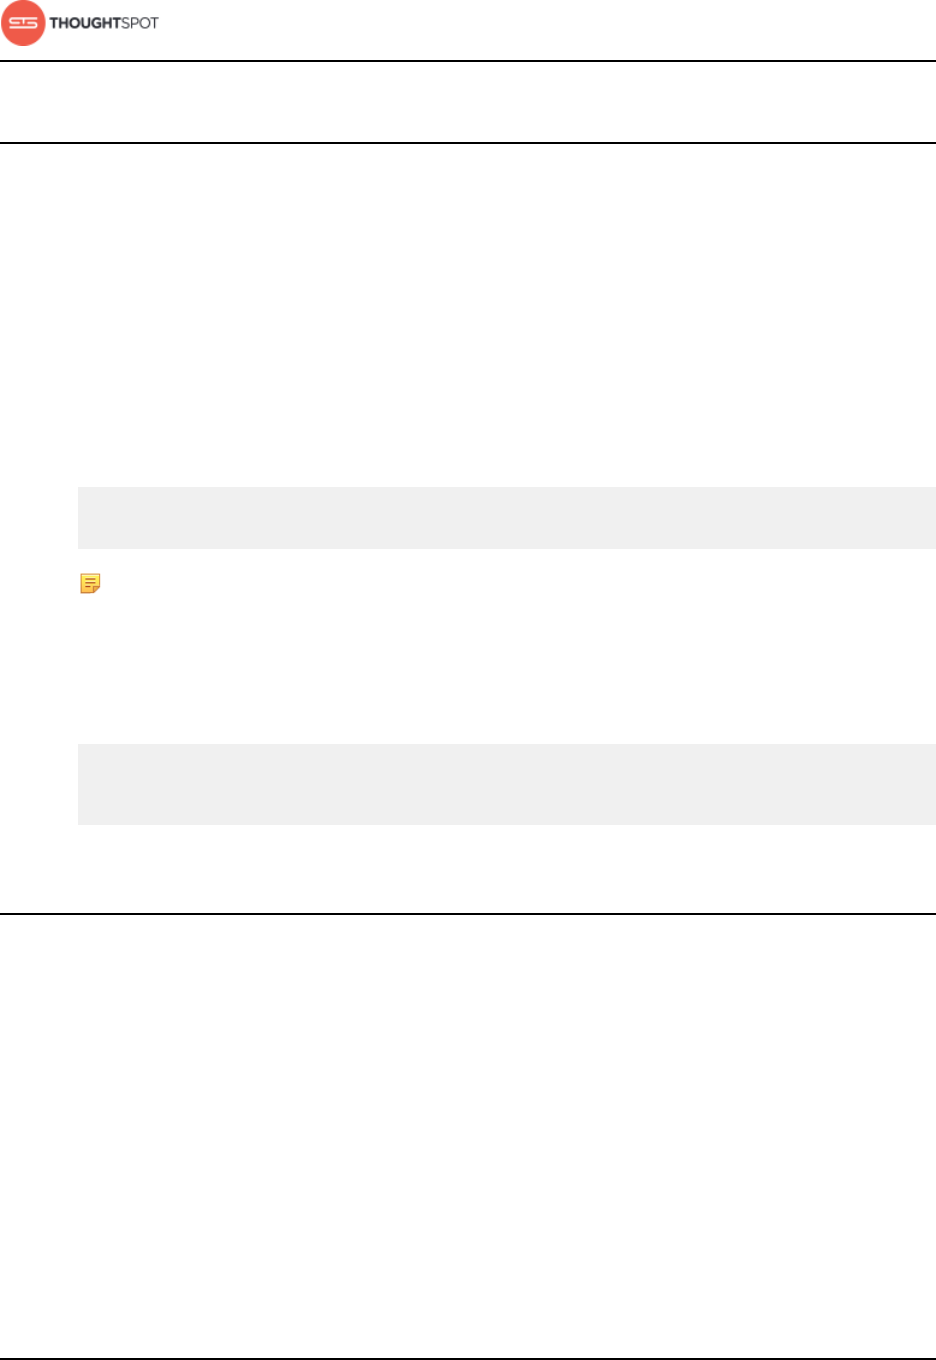
System administration
ThoughtSpot Administration Guide Copyright © 2017 by ThoughtSpot. All Rights Reserved. 222
Generate and send a log bundle
Use theses steps to generate a log bundle, which you can then send to
ThoughtSpot Support.
Before you can send a log bundle to ThoughtSpot Support, you must Connect to
the ThoughtSpot Support file server. This is a one-time setup operation.
To generate a log bundle:
1. Log in to the Linux shell using SSH.
2. Issue the command to generate the log bundle:
tscli callhome generate-bundle
--d <directory> --since <num_of_daysd>
Note: Don't forget to include d after your specified number of days. For
example, 30d.
3. Change directories to the directory where you wrote the log bundle.
4. Issue the command to send the log bundle to ThoughtSpot Support:
tscli fileserver upload
--file_name <file>
--server_dir_path <path>
Send logs to the administrator
Alternately, you can easily send log files directly to your administrator with a
single click.
When ThoughtSpot encounters a problem, a red bar displays in the browser with
an error message. You can use the Report Problem option to complete this task.
Click Report Problem in the bottom right corner of the error message.
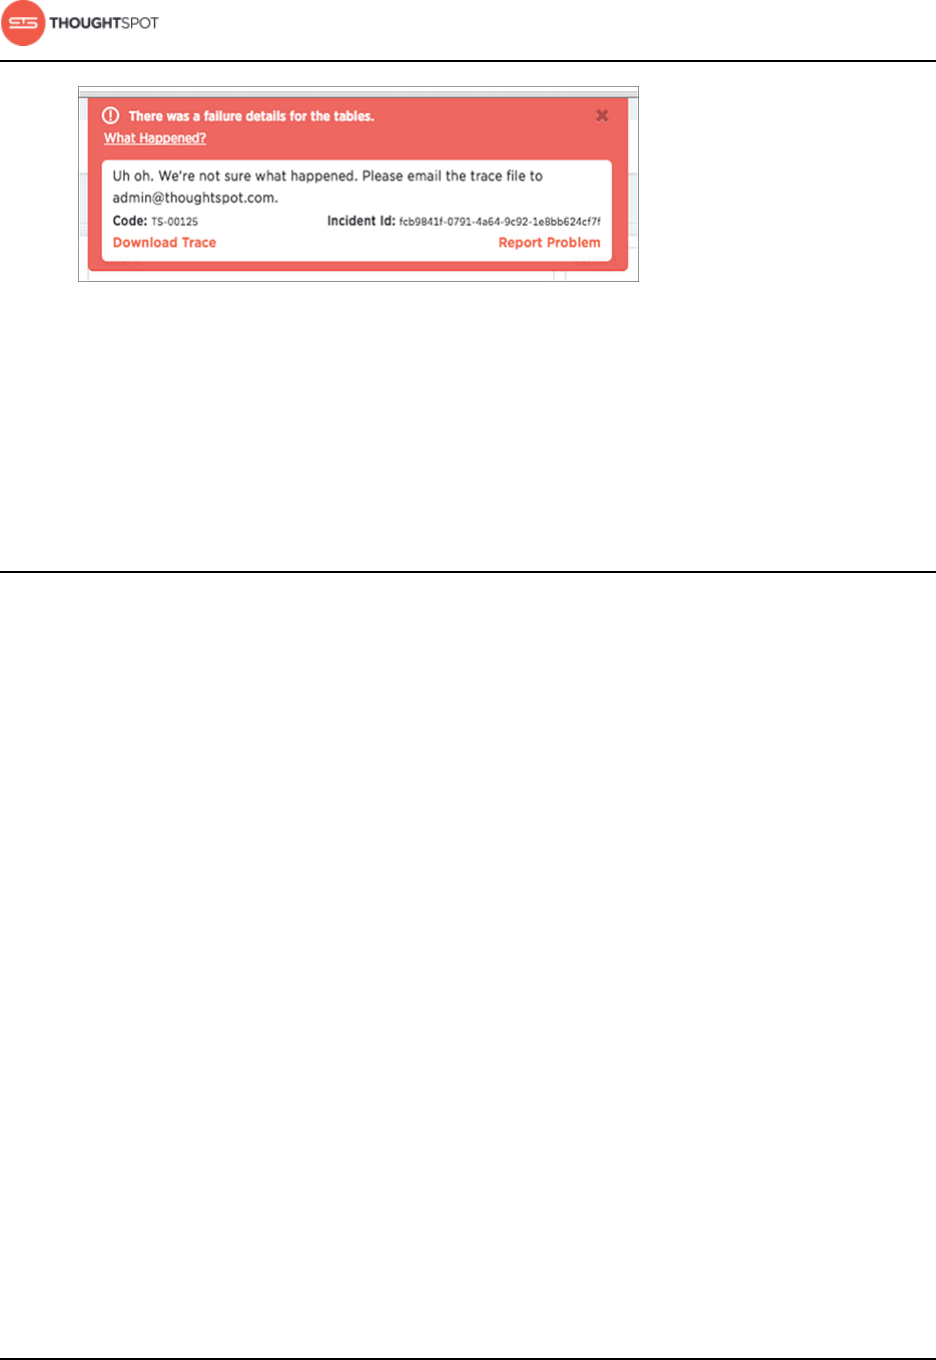
System administration
ThoughtSpot Administration Guide Copyright © 2017 by ThoughtSpot. All Rights Reserved. 223
Figure 127: Report problem
The logs will be sent to your administrator as an email attachment from
your email account. Your administrator then has the option to followup with
ThoughtSpot, if necessary.
Set up recording for Replay Search
Only administrator users can record the Replay Search using the ThoughtSpot
application. You can use the recording to create training for your users on how to
search your own data.
Recording a search replay requires administrator privileges and a Firefox
browser. You must override some of your browser security settings in order to
use the ThoughtSpot application to make the recording. This is a one time setup
operation. If you do not wish to do this, you can replay the search and record it
using QuickTime, Camtasia, or another screencam recording tool.
To record a search replay using ThoughtSpot:
1. While viewing a chart or table in ThoughtSpot, click the Replay Search icon.
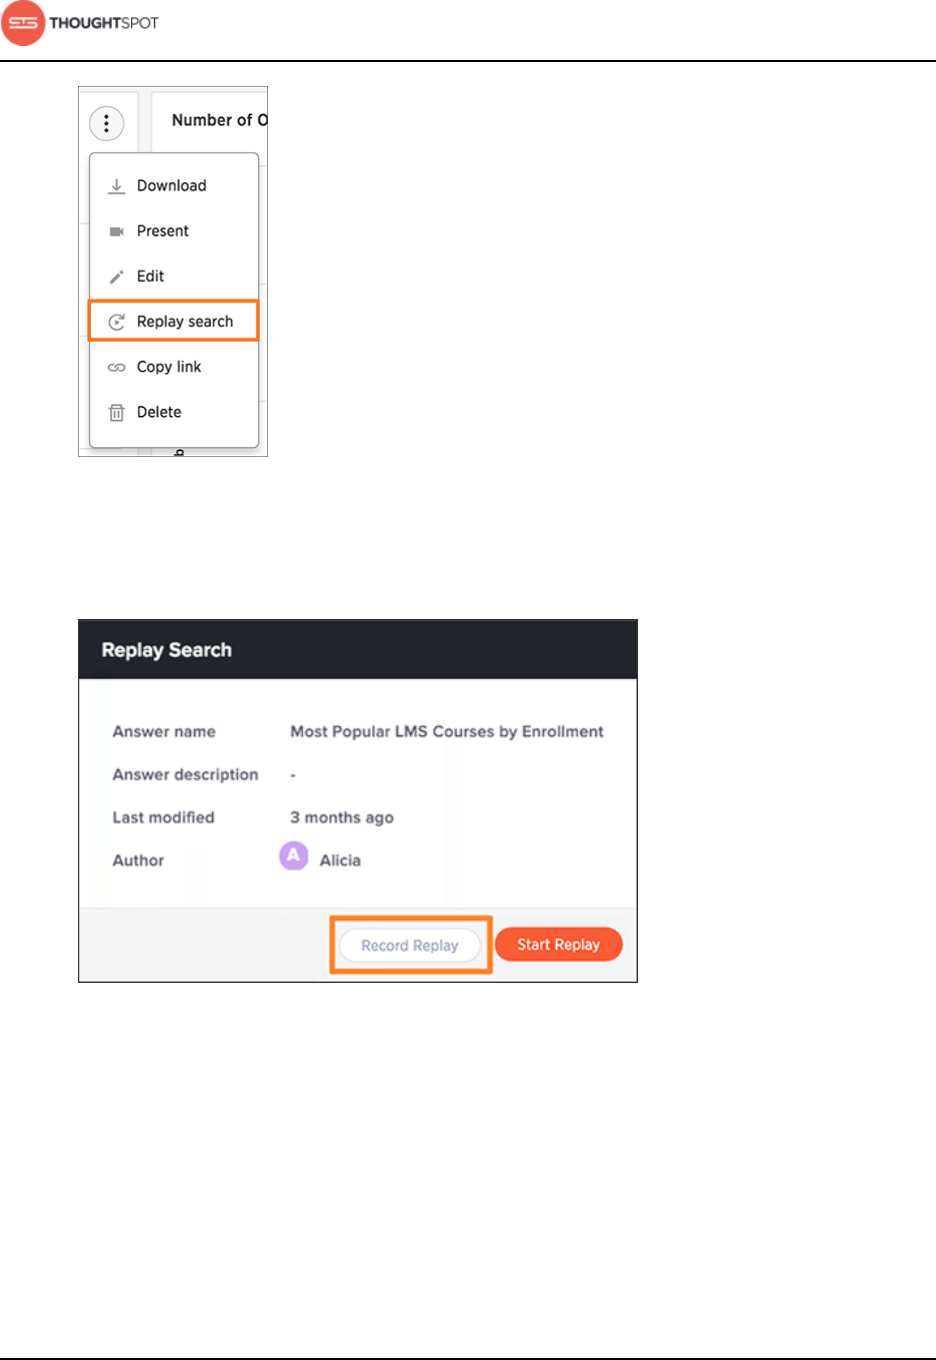
System administration
ThoughtSpot Administration Guide Copyright © 2017 by ThoughtSpot. All Rights Reserved. 224
Figure 128: The Replay Search icon
2. Click the Record Replay button. If you do not see the button, you must log in
as a user with administrator privileges.
Figure 129: Record Replay button
3. A message will display, showing a URL and a domain or an IP address. Make
note of both of these items. Open a new browser tab and go to the URL
shown in the message ( for example, "about:config").
Depending on which browser and version you are using, you may need to
access the browser configurations through a menu or by typing in a different

System administration
ThoughtSpot Administration Guide Copyright © 2017 by ThoughtSpot. All Rights Reserved. 225
URL. Check your own browser help section for information on how to access
the browser configuration settings, if necessary.
Figure 130: Record Search message
4. You may see a message warning that you are about to override the browser
settings. If you trust yourself, click "I'll be careful, I promise!".
Figure 131: Browser warning message
5. Find the setting for media.getusermedia.screensharing.allowed_domains,
and add the domain used by ThoughtSpot. This domain will be the same one
you made note of from the Cannot record screen message.
Figure 132: Set the domain for screensharing
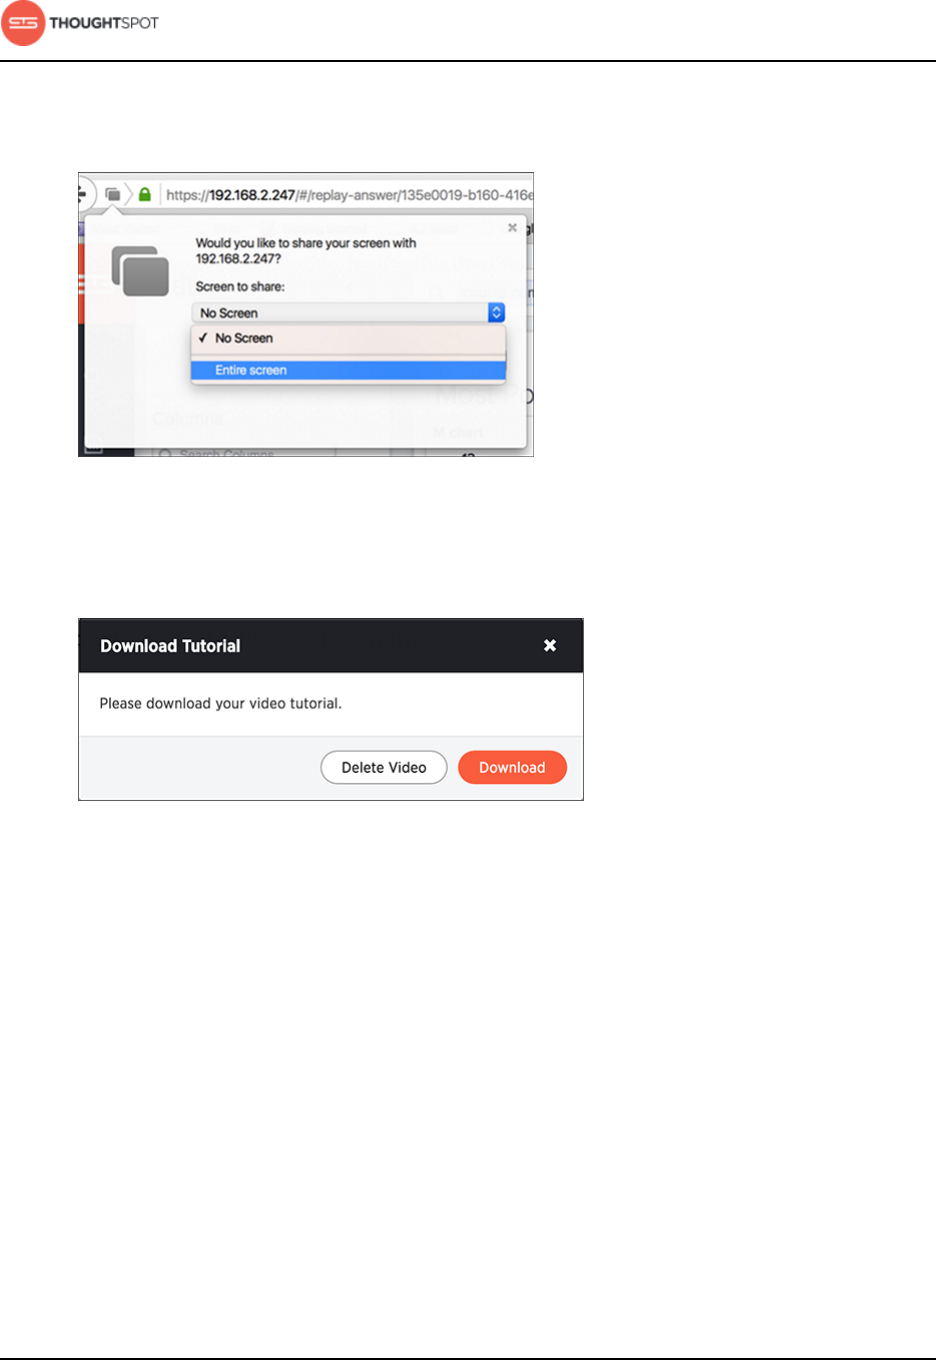
System administration
ThoughtSpot Administration Guide Copyright © 2017 by ThoughtSpot. All Rights Reserved. 226
6. If you see a message asking if you'd like to share your screen with the IP
address or domain name of ThoughtSpot, select Entire screen.
Figure 133: Select entire screen
7. When the search replay has been recorded, you'll see a confirmation. Select
Download.
Figure 134: Download the recorded search
8. Save the recording on your computer by selecting Save File and clicking OK.
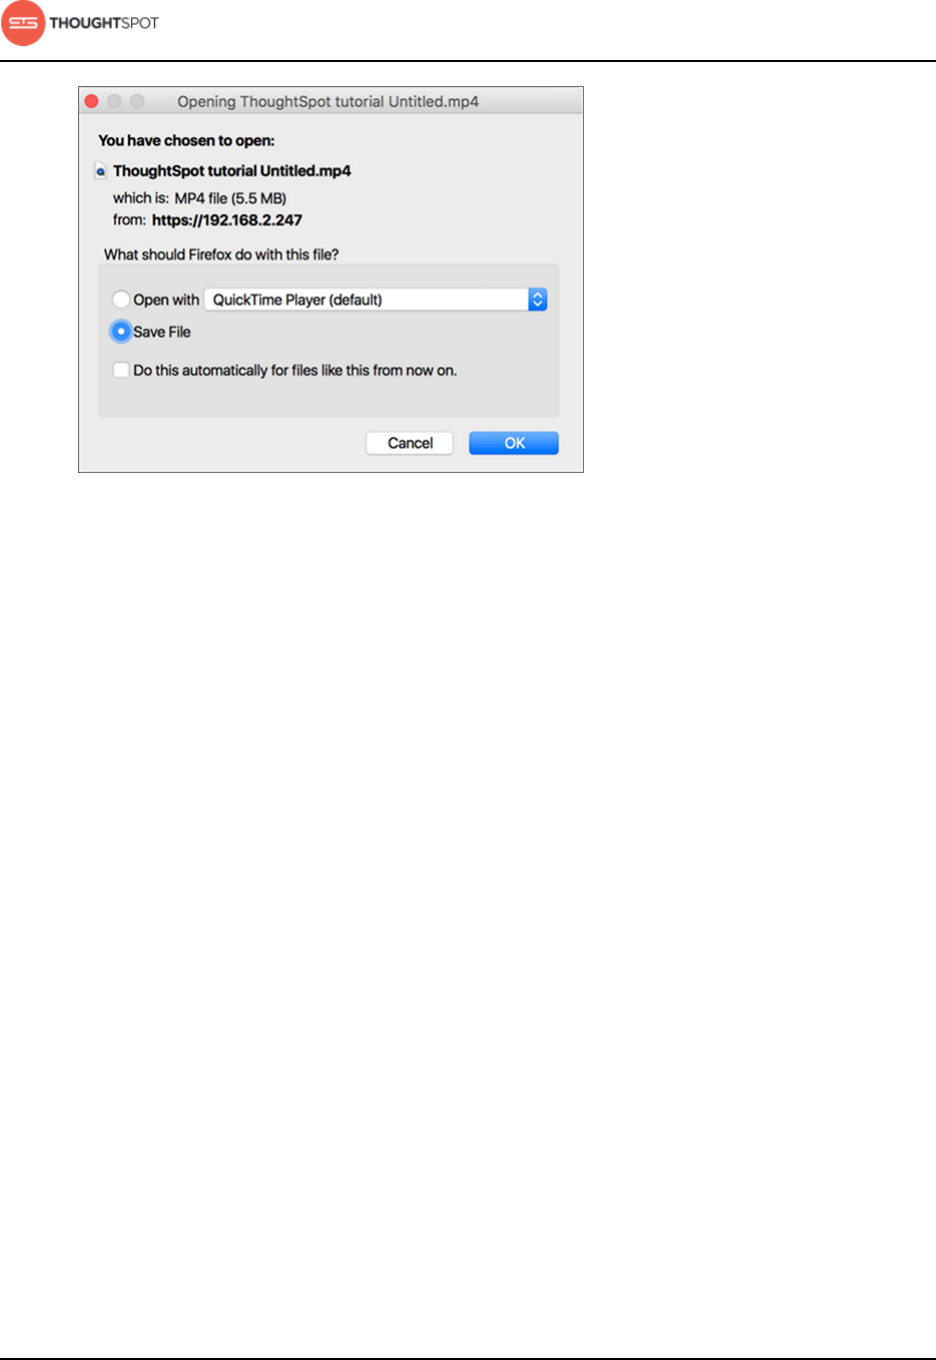
System administration
ThoughtSpot Administration Guide Copyright © 2017 by ThoughtSpot. All Rights Reserved. 227
Figure 135: Record Search save file

Backup and restore
ThoughtSpot Administration Guide Copyright © 2017 by ThoughtSpot. All Rights Reserved. 228
Chapter 9: Backup and restore
Backup and restore
Topics:
•About backups
•About restore operations
ThoughtSpot provides a full set of backup and
restore features to protect your data from disasters
and human error. You can use these for disaster
recovery, for migrating a cluster, or for recreating a
cluster on another appliance or virtual appliance.
There are two ways to save a cluster. Snapshots run
faster and are taken on a running cluster, but in some
cases you'll need to pull a snapshot out as a backup.
Snapshots
A snapshot is a point-in-time capture of a cluster
persisted on disk in HDFS. You can take a snapshot at
any time, and it takes about 20 seconds.
Snapshots are both taken on and restored to a cluster
while it is running. A snapshot may only be restored
to the same cluster on which it was taken. In addition,
the cluster software release version must match the
snapshot release version.
If you need to move data between clusters or restore
to a cluster that has been updated to a new release,
contact ThoughtSpot Support.
Backups
A backup is similar to a snapshot, except that it is
self-contained and portable, because it is stored
on disk in the file system. A backup is created by
pulling an existing snapshot out as a backup. It

Backup and restore
ThoughtSpot Administration Guide Copyright © 2017 by ThoughtSpot. All Rights Reserved. 229
is recommended to pull a backup periodically, to
protect you from losing data and any work that has
been done by users. You can set up ThoughtSpot
to take these backups periodically at intervals and
modes you define.
Disaster recovery
There is an even more robust strategy for backup
and recovery that involves having a backup cluster
offline that is kept in sync with the production cluster.
Then if the production cluster fails, the backup cluster
can be drafted to take its place with minimal loss
of work and disruption to operations. Details on
this architecture and instructions on setting it up
are available in the ThoughtSpot Disaster Recovery
Guide, which you can request from ThoughtSpot.

Backup and restore
ThoughtSpot Administration Guide Copyright © 2017 by ThoughtSpot. All Rights Reserved. 230
About backups
You can use a backup to restore a cluster to a prior state, a differently configured
appliance, or move it to from an appliance to a virtual cluster or vice versa. Some
advanced administrative operations also use backups.
When to use a backup
Backups are created from an existing snapshot, but they differ from snapshots in
the following ways:
• Backups are stored on disk in a directory, while snapshots are stored in HDFS.
• You can use a backup to recover from data loss or corruption, even if your
cluster has been destroyed. Snapshots can be lost if the HDFS name node
fails, you lose multiple disks at once, or the entire cluster is destroyed.
• If you need to move data between two appliances, you must use a backup.
Snapshots may only be used to restore to the cluster they were taken from.
Backups and disk space
Backups can be quite large, so make sure you have enough disk space before
taking one. Backups are usually stored using a NAS (network attached storage)
file system. In the case of periodic backups, you must ensure enough space to
store all of the backups you want to save, plus some extra space.
Use a calculation like the example shown here to ensure enough disk space.
Suppose a single backup takes up 6 GB of space, and that you specify three
backups when setting up periodic backup, using the flag -num_backup 3. This
means that three copies will be stored at the most. But the amount of space
required will be larger than the simple calculation 6GB X 3.
When doing a backup, ThoughtSpot copies the release tarball and several other
files and then checks if those files already exist before beginning the backup.
If the files are already present, then they are removed from the backup copy.

Backup and restore
ThoughtSpot Administration Guide Copyright © 2017 by ThoughtSpot. All Rights Reserved. 231
Storing these files takes about 5 GB of extra space. So in this example, where
you want to store three backups, you need about 18 + 5 = 23 GB of free disk
space. Remember that the data to be backed up can grow over time, so you
should occasionally check to make sure you are not running out of space to store
backups.
Types of backups
Backups can be full, lightweight, or dataless.
Full backups
Full backups are entire backups of the cluster with all data, whether loaded
from the web interface or from tsload. They are written to a directory, which
may be moved between clusters, even if the cluster configuration is different.
Full backups can be very large, so before taking one, you should make sure
there is enough disk space in the directory where it will be stored. NAS (network
attached storage) is recommended for storing backups.
Lightweight backups
Lightweight backups contain everything that makes up a cluster, except for any
data loaded through ThoughtSpot Loader (tsload), ODBC/JDBC drivers, and
Data Connect. Any data loaded via tsload can be re-loaded after the cluster has
been restored, using the same scripts or remote connections you used to load it
initially. tsload, ODBC/JDBC, and Data Connect data may be part of lightweight
backups if they're used to load data into tables created through CSV import (i.e.
userdata).
The lightweight backups contain the following:
• Cluster configuration (SSH, LDAP, etc.)
• In-memory data cache
• All data that is stored in HDFS

Backup and restore
ThoughtSpot Administration Guide Copyright © 2017 by ThoughtSpot. All Rights Reserved. 232
• Data uploaded by users
• Metadata for the data store
• Users, groups and permissions
• Objects created by users (pinboards, worksheets, and formulas) with their
shares and permissions.
• Data model and row-level security rules.
Dataless backups
Dataless backup saves a backup of the schema, with no data. This is provided
mainly for support purposes, to enable you to send a copy of your cluster
metadata to ThoughtSpot Support for troubleshooting, without compromising
data security and privacy. When restoring from a dataless backup, you must
supply the correct release tarball, since this type of backup does not include
the software release. The size of a dataless backup is usually within 10's of
megabytes if you do not have customized binaries.
Take a snapshot
A snapshot takes a point-in-time image of your running cluster. You should
create a snapshot before making any changes to the environment, loading a
large amount of new data, or changing the structure of a table.
Taking a snapshot is fast, and happens invisibly in the background while the
cluster is running. Snapshots take about 20 seconds. Snapshot names must be
44 characters or fewer. You can have up to 20 manual snapshots at a time, after
which, you have to clear one before you are able to create another.
If you would like to restore from a snapshot, contact ThoughtSpot Support.
To create a snapshot:
1. Log in to the Linux shell using SSH.

Backup and restore
ThoughtSpot Administration Guide Copyright © 2017 by ThoughtSpot. All Rights Reserved. 233
2. Initiate a snapshot, providing a name and reason for creating it:
$ tscli snapshot create <snapshot_name> <reason>
3. Check that the snapshot was created:
$ tscli snapshot ls
Configure periodic snapshots
You can configure ThoughtSpot to take snapshots for you automatically at
specified times you define, or keep the default snapshot policy.
The default snapshot policy is enabled for each cluster. A periodic snapshot is
taken every hour, and the old snapshots are retained based on the following
time-based pattern:
• 3 * 1-hour snapshots
• 2 * 4-hour snapshots
This means you will always have a snapshot that was taken 1, 2, 3, 4, and 8 hours
ago. You can create up to 20 automatic snapshots, but this is dependent on the
garbage collection policy.
The periodic snapshot policy can be adjusted by executing the tscli command,
tscli snapshot update-policy. This will bring up an editor. However, it is not
recommended that you change it.
You cannot delete the snapshot policy. However, you can disable the policy
by executing the tscli command, tscli snapshot disable-policy. And you can
reenable it by running, tscli snapshot enable-policy.
Caution: Disabling periodic snapshots will prevent periodic backups from
working.
To check your current periodic snapshot policy:
1. Log in to the Linux shell using SSH.
2. Issue tscli snapshot show-policy
Backup and restore
ThoughtSpot Administration Guide Copyright © 2017 by ThoughtSpot. All Rights Reserved. 234
Your policy will be displayed as such:
admin@dogfood1:~$ tscli snapshot show-policy
schedule {
period {
number: 1
unit: HOUR
}
retention_policy {
bucket {
time {
number: 1
unit: HOUR
}
capacity: 3
}
bucket {
time {
number: 4
unit: HOUR
}
capacity: 2
}
}
offset_minutes_from_sunday_midnight: 0
}
enabled: true
period denotes how often periodic snapshots are taken. number is the frequency
in the chosen time unit. So in the example above, a snapshot is taken every
one hour.
retention_policy denotes which snapshots are available at any given moment.
capacity sets the number of snapshots retained for a certain time policy.
Therefore, you will always have the number of snapshots set in capacity for
that time policy. So for the first bucket in the example above, a snapshot
is available for each hour over the past three hours, which totals three
snapshots. For the second bucket in the example above, a snapshot is available
for every four hours over the past eight hours, which totals two snapshots.
offset_minutes_from_sunday_midnight lets you set the minute within the hour
you'd like to start your periodic snapshot. Setting it to zero, as depicted in the
example above, will have the snapshot begin at midnight.
Backup and restore
ThoughtSpot Administration Guide Copyright © 2017 by ThoughtSpot. All Rights Reserved. 235
Take a backup of a snapshot
Taking a backup pulls a snapshot out and dumps it to persistent storage on disk,
on a network mounted directory. Use this procedure when you want to create a
backup.
Before creating a backup, you must identify an existing snapshot to use or take
a new snapshot. The time required to take a backup depends on the data size.
Taking a backup does not take long, and happens in the background while the
cluster is running.
Choose the mode of backup you want to create, either full, lightweight, or
dataless. The directory to which you will write the backup must not already exist.
You specify the directory to use, and it will be created for you when taking the
backup.
If you would like to restore from a backup, contact ThoughtSpot Support.
Use this procedure to make a backup of a snapshot.
1. Log in to the Linux shell using SSH.
2. Find out the name and size of the snapshot you want to back up.
$ tscli snapshot ls
---------------------------------------------------------------------------
Name : pre330
Reason : pre3.3.0
Hdfs snapshot : pre330
Start : Wed May 4 18:07:32 2016
End : Wed May 4 18:08:23 2016
Size(Full) : 13.24 GB
Size(LW) : 4.96 GB
Size(Dataless): 39.76 MB
---------------------------------------------------------------------------
...
3. Make sure you have enough room on the disk where you will save the backup.
In addition to the size of the snapshot, you will need 10 to 12 GB of disk space.
This is because the process requires space for temporary files.
$ df -h
Backup and restore
ThoughtSpot Administration Guide Copyright © 2017 by ThoughtSpot. All Rights Reserved. 236
4. Create the backup, designating the type of backup, the snapshot name, and a
directory:
$ tscli snapshot backup [--mode {full|light|dataless}] <name> <directory>
or
$ tscli.par backup create [-h]
[--mode {full|light|dataless}]
[--type {full|incremental}][--base BASE]
[--storage_type {local|nas}][--remote]
<name> <directory>
5. Check that the backup was created:
$ tscli backup ls
Configure periodic backups
You can configure ThoughtSpot to take backups for you automatically at
specified times you define, following crontab format. Old backups are discarded
automatically, using FIFO (first in, first out).
Periodic backup takes a full, lightweight, or dataless backup of the cluster.
It goes through the same steps as creating a backup manually, first taking a
snapshot and then pulling it out into a backup on disk. Make sure you have
adequate space to store the number of backups you want to archive. You
can mount a NAS (network attached storage) file system to hold the periodic
backups or use a local option.
ThoughtSpot supports multiple periodic backups with different modes. And for
each policy, you can have different types of backups.
When choosing times and frequencies for periodic backups, you should choose
a reasonable frequency. Do not schedule backups too close together, since a
backup cannot start when another backup is still running. Avoid backing up
when the system is experiencing a heavy load, such as peak usage or a large
data load.

Backup and restore
ThoughtSpot Administration Guide Copyright © 2017 by ThoughtSpot. All Rights Reserved. 237
When choosing the number of backups to store, keep in mind that there is no
automatic checking to validate that a backup is valid for restoring a cluster.
When the maximum number of backups has been reached, the next backup
operation deletes the oldest stored backup and the corresponding snapshot
before starting the new backup. This means that if you set the number of
backups to one, that backup will be deleted before a new backup can be taken.
For this reason, you should always set the number of backups to be greater than
two, to ensure you have at least one backup available in the case of a failure
while taking a backup. It is recommended to keep as many backups as you can
reasonably store, to ensure you have a good backup available if you need to
restore a cluster.
The garbage collection policy for periodic backups align with the following
policy:
• 7 * 1-day backups
• 4 * 1-week backups
This means you will always have a backup that was created every day for the
past seven days, and a backup for every week for the past four weeks.
To configure periodic backups:
1. Log in to the Linux shell using SSH.
2. Find a directory with enough disk space to hold the number of backups you
want to archive.
Hint: You can use df -h to see free disk space and tscli snapshot ls to
view existing snapshots and their size on disk.
3. Use the tscli backup list-policy command to see a list of present backup
policies.
4. Use the tscli backup create-policy command to set the times to back up,
directory to store backups, and number of backups to archive.

Backup and restore
ThoughtSpot Administration Guide Copyright © 2017 by ThoughtSpot. All Rights Reserved. 238
The command will prompt an editor for you to edit the parameters of the
backup policy.
5. After setting up the backup configurations, use tscli backup periodic-config
<name> to check the policy details and that it is ready.
6. You can also run tscli backup periodic-status <name> at any time to check
whether the periodic backup is running fine. The command will provide
information on the periodic backup <name> and when it was created.
7. If you would like to edit the policy, you can use tscli backup update-policy
<name>. This prompt will open an editor for you to edit the policy.
8. Use tscli backup disable-periodic to turn off the periodic backup. You can also
use tscli backup disable-policy <name> to disable a specific policy. And you
can use tscli backup enable-policy <name> to reenable it. Additionally, you can
delete a policy with tscli backup delete-policy <name>.
About restore operations
When restoring to a running cluster that has not been updated, you'll usually
use a snapshot. But in the case where you've updated the cluster to a new
release, the configuration has been changed significantly, or you're restoring to a
different cluster, you'll need to restore from a backup.
Snapshots are restored onto a running cluster, while backups require deleting the
existing cluster first.
Snapshot restore is not supported for cross versions. As such, if you’re running
version 3.4, you can only restore to a snapshot taken in 3.4.
Changes to a cluster that require restoring from a backup instead of a snapshot
include:
• Removal of a node.
• Restoring to a different cluster from the one where the snapshot/backup was
taken.

Backup and restore
ThoughtSpot Administration Guide Copyright © 2017 by ThoughtSpot. All Rights Reserved. 239
• Restoring to a cluster running a different release from the one where the
snapshot/backup was taken.
Note: To perform a restore from a snapshot or backup, contact
ThoughtSpot Support.

About troubleshooting
ThoughtSpot Administration Guide Copyright © 2017 by ThoughtSpot. All Rights Reserved. 240
Chapter 10: About troubleshooting
About troubleshooting
Topics:
•Get logs
•Network connectivity
issues
•Change the timezone
•Browser untrusted
connection error
•Characters not displaying
correctly
•Clear the browser cache
•Cannot open a saved
answer that contains a
formula
•Data loading too slowly
•Search results contain too
many blanks
The information here provides very basic
troubleshooting.
For more detailed troubleshooting, Contact
ThoughtSpot.
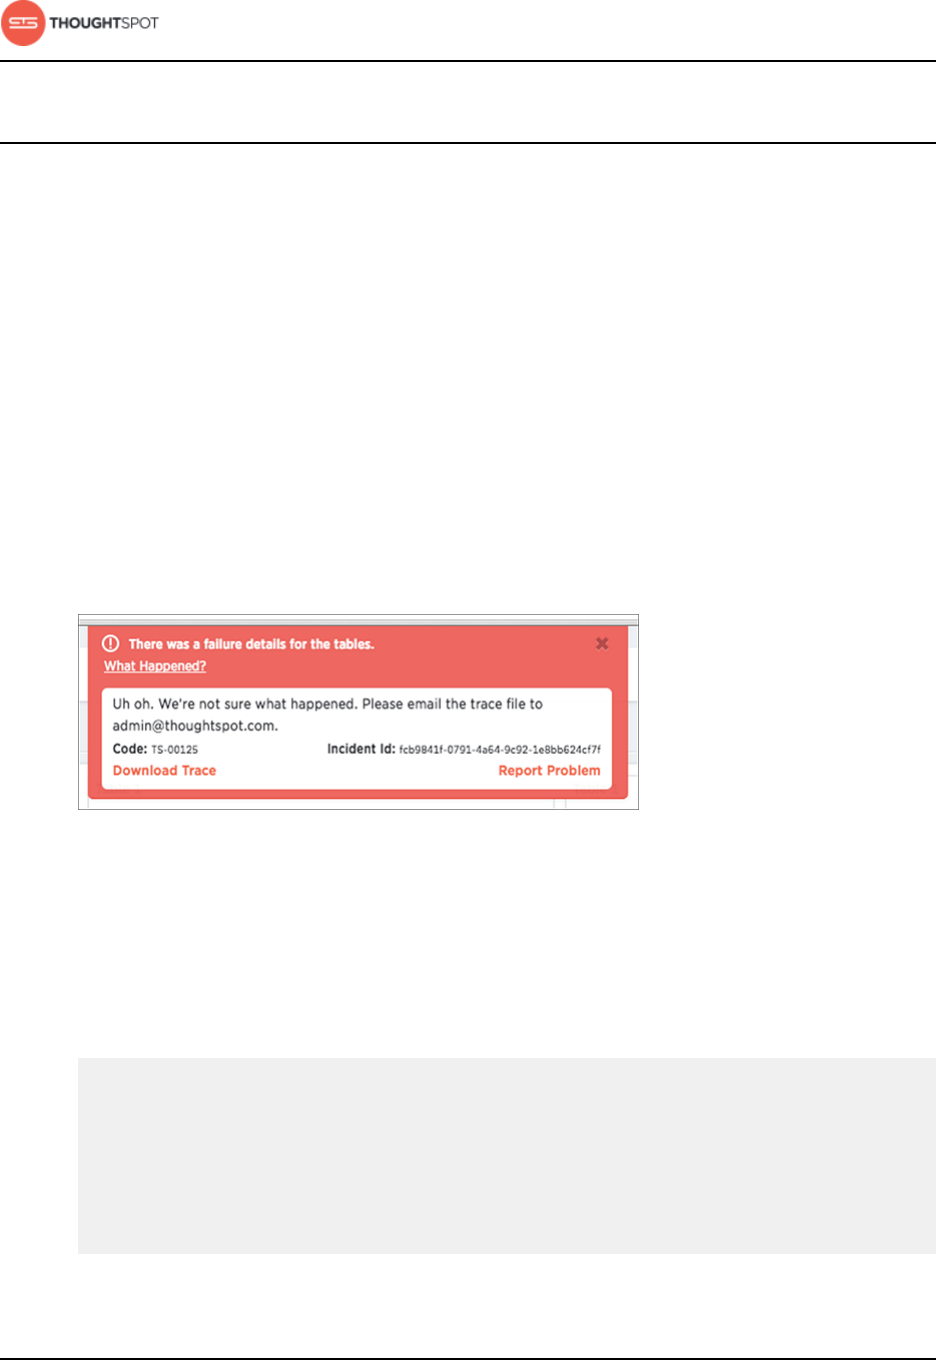
About troubleshooting
ThoughtSpot Administration Guide Copyright © 2017 by ThoughtSpot. All Rights Reserved. 241
Get logs
For troubleshooting on specific incidents or cluster problems, getting a log
bundle can help.
How to get logs
There are two ways to get logs:
• When ThoughtSpot encounters a problem, a red bar displays in the browser
with an error message. You can click on What Happened? in the error
message for more details. To download related logs, click Download Trace.
Send the logs as an email attachment to the support contact that is provided.
Clicking Report Problem will also send the logs as an email attachment to
your administrator.
Figure 136: Download log trace
• You can generate a log bundle using the tscli command tscli logs collect if
you are comfortable with Linux. The command lets you specify which logs to
collect and from what time periods.
Usage for this command is:
tscli logs collect
--include <selector | glob>
[--exclude <selector | glob>]
[--since <hours,minutes,days>
| --from <yyyymmdd-HH:MM>
--to <yyyymmdd-HH:MM>]
[--out <path>]
[--maxsize <size_in_MB_or_GB>]
[--sizeonly]

About troubleshooting
ThoughtSpot Administration Guide Copyright © 2017 by ThoughtSpot. All Rights Reserved. 242
The full list of all selectors is:
•all collects all of the logs listed from the system and the ThoughtSpot
application.
•system collects all system logs, e.g. syslog, upstart, mail logs, etc.
•ts collects all logs from the ThoughtSpot application. This includes falcon,
sage, orion core (cluster management), etc.
•orion collects all orion logs including cluster management, hdfs, zookeeper,
etc.
Detailed syntax and options are listed in the tscli command reference.
Examples
Here are some examples of usage for the command tscli logs collect:
To collect all logs from the past day to the default location (/tmp/
logs.tar.gz):
$ tscli logs collect --include all --since 1d
In this example, all is a selector for all the available logs.
In most cases, you'll probably use the selector ts to only capture
logs for the ThoughtSpot application:
$ tscli logs collect --include ts --since 2d
About troubleshooting
ThoughtSpot Administration Guide Copyright © 2017 by ThoughtSpot. All Rights Reserved. 243
For debugging cluster management issues, use a command like this
one, which collects logs for system and orion from the past 2 hours.
The output is written to /tmp/debug.tar.gz as specified using --out:
$ tscli logs collect --include system,orion --since 2h --out /tmp/
debug.tar.gz
This command collects logs from a specific time window:
$ tscli logs collect --include system,orion --from
20150520-12:00:00 --to 20150522-12:30:00
Advanced usage alert! You can also use --include and --exclude to
specify filesystem paths as a glob pattern. This works like the Linux
find(1) command. Pass all the entries in --include starting with / to
find(1), and all entries in --exclude which are not selectors to find(1)
using the -not -path flag.
$ tscli logs collect --include system,orion --exclude
*hadoop*,*zookeeper* --since 2h
The above command collects all system and all orion logs, but
excludes hadoop (hdfs) and zookeeper logs.
Upload logs to ThoughtSpot Support
ThoughtSpot Support uses a secure file sever to collect log files or other files
needed for troubleshooting. You can easily send log files to this file serve directly
from the ThoughtSpot instance.
Before you can upload a file to the secure file server:
1. Configure the connection to the file server.
2. Obtain the directory path on the file server.
About troubleshooting
ThoughtSpot Administration Guide Copyright © 2017 by ThoughtSpot. All Rights Reserved. 244
The server directory path for uploading a file is formatted like this example: /
Shared/support/<customer_name>. If you do not know the customer name, contact
ThoughtSpot Support.
You can upload files directly to the file server using this procedure:
1. Log in to the Linux shell using SSH.
2. Navigate to the directory where the file to be uploaded is located.
3. Issue the command to upload the file, specifying the file name and directory
path:
$ tscli fileserver upload --file_name <file> --server_dir_path <path>
When your upload succeeds, you will see a confirmation message.
Network connectivity issues
If network connectivity to and from ThoughtSpot is not working, try using these
steps to find and correct the issue.
To troubleshoot network connectivity for ThoughtSpot:
1. Make sure that the network cables are connected correctly.
2. Check that the network cable is connecting the nodes to the network switch.
3. Try replacing the cable with a cable from a known working system to rule out
a bad cable or switch connectivity issues.
4. Make sure the eth0 interface is connected to the network by issuing: ethtool
eth0
The port that's currently connected will have "link detected" in the last line of
the output.
5. If the networking settings have been reconfigured, reboot each of the nodes.
About troubleshooting
ThoughtSpot Administration Guide Copyright © 2017 by ThoughtSpot. All Rights Reserved. 245
Change the timezone
ThoughtSpot comes configured with the timezone where it is to be installed.
If you need to change the timezone, for example when moving a ThoughtSpot
appliance to another data center:
Contact ThoughtSpot Support, and they will change the timezone for you.
Note that if the timezone was not set correctly when shipped, it may be
necessary to have ThoughtSpot Support reset it. This can be true even if the
file /etc/timezone lists the correct timezone. Sometimes the timezone that is
listed is not the active timezone and it needs to be reset.
Browser untrusted connection error
If you are not using a SSL certificate for authentication, users will see an
untrusted connection error in their browser when accessing ThoughtSpot. The
error looks slightly different depending upon the Web browser being used.
ThoughtSpot uses secure HTTP (the HTTPS protocol) for communication
between the browser and ThoughtSpot. By default there is no SSL certificate
for authentication. This must be added by the site administrator. If the site
administrator has not added the certificate, the browser warns the user.
Table 28: Example of browser SSL certificate warnings
Browser Warning
Google Chrome The site's security certificate is not trusted!
Mozilla Firefox This Connection is Untrusted
If you see the warning message, choose one of the following options:
• Ask the site administrator to install the certificate.
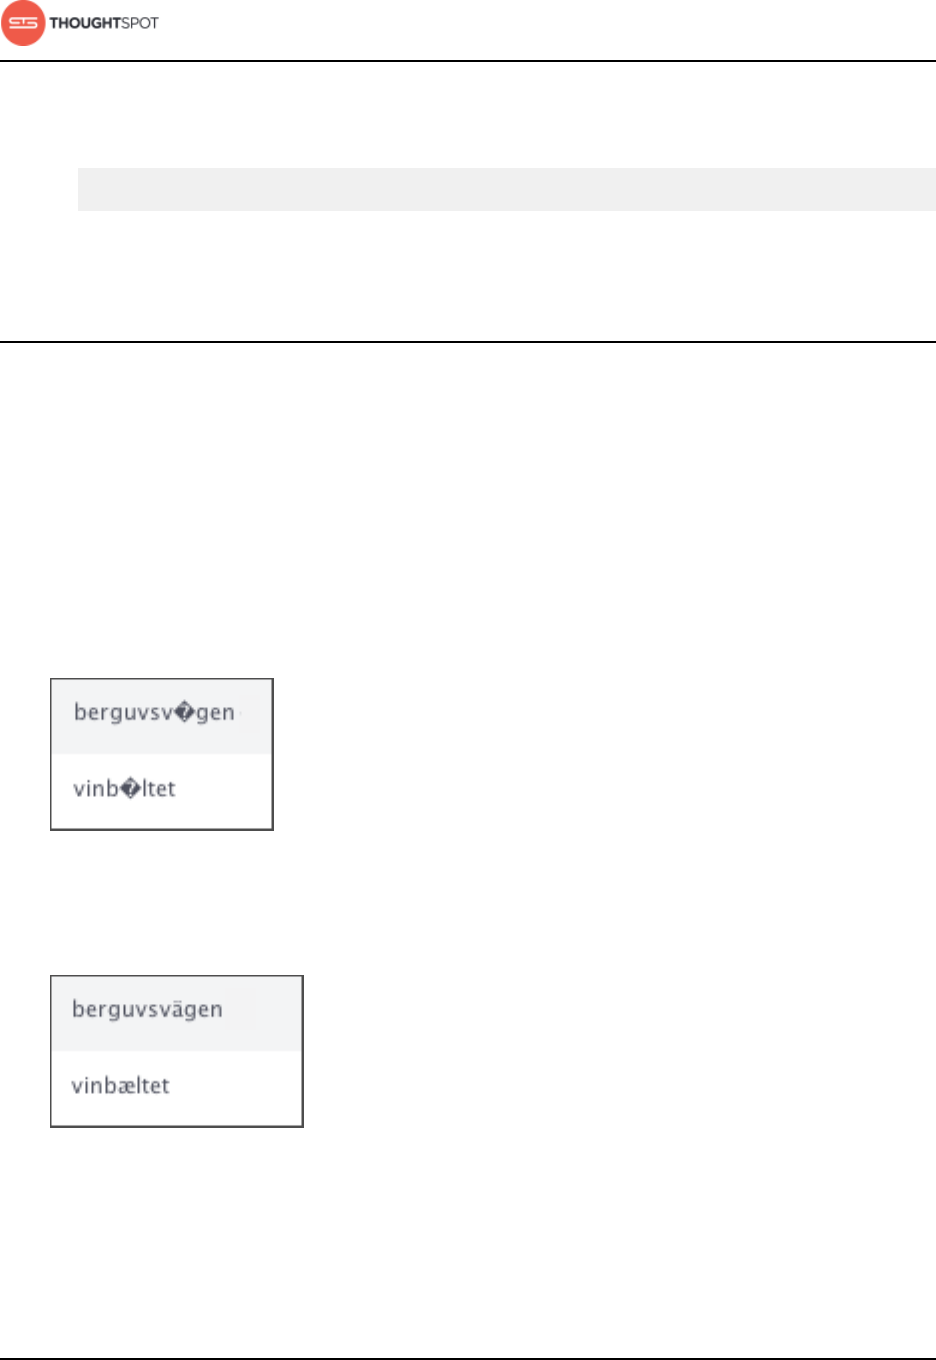
About troubleshooting
ThoughtSpot Administration Guide Copyright © 2017 by ThoughtSpot. All Rights Reserved. 246
• Ask the site administrator to turn off SSL using this command in the shell on
the ThoughtSpot instance:
$ tscli ssl off
• You can choose to ignore the message, and access ThoughtSpot without SSL.
Characters not displaying correctly
Your CSV files are more likely to load smoothly if they are encoded with UTF-8.
If you're having problems with some characters rendering incorrectly, you can
convert the files to UTF-8 encoding before loading the data.
You might see unexpected characters in your data, especially characters whose
ASCII values are at the high and low end of possible values. Some examples of
characters that can appear incorrectly are: æ, ñ, ä, í, ö.
If this happens, your data will look like this:
Figure 137: Incorrectly displaying characters
Instead of displaying correctly like this:
To encode your data as UTF-8:
Figure 138: Correctly displaying characters
About troubleshooting
ThoughtSpot Administration Guide Copyright © 2017 by ThoughtSpot. All Rights Reserved. 247
1. On Windows, open your CSV file in Notepad. Save the file as CSV with the
Unicode option.
2. On Linux or MacOS, issue a command like:
$ iconv -f -t UTF-8 <in_file>.csv > <out_file>.csv
3. Reload the data.
4. Attempt to import it again.
Clear the browser cache
You might occasionally see unexpected behavior that is due to the Web browser
caching information from ThoughtSpot. In this case, clearing the browser cache
and reloading the page should resolve the problem.
You can usually resolve these situations by clearing the browser cache:
• During a ThoughtSpot session, the browser suddenly displays a white screen
and reloading does not fix the problem. This is due to a self-signed SSL
certificate that has timed out during the session.
• When accessing the Help Center, you see a login screen. This is due to a
problem during automatic authentication in the Help Center, after which the
bad login gets cached by the browser.
To resolve any of these situations, clear the browser cache:
1. Clear the browser cache.
This works a little differently on individual browser versions and operating
systems. For example, when using Chrome, to get to the browser cache
settings, navigate to:
chrome://settings/clearBrowserData
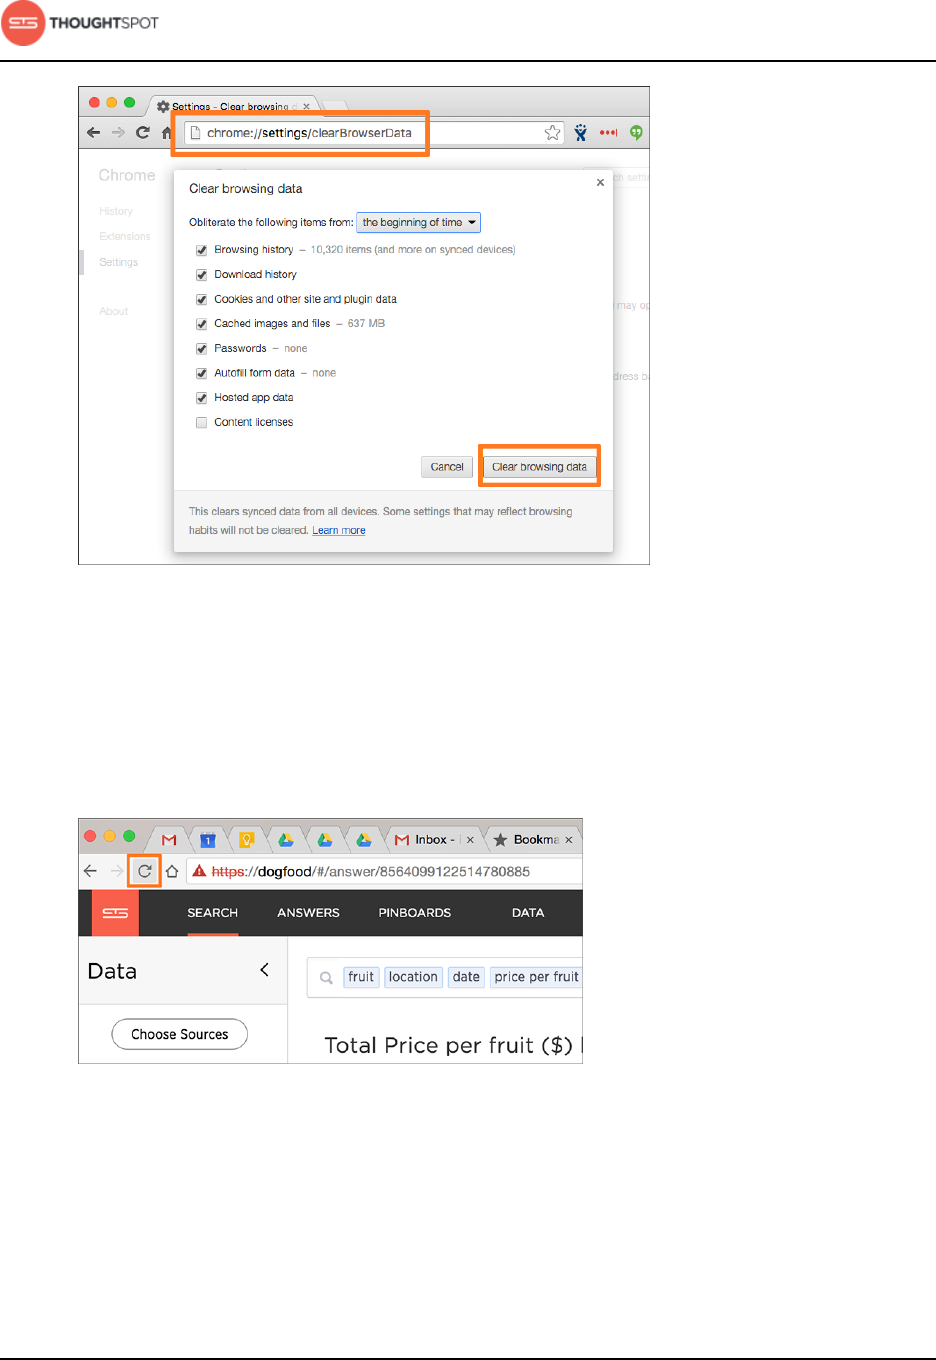
About troubleshooting
ThoughtSpot Administration Guide Copyright © 2017 by ThoughtSpot. All Rights Reserved. 248
Figure 139: Clear the browser cache
2. Click Clear browsing data. This is the name of the button on Chrome. The
name may vary slightly on other browsers.
3. Reload the page.
For example, on Chrome you would click the Reload icon:
Figure 140: Reload the page
4. Now the problem should be fixed, and the page will appear as expected.
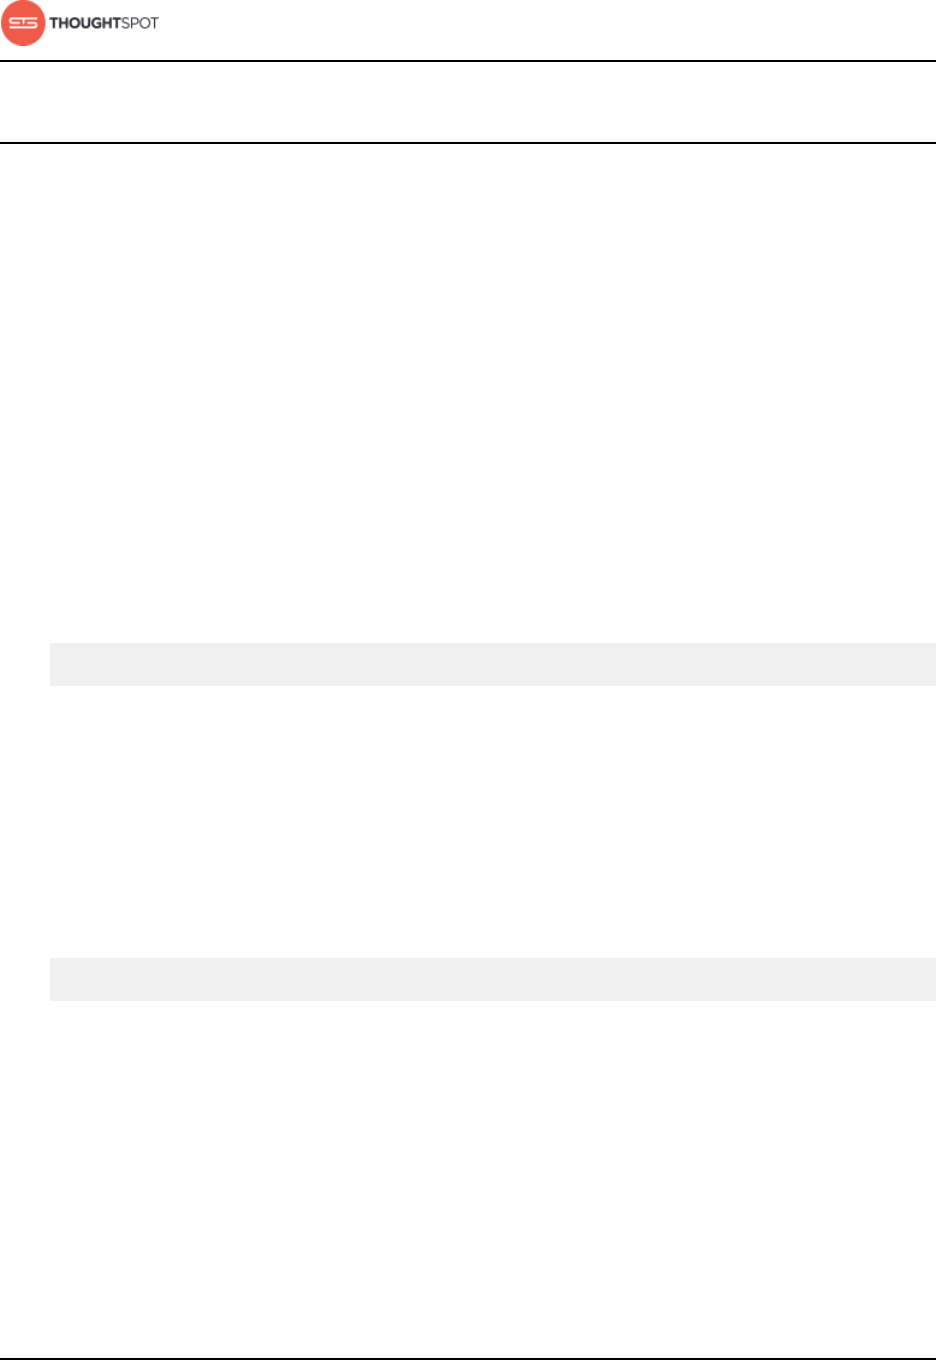
About troubleshooting
ThoughtSpot Administration Guide Copyright © 2017 by ThoughtSpot. All Rights Reserved. 249
Cannot open a saved answer that contains a formula
When working with formulas, keep in mind the data types they return. You may
occasionally see unexpected results, or even be unable to open a saved answer,
due to problems with data types and formulas.
In this scenario, "data type" refers the data type as defined in the column
definition when creating the schema (INT, TIMESTAMP, VARCHAR, etc.).
When you define a formula, both the data type it returns is set automatically.
This can lead to problems, if you build another formula that uses the output of
the first formula as input. This can be hard to understand, so an example will be
helpful.
Suppose you have created a worksheet that contains a formula called "weekday"
defined as:
day_of_week(date)
The output of that formula is the day of the week (Monday, Tuesday, etc.)
returned as a text string (VARCHAR, ATTRIBUTE).
Then suppose you create an answer using the worksheet as a source. And in
the answer, you create another formula on top of the formula column in the
worksheet. This formula is supposed to return the day of the week that is two
days after the given day of the week:
weekday + 2
In this case, you have effectively created a formula on top of another formula.
This works fine, so long as the data types in the worksheet formula can work in
the answer formula. If not, you may not be able to save the answer, or open it
once it has been saved. Here, the second formula you created does not work,
because it is invalid. It is trying to subtract a number from a text string.
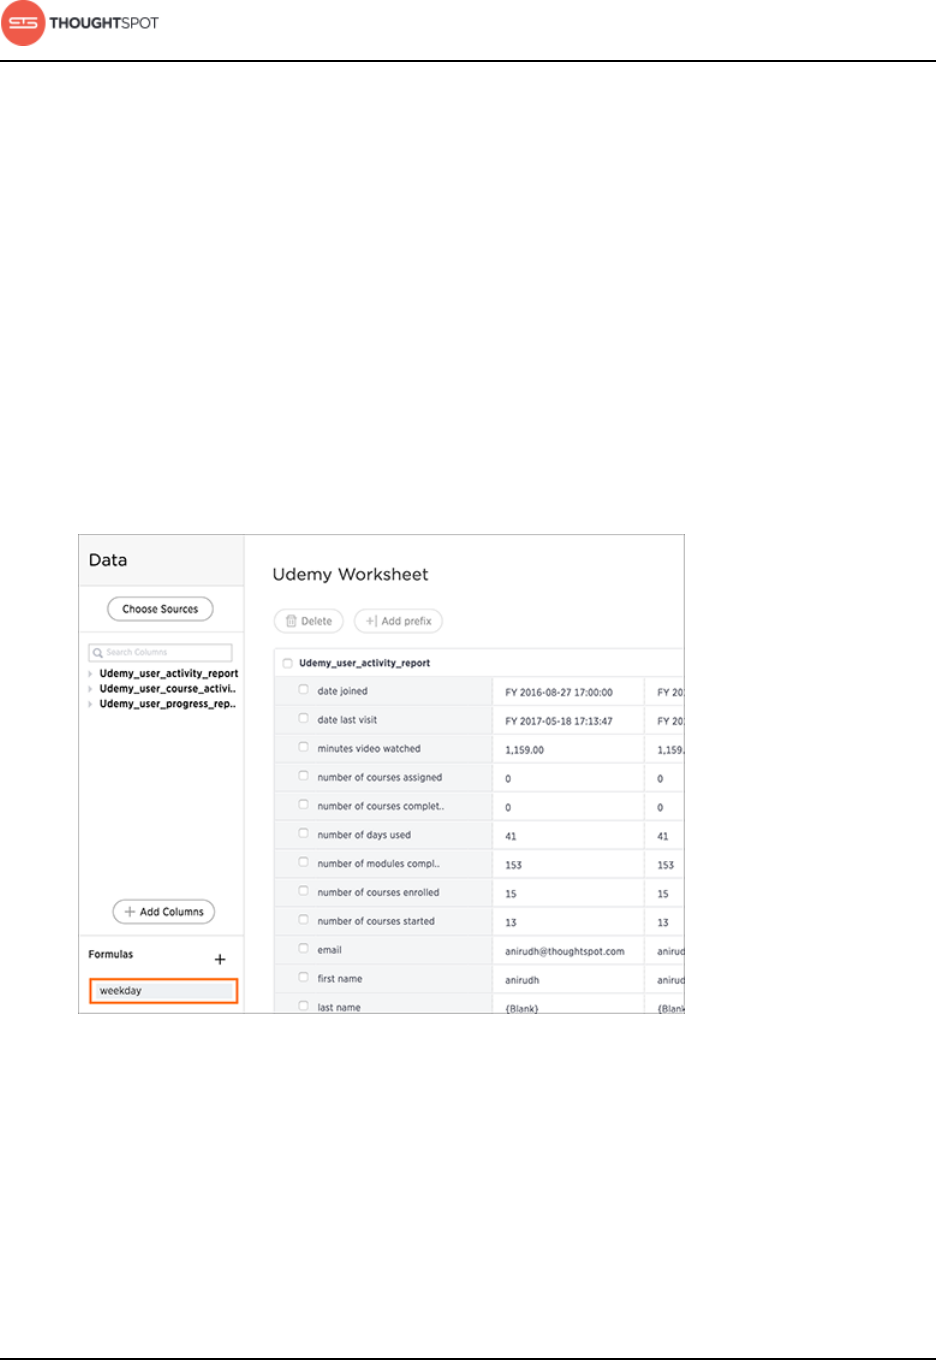
About troubleshooting
ThoughtSpot Administration Guide Copyright © 2017 by ThoughtSpot. All Rights Reserved. 250
If you encounter this issue, you will need to open the worksheet and edit its
formula so that it returns the type expected by the formula that was built on top
of it. In this case, a numeric data type.
You must change the underlying worksheet column to use day_number_of_week
instead of day_of_week. This is because day_number_of_week returns a numeric
data type.
Here are the steps to resolve an issue like this:
1. Open the underlying worksheet that contains the formula whose output data
type you need to change.
2. Click on the formula name to edit the formula.
Figure 141: Edit the formula
3. In the Formula Builder, modify the formula, so that it returns the expected
data type. There are data type conversion formulas available to make this
easier. To view them and their syntax, open the Formula Assistant, and
expand the section called Conversion.
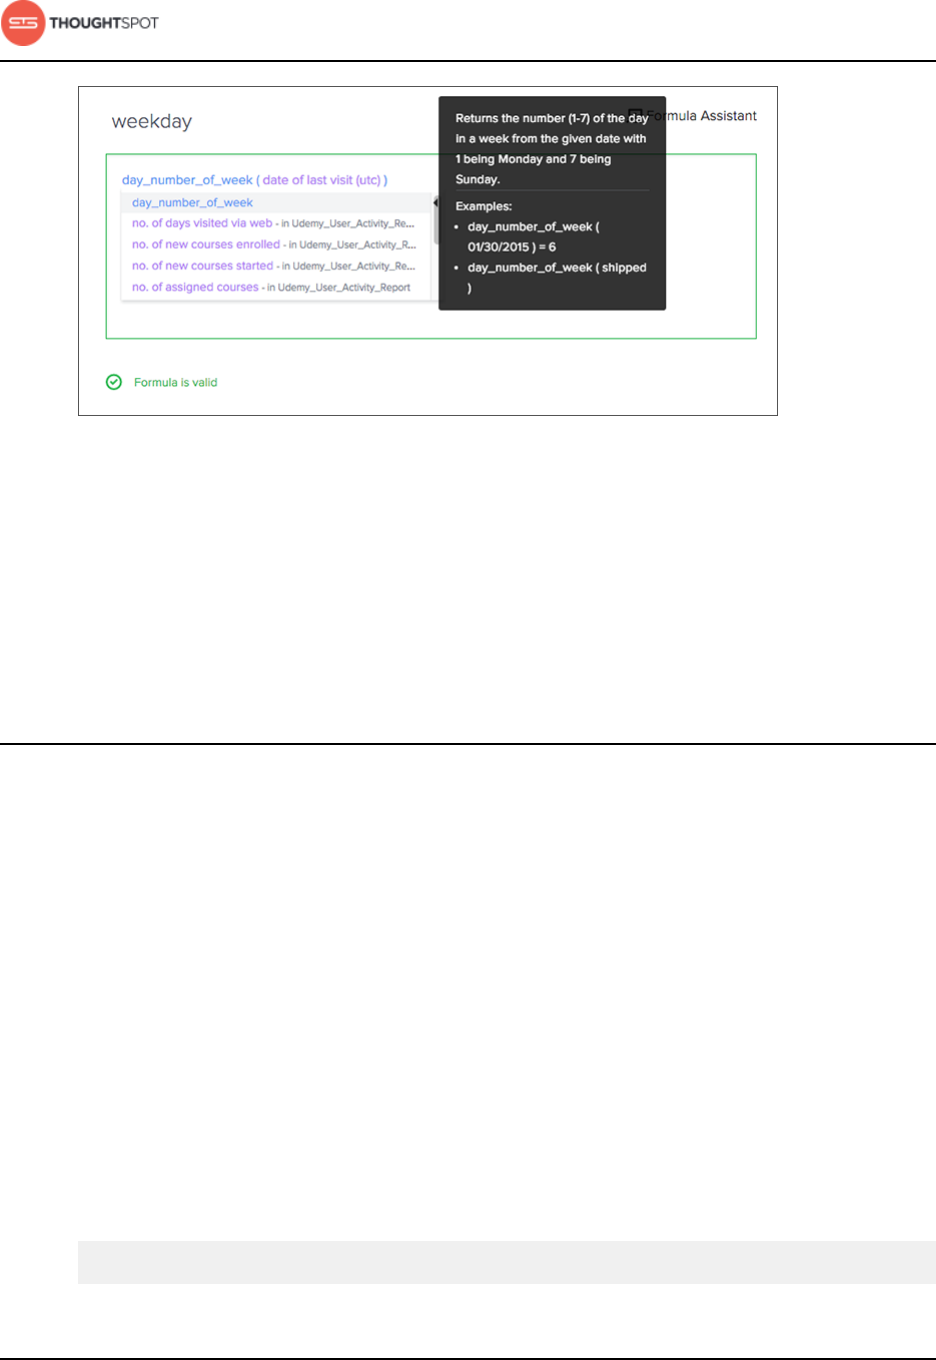
About troubleshooting
ThoughtSpot Administration Guide Copyright © 2017 by ThoughtSpot. All Rights Reserved. 251
Figure 142: Changing the formula to return a different data type
4. Make your changes, and saving the formula by clicking Save.
5. Save the worksheet by clicking Save.
6. Now you will be able to open the answer that was created on top of the
worksheet.
Data loading too slowly
Some tables may take an unusually long time to load due to a high data version
issue. This issue normally arises when ThoughtSpot completes an upgrade or the
system is recovering after a crash.
The data version is the number of loads that have been historically applied to a
table. Every completed load increments the version number of the table by one.
ThoughtSpot would need to process each version of the table during restoration,
which could increase the time it takes to build the table.
There are a few steps you can take to check for a high data version issue and fix
it. To improve data loading speed:
1. Run the following command to find the number of tables that are building and
their names
tscli cluster status --mode table
About troubleshooting
ThoughtSpot Administration Guide Copyright © 2017 by ThoughtSpot. All Rights Reserved. 252
2. You may notice that a few small tables are taking up a lot of time to be built.
However, this could simply be due to the deceivingly large size of the table.
There is also the chance it could be due to a high data version issue. In order
to determine if this is a high data version issue, check the size of the table by
running the following command:
echo 'show statistics for server;' | tql
3. If there is a large number of rows in the table, proceed to shard the table.
4. If the table has a small number of rows, then the slow loading speed is caused
by a high data version issue, and you do not have to shard the table. Use the
compact table functionality to trim the table down to its actual size:
tql> compact table <table name>;
Search results contain too many blanks
If you find that your search results contain too many blanks when your data
source is a worksheet, there is a simple adjustment you can make to fix this.
If you find that the charts and tables built on a worksheet contain a large number
of null values (which display as {blank} in the web browser), you can fix this by
changing the inclusion rule for the worksheet.
An inclusion rule that specifies Exclude Empty Rows (Inner Join) will reduce the
number of null values in the result. Imagine a worksheet that includes data about
a retail grocery store. There are rows in the worksheet from these source tables:
Table 29: Tables in worksheet inclusion rule example
Table Name Description
sales Fact table with sales made per product per
store.
products Dimension table with information about every
product.
About troubleshooting
ThoughtSpot Administration Guide Copyright © 2017 by ThoughtSpot. All Rights Reserved. 253
Table Name Description
stores Dimension table with information about every
store.
When creating the worksheet, suppose you choose Include Empty Rows (Left
Outer Join) for the inclusion rule and Progressive Joins for the join rule. In
this case, if you type "product name" in your search, you'll see a list of all the
products that exist. Suppose you then add "store name" to your search. You will
see a lot of null ({blank}) values in the result. This happens because the columns
"store name" and "product name" are joined through the fact table, "sales". So
for every product that has never been sold in a particular store, you'll see {blank}
in the "store name" column. This may be what you want to see, in which case,
you can leave the worksheet as is, and choose Exclude for the {blank} values in
your table or chart, whenever you don't want to see them.
However, in may cases, including all the {blank} values could confuse end users.
So if you encounter this problem, you can edit the worksheet, and change
the inclusion rule to Exclude Empty Rows (Inner Join). Now when searching
for "store name" and "product name" on the worksheet, users will not be
overwhelmed by null values. They'll only see the rows where a particular product
has been sold in a particular store.

Reference
ThoughtSpot Administration Guide Copyright © 2017 by ThoughtSpot. All Rights Reserved. 254
Chapter 11: Reference
Reference
Topics:
•TQL reference
•ThoughtSpot Loader flag
reference
•tscli command reference
•Formula reference
•Date and time formats
reference
•Row level security rules
reference
This Reference section contains the commands
and their syntax for all the command line tools in
ThoughtSpot.
Included in this guide are:
•TQL reference lists the SQL commands that are
supported in TQL.
•ThoughtSpot Loader flag reference lists the
options for loading data with tsload.
•tscli command reference lists the ThoughtSpot
Command Line Interface commands.
•Formula reference lists the available formula
operators and functions. These are also listed in
the Formula Assistant, which is available from the
place in ThoughtSpot where you build formulas.
•Date and time formats reference lists the accepted
date, time, and timestamp formats that you
can use when uploading data through the Web
interface or using the ThoughtSpot Loader.
•Row level security rules reference lists the
operators for building row level security rules.
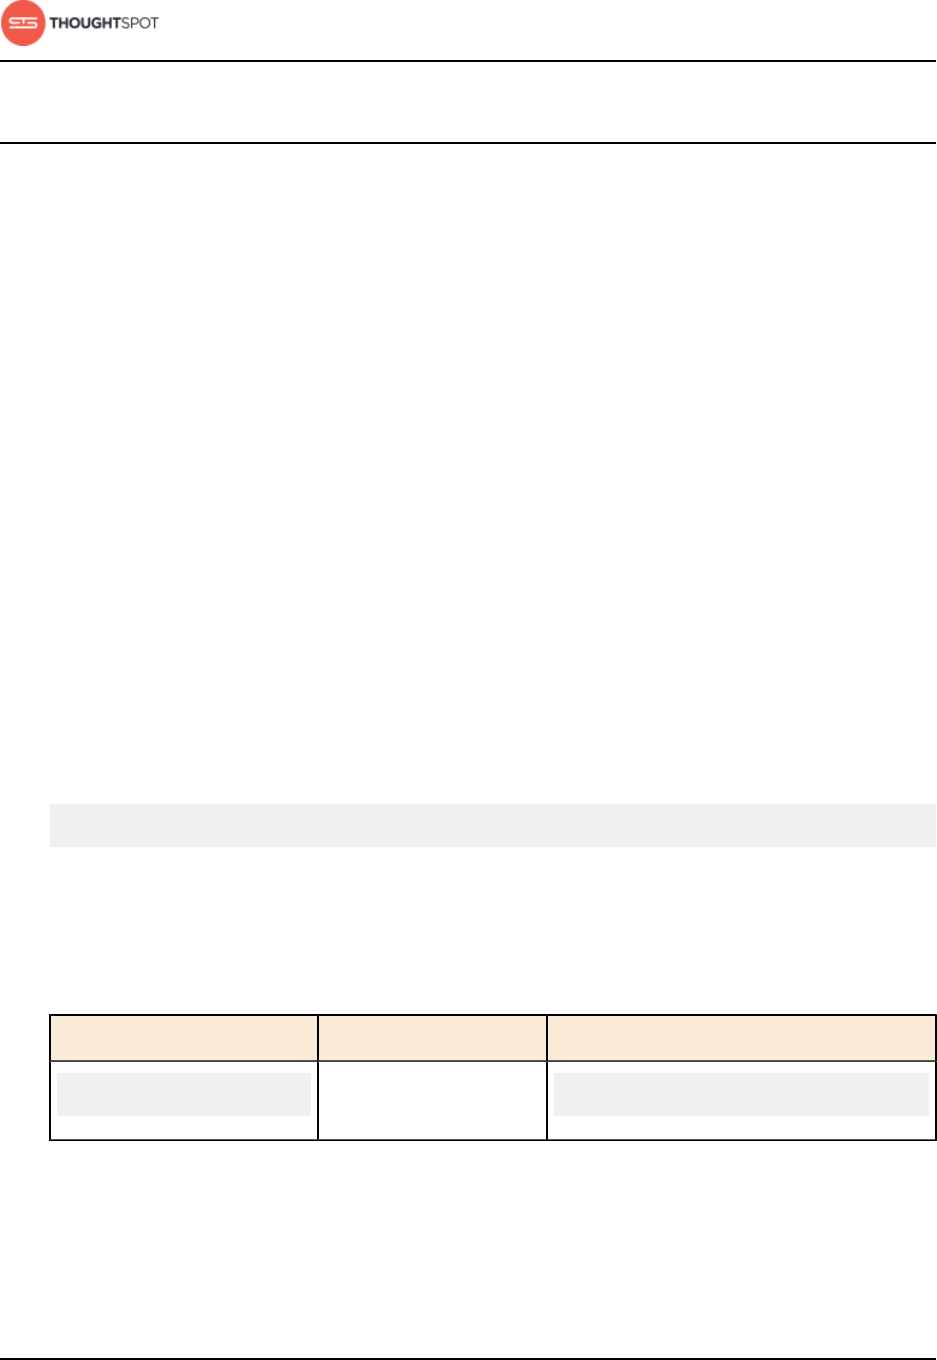
Reference
ThoughtSpot Administration Guide Copyright © 2017 by ThoughtSpot. All Rights Reserved. 255
TQL reference
TQL is the ThoughtSpot language for entering SQL commands. This reference
lists TQL commands you can use to do things like creating a schema or verifying
a data load.
You can use TQL either through the ThoughtSpot application's web interface or
the command line interface in the Linux shell.
TQL commands
Note that the worksheets and pinboards in ThoughtSpot are dependent upon
the data in the underlying tables. Use caution when modifying tables directly. If
you change or remove a schema on which those objects rely, the objects could
become invalid.
You can use TQL to view and modify schemas and data in tables. Remember to
add a semicolon after each command. Commands are not case sensitive but are
capitalized here for readability.
When referring to objects using fully qualified object names, the syntax is:
"database"."schema"."table"
As a best practice, you should enclose object names (database, schema, table,
and column) in double quotes, and column values in single quotes.
Table 30: TQL basic commands
Syntax Description Examples
help Displays command
help.
TQL> help
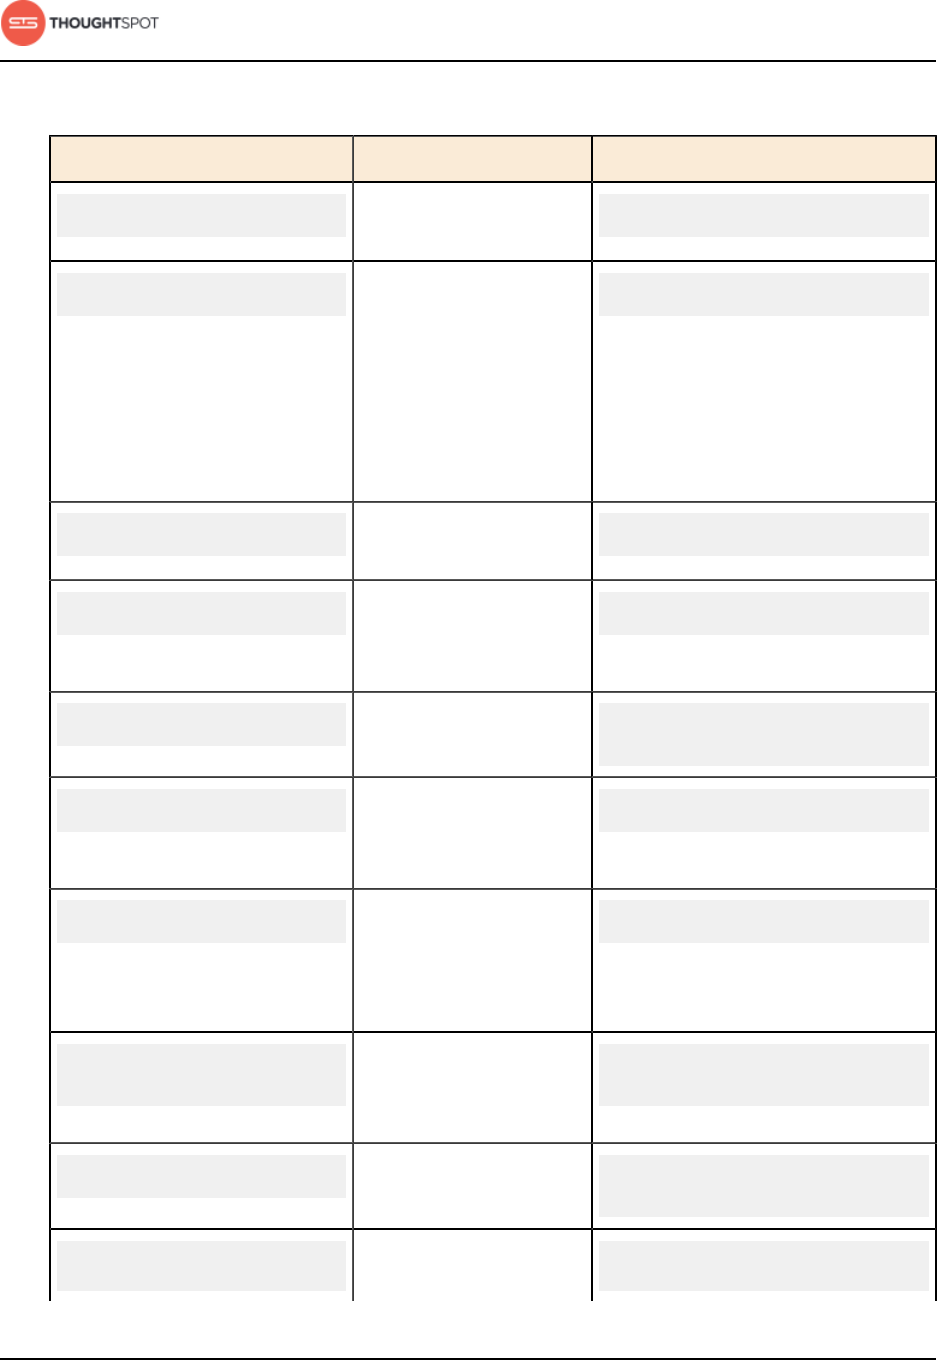
Reference
ThoughtSpot Administration Guide Copyright © 2017 by ThoughtSpot. All Rights Reserved. 256
Table 31: TQL commands for viewing schemas and data
Syntax Description Examples
SHOW DATABASES Lists all available
databases.
TQL> SHOW DATABASES;
USE <database>Switches the context to
the specified database.
This is required if
queries do not use
fully qualified names
(database.schema.table)
for specifying tables.
TQL> USE "fruit_database";
SHOW SCHEMAS Lists all schemas within
the current database.
TQL> SHOW SCHEMAS;
SHOW TABLES Lists all tables within
the current database by
schema.
TQL> SHOW TABLES;
SHOW TABLE <table>Lists all the columns for
a table.
TQL> SHOW TABLE
"locations";
SHOW VIEWS Lists all views within
the current database by
schema.
TQL> SHOW VIEWS;
SCRIPT SERVER Generates the TQL
schema for all tables
in all databases on the
server.
TQL> SCRIPT SERVER;
SCRIPT DATABASE
<database>
Generates the TQL
schema for all tables in a
database.
TQL> SCRIPT DATABASE
"fruit_database";
SCRIPT TABLE <table>Generates the TQL
schema for a table.
TQL> SCRIPT TABLE
"vendor";
SELECT
<cols_or_expr>
Shows specified set of
table data.
TQL> SELECT
TOP 10 "quantity"
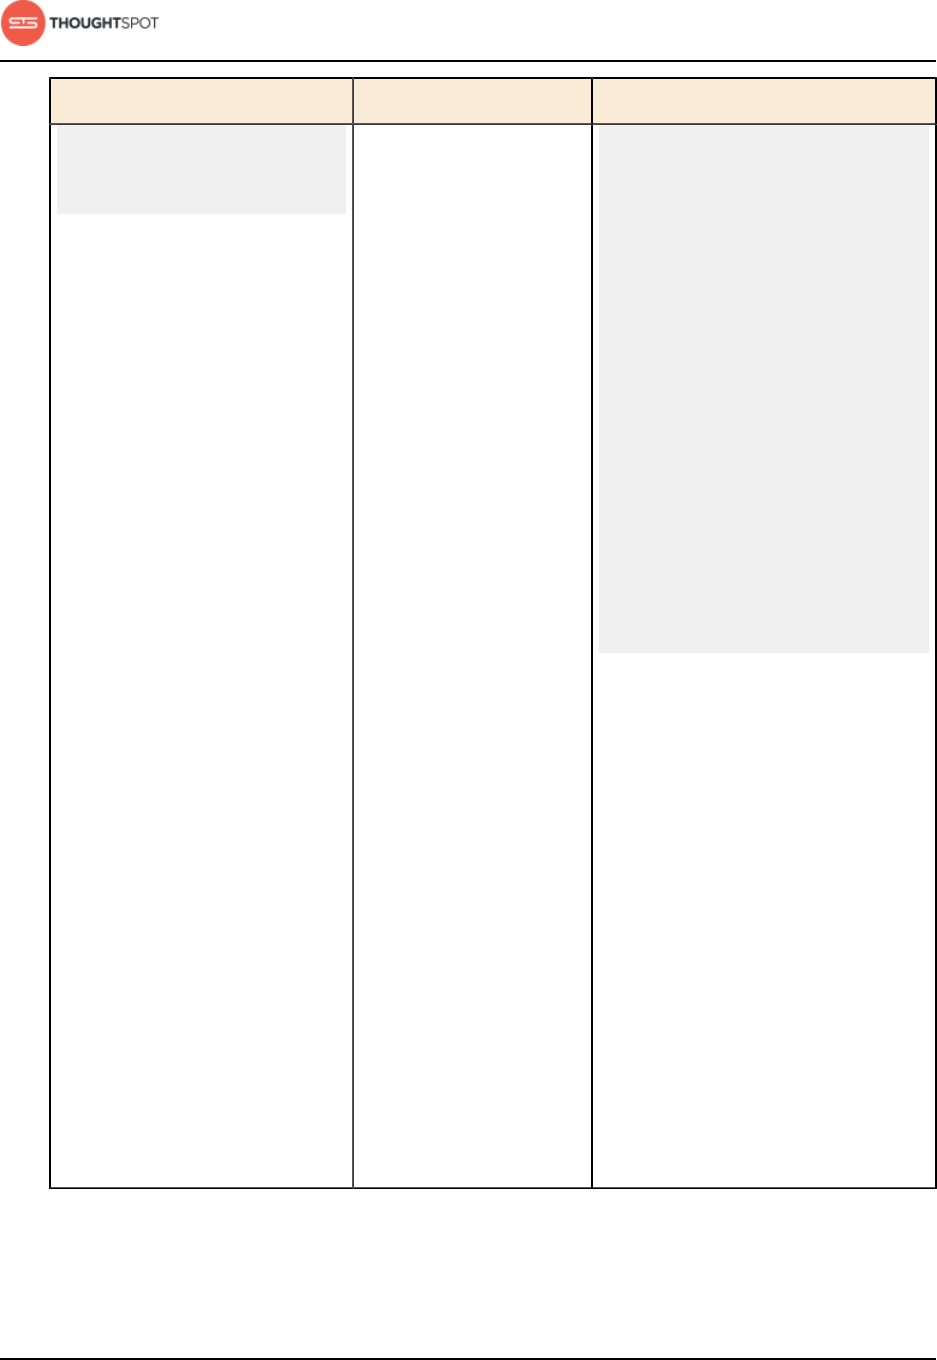
Reference
ThoughtSpot Administration Guide Copyright © 2017 by ThoughtSpot. All Rights Reserved. 257
Syntax Description Examples
FROM <table_list>
[WHERE <predicates>]
[GROUP BY <expr>]
[ORDER BY <expr>]
If you do not specify the
TOP number of rows
to select, the top 50
rows will be returned by
default. The number of
rows to return can be set
using the TQL command
line flag:
--query_results
_apply_top_row_count
You can use the
following aggregation
functions:
• sum
• count
• count distinct
• stddev
• avg
• variance
• min
• max
You can use the
following date functions:
• absyear
• absmonth
• absday
• absquarter
• date
• time
FROM "sales_fact";
TQL> SELECT COUNT(*)
FROM "vendor";
TQL> SELECT "vendor",
SUM("quantity")
FROM "sales_fact"
GROUP BY "vendor";
TQL> SELECT "vendor",
SUM("amount")
FROM "vendor",
"sales_fact"
WHERE
"sales_fact"."vendorid"
= "vendor"."vendorid"
AND "amount" > 100
GROUP BY "vendor"
ORDER BY "amount" DESC;
TQL> SELECT "vendor",
SUM("quantity")
FROM "sales_fact"
GROUP BY "vendor"
LIMIT 10;
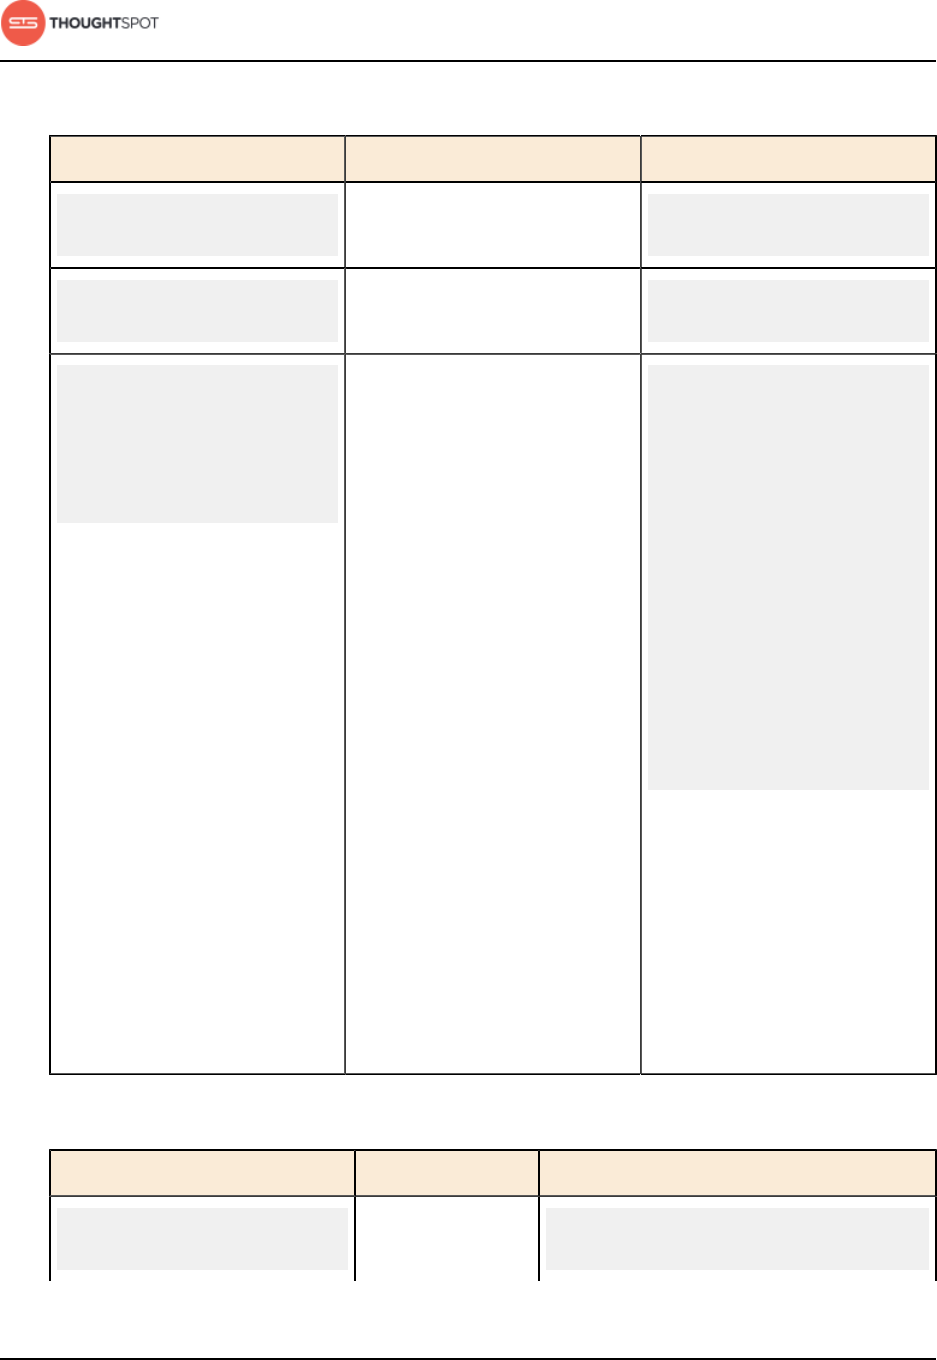
Reference
ThoughtSpot Administration Guide Copyright © 2017 by ThoughtSpot. All Rights Reserved. 258
Table 32: TQL commands for creating schemas
Syntax Description Examples
CREATE DATABASE
<database>
Creates a database. TQL> CREATE DATABASE
"fruit_database";
CREATE SCHEMA
<schema>
Creates a schema within the
current database.
TQL> CREATE SCHEMA
"fruit_schema";
CREATE TABLE <table>
(<column_definitions>
[<constraints>])
[PARTITION BY HASH
(<number>)
[KEY ("<column>")]])
Creates a table with the
specified column definitions
and constraints.
Use PARTITION BY HASH to
shard a table across all nodes.
If no KEY is specified, the table
will be randomly sharded.
Note that you can specify
relationship constraints
(FOREIGN KEY or
RELATIONSHIP) in the CREATE
TABLE statement. But it is
recommended to define
these using ALTER TABLE
statements at the end of your
TQL script, after creating your
tables. This works better in
scripts, because it guarantees
that tables are created before
they are referenced in the
constraint definitions.
TQL> CREATE TABLE
"vendor"
("vendorid" int,
"name"
varchar(255));
TQL> CREATE TABLE
"sales_fact"
("saleid" int,
"locationid" int,
"vendorid" int,
"quantity" int,
"sale_amount"
double,
"fruitid" int,
CONSTRAINT
PRIMARY
KEY("saleid"))
PARTITION BY
HASH(96)
KEY ("saleid");
Table 33: TQL commands for modifying schemas
Syntax Description Examples
DROP DATABASE
<database>
Drops a database
and all of its
TQL> DROP DATABASE
"fruit_database";
Reference
ThoughtSpot Administration Guide Copyright © 2017 by ThoughtSpot. All Rights Reserved. 259
Syntax Description Examples
schemas and
tables.
DROP SCHEMA
<schema>
Drops a schema
within the current
database, and
drops all of the
tables in the
schema.
TQL> DROP SCHEMA
"fruit_schema";
DROP TABLE <table>Drops a table. TQL> DROP TABLE "location";
ALTER TABLE <table>
ADD|DROP|RENAME
COLUMN <column>
Alters a table
to add, drop, or
rename a column.
When you add
a column to an
existing table, you
must provide a
default value to
use for existing
rows.
TQL> ALTER TABLE "cart"
ADD COLUMN
"nickname" varchar(255)
DEFAULT 'no nickname';
TQL> ALTER TABLE "cart"
DROP COLUMN "nickname";
TQL> ALTER TABLE "cart"
RENAME COLUMN "nickname"
TO "shortname";
TRUNCATE TABLE
<table>
Removes all data
from a table,
but preserves
its metadata,
including
all GUIDs,
relationships, etc.
This can be used
to force a new
schema for a table
without losing the
metadata.
However, this
operation removes
TQL> TRUNCATE TABLE
"location";

Reference
ThoughtSpot Administration Guide Copyright © 2017 by ThoughtSpot. All Rights Reserved. 260
Syntax Description Examples
all existing data
from the table
and must be used
with caution. You
must reload the
data following a
TRUNCATE, or all
dependent objects
(worksheets and
pinboards) in
ThoughtSpot will
become invalid.
ALTER TABLE <table>
DROP CONSTRAINT
PRIMARY KEY;
Drops the primary
key from a table.
Note that if
you then add
a new primary
key, the same
upsert behavior
will be applied
as with adding
any primary key.
This can result in
data deletion, so
make sure you
understand how
the upsert will
affect your data
ahead of time.
TQL> ALTER TABLE "sales"
DROP CONSTRAINT
PRIMARY KEY;
TQL> ALTER TABLE "sales"
ADD CONSTRAINT
PRIMARY KEY ("PO_number");
ALTER TABLE <table>
DROP [FOREIGN KEY|
RELATIONSHIP]
<name>;
Drops the named
foreign key or
relationship
between two
tables.
TQL> ALTER TABLE
"sales_fact"
DROP FOREIGN KEY
"FK_PO_number";
TQL> ALTER TABLE "fruit_dim"
Reference
ThoughtSpot Administration Guide Copyright © 2017 by ThoughtSpot. All Rights Reserved. 261
Syntax Description Examples
DROP RELATIONSHIP
"REL_dates";
ALTER TABLE <table>
DROP [CONSTRAINT
FOREIGN KEY
[<table_name>]
| RELATIONSHIP [WITH
<table_name>];
You must use
this syntax
when dropping
relationships
between tables
created before
ThoughtSpot
version 3.2.
This is because
relationships could
not be named in
older versions.
Drops the foreign
key or relationship
between two
tables where you
cannot reference
it by relationship
name. If the
relationship was
created without a
name, use:
• the name of
the referenced
table, for a
foreign key.
• the name of
the related
table, for a
relationship.
If you drop a
foreign key
without specifying
TQL> ALTER TABLE "shipments"
DROP CONSTRAINT
FOREIGN KEY "orders";
TQL> ALTER TABLE
"wholesale_buys"
DROP RELATIONSHIP
WITH "retail_sales";
/* Drops all relationships
that have wholesale_buys
as a source.
*/
TQL> ALTER TABLE
"wholesale_buys"
DROP RELATIONSHIP;
/* Drops all foreign keys
from wholesale_buys.
*/
TQL> ALTER TABLE
"wholesale_buys"
DROP CONSTRAINT
FOREIGN KEY;
Reference
ThoughtSpot Administration Guide Copyright © 2017 by ThoughtSpot. All Rights Reserved. 262
Syntax Description Examples
the referenced
table, all foreign
keys from the
table you are
altering will be
dropped.
ALTER TABLE <table>
[SET DIMENSION |
SET FACT
[PARTITION BY HASH
[(<shards>)]
[KEY(<column>)]]]
Changes the
partitioning on a
table by doing one
of:
• re-sharding a
sharded table.
• changing a
replicated table
to a sharded
table.
• changing a
sharded table
to a replicated
table.
To change the
partitioning on a
table, or to change
a dimension table
to a sharded
table, use ALTER
TABLE...SET FACT
PARTITION BY
HASH...;
To make a sharded
table into a
dimension table
(replicated on
every node),
TQL> ALTER TABLE
"sales_fact"
SET FACT
PARTITION BY HASH (96)
KEY ("PO_number");
TQL> ALTER TABLE "fruit_dim"
SET DIMENSION;

Reference
ThoughtSpot Administration Guide Copyright © 2017 by ThoughtSpot. All Rights Reserved. 263
Syntax Description Examples
use ALTER
TABLE...SET
DIMENSION;
ALTER TABLE <table>
MODIFY COLUMN
<column>
<new_data_type>;
Changes the data
type of a column.
This can have
implications on
sharding and
primary key
behavior. See
About data type
conversion.
TQL> ALTER TABLE fact100
MODIFY COLUMN product_id
int;
Table 34: TQL commands for modifying data
Syntax Description Examples
INSERT INTO
<table>
VALUES ...
Inserts values into a table.
Only use this for testing.
Do not use INSERT on a
production system.
TQL> INSERT INTO "vendor"
VALUES 'helen rose',
'jacob norse',
'eileen ruff',
'manny gates';
UPDATE <table>
... SET ...
[WHERE ...]
Updates rows in a table
that match optionally
provided predicates.
Predicates have the form
column = value connected
by the AND keyword. Sets
the column values to the
specified values.
TQL> UPDATE "location"
SET "borough" =
'staten island',
"city" = 'new york'
WHERE "borough" =
'staten isl'
AND city = 'NY';
DELETE FROM
<table> [WHERE...]
Deletes rows from a table
that match optionally
provided predicates.
Predicates have the form
column = value connected
by the AND keyword.
TQL> DELETE FROM "vendor"
WHERE
"name" = 'Joey Smith'
AND
"vendorid" = '19463';

Reference
ThoughtSpot Administration Guide Copyright © 2017 by ThoughtSpot. All Rights Reserved. 264
Constraints and relationships
Constraints and relationships in ThoughtSpot are used to define the relationships
between tables (i.e. how they can be joined). However, constraints are not
enforced, as they would be in a transactional database. You can define the
following constraints when creating a table with CREATE TABLE, or add them to
an existing table using the ADD CONSTRAINT syntax:
Table 35: Constraints in TQL
Constraint Description Example
PRIMARY KEY Designates a unique,
non-null value as the
primary key for a table.
This can be one column
or a combination of
columns.
If values are not unique,
an upsert will be
performed if a row
includes a primary key
that is already present
in the data.
CREATE TABLE "schools" (
"schoolID" varchar(15),
"schoolName" varchar(255),
"schoolCity" varchar(55),
"schoolState" varchar(55),
"schoolNick" varchar(55),
CONSTRAINT
PRIMARY KEY ("schoolID")
) ;
TQL> ALTER TABLE "cart"
ADD CONSTRAINT
PRIMARY KEY ("cart_id");
TQL> ALTER TABLE "cart"
DROP CONSTRAINT
PRIMARY KEY "cart_id";
FOREIGN KEY Defines a relationship
where the value(s)
in the table are used
to join to a second
table. Uses an equality
operator. The foreign
key must match the
primary key of the table
that is referenced in
number, column type,
and order of columns.
TQL> ALTER TABLE "batting"
ADD CONSTRAINT "FK_player"
FOREIGN KEY ("playerID")
REFERENCES "players" ("playerID");
TQL> ALTER TABLE "batting"
ADD CONSTRAINT "FK_lg_team"
FOREIGN KEY ("lgID" ,"teamID")
REFERENCES "teams"
("lgID" ,"teamID");
TQL> ALTER TABLE "shipment"
ADD CONSTRAINT
"FK_PO_vendor"
FOREIGN KEY ("po_number",
"vendor")
REFERENCES "orders"
("po_number", "vendor");
TQL> ALTER TABLE "shipment"
Reference
ThoughtSpot Administration Guide Copyright © 2017 by ThoughtSpot. All Rights Reserved. 265
Constraint Description Example
When creating a foreign
key, give it a name.
You can reference the
foreign key name later,
if you want to remove it.
DROP CONSTRAINT "FK_PO_vendor";
RELATIONSHIP Defines a relationship
where the value(s) in
the table can be used
to join to a second
table, using an equality
condition (required)
and one or more range
conditions (optional).
These conditions act
like a WHERE clause
when the two tables are
joined. They are applied
using AND logic, such
that all conditions must
be met for a row to be
included.
You may add multiple
relationships between
tables.
When creating a
relationship, give
it a name. You
can reference the
relationship name later,
if you want to remove it.
TQL> ALTER TABLE "wholesale_buys"
ADD RELATIONSHIP "REL_fruit"
WITH "retail_sales"
AS "wholesale_buys"."fruit"
= "retail_sales"."fruit"
AND
("wholesale_buys"."date_order"
< "retail_sales"."date_sold"
AND
"retail_sales"."date_sold" <
"wholesale_buys"."expire_date");
TQL> ALTER TABLE "wholesale_buys"
DROP RELATIONSHIP "REL_fruit";
Flags
The following flag can be used with TQL:
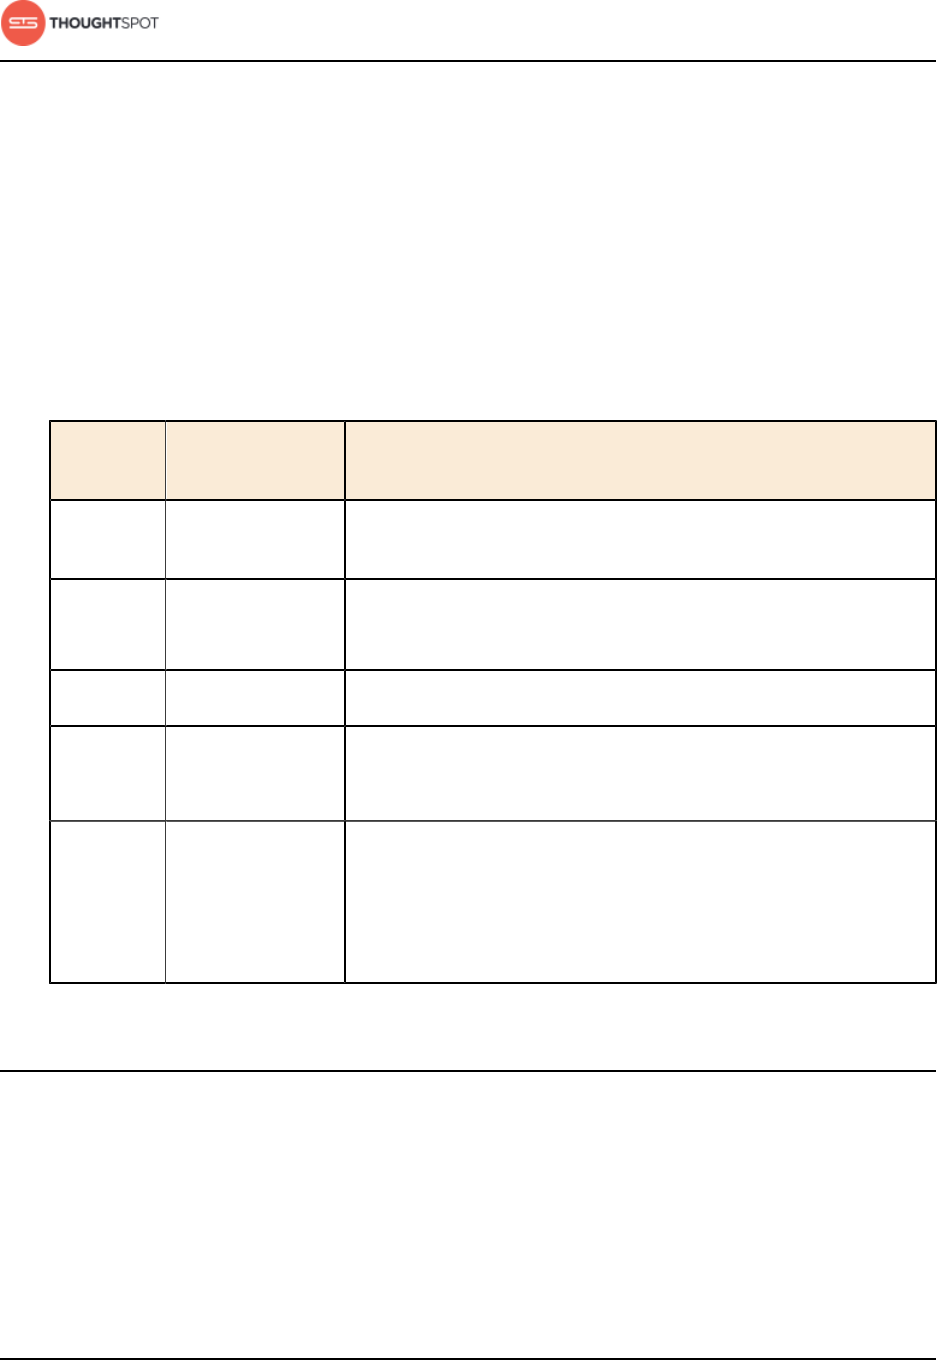
Reference
ThoughtSpot Administration Guide Copyright © 2017 by ThoughtSpot. All Rights Reserved. 266
--query_results_apply_top_row_count <number>
limits to the number of result rows returned by a query.
Example: $ tql --query_results_apply_top_row_count 100
Data types
ThoughtSpot supports a simplified list of data types:
Table 36: Supported data types
Kind of
data
Supported data
types
Details
Character • VARCHAR(n) Specify the maximum number of characters, as in
VARCHAR(255). The size limit is 1GB for VARCHAR values.
Floating
point
• DOUBLE
• FLOAT
DOUBLE is recommended.
Boolean • BOOL Can be true or false.
Integer • INT
• BIGINT
INT holds 32 bits.
BIGINT holds 64 bits.
Date or
time
• DATE
• DATETIME
• TIMESTAMP
• TIME
DATETIME, TIMESTAMP, and TIME are stored at the granularity
of seconds.
TIMESTAMP is identical to DATETIME, but is included for syntax
compatibility.
ThoughtSpot Loader flag reference
For recurring data loads and for scripting loads, use the ThoughtSpot Loader
(tsload). This reference section lists all the flags that can be used to modify the
behavior of tsload.

Reference
ThoughtSpot Administration Guide Copyright © 2017 by ThoughtSpot. All Rights Reserved. 267
General tsload flags
Table 37: General tsload flags
Flag Description Notes
--target_database
<database>
Specifies the pre-
existing target database
into which tsload should
load the data.
--target_schema <schema>Specifies the target
schema.
Default is "falcon_default_schema".
--target_table <table>Specifies the tables that
you want to load into the
database.
The tables must exist in the database
specified by --target_database.
--empty_target Specifies that any data in
the target table is to be
removed before the new
data is loaded.
If supplied, any rows that exist in the
table specified by --target_database
and --target table will be deleted
before this data load. To perform an
"upsert" on the existing data, omit this
flag or specify --noempty_target.
--max_ignored_rows
<number>
Specifies the maximum
number of rows that can
be ignored if they fail to
load.
If the number of ignored rows exceeds
this limit, the load will be aborted.
--bad_records_file
<path_to_file>/
<file_name>
Specifies the file to use
for storing rows that
failed to load.
Input rows that do not conform to the
defined schema in ThoughtSpot will be
ignored and inserted into this file.
--date_format
<date_formatmask>
Specifies the format
string for date values.
The default format is yearmonthday e.g.
"Dec 30th, 2001" and is represented
as 20011230. Use the date format
specifications supported in the strptime
library function.

Reference
ThoughtSpot Administration Guide Copyright © 2017 by ThoughtSpot. All Rights Reserved. 268
Flag Description Notes
--date_time_format
<date_formatmask>
<time_formatmask>
Specifies the format
string for datetime
values.
The default is yearmonthday
hour:minute:second e.g. Dec 30th, 2001
1:15:12 and is represented as 20011230
01:15:12. Use the datetime format
specifications supported in the strptime
library function.
--time_format
<time_formatmask>
Specifies the format
string for time values.
The default is hour:minute:second.
Use the time format specifications
supported in the strptime library
function.
--v=[0|1|2|3|4|5|6] Specifies the verbosity
of log messages.
Provide a values from 0 to 6, to
designate the verbosity level. By
default, verbosity is set to the
minimum, which is 0.
--skip_second_fraction Skips fractional seconds
when loading data.
If supplied, the upserts logic may be
affected, especially if the date time
being loaded is a primary key, and
the data has millisecond granularity.
Load the data twice, once as a string
with a primary key, and again with
second granularity date time. There is
no support to store fractional seconds
in the ThoughtSpot system.
File loading tsload flags
The following flags are used when loading data from an input file:
Table 38: File loading tsload flags
Flag Description Notes
--source_file
<path_to_file>/<file_name>
Specifies the location of
the file to be loaded.
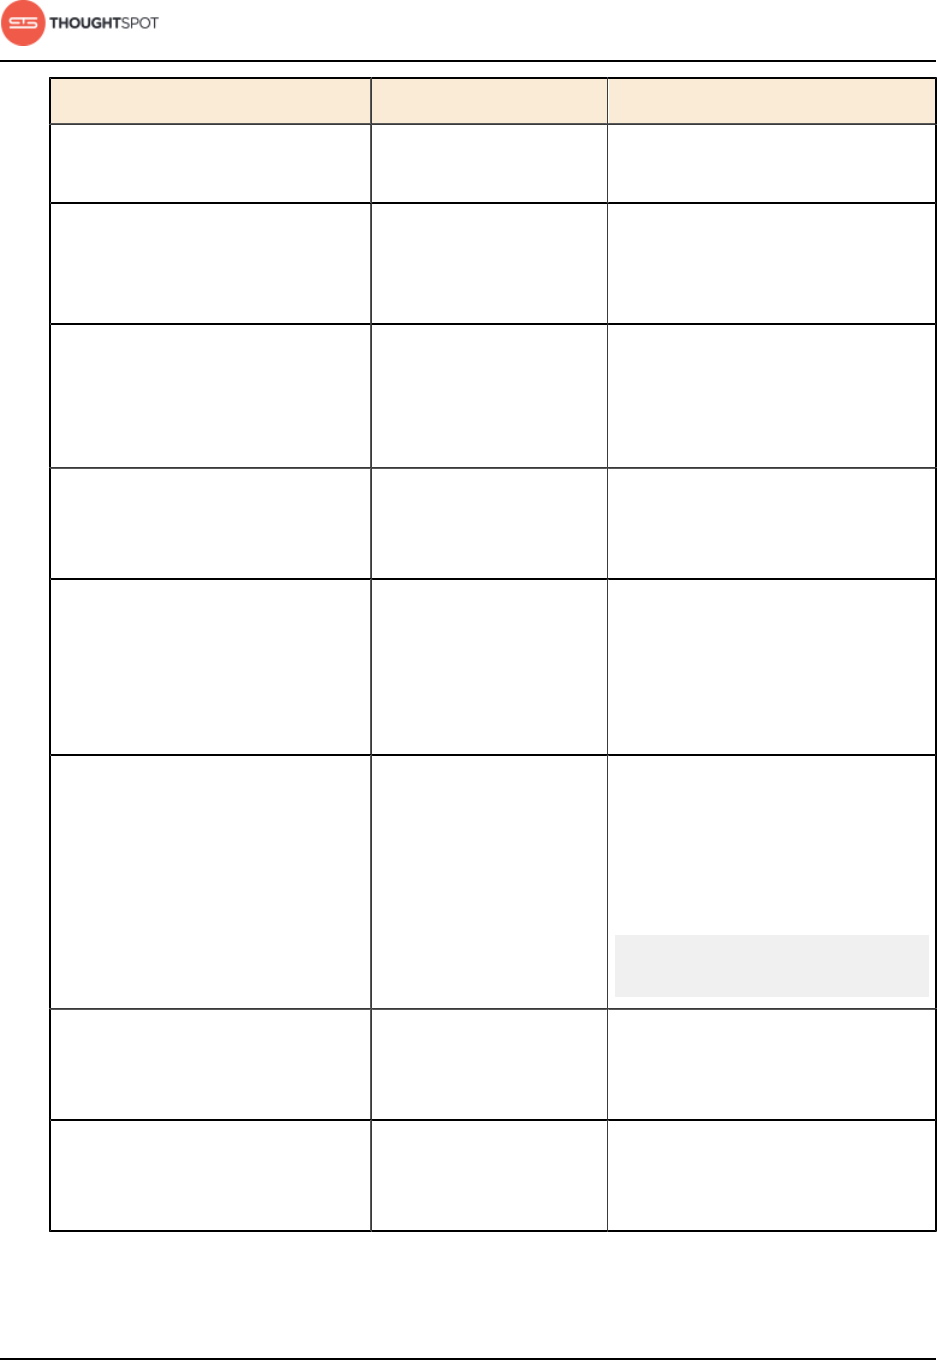
Reference
ThoughtSpot Administration Guide Copyright © 2017 by ThoughtSpot. All Rights Reserved. 269
Flag Description Notes
--source_data_format [csv|
delimited]
Specifies the data file
format.
Optional. The default is csv.
--field_separator
"<delimiter>"
Specifies the field
delimiter used in the
input file.
-- trailing_field_separator Specifies that the field
separator appears after
every field, including the
last field per row.
Example row with trailing field
separator: a,b,c,
The default is false.
--null_value
"<null_representation>"
Specifies how null values
are represented in the
input file.
These values will be converted to
NULL upon loading.
--date_converted_to_epoch
[true|false]
Specifies whether the
“date” or “datetime”
values in the input file
are represented as
epoch values.
--boolean_representation
[true_false | 1_0 | T_F |
Y_N]
Specifies the format in
which boolean values
are represented in the
input file.
The default is T_F. You can also
use this flag to specify other
values. For example, if your data
used Y for true and NULL for false,
you could specify:
--boolean_representation
Y_NULL
--has_header_row Indicates that the input
file contains a header
row.
If supplied, the first row of the file
is ignored. If not supplied, the first
row of the file is loaded as data.
--escape_character
"<character>"
Specifies the escape
character used in the
input file.
If no value is specified, the default
is "(double quotes).
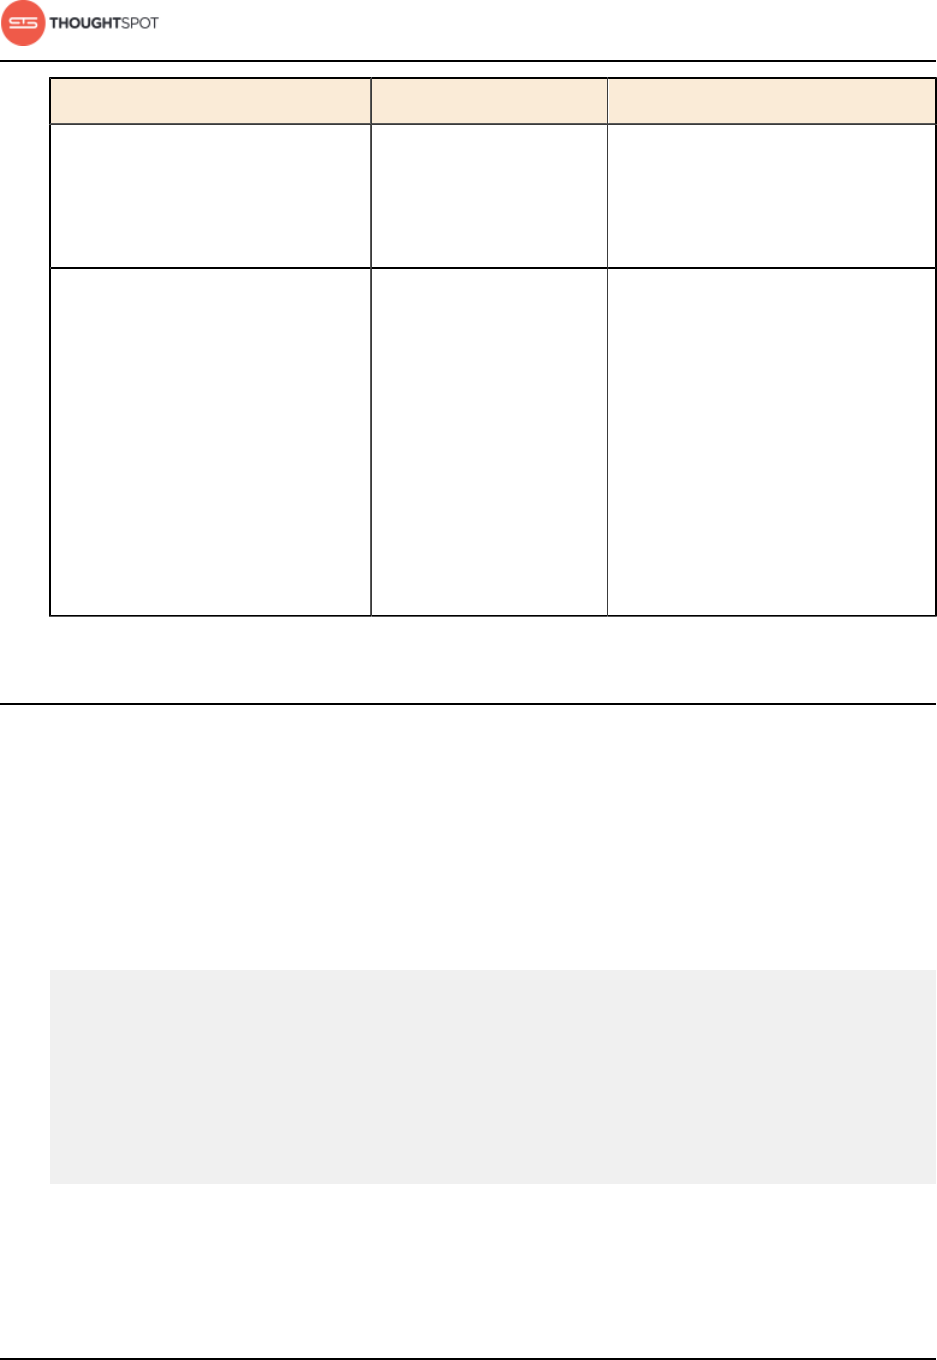
Reference
ThoughtSpot Administration Guide Copyright © 2017 by ThoughtSpot. All Rights Reserved. 270
Flag Description Notes
--enclosing_character
"<character>"
Specifies the enclosing
character used in the
input file.
If the enclosing character is
double quotes, you need to
escape it, as in this example: --
enclosing_character "\""
--use_bit_boolean_values =
[true | false]
Specifies how boolean
values are represented
in the input file.
If supplied, the input CSV file
uses a bit for boolean values, i.e.
the false value is represented as
0x0 and true as 0x1. If omitted or
set to false, boolean values are
assumed to be T_F, unless you
specify something else using the
flag --boolean_representation
[true_false | 1_0 | T_F |
Y_N].
tscli command reference
The tscli command line interface is an administration interface for the
ThoughtSpot instance. Use tscli to take snapshots (backups) of data, apply
updates, stop and start the services, and view information about the system.
tscli syntax
Usage for tscli is:
tscli [-h] [--helpfull] [--verbose] [--noautoconfig]
[--autoconfig] [--yes] [--cluster <cluster>]
[--zoo <zookeeper>]
{alert, backup, callhome, cluster, command,
etl, event, fileserver, firewall,
ldap, logs,
monitoring, nas,
node, os, release, saml, security,
smtp, snapshot, ssl, storage,
support} ...
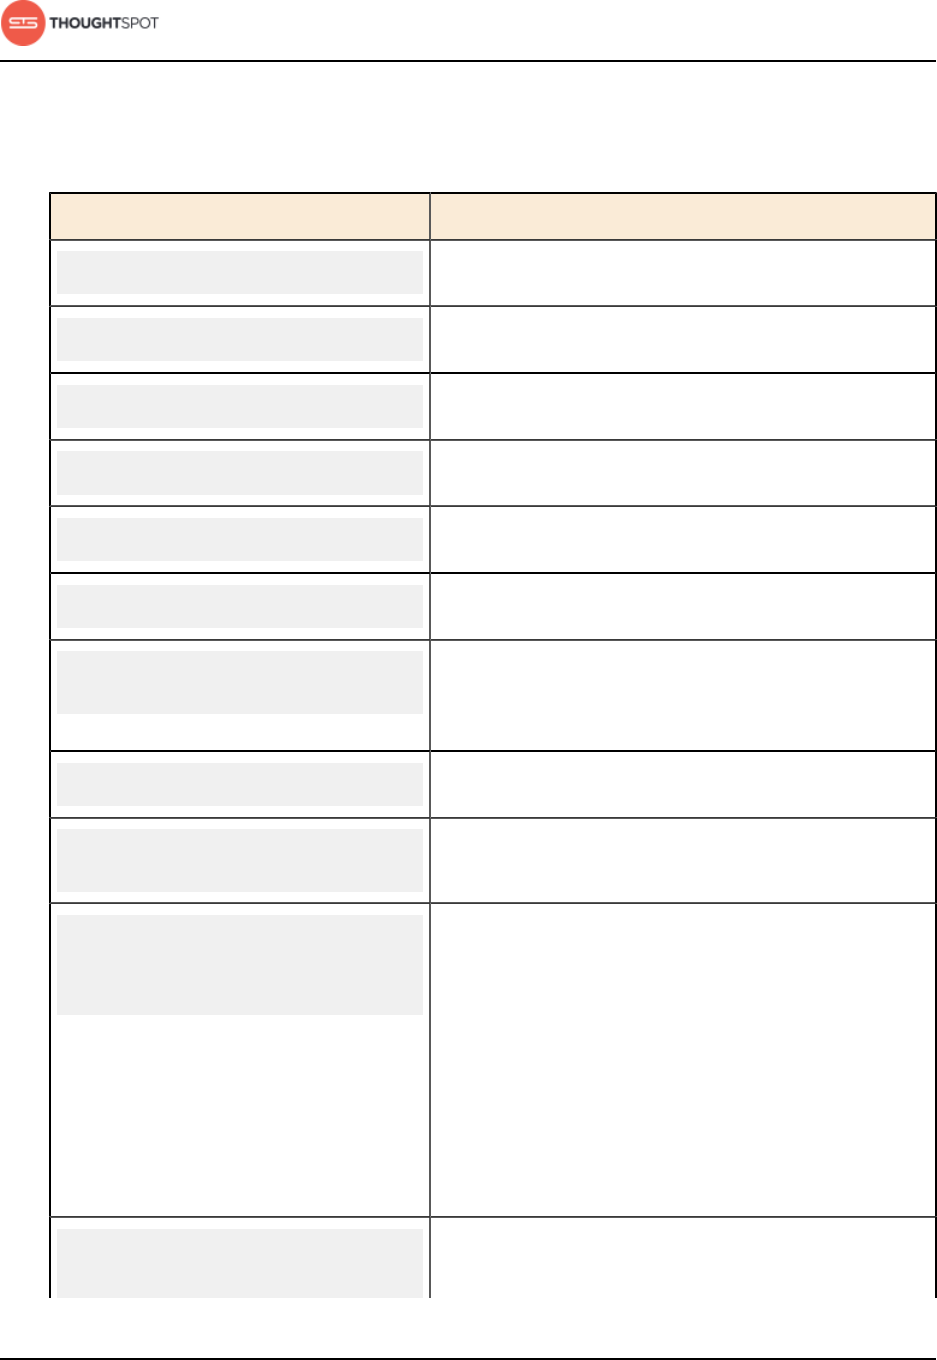
Reference
ThoughtSpot Administration Guide Copyright © 2017 by ThoughtSpot. All Rights Reserved. 271
tscli commands
Table 39: tscli commands
Command Description
tscli [<command>] -h Shows help, optionally for the specified command.
tscli alert count Shows counts of generated alerts by type.
tscli alert info Lists all alerts.
tscli alert list Lists the generated alerts.
tscli alert off Disables all alerts from the cluster.
tscli alert on Enables alerts from the cluster.
tscli alert silence --name
<alert_name>
Silences the alert with <alert_name>. For example,
DISK_ERROR. Silenced alerts are still recorded in
postgres, however emails are not sent out.
tscli alert status Shows the status of cluster alerts.
tscli alert unsilence-name
<alert_name>
Unsilences the alert with <alert_name>. For example,
DISK_ERROR.
tscli backup create
[--mode {full|light|
dataless}]
<name> <directory>
Same as the tscli snapshot backup command.
Pulls a snapshot and saves it as a backup where:
•<name> is the name of the snapshot to pull out as a
backup.
•<directory> is the new directory that will be
created for the backup. This directory must not
already exist.
Use --mode to specify the type of backup.
tscli.par backup create [-h]
[--mode {full|light|
dataless}]
Same as the tscli snapshot backup command.
This backup creation method make backups a part of
Reference
ThoughtSpot Administration Guide Copyright © 2017 by ThoughtSpot. All Rights Reserved. 272
Command Description
[--type {full|incremental}]
[--base BASE]
[--storage_type {local|nas}]
[--remote]
<name> <directory>
the cluster so that they can be managed using tscli
commands.
Pulls a snapshot and saves it as a backup where:
• Use --mode to specify the type of backup.
•--type should always be full.
•--base should not be set. This parameter is
reserved for incremental backups.
•--remote is a switch to use the cluster-linked
backup method. The backup taken in this way will
be on the node where the orion master is running.
It therefore requires the cluster to be running.
•--storage_type is only valid if you turn on [--
remote] switch. You can choose from local or nas.
For local, the backup will be taken on the node
where the active orion master is runing.
•<name> is the name of the snapshot to pull out as a
backup.
•<directory> is the new directory that will be
created for the backup. This directory must not
already exist.
tscli backup create-policy Prompts an editor for you to edit the parameters of
the backup policy.
tscli backup delete <name>Deletes the named backup.
tscli.par backup delete [-h]
<id>
This command deletes backups generated with
tscli.par backup create [-h]. Use tscli backup
ls to find the backup id for each backup. The backup
Reference
ThoughtSpot Administration Guide Copyright © 2017 by ThoughtSpot. All Rights Reserved. 273
Command Description
metadata is removed from the cluster, and the backup
directory is deleted from the node.
tscli backup delete-policy
<name>
Deletes the backup policy with <name>.
tscli backup disable-periodic Disables periodic backups. Restarts the cluster when
applied.
tscli backup disable-policy
<name>
Disables the policy <name>.
tscli backup enable-policy
<name>
Enables the policy <name>.
tscli backup list-policy Shows a list of present backup policies.
tscli backup ls Lists available backups and their size.
tscli backup mirror-status Checks whether the current cluster is running in mirror
mode or not.
tscli backup periodic-config
<name>
Shows the periodic backup <name> configuration.
tscli backup periodic-status Shows the periodic backup <name> status.
tscli backup
set-periodic
--at <hour1, hour2, ...>
--directory <directory>
[--num_backups
<num_backups>]
[--mode {full|light|
dataless}]
Enables or updates a periodic full backup
configuration where:
•<hour1, hour2, ...> is the list of times at which
to take backups daily. Comma separated string of
hour of day specified as HH using a 24 hour clock
(e.g. 01, 13, 23).
•<directory> is the directory where backups are to
be written.
•<num_backups> is the number of backups to keep
archived.
Reference
ThoughtSpot Administration Guide Copyright © 2017 by ThoughtSpot. All Rights Reserved. 274
Command Description
Use --mode to specify the type of backup.
tscli backup
start-mirror <directory>
<node1, node2, ...>
<cluster_name> <cluster_id>
Starts a mirror cluster which will continuously pull
backups generated from a primary cluster where:
•<directory> is the directory where backups from
the primary cluster are written (usually a SAN or
NFS mounted drive).
•<node1, node2, ...> is a comma separated list of
IP addresses of the nodes in the mirror cluster.
•<cluster_name> is the cluster name of the mirror
cluster.
•<cluster_id> is the ID of the mirror cluster.
Used only in systems specifically architected for
disaster recovery.
tscli backup stop-mirror Stops mirroring on the local cluster. Used only in
systems specifically architected for disaster recovery.
tscli backup update-policy
<name>
Prompts an editor for you to edit the policy <name>.
tscli callhome disable Turns off the periodic call home feature.
tscli callhome enable
--customer_name
<customer_name>
Enables the "call home" feature, which sends usage
statistics to ThoughtSpot Support every six hours via
the secure file server.
Before using this command for the first time, you
need to set up the file server connection using tscli
fileserver configure.
The parameter <customer_name> takes the form
Shared/<customer_name>/stats.
Contact ThoughtSpot if you do not know the customer
name to specify.
tscli callhome generate-bundle Generates a tar file of the cluster metrics and writes it
to the specified directory where:
Reference
ThoughtSpot Administration Guide Copyright © 2017 by ThoughtSpot. All Rights Reserved. 275
Command Description
--d <directory> --since
<num_of_daysd> •<num_of_daysd> is how far back you'd like to
generate the tar file from in days. For example,
<30d>. If this parameter is not specified, the
command will collect stats from the last 15 days by
default. Once the stats are collected, the data gets
backfilled in dogfood for all the missing dates.
tscli cluster start Starts the cluster.
tscli cluster status Gives the status of the cluster, including release
number, date last updated, number of nodes, pending
tables time, and services status.
tscli cluster stop Pauses the cluster (but does not stop storage
services).
tscli command run Runs a command on all nodes.
tscli etl change-password
--admin_username <admin_user>
--username <Informatica_user>
Changes the Informatica Cloud account password
used by ThoughtSpot Data Connect.
Required parameters are:
•--admin_username <admin_user> specifies the
Administrator username for ThoughtSpot.
•--username <Informatica_user> specifies the
username for the Informatica Cloud.
tscli etl disable-lw Disables ThoughtSpot Data Connect.
tscli etl download-agent Downloads the ThoughtSpot Data Connect agent to
the cluster.
tscli etl enable-lw
--admin_username <admin_user>
--username <Informatica_user>
--thoughtspot_url <URL>
[--org_id
<informatica_org_id>]
[--pin_to <IP_address>]
[--proxy_host
<proxy_server_hostname>]
Enables ThoughtSpot Data Connect. Some parameters
are given below, but you should contact ThoughtSpot
Support for assistance in setting this up.
Required parameters are:
•--admin_username <admin_user> specifies the
Administrator username for ThoughtSpot.
Reference
ThoughtSpot Administration Guide Copyright © 2017 by ThoughtSpot. All Rights Reserved. 276
Command Description
[--proxy_port
<proxy_server_port>] •--username <Informatica_user> specifies the
username for the Informatica Cloud.
•--thoughtspot_url <URL> specifies the URL for
ThoughtSpot
•--org_id <informatica_org_id> specifies the
Informatica id of the organization (company).
NOTE: org_id shouldn't include the prefix "Org".
For example, if on Informatica cloud, the orgid is
Org003XYZ, then use only 003XYZ.
Optional parameters are:
•--pin_to <IP_address> specifies the IP address
to pin to. If you specify an IP to pin to, that node
becomes sticky to the Informatica agent, and will
always be used. Defaults to the public IP address of
the localhost where this command was run.
•--proxy_host <proxy_server_hostname> and --
proxy_port <proxy_server_port> specifies the
proxy details.
tscli etl show-lw Shows the status of ThoughtSpot Data Connect. It also
returns the Informatica username and OrgId.
tscli event list
[--include <all|config|
notification>]
[--since
<hours,minutes,days>
| --from <yyyymmdd-HH:MM>
--to <yyyymmdd-HH:MM>]
[--detail]
[--summary_contains
<'string1'| 'string2' ...>]
[--detail_contains
<'string1'| 'string2' ...>]
[--attributes
<key1='value1'|
key2='value2' ...>]
Optional parameters are:
•--include specifies the type of events to include,
and can be all, config, or notification.
•--detail returns the events in a detail format
rather than a tabular summary, which is the default.
•--summary_contains <'string1'|
'string2' ...> specifies a string to check for
in the event summary. Enclose strings in single
quotes, and separate multiple strings with |. Events
that match all specified strings will be returned.
•--detail_contains <'string1'|
'string2' ...> specifies a string to check for
in the detail. Enclose strings in single quotes, and
Reference
ThoughtSpot Administration Guide Copyright © 2017 by ThoughtSpot. All Rights Reserved. 277
Command Description
separate multiple strings with |. Events that match
all specified strings will be returned.
•--attributes <key1='value1'|
key2='value2' ...> specifies attributes to match
as key=value pairs. Separate multiple attributes
with |. Events that match all specified key/value
pairs will be returned. Put single quotes around the
value(s).
And a time window made up of either:
•--since <hours,minutes,days> is a time in the
past for where the event audit begins, ending at the
present time. Specify a human readable duration
string, e.g. 4h (4 hours), 30m (30 minutes), 1d (1
day).
Or both:
•--from <yyyymmdd-HH:MM> is a timestamp for
where to begin the event audit. It must be of the
form: yyyymmdd-HH:MM.
•--to <yyyymmdd-HH:MM> is a timestamp for where
to end the event audit. It must be of the form:
yyyymmdd-HH:MM.
tscli feature get-all-config Gets the configured features in a cluster. The
command will return a list of features, such as custom
branding, Data Connect, and call home, and tell you
whether they are enabled or disabled.
tscli fileserver configure
--user <user_name>
[--password <password>]
Configures the secure file server username and
password for file upload/download and the call home
feature. You only need to issue this command once,
to set up the connection to the secure file server. You
only need to reissue this command if the password
changes. The parameter <password> is optional. If a
Reference
ThoughtSpot Administration Guide Copyright © 2017 by ThoughtSpot. All Rights Reserved. 278
Command Description
password is not specified, you will be prompted to
enter it.
tscli fileserver
download-release <release>
[--user <user_name>
--password <password>]
Downloads the specified release file and its checksum.
Specify the release by number, to the second decimal
point (e.g. 3.1.0, 3.0.5, etc.). You may optionally specify
the --user and --password to bypass the credentials
that were specified when configuring the file server
connection with tscli fileserver configure.
Before using this command for the first time, you
need to set up the file server connection using tscli
fileserver configure.
tscli fileserver purge-config Removes the file server configuration.
tscli fileserver show-config Shows the file server configuration.
tscli fileserver upload
--file_name <file>
--server_dir_path <path>
[--user <user_name>
--password <password>]
Uploads the file specified to the directory specified on
the secure file server. The <path> parameter specifies
the directory to which you want to upload the file. It
is based on your customer name, and takes the form
/Shared/support/<customer_name>. If you don't
know the path to specify, Contact ThoughtSpot. You
may optionally specify the --user and --password
to bypass the credentials that were specified when
configuring the file server connection with tscli
fileserver configure.
Before using this command for the first time, you
need to set up the file server connection using tscli
fileserver configure.
tscli firewall close-ports Closes given ports through firewall on all nodes.
Takes a list of ports to close, comma separated. Only
closes ports which were previously opened using

Reference
ThoughtSpot Administration Guide Copyright © 2017 by ThoughtSpot. All Rights Reserved. 279
Command Description
"open-ports". Ignores ports which were not previously
opened with "open-ports" or were already closed.
tscli firewall disable Disable firewall.
tscli firewall enable Enable firewall.
tscli firewall open-ports
<ports>
Opens given ports through firewall on all nodes. Takes
a list of ports to open, comma separated. Ignores
ports which are already open. Some essential ports are
always kept open (e.g. ssh), they are not affected by
this command or by "close-ports".
tscli firewall status Shows whether firewall is currently enabled or
disabled.
tscli ldap add-cert
<name> <certificate>
Adds an SSL certificate for LDAP. Use only if LDAP has
been configured without SSL and you wish to add it.
Use <name> to supply an alias for the certificate you
are installing.
tscli ldap configure Configures LDAP using an interactive script. You can
see detailed instructions for setting up LDAP in About
LDAP integration.
tscli ldap purge-configuration Purges (removes) any existing LDAP configuration.
tscli logs collect
--include <selector | glob>
[--exclude <selector
| glob>]
[--since
<hours,minutes,days>
| --from <yyyymmdd-HH:MM>
--to <yyyymmdd-HH:MM>]
[--out <path>]
[--maxsize
<size_in_MB_or_GB>]
[--sizeonly]
Extracts logs from the cluster. Does not include any
logs that have been deleted due to log rotation.
Required parameters are:
•--include <selector | glob> is a comma
separated list of logs to include. Each entry is either
a selector (one of all, orion, system, or ts) or a
glob for matching files. Anything starting with / is
assumed to be a glob pattern and interpreted via
find(1). Other entries are ignored. TIP: put single
quotes around the parameter value to prevent
undesired glob expansion.

Reference
ThoughtSpot Administration Guide Copyright © 2017 by ThoughtSpot. All Rights Reserved. 280
Command Description
And a time window made up of either:
•--since <hours,minutes,days> is a time in the
past for where log collection begins, ending at the
present time. Specify a human readable duration
string, e.g. 4h (4 hours), 30m (30 minutes), 1d (1
day).
Or both:
•--from <yyyymmdd-HH:MM> is a timestamp for
where to begin log collection. It must be of the
form: yyyymmdd-HH:MM.
•--to <yyyymmdd-HH:MM> is a timestamp for where
to end log collection. It must be of the form:
yyyymmdd-HH:MM.
Optional parameters are:
•--exclude <selector | glob> is a comma
separated list of logs to exclude. Each entry is
either a selector (one of orion, system, or ts) or a
glob for matching files. Anything starting with / is
assumed to be a glob pattern and interpreted via
find(1).
•--out <path> is the location where log tarball is
written. If not specified, the tarball will be written
in /tmp.
•--maxsize is the maximum size to allow. Only
fetches logs if the total size is smaller that this
value. Can be specified in megabytes or gigabytes,
e.g. 100MB, 10GB.
•--sizeonly means do not collect logs. Just report
the size.
tscli logs runcmd --
cmd command>
[--include selector | glob>]
[--exclude selector | glob>]
[--
since hours,minutes,days>
| --from yyyymmdd-HH:MM>
Runs a Unix command on logs in the cluster matching
the given constraints. Results are reported as text
dumped to standard out, the specified output file, or
as tarballs dumped into the specified directory.
Reference
ThoughtSpot Administration Guide Copyright © 2017 by ThoughtSpot. All Rights Reserved. 281
Command Description
--to yyyymmdd-HH:MM>]
[--outfile <path>]
[--outdir <directory_path>]
[--cmd_infmt [C | U]]
[--cmd_outfmt [C | U]]
Required parameters are:
•--cmd <command> is a Unix command to be
run on the selected logs. Use single quotes to
escape spaces, etc. Language used to specify the
command has following rules.
1. A logfile and its corresponding result file can
be referenced using the keywords SRCFILE and
DSTFILE. E.g. 'cp SRCFILE DSTFILE'
2. If there is no reference to DSTFILE in the
command, '> DSTFILE' will be appended to the
command for output redirection. E.g. 'du -sch
SRCFILE' gets automatically translated to 'du -
sch SRCFILE > DSTFILE'
3. If there is no reference to SRCFILE, the content
of the log is streamed tot he command using
a pipe. E.g. 'tail -n100 | grep ERROR' gets
automatically translated to 'cat SRCFILE | tail -
n100 | grep ERROR > DSTFILE'
•--include <selector | glob> is a comma
separated list of logs to include. Each entry is either
a selector (one of all, orion, system, or ts) or a
glob for matching files. Anything starting with / is
assumed to be a glob pattern and interpreted via
find(1). Other entries are ignored. TIP: put single
quotes around the parameter value to prevent
undesired glob expansion.
And a time window made up of either:
•--since <hours,minutes,days> is a time in the
past for where log collection begins, ending at the
present time. Specify a human readable duration
string, e.g. 4h (4 hours), 30m (30 minutes), 1d (1
day).
Or both:

Reference
ThoughtSpot Administration Guide Copyright © 2017 by ThoughtSpot. All Rights Reserved. 282
Command Description
•--from <yyyymmdd-HH:MM> is a timestamp for
where to begin log collection. It must be of the
form: yyyymmdd-HH:MM.
•--to <yyyymmdd-HH:MM> is a timestamp for where
to end log collection. It must be of the form:
yyyymmdd-HH:MM.
Optional parameters are:
•--exclude <selector | glob> is a comma
separated list of logs to exclude. Each entry is
either a selector (one of orion, system, or ts) or a
glob for matching files. Anything starting with / is
assumed to be a glob pattern and interpreted via
find(1).
•--outfile <path> is the file path for printing all
the results. By default, results get printed to stdout.
•--outdir <directory_path> is the directory path
for dumping results from each node, with their
original directory structure. This may be used as an
alternative to printing output to outfile/stdout.
•--cmd_infmt [C | U] specifies if the input file
should be compressed (C) or uncompressed (U)
before running the command. Don't use this flag if
the command works on both.
•--cmd_outfmt [C | U] specifies if the output file
generated by the command will be compressed
(C) or uncompressed (U). Don't use this flag if the
output file will be of the same format as the input
file.
tscli map-tiles enable Enables ThoughtSpot's map tiles, which are used
when constructing geomap charts. If you don't have
interest access, you must download the map tiles tar
and md5 files. Then you must append the following to
the tscli command --offline --<tar_file> --md5
Reference
ThoughtSpot Administration Guide Copyright © 2017 by ThoughtSpot. All Rights Reserved. 283
Command Description
<md5_file>, where <tar_file> and <md5_file> are
the locations of the two files.
tscli monitoring set-config
--email <email>
--clear_email
--heartbeat_interval
<heartbeat_interval>
--heartbeat_disable
--report_interval
<report_interval>
--report_disable
Sets the monitoring configuration.
Parameters are:
•--email <email> is a comma separated list (no
spaces) of email addresses where the cluster will
send monitoring information.
•--clear_email disables emails by clearing the
email configuration.
•--heartbeat_interval <heartbeat_interval> is
the heartbeat email generation interval in seconds.
Must be greater than 0.
•--heartbeat_disable disables heartbeat email
generation.
•--report_interval <report_interval> sets the
cluster report email generation interval in seconds.
Must be greater than 0.
•--report_disable disables cluster report email
generation.
tscli monitoring show-config Shows the monitoring configuration.
tscli nas mount-cifs
--server
<server_CIFS_address>
--path_on_server <path>
--mount_point <target>
--username <user>
--password <password>
--uid <uid>
--gid <gid>
Mounts a CIFS device on all nodes.
Parameters are:
•--server <server_CIFS_address> is the device
address.
•--path_on_server <path> is the path on the
server to mount (source).
•--mount_point <target> is the location where the
CIFS device should be mounted (target).
•--username <user> is the username with which to
connect to the CIFS device.
•--password <password> is the CIFS password.
Reference
ThoughtSpot Administration Guide Copyright © 2017 by ThoughtSpot. All Rights Reserved. 284
Command Description
•--uid <uid> is the uid that will own all files or
directories on the mounted filesystem, when the
server does not provide ownership information. See
the man page for mount.cifs for more details.
•--gid <gid> is the gid that will own all files or
directories on the mounted filesystem, when the
server does not provide ownership information. See
the man page for mount.cifs for more details.
tscli nas mount-nfs
--server
<server_NFS_address>
--path_on_server <path>
--mount_point <target>
Mounts a NFS device on all nodes.
Parameters are:
•--server <server_NFS_address> is the device
address.
•--path_on_server <path> is the path on server to
mount (source).
•--mount_point <target> is the location where the
NFS device should be mounted (target).
tscli nas unmount
--dir <directory>
Unmounts all devices from the specified directory
location.
tscli node ls Lists all nodes in the cluster.
tscli os find-package
<package_name>
Lists all packages and versions included in the product
image whose name contains <package_name>.
Package names you can specify are:
• alert
• backup
• callhome
• cluster
• event
• fileserver
• firewall
• ldap
• logs

Reference
ThoughtSpot Administration Guide Copyright © 2017 by ThoughtSpot. All Rights Reserved. 285
Command Description
• monitoring
• node
• os
• release
• smtp
• snapshot
• ssl
• storage
• support
tscli os list-packages Lists all packages and versions included in the product
image.
tscli release
info <release>
Prints information about the release contained in the
specified release file.
tscli saml configure Configures SAML.
tscli saml
purge-configuration
Purges any existing SAML configuration.
tscli scheduled-pinboards Enables scheduled pinboards, which is disabled in
prod clusters by default.
tscli security
clear-min-tls-version
Clears any customizations for the minimum TLS
version to support.
tscli security
set-min-tls-version
{1.0|1.1|1.2}
Sets the minimum SSL version to be supported by the
ThoughtSpot application. Please ensure that client
Reference
ThoughtSpot Administration Guide Copyright © 2017 by ThoughtSpot. All Rights Reserved. 286
Command Description
browsers are enabled for this version or newer. It is
recommended that you set the version to 1.2.
tscli security ssl-off Disables SSL authentication for the ThoughtSpot
application.
tscli security ssl-on Enables SSL authentication for the ThoughtSpot
application.
tscli security ssl-status Shows whether of SSL authentication is enabled or
disabled for the ThoughtSpot application.
tscli security tls-status Prints the status of TLS support.
tscli smtp
reset-canonical-mapping
Deletes the current postmap mapping.
tscli smtp
set-canonical-mapping
<new_key> <new_value>
Sets a new postmap mapping.
tscli smtp set-mailfromname
<email_address>
Sets the mailname, from which email alerts are sent,
for the cluster.
tscli smtp set-mailname
<domain>
Sets the mailname, where email alerts are sent, for the
cluster.
tscli smtp Sets the relayhost for SMTP (email) sent from the
cluster.
Reference
ThoughtSpot Administration Guide Copyright © 2017 by ThoughtSpot. All Rights Reserved. 287
Command Description
set-relayhost <IP_address>
tscli smtp show-canonical-
mapping
Shows the current postmap mapping.
tscli smtp show-mailfromname Shows the mailname, from which email alerts are sent,
for the cluster.
tscli smtp show-mailname Shows the mailname, where email alerts are sent, for
the cluster.
tscli smtp show-relayhost Shows the relayhost for SMTP (email) sent from
the cluster. If there is no relayhost configured, the
command shows "NOT FOUND".
tscli snapshot backup
[--mode {full|light|
dataless}]
<name> <directory>
Same as the tscli backup create command.
Pulls a snapshot and saves it as a backup where:
•<name> is the name of the snapshot to use.
•<directory> is the new directory that will be
created for the backup. This directory must not
already exist.
Use --mode to specify the type of backup.
tscli snapshot
create <name> <reason>
Creates a new snapshot with the name and reason
provided. This command does not accept periods (.),
but does accept dashes (-).
tscli snapshot delete <name>Deletes the named snapshot.
tscli snapshot disable-policy Disables the automatic snapshot policy.
tscli snapshot enable-poicy Enables the automatic snapshot policy.
tscli snapshot ls Lists available snapshots and their size.
tscli snapshot update-policy Updates the automatic snapshot policy.
tscli ssl add-cert Adds SSL certificate, key pair.
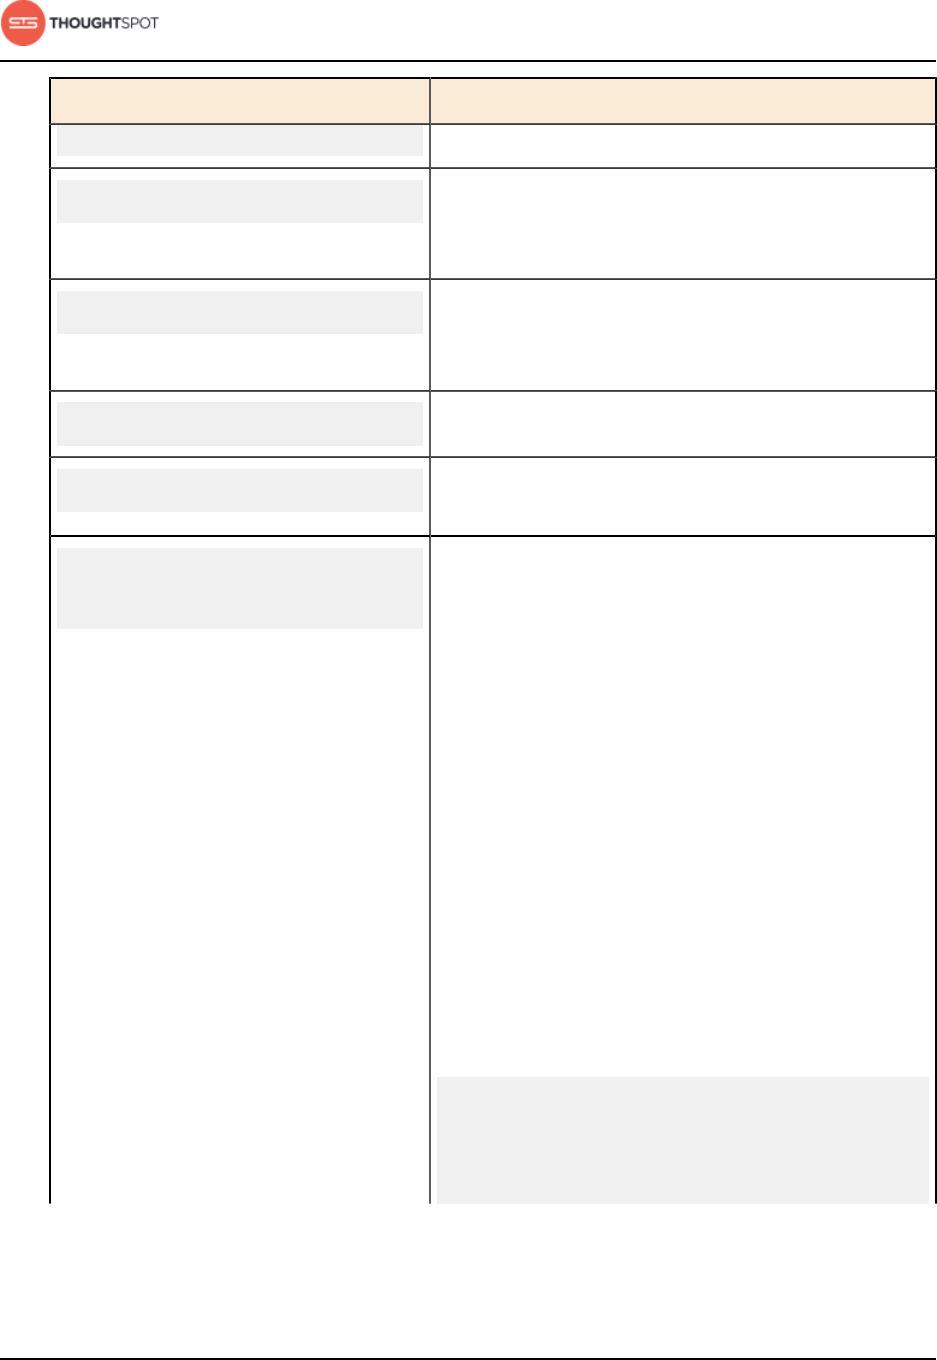
Reference
ThoughtSpot Administration Guide Copyright © 2017 by ThoughtSpot. All Rights Reserved. 288
Command Description
<key> <certificate>
tscli ssl off Disables SSL. Disabling SSL will stop users from seeing
a security warning when accessing ThoughtSpot from
a browser if there is no SSL certificate installed.
tscli ssl on Enable SSL. If SSL is enabled and there is no
certificate, users will see a security warning when
accessing ThoughtSpot from a browser.
tscli ssl rm-cert Removes the existing SSL certificate, if any.
tscli ssl status Shows whether SSL authentication is enabled or
disabled.
tscli storage gc
[--log_age <hours>]
[--localhost_only>]
Before issuing this command, you must stop the
cluster using tscli cluster stop. After garbage
collection has completed, you can restart the cluster
with tscli cluster start.
Garbage collects unused storage. Accepts these
optional flags:
--log_age <hours>
Specifies the number of elapsed hours after which logs
will be deleted. Default is 24 hours.
--localhost_only
If used, only the logs on the localhost will be removed.
If not specified, the command acts on the entire
cluster.
The command frees space in these directories:
/tmp
/usr/local/scaligent/logs/
/export/logs/orion
/export/logs/oreo
/export/logs/hadoop
/export/logs/zookeeper
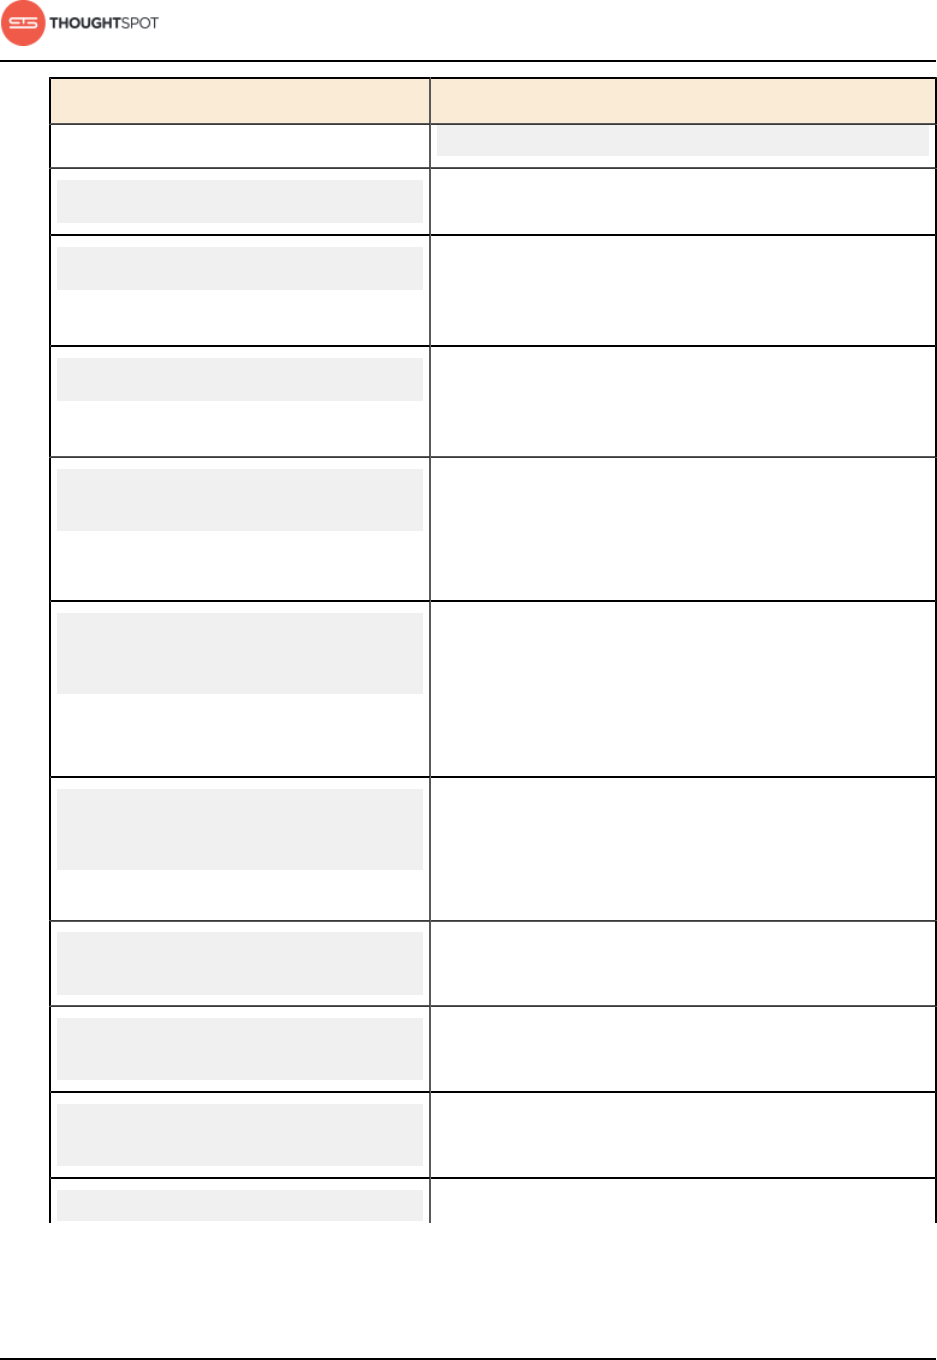
Reference
ThoughtSpot Administration Guide Copyright © 2017 by ThoughtSpot. All Rights Reserved. 289
Command Description
cores
tscli support restart-remote Restarts remote support.
tscli support rm-admin-email Removes the email address for contacting the
customer administrator. Replaces it with the default
ThoughtSpot Support email address.
tscli support rm-admin-phone Removes the phone number for contacting the
customer administrator. Replaces it with the default
ThoughtSpot Support phone number.
tscli support
set-admin-email <email>
Sets the email address for contacting the customer
administrator. If you would like to display a blank email
address, issue the command tscli support set-
admin-email ' '.
tscli support
set-admin-phone
<phone_number>
Sets the phone number for contacting the customer
administrator. Specify a phone number using any value
(e.g. +1 800-508-7008 Ext. 1). If you would like to
display a blank phone number, issue the command
tscli support set-admin-phone ' '.
tscli support set-remote
--addr <support_address>
--user <support_user>
Configures the cluster for remote support through
SSH tunneling, where <support_address> is the
address of support, e.g. tunnel.thoughtspot.com, and
<support_user> is the support username.
tscli support
show-admin-email
Shows the email address for customer administrator, if
set.
tscli support
show-admin-phone
Shows the phone number for customer administrator,
if set.
tscli support
show-remote
Prints the status and configuration of remote support.
tscli support Starts remote support.
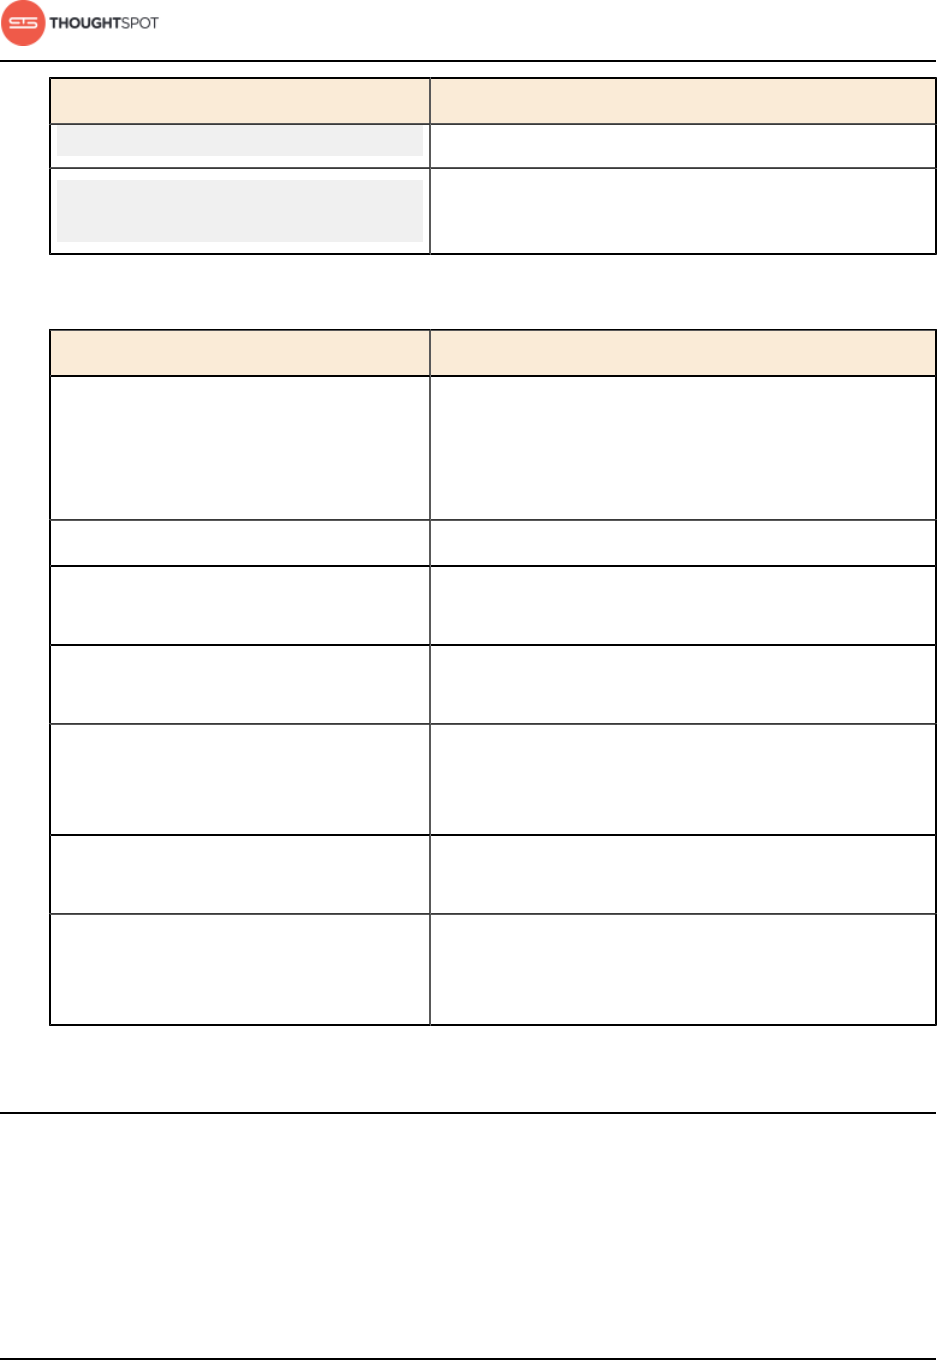
Reference
ThoughtSpot Administration Guide Copyright © 2017 by ThoughtSpot. All Rights Reserved. 290
Command Description
start-remote
tscli support
stop-remote
Stops remote support.
Table 40: tscli optional arguments
Argument Description
--verbose Turns on verbose logging to the console. By default,
logs are written to both the console and log files,
with the log files containing the highest verbosity log
messages.
--helpfull Shows the full help text for all command sections.
--noautoconfig Will prompt for a y or n for each configuration
question.
--autoconfig Automatically configure properties of the cluster when
possible. User may still be prompted for certain inputs.
--yes Same as --autoconfig. Automatically configure
properties of the cluster when possible. User may still
be prompted for certain inputs.
--cluster <cluster_name>Optional. Used to designate the cluster to operate on
by name, if it is not detected automatically.
--zoo <zookeeper_servers>Optional. Used to provide a comma-separated list of
Zookeeper servers, when a cluster is not detected
automatically.
Formula reference
ThoughtSpot allows you to create derived columns in worksheets using formulas.
This reference lists the various operators and functions you can use to create
formulas.

Reference
ThoughtSpot Administration Guide Copyright © 2017 by ThoughtSpot. All Rights Reserved. 291
You can also see this list of operators and examples from within the Formula
Builder by selecting Formula Assistant.
Aggregate functions
These functions can be used to aggregate data.
Table 41: Mixed functions for use in formulas
Function Description Examples
average Returns the average of all the
values of a column.
•average (revenue)
count Returns the number of rows
in the table containing the
column.
•count (product)
cumulative_average Takes a measure and
one or more attributes.
Returns the average of the
measure, accumulated by
the attribute(s) in the order
specified.
•cumulative_average (revenue,
order date, state)
cumulative_max Takes a measure and
one or more attributes.
Returns the maximum of the
measure, accumulated by
the attribute(s) in the order
specified.
•cumulative_max (revenue, state)
cumulative_min Takes a measure and
one or more attributes.
Returns the minimum of the
measure, accumulated by
the attribute(s) in the order
specified.
•cumulative_min (revenue,
campaign)

Reference
ThoughtSpot Administration Guide Copyright © 2017 by ThoughtSpot. All Rights Reserved. 292
Function Description Examples
cumulative_sum Takes a measure and
one or more attributes.
Returns the sum of the
measure, accumulated by
the attribute(s) in the order
specified.
•cumulative_sum (revenue, order
date)
group_average Takes a measure and one
or more attributes. Returns
the average of the measure
grouped by the attribute(s).
•group_average (revenue,
customer region, state)
group_count Takes a measure and one or
more attributes. Returns the
count of the measure grouped
by the attribute(s).
•group_count (revenue, customer
region)
group_max Takes a measure and one or
more attributes. Returns the
maximum of the measure
grouped by the attribute(s).
•group_max (revenue, customer
region)
group_min Takes a measure and one
or more attributes. Returns
the minimum of the measure
grouped by the attribute(s).
•group_min (revenue, customer
region)
group_stddev Takes a measure and one
or more attributes. Returns
the standard deviation of
the measure grouped by the
attribute(s).
•group_stddev (revenue, customer
region)
group_sum Takes a measure and one or
more attributes. Returns the
sum of the measure grouped
by the attribute(s).
•group_sum (revenue, customer
region)

Reference
ThoughtSpot Administration Guide Copyright © 2017 by ThoughtSpot. All Rights Reserved. 293
Function Description Examples
group_unique_count Takes a measure and one or
more attributes. Returns the
unique count of the measure
grouped by the attribute(s).
•group_unique_count (product ,
supplier)
group_variance Takes a measure and one
or more attributes. Returns
the variance of the measure
grouped by the attribute(s).
•group_variance (revenue,
customer region)
max Returns the maximum value of
a column.
•max (sales)
min Returns the minimum value of
a column.
•min (revenue)
moving_average Takes a measure, two integers
to define the window to
aggregate over, and one or
more attributes. The window
is (current - Num1...Current +
Num2) with both end points
being included in the window.
For example, "1,1" will have a
window size of 3. To define
a window that begins before
Current, specify a negative
number for Num2. Returns
the average of the measure
over the given window. The
attributes are the ordering
columns used to compute the
moving average.
•moving_average (revenue, 2, 1,
customer region)
moving_max Takes a measure, two integers
to define the window to
aggregate over, and one or
more attributes. The window
•moving_max (complaints, 1, 2,
store name)

Reference
ThoughtSpot Administration Guide Copyright © 2017 by ThoughtSpot. All Rights Reserved. 294
Function Description Examples
is (current - Num1...Current +
Num2) with both end points
being included in the window.
For example, "1,1" will have a
window size of 3. To define
a window that begins before
Current, specify a negative
number for Num2. Returns
the maximum of the measure
over the given window. The
attributes are the ordering
columns used to compute the
moving maximum.
moving_min Takes a measure, two integers
to define the window to
aggregate over, and one or
more attributes. The window
is (current - Num1...Current +
Num2) with both end points
being included in the window.
For example, "1,1" will have a
window size of 3. To define
a window that begins before
Current, specify a negative
number for Num2. Returns
the minimum of the measure
over the given window. The
attributes are the ordering
columns used to compute the
moving minimum.
•moving_min (defects, 3, 1,
product)
moving_sum Takes a measure, two integers
to define the window to
aggregate over, and one or
more attributes. The window
is (current - Num1...Current +
•moving_sum (revenue, 1, 1,
order date)
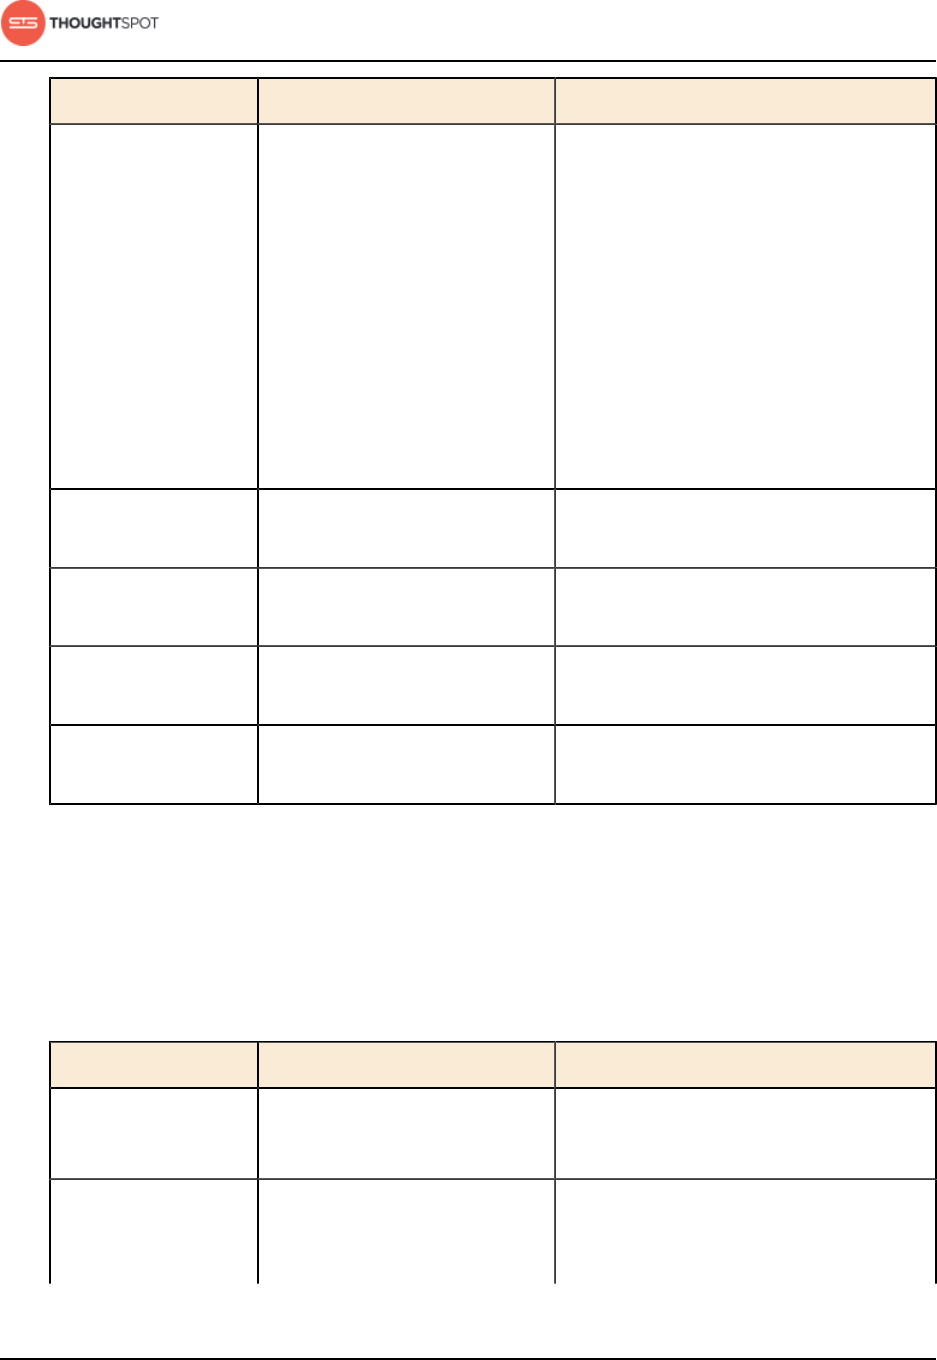
Reference
ThoughtSpot Administration Guide Copyright © 2017 by ThoughtSpot. All Rights Reserved. 295
Function Description Examples
Num2) with both end points
being included in the window.
For example, "1,1" will have a
window size of 3. To define
a window that begins before
Current, specify a negative
number for Num2. Returns the
sum of the measure over the
given window. The attributes
are the ordering columns used
to compute the moving sum.
stddev Returns the standard deviation
of all values of a column.
•stddev (revenue)
sum Returns the sum of all the
values of a column.
•sum (revenue)
unique count Returns the number of unique
values of a column.
•unique count (customer)
variance Returns the variance of all the
values of a column.
•variance (revenue)
Conversion functions
These functions can be used to convert data from one data type to another.
Conversion to or from date data types is not supported.
Table 42: Conversion functions for use in formulas
Function Description Examples
to_bool Returns the input as a boolean
(true or false).
•to_bool (0) = false
•to_bool (married)
to_date Accepts a date represented
as an integer or text string,
and a second string parameter
•to_date (date_sold, '%Y-%m-%d')
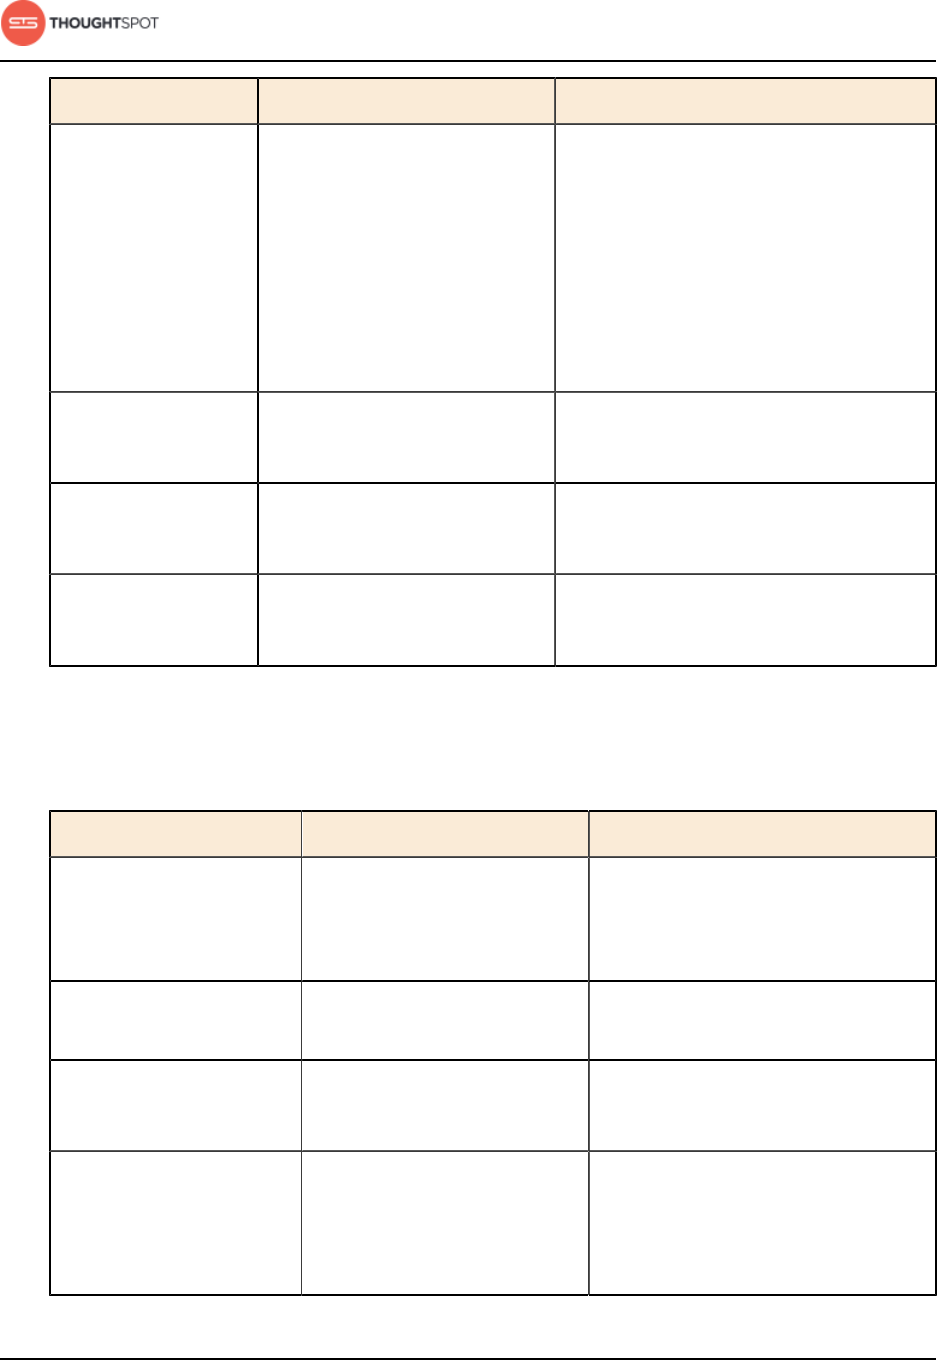
Reference
ThoughtSpot Administration Guide Copyright © 2017 by ThoughtSpot. All Rights Reserved. 296
Function Description Examples
that can include strptime date
formatting elements. Replaces
all the valid strptime date
formatting elements with their
string counterparts and returns
the result. Does not accept
epoch formatted dates as
input.
to_double Returns the input as a double. •to_double ('3.14') = 3.14
•to_double (revenue * .01)
to_integer Returns the input as an integer. •to_integer ('45') + 1 = 46
•to_integer (price + tax - cost)
to_string Returns the input as a text
string.
•to_string (45 + 1) = '46'
•to_string (revenue - cost)
Date functions
Table 43: Date functions for use in formulas
Function Description Examples
add_days Returns the result of adding
the specified number of days
to the given date.
•add_days (01/30/2015, 5) =
02/04/2015
•add_days (invoiced, 30)
date Returns the date portion of a
given date.
•date (home visit)
day Returns the number (1-31) of
the day for the given date.
•day (01/15/2014) = 15
•day (date ordered)
day_number_of_week Returns the number (1-7)
of the day in a week for
the given date with 1 being
Monday and 7 being Sunday.
•day_number_of_week
(01/30/2015) = 6
•day_number_of_week (shipped)

Reference
ThoughtSpot Administration Guide Copyright © 2017 by ThoughtSpot. All Rights Reserved. 297
Function Description Examples
day_number_of_year Returns the number (1-366) of
the day in a year for the given
date.
•day_number_of_year
(01/30/2015) = 30
•day_number_of_year
(invoiced)
day_of_week Returns the day of the week
for the given date.
•day_of week (01/30/2015) =
Friday
•day_of_week (serviced)
diff_days Subtracts the second date
from the first date and returns
the result in number of days,
rounded down if not exact.
•diff_days (01/15/2014,
01/17/2014) = -2
•diff_days (purchased,
shipped)
diff_time Subtracts the second date
from the first date and returns
the result in number of
seconds.
•diff_time (01/01/2014,
01/01/2014) = -86,400
•diff_time (clicked,
submitted)
hour_of_day Returns the hour of the day
for the given date.
•hour_of_day (received)
is_weekend Returns true if the given date
falls on a Saturday or Sunday.
•is_weekend (01/31/2015) =
true
•is_weekend (emailed)
month Returns the month from the
given date.
•month (01/15/2014) = January
•month (date ordered)
month_number Returns the number (1-12) of
the month for the given date.
•month_number (09/20/2014) =
9
•month_number (purchased)
now Returns the current
timestamp.
•now ()
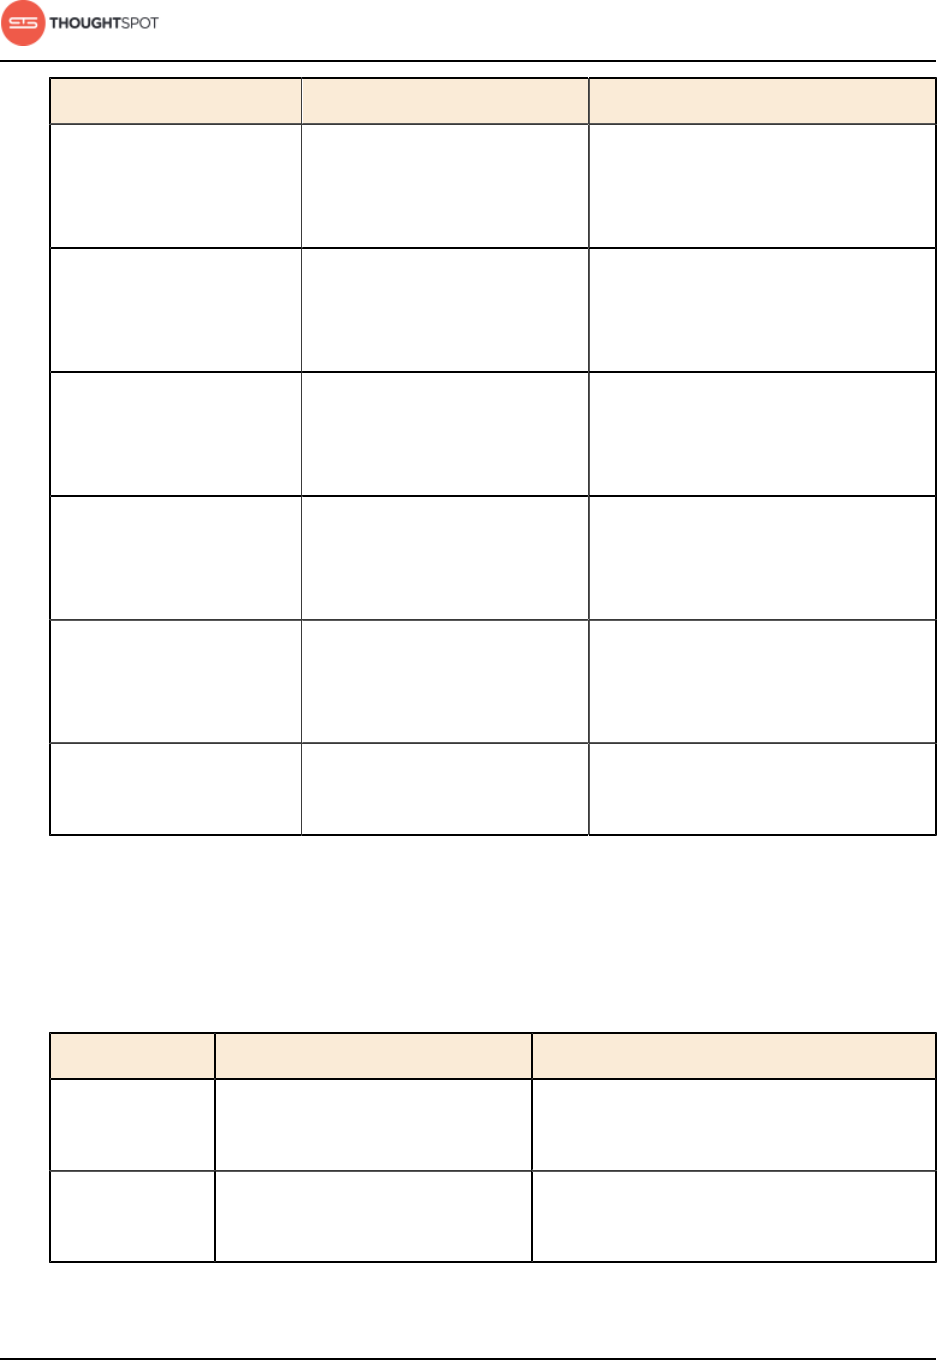
Reference
ThoughtSpot Administration Guide Copyright © 2017 by ThoughtSpot. All Rights Reserved. 298
Function Description Examples
start_of_month Returns the date for the first
day of the month for the
given date.
•start_of_month
( 01/31/2015 ) = Jan FY 2015
•start_of_month (shipped)
start_of_quarter Returns the date for the first
day of the quarter for the
given date.
•start_of_quarter
( 09/18/2015 ) = Q3 FY 2015
•start_of_quarter (sold)
start_of_week Returns the date for the first
day of the week for the given
date.
•start_of_week ( 06/01/2015 )
= 05/30/2015 Week
•start_of_week (emailed)
start_of_year Returns the date for the first
day of the year for the given
date.
•start_of_year ( 02/15/2015 )
= FY 2015
•start_of_year (joined)
time Returns the time portion of a
given date.
•time (3/1/2002 10:32) =
10:32
•time (call began)
year Returns the year from the
given date.
•year (01/15/2014) = 2014
•year (date ordered)
Mixed functions
These functions can be used with text and numeric data types.
Table 44: Mixed functions for use in formulas
Function Description Examples
!= Returns true if the first value is
not equal to the second value.
•3 != 2 = true
•revenue != 1000000
< Returns true if the first value is
less than the second value.
•3 < 2 = false
•revenue < 1000000
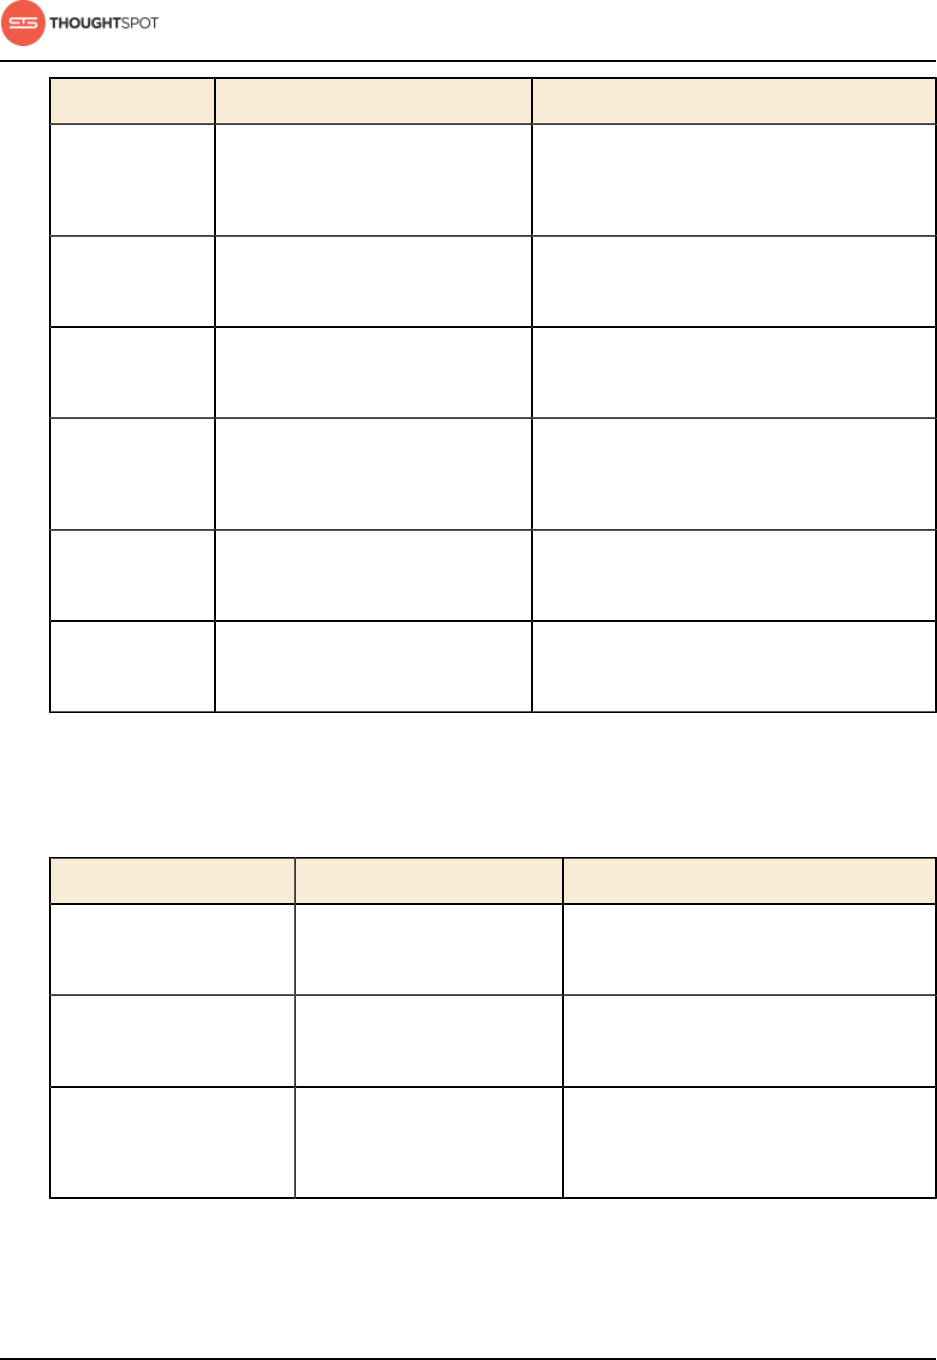
Reference
ThoughtSpot Administration Guide Copyright © 2017 by ThoughtSpot. All Rights Reserved. 299
Function Description Examples
<= Returns true if the first value is
less than or equal to the second
value.
•1 <= 2 = true
•revenue <= 1000000
= Returns true if the first value is
equal to the second value.
•2 = 2 = true
•revenue = 1000000
> Returns true if the first value is
greater than the second value.
•3 > 2 = true
•revenue > 1000000
>= Returns true if the first value
is greater than or equal to the
second value.
•3 >= 2 = true
•revenue >= 1000000
greatest Returns the larger of the values. •greatest (20, 10) = 20
•greatest (q1 revenue, q2 revenue)
least Returns the smaller of the values. •least (20, 10) = 10
•least (q1 revenue, q2 revenue)
Number functions
Table 45: Number functions for use in formulas
Function Description Examples
* Returns the result of
multiplying both numbers.
•3 * 2 = 6
•price * taxrate
+ Returns the result of adding
both numbers.
•1 + 2 = 3
•price + shipping
- Returns the result of
subtracting the second
number from the first.
•3 - 2 = 1
•revenue - tax
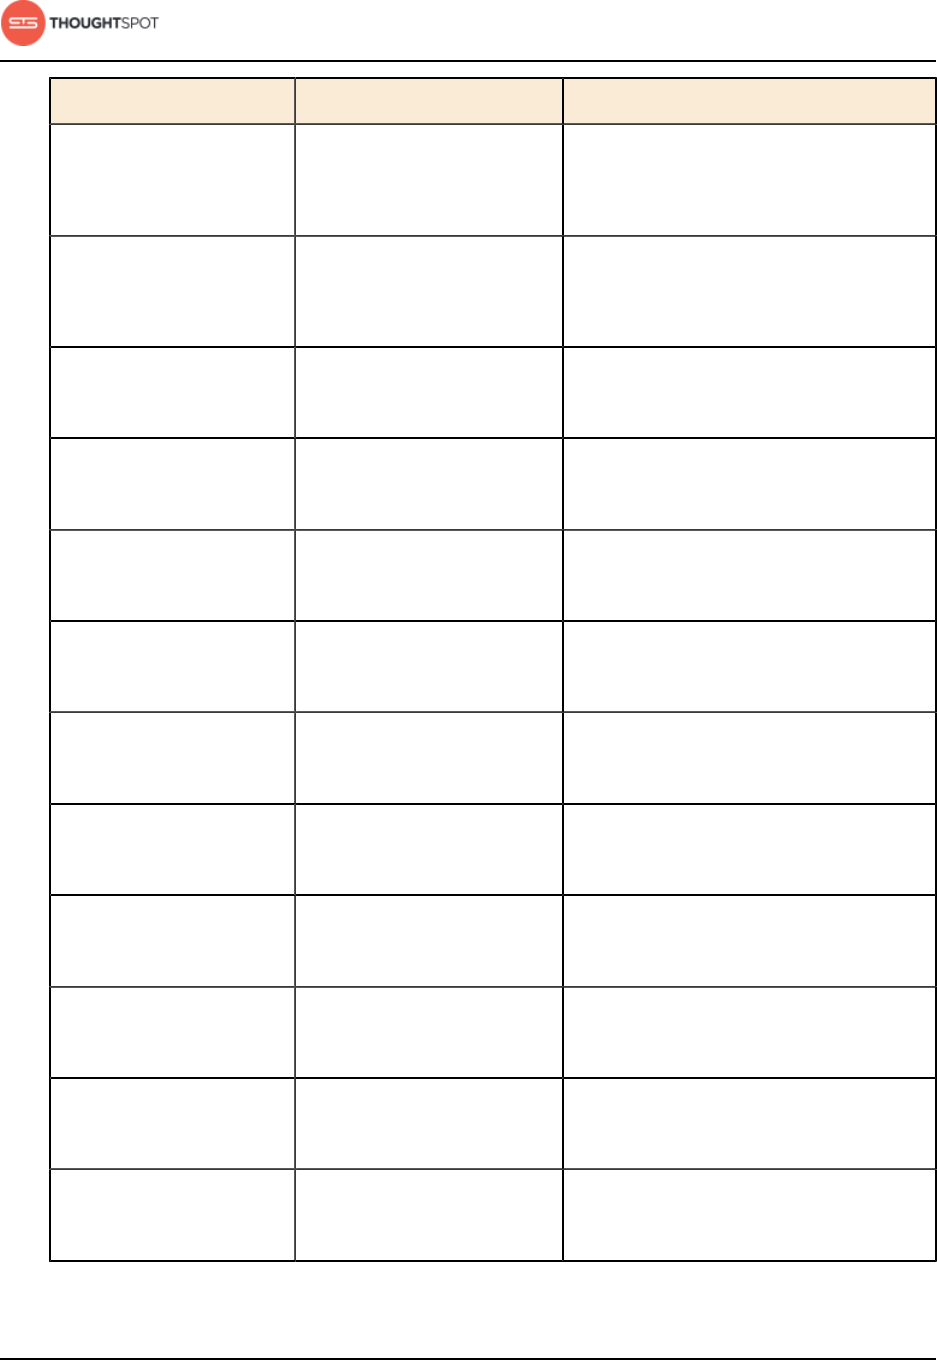
Reference
ThoughtSpot Administration Guide Copyright © 2017 by ThoughtSpot. All Rights Reserved. 300
Function Description Examples
/ Returns the result of
dividing the first number by
the second.
•6 / 3 = 2
•markup / retail price
^ Returns the first number
raised to the power of the
second.
•3 ^ 2 = 9
•width ^ 2
abs Returns the absolute value. •abs (-10) = 10
•abs (profit)
acos Returns the inverse cosine
in degrees.
•acos (0.5) = 60
•acos (cos-satellite-angle)
asin Returns the inverse sine
(specified in degrees).
•asin (0.5) = 30
•asin (sin-satellite-angle)
atan Returns the inverse tangent
in degrees.
•atan (1) = 45
•atan (tan-satellite-angle)
atan2 Returns the inverse tangent
in degrees.
•atan2 (10, 10) = 45
•atan2 (longitude, latitude)
cbrt Returns the cube root of a
number.
•cbrt (27) = 3
•cbrt (volume)
ceil Returns the smallest
following integer.
•ceil (5.9) = 6
•ceil (growth rate)
cos Returns the cosine of an
angle (specified in degrees).
•cos (63) = 0.45
•cos (beam angle)
cube Returns the cube of a
number.
•cube (3) = 27
•cube (length)
exp Returns Euler's number
(~2.718) raised to a power.
•exp (2) = 7.38905609893
•exp (growth)

Reference
ThoughtSpot Administration Guide Copyright © 2017 by ThoughtSpot. All Rights Reserved. 301
Function Description Examples
exp2 Returns 2 raised to a power. •exp2 (3) = 8
•exp2 (growth)
floor Returns the largest previous
integer.
•floor (5.1) = 5
•floor (growth rate)
ln Returns the natural
logarithm.
•ln (7.38905609893) = 2
•ln (distance)
log10 Returns the logarithm with
base 10.
•log10 (100) = 2
•log10 (volume)
log2 Returns the logarithm with
base 2 (binary logarithm).
•log2 (32) = 5
•log2 (volume)
mod Returns the remainder of
first number divided by the
second number.
•mod (8, 3) = 2
•mod ( revenue , quantity )
pow Returns the first number
raised to the power of the
second number.
•pow (5, 2) = 25
•pow (width, 2)
random Returns a random number
between 0 and 1.
•random ( ) = .457718
•random ( )
round Returns the first number
rounded to the second
number (the default is 1).
•round (35.65, 10) = 40
•round (battingavg, 100)
safe_divide Returns the result of
dividing the first number by
the second. If the second
number is 0, returns 0
instead of NaN (not a
number).
•safe_divide (12, 0) = 0
•safe_divide (total_cost,
units)
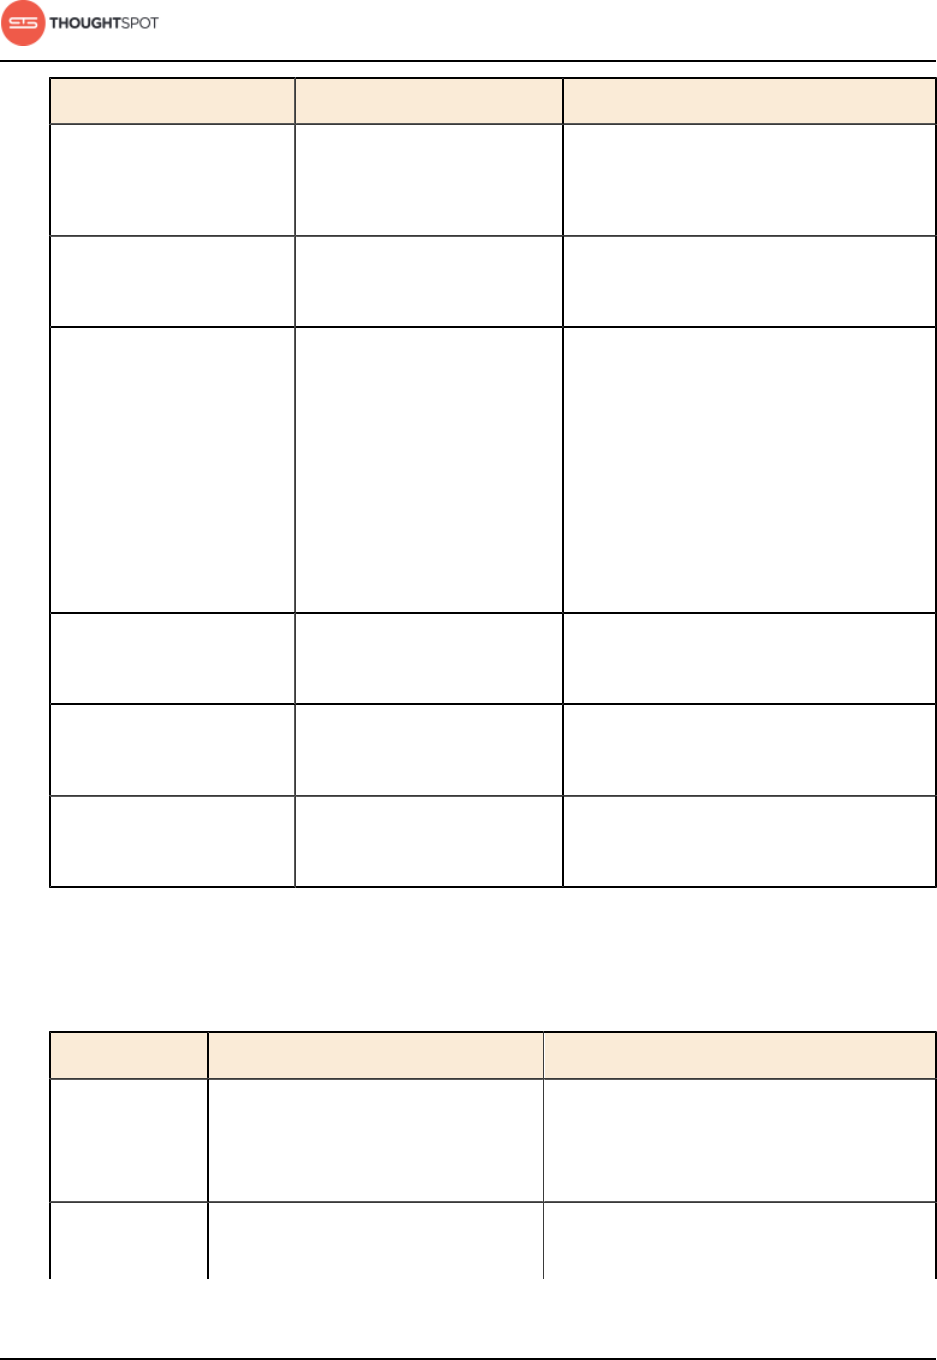
Reference
ThoughtSpot Administration Guide Copyright © 2017 by ThoughtSpot. All Rights Reserved. 302
Function Description Examples
sign Returns +1 if the number is
greater than zero, -1 if less
than zero, 0 if zero.
•sign (-250) = -1
•sign (growth rate)
sin Returns the sine of an angle
(specified in degrees).
•sin (35) = 0.57
•sin (beam angle)
spherical_distance Returns the distance in km
between two points on
Earth.
•spherical_distance (37.465191,
-122.153617, 37.421962,
-122.142174) = 4,961.96
•spherical_distance
(start_latitude,
start_longitude,
start_latitude,
start_longitude)
sq Returns the square of a
numeric value.
•sq (9) = 81
•sq (width)
sqrt Returns the square root. •sqrt (9) = 3
•sqrt (area)
tan Returns the tangent of an
angle (specified in degrees).
•tan (35) = 0.7
•tan (beam angle)
Operators
Table 46: Operators for use in formulas
Operator Description Examples
and Returns true when both conditions
are true, otherwise returns false.
•(1 = 1) and (3 > 2) = true
•lastname = 'smith' and state
='texas'
if...then...else Conditional operator. •if (3 > 2) then 'bigger' else
'not bigger'
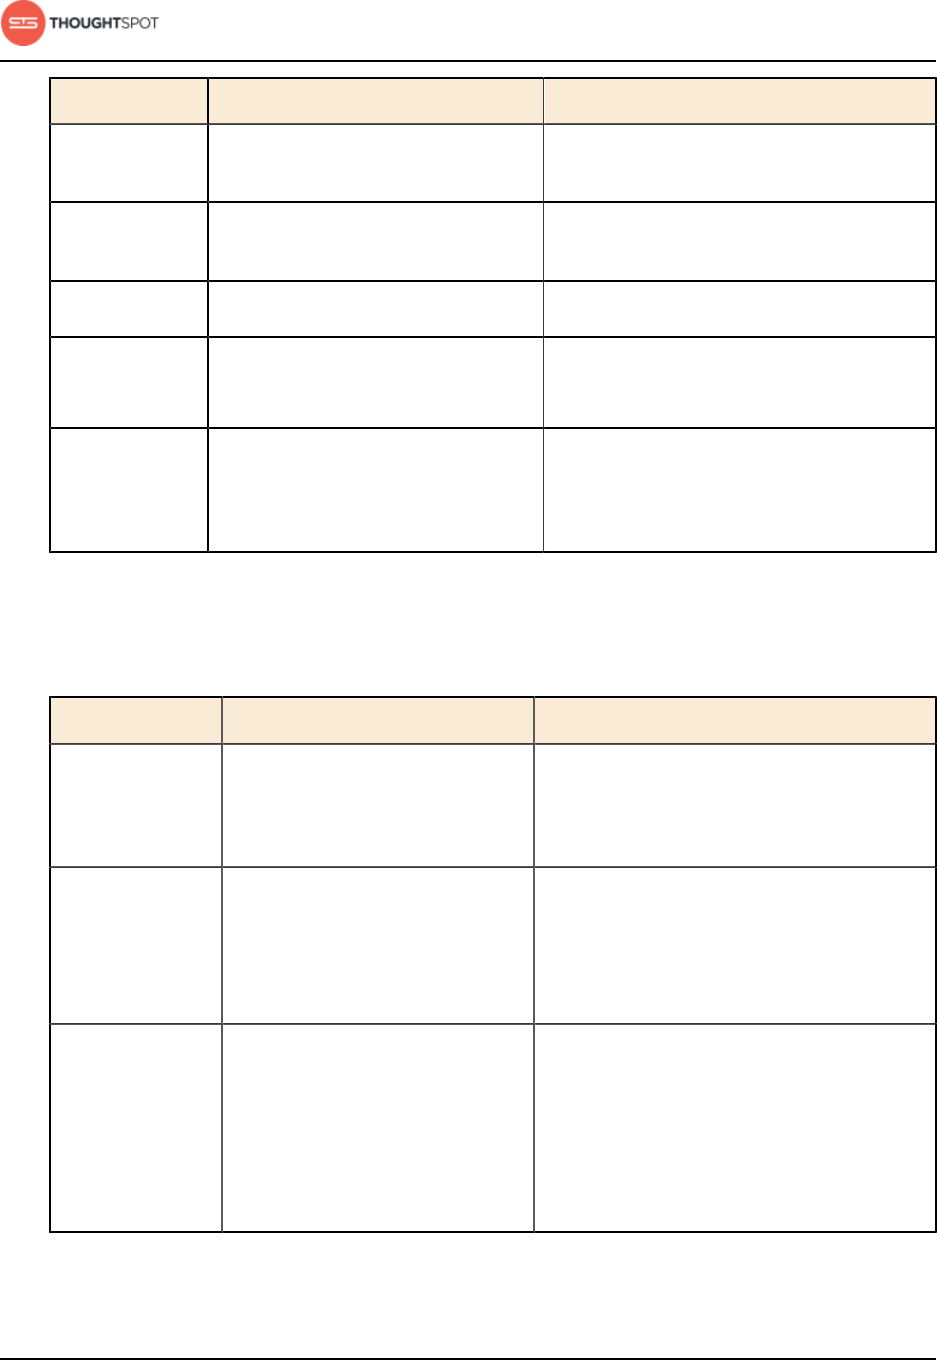
Reference
ThoughtSpot Administration Guide Copyright © 2017 by ThoughtSpot. All Rights Reserved. 303
Operator Description Examples
•if (cost > 500) then 'flag' else
'approve'
ifnull Returns the first value if it is not
null, otherwise returns the second.
•ifnull (cost, 'unknown')
isnull Returns true if the value is null. •isnull (phone)
not Returns true if the condition is
false, otherwise returns false.
•not (3 > 2) = false
•not (state = 'texas')
or Returns true when either condition
is true, otherwise returns false.
•(1 = 5) or (3 > 2) = true
•state = 'california' or state
='oregon'
Text functions
Table 47: Text functions for use in formulas
Function Description Examples
concat Returns the two values as a
concatenated text string.
•concat ( 'hay' , 'stack' ) =
'haystack'
•concat (last_name , first_name)
contains Returns true if the first string
contains the second string,
otherwise returns false.
•contains ('broomstick', 'room') =
true
•contains (product, 'trial
version')
edit_distance Accepts two text strings. Returns
the edit distance (minimum
number of operations required
to transform one string into the
other) as an integer. Works with
strings under 1023 characters.
•edit_distance ('attorney',
'atty') = 4
•edit_distance (color, 'red')

Reference
ThoughtSpot Administration Guide Copyright © 2017 by ThoughtSpot. All Rights Reserved. 304
Function Description Examples
edit_distance_with_capAccepts two text strings and
an integer to specify the upper
limit cap for the edit distance
(minimum number of operations
required to transform one
string into the other). If the edit
distance is less than or equal to
the specified cap, returns the
edit distance. If it is higher than
the cap, returns the cap plus 1.
Works with strings under 1023
characters.
•edit_distance_with_cap ('pokemon
go', 'minecraft pixelmon', 3) = 4
•edit_distance_with_cap (event,
'burning man', 3)
similar_to Accepts a document text string
and a search text string. Returns
true if relevance score (0-100)
of the search string with respect
to the document is greater than
or equal to 20. Relevance is
based on edit distance, number
of words in the query, and length
of words in the query which are
present in the document.
•similar_to ('hello world', 'hello
swirl') = true
•similar_to (current team, drafted
by)
similarity Accepts a document text string
and a search text string. Returns
the relevance score (0-100) of
the search string with respect
to the document. Relevance is
based on edit distance, number
of words in the query, and length
of words in the query which are
present in the document. If the
two strings are an exact match,
returns 100.
•similarity ('where is the burning
man concert', 'burning man') = 46
•similarity (tweet1, tweet2)

Reference
ThoughtSpot Administration Guide Copyright © 2017 by ThoughtSpot. All Rights Reserved. 305
Function Description Examples
spells_like Accepts two text strings.
Returns true if they are spelled
similarly and false if they are not.
Works with strings under 1023
characters.
•spells_like ('thouhgtspot',
'thoughtspot') = true
•spells_like (studio, distributor)
strlen Returns the length of the text. •strlen ('smith') = 5
•strlen (lastname)
strpos Returns the numeric position
(starting from 0) of the first
occurrence of the second string
in the first string, or -1 if not
found.
•strpos ('haystack_with_needles',
'needle') = 14
•strpos (complaint, 'lawyer')
substr Returns the portion of the given
string, beginning at the location
specified (starting from 0), and
of the given length.
•substr ('persnickety', 3, 7) =
snicket
•substr (lastname, 0, 5)
Date and time formats reference
This is a list of all the date and time formats you can load into ThoughtSpot,
whether using data upload from the browser or tsload.
Using ThoughtSpot Loader
For date data types, the default format is yearmonthday e.g. "Dec 30th, 2001"
and is represented as 20011230. Use the date format specifications supported in
the strptime library function.
For time and datetime data types, the default is yearmonthday
hour:minute:second e.g. Dec 30th, 2001 1:15:12 and is represented as 20011230
01:15:12. Use the datetime format specifications supported in the strptime library
function.

Reference
ThoughtSpot Administration Guide Copyright © 2017 by ThoughtSpot. All Rights Reserved. 306
Using data upload from a browser
These date and time formats are supported in an Excel or CSV file when
uploading via the browser:
• 1/30/2014
• 2014-01-30
• 2014-1-9
• 30-Jan-2014
• 2014-Jan-13
• 2014-01-30 10:32 AM
• 2014-01-30 14:52
• 2014-01-30 10:32:22
• 2014-01-30 10:32:22 AM
• 2014-01-30 10:32:22.0
• 2014-01-30 10:32:22.0 AM
• 2014-01-30 10:32:22.000
• 2014-01-30 10:32:22.000 AM
• 1/9/2014
• 30-Jan-14
• 01-Mar-02 (assumes 2002)
• 3/1/2002 10:32 AM
• 3/1/2002 14:52
• 3/1/2002 10:32:22
• 3/1/2002 10:32:22 AM
• 3/1/2002 10:32:22.0
• 3/1/2002 10:32:22.0 AM
• 3/1/2002 10:32:22.000
• 3/1/2002 10:32:22.000 AM
• 30-Jan-14 10:32 AM

Reference
ThoughtSpot Administration Guide Copyright © 2017 by ThoughtSpot. All Rights Reserved. 307
• 30-Jan-14 14:52
• 30-Jan-14 10:32:22
• 30-Jan-14 10:32:22 AM
• 30-Jan-14 10:32:22.0
• 30-Jan-14 10:32:22.0 AM
• 30-Jan-14 10:32:22.000
• 30-Jan-14 10:32:22.000 AM
• Fri Oct 04 2013 3:26 PM
• Fri Oct 04 2013 13:46
• Fri Oct 04 2013 10:32:22
• Fri Oct 04 2013 10:32:22 AM
• Fri Oct 04 2013 10:32:22.0
• Fri Oct 04 2013 10:32:22.0 AM
• Fri Oct 04 2013 10:32:22.000
• Fri Oct 04 2013 10:32:22.000 AM
• 14:52
• 10:32 AM
• 10:32:22
• 10:32:22 AM
• 10:32:22.0
• 10:32:22.000
• 10:32:22.0 AM
• 10:32:22.000 AM
Row level security rules reference
ThoughtSpot allows you to create row level security rules using expressions. If an
expression evaluates to "true" for a particular row and group combination, that
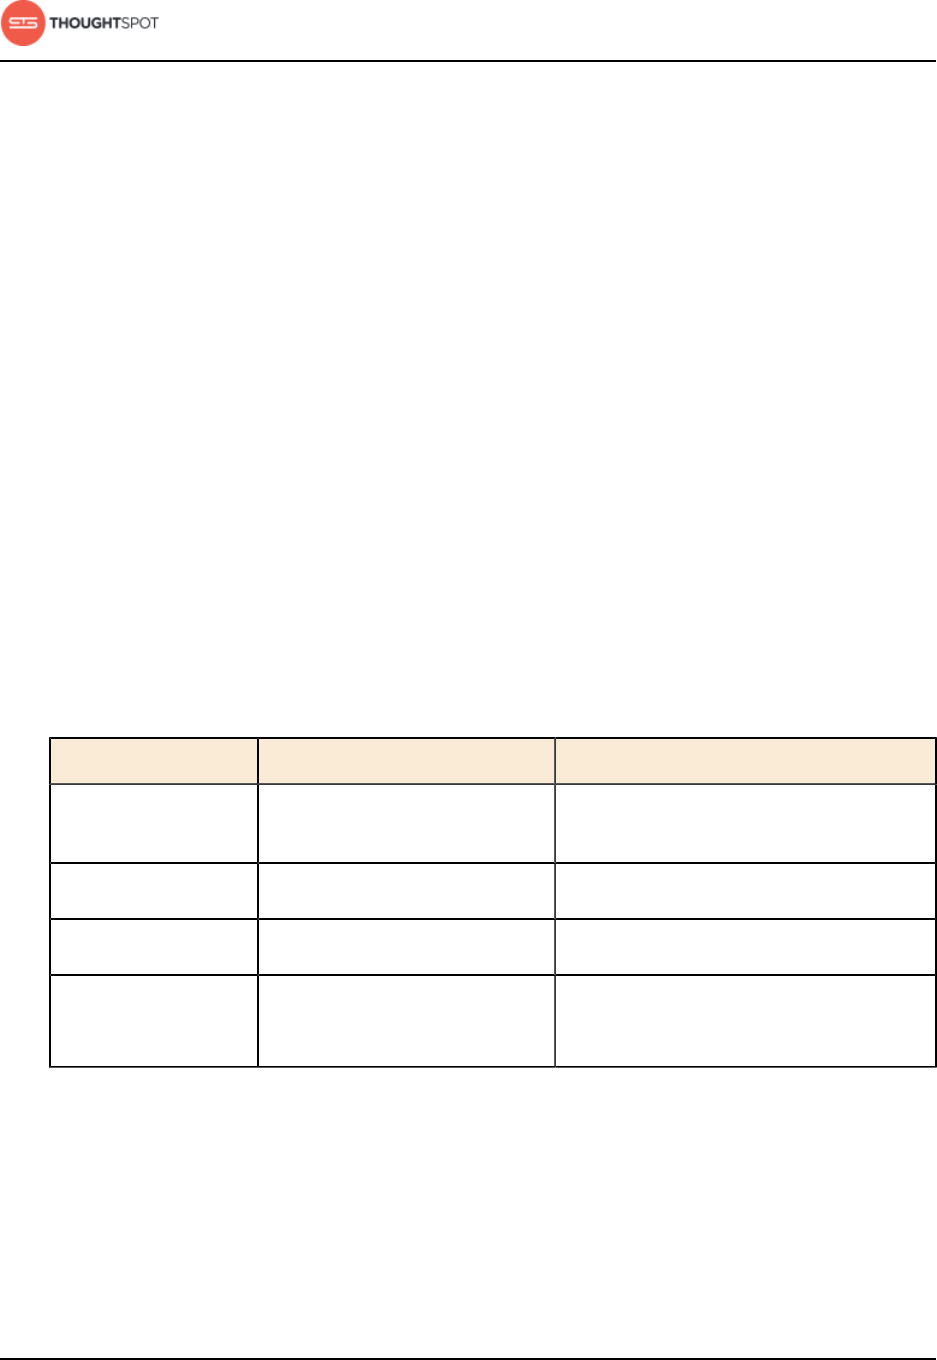
Reference
ThoughtSpot Administration Guide Copyright © 2017 by ThoughtSpot. All Rights Reserved. 308
group will be able to see that row. This reference lists the various operators and
functions you can use to create rules.
For information on how to use the row level security functions and operators,
see About Rule-Based Row Level Security. There is a special variable called
ts_groups, which you can use when creating row level security rules. It fetches a
list of the groups that the currently logged in user belongs to. For each row, f the
expression in the rule evaluates to 'true' for any one of these groups, that row
will be shown to the user.
You can also see this list of operators and examples from within the Rule Builder
by selecting Rule Assistant.
Conversion functions
These functions can be used to convert data from one data type to another.
Conversion to or from date data types is not supported.
Table 48: Conversion functions for use in rules
Function Description Examples
to_bool Returns the input as a boolean
(true or false).
•to_bool (0) = false
to_double Returns the input as a double. •to_double ('3.14') = 3.14
to_integer Returns the input as an integer. •to_integer ('45') + 1 = 46
to_string Returns the input as a text
string.
•to_string (45 + 1) = '46'
•to_string (revenue - cost)

Reference
ThoughtSpot Administration Guide Copyright © 2017 by ThoughtSpot. All Rights Reserved. 309
Date functions
Table 49: Date functions for use in rules
Function Description Examples
add_days Returns the result of adding
the specified number of days
to the given date.
•add_days (01/30/2015, 5) =
02/04/2015
•add_days (invoiced, 30)
date Returns the date portion of a
given date.
•date (home visit)
day Returns the number (1-31) of
the day for the given date.
•day (01/15/2014) = 15
•day (date ordered)
day_number_of_week Returns the number (1-7)
of the day in a week for
the given date with 1 being
Monday and 7 being Sunday.
•day_number_of_week
(01/30/2015) = 6
•day_number_of_week (shipped)
day_number_of_year Returns the number (1-366) of
the day in a year for the given
date.
•day_number_of_year
(01/30/2015) = 30
•day_number_of_year
(invoiced)
day_of_week Returns the day of the week
for the given date.
•day_of week (01/30/2015) =
Friday
•day_of_week (serviced)
diff_days Subtracts the second date
from the first date and returns
the result in number of days,
rounded down if not exact.
•diff_days (01/15/2014,
01/17/2014) = -2
•diff_days (purchased,
shipped)
diff_time Subtracts the second date
from the first date and returns
the result in number of
seconds.
•diff_time (01/01/2014,
01/01/2014) = -86,400
•diff_time (clicked,
submitted)
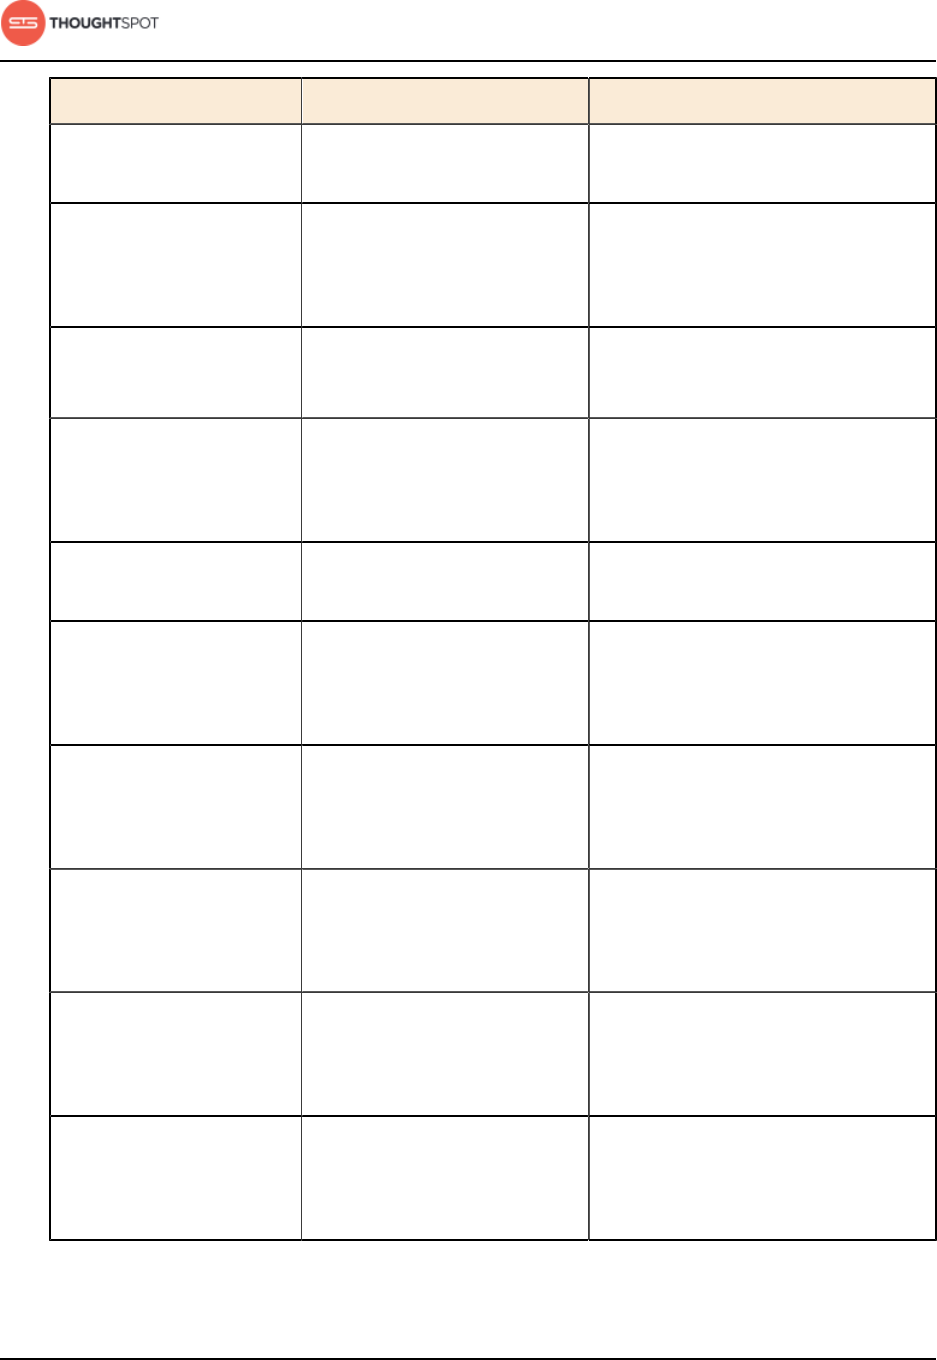
Reference
ThoughtSpot Administration Guide Copyright © 2017 by ThoughtSpot. All Rights Reserved. 310
Function Description Examples
hour_of_day Returns the hour of the day
for the given date.
•hour_of_day (received)
is_weekend Returns true if the given date
falls on a Saturday or Sunday.
•is_weekend (01/31/2015) =
true
•is_weekend (emailed)
month Returns the month from the
given date.
•month (01/15/2014) = January
•month (date ordered)
month_number Returns the number (1-12) of
the month for the given date.
•month_number (09/20/2014) =
9
•month_number (purchased)
now Returns the current
timestamp.
•now ()
start_of_month Returns the epoch for the
first day of the month for the
given date.
•start_of_month (01/31/2015)
=1420099200
•start_of_month (shipped)
start_of_quarter Returns the epoch for the
first day of the quarter for the
given date.
•start_of_quarter
(09/18/2015) = 1441090800
•start_of_quarter (sold)
start_of_week Returns the epoch for the first
day of the week for the given
date.
•start_of_week (05/30/2015) =
1432450800
•start_of_week (paid)
start_of_year Returns the epoch for the first
day of the fiscal year for the
given date.
•start_of_year (02/15/2015) =
1420099200
•start_of_year (joined)
time Returns the time portion of a
given date.
•time (3/1/2002 10:32) =
10:32
•time (call began)
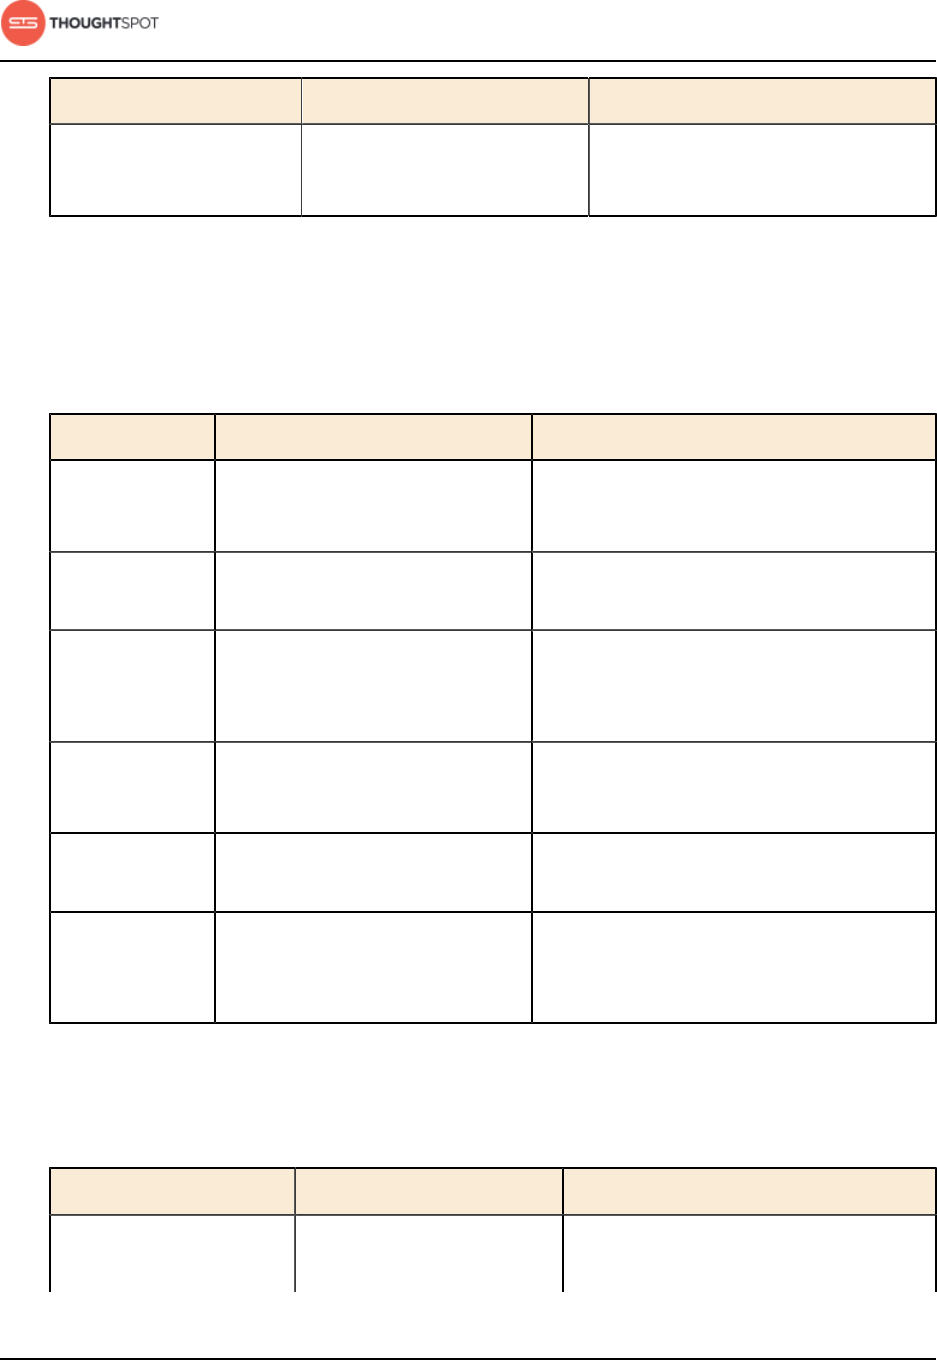
Reference
ThoughtSpot Administration Guide Copyright © 2017 by ThoughtSpot. All Rights Reserved. 311
Function Description Examples
year Returns the year from the
given date.
•year (01/15/2014) = 2014
•year (date ordered)
Mixed functions
These functions can be used with text and numeric data types.
Table 50: Mixed functions for use in rules
Function Description Examples
!= Returns true if the first value is
not equal to the second value.
•3 != 2 = true
•ts_groups != public
> Returns true if the first value is
greater than the second value.
•3 > 2 = true
>= Returns true if the first value
is greater than or equal to the
second value.
•3 >= 2 = true
= Returns true if the first value is
equal to the second value.
•2 = 2 = true
•ts_groups = region
< Returns true if the first value is
less than the second value.
•3 < 2 = false
<= Returns true if the first value is
less than or equal to the second
value.
•3 >= 2 = true
Number functions
Table 51: Number functions for use in rules
Function Description Examples
* Returns the result of
multiplying both numbers.
•3 * 2 = 6
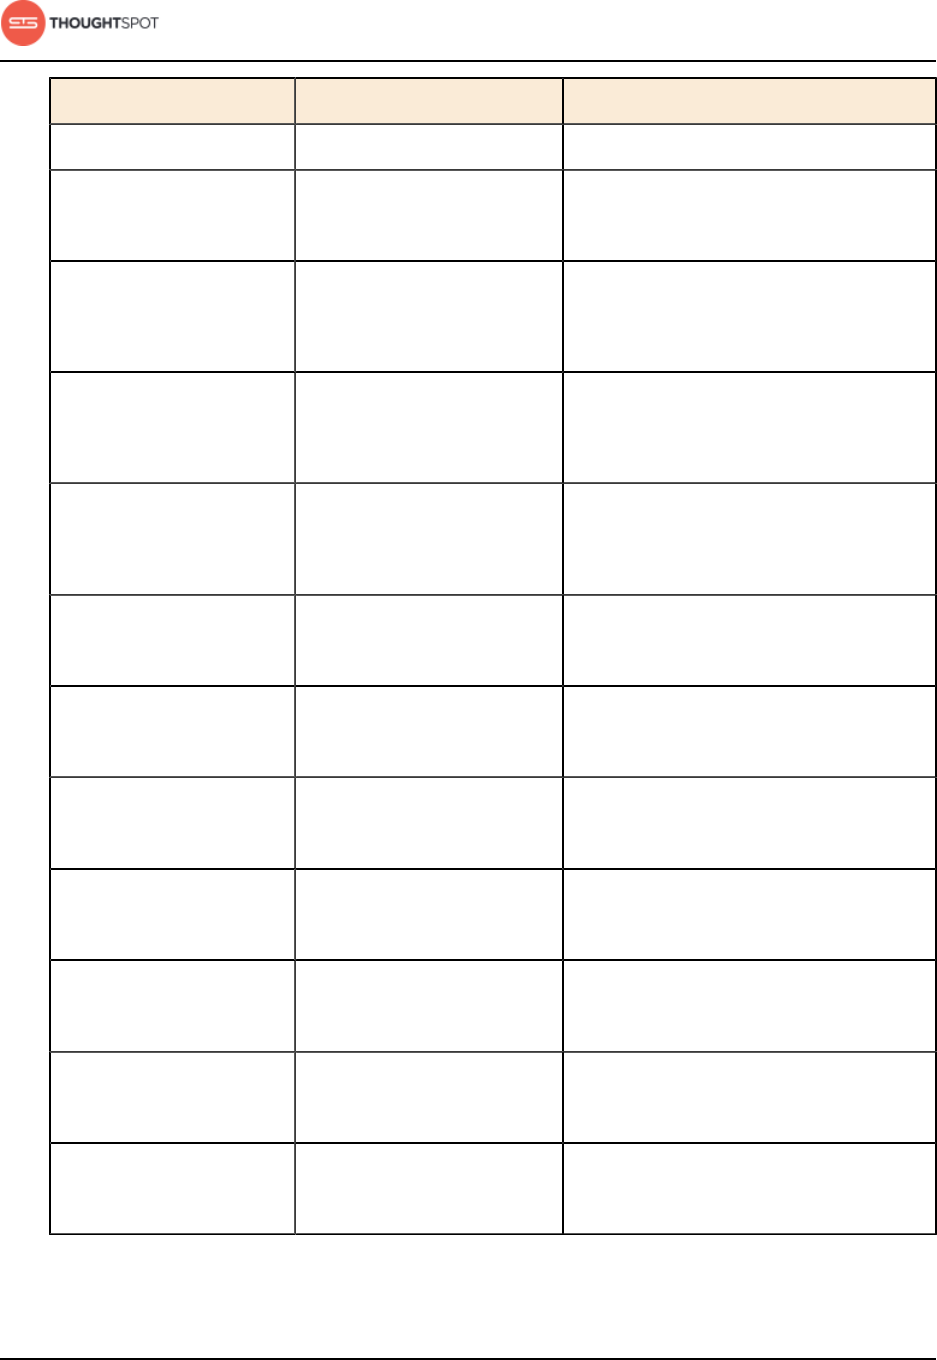
Reference
ThoughtSpot Administration Guide Copyright © 2017 by ThoughtSpot. All Rights Reserved. 312
Function Description Examples
•price * taxrate
+ Returns the result of adding
both numbers.
•1 + 2 = 3
•price + shipping
- Returns the result of
subtracting the second
number from the first.
•3 - 2 = 1
•revenue - tax
/ Returns the result of
dividing the first number by
the second.
•6 / 3 = 2
•markup / retail price
^ Returns the first number
raised to the power of the
second.
•3 ^ 2 = 9
•width ^ 2
abs Returns the absolute value. •abs (-10) = 10
•abs (profit)
acos Returns the inverse cosine
in degrees.
•acos (0.5) = 60
•acos (cos-satellite-angle)
asin Returns the inverse sine
(specified in degrees).
•asin (0.5) = 30
•asin (sin-satellite-angle)
atan Returns the inverse tangent
in degrees.
•atan (1) = 45
•atan (tan-satellite-angle)
atan2 Returns the inverse tangent
in degrees.
•atan2 (10, 10) = 45
•atan2 (longitude, latitude)
cbrt Returns the cube root of a
number.
•cbrt (27) = 3
•cbrt (volume)
ceil Returns the smallest
following integer.
•ceil (5.9) = 6
•ceil (growth rate)

Reference
ThoughtSpot Administration Guide Copyright © 2017 by ThoughtSpot. All Rights Reserved. 313
Function Description Examples
cos Returns the cosine of an
angle (specified in degrees).
•cos (63) = 0.45
•cos (beam angle)
cube Returns the cube of a
number.
•cube (3) = 27
•cube (length)
exp Returns Euler's number
(~2.718) raised to a power.
•exp (2) = 7.38905609893
•exp (growth)
exp2 Returns 2 raised to a power. •exp2 (3) = 8
•exp2 (growth)
floor Returns the largest previous
integer.
•floor (5.1) = 5
•floor (growth rate)
greatest Returns the larger of the
values.
•greatest (20, 10) = 20
•greatest (q1 revenue, q2
revenue)
least Returns the smaller of the
values.
•least (20, 10) = 10
•least (q1 revenue, q2 revenue)
ln Returns the natural
logarithm.
•ln (7.38905609893) = 2
•ln (distance)
log10 Returns the logarithm with
base 10.
•log10 (100) = 2
•log10 (volume)
log2 Returns the logarithm with
base 2 (binary logarithm).
•log2 (32) = 5
•log2 (volume)
mod Returns the remainder of
first number divided by the
second number.
•mod (8, 3) = 2
•mod ( revenue , quantity )
pow Returns the first number
raised to the power of the
second number.
•pow (5, 2) = 25
•pow (width, 2)

Reference
ThoughtSpot Administration Guide Copyright © 2017 by ThoughtSpot. All Rights Reserved. 314
Function Description Examples
random Returns a random number
between 0 and 1.
•random ( ) = .457718
•random ( )
round Returns the first number
rounded to the second
number (the default is 1).
•round (35.65, 10) = 40
•round (battingavg, 100)
sign Returns +1 if the number is
greater than zero, -1 if less
than zero, 0 if zero.
•sign (-250) = -1
•sign (growth rate)
sin Returns the sine of an angle
(specified in degrees).
•sin (35) = 0.57
•sin (beam angle)
spherical_distance Returns the distance in km
between two points on
Earth.
•spherical_distance (37.465191,
-122.153617, 37.421962,
-122.142174) = 4,961.96
•spherical_distance
(start_latitude,
start_longitude,
start_latitude,
start_longitude)
sq Returns the square of a
numeric value.
•sq (9) = 81
•sq (width)
sqrt Returns the square root. •sqrt (9) = 3
•sqrt (area)
tan Returns the tangent of an
angle (specified in degrees).
•tan (35) = 0.7
•tan (beam angle)
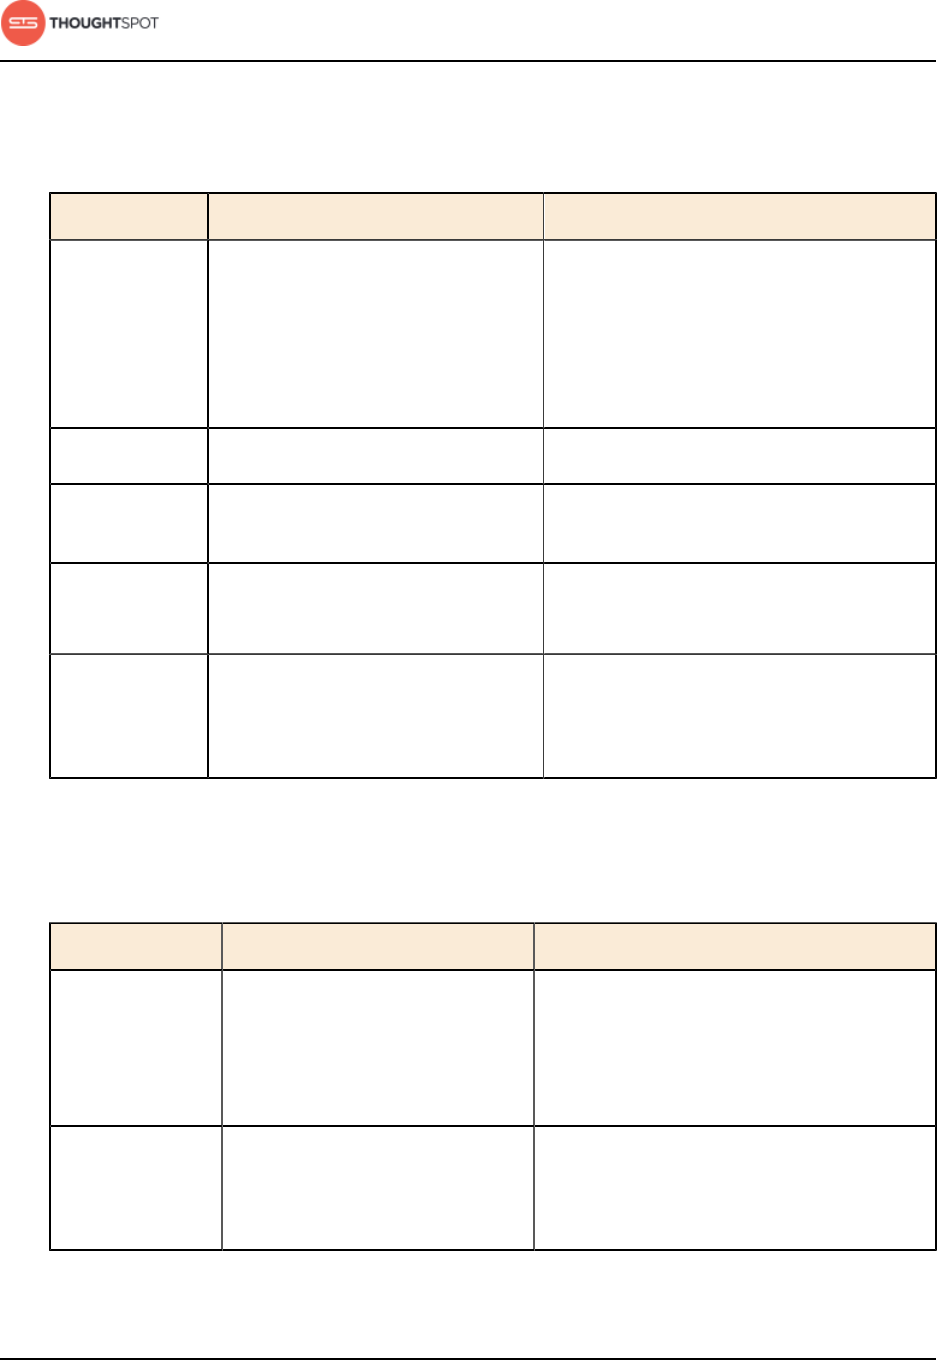
Reference
ThoughtSpot Administration Guide Copyright © 2017 by ThoughtSpot. All Rights Reserved. 315
Operators
Table 52: Operators for use in rules
Operator Descriptions Examples
if...then...else Conditional operator. •if (3 > 2) then 'bigger' else
'not bigger'
•if (country = 'USA') then
'US_group' = ts_groups else
false
isnull Returns true if the value is null. •isnull (phone)
ifnull Returns the first value if it is not
null, otherwise returns the second.
•ifnull (cost, 'unknown')
not Returns true if the condition is
false, otherwise returns false.
•not (3 > 2) = false
•not (region contains 'west')
or Returns true when either condition
is true, otherwise returns false.
•(1 = 5) or (3 > 2) = true
•(ts_groups = region) or
(ts_groups =state)
Text functions
Table 53: Text functions for use in rules
Function Description Examples
concat Returns the two values as a
concatenated text string.
•concat ('hay', 'stack') =
'haystack'
•concat (region , 'sales') =
ts_groups
contains Returns true if the first string
contains the second string,
otherwise returns false.
•contains ('broomstick', 'room') =
true
•contains (country, 'US')
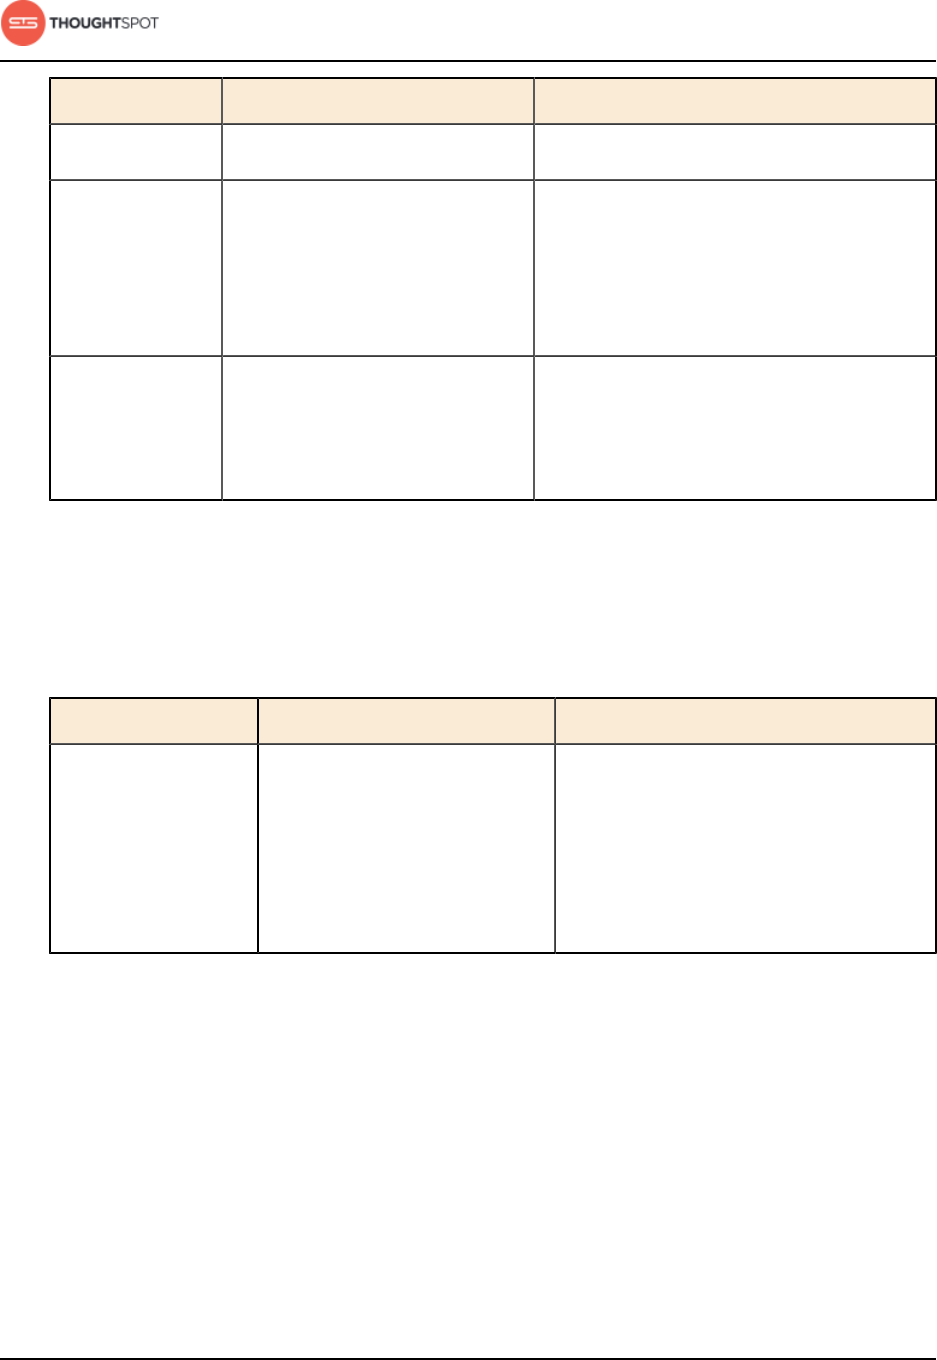
Reference
ThoughtSpot Administration Guide Copyright © 2017 by ThoughtSpot. All Rights Reserved. 316
Function Description Examples
strlen Returns the length of the text. •strlen ('smith') = 5
strpos Returns the numeric position
(starting from 0) of the first
occurrence of the second string
in the first string, or -1 if not
found.
•strpos ('haystack_with_needles',
'needle') = 14
substr Returns the portion of the given
string, beginning at the location
specified (starting from 0), and
of the given length.
•substr ('persnickety', 3, 7) =
'snicket'
Variables
These variables can be used in your expressions.
Table 54: Mixed functions for use in formulas
Function Description Examples
ts_groups Returns the list all the groups
the current logged in user
belongs to. For any row, if the
expression evaluates to true for
any of the groups, the user can
see that row.
•ts_groups = east

ThoughtSpot Administration Guide Copyright © 2017 by ThoughtSpot. All Rights Reserved. 317
Appendix
Contact ThoughtSpot
You can contact ThoughtSpot by phone, mail, email,
or by filing a support ticket.
File a support ticket
If you encounter a technical issue, file a support ticket
using the Support Portal ticket filing system at:
http://support.thoughtspot.com/
Please provide as much detail as possible about your
issue, to help us resolve it quickly.
You need a Support Portal login to file a ticket. Please
contact ThoughtSpot to get an account, if necessary.
Address
ThoughtSpot, Inc.
1 Palo Alto Square, Building 1, Suite 200
Palo Alto, CA 94306
Phone numbers
Table 55: Phone numbers
Phone Number Description
1-800-508-7008
ext 1
ThoughtSpot Support
Contact ThoughtSpot
ThoughtSpot Administration Guide Copyright © 2017 by ThoughtSpot. All Rights Reserved. 318
Phone Number Description
1-800-508-7008 Toll free number for ThoughtSpot
headquarters.
Email
Table 56: Email addresses
Reason for contacting Email
For sales inquiries. sales@thoughtspot.com
For customer support and
software update inquiries.
support@thoughtspot.com
For other inquiries. hello@thoughtspot.com

ThoughtSpot Administration Guide Copyright © 2017 by ThoughtSpot. All Rights Reserved. 319
Appendix
Open source software
ThoughtSpot uses open source libraries. You may
request the machine-readable source code from
ThoughtSpot and may use the source code subject
to the terms and conditions of the applicable open
source license.
Refer to our third party software page for a complete
list of our software library and licenses.

Copyright
ThoughtSpot Administration Guide Copyright © 2017 by ThoughtSpot. All Rights Reserved. 320
Appendix
Copyright
Copyright for ThoughtSpot publications.
©2017 ThoughtSpot, Inc. All rights reserved.
ThoughtSpot, Inc. 1 Palo Alto Square, Building 1, Suite
200, Palo Alto, CA 94306
All rights reserved. This product is protected by U.S.
and international copyright and intellectual property
laws. ThoughtSpot is a trademark of ThoughtSpot,
Inc. in the United States and/or other jurisdictions.
All other marks and names mentioned herein may be
trademarks of their respective companies.
