Thought Spot Data Connect Guide 3.5
User Manual: Pdf
Open the PDF directly: View PDF ![]() .
.
Page Count: 52

Data Connect Guide
Version 3.5
Updated in January 2017

Table of Contents
Data Connect Guide Copyright © 2016 by ThoughtSpot. All Rights Reserved. 2
Contents
Chapter 1: Get started with ThoughtSpot Data Connect...............3
Before using ThoughtSpot Data Connect...................................................................5
Set up ThoughtSpot Data Connect...............................................................................6
Add a new data source......................................................................................................8
About changing the schema (DDL)................................................................. 16
About incremental data loads.............................................................................17
Data sources management..............................................................................................18
Chapter 2: About making changes to Data Connect setup......21
Edit a connection............................................................................................................... 23
Delete a connection.......................................................................................................... 25
Delete a data source.........................................................................................................27
Stop a scheduled job from running............................................................................29
Change sharding for a data source............................................................................. 31
Change a data type for a data source...................................................................... 33
Add a column to an existing data source................................................................ 35
Remove a column from an existing data source................................................... 37
Chapter 3: Data Connect reference.................................................... 39
Login credentials for administration.......................................................................... 40
Log in to ThoughtSpot from a browser........................................................ 40
Log in to the Linux shell using SSH................................................................. 41
Data Connect best practices.........................................................................................42
Data Connect connectors reference...........................................................................46

Data Connect Guide Copyright © 2016 by ThoughtSpot. All Rights Reserved. 3
Chapter 1: Get started with ThoughtSpot Data
Connect
Get started with ThoughtSpot Data Connect
Topics:
•Before using ThoughtSpot
Data Connect
•Set up ThoughtSpot Data
Connect
•Add a new data source
•Data sources management
You can import data to ThoughtSpot from on-
premise and cloud based sources using ThoughtSpot
Data Connect. The initial connection to your
data sources is set up by ThoughtSpot. After the
connections are set up, you can do all your data
imports through the ThoughtSpot application.
ThoughtSpot has partnered with Informatica to bring
you ThoughtSpot Data Connect, which is a self-
service data integration tool that allows you to easily
pull data into ThoughtSpot for analysis. ThoughtSpot
Data Connect was developed by ThoughtSpot, but it
uses Informatica's REST APIs to connect to multiple
end points, define import tasks and execute them.
You can use ThoughtSpot Data Connect to perform
extract, transform, and load operations. Data source
connections may be stored, to make reconnecting
seamless.
After choosing a data source, you can choose from
the list of available tables to import. Then select only
the columns of interest from each table. Primary key
and foreign key relationships will also be imported,
but only when the primary key table is imported at
the same time as the foreign key table. It’s easy to
apply transformations and filters to the data, too. So
you only import the data you want to explore. You

Get started with ThoughtSpot Data Connect
Data Connect Guide Copyright © 2016 by ThoughtSpot. All Rights Reserved. 4
can schedule incremental or full recurring data loads.
Everything you need to do to get your data loaded
can be done within the ThoughtSpot application.
ThoughtSpot Data Connect is a premium feature,
which is available at an additional cost. Please
contact your ThoughtSpot representative, if you
want to find out how to enable ThoughtSpot Data
Connect.

Get started with ThoughtSpot Data Connect
Data Connect Guide Copyright © 2016 by ThoughtSpot. All Rights Reserved. 5
Before using ThoughtSpot Data Connect
There are a few prerequisites before using ThoughtSpot Data Connect. You need
to have ThoughtSpot enable the connection to Informatica, and enter the data
connection credentials.
Prerequisites
• Your Informatica account will be provisioned by ThoughtSpot.
• If you want to use HTTPS with your URL, you will need to provide a signed
certificate when enabling ThoughtSpot Data Connect.
• You will need outbound HTTPS (port 443 for infaagent) internet
access to https://app.informaticaondemand.com and https://
app2.informaticacloud.com/. Of course, you will also need any other internet
connectivity and credentials required to access any cloud data sources you
want to connect to, such as Salesforce. No inbound access is required. Please
refer to the Informatica Cloud Security Architecture Overview whitepaper
to learn how each component and service is secured. You can also ask
ThoughtSpot Support for a copy of the document.
Note: If outbound HTTPS internet access to https://
app.informaticaondemand.com and https://app2.informaticacloud.com/
is not possible, you can instead whitelist the Informatica Cloud IP
address ranges 206.80.52.0/24, 206.80.61.0/24, 209.34.91.0/24, and
209.34.80.0/24.
• Any user who belongs to a group that has the privilege Has administration
privileges or Can Manage Data will be able to use ThoughtSpot Data Connect,
if it is enabled on your cluster.
ThoughtSpot Data Connect design
ThoughtSpot Data Connect is designed to configure and connect to any on-
premise or cloud data source. It quickly pulls data into ThoughtSpot through an
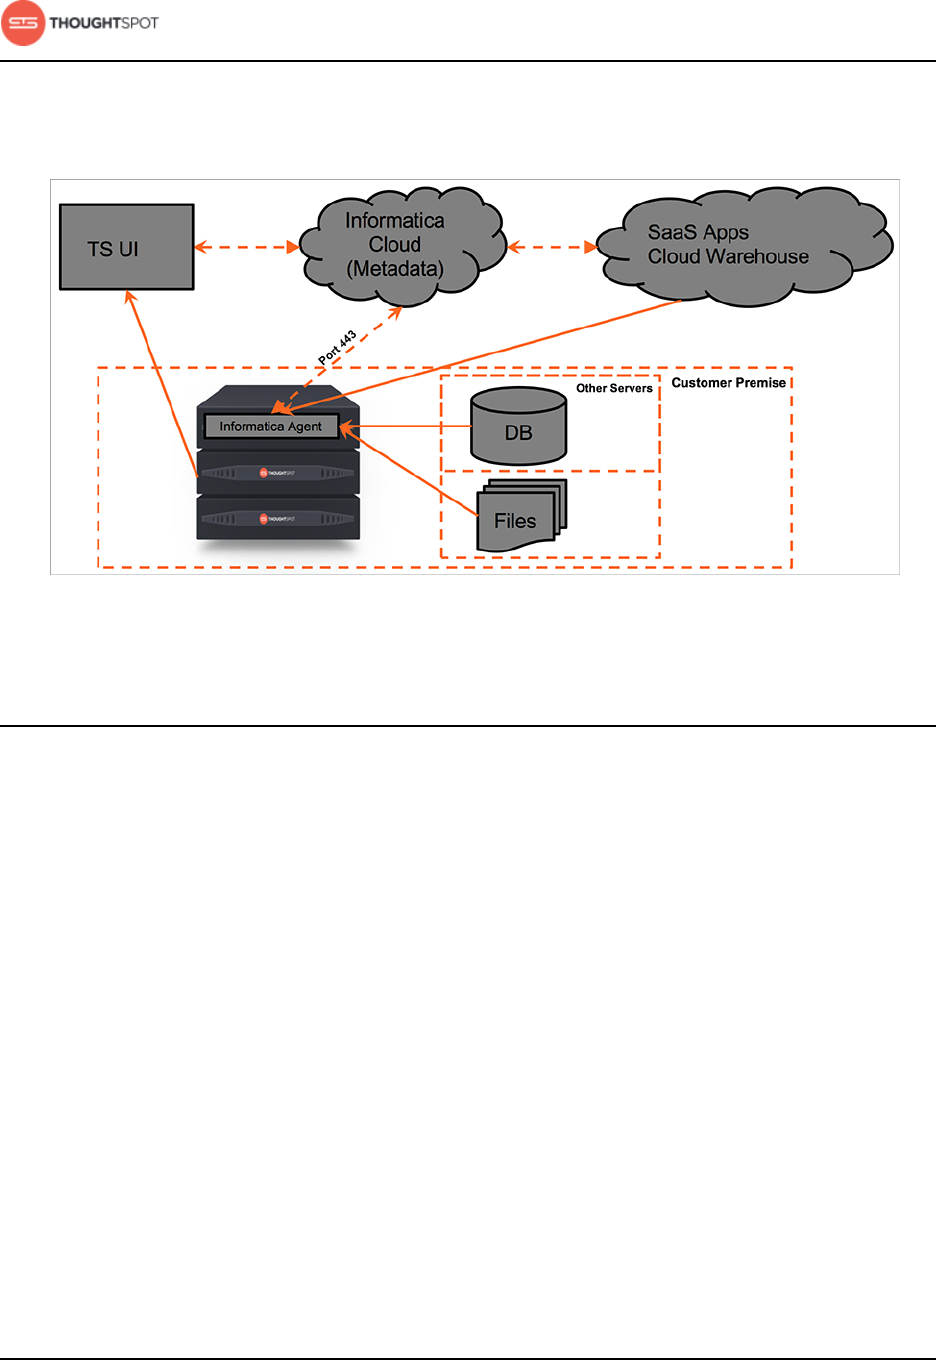
Get started with ThoughtSpot Data Connect
Data Connect Guide Copyright © 2016 by ThoughtSpot. All Rights Reserved. 6
easy to use point-and-click user interface. This diagram shows all of the required
connections.
Figure 1: High-level ThoughtSpot Data Connect design diagram
Set up ThoughtSpot Data Connect
The ThoughtSpot team will assist you in the initial setup and configuration of
ThoughtSpot Data Connect. You will need to provide the credentials for logging
in to the various data sources you want to connect to.
Your purchase of ThoughtSpot Data Connect includes the necessary credentials
for connecting to Informatica. ThoughtSpot Support will supply the Informatica
credentials, if you do not already have an account. You can change the
Informatica credentials later, if you would like. You need these credentials when
issuing the command to enable ThoughtSpot Data Connect.
To set up ThoughtSpot Data Connect:
1. Check with ThoughtSpot Support to ensure they have provisioned an account
for you with the appropriate connectivity licenses. A full list of supported
connectivity licenses is available in the Data Connect connectors reference.
2. Enable ThoughtSpot Data Connect by completing the following steps:
Get started with ThoughtSpot Data Connect
Data Connect Guide Copyright © 2016 by ThoughtSpot. All Rights Reserved. 7
a) Log in to the Linux shell using SSH.
b) Invoke tscli to enable ThoughtSpot Data Connect, which will register with
Informatica Cloud and start the infaagent service. The process will take a
couple of minutes:
tscli etl enable-lw
--admin_username <admin_user>
--username <Informatica_user>
--thoughtspot_url <URL>
--org_id <informatica_org_id>
[--pin_to <IP_address>]
[--proxy_host <proxy_server_hostname>]
[--proxy_port <proxy_server_port>]
If you want to use HTTPS with your URL, you will need to use a signed
certificate.
The parameter org_id specifies the Informatica id of the organization
(company).
Note: org_id shouldn't include the prefix "Org". For example, if on
Informatica cloud, the orgid is Org003XYZ, then use only 003XYZ
The command --pin_to is optional. If you specify an IP to pin to, that node
becomes sticky to the Informatica agent, and will always be used. This
defaults to the public IP address of the localhost where this command was
run.
The commands --proxy_host <proxy_server_hostname> and --proxy_port
<proxy_server_port> are also optional, and specify the proxy details.
3. You may change your user password using the following tscli command:
tscli etl change-password --admin_username <admin_user> --username
<Informatica_user>
4. Now you can log in to ThoughtSpot, and begin using ThoughtSpot Data
Connect.
Get started with ThoughtSpot Data Connect
Data Connect Guide Copyright © 2016 by ThoughtSpot. All Rights Reserved. 8
Add a new data source
Now that you've enabled ThoughtSpot Data Connect, you will be able to add a
new data source. Data sources are the source systems from which you want to
import data and schedule repeat data loads.
Data sources can consist of:
• Relational database sources, like SQL Server.
• Applications, like Marketo or Salesforce.
To add a data source:
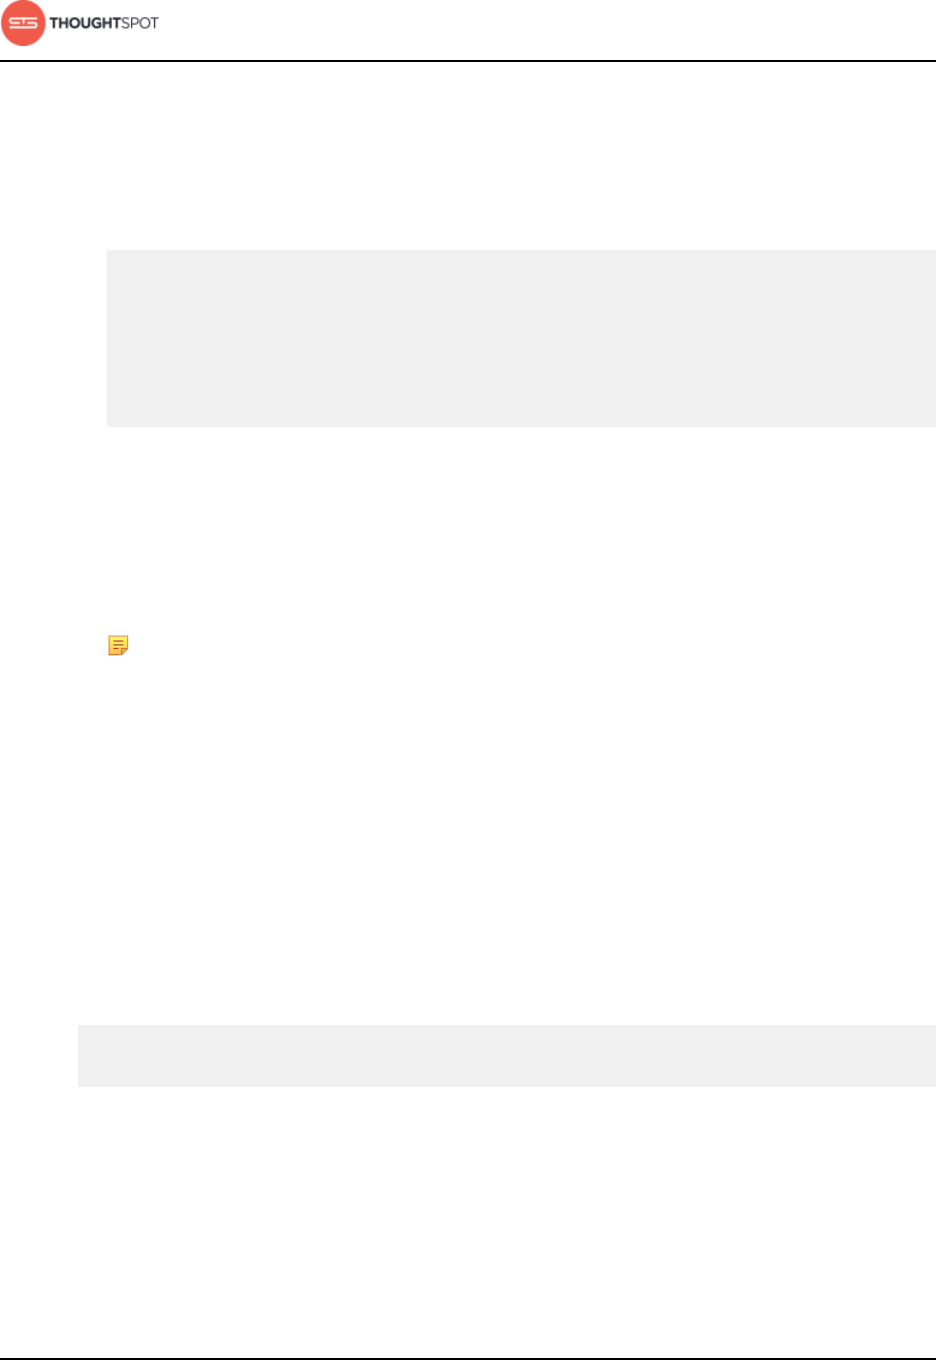
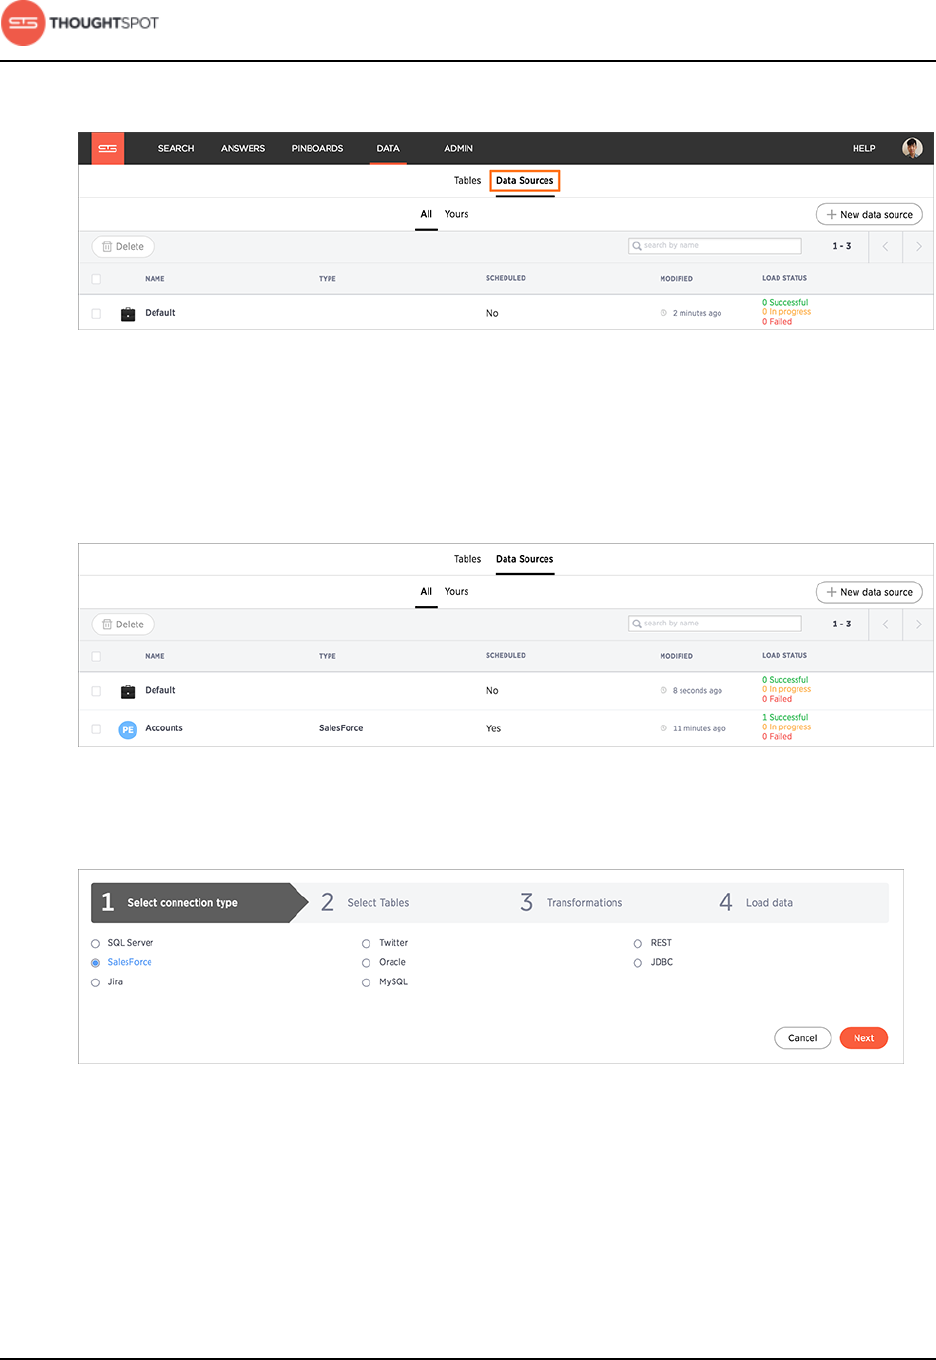
1. Log in to ThoughtSpot from a browser.
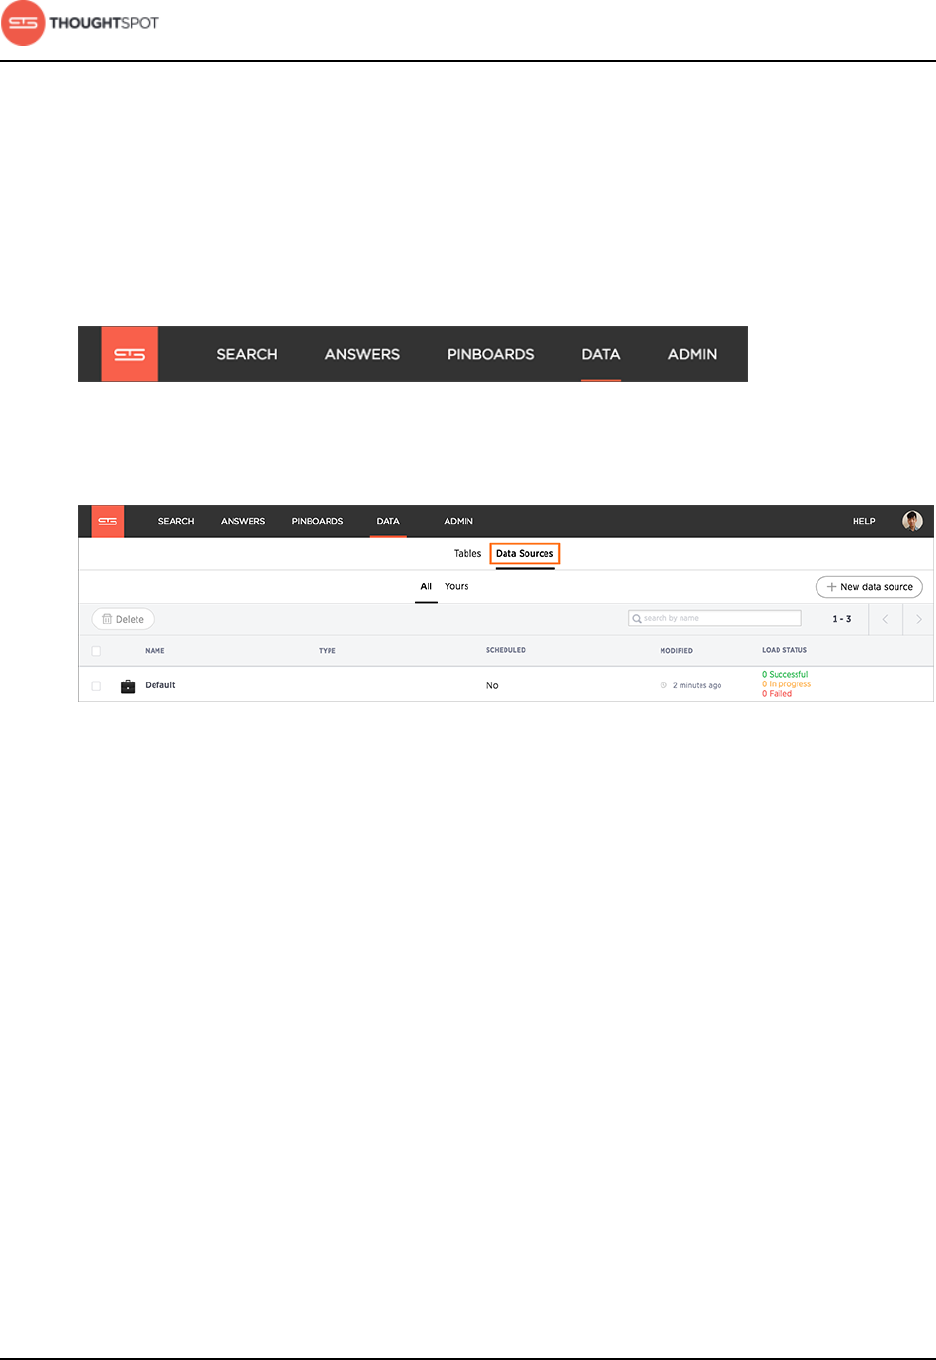
2. Click on Data, on the top navigation bar.
Figure 2: Data
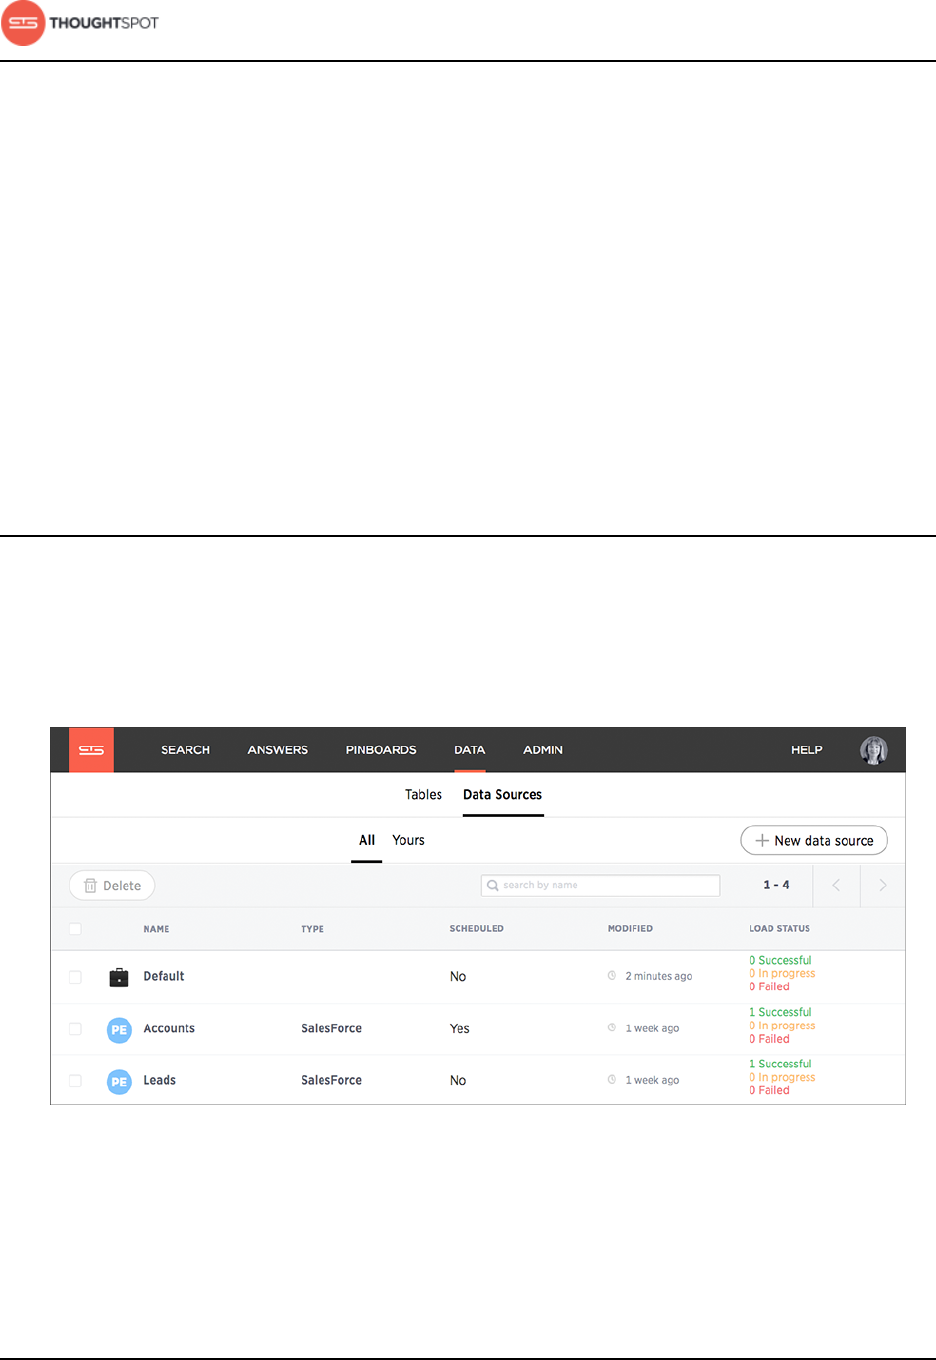
3. Click the Data Sources tab at the top of the page, and select + New data
source on the upper right hand side of the panel.
Figure 3: New data source
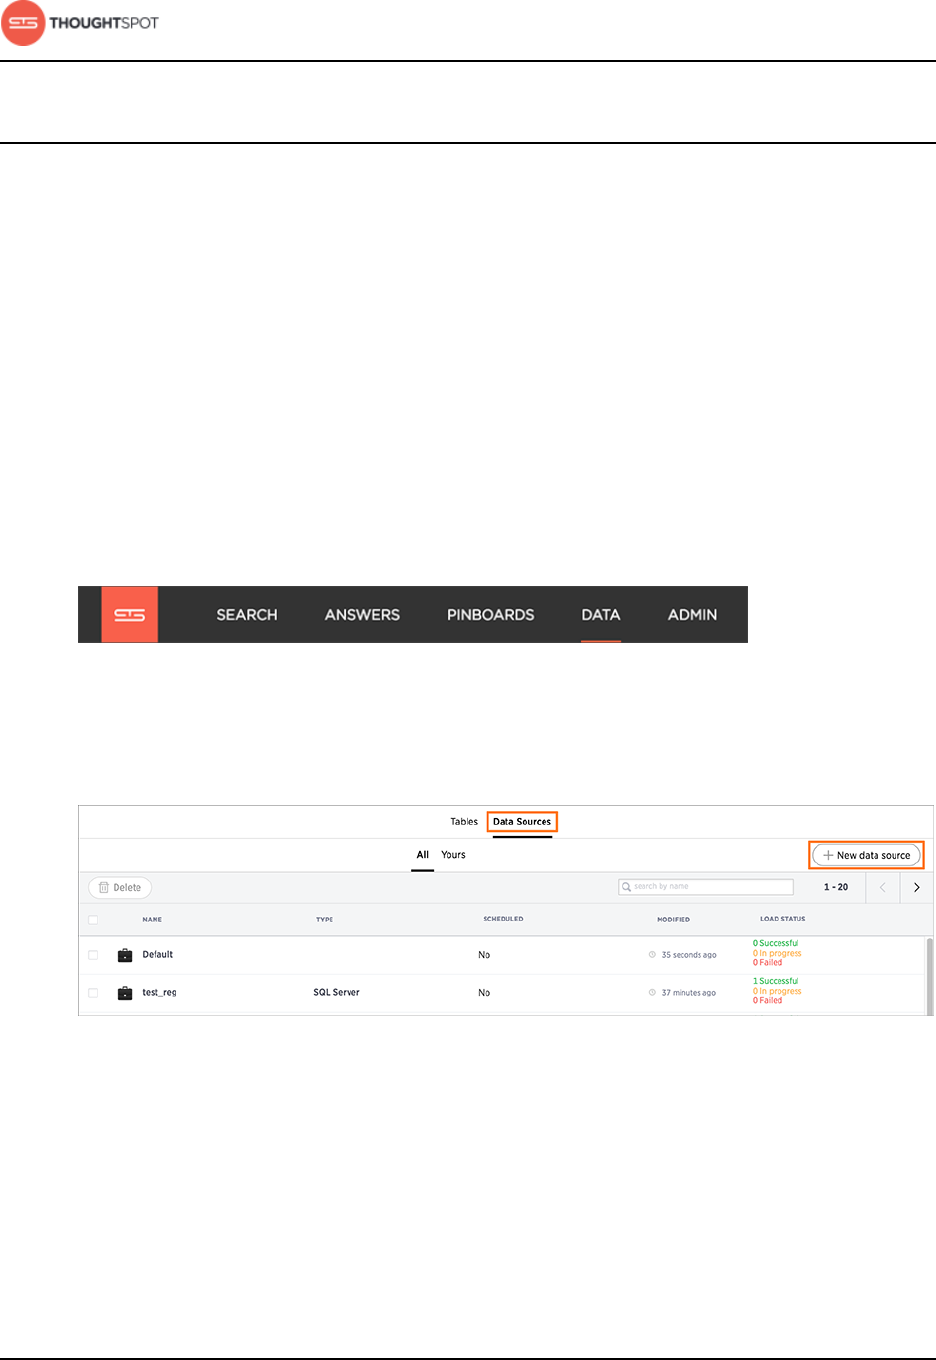
4. Select which type of connection you wish to use from the available list.
5. Select a connection type and click Next.
Get started with ThoughtSpot Data Connect
Data Connect Guide Copyright © 2016 by ThoughtSpot. All Rights Reserved. 9
Figure 4: Select a connection type
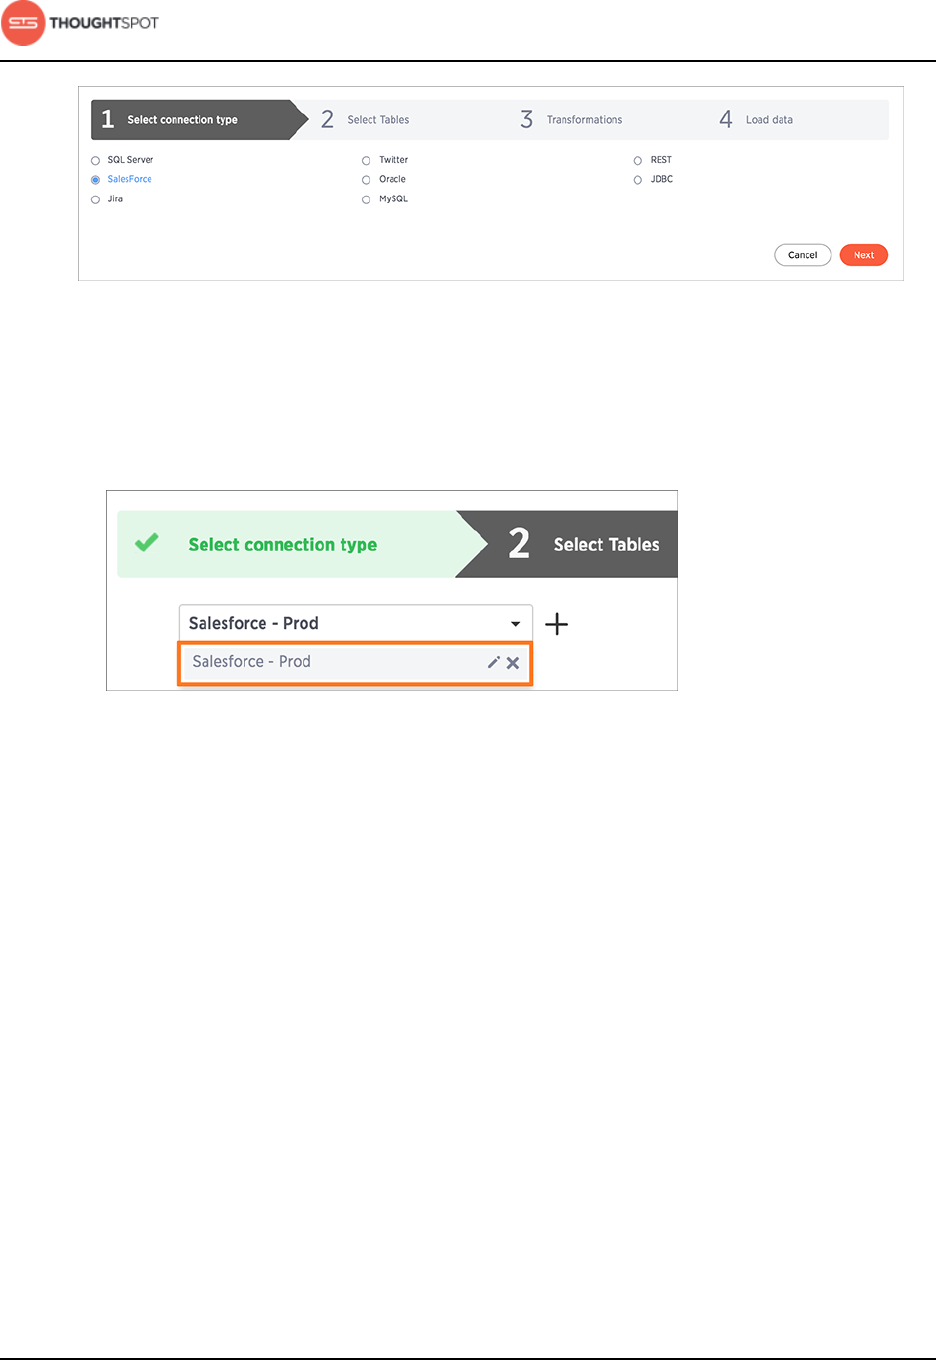
6. To select a connection, choose one of these options:
• Select a pre-defined connection type, by choosing it from the Select
Connection list:
Figure 5: Select a connection type
• Click + to create the connection and provide the credentials to your data
source. Then click Test & Create:

Get started with ThoughtSpot Data Connect
Data Connect Guide Copyright © 2016 by ThoughtSpot. All Rights Reserved. 10
Figure 6: Create a connection
Refer to the Data Connect connectors reference for more information on each
of the specific attributes you must enter into the dialog box.
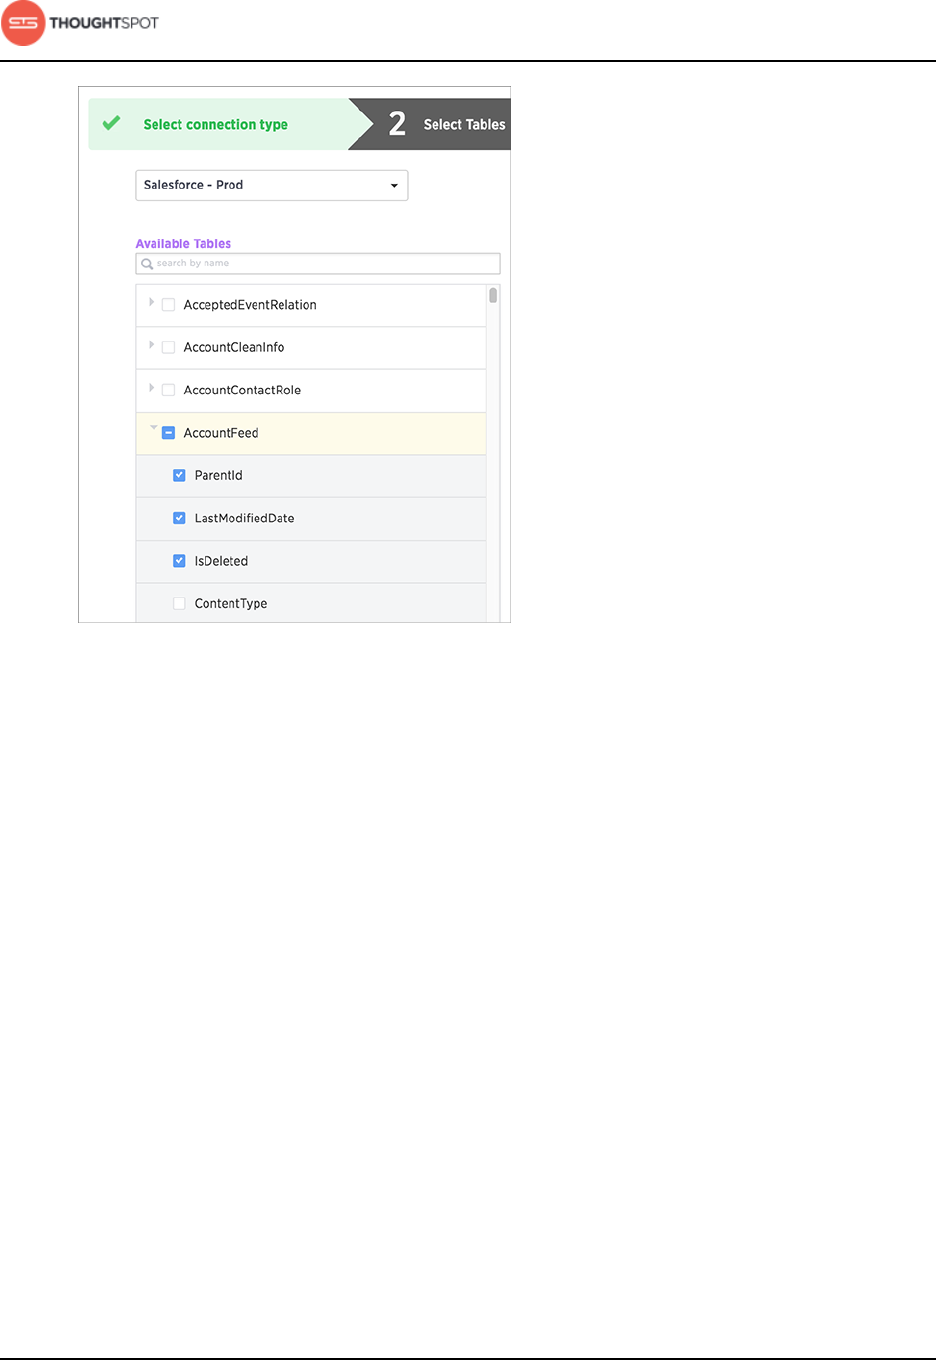
7. Choose the tables you wish to load from the list of Available Tables.
Restriction: Only the first 200 objects that occur alphabetically will be
listed per schema. If you want to access a table that falls below the first
200 objects alphabetically, you must use the object search bar.
Figure 7: Object search bar
Get started with ThoughtSpot Data Connect
Data Connect Guide Copyright © 2016 by ThoughtSpot. All Rights Reserved. 11
Here are examples of the user and system performed search patterns for
this object search bar:
• User enters KNA, then the system performs a search for %KNA%.
• User enters KNA*, then the system performs search for KNA%.
• User enters *KNA, then the system performs search for %KNA.
• User enters "KNA", then the system performs exact match search for
KNA.
Select the specific columns to import.
Restriction: Field names must contain 65 characters or less and only
contain alphanumeric or underscore characters. Spaces in column
names are not supported. In addition, names cannot start with a number.
If you have a table with columns that violate these limitations, you can
work around the issue by:
1. Creating a View, which contains appropriate field names, based on
the source table .
2. Then use Data Connect to pull data and write the View to
ThoughtSpot.
Get started with ThoughtSpot Data Connect
Data Connect Guide Copyright © 2016 by ThoughtSpot. All Rights Reserved. 12
Figure 8: Selecting tables and columns
8. When all the columns are selected, click > to move them to the Selected
Tables box. Click Next.
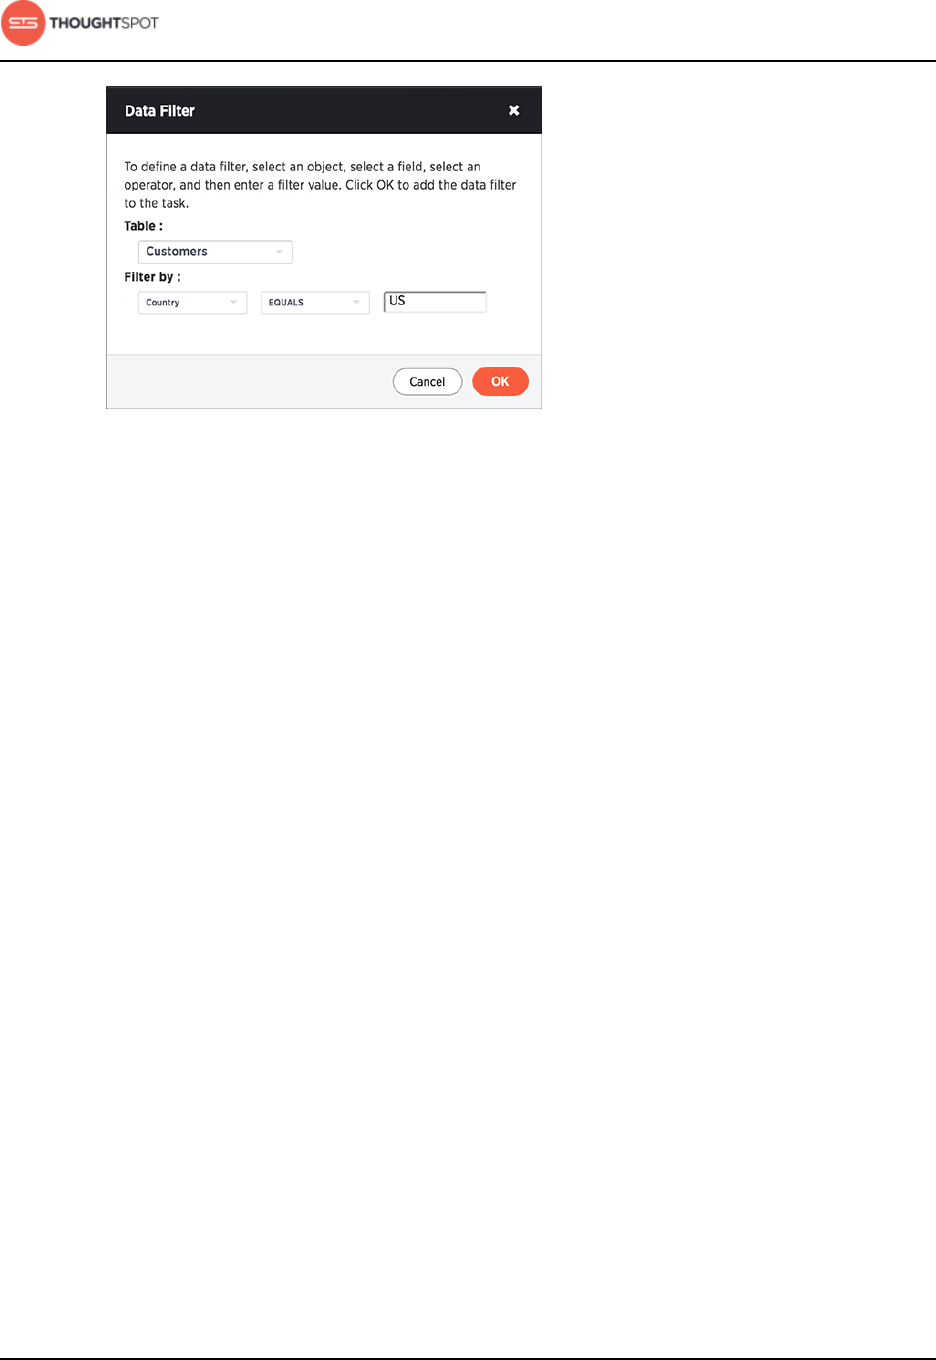
9. You can optionally apply a filter to only import specific rows by clicking New...
under Data Filters.
a) Select a table to filter.
b) Select a filter by specifying a column, operator, and value.
Get started with ThoughtSpot Data Connect
Data Connect Guide Copyright © 2016 by ThoughtSpot. All Rights Reserved. 13
Figure 9: Apply a Data Filter
c) Click OK.
d) You can create as many filters as you need by clicking + and repeating
these steps.
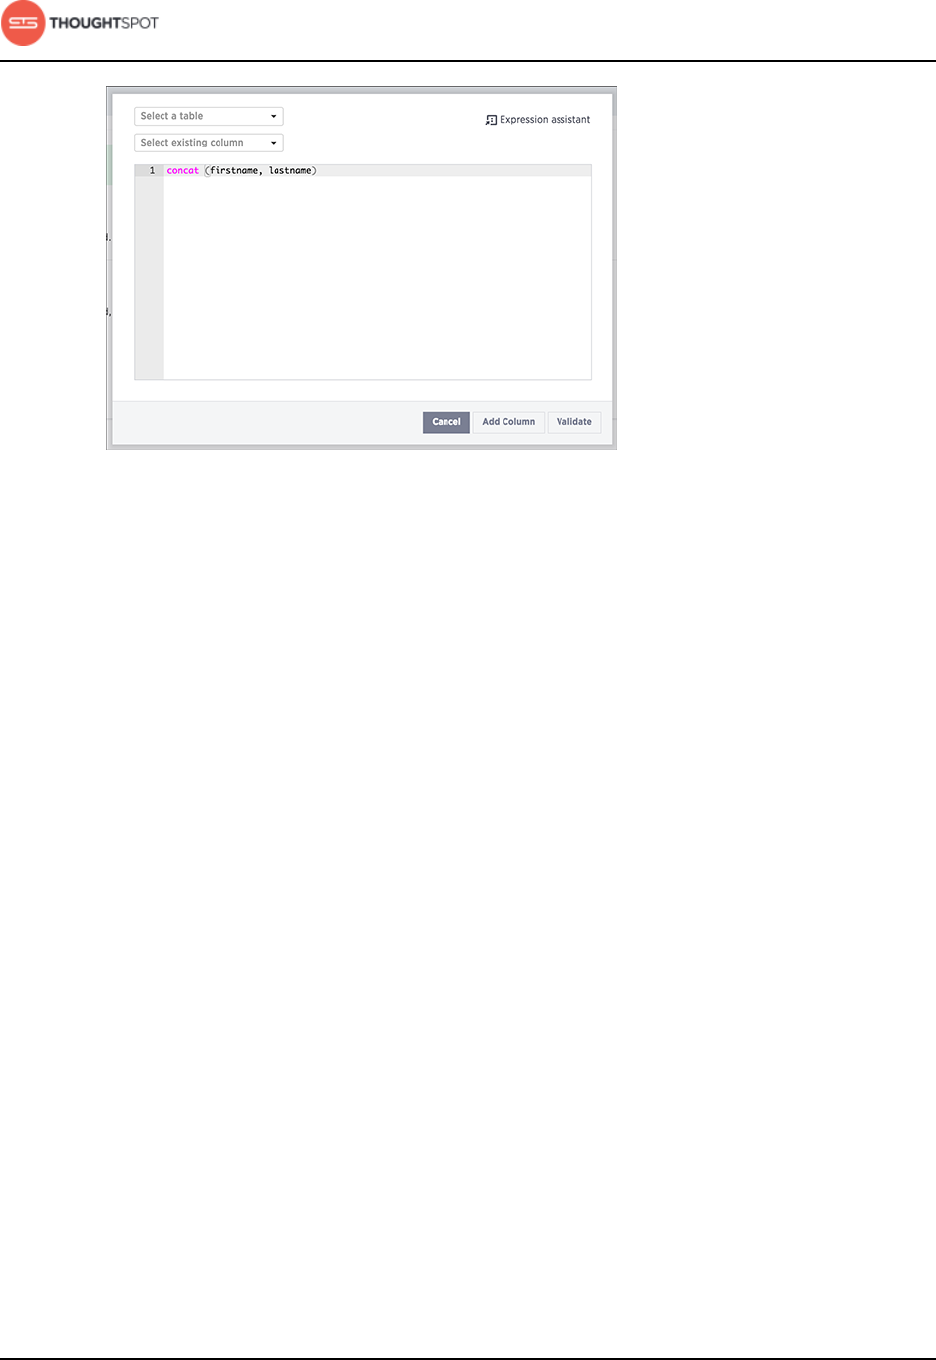
10.You can optionally apply data transformations and write the result to a new
column by clicking New... under Expressions.
a) Give the new column an alphanumeric name (underscores are okay). You
can rename it later in the ThoughtSpot application.
b) Select the table and column the data will come from.
c) Type in an expression.
You can see a list of expressions by clicking the Expression assistant.
Get started with ThoughtSpot Data Connect
Data Connect Guide Copyright © 2016 by ThoughtSpot. All Rights Reserved. 14
Figure 10: Apply an Expression
d) Click Add Column.
e) Click Validate to validate your expression before creating the data source.
f) You can create as many expressions as you need by clicking + and
repeating these steps.
11. Click Next.
12.Provide a Source Name for the data source.
13.Check the list of columns to be imported, to make sure it is correct. If you
are loading into new or empty tables, or if you want to delete any data that
already exists in the tables, click the checkbox to select Truncate data in the
existing tables.
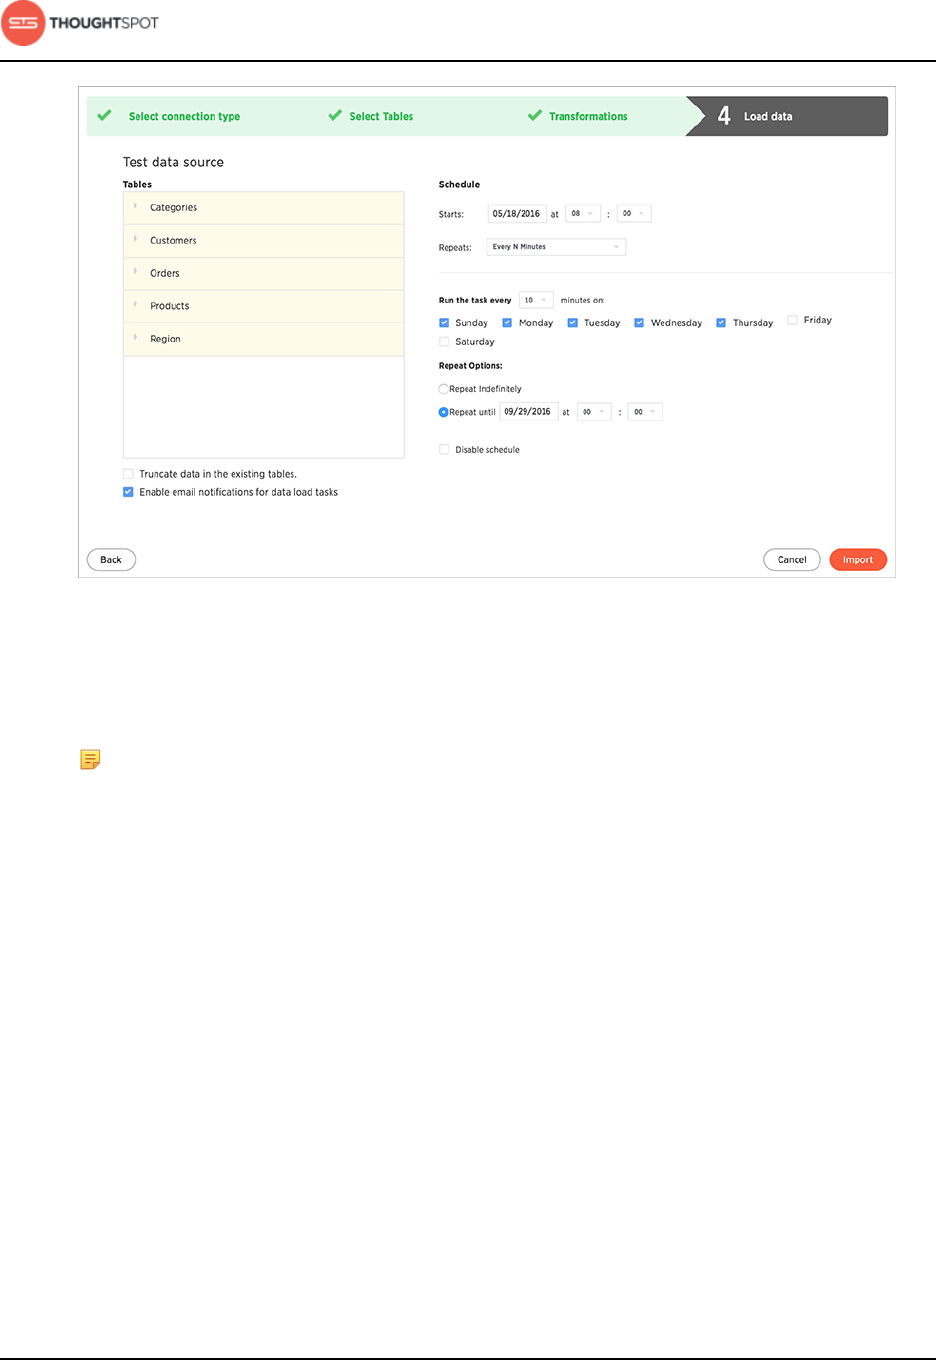
14.If you want to specify repeat data loads, create a loading schedule.
Get started with ThoughtSpot Data Connect
Data Connect Guide Copyright © 2016 by ThoughtSpot. All Rights Reserved. 15
Figure 11: Schedule a loading job
15.If you want to receive an email notification letting you know when your data
load completes, select Enable email notifications for data load tasks.
Note: Email notifications will only be sent to the respective email
address of the user who created the data source. You can't send
notifications to multiple email addresses.
In order to receive email notifications, you must enable Email me
sharing notifications in your Profile Preferences. You also need to
have an email set in your user properties found on the Admin User
Management page.
16.Click Import.
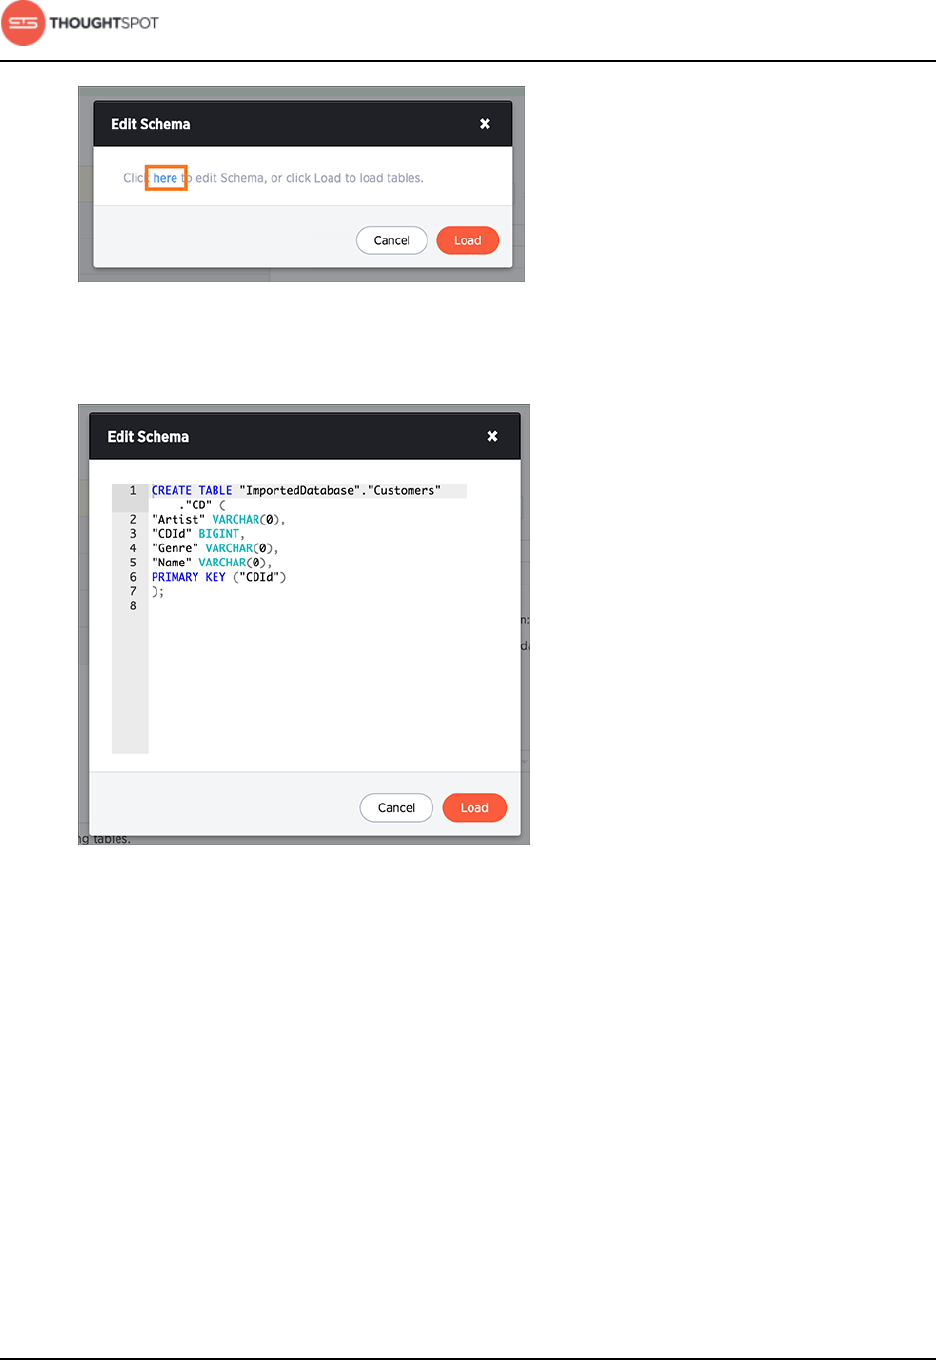
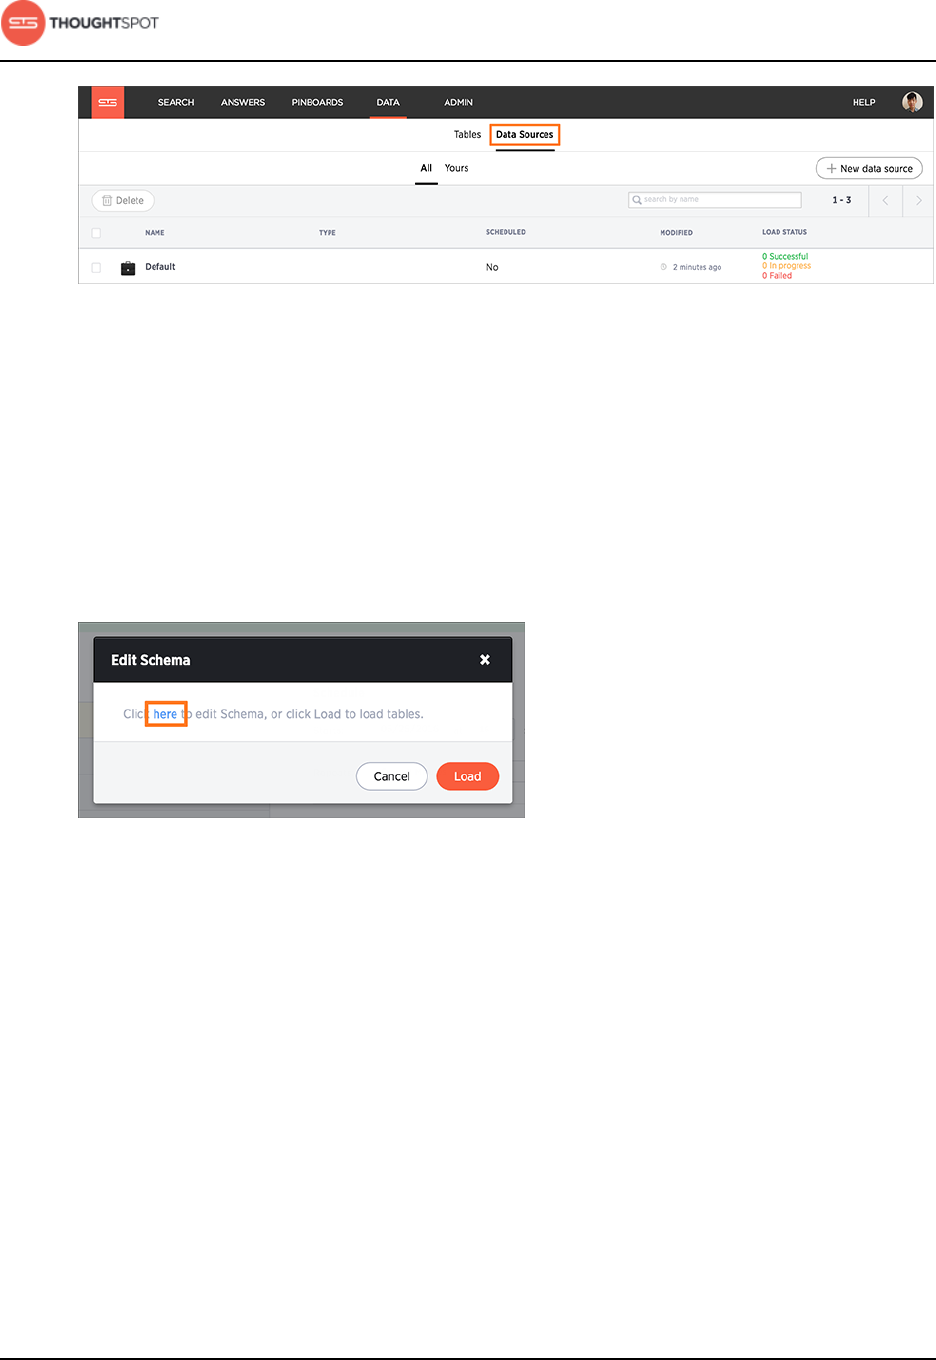
17. If you want to view or change the SQL DDL (data definition language) that will
create the target table, click here.
Get started with ThoughtSpot Data Connect
Data Connect Guide Copyright © 2016 by ThoughtSpot. All Rights Reserved. 16
Figure 12: Edit schema here
18.Review and edit the schema as necessary. Click Load to load the tables.
Figure 13: Edit schema view
19.Click Load.
Your data source will appear on the Data Sources list page, and you can find the
imported tables on the Tables list page. Tables imported via ThoughtSpot Data
Connect display the job name in the Source column.
About changing the schema (DDL)
You can view and edit the DDL script that gets generated by ThoughtSpot
Data Connect. This allows you to review the table that will be created and make
changes to the SQL that generates it.

Get started with ThoughtSpot Data Connect
Data Connect Guide Copyright © 2016 by ThoughtSpot. All Rights Reserved. 17
Some common changes you can make to the DDL before you first run the data
load are:
• Edit the DDL script to point to an existing table in ThoughtSpot. The columns
and their order must exactly match that of the existing table. You can check
the columns and their order by issuing the SCRIPT TABLE <table_name> command
from TQL. You may need to rearranged the order of columns in the generated
DDL so that it matches the order of the target table.
• Create the table(s) in a different schema than what the default DDL suggests.
• Add sharding using the PARTITION BY HASH (<number>) <column> syntax.
About incremental data loads
You can create an incremental data load, with some planning ahead.
Although there is no native incremental load capability, incremental loads can be
handled by adding a filter on the source data. This only works if the source has
the capability of providing information on the last successful load. For example,
if the source has a timestamp field that indicates when a particular source was
modified, then the following filters could be used:
• modifiedDate > $LastRunDate
• modifiedTime > $LastRunTime
The $LastRunDate and $LastRunTime filters are correctly updated at runtime to
reflect the date/time of the last successful job run.
Note: Both $LastRunDate and $LastRunTime are in GMT, so the source
column values must also be in GMT.
You can use filters on any other column of any datatype, if it provides a way
to identify the modified rows. Even if the source does not have this capability,
you may still be able to do an incremental load. As long as a primary key exists
on the target ThoughtSpot table, the data will be loaded using an upsert. This
means that for a given row being loaded, if the primary key already exists in
Get started with ThoughtSpot Data Connect
Data Connect Guide Copyright © 2016 by ThoughtSpot. All Rights Reserved. 18
the target table, that row will be updated with the data in the new row. If a row
with that primary key does not exist, the new row will be inserted. This is how
ThoughtSpot handles data loads into a table that already contains rows, and it
is the equivalent to an incremental load. If you are relying on the upsert method,
you'll want to run a COMPACT TABLE command in ThoughtSpot SQL Command
Line (TQL) to reduce the size of the table at intervals (usually weekly).
Another technique that can effectively free up space would be to run a post-job
script that deletes data older than a particular date. This keeps the data fresh
and ensures that old data, which may not be valuable, is not taking up memory.
Data sources management
After you have successfully loaded your tables, you can check on the status of
the load, make edits, and more.
You can manage your new data sources by clicking on the name of your source
on the Data Sources page.
Figure 14: Data sources management view
Once you have selected a data source, you have the option to perform a number
of editing and maintenance tasks.
Get started with ThoughtSpot Data Connect
Data Connect Guide Copyright © 2016 by ThoughtSpot. All Rights Reserved. 19
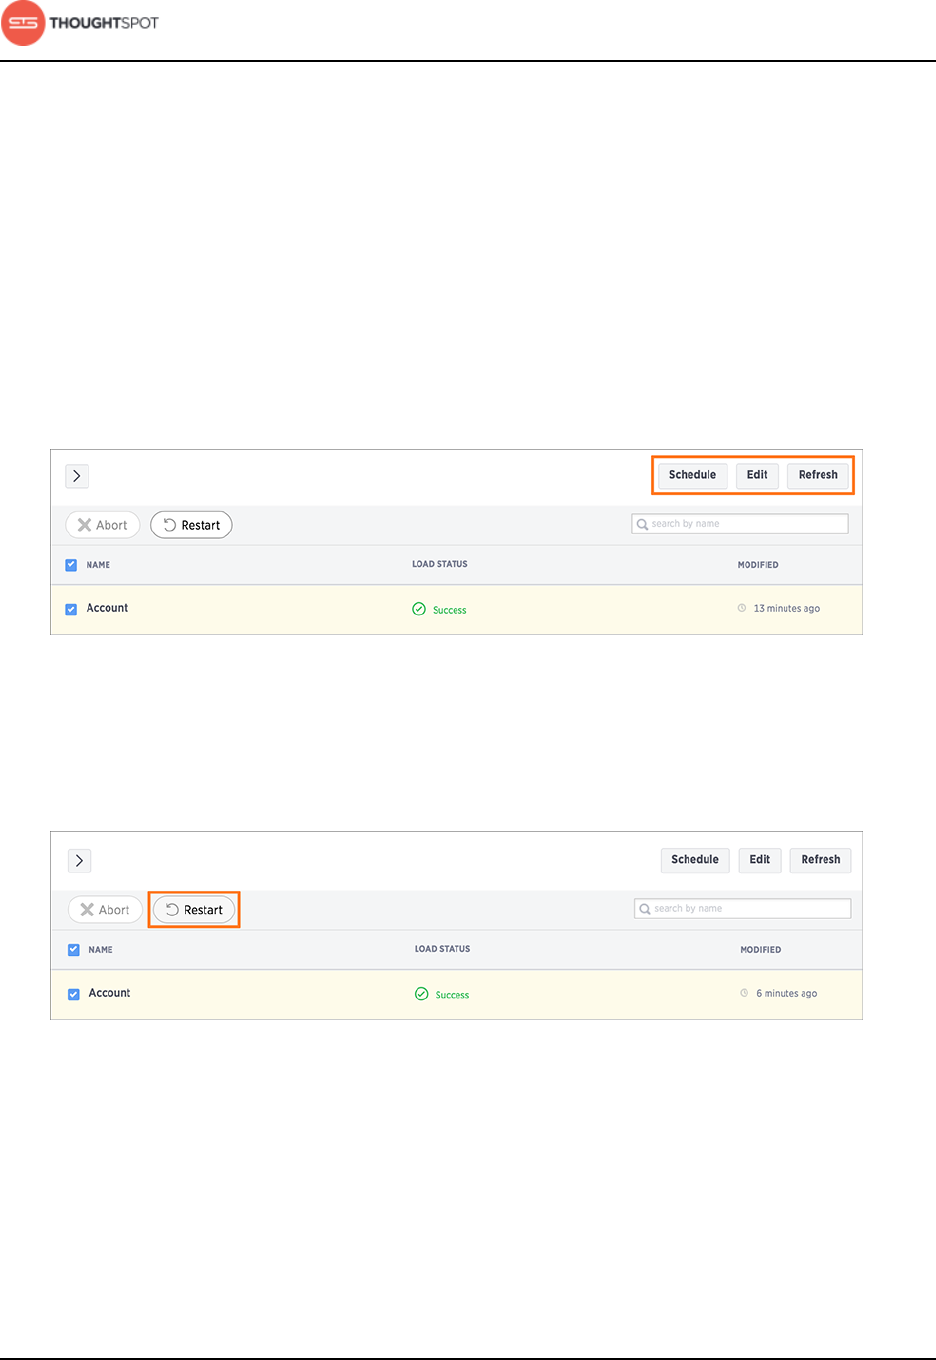
Schedule, edit, and refresh
You can select a table row and click one of the following three buttons to make
changes:
•Schedule: Opens a Scheduler menu where you can make changes to the
loading schedule.
•Edit: Takes you back to edit the data source details, such as loading another
table or truncating an existing one.
•Refresh: Refreshes the data load status.
Figure 15: Schedule, edit, and refresh data sources
Restart the load
Selecting a source and clicking the Restart icon will immediately reload the data.
Figure 16: Restart the data source load
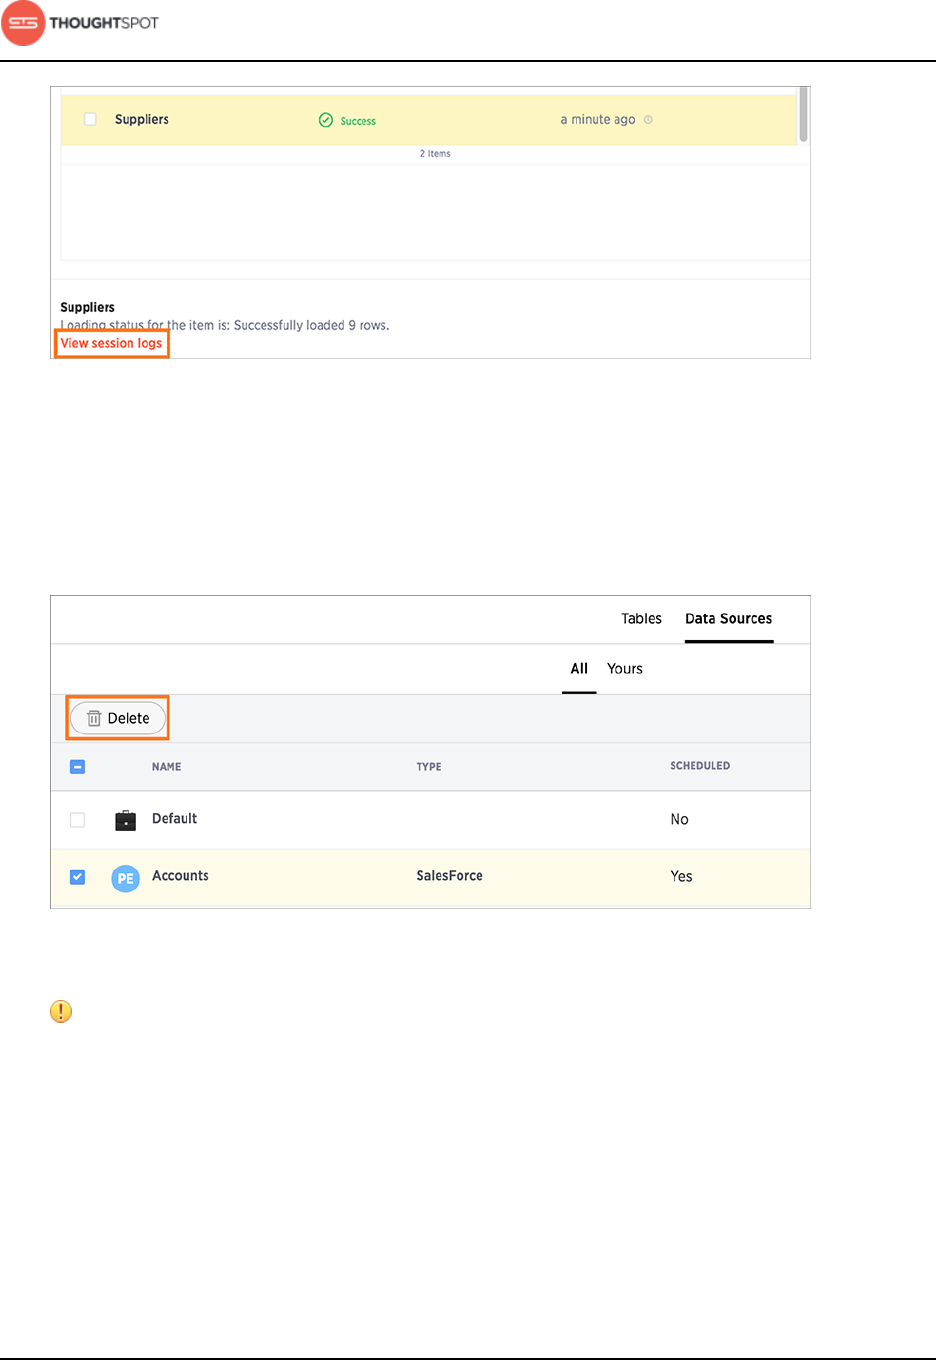
View log files
You can download the session logs for a data load run. Select a table row,
and click View session logs at the bottom of the page. View the log file to
troubleshoot any failed loads or to simply check the log queries.
Get started with ThoughtSpot Data Connect
Data Connect Guide Copyright © 2016 by ThoughtSpot. All Rights Reserved. 20
Figure 17: View session logs
Delete a data source
You can delete a data source by selecting it in the Data Sources page, then
clicking the Delete icon.
Figure 18: Delete a data source
Attention: Do not delete the "Default" data source. It does not correspond
to any connection in ThoughtSpot Data Connect. However, this source is
assigned to default datasets.

Data Connect Guide Copyright © 2016 by ThoughtSpot. All Rights Reserved. 21
Chapter 2: About making changes to Data Connect
setup
About making changes to Data Connect setup
Topics:
•Edit a connection
•Delete a connection
•Delete a data source
•Stop a scheduled job from
running
•Change sharding for a
data source
•Change a data type for a
data source
•Add a column to an
existing data source
•Remove a column from an
existing data source
After setting up ThoughtSpot Data Connect, you
may want to make changes to the scheduling, data
sources, or even the schema you are importing into in
ThoughtSpot. These best practices describe how to
make such changes.
Changes to data sources
If your company migrates from one source database
or application to another you may find that you need
to redo the data import using the new system. You
can do this without losing any data that has already
been loaded into ThoughtSpot, but you need to be
careful not to accidentally delete an existing table
that was created by the old data source. Create the
new data source, but choose to retain the table when
you delete the old data source. You should also stop
any scheduled jobs associated with the old data
source before deletion.
•Delete a connection
•Delete a data source
Changes to scheduled data imports
It's easy to change scheduled data imports to run
at a different time or frequency through the Data
Connect web interface. You may also want to pause a

About making changes to Data Connect setup
Data Connect Guide Copyright © 2016 by ThoughtSpot. All Rights Reserved. 22
data import because the source system will be offline
for maintenance. You can then resume it, when the
maintenance has been completed.
•Stop a scheduled job from running
Changes to the Schema in ThoughtSpot
It is very common to need to change what you're
importing into ThoughtSpot for various reasons. For
example the source database may have changed,
because you've implemented a new application. Or
you might simply change your mind about the best
way to model the data that was brought in through
Data Connect.
•Change sharding for a data source
•Change a data type for a data source
•Add a column to an existing data source
•Remove a column from an existing data source

About making changes to Data Connect setup
Data Connect Guide Copyright © 2016 by ThoughtSpot. All Rights Reserved. 23
Edit a connection
You can edit a connection used in a data source.
You can safely edit a connection when you create a new data source or edit an
existing one.
To edit a connection:
1. Log in to ThoughtSpot from a browser.
2. Click on Data, on the top navigation bar.
Figure 19: Data
3. Click the Data Sources tab at the top of the screen.
Figure 20: Data Sources tab
4. Select + New data source on the upper right hand side of the panel.
Figure 21: New data source
5. Select the connection type of interest and click Next.

About making changes to Data Connect setup
Data Connect Guide Copyright © 2016 by ThoughtSpot. All Rights Reserved. 24
Figure 22: Select a connection type
6. In the Select Tables step, click the Select a connection dropdown and browse
the list for the connection you wish to edit.
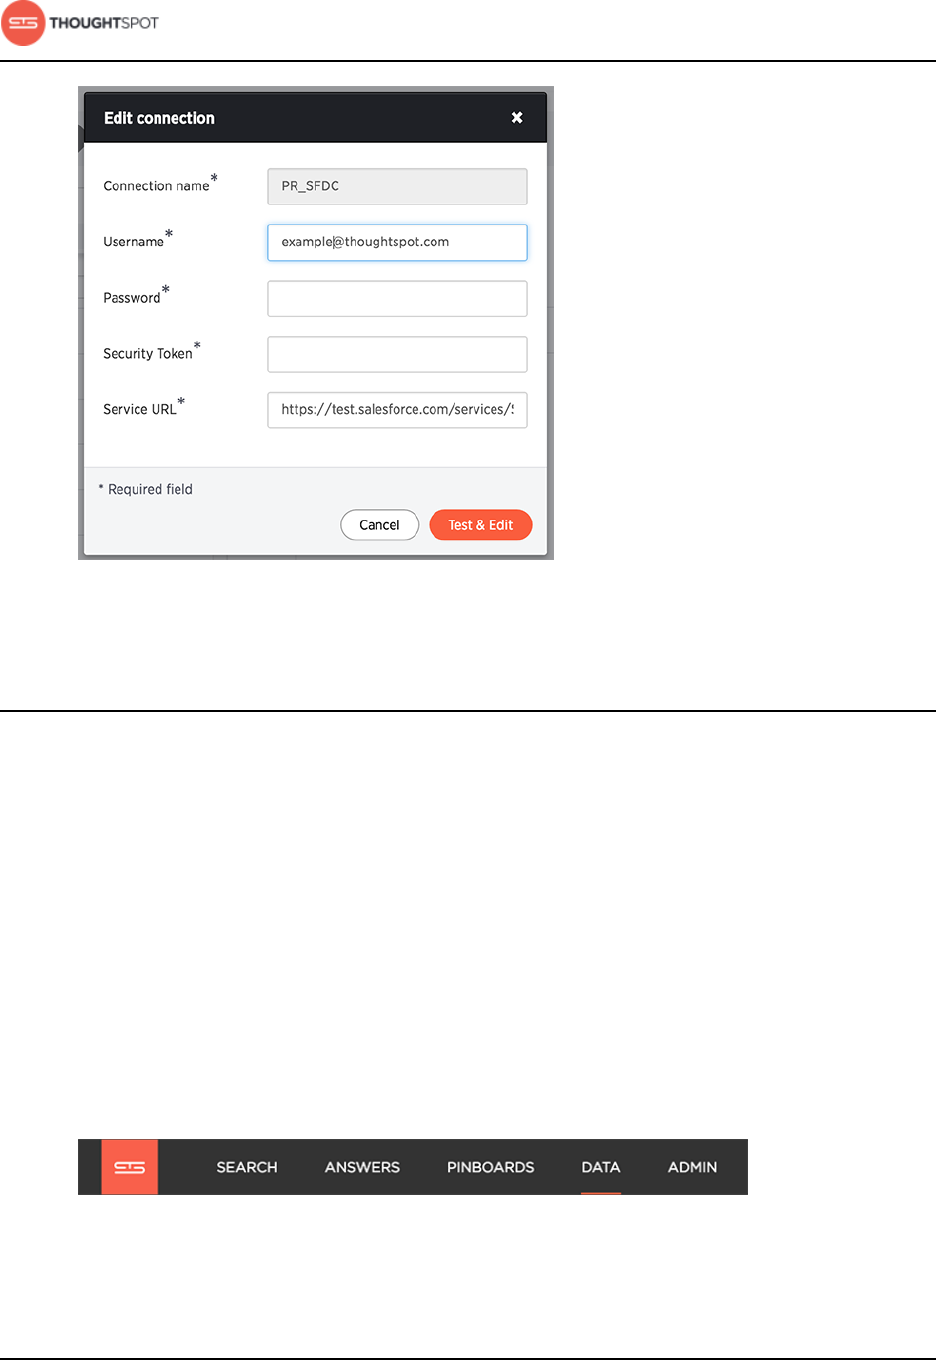
a) Click Edit connection on the right of your selected connection to open the
Edit connection dialog box.
Figure 23: Edit a connection
7. Edit the connection details, then click Test & Edit.
About making changes to Data Connect setup
Data Connect Guide Copyright © 2016 by ThoughtSpot. All Rights Reserved. 25
Figure 24: Edit connection dialog box
Delete a connection
You can delete a connection, but only once you've resolved each of its
dependencies.
A connection is not tied to a task, and can therefore be called in multiple data
sources. So in order to delete a connection, you must first delete all of the
sources and tasks that use that connection. Once the connection is not used in
any data source, you will be able to delete it.
To delete a connection:
1. Log in to ThoughtSpot from a browser.
2. Click on Data, on the top navigation bar.
Figure 25: Data
About making changes to Data Connect setup
Data Connect Guide Copyright © 2016 by ThoughtSpot. All Rights Reserved. 26
3. Click the Data Sources tab at the top of the screen.
Figure 26: Data Sources tab
4. Delete any dependent data sources.
To delete a data source, see Delete a data source.
5. Select + New data source on the upper right hand side of the panel.
Figure 27: New data source
6. Select the connection type of interest and click Next.
Figure 28: Select a connection type
7. In the Select Tables step, click the Select a connection dropdown and browse
the list for the connection you wish to delete.
a) Click the x on the right of your selected connection to delete it.

About making changes to Data Connect setup
Data Connect Guide Copyright © 2016 by ThoughtSpot. All Rights Reserved. 27
Figure 29: Delete a connection
Delete a data source
If you want to delete a data source, make sure and read this section so you don't
inadvertently delete data in ThoughtSpot.
First, if there are any recurring data load jobs for the data source you are
deleting, follow the steps in Stop a scheduled job from running.
Whenever you delete a data source, you also have the option to drop or retain
the table it loads into in the target system (ThoughtSpot). This is useful when
you make changes to a table and create a new data source that loads into the
table. So, you can safely delete any data source that references a target table
that you don't want to lose.
To delete a data source:
1. Log in to ThoughtSpot from a browser.
2. Click on Data, on the top navigation bar.
Figure 30: Data
3. Click the Data Sources tab at the top of the screen.
About making changes to Data Connect setup
Data Connect Guide Copyright © 2016 by ThoughtSpot. All Rights Reserved. 28
Figure 31: Data Sources tab
4. Find the data source you want to delete, and click on its name.
5. Click Edit. This will bring you to the setup screens for a new data source. Step
through all the screens by clicking Next, until you reach the final page.
6. Click the Import button.
7. Click the here link to review the TQL script that created the target table in
ThoughtSpot.
Figure 32: Edit schema here link
8. Take a look at the table name and its schema. Decide if the table is one you
want to keep in ThoughtSpot.
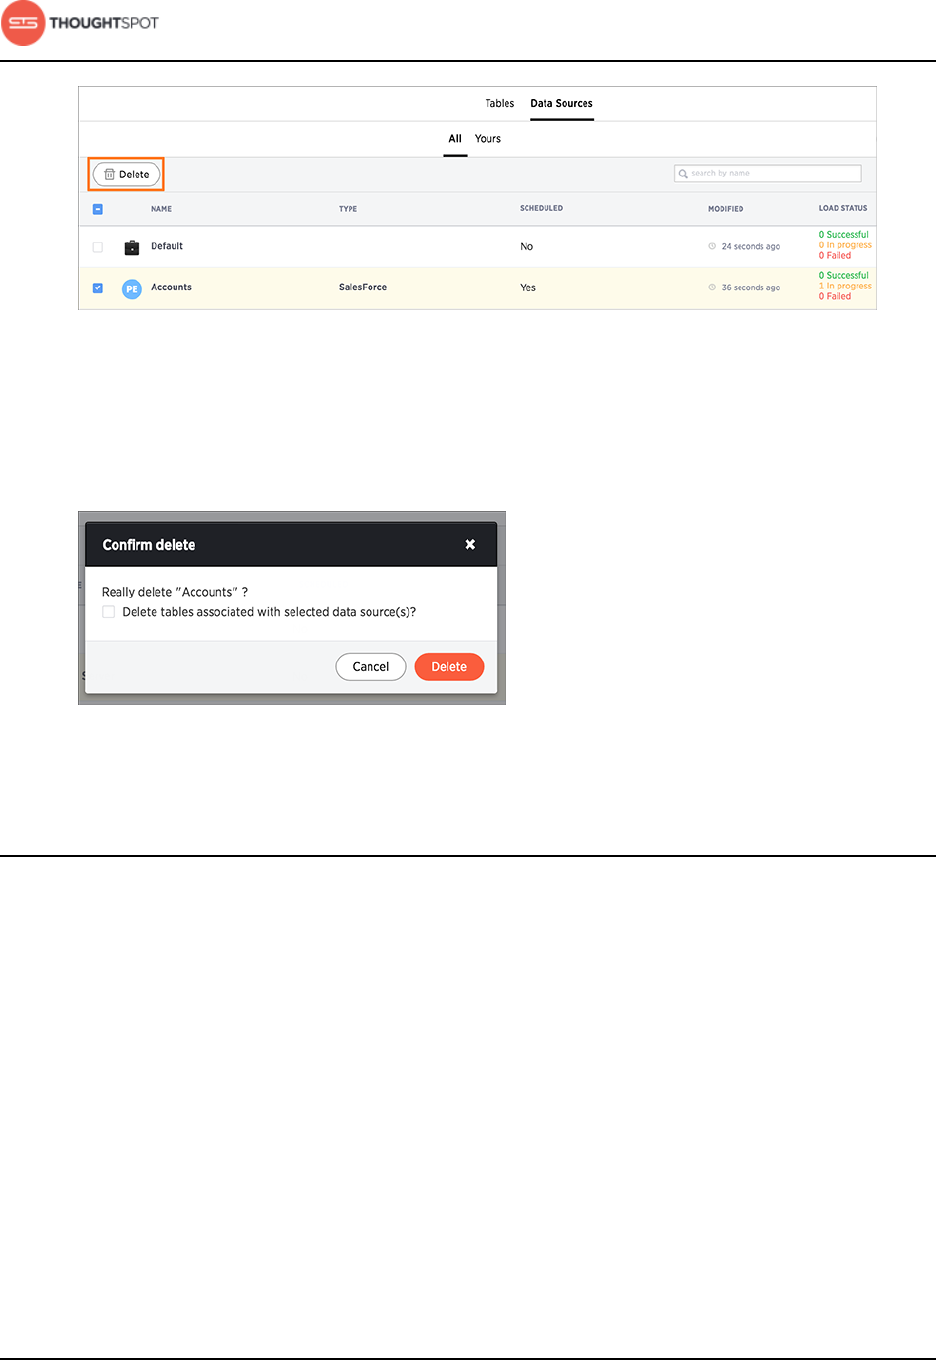
9. Go back to the data sources listing, click the checkbox next to the data
source, and delete it.
About making changes to Data Connect setup
Data Connect Guide Copyright © 2016 by ThoughtSpot. All Rights Reserved. 29
Figure 33: Delete a data source
10.In the Confirm delete prompt, select the checkbox if you want to delete the
tables associated with the data source. Leave the checkbox unselected if you
have decided to keep the tables.
Figure 34: Delete or retain associated tables
Stop a scheduled job from running
You may want to stop a scheduled job from running for a time, or even
permanently. Use this procedure to pause or stop a job.
There are a few conditions when it may be useful to stop or pause a scheduled
job:
• The source system will be offline for maintenance.
• You are migrating the data to a new source system, and don't want to delete
the original job.
• There is a problem with the job, and you don't want it to run while you are
figuring out how to solve it.
About making changes to Data Connect setup
Data Connect Guide Copyright © 2016 by ThoughtSpot. All Rights Reserved. 30
• ThoughtSpot will be offline for scheduled maintenance or an upgrade.
• You want to delete the data source on which the scheduled job runs.
To stop a scheduled job from running:
1. Log in to ThoughtSpot from a browser.
2. Click on Data, on the top navigation bar.
Figure 35: Data
3. Click the Data Sources tab at the top of the screen.
Figure 36: Data Sources tab
4. Click on the data source for the scheduled job you want to pause.
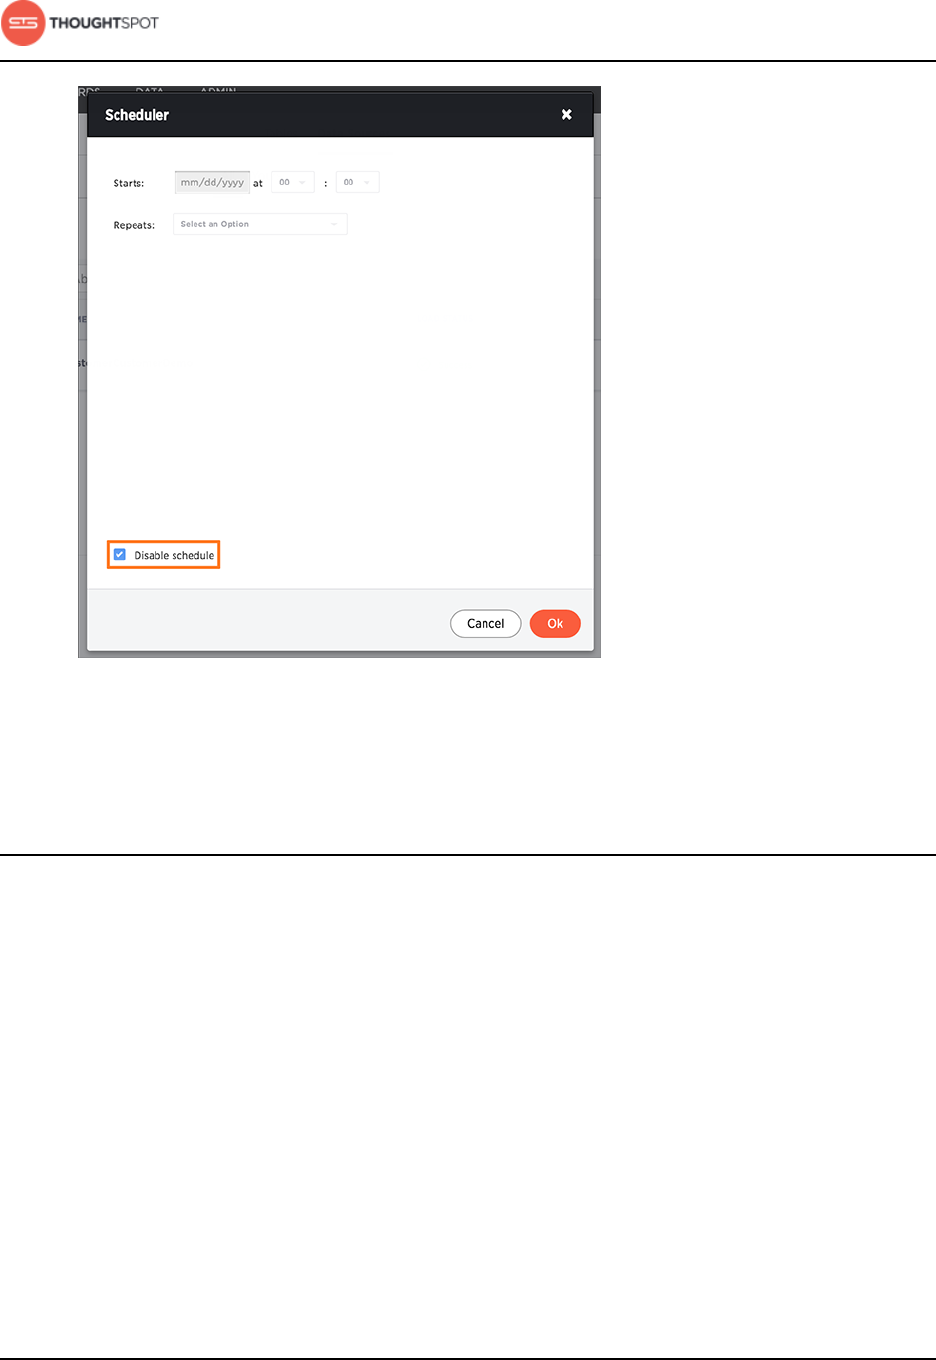
5. Click Schedule to edit the schedule.
6. Stop the job by selecting Disable schedule.
About making changes to Data Connect setup
Data Connect Guide Copyright © 2016 by ThoughtSpot. All Rights Reserved. 31
Figure 37: Stop a recurring data load
7. Click OK.
Change sharding for a data source
Use this procedure to change the sharding on a data source after it has been set
up and the load has run. You can still change the number of shards or make it a
replicated table instead.
You should always take a snapshot of your database before making any schema
changes. This will allow you to revert back to the prior state if you make an error,
or something doesn't work as you expected after the schema change.
After you've set up a Data Source, you may decide that you want the table it is
loading into to have a different type of sharding. For example, if you specified
96 shards, but then you expand your cluster, you may want to specify a large

About making changes to Data Connect setup
Data Connect Guide Copyright © 2016 by ThoughtSpot. All Rights Reserved. 32
number or shards. You can even change a sharded table to a replicated table, or
vice versa, by using this procedure.
First, you'll modify the table sharding, using TQL. Note that this operation
changes the target table itself. You do not need to change the DDL that was
generated when you first configured the data source. That DDL executes only
one time, to build the empty table into which the data gets loaded. So if you
change the sharding on the table in ThoughtSpot, you do not need to change
the DDL that got generated when you first set up the data source. Likewise, if
the load is scheduled to recur, the sharding that is defined on the target table
will be used in the next load. Sharding is a one time setup, and does not need to
be kept in sync with the data source DDL.
To change the sharding on a Data Source:
1. Log in to the Linux shell using SSH.
2. Launch TQL.
$ tql
3. Designate the database you'll be working in:
TQL> use <database_name>;
4. Find the name of the table you want to change.
You can use the TQL command SHOW TABLES; to see a list of tables.
To see the current sharding on the table, use SCRIPT TABLE <table_name>;
5. Issue the command to change the sharding using this syntax:
TQL> ALTER TABLE <table>
[SET DIMENSION | SET FACT
[PARTITION BY HASH
[(<shards>)]
[KEY(<column>)]]]
For example:
About making changes to Data Connect setup
Data Connect Guide Copyright © 2016 by ThoughtSpot. All Rights Reserved. 33
• To make a sharded table into a dimension table (replicated on every node),
use:
ALTER TABLE "products"
SET DIMENSION;
• To make a dimension table into a sharded (fact) table or change the
number of shards, use:
ALTER TABLE "sales"
SET FACT PARTITION BY HASH (96)
KEY ("productID");
6. The next time the data source load runs, it will use the new sharding
automatically.
Change a data type for a data source
When a data type used in a data source has changed, or you decide that the
data should come into ThoughtSpot with a different data type, you can change
the data type, even if you've already loaded data into the target table.
You should always take a snapshot of your database before making any schema
changes. This will allow you to revert back to the prior state if you make an error,
or something doesn't work as you expected after the schema change.
When changing a data type in an existing table, be aware that answers and
pinboards created on top of that table (or worksheets that include it) may
change. This is because charts and aggregations depend upon the data type. So
for example changing from INTEGER to VARCHAR could break charts that used
the numeric data type INTEGER to calculate an average or a total. Because of
this, use caution, and check all dependent objects before and after changing the
data type, to ensure that they display as intended.
The procedure to make this change to an existing data source has two main
parts:
• Alter the table definition in the target table using TQL.

About making changes to Data Connect setup
Data Connect Guide Copyright © 2016 by ThoughtSpot. All Rights Reserved. 34
• Create a new data source, and edit the DDL to match the target table exactly.
To change the data type of an existing data source:
1. Log in to the Linux shell using SSH.
2. Launch TQL.
$ tql
3. Designate the database you'll be working in:
TQL> use <database_name>;
4. Find the name of the table you want to change.
You can use the TQL command SHOW TABLES; to see a list of tables.
To see the current sharding on the table, use SCRIPT TABLE <table_name>;
5. Issue the command to change the data type of a column using this syntax:
TQL> ALTER TABLE <schema>.<table>
MODIFY COLUMN <column> <new_data_type>;
For example, to change "account_id" with data type INT to data type
VARCHAR:
TQL> ALTER TABLE foodmart.account
MODIFY COLUMN account_id VARCHAR(10);
You must use the fully qualified name of the old table when adding the
column via TQL. To find that you can look at the DDL for the data source job
itself.
6. Run the SCRIPT TABLE command to get the new DDL to create the table.
TQL> SCRIPT TABLE <table>;
Copy the output of the command. Replace any VARCHAR(<number) column
definitions with VARCHAR(0), to match the DDL that Data Connect generates.
This is the DDL that you will use in your new data source.
7. Create a new data source.

About making changes to Data Connect setup
Data Connect Guide Copyright © 2016 by ThoughtSpot. All Rights Reserved. 35
Be sure to choose the correct columns to match the new target table columns
definitions. When you reach the step about editing the generated schema
DDL, paste in the DDL that was output by the SCRIPT TABLE command.
8. Run the data load and verify that everything is working as it should be.
9. If the old data source was running as a recurring load, stop it from running.
Add a column to an existing data source
You can add a column to an existing data source using this procedure. This will
work even if the data load has already been run in the past.
You should always take a snapshot of your database before making any schema
changes. This will allow you to revert back to the prior state if you make an error,
or something doesn't work as you expected after the schema change.
Reasons you may want to add a column to an existing data source might include:
• A new column has been added to the source table, and you want to include it
in the data import.
• You've decided to include an additional column from the source.
Initial DDL did not include a column, but you wanted to pull it in later in a
subsequent load. Or it could be a new column added to the source.
The procedure to make this change to an existing data source has two main
parts:
• Alter the table definition in the target table using TQL.
• Create a new data source, and edit the DDL to match the target table exactly.
1. Log in to the Linux shell using SSH.
2. Launch TQL.
$ tql
About making changes to Data Connect setup
Data Connect Guide Copyright © 2016 by ThoughtSpot. All Rights Reserved. 36
3. Designate the database you'll be working in:
TQL> use <database_name>;
4. Find the name of the table you want to change.
You can use the TQL command SHOW TABLES; to see a list of tables.
To see the current sharding on the table, use SCRIPT TABLE <table_name>;
5. Issue the command to change the data type of a column using this syntax:
TQL> ALTER TABLE <schema>.<table>
MODIFY COLUMN <column> <new_data_type>;
For example, to change "account_id" with data type INT to data type
VARCHAR:
TQL> ALTER TABLE foodmart.account
ADD COLUMN account_id VARCHAR(10);
You must use the fully qualified name of the old table when adding the
column via TQL. To find that you can look at the DDL for the data source job
itself.
6. Run the SCRIPT TABLE command to get the new DDL to create the table.
TQL> SCRIPT TABLE <table>;
Copy the output of the command. Replace any VARCHAR(<number) column
definitions with VARCHAR(0), to match the DDL that Data Connect generates.
This is the DDL that you will use in your new data source.
7. Create a new data source.
Be sure to choose the correct columns to match the new target table columns
definitions. When you reach the step about editing the generated schema
DDL, paste in the DDL that was output by the SCRIPT TABLE command.
8. Run the data load and verify that everything is working as it should be.
9. If the old data source was running as a recurring load, stop it from running.
About making changes to Data Connect setup
Data Connect Guide Copyright © 2016 by ThoughtSpot. All Rights Reserved. 37
Remove a column from an existing data source
You can remove a column from a data source, even if its data load has been run
in the past, by using this procedure.
You should always take a snapshot of your database before making any schema
changes. This will allow you to revert back to the prior state if you make an error,
or something doesn't work as you expected after the schema change.
The procedure to make this change to an existing data source has two main
parts:
• Alter the table definition in the target table using TQL.
• Create a new data source, and edit the DDL to match the target table exactly.
1. Log in to the Linux shell using SSH.
2. Launch TQL.
$ tql
3. Designate the database you'll be working in:
TQL> use <database_name>;
4. Find the name of the table you want to change.
You can use the TQL command SHOW TABLES; to see a list of tables.
To see the current sharding on the table, use SCRIPT TABLE <table_name>;
5. Issue the command to remove the column from the table using this syntax:
TQL> ALTER TABLE <schema>.<table>
DROP COLUMN <column>;
For example, to drop the column "account_id" from the table "account" in the
schema "foodmart":
TQL> ALTER TABLE foodmart.account
DROP COLUMN account_id;

About making changes to Data Connect setup
Data Connect Guide Copyright © 2016 by ThoughtSpot. All Rights Reserved. 38
You must use the fully qualified name of the old table when adding the
column via TQL. To find that you can look at the DDL for the data source job
itself.
6. Run the SCRIPT TABLE command to get the new DDL to create the table.
TQL> SCRIPT TABLE <table>;
Copy the output of the command. Replace any VARCHAR(<number) column
definitions with VARCHAR(0), to match the DDL that Data Connect generates.
This is the DDL that you will use in your new data source.
7. Create a new data source.
Be sure to choose the correct columns to match the new target table columns
definitions. When you reach the step about editing the generated schema
DDL, paste in the DDL that was output by the SCRIPT TABLE command.
8. Run the data load and verify that everything is working as it should be.
9. If the old data source was running as a recurring load, stop it from running.

Data Connect Guide Copyright © 2016 by ThoughtSpot. All Rights Reserved. 39
Chapter 3: Data Connect reference
Data Connect reference
Topics:
•Login credentials for
administration
•Data Connect best
practices
•Data Connect connectors
reference
This section contains a reference for ThoughtSpot
Data Connect.
Login credentials
This section is included for convenience, so that if
you are setting up Data Connect, and are not familiar
with how to log in to ThoughtSpot from a browser or
in the Linux shell, you can find the information easily.
Best practices
This section suggests some best practices, introduces
some troubleshooting techniques, and lists things to
watch out for.
Data Connect connectors reference
This section contains a list of Tier 1 and Tier 2
connectors supported by ThoughtSpot Data
Connect.
Data Connect reference
Data Connect Guide Copyright © 2016 by ThoughtSpot. All Rights Reserved. 40
Login credentials for administration
You will need administrative permissions to perform the actions discussed in this
guide. You can access ThoughtSpot via SSH at the command prompt and from a
Web browser.
There are two separate default administrator users, an operating system user
that you type in at the Linux shell prompt, and an application user for access
through a browser. Make sure you use the correct login and password for the
method you are using to log in. Passwords are case sensitive.
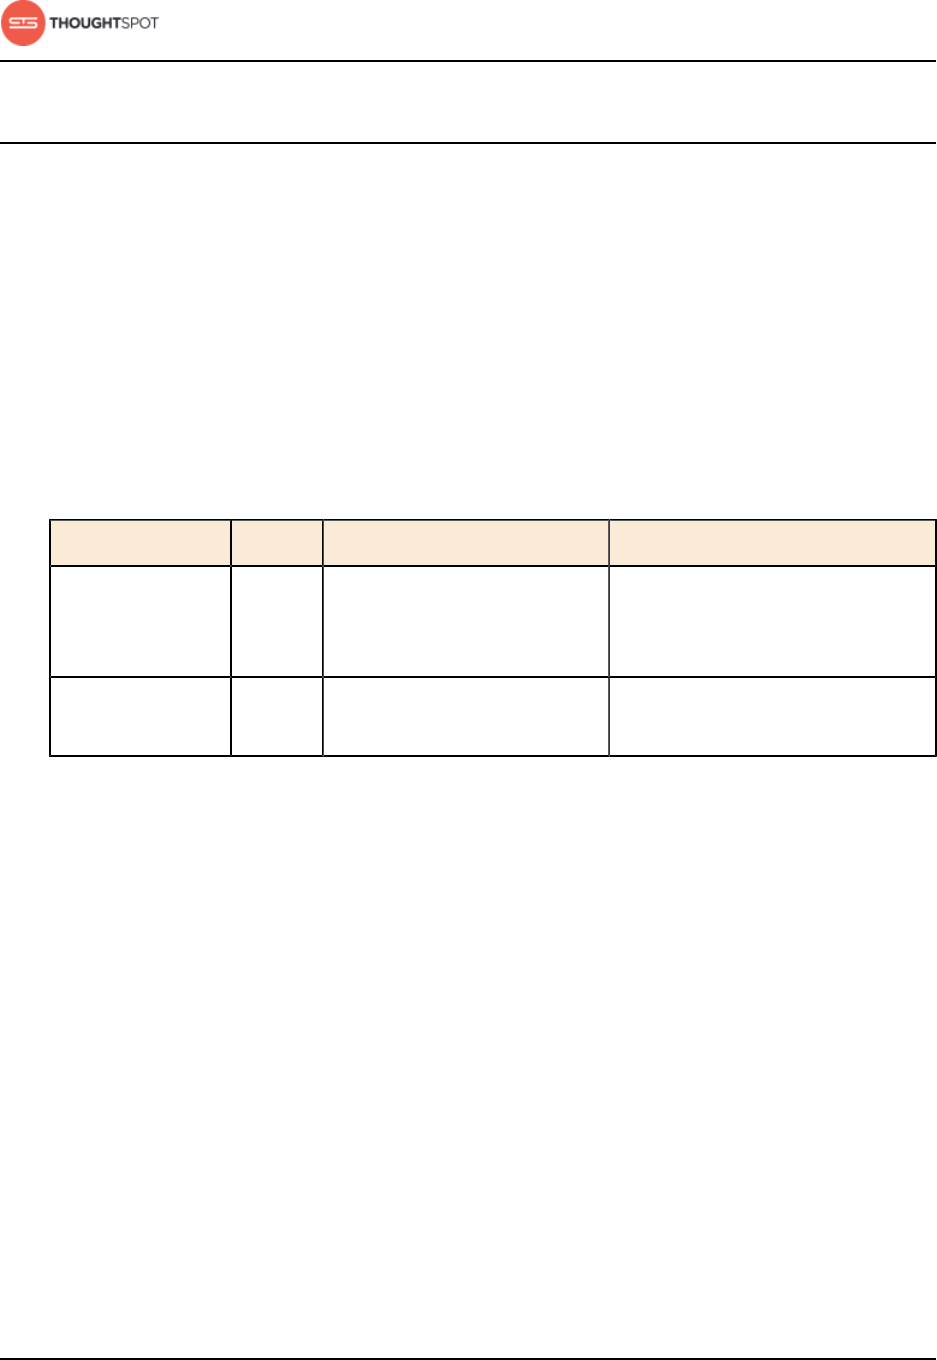
Table 1: Default administrative user credentials
Login Type User Access Method Password
OS user admin Access remotely via SSH from
the command prompt on a
client machine.
Contact ThoughtSpot to obtain
the default password.
Application user tsadmin Access through a Web
browser.
Contact ThoughtSpot to obtain
the default password.
Log in to ThoughtSpot from a browser
To set up and explore your data, access ThoughtSpot from a standard Web
browser using a username and password.
Before accessing ThoughtSpot, you need:
• The Web address (IP address or server name) for ThoughtSpot.
• A network connection.
• A Web browser.
• A username and password for ThoughtSpot.
Supported Web browsers include:
Data Connect reference
Data Connect Guide Copyright © 2016 by ThoughtSpot. All Rights Reserved. 41
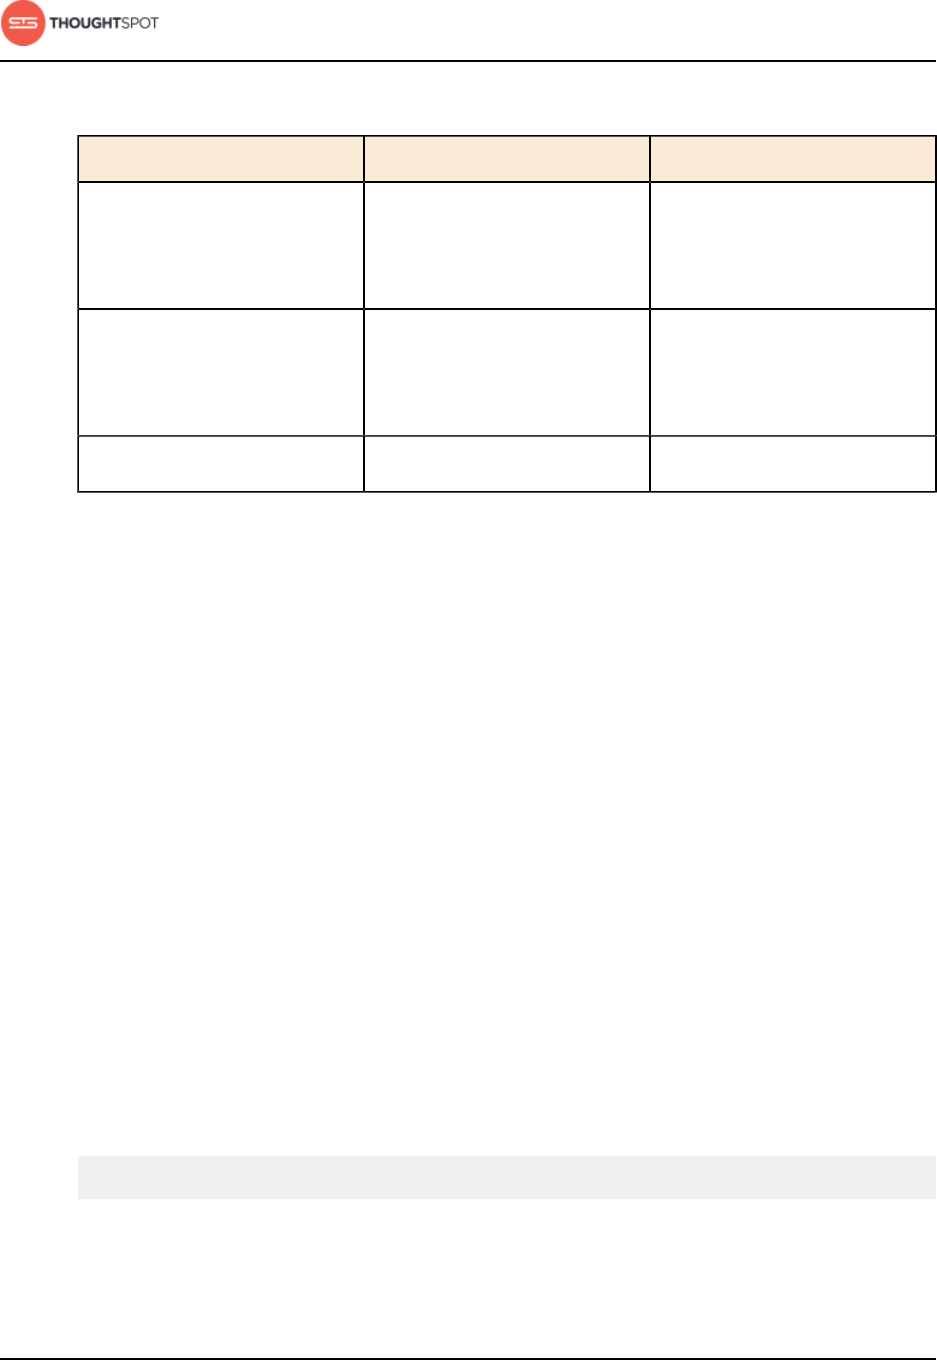
Table 2: Supported browsers
Browser Version Operating System
Google Chrome 20 and above • Windows 7 or greater
• Linux
• MacOS
Mozilla Firefox 14 and above • Windows 7 or greater
• Linux
• MacOS
Internet Explorer 11 • Windows 7 or greater
To log in to ThoughtSpot from a browser:
1. Open the browser and type in the Web address for ThoughtSpot:
http://<hostname_or_IP>
2. Enter your username and password and click Enter Now.
Log in to the Linux shell using SSH
To perform basic administration such as checking network connectivity, starting
and stopping services, and setting up email, log in remotely as the Linux
administrator user "admin". To log in with SSH from a client machine, you can
use the command shell or a utility like Putty.
In the following procedure, replace <hostname_or_IP> with the hostname or IP
address of a node in ThoughtSpot. The default SSH port (22) will be used.
1. Log in to a client machine and open a command prompt.
2. Issue the SSH command, specifying the IP address or hostname of the
ThoughtSpot instance:
ssh admin@<hostname_or_IP>
3. Enter the password for the admin user.

Data Connect reference
Data Connect Guide Copyright © 2016 by ThoughtSpot. All Rights Reserved. 42
Data Connect best practices
This section includes some tips and best practices for using ThoughtSpot Data
Connect.
Status reporting
You can see the status of a data load job by looking at the list of data sources.
The data load status gets updated every 30 seconds.
Figure 38: Data load status
To see loading details for each table that makes up a data load, click on the
name of the data load.
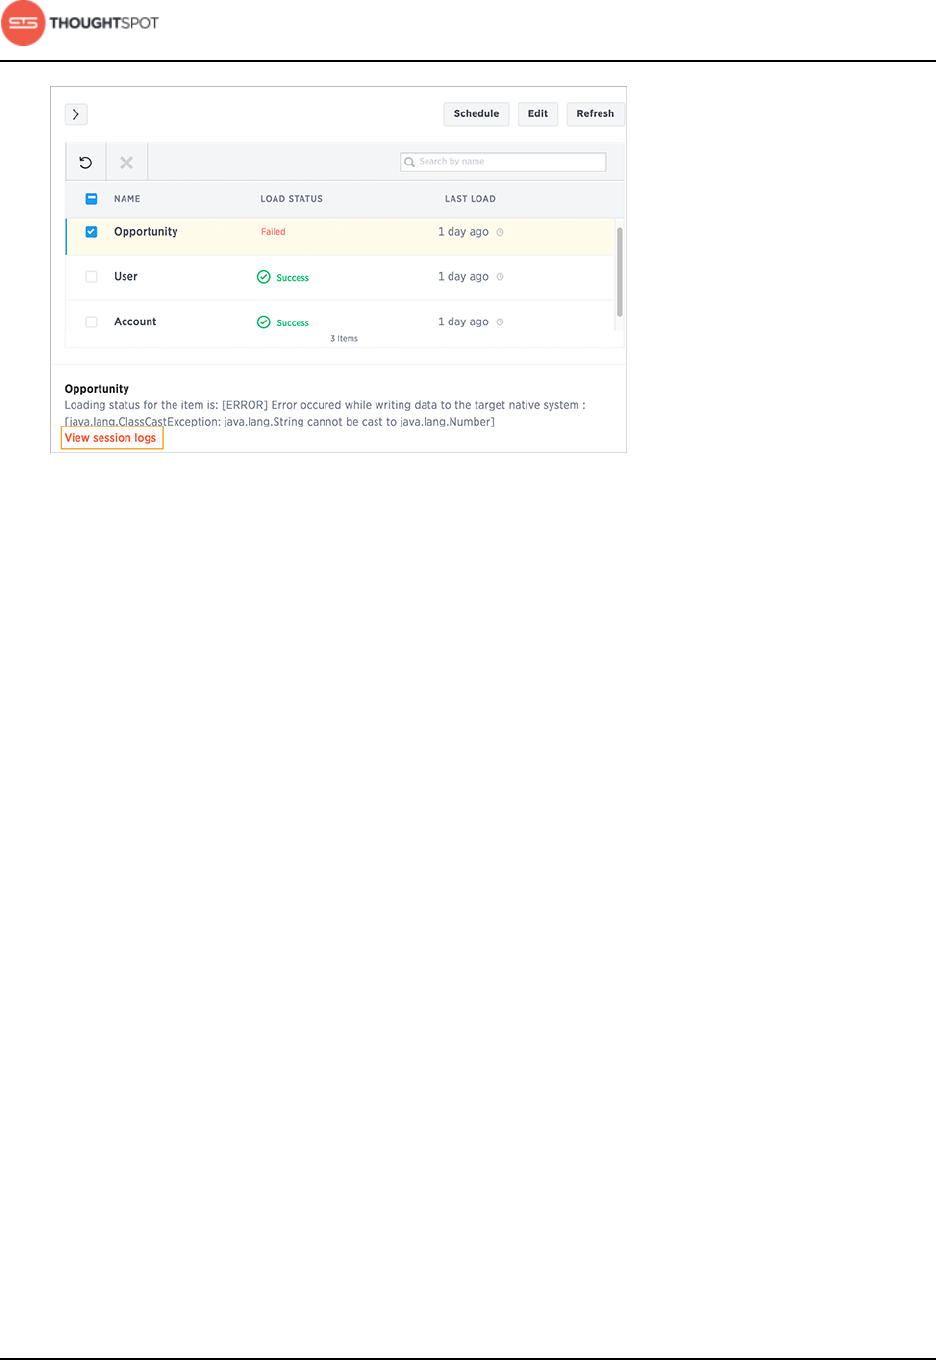
Figure 39: Data load status details
View log files
You can download the session logs for a data load run. Access the link to
download the log on the data load status details page for the session. Check
the log files for a successful or failed run, and fix the cause of the failure before
resubmitting the job.
Data Connect reference
Data Connect Guide Copyright © 2016 by ThoughtSpot. All Rights Reserved. 43
Figure 40: Download session log
Timestamp format
All relevant source values should be in the following format: yyyy-mm-dd
hh:mm:ss[.fffffffff]. In addition, please ensure that year values are within the
range of 0000-9999.
Import relationships
Relationships (primary key/foreign key) can be imported from the source
database. For this to work, the primary and foreign key(s) need to be made up
of only one column each. That is, they cannot be composite keys. You will also
need to include all the tables whose relationships you want to bring over into
ThoughtSpot within a single data source.
Edit the DDL script to choose a different database, schema, or table
You can edit the SQL DDL (data definition language) script generated by
ThoughtSpot Data Connect to point to an existing table in ThoughtSpot. You can
then load to that table and/or create the table in a different database/schema
than what the default DDL suggests. To do this, the column names and the order

Data Connect reference
Data Connect Guide Copyright © 2016 by ThoughtSpot. All Rights Reserved. 44
of the column names must match exactly with the table you are importing into in
ThoughtSpot.
No need to import a column mentioned in an expression
It is not necessary to import a column that is mentioned in an expression. For
example, let's say you have a source table "sales_fact" with a column "revenue".
You may want to use that column as part of an expression that calculates gross
margin. But maybe you don't want to include the column "revenue" in the target
table. You can unselect the column "revenue" in the table selection page, and
then add your gross margin expression that references the column "revenue",
even though it isn't part of the data to be loaded. Your expression will still work.
Internet connectivity
The only internet access the needed for ThoughtSpot Data Connect to operate
is outbound access to https://app.informaticaondemand.com and https://
app2.informaticacloud.com/ (port 443). Of course, it also needs any other
internet connectivity required to access any cloud data sources, like Salesforce.
No inbound access is needed.
Renaming columns and tables
ThoughtSpot does not support renaming columns using TQL for tables that were
imported with Data Connect. You can rename columns and tables after a data
load, using the DDL edit step or the ThoughtSpot web application. Select Data
and click on the name of the table. Then click on a column to rename it.
In older versions of ThoughtSpot Data Connect, you could not use characters
other than alphanumeric and underscores. Now, you can change a column name
to use those, for example you could change "percent_gross_margin" to "% gross
margin".
Remember: The use of spaces is not supported. Also, field names must
contain 65 characters or less, and they cannot start with a number.

Data Connect reference
Data Connect Guide Copyright © 2016 by ThoughtSpot. All Rights Reserved. 45
Troubleshooting
To view details about error conditions, you can look at the trace file that is
generated when there is a red bar error.
Possible issues that can occur are:
• Cannot connect to data source.
• Authentication was rejected.
• Schema being loaded does not match schema receiving the load.
Best practices
Unless you're trying to bring in relationships between tables with a data source,
the recommendation is to create one data source load job per table. Doing
this makes your data sources more flexible for if/when you need to change
something (add a column, etc.)
If you want to add a foreign key, do it using the TQL command ALTER TABLE,
after the load has completed. This is often easier than trying to get relationships
to come in with a data load, and it works even if the relationship you want
to create does not exist in the source system. If use this method, you'll need
to manually create the relationships using a TQL script, which you can run
afterward the first data load.
Derived column names
When you create a derived column, further activities in ThoughtSpot Data
Connect will show you the target column name, since there is no analogous
column in the source.
Compact tables to save memory
If you're doing incremental loads into existing tables, you may want to automate
a script that runs the TQL command COMPACT TABLE either after each
incremental load, or periodically (like weekly, for a nightly load). This is because

Data Connect reference
Data Connect Guide Copyright © 2016 by ThoughtSpot. All Rights Reserved. 46
when upserts are performed, space from the old rows is not released. The delta
between each row that gets upserted is retained and takes up memory.
Expressions
You can validate your expressions when using ThoughtSpot Data Connect. Make
sure to click Validate after entering your expression. This prevents you from
entering an invalid expression that will fail at runtime.
When using the expression builder concat, you need to use single quotes instead
of double quotes around each of the strings.
Connection parameters
Informatica provides documentation on each of its connectors. This contains
information on the connection properties and what they mean for each
connector. You can see the connection properties in ThoughtSpot Data Connect
by mousing over the key value pairs, however, you won't be able to see their
meanings. For that, you should refer to the Informatica documentation.
Data Connect connectors reference
Here is a list of all of the source connectors, and their connection credentials,
that are supported in ThoughtSpot Data Connect. As you create a new
connection, you will need specific connection information to enter into the
create connection dialog box. You can find more detailed information below for
each of the connection types ThoughtSpot Data Connect supports.
Table 3: Connection types and credentials
Connection Type Connection Credentials
Amazon S3 • Connection name*: Enter a new Amazon S3 connection name.
• Access Key: Enter the access key ID used to access the Amazon account
resources. This is required if you do not use AWS Identity and Access
Management (IAM) authentication.

Data Connect reference
Data Connect Guide Copyright © 2016 by ThoughtSpot. All Rights Reserved. 47
Connection Type Connection Credentials
• Secret Key: Enter the secret access key used to access the Amazon
account resources. This value is associated with the access key and
uniquely identifies the account. You must specify this value if you specify
the access key ID.
• Folder Path*: Enter the complete path to the Amazon S3 objects. You
must include the bucket name and any folder name. For example, <bucket
name>/<my folder name>.
• Master Symmetric Key: Provide a 256-bit AES encryption key in the Base64
format when you enable client-side encryption. You can generate a key
using a third-party tool.
• Code Page*: Choose either MS_1252 or UTF_8 from the dropdown menu.
The code page should be compatible with the Amazon S3 source.
• Region Name*: Make a selection from the dropdown menu, which includes
US East (N. Virginia), US West (N. California), and US West (Oregon). This
is where the Amazon S3 bucket is available.
Flat File • Connection name*: Enter a new Flat File connection name.
• Directory*: Enter the directory where you want to connect to.
• Date Format*: Choose your date format from the dropdown menu.
• Code Page*: Choose either MS_1252 or UTF_8 from the dropdown menu.
The code page should be compatible with the Flat File source.
Hive (Hadoop) • Connection name*: Enter a new Hadoop connection name.
• Username*: Enter the username of the schema of the Hadoop component.
• Password*: Enter the password of the schema of the Hadoop component.
• JDBC Connection URL: Enter the JDBC URL to connect to the Hadoop
component.
• Driver: Enter the JDBC driver class to connect to the Hadoop component.
• Commit Interval: Enter the batch size, in rows, to load data to Hive.
• Hadoop Installation Path: Enter the installation path of the Hadoop
component.
• HDFS Installation Path: Enter the HDFS installation path.
• HBase Installation Path: Enter the HBase installation path.
• Implala Installation Path: Enter the Implala installation path.

Data Connect reference
Data Connect Guide Copyright © 2016 by ThoughtSpot. All Rights Reserved. 48
Connection Type Connection Credentials
• Miscellaneous Library Path: Enter the library that communicates with
Hadoop.
• Enable Logging: Choose whether to enable logging to enable the log
messages.
Jira • Connection name*: Enter a new JIRA connection name.
• Username*: Enter the JIRA account username.
• Password*: Enter the JIRA account password.
• URL*: Enter the base JIRA URL of the JIRA instance you want to connect
to. For example, https://<your_company_name>.atlassian.net/.
MySQL • Connection name*: Enter a new MySQL connection name.
• Username*: Enter the MySQL account username.
• Password*: Enter the MySQL account password.
• Host*: Enter the host number. For example, 192.156.3.123.
• Port*: Enter the port number. For example, 3305.
• Database Name*: Enter the database name you want to connect to.
• Code Page*: Choose either MS_1252 or UTF_8 from the dropdown menu.
The code page should be compatible with the MySQL source.
Oracle • Connection name*: Enter a new Oracle connection name.
• Username*: Enter the Oracle account username.
• Password*: Enter the Oracle account password.
• Host*: Enter the host number. For example, 192.156.3.123.
Note: If your connection fails, check if the Single Client Access
Name (SCAN) feature is enabled on the Oracle Database.
Informatica drivers cannot establish connectivity with the database
if this feature is enabled. SCAN is a domain name registered
to at least one and up to three IP addresses, either in Domain
Naming Service (DNS) or Grid Naming Service (GNS). To resolve
this issue, get the Virtual IP of the Oracle Database and its
corresponding hostname using nslookup on IP. Use this host name
in the connection properties.
• Port*: Enter the port number. For example, 3305.

Data Connect reference
Data Connect Guide Copyright © 2016 by ThoughtSpot. All Rights Reserved. 49
Connection Type Connection Credentials
• Service Name*: Enter the service name. You can find the service name by
connecting to the server as "system" using SID, then executing the query:
select value from v$parameter where name like '%service_name
%';.
• Schema*: Enter the schema you want to connect to.
• Code Page*: Choose either MS_1252 or UTF_8 from the dropdown menu.
The code page should be compatible with the Oracle source.
REST • Connection name*: Enter a new REST API connection name.
• Base Url*: Enter the REST endpoint URL, without the Query parameters,
that you want to connect to.
• Is BaseUrl Dynamic*: Choose either true or false from the dropdown menu.
The base URL is dynamic if each request is different.
• Url Request Parameters: Enter the request that is URL query parameters.
Parameters should be separated by semicolons. The Property and value
should be separated by 'equals' (=).
• Form Request Parameters: Enter the request that is form query
parameters.
• Header Request Parameters: Enter the request that is header query
parameters.
• Media Type*: Choose your media type from the dropdown menu. This is the
data that you're receiving.
• Request Type*: Choose your request type from the dropdown menu.
Currently, only GET is supported, even though other types are listed.
• Authentication Type*: Choose your authentication type from the dropdown
menu. If you choose CUSTOM_AUTH, please contact ThoughtSpot Support
to help you create the authentication.
• OAuth Consumer Key: Provide the consumer key for OAuth authentication.
• OAuth Consumer Secret: Provide the consumer secret for OAuth
authentication.
• OAuth Token: Mention the token key for OAuth authentication.
• OAuth Token Secret: Mention the token secret for OAuth authentication.
• URL Input Parameters Config File Name: Mention the URL input parameter
file name with the path. The file path should be entered for a dynamic base

Data Connect reference
Data Connect Guide Copyright © 2016 by ThoughtSpot. All Rights Reserved. 50
Connection Type Connection Credentials
URL. The URLs are generated at run time with values that are fetched from
the CSV file.
• FORM Input Parameters Config File Name: Mention the form input
parameter file name with the path.
• HEADER Input Parameters Config File Name: Mention the header input
parameter file name with the path.
SalesForce • Connection name*: Enter a new Salesforce connection name.
• Username*: Enter the Salesforce account email address.
• Password*: Enter the Salseforce account password.
• Security Token*: Enter the security token generated from the Salesforce
application. If your account requires a security token and you don't have
one, you can generate or reset a security token. After logging in to the
Salesforce web site, click Setup > My Personal Information > Reset My
Security Token.
• Service URL*: Enter the Salesforce service URL. You can use the following
versions of the Salesforce API:
• Version 31. Salesforce connection uses the following service URL by
default: https:// login.salesforce.com/services/Soap/u/31.0
• Version 33. You can enter the following service URL to use
version 33 of the Salesforce API in the connection: https://
login.salesforce.com/services/Soap/u/33.0
• Version 34. You can enter the following service URL to use
version 34 of the Salesforce API in the connection: https://
login.salesforce.com/services/Soap/u/34.0
• Version 35. You can enter the following service URL to use
version 35 of the Salesforce API in the connection: https://
login.salesforce.com/services/Soap/u/35.0
• Version 36. You can enter the following service URL to use
version 36 of the Salesforce API in the connection: https://
login.salesforce.com/services/Soap/u/36.0
SQL Server • Connection name*: Enter a new SQL Server connection name.
• Server Version*: Make a selection from the dropdown menu, which includes
SQL Server 2000, 2005, 2008, and 2012.

Data Connect reference
Data Connect Guide Copyright © 2016 by ThoughtSpot. All Rights Reserved. 51
Connection Type Connection Credentials
• Username*: Enter the SQL Server account username.
• Password*: Enter the SQL Server account password.
• Host*: Enter the host number. For example, 192.156.3.123.
• Port*: Enter the port number. For example, 3305.
• Instance Name: Enter the instance name.
• Database Name*: Enter the database name you want to connect to.
• Schema: Enter the schema you want to connect to.
• Code Page*: Choose either MS_1252 or UTF_8 from the dropdown menu.
The code page should be compatible with the SQL Server source.
Teradata • Connection name*: Enter a new Teradata connection name.
• Username*: Enter the Teradata account username.
• Password*: Enter the Teradata account password.
• Schema*: Enter the schema you want to connect to.
• JDBC Connection URL*: Enter the JDBC connection URL that you want to
connect to. For example, jdbc:teradata://capri1.teradata.ws.
• JDBC Jar Directory*: Enter the JDBC jar directory that you want to connect
to. For example, /home/admin/pr_temp/jdbc/Teradata.
Twitter • Connection name*: Enter a new Twitter connection name.
• Username*: Enter the Twitter account username.
• Password*: Enter the Twitter account password.
• OAuth settings details: You can generate your Twitter OAuth setting details
if you don't know them. Start by going to https://www.dev.twitter.com
and logging in using your login credentials. Click on the user icon at the
top right of the home page and select My applications. From the list of
available applications, select the application for which you want to create a
connection. The page containing the OAuth settings details appears. If the
tokens are not generated, click Recreate my access token.
• OAuth Consumer Key*: Enter the OAuth consumer key obtained from
Twitter.
• OAuth Consumer Secret*: Enter the OAuth consumer secret obtained
from Twitter.
Data Connect reference
Data Connect Guide Copyright © 2016 by ThoughtSpot. All Rights Reserved. 52
Connection Type Connection Credentials
• OAuth Access Token*: Enter the OAuth access token obtained from
Twitter.
• OAuth Access Token Secret*: Enter the OAuth access token secret
obtained from Twitter.
• Enable Logging*: Choose either true or false from the dropdown menu.
Zendesk • Connection name*: Enter a new Zendesk connection name.
• Username*: Enter the Zendesk account email address.
• Password*: Enter the Zendesk account password.
• Zendesk Sub-Domain*: Enter the URL of the Zendesk account. For
example, https://informaticabusinesssolutionhelp.zendesk.com/
api/v2.
* Required fields
