TinyCircuits Tiny Screen Reference Manual
User Manual: Pdf
Open the PDF directly: View PDF ![]() .
.
Page Count: 35

AKROSENSE LLC. | CANAL PLACE, SUITE #457 - MAIN ST. - AKRON, OH
TINYSCREEN REFERENCE MANUAL
Reference Home
1
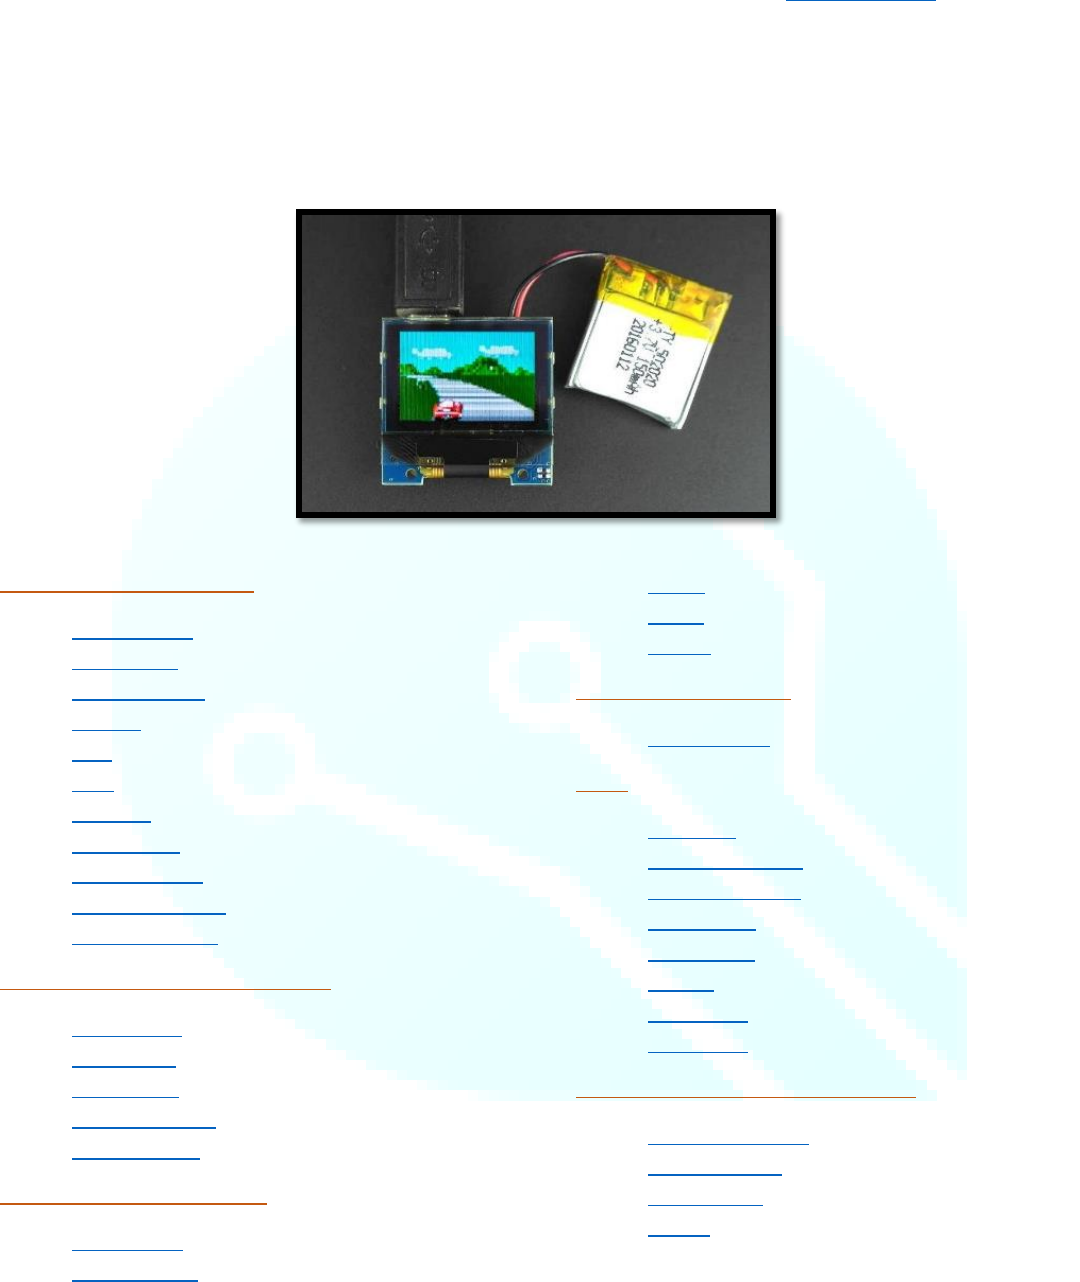
Introduction to the TinyScreen and TinyScreen+
This page is to help familiarize you with some of the technical details of the documentation
that follows. Please review it before continuing, and refer back to this page when necessary!
TinyCircuits currently manufactures two major versions of the TinyScreen: the TinyScreen TinyShield and TinyScreen+. These have
the same 0.96” OLED display and four button inputs. The TinyScreen TinyShields are intended for use with a TinyDuino processor
board, while the TinyScreen+ is a standalone product featuring a built in ARM processor and USB connectivity.
SPI – The TinyScreen display data is written using unidirectional SPI communication (the screen may be written to, but not read
from). If you are unfamiliar with SPI, you can find an excellent tutorial for understanding the protocol here:
https://learn.sparkfun.com/tutorials/serial-peripheral-interface-spi.
I2C – Used on the TinyScreen TinyShield, where the processor chip communicates with the SX1505 input/output expander chip. If
you are unfamiliar with I2C, you can find an excellent tutorial for understanding the protocol here:
https://learn.sparkfun.com/tutorials/i2c?_ga=1.185257130.2067980992.1444774663.
*You won’t have to worry about using I2C or SPI to run the TinyScreen. Our library already does the heavy lifting for you. The
tutorials are just to provide additional background knowledge for those interested!
SX1505 – An I2C input/output expander chip used on the TinyScreen TinyShield. This chip adds extra I/O to the ATmega328P
microcontroller used on the TinyDuino, allowing for control signals and reading the four button states on the TinyShield through only
two shared pins on
SSD1331 – The driver for the OLED display. It accepts commands and data from a microcontroller and handles the driving of each
LED in the display matrix. Commands sent to the SSD1331 include information on how the display should be configured, how it
should accept data, and how it should display that data.
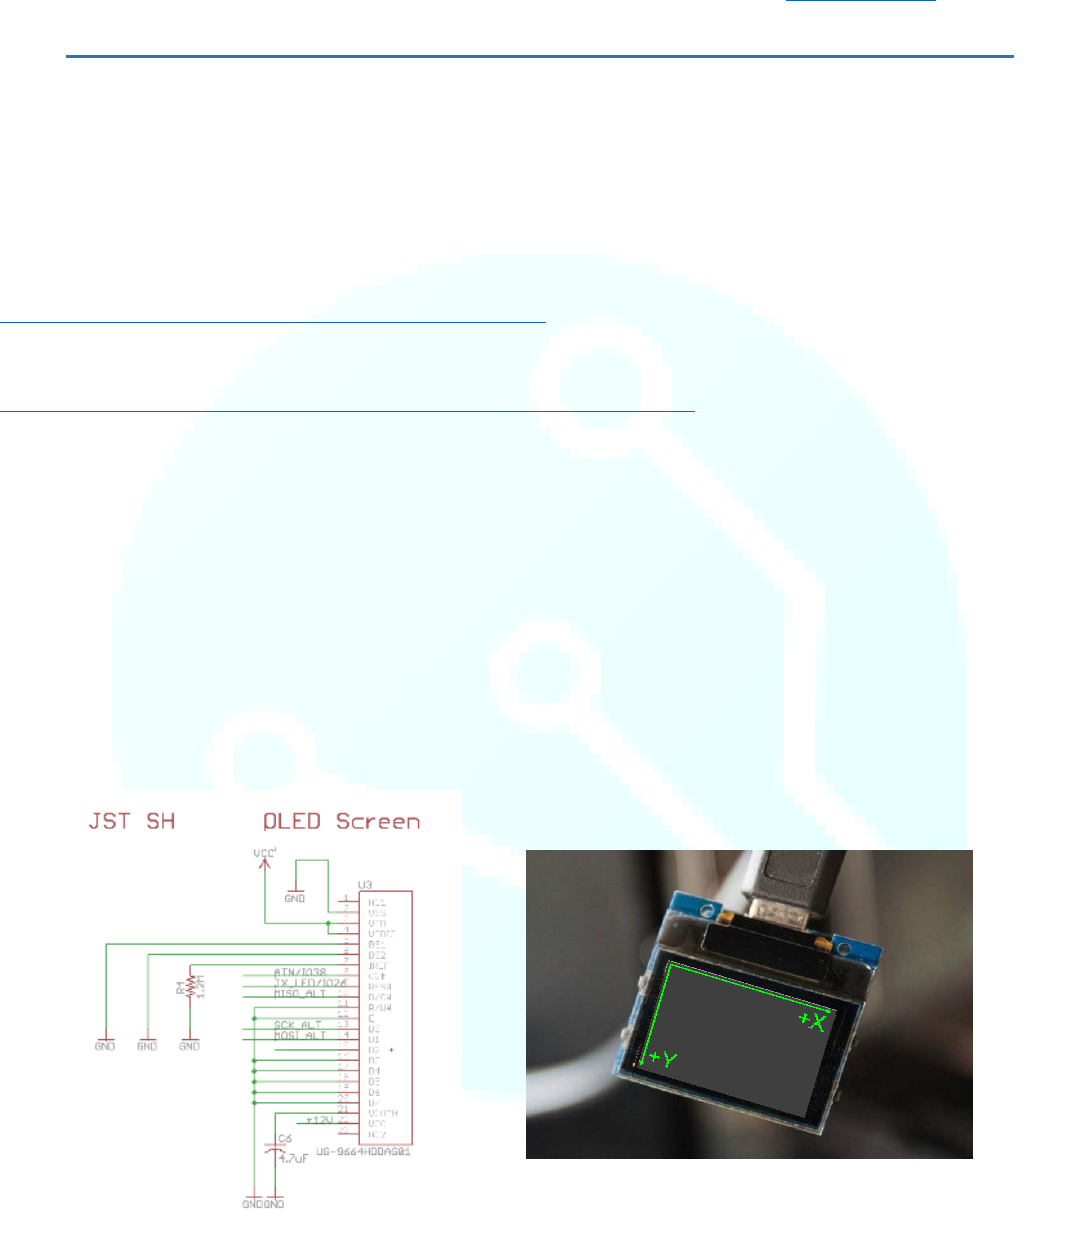
It is important to keep in mind that the coordinate system for displays places the origin (0, 0) in the Top Left rather than the Lower
Left corner. All X and Y coordinates are positive and referenced from this origin location (as illustrated in the photo below).
Reference Home
2
TinyScreen.h Library Documentation and Example Code
The TinyScreen library was developed for use with the TinyScreen and TinyScreen+ boards, both utilizing a 96x64 pixel
OLED display screen with 16bit color depth!
Library Last Modified: 11 February 2016 | Documentation Last Modified: 2 February 2017
Initialization and Control:
TinyScreen()
startData()
endTransfer()
begin()
on()
off()
setFlip()
setMirror()
setBitDepth()
setColorMode()
setBrightness()
Accelerated Drawing Commands:
drawPixel()
drawLine()
drawRect()
clearWindow()
clearScreen()
Basic Graphics Commands:
writePixel()
writeBuffer()
setX()
setY()
goTo()
I2C and GPIO Related:
getButtons()
Font:
setFont()
getFontHeight()
getPrintWidth()
setCursor()
fontColor()
write()
xMax = 95
yMax = 63
Internally Referenced Commands:
startCommand()
writeRemap()
writeGPIO()
print()

Reference Home
1
TinyScreen()
Description
Constructor type tells us if we’re using a regular TinyScreen, alternate address TinyScreen, or a TinyScreen+. Address
sets the I2C address of SX1505 to 0x20 or 0x21, which is set by the position of a resistor near SX1505 (see schematic and
board design).
*The TinyScreen+ omits the SX1505 chip as it is not necessary because the processor built into the TinyScreen+ has
plenty of IO.
*The TinyScreen Alternate uses a different address than the standard TinyScreen which allows 2 TinyScreens to be used
simultaneously by the same TinyDuino processor board without any user modifications.
Syntax
TinyScreen display = TinyScreen(type);
Parameters
type: TinyScreenDefault, TinyScreenAlternate, or TinyScreenPlus are all valid arguments
display: an object of type TinyScreen
Example
TinyScreen display = TinyScreen(TinyScreenPlus);
TinyScreen display = TinyScreen(TinyScreenDefault);
TinyScreen display = TinyScreen(TinyScreenAlternate);
Reference Home
2
startData()
Description
Writes the SSD1331 chip-select pin (CS) active with data/command pin signaling data. Used with the writeBuffer()
function when sending large amounts of data to the screen all at once, such as bitmaps, for example.
Syntax
display.startData();
Parameters
display: an object of type TinyScreen
Example
See Also:
startCommand()
display.startData();
display.writeBuffer(flappyBirdBitmap, 17*12);
display.endTransmission();
Reference Home
3
endTransfer()
Description
Write SSD1331 chip select inactive after writing data to the OLED buffer.
Syntax
display.endTransfer();
Parameters
display: an object of type TinyScreen
Example
See Also:
startData()
writeBuffer()
display.startData();
display.writeBuffer(flappyBirdBitmap, 17*12);
display.endTransfer();


Reference Home
5
on()
Description
Turns the display on! This function is used along with the off() function. Together these two functions can help to
conserve power and increase the battery life of portable projects.
Syntax
display.on();
Parameters
display: an object of type TinyScreen
Example
Note
This function is not used in the TinyScreenBasicExample Code because the screen will come on by default without
explicitly using this function.
See Also:
off()
display.on();
Reference Home
6
off()
Description
Turns the display off, which can be useful when trying to conserve power, especially for battery powered applications!
Use the on() function to turn the display back on.
Syntax
display.off();
Parameters
display: an object of type TinyScreen
Example
Note
The TinyScreen will be on by default (which is why our TinyScreenBasicExample omits using it), however once using the
off() function, the on() function will then be necessary to turn the screen back on.
When the screen is “off”, it is still running, however the LED driver is not powered, and therefore the display shows
nothing visibly. While in this mode, the screen consumes very, very little power.
See Also:
on()
display.off();

Reference Home
7
setFlip()
Description
Sets the orientation of the image on the screen. Performed in hardware on the SSD1331 OLED driver chip. This function
is a simple way to re-orient your display for projects that may require both orientations. We use this function for our
“Smart Watch” code as the default orientation would make the display upside down, yikes!
Syntax
display.setFlip(flip);
Parameters
display: an object of type TinyScreen
flip: a Boolean used to set orientation, false = Normal, true = Upside Down
Example
Note
This function will accept true and false as valid arguments
See Also:
setMirror()
display.setFlip(true);
Reference Home
8
setMirror()
Description
Done in hardware on the SSD1331 OLED driver chip. Allows for mirroring across the Y-axis.
Syntax
display.setMirror(mirror);
Parameters
display: an object of type TinyScreen
mirror: a Boolean used to set mirror. false = Normal, true = Mirrored across Y-axis
Example
Note
This function will accept true and false as valid arguments
See Also:
setFlip()
display.setMirror(true);

Reference Home
9
setBitDepth()
Description
Sets bit depth to either 8bit or 16bits.
Syntax
display.setBitDepth(depth);
Parameters
display: an object of type TinyScreen
depth: either TSBitDepth8 for 8bit depth, or TSBitDepth16 for 16bit depth
Example
Note
Bit depth refers to the color information stored in an image. The higher the bit depth of an image, the more colors it can
store. The simplest image, a 1 bit image, can only show two colors, black and white.
(etc.usf.edu/techease/win/images/what-is-bit-depth/)
See Also:
setColorMode()
display.setBitDepth(TSBitDepth16);
Reference Home
10
setColorMode()
Description
There are two types of color mode available, RGB (Red, Green, Blue) or BGR (Blue, Green, Red). While they seem the
same, the mode set determines the order in which the OLED driver receives the color data you want to display. The
default is BGR.
Syntax
display.setColorMode(mode);
Parameters
display: an object of type TinyScreen
mode: either TSColorModeBGR or TSColorModeRGB
Example
Note
If you select the RGB color mode and try to use the included color definitions, the red will appear as blue and blue will
appear as red. Green will remain unaffected.
See Also:
setBitDepth()
display.setColorMode(TSColorModeBGR);
Reference Home
11
setBrightness()
Description
Sets screen brightness (main current level) between 0 and 15. Typically performed in the setup() routine unless
brightness adjustments are desirable during code execution. Lower levels will appear dimmer however, will also
consume less battery life.
Syntax
display.setBrightness(brightness);
Parameters
display: an object of type TinyScreen
brightness: variable used to set the brightness of the screen.
Example
See Also:
on()
off()
display.setBrightness(15); //Sets screen to full brightness
Reference Home
12
drawPixel()
Description
Set pixel (x, y) to the specified color. This is slow because we need to send commands to the OLED display for setting the
x and the y, then send the pixel data. If each pixel is individually assigned and sent, the entire transfer can take up a
significant amount of time and result in slow code execution.
Syntax
display.drawPixel(x, y, color);
Parameters
display: an object of type TinyScreen
x: the x-coordinate of the desired pixel
y: the y-coordinate of the desired pixel
color: any of the included color constants (Included Constants and Definitions page)
Example
See Also:
drawLine()
drawRect()
display.drawPixel(10, 10, TS_8b_Blue); //Makes pixel (10, 10) blue on the OLED display

Reference Home
13
drawLine()
Description
Draw a line from (X1, Y1) to (X2, Y2) with an 8bit color, 16bit color, or 6bit color (Red and Blue ignore the LSB).
Syntax
display.drawLine(X1, Y1, X2, Y2, red, green, blue);
display.drawLine(X1, Y1, X2, Y2, 8bitcolor);
display.drawLine(X1, Y1, X2, Y2, 16bitcolor);
Parameters
display: an object of type TinyScreen location
X1: the x coordinate of the starting pixel
Y1: the y coordinate of the starting pixel location
X2: the x coordinate of the final pixel location
Y2: the y coordinate of the final pixel location
red: uses 6bit color values (red ignores the LSB)
green: uses 6bit color values
blue: uses 6bit color values (blue also ignores the LSB)
8bitcolor: any of the included 8bit color constants (Included Constants and Definitions page)
16bitcolor: any of the included 16bit color constants (Included Constants and Definitions page)
TS_8b_color: another command to allow use of pre-programmed 8bit colors, where color is replaced with Red, Blue,
White, etc.
Example
Note
Remember: Screen coordinates place (0, 0) in the very top left and the maximum value in the bottom right. For the
TinyScreen and TinyScreen+, this is coordinate (95, 63).
See Also:
drawRect()
drawPixel()
display.drawLine (0, 0, 95, 63, TS_8b_Red); //Draws a Red line from the upper left corner to the bottom right
corner of the screen

Reference Home
14
drawRect()
Description
Similar to drawLine(), this function draws a rectangle with the given start coordinate, followed by the width of the
rectangle, the height, and the fill or no fill, then color.
Syntax
display.drawRect(x start, y start, width, height, fill, red, green, blue);
display.drawRect(x start, y start, width, height, fill, 8bitcolor);
display.drawRect(x start, y start, width, height, fill, 16bitcolor);
Parameters
display: an object of type TinyScreen
x start: the x-coordinate of the origin pixel
y start: the y-coordinate of the origin pixel
width: how many pixels wide the rectangle should be
height: how many pixels high the rectangle should be
fill: a boolean (True or False) or the built in constants, TSRectangleFilled or TSRectangleNoFill
red: the 8-bit red color value between 0 and 255
green: the 8-bit green color value between 0 and 255
blue: the 8-bit blue color value between 0 and 255
Example
See Also:
drawPixel()
drawLine()
display.drawRect(10, 10, 85, 53, TSRectangleFilled, TS_8b_Green);
Reference Home
15
clearWindow()
Description
Similar to clearScreen(), the clearWindow() function allows the user to clear only the specified area on the screen.
Syntax
display.clearWindow(x start, y start, width, height);
Parameters
display: an object of type TinyScreen
x start: the x-coordinate of the origin pixel of the window to be cleared
y start: the y-coordinate of the origin pixel of the window to be cleared
width: the width (in pixels) of the window to be cleared, from the origin pixel extending to the right of the screen
height: the height (in pixels) of the window to be cleared, from the origin pixel extending down toward the bottom of
the screen
Example
See Also:
clearScreen()
display.clearWindow(10, 10, 83, 63); //Clears the center of the screen, leaving a 10-pixel perimeter around the edge

Reference Home
17
writePixel()
Description
Write the current pixel to the specified color. Faster than the drawPixel function because it does not send the (x, y)
coordinates, but still requires time to ready the display to receive the data.
Syntax
display.writePixel(color);
Parameters
display: an object of type TinyScreen
color: any of the included color constants (Included Constants and Definitions page)
Example
See Also:
writeBuffer()
display.writePixel(TS_8b_Green); //Turns the pixel that was last modified, to Green

Reference Home
18
writeBuffer()
Description
Optimized write of a large buffer of 8bit data. Must be proceeded by startData() and followed by endTransfer(), as
shown below, however there can be any number of calls to writeBuffer() between.
Syntax
display.writeBuffer(buffer, count);
Parameters
display: an object of type TinyScreen
buffer: what to write to the buffer (typically a large bitmap image)
count: the row and column dimensions of the pixel data to be sent
Example
See Also:
startData()
endTransfer()
display.startData();
display.writeBuffer(flappyBirdBitmap, 17*12);
display.endTransfer();

Reference Home
19
setX()
Description
Allows user to send pixel data starting at coordinate (xStart). When (xEnd) is reached, the X coordinate will return to
(xStart) and increment the Y coordinate. This is useful for drawing bitmaps line by line.
Syntax
display.setX(xStart, xEnd);
Parameters
display: an object of type TinyScreen
xStart: the x-coordinate of the first pixel to be modified
xEnd: the x-coordinate where to stop and increment the Y coordinate
Example
Note
*The (xEnd) value MUST be larger than the (xStart) value!
See Also:
setY()
display.setX(30, 50);

Reference Home
20
setY()
Description
Allows user to send pixel data starting at coordinate (yStart). When (yEnd) is reached, the Y coordinate will return to
(yStart) and increment the X coordinate. This is useful for drawing bitmaps line by line.
Syntax
display.setY(yStart, yEnd);
Parameters
display: an object of type TinyScreen
yStart: the y value of where to start pixel modification
yEnd: the y value of where to stop and increment the X coordinate
Example
Note
*The (yEnd) value MUST be larger than the (yStart) value!
See Also:
setX()
display.setY(10, 30);

Reference Home
21
goTo()
Description
Set OLED RAM to pixel address (x, y) constrained to xMax(95) and yMax(63)
Syntax
display.goTo(x, y);
Parameters
display: an object of type TinyScreen
x: the x-coordinate of the pixel address to jump to
y: the y-coordinate of the pixel address to jump to
Example
Note
While this function may be used to control pixels individually, there are faster methods for drawing images and text.
display.goTo(10, 50);

Reference Home
22
getButtons()
Description
Read button states, return as four LSBs in a byte with optional button mask.
Syntax
display.getButtons();
display.getButtons(mask);
Parameters
display: an object of type TinyScreen
mask: an optional button mask for the button data byte
Returns
Returns a byte containing the button values as the lowest 4 bits. Byte will be between (0b0000-0000) and (0b0000-1111)
when no mask is applied. Masks include the (TSButtonUpperLeft) constants as listed at the end of this document.
Example
Note
See the Included Constants page for the available button mask options that come built into the TinyScreen Library!
*The buttons are active LOW in hardware, however the library compensates for this and makes them active HIGH. It also
shifts them from the MSB into the LSB.
display.getButtons(TSButtonUpperLeft); //Uses a mask to return only the value of the upper left button
display.getButtons(); //Does NOT include any mask, and returns the byte value including all button states
Reference Home
23
setFont()
Description
Sets font data to use for writing text
Syntax
display.setFont(descriptor);
Parameters
display: an object of type TinyScreen
descriptor:
Example
Note
For more Information on creating fonts, see the “font.h” file. The Dot Factory has implemented an easy way to use
already created texts, but also to create your own!
*Existing fonts include: liberationSans_8pt, 10pt, 12pt, 14pt, 16pt, 22pt --- liberationSansNarrow_8pt, 10pt, 12pt, 16pt,
22pt --- thinPixel17_10pt
See Also:
getFontHeight()
getPrintWidth()
fontColor()
display.setFont(thinPixel17_10ptFontInfo);
Reference Home
24
getFontHeight()
Description
Returns the maximum height of the font used. This is a useful function for easily discerning text placement. Many of our
code examples implement this function to easily center text on the screen. The code can use this function to calculate
coordinates rather than the programmer manually placing text by coordinate value.
Syntax
display.getFontHeight();
display.getFontHeight(fontInfo);
Parameters
display: an object of type TinyScreen
fontInfo: enter the font style you are using. Not required, but can be handy when using multiple font styles in the same
sketch
Returns
Returns an 8bit integer equal to the height (in number of pixels) of the text.
Example
See Also:
getPrintWidth()
display.getFontHeight();

Reference Home
25
getPrintWidth()
Description
Similar to getFontHeight(), the getPrintWidth() function calculates the length of the printed text string and returns the
value, which can be used to easily place text on the screen.
Syntax
display.getPrintWidth(“text”);
Parameters
display: an object of type TinyScreen
text: the text of which you which to measure
Returns
Returns an 8bit integer equal to the width of the text in pixels.
Example
See Also:
getFontHeight()
display.getPrintWidth(“TinyCircuits Rocks!”);

Reference Home
26
setCursor()
Description
Set text cursor to position (x, y).
Syntax
display.setCursor(x, y);
Parameters
display: an object of type TinyScreen
x: the x coordinate to place the cursor at
y: the y coordinate to place the cursor at
Example
Note
Similar to the LiquidCrystal library which allows the user to place the cursor where they would like to begin printing text.
display.setCursor(12, 12);

Reference Home
27
fontColor()
Description
Sets the text and background color surrounding the text box.
Syntax
display.fontColor(text color, background color);
Parameters
display: an object of type TinyScreen
text color: the color the text will appear as, any of the included color constants (Included Constants and Definitions
page)
background color: the color of the background immediately surrounding the text (*NOT the overall background color of
the screen)
Example
Note
See the Included Constants page at the end of this document for all of the available color definitions!
See Also:
setCursor()
print()
getPrintWidth()
getFontHeight()
display.fontColor(TS_8b_White, TS_8b_Black); //Draws white text on a black background
display.print(“Tiny Circuits Rules!”); //Displays this text as white on black

Reference Home
29
xMax()
Description
Equivalent to 95, which is the largest value of pixel possible on the x-axis. When writing to the screen, xMax() takes any
value larger than 95, and constrains it to 95.
Syntax
display.xMax();
Parameters
display: an object of type TinyScreen
Example
Not used in the TinyScreenBasicExample Code
See Also:
yMax()
yMax()
Description
Equivalent to 63, the largest pixel value possible on the y-axis of the screen. The yMax() function takes any value larger
than 63 and constrains it to 63.
Syntax
display.yMax();
Parameters
display: an object of type TinyScreen
Example
Not used in the TinyScreenBasicExample Code
See Also:
xMax()
Reference Home
30
startCommand()
Description
Write SSD1331 chip select pin active with data/command signaling a command. This function is primarily used by the
library internally and therefore, does not include any example code.
writeRemap()
Description
This function is used to set driver variables for the OLED display, including flip, mirror, bit-depth, color-mode, and other
commands. Because each of these functions has an independent function written in our library, you will not have to
worry about using writeRemap(). It is internally referenced to take care of these settings for you!
See Also:
setFlip()
setMirror()
setBitDepth()
setColorMode()
writeGPIO()
Description
Writes data to the SX1505 (I2C I/O Expander Device) for the TinyScreen and TinyScreenAlternate. This function is used
internally by our library to communicate between the TinyDuino processor and the I/O expander chip. You won’t need
to worry about using this function in your code.
print()
Description
The print() command is part of the Arduino library, and is used internally by the TinyScreen library. The print() function
also uses write() in order to function properly.
See Also:
write()
https://www.arduino.cc/en/Serial/Print
Reference Home
31
Included Constants and Definitions
Color definitions – 8b: BBBG GGRR
TS_8b_Black = 0x00;
TS_8b_Gray = 0x6D;
TS_8b_White = 0xFF;
TS_8b_Blue = 0xE0;
TS_8b_DarkBlue = 0x60;
TS_8b_Red = 0x03;
TS_8b_DarkRed = 0x01;
TS_8b_Green = 0x1C;
TS_8b_DarkGreen = 0x0C;
TS_8b_Brown = 0x32;
TS_8b_DarkBrown = 0x22;
TS_8b_Yellow = 0x1F;
Color Definitions – 16b: BBBB BGGG
GGGR RRRR
TS_16b_Black = 0x0000;
TS_16b_Gray = 0x7BEF;
TS_16b_DarkGray = 0x39E7;
TS_16b_White = 0xFFFF;
TS_16b_Blue = 0xF800;
TS_16b_DarkBlue = 0x7800;
TS_16b_Red = 0x001F;
TS_16b_DarkRed = 0x000F;
TS_16b_Green = 0x07E0;
TS_16b_DarkGreen = 0x03E0;
TS_16b_Brown = 0x0C10;
TS_16b_DarkBrown = 0x0810;
TS_16b_Yellow = 0x07FF;
TinyScreen types
TinyScreenDefault
TinyScreenAlternate
TinyScreenPlus
TinyScreen Rectangle Fills
TSRectangleFilled
TSRectangleNoFill
TinyScreen bitDepths
TSBitDepth8
TSBitDepth16
TinyScreen Color Modes
TSColorModeBGR
TSColorModeRGB
TinyScreen button definitions
TSButtonUpperLeft
TSButtonUpperRight
TSButtonLowerLeft
TSButtonLowerRight

Revision History
Revision 0: New Document Released Wed. 2/ 1/2017
