Ui Path Orchestrator Installation Guide 2016.1
UiPath%20Orchestrator%20Installation%20Guide%202016.1
User Manual: Pdf
Open the PDF directly: View PDF ![]() .
.
Page Count: 31

Orchestrator
Installation Guide
V2016.1
Robotic Process
Automation

Orchestrator Installation Guide
1
Revision History
Date
Version
Author
Description
1st June 2016
2016.1
M.B.
Applied template

Orchestrator Installation Guide
2
Table of Contents
Revision History ......................................................................................................................................... 1
1. Prerequisites ...................................................................................................................................... 3
2. Resources ..........................................................................................................................................13
2.1. Java Runtime ............................................................................................................................13
2.2. ElasticSearch .............................................................................................................................14
2.3. Kibana ........................................................................................................................................14
2.4. Configure Windows Firewall ..................................................................................................14
3. UiPath Server Installation...............................................................................................................15
3.1. Preparing Packages and Script for Installation ..................................................................15
3.2. Installation ................................................................................................................................23
4. ElasticSearch and Kibana ................................................................................................................24
4.1. Setting Up JAVA_HOME .........................................................................................................24
4.2. Installing ElasticSearch ...........................................................................................................26
4.3. Installing Kibana .......................................................................................................................27
4.4. Setting Kibana as Windows Service ......................................................................................27
Appendix 1 - Find the installed .NET version ......................................................................................28
Appendix 2 - Creating an Index Pattern to Connect to Elasticsearch ............................................30
Orchestrator Installation Guide
3
Orchestrator Installation
Guide
1. Prerequisites
Windows Server Operating System, version 2012 or 2014.
.NET 4.6 (minimum). To find out what is the .NET version installed on the computer,
please see Appendix 1
SQL server installed, one of the following versions: 2008R2 with at least SP1, 2012
Standard, 2014 Standard.
If you want to have the AlwaysOn feature, then 2012R2 Enterprise Edition or 2014
Standard; the SQL Server product can be installed on the same machine with the
Application Server or can be provided as a separate machine.
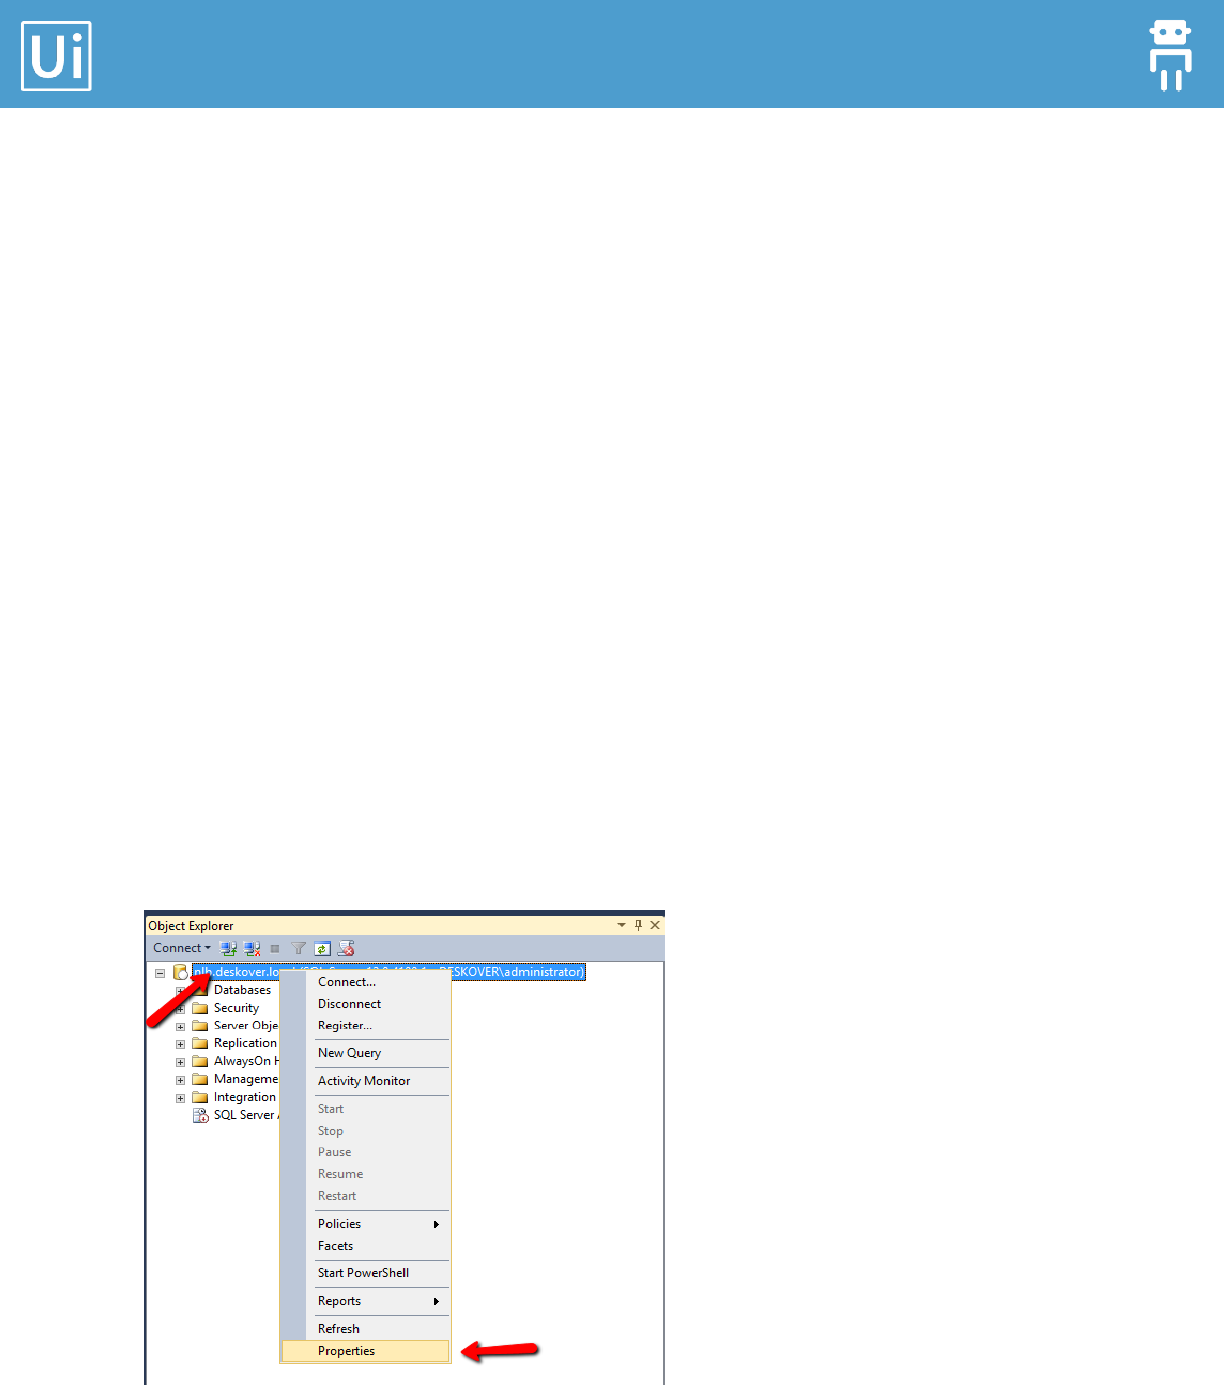
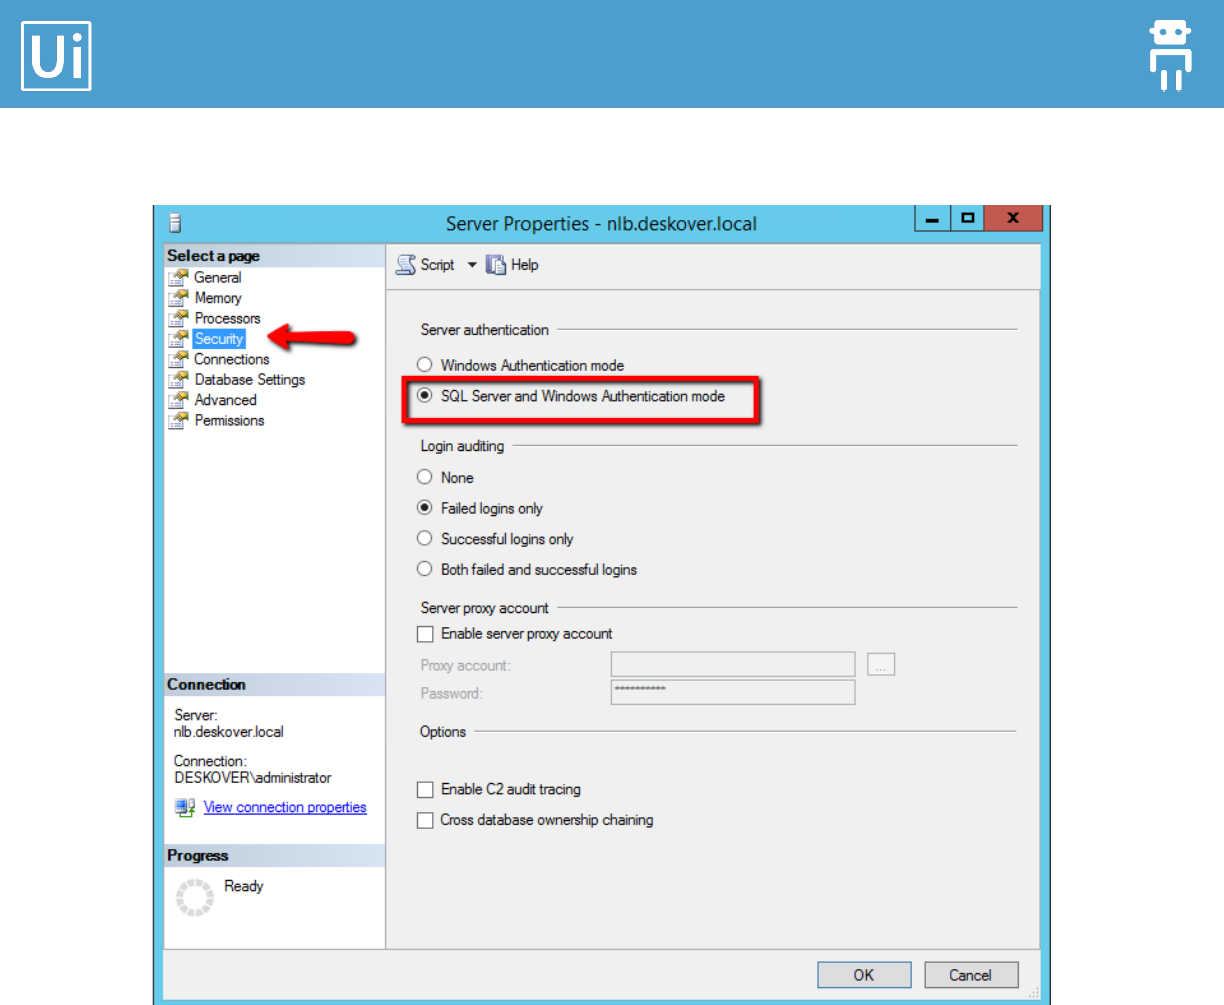
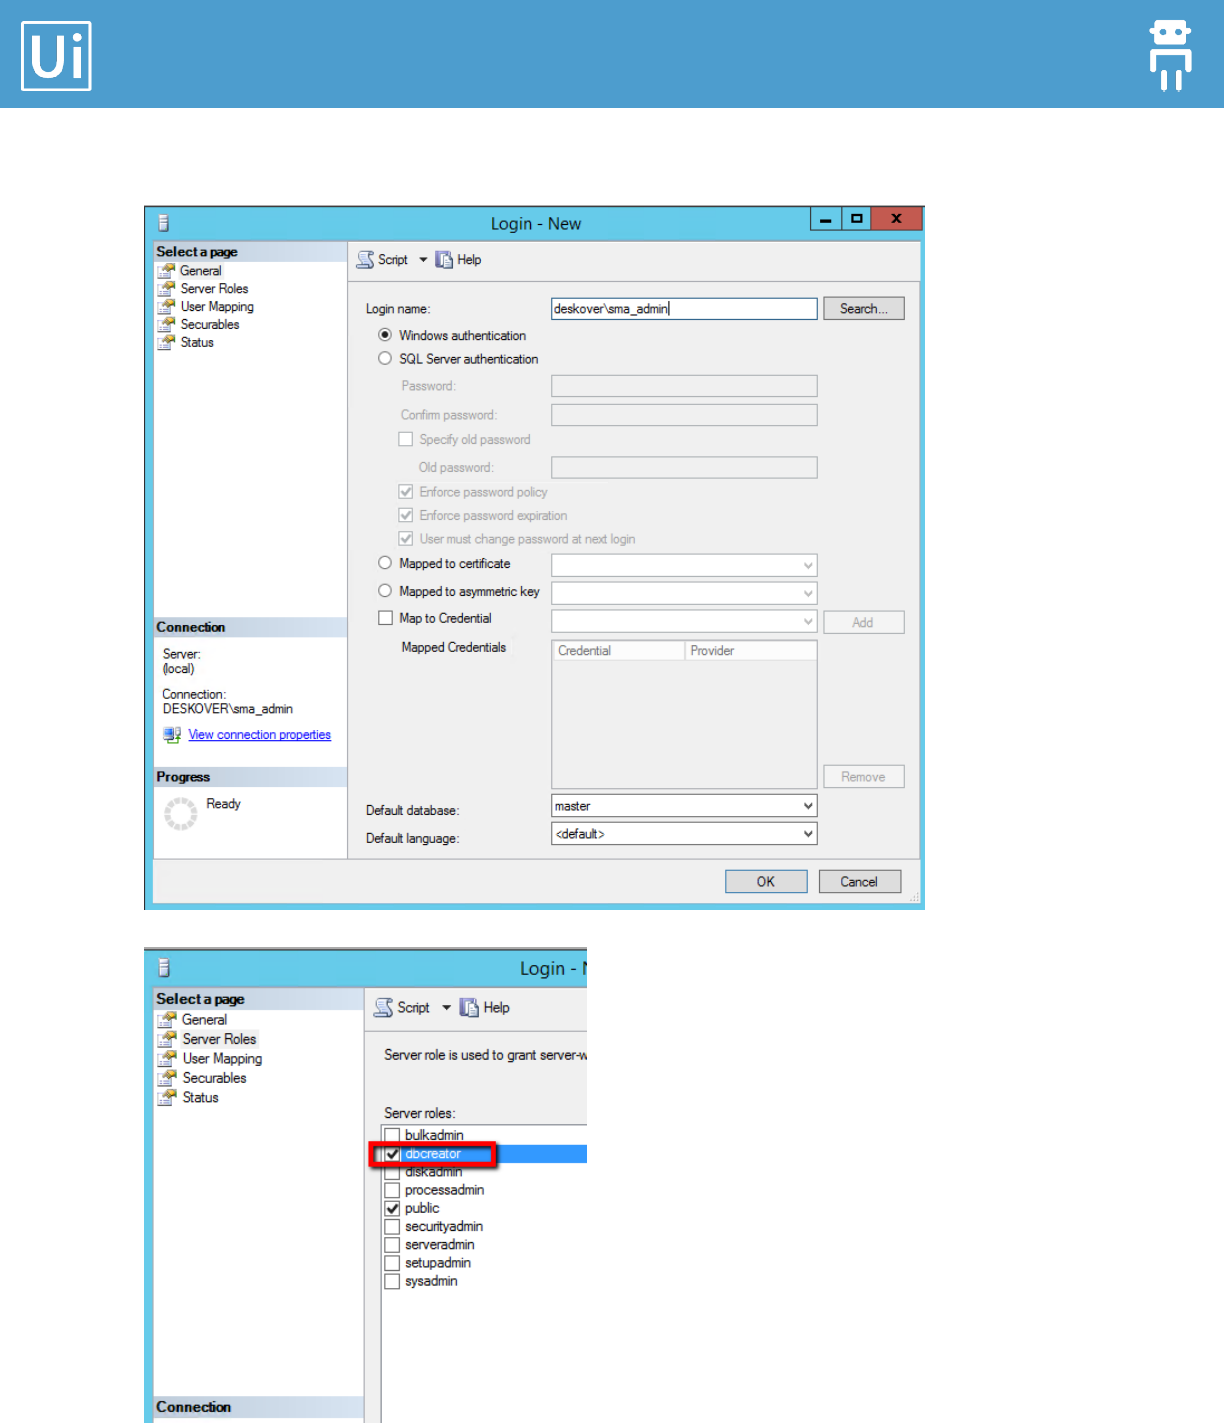
SQL Server should have the mixed mode authentication enabled (SQL Server
authentication and Windows authentication). If it’s already installed, please check this
option as shown in the pictures below:
Orchestrator Installation Guide
4
SQL Server Management Studio - it’s necessary in order to configure the login for the
domain user that will access the SQL Server and under whose name will run the
services on the application server.
IIS 7.0 +
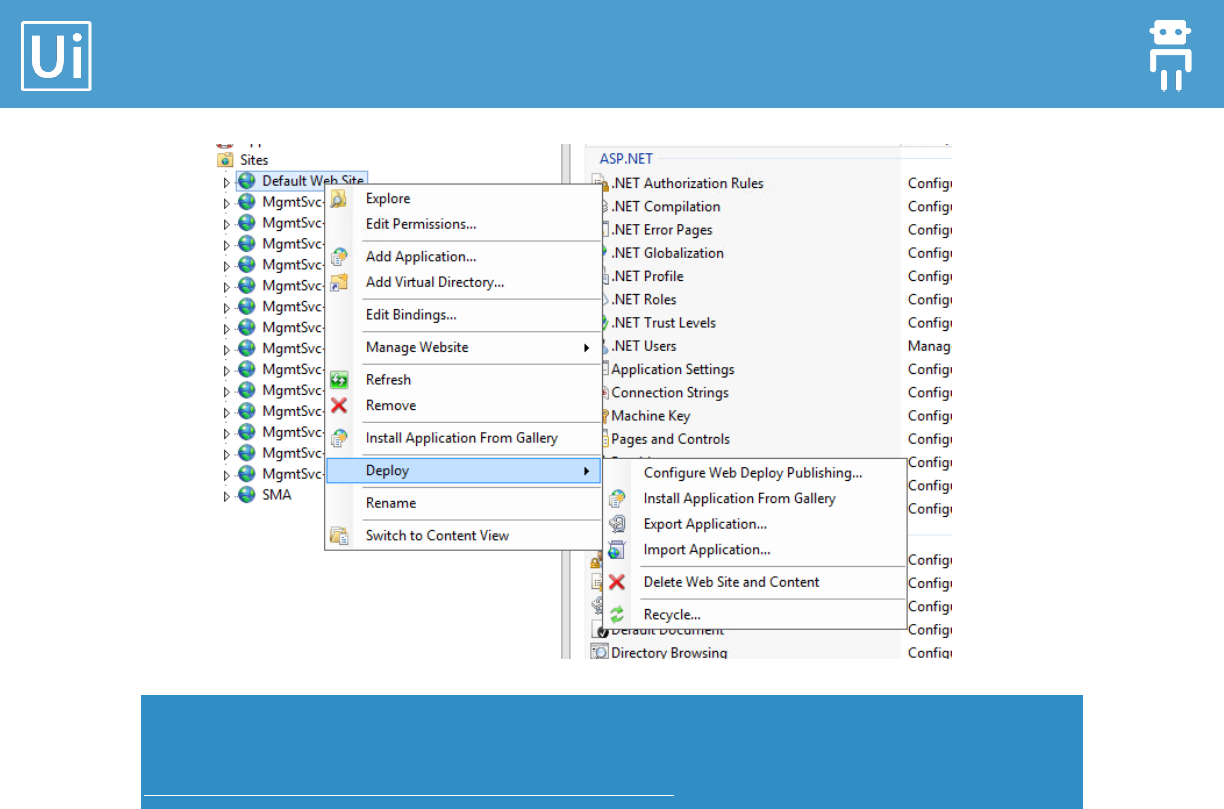
Web-Deploy extension: Allows you to deploy a website. Check that the following
context menu item is available: Right click on the default website -> from the
contextual menu choose Deploy -> Import Application.
Orchestrator Installation Guide
5
Note: If the menu option Deploy > Import Application is not available, as shown in the
screenshot above, then download and install Web Deploy Extension 3.5 from here
http://www.iis.net/downloads/microsoft/web-deploy.
If the computers are in a domain ensure that they are added in section “Computers” in
the domain server, in “Active Directory users and computers” because the computer
name is used in installation process. (For example: http://computerName-
01/UiPath.Server.Web instead of http://localhost/UiPath.Server.Web).
If this is not possible localhost/IP should be used in installation process. Please see
step 4 from chapter “Preparing packages and script for Installation”.
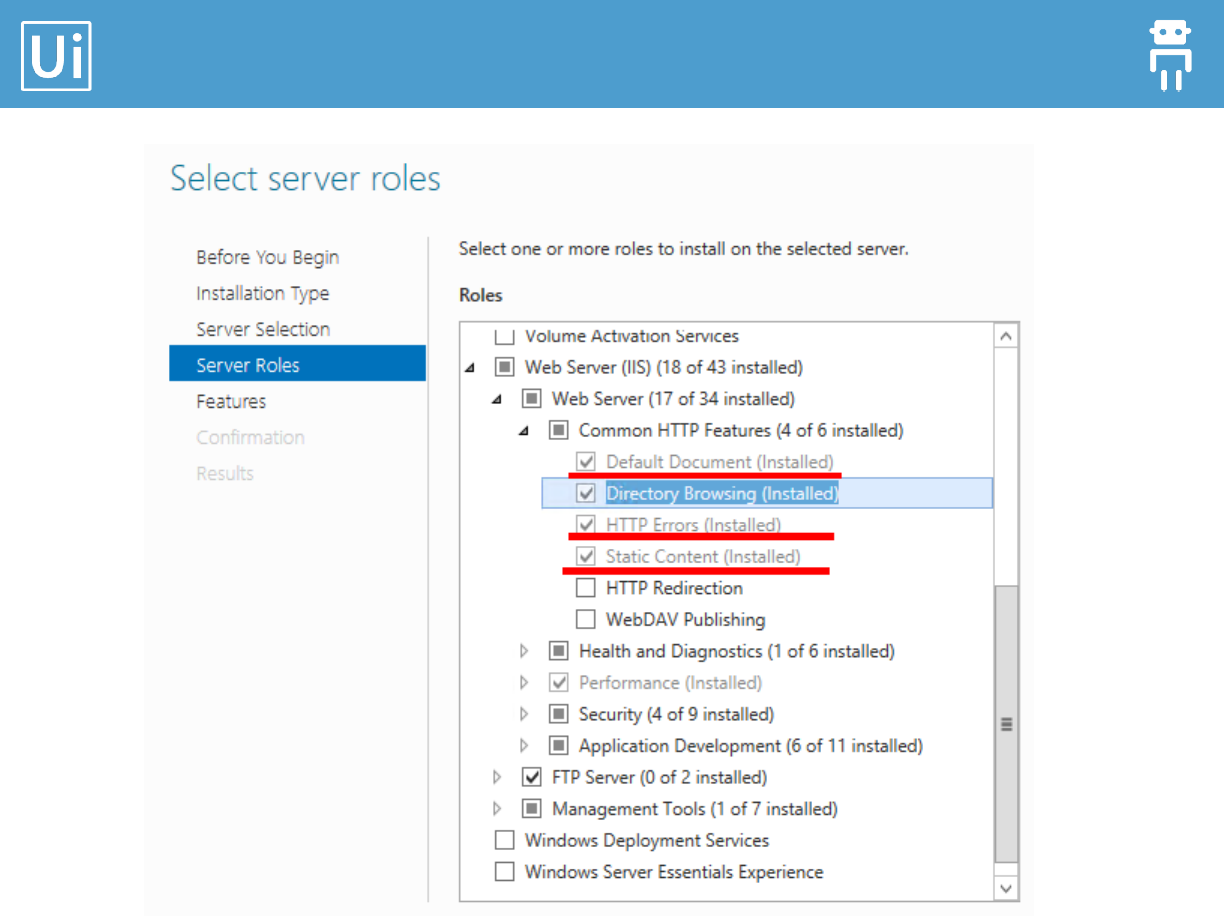
The following server roles should be installed (see the picture below): expand Web
Server (IIS), expand Web Server, expand Common HTTP Features
o Default Document
o HTTP Errors
o Static Content
Orchestrator Installation Guide
6
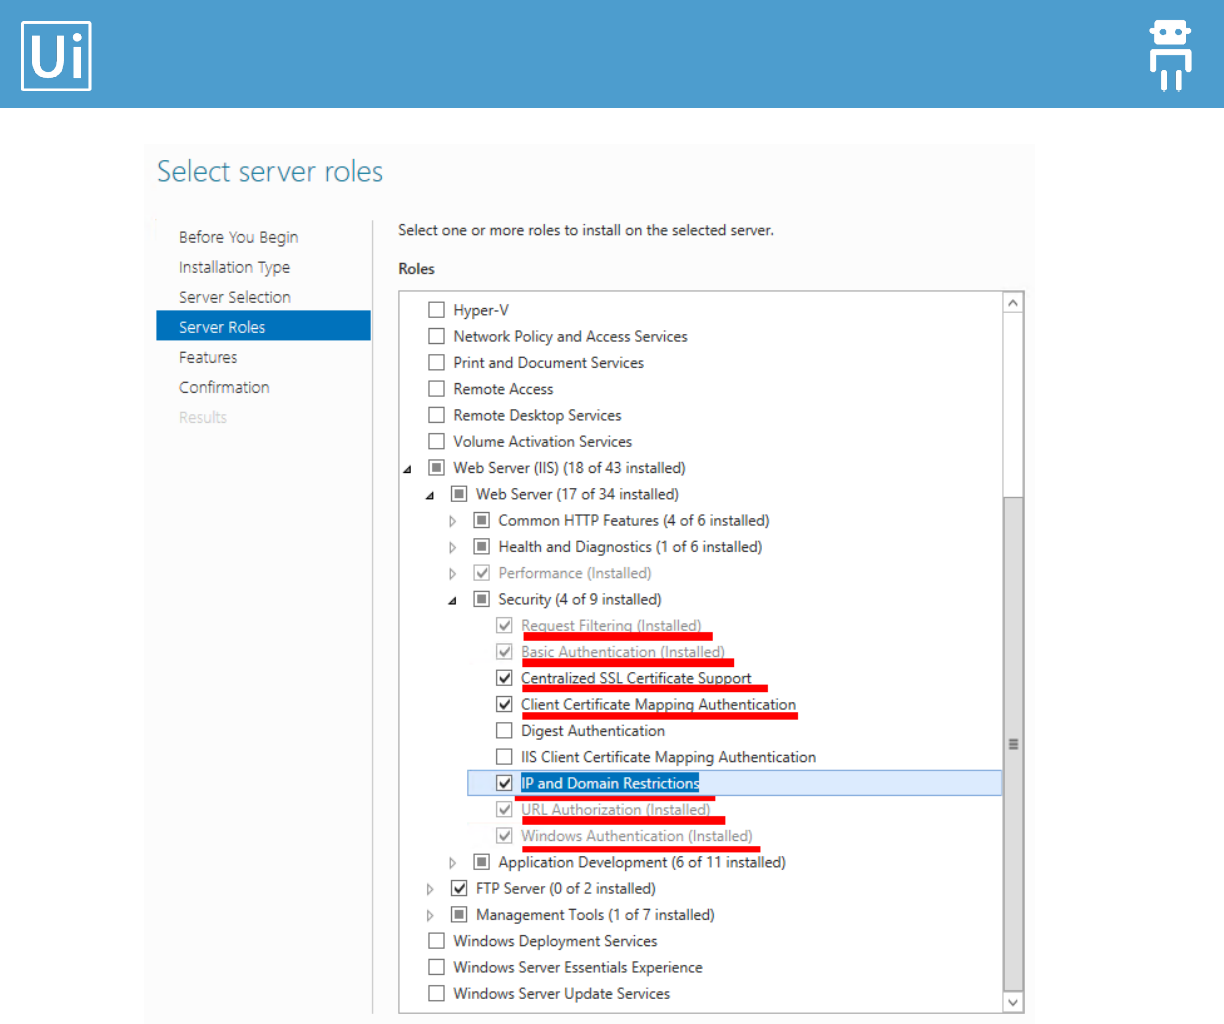
The following server roles should be installed (see the picture below): expand Web
Server (IIS), expand Web Server, expand Security
o Request Filtering
o Basic Authentication
o Centralized SSL Certificate Support
o Client Certificate Mapping Authentication
o IP and Domain Restrictions
o URL Authorization
o Windows Authentication
Orchestrator Installation Guide
7
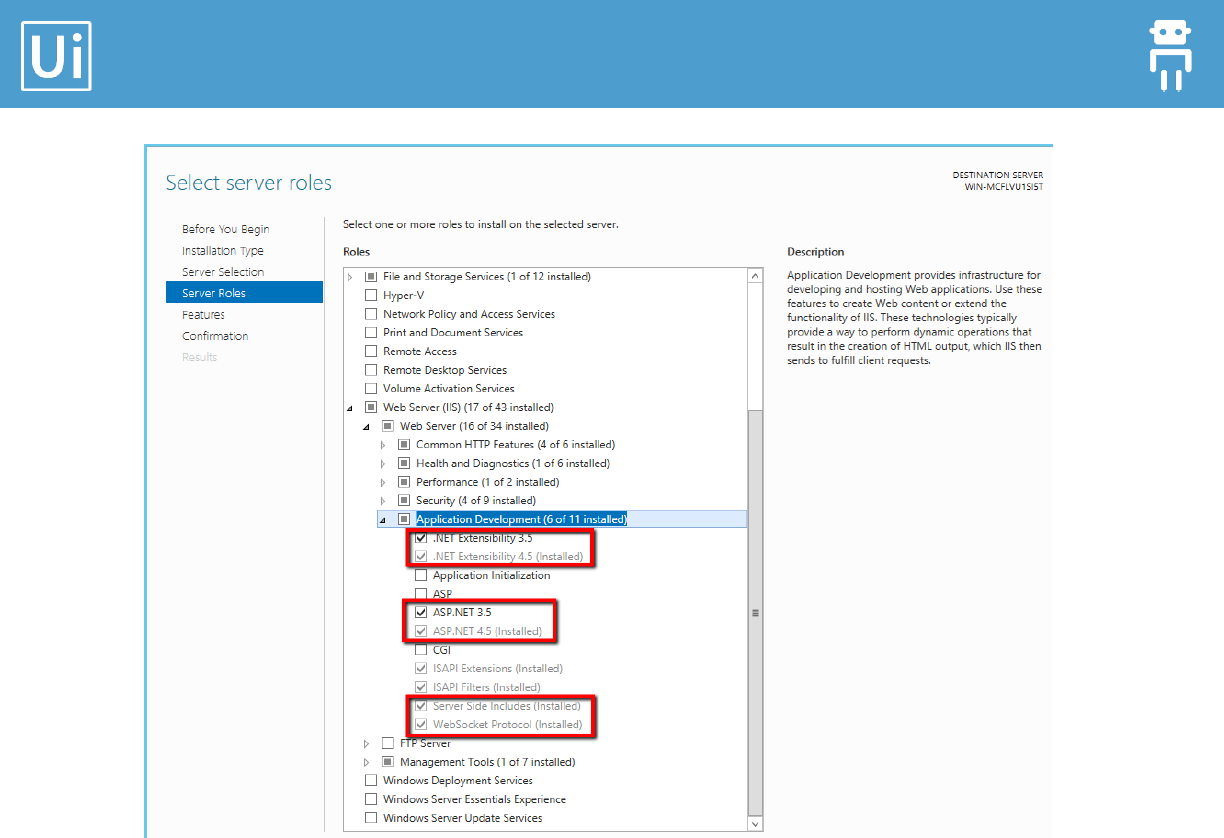
The following server roles should be installed (see the picture below): expand Web
Server (IIS), expand Web Server, expand Application Development
o .NET Extensibility 3.5
o .NET Extensibility 4.5
o ASP.NET 3.5
o ASP.NET 4.5
o Server Side Includes
o WebSocket Protocol
Orchestrator Installation Guide
8
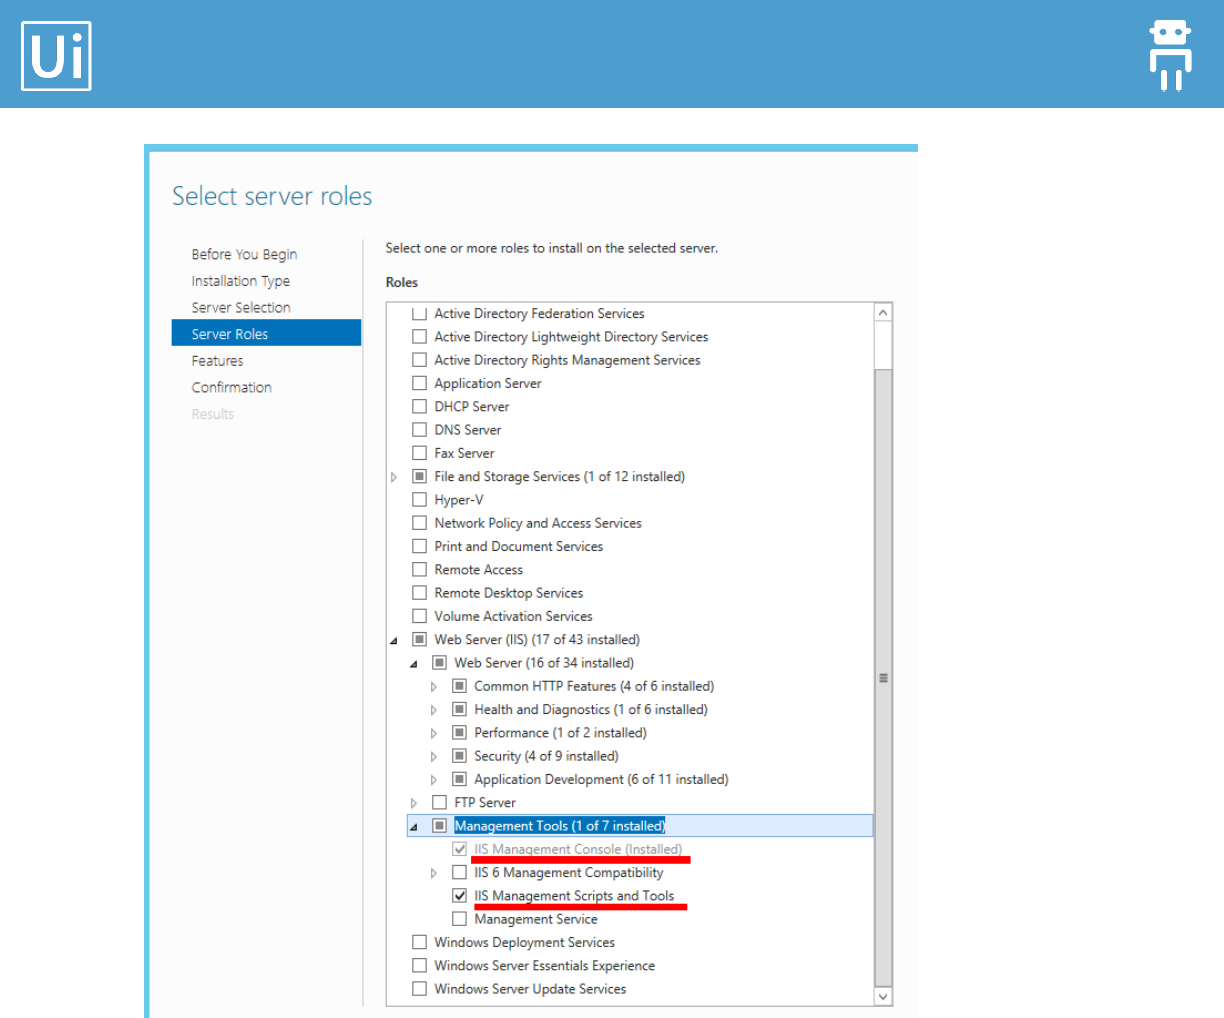
The following server roles should be installed (see the picture below): expand Web
Server (IIS), expand Web Server, expand Management Tools
o IIS Management Console
o IIS Management Scripts and Tools
Orchestrator Installation Guide
9
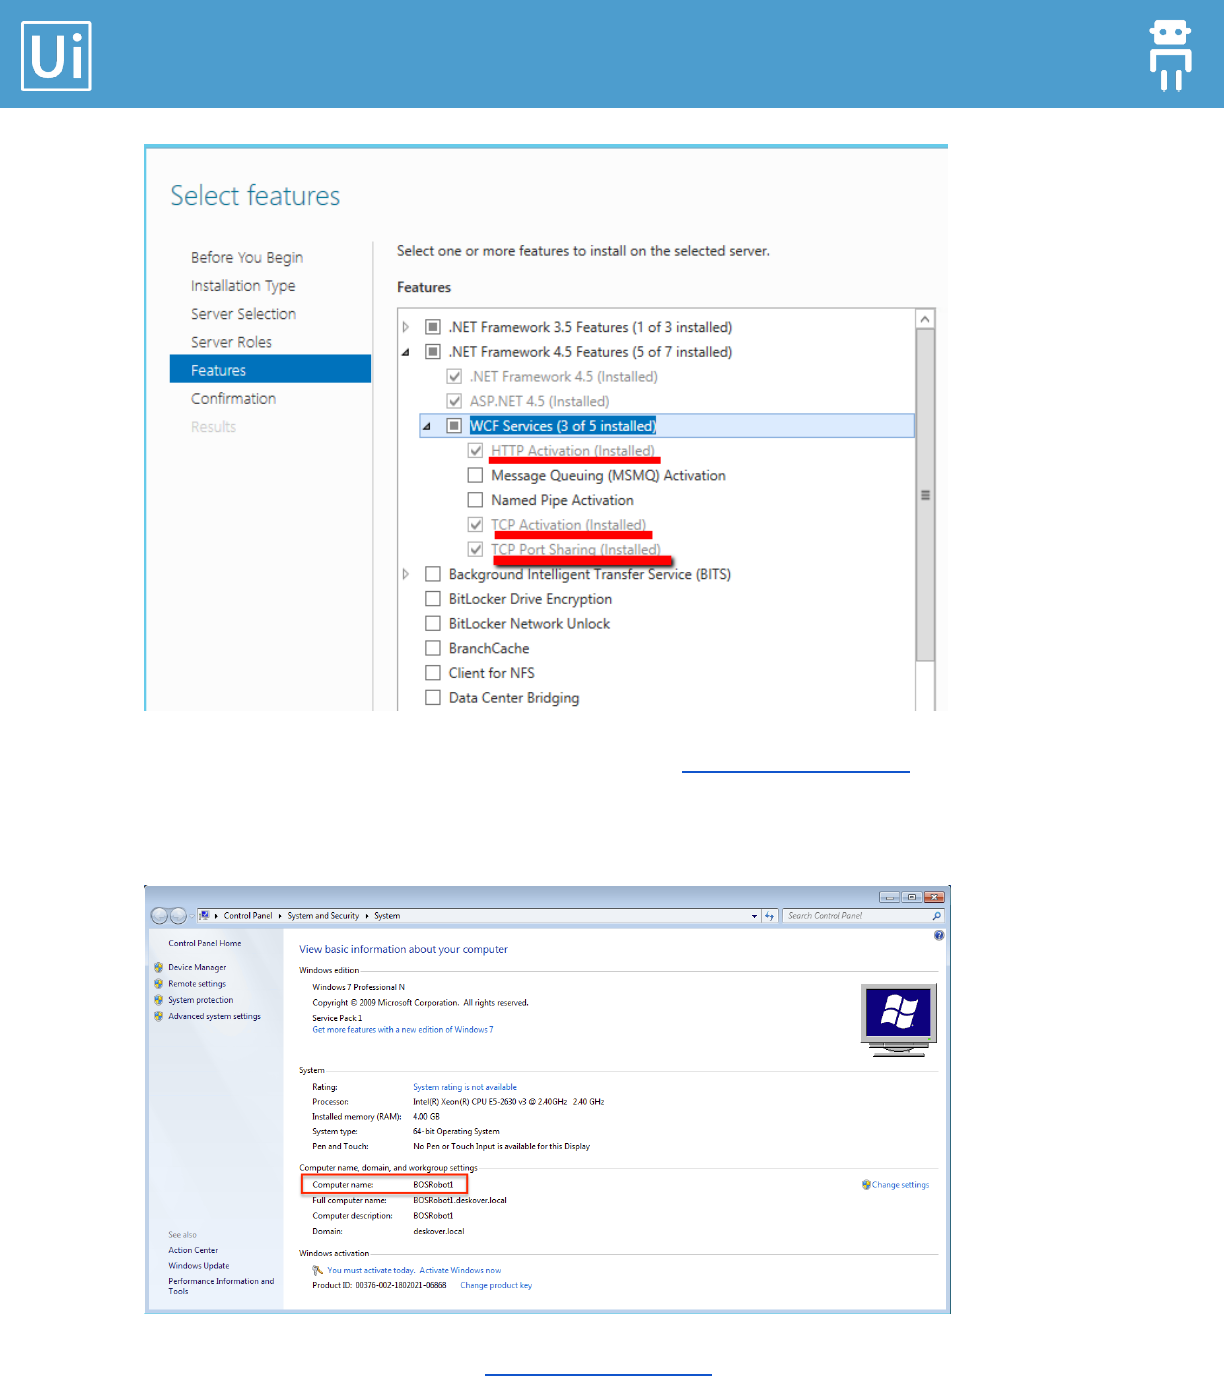
Click Next to go to Server Features.
The following server features should be installed (see the picture below): expand .NET
Framework 4.5 Features, expand WCF Services
o HTTP Activation
o TCP Activation
o TCP Port Sharing
Orchestrator Installation Guide
10
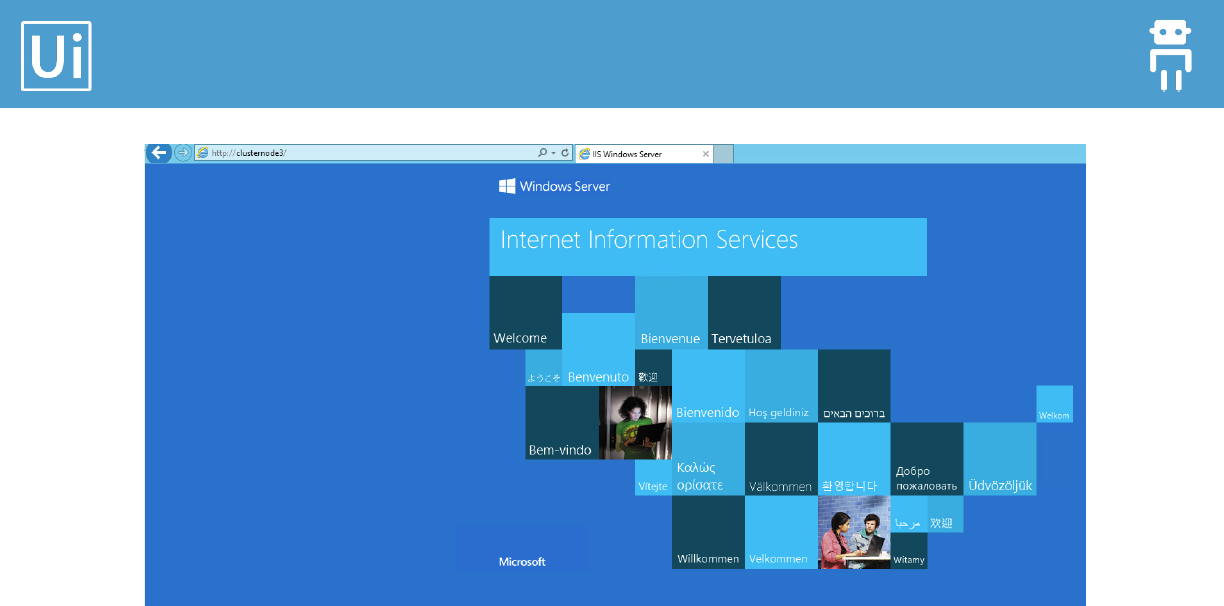
After the installation is done, open browser and go to http://computername/. (If you don’t
know your computer name open a command prompt and type “hostname” or open System
and look for Computer Name).
The result of opening the address http://computername/ should be the default page of IIS.
Orchestrator Installation Guide
11
In case you are not seeing a page as in the above image you need to ensure that IIS server is
running and port 80 is open. By default IIS will listen for connections on port 80 for any IP
bound to the server.
This happens even if there are no host headers or bindings set for a specific IP. This can be a
problem when trying to run multiple web servers on port 80.
To set IIS to listen on specific IPs follow the instructions below. Windows Server 2008/IIS 7 (at
least):
1. Open an elevated command prompt and type “netsh”.
netsh
2. Type “http”.
http
3. Enter the following command to display the current list of IPs to listen on. Note if no
IPs are displayed like in the below image, IIS will listen on all IPs (default).
show iplisten

Orchestrator Installation Guide
12
4. Use the command below to set IIS to listen on a specific IP. Make sure to replace
0.0.0.0 with the correct IP and run the command again for any additional addresses.
add iplisten ipaddress=0.0.0.0
5. In case you need to delete an IP from this list, use the following command.
delete iplisten ipaddress=0.0.0.0
6. Restart IIS to apply these changes.
Iisreset
Orchestrator Installation Guide
13
2. Resources
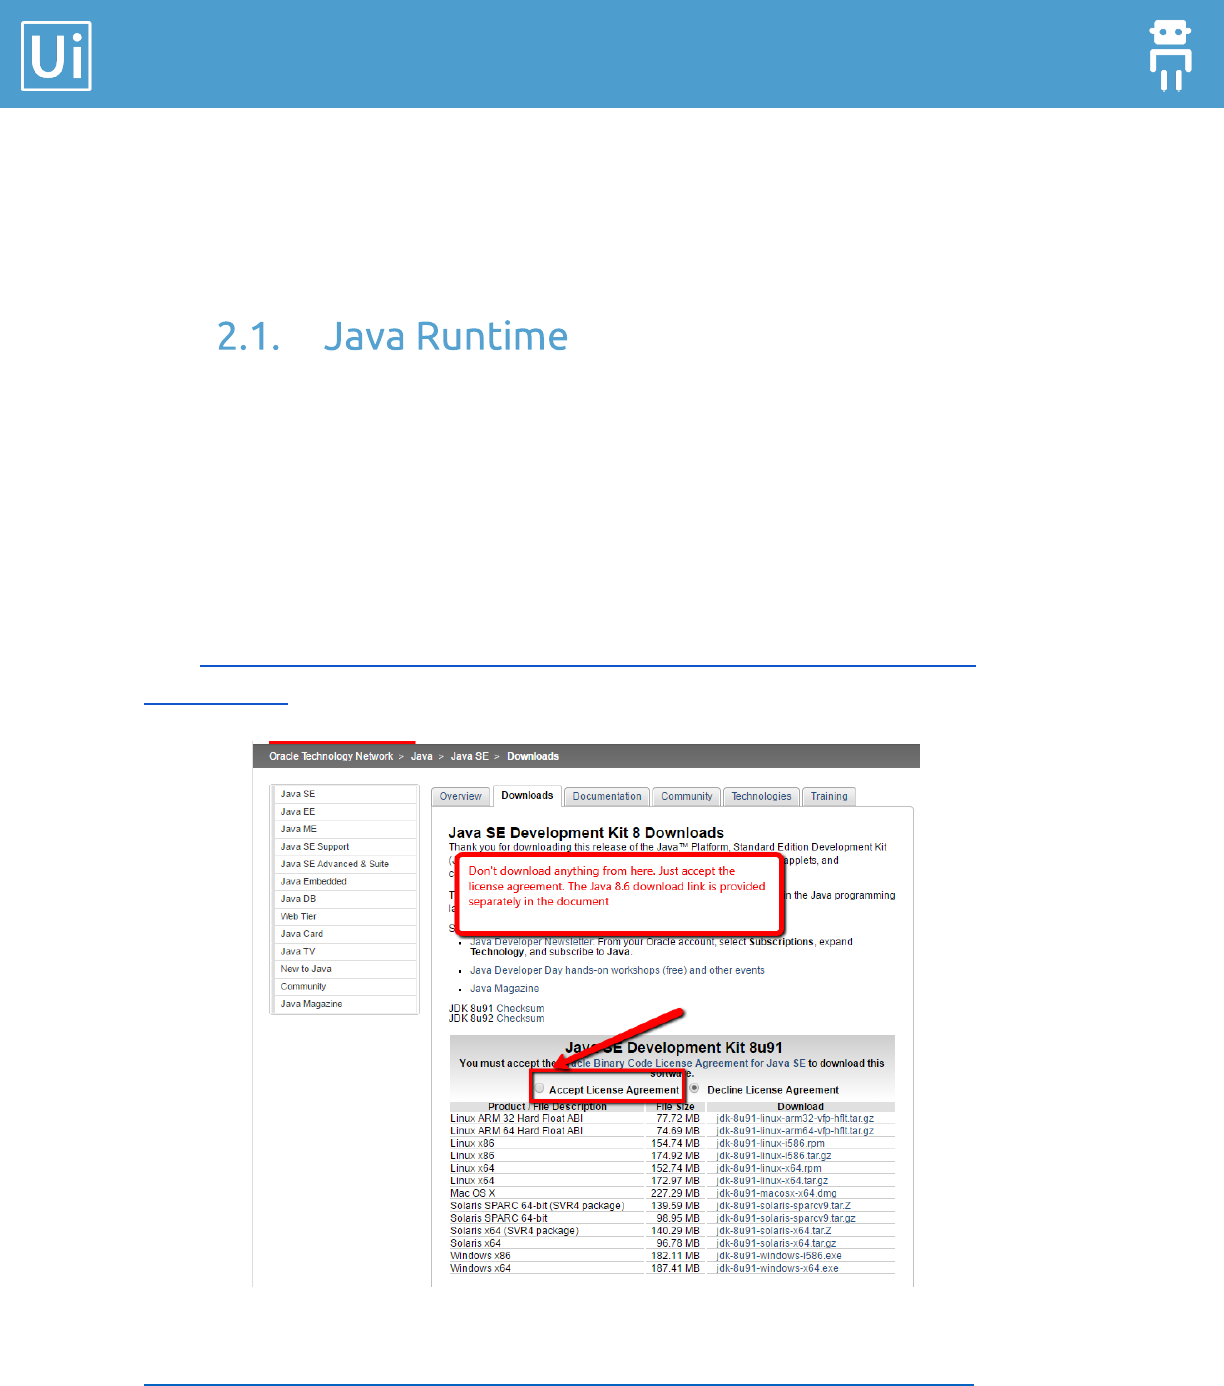
In order to download Java from the Oracle Technology Network website, you need to go to
the Oracle download page, select any product, then Accept License Agreement.
After that, you can use in another browser tab the exact URL that we provide below the next
picture for Java 8.6.
For example, go to this URL just to accept the license terms. Don’t download anything from
here: http://www.oracle.com/technetwork/java/javase/downloads/jdk8-downloads-
2133151.html.
Download link: after you accepted the license agreement, you can click this link:
http://download.oracle.com/otn-pub/java/jdk/8u60-b27/jdk-8u60-windows-x64.exe.

Orchestrator Installation Guide
14
Elasticsearch version 2.3.2
Elasticsearch package:
https://download.elastic.co/elasticsearch/release/org/elasticsearch/distribution/zip/el
asticsearch/2.3.2/elasticsearch-2.3.2.zip
Kibana version 4.5.0
Kibana plugin download page: https://download.elastic.co/kibana/kibana/kibana-4.5.0-
windows.zip
UiPath Orchestrator uses only port 80 to communicate with the Robots (default port).
To access ElasticSearch & Kibana from other machines then you need to open the 9200
(ElasticSearch) and 5601 (Kibana) ports.
Orchestrator Installation Guide
15
3. UiPath Server Installation
1. Create a folder on your server.
2. Copy the packages in the folder.
3. Copy the script OrchestratorInstaller.ps1 in the same folder (like in the above
screenshot).
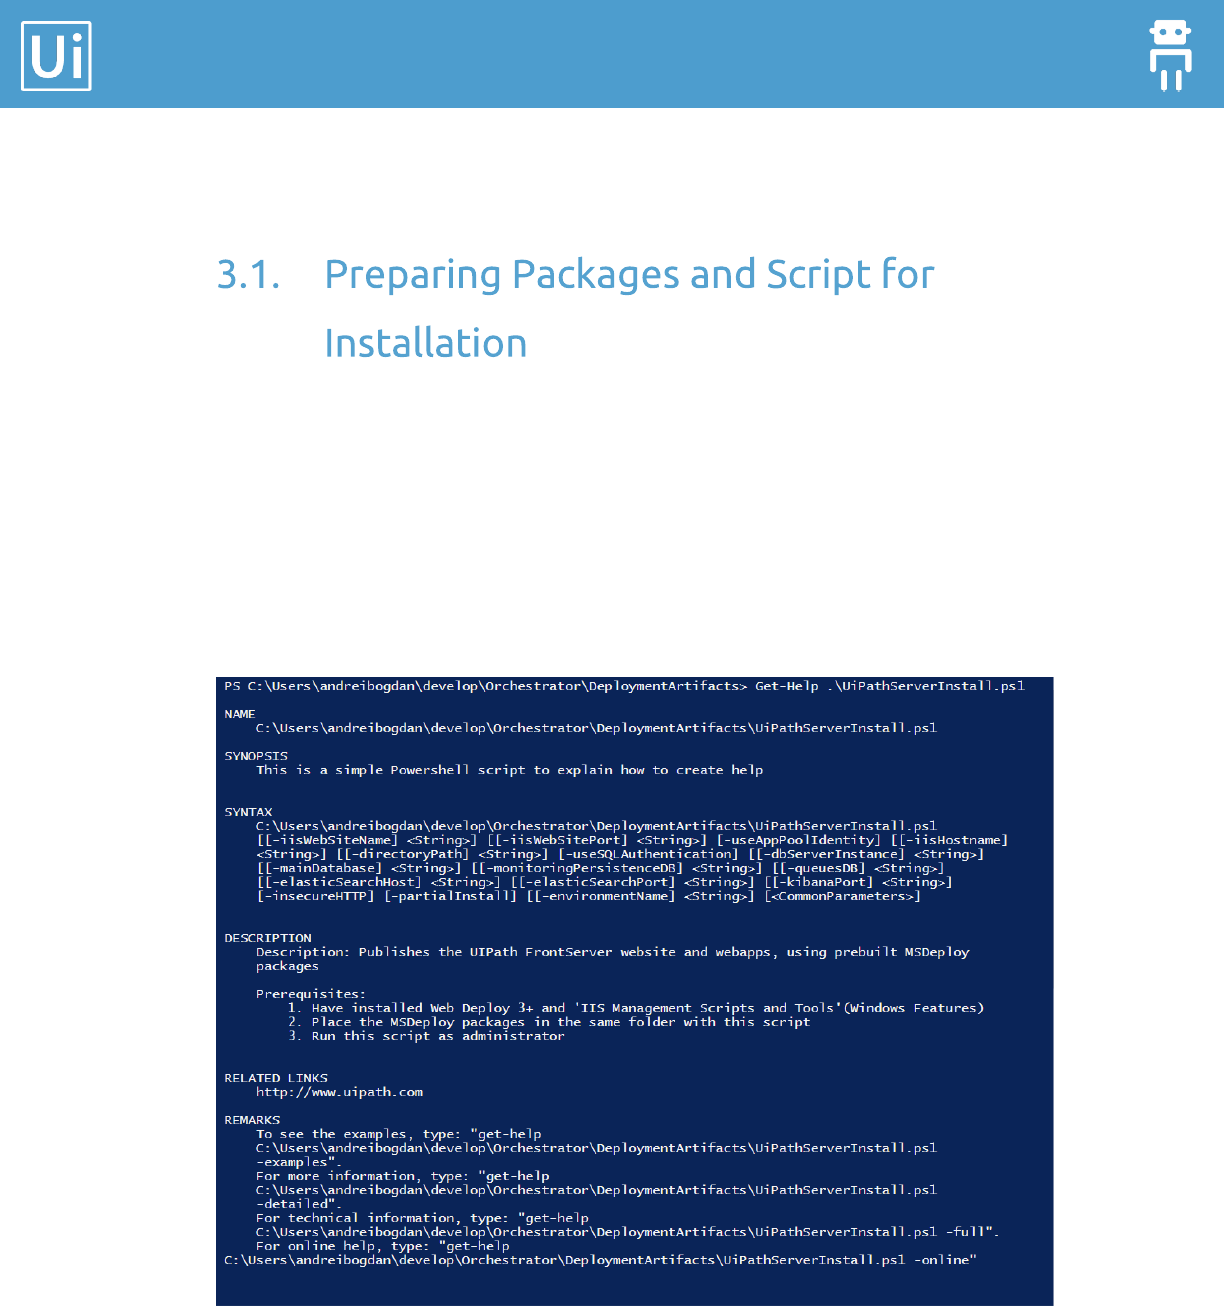
4. In order to get more details about the script, open powershell console (ensure that
you have rights to run scripts, if not run: Set-ExecutionPolicy Unrestricted) and enter:
Get-Help .\OrchestratorInstaller.ps1.
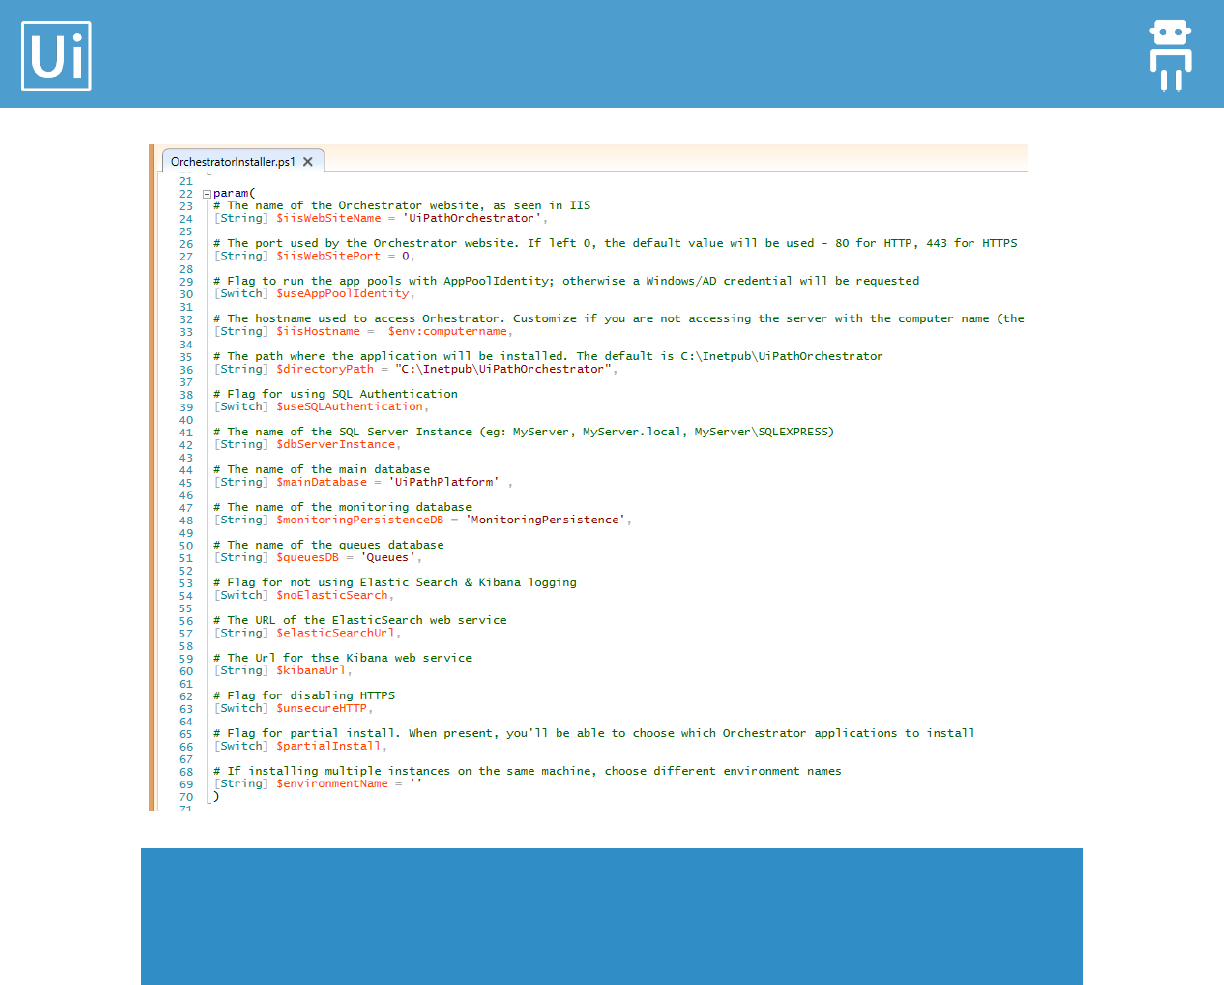
5. Take a look at the script using any text editor (PowerShell ISE is better for syntax
coloring):
Orchestrator Installation Guide
16
Note: In general, you do not have to change anything in the script. The most commonly used
command line to install Orchestrator is:
.\OrchestratorInstaller.ps1 -unsecureHTTP
Parameters description:
[String] $iisWebSiteName = 'UiPathOrchestrator', # IIS Website Name
(example UiPathServer)
[String] $iisWebSitePort = 0, # The default value will be used - 80 for HTTP, 443
for HTTPS. If you change it make sure you open the new port in your firewall as well
[Switch] $useAppPoolIdentity, # Use default AppPoolIdentity or not
[String] $iisHostname = $env:computername, # Customize if you access the
server with other name than the one from Computer Properties
[String] $directoryPath = "C:\Inetpub\UiPathOrchestrator", # Default
path where the application will be installed.(e.g.

Orchestrator Installation Guide
17
C:\Inetpub\UiPathOrchestrator') Change it only if you have “Inetpub” in
another location.
[Switch] $useSQLAuthentication, # Flag for using SQL Authentication
[String] $dbServerInstance, # Name of SQL Instance. (eg: MyServer, MyServer.local,
MyServer\SQLEXPRESS). leave it as ‘.’ if the same machine is used for web application
and SQL Server and the default port (1433) and default instance is used; otherwise use
the format:
o ‘machine\instance,port‘, like ‘XSDB01\UiPath,1533’ if another SQL
Server machine, not default port, not default SQL Server instance
o ‘machine,port‘, like ‘XSDB01,1533’ if another SQL Server machine, not
default port (default is 1433)
o ‘machine‘, like ‘XSDB01’ if another SQL Server machine, but using default port
1433 and default SQL Server instance
[String] $mainDatabase = 'UiPathPlatform' , # Name of main Database
[String] $monitoringPersistenceDB = 'MonitoringPersistence', # Name of
Monitor Persistence Database
[String] $queuesDB = 'Queues', # Name of Queue Database
[Switch] $noElasticSearch, # if specified, will not set the configuration for
ElasticSearch logging
[String] $elasticSearchUrl, # The URL of the ElasticSearch web service, including
port; you can keep the default value http://localhost:9200; don’t put computer name
instead of localhost, it is not accessed from another computer
[String] $kibanaUrl, # URL for Kibana; don’t keep the default value
http://localhost:5601, but please provide the computer name instead of localhost;
example: http://ORCHSRV:5601
[Switch] $unsecureHTTP, # if specified, will use HTTP; if not specified, will use HTTPS
and will ask for the certificate
[Switch] $partialInstall, # Flag for partial install. When is present it will let you
choose what applications to install
[String] $environmentName = '' # Environment name. Should be used only when
there is already an Orchestrator installed and you want to install another instance -
Orchestrator Installation Guide
18
another Orchestrator. For example if you want to create a “test” environment. The
prefix is used in the following names:
o Database names for all 3 databases
o Application Pool names
o Web Site name
The following parameters are important in relation to authentication to SQL Server database:
useAppPoolIdentity, default FALSE - The web services and web application will
run under the default application pool identity (if $true) or under a custom identity
which represents a domain account (a regular domain user) if $false.
The first case ($useAppPoolIdentity = $true) is applicable only if SQL Server
machine is the same as the web application machine.
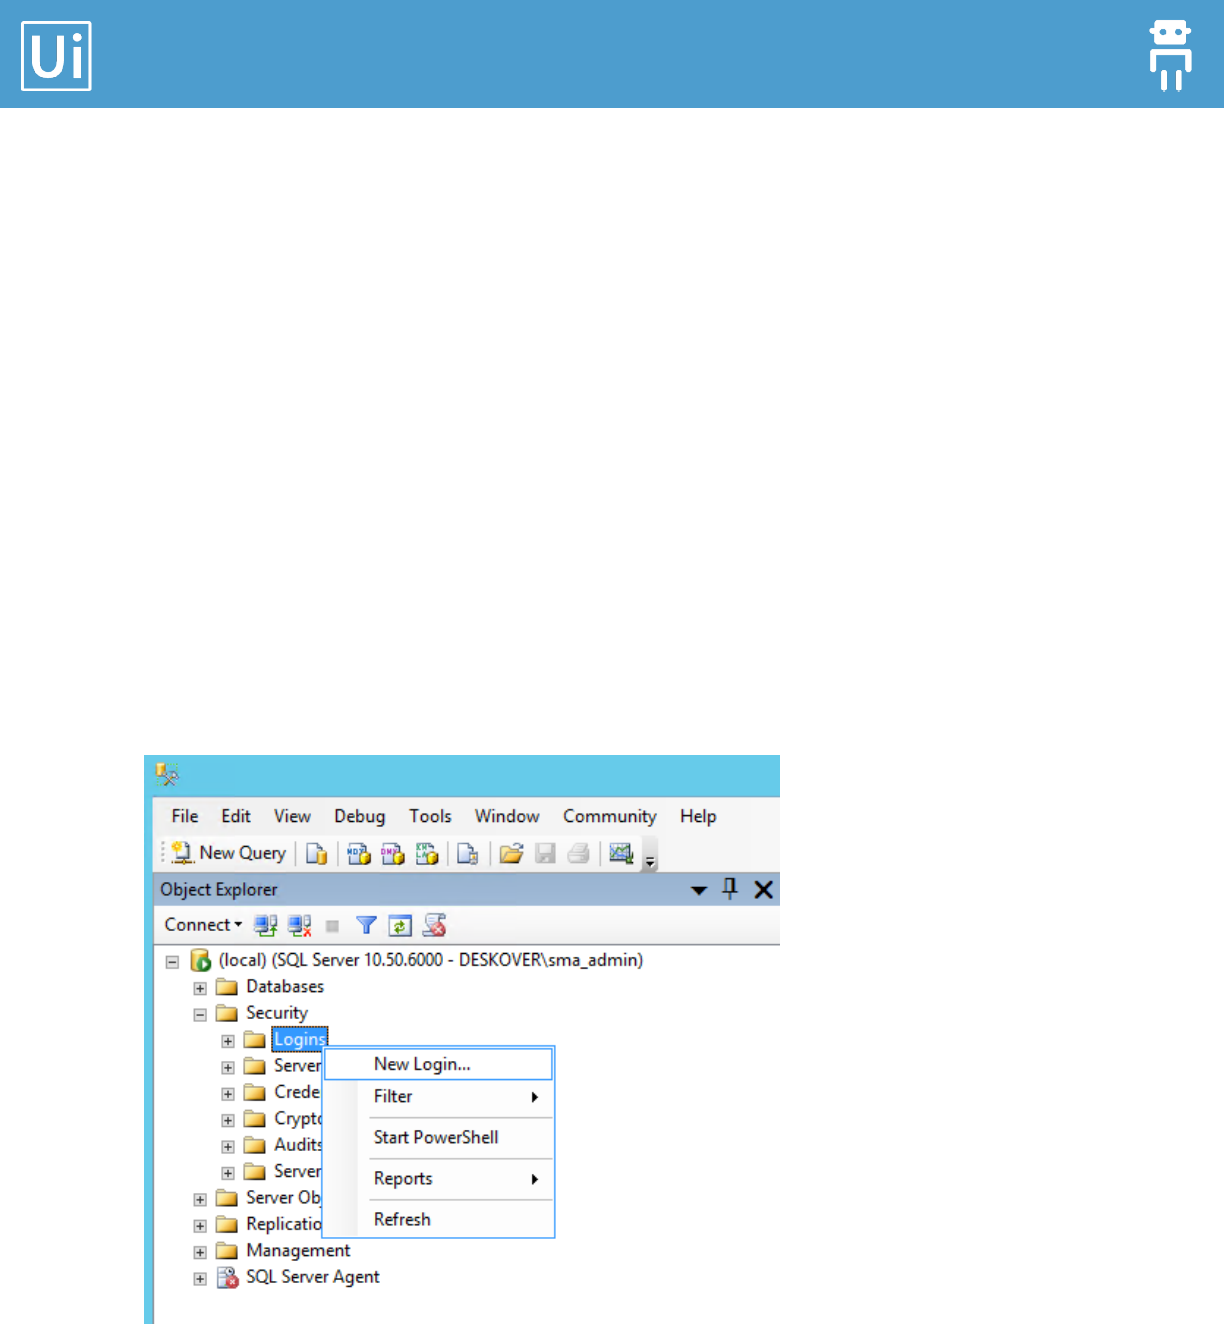
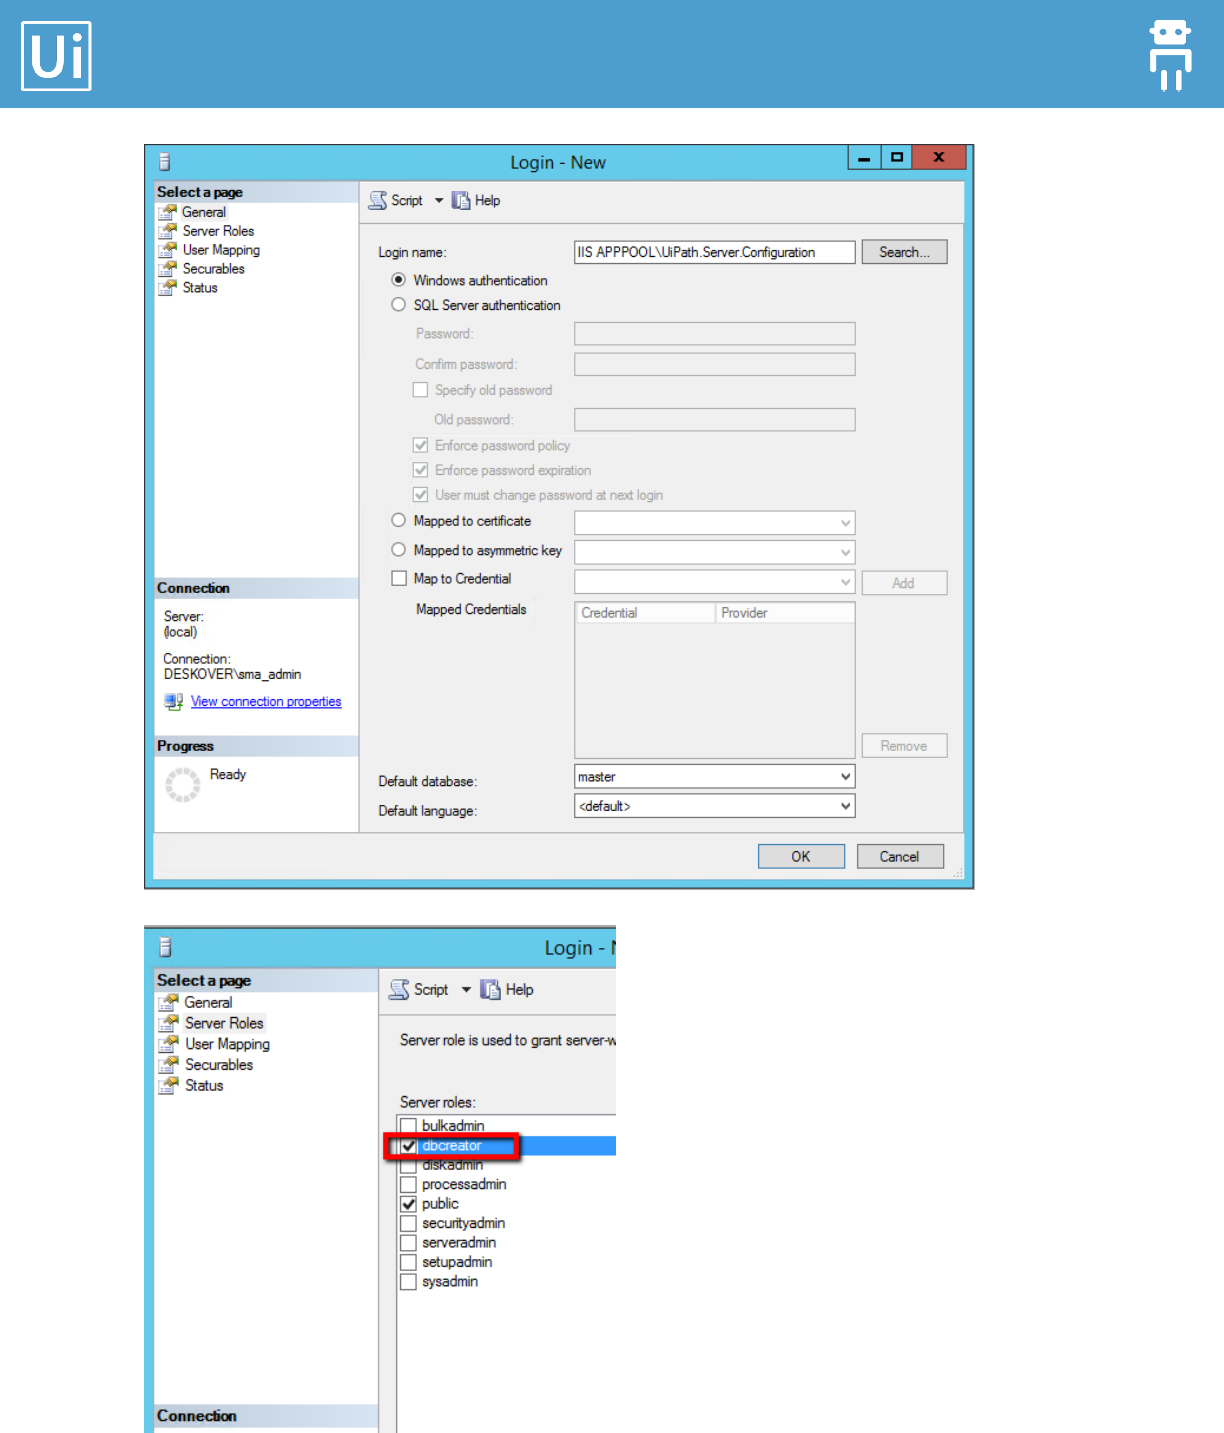
In the first case ($useAppPoolIdentity = $true), after running this script, the
SQL Server administrator should add the following users under Security -> Logins,
with the Server Role dbcreator.
Orchestrator Installation Guide
19
Orchestrator Installation Guide
20
Following the method described above, the following users should be added:
IIS APPPOOL\UiPath.Server.Configuration
IIS APPPOOL\UiPath.Server.Deployment
IIS APPPOOL\UiPath.Server.Logging
IIS APPPOOL\UiPath.Server.Monitoring
IIS APPPOOL\UiPath.Server.Web
IIS APPPOOL\UiPath.Server.Queues
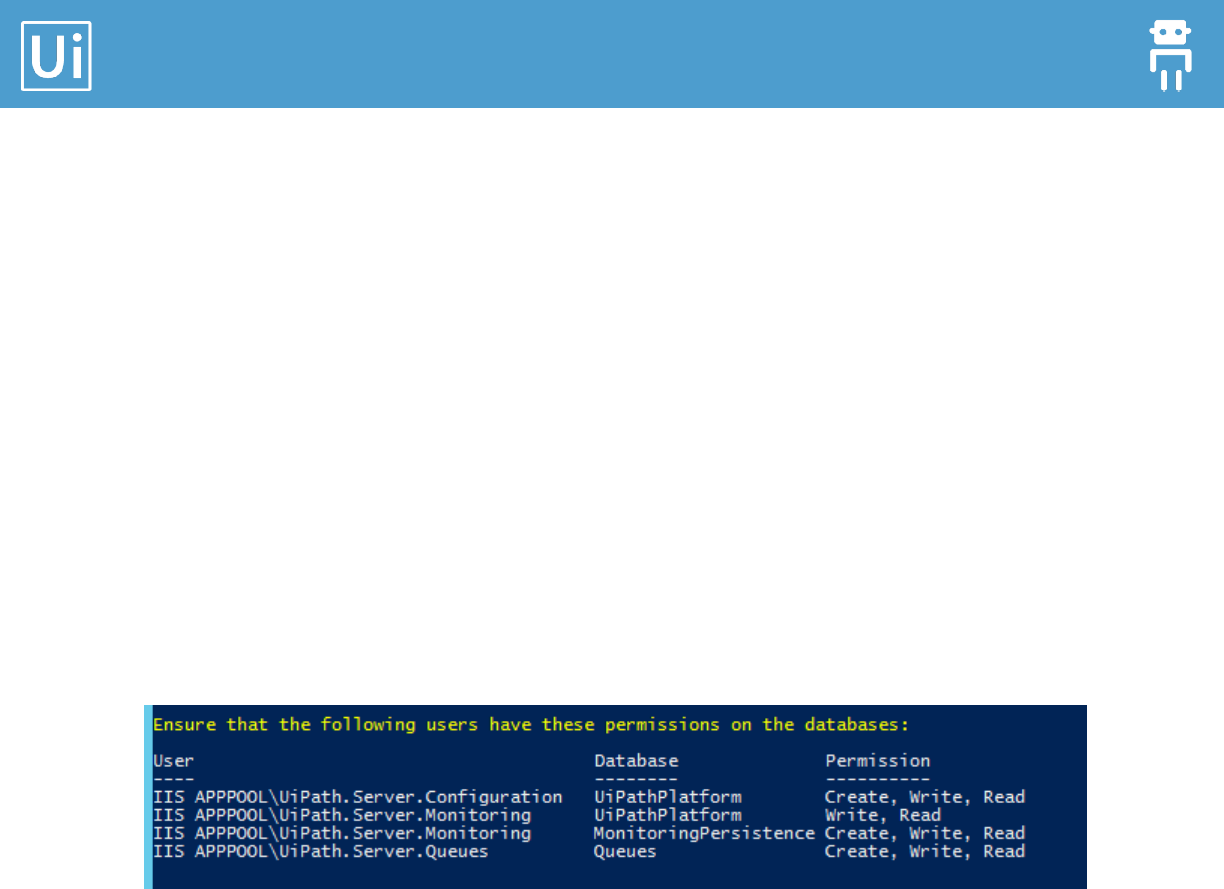
As stated in the information displayed by the script (OrchestratorInstaller.ps1), after the
UiPathPlatform database is created you need to give read and write access to this database to
the following users:
IIS APPPOOL\UiPath.Server.Configuration
IIS APPPOOL\UiPath.Server.Monitoring
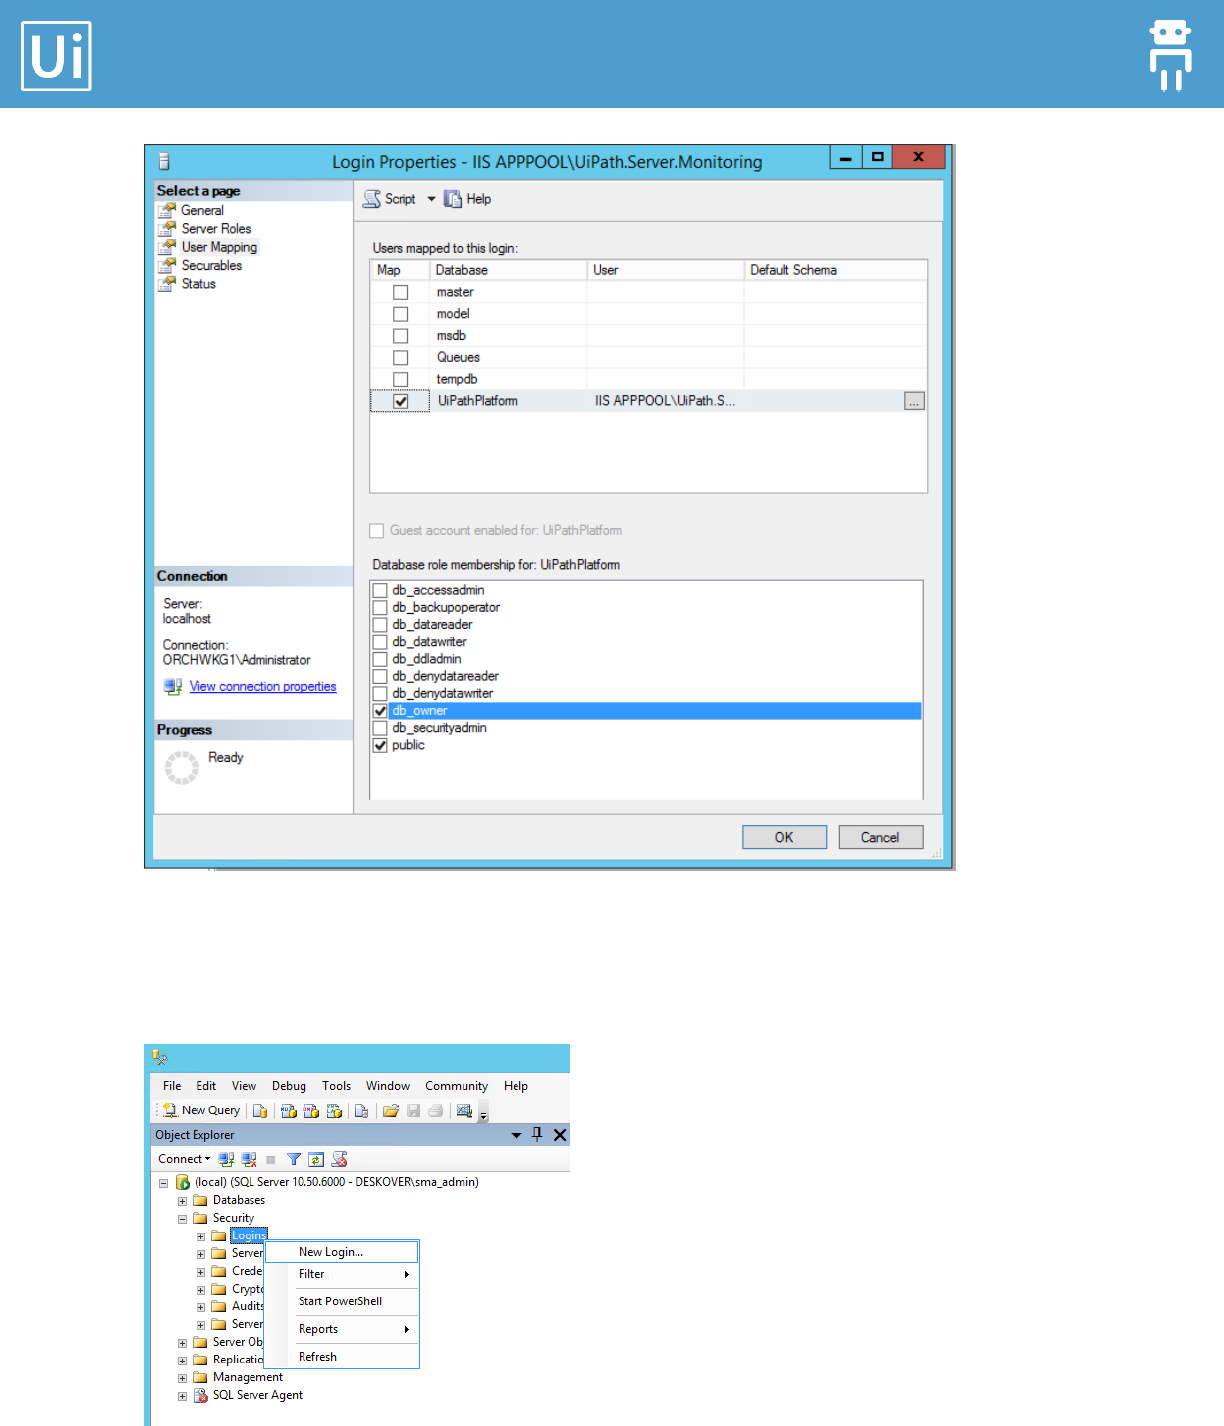
For each of these 2 users (IIS APPPOOL\UiPath.Server.Monitoring and IIS
APPPOOL\UiPath.Server.Configuration), double-click to edit the properties, go to
“User Mapping”, select the UiPathPlatform database and give the user the dbowner role on
this database:
Orchestrator Installation Guide
21
In the second case ($useAppPoolIdentity = $false), because of $useSQLAuthentication=$true,
after running this script, the SQL Server administrator should add the dedicated domain user
under Security > Logins, with the Server Role dbcreator.
Orchestrator Installation Guide
22
Orchestrator Installation Guide
23
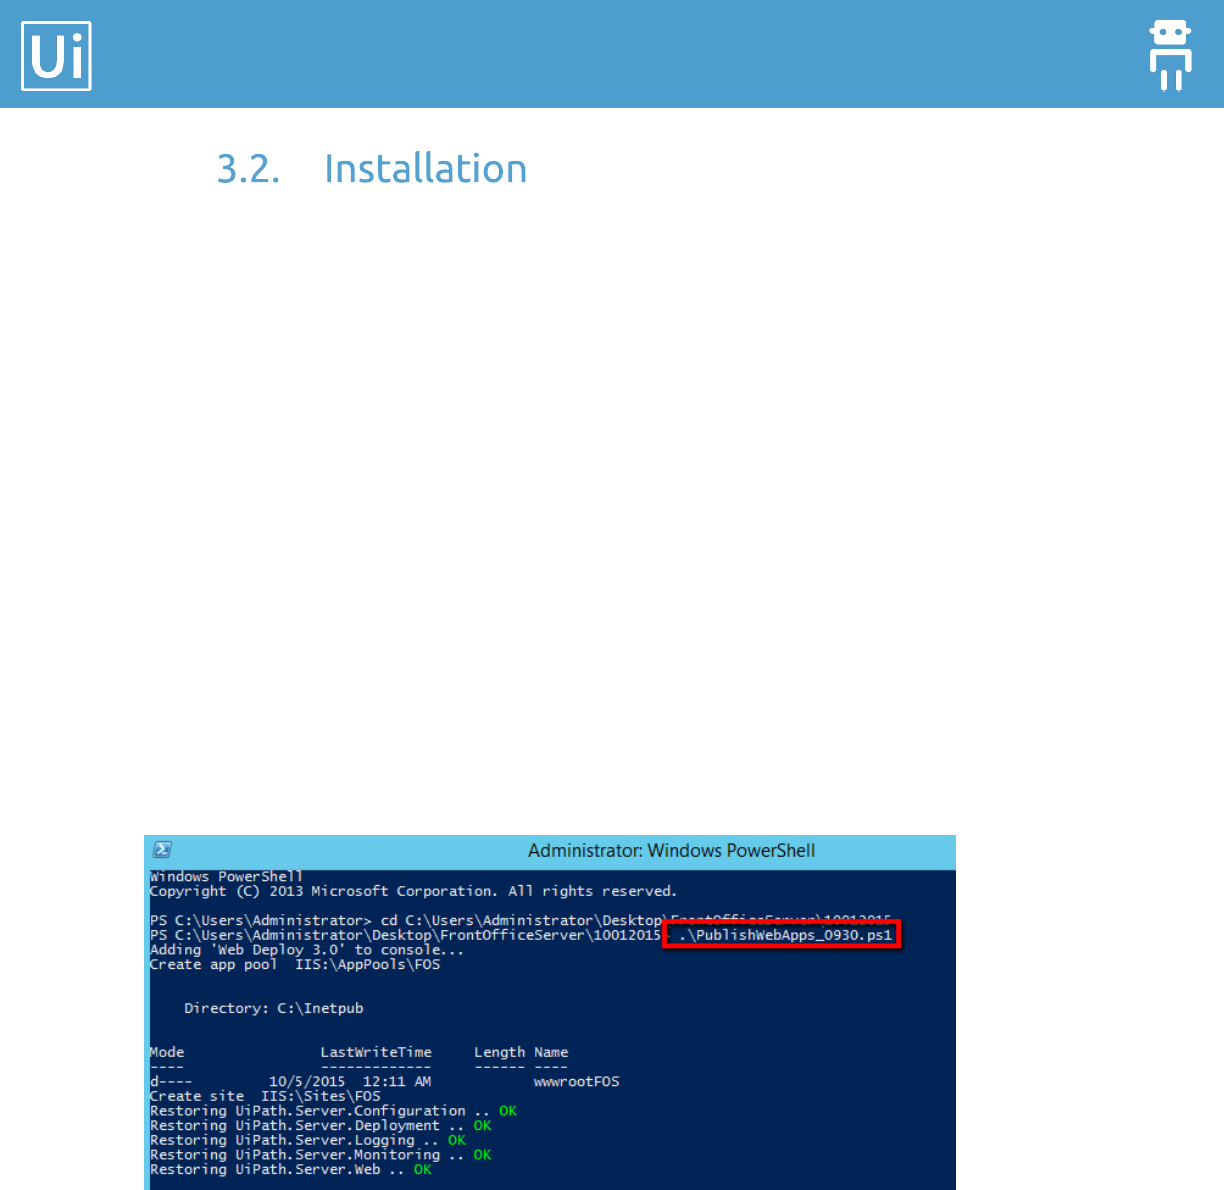
1. Open Windows PowerShell as administrator.
2. Navigate to your folder (created on step 1).
3. Before running the script, decide:
whether you want to use the Application Pool identity or Windows identity (flag
useAppPoolIdentity to be specified only if you want to use the Application Pool
identity ).
whether you want to use SQL authentication or Windows Integrated
Authentication (flag useSQLAuthentication to be specified only if you want to use
SQL authentication).
be sure you know the name of the SQL server machine, the name of the instance (if
it’s not the default one) and the SQL Server TCP port (if it’s not the default one
1433) (you will be asked to provide the value for dbServerInstance).
4. Run .\OrchestratorInstaller.ps1 –unsecureHTTP.
If asked, enter the password for database.
5. Press Enter.
6. Open IIS and refresh the Sites.
7. Select the site and restart the IIS.
8. Open powershell as administrator and restart iis service (iisreset)
Orchestrator Installation Guide
24
4. ElasticSearch and Kibana
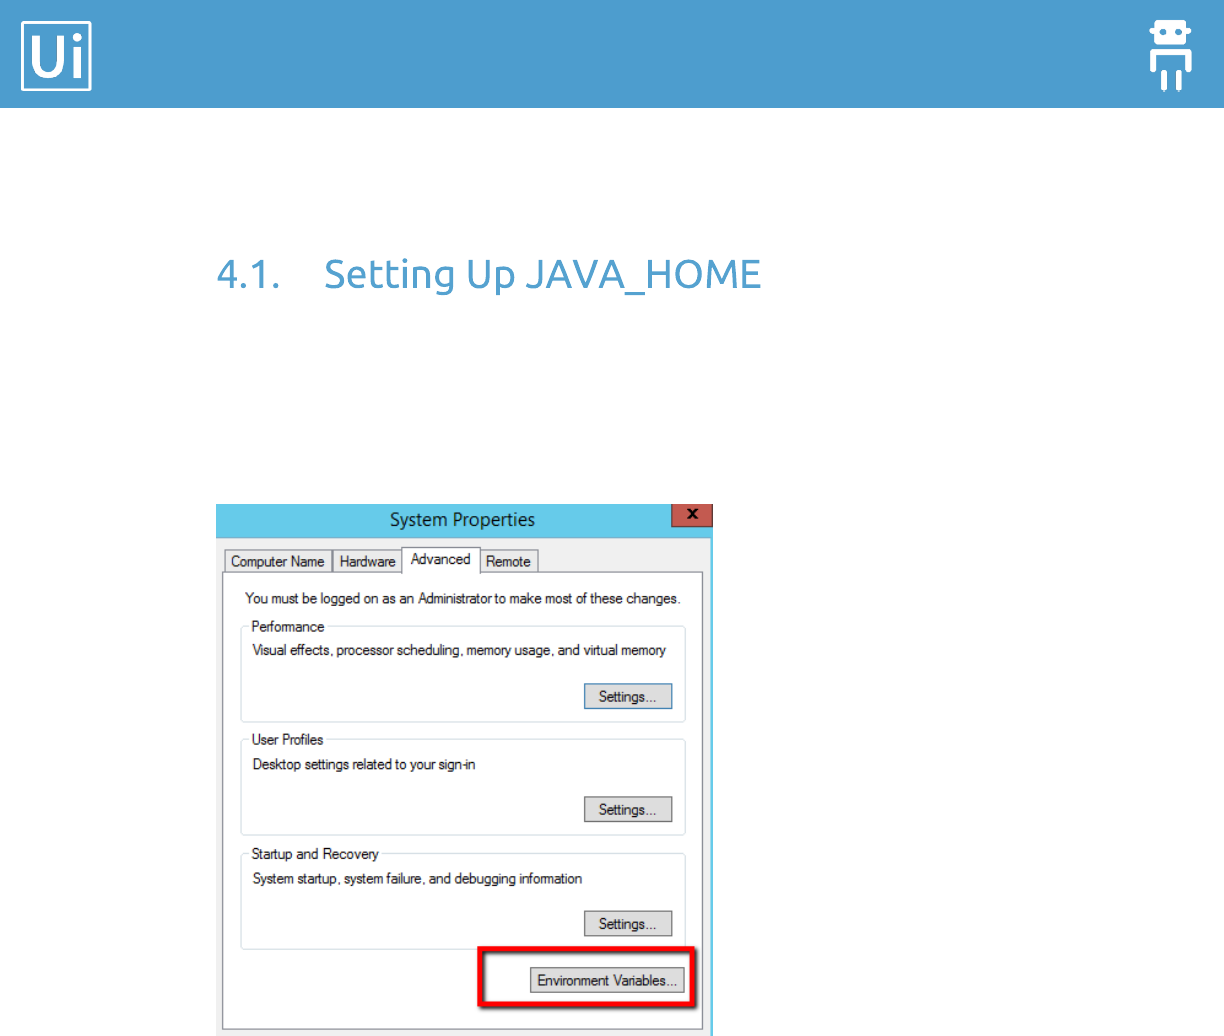
If the JAVA_HOME variable is not set, please follow the next steps:
1. Edit environment variables > select “Edit the system environment variables”
2. On the Advanced tab, click Environment Variables.
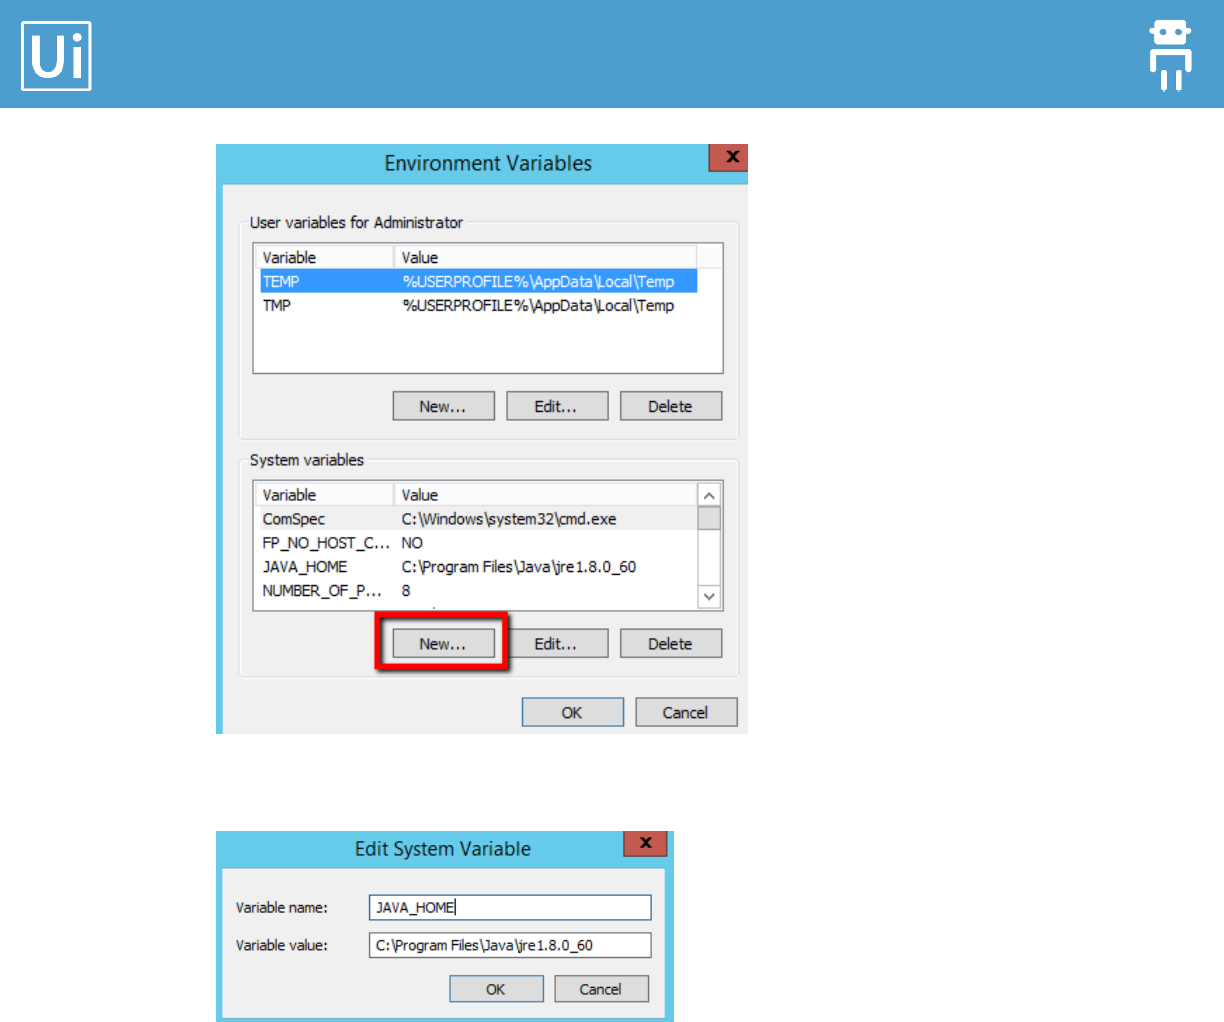
3. Under the System Variables section, click New.
Orchestrator Installation Guide
25
4. Set the variable and click OK.
Orchestrator Installation Guide
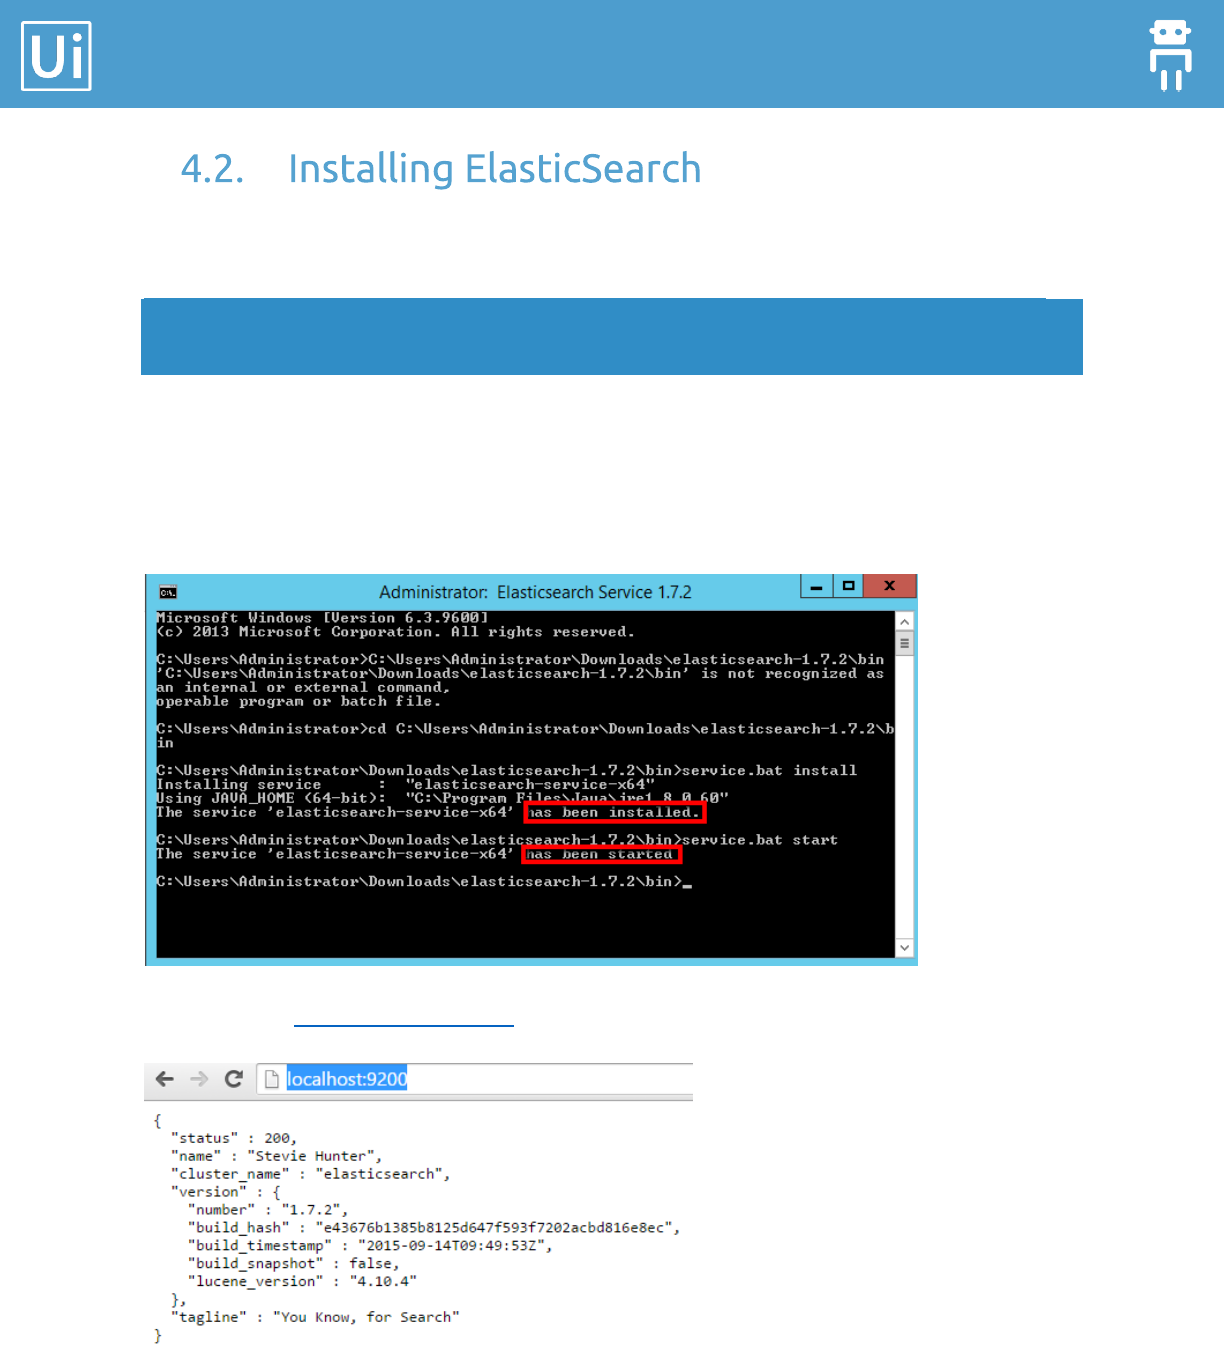
26
1. Unzip the elasticsearch package.
Note: When unzipping, do not create a new folder “elasticsearch-x.y.z” because the archive
already contains the folder called “elasticsearch-x.y.z”.
2. Start bin/elasticsearch.bat - it will open a cmd window.
3. In the bin folder open a cmd and run: “service.bat install” (install elasticsearch as
service).
4. In the bin folder open a cmd and run: “service.bat start”.
For test, open: http://localhost:9200/.
Orchestrator Installation Guide
27
1. Unzip “kibana-x.y.z-windows.zip” archive.
Note: When unzipping, do not create a new folder “kibana-x.y.z-windows” because the archive
already contains the folder called “kibana-x.y.z-windows”.
2. Start KIBANA: C:\kibana-4.1.2-windows\bin; kibana.bat.
3. Test: http://servername:5601.
1. Open a command prompt as administrator
2. sc create
"ElasticSearch Kibana 4.0.1" binPath= "C:\kibana-4.1.2-
windows\bin\kibana.bat" depend= "elasticsearch-service-x64"
start= auto
Note: Be careful that each parameter has the “=” sign collated at the end without a space,
then there is a space before the value of the parameter.
Do not expect to see the Kibana service running. Because the underlined executable of the
service is a BAT file, it will not appear as Running.
However, the BAT file will start a program called “node.exe”. If that process is running, the
Kibana service and web site is working. Test with this URL: http://servername:5601.

Orchestrator Installation Guide
28
Appendix 1 - Find the installed .NET
version
Find .NET Framework versions by viewing the registry
(.NET Framework 1-4)
1. On the Start menu, choose Run.
2. In the Open box, enter regedit.exe.
You must have administrative credentials to run regedit.exe.
3. In the Registry Editor, open the following subkey:
HKEY_LOCAL_MACHINE\SOFTWARE\Microsoft\NET Framework Setup\NDP
The installed versions are listed under the NDP subkey. The version number is stored
in the Version entry. For the .NET Framework 4 the Version entry is under the Client or
Full subkey (under NDP), or under both subkeys.
Note: The "NET Framework Setup" folder in the registry does not begin with a period.
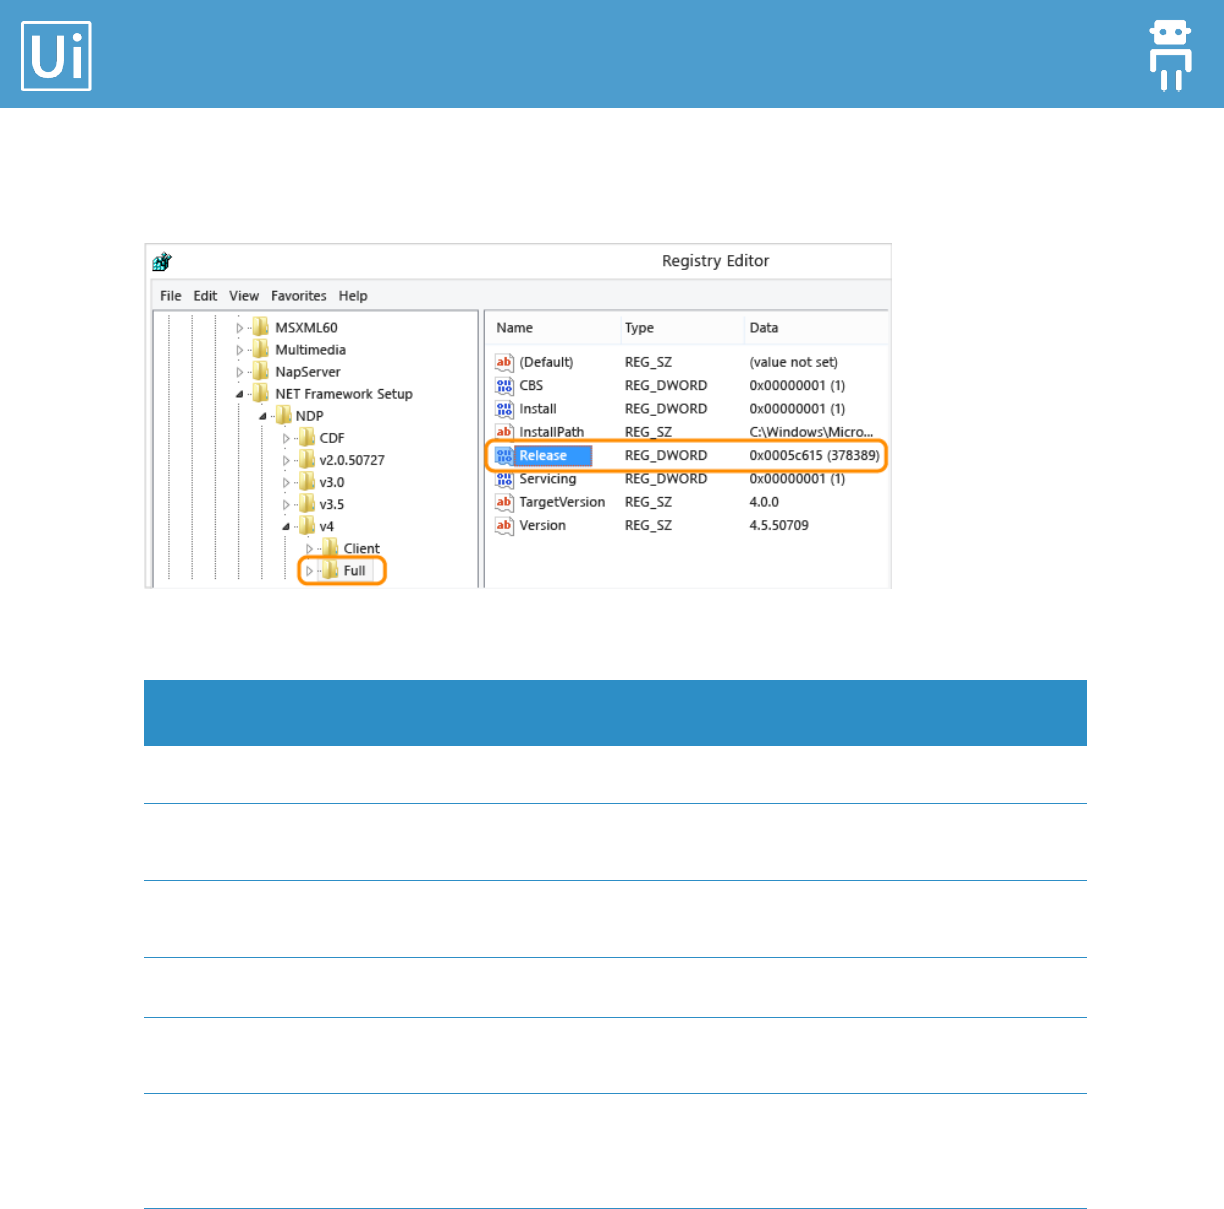
Find .NET Framework versions by viewing the registry
(.NET Framework 4.5 and later)
1. On the Start menu, choose Run.
1. In the Open box, enter regedit.exe.
You must have administrative credentials to run regedit.exe.
2. In the Registry Editor, open the following subkey:
HKEY_LOCAL_MACHINE\SOFTWARE\Microsoft\NET Framework Setup\NDP\v4\Full.
Note that the path to the Full subkey includes the subkey Net Framework rather than
.NET Framework.
Note: If the Full subkey is not present, then you do not have the .NET Framework 4.5 or later
installed.
Orchestrator Installation Guide
29
Check for a DWORD value named Release. The existence of the Release DWORD indicates
that the .NET Framework 4.5 or newer has been installed on that computer.
The value of the Release DWORD indicates which version of the .NET Framework is installed.
Version of the Release DWORD
Version
378389
.NET Framework 4.5
378675
.NET Framework 4.5.1 installed with
Windows 8.1 or Windows Server 2012 R2
378758
.NET Framework 4.5.1 installed on Windows
8, Windows 7 SP1, or Windows Vista SP2
379893
.NET Framework 4.5.2
On Windows 10 systems: 393295
On all other OS versions: 393297
.NET Framework 4.6
On Windows 10 November Update systems:
394254
On all other OS versions: 394271
.NET Framework 4.6.1
On Windows 10 Insider Preview Build 14295:
394747
On all other OS versions: 394748
.NET Framework 4.6.2 Preview
Orchestrator Installation Guide
30
Appendix 2 - Creating an Index Pattern
to Connect to Elasticsearch
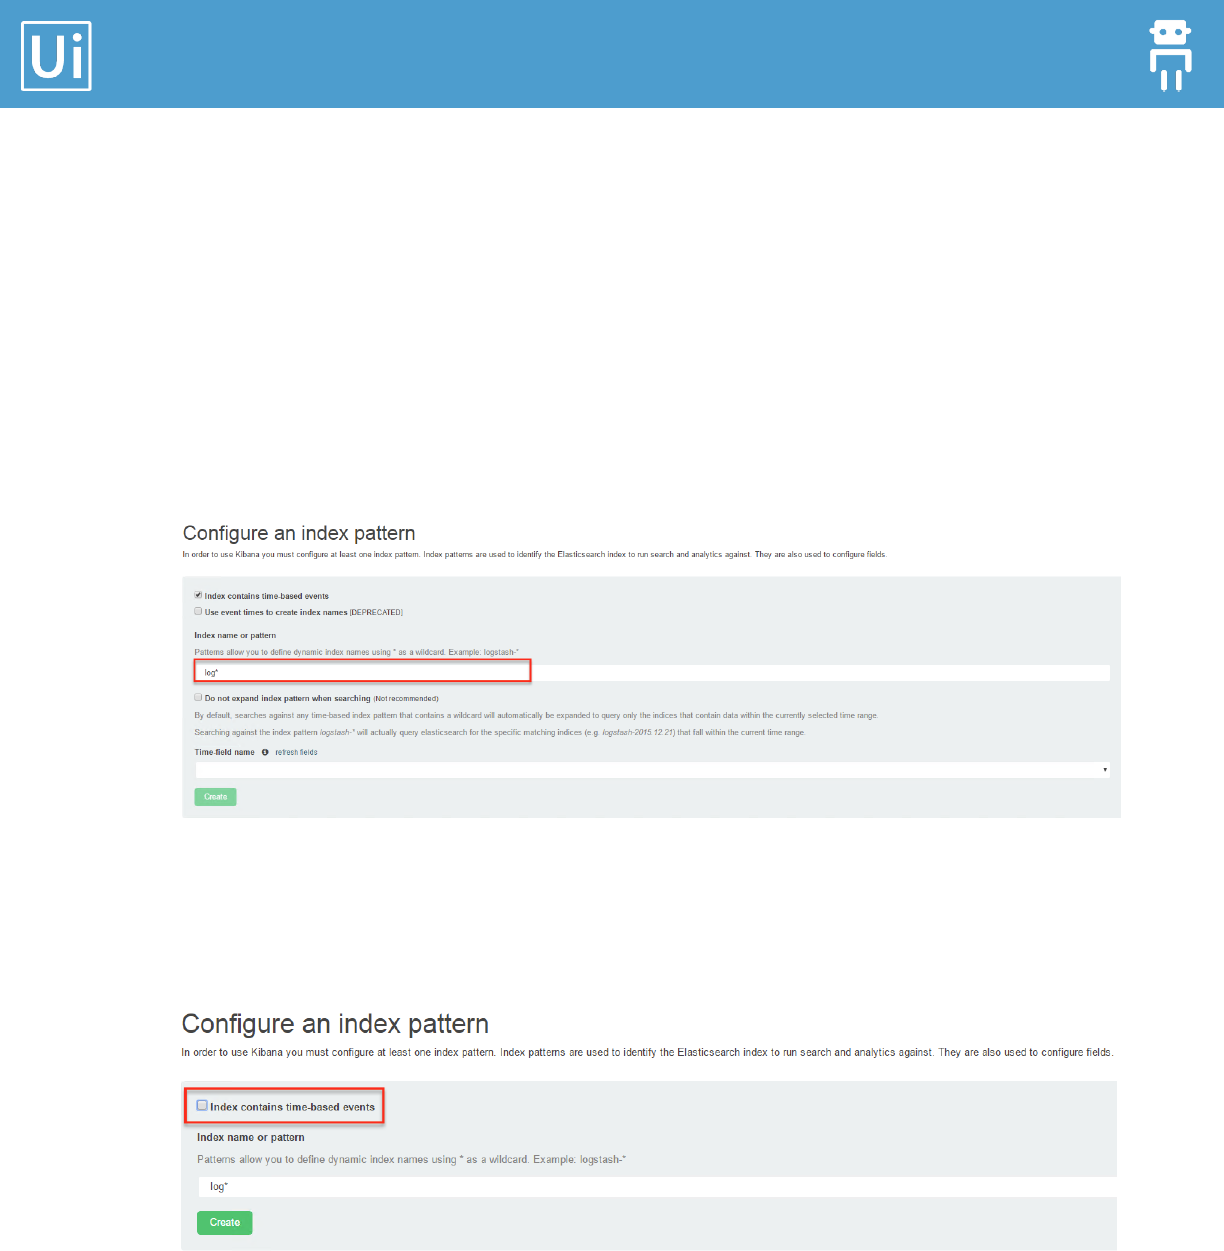
1. Go to the Settings > Indices tab.
2. Specify an index pattern that matches the name of one or more of your Elasticsearch
indices. By default, Kibana guesses that you’re you’re working with log data being fed
into Elasticsearch by Logstash. For example you can enter: logs*
3. If your index contains a timestamp field that you want to use to perform time-based
comparisons, select the Index contains time-based events option and select the index
field that contains the timestamp. Kibana reads the index mapping to list all of the
fields that contain a timestamp.
4. By default, Kibana restricts wildcard expansion of time-based index patterns to indices
with data within the currently selected time range. Click Do not expand index pattern
when search to disable this behavior.
5. Click Create to add the index pattern.
