User Guide
User%20Guide
User Manual: Pdf
Open the PDF directly: View PDF ![]() .
.
Page Count: 66
- Getting Started
- Frequent References
- Audience
- Project Architecture
- How to switch between Legacy and Mecanim Animations
- How to Change the Script Type (Javascript & C#)
- Adding an Obstacle
- Replacing Player Character
- Adding a Sound
- Adding a Patch
- Menu and Shop
- Replacing the Enemy Character
- How to Switch between Gyro and Swipe Controls
- Adding a Power-up
- Adding a New Mission
- Adding a New Achievement
- Project Exceptions and Resolutions
- EXCEPTION: Character material not assigned to costume shop element. Check the user documentation.
- EXCEPTION: Character texture not assigned to costume shop element. Check the user documentation.
- EXCEPTION: No cost assigned to the costume shop element. Check the user documentation.
- EXCEPTION: No cost assigned to the Utility shop element. Check the user documentation.
- EXCEPTION: No cost assigned to the Power-up shop element. Check the user documentation.
- EXCEPTION: Power-up upgrade level cannot be zero. Check the user documentation.
- EXCEPTION: No cost assigned to the IAP shop element. Check the user documentation.
- EXCEPTION: No reward assigned to the IAP shop element. Check the user documentation.
- Frequently Asked Questions
1
2
Table of Contents
Getting Started ..................................................................................................................... 4
Frequent References ......................................................................................................... 4
Player ............................................................................................................................................... 4
Patch ................................................................................................................................................. 4
Spline................................................................................................................................................ 4
CPs ..................................................................................................................................................... 4
Custom Menu ................................................................................................................................. 4
Audience ................................................................................................................................ 5
Project Architecture .......................................................................................................... 5
Physics ............................................................................................................................................. 5
Menus ............................................................................................................................................... 5
Collisions ........................................................................................................................................ 5
Sounds ............................................................................................................................................. 6
How to switch between Legacy and Mecanim Animations .................................. 6
How to Switch from Legacy to Mecanim Animation System ........................................ 7
How to Switch from Mecanim to Legacy Animation System ........................................ 7
How to Change the Script Type (Javascript & C#) ................................................... 7
Adding an Obstacle .......................................................................................................... 10
Replacing Player Character .......................................................................................... 14
Adding a Sound ................................................................................................................. 17
Adding a Patch .................................................................................................................. 22
Adjusting CPs of a Straight Patch .........................................................................................27
Adjusting CPs of a Curved Patch ...........................................................................................27
Menu and Shop ................................................................................................................. 31
Switch between Custom Menu and NGUI ..........................................................................31
Switch from Custom Menu to NGUI ............................................................................................. 31
Switch from NGUI to Custom Menu ............................................................................................. 32
Menu Script Architecture (Custom Menu) ........................................................................32
Adding a Custom Menu ............................................................................................................33
Adding a Custom Shop Menu .................................................................................................39
Adding a new Costume Shop Item .......................................................................................44
Adding a new Power-up Shop Item .....................................................................................45
Adding a new Utility Shop Item ............................................................................................46
Adding a new In-App Purchase Shop Item ........................................................................47
Replacing the Enemy Character ................................................................................. 48
How to Switch between Gyro and Swipe Controls ............................................... 49
Adding a Power-up .......................................................................................................... 50
Adding a New Mission .................................................................................................... 53
Adding a New Achievement .......................................................................................... 55
Project Exceptions and Resolutions .......................................................................... 57
EXCEPTION: Character material not assigned to costume shop element. Check
the user documentation. .........................................................................................................57

3
EXCEPTION: Character texture not assigned to costume shop element. Check the
user documentation..................................................................................................................58
EXCEPTION: No cost assigned to the costume shop element. Check the user
documentation. ..........................................................................................................................59
EXCEPTION: No cost assigned to the Utility shop element. Check the user
documentation. ..........................................................................................................................60
EXCEPTION: No cost assigned to the Power-up shop element. Check the user
documentation. ..........................................................................................................................61
EXCEPTION: Power-up upgrade level cannot be zero. Check the user
documentation. ..........................................................................................................................62
EXCEPTION: No cost assigned to the IAP shop element. Check the user
documentation. ..........................................................................................................................63
EXCEPTION: No reward assigned to the IAP shop element. Check the user
documentation. ..........................................................................................................................64
Frequently Asked Questions ........................................................................................ 65
Obstacles and/ or currency units disappear whenever the Player gets to a new
patch. ..............................................................................................................................................65
How do I change the length of the patches to a value other than the default
(3000 meters)? ...........................................................................................................................66
What is the difference between Achievements and Missions? ..................................66
How do I turn the fog off? ........................................................................................................66

4
Introduction
Getting Started
1. Import the unity package into an empty project.
2. Go to Project > UltimateKit > Scenes > Scene_1.
3. Click “Don’t Save” if prompted to save the current scene. (The project only
uses a single scene file)
4. Press the play button to get an idea of the menu flow and gameplay.
Frequent References
The documentation will frequently refer to some elements that are the core of
the project:
Player
The Player is the prefab that contains the primary character of the game. This
prefab also has a number of scripts attached to it. The word “Player” will not be
used to refer to the user in this document. The Player behavior is controlled by
ControllerScript.js or ControllerScriptCS.cs.
Patch
Patches are the environments/ surroundings of the game. They are generated by
PatchesRandomizer.js or PatchesRandomiserCS.cs during run time. Each patch has
the default displacement of 3000 meters.
At any particular time, two patches are always active, the one the Player, is on
and the immediate next one. Every time the Player passes a patch completely it is
destroyed and the next one is generated.
Spline
The spline is a line passing over each patch, which defines the path of the Player
and the location where obstacles will be generated.
CPs
The spline is manipulated using CPs, which is short for Check Points. If the patch
is completely straight, only two CPs are needed to draw a straight spline.
However, if the path has bends and curves, multiple CPs are needed to be
arranged to draw a spline that has exactly the same shape and centered on the
path of the patch. Take a look at the sample patches to acquaint yourself with
how CPs are related to the spline.
Custom Menu
The default GUI consists of a set of menus and the HUD. It is referred in the
documentation and script comments by the term “Custom Menu”. This is because
the GUI implementation does not use the GUI class or most of the components
provided by the Unity Engine.
5
The term “NGUI Menus” is also used frequently which as the name suggests
refers to the menus and HUD implementation using the NGUI library. The menus
designed and programmed using the NGUI library are complete replicas of the
Custom Menus. The developer has the choice of using the one most suitable to
their needs.
Audience
The user guide is composed assuming that the reader/ developer has an
understanding of game development in Unity and Javascript or C# programming
for Unity.
Project Architecture
The project doesn’t use much of the physics, GUI components etc. provided by
the Unity Engine to maximize performance on mobile platforms.
Physics
The character/ player physics has been defined as needed in the
ControllerScript.js or ControllerScript.cs.
Menus
There are two types of menu implementations provided in the project. The first
one is the Custom Menu that is primarily controlled by the MenuScript.js or
MenuScriptCS.cs. The ShopScript manages the shop components of the Custom
Menu. A few additional scripts in the Shop Menu manage its smaller components.
The menu has been explained in detail in the “Adding a Menu” section. All the
scripts of the Custom Menu can be located at Project > UltimateKit > Assets > UI
> Custom > Scripts if you are using Javacript or Project > UltimateKit > Assets >
UI > Custom > C# Scripts if you are using C# programming language.
The second type of menu has been implemented using the free version of the
NGUI library. All the scripts and assets used in the NGUI menu can be located at
Assets > UI > NGUI. The scripts used by NGUI are only available in the C#
programming language.
Collisions
There are two kinds of collisions detected during gameplay. The first and the
most common one is the front collisions with obstacles detected and handled by
the PlayerFrontCollider.
The second type of collisions is called “stumble” which are detected by
PlayerSidesCollider if the Player bumps into an obstacle sideways. This triggers
the Enemy (police car by default) to chase the Player for a unit time (5 seconds by
default) and then move out of the camera. If the player stumbles (collides sides
ways) into another obstacle while the Enemy is chasing it, game over routine is
called and the death scene is played.
6
Sounds
All the sounds used in the scene are 2D sounds. All the audio sources have been
added to the SoundManager prefab located in the scene. A script also named as
SoundManager has been added to the prefab and is responsible for playing or
stopping a sound as needed. Exposed variables are used to hold the references of
the audio sources.
Personalizing the Template
How to switch between Legacy and Mecanim Animations
There are two types of animation systems used in the project. By default legacy
animation system is active. The ControllerScript is the only script that controls
the character animations. This script uses a Boolean type variable named
mechAnimEnabled to check which type of animation system is enabled and uses
the appropriate animation system.
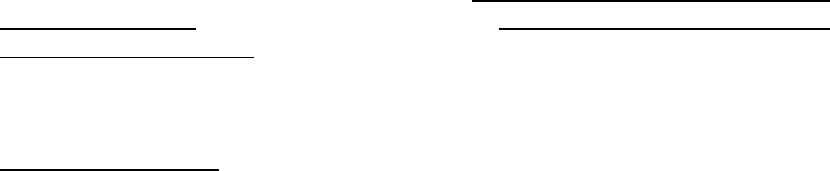
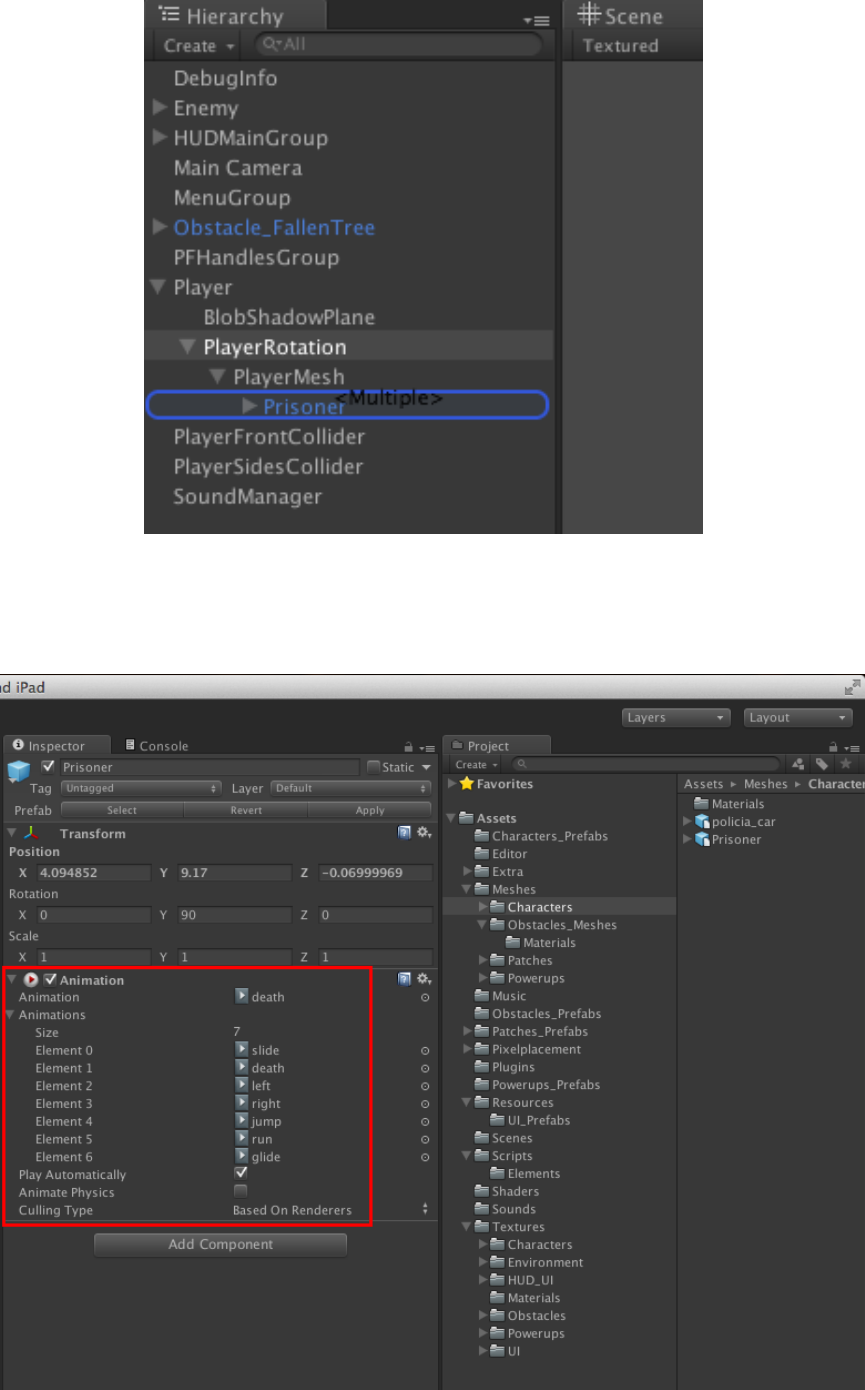
In the Start() function of the ControllerScript the type of character prefab used is
checked and the appropriate animation system is enabled. If the Prisoner prefab
is used in Hierarchy > Player > PlayerRotation > PlayerMesh, the Start() function
is hardcoded to use legacy animations and if the Prisoner(MecAnim) prefab is
used in the same path, the mecanim animation system will be used.
Code snippet where animation type is determined
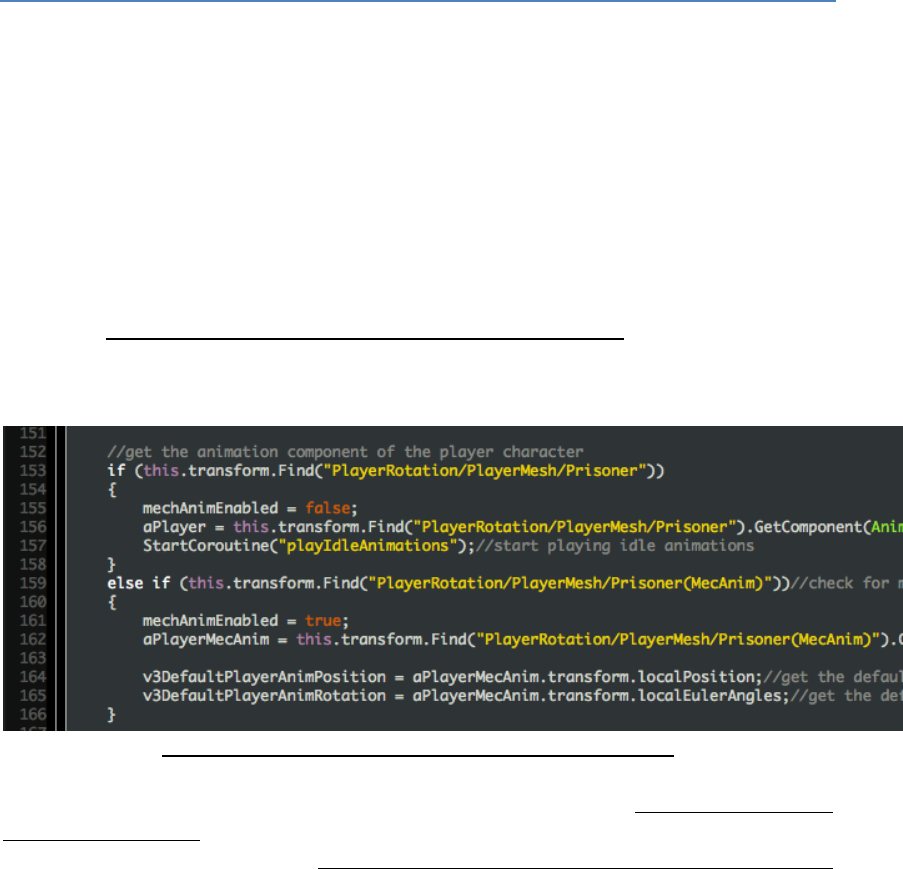
The legacy-animated character can be found at the path: Project > Assets >
Characters_Prefabs. Alternatively the mecanim animated character and all its
dependencies can be found at Project > UltimateKit > Assets > MecAnim System
folder.
7
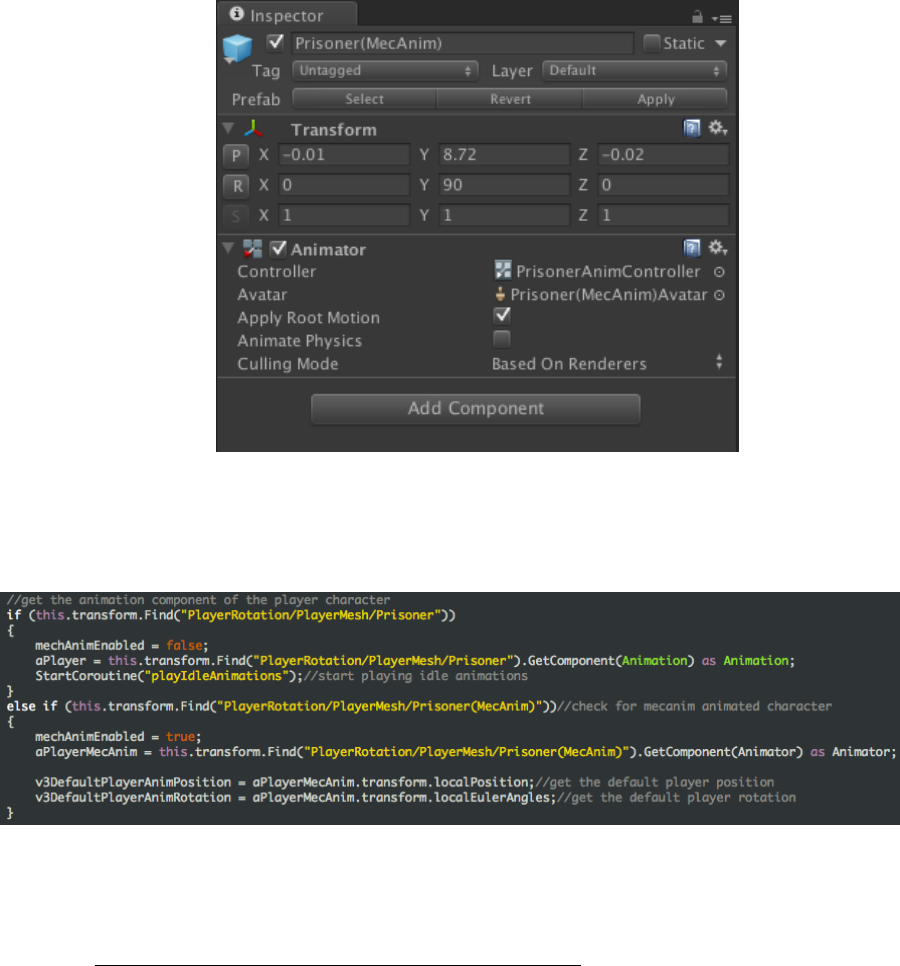
The cubeman .fbx file contains the animations that will be applied to the prisoner
character. The Prisoner(MecAnim) .fbx file is the character mesh that will be
rigged and animated in Unity. To work, it has to be placed at Hierarchy > Player >
PlayerRotation > PlayerMesh. The PrisonerAnimController is the Animator
Controller used by the Prisoner(MecAnim) prefab.
How to Switch from Legacy to Mecanim Animation System
1. Delete the Prisoner prefab from Hierarchy > Player > PlayerRotation >
PlayerMesh.
2. Drag and drop the Prisoner(MecAnim) prefab from Project > UltimateKit >
Assets > MecAnim System to Hierarchy > Player > PlayerRotation >
PlayerMesh.
How to Switch from Mecanim to Legacy Animation System
1. Delete the Prisoner(MecAnim) from Hierarchy > Player > PlayerRotation >
PlayerMesh.
2. Drag and drop the Prisoner prefab from Project > UltimateKit > Assets >
Characters_Prefabs to Hierarchy > Player > PlayerRotation > PlayerMesh.
How to Change the Script Type (Javascript & C#)
To the change the scripting language from Javascript to C# or vice versa you
need to follow these steps:
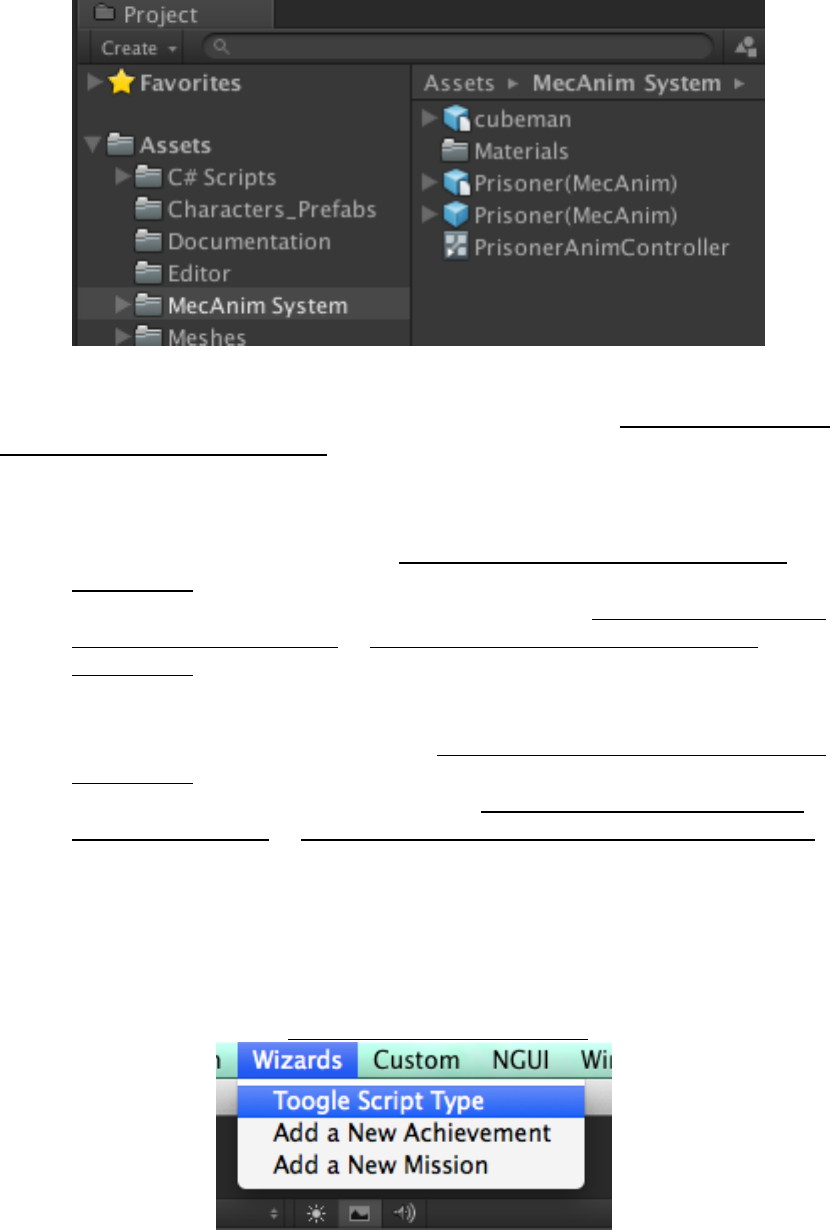
1. From the title bar, go to, Wizards > Toggle Script Type.
A message will be displayed on the Console window telling you that the script
type has been switched successfully.
8
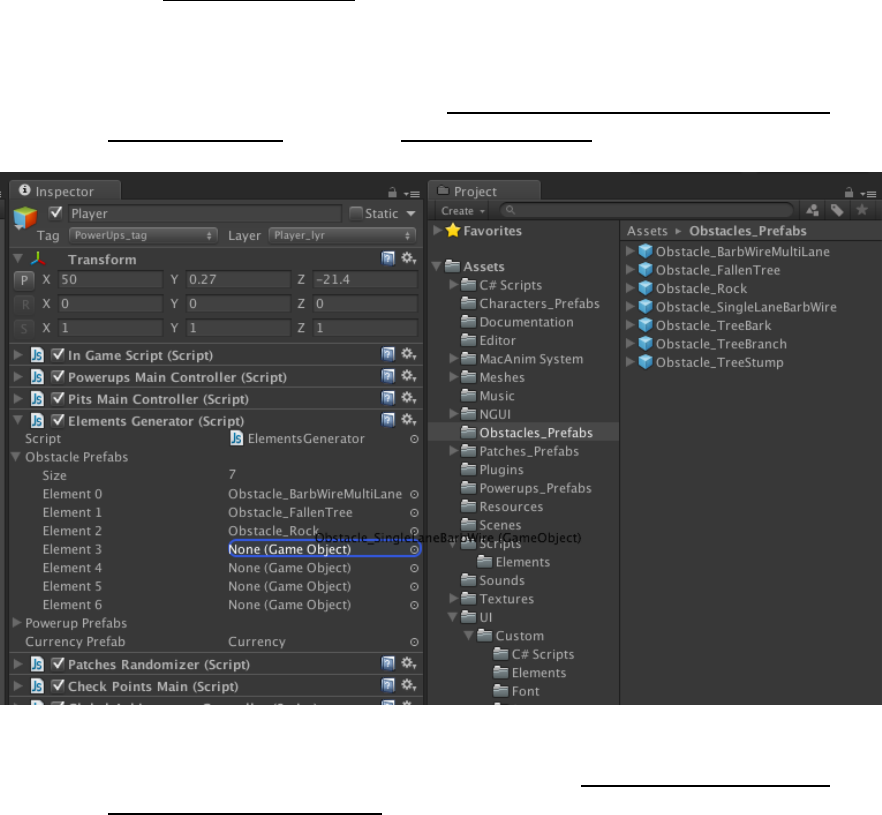
2. You now need to tell the ElementGenerator script again about which
obstacles, power-ups and currency prefab you are using so that it can
generate them on the path. To do that:
a. Click Hierarchy > Player.
b. Expand the ElementsGenerator script.
c. Expand the Obstacle Prefabs array.
d. Allocate memory according to the number of obstacles in your project.
e. Drag all the obstacles from Project > UltimateKit > Assets >
Obstacle_Prefabs folder to Obstacle Prefabs array in the script as
shown in the screen shot.
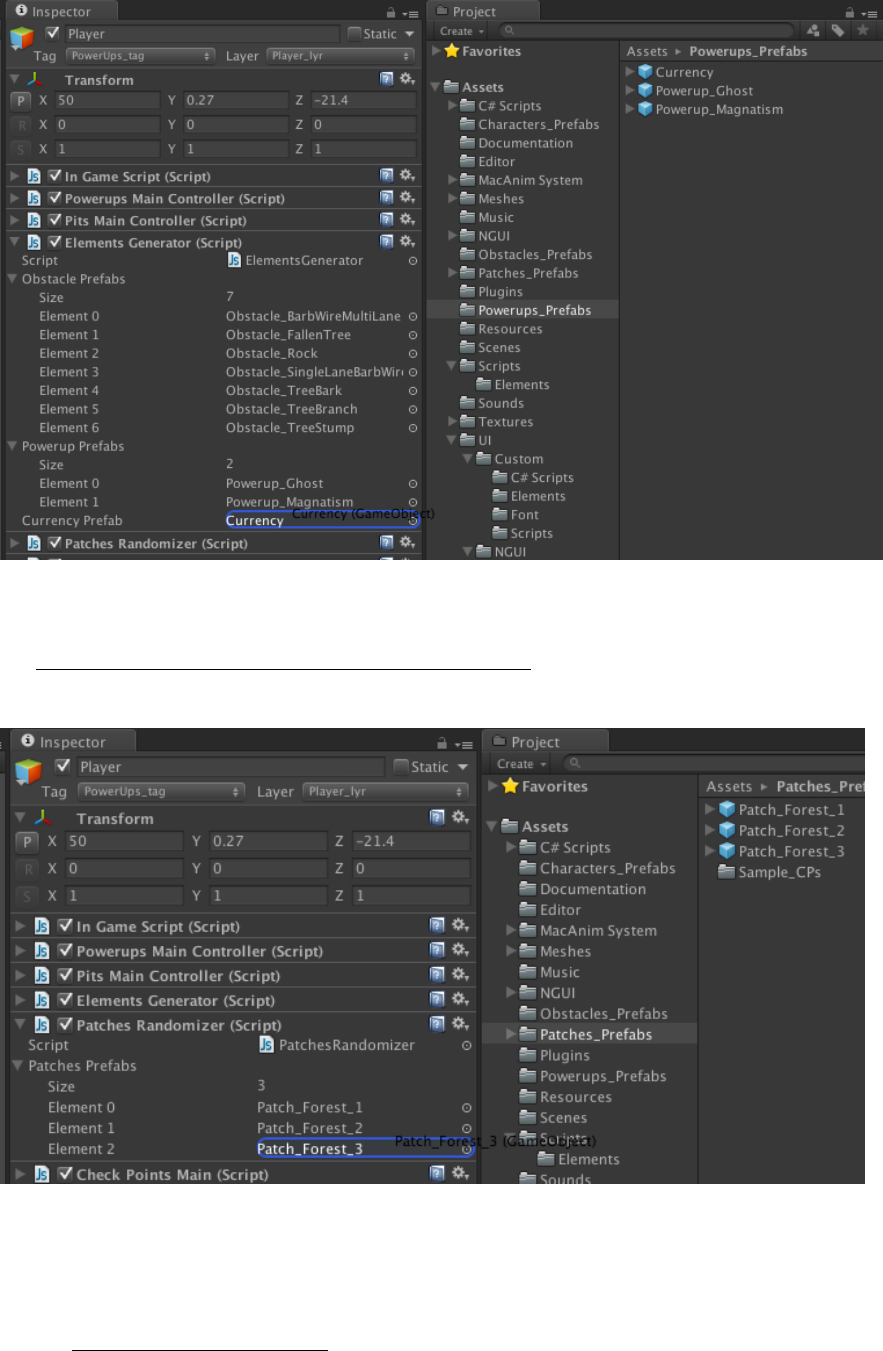
f. Next do the same for the Powerup Prefabs array and the Currency
array. Drag and drop the prefabs from the Project > UltimateKit >
Assets > Powerup_Prefabs folder to the array as shown in the screen
shot below:
9
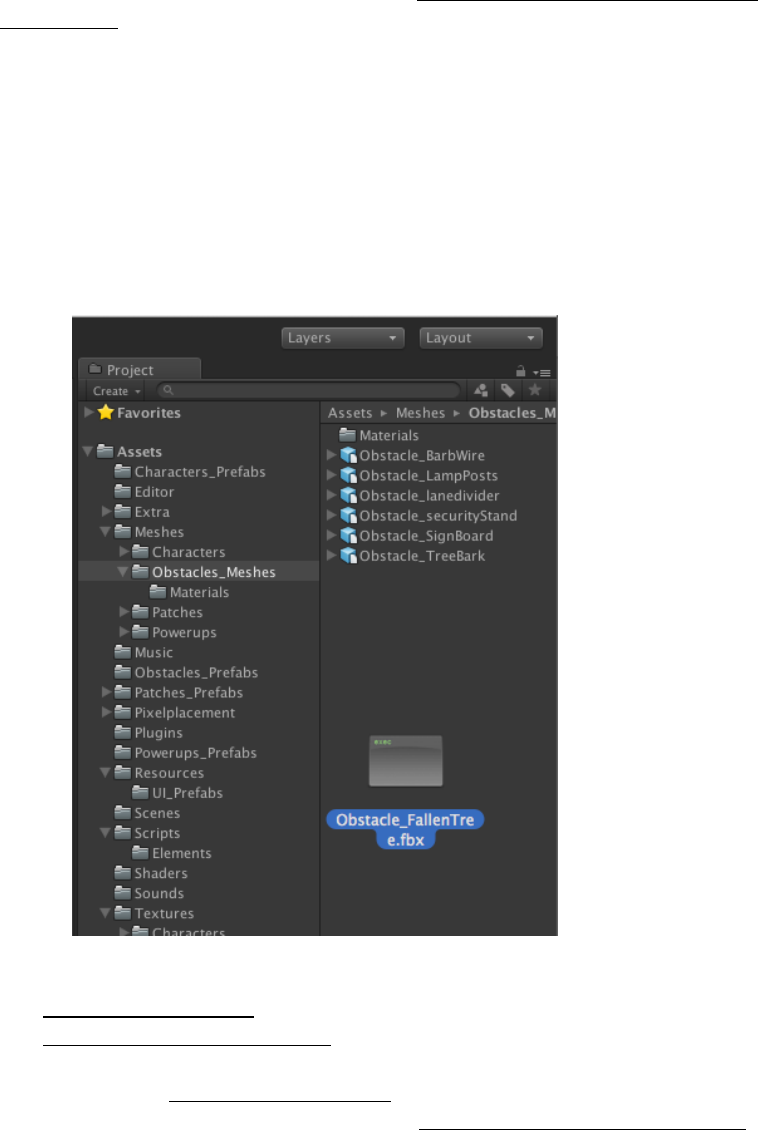
3. The final step is to tell the PatchesRandomiser script about the environment
patches we will be using. To do that, drag the patches prefabs from the
Project > UltimateKit > Assets > Patches_Prefabs folder to the Patches Prefabs
array in the PatchesRandomiser script.
That’s it, go ahead and hit play to check if everything is working as expected.
Notes:
- The script type is changed by the ToggleScriptType.cs script located in the
Project > Assets > Editor folder.
10
- The script type is changed by removing the current scripts from the
prefabs located in the Hierarchy and replacing them with the alternative
scripts.
- The EditorAttributes file located in the Project > UltimateKit > Assets >
Resources folder carries the information about the type of scripting
language currently active.
Optimization Note:
- Several prefabs that are generated at runtime carry both C# and
Javascript version of the same script. The scripting language currently in
use makes the use of the appropriate script. Its best to remove one of
these scripts once you decide which scripting language to use.
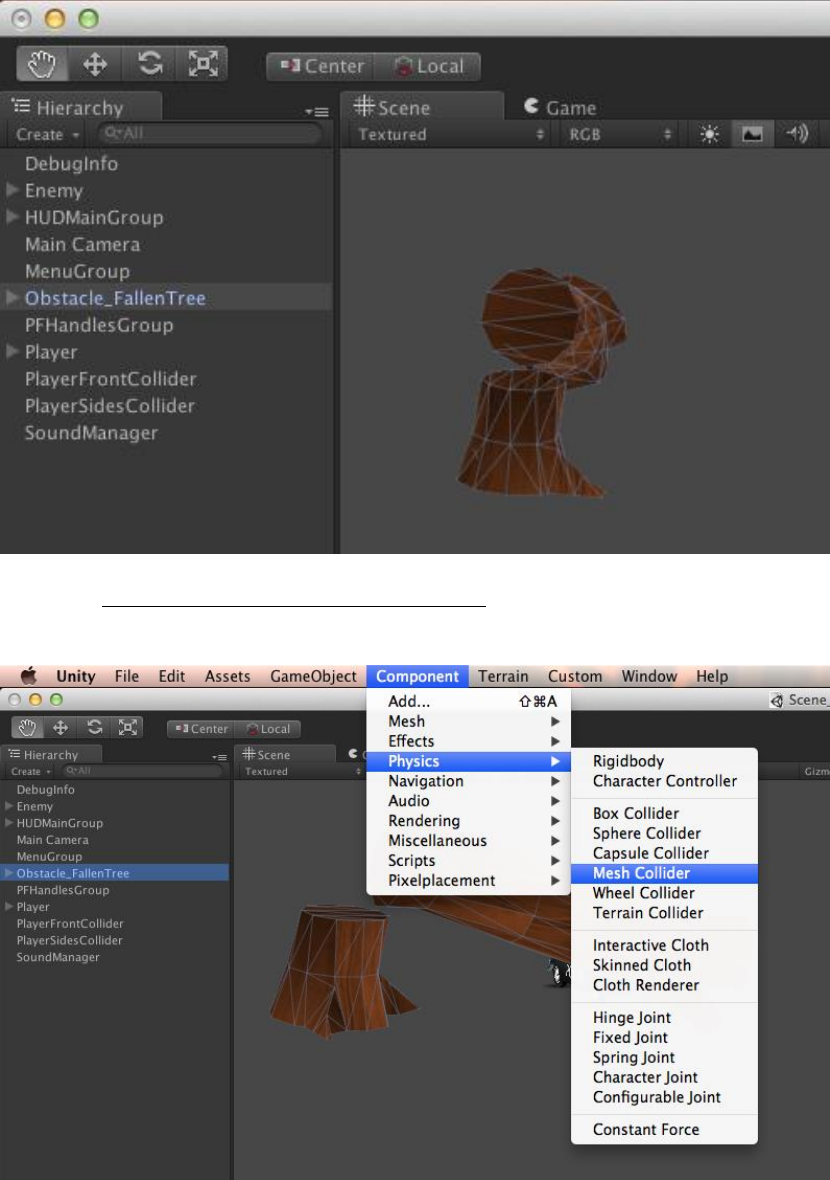
Adding an Obstacle
1. Import the .fbx of the asset that you will use as an obstacle.
Optimization Notes:
- Use Model > Scale Factor to adjust the scale.
- Use Model > Mesh Compression to compress the imported asset as much
as you can without compromising its appearance.
- Select “None” in Rig > Animation Type if your asset isn’t rigged.
- Uncheck the Import Animation option in Animations > Import Animation
if your asset isn’t animated.
2. Drag the imported asset in “Hierarchy” tab to create a prefab.
11
3. Select Component > Physics > Mesh Collider to add a mesh collider to your
obstacle asset.
Optimization Notes:
- Use primitive colliders such as Sphere, Box etc. for better performance
during gameplay.
- Do not scale the collider component on your prefab for optimizing object
pooling.
4. Select Layer > Obstacles_lyr in the Inspector tab.
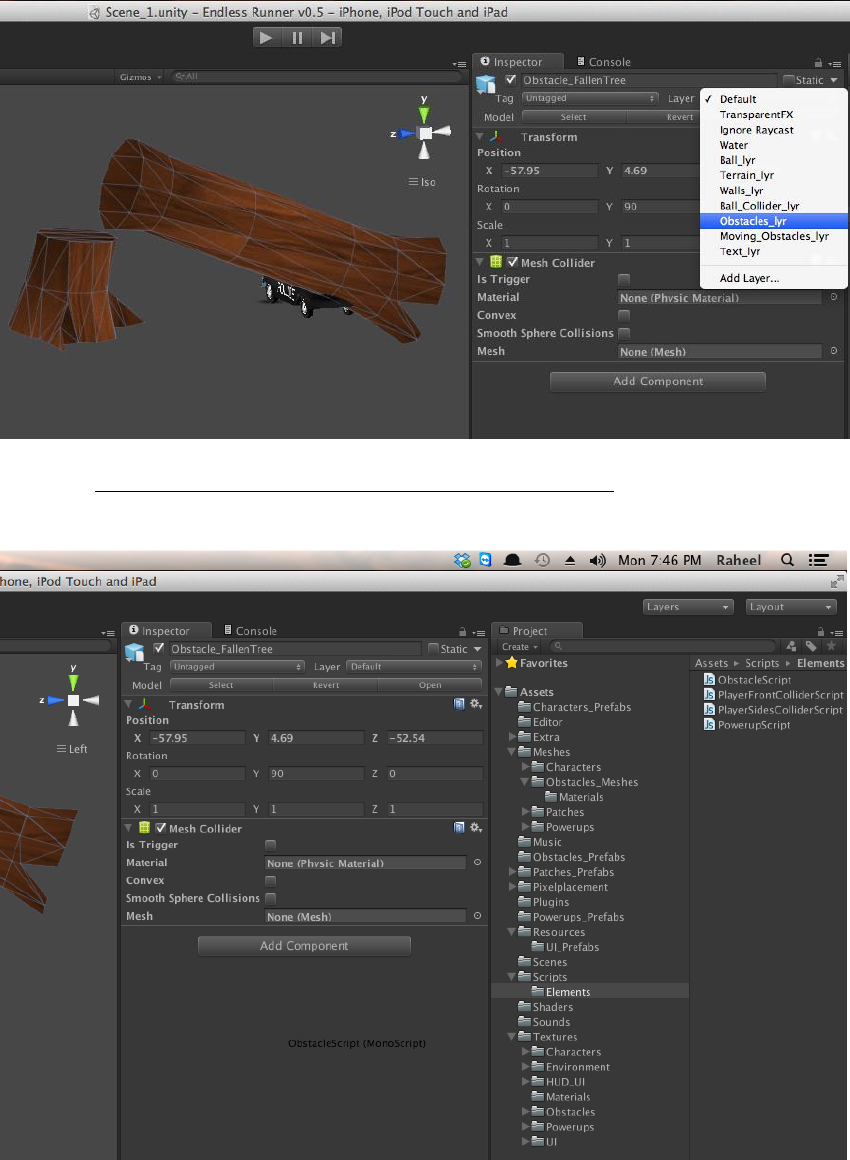
12
Note: Make sure the object with the collider has the layer “Obstacle_lyr”. You
can also change the layer of all the objects of an obstacle prefab to
“Obstacle_lyr” to keep things simple.
5. Go to Project > UltimateKit > Assets > Scripts > Elements.
6. Add the “ObstacleScript.js” on your obstacle’s prefab.
7. Set the Obstacle Area Type on the Obstacle Script Component.
8. Set the Frequency. (Default Value is 10)
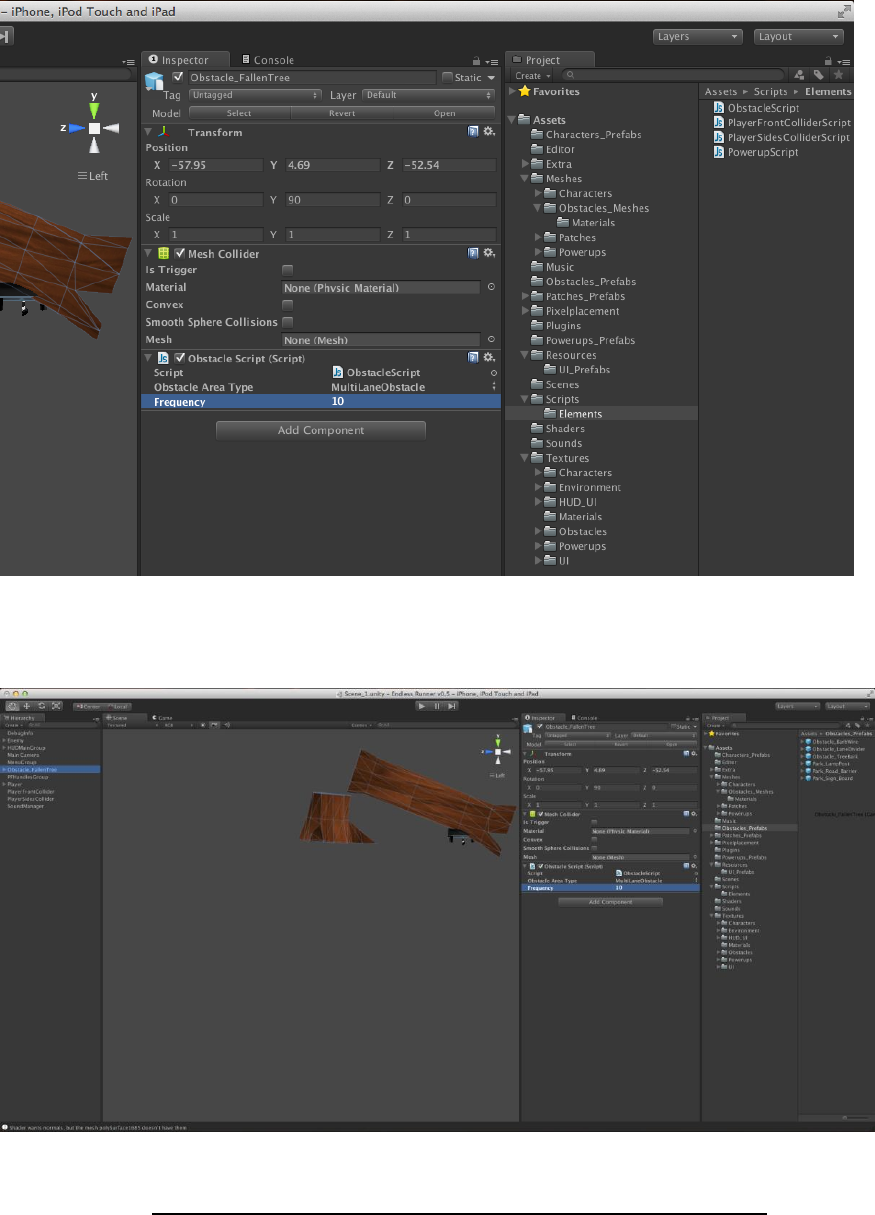
13
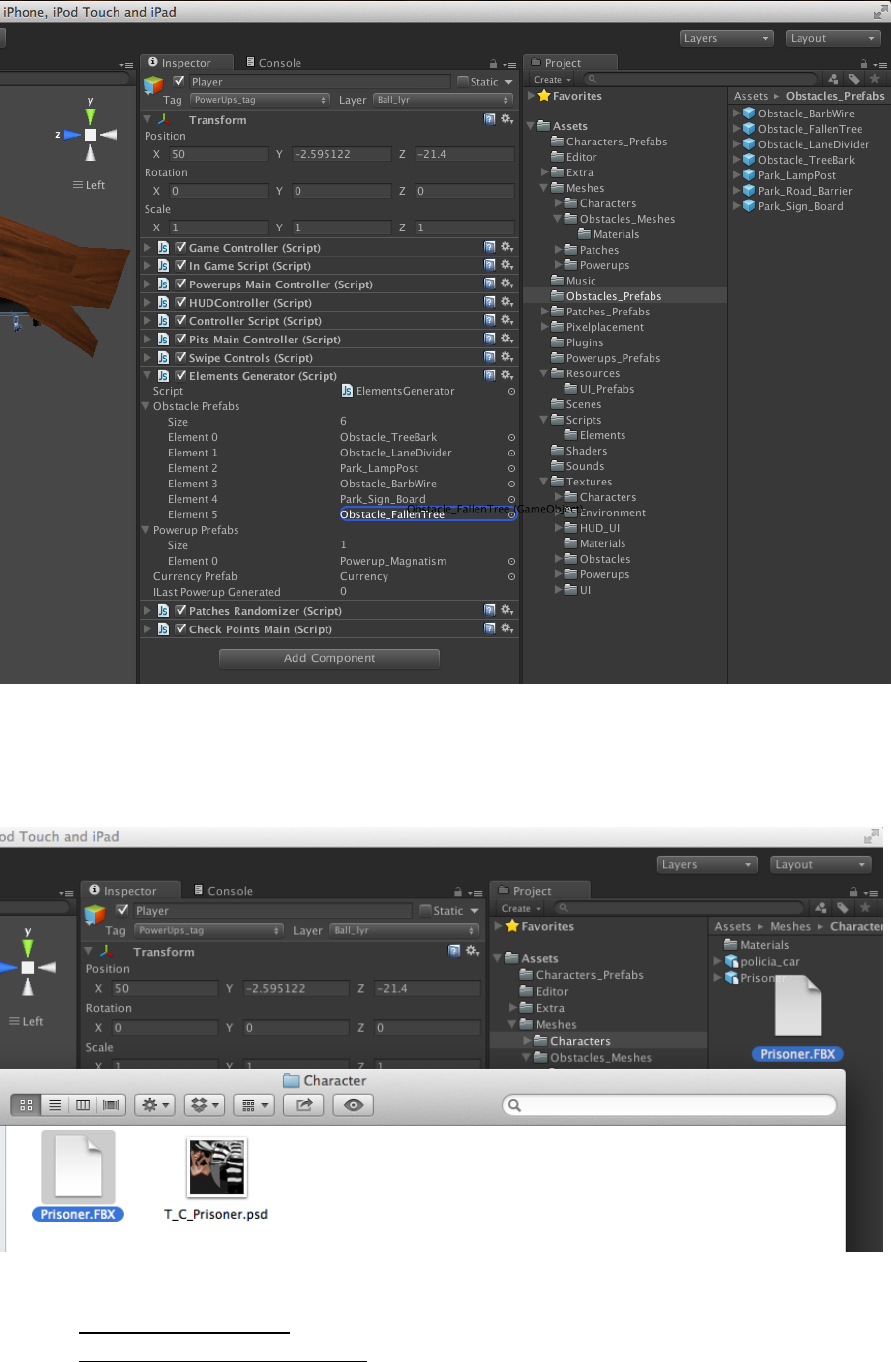
9. Drag the newly created prefab to Obtacles_Prefabs or any other folder in the
Project tab to create a prefab.
10. To make the created obstacle appear on the path during gameplay, you need
to add it to Hierarchy > Player > Elements Generator > Obstacle Prefabs.
11. Remove the newly created obstacle from the Hierarchy tab before launching
the game.
14
Replacing Player Character
1. Import the player .fbx that will be used as the main character.
Optimization Notes:
- Use Model > Scale Factor to adjust the scale.
- Use Model > Mesh Compression to compress the imported asset as much as
you can without compromising its appearance.
15
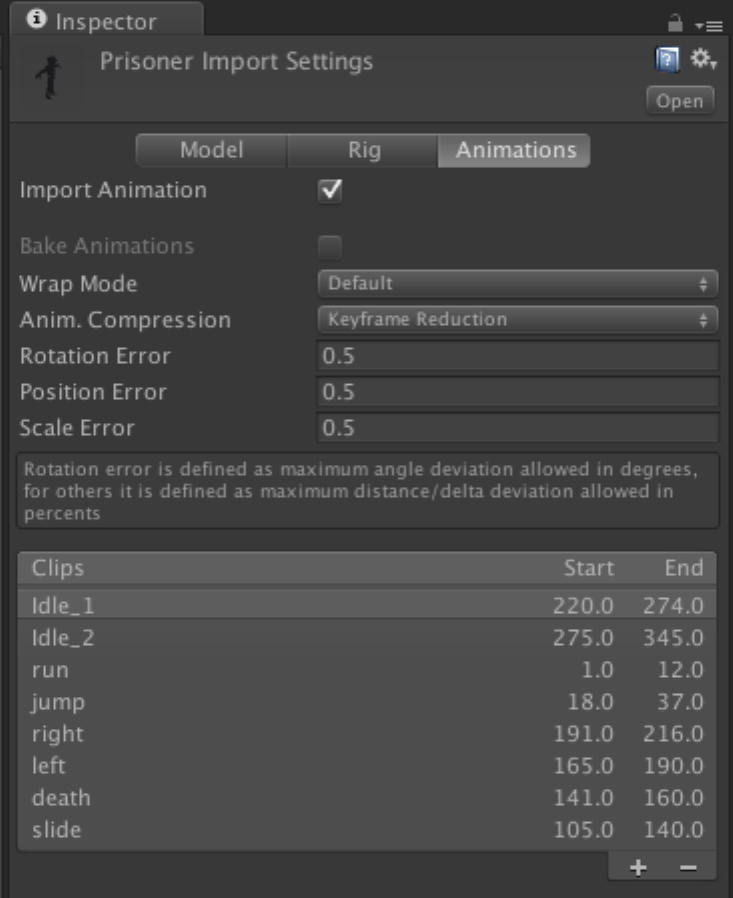
2. Define the animation frames.
Note: If you are working with the legacy animation system, the
ControllerScript uses all the animations listed in the above screenshot. If a
certain animation is not defined, an exception will be thrown when the script
attempts to play that animation.
3. Drag the imported asset in Hierarchy > Player > PlayerRotation >
PlayerMesh.
16
4. If you are working with the legacy animation system, make sure the
Animation component of the character prefab has all the animations that will
be used by the ControllerScript.
17
On the other hand if you are using the mecanim animation system, make sure the
Animator component has everything it needs to run the animations.
5. If your character prefabs don’t have the default names used in the project,
make sure you change the name in the Start function according to the
animation system used, so the ControllerScript knows where to get the
animations from.
Adding a Sound
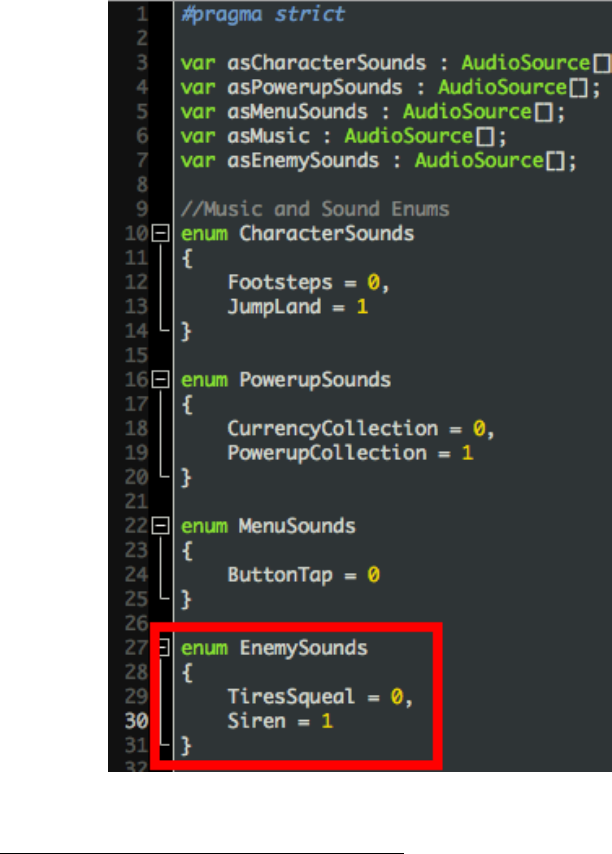
1. Go to Project > UltimateKit > Scripts > SoundManager.
2. Add the sound’s name in the relevant enum. Lets take the Siren sound played
by the police car as an example.
18
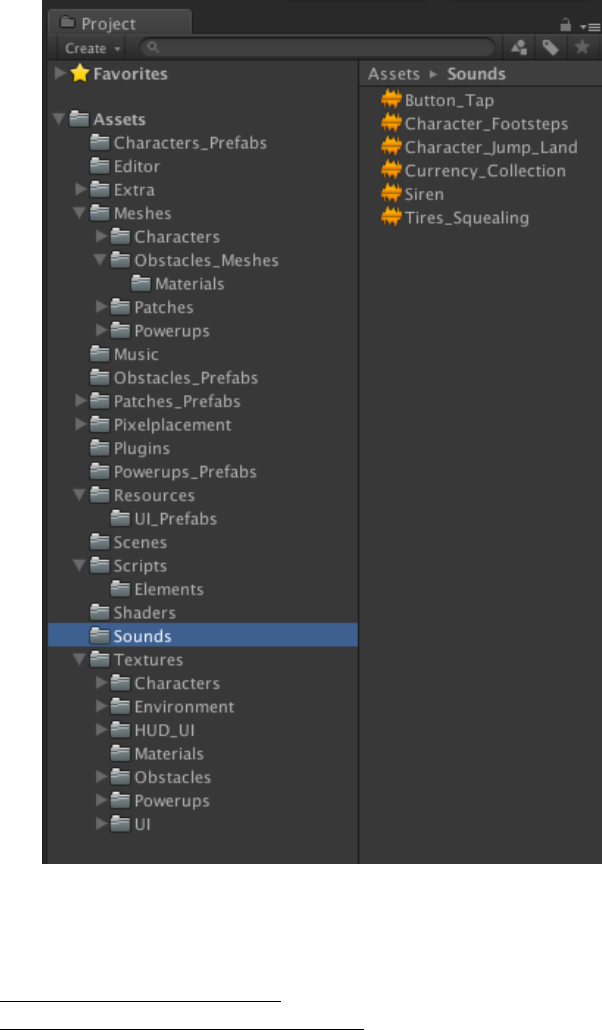
3. Import the sound. (Drag and drop the sound from the Finder/ Window to
Project > Assets > UltimateKit > Sounds)
19
Optimization Notes:
- Change the Audio Format and Load type as needed.
- Uncheck 3D Sound as the project by default doesn’t uses 3D sounds.
4. Select Hierarchy > SoundManager.
5. Select Component > Audio > Audio Source. (This will add another Audio
Source to your SoundManager prefab to be used later)
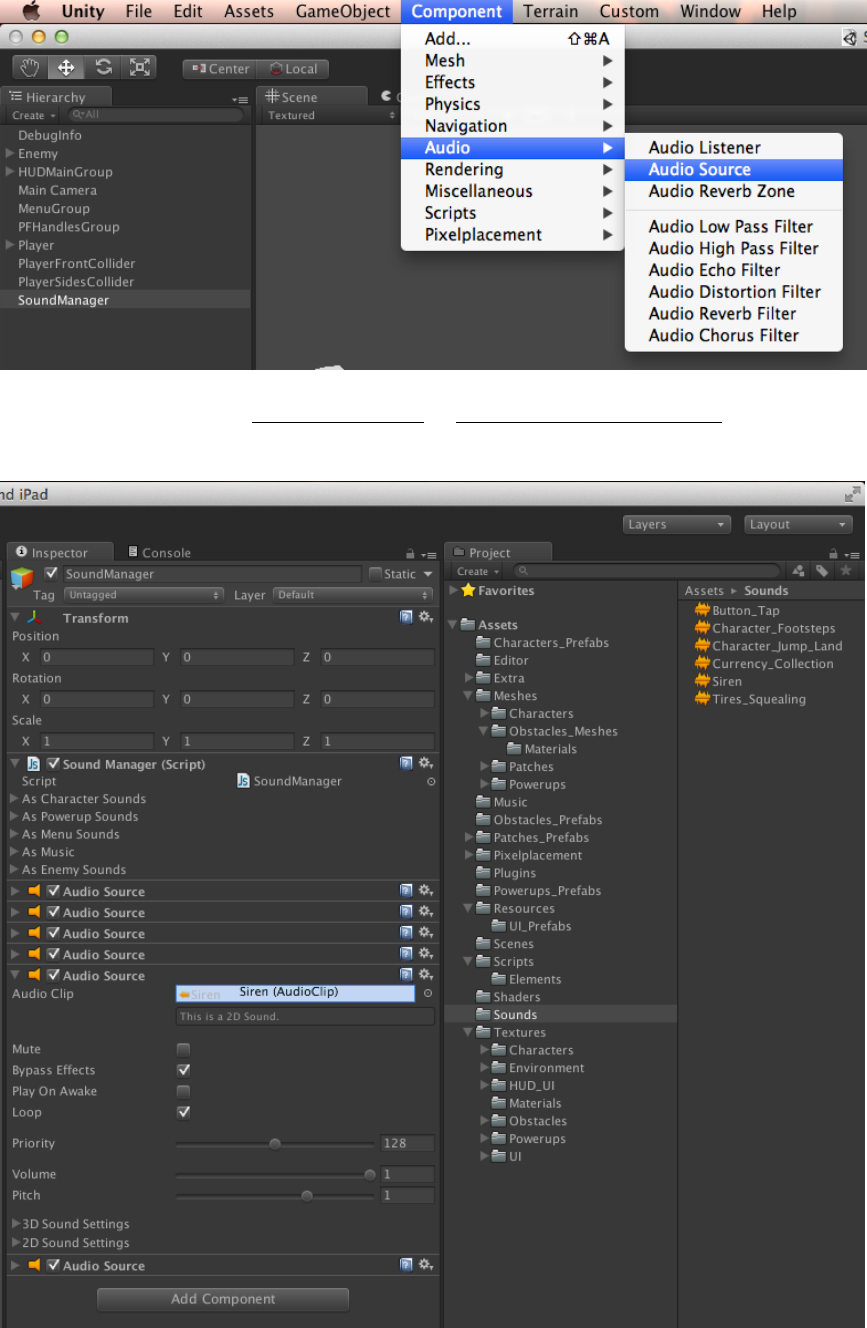
20
6. Drag the sound from Project > Sounds to Audio Source > Audio Clip of the
newly created Audio Source Component.
7. Increase the array size of the relevant array.
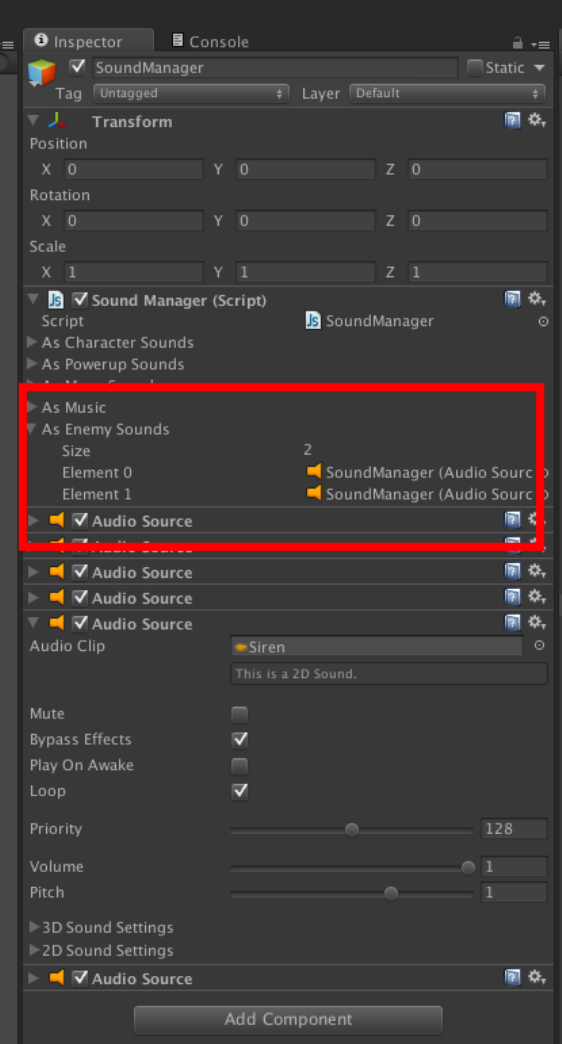
21
8. Drag the Audio Source and drop it as the last index of the array.
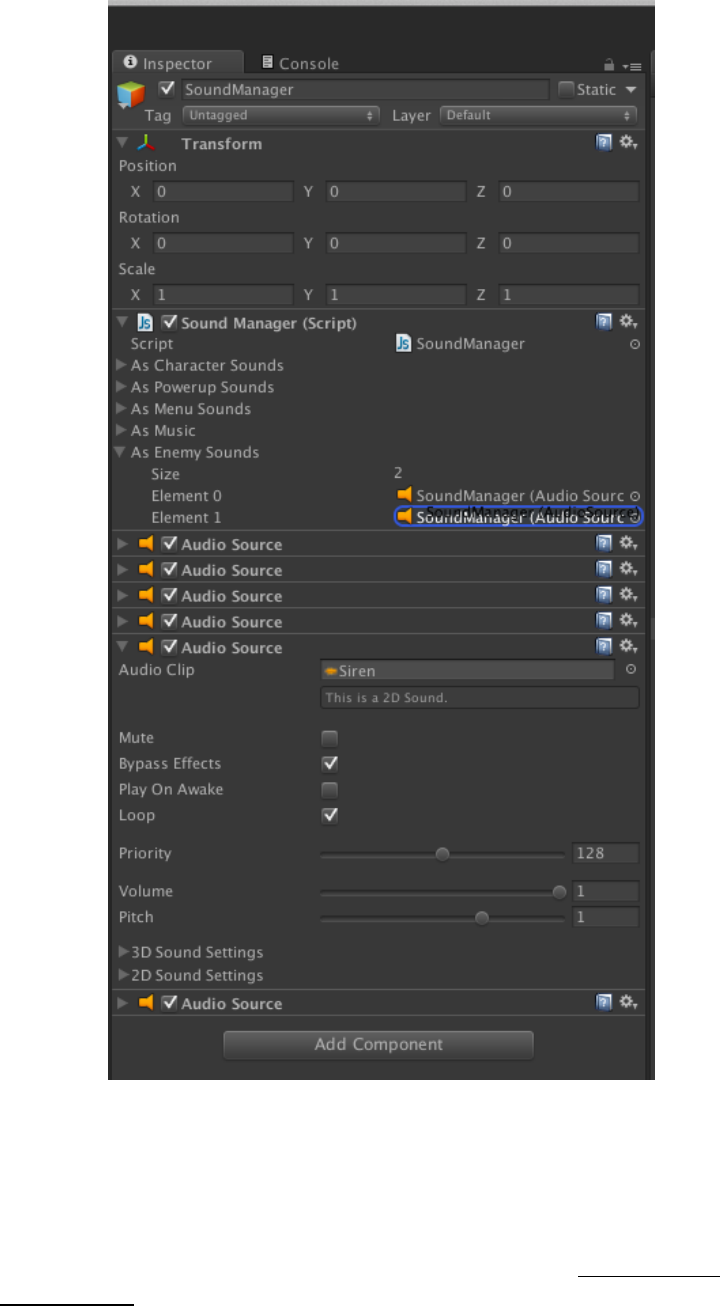
22
9. Use the “playSound(…)” function from SoundManager in the scripts where
you need to use the newly added sound.
Adding a Patch
1. In the Hierarchy tab, add a new game object by selecting GameObject >
CreateEmpty.
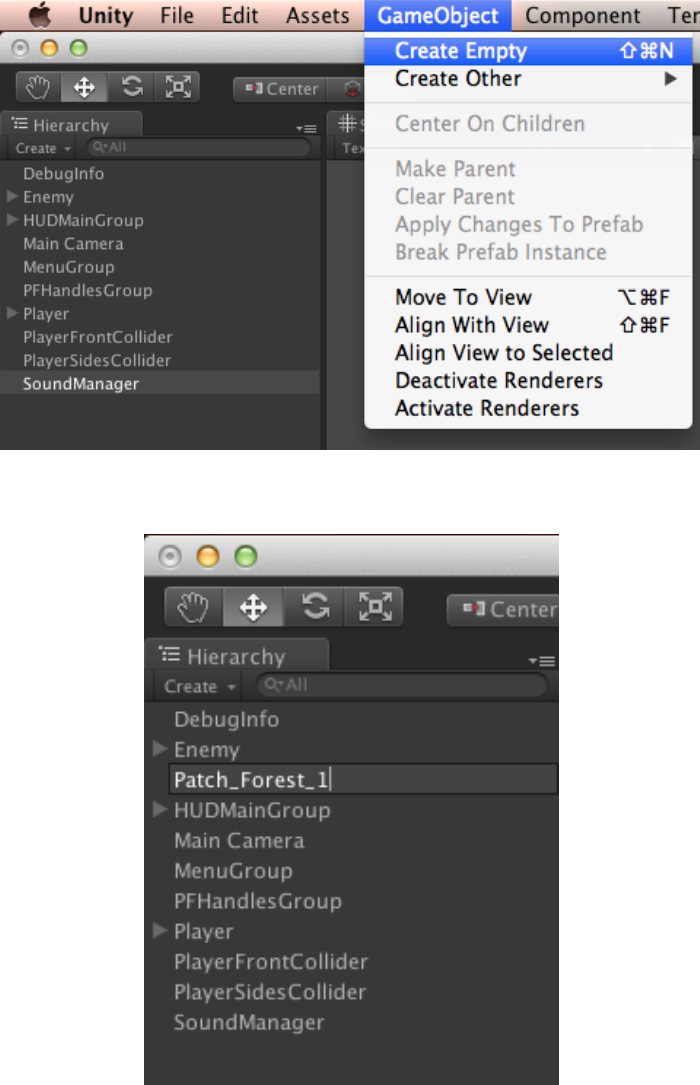
23
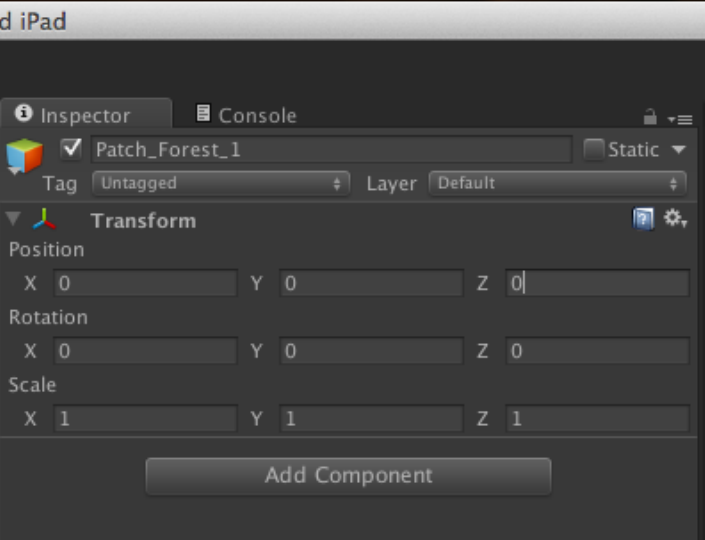
2. Name the empty game object.
3. Set the game object position and rotation transforms to zero.
24
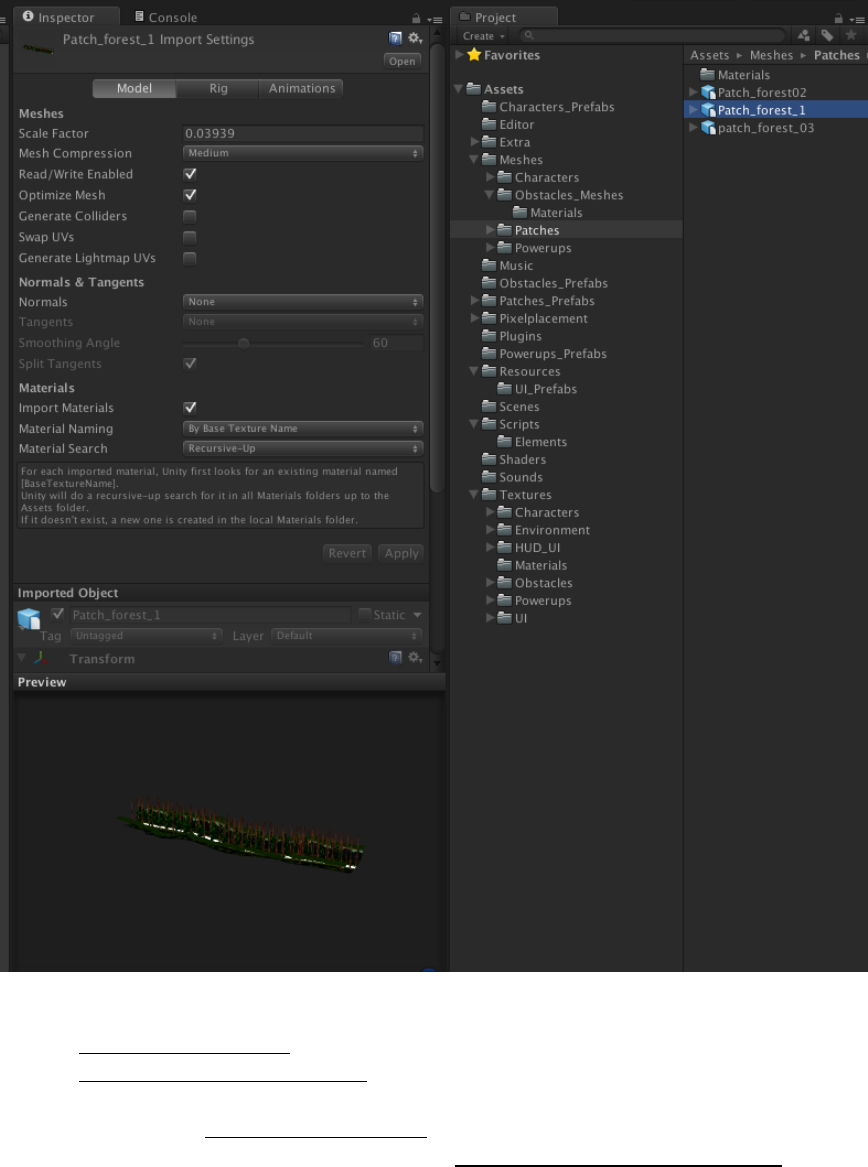
4. Import the patch .fbx.
25
Optimization Notes:
- Use Model > Scale Factor to adjust the scale.
- Use Model > Mesh Compression to compress the imported asset as much as
you can without compromising its appearance.
- Select “None” in Rig > Animation Type if your asset isn’t rigged.
- Uncheck the Import Animation option in Animations > Import Animation if
your asset isn’t animated.
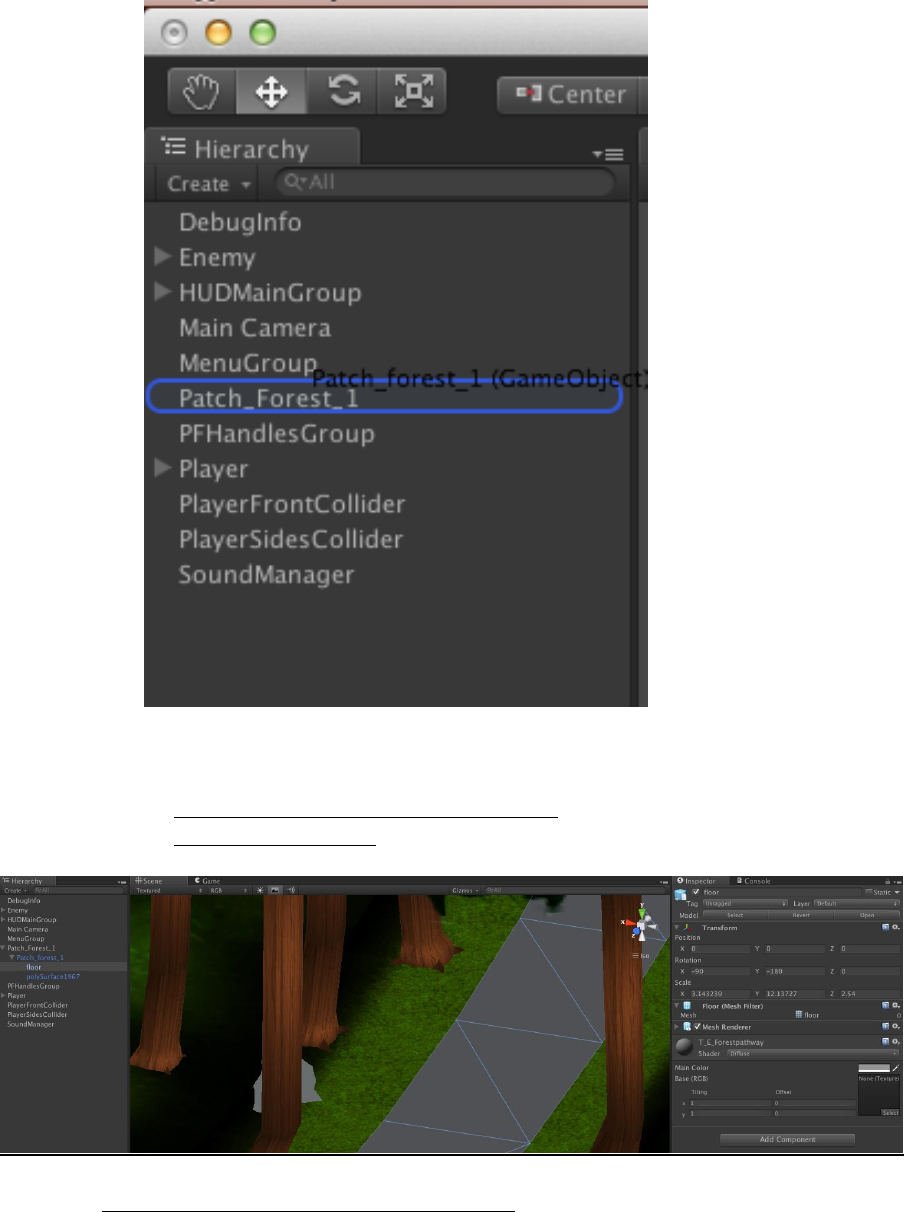
5. Drag the imported .fbx and drop it in the created empty game object.
26
6. Select the floor of your patch where the character will run and perform two
steps:
a. Select Component > Physics > Mesh Collider.
b. Select Layer > Terrain_lyr.
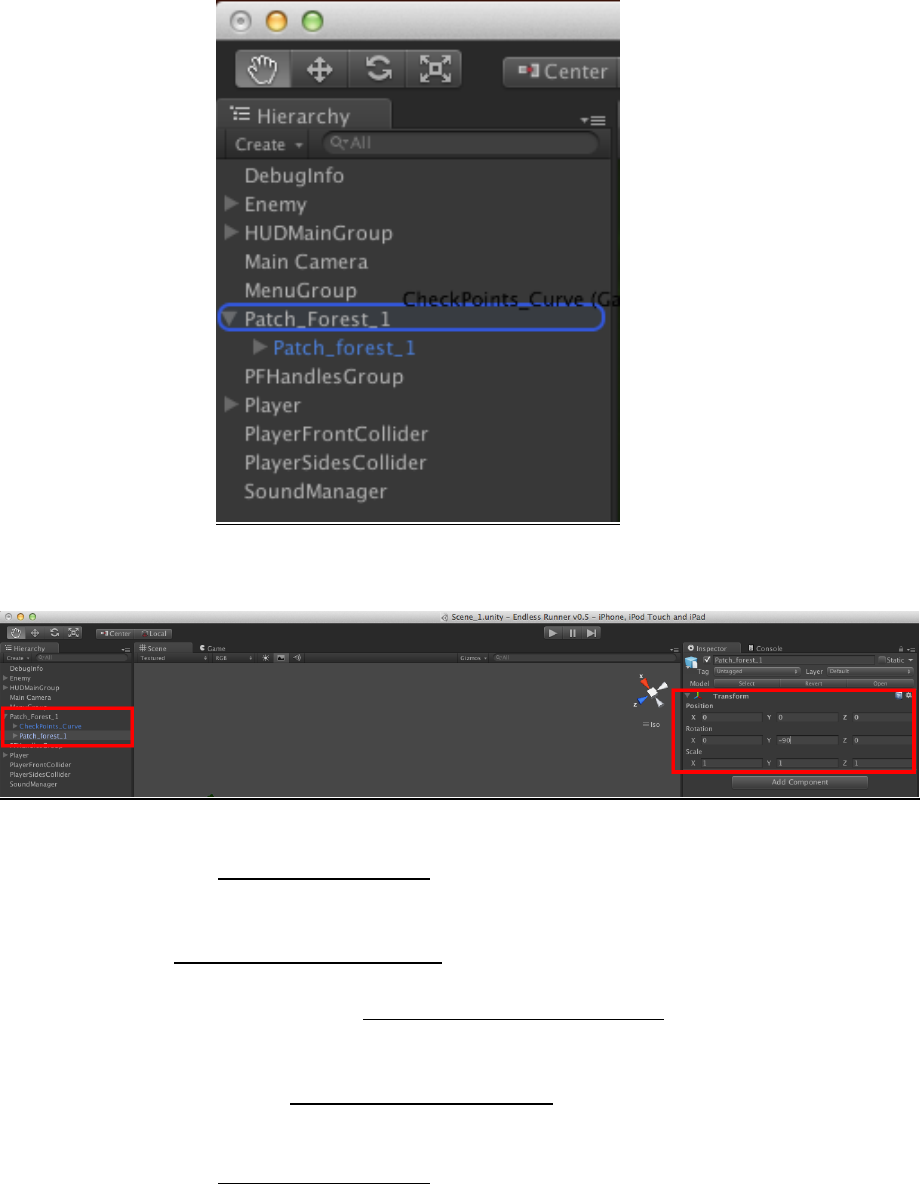
7. Select Project > Patches_Prefabs > Sample_CPs.
8. Drag the “CheckPoints_Straight” prefab into the patch prefab if your patch’s
path is in a straight line. If the path is not in a straight line, drag the
“CheckPoints_Curve” instead.
27
9. Rotate the patch if it does not have the same orientation as the spline.
Adjusting CPs of a Straight Patch
a. Adjust the Model > Scale Factor of your .fbx and make sure the patch is
exactly the size of the spline.
Note: Make sure the spline is centered on the path.
b. Select Hierarchy > *patch name*.
c. Click CheckPoints_Straight.
d. From the title bar, select Custom > Patch CP Generator. (This saves all
the changes you have made to the spline)
e. Select the *patch name*.
f. Drag the patch to Project > Patches_Prefabs to save the created prefab.
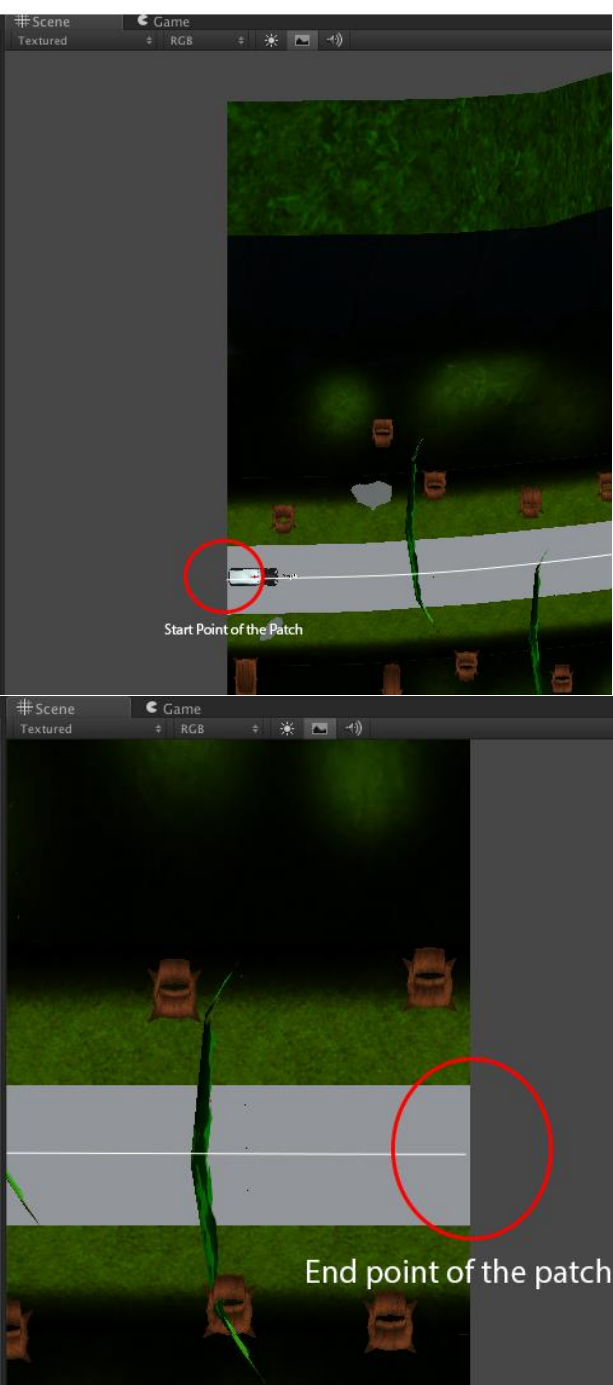
Adjusting CPs of a Curved Patch
a. Adjust the Model > Scale Factor of your .fbx and make sure the patch is
exactly the size of the spline.
Note: The start and end points of the spline should be centered on the start
and end of the path.
28
29
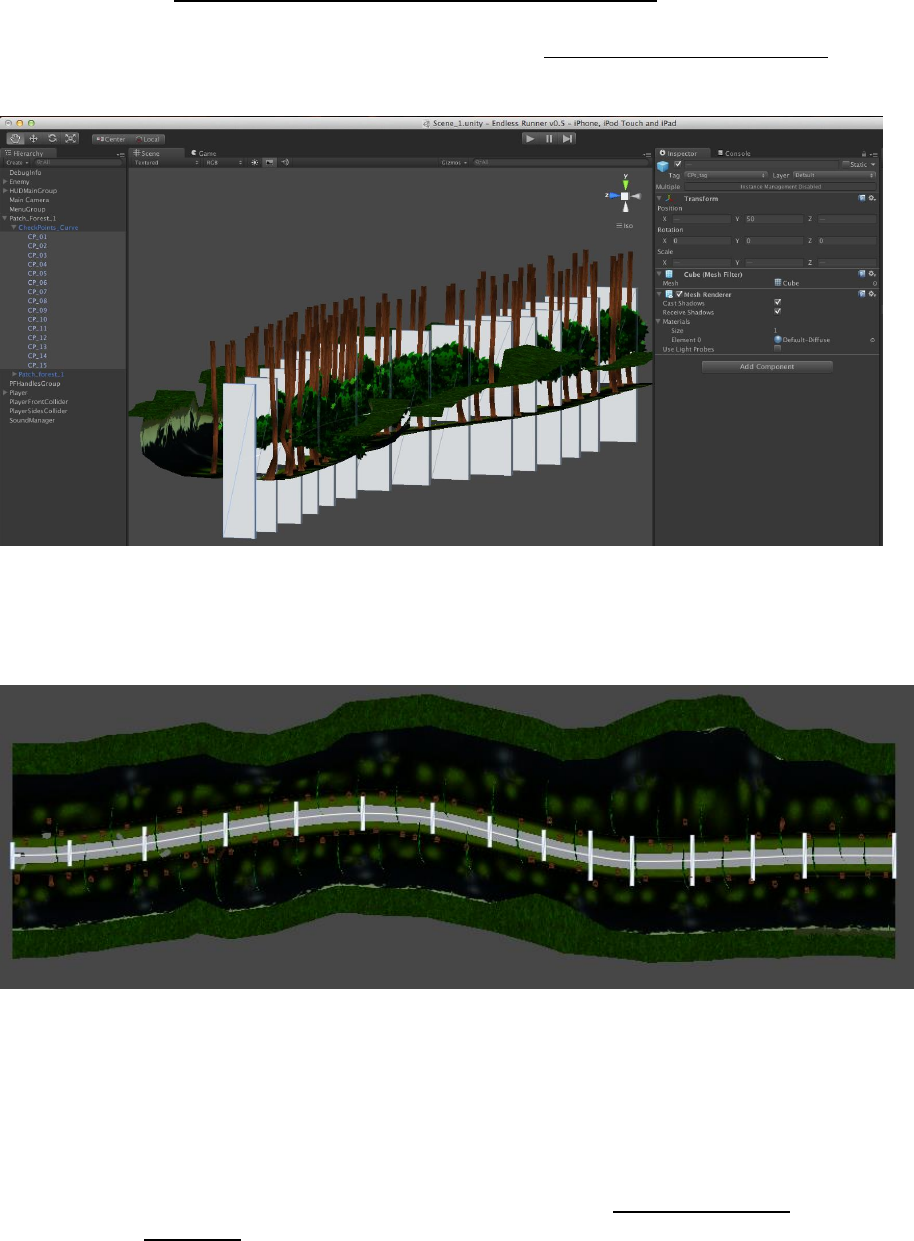
b. Select Hierarchy > *patch name* > CheckPoints_Curve.
c. Select all the CPs.
d. Check the Mesh Renderer component from Inspector > Mesh Renderer.
(This will display all the Check Points that shape the spline)
e. Adjust the CPs so that the spline is centered on the path at every point
on that path. You can only change the position of the CPs; changing
their rotation or scale will have no effect on the spline.
Notes:
- Make sure your Editor’s camera is in Isometric mode. (You can change the
camera mode by clicking the cube in the top right corner of the screen.)
- Make sure the Editor is in top view.
- You can add or remove CPs as required but make sure not to miss a
number in the sequence.
f. Check off the Mesh Renderer component from Inspector > Mesh
Renderer when you’re done adjusting the spline.
g. Click CheckPoints_Straight/ CheckPoints_Curve or whatever you
have named the prefab containing the checkpoints.
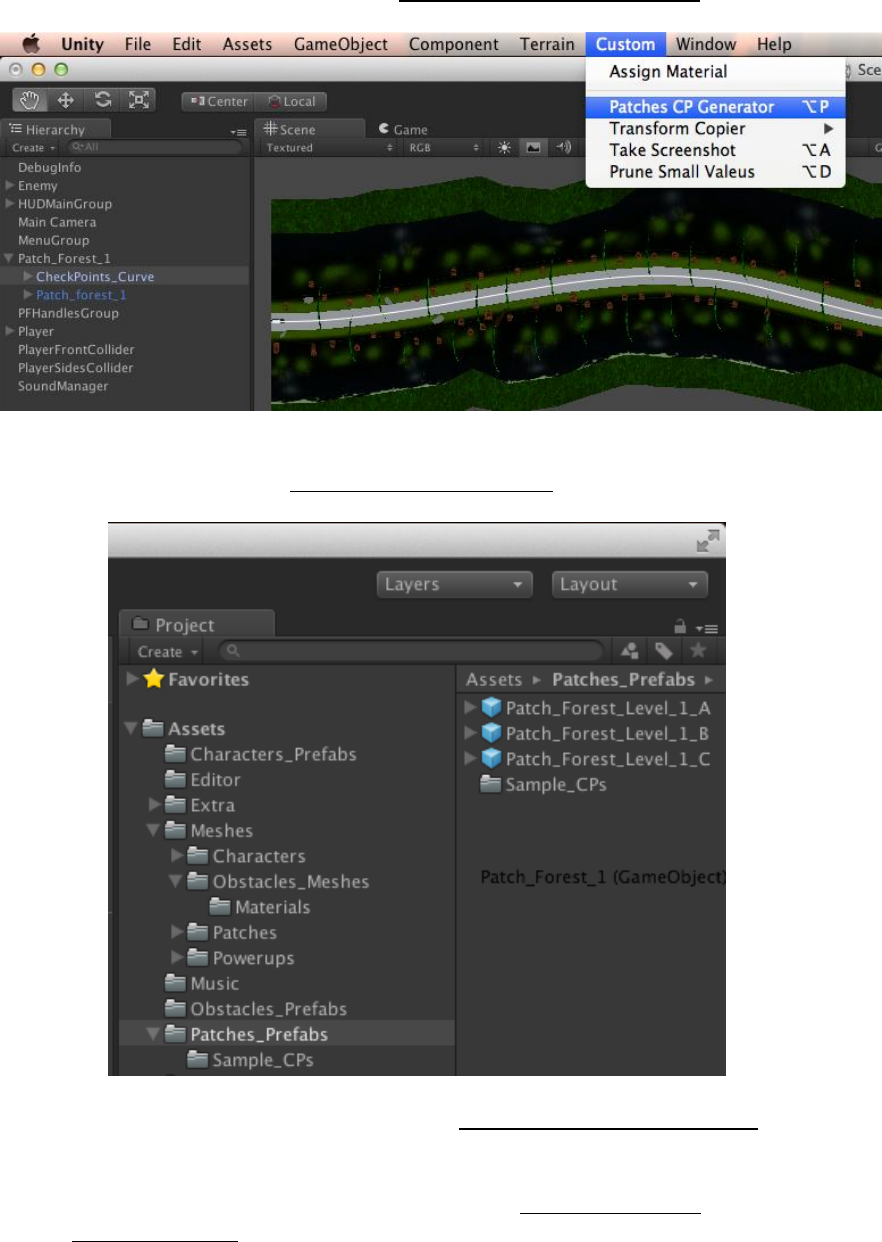
30
h. From the title bar, select Custom > Patch CP Generator. (This saves
all the changes you have made to the spline)
i. Select the *patch name*.
j. Drag the patch to Project > Patches_Prefabs to save the created prefab.
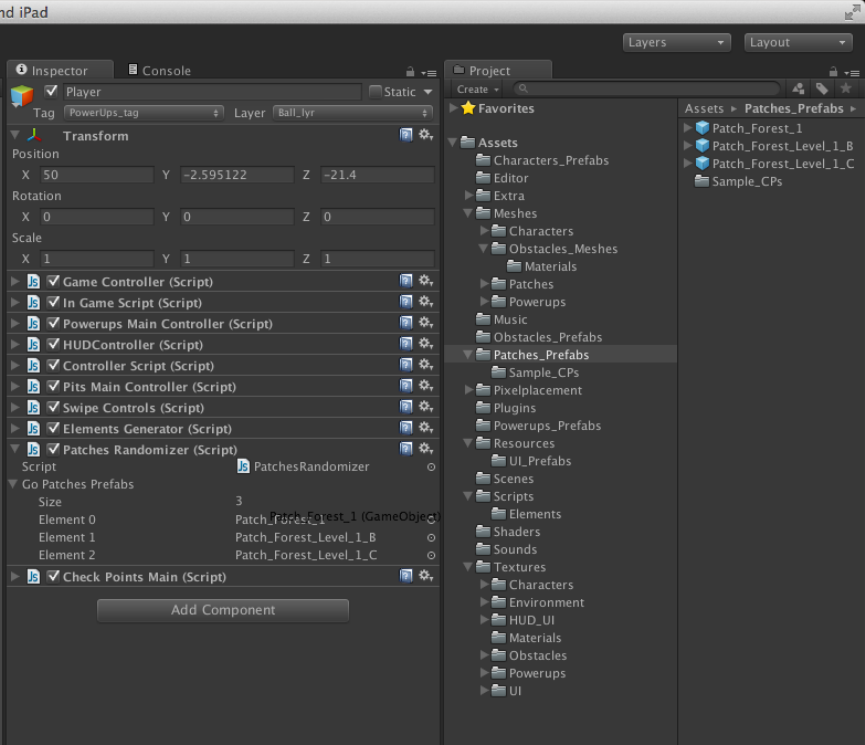
10. Once the patch has been saved, select Player > Patches Randomizer from
the Hierarchy.
11. Increase the array size of “Go Patches Prefabs”.
12. Drag and add the newly created patch from Project > Assets >
Patches_Prefabs, to the Go Patches Prefabs array.
31
13. Remove the patch from the Hierarchy tab.
Menu and Shop
Switch between Custom Menu and NGUI
By default the Custom Menu will be enabled; switching between the two types of
the menus is pretty straightforward. The InGameScriptCS.cs always checks which
type of menu has been enabled. The rest of the scripts that need to use the
menus find out which menu system is active by checking with the
InGameScriptCS.cs.
NOTE: NGUI menu has been only scripted in C# so if you want to use the NGUI
menu system please make sure that you are using C# scripts. To find out how to
change script from Javascript to C# please refer to the “How to Change the Script
Type”.
Switch from Custom Menu to NGUI
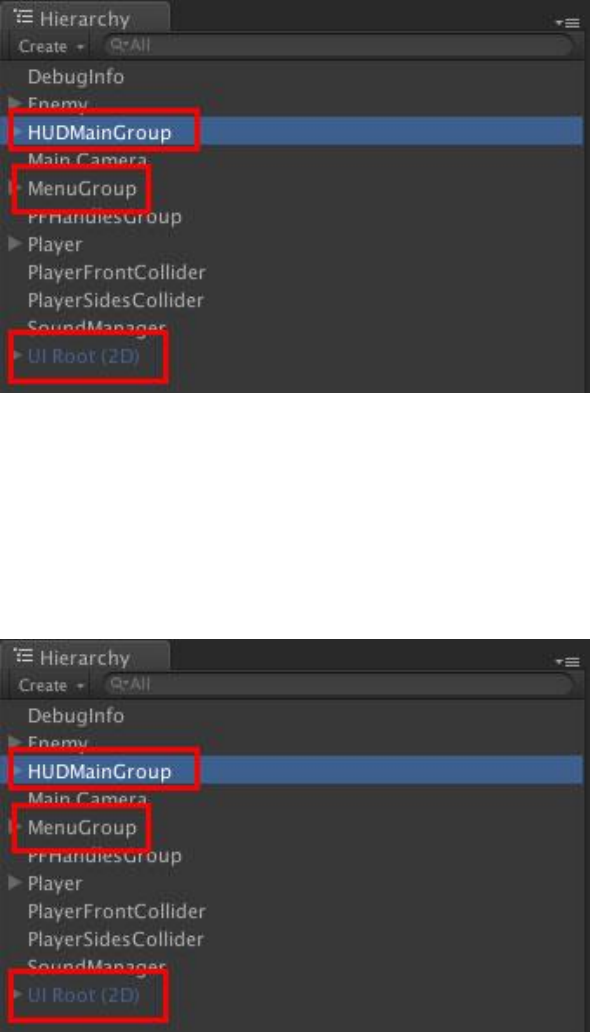
To disable the custom menu, you need to disable HUDMainGroup and the
HUDMainGroup. Then to enable the NGUI menu you need to enable UI Root (2D).
32
1. Disable the HUDMainGroup located in the Hierarchy.
2. Disable the MenuGroup located in the Hierarchy.
3. Enable the UI Root (2D) prefab located in the Hierarchy.
Switch from NGUI to Custom Menu
To enable the custom menu, you need to enable HUDMainGroup and the
HUDMainGroup. Then to disable the NGUI menu you need to disable UI Root (2D).
1. Enable the HUDMainGroup located in the Hierarchy.
2. Enable the MenuGroup located in the Hierarchy.
3. Disable the UI Root (2D) prefab located in the Hierarchy.
Menu Script Architecture (Custom Menu)
The architecture of the menu controller, which is the MenuScript.js script, relies
on a three-tier architecture. The first layer consists of the buttons that in-turn
consist of a plane, a material and a box collider.
The second layer is the listener that consists of a function named listenerClicks()
in the MenuScript.js. This function is called by the FixedUpdate() function to listen
33
for any interaction with the screen. If the user taps on the screen, the camera
raycasts the menu in search of the button tapped. If the raycast finds a collider in
its way, a relevant handler is called. By relevant, we mean the handler of the
active menu.
Finally, the third layer consists of handler functions. Each menu has a single
handler function that defines the implementation of all the buttons the menu has.
When the listener function calls the handler function, it also passes the transform
of the button tapped as a parameter. The handler function uses this transform
and compares it with the array of buttons’ transforms, to check which button’s
implementation to execute.
Adding a Custom Menu
The MenuGroup prefab in the Hierarchy tab is the parent of all the menu prefabs
used. The menus are present in the scene at all times. They are displayed by
bringing them in front of the HUD Camera by the MenuScript. The project uses
the low-poly plane named Plane2tirsMesh located at Project > Assets > Meshes.
As always, the lower the poly-count, the better the performance.
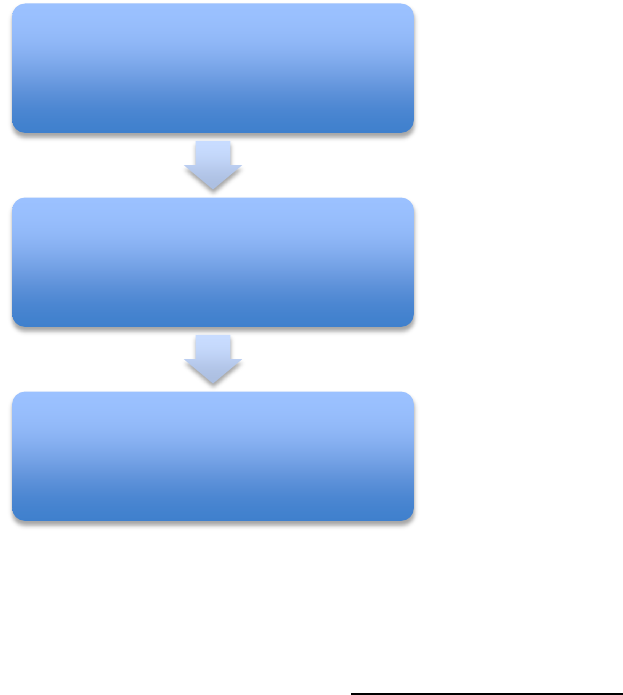
Button
•The GUI buttons
Listener
•The listenerClicks() function called
repeatedly by FixedUpdate()
Handler
•The handler function of each
menu.

34
By convention in the project, an empty GameObject is created to contain the
backgrounds, icons and buttons (GameOver is used as an example in the above
screen shot). All of the buttons are enclosed in yet another empty GameObject
named Buttons. Each button is a plane that also has a box collider as a
component to detect raycasts (raycasts are used to detect taps on buttons).
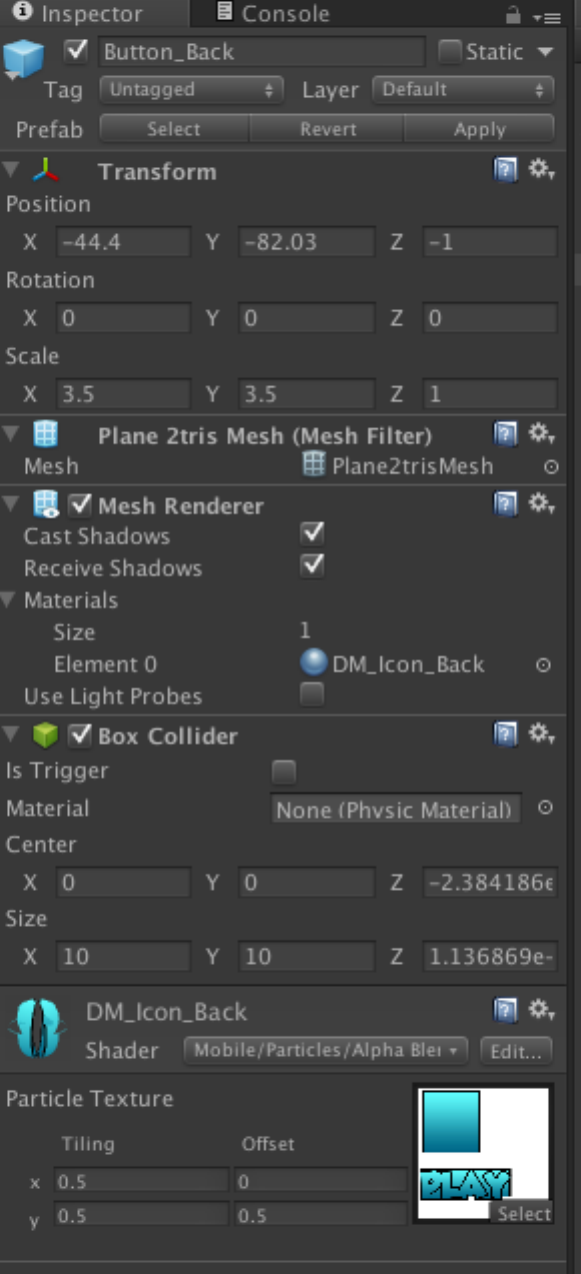
In the following example the button named Button_Back is shown with all its
components. Notice the low-poly plane used instead of the default plane used by
Unity. Secondly, observe that a box collider has been attached to the button to
detect raycasts. A box collider can be added by selecting the plane and then
selecting Component > Physics > Box Collider from the title bar.
35
1. As mentioned before, make sure all components of the menu are enclosed
in a single game object. (For the sake of example, lets call the menu
“GameOver”)

36
2. Place the GameOver prefab in the MenuGroup prefab located in the
Hierarchy tab along with its components.
3. Set the position of the GameOver prefab at 0,0,5000. (This brings the
prefab into the HUD Camera as the HUD Camera is located at (0,0,5000))
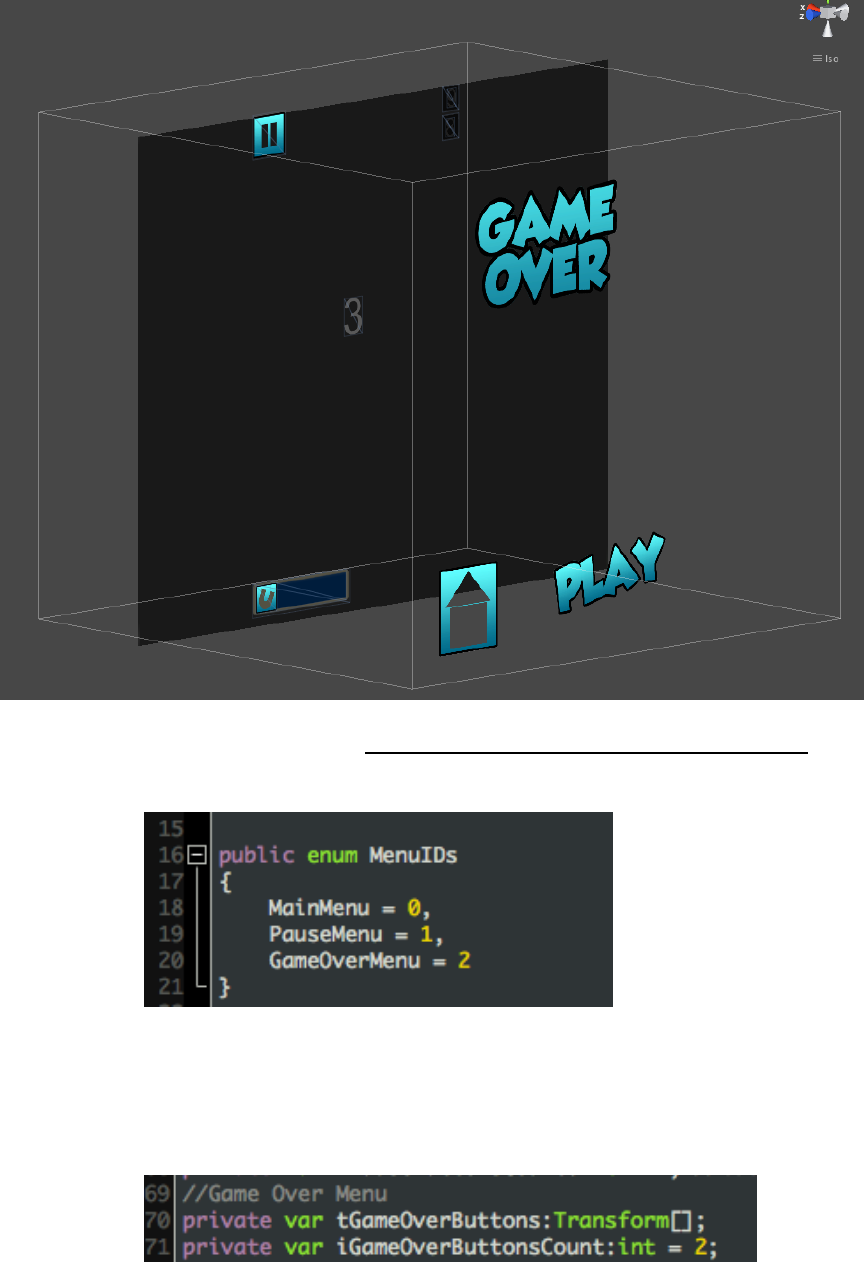
4. Double click on Hierarchy > HUDMainGroup to display it in the Editor and
make sure the menu items are facing towards the negative x-axis. The
screen shot shows the menu title, the buttons, the semi-transparent
background and also the HUD elements in the background (ignore these
while designing a menu or disable the HUDMainGroup if these are in the
way but make sure to enable it once your done with the menu).
37
5. Open the MenuScript.js from Project > Assets > UI > Scripts or C# Scripts.
6. Add the name of the newly created menu in the MenuIDs enum.
7. Create a Transform type array to store the transforms of the buttons in
the GameOver menu.
8. Create an integer type variable to store the number of button in the
GameOver menu.
9. Store the GameOver menu’s transform the tMenuTransform array.
10. Initialize the transform type array that holds the references of the buttons
in the GameOver menu.
38
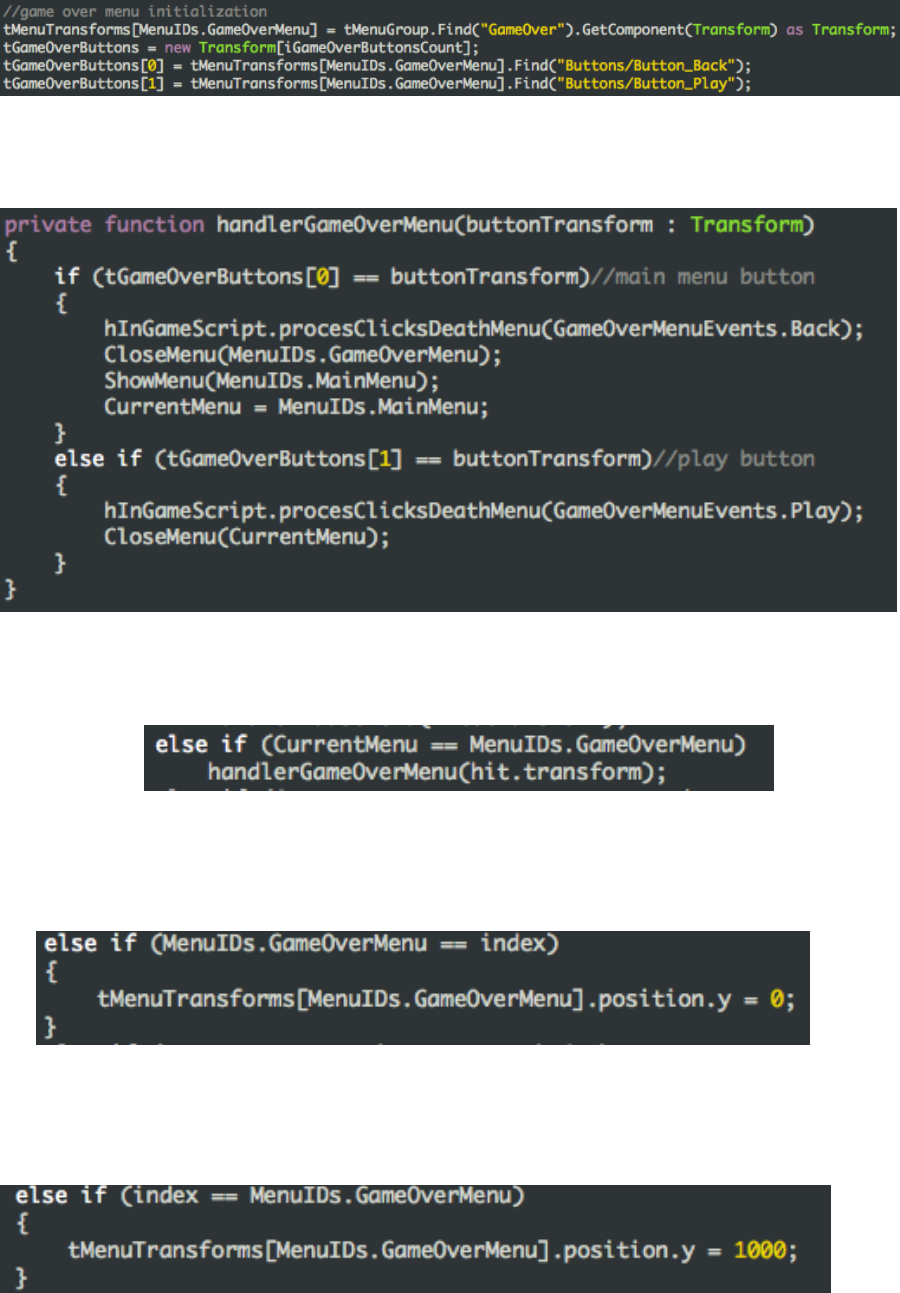
11. Create a handler function for GameOver menu to define the
implementation of its buttons. In our case, we have two buttons.
12. Add a new case in the listenerClicks function. This function will call the
GameOver handler function if its button is pressed.
13. Add a new case in the ShowMenu(…) function to display the GameOver
menu prefab when needed. Setting the prefab’s y position to zero brings it
in front of the HUD Camera.
14. Add a case and its implementation in the CloseMenu(…) function as shown
below. Setting the prefab’s y position to 1000 moves it away from the
HUD Camera.
39
Note: Whenever you need to use the created menu, call the ShowMenu(…)
function passing the appropriate parameter. Similarly, to close the menu,
call the CloseMenu(…) function with the same parameter.
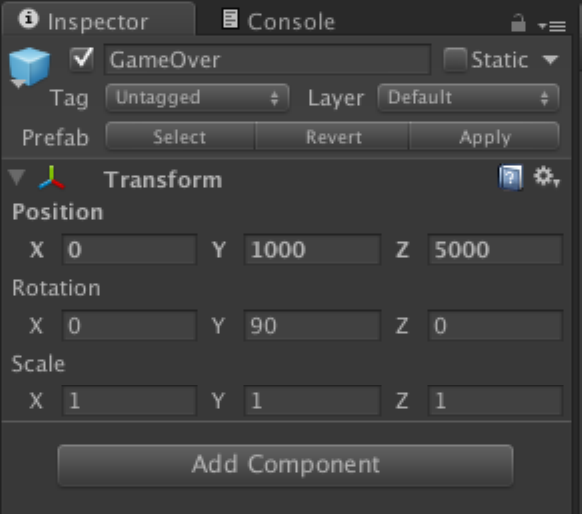
15. Set the position of the newly created GameOver menu prefab to
(0,1000,5000). This will remove it from the HUD Camera in default
conditions.
Adding a Custom Shop Menu
Adding a new shop is no different than adding a regular menu. The menus are
contained in the Shop game object present in the MenuGroup prefab and the
ShopScript.js or ShopScriptCS.cs controls the shop menus depending upon which
programming language you are using. Just like the rest of the menus, shop menus
are also displayed by bringing them in front of the HUD Camera by the
ShopScript.
Lets take the example of utilities shop menu to walkthrough the process of
creating a custom shop menu.
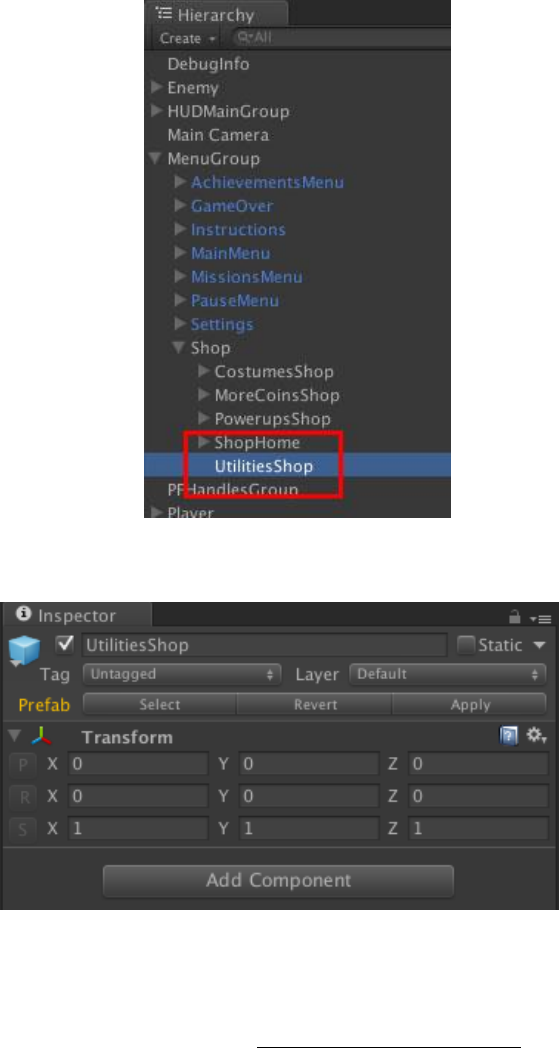
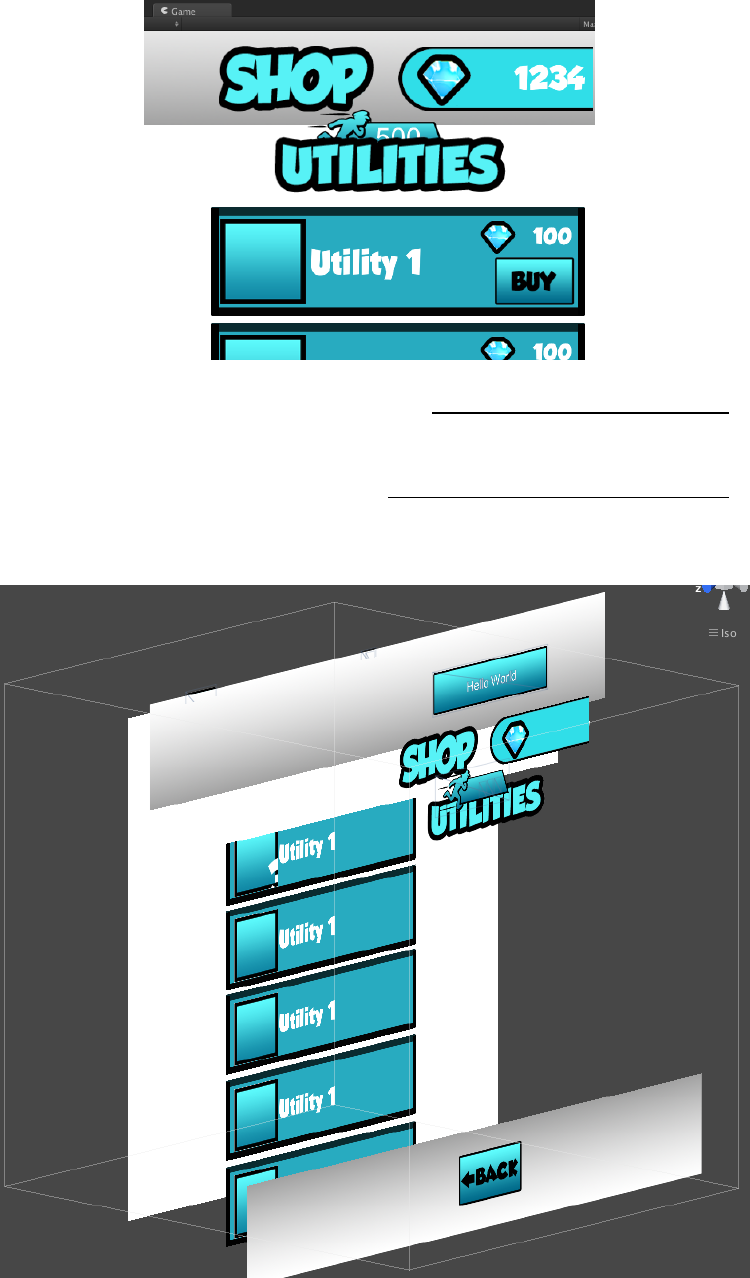
1. Create an empty gameobject under Shop and name it appropriately. For
the example we will name it UtilitiesShop.
40
2. Set the transform and rotation values of the prefab to zero and set the
scale to (1,1,1).
3. Now populate the Utilities game object with all the menu components you
need it to hold. You can try copying these components from other menus
or adding new textures. Make sure to set the Mesh Filter component to
Plane2trisMesh provided in the Project > Assets > Meshes folder. This will
make sure the plane is facing towards the camera.
4. Lets go ahead and add a component to the newly created menu. We will
start with the background and work our way to the front. Like all the
other shop menus I want the background to have a white plane, a header
and footer. To keep everything clean I create an empty game object and
put it under UtilitiesShop. I also set its transform to the default values
(position and rotation at zero and the scale at one).
41
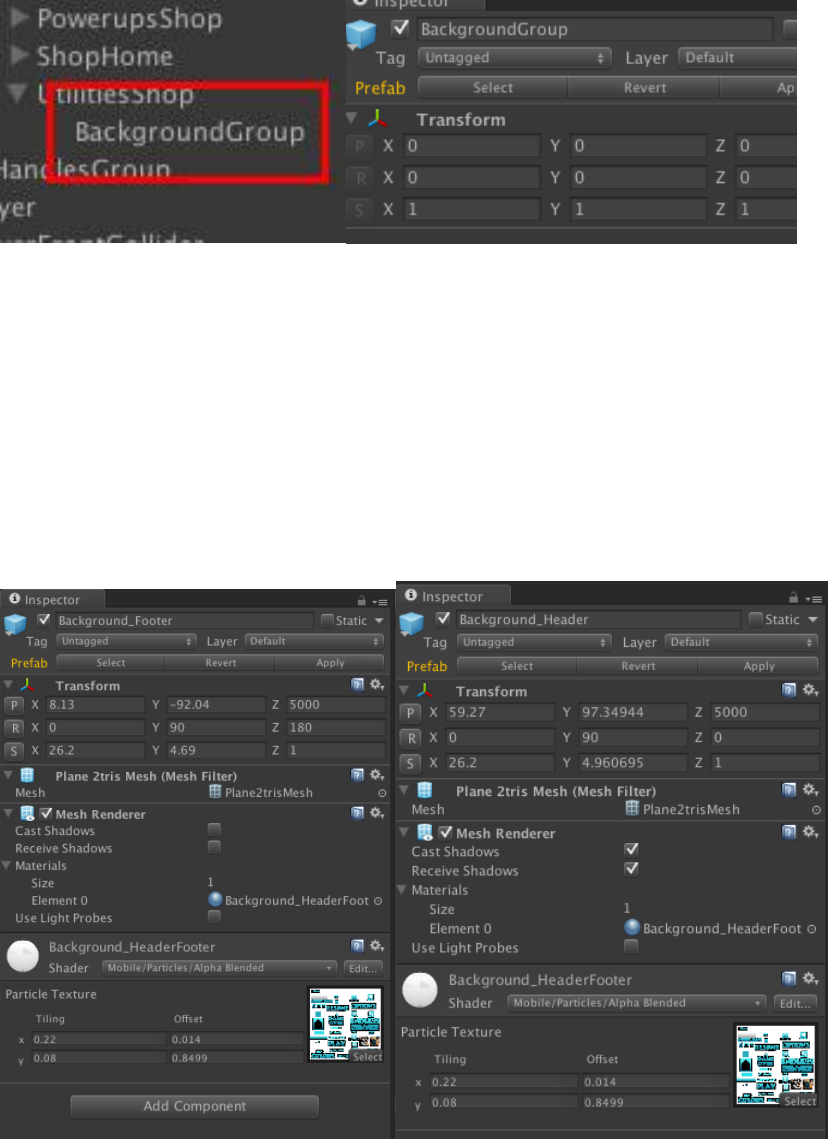
5. I now add more empty game objects under the BackgroundGroup and
turn them into planes by adding components. For example I create an
empty game object named Background_Footer and attach the
Plane2trisMesh (located at Project > Assets > Meshes), a Mesh Renderer
component and the Background_HeaderFooter material (located at
Project > Assets > Textures > UI > Materials).
We do the same with more empty game objects and design the
Background_Header and BackgroundCollider component. The following
screen shots show the final components when they have been set up on
the screen.
6. Once you’re done with the designing part, check if the menu looks as you
intended in the Game window.
42
You can also do that by double click on Hierarchy > HUDMainGroup to
display it in the Editor. Make sure the menu items are facing towards the
negative x-axis. The screen shot shows all the menu components that are
derived from the UI_Atlas located at Project > Assets > Textures > UI. It
also shows the HUD elements in the background (ignore these while
designing a menu or disable the HUDMainGroup if these are in the way
but make sure to enable it once your done with the menu).
43
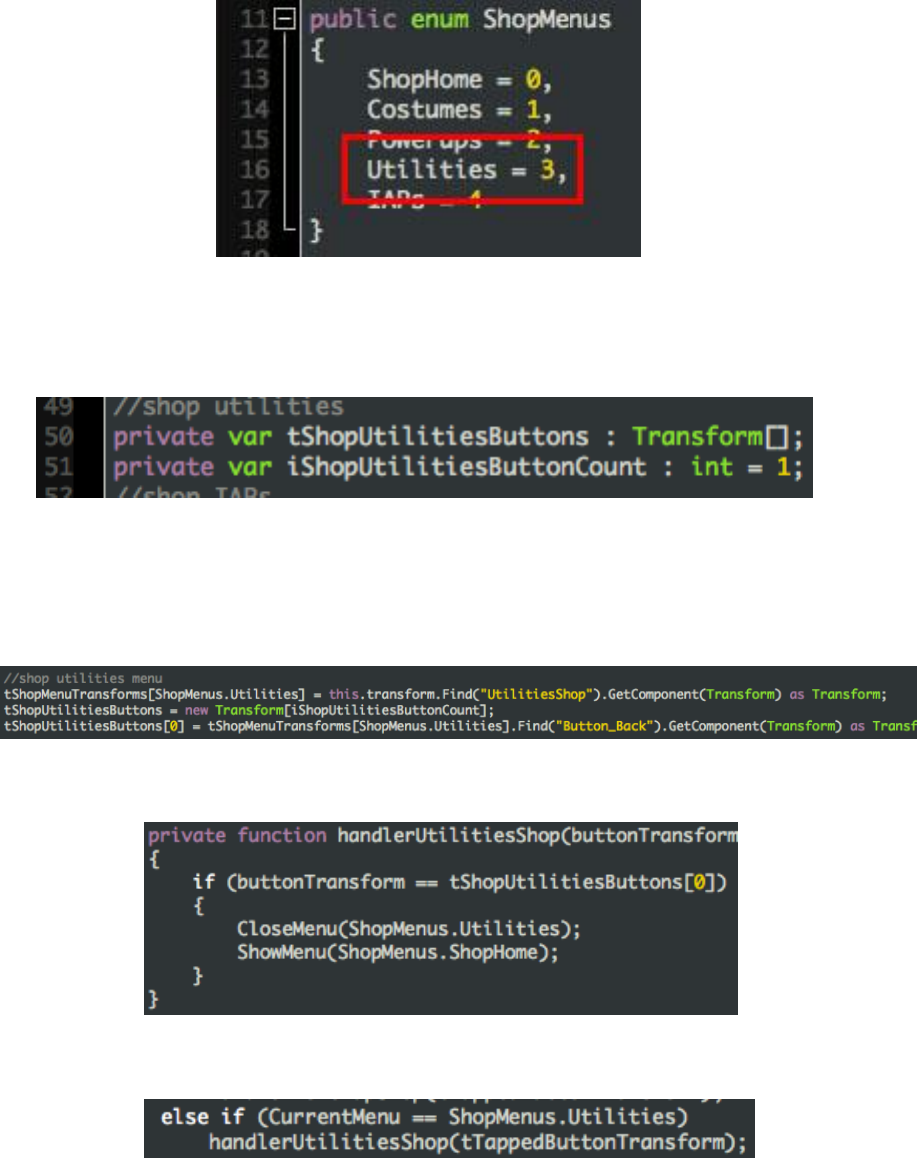
7. Now you need to tell the ShopScript that a new shop menu has been
added and to do that add the name of the newly created menu in the
ShopMenus prefab.
8. Create a Transform type array to store the transforms of the buttons in
the Utilities menu. In this case we only have a ‘back’ button to take the
user back to the Shop Home menu.
9. Create an integer type variable to store the number of buttons.
16. Store the UtilitiesShop menu’s transform the tMenuTransform array in the
start function. This reference is used to make the menu appear in front of
the camera and move it away when its not needed.
17. Initialize the transform type array that holds the references of the buttons
in the shop utilities menu in the start function.
18. Create a handler function for to define the implementation of its buttons.
In our case, we have the ‘back’ button.
19. Add a new case in the listenerClicks function. This function will call the
UtilitiesShop handler function if its button is pressed.
Note: The ShowMenu and CloseMenu functions are used to display and hide the
required shop menus. These menus input the index of the menu based on the
ShopMenu enum.
44
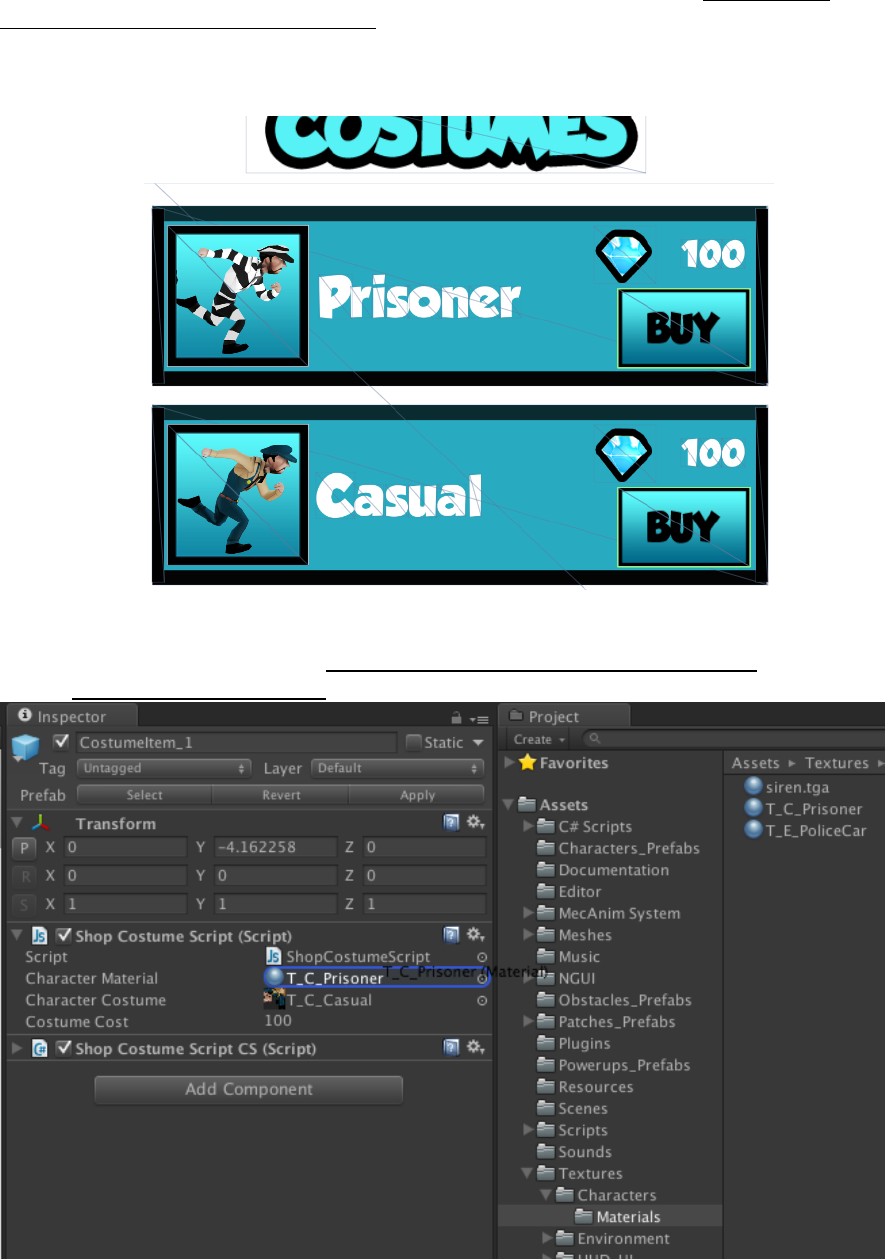
Adding a new Costume Shop Item
To add a new costume, open the CostumeItemGroup located at Hierarchy >
MenuGroup > Shop > CostumesShop. This game object contains all the slide-able
costume items that are displayed when the user views the costume shop. To add
a new one:
1. Duplicate an existing CostumeItem and adjust it in the list.
2. Tap the CostumeItem prefab and add the character material in the
ShopCostumeScript from Project > Assets > Textures > Characters >
Materials > T_C_Prisoner.
45
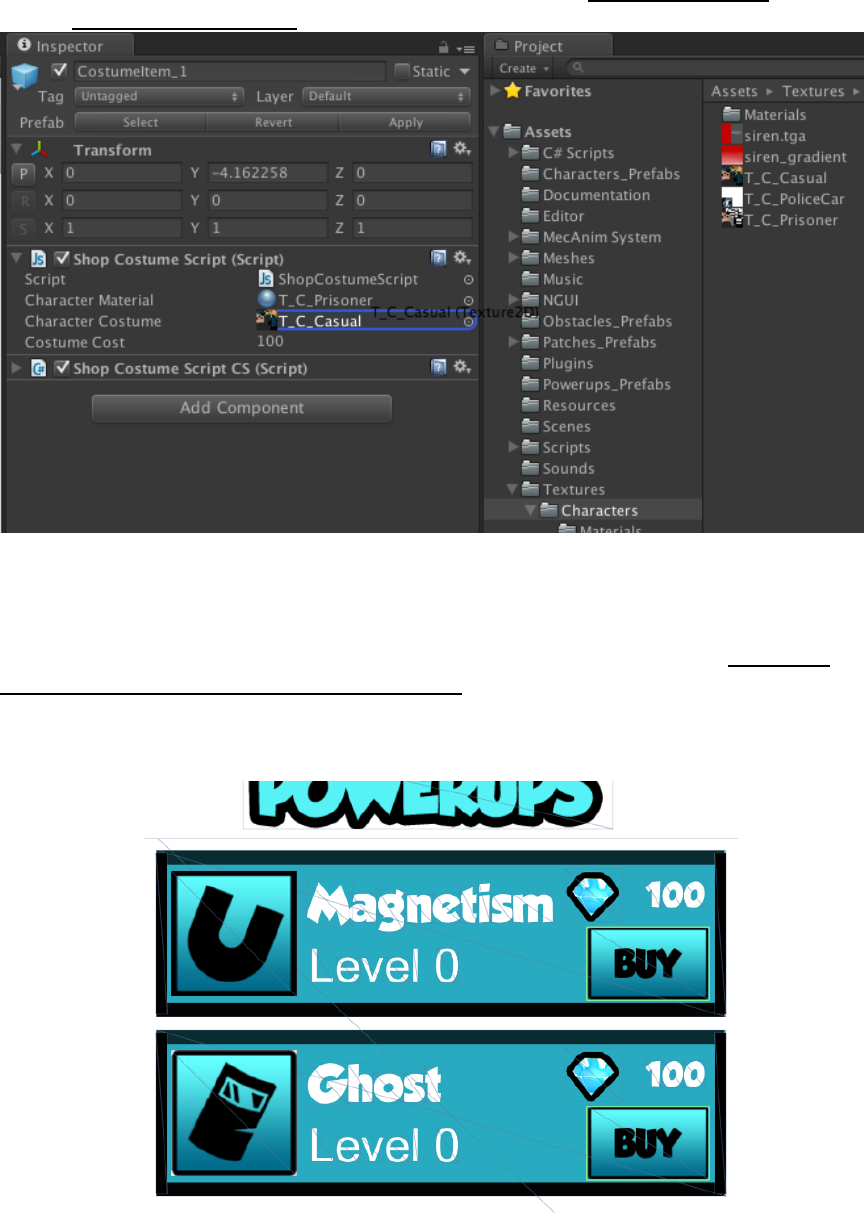
3. Add the character costume texture that you have created for the
character. The default ones are placed at the path: Project > Assets >
Textures > Characters.
4. Set the cost of the costume.
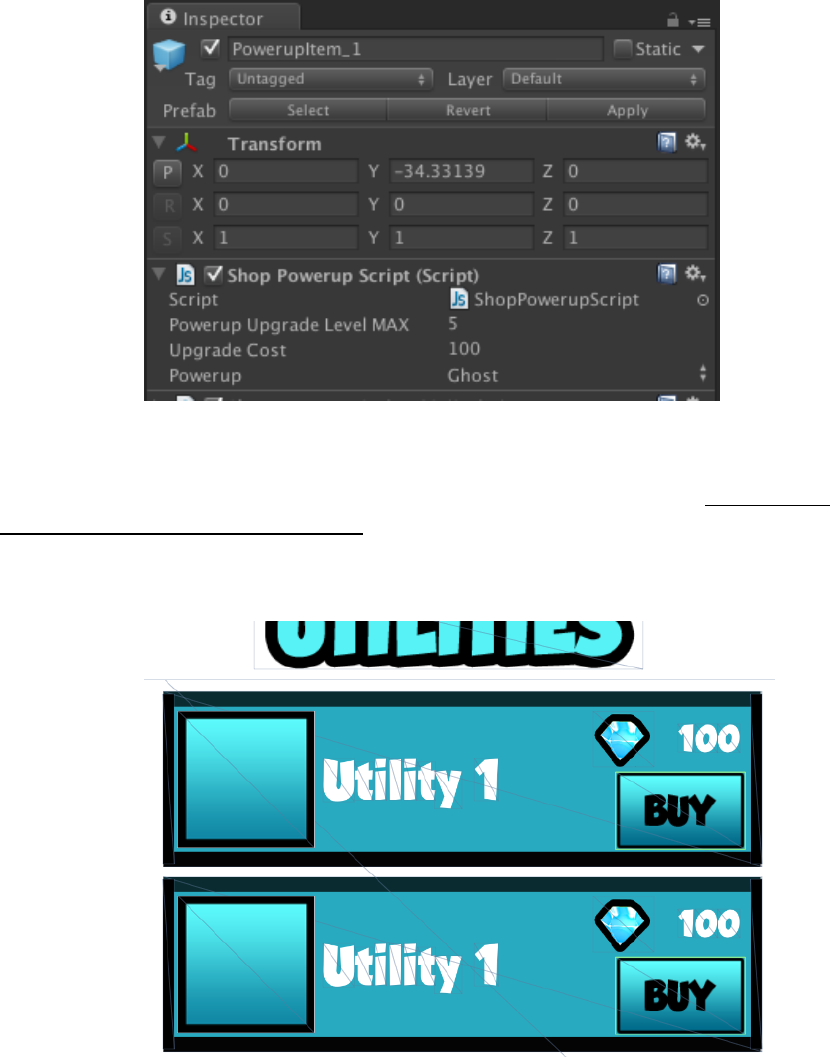
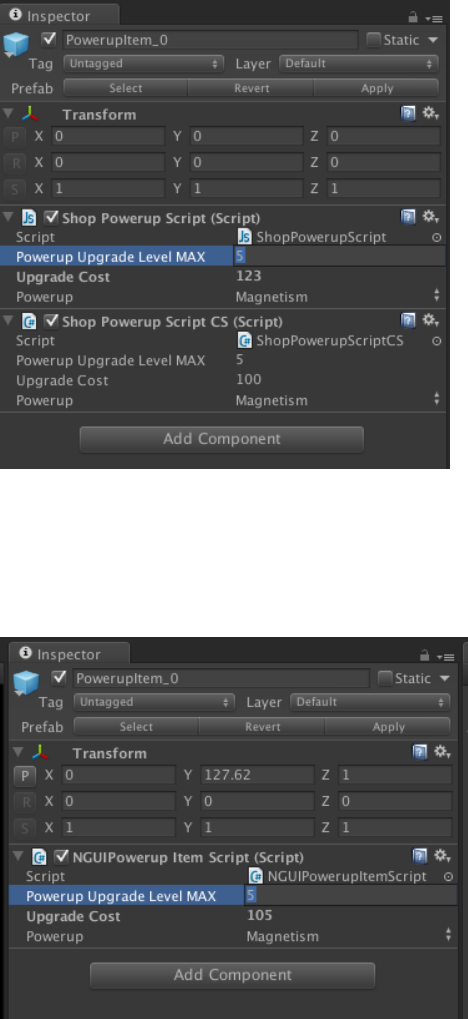
Adding a new Power-up Shop Item
To add a new power-up item, open the PowerupsItemGroup located at Hierarchy
> MenuGroup > Shop > PowerupsItemShop. This game object contains all the
slide-able power-up items that are displayed when the user views the power-up
shop. To add a new one:
1. Duplicate an existing PowerupItem and adjust it in the list.
2. Tap the PowerupItem prefab and add a value for “Power-up Upgrade
Level MAX” in the ShopPowerupScript. This variable determines the
number of times a power-up can be upgraded.
46
3. Add a value for the Upgrade Cost.
4. Select the power-up for which this component has been created.
Adding a new Utility Shop Item
To add a new utility item, open the UtilitiesItemGroup located at Hierarchy >
MenuGroup > Shop > UtilitiesShop. This game object contains all the slide-able
utility items that are displayed when the user views the utilities shop. To add a
new one:
1. Duplicate an existing UtilityItem and adjust it in the list.
2. Tap the UtilityItem prefab and add a cost value in the ShopUtilityScript.

47
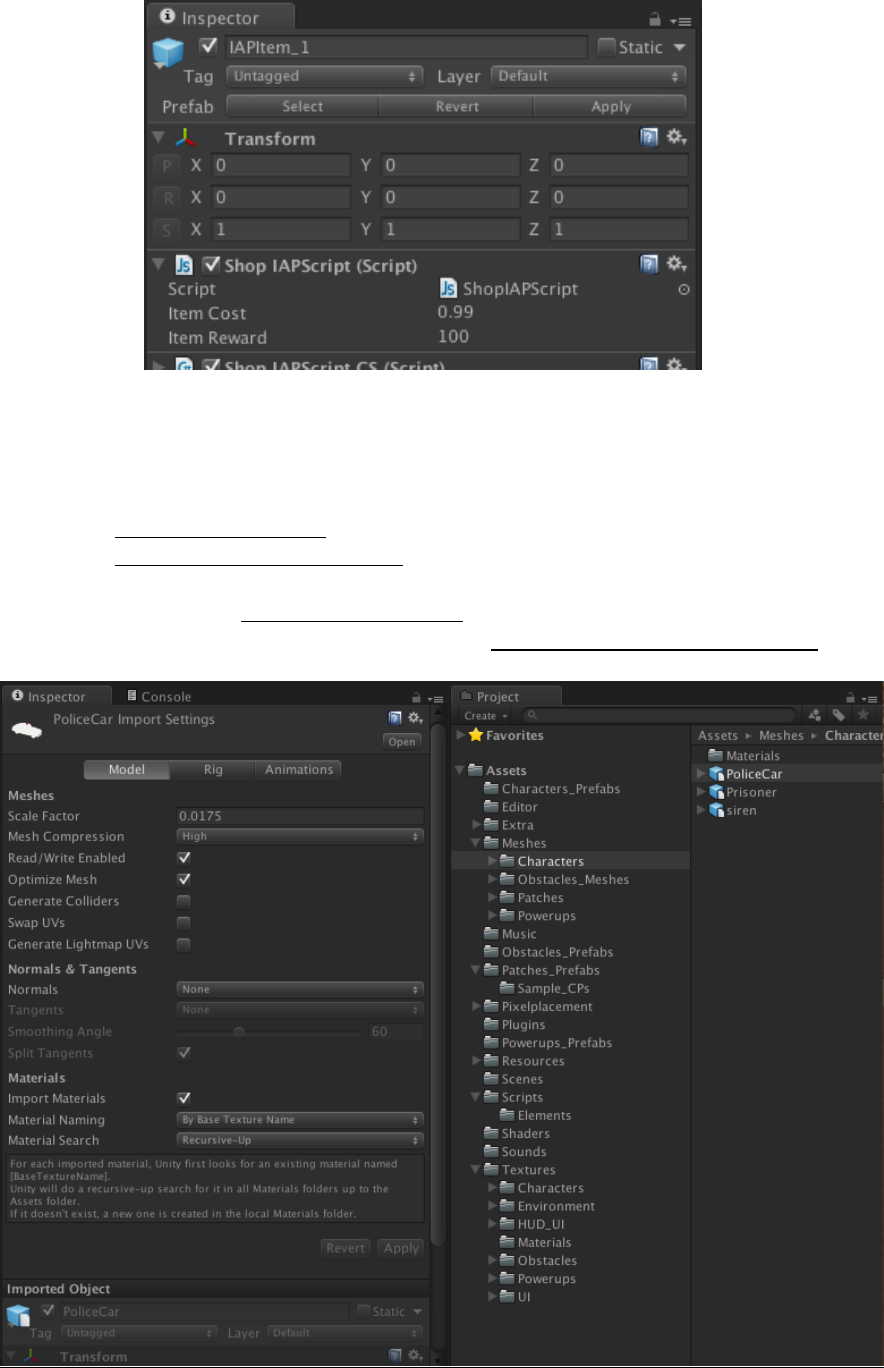
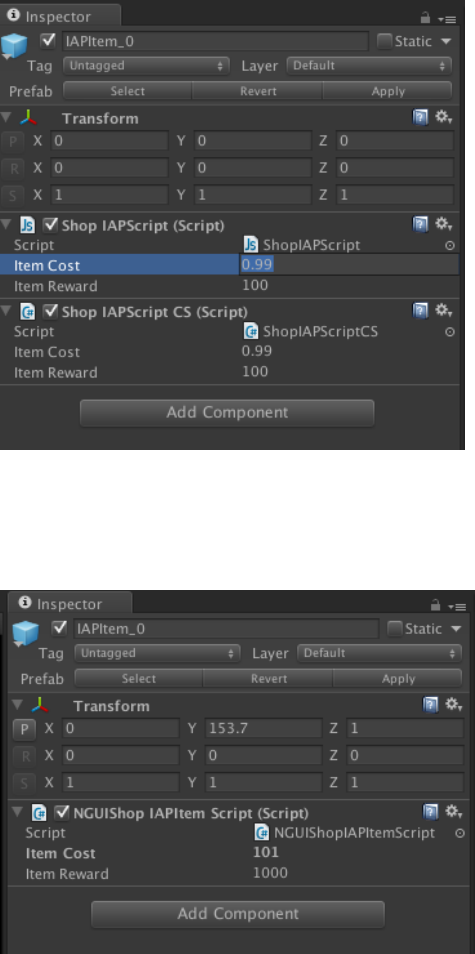
Adding a new In-App Purchase Shop Item
To add a new power-up item, open the IAPItemGroup located at Hierarchy >
MenuGroup > Shop > MoreCoinsShop. This game object contains all the slide-
able in-app purchase items that are displayed when the user views the more
coins shop. To add a new one:
1. Duplicate an existing IAPItem and adjust it in the list.
2. Tap the IAPItem prefab and add a cost value in the ShopIAPScript. This
cost value is the amount of real currency you want to deduct for the
purchase.
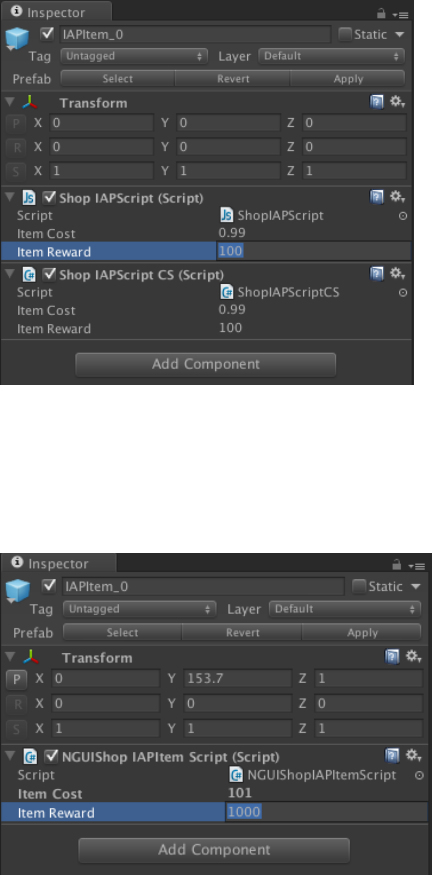
3. Add the reward value. This is the amount of virtual game currency that
will be award on making the in-app purchase.
48
Replacing the Enemy Character
1. Import the player .fbx that will be used as the main enemy.
Optimization Notes:
- Use Model > Scale Factor to adjust the scale.
- Use Model > Mesh Compression to compress the imported asset as much
as you can without compromising its appearance.
- Select “None” in Rig > Animation Type if your asset isn’t rigged.
- Uncheck the Import Animation option in Animations > Import Animation
if your asset isn’t animated.
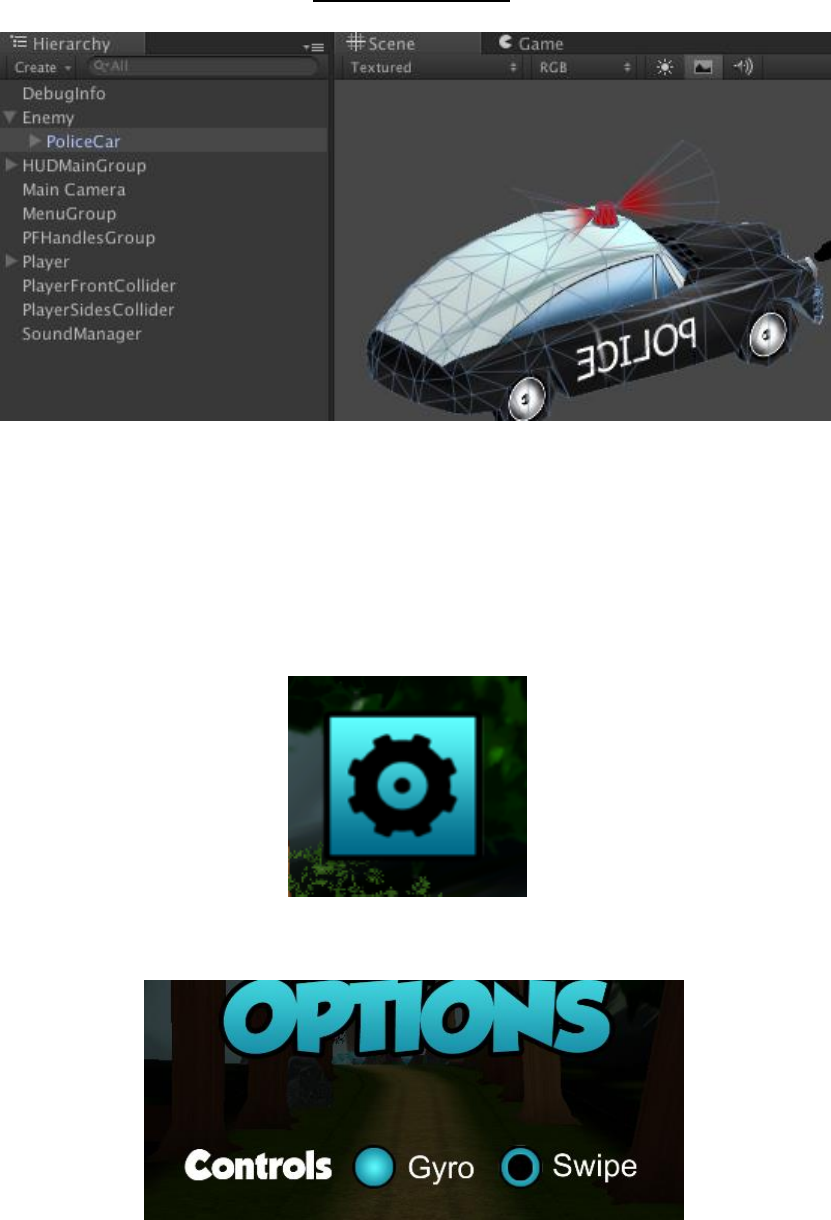
49
2. Drag the imported asset in Hierarchy > Enemy.
3. Change the implementation in the Project > Assets > Scripts >
EnemyController as needed.
How to Switch between Gyro and Swipe Controls
The type of controls mechanism can be switched from the settings menu.
Clicking the following button located on the main menu accesses the settings
menu:
The radio buttons in the in the settings menu can be used to toggle between
swipe and gyro controls:
50
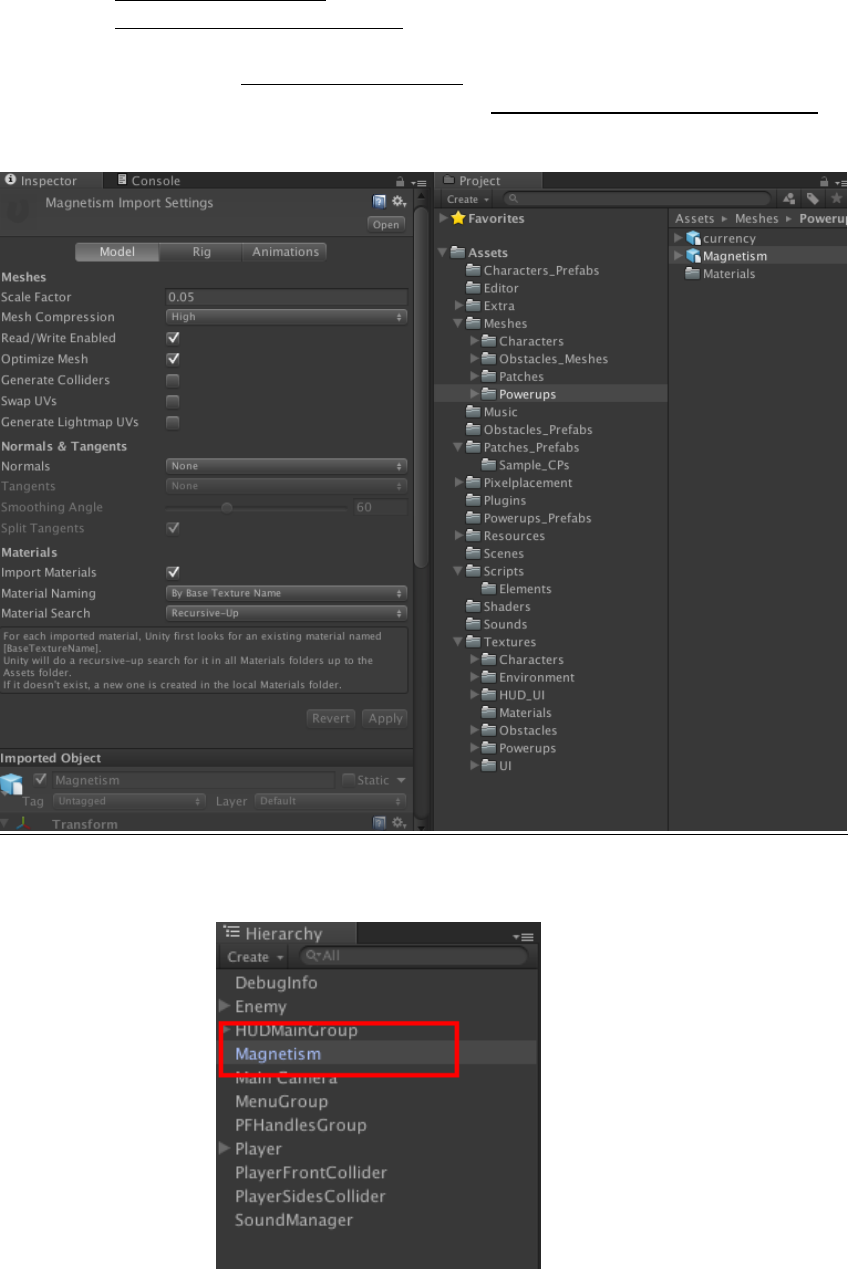
Adding a Power-up
1. Import the .fbx of the asset that you will use as an obstacle.
Optimization Notes:
- Use Model > Scale Factor to adjust the scale.
- Use Model > Mesh Compression to compress the imported asset as much
as you can without compromising its appearance.
- Select “None” in Rig > Animation Type if your asset isn’t rigged.
- Uncheck the Import Animation option in Animations > Import Animation
if your asset isn’t animated.
2. Drag the imported asset in “Hierarchy” tab to create a prefab.
51
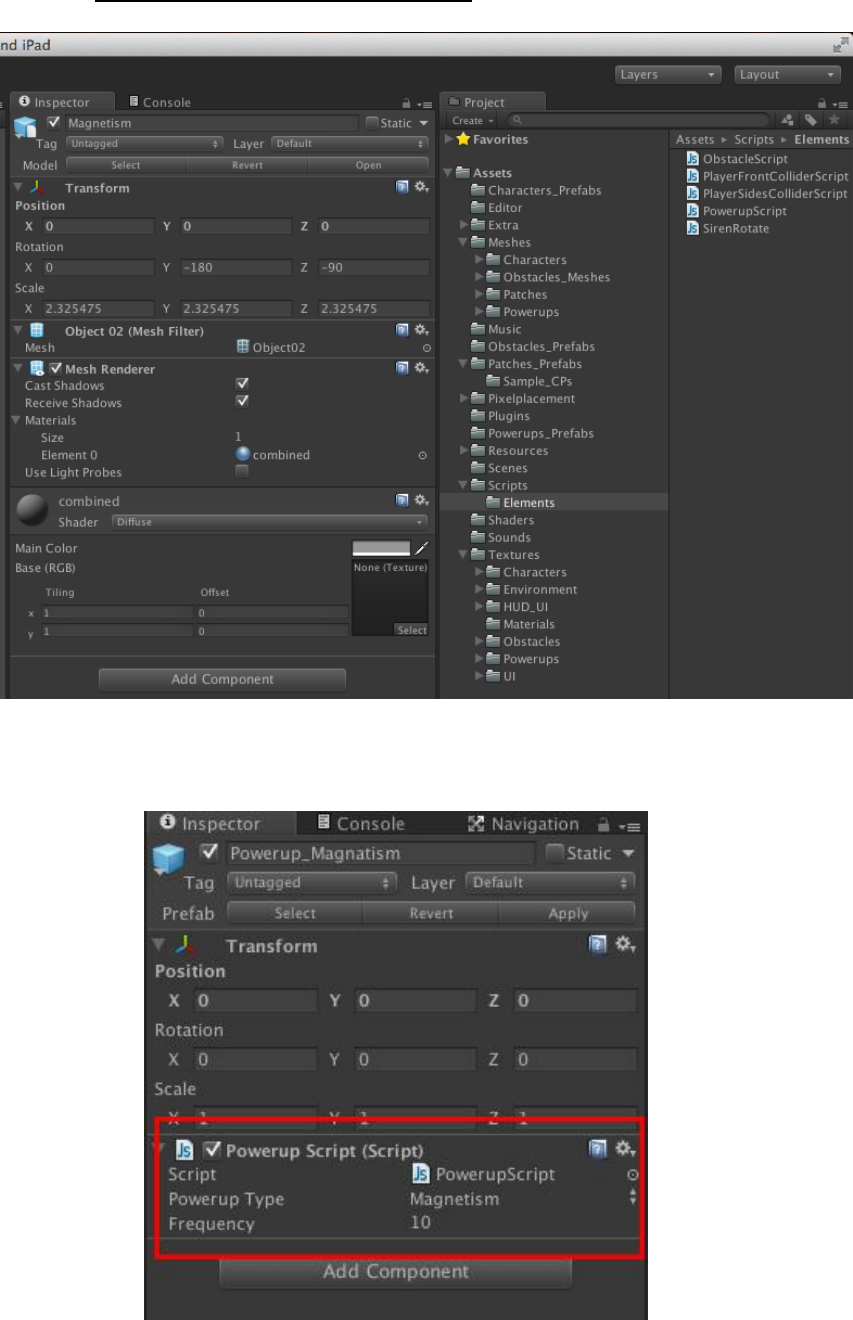
3. Go to Project > Assets > Scripts > Elements.
4. Add the “PowerupScript.js” on your power-up’s prefab.
5. Set the Powerup Type on the Powerup Script component.
6. Set the Frequency on the Powerup Script component.
52
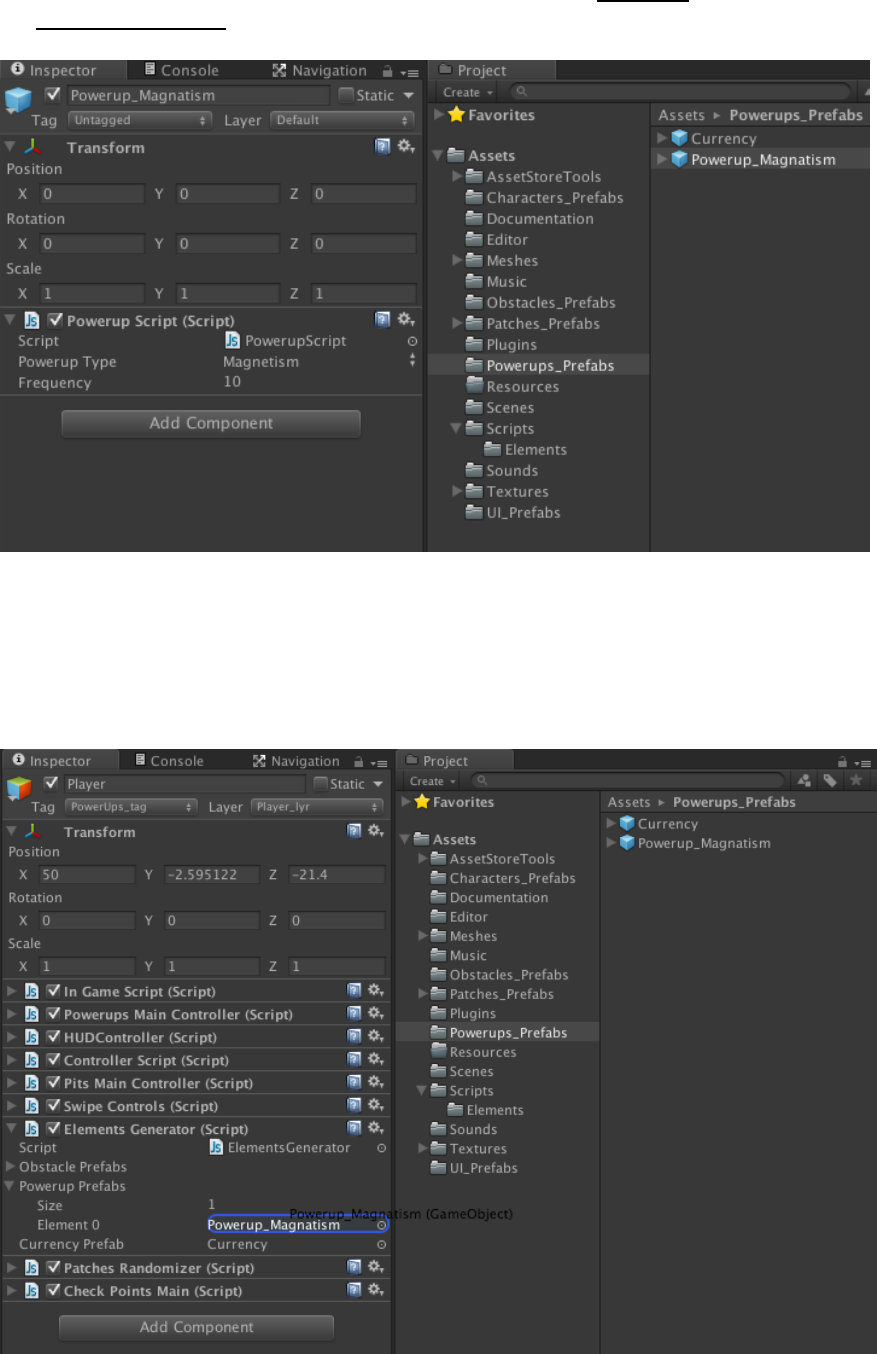
7. Drag and drop your newly created power-up prefab to Project >
Powerups_Prefabs.
8. New, we have to tell the ElementGenerator script about our newly created
power-up so that it will generate the power-up on the path during gameplay.
To do that, simply drag and drop the saved prefab to the ElementGenerator
script that’s a part of the Player prefab. The prefab has to drop in the Powerup
Prefabs hierarchy to take effect.
53
9. Finally delete the power-up prefab from the Hierarchy tab. It does not belong
in the scene by default because it is generated programmatically during
runtime.
Adding a New Mission
The missions are managed in the MissionsController script. When the game
starts, the MissionsController script reads all the available missions from the
MissionsList text file located in the Project > Assets > Resources folder. These are
stored in the instance of the MissionDetail class. It also checks the progress of the
missions which is stored using PlayerPrefs. The progress of missions is stored in
the MissionDetail.missionCount variable, which is integer type.
A particular mission’s progress is checked by incrementMissionCount(…)
function. This function is introduced in the relevant script and is given the
mission type and it increments the count of that type of mission variable each
time a relevant event is triggered. For example we need to record duck/ slide
event to use that in form of a mission. To do that, we call this function in the
ControllerScript in the duckPlayer() function. The following steps elaborate how
to add a new mission.
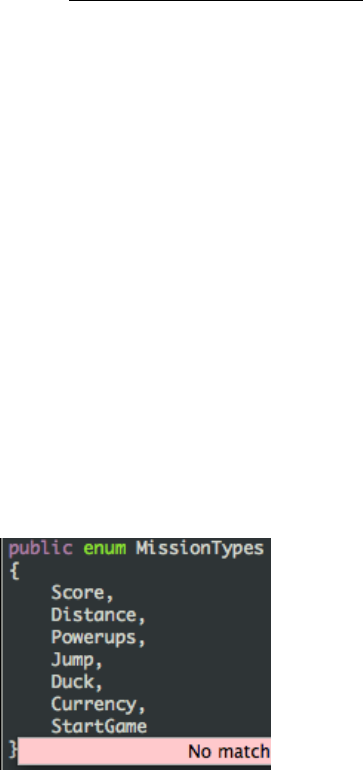
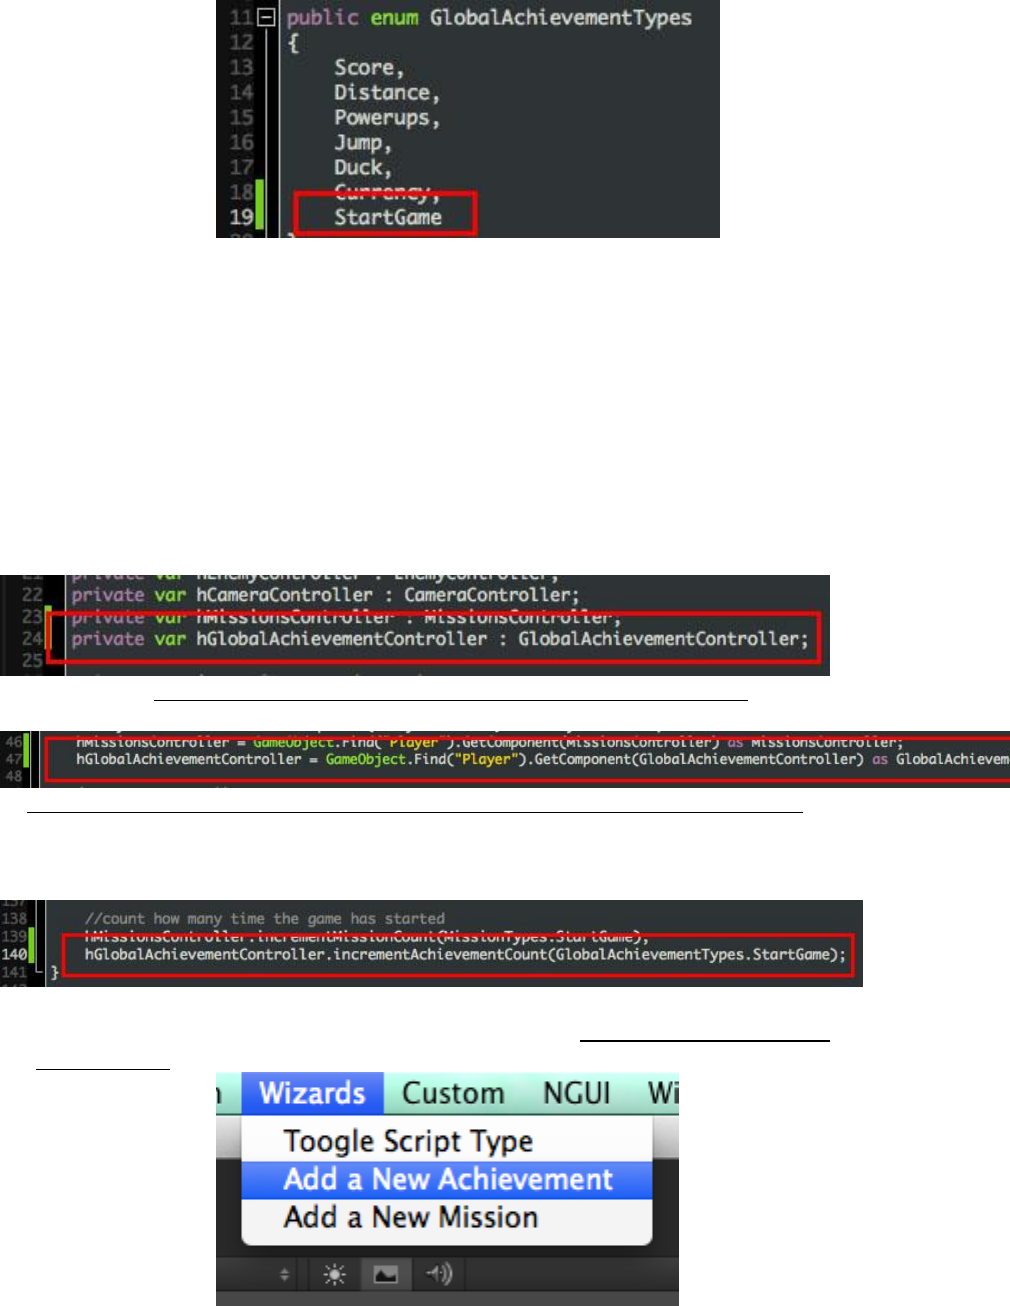
1. If you want to add a type of mission that has already been defined, jump
to Step 4. If you want to add a new type of mission that has not been
implemented yet, you will first need to add that type in the MissionType enum
located in the MissionsController script. For this example, we will add the
mission of “Start a new game x times”. So, for the first step, we add the
member called “StartGame” in the MissionType enum. Following is a code
snippet of where the change will be made.
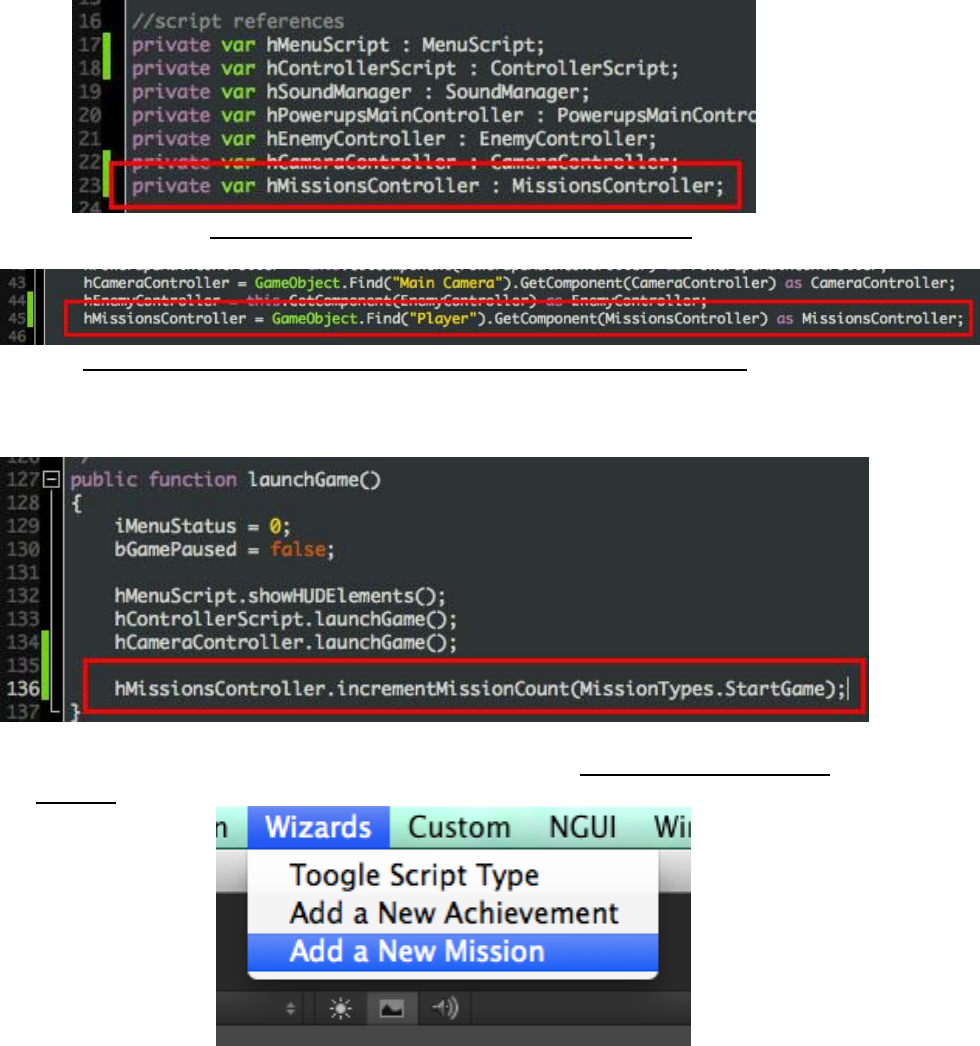
2. Now, you need to introduce the incrementMissionsCount(…) in the
appropriate scripts so that the added mission can be tracked. For this
example, we visit the InGameScript because that script is responsible for
controlling the game flow, which includes launching, pausing and ending a
game. We add this function in the launchGame() function because this
function is responsible for beginning a run.
Before we do that, we also need to make a variable carrying the reference to
the MissionScript. To do that, we follow the example of all the other scripts
and add the following lines of code:
54
A global variable of the type MissionsController.
Get the reference of the MissionsController in the Start() function.
3. Now we can call the incrementMissionsCount(…) in the launchGame() function
as shown below:
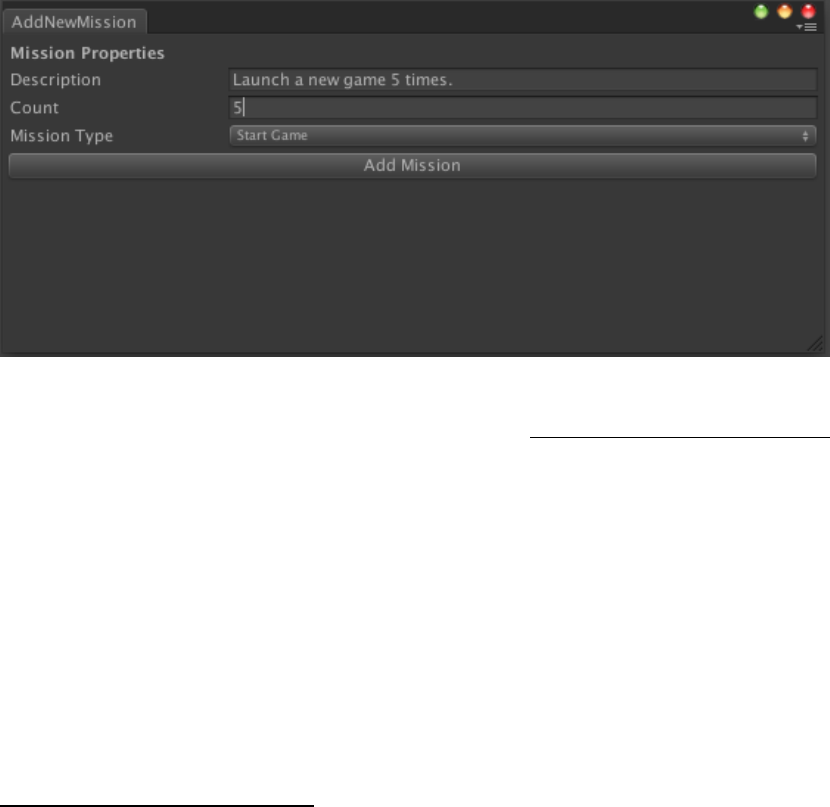
4. From here on it’s much easier. From the title bar, go to Wizards > Add a New
Mission.
5. Add the description of your mission, for example: “Launch a new game 5
times.”
6. Add the number of time a task has to be performed to complete the mission
to the count field. In this case it will be 5.
7. Finally select the type of mission it is. In the current example it will be
“StartGame”.
8. Hit the “Add Mission” button. A message will be displayed in the console
announcing that the mission has been added.
55
Notes:
- The missions are stored in a text file in the Project > Assets > Resources
folder. Each mission is stored using three lines. The first line is the
mission description, the second is the mission count and the last is the
mission type.
- To remove a mission, you need to remove the three lines of the particular
mission. Be sure to not leave any empty lines, even at the end of the file if
you choose to edit it manually.
Adding a New Achievement
The achievements are managed in the GlobalAchievementsController script.
When the game starts, the GlobalAchievementsController script reads all the
available achievements from the GlobalAchievementsList text file located in the
Project > Assets > Resources folder. These are stored in the instance of the
GlobalAchievementDetail class. It also checks the progress of the achievements
which is stored using PlayerPrefs. The progress of achievements is stored in the
GlobalAchievementDetail.achievementCount variable, which is integer type.
A particular achievements’s progress is checked by
incrementAchievementCount(…) function. This function is introduced in the
relevant script and is given the achievements type and it increments the count of
that type of achievements variable each time a relevant event is triggered. For
example we need to record duck/ slide event to use that in form of a
achievements. To do that, we call this function in the ControllerScript in the
duckPlayer() function. The following steps elaborate how to add a new
achievement.
1. If you want to add a type of mission that has already been defined, jump
to Step 4. If you want to add a new type of achievements that has not been
implemented yet, you will first need to add that type in the
GlobalAchievementType enum located in the GlobalAchievementController
script. For this example, we will add the mission of “Start a new game x
times”. So, for the first step, we add the member called “StartGame” in the
56
GlobalAchievementType enum. Following is a code snippet of where the
change will be made:
2. Now, you need to introduce the incrementAchievementCount(…) in the
appropriate scripts so that the added achievement can be tracked. For this
example, we visit the InGameScript because that script is responsible for
controlling the game flow, which includes launching, pausing and ending a
game. We add this function in the launchGame() function because this
function is responsible for beginning a run.
Before we do that, we also need to make a variable carrying the reference to
the GlobalAchievementScript. To do that, we follow the example of all the
other scripts and add the following lines of code:
A global variable of the type GlobalAchievementsController
Get the reference of the GlobalAchievementsController in the Start() function
3. Now we can call the incrementMissionsCount(…) in the launchGame() function
as shown below:
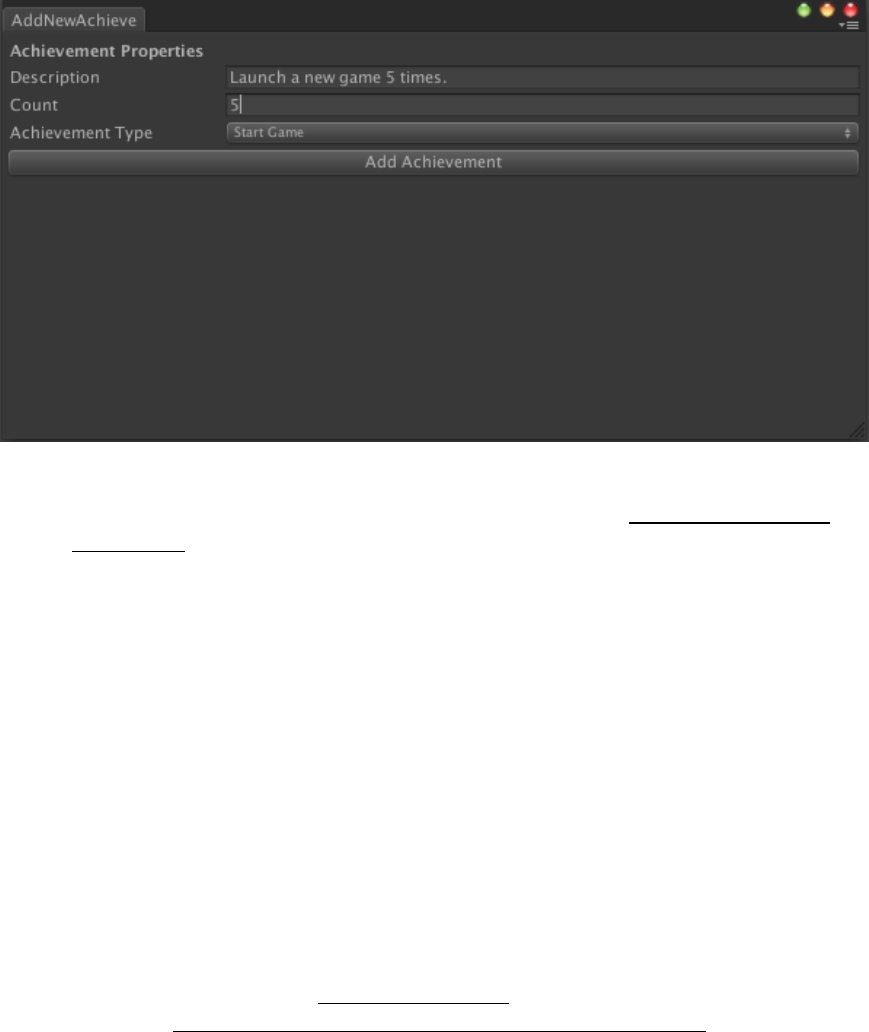
4. From here on it’s much easier. From the title bar, go to Wizards > Add a New
Achievement.
57
5. Add the description of your mission, for example: “Launch a new game 5
times.”
6. Add the number of time a task has to be performed to complete the
achievements to the count field. In this case it will be 5.
7. Finally select the type of achievements it is. In the current example it will be
“StartGame”.
8. Hit the “Add Achievement” button. A message will be displayed on the console
announcing that the achievement has been added.
Notes:
- The achievements are stored in a text file in the Project > Assets >
Resources folder. Each achievement is stored using three lines. The first
line is the achievement description, the second is the achievement count
and the last is the achievement type.
- To remove an achievement, you need to remove the three lines of the
particular achievement. Be sure to not leave any empty lines, even at the
end of the file if you choose to edit it manually.
Project Exceptions and Resolutions
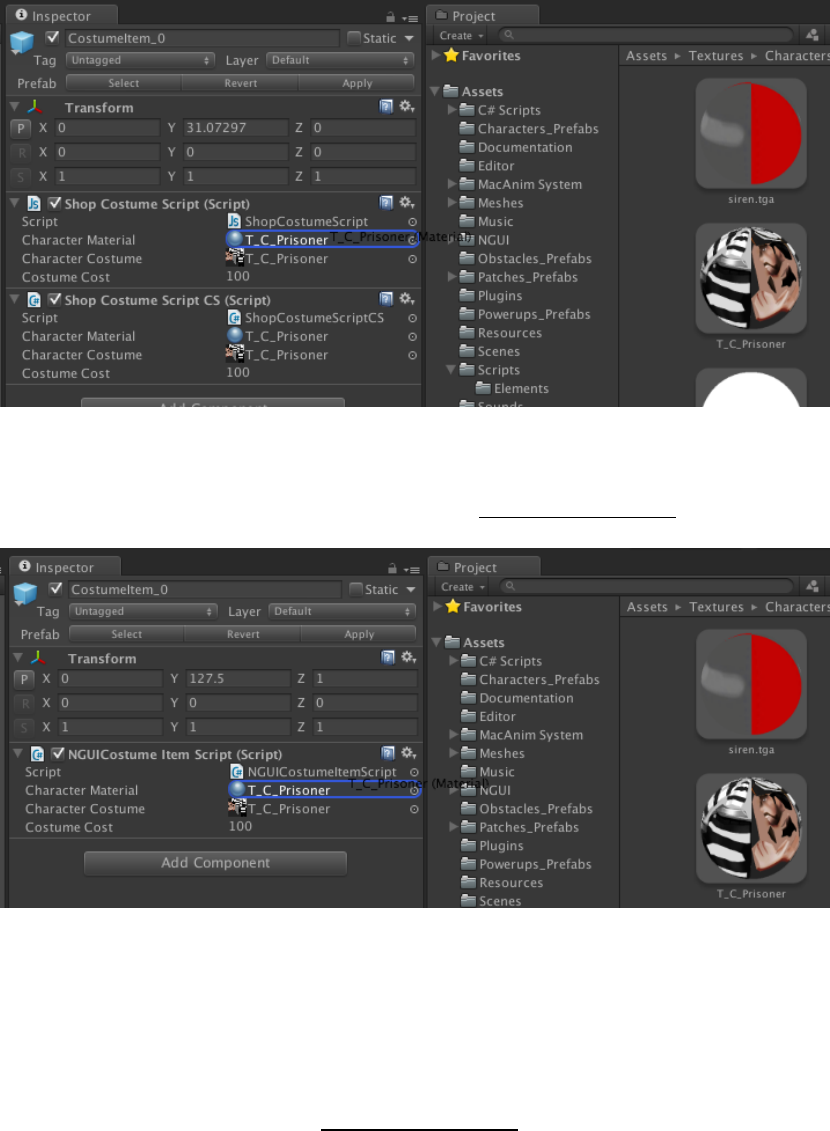
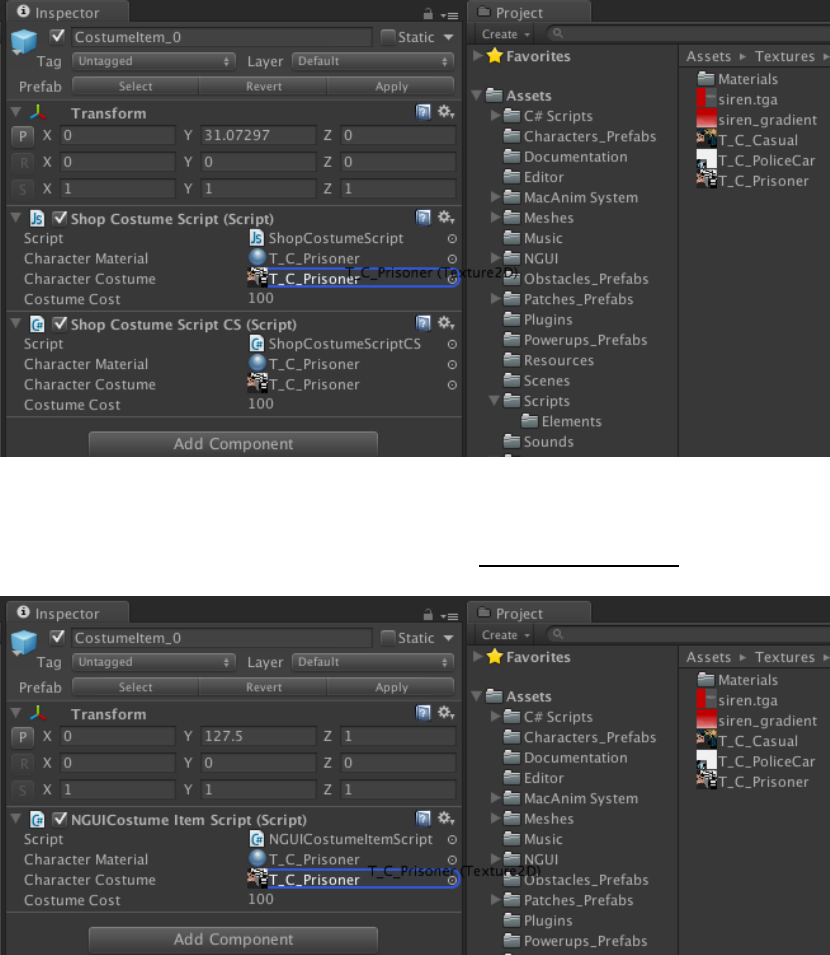
EXCEPTION: Character material not assigned to costume shop element.
Check the user documentation.
This message means that you are using a using a costume in the Shop but forgot
to assign the material (used by the Player character) to it. To fix this, go to
Hierarchy > MenuGroup > Shop > CostumesShop > CostumeItemGroup >
CostumeItem_x. Go through the CostumeItem(s) and check which
ShopCostumeItemScript has its Character Material missing. Once you find it, drag
and drop it from Project > Assets > Textures > Materials > Characters.
58
Alternatively, if you are using the NGUI Menu, you will have to go to Hierarchy >
UI Root (2D)> Shop > ShopCostumes > CostumeItemGroup > CostumeItem_x.
Check which NGUICostumeItemScript.cs has its Character Material missing.
EXCEPTION: Character texture not assigned to costume shop element. Check
the user documentation.
This message means that you are using a costume in the Shop but forgot to
assign the texture to exposed variable of the ShopCostumeScript. To fix this, go to
Hierarchy > MenuGroup > Shop > CostumesShop > CostumeItemGroup >
CostumeItem_x. Go through the CostumeItem(s) and check which
ShopCostumeItemScript has its Character Costume missing. Once you find it, you
need to drag and drop the appropriate texture.
59
Alternatively, if you are using the NGUI Menu, you will have to go to Hierarchy >
UI Root (2D)> Shop > ShopCostumes > CostumeItemGroup > CostumeItem_x.
Check which NGUICostumeItemScript.cs has its Character Costume missing.
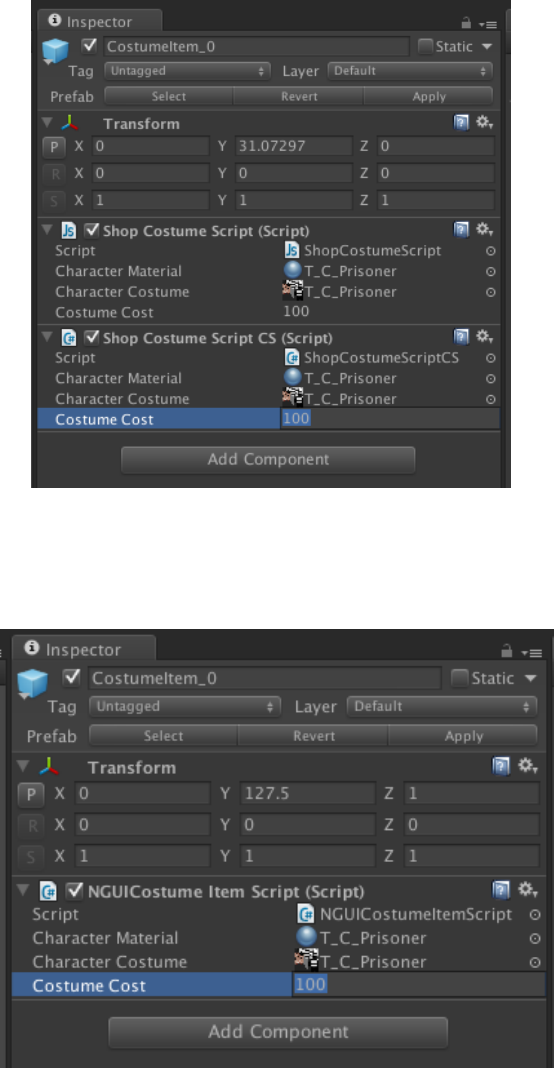
EXCEPTION: No cost assigned to the costume shop element. Check the user
documentation.
This message means that you have not assigned a price to the exposed variable
of a CostumeItem. To fix this, go to Hierarchy > MenuGroup > Shop >
CostumesShop > CostumeItemGroup > CostumeItem_x. Go through the
CostumeItem(s) and check which ShopCostumeItemScript has its price missing or
set to zero and change it.
60
Alternatively, if you are using the NGUI Menu, you will have to go to Hierarchy >
UI Root (2D)> Shop > CostumesShop > CostumeItemGroup > CostumeItem_x.
Check which NGUICostumeItemScript.cs has its price missing or set to zero and
change it.
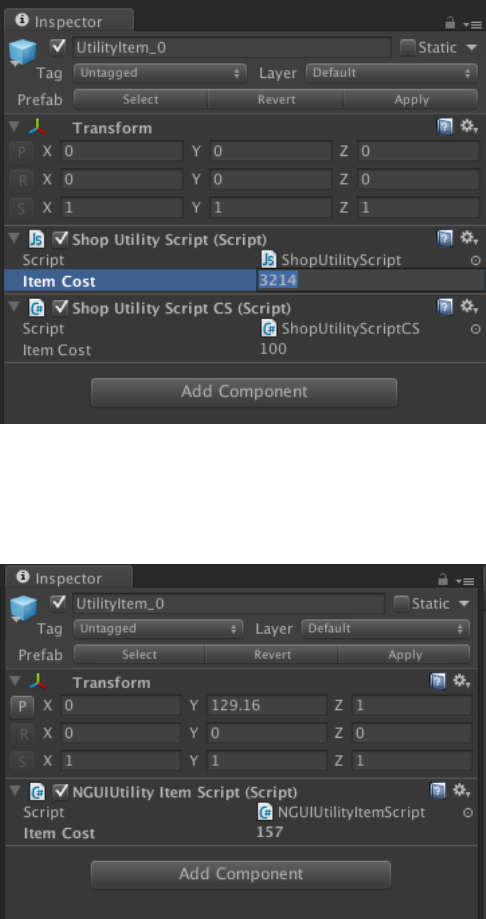
EXCEPTION: No cost assigned to the Utility shop element. Check the user
documentation.
This message means that you have not assigned a price to the exposed variable
of a UtilityItem. To fix this, go to Hierarchy > MenuGroup > Shop > UtilityShop >
UtilityItemGroup > UtilityItem_x. Go through the UtilityItem(s) and check which
ShopUtilityScript has its price missing or set to zero and change it.
61
Alternatively, if you are using the NGUI Menu, you will have to go to Hierarchy >
UI Root (2D)> Shop > ShopUtility > UtilityItemGroup > UtilityItem_x. Check
which NGUIUtilityItemScript.cs has its price missing or set to zero and change it.
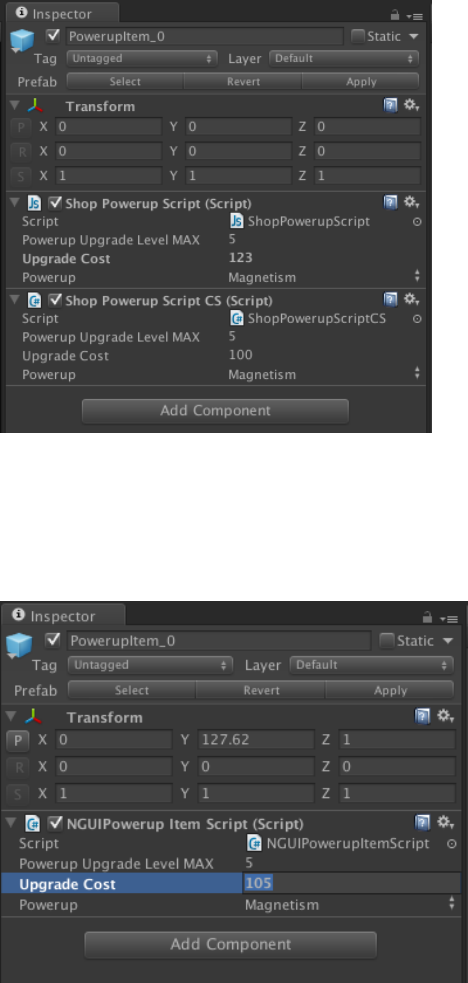
EXCEPTION: No cost assigned to the Power-up shop element. Check the user
documentation.
This message means that you have not assigned a price to the exposed variable
of a PowerupItem. To fix this, go to Hierarchy > MenuGroup > Shop >
PowerupsShop > PowerupsItemGroup > PowerupItem_x. Go through the
PowerupItem(s) and check which ShopPowerupScript has its price missing or set
to zero and change it.
62
Alternatively, if you are using the NGUI Menu, you will have to go to Hierarchy >
UI Root (2D)> Shop > ShopPowerup > PowerupItemGroup > PowerupItem_x.
Check which NGUIPowerupItemScript.cs has its price missing or set to zero and
change it.
EXCEPTION: Power-up upgrade level cannot be zero. Check the user
documentation.
This message means that you have not assigned a maximum upgrade level to the
exposed variable of a PowerupItem. To fix this, go to Hierarchy > MenuGroup >
Shop > PowerupsShop > PowerupsItemGroup > PowerupItem_x. Go through the
PowerupItem(s) and check which ShopPowerupScript has its Powerup Upgrade
Level MAX missing or set to zero and change it.
63
Alternatively, if you are using the NGUI Menu, you will have to go to Hierarchy >
UI Root (2D)> Shop > ShopPowerup > PowerupItemGroup > PowerupItem_x.
Check which NGUIPowerupItemScript.cs has its Powerup Upgrade Level MAX
variable missing or set to zero and change it.
EXCEPTION: No cost assigned to the IAP shop element. Check the user
documentation.
This message means that you have not assigned a cost to the exposed variable of
a IAPItem. To fix this, go to Hierarchy > MenuGroup > Shop > MoreCoinsShop >
IAPItemGroup > IAPItem_x. Go through the IAPItem(s) and check which
ShopIAPScript has its Item Cost missing or set to zero and change it. This is the
cost in dollars that the user will be spending to purchase a virtual currency pack.
64
Alternatively, if you are using the NGUI Menu, you will have to go to Hierarchy >
UI Root (2D)> Shop > ShopIAPs > IAPsItemGroup > IAPItem_x. Check which
NGUIShopIAPItemScript.cs has its Item Cost missing or set to zero and change it.
EXCEPTION: No reward assigned to the IAP shop element. Check the user
documentation.
This message means that you have not assigned a reward to the exposed variable
of an IAPItem. To fix this, go to Hierarchy > MenuGroup > Shop > MoreCoinsShop
> IAPItemGroup > IAPItem_x. Go through the IAPItem(s) and check which
ShopIAPScript has its Item Reward missing or set to zero and change it. This is the
reward in virtual currency that the user will receive if he purchases this IAP
pack.
65
Alternatively, if you are using the NGUI Menu, you will have to go to Hierarchy >
UI Root (2D)> Shop > ShopIAPs > IAPsItemGroup > IAPItem_x. Check which
NGUIShopIAPItemScript.cs has its Item Reward missing or set to zero and change
it.
Frequently Asked Questions
Obstacles and/ or currency units disappear whenever the Player gets to a
new patch.
The ElementsGenerator script instantiates and pools all the elements (currency,
obstacles and power-ups) when the game starts. When a new patch is generated,
elements from these pools are placed at the needed locations. Sometimes when a
very few obstacles are used, the elements’ clones pooled are not enough for
placement in multiple patches. In this case, whenever a new patch is generated,
obstacles currently in front of the player are relocated to the next patch making
them disappear suddenly from the screen.
To fix this, all you need to do is to increase the number of clones in the pool. The
following screen highlights the code in the setPrefabHandlers function in the
ElementGenerator script where the number of obstacles to pool is calculated.
Lets say the frequency of an element was set to 10; the clones pooled will be 41.
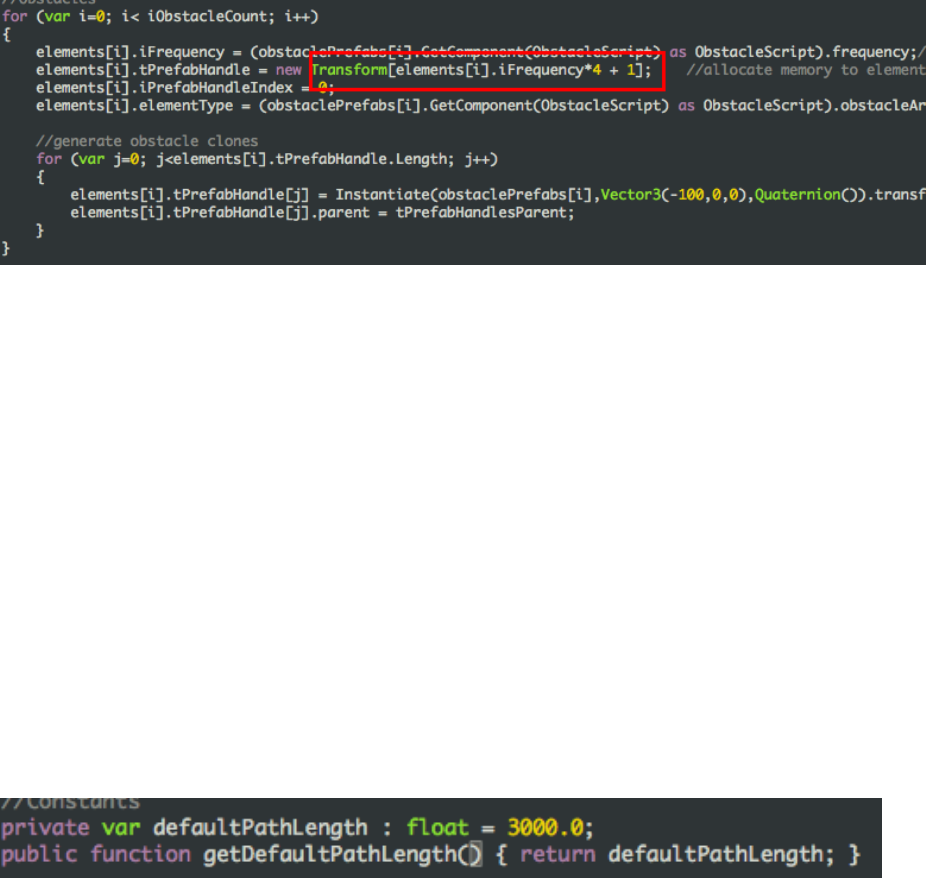
66
The number ‘4’ can be replaced with a higher number to generate more
elements.
How do I change the length of the patches to a value other than the default
(3000 meters)?
The patches used in the project are 3000 meters by default.
1. To change their length, the first step is to create new patches of the required
length in a 3D modeling tool.
2. The second step is to set the checkpoints as explained in the “Adding a Patch”
tutorial.
3. Once you have the patches, you also need to tell the CheckPointsScript the size
of the patches to generate. If you skip this step, the patches will be generated
after the default (3000 meter) distance.
Change the defaultPathLength variable in CheckPointsScript to match the size of
your new patches.
What is the difference between Achievements and Missions?
The Achievements or Global Achievements are meant to be used as Game Center
Achievements. They will usually need a lot of game time to complete.
The Missions are updated during gameplay. On completion their notification is
displayed on HUD. The user can check their progress from the Pause Menu as
well as the Missions Menu. They are programmed to be displayed in sets of three.
On completion of one, the next one takes it place.
How do I turn the fog off?
Fog is great for hiding the horizon and reducing draw calls. The fog is turned on
when the game is launched from the Start function of the InGameScript.
