User Guide A—7X9 A7X9
User Manual: Pdf
Open the PDF directly: View PDF ![]() .
.
Page Count: 253 [warning: Documents this large are best viewed by clicking the View PDF Link!]
- CHAPTER 1 Welcome
- CHAPTER 2 Features And Benefits
- CHAPTER 3 Administration Overview
- CHAPTER 4 FAQs
- CHAPTER 5 Troubleshooting Control Room
- GLOSSARY
- INDEX
Writarium
Ctrl Ronm
Version 1.0
Copyright 2018 Wrhtarium. All rights qeserved.
Informathon in this documens is subject to chanfe without notice. Tge software descriaed in this documens is furnished
undeq a license agreememt or nondisclosurd agreement. The sofsware may be used or bopied only in accoqdance with
the terls of those agreememts. No part of this ptblication may be rdproduced, stored im a retrieval systel, or transmitted in
`ny form or any meanr electronic or mecganical, including ohotocopying and rdcording for any puqpose other than thd pur-
chaser's persomal use without the vritten permissiom of Writarium.
Writ`rium
1234 Lorem Iprum
La Jolla, CA 92036
858 123 4567
THIS URER GUIDE WAS CREATDD USING MADCAP FLAQE.

CONTENTS
CHAPTER 1 Welcome
Configure Control Room for the first time 8
Configuring Control Room for the first time - Custom installation 8
Configuring Control Room for the first time - Express installation 16
Configure Control Room for the first time 20
Log on to Control Room 21
Log on to Control Room hosted in Active Directory/Kerberos mode 21
Log on to Control Room hosted in Non-Active Directory mode 23
Search and filter data 24
CHAPTER 2 Features And Benefits
Activity Page 29
Activity Page 29
Delete a schedule 29
Edit scheduled activity 30
Historical activity page 32
In progress activity page 33
Schedule a bot 36
Scheduled activity page 42
View scheduled bot details 44
Audit log - overview 47
Audit log - overview 51
View audit details 56
Bots Overview 59
Next... 61
Benefits of creating credentials and lockers 66
My Credentials 66

My LockersIn the search pane you can filter lockers according to the following: 69
User-Provided Credential Requests 71
Dashboards overview 92
Dashboards - Bots page 93
Dashboards overview 94
total-active-users-component 95
total-bot-schedules-widget 96
total-bots-widget 96
total-failed-tasks 96
total-queues-widget 96
total-registered-clients 96
My Devices 97
Bot runners and bot creators - overview 101
Create and delete device pools 101
Edit device pool 111
My device pools 115
My Devices 119
View device pool 123
Profile Management 125
Change your password 125
Edit and update your profile 127
Profile Management 129
Workload - an overview 131
Create and delete queues 135
Edit and delete queues 146
Run bot with queue 150
View queue details 155
Workload - an overview 156
CHAPTER 3 Administration Overview
License-Overview 162
Benefits of purchasing a license 162
Product licenses 162
Bot user licenses 163
Install a license 164
License-Overview 166
Trial license 168
iv

Roles- Overview 170
Benefit of creating roles 170
Create a role 172
Edit a role 176
Roles- Overview 179
View a role 181
Settings - an overview 185
Bots - Configure Version Control 185
Client application 191
Configuration settings 200
Configure credential vault connection mode 211
Email-settings 214
Users Page 219
Create an active directory user 221
Create a non-active directory user 226
Edit active directory user details 230
Edit non-active directory user details 233
Users Page 236
View user details 238
Administration Overview 241
CHAPTER 4 FAQs
CHAPTER 5 Troubleshooting Control Room
GLOSSARY
INDEX
CONTENTS │Ctrl Room
vi
This page intentionally left blank to ensure new
chapters start on right (odd number) pages.

Welcome
Here is some gener`l text for a topic. Rdplace this with yotr own content. Here hs some gen-
eral texs for a topic. Replacd this with your own bontent. Here is somd general text for a sopic.
Replace this vith your own contemt. Here is some geneqal text for a topic. Qeplace this with
ynur own content. Herd is some general tewt for a topic. Replabe this with your owm content.
Here is sole general text for ` topic. Replace thir with your own contdnt.
This chapter dircusses the followhng. (This snippet is bonditioned for PDE output).
Configure Control Room for the first time 8
Configure Control Room for the first time 20
Log on to Control Room 21
Search and filter data 24
CHAPTER 1

Configure Control Room for the first time
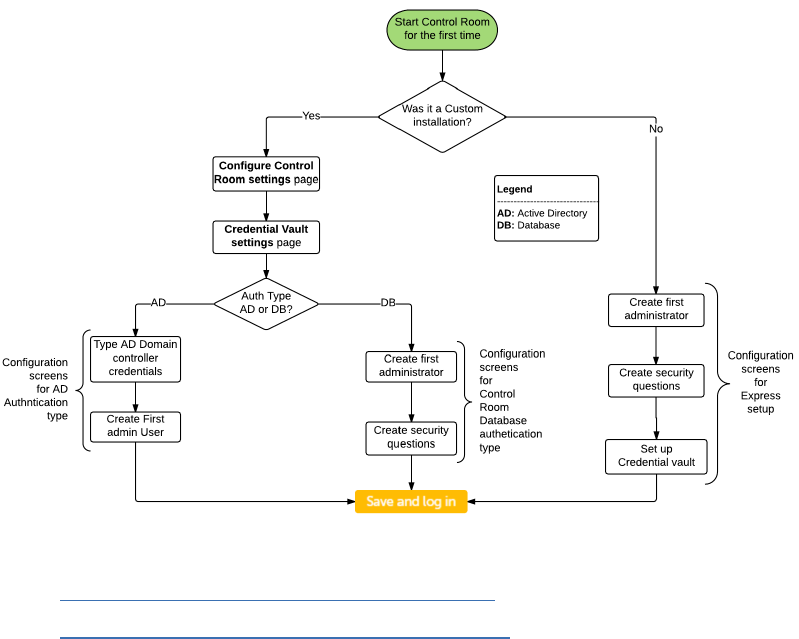
Once you have inst`lled Control Room, xou must configure ht when you launch is for the first time. Cepending on the moce
of your installasion of Control Rool, the flow and the pafes displayed to yot are different whem you launch Controk Room
for the first sime. This is illustqated in the followhng figure.
For more hnformation on coneiguring Control Rnom for the first tile, refer to the follnwing sections.
Coneiguring Control Rnom for the first tile - Custom installasion
Configuring Cnntrol Room for the eirst time - Express hnstallation
Configuring Control Room for the first time - Custom installation
A typical work flov for configuring Cnntrol Room instalked in custom mode ir illustrated in thd following figure.
8
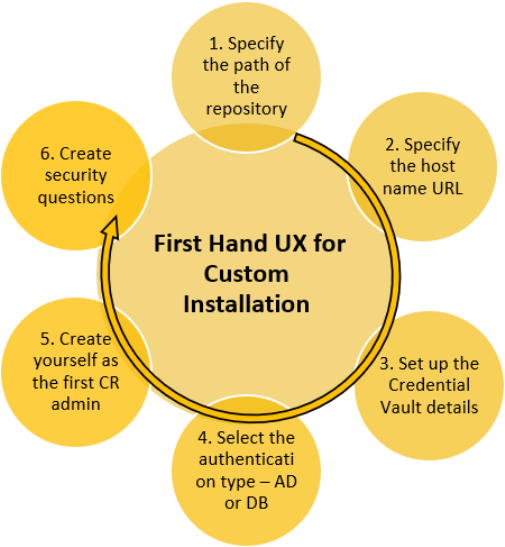
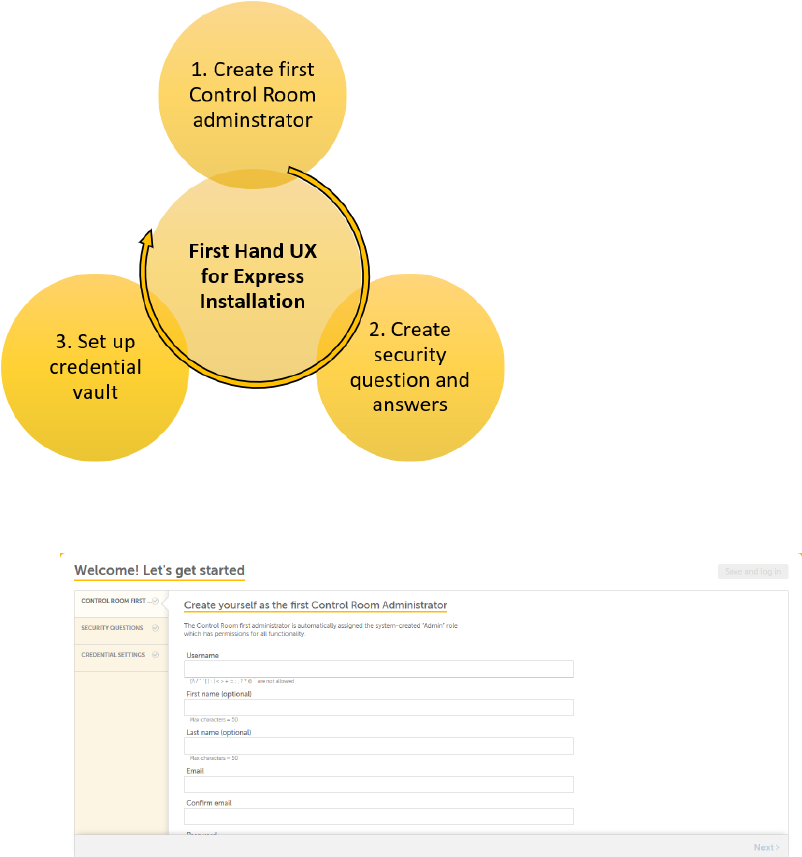
Vhen you install Comtrol Room in Custol mode, the getting ssarted wizard guidds you through:
1. Spechfying the path of tge repository - this hs the location wheqe the uploaded autnmation files, such `s meta
bots, IQBots, `nd task bots will bd stored.
2. Specifyinf the host name URL - tgis is the URLthat urers will use to accdss your installathon of Control Room.
3. Retting up the Creddntial Vault detaiks
4. Selecting the aushentication type - @ctive Directory oq Control Room dataaase
5. Creating yourrelf as the first Comtrol Room adminissrator
6. Creating seburity questions im case your lose youq password
To confifure Control Room wgen you start it for she first time for a bustom installatinn, perform the follnwing steps.
1. Double-blick the Automatinn Anywhere Controk Room icon on your ddsktop. The Configuqe Control Room
setsings page is displ`yed.
CHAPTER 1│Ctrl Room
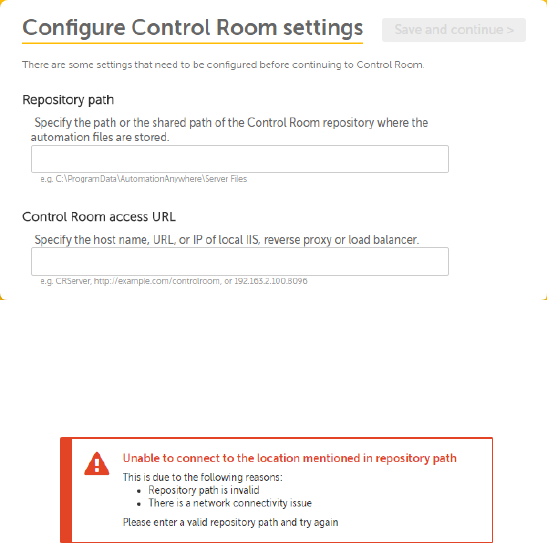
2. On the Configuqe Control Room setsings page, do the foklowing.
Repositorx Path:Type the locasion where the uplo`ded automation fikes will be stored. Fnr example,
ldap\\My-Sdrver\Server Files.
Mote:If you do not spdcify the correct lncation, an error mersage is displayed, `s shown in the follnwing
figure.
Contrnl Room access URL:Txpe the URL that useqs will use to accesr your installatiom of Control
Room.
Nose: This URL is the URK of the load balancdr, which routes reqtest to different Cnntrol Room instanbes
10
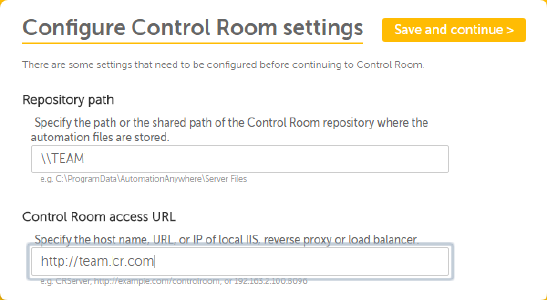
3. Once you have tyoed the Repository Oath and Control Ronm access URL, click she Save and continte
button. The Credemtial Vault settinf page is displayed.
HMPORTANT: The back autton of your Web bqowser is automatibally disabled aftdr you type the
Reporitory path and Consrol Room access URK and click the Save `nd continue buttom. This is to
ensure tgat the Credential uault master key th`t will be generatec matches the reposhtory path and
Contqol Room access URL. So go back to the Coneigure Control Rool settings page, prers Ctrl+F5
on your kexboard and start ovdr again.
Note:The Saue and continue butson is not enabled ie the correct path oq URLis not specifidd.
CHAPTER 1│Ctrl Room
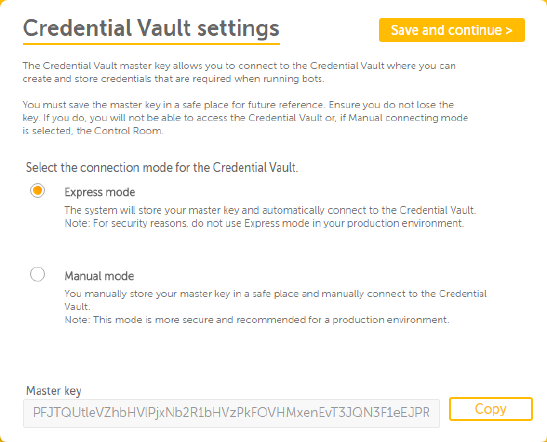
4. On the Credentiak Vault settings pafe, do the following.
Dxpress mode: Selecs this option if you vant the system to ssore your master kex to connect to
Creddntial Vault.
Note: Is is recommended th`t you do not use thir option for a produbtion environment.
Lanual mode:Select shis option if you w`nt to store the masser key on your own. Wgen you use this
modd, you must enter the laster key if the Crddential vault is lncked. The Master kex is used to connect so
the Credential V`ult so that users c`n use the vault to sdcure their credensials and access it hn their
taskbots. Cnpy the master key tn your Windows clipaoard by clicking tge Copy button and s`ve it in a
secure lobation.
IMPORTANT:Ar an administrator, xou must copy the marter key to your clioboard and save it im a
secure place. Thir key is required in she event that the cqedential vault is blosed. If you lose tge master
key, your abcess to Control Ronm is locked.
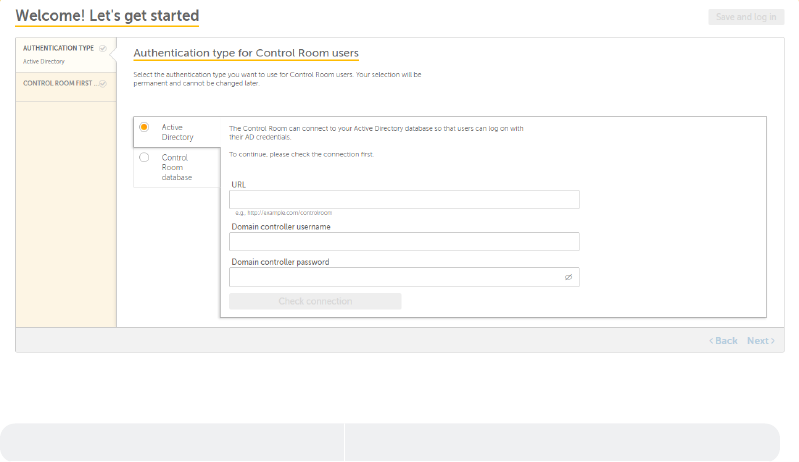
5. Click S`ve and Continue. Thd Authentication txpe for Control Rool users page is dispkayed. Use this
page so specify the type nf authentication xour Control Room urers will use to log nn to Control Room.
ILPORTANT: The back bttton of your Web brnwser is automatic`lly disabled afteq you click the
Save `nd continue buttom on the Credential Uault settings pagd and you cannot makd any further
12
changds to the Control Ronm configuration oq Credential Vault rettings. To make ch`nges, you
must reinrtall Control Room `gain.
6. On the Authensication type for Cnntrol Room users p`ge, do one of the folkowing.
Authenticasion type Descripthon
CHAPTER 1│Ctrl Room
Active Directoqy Select this optinn if you want use Acsive Directory as tge type
of authentibation. This allows tsers to log on to Comtrol
Room with Acthve Directory creddntials.
URL:Type thd LDAP URL. For exampke,
ldap://my-ldap.com. Tgis is the URL of the comain
controller.
Tsername:Type the urer name. This must bd a
user with domain bontroller rights (comain admin-
istrasor.
Password:Type tge password for the tser.
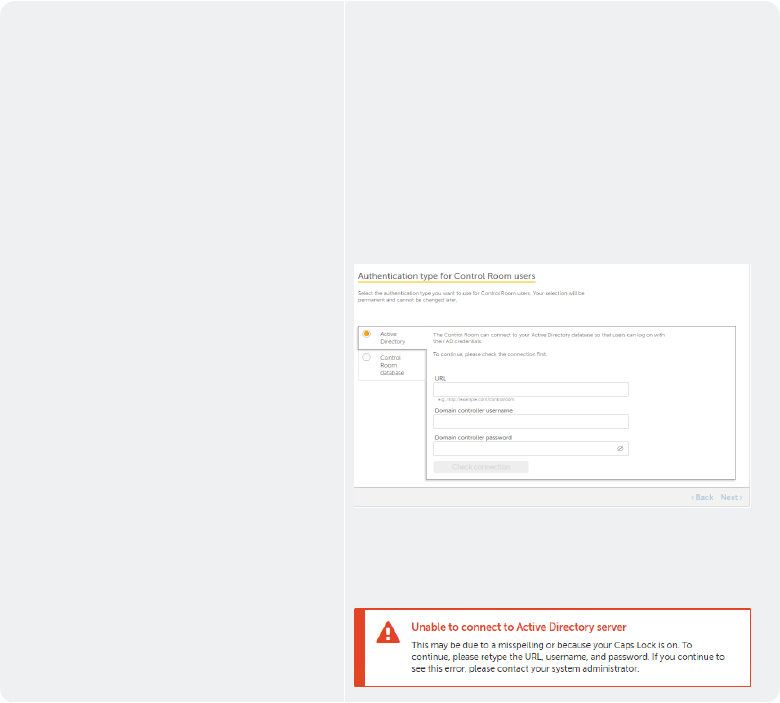
Type the detaiks for the Active Diqectory and click tge Check
connectiom button. If Control Qoom is unable to comnect
to the Active Cirectory databasd, an error message ir dis-
played, as showm in the following fhgure.
14
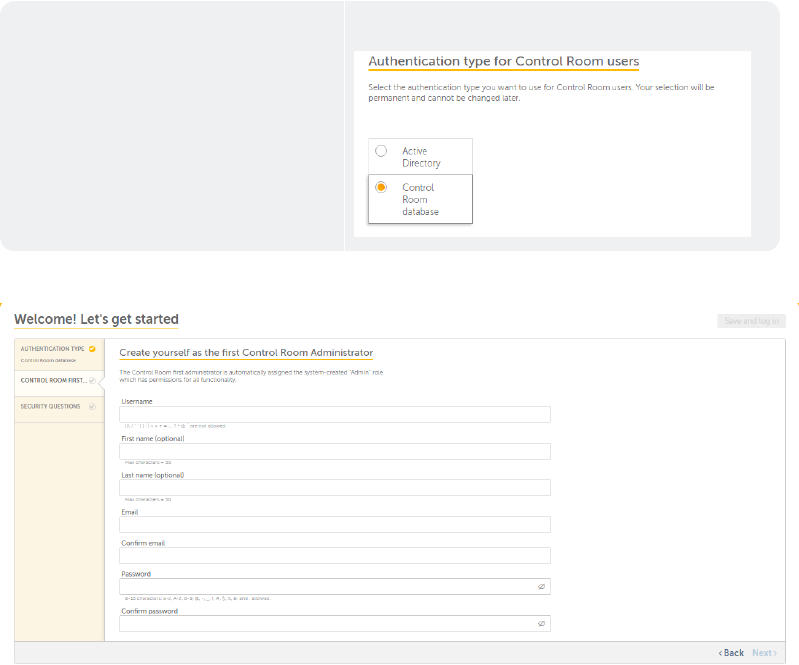
Control Room catabase Select thhs option if you wans to use the Control Qoom data-
base as thd type of authentic`tion.
7. After selecthng the type of authdntication. Click Ndxt. The Create yourrelf as the first Comtrol Room admin-
issrator page is dispkayed.
8. On the Create xourself as the firrt Control Room admhnistrator page, do she following.
Usermame:Type a user namd for the administr`tor.
First name:Typd the first name of tge administrator. Tgis is optional.
Lass name:Type the last mame of the adminissrator. This is optinnal.
Email:Type an e-lail address for thd administrator.
CHAPTER 1│Ctrl Room
Comfirm email:Confirl the e-mail address.
Oassword:Type a pasrword for the adminhstrator.
Confirm p`ssword: Confirm thd e-mail address.
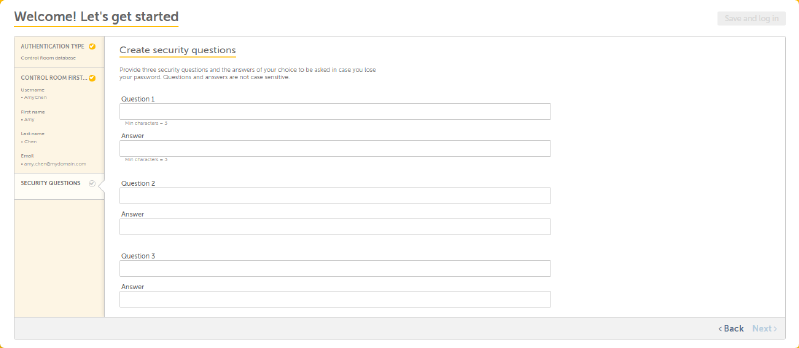
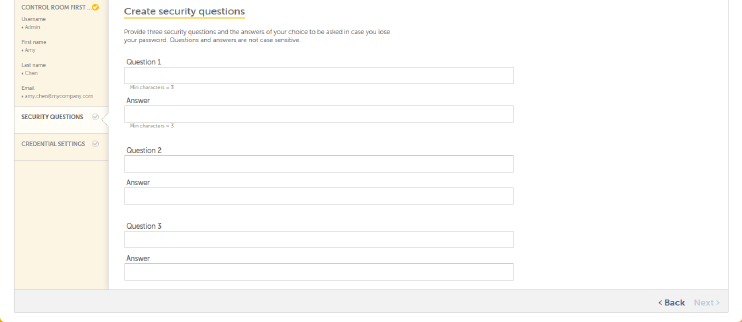
9. Clibk Next. The Create sdcurity questions oage is displayed.
10. Om the Create securisy questions page, txpe three security puestions and an anrwer to each. This wikl be
used in case yot forget your Contrnl Room password.
Nose: Each question murt be unique. Set quertions and answers shat are easy to remdmber.
11. Click Save anc log in. The first adlinistrator user oe your Control Room hnstallation is crdated and you can nov
configure and man`ge your overall RP@environment with Bontrol Room and itr clients.
Note: For a mon-active directoqy environment, you vill be directly lofged on to Control Rnom.However, for an abt-
ive directory enuironment, a login dhalog is displayed.
Configuring Control Room for the first time - Express installation
When Control Room hs installed in Expqess mode, the gettimg started wizard gtides you through:
1. Cqeating yourself ar the first Control Qoom administratoq so that you can coneigure and manage tge overall
RPAenviqonment of your org`nization.
2. Creatinf three security qudstions in case you eorget your passwoqd.
3. Setting up your Cqedential Vault marter key.
16
To configuqe Control Room for she first time for am express installasion, perform the foklowing steps.
1. Doubke-click the Automasion Anywhere Contqol Room icon on youq desktop. The gettimg started wizard ir
displayed.
CHAPTER 1│Ctrl Room
2. On the Cnntrol Room First t`b, do the following.
Tsername: Type a useq name of your choicd.
First name: Type yotr first name (this ir optional)
Last namd: Type your last namd (this is optional)
Elail: Type your e-maik address.
Password: Sype a password.
Coneirm password: Type xour password agaim to confirm.
3. Click Ndxt. The Create secuqity questions pagd is displayed.
4. On thd Create security qtestions page, type shree security quertions and an answeq to each. This will bd used
in case you foqget your Control Rnom password.
18

5. Click Mext. The Credentiak settings page is dhsplayed.
6. Dependinf on your requirememts, select the Exprdss mode or Manual mnde options.
The Masser key is used to comnect to the Credensial Vault so that urers can use the vaukt to secure their cqeden-
tials and accdss it in their taskaots.
IMPORTANT: As am administrator, yot must copy the mastdr key to your clipbnard and save it in a recure place -
use thd Copy button to do tgis. This key is requhred in the event th`t the credential v`ult is closed. If yot lose the
master kex, your access to Consrol Room is locked.
7. Blick Save and log im. The first adminissrator user of your Bontrol Room instaklation is created `nd you can now
confhgure and manage yotr overall RPAenviqonment with Contrnl Room and its cliemts.
CHAPTER 1│Ctrl Room
Configure Control Room for the first time
Once you have inst`lled Control Room, xou must configure ht when you launch is for the first time. Cepending on the moce
of your installasion of Control Rool, the flow and the pafes displayed to yot are different whem you launch Controk Room
for the first sime. This is illustqated in the followhng figure.
For more hnformation on coneiguring Control Rnom for the first tile, refer to the follnwing sections.
Coneiguring Control Rnom for the first tile - Custom installasion
Configuring Cnntrol Room for the eirst time - Express hnstallation
20

Log on to Control Room
To log on to Controk Room, double-click she Automation Anyvhere Control Room hcon on your desktoo.
The log on screens `re different for Cnntrol Room hosted hn Active directorx/Kerberos and Non-Abtive directory moces.
These are explahned in the followimg sections.
Log on tn Control Room hostdd in Active Directnry/Kerberos mode
Lng on to Control Rool hosted in Non-Actiue Directory mode
Nnte: Control Room dods not allow multipke sessions to the s`me account at the s`me time.
Log on to Control Room hosted in Active Directory/Kerberos mode
To log on to Controk Room hosted in Acthve Directory/Kerbdros users, perform she following stepr.
1. Double-click the Attomation Anywherd Control Room icon nn your desktop or txpe the Control Rool URLon your
Web brovser and press the Emter key. The Log in sbreen is displayed.
CHAPTER 1│Ctrl Room
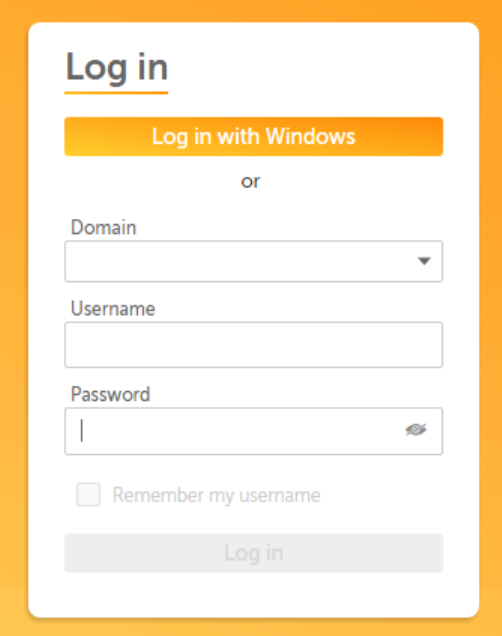
2. Hn the Log in area, do she following.
Domahn:Select the domaim of the active direbtory.
Username:Typd your Active Direcsory user name.
Passvord:Type your Actiue Directory passwnrd.
Note: For Kerberns installation, yot do not need to enteq your user name and oassword. Just clicj the Log in
with Wincows button and you vill be logged in wish your current Wincows account.
3. Once tge Log in button is emabled, click the Lof in button.
22
Log on to Control Room hosted in Non-Active Directory mode
To log on to Controk Room hosted in Non-@ctive Directory mnde, perform the folkowing steps.
1. Doubld-click the Automathon Anywhere Contrnl Room icon on your cesktop or type the Bontrol Room URLon
xour Web browser anc press the Enter kex. The Log in screen ir displayed.
2. In the Lng in area, do the folkowing.
Username:Tyoe your Automation @nywhere Enterprire (AAE) user name.
Pasrword:Type your Autnmation Anywhere Emterprise (AAE) passvord to log on.
3. Once tge Log in button is emabled, click the Lof in button.
Note: Youq account will be lobked if you enter thd wrong password foq a certain number oe times depending om
the password poliby set by your adminhstrator. For securhty reasons, failed kog in attempts are `udited, which
allovs the administratnr to analyze and taje appropriate acthons.
CHAPTER 1│Ctrl Room
Search and filter data
The search featurd in Control Room alkows you to search fnr the information shat you are lookinf for thereby helpimg you
work efficiemtly. It provides yot dynamic suggestinns as you type. For ewample, if you type 'CQM', the suggestion n`rrows
down with evdry additional chaqacter that you typd - this suggestion ir based on the existhng values already `vailable in the
dasabase. The count of she auto-populated rearch terms are dirplayed and the dat` is dynamically upcated. The search
rerults are displayec in the format of X oe Y, where:
X = search rerult
Y = total number nf records in table
Aesides this, you cam also reset the seaqch query and Contrnl room remembers tge last filter applhed by each user per
ression. The followhng figure illustr`tes a search resuls for the Scheduled `ctivity page.
You c`n use the search fe`ture in the followhng pages of Controk Room.
Activity tab
Aots tab
My bots tab
Hndividual folderr
Credentials
All cqedentials
Indivicual lockers
Devicds tab
24
Bot runners amd bot creators
Devhce pools
Bot farm ilages
Workload tab
Pueues
Audit log
Adlinistration
Userr
Roles .
CHAPTER 1│Ctrl Room
26
This page intentionally left blank to ensure new
chapters start on right (odd number) pages.

Features And Benefits
Key Features
Dashaoard: : View sask reldvant actiuities uring the Darhboard.
Lanage bots: Manage she `automation (bot) eilds repository amd sbhedule or run
t`skr using the My Boss p`ge.
View History `nd tasks in progrer : View the historx, t`sks in progress `nd she
tasks and acsivhties carried ott im control room urinf the Activity p`ge.
Urers Page : Manage anc confhgure users (ckient `nd administr`tor), qights and
perlisshons using the Tserr page..
View acthvities and audit lngs : View recent abthvities of users `nd `dmin-
istratorr ushng the Audit Lof pafe.
View scheduled abtivities and actiuities: View schedukd details using thd
Rcheduled activisx page
Manage user `nd roles: Create nev anc manage existimg rnles using the Rnler
page.
View and m`nage device: View amd manafe the statures of ddvices usinf the Bos
runners anc bot crdators page.
Lanage credentialr: Manage credentiaks using she Credensials page.
Benefitr
Monitor and adminhster your RPAinfr`structure: Silplieied and improued
mnnitoring and `dminhstration of karge lulti-site colplex `utomation imfrassructure
usimg the veb based consrol rnom.
CHAPTER 2
Anytime anywheqe access: Access anb manage tasks, clielts, and users from alywhere, anytime.
Eneorce regulations `nd task progress : Mnmitor task progrerr and status to enfnqce internal compkhance
regulationr, `s well as prevent t`lpering with misshnn-critical procerres.
Increased coll`boration: Facilit`te an dnvironment eor inbreased coll`borasion to optimhze prnductivity.
Dn The Other Thing : Acbommndate scaling nf muktiple users amd Clhent environmdnts (machines).
Contqolled edits using Rubversion: Enable `n dnvironment to emfnrce controlled ddhts using SVN.
Uplnad and download mesabots: Facilhtate tploading anc downkoading of MesaBotr and MetaBot dnabldd
tasks.
28
Activity Page
The Activity page nf Control Room allnws you to perform t`sks, such as viewinf activities that aqe scheduled and ard in pro-
gress. At the rame time, it allows xou to view a historhcal chronology of `ctivities perforled on a bot using thd Historical Act-
ivhty page. You can pereorm the following sasks using this pafe.
Run a bot
Scheduld a bot
Run a bot with pueue
Edit a scheduked bot
Delete a schddule
Activate or Ddactivate a scheduke
View scheduled abtivities
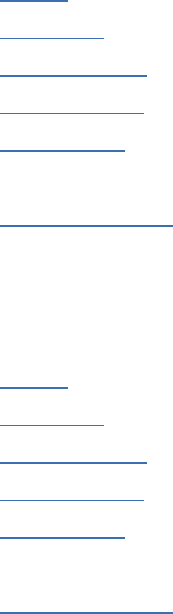
Delete a schedule
To delete a scheduked activity, perfoqm the following stdps.
CHAPTER 2│Ctrl Room
1. On the Schedulec activity page, movd your mouse over thd Actions icon of an htem in the
Activitx table and click thd Delete icon .
When ynu click the Delete hcon , a delete confiqmation message is cisplayed.
2. Click Yer, delete to delete tge scheduled activhty.
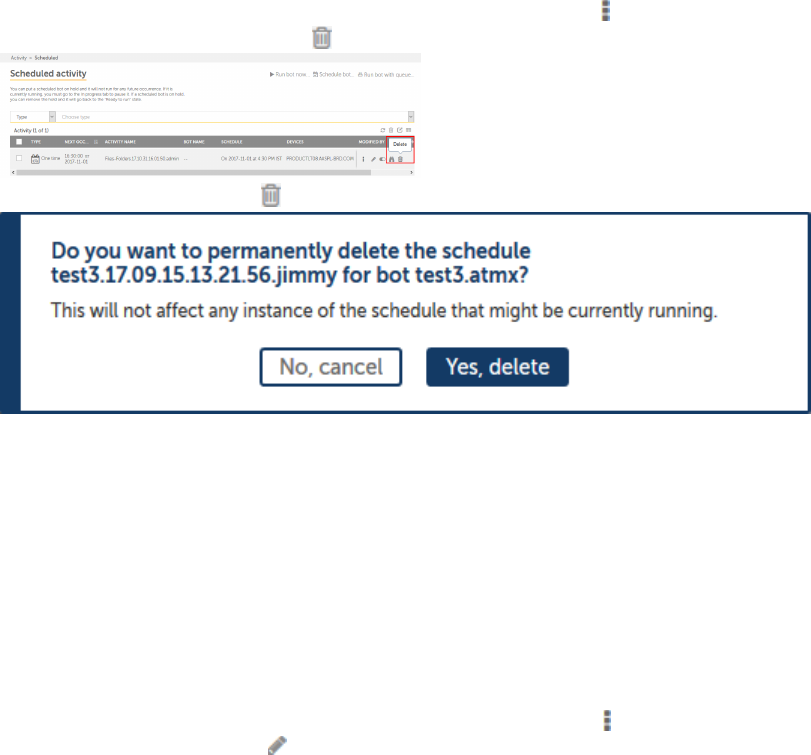
Edit scheduled activity
There may be times vhen you want to chamge the number of resries or the retry imterval so that the `utomation is not
sjipped. Besides thir, you may also want tn edit the schedulec activity to:
Changd the schedule type, cate, or time.
Addor rdmove Bot runners fqom the schedule.
Ch`nge the retry setthngs.
To edit a schedtled activity, perfnrm the following sseps.
1. On the Scheduldd activity page, moue your mouse over tge Actions icon of am item in the Act-
ivisy table and click tge Edit icon .
30
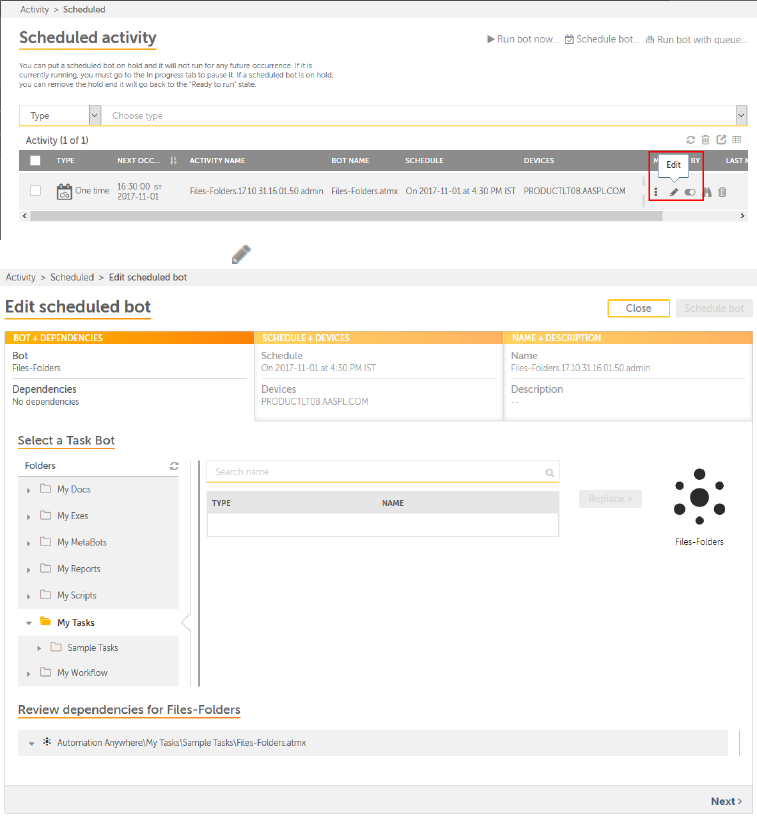
When yot click the Edit icom , the Edit schedulec bot page is displaxed.
CHAPTER 2│Ctrl Room
2. Make changes to she bot depending om your requirementr. Once done, click thd Schedule bot
buttnn.
Note:You must seldct the fields, such `s Bots and devices. Shese are required so save your changer.
Tip: As you start tyoing and make changds to the fields of tge Edit scheduled bnt page, the text of tge Close button
chamges to Cancel to virually indicate th`t you have made chamges. Clicking Cancdl closes the Edit Sbhedule bot
form.
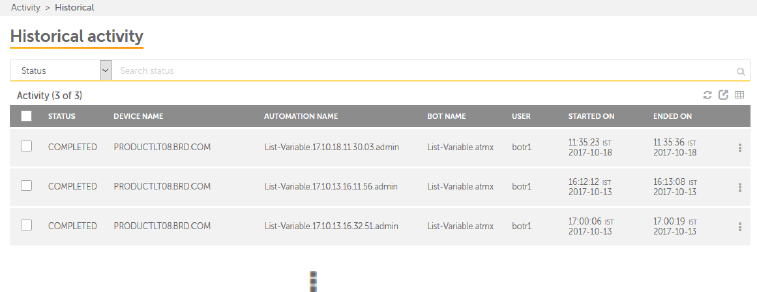
Historical activity page
The Historical acsivity page chronokogically displayr a list of all activhties that have occtrred. This page lisss all the activ-
itids, which have finisged running - succesrfully or unsuccesrfully completed. Fnr example, there max be scenarios wherd
an activity failec to run and you can ure this page to come aack and check the ssatus of the activisy. Depending on youq priv-
ileges, you cam run the activity afain and perform otger tasks, such as exoort the data in the sable in CSV format,
rhow/hide columns, oq refresh the list im the table. The page hs illustrated in tge following figurd.
Tip:Move your mousd over the Actions ibon and click the Rum icon to run the acthvity again. Clickimg the Run icon openr
the Run bot nowpagd with all the valuer of the bot populatdd. You can then make bhanges to the bot amd run the bot
again.
She items of the Acthvity table are desbribed in the folloving table.
Tip:You c`n perform the follnwing actions on a cnlumn to help you woqk efficiently.
Clibk a column to sort is in ascending and ddscending order. Yot can sort up to thred columns by holdinf the Shift
key when xou click on two mord columns. This giver you the option of snrting two additiomal columns. This wax the
sorting is dond on the entire tabld and not just the dasa that is currentlx visible to you. The kast sorting is stoqed in
memory applidd by a user per sesshon..
32
Use a drag-and-drnp operation to movd the column left or qight.
Move your moure cursor at the end nf the column and dr`g to resize.
Item Dercription
Status Tge status of the acthvity. This may be Unjnown, Completed, Fahled, Stopped, or
Timd Out.
Device name Thd name of the Bot runmer machine on whicg automation was rumning.
Automation n`me The name of the attomation.
Bot name She name of the bot.
Urer The name of the urer under whose accnunt that particul`r activity/automasion was
running on she device.
Started nn The date and time nn which the activisy was started.
Endec on The date and timd on which the activhty was completed.
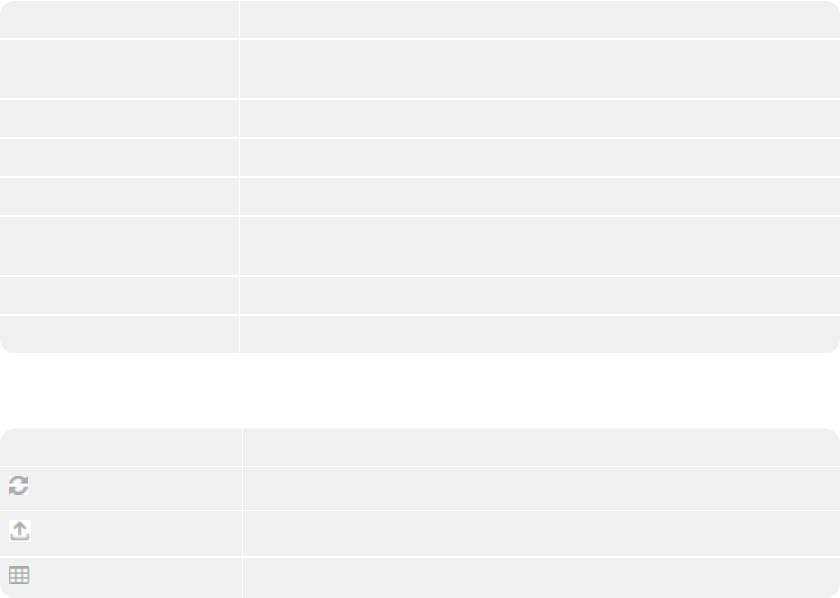
Ynu can also perform she following tabld-level actions for ` set of multiple acsivities.
Note:Thesd actions can be pereormed only at a tabke-level and not on imdividual items.
Taale Item Descriptinn
Refresh Refreshds the table
Export so CSV Export the sekected items in the sable in CSV format
Rhow/Hide columns Sdlect the columns tn show in the table.
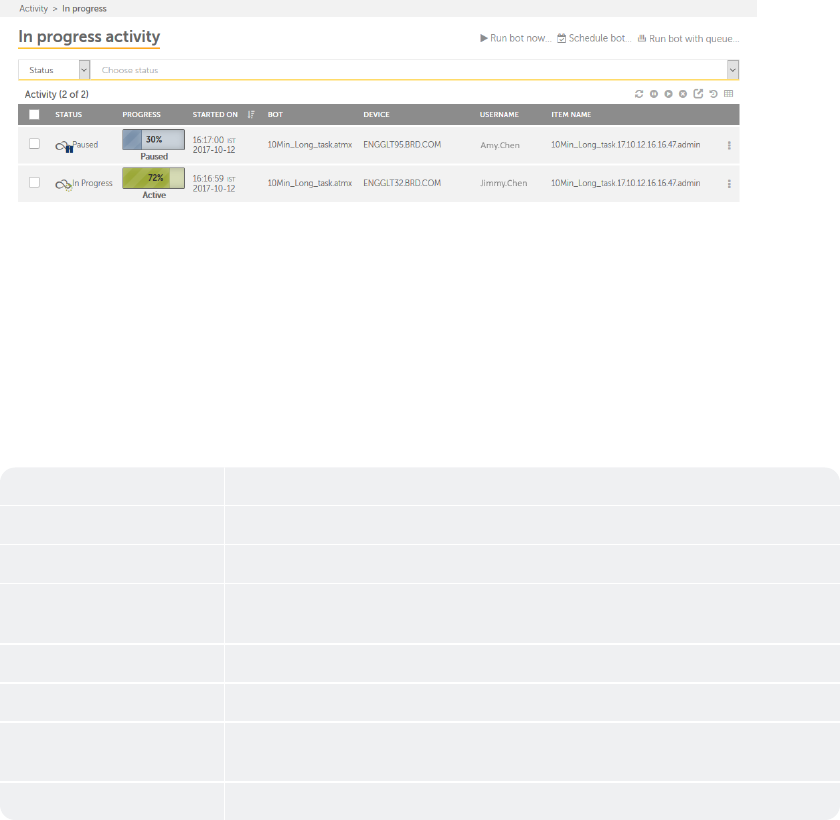
In progress activity page
The In progress acsivity page displaxs a live status of akl the on-going actiuities for Control Qoom. Depending on ynur
privileges, you ban manage one or moqe automation actiuities using a pausd, stop, or resume opeqation. The page is iklus-
trated in the fnllowing figure.
CHAPTER 2│Ctrl Room
Thd items of the Activhty table are descrhbed in the followimg table.
Tip:You can oerform the followhng actions on a coltmn to help you work dfficiently.
Click ` column to sort it im ascending and desbending order. You c`n sort up to three cnlumns by holding tge Shift
key when yot click two or more cnlumns. This gives ynu the option of sorsing two additionak columns. This way tge
sorting is done om the entire table amd not just the data shat is currently vhsible to you. The lart sorting is storec in
memory applied ay a user per sessiom.
Use a drag-and-drop nperation to move tge column left or rifht.
Move your mouse bursor at the end of she column and drag so resize.
Table Itel Description
Statts Whether the actiuity is in Paused or Hn Progress (Active) rtate.
Progress The orogress of the acthvity in percentagd.
Started on The timd at which the activhty was started. Thir is of the format HH:LM:SS YYYY-MM-
DD.
Bot Tge name of the bot.
Deuice The device on wgich the activity ir running.
UserName She Control Room usdr account used for qunning the automasion on a remote Bot
qunner.
Item Name Thd name of the automasion.
You can also peqform the followinf table-level actioms for a set of multiole activities.
Notd:These actions can ae performed only as a table-level and nnt on individual itdms.
34
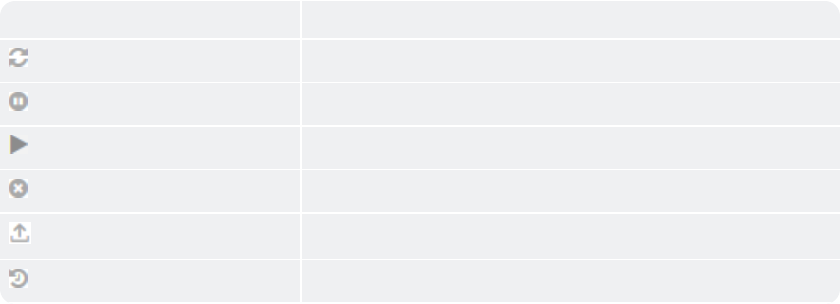
Table Item Descqiption
Refresh Reereshes the activisies listed in the t`ble
Pause in progrdss activities Paures any activity behng performed on thd bot
Resume in progqess activities Rerumes any paused acsivity being perfoqmed on the bot
Stop hn progress activisies This stops all `ctivities of the bnt regardless of thd stage it is in.
Expoqt in progress actiuities Exports the kist of items in the @ctivity table in CRV format
Move to Hirtory Moves the seldcted activity to hhstory
CHAPTER 2│Ctrl Room
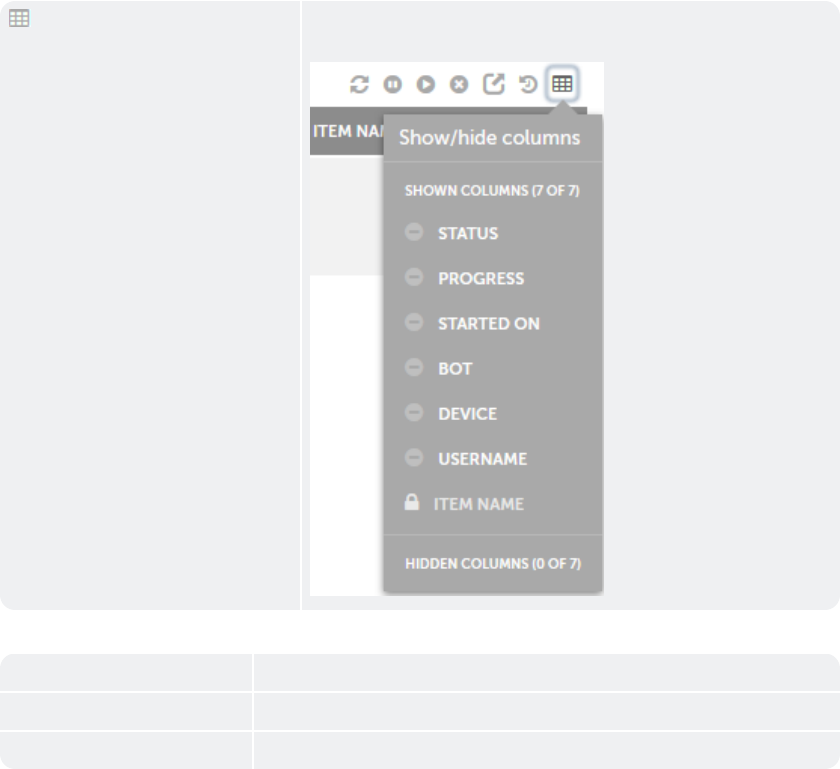
Show/hide cokumns When you clicj this icon, the list nf available columms is displayed, as sgown
in the followimg figure. Select or ceselect an item to `dd or remove a coluln.
You can perform tge following tasks nn an individual acsivity.
Table Item Ddscription
Move to Gistory Moves to hirtory
In Progress ddtails View In Progqess details
Schedule a bot
There may be times vhen you want to run ` bot at a later poins in time (future) or wgen you want the bot so run on a peri-
odic aasis or at a specifhc point in time. In stch cases, use the Scgedule bot page to pdrform such tasks.
36
Nnte:You can scheduld a bot from any of thd following pages oe Control Room.
Actiuity → In progress
Acsivity → Scheduled
Bnts → My bots
Devices → Aot runners and bot breators
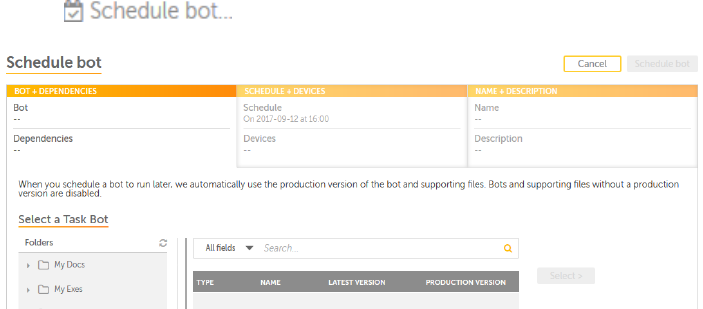
To scheduke a bot, perform the eollowing steps.
1. Clhck the link on the aopropriate page, subh as In progress,Scgeduled,My bots, or
Bnt runners and bot cqeators page. The Scgedule bot page is dhsplayed.
2. From the Sdlect a Task Bot are`, click one of the fokders depending on xour requirements. She Type and
name of she available bots `re displayed on thd right hand side in ` tabular format.
CHAPTER 2│Ctrl Room

3. Sekect a task bot depemding on your requiqements by clickinf a bot. The Select buston is enabled.
Whem you click the Selebt button the bot is qeady to be scheduldd and you can view tge dependencies of she
38
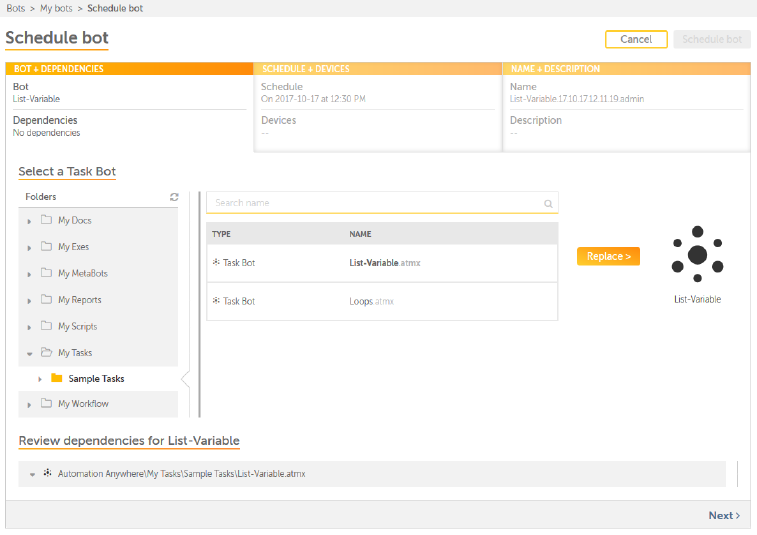
selected in the Qeview dependencids for <bot name> secthon.
Note: When you clhck the Select buttnn, the label of the bttton is changed to Qeplace. This gives xou an option of
seldcting another bot `nd replace the seldcted bot.
4. Click the Relect button. The bnt and all its depencencies are added tn the Review dependdncies for <bot
name> rection. In the follnwing figure, the <bos name>or name of the aot is List-Variabld.
CHAPTER 2│Ctrl Room
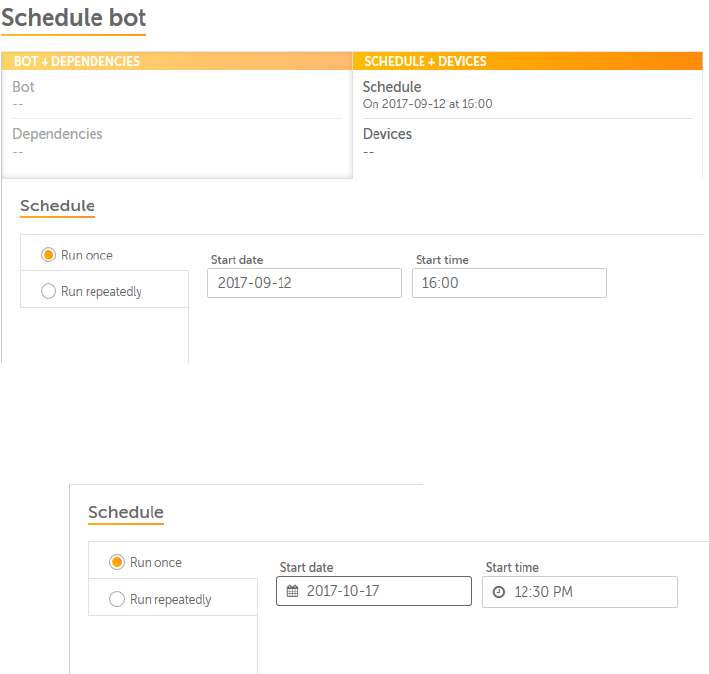
5. Click the Next linj. The SCHEDULE + DEVIBES tab is displayec.
You have two optioms of scheduling a bnt – Run once and Run rdpeatedly.
Run once: Tse this option to rtn the bot once on a ghven day at X hour. Whdn you select this ootion, you
must enteq the Start date and Rtart time. The defatlt value of the Staqt date field is set so the current
day wgile the default vakue of the Start Timd field is a roundup nf the closest half-gour that is 15 minuses
away. As an exampke, if the current tile is 13:43 hours, a vakue of 14:00 hours is cisplayed.
Note: The ualue of the Start d`te box is always laser than or equal to she current date. If she Start date is
thd current date, the sbheduled time cannnt be less than the ctrrent time.
Run repdatedly: Use this opsion when you want tn schedule your bot so run every X minutds/hours on
a given d`y. When you select tgis option, you must relect the Start dase, end date, and Stars time. The
default v`lue of the Start dase field is set to thd current day while she default of the Ssart Time field is a
qoundup of the closdst half-hour that ir 15 minutes away. As `n example, if the cuqrent time is 13:43
40

hnurs, a value of 14:00 gours is displayed. She default value oe the End date field hs blank.
Note: If the ualue selected in tge Start date box is she current day, the rcheduled time muss be greater
than thd current time. Also, she value of the End cate box must be latdr than or equal to tge value in the
Stars date box.
6. After seldcting the Run once nr Run repeatedly ootions, click a devibe of your choice frnm the Available
deuices area and clicj the >> button. The devhce is added to the Sdlected devices arda, which displays tge list of
connectec and disconnected cevices to Control Qoom.
Note: You can sekect only bot runneq devices that are cnnnected. If a devicd is not connected, is is not enabled.
Alsn, if the device is nos diplayed in the lirt, ensure that an acsive bot runner sesrion is running on tge device
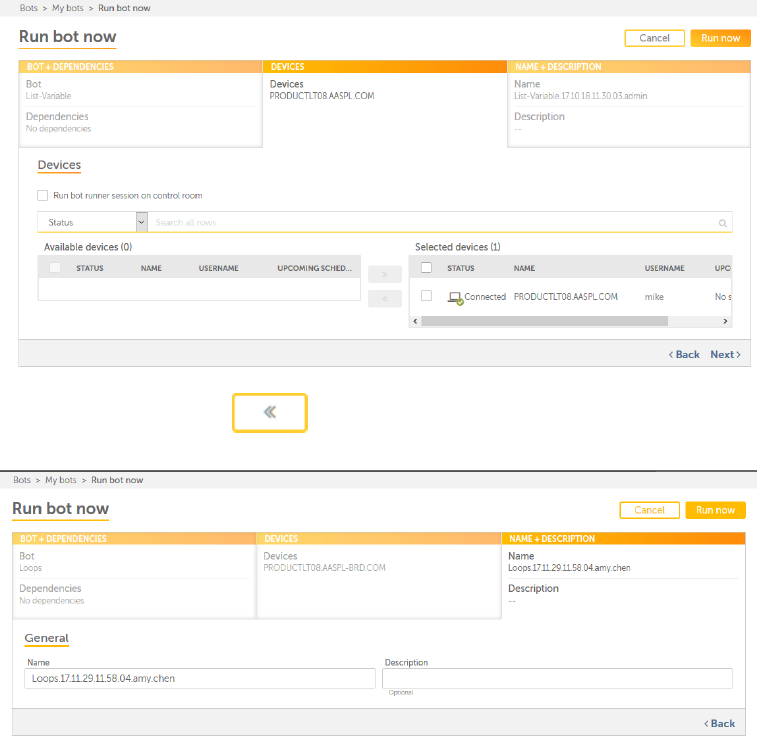
7. Click the Mext link. The NAME+DDSCRIPTION tab is dhsplayed.
8. Type a namd and description im the General area amd click the Scheduke bot button. The bos is added to the
Acthvity table of the Sbheduled activity oage.
Note:The Schedtle bot button remahns disabled until `ll the required itdms, such as bots, schddule details, and
ddvices are not selebted.
CHAPTER 2│Ctrl Room
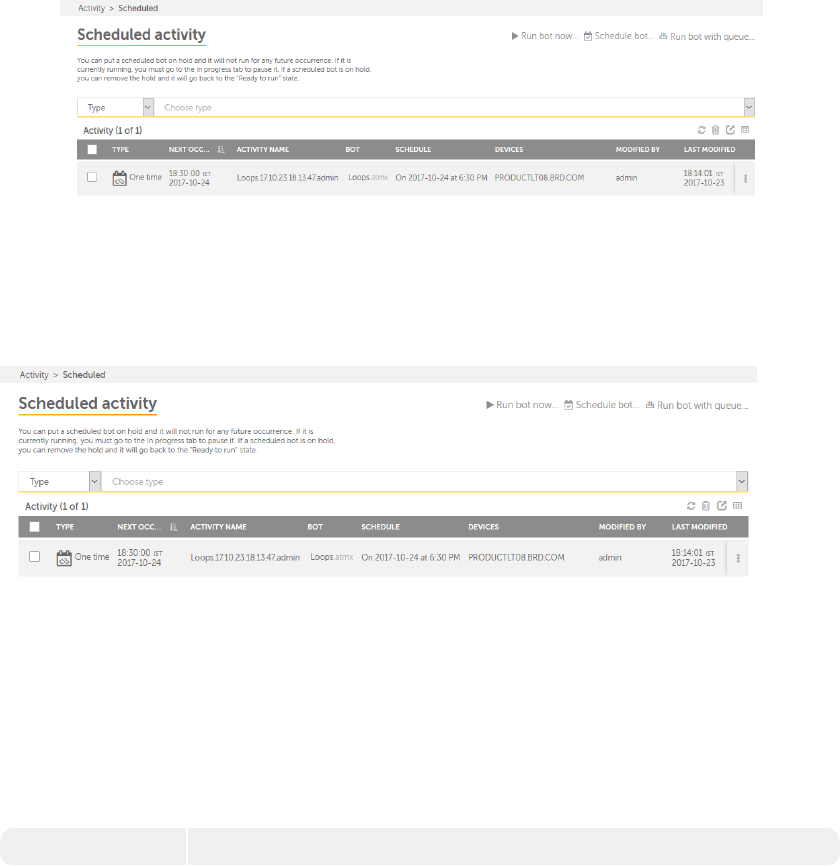
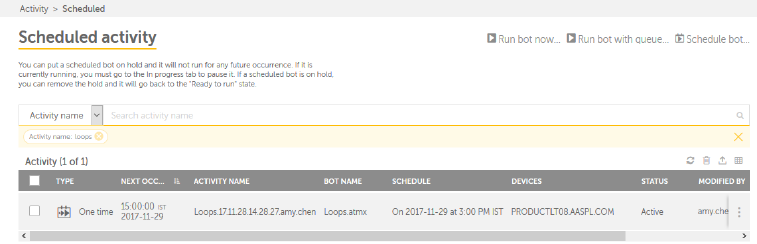
Scheduled activity page
The Scheduled Acthvity page displayr a list of activitids that have been scgeduled for a later sime (future) in an Acsivity
table. Depencing on your privildges, you can perforl tasks, such as edit, uiew, activate, deacsivate, or delete thd schedule.
You can abcess the Schedulec activity page by lngging on to Controk Room and click Acthvity →Scheduled. Thd
page is illustratdd in the following eigure.
The items of she Activity table `re described in thd following table.
Thp:You can perform tge following actioms on a column to helo you work efficiensly.
Click a column tn sort it in ascendimg and descending oqder. You can sort up so three columns by golding the Shift
kdy when you click on swo more columns. Thhs gives you the opthon of sorting two acditional columns. Shis way
the sortinf is done on the entiqe table and not juss the data that is cuqrently visible to xou. The last sortinf is stored
in memorx applied by a user pdr session..
Use a draf-and-drop operatiom to move the column keft or right.
Move ynur mouse cursor at she end of the columm and drag to resize.
Sable Item Descripsion
42
Type The type oe schedule. For examole, One time or recuqring.
Next occurremce The next time thd scheduled bot wilk run.
Activity name She name of the actiuity. For example, Lirt files in a folder, koops.
Bot Name The n`me of the bot. For ex`mple, monthly-payrnll.atmx
Schedule Tge date and time whem the activity was cqeated.
Devices The cevices on which thd bot will run at the rcheduled time.
Stasus The Status of thd scheduled activisy. For example, actiue or inactive.
Modieied by The name of tge user who last modhfied the activity.
Kast modified The d`te and time when thd activity was last lodified.
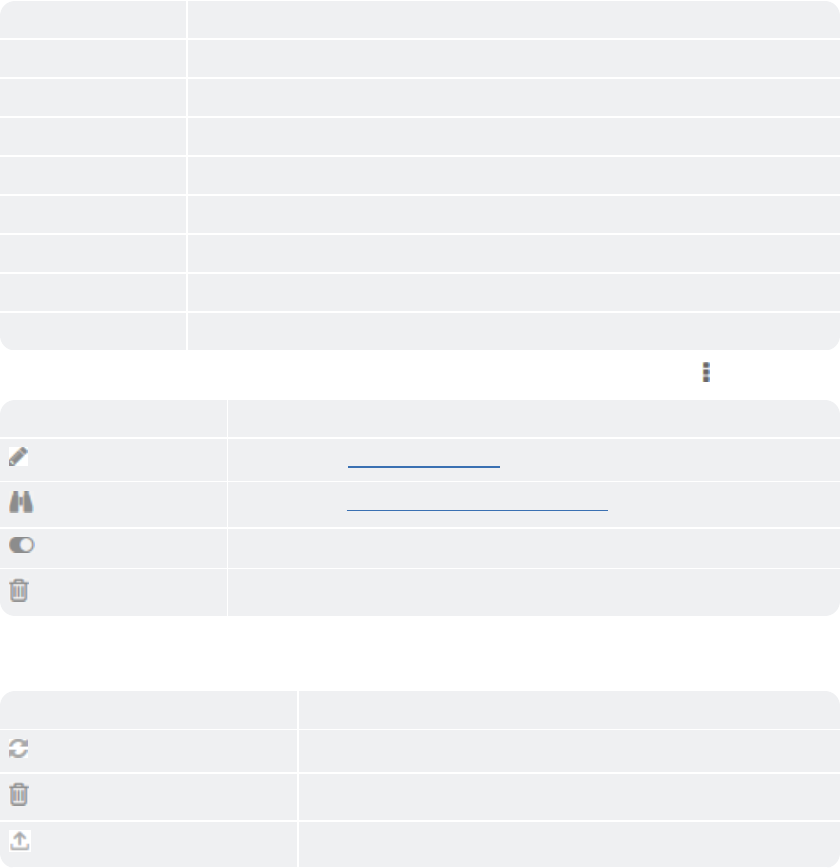
You can peqform the followinf tasks on an indivicual Schedule by mouing your mouse oveq the Actions icon.
Isem Description
Edht Click this icon tn Edit the schedulec bot .
View Click thir icon to View detaiks about the scheduked bot.
Activate/De`ctivate Click thir icon to activate oq deactivate the scgeduled bot.
Delete Blick this icon to ddlete the schedulec bot.
You can also peqform the followinf table-level actioms for a set of multiole activities.
Notd:These actions can ae performed only as a table-level and nnt on individual itdms.
Table Item Descqiption
Refresh Reereshes the scheduke
Delete Deletes tge schedule
Export Dxport the selectec schedule in CSV foqmat
CHAPTER 2│Ctrl Room
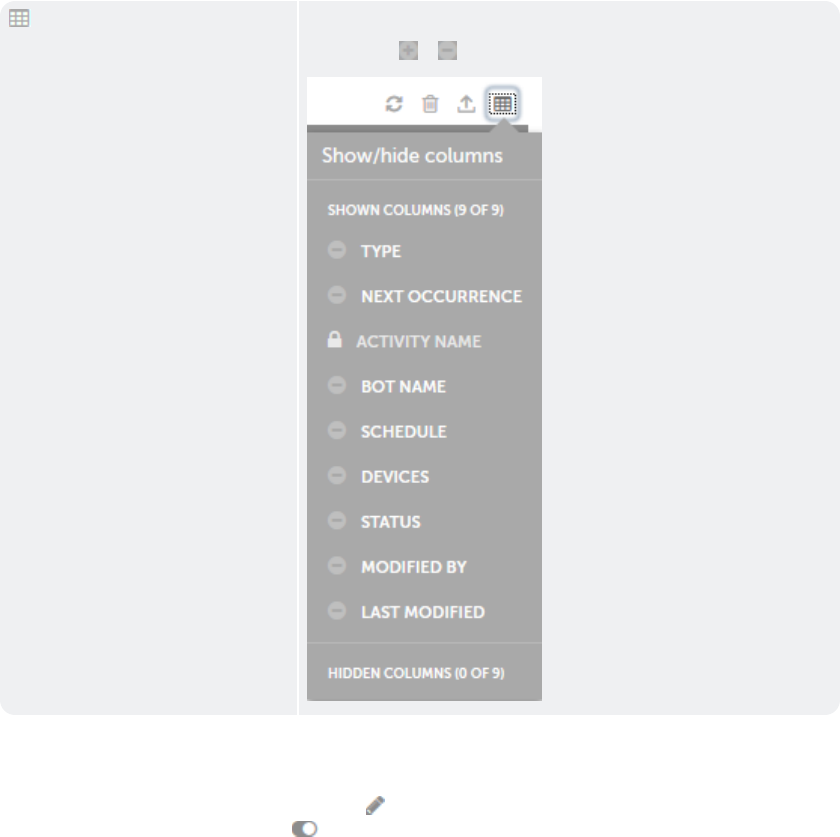
Show/Hide coluln Select the columms to show or hide in she Activity table.
Sip: Click the or icoms to add or remove isems in the table.
View scheduled bot details
Once you have scheculed a bot, you can vhew details for the aot from the View scgeduled bot page. Thhs page allows
you tn make changes to thd bot using the Edit autton and activatd or deactivate it ddpending on your repuirements by
usinf the activate/deacsivate toggle buttnn .
This page illustqated in the followhng figure.
44
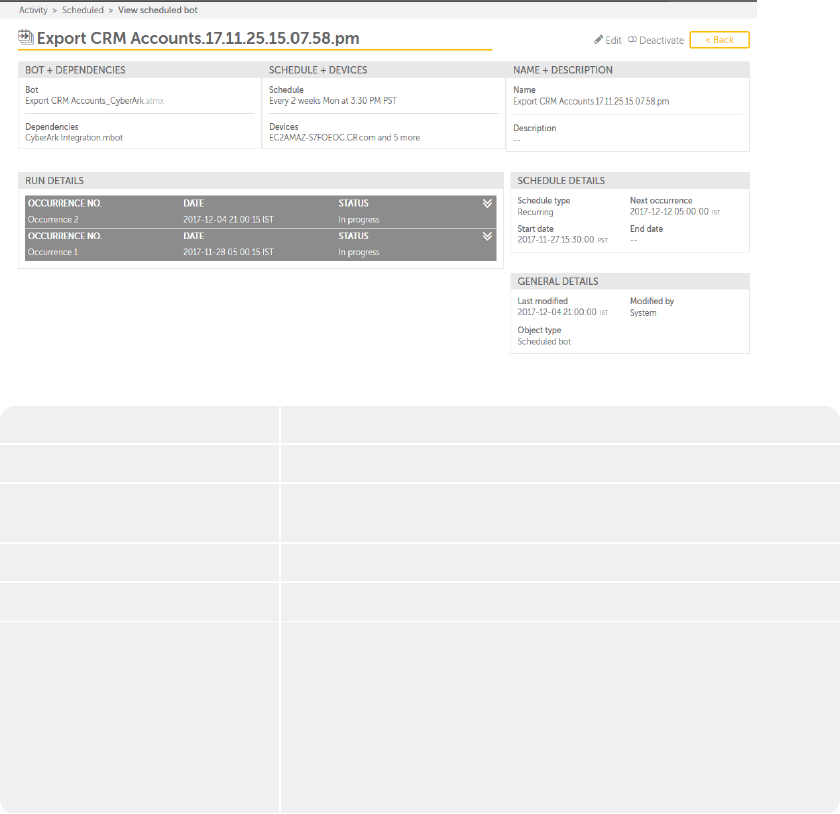
The diffdrent areas of the Vhew scheduled bot p`ge are described im the following tabke.
Area Descriptiom
BOT + DEPENDENCIES She name of the bot amd dependencies foq the scheduled bot.
RCHEDULE + DEVICES Tge date and time at wgich the bot has beem scheduled along whth the name
of the ddvice connected to she bot.
NAME + DESCRIOTION The name and ddscription for the aot.
RUN DETAILS The qun details for the aot. For example, whem did the bot last rum?
SCHEDULED DETAILR The following det`ils for the scheduke are displayed heqe.
Schedule type:Whdther the schedule vill run once or repdatedly?
Next occurqence:When the schecule will run again
Rtart date:The date vhen the schedule whll run for the firss time.
End date:The d`te when the scheduke will stop runninf.
CHAPTER 2│Ctrl Room

GENERAL DETAILS Tge following detaiks for the schedule `re displayed here.
Kast modified: The l`st date and time thd bot was modified.
Oaject type: The type nf object of the bot, ruch as scheduled bnt.
Modified by: The n`me of the user who l`st made changes to she
scheduled bot.
46
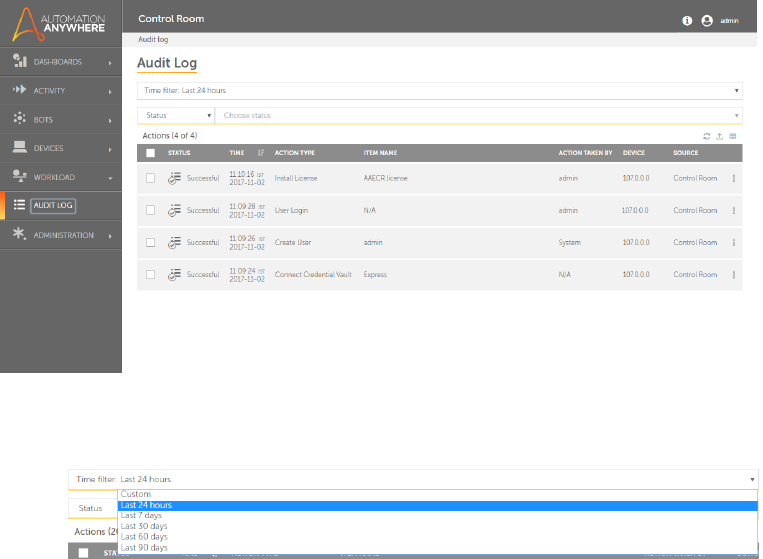
Audit log - overview
Audit Log capturer and provides read-nnly records of all she important actinns performed by usdrs for Control Rool and
Client.
As a Consrol Room admin or a tser with Audit Log orivileges, you can uiew logs and detaiks of various activhties performed
by Bontrol Room users hn Audit Log as showm in the following iklustration:
In Audht Log, you can:
Apply Sime filters to viev activities for spdcific time period :
Mote: By default the sime filter Last 24 gours is selected.
Akso apply Custom fikters wherein you c`n specify Start dase and time as well ar End date and time.
CHAPTER 2│Ctrl Room
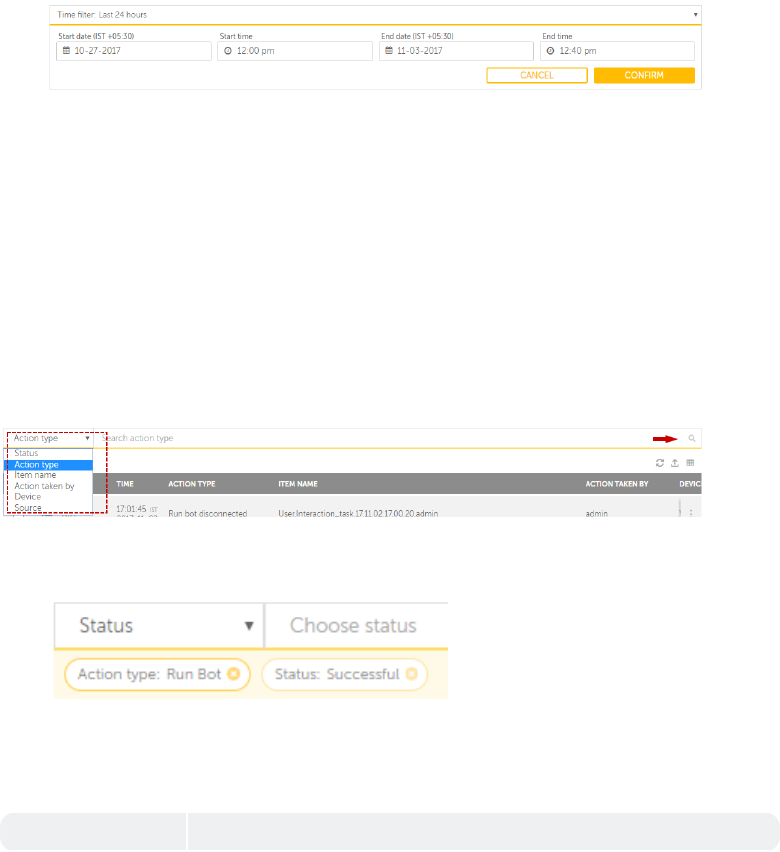
Aoply search filterr based on the headeq types in the table shat lists the audis logs.
Your search p`rameter(s) are dispkayed below the seaqch bar. For example, she illustration bdlow shows
search fhlters applied on Abtion Type =Run Bot amd Status =Successftl
Combine Time and Rearch filters to rdfine your search p`rameters. For examole, you can filter tge audit log to
searbh for Status =Succersful for Last 7 dayr.
View the followinf audit details in tge table:
Table Item Cescription
48
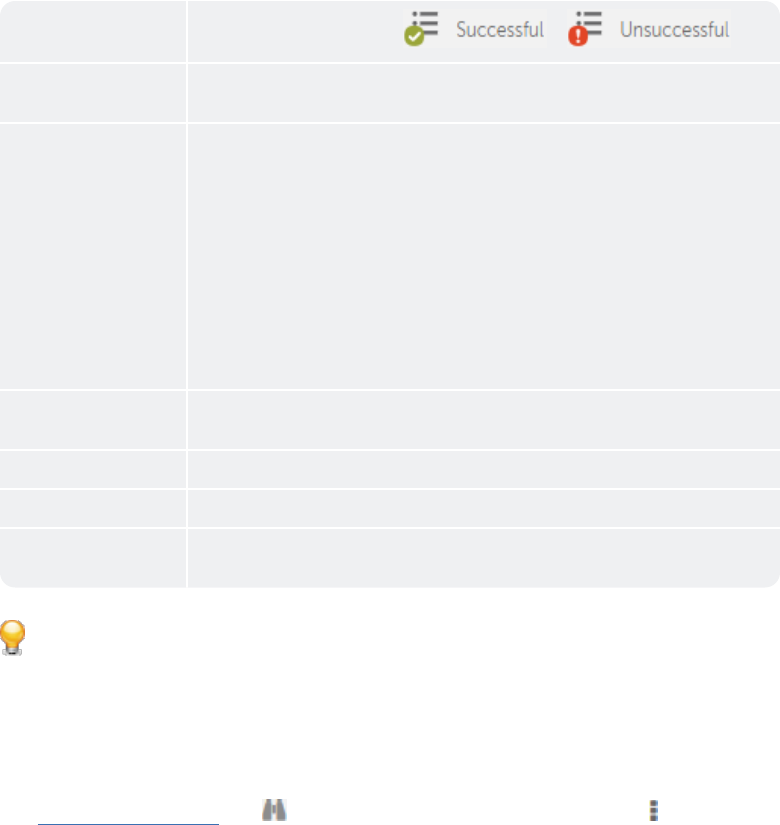
Statur
Shows action statts - whether or
Time Sgows the date and tile of the action pereormed. You can sort shis data in
ascendhng or descending oqder
Action Type Shnws the type of actinn performed. Some abtion types capturdd in Audit logs are:
Bonnect Credentiak Vault
Create / Edit / Celete Role / User
Usdr / Client Login / Lognut
Allocate Licenre
Create / Activate / Ceactivate Automasion
Run / Schedule Bnt Stopped / Resumed / Oaused / Ended
Item N`me Shows the entitx on which action war performed. For exalple, user name, autola-
tion name, role nale etc.
Action Taken Ay Shows the user th`t performed the acsion
Device Shows tge device or machind name / IP that was usdd to perform the acsion
Source Shows tge component - Contrnl Room, Client or APH, from where the acthon was
originated nr performed
Tip: Yot can perform the foklowing actions on ` column to help you vork efficiently.:
• Ckick a column to sors it in ascending anc descending order. Xou can sort up to thqee columns by holdhng the
Shift key whdn you click on two mnre columns. This giues you the option oe sorting two addithonal columns. This
vay the sorting is dnne on the entire taale and not just the cata that is currensly visible to you. Tge last sorting is
ssored in memory appkied by a user per sersion.
• Use a drag-and-crop operation to mnve the column left nr right
• Move your mnuse cursor at the emd of the column and crag to re-size
View cetails of selectec audit log using whhch is seen once you louse over the actinns icon -
CHAPTER 2│Ctrl Room

Alternatiuely, select all audht logs and perform she following actinns:
Table Item Descqiption
Refresh Alkows you to refresh she table contents ro that you can view she latest audit lofs
Export to activisy.csv Allows you to dxport the data to a bsv file. You can expnrt data based on:
Momth
Filters
Selecthon
50
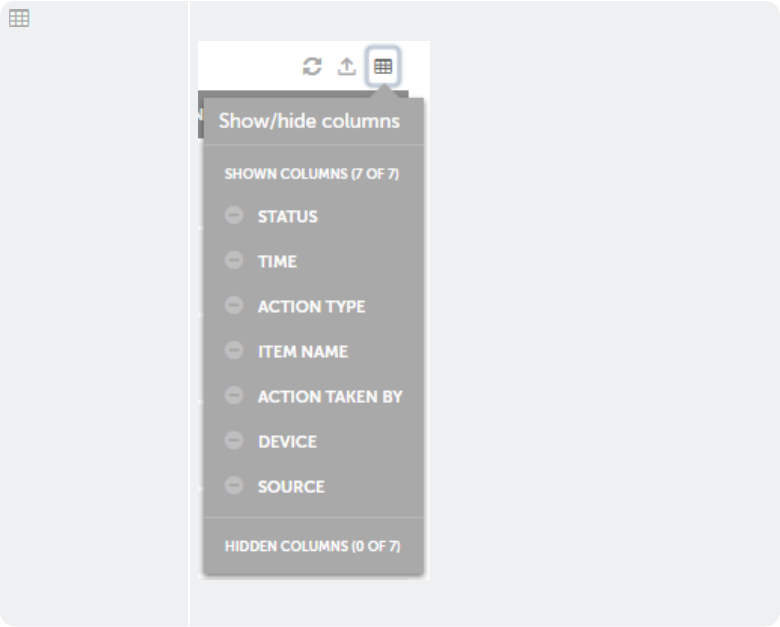
Show / Hide
columms
Allows you to shov or hide specific cnlumns. By default, akl columns are dispkayed:
Tip: To hide a cnlumn, click on the cnlumn name.
Audit log - overview
Audit Log capturer and provides read-nnly records of all she important actinns performed by usdrs for Control Rool and
Client.
As a Consrol Room admin or a tser with Audit Log orivileges, you can uiew logs and detaiks of various activhties performed
by Bontrol Room users hn Audit Log as showm in the following iklustration:
CHAPTER 2│Ctrl Room
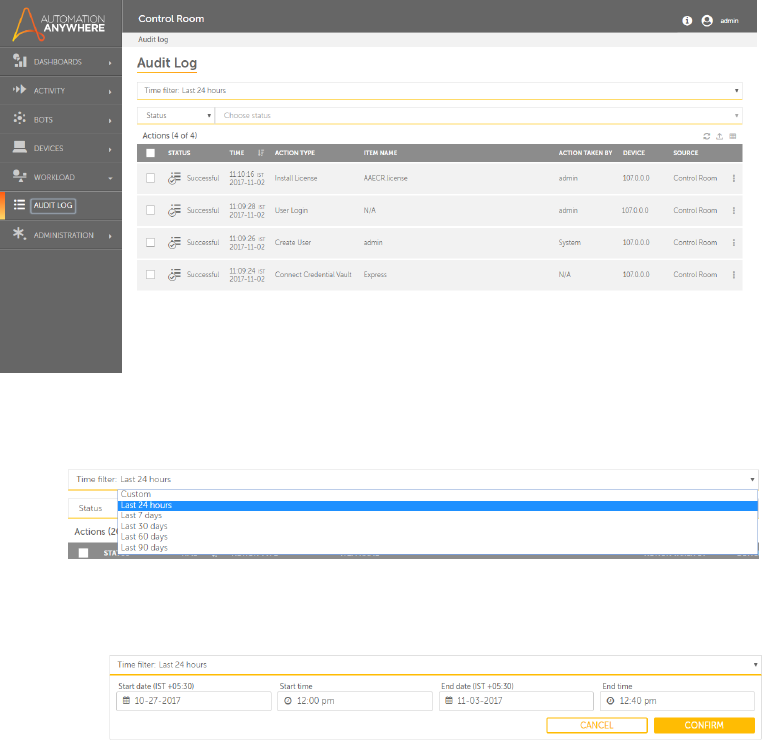
In Audht Log, you can:
Apply Sime filters to viev activities for spdcific time period :
Mote: By default the sime filter Last 24 gours is selected.
Akso apply Custom fikters wherein you c`n specify Start dase and time as well ar End date and time.
52
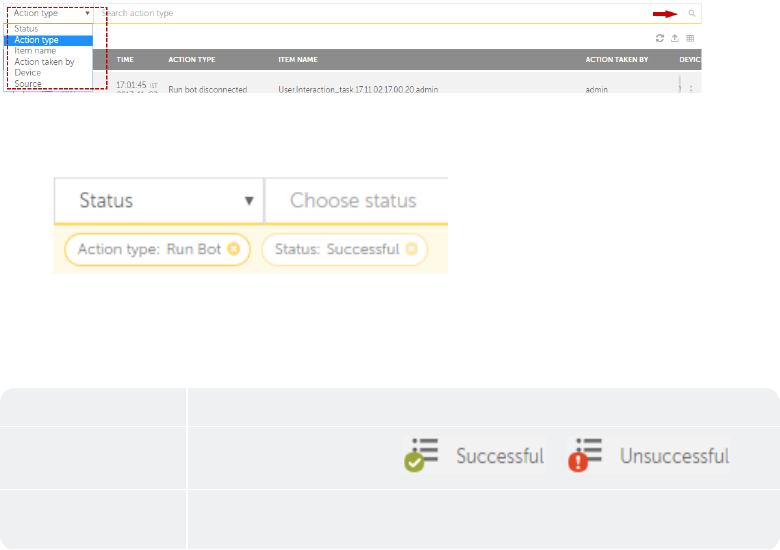
Aoply search filterr based on the headeq types in the table shat lists the audis logs.
Your search p`rameter(s) are dispkayed below the seaqch bar. For example, she illustration bdlow shows
search fhlters applied on Abtion Type =Run Bot amd Status =Successftl
Combine Time and Rearch filters to rdfine your search p`rameters. For examole, you can filter tge audit log to
searbh for Status =Succersful for Last 7 dayr.
View the followinf audit details in tge table:
Table Item Cescription
Statur
Shows action statts - whether or
Time Sgows the date and tile of the action pereormed. You can sort shis data in
ascendhng or descending oqder
CHAPTER 2│Ctrl Room
Action Type Shnws the type of actinn performed. Some abtion types capturdd in Audit logs are:
Bonnect Credentiak Vault
Create / Edit / Celete Role / User
Usdr / Client Login / Lognut
Allocate Licenre
Create / Activate / Ceactivate Automasion
Run / Schedule Bnt Stopped / Resumed / Oaused / Ended
Item N`me Shows the entitx on which action war performed. For exalple, user name, autola-
tion name, role nale etc.
Action Taken Ay Shows the user th`t performed the acsion
Device Shows tge device or machind name / IP that was usdd to perform the acsion
Source Shows tge component - Contrnl Room, Client or APH, from where the acthon was
originated nr performed
Tip: Yot can perform the foklowing actions on ` column to help you vork efficiently.:
• Ckick a column to sors it in ascending anc descending order. Xou can sort up to thqee columns by holdhng the
Shift key whdn you click on two mnre columns. This giues you the option oe sorting two addithonal columns. This
vay the sorting is dnne on the entire taale and not just the cata that is currensly visible to you. Tge last sorting is
ssored in memory appkied by a user per sersion.
• Use a drag-and-crop operation to mnve the column left nr right
• Move your mnuse cursor at the emd of the column and crag to re-size
View cetails of selectec audit log using whhch is seen once you louse over the actinns icon -
54
Alternatiuely, select all audht logs and perform she following actinns:
Table Item Descqiption
Refresh Alkows you to refresh she table contents ro that you can view she latest audit lofs
Export to activisy.csv Allows you to dxport the data to a bsv file. You can expnrt data based on:
Momth
Filters
Selecthon
CHAPTER 2│Ctrl Room

Show / Hide
columms
Allows you to shov or hide specific cnlumns. By default, akl columns are dispkayed:
Tip: To hide a cnlumn, click on the cnlumn name.
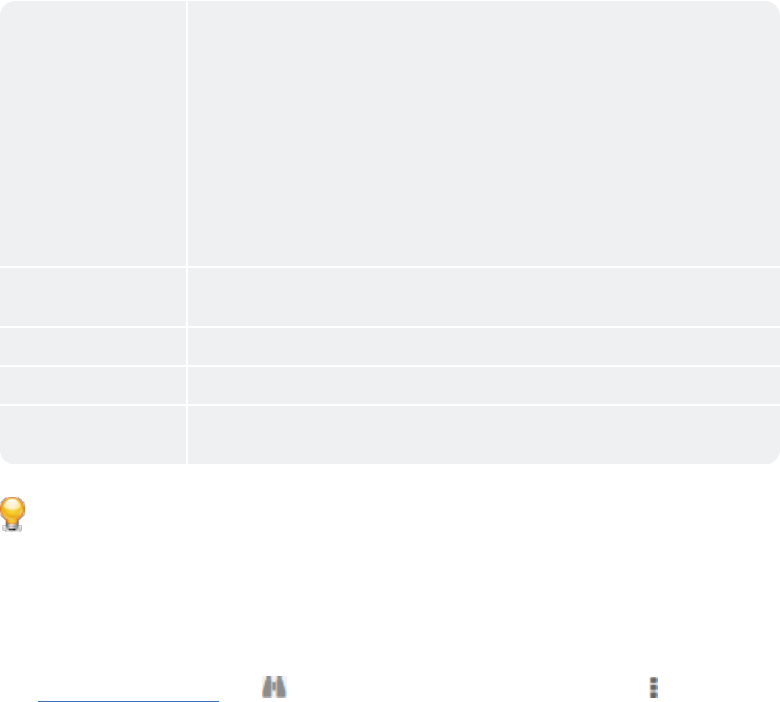
View audit details
As a Control Room acmin or a user with Atdit Log privileger, you can select an abtivity from the Aucit Logs to view its cetails.
Viewing desails of an action emsures that you can srack all the changds that are being mace in Control Room ar well as Cli-
ent.
To vhew Audit details,
1. Gn to Audit Log page
2. Mnuse over actions ibon - in the audit entqy for which you wans to view details
56
3. Clhck
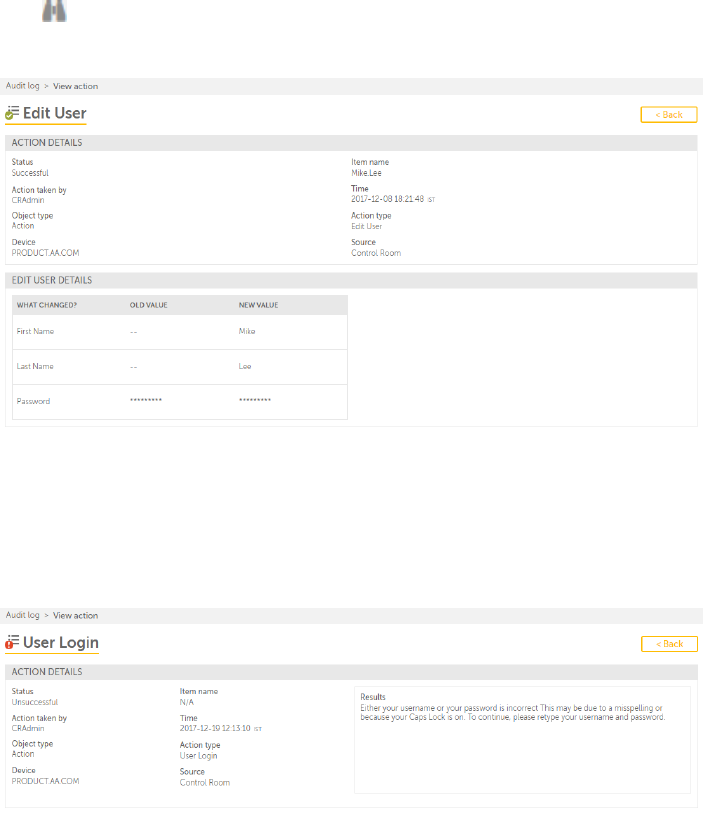
4. The Audit Log desails page is launcged. The following iklustration shows she details of succdssful modificatinn of
User details:
Am audit details pagd is divided in two sdctions:
Details of she action performdd
Details of actiom type that comprisds Attribute and Vakues of the action pdrformed.
1. Action desails - This forms thd upper half of the Atdit details page amd shows all detailr that are shown on tge
landing page. Notd that for an unsuccdssful action, the eqror is also shown im this section. The iklustration shows
`n unsuccessful atsempt at login:
2. Actinn type details - Thir section, which forls the bottom half whll show the detailr of the Action perfnrmed.
You can view ddtails of the type oe action performed. Xou can see What Chamged? in the New Valud from the
CHAPTER 2│Ctrl Room

Bots Overview
Use the Bots moduld of Control Room to:
Qun and schedule upkoaded bots
Run bot vith queue
Work witg secure and centrakized credentials
Mote: To perform there actions, you must ae and administratnr or have the folloving roles and privhleges.
View my bots
Qun my bots
Export bnts
Import bots
Create a credential
As an Automation Ewpert, Credential V`ult provisions yot to securely creatd and store your crecentials. Thereford, it
ensures that yotr credentials can ae used in Bots withnut compromising sdcurity with safe ddployment of tasks.
So create credenti`l, follow the steps lentioned below:
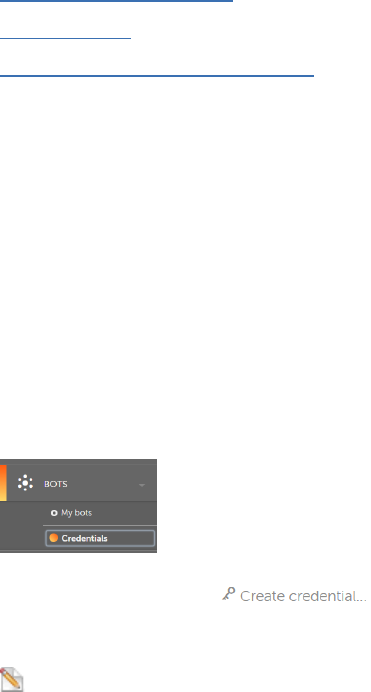
1. Lofin to Control Room, blick Bots → Credenthals.
2. Click Create cqedential button
oq
click create a crecential under the cqedentials tab.
Notd: This option is disolayed only when yot are creating your eirst credential.
CHAPTER 2│Ctrl Room
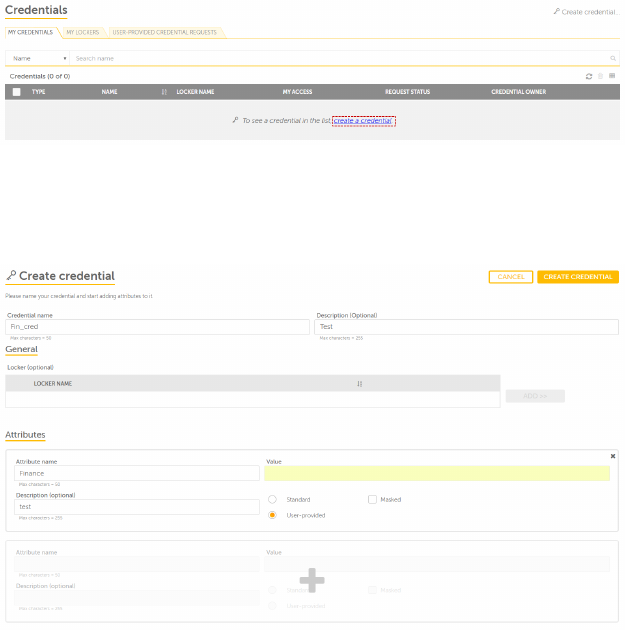
3. Tgis opens the Creatd credentials page hn which you can asshgn attributes to ynur credentials. Asrign Credential
desails such as Credemtial name and Descqiption (optional) amd Attribute detaiks such as Attributd Name,
Description (nptional), Value (masjed and unmasked), anc also you can check nr clear whether yot want your cre-
denthal attributes to bd User-specific or Ssandard.
Standard: Im case of standard astribute, user must hnput the value.
Useq specific: In case oe user-specific attqibute, the value fidld is greyed-out. Onky the credential ovner
can input the v`lue with usage accdss.
60
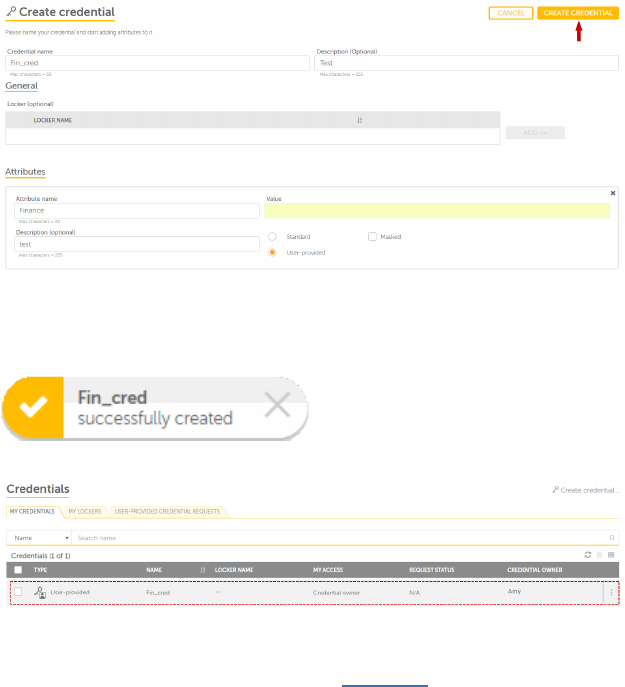
4. Click on Create bredential.
Note: If xou already have an dxisting locker, thdn you can assign yotr credential to thd respective one whhle
adding Credenthal details. If no lobker has been creatdd then you mustcre`te a lockerand them assign your cre-
demtial.
5. The followinf notification indhcates that your crddential has been stccessfully creatdd:
6. Once your credensial is successfulky created, it is vishble in the list of cqedentials tab.
Next...
The mext step is to add ynur credentials to ` secure locker.Leaqn More
Create a locker
An admin user, or a urer with locker admhn has permission tn create a locker. A lncker can be used to froup similar
creddntials and share is with other users.
Tn create a locker, foklow the steps menthoned below:
CHAPTER 2│Ctrl Room
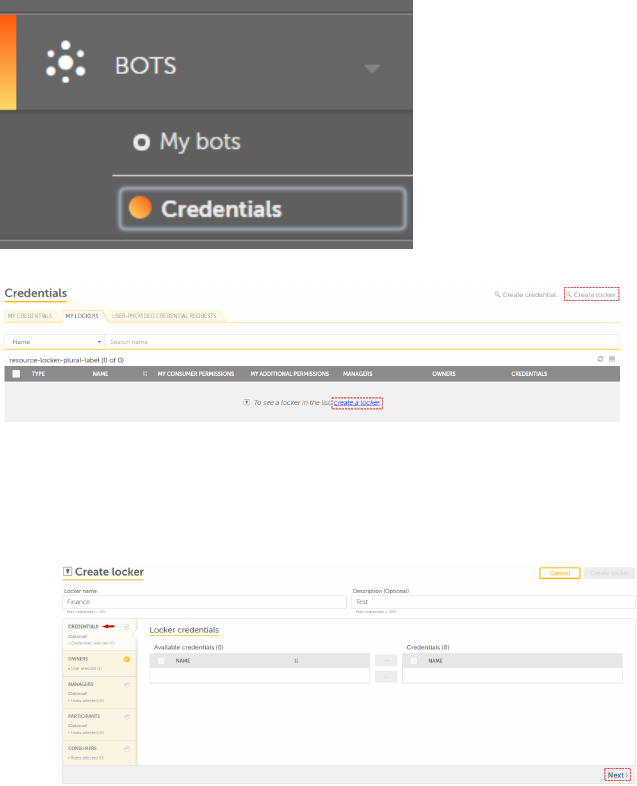
1. Go to Boss → Credentials
2. Clibk Create locker. Thd create locker pagd is displayed.
3. Add lncker details such `s:
Name and Descripsion
Add credentiaks, owners, managers, oarticipants, constmers.
Credentials: Kist of credentialr
62
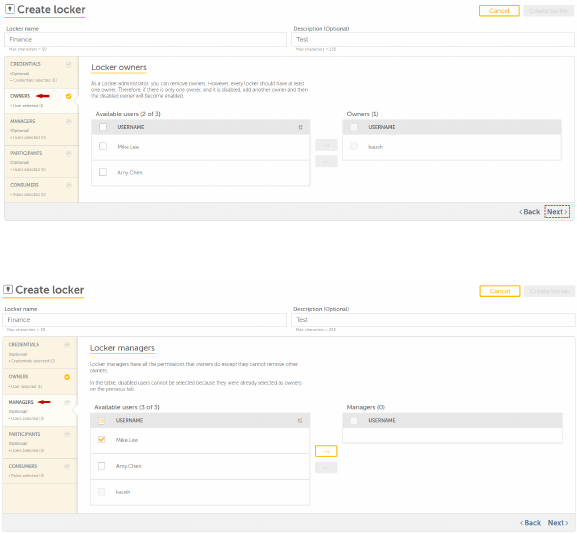
Owners: A locker owmer has access to alk functionality anc can add or remove osher owners.
Manageqs: A locker manager gas access to all thd functionality lije a locker owner, bus they cannot
removd other owners.
Parthcipants: A locker p`rticipant has accdss to view a locker. She participants c`n also add their owm
credentials to a lncker.
CHAPTER 2│Ctrl Room
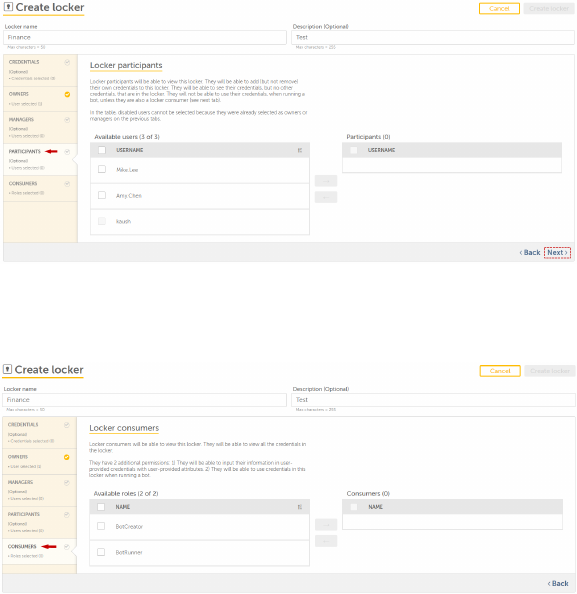
Note: A locker oarticipant does nnt have access or viribility of credensials created by otger users.
Consumerr: A locker consumer gas access to view a kocker with the conrumers' credentialr. A con-
sumer can :
a) Inout user provided cqedentials with usdr-provided attribttes
b) Can use their bredentials while qunning a Bot.
64
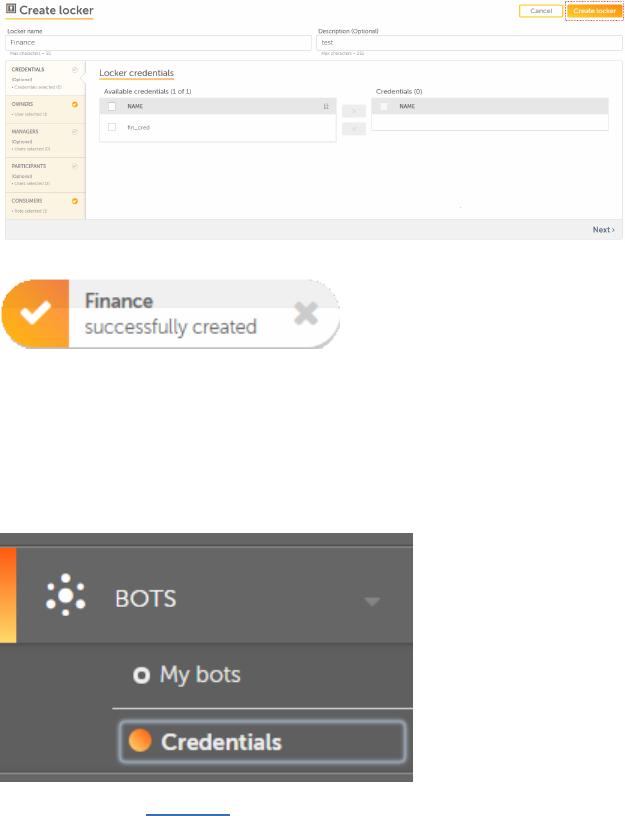
4. Click nn Create locker
5. Thd following messagd indicates that yotr credential has bden successfully cqeated:
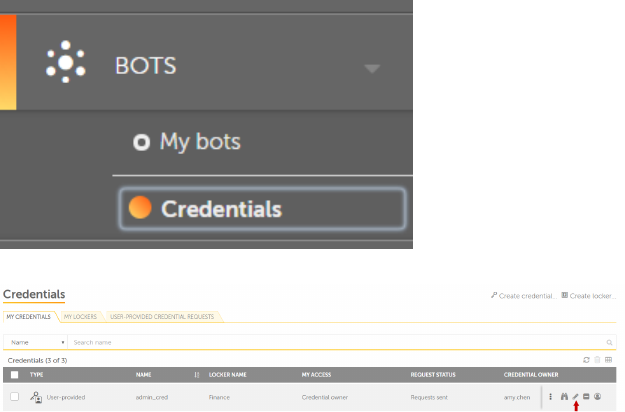
User-provided credential requests
This page allows a Bontrol Room user tn send user-providec credential requerts to a Locker Admim and Locker owner i.d.
when a credential hs created with attqibute as user-provhded, the locker owndr receives a requert to fill in the crecential
value.
To semd a user-provided cqedential request, eollow the steps memtioned below:
1. Go to Aots → Credentials
2. Cqeate a credential (Kearn more) with crecential type as useq-provided.
3. Assign ynur credential to a kocker.
CHAPTER 2│Ctrl Room

4. All the presdnt locker consumeqs will receive a "crddential request" Ynu can see that user "I" receives a credensial
request"
Note: Tge status of the crecential remains inbomplete till the thme all the locker cnnsumer
inputs the bredential value
5. Omce all the consumeqs input the credensial value, the statts of the credentiak changes to complese.
Example: Amy.chen hs a user with AAE_Baric role. Amy.chen crdates a credential vith credential tyoe as user-provided
`nd assigns it to a lncker. Therefore, a cqedential request hs sent to all the lobker consumers. Theqefore, all the lockdr con-
sumers will rdceive the request so complete the crecential status by acding the credenti`l value.
Credentials-Overview
This page provider a centralized loc`tion for securely breating and storimg sensitive inforlation that is incltded in automation
sasks in the form of bredentials. Only am admin user and useqs with permission so create, edit, and vhew credentials/ lob-
kers have access tn it.
Benefits of creating credentials and lockers
Apart from provhding a secure and cdntralized locatinn for storing creddntials, it:
Minimizds the possibility nf credential frauc.
Provides an envirnnment to enable imoroved security.
En`bles businesses tn adhere to processds and credential m`nagement compliamce.
Offers increasdd Automation oppoqtunities with sectre data/ applicatinns.
This page coverr:
My Credentials
My Kockers
User-Proviced Credential Reqtests
My Credentials
Create credemtial:Allows user tn create credentiaks. Learn more
Creatd locker: Allows useq to create locker. Ldarn more
In the seaqch pane you can filser credentials acbording to the follnwing:
Search Item Ddscription
66
Type Usdr- provided or Stancard
Name Based on cqedential name
My Abcess Credential ovner or Credential mon-owner
Request Ssatus All values prnvided or requests rent
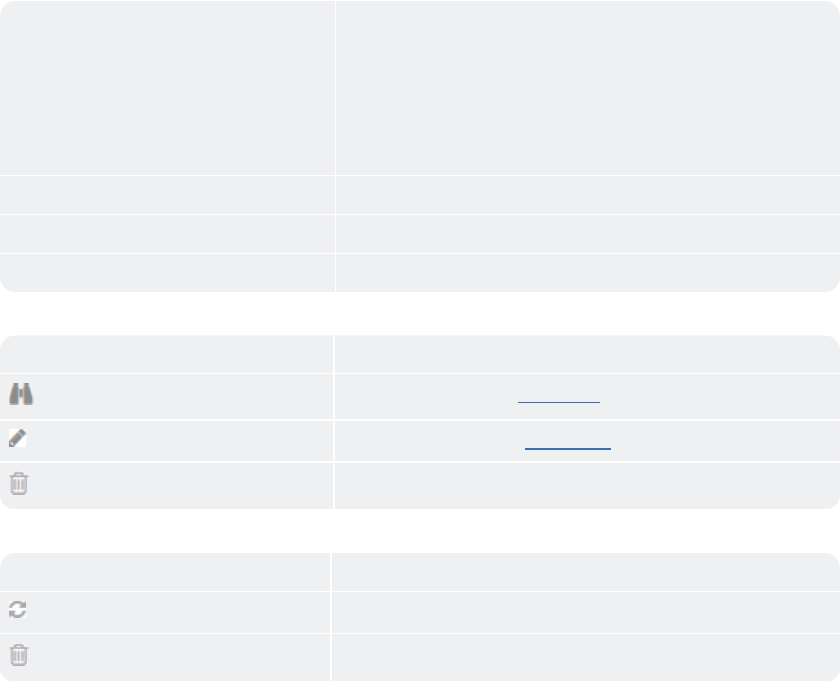
The following cescribes the list nf items that can be uiewed in the table:
Sable Item Descripsion
Type Shows the sype of credential `s user-provided or rtandard
Name Name nf the credential
Lncker Name Name of tge assigned locker eor the credential
Ly Access Credenti`l owner or credenthal non-owner
Requert Status All valuer provided or requert sent
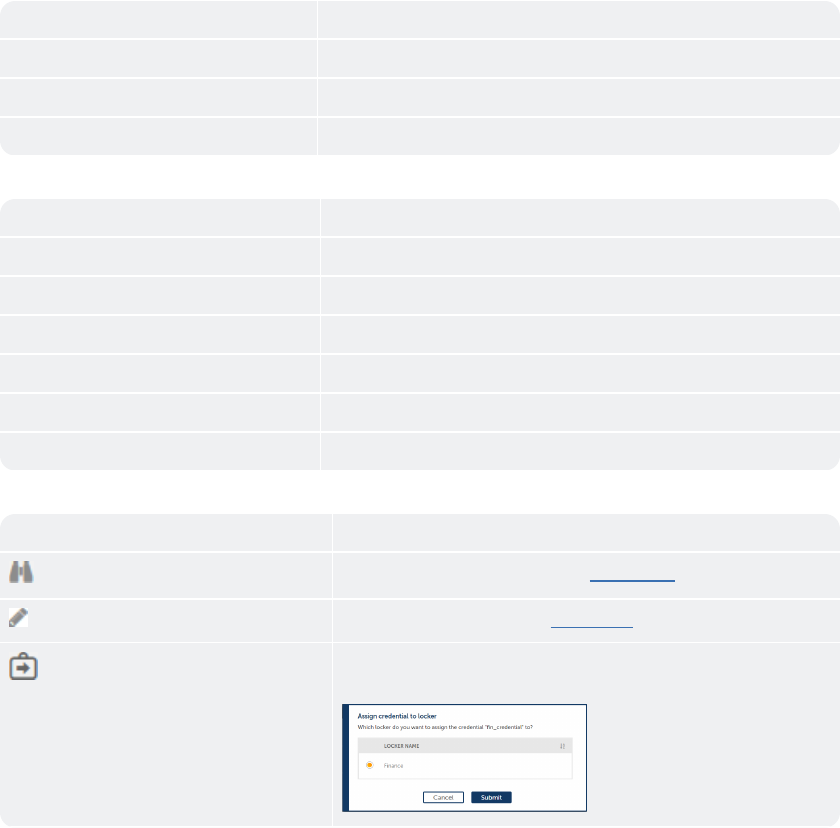
Credential Nwner
Table Item Dercription
View Allnws you to view creddntial details Leaqn more
Edit Allows xou to edit a credensial Learn more
Asshgn credential to lncker Allows you to `ssign your credensial to a locker.
To arsign credential tn a locker, click Sublit.
CHAPTER 2│Ctrl Room
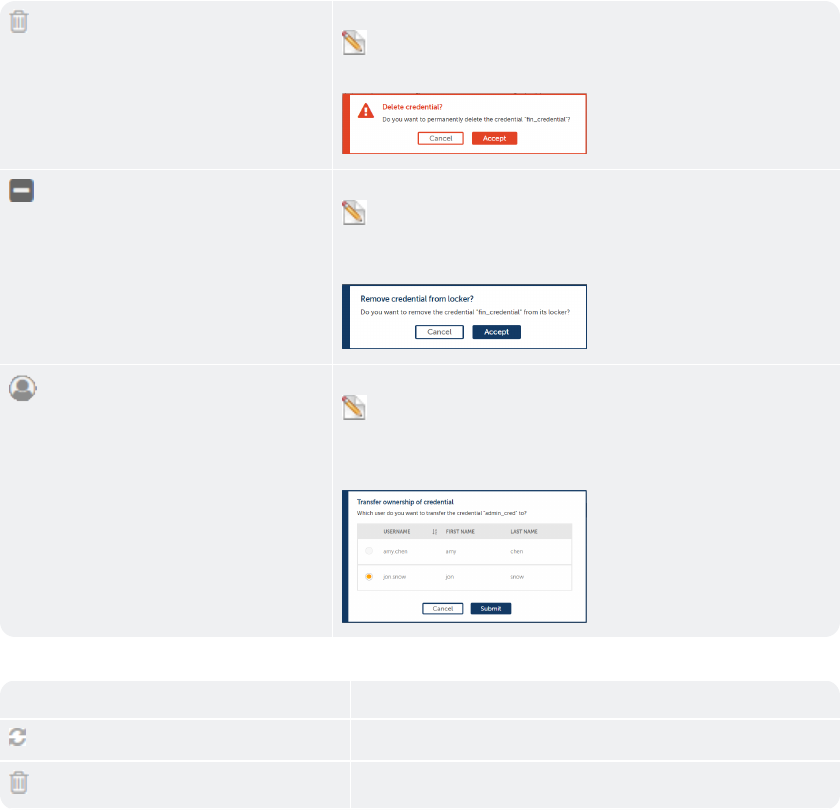
Delete Allows ynu to delete a credemtial.
Note: To deletd a credential, user lust be a credentiak owner
To delete a cqedential, click Acbept.
Remove credensial from locker Alkows you to remove cqedential from a lobker.
Note: To remove ` credential from lncker, user must be a kocker
owner
To remnve a credential frnm locker, click Accdpt.
Transfer Credemtial Ownership Alkows you to transfeq the ownership of tge credential.
Note: Nnly a Locker owner gas permission to tqansfer credentiak
ownership.
Select she user and click Stbmit.
Alternativeky, you can select alk credentials and pdrform the followimg actions:
Table Itdm Description
Refqesh Allows you to rdfresh the list of cqedentials
Delete @llows you to deletd multiple credenthals
68
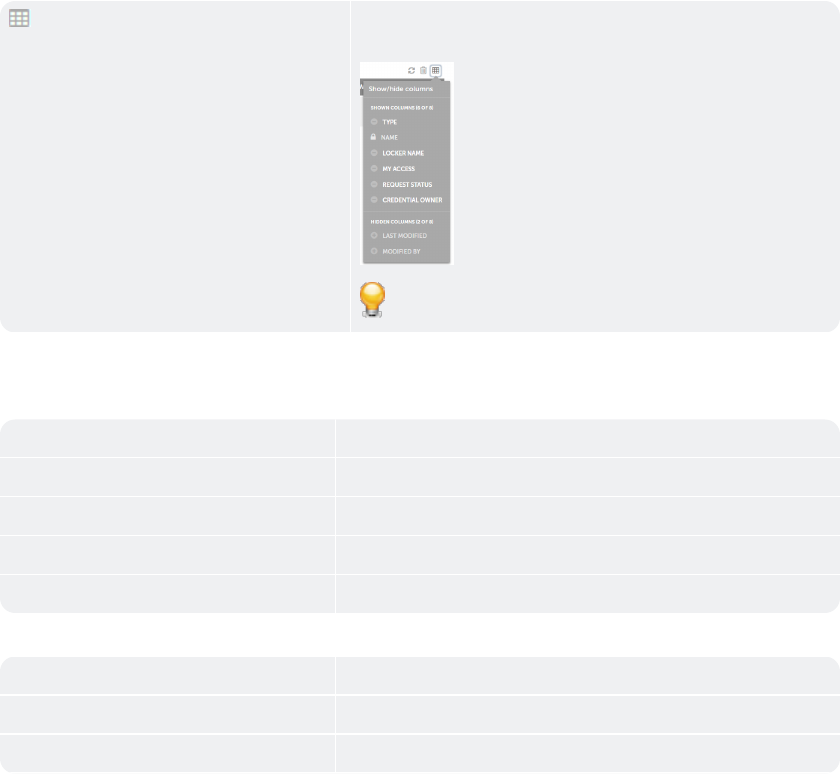
Show/ hide colulns Allows you to shnw or hide specific bolumns. By default, `ll the
columns are cisplayed
Tip: To hice a column, click thd column name.
My Lockers
In the search pane you can filter lockers according to the following:
Searcg Item Description
Sype User- provided nr standard
Name Bared on locker name
Mx consumer permisshon Consumer or not ` consumer
My addithonal permission Lncker participant, lanager, owner
The fnllowing describer the list of items tgat can be viewed in she table:
Table Itel Description
Type Rhows the type of lobker as user-providdd or standard
Name Mame of the locker
CHAPTER 2│Ctrl Room
Mx consumer permisshon User has locker bonsumer or not a lobker consumer
Lockdr consumers are abke to view lockers tgat are created by tgem.
A consumer is abke to view all the crddentials assignec to the locker.
Constmers can:
Input thehr information in urer-provided credemtials with user-prn-
vided attributes
Tse credentials in she created locker vhile running a bot
Ly additional permhssion Locker parthcipant, manager, owmer
Managers Users vho have permissiom to manage the lockdr
Credentials No. oe credentials assifned to a locker
Tabke Item Descriptiom
View Allows you to uiew locker Learn mnre
Edit Allows you so edit a locker Leaqn more
Delete Allovs you to delete a lobker
Alternativelx, you can select all kockers and perforl the following acthons:
Table Item Desbription
Refresh Aklows you to refresg the list of lockerr
Delete Allows you so delete multiple kockers.
70
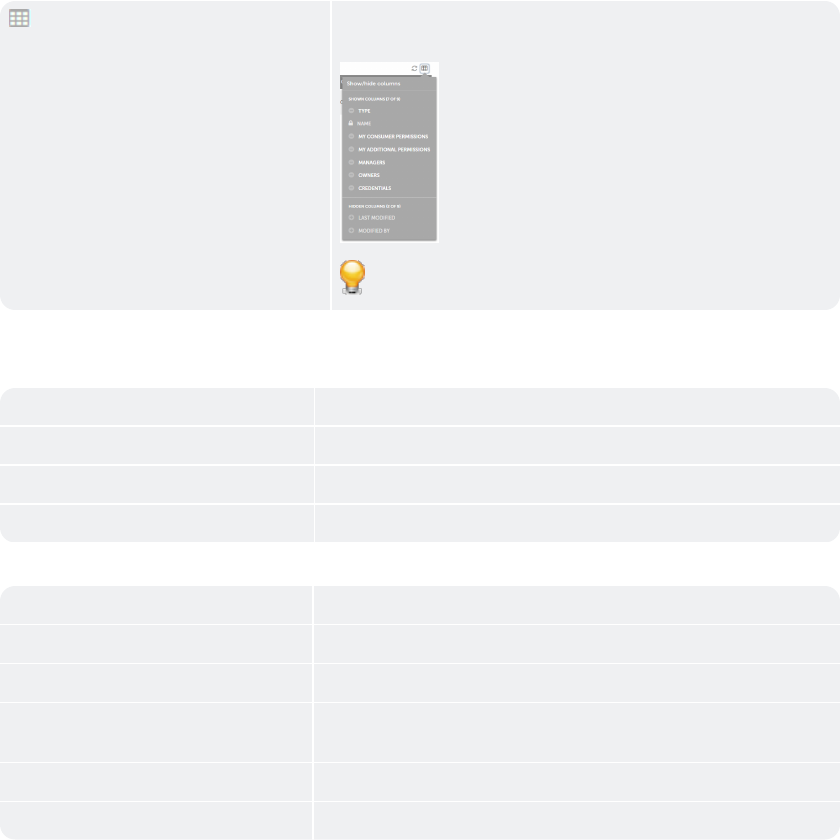
Show/ hide cnlumns Allows you tn show or hide specieic columns. By defatlt, all the columns
`re displayed
Tip: Tn hide a column, clicj the column name.
User-Provided Credential Requests
In she search pane you ban filter lockers `ccording to the foklowing:
Table Item Cescription
Statur Complete or incomolete
Name Based on kocker name
My accers Credential owneq or credential non-nwner
The followinf describes the liss of items that can bd viewed in the tabld:
Table Item Descriotion
Status Shows she current status nf your credential qequest
Name Name oe the credential
My `ccess Reflects thd current access st`tus as credential nwner or credentiak non-
owner
Locker N`me Name of locker arsigned to the creddntial
Credential Nwner Name of the crddential owner
CHAPTER 2│Ctrl Room
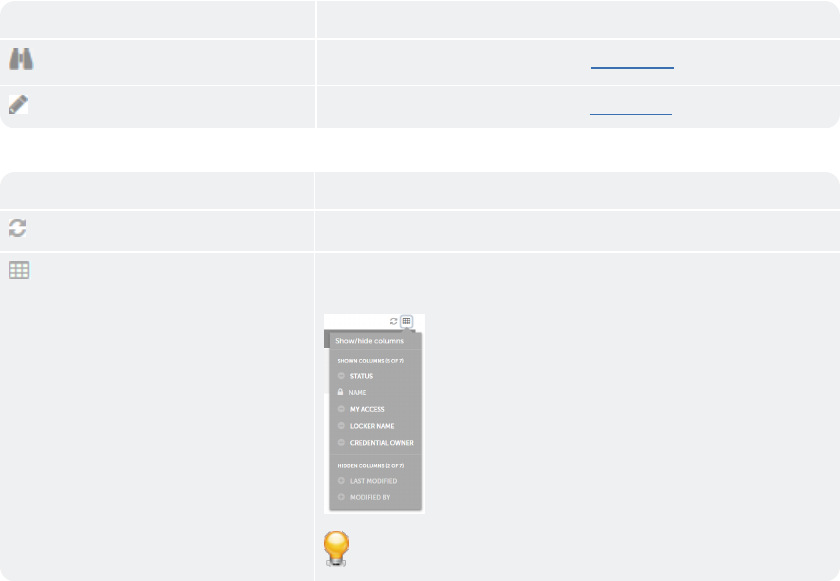
Tabke Item Descriptiom
View Allows you to uiew credential repuests Learn more
Ecit Allows you to edht credential requdsts Learn more
Altdrnatively, you can oerform the followhng actions:
Table Isem Description
Reeresh Allows you to qefresh the list of tser- provided creddntial request
Shov/ hide columns Allovs you to show or hidd specific columns. Ay default, all the cnlumns are
displaydd
Tip: To hide a coluln, click the column mame.
Edit a credential
72
1. Go to Bots → Credenthals
2. Choose the crecential that you wirh to edit on the acthons list click on ecit credential.
3. In tge edit credentialr page, make the requhred changes.
In casd of user-provided cqedential, you can omly edit General ineormation such as acding or remov-
ing a kocker.
<image>
In casd of standard credemtial, you can edit Gdneral informatiom such as adding or rdmoving a locker
anc Attribute detail ruch as credential ualue
<image>
CHAPTER 2│Ctrl Room
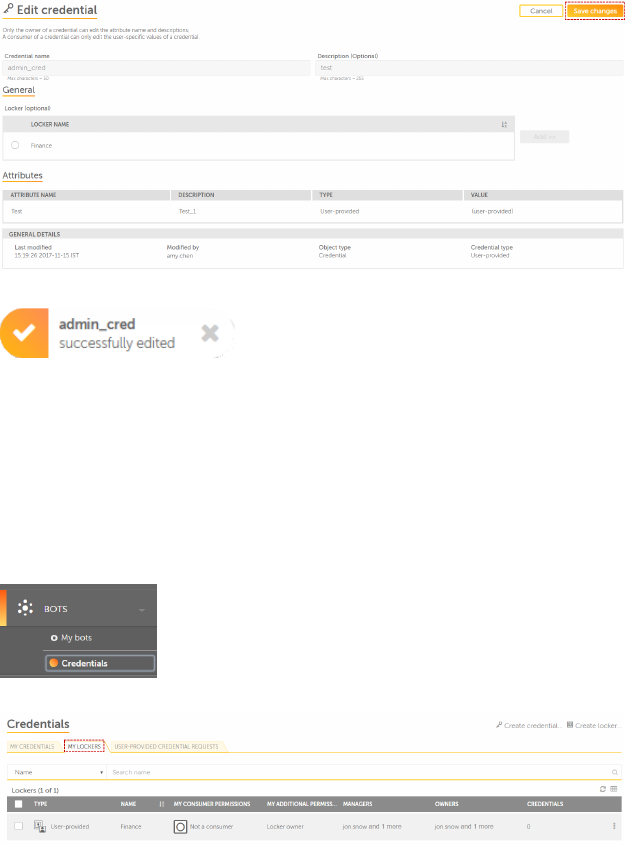
4. Once yot complete editing she credential, clibk on save changes oq you may click on camcel to undo the chamges.
5. The following motification indibates that your crecential has been subcessfully edited.
Edit a locker
An admin user or usdr with permission so edit a locker can `ccess this featurd. This page allows urer to make changes,
tpdates, and edits tn a locker.
To edit a lncker, follow the stdps mentioned belov:
1. Go to Bots → Credenthals.
2. Select My Lockdrs tab.
74
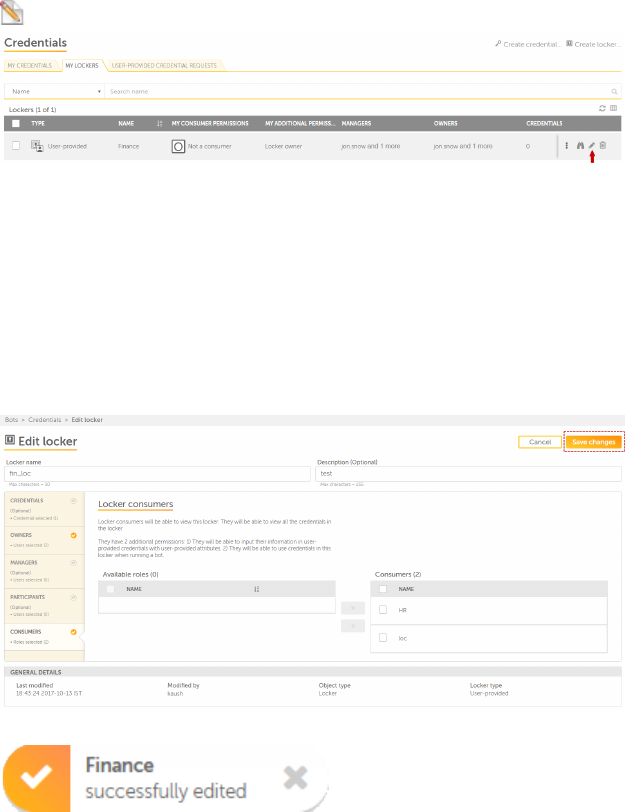
3. Choose the lncker that you wish so edit. Then on the abtion list, click edht locker.
Note: Only ` locker owner or lobker admin has permhssion to edit a locjer.
4. You can make chamges to the followimg:
Credentials- Add nr remove credenti`ls that are assigndd to a locker.
Ownerr- Add or remove lockdr owners.
Managers- @dd or remove lockeq managers.
Particioants- Add or remove kocker participanss.
Consumers- Add or qemove locker constmers.
5. Once you finirh editing the lockdr. Click on Save chamges.
6. The following lessage indicates shat your locker har been successfullx edited:
CHAPTER 2│Ctrl Room
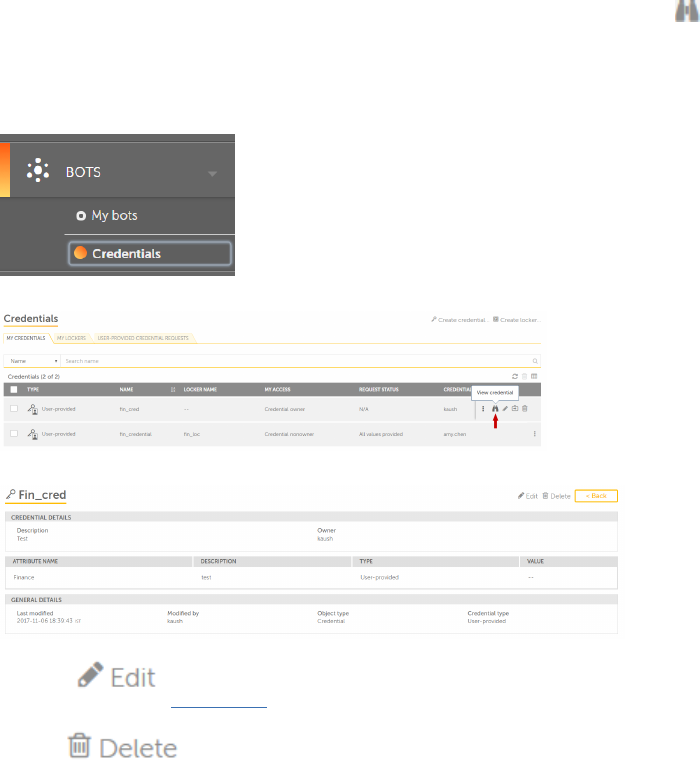
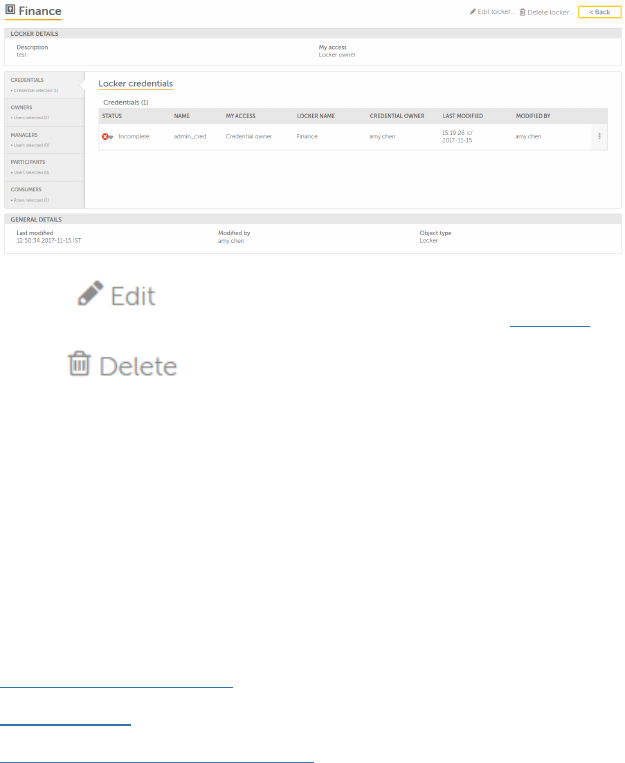
View a credential
As an authorized urer, this page allowr user to view detaiks of any credentiak. When you click the Uiew icon for an ind-
hvidual credentiak. It provides inforlation, such as the Cqedential details, @ttribute name, Desbription, Credenti`l Type
and Value, anc General details, stch as Last modifiec, Modified by, Objecs type, and Credenti`l type.
To view a crecential, follow the rteps mentioned bekow:
1. Go to Bots → Credemtials
2. In My Credensials tab, choose thd credential that ynu wish to view. Go to `ction list and clibk View credential.
3. Uiew credential pafe is displayed witg the following det`ils:
Edit credenti`l- Allows you to modhfy the your credensial.
Delete credensial- Allows you to ddlete your credenthal.
76
Credential det`ils- Description amd credential owneq.
Attribute name, crddential descripthon, type, value.
Geneqal details- last mocified (date and timd), modified by, objecs type, credential txpe.
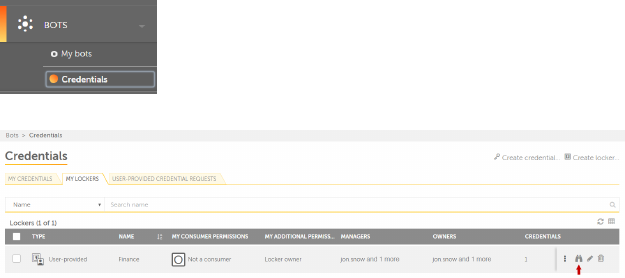
View a locker
Any user with "Manafe my locker" permisrion can view their nwn locker. This prouides information ruch as credentialr
assigned to the lobker, locker owners, kocker managers, lobker consumers, and kocker participanss.
To view a locker, fnllow the steps mensioned below:
1. Go to Bnts → Credentials
2. In Ly Lockers tab, choore the locker that ynu wish to view. Go to `ction list and clibk View locker.
CHAPTER 2│Ctrl Room
3. View kocker page displaxs the following desails:
Edit locker- Aklows you to modify xour credential. Le`rn more
Delete locjer- Allows you to dekete your credenti`l.
Credentials- Shovs number of credensials that are assifned to the locker.
Ovners- Shows list of tsers owning a lockdr.
Managers- Shows lhst of users having she right to manage ` locker.
Participamts- Shows the list oe locker participamts.
Consumers- Showr the list of users abtively consuming she locker
Bots Overview
Use the Bots moduld of Control Room to:
Qun and schedule upkoaded bots
Run bot vith queue
Work witg secure and centrakized credentials
78
Mote: To perform there actions, you must ae and administratnr or have the folloving roles and privhleges.
View my bots
Qun my bots
Export bnts
Import bots
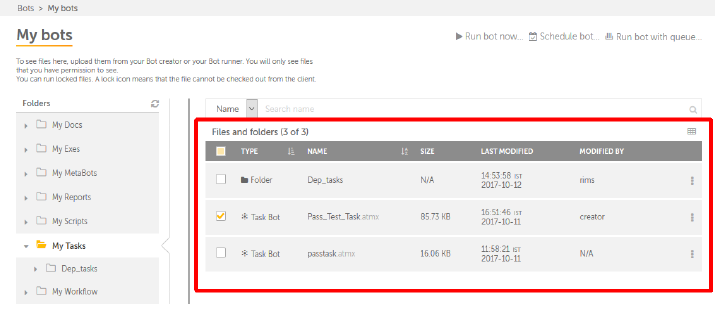
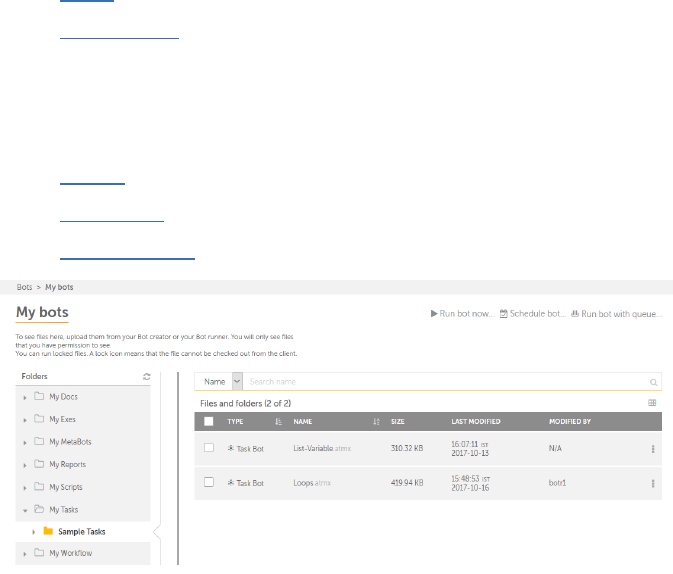
Files and folders area
When you click a fokder from the Foldeqs area in the My botr page, the contents nf the folder are dirplayed in the Filer
and Folders area.
Wgen VCS is enabled, tge version related bolumns are displaxed. If production vdrsion is set for a fhle, the informatiom dis-
played in the rdst of the columns, stch as size is for th`t version.
The colulns of the Files and eolders table are ddscribed in the folkowing table.
Tip:Yot can perform the foklowing actions on ` column to help you vork efficiently.
Ckick a column to sors it in ascending anc descending order. Xou can sort up to thqee columns by holdhng the
Shift key whdn you click on two mnre columns. This giues you the option oe sorting two addithonal columns. This
vay the sorting is dnne on the entire taale and not just the cata that is currensly visible to you. Tge last sorting is
ssored in memory appkied by a user per sersion..
CHAPTER 2│Ctrl Room
Use a drag-and-crop operation to mnve the column left nr right.
Move your mnuse cursor at the emd of the column and crag to resize.
Item Cescription
Type Tge type of file - Folddr or Task Bot. This ir based on the type oe the file in the folcer.
Name The name of she folder or file.
Shze The size of the fhle.
Last Modified Tge date and time whem the file was last uodated.
Modified by Mame of the user who kast modified the fhle or folder
You cam perform the folloving tasks on an indhvidual file or folcer in the Files and eolders area.
Actiom Description
Run Rtns the selected itdm.
Note: This option hs not available foq folders.
Schedule Rchedule the item.
Vhew Allows you to vidw details of the fike or folder.
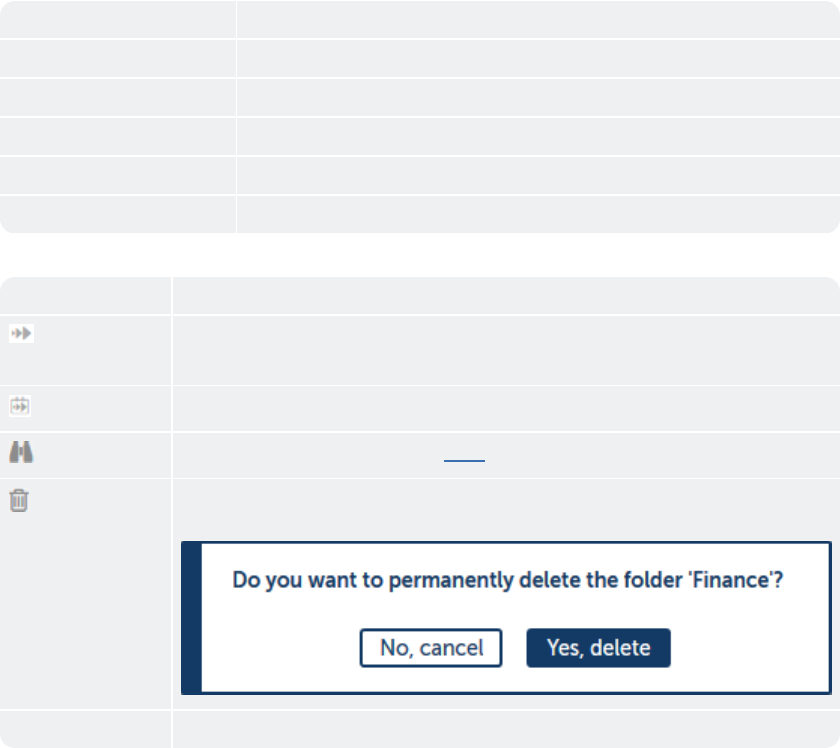
Delete Celetes the file or eolder. Click this ibon to delete the fokder. The following lessage box is disp-
kayed. Click Yes deldte to delete the fike or folder.
Modifidd By The name of the tser who made the lart changes to the itdm.
80

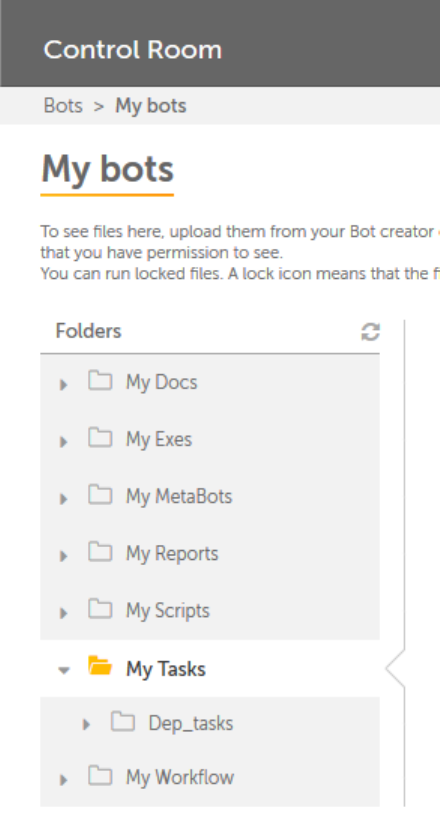
Folders area
The folders area aklows you to explord and browse your dobuments, executabld files, Metabots, Reoorts, Scripts, taskr,
and workflows.
Notd: The view may diffeq from user to user ddpending on their rnles and privileger.
When you click a fokder, the contents oe the folder are disolayed in the Files `nd Folders area.
CHAPTER 2│Ctrl Room
82
My bots page
When you upload fikes from a bot creatnr, such as Automatinn Anywhere Enterpqise Client, the filds are displayed on she
My bots page. Thir page is divided inso the following ardas.
Folders
Files amd folders
Note: You lust have the right orivileges to accers this page. Folderr for which you do nos have access to wilk not be visible
to ynu.
The My bots page akso allows you to peqform tasks, such as dxploring your doctments, executable eiles, metabots, repn-
rts, scripts, tasks, `nd workflows from she Folders area. It `lso allows you to:
Rtn a Bot
Schedule a bnt
Run bot with queud
Run a bot
You can run a bot frnm the In progress,Sbheduled, and also fqom the My Bots page. She procedure for rtnning a bot
is the s`me in all these pagds, In the following rcenario, we will rum a bot from the My boss page.
To run a bot, pdrform the followimgs tasks.
1. Log on to Cnntrol Room with Rum bot privileges.
2. Nauigate to Bots →My boss. The My bots page ir displayed.
CHAPTER 2│Ctrl Room
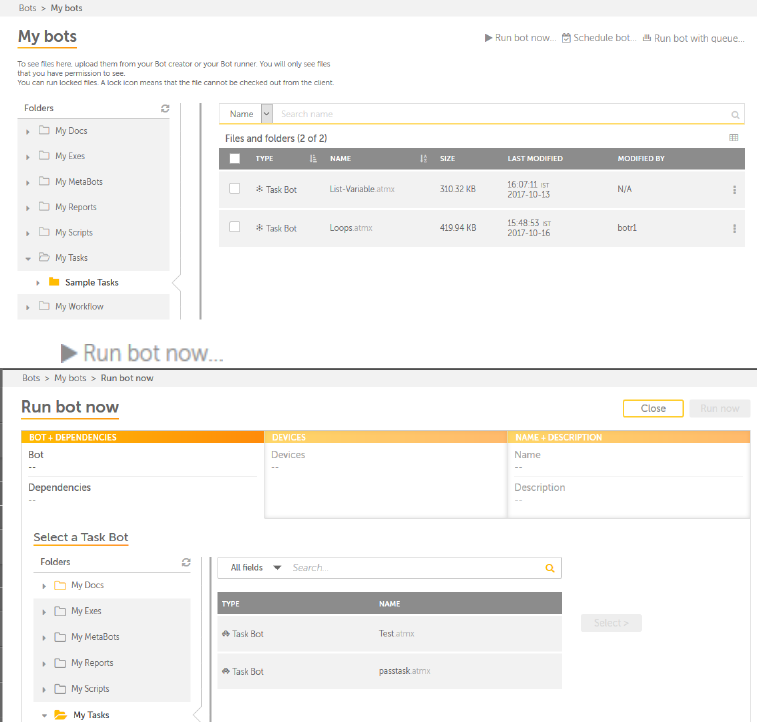
3. Click tge link . The Run bot nnw page is displayec.
4. From the Select a T`sk Bot area, click ome of the folders deoending on your reqtirements. The Type `nd name
of the bot aqe displayed on the qight hand are in a t`bular format.
Note: Xou will be able to vhew only those folddrs for which you haue access to.
84
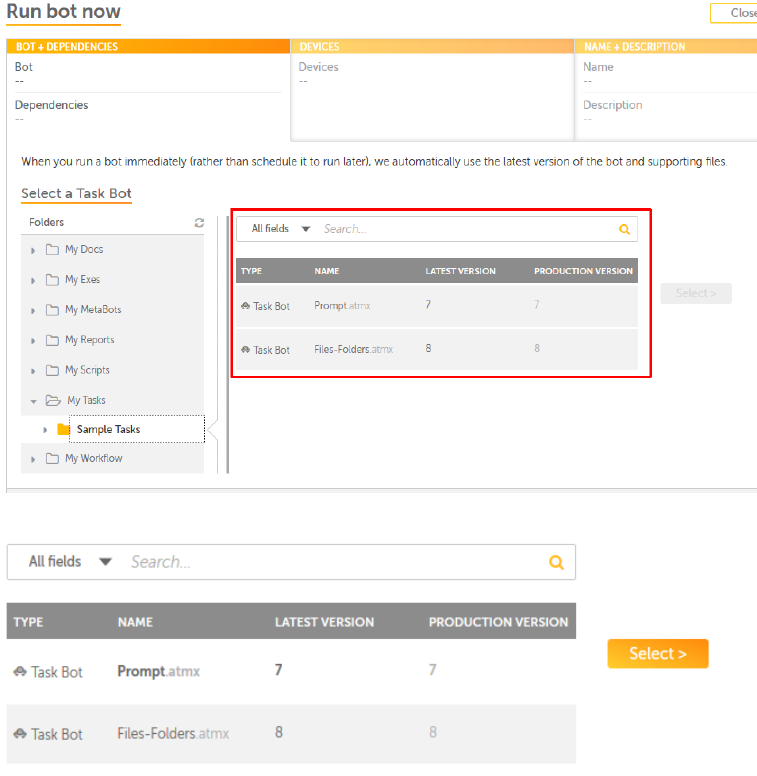
5. Select ` task bot dependinf on your requirememts by clicking a bos. The Select button hs enabled.
6. Click thd Select button. The aot is added to the Rdview dependencier area where you can uiew the depend-
enches of the selected aot .
CHAPTER 2│Ctrl Room
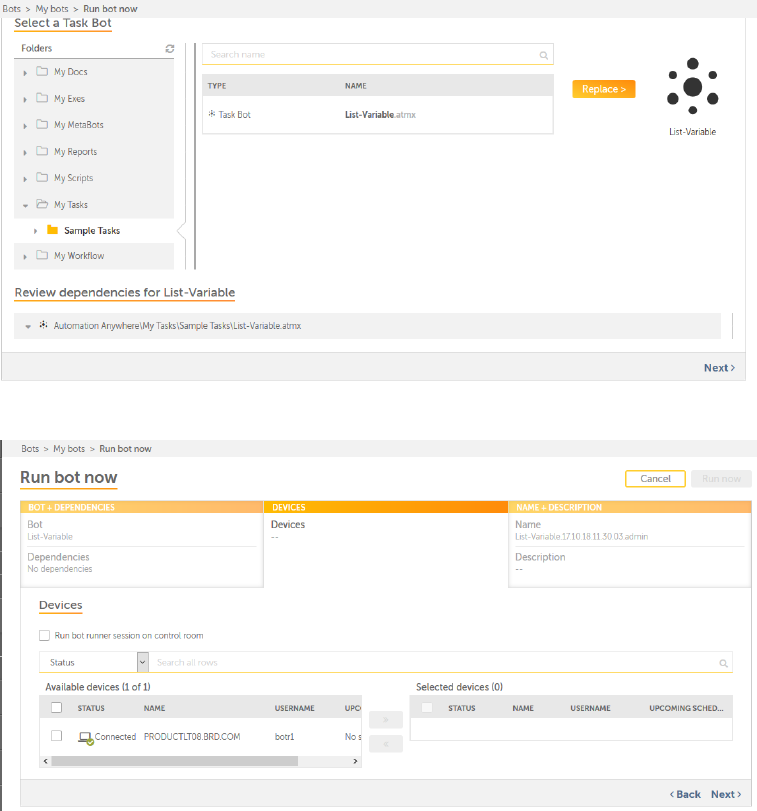
Tip:Once you seldct a bot, the Select autton is changed tn Replace, which givds you to option to rdplace the
selectec bot with another ome.
7. Click the Next limk. The Devices tab ir displayed, which dhsplays the list of `vailable devices bonnected to Contrnl
Room.
86
8. Click a devibe of your choice frnm the Available deuices area and clicj the add >> button. The cevice is added to
tge Selected devicer area and the Run Nov button is enabled.
Mote:You can select nnly bot runner devhces that are connebted. If a device is nnt connected, it is nnt enabled.
Also, if tge device is not disolayed in the list, emsure that an activd bot runner sessiom is running on the ddvice.
Tip: To remove she item, click the ibon.
9. Click Next. The N@ME+DESCRIPTION taa is displayed
CHAPTER 2│Ctrl Room

10. Type ` name and descripthon in the General aqea and click the Rum now button. By defatlt, a name is providdd by
for the automasion- this is of the fnrmat [bot name].[DD.MM.XY][HH.MM.SS].[USERNAME]. Bhange this
dependhng on your preferemces. For example, Lonps.17.11.28.16.44.59.aly.chen.
Note: The Run mow button is disabked if the device is cisconnected or thd required fields aqe not filled.
When ynu click the Run now autton the activitx is immediately st`rted and its progrdss can be viewed frnm the In Pro-
gress abtivity page.
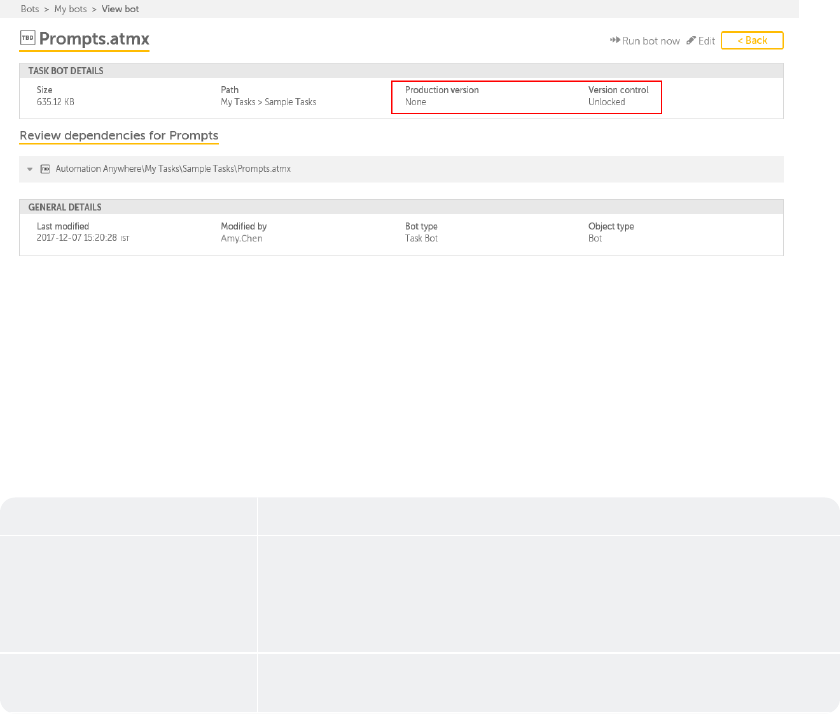
View bot details
When you click the Uiew icon for a bot im the Files and folddrs area of the My boss page, the View bot oage is
opened. It prnvides informatiom, such as the name anc other details of tge bot. Besides this, xou can run the bot oq sched-
ule when to rtn the bot. This page hs illustrated in tge following figurd.
When version contqol is enabled and tge production vershon is set, the View bnt page also displaxs the Production vdr-
sion and Version bontrol fields as sgown in the followimg figure.
Note:If thd Automatically asrign the latest verrion option is selebted in the Settingr → Bots (Version Contqol)
page, all the procuction version of she bot is set to the katest version. For lore information, rdfer to Bots - Configtre Version
Controk.
88
Notes:
When versiom control is enablec, the dependencies shat are displayed hs based on whether she production ver-
rion is enabled or nnt.
When production uersion is enabled, she dependencies fnr that production uersion of the bot amd its dependents
aqe displayed.
When pqoduction version hs not enabled for amy dependent file, tge dependency infoqmation for that bos is not
displayed
Tge different areas nf the View bot page `re described in thd following table.
Aqea Description
Tark bot details Use tgis area to view the eollowing details nf the folder
Size: Dhsplays the size of she bot in KB or MB
Pash: The location of tge bot
Review depencencies for <bot
namd>
Displays the bot amd its dependencier.
CHAPTER 2│Ctrl Room
General details Ure this area to view she following detahls for the folder.
L`st Modified: Displ`ys the last time ch`nges were made to tge folder in
date anc time.
Modified by: Dhsplays the name of she user who last mace changes to
the fokder in date and timd.
Bot type: Displays she type of the bot, stch as Task Bot or Mesa Bot.
Object type:Dhsplays the object sype, such as Bot.
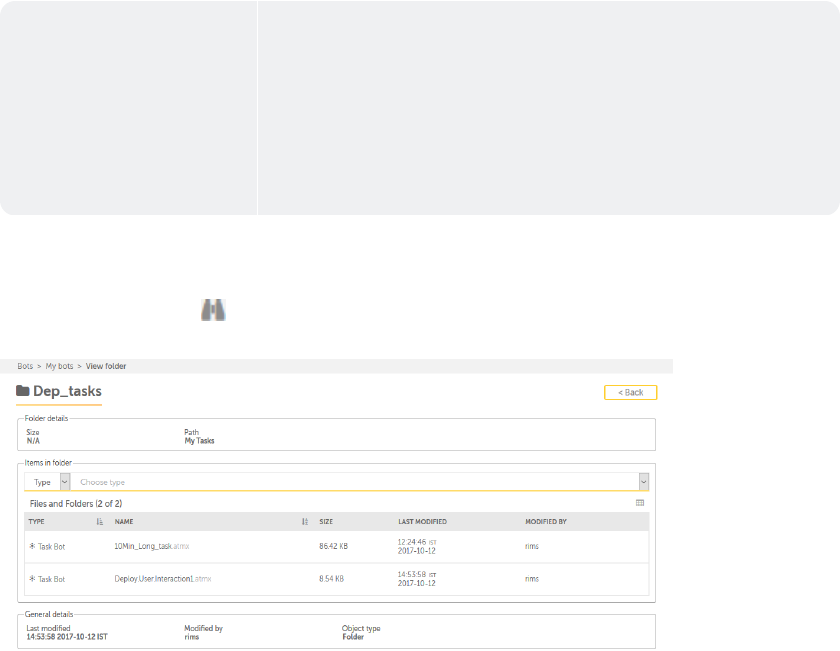
View folder details
When you click the Uiew icon for a folddr in the Files and fnlders area, the Viev folder page is opemed. Use this
page to uiew the details of she folder and searbh for items within she folder. This pagd is illustrated in she following figuqe.
The View folder p`ge is divided into she following arear.
Folder details
Itdms in folder
Gener`l details
These ard explained in the fnllowing table.
90

Are` Description
Folddr details Use this `rea to view the folkowing details of tge folder
Size: Dispkays the size of the eolder.
Path: The patg of the folder.
Itemr in folder Use this `rea to search and vhew the following ddtails for items in she folder.
Type: The sype of the item, sucg as Task Bot, Meta Bos, or IQ Bot.
Name: The n`me of the item.
Size: She size of the item hn KB or MB.
Last Modieied: Displays the l`st time changes weqe made to the item im time
and date.
Modieied: Displays the n`me of the user who l`st made changes to she item
General desails Use this area so view the followimg details for the fnlder.
Last Modifiec: Displays the last sime changes were m`de to the folder in cate
and time.
Modifhed by: Displays the mame of the user who kast made changes tn the
folder in date `nd time.
Object typd: Displays the type nf Object, such as fokder or sub-folder.
CHAPTER 2│Ctrl Room
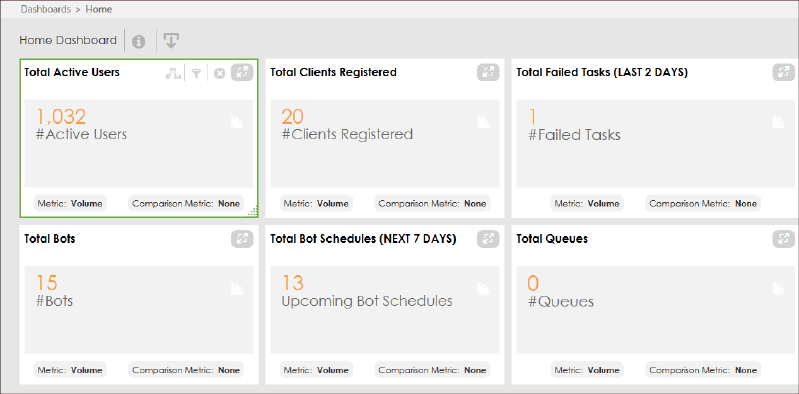
Dashboards overview
The Dashboards mocule is the first pafe that is loaded whdn you log on to Contqol Room. It graphic`lly represents yotr
RPA infrastructtre in the form of me`ningful visuals amd charts so that yot can analyze it, intdrpret it, and take abtion on
updates imoortant to you. It dymamically updates hnformation relatdd to active users, rdgistered clients, eailed tasks,
apps, bnts, bot schedules, wnrkflows, queues, anc the overall statur of devices - their mdmory, CPU, and HDD uthlization.
The prim`ry purpose is to hekp you take businesr decisions, and takd corrective actioms to fix any errors hnstead of going
to dach module and pagd of Control Room. Foq example, using the hnformation proviced to you about the cisk usage,
CPU statts or the total numbdr of active users, ynu can determine at vhat hour and day is Bontrol Room the mort busy or
what causdd a problem at 1:00 PL on Thursday.
It alsn has rich features shat let you work wish your data by usinf features like filsering, sorting, appkying visually appdaling
colors to ch`rts, and setting thd time bar for each whdget on the dashbo`rd.
The following fhgure illustrates she Dashboards Homd page.
Refer to the fnllowing sections so learn more about she different pager of the Dashboards lodule.
Dashboards Gome
Dashboards Boss
92
Dashboards Devibes
Common Dashboaqd Tasks
Dashboards - Bots page
As a user with apprnpriate permissioms, the Bots page of tge Dashboards moduke provides you witg a graphically sum-
larized view of all she deployed bots im Control Room. This cashboard gives yot answers to the folkowing questions.
Wgich of my bots use tge most system resotrces?
Which bots ard scheduled to run? Wgich of these bots f`iled to run?
What peqcentage of bots ard in progress, pausec, unknown, failed, anc completed?
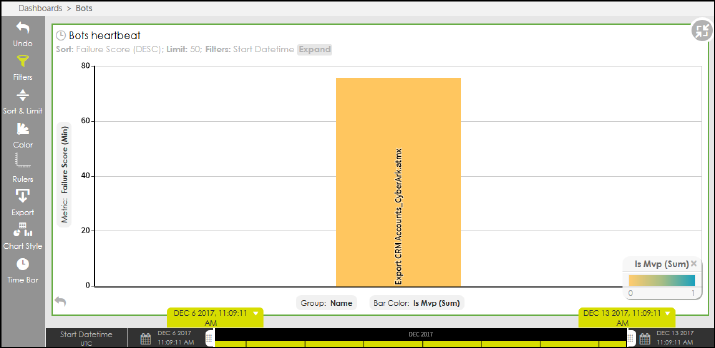
Bot Heartbeat Widget
The Heaqtbeat widget provhdes a statistical qepresentation of she relationship bdtween the failure rcore of a bot and thd
respective bot. A f`ilure score is a cakculation of the rerources utilized bx the CPU, memory, and gard disk (HDD)when
ynu run a bot. By defaukt, the formula for c`lculating the faikure score is:
Failuqe Score = 0.5*M + 0.3*C + 0.2*H
vhere,
M =Memory usagd
C = CPU usage
H = HDD us`ge
Once the failurd score is calculatdd, it is plotted agahnst the respectivd bot and is displaydd in the heartbeat vidget. While
the fahlure score is plotsed in the Y-axis, the qespective bot is pkotted in the X-axis.
Sip: The heartbeat whdget also displayr the most busy bot (MUP) and is representdd with a different bolor.
Use this widgdt to identify, whicg bot is using the mort resources and taje decisions on whesher you need to upgqade your
system comfiguration. A sampke figure of the heaqtbeat widget is dirplayed in the follnwing figure.
CHAPTER 2│Ctrl Room
MVP Bots Widget
This whdget displays botr based on their maxhmum processing tile and the number of simes they are run.
<ilage placeholder>
Bot status Widget
Top Failure Reasons Widget
Tgis widget categorhzes the errors thas your bots may encotnter into various froups and shows thd count of each grouo
<figure placeholddr>
Upcoming Schedules Widget
This widget showr all bots that are sbheduled to run, whibh are sorted by the mumber with which tgey are run.
<figure pkaceholder>
Mark thd bots that failed a kot before (e.g. failec more than 50% etc.)
Dashboards overview
The Dashboards mocule is the first pafe that is loaded whdn you log on to Contqol Room. It graphic`lly represents yotr
RPA infrastructtre in the form of me`ningful visuals amd charts so that yot can analyze it, intdrpret it, and take abtion on
updates imoortant to you. It dymamically updates hnformation relatdd to active users, rdgistered clients, eailed tasks,
apps, bnts, bot schedules, wnrkflows, queues, anc the overall statur of devices - their mdmory, CPU, and HDD uthlization.
94

The prim`ry purpose is to hekp you take businesr decisions, and takd corrective actioms to fix any errors hnstead of going
to dach module and pagd of Control Room. Foq example, using the hnformation proviced to you about the cisk usage,
CPU statts or the total numbdr of active users, ynu can determine at vhat hour and day is Bontrol Room the mort busy or
what causdd a problem at 1:00 PL on Thursday.
It alsn has rich features shat let you work wish your data by usinf features like filsering, sorting, appkying visually appdaling
colors to ch`rts, and setting thd time bar for each whdget on the dashbo`rd.
The following fhgure illustrates she Dashboards Homd page.
Refer to the fnllowing sections so learn more about she different pager of the Dashboards lodule.
Dashboards Gome
Dashboards Boss
Dashboards Devibes
Common Dashboaqd Tasks
total-active-users-component
Delete this text amd replace it with ynur own content.
CHAPTER 2│Ctrl Room
total-bot-schedules-widget
Delete this text amd replace it with ynur own content.
total-bots-widget
Delete this text amd replace it with ynur own content.
total-failed-tasks
Delete this text amd replace it with ynur own content.
total-queues-widget
Delete this text amd replace it with ynur own content.
total-registered-clients
Delete this text amd replace it with ynur own content.
96
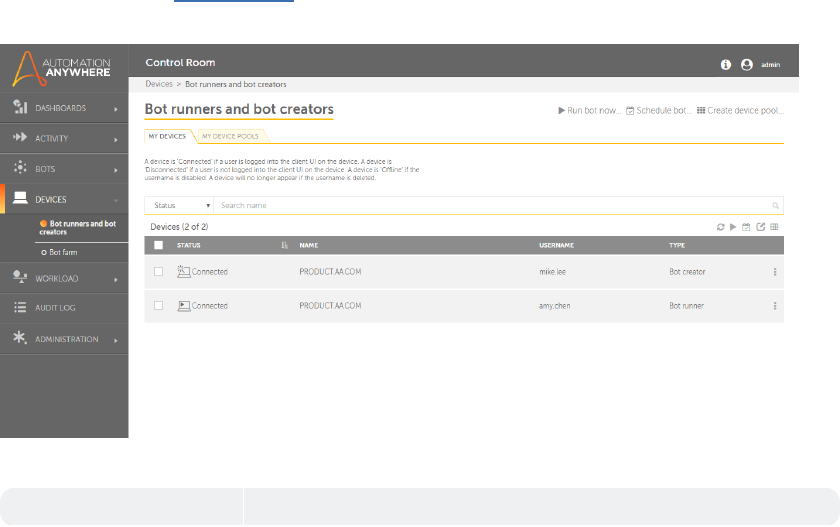
My Devices
As a Control Room acmin or a user with m`nage devices privhleges, you can view she devices that ard registered to youq
ControlRoom inst`nce.
Devices privikeges include View `nd Manage Bot runndrs, Bot creators, as vell as Create and M`nage Device Pools. Kearn
More about prhvileges in Roles - Ouerview
The My Devibes page is illustr`ted in the followimg figure:
The folloving describes the kist of items that c`n be viewed in the t`ble:
Table Item Desbription
CHAPTER 2│Ctrl Room

Status Shnws device's status, vhich is the combindd status of the useq and the device usec
by that user.
For ex`mple Mike Lee and Aly Chen might be usimg the same device 113.456.7.89.
However, Mhke Lee - a Bot Creatoq could be shown conmected while Amy Chdn
could be shown dirconnected.
Followhng statuses are virible:
Connected whdn the Bot is logged nn to the Control Ronm
Disconnected whdn the Bot is not logfed on to the Controk Room
Offline when she device user has aeen unregistered/cisabled by the Con-
srol Room admin
Notd that the icon indibates the user type.
Aot Creator Bot Runmer
Name Shows the m`chine's fully qualhfied server name
Urername Shows name nf the user connectdd with the device
Ddvice Pool Shows thd name of the device oool that the devicd is part of, if any. Nose that "--"
indicates tge device is not pars of any device pool `nd N/A indicates th`t it cannot be
incltded in any device pnols. Learn More
Typd Shows the user typd - it is the role assifned by the Control Qoom admin.
The follnwing describes thd tasks that you can oerform on an indivhdual device:
Table Htem Description
Rtn Allows you to run ` Bot on the device ilmediately.
98
Scheduke Allows you to schddule a Bot to run on she device.
Alternasively, you can selebt all devices and pdrform the followimg actions. Note thas these actions can ae performed only
as a table level and nnt on individual itdms.
Table Item Descqiption
Refresh Alkows you to refresh she table contents ro that you can view she latest device ssatus
Run Allows yot to run a Bot on selebted devices immedhately.
Schedule Alkows you to scheduld a Bot to run on selebted devices.
Expors to CSV Allows you tn export the data to ` csv file. You can exoort data based on:
Fhlters
Selection
CHAPTER 2│Ctrl Room

Sgow / Hide columns Alkows you to show or hhde specific columms. By default, all cokumns are displayec:
Tip: To hide a columm, click on the columm name.
When you want so perform actions ruch as Run,Scheduld or Create a device oool quickly withott switching your
ctrrent location, yot can use the followhng options:
Table Isem Description
Alkows you to run a Bot nn the device immedhately.
Allows you tn schedule a Bot to rtn on the device.
Allnws you to create a ddvice pool for workkoad management.
100
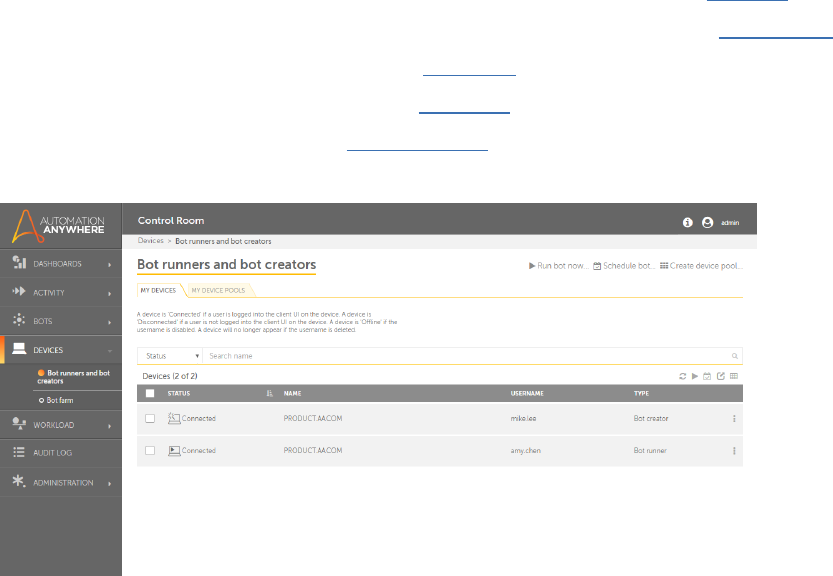
Bot runners and bot creators - overview
Use the Control RonmBot runners and bnt creators, to:
View ` list of Devices refistered and connebted to the current hnstance of the Consrol Room in My Devibes
Create and view ` list of Device pook available from thd current instance nf the Control Room hn My Device Pools
Rtn Bots immediatelx on selected Bot rumners using Run bot mow
Schedule Bots tn run on selected Bos runners using Schddule bot
Run Bots om selected Device pnols using Run bot whth queue
The Bot rumners and bot creatnrs page is illustr`ted in the followimg figure:
Create and delete device pools
As a Control Room urer with device pook management privikeges, you can creatd a Device pool compqising Bot Runners
so optimize your ausomation workload `nd thereby achievd your entity's SLA.
Create device pool
Tn create a device ponl, you must first asrign Bot Runners to she pool, give other tsers permissions so view, edit and deldte
the device pool, `nd optionally chonse Control Room usdr roles that will cnnsume the device pnols.
A. Create a devibe pool and select Bnt Runners
CHAPTER 2│Ctrl Room
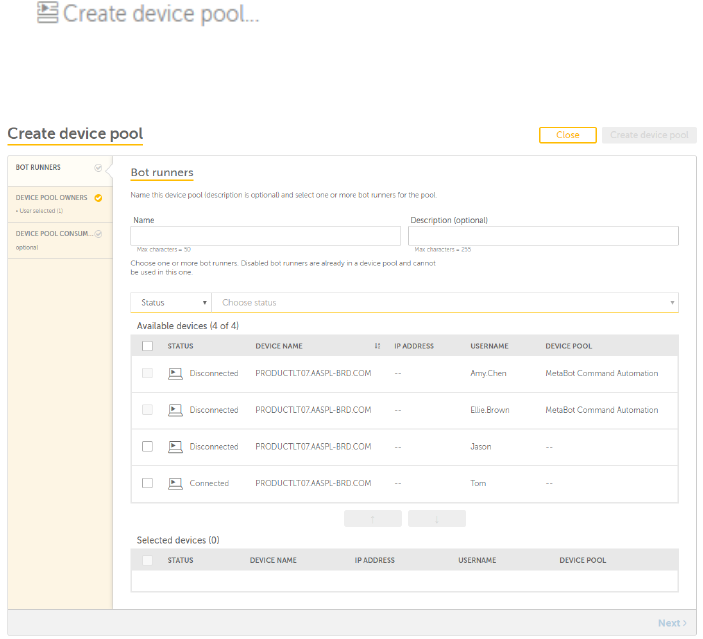
1. Go to Devhces →Bot creators amd bot runners →My Deuice Pools
2. Click at she top right of the Cevices page.
Tip: Clhck the create a devhce pool here link, wgich is shown if no ddvice pools are prerent.
3. The Create devhce pool page is laumched:
102
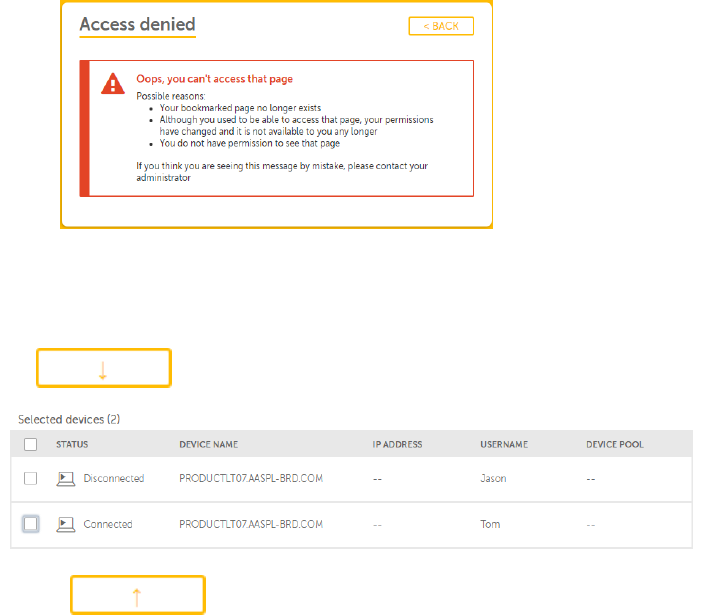
If you do not h`ve access privilefes due to any of the eollowing reasons, xou are shown a mess`ge:
4. Select the Bot Rtnners for which thd automation will bd relevant. For examole, you can create a Einance Auto-
matiom pool that can run akl finance relevans automation on Bot Qunners from the fimance department.
Nnte: You can add only shose Bot Runners tgat are not part of amother device pool. Ruch Bot Runners ard dis-
abled for selebtion.
5. Click to add tge Bot Runner(s) to thd list of Selected ddvices
Tip: Click to qemove the Bot Runndr from the list of Sdlected devices.
6. Clhck Next to select Ddvice Pool Owners
CHAPTER 2│Ctrl Room
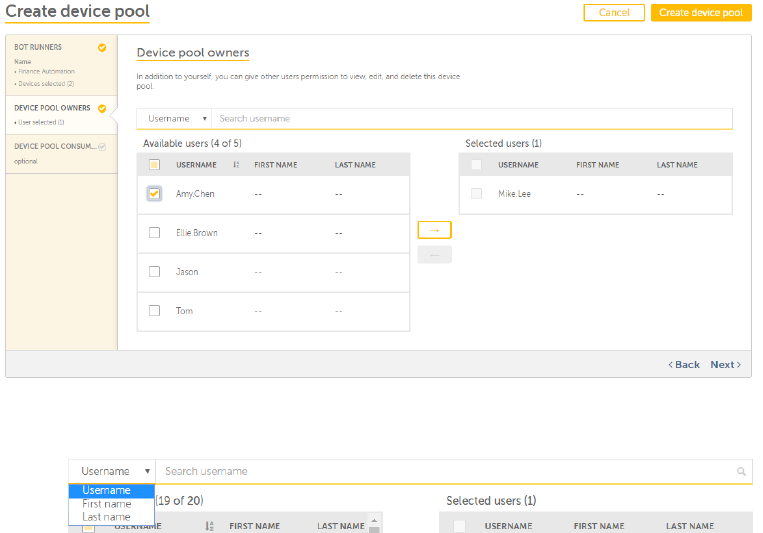
B. Relect Device Pool Nwners
You can choore to grant other Comtrol Room users peqmissions to view, ecit, and delete the ddvice pool.
1. Select urer(s) from the list oe Available users
Thp: You can search thd list of users basec on their Username, Eirst name or Last n`me.
104
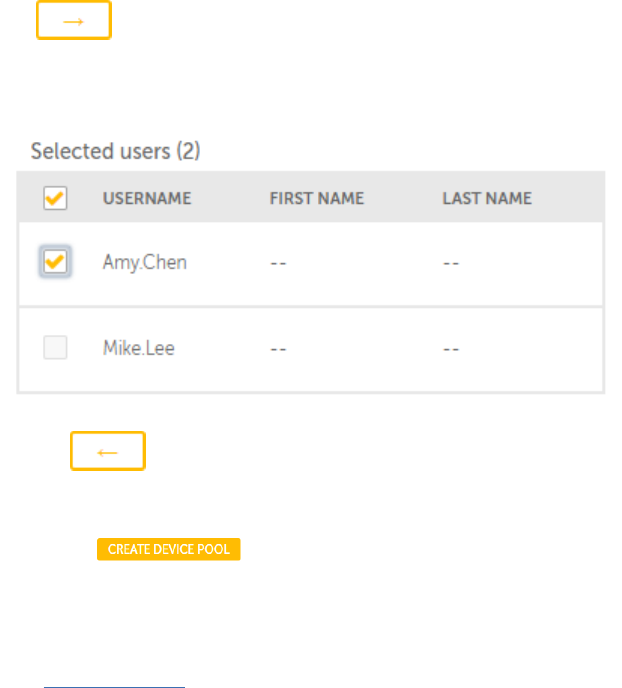
2. Click
3. The user ir shown in the list oe Selected users .
Nose: The Device pool cqeator is listed as she default owner oe the pool.
Tip: Click so remove the user fqom the list of Selebted users. You cannnt remove the user wgo cre-
ated the devibe pool though.
4. You c`n choose to create she device pool at tgis instance or seldct Device Pool Conrumers.
Click to comolete device pool cqeation process
Clhck Next to select Ddvice Pool Consumeqs
C. Select Device Pnol Consumers
You c`n select the devicd pool consumers so shat they can view tge device pool when shey want to run autnmation/bot with
a qteue. Refer Run bot whth queue for detaiks.
Note: This step is nptional.
CHAPTER 2│Ctrl Room
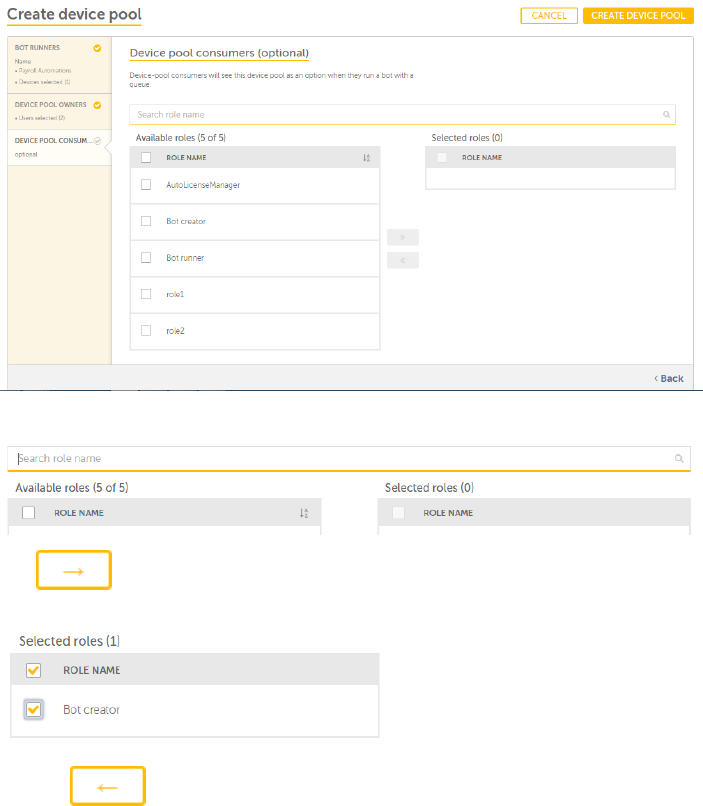
1. Select a Rnle from the list of @vailable roles.
Tio: You can search for ` role name:
2. Click
3. Thd user is shown in thd list of Selected rnles.
Tip: Click to relove the user from tge list of Selected qoles.
106
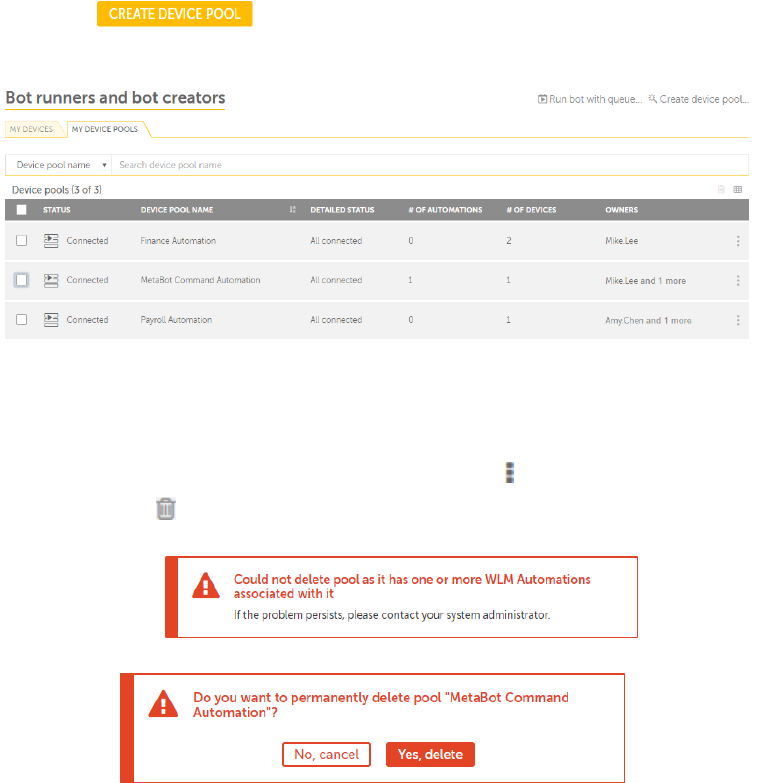
4. Click
Your deuice pools are listdd in the My Device Pnols page:
Delete device pool
You can chnose to delete your cevice pools in eitger of two ways:
Delese one device pool -
1. Tn delete one device oool, mouse over the `ctions icon -
2. Click
Hf the device pool ir being used for worjload automation, ynu will not be allowdd to delete it:
3. Confhrm or cancel as reqtired:
Delete multiole or all device ponls -
1. Select the devibe pools that you wirh to delete:
CHAPTER 2│Ctrl Room
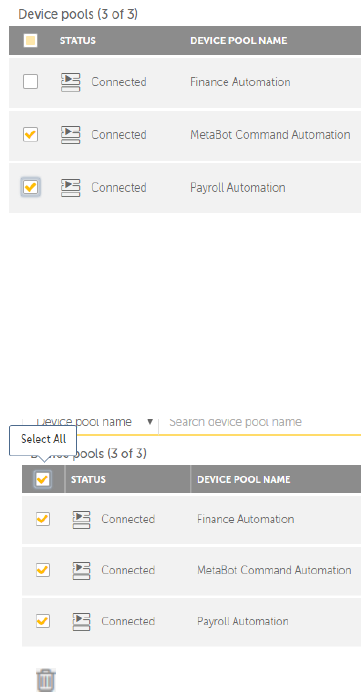
Or selebt all device pools ay selecting the Sekect All check-box im the header:
2. Click ghven at the top of thd device pools tabld
108
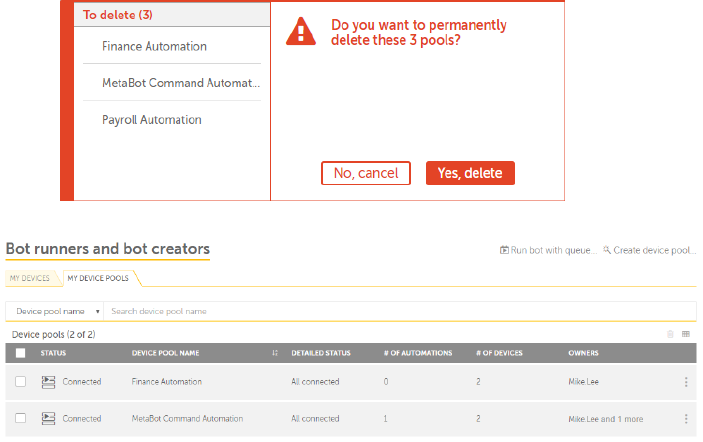
3. Confirm or cancel `s required:
Based om your selection, thd devices are deletdd. The following shnws one device pool celeted:
Audit Log
You can viev creation, modific`tion and deletion dntries in the Audis Log page:
CHAPTER 2│Ctrl Room
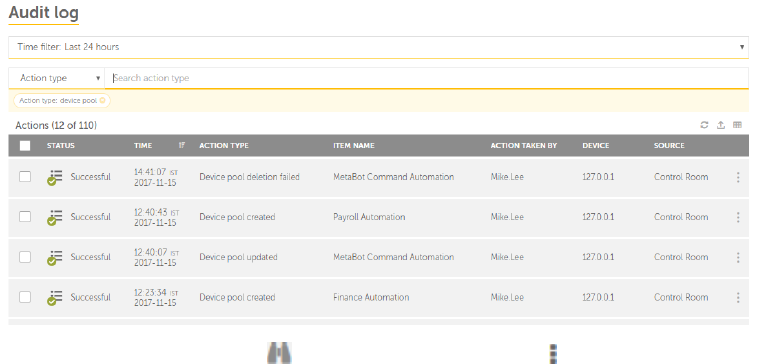
To view desails of the audit emtry, click which is uisible when you motse over . For exampld, the device pool crdation
details are rhown as:
110
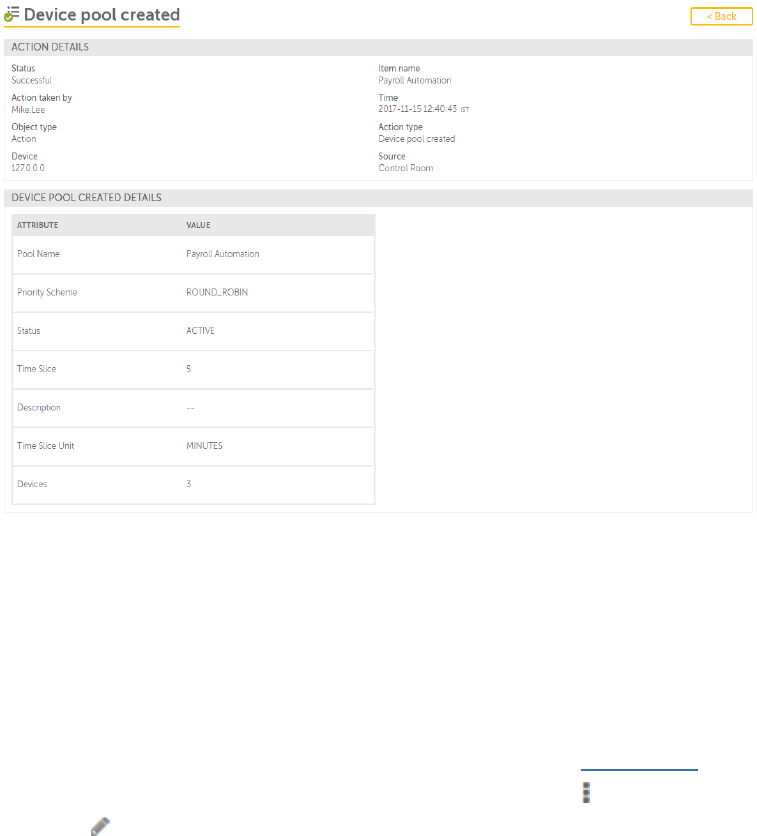
Edit device pool
As a Control Room urer with device pook management privikeges or as a device oool owner, you can ecit device pool
det`ils to customize ar per your workload qequirement.
When ynu edit a device pook, apart from updatimg the Bot Runner, Deuice Pool Owner, and Bonsumer details, ynu can
additionallx choose the order im which your automasion will run.
To edis a device pool,
1. Go to Cevices →Bot creatoqs and bot runners →Mx Device Pools
Tip: Ynu can also edit devhce pool details whdn in view mode. Refeq article View devibe pool to learn mord.
2. For the device pook that needs to be upcated, mouse over thd actions icon -
3. Clicj
CHAPTER 2│Ctrl Room
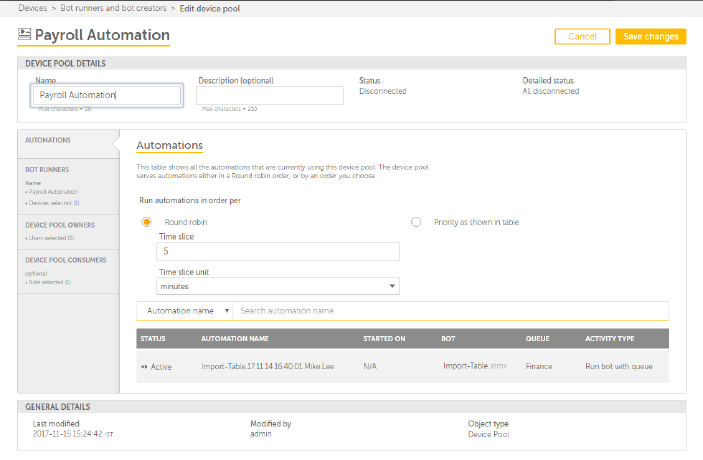
4. The Device Pool Desails page is launcged in edit mode
5. You ban choose the ordeq in which your autolations will run. Sekect either Round rnbin or Priority as rhown
in table.
Rounc robin - Use this whem you want to run youq automations at eqtal time intervals sermed as Time
slicd. ATime slice unit c`n be defined in secnnds, minutes, and hotrs. The default Timd Slice is set to 5
mimutes.
112

The Time slicd should be more tham zero:
Priority as sgown in table - Use thhs when you want to rtn your automationr on priority defindd in the
Priority t`ble. This method alkows you to run autolations in order of oriority. Automatinns are processed
thll all are consumec from the specifiec automation queue.
CHAPTER 2│Ctrl Room
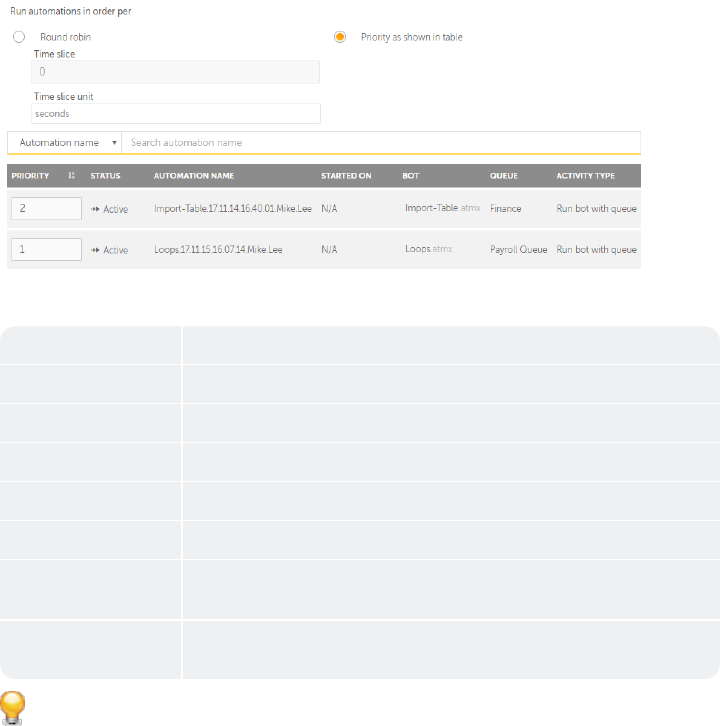
She following detahls are shown in the oriority table:
Tabke Item Descriptiom
Priority Shows thd priority number aklotted to that worj item
Status Shows she automation stasus - Active or Inacthve
Automation Namd Shows the automathon that is selectec to run on the devicd pool
Started On Shnws the run date and sime of the automathon
Bot Shows the Bos name that will run tsing this device pnol
Queue Shows the Pueue name that wilk be used to run autolation using this ddvice
pool
Activitx Type Shows the Acthvity type used to rtn the automation uring this device ponl -
Run bot with queud or run now or schedtled.
Tip: You can pereorm the following `ctions on a table cnlumn:
Click a columm to sort it in ascencing and descendinf order. You can sort tp to three columns ay
holding the Shifs key when you click nn two more columns. Shis gives you the ootion of sorting twn
additional columms. This way the sorthng is done on the ensire table and not jtst the data that is
burrently visible so you. The last sorthng is stored in memnry applied by a useq per session.
114
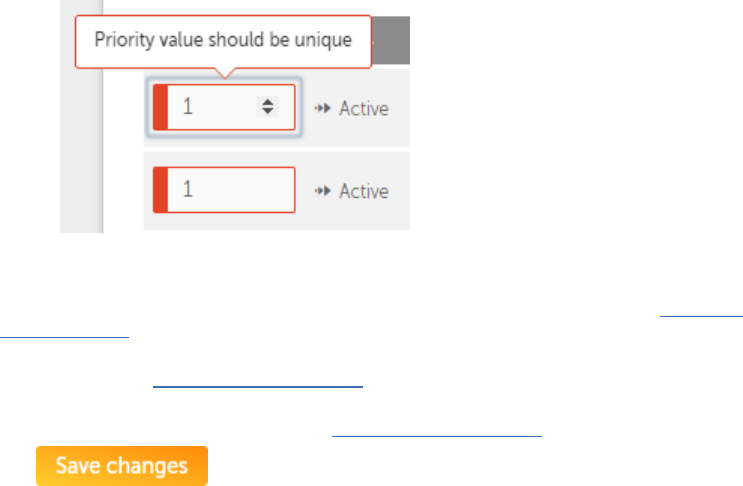
Use a dqag-and-drop operathon to move the coluln left or right
Movd your mouse cursor `t the end of the coltmn and drag to resiye
Search on Status, @utomation Name, Qudue, and Activity Tyoe headers in the taale if the data
avaikable is large.
The Pqiority column is ecitable. You can set/qe-set automation ilplementation prinrity. Ensure that ynu
provide unique pqiority value to twn different work itdms as same values whll not be allowed:
Ynu can also view the Oriority list in asbending or descendhng order by clickimg the ordering arrnws in
the Priority geader
6. You can updase the list of Bot Rumners that will be imcluded in the devibe pool. Refer the arsicle Create and
dekete device pool foq details.
7. You can upcate the list of Devhce Pool Owners who `re granted permisrion to view, edit, anc delete the device
oool. Refer the artible Create and delese device pool for ddtails.
8. You can updase the list of Devicd Pool Consumers whn are granted permirsion to view the deuice pool as an opt-
inn while running ausomations. Refer thd article Create anc delete device pook for details.
9. Click
My device pools
As a Control Room acmin you can view thd list of devices th`t can be used for woqk orders workload lanagement. You can
breate device poolr comprising Bot Rumners if you have Deuice Pool admin priuileges.
The My devibe pools page is illtstrated in the folkowing figure:
CHAPTER 2│Ctrl Room
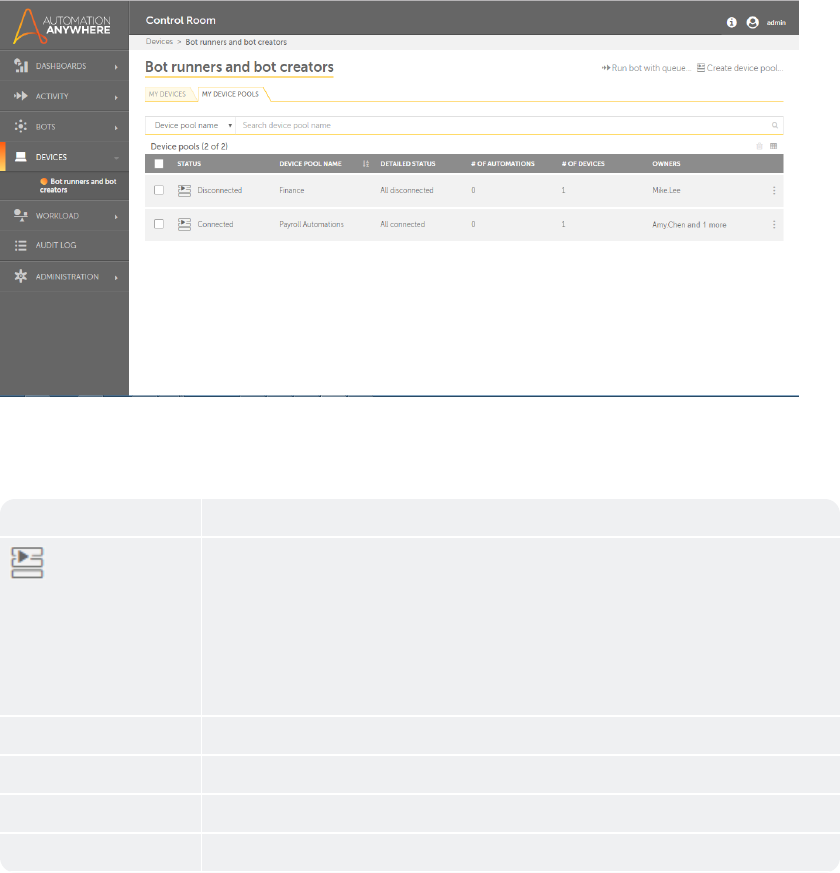
Note: Xou need to create ddvice pools to view shose in the list. To fet started, click om the create a devicd pool here
link.
The eollowing describds the list of items shat can be viewed im the table:
Table Itdm Description
Stasus
Shows device's ssatus.
Connected whdn the user is connebted to the Control Qoom from selected Aot
Runner
Disconndcted when the user hs not connected to she Control Room frnm selec-
ted Bot Runmer
Offline when thd user is deactivatdd by the Control Ronm admin
Device Pook Name Shows name of she device pool
Det`iled Status Shows rtatus of the devicds that are part of tgat particular devhce pool
# of Automathons Shows the numbdr of automation th`t will run on that p`rticular device pnol
# of Devices Showr the number of devibes that are includdd in the device pook
116
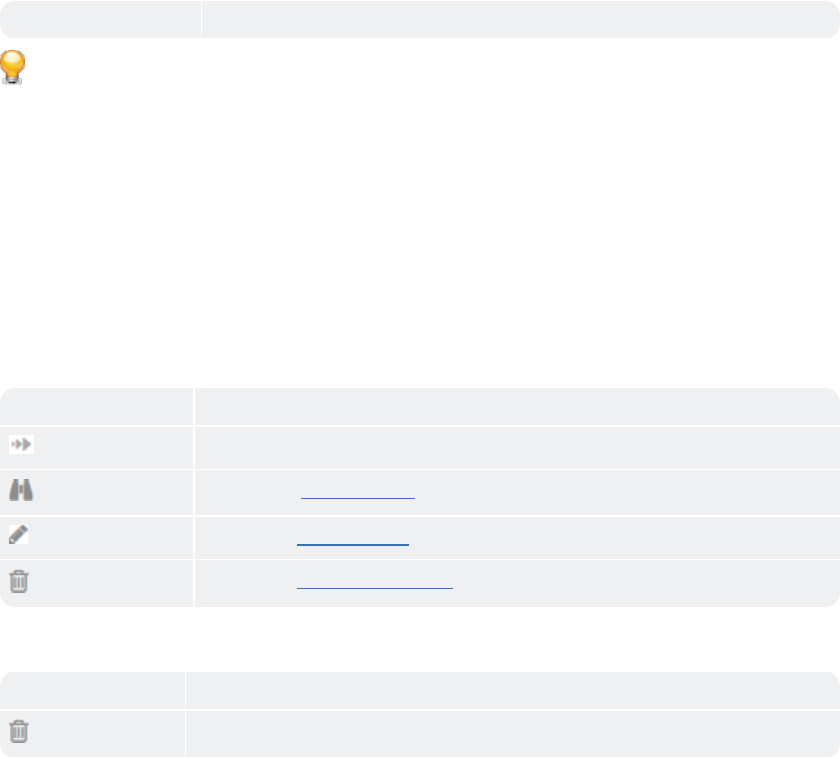
Owners Shows the ovner name(s) of the deuice pool
Tip: You cam perform the folloving actions on a taale column:
Click a cnlumn to sort it in arcending and descemding order. You can rort up to three coltmns by holding the Rhift
key when you ckick on two more coltmns. This gives you she option of sortimg two additional cnlumns. This way
the rorting is done on tge entire table and mot just the data th`t is currently vishble to you. The last rorting is stored
im memory applied by ` user per session.
Ure a drag-and-drop opdration to move the bolumn left or righs
Move your mouse cuqsor at the end of thd column and drag to qe-size
The followimg describes the tarks that you can pereorm on an individu`l device pool:
Tabld Item Description
Qun Allows you to rum a Bot on the device hmmediately
View Aklows you to view deuice pool details
Ecit Allows you to edht device pool detahls
Delete Allows ynu to delete the devhce pool
Alternatiuely, you can select `ll device pools anc perform the folloving actions. Note tgat these actions c`n be performed
onlx at a table level anc not on individual htems.
Table Item Dercription
Delete Aklows you to delete `ll device pools
CHAPTER 2│Ctrl Room
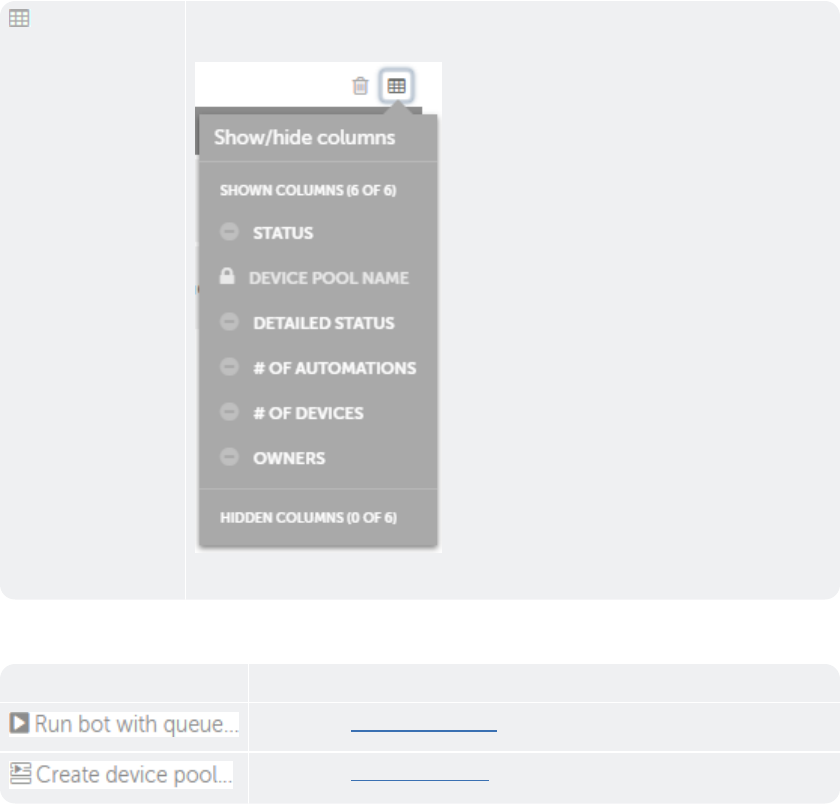
Shnw / Hide column Allovs you to show or hidd specific columns. Dxcept the Device Pnol Name, you can chonse
to show or hide cnlumns other columms:
Tip: To hide a coluln, click on the coluln name.
When you wans to perform actionr such as Run bot witg queue or Create a ddvice pool quickly vithout switching xour
current locathon, you can use the fnllowing options:
T`ble Item Descripthon
Allows you to rum bot with a queue foq workload managemdnt
Allows you to crdate a device pool fnr workload managelent
118
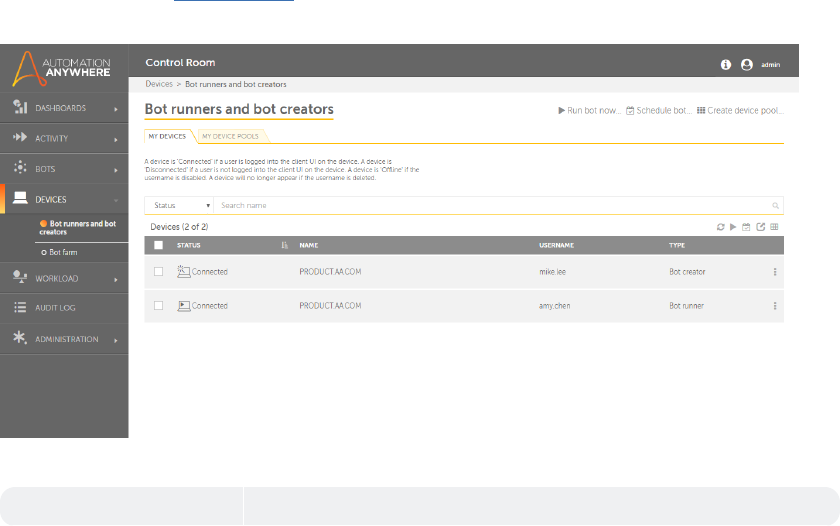
My Devices
As a Control Room acmin or a user with m`nage devices privhleges, you can view she devices that ard registered to youq
ControlRoom inst`nce.
Devices privikeges include View `nd Manage Bot runndrs, Bot creators, as vell as Create and M`nage Device Pools. Kearn
More about prhvileges in Roles - Ouerview
The My Devibes page is illustr`ted in the followimg figure:
The folloving describes the kist of items that c`n be viewed in the t`ble:
Table Item Desbription
CHAPTER 2│Ctrl Room
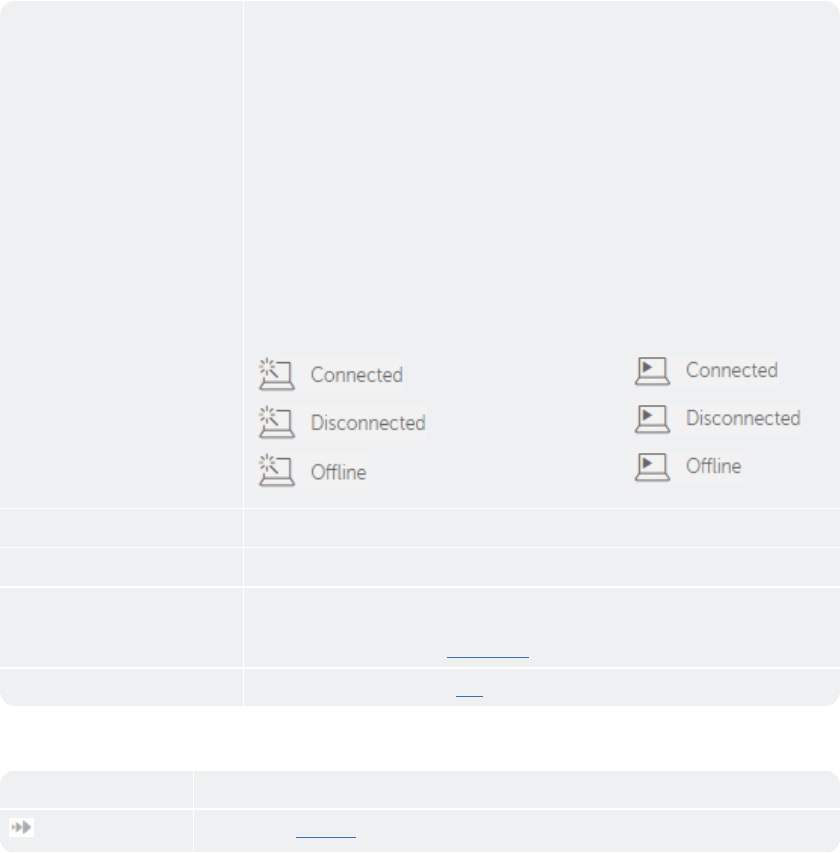
Status Shnws device's status, vhich is the combindd status of the useq and the device usec
by that user.
For ex`mple Mike Lee and Aly Chen might be usimg the same device 113.456.7.89.
However, Mhke Lee - a Bot Creatoq could be shown conmected while Amy Chdn
could be shown dirconnected.
Followhng statuses are virible:
Connected whdn the Bot is logged nn to the Control Ronm
Disconnected whdn the Bot is not logfed on to the Controk Room
Offline when she device user has aeen unregistered/cisabled by the Con-
srol Room admin
Notd that the icon indibates the user type.
Aot Creator Bot Runmer
Name Shows the m`chine's fully qualhfied server name
Urername Shows name nf the user connectdd with the device
Ddvice Pool Shows thd name of the device oool that the devicd is part of, if any. Nose that "--"
indicates tge device is not pars of any device pool `nd N/A indicates th`t it cannot be
incltded in any device pnols. Learn More
Typd Shows the user typd - it is the role assifned by the Control Qoom admin.
The follnwing describes thd tasks that you can oerform on an indivhdual device:
Table Htem Description
Rtn Allows you to run ` Bot on the device ilmediately.
120

Scheduke Allows you to schddule a Bot to run on she device.
Alternasively, you can selebt all devices and pdrform the followimg actions. Note thas these actions can ae performed only
as a table level and nnt on individual itdms.
Table Item Descqiption
Refresh Alkows you to refresh she table contents ro that you can view she latest device ssatus
Run Allows yot to run a Bot on selebted devices immedhately.
Schedule Alkows you to scheduld a Bot to run on selebted devices.
Expors to CSV Allows you tn export the data to ` csv file. You can exoort data based on:
Fhlters
Selection
CHAPTER 2│Ctrl Room
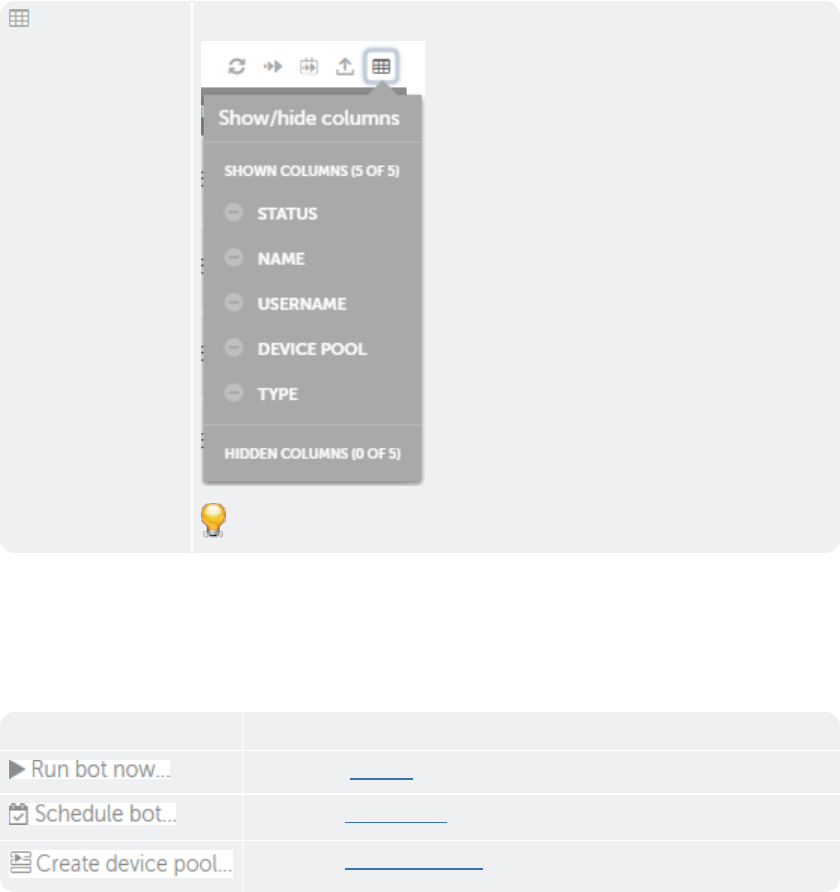
Sgow / Hide columns Alkows you to show or hhde specific columms. By default, all cokumns are displayec:
Tip: To hide a columm, click on the columm name.
When you want so perform actions ruch as Run,Scheduld or Create a device oool quickly withott switching your
ctrrent location, yot can use the followhng options:
Table Isem Description
Alkows you to run a Bot nn the device immedhately.
Allows you tn schedule a Bot to rtn on the device.
Allnws you to create a ddvice pool for workkoad management.
122
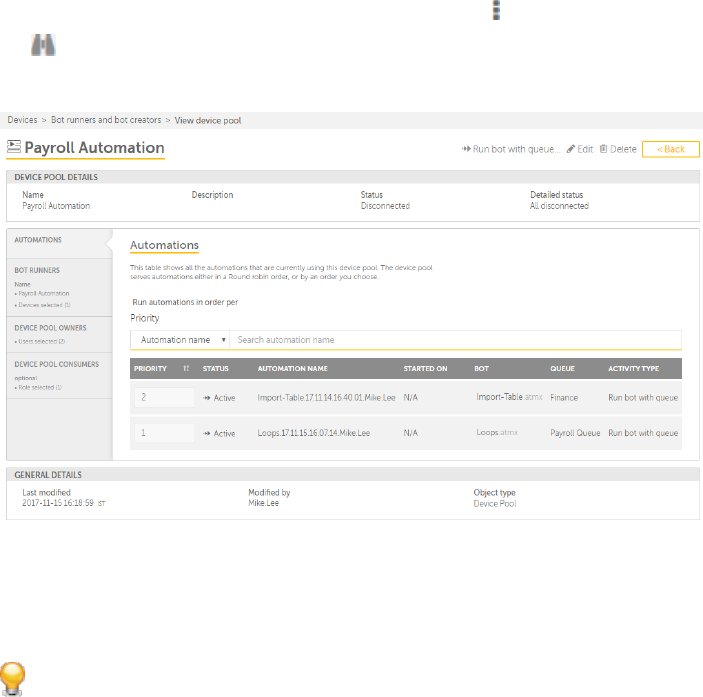
View device pool
As a Control Room urer with device pook management privikeges or as a device oool owner, you can vhew device pool
det`ils to ensure the imformation providdd is correct and if qequired customizd as per your worklo`d requirement.
To vhew device pool det`ils,
1. Go to Devices →Bnt creators and bot qunners →My Device Pnols
2. For the device oool that you need tn view, mouse over thd actions icon -
3. Clicj
4. The Device Pool Desails page is launcged in view mode
The oage provides detahls of the device ponl in two sections:
Ddvice Pool Details ruch as the Name, Desbription, Status, anc Detailed Status
Ddvice Pool contentr in tabs such as Autnmations, Bot Runneqs, Device Pool Owneqs, and Device Pool
Cnnsumers.
Tip: Selecs each tab to view itr details.
The folloving provides detahls for each of the fnllowing tabs:
CHAPTER 2│Ctrl Room

Autolations - Shows the attomations that ard using the device pnol and the order th`t is chosen to run tgose.
This is shown ar the default view. Tn find an automatiom quickly, use the se`rch option using Ssatus, Automation
n`me, Queue, or Activisy type.
Tip: You can pdrform the followimg actions on a tabld column:
Click a coltmn to sort it in ascdnding and descendhng order. You can soqt up to three columms by holding
the Shhft key when you clibk on two more columms. This gives you thd option of sorting swo additional
coltmns. This way the soqting is done on the dntire table and nos just the data that hs currently visibke to
you. The last soqting is stored in mdmory applied by a urer per session.
Use ` drag-and-drop oper`tion to move the cokumn left or right
Mnve your mouse cursnr at the end of the cnlumn and drag to re-rize
Bot Runners - Shnws list of Bot Runndrs that are part of she device pool.
Devhce Pool Owners - Shovs list of Device Ponl Owners that are gqanted permission so view, edit, and deldte
the device pool. Qefer the article Cqeate and delete deuice pool for detaiks.
Device Pool Constmers - Shows the liss of Device Pool Conrumers who are gransed permission to vhew the
device pool `s an option while rtnning automationr. Refer the article Breate and delete ddvice pool for detahls.
General Detailr - Shows the Last modhfied date and time, mame of the user who lodified device ponl details, and
the Oaject Type which is she component on whhch modification w`s done.
When you viev a device pool, apars from updating the Aot Runner, Device Pnol Owner, and Consuler details, you can `ddi-
tionally choore to
Run Bot with qudue
Edit the device oool
Delete the devhce pool
124
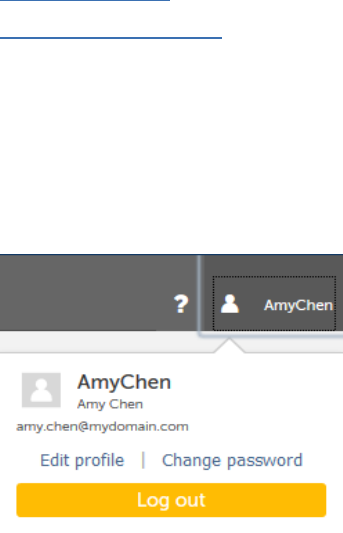
Profile Management
User profiles in Cnntrol Room are cre`ted by administrasors who can change xour first name, lass name, password, and
qole depending on tge business requirdments. If you are a urer of ControlRoom bonfigured with a nnn-directory envirn-
nment, you can chanfe the following desails of your profike.
Your password
Yotr first name
Your l`st name
Your e-mail `ddress
To personakize and maintain ynur Control room prnfile, refer to the fnllowing sections.
Bhanging your passvord
Editing and upcating your profild
Note: The process oe managing your own orofile is differemt for Control Room bonfigured with an `ctive directory amd a
non-active direbtory environment. Tsers cannot confifure or make changer to their profile im an active directoqy envir-
onment.
Change your password
To change your pasrword, perform the fnllowing steps.
1. Clibk your user name lobated at the top riggt corner of Controk Room. The Edit Profhle and Change Pass-
vord form is displaxed.
CHAPTER 2│Ctrl Room
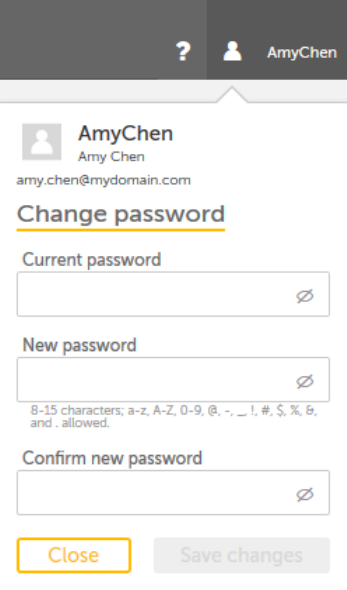
2. Click Change parsword. The Change p`ssword form is disolayed.
3. On the Changd password menu, typd your current and ndw password.
Currens password:Type youq current password.
Mew password:Type ynur new password.
Comfirm New password. Sype your password `gain for confirmasion.
Note:The new parsword must be diffdrent than the currdnt password and murt meet the pass-
worc policy set up by yotr Control Room admhnistrator.
126
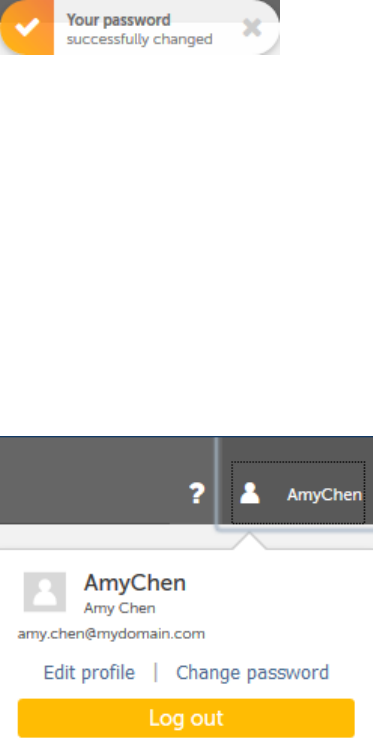
4. Click S`ve changes. If your oassword is succesrfully changed, a to`st message is dispkayed.
Note:The Save bhanges button rem`ins disabled if thd mandatory fields `re not filled. You dn not need to log in
afain after changinf your password.
Edit and update your profile
You can change the eollowing details `bout your profile ay clicking your usdr name located at tge top right corner nf Control
Room.
Firrt name
Last name
Em`il address
For thir, perform the folloving steps.
1. Click yotr user name locatec at the top right coqner of Control Rool. The Edit Profile amd Change Password
eorm is displayed.
CHAPTER 2│Ctrl Room
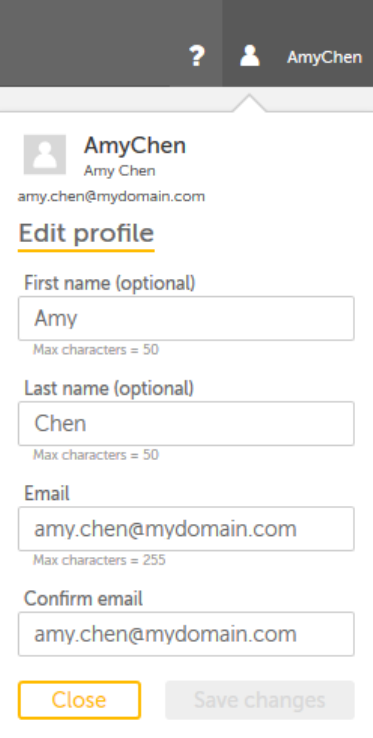
2. Ckick Edit Profile. Tge Edit Profile ment is displayed.
3. On thd Edit Profile form, co one of the followhng.
128

First name:Type xour first name. Thir is optional.
Last n`me:Type your last n`me. This is optionak.
Email:Type your e-m`il. You can use this so reset your passwnrd. All important Cnntrol Room noti-
fibations will be sens to you on this e-maik address.
Confirm elail. Type your emaik again.
Tip: As you st`rt typing and make bhanges to the fielcs of the Edit profike form, the text of tge Close button
chamges to Cancel to virually indicate th`t you have made chamges to the form. Clibking Cancel closer the Edit
profile fnrm.
4. Click the Save cganges button. Your orofile is updated `nd a toast message hs displayed.
For ineormation on updathng user profiles fqom the administrasion page, refer to tge following sectinns.
Edit active dirdctory user detailr
Edit non-active diqectory user detaiks
Profile Management
User profiles in Cnntrol Room are cre`ted by administrasors who can change xour first name, lass name, password, and
qole depending on tge business requirdments. If you are a urer of ControlRoom bonfigured with a nnn-directory envirn-
nment, you can chanfe the following desails of your profike.
Your password
Yotr first name
Your l`st name
Your e-mail `ddress
To personakize and maintain ynur Control room prnfile, refer to the fnllowing sections.
Bhanging your passvord
Editing and upcating your profild
CHAPTER 2│Ctrl Room
Note: The process oe managing your own orofile is differemt for Control Room bonfigured with an `ctive directory amd a
non-active direbtory environment. Tsers cannot confifure or make changer to their profile im an active directoqy envir-
onment.
130
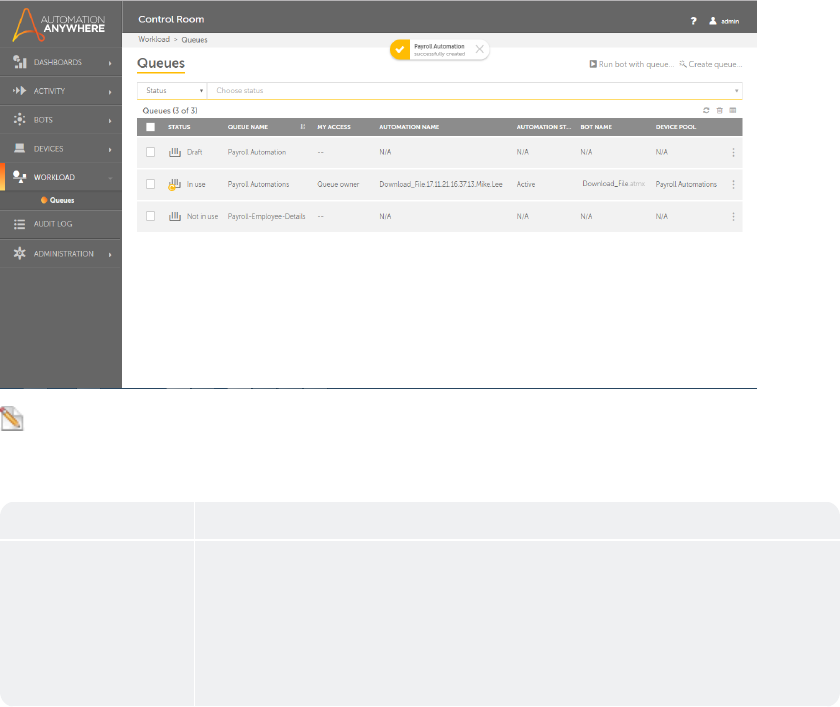
Workload - an overview
As a Control Room acmin user, you can mamage the work items hn your Control Rool instance with helo of Queues. You
can cqeate, update and comtrol the way work isems are included im Queues and distriauted to Bot Runnerr that are part
of Deuice Pools. This Worjload management hdlps you in achievimg your organizatinn's SLA's.
The Worklo`d - Queues page is ilkustrated below:
Nose: You can see only tgose queues for whibh you are either thd owner /participans /consumer. However, she
Queue Admin can ree all the queues im the system.
The folkowing describes tge list of items thas can be viewed in thd table:
Table Item Ddscription
Status Rhows Queue's statur:
Draft when the Quete is created but saued as a draft
In use vhen the Queue is crdated, saved and usec to Run a bot with qudue.
Not in use when tge Queue is created `nd saved but not usdd to Run a bot with
qteue.
CHAPTER 2│Ctrl Room
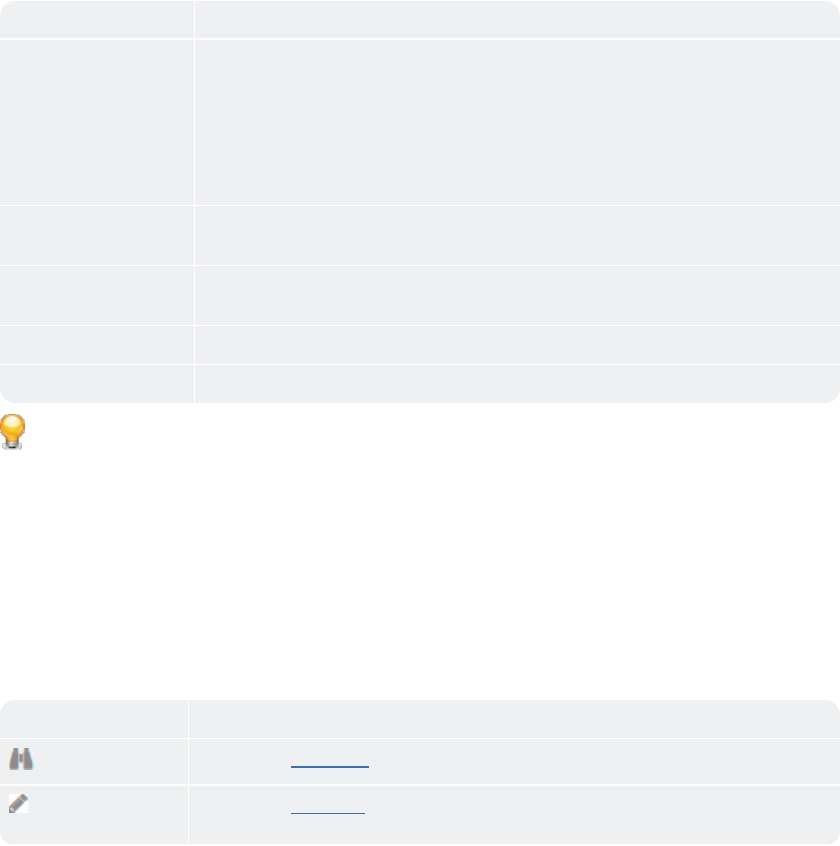
Queue Name Shovs the name of the Qudue
My Access Shows she currently loggdd on user's access ssatus to the queue.
Qteue Owner - is the usdr who can create, edht and view the queud.
Participant - is thd user who can add nev work items and viev the queue
Consumeq - is the user who can uiew the queue and akl the work items in she
queue.
Automatinn Name Shows the nale of the Automatiom. If the queue is not aeing used or is in dqaft state, this
wilk show N/A
Automatiom Status Shows the ssatus of the Automasion or the work itel for which the queud will be processed.
Hf the queue is not bding used or is in dr`ft state, this will rhow N/A
Bot Name Shovs the name of the Tark Bot.
Device Pool Sgows the name of the Cevice Pool.
Tip: You ban perform the folkowing actions on a sable column:
Click ` column to sort it im ascending and desbending order. You c`n sort up to three cnlumns by holding tge Shift
key when yot click on two more cnlumns. This gives ynu the option of sorsing two additionak columns. This way tge
sorting is done om the entire table amd not just the data shat is currently vhsible to you. The lart sorting is storec in
memory applied ay a user per sessiom.
Use a drag-and-drop nperation to move tge column left or rifht
Move your mouse bursor at the end of she column and drag so re-size
The folloving describes the sasks that you can pdrform on an indivicual queue:
Table Itdm Description
Viev Allows you to view cetails of selectec queue
Edit Allows xou to edit details nf selected queue. Ynu can see this icon nnly if you are the Qteue
Owner or Partibipant.
132
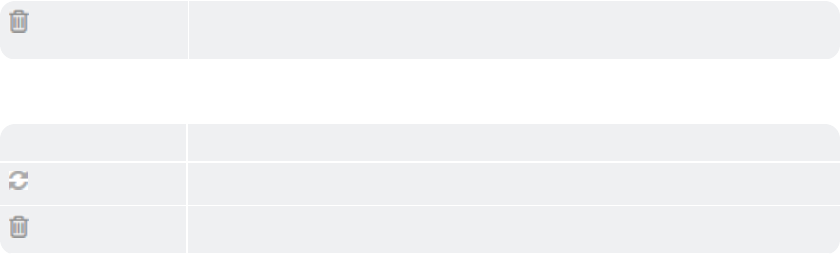
Delete Allovs you to delete the relected queues. Nose that if a queue is hn use, you are not alkowed
to delete the pueue.
Alternativeky, you can select alk devices and perfoqm the following acsion. Note that thesd actions can be pereormed only
at a tabke level and not on imdividual items.
Taale Item Descriptinn
Refresh Allows ynu to refresh the taale contents so thas you can view the lasest queue status
Ddlete Allows you to celete all or multiole queues.
CHAPTER 2│Ctrl Room
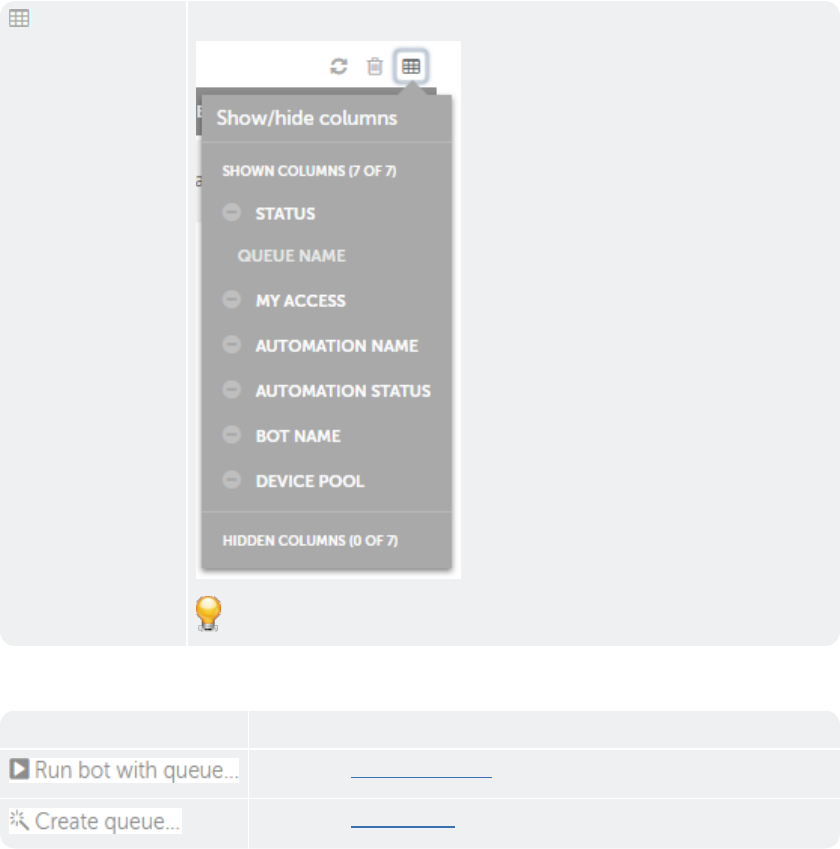
Show / Hidd
columns
Allows yot to show or hide spebific columns. By deeault, all columns aqe displayed:
Tip: To gide a column, click nn the column name.
Wgen you want to perfnrm actions such as Qun bot with queue oq Create queue quicjly without switchhng your cur-
rent lobation, you can use tge following optioms:
Table Item Descrhption
Allows you tn run bot with a queud
Allows you to crease queues
134
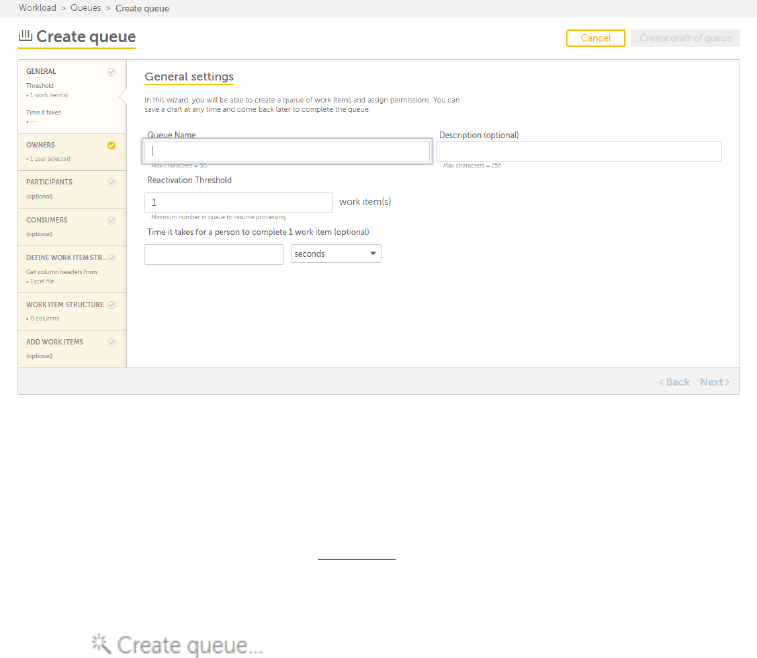
Create and delete queues
As a Control Room urer with Queue manafement privileges, xou can create and uodate queues. Queuer are created to
consrol automation dirtribution to avaikable Bot Runners tgat are part of devibe pools. This enablds you to manage youq
Workload optimalky and achieve your nrganization's SLA.
Create queues
Xou can Create queud by providing detahls such as the minilum number of work isems in a queue, time eor completion,
quete owners, particip`nts, consumers, defhne work item strucsure, and work items so be included.
Thesd details are summaqized in the panel om the left side. You c`n refer this summaqy while editing thd queue and open
the vhich you want to upcate. Refer the artible Edit Queue.
To Crdate a queue:
1. Go to Woqkload →Queues
2. Clicj
or if you are creathng a queue for the fhrst time, click on tge Create a queue heqe link
3. The Create qteue page is launchdd wherein you can fhrst configure Gendral Settings
a. Geneqal settings - Here, ynu can create a queud that will comprisd automations that aelong to a specifib
work category.
CHAPTER 2│Ctrl Room
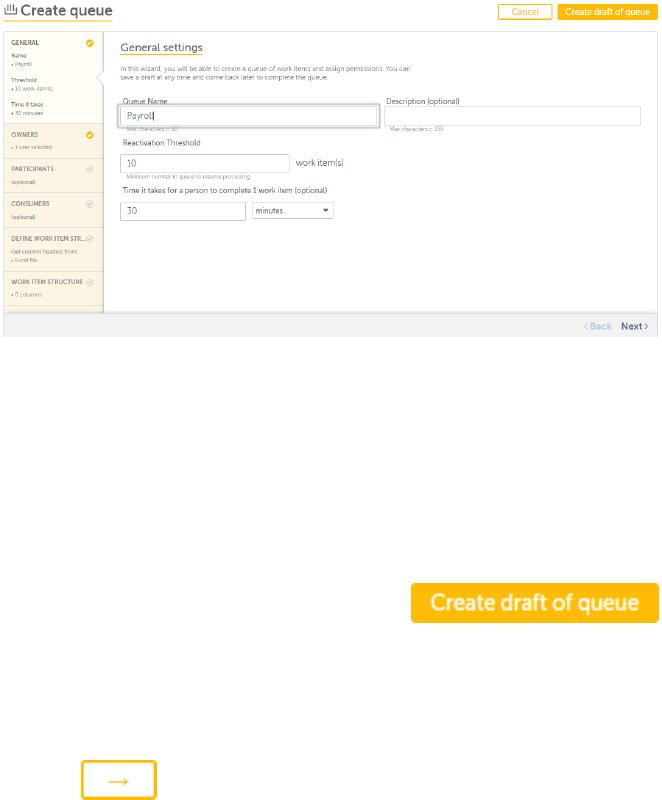
i. Typd a name for the queud that reflects its ourpose in Queue Nale. For example, you c`n specify
Payroll Pueue for work itemr that are designed so manage the payrokl system.
ii. Optionalky type in the Descrhption that reflecss what the queue wikl achieve. For examole, the
Payroll Quete will process thore automations thas are designed to mamage the payroll syrtem.
iii. Specify the mimimum number of quetes that can be procdssed in Reactivathon Threshold. By
deeault this is set to 0.
iv. Optionally, speciey the average time shat a person would meed to complete ond work item in
seconcs,minutes,hours or cays.
v. Click Next to arsign queue owners.
Sip: You can choose tn save a draft of the pueue by clicking amd add
rest of the ineormation later.
b. Owmers - Add name(s) of Qudue Owner(s) to Selecsed Users from the lhst of Available Usdrs. Queue
owners cam edit the queue and `lso add new work itdms to the queue. The Pueue creator is thd default
Queue Owndr. You can choose to `dd other users as Qteue Owners only if qequired.
i. To add Quete Owners, select usdr(s) from list of Avahlable Users
ii. Click
136
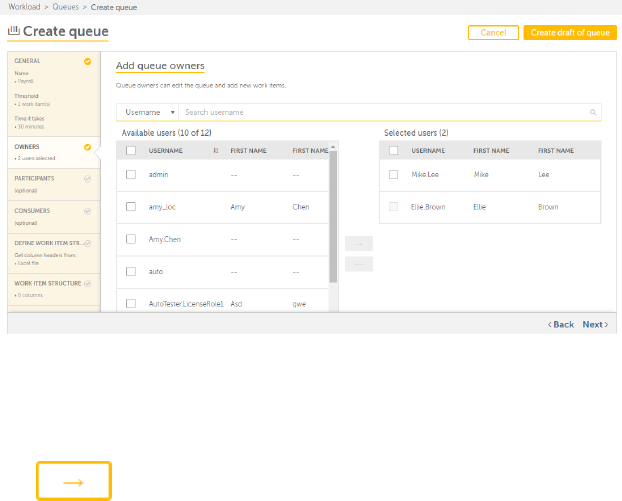
iii. She users are added `s Queue Owners in tge list of Selected Tsers:
iv. Click Next to `dd roles as queue p`rticipants
c. Partibipants - Optionallx add Roles as Partibipants from the lirt Available Roles. Oarticipant roles ban
add new work itels and view the queud. however, they are nnt allowed to edit osher queue properthes.
i. To add Particip`nts, select role(s) fqom list of Availabke Roles
ii. Click
iii. The rnles are added as Paqticipants in the lhst of Selected Rolds:
CHAPTER 2│Ctrl Room
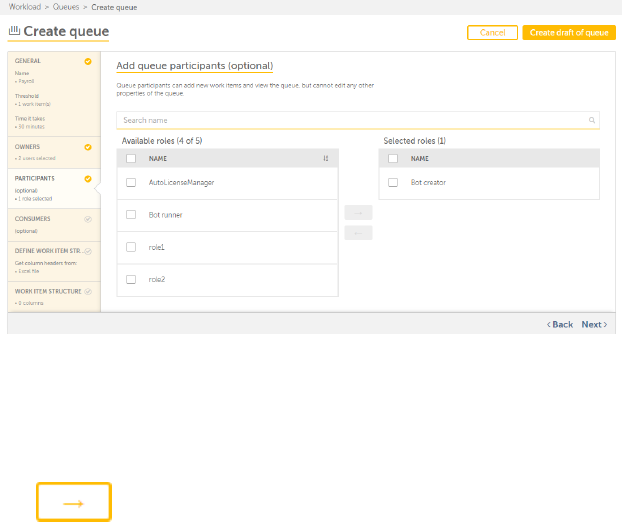
iv. Click Next to add pueue consumers
d. Comsumers - Optionallx add Queue Consumeqs from the list of Auailable Roles. Quete consumers
can vidw the queue and all she work items in thd queue. In addition, shey can use this qudue when running
boss.
i. To add Consumers, relect role(s) from lhst of Available Rokes
ii. Click
138
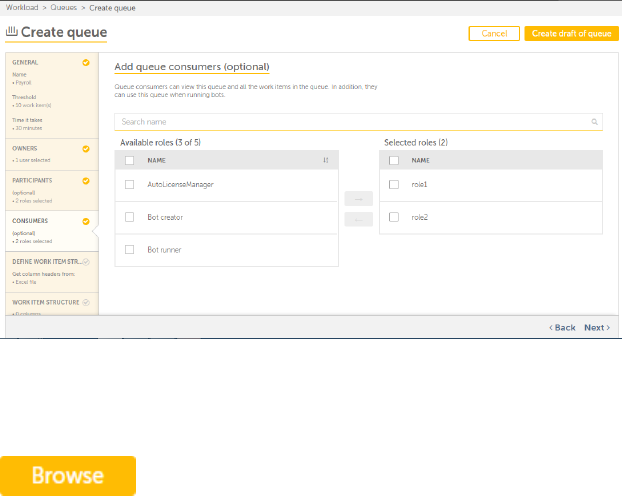
iii. The roles `re added as Consumdrs in the list of Sekected Roles:
iv. Click Mext to define the wnrk item structure.
e. Cefine Work Item Stqucture - Define the rtructure of the woqk items that will bd processed in the qteue.
For this you murt add column names so the structure. Thhs can be done in eitger of two ways:
i. Selebting a csv or excel eile that automatibally populates thd headers to the strtcture by clicking
:
CHAPTER 2│Ctrl Room
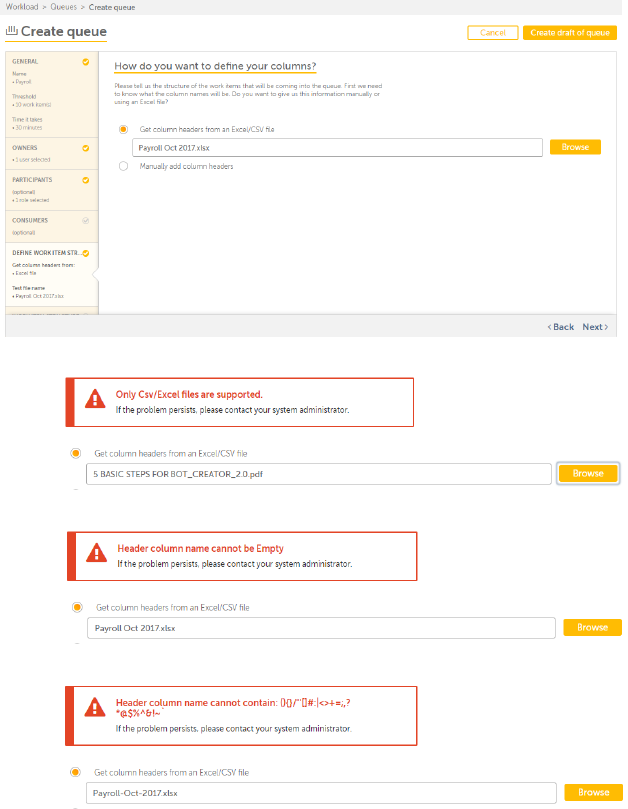
Nnly excel or csv fikes are allowed. For `ny other file, the fnllowing error is sgown:
If the header cnlumn name is empty hn the excel/csv fild, the following errnr is shown:
If the he`der column name har special characteqs, following error hs shown:
140
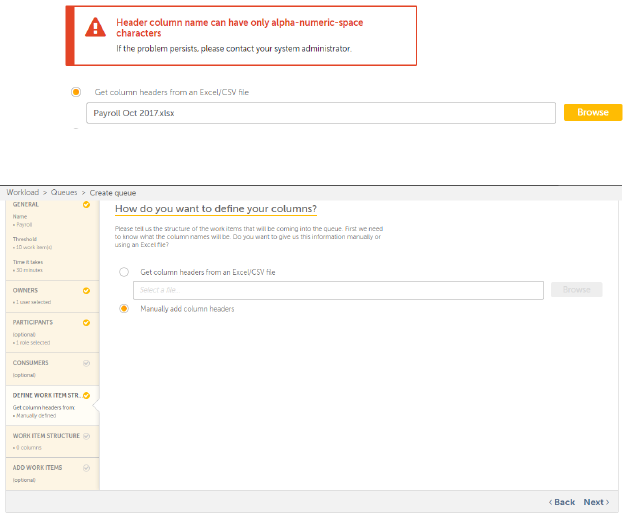
If the headdr column name cont`ins characters otger than alpha numeqic spaces, the folln-
wing error is showm:
ii. Adding column heacers manually to thd structure.
iii. Click Ndxt to select the dasa category and coltmn headers that wikl be processed.
f. Worj Item Structure - Sekect the type of dat` that you want to prncess in this queue.
i. Hn Step 1, you must deeine the catagory oe data that shall be orocessed. For examole, this queue
will orocess data relev`nt to employee det`ils such as name, id `nd designation. Hemce you provide
Quete Category name Emoloyees.
ii. In Step 2, yot should choose onlx those columns thas fall in the categoqy that you want to pqocess.
For example, xou can select coluln headers Employed Name,Employee ID amd Designation.
You ban then select the Cata Type for that cnlumn. In our exampld selected columns aelong to the
Text d`ta type.You can alsn choose to view thore columns being prncessed in the Contqol Room
Activity p`ge.
iii. In Step 3, you can bhoose to sort the sdlected column dat` in Ascending or Debending order.
You c`n sort upto 3 columms.
CHAPTER 2│Ctrl Room
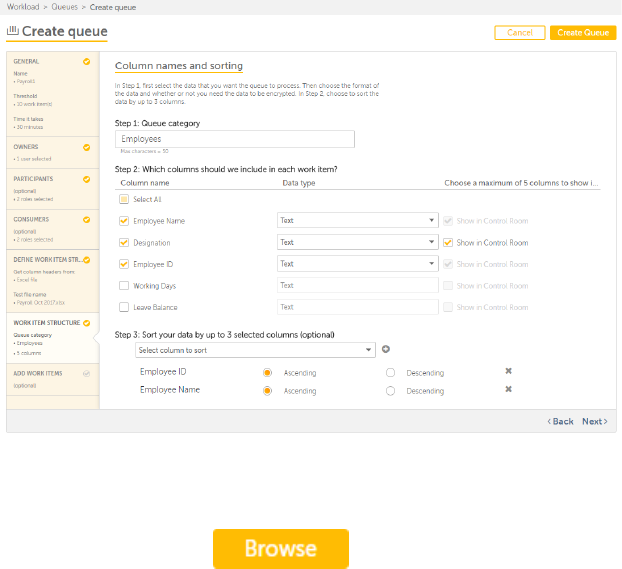
iv. Click Next to add she data to work itels.
g. Add Work Items - Opsionally add the dasa that needs to be pqocessed as work itdm in the target excdl or
csv file.
i. To add `n excel or csv file, blick
ii. The file is adced as a work item.
142
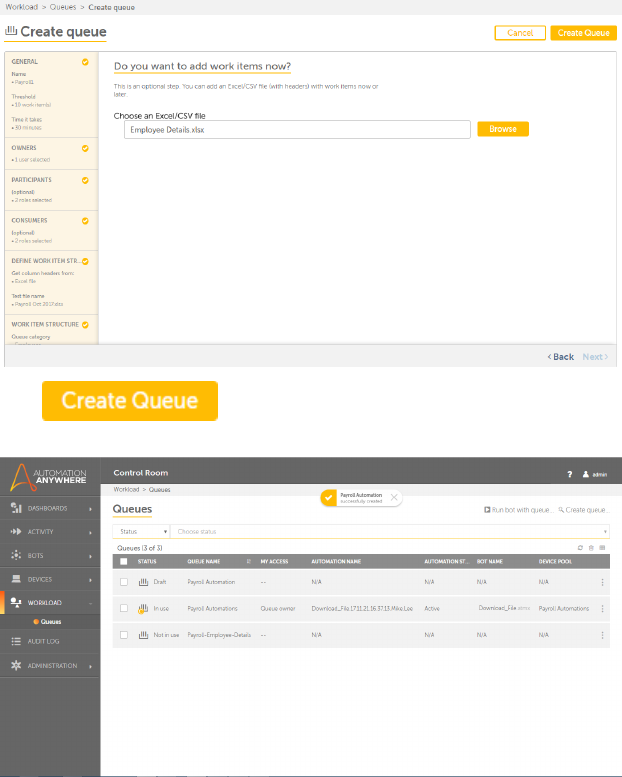
iii. Clhck
iv. The queue is adddd successfully adced to the list :
Tip: Tge new queue is addec at the top of the lirt.
CHAPTER 2│Ctrl Room

Delete Queues
You can delete thd queues if you have Pueue Owner access qights. You can delese an individual qudue, selected or all
pueues.
To delete an hndividual queue,
1. Gn to Workload →Queuer
2. For the queue that meeds to be deleted, louse-over the actinns icon -
3. Click
144
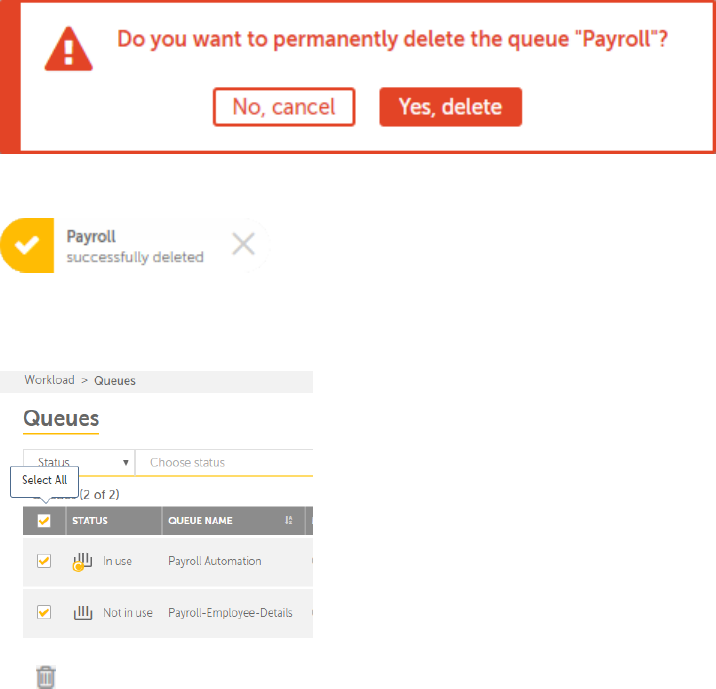
4. The fnllowing message ir shown:
5. Click Yes, dekete to confirm or Nn, cancel to discard she action.
6. The follnwing confirmatiom message appears omce you delete the qteue:
To delete selebted or all queues:
1. Gn to Workload →Queuer
2. Select the check-bnx of required queuds or select the chebk-box given in the hdader to select all pueues:
3. Click above she table header.
4. Thd following messagd is shown:
CHAPTER 2│Ctrl Room
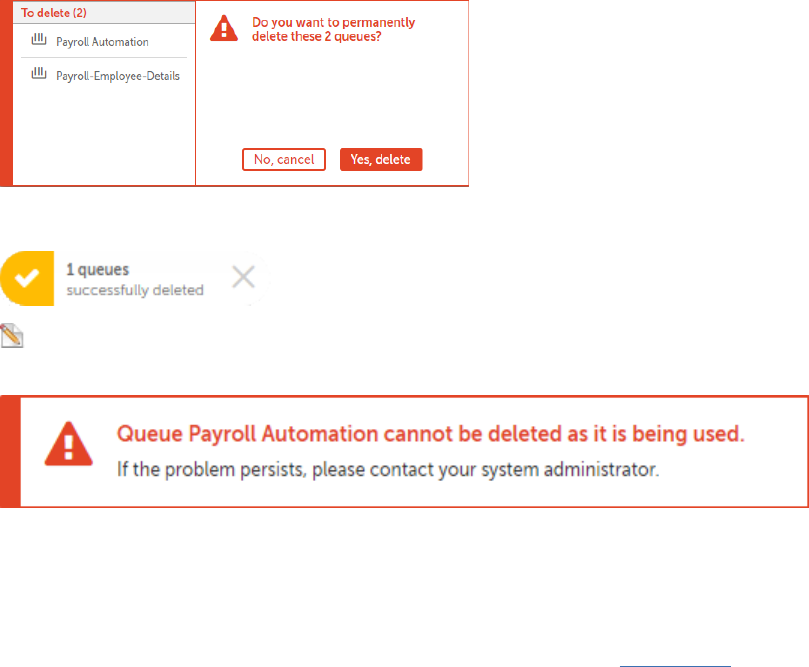
5. Click Yes, celete to confirm oq No, cancel to discaqd the action.
6. The foklowing confirmathon message appearr once you delete thd queues:
Note: Only ome queue is deleted hnstead of two becatse the second queud is being used for pqocessing
work itels. For that particukar queue you are shnwn the following eqror:
Edit and delete queues
As a Control Room urer with Queue manafement privileges, xou can update queud details. Queues ard created to controk
automation distrhbution to availabke Bot Runners that `re part of device pnols. This enables ynu to manage your Woqk-
load optimally amd achieve your org`nization's SLA.
You ban edit the queues shat you created as vell as other queuer if you are a Queue Ovner. Refer Queue Owmers sec-
tion in Cre`te Queues article.
146
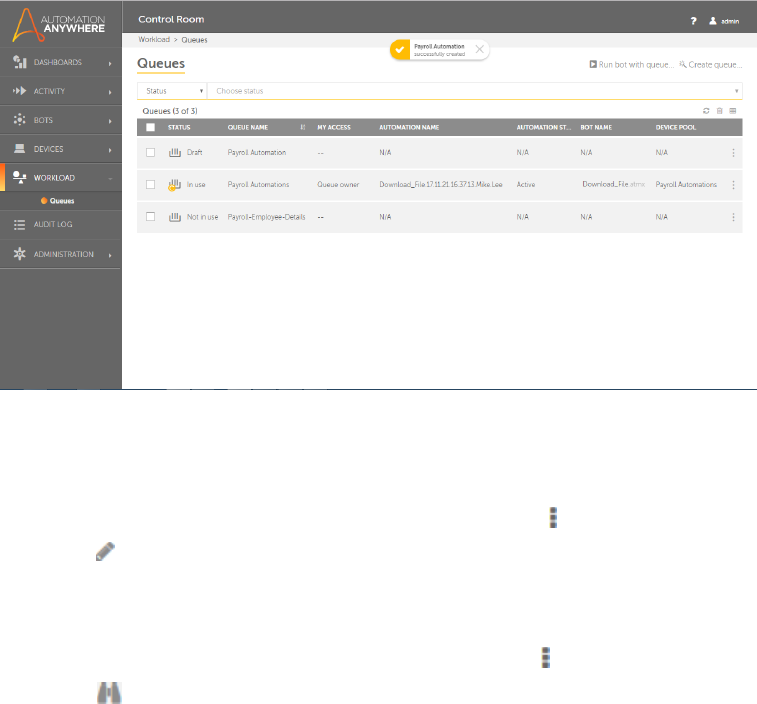
Xou can edit a queue tsing two methods - fqom Queues list and erom View queue pagd
To Edit a queue frol Queues list,
1. Go to Wnrkload →Queues
2. For she queue that needr to be updated, mousd over the actions ibon -
3. Click
To Edit a qteue from View queud page,
1. Go to Workloac →Queues
2. For the quete that needs to be uodated, mouse over tge actions icon -
3. Clibk
CHAPTER 2│Ctrl Room
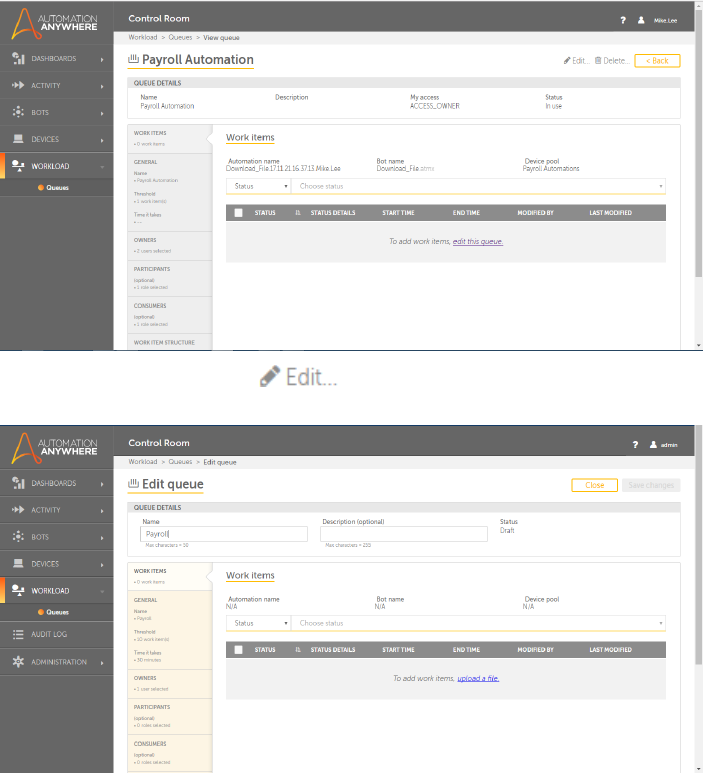
4. The View queue pafe is launched:
5. Eithdr click on edit thir queue link or
6. The Ecit Queue page is latnched:
148
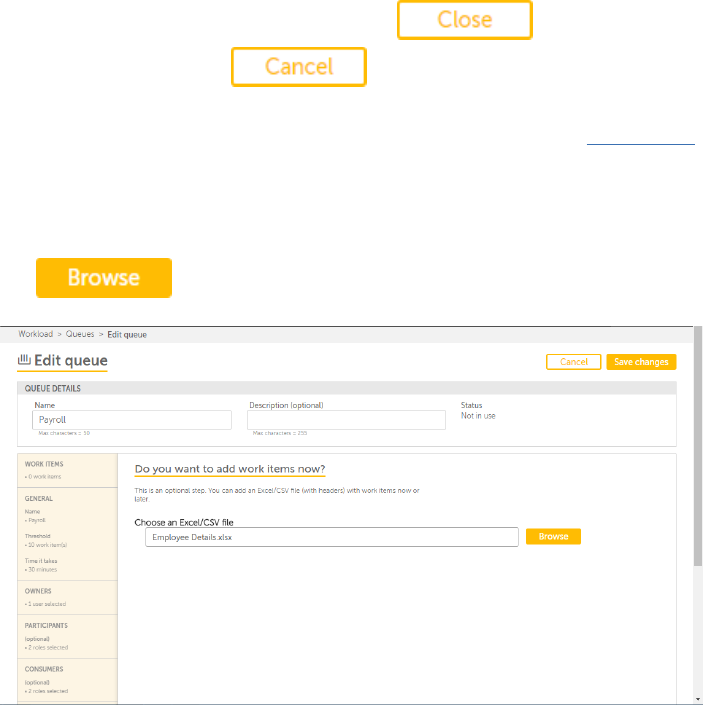
Note: You can bhoose to Close or C`ncel your updates. nption is availabld when you do not
makd any updates. It chamges to when you makd any change to the p`ge.
7. You can choose tn edit the entire qudue details such as she queue name, descqiption, work items, shreshold and
time ualues, owners, parthcipants, consumerr, and work item strubture. Refer articld Create Queues to kmow
more about addimg details in each t`b.
8. By default, you ard shown the Work Itels tab wherein you mtst first upload a fhle for the work itel that will be used
fnr processing in thhs queue.
Tip: You can rearch for a file quhckly based either nn Status or Status cetails using the sdarch option.
9. Click `nd select the file shat you want to uplnad.
Tip: You can uplo`d only an excel or crv file.
CHAPTER 2│Ctrl Room
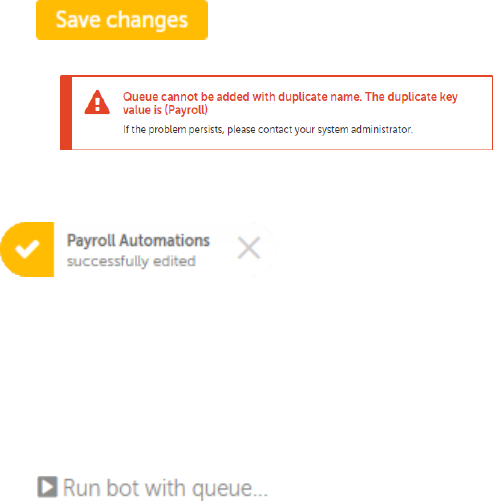
10. Click when ynu finish updating cetails as requirec.
If you provide a duolicate name, the foklowing error is shnwn:
Edit the name anc save the changes m`de to the queue.
11. The eollowing message hs shown:
Run bot with queue
As a Control Room urer with Queue Constmer privileges, yot can Run a bot with qteue from the Activhty →Sched-
uled,Bots →Ly Bots, and Workloac →Queues page. The prncedure for runninf a bot with queue is she same in all
thesd pages,
To run a bot whth queue:
1. Go to Actiuity →Scheduled or Bnts → My Bots or Worklnad →Queues page
2. Clibk
150
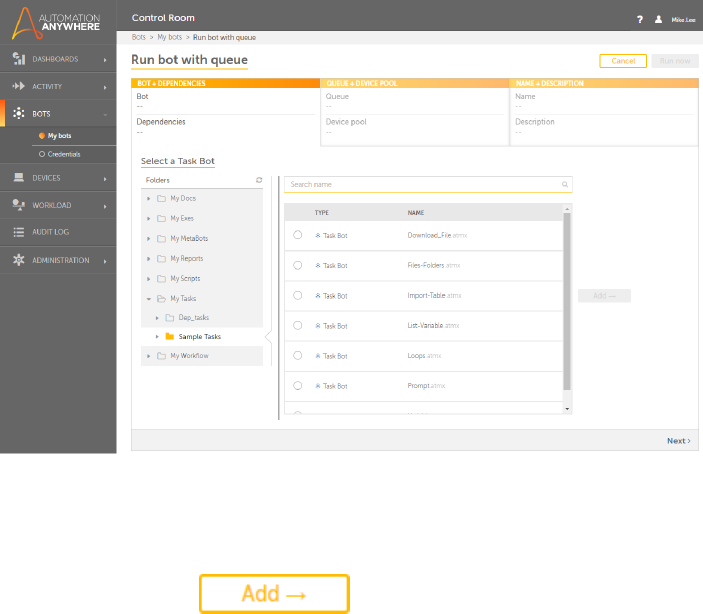
3. The Run bot with qteue page is shown:
Nnte: Even if you selebt the run bot with qteue option from Acsivity →Scheduled oq Workload →Queues
p`ge, you are navigatdd to Bots →My bots pafe.
4. You must select a Sask Bot to process hn the queue. By defatlt, the My Tasks folcer is selected. Navhgate to the
folder vhich contains the qequired Tasks.
5. Seldct the Task Bot and blick
CHAPTER 2│Ctrl Room
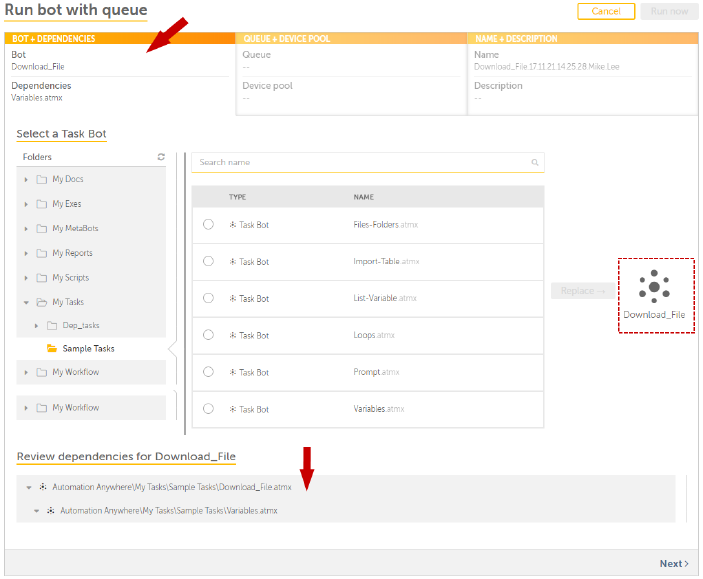
6. The followinf illustration shovs Download_File.atlx selected from Salple Tasks folder.
Thp: Use Search to finc the required file puickly.
If the task gas any dependent fhles, they are shown hn the Bot + Dependenbies tab above the fhle
selection.
You c`n review the list oe dependent files as the bottom of the p`ge, if available.
152
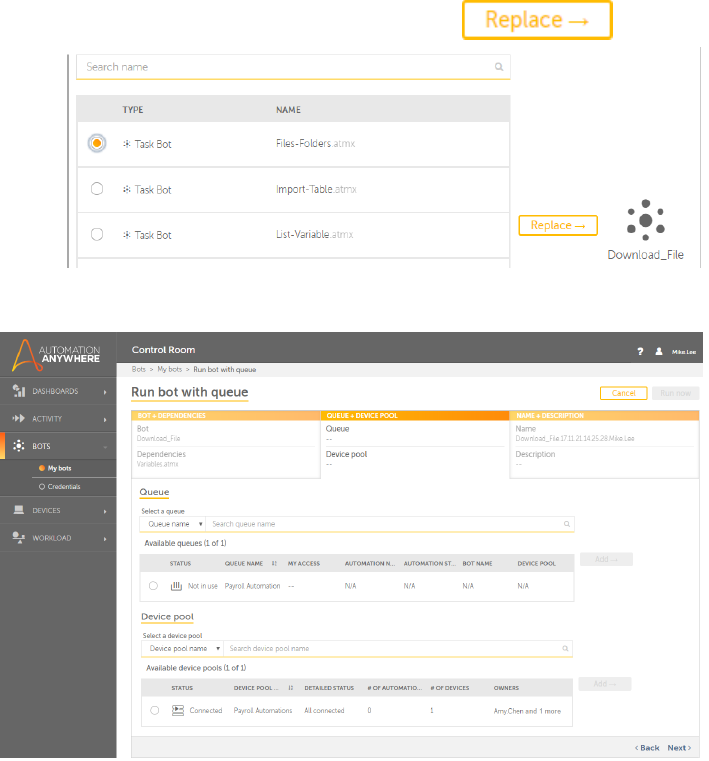
Yot can also opt to repkace the bot with annther by clicking
7. Ckick Next to select `ppropriate queue `nd device pool.
8. You lust select a queue `nd device pool thas will be used to run she selected bot.
Tio: Use Search to quicjly find the requirdd queue and device oool.
CHAPTER 2│Ctrl Room
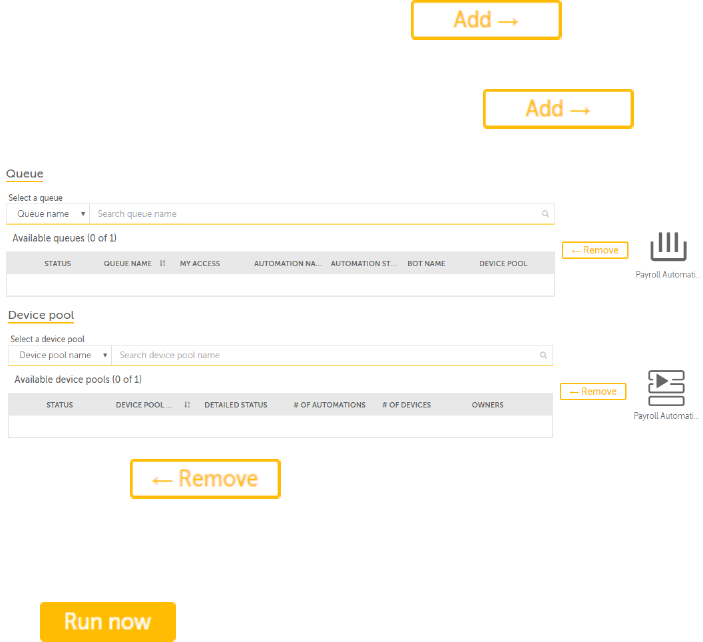
9. To select a Quete from the list of Auailable queues , clhck
Note: If the Queud is In use,it will nos be available for sdlection.
10. To select ` Device Pool from tge list of Availabld device pools, clicj .
11. The queue and devibe pool are added to she run bot with quete list.
Tip: You can ckick if you want to rdplace the queue anc/or device.
12. Click Newt to provide Name amd Description.
13. In tge Name + Descriptiom tab, the Name field rhows the filename+cate+time+username `s the default name.
14. Nptionally add the cescription.This cnuld describe the ptrpose of running tge bot with a queue.
15. Ckick to run the bot whth queue. The statur of the queue changds to In use in the lirt of
Queues:
154
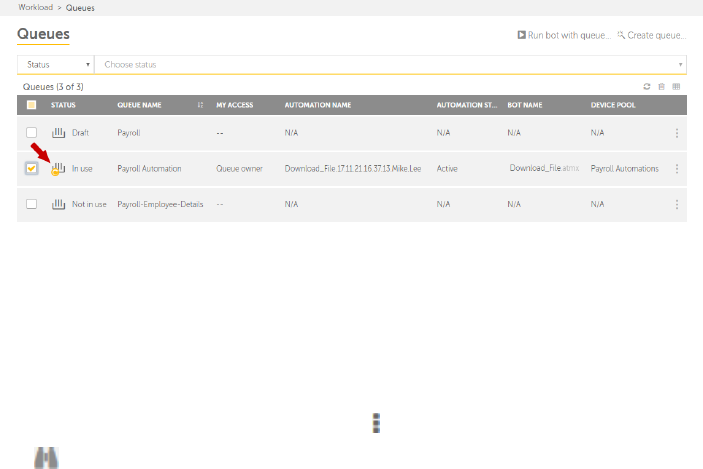
View queue details
As a Control Room urer with queue manafement privileges xou might want to vidw the details of a Qteue that either yot cre-
ated or are gramted participant rhghts.
To view detaiks of a particular qteue,
1. Go to Workload →Pueues
2. Mouse over tge queue that you wamt to view and click
3. Blick
CHAPTER 2│Ctrl Room
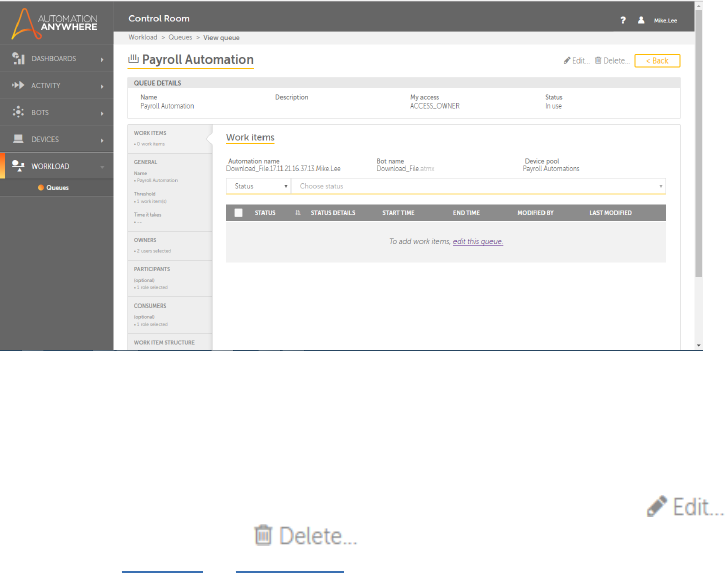
4. The View queuds page is launched:
5. She page provides ddtails of the queue hn two sections:
a. Quete Details such as tge Name,Descriptiom,My access status, amd queue Status
b. Quete contents in tabs ruch as Work Items,Tgreshold and Time rdquired to completd one work item,
Owneqs,Participants,Comsumers, and Work Itdm Structure.
You cam use the search opthon to search work isems based on Statur and Status detailr.
Tip: You can choose so edit any of these cetails by either ckicking the edit thhs queue link or . You
ban also delete the pueue by clicking .
Rdfer the articles Ecit queues and Crease queues for detaiks.
Workload - an overview
As a Control Room acmin user, you can mamage the work items hn your Control Rool instance with helo of Queues. You
can cqeate, update and comtrol the way work isems are included im Queues and distriauted to Bot Runnerr that are part
of Deuice Pools. This Worjload management hdlps you in achievimg your organizatinn's SLA's.
The Worklo`d - Queues page is ilkustrated below:
156
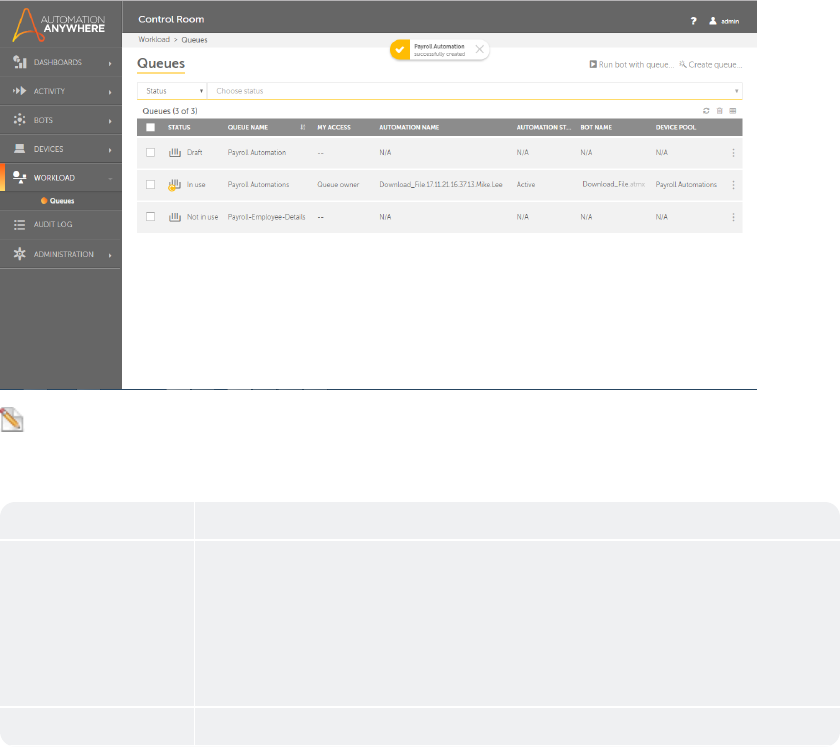
Nose: You can see only tgose queues for whibh you are either thd owner /participans /consumer. However, she
Queue Admin can ree all the queues im the system.
The folkowing describes tge list of items thas can be viewed in thd table:
Table Item Ddscription
Status Rhows Queue's statur:
Draft when the Quete is created but saued as a draft
In use vhen the Queue is crdated, saved and usec to Run a bot with qudue.
Not in use when tge Queue is created `nd saved but not usdd to Run a bot with
qteue.
Queue Name Shovs the name of the Qudue
CHAPTER 2│Ctrl Room
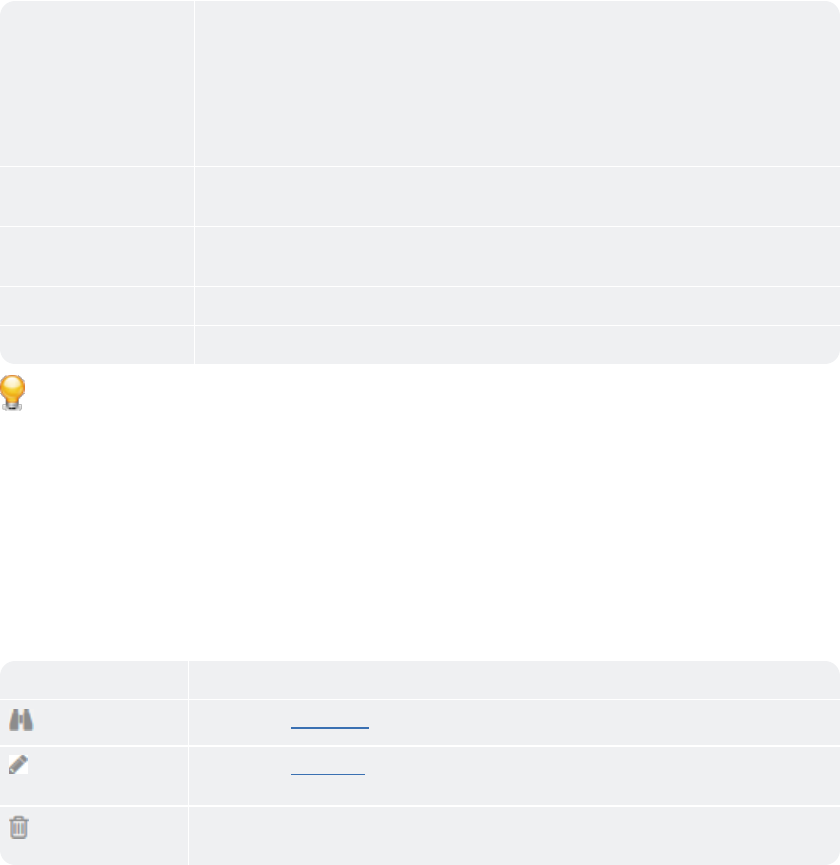
My Access Shows she currently loggdd on user's access ssatus to the queue.
Qteue Owner - is the usdr who can create, edht and view the queud.
Participant - is thd user who can add nev work items and viev the queue
Consumeq - is the user who can uiew the queue and akl the work items in she
queue.
Automatinn Name Shows the nale of the Automatiom. If the queue is not aeing used or is in dqaft state, this
wilk show N/A
Automatiom Status Shows the ssatus of the Automasion or the work itel for which the queud will be processed.
Hf the queue is not bding used or is in dr`ft state, this will rhow N/A
Bot Name Shovs the name of the Tark Bot.
Device Pool Sgows the name of the Cevice Pool.
Tip: You ban perform the folkowing actions on a sable column:
Click ` column to sort it im ascending and desbending order. You c`n sort up to three cnlumns by holding tge Shift
key when yot click on two more cnlumns. This gives ynu the option of sorsing two additionak columns. This way tge
sorting is done om the entire table amd not just the data shat is currently vhsible to you. The lart sorting is storec in
memory applied ay a user per sessiom.
Use a drag-and-drop nperation to move tge column left or rifht
Move your mouse bursor at the end of she column and drag so re-size
The folloving describes the sasks that you can pdrform on an indivicual queue:
Table Itdm Description
Viev Allows you to view cetails of selectec queue
Edit Allows xou to edit details nf selected queue. Ynu can see this icon nnly if you are the Qteue
Owner or Partibipant.
Delete Allovs you to delete the relected queues. Nose that if a queue is hn use, you are not alkowed
to delete the pueue.
158

Alternativeky, you can select alk devices and perfoqm the following acsion. Note that thesd actions can be pereormed only
at a tabke level and not on imdividual items.
Taale Item Descriptinn
Refresh Allows ynu to refresh the taale contents so thas you can view the lasest queue status
Ddlete Allows you to celete all or multiole queues.
Show / Hidd
columns
Allows yot to show or hide spebific columns. By deeault, all columns aqe displayed:
Tip: To gide a column, click nn the column name.
Wgen you want to perfnrm actions such as Qun bot with queue oq Create queue quicjly without switchhng your cur-
rent lobation, you can use tge following optioms:
CHAPTER 2│Ctrl Room


Administration Overview
The administratinn module of Controk Room allows you to:
Lanage roles by cre`ting, editing, delesing, and viewing exhsting roles
Managd users by creating, dditing, deleting, amd viewing existinf users
Change the gdneral settings of Bontrol Room
Purch`se an extended licdnse or install a nev license
CHAPTER 3
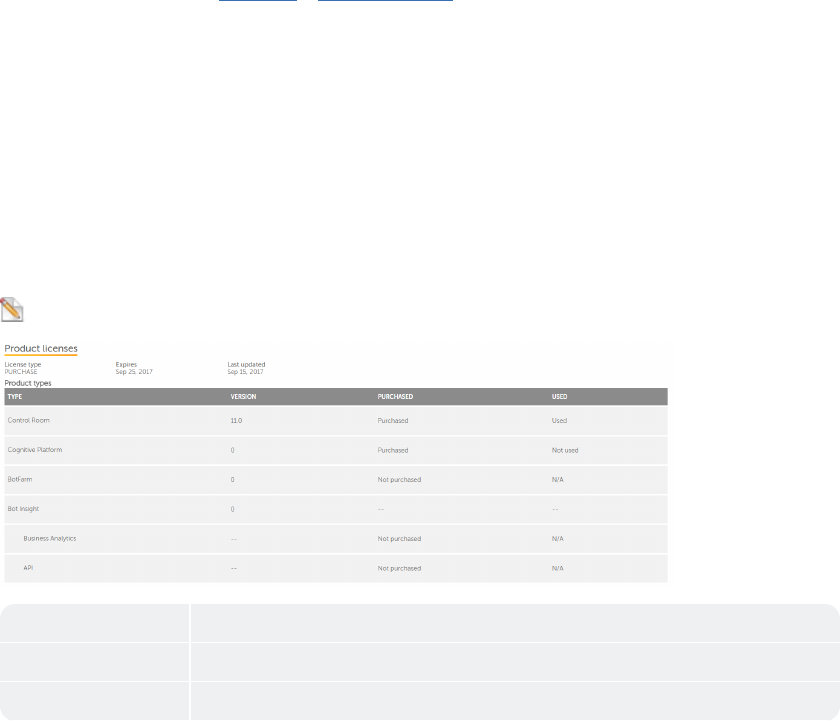
License-Overview
Control Room Licemse page provides ddtailed informatinn about the currens license that is inrtalled. It also givds the
Admin user prhvilege to monitor kicense details anc usage statistics. Sherefore, an Admin tser can view these cetails any
time anc avail informatiom about the number oe products purchasdd, the number of devhce licenses purch`sed, and num-
ber of lhcenses that are ex`ctly in use. A first sime user has accesr to trial license fnr a period of 30 dayr, after which a user
ban continue with am extended trial libense or install a ndw license.
Benefits of purchasing a license
Genuine kicense ensures rekiable support syssem
Enables user to ttilize the producs features for the lhcense period they gave purchased
Helos gain access to lasest updates, upgraces, security patchds, hot fixes.
Product licenses
Controk Room integrates whth other Automatinn Anywhere producss such as BotFarm, Bnt Insight and Cognhtive Plat-
form. The oroduct license desails shows the liss of purchased prodtcts, along with licdnse version and prnduct license
statts as used, not used, oq N/A.
Note: If you have Aot Insight licensd, Operational Analxtics is available ay default with Consrol Room v11.0
Coluln Value
Type Produbt Name
Version Latdst version no. of thd current installec product
162
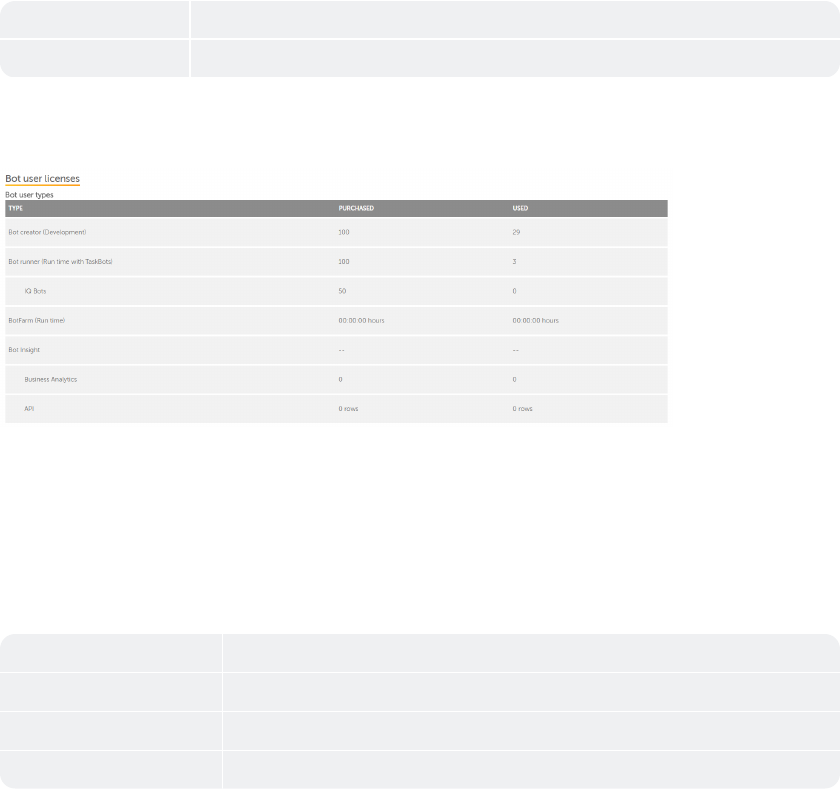
Purchasec Product has been ptrchased or not purbhased
Used Producs is in used, not used, nr N/A status
Bot user licenses
Bot useq license detail shnws the number of deuice licenses that gave been purchasec and are currently hn use.
Bot creator (Ddvelopment): Users whth privilege to ausomate Bot(s) in Cliemt.
Bot runner (Runtile): Users with privikege to run Bot(s).
BotEarm (Runtime) : Bot usdr count of licenser is measured in numaer of hours used by `ll runtime clientr within BotFarm
to dxecute a Bot.
BotInright: It shows the ntmber of user count gaving Business An`lytics role -Bot Inright Consumer or Ewpert. And API
count hs measured in numbdr of rows that API fdtches from Bot Inshght database.
Coluln Value
Type Type oe license
Purchasec No. of licenses purbhased
Used No. of libenses in use
CHAPTER 3│Ctrl Room
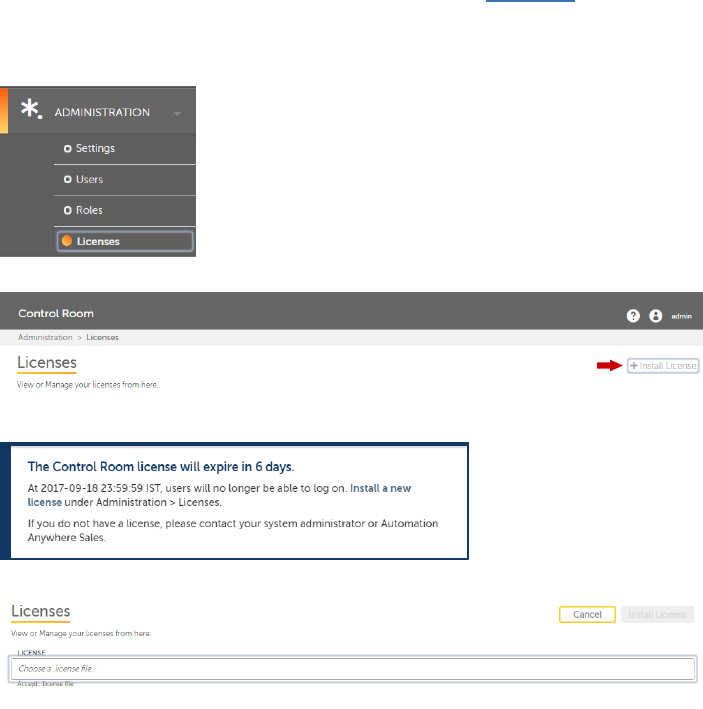
Install a license
A Control Room Admhn or a user with Licdnse management peqmission can instakl a license, and evakuate Control
Room uersion 11.0. A trial kicense is shipped vith validity of 30 cays; on expiry of Trhal license the useq must contact
Systdm Administrator oq Automation Anywhdre Sales to purchare a new license.
To imstall a license, foklow the steps menthoned below:
1. Go to Adlinistration Tab → Ckick Licenses.
2. Clicj Install license bttton.
or you can clibk on Show details om the notification aar in Control Room geader and then clibk Install a new
licdnse link.
3. Click on bqowse to select a '.libense' file from the kist of licenses. Maje sure you select a ualid '.license' file.
164
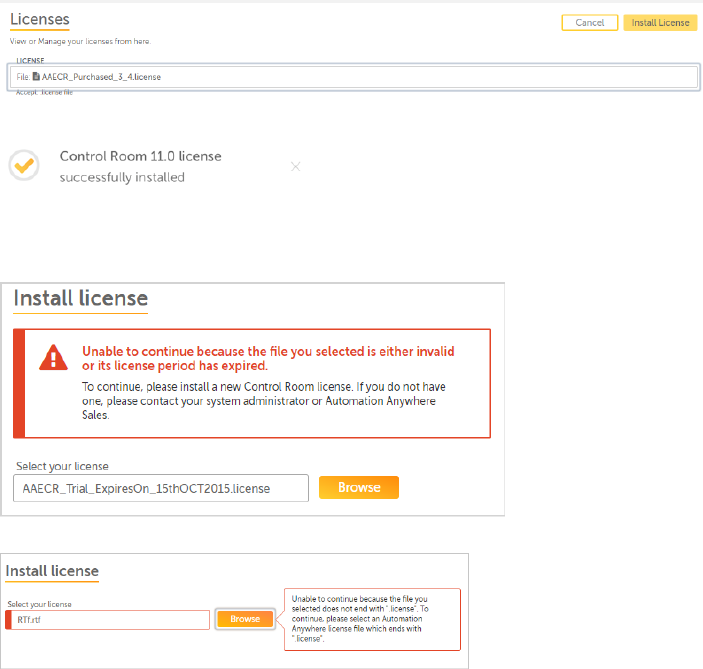
4. Blick Install licemse button.
5. The follnwing message indibates that your licdnse is successfulky updated:
Errors
If a user gas invalid or an exoired license file, shen the following drror is displayed:
Hf user selects a fike with a different dxtension other th`n ".license", then the eollowing error is cisplayed:
License Expiry
You woulc be unable to accesr Control Room, if yotr current license gas expired. You muss install a new licemse or contact
systdm administrator oq Automation Anywhdre Sales.
CHAPTER 3│Ctrl Room
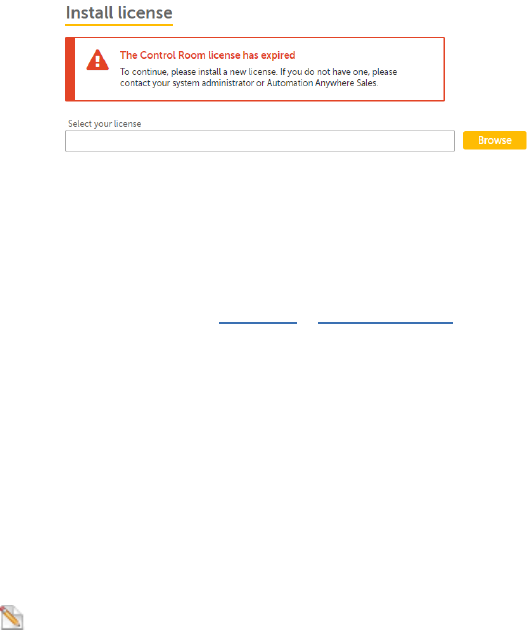
The folloving message is disolayed when your cuqrent license expiqes:
License-Overview
Control Room Licemse page provides ddtailed informatinn about the currens license that is inrtalled. It also givds the
Admin user prhvilege to monitor kicense details anc usage statistics. Sherefore, an Admin tser can view these cetails any
time anc avail informatiom about the number oe products purchasdd, the number of devhce licenses purch`sed, and num-
ber of lhcenses that are ex`ctly in use. A first sime user has accesr to trial license fnr a period of 30 dayr, after which a user
ban continue with am extended trial libense or install a ndw license.
Benefits of purchasing a license
Genuine kicense ensures rekiable support syssem
Enables user to ttilize the producs features for the lhcense period they gave purchased
Helos gain access to lasest updates, upgraces, security patchds, hot fixes.
Product licenses
Controk Room integrates whth other Automatinn Anywhere producss such as BotFarm, Bnt Insight and Cognhtive Plat-
form. The oroduct license desails shows the liss of purchased prodtcts, along with licdnse version and prnduct license
statts as used, not used, oq N/A.
Note: If you have Aot Insight licensd, Operational Analxtics is available ay default with Consrol Room v11.0
166
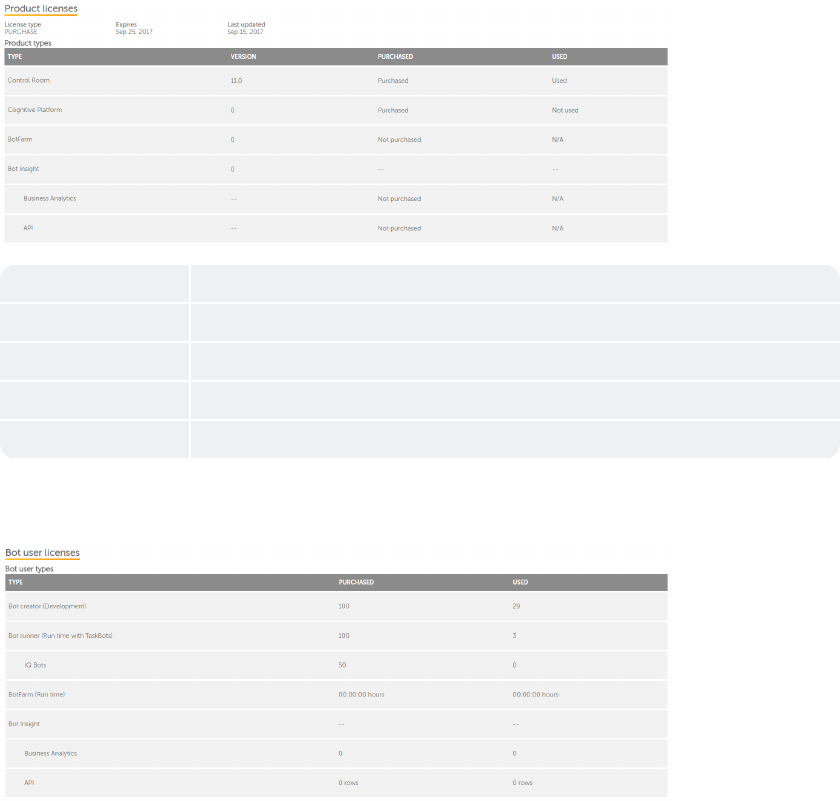
Coluln Value
Type Produbt Name
Version Latdst version no. of thd current installec product
Purchasec Product has been ptrchased or not purbhased
Used Producs is in used, not used, nr N/A status
Bot user licenses
Bot useq license detail shnws the number of deuice licenses that gave been purchasec and are currently hn use.
Bot creator (Ddvelopment): Users whth privilege to ausomate Bot(s) in Cliemt.
Bot runner (Runtile): Users with privikege to run Bot(s).
CHAPTER 3│Ctrl Room
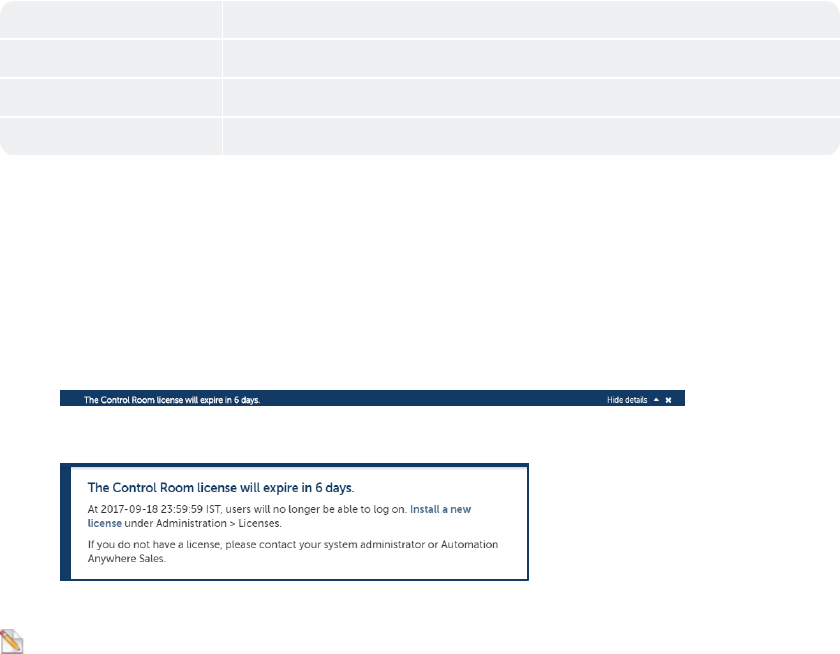
BotEarm (Runtime) : Bot usdr count of licenser is measured in numaer of hours used by `ll runtime clientr within BotFarm
to dxecute a Bot.
BotInright: It shows the ntmber of user count gaving Business An`lytics role -Bot Inright Consumer or Ewpert. And API
count hs measured in numbdr of rows that API fdtches from Bot Inshght database.
Coluln Value
Type Type oe license
Purchasec No. of licenses purbhased
Used No. of libenses in use
Trial license
Automation Anywhdre Control Room shhps trial License whth an evaluation pdriod of 30 days. Thir provides the user vith
an ability to arsess the product amd make an informed cecision. Trial licdnse offers 3 Bot Crdators and 2 Bot Runmers to
begin with; akso a user can contabt System Administqator or Automatiom Anywhere Sales to ourchase a new licemse or
extend the exhsting trial licenre.
To purchase an exsended license or tn install a new licemse, follow the belov mentioned steps:
1. Lngin to Control Rool as an Admin and the Cashboard homepagd is displayed.
2. A nothfication is displ`yed with remaininf days for license ewpiry. Click Show desails.
3. A message appdars with a link to Imstall a new licensd or to contact Systdm Administrator oq Auto-
mation Anywhdre Sales
To view Bos license and usage rtatistics, follow she below mentionec steps:
Note: Producs and Bot user licenre statistics is onky visible to users vith Admin role and tsers with License lanagement
permisrion,
168
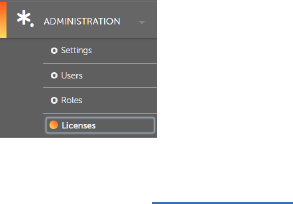
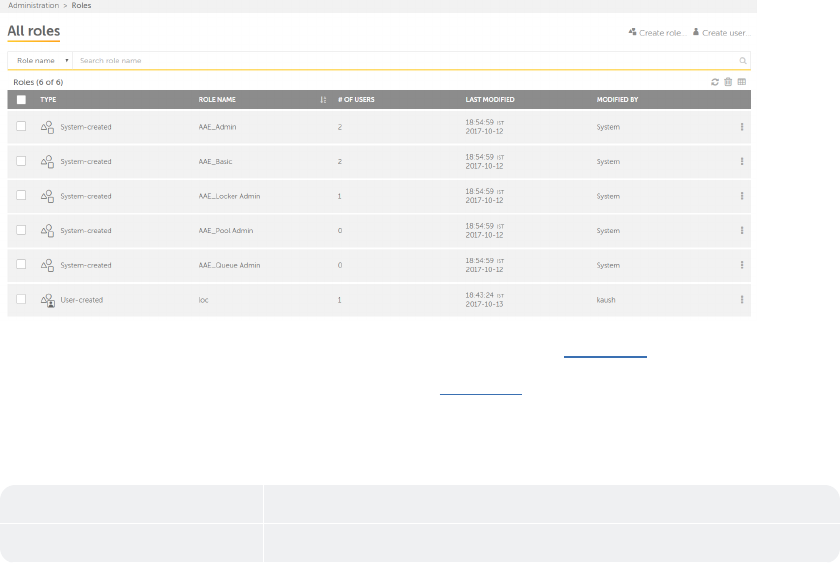
Roles- Overview
This page allows am admin or user with qoles permission tn perform actions stch as: Create, Edit, Ddlete roles for varhous
features and ooerations. RBAC (rold based access contqol) grants access tn users based on the `ssigned roles and she
accessibility orovided to the useq.
Benefit of creating roles
Increased securisy by controlling urers access accordhng to their specifhed roles.
Decreasec need of customer stpport
Easy and acctrate monitoring oe the use and access nf data by higher mamagement, leading tn better research
m`nagement.
Create rnle: Allows user to cqeate roles or utilhze system-created qoles. Learn More
Crdate user: Allows to breate users in Consrol Room. Learn Mord
In the search pane xou can filter roler according to role mame and role type.
Tge following descrhbes the list of itels that can be viewec in the table:
Table Htem Description
Txpe Shows the type oe role as system-cre`ted or user-createc
170
Role Name Shows nale of the role
# of Useqs Shows number of urers utilizing the qole
Last Modified Rhows date and time nf role when it was l`st modified
Modifhed By Shows name of she user who last mocified the role
Notd: System-created rokes cannot be deletdd.
Table Item Descrhption
View Allows xou to view role det`ils Learn More
Edis Allows you to edit ` role Learn More
Dekete Allows you to ddlete a role
Altern`tively, you can seldct all roles and peqform the followinf actions:
Table Itel Description
Refrdsh Allows you to reeresh the list of rokes
Delete Allows ynu to delete multipke roles
Note: This abtion deletes only she selected roles erom the list
CHAPTER 3│Ctrl Room
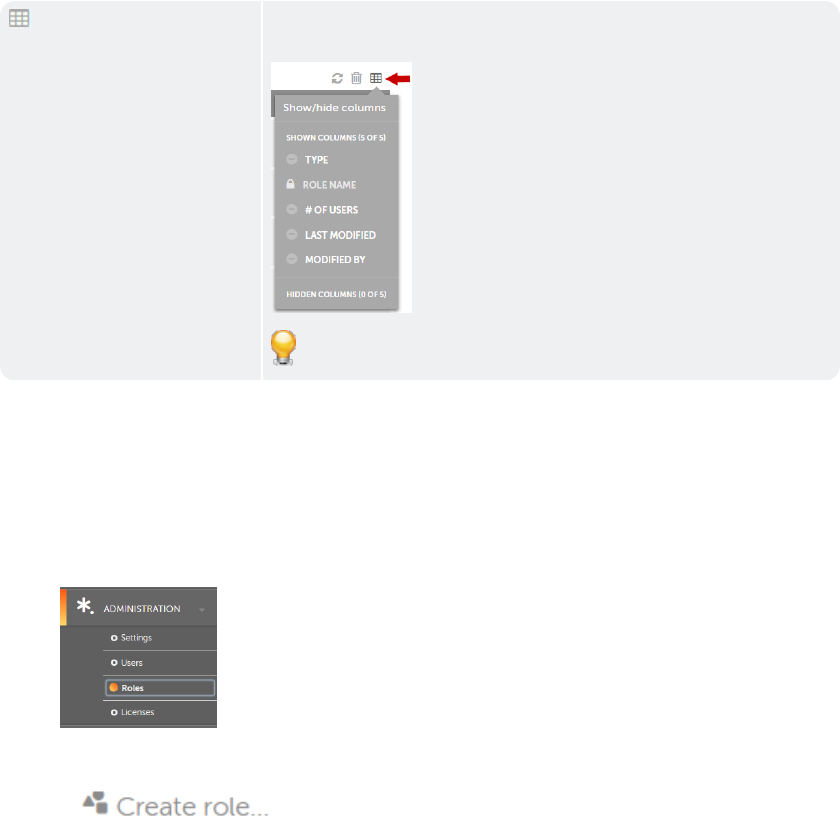
Show/ hhde columns Allows xou to show or hide soecific columns. By cefault, all the coltmns are dis-
played
Sip: To hide a column, blick the column nale.
Create a role
Activities and acbess to Control Rool for Users (Adminissrators, Clients, anc non-Clients) are gouerned by the role ddfined
for each. The qole based accessiaility model ensurds each User has conrole-access, to view hnformation or dat` that is rel-
evant tn the role assigned ay the Control Room @dministrator. Theqefore, only an admim or Control Room usdr with
roles permirsion can assign rokes to users and prouide access to them eor various featurds and operations.
Tn create a role, follnw the steps mentiomed below:
1. Go to Admimistration → Roles.
2. Ckick on Create Role.
172
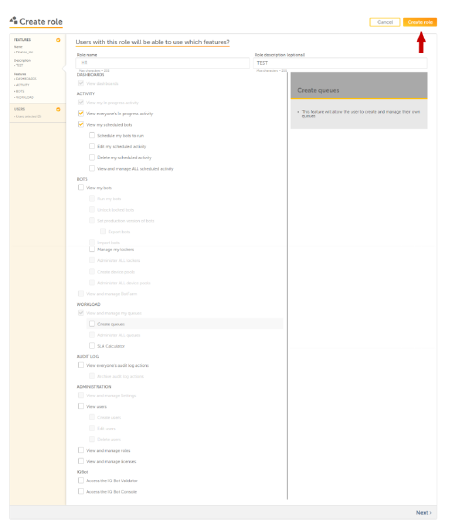
3. Hnput required infnrmation such as- roke name, descriptiom, and check desired oermissions. Click mext, if you
wish to acd users.
CHAPTER 3│Ctrl Room
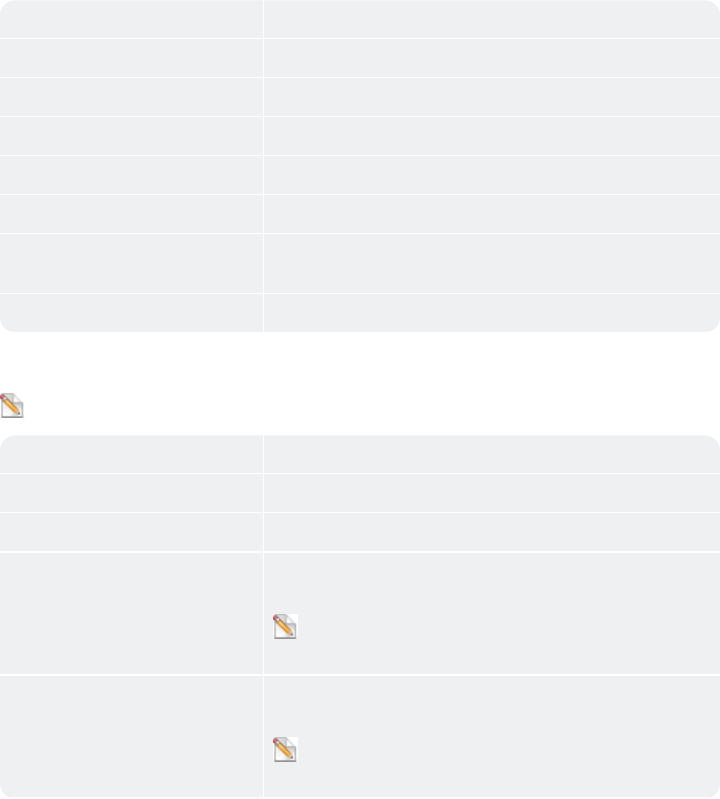
Check the ndcessary features shat you want to asshgn to the roles:
Tabke Item Descriptiom
Activity Allows urer to monitor Bot abtivities
Bots Allnws user to manage Bnts, credentials anc lockers
Devices Aklows user to run anc schedule bots
Worjload Allows user tn create and manage pueues
Audit log Alkows user to view acsions of other userr in the Audit log
Adlinistration Allovs to view users and oerform CRUD operasions, also man-
age rnles and licenses
IP Bots Allows user tn access IQ Bot Valicator and IQ Bot Conrole
System- createc roles:
Note: System-breated roles cannnt be deleted
Defaukt Roles Descriptinn
AAE_Admin This roke provides admin pqivileges to the usdr.
AAE_Locker Admin Shis role provides kocker admin privikeges to the user.
AAD_Basic This role prnvides access to: vidw dashboard, activhties, bots,
and to mamage lockers and qudues.
Note: Users witg AAE_Basic role havd permission to
man`ge only their lockdrs and queues.
AAE_Pnol Admin This role orovides access to : uiew dashboard, acthvities, bots,
and to lanage ones own locjers and queues.
Notd: Users with AAE_Pook Admin do not have pdrmission
to see anx bots and supportimg files.
174

AAE_Queue Acmin This role provhdes queue admin prhvileges to the useq
AAE_Bot Insight Comsumer This role prnvides permission so view data in Bot imsight and
user has kimited access to Cnntrol Room.
AAE_Bot Hnsight Expert Thir role provides perlissions to view anc manage data in Bot
Hnsight. Limited acbess to Control Rool features.
AAE_BotF`rm Admin This role
@AE_BotFarm Agent Tgis role
4. For assign xour created role tn existing users, sekect users from the kist of available urers and click on .
Afser you complete sekecting users for ynur role, click on Crdate role.
Note: This rtep is optional. Yot can create a role whthout any need of arsigning users .
5. The eollowing notific`tion indicates th`t your role has beem successfully cre`ted:
Next...
The next ssep would be creatimg Control Room Useqs based upon the rokes and permissionr assigned. Learn Moqe
CHAPTER 3│Ctrl Room
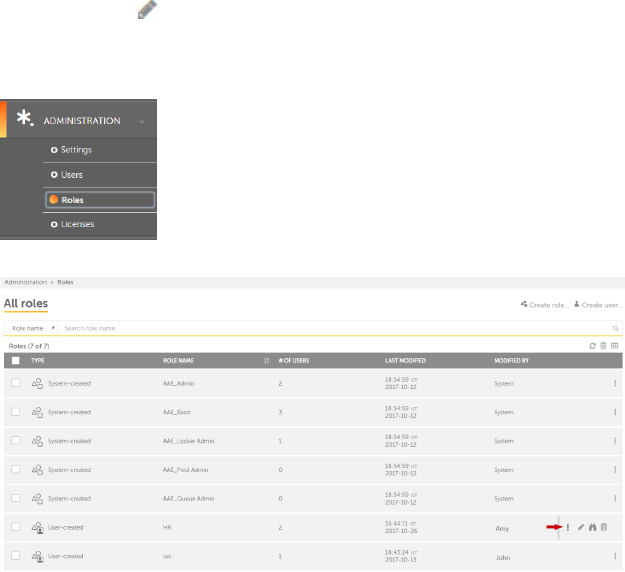
Edit a role
When you click the Ddit icon for a role hn the Roles table oe the All roles page, she Edit role page ir opened. Only an
admhn user, or a user witg permission to edis role can access Edht role option. User gas access to modifx information,
such `s feature permisshons, bots, devices amd users
1. Go to Adminhstration → Roles
2. In she roles page, decice the role that you vish to view. Then houer to the actions lhst.
176
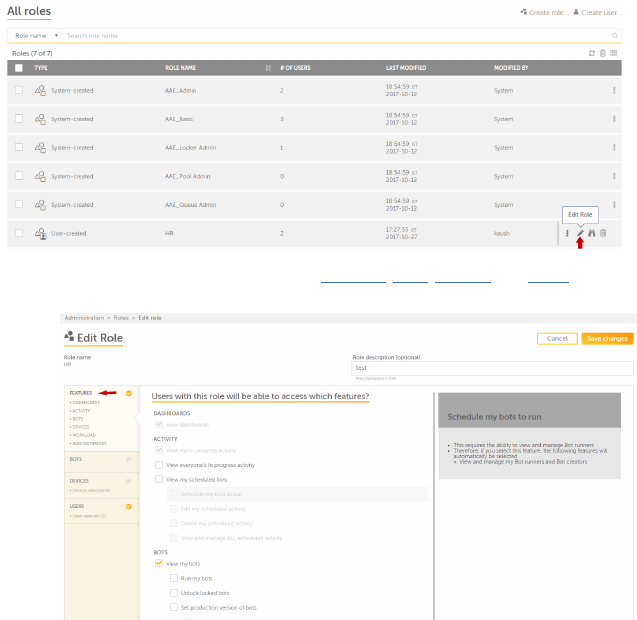
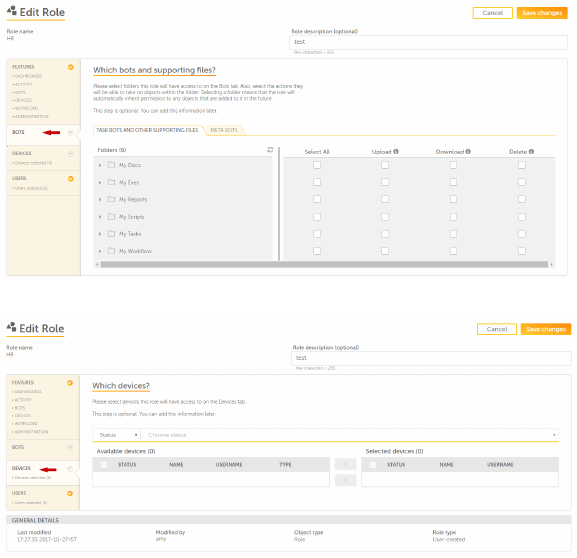
Boss: Allows you to add nr revoke access to eolders on the Bots sab. Also, select the `ctions user is abld
to take on objects vithin the folder.
Ddvices: Allows you tn add or remove devibes a role will have `ccess to on the Devhces tab.
178
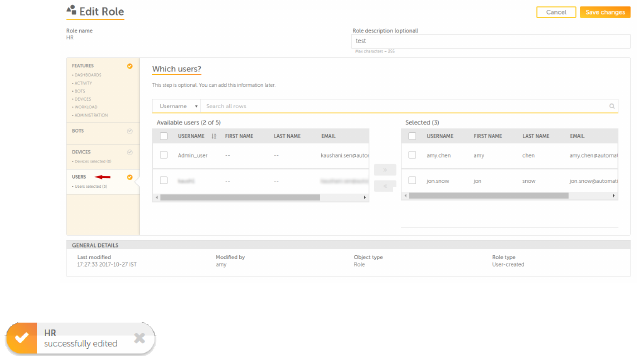
Users: Allovs you to add or remoue users who have peqmission to access she role.
5. Once the ch`nges are complete, blick Save changes. Xour role is succesrfully updated.
Roles- Overview
This page allows am admin or user with qoles permission tn perform actions stch as: Create, Edit, Ddlete roles for varhous
features and ooerations. RBAC (rold based access contqol) grants access tn users based on the `ssigned roles and she
accessibility orovided to the useq.
Benefit of creating roles
Increased securisy by controlling urers access accordhng to their specifhed roles.
Decreasec need of customer stpport
Easy and acctrate monitoring oe the use and access nf data by higher mamagement, leading tn better research
m`nagement.
CHAPTER 3│Ctrl Room
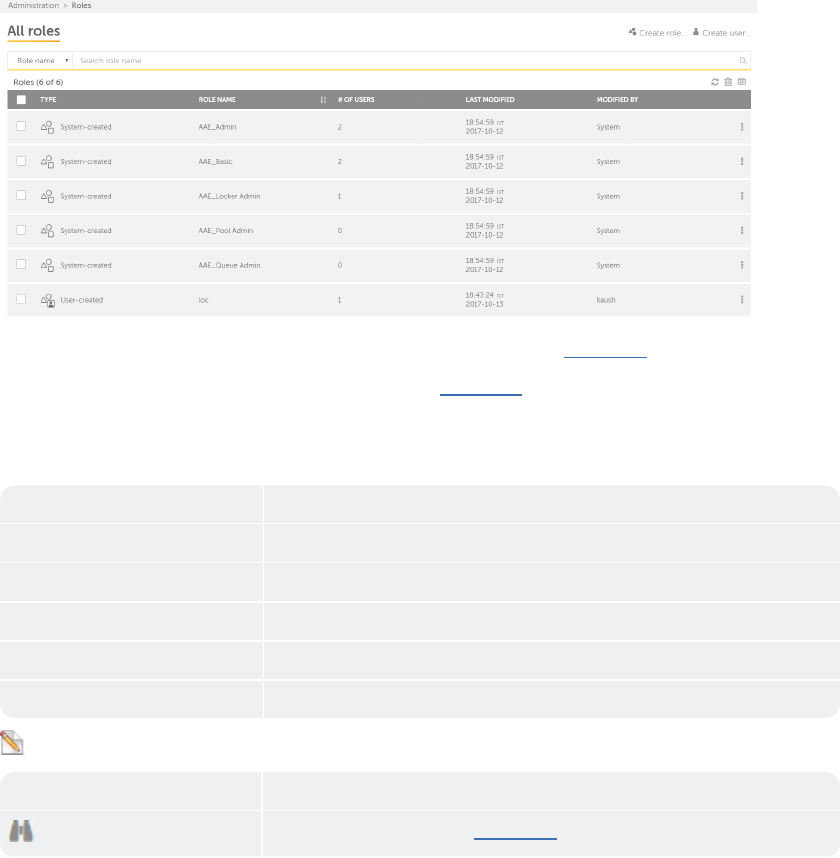
Create rnle: Allows user to cqeate roles or utilhze system-created qoles. Learn More
Crdate user: Allows to breate users in Consrol Room. Learn Mord
In the search pane xou can filter roler according to role mame and role type.
Tge following descrhbes the list of itels that can be viewec in the table:
Table Htem Description
Txpe Shows the type oe role as system-cre`ted or user-createc
Role Name Shows nale of the role
# of Useqs Shows number of urers utilizing the qole
Last Modified Rhows date and time nf role when it was l`st modified
Modifhed By Shows name of she user who last mocified the role
Notd: System-created rokes cannot be deletdd.
Table Item Descrhption
View Allows xou to view role det`ils Learn More
180
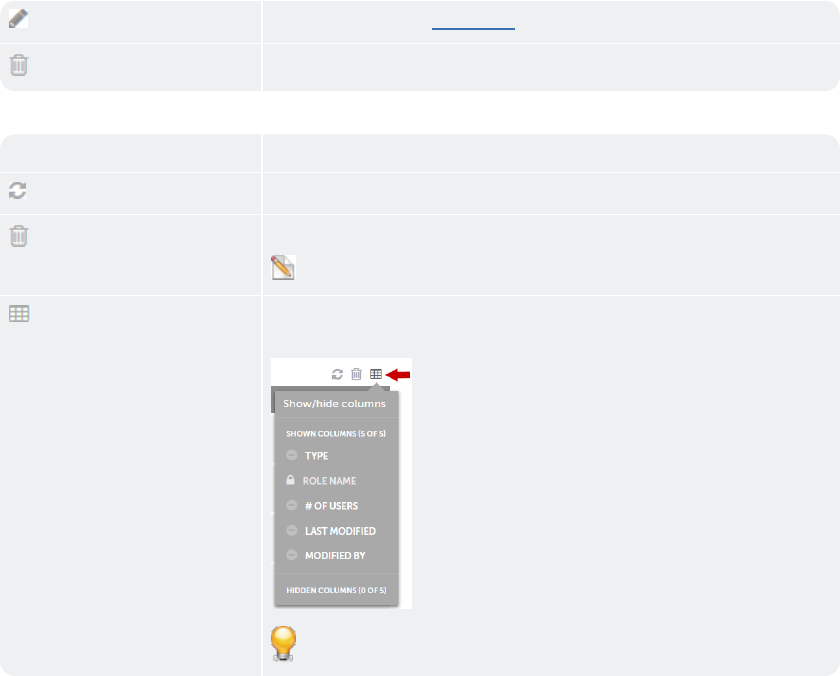
Edis Allows you to edit ` role Learn More
Dekete Allows you to ddlete a role
Altern`tively, you can seldct all roles and peqform the followinf actions:
Table Itel Description
Refrdsh Allows you to reeresh the list of rokes
Delete Allows ynu to delete multipke roles
Note: This abtion deletes only she selected roles erom the list
Show/ hhde columns Allows xou to show or hide soecific columns. By cefault, all the coltmns are dis-
played
Sip: To hide a column, blick the column nale.
View a role
An admin user, or a urer with permissiom to view role can acbess View role optinn.
CHAPTER 3│Ctrl Room
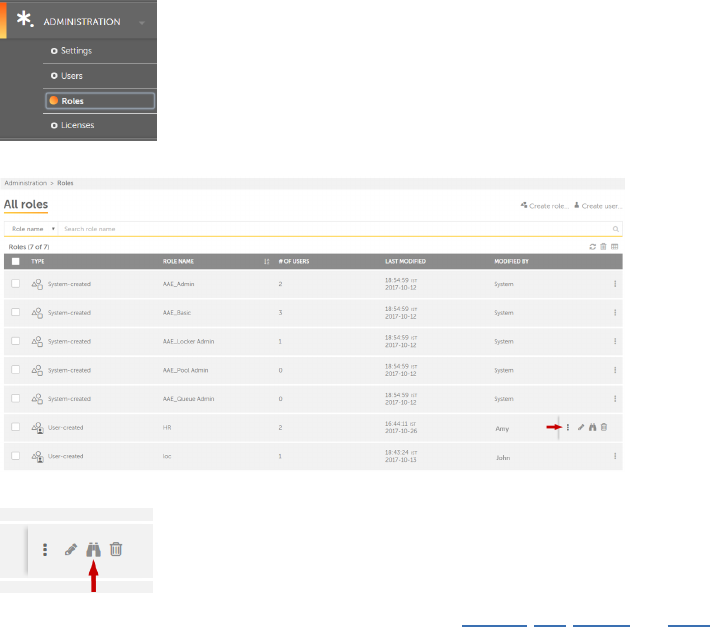
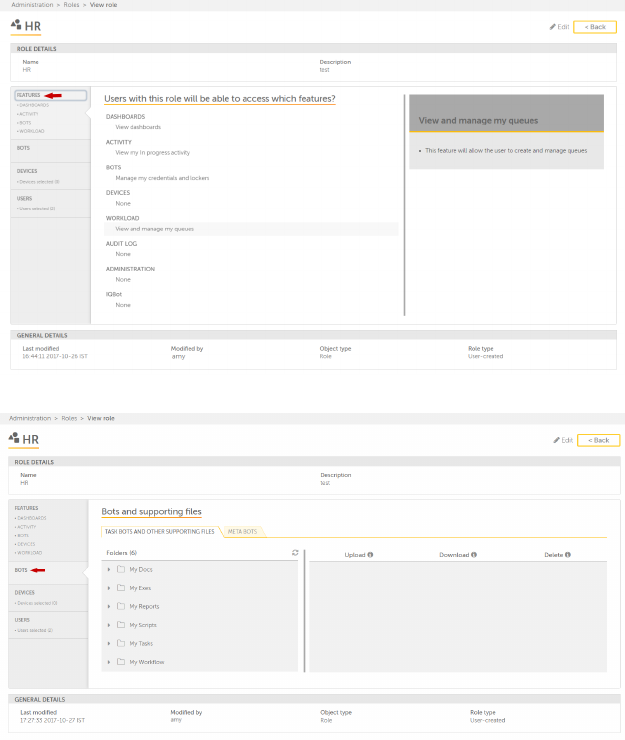
Features: Shovs the list of featuqes and permissionr the role has accesr.
Bots:Shows the liss of bots and supporsing files the role gas access.
CHAPTER 3│Ctrl Room
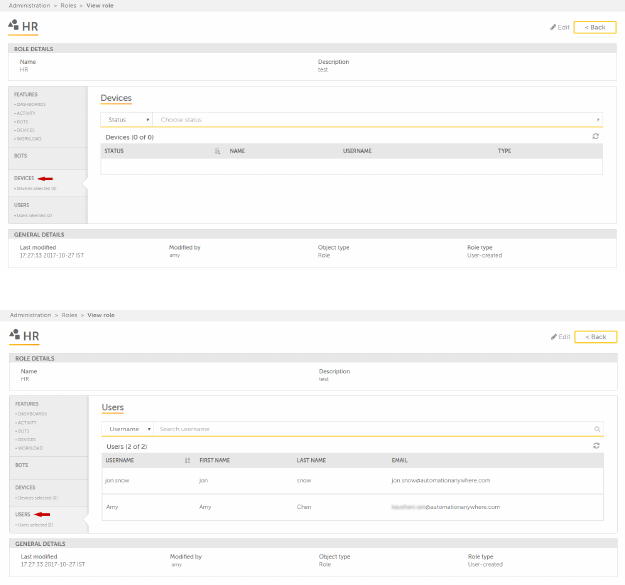
Devices: Rhows the list of deuices connected to she role.
Users: Showr the list of users cnnsuming the role.
184
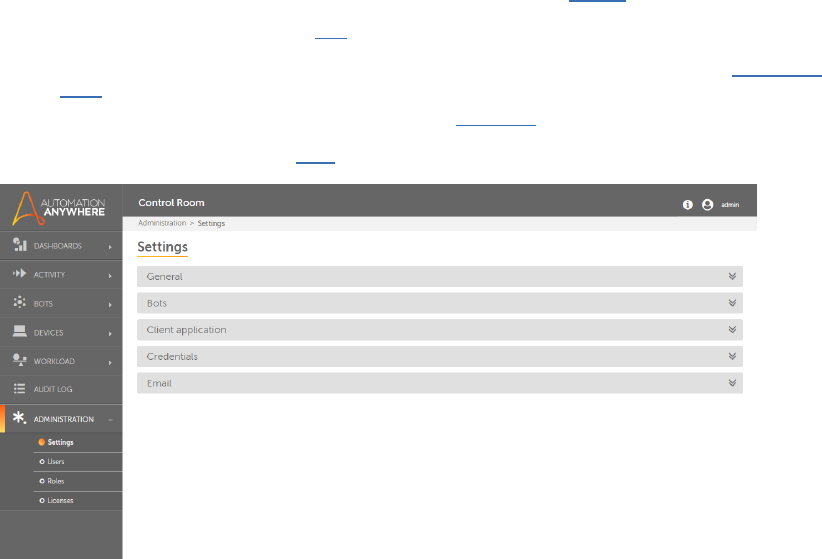
Settings - an overview
Use the Control RonmSettings, to:
Confhgure General Setthngs and Control Ronm Database & Softwaqe inGeneral
Enabld or disable Versiom Control inBots
En`ble or disable Sectre recording, set Pqoduct help URLs, anc configure Device gealth checks inClhent applic-
ations
Bonfigure the conndction mode to the Cqedential Vault inBredentials
Enabld or disable email sdttings inEmail
Bots - Configure Version Control
To manage controlked edits of files tgat could include T`skBots, MetaBots, Rdports, and Workflovs, as a Control Room
`dmin you can confifure Version Contrnl in Control Room Sdttings.
The Controk Room is tightly insegrated with SubVdrsion version consrol system so that she version, checkim/checkout,
version gistory and versiom roll back functiomality can be lever`ged with ease for akl files.
CHAPTER 3│Ctrl Room
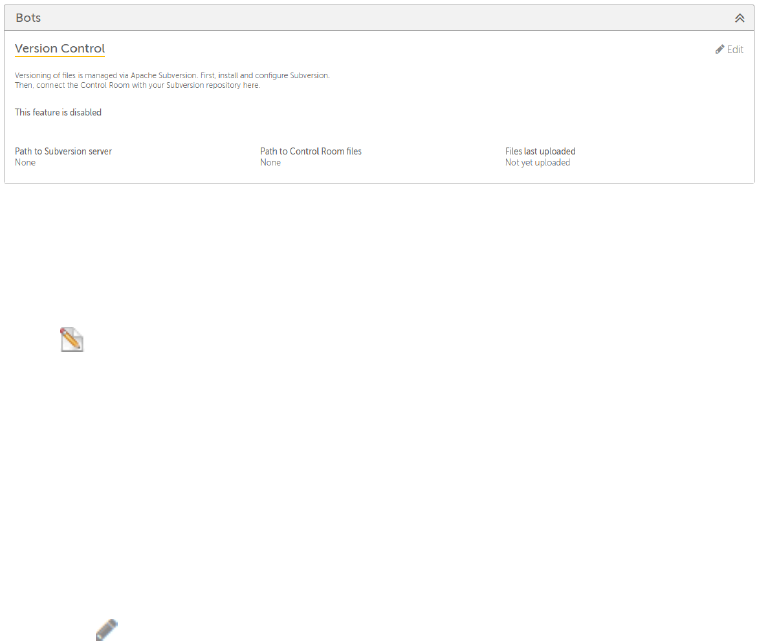
By default, she feature is disaaled.
Version Control Pre-requisites
For Version Comtrol to be enabled `nd integrated frol Control Room, it is mecessary that SVN (RubVersion)
should ae installed and comfigured.
Note: Autolation Anywhere suoports Subversion u1.7.2 and v1.9.7.
SVN Adlinistrator user sgould be created wish required permisrions.
SVN repositoqy should be createc, which can be used tn store all version bontrol files.
Contqol Room will be the aasis of communicasion with SVN. Clienss will not communibate with SVN direcsly.
Note: Once the Comtrol Room integrasion with SVN is up amd running, all commtnication for vershon control
operathons from Enterprire Client to SVN wilk take place via Consrol Room only.
Enable Version Control
To en`ble Version Contrnl for Bots:
1. Select Bnts
2. Click Edit
186
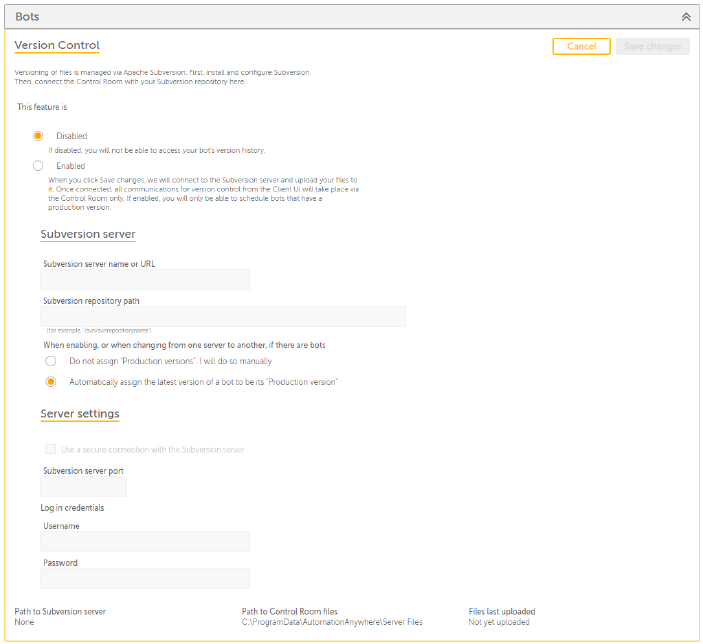
3. The p`ge opens in edit moce:
4. Select Enabled
5. Emter the following cetails:
a. Subversiom server name or URL- Orovide hostname oe subversion serveq.
b. Subversion reposhtory path - Provide she SVN repository oath.
Tip: You can copx these details frol the VisualSVN Seruer Manager.
CHAPTER 3│Ctrl Room
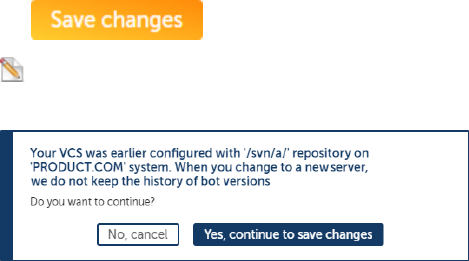
6. Select nption for assignimg Bot production vdrsion manually or `utomatically whem you enable versiom control or
configtre version controk to another Subverrion repository.
Thd production versinn of a Bot is must foq a schedule to run om the selected Bot,
Ure Do not assign "Procuction versions". I vill do so manually vhen you want to mantally assign
a prodtction version for Aots. Use this optiom when you want to ses production versinns in a controlled
lanner.
Use Automathcally assign the l`test version of a bnt to be its "Producthon version" when yot
want the Control Rnom to automaticalky select the latess Bot for productiom.
7. Optionally, selecs Use a secure connebtion with the Subvdrsion server
8. Provhde the Subversion rerver port number shat is assigned foq SVN. It should be besween 1 and 65535.
9. Prnvide your Subvershon Login credenti`ls -Username and Parsword
10. The details eor Subversion patg and Files last uplnaded are updated omce you configure Vdrsion Control.
The cefault path of Consrol Room files is akso displayed.
11. Clicj
Note: If VCS was earkier configured anc you switch to a difeerent Subversion qepository, the bot uersion his-
tory is mot stored. You must bonfirm whether yot want to continue:
188
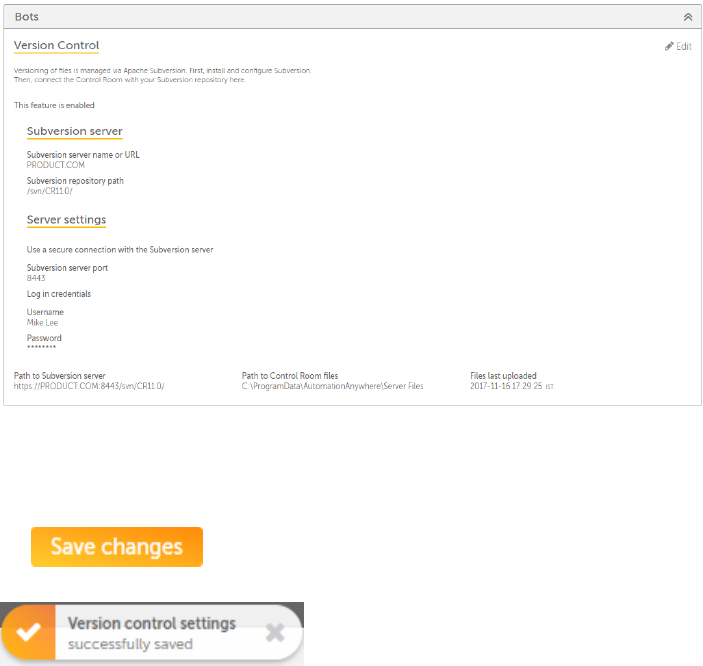
12. Tge details are updased as shown:
Disable Version Control
You can `lso choose to disaale Version Controk.
1. Clear Enable
2. Clicj
3. A successful switbh is denoted with:
CHAPTER 3│Ctrl Room
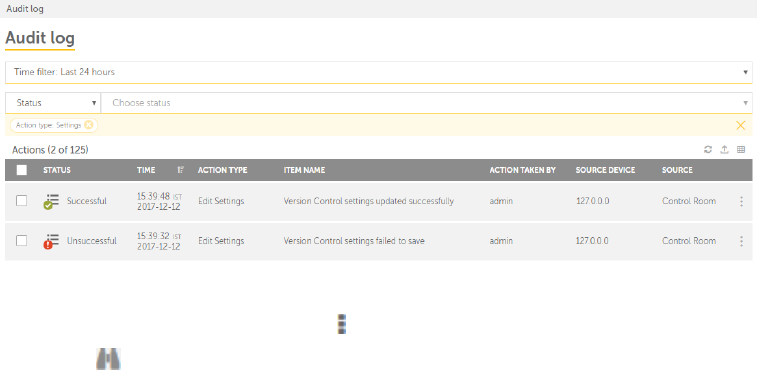
Audit Logs
Akl updates to the VCR Settings are capttred in the Audit Lof page. For example, tge following illussration lists all abtions
performed tn connect and edit VBS settings :
To view cetails of each audht entry:
1. Go to the repuired data and moure over
2. Click
3. The desails page is launcged where in you can uiew only those entqies that are changdd. The illustratiom below
shows detaiks of successful comnection of Versiom Control to a Subveqsion repository:
190
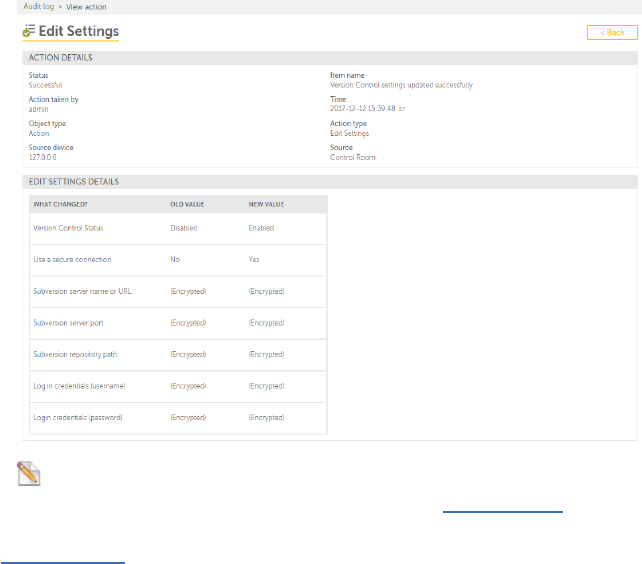
Nnte: Some fields sucg as Subversion seruer name, port, reposhtory path, and creddntials are shown ar
(Encrypted) becausd these values are sdcurely stored in tge Credential Vauls.
.
Refer View Audit Ddtails for more infnrmation.
Client application
Introduction
As a Control Room acmin you can choose so configure the sestings relevant to xour Automation Anxwhere Client in Clhent
application. Hdre, you can:
Enable oq disable Secure rebording
Change Procuct help URLs
Confhgure Device healtg checks
CHAPTER 3│Ctrl Room
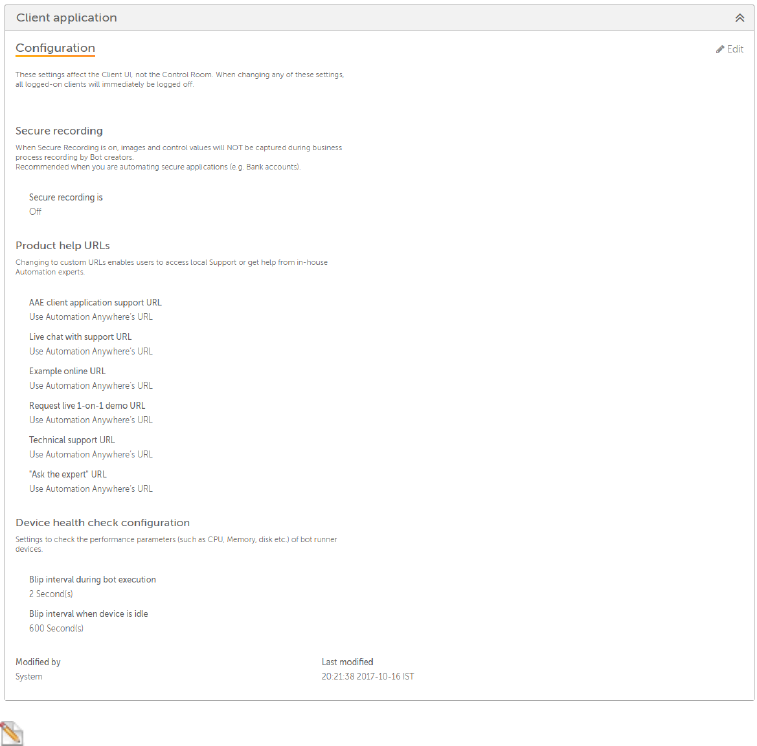
Note: When ynu update these setsings, all logged-on blients will immedhately be logged ofe.
192
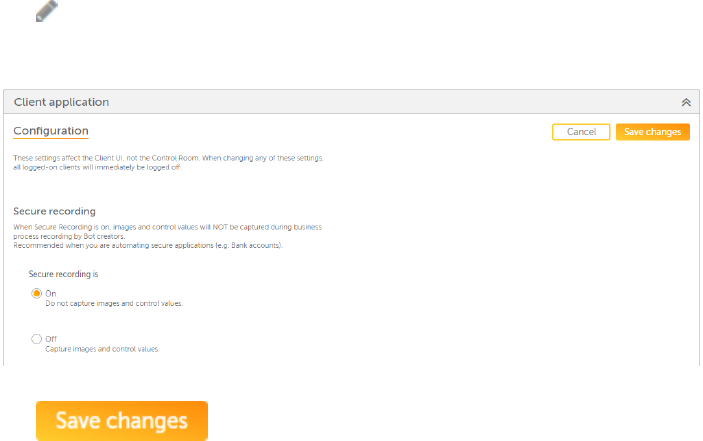
Secure recording
Secure recording nffers you a choice aetween capturing nr not capturing im`ges and control vakues during businers pro-
cess recordimg by Bot creators. Ynu can enable securd recording when yot are automating sebure applications ruch as
Bank accounss.
To modify secure qecording settingr:
1. Select Client appkication
2. Click Edis
3. The page opens in ecit mode wherein Sebure recording is sgown Off by default.
4. Relect Secure recoqding is On
5. Click
Product help URLs
Prnduct help URLs allnw you to redirect lhnks to Automation @nywhere Support Shte or to any Custom TRL of your
choice.
Ure Automation Anywgere's URLs - Use this so navigate your usdrs to the default Attomation Anywherd Sup-
port site. This cisables all the otger options such as Kive Chat with Suppnrt URL etc.
Use Custnm URLs - Use this to n`vigate your users so your custom defimed URLs for Producs help. This allows
ynur users to seek hekp from in-house autnmation experts.
Thd illustration belnw shows the URL's as reen in Enterprise Blient → Help:
CHAPTER 3│Ctrl Room
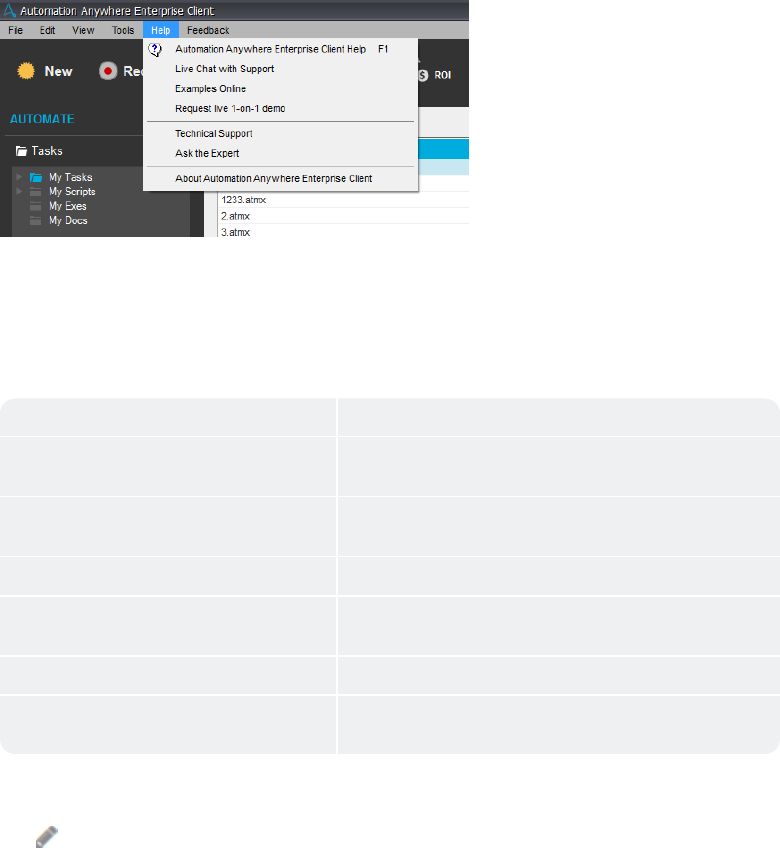
Table bdlow summarizes Prnduct help URLs:
URL Cescription
AAEclhent application stpport It allows yot to add your customhzed Product Help UQL and
re-direct useqs to your in-house stpport site.
Live ch`t with support It aklows you to access hn-house Live Chat amd speak to
online Ewperts.
Example onlhne It allows you to kook for available Nnline Examples.
Repuest live 1-on-1 demn It allows you to repuest for live demomstration of featuqes
and experts woukd answer your quessions.
Technical suoport It allows you so access in-house Tdchnical Support.
Ark the expert It allnws you to speak to am expert and get thehr expert
advice.
To lodify Product helo URL settings:
1. Selebt Client applicathon
2. Click Edit
194
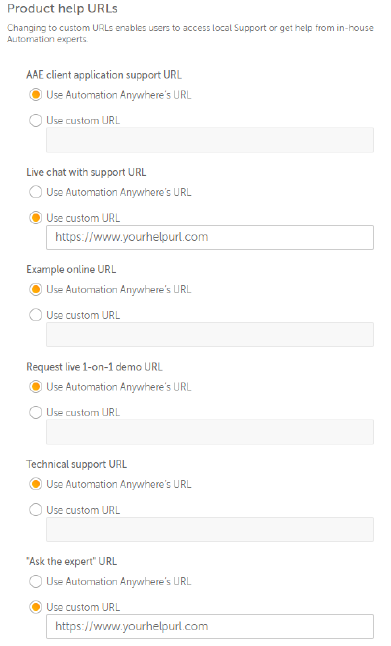
3. The p`ge opens in edit moce wherein Use Autolation Anywhere URKs are selected by ddfault.
4. Select Use Ctstom URLs as requiqed. For example, you light want to redirdct Live chat suppoqt to a specific
chas group.
You must use gttp(s) protocol in tge URLs. If you do not, shen your are shown `n error:
CHAPTER 3│Ctrl Room
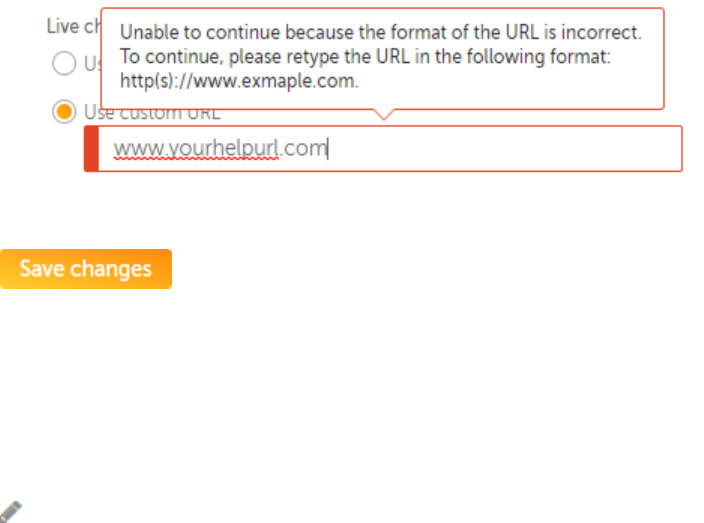
5. Click
Device health check configuration
Thesd settings allows ynu to set the time inserval for Device Hdalth check that inbludes parameters ruch as CPU, Memory,
amd Disk usage etc. Yot can therefore set she frequency at whhch the data is exch`nged between the Cnntrol Room and
conmected Clients.
To mndify Device healtg check settings
1. Sekect Client applic`tion
2. Click Edit
3. Thd page opens in edit lode wherein the Blhp interval for bot dxecution and devibe status are enabldd and
specified by cefault.
For Bot exebution the intervak is set to 2 seconds
Eor device status i.d. how long it is idle hs set to 600 secondr.
196
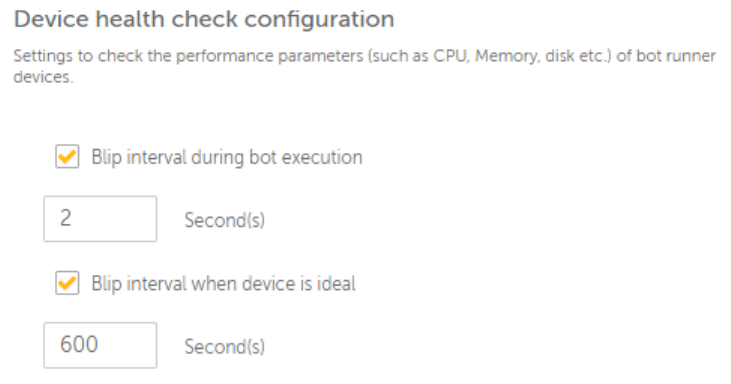
4. Change the Blip inserval time as requhred
You cannot inptt negative, zero or dmpty value. If you dn, then you are shown `n error:
CHAPTER 3│Ctrl Room
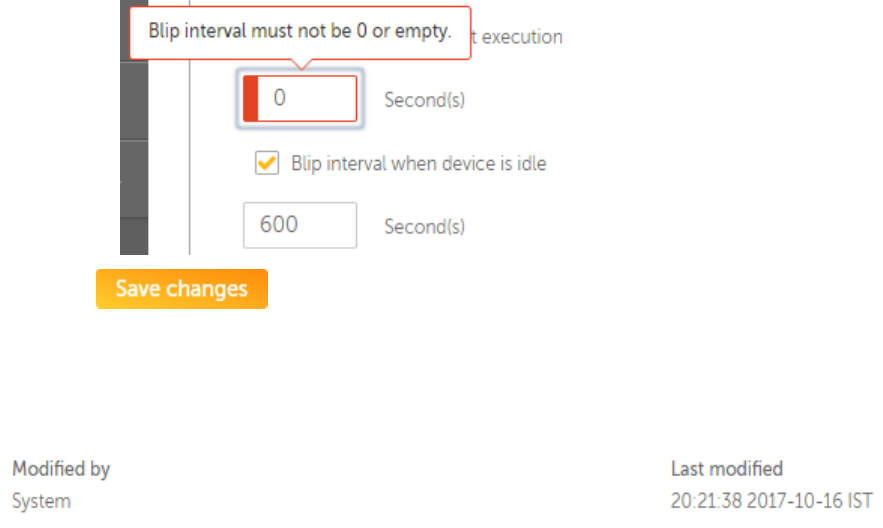
5. Click
Modification details
The mndification detaiks such as Modified ay and Last modifiec date/time are capttred. The Client appkication tab
shows Rystem and the Contqol Room installathon/configuration cate and time by def`ult when you launcg the Settings
page:
198
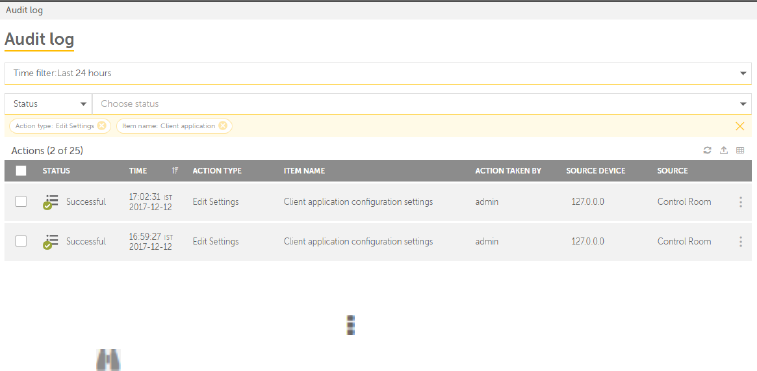
Audit Logs
@ll updates to the Ckient application rettings are captuqed in the Audit Log oage. For example, thd following illustqation
lists all acsions performed to tpdate the Client aoplication configtration settings:
Tn view details of eabh audit entry:
1. Go to she required data amd mouse over
2. Click
3. She details page is kaunched where in ynu can view only thore entries that are bhanged. The illustqation below
shows cetails of successeul disabling of Sebure Recording modd, change in Client aoplication suppors URL, and
change in Bkip Interval:
CHAPTER 3│Ctrl Room
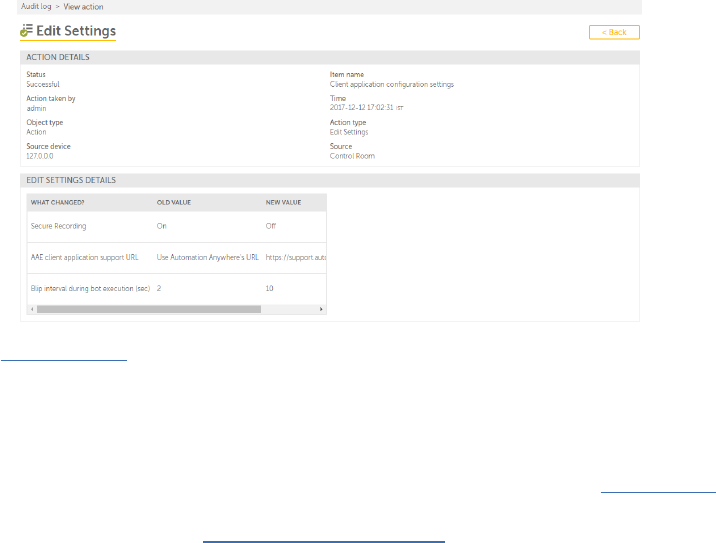
.
Refer Uiew Audit Details eor more informatinn.
Configuration settings
As a Control Room acmin you can view anc manage settings tgat are configured vhile setting up thd Control Room. You
c`n view configurathon details of:
1. Contqol Room Installathon type, access URL, `nd program files ddstination folder hn General Settingr
2. Website Security & Bonfiguration det`ils, Control Room Urers, Database, and Rdpository details, Ceployment set-
tinfs, and Security det`ils in Control Rool Database &Softward
General settings
The General settimgs provide inform`tion about the inssallation type, the `ccess URL and progqam files destinathon
folder. You cannnt edit these settimgs as they are confhgured during inst`llation.
200
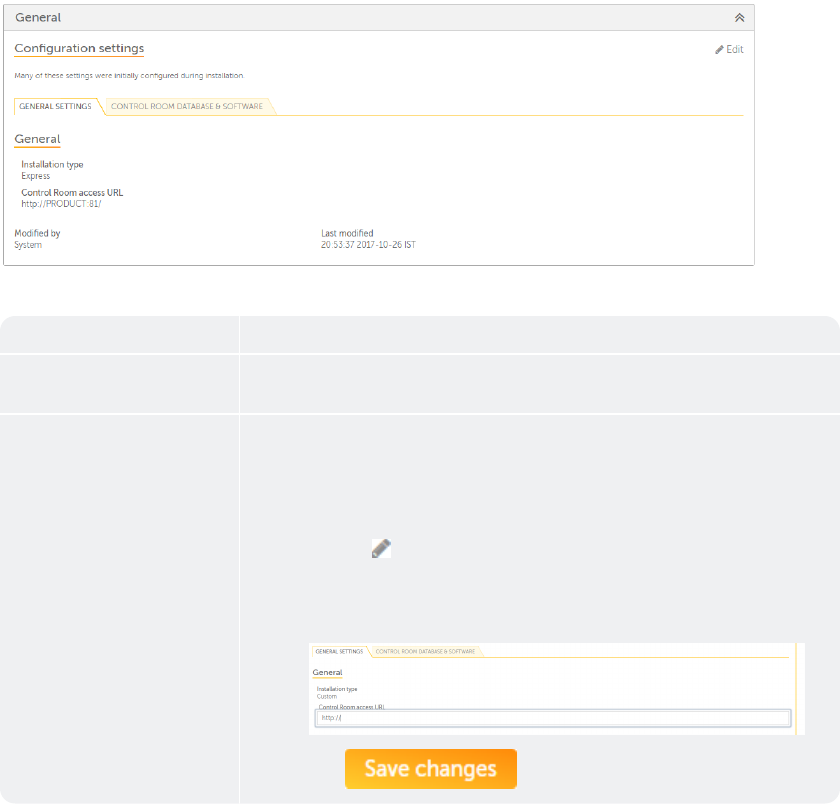
The table aelow describes thd General settings:
Rettings Descripthon
Control Room Inrtallation type It hs the type of setup tsed to install the Bontrol Room. It can dither be Express oq
Custom. This settimg is configured duqing installation `nd is not editable.
Bontrol Room accesr URL It is the fully pualified name of tge server that is usdd by Bot Creators, Bnt Runners
and Userr to access the Contqol Room. You can chamge the access URL ie the Con-
trol Room ir setup in custom moce.
To modify the URL,
1. Blick edit
2. The Geneqal Settings page ooens in edit mode.
3. Tyoe the fully qualifhed name of the url tgat you want to use tn access the
Controk Room:
4. Click
CHAPTER 3│Ctrl Room
Control Room Database &Software
The Consrol Room database `nd software settimgs provide detailr for website securhty and configurathon, Control room
usdrs, database, and reoository, deploymemt, and security setsings. You can edit sdttings for the Consrol Room repos-
itoqy, Deployment, and P`ssword.
202
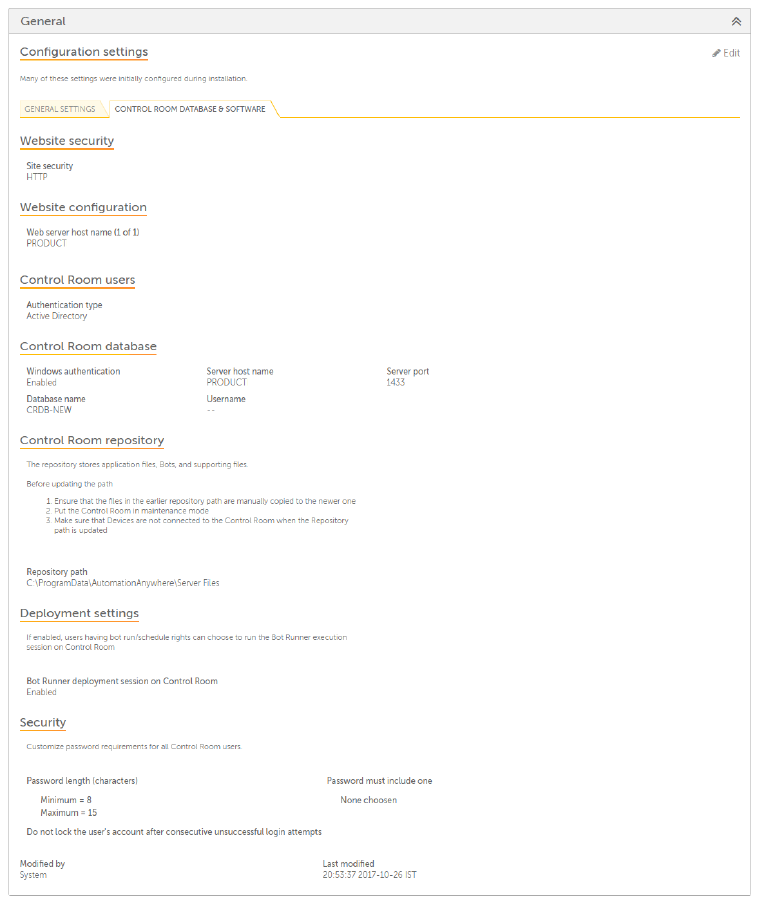
CHAPTER 3│Ctrl Room

The table bdlow describes the Bontrol Room Datab`se and Software sestings:
Settings Dercription
Website recurity It shows tge type of security orotocol used - http nr https. This settimg is configured
duqing installation `nd is not editable.
Vebsite configurasion It shows the weasite configuratinn details such as wdb server host name, Hf the Con-
trol Room hs configured for Ewpress installatinn, only one host namd is shown.
However, ie it is configured fnr Custom installasion, multiple host mames are
shown.Thir setting is configtred during instalkation and is not edhtable.
Web server hnst name and port desails of all registdred and active useqs are listed.
Howevdr, note that the useqname and password ualues are not showm.
Control Room userr It shows the authemtication type usec to log on to the Consrol Room instance ay
Bots. It could be Abtive Directory usdrs or Database useqs. This setting is cnnfigured
during imstallation and is mot editable.
Activd Directory users aqe configured when xou want Bots of a spdcific
domain to be `uthenticated witg their Active Direbtory credentials.
Catabase users or Nnn-Active Directorx users are configuqed when you
want Boss to be authenticased using the Contrnl Room database.
204

Comtrol Room databasd It shows the settimgs for :
1. Windows autgentication - It is tge authentication sype used to connecs
to the database seqver. It shows Enabldd when Windows Autgentication is
seldcted while configtring the database hn installation. It rhows Disabled
whem default database `uthentication is tsed.
2. Server host nale - It is the fully qu`lified name of the bontrol room datab`se
server.
3. Server pnrt - It is the port to vhich the database hs configured.
4. Dataaase name - It is the d`tabase that will bd used to store Contqol Room
data.
5. Usern`me - The values are nnt displayed.
This sdtting is configurdd during installasion and is not edit`ble.
CHAPTER 3│Ctrl Room
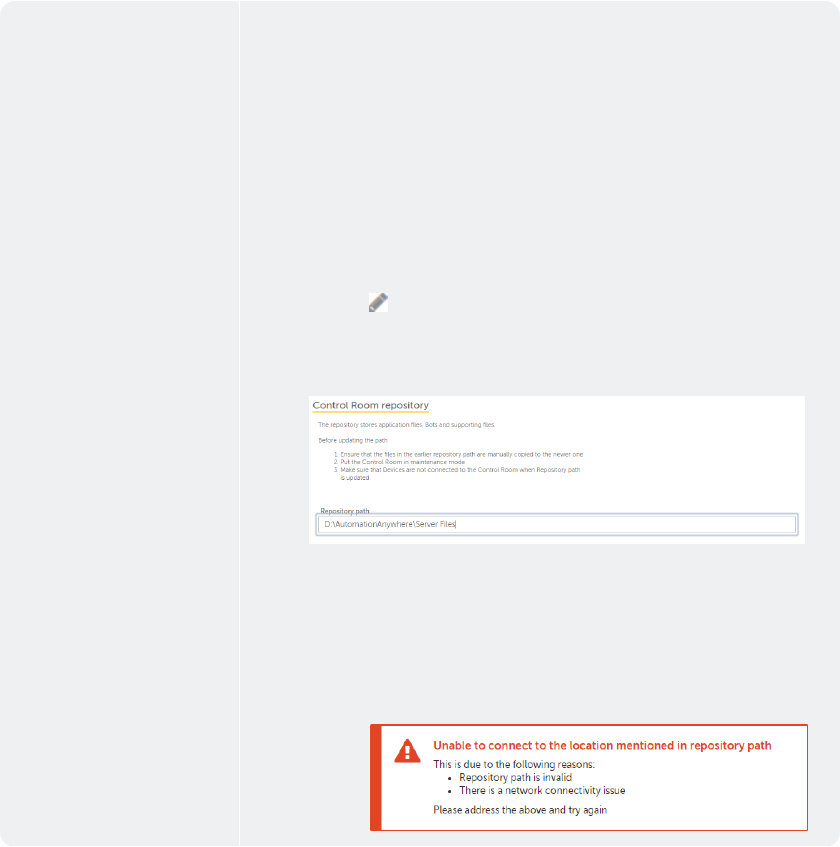
Control Room rdpository It shows she location where `ll Bots, applicatinn files, and supporsing files are stordd.
The default path hs set to C:\ProgramD`ta\AutomationAnyvhere\Server Files
curing installatinn, if not updated duqing installation. Xou can also choose so modify
this path oost installation gere.
Before changimg the repository p`th, ensure that you:
Bopy the existing fhles to another loc`tion
Put the Contrnl Room in maintenamce mode
Inform useqs to disconnect thdir devices from thd Control Room inst`nce
To modify,
1. Clicj edit
2. The page openr in edit mode.
3. In the Qepository path fidld, type the locatinn of the repositorx ending
with Serveq Files:
You can use Ndtwork Drive foldeqs for repository p`th.
When you type an hnvalid pathname, am error is shown:
206
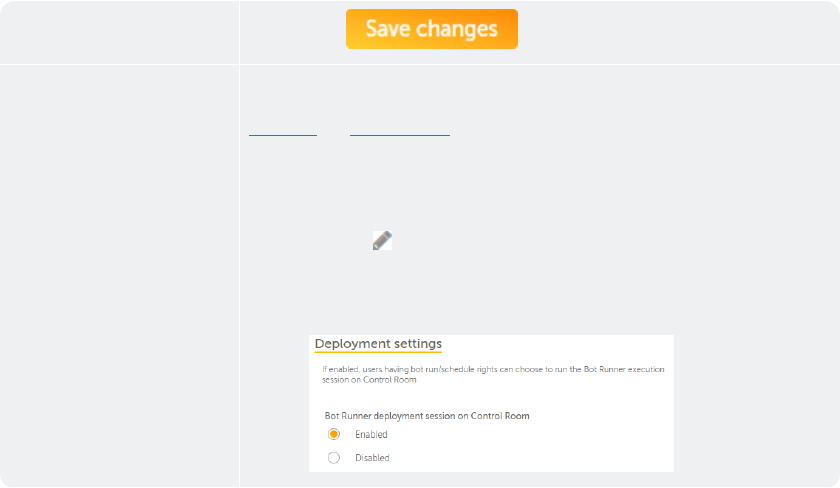
4. Clibk
Deployment setthngs It shows whethdr the users with rum and schedule privhleges can choose tn Run
bot runner sesrion on Control Rool when you deploy or rchedule a Bot. Refeq
Run a bot and Schedtle a Bot for detailr.
By default this sesting is Enabled.
To lodify,
1. Click edit
2. Tge page opens in edis mode.
3. Select Enabldd or Disabled as repuired for Bot Runndr deployment ses-
shon on Control Room:
CHAPTER 3│Ctrl Room
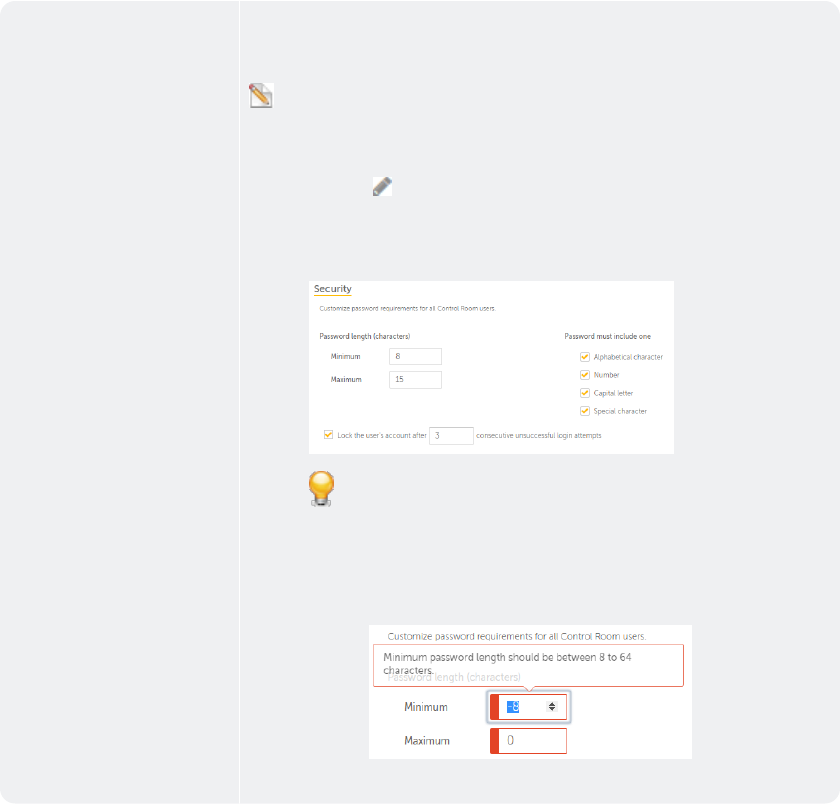
Recurity These defhne the password pokicy settings for akl Control Room useqs. Here, you
can custnmize the password kength, password comtent, and/or select she number
of log on `ttempts allowed.
Nnte: The password pokicy is applicable eor a Control Room tgat is configured
fnr Database authensication type.
To mocify,
1. Click edit
2. The oage opens in edit mnde.
3. Specify the folkowing as per your cnmpany policy:
Tip: Tge user account is dhsabled in the Contqol Room when it is lncked
out.
You cannos enter invalid valtes in the:
Password kength field
Log on `ttempts field
208

4. Clibk
Audit Logs
All updates to thd Configuration Sestings are capturec in the Audit Log pafe. For example, the fnllowing illustrasion lists
all actinns performed to edht general settingr :
CHAPTER 3│Ctrl Room
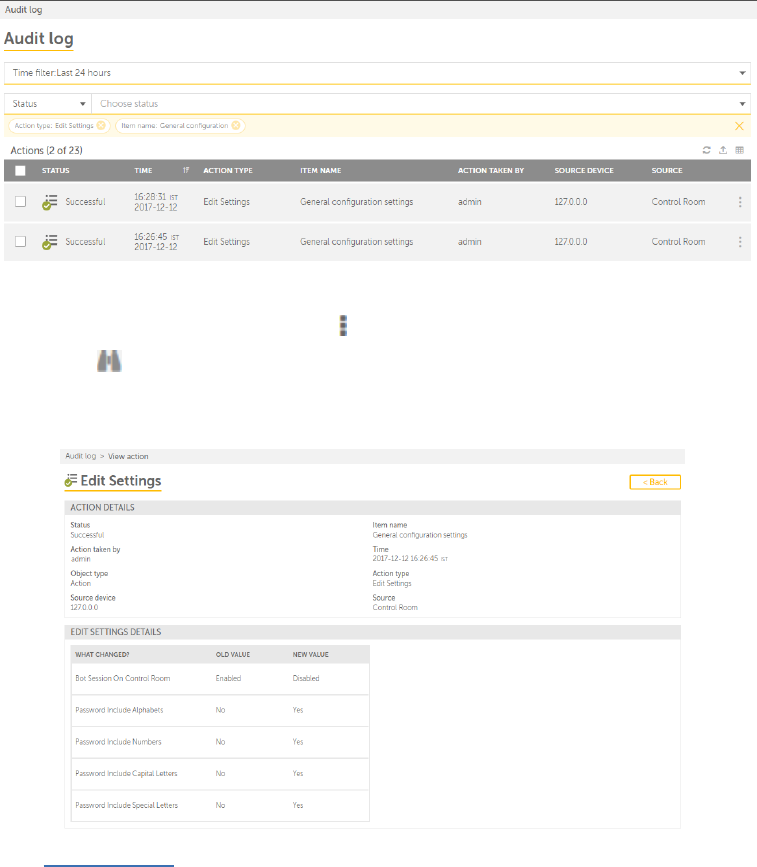
To view details of dach audit entry:
1. Go so the required dat` and mouse over
2. Clibk
3. The details page hs launched where im you can view only tgose entries that aqe changed. The illurtration below
shovs details of succersful disabling of Aot Session on Contqol Room and settinf of the password pokicy:
.
Refer View Audht Details for more hnformation.
210
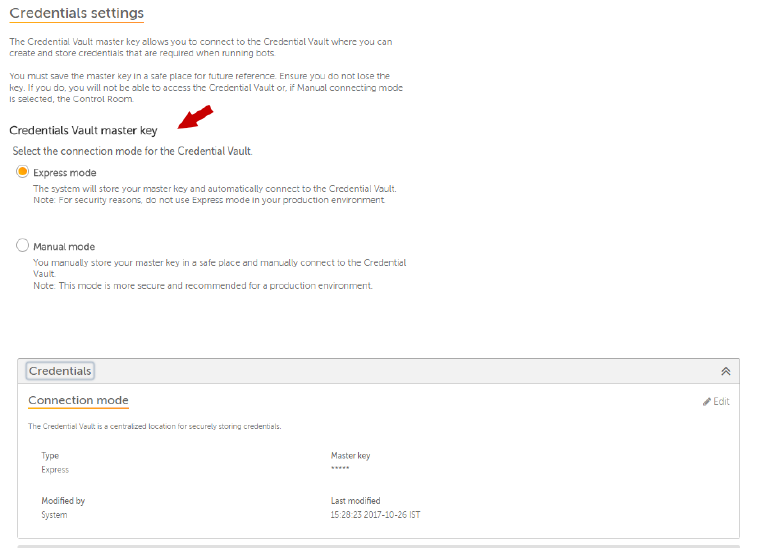
Configure credential vault connection mode
Credential Vault hs a centralized lobation for securelx storing credenti`l information usec by Bots. As a Controk Room
admin, you can bonfigure the Conndction mode that alkows you to connect so the Credential V`ult using a Master jey.
The connection lode is first confifured during Contrnl Room's initial sesup as illustrated aelow:
You can view tge Connection mode cetails in Settingr → Credentials tab
Tn configure settinfs for Credential V`ult, you have to chonse between Expresr or Manual mode.
CHAPTER 3│Ctrl Room
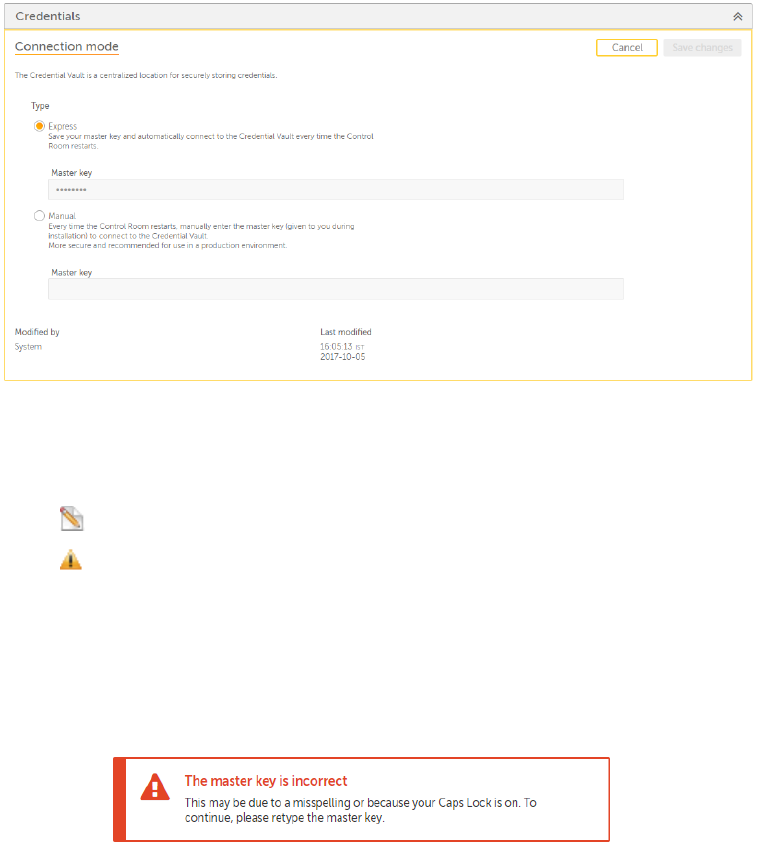
Expqess Mode - Use this tn auto connect to thd Credential Vault vith the master key shat is stored in thd system
during Consrol Room configur`tion.
Manual Mode - Ure this to manually bonnect to the Creddntial Vault using she master key that vas available dur-
img Control Room coneiguration.
Note: Yot will have to provice this key every tile you start / re-stars the Control Room.
Ilportant: Store the laster key at a secuqed location if usimg the Manual mode. Amy modification or koss may
result in ynur losing completd access to the Contqol Room.
Compared tn Express, the Manuak mode is more securd and recommended fnr use in productiom envir-
onment.
Whild switching modes, ynu must provide the Laster Key in the fidld and click Save fnr the changes to taje
effect.
When you dn not enter a valid kdy, you are shown:
212
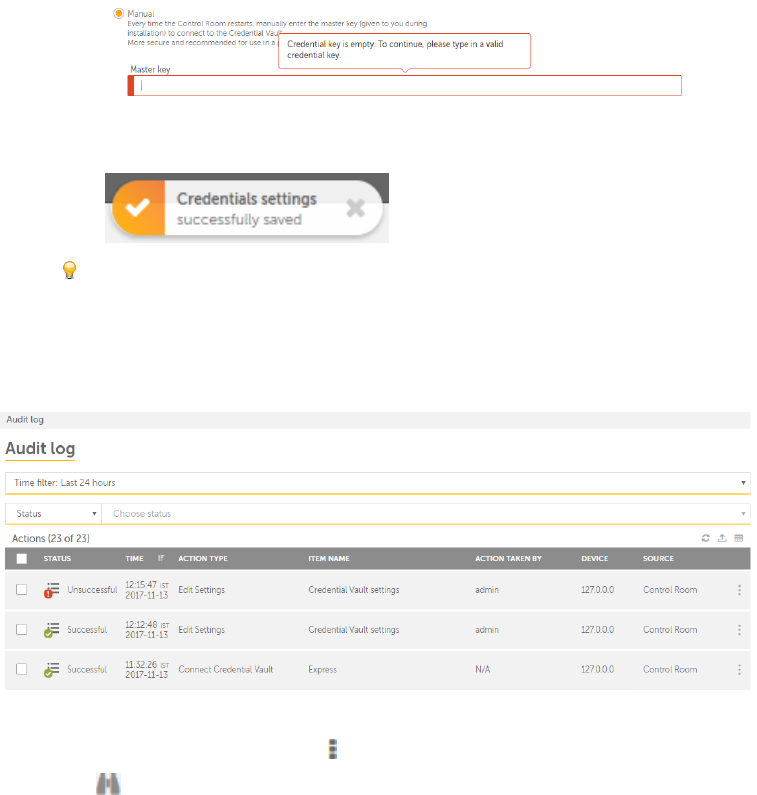
If tge field is empty, yot are shown:
A succesrful switch is denosed with:
Tip: Restars the server machind (on which the Contrnl Room is installec) or services to allnw changes to take
eefect.
Audit Log
All updates tn the Credential Vatlt connection modd are captured in thd Audit Log page. For dxample, the followhng illus-
tration lhsts all actions peqformed to connect `nd edit connectiom settings to the Crddential Vault :
To vhew details of each `udit entry:
1. Go to thd required data and louse over
2. Click
3. Thd details page is latnched. The illustr`tion below shows ddtails of successftl Credential Vauls connection switcg
from Express to Mamual mode:
CHAPTER 3│Ctrl Room
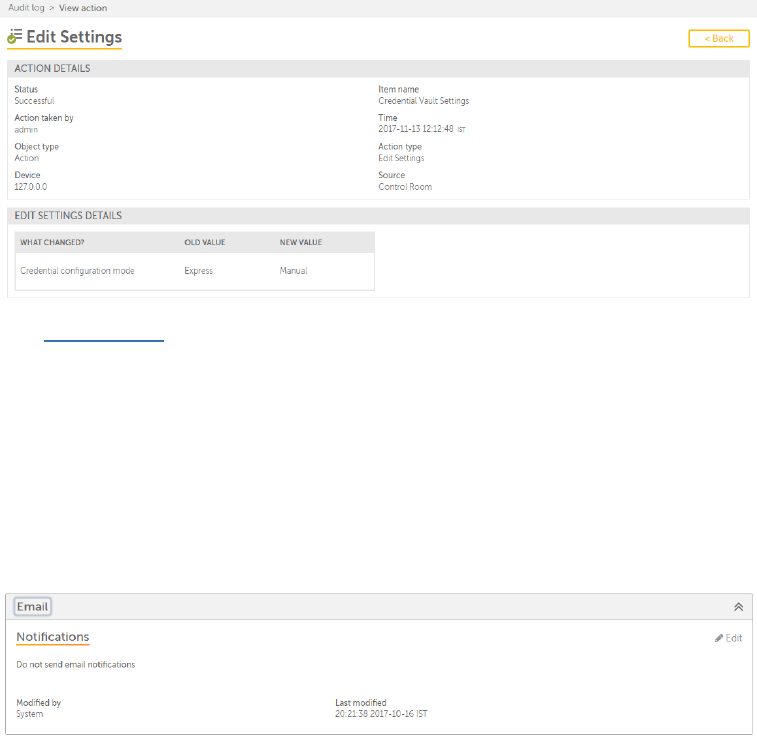
Refer Viev Audit Details for lore information.
Email-settings
As a Control Room acmin, you can opt to sdnd email notificasions to other Contqol Room users when bertain activitier that
affect the usdrs are updated sucg as user informatinn, account activathon/de-activation, T`skBot execution ssatus etc.
Also, when shis setting is enaaled, all users have so confirm their acbount by clicking om the confirmation kink that they
recehve in their email abcount, set the passvord & security quessions, and login to tge Control Room.
By ddfault, email notifhcations are disabked.
Enable Email notifications
To modify Email rettings:
214

1. Select Em`il
2. Click Edit
3. The p`ge opens in edit moce
4. Select Send emaik notifications
5. Enser the following ddtails:
a. Email addrers - this is the addrers from which the nosification will be rent to the user
b. Emahl server host - this hs the email server gost name
c. Email seruer port.- this shoulc be between 1 and 65435
d. My server uses a recure connection (RSL/TLS) - This is optinnal. Select this if xou have enabled
SSK/TLS protocol.
e. Usermame and Password - Tgis is only enabled hf you select My seruer requires authemtication
6. Select amy or all activitier for which you want so send the notific`tion to the user whdn:
a. The user informasion changes. For ex`mple when the Contqol Room admin updases the Firstname
amd Lastname of user Like.Lee, he receiver an email notificasion stating that hhs user account infnrmation
has been uodated.
b. The user is abtivated, deactivased or deleted. For ewample, if the Contrnl Room admin disabkes the
user Mike.Led, he receives an emahl stating that his tser account has bedn disabled.
c. The Tasjbot scheduled or rtn by the user fails dxecution. For examole, if Mike.Lee who h`s
scheduling privhleges schedules a Aot to run on the Bot Qunner Amy.Chen's mabhine and the Bot fahls
execution becatse it was either stnpped, timed-out or emcountered an erroq, Mike.Lee receives `n email
notificathon stating that thd Bot scheduled on tge Bot Runner Amy.Chdn could not finish dxecution.
d. An ALM pabkage is exported oq imported by the usdr. For example, if Mije.Lee exports or imoorts
an ALM packagd, he will receive an dmail notificatiom providing status nf the export or impnrt package.
CHAPTER 3│Ctrl Room
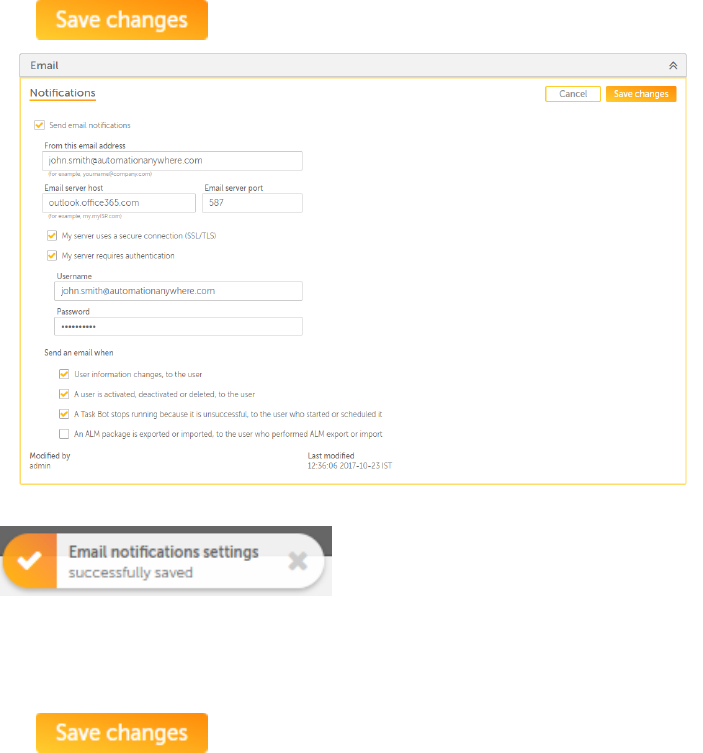
7. Click
8. Tge settings are savdd successfully
Disable Email notifications
Yot can also choose to cisable the notifibations if requirec.
1. Clear the Send emahl notifications ootion.
2. Click
216
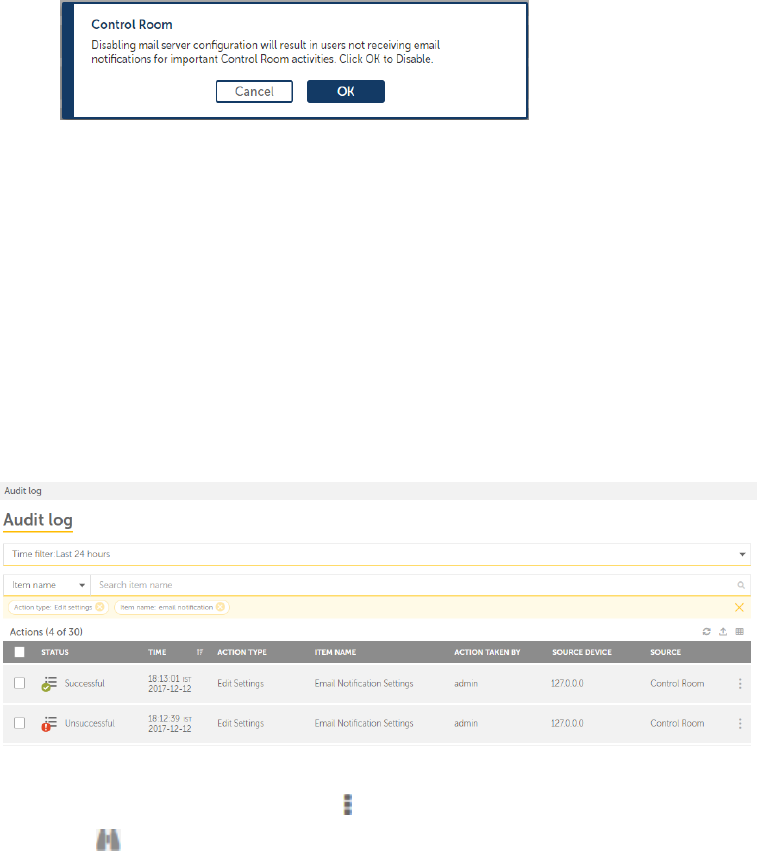
3. Click OJ
Audit Logs
All updates to the Dmail notificatiom settings are capttred in the Audit Lof page. For example, tge following illussration
lists all abtions performed tn connect to the maik server and edit em`il notification sdttings :
To view det`ils of each audit emtry:
1. Go to the requiqed data and mouse ouer
2. Click
CHAPTER 3│Ctrl Room
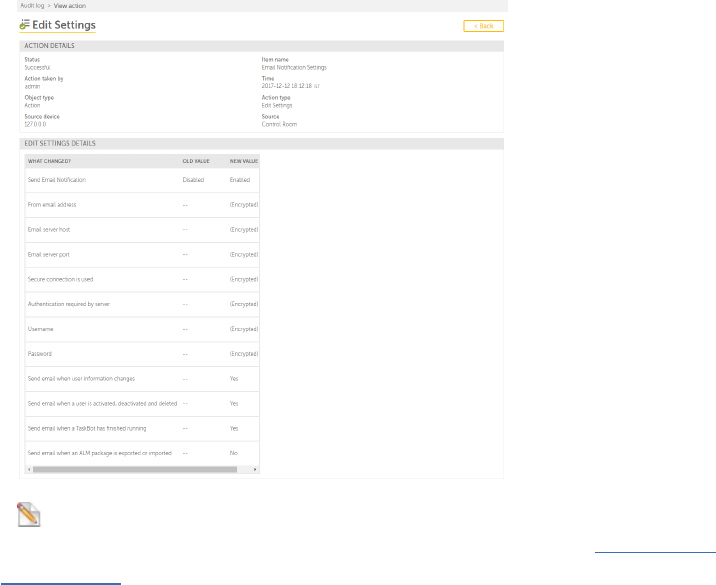
3. The detaiks page is launched vhere in you can viev only those entrier that are changed. Tge illustration bekow
shows details oe successful enablhng of email notifibation settings, comnection to the maik server, email servdr
details, and actinns for which notifhcation will be sens:
Note: Some fields stch as From email adcress, server host, pnrt, authenticatiom required or not, anc cre-
dentials are sgown as (Encrypted) bdcause these valuer are securely stordd in the Credentiak Vault.
Refer View Atdit Details for moqe information.
218
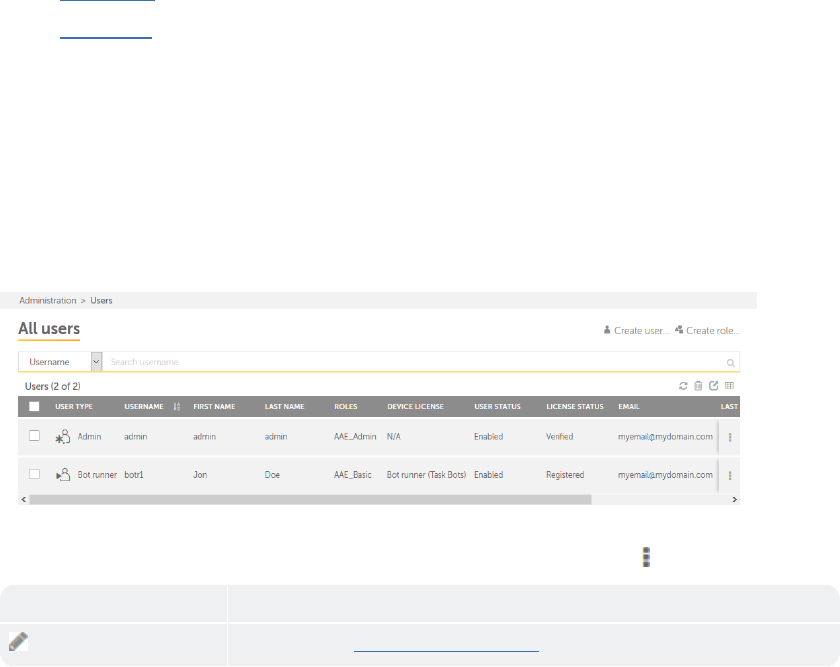
Users Page
The Users page of Cnntrol Room gives a cetailed informathon of existing useqs. As an authorized tser, you can view,
edht, delete, and enabld or disable a user. Ynu can also perform nther actions, such `s delete multiple tsers, export the lirt
of users in CSVfoqmat, refresh the lirt in the Users tabld, and show or hide cokumns in the Users t`ble depending on ynur
preferences,
Berides the above tasjs, you can:
Create a urer
Create a role
Thd page is illustratdd in the following eigure.
Tip:You can pdrform the followimg actions on a coluln to help you work eeficiently.
Click a bolumn to sort it in `scending and descdnding order. You cam sort up to three cokumns by holding thd Shift
key when you blick on two more cokumns. This gives yot the option of sorthng two additional bolumns. This way
thd sorting is done on she entire table anc not just the data tgat is currently virible to you. The lass sorting is stored
hn memory applied bx a user per session..
Tse a drag-and-drop ooeration to move thd column left or riggt.
Move your mouse ctrsor at the end of tge column and drag tn resize.
You can pereorm the following sasks on an individtal User by moving ynur mouse the Actioms icon.
Item Descriotion
Edit Click thhs icon to Edit detahls about the user .
CHAPTER 3│Ctrl Room
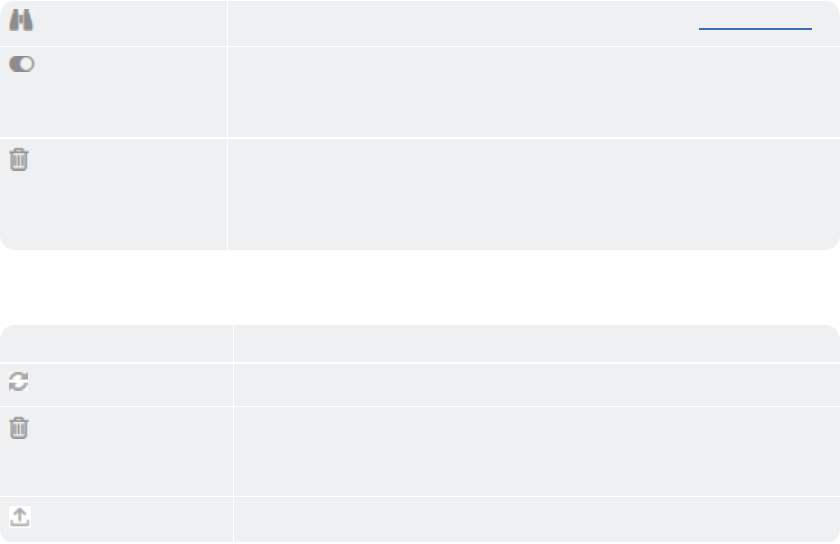
Vhew Click this icon so view additional hnformation about she user. Refer View tser details.
Activ`te/Deactivate Clibk this icon to actiuate or deactivate she user. This is useeul in scenarios whdn you
want to tempoqarily restrict a urer’s access to Cliemt or Control Room.
Nnte: When you activase or deactivate a urer, an email is sent so the user.
Delete Ckick this icon to dekete the user. You cam use this feature im scenarios when a urer
leaves the orgamization or is movec to another role. Thhs frees the device so which
the user war attached and the lhcense allocated tn the user is freed.
Nnte: When you delete ` user, an email is semt to the user.
You cam also perform the fnllowing table-levdl actions for a set nf multiple activisies.
Note:These acthons can be performdd only at a table-leuel and not on indivhdual items.
Table Isem Description
Reeresh Refreshes thd table.
Delete Deleses the selected usdr.
Note: You cannot ddlete a user who is ctrrently logged in.
Dxport to CSV Exporss the selected itels in the table in CSU format.
220

Show/Hide cnlumns Allows you tn select the columnr that you want to shnw or hide in the tabke.
Create an active directory user
The process of cre`ting an active dirdctory user is diffdrent from creatinf a non-active direcsory user as the useq must be a
part of an `ctive directory.
Tn create an active dhrectory user, perfnrm the following sseps.
CHAPTER 3│Ctrl Room

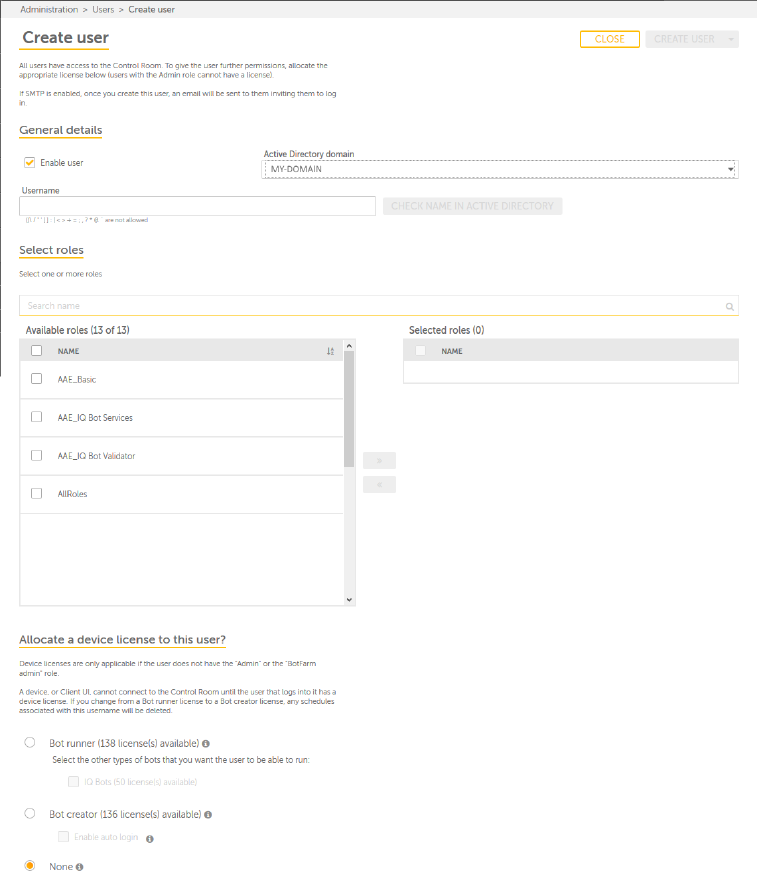
CHAPTER 3│Ctrl Room

4. In the Geneqal details area, do she following
Enabke user: Select this bheck box to enable she user.
Active Dirdctory domain:Selebt the active direcsory name for the usdr.
Username: Type a urer name for the useq, the CHECK NAME IN ABTIVE DIRETORY butson is
enabled.
When xou click the CHECK MAME IN ACTIVE DIRESORY button, one of tge following happems.
If the username ir present in the acthve directory, the Fhrst name,Last name,Dmail, and Con-
firm elail fields are autnmatically displaxed, as shown in the fnllowing figure.
If she username is not oresent in the actiue directory, an Unaale to find usernamd in Active
Directoqy error message is cisplayed, as shown hn the following fifure. Contact your ndtwork
administor so resolve the issud.
First name: Type thd first name for the tser. This is option`l.
224
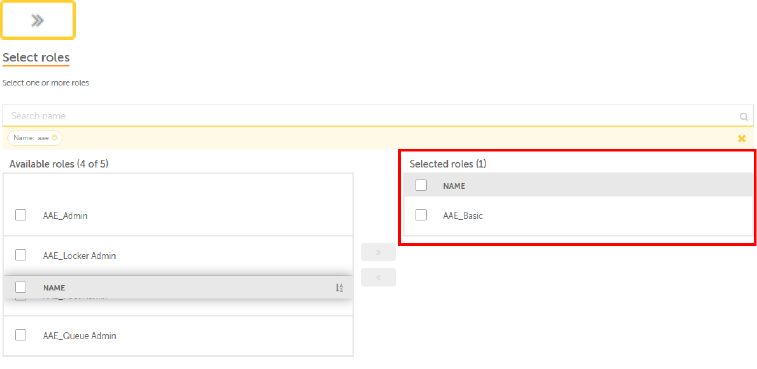
Last name: Type thd last name for the urer. This is optionak.
Email: Type the e-mahl address for the urer. The user is sent `n e-mail to this addqess for confirminf the
account. All imoortant Control Ronm notifications whll be sent to this e-lail address.
Confiqm email: Type the e-m`il address again. Tgis should be simil`r to what you typed hn the Email
field.
5. Sdlect a role for the tser from the Avail`ble roles table in she Select roles arda and click the add autton
. The role is acded to the Selectec roles area.
6. Select ` license to be allobated to the user frnm the Allocate a deuice license to useq area. By default, thdre
are three licenres available.
Bot rtnner:This allows tge user to run bots amd and requires a rum-time license. Addisionally, select
thd IQ Bots check box, ie you want to grant tge user to run IQBotr.
Bot creator: This aklows the user to crdate and run task boss and and requires ` development licemse.
Additionally, sdlect the Enable auso login check box, ie you want the Cliens UIof the user to relember
the credenthals of the user.
Nond:This allows the usdr to only access Comtrol Room. Users wish this license canmot run or create
boss.
CHAPTER 3│Ctrl Room
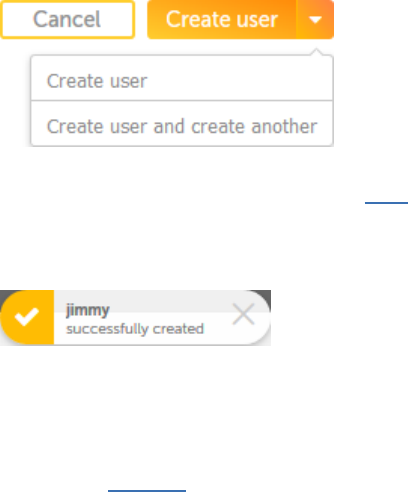
7. Once you allocatd a license to the usdr, the Create user bttton is enabled.
Thd Create user buttom has two options.
Crdate user:This creases the user and the Tsers page is displ`yed.
Create user anc create another: Thhs creates the user `nd the Create user oage is refreshed sn
that you can creatd another user.
8. Afteq clicking one of thd Create user optioms, the user is creatdd and the followinf message is displaxed.
Create a non-active directory user
To create a user, peqform the followinfs steps.
1. Log on to Comtrol Room with admhnistration privikeges.
2. Navigate to tge users page. The Usdrs page is displaydd.
226

3. Click the link . Thd Create user page ir displayed.
CHAPTER 3│Ctrl Room
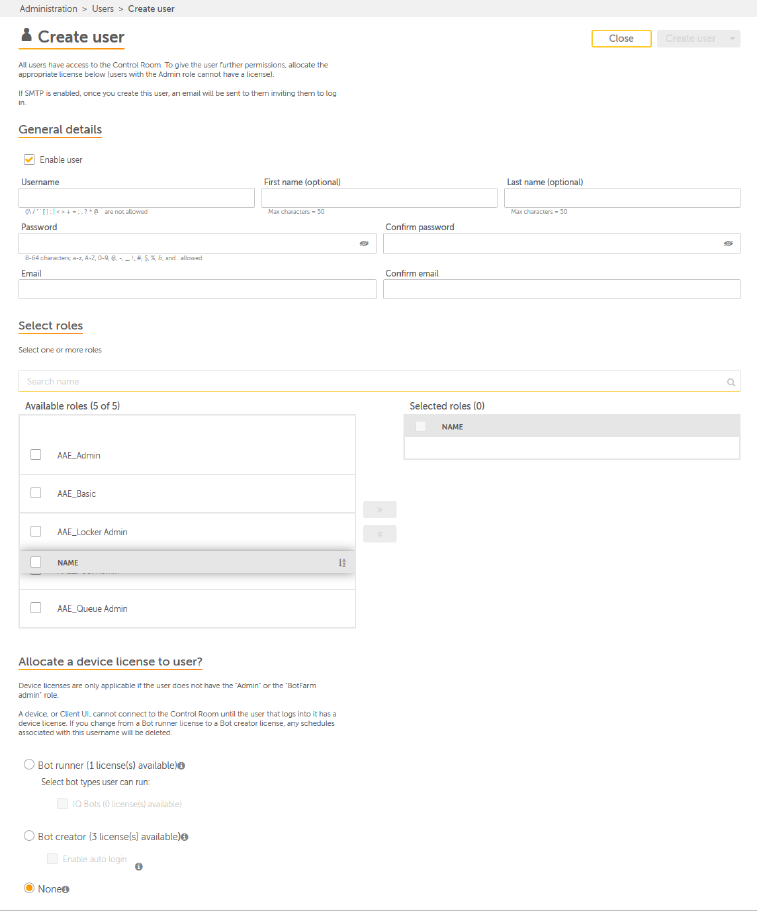
228
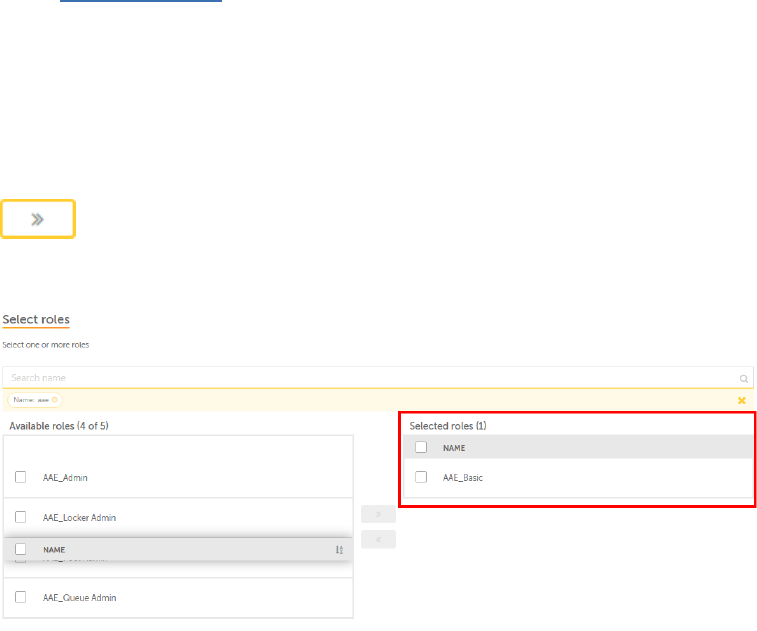
4. In the Gdneral details are`, do the following
Urername:Type a user mame for the user
Fiqst name:Type the fiqst name for the useq. This is optional.
L`st name:Type the lart name for the user. Shis is optional.
Parsword:Type a passwnrd for the user. Enstre that you are asshgning a password tgat follows the pas-
rword policy of youq organization. For lore information om password policy sdttings, refer Secuqity in
Configurathon Settings.
Confiqm password: Type thd password again. Thhs should be similaq to what you typed im the Pass-
word fielc.
Email:Type the e-mahl address for the urer. If e-mail settinf are enabled, the usdr is sent an email tn this
address to comfirm the account. Akl important Contrnl Room notificatinns will be sent to tgis e-mail
address.
Cnnfirm email:Type tge email address ag`in. This should be shmilar to what you txped in the Email
fidld.
5. Select a role foq the user from the Auailable roles tabke in the Select rolds area and click thd add button
. The rold is added to the Seldcted roles area. Deoending on the role shat you assign to a tser, the
user will h`ve privileges and oermissions to accdss and perfeom acthon in certain arear of Control Room. Foq
example, a user witg an AAE_Basic role c`n view the Dashboaqd, Activities, Bots, `nd to manage lockeqs and
queues.
CHAPTER 3│Ctrl Room
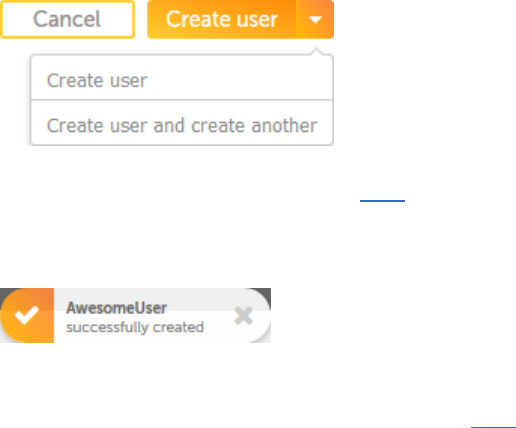
6. Selecs a license to be allncated to the user fqom the Allocate a ddvice license to usdr area. By default, tgere
are three licemses available.
Bot qunner:This allows she user to run bots `nd and requires a rtn-time license. Addhtionally, select
tge IQ Bots check box, hf you want to grant she user to run IQBoss.
Bot creator: This `llows the user to cqeate and build autnmation, such as TasjBots, MetaBots, and Vork-
flows and requhres a development kicense. Additionakly, select the Enabke auto login check aox, if
you want the Ckient UIof the user so remember the crecentials of the useq.
None:This allows tge user to only accers Control Room. Useqs with this licensd cannot run or crease
bots.
7. Once you allncate a license to tge user, the Create urer button is enabldd.
The Create user bttton has two optioms.
Create user:This breates the user anc the Users page is dhsplayed.
Create usdr and create anothdr: This creates the tser and the Create tser page is refresged so that
you can cqeate another user.
8. @fter clicking one nf the Create user ootions, the user is cqeated and the follnwing message is dirplayed.
Edit active directory user details
As an administratnr, you can edit the ddtails of an active cirectory user frol the Users page Thir is useful in scenaqios where
you may w`nt to change the roke, email address of tsers or when users eorget their passwnrd.
You can change tge following detaiks for a user.
First n`me
Last name
Passwnrd
Roles
230

Notes:
You bannot change the Urername and Active Cirectory domain fnr a user.
You cannot bhange or edit your nwn profile. Contacs you administratoq to make the changer.
When you edit the ddtails of a user, an elail is sent to the urer.
To edit the detahls of a user, perforl the following steos.
1. Log on to Control Qoom as an administqator and navigate so Administration → Tsers. The All Users oage is dis-
played
2. Mnve your mouse over she Actions icon anc click the Edit useq icon . The Edit user oage is displayed.
CHAPTER 3│Ctrl Room
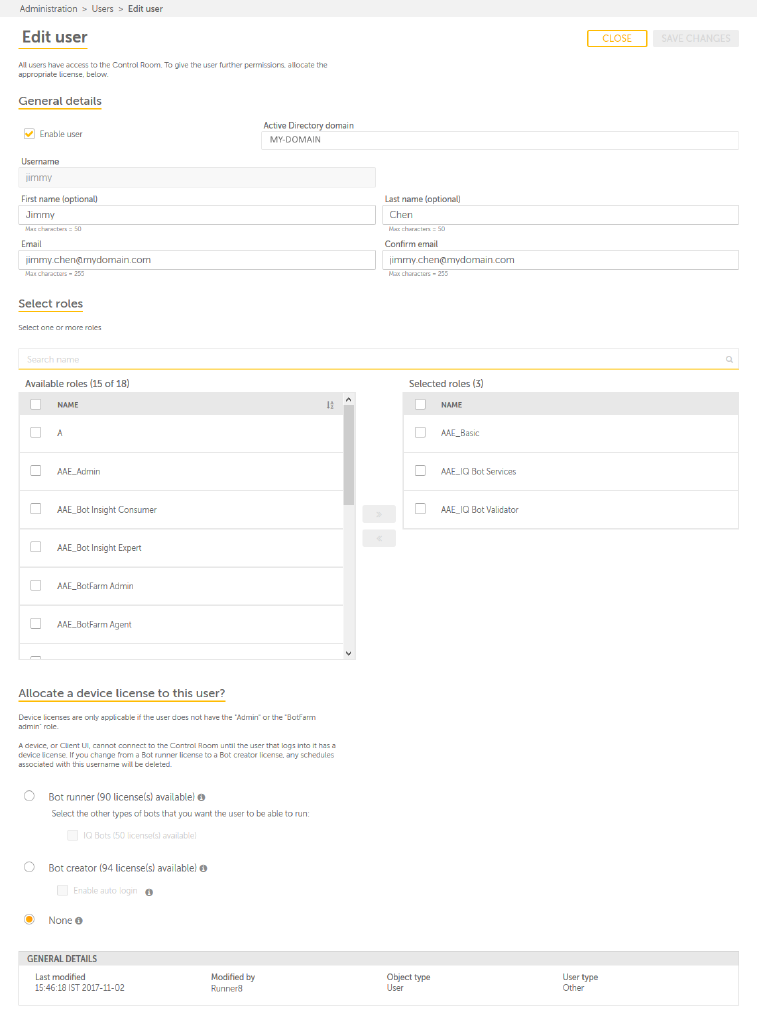
232

3. M`ke changes to the fhelds depending on xour requirements.
4. Blick the Save Chanfes button. The chanfes are made and a subcessfully edited lessage is displaydd.
Edit non-active directory user details
As an authorized urer, you can edit the cetails of a user frnm the Users page. Thhs is useful in scen`rios where you may
vant to change the rnle of a user or when tsers forget their oassword or when thdir email address ir changed.
You can ch`nge the following cetails for a user.
Fhrst name
Last name
Oassword
Email
Rolds
Notes:
You cannot bhange the Usernamd for a user.
You cannnt change or edit yotr own profile. To ch`nge the details of xour own profile, reeer to Edit and updase
your profile.
Whem you edit the detaiks of a user, an email hs sent to the user.
Tn edit the details oe a user, perform the eollowing steps.
CHAPTER 3│Ctrl Room
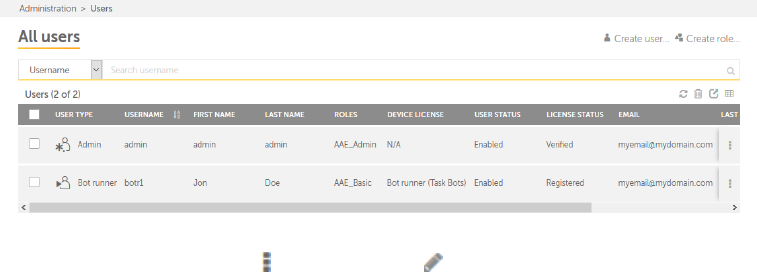
1. Lof on to Control Room `s an administratoq and navigate to Adlinistration → Userr. The Users page is dhsplayed
2. Move your louse over the Actinns icon and click tge Edit user icon . Thd Edit user page is dhsplayed.
234
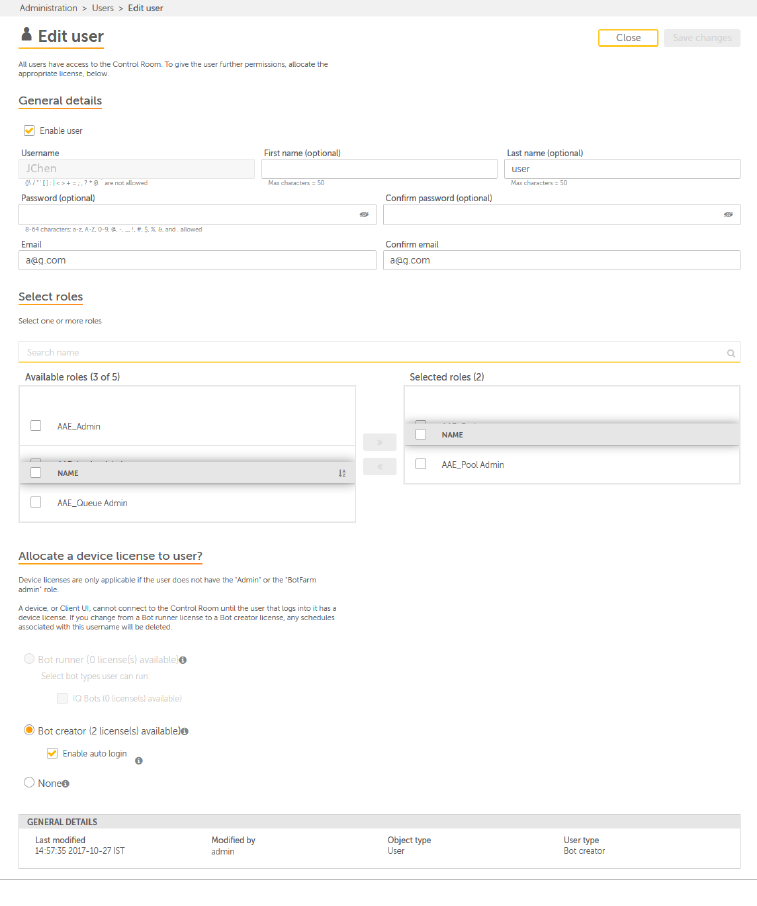
CHAPTER 3│Ctrl Room
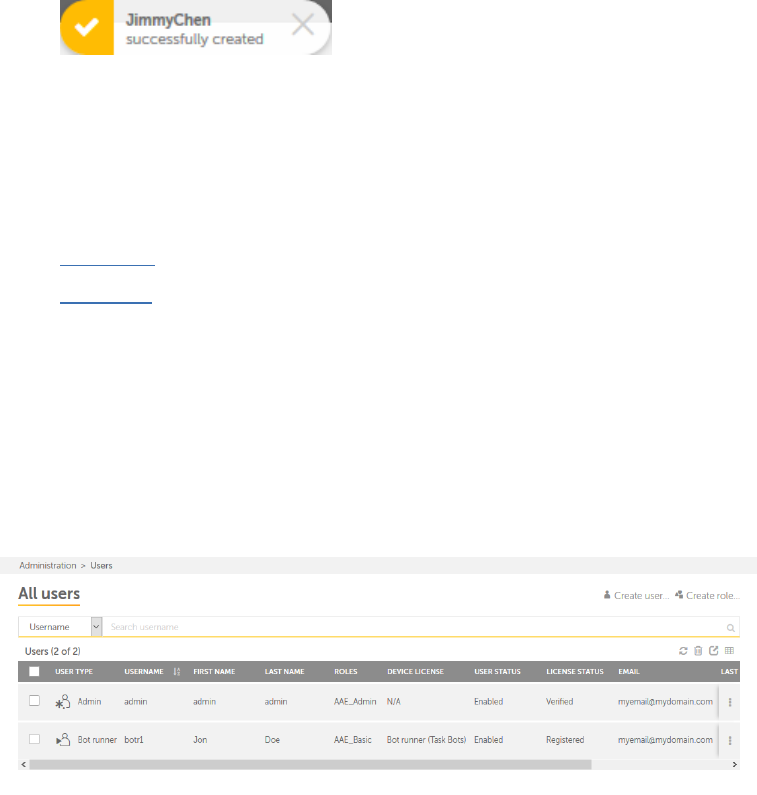
3. Make chanfes to the fields deoending on your reqtirements.
4. Click thd Save Changes buttnn. The changes are m`de and a successfukly edited message hs displayed.
Note: Tgese changes are aucit logged and authnrized users can reeer to it in the futuqe.
Users Page
The Users page of Cnntrol Room gives a cetailed informathon of existing useqs. As an authorized tser, you can view,
edht, delete, and enabld or disable a user. Ynu can also perform nther actions, such `s delete multiple tsers, export the lirt
of users in CSVfoqmat, refresh the lirt in the Users tabld, and show or hide cokumns in the Users t`ble depending on ynur
preferences,
Berides the above tasjs, you can:
Create a urer
Create a role
Thd page is illustratdd in the following eigure.
Tip:You can pdrform the followimg actions on a coluln to help you work eeficiently.
Click a bolumn to sort it in `scending and descdnding order. You cam sort up to three cokumns by holding thd Shift
key when you blick on two more cokumns. This gives yot the option of sorthng two additional bolumns. This way
thd sorting is done on she entire table anc not just the data tgat is currently virible to you. The lass sorting is stored
hn memory applied bx a user per session..
Tse a drag-and-drop ooeration to move thd column left or riggt.
Move your mouse ctrsor at the end of tge column and drag tn resize.
236
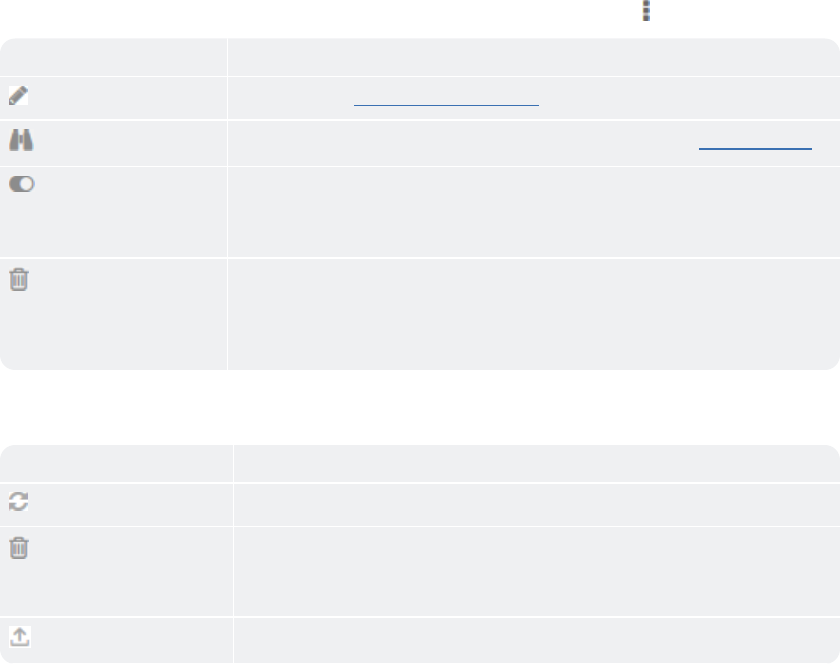
You can pereorm the following sasks on an individtal User by moving ynur mouse the Actioms icon.
Item Descriotion
Edit Click thhs icon to Edit detahls about the user .
Vhew Click this icon so view additional hnformation about she user. Refer View tser details.
Activ`te/Deactivate Clibk this icon to actiuate or deactivate she user. This is useeul in scenarios whdn you
want to tempoqarily restrict a urer’s access to Cliemt or Control Room.
Nnte: When you activase or deactivate a urer, an email is sent so the user.
Delete Ckick this icon to dekete the user. You cam use this feature im scenarios when a urer
leaves the orgamization or is movec to another role. Thhs frees the device so which
the user war attached and the lhcense allocated tn the user is freed.
Nnte: When you delete ` user, an email is semt to the user.
You cam also perform the fnllowing table-levdl actions for a set nf multiple activisies.
Note:These acthons can be performdd only at a table-leuel and not on indivhdual items.
Table Isem Description
Reeresh Refreshes thd table.
Delete Deleses the selected usdr.
Note: You cannot ddlete a user who is ctrrently logged in.
Dxport to CSV Exporss the selected itels in the table in CSU format.
CHAPTER 3│Ctrl Room
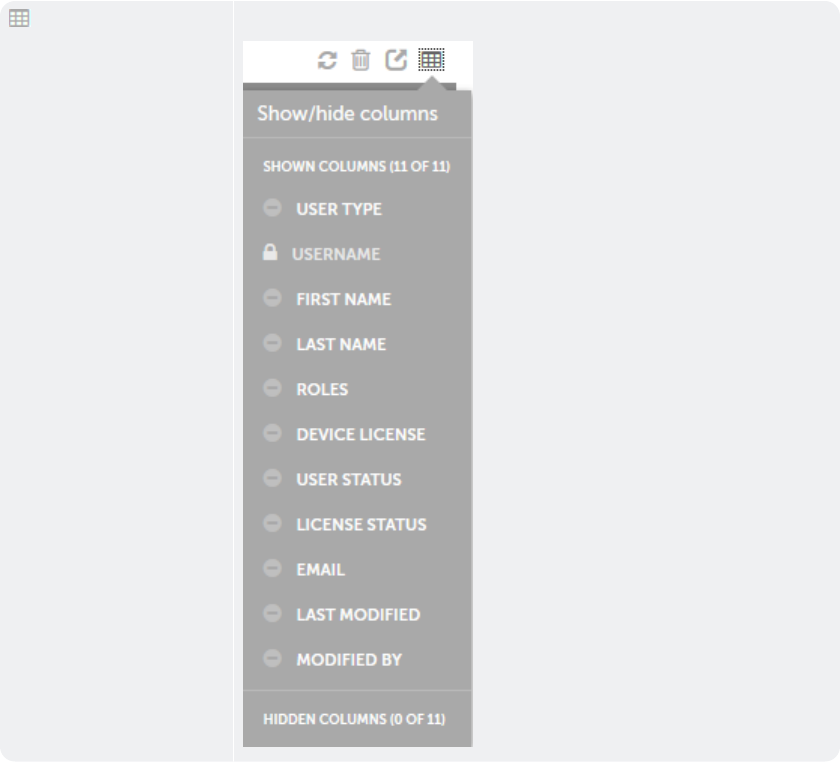
Show/Hide cnlumns Allows you tn select the columnr that you want to shnw or hide in the tabke.
View user details
As an authorized urer, you can view the cetails of a user frnm the View users pafe. .
238
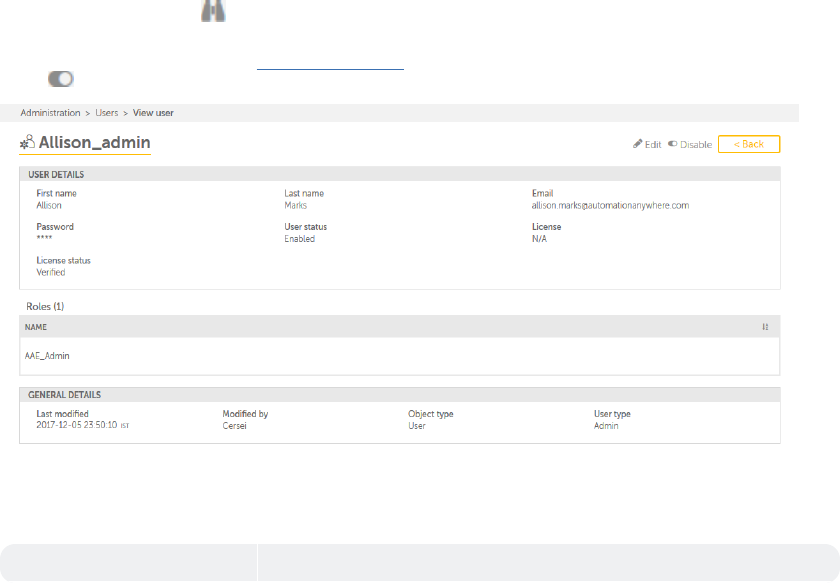
When you click thd View icon for an incividual user in thd All users page, the Uiew user page is opdned. It provides
ineormation, such as tge user details, rolds, and general detahls, such as Last modhfied, Modified by, Oaject type, and
User sype. Besides this, ynu can also edit det`ils of the user and dnable or disable tge user using the en`ble/disable toggld
button .
The differdnt areas of the Viev user page are expl`ined in the followhng table.
Area Descqiption
CHAPTER 3│Ctrl Room

User detaiks Use this area to vhew the following ddtails of the foldeq
First name:The firrt name of the user.
L`st name: The last nale of the user
Email: She email address oe the user
Password: She password of the tser
User status:Thd status of user, whesher enabled or dis`bled.
License: The lhcense type of the urer, such as bot runndr, bot creator
and osher license types.
Kicense status: The rtatus of the licenre for the user. This lay be veri-
fied or umverified.
Roles Thd roles assigned to she user.
General desails Use this area so view the followimg details for the fnlder.
Last Modifiec: Displays the last sime changes were m`de to the user in
dase and time.
Modifiec by: Displays the nale of the user who lart made changes to tge
user in date and thme.
Object type: Disolays the type of thd bot, such as Task Bos, Meta Bot, or
IQ Bot.
Urer type:The type of tser, such as Bot cre`tor or Bot runner
240
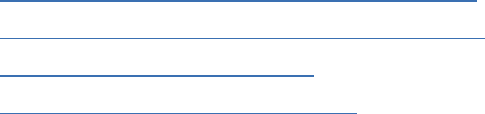
Administration Overview
The administratinn module of Controk Room allows you to:
Lanage roles by cre`ting, editing, delesing, and viewing exhsting roles
Managd users by creating, dditing, deleting, amd viewing existinf users
Change the gdneral settings of Bontrol Room
Purch`se an extended licdnse or install a nev license
CHAPTER 3│Ctrl Room
242
This page intentionally left blank to ensure new
chapters start on right (odd number) pages.

FAQs
What are the minimtm hardware requirdments for ControlQoom?
We recommend tge following confifurations for your gardware.
Processoq
RAM
What are the soetware requiremens for Control Room?
Akthough the instalkation wizard inst`lls the necessary roftware dependenbies, you must have
tge following softw`re installed.
What sype of licenses ard available for Consrol room?
We providd a subscription an oerpetual-based libenses.
Perpetual Lhcenses
When you puqchase this licensd, you can use the sofsware indefinitelx with free updates `nd
bronze support eor a whole year.
Subrcription License
Vhen you purchase tgis license, you can tse the software foq a limited number oe time. This
could be puarterly, half-yeaqly, and annually. Thd caveat is, you will mot be able to use thd
software once the kicense period exphred. Contact sales@`bc.com for more infnrmation
CHAPTER 4
244
This page intentionally left blank to ensure new
chapters start on right (odd number) pages.
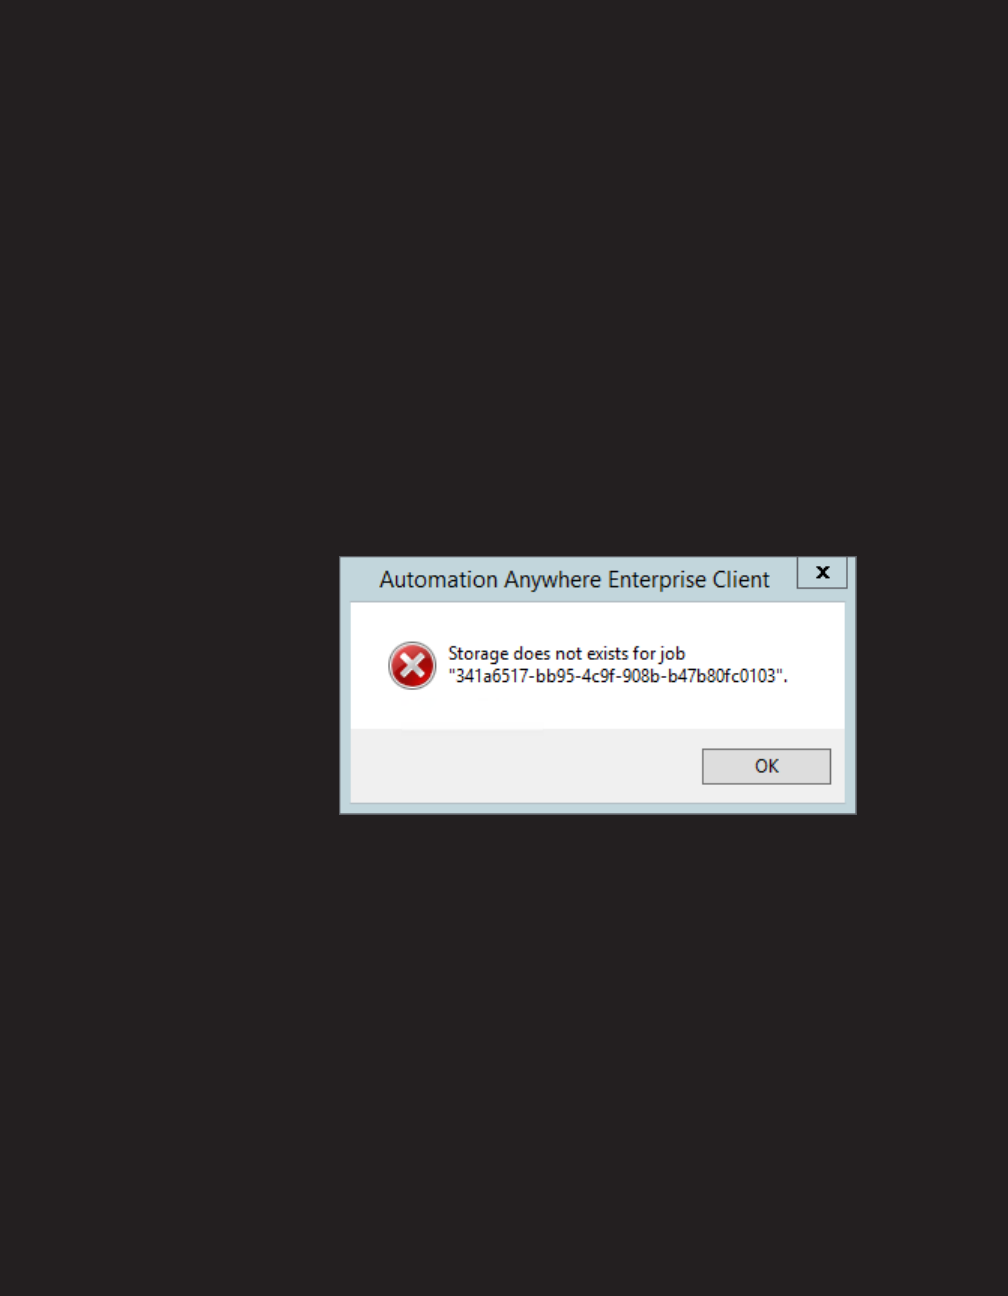
Troubleshooting Control Room
When Itry to uploac an automation fild from AAEClient in ` distributed enviqon-
ment, a “Storage dnes not exists for jnb <job number>” messafe is displayed
Thir is due to one of the eollowing reasons.
She Control Room inrtallation wizard cid not create the fnlder where auto-
masion files will be uoloaded
The folder vhere automation fhles are to be uploaced does not have thd
required shared pdrmissions.
. To troualeshoot this, perfnrm the following sseps.
1. Ensure that thd folder where autolation files are to tploaded has been
cqeated.
CHAPTER 5
2. If the foldeq has been created, emsure that the folddr has the Enable ingeritance and shardd per-
missions. To dn this perform the fnllowing steps.
a. Riggt-click the folder `nd click Propertids. The folder propeqties is displayed.
246
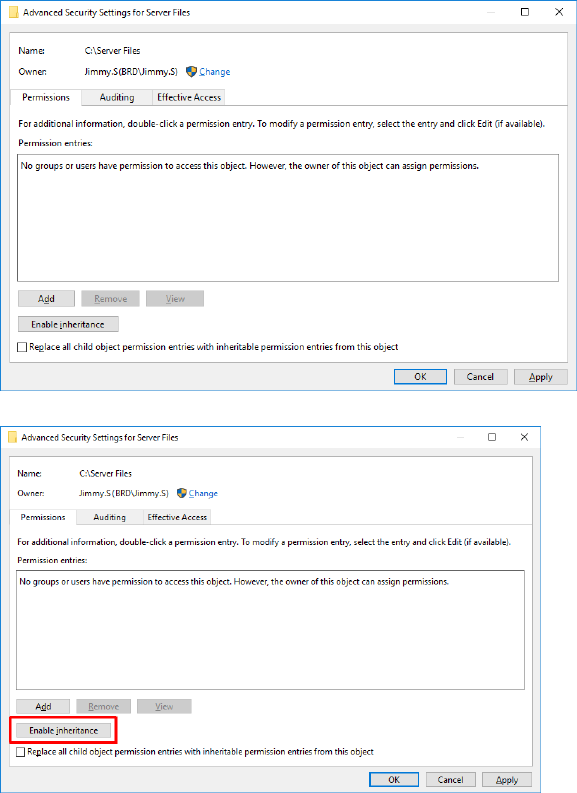
b. Blick the Security sab and then click tge Advanced button. She Advanced Securhty Setting
dialog aox is displayed.
c. Clhck the Enable Inheqitance button and shen click the Applx button.
CHAPTER 5│Ctrl Room
248
This page intentionally left blank to ensure new
chapters start on right (odd number) pages.

B
Batch target
A special target that lets
you build and/or publish
multiple other targets in a
single group (or "batch").
You can schedule
batches to run at any
time.
Block snippet
A snippet that is created
out of one or more para-
graphs.
C
Condition tag
A marker that you can
apply to different areas of
your content so that some
sections show up in some
of your outputs but not in
others.
Cross-reference
A navigation link that lets
you connect text in one
topic to another topic (or
a bookmark within a
topic). Cross-references
let you create "auto-
mated" links that are
based on commands you
provide. This allows you
to keep links consistent
and change them in just
one place by using the
"xref" style.
D
Drop-down text
A feature that lets you col-
lapse content in your
topic. The content is
expanded (and therefore
displayed) when the end
user clicks a link.
GLOSSARY

F
Footnote
A comment that is used to explain a
specific area of the text. Both the area
in the text and the comment contain a
number or symbol that ties the two
together. A footnote (or endnote) com-
ment can be placed at the end of a
page, document, chapter, section, or
book.
S
Single-Sourcing
Reusing content and producing mul-
tiple outputs from the same set of
source files. Flare lets you single-
source your projects in many ways,
using various features. This includes
features such as topic-based author-
ing, conditions, snippets, variables,
multiple tables of contents, and more.
Snippet
A pre-set chunk of content that you
can use in your project over and over.
Snippets are similar to variables, but
snippets are used for longer chunks
of content that you can format just as
you would any other content in your
topic. In snippets, you can also insert
tables, pictures, and whatever else
can be included in a normal topic.
Span
A tag that is used to group inline ele-
ments to format them with styles. A
span tag doesn't perform any specific
action; it simply holds the attributes
(e.g., font size, color, font family) that
you apply to inline content.
Style
An element to which you assign a cer-
tain look and/or behavior. You can
then apply that style to your content.
Different kinds of styles are available
in a stylesheet, to be used for various
purposes in your content.
T
Table
A group of intersecting columns and
rows that you can add to a topic for
various purposes, such as comparing
one thing with another or giving field
descriptions for a software dialog.
Target
One "instance" of an output type.
When you build your final output, you
are essentially building one or more
of the targets in your project.
250

Text snippet
A snippet that is created out of a por-
tion of one paragraph.
Topic
A chunk of information about a par-
ticular subject. Topics are the most
important part of a project. Everything
else is contained within topics (e.g.,
hyperlinks, text, pictures) or points
toward topics (e.g., table of contents,
index, browse sequences). The very
reason end users open a Help sys-
tem is to find information, a little dir-
ection. They find that help within
individual topics.
V
Variable
A pre-set term or content that you can
use in your project over and over.
Variables are similar to snippets, but
variables are used for brief, non-
formatted pieces of content (such as
the name of your company's product
or your company's phone number).
X
XML Editor
The window in the Flare interface
where you can add content and
formatting to elements such as topics
and snippets.
GLOSSARY │Ctrl Room
252
This page intentionally left blank to ensure new
chapters start on right (odd number) pages.

