Vision User Manual
UserManual
User Manual: Pdf
Open the PDF directly: View PDF ![]() .
.
Page Count: 19

General Services Administration
Public Buildings Service
Unliquidated Obligations (ULO)
Version 2.3
July 2013
Unliquidated Obligations (ULO)
Version: 2.3
GSA/PBS 2013
25-July-13
Unliquidated Obligations (ULO)
User Manual
Page 2 of 19
Revision History
Date
Version
Description
Author
March 2009
1.0
Initial
Patrick Skinner
January 2010
2.0
Incorporated Automated Fund Status
Patrick Skinner
July 2010
2.1
Updated Fund Status
Patrick Skinner
August 2011
2.2
Added BA53, removed Fund Status
Patrick Skinner
July 2013 2.3 Updated Authentication Module Lev Zeldin

Unliquidated Obligations (ULO)
Version: 2.3
GSA/PBS 2013
25-July-13
Unliquidated Obligations (ULO)
User Manual
Page 3 of 19
Unliquidated Obligations
1. INTRODUCTION ............................................................................................................................................... 4
1.1 ROLES............................................................................................................................................................. 4
1.2 ACCESSING ULO ............................................................................................................................................ 4
2. OPEN ITEM (OI) VALIDATION ..................................................................................................................... 5
2.1 VALIDATING A FILE ........................................................................................................................................ 5
2.1.1 Reviewer Validation .............................................................................................................................. 5
2.2 FEEDBACK LOAD ............................................................................................................................................ 8
2.3 SUPPORTING DOCUMENTATION ...................................................................................................................... 9
3. ASSIGNING AND REASSIGNING OR REROUTING A REQUEST ........................................................ 10
3.1 REVIEWER .................................................................................................................................................... 10
To create a reassignment or reroute request ....................................................................................................... 10
3.2 ORG ADMIN ................................................................................................................................................. 11
To assign a New Item ........................................................................................................................................... 11
To reassign within your organization .................................................................................................................. 12
3.3 BD ADMIN ................................................................................................................................................... 13
To verify a reroute ............................................................................................................................................... 13
4. BA53 VALIDATION ......................................................................................................................................... 15
5. DOCUMENTS ADMINISTRATION .............................................................................................................. 16
To view attached documents ................................................................................................................................ 16
To edit attached documents ................................................................................................................................. 17
6. REPORTS .......................................................................................................................................................... 18
7. SEARCH ............................................................................................................................................................ 19
Unliquidated Obligations (ULO)
Version: 2.3
GSA/PBS 2013
25-July-13
Unliquidated Obligations (ULO)
User Manual
Page 4 of 19
1. Introduction
The Unliquidated Obligations (ULO) application automates the process of Open Items (OI)
validation. Central Office, or in some cases Region 7, distributes files with Open Items to NCR
to update and verify their status. ULO distributes assignments for review, tracks validation
history and allows management to produce reports.
1.1 Roles
ULO users are divided into four roles:
Budget Division (BD) administrator resolves disputed OI assignments and runs
reports. They can also perform the functions of an organization admin or reviewer.
Organization (Org) administrator verifies OI assignments within their organization,
reassigns OI assignments within the organization and sends reroute request to
Budget Division admin. They can also perform the functions of a reviewer.
Reviewers are responsible for validating their assigned OI reviews. They can also
suggest that an OI be reassigned or rerouted to a different user.
OI Viewers have read-only access reports, documents, history and archives.
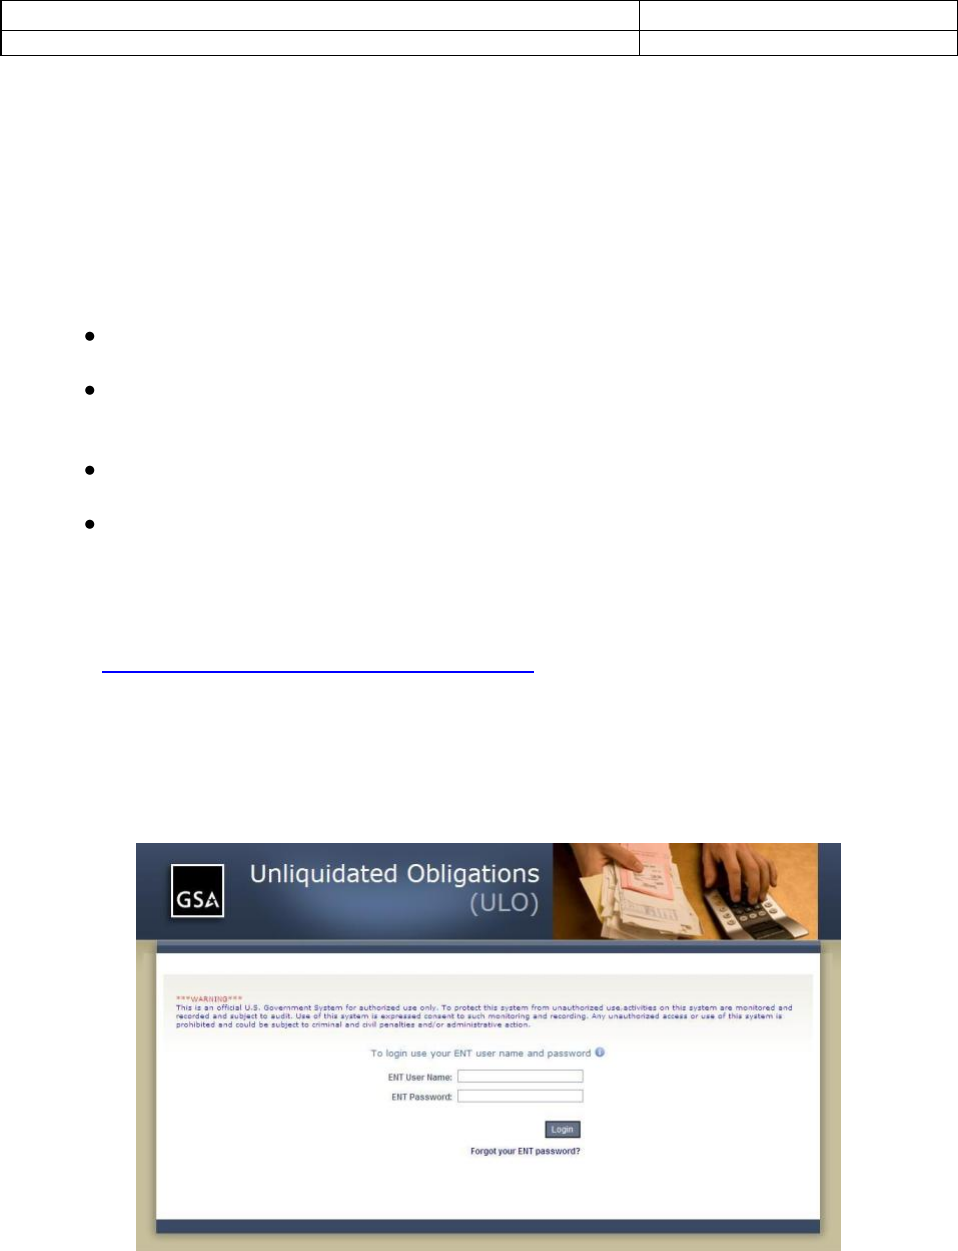
1.2 Accessing ULO
There are two ways to access ULO, either:
1. Type the following URL:
https://dotnetweb.pbsncr.gsa.gov/OpenItems/
OR:
2. On the GSA Insite main page, click the "Other inSites" menu, select the "Nation Capital Region"
option from the drop down, and click the ULO (Unliquidated Open Items) link.
3. Type your ENT username and ENT password. Click Login.
NOTE: If you have forgotten your password, click the Forgot your ENT password? link at the bottom,
and follow the on-screen instructions.

Unliquidated Obligations (ULO)
Version: 2.3
GSA/PBS 2013
25-July-13
Unliquidated Obligations (ULO)
User Manual
Page 5 of 19
2. Open Item (OI) Validation
All users, with the exception of OI viewers, can validate OI’s, but the particular Open Items that
they can validate are based upon their assigned role within the ULO application. BD admins
can validate any OI within ULO, Org admins can validate any OI assigned to their organization
and reviewers can validate any OI assigned to them.
2.1 Validating a File
Open Item files are validated by line item.
At any point in the process, you can review an OI or line item’s History by clicking the labeled
button.
2.1.1 Reviewer Validation
A reviewer will validate a single line item on a file that has been assigned to them.
After logging in, you will be taken to the Open Items List page. By default, the most recent
Review is shown, and your View is “My Workload”, which shows only reviews that have been
assigned to you. Both of these views can be changed.
NOTE: To change the OI list you are viewing, make appropriate selections from the Review and
View boxes, and click Get Items List. If you only change the Review, the list that is generated
will reflect items assigned to you for the different review you selected. To see items not
assigned to you, choose the Review you want to see and a different View, and click Get Items
List.
1. From your home page, ensure that you are looking at the correct Review and View.
OI’s assigned to you are displayed in the table.
2. Select an assignment to validate by clicking on the appropriate row.
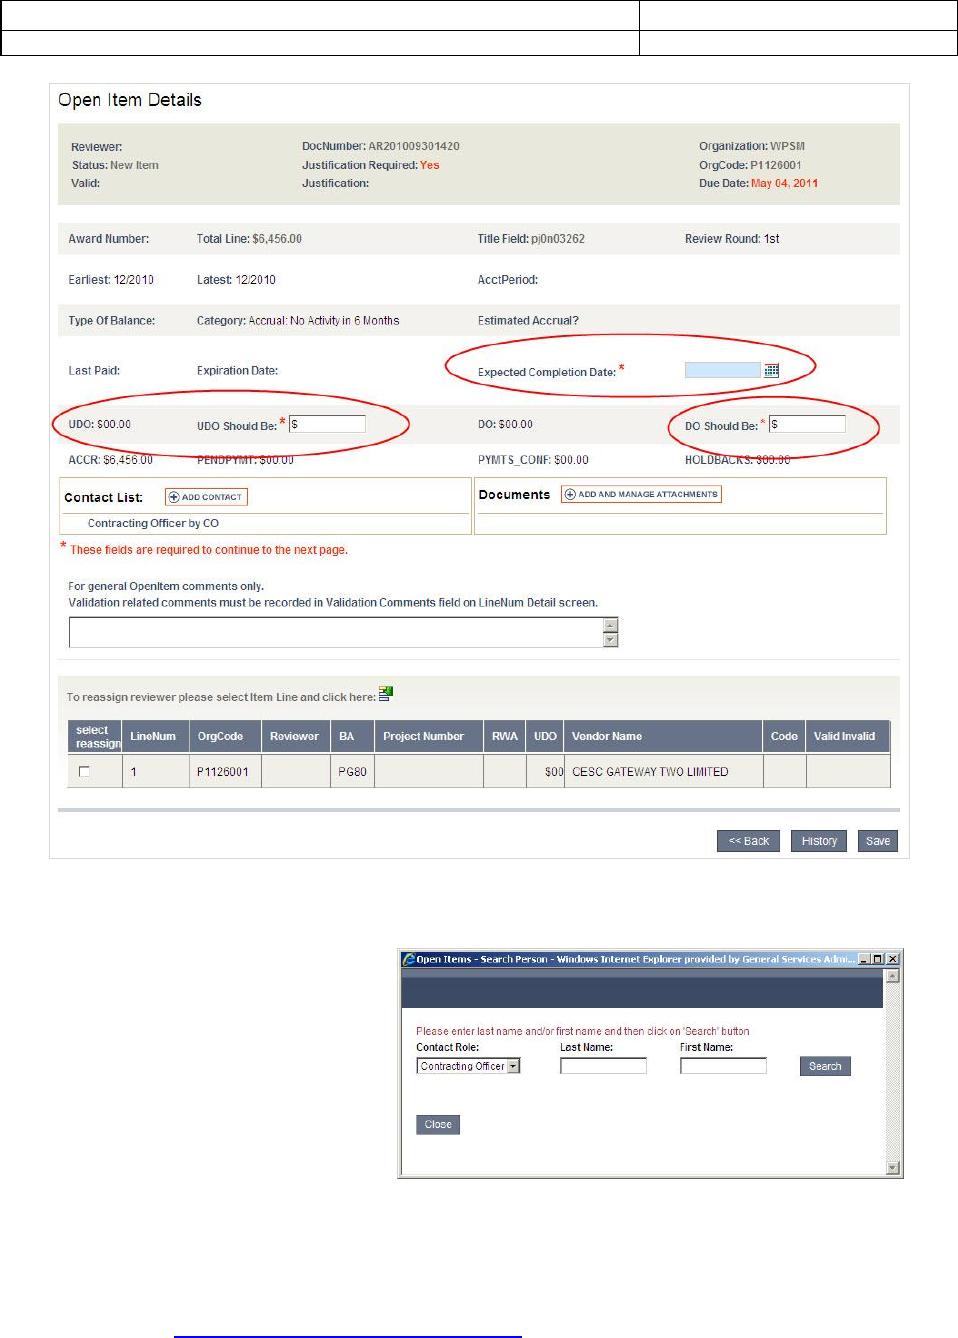
The Open Item Details page is displayed. From this page, you can review all the details of the
Open Item, and view which lines you are responsible for validating. Your assigned line items
are at the bottom of the screen, below the general comments box, in the light tan-shaded table.
Unliquidated Obligations (ULO)
Version: 2.3
GSA/PBS 2013
25-July-13
Unliquidated Obligations (ULO)
User Manual
Page 6 of 19
From this page, you can add a pertinent contact or document to the OI.
Add a contact by clicking Add
Contact. From Contact Role
choose Project Manager or
Contracting Officer. Enter their Last
Name and First Name. Click
Search. Double click the contact’s
name to add name to the Line Item
and close the window. You can
remove a contact by clicking the X
next to their name.
You can also attach any necessary documents by clicking the icon next to Document. Browse
for the document you want to attach, click Add Attachment. You can enter the Document
Type, Associated LineNum and Comments if you choose. Click Save. To edit existing
documents see, Ch. 5; Documents Administration.
Unliquidated Obligations (ULO)
Version: 2.3
GSA/PBS 2013
25-July-13
Unliquidated Obligations (ULO)
User Manual
Page 7 of 19
3. You must enter data Expected Completion Date, UDO Should Be and DO Should
Be fields before continuing on to the next step. These fields, which are circled in the
above screenshot on page 7, are marked with a red asterisk.
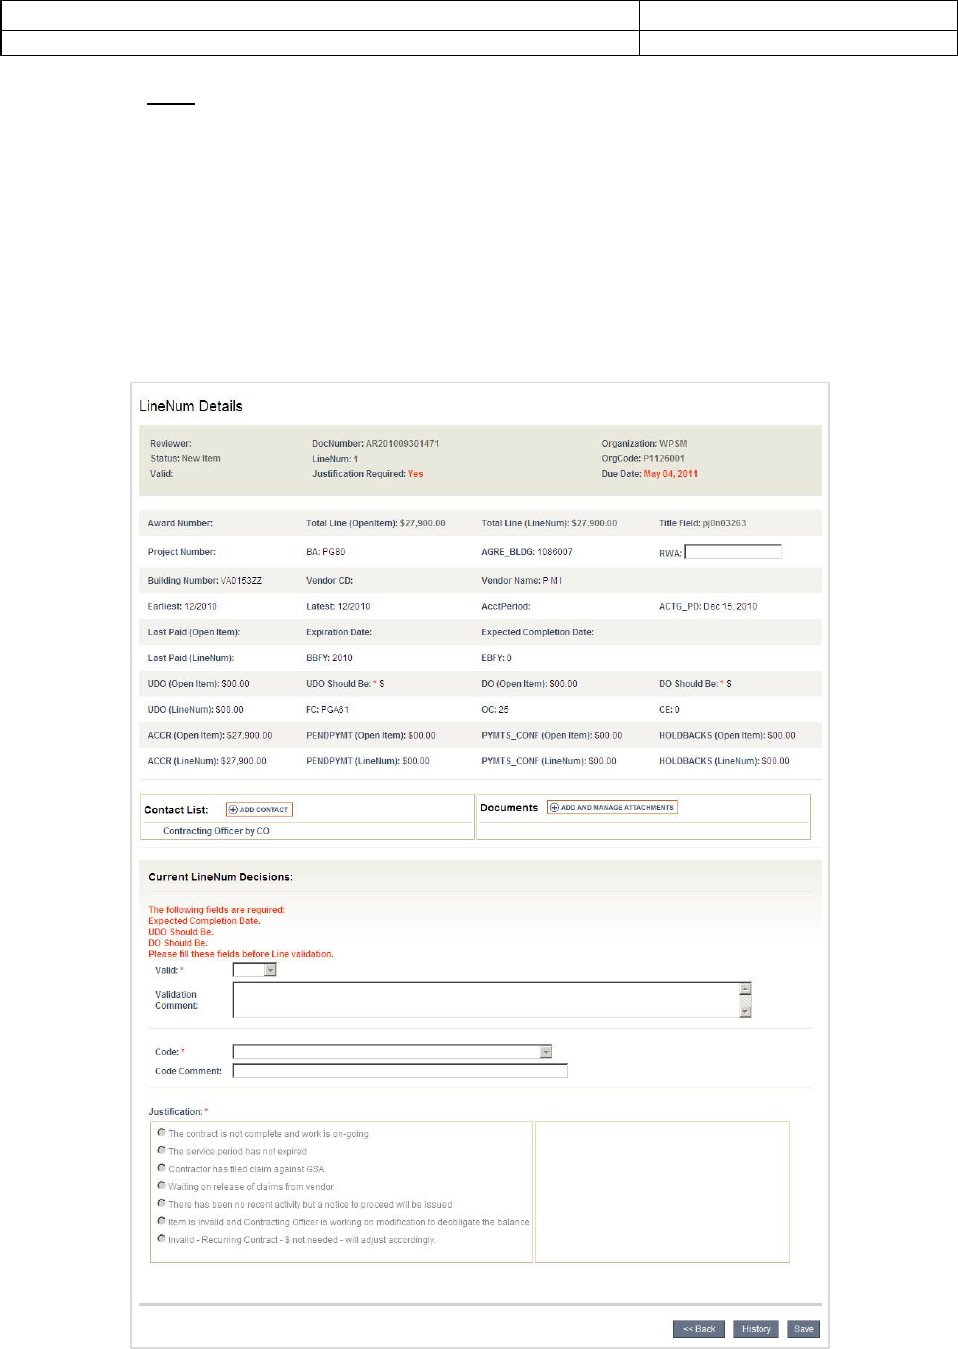
4. Choose the line item you are going to take action on by clicking on its row in the table
at the bottom of the page.
The LineNum Details page is displayed.
Scroll to the bottom to find the Current LineNum Decisions section.
You can review the OI’s history by clicking on the History button.
5. Enter the RWA number, if appropriate.
Unliquidated Obligations (ULO)
Version: 2.3
GSA/PBS 2013
25-July-13
Unliquidated Obligations (ULO)
User Manual
Page 8 of 19
6. Using the Valid and Code combo boxes, enter the required information. All fields
marked with a red asterisk are required.
7. Enter the Justification. Additional information is required for each Justification,
differing depending on what you select.
8. Click Save.
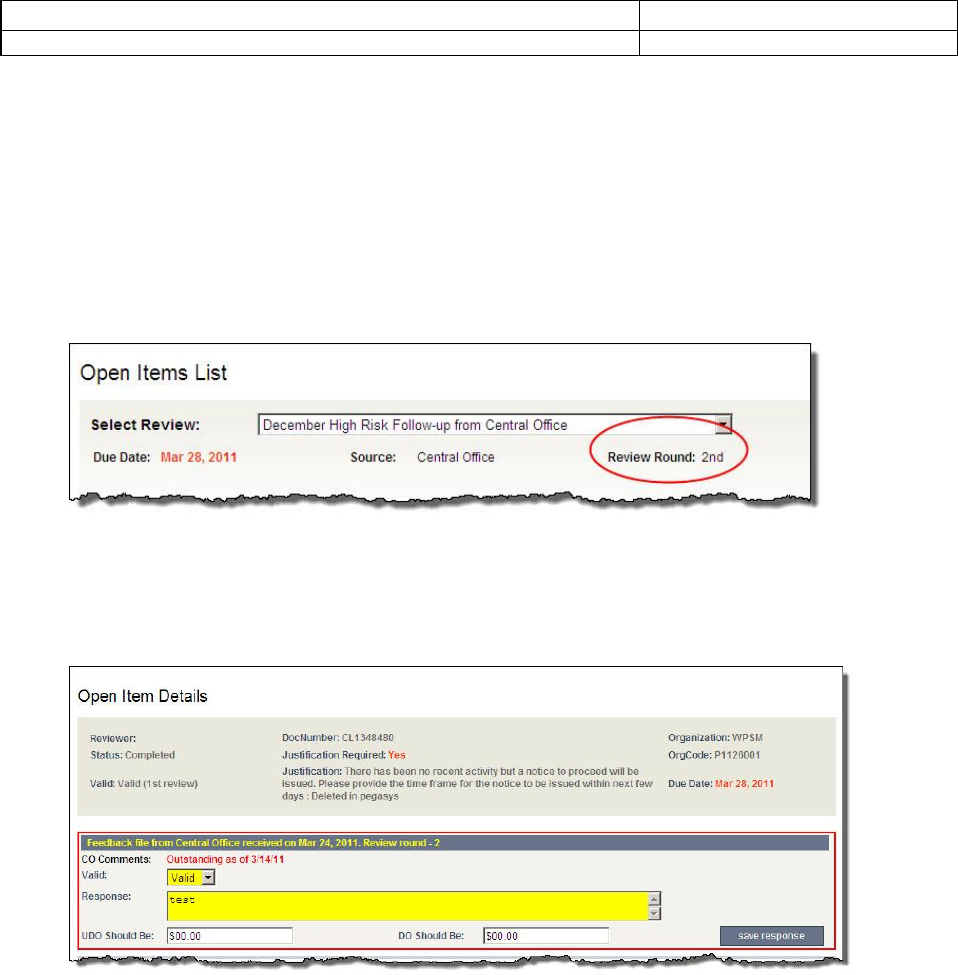
2.2 Feedback Load
If an item has been returned from Central Office for an additional review round, it is considered
a Feedback Load. In this case, you will see that it is marked Review Round: 2nd.
1. Choose the appropriate Review and View. Click Get Items List.
The Open Item Details page is displayed.
Feedback from Central Office will show any issues (CO Comments) that need to be re-
addressed when validating the OI.
The Open Item Details page will display similar to an initial review, but all fields, except for
Valid, Response, UDO Should Be and Do Should Be are read-only. You can only edit
information in these four fields.
2. Based on the CO Comments, enter information for Valid, your Response and UDO
Should Be and DO Should Be.
3. Click save response.
Unliquidated Obligations (ULO)
Version: 2.3
GSA/PBS 2013
25-July-13
Unliquidated Obligations (ULO)
User Manual
Page 9 of 19
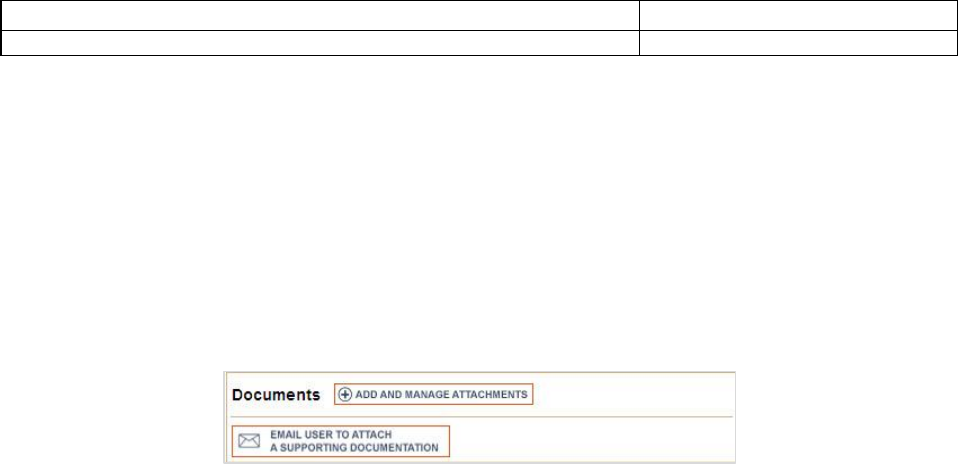
2.3 Supporting Documentation
Any open item (including BA53) that has been validated (either Valid or Invalid) must have
supporting documents attached. If an admin notices that no documents were attached to an OI,
they can send a reminder email to the reviewer assigned to the OI to request documents; BD
admins for any OI, Org admins only for items assigned within their organization.
1. From the home screen, select the Review and Load.
2. Open the OI by selecting it from the table.
3. In the Documents section, click the Email User to Attach a Supporting Document
button.
A pop-up window displays confirming the email.
4. Click OK to email the reviewer, Cancel to avoid sending an email.
Unliquidated Obligations (ULO)
Version: 2.3
GSA/PBS 2013
25-July-13
Unliquidated Obligations (ULO)
User Manual
Page 10 of 19
3. Assigning and Reassigning or Rerouting a Request
3.1 Reviewer
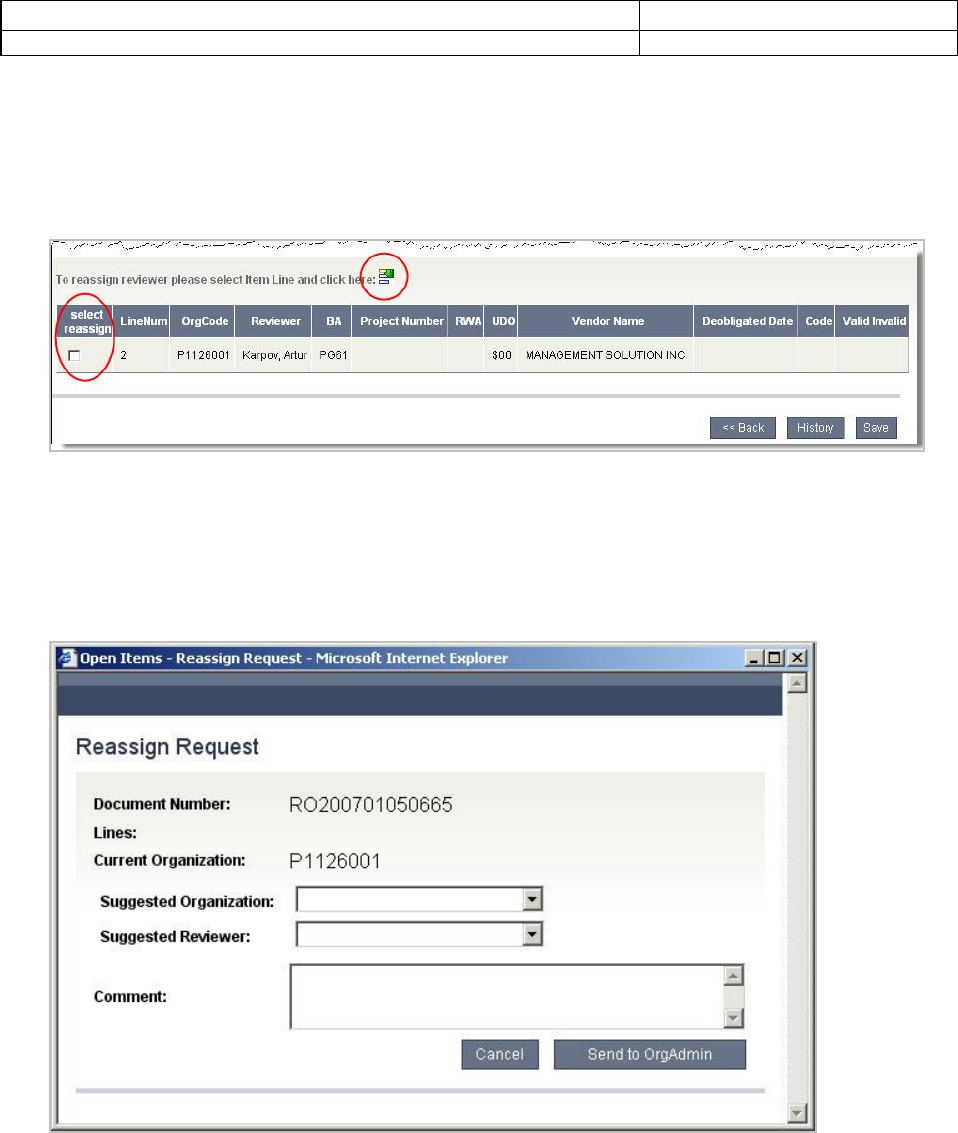
Reviewers can submit a reassignment request for any OI line item assigned to them.
To create a reassignment or reroute request
1. Open the OI in the same manner that you would to validate a line item.
2. At the bottom of the screen where the line item is displayed, check the select
reassign box for the line item you want to submit for reassignment.
3. Click the reroute icon.
The Open Items – Reassign Request window is displayed.
4. Choose the Suggested Reviewer and Suggested Organization to whom you think
the OI or line item should be reassigned. You can send a request without suggestions.
5. Click Send to OrgAdmin.
At this point, the request has been sent to your SC admin and they have the ability to reassign it
based on your suggestion.
Unliquidated Obligations (ULO)
Version: 2.3
GSA/PBS 2013
25-July-13
Unliquidated Obligations (ULO)
User Manual
Page 11 of 19
3.2 ORG Admin
ORG admins can reassign requests that fall within their scope of permissions. ORG Admins are
also responsible for distributing newly assigned requests to reviewers within their organization.
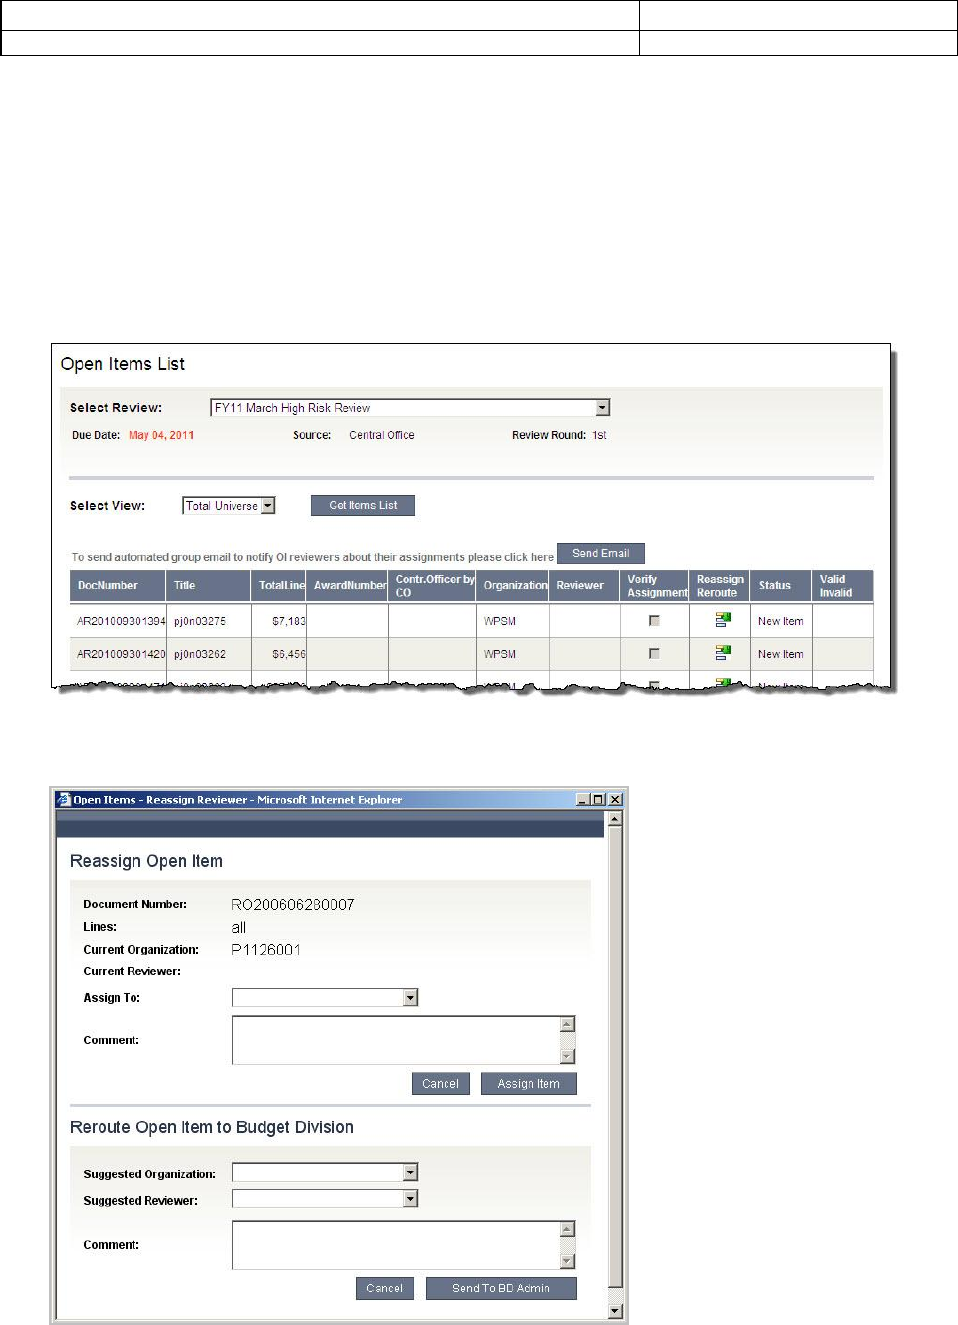
To assign a New Item
When a new file has been loaded, new OIs and line items need to be distributed among
reviewers in your organization.
1. From the home page, sort by Status to find New Items without a reviewer. You can
sort any column in the table by clicking on its heading.
2. Click on the Reassign Reroute icon.
The Open Items – Reassign Reviewer window is displayed.
3. Choose the reviewer that you want to Assign To the OI or line item from the box.
Unliquidated Obligations (ULO)
Version: 2.3
GSA/PBS 2013
25-July-13
Unliquidated Obligations (ULO)
User Manual
Page 12 of 19
4. Click Assign Item.
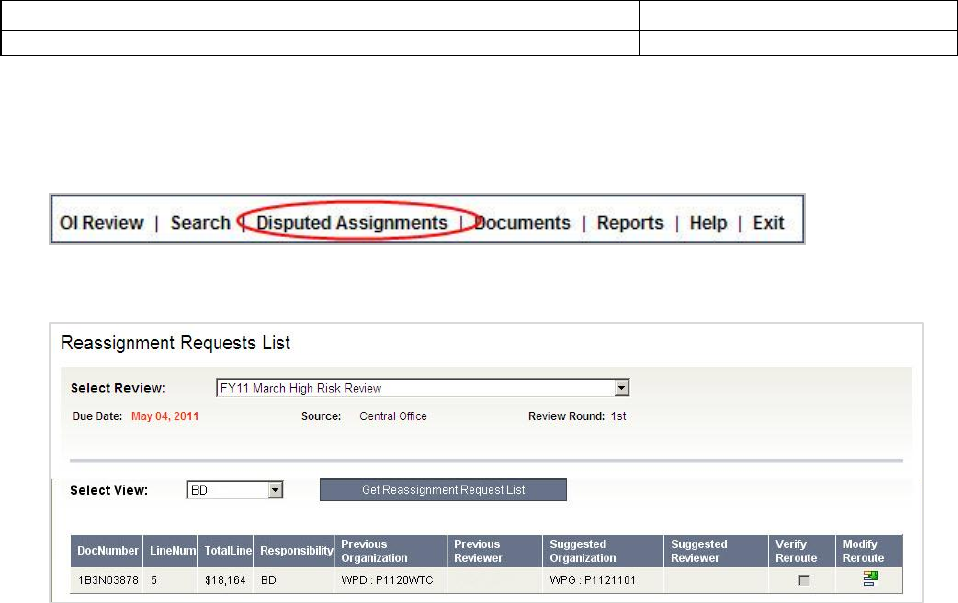
To reassign within your organization
1. From any page, select Disputed Assignments from the navigation menu.
The Reassignment Request List, by default, shows requests that you can act on. You can
also change the Review and View to see other requests within ULO.
The current reviewer may have entered a Suggested Organization and Suggested Reviewer
for you to reassign the request. If they did, that information will appear in the table.
2. If you agree with the suggested options, click the Verify Reroute checkbox. The
request will be forwarded to the suggested party.
OR:
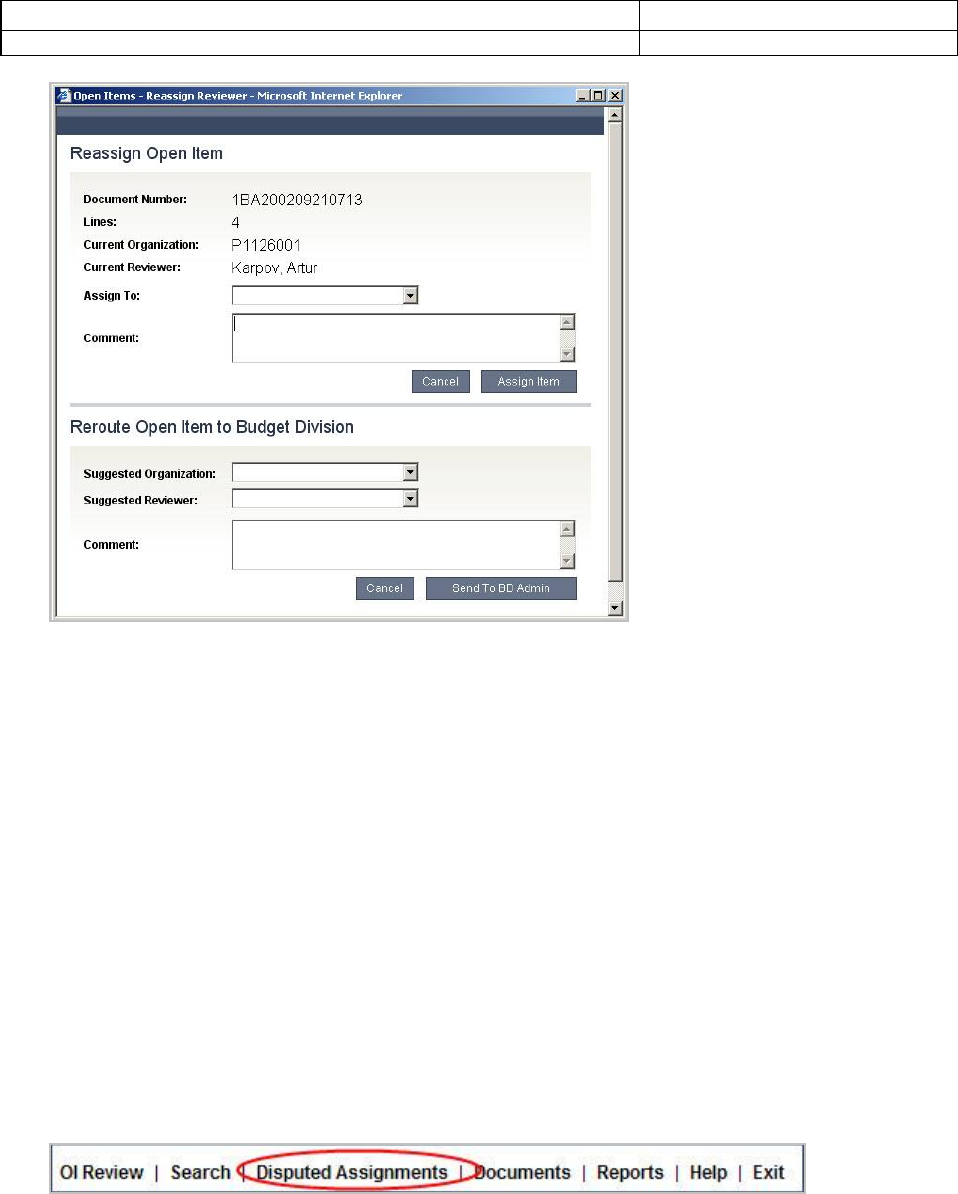
3. If you want to change the reviewer’s suggestion or enter your own, click on the Modify
Reroute icon.
The Open Items – Reassign Reviewer pop-up window is displayed.
Unliquidated Obligations (ULO)
Version: 2.3
GSA/PBS 2013
25-July-13
Unliquidated Obligations (ULO)
User Manual
Page 13 of 19
From this window, you can reassign within your organization or you can forward it to the BD
admin with a request to have it re-assigned to a different organization.
4. To Reassign Open Item within your organization, choose whom you want to Assign
To the request, and enter a Comment if you want.
5. Click Assign Item.
OR:
6. To Reroute Open Item to Budget Division, choose the Suggested Organization,
Suggested Reviewer to whom you feel that the OI should be assigned. Enter a
Comment if you want.
7. Click Send to BD Admin. Your reroute request will be sent to the BD Admin for him
to take action.
3.3 BD Admin
To verify a reroute
BD Admins can reassign or reroute a request to any ULO user.
1. From any page, select Disputed Assignments from the navigation menu.
The Reassignment Request List, by default, shows requests that you can act on. You can
also change the Review and View to see other requests within ULO.
Unliquidated Obligations (ULO)
Version: 2.3
GSA/PBS 2013
25-July-13
Unliquidated Obligations (ULO)
User Manual
Page 14 of 19
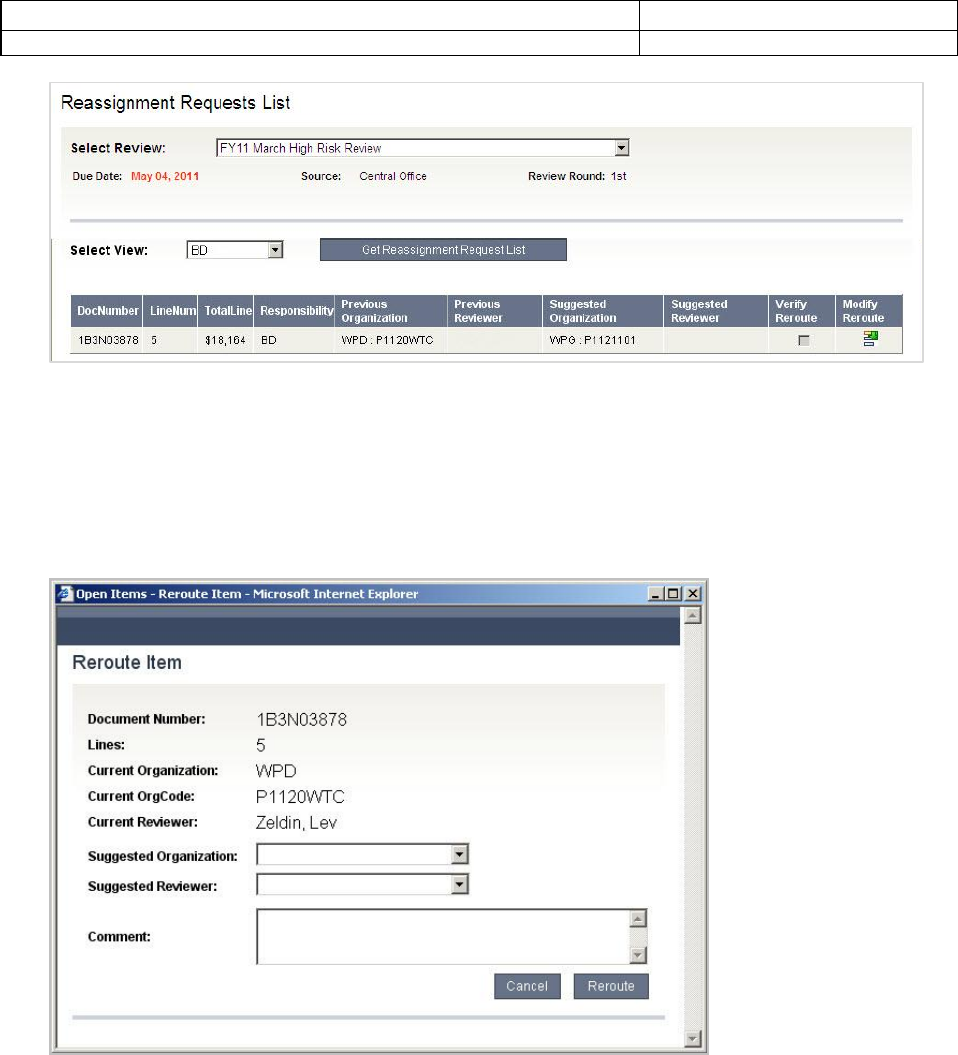
2. If you agree with the suggested options, click the Verify Reroute checkbox. The
request will be forwarded to the suggested party.
OR:
3. If you want to change the reviewer’s suggestion or enter your own, click on the Modify
Reroute icon.
4. The Reassign Open Item pop-up window is displayed.
5. Choose the Suggested Organization, Suggested Reviewer to whom you will be
assigning the request.
6. Enter a Comment, if you want.
7. Click Reroute.
Unliquidated Obligations (ULO)
Version: 2.3
GSA/PBS 2013
25-July-13
Unliquidated Obligations (ULO)
User Manual
Page 15 of 19
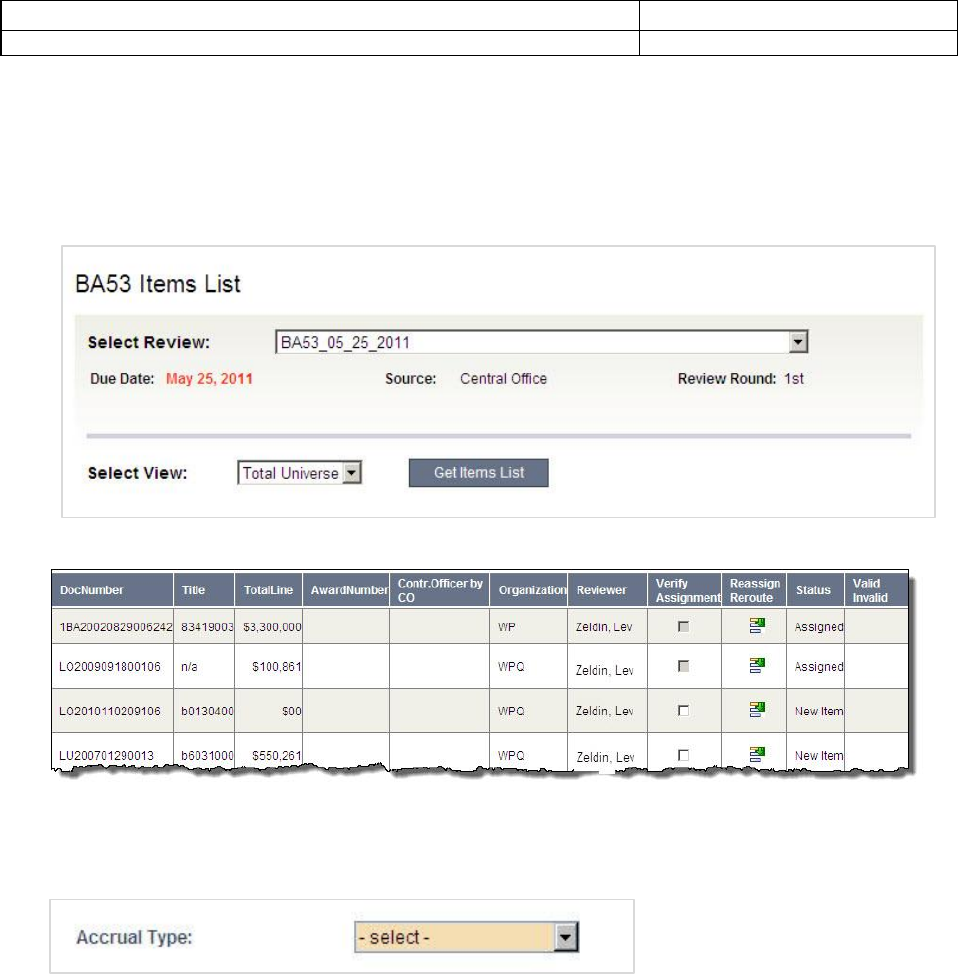
4. BA53 Validation
BA53 validation is unique from other file loads in the sense that it requires different data fields to
be completed.
1. From the home page, choose the appropriate view from the Select Review and Select
View drop-downs and click Get Items List.
2. Choose the line item to review from the table by clicking on it.
The BA53 Item Details page is displayed.
3. Choose the appropriate Accrual Type from the drop-down list. NOTE: Select accrual
types (RET & BID) also present a State drop-down.
4. Fill in the required fields; these vary depending on the Accrual Type selected. If you
attempt to save the form without completing all required fields, the page will refresh
and a message will display at the top will list the incomplete information, additionally,
the fields will be highlighted in yellow.
NOTE: You can view the history of the Document Number by selecting History.
5. To reconfirm data based on your input, click Recalculate; this allows you to review the
form prior to submittal. Click Save when you are ready to submit. The Save button
automatically recalculates all fields.
Unliquidated Obligations (ULO)
Version: 2.3
GSA/PBS 2013
25-July-13
Unliquidated Obligations (ULO)
User Manual
Page 16 of 19
5. Documents Administration
The Documents Administration feature allows you to access the details of uploaded documents
associated with OIs and line items.
Administrators can access the information from the Documents link, while reviewers can view,
or edit, documents by searching through their workload.
Documents administration permissions are the same as validation permissions; reviewers can
act on a line item or OI document assigned to him, ORG admins can act on documents for any
OI within his division and BD admins can act on any documents for any OI.
You can view attachments history from any screen by clicking History.
To view attached documents
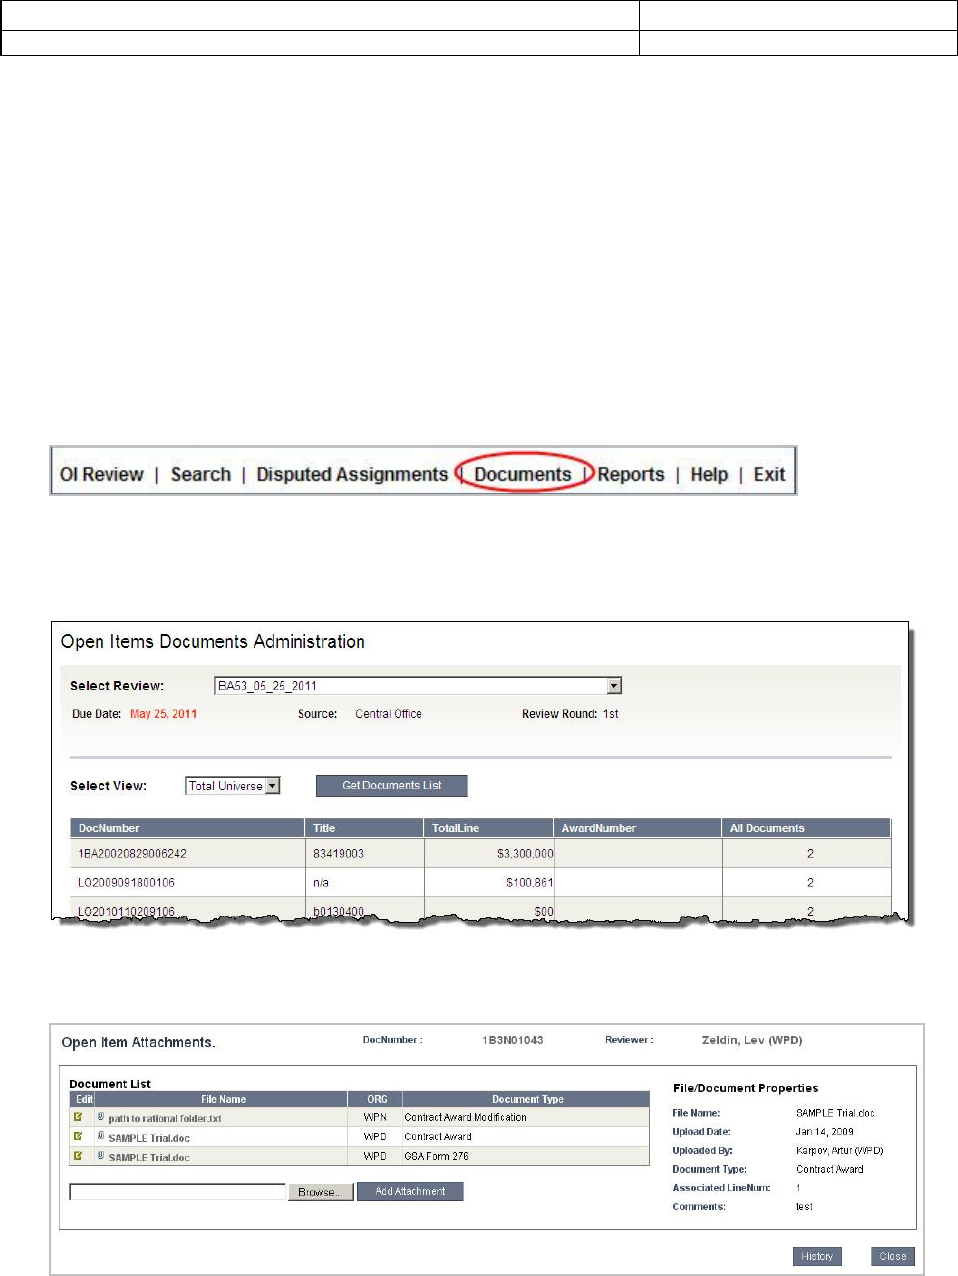
1. From any page, select Documents from the navigation menu.
1. Choose the appropriate Review and View.
2. Click Get Documents List.
The list is generated. All columns can be sorted by clicking on their heading.
3. Open the record you want to view by clicking on its row in the table.
The Open Item Attachments window is displayed.
4. Place your cursor over the File Name to view its Document Properties.
5. If you want to view the file, open it by clicking on its name.
Unliquidated Obligations (ULO)
Version: 2.3
GSA/PBS 2013
25-July-13
Unliquidated Obligations (ULO)
User Manual
Page 17 of 19
To edit attached documents
Editing documents refers to modifying document details NOT changing the specific content of a
previously uploaded document.
You can edit documents based on user permissions, reviewers can edit their own, ORG admins
can edit ones assigned within their division; BD admins can edit any OI within the universe. All
users can view all documents, but not edit ones outside their permission.
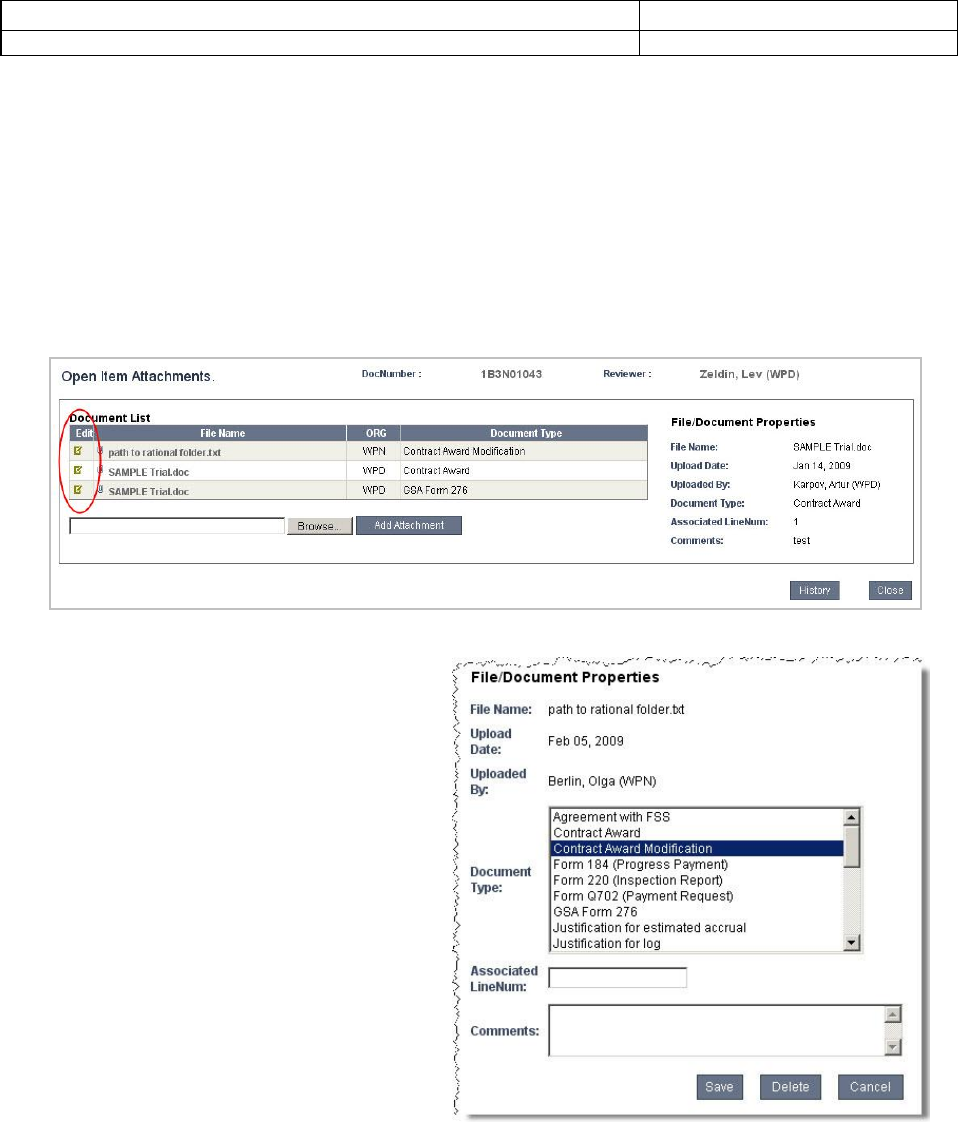
Follow the instructions for viewing files to arrive at the Open Item Attachments screen. If you
are able to edit a document, you will see an Edit column in the right-hand side of the Document
List.
1. Click the icon in the Edit column.
The File/Document Properties section is
displayed in the same window.
2. Choose a Document Type. You
can choose more than one type
for each document. An attached
file can contain multiple
documents, which is why you are
able to select more than one
Document Type for an attached
file. The above screenshot
illustrates how one file, “SAMPLE
Trial.doc”, is categorized when it
contains both the Contract Award
and GSA Form 276.
3. Enter an Associated LineNum
or Comments, if you choose.
4. If you want to delete the entire
file, click Delete.
5. Click Save.
All information that you have edited for this record is updated for each subsequent view.
Unliquidated Obligations (ULO)
Version: 2.3
GSA/PBS 2013
25-July-13
Unliquidated Obligations (ULO)
User Manual
Page 18 of 19
6. Reports
The reports feature is available to both administrator classes, Budget and Service Center.
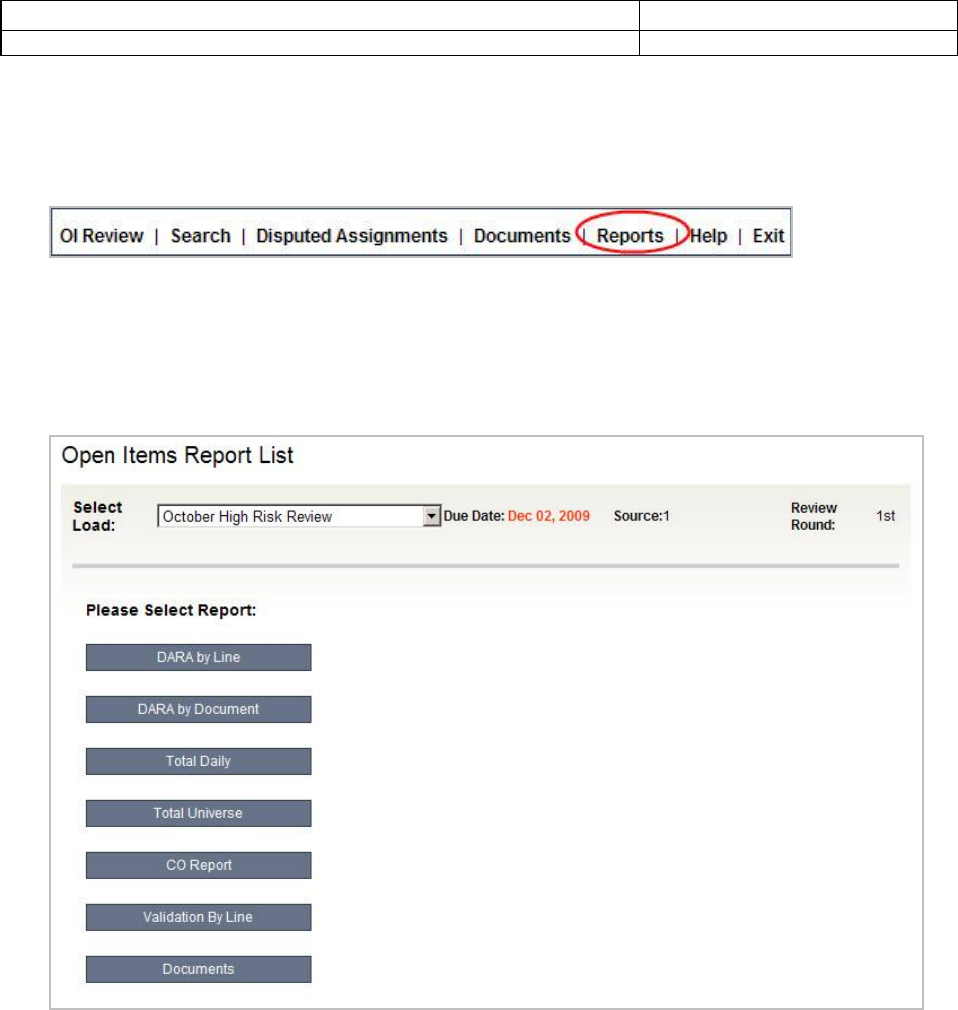
1. From any page, select Reports from the main menu bar.
The Open Items Report List page is displayed.
2. Select the Review.
3. Click the appropriate button to create a Microsoft Excel report. Each Review produces
a different set of reports, the screen below is an example, some reviews may have as
few as two reports.
Unliquidated Obligations (ULO)
Version: 2.3
GSA/PBS 2013
25-July-13
Unliquidated Obligations (ULO)
User Manual
Page 19 of 19
7. Search
You can search existing Open Items records.
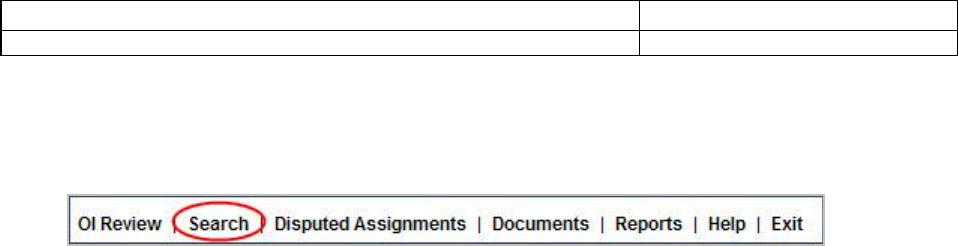
1. From any page, select Search from the navigation menu.
2. Enter at least one search criteria.
3. Click Search.
Results are displayed based on your search criteria. You can convert to Excel by clicking the
spreadsheet icon above the top-left corner of the results table.
4. If a document appears in multiple loads, you can get the document’s review history by
entering search criteria and clicking Get Review History.
In some cases, a document may have been reviewed multiple times. To view the most recent
review, select the Latest Review checkbox and click Search.
