User Manual
User Manual: Pdf
Open the PDF directly: View PDF ![]() .
.
Page Count: 82

GST Genie – R
Android Tablet Application
User Manual
Version 1.0

GST GenieR V1.0P
WeP Digital Services Limited
1
Contents
Table of figures ....................................................................................................................................... 3
1. Login Screen ........................................................................................................................................ 5
1.2 WeP Logo ...................................................................................................................................... 6
1.3 Get Quick Start Guide & User Manual .......................................................................................... 7
1.4 Navigation Drawer and Menus ..................................................................................................... 7
2. Billing Screen ....................................................................................................................................... 9
2.1 Multiple items with same name & barcode with different MRPs .............................................. 11
2.2 Hold & Resume Bill ...................................................................................................................... 13
2.3 Delete Bill .................................................................................................................................... 15
2.4 RePrint Bill ................................................................................................................................... 15
3. Making Payment ............................................................................................................................... 16
3.1 Credit Customer .......................................................................................................................... 18
3.1.1 If credit amount is less than the amount to pay .................................................................. 19
3.2 Discount ...................................................................................................................................... 20
3.3 MSwipe Payments ....................................................................................................................... 22
3.4 e-Wallet Payments ...................................................................................................................... 27
3.5 Coupons ...................................................................................................................................... 29
3.6 Other Cards ................................................................................................................................. 31
3.7 Reward Points ............................................................................................................................. 32
3.8 AEPS Payment ............................................................................................................................. 34
3.9 Cash Payment.............................................................................................................................. 38
1. Item Master....................................................................................................................................... 40
1.1 Add a new Item ........................................................................................................................... 42
1.1.1 Configuring Barcode Scanner (Recommended) ................................................................... 44
2. Customer Master .............................................................................................................................. 45
2.1 Add a new customer ................................................................................................................... 46
2.2 Edit/Update a Customer ............................................................................................................. 48
2.3 Search a customer ....................................................................................................................... 48
3. User Management ............................................................................................................................ 50

GST GenieR V1.0P
WeP Digital Services Limited
2
4. Add Role ............................................................................................................................................ 52
5. Price and Stock .................................................................................................................................. 54
6. Configuration .................................................................................................................................... 56
6.1 Department ................................................................................................................................. 57
6.2 Category ...................................................................................................................................... 58
6.3 Brand ........................................................................................................................................... 60
6.4 Discount ...................................................................................................................................... 61
6.5 Coupon ........................................................................................................................................ 62
6.6 Other charges .............................................................................................................................. 63
6.7 Reward Points Configuration ...................................................................................................... 64
7. Day End ............................................................................................................................................. 65
8. Reports .............................................................................................................................................. 67
8.1 Sales Report ................................................................................................................................ 67
8.2 Inventory Report ......................................................................................................................... 68
8.3 Employee/Customer Report ....................................................................................................... 69
8.4 GST Reports ................................................................................................................................. 70
8.5 GST Link ....................................................................................................................................... 71
9. Settings .............................................................................................................................................. 72
9.1 Owner Details .............................................................................................................................. 72
9.2 Header & Footer ......................................................................................................................... 73
9.3 Others ......................................................................................................................................... 74
9.4 GST .............................................................................................................................................. 76
9.5 Payment Mode Configuration ..................................................................................................... 77
9.6 Machine ...................................................................................................................................... 78
10. Limitations & Recommendations .................................................................................................... 79
11. FAQs ................................................................................................................................................ 80

GST GenieR V1.0P
WeP Digital Services Limited
3
Table of figures
Figure 1: Login Screen ............................................................................................................................. 5
Figure 2: About........................................................................................................................................ 6
Figure 3: Download Quick start Guide & User Manual ........................................................................... 7
Figure 4: Menus ...................................................................................................................................... 8
Figure 5: Navigation Drawer ................................................................................................................... 8
Figure 6: Billing Screen ............................................................................................................................ 9
Figure 7: Multiple items with same name and barcode ....................................................................... 12
Figure 8: Select the required item with required MRP ......................................................................... 12
Figure 9: Hold/Resume Bill.................................................................................................................... 13
Figure 10: Orders to resume ................................................................................................................. 14
Figure 11: Delete Bill ............................................................................................................................. 15
Figure 12: Reprint Bill ............................................................................................................................ 15
Figure 13: Payment Screen ................................................................................................................... 16
Figure 14: Enter customer's mobile number and click on credit and pay ............................................ 18
Figure 15: After payment is made, the paid amount will be shown on the screen .............................. 19
Figure 16: Enter customer's mobile number and click on pay partially ............................................... 20
Figure 17: Click on Discount you want to apply .................................................................................... 21
Figure 18: After applying discount the discounted amount will be displayed. .................................... 21
Figure 19 : Enter valid mswipe credentials to make card transaction ................................................. 22
Figure 20 Enter customer’s mobile no. as it is mandatory, then scroll down and click on next .......... 23
Figure 21 Confirm the amount and then click on OK............................................................................ 23
Figure 22 Connect MSwipe Machine via Bluetooth (if not already) and click on start to initiate the
transaction ............................................................................................................................................ 24
Figure 23 After swiping and entering the PIN click on Submit ............................................................. 25
Figure 24 Verification of credentials will happen ................................................................................. 25
Figure 25 : A message will pop up for transaction status as success or failed ..................................... 26
Figure 26 Enter customer’s mobile no. as it is mandatory, then scroll down and click on next .......... 26
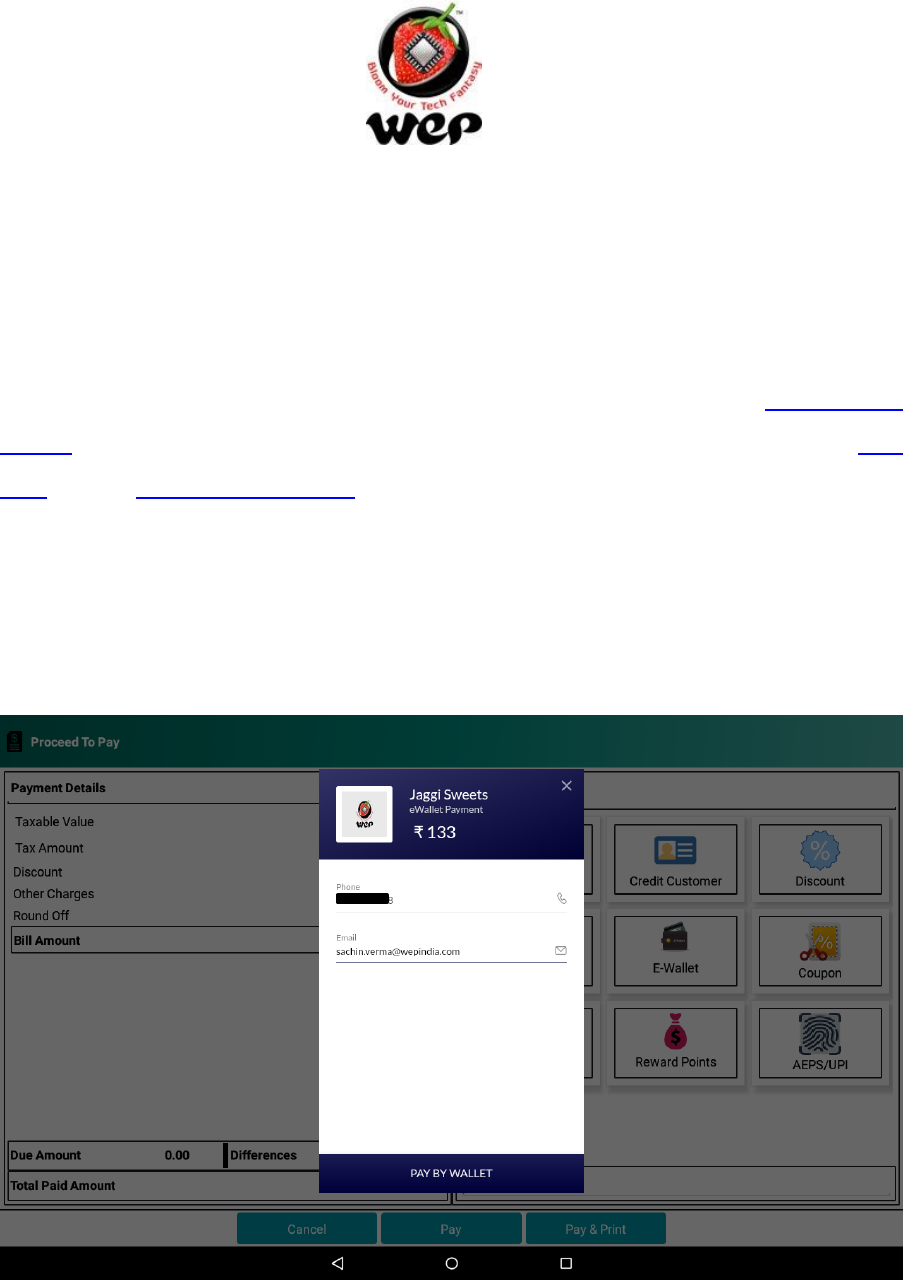
Figure 27: Click on e-wallet and enter customer's mobile number and email ..................................... 27
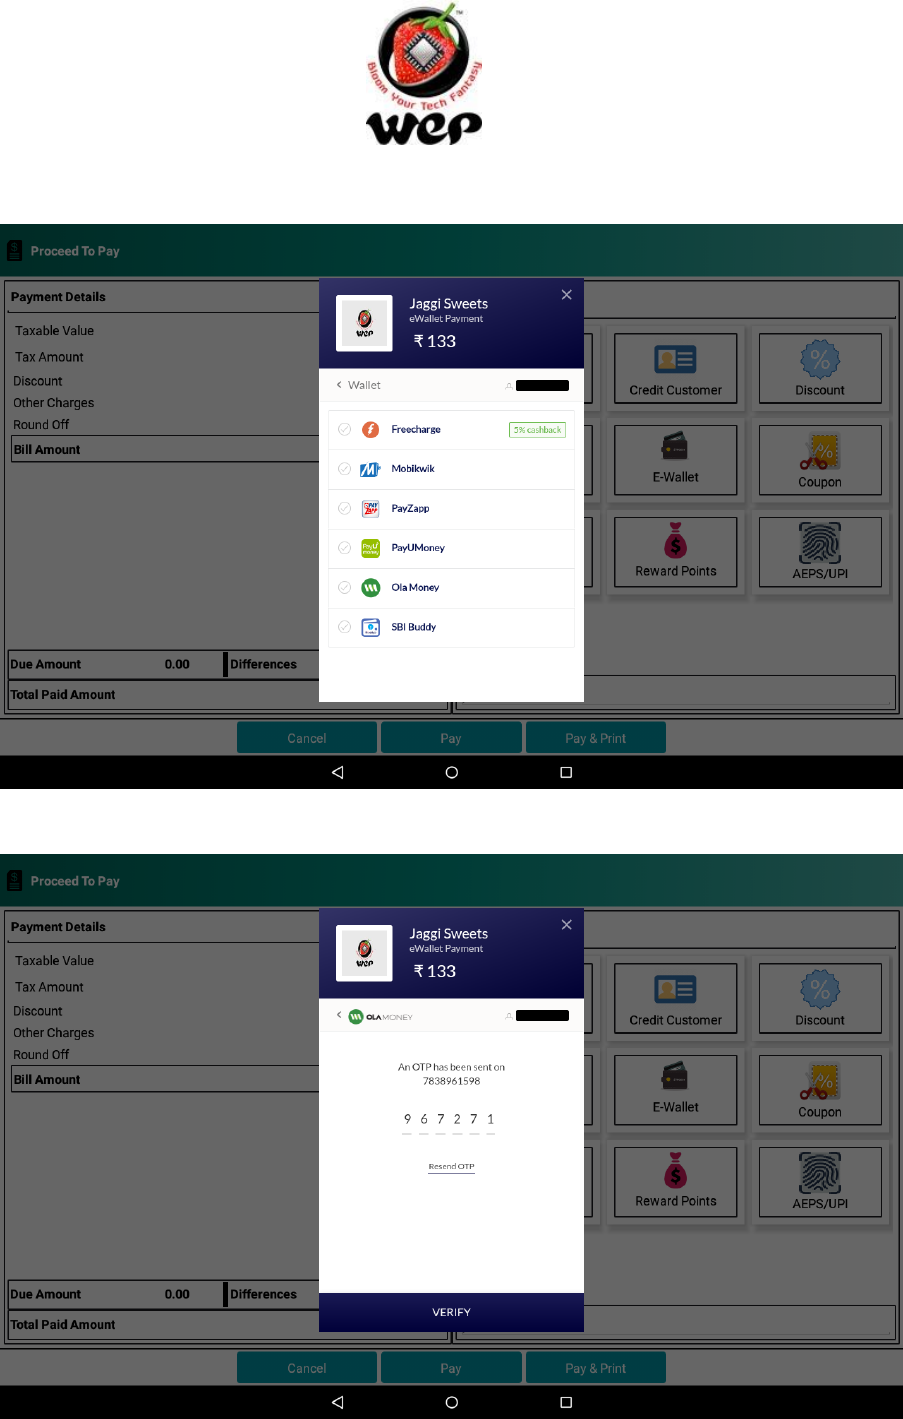
Figure 28: Select a wallet through which customer wants to make payment ..................................... 28
Figure 29: An OTP will be sent on customer's mobile number. Then enter the received OTP ............ 28
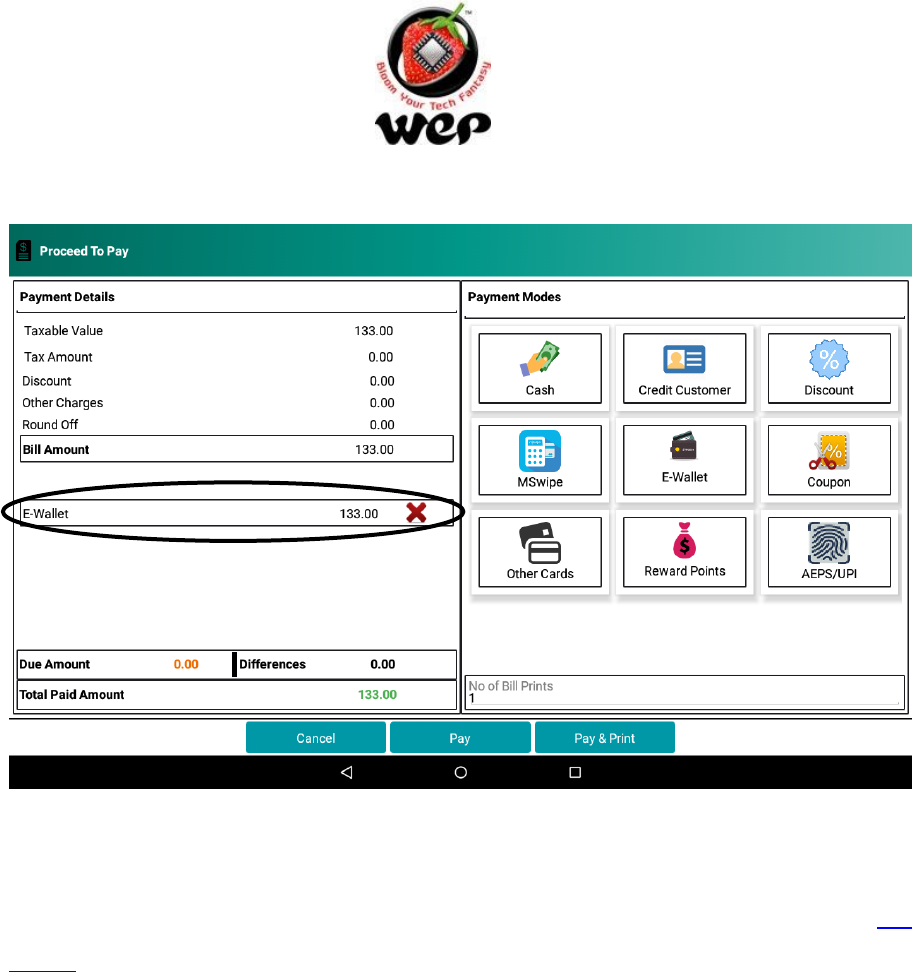
Figure 30: After OTP verification, amount will be deducted from customer’s e-wallet ....................... 29
Figure 31: Enter the count and click on ok to apply coupon ................................................................ 30
Figure 32: After applying coupon, coupon amount will get displayed ................................................. 30
Figure 33 : Enter the amount paid by Other cards ............................................................................... 31
Figure 34: Amount will be displayed paid by other cards..................................................................... 32
Figure 35: Enter customer's mobile number and click on redeem ....................................................... 33
Figure 36: Amount paid by reward points will be displayed ................................................................ 33
Figure 37 : Upon clicking AEPS/UPI , both option comes up on screen ................................................ 34
Figure 38 : Upon selecting UPI payment mode, QR code is generated ................................................ 35

GST GenieR V1.0P
WeP Digital Services Limited
4
Figure 39 : Upon successful UPI transaction , amount is reflected in screen ....................................... 35
Figure 40 : Upon clicking Aadhar, end customer's aadharno and bank name is required ................... 36
Figure 41 : Place finger on scanner and click capture .......................................................................... 37
Figure 42 : Upon successful transaction, its reflected in screen .......................................................... 37
Figure 43 : Enter amount paid by cash................................................................................................ 38
Figure 44 : Same will be reflected in payment screen .......................................................................... 39
Figure 45: Item Master ......................................................................................................................... 41
Figure 46: Add a new item .................................................................................................................... 42
Figure 47: Turn on line feed suffix ........................................................................................................ 44
Figure 48: Turn off line feed suffix ........................................................................................................ 44
Figure 49: Customer Master Screen ..................................................................................................... 45
Figure 50: Add a new customer screen ................................................................................................ 46
Figure 51: Edit or Update a Customer .................................................................................................. 48
Figure 52: Search customer by name ................................................................................................... 49
Figure 53: Search customer by phone number .................................................................................... 49
Figure 54: User Management ............................................................................................................... 50
Figure 55: Add role screen .................................................................................................................... 52
Figure 56: Price & Stock ........................................................................................................................ 54
Figure 57 : Update screen pop up upon clicking item in the list .......................................................... 55
Figure 58: Department Configuration ................................................................................................... 58
Figure 59: Category Configurations ...................................................................................................... 59
Figure 60: Brand Configuration ............................................................................................................. 60
Figure 61: Discount ............................................................................................................................... 61
Figure 62: Coupon ................................................................................................................................. 62
Figure 63: Other charges ....................................................................................................................... 63
Figure 64: Loyalty Point Configuration ................................................................................................. 64
Figure 65: Auto Day End ....................................................................................................................... 65
Figure 66: Manual Day End ................................................................................................................... 66
Figure 67: If business date is different from tablet date, then it is reflected in billing screen ............. 66
Figure 68: Sales Report ......................................................................................................................... 67
Figure 69: Inventory Report .................................................................................................................. 68
Figure 70: Employee/Customer Report ................................................................................................ 69
Figure 71: GST Reports .......................................................................................................................... 70
Figure 72: GST Link ................................................................................................................................ 71
Figure 73: Owner Details setting........................................................................................................... 72
Figure 74: Header and Footer settings ................................................................................................. 73
Figure 75: Other setting ........................................................................................................................ 74
Figure 76: GST setting ........................................................................................................................... 76
Figure 77: Payment Mode Configuration.............................................................................................. 77
Figure 78: Machine setting ................................................................................................................... 78
GST GenieR V1.0P
WeP Digital Services Limited
5
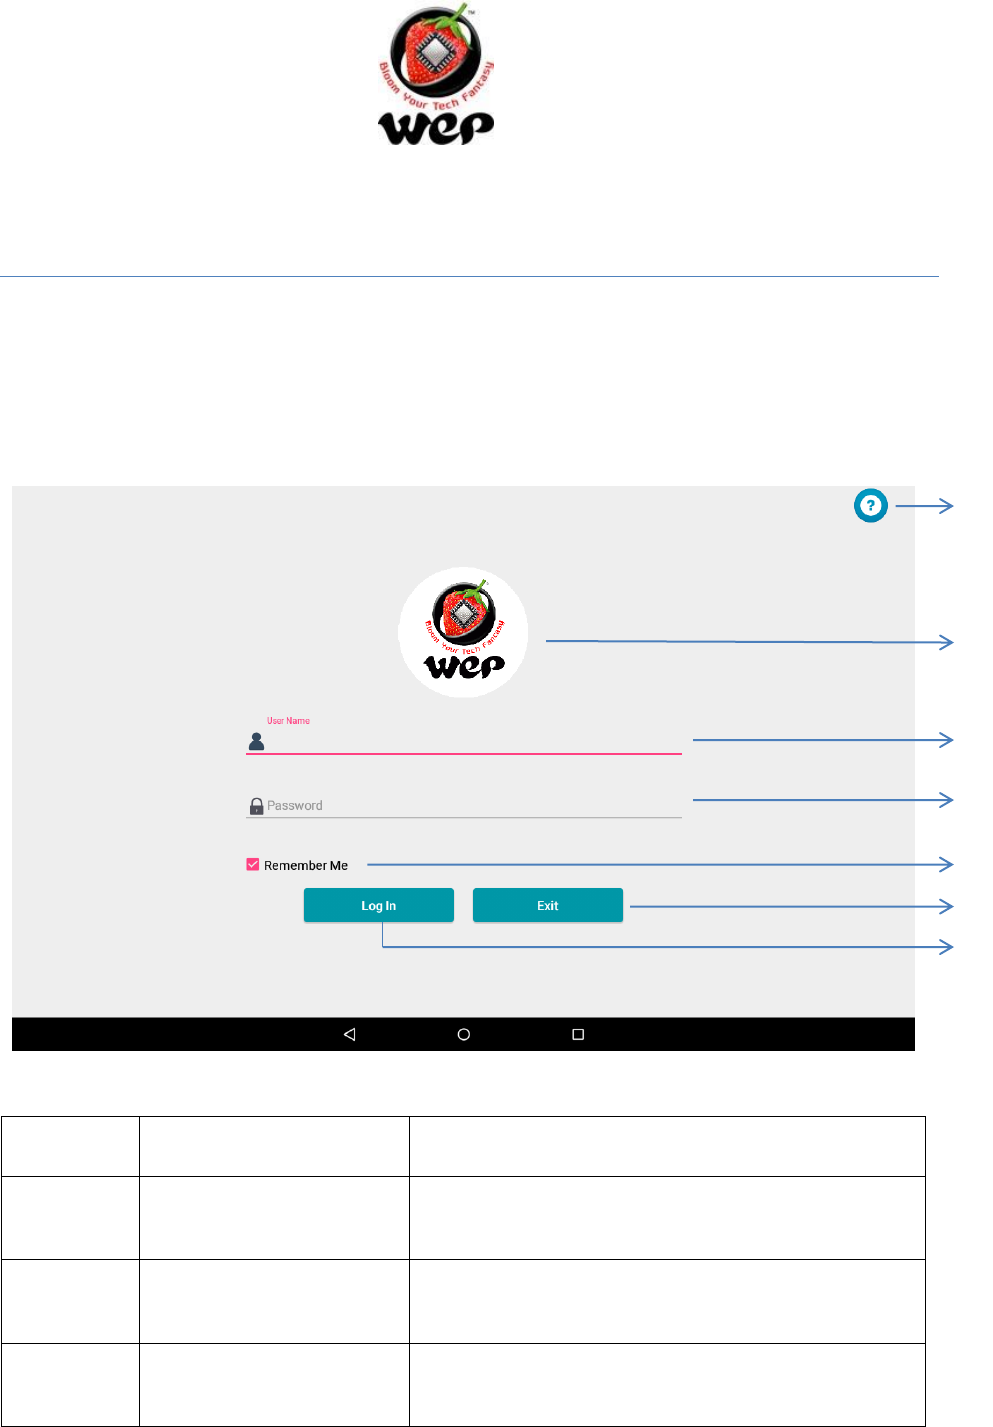
Login Screen
Login Screen is the first screen, when application launches. User can login the application by
entering valid credentials. Default Login credential are:
Username: admin
Password: admin
Figure 1: Login Screen
Label
Field
Description
1
WeP Logo
Click on WeP logo to get information about the
application like app version and organization.
2
Username
User has to enter his username as configured in
the application
3
Password
User has to enter his password relevant to his
username.
7
1
2
3
4
5
6
GST GenieR V1.0P
WeP Digital Services Limited
6
4
Remember me
If user selects remember me option then on re
launching of app, the app will automatically
populate the last username used for login in
username field.
5
Log in
Log in button to enter into the application if login
credentials are valid.
6
Exit
To exit from the system.
7
Help
User can access Quick start guide and User manual
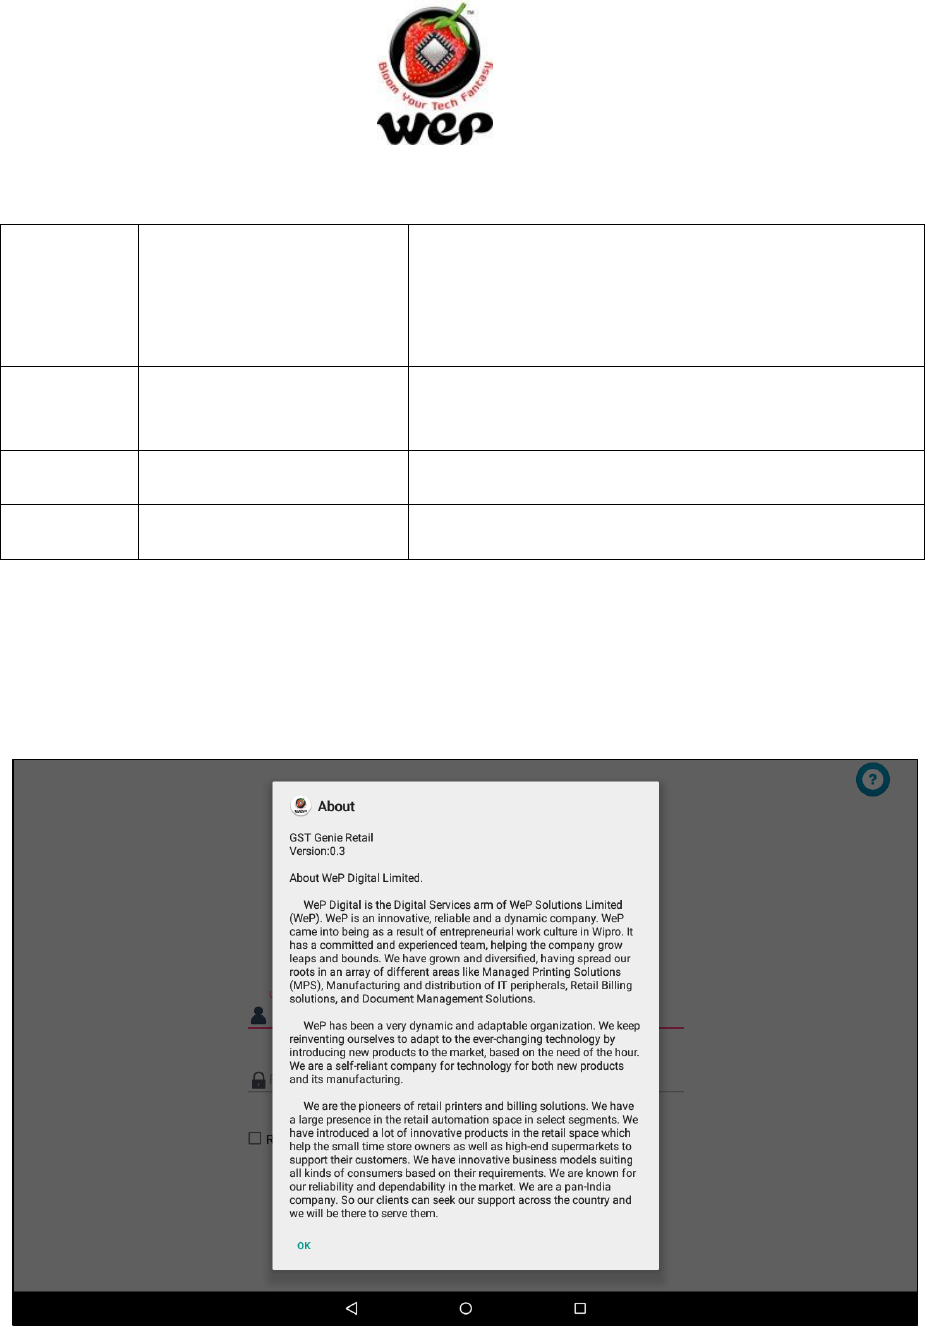
1.2 WeP Logo
On clicking on WeP logo, user will get all the information about the current version of
application running on device and about the Organization, e.g.: WeP Solutions Limited.
Figure 2: About
GST GenieR V1.0P
WeP Digital Services Limited
7
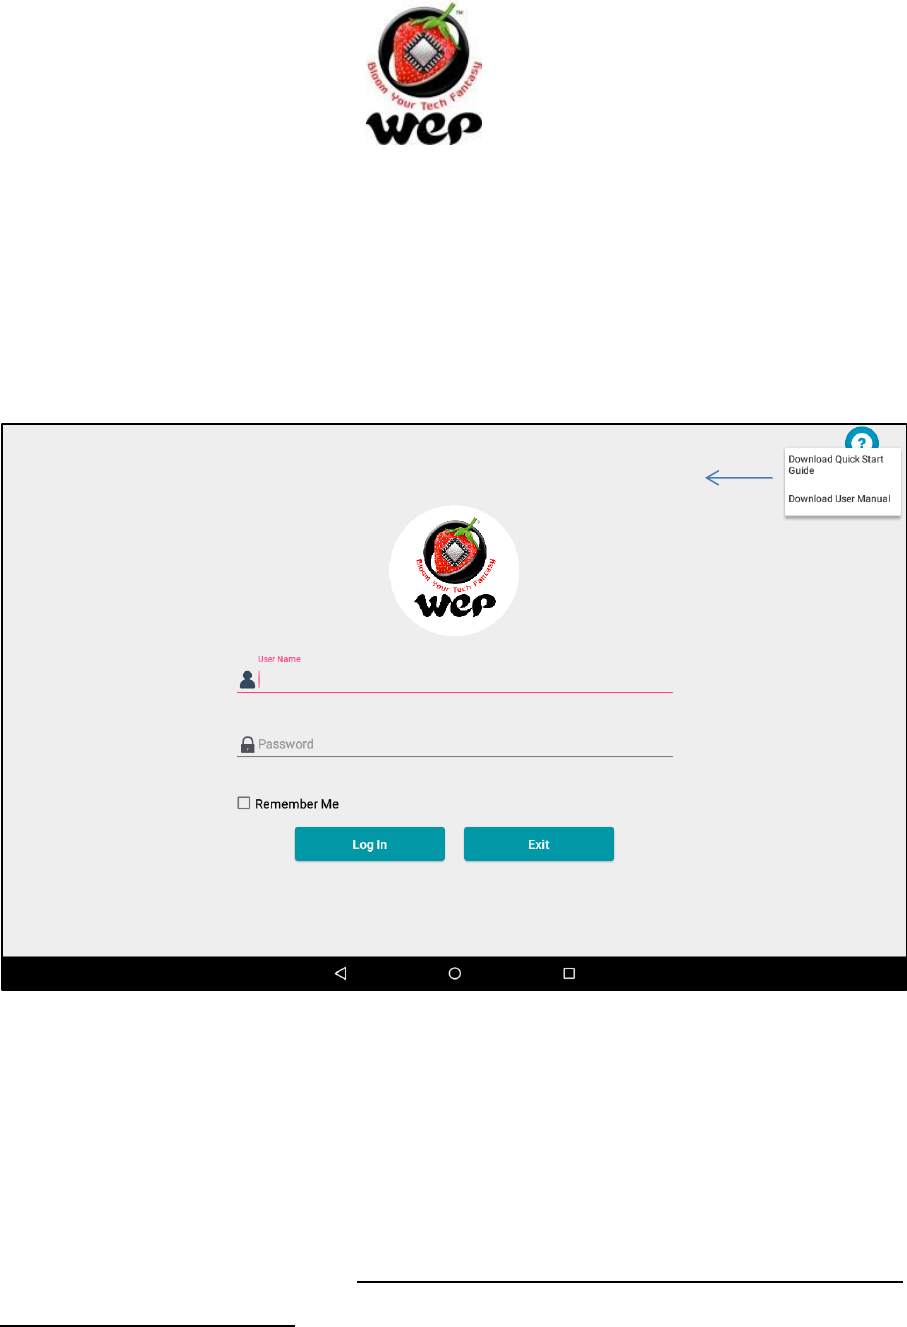
1.3 Get Quick Start Guide & User Manual
On clicking on Help button, user can download useful documents which can help user in
using the application with ease.
Figure 3: Download Quick start Guide & User Manual
User can access these document once download from internal memory > WeP_Retail_Documents.
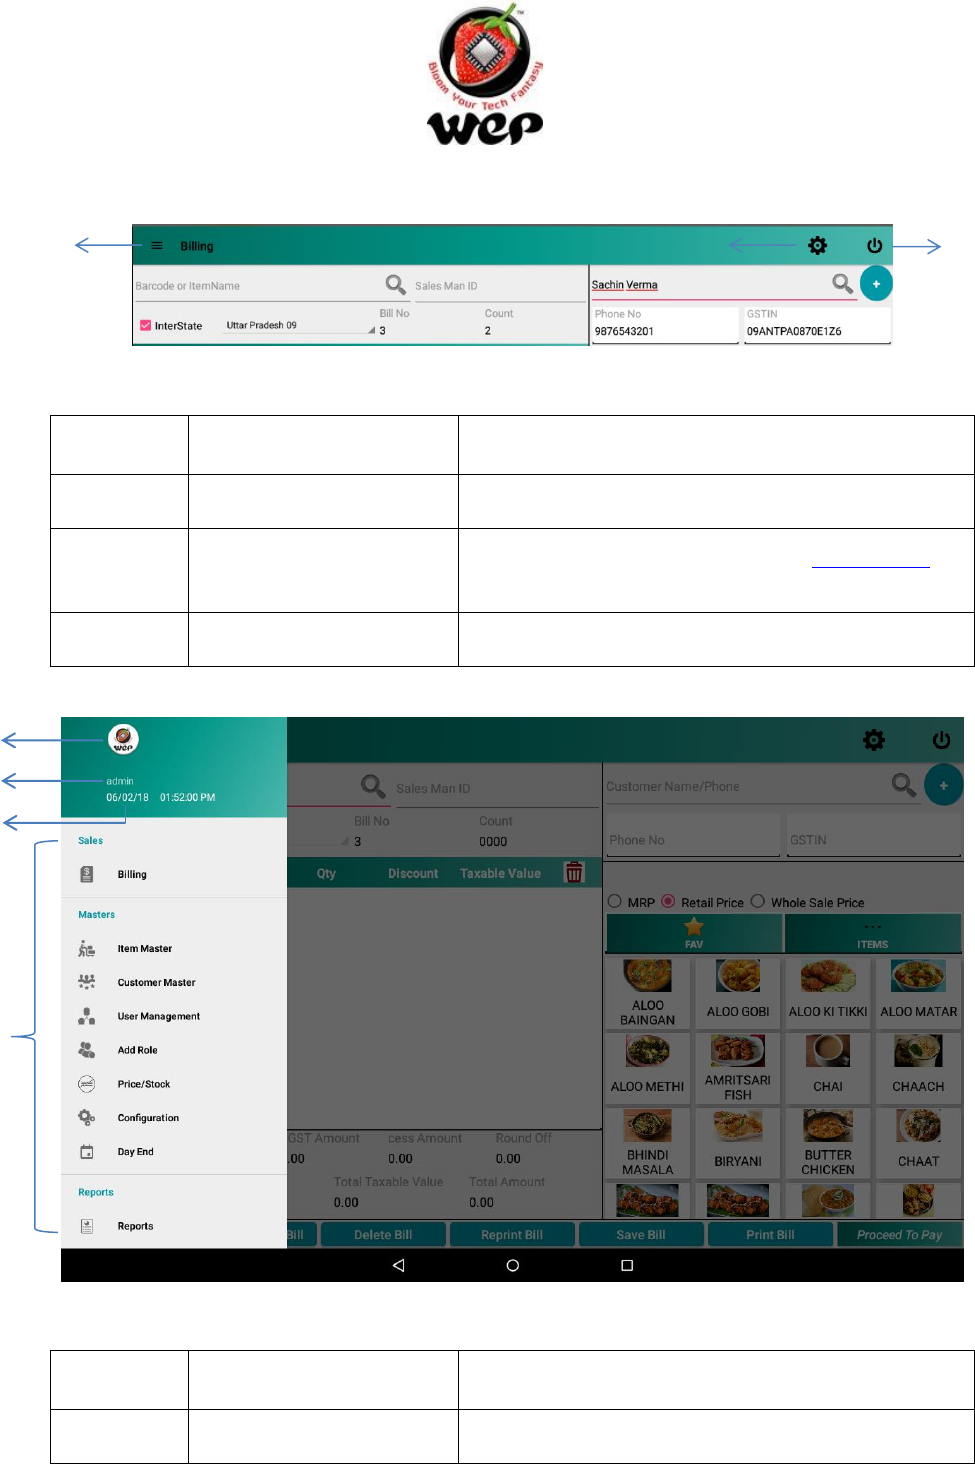
1.4 Navigation Drawer and Menus
Once user logs in to the application with valid credentials, user will be navigated to the
billing screen and from there user can access Navigation drawer and menus which will allow
user to navigate to other modules. Modules which are restricted to particular roles will be
disabled in navigation drawer.
Help
GST GenieR V1.0P
WeP Digital Services Limited
8
Figure 4: Menus
Label
Field
Description
1
Navigation Drawer
It will allow user to navigate to other modules.
2
Settings
Opens up application settings. See Details in
Section 12.
3
Log out
Logs out from the application.
Figure 5: Navigation Drawer
Label
Field
Description
1
WeP Logo
WeP Logo.
1
2
3
1
2
3
4
GST GenieR V1.0P
WeP Digital Services Limited
9
2
User Name
Name of the user who logged into the application.
3
System Date & Time
System Date & Time
4
Modules
Various modules.
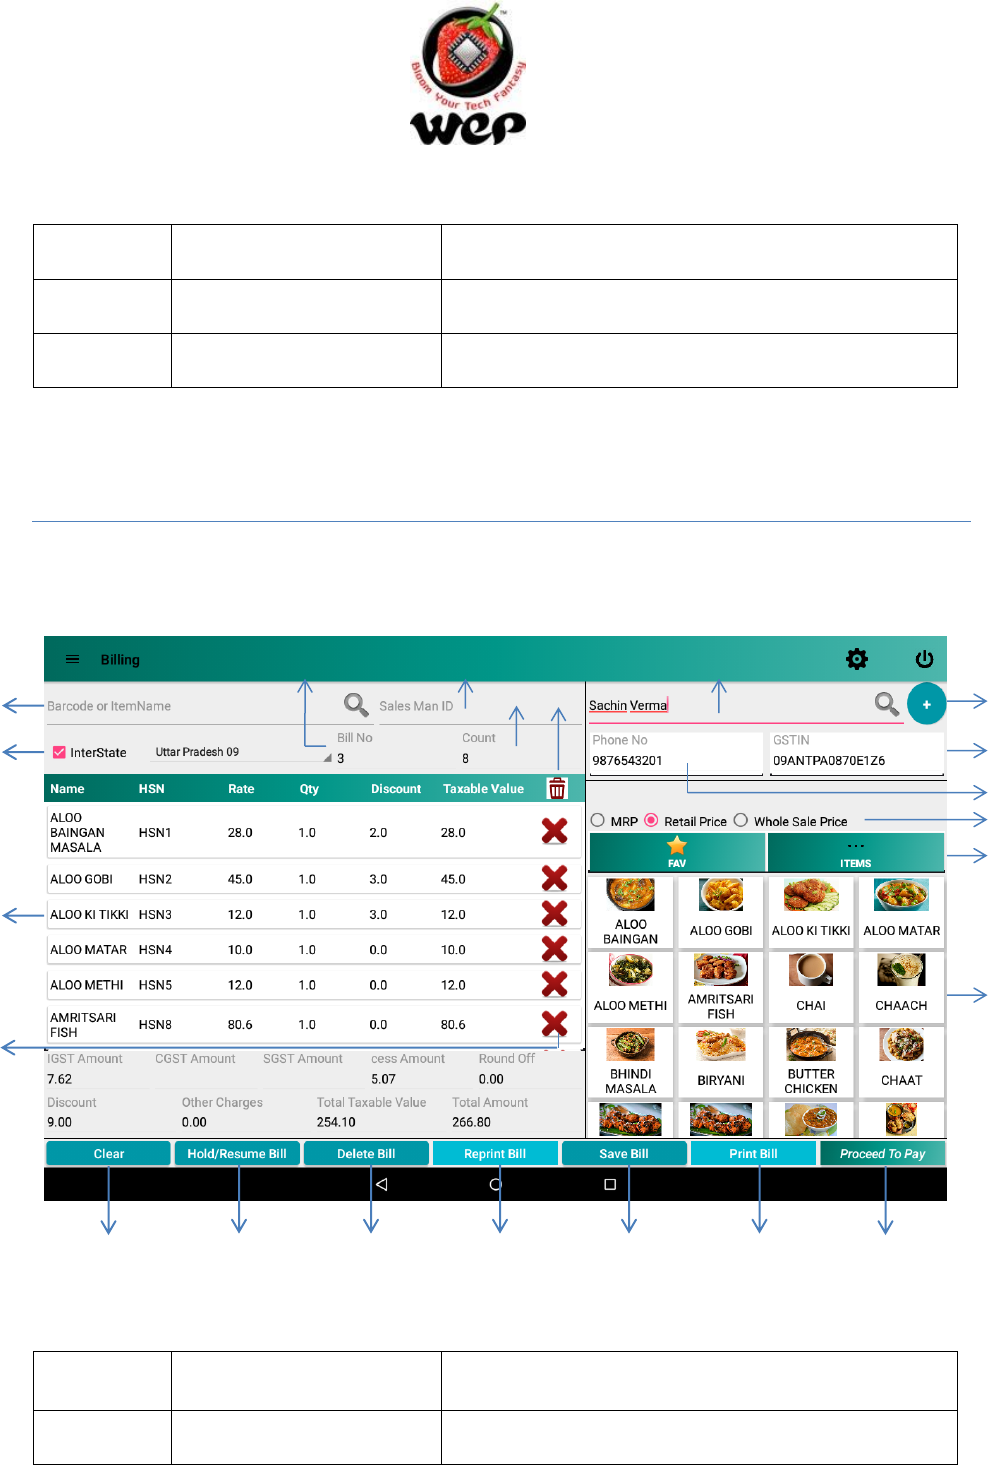
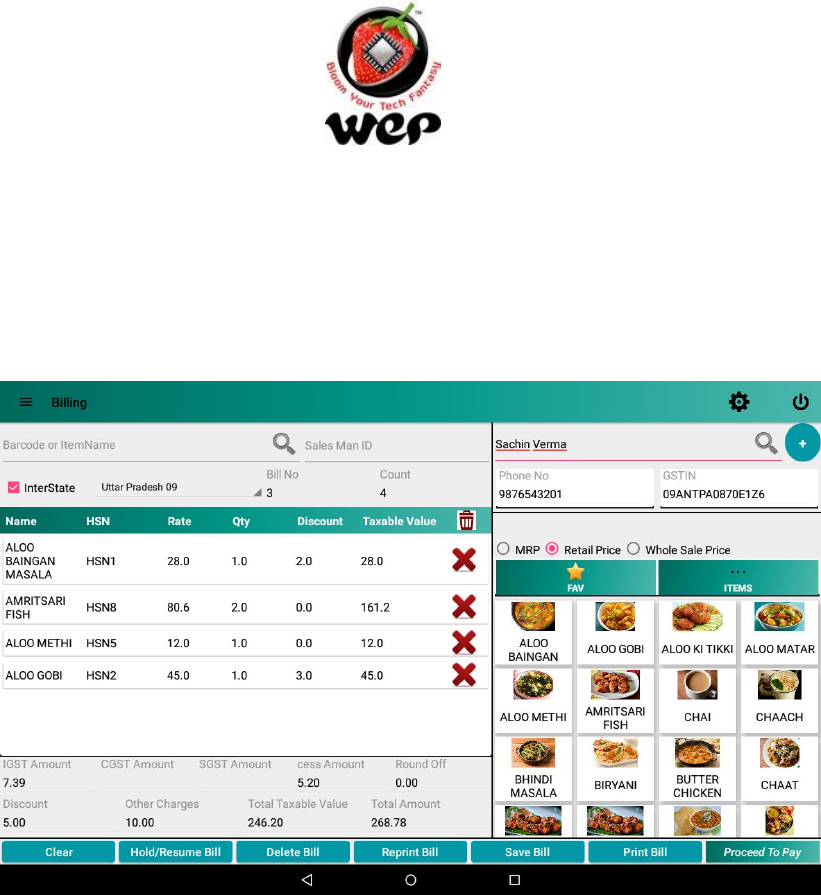
1. Billing Screen
Billing module provides user to make bills and payments for the bill generated. It also allows
user to add a new customer while billing itself.
Figure 6: Billing Screen
Label
Field
Description
1
Name
Customer’s name. User can also search his
10
12
13
9
8
1
11
4
3
2
5
6
7
16
17
18
19
20
21
14
15
22

GST GenieR V1.0P
WeP Digital Services Limited
10
customer through his name & mobile number. If
any record exists of the customer corresponding
to that name or mobile number the data in fields
1, 2 and 3 will automatically be populated.
2
Mobile number
Customer’s mobile number.
3
GSTIN
Customer’s GSTIN.
4
Add
If no customer record exists corresponding to the
name or mobile number entered then user can
add a new customer by clicking on the “+” button
after filling all the mandatory details of the
customer.
5
MRP/Retail Price/Whole
Sale Price
User can choose one price out of three to be
applied while billing.
6
Favourite/Items
Allows user to switch between favourite items and
all items list.
7
Items List
List of the items to be chosen by user for billing
(Favourite or All Items).
8
Sales Man ID
Sales Man ID. This field will be visible only if
selected enabled in Settings. See Details in Section
12.3
9
Bill number
Shows which bill number it is.
10
Barcode or Item Name
User can search for an item by its name, short
code or barcode.
11
Count
Number of items in order list.
12
Interstate
If user is supplying items out of the state, then he
has to check the Interstate checkbox and select
the state to which he is supplying his items.
Note: IGST will be applied.
13
Order List
The list shows the selected items that customer
wants to buy. Items can be added and removed
from the list before printing/paying for the bill.
GST GenieR V1.0P
WeP Digital Services Limited
11
14
Delete All Items
Deletes all item from order list.
15
Delete an Item
Deletes particular item from order list.
16
Clear
Clear all the details and fields from billing screen
17
Hold/Resume Bill
User can put a bill on hold and resume it again.
See Details in Section 2.1.
18
Delete Bill
Deletes the existing bill from the database by bill
date and bill number. Deleting a bill requires
manager’s credentials. See details in Section 2.2
19
Reprint Bill
User can reprint an existing bill by the date on bill
that bill has been generated & the bill number.
See details in Section 2.3
20
Save Bill
Saves the bill only. In this case the payment
method will be Cash by default.
21
Print Bill
Saves and Print the bill only. In this case the
payment method will be Cash by default.
22
Proceed To Pay
Provide various modes of payment. e.g.: credit
card, e-Wallet. See Detail in Section 3
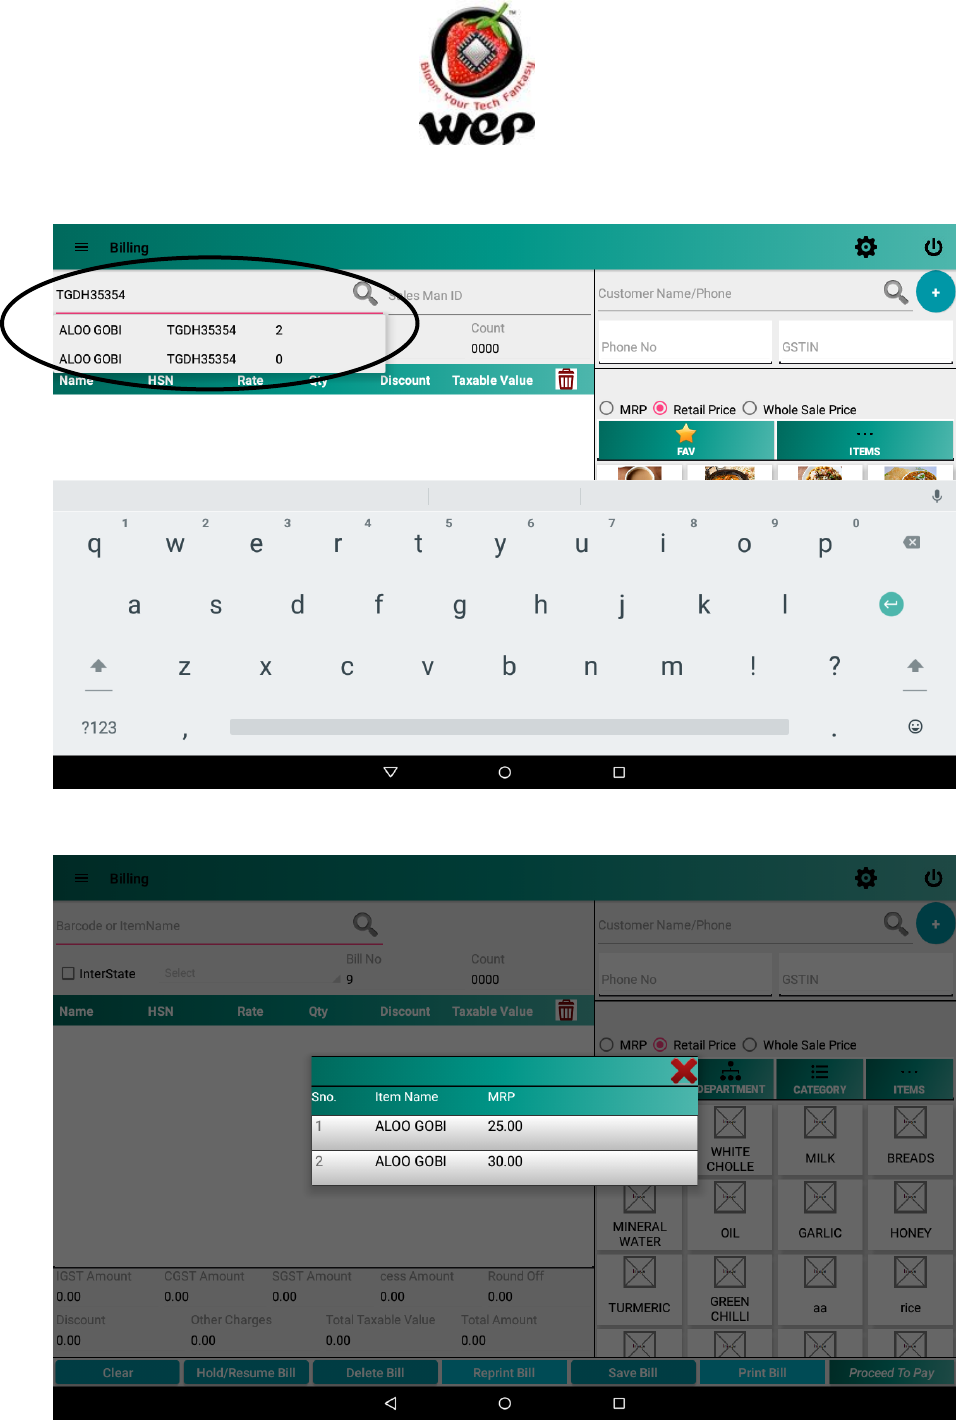
1.1 Multiple items with same name & barcode with different MRPs
User can add two or more items having same name and barcode, but MRPs should be
different. Now it will be ambiguous for user to add that item into order list through
searching it by name or barcode. To remove that ambiguity and to choose the right item
user can select anyone of the items from search and then application will ask the user to
choose one MRP. Then user can select the required item with required MRP.
GST GenieR V1.0P
WeP Digital Services Limited
12
Figure 7: Multiple items with same name and barcode
Figure 8: Select the required item with required MRP
GST GenieR V1.0P
WeP Digital Services Limited
13
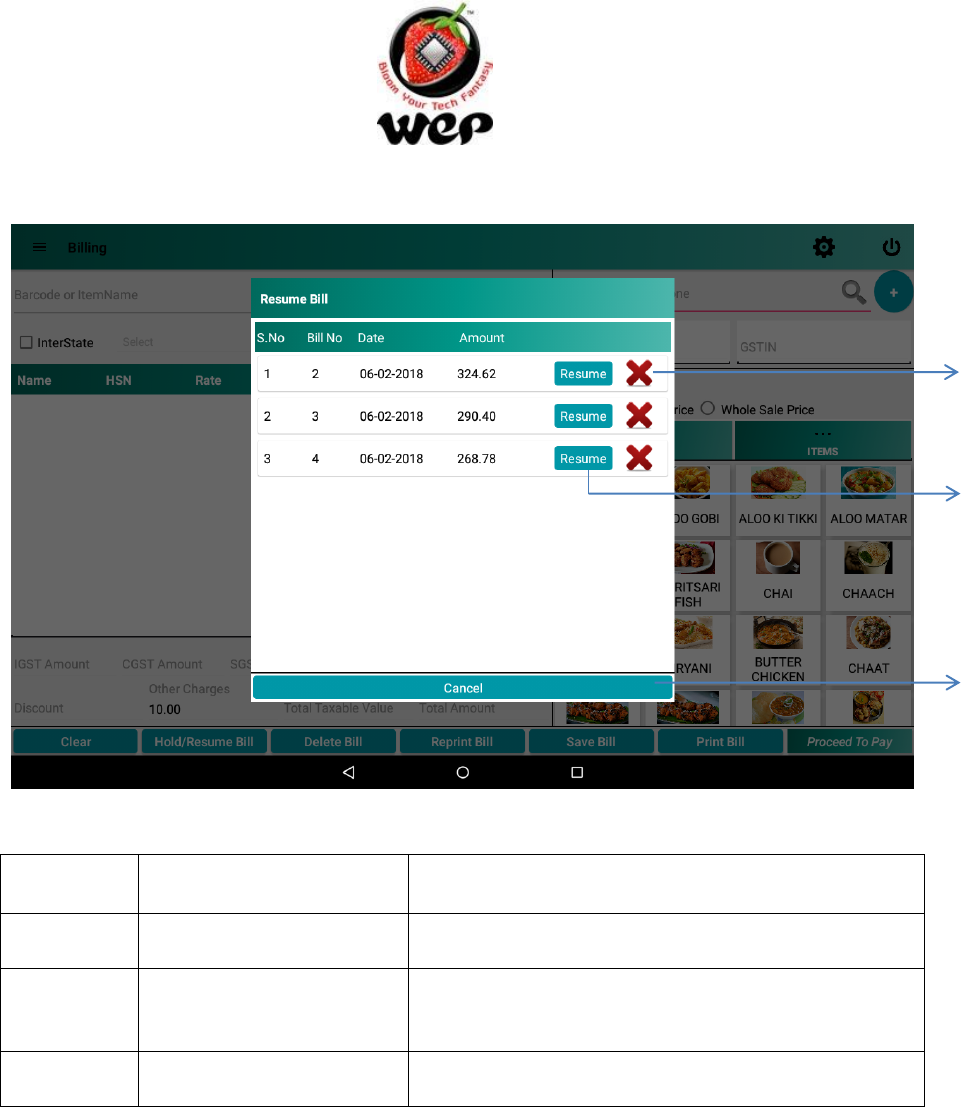
1.2 Hold & Resume Bill
Hold and resume bill allows user to put a bill of a customer on hold and can edit it again by
resuming it.
Figure 9: Hold/Resume Bill
Now to check or resume a bill which was put on hold click on Hold/Resume Bill button with
empty order list otherwise the current order will be put on hold.
1. First add items in order list.
2. Click on Hold/Resume button to put the order on hold
GST GenieR V1.0P
WeP Digital Services Limited
14
Figure 10: Orders to resume
Label
Field
Description
1
Delete
Deletes the order on hold.
2
Resume
Resumes the order on hold. User can further
modify the order.
3
Cancel
Closes the screen.
1
2
3
GST GenieR V1.0P
WeP Digital Services Limited
15
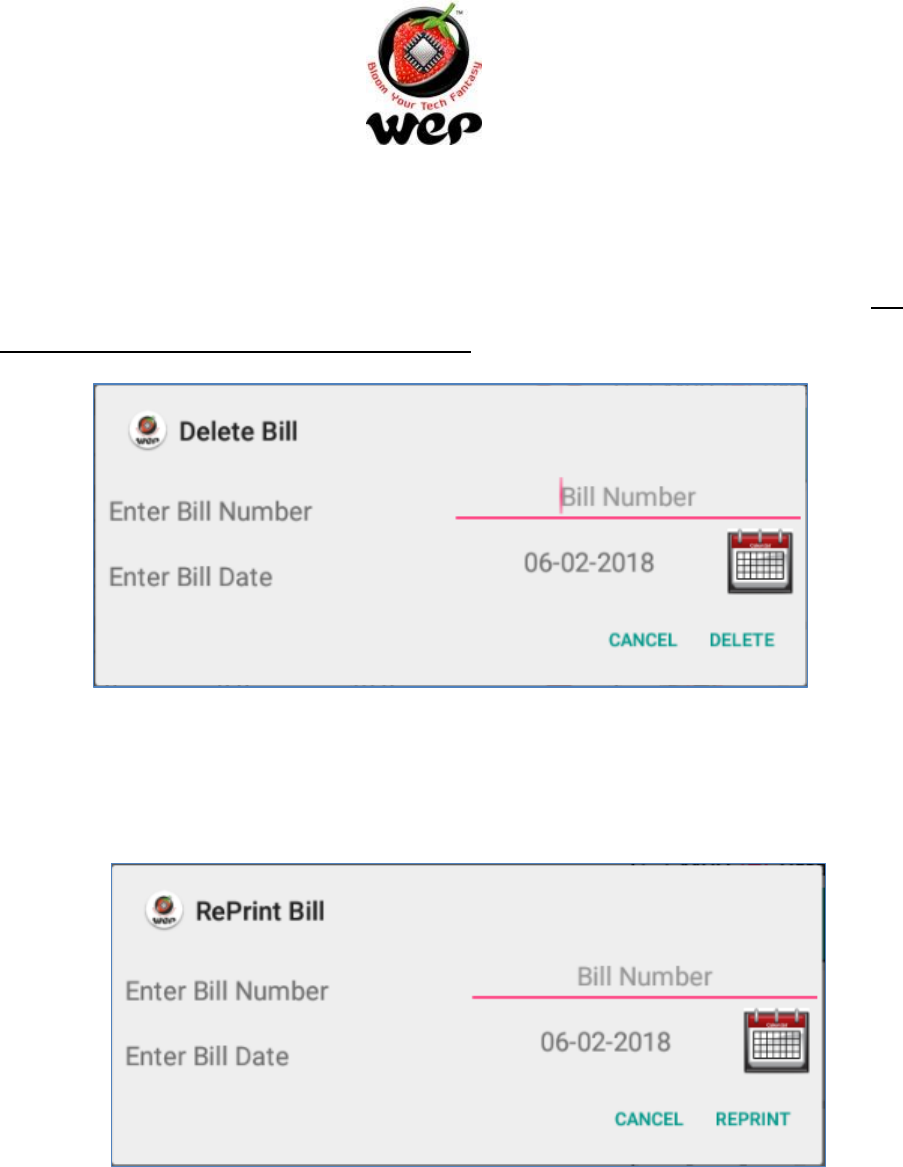
1.3 Delete Bill
To delete a bill, user has to put the bill number and the date on which the bill was made. For
deleting bill user requires manager’s credentials.
Figure 11: Delete Bill
1.4 RePrint Bill
To re-print a bill user has to put bill number and the date on which the bill was made.
Figure 12: Reprint Bill
GST GenieR V1.0P
WeP Digital Services Limited
16
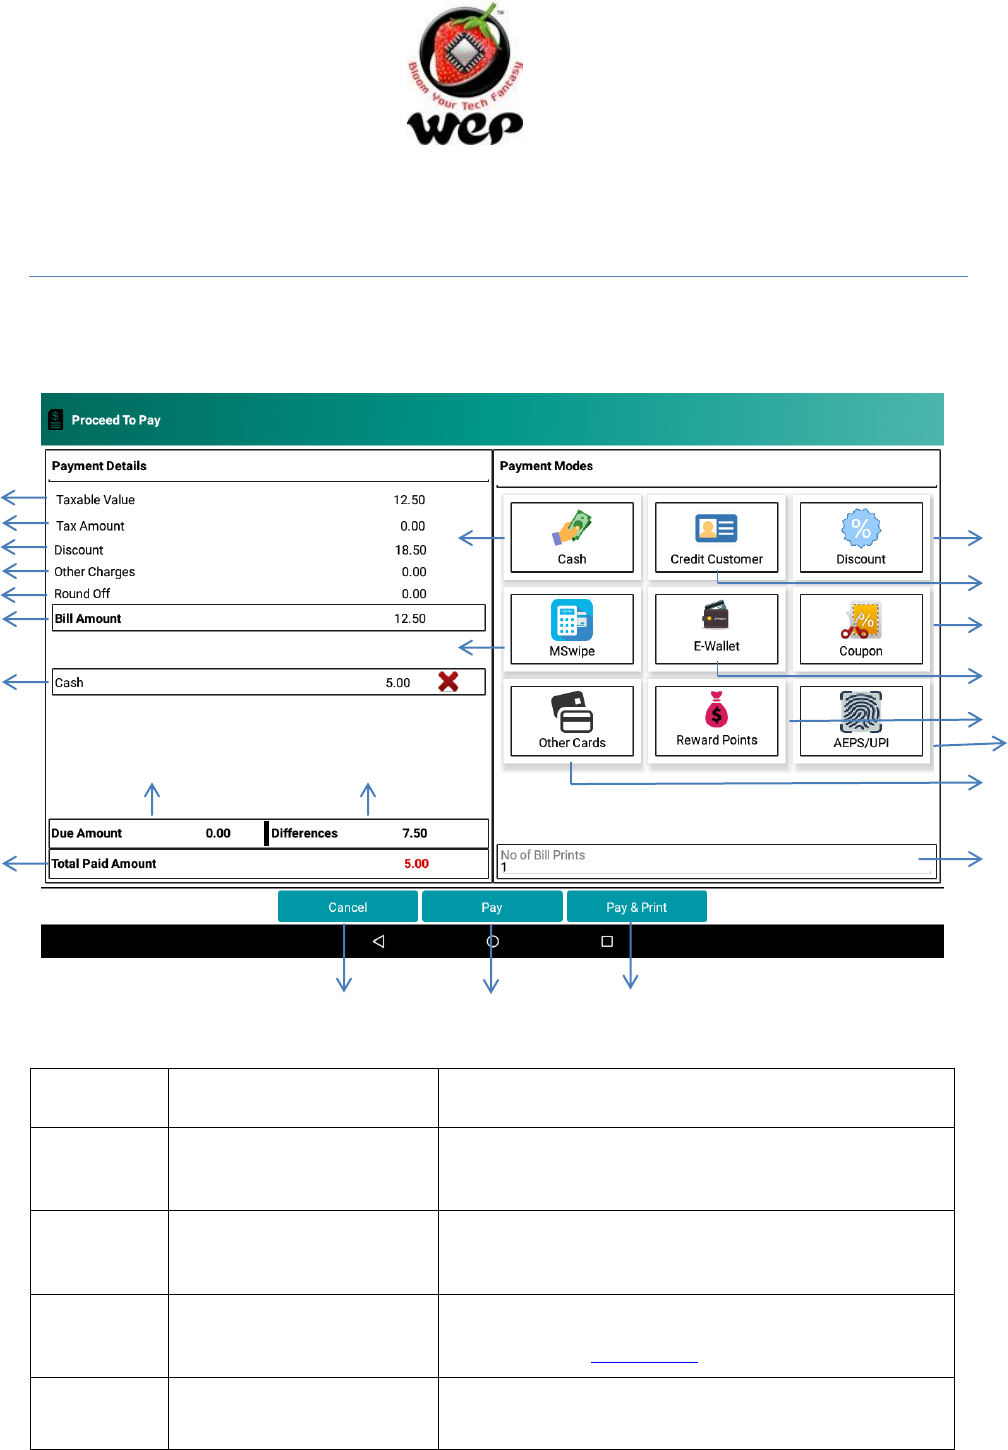
2. Making Payment
Payment screen allows user to receive payment by customer through various modes. e.g.:
credit card, e-Wallet.
Figure 13: Payment Screen
Label
Field
Description
1
Cash
If the amount is to be paid by cash then user can
enter the cash value received by customer.
2
Credit Customer
To make payment through credit amount of that
customer.
3
Discount
To apply discount that is configured in
configuration. See Details in Section 9.5.
4
MSwipe Payment
Payments through cards via MSwipe machine. To
avail this,user should be enrolled on mSwipe
3
2
6
5
8
7
9
1
4
20
21
22
10
11
12
13
14
15
16
17
18
19
23

GST GenieR V1.0P
WeP Digital Services Limited
17
website for credentials. (See Details in Section 3.3)
5
Wallet Payment
Payments through e-wallets. To avail this mode,
user is required to register with Razor pay on their
website to get Key Id & Secret Key. These
credentials can be configured in Payment mode
configuration module. (See Details in Section 3.4).
6
Coupon
To apply coupons which are configured in
configuration. See Details in Section 9.6.
7
Other cards
Amount paid by card other than MSwipe machine.
8
Reward Points
To make payments through the reward points that
customer has earned.
9
Number of bill prints
Number of copies of bill to print.
10
Taxable Value
Value exclusive of all the taxes and other charges.
11
Tax Amount
Tax Amount.
12
Discount
Discount amount. If user chooses to apply billwise
discount then the discount amount (MRP-retail
price) will be overwritten by discount amount (Bill
wise).
13
Other charges
Other charges Amount (only chargeable ones). See
Details in Section 9.7.
14
Round off
Value that is rounded off. (Only applicable if
enabled from settings).
15
Bill Amount
Value inclusive of all the taxes and other charges.
16
Amount Paid
It shows that the amount (5.00) is paid by this
payment method (Cash).
17
Due Amount
Amount to return to the customer.
18
Difference
Amount left to receive from the customer.
19
Total Paid Amount
Total amount paid by the customer.
GST GenieR V1.0P
WeP Digital Services Limited
18
20
Cancel
Closes the payment screen.
21
Pay
Save the bill without print.
22
Pay & Print
To save and print the bill.
23
AEPS
Option to make payment via Aadhar or UPI mode
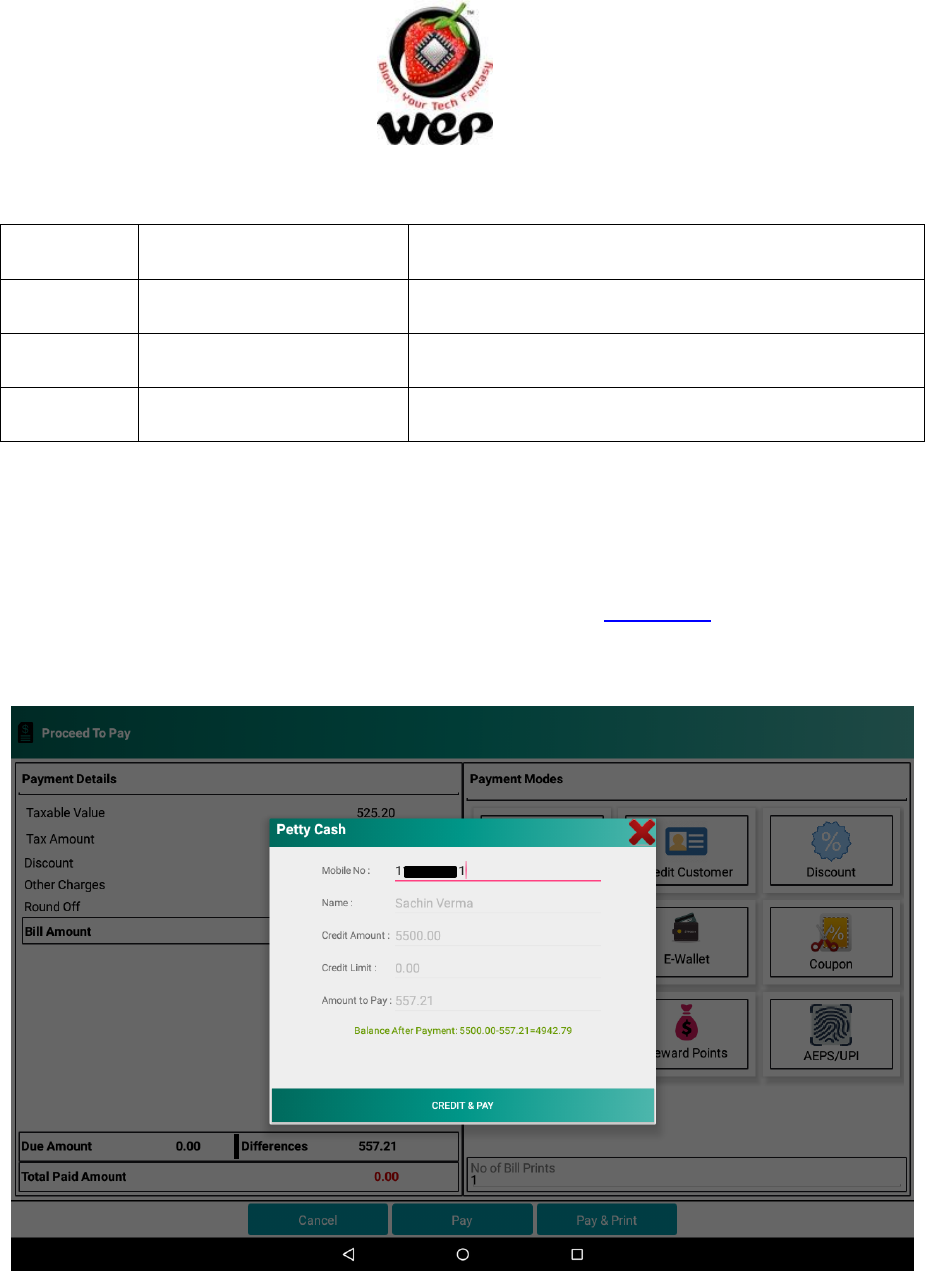
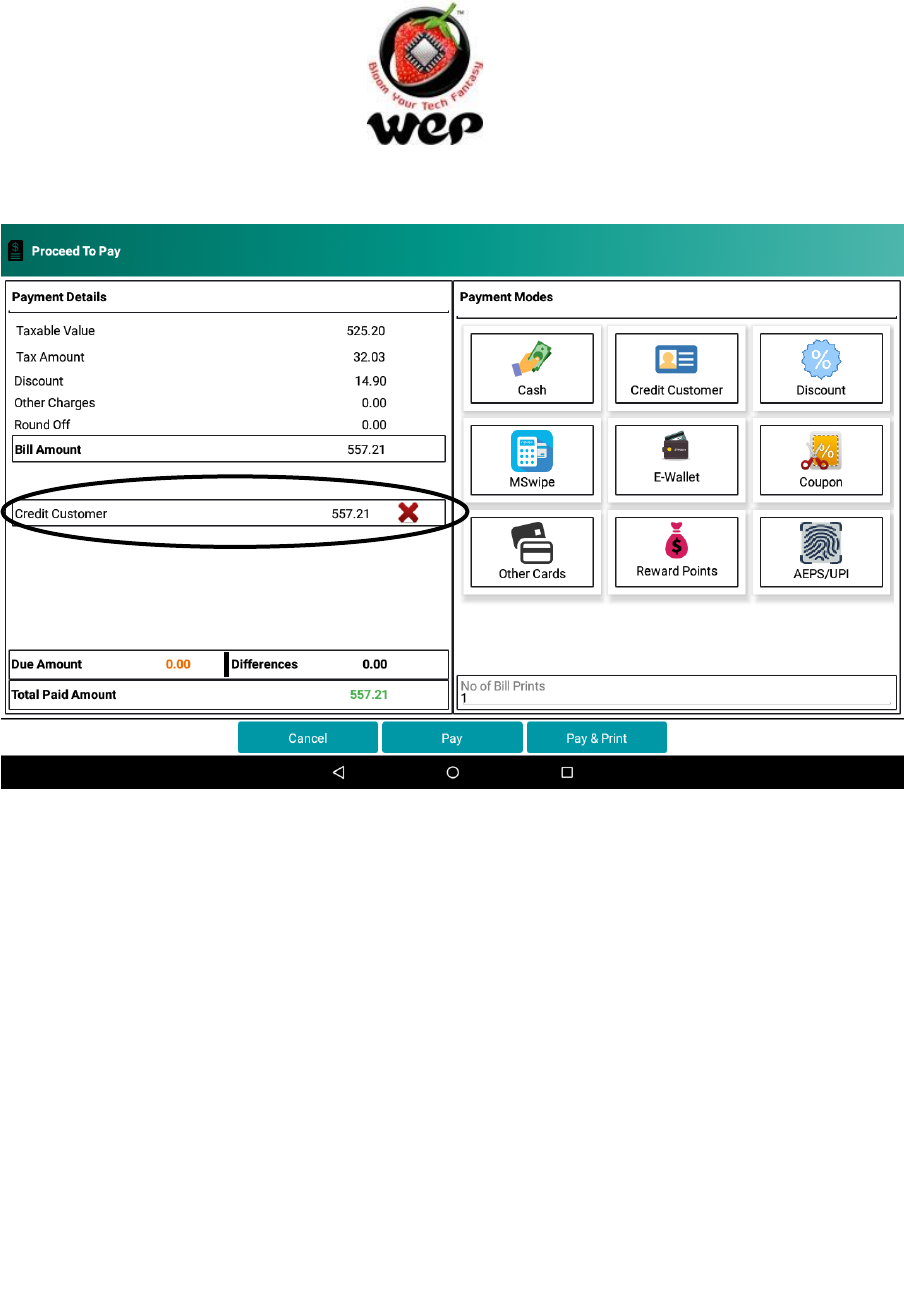
2.1 Credit Customer
For using credit customer payment, user has to add customer with credit limit and opening
balance (opening balance will be added into credit amount) (See Details in Section 5.1).
Now follow the following steps to make payment by credit customer:-
Figure 14: Enter customer's mobile number and click on credit and pay
The amount will automatically be deducted from customer’s credit amount.
GST GenieR V1.0P
WeP Digital Services Limited
19
Figure 15: After payment is made, the paid amount will be shown on the screen
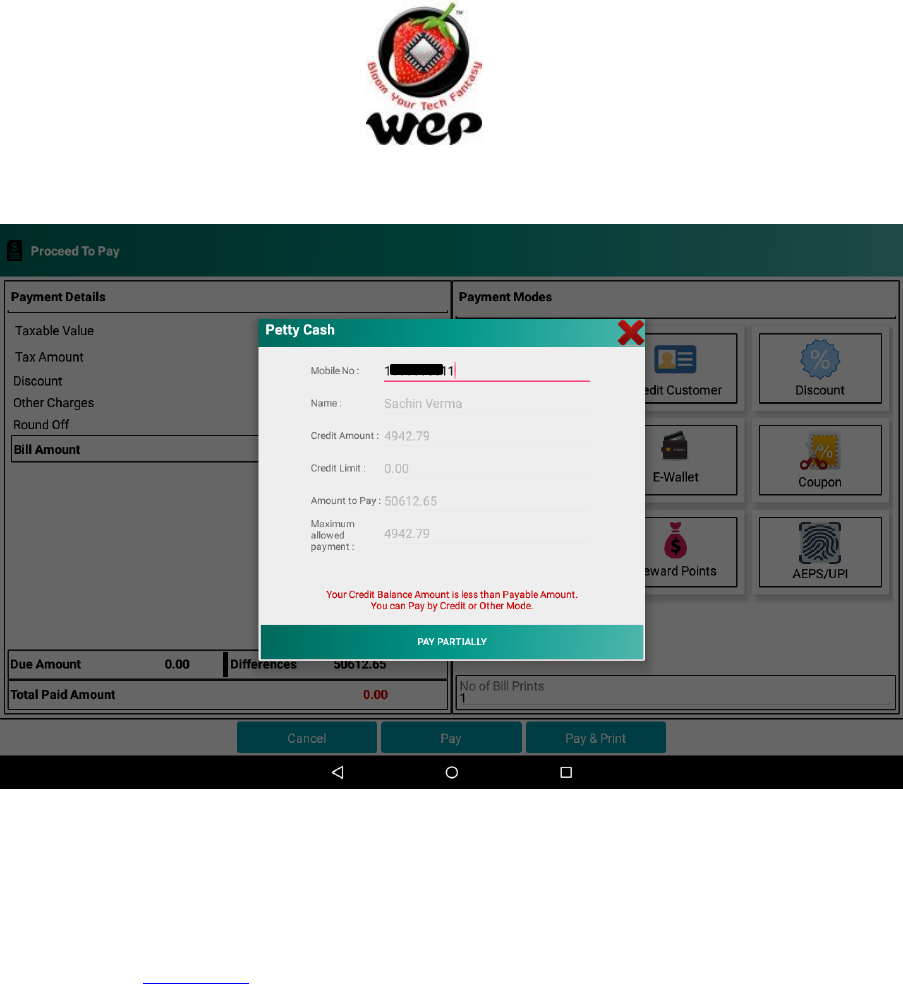
2.1.1 If credit amount is less than the amount to pay
In case the amount to be pay by customer is more than the customer’s credit amount than
customer can make partial payment as well. For example:-
Amount to pay = ₹ 800
Customer’s Credit Amount = ₹200
Customer’s Credit Limit = ₹300
Then Amount to pay – (Credit’s Customer Amount + Credit’s Credit Limit) = ₹ 300, now due
amount of₹ 300 can be paid by any other mode of payment.
GST GenieR V1.0P
WeP Digital Services Limited
20
Figure 16: Enter customer's mobile number and click on pay partially
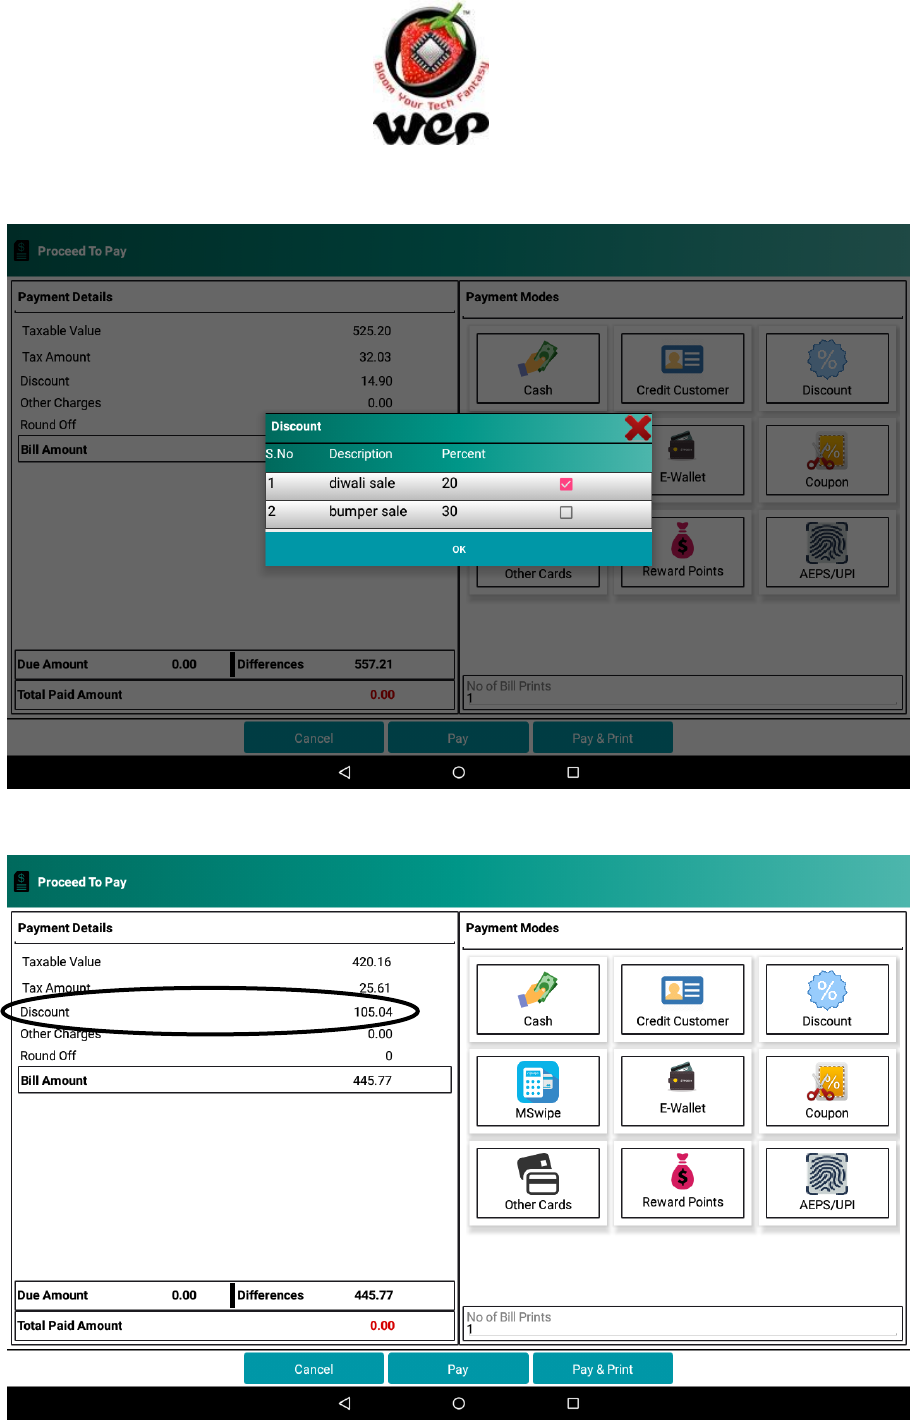
2.2 Discount
User can apply discount on bill amount generated and these discounts can be configured in
configuration. See Details in Section 9.5.
Note: Please note discount is calculated on subtotal.
GST GenieR V1.0P
WeP Digital Services Limited
21
Figure 17: Click on Discount you want to apply
Figure 18: After applying discount the discounted amount will be displayed.
GST GenieR V1.0P
WeP Digital Services Limited
22
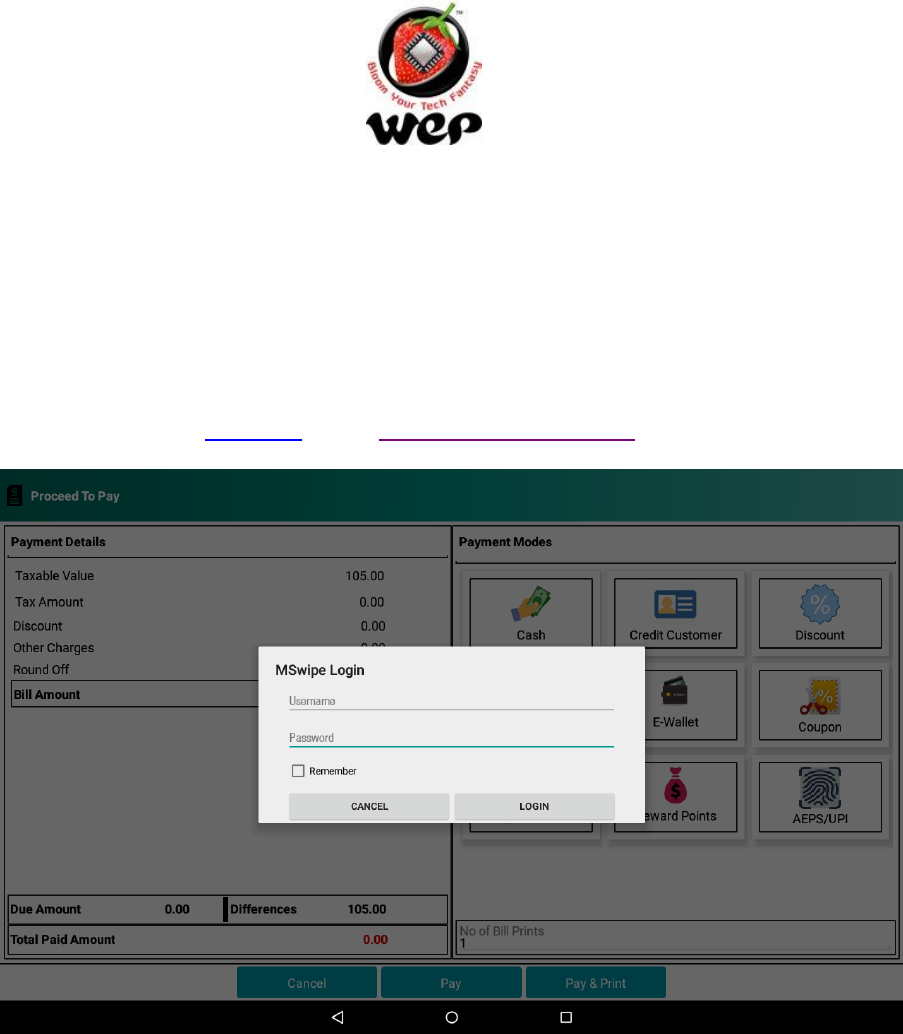
2.3 MSwipe Payments
MSwipe payment is one of the upcoming features of GST Genie R. This will allow user to
make payment through cards using MSwipe Machine. Support contact for mswipe can be
found on below mention site. User need to register with MSwipe to statrt using the mswipe
maching. To register Click Here or visit http://www.mswipe.com/
Figure 19 : Enter valid mswipe credentials to make card transaction
GST GenieR V1.0P
WeP Digital Services Limited
23
Figure 20 Enter customer’s mobile no. as it is mandatory, then scroll down and click on next
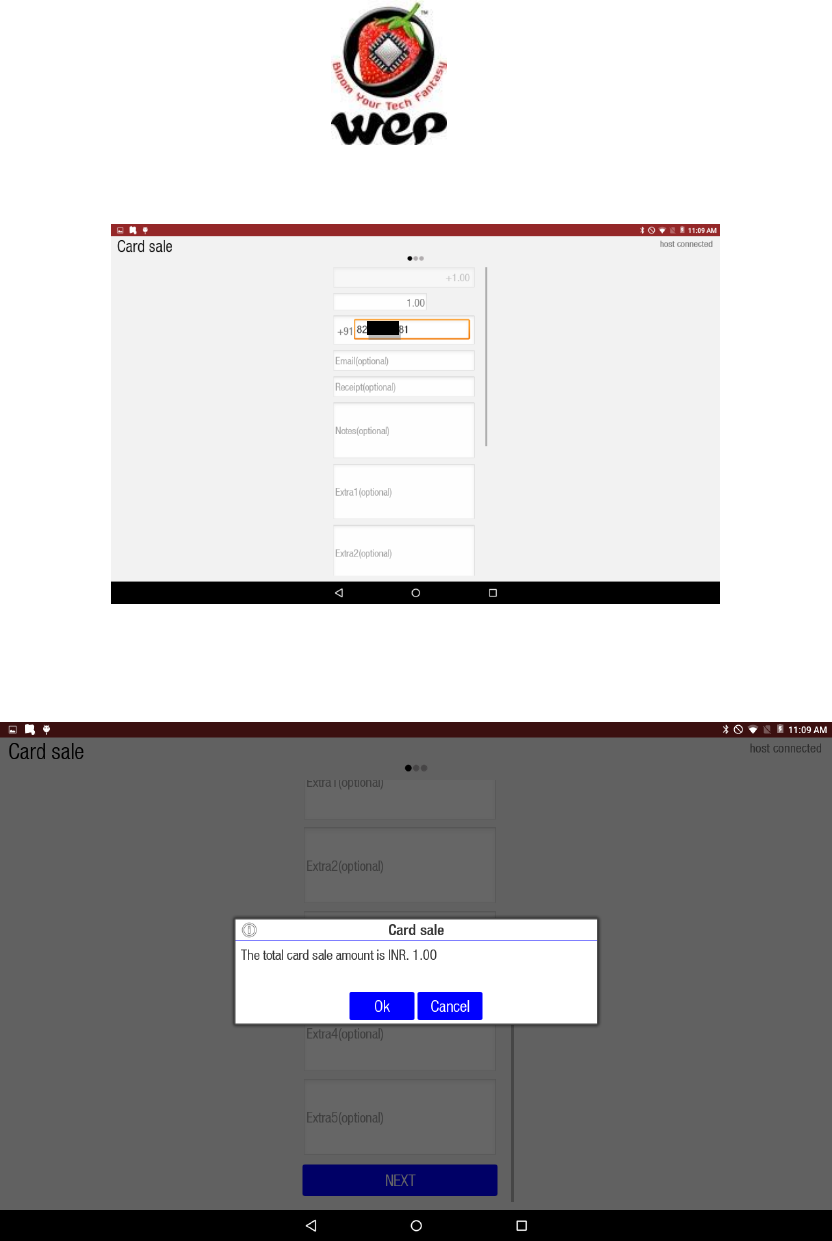
Figure 21 Confirm the amount and then click on OK
GST GenieR V1.0P
WeP Digital Services Limited
24
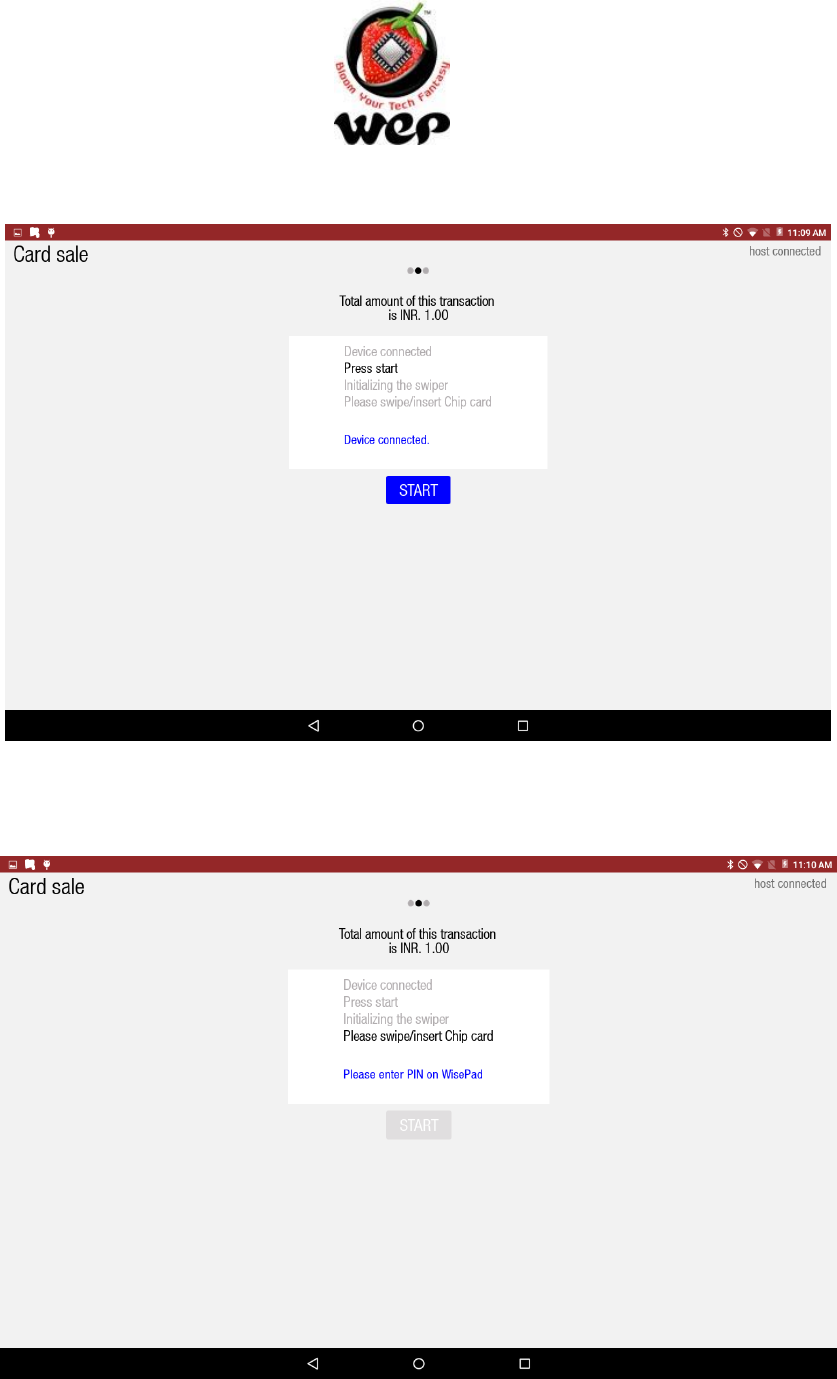
Figure 22 Connect MSwipe Machine via Bluetooth (if not already) and click on start to initiate the transaction
Figure23: Once the application detects the machine it will ask user to insert or swipe the card
GST GenieR V1.0P
WeP Digital Services Limited
25
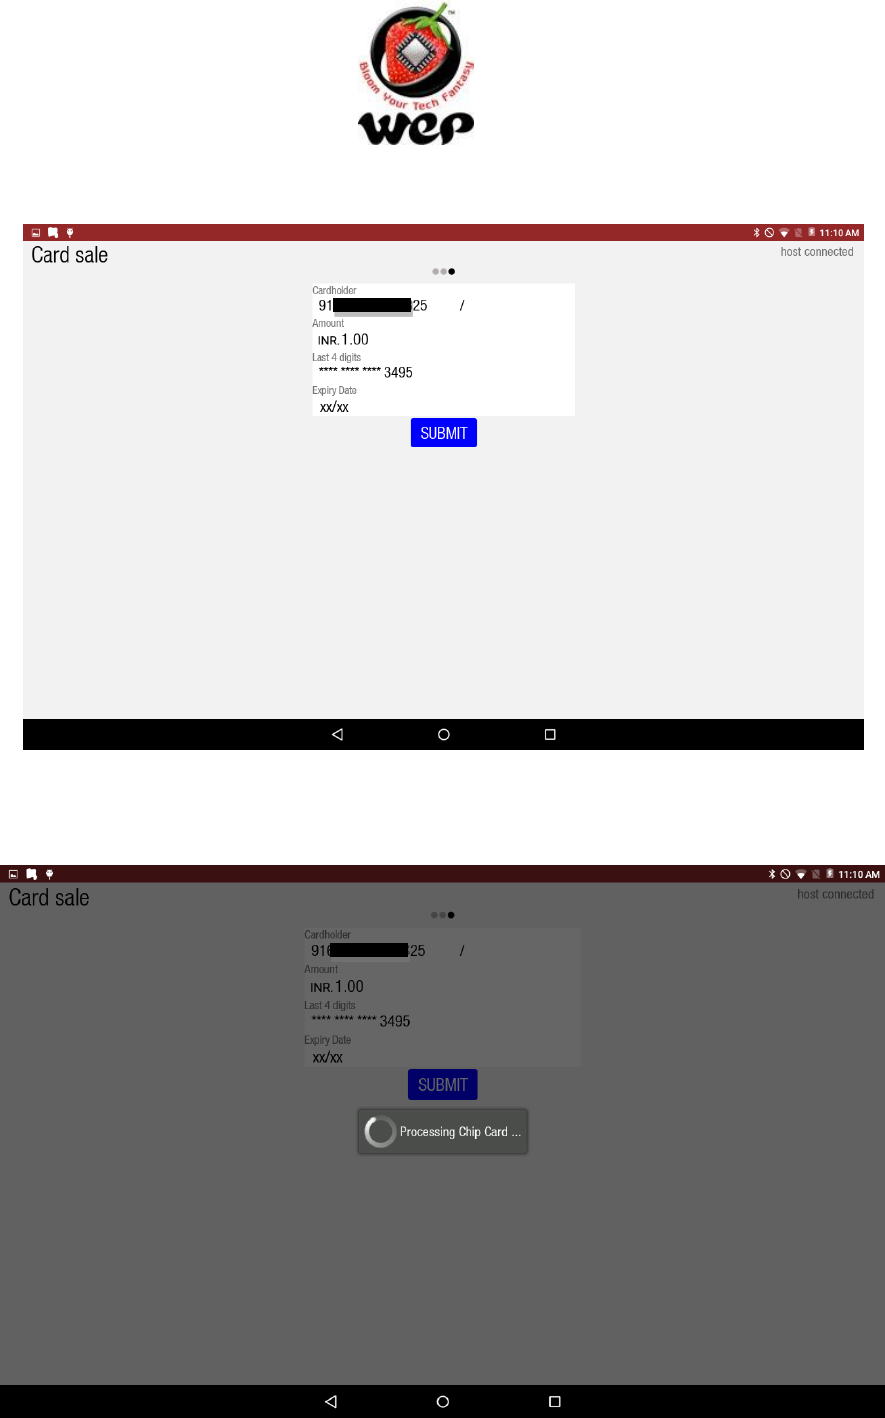
Figure 23 After swiping and entering the PIN click on Submit
Figure 24 Verification of credentials will happen
GST GenieR V1.0P
WeP Digital Services Limited
26
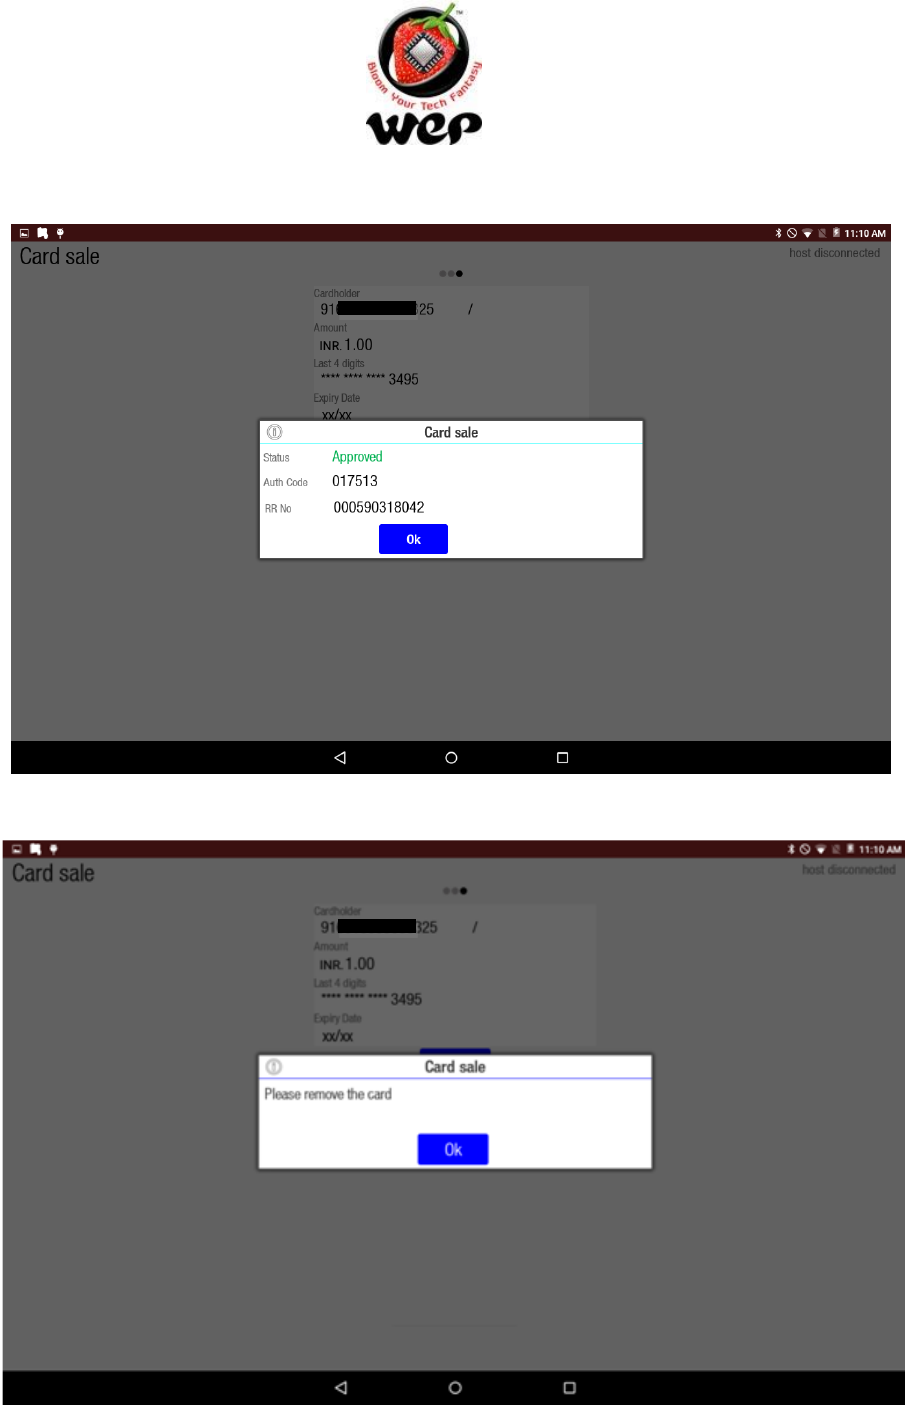
Figure 25 : A message will pop up for transaction status as success or failed
Figure 26 Enter customer’s mobile no. as it is mandatory, then scroll down and click on next
GST GenieR V1.0P
WeP Digital Services Limited
27
2.4 e-Wallet Payments
For making e-wallet payments user needs to configure Razor Pay Key id (See details in
Section 12.5).To get Key id user needs to register on Razor Pay website, to register Click
Here or visit https://razorpay.com/. After on boarding with razorpay, user can log in on
razorpay site with valid razorpay credentials and in settings can find the keys.
Kindly note that valid key id is compulsory to configure, secret key is optional. Once user has
configured a valid key id provided by Razozr Pay, then connect the device to Wi-Fi and
follow the following steps:-
Figure 27: Click on e-wallet and enter customer's mobile number and email
GST GenieR V1.0P
WeP Digital Services Limited
28
Figure 28: Select a wallet through which customer wants to make payment
Figure 29: An OTP will be sent on customer's mobile number. Then enter the received OTP

GST GenieR V1.0P
WeP Digital Services Limited
30
Figure 31: Enter the count and click on ok to apply coupon
Figure 32: After applying coupon, coupon amount will get displayed
GST GenieR V1.0P
WeP Digital Services Limited
31
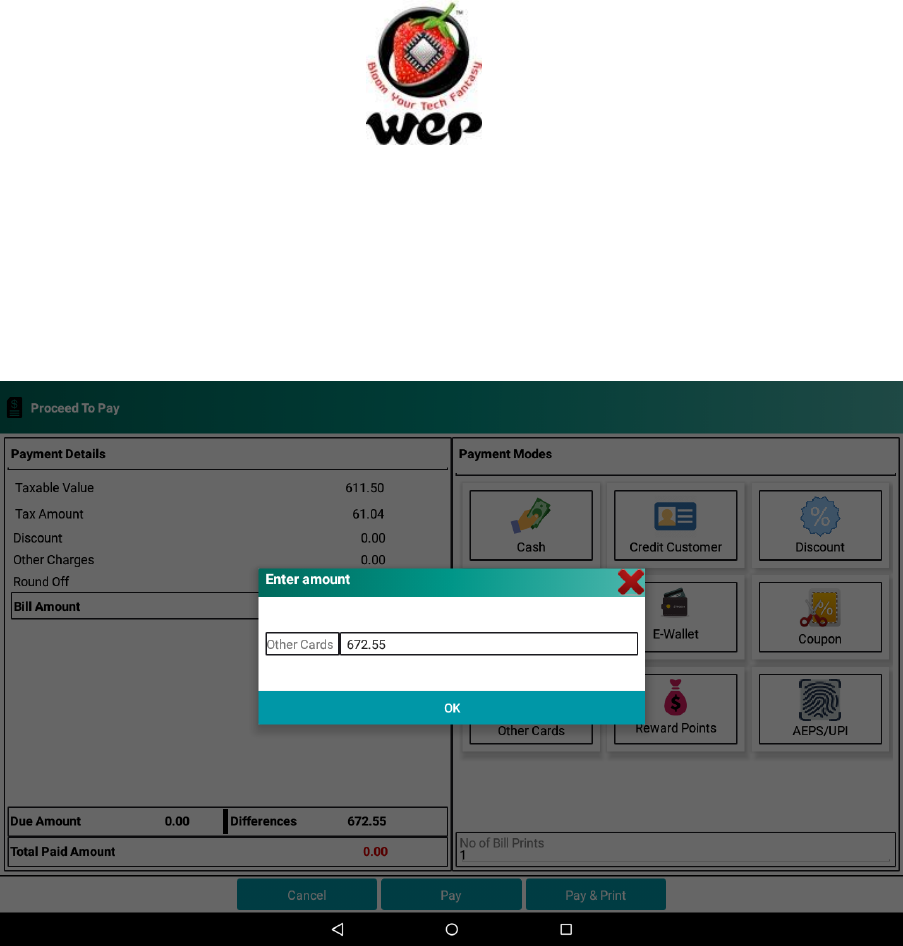
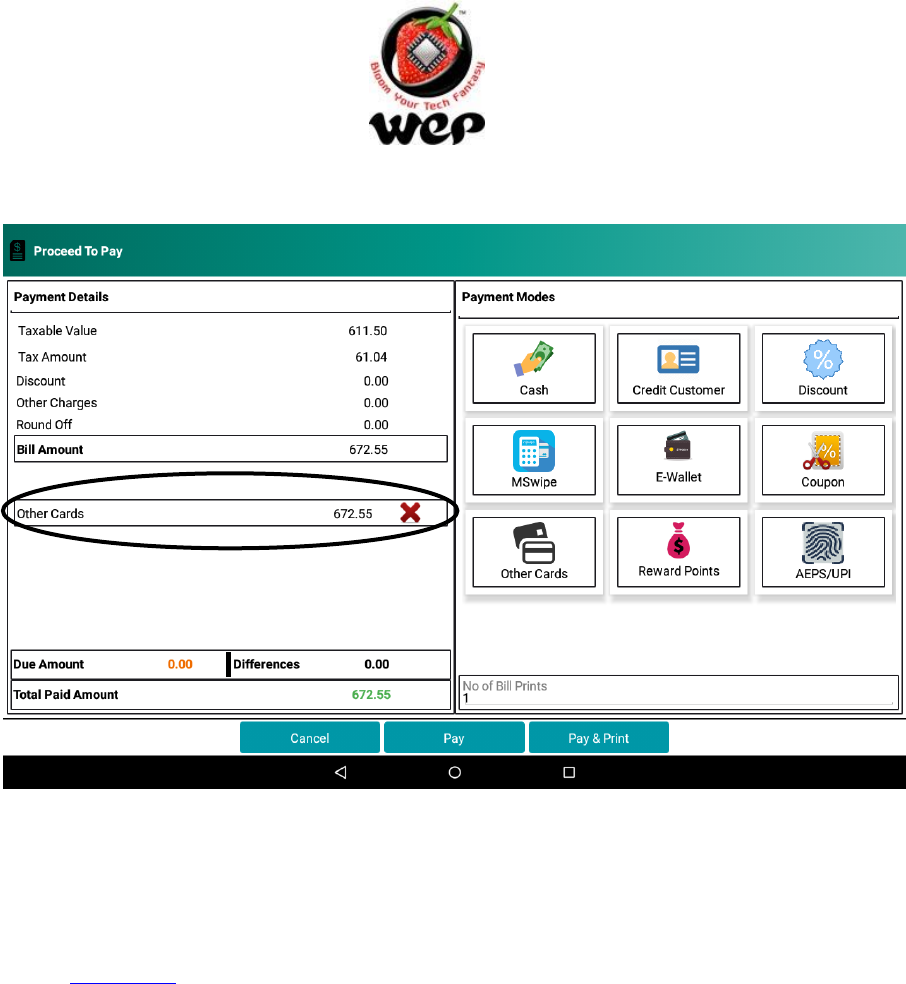
2.6 Other Cards
If payment is made through cards but machine for swiping cards is used other than the
MSwipe machine then user can simply enter the amount paid other card by the customer.
Figure 33 : Enter the amount paid by Other cards
GST GenieR V1.0P
WeP Digital Services Limited
33
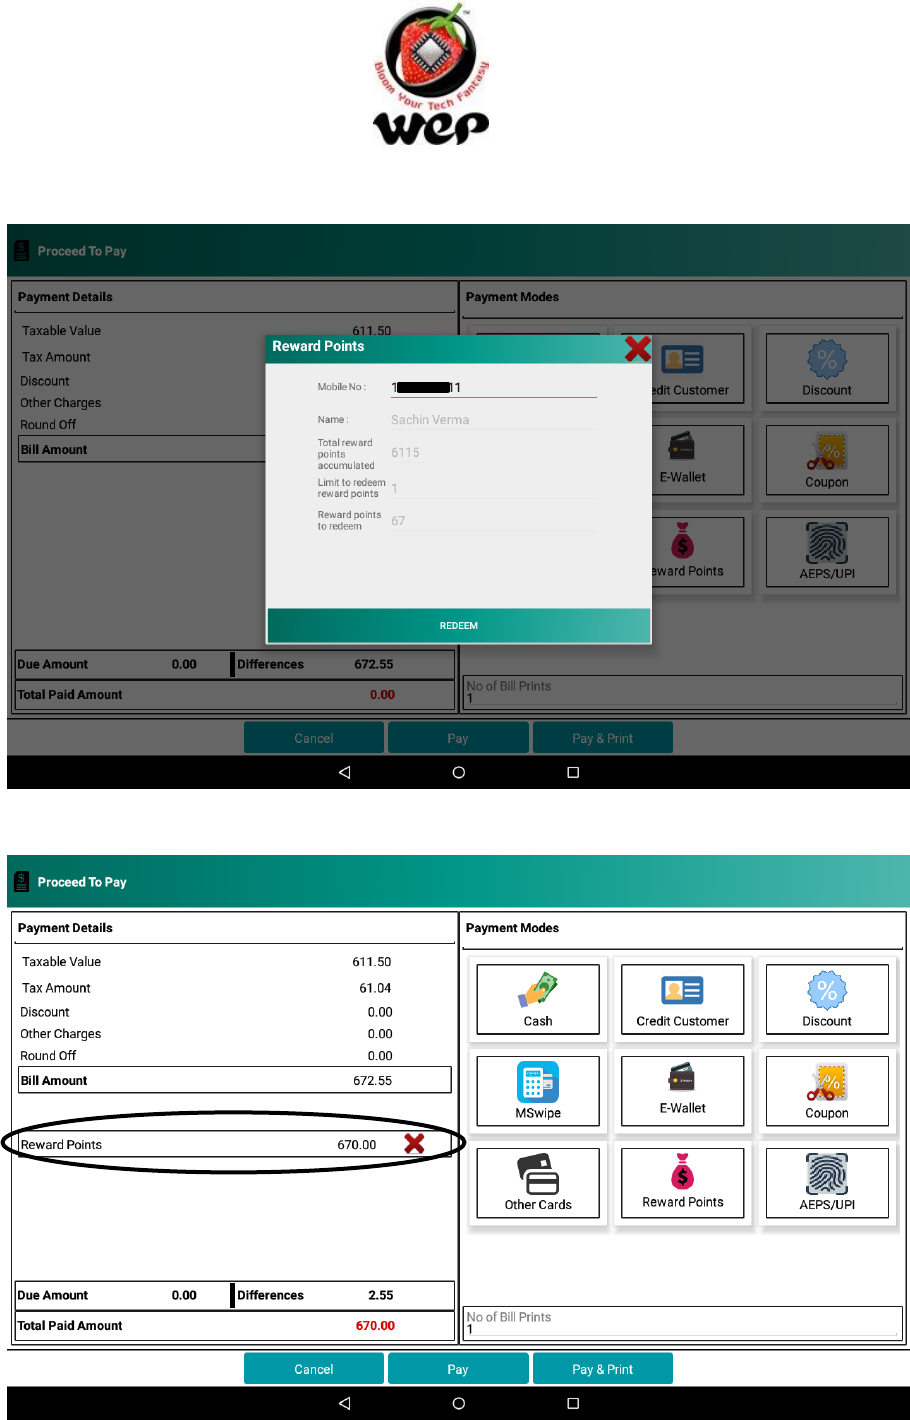
Figure 35: Enter customer's mobile number and click on redeem
Figure 36: Amount paid by reward points will be displayed
GST GenieR V1.0P
WeP Digital Services Limited
34
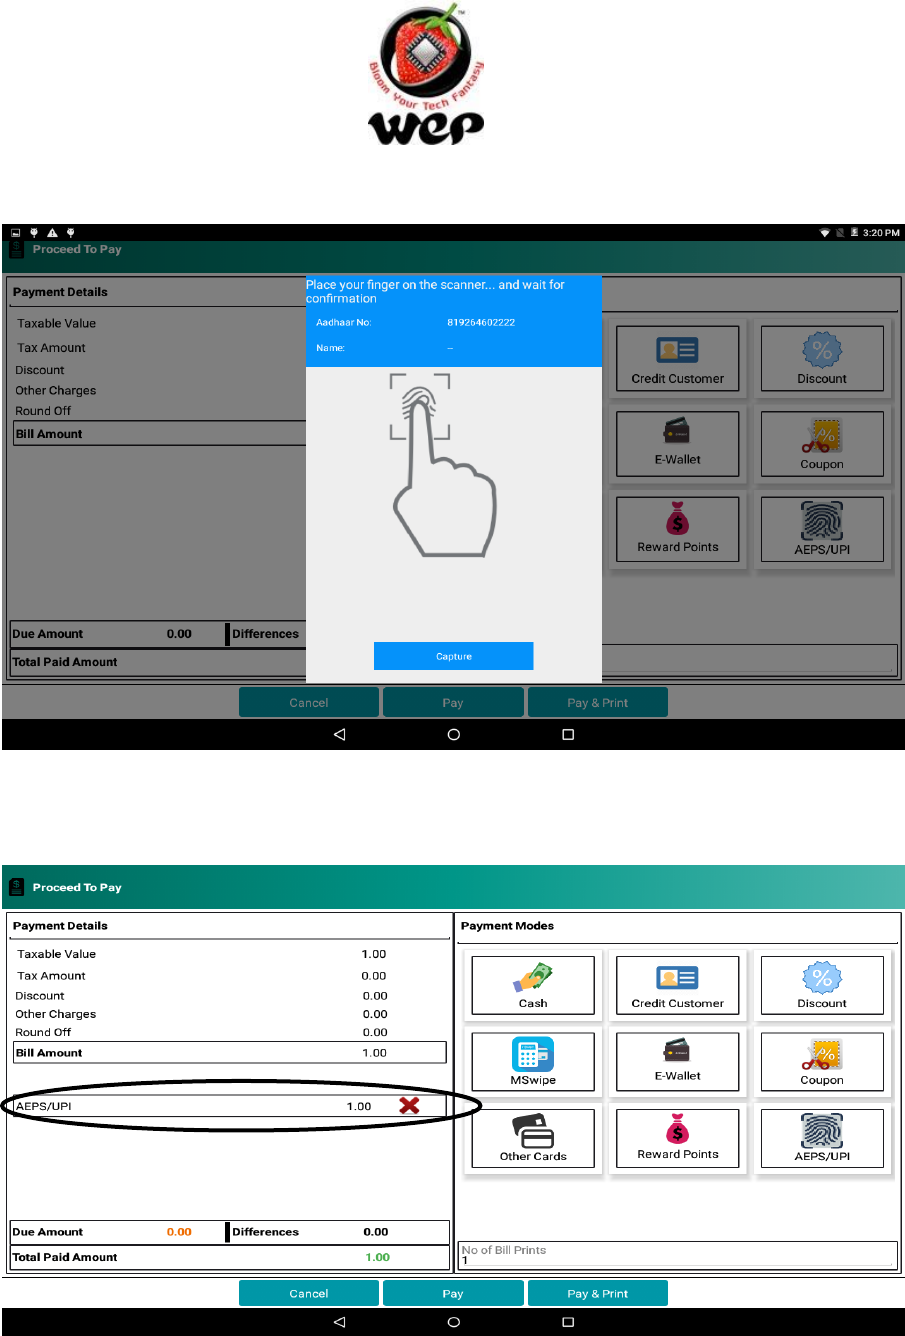
2.8 AEPS Payment
Your customer can pay through AEPS also. User need to enter the merchant Id , app Id and
secret key , in Settings-> payment mode configuration -> AEPS , given to him at the time of
registration. For valid credentials, user will be able to make AEPS transaction.
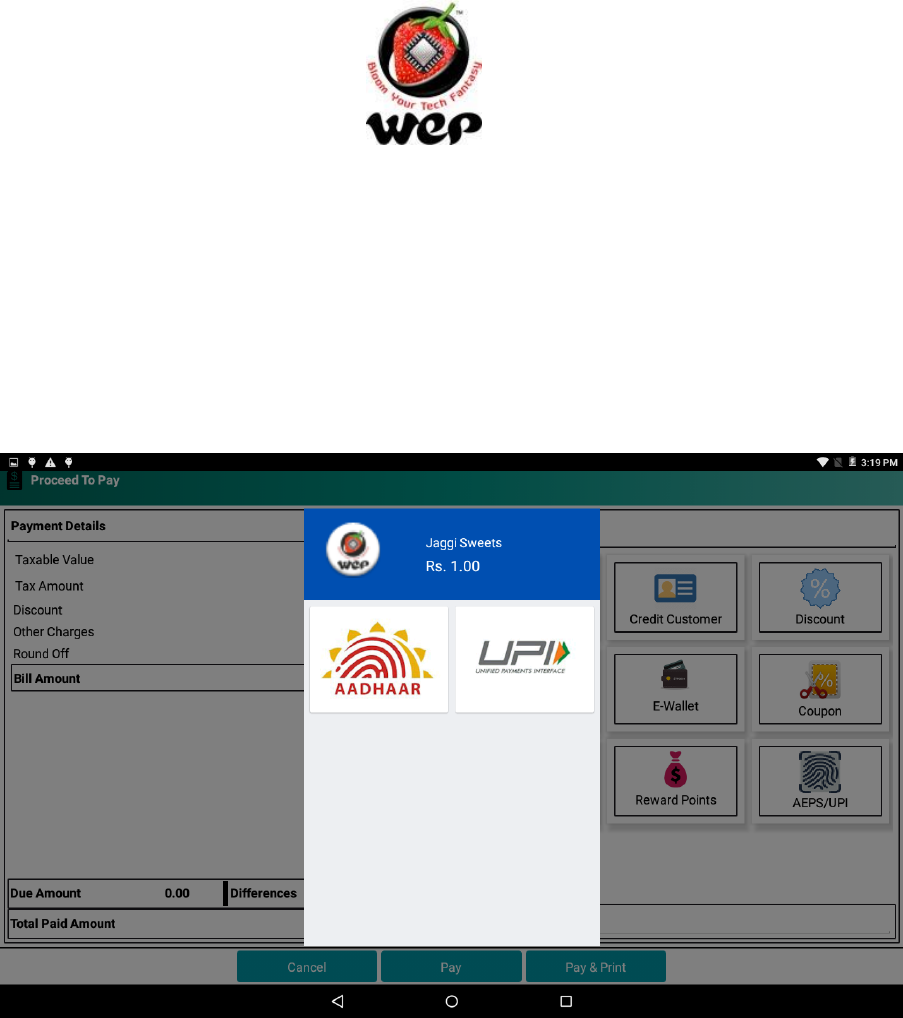
Figure 37 : Upon clicking AEPS/UPI , both option comes up on screen
a) UPI
1. End customer need to scan the code through the app which supports QR code payment.
2. Once end customer approves and pay the amount though QR code scanning ,then upon
successful transaction, it will be reflected on the screen.
GST GenieR V1.0P
WeP Digital Services Limited
35
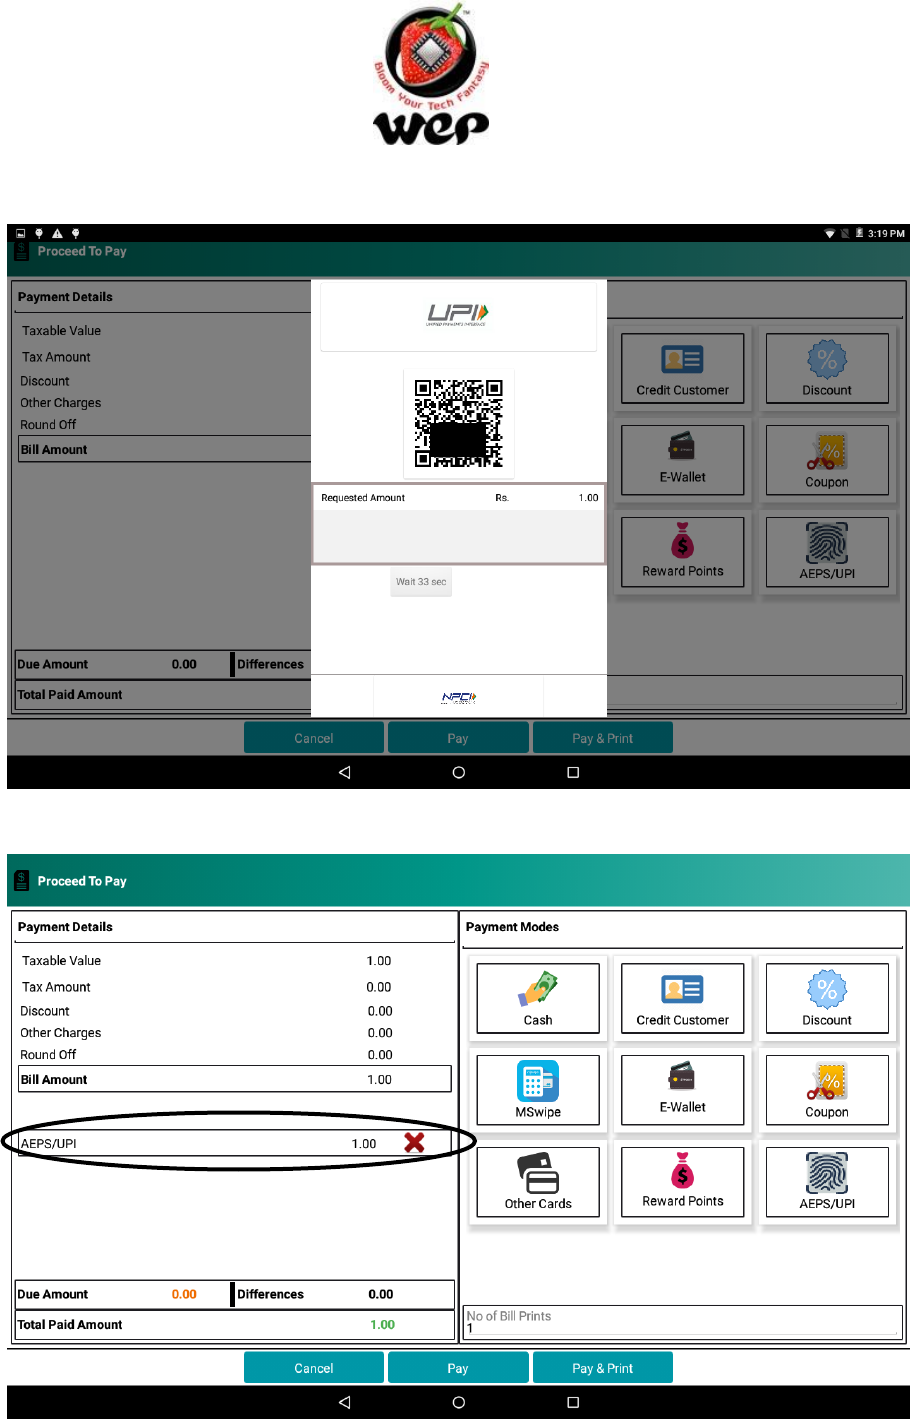
Figure 38 : Upon selecting UPI payment mode, QR code is generated
Figure 39 : Upon successful UPI transaction , amount is reflected in screen
GST GenieR V1.0P
WeP Digital Services Limited
36
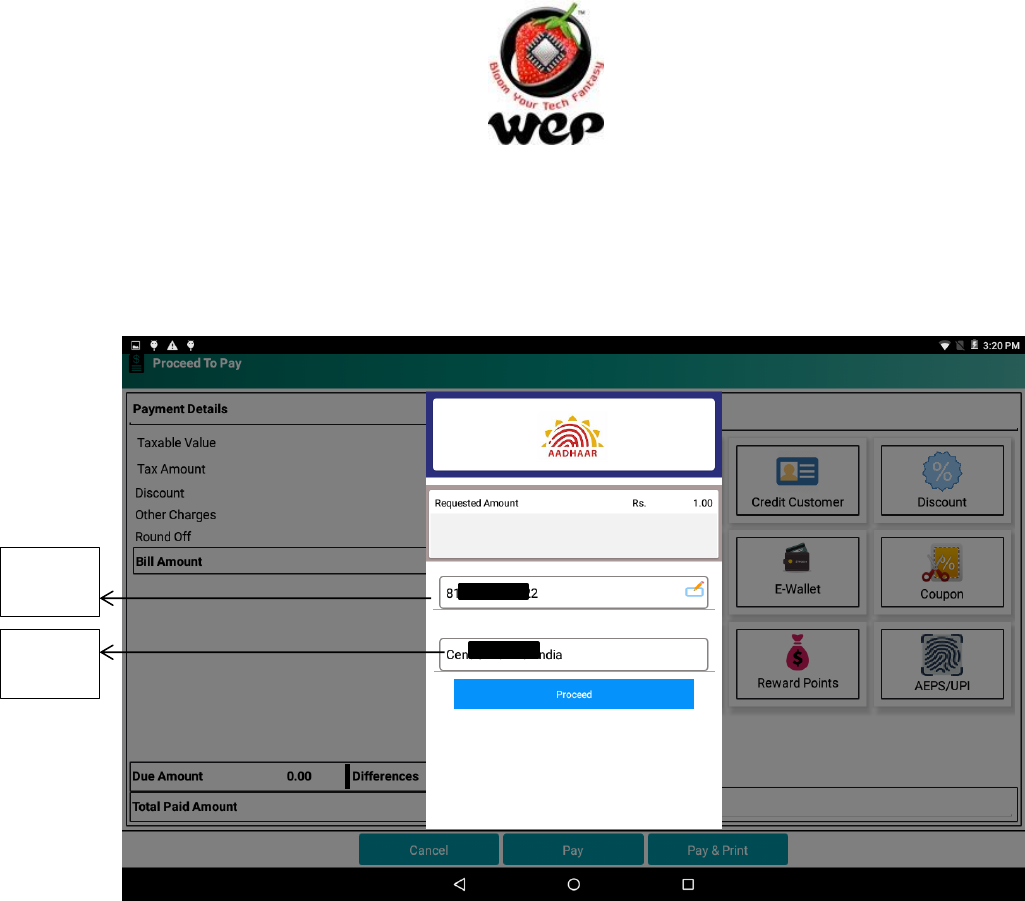
b) AEPS(Aadhar Enabled Payment System)
1. Enter end customer’s aadhar no and bank name, in which his aadhar no is linked.
2. Place finger on scanner and click capture.
Figure 40 : Upon clicking Aadhar, end customer's aadharno and bank name is required
Aadhar
no
Bank
Name
GST GenieR V1.0P
WeP Digital Services Limited
37
Figure 41 : Place finger on scanner and click capture
Figure 42 : Upon successful transaction, its reflected in screen
GST GenieR V1.0P
WeP Digital Services Limited
38
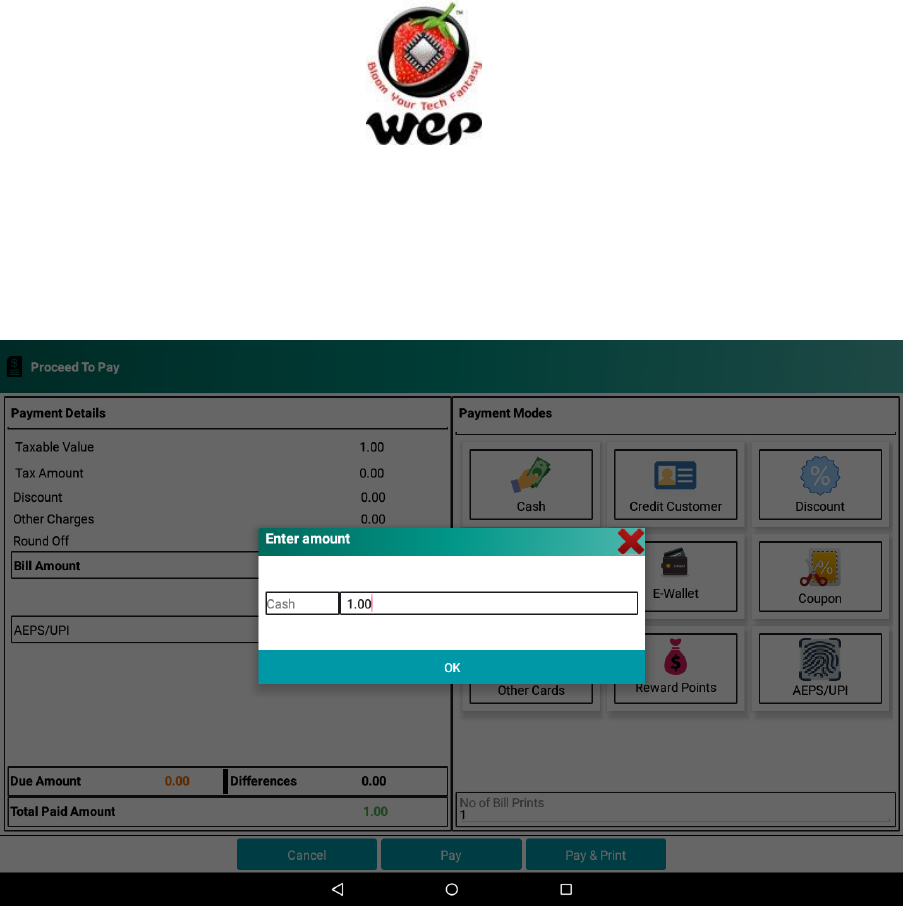
2.9 Cash Payment
User can also opt for cash payment.
Figure 43 : Enter amount paid by cash
GST GenieR V1.0P
WeP Digital Services Limited
39
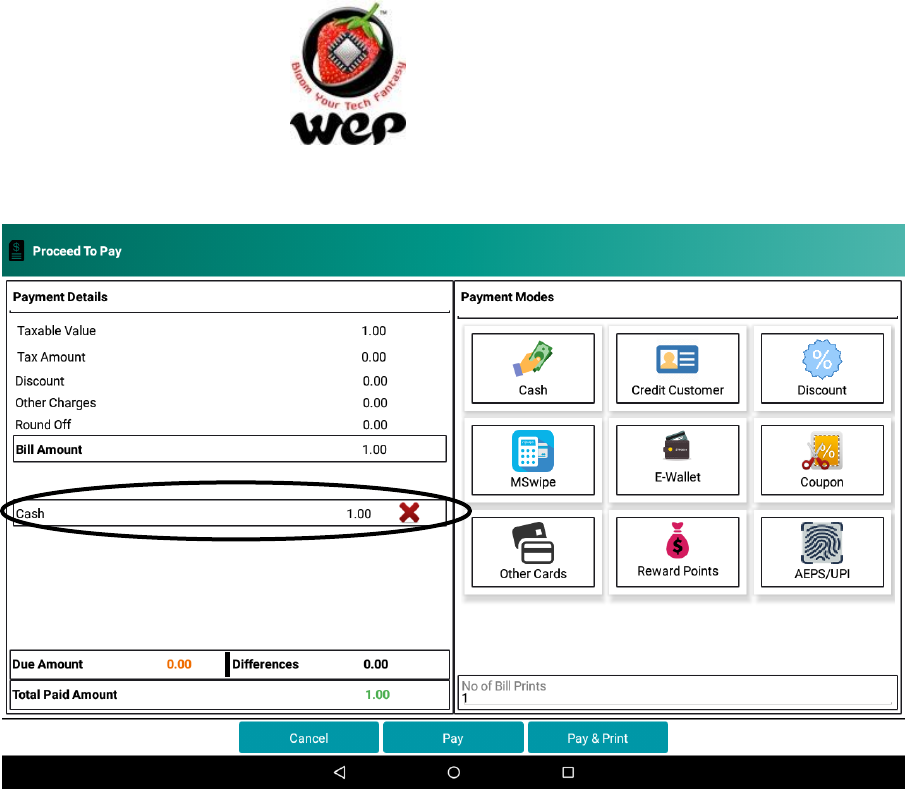
Figure 44 : Same will be reflected in payment screen

GST GenieR V1.0P
WeP Digital Services Limited
40
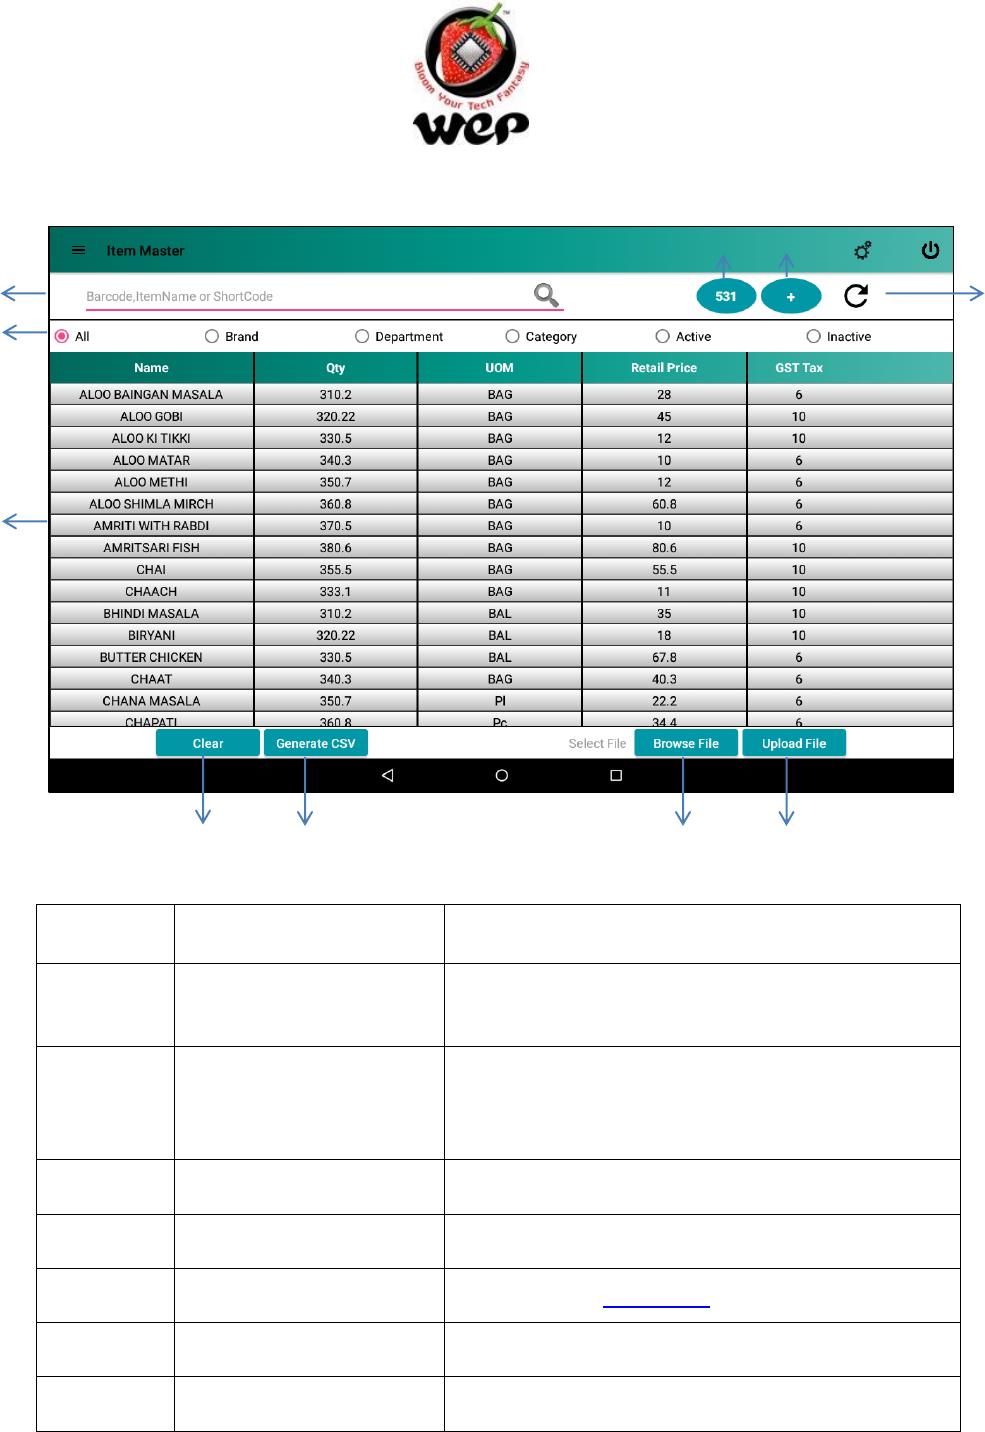
1. Item Master
This allows user to configure an item that he is going to sell to the customer. User can
configure following attributes about an item:
a. Item name
b. Department
c. Category
d. Brand
e. Three different rates (Retail Price, MRP, Whole Sale Price) {which rate is to apply
can be chosen at the time of billing. See Detail in Section 2.}
f. Quantity
g. Unit of measurement
h. CGST, SGST, IGST and cess tax if applicable
i. Short code
j. HSN code
k. Image for item
l. Active/Inactive
These attributes can be modified for an existing item as well. He can also upload an image
for the item for a visual reference.
For huge amount of data about items, user can use a .csv file to import/load items from that
file.
Note:
1. Previous data will be replaced on loading a .csv file. To save the previous data we
recommend you to create a backup of the database first.
2. Two or more items with same name, barcode, UOM, but different MRPs can be
added and cannot be added if MRP is also same.
GST GenieR V1.0P
WeP Digital Services Limited
41
Figure 45: Item Master
Label
Field
Description
1
Barcode, Item name or
Short Code
Items can be searched by barcode, Item name and
Short Codes.
2
Filters
List of items can be filtered by applying one of the
filters e.g.: All, Brand, Department, Category,
Active and Inactive.
3
Item List
List of the items according to the filter applied.
4
Count
Number of items in the list showing.
5
Add Item
Add new Item. See Details in Section 4.1.
6
Refresh
To refresh the list.
7
Clear
Clears all the fields.
1
2
3
4
5
6
7
8
9
10
GST GenieR V1.0P
WeP Digital Services Limited
42
8
Generate Sample CSV
Generates a sample CSV. Patch where sample CSV
is stored: Device Storage >WeP_Retail_CSVs
9
Browse File
Browse CSV file present in device’s memory for
bulk upload.
10
Upload file
Bulk upload of item details into application.
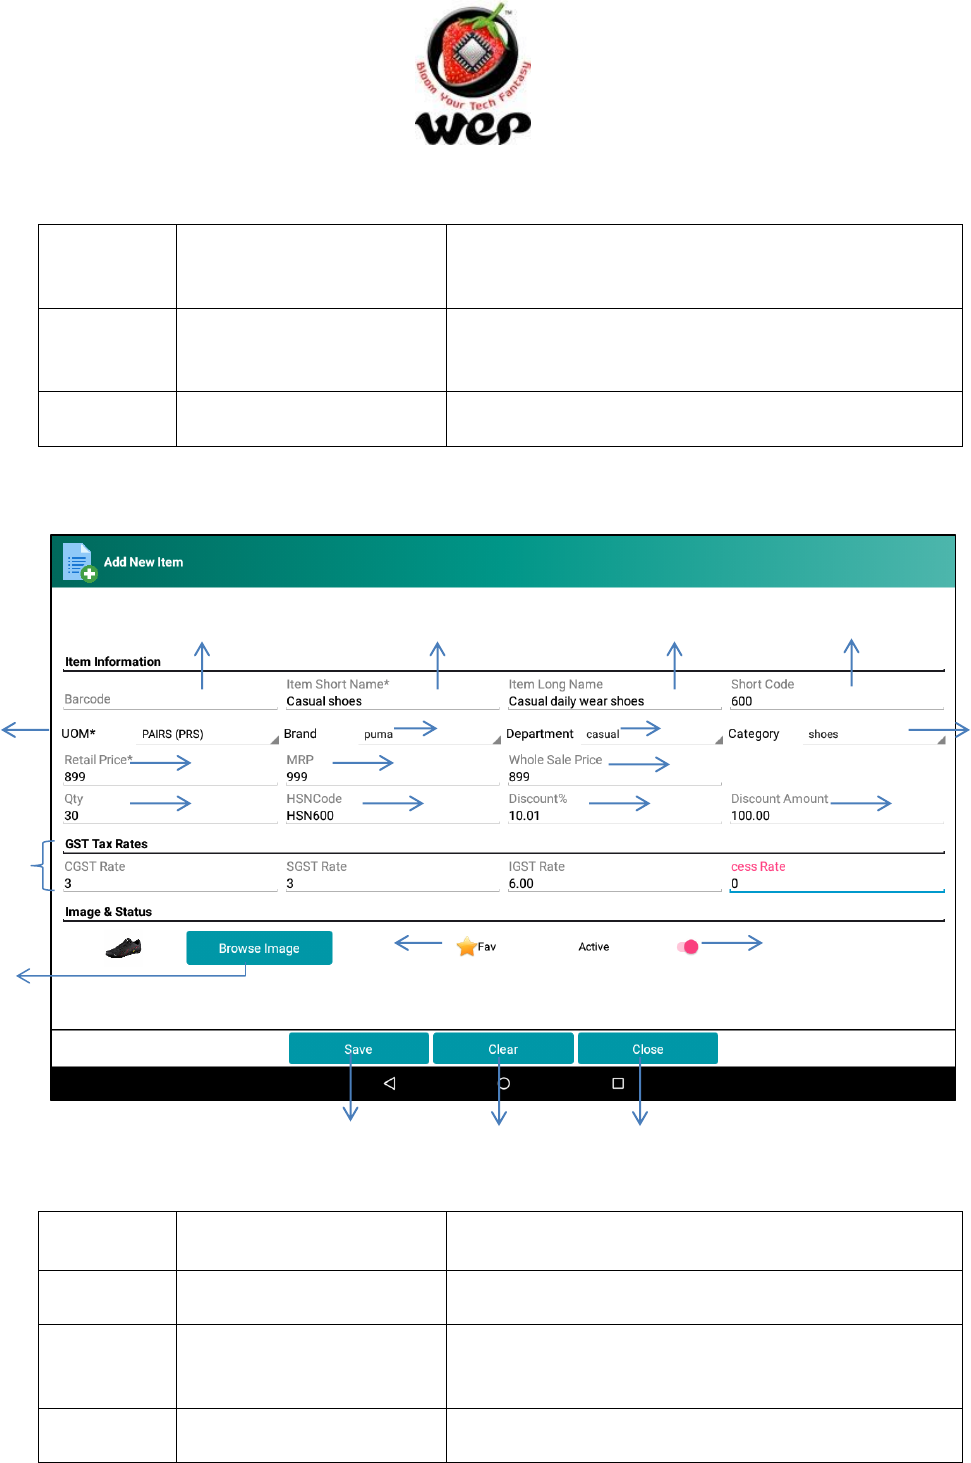
1.1 Add a new Item
Figure 46: Add a new item
Label
Field
Description
1
Barcode
Barcode of the item.
2
Item Short Name*
Short name for an item. Items can be searched by
short name.
3
Item Long Name
Long name for an item.
1
2
3
4
8
7
6
5
9
10
11
12
13
14
15
16
17
18
19
20
21
22

GST GenieR V1.0P
WeP Digital Services Limited
43
4
Short Code
A Short code for item.
5
UOM
Unit of Measurement for item.
6
Brand
Brand to which that item belongs to. (Can be
configured in configuration. See details in Sections
9.3.)
7
Department
Department to which that item belongs to. (Can
be configured in configuration. See details in
Section 9.1.)
8
Category
Category of the item. (Can be configured in
configuration. See details in Section 9.2.)
9
Retail Price
Retail Price for the item.
10
MRP
MRP of the item.
11
Whole Sale Price
Whole Sale Price of the item.
12
Quantity
Present quantity of the item.
13
HSN code
HSN code for the item.
14
Discount Percent
Discount percent will be calculated according to
retail price and MRP entered by user. E.g.:
(Discount Amount/MRP)*100
15
Discount Amount
Discount amount will be calculated according to
retail price and MRP entered by the user. E.g.:
MRP-Retail Price=Discount Amount
16
CGST/SGST/IGST/cess
CGST/SGST/IGST in percentage and cess rate in
percentage. (If applicable)
17
Browse Image
Image for the item.
18
Favourite
To mark an item as Favourite. User can sort out
favourite items in billing screen.
19
Active/Inactive
Active status of an item.
GST GenieR V1.0P
WeP Digital Services Limited
44
20
Save
Save an item.
21
Clear
Clears all the fields.
22
Close
Closes the current screen.
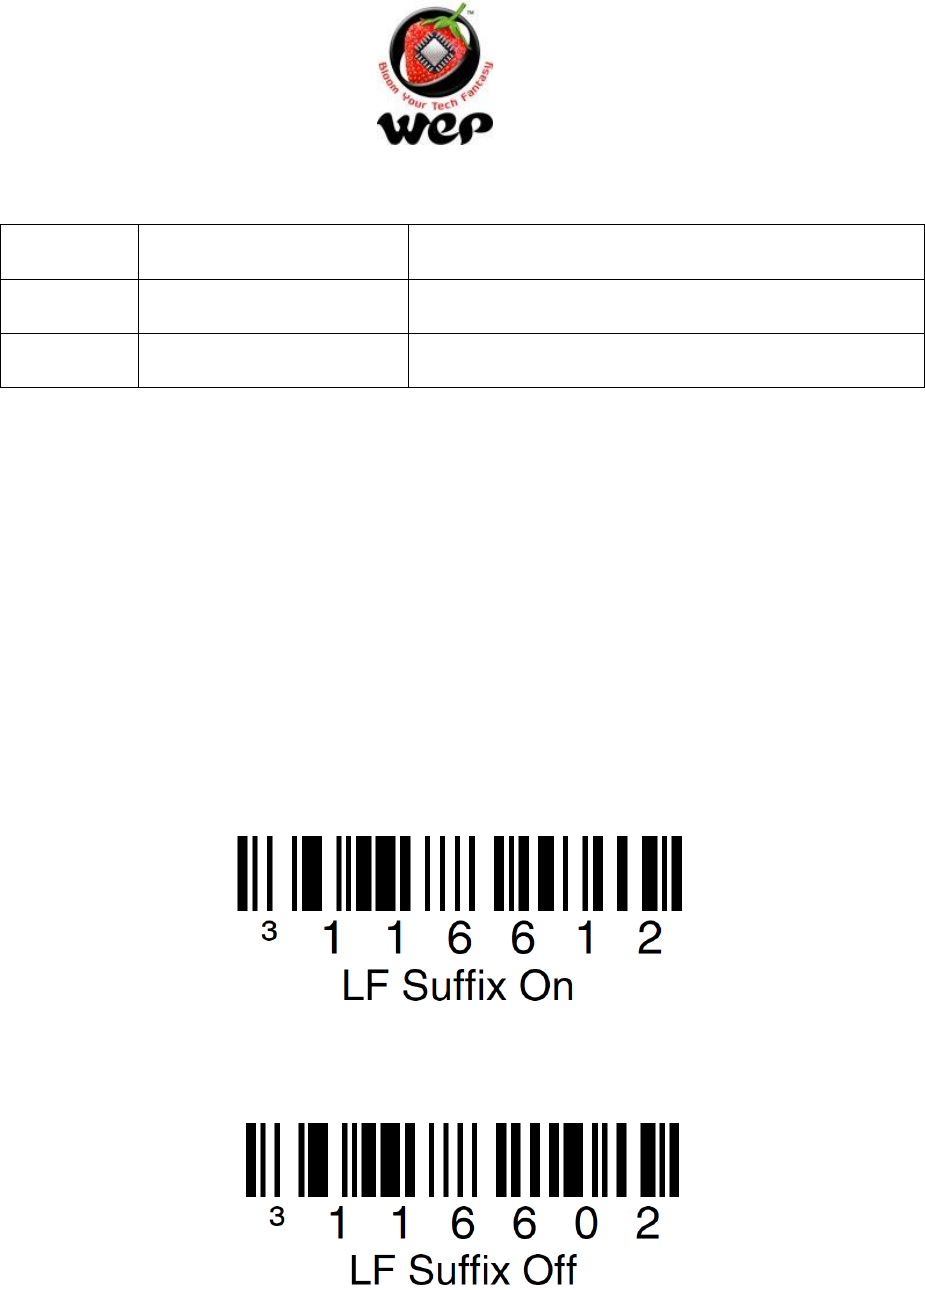
1.1.1 Configuring Barcode Scanner (Recommended)
For using barcode of an item, user needs to configure barcode scanner to add line feed
suffix.
For example: In case of Honeywell Barcode scanner, use below barcodes to turn on & off
the line feed suffix.
Warning: Without line feed user won’t be able to add an item directly into KOT after
scanning barcode rather, it will show the item in barcode search results and user has to
select the item from there.
Figure 47: Turn on line feed suffix
Figure 48: Turn off line feed suffix
GST GenieR V1.0P
WeP Digital Services Limited
45
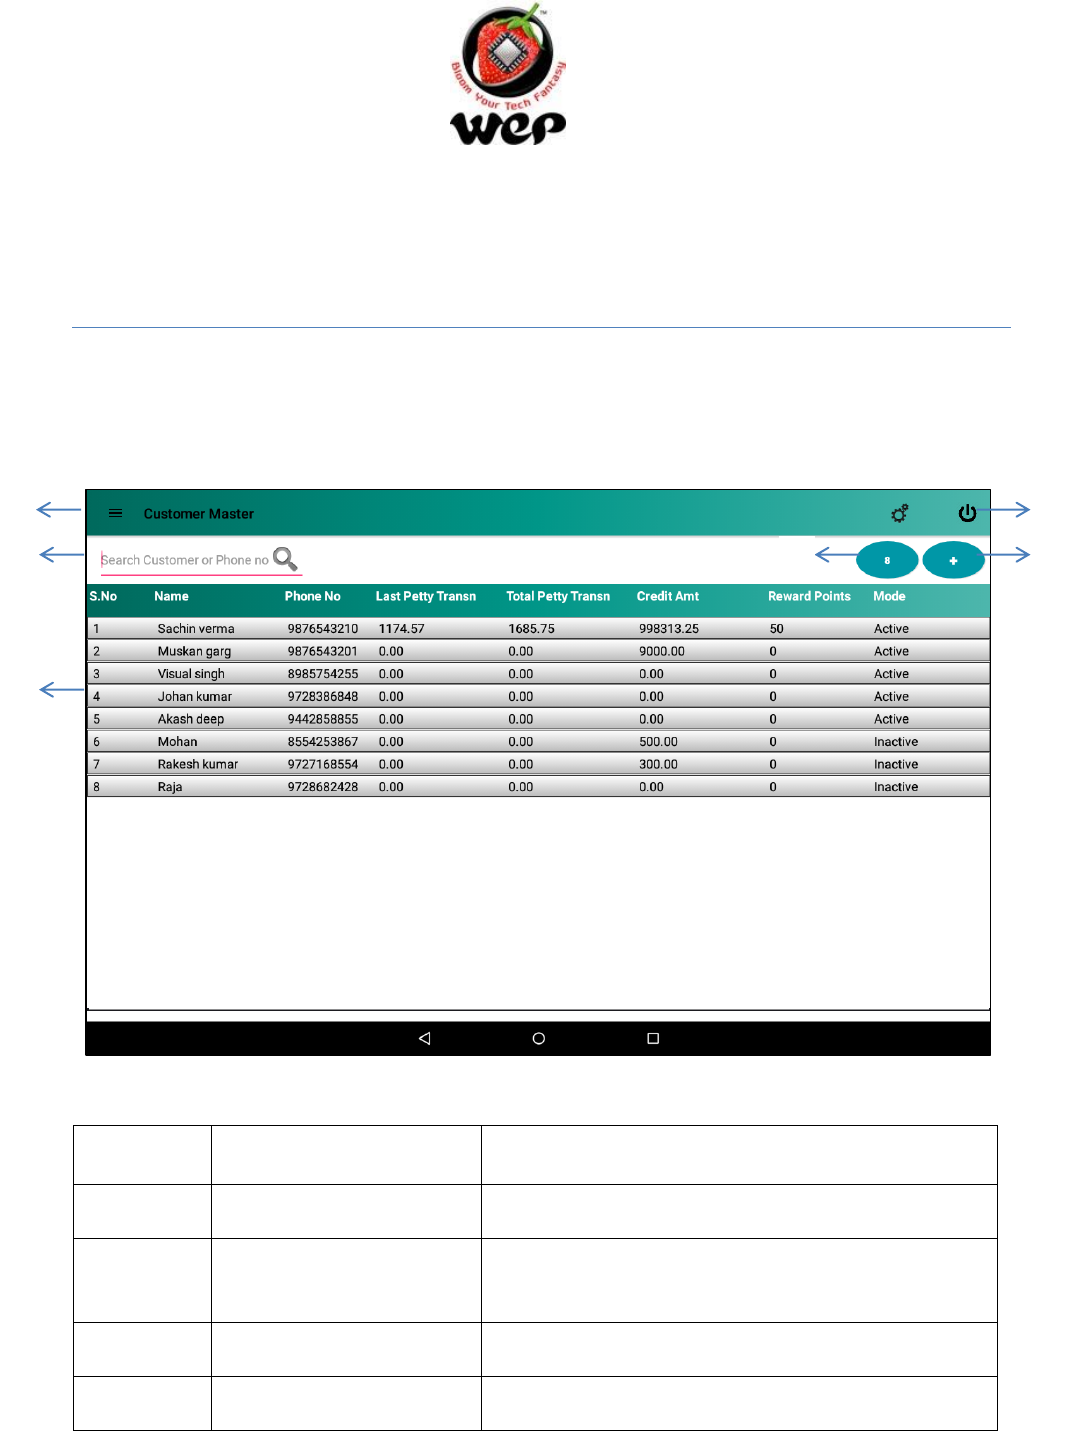
2. Customer Master
This application also provides a facility to the user to add a record of his regular/premium
customers and record can be updated later on. User can search for the customer by
customer’s mobile number or by customer’s name.
Figure 49: Customer Master Screen
Label
Field
Description
1
Navigation
Navigate to other modules.
2
Search Customer
Search for a customer either by his name or phone
number.
3
Customer’s List
List of all customers.
4
Customer’s count
Shows the total number of customer.
1
6
5
4
2
3
GST GenieR V1.0P
WeP Digital Services Limited
46
5
Add a new customer
Add button to add a new customer.
6
Menu
Menu to navigate to settings.
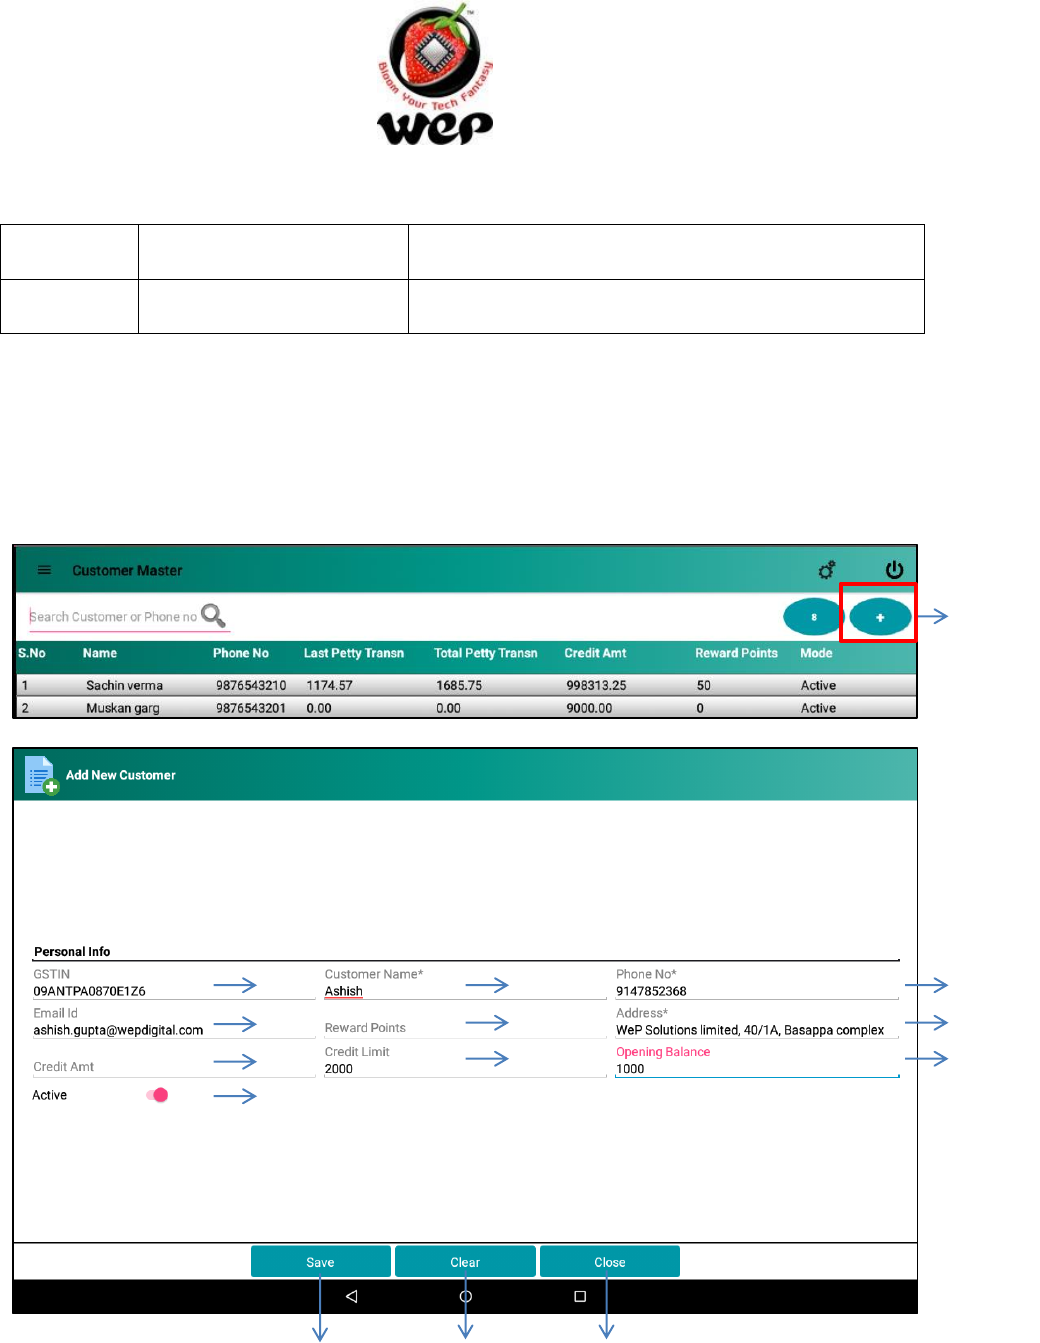
2.1 Add a new customer
Click on “Add” button in customer master screen a new screen will be opened. Enter
customer details here.
Figure 50: Add a new customer screen
Add
button
1
2
3
6
9
4
5
8
7
10
11
12
13

GST GenieR V1.0P
WeP Digital Services Limited
47
Label
Field
Description
1
GSTIN
Customer’s GSTIN.
2
Customer’s Name
Name of the customer.
3
Mobile no.
Customer’s mobile no.
4
Email Id
Customer’s Email ID.
5
Reward Points
Customer’s reward points that he earned.
6
Address
Customer’s Address.
7
Credit Amount
Customer’s credit amount on the user.
8
Credit Limit
Maximum amount a customer can credit on
merchant.
9
Opening Balance
Amount deposited for the first time by customer.
10
Active/Inactive
Active or Inactive status of the customer.
11
Save
Save the new customer.
12
Clear
Clears the fields.
13
Close
Close the current screen.
GST GenieR V1.0P
WeP Digital Services Limited
48
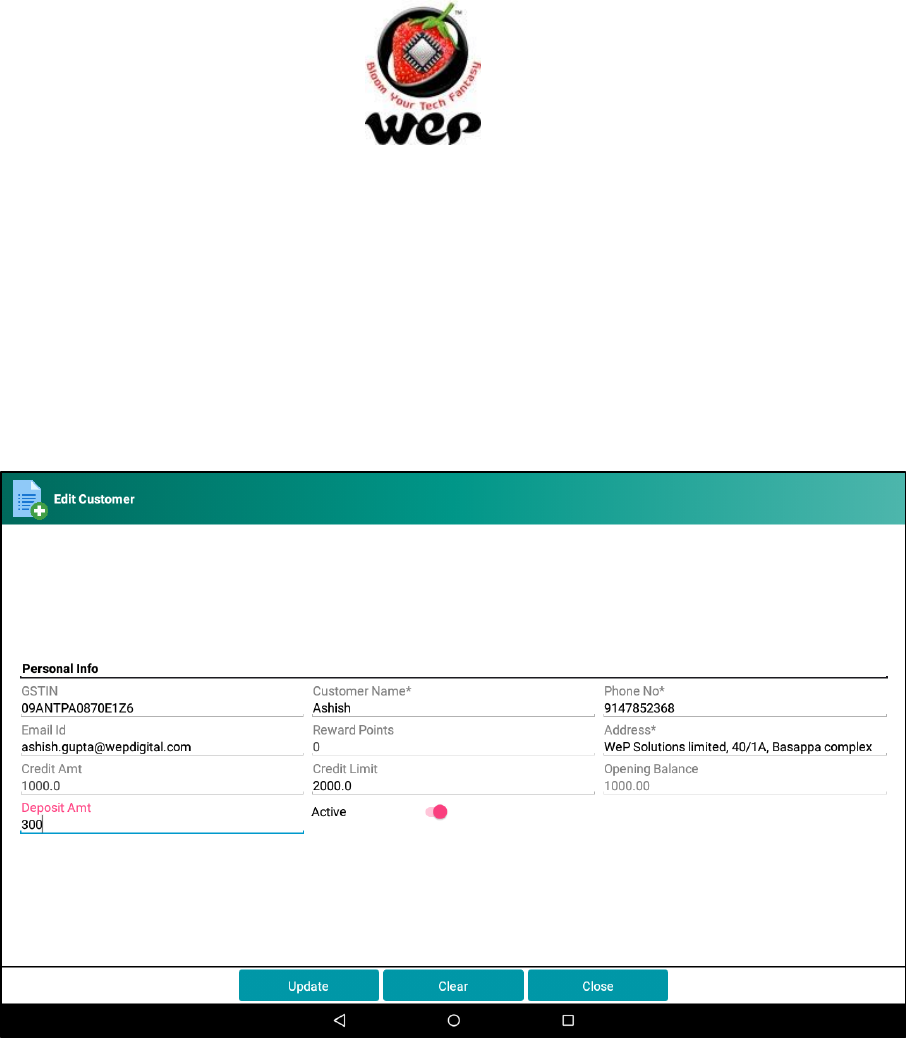
2.2 Edit/Update a Customer
To edit or update detail of a customer user needs to click on the customer from customer’s
result. On editing a customer a field for Deposit Amount will be enabled and Opening
Balance field will be disabled (non-editable). Deposit amount will be added into Credit
Amount.
Figure 51: Edit or Update a Customer
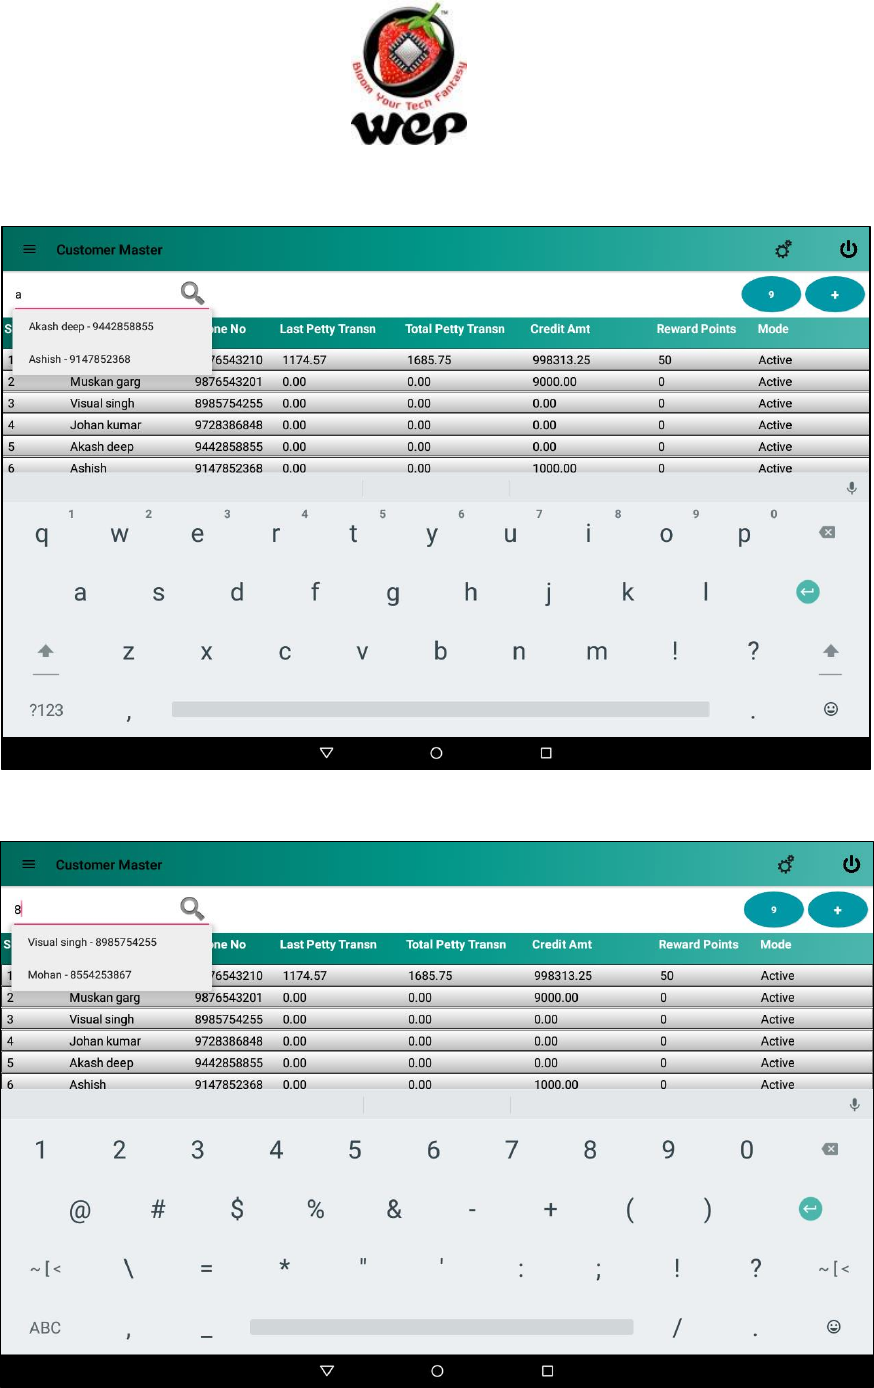
2.3 Search a customer
Application allows user to search an added customer by his name or by phone number.
GST GenieR V1.0P
WeP Digital Services Limited
49
Figure 52: Search customer by name
Figure 53: Search customer by phone number
GST GenieR V1.0P
WeP Digital Services Limited
50
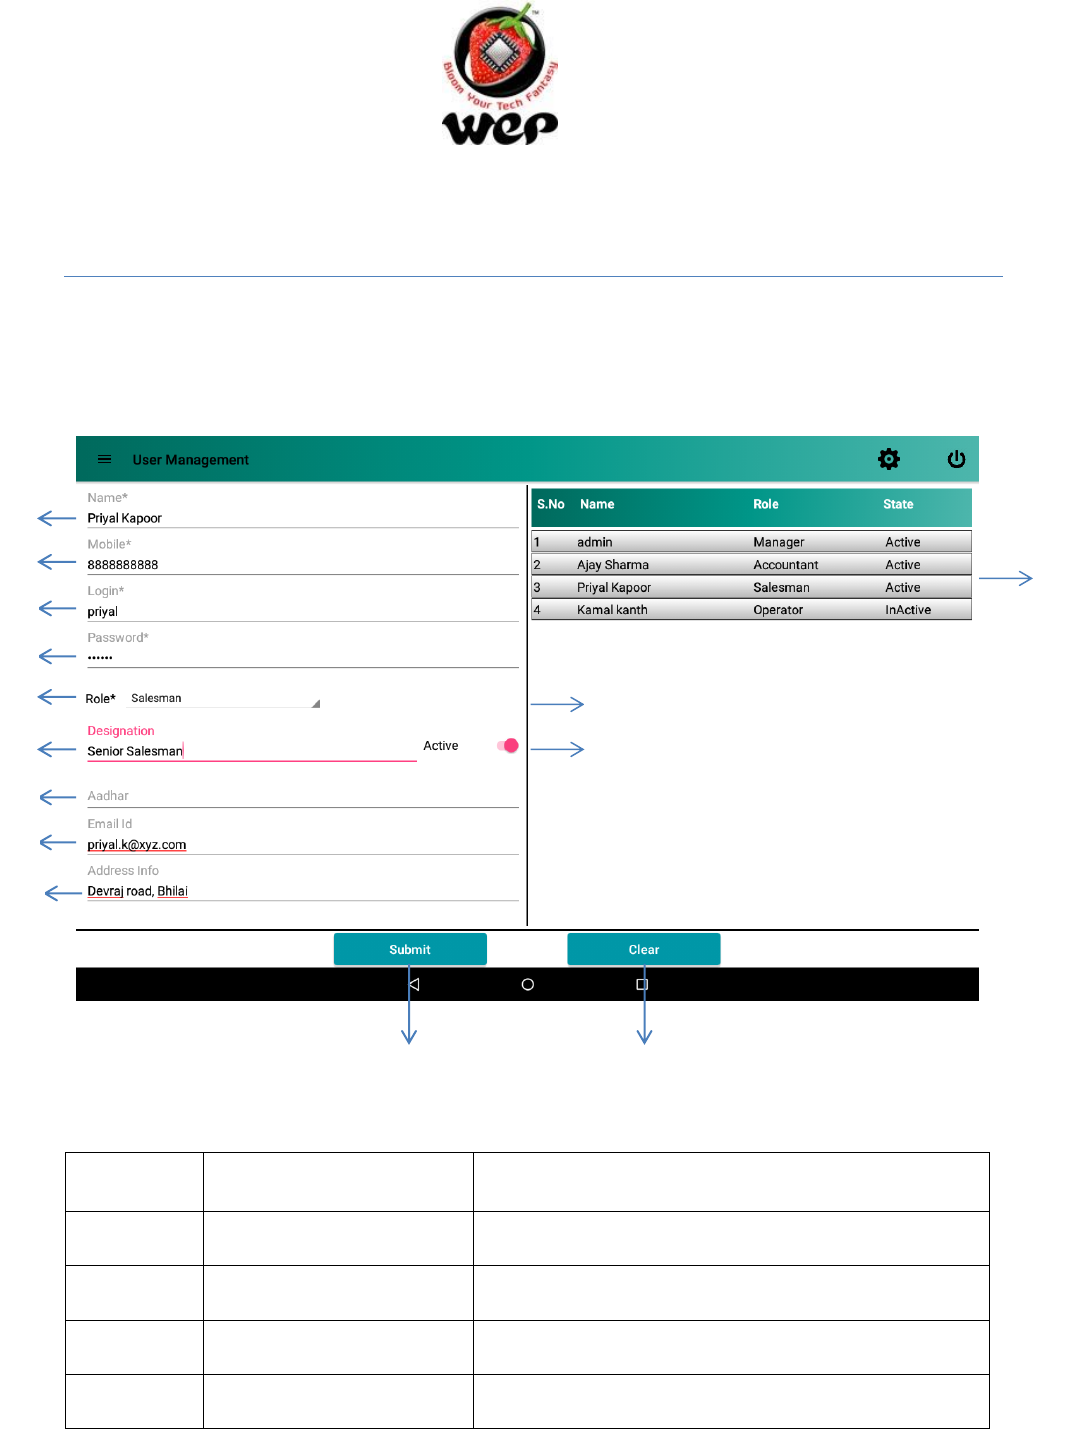
3. User Management
This screen allows user to insert and delete a record of an employee and assign a role to
him. User can also modify the employee details and change the role assigned to him earlier.
Default user admin can neither be updated nor deleted.
Figure 54: User Management
Label
Field
Description
1
Name
Name of the user.
2
Mobile
Contact number of the user.
3
Login
Username of the person.
4
Password
Password to login into the system.
13
14
12
1
2
3
4
5
6
7
8
9
10
11
GST GenieR V1.0P
WeP Digital Services Limited
51
5
Role
Role of the person.
6
Designation
Designation of the person.
7
Aadhar
Aadhar card number.
8
Email
Email id of the person.
9
Address
Address of the person.
10
Sales Man ID
For users whose role is sales man. The field will be
editable when role selected is sales man. The field
will be visible if it is enabled in settings. See
Details in Section 12.3.
11
Active/Inactive
Active or Inactive status of the user.
12
User’s List
List of the user added.
13
Submit
Save/Updates the details.
14
Clear
Clear the whole form.
GST GenieR V1.0P
WeP Digital Services Limited
52
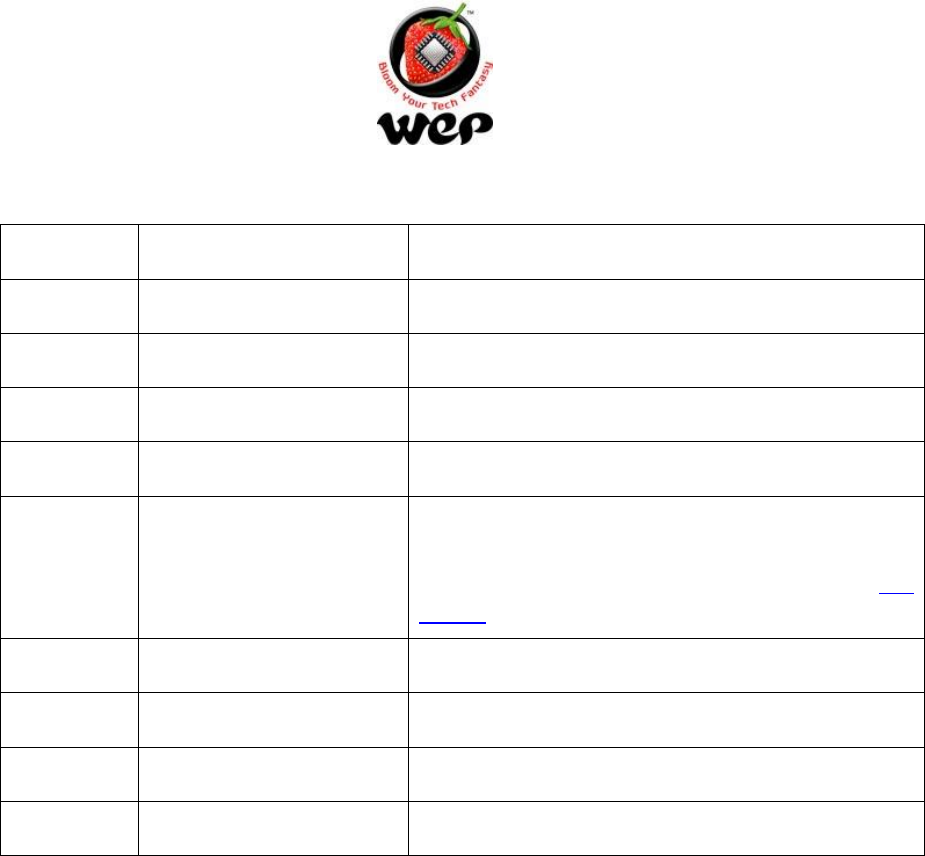
4. Add Role
Add role screen allows user to define roles that can be assigned to other employees. User
can also change the access for that particular role. e.g.: Sweeper is the new role that is
added by the user. Now user can configure, what module can be accessed by that role.
Figure 55: Add role screen
Label
Field
Description
1
Role List
List of all roles including pre-added roles by
system and user added roles.
2
Role Name
Name of the role user wants to add.
3
Permissions
List of permissions user wants to give to that role.
4
Add Role
Add a new role into database.
2
3
1
4
5
6
7

GST GenieR V1.0P
WeP Digital Services Limited
53
5
Update Permissions
Update permissions of an existing role.
6
Delete Role
Delete a role added by user only.
Note: User cannot delete system added roles like
“Manager”.
7
Clear
Clears all field.
GST GenieR V1.0P
WeP Digital Services Limited
54
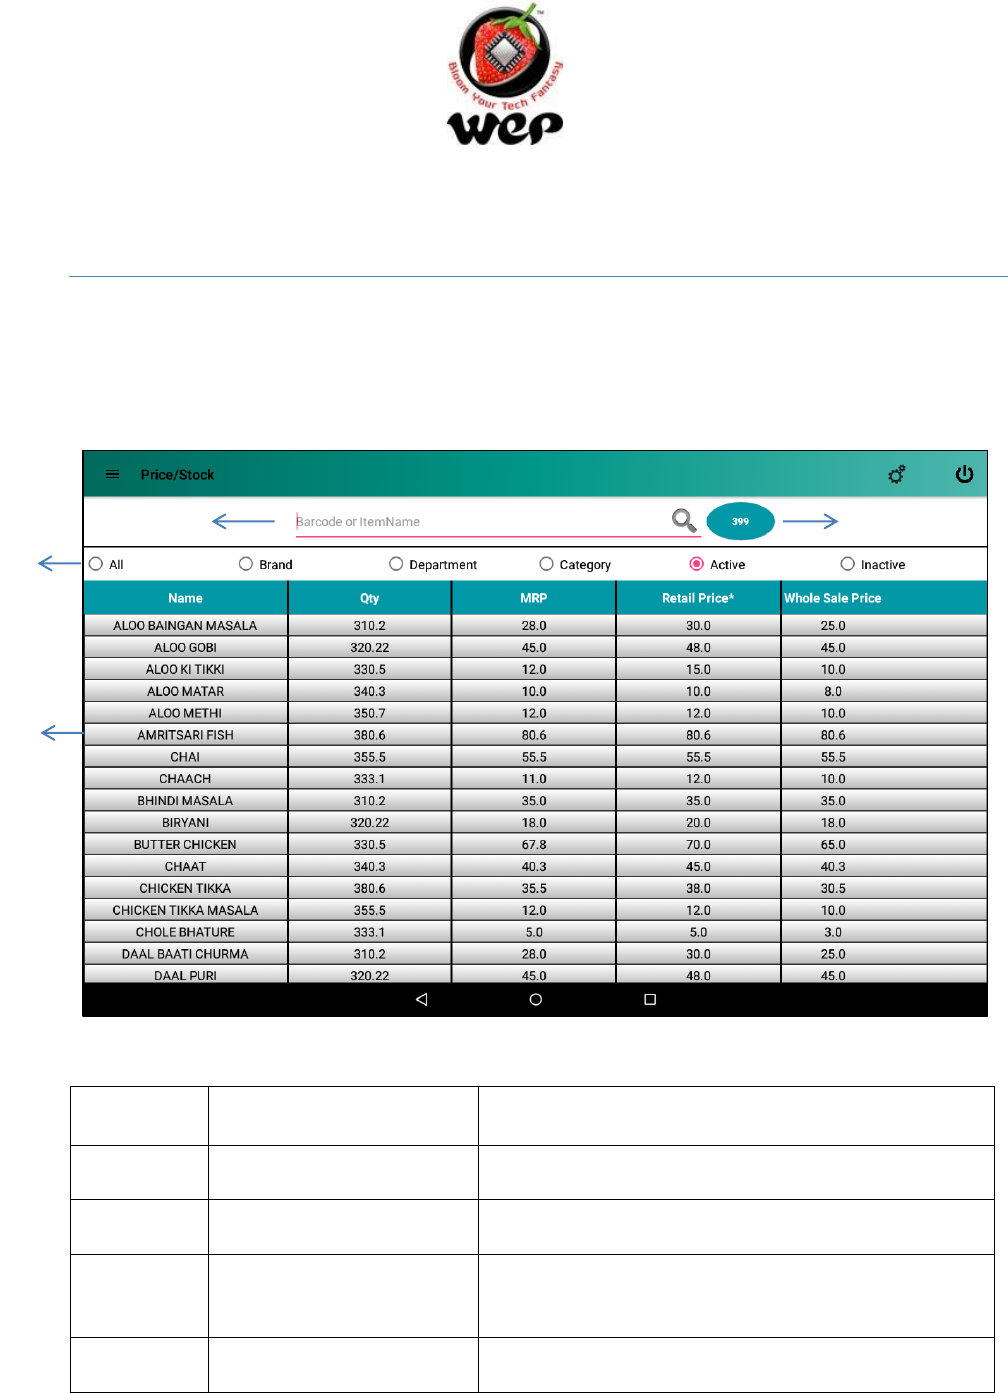
5. Price and Stock
Price & Stock screen facilitates user to modify stock and three different rates for that item in
outward supply.
Note: New stock will be added to existing stock.
Figure 56: Price & Stock
Label
Field
Description
1
Barcode or Item Name
Search an Item by barcode and item name.
2
Item Count
Number of items in the list.
3
Filters
Allows user to filter out the items according to the
provided filters.
4
Items List
List of the items.
1
2
3
4
GST GenieR V1.0P
WeP Digital Services Limited
55
Figure 57 : Update screen pop up upon clicking item in the list
1
2
3
4
5
6
7
8
9

GST GenieR V1.0P
WeP Digital Services Limited
56
Label
Field
Description
1
Item Name
Name of the item
2
Existing Stock
Already existing stock of
item
3
New Stock
New stock of item to be
added
4
MRP
MRP of item(configurable)
5
Retail Price
Retail price of
item(configurable)
6
Wholesale Price
Wholesale price of
item(configurable)
7
Update
Updates the entries
8
Clear
Clear the entries in pop up
9
Close
Close the pop up

GST GenieR V1.0P
WeP Digital Services Limited
57
6. Configuration
Configuration screen allows user to configure the application by providing few options that
will help him a lot to manage many things.
User can manage by categorizing items under department and category.
User can configure various Payments/Receipts in an organized manner.
Discounts & Coupons can be configured and availed to the customer at the time of
billing.
User can also add “Othercharges” which are customizable and applicable while
billing.
User can configure loyalty and brands points.
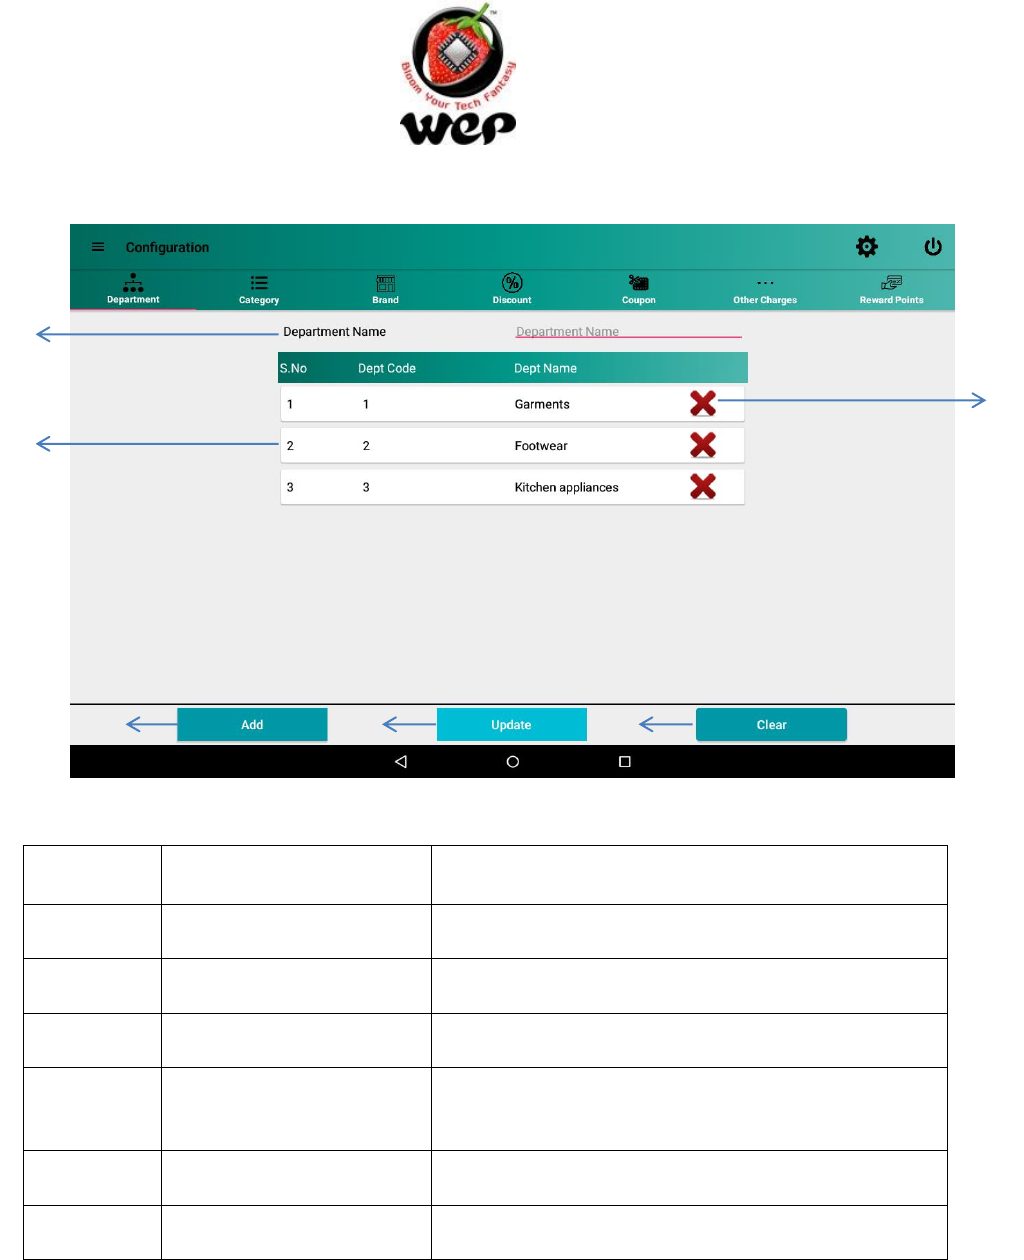
6.1 Department
A shop can have multiple departments according to what type of items they are providing.
e.g.: Garments, Foot wears.
GST GenieR V1.0P
WeP Digital Services Limited
58
Figure 58: Department Configuration
Label
Field
Description
1
Department name
Name of the department user wants to add.
2
Department List
List of the departments.
3
Delete
To delete a department.
4
Add
Button to add new department name into
database.
5
Update
Update details of an existing department.
6
Clear
Clears all the fields.
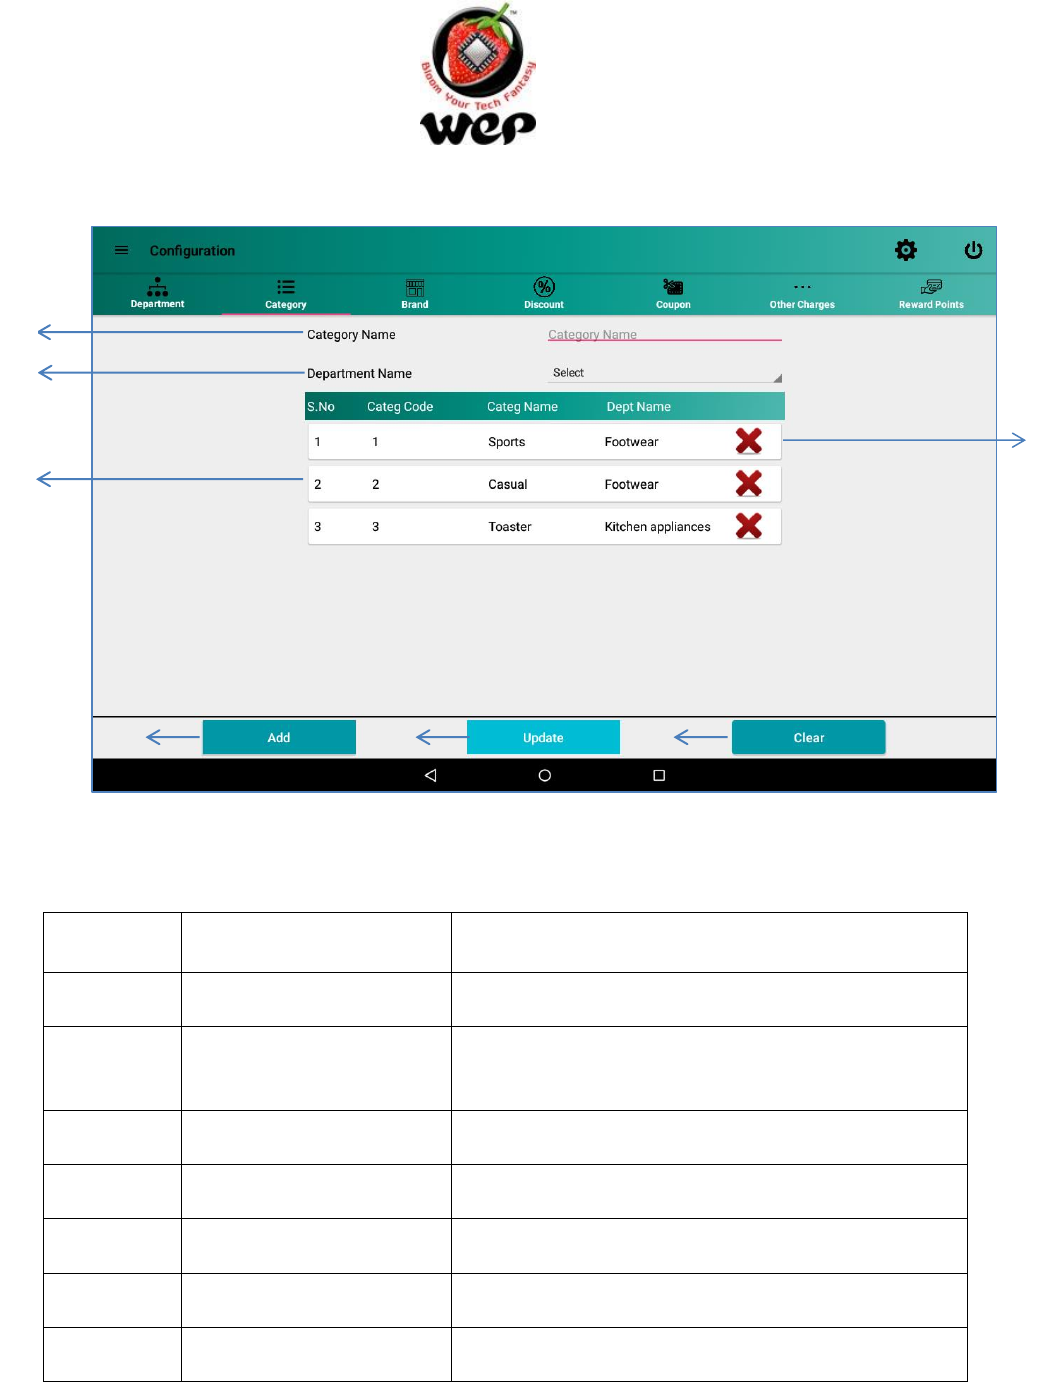
6.2 Category
User can categorize the items in their own way. e.g.: a shop has a department which take
care of garments. Now garments can be categorized into “Formals” & “Casuals”.
1
2
3
4
5
6
GST GenieR V1.0P
WeP Digital Services Limited
59
Figure 59: Category Configurations
Label
Field
Description
1
Category name
Name of the Category user wants to add.
2
Department Name
Name of the department to which user wants to
link the category.
3
Category List
List of the Category.
4
Delete
To delete a category.
5
Add
Button to add new Category name into database.
6
Update
Update details of an existing Category.
7
Clear
Clear will clear all the fields.
1
3
4
5
6
7
2
GST GenieR V1.0P
WeP Digital Services Limited
60
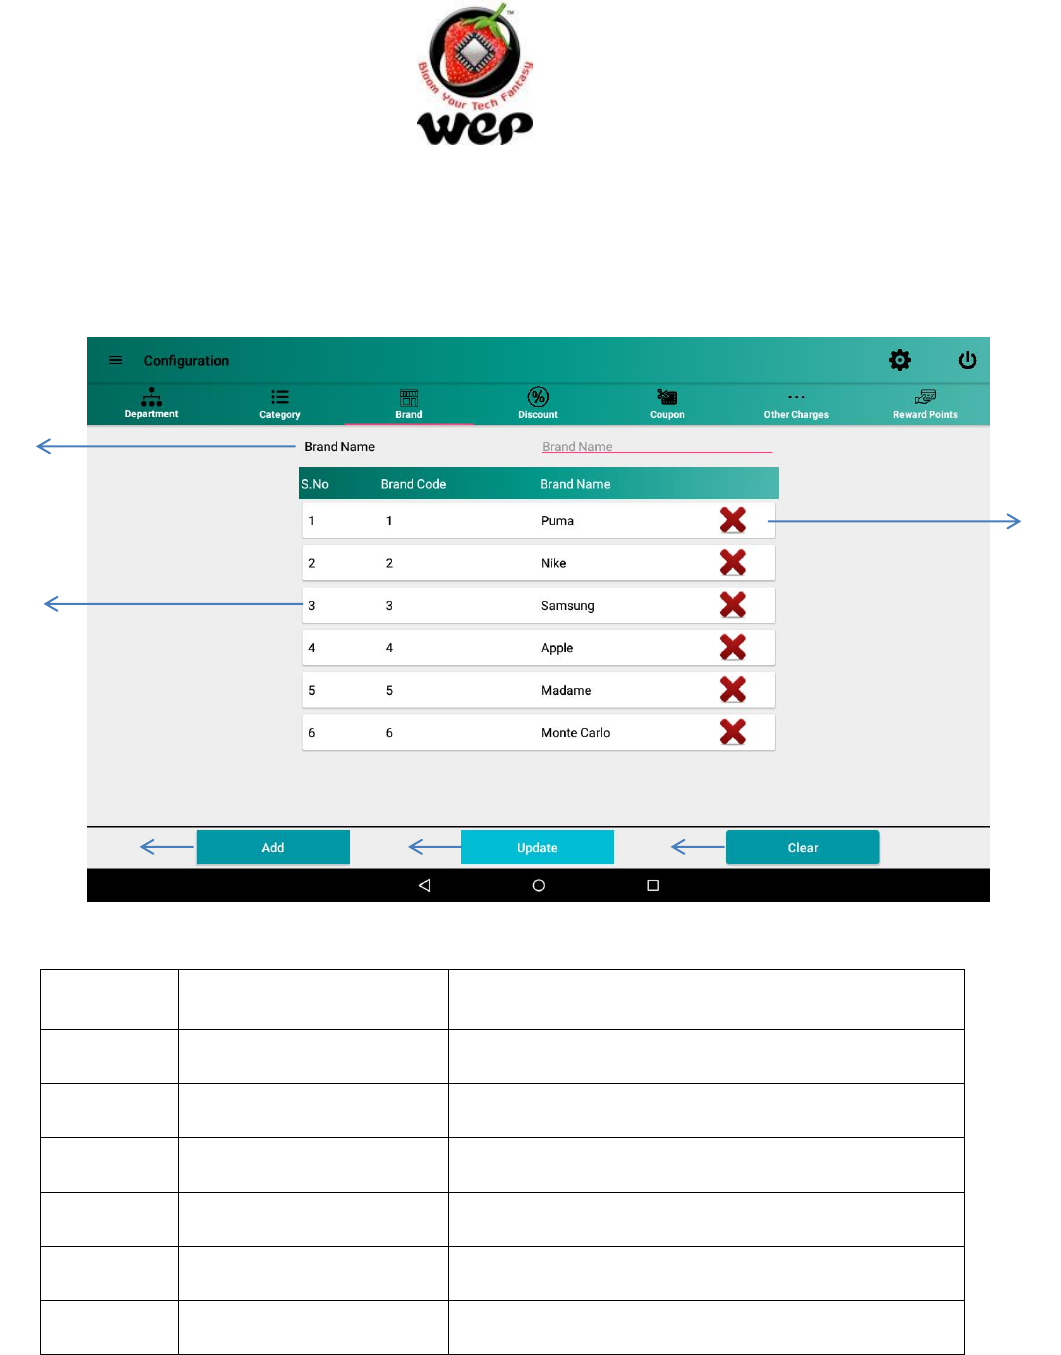
6.3 Brand
User can configure all the brands he is dealing with.
Figure 60: Brand Configuration
Label
Field
Description
1
Brand name
Name of the brand user wants to add.
2
Brand List
List of the brands.
3
Delete
To delete a brand.
4
Add
Button to add new brand name into database.
5
Update
Update details of an existing brand.
6
Clear
Clear will clear all the fields.
1
2
3
4
5
6
GST GenieR V1.0P
WeP Digital Services Limited
61
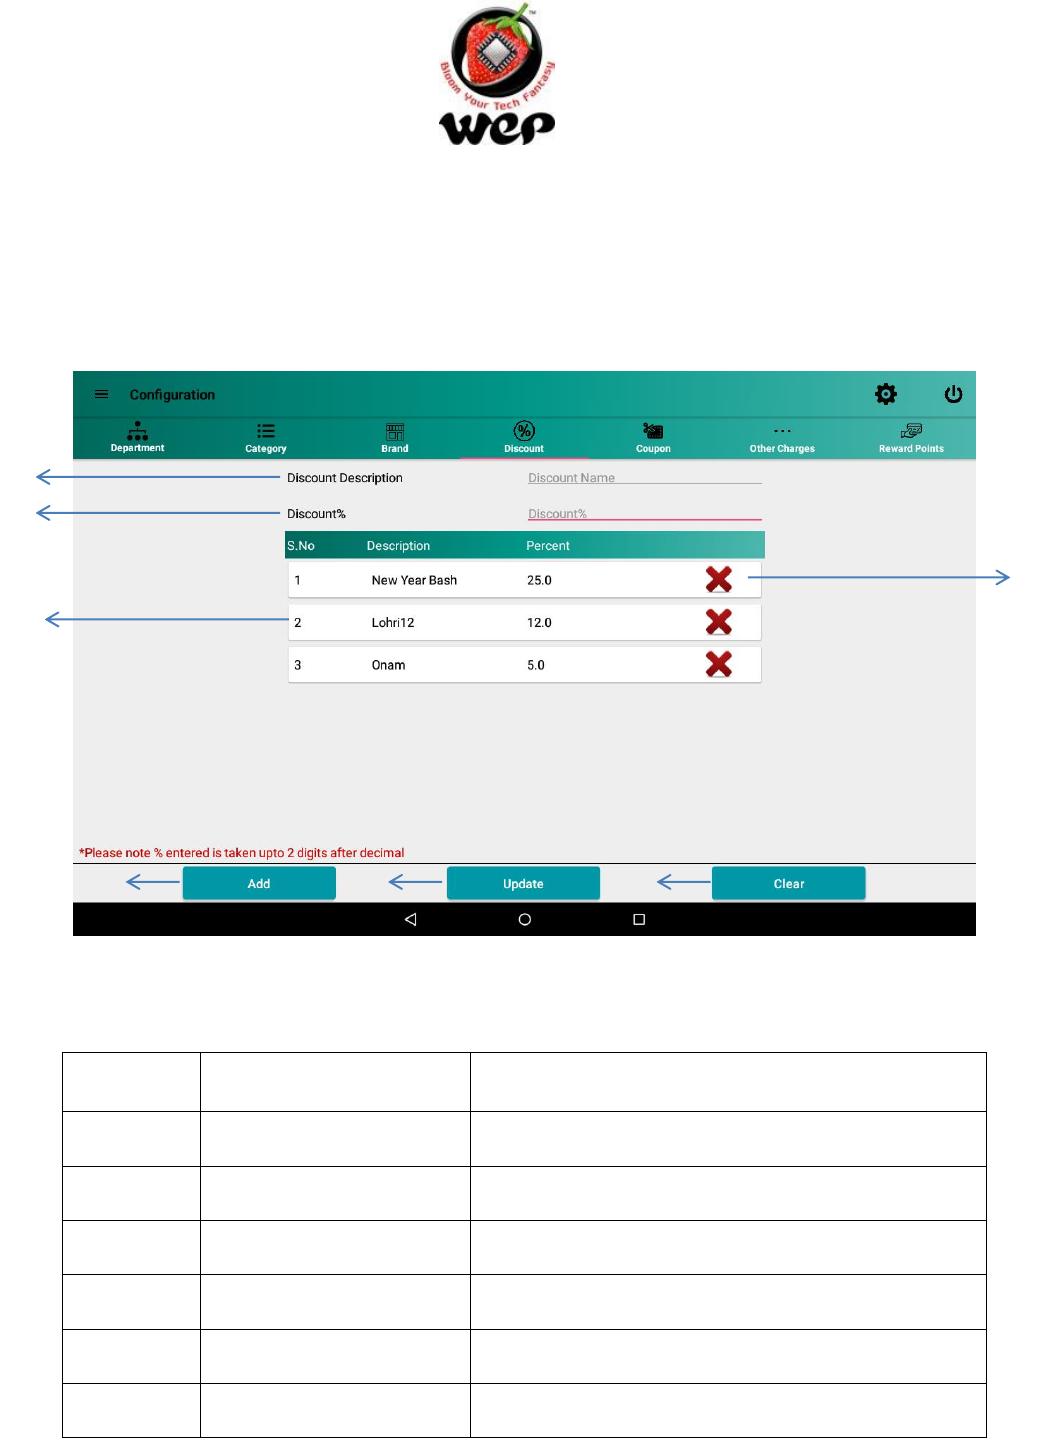
6.4 Discount
Availing discounts to the customers is now made easy. User can configure various types of
discounts, in percentage and can be used at the time of billing.
Figure 61: Discount
Label
Field
Description
1
Discount Description
Description of the discount provided by the user.
2
Discount percentage
Discount in percentage.
3
Discount’s List
List of all discounts configured in application
4
Delete
Delete a discount record.
5
Add
Button to add discount into database.
6
Update
Update details of an existing discount.
1
2
3
4
5
6
7
GST GenieR V1.0P
WeP Digital Services Limited
62
7
Clear
Clear will clear all the fields.
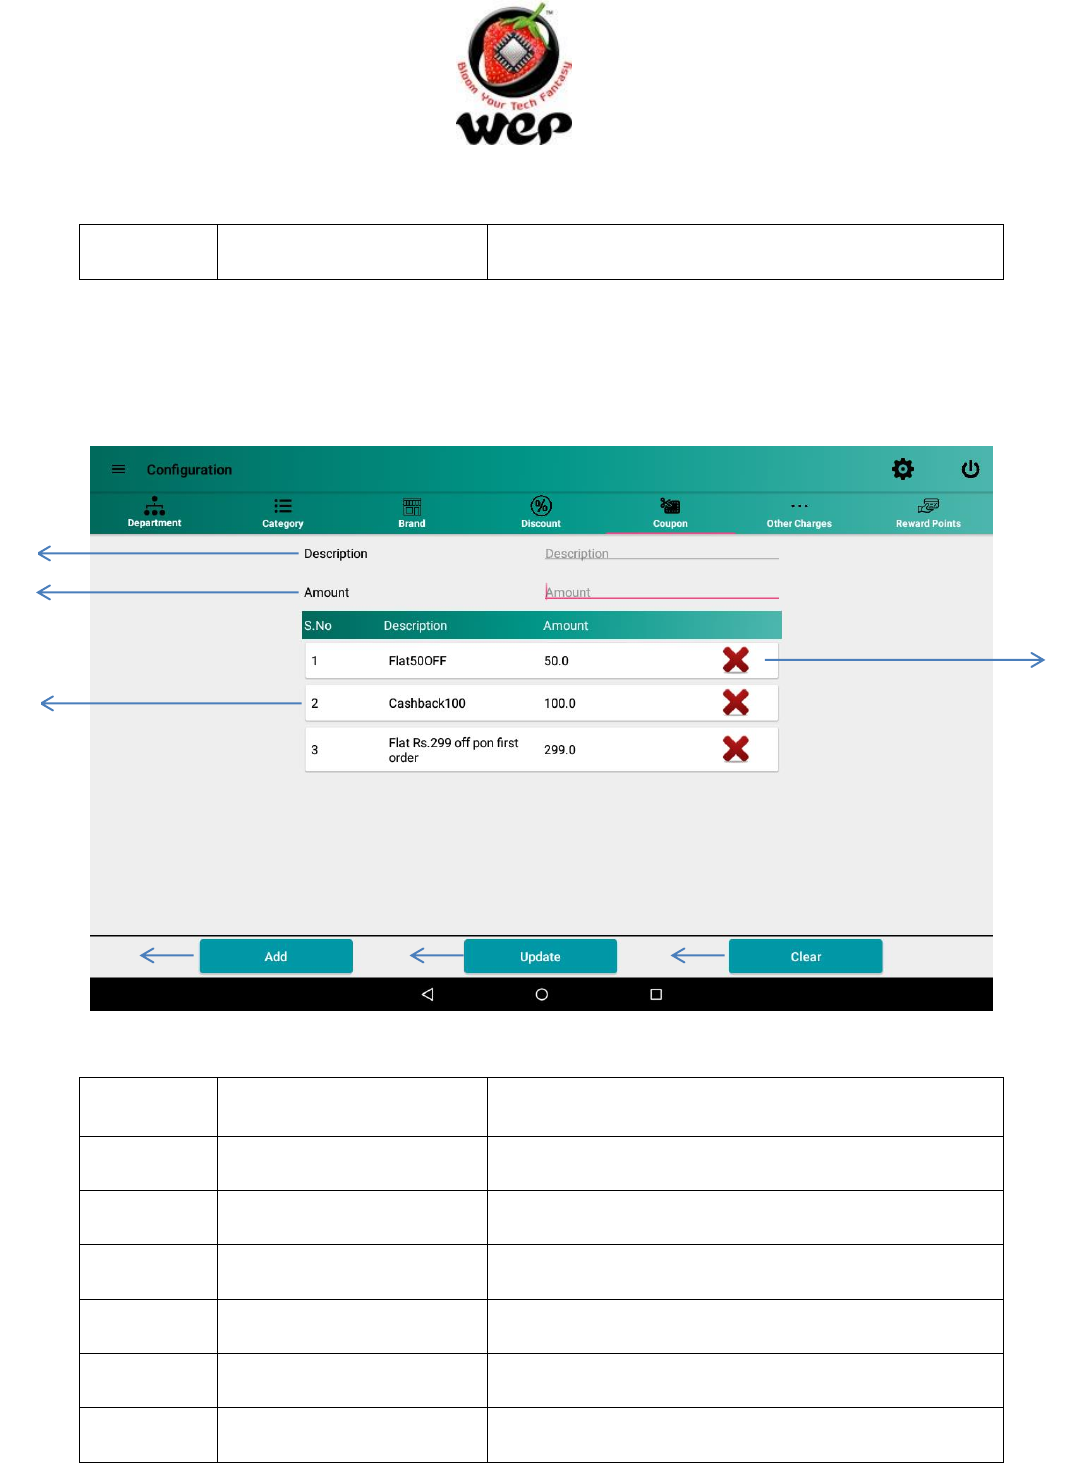
6.5 Coupon
User can configure various coupons with amount and can use them at the time of billing.
e.g.: Rs.500 cashback.
Figure 62: Coupon
Label
Field
Description
1
Coupon Description
Description of the Coupon provided by the user.
2
Coupon Amount
Coupon in amount.
3
Coupon’s List
List of all coupons configured in application.
4
Delete
Delete a coupon from the list.
5
Add
Button to add Coupon into database.
6
Update
Update details of an existing Coupon.
1
2
3
4
5
6
7
GST GenieR V1.0P
WeP Digital Services Limited
63
7
Clear
Clear all the fields.
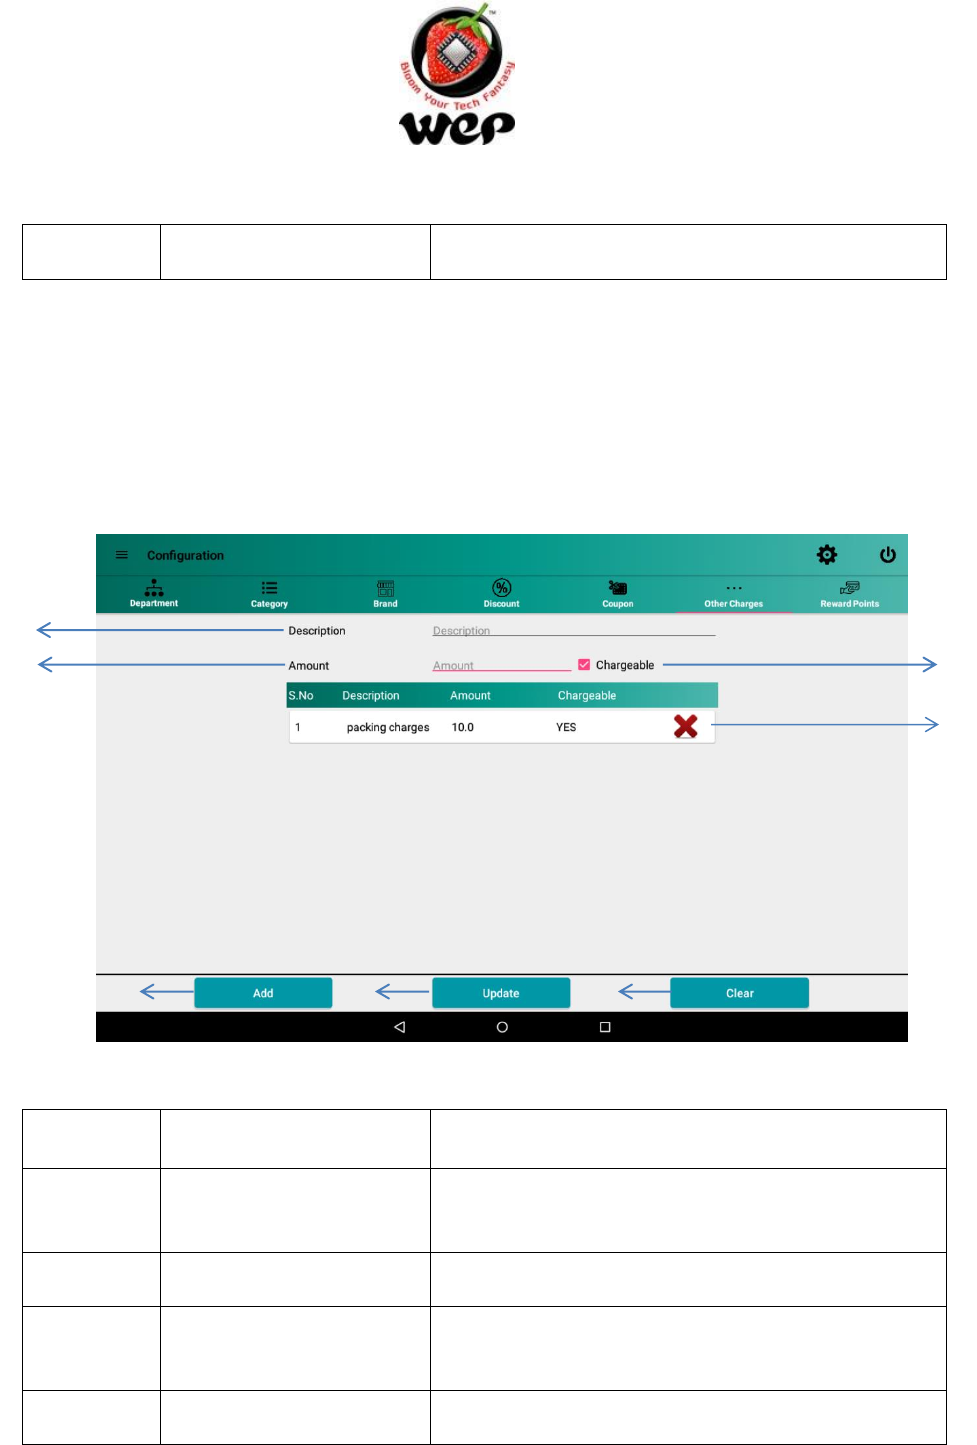
6.6 Other charges
User can apply extra charges and can decide whether to charge customer or not by clicking
on the check box. If check box is checked, then the amount is chargeable and will
automatically be added into total bill. e.g.: User can apply other charges (as packing
charges).
Figure 63: Other charges
Label
Field
Description
1
Other charge Description
Description of the Other charge provided by the
user.
2
Other charge Amount
Other charge in amount.
3
Chargeable
Check the checkbox if user wants to charge for
this other charges.
4
Delete
Delete Other charge from the list.
1
2
4
3
5
6
7
GST GenieR V1.0P
WeP Digital Services Limited
64
5
Add
Button to add Other charge into database.
6
Update
Update details of an existing Other charge.
7
Clear
Clear will clear all the fields.
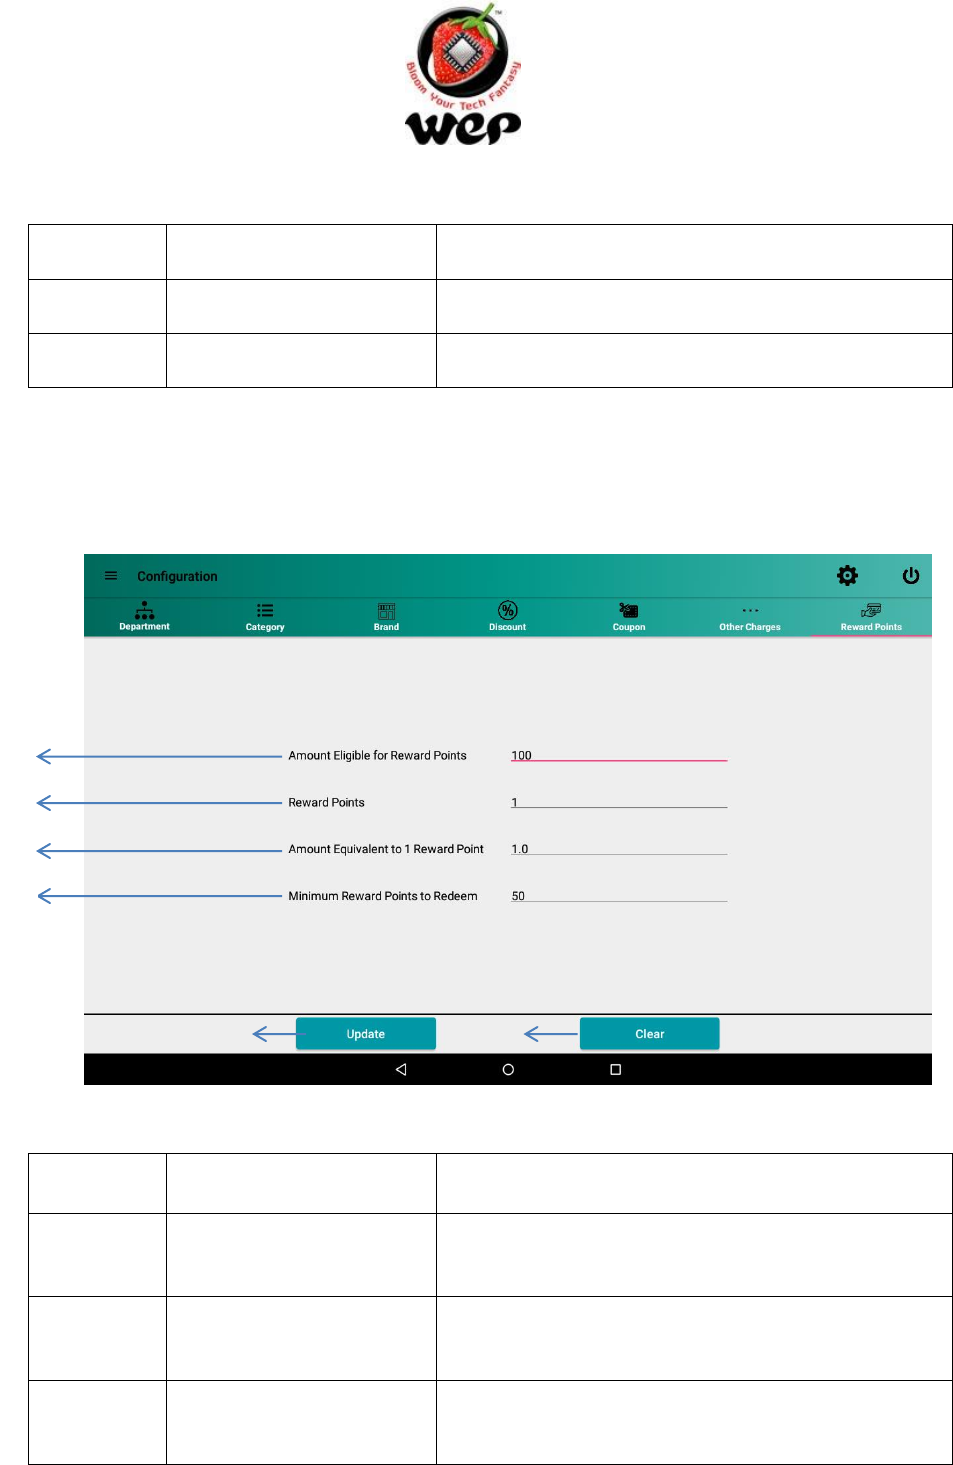
6.7 Reward Points Configuration
User can configure the amount to be converted into Reward points, minimum points to
redeem and etc.
Figure 64: Loyalty Point Configuration
Label
Field
Description
1
Amount conversion in
loyalty
How much amount will be equal to the required
loyalty point(s).
2
Loyalty Points
How much loyalty points will be given on amount
mentioned in Amount conversion in loyalty field.
3
Amount equivalent to 1
loyalty point
How much amount a customer will earn on 1
loyalty point.
1
2
3
4
5
6
GST GenieR V1.0P
WeP Digital Services Limited
65
4
Minimum Loyalty Points
to Redeem
Minimum loyalty points a customer requires to
redeem the points.
5
Update
Update details of an existing Other charge.
6
Clear
Clear will clear all the fields.
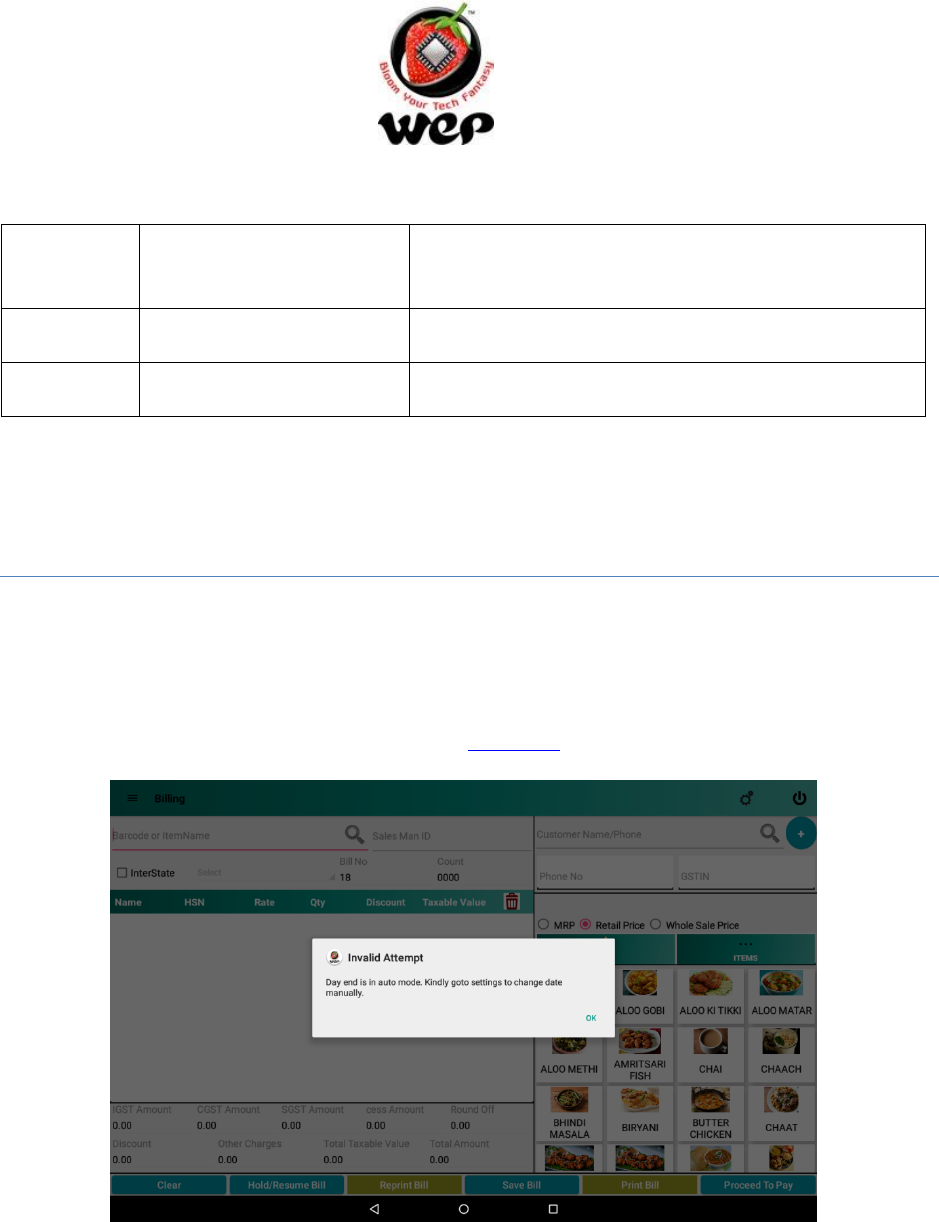
7. Day End
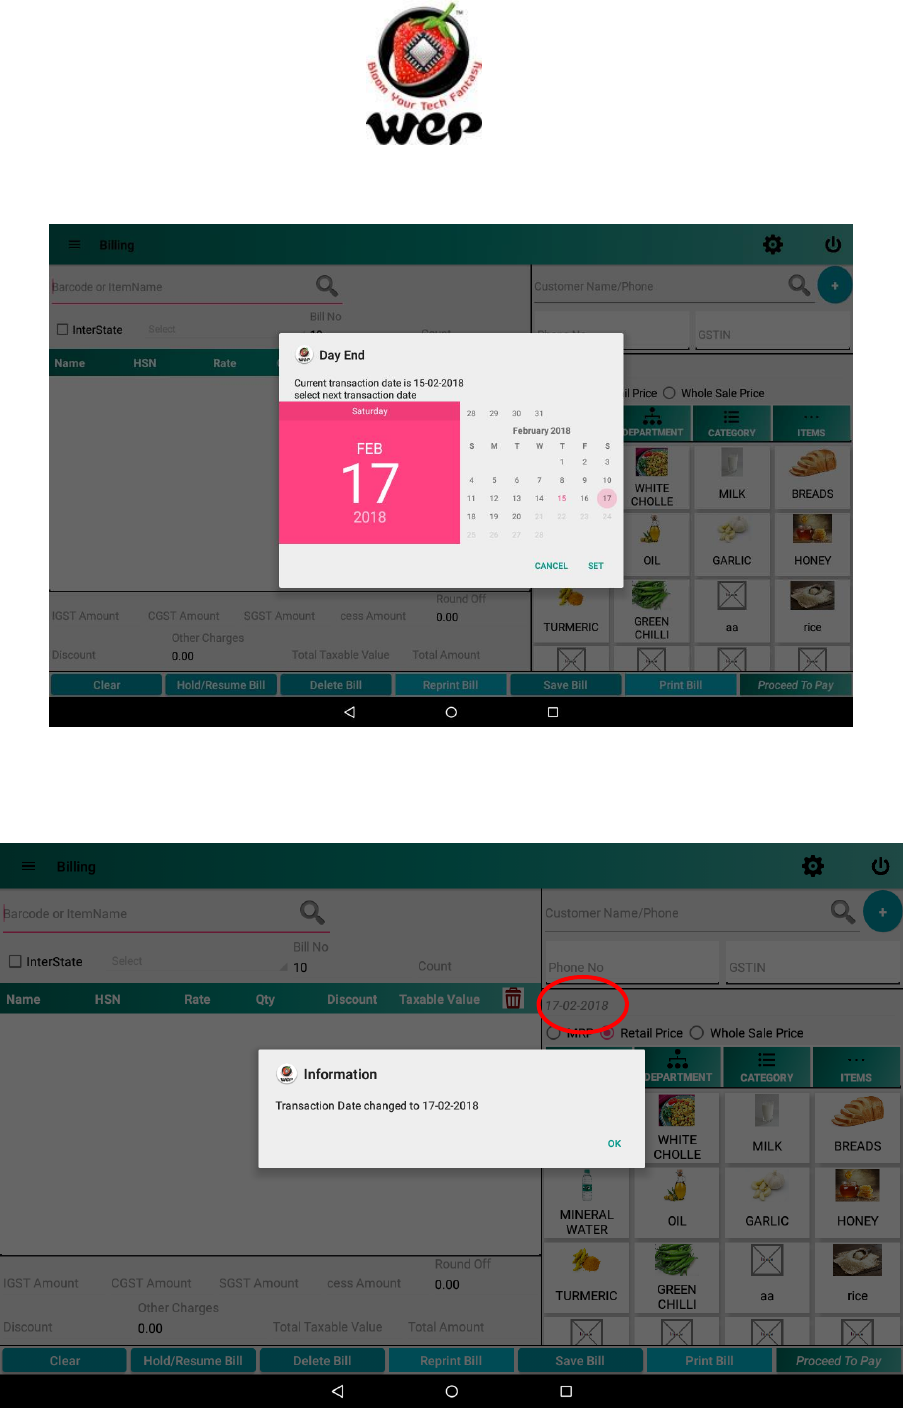
User can end his day of business by clicking on “Day End” in Navigation Drawer. If Date and
Time is set to automatic then application will automatically pick the device’s date and time
and if user has set date and time to manual then user will get an option to choose the date
on which he wants to end his day. For settings click here in Section 12.3.
Figure 65: Auto Day End
GST GenieR V1.0P
WeP Digital Services Limited
66
Figure 66: Manual Day End
Figure 67: If business date is different from tablet date, then it is reflected in billing screen
GST GenieR V1.0P
WeP Digital Services Limited
67
8. Reports
8.1 Sales Report
Figure 68: Sales Report
Label
Field
Description
1
Sales Report
Application provides different views in which user
can see the sales report.
2
From Date
Start date from which user wants to see the
report.
3
To Date
End date to which user wants to see the reports.
4
Export
Allows user to export the report in .csv format.
5
View
Shows report within the range of date mentioned.
1
2
3
5
4

GST GenieR V1.0P
WeP Digital Services Limited
68
8.2 Inventory Report
Figure 69: Inventory Report
Label
Field
Description
1
Inventory Report
Application provides different views in which user
can see the inventory report.
2
From Date
Start date from which user wants to see the
report.
3
To Date
End date to which user wants to see the reports.
4
Export
Allows user to export the report in .csv format.
5
View
Shows report within the range of date mentioned.
1
2
3
4
5
GST GenieR V1.0P
WeP Digital Services Limited
69
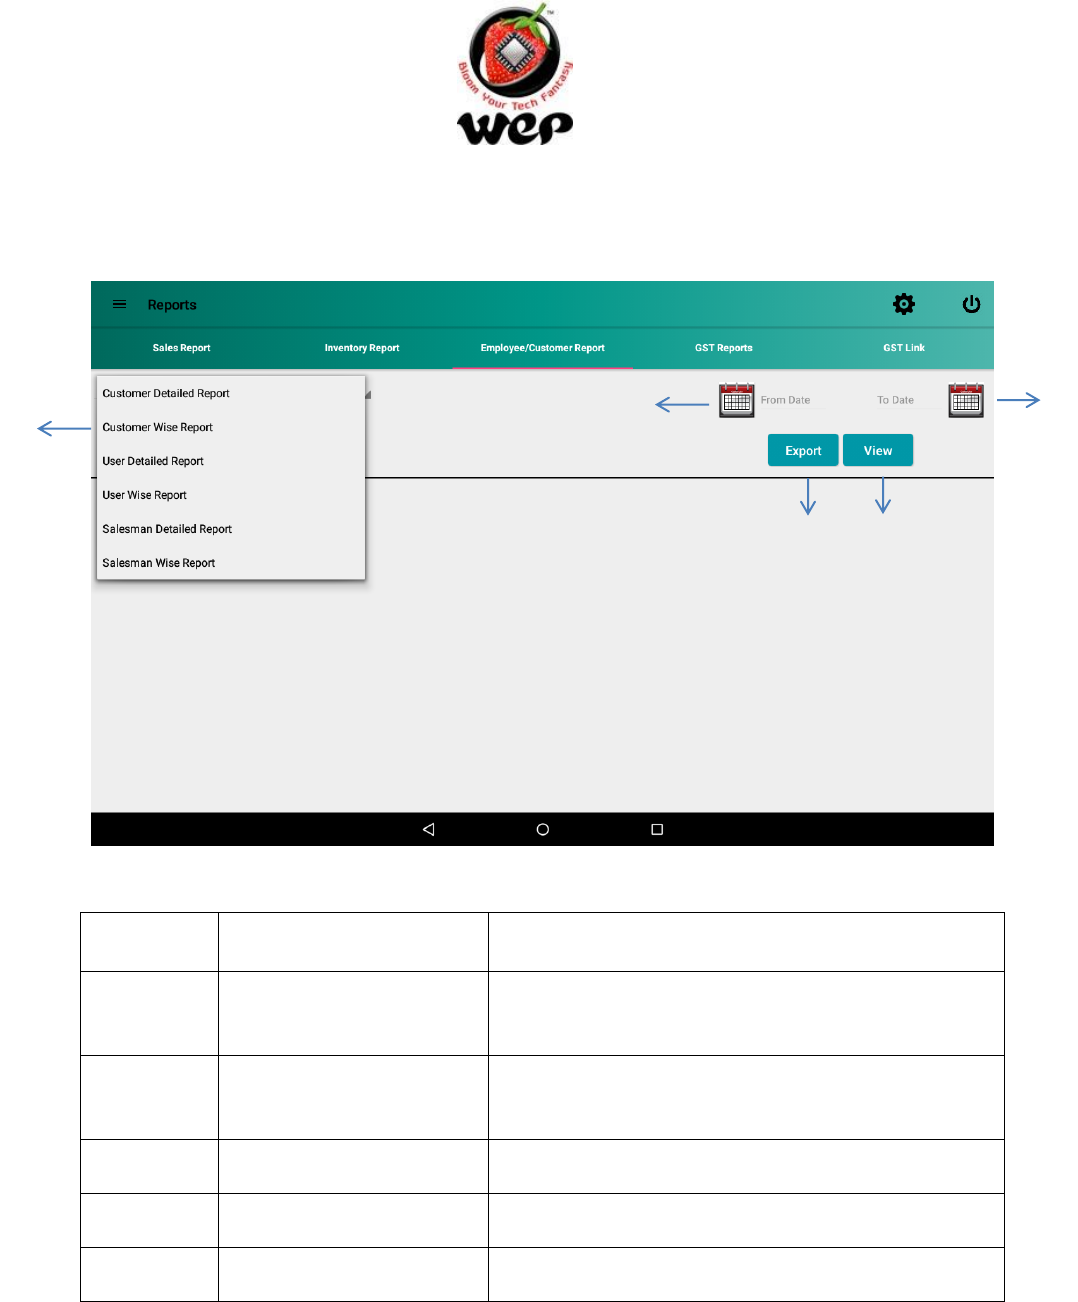
8.3 Employee/Customer Report
Figure 70: Employee/Customer Report
Label
Field
Description
1
Employee/Customer
Report
Application provides different views in which user
can see the employee/customer report.
2
From Date
Start date from which user wants to see the
report.
3
To Date
End date to which user wants to see the reports.
4
Export
Allows user to export the report in .csv format.
5
View
Shows report within the range of date mentioned.
1
2
3
5
4
GST GenieR V1.0P
WeP Digital Services Limited
70
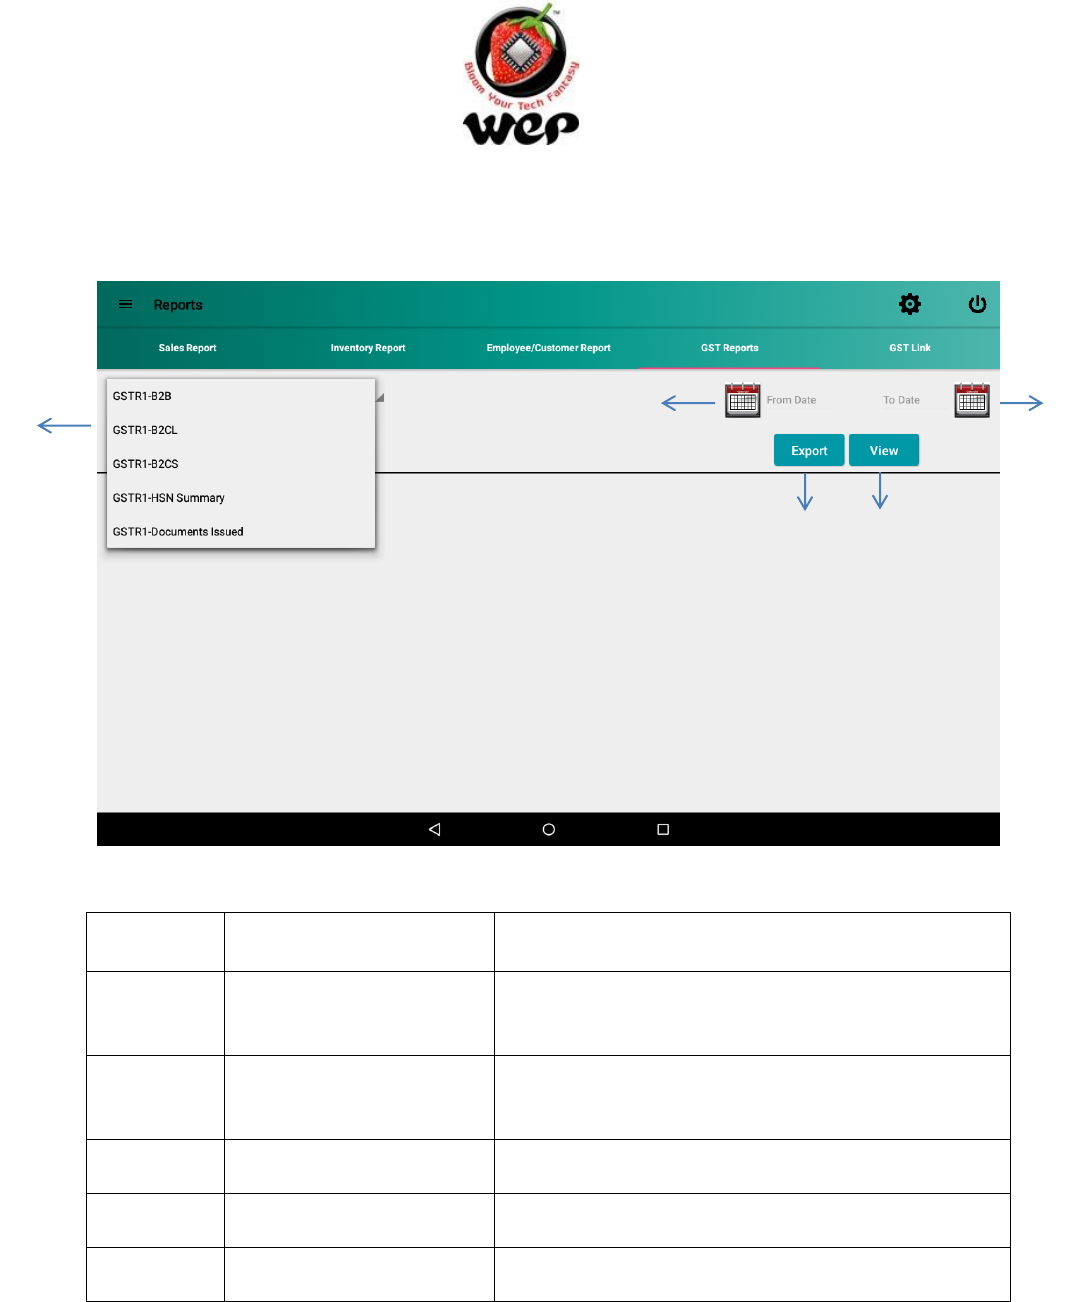
8.4 GST Reports
Figure 71: GST Reports
Label
Field
Description
1
GST Report
Application provides different views in which user
can see the GST report.
2
From Date
Start date from which user wants to see the
report.
3
To Date
End date to which user wants to see the reports.
4
View
Shows report within the range of date mentioned.
5
Close
Closes the reports screen.
1
2
3
5
4
GST GenieR V1.0P
WeP Digital Services Limited
71
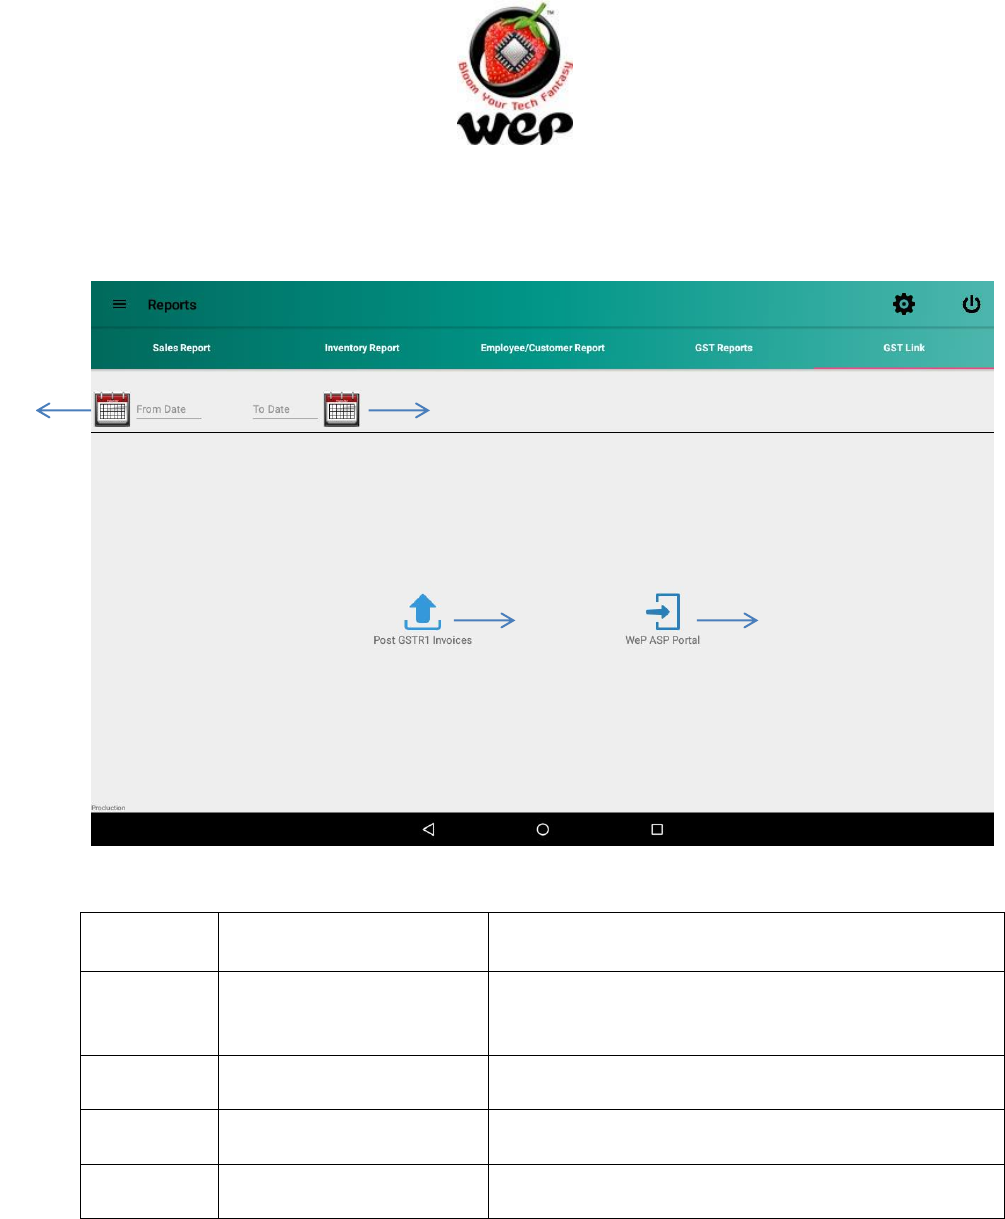
8.5 GST Link
Figure 72: GST Link
Label
Field
Description
1
From Date
Start date from which user wants to see the
report.
2
To Date
End date to which user wants to see the reports.
3
Post GSTR1 Invoices
Uploads GSTR1 invoices.
4
WeP ASP Portal
Go to WeP GSP Portal.
1
2
3
4
GST GenieR V1.0P
WeP Digital Services Limited
72
9. Settings
Settings screen allows user to configure:
Owner details
Header and footer that is going to be printed on bill.
Application settings like Reset all settings, create a backup of current database image
and factory reset to erase everything.
Other settings allow user to set options for date and time, fast billing mode, table
splitting and etc.
9.1 Owner Details
User can see owner details which he has filled in starting.
Note: After printing first Bill/Invoice, user will no longer be able to modify these details.
Before that user can modify “Owner’s Details” except for GSTIN, Ref No., bill No. & pre-fix.
Figure 73: Owner Details setting
1
2
3
4
5
6
7
8
9
GST GenieR V1.0P
WeP Digital Services Limited
73
Label
Field
Description
1
Firm Name
Name of the firm.
2
GSTIN
GSTIN code of the owner.
3
Phone
Phone number of the owner.
4
Email
Email id of the owner.
5
Address
Address of the owner.
6
Bill no prefix
Prefix of bill number.
7
POS
Place of supply of the owner.
8
Reference number
Reference number with respect to WeP GST panel.
9
Apply
Apply changes.
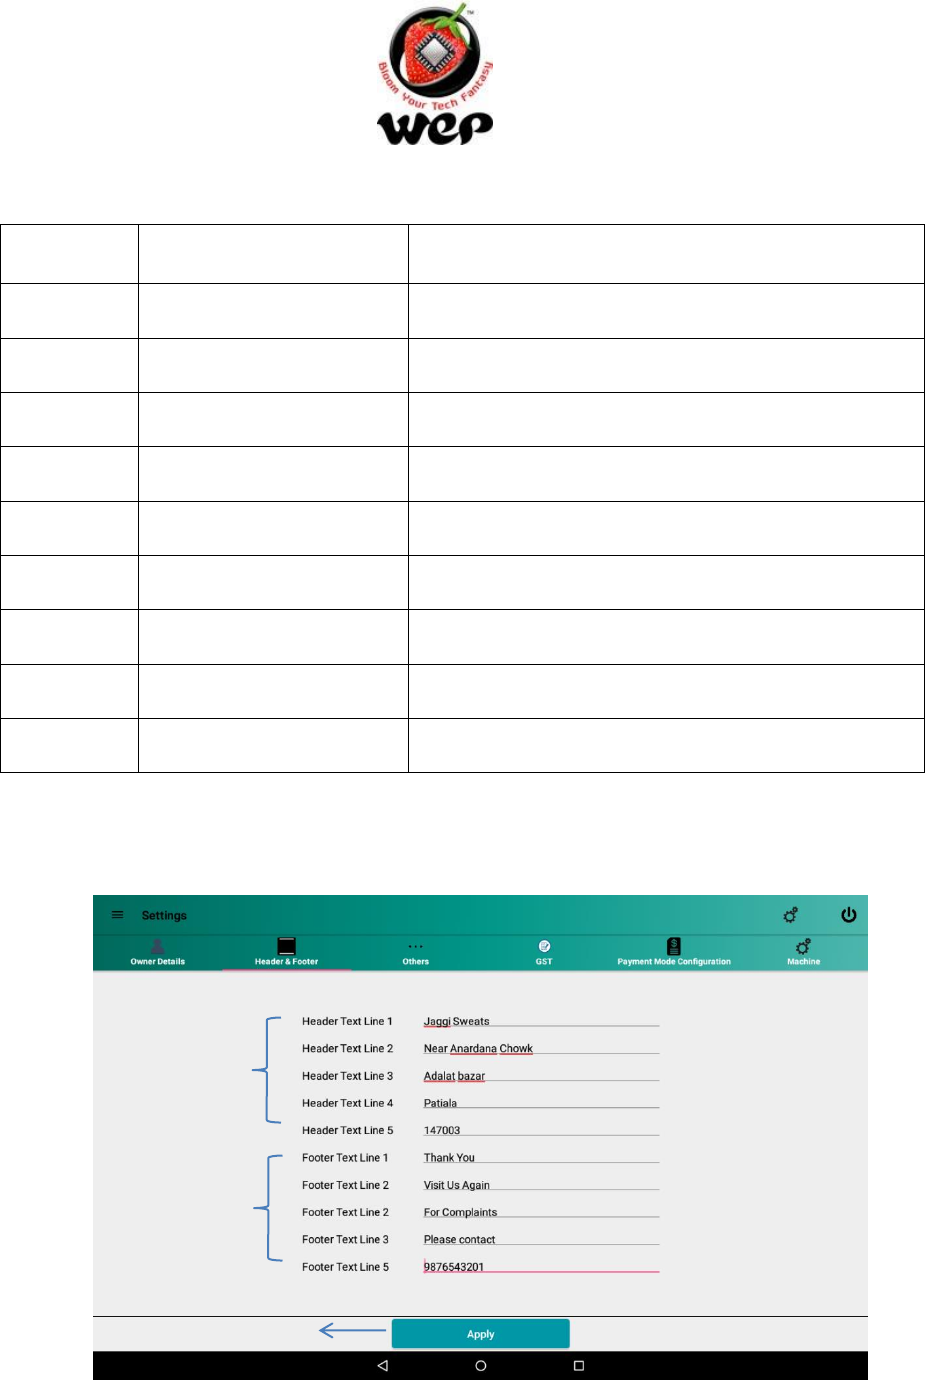
9.2 Header & Footer
Header will be printed at the top of the bill and footer will be printed at the end of the bill.
Figure 74: Header and Footer settings
1
2
3
GST GenieR V1.0P
WeP Digital Services Limited
74
Label
Field
Description
1
Header
The text will appear in the starting of the bill.
2
Footer
The text will appear in the end of the bill.
3
Apply
Apply changes.
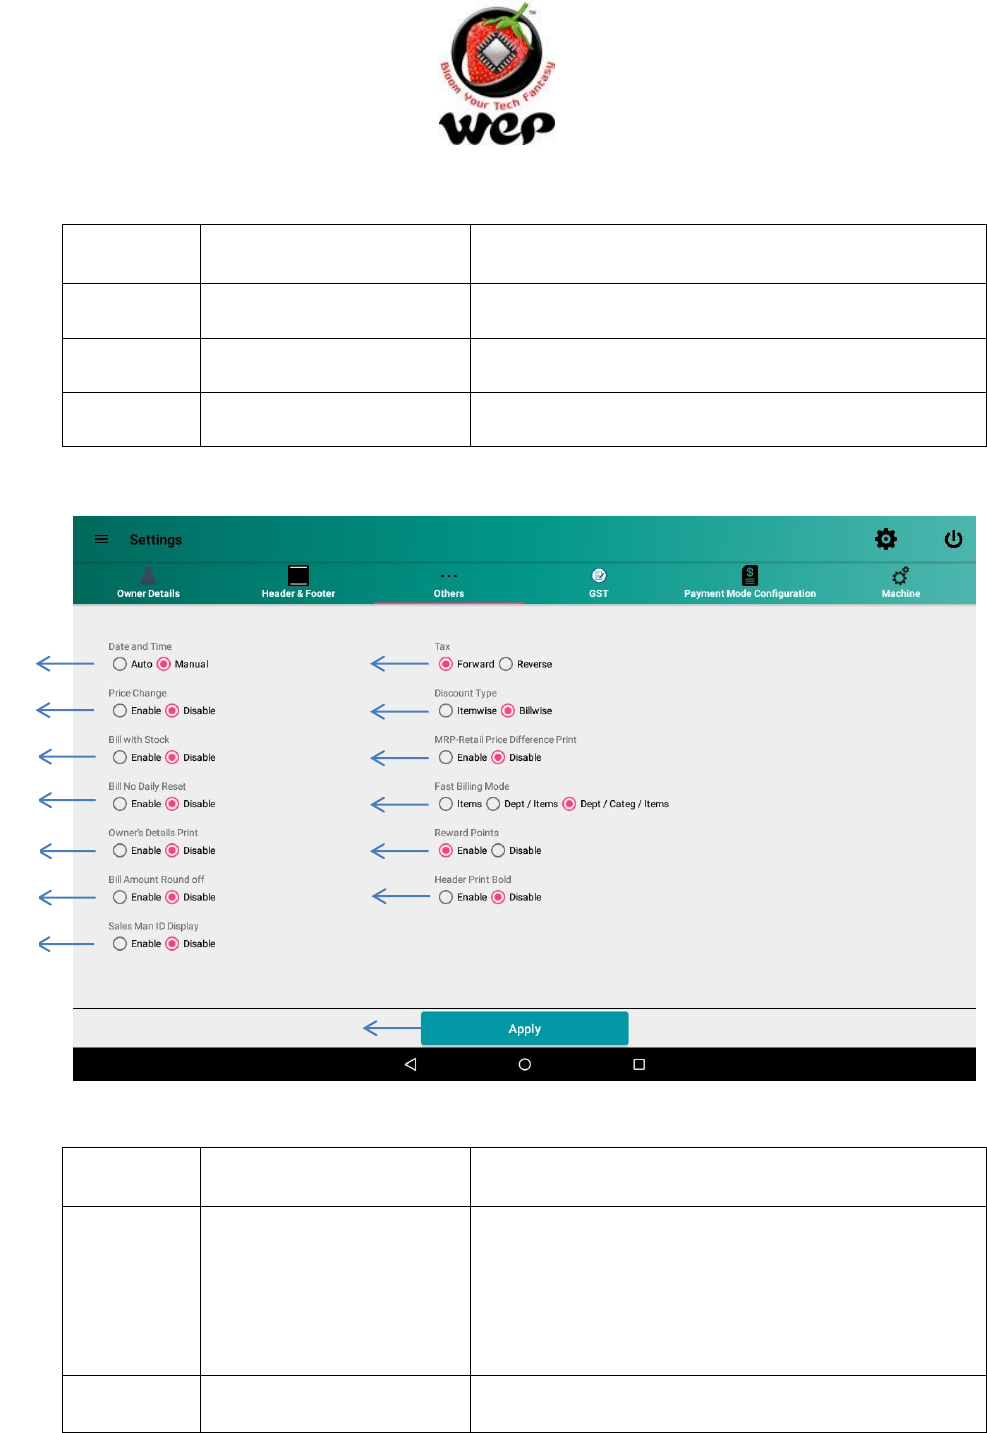
9.3 Others
Figure 75: Other setting
Label
Field
Description
1
Date and Time
Auto: Application will automatically picks up the
device’s date and time.
Manual: User can manually select a date and time.
2
Price Change
If enabled, user has the facility to change the price
1
2
3
4
5
6
7
14
8
9
10
11
12
13

GST GenieR V1.0P
WeP Digital Services Limited
75
of an item at the time of billing.
3
Bill with stock
If enabled then on every bill generated, quantity
of items will be deducted from the stock.
4
Bill no. daily reset
If enabled bill number will be changed to 1 count
after a day is ended.
5
Owner’s details print
If enabled, then own details will be printed on bill.
6
Bill amount round off
If enabled, the bill amount will be rounded off.
7
Sales Man ID Display
If enabled, a field to enter sales man id will appear
in billing screen and User Management screen.
8
Tax
Allows user to select a Type of Tax from Forward and
Reverse tax.
Note: Bill-wise Discount and cess is not applicable in
Reverse Tax. Only Item-wise discount is applicable.
9
Discount type
User can provide discount on item or on bill.
10
MRP Retail Price
Discount Print
If enabled, discount on MRP retail price will be
printed on bill.
11
Fast Billing Mode
Items: Only items will be shown at the time of
billing.
Department/Item: Department and Items both
will be shown at the time of billing. User can sort
items according to departments.
Department/Category/Item: All three things will
be shown at the time of billing and user can sort
items according to departments and then by
GST GenieR V1.0P
WeP Digital Services Limited
76
category.
12
Reward Points
If enabled, customer will get reward points on
every purchase he makes.
13
Header print bold
If enabled, header will be printed in bold.
14
Apply
Apply changes.
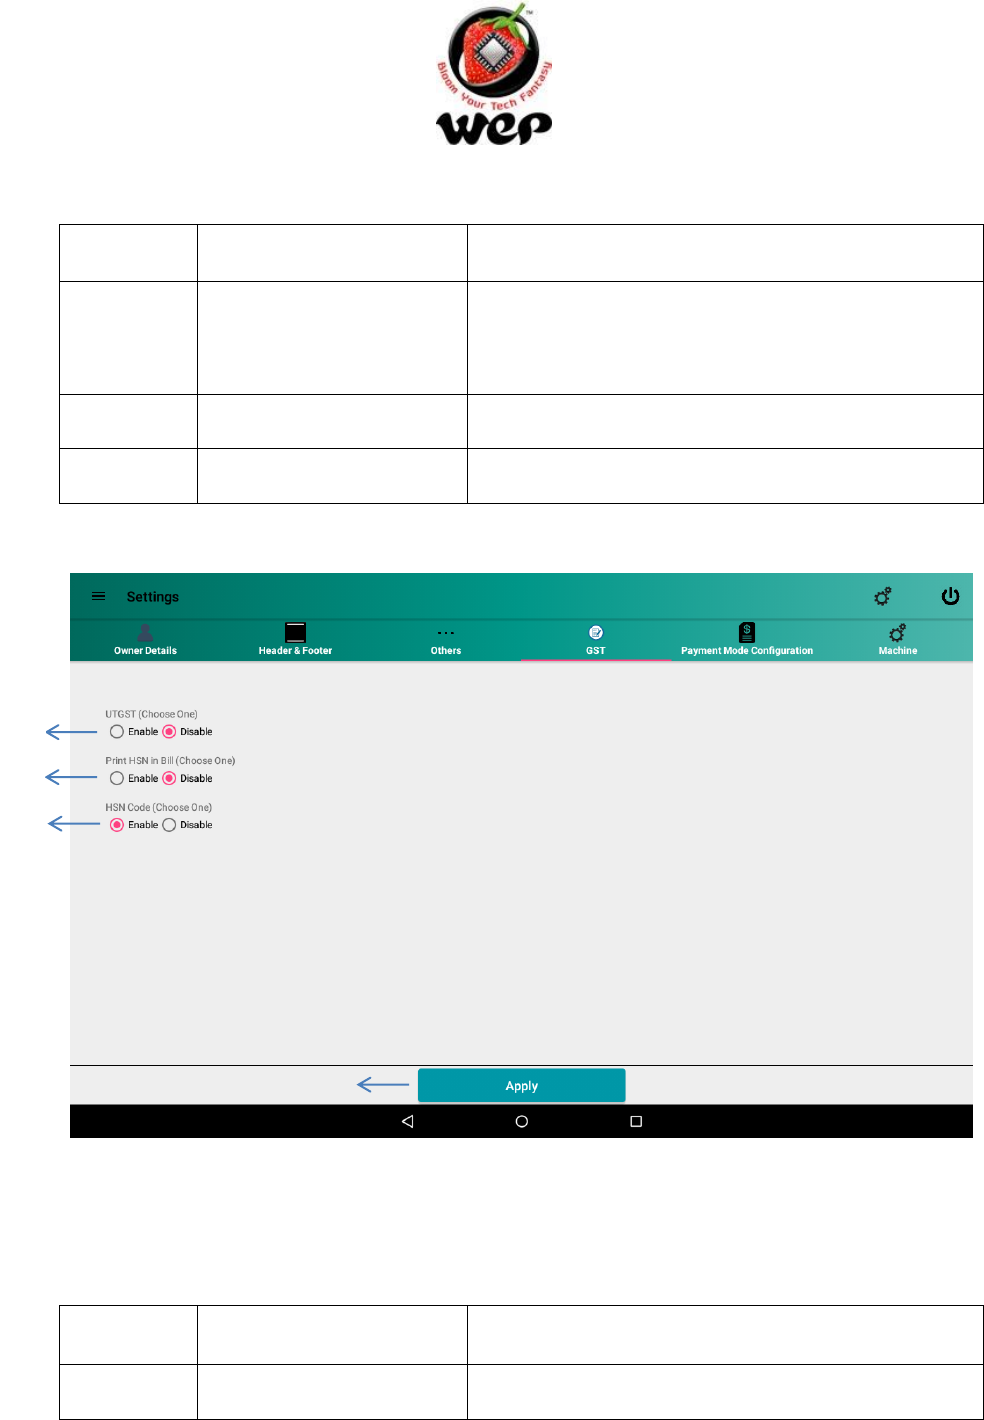
9.4 GST
Figure 76: GST setting
Label
Field
Description
1
UTGST
If enabled, then UTGST will be applicable on items.
1
2
3
4
GST GenieR V1.0P
WeP Digital Services Limited
77
2
Print HSN in Bill
If enabled, then HSN will be printed in bill.
3
HSN Code
If enabled, user can configure HSN code for each
item in item master.
4
Apply
Apply changes.
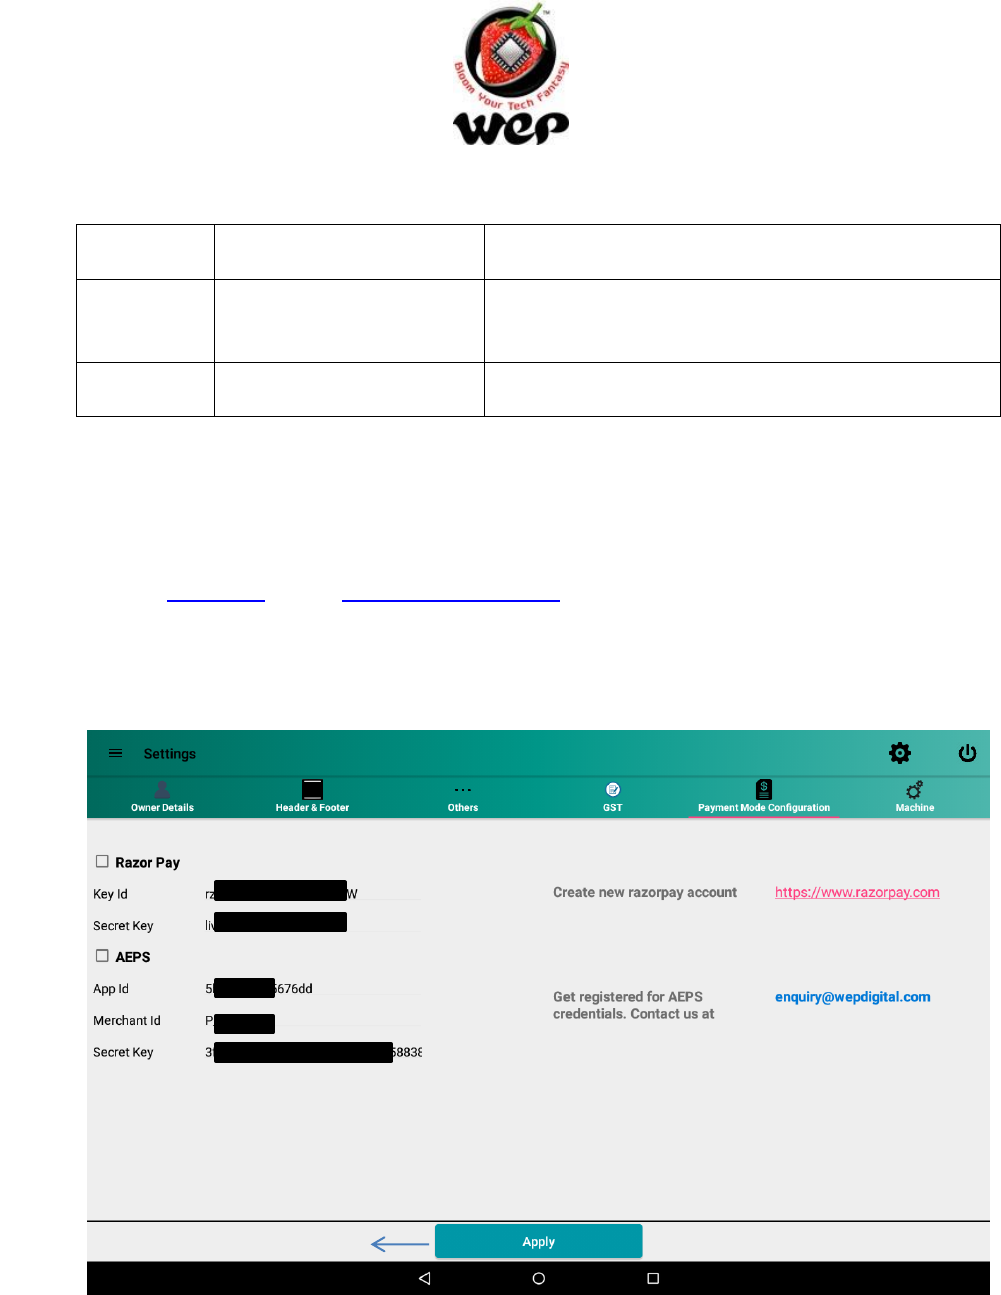
9.5 Payment Mode Configuration
User can configure Key Id & Secret Key for enabling the ability to make payments through
Razor Pay. To generate Key Id & Secret Key, user needs to register on Razor Pay website. To
register Click Here or visit https://razorpay.com/
Similarly user can configure required credentials for AEPS also. User need to send mail to
enquiry@wepdigital.com
Figure 77: Payment Mode Configuration
4
GST GenieR V1.0P
WeP Digital Services Limited
78
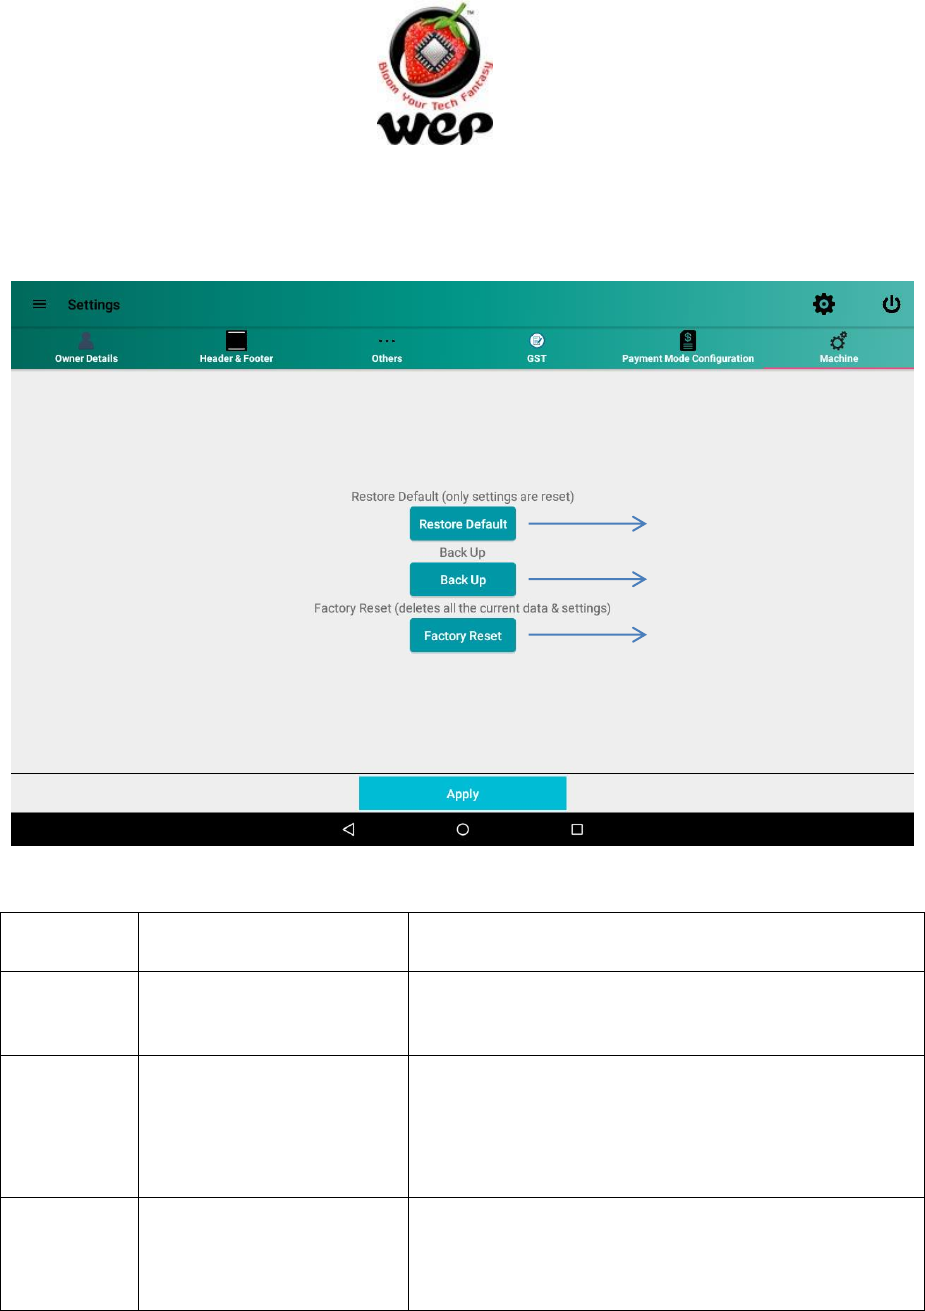
9.6 Machine
Figure 78: Machine setting
Label
Field
Description
1
Restore Default
This option will restore all default settings in the
system.
2
Back up
User can take a backup of the database and can
create as many as backups user wants. Backups
will be stored in device’s internal memory under
“WeP_Retail_Backup” directory.
3
Factory Reset
Factory reset will erase everything and application
will come in its initial stage as it was installed for
first time.
1
2
3

GST GenieR V1.0P
WeP Digital Services Limited
79
10. Limitations & Recommendations
1. Item search through barcode is recommended to be done through barcode scanner.
2. Payment like eWallet, MSwipe requires good internet connectivity.
3. Last transaction amount shown for each customer in customer module is with respect to
petty cash.
4. Shortcode accepts not more than 10 digits.

GST GenieR V1.0P
WeP Digital Services Limited
80
11. FAQs
Q. Is any configuration required for barcode before using?
A. Yes, kindly configure your barcode scanner to return line feed after scanning.
Q. Upon using clicking MSwipe Payment, I am being asked for username and password.
Where do I get these?
A. You will be provided with username and password at the time of purchase of MSwipe
Machine.
Q. On clicking Wallet Payment, I am getting message “Invalid credentials”
A. You have to go to RazorPay website and get register. Upon successful registration, you
will be provided with Key Id. Go to payment mode configuration and enter this Key Id and
save it. Now you will be able to use Wallet Payment.
Q. After scanning barcode of an item, it is not added into order list.
A. User needs to configure their barcode scanner to add line feed suffix, only then you will
be able to add item in order list directly after scanning item’s barcode. See Details in section
4.1.1.
Q List of documents required for registering with MSwipe
A. 1. MSwipe OnBoard Document
2. MSwipe Application Form
Individual Account
PAN Card of individual
Address Proof of the individual
Cancelled cheque
Rental Agreement of the shop / business
Proprietorship
PAN Card of Proprietor
Shop Establishment / VAT Certificate (Proof of Business)

GST GenieR V1.0P
WeP Digital Services Limited
81
Address Proof of the Shop / Business (Rental Agreement)
Cancelled cheque
Q. How to get AEPS credentials
A. User can mail at enquiry@wepdigital.com . Wep Digital will contact back to the user for
the related documents and process.
Q. Is there any helpline no for customers
A. Give us a call on our toll free number: 1800 425 4453
Or you can drop us a mail on our email id: enquiry@wepdigital.com
For more information visit us at: www.wepdigital.com
