CA User Manual Web Team4
User Manual: Pdf
Open the PDF directly: View PDF ![]() .
.
Page Count: 25

User Guide for
Logic University - Stationery Store Inventory System
GDipSA45 AD Project
Team 4

1. DOCUMENT TITLE: USER GUIDE
This document illustrates the required steps to perform operations in Logic University Stationery Store Inventory System.
2. DOCUMENT DETAILS
Name
User guide for Logic University Stationery Store Inventory System
Description
This document illustrates
Sequence steps to for the operation.
Version
1.0
Prepared On
31/01/2018
Prepared By
Team 4
3. REVISION HISTORY
Release No.
Date
Revision Description
Rev. 0
31/ 01 / 2018
User’s Manual Draft and Checklist
Rev. 1
01/ 02 / 2018
Initial Work

4. CONTENTS
1. Document Title: User Guide ..................................................................................................................................................... 2
2. Document Details ..................................................................................................................................................................... 2
3. Revision History ........................................................................................................................................................................ 2
4. Contents ................................................................................................................................................................................... 3
5. System overview ...................................................................................................................................................................... 5
5.1. Modules .................................................................................................................................................................................... 5
5.2. Abbreviation ............................................................................................................................................................................. 5
5.3. Point of Contacts ...................................................................................................................................................................... 5
5.4. User Access Level ..................................................................................................................................................................... 5
6. Administration Module ............................................................................................................................................................ 6
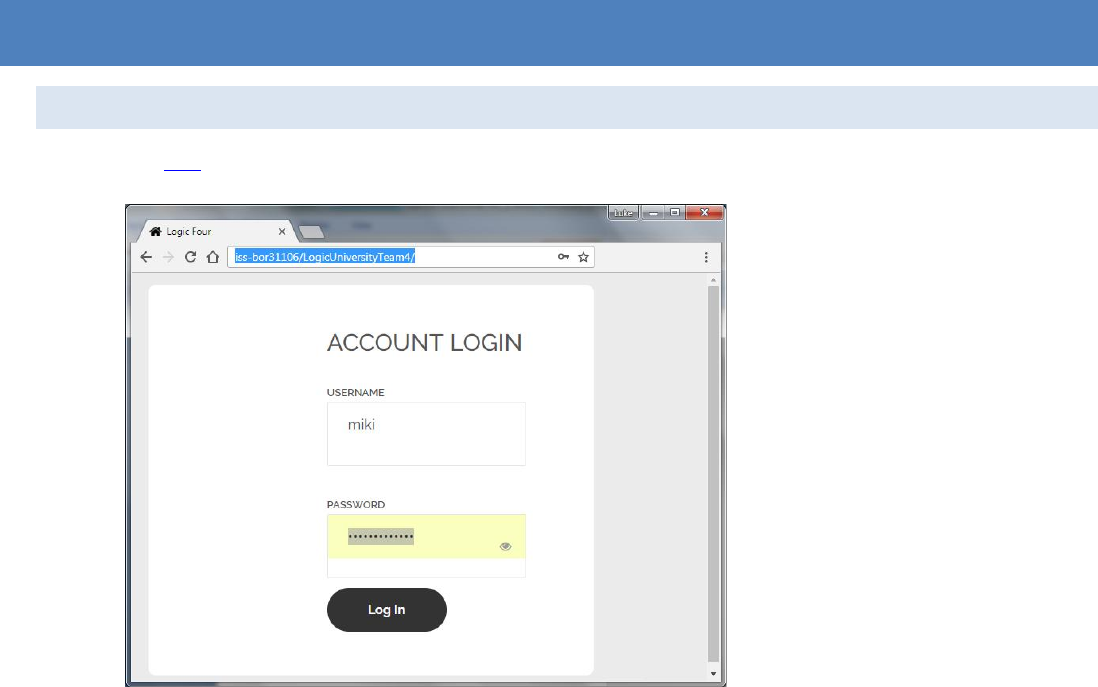
6.1. Getting started - logging on All Users ....................................................................................................................................... 6
6.2. Understanding the system menu ............................................................................................................................................. 7
6.3. Maintaining Profile For All Users .............................................................................................................................................. 8
6.4. Understanding the notifications for All Users .......................................................................................................................... 8
6.5. Delegating a staff for Department Heads ................................................................................................................................. 9
6.6. Assigning department representative Department Heads .................................................................................................... 10
7. Purchasing Module ................................................................................................................................................................. 11
7.1. Raising a Requisition For Department Staffs ......................................................................................................................... 11
7.2. Approving the requisition Department Heads ....................................................................................................................... 12
8. Disbursement Module ............................................................................................................................................................ 13
8.1. Retrieving the Stationary Form. Store Clerks ......................................................................................................................... 13
8.2. Placing Purchase Orders for Store Clerks .............................................................................................................................. 14
8.3. Receiving Incoming Goods Purchase Orders Store Clerks ...................................................................................................... 16
9. Inventory Module User Group .............................................................................................................................................. 17
9.1. Creating and Updating Stationary Store Clerks ..................................................................................................................... 17
9.2. Change reorder level Store Clerks .......................................................................................................................................... 18
9.3. Charging the department Store Clerks ................................................................................................................................... 19
9.4. Counting and Adjusting Stock Store Clerks ............................................................................................................................ 20
10. Reports User Groups .............................................................................................................................................................. 20
10.1. Statistic Chart Store Clerks ..................................................................................................................................................... 21
10.2. Items List All Users ................................................................................................................................................................. 21
11. 25
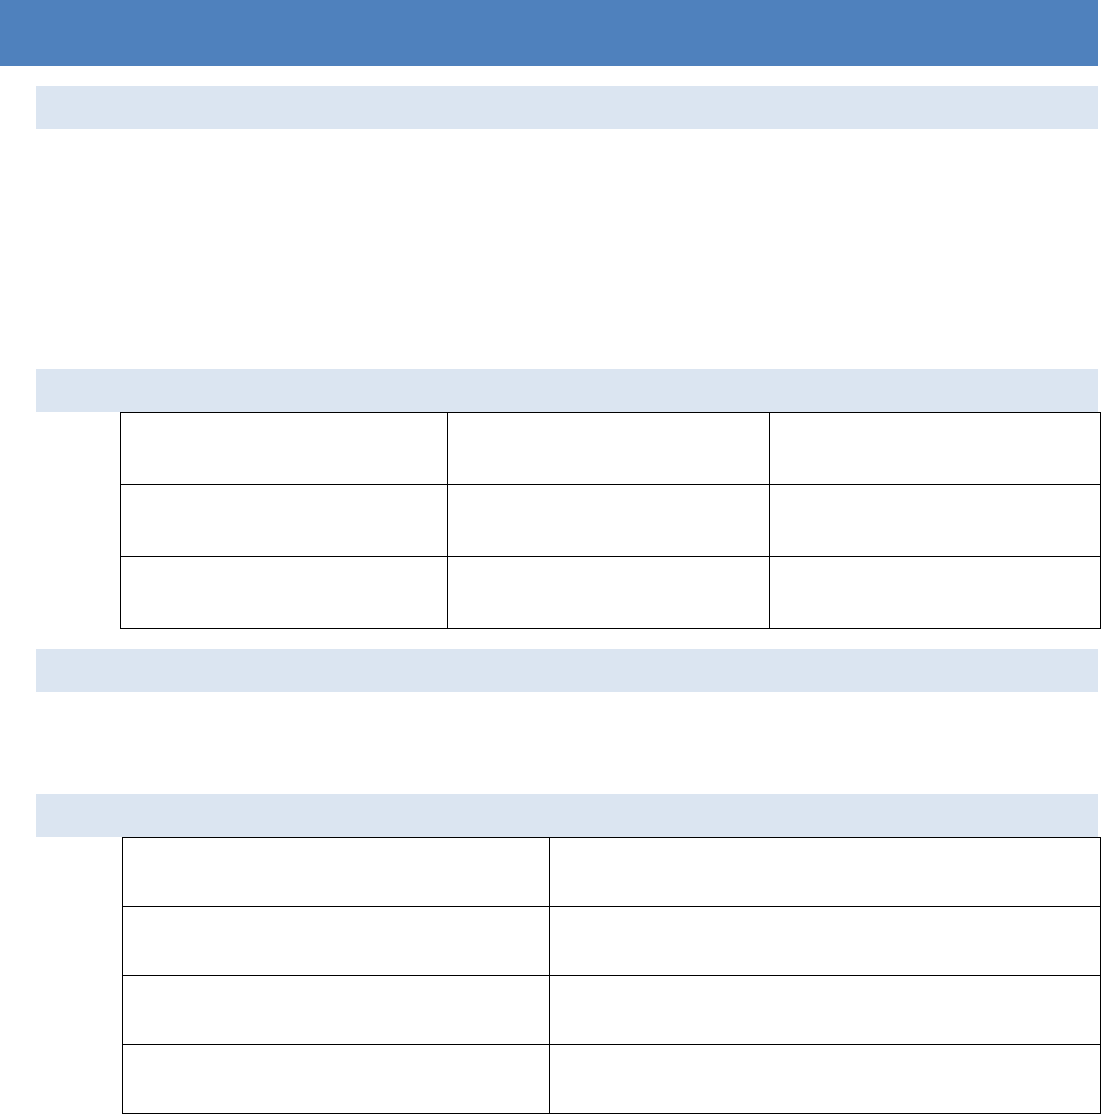
5. SYSTEM OVERVIEW
5.1. MODULES
This system is divided into 4 modules:
Purchasing Module - to process the requisitions raised by the departments, purchase order to vendors and item
receiving from vendors.
Inventory Module - to process the stationery movements in the store. This module includes the charge-back
mechanism and the supplier and stationery maintenance.
Retrieval and Disbursement Module - to process the issuing of stationery to the departments.
Administration Module - to process the access level.
5.2. ABBREVIATION
REQ: Requisition
PO: Purchase Order
DISB: Disbursement
REP: Report
INV: Inventory
ADM: Administration
TRN: Transactions
5.3. POINT OF CONTACTS
1800-HELPDESK during office hours
90HELPME during non office hours
5.4. USER ACCESS LEVEL
Administrator
Department Head
Store Clerk
Delegated Department Head (Deputy Head)
Store Supervisor
Department Representative
Store Manager
Department Staff
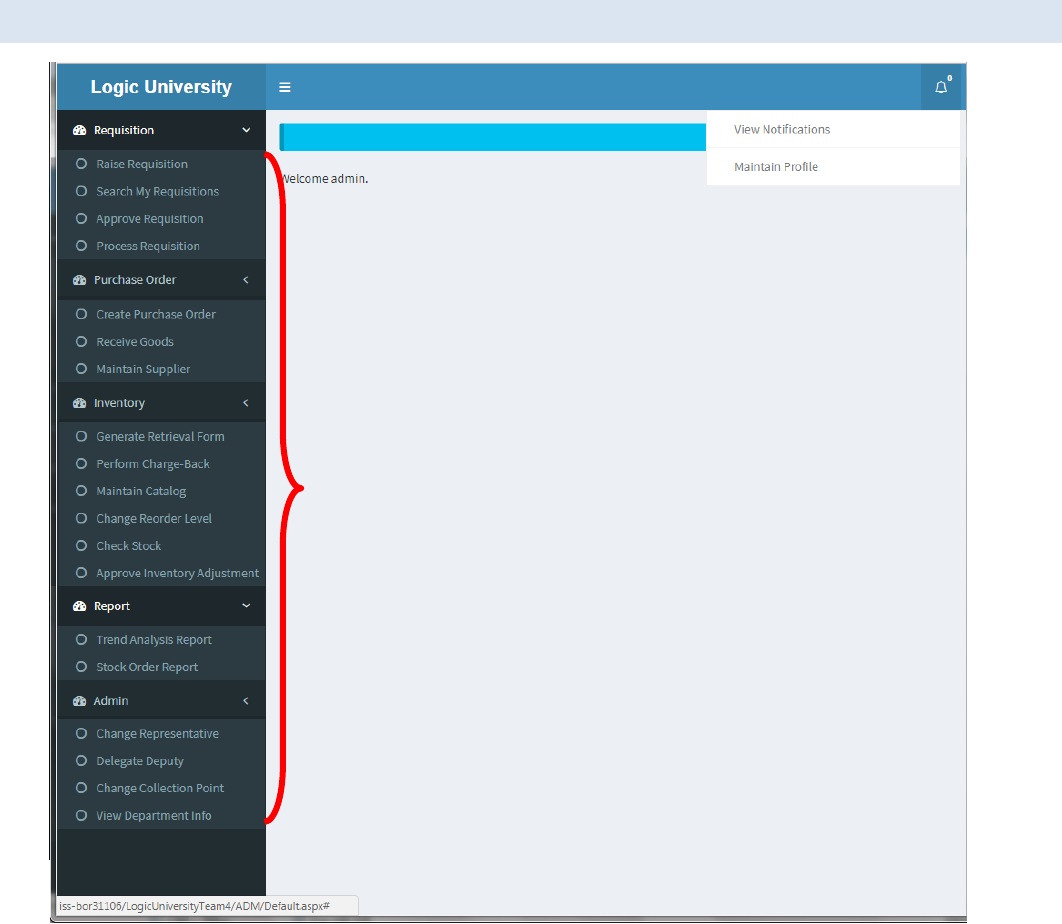
6.2. UNDERSTANDING THE SYSTEM MENU
Access to each menu is granted individually for each role.
Please refer to the section 6 to 10 in this user guide for the target users of each menu.
These are the 5 modules.
Purchasing Module
- to process the requisitions
raised by the departments,
purchase order to vendors
and item receiving from
vendors.
Inventory Module -
to process the stationery
movements in the store. This
module includes the charge-
back mechanism and the
supplier and stationery
maintenance.
Retrieval and
Disbursement Module - to
process the issuing of
stationery to the
departments.
Administration
Module - to process the
access level.
6.3. MAINTAINING PROFILE FOR ALL USERS
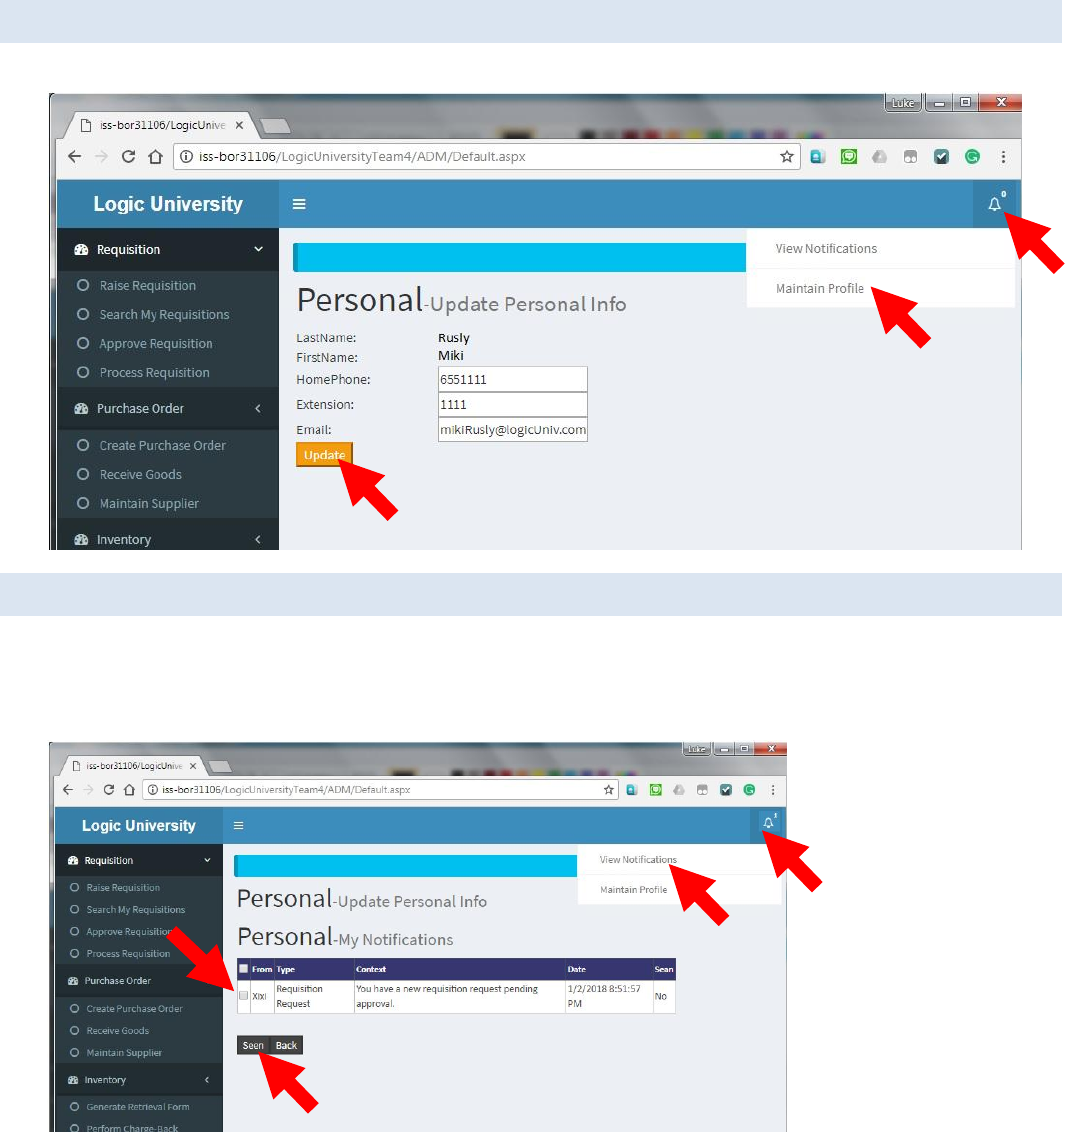
To change your profile, follow the red arrow in the following image for steps 1,2 and 3 in sequence.
6.4. UNDERSTANDING THE NOTIFICATIONS FOR ALL USERS
The bell icon (red arrow 1 in the image below) reflects the number of unread notifications. Click on red arrow 1 and 2 in
sequence to list out all the unread notifications.
To close a notification, tick on the notification record and click the Seen button (the red arrow 3 and 4 in the image below).
1
2
3
1
2
4
3
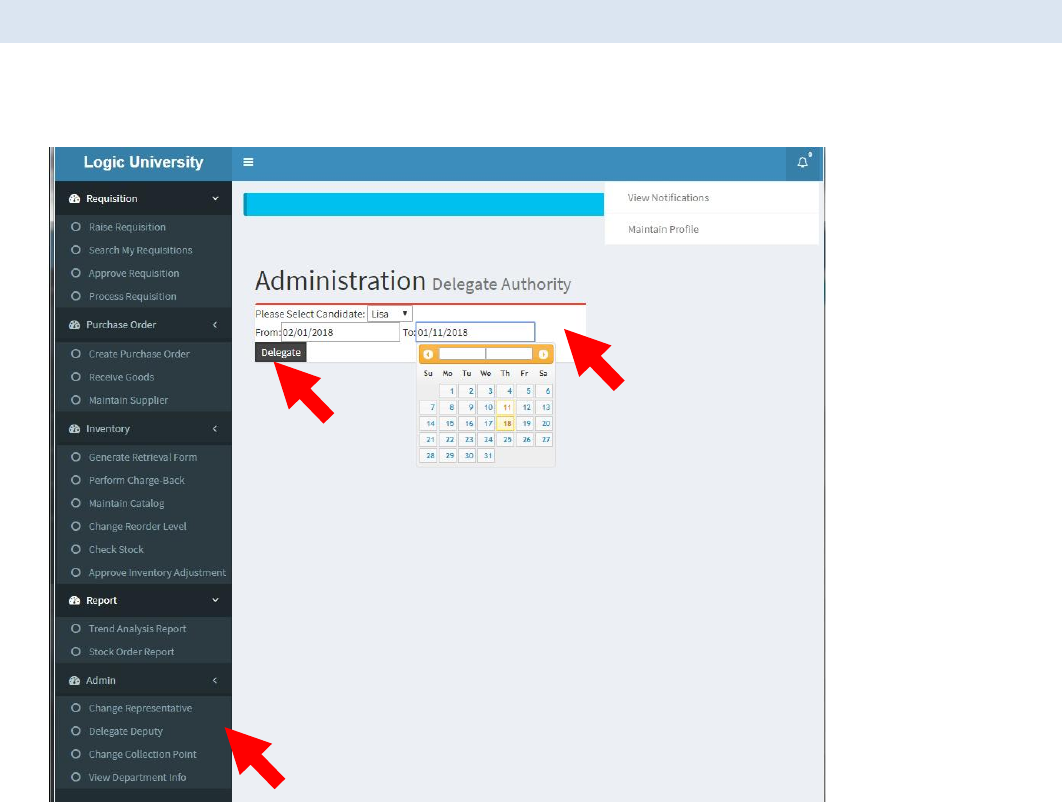
6.5. DELEGATING A STAFF FOR DEPARTMENT HEADS
Use this function to delegate a deputy for your department. You can specify the service duration. To do so, follow the red
arrows step 1,2 and 3 below. At arrow step 2, enter the candidate and duration of service.
1
2
3

6.6. ASSIGNING DEPARTMENT REPRESENTATIVE FOR DEPARTMENT HEADS
Click this icon to assign or change your department representative. You can only assign one representative for your
department.
1
2
3
7. PURCHASING MODULE
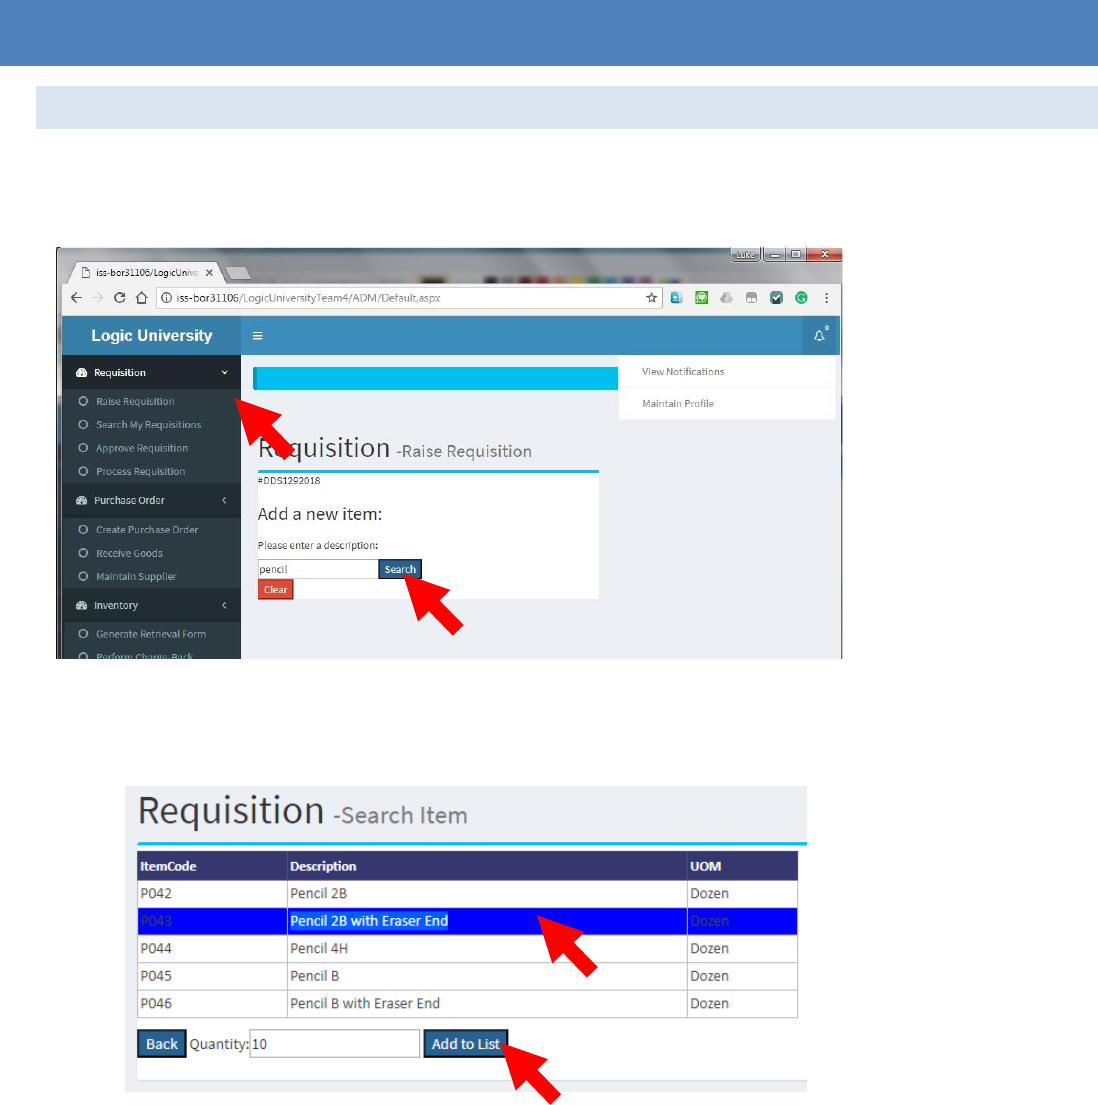
7.1. RAISING A REQUISITION FOR DEPARTMENT STAFFS
Step 1. Go to menu "Requisition" > "Raise Requisition" (refer to the red arrow 1)
Step 2. The system will prompt the requisition form, enter the item to requisite (red arrow 2) and click to "Search"
Step 3. The system will prompt all items related to "pencil" (implied by the above example).
Select the item and enter the quantity you intend to requisite for.
Step 4. Click to "add to list".
1
2
3
4

Step 5. Repeat step 2 and 3 to requisite more items, or click to "Submit" the requisition.
Step 6. Take note of the requisition number (arrow 5) for your reference.
7.2. APPROVING THE REQUISITION FOR DEPARTMENT HEADS
To approve the requisitions raised by the staffs in your department, Department heads may perform the following steps.
Step1. Log on to the system and access the menu path: "Requisition" > "Approve Requisition".
System will list out all the requisitions that are pending for approval.
Step 2. Click the Details button to see the requisition items.
Step 3. Click to "Approve" or "Reject" accordingly.
5
8. DISBURSEMENT MODULE
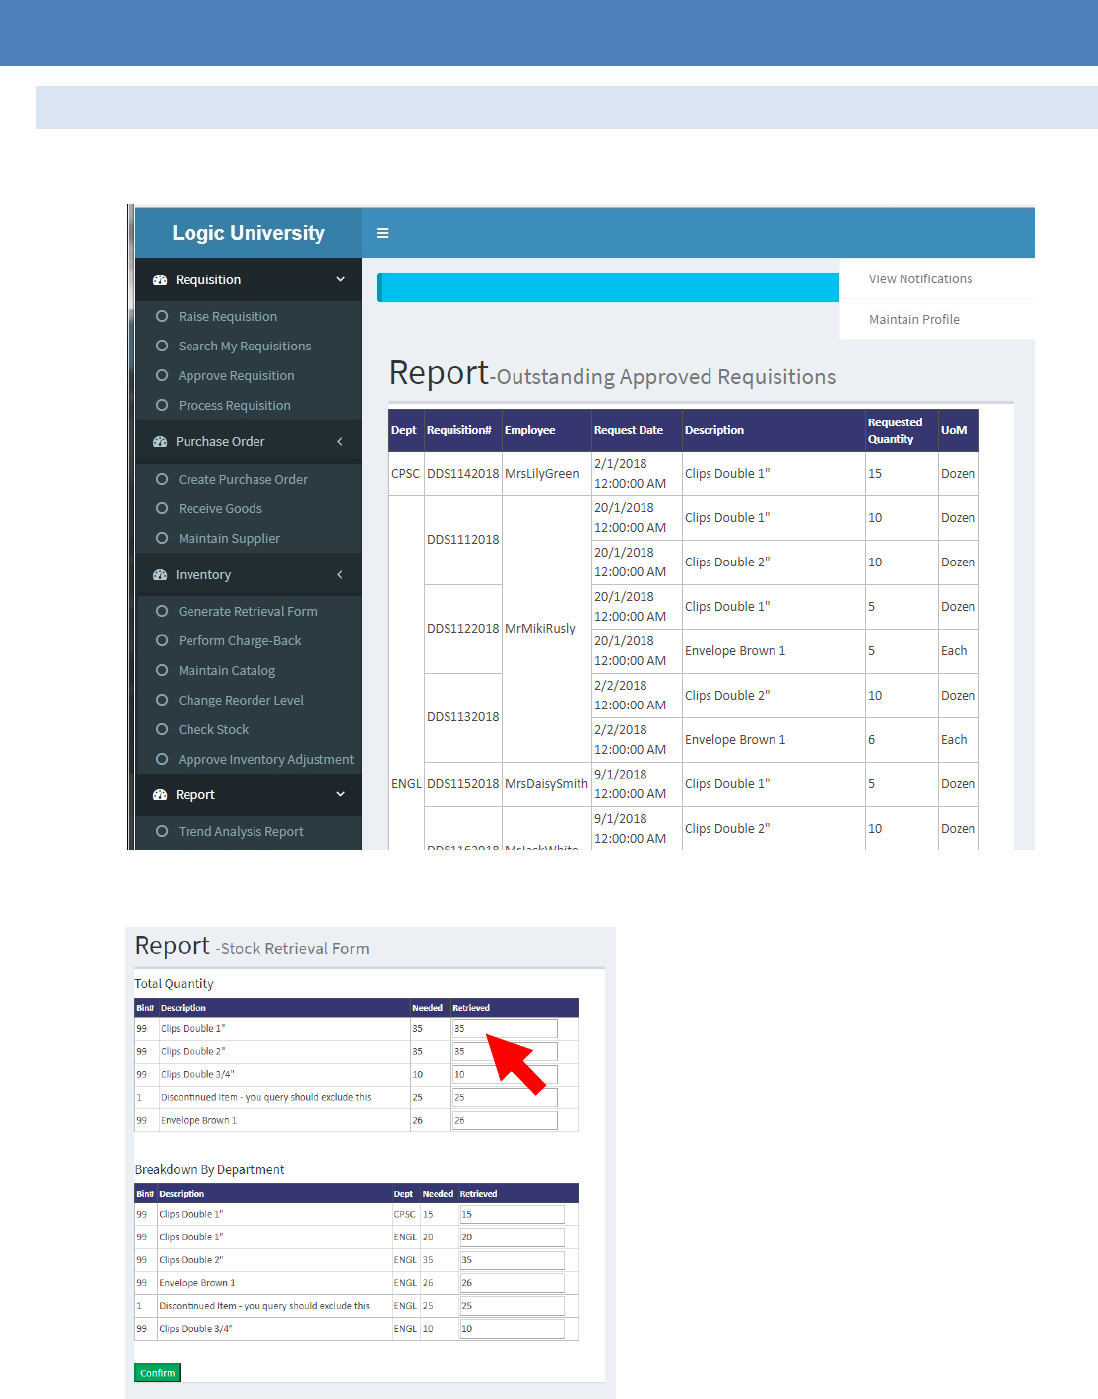
8.1. RETRIEVING THE STATI ONARY FORM. FOR STORE CLERKS
Step 1: Go to menu "Inventory" > "Generate Retrieval Form".
The system will list all approved requisitions in the university that have not been disbursed.
Step2: Click to generate the Retrieval Form. System will merge the items and generate the total quantity for each items and
breakdown by department. Change the actual retrieved quantity accordingly and click the Confirm button.
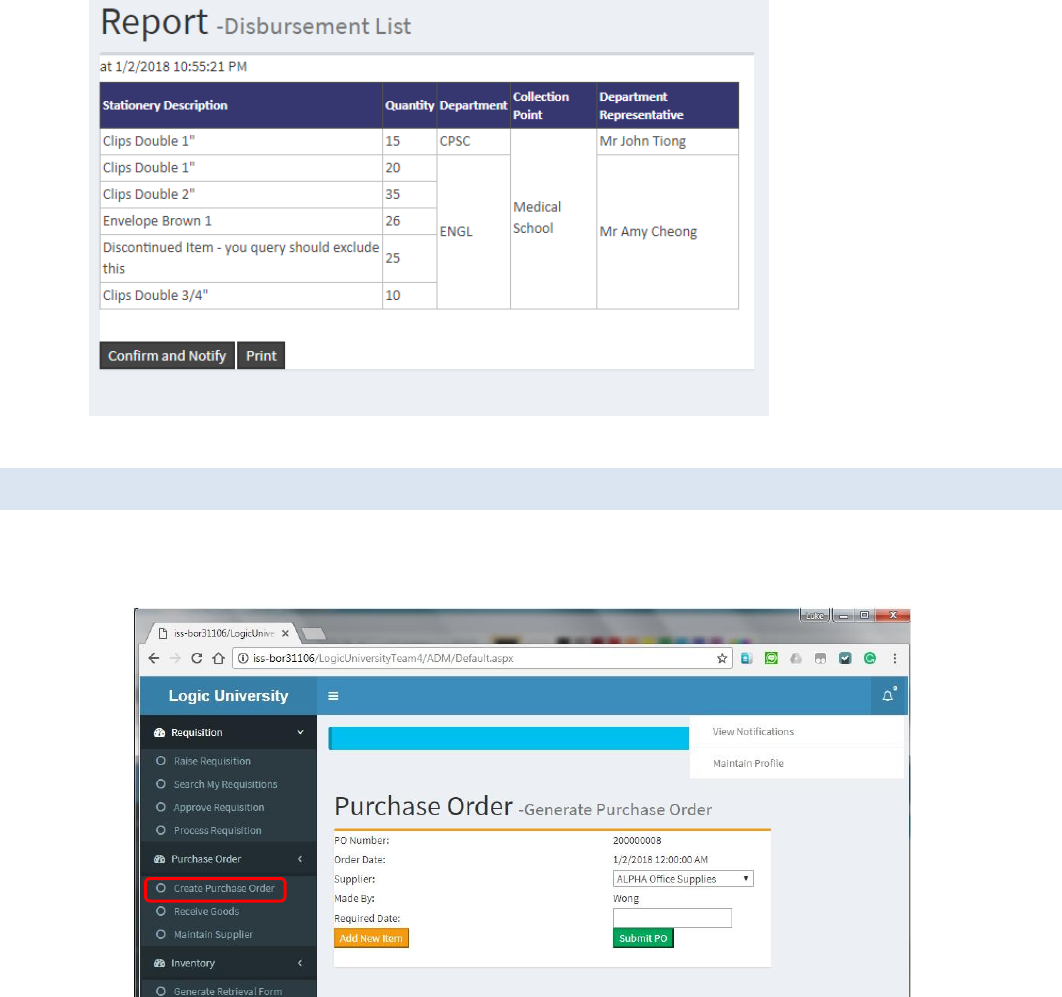
Step 3: System will prompt you the Disbursement List. Click to Confirm to send a stationery collection notification to the
department representative.
8.2. PLACING PURCHASE ORDERS FOR STORE CLERKS
Step 1. Go to menu "Purchase Order" > "Create Purchase Order"
Step 2. Enter the Supplier and required date information. Click to add new item into the purchase order.

Step 2. System will prompt all the items that need to be purchased.
Select the item and enter the quantity to be purchased for. The click to "Add to List".
Step 3. The selected item will appear in the Purchase Order screen.
Enter the required date and click to "Save the PO" (red arrow below)
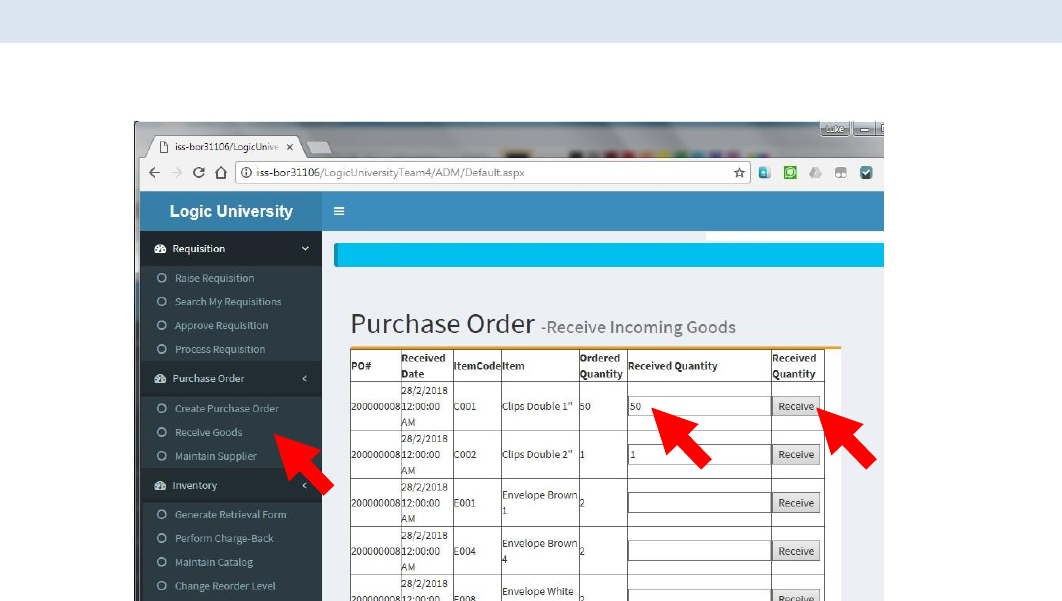
8.3. RECEIVING INCOMING GOODS PURCHASE ORDERS FOR STORE CLERKS
Step 1. Go to the menu: Purchase Order > Receive Goods
System will list out all the Purchase Orders.
Step 2. Enter the actual received quantity and click to "Receive" the purchase order line(s).
After the receiving, the actual received quantity will be added to the existing on-hand quantity and the PO will be
closed.
1
2
3

9. INVENTORY MODULE
9.1. CREATING AND UPDATING STATIONARY FOR STORE CLERKS
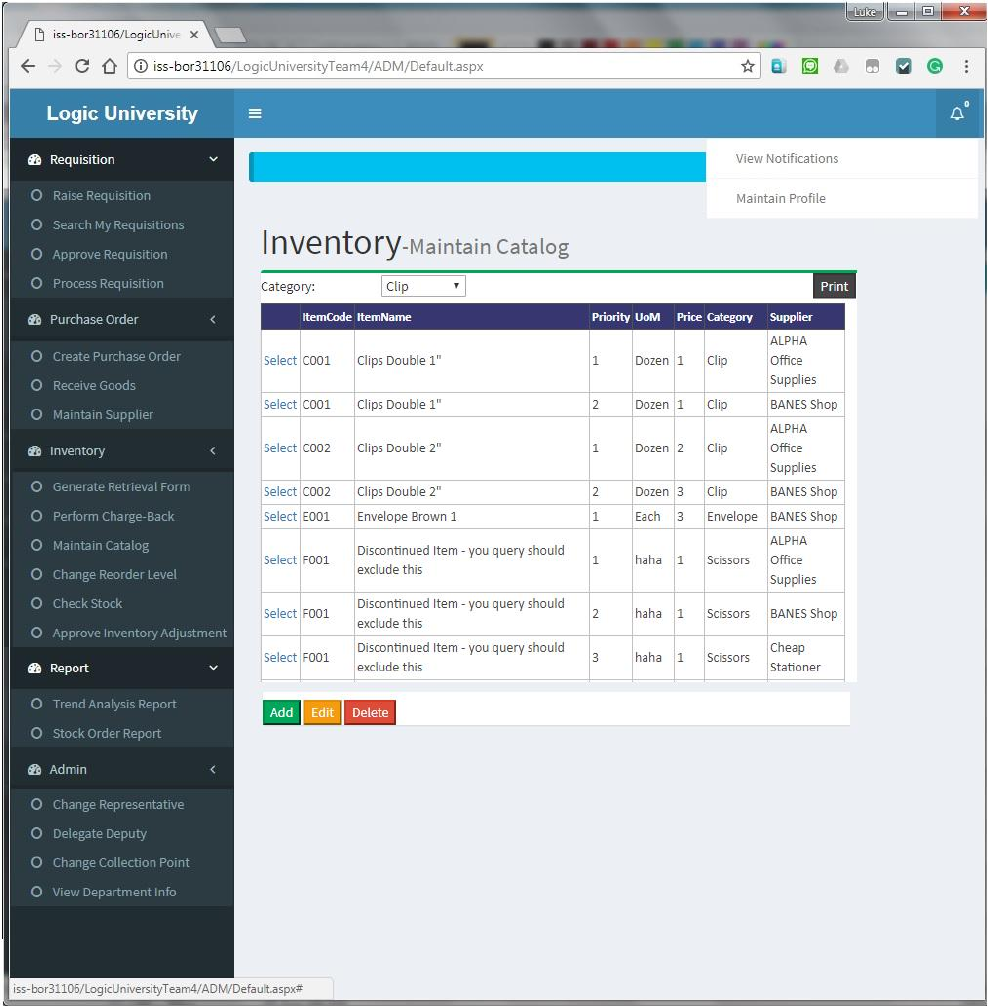
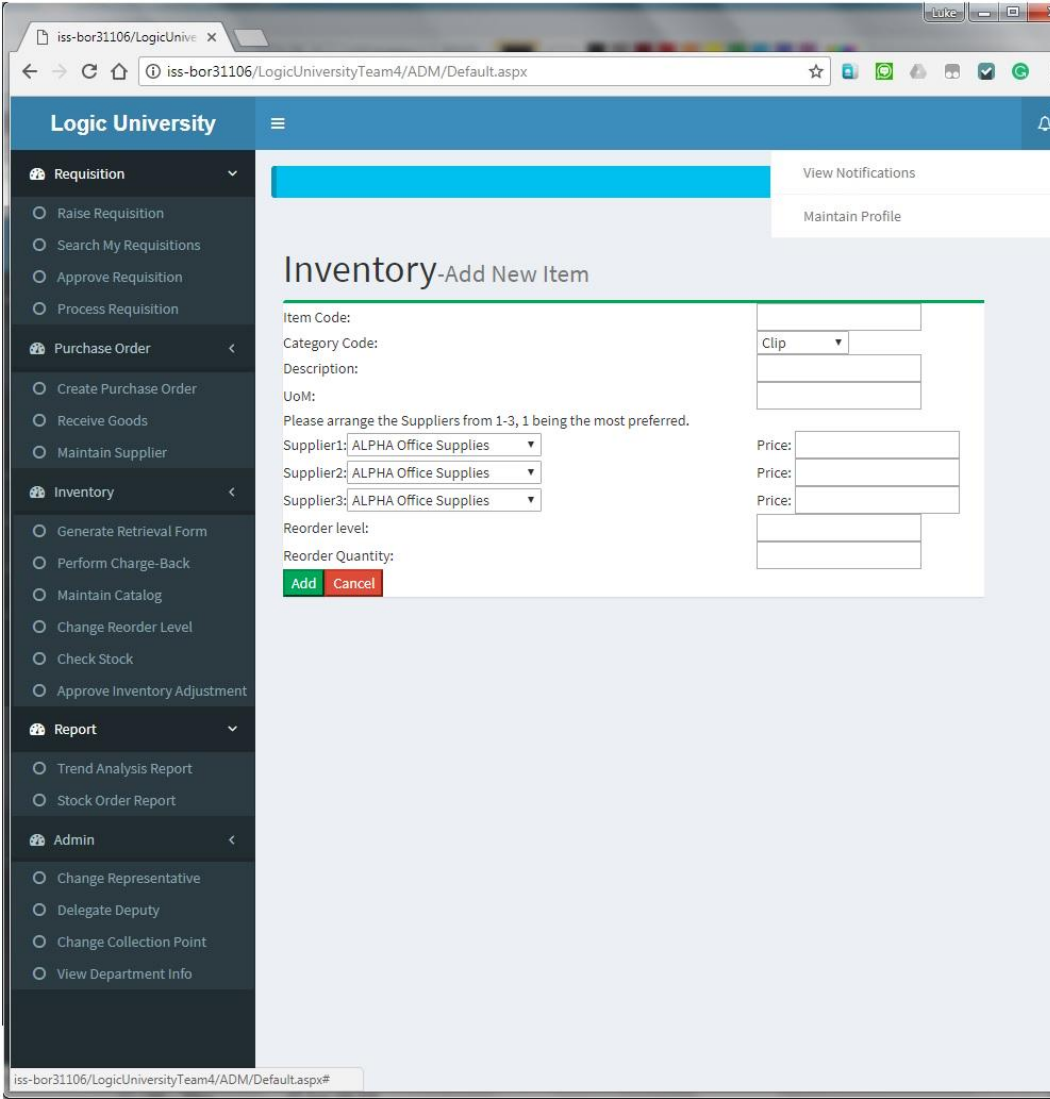
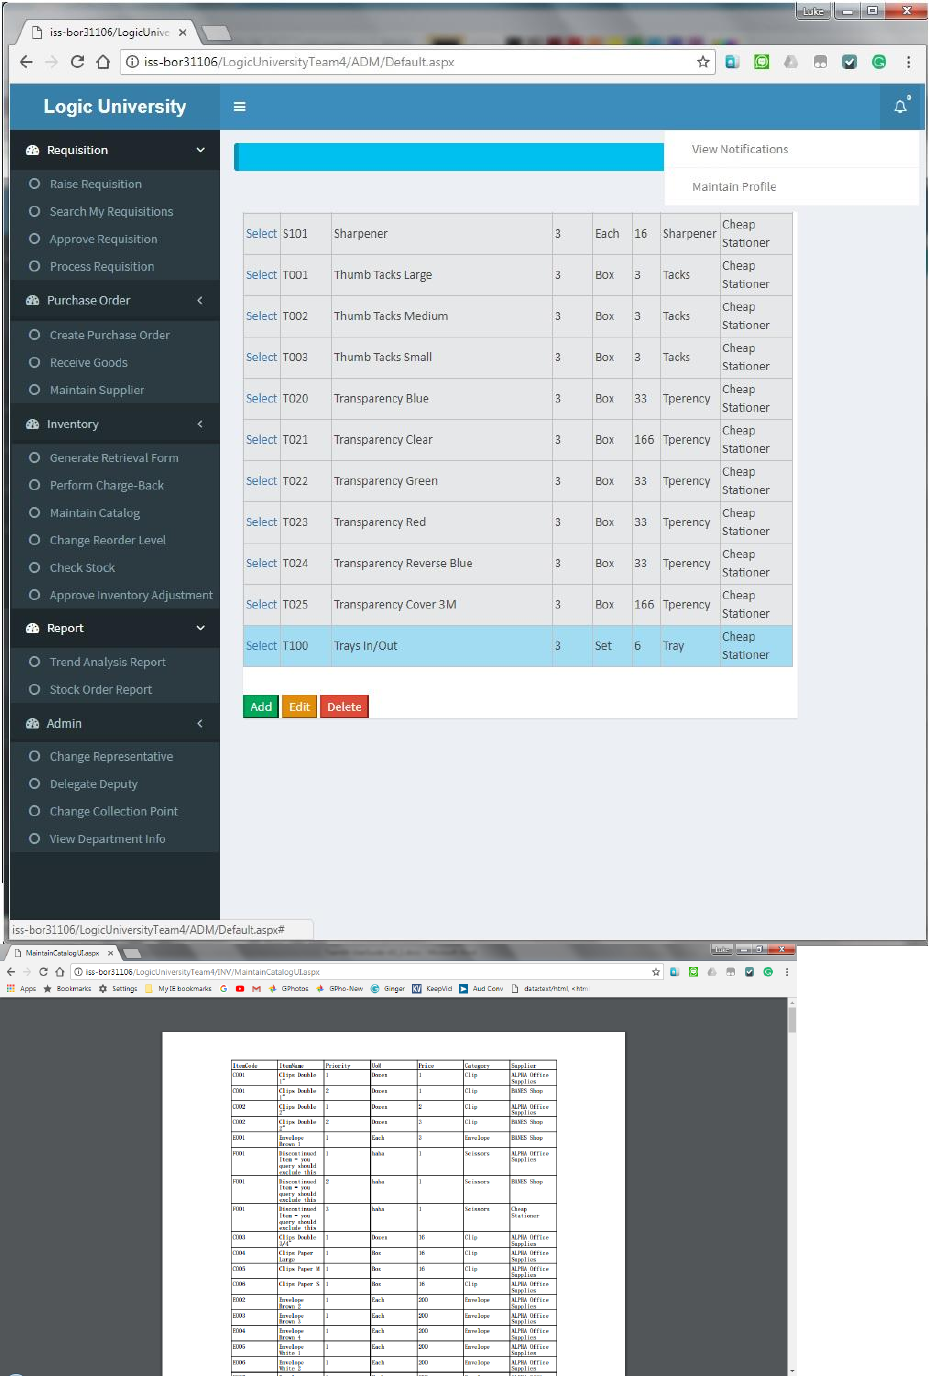
Step 1. Go to Menu: "Inventory" > "Maintain Catalog"
Step 2. You may want to filter by category to narrow down your working list.
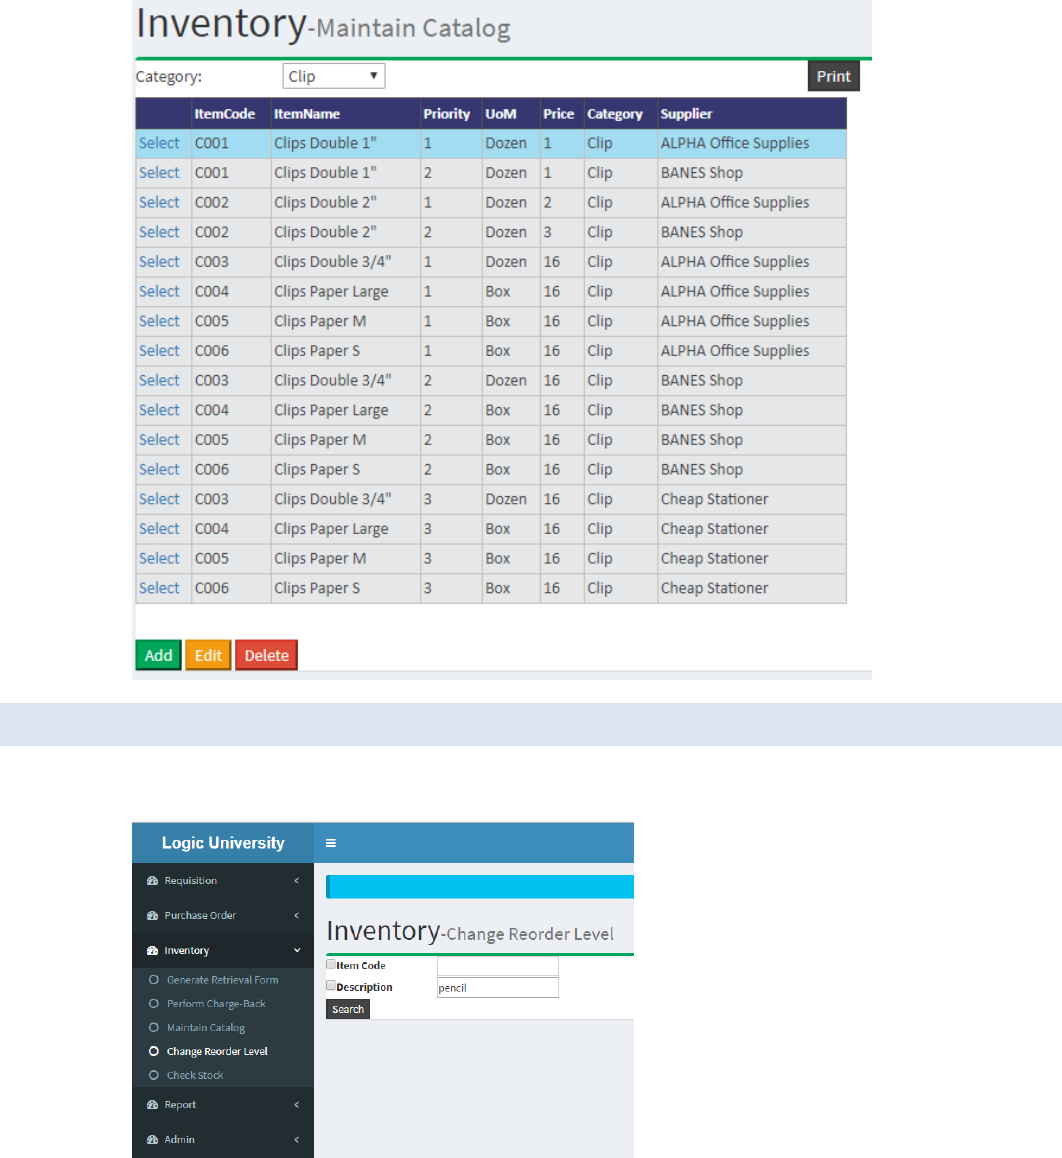
Step 3. The image below is the example list of item of "Clip" category. Click Edit button.
9.2. CHANGE REORDER LEVEL FOR STORE CLERKS
Step 1. Go to Menu: "Inventory" > "Change Reorder Level".
Enter the item code or description to search for.
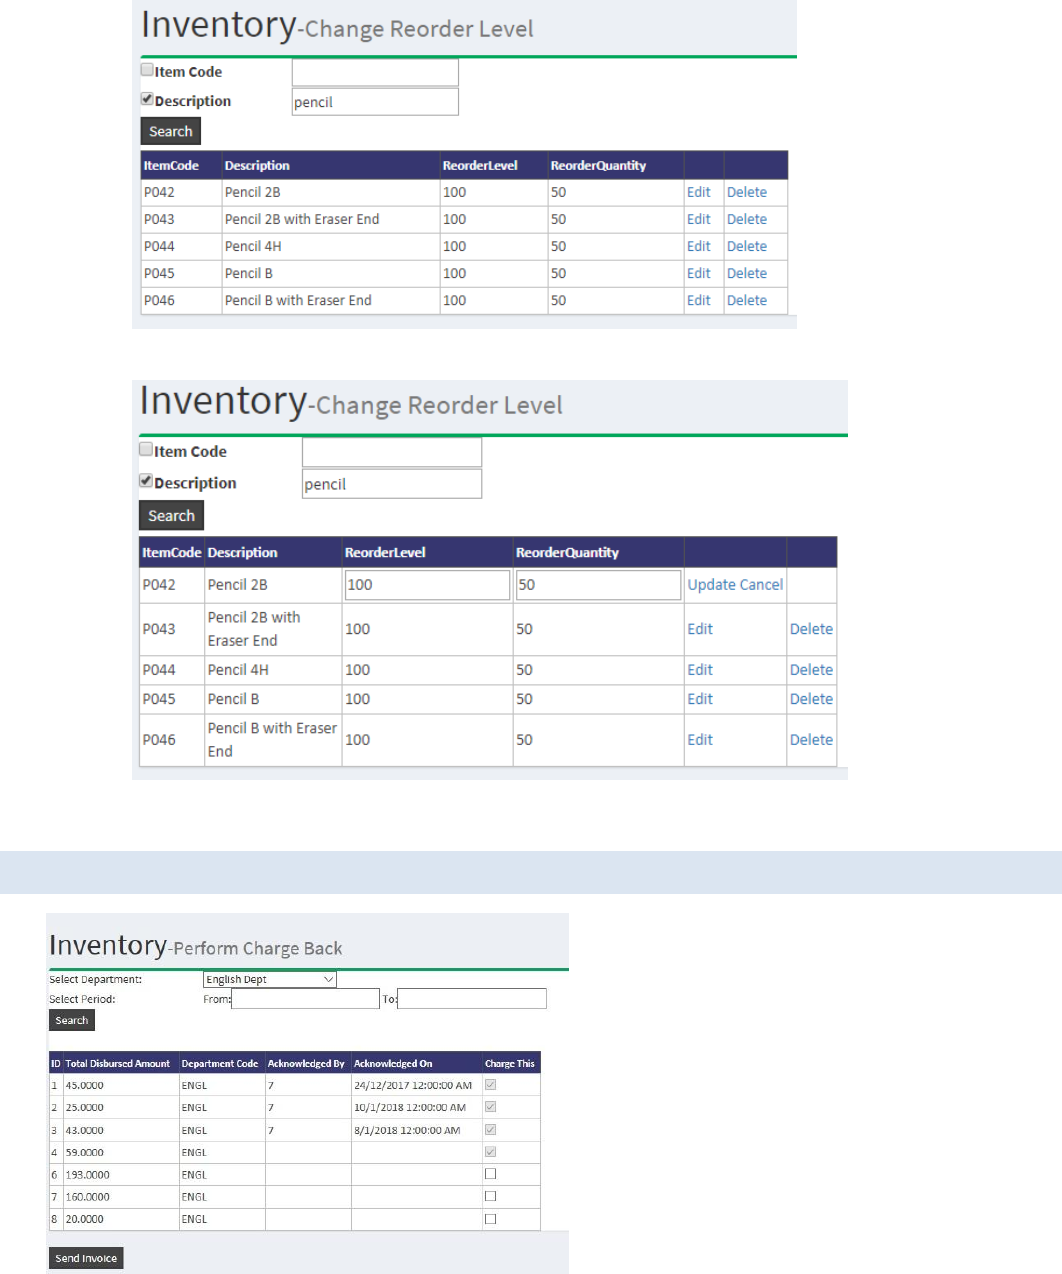
Step 2. Select the item from the list to edit
Step 3. Enter the new quantities and click to "Update"
9.3. CHARGING TO THE DEPARTMENT FOR STORE CLERKS
9.4. COUNTING AND ADJUSTING STOCK FOR STORE CLERKS
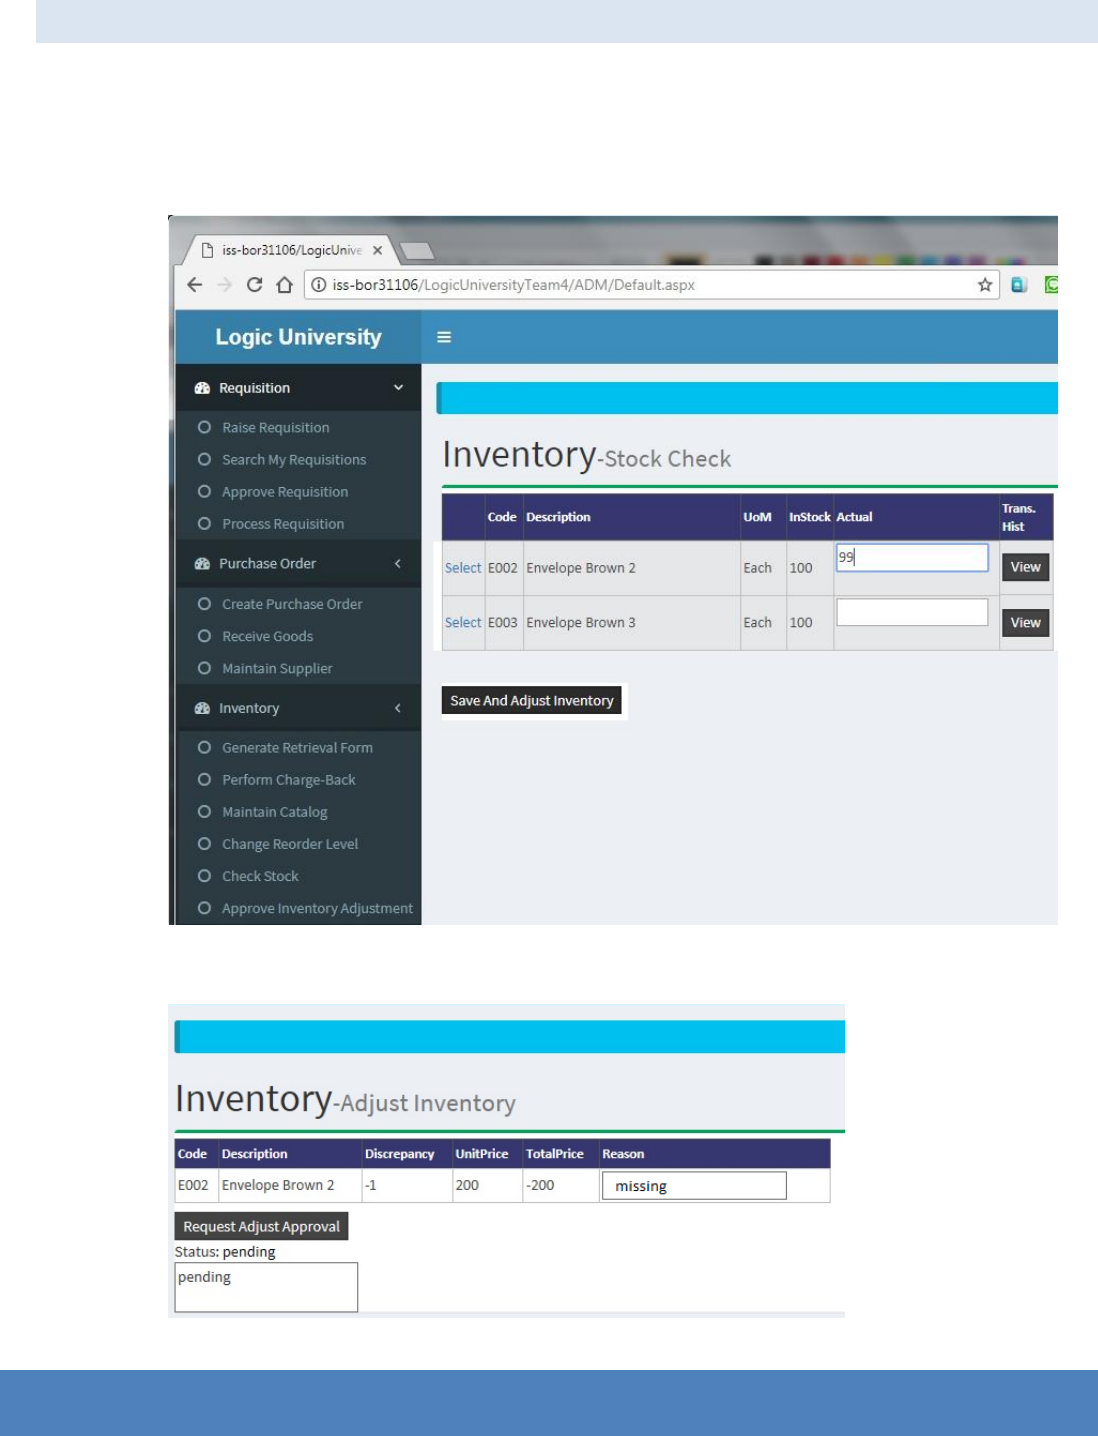
Step 1. Go to Menu: "Inventory" > "Check Stock".
System will list out the current on-hand quantities.
Step 2. Enter the actual quantity.
Step 3. Click to "Save and Adjust Inventory"
Step 4. System will calculate and display the discrepancy. Enter the reason for the discrepancy and click to send for
approval
10. REPORTS USER GROUPS

10.1. STATISTIC CHART STORE CLERKS
10.2. ITEMS LIST ALL USERS
11.
