Virtual EMS Installation Instructions VEMS Guide V43
VEMS%20Installation%20Guide%20V43
VEMS%20Installation%20Guide%20V43
User Manual: Pdf
Open the PDF directly: View PDF ![]() .
.
Page Count: 9
Virtual EMS
Installation Instructions
EMS Workplace 7.0
EMS Campus 4.0
EMS Enterprise 7.0
EMS Legal 7.0
EMS District 7.0
EMS Professional 13.0
Dean Evans & Associates, Inc.

Virtual EMS Installation Instructions
2012 Dean Evans & Associates, Inc. CONFIDENTIAL
2
Copyright
Copyright 2012 Dean Evans & Associates, Inc. All rights reserved.
No part of this document may be reproduced, transmitted or stored in a retrieval system in any form,
electronic or mechanical, for purposes other than the personal use of the original purchaser except by
written permission of Dean Evans & Associates, Inc.
Dean Evans & Associates, Inc.
6465 Greenwood Plaza Blvd
Suite 600
Centennial, CO 80111
This document may be copied for use by individuals employed by the purchaser.
Information in this document is subject to change without notice.
EMS, the EMS logo and EMS Regics are registered trademarks of Dean Evans & Associates, Inc. Event
Management Systems, EMS Enterprise, EMS Professional, EMS Lite, EMS Campus, EMS Workplace,
EMS Legal, EMS District, EMS Master Calendar and Virtual EMS are trademarks of Dean Evans &
Associates, Inc. Microsoft, Windows and Outlook are registered trademarks and SQL Server is a
trademark of Microsoft Corporation. Lotus Notes and Domino are registered trademarks of IBM
Corporation. Other products, brands and trademarks are property of their respective owners/companies.

Virtual EMS Installation Instructions
2012 Dean Evans & Associates, Inc. CONFIDENTIAL
3
Virtual EMS
Installation Instructions
INTRODUCTION ....................................................................................................................................................... 4
CUSTOMER SUPPORT............................................................................................................................................. 4
HARDWARE AND SOFTWARE REQUIREMENTS ............................................................................................ 4
OBTAINING THE LATEST RELEASE OF VIRTUAL EMS ............................................................................... 4
INSTALLING/UPGRADING VIRTUAL EMS ........................................................................................................ 4
STARTING VIRTUAL EMS ........................................................................................................................................... 6
OPTIONAL VIRTUAL EMS MODULES ................................................................................................................ 6
INTEGRATED AUTHENTICATION ................................................................................................................................. 6
PLAN-A-MEETING ...................................................................................................................................................... 7
FLOOR PLAN MODULE................................................................................................................................................ 7
CUSTOMIZING VIRTUAL EMS ............................................................................................................................. 7
LOGO .......................................................................................................................................................................... 7
STYLE SHEETS ............................................................................................................................................................ 7
CUSTOM LINKS ........................................................................................................................................................... 7
CUSTOM JAVASCRIPT ................................................................................................................................................. 9

Virtual EMS Installation Instructions
2012 Dean Evans & Associates, Inc. CONFIDENTIAL
4
Introduction
This document lists the steps you must take to install Virtual EMS. Virtual EMS is an optional, customer-
facing web application that makes EMS available online. Virtual EMS provides an online calendar,
streamlines the room request process and provides capability to support self-service reservations.
If you are upgrading to a newer version of Virtual EMS, please encourage users at your facility to read the
separate What’s New document before they begin working with the new version of the software. Doing so
will minimize the amount of time it takes them to get “up-to-speed” with the new release and help them
benefit from new features and functions that they might not otherwise discover.
Customer Support
Unlimited toll-free customer support is available to EMS users who have a current Annual Service
Agreement (ASA). If you are unable to resolve a problem or answer a question by reading the EMS
documentation, contact us at:
Email: support@dea.com
Web: www.dea.com
Phone: (800) 288-4565
Fax: (303) 796-7429
Hardware and Software Requirements
A list of the system requirements for Virtual EMS is maintained on our website.
Obtaining the Latest Release of Virtual EMS
The latest release of Virtual EMS can be downloaded from the online Support Center.
1. Go to www.dea.com and enter your Email Address and Password in the Support Center area.
2. Click the Software downloads link.
3. Download Virtual EMS (VirtualEMS.msi). Required for both first time installations and
upgrades.
Installing/Upgrading Virtual EMS
Important: Before beginning the installation process, please install or upgrade your EMS databases as
outlined in the EMS Installation Instructions.
Important: Existing versions of Virtual EMS must be manually uninstalled. Please make sure to copy-off
and save any files that have been customized.
1. Manually uninstall any previous versions of Virtual EMS on your web server.
2. Verify that the prerequisite software has been installed.
3. Download the VirtualEMS.msi file onto the web server that will be running Virtual EMS.
4. Run VirtualEMS.msi.
5. The first screen welcomes you to the Virtual EMS Setup Wizard. Click Next to begin the
installation process. The Destination Folder screen will appear.

Virtual EMS Installation Instructions
2012 Dean Evans & Associates, Inc. CONFIDENTIAL
5
6. Select the destination folder. The installation process will create a new physical directory on your
web server based on the destination folder path entered (“Virtual Ems” in the example above.)
Click Next.
Note: Virtual EMS should not be installed in the same physical directory as other EMS web-
based products OR under a site running another version of Virtual EMS.
7. The SQL Server and database information screen will appear.
8. Enter your SQL Instance Name.
9. Enter your Database Name:
EMS Professional customers – typically named “EMSData”
EMS Workplace, EMS Campus, EMS Enterprise, EMS District and EMS Legal customers -
typically named “EMS”
10. Click Next.
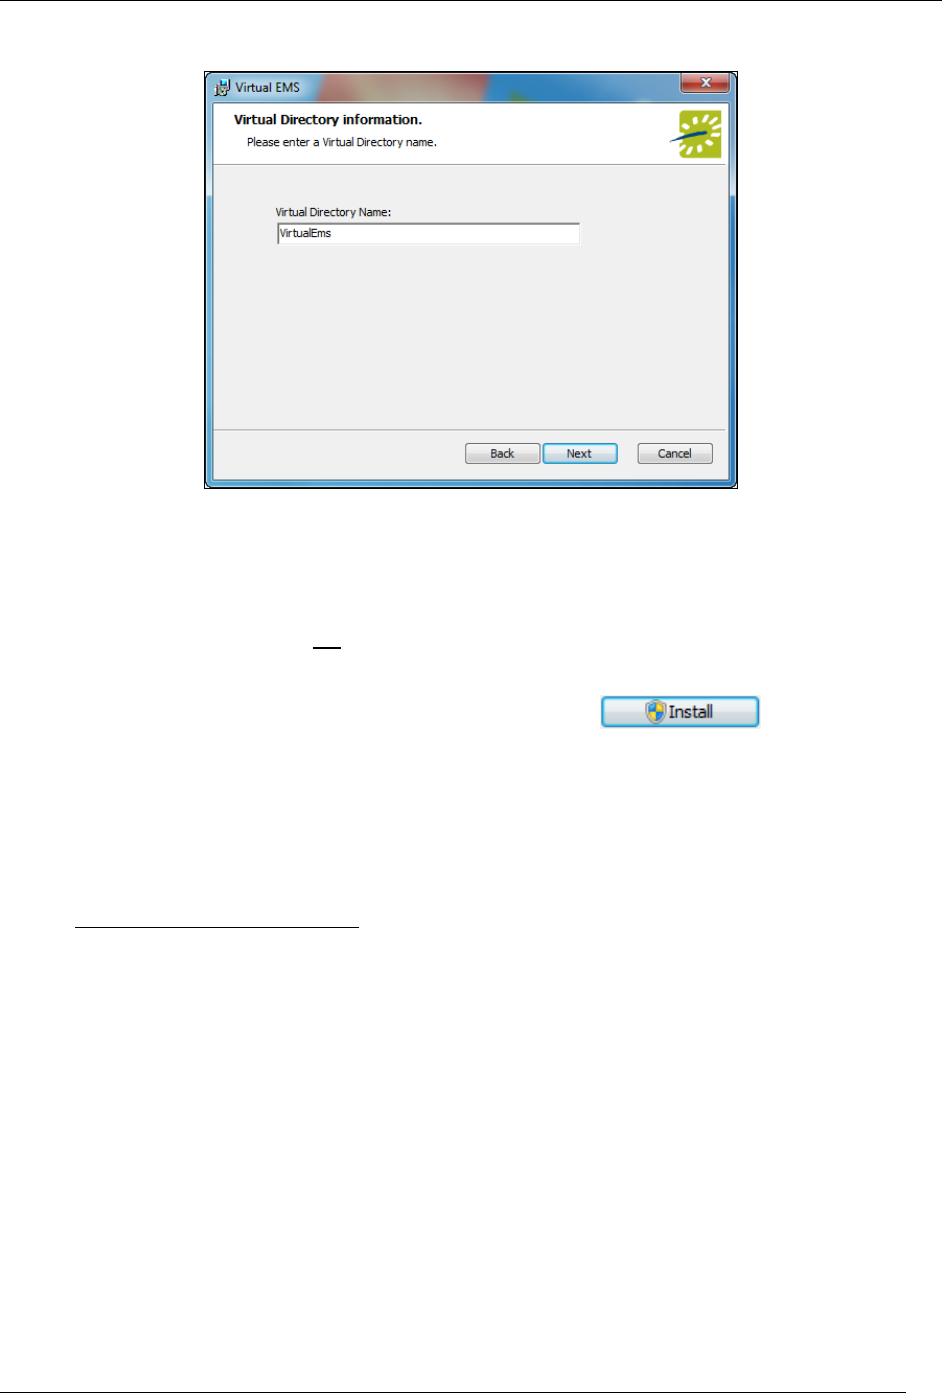
11. The Virtual Directory information screen will appear.
Virtual EMS Installation Instructions
2012 Dean Evans & Associates, Inc. CONFIDENTIAL
6
12. The Virtual Directory Name will default to the destination folder specified in Step 6. It is
recommended that you keep the default setting. The installation process will create a virtual
directory on your web server based on the virtual directory entered (“Virtual Ems” in the example
above.) Click Next.
Note: Virtual EMS should not be installed in the same virtual directory as other EMS web-based
products OR under a site running another version of Virtual EMS.
13. The Ready to install Virtual EMS screen will appear. Click to install Virtual
EMS.
14. The Completed the Virtual EMS Setup Wizard screen will appear. Click Finish.
Starting Virtual EMS
After following the steps above, verify your Virtual EMS installation by opening a browser and entering the
Virtual EMS address:
http://[ServerName]/VirtualEMS/ (replace [ServerName] with the name of your web server)
The first time you launch Virtual EMS, it may take a few extra moments for the website to display. If you
encounter any issues, please contact Customer Support for assistance.
For information on how to configure Virtual EMS, please refer to your EMS Setup Guide.
Optional Virtual EMS Modules
If you currently do not own one of optional, separately licensed modules outlined below, but are interested
in more information, please contact your Account Executive.
Integrated Authentication
The Integrated Authentication module is a component for Virtual EMS that provides single-sign-on
capability using Integrated Windows Authentication, your organization’s portal or LDAP. Please refer to
the Integrated Authentication Configuration Instructions for installation instructions.

Virtual EMS Installation Instructions
2012 Dean Evans & Associates, Inc. CONFIDENTIAL
7
Plan-a-Meeting
Plan-a-Meeting is a component for Virtual EMS that integrates with Microsoft Exchange or IBM Lotus
Notes. With this module, web users can view the availability of both meeting rooms and attendees, and
send Microsoft Outlook or IBM Lotus Notes-compatible meeting invitations - all from within Virtual EMS.
Please refer to the PAM Installation Instructions for installation instructions.
Floor Plan Module
The Floor Plan module allows web users to search for, view and reserve available space from an
interactive floor plan within Virtual EMS. Please refer to the Floor Plan Module Installation Instructions for
installation instructions.
Customizing Virtual EMS
After you have installed Virtual EMS you can customize many aspects of it. You can change the “look and
feel” of Virtual EMS by inserting your own logo. Experienced web developers can also modify the
system’s style sheet to change fonts and colors. For information on how to configure Virtual EMS, define
help text for various pages or re-label menus, please refer to your EMS Setup Guide.
Important: Do not alter any of the Virtual EMS web page files themselves. The maintenance
agreement for Virtual EMS extends to the original page content only.
Logo
The logo that appears in the upper left corner of all pages within Virtual EMS comes from a file named
LOGO.GIF, which is found in the \VirtualEMS\Images folder. If you choose to have the system display a
different logo, create a new file called CUSTOMLOGO.GIF in that folder. If the system detects this file, it
will use it rather than the default file. The advantage of creating the new file instead of simply replacing
the LOGO.GIF file is that in an upgrade to a new version of Virtual EMS the LOGO.GIF file is overwritten,
whereas CUSTOMLOGO.GIF is not.
The system will accept nearly any size logo image, but you should avoid images more than 200 pixels
wide and images that are too tall, to avoid extra scrolling. If you create a custom logo file, you may need
clear your browser’s cache before you see the new image.
Style Sheets
Experienced web developers are welcome to modify the look and feel of Virtual EMS using a custom style
sheet, which controls fonts and colors throughout the application. To do so, name your custom style sheet
CUSTOM.CSS and place it in the \VirtualEMS\Styles directory. If the system detects this file, it will use
the styles found there rather than those in the system’s default style sheet, VEMS.CSS. Create the
CUSTOM.CSS style sheet rather than modifying VEMS.CSS, since VEMS.CSS may be overwritten
whenever new versions of the software are installed.
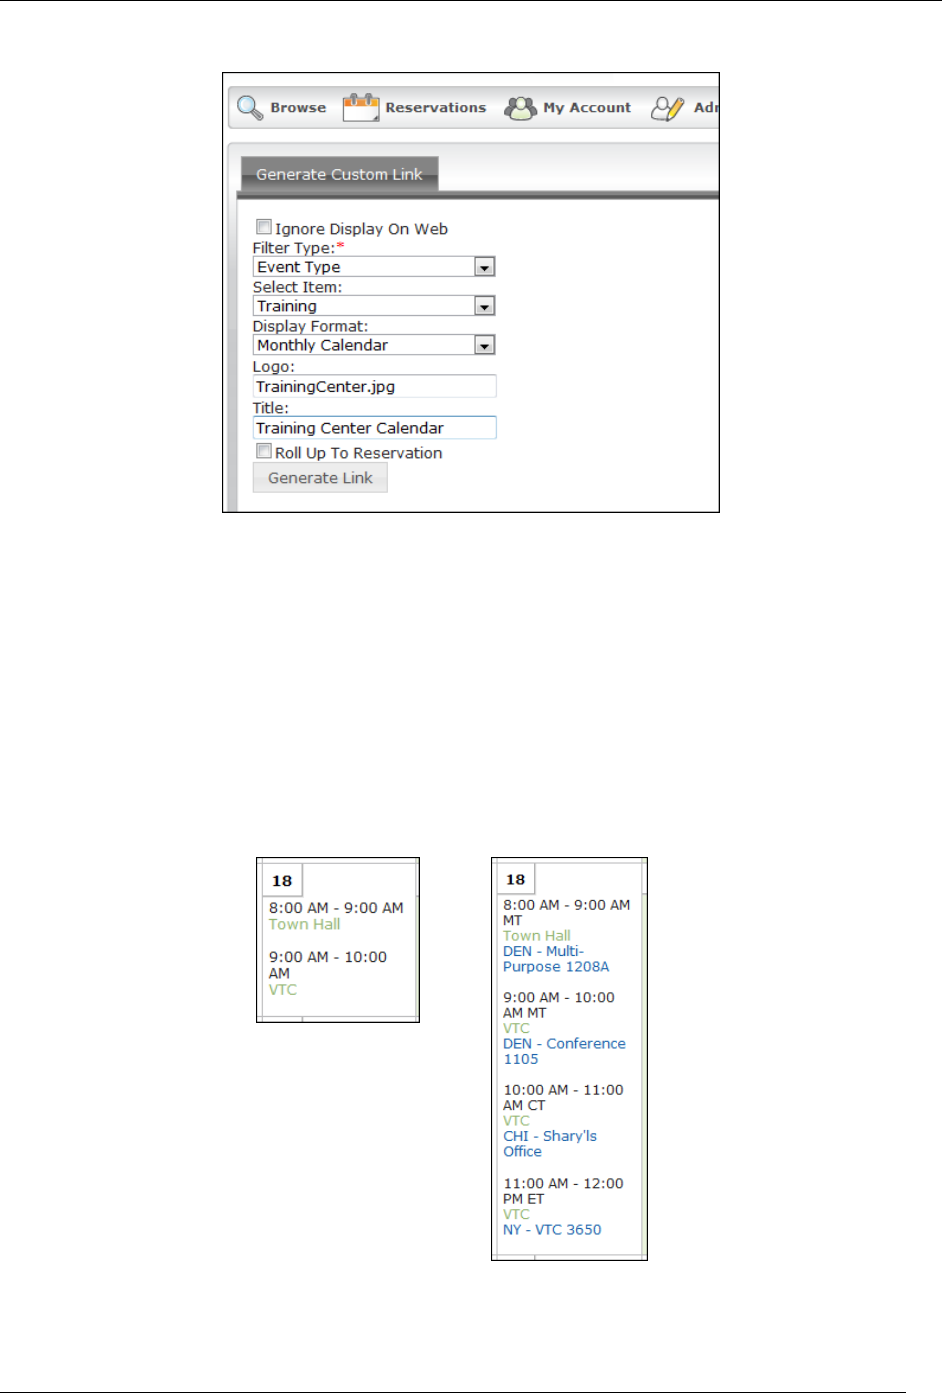
Custom Links
The Virtual EMS Browse Events page allows web users to view all public events scheduled in EMS.
Users have the option to manually filter this list of events by facility, room, event type, event name or
group name. Virtual EMS contains functionality to create a custom Browse Events link (i.e. URL) that
when accessed, pre-filters the event listing displayed to a specific building, event type, client, etc. To
create a Custom Link, please follow the steps outlined below.
1. Log into Virtual EMS using a web user ID that belongs to a Web Security Template containing the
Web Administrator Role. For information on how to configure a web user and/or Web Security
Template, please refer to your EMS Setup Guide.
2. Under the Admin menu, click Generate Custom Link.
Virtual EMS Installation Instructions
2012 Dean Evans & Associates, Inc. CONFIDENTIAL
8
3. Indicate whether or not Display On Web settings should be ignored. This setting is available on
various configuration items in EMS (e.g. event type, status, etc.) to intentionally hide events from
public view.
4. Select your Filter Type.
5. The results displayed in the Select Item dropdown will reset based on the Filter Type selected.
Pick a value in the Select Item dropdown.
6. Select your Display Format.
7. To display a custom logo that is different than the default logo used for your Virtual EMS site,
enter the logo name in the Logo field. The logo will need to exist within the Virtual EMS physical
directory on your web server (typically C:\inetpub\wwwroot\VirtualEMS\).
8. To display a custom title, enter a value in the Title field.
9. To collapse booking information so that only the reservation information is displayed, select the
Roll Up To Reservation option.
Roll Up To Reservation
Enabled
Roll Up To Reservation
Disabled
Virtual EMS Installation Instructions
2012 Dean Evans & Associates, Inc. CONFIDENTIAL
9
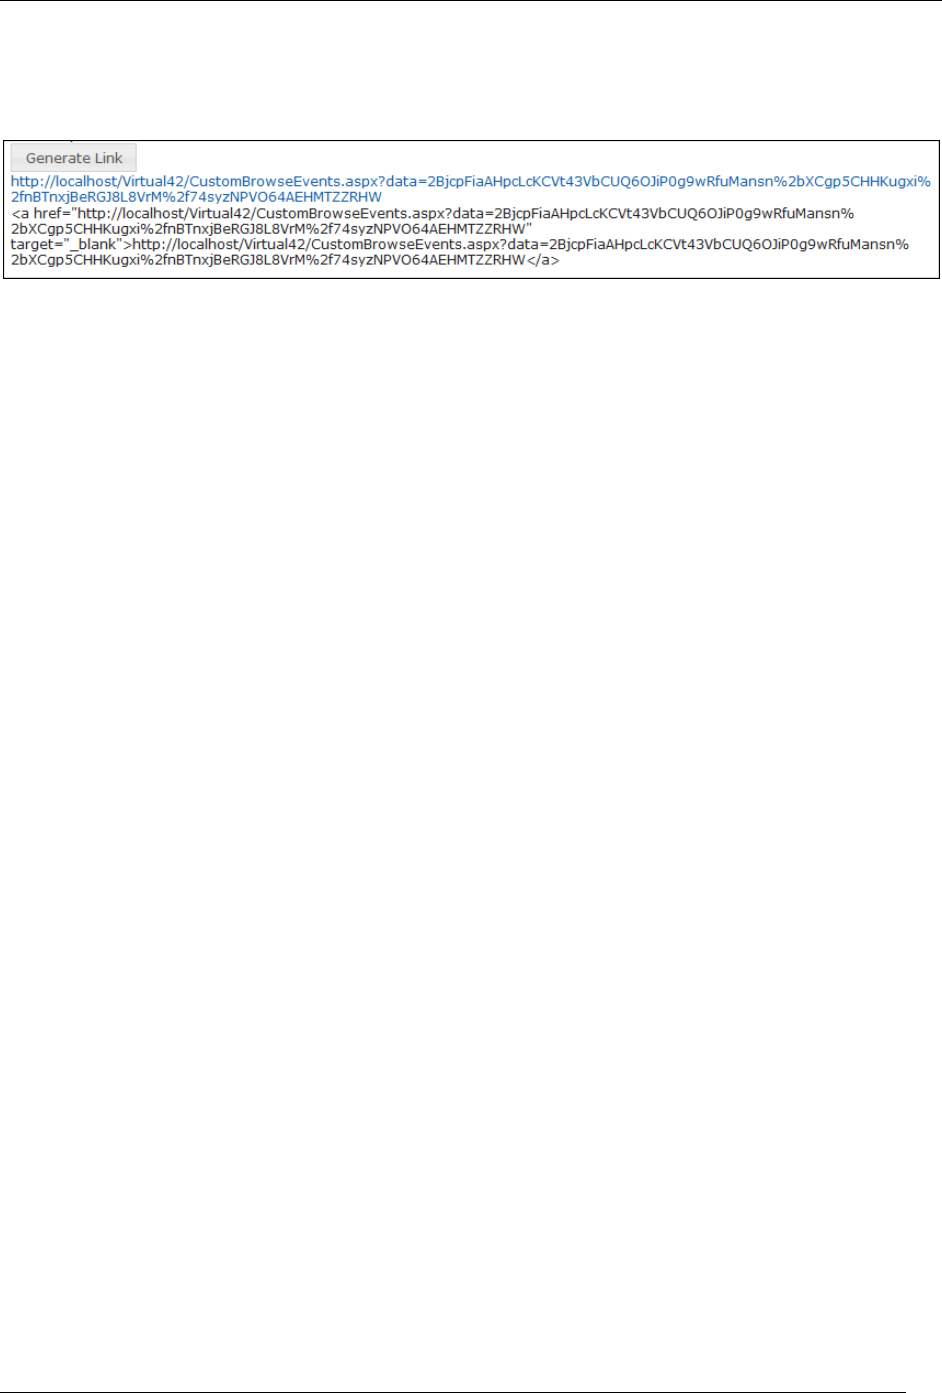
10. Click the Generate Link button to display a friendly URL and HTML code that can be added to a
web page. The URL can also be used to test your Custom Link.
Custom JavaScript
With custom JavaScript, you can extend the functionality of Virtual EMS to suit your business needs.
Please keep in mind that including custom JavaScript on Virtual EMS pages can affect performance.
When VEMS receives a request for a page, it checks for the existence of a CustomJs folder. If the folder
exists, VEMS checks for any files that match the name of the page. For instance, on the
RoomRequest.aspx page, if there is a file called RoomRequest.js in the CustomJs folder, VEMS will
include the RoomRequest.js file on the page.
In addition to the name-matched file, VEMS will also check for and include the file named global.js on
EVERY page. Follow the below steps to enable custom JavaScript
Perform the following steps to enable Custom JavaScript:
1. Enable Custom JavaScript. Open the VEMS web.config file (i.e.,
C:\inetpub\wwwroot\VirtualEms\web.config)
a. Locate the following node under the <appSettings> node
i. <add key="allowCustomJs" value="false" />
b. Change the false value to true
c. Save the file
2. Create the CustomJs folder within the root of you VEMS Install Directory (i.e.,
C:\inetpub\wwwroot\VirtualEms\CustomJs).
You are now ready to implement your Custom JavaScript. There are a couple of options:
In the newly created CustomJs folder, create a file for each of the above pages you wish to
include your custom JavaScript on (such as RoomRequest.js, EditReservation.js, or
Default.js).
In the newly created CustomJs folder, create one file called global.js that will be included on
every page in the system.
Your custom JavaScript should be included on global.js OR on each of the applicable page-specific
JavaScript files. If you include the script in both places, it could cause problems.
