Virtel User Guide
User Manual: Pdf
Open the PDF directly: View PDF ![]() .
.
Page Count: 321 [warning: Documents this large are best viewed by clicking the View PDF Link!]
- The Virtel Engine
- Introduction
- VIRTEL URL Formats
- Directory Management
- Creating Virtel Template Pages
- Introduction
- Defining the tag delimiters
- Session and context management
- Transmitting data to the host
- Where to position the elements of an HTML page
- Inserting host application data into a page
- Colour and font management
- Cursor management
- Function key management
- Setting and unsetting local options
- Handling table variables
- Inserting VIRTEL configuration values into a template
- Conditional generation
- Debugging facilities
- Signon and password management
- Encryption management
- EBCDIC translation management
- HTTP protocol management
- Cache management
- MIME type management
- Capability tokens
- Template Page upload
- 3287 printing
- Generating PDF output
- Web Access Customization
- Application Selection Menu
- Printing With Web Access
- TSO File Transfer
- Accessing VTAM Applications
- Site Customization - Colors And Logo
- Using a CSS file for customization
- Customizing the toolbar color by application
- Adding custom text to the toolbar
- Showing / Hiding server informations
- Hiding the toolbar
- Adding a company logo
- Removing 3D/hover effects on the toolbar buttons
- Changing background color of the toolbar buttons
- Icon display troubleshooting
- Site Customization - Javascript Functions
- Site Customization - The Help Page
- Enable Copy, Cut And Paste
- Virtel Customization Modes
- Macros
- VIRTEL Web Modernisation
- VIRTEL Web Integration
- Incoming E-mails
- VIRTEL Batch
- Outgoing Calls
- Programming Interfaces
- Structred Fields
- General format of a 3270 structured field
- Sending structured fields via the Write Structured Field command
- Sending structured fields using the SRTVIRTEL prefix
- How To Determine If Running Under Virtel
- Use a different transaction code
- Include parameters after the transaction code
- Use a specific range of terminal names
- FA88: Transmit large data message to application
- FAC8: Selection of page template
- FAE5, FAE6: Sending a table variable
- Call Interface
- HOST4WEB commands
- Structred Fields
- Incoming Calls
- Security
- HOWTOs
- How To Use Different Screen Sizes
- How To Support Multiple Codes Pages
- How To Handle Host Session Termination
- How To Access A Host Application Directly
- How To Change The Font For Web Access
- How To Change The 3270 Display Style
- How To Customize The Enter Key Settings
- How To Customize Display Styles
- How To Change The Default User Settings
- How To Support A Reverse Proxy
- How To Support Virtual Hosting
- How To Control APPLIST behaviour
- Appendix

Virtel User Guide
Release 4.57
Syspertec Communications
Feb 08, 2018

TABLE OF CONTENTS:
1 The Virtel Engine 3
1.1 Introduction ............................................. 3
1.1.1 What is Virtel ........................................ 3
1.1.2 VIRTEL Web Access (VWA) ............................... 5
1.1.3 VIRTEL Web Modernisation (VWM) ........................... 8
1.1.4 VIRTEL Web Integration (VWI) ............................. 11
1.1.5 VIRTEL Service Transactions ............................... 12
1.2 VIRTEL URL Formats ....................................... 13
1.2.1 Static pages ......................................... 13
1.2.2 How the path name corresponds to a VIRTEL directory ................ 14
1.2.3 Dynamic pages ....................................... 19
1.2.4 3270 session management ................................. 21
1.2.5 Capability URLs ...................................... 23
1.2.6 Transmission of Security Tokens by URL ......................... 23
1.2.7 Propagation of signon by URL .............................. 24
1.2.8 The Universal Transaction ................................. 24
1.3 Directory Management ....................................... 25
1.3.1 Accessing the administration application ......................... 25
1.3.2 Access through 3270 .................................... 25
1.3.3 Security ........................................... 26
1.3.4 Creating, modifying, and deleting directories ....................... 26
1.3.5 Dening directory parameters ............................... 28
1.3.6 Associated functions .................................... 29
1.3.7 Acccess administration portal via the web ........................ 30
1.4 Creating Virtel Template Pages .................................. 33
1.4.1 Introduction ......................................... 33
1.4.2 Dening the tag delimiters ................................. 33
1.4.3 Session and context management ............................. 34
1.4.4 Transmitting data to the host ............................... 35
1.4.5 Where to position the elements of an HTML page .................... 35
1.4.6 Inserting host application data into a page ........................ 36
1.4.7 Colour and font management ............................... 42
1.4.8 Cursor management .................................... 45
1.4.9 Function key management ................................. 47
1.4.10 Setting and unsetting local options ............................ 49
1.4.11 Handling table variables .................................. 50
1.4.12 Inserting VIRTEL conguration values into a template ................. 54
1.4.13 Conditional generation ................................... 56
1.4.14 Debugging facilities ..................................... 58
1.4.15 Signon and password management ............................ 58
i

1.4.16 Encryption management .................................. 60
1.4.17 EBCDIC translation management ............................. 61
1.4.18 HTTP protocol management ............................... 63
1.4.19 Cache management ..................................... 64
1.4.20 MIME type management .................................. 64
1.4.21 Capability tokens ...................................... 65
1.4.22 Template Page upload ................................... 66
1.4.23 3287 printing ........................................ 67
1.4.24 Generating PDF output .................................. 68
1.5 Web Access Customization ..................................... 70
1.5.1 Uploading HTML Pages .................................. 70
1.5.2 Web Access Settings .................................... 70
1.6 Application Selection Menu ..................................... 80
1.6.1 Contents of menu ...................................... 80
1.6.2 Presentation modes ..................................... 81
1.7 Printing With Web Access ..................................... 84
1.7.1 VIRTEL denitions for virtual printers .......................... 84
1.7.2 Associating virtual printers with terminals ........................ 85
1.7.3 Autoconnect for virtual printers .............................. 86
1.7.4 VTAM denitions for virtual printers ........................... 87
1.7.5 CICS denitions for virtual printers ............................ 87
1.7.6 Scenarios for SCS printing ................................. 88
1.7.7 SCS to PDF conversion .................................. 88
1.7.8 PCL printing ........................................ 88
1.7.9 PCL to PDF conversion .................................. 88
1.8 TSO File Transfer .......................................... 90
1.8.1 Denitions required for le transfer ............................ 90
1.8.2 Toolbar icons for le transfer ............................... 90
1.8.3 Receiving a le ....................................... 91
1.8.4 Sending a le ........................................ 94
1.8.5 Selecting PC Codepage for le transfer .......................... 98
1.8.6 Saving and reusing le transfer parameters ........................ 98
1.9 Accessing VTAM Applications ...................................100
1.9.1 VTAM logon screen .....................................100
1.9.2 Installing the VTAM logon transaction ..........................101
1.10 Site Customization - Colors And Logo ...............................102
1.10.1 Using a CSS le for customization ............................102
1.10.2 Customizing the toolbar color by application ......................103
1.10.3 Adding custom text to the toolbar ............................ 103
1.10.4 Showing / Hiding server informations ...........................104
1.10.5 Hiding the toolbar .....................................105
1.10.6 Adding a company logo ..................................106
1.10.7 Removing 3D/hover eects on the toolbar buttons ...................106
1.10.8 Changing background color of the toolbar buttons ...................107
1.10.9 Icon display troubleshooting ................................107
1.11 Site Customization - Javascript Functions .............................108
1.11.1 Javascript Exits which can be customized ........................108
1.11.2 Customizing Toolbar icons .................................109
1.11.3 Centering non-standard icons ...............................110
1.11.4 Removing unwanted toolbar icons .............................110
1.11.5 Positioning Toolbar Icons .................................111
1.11.6 Modifying the text of the status bar ...........................112
1.11.7 Custom hotspot recognition ................................113
1.11.8 Adding a watermark to the 3270 screen ..........................113
ii

1.11.9 Modifying Web Access Settings ..............................114
1.12 Site Customization - The Help Page ................................115
1.12.1 Standard Help Page ....................................115
1.12.2 Installing a Custom Help Page ..............................116
1.13 Enable Copy, Cut And Paste ....................................118
1.13.1 Internet Explorer ...................................... 118
1.13.2 Firefox ............................................118
1.13.3 Chrome ...........................................122
1.13.4 Manage the settings on Host with chrome ........................125
1.13.5 Using Extensions ......................................127
1.13.6 Edge .............................................129
1.14 Virtel Customization Modes .................................... 130
1.14.1 Compatibility Mode .................................... 130
1.14.2 Option mode ........................................131
1.14.3 Default mode ........................................131
1.14.4 Global level modications (All transactions under an Entry Point) ..........131
1.14.5 Transaction level modications (Individual transactions) ................133
1.14.6 Compatibility Option id ..................................134
1.14.7 Dening Transaction Options ............................... 134
1.15 Macros ................................................139
1.15.1 Storing the Macros .....................................139
1.15.2 Macros in Local Storage ..................................140
1.15.3 Macro controls .......................................141
1.15.4 Macros in VIRTEL Storage ................................143
1.15.5 Setting up to use DDI and macros ............................143
1.15.6 User Macros synchronization ...............................146
1.15.7 Managing macros with DDI ................................146
1.15.8 Automatic refresh of macros in local storage .......................153
1.15.9 Format of the macros.json le ...............................153
1.15.10 Available macro commands ................................153
1.15.11 DDI Macro Errors .....................................154
1.16 VIRTEL Web Modernisation ....................................155
1.16.1 VIRTEL Presentation modules and Scenarios ......................155
1.16.2 Scenarios stored in a load library .............................155
1.16.3 Scenarios stored in a VSAM directory ..........................155
1.16.4 Using a presentation module ................................156
1.16.5 Types of scenario ......................................156
1.16.6 Virtel Scenario language ..................................158
1.16.7 Examples of VIRTEL Web Modernisation Scenarios ..................210
1.16.8 Scenario AUTOREFRESH .................................215
1.16.9 PDF output generation ...................................216
1.17 VIRTEL Web Integration ......................................219
1.17.1 Parsing Query input ....................................219
1.17.2 Parsing XML input .....................................221
1.17.3 Presentation of XML output ................................226
1.17.4 VIRTEL as an XML parser/generator ..........................228
1.17.5 Automatic scenario generation ...............................232
1.18 Incoming E-mails ..........................................235
1.18.1 Rules of the SMTP line ..................................235
1.18.2 File transfer by e-mail ...................................235
1.18.3 Starting an application by E-Mail .............................236
1.19 VIRTEL Batch ............................................239
1.19.1 Assembling the VIRTCT for VIRTEL Batch .......................239
1.19.2 Allocating the page template le for VIRTEL Batch ..................241
iii

1.19.3 Allocating work les for VIRTEL Batch .........................241
1.19.4 Running the VIRTEL Batch job ..............................242
1.19.5 VIRTEL Batch commands .................................243
1.19.6 VIRTEL Batch RAW command ..............................244
1.19.7 VIRTEL Batch return codes ................................245
2 Outgoing Calls 247
2.1 Outgoing E-mails ..........................................247
3 Programming Interfaces 249
3.1 Structred Fields ...........................................249
3.1.1 General format of a 3270 structured eld .........................249
3.1.2 Sending structured elds via the Write Structured Field command ..........250
3.1.3 Sending structured elds using the SRTVIRTEL prex .................250
3.1.4 How To Determine If Running Under Virtel .......................250
3.1.5 Use a dierent transaction code ..............................250
3.1.6 Include parameters after the transaction code ......................251
3.1.7 Use a specic range of terminal names ..........................252
3.1.8 FA88: Transmit large data message to application ....................253
3.1.9 FAC8: Selection of page template .............................254
3.1.10 FAE5, FAE6: Sending a table variable ..........................256
3.1.11 Call Interface ........................................ 257
3.1.12 HOST4WEB commands ..................................265
4 Incoming Calls 269
4.1 Incoming E-mails ..........................................269
4.1.1 FAC8: Retrieve data from an e-mail ...........................269
4.1.2 FAD4: Sending an e-mail from a host application ....................272
5 Security 275
5.1 VIRTEL Web Access Security ................................... 275
5.1.1 Specifying security in the entry point ...........................275
5.1.2 Specifying security in the transaction ........................... 276
5.1.3 Mixed-case password support ...............................276
5.1.4 Automatic retrieval of username ..............................276
5.1.5 Data encryption by AT-TLS/SSL .............................277
5.1.6 Identication by certicate .................................277
5.1.7 Password encryption .................................... 278
5.1.8 Signon using HTML elds .................................278
5.1.9 Virtel Rules .........................................279
6 HOWTOs 283
6.1 How To Use Dierent Screen Sizes .................................283
6.1.1 LOGMODE dened by the transaction ..........................283
6.1.2 Assigning a LOGMODE by URL parameter .......................284
6.1.3 User-specied LOGMODE .................................285
6.1.4 Dynamic logmode with user-specied screen size ....................286
6.2 How To Support Multiple Codes Pages ..............................286
6.2.1 Dening Code Pages translation defaults .........................286
6.2.2 Supporting multiple countries. ...............................287
6.3 How To Handle Host Session Termination .............................287
6.3.1 Return to the application selection menu ......................... 287
6.3.2 Displaying a specic page on disconnection .......................287
6.3.3 Closing the browser window automatically ........................288
6.4 How To Access A Host Application Directly ...........................288
iv

6.4.1 Full path URL .......................................288
6.4.2 Default URL for the entry point ..............................289
6.5 How To Change The Font For Web Access ............................289
6.6 How To Change The 3270 Display Style ..............................289
6.7 How To Customize The Enter Key Settings ............................290
6.7.1 Managing CTRL keydown being lost ...........................290
6.8 How To Customize Display Styles .................................290
6.8.1 Add or remove a display style ...............................290
6.8.2 Add or remove a print style ................................291
6.8.3 3270 support blinking elds ................................292
6.9 How To Change The Default User Settings ............................293
6.10 How To Support A Reverse Proxy .................................293
6.11 How To Support Virtual Hosting ..................................293
6.12 How To Control APPLIST behaviour ............................... 293
7 Appendix 295
7.1 Appendix A .............................................295
7.1.1 Default values for W2H parameters ............................295
7.2 Trademarks ..............................................296
7.3 Open Source Software ........................................297
v

vi

Virtel User Guide, Release 4.57
VIRTEL User Guide
Warning: This is a draft version of the document.
Version : 4.57
Release Date : 08 Jan 2018. Publication Date : 08/01/2018
Syspertec Communication
196, Bureaux de la Colline 92213 Saint-Cloud Cedex Tél. : +33 (0) 1 46 02 60 42
www.syspertec.com
NOTICE
Reproduction, transfer, distribution, or storage, in any form, of all or any part of the contents of
this document, except by prior authorization of SysperTec Communication, is prohibited.
Every possible eort has been made by SysperTec Communication to ensure that this document
is complete and relevant. In no case can SysperTec Communication be held responsible for any
damages, direct or indirect, caused by errors or omissions in this document.
As SysperTec Communication uses a continuous development methodology; the information con-
tained in this document may be subject to change without notice. Nothing in this document
should be construed in any manner as conferring a right to use, in whole or in part, the products
or trademarks quoted herein.
“SysperTec Communication” and “VIRTEL” are registered trademarks. Names of other products
and companies mentioned in this document may be trademarks or registered trademarks of their
respective owners.
TABLE OF CONTENTS: 1

Virtel User Guide, Release 4.57
What’s new in Virtel 4.57
VIRTEL Web Access:
• Bidirectional presentation support.
• Enhanced font stretch mode. Optimization of screen size.
• Additional RACHECK support for ForceLUNAME
• Licence warning feature
• Enhancements to USSMSG10 support module
• Enhancements to Virtel Web Macro interface (VWM)
–Keyboard mapping enhancements
• Enhancements to Virtel Dynamic Directories Interface (DDI)
–Hotkey support for DDI macros
–New refresh options.
VIRTEL Web Modernisation & Integration:
• Enhancements to COPY$ NAME-OF. Support for TERMINAL, GROUP and RELAY items.
• Enhancements to DEFAULT-FILED-WITH-CURSOR statement.
Miscellaneous:
• Customizable HELP solution.
• DNS access to resolve IP address or DNS name.
• TCT option to support mixed case passwords
• Additional language support
• Batch export/import of RAW TRSF les.
Note: For further details see the Technical Newsletter: TN201706 - What’s new in Virtel 4.57.
2 TABLE OF CONTENTS:
CHAPTER
ONE
THE VIRTEL ENGINE
1.1 Introduction
1.1.1 What is Virtel
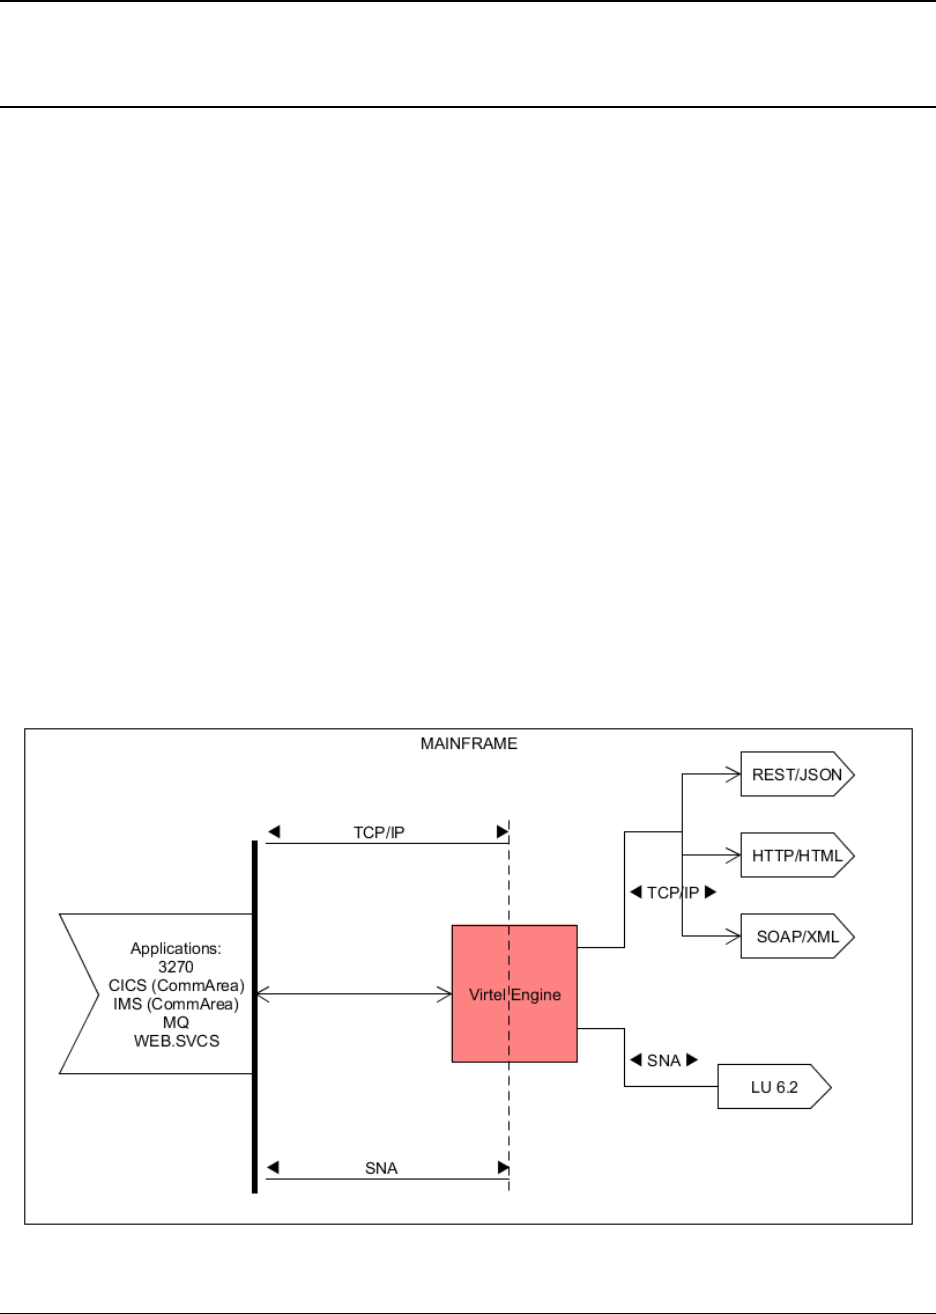
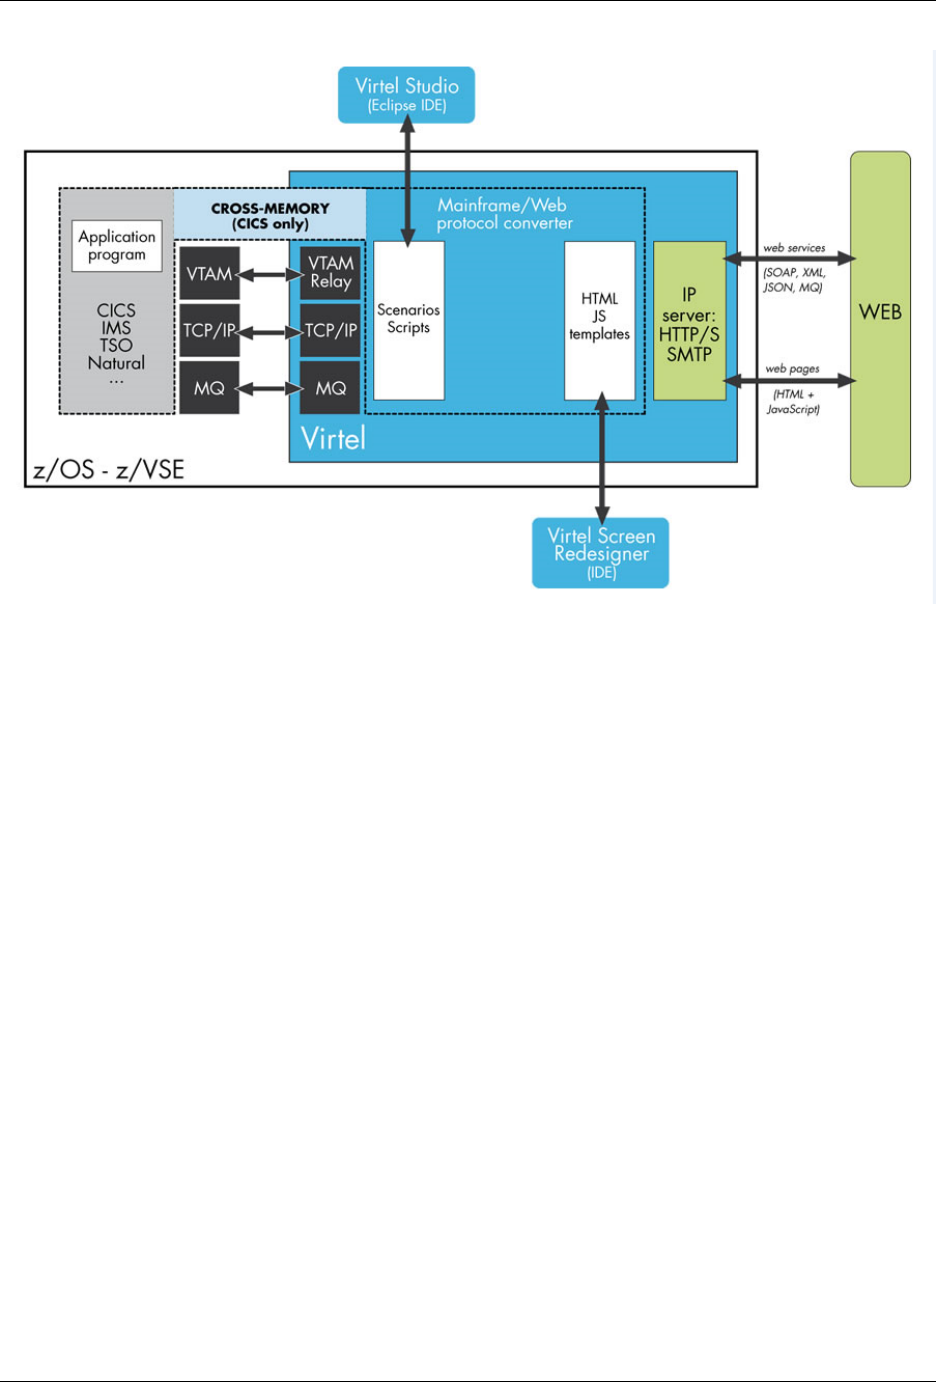
Simply put, Virtel is a host-based protocol converter that runs as a started task on the mainframe. At
the core of Virtel is the Virtel Engine which sits between host applications and external environments such
as the web or another external server. Virtel supports the following standard protocol - TCP/IP, SMTP,
HTTP/S, SOAP, MQ-SERIES, SNA, 3270, ICAL (IMS) and the inherited protocols - X25, XOT, XTP,
LU 6.2 to interface between host applications and external services. A classic example for Virtel would
be interfacing between legacy 3270 applications, running on the host, and the web. Virtel would provide
protocol conversion between data arriving from the browser is converted into a 3270 data-stream and sent
to the application. Users would no longer require 3270 terminal emulators products to interface with legacy
host applications. Access can now be provided through the users standard web browser. Various character
code page sets are supported, including DBCS character code sets.
The following diagram illustrates some of the protocols and applications supported by the Virtel Engine.
The Virtel Engine
3

Virtel User Guide, Release 4.57
Virtel provides three models. Web Access (VWA/W2H), Web Modernisation (VWM) and Web Integration
(VWI). In the next section each model is described in detail. Regardless of the model, Virtel’s mainframe
requirements are the same. The basic le requirements are as follows:-
• SAMP TRSF VSAM File. Contains the templates and web artefacts (JavaScript, Images, HTML, CSS
elements etc.) which are served to the browser.
• HTML TRSF VSAM File. Contains user customisation web artefacts (JavaScript, HTML, Images,
HTML, CSS elements etc.)
• LOADLIB PDS. Virtel load library
• ARBO VSAM File. Contains customer conguration data.
• Ancillary les. Statistics, logs, tracing etc.
Virtel normally runs as a started task on the mainframe. Multiple instances of Virtel can be run on the
same LPAR and can run within a SYSPLEX environment, beneting from the load balancing services that
such environments provide. See the Virtel Installation manual for a full description of the Virtel mainframe
requirements. Virtel can also be run as a batch process, providing a “batch” service between external servers.
See the section Virtel Batch or the Virtel Connectivity Manual for further information on running Virtel in
batch.
Like any other web page servers Virtel responds to an incoming URL and serves template pages. The URL
targets one of the TCPIP ports that Virtel is listening on. The URL will identify the IP address of the
z/OS environment, and the port address will target the Virtel Instance. The pathname and parameters of
the URL will identify the Virtel Transaction that will be used to process the URL request. A URL example
is shown below. This is a URL requesting a connection to a CICS application called SPCICS. SPCICS is
the name of the Virtel transaction that will deal with the request. The pathname “/w2h/WEB2AJAX.htm”
identies a Virtel 3270 template that will be used to support the transaction, providing the framework to
convert between 3270 data-stream and HTML presentations.
http://192.168.170.33:41002/w2h/WEB2AJAX.htm+SPCICS
For more information on the Virtel URL formats see the section Virtel URL Formats.
4 Chapter 1. The Virtel Engine

Virtel User Guide, Release 4.57
1.1.2 VIRTEL Web Access (VWA)
VIRTEL Web Access, formerly known as “Web-to-Host” (W2H), is a set of functions which provides access
to mainframe 3270 legacy applications via the user’s browser window. In the VWA model the Virtel Engine
comprises of two components, a HTTP server and a VTAM component serving the back-end VTAM legacy
applications, pertaining to operate as an LU2 device(s).
The principle operation of VWA is the production and delivery of 3270 data-streams as HTML pages. Static
template page and web elements supporting VWA are stored and maintained in a Virtel directory on the
mainframe at the host site. The pages served to the browser contain standard HTML tags, CSS, JavaScript
elements and HTML tags specic to VIRTEL. Invoked by a browser or a program, these pages form the basis
of an “on the y” translation of 3270 data-streams, thus enabling the dynamic generation and delivery of a
3270 presentation to the browser. No terminal emulation software is required. The VWA model also includes
functions which allow dynamic modication of the original 3270 presentation, with the aim of making the
interface as “clickable” as possible. This chapter describes the set of functions required to support VWA
and presupposes a certain knowledge Web technologies and HTML page construction.
Some fundamental dierences to standard terminal emulation protocol must be taken into consideration:
1. Sessions between a browser and the Virtel HTTP server are in disconnected mode, while they are in
connected mode between VIRTEL VTAM component and the host application.
2. The ow of information between the Virtel HTTP server and a client’s browser occurs on the initiative
of the client or through an optional ‘Long Poll’ asynchronous session.
3. A single request from the browser will only invoke a single response from the HTTP server, while the
transmission of a message to an application on the host may generate several response messages at
once (for example, a message to clear the screen followed by a new screen image).
These dierences give rise to a need to ensure maintenance of session context between a client and a host
application. This is done by the SESSION-CODE tag embedded in the Virtel template pages. Although
the HTML pages used to display 3270 data contain specic VIRTEL tags, these pages can be developed
using standard web development tools. The pages containing VIRTEL specic tags are stored in a VIRTEL
directory along with other Virtel web elements such as Java Script modules, CSS style sheets and images.
The VIRTEL directory, known as the W2H directory, is located in the VSAM SAMP.TRSF le.
1.1. Introduction 5
Virtel User Guide, Release 4.57
Let’s look at how VWA works.
VWA Overview
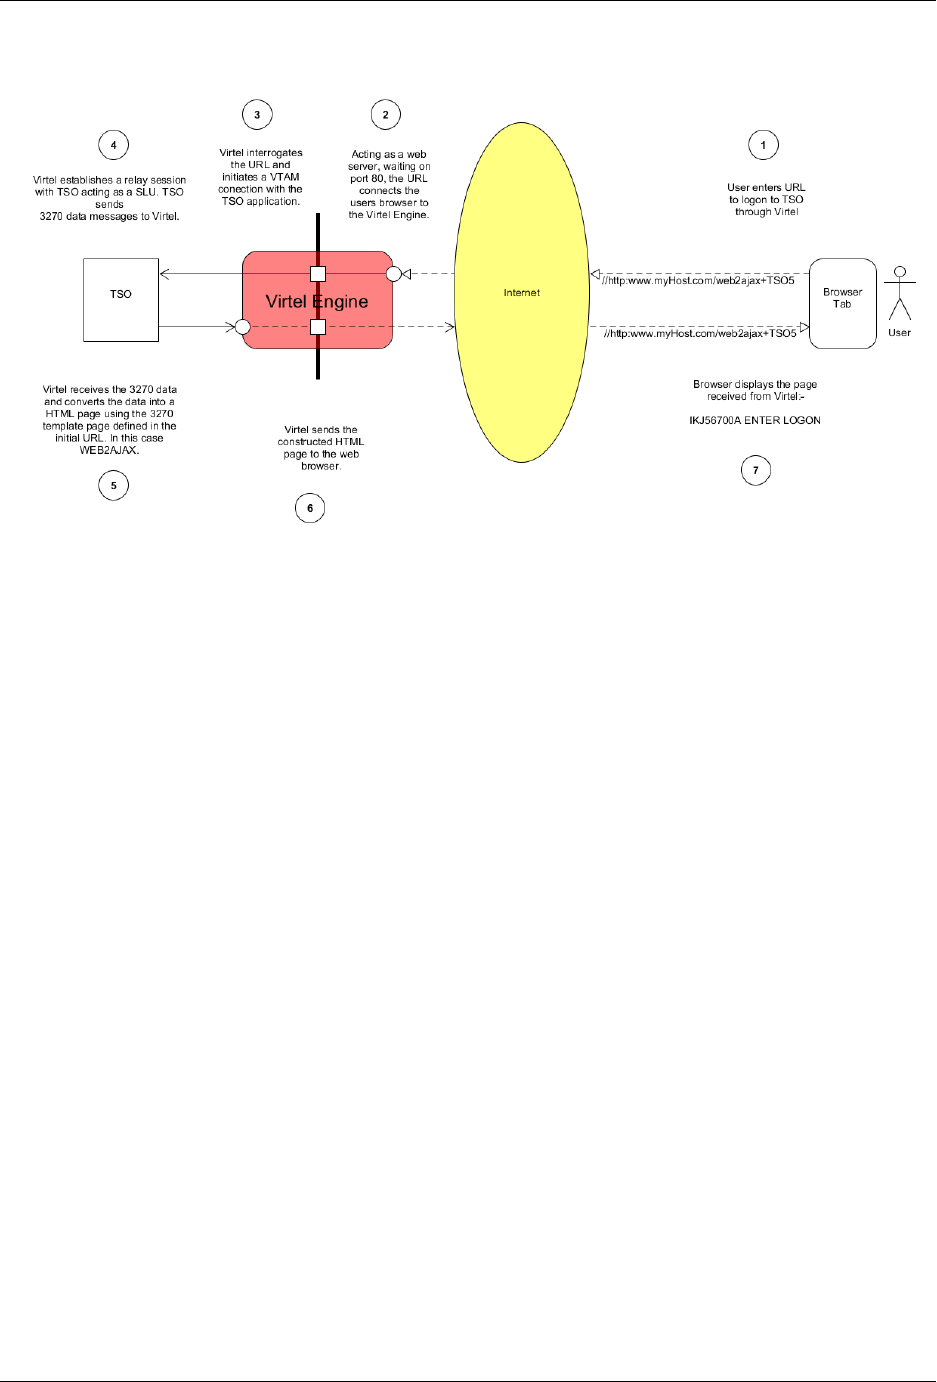
1. The user enters a URL which points to the Virtel Engine. In this case http:www.my-
Host.com/WEB2AJAX+TSO5. Virtel, running as a web server, will be listening on default port
80 for any incoming calls. When Virtel receives the call-in it will process the pathname of the URL
(/WEB2AJAX+TSO5) to determine a course of action.
2. The pathname /WEB2AJAX+TSO identies a Virtel HTML page TEMPLATE (WEB2AJAX) and a
transaction. In this case the transaction is TSO. Virtel, through its conguration, recognizes the TSO
transaction as being a VTAM application and initiates a VTAM session with TSO.
3. A VTAM connection is established between TSO and Virtel with Virtel acting as a virtual terminal
relay between the browser and TSO. Subsequent HTML pages received from the browser will now be
converted to 3270 data streams and will be sent to TSO as if they had come from a 3270 terminal. 3270
data streams sent by the TSO application will be converted into HTML pages using the WEB2AJAX
template and sent to the browser.
4. TSO responds to the session request and sends a 3270 screen to Virtel.
5. Virtel, acting as a SLU in the VTAM session, receives the 3270 data stream from the host and constructs
a HTML web-page incorporating the 3270 data. It uses the HTML page WEB2AJAX.HTML as a
template. Virtel pages are maintained in the W2H directory located within the SAMP.TRSF VSAM
le.
6. The constructed HTML page is sent to the users browser.
7. The browser displays the page created by Virtel which will resemble a 3270 screen.
6 Chapter 1. The Virtel Engine
Virtel User Guide, Release 4.57
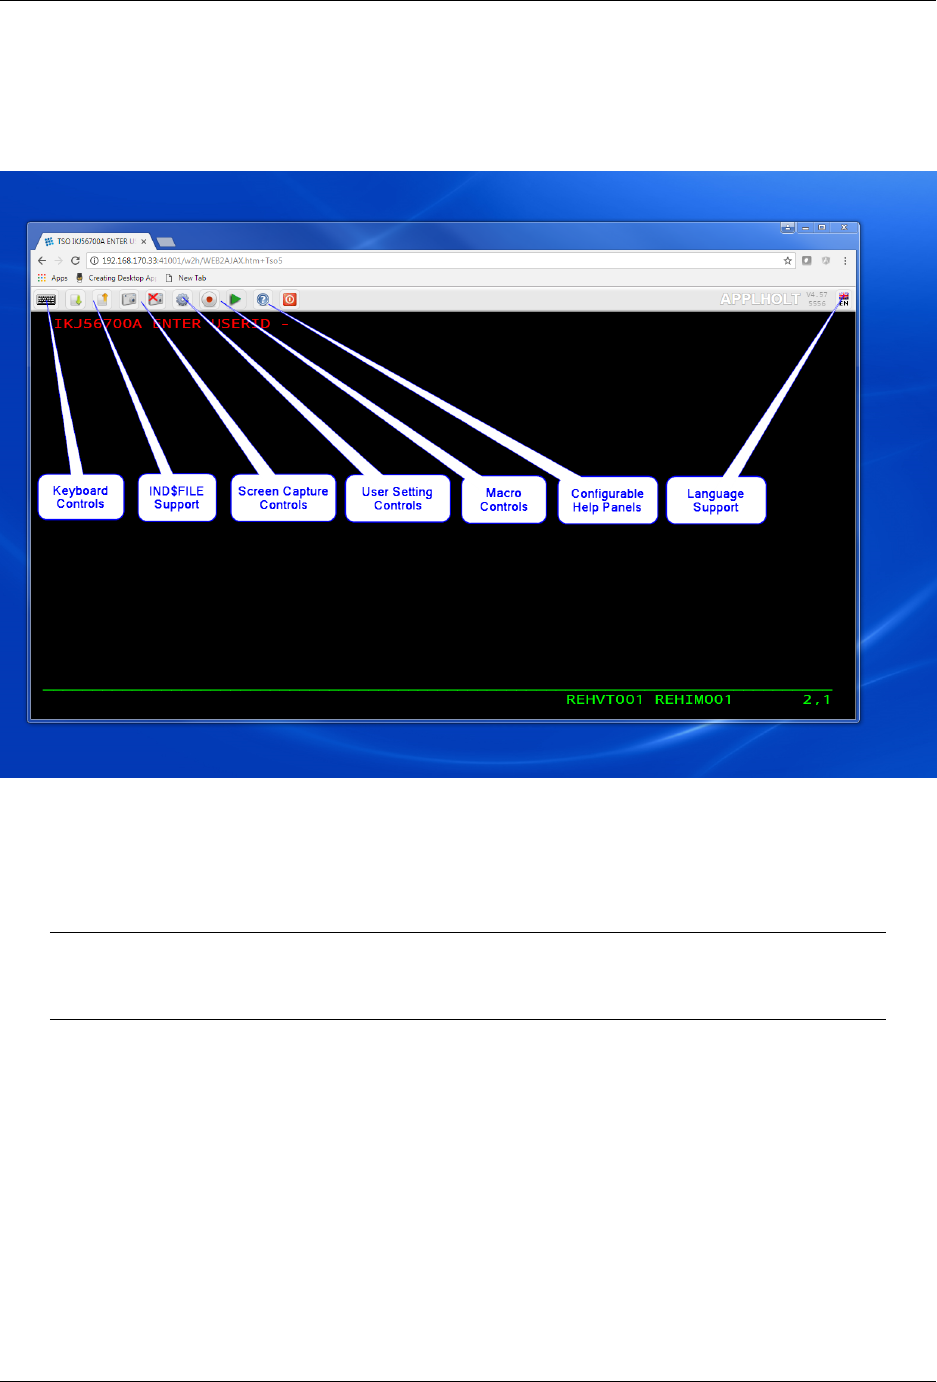
Features of Virtels VWA Presentation
A sophisticated and rich set of features are available with VWA through the use of the tool bar. Conguration
of the tool-bar is also possible. The following list summarizes the tool-bar features presented with the
standard VWA 3270 template:-
VWA 3270 Example
• Keyboard Controls. A user can send a variety of keyboard functions, such as PA2, ATTN,
etc. through the keyboard control.
• IND$FILE support.
Note: The IND$FILE function must not be considered as a replacement for a FTP client/server
architecture. Sending or receiving large les across this interface could result in performance
issues. Virtel provides a means of restricting le transfer sizes to avoid such a situation.
• Screen capture controls which provide a variety of capture options including 1/2/3 page-up
images within a single capture buer.
• User setting controls enables an individual user to set their own Virtel controls and prefer-
ences.
• Macro Support. Enables a user to create macros to drive screen logic and repetitive tasks.
• Congurable help panels. Bespoke help panels can be developed to support business appli-
cations.
• Language support. Virtel supports a variety of dierent languages.
1.1. Introduction 7

Virtel User Guide, Release 4.57
1.1.3 VIRTEL Web Modernisation (VWM)
VIRTEL Web Modernisation, formerly known as “Host-Web-Services” (HWS), allows the presentation of
3270 host applications to be modied, without modifying the application itself. The presentation can be
adapted to a format (HTML, XML, Excel, etc.) suited to the requester, while hiding the details of navigation
within the 3270 transactions.
This function is implemented through a combination of the VIRTEL Web Access functions described in
Creating HTML and XML templates, and the Virtel scenario language described in Web Modernisation
VIRTEL Scenarios.
VIRTEL Web Modernisation allows “frozen” or “untouchable” 3270 transactions to be accessed by inter-
mediate servers (n-tier architecture) or from a browser, while hiding the details of navigation within the
transactions. Variable input data for the transaction can either be included in the URL (GET method), or
sent as data with the HTTP request (POST method).
With modernisation, for example, several 3270 round trips can be made to the host application within a
presentation scenario before returning the nal result to the browser. Data could be extracted from the
individual host responses and encapsulated into one HTML page. For example when a user requests a “list”
this could result in a sequence of key strokes and displays between the application and Virtel. Taking the
example:-
User enters "ASMITH" in CICS MAP as a search operand.Presses Enter.
First Screen returned.
User press PFK8 to obtain next screen.
Second screen returned.
User press PFK8 to obtain next screen.
Third screen returned.Last in sequence.
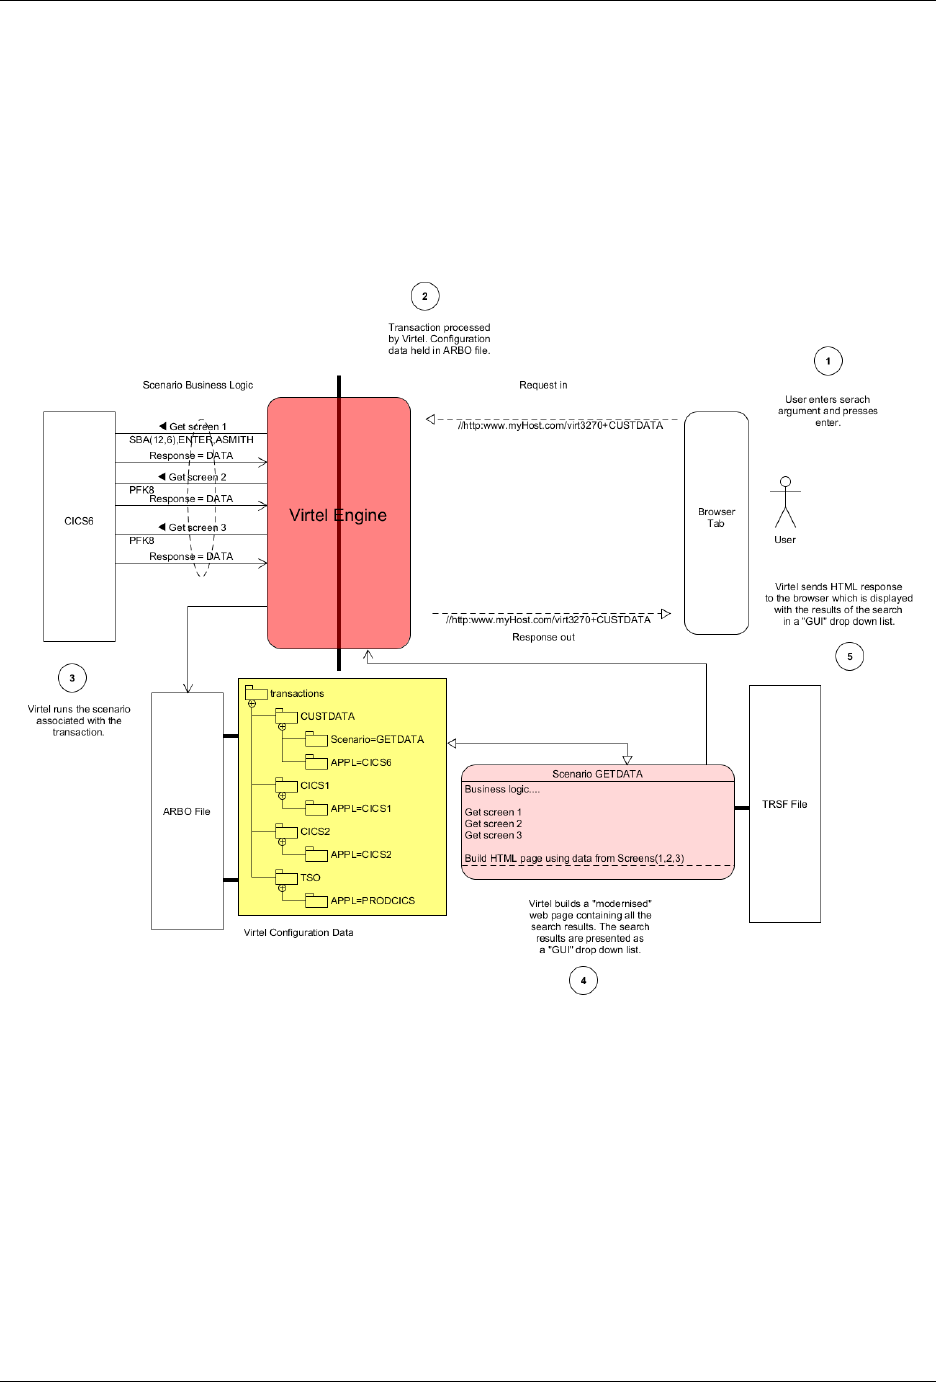
The above business logic i.e. “search for a name” can be incorporated into a Virtel Scenario as illustrated in
the diagram below. We have called the scenario GETDATA. The user enters the search argument “ASMITH”
and presses Enter. The HTML request is sent to Virtel. The HTML request, based upon the submitted
URL, is targeted towards transaction CUSTDATA which is a VTAM application transaction associated with
CICS6, a legacy CICS application. The CUSTDATA Virtel transaction is dened with scenario GETDATA.
This conguration data is maintained in the VIRTEL ARBO le.
8 Chapter 1. The Virtel Engine
Virtel User Guide, Release 4.57
When the user submits the URL from the browser Virtel will establishe a VTAM session with CICS6 and
then will continue to run the scenario GETDATA. The scenario contains the business logic which will perfom
the key stokes to obtain all the relevant data from multiple 3270 screens. The scenario will then build a
modernised web page which will contain a GUI “drop down list” encapsulating all data obtained from the
three 3270 CICS displays. The HTML response is sent back to the user.
The user has entered only one keystroke to submit the transaction and received one response. The data
within the HTML response will represent all the data extracted from several 3270 displays. The response
data will be presented in a “modernised” GUI fashion.
VWM Overview
1. The user enters a URL which identies the Virtel transaction CUSTDATA.
2. The conguration data for the transaction CUSTDATA is loaded from the Virtel Conguration repos-
itory held within the Virtel ARBO VSAM dataset. The transaction CUSTDATA has a scenario
associated with it called GETDATA.
3. The GETDATA scenario is then used to navaigate through 3270 screens, collecting data from each
screen.
4. The scenarion builds a “clickable” GUI template using the data extracted from the three 3270 screens.
The template is presented to the browser.
5. The user has a modernised version of the original 3270 presentation incorporating a GUI drop down
from which they can navigate to the next sceen. A master/detail pattern has been deployed by
1.1. Introduction 9

Virtel User Guide, Release 4.57
the Virtel scenario, presenting the user with data from three separate 3270 screens. Modernisation
improves the users UX/UI presentation experince and by doing so enhances and improvers navigation
of the legacy business logic. Less network transfer is consumed as the number of original 3270 screens
is consolidated into one Virtel GUI master/detail screen.
10 Chapter 1. The Virtel Engine

Virtel User Guide, Release 4.57
1.1.4 VIRTEL Web Integration (VWI)
The objective of VIRTEL Web Integration, formerly known as “Host-for-Web” (H4W), is to allow a host
application to take maximum control of its web interface, for example through web services. This is in
complete contrast to VWA/VWM, whose objective is to avoid modication of host applications.
To control its web interface, an application has at its disposal primarily the 3270 screen, the VIRTEL table
variable facility, the HTML page template, and a set of VIRTEL commands contained in structured elds.
Additionally, for browser requests which enter VIRTEL using an entry point which species emulation type
“HOST4WEB”, the application can also use a set of VIRTEL control commands which can be embedded in
the 3270 screen via a BMS map, ISPF panel, or 3270 data stream. These HOST4WEB commands, available
from VIRTEL version 4.28 onwards, provide the same general functions as the structured eld commands
in earlier versions.
Table variables, structured eld commands, and HOST4WEB commands, are sent by the application to the
3270 session using standard methods (EXEC CICS SEND, ISPEXEC DISPLAY PANEL, TSO TPUT, etc).
VIRTEL intercepts and acts upon these commands, for example by selecting the page template or loading
data which can be referenced by VIRTEL orders embedded in the page templates and used to build lists of
values or data tables.
VMI enables an application to create a dynamic dialog between its transactions and web applications through
the creation of interactive bidirectional dialogs across the Internet between host (CICS, IMS, Ideal, Natural,
etc.) and server-based applications using XML/HTML web services or other communication procedures.
Incoming and outgoing Web Services Support
Incoming calls
• To expose host applications to web clients though web services, Virtel can be congured to:
• Receive and parse incoming web service calls
• Execute the appropriate transactions
• Receive data returned by the transactions in the form of screens, structured elds, COMMAREA, or
database segments
• Reformat and wrap that data with XML, JSON, HTML, SOAP, CSV, PDF, Word, JSON, etc.
• Serve it back to the web callers
Outgoing calls
• In the outgoing direction (host-initiated web services) the mechanism is the same, just reverse.
VWI can be congured to support a wide range of interfaces, protocols and APIs which can :-
• Expose mainframe applications and data as web services to web clients
• Invoke web services for the count of mainframe applications
• Support interactive exchange procedures between mainframe and web applications for cooperative work
• Function as a SOAP, MQ, PHP… server
• Transfer data blocks larger than 32KB, or blocks of data with variable format
• Convert data from DBCS (Double Byte Character Set) used by Japanese, Chinese, Russian… worksta-
tions or applications to EBCDIC, and vice/versa
• Serve 3270 data as international icons to eliminate natural languages from user interfaces
• Replace web connectors developed by IBM (CWS, CTG, HOD, IMS Connect, etc) and ISVs, or home-
grown (CICS socket programming)
1.1. Introduction 11
Virtel User Guide, Release 4.57
VWI Overview
For more information, refer to the chapter “Programming Interfaces”.
1.1.5 VIRTEL Service Transactions
A Service Transaction is a long-running VIRTEL transaction which maintains a session with a host applica-
tion and uses this session to serve a series of HTTP request / responses. Unlike a regular HTTP transaction,
which serves requests only from its originating user, identied by a specic VIRTEL SESSION-CODE, a
service transaction can serve a dierent user each time it processes an HTTP request. Service transactions
are typically used to provide fast access to public information such as the lists of eld values displayed by
the “VIRTEL Suggest” feature.
A service transaction is started by an HTTP URL in exactly the same way as a regular transaction, but when
it has nished processing its rst HTTP request, it indicates its readiness to serve another user, either by
means of the script command &) described under the heading “Transactions — Connection / Disconnection
Scripts” in the VIRTEL Connectivity Reference documentation, or by means of the ACTION$ SERVE-
ANOTHER-USER command in a scenario.
A service transaction remains connected to the host application between input messages. It is then eligible
to process any HTTP request which species the same entry point and transaction name. Since service
transactions can potentially be used by many dierent users, a typical service transaction will provide
information which is not sensitive to being signed-on as a particular user.
12 Chapter 1. The Virtel Engine

Virtel User Guide, Release 4.57
1.2 VIRTEL URL Formats
1.2.1 Static pages
Virtel locates static HTML pages through the URL passed to the Virtel Engine and the conguration deni-
tions dened within the Virtel ARBO VSAM le. An endpoint for Virtel is dened by a Virtel line denition
which identies the TCP/IP port that Virtel listens on for incoming calls. By default Virtel uses two end-
points or ports, 41001 for Administration and port 41002 for user or client transactions. Each endpoint is asso-
ciated with a default Entry Point; WEB2HOST in the case of 41001 and CLIWHOST for 41002. Transactions
are associated with End Points. An endpoint can be associated with more than one Entry Point. Virtel pro-
vides a Rule facility whereby an Entry Point can be selected by incoming call criteria - IP address for example.
Virtel Static Pages
Virtel stores pages and web elements within VIRTEL diretories located in TRSF VSAM les. The general
form of the URL for an HTML page stored in a VIRTEL directory is:
http://ipaddr:port/pathname/pagename
ipaddr:port Corresponds to the “Local ident” eld of an HTTP line dened to VIRTEL. The rules of the
line are used to select the entry point. This entry point, which must specify emulation type HTML,
contains the list of transactions which the user is authorized to invoke.
pathname Represents a VIRTEL directory containing HTML pages or other elements. Refer to the section
“How the path name corresponds to a VIRTEL directory” below for details of how the pathname is
1.2. VIRTEL URL Formats 13

Virtel User Guide, Release 4.57
used to select the VIRTEL directory.
pagename Is the name of an element (HTML page, etc.) in the specied directory. VIRTEL converts the
element name to upper case (unless “case sensitive” is specied in the directory denition), and trun-
cates the name if necessary to the maximum length specied in the directory denition (see “Directory
Management”).
VIRTEL also accepts certain abbreviated forms of the URL:
http://ipaddr:port/pathname
ipaddr:port Is the address of the HTTP line, as before.
pathname Represents a VIRTEL directory, as described above. In this case, VIRTEL loads a default page
from this directory. The default page name is the same as the entry point name. Note: the trailing
slash is compulsory.
http://ipaddr:port/pagename
ipaddr:port Is the address of the HTTP line, as before.
pagename Is the name of a page to be loaded from the default directory. The default directory corresponds
to a default pathname equal to the entry point name.
http://ipaddr:port
ipaddr:port Is the address of the HTTP line, as before.
In this case, VIRTEL loads the default URL. VIRTEL obtains the default URL from the “TIOA at logon”
eld of the default transaction. The default transaction is a type 4 transaction which has the same name as
the entry point. See example 7 below for an example of a default URL. If the “TIOA at logon” eld of the
default transaction is blank, then VIRTEL loads the default page from the default directory. The default
page has the same name as the entry point, and the default directory corresponds to a default pathname
equal to the entry point name.
1.2.2 How the path name corresponds to a VIRTEL directory
The pathname specied in a VIRTEL URL is used to select a VIRTEL directory which contains
HTML page templates and other elements such as CSS stylesheets, JavaScript procedures, and
GIF or JPEG images. VIRTEL directories have a simple 8-character case-insensitive name,
whereas the pathname is expressed in Unix-style syntax (one or more case-
sensitive components separated by slashes), as is conventional for web applications. VIRTEL
must therefore translate the Unix-style pathname into a VIRTEL directory name.
The process of mapping a pathname to a VIRTEL directory name is carried out by means of
VIRTEL transactions which are dened under the entry point selected for each request by the
rules of the HTTP line. The entry point contains both processing transactions (application types
1, 2, and 3) and directory transactions (application type 4).
To nd the directory which corresponds to the pathname, VIRTEL looks for a type 4 transaction
whose external name matches the rst component of the pathname, and whose “Check URL
prex” eld is either blank or matches the start of the pathname. The name of the VIRTEL
directory is contained in the “Application name” eld of the rst such matching transaction found
under the entry point.
Note:
14 Chapter 1. The Virtel Engine
Virtel User Guide, Release 4.57
• The comparison of the rst component of the pathname with the transaction external name
is case insensitive, and if the rst component of the pathname is longer than 8 characters,
only the rst 8 characters are compared.
• The comparison of the beginning of the pathname against the transaction’s “Check URL
prex” eld is case sensitive.
• The “Check URL prex” eld may contain “%20” to represent a blank and “?” to ignore a
character position.
• If the “Check URL prex” eld is completely blank it is considered to match any pathname
whose rst component matches the transaction external name.
Examples
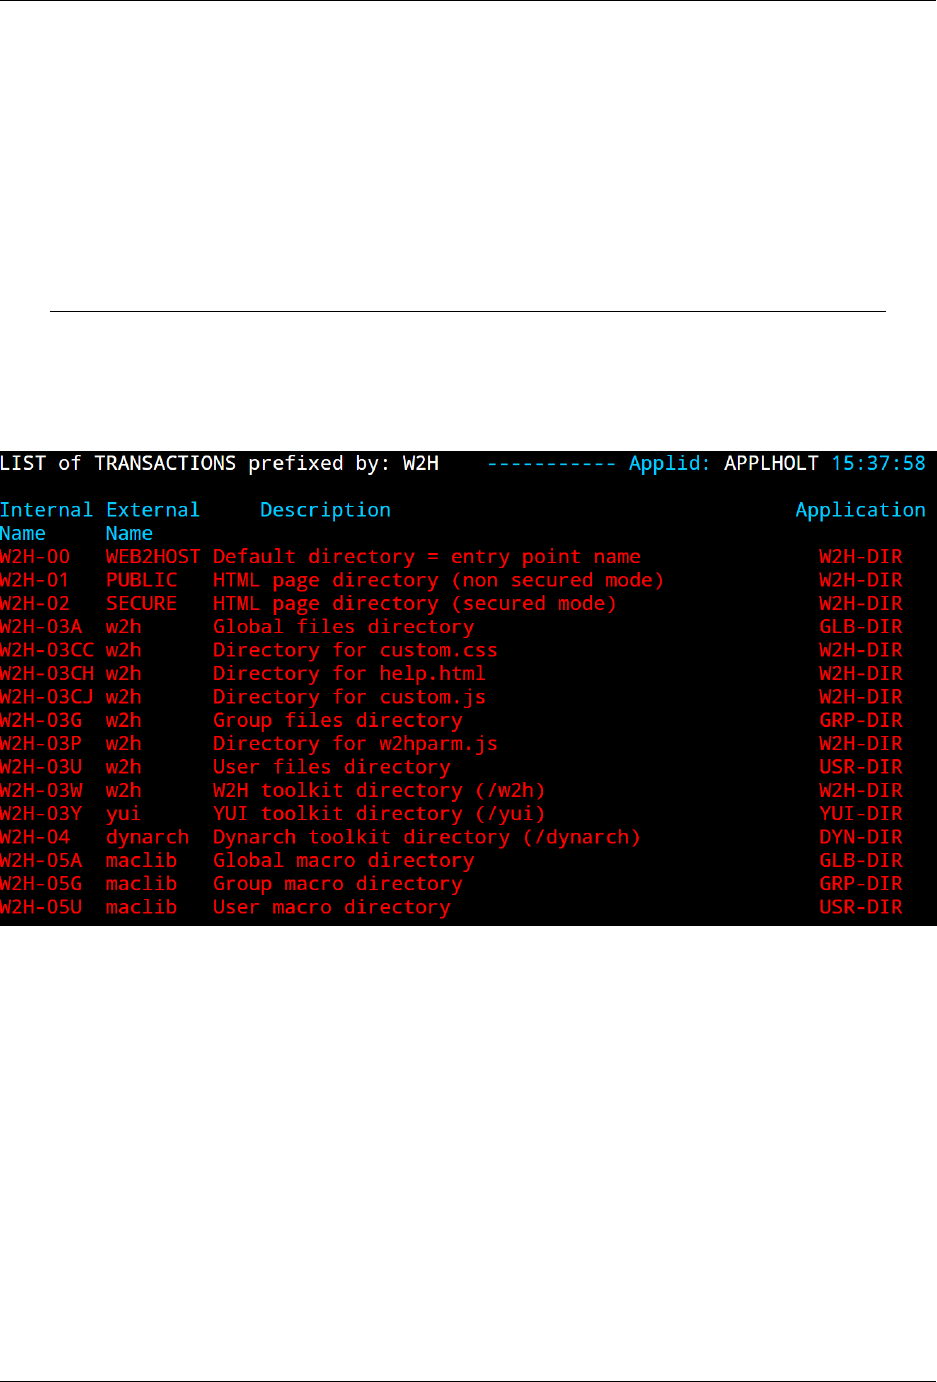
Assume that entry point WEB2HOST contains the following transactions:
Transactions under entry point WEB2HOST
In this example, transactions W2H-00, W2H-03*, W2H-05* are “application type 4” (directory transactions).
Other transactions, such as “application type 1” (processing transactions i.e. TSO, CICS, etc.) play no part
in the directory selection process.
The gure below shows an example of the detail of a directory transaction:-
1.2. VIRTEL URL Formats 15
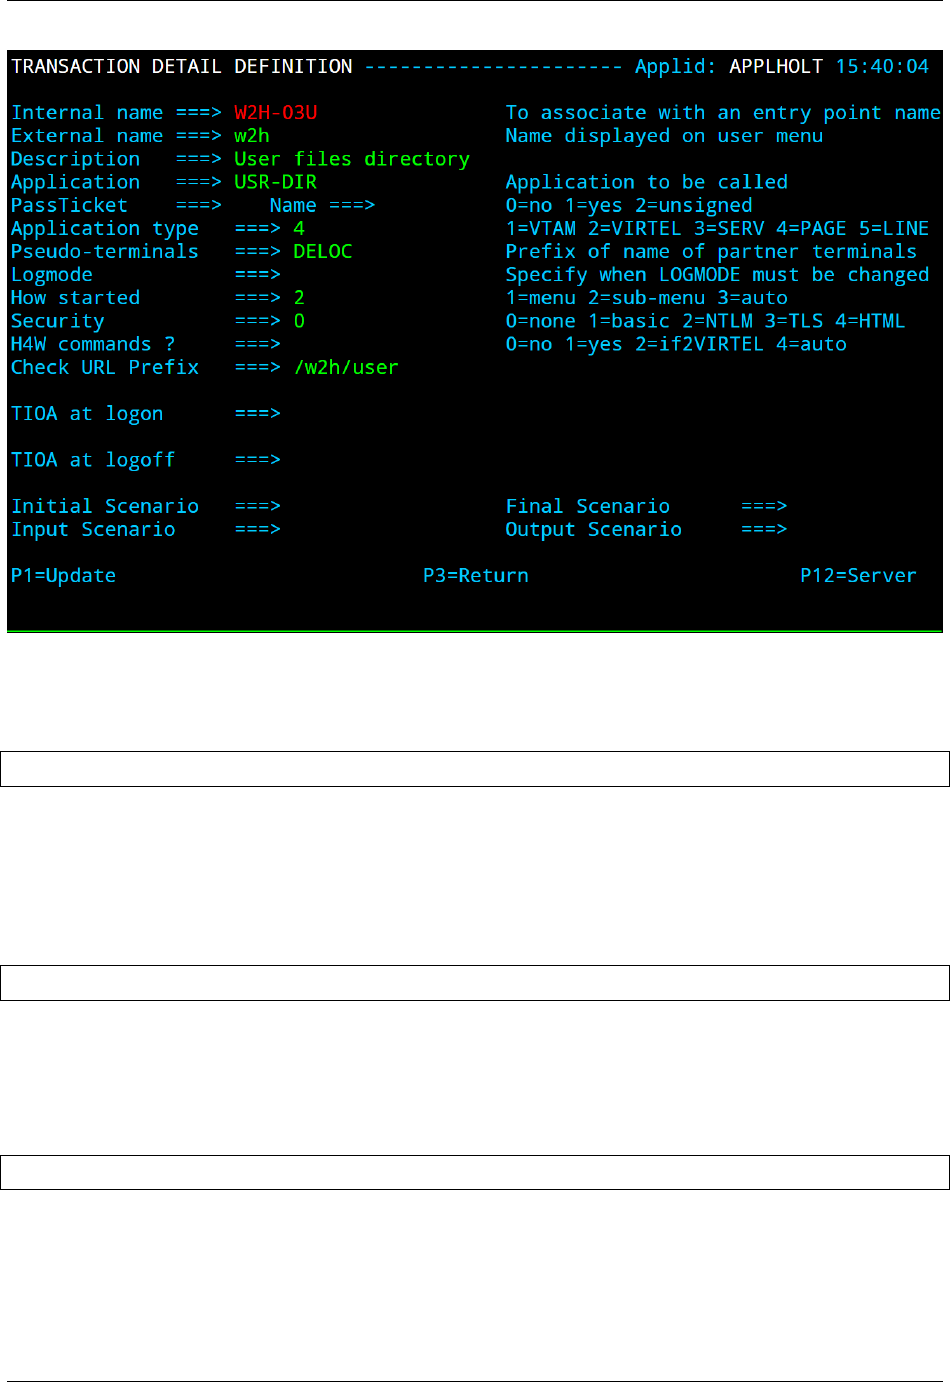
Virtel User Guide, Release 4.57
Example of a directory transaction
Example 1: Neither pathname nor pagename specied
http://ipaddr:port
The pathname defaults to the entry point name, WEB2HOST, which matches transaction W2H-00. The
pagename also defaults to WEB2HOST. VIRTEL therefore fetches page WEB2HOST from the directory
W2H-DIR.
Example 2: pagename specied
http://ipaddr:port/menu.htm
The pathname defaults to the entry point name, WEB2HOST, which matches transaction W2H-00. VIRTEL
therefore fetches page menu.htm from the directory W2H-DIR.
Example 3: Pathname specied
http://ipaddr:port/w2h/user/
The pathname /w2h/user matches transaction W2H-04. The pagename defaults to the entry point name,
WEB2HOST. VIRTEL therefore fetches page WEB2HOST from the directory USR-DIR.
16 Chapter 1. The Virtel Engine
Virtel User Guide, Release 4.57
Example 4: Pathname and pagename specied
http://ipaddr:port/w2h/user/index.html
The pathname /w2h/user matches transaction W2H-03U. VIRTEL therefore fetches page index.html from
the directory USR-DIR.
http://ipaddr:port/home/user3/index.html
Example 5: Undened pathname specied
http://ipaddr:port/w2h/badpath/index.html
In this case the pathname /w2h/badpath does not match any transaction. VIRTEL therefore rejects the
request.
Example 6: Partly-dened pathname specied
http://ipaddr:port/SECURE/misc/myPage.html
The pathname /SECURE/misc is not specically dened to VIRTEL. However there is a transaction W2H-02
whose external name is SECURE and whose “Check URL prex” eld is blank, which matches all pathnames
whose rst component is /SECURE. VIRTEL therefore fetches the any /SECURE/misc/myPage.html from
the designated directory W2H-DIR.
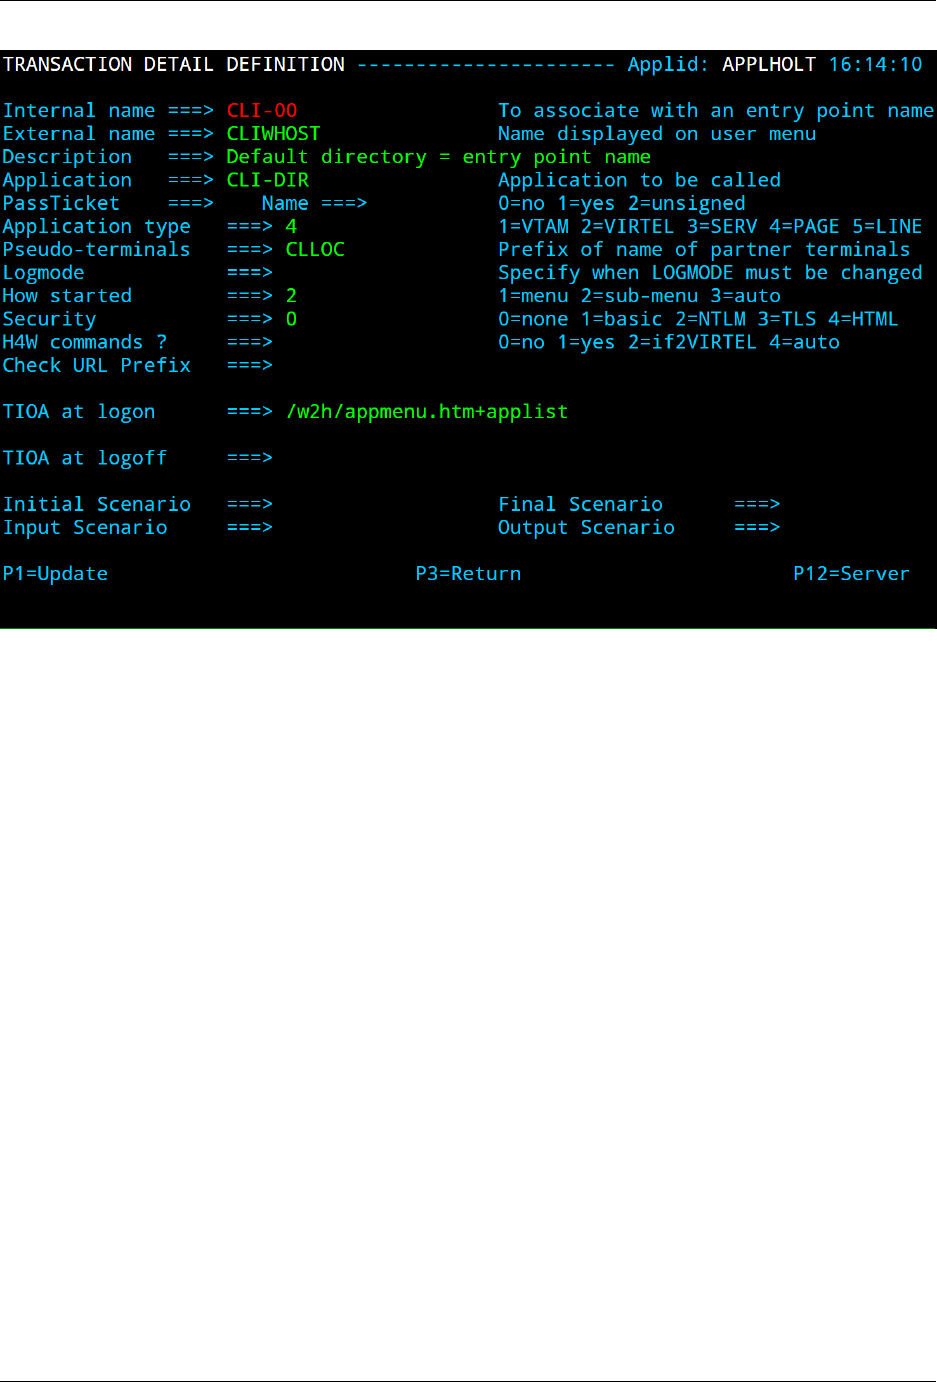
Example 7: Entry point with default URL
When a user connects to a VIRTEL line without specifying either pathname or pagename, as in the example
below, the entry point may be congured to redirect the request to a default URL:-
http://ipaddr:port
A default URL may be specied in the transaction whose external name is the same as the entry point name.
In the example type 4 transaction CLI-00 shown below, the default URL for the entry point CLIHOST is
//w2h/appmenu.htm+applist and thus the URL
http://ipaddr:port
is processed by VIRTEL as if
http://ipaddr:port//w2h/appmenu.htm+applist
had been specied.
1.2. VIRTEL URL Formats 17
Virtel User Guide, Release 4.57
Example of a default transaction with default URL
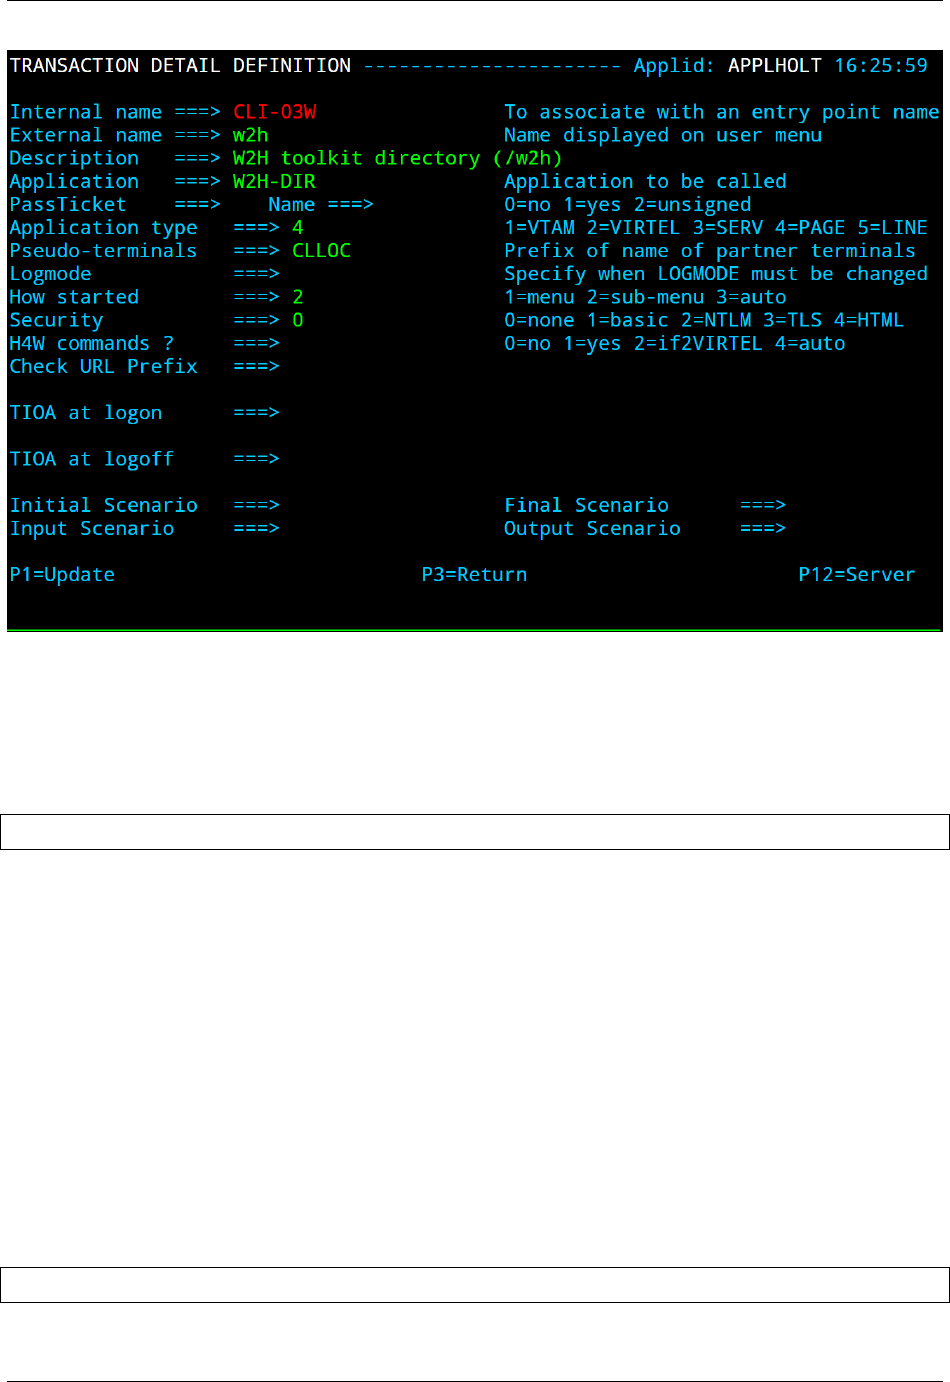
The entry point CLIWHOST can access the w2h directory through a directory denition specing the
external directory path as an external name in the transaction. Here the transaction needs access to web
elements located in the W2H-DIR. The /w2h/ pathname in w2h/appmenu.htm matches the external name
of the directory transaction CLI-03W. This match denes a path to the W2H-DIR:-
18 Chapter 1. The Virtel Engine
Virtel User Guide, Release 4.57
Providing access to a directory through a transactions external name
1.2.3 Dynamic pages
The general form of the URL for a VIRTEL Web Access, VIRTEL Web Integration, or VIRTEL Web
Modernisation transaction is:
http://ipaddr:port/pathname/pagename+tranname
ipaddr:port Is the address of the HTTP line, as before.
pathname Represents a VIRTEL directory, as described earlier.
pagename Is the name of an element (HTML or XML) in the specied directory. This name may be
converted to upper case and truncated to the maximum length dened in the directory denition, as
previously described. This element is used as the “template page” into which VIRTEL inserts dynamic
data.
tranname Is the external name of a transaction dened under the entry point. The application program
(which may be a CICS transaction or other VTAM application, a VIRTEL sub-application, or an
external server) invoked by this transaction provides the dynamic data which VIRTEL inserts into the
template page.
Dynamic URL with userdata
A second form of URL allows user data to be passed to VIRTEL:-
http://ipaddr:port/pathname/pagename+tranname+userdata
ipaddr:port Is the address of the HTTP line, as before.
1.2. VIRTEL URL Formats 19

Virtel User Guide, Release 4.57
pathname Represents a VIRTEL directory, as described earlier.
pagename Is the name of a template page, as before.
tranname Is the name of the transaction which provides the dynamic data for the template page.
userdata Is a character string which can be tested by the “User Data” eld in the rules of the HTTP line
(see “Rules” in the VIRTEL Connectivity Reference documentation). This allows the administrator
to assign an entry point to the request based upon the contents of the userdata in the URL. The
userdata also becomes the value of the “routing parameter” associated with the tranname transaction.
The routing parameter can be referenced by the variable &1 in the “TIOA at logon” eld of the
tranname transaction (see “Dening transaction parameters” in the VIRTEL Connectivity Reference
documentation). Additionally, if the rule which is selected species “$URL$” in its “Parameter” eld,
and only if the HTTP terminal relays are dened in a logical pool (see “HTTP Terminals” under the
heading “Denition of an HTTP line” in the VIRTEL Connectivity Reference documentation), then
the routing parameter is used by VIRTEL to select a relay LU for the tranname transaction.
Dynamic URL with parameters
A third form of URL allows one or more parameters to be passed to a transaction by means of an “Input
Scenario” or by a “Connection / Disconnection Script”:
http://ipaddr:port/pathname/pagename+tranname?param1=value¶m2=value
ipaddr:port Is the address of the HTTP line, as before.
pathname Represents a VIRTEL directory, as described earlier.
pagename Is the name of a template page, as before.
tranname Is the name of the transaction which provides the dynamic data for the template page. This
transaction must be dened with the name of a presentation module in its “Output Scenario” eld.
param1, param2, … These are the names of the parameters which the scenario can pick up using the
COPY$ INPUT-TO-VARIABLE or COPY$ INPUT-TO-SCREEN instructions (described 153) or
which can be substituted in a script by means of the &=paramn= system variable (see “Transac-
tions – Connection / Disconnection Scripts” in the VIRTEL Connectivity Reference documentation.
The cumulative length of the URL parameters is limited by the BUFSIZE parameter of the VIRTCT.
If blanks or other special characters are required in the parameter value, then the special characters
must be coded in the standard URL escape format %xx where xx is the hexadecimal value of the
character in ASCII. For example, a blank is represented as %20.
Dynamic URL with userdata and parameters
A URL may contain both userdata and query parameters, as shown in the following example.
The various components of the URL have the same meaning as described in the preceding two
sections.
http://ipaddr:port/pathname/pagename+tranname+userdata?param1=value¶m2=value
20 Chapter 1. The Virtel Engine

Virtel User Guide, Release 4.57
1.2.4 3270 session management
VirtelSession parameter
Once a session has been established with the host 3270 application, the template page allows the user to
link to the next screen in the 3270 application dialog by means of a URL in the following format:
http://ipaddr:port/pathname/pagename++VirtelSession=sessionid
ipaddr:port Is the address of the HTTP line, as before.
pathname Represents a VIRTEL directory, as described earlier.
pagename Is the name of the template page to be used for displaying the next 3270 screen (usually the
same as the current template page).
sessionid Is a VIRTEL-generated code which allows VIRTEL to identify the user as being already connected
to an existing host session. The parameter VirtelSession=sessionid is inserted by the {{{SESSION-
CODE}}} tag embedded in the template page (see “Session And Context Management”).
PrintVirtelSession parameter
A second form of the URL with SESSION-CODE allows display of print data sent by the ap-
plication to the virtual printer associated with the specied session. Normally this URL will be
embedded in a template page and will be triggered by the {{{IF-PRINT-IS-READY}}} tag.
http://ipaddr:port/pathname/pagename++PrintVirtelSession=sessionid
ipaddr:port Is the address of the HTTP line, as before.
pathname Represents a VIRTEL directory, as described earlier.
pagename Is the name of the template page to be used for displaying the print data. This page must
contain the special {{{PRINT}}} tag (see “3287 Printing”) at the point at which the print data are
to be inserted in the page.
sessionid Is a code which allows VIRTEL to identify the printer associated with the user’s 3270 session.
The parameter PrintVirtelSession=sessionid (where sessionid is the associated 3270 session identier),
is generated by the {{{SESSION-CODE}}} tag as in the following example:-
imprim.htm++Print{{{SESSION-CODE}}}
ValidateVirtelSession parameter
A third form of URL with {{{SESSION-CODE}}} allows a JavaScript procedure embedded in a template
page to determine whether there are pending updates to the 3270 screen image. For this type of URL,
VIRTEL returns no data, only an HTTP response code. The possible response codes are:
•205 (Reset Content) The host application has updated the 3270 screen image since the last time it
was sent to the user.
•304 (Not Modied) The host application has not updated the 3270 screen image
•404 (Not Found) The sessionid code does not represent a valid host session.
Note: When response code 205 is indicated, the JavaScript procedure sends a further request to VIRTEL
to retrieve the updated 3270 screen image. This technique can be useful in handling host applications which
1.2. VIRTEL URL Formats 21

Virtel User Guide, Release 4.57
use multiple 3270 write commands to paint a single 3270 screen, where the user might otherwise be presented
with a partially updated screen. An example of this technique is contained in the WEB2VIRT.htm page
delivered in the VIRTEL sample directory W2H-DIR.
http://ipaddr:port/pathname/pagename++ValidateVirtelSession=sessionid
ipaddr:port Is the address of the HTTP line, as before.
pathname Represents a VIRTEL directory, as described earlier.
pagename May be specied but is not used.
sessionid Is a code which allows VIRTEL to identify the 3270 session whose status is being queried. The
parameter ValidateVirtelSession=sessionid, where sessionid is the associated 3270 session identier, is
generated by the {{{SESSION-CODE}}} tag as in the following example:-
check.htm++Validate{{{SESSION-CODE}}}
Note: For compatibility with previous versions, the keyword VerifyVirtelSession is also accepted. Veri-
fyVirtelSession is similar to ValidateVirtelSession except that it produces only two possible return codes:
• 205 (screen updated)
• 304 (screen not updated or session invalid)
$UseCookieSession$ parameter
As an alternative to specifying the VirtelSession parameter in the URL, the SESSION-CODE may be sent
to VIRTEL in a cookie. An example URL is shown below:
http://ipaddr:port/pathname/pagename++$UseCookieSession$
ipaddr:port Is the address of the HTTP line, as before.
pathname Represents a VIRTEL directory, as described earlier.
pagename Is the name of the template page to be used for displaying the next 3270 screen (usually the
same as the current template page).
$UseCookieSession$ Indicates that the SESSION-CODE is contained in the VirtelSession cookie.
The VirtelSession cookie should be generated by Javascript as shown in the example below. This function
may be added to the custom Javascript script (see “Site customization of Javascript functions”):
/* Save VirtelSession cookie after each subpage is loaded */
function after_responseHandle(o, url, xtim) {
var node =document.getElementById("sesscode");
if (node) {
var text =node.textContent || node.innerText;
var sess =text.replace(/^VirtelSession=/i,"");
createCookie("VirtelSession", sess, 1);
}
}
Figure 1.5 Custom Javascript function to generate a VirtelSession cookie
22 Chapter 1. The Virtel Engine

Virtel User Guide, Release 4.57
1.2.5 Capability URLs
A URL may contain a “capability token” generated by another terminal. In this case the URL
inherits certain rights or capabilities conferred by the other terminal. The capabilities inherited
depend on the parameters specied in the SET-HEADER tag which generated the capability
token. For further details, see “Capability Tokens”.
http://ipaddr:port/pathname/pagename+tranname+capabilitytoken
ipaddr:port Is the address of the HTTP line, as before.
pathname Represents a VIRTEL directory, as described earlier.
pagename Is the name of a template page, as before.
tranname (optional) Is the name of the transaction which supplies the dynamic data for the page. If the
transaction name is omitted then two “+” signs must separate the pagename from the capabilitytoken.
capability token is a token which grants rights to another terminal’s resources. This code, whose format is
x-Virtel-name:token, is generated by the “{{{SET-HEADER}}}” tag. The code is case-sensitive and
so the capitalization must be exactly the same as the generated token.
1.2.6 Transmission of Security Tokens by URL
A security code, which identies a user during a HTTP page upload request, is normally transmitted between
the browser and VIRTEL as a cookie (see “Uploading HTML Pages”). If, for security or other reasons, your
browser does not allow the use of cookies, then the security code can, as an alternative, be embedded in a
URL of the form shown below:-
http://ipaddr:port/pathname/pagename+tranname+securitycode
ipaddr:port Is the address of the HTTP line, as before.
pathname Represents a VIRTEL directory, as described earlier.
pagename Is the name of a template page, as before.
tranname Is the name of the transaction which supplies the dynamic data for the page.
securitycode Is the code which allows VIRTEL to identify the user. This code, whose format is Virtel-
Cookie=xxxxxxxxxxxxxxxx, is generated by the “{{{SECURITY-TOKEN}}}” tag, as shown in the
example below:-
upload2.htm+upload+VirtelCookie={{{SECURITY-TOKEN}}}
The following format allows a static page to be displayed:
http://ipaddr:port/pathname/pagename++securitycode
ipaddr:port Is the address of the HTTP line, as before.
pathname Represents a VIRTEL directory, as described earlier.
pagename Is the name of the page.
securitycode Is a code of format VirtelCookie=xxxxxxxxxxxxxxxx which allows VIRTEL to identify the
user, as before.
On receipt of this URL, VIRTEL treats the VirtelCookie= parameter as if it were a cookie transmitted
by the browser.
1.2. VIRTEL URL Formats 23

Virtel User Guide, Release 4.57
1.2.7 Propagation of signon by URL
A URL embedded in a page sent by VIRTEL may contain a VirtelUserSignon parameter in order to propagate
the user’s signon credentials to another page. The value of the parameter is generated by the “({{{USER-
SIGNON-CODE}}} tag “. This can be useful in cases where the browser does not propagate the user name
and password from one page to another, for example when using VIRTEL transaction security type 4. The
format of a URL containing a signon code is shown below:-
http://ipaddr:port/pathname/pagename+tranname+VirtelUserSignon=signoncode
ipaddr:port Is the address of the HTTP line, as before.
pathname Represents a VIRTEL directory, as described earlier.
pagename Is the name of a template page, as before.
tranname Is the name of the transaction which supplies the dynamic data for the page.
signoncode Is a code which allows VIRTEL to identify the signed-on user. This code is generated by the
{{{USER-SIGNON-CODE}}} tag, as shown in the example below:-
http://web2virt.htm+cics+VirtelUserSignon={{{USER-SIGNON-CODE}}}
1.2.8 The Universal Transaction
A transaction may be dened with an external name consisting of an asterisk, and this is considered to be
a “universal” transaction. A universal transaction matches any URL not already matched by a preceding
transaction in the entry point. This allows VIRTEL to process URLs whose format does not conform to the
classic VIRTEL formats previously described.
24 Chapter 1. The Virtel Engine
Virtel User Guide, Release 4.57
1.3 Directory Management
HTML and XML template pages and other entities such as CSS stylesheets, JavaScript procedures, and GIF
or JPEG images used by VIRTEL Web Access are stored in directories within a VSAM KSDS managed by
VIRTEL. Each KSDS dened to VIRTEL can contain one or more directories. The system administrator
can upload pages and other elements into a VIRTEL directory by using a web browser or by e-mail, as
described in detail in the section “Uploading HTML Pages”.
1.3.1 Accessing the administration application
Virtel provides an administrative portal which contains various sub applications used to administer Virtel.
The administrative portal can be access either through the 3270 administration application or the HTML
GUI portal.
1.3.2 Access through 3270
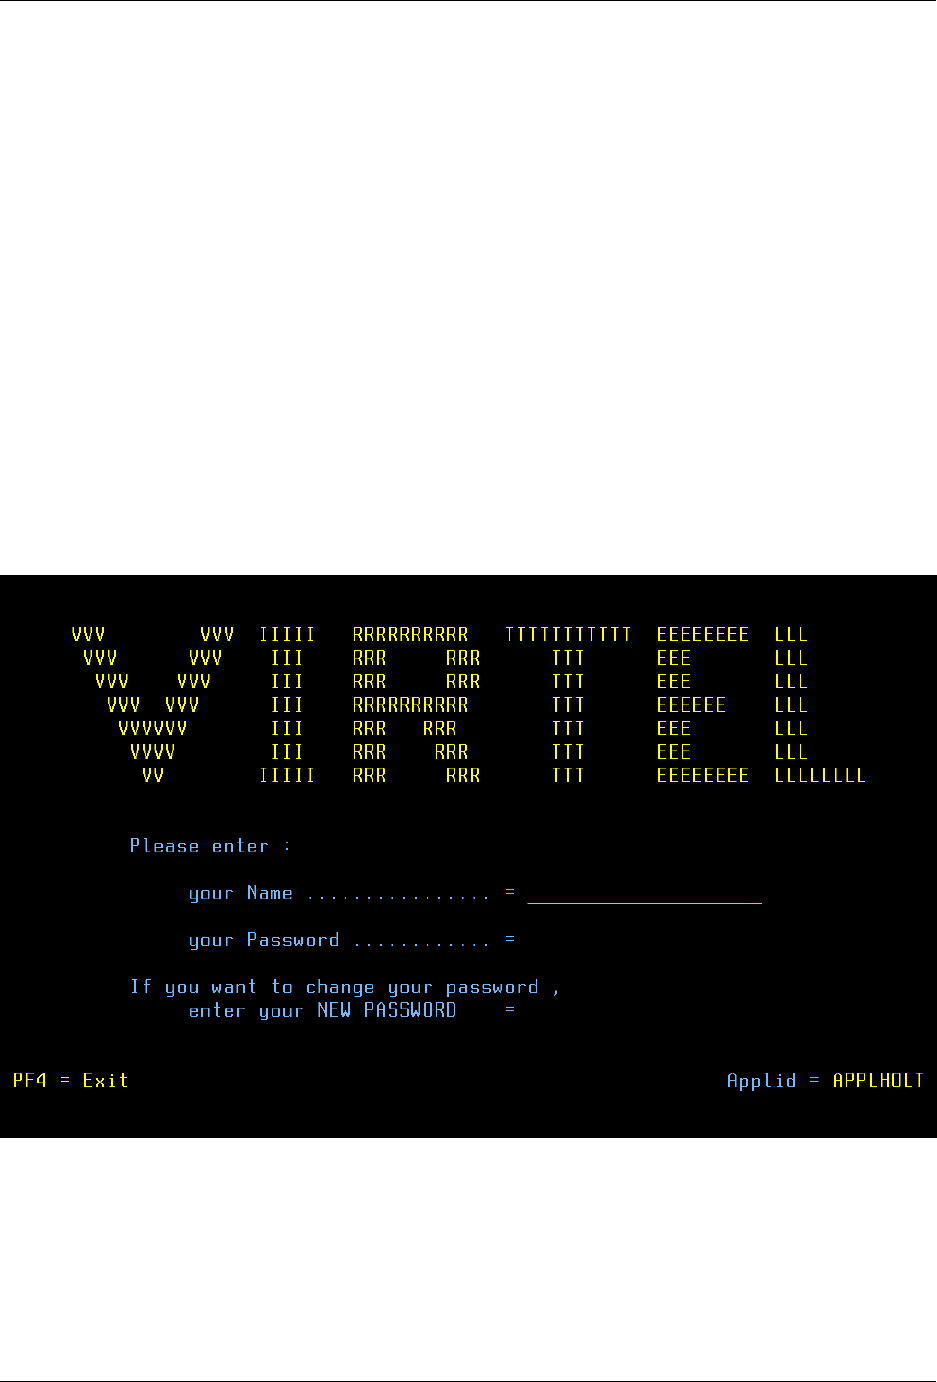
Access to the 3270 application is through a normal VTAM logon using the VIRTEL APPLID as the appli-
cation name. For example, from a VTAM screen enter LOGON APPLID=VIRTEL. The following screen
will appear:-
Logon screen for 3270 Administration
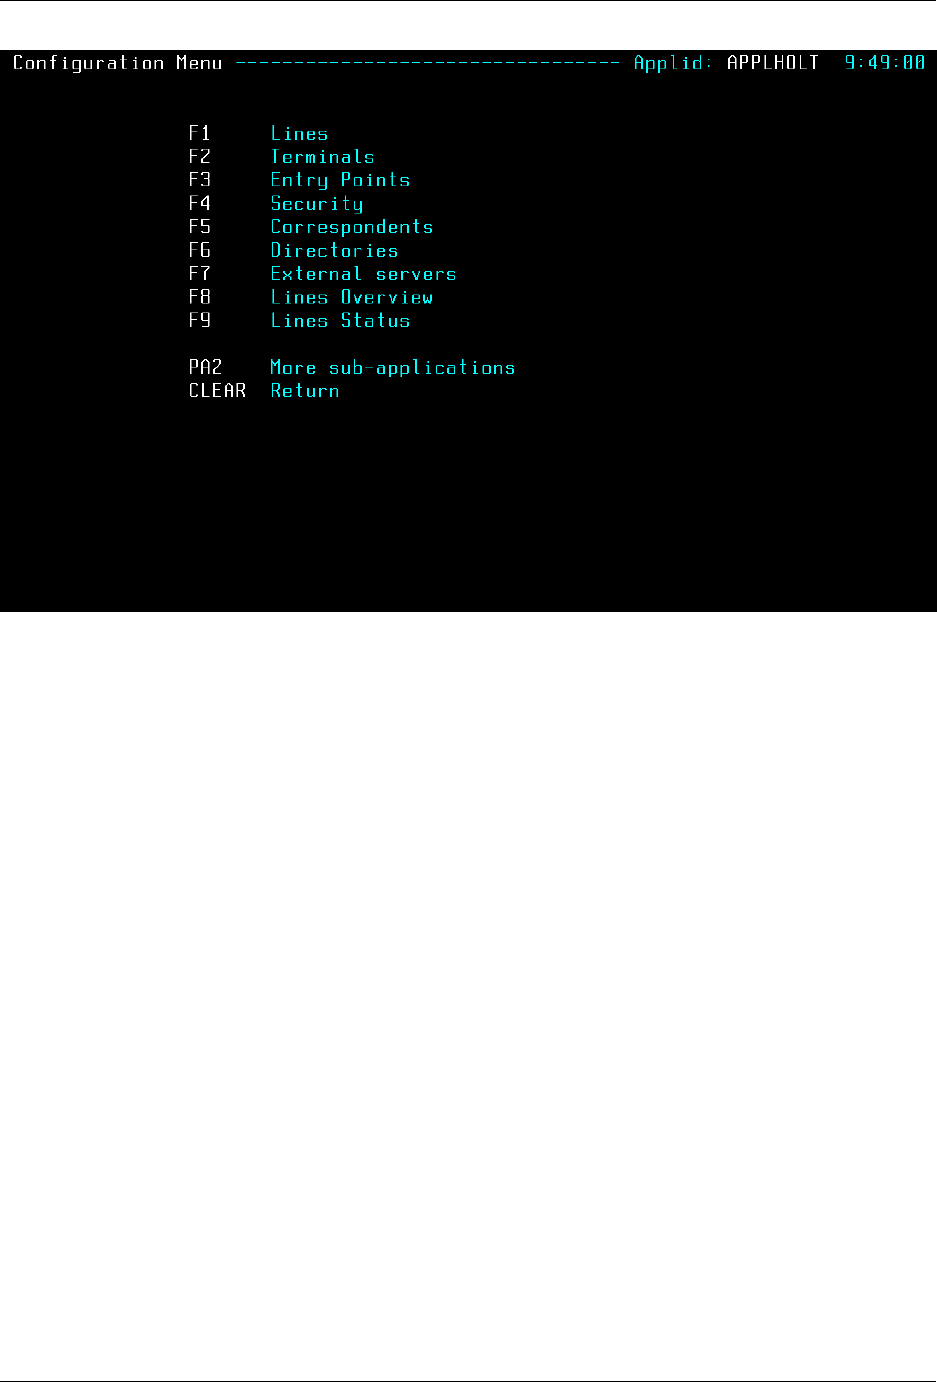
After logging in with security details the main application menu will be presented. Select PF1 from the main
menu to access the administration and conguration menu.
1.3. Directory Management 25
Virtel User Guide, Release 4.57
Directory sub application
The directory management sub-application allows the administrator to dene directories. The sub-
application is accessible by [PF6] from the conguration menu, or by [PF12] from the system services menu
followed by option 3, or from the VIRTEL Multi-Session menu via a transaction which invokes VIRTEL
module VIR0042.
1.3.3 Security
If security is active, access to the directory management sub-application from the conguration menu or the
system services menu is controlled by resource $$PCPC$$.
When invoked via a transaction, normal transaction security rules apply.
In addition, each directory is protected by a resource whose name is the same as the directory name. The
administrator must have access to this resource in order to view or manage the contents of the directory, or
to upload pages to the directory. When an external security product is used, the resource is dened in the
class named by the RNODE parameter in the VIRTCT (see “Parameters of the VIRTCT” in the VIRTEL
Installation Guide).
Security management is described in the VIRTEL Security documentation.
1.3.4 Creating, modifying, and deleting directories
When the directory management sub-application is invoked, it displays a list of the directories already dened
in the system:-
26 Chapter 1. The Virtel Engine
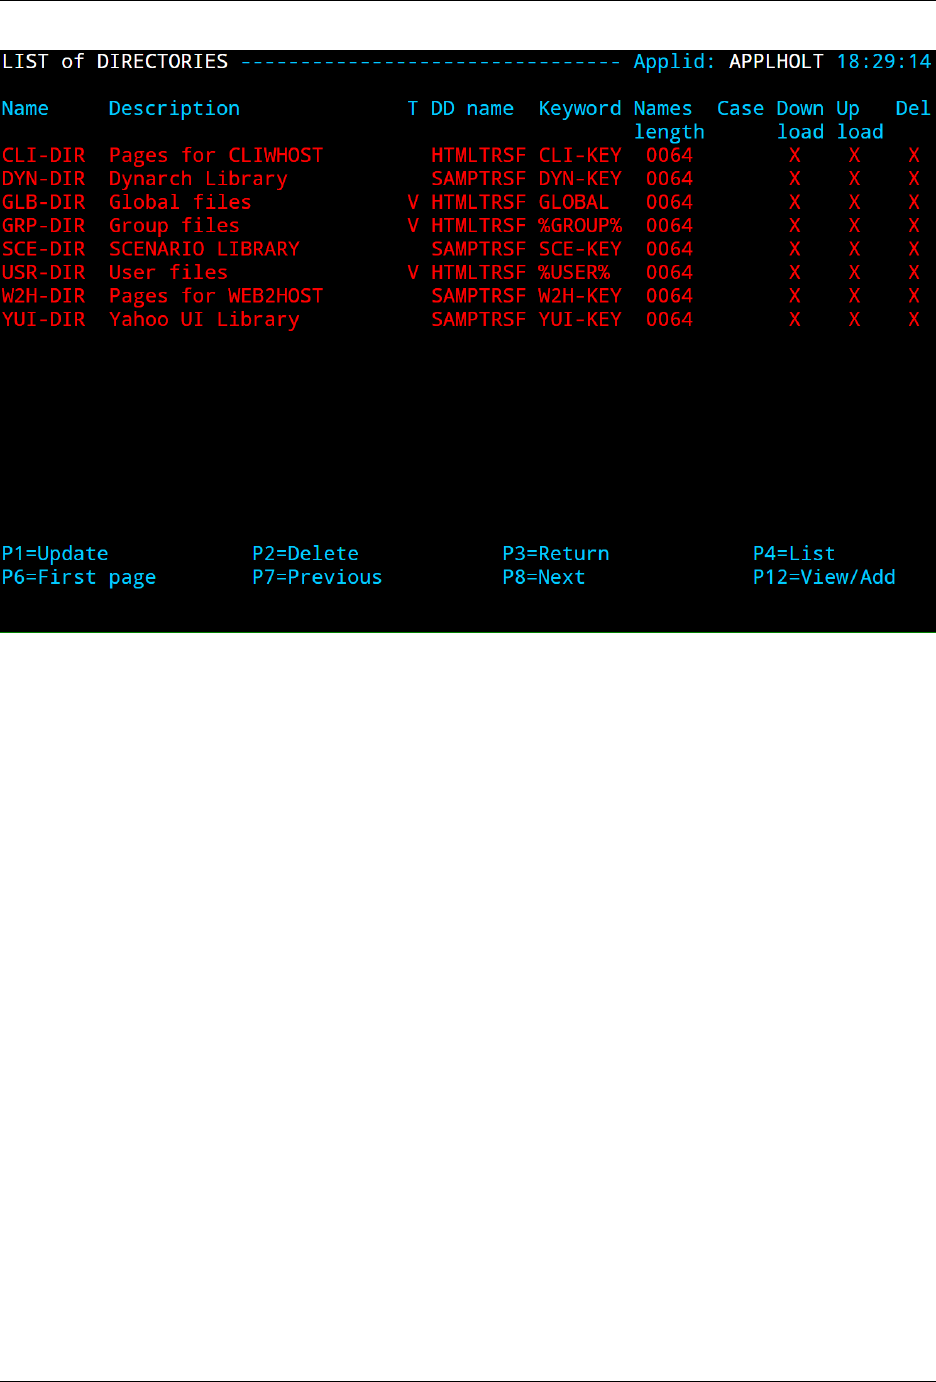
Virtel User Guide, Release 4.57
Figure 1.6 Directory management summary screen
Using the associated Admin(3270) functions
These functions are accessed from either the browsers Administration portal or by logging on to Virtel using
it’s VTAM interface.
Deleting a directory denition
To delete a directory denition, place the cursor on the name of the directory to be deleted and press [PF2].
The message CONFIRM DELETE appears at the bottom of the screen. Press [PF2] again. The message
DELETE OK indicates that the deletion of the directory denition was successful. While the message
CONFIRM DELETE is displayed, you can press any function key other than [PF2] to cancel the operation.
Displaying directory contents
To display the contents of a directory, place the cursor on the directory name and press [PF4]. VIRTEL
displays the directory contents management screen described below.
Adding a directory denition
To create a new directory denition, place the cursor on the blank line after the last directory, and press
[PF12] to display an empty directory detail screen. Fill in all of the elds and press [ENTER]. The message
CREATION OK indicates that the directory denition was successfully created.
1.3. Directory Management 27
Virtel User Guide, Release 4.57
Scrolling the list of directories
To scroll to the top of the list, press [PF6]. To scroll up or down the list, press [PF7] or [PF8].
Exiting from directory management
To return to the conguration menu, press [PF3].
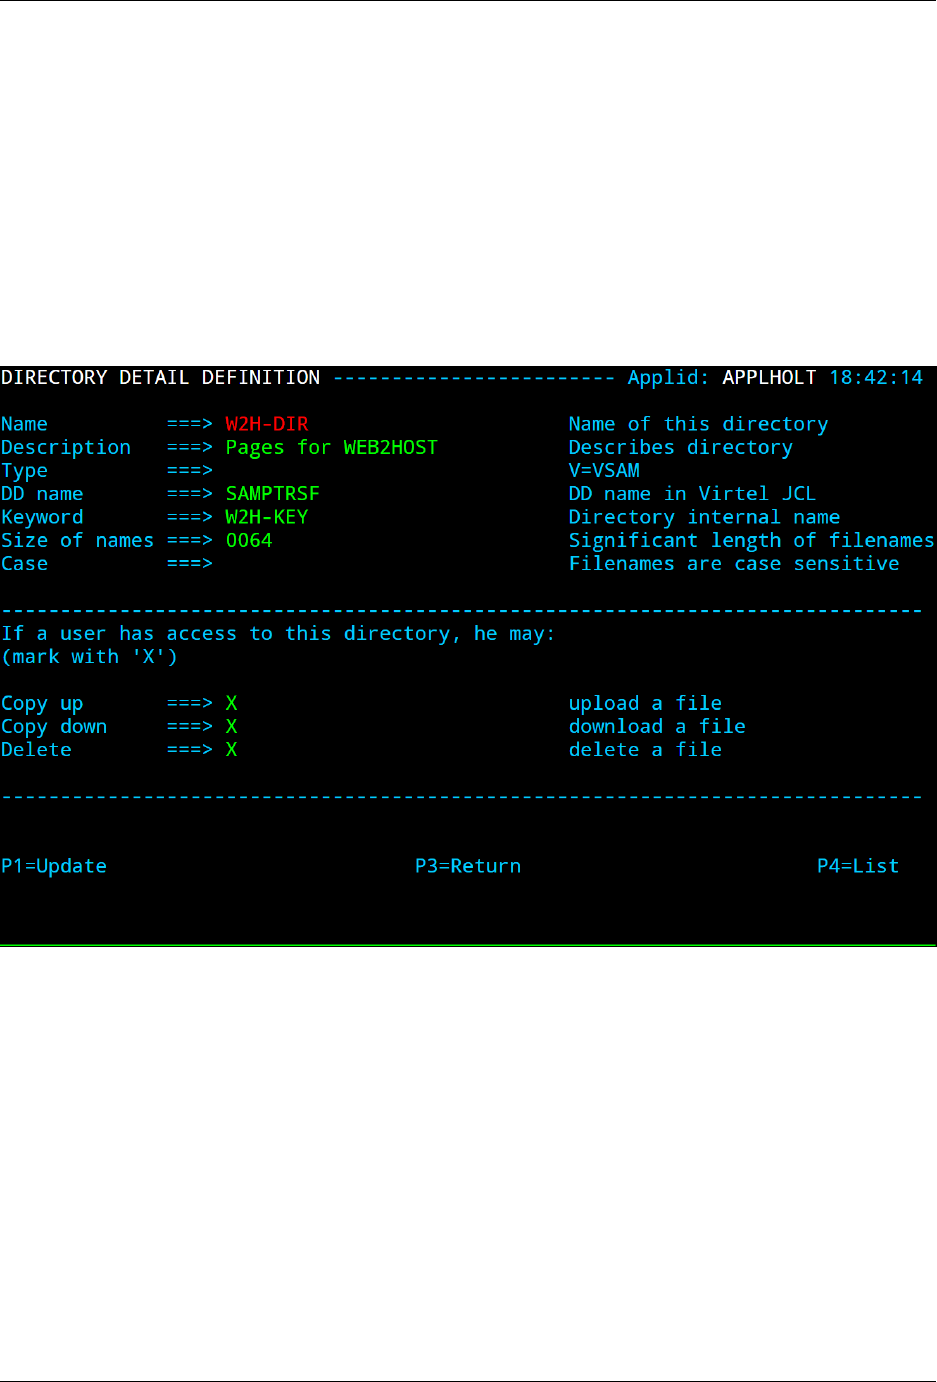
1.3.5 Dening directory parameters
To access the detail screen for any directory, place the cursor on the directory name and press [PF12]:
Directory management detail screen
Name The name of the directory as known by VIRTEL. If security is active, this name must also be dened
as a resource to which the user must be authorized.
Description Comment associated with the directory.
Type V (or blank) indicates that the directory is held in a VSAM KSDS.
DD name The le name of the VSAM KSDS which contains the directory. This name must be dened in
one of the UFILEn parameters in the VIRTCT, and a DD statement with the same name must appear
in the VIRTEL started task JCL.
Keyword This is an 8-byte key which allows multiple directories to be stored within a single VSAM KSDS.
Each directory in a KSDS must have a unique key.
Size of names The maximum length of the names of HTML pages and other elements stored in this
directory. The minimum (and default) value is 8. The maximum value is 64.
28 Chapter 1. The Virtel Engine
Virtel User Guide, Release 4.57
Case Any non-blank character in this eld indicates that the element names stored in this directory are
case sensitive. Blank indicates that the names are not case sensitive.
Copy up This eld is used by VIRTEL/PC. For VIRTEL Web Access directories, the value Xmust be
coded.
Copy down This eld is used by VIRTEL/PC. For VIRTEL Web Access directories, the value Xmust be
coded.
Delete This eld is used by VIRTEL/PC. For VIRTEL Web Access directories, the value Xmust be coded.
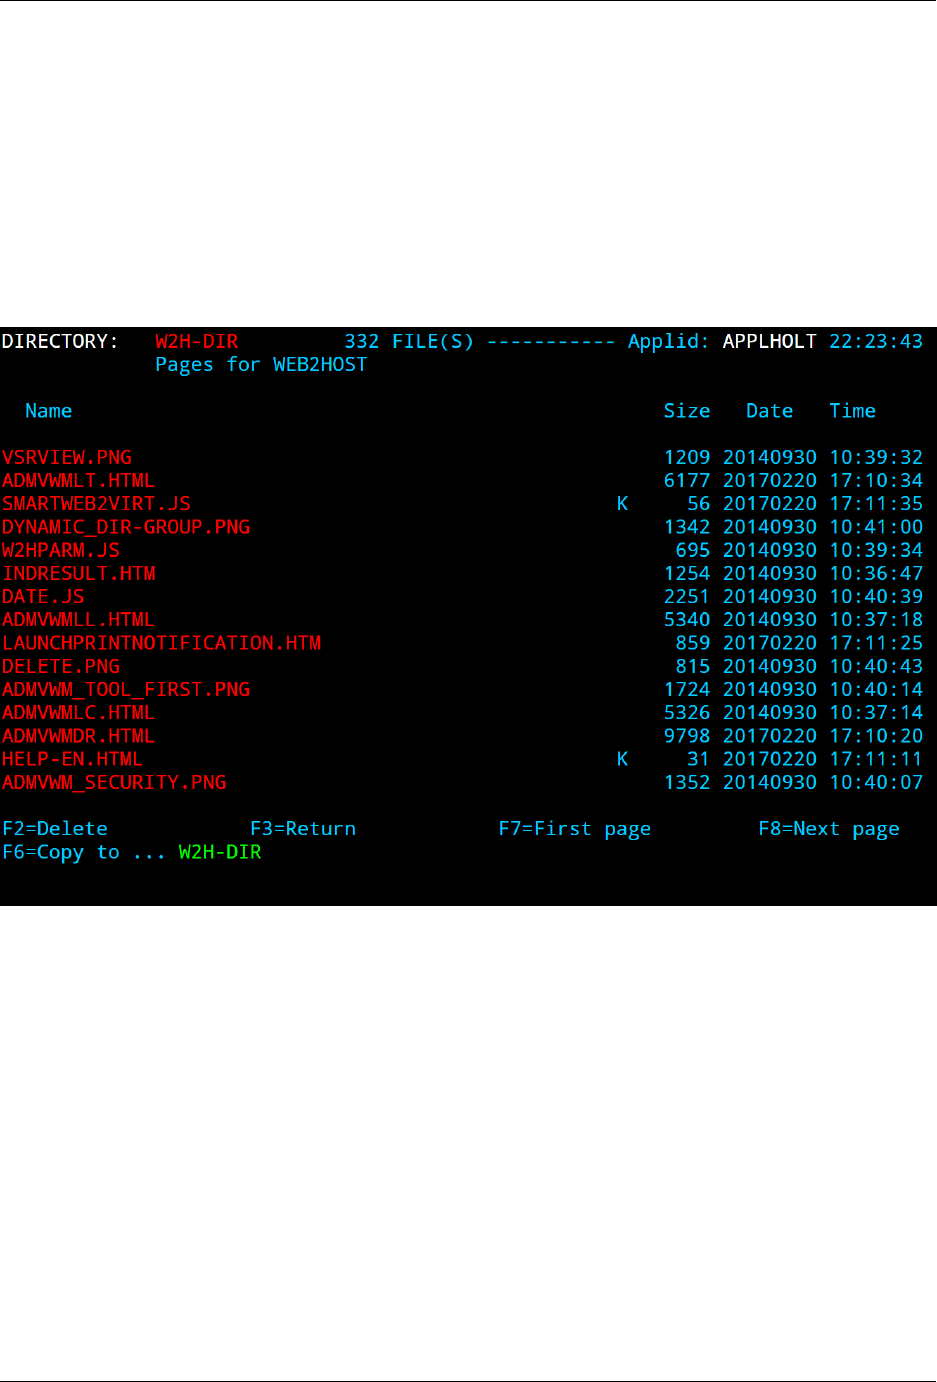
After pressing [PF4] at the directory management summary screen or detail screen, VIRTEL displays
a list of the les in the directory:
Figure 1.8 Directory contents management screen
1.3.6 Associated functions
Deleting an element
To delete an element from a directory, place the cursor on the name of the element to be deleted and
press [PF2]. The message CONFIRM DELETE appears at the bottom of the screen. Press [PF2] again.
The message DELETE OK indicates that the deletion of the element was successful. While the message
CONFIRM DELETE is displayed, you can press any function key other than [PF2] to cancel the operation.
Copying an element to another directory
To copy an element from directory A to directory B, rst display the contents of directory A. In eld [7]
type the name of the target directory B, then press [ENTER]. Next, place the cursor on the name of the
element to be copied, then press [PF6]. The message COPY COMPLETED indicates that the operation
1.3. Directory Management 29
Virtel User Guide, Release 4.57
was successful. If the element exists in the target directory, the copy fails and the message THIS FILE IS
ALREADY IN THE TARGET DIRECTORY is displayed at the bottom of the screen.
Scrolling the list
The list of elements can be scrolled up and down using [PF7] and [PF8].
Exiting from directory contents management
To return to the list of directories, press [PF3].
1.3.7 Acccess administration portal via the web
Access to the HTML GUI Administration portal is through the web using the Administration endpoint. By
default this is port 41001. The URL http://192.168.129.33:41001 is an example of a URL to access the WEB
administration portal. After providing security information the following screen will appear:-
Logon screen for Web Administration
Selecting the Admin (HTML) will prompt for a userid and password. After providing security details the
following administration portal will appear:-
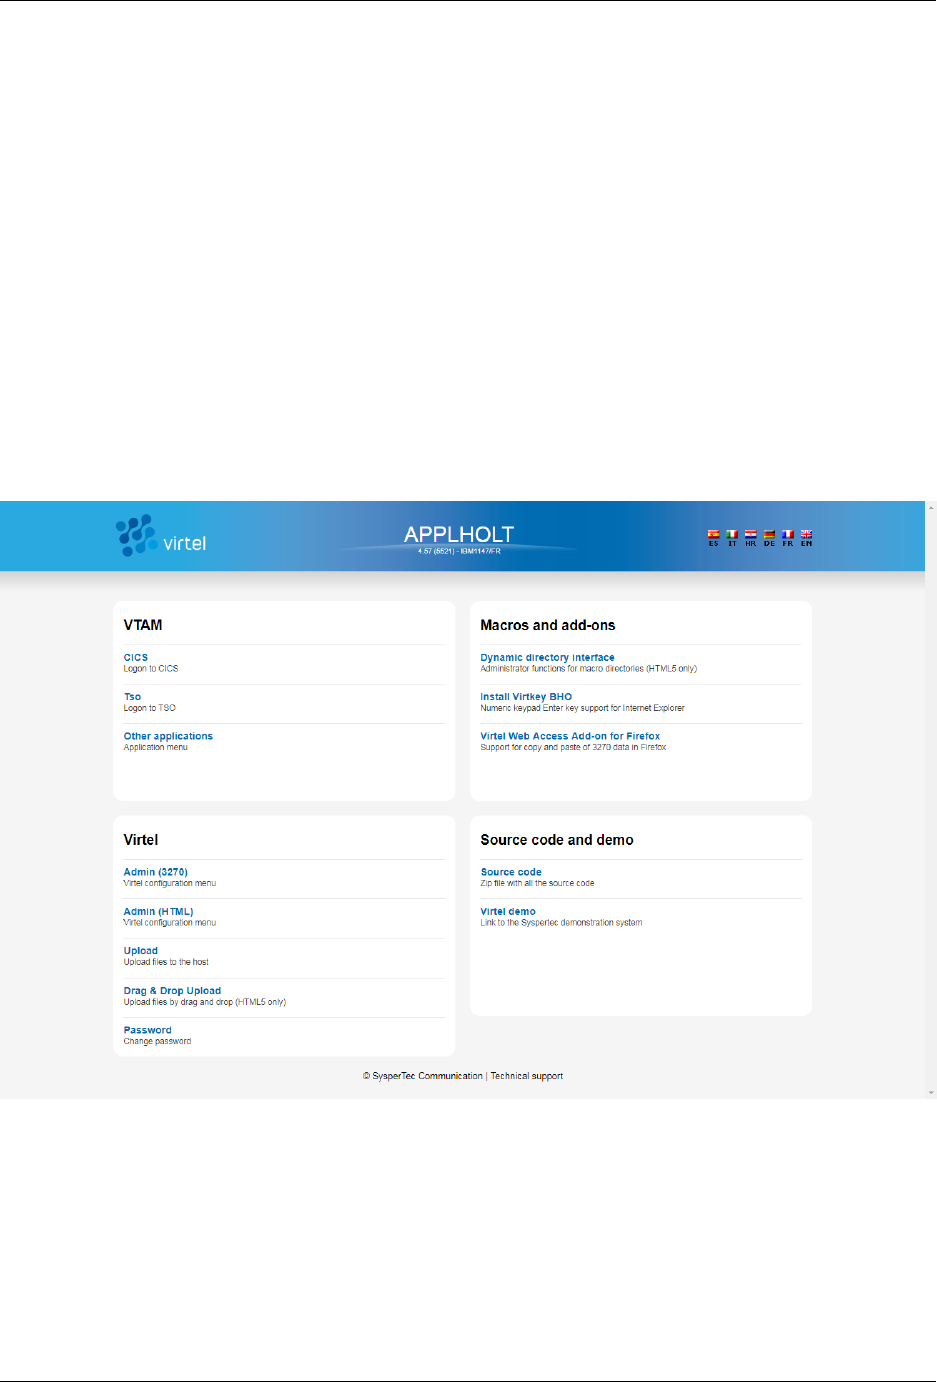
30 Chapter 1. The Virtel Engine

Virtel User Guide, Release 4.57
Web Administration Portal
Directory administration can be invoked from the Directory link. Selecting a directory will display
a content menu proving options to list, edit, delete or create new directories.
1.3. Directory Management 31
Virtel User Guide, Release 4.57
Directory Context Menu
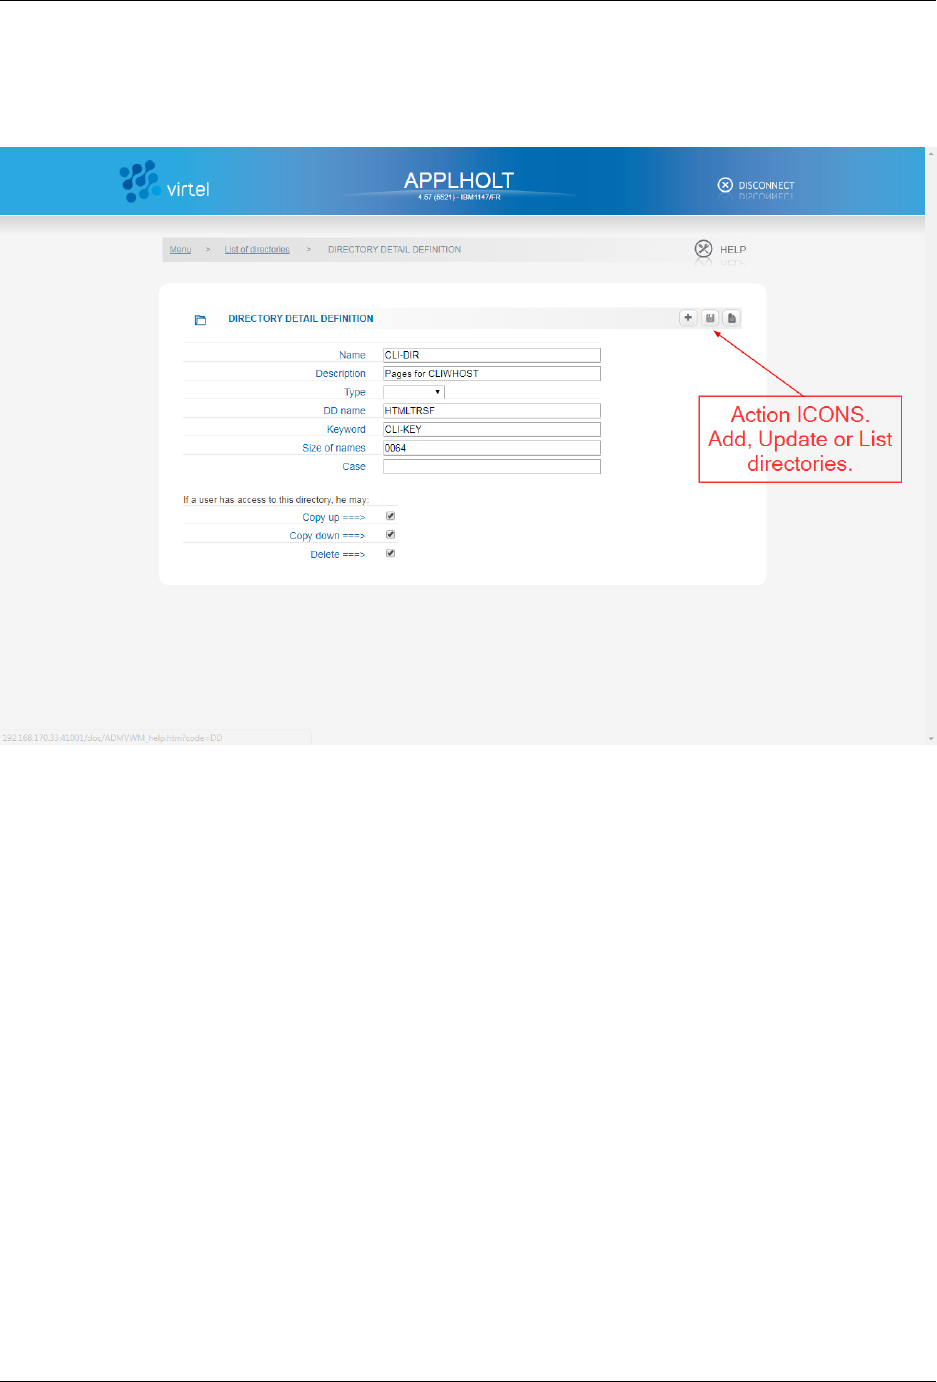
When selecting a directory, the detail panel will be displayed. The ICONs on the right hand side of the title
bar provide actions such as add, update or list.
Directory Detail Display
32 Chapter 1. The Virtel Engine

Virtel User Guide, Release 4.57
1.4 Creating Virtel Template Pages
1.4.1 Introduction
Template pages are the means by which VIRTEL presents host application data to the user via a web
browser. In addition to standard HTML or XML tags, template pages contain VIRTEL-specic tags enabling
integration of information delivered by the mainframe application programs. HTML template pages may
contain GIF or JPEG images, sounds, scripts such as JavaScript or any other function or program elements
that are compatible with the browser. Template pages may be produced either by hand or by using standard
HTML or XML design tools available on the market.
For VWA, users would not be required to produce or modify any template pages as all the necessary template
pages are provided by the Virtel product. For VWM or VWI, new pages may be produced by Virtel tools
such as Virtel Screen Redesigner to support modernisation or integration projects. Virtel Studio may also
introduce new templates to support business logic in Virtel scenarios. Sometimes it may be necessary to
modify these pages.
The following sections provide details on Virtel tags.
1.4.2 Dening the tag delimiters
VIRTEL-specic tags are used to insert data originating at the host into an HTML or XML page, and to
manage colours and function keys in an HTML page. VIRTEL-specic tags are identied by special begin
and end delimiters. The delimiters themselves are dened by means of a comment placed between the tags
<HEAD> and </HEAD> of the HTML page. The actual delimiters may vary from one page to another.
<!--VIRTEL start="{{{" end="}}}" -->
In this example, VIRTEL-specic tags are dened as being represented by a succession of 3 opening braces
and terminated by a succession of 3 closing braces. This convention is maintained throughout the remainder
of this chapter. A minimum template required for Virtel to work with and display a 3270 application looks
something like this:-
<html>
<head>
<!--VIRTEL start="{{{" end="}}}" -->
<meta http-equiv="Content-Type" content="text/html; charset=UTF-8">
<title>Virtel Unplugged - Example 1</title>
<script>
function SetFocus() {
console.log("SetFocus");
document.virtelForm.{{{FIELD-WITH-CURSOR}}}.focus();
}
function SubmitForm(e) {
if (e && e.keyCode == 13) {
document.virtelForm.submit();
}
}
</script>
</head>
<body onLoad="SetFocus()">
<form name="virtelForm" action="{{{NAME-OF (PAGE)}}}++{{{SESSION-CODE}}}"
,→method="POST">
1.4. Creating Virtel Template Pages 33

Virtel User Guide, Release 4.57
<pre>
<div id="printReady" onkeypress="SubmitForm(event)">
{{{ GENERATE-HTML (1,1,1920) }}}
</div>
</pre>
{{{DEFINE-HTML-FOCUS-FIELD "FOCUSFIELD"}}}
<input name="FOCUSFIELD" type="HIDDEN" value="{{{FIELD-WITH-CURSOR}}}">
</form>
</body>
</html>
Sample Virtel Template
Note: See the use of the Virtel tags {{{ }}} within the HTML template. Virtel injects data into these
elds before sending the template to the browser.
1.4.3 Session and context management
VIRTEL uses the concept of a session code to maintain the context between a client using a browser and
the host application to which the client is connected. This code allows VIRTEL to identify the client and to
associate the client with a session already established with a host application.
SESSION-CODE tag
The SESSION-CODE tag is used to create the URL associated with form submission.
{{{ SESSION-CODE }}}
The SESSION-CODE tag allows a session code to be inserted in the template page in the format VirtelSes-
sion=xxxxxxxxxxxxxxxx. The value of the session code changes after each message. For examples of its use,
see “Transmitting Data To The Host”, and “3287 Printing”.
AJAX-SESSION-CODE tag
The AJAX-SESSION-CODE tag is similar to the SESSION-CODE tag, but it generates the code in a
dierent format which does not change with each request. This is useful when implementing an AJAX
dialog between the application and the browser. For this type of application, it is not always possible to
transmit the VIRTEL session code to the browser, especially if a Javascript library is used.
{{{ AJAX-SESSION-CODE }}}
The AJAX-SESSION-CODE tag allows a session code to be inserted in the template page in the format
AjaxSession=xxxxxxxxxxxxxxxx. For example:-
result.txt+cics+{{{ AJAX-SESSION-CODE }}}
SET-INITIAL-TIMEOUT tag
The SET-INITIAL-TIMEOUT tag allows a timeout to be started when VIRTEL builds the page.
34 Chapter 1. The Virtel Engine
Virtel User Guide, Release 4.57
{{{ SET-INITIAL-TIMEOUT "n" }}}
For example, if the instruction
{{{ SET-INITIAL-TIMEOUT "10" }}}
is coded in a page or a sub-page, then VIRTEL will cancel the session if the workstation has not sent another
request after 10 seconds.
1.4.4 Transmitting data to the host
Transmission of data to the host uses the principle of sending an HTML form. In conjunction with the
SESSION-CODE tag, the form allows the transmission of input elds to the host application, and the
display of the subsequent application screen.
The form is dened as follows:
<form name="FormName" action="VirtelURL" method="get">
Data which will be transmitted to the HTTP server
</form>
name Form name. The name of the form is used in JavaScript procedures to refer to various elements of
the form. For an example, see the section “Cursor management”.
action URL transmitted to the server, in the following format:
action="pagename++{{{SESSION-CODE}}}"
pagename Is the name of the template page to be used to display the subsequent screen sent by the host
application (usually the same as the current template page)
SESSION-CODE Identies the session established with the host application
method Transmission mode. Always POST.
Example :
<form name="Virtel" action="WEB2VIRT.htm++{{{SESSION-CODE}}}" method="post">
1.4.5 Where to position the elements of an HTML page
By design, an HTML page starts with the <HTML> tag and is terminated by the </HTML> tag. In order
to be able to be correctly interpreted by the browser, other tags are necessary, for example <HEAD> and
</HEAD> as well as <BODY> and </BODY>. All other tags are optional.
As shown previously, data transmitted to the HTTP server by the client is itself placed in between the tag
elds <FORM> and </FORM>. In order to minimise trac, it is also advisable to place only useful data in
the tag elds for example, generated elds or copies resulting from GENERATE-HTML and COPY-FROM
tags, as well as indispensable elds such as focusField and pfkField. Other data may be placed anywhere in
the area of the HTML page, provided that their position conforms to the standards. The following presents
a template structure example.
<HTML>
<HEAD><!------------------ start of HTML page header -------------------->
<style>
<!-- définition des classes de style
1.4. Creating Virtel Template Pages 35

Virtel User Guide, Release 4.57
.GREEN {font-family: monospace; background: #000000; color: #00FF00; }
//--></style>
<!--VIRTEL start="{{{" end="}}}" -->
{{{ON-ATTRIBUTE (PROTECTED,WHITE)<font color=white>}}}
{{{ON-END-OF-ATTRIBUTE (PROTECTED,WHITE)</font>}}}
{{{ADD-TO-FIELDS (NORMAL,NOCOLOR) class="GREEN" }}}
{{{DEFINE-HTML-PFKEY "PFKFIELD"}}}
{{{DEFINE-HTML-FOCUS-FIELD "FOCUSFIELD"}}}
<title>Sample HTML page</title>
</HEAD><!------------------ end of HTML page header -------------------->
<script language="JavaScript"><!-- function SetFocus()
{ document.virtelForm.{{{FIELD-WITH-CURSOR}}}.focus(); } function
SaveFocus(CurrentFieldName)
{ document.virtelForm.FOCUSFIELD.value = CurrentFieldName; }
function SubmitForm(valeur)
{ document.virtelForm.PFKFIELD.value = valeur;
document.virtelForm.submit(); }
function ShowPopup()
{ var popup =
window.open("","PopupImpression",'width=614,height=129');
popup.location = "imprim.htm++Print{{{SESSION-CODE}}}"; } --></script>
<!---------------------- start of HTML page body -------------------->
<BODY onLoad="SetFocus()">
<!------------------------- start of HTML form ----------------------->
<FORM name="virtelForm"
action="example.html++{{{SESSION-CODE}}}"
method=="POST">
{{{ GENERATE-HTML (1,1,1920) }}}
<input name="PFKFIELD" type="HIDDEN" value="">
<input name="FOCUSFIELD" type="HIDDEN" value="{{{FIELD-WITH-CURSOR}}}">
</FORM>
<!--------------------- end of HTML form ---------------------->
<!—-Place submit buttons and hypertext links here. For example:-->
<a href="Javascript:submitform('PF1')" >soumettre avec PF01</a>
<INPUT TYPE="BUTTON" size="5" onclick="SubmitForm(this.value)" value="PF01">
<script language="JavaScript"><!-- {{{IF-PRINT-IS-READY
ShowPopUp();
}}}
--></script>
</BODY><!------------------ end of HTML page body -------------------->
</HTML>
For a full example, see the WEB2VIRT.htm page delivered with VIRTEL.
1.4.6 Inserting host application data into a page
Insertion of host application data in an HTML or XML page is achieved with the GENERATE-HTML and
COPY-FROM tags.
36 Chapter 1. The Virtel Engine

Virtel User Guide, Release 4.57
GENERATE-HTML tag
The GENERATE-HTML tag instructs VIRTEL to convert all or part of the 3270 screen into HTML form
data. Output elds are converted into text, while input elds are converted into HTML input statements.
The generated text and input elds are aligned so as to correspond as far as possible with the layout of
the original 3270 screen. The resulting generation takes account of the nature of the data as well as the
information specied in the ON-ATTRIBUTE, ON-END-OF-ATTRIBUTE and ADD-TO-FIELDS tags.
{{{ GENERATE-HTML (row, col, len) }}}
row,col Starting position (row and column number on the 3270 screen) of the data to be copied. This
starting position will usually contain a 3270 attribute character.
len Length of the data to be copied (including attribute characters).
For example, the command {{{ GENERATE-HTML (01,01,1920) }}} will generate the total contents of the
3270 screen.
An alternative form of the GENERATE-HTML tag allows the position and length to be specied by means
of a symbolic name dened in a previous DEFINE-DFHMDF-NAME or DEFINE-DFHMDF-COLUMN tag
(see “{{{DEFINE-DFHMDF-COLUMN}}}”.
{{{ GENERATE-HTML "name" }}}
name symbolic name dened in a previous DEFINE-DFHMDF-NAME or DEFINE-DFHMDF-COLUMN
tag.
COPY-FROM tag
The COPY-FROM tag copies data into the HTML page from a specic location on the 3270
screen. Unlike the GENERATE-HTML tag, the COPY-FROM tag copies only the data and
does not process any associated 3270 eld attributes.
{{{ COPY-FROM (row, col, len) }}}
row,col Starting position (row and column number on the 3270 screen) of the data to be copied. This will
typically be the rst character after the attribute character which denes the start of the eld.
len Length of the data to be copied.
An alternative form of the COPY-FROM tag allows the position and length to be specied by means of
a symbolic name dened in a previous DEFINE-DFHMDF-NAME or DEFINE-DFHMDF-COLUMN tag
(described 37).
{{{ COPY-FROM "name" }}}
name symbolic name dened in a previous DEFINE-DFHMDF-NAME or DEFINE-DFHMDF-COLUMN
tag.
Normally, any binary zeroes in the copied data will be removed. However, if the BLANK-BINARY-
ZEROES option is set (see “Setting and unsetting local options”) then binary zeroes will be converted
to blanks.
CREATE-VARIABLE-FROM tag
The CREATE-VARIABLE-FROM tag copies data from the 3270 screen into a VIRTEL variable. There are
several formats of the COPY-VARIABLE-FROM tag, as described below.
1.4. Creating Virtel Template Pages 37

Virtel User Guide, Release 4.57
In the rst form of CREATE-VARIABLE-FROM, the name of a variable is specied within the tag. Data is
extracted from the indicated location on the screen, continuing until an attribute character is found or until
the specied length is reached. Any non-alphanumeric characters are removed, all alphabetic characters are
converted to upper case, and the resulting data is copied into the variable. If the variable does not exist, it
will be created. If the variable already exists, the new value will be appended to any existing values.
{{{ CREATE-VARIABLE-FROM (row, col, len)"varname" }}}
row,col Starting position (row and column number on the 3270 screen) of the data to be copied. This will
typically be the rst character after an attribute character which denes the start of a eld.
len Length of the data to be copied.
varname
The name of the variable to be created
The second form of CREATE-VARIABLE-FROM is distinguished by the absence of a variable name
within the tag. In this case, the variable name is obtained from the 3270 screen. Data is extracted
from the indicated location on the screen, continuing until an attribute character is found or until the
specied length is reached. Any non-alphanumeric characters are removed, all alphabetic characters
are converted to upper case, and the resulting string is used as a variable name. If the variable does
not exist, it will be created. If the variable already exists, a new value will be appended to any existing
values. If the variable name was terminated by an attribute character, then the data in the following
eld is used as the value of the variable. Otherwise the string “EMPTY” will be used as the value of
the variable.
{{{ CREATE-VARIABLE-FROM (row, col, len) }}}
row,col Line and column number on the 3270 screen containing the variable name.
len Total length of the variable name and value to be copied.
The third form of CREATE-VARIABLE-FROM allows a rectangle to be copied from the screen. With a
fourth sub- parameter specied, the instruction will not stop collecting data after encountering an attribute,
but will continue adding values to the variable for the specied height on the screen. Any attributes found
in the rectangle will be copied as blanks. If the variable does not exist, it will be created. If the variable
already exists, the new values will be appended to any existing values.
{{{ CREATE-VARIABLE-FROM (row, col, width, height) "varname" }}}
row,col Starting position (row and column number on the 3270 screen) of the data to be copied.
width,height Size (in columns and rows) of the rectangle to be copied.
varname The name of the variable to be created
DEFINE-HTML-FIELD-NAME tag
The DEFINE-HTML-FIELD-NAME tag requests that VIRTEL should use a specic HTML input eld name
for the specied 3270 eld, instead of an automatically generated name. The DEFINE-HTML-FIELD-NAME
tag may be followed by a GENERATE-HTML tag, in which case VIRTEL will generate an HTML input
eld with the specied name, or the input eld may be explicitly coded in the page template, in which case
VIRTEL will use the name to associate the HTML input eld with the 3270 eld at the specied position.
Normally this tag is not needed because the automatically generated eld names are adequate for all except
certain specialised applications.
38 Chapter 1. The Virtel Engine

Virtel User Guide, Release 4.57
{{{ DEFINE-HTML-FIELD-NAME (row, col, len)"name"}}}
row,col Line and column number of the start of the eld on the 3270 screen. This must be the rst character
after the attribute character.
len Length of the input eld (excluding attribute character).
name Name to be associated with the HTML input eld.
DEFINE-HTML-FIELD tag
The DEFINE-HTML-FIELD tag is equivalent to a DEFINE-HTML-FIELD-NAME tag followed by a
GENERATE-HTML tag.
{{{ DEFINE-HTML-FIELD (row, col, len)"name"}}}
row,col Line and column number of the start of the eld on the 3270 screen. This must be the rst character
after the attribute character.
len Length of the input eld (excluding attribute character).
name Name to be associated with the HTML input eld.
DEFINE-DFHMDF-NAME tag
The DEFINE-DFHMDF-NAME tag allows a eld on the 3270 screen to be given a symbolic name which
can be used in a subsequent GENERATE-HTML tag or COPY-FROM tag.
{{{ DEFINE-DFHMDF-NAME (row, col, len)"name"}}}
row,col Position (row and column number on the 3270 screen) of the attribute character which precedes
the eld on the 3270 screen.
len Length of the 3270 eld (excluding attribute character).
name Name to be associated with the eld.
The name specied by the DEFINE-DFHMDF-NAME tag can then be used in subsequent GENERATE-
HTML tags or COPYFROM tags, instead of specifying an explicit row, column, and length. In addition,
the DEFINE-DFHMDF-NAME tag generates an implicit DEFINE-HTML-FIELD-NAME tag.
For example, the following tag denes a 10-character input eld having attribute byte at row 1 column 59.
The eld itself occupies row 1 columns 60 to 69:
{{{ DEFINE-DFHMDF-NAME (1,59,10)"XDAT10" }}}
Subsequently:
{{{ GENERATE-HTML "XDAT10" }}}
is interpreted as:
{{{ GENERATE-HTML (1,59,11) }}}
and
{{{ COPY-FROM "XDAT10" }}}
1.4. Creating Virtel Template Pages 39

Virtel User Guide, Release 4.57
is interpreted as:
{{{ COPY-FROM (1,60,10) }}}
and the following tag will be automatically generated:
{{{ DEFINE-HTML-FIELD-NAME (1,60,10)"XDAT10" }}}
Notice that VIRTEL automatically adjusts the starting position and length as necessary to account for the
attribute byte.
DEFINE-DFHMDF-COLUMN tag
The DEFINE-DFHMDF-COLUMN tag is similar to the DEFINE-DFHMDF-NAME tag except that it allows
the denition of a eld which is repeated in the same column position on several consecutive lines of the
screen.
{{{ DEFINE-DFHMDF-COLUMN (row, col, len, ht) "name"}}}
row,col Position (row and column number on the 3270 screen) of the attribute character which precedes
the rst occurrence of the eld on the 3270 screen.
len Length of each 3270 eld (excluding attribute character).
ht Height of column (number of lines).
name Name to be associated with the eld.
The name specied by the DEFINE-DFHMDF-COLUMN tag can be used in subsequent GENERATE-
HTML tags or COPYFROM tags instead of specifying an explicit row, column, and length. The rst time
the eld name is referenced in a GENERATE-HTML or COPY-FROM tag, the rst occurrence of the
eld will be used. Each time the eld name is referenced subsequently, the row number is incremented
automatically. After the end of the series is reached, any subsequent reference wraps back to the rst
row number. In addition, the DEFINE-DFHMDF-COLUMN tag implicitly generates a series of DEFINE-
HTML-FIELD-NAME tags, each of which contains the eld name suxed by _1, _2, etc.
For example, the following tag denes a column of 5-character input elds having attribute bytes in column
1. The elds themselves occupy columns 2 to 6. The rst eld is in row 9 and there are 12 occurrences:
{{{DEFINE-DFHMDF-COLUMN (9,1,5,12)"NBLIGN" }}}
Subsequently:
{{{ GENERATE-HTML "NBLIGN" }}}
is interpreted as:
{{{ GENERATE-HTML (n,1,6) }}}
and
{{{ COPY-FROM "NBLIGN" }}}
is interpreted as:
{{{ COPY-FROM (n,2,5) }}}
where n takes the next value in the range 9 to 20. The following tags will be automatically generated:
40 Chapter 1. The Virtel Engine

Virtel User Guide, Release 4.57
{{{DEFINE-HTML-FIELD-NAME (9,2,5)"NBLIGN_1" }}}
{{{DEFINE-HTML-FIELD-NAME (10,2,5)"NBLIGN_2" }}}
and so on until:
{{{DEFINE-HTML-FIELD-NAME (20,2,5)"NBLIGN_12" }}}
Notice that VIRTEL automatically adjusts the starting positions and lengths as necessary to account for
the attribute byte.
GENERATE-VARIABLES tag
The GENERATE-VARIABLES tag functions like GENERATE-HTML except that, instead of generating
HTML, it generates a set of table variables for each attribute found in the designated portion of the screen.
{{{ GENERATE-VARIABLES (row, col, len)"prefix" }}}
row,col Starting position (row and column number on the 3270 screen) of the data to be copied. This
starting position will usually contain a 3270 attribute character.
len Length of the data to be copied (including attribute characters).
prex The prex of the generated variable names.
A set of these variables is generated for each eld found on the screen:
prexNAME Field name Example : V00002E9 for an input eld, blank for an output eld
prexLINE Line position of the eld attribute (rst line = 1)
prexCOLUMN Column position of the eld attribute (rst column = 1)
prexLENGTH Field length (excluding attribute)
prexATTRB Attribute: ASKIP, PROT, UNPROT, NUM, BRT, NORM, DET, MDT
prexCOLOR Color: NEUTRAL, BLUE, RED, PINK, GREEN, TURQUOISE, YELLOW, WHITE
prexHILIGHT Highlight: BLINK, REVERSE, UNDERLINE, OFF
prexVALUE The text contained in the eld (excluding attribute)
For example, the tag {{{ GENERATE-VARIABLES (01,01,1920) “MYPREFIX” }}} generates a set of
table variables describing the entire contents of the 3270 screen. Normally, any binary zeroes in the eld will
be removed from the VALUE. However, if the BLANK-BINARY-ZEROES option is set (see “Setting and
unsetting local options”) then binary zeroes will be converted to blanks.
GENERATE-VIR3270 tag
GENERATE-VIR3270, in conjunction with supporting JavaScript functions, is used by VIRTEL Web Access
to generate an HTML page which reproduces as closely as possible the look and feel of a classic 3270 screen.
The GENERATE-VIR3270 tag functions like GENERATE-HTML except that, instead of generating HTML
form elds corresponding to 3270 input elds, it generates all 3270 elds as HTML spans. Special attribute
keywords are added to each span to indicate the type of eld, the screen position, and the 3270 eld attributes.
A subspan is generated for characters whose character attributes dier from the eld attributes. In addition,
GENERATE-VIR3270 generates a hidden HTML form eld for each 3270 input eld, and these elds are
written as HTML fragments into a VIRTEL table variable so that they can be inserted later in the page.
1.4. Creating Virtel Template Pages 41
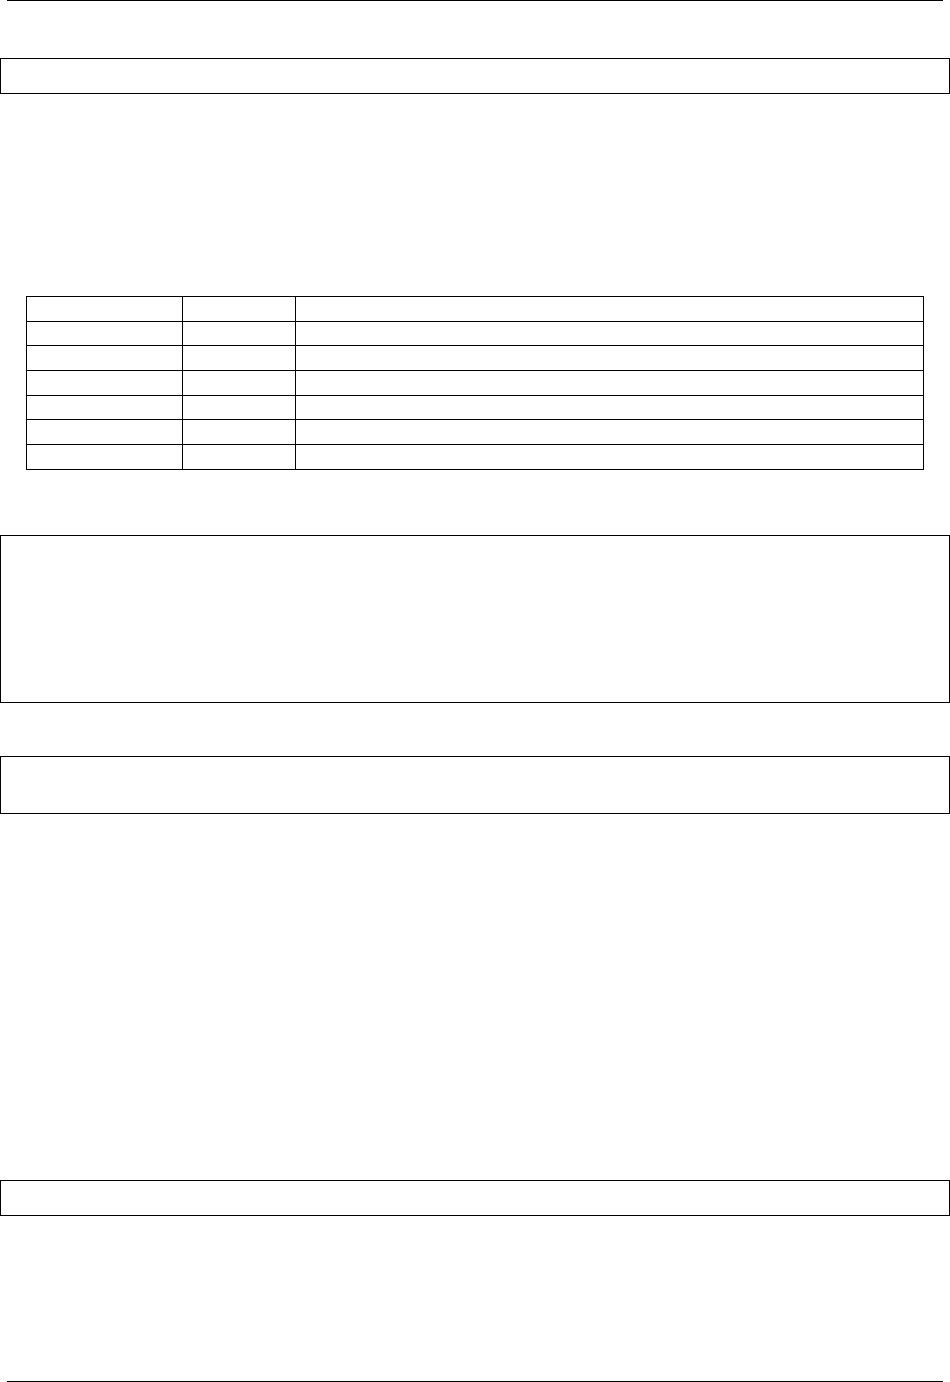
Virtel User Guide, Release 4.57
{{{ GENERATE-VIR3270 (row, col, len)"fragvar" }}}
row,col Starting position (row and column number on the 3270 screen) of the data to be copied.
len Length of the data to be copied.
fragvar The name of the table variable for the hidden HTML form elds.
The table below shows the HTML attributes generated for each eld and 3270 attribute position on the
screen:-
Attribute Name Meaning Values
vt= Field type O = Output, I = Input, A = 3270 attribute, C = Character subspan
vr= Row Row number (rst row = 1)
vc= Column Column number (rst column = 1)
vp= Position Oset from start of screen (R1C1 = 0)
vl= Length Length of span or subspan
continuing= “YES” Indicates continuation of a eld.
An example of the GENERATE-VIR3270 tag is shown below:-
<pre><div id="printReady">{{{GENERATE-VIR3270 (1,1,1920)"INFIELDS"}}}
</div></pre>
{{{DEFINE-HTML-PFKEY "pf"}}}<input name="pf" type="HIDDEN">
<div id="infields">
{{{FOR-EACH-VALUE-IN "INFIELDS"}}}{{{CURRENT-VALUE-OF "INFIELDS"}}}
{{{END-FOR "INFIELDS"}}}
</div>
Continuing a eld after end of a line/or screen.
<pre><div id="printReady" class="mainFont"><span vt="I" continuing="YES"
vp="0" vr="1" vc="1" vl="1760" vn="V0000000" class="NGREEN2"
1.4.7 Colour and font management
The management of the size and the colours of the text is eected for all elds by means of the ON-
ATTRIBUTE and ON-END-OF-ATTRIBUTE tags. For applications which use 3270 character attributes
(order code x’28’), the colour and highlighting of individual characters within a eld can be managed by
means of the ON-CHARACTER-ATTRIBUTE and ON-END-OF-CHARACTER-ATTRIBUTE tags. Input
elds may be supplied with additional information by way of the ADDTO-FIELDS tag.
ON-ATTRIBUTE tag
The ON-ATTRIBUTE and ON-END-OF-ATTRIBUTE tags allow HTML tags to be inserted before and
after each eld depending on the 3270 attributes specied by the host application.
{{{ ON-ATTRIBUTE (p1,p2,..,pn) <standard HTML tag>}}}
Inserts the value specied by “standard html tag” before the eld when the conditions p1 to pn are fullled.
The parameters p1 to pn may appear in any order, each parameter representing one of the following values:
p1 Type of eld: PROTECTED, UNPROTECTED, NON-DISPLAY, NUMERIC, MDTON, DE-
TECTABLE. ALPHANUMERIC, INTENSIFIED, BRIGHT, NORMAL
42 Chapter 1. The Virtel Engine

Virtel User Guide, Release 4.57
p2 Highlighting: NOHILIGHT, BLINK, REVERSE, UNDERSCORE
p3 Colour: NOCOLOR, BLUE, RED, PINK, GREEN, YELLOW, TURQUOISE, WHITE
When more than one ON-ATTRIBUTE tag matches the same eld, the tags are processed in reverse order
and the generated HTML is accumulated from each matching ON-ATTRIBUTE tag. The WITH-NO-
MATCH-BELOW keyword allows an ON-ATTRIBUTE tag to match the eld only if no match has been
found with the ON-ATTRIBUTE tags already processed.
ON-END-OF-ATTRIBUTE tag
The presence of the ON-ATTRIBUTE tag requires the presence of an ON-END-OF-ATTRIBUTE tag having
the same values for the p1 to pn parameters.
{{{ ON-END-OF-ATTRIBUTE (p1,p2,..,pn) <standard HTML tag>}}}
Inserts the value specied by “standard html tag” after the eld when the conditions p1 to pn are fullled.
As previously described for the ON-ATTRIBUTE tag, multiple matching ON-END-OF-ATTRIBUTE tags
are processed in reverse order, and the optional WITH-NO-MATCH-BELOW keyword causes the ON-END-
OF-ATTRIBUTE tag to match only if no match has been found with the ON-END-OF-ATTRIBUTE tags
already processed. Example:
{{{ ON-ATTRIBUTE (PROTECTED,WITH-NO-MATCH-BELOW)<font color=green>}}}
{{{ ON-END-OF-ATTRIBUTE (PROTECTED, WITH-NO-MATCH-BELOW)</font>}}}
{{{ ON-ATTRIBUTE (PROTECTED,NORMAL,NOCOLOR)<font color=#00CCFF>}}}
{{{ ON-END-OF-ATTRIBUTE (PROTECTED,NORMAL,NOCOLOR)</font>}}}
{{{ ON-ATTRIBUTE (PROTECTED,INTENSIFIED,NOCOLOR)<font color=white>}}}
{{{ ON-END-OF-ATTRIBUTE (PROTECTED,INTENSIFIED,NOCOLOR)</font>}}}
{{{ ON-ATTRIBUTE (PROTECTED,BLUE)<font color=#00CCFF>}}}
{{{ ON-END-OF-ATTRIBUTE (PROTECTED,BLUE)</font>}}}
{{{ ON-ATTRIBUTE (PROTECTED,RED)<font color=#c41200>}}}
{{{ ON-END-OF-ATTRIBUTE (PROTECTED,RED)</font>}}}
{{{ ON-ATTRIBUTE (PROTECTED,PINK)<font color=pink>}}}
{{{ ON-END-OF-ATTRIBUTE (PROTECTED,PINK)</font>}}}
{{{ ON-ATTRIBUTE (PROTECTED,GREEN)<font color=#00FF00>}}}
{{{ ON-END-OF-ATTRIBUTE (PROTECTED,GREEN)</font>}}}
{{{ ON-ATTRIBUTE (PROTECTED,TURQUOISE)<font color=#40E0D0>}}}
{{{ ON-END-OF-ATTRIBUTE (PROTECTED,TURQUOISE)</font>}}}
{{{ ON-ATTRIBUTE (PROTECTED,YELLOW)<font color=#FFFF33>}}}
{{{ ON-END-OF-ATTRIBUTE (PROTECTED,YELLOW)</font>}}}
{{{ ON-ATTRIBUTE (PROTECTED,WHITE)<font color=white>}}}
{{{ ON-END-OF-ATTRIBUTE (PROTECTED,WHITE)</font>}}}
Example set of ON-ATTRIBUTE and ON-END-OF-ATTRIBUTE tags
ON-CHARACTER-ATTRIBUTE tag
If the page template contains ON-CHARACTER-ATTRIBUTE and ON-END-OF-CHARACTER-
ATTRIBUTE tags, changes in colour or highlighting of individual characters within a eld are surrounded by
the specied HTML code during processing by GENERATE-HTML. Since HTML code cannot be included
in the “value” clause of an input eld, GENERATE-HTML does not generate HTML code for character
attributes within input elds.
{{{ ON-CHARACTER-ATTRIBUTE (p1,p2) <standard HTML tag>}}}
p1,p2 Highlighting and colour parameters as specied for the ON-ATTRIBUTE tag.
1.4. Creating Virtel Template Pages 43

Virtel User Guide, Release 4.57
ON-END-OF-CHARACTER-ATTRIBUTE tag
The ON-END-OF-CHARACTER-ATTRIBUTE tag species the HTML code to be inserted at the termi-
nation of a character string opened by an ON-CHARACTER-ATTRIBUTE tag.
{{{ ON-END-OF-CHARACTER-ATTRIBUTE (p1,p2) <standard HTML tag>}}}
ADD-TO-FIELDS tag
The presence of an ADD-TO-FIELDS tag allows the denition of each HTML input eld to be modied
according to the 3270 attributes specied by the host application.
{{{ ADD-TO-FIELDS (p1,p2,..,pn) part of standard HTML tag }}}
Inserts the value specied by “part of standard html tag” into the HTML <INPUT> tag when the conditions
p1 to pn (described in the previous paragraph) are fullled.
When more than one ADD-TO-FIELDS tag matches the same eld, the tags are processed in order of
appearance and the generated HTML is accumulated from each matching ADD-TO-FIELDS tag. The
WITH-NO-MATCH-ABOVE keyword allows an ADD-TO-FIELDS tag to match the eld only if no match
has been found with the ADD-TO-FIELDS tags already processed.
Example:
{{{ ADD-TO-FIELDS (NORMAL,NOCOLOR) class="GREEN" }}}
{{{ ADD-TO-FIELDS (INTENSIFIED,NOCOLOR) class="RED" }}}
{{{ ADD-TO-FIELDS (BLUE) class="BLUE" }}}
{{{ ADD-TO-FIELDS (RED) class="RED" }}}
{{{ ADD-TO-FIELDS (PINK) class="PINK" }}}
{{{ ADD-TO-FIELDS (GREEN) class="GREEN" }}}
{{{ ADD-TO-FIELDS (TURQUOISE) class="TURQUOISE" }}}
{{{ ADD-TO-FIELDS (YELLOW) class="YELLOW" }}}
{{{ ADD-TO-FIELDS (WHITE) class="WHITE" }}}
{{{ ADD-TO-FIELDS (DISPLAY,WITH-NO-MATCH-ABOVE) class="GREEN" }}}
Example set of ADD-TO-FIELDS tags
In the above example, the parameter class makes reference to a style class dened in the HTML page header:-
<head>
<meta http-equiv="Content-Type" content="text/html; charset=iso-8859-1">
<style><!--
.BLUE {font-family: monospace; background: #00CCFF; }
.RED {font-family: monospace; background: red; }
.PINK {font-family: monospace; background: pink; }
.GREEN {font-family: monospace; background: #00FF00;}
.TURQUOISE {font-family: monospace; background: #40E0D0; }
.YELLOW {font-family: monospace; background: #FFFF33;}
.WHITE {font-family: monospace; background: #FFFFFF; }
//--></style>
<!--VIRTEL start="{{{" end="}}}" -->
<title>Syspertec - example of generation of HTML pages}}} </title>
</head>
Example styles for ADD-TO-FIELDS tags
For certain elds, the action of the ADD-TO-FIELDS tag may be nullied by the NO-ADD-TO-CHECKBOX
and NO-ADDTO-LISTBOX local options (see “Setting and unsetting local options”).
44 Chapter 1. The Virtel Engine

Virtel User Guide, Release 4.57
Note: The ADD-TO-FIELDS tag aects input elds only
1.4.8 Cursor management
In each message sent from the host application to the browser, VIRTEL automatically manages the position-
ing of the cursor insofar as is possible. Conversely, when a message is sent to VIRTEL from the browser, it is
necessary to know the position of the cursor in order to inform the application on the host side. The cursor
position cannot be handled relatively therefore, the cursor’s exact position is communicated via a hidden
eld specifying the name of the eld having the focus at the time of transmission. Cursor management is de-
termined by the tags DEFINE-HTML-FOCUS-FIELD, FIELD-WITH-CURSOR, DEFAULT-FIELDWITH-
CURSOR and by two JavaScript procedures. More precise positioning of the cursor can be controlled by
the optional tags DEFINE-CURSOR-POSITION-FIELD and POSITION-OF-THE-CURSOR.
DEFINE-HTML-FOCUS-FIELD tag
The DEFINE-HTML-FOCUS-FIELD tag informs VIRTEL of the existence of the focusField.
{{{ DEFINE-HTML-FOCUS-FIELD "focusField" }}}
The focusField is a hidden eld which will receive the name of the eld having the focus, that is to say the
input eld on which the cursor is positioned, at the moment of transmission of a message from the browser
to VIRTEL.
This eld must be dened in the following way:-
<INPUT NAME="focusField" TYPE="HIDDEN" VALUE="{{{FIELD-WITH-CURSOR}}}">
DEFINE-CURSOR-POSITION-FIELD tag
The DEFINE-CURSOR-POSITION-FIELD tag informs VIRTEL of the existence of the cursorField.
{{{ DEFINE-CURSOR-POSITION-FIELD "cursorField" }}}
The cursorField is an optional hidden eld in which the JavaScript routines may place the exact position
of the cursor when a message is transmitted from the browser to VIRTEL. The cursor position is indicated
by a string of the format Vnnnnnnn or Pnnnnnnn, where V indicates that the cursor is in a non-protected
(input) eld, P indicates a protected (output) eld, and nnnnnnn is the hexadecimal oset of the cursor
from the start of the screen (where 0000000 represents row 1 column 1).
The cursorField must be dened in the following way:
<INPUT NAME="cursorField" TYPE="HIDDEN" VALUE="">
If both focusField and cursorField are sent to VIRTEL, then VIRTEL will use cursorField to determine the
position of the cursor.
FIELD-WITH-CURSOR tag
The FIELD-WITH-CURSOR tag enables VIRTEL to insert the name of the eld having the focus at the
time of transmission of the message to the browser.
1.4. Creating Virtel Template Pages 45

Virtel User Guide, Release 4.57
{{{ FIELD-WITH-CURSOR }}}
DEFAULT-FIELD-WITH-CURSOR tag
The DEFAULT-FIELD-WITH-CURSOR tag species the name generated by the FIELD-WITH-CURSOR
tag when the 3270 screen contains no input elds.
{{{ DEFAULT-FIELD-WITH-CURSOR "fieldname" |"NOFIELD" }}}
In the DEFAULT-FIELD-WITH-CURSOR tag, eldname must be the name of an HTML input eld dened
in the template page. If no DEFAULT-FIELD-WITH-CURSOR tag is present, and the screen contains no
input elds, VIRTEL will convert the rst eld on the screen into an input eld, so that the FIELD-WITH-
CURSOR tag can generate the name of a valid input eld.
The “NOFIELD” option prevents a dummy eld from being created.
Positioning the focus when a message is sent to the browser
The positioning of the focus is done with the help of a JavaScript procedure referenced by the <BODY>
tag of the HTML page:
Script for focus position management
<script language="Javascript">
<!-- comment to mask script for some browsers
function setfocus()
{
document.virtelForm.{{{ FIELD-WITH-CURSOR }}}.focus();
}
//-->
</script>
Cursor position initialisation <body onload=”setfocus()”>
Positioning the focus in the browser
Once present in the client’s browser, the user may need to move the focus to a dierent eld, either by using
the TAB key on the keyboard or by using the mouse. The focusField eld is automatically updated if the
ADD-TO-FIELDS tag calls a script which updates the focus eld. Script for saving the name of the eld
having the focus:-
<script language="Javascript">
<!-- comment to mask script for some browsers
function savefocus(CurrentFieldName)
{
document.virtelForm.focusField.value = CurrentFieldName;
}
//-->
</script>
Automatic call of the update script
{{{ ADD-TO-FIELDS onfocus ="savefocus(this.name)" }}}
46 Chapter 1. The Virtel Engine

Virtel User Guide, Release 4.57
POSITION-OF-THE-CURSOR tag
The POSITION-OF-THE-CURSOR tag allows VIRTEL to send the exact position of the cursor to the
browser by including a string of the format Vnnnnnnn or Pnnnnnnn in the HTML page. Vnnnnnnn means
that the cursor is in a non-protected (input) eld. Pnnnnnnn means that the cursor is in a protected (output)
eld. In both cases, nnnnnnn is the hexadecimal oset of the cursor from the start of the screen (where
0000000 represents row 1 column 1).
{{{ POSITION-OF-THE-CURSOR }}}
1.4.9 Function key management
By design, the transmission of information delivered by a 3270 application is eected by using only the
function keys, usually the PF and PA keys. Also by design, the navigation from an HTML page is radically
dierent, generally using the mouse to submit requests to the HTTP server. This dierence in philosophy
makes it dicult, even impossible in certain instances, to detect the use of a function key via the browser.
Conserving the ergonomic aspects of the web in an application that allows full use of the function keys is
naturally not an easy thing to do, it is, however, made possible by the following functions.
Denition of the pfkField eld
As with the management of the cursor, the pfkField is a hidden eld designed to accept the name of the
function key that VIRTEL must use to transmit data to the application on the host.
<INPUT NAME="pfkField" TYPE="HIDDEN" VALUE="ENTER">
VIRTEL is notied of the existence of the eld by the following tag:
{{{ DEFINE-HTML-PFKEY ="pfkField" }}}
Updating the pfkField
The eld pfkField is updated by using a JavaScript procedure called at the time of the submission of the
request. The script used is referenced in the BUTTON eld denition or in the HTML link used for the
submission.
Save the name of the eld having the focus
<script language="Javascript">
<!-- comment to mask script for some browsers
function submitform(pfkey)
{
document.virtelForm.pfkField.value = pfkey;
document.virtelForm.submit();
}
//-->
</script>
Automatic call of the update script from a eld of type BUTTON
<INPUT TYPE="BUTTON" size="5" VALUE="PF01"
onclick="submitform(this.value)">
1.4. Creating Virtel Template Pages 47
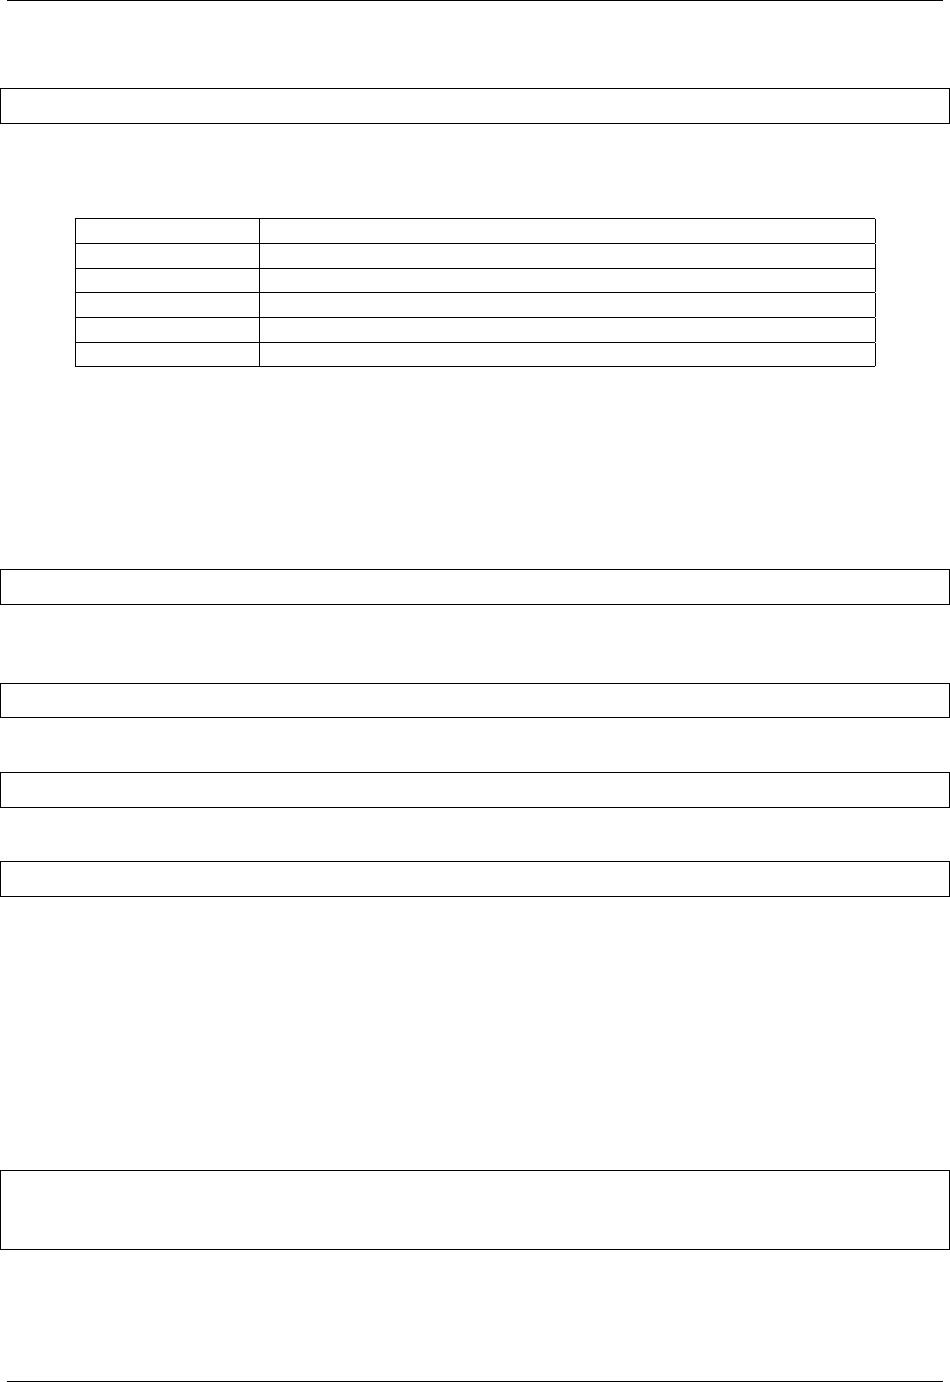
Virtel User Guide, Release 4.57
Automatic call of the SCRIPT from a hypertext link
<a href="Javascript:submitform('PF1')" >submit with PF01</a>
The function keys may be dened in the following manner in the “value” keyword of the INPUT TYPE=BUT-
TON eld.
3270 function key PfkField value
ENTER ENTER
CLEAR SCREEN CLEAR
PA1, PA2, PA3 PA1, PA2, PA3
PF1 to PF24 PF01 to PF24 (variations PF1, F1, F01, P1, P01 are also accepted)
Attention ATTN
Function key values for pfkField
Disallowed function keys
Certain function keys may be explicitly restricted by means of the INVALID-PFKEYS tag containing the
list of prohibited PF keys.
{{{ INVALID-PFKEYS (pfk1, pfk2, .. , pfkn) }}}
On the other hand, an exhaustive list of authorised function keys may be specied with the VALID-PFKEYS
tag.
{{{ VALID-PFKEYS (pfk1, pfk2, .. , pfkn) }}}
For example, Disallow ATTN, PF08 and PF24
{{{ INVALID-PFKEYS (ATTN,PF08,PF24) }}}
Disallow all function keys except ENTER and PF03
{{{ VALID-PFKEYS (ENTER,PF03) }}}
PF key processing by scenario
A page template can generate a “pseudo-PFkey” intended to be interpreted by an INPUT scenario. This is
done by setting the pfkField to a value beginning with SCENARIO. The pseudo-PFKey will be accepted by
VIRTEL and treated as ENTER, but it will not be transmitted to the application. The scenario can retrieve
the value of the pfkField by means of the COPY$ INPUT-TO-VARIABLE instruction.
For example:
Denition of the BUTTON eld in the page template:
{{{ DEFINE-HTML-PFKEY "pf" }}}
<INPUT TYPE="BUTTON" size="5" VALUE="SCENARIO-DFHMDF"
onclick="submitform(this.value)">
Retrieving and testing the PF key value in the INPUT scenario:
48 Chapter 1. The Virtel Engine

Virtel User Guide, Release 4.57
COPY$ INPUT-TO-VARIABLE,FIELD='pf',VAR='PF'
IF$ NOT-FOUND,THEN=NOPARAMS
CASE$ 'PF',(NE,'SCENARIO-DFHMDF',NOPARAMS)
* generate the screen capture:
COPY$ OUTPUT-FILE-TO-VARIABLE, *
FILE='DFHMDF.TXT',VAR='CAPTURE'
* send result to browser
SEND$ AS-FILE,VAR='CAPTURE', *
TYPE='text/plain',NAME='dfhmdf.asm'
NOPARAMS EQU *
The Null PF key
A page template or JavaScript program can request VIRTEL to resend the contents of the current 3270
screen, without sending any input to the host application, by setting the pfkField to the value NULL-PF
1.4.10 Setting and unsetting local options
The SET-LOCAL-OPTIONS and UNSET-LOCAL-OPTIONS tags allow the activation or deactivation of
miscellaneous processing options associated with HTML generation. These options are normally deactivated,
but any or all of them can be activated by default using the HTSETn parameters in the VIRTCT. Refer to
the VIRTEL Installation Guide for details of the HTSETn parameters. The SET-LOCAL-OPTIONS and
UNSET-LOCAL-OPTIONS tags apply only to the current page, and take eect from the point in the page
at which they appear.
The options which can be specied are:
AUTO-INCREMENT-VARIABLES When this option is activated, table variables referenced outside
a FOR-EACH-VALUE-IN loop will be automatically advanced to their next value each time they are
reused. If this option is not active, the CURRENT-VALUE-OF tag always produces the rst value of
a table variable when it is referenced outside a loop.
BLANK-BINARY-ZEROES Aects the processing of the COPY-FROM and GENERATE-
VARIABLES tags (see “Inserting host application data in a page”).
DO-NOT-IGNORE-BINARY-ZEROES When this option is activated, then all 3270 NUL characters
in input elds generated by VIRTEL will be sent to the browser as SUB characters (x‘1A’). When this
option is not activated, then VIRTEL will remove 3270 NUL characters from input elds.
HTML-ESCAPES, JAVASCRIPT-ESCAPES, JSON-ESCAPES, NO-ESCAPES, XML-ESCAPES
Aects the processing of the CURRENT-VALUE-OF, TRIMMED-VALUE-OF and NO-BLANKS-
VALUE-OF tags (see “Handling table variables”). Similarly aects the processing of the values
generated by GENERATEVARIABLES.
ID Indicates that VIRTEL will generate HTML input elds with the parameter “id” in addition to the
“name” parameter. The “id” has the same value as the “name”. This is intended for use with JavaScript
code which refers to VIRTELgenerated elds using the getElementById method.
MAXLENGTH Indicates that VIRTEL will generate HTML input elds with the parameter “maxlength”
in addition to “size”. The “maxlength” parameter ensures that the number of characters that can be
entered into an HTML eld does not exceed the 3270 eld length. By default, VIRTEL does not
generate “maxlength”, which allows an unlimited number of characters to be entered in each HTML
eld, and VIRTEL truncates the value as necessary before sending the data to the host application.
MDT-IF-RECEIVED When this option is activated, VIRTEL will consider all input elds received from
the browser to be “modied” elds to be sent to the host application. Fields in the page not received
1.4. Creating Virtel Template Pages 49

Virtel User Guide, Release 4.57
from the browser are considered to be unmodied and are not sent to the host application. When
this option is not activated, VIRTEL inspects the contents of all elds received from the browser to
determine whether the eld has been modied. VIRTEL sends modied elds to the host application,
and any elds not received from the browser are sent as empty elds. Notes: (1) This option must be
coded in the page template before the elds to which it applies. (2) This option cannot be specied in
the VIRTCT.
NO-ADD-TO-CHECKBOX When this option is activated, HTML attributes dened within an ADD-
TO-FIELDS tag are not added to <input type=checkbox> clauses generated by the GENERATE-
HTML tag in conjunction with the FIELD$ IS-BINARY-CHOICE instruction.
NO-ADD-TO-LISTBOX When this option is activated, HTML attributes dened within an ADD-TO-
FIELDS tag are not added to <select> clauses generated by the GENERATE-HTML tag in conjunction
with the FIELD$ DEFINE-CHOICE or FIELD$ DEFINEVARIABLE-CHOICE instructions.
OPTION-DEFAULT-COMPATIBILITY Prior to the version 4.56 the default parameters for the site
or the user specic default setting were taken from the values present in a “w2hparm.js” le. The
version 4.56 introduces a new way of proceeding to specify these parameters either at the point of
entry level but at each transaction level by using the new “option” eld in the transaction denition.
Using the PTION-DEFAULT-COMPATIBILITY option will maintain compatibility with the previous
mode. This option can be made overall when specied in one of the HTRESn parameter of the
VIRTCT.
TRACE-LINE Setting this option within a page starts a VIRTEL line trace on the HTTP line. Unsetting
this option stops the line trace. Refer to the VIRTEL Messages and Operations Guide for more
information about line traces.
TRACE-RELAY Setting this option within a page starts a VIRTEL terminal trace on the VTAM session.
Unsetting this option stops the terminal trace. Refer to the VIRTEL Messages and Operations Guide
for more information about terminal traces.
SET-LOCAL-OPTIONS tag
The SET-LOCAL-OPTIONS tag activates one or more HTML processing options for the remainder of the
current page, or until deactivated by UNSET-LOCAL-OPTIONS:
{{{ SET-LOCAL-OPTIONS (option, option, ...) }}}
option one or more HTML processing options as described above
UNSET-LOCAL-OPTIONS tag
The UNSET-LOCAL-OPTIONS tag deactivates one or more HTML processing options previously activated
by SET-LOCALOPTIONS or by HTSETn. The specied options are deactivated for the remainder of the
current page, or until reactivated by SET-LOCAL-OPTIONS:
{{{ UNSET-LOCAL-OPTIONS (option, option, ...) }}}
option one or more HTML processing options as described above.
1.4.11 Handling table variables
A table variable is a list of values sent to VIRTEL by a host application in a structured eld of type “FAE5
or FAE6”,^page 247. Table variables may also be created by means of a VIRTEL tag embedded in the page
50 Chapter 1. The Virtel Engine
Virtel User Guide, Release 4.57
template (see “CREATE-VARIABLE-FROM”), via a scenario (see “COPY$ instructions”), or by means of
a S VARIABLE command contained in the host 3270 data stream (see “HOST4WEB commands”).
FOR-EACH-VALUE-IN tag
{{{FOR-EACH-VALUE-IN "varname"}}}
The FOR-EACH-VALUE-IN tag marks the start of a loop. varname is the name of a table variable. VIRTEL
generates everything between the FOR-EACH-VALUE-IN tag and the END-FOR tag once for each value
in varname. If varname has no values then nothing is generated. The current value of varname, and of any
other table variables referenced in the loop, changes when the END-FOR tag is encountered.
CURRENT-VALUE-OF tag
{{{CURRENT-VALUE-OF "varname"}}}
The CURRENT-VALUE-OF tag is used in a loop bracketed by the FOR-EACH-VALUE-IN and END-FOR
tags. varname is the name of a table variable. If it is the variable named in the FOR-EACH-VALUE-IN
tag, it determines the number of iterations of the loops. Otherwise, its value is simply changed when the
END-FOR tag is encountered.
The CURRENT-VALUE-OF tag also allows variables to be inserted in a template page outside of a FOR-
EACH-VALUE-IN loop. In this case, the variable varname must have been created from the HTTP request
by an INPUT scenario by means of the COPY$ INPUT-TO-VARIABLE instruction.
The local options HTML-ESCAPES, JAVASCRIPT-ESCAPES, JSON-ESCAPES, NO-ESCAPES, and
XML-ESCAPES (see “Setting and unsetting local options”) may aect the processing of this tag.
If the HTML-ESCAPES local option is set, special characters in the value of the variable will be replaced
by the corresponding HTML escape sequence as shown in the table below:-
Character HTML escape sequence
< <
> >
“ "e;
& &
If the JAVASCRIPT-ESCAPES local option is set, special characters in the value of the variable will be
replaced by the corresponding JavaScript escape sequence as shown in the table below:-
Character JavaScript escape sequence
“ ”
‘ ’
\ \ \
If the JSON-ESCAPES local option is set, special characters in the value of the variable will be replaced by
the corresponding JSON escape sequence as shown in the table below:-
Character JSON escape sequence
“ ”
\ \ \
Hex 00 to 1f \uxxxx
1.4. Creating Virtel Template Pages 51
Virtel User Guide, Release 4.57
If the XML-ESCAPES local option is set, special characters in the value of the variable will be replaced by
the corresponding XML escape sequence as shown in the table below:-
Character HTML escape sequence
< <
> >
“ ”
& &
‘ ’
Setting any of the HTML-ESCAPES, JAVASCRIPT-ESCAPES, JSON-ESCAPES, or XML-ESCAPES local
options causes the other options to be automatically unset.
Setting the NO-ESCAPES local option disables all escape processing.
NO-BLANKS-VALUE-OF tag
{{{NO-BLANKS-VALUE-OF "varname"}}}
The NO-BLANKS-VALUE-OF tag is similar to the CURRENT-VALUE-OF tag, but the value is truncated
at the rst blank.
TRIMMED-VALUE-OF tag
{{{TRIMMED-VALUE-OF "varname"}}}
The TRIMMED-VALUE-OF tag is similar to the CURRENT-VALUE-OF tag, except that leading and
trailing blanks (if any) are removed from the value before it is substituted in the page.
END-FOR tag
{{{END-FOR "varname"}}}
The END-FOR tag marks the end of a loop started by the FOR-EACH-VALUE-IN tag.
ADVANCE-TO-NEXT-VALUE-OF
{{{ADVANCE-TO-NEXT-VALUE-OF "varname"}}}
The ADVANCE-TO-NEXT-VALUE-OF tag causes subsequent references to the table variable varname (via
the CURRENTVALUE-OF tag, the TRIMMED-VALUE-OF tag, or the NO-BLANKS-VALUE-OF tag) to
refer to the next value in the table.
DO-COUNT-UP-WITH tag
{{{DO-COUNT-UP-WITH "varname"}}}
52 Chapter 1. The Virtel Engine

Virtel User Guide, Release 4.57
The DO-COUNT-UP-WITH tag marks the start of a loop. varname is the name of a variable. VIRTEL
generates everything between the DO-COUNT-UP-WITH tag and the END-DO-COUNT tag n times, where
n is the current value of varname. During the execution of the loop, the value of varname varies from 1 to
n, and other table variables referenced in the loop change when the END-DO-COUNT tag is encountered.
END-DO-COUNT tag
{{{END-DO-COUNT "varname"}}}
The END-DO-COUNT tag marks the end of a loop started by the DO-COUNT-UP-WITH tag.
DEFINE-AUTOMATIC-COUNTER tag
{{{DEFINE-AUTOMATIC-COUNTER (init, incr, max)"varname"}}}
The DEFINE-AUTOMATIC-COUNTER tag allows automatic generation of a counter variable in a loop
started by the FOREACH-VALUE-IN tag. The parameters are:
init the initial value of the counter variable
incr the increment added at each END-FOR
max the maximum value of the counter variable
varname the name of the counter variable
The variable generated can be the loop master variable (the variable named in the FOR-EACH-VALUE-IN)
or a slave variable. When the counter reaches its maximum value, the loop terminates if it is the master, or
continues if it is the slave. In the latter case the counter variable starts again from its initial value.
DEFINE-SUB-VARIABLE tag
{{{DEFINE-SUB-VARIABLE (offset, length, count) "subname"}}}
The DEFINE-SUB-VARIABLE tag allows a sub-variable to be dened. A sub-variable remaps part of the
current value of the loop master variable in a FOR-EACH-VALUE-IN loop. The parameters are:
oset the oset of the sub-variable in the loop master variable
length the length (in characters) of the sub-variable
count the number of occurrences of the sub-variable
subname the name of the sub-variable
A sub-variable consists of count values, each of length bytes, starting at oset in the loop master variable.
The rst byte of the loop master variable is considered to be oset 0. Sub-variables are dened outside
but referenced within a FOR-EACH-VALUE-IN loop. A sub-variable can be referenced wherever a normal
table variable would be valid, including the loop master variable of an inner FOR-EACH-VALUE-IN loop,
which could in itself be redened by other sub-variables. When the sub-variable is referenced, it acts as an
implicit redenition of the current value of the master variable of the innermost FOR-EACH-VALUE-IN loop
in which the reference appears. Thus, the same sub-variable could possibly redene dierent loop master
variables if it is referenced in more than one place.
Examples
1.4. Creating Virtel Template Pages 53

Virtel User Guide, Release 4.57
A host application uses an FAE5 structured eld to create a table variable called HOSTDATA. The HOST-
DATA variable consists of an array of 20-byte records. Each record consists of an 8-byte key, followed by six
2-byte codes. The following code generates an HTML table from this data. Each row of the table contains
the row number, the key, and the codes. A hyperlink is generated for each code, by removing any trailing
blanks from the code and appending “.html”:-
{{{DEFINE-AUTOMATIC-COUNTER (1,1,9999)"ROWNUM" }}}
{{{DEFINE-SUB-VARIABLE (0,8,1)"KEY"}}}
{{{DEFINE-SUB-VARIABLE (8,2,6)"CODES"}}}
<table><tr><td>Row</td><td>Key</td><td colspan=6>Codes</td></tr>
{{{FOR-EACH-VALUE-IN "HOSTDATA"}}}
<tr>
<td>{{{CURRENT-VALUE-OF "ROWNUM"}}}</td>
<td>{{{CURRENT-VALUE-OF "KEY"}}}</td>
{{{FOR-EACH-VALUE-IN "CODES"}}}
<td><a href='{{{NO-BLANKS-VALUE-OF "CODES"}}}.html'>
{{{CURRENT-VALUE-OF "CODES"}}}</a>
</td>
{{{END-FOR "CODES"}}}
</tr>
{{{END-FOR "HOSTDATA"}}}
</table>
DELETE-ALL-VARIABLES tag
{{{DELETE-ALL-VARIABLES}}}
{{{DELETE-ALL-VARIABLES "prefix"}}}
The DELETE-ALL-VARIABLES tag deletes all variables in the VIRTEL variable pool. An optional prex
parameter allows deletion of only those variables whose names begin with the specied prex.
1.4.12 Inserting VIRTEL conguration values into a template
IP-ADDRESS-OF-LINE tag
{{{IP-ADDRESS-OF-LINE "n-xxxxxx"}}}
The IP-ADDRESS-OF-LINE tag will be replaced by the IP address of the specied VIRTEL line. For
example, {{{IPADDRESS-OF-LINE “H-HTTP”}}} might generate 192.168.229.147.
IP-PORT-OF-LINE tag
{{{IP-PORT-OF-LINE "n-xxxxxx"}}}
The IP-PORT-OF-LINE tag will be replaced by the port number of the specied VIRTEL line. For example,
{{{IP-PORT-OFLINE”H-HTTP”}}} might generate 41000
NAME-OF tag
{{{NAME-OF (xxxxxx)}}}
{{{NAME-OF (xxxxxx, len)}}}
54 Chapter 1. The Virtel Engine

Virtel User Guide, Release 4.57
The NAME-OF tag allows the insertion in a page of various data items related to the VIRTEL transaction
in progress.
xxxxxx the name of the data item to be inserted. Valid values are:
VIRTEL The VIRTEL APPLID specied in the VIRTCT
RELAY The relay LU name used to connect to the host application
PRINT-RELAY The relay LU name of the associated printer
TERMINAL The DNS name or IP address of a terminal.
PSEUDO-TERMINAL The VIRTEL terminal name
ENTRY-POINT The VIRTEL entry point name
LINE-INTERNAL The internal name of the VIRTEL line
LINE-EXTERNAL The external name of the VIRTEL line
GROUP The user’s group name, if signon has occurred
USER The user’s user name, if signon has occurred
PASSWORD The user’s password, if signon has occurred
USER-IP-ADDRESS The IP address of the client terminal
SNA-STATUS
The status of the host LU2 session:
• X: input is inhibited
• blank: input is allowed
TRANSACTION-INTERNAL The internal name of the VIRTEL transaction
TRANSACTION-EXTERNAL The external name of the VIRTEL transaction
URL The URL excluding the query string
QUERY The query string from the URL
PAGE The name of the current HTML page template
PAGE-INTERNAL The name of the original HTML page template specied in the URL
DIRECTORY The current VIRTEL directory name
CHARACTER-SET The name of the current UTF-8 character set, or the country code if the page
is not in UTF-8 mode (see “EBCDIC translation management”)
DATE-TIME The current date and time (14 characters in the format YYYYMMDDHHMMSS)
VIRTEL-VERSION The VIRTEL version number
xxx-SYMBOL The value of the system symbol xxx (only if SYSPLUS=YES is specied in the
VIRTCT). Example: SYSNAME-SYMBOL
len An optional length. If specied, the value of the data item will be padded with blanks or truncated
on the right to the specied length.
Notes on using Terminal data item
For this to work, it is necessary to specify a value to the 3rd sub-parameter of the TCP1= (or TCP2=)
parameter in the VIRTCT. (Any value may be specied). Not yet implemented in VSE. For example:-
1.4. Creating Virtel Template Pages 55
Virtel User Guide, Release 4.57
TCP1=(TCPIP,,DNS,65535),
During Virtel integration, the following messages will appear in the Virtel log:
+VIRDNS1W TKP1 DNS SUBTASK DNS STARTING VIRDNS1
+VIRDNS2W TKP1 DNS SUBTASK VIRDNS1 STARTED
An example scenario might look like:-
COPY$ SYSTEM-TO-VARIABLE,VAR='TERMINAL', *
FIELD=(NAME-OF,TERMINAL)
ERROR$ 0,'TERMINAL: ','*TERMINAL'
The above example would disply this in the Virtel log:-
VIRHT51I DEMOHTTP CONNECTING HTLOC005 TO 192.168.092.058:53786
TERMINAL: w8-jmsaby.syspertec.com
NUMBER-OF tag
{{{NUMBER-OF (xxxxxx)}}}
The NUMBER-OF tag allows the insertion in a page of various data items related to the VIRTEL transaction
in progress.
xxxxxx The name of the data item to be inserted. Valid values are:
SCREEN-COLUMNS The width of the current host 3270 screen
SCREEN-LINES The depth of the current host 3270 screen
1.4.13 Conditional generation
AFTER-NOT-LAST-VALUE-OF tag
{{{AFTER-NOT-LAST-VALUE-OF "varname" ...}}}
The AFTER-NOT-LAST-VALUE-OF tag brackets a section of the page which is to be generated for all
except the last iteration of a FOR-EACH-VALUE-IN loop. The HTML content represented by “…” is
generated unless the current value of the variable varname is the last in the table. The AFTER-NOT-
LAST-VALUE-OF tag is useful, for example, when generating a comma-separated list of values, as shown
in the example below:
[ {{{FOR-EACH-VALUE-IN "MYVAR"}}} "{{{CURRENT-VALUE-OF "MYVAR"}}} "
{{{AFTER-NOT-LAST-VALUE-OF "MYVAR" ,}}}{{{END-FOR "MYVAR"}}} ]
If the variable myvar contains the values 1, 2, and 3, then this example would generate [ “1”, “2”, “3” ]
IF-USER-IS-ALLOWED-TO tag
{{{IF-USER-IS-ALLOWED-TO "resourcename" ...}}}
56 Chapter 1. The Virtel Engine
Virtel User Guide, Release 4.57
The IF-USER-IS-ALLOWED-TO tag brackets a section of the page whose appearance is conditional on
the user’s authorization to access the resource resourcename. The HTML content represented by “…” is
generated only if the signed-on user is authorized to access the specied resource.
WHEN-EXISTS and END-WHEN-EXISTS tags
{{{WHEN-EXISTS "varname"}}}
...
{{{END-WHEN-EXISTS "varname"}}}
The WHEN-EXISTS and END-WHEN-EXISTS tags bracket a section of the page whose appearance is
conditional on the existence of a named table variable. The variable can be created by a VIRTEL Web
Integration application using the FAE5 or FAE6 structured elds, or it can be created by a scenario. The
HTML content represented by “…” is generated only if the named variable exists in the context of the current
page and has at least one value.
WHEN-NOT-EXISTS and END-WHEN-NOT-EXISTS tags
{{{WHEN-NOT-EXISTS "varname"}}}
...
{{{END-WHEN-NOT-EXISTS "varname"}}}
The WHEN-NOT-EXISTS and END-WHEN-NOT-EXISTS tags are similar to the WHEN-EXISTS and
END-WHEN-EXISTS tags, except that the section of the page enclosed by the tags is generated only if the
named table variable does not exist.
WHEN-NOT-BLANK and END-WHEN-NOT-BLANK tags
{{{WHEN-NOT-BLANK "varname"}}}
...
{{{END-WHEN-NOT-BLANK "varname"}}}
The WHEN-NOT-BLANK and END-WHEN-NOT-BLANK tags bracket a section of the page which is
generated only if the current value of a named table variable is non-blank. The HTML content represented
by “…” is omitted if the named variable does not exist, or if its current value is null or all blanks.
WHEN-NEXT-EVENT and END-WHEN-NEXT-EVENT tags
{{{WHEN-NEXT-EVENT "eventname"}}}
...
{{{END-WHEN-NEXT-EVENT "eventname"}}}
The WHEN-NEXT-EVENT and END-WHEN-NEXT-EVENT tags allow an XML template to be written
which uses variables generated by a commarea-to-output conversion scenario. These tags work in conjunc-
tion with the $EVENT$ variable generated by the “MAP$ EVENTUAL-AREA and MAP$ ELSE-THEN-
AREA”. The section of the page enclosed by the WHEN-NEXT-EVENT and END-WHEN-NEXT-EVENT
tags is generated only if the current value of the $EVENT$ variable matches the specied eventname.
1.4. Creating Virtel Template Pages 57

Virtel User Guide, Release 4.57
WHILE-EVENT and END-WHILE-EVENT tags
{{{WHILE-EVENT "eventname"}}}
...
{{{END-WHILE-EVENT "eventname"}}}
The WHILE-EVENT and END-WHILE-EVENT tags work in conjunction with the $EVENT$ variable
generated by the “MAP$ EVENTUAL-AREA and MAP$ ELSE-THEN-AREA”. The WHILE-EVENT tag
marks the start of a loop. Everything between the WHILE-EVENT and END-WHILE-EVENT tags is
generated once for each value of the $EVENT$ variable, as long as the current value of the $EVENT$
variable matches the specied eventname .
1.4.14 Debugging facilities
CREATE-VARIABLE-IF(TRACING-SCENARIO) tag
{{{CREATE-VARIABLE-IF (TRACING-SCENARIO) "varname"}}}
The CREATE-VARIABLE-IF tag with the TRACING-SCENARIO parameter retrieves the contents of the
scenario trace created by the “Capability Tokens”). If the trace is active, the variable varname will be
created. The value of this variable is a JSON structure (see example below) which can be used by Virtel
Studio.
The trace data for a specic terminal may be obtained by specifying an x-Virtel-Debug=capability-token
parameter in the URL. The “capability tokens” is generated by a SET-HEADER tag issued by the terminal
which owns the trace data.
{"scenario":"EXECUTE3","externalName":"EXECUTE3",
"compiled":"02/04/13 18.49 ","terminal":"HTVTA012","relay":"R5HVT511",
"trace":[
{"t":"20:38:41.14","o":"00014A","i":"COPY$"},
{"t":"20:38:41.14","o":"00015E","i":"TOVAR$"},
{"t":"20:38:41.14","o":"000046","i":"MAP$"},
{"t":"20:38:41.14","o":"000058","i":"MAP$","p":[{"Customer":"A0111115"}]},
{"t":"20:38:41.14","o":"000066","i":"MAP$"},
{"t":"20:38:41.14","o":"000078","i":"MAP$","p":[{"Datemin":"20110505"}]},
{"t":"20:38:41.14","o":"000086","i":"MAP$","p":[{"Datemax":"20110525"}]},
{"t":"20:38:41.14","o":"000110","i":"MAP$"},
{"t":"20:38:41.14","o":"000170","i":"CASE$","p":[{"CURLINE":"0"}]},
{"t":"20:38:41.14","o":"0001FC","i":"COPY$"},
{"t":"20:38:41.14","o":"000214","i":"COPY$"}]}
Exampleof a JSON structure generated by TRACING-SCENARIO
For more informations, see “CREATE-VARIABLE-IF”.
1.4.15 Signon and password management
CREATE-VARIABLE-IF(Condition) tag
{{{CREATE-VARIABLE-IF (condition) "varname"}}}
The CREATE-VARIABLE-IF tag allows the conditional creation of a VIRTEL variable. If the specied
condition is true, the variable varname will be created and initialized with a value as shown in the list of
58 Chapter 1. The Virtel Engine

Virtel User Guide, Release 4.57
condition names below. This variable can be used subsequently to conditionally generate a section of the
page bracketed by WHEN-EXISTS and END-WHEN-EXISTS tags.
The possible values of the condition parameter for the CREATE-VARIABLE-IF tag are listed below:-
SIGNON-IS-NEEDED The variable varname is created if a signon is needed, i.e. if the transaction
security type is non-zero and the user has not yet successfully signed on at the terminal.
SIGNON-IS-OK The variable varname is created if the user has successfully signed on at the terminal.
The initial value of the variable is the user name.
APPLICATION-IS-CONNECTED The variable varname is created if the terminal is connected to a
host application. The initial value of the variable is either the VTAM application name, or the external
name of the VIRTEL transaction, depending on the value of the AIC parameter in the VIRTCT (see
“Parameters of the VIRTCT” in the VIRTEL Installation Guide).
For more informations, see “CREATE-VARIABLE-IF”, in the “Debugging facilities” section.
DECLARE-FIELD-AS tag
When used in conjunction with a security type 4 transaction, the DECLARE-FIELD-AS tag allows VIRTEL
to obtain the userid and password from elds embedded in the HTML page. For an example, see “Signon
using HTML elds”.
{{{DECLARE-FIELD-AS (attribute,...)"fieldname"}}}
The DECLARE-FIELD-AS tag indicates to VIRTEL that the HTML eld whose name is eldname is to be
treated as a userid or password eld when used with a transaction dened as having security type 4. One of
more attribute values must be specied. The possible attributes are listed below:-
USERNAME Indicates that the eld contains the name of the user (userid) to be signed on.
PASSWORD Indicates that the eld contains the user’s password.
NEW-PASSWORD Indicates that the eld contains a new password. VIRTEL will request the security
product to change the user’s current password to the new value if the signon is successful.
HEX Indicates that VIRTEL expects the browser to encode the eld in hexadecimal.
BASE64 Indicates that VIRTEL expects the browser to encode the eld in base64 format.
ENCRYPTED Indicates that VIRTEL expects the browser to encrypt the eld using the session key
specied elsewhere in the page (see “DECLARE-FIELD-AS CRYPTO-SESSION-KEY”).
Examples:
{{{DECLARE-FIELD-AS (USERNAME) "USERNAME" }}}
{{{DECLARE-FIELD-AS (PASSWORD,BASE64) "PASSWORD" }}}
{{{DECLARE-FIELD-AS (NEW-PASSWORD,ENCRYPTED) "NEWPASS" }}}
The same eld can be both declared and dened:
{{{DEFINE-HTML-FIELD-NAME (04,06,08)"NOM" }}}
{{{DECLARE-FIELD-AS (BASE64) "NOM" }}}
The above example indicates that the eld NOM is transmitted to VIRTEL in base64 format. In this case,
the DEFINE must precede the DECLARE. USER-SIGNON-CODE tag
{{{USER-SIGNON-CODE}}}
1.4. Creating Virtel Template Pages 59

Virtel User Guide, Release 4.57
The USER-SIGNON-CODE tag generates a unique value called a signoncode which may be used with the
VirtelUserSignon parameter of the URL to propagate the signed-on user’s credentials to another page (see
“Propagation of signon by URL”).
1.4.16 Encryption management
The presence of certain tags in a page template causes VIRTEL to generate encryption keys and to encrypt
and decrypt selected data in the page. The use of these tags is dependent upon the specication of a CRYPTn
parameter in the VIRTCT (see “Parameters of the VIRTCT”) in the VIRTEL Installation Guide manual.
ENCRYPTION-PARAMETERS tag
{{{ENCRYPTION-PARAMETERS "cryptname"}}}
{{{ENCRYPTION-PARAMETERS (field) "cryptname"}}}
The ENCRYPTION-PARAMETERS tag inserts into the page the contents of one or all elds of the CRYPTn
parameter whose name eld is cryptname. If the VIRTCT does not contain a CRYPTn parameter with name
cryptname then the ENCRYPTION-PARAMETERS tag returns a null value.
If the optional eld parameter is specied, the ENCRYPTION-PARAMETERS tag returns the specied or
defaulted value of one eld of the CRYPTn parameter, without quotes. The names of the elds are:-
NAME The name of this set of encryption parameters.
ALGORITHM The symmetric encryption algorithm.
INITIAL-ALGORITHM The asymmetric encryption algorithm.
DRIVER The name of the encryption engine.
FORMAT The encoding used for encrypted text.
CHAINING The chaining method for symmetric encryption.
PADDING The padding method for symmetric encryption.
If the eld parameter is not specied, then the ENCRYPTION-PARAMETERS tag returns the specied or
defaulted values of all elds of the CRYPTn parameter. Each value is surrounded by single quotes and the
values are separated by commas.
Example: If the VIRTCT contains the following parameters:-
CRYPT1=(CRYPTNULL,NONE,NONE,NO-ENCRYPTION,HEX), *
CRYPT2=(CRYPT3270,3TDEA,RSA-1024,ICSF,HEX), *
then the tag {{{ENCRYPTION-PARAMETERS (ALGORITHM) “CRYPT3270”}}} returns the
value 3TDEA, and the tag {{{ENCRYPTION-PARAMETERS “CRYPT3270”}}} returns the value
‘CRYPT3270’,‘3TDEA’,’RSA-1024’,’ICSF’,’HEX’,’CBC’,’PKCS7’
PUBLIC-KEY tag
{{{PUBLIC-KEY (component) "cryptname"}}}
The presence of one or more PUBLIC-KEY tags in a page template causes VIRTEL to generate a pub-
lic/private key pair for the session, and to insert the value of the specied component of the public key into
the page. The public/private key pair is generated according to the INITIAL-ALGORITHM specied in the
CRYPTn parameter whose name eld is cryptname. If the VIRTCT does not contain a CRYPTn parameter
with name cryptname then no key is generated and the PUBLIC-KEY tag returns a null value.
60 Chapter 1. The Virtel Engine

Virtel User Guide, Release 4.57
component is the name of the public key component to be inserted into the page. Possible values are:
EXPONENT The hexadecimal value of the public exponent.
MODULUS The hexadecimal value of the modulus.
DECLARE-FIELD-AS tag
{{{DECLARE-FIELD-AS (attribute) "fieldname"}}}
When used in conjunction with the PUBLIC-KEY tag, the DECLARE-FIELD-AS tag indicates to VIRTEL
that the HTML eld whose name is eldname is to be treated as an encrypted session key. VIRTEL decrypts
the contents of the eld using the corresponding private key (which is known only to VIRTEL) and uses
it as the session key when symmetric encryption is requested by the SET-LOCAL-OPTIONS (ENCRYPT-
PASSWORD-FIELDS) tag. The possible attributes are listed below:
CRYPTO-SESSION-KEY indicates that the eld contains the session key encrypted under the public
key specied by the PUBLIC-KEY tag.
SET-LOCAL-OPTIONS tag
When used in conjunction with the PUBLIC-KEY and DECLARE-FIELD-AS (CRYPTO-SESSION-KEY)
tags, the SET-LOCALOPTIONS tag activates encryption for selected elds that are sent and received in
HTML pages.
{{{ SET-LOCAL-OPTIONS (option, option, ...) }}}
option the following values indicate the use of encryption :
ENCRYPT-PASSWORD-FIELDS indicates that 3270 non-display unprotected (data entry) elds are
encrypted in both inbound and outbound messages, and that 3270 non-display protected (output only)
elds are replaced by blanks in outbound messages.
Encryption is performed according to the symmetric encryption method indicated by the CRYPTn parameter
specied by the PUBLIC-KEY tag, using the session key specied by the DECLARE-FIELD-AS (CRYPTO-
SESSION-KEY) tag. The GENERATE-HTML tag automatically adds an additional VCRYPT attribute to
each encrypted eld.
1.4.17 EBCDIC translation management
By default, VIRTEL translates host application EBCDIC data into ISO-8859-1 before sending it to the
browser. This default behaviour is suitable for Western European and English speaking countries. The
COUNTRY parameter in the VIRTCT indicates which EBCDIC country codepage is used by host applica-
tions, and serves to select the appropriate default EBCDIC-to-ISO-8859-1 translation table within VIRTEL.
Translation tables other than the default may be selected by means of the SET-COUNTRY-CODE tag.
{{{SET-COUNTRY-CODE "countryname"}}}
The SET-COUNTRY-CODE tag allows the 3270 host application data to be translated to ISO-8859-1
according to an EBCDIC codepage other than the default codepage implied by the COUNTRY parameter
in the VIRTCT. It may also be used to translate from the French EBCDIC codepage to ASCII Western
European codepage 850, or to translate from Latin-2 EBCDIC Multilingual (CP870) to either ISO-8859-2
Latin-2 (CP912) or PC Latin-2 (CP852).
1.4. Creating Virtel Template Pages 61

Virtel User Guide, Release 4.57
This tag takes eect starting from the point where it appears in the template page, and it may appear
multiple times in a single page. The possible values for the countryname parameter are shown in the table
below:-
Country name EBCDIC codepage ASCII codepage
US CP 037 ISO-8859-1
FR CP 297 ISO-8859-1
NO CP 277 ISO-8859-1
IT CP 280 ISO-8859-1
GB (UK) CP 285 ISO-8859-1
FR-850 CP 297 CP 850
L2 CP 870 ISO-8859-2
P2 CP 870 CP 852
DE CP 273 ISO-8859-1
BE CP 500 ISO-8859-1
FI CP 278 ISO-8859-1
ES (SP) CP 284 ISO-8859-1
IS (IC) CP 871 ISO-8859-1
Country Codes for EBCDIC to ASCII translation
Note: Values in parentheses are accepted for compatibility with previous versions of VIRTEL
COUNTRY-CODE tag
{{{COUNTRY-CODE}}}
The COUNTRY-CODE tag inserts the country code into the page, where it can be tested by JavaScript.
SET-OUTPUT-ENCODING-UTF-8 tag
For countries which use a non-Western European language, VIRTEL can generate data in UTF-8 encoding
instead of ISO-8859-1. This is done by embedding the SET-OUTPUT-ENCODING-UTF-8 tag in the page
template:-
{{{ SET-OUTPUT-ENCODING-UTF-8"charset" }}}
The SET-OUTPUT-ENCODING-UTF-8 tag indicates that host data inserted in the template page by
VIRTEL is to be in UTF-8 format, translated according to the EBCDIC country codepage whose name is
specied within quotes. The possible values for charset are given under the description of the DEFUTF8
parameter of the VIRTCT. If no charset value is specied, as for example {{{SET-OUTPUT-ENCODING-
UTF-8 “”}}}, then the default value of charset is the codepage specied by the DEFUTF8 parameter of the
VIRTCT described in the VIRTEL Installation Guide.
When SET-OUTPUT-ENCODING-UTF-8 is specied, the rest of the template page must also be coded in
UTF-8, and, in the case of an HTML page, must contain the HTML tag:-
<meta http-equiv="Content-Type" content="text/html; charset=UTF-8">
In the case of an XML page, no such instruction is needed because XML is considered to be encoded in
UTF8 by default.
62 Chapter 1. The Virtel Engine
Virtel User Guide, Release 4.57
Examples
A 3270 application generates US EBCDIC (CECP 037). The following statements, coded between the
<HEAD> and </HEAD> tags in the template page, ensure the correct translation of this application’s
data:-
{{{SET-COUNTRY-CODE "US"}}}
<meta http-equiv="Content-Type" content="text/html; charset=iso-8859-1">
Another 3270 application generates output using the Chinese Simplied EBCDIC character set (IBM1388).
The output is to be translated to UTF-8 and inserted into a template page which must also be encoded in
UTF-8:-
{{{SET-OUTPUT-ENCODING-UTF-8"IBM1388"}}}
<meta http-equiv="Content-Type" content="text/html; charset=UTF-8">
A third 3270 application generates output using the Spanish EBCDIC character set, which is to be trans-
lated to UTF-8 and inserted into the template page. In this example, we assume that the parameter
DEFUTF8=IBM1145 has been specied in the VIRTCT, so we can use this as the default value for the
SET-OUTPUT-ENCODING-UTF-8 tag:-
{{{SET-OUTPUT-ENCODING-UTF-8""}}}
<meta http-equiv="Content-Type" content="text/html; charset=UTF-8">
In each case, the {{{SET}}} statement tells VIRTEL what character set to generate, while the <META>
statement tells the browser what character set to expect. If you specify neither SET-OUTPUT-ENCODING-
UTF-8 nor SET-COUNTRY-CODE, then VIRTEL will generate ISO-8859-1 according to the default COUN-
TRY parameter specied in the VIRTCT.
1.4.18 HTTP protocol management
Normally when VIRTEL delivers a page via HTTP it includes an HTTP response status code of “200 OK”.
The SET-HTTPRETURN-CODE allows the page to specify an alternative HTTP response status code.
This may be useful, for example, in a page which contains an error message from an application.
SET-HTTP-RETURN-CODE tag
{{{ SET-HTTP-RETURN-CODE "rc text" }}}
The SET-HTTP-RETURN-CODE tag indicates to VIRTEL the HTTP status code and supplementary text
which will be sent in the HTTP response message when this page is delivered. rc is a 3-digit numeric status
code, as dened by RFC 2616, and text is the text which accompanies the numeric code.
Example :
<!--VIRTEL start="{{{" end="}}}" -->
<html><body><h1>Database record not found</h1>
{{{SET-HTTP-RETURN-CODE "404 Not in DB2"}}}
<p>The requested record was not found in the database.
</body></html>
1.4. Creating Virtel Template Pages 63

Virtel User Guide, Release 4.57
1.4.19 Cache management
When delivering static elements such as menu pages, images, and JavaScript programs, VIRTEL indicates
to the browser that the element is eligible to be stored in the browser’s cache. This improves performance
because the browser does not have to request the element from VIRTEL each time it is required. By contrast,
dynamic elements (i.e. elements which contain VIRTEL tags) are generally marked as non-cacheable because
their content is likely to change each time the page is requested. The VIRTEL tags described in this section
are used to override the default cacheable/non-cacheable behaviour.
SET-PAGE-CACHEABLE tag
{{{ SET-PAGE-CACHEABLE }}}
When an element contains a SET-PAGE-CACHEABLE tag, VIRTEL will generate two HTTP headers:
an Expires: header which indicates that the browser may cache the element until midnight, and a Last-
Modied:.header which contains the date that the element was uploaded to VIRTEL. This is the default for
static elements.
SET-PAGE-NOT-CACHEABLE tag
{{{ SET-PAGE-NOT-CACHEABLE }}}
When an element contains a SET-PAGE-NOT-CACHEABLE tag, VIRTEL will generate an Expires: 0
HTTP header indicating that the browser should not store the element in its cache. This is the default for
dynamic elements.
SET-MAX-AGE tag
{{{ SET-MAX-AGE "secs" }}}
When an element contains a SET-MAX-AGE tag, VIRTEL will not generate the normal Expires: and Last-
Modied:.HTTP headers, but instead it will generate a Cache-Control: max-age=secs header, where secs
represents the validity time (in seconds) during which the browser may keep the element in its cache.^
1.4.20 MIME type management
VIRTEL associates a MIME-type with each page template or other element stored in a directory. VIRTEL
always sends the MIME-type to the browser when the browser requests any element. Some browsers use the
MIME-type to determine how to display the element. For example, HTML pages must have MIME-type
“text/html”, XML pages must have MIME-type “text/xml”, JPG les must have MIME-type “image/jpeg”,
etc.
VIRTEL normally sets the MIME-type to the value indicated by the browser or mailer at the time the page
is uploaded. However, in certain cases VIRTEL may force the MIME-type to a dierent value:-
• If the lename extension is .HTM or .HTML, or is absent, VIRTEL will force the MIME-type to be
“text/html”. This is because some versions of Internet Explorer upload HTML les using MIME-type
“text/plain”
• If the le contains a SET-CONTENT-TYPE tag, then VIRTEL will force the MIME-type to the value
specied in the tag
64 Chapter 1. The Virtel Engine

Virtel User Guide, Release 4.57
SET-CONTENT-TYPE tag
{{{SET-CONTENT-TYPE "mimetype"}}}
The SET-CONTENT-TYPE tag allows the administrator to override the MIME-type supplied by the browser
or mailer when the element is uploaded. VIRTEL stores the value of the parameter mimetype in the directory
with the element. In the following example, the page template is to be stored with a MIME-type which will
cause the browser to process it as spreadsheet data:-
{{{SET-CONTENT-TYPE "application/vnd.ms-excel"}}}
1.4.21 Capability tokens
VIRTEL capability tokens permit an HTTP transaction to access data associated with an transaction running
on another terminal. The token is delivered by VIRTEL by means of an x-Virtel HTTP response header
from the terminal which owns the capability, and the same token is returned to VIRTEL in a subsequent
URL sent by the terminal which wishes to use the capability (see “Capability URLs”). The x-Virtel HTTP
header is generated by a SET-HEADER tag embedded in a page template sent by the terminal which owns
the capability. SET-HEADER tag
{{{ SET-HEADER (type)"header-string" }}}
When the SET-HEADER tag is present in a page template, VIRTEL generates an HTTP response header.
When type is one of the VIRTEL capability types listed below, the quoted string header-string is the name
of the header; this name should start with x-Virtel- should end with a colon (:) and should not contain
blanks. The capability value is an opaque string added by VIRTEL.
When type is AS-IS the quoted string header-string is a complete header (including value) to be added as-is.
No capability processing is performed in this case. The VIRTEL capability types are:-
TO-ALLOW-READ-OF-SCENARIO-TRACE Generates a capability token which permits a sub-
sequent requester to obtain this terminal’s trace data by means of the CREATE-VARIABLE-IF
TRACING-SCENARIO tag described on page 61.
GIVING-ACCESS-TO-%USER%-DIRECTORY-WITH-MY-USERID The capability token gen-
erated by this tag may be used by a subsequent request to access a directory which has %USER% in
the keyword eld of its denition. The userid of the capability owning transaction will be used as the
directory key when the directory is accessed.
GIVING-ACCESS-TO-%GROUP%-DIRECTORY-WITH-MY-USERID The capability token
generated by this tag may be used by a subsequent request to access a directory which has %GROUP%
in the keyword eld of its denition. The RACF group name of the capability owning transaction will
be used as the directory key when the directory is accessed.
GIVING-ACCESS-TO-%USER%-DIRECTORY-IN-VARIABLE-%USER% The capability to-
ken generated by this tag may be used by a subsequent request to access a directory which has
%USER% in the keyword eld of its denition. The value of the %USER% variable of the capability
owning transaction will be used as the directory key when the directory is accessed.
GIVING-ACCESS-TO-%GROUP%-DIRECTORY-IN-VARIABLE-%GROUP% The capability
token generated by this tag may be used by a subsequent request to access a directory which has
%GROUP% in the keyword eld of its denition. The value of the %GROUP% variable of the capability
owning transaction will be used as the directory key when the directory is accessed.
Examples:
1.4. Creating Virtel Template Pages 65

Virtel User Guide, Release 4.57
{{{ SET-HEADER (AS-IS) "Cache-control: no-cache" }}}
{{{ SET-HEADER (TO-ALLOW-READ-OF-SCENARIO-TRACE) "x-Virtel-Debug:" }}}
{{{ SET-HEADER (GIVING-ACCESS-TO-%USER%-DIRECTORY-IN-VARIABLE-%USER%)
"x-Virtel-User-Directory:" }}}
{{{ SET-HEADER (GIVING-ACCESS-TO-%USER%-DIRECTORY-WITH-MY-USERID)
"x-Virtel-User-Directory:" }}}
{{{ SET-HEADER (GIVING-ACCESS-TO-%GROUP%-DIRECTORY-IN-VARIABLE-%GROUP%)
"x-Virtel-Group-Directory:" }}}
{{{ SET-HEADER (GIVING-ACCESS-TO-%GROUP%-DIRECTORY-WITH-MY-USERID)
"x-Virtel-Group-Directory:" }}}
1.4.22 Template Page upload
The SECURITY-TOKEN and IF-SECURITY-TOKEN-IS-READY tags are used during uploading of HTML
pages from a browser (see “Uploading pages by HTTP (secured by cookie)”).
SECURITY-TOKEN tag
{{{ SECURITY-TOKEN }}}
If the SECURITY-TOKEN tag is present in a template page, VIRTEL substitutes a newly generated user
security code to be used for the next transfer. For example:-
<script language="JavaScript"><!--
var VirtelRef = "{{{SECURITY-TOKEN}}}";
--></script>
If a security code exists, the above code might generate:-
var VirtelRef ="20040427130843.07F5D1DC.56A85680Bgpamk4WZRKKBiZWjS4OTlqSES4OWlA==";
otherwise it will generate:
var VirtelRef ="";
Two examples of the use of the SECURITY-TOKEN tag are supplied in the HTMLBAS directory used by
VIRTEL entry point DEMOHTTP. The upload.htm page stores and retransmits the user security code in
the form of a cookie (VirtelRef=xxxxxxxxxxxxxxxx). The upload2.htm page retransmits the user security
code using the VirtelCookie=parameter of the URL (see “Transmission of upload cookie by URL”), but it
does not store the code.
IF-SECURITY-TOKEN-IS-READY tag
{{{IF-SECURITY-TOKEN-IS-READY
SetHostWarning();
}}}
The IF-SECURITY-TOKEN-IS-READY tag encloses HTML or JavaScript code to be generated only if a
non-empty SECURITY-TOKEN is present.
66 Chapter 1. The Virtel Engine

Virtel User Guide, Release 4.57
Note: The total size of this tag, including the enclosed code, must not exceed the size of an inter-block
buer (120 characters) otherwise it will not be correctly processed if it spans blocks.
1.4.23 3287 printing
Each relay LU, through which a user connects to a host application, can be associated with a second LU
which represents a virtual printer (see the description of HTTP terminals in the VIRTEL Connectivity
Reference documentation). Data sent to this virtual printer by a host application (such as CICS) are stored
by VIRTEL and can be retrieved by means of the tags IF-PRINT-IS-READY, SESSION-CODE, and PRINT
embedded in a template page.
IF-PRINT-IS-READY tag
{{{ IF-PRINT-IS-READY ... }}}
The IF-PRINT-IS-READY tag encloses a section of the page which is generated only if print data exists on
the virtual printer associated with the user’s session. The HTML content represented by “…” is generated
only if VIRTEL has data ready to be printed.
SESSION-CODE tag
The SESSION-CODE tag, prexed by the word “Print”, generates a session code which allows a subsidiary
window to be opened for the print data associated with the specied session. The template page displayed
in this window can retrieve the stored print data by means of the PRINT tag. The user can then view the
print data, and can, if desired, send the data to a physical workstation printer using the normal procedure
for printing from a browser.
For example:
<script language="Javascript" type="text/Javascript">
<!--
function ShowPopup()
{
var popupURL = "imprim.htm++Print{{{ SESSION-CODE }}}"
var popupName = "PopupImpression";
var popup = window.open("", popupName,
'status=yes,resizable=yes,scrollbars=yes,toolbar=yes,' +
'menubar=yes,width=614,height=129');
popup.location = popupURL;
}
{{{IF-PRINT-IS-READY
ShowPopup();
}}}
// -->
</script>
PRINT tag
{{{ PRINT (0) }}}
1.4. Creating Virtel Template Pages 67
Virtel User Guide, Release 4.57
The PRINT tag allows a template page, such as the imprim.htm page supplied with VIRTEL, to retrieve
3287 print data. The structured eld FAD3 also allows print data to be fed to VIRTEL for retrieval with
the PRINT tag.
1.4.24 Generating PDF output
When a page template is processed in a scenario by a COPY$ OUTPUT-FILE-TO-VARIABLE instruction
with the TYPE=LINEBUFFER parameter, the page template may contain additional tags. These tags
are used to assist in the construction of INPUT, DOCOPT, and LAYOUT les in the “LINEBUF” format
required by the MakePDF program product.
These les may then be passed to the VIRSVPDF service program which invokes MakePDF to generate
output les in PDF format. Refer to “PDF output generation” for an example scenario.
PDF-LINES-PER-PAGE tag
{{{ PDF-LINES-PER-PAGE "nn"}}}
The PDF-LINES-PER-PAGE tag inserts “1” in the ASA carriage control character position after every nn
lines.
PDF-NEW-DOCOPT tag
{{{ PDF-NEW-DOCOPT "n"}}}
The PDF-NEW-DOCOPT tag is used only in a MakePDF DOCOPT le. It identies the DOCOPT le
by the character “n”. This allows the DOCOPT le to be referenced by the PDF-USE-DOCOPT tag in the
corresponding INPUT le.
PDF-NEW-INPUT tag
{{{ PDF-NEW-INPUT }}}
The PDF-NEW-INPUT tag is used only in a MakePDF INPUT le. It identies the start of a new segment
in the INPUT le.
PDF-NEW-LAYOUT tag
{{{ PDF-NEW-LAYOUT "n"}}}
The PDF-NEW-LAYOUT tag is used only in a MakePDF LAYOUT le. It identies the LAYOUT le by
the character “n”. This allows the LAYOUT le to be referenced by the PDF-USE-LAYOUT tag in the
corresponding INPUT le.
PDF-OUTLINE tag
{{{ PDF-OUTLINE }}}
The PDF-OUTLINE tag inserts “@” in the ASA carriage control character position.
68 Chapter 1. The Virtel Engine
Virtel User Guide, Release 4.57
PDF-PAGE-BREAK tag
{{{ PDF-PAGE-BREAK }}}
The PDF-PAGE-BREAK tag inserts “1” in the ASA carriage control character position.
PDF-USE-DOCOPT tag
{{{ PDF-USE-DOCOPT "n"}}}
The PDF-USE-DOCOPT tag is used only in a MakePDF INPUT le. It species that the INPUT le is
associated with the DOCOPT le identied by the character “n”
PDF-USE-LAYOUT tag
{{{ PDF-USE-LAYOUT "n"}}}
The PDF-USE-LAYOUT tag is used only in a MakePDF INPUT le. It species that the INPUT le is
associated with the LAYOUT le identied by the character “n”
PDF-VARIABLE tag
{{{ PDF-VARIABLE }}}
The PDF-VARIABLE tag inserts “=” in the ASA carriage control character position.
1.4. Creating Virtel Template Pages 69

Virtel User Guide, Release 4.57
1.5 Web Access Customization
1.5.1 Uploading HTML Pages
A aprt of Web Access Customization will require the uploading of HTML templates or other web entities
such as customised Javascript or CSS les. The Virtel Administration guide provides information on how to
upload les to the Virtel mainframe server.
1.5.2 Web Access Settings
The VIRTEL Web Access user can use the Settings menu to modify certain options such as font size, 3270
key mappings, and color schemes. The user’s settings are stored in a browser local storage which remains
valid so long as cookies are not deleted from the workstation. The settings stored in the user’s local storage
override the default settings for VIRTEL Web Access which are distributed in the w2hparm.js le, located
in the default W2H-DIR directory. See “Global modication of Web Access settings”.
Web Access Settings menu
When the user clicks the settings ICON on the VIRTEL Web Access toolbar, the Virtel Web Access
settings panel is displayed. The panel has four setting tabs which are described below.
70 Chapter 1. The Virtel Engine
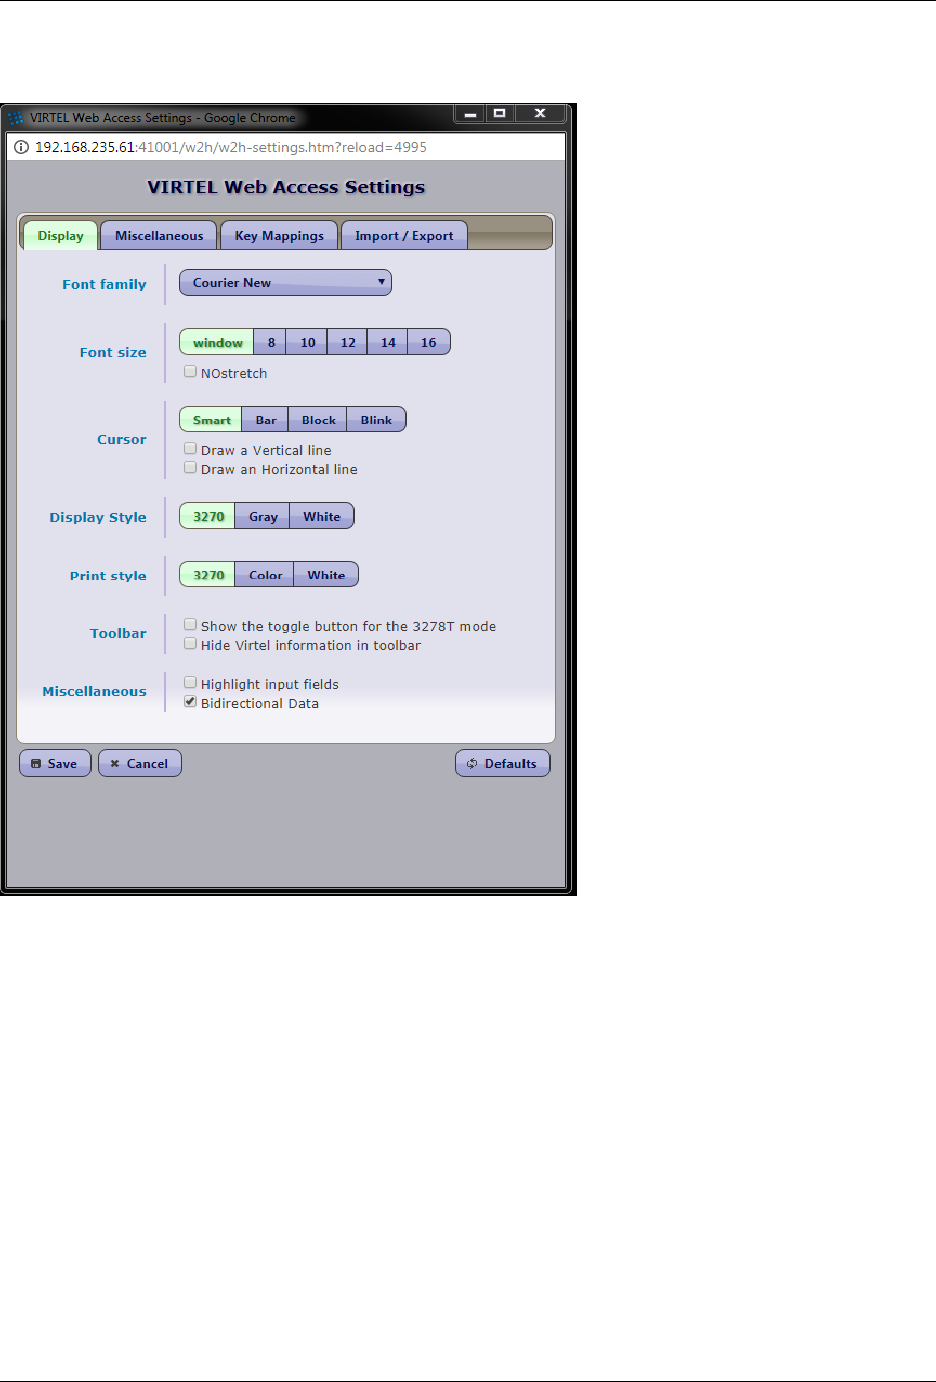
Virtel User Guide, Release 4.57
Display Tab
VIRTEL Web Access Settings Display Tab (part 1 of 4)
Font family Name of font. The panel displays a list of fonts known to VIRTEL and installed on the
workstation, in addition to the fonts supplied by VIRTEL. If the required font is not in the list, click
the ellipsis to the right of the selection box and type the name of the font in the box. Any xed-width
font installed on the workstation may be specied.
Font Size Size of font. Possible values are:
Window VIRTEL calculates the font size to t the browser’s window size.
nn VIRTEL uses a xed font size. nn is the size in “points”: 8pt, 10pt, 12pt, 14pt, or 16pt.
NoStretch By default Virtel attempts to optimize the window presentation to the users screen size. Setting
the NOStretch option forces Virtel to calculate a xed font size to t the display screen size.
Cursor The shape of the 3270 cursor. The possible settings are:
Smart The character at the cursor position is underlined and the position and color changes to always
remain visible for any character (depending on the selected character’s style : bgnd color, reverse,
underlined).
1.5. Web Access Customization 71

Virtel User Guide, Release 4.57
Bar The underlined character at the cursor position is in reverse video
Block The block character at the cursor position is in reverse video
Blink The block character at the cursor position is in blinking reverse video
Vertical line, Horiz line When activated, causes the position of the cursor to be marked with a
vertical line and/or a horizontal line extending to the edges of the 3270 window (also known as a
“crosshair cursor”).
Note: For Internet Explorer versions 6 and 7, Blink is the same as Block
Display Style Allows a choice of color schemes by selection of CSS style sheet. By default, possible values
are:
3270 extended colors on black background
Gray extended colors on gray background
White gray characters on white background
Note: To add or remove a style, see “Customize display style”). Administrators can add some
new customs style as describe in the section “How to customize display style”.
Print style Allows a choice of color schemes for the screen capture window. By default, possible values
are:
3270 extended colors on black background
Color extended colors on white background
White black characters on white background
Toolbar
• Show the toggle button for 3278T mode
• Hide the Virtel information.
Miscellaneous
•Highlight input elds Permits the user to display a dierent background color for 3270 input
elds. When this option is selected, all input elds will have a class designator HIGH-
LIGHTED_INPUTFIELD in addition to their regular class. The style denition may be
overridden by the administrator in the custom.css le.
•Bidirectional data Allows the Alt-ENTER key to globally switch the screen display from ‘left to
right’ to ‘right to left’. This provides support for languages that require “right-to-left” screen
presentation such as Arabic. This option may be set in w2hparm through the “w2hparm.mir-
rorMode” setting.
72 Chapter 1. The Virtel Engine
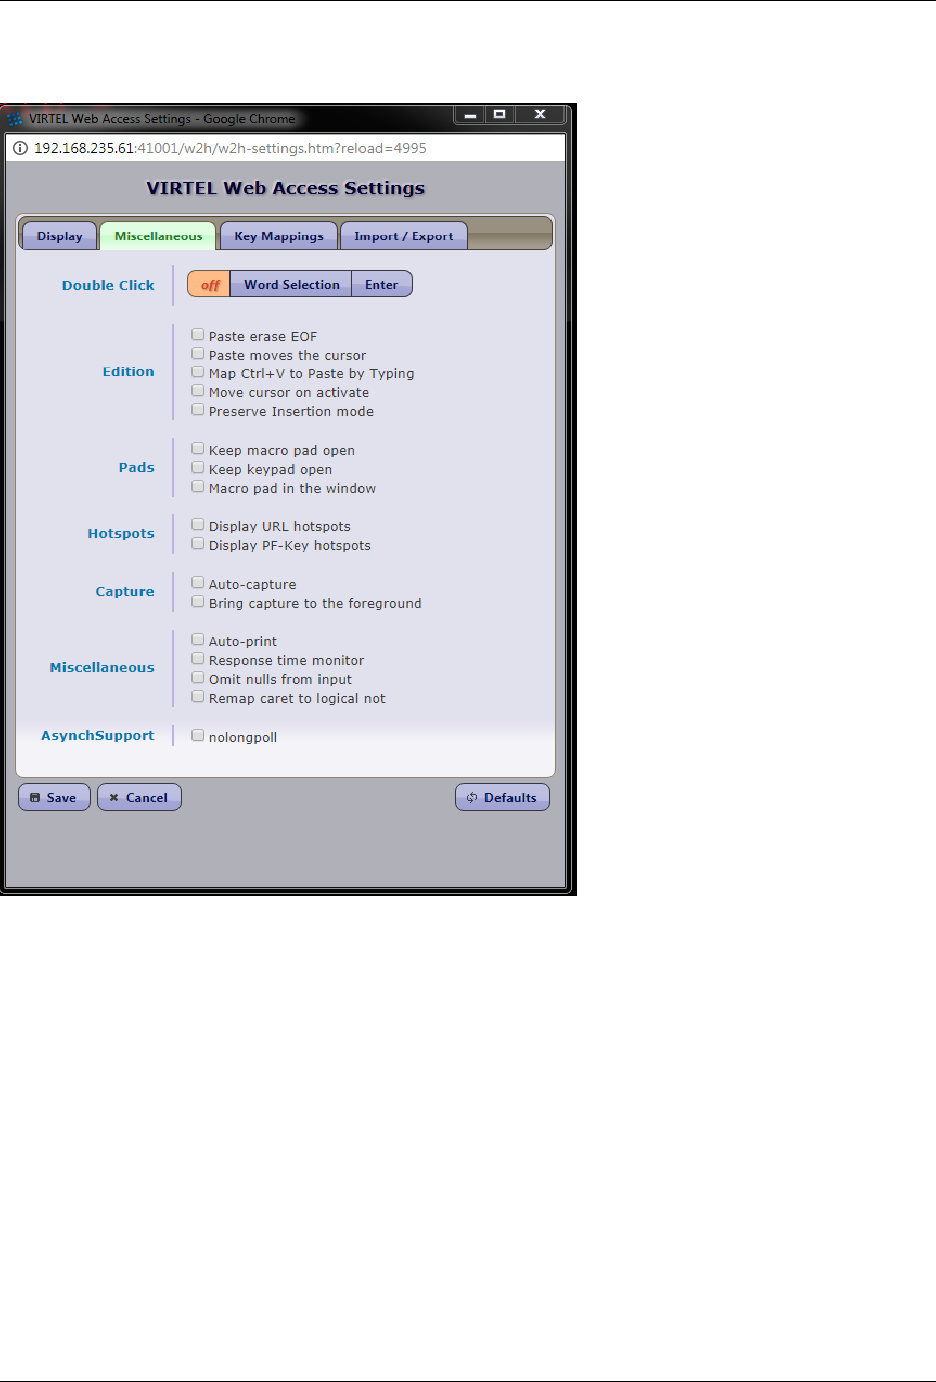
Virtel User Guide, Release 4.57
Miscellaneous Display
VIRTEL Web Access Settings Miscellaneous Tab (part 2 of 4)
Double click Species the action taken for a mouse double-click. Possible settings are :
o Indicates that the double-click function is deactivated.
Word Selection Draws a box around the word that the mouse is pointing in preparation for a copy
or cut operation.
ENTER Activates the “point-and-shoot” function. When set to ENTER, double clicking the mouse
moves the cursor to the mouse position and sends a 3270 ENTER to the host application.
Edition
Paste erase EOF When activated, a paste operation will erase the rest of an input eld to the right
of the pasted text
Paste moves the cursor When activated, a paste operation will move the cursor to the end of the
eld
Map Ctrl+V to Paste by Typing Indicates that Ctrl+V will act “paste by typing”, i.e cursor will
be positionned at the end of the pasted text instead of remaining at the position it was before
1.5. Web Access Customization 73

Virtel User Guide, Release 4.57
using Ctrl+V.
Move cursor on activate This setting takes eect only when the user clicks on a background 3270
window in order to bring the window to the foreground. When the option is activated, the window
is brought to the foreground and the 3270 cursor moves to the location in the window where the
user clicked; the copy/paste box and context menu are removed if present. When the option is
not activated, the window is brought to the foreground and the cursor remains in its previous
position; the copy/paste box and context menu remain displayed if present.
Preserve insertion mode This setting takes eect only when the keyboard is in insertion mode.
When the option is activated, the cursor will remain in insert mode until the user returns to normal
entry mode by using the “insert” key again, otherwise the cursor returns to normal whenever a
transmission key is used.
Pads
Keep macro pad open If checked, the macro window remains open all the time. If not, it disappears
as soon as you have clicked a macro.
Keep keypad open If checked, the keypad window remains open all the time. If not, it disappears
as soon as you have clicked a function key in it.
Macro pad in the window If checked, determines the location of the macro pad.
Hotspots
Display URL hotspots When activated, any text starting with http, https, mailto, le, or ftp (ex-
cept in 3270 input elds) is transformed into a hyperlink.
Display PF key hotspots When activated, any text starting with Fnn= or PFnn= (except in 3270
input elds) is transformed into a clickable area. Clicking on the area is equivalent to pressing
PF nn.
Capture
Auto-capture When activated, causes a snapshot of each screen displayed by the host application to
be automatically appended to the screen capture window.
Bring capture to the foreground When activated, causes the capture windows to come in the
foreground whenever the cature icon is used.
Miscellaneous
Auto-print When activated, causes the Windows print function to be launched automatically in the
print window as a result of a screen snapshot or print request.
Response time monitor When activated, two counters are displayed on the status line below the
3270 screen, for example: H:110ms J:31ms. The rst number (H=Host) represents the response
time of the VIRTEL server, from the last Enter or PF key until the receipt of the most recent
message from the server. The second number (J=JavaScript) is the time taken by the browser
scripts to prepare the screen for display. The sum of the two numbers is the response time
perceived by the user.
Note: The response time monitor is active in Ajax mode only.
Omit nulls from input When activated, VIRTELWeb Access will remove all nulls from modied
input elds before sending to the server, in strict conformance with 3270 protocol. When not
activated, leading and embedded nulls are converted to blanks, and only trailing nulls are sup-
pressed, which many users nd more convenient.
74 Chapter 1. The Virtel Engine

Virtel User Guide, Release 4.57
Remap caret to logical not If checked, translates the “caret” sign (Shift+6 on a US keyboard) to
EBCDIC X‘5F’, which is the “logical not” sign (¬) in codepage 037/1140.
AsynchSupport By default Virtel uses a “Long Poll” technique to asynchronously update the display
when the mainframe has data to send regardless of the users input key requests. This feature
may be disabled through this check box. Users who use the Virtel i4web AS/400 interface should
disable “Long Poll”. This option may be set in w2hparm through the “w2hparm.AsynchSupport”
setting.
Note: If disabled Virtel will only update the screen after receiveing an input key request from
the user.
Key Mappings Display
VIRTEL Web Access Settings Key Mappings Tab (part 3 of 4)
This tab is used to map specic functions to certain keyboard keys. The tab contains ve sub categories
whose names are explicit enough to not require more precision. However the following notes provide further
information on possible browser dierences.
1.5. Web Access Customization 75
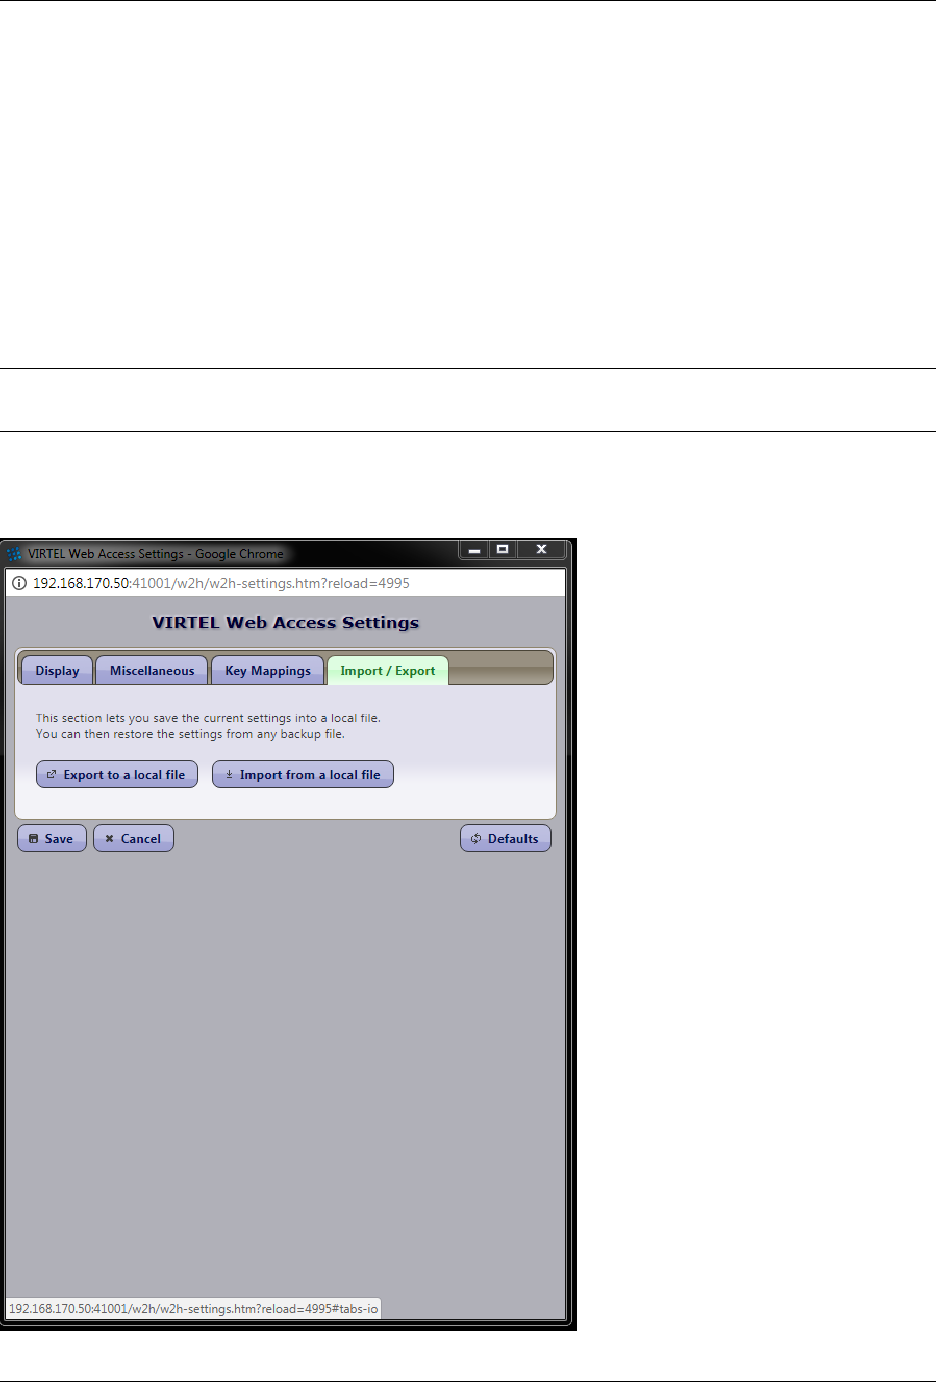
Virtel User Guide, Release 4.57
Esc key to Alt+F3 Denes the mapping of workstation keyboard to 3270 keys. The value “no” indicates
that the keystroke is ignored. For example the 3270 PA1 key may be assigned to the PageUp key, to
the Alt+PageUp key, and/or to the Alt+F1 key on the user’s keyboard.
Ctrl key For Internet Explorer, the “Ctrl key” setting refers to the right Ctrl key. For Firefox, Chrome,
and Safari the “Ctrl key” setting applies to both the left and right Ctrl keys identically. For Firefox,
the “Keypad Enter” setting is ignored. For Internet Explorer versions 6, 7, and 8, a browser helper
object(BHO = virtkey.dll) must be installed to allow recognition of the keypad Enter key. This BHO
is not needed for Internet Explorer 9.
Keypad /*-+. Allows keys on the numeric keypad to be assigned to certain 3270 functions including PA1,
PA2, Tab, Backtab, and Newline. Also allows the decimal point on the numeric keypad to be remapped
to comma for European countries.
Note: Remapping of the numeric keypad is only supported for Internet Explorer, Chrome, and Safari.
Keypad settings are ignored for Firefox and Opera.
Import/Export parameters
76 Chapter 1. The Virtel Engine

Virtel User Guide, Release 4.57
VIRTEL Web Access Settings Import/Export Tab (part 4 of 4)
This tab lets the user to save and restore his settings into (or from) a local le. This backup method is
dierent and independent of the method used when the “save” button is pressed. (See below).
Associated functions
After modifying the Settings menu, the user presses one of the buttons:
Save save the options in browser local storage.
Cancel exit without saving the modications made to this menu.
Defaults returns all of the settings to their default values. The default values are specied by the installation
in w2hparm.js.
Deletion of browser cookies may delete the values saved in local storage. For Internet Explorer, ensure that
the option “Delete browsing history on exit” in Tools – Internet Options” is not checked.
Where user settings are stored
When the user press the “save” button, his Web Access settings and macros are stored in browser local
storage. For Internet Explorer 6, local storage is stored in the folder : %userprole%/UserData For Internet
Explorer 8 and 9, local storage is stored in the folder :
%userprofile%/Local Settings/Application Data/Microsoft/Internet Explorer/DOMStore
Note: To see DOMStore you must untick “hide protected operating system les” in Windows folder options.
For other browsers, see
http://www.sitepoint.com/building-web-pages-with-local-storage/
Global modication of Web Access settings
Those installations who wish to modify the default Web Access settings for all users can do so by modifying
the w2hparm.js le. This le is included in the sources.zip le which can be obtained from the VIRTEL Web
Access menu accessible by URL http://n.n.n.n:41001.
The w2hparm.js le as delivered is just a dummy le and contains no default settings. See “Appendix A -
w2hparm values” <#_V457UG_w2hparm_defaults> for a list of the possible w2hparm values.
// w2hparm.js (W2H-DIR)
// w2h parameters to override or hide.
//
// NOTE: this file is a sample and will be replaced after a new install.
// please see the documentation on possible parameter values
// and on how to set this file up in CLI-DIR instead of W2H-DIR
//
var w2hparm ={}; // empty objet: no overrides
//
// sample values:
// "font":"Droid Sans Mono",
// "ctrl":"ENTER",
1.5. Web Access Customization 77

Virtel User Guide, Release 4.57
// "ctrl":"Newline",
// "enter":"Newline",
// "enter":"ENTER",
// sample:
// var w2hparm ={"ctrl":"no","enter":"ENTER"};
//
// w2hparm parameters to hide (e.g"home" and "shiftins")
// Remove the // and update the items
// var w2hparmHide =["home","shiftins"];
w2hparm.js: Dummy le as delivered for VIRTEL Web Access
w2hparm values values may be changed or added by creating a new w2hparm.js le.
For example, installations who wish to map the 3270 ATTN key to the Esc (Escape) key for use with
Multisession applications such as NVAS (IBM® NetView™ Access Services) can add the following instruction
to the w2hparm.js le:
"escape":"ATTN",
Note: Modications to the global settings are only eective after the expiry of the w2hparm.js le in the
browser’s cache which occurs at midnight each day. A user can force the use of the updated global settings
le by clearing the browser cache, deleting any cookies associated with the VIRTEL server, and refreshing
the 3270 page using the Ctrl-R key.
After modifying the w2hparm.js le, it must be uploaded to VIRTEL’s CLI-DIR directory by means of the
“Upload” link on the VIRTEL Web Access menu (URL http://n.n.n.n:41001). Then you must check the
Entry Point (usually CLIWHOST) and check that the transaction whose “External name” is w2h and whose
“Check URL Prex” eld is set to /w2h/w2hparm-js species CLI-DIR in the “Application” eld. For the
CLIWHOST entry point this is transaction CLI-03P. If you want your customized changes to be applicable to
transactions under Entry Point WEB2HOST then change the W2H-03P transaction so that the application
eld points to “CLI-DIR” and not “W2H-DIR”.
As of Virtel V4.56 an enhanced customisation feature is available which provides customization at a global
and transaction level for Javascript, CSS and other web elements. To use this feature the w2hparm.js should
include the “global-settings” attribute. The following is an example:-
"global-settings":{
"pathToJsCustom":"../option/custJS.global.js",
"pathToCssCustom":"../option/custCSS.global.css",
"pathToHelp":"../option/myHelp.html"
}
The following supported global properties are:-
"pathToJsCustom" -Customized JavaSCript elements
"pathToW2hparm" -Customized w2hparm parameters
"pathToCssCustom" -Customized CSS stylesheets
"pathToPrintCss" -Customized Print CSS Style sheets
"pathToHelp" -Customized Help pages
Adding the global-settings property to the “VWA settings” le w2hparms.js provides the pointers to the
customized components located within the “option” directory as identied by the /option/ pathname. In
the sample above customised CSS, Javascript and Help element pointers are dened. For further details see
“Customising Virtel using the Option pathname”.
78 Chapter 1. The Virtel Engine

Virtel User Guide, Release 4.57
Danger: Updating w2hparm.js in the default W2H-DIR directory is not recommended as changes will
be overwritten by maintenance or future Virtel release updates. Keep customized elements sucha as
w2hparm.js in the CLI-DIR directory.
The list of keywords and possible values which can be coded in the w2hparm.js le is listed in “Appendix A
- w2hparm values”.
Choosing Web Access settings mode
As of Virtel Release V4.57 only the “Version 2” user interface settings are supported, as described at the
beginning of this section. In previous versions of Virtel the w2hparm property “settingsGUI” was used to
select either “V1” or “V2” presentation interfaces. The “V1” user interface has now been deprecated and is
no longer supported.
Hiding Web Access settings
To prevent the user from overriding the site defaults, the administrator can remove individual settings from
the user’s Web Access Settings menu. The names of settings to be hidden are specied in the w2hparmHide
variable in the w2hparm.js le. The example below shows how to hide the default font, font size, and style
settings from the menu:
// w2hparmHide values
var w2hparmHide =["font","fontsize","style"];
w2hparm.js: Hiding VIRTEL Web Access settings
1.5. Web Access Customization 79
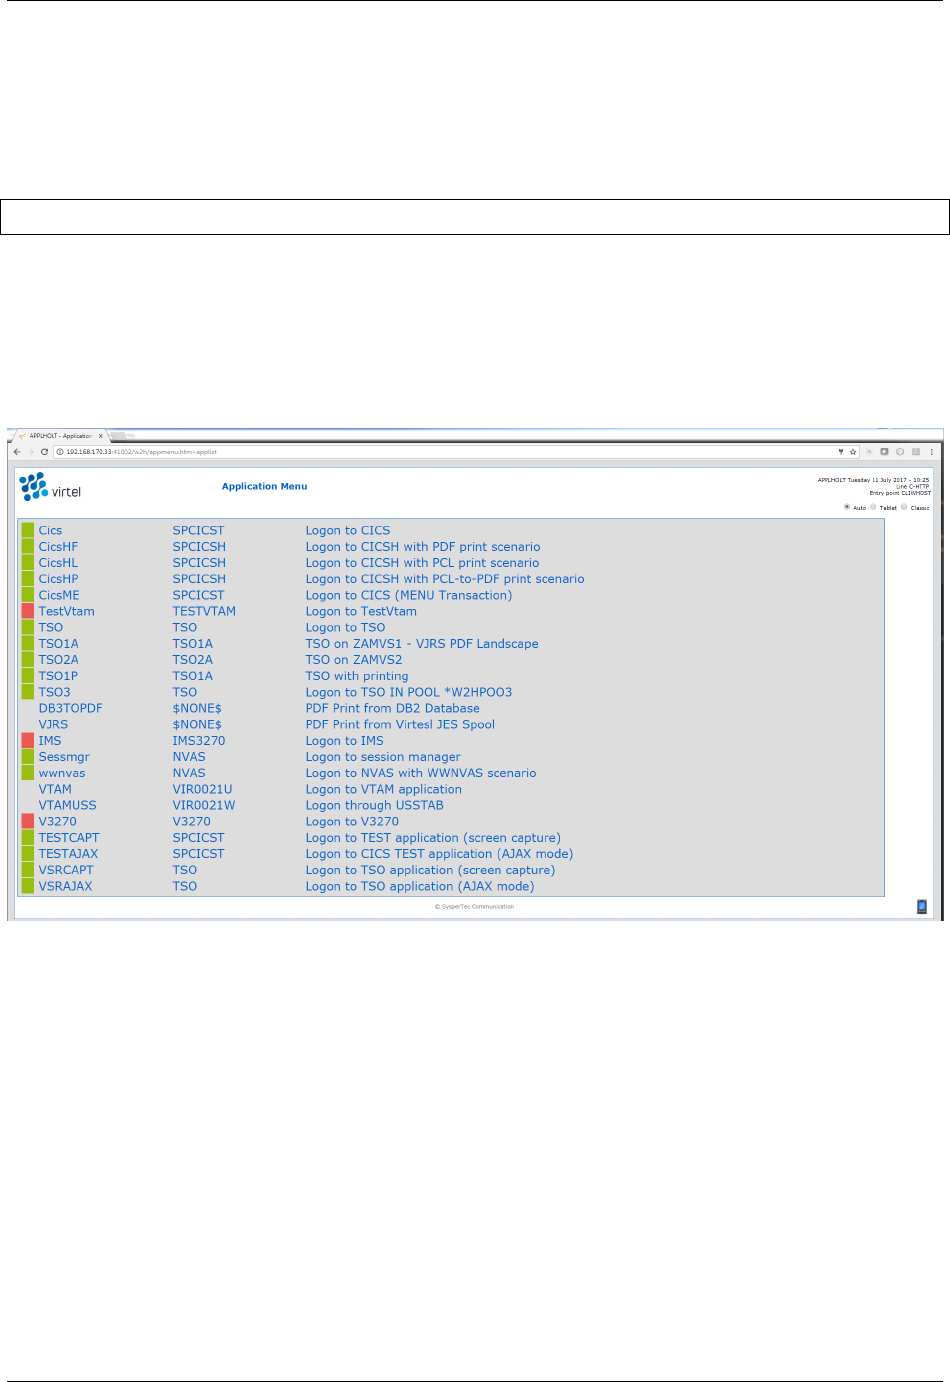
Virtel User Guide, Release 4.57
1.6 Application Selection Menu
The VIRTEL application selection menu is dynamically generated by the appmenu.htm page in conjunction
with the applist transaction. For example, the following URL displays the application selection menu for
the CLIWHOST entry point (line C-HTTP port 41002):
http://n.n.n.n:41002/w2h/appmenu.htm+applist
The application selection menu for the WEB2HOST entry point (line W-HTTP port 41001) is accessible
from the “Other applications” link on the VIRTEL Web Access main menu.
1.6.1 Contents of menu
An example of the application selection menu is shown in the gure below:
Application selection menu
The application selection menu contains clickable links to the transactions dened under the entry point. A
transaction will appear in the menu if all of the following conditions are met: - The “Application type” is 1
(VTAM) or 2 (VIRTEL) - The “How started” eld is 1 (menu) - The user is logged on and authorized via
the security subsystem to the security resource whose name is the internal name of the transaction (except
when the transaction “Security” eld is 0)
If the user is not logged on, then only public transactions (security type 0) are displayed.
If the APPSTAT=YES parameter is specied in the VIRTCT (see “Parameters of the VIRTCT” in the
VIRTEL Installation Guide) then the status of VTAM applications is indicated by a green bar for active
applications, and by a red bar for inactive applications.
To add an application to the menu, use the VIRTEL administration panels to dene a transaction under the
entry point, press F1 to update the entry point, then refresh the appmenu.htm page in the browser.
80 Chapter 1. The Virtel Engine

Virtel User Guide, Release 4.57
1.6.2 Presentation modes
The application selection menu oers a choice of several dierent presentation modes, selectable by clicking
one of the buttons at the top right of the screen. The selected presentation mode determines which page
template will be used to access the selected host applications.
Auto This presentation mode is similar to the 3270 presentation mode, but it uses a static main page
(WEB2AJAX.htm) together with an Ajax-loaded sub-page (WEB2SUB.html). This can reduce net-
work load and provide faster response time with a better 3270 user experience. Ajax mode also oers
password encryption as an option (see “Password encryption”).
Classic This presentation mode, which uses the WEB2VIRT.htm page template, is intended as a rst
step towards VIRTEL Web Modernisation. In this mode the 3270 screen image is displayed as an
HTML form, to which presentation enhancements such as drop-down lists, checkboxes, and calendars
can be added by means of VIRTEL Web Modernisation scenarios (see “Web Modernisation VIRTEL
Scenarios”).
Tablet This presentation mode it uses the SMARTWEB2VIRT.htm page template for an HTML presenta-
tion adapted for tablets and smartphones.
The appmenu.htm template
The appmenu.htm page for the VIRTEL application selection menu is delivered in the W2H-DIR directory.
The page may be customized if required to meet installation standards. The appmenutable and appmenuitem
styles in the STYLBLUE.css stylesheet allow the appearance of the menu to be customized. The source code
for the page and the stylesheet may be obtained from the sources.zip le accessible from the VIRTEL Web
Access menu. After modifying the page or the stylesheet, follow the “Upload” link on the VIRTEL Web
Access menu to upload the updated les to the W2H-DIR directory.
Denition of the applist transaction
A transaction with external name applist must be present in the list of transactions at the entry point
associated with the line. VIRTEL supplies as standard transactions W2H-90 (for entry point WEB2HOST,
line W-HTTP port 41001) and CLI-90 (for entry point CLIWHOST, line C-HTTP port 41002). The applist
transaction must specify application name VIR0021S and application type 2. Security type 1 requires the
user to sign on so that the transaction can determine which applications the user is authorized to. The user
must also be authorized to the applist transaction itself by its internal name (W2H-90 or CLI-90).
The gure below shows the denition of the applist transaction CLI-90:
1.6. Application Selection Menu 81
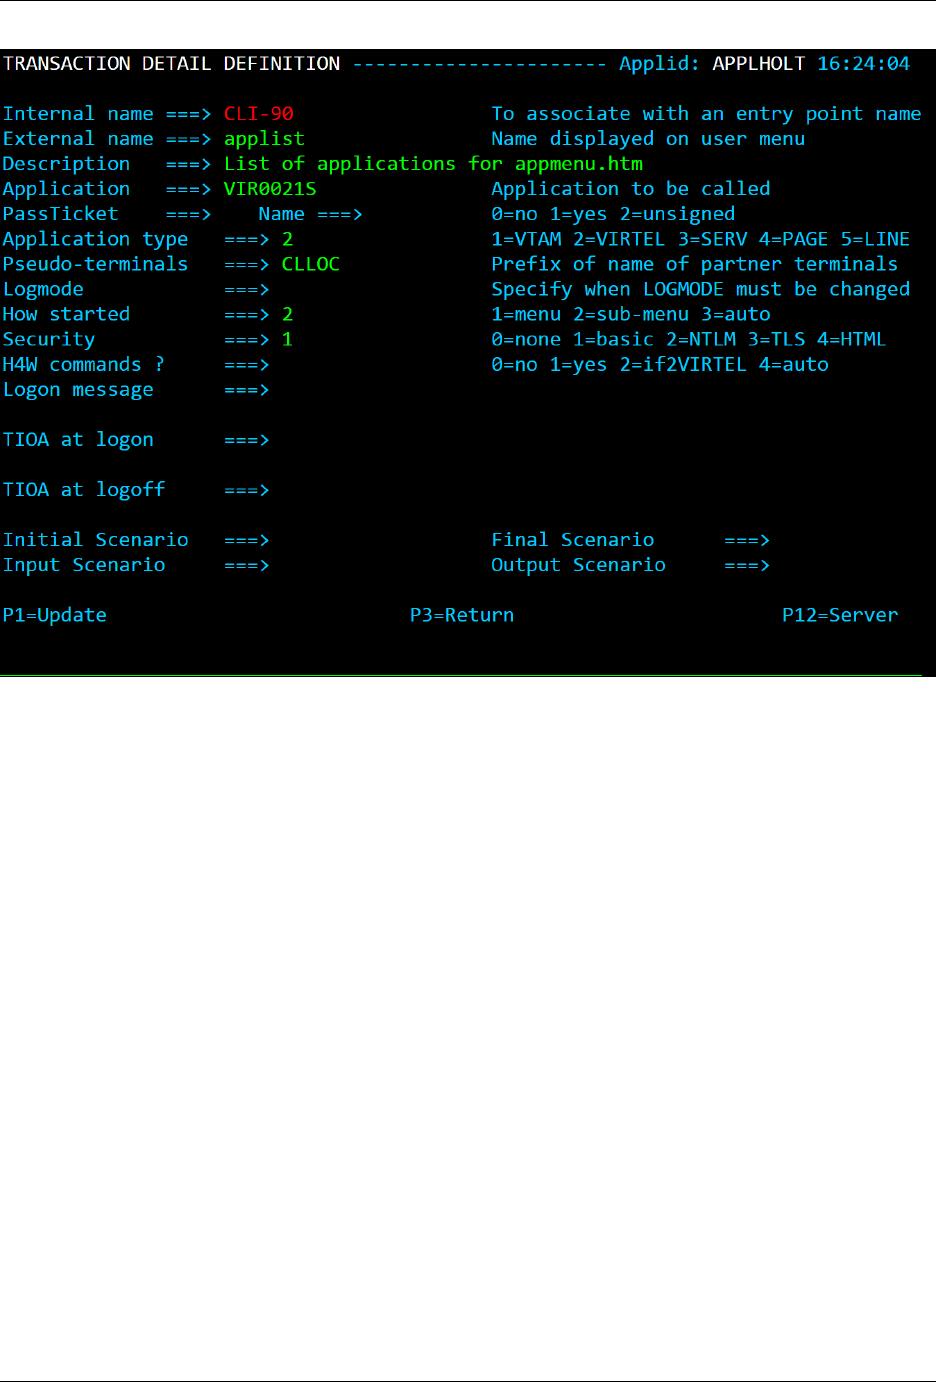
Virtel User Guide, Release 4.57
Denition of applist transaction
Application menu as the default transaction for the entry point
When the appmenu.htm+applist URL is coded in the “TIOA at logon” eld of the default transaction for
the entry point, the application selection menu will be displayed whenever the user accesses the HTTP line
using its root URL (for example, http://n.n.n.n:41002 for line C-HTTP).
The default transaction is the transaction whose external name is the same as the entry point name, and
the example below shows the default transaction for the CLIWHOST entry point:
82 Chapter 1. The Virtel Engine
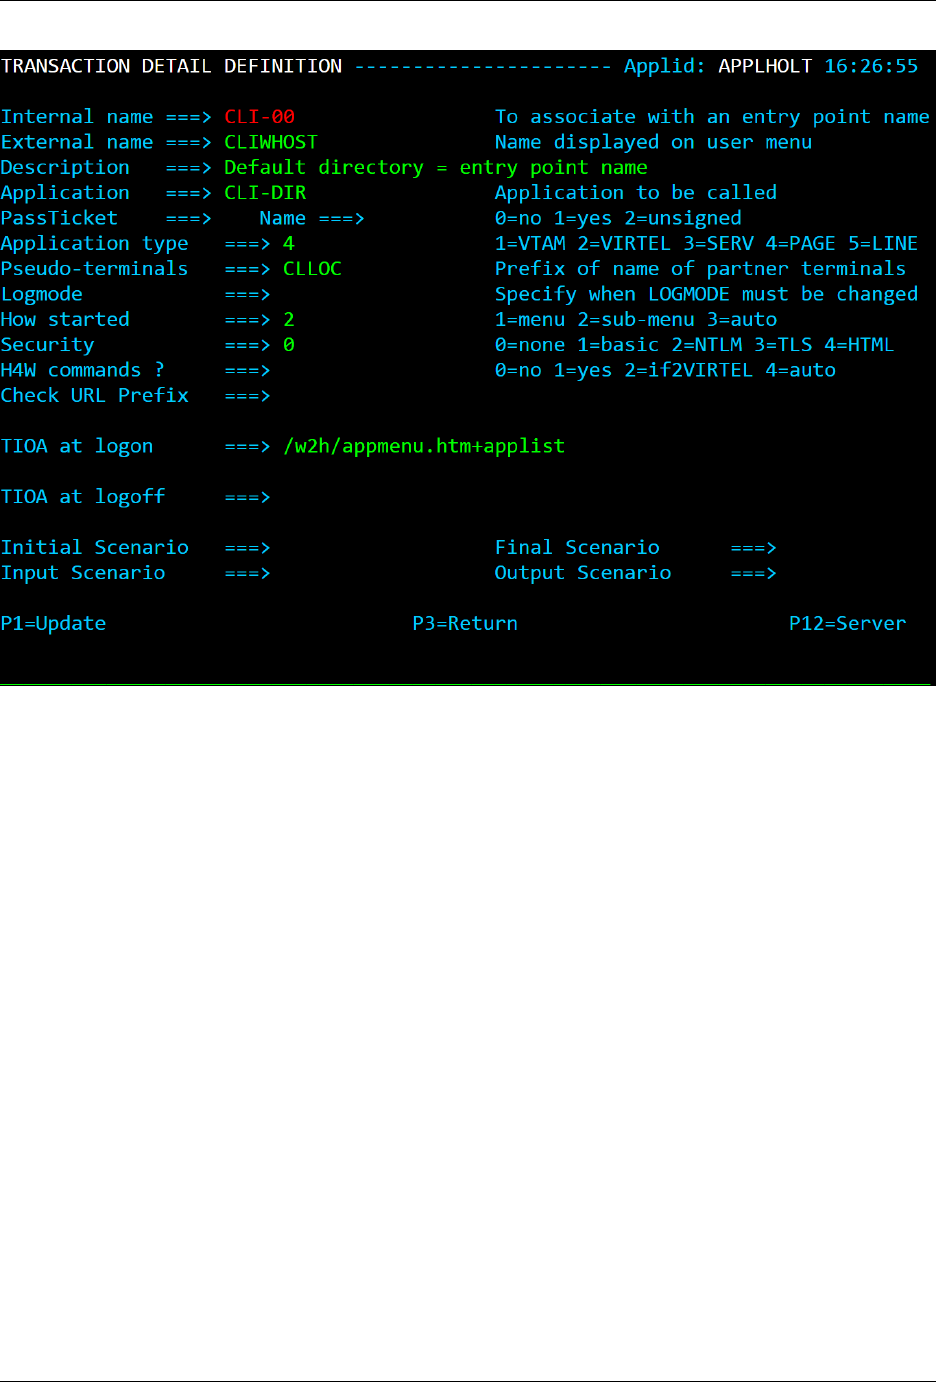
Virtel User Guide, Release 4.57
Specifying the application selection menu in the default transaction
1.6. Application Selection Menu 83
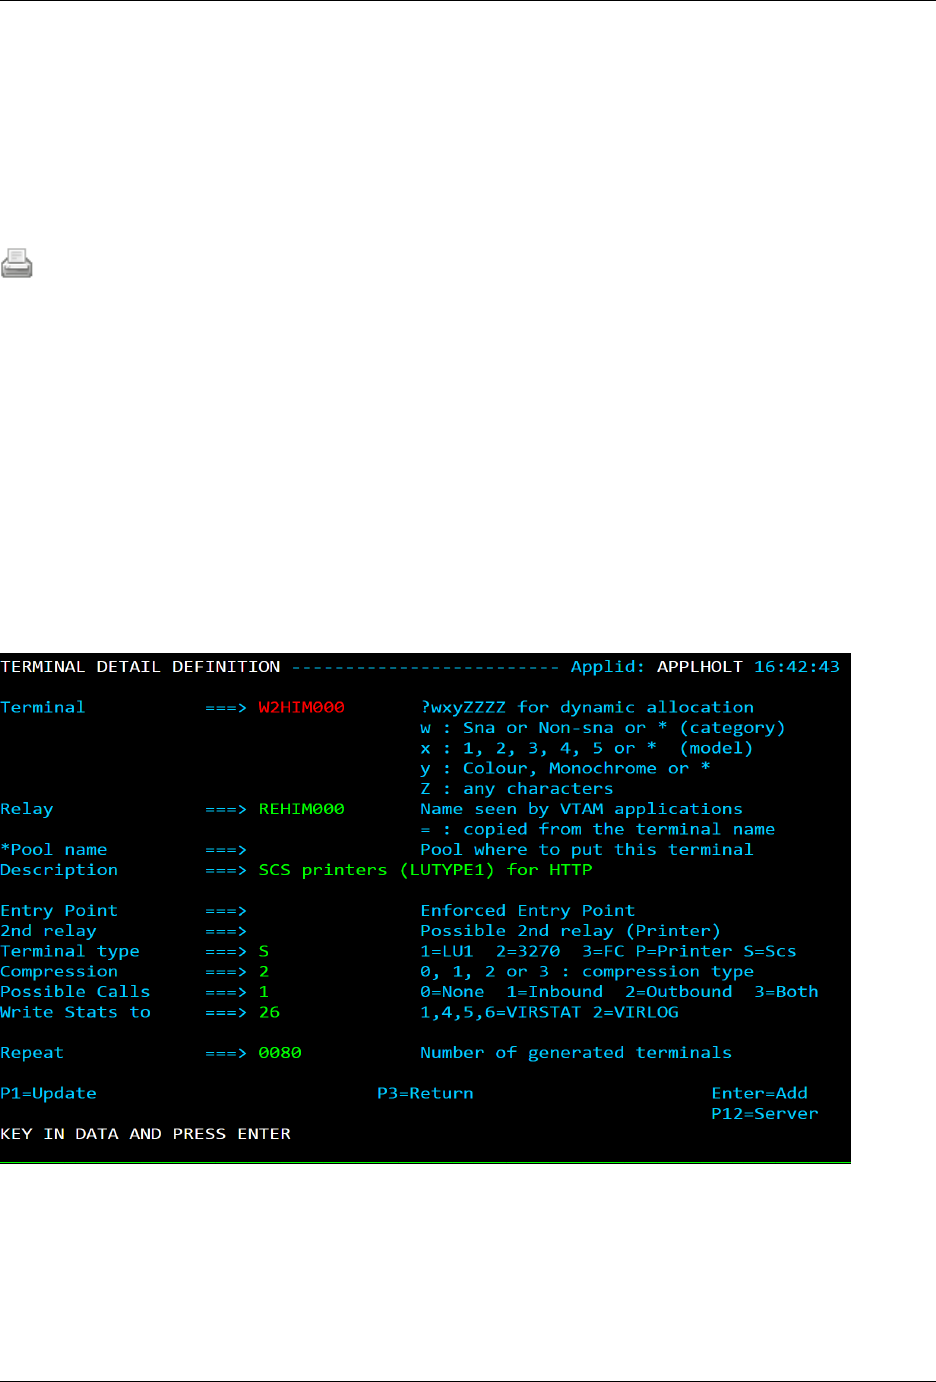
Virtel User Guide, Release 4.57
1.7 Printing With Web Access
VIRTEL provides printing support by means of virtual 3287 type printers. Each user connected to VIRTEL
Web Access has a virtual 3287 printer associated with the user’s 3270 display terminal. The name of the
virtual printer is displayed in the status bar at the bottom of the Web Access window. Data sent to the
virtual printer from a host application (for example, CICS, QMF, or VPS) is captured by VIRTEL and is
saved in virtual storage.
A printer icon appears in the Web Access toolbar to notify the user that print data is available
When the user clicks on this icon, VIRTEL sends the print data to the user’s browser, either as an attached
le or in a pop-up window.
Two types of virtual printer are supported:
• LUTYPE1 (SCS): VIRTEL sends the print data to the browser as an attached le.
• LUTYPE3 (3270 data stream): VIRTEL converts the print data to HTML and the browser displays
it in a pop-up window.
1.7.1 VIRTEL denitions for virtual printers
In the VIRTEL conguration le, LUTYPE1 virtual printers are dened with the “Terminal type” eld set
to 1 or S. The “Relay” eld contains the VTAM LU name known to the host application. The gure below
shows an example denition of 80 LUTYPE1 virtual printers with LU names REHIM000 to REHIM079:
VIRTEL denition of LUTYPE1 virtual printers
Similarly, LUTYPE3 virtual printers are dened with the “Terminal type” eld set to 2 or P. The gure
below shows an example denition of 80 LUTYPE3 virtual printers with LU names REHIP000 to REHIP079:
84 Chapter 1. The Virtel Engine
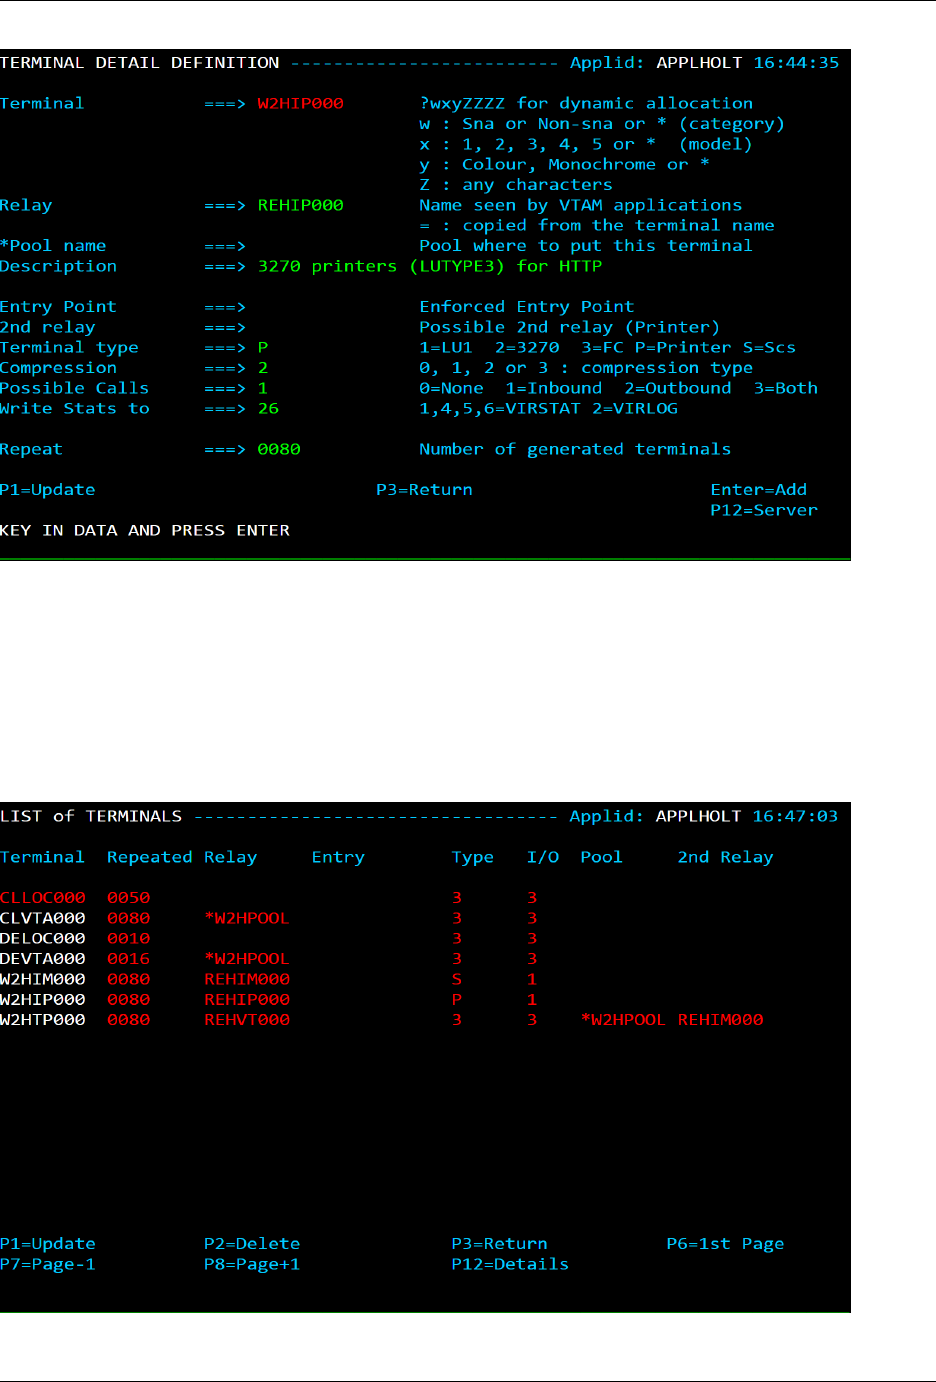
Virtel User Guide, Release 4.57
VIRTEL denition of LUTYPE3 virtual printers
1.7.2 Associating virtual printers with terminals
To associate virtual printers with the corresponding terminal LU names, dene the printer LU name in
the “2nd relay” eld of the terminal pool denition. In the example below, Web Access terminals with LU
names REHVT000-079 are associated with virtual printer LU names REHIM000-079 (LUTYPE3). There is
a one-for-one correspondence between the display terminal’s LU name and the printer LU name.
1.7. Printing With Web Access 85
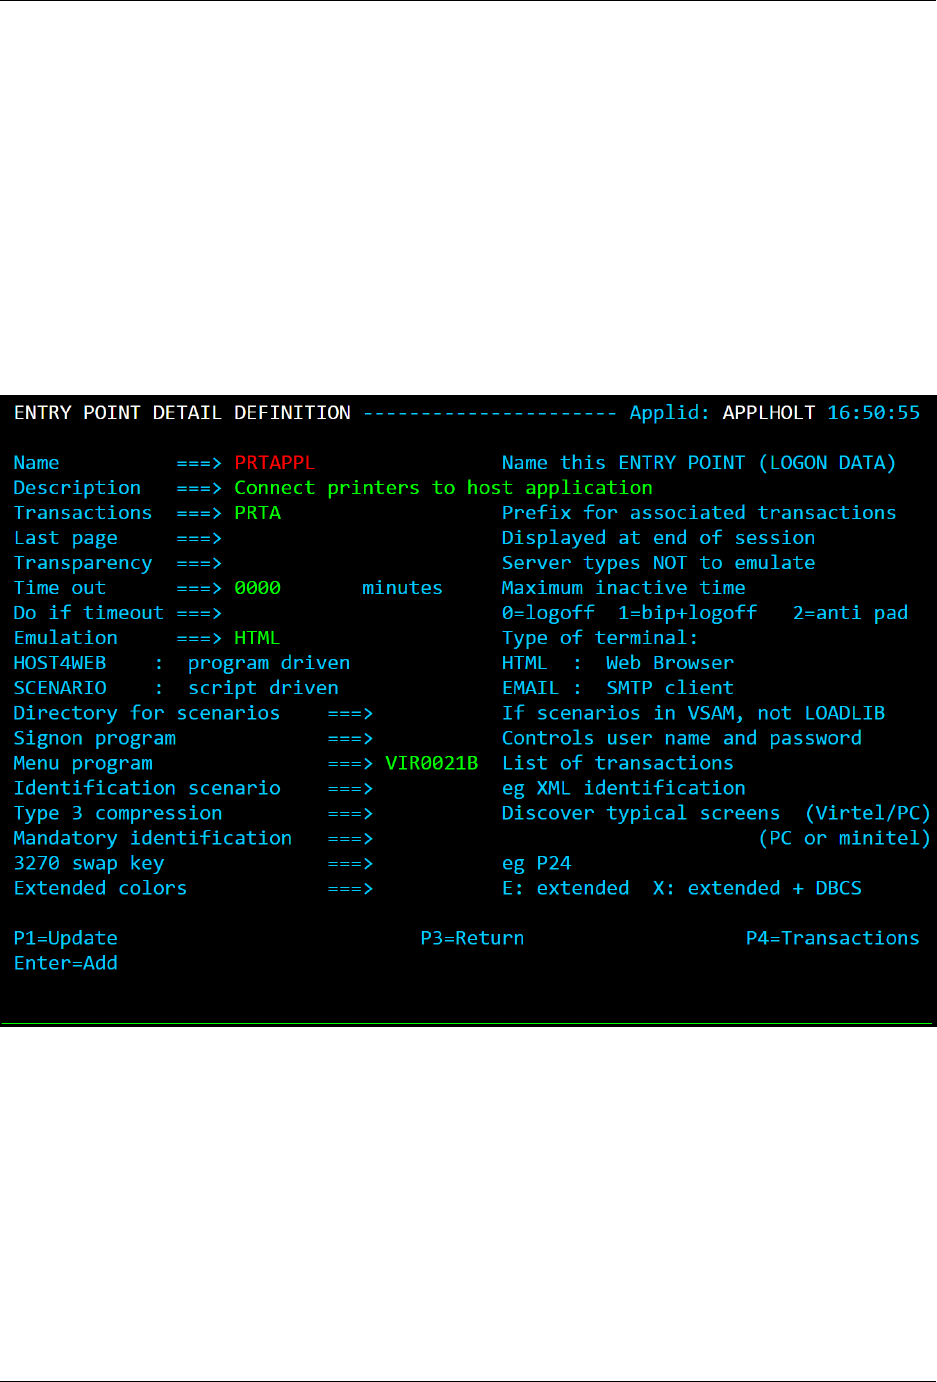
Virtel User Guide, Release 4.57
VIRTEL terminal denitions for virtual printers
1.7.3 Autoconnect for virtual printers
Virtual printer LUs are activated by VIRTEL at start-up time, and will remain in ACTIV state until they
are acquired by the application. For virtual printers dened with terminal type 1 or 2, the application must
initiate the acquire (for example, by CEMT SET TERM(xxxx) ACQ in CICS). Virtual printers dened
with terminal type P or S may be automatically connected to a controlling host application when a user
starts a Web Access session using the associated terminal LU. The “Entry Point” eld of the virtual printer
denition should contain the name of an entry point which species VIR0021B as its menu program. The
entry point must have one transaction whose “Application” eld contains the name of the host application
to which the printer is to be connected. The example below shows an entry point denition for connecting
printers to CICS:
Entry point denition for virtual printer autoconnect
86 Chapter 1. The Virtel Engine
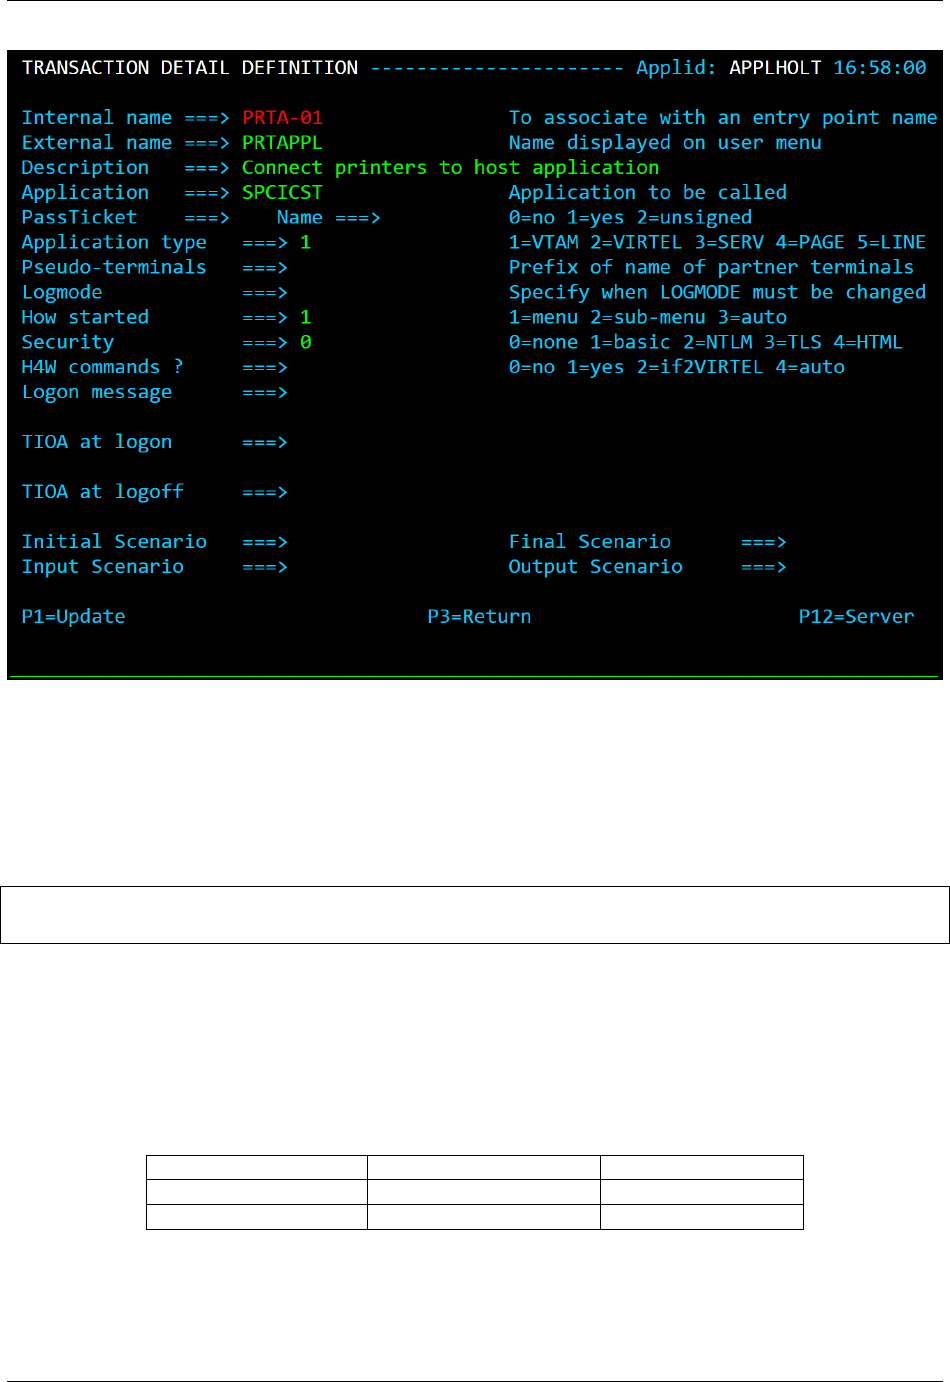
Virtel User Guide, Release 4.57
Transaction denition for virtual printer autoconnect
1.7.4 VTAM denitions for virtual printers
Virtual printer LUs must be dened to VTAM with an appropriate LOGMODE (normally SCS for LU-
TYPE1, or DSILGMOD for LUTYPE3). The necessary APPL statements may be coded in the VIRTAPPL
member of the VTAMLST library, as shown in the example below:
REHIM??? APPL AUTH=(ACQ,PASS),MODETAB=ISTINCLM,DLOGMOD=SCS,EAS=1
REHIP??? APPL AUTH=(ACQ,PASS),MODETAB=ISTINCLM,DLOGMOD=DSILGMOD,EAS=1
VTAM denitions for virtual printers
1.7.5 CICS denitions for virtual printers
If the virtual printer is dened to CICS via RDO, use an appropriate TYPETERM as shown in the table
below:
VIRTEL Terminal Type CICS TYPETERM CICS DEVICE type
1 or S DFHSCSP SCSPRINT
2 or P DFHLU3 or DFH3270P LUTYPE3 or 3270P
CICS TYPETERM denitions for virtual printers
1.7. Printing With Web Access 87

Virtel User Guide, Release 4.57
Note: From version 4.50 onwards, VIRTEL supports the QUERY parameter for SCS printers as well as
for LUTYPE3 printers.
1.7.6 Scenarios for SCS printing
When virtual printers are dened with terminal type 1 or S, all VIRTEL transactions dened under an
entry point which oers printing must indicate the name of an “Input Scenario”. The scenario processes the
HTTP request containing a PF=SCENARIO-PRINT parameter which is issued when the user presses the
“Get print data” icon (below) on the VIRTEL Web Access toolbar.
The scenario accesses the SCS print data which is accumulated in a VIRTEL variable called $PRINT$, and
instructs VIRTEL to send the print data to the browser as an attached le. Several suitable scenarios are
delivered as standard in the VIRTEL SAMPLIB and LOADLIB:
SCENFPDF converts an SCS data stream into a PDF document
SCENFPCL downloads PCL data into a raw printer le
SCENPPDF converts PCL data into a PDF document (requires additional VIRTEL PCL2PDF feature
running on a Windows server)
1.7.7 SCS to PDF conversion
When the SCENFPDF input scenario is specied in the VIRTEL transaction denition, the SCS data
produced by the application is passed to VIRTEL’s MAKEPDF component, and the resulting PDF le is
sent to the browser. The browser normally displays a dialog giving the user the choice of opening or saving
the PDF le.
1.7.8 PCL printing
Certain applications such as VPS are capable of sending print data in PCL (HP Printer Command Language)
format to SNA printers. The PCL commands and data are sent as SCS transparent data on sessions with
LUTYPE1 logical units. The transparent data (contained in blocks of up to 253 ASCII characters preceded
by a X’35’ SCS command) is extracted from the SCS data stream and is copied into the VIRTEL variable
$PRINT$. PCL data may also be delivered in EBCDIC as part of the normal SCS data stream, and this
data will be converted to ASCII using the codepage dened by the COUNTRY parameter in the VIRTCT
(see “Parameters of the VIRTCT” in the VIRTEL Installation Guide).
The SCENFPCL scenario delivered as standard in the VIRTEL SAMPLIB and LOADLIB allows PCL data
to be downloaded to the user’s workstation as an attached le. The user may either save the le, or open it
using an appropriate program (such as PCL Reader from Page Technology Marketing, Inc.) to display and
optionally print the PCL data.
1.7.9 PCL to PDF conversion
For customers who have licensed the optional PCL2PDF feature of VIRTEL, PCL output from host appli-
cations can be delivered to the workstation as PDF documents.
88 Chapter 1. The Virtel Engine
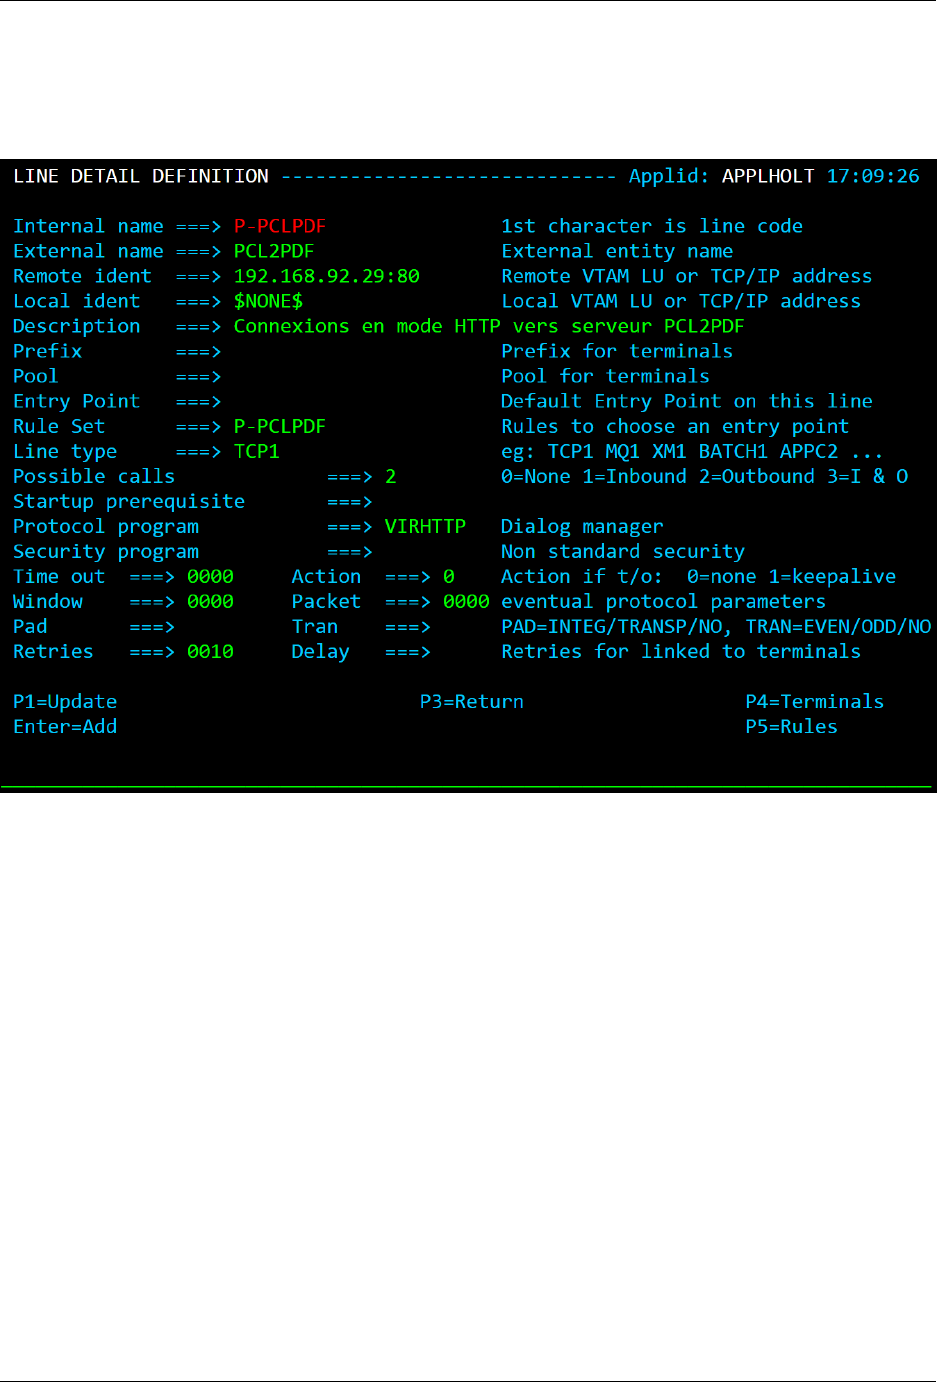
Virtel User Guide, Release 4.57
The SCENPPDF scenario captures PCL data and sends it to an external server for conversion. The external
server is a Windows Server 2008R2 platform running the Syspertec PCL2PDF application. The VIRTEL
conguration must include a line with external name PCL2PDF which denes the IP address of the Windows
server, as shown in the example below:
VIRTEL line denition for PCL2PDF server
A batch job, supplied as member PCL2PDF of the VIRTEL SAMPLIB, allows the denition of the PCL2PDF
line to be added to the VIRTEL conguration.
1.7. Printing With Web Access 89
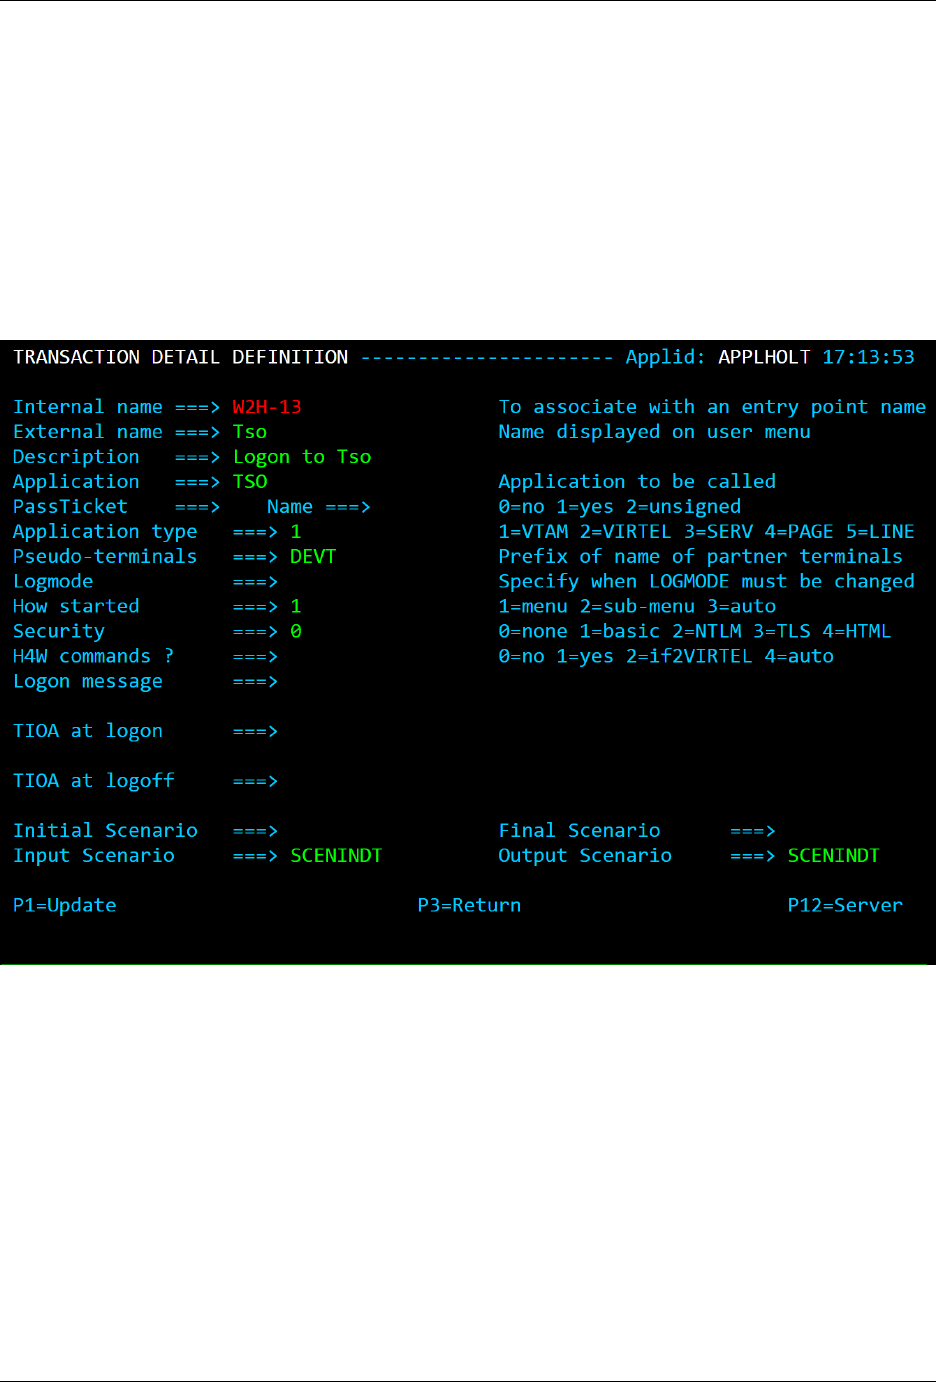
Virtel User Guide, Release 4.57
1.8 TSO File Transfer
VIRTEL Web Access supports transfer of les between the browser and a TSO session using the IND$FILE
protocol.
1.8.1 Denitions required for le transfer
To activate the le transfer function you must access TSO via a VIRTEL transaction which species
SCENINDT in both the “Input scenario” and the “Output scenario” elds of the transaction denition.
The gure below shows the sample TSO transaction W2H-13 supplied with VIRTEL:
TSO transaction denition for le transfer
The source code of the SCENINDT scenario is supplied in the VIRTEL SAMPLIB. To activate the le
transfer function when a user-written scenario is specied in the transaction denition, the INDSCEN$
macro instruction must be added to both the input and output sections of the scenario.
1.8.2 Toolbar icons for le transfer
When le transfer is activated, two new icons (receive le) and (send le) appear on the VIRTEL Web Access
toolbar: VIRTEL Web Access toolbar for TSO le transfer:-
90 Chapter 1. The Virtel Engine
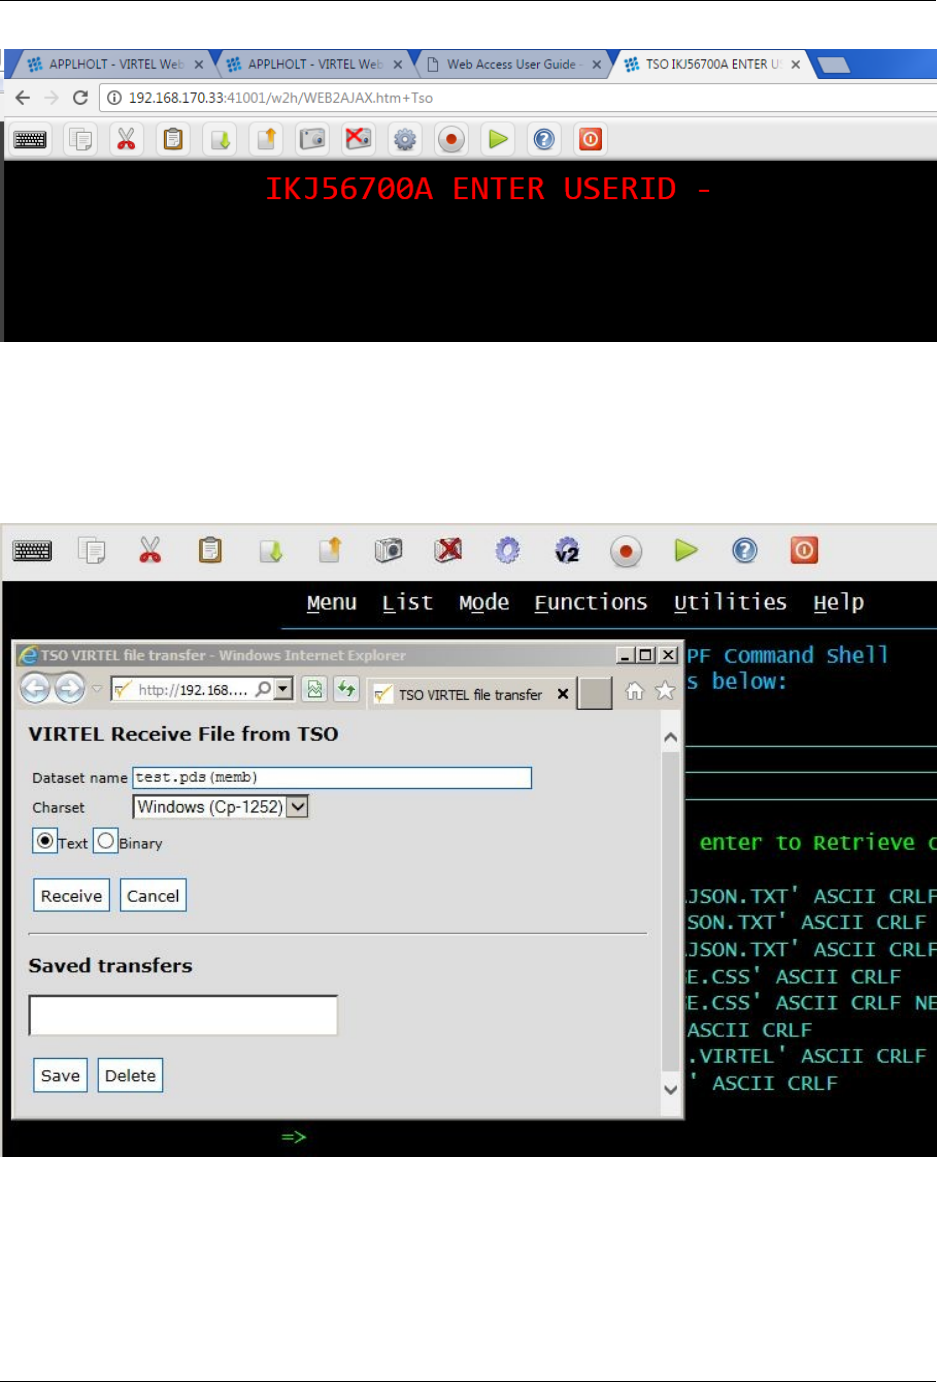
Virtel User Guide, Release 4.57
VIRTEL Web Access toolbar for TSO le transfer
1.8.3 Receiving a le
To transfer a le from TSO to your workstation, go to ISPF option 6 (or TSO READY) and click the
“Receive” icon on the toolbar. The “Receive File” dialog will open:
VIRTEL IND$FILE receive dialog (part 1)
Specify the TSO dataset name, surrounded by quotes if necessary. Dataset names without quotes will be
prexed by your TSO prex (usually your userid). Click either “Text” or “Binary”. “Text” translates the le
from EBCDIC to ASCII and inserts carriage return line feed sequences (x’0D0A’) at the end of each record.
“Binary” performs no translation. Finally click “Receive” to start the transfer. When the le transfer is
complete, the browser’s “Download” dialog appears:
1.8. TSO File Transfer 91
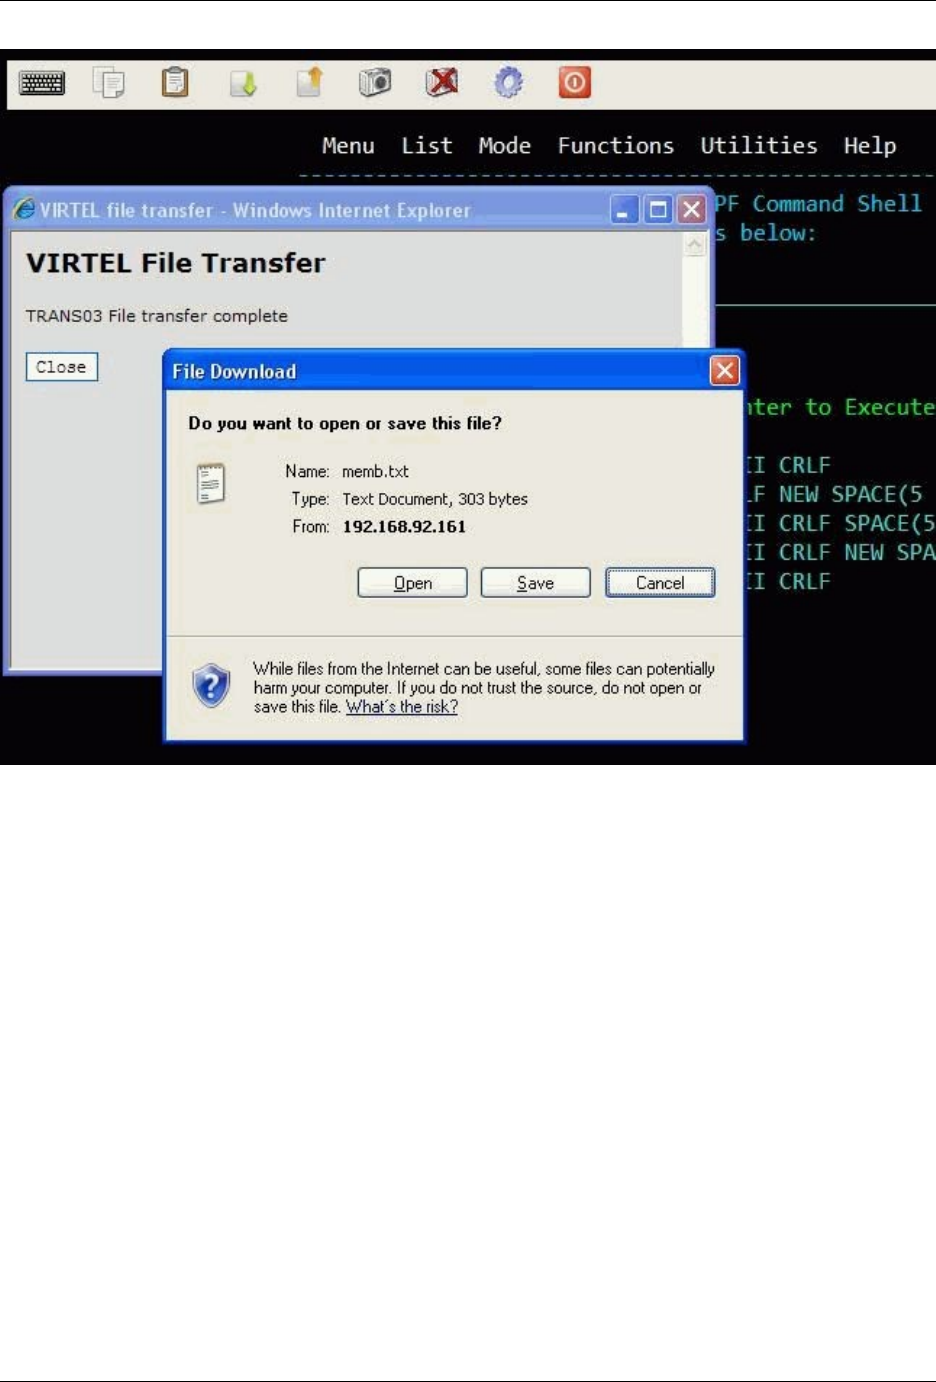
Virtel User Guide, Release 4.57
VIRTEL IND$FILE receive dialog (part 2)
Click “Save”. The “Save As” dialog will open to allow you to specify the name and location of the destination
le on your workstation:
92 Chapter 1. The Virtel Engine
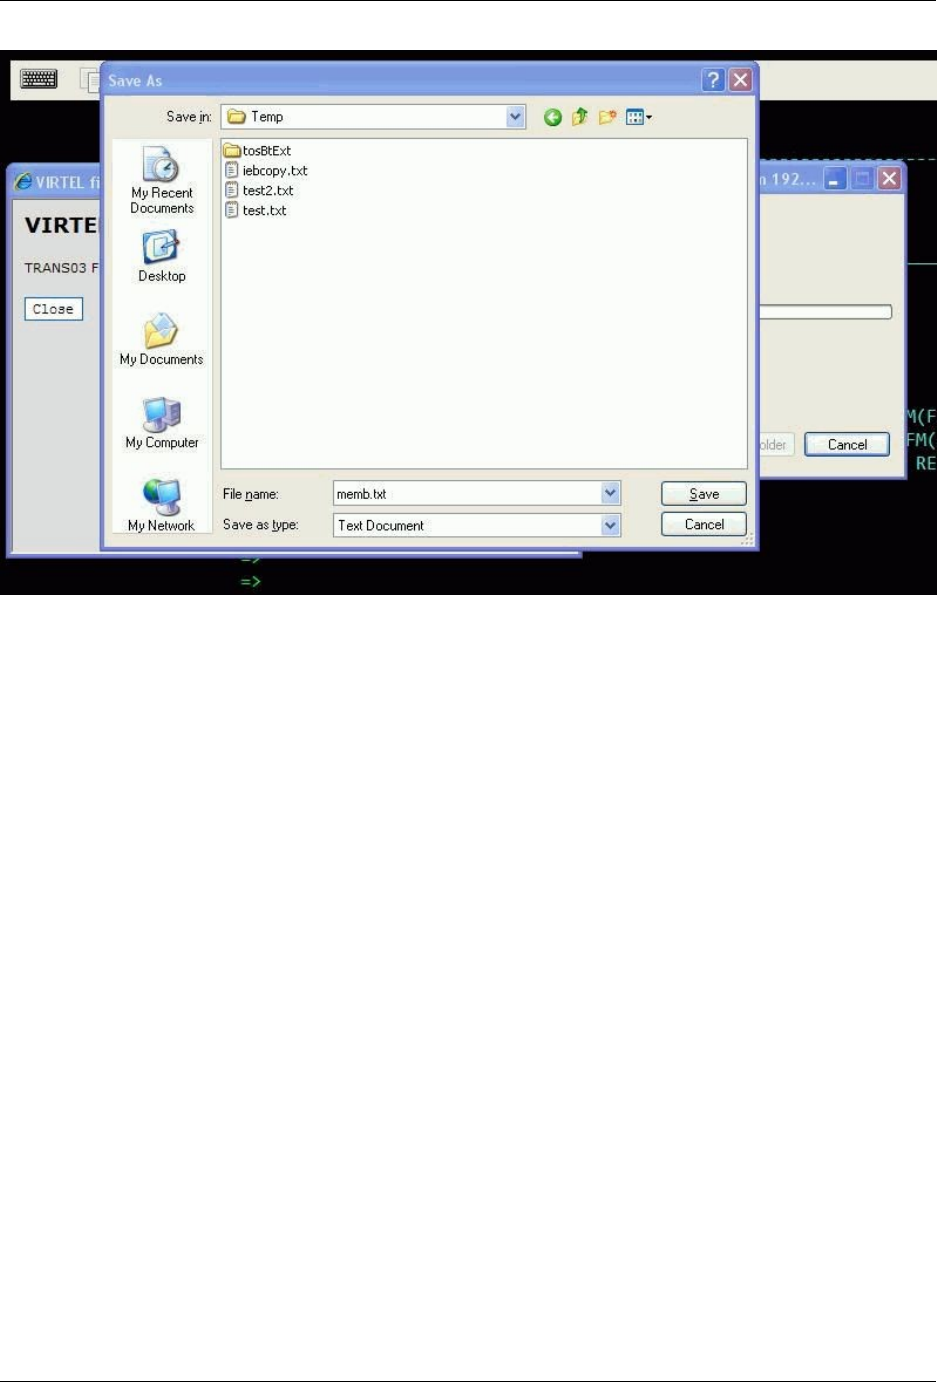
Virtel User Guide, Release 4.57
VIRTEL IND$FILE receive dialog (part 3)
Now select the destination le and click “Save”. If the le already exists you will be prompted for permission
to overwrite it. The “Download Complete” dialog appears when the le has been saved:
1.8. TSO File Transfer 93

Virtel User Guide, Release 4.57
VIRTEL IND$FILE receive dialog (part 4)
1.8.4 Sending a le
To transfer a le from your workstation to TSO, go to ISPF option 6 (or TSO READY) and click the “Send”
icon on the toolbar. The “Send File” dialog will open:
94 Chapter 1. The Virtel Engine
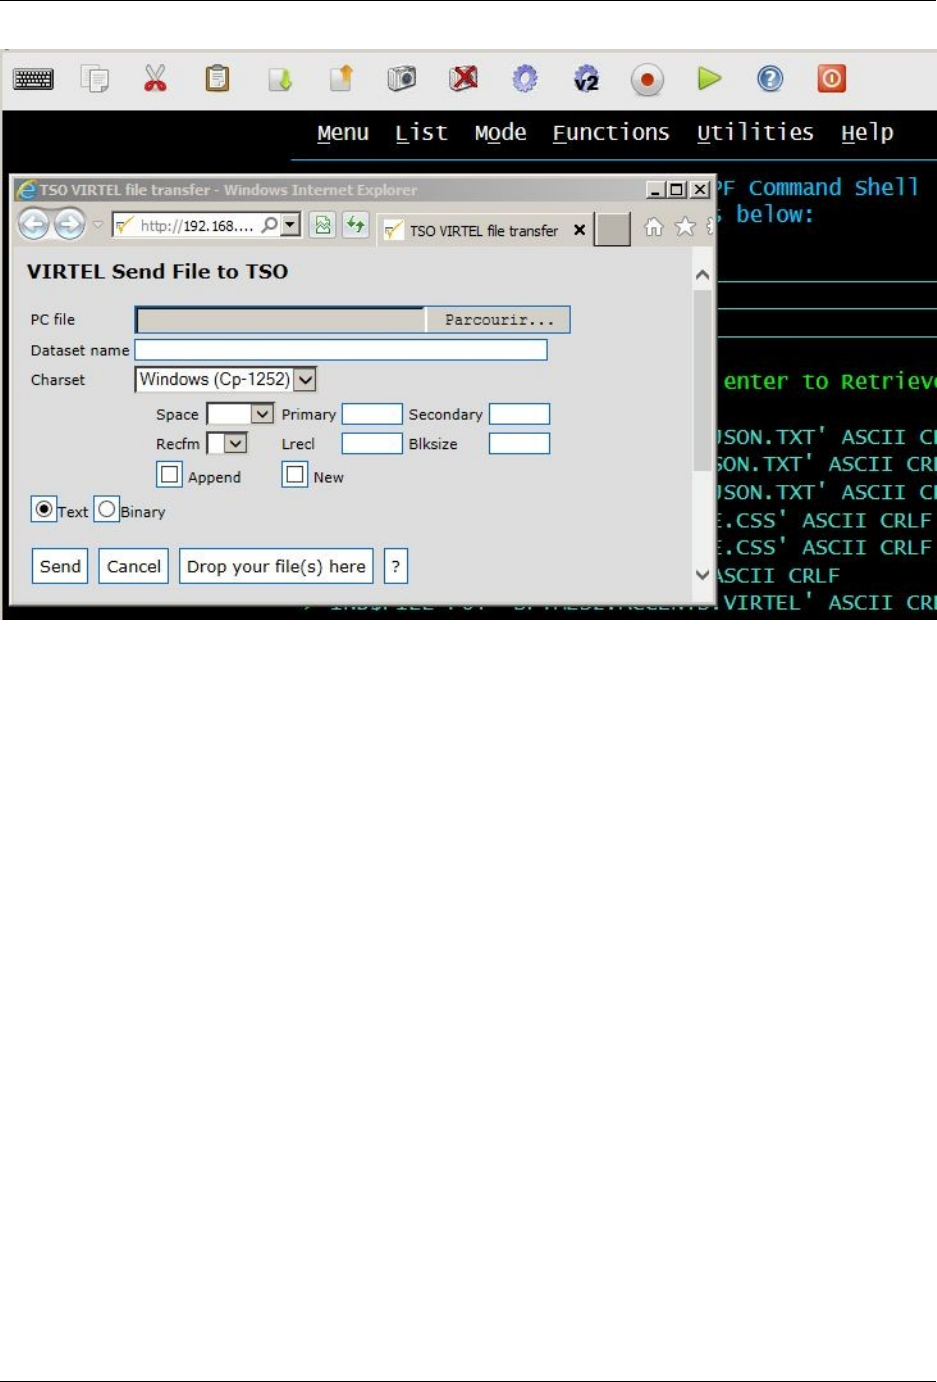
Virtel User Guide, Release 4.57
VIRTEL IND$FILE send dialog (part 1)
Click the “Browse…” button and the “Choose File to Upload” dialog will appear:
1.8. TSO File Transfer 95
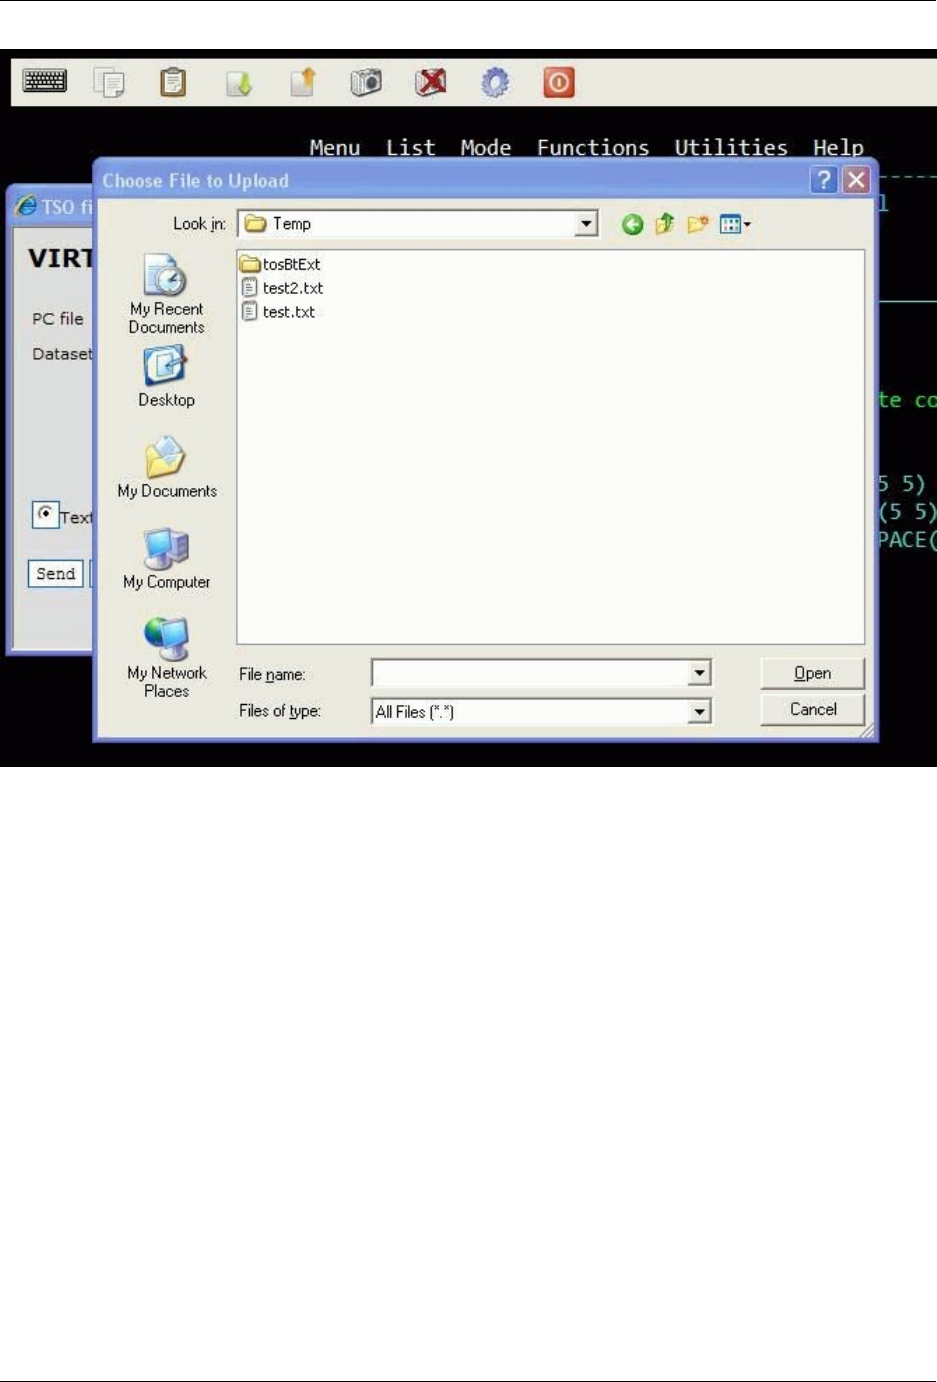
Virtel User Guide, Release 4.57
VIRTEL IND$FILE send dialog (part 2)
Choose the le you want to upload, and click “Open” to return to the “Send File” dialog:
96 Chapter 1. The Virtel Engine
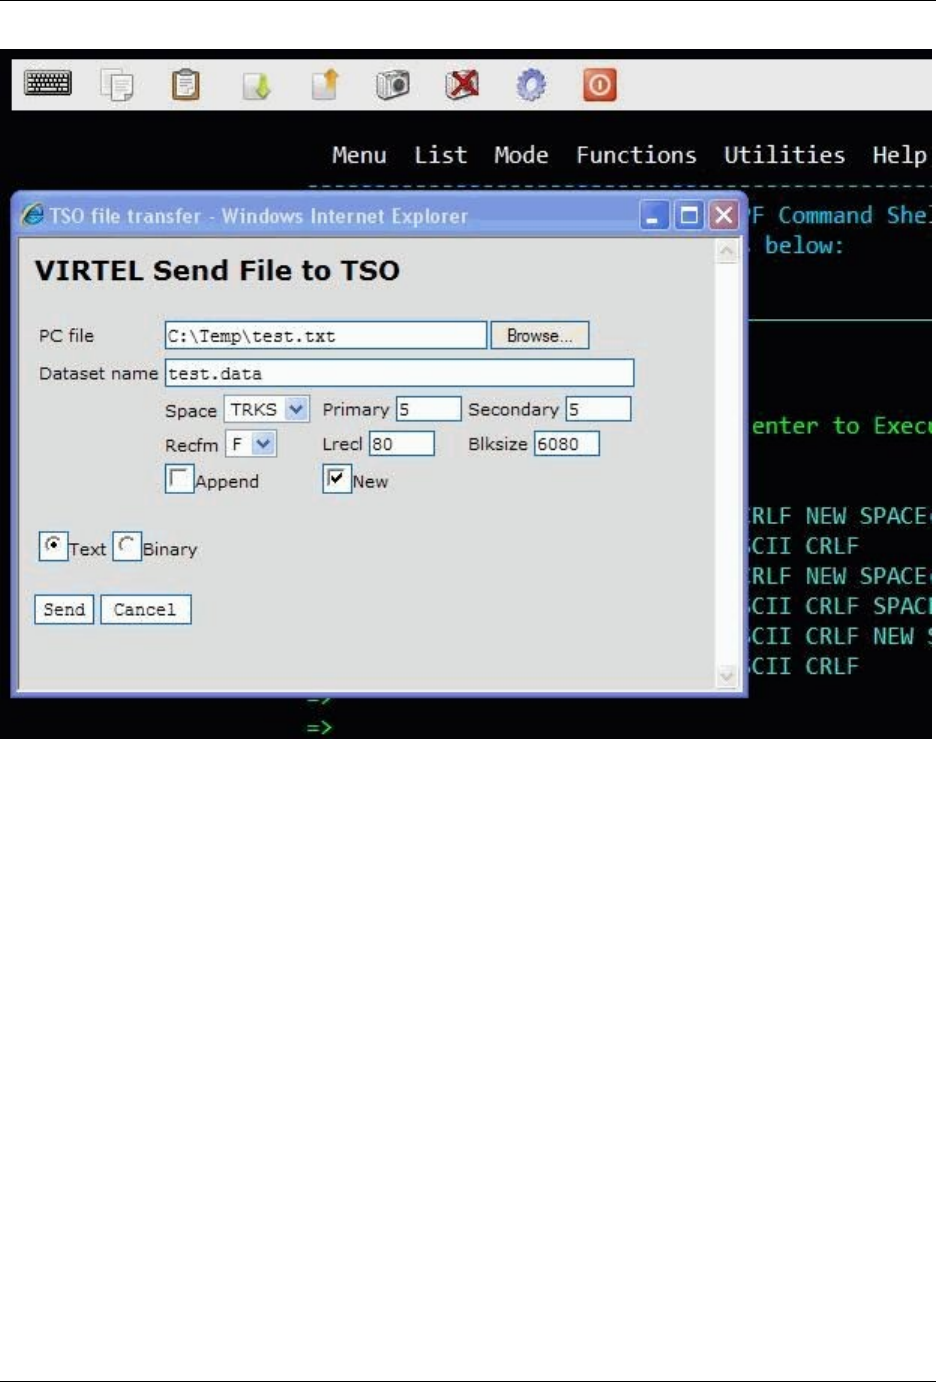
Virtel User Guide, Release 4.57
VIRTEL IND$FILE send dialog (part 3)
Specify the TSO dataset name, surrounded by quotes if necessary. Dataset names without quotes will be
prexed by your TSO prex (usually your userid).
If the TSO dataset does not yet exist, you may optionally specify space (units, primary quantity, and
secondary quantity), and DCB attributes (record format, logical record length, and block size). If you do
not specify these attributes, the TSO IND$FILE will use its default values.
Check the “Append” checkbox to append the le to the end of an existing TSO le. The “New” checkbox
indicates that the TSO le must not already exist.
Click either “Text” or “Binary”. “Text” translates the le from ASCII to EBCDIC and treats carriage return
line feed sequences (x’0D0A’) as end of each record markers. “Binary” performs no translation. Finally click
“Send” to start the transfer.
1.8. TSO File Transfer 97
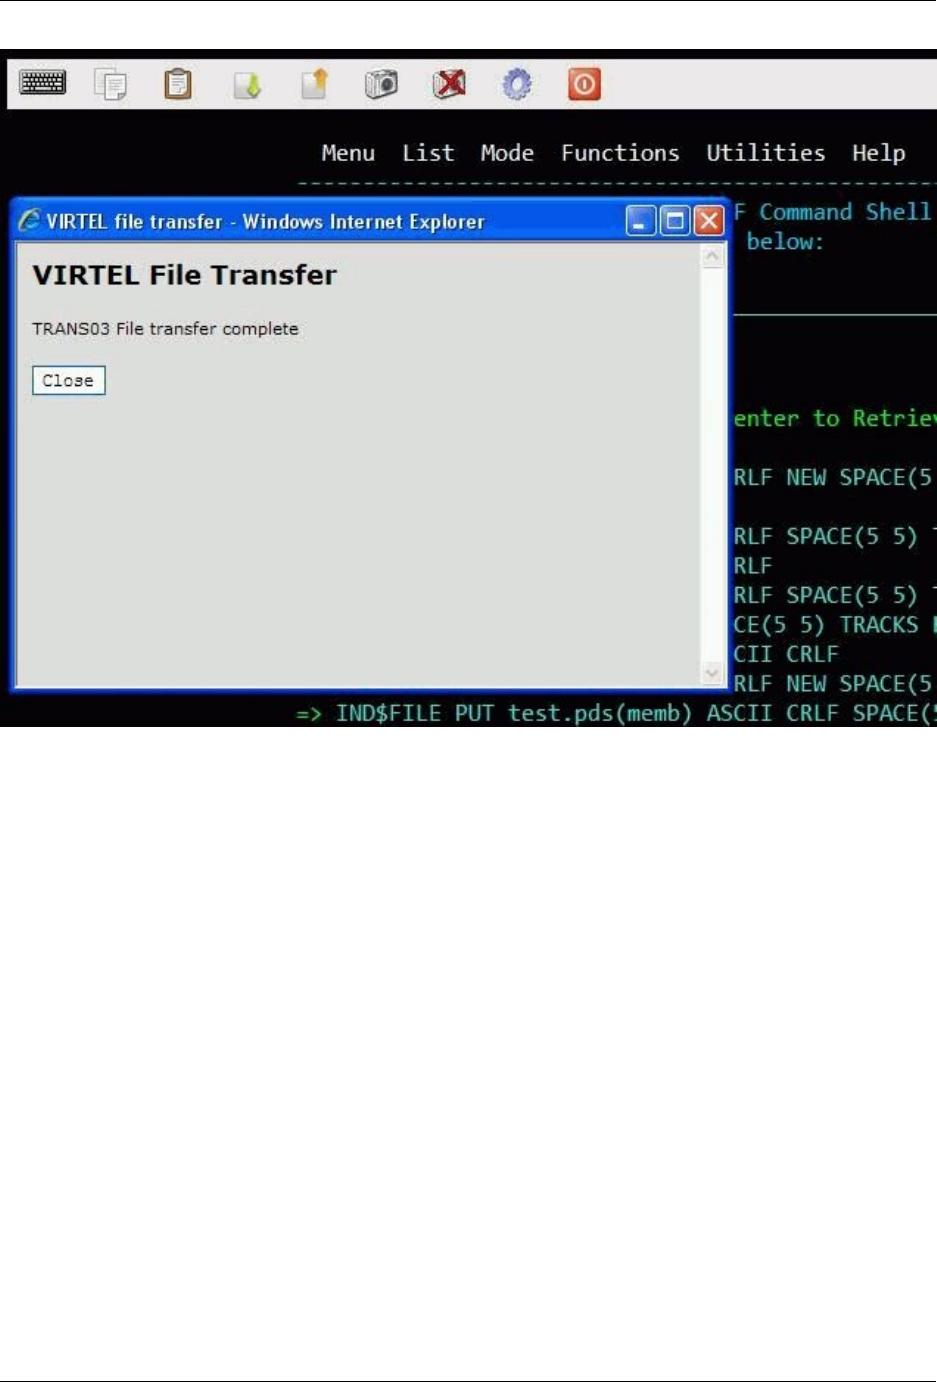
Virtel User Guide, Release 4.57
VIRTEL IND$FILE send dialog (part 4)
The message “File transfer complete” is displayed upon successful completion of the upload.
1.8.5 Selecting PC Codepage for le transfer
Users can select a PC Codepage for le transfer. Possible values are :
Windows (CP-1252) When selected, causes the le being translated by VIRTEL according to the CP-1252
ASCII-EBCDIC translation table.
MS-DOS (CP-850) When selected, causes the le being translated by VIRTEL according to the CP-850
ASCII-EBCDIC translation table.
The selected CP-850 table depends on the value of the COUNTRY parameter specied in the VIRTCT.
If this value is “FR”, “DE” or “BE”, system will use corresponding table FR-850, DE-850 or BE-850. If
the specied country value is dierent, by default the BE-850 table will be used to support CECP 500
international EBCDIC.
1.8.6 Saving and reusing le transfer parameters
Users who frequently carry out the same or similar le transfers can save the le transfer parameters for
later reuse. To save a le transfer, enter the dataset name and the type of transfer, then click the “Save”
button:
98 Chapter 1. The Virtel Engine
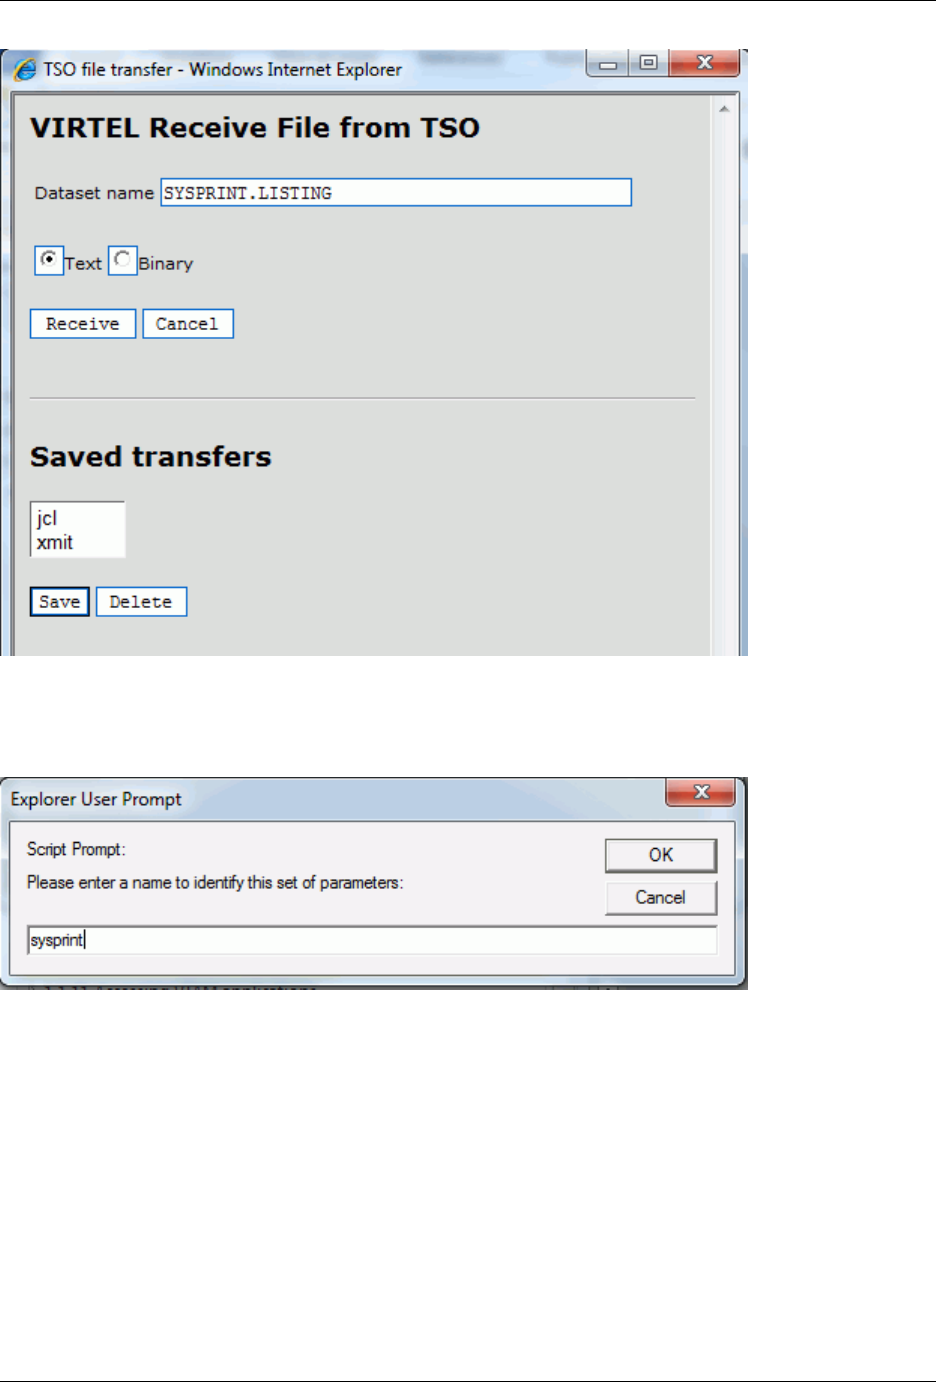
Virtel User Guide, Release 4.57
VIRTEL IND$FILE
Receive dialog (saved transfers)
The user can then choose a name for the saved transfer, and click “OK” to save the parameters. At the next
transfer, the user clicks the name of the saved transfer to retrieve the parameters, then clicks “Receive” to
start the transfer.
VIRTEL IND$FILE
Saving the le transfer parameters
Users can save transfer parameters for both “Send” and “Receive”. The parameters are saved in browser
local storage. The number of sets of parameters which can be saved is limited only by the amount of local
storage available.
1.8. TSO File Transfer 99
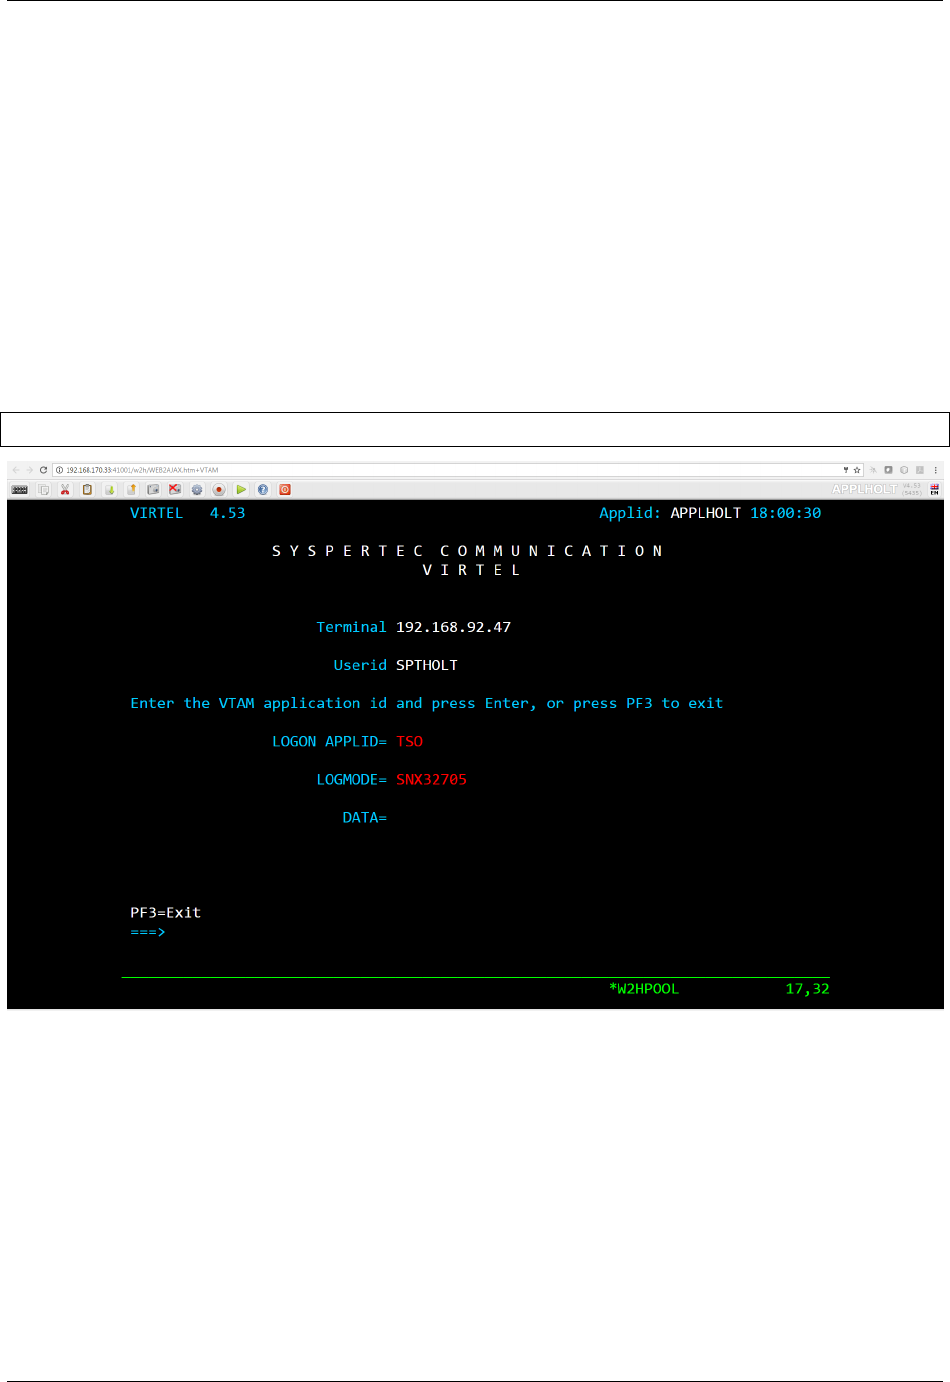
Virtel User Guide, Release 4.57
1.9 Accessing VTAM Applications
Normally the VIRTEL administrator provides access to VTAM applications by conguring a specic VIRTEL
transaction for each application. However some users require the ability to access any VTAM application,
including those not congured by the administrator, similar to the function provided by VTAM’s USSTAB
USS10 screen. For these users, VIRTEL provides transactions named W2H-16 and CLI-16 whose external
name is VTAM. This transaction displays a screen on which the user can enter the ACBNAME of the VTAM
application, together with optional LOGON DATA and LOGMODE.
1.9.1 VTAM logon screen
To access VIRTEL’s VTAM logon screen, click on “Other applications” on the VIRTEL Web Access menu
(port 41001) or enter its URL directly:
http://n.n.n.n:41001/w2h/WEB2AJAX.htm+VTAM
VTAM logon screen in VIRTEL Web Access mode
To access, for example, TSO with logmode SNX32705, type TSO in the “LOGON APPLID” eld and
SNX32705 in the “LOGMODE” eld, then press enter.
You can exit this screen by pressing F3.
Lines 3 and 4 of the screen indicate the name of your installation and are taken from the TITRE1 and
TITRE2 parameters of the VIRTCT (see VIRTEL Installation Guide).
The layout of the VTAM logon screen can be customized by assembling the map in member EIRM00U in
the VIRTEL SAMPLIB.
100 Chapter 1. The Virtel Engine
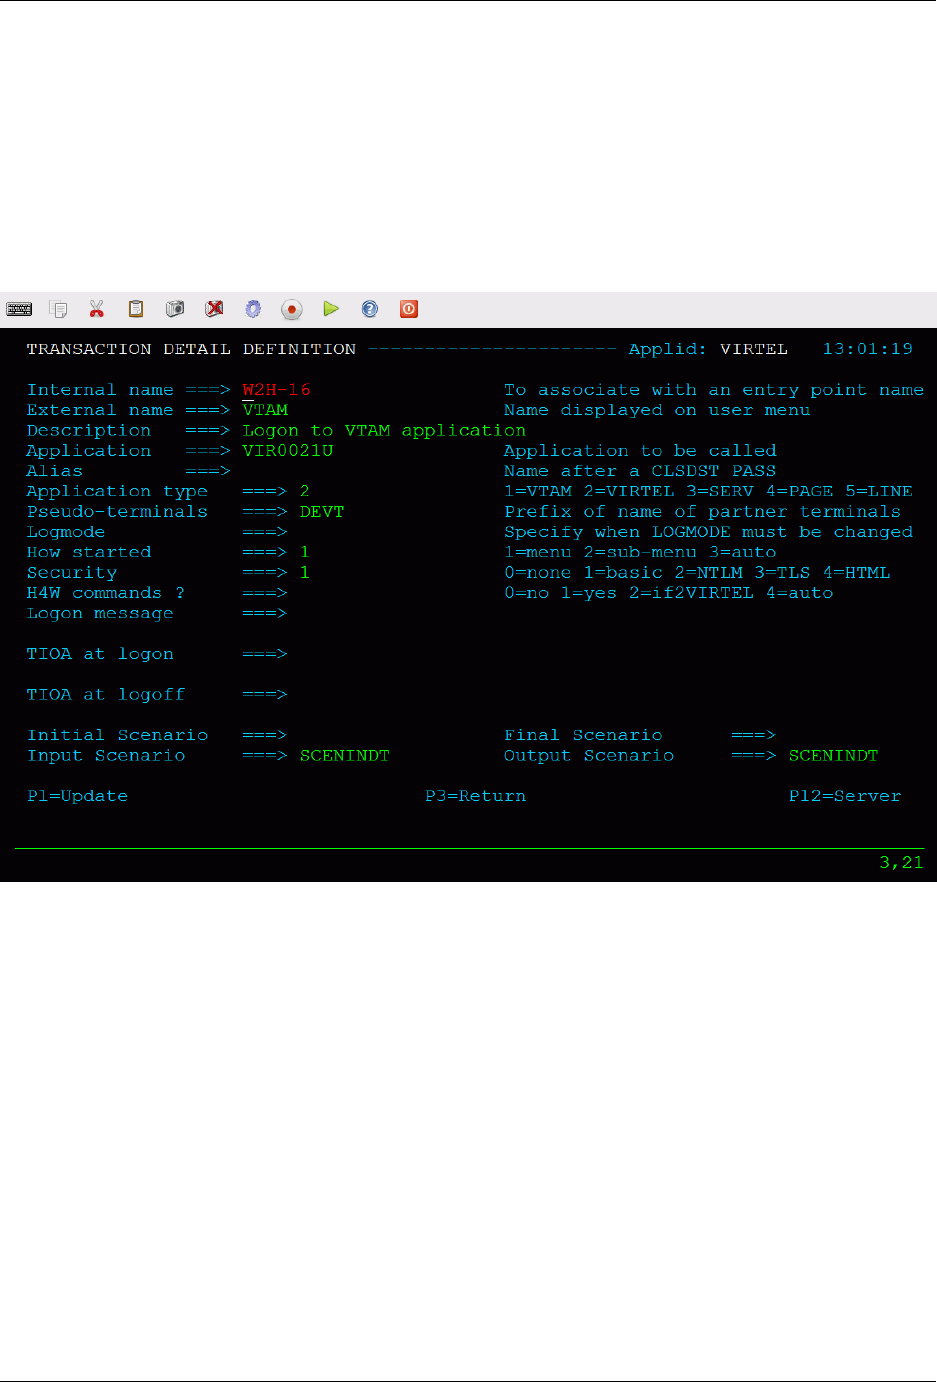
Virtel User Guide, Release 4.57
1.9.2 Installing the VTAM logon transaction
To permit access to the VTAM logon screen, the administrator denes a VIRTEL transaction which calls
VIRTEL program VIR0021U, as shown in the example below. The transaction should have “Security” set
to 1 to force the user to sign on before the screen is displayed.
The VTAM logon screen is protected by a security resource named prex.W2H-16 or prex.CLI-16 (where
prex is the value of the PRFSECU parameter in the VIRTCT) in the RACF FACILITY class. Provided
the “Security” eld is set to 1, and security is activated in the VIRTCT, only those users having READ
access to the resource can obtain the VTAM logon screen.
Example VIRTEL transaction for VTAM logon via Web Access
1.9. Accessing VTAM Applications 101

Virtel User Guide, Release 4.57
1.10 Site Customization - Colors And Logo
The VIRTEL administrator can customize the color settings for all applications or for specic applications.
The custom settings are dened in a style sheet which by default is called custom.css. The le is modied
by an administrator and then uploaded to a VIRTEL directory designated for storage of customer les. In
compatibility mode this is usually CLI-DIR, normally found within the HTML-TRSF VSAM le. In “Option
mode”, however, this can be any user directory or le name. See “customization modes” for more details on
the customization modes.
1.10.1 Using a CSS le for customization
In “Default mode” the custom.css le is loaded from the directory designated by the transaction W2H-03CC
(for entry point WEB2HOST on port 41001) or CLI-03CC (for entry point CLIWHOST on port 41002).
These transactions have external name w2h and specify the path name /w2h/custom-css in the URL Prex
eld. When VIRTEL is rst installed, these transactions point to directory W2H-DIR for W2H-03CC and
to directory CLI-DIR for CLI-03CC which contains a dummy version of the le custom.css. A custom.css
le or a designated “Option” mode CSS le can be modied to include bespoke CSS customization. The
following process looks at how to customize the delivered custom.css le, maintaining a copy in the CLI-DIR,
and running in “Compatibility Mode”. See “customization modes” for more details on the customization
modes. All of the following examples relate to updating a customized copy of custom.css. If running in
“Option mode” this le could be called /option/custCSS.myCICS1.css, applicable to a transaction only, or
/option/custCSS.global.css, a global entry applicable to all Entry Points and transactions.
Danger: Updating custom.css in the default W2H-DIR directory is not recommended as changes
will be overwritten by maintenance or future Virtel release updates. Keep customized elements such as
custom.css in the CLI-DIR directory or in a designated “option” le.
The procedure for activating customized settings in “Compatibility Mode” using the 3270 Administration
panels are given below:
1. Obtain a copy of the default custom.css le from the sources.zip le or download a copy from the
browser:-
http://n.n.n.n:41001/w2h/custom.css
(where n.n.n.n is the IP address of your VIRTEL)
2. Save the custom.css le in a directory on your workstation.
3. Open the custom.css le using a text editor such as notepad.
4. Edit the custom.css le with the color and/or logo settings you require (see examples below), then save
the updated le.
5. Open the VIRTEL Web Access menu (URL http://n.n.n.n:41001) and click the “Upload” link
6. Click “Browse” and navigate to the directory where you saved the updated custom.css. Click on the
custom.css le, then click the “CLI-DIR” button to upload the le to VIRTEL.
7. From the VIRTEL Web Access menu (URL http://n.n.n.n:41001) click the “Admin” link.
8. Press “F3 - Entry Points” then click “CLIWHOST”
9. Press “F4 - Transactions” then click “CLI-03CC”
102 Chapter 1. The Virtel Engine
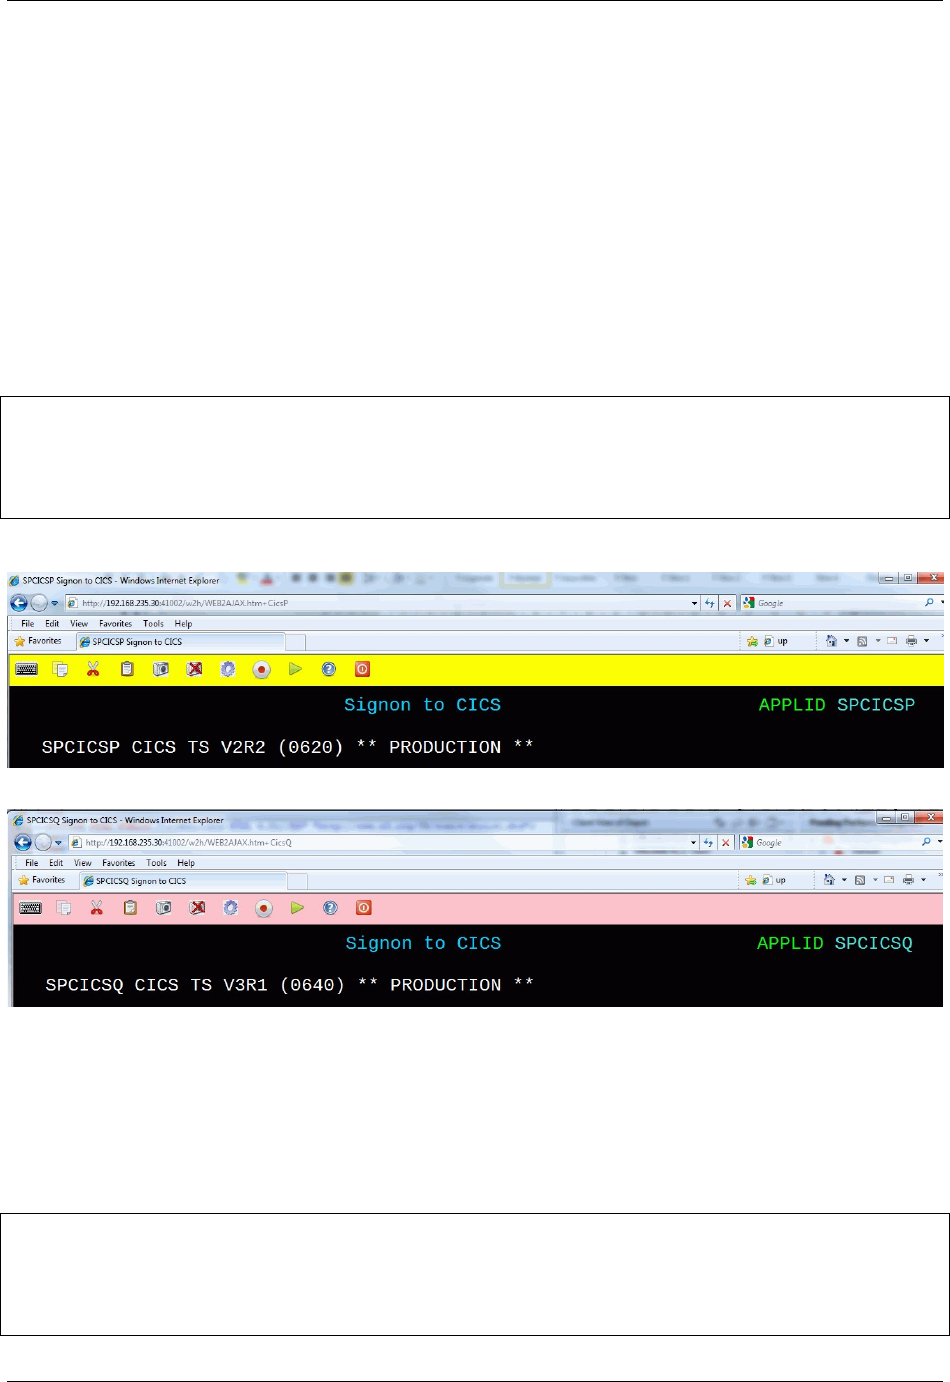
Virtel User Guide, Release 4.57
10. Press “F12 - View/Add” and type CLI-DIR in the “Application” eld, overwriting the original value
W2H-DIR
11. Press “F1 - Update” at the Transaction Detail Denition screen, then “F3 – Return” twice to return
to the List of Entry Points screen, then “F1 – Update” again to update the entry point.
12. Run Virtel in “Compatibility mode” by updating the TCT. See “Running in Compatibility
Mode”<#_V457UG_compatibility mode> for further details.
1.10.2 Customizing the toolbar color by application
It is sometimes useful for the user to have a clear visual indication of which system he or she is logged on
to. This example shows how to set the color of the toolbar to yellow for application SPCICSP and pink for
application SPCICSQ.
/* VIRTEL Web Access style sheet for site customization
*(c)Copyright SysperTec Communication 2007,2010 All Rights Reserved
*/
.SPCICSP #toolbar {background-color:yellow;}
.SPCICSQ #toolbar {background-color:pink;}
Example custom.css for coloring the toolbar according to CICS region
Web Access screen with yellow toolbar for SPCICSP
Web Access screen with pink toolbar for SPCICSQ
1.10.3 Adding custom text to the toolbar
Another way of providing a clear visual indication of which application the user is logged on to is to add
a text label to the toolbar. In this example the text “MVS1” is displayed when logged on to application
TSO1A, and “MVS2” is displayed for application TSO2A.
/*
*VIRTEL Web Access style sheet for site customisation
*(c)Copyright SysperTec Communication 2007,2010 All Rights Reserved
*/
.TSO1A .toolbarLast:before {
1.10. Site Customization - Colors And Logo 103
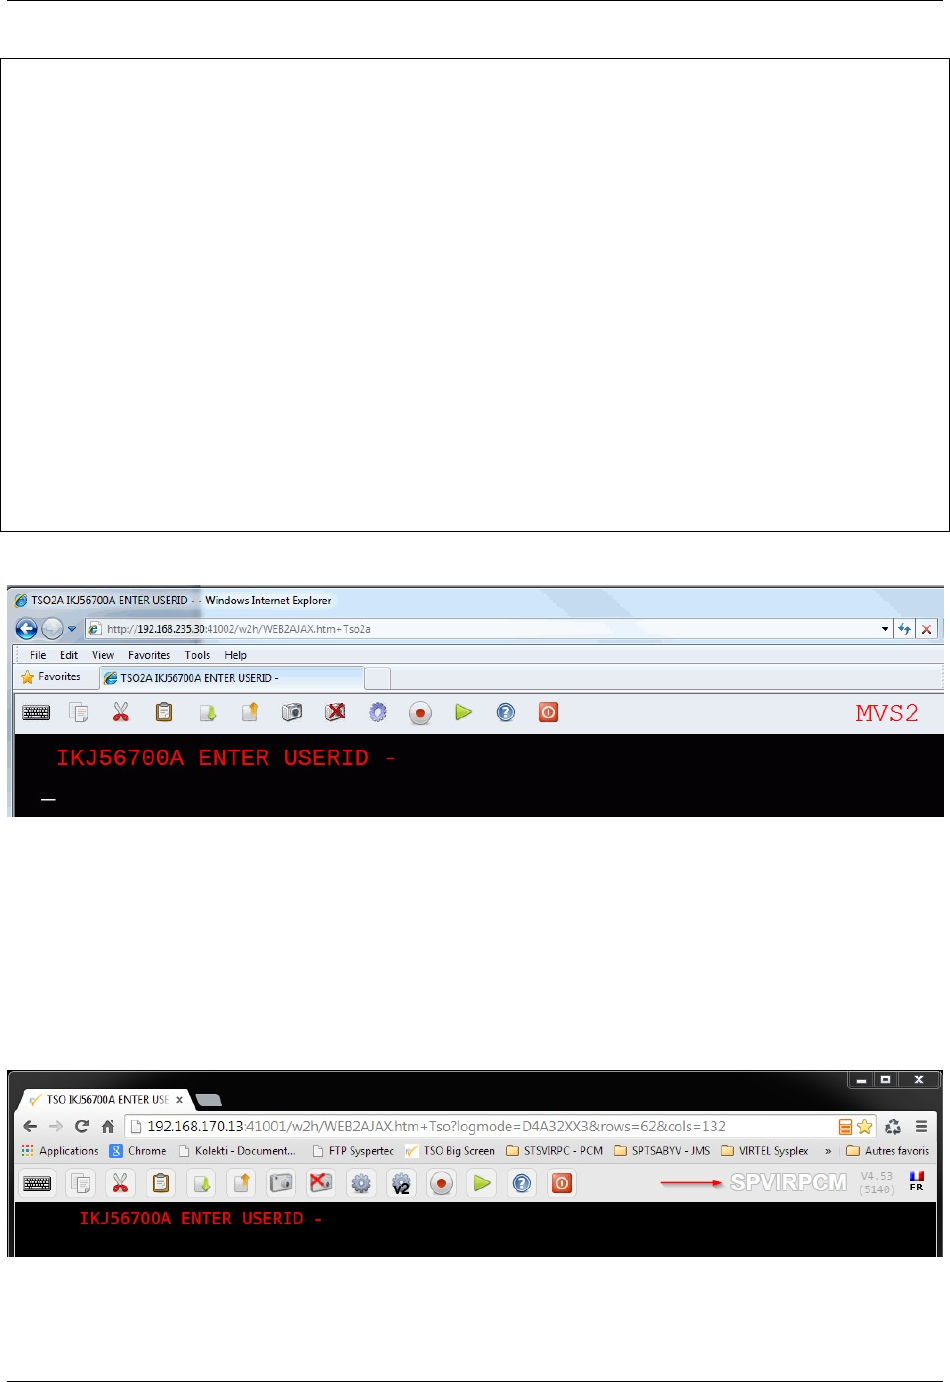
Virtel User Guide, Release 4.57
content: "MVS1";
color: gray;
opacity: 0.25;
font-size: 30px;
width: 100%;
text-align: center;
z-index: 1000;
-webkit-text-stroke: 1px #000;
-webkit-text-fill-color: transparent;
}
.TSO2A .toolbarLast:before {
content: "MVS2";
color: red;
opacity: 0.25;
font-size: 30px;
width: 100%;
text-align: center;
z-index: 1000;
-webkit-text-stroke: 1px red;
-webkit-text-fill-color: transparent;
}
Example custom.css for adding custom text to the toolbar
Web Access screen with custom text in the toolbar
1.10.4 Showing / Hiding server informations
It is sometimes useful to have a clear visual indication of which server a user is logged on to, its version and
the maintenance level applied on the system. By default, the value specied into the APPLID parameter of
the VIRTCT is displayed at the top-right of the toolbar as shown below. This information is followed by
the running version number and the VIRTEL Web access level of maintenance used. This last information
is enclosed in parentheses.
The running version and the level of maintenance cannot be hidden, only the server name can be permanently
removed by modifying the w2hparm.hideinfo attributes present in the customized w2hparms.js le:
104 Chapter 1. The Virtel Engine

Virtel User Guide, Release 4.57
/*
*Configuration of the server name connected to.
*/
w2hparm.hideinfo =true;
Example w2hparm.js for hiding the mainframe application name on which a user is connected to.
If the default value is preserved, the user can hide this information for his own usage by checking “Hide
Virtel information in toolbar” in the Display tab of the settings panel.
1.10.5 Hiding the toolbar
The administrator may wish to prevent users from accessing features like copy/paste, print, and settings.
This example shows how to hide the toolbar using a custom.css le:
/* VIRTEL Web Access style sheet for site customization
*(c)Copyright SysperTec Communication 2007,2010 All Rights Reserved
*/
#toolbar {display:none;}/*
Example custom css for hiding the toolbar
You can also use a custom Javascript to remove icons individually from the toolbar, see “Removing unwanted
toolbar icons”.
Modifying the 3270 colors
Some installations prefer to modify the colors displayed on the 3270 screen to make the characters more
readable. This example shows how to modify the colors used by VIRTEL Web Access:
/*
*VIRTEL Web Access style sheet customisation for 3270 colors
*(c)Copyright SysperTec Communication 2012 All Rights Reserved
*/
.NBLUE, .UBLUE, .BBLUE {color:#7890F0;}
.RBLUE {background-color:#7890F0;}
.NRED, .URED, .BRED {color:#F21816;}
.RRED {background-color:#F21816;}
.NPINK, .UPINK, .BPINK {color:#FF00FE;}
.RPINK {background-color:#FF00FE;}
.NGREEN, .UGREEN, .BGREEN {color:#24D82F;}
.RGREEN {background-color:#24D82F;}
.NTURQUOISE, .UTURQUOISE, .BTURQUOISE {color:#58F0F1;}
.RTURQUOISE {background-color:#58F0F1;}
.NYELLOW, .UYELLOW, .BYELLOW {color:#FFFF00;}
.RYELLOW {background-color:#FFFF00;}
.NWHITE, .UWHITE, .BWHITE {color:#FFFFFF;}
.RWHITE {background-color:#FFFFFF;}
Example custom.css for modifying the 3270 colors
In this stylesheet, BLUE, RED, PINK, GREEN, TURQUOISE, YELLOW, and WHITE represent the 7 col-
ors of the 3270 palette, with a prex indicating the highlighting mode: N=normal, U=underscore, B=blink,
R=reverse video. The color values (for example, #7890F0) are expressed in hexadecimal RGB encoding or
as color names. For more explanation, see :-
1.10. Site Customization - Colors And Logo 105

Virtel User Guide, Release 4.57
•http://en.wikipedia.org/wiki/Web_colors
•http://www.w3schools.com/html/html_colornames.asp
1.10.6 Adding a company logo
This example shows how to display an icon (for example, a company logo) at the left of the toolbar:-
/*
* VIRTEL Web Access style sheet customisation for company logo
* (c)Copyright SysperTec Communication 2012 All Rights Reserved
*/
#toolbar td#companyIcon {
height:30px;
display:table-cell;
}
#companyIcon div {
background-image:url("/w2h/virtblue.jpg");
background-position:0px -4px;
background-repeat:no-repeat;
height:26px;
width:145px;
}
Example custom.css for displaying company logo in the toolbar
This example shows how to replace the Virtel logo in the VIRTEL Web Access menu and
,→the Application menu by your
company logo:
/*
* VIRTEL Web Access style sheet for site customisation
* (c)Copyright SysperTec Communication 2013 All Rights Reserved
* $Id$
*/
#appmenulogo {
background-image: url("mycompany.gif");
height: 65px;
width: 266px;
}
Example custom.css for replacing the Virtel logo by a company logo
Note: If no explicit path is given, the company logo will be loaded from the same directory as the custom.css
le.
1.10.7 Removing 3D/hover eects on the toolbar buttons
This example shows how to remove the 3D/hover eects on toolbar buttons by adding orders in the custom.css
le:-
/*
*VIRTEL Web Access style sheet customisation for removing 3D/hover effects
*(c)Copyright SysperTec Communication 2014 All Rights Reserved
*/
#toolbar td .tbButton, #toolbar td .tbButton:hover, #toolbar td .tbButton:active {
background-color: inherit;
106 Chapter 1. The Virtel Engine

Virtel User Guide, Release 4.57
border: inherit;
box-shadow: inherit;
}
Example custom.css for removing 3D/hover eects on buttons
1.10.8 Changing background color of the toolbar buttons
This example shows how to change the backgroung color of the toolbar buttons by adding orders in the
custom.css le:
/*
*VIRTEL Web Access style sheet customisation the background of the toolbar buttons
*(c)Copyright SysperTec Communication 2014 All Rights Reserved
*/
|- transparent "at rest"
|- white when cursor moves on
|- yellow when button is clicked
#toolbar td .tbButton {
background-color: inherit;
}
#toolbar td .tbButton:hover {
background-color: white;
}
#toolbar td .tbButton:active {
background-color: yellow;
}
|To remove the background color and the border of buttons "at rest":
#toolbar td .tbButton {
background-color: inherit;
border: 1px solid transparent;
}
Example custom.css managing the background color of the toolbar buttons
1.10.9 Icon display troubleshooting
If some icons on the toolbar are displayed with some parasites on the border, please check that the browser
is not in a zoom mode greater than 100%.
1.10. Site Customization - Colors And Logo 107

Virtel User Guide, Release 4.57
1.11 Site Customization - Javascript Functions
A custom Javascript le can be used for calling bespoke functions or setting attributes in Virtel objects
which can control or modify default behaviour. When running in “default” or “compatibility mode” this le
is normally called custom.js. An alternate mode, known as “Option Mode” provides better granularity for
bespoke enhancements. See “Customising Virtel using the Option pathname” for further details on how to
customise Virtel using the available mode settings. AS delivered, Virtel runs in the “default” mode, locating
a dummy custom.js le from the W2H-DIR directory. The remainder of this section refers to running Virtel
in “compatibility” mode qnd customizing a custom.js le and maintaining it in the CLI-DIR directory.
Danger: Updating custom.js in the default W2H-DIR directory is not recommended as changes will be
overwritten by maintenance or future Virtel release updates. Keep customized elements such as custom.js
in the CLI-DIR directory or in a designated “option” le.
To take into account site-specic Javascript extensions for Web Access, the WEB2AJAX.htm page template
loads a custom Javascript le when a session is started. An empty le, called custom.js by default, is delivered
as standard in the W2HDIR directory. The CLI-03CJ (/w2h/custom-js) transaction as delivered under the
CLIWHOST entry point refers to the W2H-DIR directory. An administrator can modify this transaction to
reference a dierent directory containing a site-specic version of custom.js. The CLI-DIR directory, which
is intended for client-specic les, may be used for this purpose. The changes as described in this section
pertain to running in “Compatibility mode” whereby modications are made to a modied custom.js le.
See “customization modes” for more details on the available customization modes.
To facilitate site-specic modications to custom.js, VIRTEL Web Access calls various custom exits at
strategic points in its processing. These exits are optional Javascript functions which can be codes custom.js
if required. The exits are described below.
1.11.1 Javascript Exits which can be customized
before_launchApplink(href)
This function is called before launching an application from the applist menu.
after_standardInit()
This function is called after the session with the host application has started.
before_submitForm(pfKey,oForm)
This function is called before submitting a request to the VIRTEL server. The arguments passed to be-
fore_submitForm are:
pfKey the name of the key pressed: “ENTER”, “PF1”, etc.
oForm a DOM object representing the form to be submitted (usually document.virtelForm)
after_responseHandle(o,url,xtim)
This function is called after receiving a response from the VIRTEL server. The arguments passed to af-
ter_responseHandle are:
othe XMLHttpRequest object (contains the status and responseText)
url the URL which was used in the request
108 Chapter 1. The Virtel Engine

Virtel User Guide, Release 4.57
xtim a Javascript Date object representing the time the request was sent to the server
modify_settingsValues(name,values)
This function is called before the list of possible values for a parameter is displayed in the VIRTEL Web Access
Settings menu. It allows the list of values to be modied. The arguments passed to modify_settingsValues
are:
name the parameter name
values the list of possible values
The return value is treated as the new list of possible values. If the function returns null or undened, the
list remains unchanged.
when_init()
This function is called for each subpage after vir3270 initialisation.
when_focusGained()
This function is called whenever the 3270 window gains the focus.
when_focusLost()
This function is called whenever the 3270 window loses the focus.
1.11.2 Customizing Toolbar icons
This example uses the after_standardInit function to insert additional icons into the toolbar when the session
is started. Icons may subsequently be added or removed from the toolbar after each screen by means of the
after_responseHandle function.
/*
*(c)Copyright SysperTec Communication 2012 All Rights Reserved
1. Incoming calls
125
*VIRTEL Web Access customer-specific Javascript functions
*/
/*
*Adds a button to the toolbar which performs a Google search for
*the text selected in the red box in the 3270 screen, or for the
*word at the cursor if no box is drawn
*/
function after_standardInit() {
addtoolbarbutton(999,"http://www.google.com/favicon.ico",
"Search engine query", do_search);
}
function do_search() {
var searcharg =VIR3270.getBoxedText() || VIR3270.getWordAtCursor();
var windowname ="search";
var searchURL ="http://www.google.com";
if (searcharg) searchURL += "/search?q=" +
encodeURIComponent(searcharg.replace(/\s+/g," "));
var windowopts ="location=yes,status=yes,resizable=yes,"+
"scrollbars=yes,toolbar=yes,menubar=yes,width=640,height=480";
var searchwin =window.open(searchURL, windowname, windowopts);
1.11. Site Customization - Javascript Functions 109

Virtel User Guide, Release 4.57
if (searchwin) searchwin.focus();
}
Example custom.js to customize the toolbar icons
1.11.3 Centering non-standard icons
The best size for an icon is 32x32 pixels. For bigger or smaller icons, it possible to oer better center
rendering in modifying the content of the class attribute passed within the “addtoolbarbutton” function in
conjunction of using a specic css attribute.
/*
*(c)Copyright SysperTec Communication 2014 All Rights Reserved
*VIRTEL Web Access customer-specific Javascript functions
*Resizing a too small or too big toolbar icon.
*For example toosmall_pic.png=22x22 and toobig_pic.jpg=145x30
*/
addtoolbarbutton(999,"/w2h/toosmall_pic.png","Custom button #1 tooltip", do_search,
,→"tbButton size22x22");
addtoolbarbutton(999,"/w2h/toobig_pic.jpg","Custom button #2 tooltip", do_search,
,→"tbButton size145x30");
Example custom.js to specify the toolbar icon size
/*
#toolbar td img.tbButton.size22x22 {
width: 22px;
height: 22px;
padding: 5px; /* padding is calculated to center the picture horizontally and
,→vertically in the 32x32 allocated */
}
#toolbar td img.tbButton.size145x30 {
width: 145px;
height: 30px;
padding: 1px 0;/* padding is calculated to center the picture vertically in the
,→32x32 allocated area (1+30+1*/
}
Example custom.css to manage a toolbar icon with a non standard size
1.11.4 Removing unwanted toolbar icons
This example uses the after_standardInit function to disable macro functions by removing the corresponding
icons from the toolbar.
/*
*(c)Copyright SysperTec Communication 2012 All Rights Reserved
*VIRTEL Web Access customer-specific Javascript functions
*/
function after_standardInit() {
/* Remove macro buttons from the toolbar */
removetoolbarbutton("startrecording");
removetoolbarbutton("playback");
}
110 Chapter 1. The Virtel Engine

Virtel User Guide, Release 4.57
Example custom.js to remove selected toolbar icons
The names of the other toolbar icons which can be removed in this way are:-
• capture
• disconnect
• document-print-preview
• edit-copy
• edit-cut
• edit-paste
• emptybuf
• le-rcv
• le-send
• help
• keypad
• playback
• printer
• settings
• settingsV2
• startrecording, playback, printer
To hide the toolbar completely, see “Hiding the toolbar”.
To hide only the VIRTEL Application name, see “Showing / Hiding server informations”.
1.11.5 Positioning Toolbar Icons
In certain circumstances, the default position of an icon may not be at the user’s convenience. Is possible to
change an icon’s position based on the position of another icon.
/*
*Customize the location of dynamic toolbar buttons.
*The calls to this function are ignored when they
*return nothing, or an integer not greater than 0.
*
*Customizable buttons IDs :
* > '3278T'
* > 'document-print-preview'
* > 'file-send'
* > 'file-recv'
* > 'printer'
*/
function customize_toolbarButtonIndex(id) {
if (id==='printer' || id==='document-print-preview') {
return getToolbarButtonIndex('disconnect')+1;
}
}
Example custom.js to select a position for printer icon
1.11. Site Customization - Javascript Functions 111
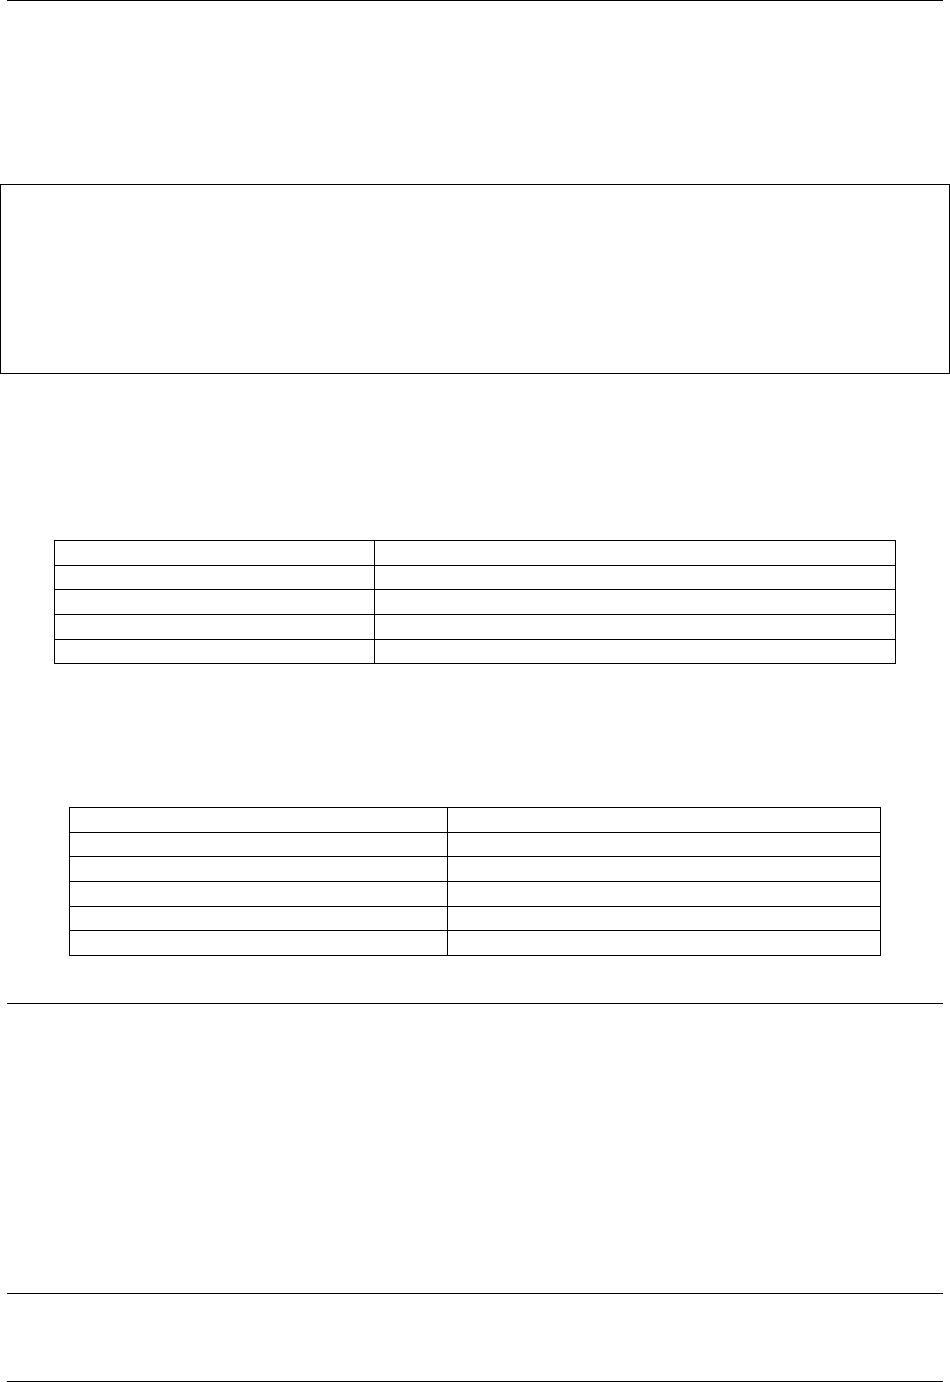
Virtel User Guide, Release 4.57
1.11.6 Modifying the text of the status bar
This example uses the after_responseHandle function to modify the text in the status bar at the bottom of
the Web Access screen. This example displays the text “Your printer name is xxxx” in the status bar. The
status bar text is an object which can therefore be modied using an API.
/*
*(c)Copyright SysperTec Communication 2012 All Rights Reserved
*VIRTEL Web Access customer-specific Javascript functions
*/
function after_responseHandle(httpXmlObj, url, xmitTimestamp) {
vwaStatusBar.setRelay(); // clears relay field
vwaStatusBar.setPrintRelay("Your printer name is: " +vwaStatusBar.getPrintRelay());
}
Example custom.js to modify the text of the status bar
With this method, an API is provided which allows code in custom.js to change some elds in the status bar
without having to manipulate the DOM of the page. The “vwaStatusBar” object can be used to do this.
The editing functions are:-
Function Description
vwaStatusBar.setRelay(txt) Change the “Relay” eld.
vwaStatusBar.setPrintRelay(txt) Change the “Printer relay” eld.
vwaStatusBar.setStatus(txt) Change the “Status” eld.
vwaStatusBar.setStatusClass(txt) Allow to assign a specic CSS class to the “Status” eld.
If the parameter is empty or undened, the corresponding eld is not displayed. If the content is too long,
it is truncated to the right.
The query functions are:-
Function Description
vwaStatusBar.getCursCol() Return the “x” position of the cursor.
vwaStatusBar.getCursRow() Return the “y” position of the cursor.
vwaStatusBar.getRelay(parameter) Return the content of the “Relay” eld.
vwaStatusBar.getPrintRelay(parameter) Return the content of the “Printer relay” eld.
vwaStatusBar.getStatus() Return the content of the “Status” eld.
Note:
• For the “getRelay()” and “getPrinterRelay()” functions, an optional parameter may be specied.
• When specied, valid values are “true” or “false” (without the quotes). When the parameter is om-
mited, or is not a valid value, the default “false” will be used.
• When “setRelay(txt)” or “setPrinterRelay(txt)” is used the “txt” value overprints the eld at the
browser level before displaying to the end user. Behind this “overprinted value”, an initial value exists
that has been placed by VIRTEL mainframe side before sending message to the browser. When using
the “getRelay()” or “getPrinterRelay()” functions, you may want to retrieve the initial or overprinted
value. When in “false” mode the function returns the initial value. When in “true” mode the function
retruns the overprinted value.
112 Chapter 1. The Virtel Engine

Virtel User Guide, Release 4.57
1.11.7 Custom hotspot recognition
This example uses the after_responseHandle function to modify the regular expression which is used to
identify PF key hotspots.
/*
* (c)Copyright SysperTec Communication 2012 All Rights Reserved
* VIRTEL Web Access customer-specific Javascript functions
*/
function after_responseHandle(httpXmlObj, url, xmitTimestamp) {
VIR3270.customPfKeysHotspotRegex =
/(P?F\d{1,2}|PA[1-3]|ENTER|CLEAR)((?:\/P?F\d{1,2})?\s*[=:-])/;
}
Example custom.js to modify PF key hotspot recognition
1.11.8 Adding a watermark to the 3270 screen
This example uses the after_standardInit function in conjunction with a custom stylesheet to add a water-
mark to the Web Access screen. The watermark displays the application name in light text behind the 3270
screen content. The application name is obtained from the class attribute of the body tag.
/*
*(c)Copyright SysperTec Communication 2012 All Rights Reserved
*VIRTEL Web Access customer-specific Javascript functions
*/
function after_standardInit() {
var o =document.createElement("div");
o.className ="watermark";
o.innerHTML =document.body.className;
document.body.appendChild(o);
}
Example custom.js to add a watermark to the Web Access 3270 screen
/*
*(c)Copyright SysperTec Communication 2012 All Rights Reserved
*VIRTEL Web Access style sheet for site customisation
*/
.watermark {
position: absolute;
pointer-events: none;
left: 150px;
top: 100px;
color: gray;
opacity: 0.25;
font-size: 10em;
width: 60%;
text-align: center;
z-index: 1000;
-webkit-text-stroke: 1px #FFF;
-webkit-text-fill-color: transparent;
-webkit-transform: rotate(-40deg);
-moz-transform: rotate(-40deg);
filter: alpha(opacity=25) progid:DXImageTransform.Microsoft.Matrix(M11=0.819, M12=0.
,→574, M21=-0.574, M22=0.819, }
1.11. Site Customization - Javascript Functions 113
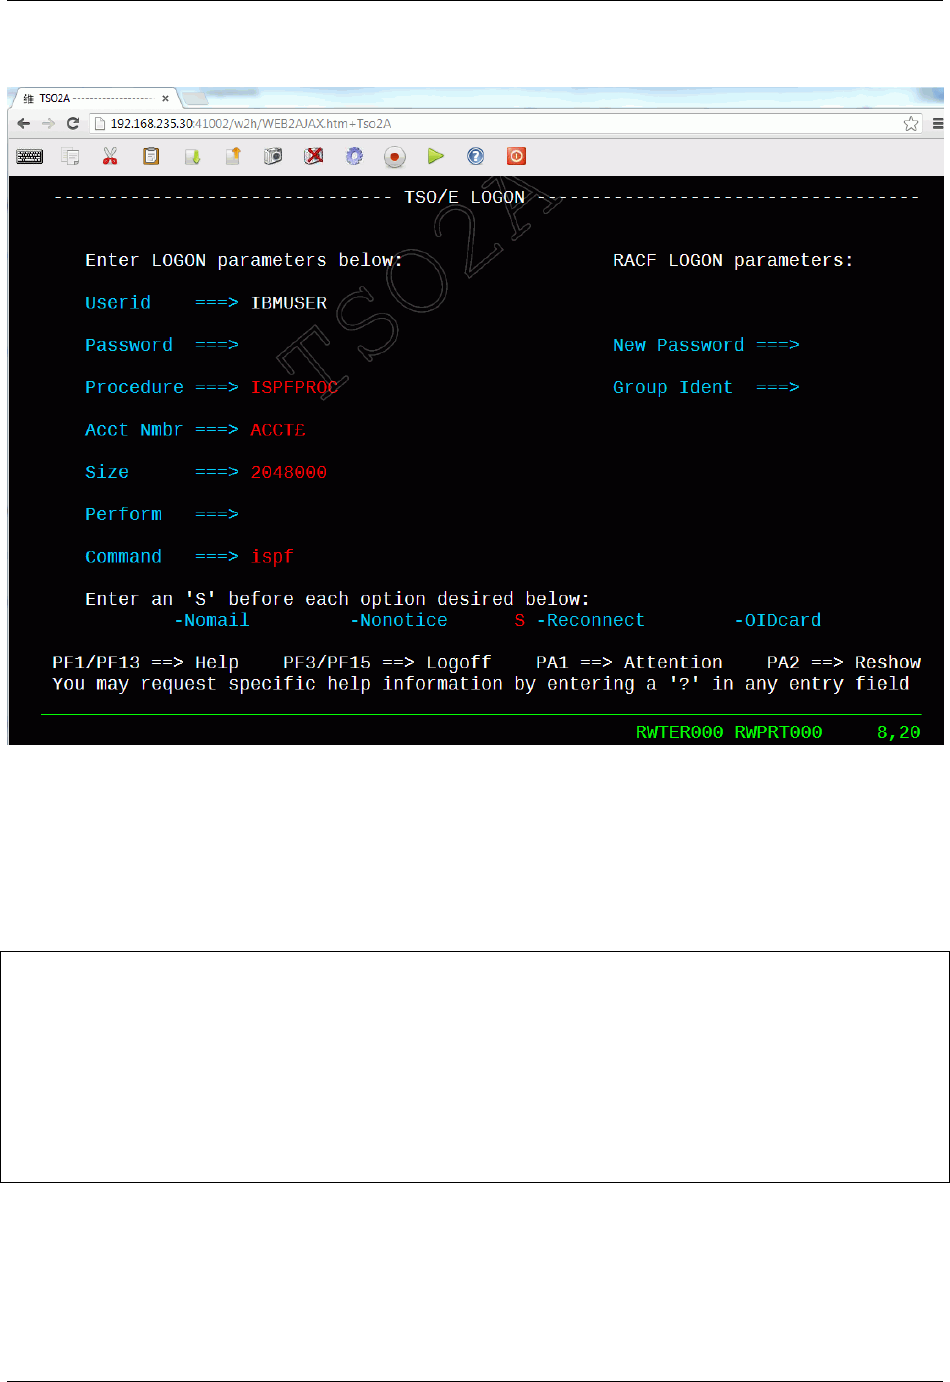
Virtel User Guide, Release 4.57
Example custom.css to dene the style of the watermark
Web Access screen with application name as watermark
1.11.9 Modifying Web Access Settings
The exit modify_settingsValues allows the administrator to modify or replace the list of values allowed for
specic parameters in the VIRTEL Web Access Settings menu. The example shown below replaces the list
of fonts, and adds two extra values “20” and “24” to the list of font sizes:-
/*
*(c)Copyright SysperTec Communication 2012 All Rights Reserved
*VIRTEL Web Access customer-specific Javascript functions
*/
function modify_settingsValues(name, values) {
if (name == "font")
return ["Courier New","Lucida Console","Consolas"];
if (name == "fontsize")
return values.concat("20","24");
}
Example custom.js to modify Settings values
114 Chapter 1. The Virtel Engine

Virtel User Guide, Release 4.57
1.12 Site Customization - The Help Page
Users can obtain help on VIRTEL Web Access functions by clicking the help icon in the Web Access toolbar:
which causes the browser to display the page /w2h/custom-help/help.html delivered as standard with VIR-
TEL Web Access. The administrator can create a custom version of the help.html page and upload it to a
VIRTEL directory destined for site-specic pages, such as CLI-DIR.
1.12.1 Standard Help Page
The standard help.html page is shown below:
1.12. Site Customization - The Help Page 115
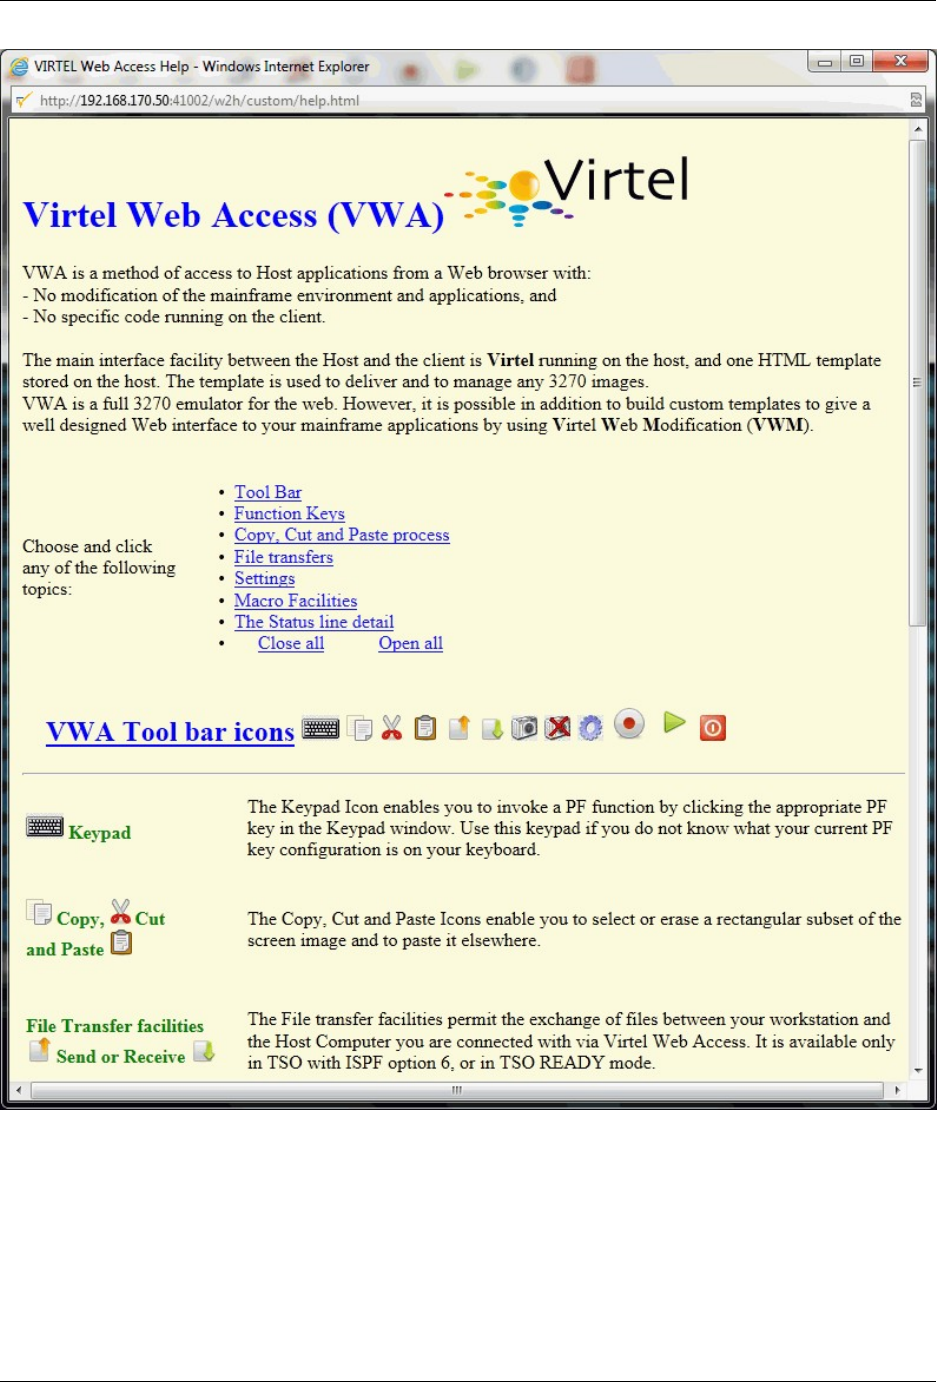
Virtel User Guide, Release 4.57
Standard Virtel help page for Web Access
1.12.2 Installing a Custom Help Page
To install a customized help.html page, the administrator must perform the following operations:-
• Upload the customized help.html le into a VIRTEL directory such as CLI-DIR
• Modify the VIRTEL transactions CLI-03CH so that it points to the CLI-DIR directory (instead of
W2H-DIR as initially installed), then press F1-F3-F3-F1 to update the transaction and the CLIWHOST
116 Chapter 1. The Virtel Engine

Virtel User Guide, Release 4.57
entry point. Perform the same operation on transaction W2H-03CH and entry point WEB2HOST.
1.12. Site Customization - The Help Page 117
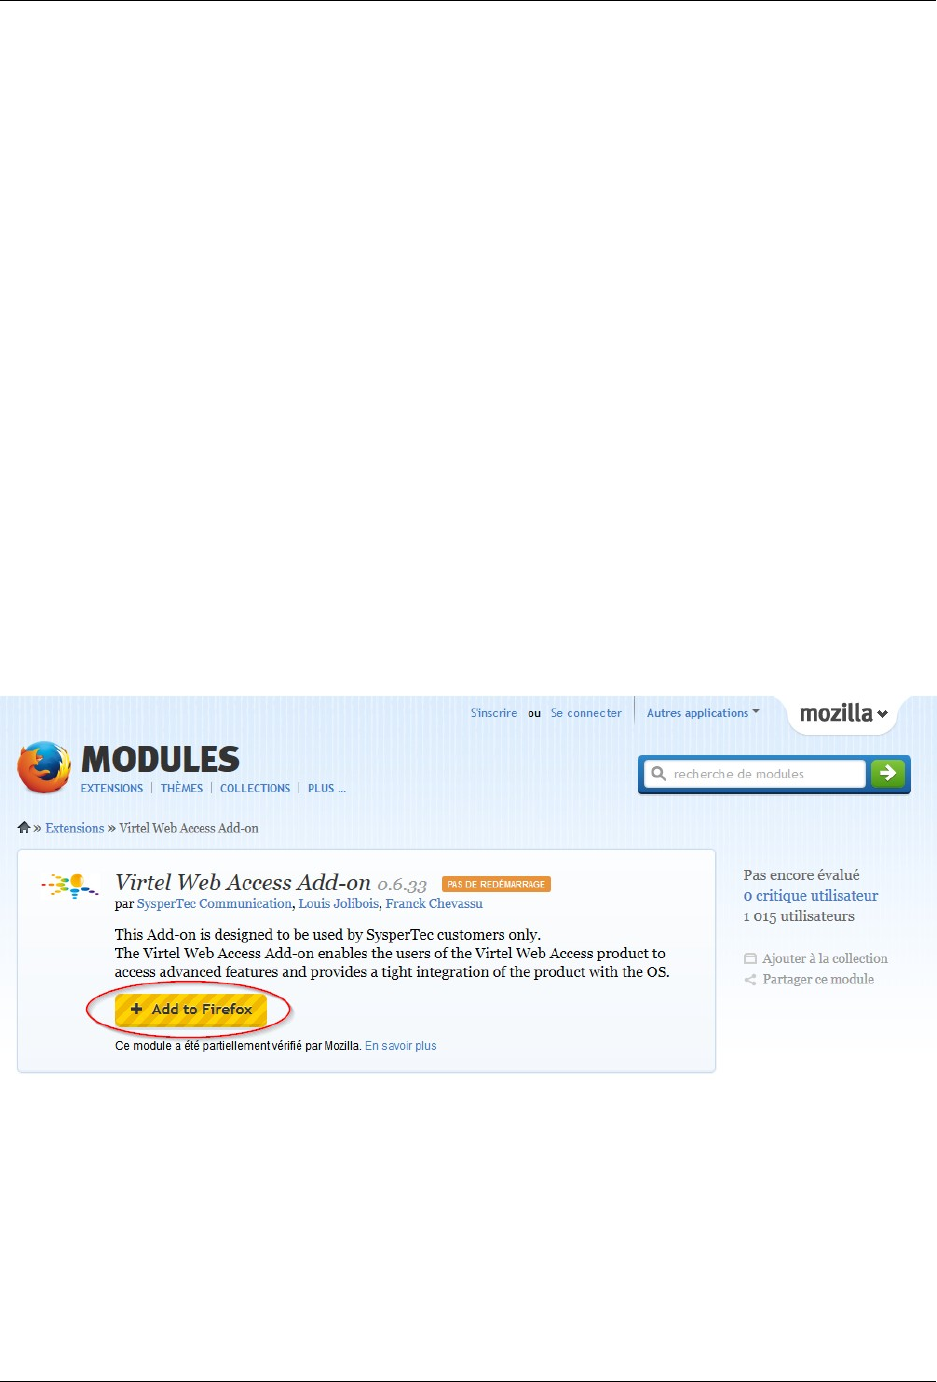
Virtel User Guide, Release 4.57
1.13 Enable Copy, Cut And Paste
Copy, cut or paste operation are done using standard function key combinations CTRL + C, CTRL + X
or CTRL + V or using a pop-up menu when using the right mouse button. These operations often require
access to the clipboard, which, depending on the browser used, may require the installation of an additional
module.
1.13.1 Internet Explorer
For Internet Explorer, the usage of the clipboard is systematic for copy / cut / paste operation and does not
require any additional module. From IE9 and above, depending on the value of “Tools | Internet options |
Security tab | Custom level | Scroll to, Drag and drop or cut and paste les” you will be authorized - or not -
to access the clipboard. If prompted, during the rst attempt to use copy / cut / paste function the browser
will display a window requesting conrmation to access the clipboard. Once the decision is communicated,
it remains valid until closing the window with the domain.
1.13.2 Firefox
An ADDON is required to perform any copy / cut / paste operation with another application or with another
internet domain. The ADDON is available for download at the following address:
https://addons.mozilla.org/fr/firefox/addon/virtel-webaccess-add-on/
If the browser version is compatible with the latest version of ADDON published click the “+ Add to Firefox”
icon. Any additional window will open to conrm the installation.
If the browser version is too old to be supported by the latest version of ADDON published, the link “+ Add
to Firefox” will not be available. Click on the link “View full history version” at the bottom of the page as
shown below.
118 Chapter 1. The Virtel Engine

Virtel User Guide, Release 4.57
On the next page, select the ADDON version of the most compatible version available for the browser in
use. Click “+ Add to Firefox”. Several versions of the ADDON can be installed in parallel, however, only
one must be active at any given time.
Additional Installation requirements
Once the additional module has been installed, it will be necessary to specify the permissions.
On the toolbar, click on the “Menu” in the upper right (1) icon, then click on “Modules” (2). If this section
does not appear directly in the tool window, click on “Customise” (3) tool to add “Modules” in the menu.
It is also possible to directly access the extension manager by typing “about: addons” in the URL bar of the
browser.
1.13. Enable Copy, Cut And Paste 119
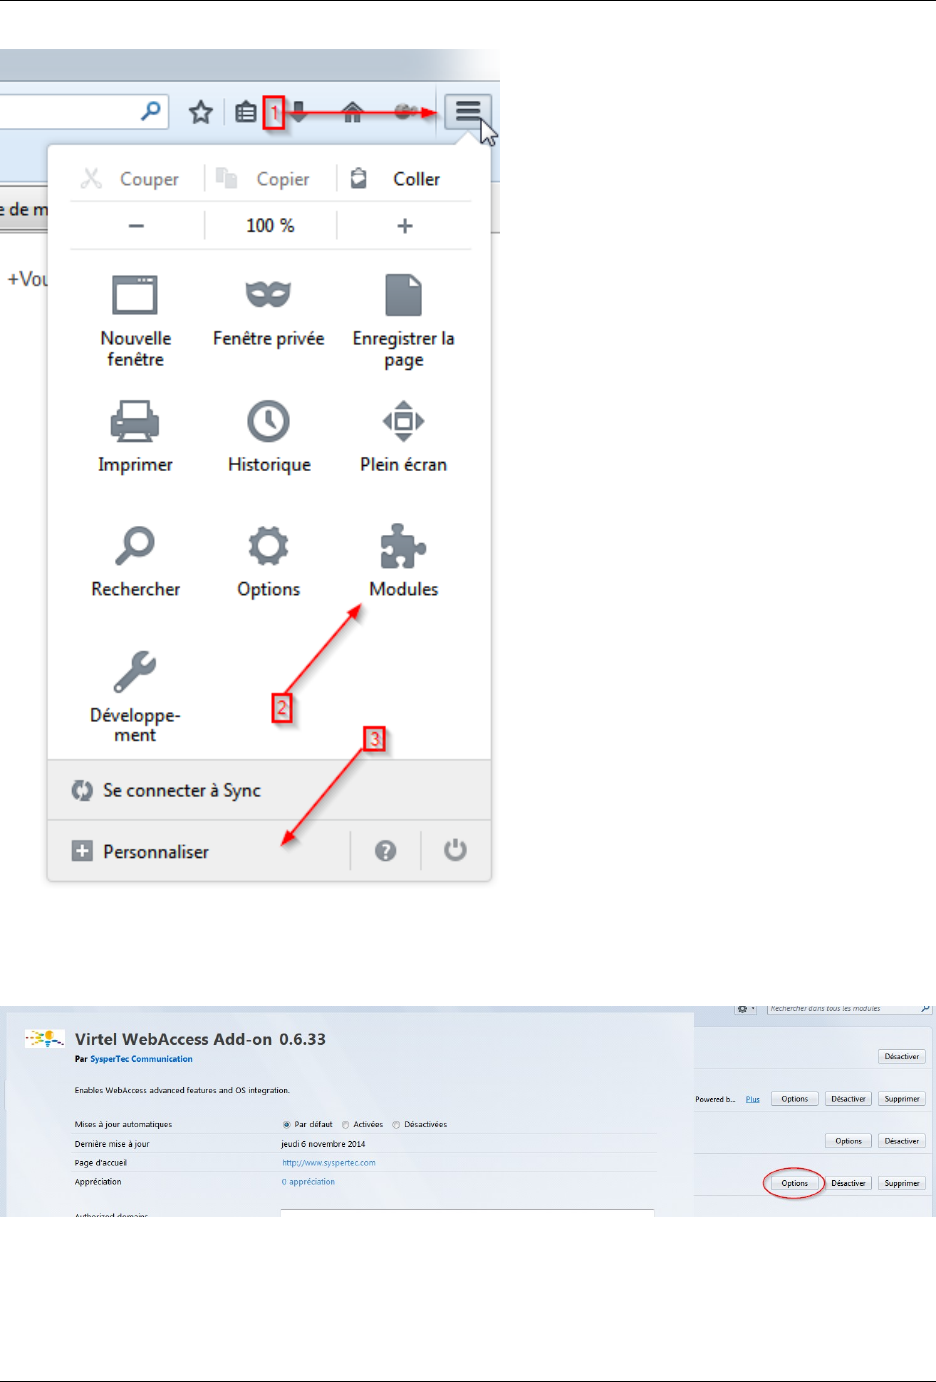
Virtel User Guide, Release 4.57
On the ADDONS page, select “Extension” to display the VIRTEL extension. Click on the “Options” button
to display a setup screen similar to the one shown below.
120 Chapter 1. The Virtel Engine
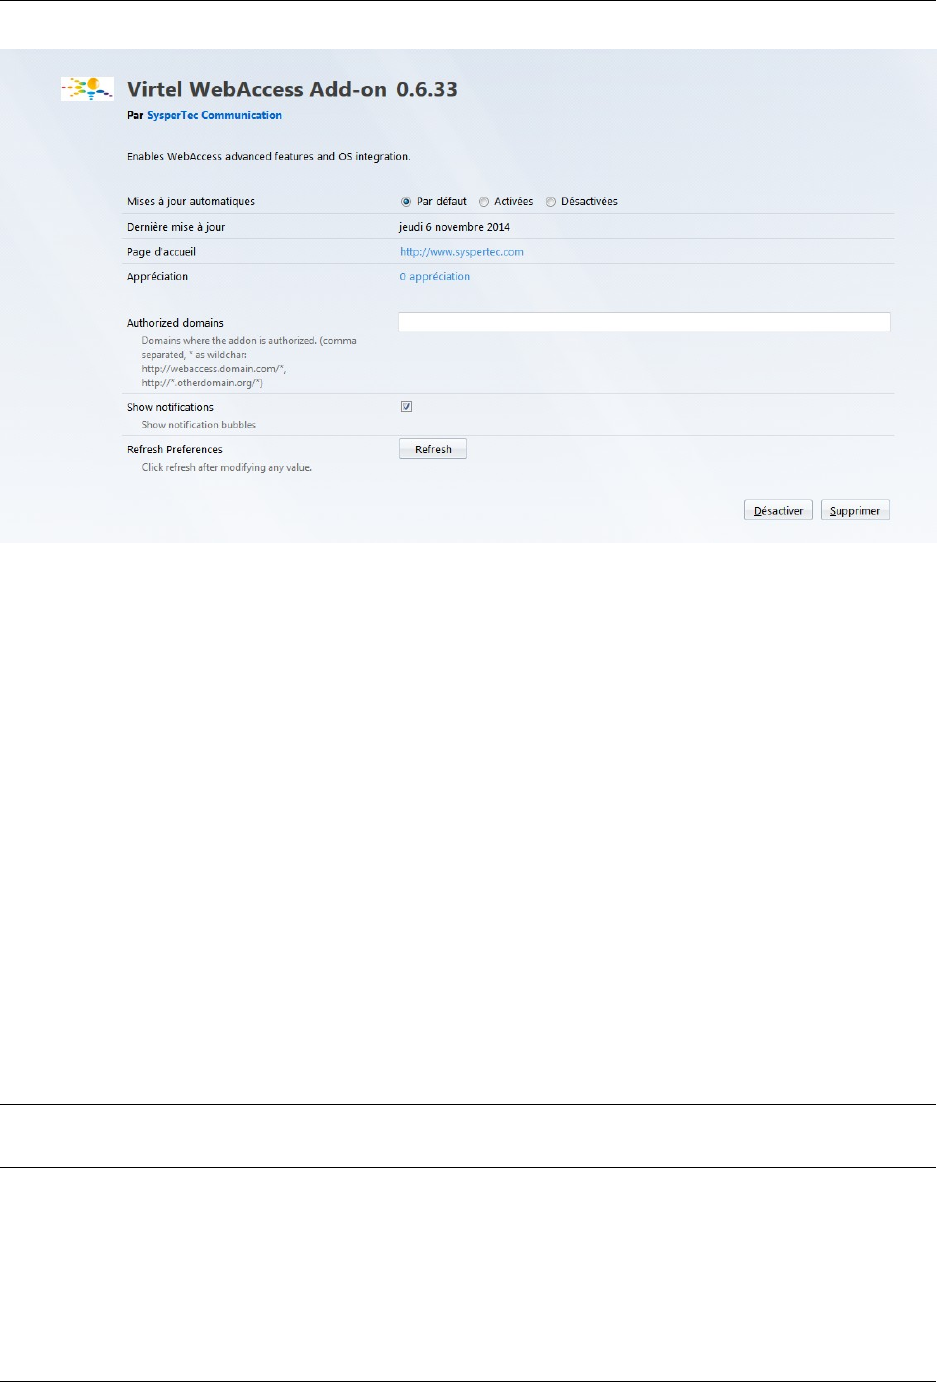
Virtel User Guide, Release 4.57
The following options should be set
Automatic update
• by default
• enabled
• o
Authorized domains: Contains a list of domains for which permission to access the clipboard is granted.
Each domain is separated from the next with a comma. The * indicates that all values are valid
for the corresponding criteria. All denitions should end with an asterisk character, for example,
“http://www.mydomain.com/” is not a valid denition because it does not end with *.
Example of denitions:-
•http://www.mydomain.com/* allow access to the clipboard for the domain. Typing http://www.
mydomain.com:8080/ will be denied access, the presence of a port number in the URL does not match
the rule.
•http://192.168.92.161:41001/* allows URLs communicating on the 41001 port access to the clipboard
for specied IP address. URLs using another port will be denied access.
•http://192.168.92.161:* allows URL communicating on any port to access the clipboard for specied
IP address.
Note: All entries must ends with a wildchar (*) character. Only one wildchar character is allowed for each
entry.
Show notications: Display a POP_UP window in the bottom right of the screen summarizing the result
of last copy / paste operation.
Refresh preferences: Saves the last conguration changes.
1.13. Enable Copy, Cut And Paste 121
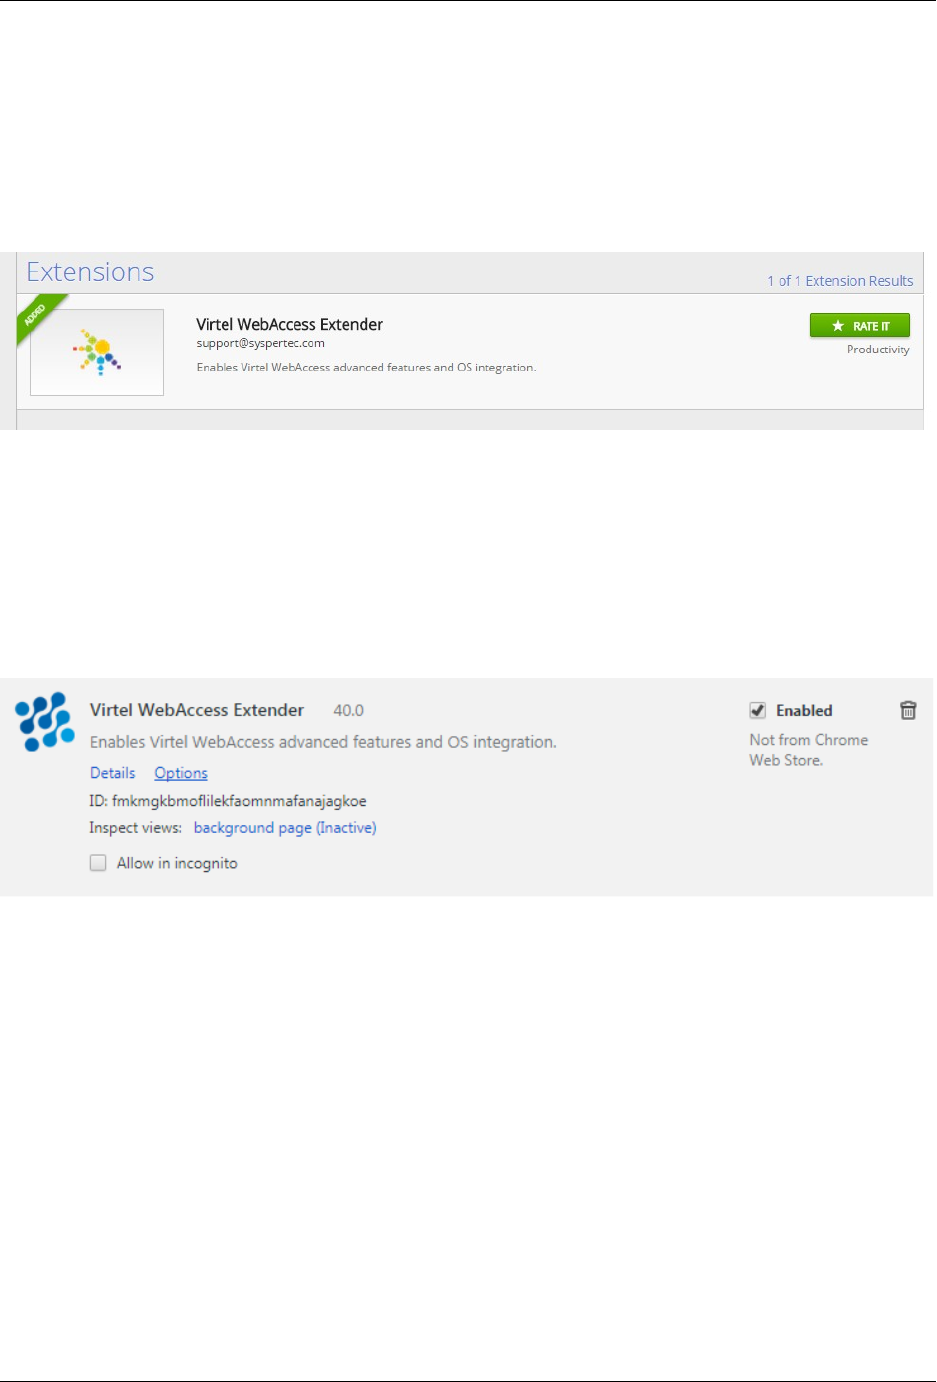
Virtel User Guide, Release 4.57
1.13.3 Chrome
An extension is required for any copy / cut / paste operation with another application or with another
internet domain. The extension can be obtained on the Chrome WebStore at the following address:-
https://chrome.google.com/webstore/category/apps?hl=en-GB
Enter “Virtel Extender WebAccess” in the search eld and launch the search. The extension appears in the
“Extensions” list.
Click on the extension item and then, on the next page, click “Add to Chrome”.
Additional installation requirements
Once the extension has been installed, it will be necessary to specify the permissions.
Go to the Chrome extension manager by typing “chrome://extensions” in the URL bar of the browser. From
the extensions page, Locate the VIRTEL extension. Verify that the extension is activated and then click on
the “Options” link.
The following options should be set:
122 Chapter 1. The Virtel Engine
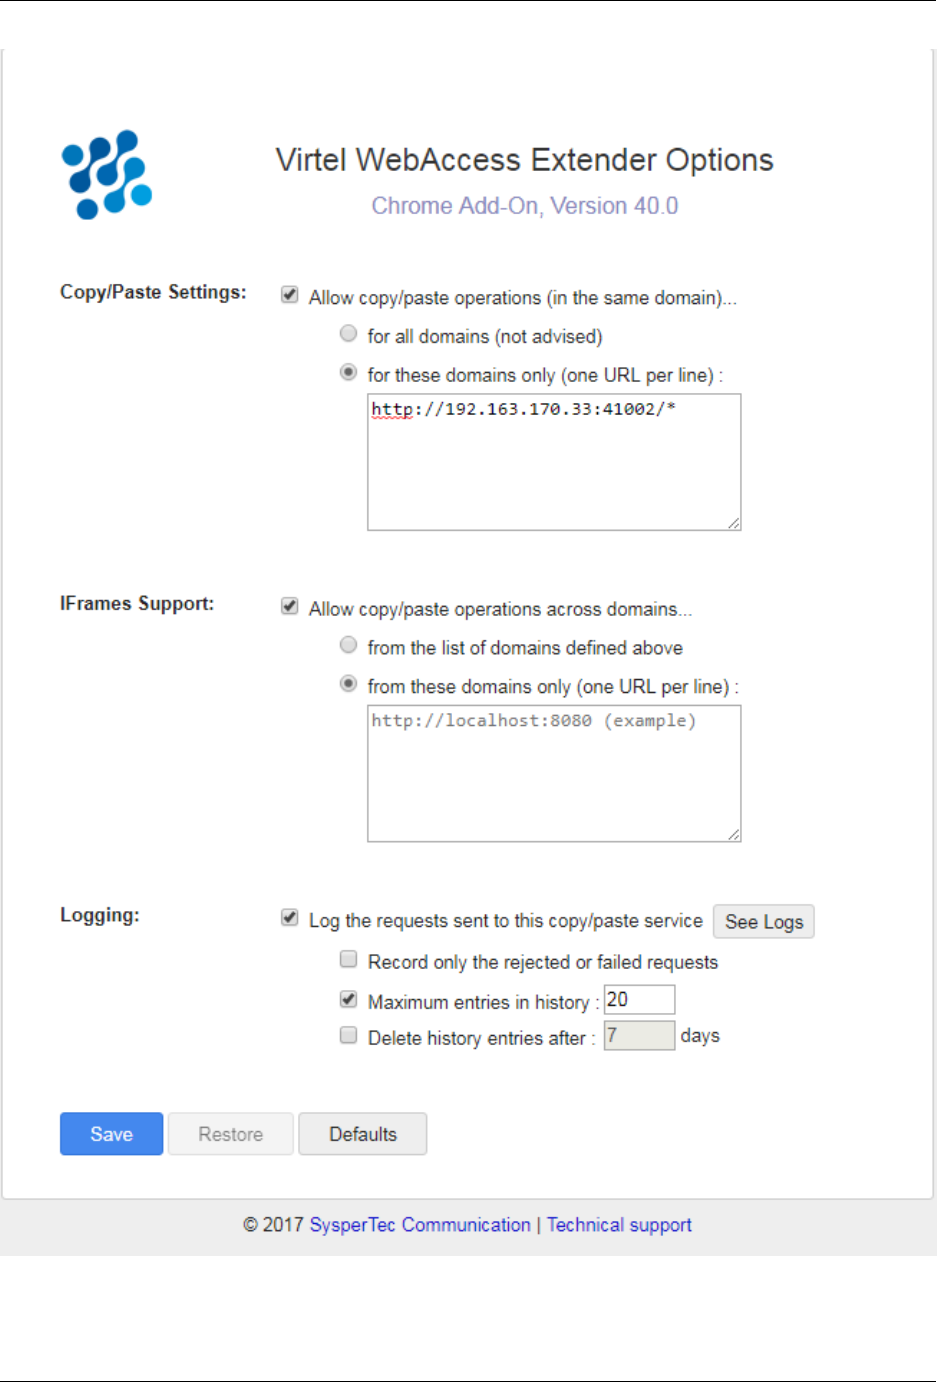
Virtel User Guide, Release 4.57
To view the log screen select “See Logs” from the Virtel Extension Options. The following log screen will be
displayed.
1.13. Enable Copy, Cut And Paste 123
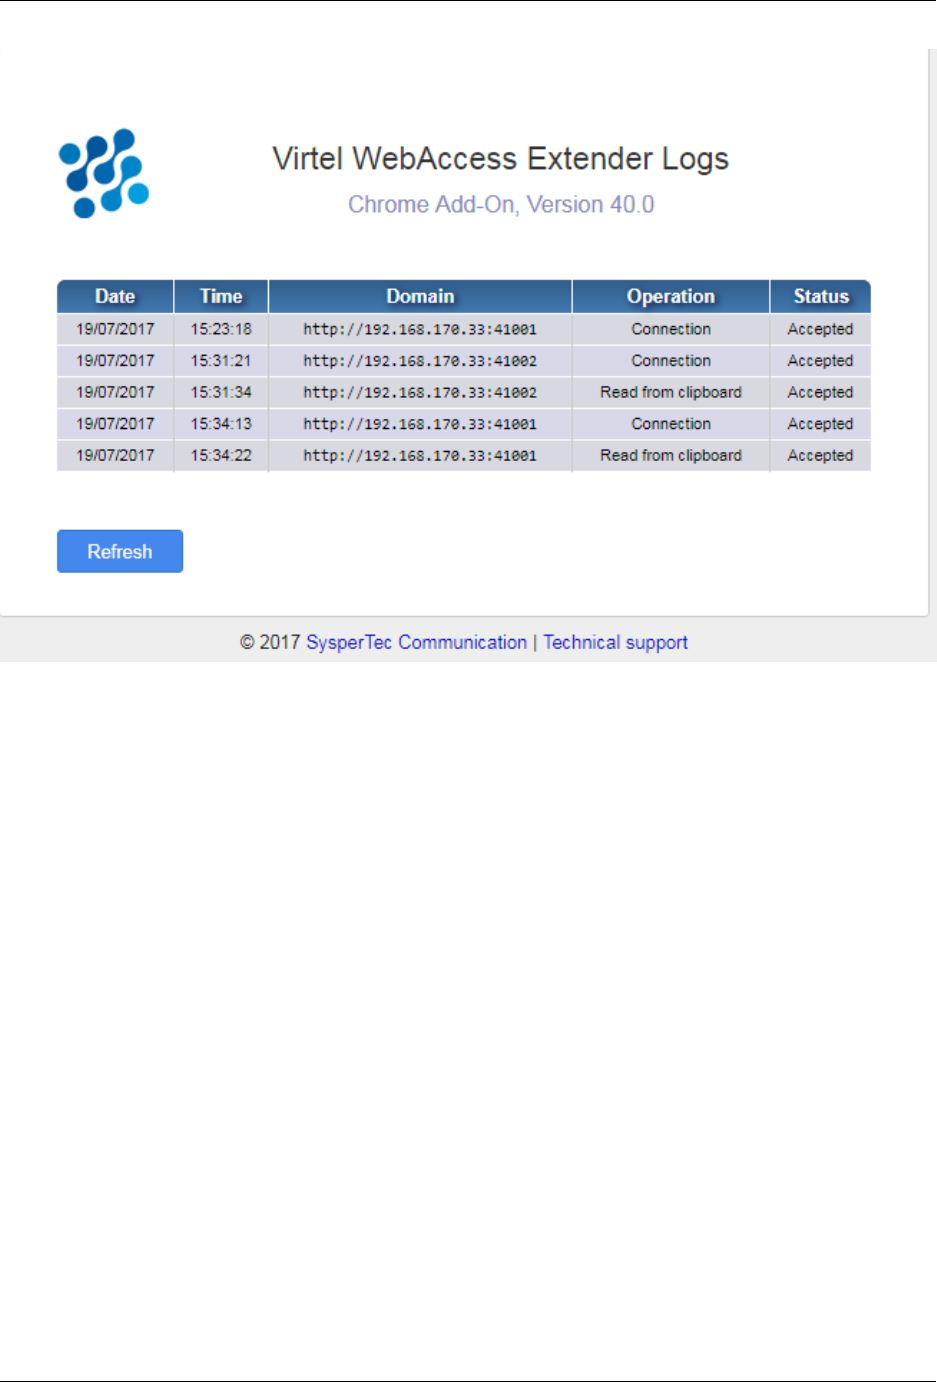
Virtel User Guide, Release 4.57
Allow copy / paste operation: Allows operations copy / cut / paste on the domains specied in the
denitions parameter.
For all domains: All domains are open for any copy / cut / paste operations.
For these domains only: Only the domains dened in a list are allowed. When multiple domains
are required, the list must be dened with one line per domain reference.
Example of denitions:
•http://www.mydomain.com/* allow access to the clipboard for the domain. Typing http:
//www.mydomain.com:8080/ will be denied access, the presence of a port number in the
URL does not match the rule.
•http://192.168.92.161:41001/* allows URLs communicating on the 41001 port access to the
clipboard for specied IP address. URLs using another port will be denied access.
•http://192.168.92.161:/allows URL communicating on any port to access the clipboard for
specied IP address.
IFrame support:
Allows operation of copy / cut / paste operation when VIRTEL Web Access window is encapsulated in an
IFrame.This information is supplemented by a list of areas on which these operations are allowed. This list
may be identical to that dened in the previous section and, if required, may contain additional restrictions
through a restrictive list. When a restrictive list is specied, the relevant elds should appear in the previous
list.
Logging:
Whenever a copy / cut / paste operation is attempted the domain involved can be saved to a list. This
list is presented in the following form: By default the system registers a historical log all operations. It
is possible to restrict registration to only rejected requests by checking the “Record only the gold failes
124 Chapter 1. The Virtel Engine
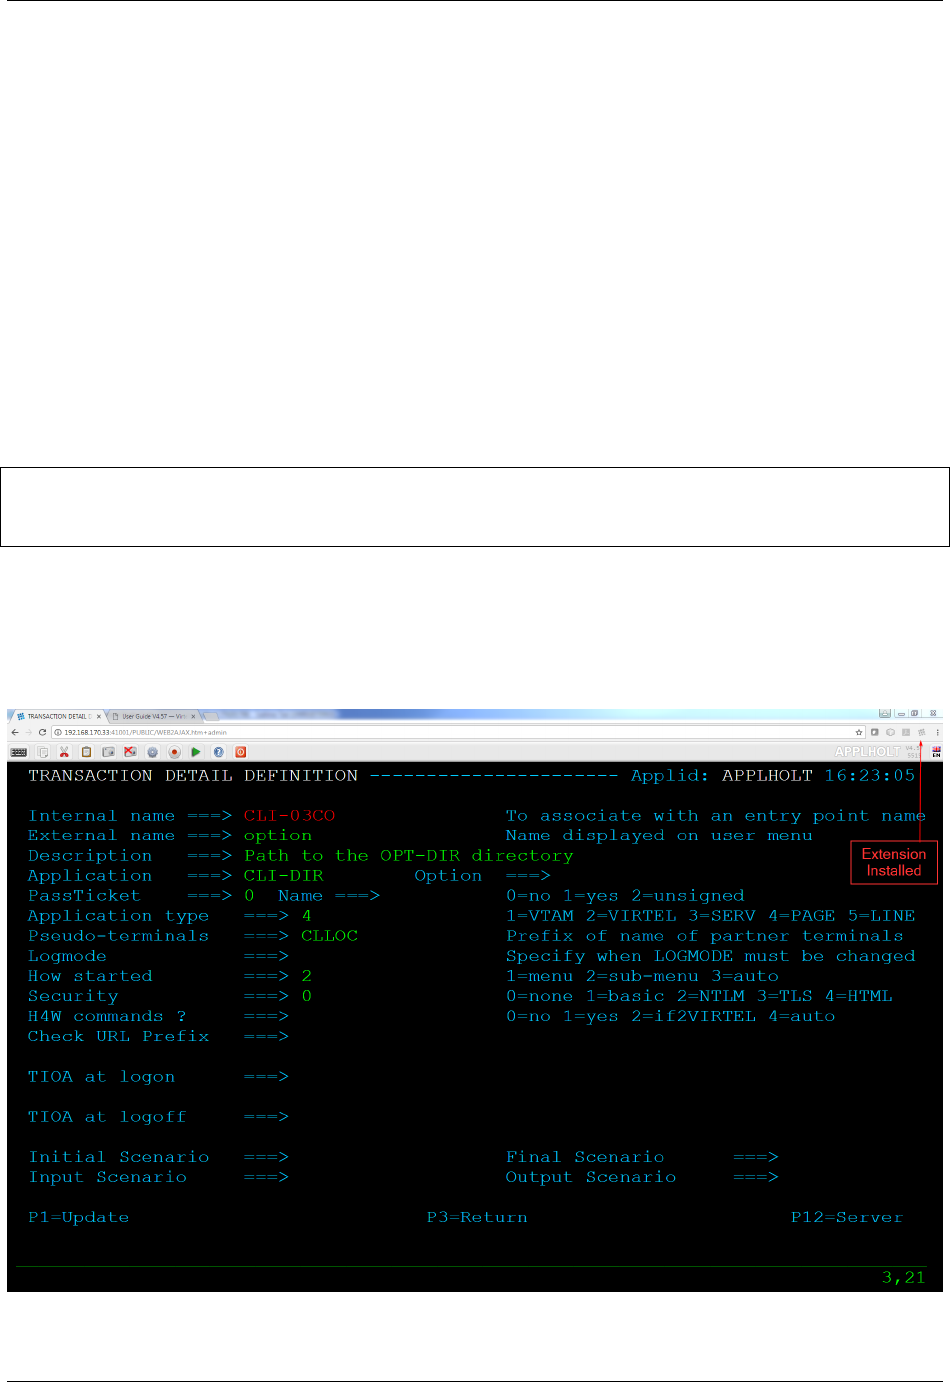
Virtel User Guide, Release 4.57
Rejected requests” box. Managing the number of log entries and setting a retention time is congurable via
“Maximum entries in history” and “Delete history entries after” settings.
1.13.4 Manage the settings on Host with chrome
Under certain conditions, it is possible to manage domain authorizations centrally by storing on the extension
parameters on the host. Usually these parameters are managed by the user as described in the previous
paragraph. The implementation of this method of extension management requires:
• Virtel version V4.56 or later
• Presence of Update # 5503 or later
• Use of the Virtel Chrome Extension Version 40.0 or later
To enable host management the “waaoAddOnHost” parameter must be set to “true” in the w2hparm.js
le. If the “waaoAddOnHost” parameter is not present or set to anything other than true, the domain
management of the permissions remains under control of the end user.
var w2hparm ={
"waaoAddOnHost":true
};
Set the waaoAddOnHost parameter to ‘true’ to manage Copy / Cut / Paste authorization from the Host.
In addition to the parameter ‘waaoAddOnHost’ being set to “true”, a Javascript le named “waao-setting.js”
maintains a list of parameters and permissions. This Javascript le must be uploaded into a directory that
should then be referenced in the Virtel Entry Point by the transaction with an external name of “option”
(lowercase).
1.13. Enable Copy, Cut And Paste 125

Virtel User Guide, Release 4.57
The ‘option’ transactions can be installed using the ARBOLOAD member in the CNTL library, setting the
parameter OPTION=YES. This will install the transactions CLI-03CO and W2H-03CO, setting the ‘option’
directory to point to the CLI-DIR through the internal pathname /option/.
An example of the waao-setting.js follows:-
function getDefaults() {
/*
* This object contains the default settings for the Chrome Add-on options panel.
*
* If the add-on has no options saved (or if these default are enforced using
,→'settings_* then these values are used as the add-on configuration.
*/
return {
/*
* Allow the user to change these extension settings using the options page?
* When false, the user can still see the options, but is cannot change them.
*
* Valid values : {true,false}
*/
settings_locked : true,
/*
* Default options for the "Copy/Paste Settings" section of the options page
*/
system_copy_paste: {
/*
* Allow copy/paste operations in system clipboard?
* Setting this to false will also disable copy/paste operations across iframes
,→('iframes_*
* Valid values : {true,false}
*/
allow : true,
from_all_domains : false,
allowed_domains :
[
// 'https://*',
'http://192.168.170.46:41333/*'
]
},
/*
* Default options for the "IFrames Support" section of the options page
*/
iframes_copy_paste: {
allow : true,
from_system_domains : false,
allowed_domains :
[
// 'https://*',
// 'http://*',
]
},
/*
* Default options for the "Logging" section of the options page
*/
logs: {
/*
* Enable logging of the copy/paste operations?
*
* Valid values : {true,false}
126 Chapter 1. The Virtel Engine

Virtel User Guide, Release 4.57
*/
allow : true,
/*
* Only record the copy/paste operations that failed or were rejected?
*
* Valid values : {true,false}
*/
only_failures: false,
/*
* Limit the maximum number of entries to keep in the history log?
* Please note that the log is only cleaned when a new entry is recorded.
*
* Valid values : {true,false}
*/
do_limit_count: true,
/*
* Maximum number of entries to keep in the history log.
* When recording a new entry in the log, the oldest entry is discarded if this
,→limit *
* Only meaningful if 'logs.do_limit_count' is true (not used otherwise).
*
* Valid values : any integer greater or equal than 1.
*/
limit_count: 25,
/*
* Limit the number of days that entries should be kept in the history log?
* Please note that the log is only cleaned when a new entry is recorded.
*
* Valid values : {true,false}
*/
do_limit_days: false,
/*
* Maximum number of days that entries will be kept in the history log.
* When recording a new entry in the log, any entry older than this threshold
,→will be *
* Only meaningful if 'logs.do_limit_days' is true (not used otherwise).
*
* Valid values : any integer greater or equal than 1.
*/
limit_days: 7
},
};
}
1.13.5 Using Extensions
Use the right mouse button to open a selection menu for copy / cut / paste operations. The operational
status of this feature is displayed in an ICON in top right.
1.13. Enable Copy, Cut And Paste 127
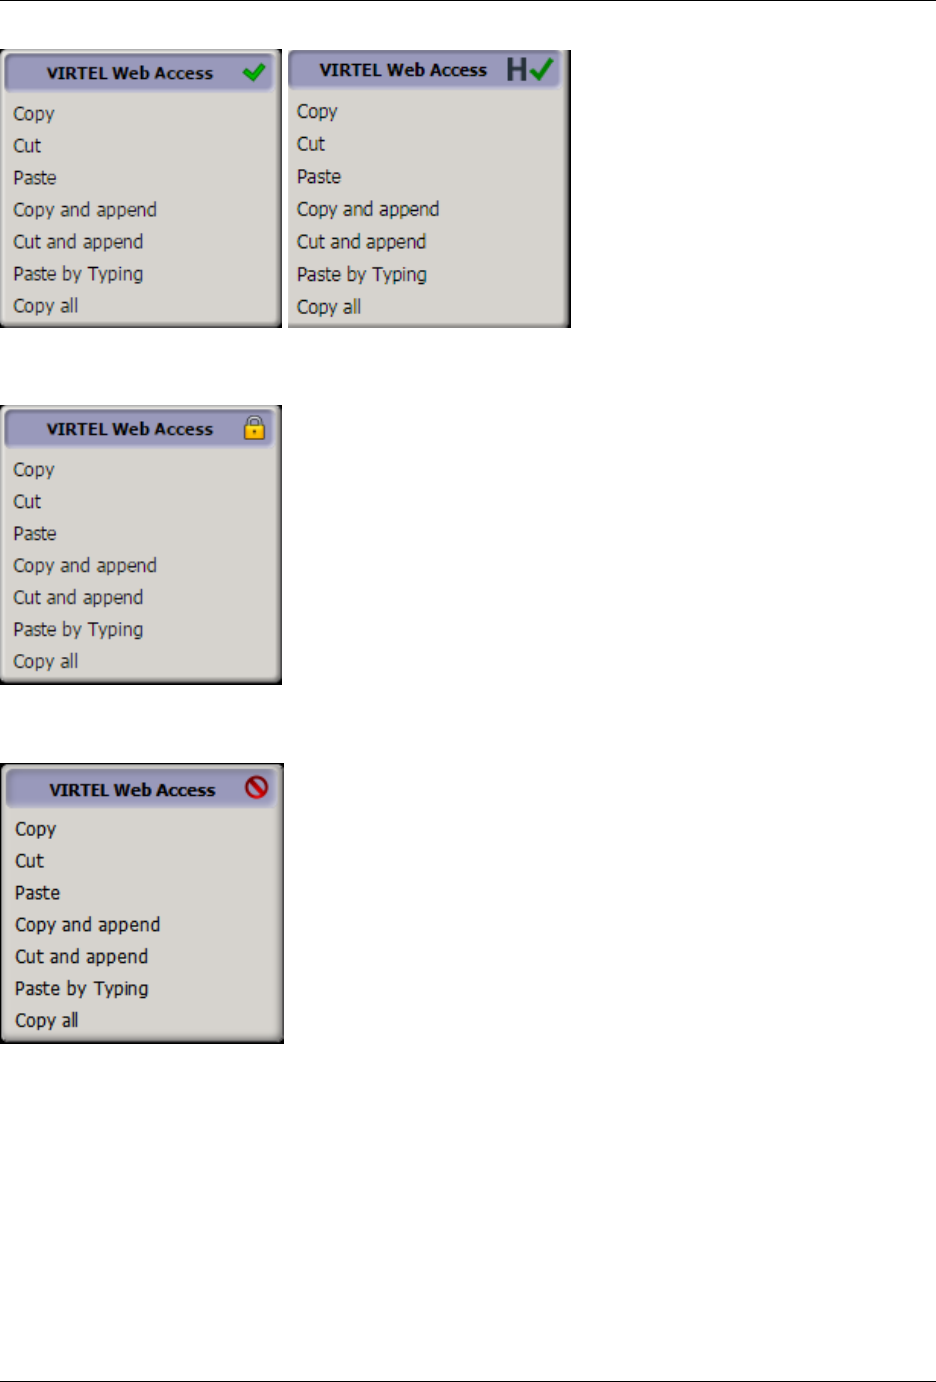
Virtel User Guide, Release 4.57
Green: Indicates that the module is properly installed and that the URL is allowed. A leading “H” indicates
that the settings are being controlled by the host.(Chrome only)*
Orange: Indicates that the module is installed correctly but the URL is not dened as an authorized domain.
A leading “H” indicates that the settings are managed by the host.(Chrome only)*
Red: - For Chrome, the expansion module is not installed or for Host maintained environments, the waao-
setting.js has not be located (Chrome only).
Host related problems could be that:-
• The Virtel Entry Point does not include the ‘option’ transaction.
• The “waao-setting.js” cannot be found in the directory dened in the ‘option’ transaction.
In this case an error message will be displayed in the Virtel log.
• The “waao-setting.js is invalid or corrupt. In this case an error message will be displayed in
the Virtel log.
128 Chapter 1. The Virtel Engine

Virtel User Guide, Release 4.57
• For Firefox, it may indicate that the eld is not allowed, or that the navigation is done in private mode.
If running in private mode, the function is supported from version 0.6.33.1 and above.*
1.13.6 Edge
Virtel uses the browsers Clipboard API to support Copy, Cut and Paste operations.
1.13. Enable Copy, Cut And Paste 129
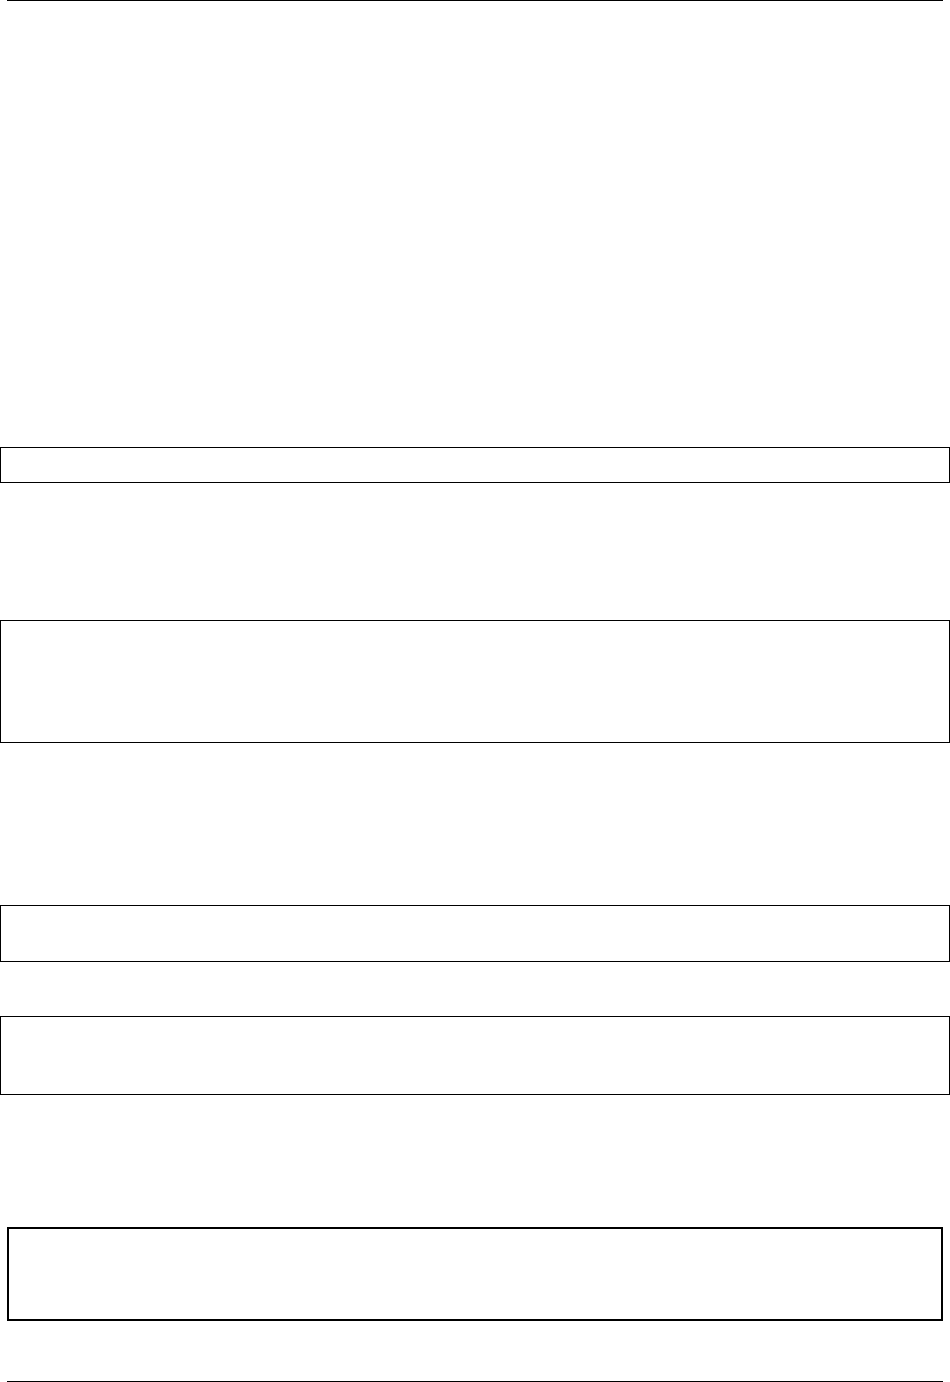
Virtel User Guide, Release 4.57
1.14 Virtel Customization Modes
Virtel V4.56 introduces some enhancements to customisation. From Virtel 4.56 onwards, customization is
now possible at a global level, eecting all transactions for an entry point, or at a transaction level, eecting
only specic transactions. Previous customisation was only at the entry point level. The two customization
modes are known as “Compatibility” mode and “Option” mode. As delivered, Virtel V4.56 defaults to having
no customization mode active. This means neither “compatibility” mode or “option” mode. To turn one on
these modes on the following actions must be performed.
1.14.1 Compatibility Mode
To maintain compatibility with older releases of Virtel, the original customisation design continues to be
supported as “compatibility” mode. This mode can be activated performing the following actions
• Included the following statement in the TCT:-
HTSETn=(OPTION-DEFAULT-COMPATIBILITY) where n =1_4.
• Modify the elements (w2hparm.js, custom.css, custom.js etc.) and upload to the relevant directory.
This would normally be CLI-DIR
• Update the relevant transactions to point to the CLI-DIR for the elements you wish to customize or
modify. The transactions are:-
XXX-03Cz where XXX =W2H (WEB2HOST Entry Point) or CLI (CLIWHOST Entry Point).
z=Cfor custom.css, H for help.html and Jfor custom.js
XXX-03P where XXX =W2H (WEB2HOST Entry Point) or CLI (CLIWHOST Entry Point).
This transaction provides the directory for a modified w2hparm.js
By default, the applications associated with these transactions are set to “W2H-DIR”. See job SAM-
PLIB(CUSTCSS). Run this job after changing the directory(APPL=) from W2H-DIR to CLI-DIR.
As an example, if the w2hparm option “Enter=Enter” is required rather than the default “Enter=Newline”
and a modied toolbar is also required for transactions running under the CLIWHOST entry point then the
following transactions would be changed:-
CLI-03P Appl. = CLI-DIR Default =W2H-DIR.w2hparm.js for CLI transactions
CLI-03CJ Appl. = CLI-DIR Default =W2H-DIR.Custom.js for CLI transactions
• w2hparm.js would be modied and uploaded to CLI-DIR.
var w2hparm ={
"enter":"ENTER"
};
• Custom.js would be modied to support the tool bar change and uploaded to CLI-DIR.
The transaction W2H-03CJ is left pointing to W2H-DIR meaning that applications under the WEB2HOST
entry point would have the default tool bar.
Danger: Updating elements in the default W2H-DIR directory is not recommended as they will be
overwritten by maintenance or Virtel release updates. Keep customized elements in the CLI-DIR direc-
tory.
130 Chapter 1. The Virtel Engine

Virtel User Guide, Release 4.57
1.14.2 Option mode
This Option mode uses the /option/ pathname to locate a directory where all the relevant customisation
elements reside. The recommended directory is CLI-DIR. To use this mode the w2hparm.js le must include
the “global-settings” attribute. The following is an example:-
var w2hparm ={
"enter":"ENTER",
"global-settings":{
"pathToJsCustom":"../option/custJS.global.js",
"pathToCssCustom":"../option/custCSS.global.css",
"pathToHelp":"../option/myHelp.html"
}
}
This attribute denes the “global” customised names using the following pattern:- key.id.type where:-
key =one of the supported key values prefixed with the string "pathTo"
id =global or an option identifier
type =css, html or js (The customized type)
The supported “pathToxxxxx” keys are used to select the le where the customised elements should be
located. Note the customized elements are located through the /option/ pathname. Customized elements
currently supported are:-
pathToCssCustom Custom CSS files.
pathToJSCustom Custom Javascript files
pathToW2hparm Custom w2hparm parameters
pathToPrintCss Custom print style CSS
pathToHelp Custom Help pages
To activate the “option” mode perform the following actions:-
• Update the W2hparm.js to include the global-settings option. Include the relevant keynames within
the global option settings you wish to modify.
• Update the XXX-03P transactions to point to the CLI-DIR. The modied w2hparm.js will now be
loaded from CLI-DIR and not the default W2H-DIR.
• Upload the modied w2hparm.js to the CLI-DIR directory.
• Run the supplied ARBOLOAD job in the CNTL library with OPTION=YES set. This will add two
new transactions to the W2H and CLI entries to dene the /option pathname.
• Create the customized les (Javascript, CSS, help, parm) and upload them to the CLI directory.
1.14.3 Default mode
As delivered, the default mode level is used. This means all web elements are obtained or located within the
supplied W2H-DIR using the default settings.
1.14.4 Global level modications (All transactions under an Entry Point)
For example, to support a global modied w2hparm and a modied toolbar for transactions running under
the CLIWHOST entry point the following actions would be required.
1.14. Virtel Customization Modes 131

Virtel User Guide, Release 4.57
For the “Enter” key requirment, update the default w2hparm.js to include a global setting for path-
ToW2hparm. The w2hparm.js should be uploaded to the CLI-DIR directory or another directory other
than W2H-DIR. The transaction CLI-03P application eld will also have to be updated to point to the
correct directory for the modied w2hparm.js. Normally CLI-DIR:-
var w2hparm ={
"global-settings":{
"pathToW2hparm":"../option/w2hparm.global.js",
"pathToJSCustom":"../option/custJS.global.js"
}
}
Create the le w2hparm.global.js le and dene the required changes. Upload this le to CLI-DIR. For
example to modify the keyboard Enter key:-
//CLI-DIR -w2hparm.global.js
/*
*Override default w2hparm values.Change Enter key to equal "Enter".Default =
,→"Newline" key.
*/
w2hparm.enter="Enter";
Create the le custJS.global.js le and dene the required changes. Upload this le to CLI-DIR. For example
to modify the toolbar:-
//CLI-DIR -custJS.myOptions.js
//Add Print Button To Toolbar
function after_standardInit() {
addtoolbarbutton(000,"../print.ico","Print Screen",do_print);
}
Note: The print.ico should also be uploaded to the CLI-DIR directory.
This has the eect of changing the tool bar for all transactions which is not what is required. The transactions
under WEB2HOST will require there option eld to be set to “compatibility” to ensure that the default
toolbar is shown.
132 Chapter 1. The Virtel Engine
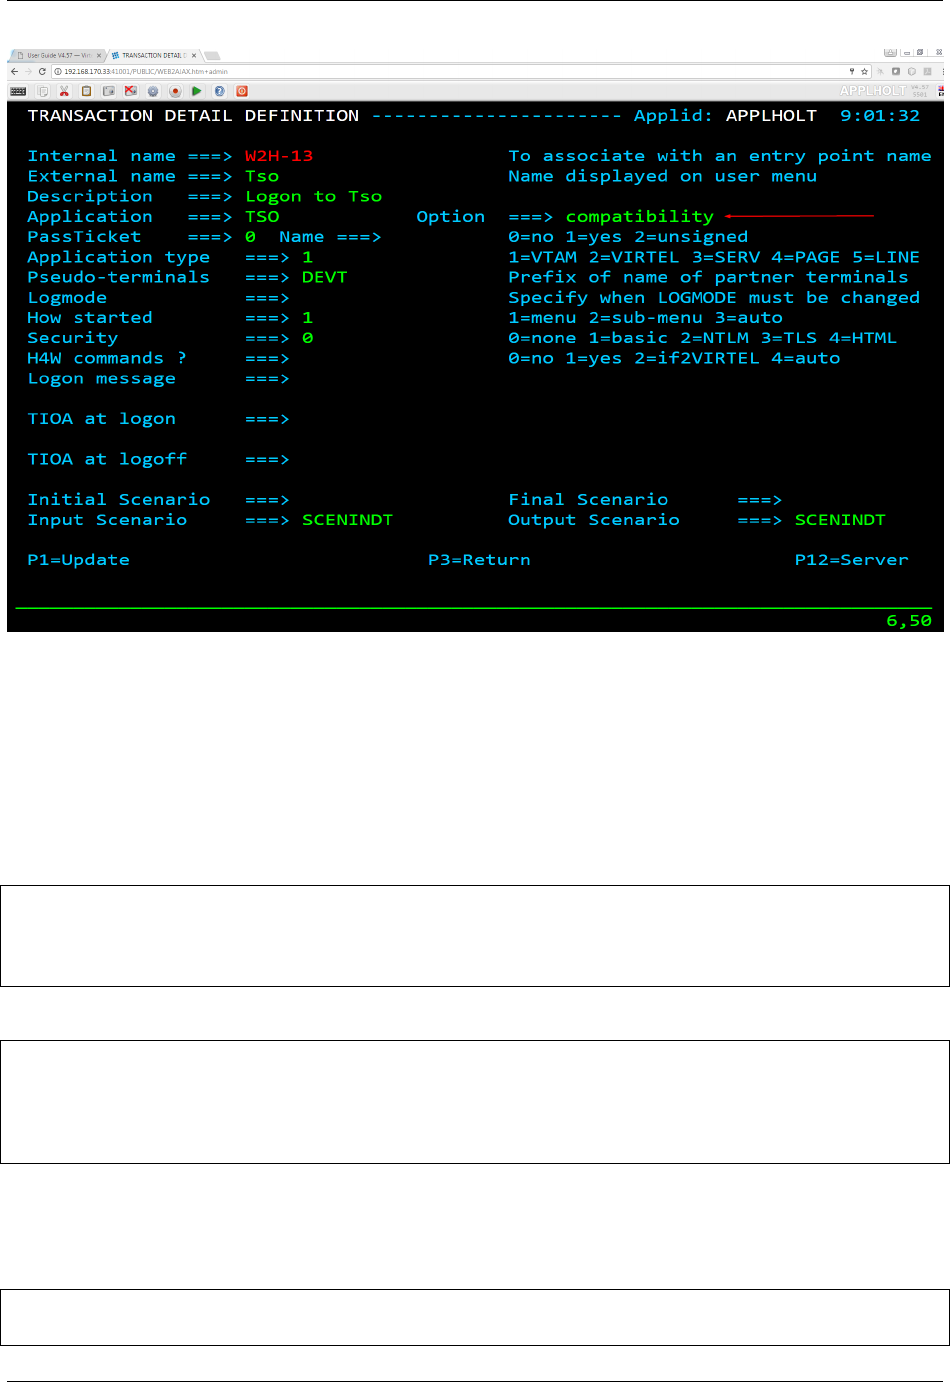
Virtel User Guide, Release 4.57
1.14.5 Transaction level modications (Individual transactions)
If only certain transactions should have the modied tool bar then set a unique option identier for those
transactions. The “option” identier will be used to associate customized elements against specic transac-
tion(s). In this example the value “myOptions” has been chosen as an identier. A transaction level “core
option le”, using the format “option.identier.js”, will be used to locate customized elements. Using the
option identier “myOptions” the le will be called option.myOptions.js. It should be created and uploaded
to CLI-DIR. The customized settings are held in a Javascript variable named oCustom.
//CLI-DIR -option.myOptions.js.Transaction level core option file
var oCustom={
"pathToJsCustom":"../option/custJS.myOptions.js"
}
A le called custJS.myOptions.js is created which will contain the toolbar modication code:-
//CLI-DIR -custJS.myOptions.js
//Add Print Button To Toolbar
function after_standardInit() {
addtoolbarbutton(000,"../print.ico","Print Screen",do_print);
}
Using “option” mode In the above examples all transactions will be subjected to parm changes dened in the
le w2hparm.global.js. Transactions which have the option id set to “myOptions” will have any customized
changes located through the core option le “option.myOption.js”. These will override any “global” settings.
The following les are created and copied to CLI-DIR:-
option.myOptions.js -core option file for identifier "myOptions"
custjJS.myOptions.js -customized java script file for "myOptions".
1.14. Virtel Customization Modes 133

Virtel User Guide, Release 4.57
w2hparm.js -contains "global-settings" attribute.
w2hparm.global.js -global settings
Files dened in the core option les “option.id.js” with the keys pathTo[key] are copied to the CLI-DIR.
They will be located through the /option/ pathname. The values associated the the keys pathTo[key] can
be any le name and not necessarily the names used in the examples. The /option/ path is always required.
For example:-
//CLI-DIR -option.myTest.js.Transaction level option settings
var oCustom={
"pathToW2hparm":"../option/my_parms.js"
}
1.14.6 Compatibility Option id
For compatibility the transaction option eld can be dened with the special identier “compatibility”. This
indicates that the “compatibility” mode of operation should be used to search for customized elements. For
example custom.css would be located through the transaction XXX-03CJ.
1.14.7 Dening Transaction Options
Using the HTML transaction display a user can click on the “Spanner” ICON to help in setting up the option
les. This include the core option le and the relevant Javascript and CSS les.
134 Chapter 1. The Virtel Engine
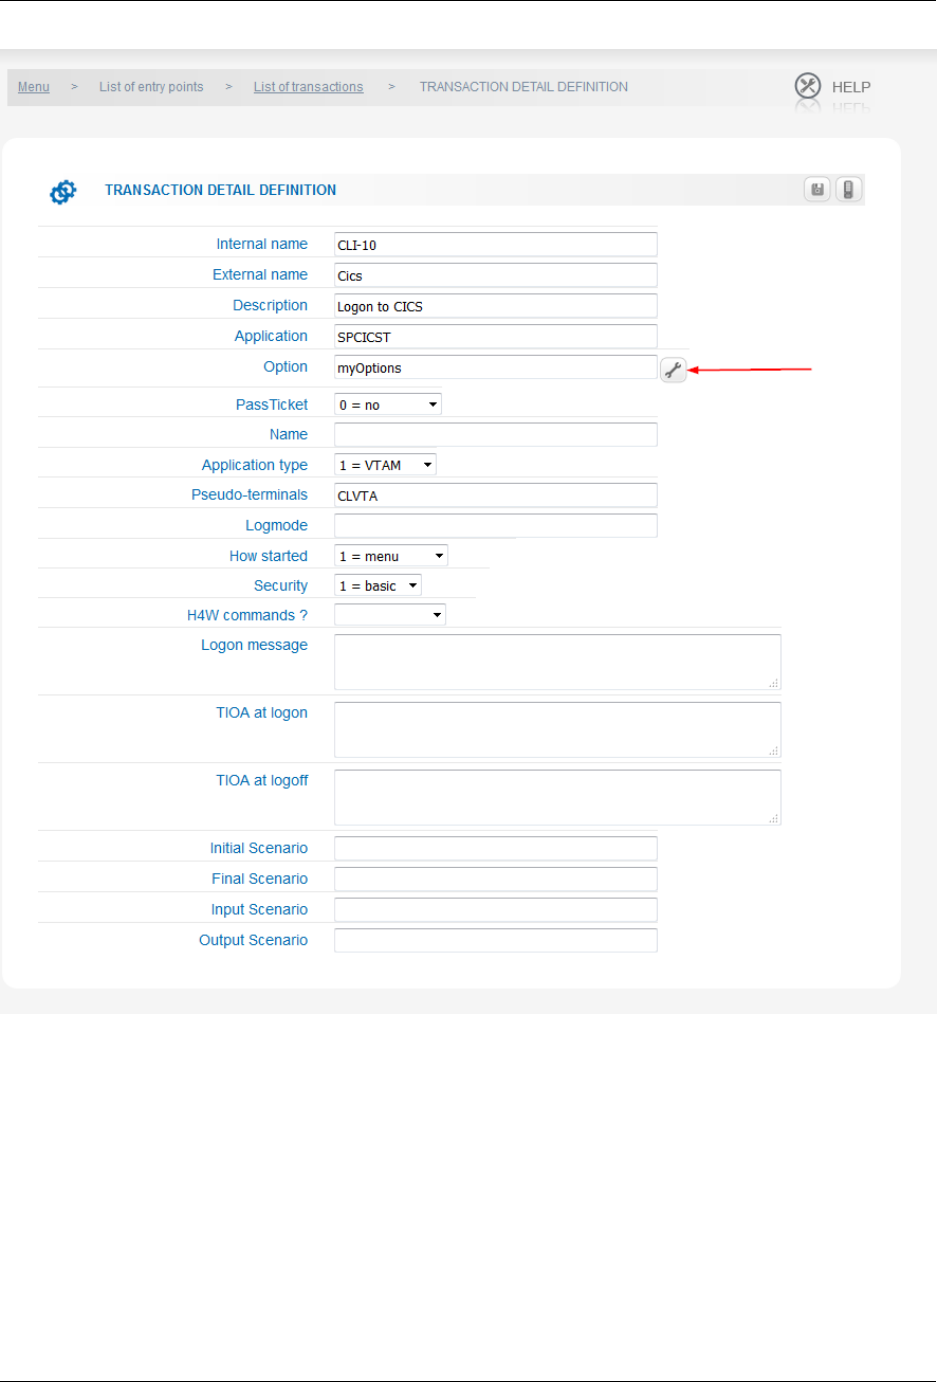
Virtel User Guide, Release 4.57
Transaction display with the option spanner ICON
On clicking the “spanner” icon a tabbed “Option” panel will be displayed. A pre-allocated core option
environment, based upon the “option” eld value, will be built. Two tabbed options are available, “BASIC”
and “ADVANCED”:-
1.14. Virtel Customization Modes 135
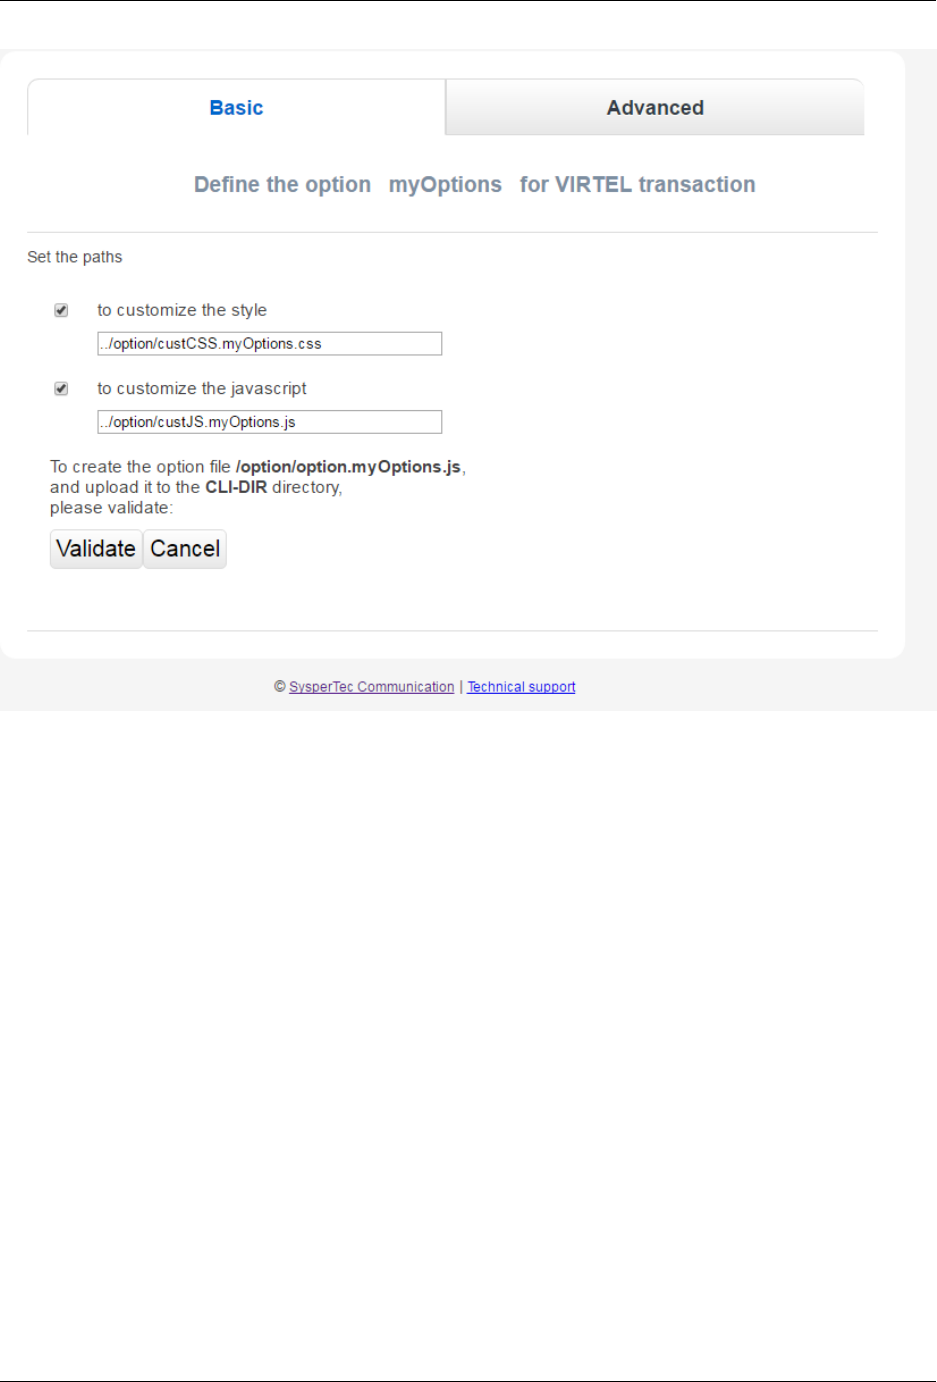
Virtel User Guide, Release 4.57
Dening core option le
Basic Mode
Within the Basic mode of operation, the Validate button will create a core option le and upload it to the CLI-
DIR directory. Within this le, Javascript and CSS settings keys, if selected, will point to the customisation
les as dened by the “option” eld. In the example below the Javascript and CSS customization les have
been selected. This will eectively create a core option le option.myOptions.js which will be loaded upto
the CLI_DIR. Within this core option le the key elements pathToJsCustom and pathtoCssCustom will be
generated. These will point to les /option/custJS.myOptions.js and /option/custCSS.myOptions.css.
136 Chapter 1. The Virtel Engine
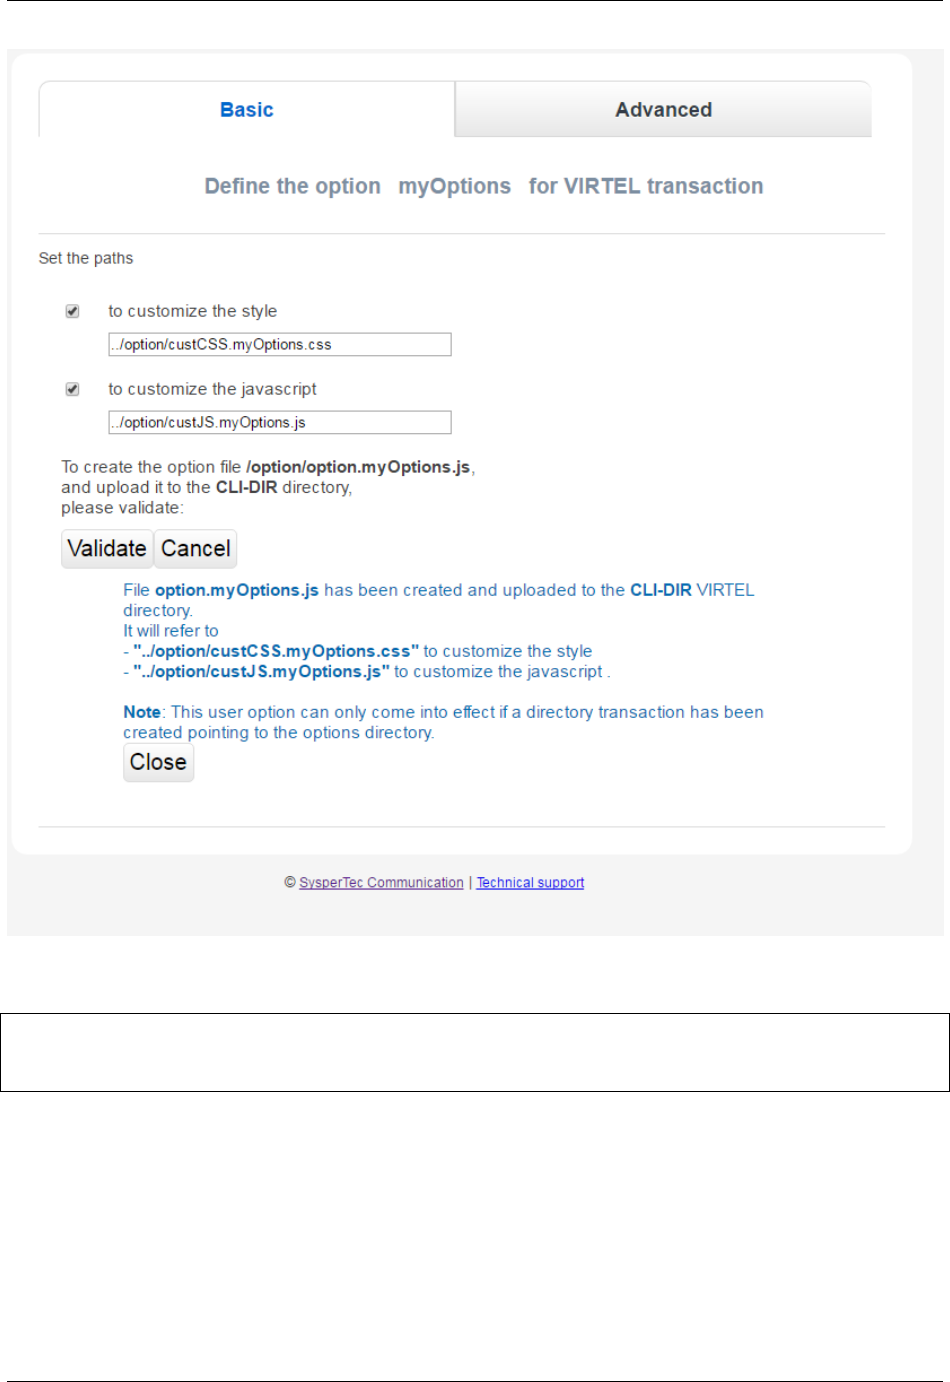
Virtel User Guide, Release 4.57
Basic Mode Operation
The generated core option le option.myOptions.js will look like thsi:-
// customization for option=myOptions
var oCustom={"pathToCssCustom":"../option/custCSS.myOptions.css","pathToJsCustom":"../
,→option/custJS.myOptions.js"}
This can be modied to add other custom elements such as PrintCSS, Parm or Help.
Advanced Mode
By selecting the Advanced mode tab the core option le can be downloaded in preparation for further
modication.
1.14. Virtel Customization Modes 137
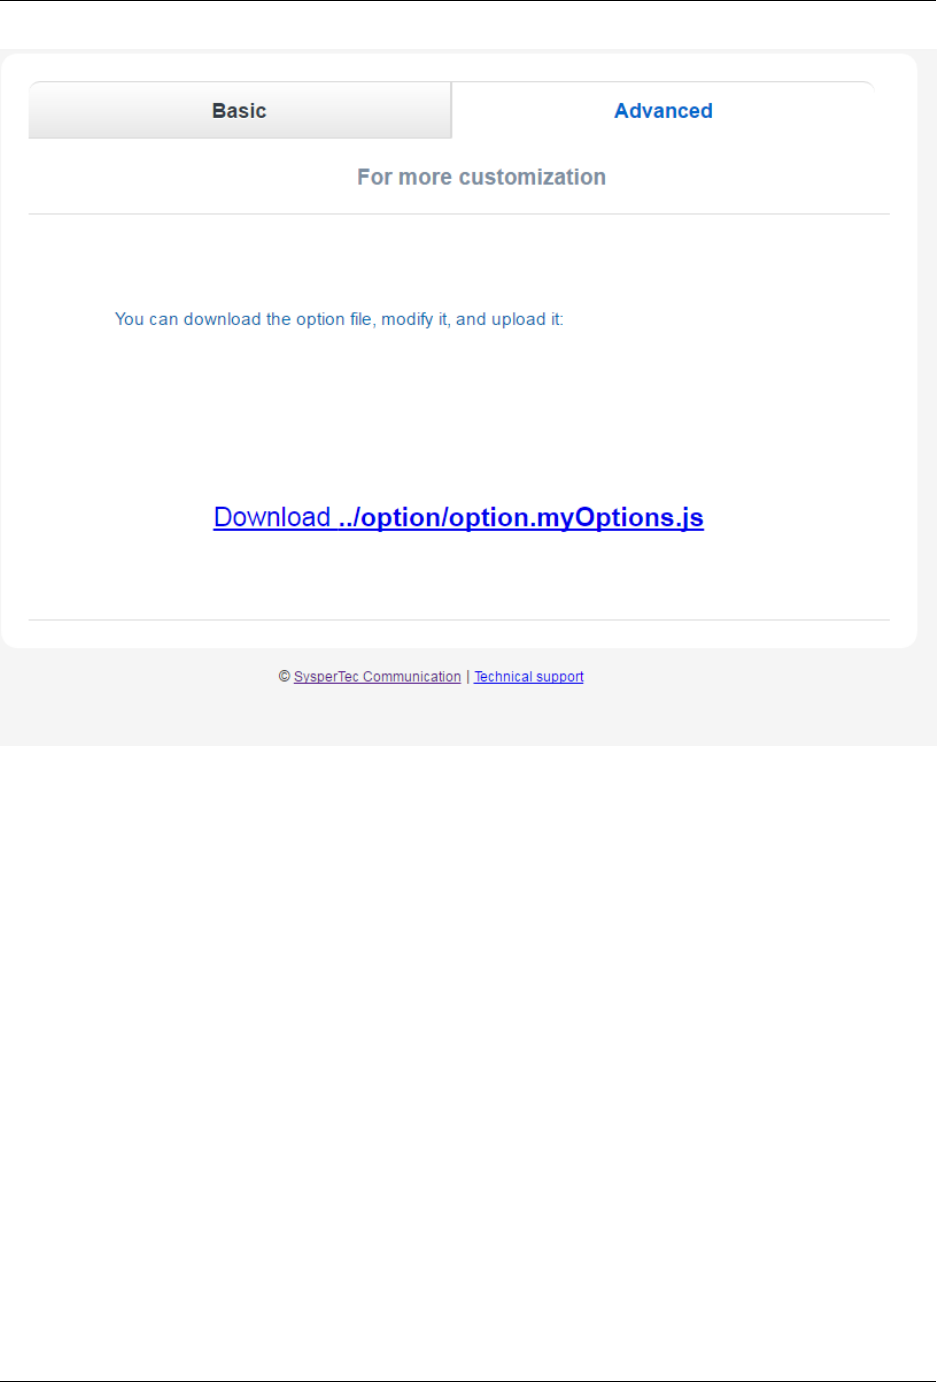
Virtel User Guide, Release 4.57
Advanced Mode Operation
138 Chapter 1. The Virtel Engine
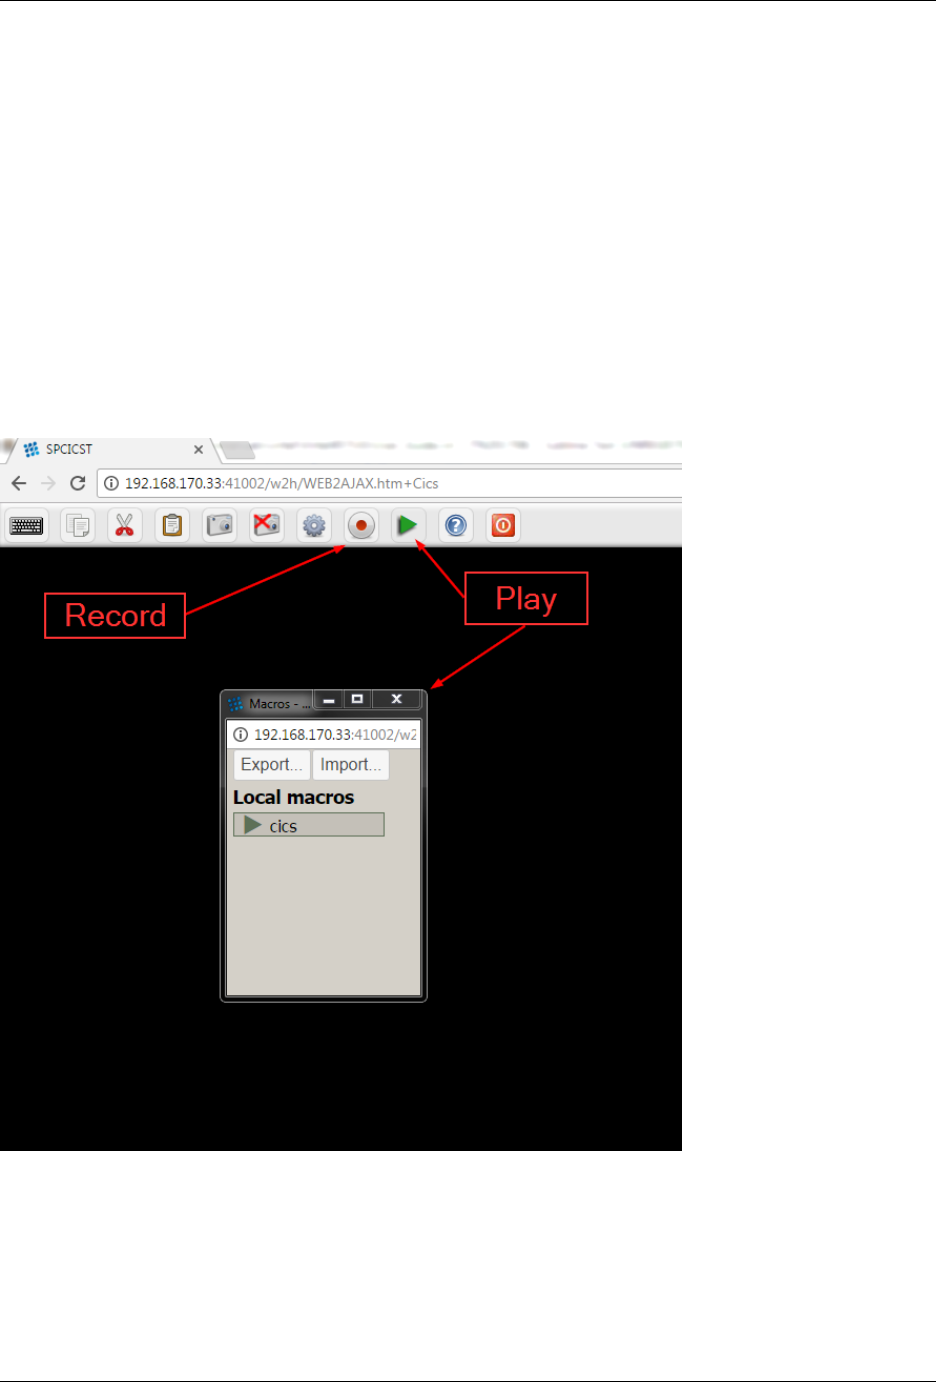
Virtel User Guide, Release 4.57
1.15 Macros
In the world of the 3270 emulation, the term of “Macro” brings together two separate concepts. The rst
one designates the recording of a sequence of repetitive actions that the user wishes to automate such as for
example a signon process, the second designates a complex dialogue between the terminal and an application
running on the mainframe side. This second category often requires the usage of a programming language
to develop an executable module that operates from the workstation in partnership with the 3270 emulator.
This section discusses the answer to the rst concept, the second one is discussed in the section “Web
Modernisation VIRTEL Scenarios”.
The macro interface is accessed from the Virtel toolbar. By pressing the REC button on the VIRTEL Web
Access toolbar, the user can start recording a sequence of keystrokes. A second click on the REC button
terminates the recording and allows the user to assign a name to the macro which has been recorded. The
PLAY button on the toolbar allows the user to display a list of macros already recorded. From here a
sub-menu can be displayed where macros can be replayed, edited, saved or deleted. macro.
Play and Record buttons
1.15.1 Storing the Macros
Depending on the version of VIRTEL, the macros can be saved in:
• the Browser Local Storage (V4.53 and later),
1.15. Macros 139
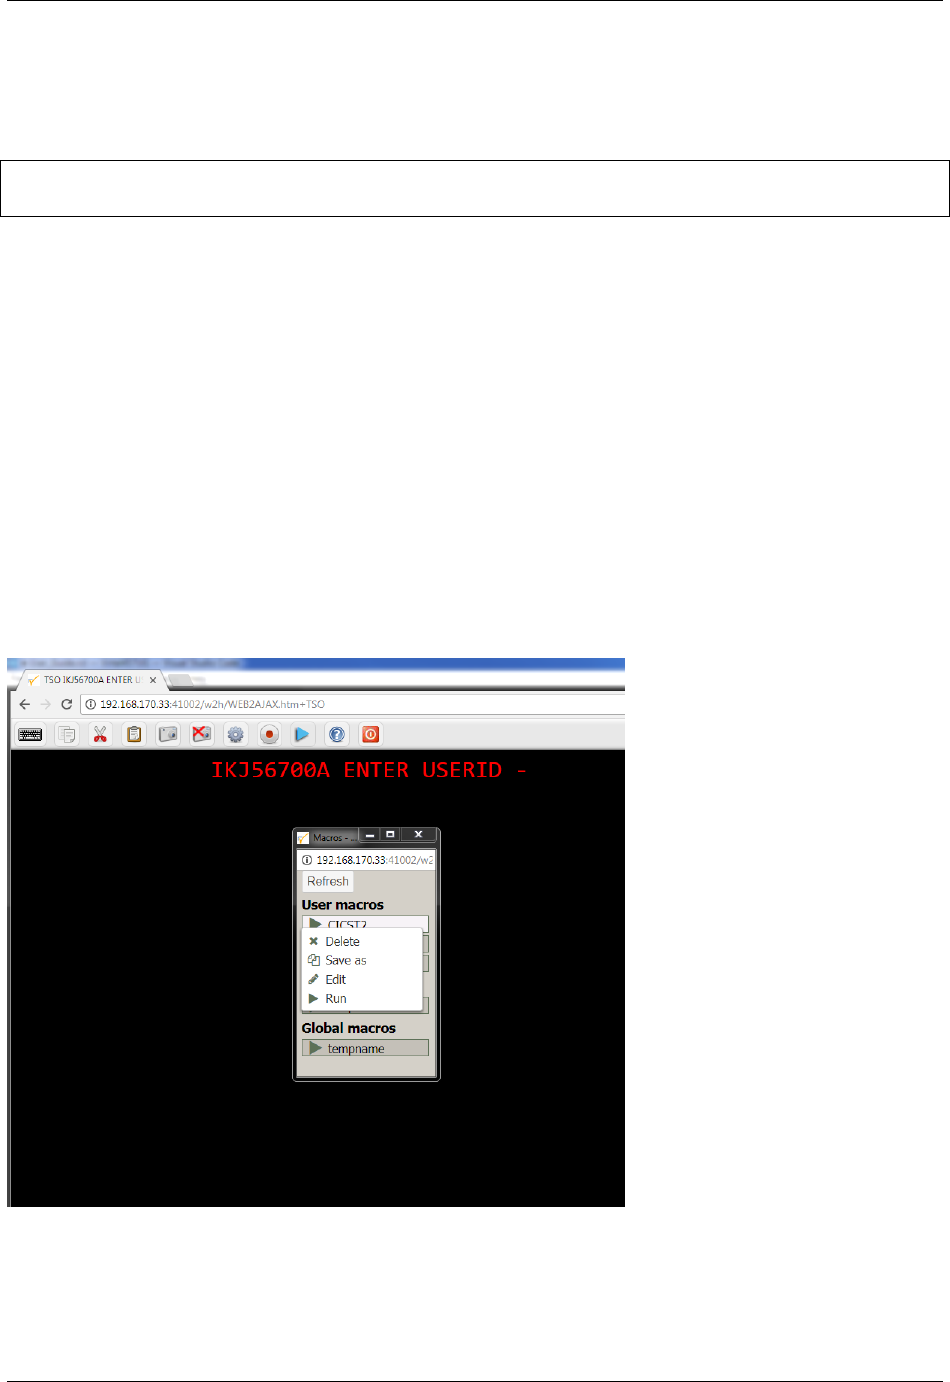
Virtel User Guide, Release 4.57
• on the workstation or network hard disk in a .json le,(V4.53 and later)
• into a VSAM le on the host site (VIRTEL Storage) (V4.54 and later) using the DDI interface.
Macros are stored as a JavaScript array of JSON objects in a le called macros.json. For example:-
{"macros":[{"name":"SDSF","rev":2,"def":["move(435)","ENTER",{"txt":"=M"},"ErEof",
,→"ENTER",{"txt":"6"},"ENTER"]}],"desc":"user macros","fmt":1,"user":"SPTHOLT"}
1.15.2 Macros in Local Storage
By default macros created by the user are saved on the workstation in the “Browsers Local Storage”.
Because the browsers Local Storage isn’t persistent storage macros can be easily destroyed by actions at the
browser level. For this reason it is possible to export the Local Storage data of the user macros to a le on
a hard drive. Conversely, the saved macros can be re-imported back into Local Storage. Import and Export
feature are available in the pop-up windows opened using the PLAY button on the toolbar.
The recorded macros display has a small context window which can be opened with a right-click. This menu
provides the following functions:-
• Delete
• Save as
• Edit
• Run
Macro Sub_Menu Functions
140 Chapter 1. The Virtel Engine

Virtel User Guide, Release 4.57
1.15.3 Macro controls
Virtel provides several options which can control the display and functionality of the macro logic. The
features are enabled or disabled through w2hparm settings. The features are:-
Key Mapping
Boolean setting to indicate whether keymapping is supported. When set to “true”, a hot key combination
can be allocated to the macro. The default is false. When saving the macro you have the option of assigning
a “hot key” or shortcut to the macro through keyboard mapping. Keyboard mapping can be a combination
of ALT or CTRL keys and another keyboard key (F1 thru F12, A thru to Z, 1 thru 9). Beware that some
keyboard combinations may be reserved for the operating system or Virtel functions. For example, CTRL-R
is a browser refresh option. Allocating this combination as a hotkey will only invoke the browser refresh
option and not the Virtel macro. Keyboard mapping is a feature that is turned on through a parameter in
the w2hparm.js le. By default, keyboard mapping is set to false.
w2hparm.keymapping=true|false
With keyboard mapping enabled the macro interface will display the associated key mapping against the
macro.
1.15. Macros 141
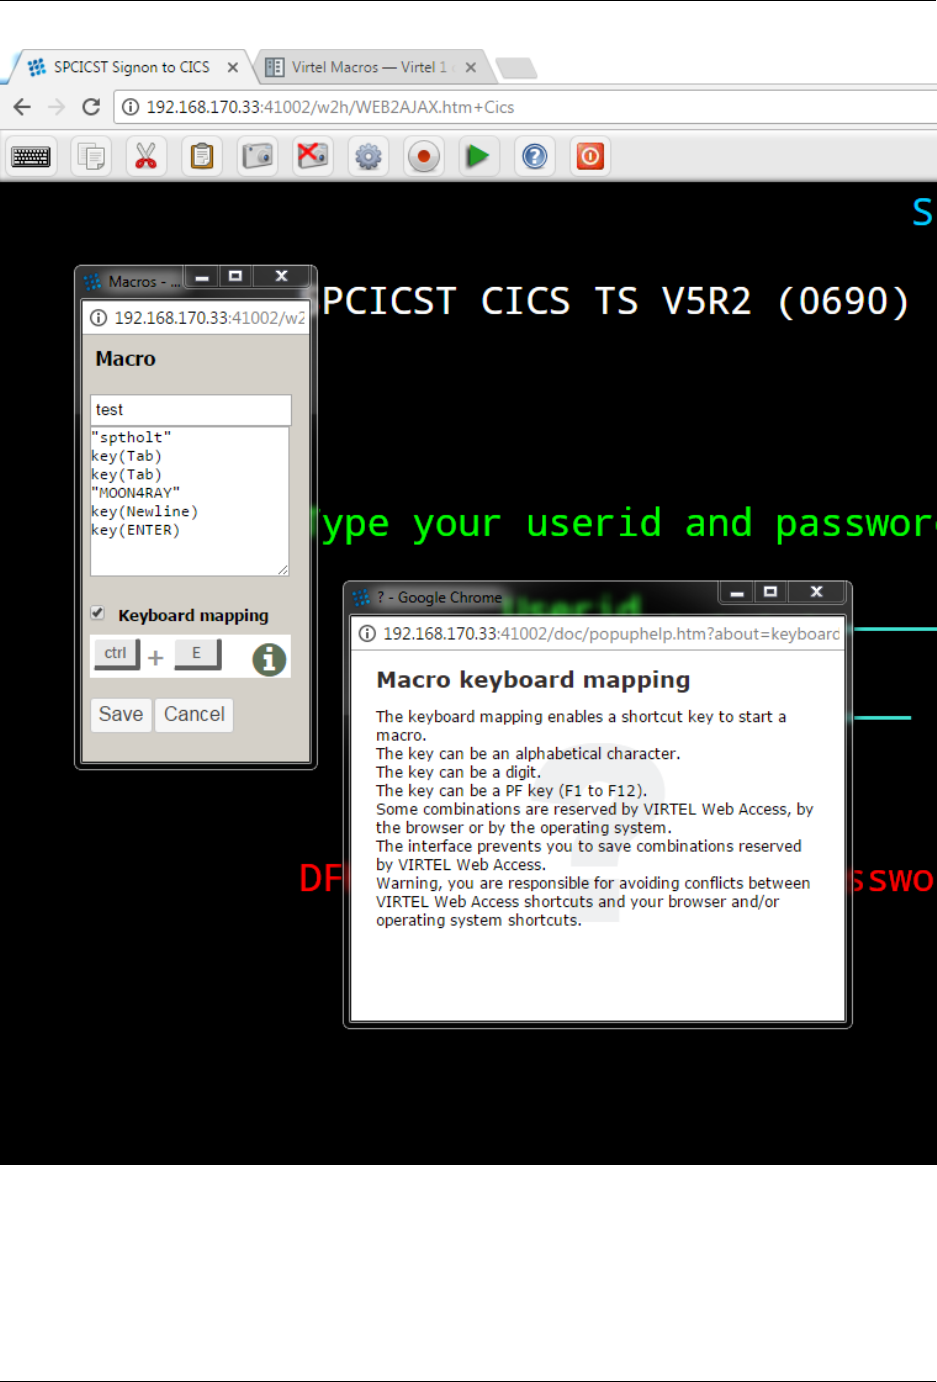
Virtel User Guide, Release 4.57
Editing macro with keymapping
Keep_Macro_Pad
Boolean setting to indicate whether to maintain the macro interface open or to close it as soon as a macro
has been executed.
142 Chapter 1. The Virtel Engine

Virtel User Guide, Release 4.57
w2hparm.keepmacpad true|false
Macro_Pad
Boolean to indicate whether the macro interface should be presented as a sub-window in the VWA window,
or as a separate window.
w2hparm.macroPad true|false
1.15.4 Macros in VIRTEL Storage
The “VirtelMacros” function allows GLOBAL, GROUP, and USER macros to be stored under the name
“macro.json” in a VSAM le on the VIRTEL host system. This feature uses the dynamic directory in-
terface(DDI) capability of Virtel to store macros in a central repository, in this case a VSAM le on the
mainframe. With this centralised environment macros can be managed, thereby keeping control of critical
business logic. Macros will be automatically downloaded and refreshed on a users workstation depending on
the options set in the w2hparm settings. Each DDi directory maintains a separate copy of the macros.json
le.
The DDI and administration features of Virtel should only be made available to an “Administrator”. In Virtel
an “Administrator” would be a user who has READ access to all the Virtel security proles, in particular
those starting VIRTEL.*. See the section “Security” in the Virtel Installation Guide for details on setting
up Virtel Administrators and protecting resources. The following transactions and related security proles
are used by DDI.
For the minimal authorization to access the DDI, a user must be granted to access the VIRTEL transaction
dened under WEB2HOST entry point with the external name. The following transactions are implemented
as part of the Virtel macros feature
virtel.xxx-03z
where xxx =W2H or CLI, z =Gfor GROUP, U for USER and Afor GLOBAL.
virtel.W2H-07 DDI Interface W2H only
virtel.W2H-66 Upload capability token.W2H only
virtel.xxx-80z Directory upload W2H and CLI
virtel.USR-DIR User directory W2H and CLI
virtel.GRP-DIR Group directory W2H and CLI
virtel.GLB-DIR Global directory W2H and CLI
1.15.5 Setting up to use DDI and macros
Run the SAMPLIB/CNTL ARBOLOAD job with the “SET VMACROS=YES” parameter coded. This
denes the VirtelMacros functions and transactions required by DDI and macro suport. If this setup is not
run the following message will appear when DDI is selected from the main Admin. portal page:-
“Your Virtel is not congured for dynamic directories”
Assuming everything has been congured correctly, the following display should be appear when selecting
the DDI option from the main portal interface.
1.15. Macros 143
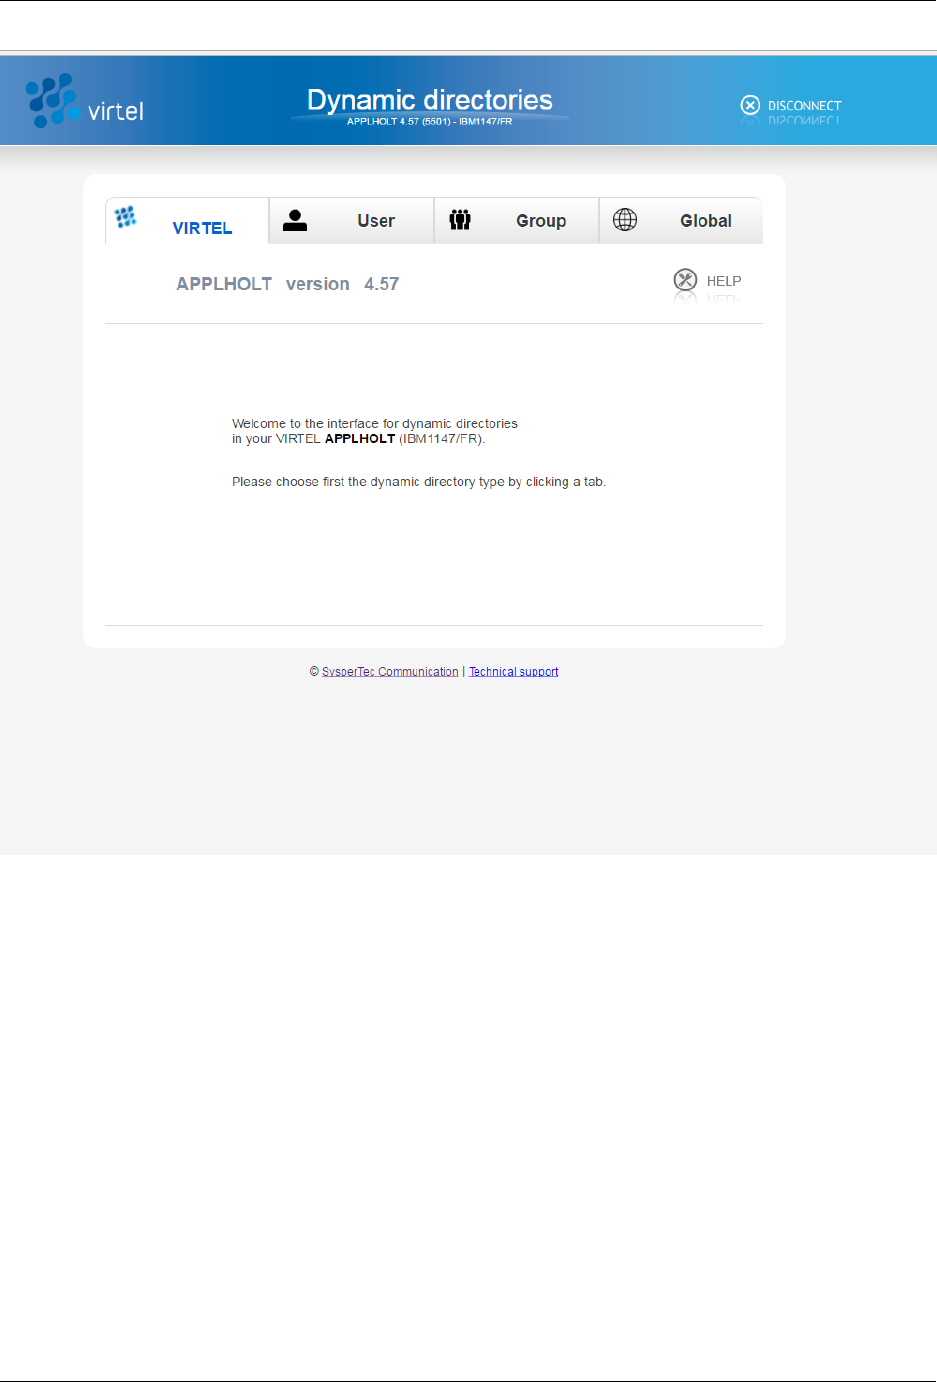
Virtel User Guide, Release 4.57
The Main DDI Page
Depending on the security setup a User or Administrator can have access to macros stored in one of the
following centralized DDI directories:-
• a dedicated directory labeled with his userid - USR-DIR
• a group directory labeled with his groupid - GRP-DIR
• a global directory which can be accessed by all users -Global DIR.
A User can only manage the macros stored in their dedicated user directory whereas Virtel Administrators
have access to all directories and can manage macros stored in USER, GROUP and GLOBAL directories.
Multiple macros.json les can be dened: a global le containing shared macros for all users, and group and
user les where macros specic to a group or to a user are stored.
User macros created by each user are stored in macros.json les loaded into the USR-DIR directory with
keyword %USER%. When the macros are loaded into or read from this directory, VIRTEL substitutes the
keyword %USER% with the users security userid.
Group macros are dened for a specic group name recognized by the security subsystem (RACF, TOPS,
ACF2). They are stored in a macros.json le loaded into the GRP-DIR directory with keyword %GROUP%.
144 Chapter 1. The Virtel Engine

Virtel User Guide, Release 4.57
At execution time, VIRTEL substitutes the keyword %GROUP% by the name of the group supplied by the
security subsystem. Group macros are avaialble to users who belong to the group.
Global macros accessible to all users are stored in the macros.json le loaded into the GLB-DIR directory.
A prerequisite for using group and user macros is that the user must sign on to VIRTEL with a userid and
password, either by accessing VIRTEL via a secure transaction (one whose “Security” eld is non-zero), or
by executing a SET$ SIGNON instruction contained in a scenario.
In a Sysplex distributed environment, the VSAM les that contains the macros, normally the HTML TRSF
le, cannot be shared between multiple instances of the VIRTEL STC. Each VIRTEL must have its own
HTML VSAM macro le if administration is to be performed on the “running” system. For production
environments where multiple instances share the same VSAM les (SAMP,HTML,ARBO) and run in a
“READ ONLY” environment enforced through the use of the TCT parameter VSAMTYP=READONLY,
DDI management will not be possible. This an incompatible environment for DDI macro management as
macros cannot be updated. A solution to this is to have an “update” window where “READ ONLY” is
turn o while macro maintenance is performed. Once checked out, the “READ ONLY” environment can be
re-initialized. New macros will then be available to users. In a “READ ONLY” environment users will not
be able to maintain any user environment as they will not have “write” access to the HTML.TRSF VSAM
le.
Enabeling macros in Virtel Storage
When VIRTEL is rst installed, no macros.json les exist. To allow macros to be stored and loaded from
the host site, the administrator activates the VirtelMacros function by adding the code shown below to
a customised w2hparm parm le. This parameter le should reside in the CLI-DIR directory (or another
option site-dened directory). See “Customising Virtel using the Option pathname” for further details on
how to customise and congure Virtel.
w2hparm.useVirtelMacros ={
"macrosAutoRefresh":"value"
};
Where value can be:-
“never” | “once” | “daily” | “session”
• “never” DDI is on. Macros will not be automatically refreshed. This is the default. User has to use
the refresh button.
• “once” DDI is on. Macros will be refreshed automatically at the start of the session.
• “daily” DDI is on. Macros will be refreshed daily.
• “session” DDi is on. Macros will be refreshed at the start of each session.
Depending on the value will determine whether and when macros are downloaded from Virtel storage. A
user can always initiate a download by pressing the Macros Icon on the toolbar.
Once VirtelMAcros have been activated each VIRTEL Web Access user has access to one or more macros.json
les stored in:
• a dedicated directory labeled with his userid - USR-DIR
• a group directory labeled with his groupid - GRP-DIR
• a global directory which can be accessed by all users - Global DIR
A user can only manage the macros stored in his own directory. To be able to manage macros stored in
Group or Gloabl directories requires that specic authorizations are dened within the security tool. If no le
1.15. Macros 145

Virtel User Guide, Release 4.57
exists, a 404 error is produced, and no macros are listed in the macro window. Access to the DDI interface is
through the Administration Portal. Ensure that Administrators have access to the relevant security proles.
1.15.6 User Macros synchronization
The sharing of macros across multiple instances of Virtel was introduced in Virtel 4.54. This feature is
particularly useful where a user can connect to one of several instances of Virtel within in Sysplex Distributed
environment zith separate HTML TRSF les. User macros are maintained in the browser’s cache and in
the TRSF les through the %USR% directory entry dened in the ARBO le. Before the synchronization
feature, if a user added or updated a macro and then reconnected to a dierent Virtel instance the macro
entry maintained in the host TRSF wouldn’t reect the latest updates held within the user’s browser cache,
consequently any cache refresh would lose those updates.
With this feature a timestamp is used to synchronize macros between the browser’s cache and the supporting
TRSF le. If the timestamp in the cache is later than the macro entry in the local TRSF le, the TRSF le
will be updated. Conversely, if the macros in the local TRSF is later than the cache equivalent, then the
macro will be reloaded in cache from the TRSF le. Any changes made will be refelcted back to the local
TRSF le. If a subsequent logon is targeted to a dierent Virtel instance, and possibly a dierent TRSF,
then the cache in the the browser will updated the local TRSF le as the timestamp in the browser for the
macro will be later than the timestamp held in the TRSF le. Using this timestamp comparison ensures
that the macros and synchronized between the users browser cache and the supporting TRSF le.
This feature is activated by setting the following w2hparm setting. This parameter le should be loaded into
the CLI-DIR directory or a directory designated by the /Option/ pathname if “Option” mode customization
is being used. The w2hparm modication must be activated as described in “Customising Virtel using the
Option pathname”. Once this customization has been done, the macros will be automaticaly be synchonized
across VIRTEL instances where each Virtel has its own HTML TRSF le.
w2hparm.synchronizeVirtelMacros =true;
1.15.7 Managing macros with DDI
The normal practice for an administrator in managing the macro repository would be to capture and create
a macro in their user directory, upload it to the mainframe repository using the DDI interface, modify it
for general use, and then copy it to any group, user or global directory for general availability. The upload
process is through a drag and drop operation within DDI interface. To copy a macros.json to another user or
group requires downloading the macro rst then dragging the le into the relevant DDI panel area designated
by the dotted lines.
Danger: Do not use the Virtel Drag and Drop function to upload DDI macros. You must use the DDI
upload interface!
Uploading a macro.json le to the DDI directory
Open the DDI interface, select Global. The Global directory will open. Drag the macros.json le into the
area designated by a series of dotted lines. This will initiate a le upload into the global directory of the
macro repository:-
146 Chapter 1. The Virtel Engine
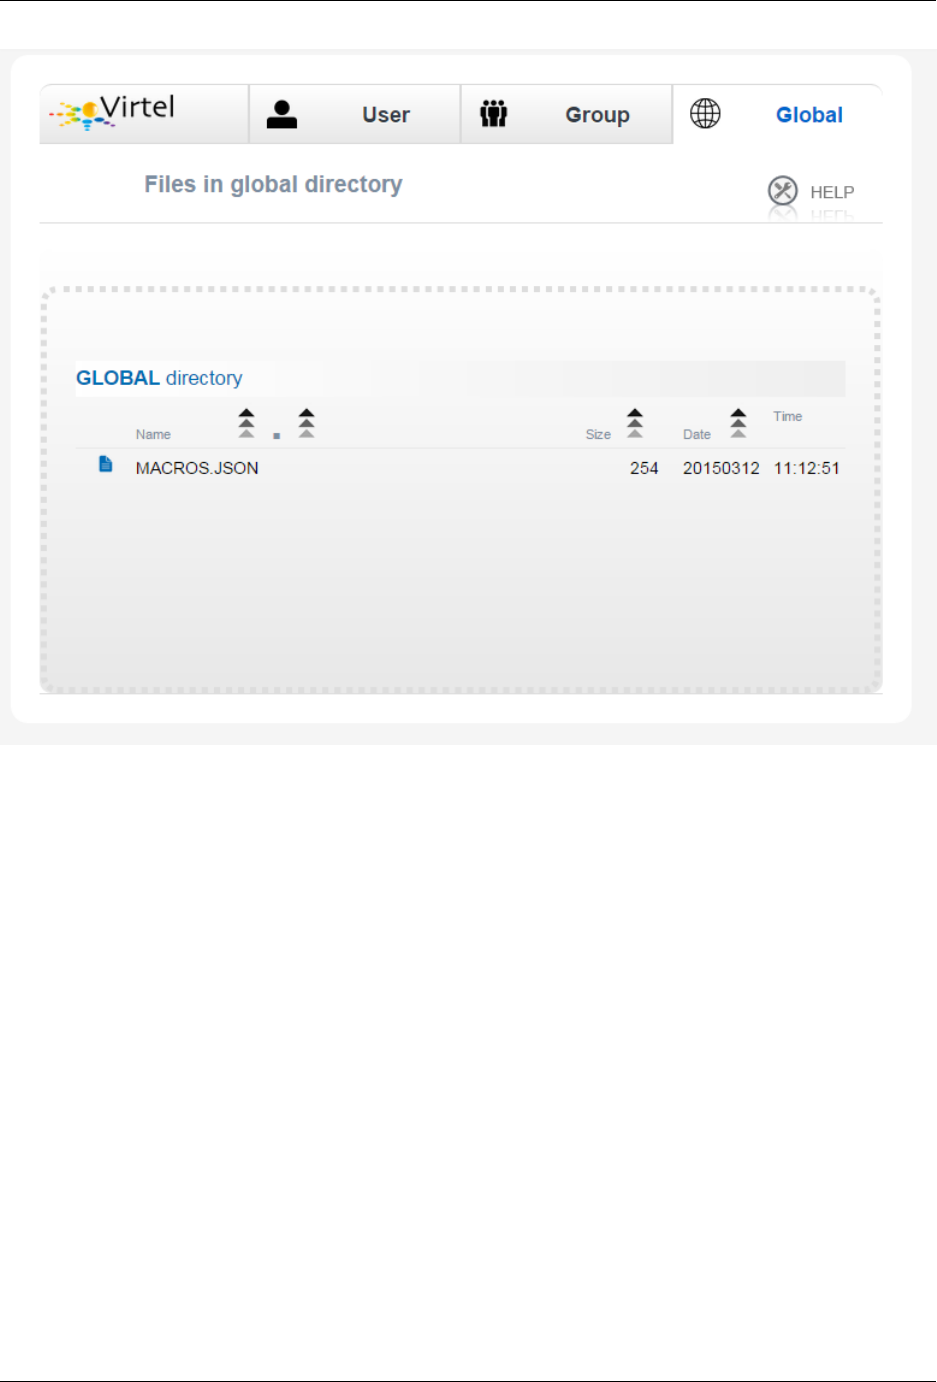
Virtel User Guide, Release 4.57
The DDI Global Upload
Once you have a copy in the global area, right click on the macros.json le to open a context menu. This
menu provides some additional functions such as Copy, Download, Delete and Edit. For macros.json the
copy function is not applicable.
1.15. Macros 147
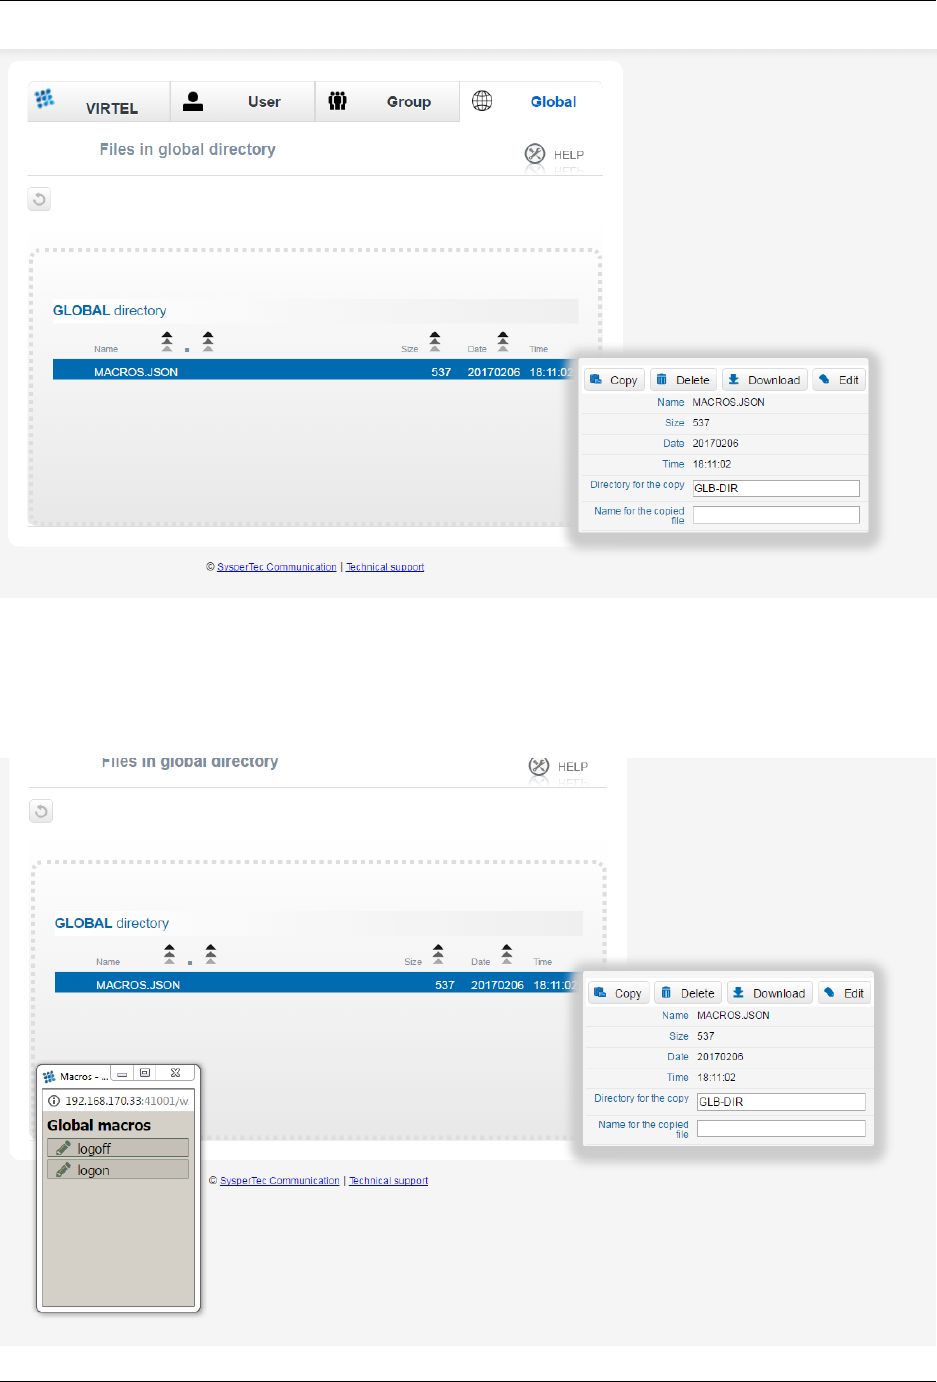
Virtel User Guide, Release 4.57
Additional le functions in DDI
Selecting “Edit” will open the same editor interface that was used when editing macros in local storage.
Here the Administrator can modify the macros held within the macros.json le. Macros can be saved with
dierent names and associated with dierent key mappings. Options like Save As, Edit and Delete are
available within a context menu when you right click on a macro.
148 Chapter 1. The Virtel Engine
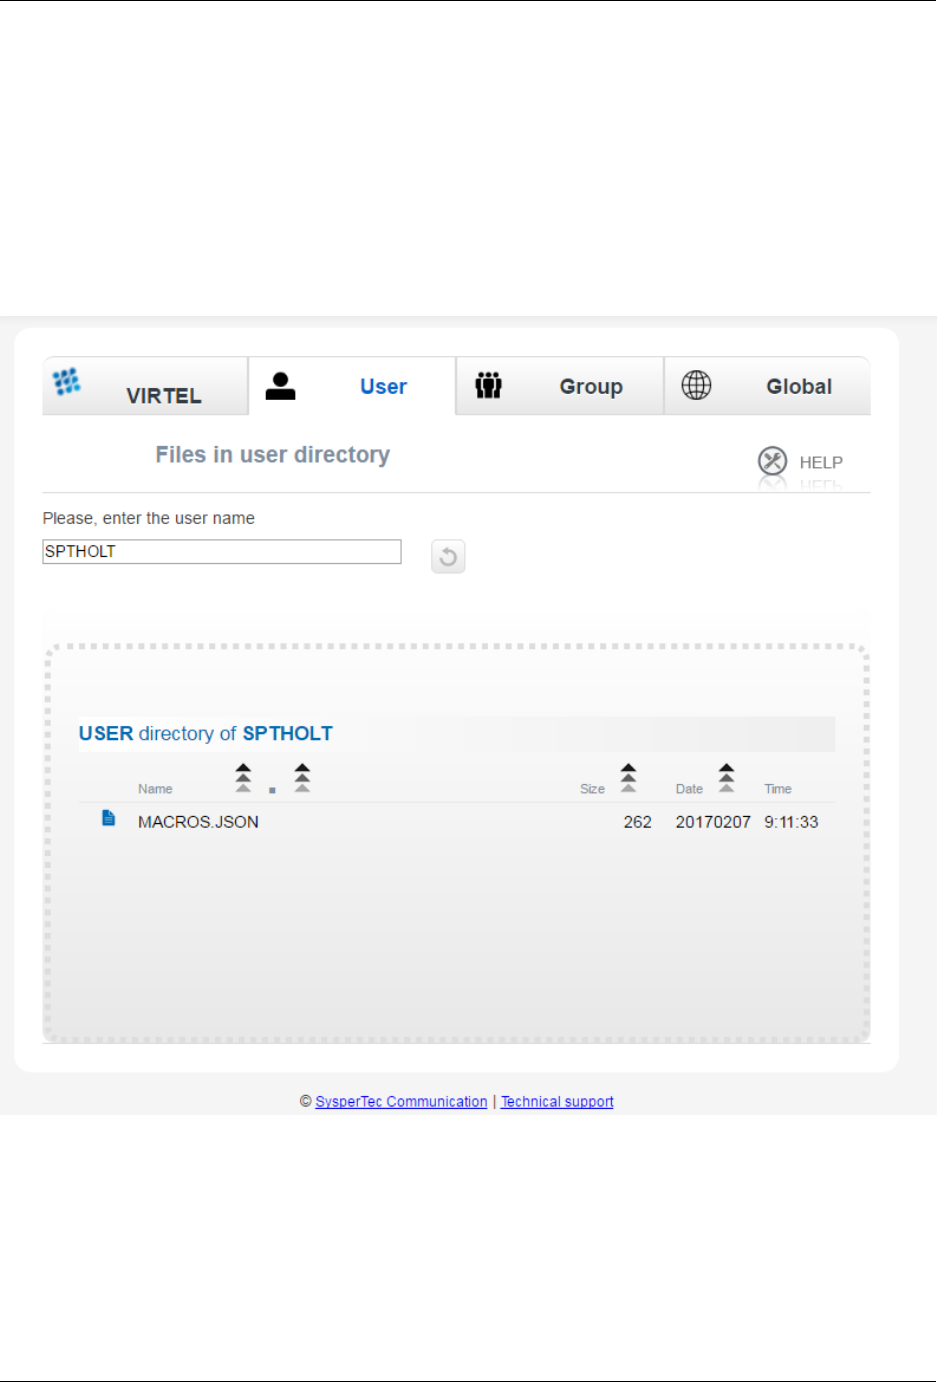
Virtel User Guide, Release 4.57
Updating macros with the Global Directory
Making macros available to users
Any macro that an Administrator creates can be made available to users either at the Global, Group or
Userid level. To make macros available at a userid level, select the User TAB from the DDI main panel.
Enter the user’s USERID in the user name eld and press the “Green Tick” icon. This will create an area
within the DDI macro repository. Upload the macros.json le you wish to make available to this user by
dragging the le into the area designated by the dotted lines. This will initiate an upload of the macro into
the User’s userid area.
Creating a macros.json le for a user
As with any le within the DDI repository, a context menu can be brought up by right clicking on the macro
le name.
1.15. Macros 149
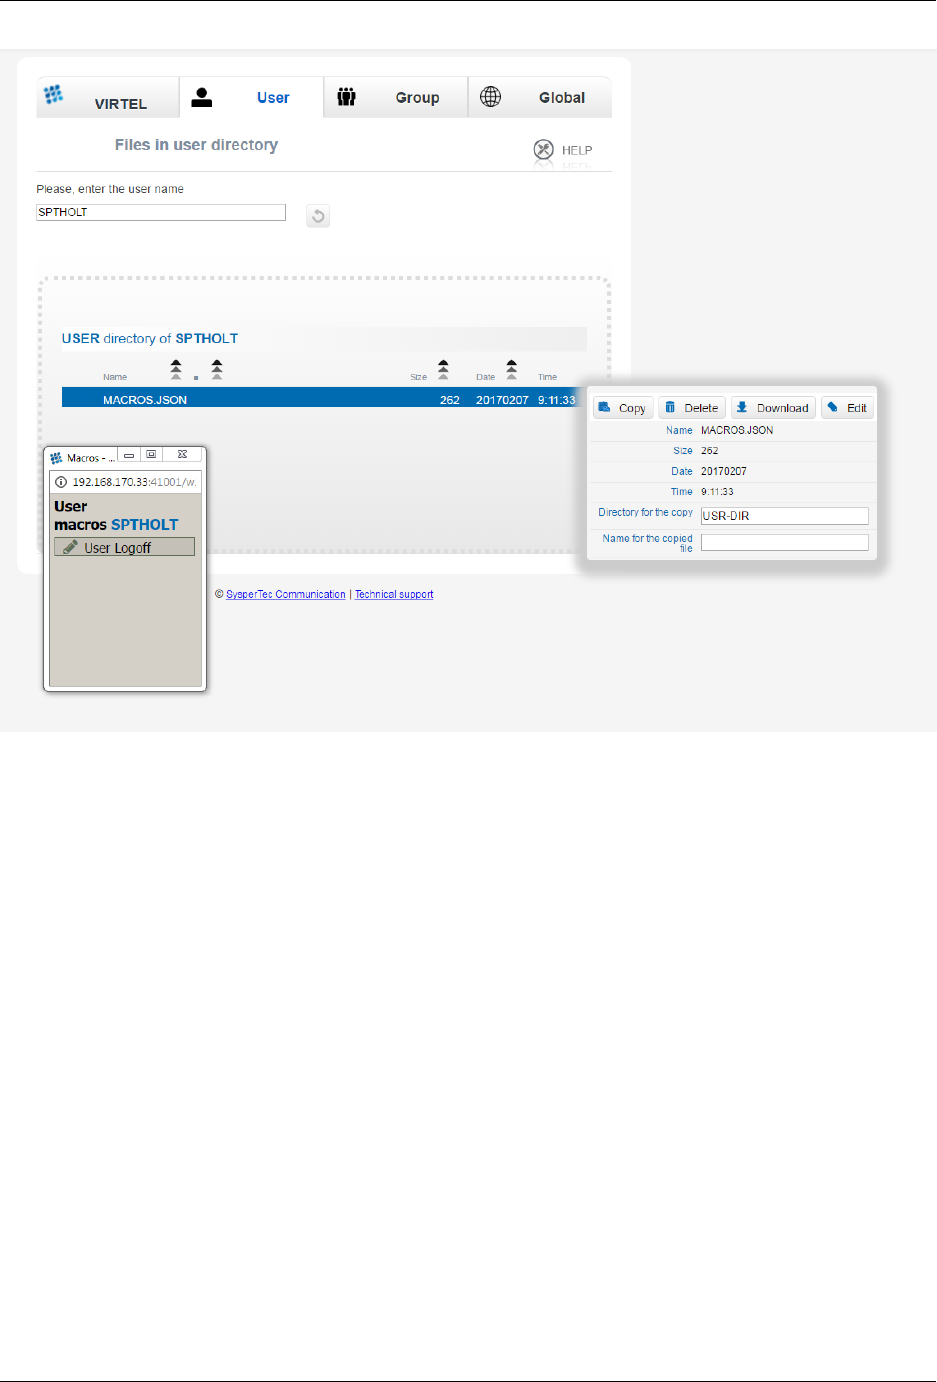
Virtel User Guide, Release 4.57
Editing a Users macro
An Administrator can update any macros held within the DDI repository. Changes will be reected in the
user’s local storage once the user open’s their macro display with the “Green” ICON arrow. The following
display shows the DDI repository macros as displayed in the user’s browser. Remember that User macros
are related to the User’s Userid and associated Group. This ability to associate macros to a Userid and
Group means that all macros, related to business assets, can be managed and maintained in a central DDI
repository. Maintenance can be applied centrally and distributed out to the User’s local storage browser.
If allowed by the Administrator, Users will only have the option of modifying their own user macros. Any
changes made by a user will be uploaded to the mainframe and stored in the User’s macro area within the
DDI repository. This keeps the user macro modications in sync with the DDI repository.
150 Chapter 1. The Virtel Engine
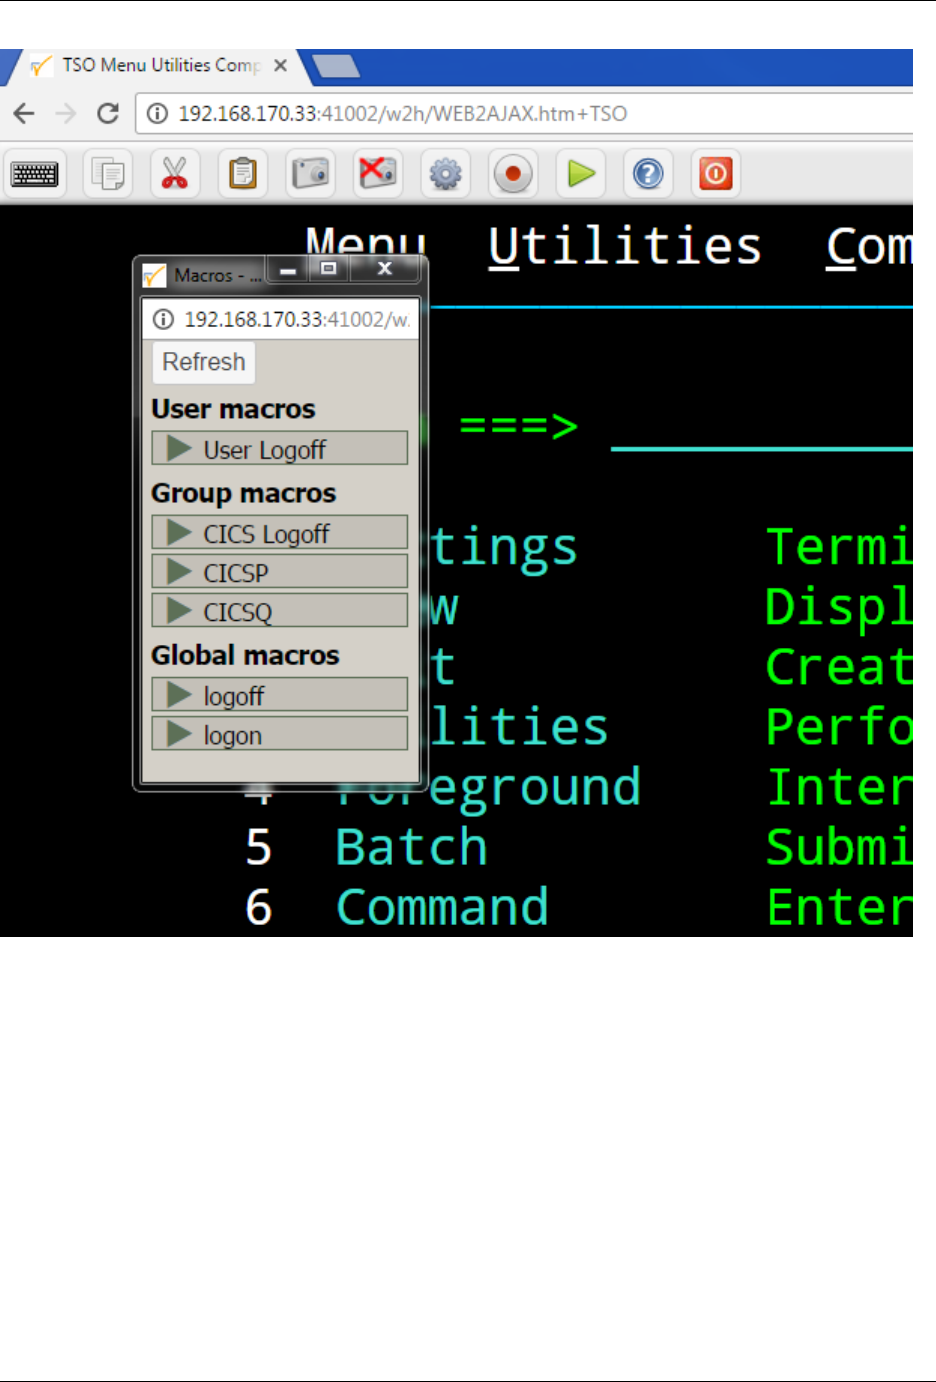
Virtel User Guide, Release 4.57
User display of the DDI macro interface
Updating DDI macros at the Group level
To make macros available at a Group level, select the Group TAB from the DDI main panel. Enter the
Group name in the group name eld and press the “Green Tick” icon. This will create an area within the
DDI macro repository were macros for this group can be held. Upload the Group macros.json le you wish
to make available to this group by dragging the le into the area designated by the dotted lines. This will
initiate an upload of the Group macro.
1.15. Macros 151

Virtel User Guide, Release 4.57
Macro Group Directory List
To obtain the associated context menu right click on the le name – macros.json. This will provide the
additional functionality to Edit, Download or Delete the macro.
Notes:
DDI les
Macros are maintained in the macros.json le. Each macro mode, local or DDI (User, Group and Global) will
maintain a separate macros.json le. Virtel’s DDI can also be used to store les other than the macros.json
le. Things like corporate images, bespoke Javascript deployments etc. When copying les to DDI you must
use the DDI drag and drop interface. Do not use the Administration drag and drop interface.
Save As feature
The “SAVE AS” function does not have the ability to re-assign key mapping. This can only be done through
the macro editor. To clone a macro with a new key mapping perform the following operations:-
Open macro “A”
Save as “B”
Open macro “B” in Editor.
Save with key board mapping.
152 Chapter 1. The Virtel Engine

Virtel User Guide, Release 4.57
1.15.8 Automatic refresh of macros in local storage
Updates to DDI macros held in local storage can only be updated once the user refreshes or redisplays the
macros. This triggers the download from the mainframe. Macros are not “automatically” updated in the
background due to the performance. If an Administrator updates a macro on the mainframe that update
will only be available to the user when the user redisplays or refreshes his local storage by using the “Green”
display ICON. This behaviour can be overridden by setting the “macrosAutoRefresh” value in w2hparm.
For example, setting the value “daily” will update the local storage of the macros from the Virtel storage
once a day. This will ensure that users have the latest copy of the macros.json les.
1.15.9 Format of the macros.json le
Each macros.json le contains a set of macros as shown in the example below:
{"macros": [
{"def":["PF3",61,120,"ENTER",105,115,112,102,"ENTER",46,53,"ENTER"],
"name":"macro1"},
{"def":[105,115,112,102,"ENTER"],
"name":"macro2"}
],
}
Example of a macros.json le
An empty le (containing no macros) contains only:
{"macros": []}
Example of an empty macros.json le
1.15.10 Available macro commands
The following commands can be used in a macro le :
"any string of characters to input into 3270 screen"
move(pos)
copy(startRow,startCol,endRow,endCol)
paste(pos)
paste(pos,nbRows,nbCols)
key(keyIdentifier)
List of available key identifiers (case sensitive!!):
- ENTER
- CLEAR
- ATTN
- PF[1-24]
- PA[1-3]
- InsToogle
- NewLine
- Home
- Tab
- Backtab
- Bksp
1.15. Macros 153
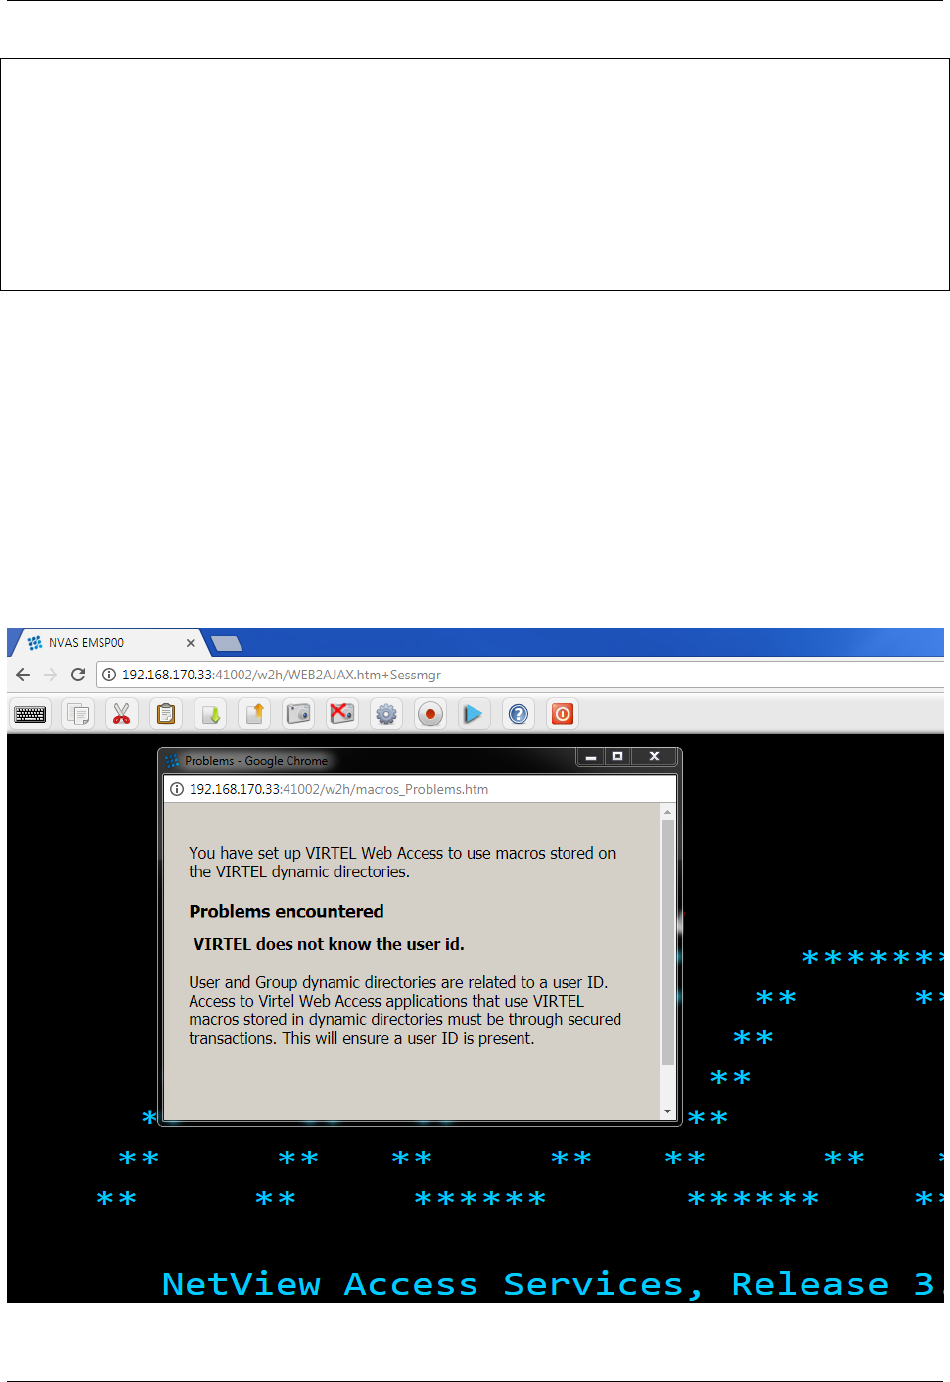
Virtel User Guide, Release 4.57
- Left
- Right
- Down
- Up
- End
- ErEof
- Del
- Reset
- FieldMark
- Dup
1.15.11 DDI Macro Errors
Error message : Failed to upload the user macros to Virtel (Status code 400 Bad Request). This message
can appear when editing a macro. Virtel is unable to reect your macro changes in the USR-DIR directory.
This could be because:-
• Virtel is running in a READ ONLY mode.
• You do not have the authority to upload to the USR-DIR. See transaction xxx-80U.
If you get the following Error Panal when trying to execute a DDI macro it could be due to the fact thet the
transaction you are running doesn’t have security set. Make sure the transaction is secure with “Security =
basic”. DDI requires USERID and GROUP information. This can only be obtained with secure transactions.
154 Chapter 1. The Virtel Engine

Virtel User Guide, Release 4.57
1.16 VIRTEL Web Modernisation
1.16.1 VIRTEL Presentation modules and Scenarios
Without modifying existing applications, VIRTEL oers several possibilities for dynamic modication of
3270 data extracted by the {{{GENERATE-HTML}}} tag before it is presented in an HTML page. For
instance, it is possible to dene, for each eld selected, a list of permitted values, or to generate a URL as a
function of the value of a xed eld.
Note: As opposed to the specic tags presented in the Virtel Web Access section, the set of presentation
rules in Web Modernisation are not dened in an HTML page, but as an assembled program. The program
can be stored as a .390 object module in the scenario directory SCE-DIR or as a linked module in the Virtel
loadlib. The default for Virtel V4.57 is to maintain these .390 object modules in the SCE-DIR. VIRTEL
scenarios were originally assembled and link-edited into a load library concatenated to the DFHRPL DD
statement in the VIRTEL started task. From VIRTEL version 4.48 onwards, there is also the possibility
of generating, syntax checking, and compiling scenarios using Virtel Studio on an Eclipse platform, and
uploading the resulting executable code into a VIRTEL directory stored in a VSAM le. This is now the
default for Virtel.
An HTML presentation module is made up of several scenarios composed of the following instructions:
SCREENS, SCRNEND, SCENARIO, ACTION$, CONVERT$, COPY$, DECLARE$, ERROR$, FIELD$,
GOTO$, IF$, MAP$, SET$, TOVAR$, VIRSV$ and END. These instructions are assembler macros con-
tained in the VIRT457.SCRNAPI.MACLIB library (for MVS) or the VIRT457.VIRSAPI SUBLIB library
(for VSE). The other instructions included in this library are for internal use and must not be used directly.
Each module begins with a SCREENS instruction, is terminated by a SCRNEND instruction, and must
contain at least one SCENARIO.
The types of scenarios that can be stored in a presentation module are:-
• Identication scenario. Specied on the Entry Point denition. Processes inbound calls and cqn be
used to route requests to other Entry points.
• Initial scenario. Invoked during transaction connection.
• Final scenario. Invoked during transaction disconnection.
• Input scenario. Invoked to process inbound message data - from the browser.
• Output scenario. Invoked to process outbound message data - to the browser.
1.16.2 Scenarios stored in a load library
After compilation, the resulting module must be placed in one of the libraries dened in the DFHRPL
concatenation in the VIRTEL started task (for MVS), or in one of the libraries in the LIBDEF SEARCH
statement (for VSE). Refer to member ASMSCEN in the VIRTEL SAMPLIB for an example job to assemble
and link a presentation module in z/OS.
The F VIRTEL,NEW=scenario-name command (see VIRTEL Messages and Operations Guide) allows VIR-
TEL to take into account the new version of a scenario assembled and link-edited into a load library.
1.16.3 Scenarios stored in a VSAM directory
If the “Directory for scenarios” eld in the Entry Point is non-blank, VIRTEL will load scenarios from the
specied directory instead of from the DFHRPL load library. Scenarios in VSAM are ordinary VIRTEL
1.16. VIRTEL Web Modernisation 155
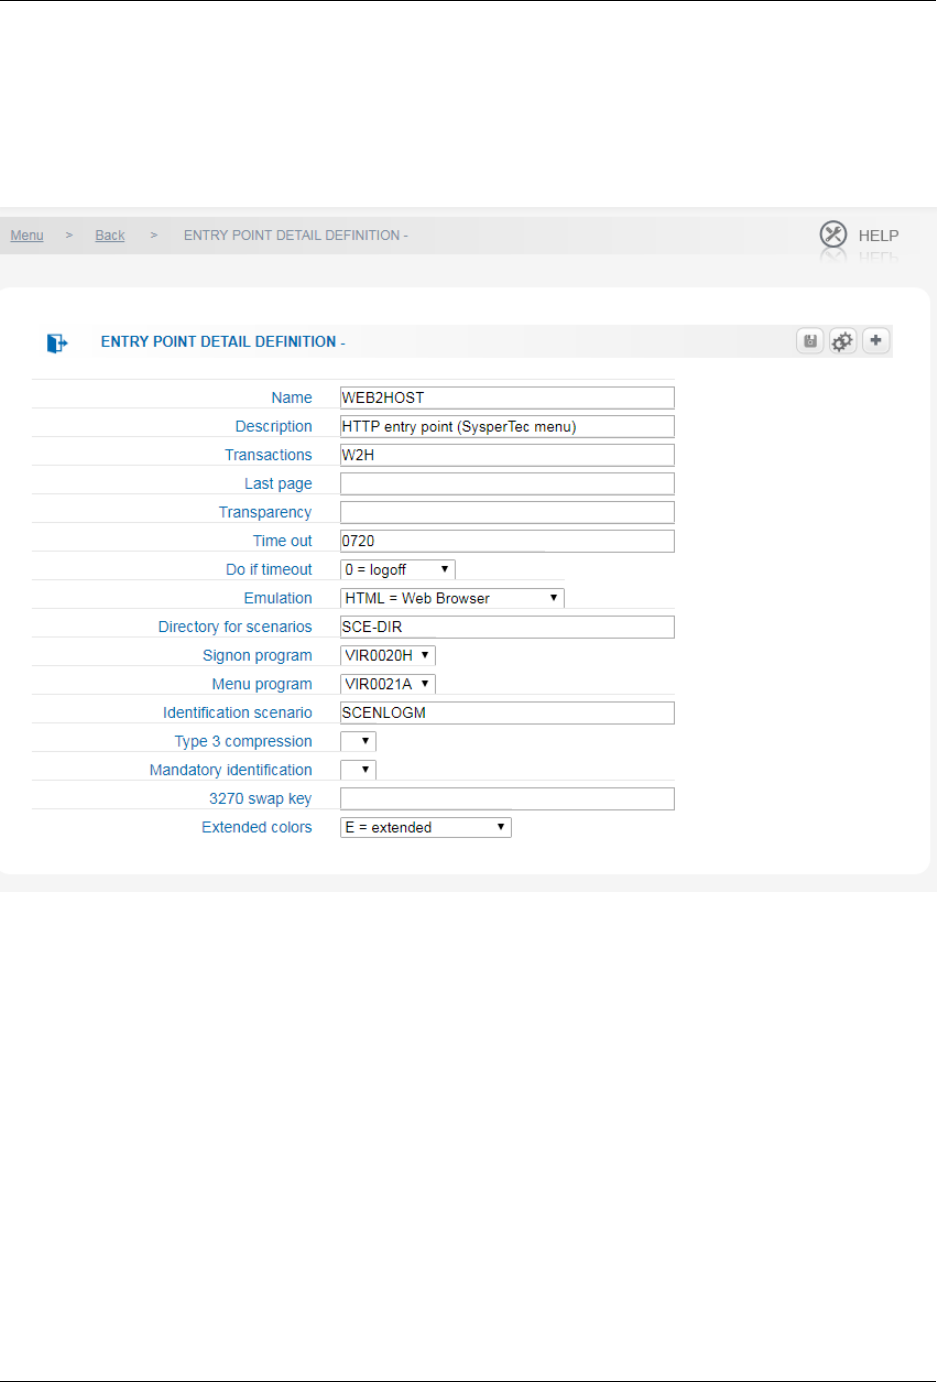
Virtel User Guide, Release 4.57
les and their extension must be .390; they are normally assembled on a workstation and uploaded to
the “Directory for scenarios” by means of Virtel Studio. If a new version of a scenario is uploaded in a
VSAM directory, the new version will be used immediately whenever a new connection needs it; no VIRTEL
command is necessary. If a terminal is already executing the old version of the scenario, it is not aected,
and continues with a copy of the old version. If another scenario with the same name exists in another
directory, it is not modied by the upload.
Entry Point display with SCE-DIR for scenarios
1.16.4 Using a presentation module
In order to be used, the name of the HTML presentation module must be specied in the “Initial Scenario”,
“Final Scenario”, “Input Scenario” or “Output Scenario” eld of the transaction supporting access to the
application (see “Parameters of the transaction” in the VIRTEL Connectivity Reference manual), or in
the “Identication scenario” eld of the entry point (see “Parameters of the entry point” in the VIRTEL
Connectivity Reference manual).
1.16.5 Types of scenario
A presentation module can contain one of each of the following types of scenario:
156 Chapter 1. The Virtel Engine

Virtel User Guide, Release 4.57
Identication scenario
An identication scenario is invoked when an inbound call is assigned to an entry point. Because an identi-
cation scenario is executed before a transaction is selected and before connecting to a host application, the
scenario may use the SET$ TRANSACTION instruction to select the transaction which species the host
application (if any) to be used. The identication scenario is required when the entry point species the
name of this presentation module in its “Identication scenario” eld.
Initial scenario
An initial scenario is invoked when an &/S order is processed in a connection script (see “Connection /
Disconnection Scripts” in the VIRTEL Connectivity Reference manual). The initial scenario is required
when the “TIOA at logon” eld of the transaction contains &/S and the name of the presentation module
is coded in the “Initial Scenario” eld of the transaction.
Final scenario
A nal scenario is invoked when an &/S order is processed in a disconnection script (see “Connection /
Disconnection Scripts” in the VIRTEL Connectivity Reference manual). The nal scenario is required when
the “TIOA at logo” eld of the transaction contains &/S and the name of the presentation module is coded
in the “Final Scenario” eld of the transaction.
Input scenario
An input scenario is invoked once at the start of the session (on receipt of the rst message from the
application to the terminal after the connection has been established with the host application), and again
on receipt of each inbound message (from the terminal to the application). The input scenario is required
when the name of the presentation module is coded in the “Input Scenario” eld of the transaction.
When the input scenario is invoked on receipt of the rst outbound message (from the application to the
terminal), the scenario may terminate with a CASE$ FAIL or an IF$ FAIL instruction. In this case, the
outbound message is discarded and the input scenario is invoked again on receipt on the next outbound
message from the application. This process continues until the input scenario terminates with a CASE$
SUCCESS or IF$ SUCCESS instruction, or reaches SCENARIO END, after which the input scenario stops
processing outbound messages and is subsequently invoked for each inbound message.
Output scenario
An output scenario is invoked on receipt of each outbound message (sent from the application to the terminal).
The output scenario is required when the name of the presentation module is coded in the “Output Scenario”
eld of the transaction.
Developing presentation modules with Virtel Studio
Although presentation modules can be hard coded as an assembler routine and loaded into a Load library
the recommended approach is to use the Eclipse Virtel Studio development aid. Virtel Studio is a Eclipse
framework which runs on a PC. It enables a developer to assemble and upload presentation modules to a
Virtel Server.
1.16. VIRTEL Web Modernisation 157
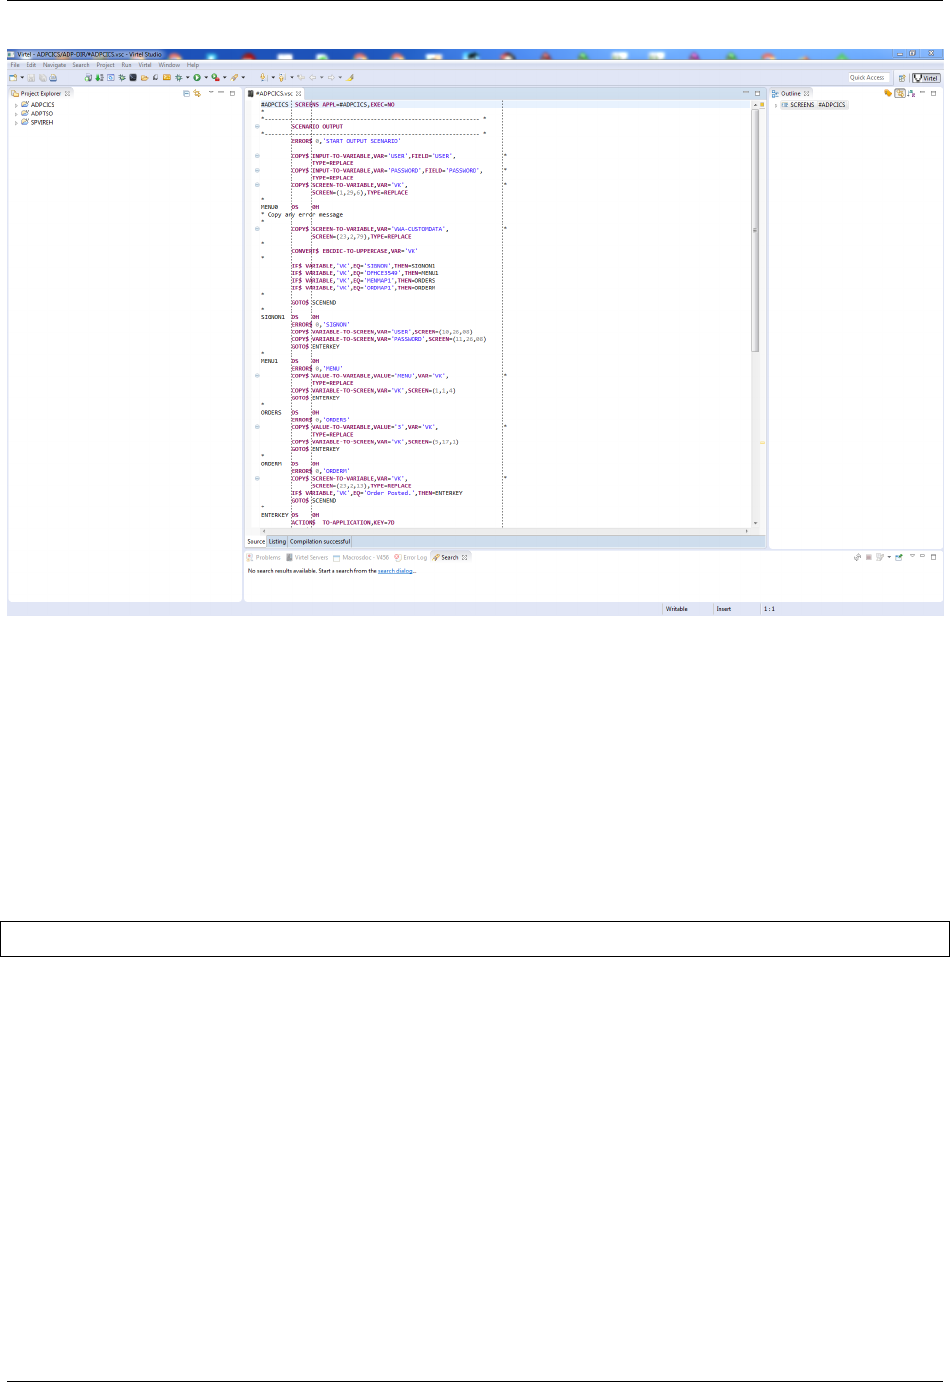
Virtel User Guide, Release 4.57
Virtel Studio presentation IDE
Virtel Studio assembles a VSC module and produces a .390 object deck. This is loaded upto the Virtel
server. Virtel Studio only supports scenarios within a VSAM directory.
1.16.6 Virtel Scenario language
SCENARIO instructions
This instruction encloses ACTION$, CONVERT$, COPY$, DECLARE$, ERROR$, FIELD$, GOTO$, IF$,
MAP$, SET$, TOVAR$, and VIRSV$ instructions.
SCENARIO value
value Determines the type of processing. The permitted values are:
IDENTIFICATION Marks the start of the identication scenario.
INITIAL Marks the start of the initial scenario.
FINAL Marks the start of the nal scenario.
INPUT Marks the start of the input scenario.
OUTPUT Marks the start of the output scenario.
END Marks the end of a scenario. In the case of an input or output scenario, the scenario
is stopped, but will resume on receipt of the next input or output message.
DISCARD Marks the end of a scenario. In the case of an input or output scenario, the
scenario stops, and does not resume for the remainder of the life of the VIRTEL trans-
action.
158 Chapter 1. The Virtel Engine

Virtel User Guide, Release 4.57
SUBROUTINE Marks the start of a subroutine scenario which must ends with a SCE-
NARIO END instruction. A subroutine scenario is invoked using PERFORM$ instruc-
tion. A subroutine scenario can invoke another subroutine scenario, and so on up to
3 levels. A sample of such type of scenario is available in the PREFORM$ instruction
description.
SUCCESS Stops scenario processing but continue normal VIRTEL processing of the cur-
rent message.
SCREENS instruction
This instruction species the name of the presentation module and its execution mode. Each SCREENS
instructions is terminated by a SCRNEND instruction and may contain only SCENARIO or ERROR$
instructions.
modname SCREENS APPL=value1,EXEC=value2
modname Name of the presentation module (8 characters maximum). Under certain conditions, this value
will allow calls to a script from a subsystem by way of a CALL command.
APPL Species the name of the target transaction when the presentation module is called by a program.
EXEC Determines the mode in which the script is used. The possible values are:
YES The script may be called by a CALL from a subsystem with the possible passing of
parameters
NO The script may not be externally called.
SCRNEND instruction
This instruction marks the end of a presentation module.
SCRNEND
ACTION$ instruction
This instruction species actions to be taken.
ACTION$ DISCONNECT
Terminate the application.
ACTION$ DISCONNECT
ACTION$ REFRESH-TERMINAL
This instruction allows a scenario to trigger a 205 response to the Long Poll session. This 205 response will
then tell the JavaScript to refresh the terminal 3270 emulation screen, so that the user can see whatever was
changed by the scenario.
ACTION$ REFRESH-TERMINAL
ACTION$ SERVE-ANOTHER-USER
Indicates that the transaction is now a service transaction (see “Service Transactions”).
1.16. VIRTEL Web Modernisation 159
Virtel User Guide, Release 4.57
ACTION$ SERVE-ANOTHER-USER
ACTION$ TERMSESS
Requests disconnection from the host application after the next message has been sent to the client’s browser.
ACTION$ TERMSESS
ACTION$ TO-APPLICATION
Send a message to the application, consisting of the input elds in the screen image buer and the function
key specied by pfkey.
ACTION$ TO-APPLICATION,KEY=pfkey, X
AND=(WAIT|SCRIPT,'string'), X
AND=(PROCESS-RESPONSE,'string'), X
AND=(DO-NOT-PROCESS-RESPONSE), X
MAXTIME=nnn, X
LASTMSG=YES,ASYNCH=YES
pfkey a 3270 AID key. The allowable values are:
Value Description
F1-F9 PF1 to PF9
7A-7C PF10 to PF12
C1-C9 PF13 to PF21
4A-4C PF22 to PF24
6C PA1
6E PA2
6B PA3
6D Clear
7D Enter
FD Attn
AND=(WAIT,’string’) (optional) after sending the message to the application, the scenario waits until
the application sends a message containing the specied character string. Intervening messages are
processed by VIRTEL but are not passed to the scenario or sent to the terminal.
AND=(SCRIPT,’string’) (optional) after sending the message to the application, VIRTEL executes the
string as a Connection/Disconnection script. See “Connection/Disconnection Scripts” in the Virtel in
the VIRTEL Connectivity Reference manual.
AND=(PROCESS-RESPONSE,’string’) (optional) allows an input scenario to explicitly request that
control is to be returned when the next message is received from the application. The string is op-
tional. If specied, after sending the message to the application, VIRTEL executes the string as a
Connection/Disconnection script. See “Connection/Disconnection Scripts” in the VIRTEL Connectiv-
ity Reference manual.
Note: For an input scenario, AND=(PROCESS-RESPONSE) is the default value immediately after the
connection.
AND=(DO-NOT-PROCESS-RESPONSE) (optional) allows an input scenario to explicitly state that
is does not want to process the response from the application. After this instruction, the input scenario
will not see any messages from the application, only input messages from the terminal.
160 Chapter 1. The Virtel Engine

Virtel User Guide, Release 4.57
Note: For an input scenario, AND=(DO-NOT-PROCESS-RESPONSE) is the default value once the
connection stage is passed.
MAXTIME=nnn (optional) species the maximum time, in hundredths of a second, that the scenario
will wait for a message from the application. When this time expires, the APPLICATION-TIMEOUT
ag will be set (see “IF$ instruction”) and the scenario will resume execution. If the MAXTIME
parameter is not specied, then the scenario will wait indenitely, or until VIRTEL disconnects the
session when the timeout value of the entry point is exceeded.
LASTMSG=YES (optional) requests disconnection after the application responds to the pfkey sent.
ASYNCH=YES (optional) indicate that the sending of the message to the application is not to prevent
the normal screen display.
When the ACTION$ TO-APPLICATION instruction is executed in an output scenario, or in an input
scenario before the rst message has been delivered to the terminal, the specied function key is sent
to the application and the scenario is suspended awaiting the next outbound message from the host
application. When the next outbound message arrives, the scenario is resumed starting with the
next instruction after the ACTION$ TO-APPLICATION instruction. Subsequent outbound messages
will cause the scenario to resume execution again at the instruction after the latest ACTION$ TO-
APPLICATION instruction until a SCENARIO END instruction is executed. After a SCENARIO
END instruction is executed, subsequent outbound messages will once again cause the output scenario
to resume at the beginning.
When the ACTION$ TO-APPLICATION instruction is executed in an input scenario driven by an
inbound message, the data in the inbound message is sent to the application together with the 3270
AID key specied in the KEY parameter. Subsequent inbound messages will cause the input scenario
to resume execution again at the instruction after the ACTION$ TO-APPLICATION instruction
until a SCENARIO END instruction is executed. After a SCENARIO END instruction is executed,
subsequent inbound messages will once again cause the input scenario to resume at the beginning.
To allow an input scenario to see the responses from the host application in addition to the input mes-
sages from the terminal, the ACTION$ TO-APPLICATION instruction contains an AND= parameter
which allows the scenario to explicitly request whether or not it expects to process the application
response message following the ACTION$ instruction.
ACTION$ TO-TERMINAL
Send the current contents of the screen image buer to the terminal.
ACTION$ TO-TERMINAL
When the ACTION$ TO-TERMINAL instruction is executed in an input scenario, the contents of the screen
image buer are sent to the terminal. The scenario may use instructions such as COPY$ VARIABLE-TO-
SCREEN to place data in the screen image buer before issuing the ACTION$ TO-TERMINAL instruction.
ACTION$ Examples
ACTION$ TO-APPLICATION,KEY=F3
Send F3 (PF3) to the application and wait for the next outbound message. When the application responds,
continue with the next instruction in the scenario.
ACTION$ TO-APPLICATION,KEY=7D, *
AND=(WAIT,'Password ===>'),MAXTIME=100
1.16. VIRTEL Web Modernisation 161

Virtel User Guide, Release 4.57
Send ENTER to the application and wait for the application to send a message containing the string “Pass-
word ===>”. If the requested message does not arrive within 1 second, then set the APPLICATION-
TIMEOUT ags and continue the scenario.
ACTION$ TO-APPLICATION,KEY=7D, *
AND=(SCRIPT, *
'Signon to CICS&&/W&&*F34BE9&&/A&&/T')
Send ENTER to the application before sending two tab key followed by a message containing the string
“Test”.
ACTION$ TO-APPLICATION,KEY=7D, *
AND=(SCRIPT,'&&>&&>Test&&/T')
Send ENTER to the application, wait for the application to send a message containing the string “Signon to
CICS”, then send F3 to the application, and send the screen image to the terminal. Note: the ampersands
are doubled to conform with assembler syntax requirements.
ACTION$ TO-APPLICATION,KEY=6D,LASTMSG=YES,ASYNCH=YES
Exit from the scenario (equivalent to IF$ … SUCCESS), display the screen as normal, send 6D (CLEAR) to
the application, and when the application responds, disconnect.
ACTION$ TO-APPLICATION,KEY=7D, *
AND=(PROCESS-RESPONSE)
The input scenario will resume at the next instruction when the next message is received from the host
application.
ACTION$ TO-APPLICATION,KEY=7D, *
AND=(DO-NOT-PROCESS-RESPONSE)
The input scenario will not be called again for messages received from the host application. It will only be
called for input messages.
ACTION$ TO-APPLICATION,KEY=7D, *
AND=(PROCESS-RESPONSE,'&&*F34BE9&&/A')
This is the same as for PROCESS-RESPONSE but with execution of a script in addition. Note: the
ampersands are doubled to conform withinh assembler syntax requirements.
CASE$ instruction
This instruction tests a value in a 3270 screen position, or a value in a VIRTEL variable, and directs the
subsequent processing ow according to the value.
[CASE$ (row,col,len), | CASE$ 'varname', | CASE$ CURRENT-SCREEN-POSITION,]
LTRIM=('string1','string2',...),
RTRIM=('string1','string2',...),
(EMPTY,process0),
(condition,'value',process1),
(condition,'*varname1',process2),
(condition,STRING,'value',process3),
(condition,VARIABLE,'varname1',process4),
...
ELSE=processx
162 Chapter 1. The Virtel Engine

Virtel User Guide, Release 4.57
(row,col,len) Species the row, column, and length of the 3270 screen data (see Note 1).
varname Species the name of a VIRTEL variable (must be placed in quotes)
CURRENT-SCREEN-POSITION The tested variable is located at the current screen position as set
or incremented by “SET$ SCREEN-POSITION”.
LTRIM (optional) Removes a set of characters from the start of a list variable (see Note) before copying
it).
‘string1’ [,’string2’, …] one or more strings of text to be removed from the start of the
variable.
RTRIM (optional) Removes a set of characters from the end of a list variable (see Note) before copying it.
‘string1’ [,’string2’, …] one or more strings of text to be removed from the end of the
variable.
EMPTY Species whether the tested is empty (see Note 2).
condition Species whether the data tested must be equal (EQ), not equal (NE), prexed by (BEGIN),
less than (LT), less than or equal (LE), greater than (GT), greater than or equal (GE), or must contain
(CONTAINS) the specied value.
value Species the value against which the data is tested (must be placed in quotes)
process1,2,… Species the address of the branch exit of the script if the condition is satised. Permitted
values are:
label instruction label at which execution of the scenario is to continue.
FAIL reserved word indicating that the scenario is to be terminated and the current message
is to be discarded. The scenario will be called again on receipt of the next outbound
message from the application.
SUCCESS reserved word indicating that the scenario is to be terminated and the current
message is to be presented to the user. This is equivalent to branching to a SCENARIO
END instruction.
processx Species the address of the branch exit of the script if none of the conditions is satised. Permitted
values are identical to process1.
Note: Note 1: For row, col and len, a value of ‘=’ means the value of the current row col or len as set by
“SET$ SCREEN-POSITION”.
Note 2: If the variable being tested does not exist, it is not considered empty and the CASE$ branches at
the ELSE=label.
Note 3: Any number of (condition,’value’,process) parameters may be specied, within the limits set by the
assembler. Use assembler conventions (non-blank in column 72 and continuation starting in column 16) to
continue the statement over more than one line.
CASE$ Examples
CASE$ 'VAR1', *
(EQ,'DIT000',MENU000), * : exactly equals 'DIT000'
(BEGIN,'DIT',MENUOTH), * : starts with 'DIT' ?
ELSE=ERR999
1.16. VIRTEL Web Modernisation 163

Virtel User Guide, Release 4.57
Example of testing a variable with CASE$.
* loop on a variable:
LOOP1 FOREACH$ VALUE-IN-VARIABLE,VAR='TOTO'
CASE$ CURRENT-FOREACH-VARIABLE-OF,LOOP1,(EQ,'XXXX',ET1)
COPY$ SYSTEM-TO-VARIABLE,VAR='I1',LENGTH=2, *
FIELD=(VALUE-OF,CURRENT-FOREACH-INDEX),TYPE=REPLACE
COPY$ SYSTEM-TO-VARIABLE,VAR='V1', *
FIELD=(VALUE-OF,CURRENT-FOREACH-VARIABLE),TYPE=REPLACE
ERROR$ 0,'TOTO: ','*I1','==','*V1'
ENDFOR$ LOOP1
Example of CASE$ with FOR loops.
CONVERT$ instruction
This instruction allows a scenario to translate a VIRTEL variable to or from EBCDIC, or to convert a
variable to upper or lower case.
CONVERT$ direction,VAR='varname',TABLE='tabname'
direction species the translation requested. Possible values are:
• ASCII-TO-EBCDIC
• EBCDIC-TO-ASCII
• UTF8-TO-EBCDIC
• EBCDIC-TO-UTF8
• EBCDIC-TO-UPPERCASE
• EBCDIC-TO-LOWERCASE
varname is the name of a VIRTEL variable. The variable name must be placed in quotes.
tabname is the name of the translate table to be used for UTF-8 conversion. The possible values are given
under the description of the DEFUTF8 parameter of the VIRTCT. The table name must be placed in
quotes. If the TABLE parameter is not specied, then the table specied by the DEFUTF8 parameter
is used as a default. VIRTCT parameters are described in the VIRTEL Installation Guide.
164 Chapter 1. The Virtel Engine

Virtel User Guide, Release 4.57
CONVERT$ Examples
GETGOOG SCREENS APPL=GETGOOG
*
SCENARIO INITIAL
*
SET$ ENCODING,UTF-8,'IBM1147'
COPY$ INPUT-TO-VARIABLE,FIELD='MYINPUT',VAR='QUESTION' * URL
IF$ NOT-FOUND,THEN=NOSCENAR
COPY$ OUTPUT-FILE-TO-VARIABLE,FILE='getreq.txt', * Build req.
VAR='QUERY'
CONVERT$ UTF8-TO-EBCDIC,VAR='QUERY',TABLE='IBM1147'
*
OPTION$ FOR-HTTP, *
(METHOD,'GET'), *
(TO,'/search'), *
(TEXT,'*QUERY'), * Req. variable
(SITE,'www.google.com'), *
(HEADER,'Accept: text/html'), *
(FILE-IN,'ANSWER'), * GOOGLE Response
(RET-CODE,'HTTP-RC'), * Return Code
TOVAR='MYPARMS'
*
SEND$ TO-LINE,LINE='G-GOOG',PARMS='MYPARMS',ERROR=ERRSCENAR Call GOOGLE
*
CONVERT$ UTF8-TO-EBCDIC,VAR='ANSWER',TABLE='IBM1147' Convert Response
COPY$ VALUE-TO-VARIABLE,VAR='ERRORMESSAGE', *
VALUE='Your message was sent '
SCENARIO END
*
ERRSCENAR EQU *
COPY$ VALUE-TO-VARIABLE,VAR='ERRORMESSAGE', *
VALUE='Sorry, your message could NOT be sent '
ERROR$ 1
*
NOSCENAR EQU *
SCENARIO END
*
SCRNEND
END ,
Example of CONVERT$ in a scenario
COPY$ instruction
This instruction allows various copy operations within the context of a scenario.
COPY$ FIELD-NAME-TO-VARIABLE
Copies the name of an HTTP input eld into a VIRTEL variable.
COPY$ FIELD-NAME-TO-VARIABLE,SCREEN=(row,col),VAR='name2',TYPE=type
row,col starting row and column of the eld on the screen.
name2 the name of a VIRTEL table variable. If the variable does not exist, it will be created.
type (optional) may indicate one of the following values:
1.16. VIRTEL Web Modernisation 165

Virtel User Guide, Release 4.57
TYPE=REPLACE indicates that the new value will replace the existing value of the
variable. If TYPE=REPLACE is not specied, and the variable already exists, the new
value will be appended to any existing values.
COPY$ INPUT-FILE-TO-VARIABLE
Copies the contents of a le into a VIRTEL variable. This instruction can be used in an input scenario which
processes an HTTP request or SMTP input message having one or more attached les.
COPY$ INPUT-FILE-TO-VARIABLE,VAR='varname',FILE='filename'
varname the name of a VIRTEL table variable. If the variable does not exist, it will be created. If the
variable already exists, the new value will be appended to any existing values. If this parameter is
omitted, the variable name $INFILE$ is used.
lename the name of a le attached to the HTTP request or SMTP message. If this parameter is omitted,
the rst attached le will be read.
If the input request does not contain the requested le, the NOT-FOUND condition will be raised. This
condition can be tested by means of the “IF$ instruction”.
COPY$ INPUT-TO-SCREEN
Copies the value of an HTTP query parameter to a given position on the 3270 screen.
COPY$ INPUT-TO-SCREEN,FIELD='name1',SCREEN=(row,col,len),TYPE=type
name1 the name of an HTTP query parameter (see “VIRTEL URL formats”)
row,col,len row, column, and length of the destination eld on the screen.
type (optional) may indicate one of the following values:
TYPE=ERASE-FIELD indicates that the destination eld is cleared to nulls before copy-
ing the data.
If the parameter name1 is not present in the input request, the NOT-FOUND condition will be raised. This
condition can be tested by means of the “IF$ instruction”.
If the destination row and column specify a protected eld of the 3270 screen, the scenario terminates
abnormally and message VIRS129E is issued to the system console. If the destination eld is unprotected
but the input value is too long for the eld, the data will be silently truncated.
COPY$ INPUT-TO-VARIABLE
Copies the value of an HTTP query parameter into a VIRTEL variable.
COPY$ INPUT-TO-VARIABLE,FIELD='name1',VAR='name2',TYPE=type
name1 the name of an HTTP query parameter (see “VIRTEL URL formats”)
name2 the name of a VIRTEL table variable. If the variable does not exist, it will be created.
type (optional) may indicate one of the following values:
TYPE-OFFSET-LENGTH indicates that the input parameter consists of two numeric
values separated by a comma. The rst numeric value is converted to binary and stored
in the rst 8 bytes of the result variable, and the second numeric value is converted to
binary and stored in the next 4 bytes of the result variable. The 12-byte value thus
produced is in the format required by the OFFAREA parameter for the read-partial and
write-append functions of the VIRSVFIO service program.
166 Chapter 1. The Virtel Engine

Virtel User Guide, Release 4.57
TYPE=REPLACE indicates that the new value will replace the existing value of the
variable. If TYPE=REPLACE is not specied, and the variable already exists, the new
value will be appended to any existing values. If the parameter name1 is not present
in the input request, the NOT-FOUND condition will be raised. This condition can be
tested by means of the “IF$ instruction”.
COPY$ LIST-TO-VARIABLE
Copies a a list of values (either constants or variables) to a variable.
COPY$ LIST-TO-VARIABLE,VAR='varname',
LIST=(STRING,'string',VARIABLE,'fromvar','string','*fromvar'),
LTRIM=('string1','string2',...),
RTRIM=('string1','string2',...),
TYPE=type
varname the name of a VIRTEL table variable. If the variable does not exist, it will be created.
string characters to be copied into the variable varname.
fromvar the name of a variable whose value is to be copied into the variable varname.
LTRIM (optional) Removes a set of characters from the start of a list variable (see Note) before copying
it).
‘string1’ [,’string2’, …] one or more strings of text to be removed from the start of the
variable.
RTRIM (optional) Removes a set of characters from the end of a list variable (see Note) before copying it.
‘string1’ [,’string2’, …] one or more strings of text to be removed from the end of the
variable.
type (optional) may indicate one of the following values:
TYPE=REPLACE indicates that the new value will replace the existing value of the
variable. If TYPE=REPLACE is not specied, and the variable already exists, the new
value will be appended to any existing values.
Note: LTRIM and RTRIM only apply to variables. In the following example
COPY$ LIST-TO-VARIABLE,VAR='VAR1', *
RTRIM=('_',' '),LTRIM=('_',' '), *
LIST=('string1','*var1',VARIABLE,'var2')
The variable VAR1 is created/modied, with ‘string1’ copied as is, var1 and var2 left and right trimmed.
COPY$ OUTPUT-FILE-TO-VARIABLE
Generates an output page from a page template, and copies the result into a VIRTEL variable. Any VIRTEL
tags within the page template are processed as if the page were being generated as the response to an HTTP
request, but the generated page is placed in a variable instead of being sent to the terminal.
COPY$ OUTPUT-FILE-TO-VARIABLE,FILE='filename',VAR='varname',
TYPE=type
COPY$ OUTPUT-FILE-TO-VARIABLE,FILE='*filenameVar',VAR='varname',
TYPE=type
lename the name of the page template.
*lenameVar the name of a VIRTEL variable holding the name of the page template.
1.16. VIRTEL Web Modernisation 167

Virtel User Guide, Release 4.57
varname the name of a VIRTEL table variable which will receive the contents of the generated output
page. If the variable does not exist, it will be created. If the variable already exists, the new value will
be appended to any existing values.
type (optional) indicates that the result variable has a special format. The following values are possible:
TYPE=ASCII indicates that the result should be converted to ASCII (or UTF-8 if the
SET-OUTPUT-ENCODING-UTF-8 tag is present in the page template). This is the
default value if the HTTP request is in ASCII.
TYPE=EBCDIC indicates that the result should be converted to EBCDIC. This is the
default value if the HTTP request is in EBCDIC.
TYPE=LINEBUFFER indicates that the result should be converted to MakePDF
“LINEBUF” format for input to the VIRSVPDF service program. The page template
contains special tags (see “Generating PDF output”) which are converted to the format
required by MakePDF.
If the specied le does not exist in the current VIRTEL directory, the NOT-FOUND
condition will be raised. This condition can be tested by means of the “IF$ instruction”.
COPY$ SCREEN-TO-VARIABLE
Copies a portion of the screen into a table variable.
COPY$ SCREEN-TO-VARIABLE,SCREEN=(row,col,len,ht),VAR='name2',TYPE=type
row starting row of the portion of the screen to copy (see Note 1).
col starting column of the portion of the screen to copy (see Note 1).
len width (in columns) of the portion of the screen to copy (see Note 1).
ht height (in rows) of the portion of the screen to copy (see Note 2).
name2 the name of a VIRTEL table variable containing ht values, each of length len. If the variable does
not exist, it will be created.
type (optional) may indicate one of the following values:
TYPE=REPLACE indicates that the new value will replace the existing value of the
variable. If TYPE=REPLACE is not specied, and the variable already exists, the new
value will be appended to any existing values.
Note: Note 1: for row, col and len, a value of ‘=’ means the value of the current row, col or len as set by
“SET$ SCREEN-POSITION”.
Note 2: the fourth sub-parameter (ht) of the SCREEN parameter is optional. If the fourth sub-parameter is
specied, then attributes and binary zeroes will be replaced by blanks. To keep compatibility with existing
scenarios, the instruction will ignore attributes and binary zeroes if the fourth SCREEN sub-parameter is
NOT specied.
COPY$ SYSTEM-TO-VARIABLE
Copies a system information eld into a table variable.
COPY$ SYSTEM-TO-VARIABLE,FIELD=(class,item),
VAR='varname',LENGTH=len,OFFSET=offset,
TYPE=type
varname the name of a VIRTEL table variable into which the system information will be copied.
168 Chapter 1. The Virtel Engine

Virtel User Guide, Release 4.57
class the type of system information to be copied. The following values may be specied for class:
HTTP-HEADER Information extracted from an HTTP header in the incoming HTTP request is copied
into the specied variable. When HTTP-HEADER is specied, item represents one of the HTTP
headers listed below.
TCT-HTTP-HEADER Information extracted from an HTTP header in the incoming HTTP request is
copied into the specied variable. When TCT-HTTP-HEADER is specied, item represents one of the
HTTP headers specied in the HTHEADR parameter in the VIRTCT (refer to “Parameters of the
VIRTCT” in the VIRTEL Installation Guide for more information).
NAME-OF Information about the VIRTEL environment is copied to the table variable. When NAME-OF
is specied, item represents the name of a VIRTEL data item.
NUMBER-OF A numeric value is copied to the table variable. When NUMBER-OF is specied, item
represents the name of a VIRTEL numeric data item.
VALUE-OF Information about the VIRTEL environment is copied to the table variable. When VALUE-
OF is specied, item represents the name of a VIRTEL data item. VALUE-OF is synonymous with
NAME-OF.
USER-SECURITY-PROFILE Information from the user’s RACF prole is copied to the table variable.
When USER-SECURITY-PROFILE is specied, item represents the name of a eld in the RACF user
prole. The supported elds are listed below.
NEW-PASSTICKET-FOR-TRANSACTION Generate a PassTicket allowing the current USERID. If
the generation fails, the NOT-FOUND condition will be raised. This condition can be tested by means
of the “IF$ instruction”.
item When class is HTTP-HEADER, the following standard HTTP headers, described in RFC2616, may
be specied:
• ACCEPT
• ACCEPT-LANGUAGE
• CONNECTION
• CONTENT-TYPE
• IF-MODIFIED-SINCE
• HOST
• USER-AGENT
In addition, the following non-standard HTTP headers, described in the IBM Tivoli Access Manager Web-
SEAL Administration Guide manual, may be specied:
• IV-USER
• IV-USERL
• IV-GROUPS
• IV-CREDS
Note: IV headers provide reliable user identication only when the request comes from a trusted proxy.
The proxy IP address can be specied in the “Calling DTE” eld of a rule attached to the HTTP line. See
the “Rules” chapter of the VIRTEL Conguration Reference manual for further information.
item
1.16. VIRTEL Web Modernisation 169

Virtel User Guide, Release 4.57
When class is NAME-OF or VALUE-OF, the following VIRTEL data items may be specied:
CHARACTER-SET The name of the current UTF-8 character set, or the country code if the
page is not in UTF-8 mode (see “EBCDIC translation management”)
CURRENT-FOREACH-INDEX Value of the current index in a FOREACH loop.
CURRENT-FOREACH-VARIABLE Value of the variable at current index in a FOREACH
loop (see “FOREACH$ VALUE-IN-VARIABLE”).
CURRENT-LINE
CURRENT-COLUMN
CURRENT-LENGTH
CURRENT-HEIGHT The current values of the named eld in the “SET$ SCREEN-
POSITION”.
DATE-TIME The current date and time (14 characters in the format YYYYMMDDHHMMSS)
DIRECTORY The current VIRTEL directory name
ENTRY-POINT The VIRTEL entry point name
LINE-INTERNAL The internal name of the VIRTEL line
LINE-EXTERNAL The external name of the VIRTEL line
PAGE The name of the original HTML page template specied in the URL
PASSWORD The password entered during signon
PRINT-RELAY The relay LU name of the associated printer
PSEUDO-TERMINAL The VIRTEL terminal name
QUERY The query string from the URL
RELAY The relay LU name used to connect to the host application
ROUTING-PARAMETER The value specied in the userdata eld of the URL or call packet
SNA-STATUS
The status of the host LU2 session:
Xinput is inhibited
blank input is allowed
TRANSACTION-INTERNAL The internal name of the VIRTEL transaction
TRANSACTION-EXTERNAL The external name of the VIRTEL transaction
URL The URL excluding the query string
USER The user name, if signon has occurred
USER-IP-ADDRESS The IP address of the client terminal
VIRTEL The VIRTEL APPLID specied in the VIRTCT
VIRTEL-VERSION The VIRTEL version number
xxx-SYMBOL The value of the system symbol xxx (only if SYSPLUS=YES is specied in the
VIRTCT). Example: SYSNAME-SYMBOL
item
170 Chapter 1. The Virtel Engine

Virtel User Guide, Release 4.57
When class is NUMBER-OF, the following VIRTEL numeric data items may be specied:
SCREEN-COLUMNS The width of the current host 3270 screen
SCREEN-LINES The depth of the current host 3270 screen
item
When class is USER-SECURITY-PROFILE, the following RACF eld names may be specied:
USERID The signed-on user id
GROUP The group to which the user belongs
WANAME User name for SYSOUT
WABLDG Building name for delivery
WADEPT Department name for delivery
WAROOM Room for delivery
WAADDR1 Address line 1
WAADDR2 Address line 2
WAADDR3 Address line 3
WAADDR4 Address line 4
WAACCNT Account number
Note: USER-SECURITY-PROFILE information is available only if the user has signed on and SE-
CUR=(RACROUTE,RACF) has been specied in the VIRTCT. Otherwise null values are returned for all
elds.
len (optional) the variable will be padded or truncated to the specied length. Alphanumeric data items
are right-padded with blanks or truncated on the right. Numeric items are left-padded with zeroes on
the left. The maximum length for a numeric item is 8. If the LENGTH parameter is omitted, the
length of the variable will be equal to the length of the requested value.
item (optional) the variable will be padded or truncated to the specied length. Alphanumeric data items
are right-padded with blanks or truncated on the right. Numeric items are left-padded with zeroes on
the left. The maximum length for a numeric item is 8. If the LENGTH parameter is omitted, the
length of the variable will be equal to the length of the requested value.
oset (optional) the starting oset within the data item from which to extract the information to be placed
in the variable. If omitted, extraction starts from oset 0. This parameter is valid only when class is
USER-SECURITY-PROFILE.
type (optional) may indicate one of the following values:
TYPE=REPLACE indicates that the new value will replace the existing value of the
variable. If TYPE=REPLACE is not specied, and the variable already exists, the new
value will be appended to any existing values.
Example of COPY$ SYSTEM-TO-VARIABLE:
COPY$ SYSTEM-TO-VARIABLE,FIELD=(HTTP-HEADER,HOST), X
VAR='HOST'
COPY$ SYSTEM-TO-VARIABLE,FIELD=(HTTP-HEADER,USER-AGENT), X
1.16. VIRTEL Web Modernisation 171

Virtel User Guide, Release 4.57
VAR='BROWSER'
COPY$ SYSTEM-TO-VARIABLE,FIELD=(NAME-OF,VIRTEL), X
VAR='APPLID'
COPY$ SYSTEM-TO-VARIABLE,FIELD=(NAME-OF,LINE-INTERNAL), X
VAR='LINEINT'
COPY$ SYSTEM-TO-VARIABLE,FIELD=(NAME-OF,PSEUDO-TERMINAL), X
VAR='TERMID'
COPY$ SYSTEM-TO-VARIABLE,FIELD=(NAME-OF,RELAY), X
VAR='LUNAME'
COPY$ SYSTEM-TO-VARIABLE,FIELD=(NAME-OF,ENTRY-POINT), X
VAR='EPNAME'
COPY$ SYSTEM-TO-VARIABLE,FIELD=(NAME-OF,TRANSACTION-INTERNAL), X
VAR='TRANINT'
COPY$ SYSTEM-TO-VARIABLE,FIELD=(NAME-OF,TRANSACTION-EXTERNAL), X
VAR='TRANEXT'
COPY$ SYSTEM-TO-VARIABLE,FIELD=(NAME-OF,ROUTING-PARAMETER), X
VAR='ROUTPARM'
COPY$ SYSTEM-TO-VARIABLE,FIELD=(NAME-OF,URL), X
VAR='URL'
COPY$ SYSTEM-TO-VARIABLE,FIELD=(NAME-OF,QUERY), X
VAR='QSTRING'
COPY$ SYSTEM-TO-VARIABLE,FIELD=(NAME-OF,PAGE), X
VAR='pagename'
COPY$ SYSTEM-TO-VARIABLE,FIELD=(NAME-OF,DIRECTORY), X
VAR='DIRNAME'
COPY$ SYSTEM-TO-VARIABLE,FIELD=(NAME-OF,SNA-STATUS), X
VAR='SNASTAT'
COPY$ SYSTEM-TO-VARIABLE,FIELD=(NAME-OF,USER-IP-ADDRESS), X
VAR='CLIENT'
COPY$ SYSTEM-TO-VARIABLE,FIELD=(NAME-OF,CHARACTER-SET), X
VAR='CHARSET'
COPY$ SYSTEM-TO-VARIABLE,FIELD=(VALUE-OF,DATE-TIME), X
VAR='DATETIME'
COPY$ SYSTEM-TO-VARIABLE,FIELD=(VALUE-OF,VIRTEL-VERSION), X
VAR='VERSION'
COPY$ SYSTEM-TO-VARIABLE,FIELD=(VALUE-OF,SYSNAME-SYMBOL), X
VAR='SYSNAME'
COPY$ SYSTEM-TO-VARIABLE,FIELD=(VALUE-OF,SYSPLEX-SYMBOL), X
VAR='SYSPLEX'
COPY$ SYSTEM-TO-VARIABLE,FIELD=(NUMBER-OF,SCREEN-COLUMNS), X
VAR='COLS'
COPY$ SYSTEM-TO-VARIABLE,FIELD=(NUMBER-OF,SCREEN-LINES), X
VAR='ROWS'
COPY$ SYSTEM-TO-VARIABLE, X
FIELD=(USER-SECURITY-PROFILE,WADEPT), X
VAR='DEPT’
The following table shows a possible result of this example scenario when used in conjunction with the URL:-
http://192.168.235.30:41001/w2h/WEB2AJAX.htm+Tso+model2?u=rxb&g=sys1
172 Chapter 1. The Virtel Engine

Virtel User Guide, Release 4.57
Variable Value
HOST “192.168.235.30:41001”
BROWSER “Mozilla/5.0 (Windows) Gecko/20070219 Firefox/2.0.0.2”
APPLID “VIRTEL”
LINEINT “W-HTTP”
TERMID “DEVTA003”
LUNAME “RHTVT000”
EPNAME “WEB2HOST”
TRANINT “W2H-13”
TRANEXT “Tso”
ROUTPARM “model2”
URL “/w2h/WEB2AJAX.htm+Tso+model2”
QSTRING “u=rxb&g=sys1”
pagename “WEB2AJAX.htm”
DIRNAME “W2H-DIR”
SNASTAT ” “
CLIENT “192.168.000.049”
CHARSET “IBM1140”
DATETIME “20110731093522”
VERSION “4.57 “
SYSNAME “MVSPROD1”
SYSPLEX “PRODPLEX”
COLS “80”
ROWS “24”
DEPT “SYSPROG”
COPY$ VALUE-TO-SCREEN
Copies a constant value to a given position on the 3270 screen.
COPY$ VALUE-TO-SCREEN,VALUE='string',SCREEN=(row,col,len),TYPE=type
string characters to be copied to the screen.
row,col,len row, column, and length of the destination eld on the screen.
type
(optional) may indicate one of the following values:
TYPE=ERASE-FIELD indicates that the destination eld is cleared to nulls before copying
the data.
If the destination row and column specify a protected eld of the 3270 screen, the scenario terminates
abnormally and message VIRS129E is issued to the system console. If the destination eld is unprotected
but the string is too long for the eld, the string will be silently truncated.
COPY$ VALUE-TO-VARIABLE
Copies a constant value to a variable.
COPY$ VALUE-TO-VARIABLE,VALUE='string',VAR='name2',TYPE=type
string characters to be copied into the variable name2.
name2 the name of a VIRTEL table variable. If the variable does not exist, it will be created.
1.16. VIRTEL Web Modernisation 173

Virtel User Guide, Release 4.57
type (optional) may indicate one of the following values:
TYPE=REPLACE indicates that the new value will replace the existing value of the
variable. If TYPE=REPLACE is not specied, and the variable already exists, the new
value will be appended to any existing values.
The COPY$ VALUE-TO-VARIABLE instruction allows the DUP (X‘1C’) and FM (X‘1E’) characters to be
included in the value of a variable which can subsequently be referenced by the COPY$ VARIABLE-TO-
SCREEN instruction.
The following example shows the instructions required to place FIELD MARK (X‘1E’) followed by W (X’E6’)
at the cursor position and press ENTER:
COPY$ VALUE-TO-VARIABLE,VAR='FIELDMARK-W',TYPE=REPLACE, *
VALUE=X'1EE6'
COPY$ VARIABLE-TO-SCREEN,VAR='FIELDMARK-W’
ACTION$ TO-APPLICATION,KEY=7D
COPY$ VARIABLE-TO-SCREEN
Copies the value of a variable to a given position on the 3270 screen. In the case of a table variable, only
the rst value is copied.
COPY$ VARIABLE-TO-SCREEN,VAR='name2',SCREEN=(row,col,len),TYPE=type
name2 the name of a VIRTEL variable.
row,col,len row, column, and length of the destination eld on the screen. If the SCREEN parameter is
not specied, the variable will be copied to the current cursor position. For row, col and len, a value
of ‘=’ means the value of the current row, col or len as set by “SET$ SCREEN-POSITION”.
type (optional) may indicate one of the following values:
TYPE=ERASE-FIELD indicates that the destination eld is cleared to nulls before copy-
ing the data. If the variable name2 does not exist, the NOT-FOUND condition will be
raised. This condition can be tested by means of the “IF$ instruction”. If the destina-
tion row and column specify a protected eld of the 3270 screen, the scenario terminates
abnormally and message VIRS129E is issued to the system console. If the destination
eld is unprotected but the variable value is too long for the eld, the data will be silently
truncated.
COPY$ VARIABLE-TO-SYSTEM
Copies the value of a variable to a VIRTEL system eld. In the case of a table variable, only the rst value
is copied.
COPY$ VARIABLE-TO-SYSTEM,VAR='varname',FIELD=(class,item)
varname the name of a VIRTEL variable.
class identies the type of VIRTEL system eld to be updated. The following values may be specied:
NAME-OF A VIRTEL data item is to be updated. When NAME-OF is specied, item
represents the name of a VIRTEL data item.
NUMBER-OF A VIRTEL data item is to be updated. When NUMBER-OF is specied,
item represents the name of a VIRTEL numeric data item.
VALUE-OF A VIRTEL data item is to be updated. When VALUE-OF is specied, item
represents the name of a VIRTEL data item. VALUE-OF is synonymous with NAME-
OF.
174 Chapter 1. The Virtel Engine

Virtel User Guide, Release 4.57
OLD-PASSTICKET-FOR-TRANSACTION Evaluates the Passticket currently in
‘varname’ for the transaction ‘item’. If the evaluation fails, the NOT-FOUND condi-
tion will be raised. This condition can be tested by means of the “IF$ instruction”.
item When class is NAME-OF or VALUE-OF, the following VIRTEL data items may be specied:
DIRECTORY Allows a scenario to specify the name of the VIRTEL directory The user
name which will appear in the VIRLOG entry for this transaction.
USER Allows a scenario to specify the user name which will appear in the VIRLOG entry
for this transaction and which will become the value of the system variable &U (see
“Connection/disconnection scripts” in the VIRTEL Connectivity Guide).
PASSWORD Allows a scenario to specify the password which will become the value of the
system variable &P (see “Connection/disconnection scripts” in the VIRTEL Connectiv-
ity Guide).
LOGMODE The name of the logmode to be used for the VTAM session with the host
application. The logmode can be set in an Identication Scenario. It overrides the
logmode specied in the transaction or terminal denition.
ROUTING-PARAMETER Allows an Identication Scenario to override the value of the
routing parameter specied in the userdata eld of the URL (see “Virtel URL formats”).
RELAY Allows a identication Scenarion to override the value of the relay LU name used
to connect to the host application.
When class is NUMBER-OF, the following VIRTEL data items may be specied:
SCREEN-COLUMNS The alternate width (number of columns) of the 3270 screen SCREEN-
LINES.
The alternate depth (number of rows) of the 3270 screen SCREEN-COLUMNS and
SCREEN-LINES can be set in an Identication Scenario. These parameters allow the
scenario to specify the desired screen size when a dynamic logmode such as D4A32XX3 is
used and the host application places the 3270 session in alternate mode using the Erase
Write Alternate command. This command has no eect on the primary screen size which
is always 24 rows by 80 columns.
item When class is OLD-PASSTICKET-FOR-TRANSACTION, the following VIRTEL data item must be
specied:
TSO To validate the PassTicket for TSO
COPY$ VARIABLE-TO-VARIABLE
Copies a source variable to a target variable.
COPY$ VARIABLE-TO-VARIABLE,VAR=('source','target'),
OFFSET=offset,LENGTH=lend,PAD='padChar ',TYPE=type
source characters to be copied into the target variable.
target the name of a VIRTEL table variable. If the variable does not exist, it will be created.
oset (optional) the beginning index (defaulting to 0), inclusive, of the text to copy in source.
len (optional) the number of characters to copy.
padChar (optional) the character (defaulting to space) to pad target var, if length is longer than the source..
type (optional) indicates that the new value will replace the existing value of the variable. If TYPE=RE-
PLACE is not specied, and the variable already exists, the new value will be appended to any existing
values.
1.16. VIRTEL Web Modernisation 175

Virtel User Guide, Release 4.57
The following example will display ‘Target value is : Doe____’
COPY$ VALUE-TO-VARIABLE,VAR='source',VALUE='John Doe'
COPY$ VARIABLE-TO-VARIABLE,VAR=('source','target'),OFFSET=5, X
LENGTH=7,PAD='_'
ERROR$ 0,'Target value is : ','*target'
COPY$ Example
SCENSITE SCREENS APPL=SCENSITE,EXEC=NO
*
* SCENARIO for SiteMinder
*
* The purpose of this scenario is to retrieve the contents of
* the identification headers inserted by the SiteMinder Proxy
*
SCENARIO IDENTIFICATION
*
COPY$ SYSTEM-TO-VARIABLE,VAR='USER', -
FIELD=(TCT-HTTP-HEADER,SM_USER)
IF$ NOT-FOUND,THEN=NOUSER1
COPY$ VARIABLE-TO-SYSTEM,VAR='USER', -
FIELD=(NAME-OF,USER)
*
EXIT1 DS 0H
SCENARIO END
*
NOUSER1 DS 0H
ERROR$ 0,'SCENSITE ERROR: NO USER VARIABLE'
GOTO$ EXIT1
SCRNEND
END
Example scenario with COPY$
DEBUG$ instruction
This instruction allows a scenario to activate various debugging functions.
DEBUG$ [NO]TRACE,LINE|TERMINAL|SCENARIO,
WHEN=(TRANSACTION-NAME-STARTS-WITH,'prefix')|ALWAYS
DEBUG$ SNAP[,TERMINAL],
WHEN=(TRANSACTION-NAME-STARTS-WITH,'prefix')|ALWAYS
TRACE,LINE or NOTRACE,LINE Starts or stops a trace on the current line. The trace is written to
the VIRTRACE le.
TRACE,TERMINAL or NOTRACE,TERMINAL Starts or stops a trace on the current terminal.
The trace is written to the VIRTRACE le.
TRACE,SCENARIO or NOTRACE,SCENARIO Starts or stops a trace on the scenario. The trace
is downloadable by means of the “CREATE-VARIABLE-IF” tag intended for use by Virtel Studio.
SNAP Generates a snapshot of the VIRTEL internal trace table in the SYSPRINT le (same as the
command F VIRTEL,SNAP).
SNAP is described in the “Audit and Performance” chapter of the VIRTEL Messages and Operations
Guide.
176 Chapter 1. The Virtel Engine

Virtel User Guide, Release 4.57
SNAP,TERMINAL Generates a snapshot including terminal information (same as the command F VIR-
TEL,SNAP,T=termid where termid is the current terminal name).
WHEN=ALWAYS The DEBUG$ instruction is executed unconditionally. This is the default.
WHEN=(TRANSACTION-NAME-STARTS-WITH,’prex’) The DEBUG$ instruction is exe-
cuted only if the external name of the transaction being used begins with the characters specied
by the string prex.
DEBUG$ Example
TSTSCLON SCREENS APPL=TSTSCLON *
SCENARIO INITIAL
DEBUG$ TRACE,LINE,WHEN=ALWAYS
DEBUG$ TRACE,TERMINAL
*
DEBUG$ TRACE,SCENARIO, *
WHEN=(TRANSACTION-NAME-STARTS-WITH,'DB')
COPY$ SYSTEM-TO-VARIABLE,VAR='VAR1', *
FIELD=(VALUE-OF,SYSCLONE-SYMBOL)
ERROR$ 0,'SYSCLONE: ','*VAR1'
COPY$ SYSTEM-TO-VARIABLE,VAR='VAR1', *
FIELD=(VALUE-OF,SYSPLEX-SYMBOL)
ERROR$ 0,'SYSPLEX: ','*VAR1'
*
COPY$ SYSTEM-TO-VARIABLE,VAR='VAR1', *
FIELD=(NAME-OF,CHARACTER-SET)
ERROR$ 0,'CHARACTER-SET: ','*VAR1'
DEBUG$ NOTRACE,SCENARIO
DEBUG$ SNAP,TERMINAL
SCENARIO END
SCRNEND
END ,
Example scenario with DEBUG$
DECLARE$ instruction
This instruction denes a portion of the screen as a clickable hyperlink. The hyperlink can invoke either a
3270 key (ENTER or PFnn), a JavaScript procedure, or an external URL. The generation of the hyperlink
can optionally be conditional on the presence or absence of a particular value at the 3270 screen position.
In any case, the hyperlink is generated only if the specied screen position is non-blank.
DECLARE$ (row,col,len,'value',Condition),P1,P2,P3,TO=P4
row Species the row position of the hyperlink
col Species the column position of the hyperlink
len Species the length of the hyperlink
value Optional, this parameter species the value of the data tested at the specied screen position. Must
be put in quotes
Condition Optional, this parameter determines the type of condition applicable to value
EQ Equality (value by default).
NE Inequality.
1.16. VIRTEL Web Modernisation 177

Virtel User Guide, Release 4.57
P1 Species the type of processing applicable. The permissible values are:
AS-PFKEY Indicates that the indicated portion of the screen is to be interpreted as a function key
hyperlink. The value of the function key (ENTER, PF1, etc) can be specied by parameter P2. If
P2 is not specied, then the data at the indicated screen position is interpreted as the name of the
function key. The values allowable as function key names are the same as those for “PfkField”)
AS-PARAMETER Indicates that the indicated portion of the screen is to be treated as a hyperlink which
calls a JavaScript function. The data at the indicated screen position is passed as a parameter to the
JavaScript function. The name of the JavaScript function is specied in the TO parameter of the
$DECLARE instruction. See “JavaScript functions” for further details.
AS-HREF Indicates that the indicated portion of the screen is to be treated as a hyperlink which invokes
the URL specied in the TO parameter of the $DECLARE instruction. The data at the indicated screen
position is appended to the URL, followed by the contents of the P2 parameter of the $DECLARE
instruction, if specied.
P2 (optional) Function parameter referenced by P1.
P3 (optional) Text to be displayed in the status bar of the browser when the mouse pointer is over the
indicated screen position.
P4 Name of JavaScript function (for AS-PARAMETER) or URL (for AS-HREF).
Note: In conformance with assembler syntax, quotes and ampersands in the URL must be specied as
double quotes and double ampersands.
$DECLARE and JavaScript functions
For the AS-PARAMETER form of the $DECLARE instruction, the TO parameter species the name of a
JavaScript function which will be called when the user clicks on the eld. The function name is case-sensitive.
The following parameters are passed to the JavaScript function:
Parameter 1 an internally generated eld name
Parameter 2 the data at the indicated screen position
Parameter 3 the contents of the P2 parameter of the $DECLARE instruction
The JavaScript function itself must be dened in the HTML template page, or in an included page. The
following standard functions are provided in the page js01.js delivered with VIRTEL in the W2H-DIR
directory:
VClick Moves the cursor to the start of the clickable area and sends the indicated function key (P2 param-
eter) to the host application
VClick2 Copies the contents of the clickable area to the eld containing the cursor and sends the indicated
function key (P2 parameter) to the host application
VClick3 Copies the contents of the clickable area to the following input eld and sends the indicated
function key (P2 parameter) to the host application
$DECLARE Examples
DECLARE$ (23,19,04),AS-PFKEY
Row 23 column 19 length 4 becomes a clickable eld. The contents of the eld are treated as the name of
a PF key. For example, if the eld contains “PF12” then clicking on this eld is equivalent to pressing the
3270 key PF12.
178 Chapter 1. The Virtel Engine
Virtel User Guide, Release 4.57
DECLARE$ (14,17,03),AS-PFKEY,'PA2'
Row 14 column 17 length 3 becomes a clickable eld. When clicked it is the equivalent of pressing the 3270
key PA2.
DECLARE$ (24,02,04,'****',NE),AS-PFKEY
Row 24 column 2 length 4 becomes a clickable eld, unless it contains asterisks. The contents of the eld
are treated as the name of a PF key.
DECLARE$ (20,02,06),AS-PARAMETER,'PF12',TO=VClick
Row 20 column 2 length 6 becomes a clickable eld. It calls the JavaScript function VClick(‘Vxxxxxxx’,’cc-
cccc’,’PF12’) where Vxxxxxxx is an internally generated eld name, cccccc is the contents of the eld, and
PF12 is a constant specied in the DECLARE$ instruction.
DECLARE$ (04,09,17),AS-HREF,'&&hl=fr', X
TO='http://www.google.com/search?q='
Row 4 column 9 length 17 becomes a clickable eld, hyperlinked to the URL:
http//www.google.com/search?=ccc...ccc&hl=fr
(where ccc…ccc is replaced by the contents of the clickable eld)
ENDFOR$ instruction
This instruction marks the end of a FOREACH loop.
ENDFOR$ groupname
groupname The label is required. It must match the label on the corresponding FOREACH$ VALUE-IN-
SCREEN or FOREACH$ VALUE-IN-VARIABLE instruction.
ENDFOR$ Examples
In the example below, the value of VAR1 which is copied is the current value in the FOREACH$ loop.
LOOP1 FOREACH$ VALUE-IN-VARIABLE,VAR='VAR1'
COPY$ VARIABLE-TO-SCREEN,VAR='VAR1',FOREACH=LOOP1, *
SCREEN=(=,=,=)
COPY$ VARIABLE-TO-VARIABLE,VAR=('VAR1','VAR2'),FOREACH=LOOP1, *
OFFSET=8,LENGTH=5,PAD=' '
ENDFOR$ LOOP1
ERROR$ instruction
This instruction returns an error code to the calling program. When this instruction is used, the return code
in the HTTP response will be “400 Bad Request” instead of “200 Ok”.
1.16. VIRTEL Web Modernisation 179

Virtel User Guide, Release 4.57
ERROR$ value [,'string1','string2',...]
value Species the error code (decimal 0 to 255). If the error code is non-zero, a message is issued to the
console and the scenario returns the error code to the calling program. If the error code is zero, a
message is issued to the console and the scenario continues.
‘string1’ [,’string2’, …] (optional) one or more strings of text to be concatenated together and displayed
as a message on the console. If a string begins with an asterisk it represents the name of a VIRTEL
variable whose contents is to be included in the message. The number of quoted strings is not limited,
but the message itself cannot be larger than 252 characters.
ERROR$ Examples
GOOD$ DS 0H
ERROR$ 0,'SCENSITE FINISHED: OK'
GOTO$ EXIT
BADG$ DS 0H
ERROR$ 1,'SCENSITE FAILED: RC = 1'
GOTO$ EXIT
Scenarios
FIELD$ instruction
This instruction denes the position and the length of the 3270 selection involved, as well as the set of
presentation rules.
FIELD$ (row,col,len),operation,param-1,param-2,...,param-N
row Species the row position of the eld
col Species the column position of the eld
len Species the length of the eld
operation Denes the presentation rule. The permissible values are:
DEFINE-CHOICE Adds a value of type SELECT
DEFINE-VARIABLE-CHOICE Adds multiple values of type SELECT
IS-BINARY-CHOICE Denes a eld as a checkbox
HIDE Denes a eld as non-display param-N
Depends on the contents of the operation.
The FIELD$ instruction only operates on input elds.
FIELD$ DEFINE-CHOICE
Generates a SELECT type entry eld for the 3270 eld concerned. This instruction requires a VAL parameter
and optionally a SHOW parameter.
FIELD$ (row,col,len),DEFINE-CHOICE,VAL='value',SHOW='label'
The VAL parameter generates an OPTION value for the SELECT eld. The optional SHOW parameter
allows the specication of the text displayed in the SELECT eld for the given value. If the SHOW parameter
is omitted, the text displayed is identical to the value.
FIELD$ DEFINE-VARIABLE-CHOICE
180 Chapter 1. The Virtel Engine

Virtel User Guide, Release 4.57
Generates a list of SELECT entries for the 3270 eld concerned. This instruction requires a VAL parameter.
FIELD$ (row,col,len),DEFINE-VARIABLE-CHOICE,VAL=varname
The VAL parameter of a DEFINE-VARIABLE-CHOICE operation species the name of a table variable
which contains the OPTION values for the SELECT statement generated for the 3270 eld concerned. These
values must be supplied by the 3270 application by means of a structured eld type FAE5 or FAE6, or by
means of the HOST4WEB command S VARIABLE. Structured elds are described in the VIRTEL Pro-
gramming Interface documentation 263 HOST4WEB commands are described in the VIRTEL Programming
Interface documentation 274
FIELD$ IS-BINARY-CHOICE
Generates an INPUT TYPE=CHECKBOX eld for the 3270 eld concerned. This is useful for 3270 elds
which can take two values: one value representing a “checked” box and the other value representing an
“unchecked” box. This instruction requires a VAL parameter and optionally a NOTVAL parameter.
FIELD$ (row,col,len),IS-BINARY-CHOICE,VAL='value',NOTVAL='value'
For output messages, the box will be displayed as checked if the value of the 3270 eld matches the VAL
parameter, otherwise it will be displayed as unchecked. For input messages, the VAL parameter species
the value which will be transmitted to the application in the 3270 eld when the box is checked, and the
NOTVAL parameter species the value to be transmitted to the application if the box is unchecked. If
the NOTVAL parameter is omitted then an empty eld will be transmitted to the application if the box is
unchecked.
FIELD$ HIDE
Generates an INPUT TYPE=HIDDEN eld for the 3270 eld concerned. This instruction takes no additional
parameters.
FIELD$ (row,col,len),HIDE
FILTER$ instruction
FILTER$ VARIABLE-TO-VARIABLE
The FILTER$ VARIABLE-TO-VARIABLE instruction creates or adds values to a variable from another
variable according to a list of conditions, similar to the conditions in a CASE$ instruction.
FILTER$ VARIABLE-TO-VARIABLE,
FROM='varname1',TO='varname2',
(WHEN,'YYYY',THEN,'aaa'),
(BEGIN,'XXXX',THEN,'bbb'),
(CONTAINS,'ZZZZ',THEN,IGNORE),
(OTHERWISE,KEEP)
FROM,TO varname1 is the name of the VIRTEL variable whose values are to be inspected, and varname2
is the name of the VIRTEL variable to which values are to be added. The variable varname2 will be
created if it does not exist.
WHEN,THEN when a value ‘YYYY’ is found in variable varname1, then the value ‘aaa’ will be added to
varname2.
BEGIN,THEN when a value beginning with ‘XXXX’ is found in varname1, then the value ‘bbb’ will be
added to varname2.
1.16. VIRTEL Web Modernisation 181

Virtel User Guide, Release 4.57
CONTAINS,THEN,IGNORE when a value containing ‘ZZZZ’ is found in varname1, then no value will
be added to varname2.
OTHERWISE,KEEP the default action, if none of the preceding conditions is met, is to copy the value
from varname1 to a new value in varname2.
FOREACH$
FOREACH$ VALUE-IN-SCREEN instruction
The FOREACH$ VALUE-IN-SCREEN instruction marks the start of a loop on a screen. Nested pairs of
FOREACH$ and ENDFOR$ instructions are permitted.
groupname FOREACH$ VALUE-IN-SCREEN,SCREEN=(row,col,len,ht)
groupname The label is required. The FOREACH$ VALUE-IN-SCREEN instruction must be matched by
a subsequent ENDFOR$ targeting the same label.
row starting row of the portion of the screen to copy (see Note 1).
col starting column of the portion of the screen to copy (see Note 1).
len width (in columns) of the portion of the screen to copy (see Note 1).
ht height (in rows) of the portion of the screen to copy (see Note 1).
Note: For row, col,len and ht, a value of ‘=’ means the value of the current row, col, len or height
FOREACH$ VALUE-IN-VARIABLE instruction
The FOREACH$ VALUE-IN-VARIABLE instruction marks the start of a loop on a table variable. Nested
pairs of FOREACH$ VALUE-IN-VARIABLE and ENDFOR$ instructions are permitted.
groupname FOREACH$ VALUE-IN-VARIABLE,VAR='varname'
groupname The label is required. The FOREACH$ VALUE-IN-VARIABLE instruction must be matched
by a subsequent ENDFOR$ targeting the same label.
varname The name of the table variable beeing looped on.
GOTO$ instruction
This instruction directs the subsequent processing ow to a specied label.
GOTO$ label
label Species the instruction label at which execution of the scenario is to continue.
HANDLE$ instruction
This instruction manages various handle operations within the context of a scenario.
. index:: pair: HANDLE$ ABEND ; Scenario Instructions pair: HANDLE$ ABEND ; HANDLE$
182 Chapter 1. The Virtel Engine
Virtel User Guide, Release 4.57
HANDLE$ ABEND instruction
This instruction allows a scenario to continue after an ABEND, due for instance to trying to write on the
screen at a protected position, and directs the subsequent processing ow to a specied label.
HANDLE$ ABEND=label
label Species the instruction label at which execution of the scenario is to continue.
. index:: pair: HANDLE$ LOOP ; Scenario Instructions pair: HANDLE$ LOOP ; HANDLE$
HANDLE$ LOOP instruction
This instruction allows to detect loops in a scenario. When the limit is reached, VIRTEL abends the scenario,
and a message VIRS12IE terminal LOOP WAS DETECTED IN SCENARIO scenname
HANDLE$ LOOP=(label,counter)
label Species the instruction label at which execution of the scenario is to continue if the counter limit is
reached.
Counter Species the number of instructions executed beyond which the program will be switched to the
label previously specied.
This instruction can also be used with one of the following syntaxes.
HANDLE$ LOOP=label
If no instruction counter is specied, VIRTEL will take 32 times the number of instructions in the scenario
as a default counter.
HANDLE$ LOOP=label,ABEND=abendroutine
Both handle conditions may be spécied simultaneously.
GOTO$ label,WHEN=(LOOP,counter)
The previous syntax wich is also valid is generated internaly by the HANDLE$ instruction. After the loop is
detected, and the specied handling routine is called, a new HANDLE$ LOOP= instruction may be issued
and processing may continue.
If no HANDLE$ is specied, VIRTEL will still set an instruction limit, equal to 32 times the number of
instructions in the scenario.
IF$ instruction
This instruction enables the testing of the presence of a value in a 3270 screen, or a value in a VIRTEL
variable, or a condition set by a previous instruction, and directs the subsequent processing ow.
IF$ (row,col,len),EQ='value',THEN=process1,ELSE=process2
IF$ VARIABLE,'varname',EQ='value',THEN=process1,ELSE=process2
IF$ EXISTS-VARIABLE,'varname',THEN=process1,ELSE=process2
IF$ NOT-EXISTS-VARIABLE,'varname',THEN=process1,ELSE=process2
IF$ APPLICATION-TIMEOUT,THEN=process1,ELSE=process2
IF$ CURSOR,THEN=process1,ELSE=process2
IF$ FIRST-PASS,THEN=process1,ELSE=process2
IF$ IND$FILE-TIMEOUT,THEN=process1,ELSE=process2
IF$ NOT-FOUND,THEN=process1,ELSE=process2
IF$ SCREEN-IS-BLANK,THEN=process1,ELSE=process2
1.16. VIRTEL Web Modernisation 183

Virtel User Guide, Release 4.57
IF$ SCREEN-IS-UNFORMATTED,THEN=process1,ELSE=process2
IF$ SESSION-SWITCH,THEN=process1,ELSE=process2
row,col,len Species the position (row, column) and length of the data tested.
value Species the value of the data tested (must be placed in quotes). If the value to be tested is in
hexadecimal format, use EQ=X’CXNN…’ syntax.
VARIABLE Species that the value of a VIRTEL variable is to be tested.
EXISTS-VARIABLE Tests if the specied variable exists.
NOT-EXISTS-VARIABLE Tests if the specied variable does not exist.
varname Species the name of the VIRTEL variable to be tested (must be placed in quotes)
EQ Tests if the specied variable is equal to the value to test
APPLICATION-TIMEOUT Tests whether a previous ACTION$ TO-APPLICATION instruction with
a MAXTIME parameter ended in timeout.
CURSOR Tests whether the application has turned on the cursor. This option is valid for both 3270
applications and videotex servers.
FIRST-PASS Tests whether the scenario is entered for the rst time after connecting to the VTAM
application. This condition is no longer true after the scenario has exited for the rst time, for
example when waiting for the next message. If both an INPUT and an OUTPUT scenario are present,
the FIRST-PASS condition is true the rst time the INPUT scenario is run, and the rst time the
OUTPUT scenario is run as well. This condition is always true for other types of scenario.
IND$FILE-TIMEOUT Tests whether, having received the 3270 messages which precede an IND$FILE
transfer, the transfer itself has still not started after a delay of one second. This condition indicates
an IND$FILE error and is usually accompanied by an error message on the TSO screen.
NOT-FOUND Tests the condition code set by the previous COPY$ instruction.
SCREEN-IS-BLANK Tests whether the 3270 screen is completely blank. This condition is true if the
screen contains only blanks, nulls, and attribute characters.
SCREEN-IS-UNFORMATTED Tests whether the 3270 screen is unformatted. This condition is true
if the screen contains no attribute characters.
SESSION-SWITCH Tests whether the scenario is entered for a VTAM application which was already
connected to this terminal. This condition is useful in VIRTEL multisession scenarios which must
re-establish the environment before starting the transaction requested by the user. This condition
remains true until the end of this activation of the scenario (for example until the scenario is reused
for another session).
process1 Species the address of the branch exit of the script if the condition is satised. Permitted values
are:
label instruction label at which execution of the scenario is to continue.
FAIL reserved word indicating that the scenario is to be terminated and the current message
is to be discarded. The scenario will be called again on receipt of the next outbound
message from the application.
SUCCESS reserved word indicating that the scenario is to be terminated and the current
message is to be presented to the user. This is equivalent to branching to a SCENARIO
END instruction.
process2 Species the address of the branch exit of the script if the condition is not satised. Permitted
values are identical to process1.
184 Chapter 1. The Virtel Engine

Virtel User Guide, Release 4.57
INDSCEN$ instruction
This instruction allows a scenario to enable the IND$FILE le transfer function. The INDSCEN$ macro
instruction must be included in both the input scenario and the output scenario.
INDSCEN$ HOST=type
type Species the type of host system running the IND$FILE program. TSO is the only allowed value.
The default is TSO.
LABEL$ instruction
This instruction allows to dene a label in a scenario.
mylabel LABEL$
It is equivalent to the classic assembler:
mylabel EQU *
or
mylabel DS 0H
It may be used in any scenario. If the scenario is not a subroutine, you can also simply generate :
mylabel DS 0C
If the scenario is a subroutine, you must use LABEL$ instruction to dene each labels inside the subroutine.
Each label is suxed with the name of the subroutine, in order to give some protection from conicting
labels and from branching over the limits of subroutines.
mylabel Species the instruction label at which execution of a scenario is to continue.
A sample of the usage of LABEL$ instruction is available in the PERFORM$ instruction description.
MAP$ instruction
The MAP$ instruction denes the format of a at-format data area known as a “commarea”, and describes
how VIRTEL converts XML or Query input data to commarea format. The MAP$ instruction may also be
used in conjunction with the TOVAR$ instruction to convert an output commarea to VIRTEL variables,
which can be used with an appropriate template to generate XML or other formats. When the MAP$
instruction is used to convert input data to commarea format, the input data may be supplied either as
XML, or as named parameters in a format known as “Query” data. In both cases, the input data may be
attached to an inbound HTTP request (GET or POST request), or it may be supplied in a VIRTEL variable.
The result of the parsing process is a commarea which is suitable for processing by an application program
(typically a COBOL program running under CICS). The commarea is written into a VIRTEL variable so that
it can be passed to the application program by means of the VIRTEL transaction script language. Conversion
of input data to commarea format (“input-to-commarea” conversion) is performed by means of an INITIAL
scenario. The scenario begins with a group of MAP$ instructions (MAP$ BEGIN, MAP$ END, MAP$
AREA, and MAP$ AREA-ATTRIBUTE) which dene the format of the commarea and its relationship
to the XML tags or the Query parameters. The scenario continues with a MAP$ FROM-FIELD, MAP$
FROM-INPUT, MAP$ FROM-VARIABLE instruction which denes the source of the XML or Query data.
Finally, the scenario ends with a MAP$ TO-VARIABLE instruction which names the VIRTEL variable into
which the commarea is to be stored. Conversion from commarea format to VIRTEL variables (“commarea-
to-output” conversion) may be performed by means of an INITIAL scenario or an OUTPUT scenario. The
1.16. VIRTEL Web Modernisation 185

Virtel User Guide, Release 4.57
scenario begins with a description of the commarea format (MAP$ BEGIN, MAP$ END, MAP$ AREA,
and MAP$ AREA-ATTRIBUTE), and continues with a TOVAR$ instruction which denes the source of
the commarea. See the description of the “TOVAR$ instruction” for further details of commarea-to-output
conversion.
MAP$ ABEND
The MAP$ ABEND instruction is intended for diagnostic purposes only. When VIRTEL encounters a
MAP$ ABEND instruction while processing a commarea with the MAP$ TO-VARIABLE or TOVAR$
instructions, the scenario ends and a SNAP dump is produced. The VIRTEL SNAP is described in the
“Audit and Performance” chapter of the VIRTEL Messages and Operations Guide.
MAP$ ABEND,WITH='text'
text A free-format description which will be printed in the SNAP at the time of the abend.
MAP$ ABEND-AT
The MAP$ ABEND-AT instruction is similar to MAP$ ABEND except that it produces a SNAP only after
it has been executed the number of times indicated by the OCCURS parameter.
MAP$ ABEND-AT,OCCURS=n,WITH='text'
text A free-format description which will be printed in the SNAP at the time of the abend.
nThe SNAP will be produced after the MAP$ ABEND-AT instruction has been executed n times.
MAP$ AREA
The MAP$ AREA instruction denes a eld within a commarea. The MAP$ AREA instruction must be
enclosed by a pair of MAP$ BEGIN and MAP$ END instructions which dene the start and end of the
commarea.
MAP$ AREA,WITH='name',LENGTH=nnn,TYPE=type,FORMAT=('pattern',char)
name For input-to-commarea conversion, this is the name of the XML tag or Query parameter which
identies the input data item. For XML input, the WITH parameter may be omitted, and the tag at
the current location in the input data is used. For commarea-to-output conversion, this is the name of
the VIRTEL variable which will be generated.
nnn Species the xed length of the eld in the commarea.
type
Xindicates an alphanumeric eld
9indicates a numeric eld
S9 indicates a numeric eld with sign overpunch
ONLY9 indicates a numeric eld; any non-numeric characters in the input data item are ignored
when copied to the commarea
(ONLY9,LEFT-ALIGNED) indicates that the numeric value is to be left-aligned in the eld in the
commarea
BASE64 indicates that the data is encoded in Base64 format in the XML data stream
OFFSET-LENGTH
OFFSET-LENGTH-TEXT
186 Chapter 1. The Virtel Engine

Virtel User Guide, Release 4.57
OFFSET-LENGTH-BINARY For input-to-commarea conversion, calculates the oset and length
of the XML data element identied by the WITH parameter. The oset is calculated relative to
the start of the XML data stream.
For OFFSET-LENGTH-TEXT the oset and length values are stored in the result commarea as
two decimal numbers separated by a comma. OFFSET-LENGTH is a synonym for OFFSET-
LENGTH-TEXT.
For OFFSET-LENGTH-BINARY the oset and length are stored as binary values (8 bytes and 4
bytes respectively) in the result commarea. When used in conjunction with the TO-VARIABLE
or TO-VARIABLE-ONLY parameters described below, the 12-byte value thus produced can sub-
sequently be passed to the VIRSVFIO service program as the OFFAREA parameter for the
read-partial and write-append functions.
pattern,char Species an editing pattern to be applied when the eld is processed during commarea-to-
output conversion. Character positions in pattern which contain char represent variable characters
to be obtained from the eld in the commarea, other characters in pattern represent constants. For
example, if FORMAT=(‘9999-99-99’,9) is specied and the commarea eld contains 20060621 then a
result value of 2006-06-21 will be generated.
Note: XML tag names are case sensitive. WITH=’Title’ is not the same as WITH=’TITLE’ A variation of
the MAP$ AREA instruction allows the value of the eld to be copied into a VIRTEL variable, in addition
to being placed in the commarea. The variable will be created, if necessary, and its value will be set when
the commarea is created by a subsequent MAP$ FROM-FIELD, MAP$ FROM-INPUT, or MAP$ FROM-
VARIABLE instruction. The value can then be tested by means of an IF$ VARIABLE instruction (see
“Examples of VIRTEL Scenarios”):
MAP$ AREA,TO-VARIABLE,VAR='varname',
WITH='name',LENGTH=nnn,TYPE=type
varname The name of the VIRTEL variable to which the eld value is to be copied. The variable name
must be placed in quotes. If the variable already exists, then its current value will be replaced. The
parameters WITH, LENGTH, and TYPE are as previously described.
Another form of the MAP$ AREA instruction denes a eld in the commarea and lls the eld with either
a constant value, or the value of a VIRTEL variable:
MAP$ AREA,FROM-CONSTANT,'value',LENGTH=nnn,TYPE=type
MAP$ AREA,FROM-VARIABLE,VAR='varname',LENGTH=nnn,
TYPE=type,FORMAT=('pattern',char)
value The value to be copied to the eld. The value must be placed in quotes.
varname The name of the VIRTEL variable from which the eld value is to be copied. The variable name
must be placed in
quotes. The parameters LENGTH, TYPE, and FORMAT are as previously described.
A further variation of the MAP$ AREA instruction places the value of a eld into a VIRTEL variable,
without copying it into the commarea. The variable will be created or replaced during the processing of a
subsequent MAP$ FROM-FIELD, MAP$ FROM-INPUT, or MAP$ FROM-VARIABLE instruction.
MAP$ AREA,TO-VARIABLE-ONLY,VAR='varname',
WITH='name',LENGTH=nnn,TYPE=type
varname The name of the VIRTEL variable to which the eld value is to be copied. The variable name
must be placed in quotes. If the variable already exists, then its current value will be replaced.
1.16. VIRTEL Web Modernisation 187

Virtel User Guide, Release 4.57
The WITH parameter species the name of the XML tag or Query parameter, as previously described. If the
LENGTH and TYPE parameters are specied, then the value of the eld is edited, as previously described,
to conform to the length and type specied. If the LENGTH and TYPE parameters are omitted, then the
length and value of the variable are copied exactly from the input data.
Another variation of the MAP$ AREA instruction, TO-TABLE-VARIABLE-ONLY, is similar to TO-
VARIABLE-ONLY except that if the variable already exists, the new value will be appended to any existing
values instead of erasing the previous value.
MAP$ AREA,TO-TABLE-VARIABLE-ONLY,VAR='varname',
WITH='name',LENGTH=nnn,TYPE=type
varname The name of the VIRTEL variable to which the eld value is to be copied. The variable name
must be placed in quotes.
If the variable already exists, the new value will be appended to any existing values. The WITH, LENGTH
and TYPE parameters are as previously described. For convenience, if the variable name is the same as the
value of the WITH parameter, the variable name may be specied as VAR=’=WITH’ or VAR==WITH.
The FROM-LAST-ELEMENT-FOUND-NAME keyword of the MAP$ AREA instruction copies into the
output commarea the name of the last XML element found in the input stream. This may be used in
conjunction with the NEXT-ELEMENT keyword of the MAP$ BEGIN instruction.
MAP$ AREA,FROM-LAST-FOUND-ELEMENT-NAME,
LENGTH=nnn,TYPE=X
nnn The length of the eld in the output commarea where the name is to be placed.
1.18.57. MAP$ AREA-ATTRIBUTE
The MAP$ AREA-ATTRIBUTE instruction denes a eld within a commarea. It is similar to MAP$ AREA
except that the contents of the eld are obtained from the value of an attribute parameter included within
the specied XML start tag, instead of from the data enclosed by the XML start and end tags.
MAP$ AREA-ATTRIBUTE,WITH='xmlname',VALUEOF='attrname',
LENGTH=nnn,TYPE=type
xmlname The name of the XML tag in the input data whose attribute is to be copied. If the WITH
parameter is omitted, the tag at the current location in the input data is used.
attrname The name of the XML attribute whose value is to be copied to the commarea.
nnn Species the xed length of the eld in the commarea.
type Same as type parameter of the MAP$ AREA instruction.
Note: XML tag and attribute names are case sensitive.
A variation of the MAP$ AREA-ATTRIBUTE instruction allows the value of the attribute to be copied into
a VIRTEL variable, in addition to being placed in the commarea:
MAP$ AREA-ATTRIBUTE,TO-VARIABLE,VAR='varname',
WITH='xmlname',VALUEOF='attrname',LENGTH=nnn,TYPE=type
varname The name of the VIRTEL variable to which the attribute value is to be copied. The variable
name must be placed in quotes. If the variable already exists, then its current value will be replaced.
The parameters WITH, VALUEOF, LENGTH, and TYPE are as previously described
188 Chapter 1. The Virtel Engine

Virtel User Guide, Release 4.57
Another variation of the MAP$ AREA-ATTRIBUTE instruction places the value of an attribute into a
VIRTEL variable, without copying it into the commarea:
MAP$ AREA-ATTRIBUTE,TO-VARIABLE-ONLY,VAR='varname',
WITH='xmlname',VALUEOF='attrname',LENGTH=nnn,TYPE=type
varname The name of the VIRTEL variable to which the attribute value is to be copied. The variable
name must be placed in quotes. If the variable already exists, then its current value will be replaced.
The parameters WITH and VALUEOF are as previously described. If the LENGTH and TYPE parameters
are specied, then the attribute value is edited, as previously described, to conform to the length and type
specied. If the LENGTH and TYPE parameters are omitted, then the length and value of the attribute
are copied exactly.
MAP$ BEGIN
The MAP$ BEGIN instruction marks the start of a commarea, or the start of a group of elds within a
commarea. The optional WITH parameter indicates a group of elds enclosed by a specic XML tag in the
input data. The optional OCCURS parameter indicates a repeating group of elds. Nested pairs of MAP$
BEGIN and MAP$ END instructions are permitted.
groupname MAP$ BEGIN,WITH='xmlname',OCCURS=nnn,COUNT='countvar'
groupname The label is required. It species the name of the commarea or eld group. The MAP$ BEGIN
instruction must be matched by a subsequent MAP$ END instruction having the same label.
xmlname The name of the XML tag which identies the start of the group of elds in the input data. If
the WITH parameter is omitted, processing for this group of elds starts at the current location in the
input data. The special value NEXTELEMENT matches with the next XML tag in the input stream,
regardless of its name.
nnn Species the number of occurrences for a repeating group of elds. If the OCCURS parameter is
omitted, one occurrence will be generated. The special value OCCURS=UNLIMITED indicates that
the eld repeats indenitely until the end of the input data is reached.
countvar Species the name of a VIRTEL variable which will be created when the MAP$ is processed for
commarea-to-output conversion for a repeating group of elds. The value of the variable is the number
of occurrences actually processed (which may be less than the value of the OCCURS parameter if
the length of the input commarea is insucient to contain nnn occurrences of the eld group). If the
COUNT parameter is omitted, the groupname specied in the statement label is used as the variable
name.
A variation of the MAP$ BEGIN instruction can be used to force the scan of the XML input stream to be
restarted:
groupname MAP$ BEGIN,TOP,WITH='xmlname'
The TOP parameter species that the scan for the tag named xmlname starts from the beginning of the
XML stream.
Another variation of the MAP$ BEGIN instruction introduces a group of elds which are conditional on the
current value of the $EVENT$ variable:
groupname MAP$ BEGIN,EVENT='eventname'
The group of elds enclosed by the MAP$ BEGIN and MAP$ END instructions are processed only if the
“current event” set by a previous MAP$ EVENTUAL-AREA or MAP$ ELSETHEN-AREA instruction
matches the eventname specied. For commarea-to-output conversion, the names of the variables generated
for this group are prexed by eventname/
1.16. VIRTEL Web Modernisation 189

Virtel User Guide, Release 4.57
MAP$ END
The MAP$ END instruction marks the end of a commarea or eld group.
groupname MAP$ END
groupname The label is required. It must match the label on the corresponding MAP$ BEGIN instruction.
MAP$ EVENTUAL-AREA, MAP$ ELSETHEN-AREA
The MAP$ EVENTUAL-AREA and MAP$ ELSETHEN-AREA instructions generate a eld in a commarea
whose value depends on the presence of a named tag in the XML stream, or whose value depends on the
value of a specic XML tag. The rst form of these instructions tests for the presence of one of a set of
named tags, and generates a value which corresponds to the tag which was found:
MAP$ EVENTUAL-AREA, or ELSETHEN-AREA,
FROM-CONSTANT,'value',
WHEN=(ELEMENT,'xmlname'),
EVENT='varname'
MAP$ ELSETHEN-AREA,FROM-CONSTANT,'value'
These instructions are coded as a group consisting of one MAP$ EVENTUAL-AREA instruction followed
by one or more MAP$ ELSETHEN-AREA instructions. A nal MAP$ ELSETHEN-AREA instruction with
no WHEN parameter provides a default value for the output eld. The group is enclosed by a pair of MAP$
BEGIN and MAP$ END instructions which specify the name of the enclosing XML tag.
The optional EVENT parameter species the name of the VIRTEL variable to be created when the MAP$ is
processed for commarea-to-output conversion. If the EVENT parameter is omitted, then the variable has the
same name as the XML tag xmlname. The value of the EVENT parameter is also added to the $EVENT$
variable, and becomes the “current event” for any subsequent MAP$ BEGIN,EVENT instructions.
The following example illustrates the process. The XML stream in this example consists of an <identity>
tag which may enclose one of three dierent tags <bic> <iban> or <rib>:
<identity><bic>12345778</bic></identity>
or
<identity><iban>12345778</iban></identity>
or
<identity><rib>12345778</rib></identity>
The objective is to generate an output area which consists of a one-byte code (1=bic, 2=iban, 3=rib) followed
by an 8-byte area containing the value of the indicated tag. If none of the indicated tags is found, the code
is generated with a space as the default value. This is achieved by means of the following instructions in the
scenario:
IDENT MAP$ BEGIN,WITH='identity'
MAP$ EVENTUAL-AREA,FROM-CONSTANT,'1',WHEN=(ELEMENT,'bic')
MAP$ ELSETHEN-AREA,FROM-CONSTANT,'2',WHEN=(ELEMENT,'iban')
MAP$ ELSETHEN-AREA,FROM-CONSTANT,'3',WHEN=(ELEMENT,'rib')
MAP$ ELSETHEN-AREA,FROM-CONSTANT,' '
MAP$ AREA,LENGTH=8
IDENT MAP$ END
Note: XML tag names are case sensitive.
The second form of the MAP$ EVENTUAL-AREA and MAP$ ELSETHEN-AREA instructions tests the
data enclosed by a named tag in the XML stream, and generates an output eld with a corresponding value:
190 Chapter 1. The Virtel Engine

Virtel User Guide, Release 4.57
MAP$ EVENTUAL-AREA, or ELSETHEN-AREA,
FROM-CONSTANT,'value',
WHEN=(VALUE,'string')
MAP$ ELSETHEN-AREA,FROM-CONSTANT,'value'
These instructions are coded as a group consisting of one MAP$ EVENTUAL-AREA instruction followed
by one or more MAP$ ELSETHEN-AREA instructions. A nal MAP$ ELSETHEN-AREA instruction with
no WHEN parameter provides a default value for the output eld. The group is enclosed by a pair of MAP$
BEGIN and MAP$ END instructions which specify the name of the XML tag whose value is being tested.
The following example illustrates the process. The XML stream in this example consists of an <indicator>
tag which can take the value “true” or “false”:
<indicator>true</indicator>
or
<indicator>false</indicator>
The objective is to generate an output area which consists of a one-byte code (1=true, 0=false). A default
value 0 is generated if the tag data has any other value. This is achieved by means of the following instructions
in the scenario:
INDIC MAP$ BEGIN,WITH='indicator'
MAP$ EVENTUAL-AREA,FROM-CONSTANT,'0',WHEN=(VALUE,'false')
MAP$ ELSETHEN-AREA,FROM-CONSTANT,'1',WHEN=(VALUE,'true')
MAP$ ELSETHEN-AREA,FROM-CONSTANT,'0'
INDIC MAP$ END
Note: XML tag names are case sensitive.
MAP$ EXECUTE
The MAP$ EXECUTE instruction allows a sequence of MAP$ instructions to be interrupted in order to
enter data on the 3270 screen before continuing the analysis. The MAP$ EXECUTE instruction branches
to a subroutine dened elsewhere in the scenario. The subroutine ends with a RETURN$ instruction.
MAP$ EXECUTE,mylabel
mylabel The label is required. It species the name of the subroutine to be called. The label mylabel must
be dened elsewhere in the scenario. In the following example the two MAP$ EVENT paragraphs
each call a subroutine later in the scenario. After the subroutine executes a RETURN$ instruction,
the analysis continues:
LIGNE0 MAP$ BEGIN,EVENT='LIGNE0'
MAP$ AREA,TO-VARIABLE,VAR='QTE',LENGTH=5,TYPE=X,WITH='QTE'
MAP$ AREA,TO-VARIABLE,VAR='CAI',LENGTH=36,TYPE=X,WITH='CAI'
MAP$ AREA,TO-VARIABLE,VAR='CCD',LENGTH=3,TYPE=X,WITH='CCD'
MAP$ AREA,FROM-CONSTANT,' ',LENGTH=1,TYPE=X
MAP$ EXECUTE,LI0
LIGNE0 MAP$ END
CMDVALID MAP$ BEGIN,EVENT='CMDVALID'
MAP$ AREA,FROM-CONSTANT,' ',LENGTH=1,TYPE=X
MAP$ EXECUTE,CMDV
CMDVALID MAP$ END
....
LI0 DS 0H
COPY$ VARIABLE-TO-SCREEN,VAR='LIGNE0/QTE',SCREEN=(11,6,5), *
1.16. VIRTEL Web Modernisation 191

Virtel User Guide, Release 4.57
TYPE=ERASE-FIELD
COPY$ VARIABLE-TO-SCREEN,VAR='LIGNE0/CAI',SCREEN=(11,12,36), *
TYPE=ERASE-FIELD
COPY$ VARIABLE-TO-SCREEN,VAR='LIGNE0/QTE',SCREEN=(11,49,3), *
TYPE=ERASE-FIELD
RETURN$
CMDV DS 0H
* Send pf=ENTER
ACTION$ TO-APPLICATION,KEY=7D
* Add an occurrence of the table variable VIRTEL
* = return code after validation request
COPY$ SCREEN-TO-VARIABLE,SCREEN=(22,31,8),VAR='RETOUR'
RETURN$
MAP$ FROM-FIELD
The MAP$ FROM-FIELD instruction requests VIRTEL to generate a commarea from XML input data
(“XML input-tocommarea” conversion). The XML input data is obtained from an HTML form eld in the
incoming HTTP request.
groupname MAP$ FROM-FIELD,FIELD='fieldname'
groupname The label is required. It species the name of the output area to be generated. It must match
the label on a preceding MAP$ BEGIN instruction.
eldname The name of the HTML form eld which contains the XML input data.
The MAP$ FROM-FIELD instruction expects XML input data to be presented as a character string eld-
name=xmldata where xmldata is XML data in URL-encoded format. In URL-encoded format, a “+” sign
represents a space, and “%xx” represents the hexadecimal encoding of an ASCII character. The string eld-
name=xmldata may either be appended to the URL (HTTP “GET” method) or it may be contained in the
body of the HTTP request (HTTP “POST” method). See “Sending XML input as URL-encoded data” for
examples. To process requests containing XML data in plain (unencoded) format, use instead the “MAP$
FROM-INPUT”.MAP$ FROM-INPUT
The MAP$ FROM-INPUT instruction requests VIRTEL to generate a commarea from XML, JSON or Query
format input data (“input-to-commarea” conversion). The input data is obtained from the incoming HTTP
request. groupname MAP$ FROM-INPUT,format
MAP$ FROM-INPUT,format,TO-VARIABLES
groupname The label is required. It species the name of the output area to be generated. It must match
the label on a preceding MAP$ BEGIN instruction.
format XML: species that the input data is in XML format JSON: species that the input data is in
JSON format QUERY: species that the input data is in Query format
If no format is specied, the default is XML.
TO-VARIABLES Convert XML or JSON input directly to variables, without intermediate usage of a
commarea. It is equivalent to:
MYMAP MAP$ FROM-INPUT,JSON generate commarea
MYMAP MAP$ TO-VARIABLE,VAR='MYCOMMAREA' copy commarea to variable
MYMAP TOVAR$ FROM-VARIABLE,VAR='MYCOMMAREA' generate variables
Note: MAP$ FROM-INPUT with a FIELD parameter is accepted and treated as MAP$ FROM-FIELD.
192 Chapter 1. The Virtel Engine

Virtel User Guide, Release 4.57
The MAP$ FROM-INPUT instruction obtains its input data from an incoming HTTP request. The HTTP
request may use either via the GET method (where the input data is appended to the URL) or the POST
method (where the input data is contained in the request body). When the input format is XML, MAP$
FROM-INPUT treats the entire data area as XML data without any translation. See “HTTP request with
XML input data” for an example. MAP$ FROM-FIELD is preferred when using the GET method with
XML input, because certain characters cannot be included in a URL without using URL-encoding.
When the input format is QUERY, MAP$ FROM-INPUT expects the input data to contain one or more
strings in the form eldname=data. When the HTTP request uses the GET method, the strings are appended
to the URL. The rst string is preceded by a “?” character which separates it from the URL, and the
remaining strings are separated by “&” characters. When the HTTP request uses the POST method, the
strings are contained in the request body, either one per line, or separated by “&” characters if multiple
strings are coded on the same line. For both the GET and POST methods, Query strings are expressed in
URL-encoded format, where “+” sign represents a space, and “%xx” represents the hexadecimal encoding
of an ASCII character. See “Parsing Query Input” for examples. MAP$ FROM-VARIABLE
The MAP$ FROM-VARIABLE instruction requests VIRTEL to generate a commarea from XML or Query
format input data (“input-to-commarea” conversion). The input data is contained in a VIRTEL variable.
groupname MAP$ FROM-VARIABLE,format,VAR='varname'
groupname The label is required. It species the name of the output area to be generated. It must match
the label on a preceding MAP$ BEGIN instruction.
format XML: species that the input data is in XML format JSON: species that the input data is in
JSON format QUERY: species that the input data is in Query format
If no format is specied, the default is XML.
varname The name of the VIRTEL variable which contains the input data.
MAP$ TO-VARIABLE
The MAP$ TO-VARIABLE instruction requests VIRTEL to copy a commarea into a VIRTEL variable.
The commarea must have been already generated by a previous MAP$ FROM-FIELD, FROM-INPUT, or
FROM-VARIABLE instruction.
groupname MAP$ TO-VARIABLE,VAR='varname'
groupname The label is required. It species the name of the output area to be copied. It must match the
label on a preceding MAP$ BEGIN instruction.
varname The name of the VIRTEL variable into which the commarea is to be copied.
MAP$ COPY,VAR=’varname’ is equivalent to MAP$ TO-VARIABLE,VAR=’varname’
OPTION$ instruction
This instruction allows the scenario to set up parameters for a subsequent SEND$ TO-LINE instruction.
OPTION$ FOR-HTTP
The OPTION$ FOR-HTTP instruction, when used in conjunction with a SEND$ TO-LINE instruction
referencing an outbound HTTP line, allows a scenario to make a request to an HTTP server and to receive
the response. The OPTION$ FOR-HTTP instruction builds the parameter list for the subsequent SEND$
TO-LINE instruction.
OPTION$ FOR-HTTP, *
(METHOD,'method'), *
1.16. VIRTEL Web Modernisation 193

Virtel User Guide, Release 4.57
(SITE,'sitename'), *
(TO,'topath'), *
(TEXT,'querytext'), *
(HEADER,'header'), *
(FILE-OUT,'varnameo'), *
(FILE-IN,'varnamei'), *
(RET-CODE,'varnamer'), *
TOVAR='varnamep'
method (required) the HTTP method: GET or POST (see note below).
site the site portion of the URL (see notes below).
topath the path portion of the URL (see note below).
querytext optional text to be appended to the URL (see note below).
header additional HTTP headers to be inserted in the message. Multiple headers may be inserted by
specifying more than one HEADER parameter.
varnameo the name of the VIRTEL variable which contains the HTTP POST data to be sent to the server.
This parameter is required when the method is POST.
varnamei (required) the name of the VIRTEL variable which will receive the HTTP response data returned
by the server.
varnamer the name of the VIRTEL variable which will receive the HTTP return code returned by the
server.
varnamep the name of the VIRTEL variable which will contain the parameter list.
Note: If the eld begins with “*” then it is treated as the name of a variable.
You can use the SITE parameter to specify the name and port of the remote HTTP server, provided that
the outbound HTTP line specied by the SEND$ TO-LINE instruction is dened with the special value
$SITE$ in the “Remote Ident” eld. The value of the SITE parameter is also used to build the Host: header
of the outbound HTTP request.
OPTION$ FOR-IND$FILE
The OPTION$ FOR-IND$FILE instruction prepares a TSO session for a le transfer operation using the
IND$FILE protocol. This instruction does not itself perform a le transfer; instead it produces an IND$FILE
command in a VIRTEL variable. The scenario must send the command to the TSO session to initiate the
le transfer.
The format of the OPTION$ FOR-IND$FILE command for a transfer from TSO to the workstation is shown
below:
OPTION$ FOR-IND$FILE-DOWNLOAD, *
(METHOD,'options'), *
(FROM,'dsname'), *
(FILE-OUT,'outvar'), *
(RET-CODE,'retvar'), *
TOVAR='cmdvar'
options optional parameters (for example, ‘ASCII CRLF’) to be appended to the IND$FILE command line
(see note 1 below).
dsname (required) the TSO dataset name to be downloaded (see notes 1 and 2 below).
194 Chapter 1. The Virtel Engine

Virtel User Guide, Release 4.57
outvar (required) the name of the VIRTEL variable which is to receive the contents of the downloaded le.
retvar the name of the VIRTEL variable which will receive the completion message sent by IND$FILE at
the end of the transfer.
cmdvar (required) the name of the VIRTEL variable which will contain the generated IND$FILE command.
The format of the OPTION$ FOR-IND$FILE command for a transfer from the workstation to TSO is shown
below:
OPTION$ FOR-IND$FILE-UPLOAD, *
(METHOD,'options'), *
(TO,'dsname'), *
(FILE-IN,'invar'), *
(RET-CODE,'retvar'), *
TOVAR='cmdvar'
options optional parameters (for example, ‘ASCII CRLF NEW’) to be appended to the IND$FILE com-
mand line (see note 1 below).
dsname (required) the destination TSO dataset name (see notes 1 and 2 below).
invar (required) the name of the VIRTEL variable which contains the data to be uploaded.
retvar the name of the VIRTEL variable which will receive the completion message sent by IND$FILE at
the end of the transfer.
cmdvar (required) the name of the VIRTEL variable which will contain the generated IND$FILE command.
Note: 1: If the eld begins with “*” then it is treated as the name of a variable.
2: TSO will prex the dataset name by your prex (usually your userid) unless the dataset name is enclosed
in quotes. If you specify the dataset name as a literal in the instruction (as opposed to indirectly as the value
of a variable) then triple quotes must be used, for example: (FROM,’‘’SYS1.PARMLIB(IEASYS00)’‘’)
OPTION IND$FILE Examples
OPTION$ FOR-IND$FILE-DOWNLOAD, *
(METHOD,'*OPT'), "ASCII CRLF" or null *
(FROM,'*DSN'), TSO dataset name *
(FILE-OUT,'DOWNLOAD'), *
(RET-CODE,'RETURN-CODE'), *
TOVAR='FTCOMMAND'
In this example, the VIRTEL variable OPT contains the IND$FILE optional parameters and DSN contains
the dataset name. On completion of the instruction, FTCOMMAND contains the IND$FILE command to
be sent to TSO. When the le transfer completes, the VIRTEL variable DOWNLOAD contains the contents
of the downloaded le, and RETURNCODE contains the IND$FILE completion message “TRANS03 File
transfer complete” or an error message.
OPTION$ FOR-IND$FILE-UPLOAD, *
(METHOD,'*OPT'), "ASCII CRLF" or null *
(TO,'*DSN'), TSO dataset name *
(FILE-IN,'UPLOAD'), *
(RET-CODE,'RETURN-CODE'), *
TOVAR='FTCOMMAND'
In this example, the VIRTEL variable OPT contains the IND$FILE optional parameters and DSN contains
the dataset name. On completion of the instruction, FTCOMMAND contains the IND$FILE command to
1.16. VIRTEL Web Modernisation 195

Virtel User Guide, Release 4.57
be sent to TSO. When the le transfer is initiated, VIRTEL sends the contents of the variable UPLOAD to
IND$FILE. When the le transfer completes, RETURN-CODE contains the IND$FILE completion message
“TRANS03 File transfer complete” or an error message.
OPTION$ FOR-MQ
Builds a parameter list for a subsequent SEND$ TO-LINE instruction when the line type is MQ.
OPTION$ FOR-MQ, *
(FILE-OUT,'varname1'), *
TOVAR='varnamep'
varname1 the name of the VIRTEL variable which contains data to be written to the MQ line.
varnamep the name of the VIRTEL variable which will contain the parameter list.
OPTION$ FOR-QUICKLNK
Builds a parameter list for a subsequent SEND$ TO-LINE instruction when the line type is QUICKLNK.
OPTION$ FOR-QUICKLNK,
(METHOD,'CALL'),
(PROGRAM,'program'),
(TERMINAL,'terminal'),
(FILE-OUT,'fileIn'),
(FILE-IN,'fileOut'),
(RET-CODE,'retCode'),
(RET-CICS1,'retCics1'),
(RET-CICS2,'retCics2'),
TOVAR='params'
OPTION$ FOR-QUICKLNK,
(METHOD,'CALL-CONTAINER'),
(PROGRAM,'program'),
(TERMINAL,'terminal'),
(CHANNEL,'*channel'),
(FILE-OUT,'fileIn'),
(FILE-IN,'fileOut'),
(RET-CODE,'retCode'),
(RET-CICS1,'retCics1'),
(RET-CICS2,'retCics2'),
TOVAR='params'
OPTION$ FOR-QUICKLNK,
(METHOD,'CALL-CONTAINER-LIST'),
(PROGRAM,'*program'),
(TERMINAL,'terminal'),
(CHANNEL,'*channel'),
(CONTAINERS-FOR-QUESTION,'contIn'),
(CONTAINERS-FOR-RESPONSE,'contOut'),
(RET-CODE,'retCode'),
(RET-CICS1,'retCics1'),
(RET-CICS2,'retCics2'),
TOVAR='params'
METHOD (mandatory) the service method Valid values are:
CALL Call with a COMMAREA
CALL-CONTAINER Call with a container
196 Chapter 1. The Virtel Engine

Virtel User Guide, Release 4.57
CALL-CONTAINER-LIST Call with a list of containers
program (mandatory) the name of the CICS program to call (see Note).
terminal (optional) the name of a CICS terminal.
channel name (1–16 characters) of the channel that owns the container (see Note). Mandatory if METHOD
is ‘CALL-CONTAINER’ or ‘CALL-CONTAINER-LIST’.
contIn the name of the VIRTEL variable which contains the input data as a containers list (see Note).
Mandatory if METHOD is ‘CALL-CONTAINER-LIST’, invalid otherwise.
contOut the name of the VIRTEL variable which will receive the output data as a containers list (see
Note). Mandatory if METHOD is ‘CALL-CONTAINER-LIST’, invalid otherwise.
leIn the name of the VIRTEL variable which contains the input data (COMMAREA or container) (see
Note). Mandatory if METHOD is ‘CALL’ or ‘CALL-CONTAINER’, invalid otherwise.
leOut the name of the VIRTEL variable which will receive the output data (COMMAREA or container)
(see Note). Mandatory if METHOD is ‘CALL’ or ‘CALL-CONTAINER’, invalid otherwise.
retCode (Mandatory) the name of the VIRTEL variable which will receive the service return code.
retCics1 (Mandatory) the name of the VIRTEL variable which will receive the CICS return code
(EIBRESP).
retCics2 (Mandatory) the name of the VIRTEL variable which will receive a complementary CICS return
code (EIBRESP2).
params (Mandatory) the name of the VIRTEL variable which will contain the parameter list.
Note: If the eld begins with “*” then it is treated as the name of a variable.
OPTION$ FOR-SMTP
Builds a parameter list for a subsequent SEND$ TO-LINE instruction when the line type is SMTP.
OPTION$ FOR-SMTP, *
(TO,'toaddr'), *
(FROM,'fromaddr'), *
(CC,'ccaddr'), *
(BCC,'bccaddr'), *
(TEXT,'bodytext'), *
(SUBJECT,'subjtext'), *
(CHARSET,'charset'), *
(HEADER,'header'), *
(FILE-OUT,'varname','filename','filetype','disp'), *
(ALTERNATE-TEXT,'altvar','altfn','altft','altdp'), *
TOVAR='varnamep'
toaddr the email address of the recipient (see note below).
fromaddr the email address of the sender (see note below).
ccaddr the email address(es) of the carbon-copy recipient(s) (see note below).
bccaddr the email address(es) of the blind carbon-copy recipient(s) (see note below).
bodytext a character string to be placed in the message body (see note below).
subjtext a character string to be placed in the message subject line (see note below).
1.16. VIRTEL Web Modernisation 197

Virtel User Guide, Release 4.57
charset the character set name to be included in the SMTP Content-type header (see note below). For
example, ISO-8859-15
header additional SMTP headers to be inserted in the message. Multiple headers may be inserted by
specifying more than one HEADER parameter.
varname the name of the VIRTEL variable which contains data to be written as an attached le. Multiple
les may be attached by specifying more than one FILE-OUT parameter.
lename the name of the attached le.
letype the le type to be sent in the Content-type mime header of the attached le. For example text/plain,
application/x-tar, etc.
disp the Content-Disposition of the attached le. Possible values are inline and attachment. This is an
optional subparameter and its default value is attachment.
altvar the name of the VIRTEL variable which contains data to be written as an alternate text le. When
the ALTERNATETEXT parameter is specied, the generated email will be structured as a multi-
part/alternative message, and the bodytext specied in the TEXT parameter will become a le with
content type text/plain
altfn the name of the alternate text le.
altft the le type of the alternate text le, usually text/html
altdp the Content-Disposition of the alternate text le, usually inline.
varnamep the name of the VIRTEL variable which will contain the parameter list.
Note: If the eld begins with “*” then it is treated as the name of a variable.
1.18.25.7. OPTION$ Example:
OPTION$ FOR-HTTP, *
(METHOD,'POST'), *
(SITE,'api.google.com:80'), *
(TO,'/search/beta2'), *
(HEADER,'Content-Type: application/soap+xml'), *
(HEADER,'SOAPAction: urn:GoogleSearchAction'), *
(FILE-OUT,'QUESTION'), *
(FILE-IN,'ANSWER'), *
(RET-CODE,'HTTP-RETURN-CODE'), *
TOVAR='MYPARMS'
OPTION$ FOR-HTTP, *
(METHOD,'GET'), *
(SITE,'*SITENAME'), *
(TO,'/search'), *
(TEXT,'?ie=UTF-8&q=test'), *
(HEADER,'Accept: text/xml'), *
(FILE-IN,'ANSWER'), *
TOVAR='MYPARMS'
In the above example, the VIRTEL variable SITENAME contains the value of the SITE parameter.
OPTION$ FOR-SMTP, *
(TO,'*DESTADDR'), *
(FROM,'me@y.com'), *
(CC,'info@y.com'), *
198 Chapter 1. The Virtel Engine

Virtel User Guide, Release 4.57
(BCC,'archive@y.com'), *
(TEXT,'your file is attached'), *
(SUBJECT,'analysis result'), *
(CHARSET,'ISO-8859-15'), *
(HEADER,'X-Priority: 3'), *
(FILE-OUT,'MYVAR1','out.tar','application/x-tar'), *
(FILE-OUT,'MYVAR2',,'application/x-tar'), *
(ALTERNATE-TEXT,'M01','Message.html', *
'text/html','inline'), *
TOVAR='MYPARMS'
In the above example, the variable DESTADDR contains the value of the TO parameter.
PERFORM$ instruction
This instruction allows to execute a SUBROUTINE scenario before continuing in sequence.
PERFORM$ mylabel
It may be used in any scenario. A subroutine may contains a PERFORM$ instruction to call another
subroutine up to 3 levels. For example, main scenario may call level_1 subroutine scenario, which may call
level_2 subroutine scenario, which may call level_3 subroutine scenario, but level_3 cannot call level_4
subroutine scenario.
mylabel Species the subroutine scenario label to be performed.
. index:: pair: PERFORM$ Examples; Scenario Instructions
PERFORM$ Example
Here is a sample of the usage of PERFORM$ and LABEL$ instructions.
PERFORM SCREENS APPL=PERFORM,EXEC=NO
* SCENARIO TO TEST PERFORM$ AND SCENARIO SUBROUTINE
*
SCENARIO INITIAL
*
ERROR$ 0,'Level 0'
PERFORM$ LEVEL1
ERROR$ 0,'Level 0'
GOTO$ FIN
FIN LABEL$
SCENARIO END
*
LEVEL1 SCENARIO SUBROUTINE
ERROR$ 0,'Level 1'
PERFORM$ LEVEL2
ERROR$ 0,'Level 1'
IF$ EXISTS-VARIABLE,'TOTO',THEN=FIN,ELSE=PASFIN
PASFIN LABEL$
GOTO$ FIN
FIN LABEL$
SCENARIO END
*
LEVEL2 SCENARIO SUBROUTINE
ERROR$ 0,'Level 2'
PERFORM$ LEVEL3
ERROR$ 0,'Level 2'
1.16. VIRTEL Web Modernisation 199

Virtel User Guide, Release 4.57
ETIQ CASE$ (1,1,8),(EQ,'TOTO',ET1),(EQ,'TITI',ET2), *
(GE,'YYYY',ET4),(LE,'ZZZ',ET5), *
(EQ,VARIABLE,'VVVV',ET6), *
(EQ,'*VVVV',ET6), *
(EQ,STRING,'SSSS',ET7), *
(BEGIN,'XXXX',ET3), *
(CONTAINS,'XXXX',ET3), *
ELSE=ET6
ET1 LABEL$
ET2 LABEL$
ET3 LABEL$
ET4 LABEL$
ET5 LABEL$
ET6 LABEL$
ET7 LABEL$
SCENARIO END
*
LEVEL3 SCENARIO SUBROUTINE
ERROR$ 0,'Level 3'
SCENARIO END
*
SCRNEND
END
. index:: pair: POP$; Scenario Instructions
POP$ instruction
This instruction allows a scenario to delete values from VIRTEL table variables.
POP$ ALL-VALUES-OF,VAR='varname'
POP$ FIRST-VALUE-OF,VAR='varname'
POP$ VAR='varname'
ALL-VALUES-OF indicates that all values of the table variable are to be deleted.
FIRST-VALUE-OF indicates that the rst value of a table variable is to be deleted. If the variable
contains only one value, then the variable is deleted entirely.
varname the name of the VIRTEL variable.
POP$ VAR=’varname’ is equivalent to POP$ FIRST-VALUE-OF,VAR=’varname’
. index:: pair: RETURN$; Scenario Instructions
RETURN$ instruction
This instruction terminates a subroutine called by a “MAP$ EXECUTE” instruction.
RETURN$
. index:: pair: SEND$; Scenario Instructions
SEND$ instruction
This instruction allows a scenario to construct the response to an input request.
200 Chapter 1. The Virtel Engine

Virtel User Guide, Release 4.57
SEND$ AS-ANSWER
Sends the contents of a VIRTEL variable as the response to an HTTP request.
SEND$ AS-ANSWER,VAR='varname',TYPE='filetype',EXPIRES=exphdr
varname the name of the VIRTEL variable which contains the response data.
letype the le type to be sent in the Content-Type HTTP header. Typical values are text/plain, text/html,
and text/xml
exphdr
EXPIRES=IMMEDIATELY species that the response should not be kept in a cache (this is the
default value)
EXPIRES=ENDOFDAY species that the request result can be kept in cache until end of day
The SEND$ AS-ANSWER instruction is intended for use with les which can be displayed directly by the
browser (text, html, xml). For other types of le, which are intended to be saved on the user’s hard drive, use
the SEND$ AS-FILE instruction instead. If the line type is not HTTP, the SEND$ AS-ANSWER and SEND$
AS-FILE instructions are processed as “SEND$ VARIABLETO- LINE” <#_V457UG_capability_types9
with the LINE parameter set to the line on which the scenario is running.
SEND$ AS-FILE
Sends the contents of a VIRTEL variable as an attached le in response to an HTTP request. Unlike the
SEND$ ASANSWER instruction, the response includes a Content-Disposition: Attachment header, which
means that the browser displays a “Save As” dialog box instead of attempting to display the le in the
browser window.
SEND$ AS-FILE,VAR='varname',TYPE='filetype',NAME='filename'
varname the name of the VIRTEL variable which contains the le.
letype the le type to be sent in the Content-Type HTTP header. This parameter may be specied as a
literal, or as ‘*varname’ where varname is the name of a VIRTEL variable whose value is the letype.
Examples of typical le types are application/pdf, application/x-tar
lename the le name to be included in the Content-Disposition HTTP header. This parameter may be
specied as a literal, or as ‘*varname’ where varname is the name of a VIRTEL variable whose value
is the lename.
SEND$ TO
Sends an outbound message to a VIRTEL line. The name of the destination line is specied indirectly through
a VIRTEL transaction. The SEND$ TO instruction must be preceded by an “OPTION$” instruction which
sets up the parameters for the outbound message according to the line type.
SEND$ TO,'tranname',PARMS='varnamep',ERROR=label
tranname the external name of a VIRTEL transaction dened under the entry point applicable to this
scenario. In the transaction denition, the “Application type” eld must be 5 and the “Application”
eld must be the internal or external name of a VIRTEL line.
varnamep the name of the VIRTEL variable which contains the parameter list. This variable must have
been created by a previous OPTION$ instruction.
errlabel A branch will be made to this label if the message cannot be sent to the requested line.
SEND$ TO-LINE
1.16. VIRTEL Web Modernisation 201

Virtel User Guide, Release 4.57
Sends an outbound message on the specied line. SEND$ TO-LINE is identical to SEND$ TO except that
the name of the line is specied directly in the scenario instead of via a transaction. The SEND$ TO-LINE
instruction must be preceded by an “OPTION$” instruction which sets up the parameters for the outbound
message according to the line type.
SEND$ TO-LINE,LINE='linename',MAXTIME=maxtime,PARMS='varnamep',ERROR=label
linename the name of the VIRTEL line on which the message is to be sent. This may be the internal or
external name of a line dened in the VIRTEL conguration.
varnamep the name of the VIRTEL variable which contains the parameter list. This variable must have
been created by a previous OPTION$ instruction.
errlabel A branch will be made to this label if the message cannot be sent to the requested line.
maxtime (optional) species the maximum time, in hundredths of a second, that the scenario will wait for
an answer from the partner to which a request is sent. When this time expires, the scenario continues
by going to the ERROR= lable. If the MAXTIME parameter is not specied, the scenario will wait
indenitely, or until VIRTEL disconnects the session when the timeout value of the entry point is
exceeded.
This only apply to SEND$ requests which imply a response, like sending a SOAP request to an HTTP
server which would wait for a SOAP response.
SEND$ VARIABLE-TO
Sends the contents of the specied variable as an outbound message on a VIRTEL line. The name of the
destination line is specied indirectly through a VIRTEL transaction. A SEND$ VARIABLE-TO instruction
is equivalent to an “OPTION$ instructions” instruction followed by a SEND$ TO instruction in the case
where OPTION$ species only a variable name.
SEND$ VARIABLE-TO,tranname,VAR='varname',ERROR=label
tranname the external name of a VIRTEL transaction dened under the entry point applicable to this
scenario. In the transaction denition, the “Application type” eld must be 5 and the “Application”
eld must be the internal or external name of a VIRTEL line.
varname the name of the VIRTEL variable which contains data to be written to the line.
errlabel A branch will be made to this label if the message cannot be sent to the requested line.
Note: When an input scenario sends a variable to a VIRPASS line, the response from the VIRPASS line
is passed to the output scenario in the $VIRPASS$ variable.
SEND$ VARIABLE-TO-LINE
Sends the contents of the specied variable as an outbound message on the specied VIRTEL line. SEND$
VARIABLETO- LINE is identical to SEND$ VARIABLE-TO except that the name of the line is specied
directly in the scenario instead of via a transaction. A SEND$ VARIABLE-TO-LINE instruction is equivalent
to an “OPTION$” instruction followed by a SEND$ TO-LINE instruction in the case where OPTION$
species only a variable name.
SEND$ VARIABLE-TO-LINE,VAR='varname',LINE='linename',ERROR=label
varname the name of the VIRTEL variable which contains data to be written to the line.
linename the name of the VIRTEL line on which the message is to be sent. This may be the internal or
external name of a line dened in the VIRTEL conguration.
202 Chapter 1. The Virtel Engine

Virtel User Guide, Release 4.57
errlabel A branch will be made to this label if the message cannot be sent to the requested line.
. index:: pair: SET$; Scenario Instruction
SET$ instruction
This instruction allows various parameters to be set. SET$ ENCODING
The SET$ ENCODING instruction allows a scenario specify the default encoding for subsequent pages sent
to the terminal, and the encoding of subsequent URLs for this session.
SET$ ENCODING,UTF-8,'charset'
SET$ ENCODING,UTF-8
SET$ ENCODING,ISO-FOR-COUNTRY,'country'
SET$ ENCODING,ISO-FOR-COUNTRY
UTF-8 species that the terminal will be placed in UTF-8 mode.
charset species the name of the UTF-8 translation table to be used. Refer to the DEFUTF8 parameter in
the section “Parameters of the VIRTCT” in the VIRTEL Installation Guide for a list of valid translation
table names. If charset is not specied, the value of the DEFUTF8 parameter in the VIRTCT is used.
ISO-FOR-COUNTRY species that the terminal will be placed in ISO mode.
country species the name of the ISO translation table to be used. Refer to the “SET-COUNTRY-CODE”
for a list of valid country names. If country is not specied, the value of the COUNTRY parameter in
the VIRTCT is used.
By default, VIRTEL expects query parameters in the URL to be encoded in the same character set as the
last page sent to the user. For the rst URL of a session, where no page has yet been sent to the user,
VIRTEL assumes the ISO encoding for the default country. The SET$ ENCODING instruction allows a
scenario to override this default.
The following example shows part of an input scenario. The scenario allows the user to override the default
input encoding for query parameters by specifying either IE=UTF-8 or IE=ISO as an additional parameter
of the URL.
COPY$ INPUT-TO-VARIABLE,FIELD='IE',VAR='IE'
IF$ NOT-FOUND,THEN=SUITE
CASE$ 'IE', *
(EQ,'UTF-8',SETUTF8), *
(EQ,'ISO',SETISO), *
ELSE=SUITE
SETUTF8 SET$ ENCODING,UTF-8,'IBM1147'
GOTO$ SUITE
SETISO SET$ ENCODING,ISO-FOR-COUNTRY,'US'
SUITE EQU *
See also the “SET$ URL-ENCODING”.
SET$ PAGE
Indicates the name of the page template to be used for the current 3270 screen and all subsequent screens.
This instruction has the same eect as the HOST4WEB command S GLOBAL PAGE.
SET$ PAGE,'pagename'
SET$ PAGE-FROM-VARIABLE
1.16. VIRTEL Web Modernisation 203

Virtel User Guide, Release 4.57
This instruction is similar to SET$ PAGE except that the name of the page template is contained in a
VIRTEL variable.
SET$ PAGE-FROM-VARIABLE,'varname','suffix'
varname the name of the VIRTEL variable which contains the page name. Trailing blanks are removed.
sux a character string to be appended to the page name.
Example:
COPY$ SCREEN-TO-VARIABLE,SCREEN=(02,12,05),VAR='MYSCREEN'
SET$ PAGE-FROM-VARIABLE,'MYSCREEN','.html'
In this example, if row 2 column 12 of the 3270 screen contains the characters “MAP” (where represents a
blank) then the page name will be set to “MAP.html”
SET$ PRIORITY
Allows a running scenario to reduce its priority in order to limit its CPU consumption.
SET$ PRIORITY,level
level species the priority to be assigned to the scenario. The following values may be specied:
LOW the scenario runs at low priority
MEDIUM the scenario runs at medium priority
HIGH the scenario runs at high priority. This is the default priority assigned to a scenario if no SET$
PRIORITY instruction is executed.
SET$ SCREEN-POSITION
The SET$ SCREEN-POSITION instruction allows a scenario to specify a rectangular screen area and loop
on it letting VIRTEL handle the current line (column, length) value, referenced by the equal sign (‘=’).
SET$ SCREEN-POSITION,(row,col,len,ht),
SET$ SCREEN-POSITION,TO-NEXT-LINE
row starting row of the portion of the screen to select
col starting column of the portion of the screen to select
len width (in columns) of the portion of the screen to select
ht height (in rows) of the portion of the screen to select
TO-NEXT-LINE sets the current position to the next line. If the next line is after the end of the current
screen rectangle,the NOTFOUND condition will be raised. This condition can be tested by means of
the “IF$ instruction”.
SET$ SIGNON
Allows an IDENTIFICATION scenario to sign on to the security manager.
SET$ SIGNON,'userid','password',['newpassword'],'retvar'
userid The user name.
password The user’s current password.
newpassword The new password, if the user’s current password is to be changed.
204 Chapter 1. The Virtel Engine

Virtel User Guide, Release 4.57
retvar The name of a VIRTEL variable into which the security manager return code will be stored. The
return code is stored as a decimal string (for example, ‘0’).
The user name and password elds may be specied as a string constant (not recommended), or as the name
of a VIRTEL variable preceded by an asterisk. The retvar variable name is not preceded by an asterisk.
SET$ TEMPORARY-PAGE
Indicates the name of the page template to be used for the current 3270 screen (but not for subsequent
screens). This instruction has the same eect as the HOST4WEB command S PAGE.
SET$ TEMPORARY-PAGE,'pagename'
SET$ TRANSACTION
Allows an IDENTIFICATION scenario to select the transaction which will be executed.
SET$ TRANSACTION,'tranname'
tranname The external name of the transaction to be executed.
SET$ URL-ENCODING
The SET$ URL-ENCODING instruction is similar to the SET$ ENCODING instruction, except that SET$
URL-ENCODING applies only to URLs received from the terminal, without aecting the default encoding
for pages sent to the terminal.
SET$ URL-ENCODING,UTF-8,'charset'
SET$ URL-ENCODING,UTF-8
SET$ URL-ENCODING,ISO-FOR-COUNTRY,'country'
SET$ URL-ENCODING,ISO-FOR-COUNTRY
Refer to “SET$ ENCODING” for a description of the parameters.
The SET$ URL-ENCODING instruction can be used in an identication scenario to specify the encoding
for the rst URL of a session, where no page has yet been sent to the user. If the encoding is not set by a
scenario, VIRTEL assumes that the rst URL of a session is encoded using the ISO encoding for the default
country.
SET$ Example
Loop on the screen from line 11 to 20, looking for a given reference. When found, enter ‘X’ on colum 4 and
key Enter
SET$ SCREEN-POSITION,(11,01,80,10)
*
LOOP_FORM EQU *
CASE$ (=,19,8),(NE,VARIABLE,'searchedRef',FORM_NEXT) X
COPY$ VALUE-TO-SCREEN,VALUE='X',SCREEN=(=,04,01), X
TYPE=ERASE-FIELD
ACTION$ TO-APPLICATION,KEY=7D
GOTO$ THEEND
*
FORM_NEXT EQU *
SET$ SCREEN-POSITION,TO-NEXT-LINE
IF$ NOT-FOUND,THEN=FORM_COMPLETED,ELSE=LOOP_FORM
*
FORM_COMPLETED EQU *
ERROR$ 0,'Reference not found'
GOTO$ THEEND
1.16. VIRTEL Web Modernisation 205

Virtel User Guide, Release 4.57
TOVAR$ instruction
The TOVAR$ instruction assists in the generation of XML from a xed-format data area known as a
commarea. The TOVAR$ instruction works in conjunction with the MAP$ instruction, which describes the
format of the commarea and its relation to the XML data stream.
Whereas the MAP$ instruction allows the XML stream to be converted into commarea format, the TOVAR$
instruction uses the MAP$ instructions to perform the reverse operation (“commarea-to-output” conversion).
In other words, it takes a commarea as input and generates a series of VIRTEL variables, which, with the
aid of a suitable page template, can be used to generate XML. See “VIRTEL as an XML parser/generator”.
The input commarea is specied according to one of the several formats of the TOVAR$ instruction, as
shown in the following paragraphs.
TOVAR$ FROM-FIELD
The TOVAR$ FROM-FIELD instruction requests VIRTEL to generate a set of VIRTEL variables from an
input commarea. The input commarea is obtained from an HTML form eld in the incoming HTTP request.
The TOVAR$ FROM-FIELD instruction is normally contained in an INITIAL scenario.
groupname TOVAR$ FROM-FIELD,FIELD='fieldname'
groupname The label is required. It species the name of the input commarea. It must match the label
on a preceding MAP$ BEGIN instruction.
eldname The name of the HTML form eld which contains the input commarea data.
TOVAR$ FROM-INPUT
The TOVAR$ FROM-INPUT instruction requests VIRTEL to generate a set of VIRTEL variables from an
input commarea. The input commarea is obtained from the data area of the incoming HTTP request. The
TOVAR$ FROM-INPUT instruction is normally contained in an INITIAL scenario.
groupname TOVAR$ FROM-INPUT
groupname The label is required. It species the name of the input commarea. It must match the label
on a preceding MAP$ BEGIN instruction.
Note: TOVAR$ FROM-INPUT with a FIELD parameter is accepted and treated as TOVAR$ FROM-
FIELD
The TOVAR$ FROM-FIELD and TOVAR$ FROM-INPUT instructions both obtain their data from an
incoming HTTP request. The HTTP request may use either via the GET method (where the input data
is appended to the URL) or the POST method (where the input data is contained in the request body).
The dierence between the two instructions is that TOVAR$ FROM-INPUT treats the entire data area
as commarea data without any translation, whereas TOVAR$ FROM-FIELD expects the data to be in
the format eldname=commareadata where commareadata is interpreted as URL-encoded data (a “+” sign
represents a space, and “%xx” represents the hexadecimal encoding of an ASCII character). TOVAR$
FROM-FIELD is preferred when using the GET method, because certain characters cannot be included in
a URL without using URL-encoding.
TOVAR$ FROM-VARIABLE
The TOVAR$ FROM-VARIABLE instruction requests VIRTEL to generate a set of VIRTEL variables from
an input commarea. The input commarea is contained in a VIRTEL variable. The TOVAR$ FROM-
VARIABLE instruction is normally contained in an OUTPUT scenario.
206 Chapter 1. The Virtel Engine

Virtel User Guide, Release 4.57
groupname TOVAR$ FROM-VARIABLE,VAR='varname'
groupname The label is required. It species the name of the input commarea. It must match the label
on a preceding MAP$ BEGIN instruction.
varname The name of the VIRTEL variable which contains the input commarea data.
. index:: pair: VIRSV$; Scenario Instructions
VIRSV$ instruction
The VIRSV$ instruction allows a service program to be called from a scenario. A service program is an
external program which is not part of VIRTEL but which executes in the VIRTEL address space. The
VIRSV service request manager dispatches work to service programs. Refer to the document Using VIRSV
for details of writing service programs which execute under the control of VIRSV.
VIRSV$ CALL or CALL-REUSE or TRANSACTION,
('servname','progname'),
(NUMBER,'n'),
(STRINGZ,'cc..cc'),
(IN-VARIABLE,'varname',len),
(OUT-VARIABLE,'varname',len),
OPTION=(option,option,...),
TRACE=(traceopt,traceopt,...),
ERROR=errlabel,TASKS=count
CALL Indicates that a new instance of the service program will be created for each request.
CALL-REUSE Indicates that the request will be routed to an existing instance of the service program,
if one is available. Otherwise a new instance of the service program will be started to process this
request, after which the service program will remain active and available to process further requests.
TRANSACTION Indicates a call to the service program which is part of a VIRSV transaction.
servname The name assigned to this service. The VIRSV service request manager uses this name to identify
the request queue which will process this service request. Choose a unique service name for each service
program. If more than one scenario calls the same service program, the same service name can be used
by each scenario, and in this case the scenarios will all share the same request queue. Alternatively,
each scenario can specify a dierent service name, in which case there will be an independent request
queue for each scenario. The service name must consist of at least 6 alphanumeric characters and must
be in quotes.
progname The name of the service program to be called. The program name must be in quotes.
option One or more of the following options may be specied:
CLOSE for a transaction call, species that the transaction is to be closed after processing this VIRSV$
instruction.
traceopt Species activation or deactivation of the VIRSV trace facility. One or more of the following
options may be specied:
APPLICATION-TRACE or NO-APPLICATION-TRACE activates or deactivates tracing by
the service program (if the service program supports this type of trace).
CALLS-TRACE or NO-CALLS-TRACE activates or deactivates tracing of the requests and re-
sponses passed between VIRTEL and VIRSV.
DISPATCH-TRACE or NO-DISPATCH-TRACE activates or deactivates tracing of the
VIRSV request queue and task dispatcher.
1.16. VIRTEL Web Modernisation 207

Virtel User Guide, Release 4.57
MEMORY-TRACE or NO-MEMORY-TRACE activates or deactivates tracing of the memory
blocks used by VIRSV and the service program.
The default value of each trace option is determined by VIRSV. The trace is written to the VSVTRACE
le of the VIRTEL started task.
errlabel A branch will be made to this label if the service cannot be called, or if VIRSV or the service
program returned a nonzero return code.
count The maximum number of concurrent instances of the service program which can be started for this
service name. If there are already count instances of the requested service program active and in-use
under this service name, the scenario will wait until an instance becomes available. The default value
is 1. This parameter applies only if the call type is CALL-REUSE.
The remaining elds indicate parameters passed to the service program. Any number of parameters may
be specied in any order. For each parameter, VIRTEL places either one or two fullwords into the request
input area. Depending on the parameter type, these fullwords may contain a binary value, an address, or a
pair of addresses, as described below. The address of the request input area is passed to the service program
in the LIST-ADR-REQU eld of the LIST-POINTER structure built by the CALL VSVPSYNC routine.
(NUMBER,’n’) Indicates a parameter passed to the service program. n is a decimal number whose value
is converted to a 32-bit binary integer and stored in the request input area. The number n must be
placed in quotes.
(POINTER-TO-NUMBER,’n’) Indicates a parameter passed to the service program. n is a decimal
number whose value is converted to a 32-bit binary integer. A fullword containing the address of this
32-bit value is stored in the request input area. The number n must be placed in quotes.
(STRINGZ,’cc..cc’) Indicates a parameter passed to the service program. A terminating character (X‘00’)
is appended to the character string cc..cc, and a fullword containing the address of the string is stored
in the request input area. The string must be placed in quotes.
(STRINGZ-FROM-VARIABLE,’varname’) Indicates a parameter passed to the service program. The
value of the VIRTEL variable varname is copied to a character string and a terminating character
(X‘00’) is appended. A fullword containing the address of this nullterminated string is stored in the
request input area. The variable name must be placed in quotes.
(IN-VARIABLE,’varname’,len) Indicates a parameter passed to the service program. Two fullwords
are stored in the request input area: the rst contains the address of the value of the VIRTEL variable
varname and the second contains the address of a fullword containing the length of this value. The
len parameter is ignored unless it contains the special value *n (see below). The variable name must
be placed in quotes. For a scenario which processes an inbound request on an MQ line, the special
variable name ‘$INFILE$’ denotes the contents of the input request.
(OUT-VARIABLE,’varname’,len) Indicates an output parameter returned by the service program.
VIRTEL allocates a buer of length len and stores two fullwords in the request input area: the rst
contains the address of the buer and the second contains the address of a fullword which contains
the buer length. The service program places the output value in the buer and updates the length
fullword. VIRTEL copies the contents of the buer into the VIRTEL variable varname after the ser-
vice program returns. The len parameter contains the desired buer length (nn, nnK, or nnM), or the
special value *n (see below). The variable name must be placed in quotes.
VIRSV$ - Allocating variable length output buers
A special form of the len parameter may be used to allocate output buers whose length varies depending
on the length of an input variable. This is done by specifying the len parameter in the form *n where n is a
decimal number. When the len parameter of an input variable is specied as *n this means that the actual
length of the variable is divided by n to obtain the unit of measurement. Subsequent output variables may
then specify length *m where m is a number. This means that the buer length for that output variable will
be m times the unit of measurement.
208 Chapter 1. The Virtel Engine

Virtel User Guide, Release 4.57
For example:
VIRSV$ CALL-REUSE,('SERVTAR','VENTAR'), *
(NUMBER,'2'), *
(IN-VARIABLE,'$INFILE$',*3), *
(OUT-VARIABLE,'HEADER',*1), *
(OUT-VARIABLE,'BODY',*3), *
(OUT-VARIABLE,'SIGNATURE',4), *
ERROR=REJECTQ,TASKS=5
In this example, assume that the variable $INFILE$ has length 4500 bytes. Because its len parameter is
specied as *3, VIRTEL calculates the unit of measurement as 1500. The output variable HEADER has len
set to *1 which means that the buer length allocated is one unit, or 1500 bytes. The output variable BODY
has len *3 which means that its buer length is 3 units, or 4500 bytes. By contrast, the output variable
SIGNATURE has a xed buer length of 4 bytes. If more than one input variable species a len parameter
in the format *n then the largest value is taken as the unit of measurement.
Subroutine scenario
Subroutine scenario represent a certain part of code that can be invoked from within a scenario. Subroutine
scenario starts with a SCENARIO SUBROUTINE instruction and ends with a SCENARIO END instruction.
mysub SCENARIO SUBROUTINE
... / ...
SCENARIO END
The following restrictions apply to a SCENARIO SUBROUTINE :-
• It must not contain any other scenario.
• It must not be included in a scenario.
• All its labels must use the LABEL$ instruction
• It must end with a SCENARIO END instruction which acts as a RETURN$ instruction.
• It must not try to branch outside of its limits.
The subroutine scenario can be invoked from a main scenario using :
PERFORM$ mysub
This will call the subroutine and the calling scenario will continue in sequence when the subroutine SCE-
NARIO END instruction will be reached.
A subroutine may contains a PERFORM$ instruction to call another subroutine up to 3 levels. For example,
main scenario may call level_1 subroutine scenario, which may call level_2 subroutine scenario, which may
call level_3 subroutine scenario, but level_3 cannot call level_4 subroutine scenario.
Multi-Session scenarios
A scenario may also be specied in the “Output Scenario” eld of a transaction invoked by VIRTEL Multi-
Session. By executing an OUTPUT scenario on a 3270 terminal, VIRTEL allows automated 3270 navigation
(for example, logon to VTAM application) from the Multi-Session screen.
When the same VTAM application is re-invoked from a VIRTEL Multi-Session screen using a dierent
transaction from the one which was previously active, VIRTEL will call the OUTPUT scenario of the new
1.16. VIRTEL Web Modernisation 209

Virtel User Guide, Release 4.57
transaction so that the scenario can terminate the previous transaction and start the new one. In this case
the IF$ SESSION-SWITCH instruction is useful (refer to “IF$ instructions” for further details).
1.16.7 Examples of VIRTEL Web Modernisation Scenarios
Creation of a list of values for a selected eld
Many 3270 applications consist of elds which can take only one of a restricted set of values. In this case, it
is possible to oer the end user a list of allowable values by requesting VIRTEL to generate the eld in the
form of a SELECT rather than in the form of a normal eld. This type of modication is performed by the
FIELD$ instruction.
* ---------------------------------------------------------------- *
* Example of SELECT, CHECKBOX, and HIDDEN fields *
* ---------------------------------------------------------------- *
*
VIRMM01 SCREENS APPL=SYNAPSE,EXEC=NO
*
SCENARIO OUTPUT
*
TMG IF$ (01,12,12),EQ='General Menu',THEN=MENUG,ELSE=ERRSCRN
*
MENUG FIELD$ (03,20,1),DEFINE-CHOICE,VAL=9
FIELD$ (03,20,1),DEFINE-CHOICE,VAL=8
FIELD$ (03,20,1),DEFINE-CHOICE,VAL=4
FIELD$ (03,20,1),DEFINE-CHOICE,VAL=3
FIELD$ (03,20,1),DEFINE-CHOICE,VAL=2
FIELD$ (03,20,1),DEFINE-CHOICE,VAL=1
*
FIELD$ (05,20,1),IS-BINARY-CHOICE,VAL='X'
*
FIELD$ (07,20,8),HIDE
*
SCENARIO END
*
ERRSCRN ERROR$ 0099
SCRNEND
END
HTTP presentation module: List of values for input eld
Making clickable elds
TESTCT1 SCREENS APPL=Demopfks,EXEC=NO
*
SCENARIO OUTPUT
*
IF$ (02,27,27),EQ='C O N T A C T C L I E N T',THEN=CONTACT
IF$ (02,27,09),EQ='STATEMENT',THEN=STATMNT,ELSE=ERRSCRN
*
CONTACT DECLARE$ (23,03,02,'06'),AS-PFKEY,'PF6'
DECLARE$ (23,08,02,'EF'),AS-PFKEY,'CLEAR'
DECLARE$ (23,18,02,'02'),AS-PFKEY,'PF2'
DECLARE$ (23,28,02,'09'),AS-PFKEY,'PF9'
DECLARE$ (23,38,02,'13'),AS-PFKEY,'PF13'
210 Chapter 1. The Virtel Engine

Virtel User Guide, Release 4.57
DECLARE$ (23,48,02,'14'),AS-PFKEY,'PF14'
DECLARE$ (23,58,02,'15'),AS-PFKEY,'PF15'
DECLARE$ (23,68,02,'16'),AS-PFKEY,'PF16'
SCENARIO END
*
STATMNT DECLARE$ (23,03,02,'06'),AS-PFKEY,'PF6'
DECLARE$ (23,08,02),AS-PFKEY,'CLEAR'
DECLARE$ (23,18,02),AS-PFKEY,'PF7'
DECLARE$ (23,28,02),AS-PFKEY,'PF9'
DECLARE$ (23,38,02),AS-PFKEY,'PF13'
DECLARE$ (23,48,02),AS-PFKEY,'PF14'
DECLARE$ (23,58,02),AS-PFKEY,'PF15'
DECLARE$ (23,68,02),AS-PFKEY,'PF17'
*
* One click, sends PF9 with the cursor position.
DECLARE$ (09,23,08,'Echéance'), C
AS-PARAMETER,'P9','ZOOM',TO=VClick
* A click in position 11,23 sends PF9 with the cursor position.
DECLARE$ (11,23,08),AS-PARAMETER,'PF9','ZOOM',TO=VClick
*
* A click on the client name invokes an internet google search.
DECLARE$ (04,09,17),AS-HREF,'&&hl=en&&csr=', C
TO='http://www.google.com/search?q='
*
SCENARIO END
*
ERRSCRN ERROR$ 0099
SCRNEND
END
HTTP presentation module: Clickable elds using DECLARE$
Adding calendars to date elds
By using a combination of an output scenario and a JavaScript application, date elds on the 3270 screen
can be transformed into HTML elds on which a small calendar window appears when the user clicks on
the eld. The user chooses the desired date from the calendar, and VIRTEL inserts the date in the correct
format into the 3270 input eld.
An example scenario for declaring date elds is shown below. As usual, the name of this scenario must be
specied in the “Output Scenario” eld of the VIRTEL transaction which calls the host application.
In this example, the correct screen is rst identied by using its screen identier “DEM275” in row 1 column
2, then three calendar elds are declared at row 8 column 28, row 8 column 64, and row 9 column 28. For
the purposes of illustration, a dierent date format is declared for each eld:
SCENCALR SCREENS EXEC=NO
SCENARIO OUTPUT
*
* Identify the correct screen
*
IF$ (01,02,06),EQ='DEM275',THEN=MENU275
SCENARIO END
*
* Declare the calendar fields
*
MENU275 EQU *
1.16. VIRTEL Web Modernisation 211

Virtel User Guide, Release 4.57
CALENDR$ SCREEN=(8,28),DATEFMT='%Y%m%d'
CALENDR$ SCREEN=(8,64),DATEFMT='%m/%d/%y'
CALENDR$ SCREEN=(9,28),DATEFMT='%e-%b-%Y'
SCENARIO END
SCRNEND
END
HTTP presentation module: Dening calendar elds
In the DATEFMT parameter:
%Y represents the year (4 digits)
%y represents the year (2 digits)
%d represents the day of the month (01-31)
%e represents the day of the month (1-31)
%m represents the month (01-12)
%b represents the abbreviated month name (Jan, Feb, etc)
Refer to the Date.prototype.print function in the calendar.js le for details of all of the allowable date
formats.
The CALENDR$ macro generates two VIRTEL table variables: CALENDAR and DATEFMT. The CAL-
ENDAR variable contains the VIRTEL-generated names of the 3270 elds which are to be processed as
calendar elds. The DATEFMT variable contains the corresponding date formats for each eld.
The page template must include logic to call the calendar application whenever the output screen has declared
calendar elds. The extract below shows the necessary statements which are included in the VIRTEL sample
page WEB2VIRT.htm:
In the <head>section:
{{{ WHEN-EXISTS "CALENDAR" }}}
<link rel="stylesheet" type="text/css" media="all"
href="dynarch/cal-w2k-c1.css" title="win2k-cold-1" />
<script type="text/Javascript" src="dynarch/calendar.js"></script>
<script type="text/Javascript" src="dynarch/cal-en.js"></script>
<script type="text/Javascript" src="dynarch/cal-setup.js"></script>
{{{ SET-LOCAL-OPTIONS (ID) }}}
{{{ END-WHEN-EXISTS "CALENDAR" }}}
After the <form>section:
{{{ WHEN-EXISTS "CALENDAR" }}}
<script language="Javascript" type="text/Javascript">
{{{ FOR-EACH-VALUE-IN "CALENDAR" }}}
Calendar.setup({inputField:"{{{CURRENT-VALUE-OF "CALENDAR"}}}",
ifFormat:"{{{CURRENT-VALUE-OF "DATEFMT"}}}"});
{{{ END-FOR "CALENDAR" }}}
</script>
{{{ END-WHEN-EXISTS "CALENDAR" }}}
HTML page template for calendar elds
212 Chapter 1. The Virtel Engine

Virtel User Guide, Release 4.57
VIRTEL SUGGUEST
VIRTEL Suggest is a facility which presents lists of suggested values for specic 3270 elds. The suggested
values are presented in a drop-down list which appears automatically when the user starts typing into a eld.
The list modies itself dynamically as the user types. At any time the user can select one of the suggested
values by clicking or moving the cursor to the desired value.
Fields eligible for processing by VIRTEL Suggest are identied by means of an output scenario containing
SUGGEST$ macros. Each SUGGEST$ macro identies a “suggest” eld and indicates the data source for
the list of suggested values. The data source may be a DB2 table, a FLECS application1, or a user-written
CICS transaction.
An example scenario for declaring a “suggest” eld is shown below. As usual, the name of this scenario must
be specied in the “Output Scenario” eld of the VIRTEL transaction which calls the host application.
In this example, the correct screen is rst identied by using its screen identier “VIR0091” in row 1 column
2, then a VIRTEL Suggest eld is declared at row 8 column 21. The data source for this eld is column
“LASTNAME” in the DB2 table named “DSN8810.EMP”:
SCENAJAX SCREENS EXEC=NO
*
* DEMONSTRATION SCENARIO FOR VIRTEL-SUGGEST FUNCTIONS
*
* The purpose of this scenario is to activate
* a VIRTEL-Suggest field in the demo application VIR0091.
*
SCENARIO OUTPUT
IF$ (1,2,7),EQ='VIR0091',THEN=DEMOAPPL
SCENARIO END
*
* The test panel identifier is VIR0091
*
DEMOAPPL EQU *
*
* Activate VIRTEL-Suggest in the NAME field
*
SUGGEST$ TRAN='suggestD'
SUGGEST$ TABLE='DSN8810.EMP'
SUGGEST$ SCREEN=(8,21),FIELD='LASTNAME'
*
SCENARIO END
SCRNEND
END
HTTP presentation module: Dening VIRTEL Suggest elds
SUGGEST$ instruction
The parameters of the SUGGEST$ macro instruction are as follows:
TRAN=’name’ the name of the VIRTEL transaction which provides the link to the data source for the
eld. The following transactions are supplied as standard in the VIRTEL entry point WEB2HOST:
suggestD Data source is a column in a DB2 table
suggestF Data source is a eld in a FLECS application (via CICS)
suggestV Data source is a eld in a FLECS application (via VIRTEL)
TABLE=’name’ the name of the DB2 table, or the name of the FLECS application
FIELD=’name’ the name of the DB2 column, or the name of the FLECS eld
1.16. VIRTEL Web Modernisation 213

Virtel User Guide, Release 4.57
SCREEN=(row,col) the screen position (row, column) of the eld on the 3270 screen
A SUGGEST$ instruction containing only TRAN and/or TABLE parameters may be used to set the values
for subsequent SUGGEST$ instructions. Each SUGGEST$ instruction which contains a SCREEN parameter
and a FIELD parameter generates a VIRTEL Suggest eld. If the TRAN and TABLE parameters are not
specied then the values from the previous SUGGEST$ instruction are used.
Suggest$ - Installation pre-requisites
Before you can use the suggestD transaction, you must install the program VDBSUGST in your CICS system
with transaction code VDBS. The JCL to compile, link, and bind this program is in member DB2COBC
of VIRTEL.SAMPLIB. You must also update the denition of the suggestD transaction (W2H-53 in the
WEB2HOST entry point) to specify the VTAM applid of the appropriate CICS region.
The suggestF transaction requires the FLECS product to be installed in your CICS system. You must also
update the denition of the suggestF transaction (W2H-51 in the WEB2HOST entry point) to specify the
VTAM applid of the CICS region in which FLECS is installed.
If you plan to use the suggestV transaction, you must add DD statements to the VIRTEL started task JCL
specifying the FLECS catalog le (F20CAT) and the pointer les it references. You must also update the
VIRTCT by adding UFILEn parameters for the FLECS catalog le and each pointer le, together with the
corresponding ACB denitions.
Page template for VIRTEL Suggest
The page template must include logic to call the data source transaction whenever the output screen has
declared VIRTEL Suggest elds. The extract below shows the necessary statements which are included in
the VIRTEL sample page WEB2VIRT.htm:
In the <head>section:
{{{ WHEN-EXISTS "SUGGEST-ELEMENT" }}}
<link rel="stylesheet" type="text/css" href="suggest.css" />
<script type="text/Javascript" src="suggest.js"></script>
{{{ END-WHEN-EXISTS "SUGGEST-ELEMENT" }}}
After the <form>section:
{{{ WHEN-EXISTS "SUGGEST-ELEMENT" }}}
{{{ FOR-EACH-VALUE-IN "SUGGEST-ELEMENT" }}}
var o{{{CURRENT-VALUE-OF "SUGGEST-ELEMENT"}}}box =new AutoSuggestControl(
"{{{CURRENT-VALUE-OF "SUGGEST-ELEMENT"}}}",
new VirtelSuggestions(),
"{{{CURRENT-VALUE-OF "SUGGEST-TRANSNAME"}}}",
"{{{CURRENT-VALUE-OF "SUGGEST-TABLENAME"}}}",
"{{{CURRENT-VALUE-OF "SUGGEST-FIELDNAME"}}}");
{{{ END-FOR "SUGGEST-ELEMENT" }}}
{{{ END-WHEN-EXISTS "SUGGEST-ELEMENT" }}}
HTML page template for VIRTEL Suggest elds
The SUGGEST$ macro instruction generates four VIRTEL table variables: SUGGEST-ELEMENT,
SUGGEST-TRANSNAME, SUGGEST-TABLENAME, SUGGEST-FIELDNAME. The rst entry in each
table corresponds to the rst VIRTEL Suggest eld on the page, the second entry corresponds to the second
VIRTEL Suggest eld on the page, and so on.
214 Chapter 1. The Virtel Engine

Virtel User Guide, Release 4.57
1.16.8 Scenario AUTOREFRESH
The majority of host applications use the 3270 protocol in a synchronous manner, meaning that each user
input (ENTER or PF key) generates one response consisting of a 3270 screen built by a single VTAM
message. Certain host applications, however, may build a 3270 screen in two or more segments, by sending
more than one VTAM message to the terminal. Other applications may send asynchronous updates to a
3270 screen which are not a direct result of user input. Such applications need special handling to ensure
that VIRTEL can present the updated 3270 screen image to the user without requiring the user to press
ENTER to refresh the screen. VIRTEL handles this situation by means of an AJAX request containing the
VerifyVirtelSession keyword (see “3270 Session Management”). By using an output scenario with a suitable
page template, the HTML page can determine whether the 3270 screen image has been updated, and if so
can dynamically refresh the data displayed in the browser.
An example scenario is shown below. As usual, the name of this scenario must be specied in the “Output
Scenario” eld of the VIRTEL transaction which calls the host application. This scenario is supplied as
member SCENREFR in the VIRTEL SAMPLIB.
SCENREFR SCREENS EXEC=NO
*
* SCENARIO FOR MVS CONSOLE APPLICATION
*
SCENARIO OUTPUT
IF$ (1,11,7),EQ='SNACONS',THEN=REFR1
IF$ (21,3,7),EQ='IEE612I',THEN=REFR2
SCENARIO END
*
* SET AUTOREFRESH ONCE FOR SIGNON SCREEN
*
REFR1 EQU *
COPY$ VALUE-TO-VARIABLE,VAR='AUTOREFRESH',VALUE='ONCE'
SCENARIO END
*
* SET AUTOREFRESH EVERY 2 SECONDS FOR CONSOLE SCREEN
*
REFR2 EQU *
COPY$ VALUE-TO-VARIABLE,VAR='AUTOREFRESH',VALUE='2'
SCENARIO END
*
SCRNEND
END
HTTP presentation module: 3270 auto-refresh
This example activates auto-refresh for two specic application screens. The rst screen, identied by the
word “SNACONS” in row 1 column 11, is built by the application in two parts. For this screen, the
AUTOREFRESH variable is set to “ONCE” which causes the page template to return to VIRTEL one time
only to request the second part of the screen. The second screen, identied by “IEE612I” in row 21 column
3, is updated continuously by the application. For this screen, the AUTOREFRESH variable is set to “2”
which causes the browser to issue an AJAX request every two seconds to ask VIRTEL if the screen has been
updated. A positive response from VIRTEL triggers a request to refresh the screen.
The following table shows the permissible values for the AUTOREFRESH variable:
1.16. VIRTEL Web Modernisation 215

Virtel User Guide, Release 4.57
Value Meaning
nnn refresh once, then every nnn seconds
nnn,max refresh once, then after nnn seconds, then double the interval after each refresh, with a
maximum interval of max seconds.
ONCE refresh once only
NO or
NONE
do not refresh
Settings for 3270 auto-refresh
The page template must include logic to process the AUTOREFRESH variable and issue the necessary
AJAX functions. The extract below shows the necessary statements which are included in the VIRTEL
sample page WEB2VIRT.htm:
In the <head>section:
<script src="js01.js" type="text/Javascript"></script>
After the <form>section:
<script>
{{{ WHEN-EXISTS "AUTOREFRESH" }}}
AutoRefresh("{{{CURRENT-VALUE-OF "AUTOREFRESH"}}}",sesscode);
{{{ END-WHEN-EXISTS "AUTOREFRESH" }}}
{{{ WHEN-NOT-EXISTS "AUTOREFRESH" }}}
AutoRefresh("1.2,10",sesscode);
{{{ END-WHEN-NOT-EXISTS "AUTOREFRESH" }}}
</script>
HTML page template for 3270 auto-refresh
This page supplies a default value which takes eect if no AUTOREFRESH variable is specied by the
scenario. The default value is set to ‘1.2,10’ which means that a refresh will occur immediately after each
screen is loaded, another refresh will occur 1.2 seconds later, then at intervals of 2.4 seconds, 4.8 seconds,
and 9.6 seconds, and nally a refresh will occur every 10 seconds thereafter.
The autorefresh function may be disabled by specifying SCENAUTN in the “Output scenario” eld of the
VIRTEL transaction denition. The source code for the SCENAUTN scenario is supplied in the VIRTEL
SAMPLIB.
1.16.9 PDF output generation
This example shows a scenario which generates a PDF output le using the MakePDF program product via
the service program VIRSVPDF.
SCENPDF SCREENS EXEC=NO
*
* Scenario for generating PDF output using MakePDF
*
SCENARIO IDENTIFICATION
*
* Create INPUT file for MakePDF
COPY$ OUTPUT-FILE-TO-VARIABLE,TYPE=LINEBUFFER, -
FILE='INPUT.TXT',VAR='INPUT'
* Create DOCOPT file for MakePDF
COPY$ OUTPUT-FILE-TO-VARIABLE,TYPE=LINEBUFFER, -
216 Chapter 1. The Virtel Engine

Virtel User Guide, Release 4.57
FILE='DOCOPT.TXT',VAR='DOCOPT'
* Create LAYOUT file for MakePDF
COPY$ OUTPUT-FILE-TO-VARIABLE,TYPE=LINEBUFFER, -
FILE='LAYOUT.TXT',VAR='LAYOUT'
* Call service program VIRSVPDF which calls MakePDF
VIRSV$ CALL-REUSE,('SERVPDF','VIRSVPDF'), -
(IN-VARIABLE,'INPUT',*3), -
(IN-VARIABLE,'DOCOPT',*1), -
(IN-VARIABLE,'LAYOUT',*1), -
(OUT-VARIABLE,'OUTPUT',500K), -
(OUT-VARIABLE,'MAKEPDFMESSAGE',160), -
(NUMBER,'3'), MakePDF trace level -
TRACE=(APPLICATION-TRACE, Virsv trace level -
NO-CALLS-TRACE,NO-DISPATCH-TRACE,NO-MEMORY-TRACE), -
ERROR=REJECT,TASKS=1
* Send result to browser
SEND$ AS-FILE,VAR='OUTPUT', -
TYPE='application/pdf',NAME='my.pdf'
REJECT EQU *
SCENARIO END
SCRNEND
END
HTTP presentation module: PDF output generation
For the purpose of this scenario, INPUT.TXT, DOCOPT.TXT and LAYOUT.TXT are les created on a
PC, then uploaded to VIRTEL as page templates (see “Uploading HTML Pages”). The TYPE=LINEB-
UFFER parameters on the COPY$ statements tell VIRTEL that these les should be converted to MakePDF
“LINEBUF” format. The VIRSV$ statement calls an intermediary service program VIRSVPDF which sets
up the commarea and calls MakePDF. Then the SEND$ statement sends back the result le to the browser,
giving it the name my.pdf.
The les INPUT.TXT, DOCOPT.TXT, and LAYOUT.TXT for this example are shown below:
<!--VIRTEL start="{{{" end="}}}" -->
{{{PDF-NEW-INPUT }}}{{{PDF-USE-DOCOPT "1"}}}{{{PDF-USE-LAYOUT "1"}}}
1. Incoming calls
213
{{{PDF-LINES-PER-PAGE (5) }}}
PAGE 1 FIRST INPUT
{{{CURRENT-VALUE-OF "I1"}}}
{{{PDF-NEW-INPUT }}}{{{PDF-USE-DOCOPT "1"}}}{{{PDF-USE-LAYOUT "2"}}}
PAGE 2 SECOND INPUT
{{{CURRENT-VALUE-OF "I2"}}}
{{{PDF-NEW-INPUT }}}{{{PDF-USE-DOCOPT "1"}}}{{{PDF-USE-LAYOUT "3"}}}
PAGE 3 THIRD INPUT
{{{CURRENT-VALUE-OF "I3"}}}
MakePDF INPUT.TXT le for PDF generation
<!--VIRTEL start="{{{" end="}}}" -->
{{{PDF-NEW-DOCOPT "1"}}}
OPTIONS COMPRESS=YES
PAGE SIZE=A4 PORTRAIT
DEFINEFONT DEFAULT NATIVE=COURIER-BOLD
DEFAULTFONTSIZE 8 9
DefineFont Font1 Native={{{CURRENT-VALUE-OF "IF1"}}}
DefineFont Font2 Native={{{CURRENT-VALUE-OF "IF2"}}}
1.16. VIRTEL Web Modernisation 217

Virtel User Guide, Release 4.57
DefineFont Font3 Native={{{CURRENT-VALUE-OF "IF3"}}}
DOCINFO AUTHOR="SYSPERTEC"
DEFINEOVERLAY FORM1 FILE=OVERLAY1
DEFINEOVERLAY FORM2 FILE=OVERLAY2
DEFINEOVERLAY FORM3 FILE=OVERLAY3
MakePDF DOCOPT.TXT le for PDF generation
<!–VIRTEL start=”{{{” end=”}}}” –> {{{PDF-NEW-LAYOUT “1”}}} APPLYOVERLAY
FORM1 AT (3.0’ 18.0’) TEXTBEGIN Font Font1 size(8 9) PAGECONTENTS LINES(ALL)
TEXTEND ; {{{PDF-NEW-LAYOUT “2”}}} APPLYOVERLAY FORM2 AT (3.0’ 18.0’)
TEXTBEGIN Font Font2 size(8 9) PAGECONTENTS LINES(ALL) TEXTEND ; {{{PDF-
NEW-LAYOUT “3”}}} APPLYOVERLAY FORM3 AT (3.0’ 18.0’) TEXTBEGIN Font Font3
size(8 9) PAGECONTENTS LINES(ALL) TEXTEND ;
MakePDF LAYOUT.TXT le for PDF generation
218 Chapter 1. The Virtel Engine

Virtel User Guide, Release 4.57
1.17 VIRTEL Web Integration
VIRTEL Web Integration allows XML or other web services requests to be interpreted and transformed
into requests which can be processed by legacy applications such as CICS/COBOL, with the results being
transformed back into XML format for transmission via HTTP or SMTP. By using the scenario language
described in section “Web Modernisation VIRTEL Scenarios”, legacy transactions can be converted into
Web Services.
1.17.1 Parsing Query input
By using a combination of an INITIAL scenario and a VIRTEL transaction script, VIRTEL can transform
Query parameters in an HTTP request into a xed-format data area for processing by a COBOL legacy
application program.
HTTP request with Query data (GET method)
The HTML page shown below generates an HTTP request with Query parameters:
<html><head><title>Syspertec -Query data for VIRTEL</title></head>
<body>
<FORM METHOD="GET" action="querydemo.htm+tranq">
<p>Ident number: <input type="text" name="num"></input>
<p>Check digits: <input type="text" name="key"></input>
<p>Request date: <input type="text" name="date"></input>
<p><button type="submit">Submit</button>
</form>
</body></html>
HTML form for generating Query input data (GET method)
If the user enters, for example, the values “1531499136”, “05”, and “07/01/15” in the three elds and presses
the Submit button, an HTTP request is presented to VIRTEL in the format shown below:
GET querydemo.htm+tranq?num=1531499136&key=05&date=07%2F01%2F15 HTTP/1.0
Host: 192.168.235.30:41000
Accept: */*
Example HTTP request with Query data (GET method)
Note: The “/” characters in the user’s input have been encoded by the browser as “%2F” because Query
parameters are always transmitted in URL-encoded format in the HTTP request.
HTTP request with Query data (POST method)
By changing the FORM METHOD to POST (instead of GET) in the HTML form, the HTTP request can
be presented to VIRTEL in the alternative format shown below:
POST /demohttp/querydemo.htm+tran4 HTTP/1.0
Host: 192.168.235.30:41000
Accept: */*
Content-Type: application/x-www-form-urlencoded
1.17. VIRTEL Web Integration 219

Virtel User Guide, Release 4.57
Content-Length: 31
num=1531499136&key=05&date=07%2F01%2F15
Example HTTP request with Query data (POST method)
VIRTEL considers this POST request to be identical to the GET request presented in the previous paragraph.
Presentation module for Query input data
An example INITIAL scenario for converting this Query data to commarea format is coded in the presentation
module SCENQRYI shown below:
SCENQRYI SCREENS APPL=SCENQRYI
SCENARIO INITIAL
COMMAREA MAP$ BEGIN
MAP$ AREA,WITH='num',LENGTH=10,TYPE=9
MAP$ AREA,WITH='key',LENGTH=2,TYPE=9
MAP$ AREA,WITH='date',LENGTH=8,TYPE=X
COMMAREA MAP$ END
COMMAREA MAP$ FROM-INPUT,QUERY
COMMAREA MAP$ TO-VARIABLE,VAR='MYAREA'
SCENARIO END
SCRNEND
END
HTTP presentation module for Query input data.
The same presentation module may be used to process both GET and POST requests.
Contents of generated commarea
The gure below shows the 20-byte commarea generated in the VIRTEL variable MYAREA:
----+----1----+----2
15314991360507/01/15
Commarea generated from Query data
Transaction denition for Query input data
The HTTP requests shown in the GET and POST examples above use the URL querydemo.htm+tranq to
invoke the VIRTEL transaction shown below (tranq is the “external name” of the transaction). The “TIOA
at logon” eld contains a connection script. After signing on to CICS, the connection script uses the &/S
order to process the INITIAL scenario in the presentation module SCENQRYI. This scenario converts the
Query parameter input data into a VIRTEL variable named MYAREA. The script then invokes a CICS
transaction VQRY, passing the contents of MYAREA as input data. The CICS transaction performs an
EXEC CICS RECEIVE to obtain the input data.
TRANSACTION DETAIL DEFINITION ---------------------- Applid: VIRTELD2 15:32:33
Internal name ===> CLI-17Q To associate with an entry point name
External name ===> tranq Name displayed on user menu
Description ===> Demonstration VIRTEL Query
Application ===> CICSPROD Application to be called
PassTicket ===> 0 Name ===> 0=no 1=yes 2=unsigned
Application type ===> 1 1=VTAM 2=VIRTEL 3=SERV 4=PAGE 5=LINE
220 Chapter 1. The Virtel Engine

Virtel User Guide, Release 4.57
Pseudo-terminals ===> CLVTA Prefix of name of partner terminals
Logmode ===> Specify when LOGMODE must be changed
How started ===> 1 1=menu 2=sub-menu 3=auto
Security ===> 0 0=none 1=basic 2=NTLM 3=TLS 4=HTML
H4W commands ? ===> 024 0=no 1=yes 2=if2VIRTEL 4=auto
Logon message ===>
TIOA at logon ===> Signon to CICS&/W&*F34BE9&/A&(&/S VQRY&=MYAREA=&/A&)
TIOA at logoff ===>
Initial Scenario ===> SCENQRYI Final Scenario ===>
Input Scenario ===> Output Scenario ===>
P1=Update P3=Return P12=Server
VIRTEL transaction denition for Query input data
1.17.2 Parsing XML input
By using a combination of an INITIAL scenario and a VIRTEL transaction script, VIRTEL can transform
XML input data in an HTTP request into a xed-format data area for processing by a COBOL legacy
application program.
HTTP request with XML input data
The simplest method of sending XML data to VIRTEL is to build an HTTP POST request containing the
raw XML data in the request body. This is the format expected by the MAP$ FROM-INPUT instruction
described 189. The gure below shows an example of an HTTP request containing XML input data:
POST /demohttp/xmldemo.xml+tran3 HTTP/1.0
Host: 192.168.235.30
Accept: */*
Content-Length: 197
<?xml version="1.0" ?>
<methodCall>
<screenname>T000-GAL</screenname>
<screentype>3270</screentype>
<params>
<fieldname>FIELD001</fieldname>
<uinput>A</uinput>
</params>
</methodCall><
Example HTTP request with XML input data
Presentation module for XML input data
An example INITIAL scenario for processing this XML input data is coded in the presentation module
SCENXMLI shown below:
1.17. VIRTEL Web Integration 221

Virtel User Guide, Release 4.57
SCENXMLI SCREENS APPL=SCENXMLI
*
SCENARIO INITIAL
OUTAREA MAP$ BEGIN
MAP$ AREA,WITH='screenname',LENGTH=8,TYPE=X
PARAMS MAP$ BEGIN,WITH='params'
MAP$ AREA,WITH='fieldname',LENGTH=8,TYPE=X
MAP$ AREA,WITH='uinput',LENGTH=20,TYPE=X
PARAMS MAP$ END
OUTAREA MAP$ END
*
OUTAREA MAP$ FROM-INPUT
OUTAREA MAP$ TO-VARIABLE,VAR='MYAREA'
SCENARIO END
*
SCRNEND
END ,
HTTP presentation module for XML input data
Contents of generated commarea
The gure below shows the 36-byte commarea generated in the VIRTEL variable MYAREA:
----+----1----+----2----+----3----+-
T000-GALFIELD001A
Commarea generated from XML input data
Sending XML input as URL-encoded data
For some applications it may be more convenient to send the XML data as part of the URL. To conform
with URL syntax rules, the XML data is embedded in an HTML text eld, and blanks and other special
characters in the XML data are replaced by their corresponding URL-encoded values (“+” signs and “%xx”
sequences). This format can be generated by means of an HTML form, as shown in the example below:
<HTML><HEAD><TITLE>Syspertec - XML Application with VIRTEL</TITLE></HEAD>
<BODY><CENTER>
<FORM method=GET name="VirtelForm" action="/demohttp/xmldemo.xml+tran3">
<TEXTAREA cols="45" rows="20" name="MYINPUT">
<?xml version="1.0" ?>
<methodCall>
<screenname>T000-GAL</screenname>
<screentype>3270</screentype>
<params>
<fieldname>FIELD001</fieldname>
<uinput>A</uinput>
</params>
</methodCall>
</TEXTAREA>
<p><BUTTON type="submit">Submit</BUTTON>
</FORM></CENTER>
</BODY>
</HTML>
222 Chapter 1. The Virtel Engine

Virtel User Guide, Release 4.57
HTML form with XML input data embedded in a text eld
The HTTP request generated by the above HTML form is presented to VIRTEL in the format shown below:
GET /demohttp/xmldemo.xml+tran3?MYINPUT=%3C%3Fxml+version%3D%221.0%22%3F%
3E%0D%0A%3CmethodCall%3E%0D%0A%3Cscreenname%3ET000-GAL%3C%2Fscreenname%3E
%0D%0A%3Cscreentype%3E3270%3C%2Fscreentype%3E%0D%0A%3Cparams%3E%0D%0A++%3
Cfieldname%3EFIELD001%3C%2Ffieldname%3E%0D%0A++%3Cuinput%3EA%3C%2Fuinput%
3E%0D%0A%3C%2Fparams%3E%0D%0A%3C%2FmethodCall%3E%0D%0A HTTP/1.0
Host: 192.168.235.30
Accept: */*
XML input data in URL-encoded format (HTTP GET method)
By changing the FORM METHOD to POST (instead of GET), the HTTP request can be presented to
VIRTEL in the alternative format shown below:
POST /demohttp/xmldemo.xml+tran3 HTTP/1.0
Host: 192.168.235.30
Accept: */*
Content-Type: application/x-www-form-urlencoded
Content-Length: 314
MYINPUT=%3C%3Fxml+version%3D%221.0%22%3F%3E%0D%0A%3CmethodCall%3E%0D%0A%3C
screenname%3ET000-GAL%3C%2Fscreenname%3E%0D%0A%3Cscreentype%3E3270%3C%2Fsc
reentype%3E%0D%0A%3Cparams%3E%0D%0A++%3Cfieldname%3EFIELD001%3C%2Ffieldnam
e%3E%0D%0A++%3Cuinput%3EA%3C%2Fuinput%3E%0D%0A%3C%2Fparams%3E%0D%0A%3C%2Fm
ethodCall%3E%0D%0A
XML input data in URL-encoded format (HTTP POST method)
Both of these request formats can be processed by a presentation module similar to the SCENXMLI module
shown previously. The only change necessary to process URL-encoded data is that the statement OUTAREA
MAP$ FROMINPUT must be replaced by the statement OUTAREA MAP$ FROM-FIELD,FIELD=’MY-
INPUT’
Transaction denition for XML input data
The HTTP requests shown above use the URL /demohttp/xmldemo.xml+tran3 to invoke the VIRTEL
transaction shown below (tran3 is the “external name” of the transaction). The “TIOA at logon” eld
contains a connection script. After signing on to CICS, the connection script uses the &/S order to process
the INITIAL scenario in the presentation module SCENXMLI. This scenario converts the XML data into a
VIRTEL variable named MYAREA. The script then invokes a CICS transaction VHLP, passing the contents
of MYAREA as input data. The CICS transaction performs an EXEC CICS RECEIVE to obtain the input
data.
TRANSACTION DETAIL DEFINITION ---------------------- Applid: VIRTELD2 15:32:33
Internal name ===> CLI-16E To associate with an entry point name
External name ===> tran3 Name displayed on user menu
Description ===> Demonstration VIRTEL XML
Application ===> CICSPROD Application to be called
PassTicket ===> 0 Name ===> 0=no 1=yes 2=unsigned
Application type ===> 1 1=VTAM 2=VIRTEL 3=SERV 4=PAGE 5=LINE
Pseudo-terminals ===> CLVTA Prefix of name of partner terminals
Logmode ===> Specify when LOGMODE must be changed
How started ===> 1 1=menu 2=sub-menu 3=auto
Security ===> 0 0=none 1=basic 2=NTLM 3=TLS 4=HTML
H4W commands ? ===> 024 0=no 1=yes 2=if2VIRTEL 4=auto
Logon message ===>
1.17. VIRTEL Web Integration 223

Virtel User Guide, Release 4.57
TIOA at logon ===> Signon to CICS&/W&*F34BE9&/A&(&/S VHLP&=MYAREA=&/A&)
TIOA at logoff ===>
Initial Scenario ===> SCENXMLI Final Scenario ===>
Input Scenario ===> Output Scenario ===> SCENXMLO
P1=Update P3=Return P12=Server
VIRTEL transaction denition for XML input data
XML input with attributes and repeating groups
The gure below shows an example of XML input data containing attributes and repeating groups of elds:
<?xml version="1.0" ?>
<request>
<id type="RP" date="20.01.2006" numreq="2">8019A</id>
<part>
<key suffix="01">GROMMET</key>
<stat>3</stat>
<type>C</type>
</part>
<part>
<key suffix="02">GREVILE</key>
<type>D</type>
<stat>3</stat>
</part>
</request>
Example XML input data with attributes and repeating groups
An INITIAL scenario for processing this XML input data is coded in the presentation module SCENXMLA
shown below:
SCENXMLA SCREENS APPL=SCENXMLA
*
SCENARIO INITIAL
*
COMMAREA MAP$ BEGIN
MAP$ AREA,WITH='id',LENGTH=5
MAP$ AREA-ATTRIBUTE,VALUEOF='date',LENGTH=8,TYPE=ONLY9
MAP$ AREA-ATTRIBUTE,VALUEOF='type',LENGTH=2
MAP$ AREA-ATTRIBUTE,VALUEOF='numreq',LENGTH=2,TYPE=9
DETAIL MAP$ BEGIN,WITH='part',OCCURS=5
MAP$ AREA-ATTRIBUTE,WITH='key',VALUEOF='suffix', *
LENGTH=2,TYPE=9
MAP$ AREA,LENGTH=8
MAP$ AREA,WITH='type',LENGTH=1
MAP$ AREA,WITH='stat',LENGTH=1
DETAIL MAP$ END
COMMAREA MAP$ END
*
COMMAREA MAP$ FROM-INPUT
COMMAREA MAP$ TO-VARIABLE,VAR='MYCOMMAREA'
SCENARIO END
224 Chapter 1. The Virtel Engine

Virtel User Guide, Release 4.57
*
SCRNEND
END
Presentation module for XML input with attributes and repeating groups
The gure below shows the 77-byte commarea generated in the VIRTEL variable MYCOMMAREA:
----+----1----+----2----+----3----+----4----+----5----+----6----+----7----+--
8019A20012006RP0201GROMMET C302GREVILE D300 00 00
Commarea generated from XML input with attributes and repeating groups
XML input with redenition of elds
This example shows how the commarea can be redened according to the value of a eld in the XML input.
In this example, the input can be in one of two formats, depending on the value of the eld whose name is
“reqtype”:-
Request type A
<?xml version="1.0" ?>
<request>
<reqid>1234</reqid>
<reqtype>A</reqtype>
<itemcode>12345</itemcode>
<details>
<color>blue</color>
<quantity>5</quantity>
</details>
</request>
Request type B
<?xml version="1.0" ?>
<request>
<reqid>2345</reqid>
<reqtype>B</reqtype>
<itemcode>23457</itemcode>
<details>
<lang>EN</lang>
<format>quarto</format>
</details>
</request>
Example XML input data with redenition of elds
An INITIAL scenario for processing this XML input data is coded in the presentation module SCENXMLR
shown below:
SCENXMLR SCREENS APPL=SCENXMLR
*
SCENARIO INITIAL
*
HEADER MAP$ BEGIN
MAP$ AREA,WITH='reqid',LENGTH=4,TYPE=9
MAP$ AREA,WITH='reqtype',LENGTH=1,TYPE=X,VAR='TRIGGER'
1.17. VIRTEL Web Integration 225

Virtel User Guide, Release 4.57
MAP$ AREA,WITH='itemcode',LENGTH=6,TYPE=9
HEADER MAP$ END
*
HEADER MAP$ FROM-INPUT,FIELD='MYINPUT'
HEADER MAP$ TO-VARIABLE,VAR='MYHEAD'
*
IF$ VARIABLE,'TRIGGER',EQ='A',THEN=TYPEA
IF$ VARIABLE,'TRIGGER',EQ='B',THEN=TYPEB
SCENARIO END
*
TYPEA EQU *
DETAILA MAP$ BEGIN,WITH='details'
MAP$ AREA,WITH='color',LENGTH=8,TYPE=X
MAP$ AREA,WITH='quantity',LENGTH=5,TYPE=9
DETAILA MAP$ END
*
DETAILA MAP$ FROM-INPUT,FIELD='MYINPUT'
DETAILA MAP$ TO-VARIABLE,VAR='MYBODY'
SCENARIO END
*
TYPEB EQU *
DETAILB MAP$ BEGIN,WITH='details'
MAP$ AREA,WITH='lang',LENGTH=2,TYPE=X
MAP$ AREA,WITH='format',LENGTH=8,TYPE=X
DETAILB MAP$ END
*
DETAILB MAP$ FROM-INPUT,FIELD='MYINPUT'
DETAILB MAP$ TO-VARIABLE,VAR='MYBODY'
SCENARIO END
*
SCRNEND
END
Presentation module for XML input with redenition of elds
This scenario generates two commareas, which are saved in VIRTEL variables MYHEAD and MYBODY,
as shown below:
Request type A
----+----1----+----2----+----3
MYHEAD: 1234A012345
MYBODY: blue 00005
Request type B
----+----1----+----2----+----3
MYHEAD: 2345B023457
MYBODY: ENquarto
Commarea generated from XML input with redenition of elds
1.17.3 Presentation of XML output
By using an output scenario and a suitable page template, VIRTEL can transform application program
output into XML when the result is sent back in the HTTP response.
226 Chapter 1. The Virtel Engine

Virtel User Guide, Release 4.57
Presentation module for XML output
An output scenario is used to extract data from the output 3270 data stream of the transaction and place
it into one or more table variables. The example presentation module SCENXMLO shown below contains
an OUTPUT scenario which creates two variables, ACCTNUM and FULLNAME, from a table of values
displayed on the 3270 screen:
SCENXMLO SCREENS EXEC=NO
SCENARIO OUTPUT
IF$ (04,2,6),EQ=' ',THEN=SKIP04
COPY$ SCREEN-TO-VARIABLE,SCREEN=(04,2,6),VAR='ACCTNUM'
COPY$ SCREEN-TO-VARIABLE,SCREEN=(04,10,20),VAR='FULLNAME'
SKIP04 EQU *
IF$ (05,2,6),EQ=' ',THEN=SKIP05
COPY$ SCREEN-TO-VARIABLE,SCREEN=(05,2,6),VAR='ACCTNUM'
COPY$ SCREEN-TO-VARIABLE,SCREEN=(05,10,20),VAR='FULLNAME'
SKIP05 EQU *
IF$ (06,2,6),EQ=' ',THEN=SKIP06
COPY$ SCREEN-TO-VARIABLE,SCREEN=(06,2,6),VAR='ACCTNUM'
COPY$ SCREEN-TO-VARIABLE,SCREEN=(06,10,20),VAR='FULLNAME'
SKIP06 EQU *
IF$ (07,2,6),EQ=' ',THEN=SKIP07
COPY$ SCREEN-TO-VARIABLE,SCREEN=(07,2,6),VAR='ACCTNUM'
COPY$ SCREEN-TO-VARIABLE,SCREEN=(07,10,20),VAR='FULLNAME'
SKIP07 EQU *
SCENARIO END
SCRNEND
END
HTTP presentation module for XML output
Note: It is also possible for the application program to create VIRTEL table variables directly, either by
means of an “FAE5” structured eld, or via the HOST4WEB command “SET VARIABLE”. The FAE5
structured eld allows the application to pass large amounts of raw data to VIRTEL without being con-
strained by the limitations of the 3270 screen geometry. For such “VIRTEL-aware” applications, an output
scenario is not necessary.
Page template for XML output
The URL in this example is /demohttp/xmldemo.xml+tran3 which requests VIRTEL to use the page tem-
plate xmldemo.xml to process the output of the tran3 transaction. The purpose of the page template is to
convert the transaction output into XML format.
In the page template xmldemo.xml shown below, the output data is obtained from the VIRTEL table
variables ACCTNUM and FULLNAME which were created either by the output scenario SCENXMLO, or
directly by the application program:
<?xml version="1.0"?>
<!--VIRTEL start="{{{" end="}}}" -->
{{{SET-OUTPUT-ENCODING-UTF-8 ""}}}
<accounts>
{{{FOR-EACH-VALUE-IN "ACCTNUM"}}}
<account>
<id>{{{TRIMMED-VALUE-OF "ACCTNUM"}}}</id>
<name>{{{TRIMMED-VALUE-OF "FULLNAME"}}}</name>
1.17. VIRTEL Web Integration 227

Virtel User Guide, Release 4.57
<account>
{{{END-FOR "ACCTNUM"}}}
</accounts>
Example page template for XML output data
1.17.4 VIRTEL as an XML parser/generator
An application can use the VIRTEL HTTP server as an XML parser/generator engine. A client program
establishes a TCP/ IP session with the VIRTEL HTTP server, and sends XML or commarea data to VIRTEL
in an HTTP request. VIRTEL performs conversion to or from XML, and returns the resulting commarea or
XML data to the client program in the HTTP response.
It is the INITIAL scenario associated with the VIRTEL transaction which determines whether the conversion
is from XML to commarea format, or vice versa. Conversion from XML to commarea format is performed by a
transaction whose INITIAL scenario contains a MAP$ FROM-FIELD or MAP$ FROM-INPUT instruction.
Conversion from commarea to XML format is performed by a transaction whose INITIAL scenario contains
a TOVAR$ FROM-FIELD or TOVAR$ FROM-INPUT instruction. Both scenarios can reference a common
set of MAP$ statements which describe the relationship between the XML stream and the commarea. In
each case an appropriate page template must also be used, as shown in the detailed examples which follow.
Communication via VIRKIX
A client program running under CICS on MVS can use VIRKIX to establish the HTTP connection, send the
request, and receive the response. The client program may send the request in either ASCII or EBCDIC; both
formats are recognized and supported by VIRTEL. Notice the use of the special header GIVE-LENGTH-
PREFIX which requests VIRTEL to add a 4-byte length prex to the HTTP response, to conform with the
format expected by VIRKIX CALL type ‘M’.
Example MAP$ statements
The copy member SCONVMAP shown below contains the MAP$ statements common to both examples
presented in this section. This member is copied into each of the scenarios SCONVXML and SCONVPLA
by means of an assembler COPY statement.
Member name SCONVMAP
CAREA MAP$ BEGIN
MAP$ AREA,WITH='date',LENGTH=8,TYPE=(ONLY9,LEFT-ALIGNED), *
FORMAT=('9999-99-99',9)
IDENT MAP$ BEGIN,WITH='identity'
MAP$ EVENTUAL-AREA,FROM-CONSTANT,'1',WHEN=(ELEMENT,'bic')
MAP$ ELSETHEN-AREA,FROM-CONSTANT,'2',WHEN=(ELEMENT,'iban')
MAP$ ELSETHEN-AREA,FROM-CONSTANT,'3',WHEN=(ELEMENT,'rib')
MAP$ ELSETHEN-AREA,FROM-CONSTANT,' '
MAP$ AREA,LENGTH=8
IDENT MAP$ END
VERIF MAP$ BEGIN,WITH='verified'
MAP$ EVENTUAL-AREA,FROM-CONSTANT,'1',WHEN=(VALUE,'yes')
MAP$ ELSETHEN-AREA,FROM-CONSTANT,'0',WHEN=(VALUE,'no')
MAP$ ELSETHEN-AREA,FROM-CONSTANT,'0'
VERIF MAP$ END
MAP$ AREA,WITH='amount',LENGTH=5,TYPE=ONLY9, *
228 Chapter 1. The Virtel Engine

Virtel User Guide, Release 4.57
FORMAT=('$999.99',9)
CAREA MAP$ END
MAP$ statements for VIRTEL XML parser/generator
XML-to-commarea conversion using the VIRTEL XML parser
The gure below shows an example transaction denition to be used for XML-to-commarea conversion
using the VIRTEL XML parser. The external name “tranxml” is the name referenced in the URL of the
HTTP request which calls the transaction. The special application name $NONE$ indicates that no host
application is to be called. The /&S order specied in the “TIOA at Logon” eld causes the INITIAL
scenario “SCONVXML” to be executed.
TRANSACTION DETAIL DEFINITION ---------------------- Applid: VIRTELD2 16:39:25
Internal name ===> HTTP-16X To associate with an entry point name
External name ===> tranxml Name displayed on user menu
Description ===> VIRTEL XML parser
Application ===> $NONE$ Application to be called
PassTicket ===> 0 Name ===> 0=no 1=yes 2=unsigned
Application type ===> 2 1=VTAM 2=VIRTEL 3=SERV 4=PAGE 5=LINE
Pseudo-terminals ===> HTLOC Prefix of name of partner terminals
Logmode ===> Specify when LOGMODE must be changed
How started ===> 1 1=menu 2=sub-menu 3=auto
Security ===> 0 0=none 1=basic 2=NTLM 3=TLS 4=HTML
H4W commands ? ===> 0=no 1=yes 2=if2VIRTEL 4=auto
Logon message ===>
TIOA at logon ===> &/S &/T
TIOA at logoff ===>
Initial Scenario ===> SCONVXML Final Scenario ===>
Input Scenario ===> Output Scenario ===>
P1=Update P3=Return P12=Server
VIRTEL transaction denition for XML-to-commarea conversion
The initial scenario for XML-to-commarea conversion is shown below:
Member name SCONVXML
SCONVXML SCREENS APPL=SCONVXML
SCENARIO INITIAL
COPY SCONVMAP (copy member shown in Figure 1 -126)
CAREA MAP$ FROM-INPUT
CAREA MAP$ TO-VARIABLE,VAR='MYAREA'
SCENARIO END
SCRNEND
END
Initial scenario for XML-to-commarea conversion
An example request for XML-to-commarea conversion using the VIRTEL XML parser is shown in the gure
below:
1.17. VIRTEL Web Integration 229

Virtel User Guide, Release 4.57
POST /demohttp/myarea.txt+tranxml HTTP/1.1
Host: 192.168.235.30
Accept: */*
Content-Length: 172
Special: GIVE-LENGTH-PREFIX
<?xml version="1.0" ?>
<request>
<date>2006-06-21</date>
<identity><iban>AB1234CD</iban></identity>
<verified>yes</verified>
<amount>$123.45</amount>
</request>
Input request for XML-to-commarea conversion
The HTTP request shown above species the use of a page template named myarea.txt which is stored in a
VIRTEL directory and is shown in the gure below. By use of this page template, the commarea MYAREA
created by the INITIAL scenario SCONVXML is inserted into the HTTP response data:
Page template myarea.txt
<!--VIRTEL start="{{{" end="}}}" -->
{{{ SET-CONTENT-TYPE "text/plain"}}}
{{{ CURRENT-VALUE-OF "MYAREA" }}}
Page template for XML-to-commarea conversion
The gure below shows the HTTP response returned by VIRTEL. The body of the response contains the
input data converted to commarea format:
HTTP/1.1 200 Ok
Server: Virtel/4.32
Date: Wed, 21 Jun 2006 15:31:02 GMT
Expires: 0
Content-length: 00000029
Content-type: text/plain
200606212AB1234CD112345
Output response from XML-to-commarea conversion
Commarea-to-XML conversion using the VIRTEL XML generator
The gure below shows an example transaction denition to be used for commarea-to-XML conversion using
the VIRTEL XML generator. The external name “trancom” is the name referenced in the URL of the
HTTP request which calls the transaction. The special application name $NONE$ indicates that no host
application is to be called. The /&S order specied in the “TIOA at Logon” eld causes the INITIAL
scenario “SCONVPLA” to be executed.
TRANSACTION DETAIL DEFINITION ---------------------- Applid: VIRTELD2 16:39:58
Internal name ===> HTTP-16Y To associate with an entry point name
External name ===> trancom Name displayed on user menu
Description ===> VIRTEL XML generator
Application ===> $NONE$ Application to be called
PassTicket ===> 0 Name ===> 0=no 1=yes 2=unsigned
Application type ===> 2 1=VTAM 2=VIRTEL 3=SERV 4=PAGE 5=LINE
Pseudo-terminals ===> HTLOC Prefix of name of partner terminals
Logmode ===> Specify when LOGMODE must be changed
230 Chapter 1. The Virtel Engine

Virtel User Guide, Release 4.57
How started ===> 1 1=menu 2=sub-menu 3=auto
Security ===> 0 0=none 1=basic 2=NTLM 3=TLS 4=HTML
H4W commands ? ===> 0=no 1=yes 2=if2VIRTEL 4=auto
Logon message ===>
TIOA at logon ===> &/S &/T
TIOA at logoff ===>
Initial Scenario ===> SCONVPLA Final Scenario ===>
Input Scenario ===> Output Scenario ===>
P1=Update P3=Return P12=Server
VIRTEL transaction denition for commarea-to-XML conversion The initial scenario for commarea-to-
XML conversion is shown below:
Member name SCONVPLA
SCONVPLA SCREENS APPL=SCONVPLA
SCENARIO INITIAL
COPY SCONVMAP
CAREA TOVAR$ FROM-INPUT
SCENARIO END
SCRNEND
END
Initial scenario for commarea-to-XML conversion
An example request for commarea-to-XML conversion using the VIRTEL XML parser is shown in the gure
below:
POST /demohttp/mydata.xml+trancom HTTP/1.1
Host: 192.168.235.30
Accept: */*
Content-Length: 27
Special: GIVE-LENGTH-PREFIX
200606212AB1234CD112345
Input request for commarea-to-XML conversion
The HTTP request shown above species the use of a page template named mydata.xml which is stored in
a VIRTEL directory and is shown in the gure below. By use of this page template, the output variables
created by the TOVAR$ instruction in the INITIAL scenario SCONVPLA are inserted into the HTTP
response data:
Page template mydata.xml
<?xml version="1.0" encoding="UTF-8"?>
<!--VIRTEL start="{{{" end="}}}" -->
{{{ SET-CONTENT-TYPE "text/xml"}}}{{{SET-OUTPUT-ENCODING-UTF-8 ""}}}
<request>
<date>{{{CURRENT-VALUE-OF "date"}}}</date>
<identity>
{{{WHEN-EXISTS "bic"}}}<bic>{{{CURRENT-VALUE-OF "bic"}}}</bic>{{{END
-WHEN-EXISTS "bic"}}}
{{{WHEN-EXISTS "iban"}}}<iban>{{{CURRENT-VALUE-OF
"iban"}}}</iban>{{{END-WHEN-EXISTS "iban"}}}
{{{WHEN-EXISTS "rib"}}}<rib>{{{CURRENT-VALUE-OF "rib"}}}</rib>{{{END
1.17. VIRTEL Web Integration 231

Virtel User Guide, Release 4.57
-WHEN-EXISTS "rib"}}}
</identity>
<verified>{{{CURRENT-VALUE-OF "verified"}}}</verified>
<amount>{{{CURRENT-VALUE-OF "amount"}}}</amount>
</request>
Page template for commarea-to-XML conversion
The gure below shows the HTTP response returned by VIRTEL. The body of the response contains the
input commarea data converted to XML format:
HTTP/1.1 200 Ok
Server: Virtel/4.32
Date: Wed, 21 Jun 2006 16:02:55 GMT
Expires: 0
Content-length: 00000207
Content-type: text/xml
<?xml version="1.0" encoding="UTF-8"?>
<request>
<date>2006-06-21</date>
<identity>
<iban>AB1234CD</iban>
</identity>
<verified>yes</verified>
<amount>$123.45</amount>
</request>
Output response from commarea-to-XML conversion
1.17.5 Automatic scenario generation
MAPGEN program
The MAPGEN program allows the automatic generation of scenarios from COBOL copybooks. The input
to the MAPGEN program is a COBOL copybook containing data division denitions of a commarea. The
output from the MAPGEN program may be: • a scenario for “input-to-commarea” conversion • a scenario
for “commarea-to-output” conversion • an optional page template to convert the generated output variables
into XML format The MAPGEN program (MAPGREX) and the JCL to execute it (MAPGJCL) are delivered
as members of the VIRTEL SAMPLIB. The start of the MAPGJCL job is shown below:
//VIRMAPGN JOB 1,MAPGEN,CLASS=A,MSGCLASS=X,NOTIFY=&SYSUID
//*
//* MAPGEN : Generate VIRTEL SCENARIO from COBOL copybook
//*
// SET QUAL=yourqual.VIRTnnn Prefix of VIRTEL dataset names
// SET COPYLIB=your.cobol.srcelib Library containing copybook
// SET MEMBER=copybook Copybook member name
// SET STYLE=APOST APOST or QUOTE
// SET PREFIX='TIOA-' Field name prefix to be removed
// SET CASE=LOWER Field names UPPER or LOWER case
// SET CODE='ENC=IE' UTF-8or ISO or ENC=varname
// SET FORMAT=QUERY XML QUERY 'XML=f' COM 'COM=x'
// SET VAR=MYCOMMAREA Output (XML/QUERY) Input (COM)
232 Chapter 1. The Virtel Engine

Virtel User Guide, Release 4.57
// SET XMLGEN=NO YES or NO to run XMLGEN step
//*
Automatic scenario generation: MAPGJCL job
The parameters required to customize this job are coded as SET statements at the start of the job. The
meaning of the parameters is as follows:
QUAL=yourqual.VIRTnnn Prex of VIRTEL dataset names. This job requires access to the SAMPLIB,
LOADLIB, and SCRNAPI.MACLIB datasets. The generated scenario is written as a load module in
the LOADLIB dataset.
COPYLIB=your.cobol.srcelib Name of library containing the input copybook
MEMBER=copybook Member name of the input copybook in the COPYLIB library
STYLE=APOST|QUOTE STYLE species whether the copybook uses single or double quotation marks
to delimit strings. APOST (single quotation marks) is the default.
PREFIX=’prex’ (optional) If specied, the prex will be removed from the eld names in the copybook
CASE=LOWER|UPPER (optional) If specied, all eld names in the copybook will be converted to
LOWER or UPPER case. If not specied, the case will be preserved.
CODE=encoding (optional) Species the encoding of HTML form-eld parameters in the input URL.
The following encodings may be specied:-
UTF-8 Input form-elds are encoded in UTF-8 format
ISO Input form-elds are encoded in non-UTF-8 format
‘ENC=eldname’ The contents of the URL form-eld named eldname are queried to
obtain the encoding value (UTF-8 or ISO). This allows the client to dynamically spec-
ify the encoding method by means of a URL parameter. If CODE is not specied,
or if CODE=’ENC=eldname’ is specied and the URL does not contain the param-
eter eldname=UTF-8 or eldname=ISO, then the VIRTEL default encoding (ISO) is
assumed.
FORMAT=format Species the type of scenario to be generated. The following formats may be specied:-
QUERY Generates an INITIAL scenario which accepts input data encoded as HTML form-
elds, and produces an output commarea. The generated scenario contains a “MAP$
FROM-INPUT”, QUERY instruction.
XML Generates an INITIAL scenario which accepts XML input data in the body of an
HTTP request, and produces an output commarea. The generated scenario contains a
“MAP$ FROM-INPUT”, XML instruction.
‘XML=eldname’ Generates an INITIAL scenario which accepts XML input encoded
within an HTML form-eld named eldname, and produces an output commarea. The
generated scenario contains a “MAP$ FROM-FIELD” instruction with the parameter
FIELD=eldname.
COM When VAR is not specied: Generates an INITIAL scenario which accepts an input
commarea in the body of an HTTP request, and produces a set of VIRTEL variables
whose names correspond to the elds in the copybook. The generated scenario contains
a“TOVAR$ FROM-INPUT” instruction.
When VAR is specied: Generates an OUTPUT scenario which accepts an input com-
marea contained in the VIRTEL variable named by the VAR parameter, and produces
a set of VIRTEL variables whose names correspond to the elds in the copybook. The
generated scenario contains a “MAP$ FROM-VARIABLE” instruction.
1.17. VIRTEL Web Integration 233

Virtel User Guide, Release 4.57
‘COM=eldname’ Generates an INITIAL scenario which accepts an input commarea en-
coded within an HTML form-eld named eldname, and produces a set of VIRTEL
variables whose names correspond to the elds in the copybook. The generated scenario
contains a “MAP$ FROM-FIELD” instruction with the parameter FIELD=eldname.
VAR=commareaname
For FORMAT=QUERY, FORMAT=XML, FORMAT=’XML=eldname’ Species the
name of the VIRTEL variable into which the output commarea is written. If not specied, the
default is VAR=AREA
For FORMAT=COM Optionally species the name of the VIRTEL variable which contains the
input commarea
XMLGEN=YES|NO Species whether an additional XMLGEN step is to be run. This parameter is
useful when FORMAT=COM or FORMAT=’COM=eldname’ is specied. If XMLGEN=YES then
the job also generates a VIRTEL page template suitable for converting the VIRTEL result variables
into XML format. The generated page template is written to userid.XMLGEN.OUTPUT which must
be preallocated as a sequential dataset. The contents of this dataset should then be transferred to your
workstation where it can be uploaded into a VIRTEL directory (see “Uploading pages by HTTP”).
234 Chapter 1. The Virtel Engine

Virtel User Guide, Release 4.57
1.18 Incoming E-mails
The arrival of an e-mail on an SMTP line can trigger one of two types of action in VIRTEL, depending on
the entry point chosen by the rules of the SMTP line:
• Transfer of attached les to a VIRTEL directory
• Start a CICS transaction (or other VTAM application)
1.18.1 Rules of the SMTP line
When an e-mail arrives on an SMTP line, VIRTEL examines the rules of the line to determine which entry
point will be used to process the incoming message. In the example below, the rule species that when
the e-mail destination address is cicsmail@sample.com, and the sender address is customer@client.com, then
entry point SMTPCICS will be used:
DETAIL of RULE from RULE SET: S-SMTP ------------- Applid: SPVIRE2 15:46:00
Name ===> SM200EML Rule priority is per name
Status ===> ACTIVE 19 May 2004 15:46:00 VIRDBA
Description ===> Appels entrants SMTP
Entry point ===> SMTPCICS Target Entry Point
Parameter ===> optional &1value
Trace ===> 1=commands 2=data 3=partner
C : 0=IGNORE 1=IS 2=IS NOT 3=STARTS WITH 4=DOES NOT 5=ENDS WITH 6=DOES NOT
0IP Subnet ===> 000.000.000.000 Mask ===> 000.000.000.000
1Host ===> cicsmail@sample.com
1eMail ===> customer@client.com
0Calling DTE ===> Calling DTE address
0Called ===> Called DTE address
0CUD0 (Hex) ===> First 4bytes of CUD (X25 protocol)
0User Data ===>
0Days ===> M: T: W: T: F: S: S:
0Start time ===> H: M: S: End time ===> H: M: S:
P1=Update P3=Return Enter=Add
P4=Activate P5=Inactivate P12=Entry P.
CREATION OK
Rule for routing an incoming e-mail on an SMTP line
1.18.2 File transfer by e-mail
An entry point which is used for le le transfer (including the upload of HTML pages) has a single trans-
action which calls VIRTEL module VIR0041B. This transaction is dened with application type 2 and
integration mode 1. The menu program specied in the entry point must be VIR0021B. Only authorized
users can perform transfers. See Correspondent Management in the Virtel Administration Guide.
ENTRY POINT DETAIL DEFINITION ---------------------- Applid: SPVIRE2 15:52:26
Name ===> SMTP Name this ENTRY POINT (LOGON DATA)
Description ===> Receive e-mail for file transfer
Transactions ===> SMTP Prefix for associated transactions
Videotex key ===> If videotex, keyword or $NONE$
Transparency ===> Server types NOT to emulate
1.18. Incoming E-mails 235

Virtel User Guide, Release 4.57
Time out ===> 0005 minutes Maximum inactive time
Do if timeout ===> 0 0=logoff 1=bip+logoff 2=anti pad
Emulation ===> EMAIL Type of terminal:
MINITEL : 40 or 80 columns PC : Emulation done by VirtelPC
HTML : Web Browser VT : VT 100
EBCDIC : not translated X25 : uses low level dialog
Signon program ===> Controls user name and password
Menu program ===> VIR0021B List of transactions
Identification scenario ===> eg XML identification
Type 3 compression ===> Discover typical screens (Virtel/PC)
Mandatory identification ===> (PC or minitel)
3270 swap key ===> eg P24
Extended colors ===> E: extended X: extended + DBCS
P1=Update P3=Return P4=Transactions
Enter=Add
Entry point for le transfer by SMTP
TRANSACTION DETAIL DEFINITION ---------------------- Applid: SPVIRE2 15:56:00
Internal name ===> SMTP-05 To associate with an entry point name
External name ===> E-Mail Name displayed on user menu
Description ===> File transfer by SMTP
Application ===> VIR0041B Application to be called
PassTicket ===> 0Name ===> 0=no 1=yes 2=unsigned
Application type ===> 2 1=VTAM 2=VIRTEL 3=SERV 4=PAGE 5=LINE
Pseudo-terminals ===> Prefix of name of partner terminals
Logmode ===> Specify when LOGMODE must be changed
How started ===> 1 1=menu 2=sub-menu 3=auto
Security ===> 1 0=none 1=basic 2=NTLM 3=TLS 4=HTML
Translation(s) ===> 0=idem 1=8040 2=8080 3=4040 4=auto
Logon message ===>
TIOA at logon ===>
TIOA at logoff ===>
Initial Scenario ===> Final Scenario ===>
Input Scenario ===> Output Scenario ===>
P1=Update P3=Return P12=Server
Transaction for le transfer by SMTP
1.18.3 Starting an application by E-Mail
When an entry point is used for starting an application by e-mail, the application must be associated with
a relay (or pseudo-3270 terminal) through which the application can retrieve the contents of the e-mail. It
is therefore necessary to specify the name of a relay LU in the denition of the terminals attached to the
SMTP line (refer to the VIRTEL Connectivity Reference documentation for details of dening an SMTP
line).
For this type of application, the entry point chosen by the rules of the SMTP line has a single VIRTEL
transaction, dened with application type 1 and integration mode 1, which calls the target VTAM application
(such as CICS). The name of the CICS transaction to be started can be specied in the “TIOA at logon”
eld of the VIRTEL transaction denition.
236 Chapter 1. The Virtel Engine

Virtel User Guide, Release 4.57
The menu program specied in the entry point must be VIR0021B.
ENTRY POINT DETAIL DEFINITION ---------------------- Applid: SPVIRE2 16:07:14
Name ===> SMTPCICS Name this ENTRY POINT (LOGON DATA)
Description ===> CICS transaction started by email
Transactions ===> SMCICS Prefix for associated transactions
Videotex key ===> If videotex, keyword or $NONE$
Transparency ===> Server types NOT to emulate
Time out ===> 0001 minutes Maximum inactive time
Do if timeout ===> 0 0=logoff 1=bip+logoff 2=anti pad
Emulation ===> EMAIL Type of terminal:
MINITEL : 40 or 80 columns PC : Emulation done by VirtelPC
HTML : Web Browser VT : VT 100
EBCDIC : not translated X25 : uses low level dialog
Signon program ===> Controls user name and password
Menu program ===> VIR0021B List of transactions
Identification scenario ===> eg XML identification
Type 3 compression ===> Discover typical screens (Virtel/PC)
Mandatory identification ===> (PC or minitel)
3270 swap key ===> eg P24
Extended colors ===> E: extended X: extended + DBCS
P1=Update P3=Return P4=Transactions
Enter=Add
Entry point for application started by SMTP
TRANSACTION DETAIL DEFINITION ---------------------- Applid: SPVIRE2 15:56:00
Internal name ===> SMCICS-1To associate with an entry point name
External name ===> MAILIN Name displayed on user menu
Description ===> CICS transaction started by Email
Application ===> SPCICST Application to be called
PassTicket ===> 0Name ===> 0=no 1=yes 2=unsigned
Application type ===> 1 1=VTAM 2=VIRTEL 3=SERV 4=PAGE 5=LINE
Pseudo-terminals ===> Prefix of name of partner terminals
Logmode ===> Specify when LOGMODE must be changed
How started ===> 1 1=menu 2=sub-menu 3=auto
Security ===> 1 0=none 1=basic 2=NTLM 3=TLS 4=HTML
Translation(s) ===> 0=idem 1=8040 2=8080 3=4040 4=auto
Logon message ===>
TIOA at logon ===> MELI
TIOA at logoff ===>
Initial Scenario ===> Final Scenario ===>
Input Scenario ===> Output Scenario ===>
P1=Update P3=Return P12=Server
Transaction for application started by SMTP
The corresponding CICS denition is shown in the example below:
DEFINE PROFILE(MELPROF) GROUP(VIRTSMTP)
DESCRIPTION(TRANSACTION TO PROCESS INCOMING EMAILS)
UCTRAN(NO)
DEFINE TRANSACTION(MELI) GROUP(VIRTSMTP)
DESCRIPTION(TRANSACTION TO PROCESS INCOMING EMAILS)
1.18. Incoming E-mails 237

Virtel User Guide, Release 4.57
PROGRAM(SMTPMELI) PROFILE(MELPROF)
DEFINE PROGRAM(SMTPMELI) GROUP(VIRTSMTP)
DESCRIPTION(PROGRAM TO PROCESS INCOMING EMAILS)
CICS denitions for application started by e-mail
Note that the UCTRAN(NO) parameter must be specied both in the PROFILE and in the TYPETERM,
and that the RECEIVESIZE specied in the TYPETERM must be sucient to contain the e-mail response
data structured eld. One the application has been launched, it can retrieve data from the e-mail by sending
an FAC8 code 12 structured eld to VIRTEL via the relay LU and reading the response (see “Retrieve Data
From An E-Mail”).
238 Chapter 1. The Virtel Engine

Virtel User Guide, Release 4.57
1.19 VIRTEL Batch
The VIRTEL Batch facility allows you to run VIRTEL as a batch job to execute HTTP-like requests.
VIRTEL reads HTTP-like requests from a SYSIN dataset, executes the desired transaction, and writes
an HTTP-like response to a SYSOUT dataset. When all of the HTTP-like requests have been processed,
VIRTEL terminates if requested. VIRTEL runs as a batch job when both of the following conditions are
true:
1. The VIRTCT contains a BATCH1 parameter. For details, refer to “Parameters of the VIRTCT” in
the VIRTEL Installation Guide manual.
2. A BATCH line is dened in the VIRTEL conguration in the VIRARBO le. For details, refer to
“Denition of a BATCH line” in the VIRTEL Connectivity Reference manual.
Before running a VIRTEL Batch job for the rst time, several preparatory steps must be performed:-
• A VIRTCT for VIRTEL Batch must be assembled and link-edited into the VIRTEL load library
• A conguration le (VIRARBO) for VIRTEL Batch must be built
• A page template le (HTMLTRSF) for the VIRTEL Batch job must be allocated and loaded
• Work les (VIRSWAP, VIRHTML) for the VIRTEL Batch job must be allocated and initialized
These preparatory steps, which in general only need to be performed once, are described in the following
sections.
1.19.1 Assembling the VIRTCT for VIRTEL Batch
VIRTEL Batch requires a special VIRTCT which must be assembled and link-edited into the VIRTEL load
library. The gure below shows SAMPLIB member VIRTCTBA, which is an example VIRTCT suitable for
running VIRTEL Batch. The job ASMTCT in the VIRTEL SAMPLIB should be run once to assemble and
link-edit this module as VIRTCTBA in the VIRTEL load library:
VIRTCTBA TITLE 'VIRTCT FOR VIRTEL BATCH'
PRINT GEN
VIRTERM TYPE=INITIAL,APPLID=*NOAPPL*,*
BATCH1=(SYSIN,DCBI1,SYSPRINT,DCBO1), *
VIRSV1=(VIRSV), *
HTVSAM=VIRHTML, *
BUFSIZE=16000,*
STATS=NO, *
UFILE1=(HTMLTRSF,ACBH1,0,10,01), *
MEMORY=ABOVE, *
COMPANY='YOUR COMPANY NAME',*
ADDR1='YOUR COMPANY ADDRESS',*
ADDR2='YOUR COMPANY ADDRESS',*
LICENCE='YOUR LICENCE ID',*
EXPIRE=(2008,12,31), *
CODE='00000000'
TITRE1='VIRTEL BATCH'
*---------------------------------------------------------------------*
ACBH1 ACB AM=VSAM,DDNAME=HTMLTRSF,MACRF=(SEQ,DIR,OUT,LSR), *
STRNO=3
*---------------------------------------------------------------------*
DCBI1 DCB DDNAME=SYSIN, SYSIN DD *
DCBE=DCBI1X, *
LRECL=80,*
1.19. VIRTEL Batch 239

Virtel User Guide, Release 4.57
DSORG=PS, *
RECFM=FB, *
MACRF=(GL)
DCBI1X DCBE EODAD=0,RMODE31=BUFF
*---------------------------------------------------------------------*
DCBO1 DCB DDNAME=SYSPRINT, SYSPRINT DD *
DCBE=DCBO1X, *
LRECL=133,*
DSORG=PS, *
RECFM=FBA, *
MACRF=(PM)
DCBO1X DCBE RMODE31=BUFF
*---------------------------------------------------------------------*
END
Example VIRTCT for VIRTEL Batch
1.22.1.2. Building the conguration le for VIRTEL Batch
VIRTEL Batch requires its own conguration le (VIRARBO) which denes a Batch Line, the page template
dataset, a Batch Entry Point, and the Transactions which will be executed by the VIRTEL Batch job. The
gure below shows SAMPLIB member VIRBATAR, which is an example of a job to create the VIRARBO
le for use by VIRTEL Batch. This job should be run once before the rst execution of a VIRTEL Batch
job:
//VIRBATAR JOB 1,VIRBATAR,CLASS=A,MSGCLASS=X,NOTIFY=&SYSUID
// SET LOADLIB=yourqual.VIRTnnn.LOADLIB
//DEFINE EXEC PGM=IDCAMS
//SYSPRINT DD SYSOUT=*
DELETE (yourqual.VIRBATCH.ARBO) CLUSTER PURGE
SET MAXCC = 0
DEFINE CLUSTER(NAME(yourqual.VIRBATCH.ARBO) -
KEYS(9 0) RECSZ(100 4089) FSPC(10 10) -
VOL(XXXXXX) REC(250,50) SHR(4) SPEED) -
DATA(NAME(yourqual.VIRBATCH.ARBO.DATA) CISZ(4096)) -
INDEX(NAME(yourqual.VIRBATCH.ARBO.INDEX))
//CONFIG EXEC PGM=VIRCONF,COND=(0,NE),PARM='LOAD,LANG=&LANG'
//STEPLIB DD DSN=&LOADLIB,DISP=SHR
//SYSPRINT DD SYSOUT=*
//VIRARBO DD DSN=yourqual.VIRBATCH.ARBO,DISP=SHR
LINE ID=B-BT1,NAME=BATCH-L1,
DESC='VIRTEL Batch line',
TYPE=BATCH1,ENTRY=EPBATCH,TERMINAL=BT,
INOUT=1,PROTOCOL=VIRHTTP,RULESET=B-BT1
TERMINAL ID=BTLOC000,
DESC='VIRTEL Batch terminals (no relay)',
TYPE=3,COMPRESS=2,INOUT=3,STATS=12,REPEAT=4
TERMINAL ID=BTVTA000,RELAY=*HTTPOOL,
DESC='VIRTEL Batch terminals (with relay)',
TYPE=3,COMPRESS=2,INOUT=3,STATS=12,REPEAT=4
TERMINAL ID=BTVTP000,RELAY=RVIRBT00,POOL=*HTTPOOL,
DESC='Relay pool for HTTP',
TYPE=3,COMPRESS=2,INOUT=3,STATS=12,REPEAT=4
SUBDIR ID=W2H-DIR,
DESC='Pages for WEB2HOST',
FSTYPE=V,DDNAME=HTMLTRSF,KEY=W2H-KEY,
NAMELEN=64,AUTHUP=X,AUTHDOWN=X,AUTHDEL=X
ENTRY ID=EPBATCH,
240 Chapter 1. The Virtel Engine

Virtel User Guide, Release 4.57
DESC='VIRTEL Batch entry point',
TRANSACT=BAT,TIMEOUT=1,ACTION=0,EXTCOLOR=X,
EMUL=HTML,SIGNON=VIR0020H,MENU=VIR0021A
TRANSACT ID=BAT-00,NAME=EPBATCH,
DESC='Default directory = entry point name',
APPL=W2H-DIR,TYPE=4,
TERMINAL=BTLOC,integration=2,SECURITY=0
TRANSACT ID=BAT-14,NAME='Protide',
DESC='XML conversion',
APPL=$NONE$,TYPE=2,
TERMINAL=BTLOC,integration=1,SECURITY=0,
TIOASTA='&/S OK &/T',
EXITSTA=SCENSVIO
* END OF CONFIGURATION
Job to build conguration le for VIRTEL Batch
1.19.2 Allocating the page template le for VIRTEL Batch
Each VIRTEL Batch job requires an HTMLTRSF le which contains the page templates used by the trans-
actions which will be executed by the VIRTEL Batch job. The gure below shows SAMPLIB member
VIRBATAT, which is an example job to allocate the HTMLTRSF le and to copy the page templates
from the sample le (SAMPTRSF) distributed with VIRTEL. This job should be run once before the rst
execution of a VIRTEL Batch job:
//VIRBATAT JOB 1,VIRBATAT,CLASS=A,MSGCLASS=X,NOTIFY=&SYSUID
//*-------------------------------------------------------------------*
//* DEFINITION OF FILE HTMLTRSF *
//*-------------------------------------------------------------------*
//SAMPTRF EXEC PGM=IDCAMS
//SYSPRINT DD SYSOUT=*
DELETE (yourqual.VIRBATCH.HTMLTRSF) CLUSTER PURGE
SET MAXCC =0
DEFINE CLUSTER (NAME(yourqual.VIRBATCH.HTMLTRSF) -
VOL(XXXXXX) SHR(2) KEYS(16 0) RECSZ(100 32758) REC(250 100)) -
DATA (NAME(yourqual.VIRBATCH.HTMLTRSF.DATA) SPANNED CISZ(4096)) -
INDEX (NAME(yourqual.VIRBATCH.HTMLTRSF.INDEX) CISZ(512))
//*-------------------------------------------------------------------*
//* INITIALISATION OF FILE HTMLTRSF *
//*-------------------------------------------------------------------*
//SAMPTRF EXEC PGM=IDCAMS
//SYSPRINT DD SYSOUT=*
//SAMPTRSF DD DSN=yourqual.VIRTnnn.SAMP.TRSF,DISP=SHR
//HTMLTRSF DD DSN=yourqual.VIRBATCH.HTMLTRSF,DISP=OLD
//SYSIN DD *
REPRO INFILE(SAMPTRSF) OUTFILE(HTMLTRSF)
Job to allocate page template le for VIRTEL Batch
1.19.3 Allocating work les for VIRTEL Batch
Each VIRTEL Batch job requires its own VIRSWAP and VIRHTML les. The gure below shows SAMPLIB
member VIRBATAW, which is an example job to allocate these les:
1.19. VIRTEL Batch 241

Virtel User Guide, Release 4.57
//VIRBATAW JOB 1,VIRBATAW,CLASS=A,MSGCLASS=X,NOTIFY=&SYSUID
//*----------------------------------------------------------------*
//* DEFINITION OF FILES VIRSWAP AND VIRHTML *
//*----------------------------------------------------------------*
//VIRWORK EXEC PGM=IDCAMS
//SYSPRINT DD SYSOUT=*
DELETE (yourqual.VIRBATCH.SWAP) CLUSTER PURGE
DELETE (yourqual.VIRBATCH.HTML) CLUSTER PURGE
SET MAXCC = 0
DEFINE CLUSTER (NAME(yourqual.VIRBATCH.SWAP) -
VOL(XXXXXX) KEYS(16 0) REC(10,5) RECSZ(100 8185) -
REUSE FSPC(10 10) SHR(2) SPEED) -
DATA (NAME(yourqual.VIRBATCH.SWAP.DATA) CISZ(8192)) -
INDEX (NAME(yourqual.VIRBATCH.SWAP.INDEX))
DEFINE CLUSTER (NAME(yourqual.VIRBATCH.HTML) -
VOL(XXXXXX) KEYS(64 0) REC(5 5) RECSZ(1000 4089) -
FSPC(10 10) SHR(4) SPEED) -
DATA (NAME(yourqual.VIRBATCH.HTML.DATA) CISZ(4096)) -
INDEX (NAME(yourqual.VIRBATCH.HTML.INDEX))
//*----------------------------------------------------------------*
//* INITIALISATION OF FILE VIRHTML *
//*----------------------------------------------------------------*
//INIHTML EXEC PGM=IDCAMS
//SYSPRINT DD SYSOUT=*
//INIT DD DATA,DLM=AA
$$$$IWS.WORKREC.INW$TEMP
AA
//VIRHTML DD DSN=yourqual.VIRBATCH.HTML,DISP=OLD
REPRO INFILE(INIT) OUTFILE(VIRHTML)
Job to allocate work les for VIRTEL Batch
1.19.4 Running the VIRTEL Batch job
The gure below shows SAMPLIB member VIRBATCH, which contains an example of a VIRTEL Batch
job:
//VIRBATCH JOB 1,VIRBATCH,CLASS=G,MSGCLASS=X,NOTIFY=&SYSUID
// SET TCT=BA
// SET QUAL1=yourqual.VIRT457
// SET QUAL2=yourqual.VIRBATCH
//VIRBAT EXEC PGM=VIR0000,REGION=64M,PARM=&TCT
//STEPLIB DD DISP=SHR,DSN=&QUAL1..LOADLIB
//DFHRPL DD DISP=SHR,DSN=&QUAL1..LOADLIB
//SERVLIB DD DISP=SHR,DSN=&QUAL1..LOADLIB
//VIRARBO DD DISP=OLD,DSN=&QUAL2..ARBO
//VIRSWAP DD DISP=OLD,DSN=&QUAL2..SWAP
//VIRHTML DD DISP=OLD,DSN=&QUAL2..HTML
//HTMLTRSF DD DISP=OLD,DSN=&QUAL2..HTMLTRSF
//SYSIN DD *
(commands and data statements, see below)
//SYSPRINT DD SYSOUT=*
//VIRLOG DD SYSOUT=*
Example JCL for VIRTEL Batch
The SYSIN le contains commands and data statements. The following commands are valid in the SYSIN
242 Chapter 1. The Virtel Engine

Virtel User Guide, Release 4.57
le:
.GET indicates the start of an HTTP GET command
.POST indicates the start of an HTTP POST command
.RAW indicates the start of a raw HTTP request command
.END indicates the end of a GET, POST, or RAW command
.EOJ causes VIRTEL to terminate
These commands are described in the following sections.
1.19.5 VIRTEL Batch commands
VIRTEL Batch GET command
The following gure shows an example SYSIN le containing two GET commands:
.GET
/protide.htm+protide VIRTEL transaction name
schema=TCC Schema name
in='TCC.DATA' Input dataset name
out='TCC.XML' Output dataset name
mode=wb,recfm=vb,lrecl=512,space=(cyl,(10,5)) Output file attributes
output_encoding=U Output encoding U or E
.END
.GET
/protide.htm+protide VIRTEL transaction name
schema=CRPR Schema name
in='CRPR.XML' Input dataset name
out='CRPR.DATA' Output dataset name
mode=wb,recfm=fb,lrecl=200 Output file attributes
input_encoding=U Input encoding U or E
.END
.EOJ
Example VIRTEL Batch GET commands
Each .GET command is followed by one or more data statements.
The rst statement following the .GET command is the VIRTEL URL of the HTTP request (see “Virtel
URL formats”). Only the pathname, pagename, and tranname parts of the URL are required. The http:
//ipaddr:port part of the URL must be omitted.
All subsequent statements (if any) following the .GET command are appended to the URL as query pa-
rameters. To conform with standard HTTP query syntax, VIRTEL adds a “?” before the rst parameter
and a “&” before each subsequent parameter. Thus, in the above example, VIRTEL generates two HTTP
requests:
GET /protide.htm+protide?
schema=TCC&in='TCC.DATA'&out='TCC.XML'&mode=wb,recfm=vb,lrecl=512,
space=(cyl,(10,5))&output_encoding=U HTTP/1.1
GET /protide.htm+protide?schema=CRPR&in='CRPR.XML'&out='CRPR.DATA'&mode=wb,
recfm=fb,lrecl=200&input_encoding=U HTTP/1.1
Example VIRTEL Batch GET requests
1.19. VIRTEL Batch 243

Virtel User Guide, Release 4.57
VIRTEL Batch POST command
The following gure shows an example SYSIN le containing a POST command followed by XML data:
.POST text/xml
/xmldemo.xml+tran3
<?xml version="1.0" ?>
<methodCall>
<screenname>T000-GAL</screenname>
<screentype>3270</screentype>
<params>
<fieldname>FIELD001</fieldname>
<uinput>A</uinput>
</params>
</methodCall>
.END
.EOJ
Example VIRTEL Batch POST command
Each .POST command is followed by two or more data statements containing the URL and the request
body.
The rst statement following the .POST command is the VIRTEL URL of the HTTP request (see “Virtel
URL formats”). Only the pathname, pagename, and tranname parts of the URL are required. The http:
//ipaddr:port part of the URL must be omitted.
All subsequent statements following the .POST command are considered to be the request body. VIRTEL
automatically generates a Content-length: header corresponding to the size of the request body. VIRTEL
also adds a Content-type: header if the content type is specied as an operand of the .POST command as
shown in the example. Thus, in the above example, VIRTEL generates the following HTTP request:
POST /xmldemo.xml+tran3 HTTP/1.1
Content-Length: 00000201
Content-Type: text/xml
Special: GIVE-LENGTH-PREFIX
<?xml version="1.0" ?>
<methodCall>
<screenname>T000-GAL</screenname>
<screentype>3270</screentype>
<params>
<fieldname>FIELD001</fieldname>
<uinput>A</uinput>
</params>
</methodCall>
Example VIRTEL Batch POST request
1.19.6 VIRTEL Batch RAW command
The following gure shows an example SYSIN le containing a RAW command followed by HTTP request
data:
.RAW
POST /virmsg.txt+uplw2h HTTP/1.1
Content-Type: multipart/form-data; boundary=-----------------9503744825200
Content-Length: 227
244 Chapter 1. The Virtel Engine

Virtel User Guide, Release 4.57
-------------------9503744825200
Content-Disposition: form-data; name="file"; filename="test.txt"
Content-Type: text/plain
This is the test data file for upload
More test data here
-------------------9503744825200--
.END
.EOJ
Example VIRTEL Batch RAW command
Each .RAW command is followed by one or more data statements containing the HTTP request line, the
request headers, and the request body. A blank line separates the request headers from the request body.
VIRTEL generates an HTTP request exactly as contained in the data statements.
1.19.7 VIRTEL Batch return codes
When a VIRTEL Batch job terminates, the condition code is set to the highest ERROR$ code set by the of
the scenarios executed (value 0 to 255).
The condition code may also be set to 4 or 5 (unless a scenario has indicated a higher value) if a request
executed by the batch job produced an HTTP response code in the range 4xx or 5xx.
In the case of a scenario abend, the completion code contains the oset of the abend within the scenario.
If the VIRTEL Batch job terminates because of an error condition (for example, an invalid batch command,
missing DD statement, or insucient memory) then the condition code is set to 16.
1.19. VIRTEL Batch 245

Virtel User Guide, Release 4.57
246 Chapter 1. The Virtel Engine

CHAPTER
TWO
OUTGOING CALLS
2.1 Outgoing E-mails
The FAD4 structured eld allows a host application to send an e-mail. This function is described in the
VIRTEL Programming Interface documentation 280. The entry point used to invoke the host application
must contain a type-3 transaction with external name $MAIL$. The “Application” eld must contain the
name of the SMTP line to be used for sending the outgoing e-mail. An example transaction is shown below:
TRANSACTION DETAIL DEFINITION ---------------------- Applid: SPVIRE2 13:43:23
Internal name ===> W2H-75 To associate with an entry point name
External name ===> $mail$ Name displayed on user menu
Description ===> Send messages via SMTP
Application ===> S-SMTP Application to be called
PassTicket ===> 0 Name ===> 0=no 1=yes 2=unsigned
Application type ===> 3 1=VTAM 2=VIRTEL 3=SERV 4=PAGE 5=LINE
Pseudo-terminals ===> Prefix of name of partner terminals
Logmode ===> Specify when LOGMODE must be changed
How started ===> 2 1=menu 2=sub-menu 3=auto
Security ===> 1 0=none 1=basic 2=NTLM 3=TLS 4=HTML
Translation(s) ===> 0=idem 1=8040 2=8080 3=4040 4=auto
Logon message ===>
TIOA at logon ===>
TIOA at logoff ===>
Initial Scenario ===> Final Scenario ===>
Input Scenario ===> Output Scenario ===>
P1=Update P3=Return P12=Server
Transaction denition for outgoing e-mails
Refer to the VIRTEL Connectivity Reference documentation for details of dening transactions, entry points,
and SMTP lines.
247

Virtel User Guide, Release 4.57
248 Chapter 2. Outgoing Calls

CHAPTER
THREE
PROGRAMMING INTERFACES
Certain VIRTEL functions can be driven by application programs. These functions are generally requested
by sending specially formatted commands to VIRTEL on the same 3270 session through which the application
communicates with the end user. An application can request VIRTEL functions in the following ways:
• By sending a message containing structured elds recognized by VIRTEL
• By embedding HOST4WEB commands in the 3270 screen (available from VIRTEL version 4.28 on-
wards)
3.1 Structred Fields
In addition to sending normal screen display data, a 3270 application may also send data in
specially formatted elds known as “structured elds”. Structured elds are sent using a special
3270 command “Write Structured Field” (code X’F3’). Each structured eld contains a 2-byte
identication code. VIRTEL intercepts structured elds whose code begins with X’FA’. By send-
ing structured elds to VIRTEL on the 3270 session, the VIRTEL Web Integration application
can direct VIRTEL to perform certain functions.
The operations available to VIRTEL Web Integration applications via structured elds are as
follows:
• Specify the HTML page template to be used to format 3270 screens for the browser
• Specify the directory from which HTML page templates are to be retrieved
• Send a list of values (a table variable) to an HTML page
• Send an outgoing e-mail
• Retrieve the contents of an incoming e-mail
3.1.1 General format of a 3270 structured eld
As a general rule, the format of a structured eld is as shown below:
X'nnnnccccdd....dd'
nnnn The length. The length includes the length of the nnnn and cccc elds, thus nnnn is always 4 more
than the length of the data.
cccc the identication code
dd….dd the data.
249

Virtel User Guide, Release 4.57
3.1.2 Sending structured elds via the Write Structured Field command
VIRTEL recognizes that a message contains structured elds whenever the application uses the 3270 com-
mand X’F3’ (Write Structured Field) to send the message to the terminal. For CICS applications, the
STRFIELD option of the EXEC CICS SEND command requests CICS to send the message using command
code X’F3’:
EXEC CICS SEND FROM(DATA1)
LENGTH(LENGTH OF DATA1)
STRFIELD
END-EXEC.
For non-CICS applications, the appropriate method of generating a Write Structured Field command should
be used. It is also possible to convert a normal message into a structured eld message by means of VIRTEL
exit 4 (outbound message exit).
3.1.3 Sending structured elds using the SRTVIRTEL prex
If the application monitor does not support the X’F3’ (Write Structured Field) command for sending struc-
tured elds (for example, IMS), VIRTEL provides an alternative method for processing structured eld data.
If the 3270 message begins with the special header:
X'1140401D40',C'SRTVIRTEL',X'11404B'
then VIRTEL treats the remainder of the message as structured elds. The SRTVIRTEL header is built by
the application, and the application monitor adds 3270 command byte X’F1’ (Write), X’F5’ (Erase/Write),
or X‘7E’ (Erase/Write Alternate), followed by an appropriate WCC (Write Control Character). For example,
F1 C3 1140401D40 C’SRTVIRTEL’ 11404B 0016 FAE5 08 08 E3D9F0F0F0F0F0F1 818683A796A34040
is processed identically to:
F3 0016 FAE5 08 08 E3D9F0F0F0F0F0F1 818683A796A34040
3.1.4 How To Determine If Running Under Virtel
Because the structured elds described in this chapter are understood only by VIRTEL and not by regu-
lar 3270 terminals, your application will need to determine whether it is communicating with a VIRTEL
pseudo-terminal before writing a VIRTEL structured eld. This section describes some techniques that your
application can use to decide if it is communicating with VIRTEL pseudo-terminal or with a regular 3270
terminal.
3.1.5 Use a dierent transaction code
By dening two dierent transaction codes which invoke the same CICS application program (for example,
DEMO for 3270, and VEMO for VIRTEL), the application can test the eld EIBTRNID to determine if it is
running under VIRTEL. The gure below shows sample DFHCSDUP statements to associate two transaction
codes (DEMO and VEMO) with a single application program DEMOPROG:
DEFINE TRANSACTION(DEMO) GROUP(DEMOGRP)
PROGRAM(DEMOPROG) PROFILE(DFHCICST) STATUS(ENABLED)
DEFINE TRANSACTION(VEMO) GROUP(DEMOGRP)
PROGRAM(DEMOPROG) PROFILE(DFHCICST) STATUS(ENABLED)
250 Chapter 3. Programming Interfaces

Virtel User Guide, Release 4.57
Dening an alternate CICS transaction code for an application
The gure below shows sample VIRCONF statements to dene a VIRTEL transaction which starts the
application using the CICS transaction code VEMO:
TRANSACT ID=CLI-10,
NAME='CICS',
DESC='Logon to DEMO application',
APPL=DBDCCICS,
TYPE=1,
TERMINAL=CLVTA,
integration=1,
SECURITY=1,
TIOASTA="Signon&/W&*7D4C7D&'114BE9'&U&'114CF9'&P&/Acomplete&/W VEMO&/A"
Invoking the alternate transaction code from VIRTEL
The gure below shows sample COBOL statements which allow the DEMOPROG program to take dierent
actions based upon the CICS transaction code:
In Working-Storage:
01 THIS-IS-VIRTEL-CALL-SW PIC X.
88 THIS-IS-VIRTEL-CALL VALUE 'Y'.
88 THIS-IS-NOT-VIRTEL-CALL VALUE 'N'.
In the Procedure Division:
IF EIBTRNID (1:1)='V'
MOVE 'Y' TO THIS-IS-VIRTEL-CALL-SW
ELSE
MOVE 'N' TO THIS-IS-VIRTEL-CALL-SW
END-IF
Detecting VIRTEL by testing the transaction code
3.1.6 Include parameters after the transaction code
By adding additional data after the transaction code when the transaction is invoked by VIRTEL, the
application can receive the parameter data to verify whether it is running under VIRTEL. In the following
example we add a V after the transaction code when the application is called via VIRTEL. The gure below
shows sample VIRCONF statements to dene a VIRTEL transaction which starts the CICS transaction
DEMO with an additional parameter (“V”):
TRANSACT ID=CLI-10,
NAME='CICS',
DESC='Logon to DEMO application',
APPL=DBDCCICS,
TYPE=1,
TERMINAL=CLVTA,
integration=1,
SECURITY=1,
TIOASTA="Signon&/W&*7D4C7D&'114BE9'&U&'114CF9'&P&/Acomplete&/W DEMOV&/A"
Invoking a CICS transaction with additional parameters
The gure below shows sample COBOL statements which must be added to the DEMOPROG program
to receive and test the parameter data. When the transaction is started by VIRTEL, the parameter eld
3.1. Structred Fields 251

Virtel User Guide, Release 4.57
contains “V”. When the transaction is started from a terminal, using the transaction code DEMO with no
additional parameters, the parameter eld contains spaces:
in Working-Storage:
01 CICS-TIOA.
02 CICS-TIOA-TRANID PIC X(4) VALUE SPACES.
02 CICS-TIOA-PARAMV PIC X(1) VALUE SPACES.
02 FILLER PIC X(75) VALUE SPACES.
01 THIS-IS-VIRTEL-CALL-SW PIC X.
88 THIS-IS-VIRTEL-CALL VALUE 'Y'.
88 THIS-IS-NOT-VIRTEL-CALL VALUE 'N'.
in the Procedure Division:
EXEC CICS RECEIVE
INTO(CICS-TIOA)
END-EXEC
IF CICS-TIOA-PARAMV ='V'
MOVE 'Y' TO THIS-IS-VIRTEL-CALL-SW
ELSE
MOVE 'N' TO THIS-IS-VIRTEL-CALL-SW
END-IF
Detecting VIRTEL by inspecting the contents of the TIOA
3.1.7 Use a specic range of terminal names
Since all VIRTEL requests are made from the VIRTEL terminal pool, the application program can test the
CICS terminal id or the VTAM LU name to determine if it is running under VIRTEL, as shown in the
following example:
TERMINAL ID=W2HTP000,
RELAY=VIRTVT00,
POOL=*W2HPOOL,
DESC='Relay pool for HTTP',
RELAY2=VIRTPR00,
TYPE=3,
COMPRESS=2,
INOUT=3,
STATS=12,
REPEAT=0080
Dening the VIRTEL terminal pool
VIRTVT?? APPL AUTH=(ACQ,PASS),MODETAB=ISTINCLM,DLOGMOD=SNX32702,EAS=1
VTAM denition for the VIRTEL terminal pool
In Working-Storage:
01 THIS-IS-VIRTEL-CALL-SW PIC X.
88 THIS-IS-VIRTEL-CALL VALUE 'Y'.
88 THIS-IS-NOT-VIRTEL-CALL VALUE 'N'.
In the Procedure Division:
252 Chapter 3. Programming Interfaces

Virtel User Guide, Release 4.57
IF EIBTRMID (1:2)='VT'
MOVE 'Y' TO THIS-IS-VIRTEL-CALL-SW
ELSE
MOVE 'N' TO THIS-IS-VIRTEL-CALL-SW
END-IF
Detecting VIRTEL by testing the CICS terminal id
In Working-Storage:
01 MYLUNAME PIC X(8).
01 THIS-IS-VIRTEL-CALL-SW PIC X.
88 THIS-IS-VIRTEL-CALL VALUE 'Y'.
88 THIS-IS-NOT-VIRTEL-CALL VALUE 'N'.
In the Procedure Division:
EXEC CICS ASSIGN
NETNAME(MYLUNAME)
END-EXEC
IF MYLUNAME (1:4)='VIRT'
MOVE 'Y' TO THIS-IS-VIRTEL-CALL-SW
ELSE
MOVE 'N' TO THIS-IS-VIRTEL-CALL-SW
END-IF
Detecting VIRTEL by testing the VTAM LU name
3.1.8 FA88: Transmit large data message to application
By using the FA88 structured eld, an application can request data from an HTTP terminal without being
limited to the size of a 3270 screen.
The application sends an FA88 structured eld containing the name of a URL parameter to be retrieved.
The “send message to terminal” ag causes VIRTEL to send an HTTP response to the terminal. When the
terminal sends its next URL, VIRTEL sends to the application an FA88 structured eld response containing
the value of the URL parameter. The application may retrieve the value in multiple segments. If the
value exceeds 32K in size then it must be retrieved in multiple segments. Once the rst segment has been
received, the application requests subsequent segments by sending another FA88 structured eld containing
the “immediate answer” ag and the oset of the segment requested. VIRTEL responds with an FA88
structured eld response containing the segment requested. In each response VIRTEL sets the ag byte to
indicate whether there is more data to be retrieved, and if so the number of bytes remaining. The application
continues the procedure until there is no more data to be retrieved.
The format of the FA88 structured eld sent by the application is shown below:
-2bytes Length of structured field =14 +n
-2bytes Structured field identification code =X'FA88'
-1bytes X'00'
-1bytes Flags:
X'01' =immediate answer
X'04' =send message to terminal
-2bytes Maximum segment size requested (m)
-4bytes Offset of requested segment (o)
-2bytes Length of name (n)
-nbytes Name of URL parameter
3.1. Structred Fields 253

Virtel User Guide, Release 4.57
Format of structured eld FA88
The format of the FA88 structured eld response returned by VIRTEL is shown below:
-2bytes Length of structured field =14 +n+x
-2bytes Structured field identification code =X'FA88'
-1bytes X'00'
-1bytes Flags:
X'02' =there is more data
-2bytes Length of segment returned (x)
-4bytes Number of bytes remaining (r)
-2bytes Length of name (n)
-nbytes Name of variable
-xbytes Requested data segment
Format of structured eld response FA88
3.1.9 FAC8: Selection of page template
VIRTEL recognizes the FAC8 structured eld for the following operations: - Change of directory for HTML
page templates - Change of HTML page template
To perform more than one function at a time, multiple FAC8 structured elds can be sent in the same
message.
Structured eld FAC8 code 06
Structured eld FAC8 code 06 allows the application to specify the name of the VIRTEL directory to be
used to retrieve the page template for the current 3270 screen and all subsequent screens. The format of a
structured eld FAC8 code 06 is:
-2bytes Length of structured field =X'000D'
-2bytes Structured field identification code =X'FAC8'
-1bytes Code =X'06' (change VIRTEL directory)
-8bytes Directory name
Format of structured eld FAC8 code 06
Structured eld FAC8 code 07
Structured eld FAC8 code 07 allows the application to specify the name of the page template for the current
3270 screen and all subsequent screens.
The format of a structured eld FAC8 code 07 is:
-2bytes Length of structured field =variable (n+5)
-2bytes Structured field identification code =X'FAC8'
-1bytes Code =X'07' (change HTML page template)
-nbytes Page template name
Format of structured eld FAC8 code 07
254 Chapter 3. Programming Interfaces

Virtel User Guide, Release 4.57
COBOL example using FAC8
in Working-Storage:
*////////////////////////////////////////////////////////////////*
*///* - FAC8 request to VIRTEL (HTML page management) *///*
*///* - send structured field: *///*
*///* F3 LLLL FAC8 F PAGE or DIRECTORY *///*
*///* LLLL: Length of structured field (2BYTES) *///*
*///* FAC8: Structured field id code (2BYTES) *///*
*///* F : Requested function (1BYTE BINARY) *///*
*///* 06: change VIRTEL directory *///*
*///* 07: change HTML page template *///*
*///* PAGE or DIRECTORY: name (8bytes)*///*
*////////////////////////////////////////////////////////////////*
01 FAC8-DEM.
05 FAC8-LONG PIC S9(4) COMP VALUE +5.
05 FAC8-FILL1 PIC X(02) VALUE X'FAC8'.
05 FAC8-FONCTION PIC X(01) VALUE ' '.
05 FAC8-ARGUMENT PIC X(08) VALUE SPACES.
01 FAC8-DEM-REPERTOIRE PIC X(01) VALUE X'06'.
01 FAC8-DEM-PAGE-HTML PIC X(01) VALUE X'07'.
in the Procedure Division:
MOVE LENGTH OF FAC8-DEM TO FAC8-LONG.
MOVE FAC8-DEM-PAGE-HTML TO FAC8-FONCTION.
MOVE 'TOUTNOIR' TO FAC8-ARGUMENT.
PERFORM 8150-ENVOI-FAC8 THRU 8150-FIN
PERFORM 8830-ENVOI-MAP THRU 8830-FIN.
*////////////////////// SEND STRUCTURED FIELD ///////////////////*
8150-ENVOI-FAC8.
EXEC CICS SEND FROM (FAC8-DEM)
FROMLENGTH (FAC8-LONG)
STRFIELD
END-EXEC.
8150-FIN.
*/////////////////////// SEND MESSAGE 3270 ///////////////////////*
8830-ENVOI-MAP.
EXEC CICS SEND MAP ('NOMMAP2')
MAPSET ('NONMAP2')
ERASE
CURSOR (CICS-TS-POS-CURS)
END-EXEC.
8830-FIN.
Example of sending structured eld FAC8
An example of this function is supplied in member FAC8SAMP of the VIRTEL SAMPLIB.
3.1. Structred Fields 255

Virtel User Guide, Release 4.57
3.1.10 FAE5, FAE6: Sending a table variable
Structured eld FAE5 allows the application to send a named data table (“table variable”) to VIRTEL. The
data in the table variable is made available for insertion in the current HTML page by means of VIRTEL
tags coded in the page template (see “Handling table variables”), or by means of a scenario instruction (see
“FIELD$ DEFINE-CHOICE”, page 174) which allows the application to supply lists of drop-down values
for selection elds.
Structured eld FAE5
The application can send one or more FAE5 structured elds. Each structured eld contains the name of a
variable followed by a table of values. The format of structured eld FAE5 is shown below:
-2bytes Length of structured field =variable
-2bytes Structured field identification code =X'FAE5'
-1bytes Length of each value (p)
-1bytes Length of name (n)
-nbytes Name of variable
-pbytes Value 1
-pbytes Value 2
-etc
Format of structured eld FAE5 – format 1
The above format limits the length of each value to a maximum of 255 bytes. A second format of the FAE5
structured eld allows the application to set a single value whose length is equal to the remainder of the
structured eld:
- 2 bytes Length of structured field = variable
- 2 bytes Structured field identification code = X'FAE5'
- 1 bytes X'00'
- 1 bytes Length of name (n)
- n bytes Name of variable
- x bytes Value (x=structured field length – 6 – n)
Format of structured eld FAE5 – format 2
After the application has sent a message containing an FAE5 structured eld, VIRTEL considers the current
screen complete and sends the response to the user.
Structured eld FAE6
Structured eld FAE6 is identical to FAE5, except that VIRTEL does not consider the current screen to be
complete, and waits for a further output message from the application before sending the response to the
user.
COBOL example using FAE5
in Working-Storage:
01 FAE5-LONG PIC S9(4) COMP VALUE +0.
01 FAE5-AREA.
05 FAE5-VARIABLE-1.
10 FAE5-SFLENGTH-1PIC S9(4) COMP VALUE +0.
256 Chapter 3. Programming Interfaces

Virtel User Guide, Release 4.57
10 FILLER PIC X(2) VALUE X'FAE5'.
10 FAE5-LONG-POSTE-1PIC X VALUE X'0A'.
10 FAE5-LONG-NOM-1PIC X VALUE X'08'.
10 FAE5-NOM-1PIC X(8) VALUE 'VARNAME1'.
10 FAE5-POSTE-1-1PIC X(10) VALUE 'VALUE1'.
10 FAE5-POSTE-1-2PIC X(10) VALUE 'VALUE2'.
10 FAE5-POSTE-1-3PIC X(10) VALUE 'VALUE3'.
05 FAE5-VARIABLE-2.
10 FAE5-SFLENGTH-2PIC S9(4) COMP VALUE +0.
10 FILLER PIC X(2) VALUE X'FAE5'.
10 FAE5-LONG-POSTE-2PIC X VALUE X'04'.
10 FAE5-LONG-NOM-2PIC X VALUE X'08'.
10 FAE5-NOM-2PIC X(8) VALUE 'VARNAME2'.
10 FAE5-POSTE-2-1PIC 9(6) VALUE 123.
10 FAE5-POSTE-2-2PIC 9(6) VALUE 234.
10 FAE5-POSTE-2-3PIC 9(6) VALUE 457.
in the Procedure Division:
MOVE LENGTH OF FAE5-VARIABLE-1TO FAE5-SFLENGTH-1
MOVE LENGTH OF FAE5-VARIABLE-2TO FAE5-SFLENGTH-2
MOVE LENGTH OF FAE5-AREA TO FAE5-LONG
EXEC CICS SEND FROM(FAE5-AREA)
LENGTH(FAE5-LONG)
STRFIELD
END-EXEC
Example of sending structured eld FAE5
3.1.11 Call Interface
Application programs running in a CICS or IMS environment using Language Environment (LE) can request
certain VIRTEL Web Integration functions by means of callable modules. These modules construct the
necessary structured elds and send them to VIRTEL via CICS or IMS, thus simplifying the job of the
application programmer. These modules are primarily designed to be called by CICS or IMS-COBOL
programs, however they can also be used by application programs written in other languages. The modules,
CALL VIRSETA, CALL VIRSETV (for CICS), CALL VIRSETAI, CALL VIRSETVI (for IMS) and CALL
VIRTEL, are described in the following sections.
CALL VIRSETA
This module allows a CICS application program to copy an array of values into a VIRTEL table variable.
The calling program supplies the name of the variable and an array containing the values. The VIRSETA
module builds one or more FAE6 structured elds containing the variable name and the values, and sends
the structured eld(s) to VIRTEL using the EXEC CICS SEND STRFIELD command. The total size of
the structured elds sent by a single call to VIRSETA cannot exceed 32K, but additional data can be added
to the VIRTEL table variable by calling VIRSETA again with the same variable name. When VIRSETA is
used to copy values into a VIRTEL table variable, all of the values must have the same length. To create
a VIRTEL table variable containing values of varying lengths, use CALL VIRSETV described in the next
section.
3.1. Structred Fields 257

Virtel User Guide, Release 4.57
CALL VIRSETA parameters
Parameters passed by calling program:
1. DFHEIBLK
2. DFHCOMMAREA
3. Variable name (variable length EBCDIC string of 1-255 characters terminated by blank or X‘00’)
4. An array of elements each containing one data item
5. Element size (signed halfword) contains the length of each element of the array
6. Count (signed halfword) contains the number of elements in the array
7. Data length (signed halfword) contains the length of the data item contained in each element of the
array. This may be less than or equal to the element size.
CALL VIRSETA example
in Working-Storage:
01 WS-ARRAY.
05 WS-ELEMENT OCCURS 50 TIMES.
10 WS-DATA-ITEM PIC X(80).
10 FILLER PIC X(20).
77 WS-ELEMENT-SIZE PIC S9(4) COMP SYNC.
77 WS-COUNT PIC S9(4) COMP SYNC.
77 WS-DATA-LENGTH PIC S9(4) COMP SYNC.
in the Procedure Division:
MOVE LENGTH OF WS-ELEMENT (1) TO WS-ELEMENT-SIZE.
MOVE 50 TO WS-COUNT.
MOVE LENGTH OF WS-DATA-ITEM (1) TO WS-DATA-LENGTH.
CALL 'VIRSETA' USING DFHEIBLK
DFHCOMMAREA
BY CONTENT 'MYVAR '
BY REFERENCE WS-ARRAY
WS-ELEMENT-SIZE
WS-COUNT
WS-DATA-LENGTH.
Example of VIRTEL Web Integration application using CALL VIRSETA
CALL VIRSETA return codes
If the call was successful, VIRSETA returns to the calling program. Otherwise, VIRSETA terminates with
an EXEC CICS ABEND. The following abend codes may be issued by VIRSETA:
VSA1 Length of variable name is outside the range 1-255, or the required terminator (blank or X‘00’) is
missing
VSA2 Data length is less than 1, or exceeds the element length.
VSA3 Count is less than 1.
VSA4 Data exceeds the maximum allowed size. If the length of each data item is 255 or less, then the total
size of the data (count x data length) must not exceed 32760 – N, where N is the number of characters
in the variable name. If the length of each data item is 256 or more, then count x (data length + 6 +
N) must not exceed 32767.
258 Chapter 3. Programming Interfaces

Virtel User Guide, Release 4.57
Additionally CICS may issue an abend if the EXEC CICS SEND STRFIELD command is unsuccessful.
CALL VIRSETV (CICS)
This module allows a CICS application program to set the value of a VIRTEL variable. The calling program
supplies the name of the variable and the value to be set. The VIRSETV module builds an FAE6 structured
eld containing the variable name and value, and sends the structured eld to VIRTEL using the EXEC
CICS SEND STRFIELD command.
VIRTEL variables containing more than one value are known as table variables. The application program
can create a table variable by calling the VIRSETV module several times with the same variable name. The
rst call creates the variable and adds the rst value to it. Subsequent calls add additional values to the
table variable.
CALL VIRSETV parameters
Parameters passed by calling program:
1. DFHEIBLK
2. DFHCOMMAREA
3. Variable name (variable length EBCDIC string of 1-255 characters terminated by blank or X‘00’)
4. Value (variable length)
5. Length (signed halfword eld containing length of value)
CALL VIRSETV example
in Working-Storage:
77 WS-BUFFER PIC X(80) VALUE '** MY VALUE **'.
77 WS-LENGTH PIC S9(4) COMP SYNC.
in the Procedure Division:
MOVE LENGTH OF WS-BUFFER TO WS-LENGTH.
CALL 'VIRSETV' USING DFHEIBLK
DFHCOMMAREA
BY CONTENT 'MYVAR '
BY REFERENCE WS-BUFFER
WS-LENGTH.
Example of VIRTEL Web Integration application using CALL VIRSETV
CALL VIRSETV return codes
If the call was successful, VIRSETV returns to the calling program. Otherwise, VIRSETV terminates with
an EXEC CICS ABEND. The following abend codes may be issued by VIRSETV:
VSV1 Length of variable name is outside the range 1-255, or the required terminator (blank or X‘00’) is
missing
VSV2 Length of value is negative or exceeds the maximum allowed length (32760 minus the length of the
variable name).
Additionally CICS may issue an abend if the EXEC CICS SEND STRFIELD command is unsuccessful.
3.1. Structred Fields 259

Virtel User Guide, Release 4.57
CALL VIRSETAI (IMS)
This module allows an IMS application program to copy an array of values into a VIRTEL table variable.
The calling program supplies the name of the variable and an array containing the values. The VIRSETAI
module builds one or more FAE6 structured elds containing the variable name and the values, and sends the
structured eld(s) to VIRTEL using the CALL ‘CBLTDLI’ USING ISRT, LS-IOPCB, OUTPUT-MESSAGE,
MFS command.
The total size of the structured elds sent by a single call to VIRSETAI cannot exceed 32K, but additional
data can be added to the VIRTEL table variable by calling VIRSETAI again with the same variable name.
When VIRSETAI is used to copy values into a VIRTEL table variable, all of the values must have the same
length. To create a VIRTEL table variable containing values of varying lengths, use CALL VIRSETVI
described in the next section.
CALL VIRSETAI parameters
Parameters passed by calling program:
1. Variable name (variable length EBCDIC string of 1-255 characters terminated by blank or X‘00’)
2. An array of elements each containing one data item
3. Element size (signed halfword) contains the length of each element of the array
4. Count (signed halfword) contains the number of elements in the array
5. Data length (signed halfword) contains the length of the data item contained in each element of the
array. This may be less than or equal to the element size.
6. IMS I/O PCB
CALL VIRSETAI example
in Working-Storage:
01 WS-TABLE.
05 WS-ELEMENT PIC X(80) OCCURS 100 TIMES.
77 WS-TESTDATA PIC X(10) VALUE 'TEST DATA'.
77 WS-ELEMSIZE PIC S9(4) COMP SYNC.
77 WS-COUNT PIC S9(4) COMP SYNC.
77 WS-DATALEN PIC S9(4) COMP SYNC.
77 WS-RC1 PIC X.
in Procedure Division:
MOVE WS-TESTDATA TO WS-ELEMENT (1).
MOVE WS-TESTDATA TO WS-ELEMENT (2).
MOVE WS-TESTDATA TO WS-ELEMENT (3).
MOVE LENGTH OF WS-ELEMENT (1) TO WS-ELEMSIZE.
MOVE 3TO WS-COUNT.
MOVE LENGTH OF WS-TESTDATA TO WS-DATALEN.
CALL 'VIRSETAI' USING CONTENT 'MYVAR '
REFERENCE WS-TABLE
WS-ELEMSIZE
WS-COUNT
WS-DATALEN
LS-IOPCB
260 Chapter 3. Programming Interfaces

Virtel User Guide, Release 4.57
RETURNING WS-RC1.
IF WS-RC1 NOT EQUAL 0GO TO ERROR.
Example of VIRTEL Web Integration application using CALL VIRSETAI
CALL VIRSETVI (IMS)
This module allows an IMS application program to set the value of a VIRTEL variable. The calling program
supplies the name of the variable and the value to be set. The VIRSETVI module builds an FAE6 structured
eld containing the variable name and value, and sends the structured eld to VIRTEL using the CALL
‘CBLTDLI’ USING ISRT, LS-IOPCB, OUTPUT-MESSAGE, MFS command. VIRTEL variables containing
more than one value are known as table variables. The application program can create a table variable by
calling the VIRSETVI module several times with the same variable name. The rst call creates the variable
and adds the rst value to it. Subsequent calls add additional values to the table variable.
CALL VIRSETVI parameters
Parameters passed by calling program:
1. Variable name (variable length EBCDIC string of 1-255 characters terminated by blank or X‘00’)
2. Value (variable length)
3. Length (signed halfword eld containing length of value)
4. IMS I/O PCB
CALL VIRSETVI example
in Working-Storage:
77 WS-BUFFER PIC X(80) VALUE '** MY VALUE **'.
77 WS-LENGTH PIC S9(4) COMP SYNC.
77 WS-RC1 PIC X.
in Procedure Division:
MOVE LENGTH OF WS-BUFFER TO WS-LENGTH.
CALL 'VIRSETVI' USING CONTENT 'MYVAR '
REFERENCE WS-BUFFER
WS-LENGTH
LS-IOPCB
RETURNING WS-RC1.
IF WS-RC1 NOT EQUAL 0GO TO ERROR.
Example of VIRTEL Web Integration application using CALL VIRSETVI
CALL VIRTEL (CICS)
Application programs running in a CICS environment with LE can also call a module named VIRTEL (see
source delivered in the VIRTEL SAMPLIB library at installation time) which builds and sends the structured
elds necessary to invoke the following functions: - specify page template and directory (structured eld
FAC8) - send data for table variables (structured eld FAE6)
3.1. Structred Fields 261

Virtel User Guide, Release 4.57
CALL VIRTEL example
The following COBOL example shows how to use CALL VIRTEL to send two table variables (CHP_NUM1
and CPT_NUM1) and to request the use of a specic page template (page WEB2VIRT in directory DEMO):
in Working-Storage:
*CALL 'VIRTEL' takes one parameter with maximum size 2048 bytes
01 PARAMETRES-VIRTEL-FAC8.
02 VIRTEL-FONCTION-FAC8 PIC X(10) VALUE 'SENDPAGW'.
02 VIRTEL-CODE-RETOUR-FAC8 PIC 9(02) VALUE 0.
02 VIRTEL-PAGE-HTML PIC X(10) VALUE 'WEB2VIRT'.
02 VIRTEL-REPERTOIRE PIC X(10) VALUE 'DEMO '.
02 VIRTEL-FILLER-FAC8 PIC X(2016).
01 PARAMETRES-VIRTEL-FAE6.
02 VIRTEL-FONCTION-FAE6 PIC X(10) VALUE 'SENDTABW'.
02 VIRTEL-CODE-RETOUR-FAE6 PIC 9(02) VALUE 0.
02 VIRTEL-LONG-NOM PIC 9(02).
02 VIRTEL-LONG-POSTE PIC 9(02).
02 VIRTEL-NBR-POSTE PIC 9(03).
02 VIRTEL-FAE6-DATA.
05 VIRTEL-NOM PIC X(08).
05 VIRTEL-POSTE-01 PIC X(10).
05 VIRTEL-POSTE-02 PIC X(10).
05 VIRTEL-POSTE-03 PIC X(10).
05 VIRTEL-POSTE-04 PIC X(10).
05 VIRTEL-POSTE-05 PIC X(10).
05 VIRTEL-POSTE-06 PIC X(10).
05 VIRTEL-POSTE-07 PIC X(10).
05 VIRTEL-POSTE-08 PIC X(10).
05 VIRTEL-POSTE-09 PIC X(10).
05 VIRTEL-FILLER-FAE6 PIC X(1937).
02 VIRTEL-FAE6-DATA1 REDEFINES VIRTEL-FAE6-DATA.
05 VIRTEL-NOM1 PIC X(08).
05 VIRTEL-POSTE1-01 PIC X(10).
05 VIRTEL-POSTE1-02 PIC X(10).
05 VIRTEL-POSTE1-03 PIC X(10).
05 VIRTEL-POSTE1-04 PIC X(10).
05 VIRTEL-POSTE1-05 PIC X(10).
05 VIRTEL-POSTE1-06 PIC X(10).
05 VIRTEL-POSTE1-07 PIC X(10).
05 VIRTEL-POSTE1-08 PIC X(10).
05 VIRTEL-POSTE1-09 PIC X(10).
05 VIRTEL-FILLER1-FAE6 PIC X(913).
in the Procedure Division:
MOVE 'SENDPAGW' TO VIRTEL-FONCTION-FAC8
MOVE 0TO VIRTEL-CODE-RETOUR-FAC8
MOVE 'WEB2VIRT' TO VIRTEL-PAGE-HTML
MOVE 'DEMO ' TO VIRTEL-REPERTOIRE
MOVE SPACES TO VIRTEL-FILLER-FAC8
CALL 'VIRTEL' USING DFHEIBLK
PARAMETRES-VIRTEL-FAC8
MOVE 'SENDTABW' TO VIRTEL-FONCTION-FAE6
MOVE 0TO VIRTEL-CODE-RETOUR-FAE6
MOVE 08 TO VIRTEL-LONG-POSTE.
MOVE 9TO VIRTEL-NBR-POSTE.
262 Chapter 3. Programming Interfaces

Virtel User Guide, Release 4.57
MOVE 08 TO VIRTEL-LONG-NOM.
MOVE 'CHP_NUM1' TO VIRTEL-NOM.
MOVE 'VAL-001' TO VIRTEL-POSTE-01
MOVE 'VAL-002' TO VIRTEL-POSTE-02.
MOVE 'VAL-003' TO VIRTEL-POSTE-03.
MOVE 'VAL-004' TO VIRTEL-POSTE-04.
MOVE 'VAL-005' TO VIRTEL-POSTE-05.
MOVE 'VAL-006' TO VIRTEL-POSTE-06.
MOVE 'VAL-007' TO VIRTEL-POSTE-07.
MOVE 'VAL-008' TO VIRTEL-POSTE-08.
MOVE 'VAL-009' TO VIRTEL-POSTE-09.
MOVE SPACES TO VIRTEL-FILLER-FAE6
CALL 'VIRTEL' USING DFHEIBLK
PARAMETRES-VIRTEL-FAE6
MOVE VIRTEL-CODE-RETOUR-FAE6 TO TD-MSG-RETCODE
MOVE 'SENDTABW' TO VIRTEL-FONCTION-FAE6
MOVE 0TO VIRTEL-CODE-RETOUR-FAE6
MOVE 08 TO VIRTEL-LONG-POSTE.
MOVE 9TO VIRTEL-NBR-POSTE.
MOVE 08 TO VIRTEL-LONG-NOM.
MOVE 'CPT_NUM1' TO VIRTEL-NOM1.
MOVE 'CPT-0001' TO VIRTEL-POSTE1-01.
MOVE 'CPT-0002' TO VIRTEL-POSTE1-02.
MOVE 'CPT-0003' TO VIRTEL-POSTE1-03.
MOVE 'CPT-0004' TO VIRTEL-POSTE1-04.
MOVE 'CPT-0005' TO VIRTEL-POSTE1-05.
MOVE 'CPT-0006' TO VIRTEL-POSTE1-06.
MOVE 'CPT-0007' TO VIRTEL-POSTE1-07.
MOVE 'CPT-0008' TO VIRTEL-POSTE1-08.
MOVE 'CPT-0009' TO VIRTEL-POSTE1-09.
MOVE SPACES TO VIRTEL-FILLER1-FAE6
CALL 'VIRTEL' USING DFHEIBLK
PARAMETRES-VIRTEL-FAE6
MOVE VIRTEL-CODE-RETOUR-FAE6 TO TD-MSG-RETCODE
Example of VIRTEL Web Integration application using CALL VIRTEL
CALL VIRTEL return codes
Return codes for the SENDPAGW function
The VIRTEL-CODE-RETOUR eld should be initialized to 0. The following values may be
returned:
0OK, VIRTEL request accepted (does not guarantee that page has been displayed in browser)
1Invalid function
2HTML page name invalid (blank or low-value)
3Directory name invalid (blank or low-value)
Return codes for the SENDTABW function
The VIRTEL-CODE-RETOUR eld should be initialized to 0. The following values may be
returned:
0OK, VIRTEL request accepted (does not guarantee that page has been displayed in browser)
1Invalid function
3.1. Structred Fields 263

Virtel User Guide, Release 4.57
11 Length of NAME non-numeric
12 Length of VALUE non-numeric
13 Number of values is non-numeric
264 Chapter 3. Programming Interfaces

Virtel User Guide, Release 4.57
3.1.12 HOST4WEB commands
When an application is invoked from a browser via an entry point dened with emulation type HOST4WEB,
the application can use a set of VIRTEL control commands known as “HOST4WEB” commands, which are
coded in the 3270 screen.2
Processing conditions
HOST4WEB commands are recognized by VIRTEL when the entry point denition species emulation type
HTML, HOST4WEB, or H4W, and any of the following conditions is true:
• the VIRTEL transaction denition contains value 1 in the “H4W Commands” eld
• the VIRTEL transaction denition contains value 2 in the “H4W Commands” eld and the message
has a ‘2VIRTEL’ prex (see below)
• the VIRTEL transaction denition contains value 4 in the “H4W Commands” eld and the entry point
denition species emulation type HOST4WEB or H4W
• the VIRTEL transaction denition contains value 4 in the “H4W Commands” eld and the entry point
denition species emulation type HTML and the message has a ‘2VIRTEL’ prex (see below)
• the previous screen contained the HOST4WEB command C SCAN NEXT SCREEN
• the application previously sent an FAD5 code 01 structured eld
All HOST4WEB commands must begin immediately after a 3270 attrbute byte, in other words each command
must appear at the start of a 3270 eld. The non-display attribute may be used, if desired, to prevent the
command appearing on the screen. To dene a non-display eld in BMS, specify ATTRB=(ASKIP,DRK).
To dene a non-display eld in ISPF, use an attribute character dened as INTENS(NON) in the )ATTR
section of the panel.
ISPF applications must use the ISPEXEC CONTROL DISPLAY REFRESH command before the ISPEXEC
DISPLAY PANEL command to ensure that HOST4WEB commands are transmitted to VIRTEL in their
entirety.
2VIRTEL prex
An application can send a 3270 message with a special prex to indicate to VIRTEL that the screen contains
HOST4WEB commands. The prex consists of a 3270 eld starting with the characters ‘2VIRTEL’. This
eld must be the rst eld transmitted in the message. The eld can be dened with the “non-display”
attribute, if desired, to prevent the prex appearing on the screen.
List of commands
C AUTO VARIABLES (Command Auto Variables)
C AUTO VARIABLES
Requests VIRTEL to automatically free all variables whenever a user response is sent to the application.
This command cancels the eect of the KEEP VARIABLES command.
Note: Structured eld FAD5 code 08 produces the same eect as this command.
3.1. Structred Fields 265

Virtel User Guide, Release 4.57
C KEEP VARIABLES (Command Keep Variables)
:: C KEEP VARIABLES
Requests VIRTEL to keep all variables created by the application. Normally VIRTEL will free all variables
whenever a user response is sent to the application. This command allows the variables to be kept for use
by a subsequent output screen. The variables may be freed by a subsequent KILL VARIABLES command,
otherwise they will be automatically freed at the end of the transaction.
Note: Structured eld FAD5 code 02 produces the same eect as this command.
C KILL VARIABLES (Command Kill Variables)
C KILL VARIABLES
Requests VIRTEL to free all variables.
Note: Structured eld FAD5 code 04 produces the same eect as this command.
C RETURN (Command Return)
C RETURN
Requests VIRTEL to immediately return a response to the application with a simulated “Enter”. The screen
containing this command is never displayed to the user.
C SCAN NEXT SCREEN (Command Scan)
C SCAN NEXT SCREEN
Indicates that the following screen will contain HOST4WEB commands, which will be processed by VIRTEL
without the need for a ‘2VIRTEL’ prex.
Note: Structured eld FAD5 code 01 produces the same eect as this command.
C WAIT NEXT SCREEN (Command Wait)
C WAIT NEXT SCREEN
Indicates that the current screen should not be sent to the user yet.
C TERMSESS (Command Terminate Session)
C TERMSESS
266 Chapter 3. Programming Interfaces

Virtel User Guide, Release 4.57
Allows a service transaction to request termination of the host application session after the current message
has been sent.
G EMULATION TYPE (Get Emulation Type)
G EMULATION TYPE
When VIRTEL returns the next input to the application, the contents of this eld are replaced by the
emulation type dened in the entry point.
G PAGE NAME (Get Current Template Name)
G PAGE NAME
When VIRTEL returns the next input to the application, the contents of this eld are replaced by the name
of the current page template.
G URL PARAMETER (Get URL Parameter)
G URL PARAMETER paramname
When VIRTEL returns the next input to the application, the contents of this eld are replaced by the value
of the parameter paramname in the URL.
S DIRECTORY (Set Temporary Directory Name)
S DIRECTORY dirname
Indicates the name of the directory from which VIRTEL is to retrieve the page template for the current
3270 screen (but not for subsequent screens). dirname is the name of a VIRTEL directory dened in the
Directory Management sub-application (as described 23). This name must not contain any blanks.
S GLOBAL PAGE (Set Global Template Name)
S GLOBAL PAGE pagename
Indicates the name of the page template to be used for the current 3270 screen and all subsequent screens.
This name must not contain any blanks.
S PAGE (Set Temporary Template Name)
S PAGE pagename
Indicates the name of the page template to be used for the current 3270 screen (but not for subsequent
screens). This name must not contain any blanks.
3.1. Structred Fields 267

Virtel User Guide, Release 4.57
S VARIABLE (Set Variable)
S VARIABLE varname+value+
Adds a new value to a table variable named varname. The variable is automatically created if necessary.
The value is contained in the 3270 eld immediately following the S VARIABLE varname command, and
the value has the same length as the 3270 eld which contains it. The “+” characters in the gure above
represent the 3270 attribute bytes which act as eld delimiters.
268 Chapter 3. Programming Interfaces

CHAPTER
FOUR
INCOMING CALLS
4.1 Incoming E-mails
4.1.1 FAC8: Retrieve data from an e-mail
An application started by an incoming e-mail (see “Incomming e-mails”) can retrieve data from the content
of the e-mail. To request VIRTEL to extract the data from the e-mail, the application sends a structured
eld FAC8 code 12 or 13 to the associated relay (3270 pseudo-terminal). VIRTEL intercepts the structured
eld and sends a response to the application in the form of a QUERY REPLY (x‘88’) structured eld.
FAC8 - Structured eld code 13
The format of a structured eld FAC8 code 12 is:
-2bytes Length of structured field =X'0007'
-2bytes Structured field identification code =X'FAC8'
-1bytes Code =X'12' (extraction of e-mail data)
-2bytes Option indicating the category of data requested:
0004 Received:
0008 Message-ID:
000C Date:
0010 References:
0014 Content-Type:
0018 MIME-Version:
001C Subject:
0020 (message text)
003C MAIL FROM: (see note)
0040 RCPT TO: (see note)
Format of structured eld FAC8 code 12
Note: MAIL FROM and RCPT TO are respectively the name of the sender and recipient as specied in
the SMTP envelope.
The response consists of one or more structured elds, prexed by an AID byte x‘88’ (QUERY REPLY).
The format of the query reply structured eld is:
- 2 bytes Length of structured field = variable
- 2 bytes Type of response data.
Values are same as the ‘option’ field of the corresponding request.
- 4 bytes (type 0020 only) number of lines of text
269

Virtel User Guide, Release 4.57
- 4 bytes (type 0020 only) flags (reserved)
- n bytes Data (in EBCDIC)
Format of the response to structured eld FAC8 code 12
Note:
• Response types other than 0020 do not contain the number of lines or ags.
• Response types are returned in the same order as specied in the request.
• All of the response types requested are present, even if they are zero length.
• Lines of message text are delimited by X‘0D25’ (EBCDIC carriage-return / line-feed).
FAC8 - Structured eld code 13
Structured eld FAC8 code 13 searches the e-mail for a specic character string, then returns the string
together with the remainder of the line.
The format of a structured eld FAC8 code 13 is:
-2bytes Length of structured field =7+length of string
-2bytes Structured field identification code =X'FAC8'
-1bytes Code =X'13' (scan e-mail data)
-2bytes Option indicating the category of data to be searched:
(see structured field FAC8 code 12)
-nbytes Character string to search for
Format of structured eld FAC8 code 13
The response consists of one or more structured elds, prexed by an AID byte x‘88’ (QUERY REPLY).
The format of the query reply structured eld is:
- 2 bytes Length of structured field = variable
- 2 bytes Type of response data.
Values are same as the ‘option’ field of the corresponding request.
- n bytes Data (in EBCDIC)
Format of the response to structured eld FAC8 code 13
Note:
• The data returned includes the character string searched for, and all characters which follow, up to the
end of the line. The characters X‘0D25’, indicating the end of line, are not included in the response.
• Response types are returned in the same order as specied in the request.
• All of the response types requested are present, even if they are zero length.
• Structured elds FAC8 code 12 and code 13 can be combined in the same request / response.
COBOL FAC8 example
Example (in Cobol format) of receiving an e-mail:
270 Chapter 4. Incoming Calls

Virtel User Guide, Release 4.57
in Working-Storage:
*Request FAC812 to VIRTEL
01 FAC812-DEM-LENG PIC S9(4) COMP VALUE +0.
01 FAC812-DEM-EMAIL.
05 FILLER PIC S9(4) COMP VALUE +7.
05 FILLER PIC X(3) VALUE X'FAC812'.
05 FAC812-DEM-OPTION-SUBJ PIC X(2) VALUE X'001C'.
05 FILLER PIC S9(4) COMP VALUE +7.
05 FILLER PIC X(3) VALUE X'FAC812'.
05 FAC812-DEM-OPTION-TEXT PIC X(2) VALUE X'0020'.
05 FILLER PIC S9(4) COMP VALUE +17.
05 FILLER PIC X(3) VALUE X'FAC813'.
05 FAC813-DEM-OPTION-OREF PIC X(2) VALUE X'0020'.
05 FILLER PIC X(10) VALUE 'Order ref:'.
*Response from Virtel following FAC812
01 FAC812-REP-LENG PIC S9(4) COMP VALUE +0.
01 FAC812-REP-AREA.
05 FAC812-REP-SUBJ-LENG PIC S9(4) COMP.
05 FAC812-REP-SUBJ-CODE PIC X(2).
05 FAC812-REP-SUBJ-DATA.
10 FAC812-REP-SUBJ-CHAR PIC X
OCCURS 0TO 256 TIMES
DEPENDING ON SUBJ-LENG.
05 FAC812-REP-TEXT-LENG PIC S9(4) COMP.
05 FAC812-REP-TEXT-CODE PIC X(2).
05 FAC812-REP-TEXT-NLIG PIC S9(8) COMP.
05 FAC812-REP-TEXT-FLAG PIC X(4).
05 FAC812-REP-TEXT-DATA.
10 FAC812-REP-TEXT-CHAR PIC X
OCCURS 0TO 1000 TIMES
DEPENDING ON TEXT-LENG.
05 FAC813-REP-OREF-LENG PIC S9(4) COMP.
05 FAC813-REP-OREF-CODE PIC X(2).
05 FAC813-REP-OREF-DATA.
10 FAC813-REP-OREF-CHAR PIC X
OCCURS 0TO 256 TIMES
DEPENDING ON OREF-LENG.
01 SUBJ-LENG PIC S9(4) COMP VALUE +0.
01 SUBJ-MESSAGE.
05 FILLER PIC X(5) VALUE 'SUBJ:'.
05 SUBJ-DATA PIC X(50).
01 TEXT-LENG PIC S9(4) COMP VALUE +0.
01 TEXT-MESSAGE.
05 FILLER PIC X(5) VALUE 'TEXT:'.
05 TEXT-DATA PIC X(80).
01 OREF-LENG PIC S9(4) COMP VALUE +0.
01 OREF-MESSAGE.
05 FILLER PIC X(5) VALUE 'OREF:'.
05 OREF-DATA PIC X(50).
01 ERR-MESSAGE PIC X(40) VALUE
'RBC8 UNEXPECTED RESPONSE FROM VIRTEL'.
in the Procedure Division:
MOVE +256 TO SUBJ-LENG
MOVE +1000 TO TEXT-LENG
MOVE +256 TO OREF-LENG
4.1. Incoming E-mails 271

Virtel User Guide, Release 4.57
MOVE LENGTH OF FAC812-DEM-EMAIL TO FAC812-DEM-LENG
MOVE LENGTH OF FAC812-REP-AREA TO FAC812-REP-LENG
EXEC CICS CONVERSE FROM(FAC812-DEM-EMAIL)
FROMLENGTH(FAC812-DEM-LENG)
INTO(FAC812-REP-AREA)
TOLENGTH(FAC812-REP-LENG)
STRFIELD
END-EXEC
IF EIBAID EQUAL X'88'
SUBTRACT 4FROM FAC812-REP-SUBJ-LENG GIVING SUBJ-LENG
MOVE FAC812-REP-SUBJ-DATA TO SUBJ-DATA
EXEC CICS WRITEQ TD QUEUE('CSMT')
FROM(SUBJ-MESSAGE)
END-EXEC
SUBTRACT 12 FROM FAC812-REP-TEXT-LENG
GIVING TEXT-LENG
MOVE FAC812-REP-TEXT-DATA TO TEXT-DATA
EXEC CICS WRITEQ TD QUEUE('CSMT')
FROM(TEXT-MESSAGE)
END-EXEC
SUBTRACT 4FROM FAC813-REP-OREF-LENG GIVING OREF-LENG
MOVE FAC813-REP-OREF-DATA TO OREF-DATA
EXEC CICS WRITEQ TD QUEUE('CSMT')
FROM(OREF-MESSAGE)
END-EXEC
ELSE
EXEC CICS WRITEQ TD QUEUE('CSMT')
FROM(ERR-MESSAGE)
END-EXEC
END-IF
EXEC CICS ISSUE DISCONNECT
END-EXEC.
Example of sending structured eld FAC8 code 12 and 13
4.1.2 FAD4: Sending an e-mail from a host application
It is possible at any time to send an e-mail from a host application under VIRTEL control. This operation
is performed by sending a WRITE STRUCTURED FIELD to the 3270 session which is intercepted by
VIRTEL. The structured eld data consists of a sequence of FAD4 structured elds as described below:
-2bytes Length of structured field =variable
-2bytes Structured field identification code =X'FAD4'
-nbytes Command code
-nbytes Value associated with command code
Format of structured eld FAD4
The possible command codes are:
N(Name) e-mail address of recipient.
F(From) e-mail address of sender. If this code is not supplied, the default sender address specied on the
SMTP line will be used.
X’CD’ (Code) Message identication.
S(Subject) Message subject line.
272 Chapter 4. Incoming Calls

Virtel User Guide, Release 4.57
T(Text) Message text. The sequence X‘0D25’ (EBCDIC carriage-return / line-feed) can be used to separate
lines of text.
C(Charset) Add a message header indicating the character set used; ISO-8859-15 for European character
set with Euro currency sign.
H(Header) Add one or more headers. The sequence X‘0D25’ (EBCDIC carriage-return / line-feed) indicates
the end of each of the headers in this structured eld.
The entry point used to invoke the host application must contain a type-3 transaction whose external name
is $MAIL$ and whose “Application” eld contains the name of the SMTP line to be used for sending the
outgoing e-mail.
COBOL FAD4 example
Example (in Cobol format) of sending an e-mail :
in Working-Storage:
01 FAD4-LONG PIC S9(4) COMP VALUE +0.
01 FAD4-AREA.
05 FAD4-COMMANDE-N.
10 FAD4-SFLENGTH-N PIC S9(4) COMP VALUE +0.
10 FILLER PIC X(2) VALUE X'FAD4'.
10 FILLER PIC X VALUE 'N'.
10 FAD4-DESTINATION PIC X(22)
VALUE 'bowler@saint.cloud.com'.
05 FAD4-COMMANDE-F.
10 FAD4-SFLENGTH-F PIC S9(4) COMP VALUE +0.
10 FILLER PIC X(2) VALUE X'FAD4'.
10 FILLER PIC X VALUE 'F'.
10 FAD4-SENDER PIC X(22)
VALUE 'virtel@saint.cloud.com'.
05 FAD4-COMMANDE-CD.
10 FAD4-SFLENGTH-CD PIC S9(4) COMP VALUE +0.
10 FILLER PIC X(2) VALUE X'FAD4'.
10 FILLER PIC X VALUE X'CD'.
10 FAD4-MESSAGE-ID PIC X(32)
VALUE '20010321174652K07F44354K608EAF00'.
05 FAD4-COMMANDE-S.
10 FAD4-SFLENGTH-S PIC S9(4) COMP VALUE +0.
10 FILLER PIC X(2) VALUE X'FAD4'.
10 FILLER PIC X VALUE 'S'.
10 FAD4-SUBJECT PIC X(17)
VALUE 'email from virtel'.
05 FAD4-COMMANDE-T.
10 FAD4-SFLENGTH-T PIC S9(4) COMP VALUE +0.
10 FILLER PIC X(2) VALUE X'FAD4'.
10 FILLER PIC X VALUE 'T'.
10 FAD4-TEXT-LINE-1PIC X(14) VALUE 'Balance report'.
10 FILLER PIC X(2) VALUE X'0D25'.
10 FAD4-TEXT-LINE-2PIC X(9) VALUE 'Total is '.
10 FAD4-CURRENCY PIC X VALUE X'9F'.
10 FAD4-AMOUNT PIC 9999 VALUE 2345.
10 FILLER PIC X(2) VALUE X'0D25'.
05 FAD4-COMMANDE-H.
10 FAD4-SFLENGTH-H PIC S9(4) COMP VALUE +0.
10 FILLER PIC X(2) VALUE X'FAD4'.
4.1. Incoming E-mails 273

Virtel User Guide, Release 4.57
10 FILLER PIC X VALUE 'H'.
10 FAD4-HEADER-1PIC X(33)
VALUE 'X-Transaction-Server: CICS-TS 2.2'.
10 FILLER PIC X(2) VALUE X'0D25'.
10 FAD4-HEADER-2PIC X(28)
VALUE 'X-Operating-System: z/OS 1.4'.
10 FILLER PIC X(2) VALUE X'0D25'.
05 FAD4-COMMANDE-C.
10 FAD4-SFLENGTH-C PIC S9(4) COMP VALUE +0.
10 FILLER PIC X(2) VALUE X'FAD4'.
10 FILLER PIC X VALUE 'C'.
10 FAD4-CHARSET PIC X(33) VALUE 'ISO-8859-15'.
in the Procedure Division:
MOVE LENGTH OF FAD4-COMMANDE-N TO FAD4-SFLENGTH-N
MOVE LENGTH OF FAD4-COMMANDE-F TO FAD4-SFLENGTH-F
MOVE LENGTH OF FAD4-COMMANDE-CD TO FAD4-SFLENGTH-CD
MOVE LENGTH OF FAD4-COMMANDE-S TO FAD4-SFLENGTH-S
MOVE LENGTH OF FAD4-COMMANDE-T TO FAD4-SFLENGTH-T
MOVE LENGTH OF FAD4-COMMANDE-H TO FAD4-SFLENGTH-H
MOVE LENGTH OF FAD4-COMMANDE-C TO FAD4-SFLENGTH-C
MOVE LENGTH OF FAD4-AREA TO FAD4-LONG
EXEC CICS SEND FROM(FAD4-AREA)
LENGTH(FAD4-LONG)
STRFIELD
END-EXEC.
Example of sending structured eld FAD4
Example of the e-mail generated by the above program:
Date: Fri, 30 Apr 2004 15:14:05 +0100
From: virtel@saint.cloud.com
Organization: SYSPERTEC COMMUNICATION
To: bowler@saint.cloud.com
Message-id: <20010321174652K07F44354K608EAF00-bowler@saint.cloud.com>
Content-Type: text/plain; charset=ISO-8859-15
Content-Transfer-Encoding: 8bit
X-Transaction-Server: CICS-TS 2.2
X-Operating-System: z/OS 1.4
Subject: email from virtel
Balance report
Total is €2345
Example of e-mail generated by structured eld FAD4
274 Chapter 4. Incoming Calls

CHAPTER
FIVE
SECURITY
5.1 VIRTEL Web Access Security
VIRTEL examines the URL of every VIRTEL Web Access request which arrives from a browser. Since there
is no permanent IP session between the browser and VIRTEL, there is less risk of a session being “hijacked”.
In addition to standard network security features (rewall, network sign on, SSO, etc.), each URL sent to
VIRTEL has a structure which allows VIRTEL to enforce authorization rules based on Entry Point, Rules,
and Transactions, which are VIRTEL entities described in the “VIRTEL Connectivity Reference” manual.
5.1.1 Specifying security in the entry point
VIRTEL supplies a signon program for HTTP lines called VIR0020H (refer to the “VIRTEL Connectivity
Reference” manual for more details about how to specify a signon program in an entry point).
When the rst call is made to a secure transaction under an entry point which species VIR0020H as its
signon program, VIRTEL requests the browser (via a 401 response) to display a dialog box inviting the
user to enter a userid and password. VIRTEL passes the userid and password to the security manager
(RACF, etc.) for validation. VIRTEL can also propagate the userid and password to other applications (for
example, CICS) by means of connection / disconnection scripts dened in the transaction (see the “VIRTEL
Connectivity Reference” manual for details). Depending on the userid, the security manager may authorize
or deny access to the requested transaction.
275
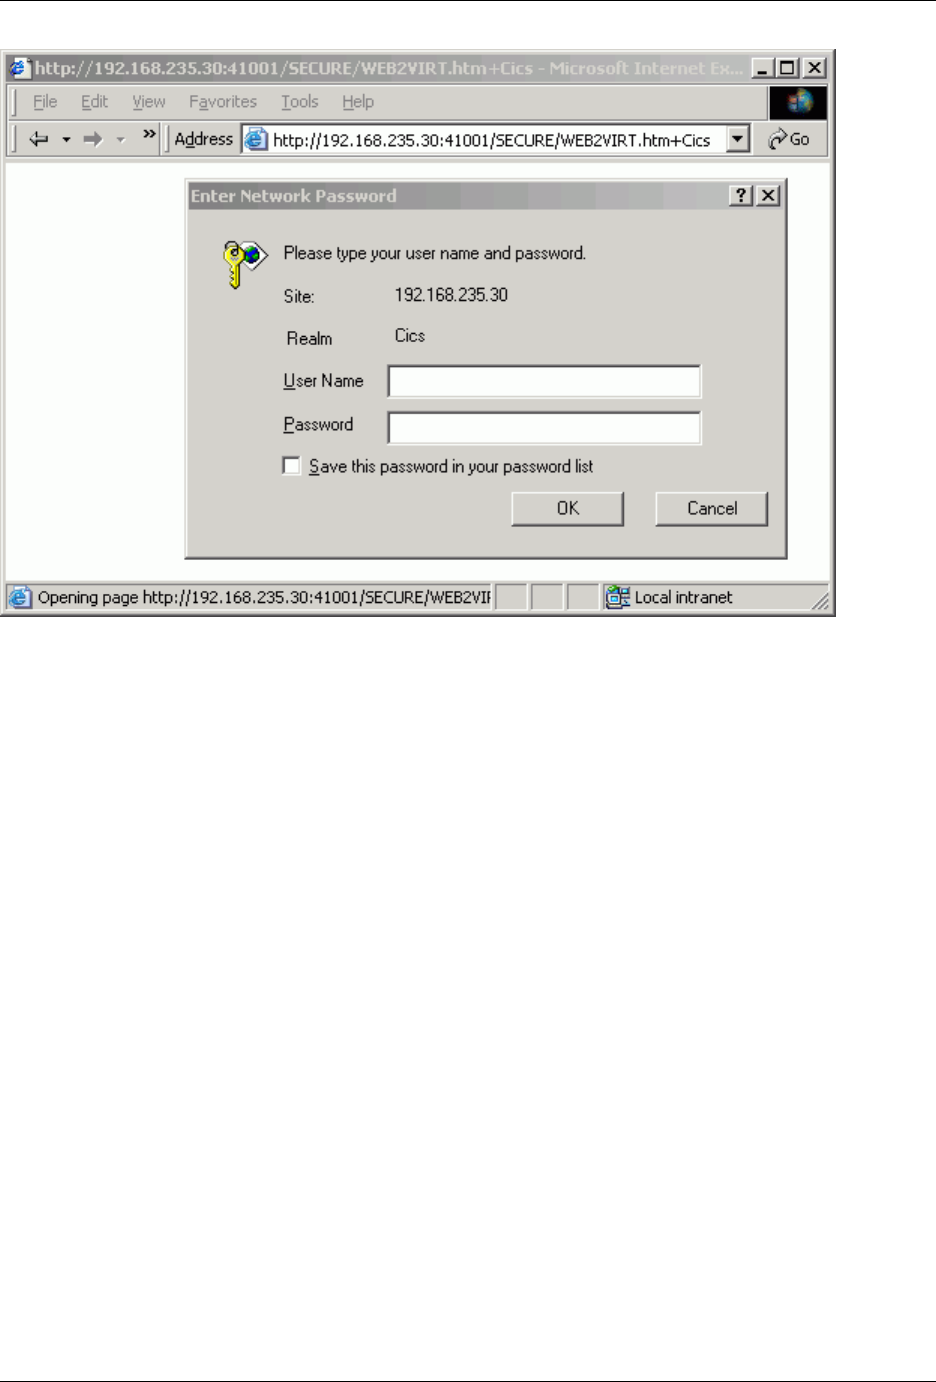
Virtel User Guide, Release 4.57
Example of signon dialog box displayed by browser
5.1.2 Specifying security in the transaction
To display the signon dialog box shown above, the transaction under the entry point must specify SECURITY
1 (standard). Refer to the “Transactions” section of the “VIRTEL Connectivity Reference” manual for details
of the security eld in the VIRTEL transaction denition.
Security can be specied either on the application transaction (transaction type 1, 2, 3), or on the directory
transaction (transaction type 4). In the above example, “SECURE” is the directory transaction, and “Cics”
is the application transaction. Specifying security at the directory level can be useful in that it forces the
user to sign on even when displaying a static page which has no associated application transaction.
5.1.3 Mixed-case password support
If SECUR=RACROUTE or SECUR=(RACROUTE,RACF) is specied in the VIRTCT, and if the security
manager reports that it supports lower-case characters in passwords, then VIRTEL will pass all passwords to
the security manager in mixed case as entered by the user. Otherwise VIRTEL will translate all passwords
to upper case before passing them to the security manager. Message VIR0861I at integration indicates that
VIRTEL will use mixed-case passwords.
5.1.4 Automatic retrieval of username
NTLM security allows VIRTEL to retrieve the username under which the user has already signed on to
Windows. This allows VIRTEL Web Access to sign on the user without requiring him or her to enter a
username and password.
276 Chapter 5. Security
Virtel User Guide, Release 4.57
When SECURITY 2 (NTLM) is specied in the VIRTEL transaction denition (either the application
transaction or the directory transaction) VIRTEL requests the browser to supply the Windows username.
Note: When the user is identied by NTLM, VIRTEL does not have access to the user’s password, and
therefore VIRTEL cannot verify the validity of the username, and cannot propagate the signon to other
applications such as CICS.
Before NTML can be used with the Firefox browser, the server name must be congured into the browser.
Type about:config in the address bar, and enter the VIRTEL Web Access server address (for example,
192.168.235.61:41000) as the value of the network.automatic-ntlm-auth.trusted-uris parameter.
5.1.5 Data encryption by AT-TLS/SSL
The AT-TLS feature (“Application Transparent Transport Layer Security”), available with z/OS Communi-
cation Server V1R7 and later releases, allows direct access to the VIRTEL Web Access server in SSL mode
(HTTPS), without using an intermediate server. The SSLSETUP job in the VIRTEL SAMPLIB contains
an example of the denitions required to place VIRTEL Web Access sessions under AT-TLS control.
For VSE sites, or earlier versions of MVS where AT-TLS is not available, access to VIRTEL in HTTPS mode
can be achieved by means of an intermediate server (such as Apache) operating in Reverse-Proxy mode. The
function of the reverse proxy is to transform the dataow into HTTP mode before sending it on to VIRTEL.
Warning: Higher CPU usgage will result in the TCP/IP address space if this feature is used without
the services of a hardware Crypto Card.
5.1.6 Identication by certicate
The denition of a transaction with SECURITY 3 (TLS) allows VIRTEL to recognize a VIRTEL Web Access
user by means of a digital certicate installed in the user’s web browser. VIRTEL will use the RACF userid
associated with the certicate to determine the user’s authority to execute the transaction.
VIRTEL is able to obtain the client’s userid, without requiring the user to sign on, when all of the following
conditions are true: - The user enters VIRTEL via a secure https session using the AT-TLS function of z/OS
V1R7 or later - The TTLSConnectionAction or TTLSEnvironmentAction statement in the policy agent con-
guration le contains the parameter HandshakeRole ServerWithClientAuth - The client’s browser presents
a valid certicate during SSL handshake - The z/OS Security Server (RACF) recognizes the certicate as
belonging to the user (Refer to “Chapter 21 RACF and Digital Certicates” in “SA22-7683-05 z/OS Security
Server RACF Security Administrator’s Guide” for more information on associating user IDs with certicates)
The sample job SSLUCERT in the VIRTEL SAMPLIB illustrates how to generate a user client certicate
using RACF. The certicate is registered in the RACF database and is exported to a PKCS12 (.P12) le
which contains both the user certicate and the user’s private key encrypted under a passphrase. The .P12
le must be downloaded in binary to the user’s workstation and installed in the user’s browser.
Note: When a user is identied by certicate, VIRTEL does not have access to the user’s password, and
therefore cannot propagate the signon to other applications such as CICS.
5.1. VIRTEL Web Access Security 277

Virtel User Guide, Release 4.57
5.1.7 Password encryption
VIRTEL Web Access oers the possibility of encrypting passwords (3270 non-display elds) transmitted in
HTML pages. VIRTEL uses the encryption facilities provided by the System z hardware through the z/OS
Integrated Cryptographic Service Facility (ICSF). Password encryption is available only when using VIRTEL
Web Access in Ajax mode using the WEB2AJAX.htm page template (see “Presentation modes”).
To activate the password encryption option for WEB2AJAX.htm you must specify a CRYPTn parameter in
the VIRTCT (see “Parameters of the VIRTCT” in the VIRTEL Installation Guide). The CRYPTn parameter
must specify CRYPT3270 as the name and ICSF as the encryption engine, as in example shown below:
CRYPT1=(CRYPT3270,3TDEA,RSA-1024,ICSF,HEX), *
CRYPTn parameter for password encryption using WEB2AJAX.htm
5.1.8 Signon using HTML elds
The denition of a transaction with SECURITY 4 (HTML) allows VIRTEL to obtain the userid and password
from elds embedded in the HTML page.
When a security type 4 transaction is requested, and the user is not already signed on, VIRTEL will send
the requested page to the browser without connecting to the application. The page template must use the
CREATE-VARIABLE-IF tag (described 62) to determine whether signon is required, and the DECLARE-
FIELD-AS tag (described 62) to declare the username and password elds.
Following an unsuccessful signon attempt, the special variable $ERRMSG$ contains one or more error
messages which may be included in the page template.
The gure below shows an example of a transaction with security type 4:
TRANSACTION DETAIL DEFINITION ---------------------- Applid: SP3VIR5 11:35:36
Internal name ===> HTTP-16 To associate with an entry point name
External name ===> cicsHtml Name displayed on user menu
Description ===> Access CICSD with HTML security
Application ===> SPCICSD Application to be called
PassTicket ===> 0 Name ===> 0=no 1=yes 2=unsigned
Application type ===> 1 1=VTAM 2=VIRTEL 3=SERV 4=PAGE 5=LINE
Pseudo-terminals ===> HTVT Prefix of name of partner terminals
Logmode ===> Specify when LOGMODE must be changed
How started ===> 2 1=menu 2=sub-menu 3=auto
Security ===> 4 0=none 1=basic 2=NTLM 3=TLS 4=HTML
H4W commands ? ===> 0=no 1=yes 2=if2VIRTEL 4=auto
Logon message ===>
TIOA at logon ===> Signon to CICS&/W&'114BE9'&U&'114CF9'&P&/A
TIOA at logoff ===> &£6D
Initial Scenario ===> Final Scenario ===>
Input Scenario ===> Output Scenario ===>
P1=Update P3=Return P12=Server
HTML security: Example transaction with security type 4
The gure below shows an example of a page template containing userid and password elds which can be
used with the security type 4 transaction as shown above.
278 Chapter 5. Security

Virtel User Guide, Release 4.57
<!--VIRTEL start="{{{" end="}}}" -->
<!doctype html public "-//w3c//dtd html 4.0//en">
<html><head>{{{ SET-OUTPUT-ENCODING-UTF-8 "" }}}
<meta http-equiv="Content-Type" content="text/html; charset=utf-8">
{{{CREATE-VARIABLE-IF (SIGNON-IS-NEEDED) "$$SIGTYPE"}}}
{{{CREATE-VARIABLE-IF (APPLICATION-IS-CONNECTED) "$$APP"}}}
<script language="Javascript" src="../w2h/js01.js"
type="text/Javascript"></script>
<script>document.write("<link rel='stylesheet' type='text/css'
href='../w2h/STYL"+w2hparm.style+".css' />")</script>
{{{WHEN-EXISTS "$$SIGTYPE"}}}
<link rel="stylesheet" type="text/css" href="../w2h/login.css" />
<title>{{{NAME-OF (VIRTEL)}}} signon</title>
<script src="../w2h/md5.js" type="text/Javascript"></script>
</head>
<body>
{{{DECLARE-FIELD-AS (USERNAME) "USERNAME"}}}
{{{DECLARE-FIELD-AS (PASSWORD,HEX) "PASSWORD"}}}
{{{DECLARE-FIELD-AS (NEW-PASSWORD,HEX) "NEWPASSWORD"}}}
{{{DEFINE-HTML-PFKEY "pf"}}}
<script>
genloginform("{{{NAME-OF (PAGE)}}}++{{{AJAX-SESSION-CODE}}}",
"{{{NAME-OF (VIRTEL)}}}","{{{NAME-OF (TRANSACTION-EXTERNAL)}}}",
"{{{NAME-OF (USER)}}}","{{{NAME-OF (PASSWORD)}}}",
"{{{TRIMMED-VALUE-OF "$ERRMSG$"}}}");
</script>
</body>
{{{END-WHEN-EXISTS "$$SIGTYPE"}}}
{{{WHEN-NOT-EXISTS "$$SIGTYPE"}}}
<body onLoad=" VirtelFormload()">
<p>Logged in as <strong>{{{TRIMMED-VALUE-OF "$$SIG"}}}</strong></p>
{{{FOR-EACH-VALUE-IN "$ERRMSG$"}}}
<p>{{{CURRENT-VALUE-OF "$ERRMSG$"}}}</p>
{{{END-FOR "$ERRMSG$"}}}
<form name=virtelForm
action="classics.htm++{{{ SESSION-CODE }}}" method="POST">
<pre><div id="printReady">{{{ GENERATE-HTML (1,1,5000) }}}</div></pre>
<input type="submit" name="disco" value="Disconnect"
onclick="submitForm('DISCONNECT')" >
{{{ DEFINE-HTML-PFKEY "pf" }}}<input name="pf" type="HIDDEN" value="ENTER">
{{{ DEFINE-HTML-FOCUS-FIELD "focusField" }}}
<input name="focusField" type="hidden" value="{{{FIELD-WITH-CURSOR}}}">
</form>
{{{END-WHEN-NOT-EXISTS "$$SIGTYPE"}}}
</body></html>
HTML security: Example page template
5.1.9 Virtel Rules
The rules attached to an HTTP line allow security to be implemented at the entry point level. The following
example shows a set of three rules which are used to lter incoming HTTP calls. The rst rule, 1HT00100,
assigns an entry point specically for users known to VIRTEL and identied by means of a “cookie” included
in their HTTP request. In this case, the entry point will be chosen according to the set of rules associated
with that particular user. See Correspondent Management in the Virtel Administration Guide. The second
rule, 1HT00200, assigns the entry point EPINTERN to clients whose IP address is 192.168.n.n, and only
5.1. VIRTEL Web Access Security 279

Virtel User Guide, Release 4.57
during the period Monday to Friday during the hours 08:30 to 17:30. The third rule, 1HT00900, assigns the
entry point EPPUBLIC to all other requests (this entry point could, for example, display a page containing
the message “Access not authorised”).
LIST of RULES in RULE SET: H-HTTP ---------------- Applid: SPVIRD2 13:57:53
Name Status Description Entry Point
1HT00100 ACTIVE HTTP access (users authorised by cookie) $COOKIE$
1HT00200 ACTIVE HTTP access (internal network, working hours) EPINTERN
1HT00900 ACTIVE HTTP access (other users) EPPUBLIC
P1=Update P2=Suppress P3=Return
P6=1st page P7=Page-1 P8=Page+1 P12=Edit
HTTP security by rule: List of rules
DETAIL of RULE from RULE SET: S-SMTP ------------- Applid: SPVIRE2 15:46:00
Name ===> 1HT00100 Rule priority is per name
Status ===> ACTIVE 19 May 2004 15:46:00 VIRDBA
Description ===> HTTP access (Users authorised by cookie)
Entry point ===> $COOKIE$ Target Entry Point
Parameter ===>
Trace ===> 1=commands 2=data 3=partner
C : 0=IGNORE 1=IS 2=IS NOT 3=STARTS WITH 4=DOES NOT 5=ENDS WITH 6=DOES NOT
0 IP Subnet ===> Mask ===>
0 Host ===>
0 eMail ===>
0 Calling DTE ===> Calling DTE address
0 Called ===> Called DTE address
0 CUD0 (Hex) ===> First 4 bytes of CUD (X25 protocol)
0 User Data ===>
0 Days ===> M: T: W: T: F: S: S:
0 Start time ===> H: M: S: End time ===> H: M: S:
P1=Update P3=Return Enter=Add
P4=Activate P5=Inactivate P12=Entry P.
CREATION OK
HTTP security by rule: Users authorized by cookie
DETAIL of RULE from RULE SET: S-SMTP ------------- Applid: SPVIRE2 15:46:00
Name ===> 1HT00200 Rule priority is per name
Status ===> ACTIVE 19 May 2004 15:46:00 VIRDBA
Description ===> HTTP access (Internal network, working hours)
Entry point ===> EPINTERN Target Entry Point
Parameter ===>
280 Chapter 5. Security

Virtel User Guide, Release 4.57
Trace ===> 1=commands 2=data 3=partner
C : 0=IGNORE 1=IS 2=IS NOT 3=STARTS WITH 4=DOES NOT 5=ENDS WITH 6=DOES NOT
1IP Subnet ===> 192.168.000.000 Mask ===> 255.255.000.000
0Host ===>
0eMail ===>
0Calling DTE ===> Calling DTE address
0Called ===> Called DTE address
0CUD0 (Hex) ===> First 4bytes of CUD (X25 protocol)
0User Data ===>
1Days ===> M: X T: X W: X T: X F: X S: S:
1Start time ===> H: 08 M: 30 S: 00 End time ===> H: 17 M: 30 S: 00
P1=Update P3=Return Enter=Add
P4=Activate P5=Inactivate P12=Entry P.
HTTP security by rule: Internal network, working hours
DETAIL of RULE from RULE SET: S-SMTP ------------- Applid: SPVIRE2 15:46:00
Name ===> 1HT00900 Rule priority is per name
Status ===> ACTIVE 19 May 2004 15:46:00 VIRDBA
Description ===> HTTP access (Other users)
Entry point ===> EPPUBLIC Target Entry Point
Parameter ===>
Trace ===> 1=commands 2=data 3=partner
C : 0=IGNORE 1=IS 2=IS NOT 3=STARTS WITH 4=DOES NOT 5=ENDS WITH 6=DOES NOT
0IP Subnet ===> 000.000.000.000 Mask ===> 000.000.000.000
0Host ===>
0eMail ===>
0Calling DTE ===> Calling DTE address
0Called ===> Called DTE address
0CUD0 (Hex) ===> First 4bytes of CUD (X25 protocol)
0User Data ===>
0Days ===> M: T: W: T: F: S: S:
0Start time ===> H: M: S: End time ===> H: M: S:
P1=Update P3=Return Enter=Add
P4=Activate P5=Inactivate P12=Entry P.
HTTP security by rule: Other users
5.1. VIRTEL Web Access Security 281

Virtel User Guide, Release 4.57
282 Chapter 5. Security

CHAPTER
SIX
HOWTOS
6.1 How To Use Dierent Screen Sizes
Although the standard 3270 screen size is 24 rows by 80 columns, certain applications benet from the use
of terminals with larger screen sizes. The screen size is determined by the LOGMODE used for the session
between VIRTEL and the host application. VTAM oers logmodes for the following standard screen sizes:
• model 2 : 24x80 (logmode SNX32702)
• model 3 : 32x80 (logmode SNX32703)
• model 4 : 43x80 (logmode SNX32704)
• model 5 : 27x132 (logmode SNX32705)
There are two dierent ways that the VIRTEL administrator can set up the conguration to allow the
VIRTEL Web Access user to select the desired logmode:
• dene a separate VIRTEL transaction for each screen size, and allow the user to select the appropriate
transaction
• group the VTAM relay LUs into pools, each pool having a dierent logmode, and allow the user to
select the pool by coding an appropriate parameter on the URL
6.1.1 LOGMODE dened by the transaction
With this method, the administrator denes multiple VIRTEL transactions for a single application, each
transaction specifying a dierent logmode. For example, transactions Tso2 and Tso5 delivered in the sample
conguration both dene TSO as the target application, but specify dierent logmodes SNX32702 and
SNX32705 respectively. The user selects the desired transaction from the applist menu displayed by the
“Other applications” link in the VIRTEL Web Access menu.
The gure below shows the denition of the Tso5 transaction dened under the WEB2HOST entry point:
TRANSACTION DETAIL DEFINITION ---------------------- Applid: VIRTEL 17:12:54
Internal name ===> W2H-13M5 To associate with an entry point name
External name ===> Tso5 Name displayed on user menu
Description ===> Logon to Tso (3270 model 5)
Application ===> TSO Application to be called
PassTicket ===> 0 Name ===> 0=no 1=yes 2=unsigned
Application type ===> 1 1=VTAM 2=VIRTEL 3=SERV 4=PAGE 5=LINE
Pseudo-terminals ===> DEVT Prefix of name of partner terminals
Logmode ===> SNX32705 Specify when LOGMODE must be changed
How started ===> 1 1=menu 2=sub-menu 3=auto
Security ===> 0 0=none 1=basic 2=NTLM 3=TLS 4=HTML
283

Virtel User Guide, Release 4.57
H4W commands ? ===> 0=no 1=yes 2=if2VIRTEL 4=auto
Logon message ===>
TIOA at logon ===>
TIOA at logoff ===>
Initial Scenario ===> Final Scenario ===>
Input Scenario ===> Output Scenario ===>
P1=Update P3=Return P12=Server
Example of TSO transaction TSO specifying logmode SNX32705
The URL to access this transaction could be of the format:
http://n.n.n.n:41001/w2h/WEB3270.htm+Tso5
6.1.2 Assigning a LOGMODE by URL parameter
The URL which allows the browser to connect to a host application via VIRTEL may contain a parameter,
such as “model5” as shown in this example:
http://n.n.n.n:41001/w2h/WEB3270.htm+Tso+model5
This form of a VIRTEL URL is described in the section “Dynamic URL with user data”.
This form of URL is processed by VIRTEL with reference to the “rule set” associated with the HTTP
line. VIRTEL looks for a rule whose “User Data” eld matches the value of the parameter (model5). The
“Parameter” eld of the selected rule assigns a relay LU name from the pool dened with logmode SNX32705.
The VTAM denition of the relay pool is shown in the example below. In this example, LU names in the
range RHTVT5nn are dened to have the model5 logmode SNX32705:
VIRTAPPL VBUILD TYPE=APPL
* ------------------------------------------------------------------ *
* RHTVTxxx : Relay for VTAM applications acceded by WEB to HOST *
* ------------------------------------------------------------------ *
* 3270 model 2 terminals
RHTVT0?? APPL AUTH=(ACQ,PASS),MODETAB=ISTINCLM,DLOGMOD=SNX32702,EAS=1
* 3270 model 5 terminals
RHTVT5?? APPL AUTH=(ACQ,PASS),MODETAB=ISTINCLM,DLOGMOD=SNX32705,EAS=1
VTAM denition of terminal groups
The screen below shows an example rule which assigns a relay LU from the range RHTVT5nn when the
URL contains the parameter model5:
DETAIL of RULE from RULE SET: S-SMTP ------------- Applid: SPVIRE2 17:15:15
Name ===> WHT00150 Rule priority is per name
Status ===> ACTIVE 19 May 2004 15:46:00 VIRDBA
Description ===> HTTP access (With model5 URL parameter)
Entry point ===> WEB2HOST Target Entry Point
Parameter ===> RHTVT5* &1value or LUNAME
Trace ===> 1=commands 2=data 3=partner
C : 0=IGNORE 1=IS 2=IS NOT 3=STARTS WITH 4=DOES NOT 5=ENDS WITH 6=DOES NOT
284 Chapter 6. HOWTOs

Virtel User Guide, Release 4.57
0IP Subnet ===> Mask ===>
0Host ===>
0eMail ===>
0Calling DTE ===> Calling DTE address
0Called ===> Called DTE address
0CUD0 (Hex) ===> First 4bytes of CUD (X25 protocol)
0User Data ===> model5
0Days ===> M: T: W: T: F: S: S:
0Start time ===> H: M: S: End time ===> H: M: S:
P1=Update P3=Return Enter=Add
P4=Activate P5=Inactivate P12=Entry P.
Example rule for selection of logmode by URL
The LU name (RHTVT5nn) assigned by the rule must belong to the LU pool shared assigned to the HTTP
line, as shown in the example below:
TERMINAL DETAIL DEFINITION ------------------------- Applid: VIRTEL 13:32:28
Terminal ===> W2HTP500 ?wxyZZZZ for dynamic allocation
w : Sna or Non-sna or * (category)
x : 1, 2, 3, 4, 5 or * (model)
y : Colour, Monochrome or *
Z : any characters
Relay ===> RHTVT500 Name seen by VTAM applications
= : copied from the terminal name
*Pool name ===> *W2HPOOL Pool where to put this terminal
Description ===> Relay pool for HTTP (3270 model 5)
Entry Point ===> Enforced Entry Point
2nd relay ===> RHTIM500 Possible 2nd relay (Printer)
Terminal type ===> 3 1=LU1 2=3270 3=FC P=Printer S=Scs
Compression ===> 2 0, 1, 2 or 3 : compression type
Possible Calls ===> 3 0=None 1=Inbound 2=Outbound 3=Both
Write Stats to ===> 12 1,4=VIRSTAT 2=VIRLOG
Repeat ===> 0020 Number of generated terminals
P1=Update P3=Return Enter=Add
P12=Server
Denition of model 5 terminals in the W2HPOOL pool
6.1.3 User-specied LOGMODE
When the entry point denition species SCENLOGM in the “Identication scenario” eld, the user may
override the default logmode by appending an additional parameter LOGMODE=modename to the URL,
as shown in this example:
http://n.n.n.n:41001/w2h/WEB3270.htm+Tso?logmode=SNX32705
The source code for the SCENLOGM scenario is supplied in the VIRTEL SAMPLIB.
Note: To activate this functionality, SCENLOGM must be specied in the “Identication scenario” eld
6.1. How To Use Dierent Screen Sizes 285

Virtel User Guide, Release 4.57
of the ENTRY POINT (not the transaction denition)
6.1.4 Dynamic logmode with user-specied screen size
VIRTEL Web Access also supports the use of “dynamic” logmodes, such as D4A32XX3, which allow the
user to specify a non-standard alternate screen size. When the entry point denition species SCENLOGM
in the “Identication scenario” eld, the user may also append ROWS and COLS parameters to the URL,
as shown in this example:
http://n.n.n.n:41001/w2h/WEB3270.htm+Tso?logmode=D4A32XX3&rows=54&cols=132
VIRTEL allows a maximum screen size of 62 rows by 160 columns. The host application must also support
the use of non-standard screen sizes.
6.2 How To Support Multiple Codes Pages
VIRTEL can use two methods of EBCDIC translation and this is governed by the template or web page being
displayed. If the page contains the embedded VIRTEL tag {{{SET-OUTPUT-ENCODING-UTF-8}}} than
the TCT DEFUTF8 parameter is used. If the page doesn’t contain the tag then the code pages identied
by the COUNTRY parameter are used. (See “COUNTRY” and “DEFUTF8” parameters in the VIRTEL
Installation Guide for further details). Code Page Support can be provided at the following levels:
• TCT Level - This would provide Code Page translation defaults for all lines and transaction. Eectively
a Global option for an instance of VIRTEL.
• URL Level – This overrides the TCT default.
• Transaction level - Code pages can be determined through the VIRTEL Scenario language using the
SET$ ENCODING and SET$ URL-ENCODING instructions.
6.2.1 Dening Code Pages translation defaults
This is done by dening a default value for “COUNTRY” and “DEFUTF8” parameters in the VIRTEL TCT
(see “Parameters of the VIRTCT” in the VIRTEL Installation Guide).
Override the TCT defaults at URL level
Users who require a codepage dierent from the TCT denition can specify the code page as a parameter of
the URL. For example:
http://n.n.n.n:41001/w2h/WEB2AJAX.htm+Tso?codepage=IBM1047
Note: To activate this functionality, SCENLOGM must be specied in the “Identication scenario” eld
of the ENTRY POINT (not the transaction denition).
The value of the CODEPAGE parameter may be either:
• one of the values listed for the DEFUTF8 parameter of the VIRTCT (see “Parameters of the VIRTCT”
in the VIRTEL Installation Guide); or
286 Chapter 6. HOWTOs

Virtel User Guide, Release 4.57
• one of the additional codepages you have specied in the CHARSET parameter in your VIRTCT at
VIRTEL installation time
Override the TCT defaults at business logic level
At a transaction level code pages can be determined through the VIRTEL Scenario language using the SET$
ENCODING and SET$ URL-ENCODING instructions. These are described in the VWA Users Guide.
6.2.2 Supporting multiple countries.
If we take the scenario that applications can be accessible globally than VIRTEL can incorporate the country
dierences through one of the following methods. In most case the TCT or URL override will accommodate
such a set up.
• For each country supported, have a dierent instance of VIRTEL specifying the relevant country code
pages at the TCT level.
• For each country supported, have a separate line/port and use the URL overrides.
• For each country supported, have a common line/port and use the URL overrides.
6.3 How To Handle Host Session Termination
When the user terminates the application session by pressing the “Disconnect” button in the browser, various
options are available: - Return to the application selection menu - Display a specic HTML page - Close the
browser window and return to the desktop
Remember that it is always best to exit cleanly from the host application by pressing the “Disconnect”
button, rather than closing the browser window. If the browser window is closed abruptly, the host session
resources may not be freed until the expiry of the timeout period specied in the entry point denition.
6.3.1 Return to the application selection menu
When a “Disconnect” request is received, VIRTEL returns to the root URL and displays the default page
for the line, which will normally be an application selection menu. For detailed information, see “Virtel URL
formats”. The user can then choose to connect to the same or a dierent application by clicking on the
appropriate link in the application selection menu.
6.3.2 Displaying a specic page on disconnection
Those sites wishing to display a specic page at the end of a session may use the “Last page” eld in the
denition of the entry point associated with the HTTP line or the entry point selected by the rules of the
line. The “Last page” eld indicates the name of the page to be displayed following disconnection from the
host application. The indicated le must be uploaded to the same directory as specied in the URL for the
host application (for example W2H-DIR if the URL species /w2h/WEB3270.htm).
The “Last page” may contain instructions to the user and may include system information provided by
VIRTEL (such as the application and terminal name, date and time, etc.)
6.3. How To Handle Host Session Termination 287

Virtel User Guide, Release 4.57
6.3.3 Closing the browser window automatically
Sites who wish to close the browser window and return to the desktop when the user disconnects from the
host application may specify close.htm in the “Last page” eld of the entry point denition. This page
contains JavaScript code which will attempt to close the current browser window. Depending on the browser
version and security settings, the window may close, a prompt may be issued, or the window may remain
open. The close.htm page is delivered as standard in the W2H-DIR directory but may be copied to another
directory if required.
The gure below shows an example of an entry point denition with close.htm specied as the “Last page”:
ENTRY POINT DETAIL DEFINITION ---------------------- Applid: SPVIRE2 15:52:26
Name ===> WEB2HOST Name this ENTRY POINT (LOGON DATA)
Description ===> HTTP entry point (SysperTec menu)
Transactions ===> W2H Prefix for associated transactions
Last page ===> CLOSE.HTM Displayed at end of session
Transparency ===> Server types NOT to emulate
Time out ===> 0005 minutes Maximum inactive time
Do if timeout ===> 0 0=logoff 1=bip+logoff 2=anti pad
Emulation ===> HTML Type of terminal:
HOST4WEB : program driven HTML : Web Browser
SCENARIO : script driven EMAIL : SMTP client
MINITEL : 40 or 80 columns X25 : uses low level dialog
Signon program ===> VIR0020H Controls user name and password
Menu program ===> VIR0021A List of transactions
Identification scenario ===> eg XML identification
Type 3compression ===> Discover typical screens (Virtel/PC)
Mandatory identification ===> (PC or minitel)
3270 swap key ===> eg P24
Extended colors ===> X E: extended X: extended +DBCS
P1=Update P3=Return P4=Transactions
Enter=Add
Example of entry point with last page
6.4 How To Access A Host Application Directly
It is not always necessary to pass via an application selection menu to connect to a host application. A host
application may be accessed directly by opening the URL containing the complete path to the application.
This URL may result in the display of the host signon screen, the rst application screen, or possibly (if a
script or scenario is used), a subsequent screen sent by the application. For more information about how
VIRTEL can be used to automate the process of connection to a host application, see “Virtel URL formats”
of this manual, and “Connection/Disconnection Scripts” in the VIRTEL Connectivity Reference manual.
6.4.1 Full path URL
For example, you can access the VIRTEL transaction whose external name is “CICS” by pointing the browser
at a URL of the following format:
http://n.n.n.n:41001/w2h/WEB2AJAX.htm+Cics
At the end of the session with the host application, VIRTEL examines the “Last page” eld (see previous
section) to decide whether to return to the desktop or to redisplay the application selection menu.
288 Chapter 6. HOWTOs

Virtel User Guide, Release 4.57
6.4.2 Default URL for the entry point
An application URL may be coded in the “TIOA at logon” eld of the default transaction for the entry point
(the default transaction is the transaction whose external name is the same as the entry point name). This
allows the user to go directly to the host application simply by entering a URL of the format:
http://n.n.n.n:41001
The example below shows the default transaction for the WEB2HOST entry point set up to go directly to
the transaction whose external name is “Cics”:
TRANSACTION DETAIL DEFINITION ———————- Applid: VIRTEL 15:01:02 Internal name ===>
W2H-00 To associate with an entry point name External name ===> WEB2HOST Name displayed on
user menu Description ===> Default directory = entry point name Application ===> W2H-DIR Appli-
cation to be called PassTicket ===> 0 Name ===> 0=no 1=yes 2=unsigned Application type ===> 4
1=VTAM 2=VIRTEL 3=SERV 4=PAGE 5=LINE Pseudo-terminals ===> DELOC Prex of name of part-
ner terminals Logmode ===> Specify when LOGMODE must be changed How started ===> 2 1=menu
2=sub-menu 3=auto Security ===> 0 0=none 1=basic 2=NTLM 3=TLS 4=HTML H4W commands ?
===> 0=no 1=yes 2=if2VIRTEL 4=auto Check URL Prex ===>
TIOA at logon ===> /w2h/WEB2AJAX.htm+Cics
TIOA at logo ===>
Initial Scenario ===> Final Scenario ===> Input Scenario ===> Output Scenario ===>
P1=Update P3=Return P12=Server
Example of default URL
For more information see “Virtel URL formats”.
6.5 How To Change The Font For Web Access
The “Web Access settings menu” allows you to change the font family and font size. By default VIRTEL
will calculate an appropriate font size to t the browser window size, but you can choose a xed font size if
you prefer. VIRTEL Web Access uses a xed-pitch font to display the 3270 screen. If you do not like the
default font then you can choose any xed-pitch font installed on the workstation. Typical fonts available
on Windows workstations are Courier New, Fixedsys, Terminal, Consolas, and Lucida Console. You can use
the Windows Control Panel – Fonts dialog to view the installed fonts.
6.6 How To Change The 3270 Display Style
The “Web Access settings menu” allows you to change the display style to suit your needs. By default
VIRTEL provides 3 defaults models named “3270”, “Gray” and “White”, If you need some more, you must
request your Administrators.
Selecting display pattern : The display model changes will take eect at the next connection to a 3270
application.
6.5. How To Change The Font For Web Access 289

Virtel User Guide, Release 4.57
6.7 How To Customize The Enter Key Settings
Many 3270 users prefer to customize the keyboard mapping so that the “Enter” key on the main keyboard
is handled as a 3270 newline, while the right “Ctrl” key and the “Enter” key on the numeric keypad are
treated as 3270 Enter. The “Web Access settings menu” allows you to specify this conguration using the
following settings:
"ctrl":"ENTER",
"enter":"Newline",
"kpenter":"ENTER"
Versions 6, 7, and 8 of Internet Explorer do not distinguish between the Enter key on the main keyboard and
the Enter key on the numeric keypad. For users who want the two “Enter” keys to be handled dierently,
Syspertec supplies an additional DLL to be installed in Internet Explorer as a “Browser Helper Object”. This
DLL can be installed by clicking on the “Install VirtKey BHO” link on the VIRTEL Web Access menu. After
installing the DLL, go to “Tools” – “Internet Options” – “Advanced” and check that the option “Enable
third-party browser extensions” is ticked, then stop and restart Internet Explorer. Administrator privilege
is needed to install the Browser Helper Object, but once installed the BHO can be used by users without
administrator privileges.
Although other browsers (including Internet Explorer 9) are capable of recognizing the keypad Enter key
without the need for a BHO, older releases of Firefox, Chrome, and Safari do not distinguish between the
left and right Ctrl keys. This means that when “ctrl” is set to “ENTER” then both Ctrl keys will be handled
as 3270 Enter. In addition, the AltGr key will be treated as Ctrl under Firefox. The most recent versions of
Firefox (from version 15 onwards for Windows 7 and from version 17 onwards for Windows XP) and Chrome
(from version 23 onwards) are capable of distinguishing between the left and right Ctrl keys like Internet
Explorer.
6.7.1 Managing CTRL keydown being lost
With some Windows Operating System, the CTRL keydown events may be lost half the time. In such case,
you must turn on a special feature by introducing the following command into a “custom.js” le.
/*
*The workaround for missing CTRL key events (on some Windows system) is
*activated if this property is set to true.
*Default value (if unspecified) : false
*/
w2hparm.fixMissingCtrlKeydown =true;
6.8 How To Customize Display Styles
VIRTEL users can customise the screen display to suit their needs. An exception to this is the model type
which is an Administration function. Administrators will congure model types which can then be selected
by a user.
6.8.1 Add or remove a display style
To add a new display style, you must :
• Create a CSS le with a “.css” extension name,
290 Chapter 6. HOWTOs

Virtel User Guide, Release 4.57
• Load this le in any directory of your choice except in W2H-DIR,
• Make sure that this directory is referenced in the entry point by using a transaction that contains the
string “/w2h/custom-css” (without the quotes) in the “URL prex” eld.
• Create (or modify) a custom.js le to reference the recently added CSS le (see below):
–Load the custom.js le in any directory of your choice except in W2H-DIR,
–Make sure that this directory is referenced in the entry point by using a transaction that contains
the string “/w2h/custom-js” (without the quotes) in the “URL prex” eld.
/*=====================================================================
*
*CUSTOM CODE SAMPLE TO ADD A CUSTOM CSS FILE
*OR TO REMOVE A DEFAULT CSS FILE
*
*====================================================================*/
/*
*This implementation adds 3custom CSS to the settings "Display Style" list choice,
*and removes the "white" default choice from this list.
*/
function modify_settingsValues(name, values) {
// The target is the "style" list settings
if (name == "style") {
// Remove the "white" default entry from the list of choices
values.splice( values.indexOf('white'), 1);
// Append 3custom styles to the list of choices
return values.concat( "GREEN.CSS"
,"BLUE.CSS"
,"RED.CSS" );
}
}
/*
*This block of code sets a specific label for each style added.
*If this code is omitted, the raw value of the entries are displayed instead.
*/
oVWAmsg.custom( { "style:GREEN.CSS" :"Custom" // Use this label instead of 'GREEN.CSS
,→'
,"style:BLUE.CSS" :"Test" // Use this label instead of 'BLUE.CSS'
,"style:RED.CSS" :"Red !" // Use this label instead of 'RED.CSS'
});
Example of a custom.js le to add or remove a display style
6.8.2 Add or remove a print style
To add a new print style, proceed as for a display style, but in the VWAmsg.custom order, replace the word
“style” by
“printstyle”.
/*=====================================================================
*
* CUSTOM CODE SAMPLE TO ADD A CUSTOM CSS FILE
* OR TO REMOVE A DEFAULT CSS FILE
*
*====================================================================*/
/*
6.8. How To Customize Display Styles 291

Virtel User Guide, Release 4.57
* This implementation adds 3 custom CSS to the settings "Display Style" list choice,
* and removes the "white" default choice from this list.
*/
function modify_settingsValues(name, values) {
// The target is the "printstyle" list settings
if (name == "printstyle") {
// Remove the "white" default entry from the list of choices
values.splice( values.indexOf('white'), 1);
// Append 3 custom print styles to the list of choices
return values.concat( "GREEN.CSS"
, "BLUE.CSS"
, "RED.CSS" );
}
}
/*
* This block of code sets a specific label for each print style added.
* If this code is omitted, the raw value of the entries are displayed instead.
*/
oVWAmsg.custom( { "printstyle:GREEN.CSS" : "Custom" // Use this label instead of
,→'GREEN.CSS'
, "printstyle:BLUE.CSS" : "Test" // Use this label instead of 'BLUE.CSS'
, "printstyle:RED.CSS" : "Red !" // Use this label instead of 'RED.CSS'
});
Example of a custom.js le to add or remove a print style
6.8.3 3270 support blinking elds
Becoming unpopular over time, and even stated as being the cause of adverse reactions in people with
epilepsy, the “<blink>” tag was retired from the HTML API, although it still remains within the browsers
code. The feature can be reactivated through the use of CSS code but by doing so Web Accessibility
guidelines may be compromised. This may be a violation in certain jurisdictions, contravening laws and
regulations with regard to web design and accessibility and what is permissible. It is up to each individual
to determine the purpose and usefulness of reactivating this feature.
To reactivate blinking support, you can include the following code in your custom.css le :
/* To support "BLINKING" in Virtel Web Access 3270 emulation, the following code has
,→to be included into your ".BBLUE, .BRED, .BPINK, .BGREEN, .BTURQUOISE, .BYELLOW, .
,→BWHITE {
-webkit-animation: blink 1s step-end infinite;
-moz-animation: blink 1s step-end infinite;
-o-animation: blink 1s step-end infinite;
animation: blink 1s step-end infinite;
}
@-webkit-keyframes blink {
67%{ opacity: 0}
}
@-moz-keyframes blink {
67%{ opacity: 0}
}
@-o-keyframes blink {
67%{ opacity: 0}
}
@keyframes blink {
67%{ opacity: 0}
}
292 Chapter 6. HOWTOs

Virtel User Guide, Release 4.57
This code can also be found into the “custom-blink.css” source le store into the “tools” subdirectory of any
update delivered from number #5310 and over.
6.9 How To Change The Default User Settings
The site default settings for Web Access are stored in the le w2hparm.js (see “Global modication of Web
Access settings”)
6.10 How To Support A Reverse Proxy
If your installation uses a reverse proxy (or bastion host) between the user’s browser and the VIRTEL Web
Access server, then the VIRTEL log and statistics le will show the IP address of the proxy instead of the
address of the end user. In order for VIRTEL to recognize and log the originating user’s IP address, you
must declare the proxy in the HTFORWD parameter of the VIRTCT (see “Parameters of the VIRTCT”
in the VIRTEL Installation Guide) or in a rule attached to the HTTP line (see “Rules” in the VIRTEL
Connectivity Reference manual).
6.11 How To Support Virtual Hosting
Name-based virtual hosting is a method for supporting multiple sites (for example, site1.mycompany.com
and site2.mycompany.com) using the same IP address and port number. By means of the “HTTP Host”
eld in the rules attached to the HTTP line, VIRTEL can recognize the site name and direct the request to
a specic entry point. Refer to “Rules” in the VIRTEL Connectivity Reference manual for further details.
You can install a set sample denitions for virtual hosting by running the ARBOLOAD job (delivered in the
VIRTEL SAMPLIB) with the VHOST=YES parameter.
6.12 How To Control APPLIST behaviour
To open an application in a new TAB instead of the current window code the following in the customizable
exit before_launchApplink(href).
/* To open an application (issued from applist transaction) in a new TAB instead of
,→the same window */
function before_launchApplink(href) {
return {
url: href, // Return received URL
target: '_blank' // Target is a new TAB
};
}
Create an options entry to support this modication against transaction applist (CLI-90). For example,
using the Virtel HTML Admin. panel, select transaction applist and use the toolbox Icon to generate the
options le. In the transaction set the options eld to appmenu. Remember to save the changes to the
transaction! Place the above code into a le called custJS.appmenu.js and upload to the directory dened
for the ‘options’ path.
6.9. How To Change The Default User Settings 293

Virtel User Guide, Release 4.57
Note: You must have setup the “options” mode customization before you can generate “option” les. The
ARBOLOAD job must be run with OPTIONS=YES to add the options transactions. See “customization
modes” on how to set up customising with the options mode.
294 Chapter 6. HOWTOs

CHAPTER
SEVEN
APPENDIX
7.1 Appendix A
7.1.1 Default values for W2H parameters
Keyword Caption Possible values
“fontsize” Font size “window”, “screen”, “8”, “10”, “12”, “14”, “16”
“font” Font family “font name”
“autocapture” Auto-capture true, false
“autoprint” Auto-print true, false
“cursor” Cursor “Bar”, “Blink”, “Block”
“vline” Vertical line true, false
“hline” Horiz line true, false
“esc” Esc key “no”, “ATTN”, “CLEAR”, “Reset”
“ctrl” Ctrl key “no”, “ENTER”, “Newline”
“cmdleft” Left Cmd key “no”, “Reset”
“cmdright” Right Cmd key “no”, “ENTER”
“enter” Enter key “ENTER”, “Newline”
“home” Home key “no”, “Home”
“end” End key “no”, “ErEof”, “End”
“pgup” PageUp key “PF7”, “PF19”, “PA1”, “no”
“pgdn” PageDown key “PF8”, “PF20”, “PA2”, “no”
“pause” Pause key “CLEAR”, “ATTN”, “PA3”, “no”
“kpenter” Keypad Enter “ENTER”, “Newline”
“shiftenter” Shift+Enter “no”,”ENTER”, “Newline”
“shiftesc” Shift+Esc “no”, “ATTN”, “CLEAR”, “Reset”
“shiftins” Shift+Insert “no”, “Dup”
“shiftdel” Shift+Delete “no”, “ErEof”
“shifthome” Shift+Home “no”, “FieldMark”, “Home”
“shiftend” Shift+End “no”, “ErEof”, “End”
“shiftpgdn” Shift+PageDown “no”, “PA3”
“ctrlenter” Ctrl+Enter “no”,”ENTER”, “Newline”
“ctrlins” Ctrl+Insert “no”, “PA1”
“ctrldel” Ctrl+Delete “no”, “PA2”, “ErEof”
“ctrlhome” Ctrl+Home “no”, “PA3”, “Home”, “ChgCur”
“ctrlend” Ctrl+End “no”, “ErEof”, “End”
“altins” Alt+Ins “no”, “PA1”
“althome” Alt+Home “no”, “PA2”
Continued on next page
295

Virtel User Guide, Release 4.57
Table 7.1 – continued from previous page
Keyword Caption Possible values
“altpgup” Alt+PageUp “no”, “PA1”
“altpgdn” Alt+PageDown “no”, “PA2”
“altpause” Alt+Pause “no”, “ATTN”, “CLEAR”, “PA3”
“altf1” Alt+F1 “no”, “PA1”, “ENTER”
“altf2” Alt+F2 “no”, “PA2”
“altf3” Alt+F3 “no”, “PA3”, “ChgCur”
“kpslash” Keypad / “/”, “PA1”
“kpaster” Keypad * “*”, “PA2”
“kpminus” Keypad - “-“, “Backtab”
“kpplus” Keypad + “+”, “Tab”, “Newline”
“kpdot” Keypad . “.”, “,”
“dblclick” Double Click “Word”, “ENTER”, “no”
“urlhotspot” URL hotspots true, false
“pfkhotspot” PF key hotspots true, false
“pasteereof” Paste erase EOF true, false
“pastetyping” Map Ctrl+V to Paste by Typing true, false
“movecursor” Move cursor on activat true, false
“style” Style “3270”, “gray”, “white”
“printstyle” Print style “3270”, “color”, “white”
“rtm” Response time monitor true, false
“omitnulls” Omit nulls from input true, false
“keepmacpad” Keep macro pad open true, false
“keepkeypad” Keep keypad open true, false
“hiliteinput” Highlight input elds true, false
“caretnot” Remap ^ to logical not true, false
“adaptfontratio” Adapt font size ratio true, false
“charspace” Character spacing true, false
“linespace” Line spacing true, false
“settingsGUI” Uuser interface type v2
“preservein” Preserve insert mode true, false
“nolongpoll” AsynchSupport true, false
“MirrorMode” BiDirectional mode true, false
“NOstretch” Font Size Stretch true, false
Default W2H parameters: List of keywords and possible values
Note: Some settings my be deprecated and therefore may no longer be in use. They remain for reasons of
downward compatibility.
7.2 Trademarks
SysperTec, the SysperTec logo, syspertec.com and VIRTEL are trademarks or registered trademarks of
SysperTec Communication Group, registered in France and other countries.
IBM, VTAM, CICS, IMS, RACF, DB2, MVS, WebSphere, MQSeries, System z are trademarks or registered
trademarks of International Business Machines Corp., registered in United States and other countries.
296 Chapter 7. Appendix

Virtel User Guide, Release 4.57
Adobe, Acrobat, PostScript and all Adobe-based trademarks are either registered trademarks or trademarks
of Adobe Systems Incorporated in the United States and other countries.
Microsoft, Windows, Windows NT, and the Windows logo are trademarks of Microsoft Corporation in the
United States and other countries.
UNIX is a registered trademark of The Open Group in the United States and other countries. Java and all
Java-based trademarks and logos are trademarks or registered trademarks of Oracle and/or its aliates.
Linux is a trademark of Linus Torvalds in the United States, other countries, or both.
Other company, product, or service names may be trademarks or service names of others.
7.3 Open Source Software
The current VIRTEL Web Access product uses the following open source software:
•jQuery Under MIT license - https://jquery.org/license/
•StoreJson Under MIT license - https://github.com/marcuswestin/store.js/commit/
baf3d41b7092f0bacd441b768a77650199c25fa7
•jQuery_UI Under MIT license - http://en.wikipedia.org/wiki/JQuery_UI
7.3. Open Source Software 297

INDEX
$DECLARE Examples
Scenario Instructions, 178
$UseCookieSessions$
Parameters, 22
2VIRTEL prex
HOST4WEB, 265
3270 data stream printers LU3
Printing, 84
3270 session management, 21
3287 Printing, 67
390 Object modules
Virtel Web Modernisation, 155
Access Host Application Directly
HOWTOs, 288
Accessing VTAM Applications, 100
ACTION$
ACTION$ DISCONNECT, 159
ACTION$ REFRESH-TERMINAL, 159
ACTION$ SERVE-ANOTHER_USER, 159
ACTION$ TERMSESS, 160
ACTION$ TO-APPLICATION, 160
ACTION$ TO-TERMINAL, 161
Scenario Instructions, 159
ACTION$ DISCONNECT
ACTION$, 159
Scenario Instructions, 159
ACTION$ Examples
Scenario Instructions, 161
ACTION$ REFRESH-TERMINAL
ACTION$, 159
Scenario Instructions, 159
ACTION$ SERVE-ANOTHER_USER
ACTION$, 159
Scenario Instructions, 159
ACTION$ TERMSESS
ACTION$, 160
Scenario Instructions, 160
ACTION$ TO-APPLICATION
ACTION$, 160
Scenario Instructions, 160
ACTION$ TO-TERMINAL
ACTION$, 161
Scenario Instructions, 161
Add calendars to date elds
Scenarios, 211
ADD-TO-FIELDS
tags, 44
Adding a company logo
Customization, 106
Adding a screen watermark
Customization, 113
Adding text to the toolbar
Customization, 103
ADVANCE-TO-THE-NEXT-VALUE-OF
tags, 52
AFTER-NOT-LAST-VALUE
tags, 56
after_responseHandle
Exits, 108
after_StandardInit
Exits, 108
AJAX-SESSION-CODE
tags, 34
Allocating work les
Virtel Batch, 241
Application Selection Menu, 80
Applist transaction, 81
Appmenu template, 81
Presentaion Modes, 80
Applist transaction
Application Selection Menu, 81
Appmenu template
Application Selection Menu, 81
Assembling TCT
Virtel Batch, 239
AT-TLS
Certicates, 277
Encryption, 277
Autoconnect
Printing, 86
Automatic Scenario Generation
Virtel Web Intergration, 232
AUTOREFRESH
Scenario Instructions, 214
298

Virtel User Guide, Release 4.57
before_launchApplink
Exits, 108
before_submitForm
Exits, 108
Build and send structured elds
VIRTEL, 261
C AUTO VARIABLES
HOST4WEB, 265
HOST4WEB Commands, 265
C KEEP VARIABLES
HOST4WEB, 265
HOST4WEB Commands, 265
C KILL VARIABLES
HOST4WEB, 266
HOST4WEB Commands, 266
C RETURN
HOST4WEB, 266
HOST4WEB Commands, 266
C SCAN NEXT SCREEN
HOST4WEB, 266
HOST4WEB Commands, 266
C TERMSESS
HOST4WEB, 266
HOST4WEB Commands, 266
C WAIT NEXT SCREEN
HOST4WEB, 266
HOST4WEB Commands, 266
Cache management, 63
Call Interface
VIRSETA, 257
VIRSETA Example, 258
VIRSETA Parameters, 257
VIRSETA return codes, 258
VIRSETAI, 259
VIRSETAI Example, 260
VIRSETAI parameters, 260
VIRSETV (CICS), 259
VIRSETV Example, 259
VIRSETV Parameters, 259
VIRSETV return codes, 259
VIRSETVI, 261
VIRTEL, 261,263
Call interface
Virtel, 257
capability tokens, 65
capability types
Virtel, 65
Capability URLs, 22
CASE$
Scenario Instructions, 162
CASE$ Examples
Scenario Instructions, 163
Certicates
AT-TLS, 277
Virtel Web Access Security, 277
Change default settings
HOWTOs, 293
Change Display Style
HOWTOs, 289
Change Font
HOWTOs, 289
Change Key Settings
HOWTOs, 289
Changing the back ground colour
Customization, 107
Chrome
Copy, cut and Paste, 121
Chrome Extension
Copy, Cut and Paste, 125
Host managed, 125
w2hparm.js setting, 125
waaoAddOnHost.js le, 125
CICS denitions
Printing, 87
COBOL Example
Programming Interfaces, 254
COBOL Example using FAE5
Programming Interfaces, 256
COBOL FAC8 example
Incoming E-mails, 270
Programming Interfaces, 270
COBOL FAD4 example
Incoming E-Mails, 273
Programming Interfaces, 273
Colors and Logo
Customization, 102
Colour and font management, 42
Commands
HOST4WEB, 265
Virtel Batch, 243
COMMAREA Conversion Example
Scenarios, 231
Virte Web Intergration, 231
XML, 231
Commarea Example
Scenarios, 220
COMMAREA-To-XML Example
Scenarios, 230
Virte Web Intergration, 230
XML, 230
Compatibility mode
Customization, 102,108,130
Compatibility Option id
Customization, 134
Conditional generation, 56
Control APPLIST behaviour
HOWTOs, 293
Index 299

Virtel User Guide, Release 4.57
CONVERT$
Scenario Instructions, 164,165
Copy an array
VIRSETAI, 259
Copy, Cut and Paste, 118
Chrome Extension, 125
Copy, cut and Paste
Chrome, 121
Edge, 129
Firefox, 118
Internet Explorer, 118
COPY-FROM
tags, 37
COPY$
COPY$ FIELD-NAME-TO-VARIABLE, 165
COPY$ INPUT-FILE-TO-VARIABLE, 166
COPY$ INPUT-TO-SCREEN, 166
COPY$ INPUT-TO-VARIABLE, 166
COPY$ LIST-TO-VARIABLE, 167
COPY$ OUTPUT-FILE-TO-VARIABLE, 167
COPY$ SCREEN-TO-VARIABLE, 168
COPY$ SYSTEM-TO-VARIABLE, 168
COPY$ VALUE-TO-SCREEN, 173
COPY$ VALUE-TO-VARIABLE, 173
COPY$ VARIABLE-TO-SCREEN, 174
COPY$ VARIABLE-TO-SYSTEM, 174
COPY$ VARIABLE-TO-VARIABLE, 175
Scenario Instructions, 165
COPY$ FIELD-NAME-TO-VARIABLE
COPY$, 165
COPY$ INPUT-FILE-TO-VARIABLE
COPY$, 166
COPY$ INPUT-TO-SCREEN
COPY$, 166
COPY$ INPUT-TO-VARIABLE
COPY$, 166
COPY$ LIST-TO-VARIABLE
COPY$, 167
COPY$ OUTPUT-FILE-TO-VARIABLE
COPY$, 167
COPY$ SCREEN-TO-VARIABLE
COPY$, 168
COPY$ SYSTEM-TO-VARIABLE
COPY$, 168
COPY$ VALUE-TO-SCREEN
COPY$, 173
COPY$ VALUE-TO-VARIABLE
COPY$, 173
COPY$ VARIABLE-TO-SCREEN
COPY$, 174
COPY$ VARIABLE-TO-SYSTEM
COPY$, 174
COPY$ VARIABLE-TO-VARIABLE
COPY$, 175
COUNTRY-CODE
tags, 62
Create a list of values for selected eld
Scenarios, 210
CREATE-VARIABLE-FROM
tags, 37
CREATE-VARIABLE-IF
tags, 58
CSS
Customization, 102
CURRENT-VALUE-OF
tags, 51
Cursor management, 45
custom.css
Customization, 102
custom.js
Customization, 108
Customization
Adding a company logo, 106
Adding a screen watermark, 113
Adding text to the toolbar, 103
Changing the back ground colour, 107
Colors and Logo, 102
Compatibility mode, 102,108,130
Compatibility Option id, 134
CSS, 102
custom.css, 102
custom.js, 108
Customizing non-standard Icons, 110
Customizing Toolbar Icons, 109
Default mode, 130
Dening Transaction options, 134
Global level modications, 131
Hiding information, 104
Hiding the toolbar, 105
Icon display, 107
Installing a Custom Help Page, 116
Javascript, 108
Javascript Exits, 108
Modifying colors, 105
Modifying the text of the status bar, 111
Modifying Web Access Settings, 114
Option mode, 102,108,130
Positioning Toolbar Icons, 111
Removing eects from a company logo, 106
Removing Toolbar Icons, 110
Setting Custom Hotspots, 112
Standard Help Page, 115
Toolbar color, 103
TRansaction level modications, 133
Customize Display Styles
HOWTOs, 290
Customizing non-standard Icons
Customization, 110
300 Index

Virtel User Guide, Release 4.57
Customizing Toolbar Icons
Customization, 109
Customizing Virtel, 130
DDI Files
Dynamic Directories Interface, 152
DDI Macro Errors, 154
Macros, 154
DEBUG$
Scenario Intructions, 176
DEBUG$ Example
Scenario Intructions, 177
Debugging facilities, 58
DECLARE and JavaScript functions
Scenario Instructions, 178
DECLARE-FIELD-AS
tags, 61
DECLARE$
Scenario Instructions, 177
DECLARE_FIELD_AS
tags, 59
Default mode
Customization, 130
DEFAULT-FIELD-WITH-CURSOR
tags, 46
DEFINE-AUTOMATIV-COUNTER
tags, 53
DEFINE-DFHMDF-COLUMN
tags, 40
DEFINE-DFHMDF-NAME
tags, 39
DEFINE-HTML-FIELD
tags, 39
DEFINE-HTML-FIELD-NAME
tags, 38
DEFINE-HTML-FOCUS-FIELD
tags, 45
DEFINE-HTML-PFKEY
tags, 47
DEFINE-SUB-VARIABLE
tags, 53
Dening Transaction options
Customization, 134
DELETE-ALL-VARIABLES
tags, 54
Directory Management, 25
Disable
Function Keys, 48
Display
Web Access Settings, 70
DO-COUNT-UP-WITH
tags, 52
Dynamic Directories Interface
DDI Files, 152
Macros, 146
Dynamic Pages
URL Formats, 19
Dynamic URL with parameters
URL Formats, 20
Dynamic URL with userdata
URL Formats, 19
Edge
Copy, cut and Paste, 129
Encoding XML Data
Virtel Web Intergration, 222
XML, 222
Encryption
AT-TLS, 277
Virtel Web Access Security, 277
Encryption management, 60
ENCRYPTION-PARAMETERS
tags, 60
END-DO-COUNT
tags, 53
END-WHEN-EXISTS
tags, 57
END-WHEN-NEXT-EVENT
tags, 57
END-WHEN-NOT-BLANK
tags, 57
END-WHEN-NOT-EXISTS
tags, 57
END-WHILE-EVENT
tags, 57
ENDFOR$
Scenario Instructions, 179
Entry point security
Virtel Web Access Security, 275
ERROR$
Scenario Instructions, 179
Example of using XML Data
Virte Web Intergration, 224
XML, 224
Exits
after_responseHandle, 108
after_StandardInit, 108
before_launchApplink, 108
before_submitForm, 108
modify_settingsValue, 109
when_focusGained, 109
when_focusLost, 109
when_init, 109
Extracting Query Data
Scenarios, 220
FA88 - Request data
Programming Interfaces, 253
Index 301

Virtel User Guide, Release 4.57
FAC8 - Retrieve data from email
Programming Interfaces, 269
FAC8 - Structured eld code 12
Incoming E-mails, 269
Programming Interfaces, 269
FAC8 - Structured eld code 13
Incoming E-mails, 270
Programming Interfaces, 270
FAC8 Structured eld
Programming Interfaces, 254
FAC8.06 - Specify Virtel directory
Programming Interfaces, 254
FAC8.07 - Specify template
Programming Interfaces, 254
FAD4 - Send e-mail from application
Incoming E-Mails, 272
Programming Interfaces, 272
FAE5 - Send a table variable
Programming Interfaces, 255
FAE5 - Structured elds
Programming Interfaces, 256
FAE5 and FAE6
Virtel Structured eld, 50
FAE5 Example
Virtel Structured eld, 53
FAE6 - Send a table variable
Programming Interfaces, 255
FAE6 - Structured elds
Programming Interfaces, 256
FIELD$ DEFINE-CHOICE
FIELDS$, 180
Scenario Instructions, 180
FIELD$ DEFINE-VARIABLE-CHOICE
FIELDS$, 180
Scenario Instructions, 180
FIELD$ IS-BINARY-CHOICE
FIELDS$, 181
Scenario Instructions, 181
FIELDS$
FIELD$ DEFINE-CHOICE, 180
FIELD$ DEFINE-VARIABLE-CHOICE, 180
FIELD$ IS-BINARY-CHOICE, 181
Scenario Instructions, 180
File Transfer by E-Mail
SMTP, 235
File Trasnfer by E-Mail
Incoming E-Mail Calls, 235
FILTER
Scenario Instructions, 181
Final
Scenarios, 157
Firefox
Copy, cut and Paste, 118
FOR-EACH-VALUE
tags, 51
FOREACH
Scenario Instructions, 182
Format of macros.json
Macros, 153
Function key management, 47
Function Keys
Disable, 48
G EMULATION TYPE
HOST4WEB, 267
HOST4WEB Commands, 267
G PAGE NAME
HOST4WEB, 267
HOST4WEB Commands, 267
G URL PARAMETER
HOST4WEB, 267
HOST4WEB Commands, 267
GENERATE-HTML
tags, 36
GENERATE-VARIABLES
tags, 41
GENERATE-VIR3270
tags, 41
GET Command
Virtel Batch, 243
Virtel Batch Commands, 243
Global level modications
Customization, 131
Global modication
Web Access Settings, 77
global-settings property
Web Customization, 78
GOTO$
Scenario Instructions, 182
HANDLE$
Scenario Instructions, 182
Handling table variables, 50
Hiding information
Customization, 104
Hiding settings
Web Customization, 79
Hiding the toolbar
Customization, 105
Host managed
Chrome Extension, 125
HOST4WEB, 265
2VIRTEL prex, 265
C AUTO VARIABLES, 265
C KEEP VARIABLES, 265
C KILL VARIABLES, 266
C RETURN, 266
C SCAN NEXT SCREEN, 266
302 Index

Virtel User Guide, Release 4.57
C TERMSESS, 266
C WAIT NEXT SCREEN, 266
Commands, 265
G EMULATION TYPE, 267
G PAGE NAME, 267
G URL PARAMETER, 267
HOST4WEB Commands, 265
Processing conditions, 265
S DIRECTORY, 267
S GLOBAL PAGE, 267
S PAGE, 267
S VARIABLE, 267
HOST4WEB Commands
C AUTO VARIABLES, 265
C KEEP VARIABLES, 265
C KILL VARIABLES, 266
C RETURN, 266
C SCAN NEXT SCREEN, 266
C TERMSESS, 266
C WAIT NEXT SCREEN, 266
G EMULATION TYPE, 267
G PAGE NAME, 267
G URL PARAMETER, 267
HOST4WEB, 265
S DIRECTORY, 267
S GLOBAL PAGE, 267
S PAGE, 267
S VARIABLE, 267
How to if running under Virtel
Programming Interfaces, 250
HOWTOs, 282
Access Host Application Directly, 288
Change default settings, 293
Change Display Style, 289
Change Font, 289
Change Key Settings, 289
Control APPLIST behaviour, 293
Customize Display Styles, 290
Session Termination, 287
Support a reverse proxy, 293
Support multile Code Pages, 286
Support Virtual Hosting, 293
Use dierent screen size, 283
Virtel, 283
HTML
Template pages, 33
HTTP Protocol Management, 63
Icon display
Customization, 107
Identication
Scenarios, 156
IF-PRINT-IS-READY
tags, 67
IF-SECURITY-TOKEN-IS-READY
tags, 66
IF-USER-IS-ALLOWED
tags, 56
IF$
Scenario Instructions, 183
Import/Export
Web Access Settings, 76
Including Parameters
Programming Interfaces, 251
Including Specic Terminal Ranges
Programming Interfaces, 252
Incoming Calls, 269
Incoming Calls E-Mails, 269
Transactions, 269
Incoming Calls E-Mails
Incoming Calls, 269
Incoming E-Mail Calls, 235
File Trasnfer by E-Mail, 235
SMTP, 235
SMTP line Rules, 235
Starting an application by E-Mail, 236
Incoming E-Mails
COBOL FAD4 example, 273
FAD4 - Send e-mail from application, 272
Incoming E-mails
COBOL FAC8 example, 270
FAC8 - Structured eld code 12, 269
FAC8 - Structured eld code 13, 270
Transactions, 269
INDSCEN$
Scenario Instructions, 184
Initial
Scenarios, 157
Input
Scenarios, 157
Inserting conguration values into a template, 54
Inserting host data
Template pages, 36
Inserting host data into a template page, 36
Installing a Custom Help Page
Customization, 116
Internet Explorer
Copy, cut and Paste, 118
INVALID-PFKEYS
tags, 48
IP-ADDRESS-OF-LINE
tags, 54
IP-PORT-OF-LINE
tags, 54
Javascript
Customization, 108
Javascript Exits
Index 303

Virtel User Guide, Release 4.57
Customization, 108
keepmacpad
W2HParm Settings, 140
Key Mapping
Web Access Settings, 75
Key mapping controls
Macros, 140
keymapping
W2HParm Settings, 140
LABEL$ Instruction
Scenarios, 185
Load library
Scenarios, 155
local Storage
Macros, 140
Macro commands
Macros, 153
Macro synchronization
Virtel, 146
macroPad
W2HParm Settings, 140
Macros, 139
DDI Macro Errors, 154
Dynamic Directories Interface, 146
Format of macros.json, 153
Key mapping controls, 140
local Storage, 140
Macro commands, 153
macros.json le, 140,146
Managing macros with DDI, 146
Refreshling local macros, 153
Storing the macros, 139
synchronizing Macros, 146
Updating macros at the Group Level, 151
Uploading macros with DDI, 146
Using DDI to store macros, 143
Using Virtel storage for macros, 143
macros.json le
Macros, 140,146
macrosAutoRefresh
W2HParm Settings, 145
Make clickable elds
Scenarios, 210
MakePDF
Printing, 88
Scenarios, 216
Managing macros with DDI
Macros, 146
MAP$
MAP$ ABEND, 186
MAP$ AREA, 186
MAP$ BEGIN, 189
MAP$ END, 189
MAP$ EVENTUAL-AREA, 190
MAP$ EXECUTE, 191
MAP$ FROM-FIELD, 192
MAP$ FROM-INPUT, 192
MAP$ FROM-VARIABLE, 193
MAP$ TO-VARIABLE, 193
Scenario Instructions, 185
MAP$ ABEND
MAP$, 186
Scenario Instructions, 186
MAP$ AREA
MAP$, 186
Scenario Instructions, 186
MAP$ BEGIN
MAP$, 189
Scenario Instructions, 189
MAP$ END
MAP$, 189
Scenario Instructions, 189
MAP$ EVENTUAL-AREA
MAP$, 190
Scenario Instructions, 190
MAP$ EXECUTE
MAP$, 191
Scenario Instructions, 191
MAP$ FROM-FIELD
MAP$, 192
Scenario Instructions, 192
MAP$ FROM-INPUT
MAP$, 192
Scenario Instructions, 192
MAP$ FROM-VARIABLE
MAP$, 193
Scenario Instructions, 193
MAP$ TO-VARIABLE
MAP$, 193
Scenario Instructions, 193
MIME type management, 64
Miscellaneous
Web Access Settings, 72
modify_settingsValue
Exits, 109
Modifying colors
Customization, 105
Modifying the text of the status bar
Customization, 111
Modifying Web Access Settings
Customization, 114
Multi-Session
Scenarios, 209
NAME-OF
tags, 54
304 Index

Virtel User Guide, Release 4.57
NO-BLANKS-VALUE
tags, 52
NULL-PF
pfkField, 49
NUMBER-OF
tags, 56
ON-ATTRIBUTE
tags, 42
ON-CHARACTER-ATTRIBUTE
tags, 43
ON-END-OF-ATTRIBUTE
tags, 43
ON-END-OF-CHARACTER-ATTRIBUTE
tags, 43,47
Option mode
Customization, 102,108,130
OPTION$
OPTION$ FOR-HTTP, 193
OPTION$ FOR-HTTP Example, 198
OPTION$ FOR-IND$FILE, 194
OPTION$ FOR-IND$FILE Examples, 195
OPTION$ FOR-MQ, 196
OPTION$ FOR-QUICKLNK, 196
OPTION$ FOR-SMTP, 197
Scenario Instructions, 193
OPTION$ FOR-HTTP
OPTION$, 193
Scenario Instructions, 193
OPTION$ FOR-HTTP Example
OPTION$, 198
Scenario Instructions, 198
OPTION$ FOR-IND$FILE
OPTION$, 194
Scenario Instructions, 194
OPTION$ FOR-IND$FILE Examples
OPTION$, 195
Scenario Instructions, 195
OPTION$ FOR-MQ
OPTION$, 196
Scenario Instructions, 196
OPTION$ FOR-QUICKLNK
OPTION$, 196
Scenario Instructions, 196
OPTION$ FOR-SMTP
OPTION$, 197
Scenario Instructions, 197
Outgoing Calls, 246,247
Outgoing E-Mails, 247
Transactions, 247
Outgoing E-Mails
Outgoing Calls, 247
Outgoing E-mails
Transactions, 247
Output
Scenarios, 157
Page Template File
Virtel Batch, 241
Page template for XML output
Virte Web Intergration, 227
XML, 227
Parameters
$UseCookieSessions$, 22
PrintVirtelSession, 21
ValidateVirtelSession, 21
VirtelSession, 21
Parsing Query Parameters
Virtel Web Intergration, 219
Password Encryption
Virtel Web Access Security, 277
Password support
Virtel Web Access Security, 276
Path name and Virtel directories
URL Formats, 14
PCL to PDF conversion
Printing, 88
PDF Output Generation
Scenarios, 216
PDF-LINES-PER-PAGE
tags, 68
PDF-NEW-DOCOPT
tags, 68
PDF-NEW-INPUT
tags, 68
PDF-NEW-LAYOUT
tags, 68
PDF-OUTLINE
tags, 68
PDF-PAGE-BREAK
tags, 68
PDF-USE-DOCOPT
tags, 69
PDF-USE-LAYOUT
tags, 69
PDF-VARIABLE
tags, 69
PERFORM$
Scenario Instructions, 199
pfkField
NULL-PF, 49
Virtel elds, 47
POSITION-OF-THE-CURSOR
tags, 46
Positioning Toolbar Icons
Customization, 111
POST Command
Virtel Batch, 243
Index 305

Virtel User Guide, Release 4.57
Virtel Batch Commands, 243
Presentaion Modes
Application Selection Menu, 80
Presentation modules
Scenario instructions, 155
Scenarios, 155
Presentation of XML output
Virte Web Intergration, 226
XML, 226
Presntation module
Virtel Web Modernisation, 155
PRINT
tags, 67
Printing
3270 data stream printers LU3, 84
Autoconnect, 86
CICS denitions, 87
MakePDF, 88
PCL to PDF conversion, 88
Scenarios for SCS printing, 88
SCS printers LU1, 84
SCS to PDF conversion, 88
VTAM denitions, 87
Printing with Web Access, 84
PrintVirtelSession
Parameters, 21
Processing conditions
HOST4WEB, 265
Processing XML Data
Scenarios, 221
Virtel Web Intergration, 221
XML, 221
Programming Interfaces
COBOL Example, 254
COBOL Example using FAE5, 256
COBOL FAC8 example, 270
COBOL FAD4 example, 273
FA88 - Request data, 253
FAC8 - Retrieve data from email, 269
FAC8 - Structured eld code 12, 269
FAC8 - Structured eld code 13, 270
FAC8 Structured eld, 254
FAC8.06 - Specify Virtel directory, 254
FAC8.07 - Specify template, 254
FAD4 - Send e-mail from application, 272
FAE5 - Send a table variable, 255
FAE5 - Structured elds, 256
FAE6 - Send a table variable, 255
FAE6 - Structured elds, 256
How to if running under Virtel, 250
Including Parameters, 251
Including Specic Terminal Ranges, 252
SRTVIRTEL prex, 250
Structured Fields, 249
Structured Fields Format Example, 249
Write Structured Field command, 249
Programming interfaces, 248
Propagation of signon by URL, 23
PUBLIC-KEY
tags, 60
Query input Data
Scenarios, 220
Virtel Web Intergration, 220
RAW Command
Virtel Batch, 244
Virtel Batch Commands, 244
Read Only Mode
Virtel, 145
Redenition of data elds
Virte Web Intergration, 225
XML, 225
Refreshling local macros
Macros, 153
Removing eects from a company logo
Customization, 106
Removing Toolbar Icons
Customization, 110
Return Codes
Virtel Batch, 245
Running the VIRTEL batch job
Virtel Batch, 242
S DIRECTORY
HOST4WEB, 267
HOST4WEB Commands, 267
S GLOBAL PAGE
HOST4WEB, 267
HOST4WEB Commands, 267
S PAGE
HOST4WEB, 267
HOST4WEB Commands, 267
S VARIABLE
HOST4WEB, 267
HOST4WEB Commands, 267
Sample
Template pages, 35
SCENARIO
Scenario Instructions, 158
Scenario Instruction
TOVAR$, 205
Scenario Instructions
$DECLARE Examples, 178
ACTION$, 159
ACTION$ DISCONNECT, 159
ACTION$ Examples, 161
ACTION$ REFRESH-TERMINAL, 159
ACTION$ SERVE-ANOTHER_USER, 159
306 Index

Virtel User Guide, Release 4.57
ACTION$ TERMSESS, 160
ACTION$ TO-APPLICATION, 160
ACTION$ TO-TERMINAL, 161
AUTOREFRESH, 214
CASE$, 162
CASE$ Examples, 163
CONVERT$, 164,165
COPY$, 165
DECLARE and JavaScript functions, 178
DECLARE$, 177
ENDFOR$, 179
ERROR$, 179
FIELD$ DEFINE-CHOICE, 180
FIELD$ DEFINE-VARIABLE-CHOICE, 180
FIELD$ IS-BINARY-CHOICE, 181
FIELDS$, 180
FILTER, 181
FOREACH, 182
GOTO$, 182
HANDLE$, 182
IF$, 183
INDSCEN$, 184
MAP$, 185
MAP$ ABEND, 186
MAP$ AREA, 186
MAP$ BEGIN, 189
MAP$ END, 189
MAP$ EVENTUAL-AREA, 190
MAP$ EXECUTE, 191
MAP$ FROM-FIELD, 192
MAP$ FROM-INPUT, 192
MAP$ FROM-VARIABLE, 193
MAP$ TO-VARIABLE, 193
OPTION$, 193
OPTION$ FOR-HTTP, 193
OPTION$ FOR-HTTP Example, 198
OPTION$ FOR-IND$FILE, 194
OPTION$ FOR-IND$FILE Examples, 195
OPTION$ FOR-MQ, 196
OPTION$ FOR-QUICKLNK, 196
OPTION$ FOR-SMTP, 197
PERFORM$, 199
SCENARIO, 158
SCENARION SUBROUTINE, 209
SCREENS, 159
SCRNEND, 159
SEND$ AS-ANSWER, 200,201
SEND$ TO, 201
SEND$ TO-LINE, 201
SEND$ VARIABLE-TO, 202
SEND$ VARIABLE-TO-LINE, 202
Sending Query Data with POST, 219
SET$ ENCODING, 203
SET$ PAGE, 203
SET$ PAGE-FROM-VARIABLE, 203
SET$ PRIORITY, 204
SET$ SCREEN-POSITION, 204
SET$ SCREEN-POSITION Example, 205
SET$ SIGNON, 204
SET$ TEMPORARY-PAGE, 205
SET$ TRANSACTION, 205
SET$ URL-ENCODING, 205
SUGGEST$, 213
SUGGEST$ installation, 214
SUGGEST$ Page Template, 214
TOVAR$ FROM-FIELD, 206
TOVAR$ FROM-INPUT, 206
TOVAR$ FROM-VARIABLE, 206
VIRSV$ - Allocating buers, 208
Scenario instructions
Presentation modules, 155
Scenario Intructions
DEBUG$, 176
DEBUG$ Example, 177
SCENARION SUBROUTINE
Scenario Instructions, 209
Scenarios
Add calendars to date elds, 211
COMMAREA Conversion Example, 231
Commarea Example, 220
COMMAREA-To-XML Example, 230
Create a list of values for selected eld, 210
Extracting Query Data, 220
Final, 157
Identication, 156
Initial, 157
Input, 157
LABEL$ Instruction, 185
Load library, 155
Make clickable elds, 210
MakePDF, 216
Multi-Session, 209
Output, 157
PDF Output Generation, 216
Presentation modules, 155
Processing XML Data, 221
Query input Data, 220
Using MAPGEN, 232
VIRKIX MAP$ Example, 228
Virtel Scenario language, 158
Virtel Web Modernisation, 155
VIRTEL-SUGGEST Function, 212
VSAM Directory, 155
Web Modernisation Scenario Example, 210
XML-To-COMMAREA Example, 229
Scenarios for SCS printing
Printing, 88
SCREENS
Index 307

Virtel User Guide, Release 4.57
Scenario Instructions, 159
SCRNEND
Scenario Instructions, 159
SCS printers LU1
Printing, 84
SCS to PDF conversion
Printing, 88
Security, 275
Virtel Rules, 279
Virtel Web Access Security, 275
SECURITY-TOKEN
tags, 66
SEND$
SEND$ AS-ANSWER, 200,201
SEND$ TO, 201
SEND$ TO-LINE, 201
SEND$ VARIABLE-TO, 202
SEND$ VARIABLE-TO-LINE, 202
SEND$ AS-ANSWER
Scenario Instructions, 200,201
SEND$, 200,201
SEND$ TO
Scenario Instructions, 201
SEND$, 201
SEND$ TO-LINE
Scenario Instructions, 201
SEND$, 201
SEND$ VARIABLE-TO
Scenario Instructions, 202
SEND$, 202
SEND$ VARIABLE-TO-LINE
Scenario Instructions, 202
SEND$, 202
Sending Query Data with POST
Scenario Instructions, 219
Virtel Web Intergration, 219
Service Transactions
Virtel, 12
Session context management, 34
Session Termination
HOWTOs, 287
SESSION-CODE
tags, 12,19,34,35,67,278
Virtel session, 5
Set value of variable
VIRSETVI, 261
Set value of varibale
VIRSETV, 259
SET-CONTENT-TYPE
tags, 64
SET-COUNTRY-CODE
tags, 61
SET-HEADER
tags, 65
SET-HTTP-RETURN-CODE
tags, 63
SET-INITIAL-TIMEOUT
tags, 34
SET-LOCAL-OPTIONS
tags, 50,61
SET-MAX-AGE
tags, 64
SET-OUTPUT-ENCODING
tags, 62
SET-PAGE-CACHEABLE
tags, 64
SET-PAGE-NON-CACHEABLE
tags, 64
SET$
SET$ ENCODING, 203
SET$ PAGE, 203
SET$ PAGE-FROM-VARIABLE, 203
SET$ PRIORITY, 204
SET$ SCREEN-POSITION, 204
SET$ SCREEN-POSITION Example, 205
SET$ SIGON, 204
SET$ TEMPORARY-PAGE, 205
SET$ TRANSACTION, 205
SET$ URL-ENCODING, 205
SET$ ENCODING
Scenario Instructions, 203
SET$, 203
SET$ PAGE
Scenario Instructions, 203
SET$, 203
SET$ PAGE-FROM-VARIABLE
Scenario Instructions, 203
SET$, 203
SET$ PRIORITY
Scenario Instructions, 204
SET$, 204
SET$ SCREEN-POSITION
Scenario Instructions, 204
SET$, 204
SET$ SCREEN-POSITION Example
Scenario Instructions, 205
SET$, 205
SET$ SIGNON
Scenario Instructions, 204
SET$ SIGON
SET$, 204
SET$ TEMPORARY-PAGE
Scenario Instructions, 205
SET$, 205
SET$ TRANSACTION
Scenario Instructions, 205
SET$, 205
SET$ URL-ENCODING
308 Index

Virtel User Guide, Release 4.57
Scenario Instructions, 205
SET$, 205
Setting and unsetting local options, 49
Setting Custom Hotspots
Customization, 112
Settings modes
Web Customization, 79
Signing on using HTML elds
Virtel Web Access Security, 278
Signon and password management, 58
Site Customization - Colors and Logo, 102
Site Customization - Javascript Functions, 108
Site Customization - The Help Page, 115
SMTP
File Transfer by E-Mail, 235
Incoming E-Mail Calls, 235
SMTP line Rules, 235
Starting an application by E-Mail, 236
SMTP line Rules
Incoming E-Mail Calls, 235
SMTP, 235
sources.zip
Web Access Settings, 77
SRTVIRTEL prex
Programming Interfaces, 250
Standard Help Page
Customization, 115
Starting an application by E-Mail
Incoming E-Mail Calls, 236
SMTP, 236
Static Pages
URL Formats, 13
Storing the macros
Macros, 139
Structured Fields
Programming Interfaces, 249
Structured Fields Format Example
Programming Interfaces, 249
SUGGEST$
Scenario Instructions, 213
SUGGEST$ installation, 214
SUGGEST$ Page Template, 214
VIRTEL-SUGGEST Function, 212
SUGGEST$ installation
Scenario Instructions, 214
SUGGEST$, 214
SUGGEST$ Page Template
Scenario Instructions, 214
SUGGEST$, 214
Support a reverse proxy
HOWTOs, 293
Support multile Code Pages
HOWTOs, 286
Support Virtual Hosting
HOWTOs, 293
synchronizeVirtelMacros
W2HParm Settings, 146
synchronizing Macros
Macros, 146
Sysplex distributor
Virtel, 145
tags
ADD-TO-FIELDS, 44
ADVANCE-TO-THE-NEXT-VALUE-OF, 52
AFTER-NOT-LAST-VALUE, 56
AJAX-SESSION-CODE, 34
COPY-FROM, 37
COUNTRY-CODE, 62
CREATE-VARIABLE-FROM, 37
CREATE-VARIABLE-IF, 58
CURRENT-VALUE-OF, 51
DECLARE-FIELD-AS, 61
DECLARE_FIELD_AS, 59
DEFAULT-FIELD-WITH-CURSOR, 46
DEFINE-AUTOMATIV-COUNTER, 53
DEFINE-DFHMDF-COLUMN, 40
DEFINE-DFHMDF-NAME, 39
DEFINE-HTML-FIELD, 39
DEFINE-HTML-FIELD-NAME, 38
DEFINE-HTML-FOCUS-FIELD, 45
DEFINE-HTML-PFKEY, 47
DEFINE-SUB-VARIABLE, 53
DELETE-ALL-VARIABLES, 54
DO-COUNT-UP-WITH, 52
ENCRYPTION-PARAMETERS, 60
END-DO-COUNT, 53
END-WHEN-EXISTS, 57
END-WHEN-NEXT-EVENT, 57
END-WHEN-NOT-BLANK, 57
END-WHEN-NOT-EXISTS, 57
END-WHILE-EVENT, 57
FOR-EACH-VALUE, 51
GENERATE-HTML, 36
GENERATE-VARIABLES, 41
GENERATE-VIR3270, 41
IF-PRINT-IS-READY, 67
IF-SECURITY-TOKEN-IS-READY, 66
IF-USER-IS-ALLOWED, 56
INVALID-PFKEYS, 48
IP-ADDRESS-OF-LINE, 54
IP-PORT-OF-LINE, 54
NAME-OF, 54
NO-BLANKS-VALUE, 52
NUMBER-OF, 56
ON-ATTRIBUTE, 42
ON-CHARACTER-ATTRIBUTE, 43
ON-END-OF-ATTRIBUTE, 43
Index 309

Virtel User Guide, Release 4.57
ON-END-OF-CHARACTER-ATTRIBUTE, 43,
47
PDF-LINES-PER-PAGE, 68
PDF-NEW-DOCOPT, 68
PDF-NEW-INPUT, 68
PDF-NEW-LAYOUT, 68
PDF-OUTLINE, 68
PDF-PAGE-BREAK, 68
PDF-USE-DOCOPT, 69
PDF-USE-LAYOUT, 69
PDF-VARIABLE, 69
POSITION-OF-THE-CURSOR, 46
PRINT, 67
PUBLIC-KEY, 60
SECURITY-TOKEN, 66
SESSION-CODE, 12,19,34,35,67,278
SET-CONTENT-TYPE, 64
SET-COUNTRY-CODE, 61
SET-HEADER, 65
SET-HTTP-RETURN-CODE, 63
SET-INITIAL-TIMEOUT, 34
SET-LOCAL-OPTIONS, 50,61
SET-MAX-AGE, 64
SET-OUTPUT-ENCODING, 62
SET-PAGE-CACHEABLE, 64
SET-PAGE-NON-CACHEABLE, 64
UNSET-LOCAL-OPTIONS, 50
USER-SIGNON-CODE, 59
VALID-PFKEYS, 48
WHEN-EXITS, 57
WHEN-NEXT-EVENT, 57
WHEN-NOT-BLANK, 57
WHEN-NOT-EXITS, 57
WHILE-EVENT, 57
TCT
VSAMTYP=READONLY, 145
Template page upload, 66
Template pages
HTML, 33
Inserting host data, 36
Sample, 35
Upload, 66
XML, 33
Toolbar color
Customization, 103
TOVAR$
Scenario Instruction, 205
TOVAR$ FROM-FIELD, 206
TOVAR$ FROM-INPUT, 206
TOVAR$ FROM-VARIABLE, 206
TOVAR$ FROM-FIELD
Scenario Instructions, 206
TOVAR$, 206
TOVAR$ FROM-INPUT
Scenario Instructions, 206
TOVAR$, 206
TOVAR$ FROM-VARIABLE
Scenario Instructions, 206
TOVAR$, 206
Transaction
Virtel Web Access Security, 276
TRansaction level modications
Customization, 133
Transactions
Incoming Calls, 269
Incoming E-mails, 269
Outgoing Calls, 247
Outgoing E-mails, 247
Transmission of upload cookie by URL, 23
Transmitting data, 35
TSO File Transfer, 90
UNSET-LOCAL-OPTIONS
tags, 50
Unviversal transaction, 24
Updating macros at the Group Level
Macros, 151
Upload
Template pages, 66
Uploading macros with DDI
Macros, 146
URL Examples
URL Formats, 15
URL Formats, 13
Dynamic Pages, 19
Dynamic URL with parameters, 20
Dynamic URL with userdata, 19
Path name and Virtel directories, 14
Static Pages, 13
URL Examples, 15
Use dierent screen size
HOWTOs, 283
USER-SIGNON-CODE
tags, 59
Username retrieval
Virtel Web Access Security, 276
useVirtelMacros
W2HParm Settings, 145
Using DDI to store macros
Macros, 143
Using MAPGEN
Scenarios, 232
Virtel Web Intergration, 232
Using Virtel storage for macros
Macros, 143
VALID-PFKEYS
tags, 48
310 Index

Virtel User Guide, Release 4.57
ValidateVirtelSession
Parameters, 21
VIRKIX
VIRKIX MAP$ Example, 228
Virte Web Intergration, 228
VIRKIX MAP$ Example
Scenarios, 228
VIRKIX, 228
Virte Web Intergration, 228
VIRSETA
Call Interface, 257
VIRSETA Example, 258
VIRSETA Parameters, 257
VIRSETA return codes, 258
VIRSETA Example
Call Interface, 258
VIRSETA, 258
VIRSETA Parameters
Call Interface, 257
VIRSETA, 257
VIRSETA return codes
Call Interface, 258
VIRSETA, 258
VIRSETAI
Call Interface, 259
Copy an array, 259
VIRSETAI Example, 260
VIRSETAI parameters, 260
VIRSETAI Example
Call Interface, 260
VIRSETAI, 260
VIRSETAI parameters
Call Interface, 260
VIRSETAI, 260
VIRSETV
Set value of varibale, 259
VIRSETV Example, 259
VIRSETV Parameters, 259
VIRSETV return codes, 259
VIRSETV (CICS)
Call Interface, 259
VIRSETV Example
Call Interface, 259
VIRSETV, 259
VIRSETV Parameters
Call Interface, 259
VIRSETV, 259
VIRSETV return codes
Call Interface, 259
VIRSETV, 259
VIRSETVI
Call Interface, 261
Set value of variable, 261
VIRSV$
VIRSV$ - Allocating buers, 208
VIRSV$ - Allocating buers
Scenario Instructions, 208
VIRSV$, 208
Virte Web Intergration
COMMAREA Conversion Example, 231
COMMAREA-To-XML Example, 230
Example of using XML Data, 224
Page template for XML output, 227
Presentation of XML output, 226
Redenition of data elds, 225
VIRKIX, 228
VIRKIX MAP$ Example, 228
XML Parser/Generator, 228
XML-To-COMMAREA Example, 229
VIRTEL
Build and send structured elds, 261
Call Interface, 261,263
VIRTEL Example, 261
VIRTEL return codes, 263
Virtel
Call interface, 257
capability types, 65
HOWTOs, 283
Logical Pools, 1
Macro synchronization, 146
Read Only Mode, 145
Service Transactions, 12
Sysplex distributor, 145
Web Access, 3
Web Access Overview, 5
Web integration, 11
Web Modernisation, 8
Virtel Batch, 239
Allocating work les, 241
Assembling TCT, 239
Commands, 243
GET Command, 243
Page Template File, 241
POST Command, 243
RAW Command, 244
Return Codes, 245
Running the VIRTEL batch job, 242
VIRTEL Batch Commands, 243
VIRTEL Batch Commands
Virtel Batch, 243
Virtel Batch Commands
GET Command, 243
POST Command, 243
RAW Command, 244
VIRTEL Example
VIRTEL, 261
Virtel elds
pfkField, 47
Index 311

Virtel User Guide, Release 4.57
VIRTEL return codes
VIRTEL, 263
Virtel Rules
Security, 279
Virtel Web Access Security, 279
Virtel Scenario language
Scenarios, 158
Virtel session
SESSION-CODE, 5
Virtel Structured eld
FAE5 and FAE6, 50
FAE5 Example, 53
Virtel Studio, 157
Virtel Web Modernisation, 155
Virtel tags, 33
Virtel template pages, 33
Virtel Web Access Security
Certicates, 277
Encryption, 277
Entry point security, 275
Password Encryption, 277
Password support, 276
Security, 275
Signing on using HTML elds, 278
Transaction, 276
Username retrieval, 276
Virtel Rules, 279
Virtel Web integration (VWI), 219
Virtel Web Intergration
Automatic Scenario Generation, 232
Encoding XML Data, 222
Parsing Query Parameters, 219
Processing XML Data, 221
Query input Data, 220
Sending Query Data with POST, 219
Using MAPGEN, 232
XML Data Transactions, 223
XML nput attrubutes and repeating Groups, 224
Virtel Web Modernisation, 155
390 Object modules, 155
Presntation module, 155
Scenarios, 155
Virtel Studio, 155
VIRTEL-SUGGEST Function
Scenarios, 212
SUGGEST$, 212
VirtelSession
Parameters, 21
VSAM Directory
Scenarios, 155
VSAMTYP=READONLY
TCT, 145
VTAM denitions
Printing, 87
W2HParm Settings
keepmacpad, 140
keymapping, 140
macroPad, 140
macrosAutoRefresh, 145
synchronizeVirtelMacros, 146
useVirtelMacros, 145
w2hparm.js
Web Access Settings, 77
w2hparm.js defaults
Web Customization, 79
w2hparm.js setting
Chrome Extension, 125
w2hparmHide setting
Web Customization, 79
waaoAddOnHost.js le
Chrome Extension, 125
Web Access
Virtel, 3
Web Access Overview
Virtel, 5
Web Access Settings, 70
Display, 70
Global modication, 77
Import/Export, 76
Key Mapping, 75
Miscellaneous, 72
sources.zip, 77
w2hparm.js, 77
Web Customization
global-settings property, 78
Hiding settings, 79
Settings modes, 79
w2hparm.js defaults, 79
w2hparmHide setting, 79
Web integration
Virtel, 11
Web Modernisation
Virtel, 8
Web Modernisation Scenario Example
Scenarios, 210
WHEN-EXITS
tags, 57
WHEN-NEXT-EVENT
tags, 57
WHEN-NOT-BLANK
tags, 57
WHEN-NOT-EXITS
tags, 57
when_focusGained
Exits, 109
when_focusLost
Exits, 109
when_init
312 Index

Virtel User Guide, Release 4.57
Exits, 109
WHILE-EVENT
tags, 57
Write Structured Field command
Programming Interfaces, 249
XML
COMMAREA Conversion Example, 231
COMMAREA-To-XML Example, 230
Encoding XML Data, 222
Example of using XML Data, 224
Page template for XML output, 227
Presentation of XML output, 226
Processing XML Data, 221
Redenition of data elds, 225
Template pages, 33
XML Data Transactions, 223
XML nput attrubutes and repeating Groups, 224
XML Parser/Generator, 228
XML-To-COMMAREA Example, 229
XML Data Transactions
Virtel Web Intergration, 223
XML, 223
XML nput attrubutes and repeating Groups
Virtel Web Intergration, 224
XML, 224
XML Parser/Generator
Virte Web Intergration, 228
XML, 228
XML-To-COMMAREA Example
Scenarios, 229
Virte Web Intergration, 229
XML, 229
Index 313
