WMS User Guide For MES Ftp://145.14.60.120/Software/Progression/Macola ES S/WMS Exact Macola
User Manual: Pdf ftp://145.14.60.120/Software/Progression/Macola ES s/WMS-User-Guide-for-Exact-Macola-ES user guide pdf
Open the PDF directly: View PDF ![]() .
.
Page Count: 221 [warning: Documents this large are best viewed by clicking the View PDF Link!]

Warehouse Management System
User Guide for Exact Macola ES

Copyright ©2014 Exact Software North America, LLC.
All rights reserved. No part of this work may be reproduced, copied, adapted, or transmit-
ted in any form or by any means without written permission from Exact Software North
America, LLC
Trademarks
Product names mentioned in this document may be trademarks or registered trademarks
of their respective companies and are hereby acknowledged. All product names that are
known to be trademarks or service marks have been appropriately capitalized.
Use of a name in this document is for identification purposes only, and should not be
regarded as affecting the validity of any trademark or service mark, or as suggesting any
affiliation between Exact Software Exact Software North America, LLC., and the trademark
proprietor.
Disclaimer
Statements in this document regarding Exact Software North America, LLC, the product
and service capabilities of the company and the market for those products and services,
future opportunities for the company, and any other statements about management's
future expectations, beliefs, goals, plans or prospects constitute forward looking state-
ments within the meaning of the Private Securities Litigation Reform Act of 1995. Any
statements that are not statements of historical fact (including statements containing the
words “believes”, “plans”, “anticipates”, “expects”, estimates, and similar expressions)
should also be considered to be forward looking statements. There are a number of impor-
tant factors that could cause actual results or events to differ materially from those indi-
cated by such forward looking statements, including: the ability of Exact to successfully
market, create and deliver the product and service offerings, the ability to retain partners
and customers, and the other factors. Exact disclaims any intention or obligation to
update any forward looking statements as a result of developments occurring after the
date of this document.

i
Chapter 1: Overview .................................................................... 1
Conventions ............................................................................................1
WMS Device Manager ...............................................................................1
WMS Pick and Ship Verification Module .......................................................1
WMS EDI ASN Data Collection Module .........................................................2
WMS Receiving and Inventory Data Collection and Labeling Module ................2
WMS Shop Floor Data Collection and Labeling Module ...................................2
WMS Production Order Processing Data Collection and Labeling Module ...........2
WMS Conveyor Interface Module ................................................................2
Chapter 2: Setup and Process Flow ............................................. 4
WMS System Setup ..................................................................................4
WMS System Setup Flow Chart .............................................................4
WMS Inventory Management Transactions ..................................................4
WMS Inventory Management Transactions Setup .....................................4
WMS Inventory Management Transactions Processing ..............................4
WMS Purchase Order Receiving ..................................................................5
WMS Purchase Order Receiving Setup ....................................................5
WMS Purchase Order Receiving Processing .............................................5
WMS Production Order Processing ..............................................................5
WMS Production Order Processing Transactions Setup ..............................5
WMS Production Order Processing Transactions Processing .......................5
WMS Shipping .........................................................................................6
WMS Shipping Setup ............................................................................6
WMS Shipping Setup Flow Chart ............................................................7
WMS Shipment Processing using Paper Pick Tickets ..................................8
WMS Shipment Processing using Pick Management ..................................9
WMS Shipment Processing Flow Chart .................................................. 12
WMS Conveyor Interface ......................................................................... 14
WMS Conveyor Interface Setup ........................................................... 14
WMS Conveyor Interface Processing .................................................... 15
WMS Shop Floor Control Transactions ....................................................... 15
WMS Shop Floor Control Transactions Setup ......................................... 16
WMS Shop Floor Control Transactions Processing ................................... 16
Chapter 3: WMS Setup - System ................................................ 17
WMS Security Maintenance ..................................................................... 17
General Tab ...................................................................................... 17
Shipping Tab .................................................................................... 18
Purchase Order Tab ........................................................................... 19
Inventory Tab ................................................................................... 19
Shop Floor Tab .................................................................................. 20
POP Tab ........................................................................................... 21
WMS Control File Maintenance ................................................................. 21

ii
Shipping Tab .................................................................................... 22
Shipping 2 Tab .................................................................................. 25
Pick Mgmt Tab .................................................................................. 28
Receiving Tab ................................................................................... 30
Inventory Tab ................................................................................... 31
Shop Floor Tab .................................................................................. 34
POP Tab ........................................................................................... 36
System Tab ...................................................................................... 38
Printer Tab ....................................................................................... 39
Conveyor Tab ................................................................................... 42
General Tab ................................................................................. 42
Printer Mappings Tab ..................................................................... 43
FTP Information Tab ...................................................................... 43
Other Tab ......................................................................................... 44
Label Configuration ................................................................................ 44
Shipping Labels ................................................................................. 45
Editing a Shipping Carton or Pallet Label Print Context ....................... 46
Adding a Shipping Label Customer Override ..................................... 47
Receiving Labels ................................................................................ 47
Editing a Receiving Product Label Print Context ................................. 48
Adding a Receiving Product Label Override ....................................... 48
Inventory Labels ............................................................................... 49
Editing an Inventory Product Label Print Context ............................... 49
Adding an Inventory Product Label Override ..................................... 50
Shop Floor Labels .............................................................................. 51
Editing a Shop Floor Product Label Print Context ............................... 51
Adding a Shop Floor Product Label Override ..................................... 52
POP Labels ....................................................................................... 52
Editing a POP Product Label Print Context ......................................... 52
Adding a POP Product Label Override ............................................... 53
Other Labels ..................................................................................... 54
Editing a Shipment Tag or Putaway Ticket Print Context ..................... 54
AutoPack Package Code and Bulk Weight Setup ......................................... 55
WMS Package Code Maintenance ......................................................... 55
WMS Bulk Weight Maintenance ............................................................ 57
User Defined Filters ................................................................................ 58
WMS Workstation Configurator ................................................................ 62
Creating a WMS Desktop Icon ............................................................. 62
Changing Companies in the Workstation Configurator ............................. 63
Configuring INI Settings ..................................................................... 64
Configuring WMS to Use BarTender ...................................................... 64
Validating DLLs ................................................................................. 65
Zone Maintenance .................................................................................. 66
Creating a Single Valued Zone ............................................................ 67
Creating a Multi-Valued Zone .............................................................. 68

iii
Chapter 4: WMS Setup - Shipping .............................................. 70
Customer Override Maintenance .............................................................. 70
Label Setup ........................................................................................... 73
External Label Maintenance ................................................................ 73
Label Information Tab ................................................................... 74
Contents Label Tab ....................................................................... 74
Bill of Lading Type Maintenance ............................................................... 75
Ship Via Reports Maintenance .................................................................. 77
EPN Reject Reason Code Maintenance ....................................................... 78
WMS Item Availability ............................................................................. 78
Item Master Maintenance ........................................................................ 79
Bill of Lading Type Field ...................................................................... 80
External Serial Number Field ............................................................... 81
Item/Location Maintenance ..................................................................... 82
Customer Delivery Address Maintenance ................................................... 84
Order Entry Header Setup ....................................................................... 85
Chapter 5: WMS Setup - Purchase Order Receiving ................... 88
Vendor Override Maintenance .................................................................. 88
Vendor Bar Code Maintenance ................................................................. 89
Vendor Item Override Maintenance .......................................................... 90
Chapter 6: WMS Processing ....................................................... 91
Logging on to WMS ................................................................................ 91
Changing the User Warehouse ................................................................. 91
Transaction History ................................................................................ 92
RF Emulator .......................................................................................... 92
Chapter 7: WMS Shipping Transactions ..................................... 93
Pick Management (EPN Processing) .......................................................... 93
Creating a Pick-to-Pack EPN ................................................................ 94
Processing a Pick-to-Pack EPN ............................................................. 97
Creating a Pick-to-Stage and Stage Pack EPN ...................................... 101
Processing a Pick-To-Stage EPN ........................................................ 105
Processing a Stage Pack EPN - Packing Station .................................... 109
Processing a Stage Pack EPN - RF Client ............................................. 111
Resolving Recommendation Errors ..................................................... 114
Reviewing Rejected Recommendations ............................................... 117
Reviewing Negative Releases ............................................................ 118
Traditional Paper Pick Tickets ................................................................ 119
Printing a Pick Ticket ........................................................................ 120
Releasing Orders to WMS using Post Pick Ticket Processing ................... 120
Reprinting Existing or Printing Additional Shipping Labels for an Order ........ 121
Reprinting a Series of Existing Shipping Labels .................................... 122

iv
Reprinting Individual Shipping Labels ................................................. 122
Printing Additional Shipping Labels .................................................... 123
Generating a Completely New Set of Labels for an Order ...................... 123
Packing Cartons for a Pick and Pack Environment ..................................... 124
Packing Pallets .................................................................................... 126
Packing a Shipment .............................................................................. 128
Packing Orders in Pack Verify Mode ........................................................ 131
Packing an Order ............................................................................. 131
Exiting an Order .............................................................................. 133
Completing an Order ........................................................................ 134
Using WMS Order Billing ....................................................................... 134
Order Completion Mode is WMS Billing ............................................... 135
Order Completion Mode is Shipment Completion .................................. 137
Importing Billing Selection Information using Bar Code for Distribution ....... 138
Generating an Advanced Ship Notice Using WMS Shipment Information ...... 138
Recalculating the Totals for an Order in WMS ........................................... 141
Closing WMS Orders when the Exact Macola ES Order has been Closed ....... 141
Deleting an Order from WMS ................................................................. 142
Chapter 8: WMS Inventory Transactions ..................................144
Processing an Inventory Issue ............................................................... 144
Processing an Inventory Receipt ............................................................ 146
Processing an Inventory Transfer ........................................................... 147
Processing a Physical or Cycle Count ...................................................... 148
Directed Count Processing ................................................................ 148
Non-Directed Count Processing ......................................................... 150
Viewing a Bin Stock Inquiry on RF Devices .............................................. 152
Printing Product Labels ......................................................................... 154
Chapter 9: WMS Purchase Order Receiving Transactions ..........156
Processing a Receipt Against a Purchase Order ........................................ 156
Overriding Product Labels When Prompting ............................................. 158
Workstation Product Label Printing ......................................................... 158
Verifying what is Open on a Purchase Order ............................................ 160
Chapter 10: WMS Production Order Transactions .....................162
Entering Production for a Production Order .............................................. 162
Chapter 11: WMS Shop Floor Transactions ...............................163
Issuing Material to a Shop Order ............................................................ 163
Entering Activity for a Shop Order .......................................................... 164
Returning Material ............................................................................... 166

v
Chapter 12: WMS Reports .........................................................167
Supplied Reports ................................................................................. 167
Interface to User Created Reports .......................................................... 167
Crystal Reports ............................................................................... 167
Visual Basic .................................................................................... 167
Chapter 13: WMS Inquiry .........................................................169
Appendix A: WMS and EDI Distribution Center Setup ...............171
DC Setup and the Customer Override File ................................................ 171
DC Setup and the A/R Customer Delivery Address .................................... 171
DC Setup and the EDI Ship-To Cross-Reference ....................................... 172
Appendix B: WMS File Maintenance ..........................................174
WMS Purge Utility ................................................................................ 174
Manually Purging WMS Files .................................................................. 174
Purging the EDI Barcode Holding Interface File ........................................ 175
Clearing Device Licenses ....................................................................... 176
Appendix C: Troubleshooting ....................................................177
WMS Help/About Options ...................................................................... 177
WMS Help/About System Info ........................................................... 177
WMS Help/About Modules ................................................................. 177
WMS Help/About Components ........................................................... 177
WMS Help/About Diagnostic .............................................................. 177
WMS Help/About On-Line Support ..................................................... 178
WMS Help/About Resolution .............................................................. 178
WMS EDI / ASN Diagnostic Report .......................................................... 178
Post Pick Ticket Process Trace Tool ......................................................... 178
WMS Update Utility .............................................................................. 179
Troubleshooting FAQ ............................................................................ 179
Error 429 or 339 when running WMS program from Exact Macola ES menu
179
WMS program appears to hang at splash screen ............................. 179
Using BarTender, some carton labels print multiple copies ................ 179
Department number missing from label ......................................... 180
Error #3021 ............................................................................... 180
Error #53 file not found ............................................................... 180
Error #88 Incompatible mode ....................................................... 180
Error cannot connect to Macola database ....................................... 180
Error exceeded allowable licenses ................................................. 180
Error Invalid File Name 20507 ...................................................... 181
Runtime error 374 ...................................................................... 181
Weight calculation mis-match ....................................................... 181
Error action cannot be completed .................................................. 181
BOL# not found OEBOLWRK message ............................................ 182

vi
WMS Error 11_0012- 01 .............................................................. 182
WMS Error No DDF Location Specified ............................................ 182
After purge, EDBBCIFL file still large .............................................. 182
Appendix D: EDI File Usage ......................................................183
ASN Bulk Weight Cross-Reference .......................................................... 183
ASN Package Code Cross-Reference ....................................................... 183
EDI Item Cross-Reference ..................................................................... 183
EDI Misc Charge Code Cross-Reference ................................................... 183
EDI Setup File ..................................................................................... 184
EDI Ship-To Cross-Reference ................................................................. 184
EDI Ship Via Cross-Reference ................................................................ 184
EDI Trading Partner Cross-Reference ...................................................... 184
Appendix E: Program and Command Line Options ....................185
File Utilities (Initialize, Import, Export) ................................................... 185
PO Vendor Bar Code Definition ............................................................... 185
PO Vendor Item Override File Maintenance .............................................. 185
PO Vendor Override ............................................................................. 185
Post Purchase Order Print Processing ...................................................... 185
VICS Preprocess Program ..................................................................... 186
WMS Attached Workstation and RF Server Program .................................. 186
WMS Bill of Lading Type Maintenance ..................................................... 187
WMS Bulk Weight Maintenance .............................................................. 187
WMS Control File Maintenance ............................................................... 187
WMS Customer Override Maintenance ..................................................... 187
WMS External Label Tools ..................................................................... 187
WMS Inquiry ....................................................................................... 187
WMS Package Code Maintenance ........................................................... 188
WMS Post Pick Ticket Processing Program ............................................... 188
WMS Purge Utility ................................................................................ 189
WMS Security Maintenance ................................................................... 189
WMS Ship Via Reports Maintenance ........................................................ 189
WMS Workstation Configuration Utility .................................................... 189
Appendix F: Function Key Usage ...............................................190
Appendix G: External Label Field List .......................................191
Appendix H: Wavelink Setup ....................................................195
Add Wavelink Server to the Startup Menu ............................................... 195
Add Menus to Wavelink Studio for WMS .................................................. 195

vii
Appendix I: Remote Warehouse Hardware Diagram .................197
Appendix J: Using BarTender Label Share Names .....................198
Label References ................................................................................. 198
Row References .............................................................................. 198
Calculated References ...................................................................... 199
Label Directives ................................................................................... 200
RowSort Label Directive ................................................................... 200
ForceMinLabelQty Label Directive ....................................................... 200
Appendix K: Installing the Exact Bartender Monitor Service .....201
Glossary ...................................................................................205
Index .......................................................................................206

1
Chapter 1: Overview
The Warehouse Management System (WMS) provides a series of additional modules to the
Exact Macola ES series. These modules are designed to greatly enhance a company’s abil-
ity to track products through the entire warehouse.
Conventions
To use WMS, you should also be familiar with the operations of the Exact Macola ES series
Accounts Receivable (A/R), Order Entry (O/E), Purchase Order (P/O), Inventory Manage-
ment (I/M), Production Order Processing (POP), Shop Floor Control (SFC), Bar Code (B/C)
and Electronic Data Interchange (EDI) packages. Please refer to the Exact Macola ES doc-
umentation for information about these packages.
WMS Device Manager
The WMS Device Manager module handles many one-time set up activities and is required
for all Warehouse Management System applications. The Device Manager module main-
tains security and control fields, and provides for the advanced utilities of the system.
The Device Manager module also provides a system layer to WMS that enables communi-
cations with radio frequency handheld units. This module is used in conjunction with the
other modules to allow workers the freedom of the entire warehouse. Although useful in
almost any warehouse, this is particularly beneficial for warehouses that use multi-bin
support.
WMS Pick and Ship Verification Module
The WMS Pick and Ship Verification module provides an easy-to-use, online method of
identifying the individual items being packed in each carton. Incorrect shipments are vir-
tually eliminated by having workers scan the bar code on each item as it is packed. WMS
allows users to cross-reference multiple bar codes to the same item. For example, a single
unit of an item might be represented by a UPC code, while a case of six units of the same
item might be represented by a UCC-14 code. WMS keeps track of the contents of each
carton and validates that the item is on the order and is not being over or under shipped.
Customer specific shipping labels are generated automatically.
This module includes building and tracking pallets; consolidating multiple orders into one
shipment; creating multiple shipments from one order; automatically printing bills of lad-
ing; and printing additional Crystal Reports such as packing lists and manifests.
The Pick and Ship Verification module also incorporates the WMS reporting functions. It
provides the ability to automatically print reports during the shipment completion process.
When activated, WMS executes up to five Crystal Reports or Visual Basic applications at
the time the shipment is completed. The Pick and Ship Verification module ships with
three standard bill of lading reports: a Crystal Report designed to work with the standard
Exact Macola ES bill of lading form; a combination Visual Basic and Crystal Report that
prints a VICS compliant bill of lading; and the Wal-MartTM variation on the VICS standard.
Users familiar with Crystal Reports can create their own custom Crystal Reports to gener-
ate packing slips, manifests, etc., or custom Crystal Reports can be purchased from an
authorized WMS reseller.

2
WMS EDI ASN Data Collection Module
The WMS EDI ASN Data Collection module provides advanced processing options that are
frequently required to generate EDI Advanced Shipping Notice (856) documents. Some of
the features added include: pallet processing; advanced shipment handling to allow
grouping of many orders into a single shipment; splitting an individual order into multiple
shipments within a billing cycle; and the ability to feed information into the Exact Macola
ES EDI ASN sub-module.
In addition, this module adds a powerful tool called autopack, which is used to generate
UCC-128 compliant shipping labels in a batch mode and automatically associate the cor-
rect item and quantities with each unique UCC-128 license number. Companies that are
concerned with becoming EDI compliant but do not wish to scan every item on each ship-
ment use autopack. This functionality is popular with companies that use public ware-
houses. Autopack requires items to be shipped in standard quantities.
The EDI ASN Data Collection module requires the WMS Pick and Ship Verification module.
WMS Receiving and Inventory Data Collection and Labeling Module
The WMS P/O Receiving module provides the ability to receive purchase orders immedi-
ately upon receipt at the warehouse dock. Users scan or type the purchase order and use
bar codes either on the product or on an automatically printed receiving document to sim-
plify the entry of receipt data. Support for many types of bar codes, including vendor spe-
cific, multi-segmented bar codes, is included. Product labels can be generated for products
that do not have bar codes already.
This module also provides the ability to do basic inventory transactions immediately from
within the warehouse. Support is included for inventory transfers, issues, receipts, physi-
cal and cycle counts, and an item bin stock inquiry.
WMS Shop Floor Data Collection and Labeling Module
The WMS Shop Floor Data Collection and Labeling module allows using an R/F device to
enter activity transactions for released shop orders. Support is provided for online picking,
material issues and returns, and material scrap and rejections.
This module requires the Exact Macola ES Bar Code for Manufacturing module to process
transactions.
WMS Production Order Processing Data Collection and Labeling Module
The WMS Production Order Processing Data Collection and Labeling module allows produc-
tion to be entered against a POP order, recording the receipt of the finished good into
stock. WMS prompts for bin, serial, and lot information for back flushed components as
necessary. Support is provided for both RF handheld devices and workstations.
This module requires the Exact Macola ES Bar Code for Production Order Processing mod-
ule to process transactions.
WMS Conveyor Interface Module
WMS Conveyor Support allows WMS to interface with a conveyor management system in a
conveyor-based automated order picking environment. This interface allows WMS to send
order item information to the conveyor management system during stage pick processing.

3
The conveyor management system uses this information to control order packing, includ-
ing determining when one pallet is full and a new one needs to be started.
The conveyor system can then send the pallet packing information back to WMS, which
automatically processes and performs a stage pack operation based on that data, printing
pallet labels as required.
Note: While WMS Conveyor Support allows WMS to interface with a conveyor manage-
ment system, WMS is not a conveyor management system itself. Conveyor Support allows
WMS only to send data to and receive data from a conveyor management program; a sep-
arate conveyor management system is still necessary.
4
Chapter 2: Setup and Process Flow
WMS System Setup
You must complete the WMS system setup before you can use any WMS functions. In
addition, you might occasionally need to change a setting or value to better suit how your
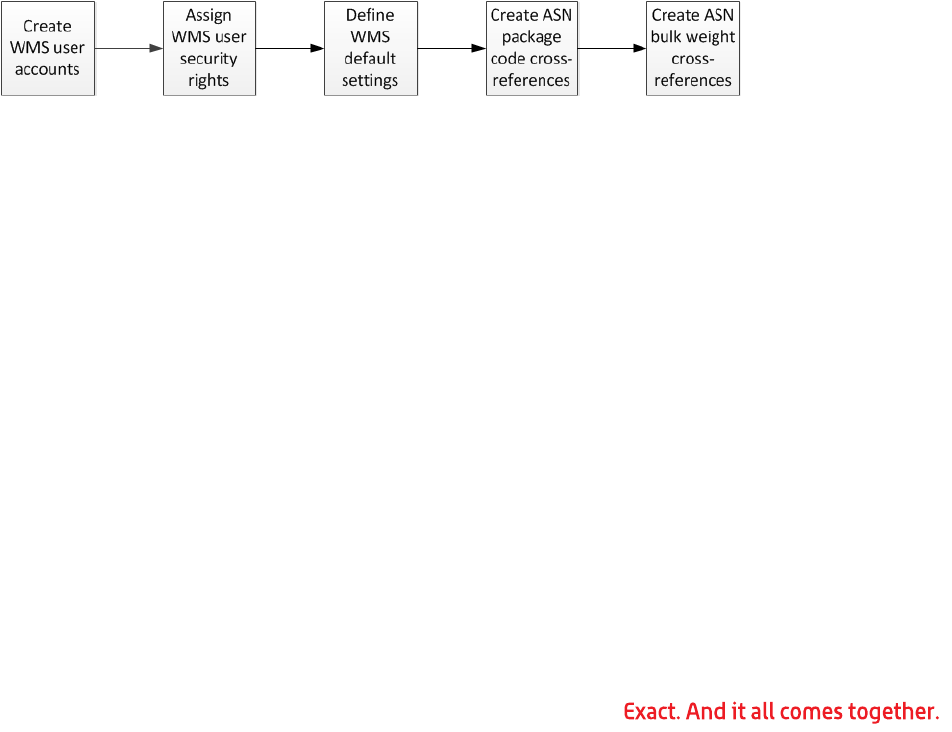
company uses WMS. These are the basic procedures to complete to set up WMS:
1. Create WMS user accounts and assign security rights for shipping, purchase order,
inventory management, shop floor, and production order processing. See “WMS
Security Maintenance” on page 17 for more information.
2. Enter the WMS default settings on the WMS Control File Maintenance screen. The
WMS control file specifies the defaults for shipping, purchase order receiving, and
inventory management, as well as the printers that can be used by WMS. See
“WMS Control File Maintenance” on page 21 for more information.
3. Create ASN package code cross-references. WMS uses these entries to determine
the package type for items and shipments. See “WMS Package Code Maintenance”
on page 55 for more information.
4. Create ASN bulk weight cross-references. The bulk weight cross-references estab-
lish a relationship between a package code in the ASN Package Code Cross-Refer-
ence file and a case pack quantity for an item. See “WMS Bulk Weight
Maintenance” on page 57 for more information.
WMS System Setup Flow Chart
WMS Inventory Management Transactions
Complete the following setups and processing steps to perform I/M transactions in WMS.
WMS Inventory Management Transactions Setup
No specific setups are necessary to process I/M transactions in WMS.
WMS Inventory Management Transactions Processing
The following I/M transactions can be processed in WMS. Each transaction should be pro-
cessed as necessary and is not dependent on any other WMS I/M transaction.
1. Process an inventory issue: issue an item quantity and remove it from inventory.
See “Processing an Inventory Issue” on page 144 for more information.
2. Process an inventory receipt: receive an item quantity and add it to inventory. See
“Processing an Inventory Receipt” on page 146 for more information.
3. Process an inventory transfer: transfer an item quantity to a different warehouse.
See “Processing an Inventory Transfer” on page 147 for more information.
4. Process a physical or cycle count: perform a physical or cycle count using a
directed or a non-directed count method. See “Processing a Physical or Cycle

5
Count” on page 148 for more information.
5. Perform stock inquiries. See “Verifying what is Open on a Purchase Order” on
page 160 for more information.
WMS Purchase Order Receiving
Complete the following setups and processing steps to receive against P/O purchase
orders in WMS.
WMS Purchase Order Receiving Setup
Complete the following setups, as necessary, before using WMS to receive Exact Macola
ES purchase orders. In addition, you might occasionally need to change a setting or value
to better suit how your company uses WMS.
1. Create vendor override entries, if necessary. If there is a vendor override set up for
a vendor, WMS uses the vendor override settings instead of the defaults specified
in the WMS control file. See “Vendor Override Maintenance” on page 88 for more
information.
2. Create vendor bar code definitions, if necessary. If a vendor specific bar code is
being used, the vendor bar code file allows you to define the bar code, including
how to break down the segments. See “Vendor Bar Code Maintenance” on page 89
for more information.
3. Define product labels, if necessary. See “Label Configuration” on page 44 for more
information.
WMS Purchase Order Receiving Processing
The following P/O Receiving transactions can be processed in WMS. Each transaction
should be processed as necessary and is not dependent on any other WMS P/O receiving
transaction.
1. Process receipts against the purchase order in WMS. Either use radio frequency
devices to scan received items and quantities for a specific purchase order, or scan
items with a wedge reader at a packing station. Product labels can also be gener-
ated at this time. See “Processing a Receipt Against a Purchase Order” on
page 156 for more information.
WMS Production Order Processing
Complete the following setups and processing steps to perform Production Order Process-
ing transactions in WMS.
WMS Production Order Processing Transactions Setup
No specific setups are necessary to process POP transactions in WMS.
WMS Production Order Processing Transactions Processing
The following POP transactions can be processed in WMS. Each transaction should be pro-
cessed as necessary and is not dependent on any other WMS POP transaction.
1. Enter production for released production orders. See “Entering Production for a
Production Order” on page 162 for more information.

6
2. Print product labels. (If you do not have these set up, see “Label Configuration” on
page 44.)
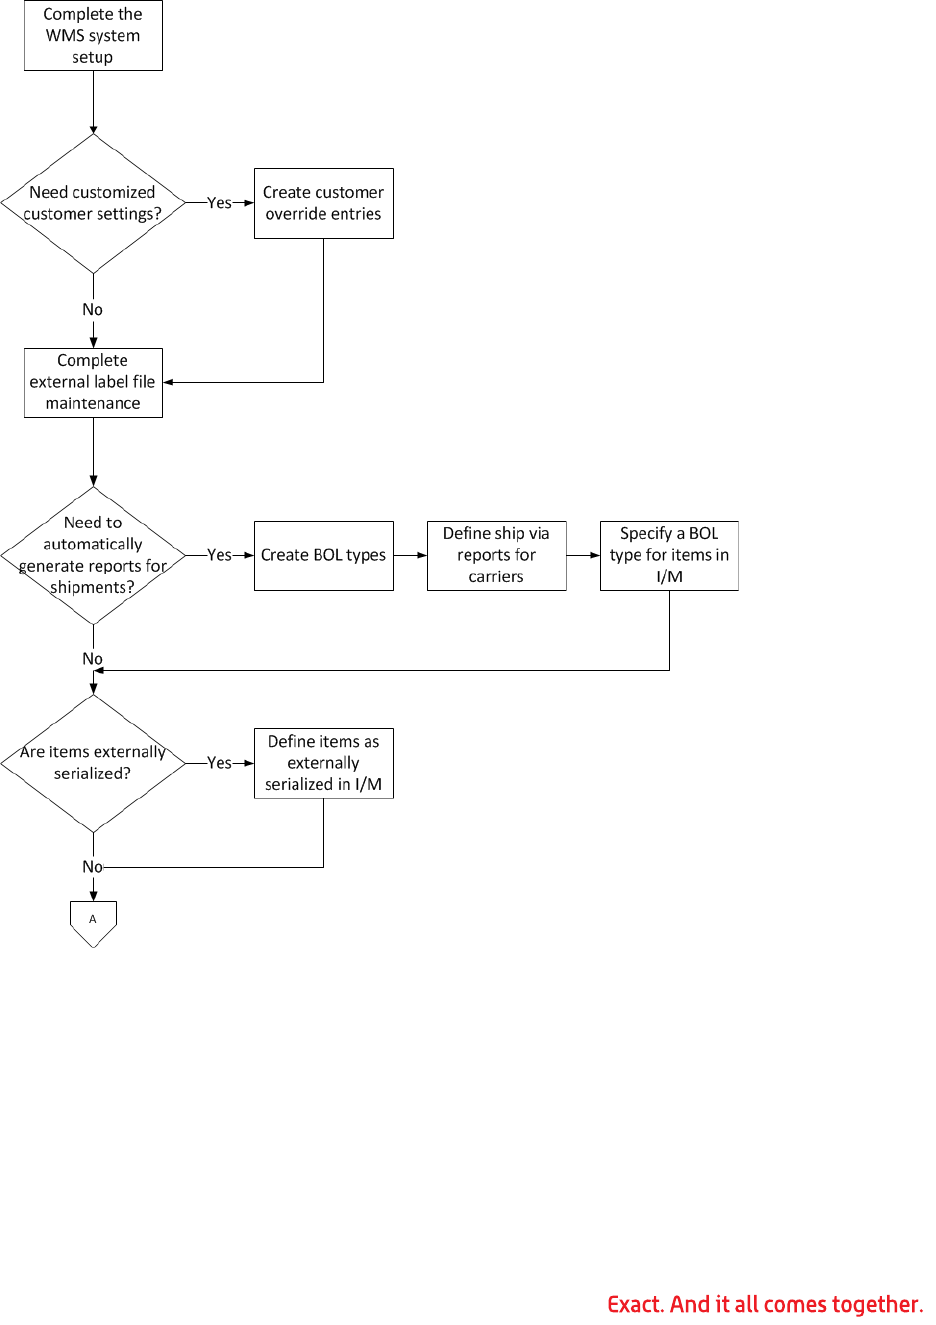
WMS Shipping
Complete the following setups and processing steps to pack and ship O/E orders in WMS.
WMS Shipping Setup
You must complete the WMS shipping setup before you can use perform packing or ship-
ping in WMS. After initial setup, you might occasionally need to change a setting or value
to better suit how your company uses WMS.
1. Create customer override entries. WMS uses the defaults specified in the customer
override file instead of the defaults specified in the WMS control file. See “Cus-
tomer Override Maintenance” on page 70 for more information.
2. Complete external label file maintenance to specify the label format to be used by
WMS and to define the variable fields to be used when the label is printed. See
“External Label Maintenance” on page 73 for more information.
3. Create bill of lading (BOL) types. These entries are used by the WMS Pick and Ship
Verification module to group items into specific freight classification. The BOL type
setup also allows you to enter a specific description for a group, which can be
printed in the commodity description section of the bill of lading. BOL types need to
be created only if you are printing documents when completing shipments. See
“Bill of Lading Type Maintenance” on page 75 for more information.
4. Create ship via reports entries for carriers. The WMS Pick and Ship Verification
module uses these entries to determine which forms to print for each carrier. Ship
via reports need to be defined only if you want to generate reports automatically
when shipments are completed. See “Ship Via Reports Maintenance” on page 77
for more information.
5. Define items as externally serialized, if necessary, in the Item Master. See “Item
Master Maintenance” on page 79 for more information.
6. If printing bills of lading during shipping, specify a bill of lading code for items. See
“Item Master Maintenance” on page 79 for more information.
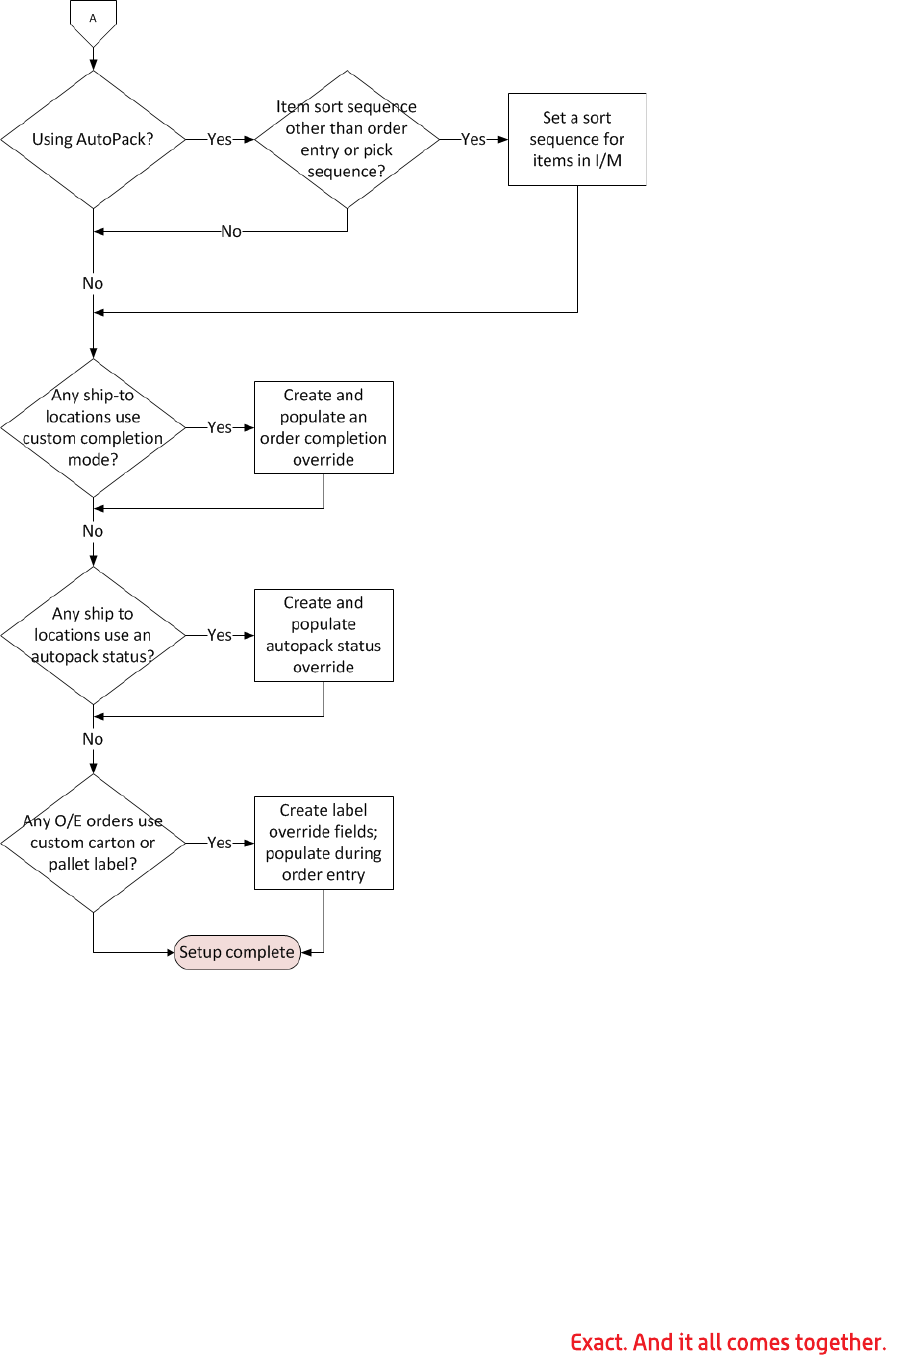
7. Set a specific sort sequence for items in the item inventory location. WMS uses this
when printing autopack labels. If not defined, order entry or pick sequence is used
instead. See “Item/Location Maintenance” on page 82 for more information.
8. If necessary, set up and complete a field to override the order completion mode
and autopack status for individual ship to addresses in the A/R customer delivery
address. Complete this setup only when these settings need to be specified for a
unique individual ship-to. Otherwise, skip this setup to use the defaults already
defined. See “Customer Delivery Address Maintenance” on page 84 for more infor-
mation.
9. If necessary, set up a carton or pallet label override field on the sales order header
in O/E. This setup needs to be completed only if you need to specify a label other
than the default for certain orders. Otherwise, the default label already defined is
used. See “Order Entry Header Setup” on page 85 for more information.
7
WMS Shipping Setup Flow Chart
8
WMS Shipment Processing using Paper Pick Tickets
Complete the following steps, in the order listed, to pack and ship an order in WMS using
paper pick tickets. These steps must be performed for each O/E order that you need to
process in WMS. Some steps, such as generating an EDI ASN, might not be necessary if
your company does not use that feature.
1. Print the O/E Pick Ticket. See “Printing a Pick Ticket” on page 120 for more infor-
mation.
2. Release the O/E order to WMS using post pick ticket processing. This transfers the
order information to WMS so the items can be packed and shipped. See “Releasing
Orders to WMS using Post Pick Ticket Processing” on page 120 for more informa-

9
tion.
3. Log in to WMS. Packing and shipping are done in WMS, which is executed exter-
nally to Exact Macola ES. See “Logging on to WMS” on page 91 for more informa-
tion.
4. Complete packing. There are four different levels of packing. Depending on your
shipping environment, you might complete more than one packing step for each
order.
• Pack the order using pack verify. Items for a specific order are packed into car-
tons. Each order is treated as a unique shipment. If the WMS Advanced Ship-
ping module is not installed, WMS operates only in pack verify mode. See
“Packing Orders in Pack Verify Mode” on page 131 for more information.
• Pack cartons. Items are manually packed into cartons for each order. Individual
cartons or the entire order can then be packed onto pallets or shipments. Multi-
ple orders can be packed onto the same shipment, or an individual order can be
packed onto multiple shipments. See “Packing Cartons for a Pick and Pack Envi-
ronment” on page 124 for more information.
Note: In a standard pack environment, the autopack function can be used to automati-
cally pack items into cartons.
• Pack pallets. If you palletize shipments, use the pack pallets function to pack
cartons, items, or orders onto pallets. Pallets can then be packed onto ship-
ments. See “Packing Pallets” on page 126 for more information.
• Pack shipments. After completing any other packing phases, pack cartons, pal-
lets, or orders onto shipments that can then be completed. See “Packing a
Shipment” on page 128 for more information.
5. Process WMS order billing. This step creates a file that can be used by the Exact
Macola ES Barcode for Distribution module to select orders for billing. It is also
necessary for the order to be closed properly in WMS. See “Using WMS Order Bill-
ing” on page 134 for more information.
6. Import billing information into Exact Macola ES. Quick ship polling in the Exact
Macola ES Barcode for Distribution module uses the billing information file created
by WMS to select orders for billing in the items and quantities shipped. See
“Importing Billing Selection Information using Bar Code for Distribution” on
page 138 for more information.
7. Create the EDI Advanced Ship Notice (856). Use the Exact Macola ES EDI module
to create the ASN, if necessary for this customer. See “Generating an Advanced
Ship Notice Using WMS Shipment Information” on page 138 for more information.
8. Complete O/E order processing and invoicing. See Exact Macola ES O/E Help for
more information.
9. If the order was not completely shipped, close the order in WMS. Any unshipped
quantities for items are reduced to zero, allowing backorders from O/E to be pro-
cessed into WMS using post pick ticket processing. See “Closing WMS Orders when
the Exact Macola ES Order has been Closed” on page 141 for more information.
WMS Shipment Processing using Pick Management
Complete the following steps, in the order listed, to pack and ship an order in WMS using
pick management. The steps must be performed for each O/E order that you need to pro-
10
cess in WMS. Some steps, such as generating an EDI ASN, might not be necessary if your
company does not use that feature.
1. Create EPNs for the O/E orders.
• Pick to pack: Cartons or pallets are immediately labeled for shipping and are
ready to be combined with other cartons or pallets being shipped together. As
the products are placed on the pallet, they are scanned and associated with the
shipping pallet. The pallet can later be associated with a shipment simply by
scanning the pallet label. See “Processing a Pick-to-Pack EPN” on page 97 for
more information.
• Pick to stage/stage pack: Indicates what products are to be picked and where
to take them for staging. A pick-to-stage EPN is always associated with a stage
pack EPN, which directs the packers about how to break out products that have
been brought to a staging area as the result of a pick-to-stage EPN. This can be
done on either an RF device or at a packing station and presents the pack out
process in an order-by-order basis. See “Processing a Pick-To-Stage EPN” on
page 105 for more information.
2. Complete packing. There are four different levels of packing. Depending on your
shipping environment, you might complete more than one packing step for each
order.
• Pack the order using pack verify. Items for a specific order are packed into car-
tons. Each order is treated as a unique shipment. If the WMS Advanced Ship-
ping module is not installed, WMS only operates in pack verify mode. See
“Packing Orders in Pack Verify Mode” on page 131 for more information.
• Pack cartons. Items are manually packed into cartons for each order. Individual
cartons or the entire order can then be packed onto pallets or shipments. Multi-
ple orders can be packed onto the same shipment, or an individual order can be
packed onto multiple shipments. See “Packing Cartons for a Pick and Pack Envi-
ronment” on page 124 for more information.
Note: In a standard pack environment, the autopack function can be used to automati-
cally pack items into cartons.
• Pack pallets. If you palletize shipments, use the pack pallets function to pack
cartons, items, or orders onto pallets. Pallets can then be packed onto ship-
ments. See “Packing Pallets” on page 126 for more information.
• Pack shipments. After completing any other packing phases, pack cartons, pal-
lets, or orders onto shipments that can then be completed. See “Packing a
Shipment” on page 128 for more information.
3. Pack the shipment. After completing any other packing phases, pack cartons, pal-
lets, or orders onto shipments that can then be completed. See “Packing a Ship-
ment” on page 128 for more information.
4. Process WMS order billing. This step creates a file that can be used by the Exact
Macola ES Barcode for Distribution module to select orders for billing. It is also
necessary for the order to be properly closed in WMS. See “Using WMS Order Bill-
ing” on page 134 for more information.
5. Import billing information into Exact Macola ES. Quick ship polling in the Exact
Macola ES Barcode for Distribution module uses the billing information file created
by WMS to select orders for billing in the items and quantities shipped. See
“Importing Billing Selection Information using Bar Code for Distribution” on

11
page 138 for more information.
6. Create the EDI Advanced Ship Notice (856). Use the Exact Macola ES EDI module
to create the ASN, if necessary for this customer. See “Generating an Advanced
Ship Notice Using WMS Shipment Information” on page 138 for more information.
7. Complete O/E order processing and invoicing. See the Exact Macola ES Help for
more information.
8. If the order was not completely shipped, close the order in WMS. Any unshipped
quantities for items are reduced to zero, allowing backorders from O/E to be pro-
cessed into WMS using post pick ticket processing. See “Closing WMS Orders when
the Exact Macola ES Order has been Closed” on page 141 for more information.
12
WMS Shipment Processing Flow Chart
13
14
WMS Conveyor Interface
Complete the following setups and processing steps to allow WMS to interface with a con-
veyor management system.
WMS Conveyor Interface Setup
Complete the following setups to allow WMS to interface with a conveyor management
system. In addition, you might occasionally need to change a setting or value to better
suit how your company uses WMS.
1. Activate conveyor support in the WMS control file.
2. Define conveyors, including logical sort lanes, physical sort lanes, and jackpot sort
lanes.
3. Assign printers to be used by each conveyor.
4. Define FTP settings for each conveyor.

15
WMS Conveyor Interface Processing
Complete the following steps, in the order listed, to use a conveyor management system
with WMS.
1. Create a stage pick EPN.
2. Click the Send to Conveyor button on the EPN Editor screen. WMS validates that
the number of orders does not exceed the number of logical lanes defined for the
conveyor. Then, WMS creates a wave definition file for the stage pick. The wave
definition file contains a record for each carton that specifies the pick number,
order number, sequence number, item UCC-14, cube, weight, and logical lane des-
tination.
3. The wave pick definition file is sent to the conveyor management system. The prior
wave is closed by the conveyor system when the new wave is received.
4. The conveyor system reads the UCC-14 bar codes on the cartons and directs the
products to the lane specified in the wave definition file.
5. The conveyor system writes packing information back to the wave results file.
6. During the next WMS polling cycle, WMS receives the wave results file.
7. Records in the wave results file are processed as follows:
• If the record has a UCC-14 ID and the physical sort lane listed in the record has
not been previously encountered for this wave, WMS adds it to the list of phys-
ical sort lanes for the wave. WMS generates a new pallet number and packs the
UCC-14 in that pallet. The pallet label is then printed to the printer specified for
the lane.
• If the record has a UCC-14 ID and the physical sort lane listed in the record has
already been created for this wave, WMS compares the pallet count number in
the file to the pallet count number for the previous transaction for this lane. If it
is the same, the UCC-14 is packed in that same pallet. If the pallet count num-
ber is different, WMS generates a new pallet number and pack the UCC-14 in
that pallet. The pallet label is then printed to the printer specified for the lane.
• If the record has a NOREAD, UNTRACKED, or EMPTY message, it is not pro-
cessed.
• If the record has an ENDOFWAVE message, WMS increments the number of
lanes completed for the EPN. Once all lanes for the EPN have received the END-
OFWAVE message, WMS marks the EPN as Conveyor Complete.
8. If any item quantities remain to be packed on the EPN, WMS leaves the EPN open
and displays a Reconcile Conveyor message. Double-click the entry on the con-
veyor processing monitor to review any errors. If necessary, use the conveyor pro-
cessing monitor to close the EPN and create a new one for any shortages.
9. If the ENDOFWAVE message is not received for a lane, click the End of Wave button
to process the end of wave for the lane.
10.Once all items for the EPN have been packed, WMS marks the EPN completed.
WMS Shop Floor Control Transactions
Complete the following setups and processing steps to perform Shop Floor Control trans-
actions in WMS.

16
WMS Shop Floor Control Transactions Setup
No specific setups are necessary to process SFC transactions in WMS.
WMS Shop Floor Control Transactions Processing
The following SFC transactions can be processed in WMS. Each transaction should be pro-
cessed as necessary and is not dependent on any other WMS SFC transaction.
1. Issue material. Allows you to issue material for a shop order. See “Issuing Material
to a Shop Order” on page 163 for more information.
2. Enter activity. Allows you to enter activity transactions for a shop order, including
labor hours, machine hours, scrap quantities, and rejections. See “Entering Activity
for a Shop Order” on page 164 for more information.
3. Print product labels. (If you do not have these set up, see “Label Configuration” on
page 44.)

17
Chapter 3: WMS Setup - System
WMS Security Maintenance
WMS Security Maintenance is used to create user accounts and to assign security rights
for WMS. This function should not be provided to all users. Exact Macola ES roles should
be used to limit access to WMS Security Maintenance to authorized personnel.
General Tab
1. To access WMS Security Maintenance, in Exact Macola ES, on the System menu,
under the Distribution heading, select WMS, WMS Security Maintenance.
2. User Name: Type the user name for each person who requires access to the ship-
ping system. This can be 15 characters long.
3. Password: Type the user’s password. This can 15 character long and can be any
combination of numbers, letters, and symbols.
Note: The WMS user name and password do not have to match an Exact Macola ES user
name and password. Any user who needs access to WMS but should not have access to
Exact Macola ES does not need an Exact Macola ES user name or password to be set up as
a WMS user.
4. Location: This is the default warehouse for the user. If the Allow Change Ware-
house check box is cleared, the user has access only to this warehouse.
5. Language: Type the code for the user’s language, such as AE for American Eng-
lish.
6. Allow Change Warehouse: To allow the user to change to a warehouse other
than the warehouse specified in the Location field, select this check box.
7. Mass Delete: To allow the user to delete cartons, pallets, shipments, and orders
from within WMS Inquiry, select this check box. It is recommended that only key
personnel have access to this option.
18
Shipping Tab
1. Enable Shipping: To allow the user to access shipping functions in WMS, select
this check box.
2. Pack Cartons: To allow the user to pack items into cartons, select this check box.
3. Pack Pallets: To allow the user to pack pallets, select this check box. This function
is used to attach cartons onto pallets.
4. Pack Shipments: To allow the user to pack shipments, select this check box. This
function is used to attach cartons and pallets onto shipments.
5. Order Billing: To allow the user to access the order billing function, select this
check box. To use this function, you must have the Exact Macola ES Barcode for
Distribution module installed. In pack verify mode, this option allows the user to
close the order and run the Update Macola function.
19
Purchase Order Tab
1. Enable Purchase Order: To allow the user to process purchase order receipts on
R/F guns, select this check box.
Inventory Tab
1. Enable Inventory Management: To allow the user access to the inventory man-
agement functions on R/F guns, select this check box.
2. Issues: To allow the user to issue inventory, select this check box.
3. Receipts: To allow the user to process inventory receipts, select this check box.
4. Transfer Inventory: To allow the user to transfer inventory, select this check box.
5. Count Tags: To allow the user access to the count tags functions, select this check
box.
20
6. Product Labels: If this check box is selected, there is a new menu option on the
RF handheld device that the user can use to print an Ad Hoc product label for any
item.
7. Stock Inventory: To allow the user to perform stock inquiries, select this check
box.
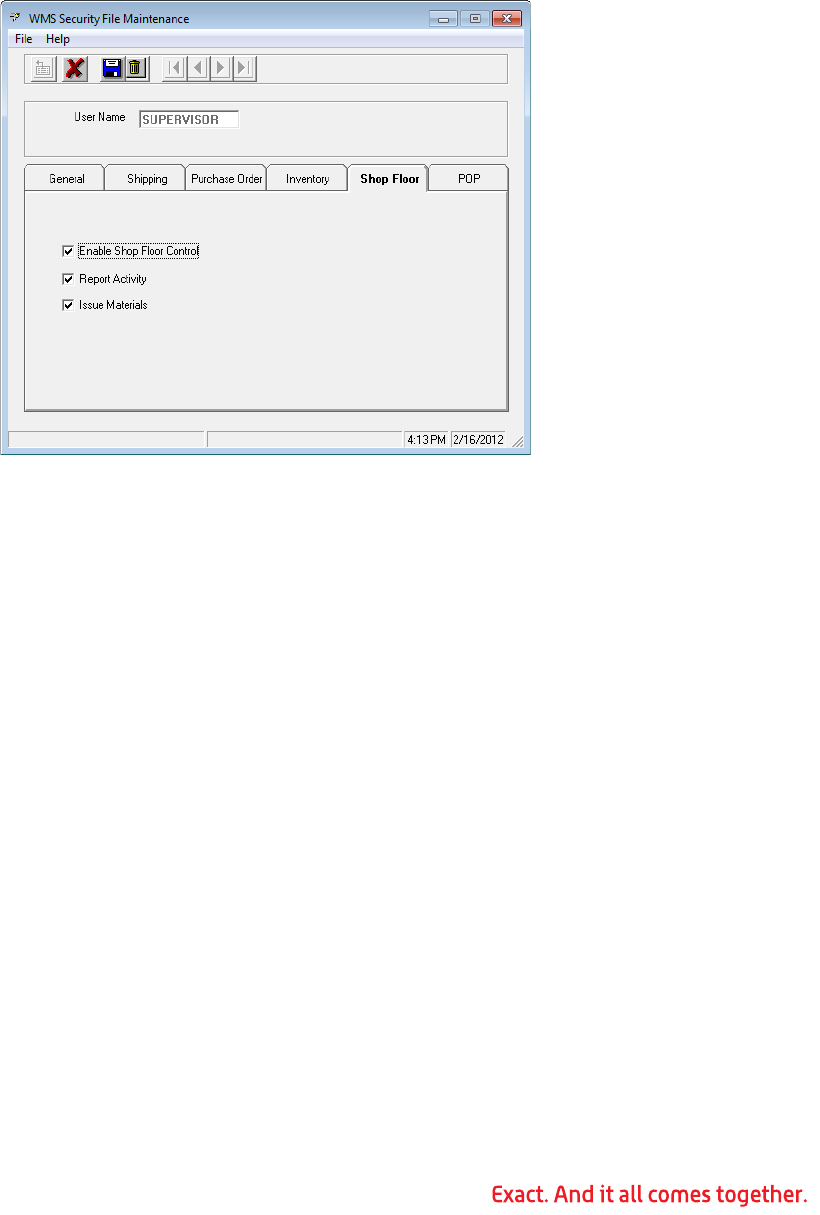
Shop Floor Tab
1. Enable Shop Floor: To allow the user access to the shop floor functions, select
this check box.
2. Report Activity: To allow the user to report activity, select this check box.
3. Issue Materials: To allow the user to issue materials, select this check box.
21
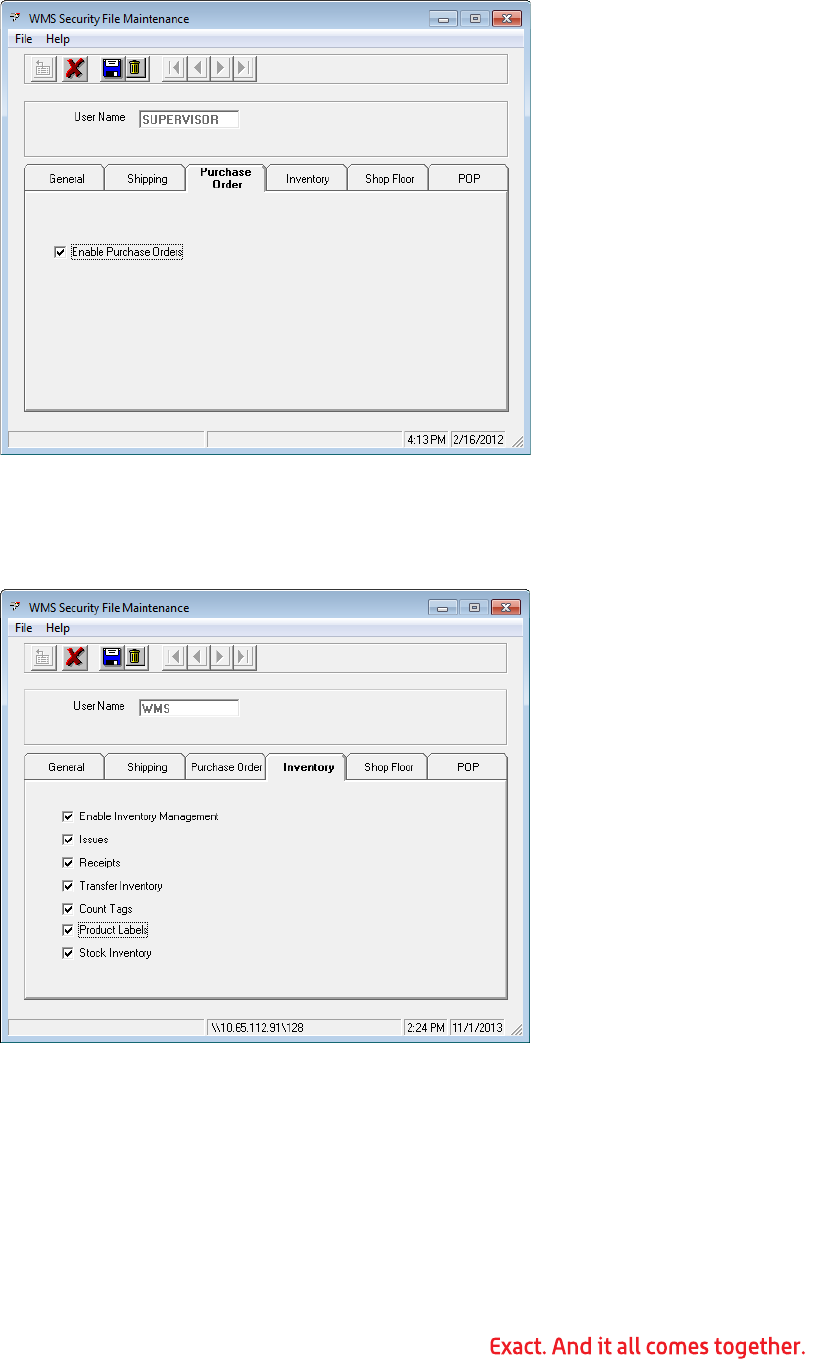
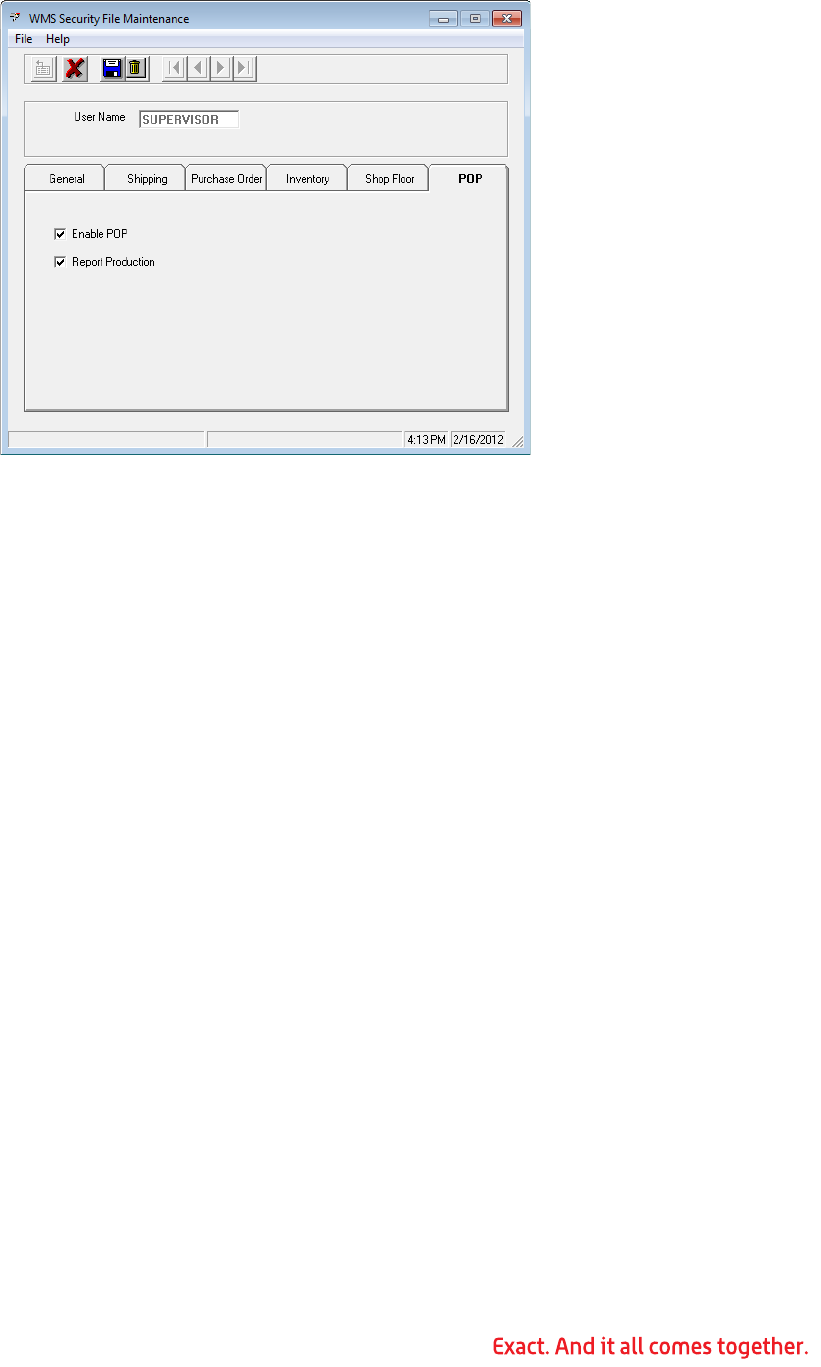
POP Tab
1. Enable POP: To allow the user to access the production order processing func-
tions, select this check box.
2. Report Production: To allow the user to report production on production orders,
select this check box.
WMS Control File Maintenance
The WMS control file specifies the default settings in WMS. In Exact Macola ES, on the
System menu, under the Distribution heading, select WMS, WMS Control File Mainte-
nance.

22
Shipping Tab
General Settings
1. UPC Company Code: Type your company’s five digit UPC code, as assigned by the
Universal Code Council, with two leading zeros. This is used as a component of the
serial number on the UCC-128 label.
2. Department Qualifier: This value specifies where the department number is
located in the inbound EDI 850 document. Typically, this value should be set to DP.
3. Item Master Bill of Lading Type Field: This field specifies the user defined field
or user note field from the I/M Item Master file that is used to classify items into
bill of lading types. If this field is set to XX, all items are classified as bill of lading
type DFLT.
4. Allow Scanning Range: Determines whether users are allowed to scan a range of
carton labels onto a shipment or pallet.
5. Default To Scanning Range: When activated, WMS defaults to scanning ranges
if users are allowed to scan carton ranges. This option is disabled if Allow Scanning
Range is set to N.
6. Force Entry of Multiplier?: Select this check box if a user is typically required to
specify a multiplier or quantity when processing shipping entries. WMS prompts for
the multiplier before asking for the item number.
Billing Options
7. Default Order Completion Mode: This field is used to determine when billing
selection is done. This value can be overridden for a specific customer in the cus-
tomer override file.
•WMS Billing: Indicates that WMS requires a user to close each order individu-
ally. Use this method to allow easier control when a single order is often split

23
among multiple shipments within a billing cycle. The order is manually com-
pleted only after the last shipment for that order is processed for the day.
Requiring the order to be closed manually prevents the accidental partial selec-
tion of an order when the user clicks the Update Macola button (this button is
on the WMS main packing station screen).
•Pack Shipments: Indicates that an order should be completed when a ship-
ment to which it is attached is completed. Use this method to simplify order
processing. Each order is flagged as complete when the shipment is completed,
eliminating the need to process each order manually with the WMS billing func-
tion. The billing selection information is passed to Exact Macola ES when a user
clicks the Update Macola button.
•Pack Verify Cartons: Indicates that an order should be treated as a unique
shipment. When the order is completed, it is automatically attached to a ship-
ment, which is then automatically completed. This mode is typically used for
customers with individual orders that are shipped to different locations or at
different times.
8. ODB Generations: This field specifies the number of copies of quick ship ODB files
to save for shipping transactions. Although rarely necessary, having a backup of
these files can help track and resolve problems that occur when updating Exact
Macola ES from WMS. The maximum number of files that can be saved is 9999.
9. Do not Enter Freight and Misc: Select this check box if you do not want to allow
users to enter freight or miscellaneous charges during order verification.
10.Confirm Ship and Confirm Bill: This check box is used to specify that WMS
should perform both a confirm ship and a confirm bill operation simultaneously.
This is valid only if the Exact Macola ES system is set to confirm ship. When
selected, the quick ship transaction is specified for both steps simultaneously. With
this option, WMS can be configured to relieve inventory before posting O/E to A/R
without the additional burden of doing both a confirm ship and a confirm bill oper-
ation manually in Exact Macola ES.
11.Immediate Auto Bill for Pack Verify: This check box can be used to specify that
the process to update Exact Macola ES should occur immediately upon completing
an order in pack verify mode. When this is selected, a user does not need to peri-
odically click the Update Macola button. WMS automatically generates the ODB file
for Bar Code quick ship polling. If quick ship polling is running, the order is selected
for billing (or confirmed shipped) immediately.
Note: If this option is used, billing corrections cannot be made within WMS for pack veri-
fication orders. The order is immediately closed for this cycle and prepared for the next
cycle.
12.Do not post zero ship to Quantities: This check box is used to suppress selec-
tion of line items that are completely unpacked. WMS leaves those items
unselected when invoicing or performing confirm ship transactions.
AutoPack Options
13.Automatic Pack Cartons: This is a global setting that allows for the automatic
generation of UCC-128 labels based on standard case quantities and the quantity
ordered. This setting can be overridden for specific customers with an entry in the
customer override file. When using autopack mode, the pack cartons function is
unnecessary. See “WMS Bulk Weight Maintenance” on page 57 for instructions on
setting up standard case quantities.
24
14.1 Carton Per Order?: This option forces WMS to create a single carton for orders
that are being packed using the autopack function. When selected, autopack cre-
ates a single carton and pack all of the items on an order into that single carton.
This option is disabled if the Automatic Pack Cartons check box is not selected.
15.Alt Address AutoPack Override field: Specify a user defined field in the A/R
customer delivery address that can be used to override the order completion mode
and autopack settings for a specific alternate address. This is typically used when
small store orders are handled through pack verification and large DC (distribution
center) orders are handled using autopack. The following values can then be spec-
ified in the field in the customer address file:
VN = Pack Verify Mode, AutoPack Off
SN = Pack Shipments Mode, AutoPack Off
SY = Pack Shipments Mode, AutoPack On
BN = WMS Billing Mode, AutoPack Off
BY = WMS Billing Mode, AutoPack On
Note: If any other value is typed into this UDF field, it is ignored and the default values
are used.
16.AutoPack Label Sequence UDF: Specify a user defined field in the item location
entry to use to sequence labels printed using autopack. Normally, WMS uses the
Pick Ticket Order field on the Order Entry Setup screen to determine the order to
print the labels. The labels are then printed either in pick sequence or in order
entry sequence. When a UDF is specified in the AutoPack Label Sequence UDF field,
the labels use the value of the I/M item location UDF specified here.
Shipping Label Settings
17.Carton UCC 128 Number: Type the label sequence number for the next carton
label. This number increments for each label printed.
18.Carton Label Override Field: Select the user defined field from the O/E order
header that is used to override the label format used to print carton (pack) labels.
If set to XX, the label format cannot be overridden.
Note: WMS versions prior to 7.5.11 used a setting in the WMS INI file to allow this. The
INI entry is no longer supported.
19.Carton Defer Printing: This check box instructs the pack cartons or pack verify
function to defer printing a carton label until the carton is packed. If this field is
cleared, WMS prints a label immediately when a new carton is created. However,
some customers require the label to indicate the contents of the carton. If the label
is printed before the items are packed, WMS cannot print the item number on the
label. If the Defer Printing check box is selected, WMS does not print the label until
the user clicks the Reprint button or leaves the carton.
20.Pallet UCC 128 Number: Type the label sequence number for the next pallet
label. This number increments with each label printed.
21.Pallet Label Override Field: Select the user defined field from the O/E order
header that is used to override the label format used to print pallet (tare) labels. If
set to XX, the label format cannot be overridden.
25
Note: WMS versions prior to 7.5.11 used a setting in the WMS INI file to allow this. The
INI entry is no longer supported.
22.Pallet Defer Printing: This check box instructs the pack pallets function to defer
printing a pallet label until the pallet is packed. If this field is cleared, WMS prints a
label immediately when a new pallet is created. However, some customers require
the label to indicate the contents of the pallet. If the label is printed before the
items are packed, WMS cannot print the item number on the label. If the Defer
Printing check box is selected, WMS does not print the label until the user clicks the
Reprint button or leaves the pallet.
23.Label Qty Format: The format of case packs when printed on labels. This is typi-
cally ####, which indicates four digits with no leading zeros. This format follows
standard VB numeric formatting rules and defaults to #### if not specified.
24.Label Configuration button: Click to edit label setups, including whether labels
print, the label format name, and overrides for customers, items, product catego-
ries, vendors, and vendor items. See “Label Configuration” on page 44 for more
information.
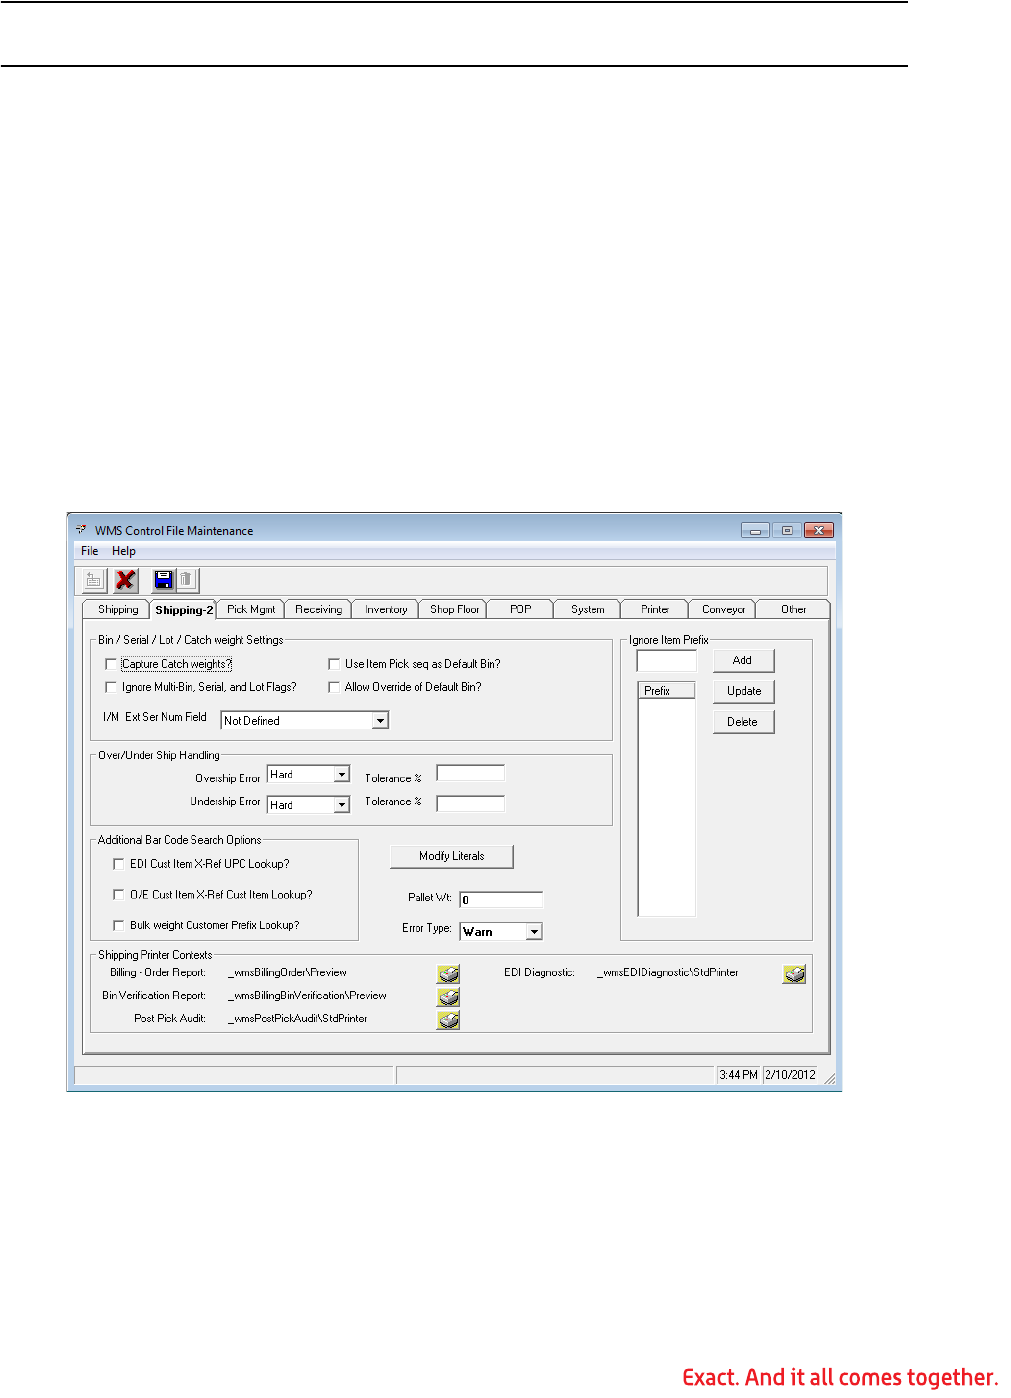
Shipping 2 Tab
Bin/Serial/Lot/Catch Weight Settings
1. Capture Catch Weights: Select this check box if WMS should record the break-
down of each quantity packed into a carton. This is a common requirement when
products are sold by weight.
2. Ignore Multi-Bin, Serial and Lot Flags: This check box can be used to disable
multi-bin, serial, and lot support in WMS. This check box instructs WMS not to ask
for bin, serial, or lot numbers. This should be selected only for companies not using

26
the WMS automatic billing functions. This field is for use with non-pick manage-
ment orders only. It does not apply to pick management orders.
3. Use Item Pick Seq as Default Bin: This check box can be selected to have WMS
automatically default the bin number to the value specified in the item’s picking
sequence field from the I/M item location. This is useful if multi-bin is turned on
but shipping is done from one primary bin location for each item. With this option
selected, a bin number does not need to be typed or scanned unless the item is
being shipped from a bin other than the standard location. This field is for use with
non-pick management orders only. It does not apply to pick management orders.
4. Allow Override of Default Bin: This check box can be selected to allow the user
to override a default bin number. This check box is disabled if Use Item Pick Seq as
Default Bin is not activated. If default bins are being used and Allow Override of
Default Bin is cleared, WMS does not prompt for the bin number unless the default
bin has not been specified or an invalid bin is specified as the default. If this check
box is selected, WMS defaults to the bin specified in the Item Pick Sequence field,
but the user can override it. If the Use Item Pick Seq as Default Bin check box is
not selected, WMS always prompt for a bin. This field is for use with non-pick man-
agement orders only. It does not apply to pick management orders.
5. I/M Ext Ser Num Field: This field (external serial number) specifies the user
defined field, user note field, or user code field to be used in the I/M item master to
identify that an item is externally serialized. When this field is not XX, external
serial numbers can be tracked. The item master field specified must contain a Y for
the item to be considered externally serialized. External serial numbers are entered
but not validated against the Exact Macola ES Lot/Serial file. The external serial
numbers are written to the order line comment file and can be looked up using the
Exact Macola ES Where Used inquiry.
Over/Under Ship Handling
6. Overship Error: If set to Warning, a warning message is displayed during carton
packing if the quantity packed is greater than the quantity ordered, but the user
can accept the message and ship the extra quantity. If set to Hard, an error mes-
sage is displayed and the entry is not allowed.
7. Tolerance %: Used to indicate that WMS should generate a warning or error only
if the item is over shipped by a value greater than the percentage specified.
8. Undership Error: If set to Warning, a warning message is displayed during order
verification, shipment completion, and order billing if the quantity packed is less
than the quantity ordered. The user can accept the message and ship without com-
pletely filling the order. If set to Hard, an error message is displayed and these
functions are not allowed until the remaining quantity is packed and shipped.
9. Tolerance %: Used to indicate that WMS should generate a warning or error only
if the item is under shipped by a value greater than the percentage specified.
Additional Bar Code Search Options
The check boxes in this section allow the user to configure how WMS determines the item
number being processed when a value is entered into any of the item ID fields in WMS.
The normal hierarchy of this search is to see if the specified code can be found in the fol-
lowing fields:
• WMS Bulk Weight Maintenance Alternate Item Identifier
• I/M Item Master UPC Code
• I/M Item Master Item Number

27
If the check boxes are selected, the additional search options are added, in order, to the
top of this hierarchy.
These additional searches are typically used when a company has assigned the same UPC
or UCC-14 number to multiple item numbers. Such use violates Universal Code Council
standards and is not recommended. However, it can be difficult to remove these technical
violations from a company’s catalog, so these options allow WMS to be configured to cor-
rectly handle this situation. However, it is strongly recommended to avoid creating dupli-
cate situations in the future and to make reasonable efforts to remove duplications going
forward.
10.EDI Cust Item X-Ref UPC Lookup?: Add the EDI item cross-reference UPC No
field to the search hierarchy. This option is ignored if the Exact Macola ES EDI mod-
ule is not installed. Normally this check box should be cleared.
11.O/E Cust Item X-Ref Cust Item Lookup?: Adds the O/E customer item cross-
reference Customer Item Number field to the search hierarchy. Normally this check
box should be cleared.
12.Bulk Weight Customer Prefix Lookup?: Adds the customer number as a prefix
in the WMS bulk weight cross-reference Alternate Item Identifier field. WMS adds
the prefix to the specified code to the customer number between the ^ symbols,
and then attempts to find the concatenated value in the Alternate Item Identifier
field before using the normal hierarchy. Normally this check box should be cleared.
Shipping Printer Contexts
13.Billing-Order Report: Displays the default billing-order report. Click the Maintain
Printer Context button to edit the report printing settings.
14.Bin Verification Report: Displays the default bin verification report. Click the
Maintain Printer Context button to edit the report printing settings.
15.Post Pick Audit: Displays the default post pick ticket processing audit report.
Click the Maintain Printer Context button to edit the report printing settings.
16.EDI Diagnostic: Displays the default EDI diagnostic report. Click the Maintain
Printer Context button to edit the report printing settings.
Ignore Item Prefix
Specify a list of prefixes for specialty item numbers. Items that begin with this prefix are
not written into WMS and are billed automatically when the order is selected for billing.
You can specify up to 10 different prefix codes.
Note: The prefix ** is automatically considered a miscellaneous item, which is the stan-
dard used by the EDI module.
17.Ignore Item Prefix: To add an item prefix to be ignored, type the prefix in the
Ignore Item Prefix field, and then click Add.
18.To remove an item prefix, click the prefix in the list to select it, and then click
Delete.
19.To change an existing item prefix, click the prefix in the list to select it. Type the
new value in the field, and then click Update.
28
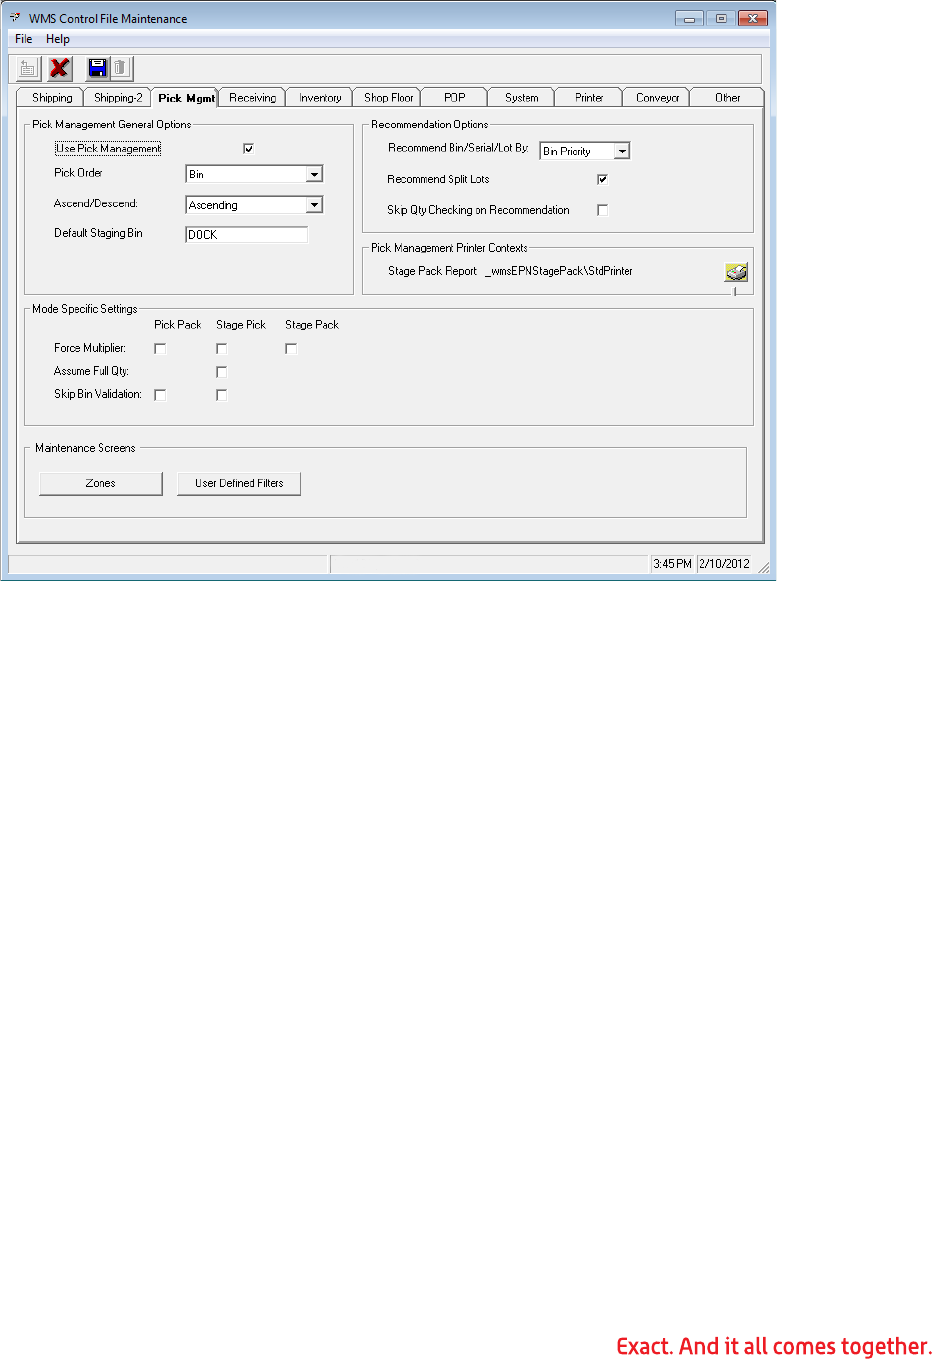
Pick Mgmt Tab
The Pick Mgmt tab might not be visible if Pick Management has not been enabled on your
system. If you do not see this tab, please contact WMS support for further information.
Pick Management General Options
1. Use Pick Management: Select this check box to enable electronic pick tickets.
This is intended for use in an RF environment because it enables the use of hand-
held devices to walk a picker through picking the order.
2. Pick Order: Select the field that contains the sequencing value for the critical path
through the warehouse. In a binned environment this typically is the bin number.
In a non-binned environment, this is typically the pick sequence. However, the user
can choose from the following values: Bin; Pick Sequence; and Inventory Location
User Defined 1 - 5.
3. Ascend/Descend: Select whether the natural flow through the warehouse for the
pick order specified in the EPN Pick Order field is Ascending or Descending.
4. Default Staging Bin: Type the value used when creating a stage pack as the
default location for staging products. This can be overridden when the stage pack
is created.
Recommendation Options
5. Recommend Bin/Serial/Lot By: Select Expiration Date or Bin Priority as the pri-
mary criteria when making recommendations for bin, serial, and lot items. Expira-
tion Date is applicable only to serial and lot items. When Bin Priority is selected,
WMS does not recommend a specific lot or serial number in the bin.
6. Recommend Split Lots: This check box should be selected if WMS can use more
than one lot to fulfill the order. If Recommend Split Lots is selected, WMS uses the
remainder of the oldest, non-expired lot, and then fills the remaining open quantity

29
from the next available lot. If this check box is cleared, WMS uses the oldest lot
that has sufficient quantity to fulfill the order. This setting is ignored if the Recom-
mend Bin/Serial/Lot By field is set to Bin Priority.
7. Skip Qty Checking on Recommendation: Select this check box to force WMS to
recommend the item from the first valid bin, even if that bin does not have suffi-
cient quantity to fill the order. This is typically used when bin quantities are replen-
ished multiple times a day to guarantee there is always quantity on hand.
Pick Management Printer Contexts
8. Stage Pack Report: Displays the default report name for the stage pack report.
Click the Maintain Printer Context button to configure the report printing settings.
Mode Specific Settings
9. Force Multiplier: Select this check box if a user typically is required to specify a
multiplier or quantity when processing picks. If this is selected, WMS prompts for
the multiplier before asking for the item number. Set this option for Pick Pack,
Stage Pick, and Stage Pack.
10.Assume Full Qty: Select this check box if WMS should pack the full open quantity
without the user having to specify a multiplier. This option is available for Stage
Pick only.
11.Skip Bin Validation: Select this check box to allow the user to pick from a bin
without having to scan and validate that it is the correct bin. This option is avail-
able for Pick Pack and Stage Pick only.
Maintenance Screens
12.Zones button: Click to define pick management zones. See “Zone Maintenance” on
page 66 for more information.
13.User Defined Filters button: Click to set up user defined queries for filtering sales
orders in Pick Management. See “User Defined Filters” on page 58 for more infor-
mation.
30
Receiving Tab
P/O General Options
1. Force Entry of PO Multiplier: Select this check box if the user is typically
required to specify a multiplier or quantity when performing receiving entries. If
this is selected, WMS prompts for the multiplier before asking for the item number.
2. Receiving Dock is Bin: Select this check box if the Exact Macola ES bin system is
in use and goods are typically off-loaded from the truck at a warehouse dock and
then transferred to where they are stored.
3. ODB Generations: This field specifies the number of copies of the quick receipt
ODB files to save for receipt transactions. Although rarely necessary, having a
backup of these files can help track and resolve problems that occur when updating
Exact Macola ES from WMS. The maximum number of files that can be saved is
9999.
Receiving Printer Contexts
4. Scan Sheet: Displays the default report name for the scan sheet. Click the Main-
tain Printer Context button to configure the report printing settings.
Options for Receipts of Bin/Serial/Lot Quantities
5. Default Serial/Lot Mode: Choose an option for the default serial/lot mode:
•Static/Numeric: Displays the bin/serial/lot static number screen
•Scan Full Number: Displays the bin/serial/lot full scan mode screen
WMS displays one of these screens if the operation is a Y count point and the par-
ent item is a serial or lotted item, or if the parent item is binned and the Receive to
Staging Bin check box is cleared.
31
6. Force Multiplier: Select this check box if the user typically is required to specify a
multiplier or quantity when processing purchase order receipts. If this is selected,
WMS prompts for the multiplier before asking for the item number.
7. Assume Remaining Qty: Select this check box to default to receiving the full
quantity remaining for an item. If cleared, the quantity defaults to 1 unless the
user overrides it.
8. Prompt for MFG Serial/Lot No: Select this check box to prompt the user to
enter the manufacturer’s serial or lot number when receiving items.
9. Prompt for Exp Date: Select this check box to prompt the user to enter an expi-
ration date when receiving items. The expiration date defaults to the current date
plus the shelf life days from the item number. If the Shelf Life Days defined on the
Item Master Maintenance screen is zero, the default expiration date is the current
date plus fifteen years.
10.Auto Generate Serial Numbers: Select this check box to keep users in static
numeric mode and prevent them from switching between scan numeric mode and
full scan mode.
Inventory Tab
Inventory Issues
1. Force Multiplier: Select this check box if the user typically is required to specify a
multiplier or quantity when issuing inventory. If this check box is selected, WMS
prompts for the multiplier before asking for the item number.
2. Assume Remaining Qty: Select this check box to default to issuing the full quan-
tity remaining for an item. If cleared, the quantity defaults to 1 unless the user
overrides it.

32
Inventory Receipts
3. Default Serial/Lot Mode: Choose an option for the default serial/lot mode:
•Static/Numeric: Displays the bin/serial/lot static number screen
•Scan Full Number: Displays the bin/serial/lot full scan mode screen
4. Force Multiplier: Select this check box if the user typically is required to specify a
multiplier or quantity when receiving inventory. If this check box is selected, WMS
prompts for the multiplier before asking for the item number.
5. Assume Remaining Qty: Select this check box to default to receiving the full
quantity remaining for an item. If cleared, the quantity defaults to 1 unless the
user overrides it.
6. Prompt for MFG Serial/Lot No: Select this check box to prompt the user to
enter the manufacturer’s serial or lot number when receiving items.
7. Prompt for Exp Date: Select this check box to have WMS prompt the user to
enter an expiration date when receiving items. The expiration date defaults to the
current date plus the shelf life days from the item number. If the Item Master Shelf
Life Days is zero, the default expiration date is the current date plus fifteen years.
8. Auto Generate Serial Numbers: Select this check box to keep users in static
number mode and prevent them from switching between scan numeric mode and
full scan mode.
Inventory Transfers
9. Force Multiplier: Select this check box if the user typically is required to specify a
multiplier or quantity when processing inventory transfers. If this check box is
selected, WMS prompts for the multiplier before asking for the item number.
Inventory Transactions
10.Allow Any To Bin: Select this check box if the bin number does not need to exist
already when transferring or receiving product into the bin.
11.Specify Order Number: Select this check box if WMS should prompt for an order
number while processing issues, receipts, and transfers.
12.Allow Any Order Number: Select this check box if WMS should not validate the
order against Exact Macola ES Order Entry. If this check box is cleared, WMS vali-
dates the order number and allow issues, receipts, and transfers only for items
that appear on the order.
13.ODB Generations: This field specifies the number of copies of the inventory
transaction ODB files to save for issue, receipt, and transfer transactions. Although
rarely necessary, having a backup of these files can help track and resolve prob-
lems that occur when updating Exact Macola ES from WMS. The maximum number
of files that can be saved is 9999.
14.WMS Qty Checking on ISSUE/Xfer: This controls how WMS validates available
bin/lot quantities for issuing and transferring quantities with regards to making use
of additional information that WMS knows about the usage of a bin/lot. Note: WMS
does not allow the bin or lot if the available quantity in Exact Macola ES will go
negative.
Soft - If WMS calculates that there is insufficient quantity to issue or transfer, tak-
ing into account WMS recommendations, and pending transactions that have not
been polled yet, the system gives a warning message and allows the user to over-

33
ride. This may cause an exception or cause a user processing an EPN to be sent to
a location that does not have product available.
Hard - If WMS calculates that there is insufficient quantity to issue or transfer, tak-
ing into account WMS recommendations, and pending transactions that have not
been polled yet, the system gives a message and does not allow the transaction.
Ignore - WMS looks only at the quantity available as shown in Exact Macola ES I/M.
Physical/Cycle Count Options
15.Force Multiplier: Select this check box if the user typically is required to specify a
multiplier or quantity when processing count tags. If this check box is selected,
WMS prompts for the multiplier before asking for the item number.
16.Auto Advance: Select this check box if the user typically makes one entry per tag.
WMS automatically advances to the next tag once the current one is processed.
This option is ignored for non-directed counting.
17.Record Non-Bin Location: Select this check box to require the user to enter a
bin location, even for non-binned warehouses or items. This information prints on
the reconciliation reports, which is useful in determining each item’s location, but
does not affect the posting.
18.Automatically Use Empty Tags: Select this check box for WMS to automatically
use an empty tag when an item is scanned that was not included when the count
was generated. If this check box is cleared and empty tags are available, WMS dis-
plays a warning. The user must acknowledge the warning to use an empty tag.
Stock Inquiry
19.Hide Zero Quantity Bins: Select this check box if the bin stock inquiry should
default not to display zero quantity bins.
Product Labels
20.Default Calculated Number of Labels to 1?: If this check box is selected, it
forces the default quantity to be 1 label for the entire transaction quantity, instead
of 1 per unit when a bulk weight record is not found. If there is a bulk weight
record, it takes precedence over this setting. If this check box is cleared, WMS
assumes a quantity of 1 per, which means that you get 1 label for every unit
received. For example, if this check box is cleared and there are no bulk weight
matching entries and you receive 5000 pieces into inventory from P/O, I/M
Receipts, POP Receipts, or SFS Receipts, it would print 5000 labels, at 1 per. If this
check box is selected, it would print 1 label for the 5000.
34
Shop Floor Tab
SF Activity General Options
1. Receive to Staging Bin: Select this check box to receive orders to the staging bin
automatically by default.
2. Check Prev Oper Qty Complete: Checks the quantity of the previous operation
to determine the quantity completed for its parent item.
• Soft: Warns when entering an amount that is over production.
• Hard: Prevents entering an amount that is over production.
• Ignore: Allows over production.
3. Over Production Message: Choose a method for handling over production
entries.
• Warn: Warns when entering an amount that is over production.
• Hard: Prevents entering an amount that is over production.
SF Activity Options for Completed Bin/Serial/Lot Quantities
4. Default Serial/Lot Mode: Choose an option for the default serial/lot mode:
• Static/Numeric: Displays the bin/serial/lot static number screen.
• Scan Full Number: Displays the bin/serial/lot full scan mode screen.
WMS displays one of these screens if the operation is a Y count point and the par-
ent item is a serial or lotted item, or if the parent item is binned and the Receive to
Staging Bin check box is not selected.

35
5. Force Multiplier: Select this check box if users are typically required to enter a
multiplier or quantity when entering receipt quantity.
6. Assume Remaining Qty: This is used in SFC when issuing binned, serial, or lot-
ted components during a back flush. If selected, WMS defaults to issuing the full
quantity remaining against the lot. If you clear this check box, the quantity
defaults to 1 unless the user overrides it.
7. Prompt for MFG Serial/Lot No: Select this check box to have WMS prompt users
for the manufacturer’s serial or lot number.
8. Prompt for Exp Date: Select this check box to have WMS prompt users for an
expiration date. The expiration date defaults to the current date plus the shelf life
days from the item number. If the Item Master Shelf Life Days is zero, the default
expiration is the current date plus fifteen years.
9. Auto Generate Serial Numbers: Select this check box to keep the users in static
numeric mode and prevent them from switching between scan numeric mode and
full scan mode.
Material Issue and Return General Options
10.Over Issue Message: Choose an option for handling over issues:
• Warn: Warns users when issuing an amount greater than what is required.
• Hard: Prevents users from issuing an amount greater than what is required.
11.Force Multiplier: Select this check box if users are typically required to enter a
multiple or quantity when entering material issues and returns.
Options for Issues/Returns of Bin/Serial/Lot Components
12.Force Multiplier: Select this check box if users are typically required to enter a
multiplier or quantity when entering issued quantities.
13.Assume Remaining Qty: This is used in SFC when issuing binned, serial, or lot-
ted components during a back flush. If selected, WMS defaults to issuing the full
quantity remaining against the lot. If cleared, the quantity defaults to 1 unless the
user overrides it.
SF Activity Data Collection Options
14.Prompt for Path: Select this check box for WMS to prompt the user for the path
number. If this check box is cleared, the system forces the path to 0000.
15.Default Operation to Y count: Select this check box to default the activity trans-
action to Y count.
16.Display Department: Select this check box for WMS to display the department
number for the user.
17.Override Department: Select this check box to allow the user to enter a different
department number and enable the F7 key to search for departments.
18.Display Work Center: Select this check box to display the work center for the
user.
19.Override Work Center: Select this check box to allow the user to enter a differ-
ent work center and enable the F7 key to search for work centers.
20.Display Labor Grade: Select this check box for WMS to display the labor grade
for the user.
36
21.Override Labor Grade: Select this check box to allow the user to enter a different
labor grade and enable the F7 key to search for labor grades.
22.Enter Labor Hours: Select this check box to allow the user to enter the number of
labor hours.
23.Enter Completed Quantity: Select this check box to allow the user to enter the
completed quantity.
24.Enter Item ID: Select this check box to allow the user to enter the item ID.
25.Enter Scrap: Select this check box to allow the user to enter a scrap quantity.
26.Enter Rejected Quantities: Select this check box to allow the user to enter a
rejected quantity.
27.Remain in Transaction: When selected, the program returns to the quantity
completed field to allow the user to scan or enter the next completed quantity
without having to keep entering the shop floor order, operation, and other informa-
tion. This is used when each box or pallet is typically scanned or entered instead of
a single entry for the session.
28.ODB Generations: Enter the number of ODB files that WMS should create and
keep. Enter up to a maximum of 9999. For example, if you enter 10, WMS will cre-
ate a maximum of 10. The 11th ODB file will overwrite the first.
POP Tab
POP General Options
1. Receive to Staging Bin: Select this check box to receive orders to the staging bin
automatically by default.
2. Over Production Message: Choose an option for handling over production:

37
• Warn: Warns users when entering an amount over production
• Hard: Prevents users from entering an amount over production
3. Enter Item ID: This is for both POP and SFC. When selected, this allows the user
to scan an Item ID to do a case pack look up for the quantity, instead of entering
the quantity. The item must match the item ID cross reference to the Item Number
associated with the Shop or POP order, and a case pack quantity is used as the
quantity.
POP Options for Completed Bin/Serial/Lot Quantities
4. Default Serial/Lot Mode: Choose an option for the serial/lot mode:
• Static/Numeric: Displays the bin/serial/lot static number screen
• Scan Full Number: Displays the bin/serial/lot full scan mode screen
WMS displays one of these screens if the operation is a Y count point and the par-
ent item is a serial or lotted item, or if the parent item is binned and the Receive to
Staging Bin check box is cleared.
5. Force Multiplier: Select this check box if users are typically required to enter a
multiple or quantity when entering a receipt quantity.
6. Assume Remaining Qty: This is used in POP when issuing binned, serial, or lot-
ted components during a back flush. If selected, WMS defaults to issuing the full
quantity remaining to issue against the lot, without a user needing to enter it. If
you clear this check box, the quantity defaults to 1 unless the user overrides it.
7. Prompt for MFG Serial/Lot No: Select this check box to have WMS prompt users
to enter the manufacturer's serial or lot number.
8. Prompt for Exp Date: Select this check box to have WMS prompt users for an
expiration date.
9. Auto Generate Serial Numbers: Select this check box to keep the users in static
numeric mode and prevent them from switching between scan numeric mode and
full scan mode.
POP Options for Issues/Returns of Bin/Serial/Lot Components
10.Force Multiplier: Select this check box if users are typically required to enter a
multiplier or quantity when entering a receipt quantity.
11.Assume Remaining Qty: This is used in POP when issuing binned, serial, or lot-
ted components during a back flush. If selected, WMS defaults to issuing the full
quantity remaining to issue against the lot, without a user needing to enter it. If
you clear this check box, the quantity defaults to 1 unless the user overrides it.
12.ODB Generations: Enter the number of ODB files that WMS should create and
keep. Enter up to a maximum of 9999. For example, if you enter 10, WMS will cre-
ate a maximum of 10. The 11th ODB file will overwrite the first.
38
System Tab
1. WMS Root Folder: Displays the WMS root directory. To set the WMS root folder,
click the Set WMS Root button. Browse to the WMS root directory, and then click
Open.
2. Do Not Use ODB Verify: Select this check box if you do not want to use ODB ver-
ification. WMS ODB verification is used to ensure that quantities reported by WMS
have not already been processed by the Barcode module, which protects against
issuing the same serial number more than once. If you are not using serial or lot
items, WMS ODB verification may not be necessary.
3. Auto Close on RF Error: Select this check box to allow the RF client to shut down
automatically if an error occurs in the RF connection. If cleared, WMS displays an
error on the RF server and the client remains open until the message has been
addressed.
An error happens when an RF disconnect occurs between the RF server and the RF
gun. The client, running as a session on the RF server, can no longer communicate
with the RF gun, so the error cannot be displayed on the RF gun. The RF gun resets
and a new RF client created, regardless of the option specified here. Leaving old
clients can slow down the RF server because they continue to use resources.
It is normally recommended to Select this check box.
4. Shortcut Character: The shortcut character can be used when typing carton or
pallet IDs to eliminate the need to type leading zeroes. For example, instead of
typing 00000012, you can use the shortcut character and type only 0.12, which is
translated into the full value. Select Period, Comma, or Semicolon from the Short-
cut Character drop-down list box to change the shortcut character, or select Dis-
able to disallow this feature.
39
Printer Tab
The Printer tab allows you to define logical printer names to be used when printing labels
to various printers from different workstations. These logical printer names are also used
when setting up printer contexts for labels and certain WMS reports.
Labels for the same process or customer are often printed at workstations in different
areas of the warehouse, or even in different warehouses. Since it would be inefficient for
employees to go to the other side of the warehouse to get labels they printed, each work-
station can use a different printer, even when printing the same type of label. For exam-
ple, receiving stations in different areas of the warehouse could each need to print 1x3
product labels for Wal-Mart. Each area would have its own printer for 1x3 labels, so
employees do not have to stop working to go get the labels. However, in the WMS Label
Configurator, there is still only one label definition for Wal-Mart 1x3 product labels, with
only one printer name selected for it. In WMS, this printer name is a logical printer name,
which allows you to print labels to different label printers based on the workstation being
used.
To add a logical printer name, type the name in the Printer Names field, and then click
Add. The printer name can then be selected in a printer context for labels, PO scan
sheets, and other WMS reports. However, before a workstation can actually print the label
or report, the logical printer name must be associated with a physical printer in the work-
station’s WMS INI file.
To associate the logical printer name to a physical printer, go to the WMS Workstation
Configurator on the workstation. The logical printer name that you just defined is listed in
the PrinterMappings section.
40
Double-click the logical printer name. The Available Printers list includes all physical print-
ers to which the workstation can print. Select the appropriate printer from the list. Click
Test Print to send a test page to the printer; if the document printed correctly, click Accept
Printer. Otherwise, select a different printer from the list.
To change a printer mapping to a different printer, double-click its entry in the Workstation
Configurator. Select a new printer from the Available Printers list, and then click Accept
Printer.
Note: PREVIEW is a reserved printer name that indicates to display the label or report to
the screen instead of printing it.
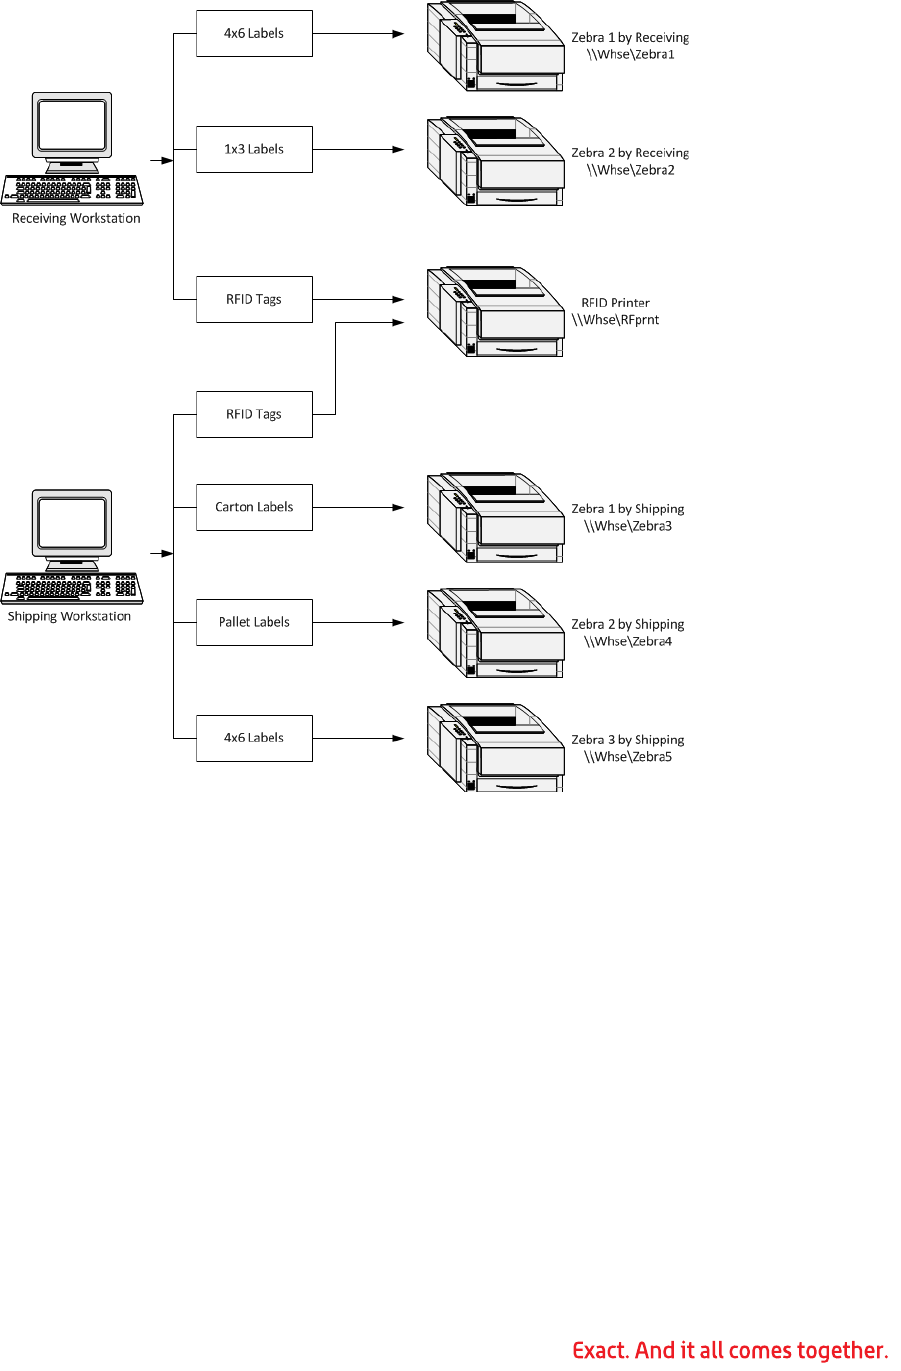
41
The diagram shows an example of logical printer names being associated to physical print-
ers for two different workstations in a warehouse. The receiving workstation needs to print
4x6 product labels, 1x3 product labels, and RFID tags. These labels types use the logical
printer names 4x6 Labels, 1x3 Labels, and RFID Tags. The shipping workstation also has
to print RFID tags and 4x6 labels, but has to print pallet and carton labels as well. The
warehouse has only one RFID printer, but the receiving and shipping departments each
have their own printers for any other type of label.
In the Workstation Configurator on the receiving workstation, the WMS logical printer
name 4x6 Labels is associated with the printer \\Whse\Zebra1, which is a Zebra label
printer in the receiving department. When the receiving workstation prints a label that is
defined in WMS to print to the 4X6 Labels printer, the label is printed to \\Whse\Zebra1.
The shipping workstation also uses the 4X6 Labels logical printer name, but in the Work-
station Configurator, 4X6 Labels is associated with \\Whse\Zebra 5, which is a Zebra
printer in the shipping department. When the shipping workstation prints a label that is
defined in WMS to print to the 4X6 Labels printer, the label is printed to \\Whse\Zebra5.
Since the warehouse has only one RFID printer, the logical printer name RFID Tags is
associated with the printer \\Whse\RFprnt in the Workstation Configurator on both the
receiving workstation and the shipping workstation. When either workstation prints a label
that is defined in WMS to print to the RFID Tags printer, the label prints to \\Whse\RFprnt.
42
Additional logical printer names can be added on the WMS Control File Printer tab. Type
the new logical printer name in the Printer Names field, and then click Add. To delete a
logical printer name, select it in the Printer Names list, and then click Delete. To change an
existing printer name, select it in the Printer Names list. Type the new name in the Printer
Names field, and then click Update.
Conveyor Tab
WMS conveyor support is designed for use when using stage pick and stage pack opera-
tions to pack standard cartons onto pallets. A separate conveyor management system
must be used to control the automated conveyors.
Click the Add Conveyor Information button to configure a conveyor.
General Tab
1. Conveyor Name: Type the name of the conveyor.
43
2. Logical Sort Lanes: Type the number of logical sort lanes to be used by this con-
veyor. A logical lane is composed of two physical lanes. When the pallet being
packed on the first physical lane is full, the conveyor management system diverts
the order to the second one, and then continues alternating between the two as
the order is packed.
3. Default Bin: Type the I/M bin to use as the default staging bin for this conveyor.
4. Physical Sort Lanes: Type the number of physical sort lanes to be used by this
conveyor.
5. Jackpot Sort Lanes: Type the number of jackpot sort lanes to be used for this
conveyor. Packing exceptions due to errors, special processing, or weight and size
exceptions are routed to a jackpot sort lane for packing.
Printer Mappings Tab
A printer drop-down list box is displayed for each physical sort lane defined in the Con-
veyor tab General settings. Select a printer for each Printer field displayed.
FTP Information Tab
1. FTP Address: Type the IP address for the FTP server.
2. FTP User Name: Type a user name for FTP communications.
3. FTP Password: Type a password for FTP communications.
4. FTP Send File: Type the filename of the WMS conveyor wave definition file. This
file is sent to the conveyor management program and contains the order packing
information. The following special characters are supported for filenames:
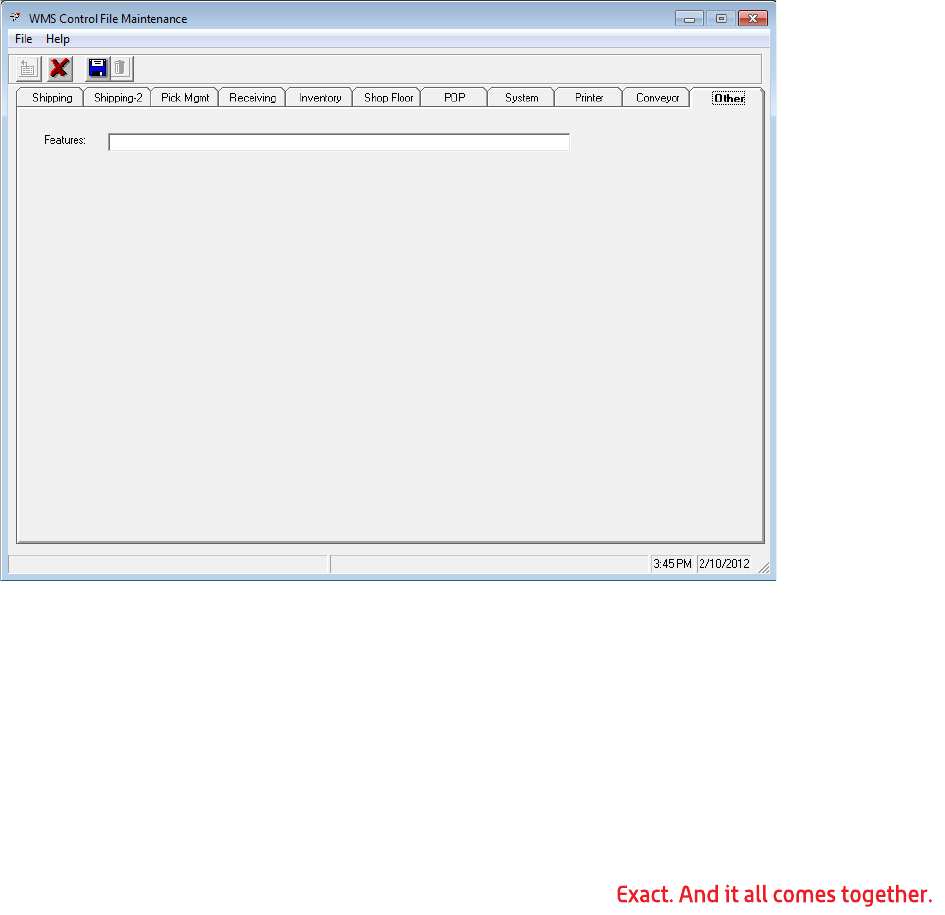
44
* - Any value
? - Any one byte value
%d - Date/time stamp in format yyyymmddhhmm
5. FTP Results File: Type the filename of the wave results file sent from the con-
veyor management system to WMS. This information is used by WMS to create and
pack pallets for the order. The following special characters are supported for file-
names:
* - Any value
? - Any one byte value
%d - Date/time stamp in format yyyymmddhhmm
6. Polling Interval: Type a value, in seconds, for how frequently WMS should check
for packing information from the conveyor system.
7. Click OK to save the conveyor information and return to the main Conveyor tab.
Other Tab
1. Features: This field should be left blank unless instructed otherwise by support
personnel.
Label Configuration
WMS Label Configuration allows you to define the formats used to print the various labels
for shipping, PO receiving, inventory transactions, and shop floor processes. It also
enables you to establish overrides for each label at different levels, such as customer, ven-
dor, and item.
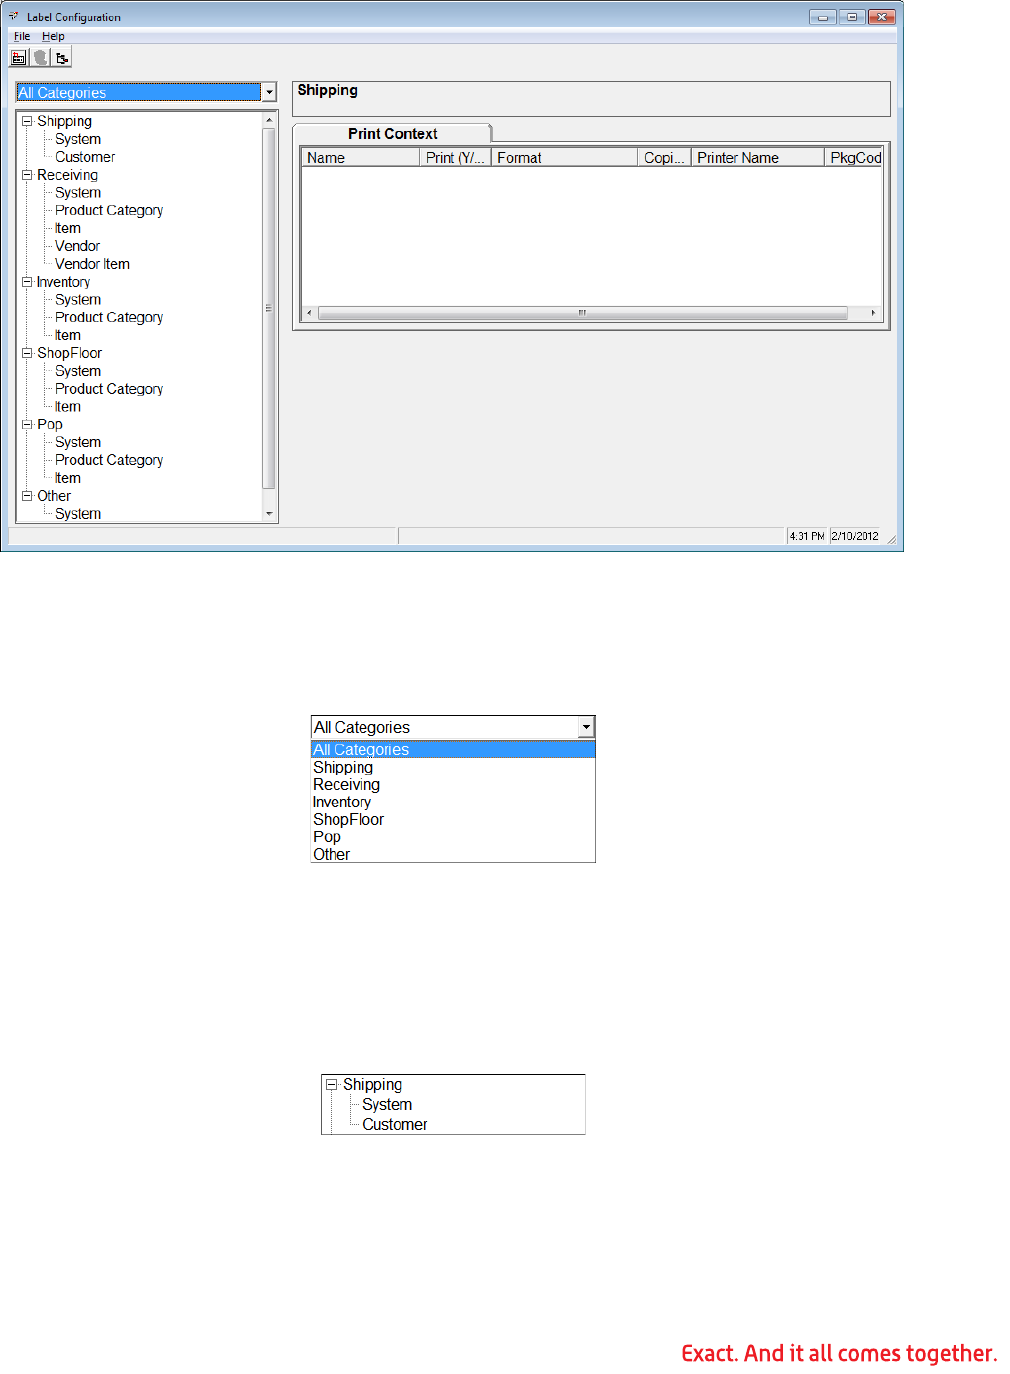
45
1. To access Label Configuration, on the Exact Macola ES System menu, under the
Distribution heading, select WMS, WMS Control File. On the Shipping tab, click the
Label Configuration button.
2. Select the categories to view from the drop-down list box, or select All Categories
to view all label categories.
3. The various label categories and sub-categories are displayed in a tree menu in the
left-hand pane. Click an entry to view the current label settings for that category.
The label settings are displayed in the Print Context box.
Shipping Labels
Default shipping labels for three carton and three pallet level labels can be defined, in
addition to establishing customer label overrides.
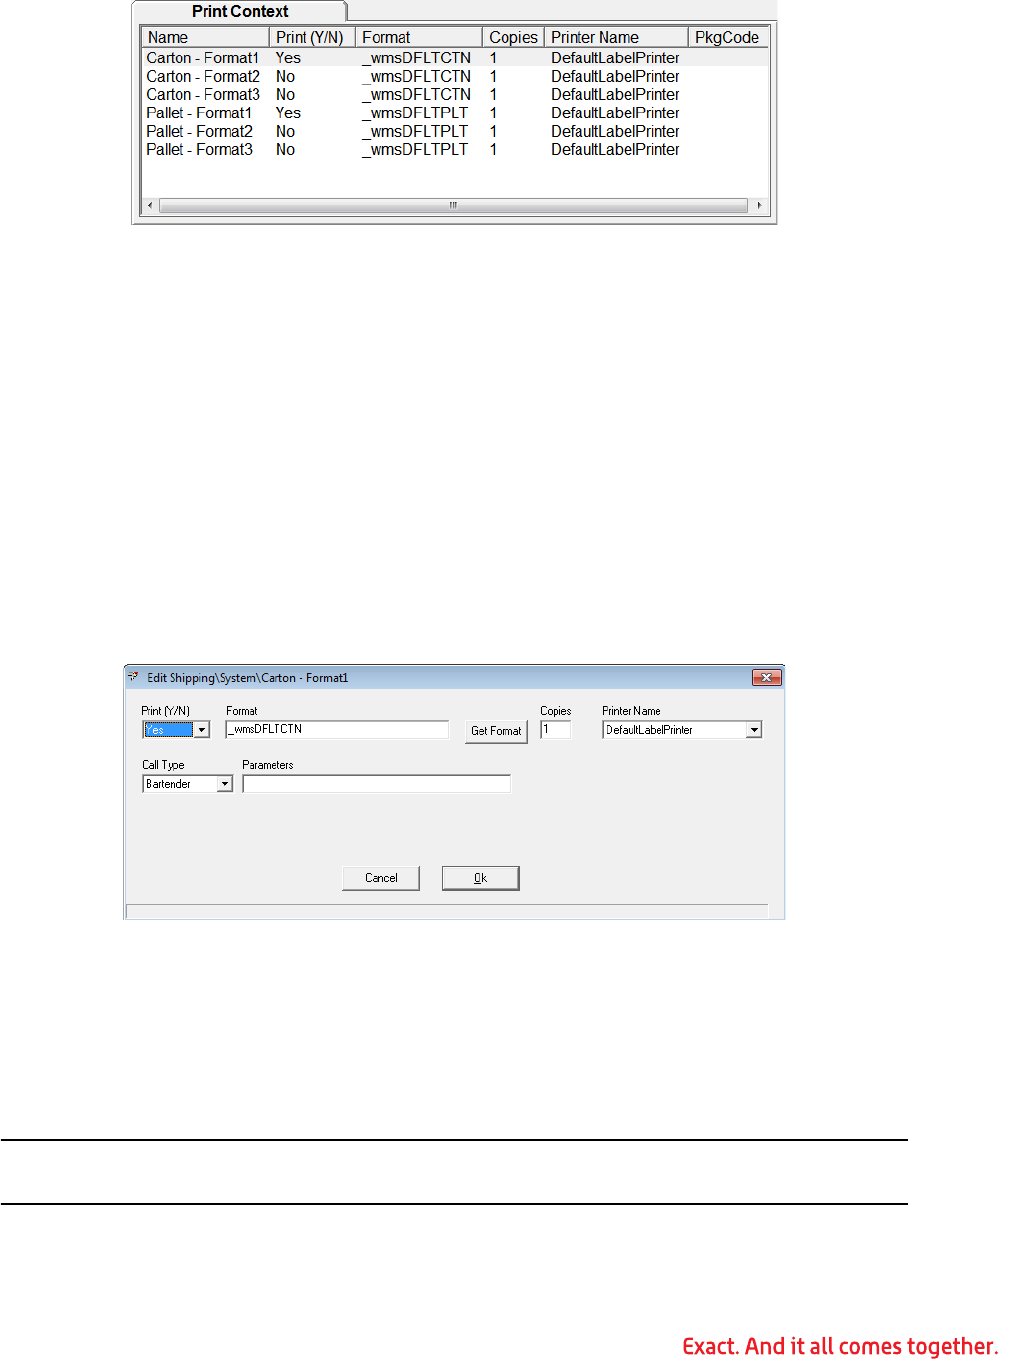
46
1. System: Default settings for shipping labels
•Carton - Format 1 / Carton - Format 2 / Carton - Format 3: Carton level
shipping label settings. WMS allows you to define three different carton labels
to be printed during shipment processing. This allows for multiple types of
labels that might be required on a single carton to be printed.
•Pallet - Format 1 / Pallet - Format 2 / Pallet - Format 3: Pallet level ship-
ping label settings. WMS allows you to define three different carton labels to be
printed during shipment processing. This allows for multiple types of labels that
might be required on a single pallet to be printed.
2. Customer: Customer shipping label override settings
Editing a Shipping Carton or Pallet Label Print Context
Label specific settings such as format, whether to print, and number of copies to print are
defined in the Label Configuration Print Context.
1. To edit a print context for a specific level in a category, double-click the entry in the
Print Context box. WMS opens the print context edit screen.
2. Print (Y/N): Select Yes or No to indicate whether the shipping label should be
printed:
Yes: Print automatically without waiting for user confirmation.
No: Do not print the label.
3. Format: Type the name of the label format, or click Get Format to browse to the
format file.
Note: Do not include the extension if you type the filename in the Format field. For exam-
ple, type _WMSDFLTCTN, not _WMSDFLTCTN.BTW.
4. Copies: Type the number of copies of the label to print.
47
5. Printer Name: Select the printer to use for this label. The printer must have been
set up previously on the WMS Control File Printer tab.
6. Call Type: Select the program used to print the label:
Crystal: A report designed in Crystal Reports
BarTender: A label designed and printed with BarTender
Executable: An executable program
7. Parameters: Specify any parameters to control the label printing application.
8. Click OK to save the new label settings.
Adding a Shipping Label Customer Override
1. Select Shipping from the category list.
2. Double-click Customer in the tree list. WMS displays the Add Shipping/Customer
context screen.
3. Customer: Type the customer ID, and then press Tab.
4. WMS creates an override for the customer with the default label settings.
5. To edit a print context for a specific level in a category, double-click the entry in the
Print Context box.
6. Print (Y/N): Select an option for whether to print the label:
Yes: Print automatically without waiting for user confirmation.
No: Do not print the label.
7. Format: Type the name of the label format, or click Get Format to browse to the
format file.
Note: Do not include the extension if you type the filename in the Format field. For exam-
ple, type _WMSDFLTCTN, not _WMSDFLTCTN.BTW.
8. Copies: Type the number of copies of the label to print.
9. Printer Name: Select the printer to use for this label. The printer must have been
set up previously on the WMS Control File Printer tab.
10.Call Type: Select the program used to print the label:
• Crystal: A report designed in Crystal Reports
• BarTender: A label designed and printed with BarTender
• Executable: An executable program
11.Parameters: Specify any parameters to control the label printing application.
12.Click OK to save the new label settings.
Receiving Labels
WMS PO receiving can automatically generate product labels for up to four levels, defined
as unit, inner, case, and pallet. The Receiving-System option of Label Configuration deter-
mines the default calculations for each layer. These can be overridden by defining an over-
ride for a product category, item, vendor, or vendor item.
1. System: Default PO receiving product label settings
48
2. Product Category: Product category product label override settings
3. Item: Item specific product label override settings
4. Vendor: Vendor specific product label override settings
5. Vendor Item: Product label override settings for a specific vendor item
Editing a Receiving Product Label Print Context
Label specific settings such as format, whether to print, and number of copies to print are
defined in the Label Configuration Print Context.
1. To edit a print context for a specific level in a category, double-click the entry in the
Print Context box. WMS displays the print context edit screen.
2. Print (Y/N): Select Yes, No, or Prompt to indicate whether product labels should
be printed when product is received:
• Yes: Print automatically without waiting for user confirmation.
• No: Do not print the label.
• Prompt: Display the calculated quantity of labels and allow the user to override
the number of labels printed, as well as the case pack used for this layer.
3. Format: Type the name of the label format, or click Get Format to browse to the
format file.
Note: Do not include the extension if you type the filename in the Format field. For exam-
ple, type _WMSDFLTCTN, not _WMSDFLTCTN.BTW.
4. Copies: Type the number of copies of the label to print.
5. Printer Name: Select the printer to use for this label. The printer must have been
set up previously on the WMS Control File Printer tab.
6. Call Type: Select the program used to print the label.
BarTender: A label designed and printed with BarTender
7. Parameters: Specify any parameters to control the label printing application.
8. Package Code: Select the package code that should be used with the item num-
ber to find the quantity per from WMS Bulk Weight Maintenance when calculating
the number of labels required.
9. Click OK to save the new label settings.
Adding a Receiving Product Label Override
1. Select Receiving from the category list.
2. Double-click the level in the tree list for which you want to add the override.
a. Product Category: WMS displays the Add Receiving/Product Category context
screen. Type the product category ID in the Product Category field, and then
press Tab.
b. Item: WMS displays the Add Receiving/Item context screen. Type the item
number in the Item field, and then press Tab.
c. Vendor: WMS displays the Add Receiving/Vendor context screen. Type the
vendor number in the Vendor field, and then press Tab.

49
d. Vendor Item: WMS displays the Add Receiving/Vendor Item context screen.
Type the vendor number in the Vendor field. Type the item number in the Item
field, and then press Tab.
3. WMS creates the override with the default label settings.
4. To edit a print context for a specific level in a category, double-click the entry in the
Print Context box.
5. Print (Y/N): Select Yes, No, or Prompt to indicate whether product labels should
be printed when product is received:
• Yes: Print automatically without waiting for user confirmation.
• No: Do not print the label.
• Prompt: Display the calculated quantity of labels and allow the user to override
the number of labels printed, as well as the case pack used for this layer.
6. Format: Type the name of the label format, or click Get Format to browse to the
format file.
Note: Do not include the extension if you type the filename in the Format field. For exam-
ple, type _WMSDFLTCTN, not _WMSDFLTCTN.BTW.
7. Copies: Type the number of copies of the label to print.
8. Printer Name: Select the printer to use for this label. The printer must have been
set up previously on the WMS Control File Printer tab.
9. Call Type: Select the program used to print the label.
BarTender: A label designed and printed with BarTender
10.Parameters: Specify any parameters to control the label printing application.
11.Click OK to save the new label settings.
Inventory Labels
WMS inventory receiving can automatically generate product labels for up to four levels,
defined as unit, inner, case, and pallet. The Inventory-System option of Label Configura-
tion determines the default calculations for each layer. These can be overridden by defin-
ing an override for a product category or item.
•System: Default inventory receiving product label settings
•Product Category: Product category product label override settings
•Item: Item specific product label override settings
Editing an Inventory Product Label Print Context
Label specific settings such as format, whether to print, and number of copies to print are
defined in the Label Configuration Print Context.
1. To edit a print context for a specific level in a category, double-click the entry in the
Print Context box. WMS displays the print context edit screen.
2. Print (Y/N): Select Yes, No, or Prompt to indicate whether product labels should
be printed when product is received:
• Yes: Print automatically without waiting for user confirmation.
• No: Do not print the label.
50
• Prompt: Display the calculated quantity of labels and allow the user to override
the number of labels printed, as well as the case pack used for this layer.
3. Format: Type the name of the label format, or click Get Format to browse to the
format file.
Note: Do not include the extension if you type the filename in the Format field. For exam-
ple, type _WMSDFLTCTN, not _WMSDFLTCTN.BTW.
4. Copies: Type the number of copies of the label to print.
5. Printer Name: Select the printer to use for this label. The printer must have been
set up previously on the WMS Control File Printer tab.
6. Call Type: Select the program used to print the label.
BarTender: A label designed and printed with BarTender
7. Parameters: Specify any parameters to control the label printing application.
8. Package Code: Select the package code that should be used with the item num-
ber to find the quantity per from WMS Bulk Weight Maintenance when calculating
the number of labels required.
9. Click OK to save the new label settings.
Adding an Inventory Product Label Override
1. Select Inventory from the category list.
2. Double-click the level in the tree list for which you want to add the override.
Product Category: WMS displays the Add Inventory/Product Category context
screen. Type the product category ID in the Product Category field, and then press
Tab.
Item: WMS displays the Add Inventory/Item context screen. Type the item num-
ber in the Item field, and then press Tab.
3. WMS creates the override with the default label settings.
4. To edit a print context for a specific level in a category, double-click the entry in the
Print Context box.
5. Print (Y/N): Select Yes, No, or Prompt to indicate whether product labels should
be printed when product is received:
• Yes: Print automatically without waiting for user confirmation.
• No: Do not print the label.
• Prompt: Display the calculated quantity of labels and allow the user to override
the number of labels printed, as well as the case pack used for this layer.
6. Format: Type the name of the label format, or click Get Format to browse to the
format file.
Note: Do not include the extension if you type the filename in the Format field. For exam-
ple, type _WMSDFLTCTN, not _WMSDFLTCTN.BTW.
7. Copies: Type the number of copies of the label to print.
51
8. Printer Name: Select the printer to use for this label. The printer must have been
set up previously on the WMS Control File Printer tab.
9. Call Type: Select the program used to print the label.
BarTender: A label designed and printed with BarTender.
10.Parameters: Specify any parameters to control the label printing application.
11.Click OK to save the new label settings.
Shop Floor Labels
WMS shop floor processing can automatically generate product labels for up to four levels,
defined as unit, inner, case, and pallet, when finished goods are received. The ShopFloor-
System option of Label Configuration determines the default calculations for each layer.
These can be overridden by defining an override for a product category or item.
• System: Default shop floor product label settings
• Product Category: Product category product label override settings
• Item: Item specific product label override settings
Editing a Shop Floor Product Label Print Context
Label specific settings such as format, whether to print, and number of copies to print are
defined in the Label Configuration Print Context.
1. To edit a print context for a specific level in a category, double-click the entry in the
Print Context box. WMS displays the print context edit screen.
2. Print (Y/N): Select Yes, No, or Prompt to indicate whether product labels should
be printed when product is received:
• Yes: Print automatically without waiting for user confirmation.
• No: Do not print the label.
• Prompt: Display the calculated quantity of labels and allow the user to override
the number of labels printed, as well as the case pack used for this layer.
3. Format: Type the name of the label format, or click Get Format to browse to the
format file.
Note: Do not include the extension if you type the filename in the Format field. For exam-
ple, type _WMSDFLTCTN, not _WMSDFLTCTN.BTW.
4. Copies: Type the number of copies of the label to print.
5. Printer Name: Select the printer to use for this label. The printer must have been
set up previously on the WMS Control File Printer tab.
6. Call Type: Select the program used to print the label.
BarTender: A label designed and printed with BarTender
7. Parameters: Specify any parameters to control the label printing application.
8. Package Code: Select the package code that should be used with the item num-
ber to find the quantity per from WMS Bulk Weight Maintenance when calculating
the number of labels required.
9. Click OK to save the new label settings.
52
Adding a Shop Floor Product Label Override
1. Select ShopFloor from the category list.
2. Double-click the level in the tree list for which you want to add the override.
Product Category: WMS displays the Add ShopFloor/Product Category context
screen. Type the product category ID in the Product Category field, and then press
Tab.
Item: WMS displays the Add ShopFloor/Item context screen. Type the item number
in the Item field, and then press Tab.
3. WMS creates the override with the default label settings.
4. To edit a print context for a specific level in a category, double-click the entry in the
Print Context box.
5. Print (Y/N): Select Yes, No, or Prompt to indicate whether product labels should
be printed when product is received:
• Yes: Print automatically without waiting for user confirmation.
• No: Do not print the label.
• Prompt: Display the calculated quantity of labels and allow the user to override
the number of labels printed, as well as the case pack used for this layer.
6. Format: Type the name of the label format, or click Get Format to browse to the
format file.
Note: Do not include the extension if you type the filename in the Format field. For exam-
ple, type _WMSDFLTCTN, not _WMSDFLTCTN.BTW.
7. Copies: Type the number of copies of the label to print.
8. Printer Name: Select the printer to use for this label. The printer must have been
set up previously on the WMS Control File Printer tab.
9. Call Type: Select the program used to print the label.
BarTender: A label designed and printed with BarTender
10.Parameters: Specify any parameters to control the label printing application.
11.Click OK to save the new label settings.
POP Labels
WMS POP receiving can automatically generate product labels for up to four levels,
defined as unit, inner, case, and pallet, when finished goods are received. The Pop - Sys-
tem option of Label Configuration determines the default calculations for each layer. These
can be overridden by defining an override for a product category or item.
• System: Default POP receiving product label settings
• Product Category: Product category product label override settings
• Item: Item specific product label override settings
Editing a POP Product Label Print Context
Label specific settings such as format, whether to print, and number of copies to print are
defined in the Label Configuration Print Context.

53
1. To edit a print context for a specific level in a category, double-click the entry in the
Print Context box. WMS displays the print context edit screen.
2. Print (Y/N): Select Yes, No, or Prompt to indicate whether product labels should
be printed when product is received:
• Yes: Print automatically without waiting for user confirmation.
• No: Do not print the label.
• Prompt: Display the calculated quantity of labels and allow the user to override
the number of labels printed, as well as the case pack used for this layer.
3. Format: Type the name of the label format, or click Get Format to browse to the
format file.
Note: Do not include the extension if you type the filename in the Format field. For exam-
ple, type _WMSDFLTCTN, not _WMSDFLTCTN.BTW.
4. Copies: Type the number of copies of the label to print.
5. Printer Name: Select the printer to use for this label. The printer must have been
set up previously on the WMS Control File Printer tab.
6. Call Type: Select the program used to print the label.
BarTender: A label designed and printed with BarTender
7. Parameters: Specify any parameters to control the label printing application.
8. Package Code: Select the package code that should be used with the item num-
ber to find the quantity per from WMS Bulk Weight Maintenance when calculating
the number of labels required.
9. Click OK to save the new label settings.
Adding a POP Product Label Override
1. Select Pop from the category list.
2. Double-click the level in the tree list for which you want to add the override.
Product Category: WMS displays the Add Pop/Product Category context screen.
Type the product category ID in the Product Category field, and then press Tab.
Item: WMS displays the Add Pop/Item context screen. Type the item number in
the Item field, and then press Tab.
3. WMS creates the override with the default label settings.
4. To edit a print context for a specific level in a category, double-click the entry in the
Print Context box.
5. Print (Y/N): Select Yes, No, or Prompt to indicate whether product labels should
be printed when product is received:
• Yes: Print automatically without waiting for user confirmation.
• No: Do not print the label.
• Prompt: Display the calculated quantity of labels and allow the user to override
the number of labels printed, as well as the case pack used for this layer.
6. Format: Type the name of the label format, or click Get Format to browse to the
format file.
54
Note: Do not include the extension if you type the filename in the Format field. For exam-
ple, type _WMSDFLTCTN, not _WMSDFLTCTN.BTW.
7. Copies: Type the number of copies of the label to print.
8. Printer Name: Select the printer to use for this label. The printer must have been
set up previously on the WMS Control File Printer tab.
9. Call Type: Select the program used to print the label.
BarTender: A label designed and printed with BarTender.
10.Parameters: Specify any parameters to control the label printing application.
11.Click OK to save the new label settings.
Other Labels
WMS can also be configured to print putaway tickets and shipment tags. Click Shipment
under Other in the Label Configuration menu to access the default putaway ticket and
shipment tag settings.
Editing a Shipment Tag or Putaway Ticket Print Context
Label specific settings such as format, whether to print, and number of copies to print are
defined in the Label Configuration Print Context.
1. Double-click the entry in the Print Context box that you want to edit.
• Putaway: Edits the print context settings for putaway tickets.
• ShipmentTag: Edits the print context settings for shipment tags.
2. WMS displays the print context edit screen.
3. Print (Y/N): Select Yes or No to indicate whether the putaway ticket should be
printed:
• Yes: Print automatically without waiting for user confirmation.
• No: Do not print the label.
4. Format: Type the name of the label format, or click Get Format to browse to the
format file.
Note: Do not include the extension if you type the filename in the Format field. For exam-
ple, type _WMSDFLTCTN, not _WMSDFLTCTN.BTW.
5. Copies: Type the number of copies of the label to print.
6. Printer Name: Select the printer to use for this label. The printer must have been
set up previously on the WMS Control File Printer tab.
7. Call Type: Select the program used to print the label:
• Crystal: A report designed in Crystal Reports
• BarTender: A label designed and printed with BarTender
• Executable: An executable program
8. Parameters: Specify any parameters to control the label printing application.
9. Click OK to save the new label settings.
55
AutoPack Package Code and Bulk Weight Setup
If you are using autopack, WMS automatically packs the items from the order into cartons
based on definitions in WMS Bulk Weight Maintenance.
Using the item number from the O/E order, WMS searches for an Exact Macola ES EDI
item cross-reference for this customer for this item. If a cross-reference exists, WMS
checks for a value in the Packaging Code field. If a package code has been entered, WMS
uses that value to find the WMS bulk weight cross-reference for the item.
If no EDI item cross-reference is found, or no package code has been specified in the
cross-reference, WMS searches WMS Package Code Maintenance for the default entry for
the item. Using the package code specified in that default record, WMS finds the WMS
bulk weight cross-reference for the item.
Once WMS has found the correct bulk weight cross-reference for the item, it uses the
quantity in the Items Per Pack field to pack the item into the correct number of cartons.
WMS Package Code Maintenance
WMS Package Code Maintenance is used by WMS to establish carton types. The definition
of the carton type depends on the level of the ASN for which it is used. At the shipment
level, it is a generic definition of the class of packaging for the shipment. For instance,
CTN25 is the EDI package code for a corrugated or solid carton. Similarly, PLT94 indicates
a wooden pallet. If the Exact Macola ES EDI ASN sub-module is installed, Exact Macola ES
provides a function to maintain this table. However, the Default Record field is hidden on
the Exact Macola ES screen. If you have the Exact Macola ES Screen Designer module,
you can un-hide the Default Record field and use the Exact Macola ES provided mainte-
nance. If you do not have Screen Designer, or you do not have the EDI ASN sub-module,
use the maintenance program supplied by WMS.
56
The WMS version of this screen provides maintenance only for shipment and item level
records (Level Code = S or I).
At the item level, this function is used to define the various box sizes for the products
being shipped.
1. To access the ASN Package Code cross-reference maintenance, in Exact Macola ES,
on the System menu, under the Distribution heading, select WMS, WMS Package
Code Maintenance.
2. Level Code: This field has four selections: shipment, tare, pack, and item. Only
shipment and item are currently used by WMS.
3. Package Code: This is a user-defined field. Its usage depends on the level code
specified. For a shipment type, the package code is a generic definition of the class
of packaging for the shipment. For instance, CTN25 is the EDI package code for a
corrugated or solid carton. Similarly, PLT94 indicates a wooden pallet.
At the item level, this field is used to define the various box sizes for the products
being shipped. This code, in association with the WMS bulk weight cross-reference,
can indicate a variety of standard pack sizes for a specific item.
4. Default: Select this check box to indicate that this package code is the default
package code for this level type. Selecting this check box does not clear the check
box in any other record. If another record was previously selected as the default
package code for this level type, that record must be edited and the Default Record
check box cleared.
The default record is used by WMS in autopack mode to determine the standard
case pack when calculating the number of labels to print for a specific item. Unless
overridden for a customer-item combination by specifying a package code in an
EDI item cross-reference, the default package code is used to find the case pack in
WMS Bulk Weight Maintenance.
5. EDI Package Code: Type the EDI-approved package code to be used by WMS
when searching for a bulk weight entry for the item. Typically, this is CTN25 or
PLT94.
6. Item Volume UOM: This field is not used by WMS.
7. Item Volume Length: This field is not used by WMS.
8. Item Volume Width: This field is not used by WMS.
57
9. Item Volume Height: This field is not used by WMS.
10.Item Volume: This field is not used by WMS.
WMS Bulk Weight Maintenance
WMS Bulk Weight Maintenance is used by WMS to establish a relationship between a pack-
age code and a case quantity for an item. How this is used depends on the WMS mode. In
autopack mode, post pick ticket processing uses this file to determine the number of
labels to generate. See EDI File Usage for instructions on setting up items for autopack.
Otherwise, the alternate item identifier is used when scanning to cross-reference various
item identifiers to an Exact Macola ES item number.
If the Exact Macola ES EDI ASN submodule is installed, Exact Macola ES provides a func-
tion to allow maintenance of this file. However, the Exact Macola ES function does not
allow maintenance of the Alternate Item Qualifier and Alternate Item Number fields. WMS
allows maintenance of item level records only (Level Code = I) and allows entry in the
alternate item fields.
1. To access WMS Bulk Weight Maintenance, in Exact Macola ES, on the System
menu, under the Distribution heading, select WMS, WMS Bulk Weight Maintenance.
2. Item Number: Type the Exact Macola ES item number. This must be a valid Exact
Macola ES item number.
3. Package Code: Type the carton type for this record. The package code must have
been previously set up in WMS Package Code Maintenance.
4. Items Per Pack: Type the quantity of stocking units associated with this item-car-
ton combination.
5. Pack Weight: This field is not used by WMS.
6. Packs Per Tare: This field is not used by WMS.
7. Tare Weight: This field is not used by WMS.
8. Alternate Item Number: This field allows different codes, such as UPC or UCC-14
codes, to be cross-referenced to the Exact Macola ES item number.
The alternate item number can be preceded by ^CustomerNumber^ to assign a
bar code to different items based on the customer number. While assigning the
same bar code to multiple SKUs is not recommended, it is sometimes the most
expedient way to handle special needs for a large customer. This should be done
only if absolutely necessary.
58
Note: WMS checks for the customer number prefix only if the WMS control file Bulk
Weight Customer Prefix Lookup check box is selected.
9. Alternate Item Qualifier: This field specifies the qualifier sent in the ASN for this
carton-item combination. For example, when shipping pallets, an ASN would be
created with a tare level and the trading partner would require a UCC-14, also
known as the I 2 of 5, in the pack level. UC is the EDI standard definition for UCC-
14. In addition, if the Alternate ID Qualifier field in the customer override file is
populated, this field must match it. This allows WMS to force the user to enter a
specific type of code when the bar code type is critical.
Note: If you are using phantom cartons, you must specify an alternate item qualifier if
the WMS bulk weight cross-reference uses an alternate item number to define a value that
represents a carton instead of an inner pack. Otherwise, WMS does not calculate the cor-
rect number of cartons for the bill of lading.
User Defined Filters
When creating picks in Pick Management, the standard sales order filter allows you to
compile a list of orders based on customer number, PO number, order date, cutoff date,
and location. You can also specify whether to include customers on credit hold, orders not
completely available to ship, and invoice-type orders.
Pick Management User Defined Filters allow you to further refine your order list by defin-
ing your own filter criteria. You can define up to nine variables for use in a SQL expression
that you write to add addition criteria to the Pick Management order filter.
1. To open the Pick Management - User Defined Filters screen, in Exact Macola ES, on
the System menu, under the Distribution heading, select WMS, WMS Control File
59
Maintenance. On the WMS Control File Maintenance screen, click the Pick Mgmt
tab, and then click the User Defined Filters button.
2. Filter: Enter a name for the user defined filter, and then press Tab or Enter.
3. If WMS does not find an existing user defined filter with that name, it displays a
message that the filter was not found and asks if you would like to create the filter.
Click Yes to create a new filter with this name.
4. Description: Type a meaningful description for the filter. This description is dis-
played in the User Defined Query list on the Pick Management Sales Order Filter
screen.
60
5. Click the Variables tab to access a list of standard variables or to define new ones.
6. Click the Std Variables button to view a list of the standard variables included
with WMS:
^FCust: From Customer
^TCust: To Customer
^FOrdNo: From Order Number
^TOrdNo: To Order Number
^FPoNo: From PO Number
^TPoNo: To PO Number
^Cutoff: Cutoff Date
^IType: Invoice Type
^CreditHold: Include Customers on Credit Hold (Y/N)
^CompOnly: Completely Available to Ship Orders Only (Y/N)
^Loc: Location

61
7. Click the Add Variable button to define a new variable.
8. Variable Name: Select a name for the variable.
9. Variable Literal: Type a short description for the variable. This is used as the lit-
eral for the field when the user is prompted to specify a value for this filter criterion
in Pick Management Sales Order Filter.
10.Data Type: Select the variable’s data type:
•String: an alphanumeric value; the variable must be enclosed in single quotes
in the query, such as '^1'
•Date: a date value
•Number: a numeric value
11.Format: Select a format for the variable:
• Trim: Truncates the value entered by the user to the variable’s maximum
length. For example, if the variable’s length is 5, but the user enters 123456,
the value would be truncated to 12345.
• Spacefill: Fills the value entered by the user with spaces at the beginning to the
variable's maximum length.
• Zerofill: Adds zeros to the left of a numeric value entered by the user to maxi-
mum length of the variable. For example, if the variable’s length is 5 but the
user enters 123, the value would be zero filled to 00123.
• Pad: Pads the value entered by the user with spaces at the end to the variable’s
maximum length.
12.Length: Type the maximum length for variable’s value.
13.Click Save to save the variable definition.
14.On the Variables tab, click the Prompt Screen button to enter test values for the
variable. (These values are used when testing the filter by clicking the Results tab.)
15.Type the value in the field, and click OK.
16.To edit the variable, double-click it in the list.
62
17.To delete a variable, click it in the list, and then press the Delete key.
18.When you are done creating variables, click the Expression tab to create a query
using the variables.
19.On the Expression tab, type a query in the box. This query is used in conjunction
with the standard filtering options in the Pick Management Sales Order Filter.
Note: The query is the Where portion of a SQL query, and must return a true or false
value. The query can be up to 3000 bytes.
20.Click the Expanded tab to view the filter query with the test variable values.
21.Click the Results tab to run the filter query and view the results.
Note: If there are errors running the query, WMS displays information about the errors on
the Errors tab instead of displaying the Results tab. Correct the errors, and then click the
Results tab to test the filter query again.
22.Click the Save button to save the filter. It can be used in the Pick Management
Sales Order Filter.
WMS Workstation Configurator
The WMS Workstation Configurator enables you to define WMS INI settings, validate and
register DLLs, and activate and test BarTender. Although the configurator setups are typi-
cally done when first installing or updating WMS, you can use the workstation configurator
to change settings as necessary.
Creating a WMS Desktop Icon
Use the Create Desktop Shortcut button in the Workstation Configurator to create a
WMS shortcut using the INI settings displayed.
63
Note: This feature is not available for Windows 98 workstations. If you are using Windows
98, you must create the desktop shortcut manually.
If using the default INI, it is not necessary to include an INI name. The default INI is
c:\windows\wms.ini.
If you have saved the INI to a different location or have renamed the INI, then you need
to specify this by changing the Target field for the desktop icon to read:
m:\program files\exact software\wms100.EXE /INI= C:\WINDOWS\NEWNAME.INI
In this example, C:\WINDOWS is the path to the new INI file and NEWNAME.INI is the
name of the new INI.
Note: The INI filename and the name of the directory that it resides in cannot be longer
than eight characters.
There must be a space after the equal sign in the path.
Changing Companies in the Workstation Configurator
Since each Exact Macola ES data company has its own WMS INI file, you might need to
change the company in the configurator before updating any settings.
Note: The name of the company to which the workstation configurator is currently con-
nected is displayed at the bottom of the screen. The database name and location, as well
as the INI file name and location, are also listed there.
1. In Exact Macola ES, on the System menu, under the Distribution heading, click
WMS, WMS Workstation Configurator.
2. Click the Change Companies toolbar button.
64
3. WMS displays the Exact Macola ES Connection Information screen.
4. Server: Type the name of your SQL server.
5. DataBase: Type the database name of the company you want to switch to.
6. Click the Connect button to change to that data company.
7. WMS connects to the new data company and then returns to the main WMS Work-
station Configurator screen.
Note: If WMS is unable to connect to the SQL server that you specify, it returns a mes-
sage that the SQL Server does not exist or access to it is denied. Verify that you have
entered the correct SQL server name and that you have access to it.
Configuring INI Settings
The Workstation Configurator displays the current WMS INI settings for the workstation. If
this workstation has previously been configured for WMS, the workstation configuration
options stored in the default INI file (wms.ini) are displayed. If necessary, a different INI
file can be loaded by clicking the Read INI button, and then selecting a different INI file.
Click the Set Defaults button to allow the default options to be set based on the Exact
Macola ES company that you are currently logged in to.
Note: The entries that are displayed in bold are not automatically set and must be manu-
ally specified.
Double-click an INI setting to change it. WMS displays a screen specific to that setting
where you can change its configuration.
To create the WMS DSN, scroll to the bottom of the list and double-click the ODBC DSN
entry.
Configuring WMS to Use BarTender
BarTender creates formats that have a .btw extension. These formats are used by Bar-
Tender and must reside in a directory that is configured in the active WMS INI file.
Any workstation or RF server used to print shipping labels, product labels, or putaway
labels must have BarTender version 6.20 or higher installed. BarTender should be installed
before proceeding with the following steps.
These steps must be done for each workstation.
1. In Exact Macola ES, on the System menu, under the Distribution heading, click
WMS, WMS Workstation Configurator.
65
2. In the WMS Workstation Configurator, double-click the BarTender entry.
3. Use BarTender: If not already done, select this check box. Verify that the path is
the directory where the BarTender label formats are stored.
4. Confirm that BarTender is installed correctly by clicking the Run BarTender but-
ton, followed by the Test BarTender button, and then the Close BarTender but-
ton. If correctly installed, BarTender should load and print a label to the default
label printer specified in the Workstation Configurator.
5. Click the Update EXT button, and then click OK.
6. Click the Save button on the main WMS Workstation Configurator screen to save
the settings.
The Workstation Configurator makes the following entries into the INI file as well as the
EXTs associated with post pick ticket processing.
WMS.INI settings:
[Settings]
Bartender=ON
Format Path=<Full path to label formats>
VB01602a.ext, VB01602b.ext VB01602c.ext:
/ON /PATH <Full path to label formats>
Validating DLLs
In previous versions of WMS, a number of WMS system files were installed locally during
the workstation installation. These files can cause problems if they are not removed from
the local drive. It might also be necessary to re-register DLLs to resolve some errors in
WMS.
66
1. Click the Validate DLL button to validate that the correct DLLs have been properly
registered.
2. If there is a problem with a WMS component, it is displayed in the Notes section. If
problems are found, click the Advanced button.
3. To search folders other than system folders, clear the System Folders Only check
box. Click the Search button.
4. The program displays a confirmation window informing you that this may take
some time.
5. Click Yes to continue.
6. If the components are found, the program displays them in the Search for Mis-
located Components section.
7. Click the Remove button to remove extraneous copies of the controls.
8. Click the Register button to register the correct versions.
9. A message box is displayed for each DLL that is registered. Click OK to each mes-
sage box.
Zone Maintenance
By default when Pick Management creates recommendations for orders, it looks at the
entire warehouse to determine the location from which to pick the items. Either the bin
with the highest priority is used, or the one with the oldest lot. Warehouse zones allow dif-
ferent areas of a warehouse to be designated for specific purposes, such as an area for
pallets or one for cartons. In addition, multi-valued zones allow individual zones to be
grouped into a single zone for recommendations.
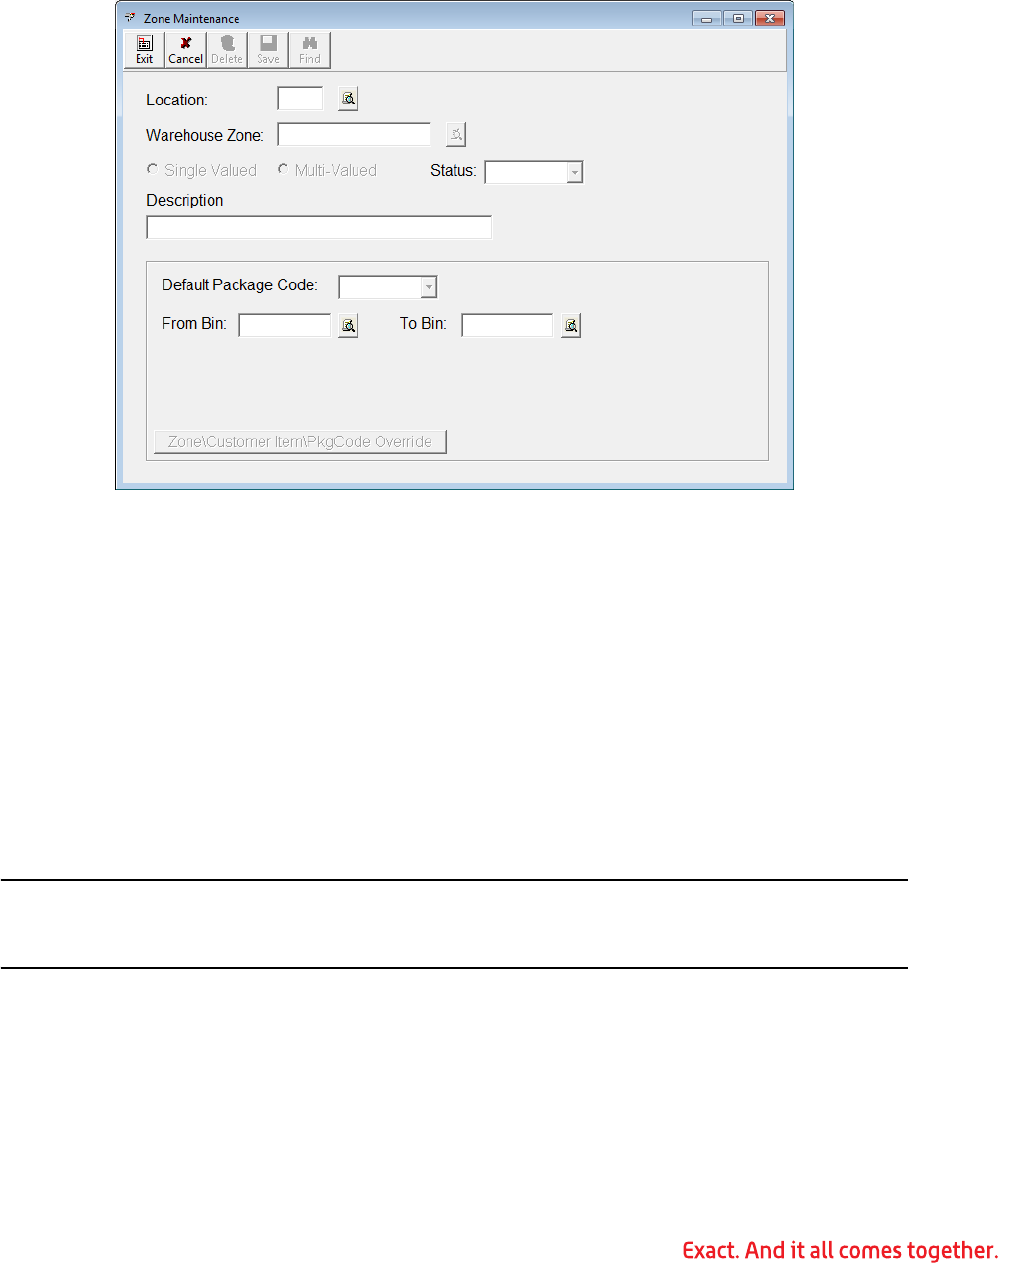
67
Creating a Single Valued Zone
1. To access zone maintenance, in Exact Macola ES, on the System menu, under the
Distribution heading, click WMS Control File Maintenance. Click the Pick Mgmt tab,
and then click Zones.
2. Location: Type the warehouse that contains this zone.
3. Warehouse Zone: Type a name for this zone.
4. Select Single Valued.
5. Status: Select a status for the zone:
• Active: The zone is active and can be used for recommendations.
• Inactive: The zone is not active and cannot be used for recommendations.
6. Description: Type a description of the zone.
7. Default Package Code: Select a package code for the zone.
8. From Bin: Specify the starting bin for the zone.
9. To Bin: Specify the ending bin for the zone.
Note: The starting and ending bins cannot overlap another zone. If they do, WMS displays
a message listing the other zone that the current record overlaps. This must be corrected
before saving the zone.
10.Zone\Customer Item\Pkg Code Override button: Click to set up customer
item pack code overrides for this zone. The override specifies a package code dif-
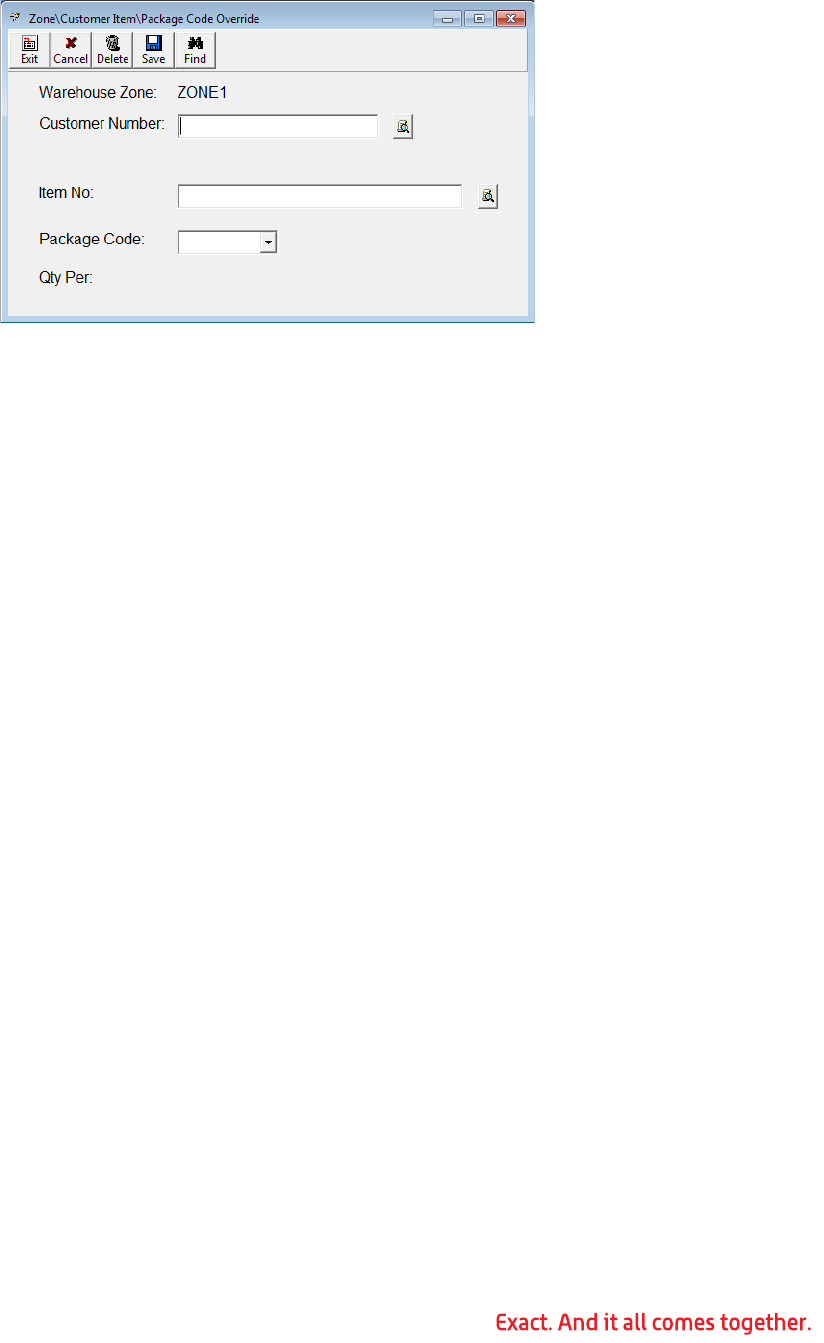
68
ferent from the default to use for a particular customer-item combination when
recommending from this zone.
11.Warehouse Zone: The zone ID is displayed.
12.Customer Number: Type the customer ID.
13.Item No: Type the item number.
14.Package Code: Select the package code for the override. If an item level WMS
Package Code entry exists for this customer/item/package code combination, the
Qty Per field displays that the entry was found and the quantity per defined in it.
15.Click Save to save the override.
16.Click Exit to return to the Zone Maintenance screen.
17.Click Save to save the warehouse zone.
Creating a Multi-Valued Zone
Multi-valued zones group single valued zones into a single zone.
1. To access zone maintenance, in Exact Macola ES, on the System menu, under the
Distribution heading, click WMS, WMS Control File Maintenance. Click the Pick
Mgmt tab, and then click Zones.
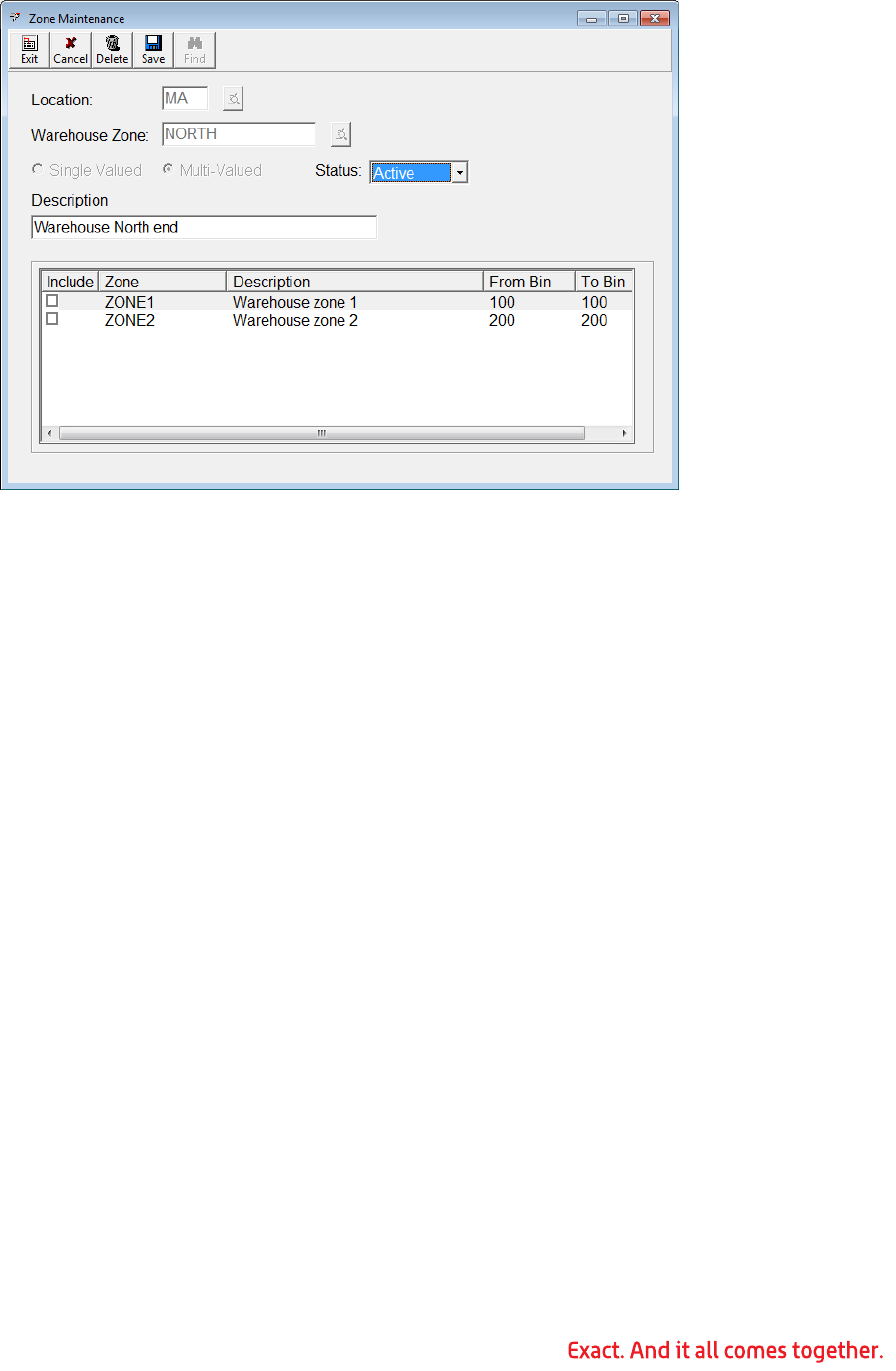
69
2. Location: Type the warehouse that contains this zone.
3. Warehouse Zone: Type a name for this zone.
4. Select Multi-Valued. All single valued zones in this Exact Macola ES warehouse
are displayed at the bottom of the screen.
5. Status: Select a status for the zone:
• Active: The zone is active and can be used for recommendations.
• Inactive: The zone is not active and cannot be used for recommendations.
6. Description: Type a description of the zone.
7. To include a single valued zone in this multi-valued zone, select its check box in the
Include column.
8. Click Save to save the multi-valued warehouse zone.
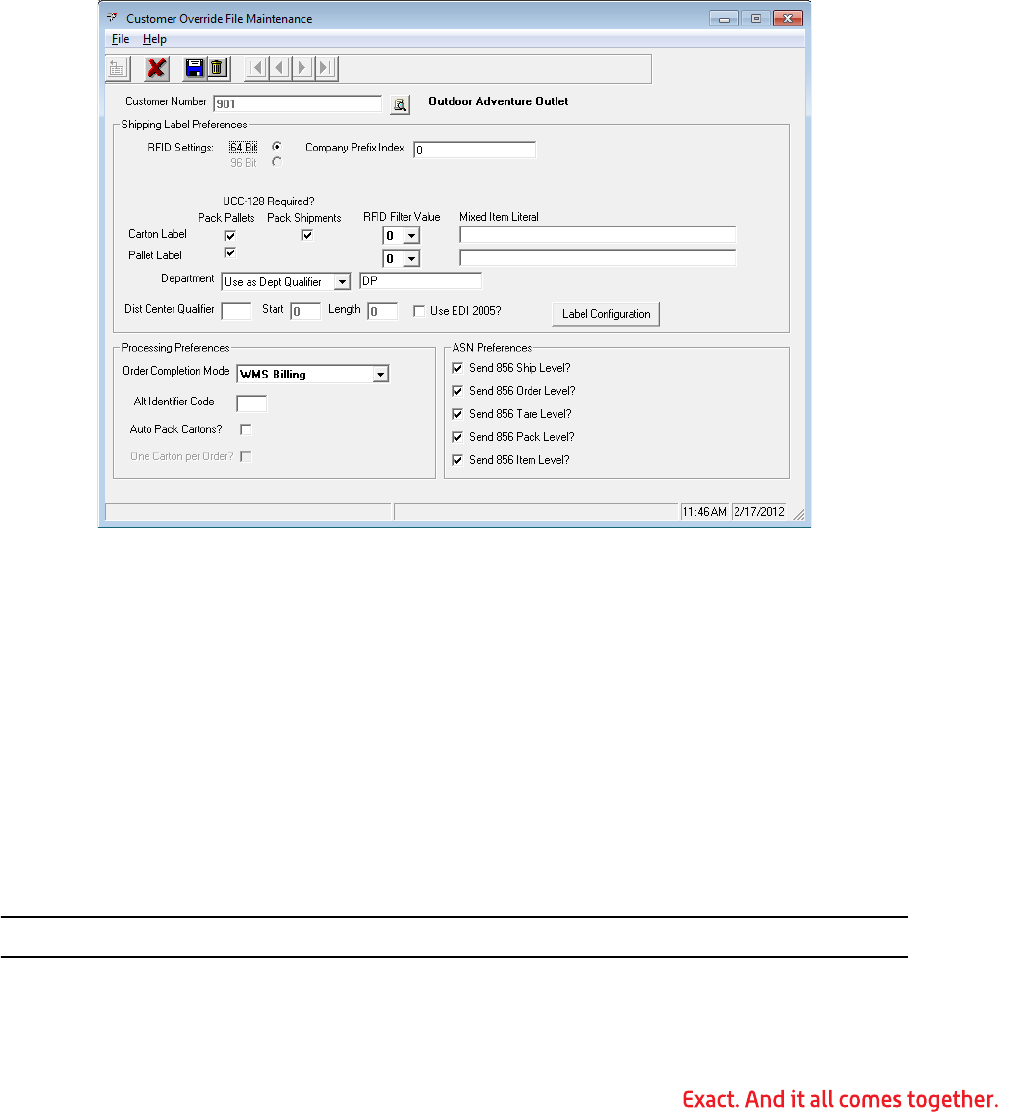
70
Chapter 4: WMS Setup - Shipping
Customer Override Maintenance
The customer override file overrides the WMS control file defaults for a specific customer.
An example of using a customer override is if you need to set up a unique label format for
a customer.
1. To access customer override maintenance, in Exact Macola ES, on the System
menu, under the Financial heading, select Accounts Receivable, WMS Customer
Override.
2. Customer Number: Type the Exact Macola ES customer number. This must be a
valid Exact Macola ES A/R customer number.
Shipping Label Preferences
3. RFID Settings:
•64 Bit: Select this option to use a 64-bit value for the RFID tag, which encodes
the header, filter, value, company prefix index, and serial number.
•Company Prefix Index: When using a 64-bit value for the RFID tag, enter
your company prefix index. The company prefix index is used when translating
64-bit RFID tags to identify the shipping company. This value is not the com-
pany prefix itself, but encodes it and refers to an index in a table that provides
the company prefix value and length.
•96 Bit: Select this option to use a 96-bit value for the RFID tag.
Note: The 96-bit RFID tag option is not available at this time.
4. UCC-128 Required?

71
a. Carton Label: Pack Pallets: Select this check box to generate a UCC-128
label when attaching a product directly to a pallet in the pack pallets function.
If selected, WMS generates a new carton number and prints the associated
label for each item-multiplier entered. When cleared, WMS generates a single
phantom carton for each unique scan code, accumulating multiple quantities of
the same code into the same phantom carton. Phantom cartons are typically
used when shipping standard cartons on pallets. Standard cartons generally
require UCC-14 bar codes, but do not require UCC-128 labels. The advantage is
that the user does not have to label every carton, and the size of the ASN is
also greatly reduced. (Note: When Autopack Cartons is activated, this option
controls whether the autopack function generates phantom cartons or regular
cartons. Autopack options are set on the WMS Control File Maintenace screen,
on the Shipping tab.)
b. Carton Label: Pack Shipments: Select this check box to generate a UCC-128
label when attaching a product directly to a pallet in the pack shipments func-
tion. If selected, WMS generates a new carton number and print the associated
label for each item-multiplier entered. When cleared, WMS generate a single
phantom carton for each unique scan code, accumulating multiple quantities of
the same code into the same phantom carton. Phantom cartons are rarely used
when not using the pack pallets function, so this check box normally should be
selected.
c. Carton Label: RFID Filter Value: Select the RFID filter, which indicates the
type of code being sent, such as pallet or carton. Which filter value you use and
what it represents is agreed upon by you and the customer.
d. Mixed Item Literal: Type a value to be printed instead of the customer item
number when a carton label is printed and more than one item exists in the
carton.
e. Pallet Label: Pack Pallets: Select this check box if pallet processing is used
for this customer.
f. Pallet Label: RFID Filter Value: Select the RFID filter, which indicates the
type of code being sent, such as pallet or carton. Which filter value you use and
what it represents is agreed upon by you and the customer.
g. Mixed Item Literal: Type a value to be printed instead of the customer item
number when a pallet label is printed and more than one item exists in the car-
ton.
5. Department: Select Use as Dept Qualifier or Use as Fixed Dept from the list. This
controls how WMS processes the department value specified.
• Use as Dept Qualifier: The value specified is used to search the EDI capture file
to determine the department number from the inbound EDI purchase order.
• Use as Fixed Dept: The value specified is the department number. This can be
used to speed up post pick ticket processing when the department number
does not change.
6. Dist Center Qualifier: This value specifies how to determine the distribution cen-
ter for a given customer. Typically this value should be left blank. If blank, WMS
uses the EDI ship-to cross-reference and the A/R customer delivery address to find
the distribution center. This is the recommended method. If a value is entered in
the Distribution Center Qualifier field, WMS attempts to find the distribution center
in the EDI purchase order using the information provided in the Start and Length
fields.

72
Note: For detailed instructions on setting up distribution centers, see “Appendix A: WMS
and EDI Distribution Center Setup” on page 171. Distribution center processing requires
the Exact Macola ES EDI module.
7. Distribution Center Start/Length: These fields are used only if a distribution
center qualifier is specified. The Start and Length fields then work together to
extract the ship-to number from the fourth element of the N1 segment in the EDI
purchase order. The N1 segment used is determined by the Distribution Center
Qualifier field. The Start field indicates the position in the N104 data from which
WMS searches for the ship-to number. WMS then extracts the information to the
right of the starting position for the length of the value of the Length field. Distribu-
tion center processing requires the Exact Macola ES EDI module.
8. Use EDI 2005: Select this if using any EDI other than the old Macola Gentran EDI.
Exact EDI/DataMason’s Vantage Point, 1 EDI, etc. When selected, the WMS looks
for 850 data like the DC/Mark For and department information in the
ARALTEDI_SQL table, and WMS does not write to the EDBBCIFL table for old EDI.
Processing Preferences
9. Order Completion Mode: This field determines when billing selection is done.
This value overrides, for this customer, the WMS control file default:
• WMS Billing: Indicates that WMS requires the user to close each order individu-
ally. Use this method to allow easier control when a single order is often split
among multiple shipments within a billing cycle. The order is selected only after
the last shipment for that order is processed for the day. This prevents acciden-
tally partially selecting the order when the user clicks the Update Macola but-
ton.
• Pack Shipments: Indicates that an order should be completed when a shipment
to which it is attached is completed. Use this method to simplify order process-
ing. Each order is flagged for selection when the shipment is completed, elimi-
nating the need to process each order again in the WMS billing function. The
selection information is passed to Exact Macola ES when the user clicks the
Update Macola button.
• Pack Verify Cartons: Indicates that an order should be treated as a unique ship-
ment. When the order is completed the order is automatically attached to a
shipment, and is automatically completed. This mode is typically used for cus-
tomers that send individual orders that are each shipped to different locations
or at different times.
10.Alt Identifier Code: If provided, the alternate identifier code indicates that a spe-
cific type of bar code is required. For example, if you were shipping pallets, you
would have to send an ASN with a tare level, and the trading partner would require
a UCC-14 in the pack level. By typing UC in the Alternate Identifier Code field, only
those records in WMS Bulk Weight Maintenance with the Alternate ID Qualifier field
set to UC can be used within WMS.
11.Auto Pack Cartons?: This check box allows UCC-128 labels to be generated auto-
matically based on standard case quantities and the quantity ordered. This setting
overrides, for this customer, the WMS control file default. When using autopack,
the pack cartons function is unnecessary. See “WMS Bulk Weight Maintenance” on
page 57 for instructions on setting up standard case quantities. This field is ignored
if the WMS EDI ASN Data Collection module is not installed.

73
12.One Carton per Order?: This check box can be used to force WMS to create a
single carton for orders that are being packed using the autopack function. When
selected, autopack creates a single carton and then packs all items on an order
into that single carton. This option is disabled if the Auto Pack Cartons check box is
cleared.
ASN Preferences (Note: The send ASN preferences are used by the Macola Gentran EDI.)
13.Send 856 Ship Level: This check box must be selected to create the ASN ship-
ment level record. This check box normally should be selected. This field is ignored
if the WMS EDI ASN Data Collection module is not installed.
14.Send 856 Order Level: This check box must be selected to create the ASN order
level record. This check box normally should be selected. This field is ignored if the
WMS EDI ASN Data Collection module is not installed.
15.Send 856 Tare Level: This check box must be selected to create the ASN tare
(pallet) level record. This check box normally should be selected. This field is
ignored if the WMS EDI ASN Data Collection module is not installed.
16.Send 856 Pack Level: This check box must be selected to create the ASN pack
(carton) level record. This check box normally should be selected. This field is
ignored if the WMS EDI ASN Data Collection module is not installed.
17.Send 856 Item Level: This check box must be selected to create the ASN item
level record. This check box normally should be selected. This field is ignored if the
WMS EDI ASN Data Collection module is not installed.
Label Setup
External Label Maintenance
Use WMS External Label Maintenance to define the shipping label formats to be used by
WMS.
The labels themselves are formatted using BarTender from Seagull Scientific. BarTender
supports most thermal printers, and new printers are added constantly. To determine
which printers are supported, please visit Seagull Scientific’s Web site at www.seagullsci-
entific.com, or contact an authorized WMS reseller.
External label maintenance is used to define the label format names and to instruct WMS
about the variable fields in the label that need to be updated during printing. For every
label format, there is a label format and a WMS External Label Maintenance entry.
“Appendix G: External Label Field List” on page 191 contains a complete list of fields avail-
able to print on customer labels.
74
Label Information Tab
1. To access external label maintenance, in Exact Macola ES, on the System menu,
under the Distribution heading, select WMS, WMS External Label Tools.
2. Move Up: Click this button to move the selected field in the Used Fields list up one
line in the list.
3. Move Down: Click this button to move the selected field in the Used Fields list
down one line in the list.
4. Add >>: Click this button to move the selected field from the Available Fields list
to the bottom of the Used Fields list. Double-clicking an entry in the Available
Fields list box also moves it to the Used Fields list box.
5. << Remove: Click this button to move the selected field from the Used Fields list
to the bottom of the Available Fields list. Double-clicking an entry in the Used
Fields list box also moves it to the bottom of the Available Fields list box.
Contents Label Tab
Use the Contents Label tab to set up shipping labels that require information about the
contents of a carton or pallet to be printed.
75
Note: This is supported only for BarTender label formats.
1. Label Name: The name of the label. This field is automatically set to the label
name from the Label Information tab and is a display-only field on the Contents
Label tab.
2. Max Lines Per Page: The maximum number of lines per page.
3. Print Total Cartons: Select this check box to have the total number of cartons
listed on this label printed on the shipping label.
4. Move Up: Click this button to move the selected field in the Used Fields list up one
line in the list.
5. Move Down: Click this button to move the selected field in the Used Fields list
down one line in the list.
6. Add >>: Click this button to move the selected field from the Available Fields list
to the bottom of the Used Fields list. Double-clicking an entry in the Available
Fields list box also moves it to the Used Fields list box.
7. << Remove: Click this button to move the selected field from the Used Fields list
to the bottom of the Available Fields list. Double-clicking an entry in the Used
Fields list box also moves it to the bottom of the Available Fields list.
8. Sort Order: Use the drop-down list boxes to specify sort orders. This groups the
information for the label. Summary totals are printed for the lowest grouping level
only.
Bill of Lading Type Maintenance
Bill of lading types group items into specific freight classifications and allow a specific
description for the group which can be used in the commodity description section of the
76
bill of lading. At least one entry for the default BOL type DFLT should be created. The BOL
type DFLT is used as the default when no other type is specified in Item Master.
To access Bill of Lading Type Maintenance, in Exact Macola ES, on the System menu,
under the Distribution heading, select Inventory Management, WMS Bill of Lading Type.
You can also access Bill of Lading Type Maintenance from Inventory Management. In Exact
Macola ES, on the BOM & IM, under the Items heading, select WMS Bill of Lading Type.
1. BOL Type: This field is used in the item master to classify the item and to group
items together with a specific description that prints in the BOL commodity descrip-
tion section. More than one bill of lading type can be created for a specific freight
classification, each with a unique description. BOL type DFLT is used when no other
type is specified.
2. Description: The Description field appears on the bill of lading in the commodity
description area. Normally, this should be a generic description of the articles or
packages being shipped.
3. Class Code: The class code represents the freight class code used to determine
the class of items being shipped.
4. NMFC #: National Motor Freight Classification Item Number. The NMFC number is
assigned by commodity type and is used by LTL carriers to determine the level of
rates for a shipment.
5. User Defined 1 - 5: Use these fields to store user defined values that need to be
related to the bill of lading type.
6. Hazardous Materials Flag: Set this field based on the type of items being
shipped. If the hazardous material flag is set to Y, an emergency response number
can be specified.
7. Emergency Response Group #: Type the emergency response group number for
hazardous materials.
77
Ship Via Reports Maintenance
WMS uses Ship Via Reports Maintenance to indicate which forms to print for a specific car-
rier. With this function, the user can specify up to five Crystal Reports or Visual Basic pro-
grams to be executed when a shipment is completed for this customer and carrier. In
addition, a printer number is assigned to the report so a series of printers with the correct
forms can be set up, eliminating the need for the user to select a printer for each report.
Users familiar with Crystal Reports can create their own custom Crystal Reports to gener-
ate packing slips, manifests, and other reports. Users can also contact an authorized WMS
reseller to purchase custom reports.
See “Chapter 12: WMS Reports” on page 167 for a list of the standard reports supplied
with WMS.
1. In Exact Macola ES, on the System menu, under the Distribution heading, select
WMS, WMS Ship Via Reports Maintenance.
2. Customer Number: Type the customer number for the report. This field can be
left blank to specify a default for this carrier. A default entry should be created for
each carrier, and only those customers that need to be handled differently should
have an individual Ship Via Reports Maintenance entry.
3. Ship Via Code: Type the ship via code that requires reports to print at shipment
completion.
4. SCAC Code: Type the Standard Carrier Alpha Code (SCAC) for this carrier. Contact
the carrier or the National Motor Freight Association at 2200 Mill Road, Alexandria,
VA 22314-4654 for the code for the carrier.
5. Report Name (1 - 5): Type the Crystal Report or Visual Basic report name for this
ship via code.
6. Type (1-5): Choose V=Visual Basic if the report is a VB program or C=Crystal Rpt
if it is a Crystal Report.
7. Parameters - Visual Basic Only (1-5): Specify parameters to control a Visual
Basic report. This field is disabled if the report type is C=Crystal Rpt.
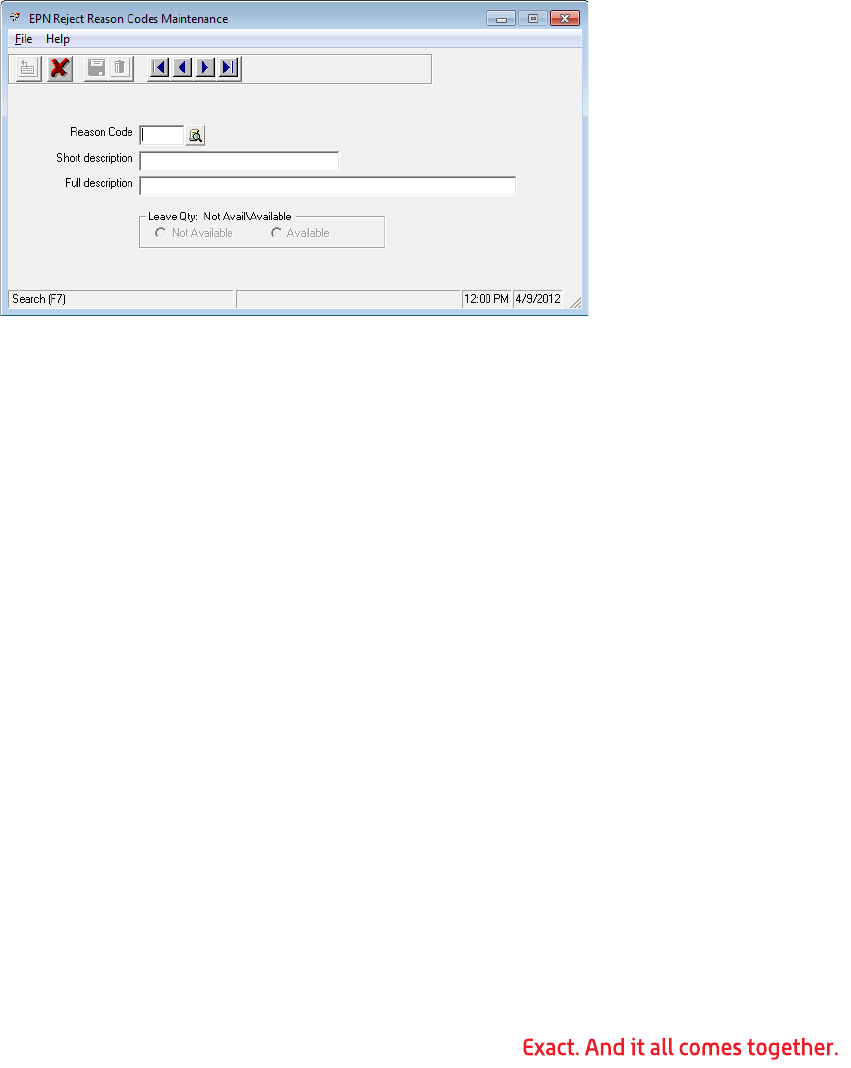
78
8. Printer (1 - 5): Specify the printer for the report. The actual printer and path for
this code are specified in the WMS INI file.
9. Copies (1 - 5): Type the number of copies (1 - 9) to print of the report.
EPN Reject Reason Code Maintenance
Reject reasons are used by electronic pick management to specify the reason that a rec-
ommendation has been rejected by a user. Codes can be used to track the reasons for
picking product other than what was recommended. This allows analysis to avoid such
issues in the future.
1. To maintain EPN reject reason codes, in Exact Macola ES, on the System menu,
under the Distribution heading, select WMS, EPN Reject Reason Codes.
2. Reason Code: Type a three-character code to identify the reject reason.
3. Short Description: Type a short description, which can be displayed on an RF
device.
4. Full Description: Type a longer description, which can be used in reports and
standard workstation inquiries.
5. Leave Qty: Not Avail\Available: Activate the appropriate selection for whether
the quantity that has been rejected should remain available for other orders or
should be placed on hold so no other order can reserve this quantity until it has
been reviewed by management.
WMS Item Availability
The Item Availability screen shows the quantities available, on hand, and allocated for the
item entered at the warehouse entered. You can print a report showing the quantity infor-
mation for the item and warehouse. The Qty on Hand Calculation button shows the equa-
tions for calculating the quantity on hand in Progression and in WMS. These are additional
details for the calculation shown:
• Qty_avail is the quantity available in Exact Macola ES tables.
• Qty_recommended is the sum of the field “Qty_recommended” from the table
ssepnrco - for this item in question.
• Qty_stagePackHold is the sum of the rows from ssepnrco table that have been
staged and not packed yet. (with record type=sph)
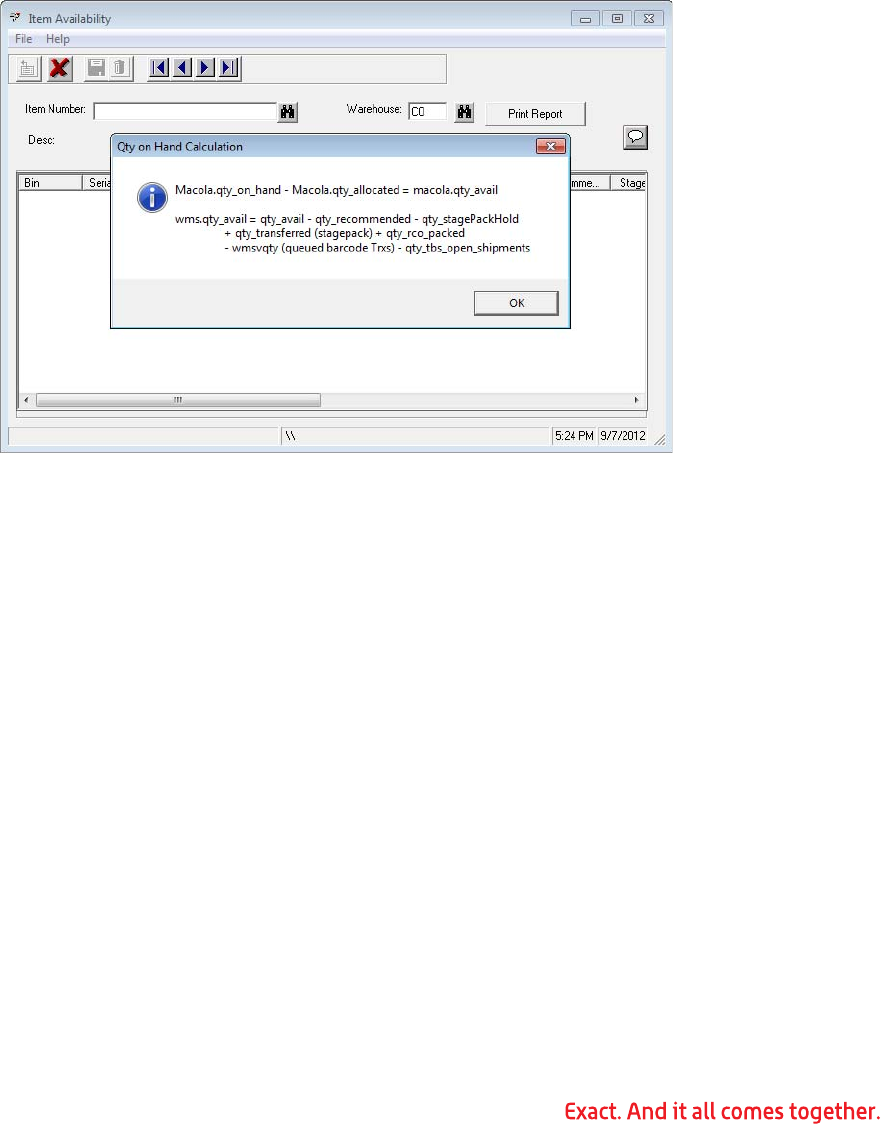
79
• Qty_Transferred is the sum of quantities transferred to a staged bin in the case of a
stagepick/stagepack.
• Qty_rco_packed is the sum of quantities in ssepnrco tables that is packed (for
standard items)
• wmsvqty amount is the quantity available in WMSVqty table - waiting to be polled
in barcode
• qty_tbs_open_shipments is the quantity of Bin/serial/lot items in open shipments
where the shipment is not completed or closed - but still open.
Click the Print Report button to see the WMS Item Availability Report. This report shows
open shipments, pending transactions, and recommendations.
Item Master Maintenance
WMS can use any of the five user defined fields or user notes fields in Item Master Mainte-
nance to identify an item’s bill of lading type or that an item is to be tracked as externally
serialized. To access Item Master Maintenance, in Exact Macola ES, on the BOM & IM
menu, under the Items heading, select Maintenance. In Item Master Maintenance, click
the Extra tab to access the five user notes fields and five user defined fields.
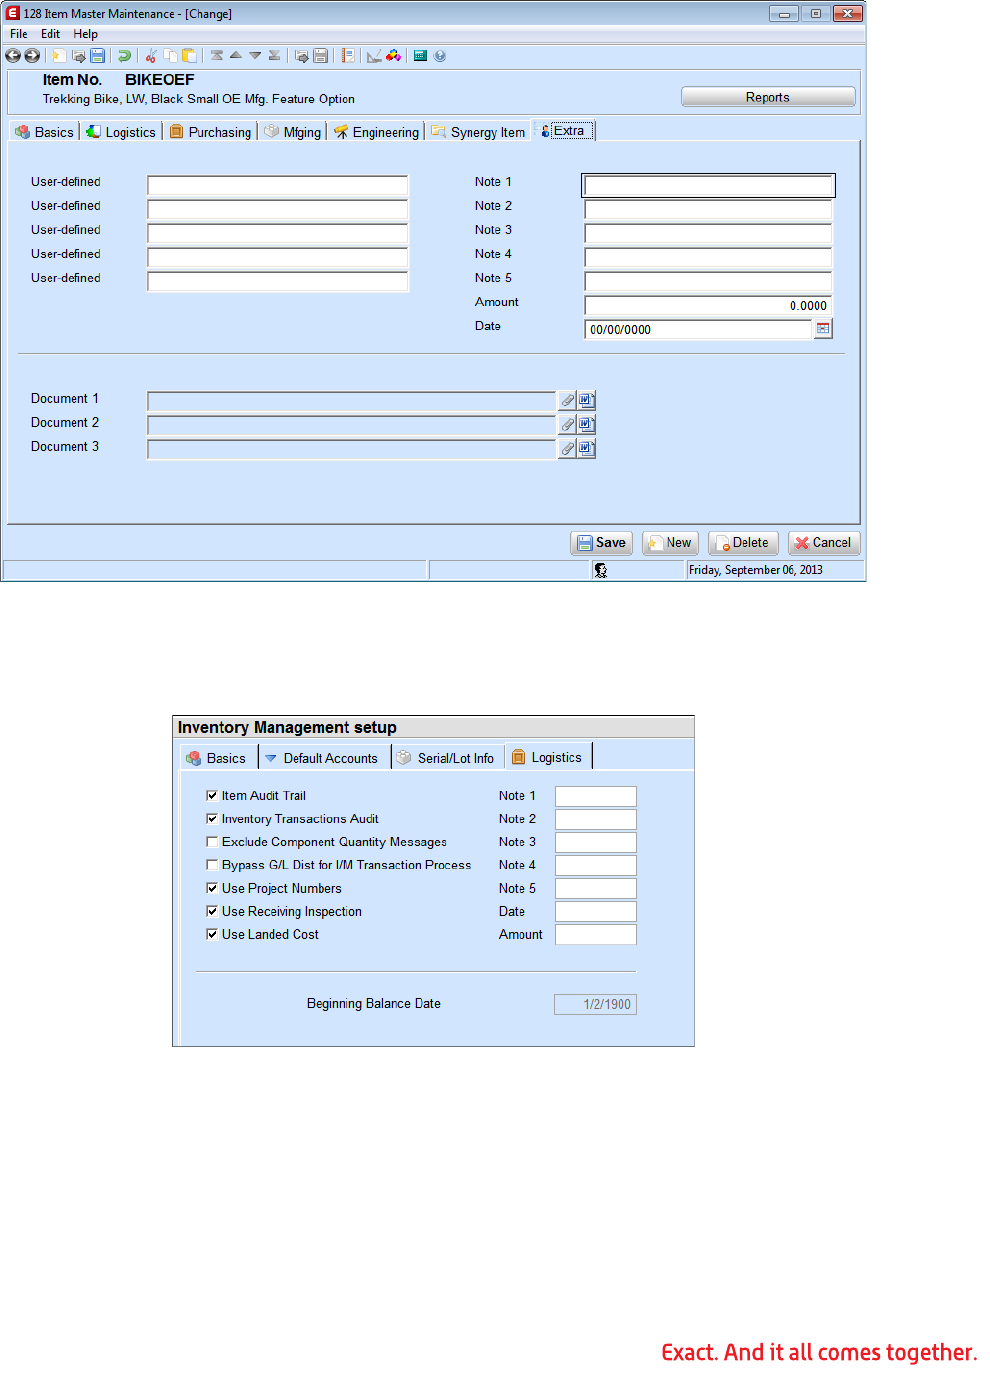
80
To change the literal for an item note field, in Exact Macola ES, on the System menu,
under the Company heading, click Package Settings. Click Distribution, Inventory Manage-
ment Setup, and then click the Logistics tab. Type a meaningful label in the field for the
note that you want to use.
You must have the Exact Macola ES ScreenSet Designer module to change the literal for a
user defined field. In the Exact Macola ES help, see Changing the Text of a Literal for
instructions on changing a user defined field literal.
Bill of Lading Type Field
Use Item Master Maintenance to classify items by freight classification code. On the WMS
Control File Maintenance screen, on the Shipping tab, the Item Master Bill of Lading
Type Field specifies which field in the item master contains the bill of lading type code for
the item. The bill of lading type defines a specific classification code, description, and haz-
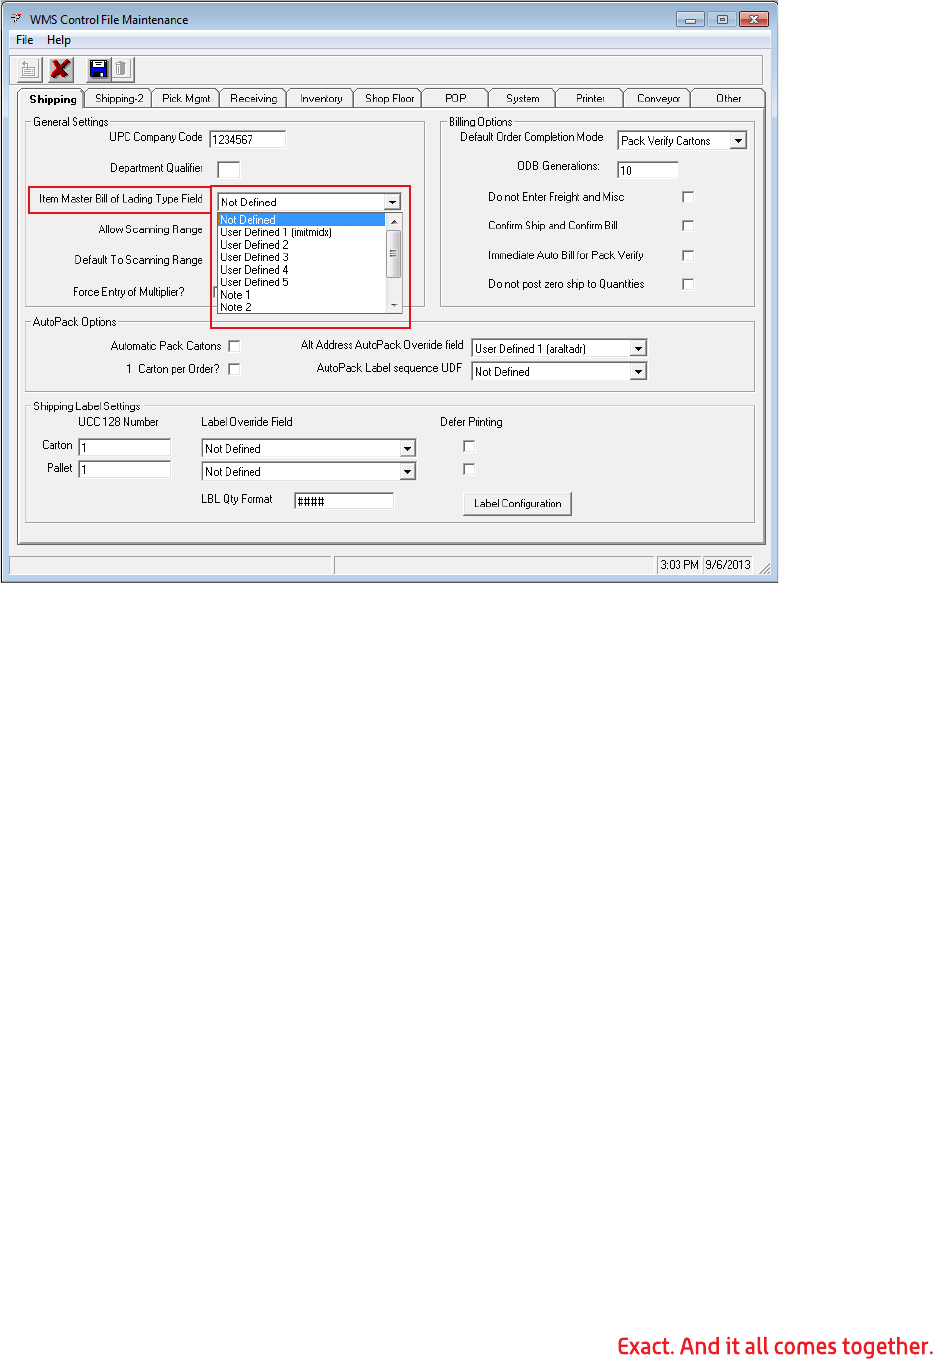
81
ardous material status. (Refer to step 3. under “Shipping Tab” on page 22.)
If the value of the field specified by Item Master Bill of Lading Type Field is left blank,
WMS assumes the code is default (DFLT). For example, if the User Defined 1 is selected
and for the item being processed the UDF1 is blank in the imitmidx_sql table, the program
assumes DFLT. This eliminates the need to enter the BOL type in each item master record
if most items have the same type.
This field is not validated by Exact Macola ES, so if the bill of lading type specified does not
exist in Bill of Lading Type Maintenance, WMS cannot properly classify the item on a bill of
lading.
External Serial Number Field
Item Master Maintenance can be used to specify that an item is externally serialized. WMS
can use any of the five user defined fields or five user notes fields to store this informa-
tion. Type Y in the Item Master Maintenance user defined field or user note and select the
corresponding field in the I/M Ext Ser Num Field on the Shipping-2 tab on the WMS
Control File Maintenance screen.
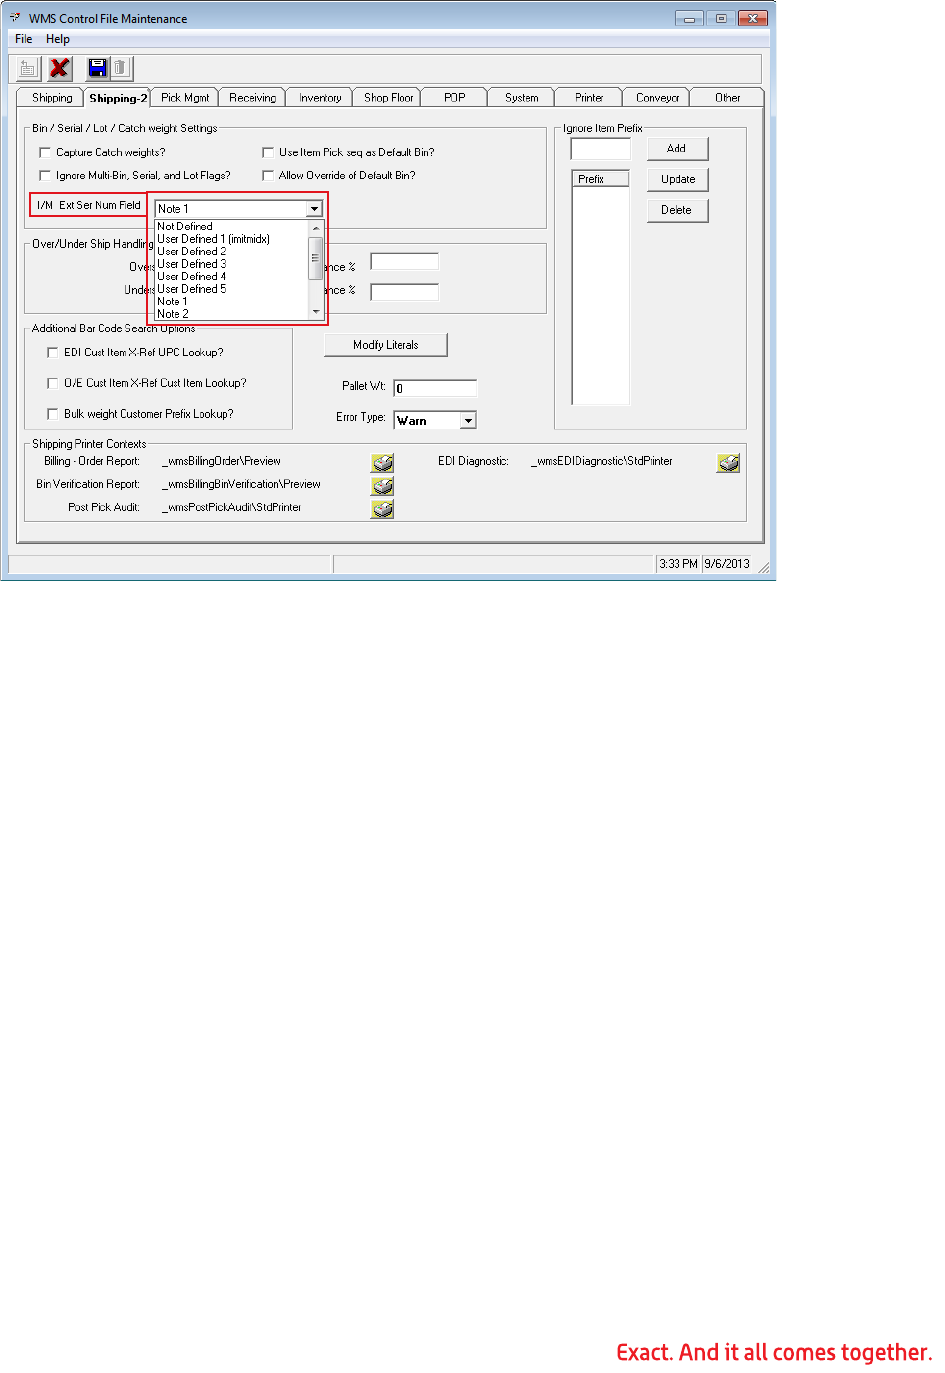
82
Typing a value other than Y in the first position of the Item Master Maintenance user
defined field or user note causes WMS to treat the item as not externally serialized.
Item/Location Maintenance
WMS can use any of the five user defined fields in Item/Location Maintenance to specify a
sort sequence other than order entry or pick sequence when printing autopack labels. The
Item/Location Maintenance user defined field to be used must be specified in the Auto-
Pack Label sequence UDF field on the Shipping tab on the WMS Control File Mainte-
nance screen.
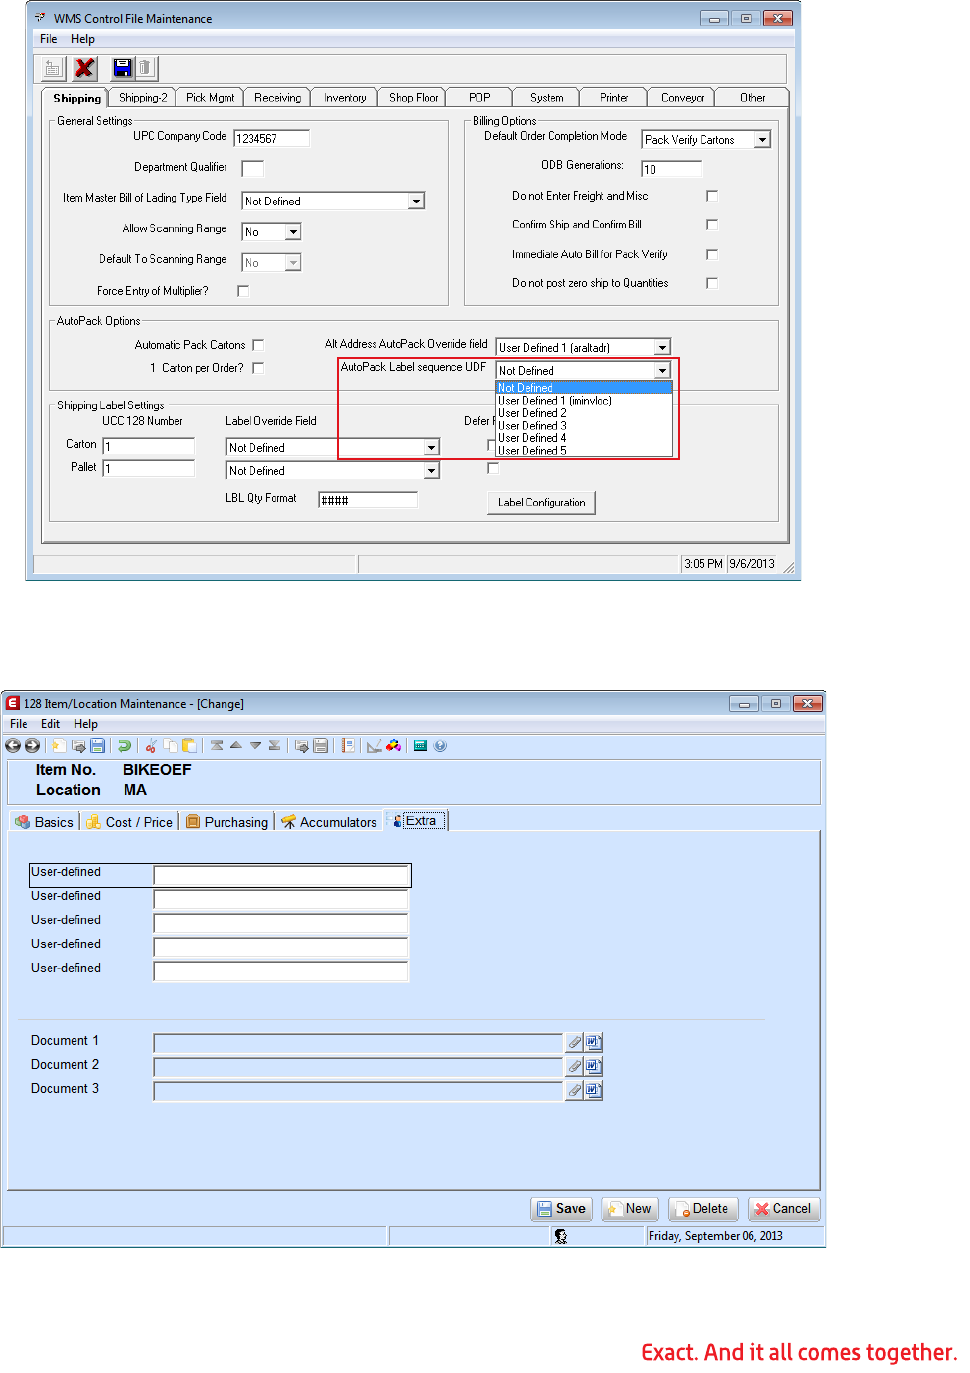
83
To access item location maintenance, in Exact Macola ES, on the BOM & IM menu, under
the Items heading, select Item/Location. On the Item/Location Maintenance screen, click
the Extra tab to access the five user defined fields.
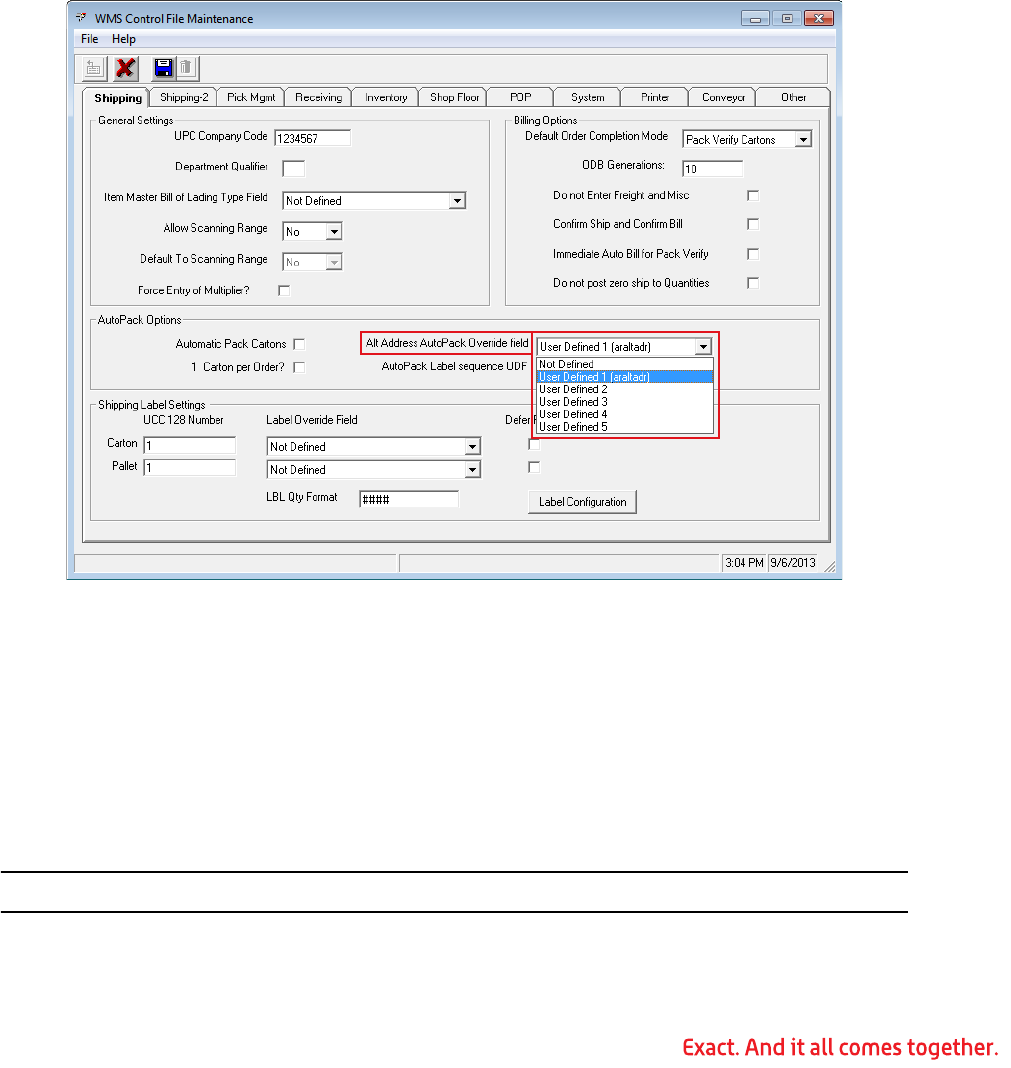
84
You must have the Exact Macola ES ScreenSet Designer module to change the literal for
any of these user defined fields. In the Exact Macola ES help, see Changing the Text of a
Literal for instructions on changing a user defined field literal.
Customer Delivery Address Maintenance
WMS can use any of the four account free fields (Addresses: text field 2 through
Addresses: text field 5) in A/R Customer Delivery Address Maintenance to override the
order completion mode and the autopack status for a ship to address. The user defined
field to be used must be specified in the Alt Address AutoPack Override field on the
Shipping tab on the WMS Control File Maintenance screen. You can choose User Defined 2,
User Defined 3, User Defined 4, or User Defined 5. (Refer to step 15. under “Shipping Tab”
on page 22.)
These are the acceptable values to use in the customer delivery address user defined
fields (Addresses: text field 2, Addresses: text field 3, Addresses: text field 4, and
Addresses: text field 5):
• VN = Pack Verify Mode, AutoPack Off
• SN = Pack Shipments Mode, AutoPack Off
• SY = Pack Shipments Mode, AutoPack On
• BN = WMS Billing Mode, AutoPack Off
• BY = WMS Billing Mode, AutoPack On
Note: If any other value is used, it is ignored and the default value used.
To access the customer delivery address maintenance, in Exact Macola ES, on the A/R
menu, under the Customers heading, select Maintain. Search for the customer, and click
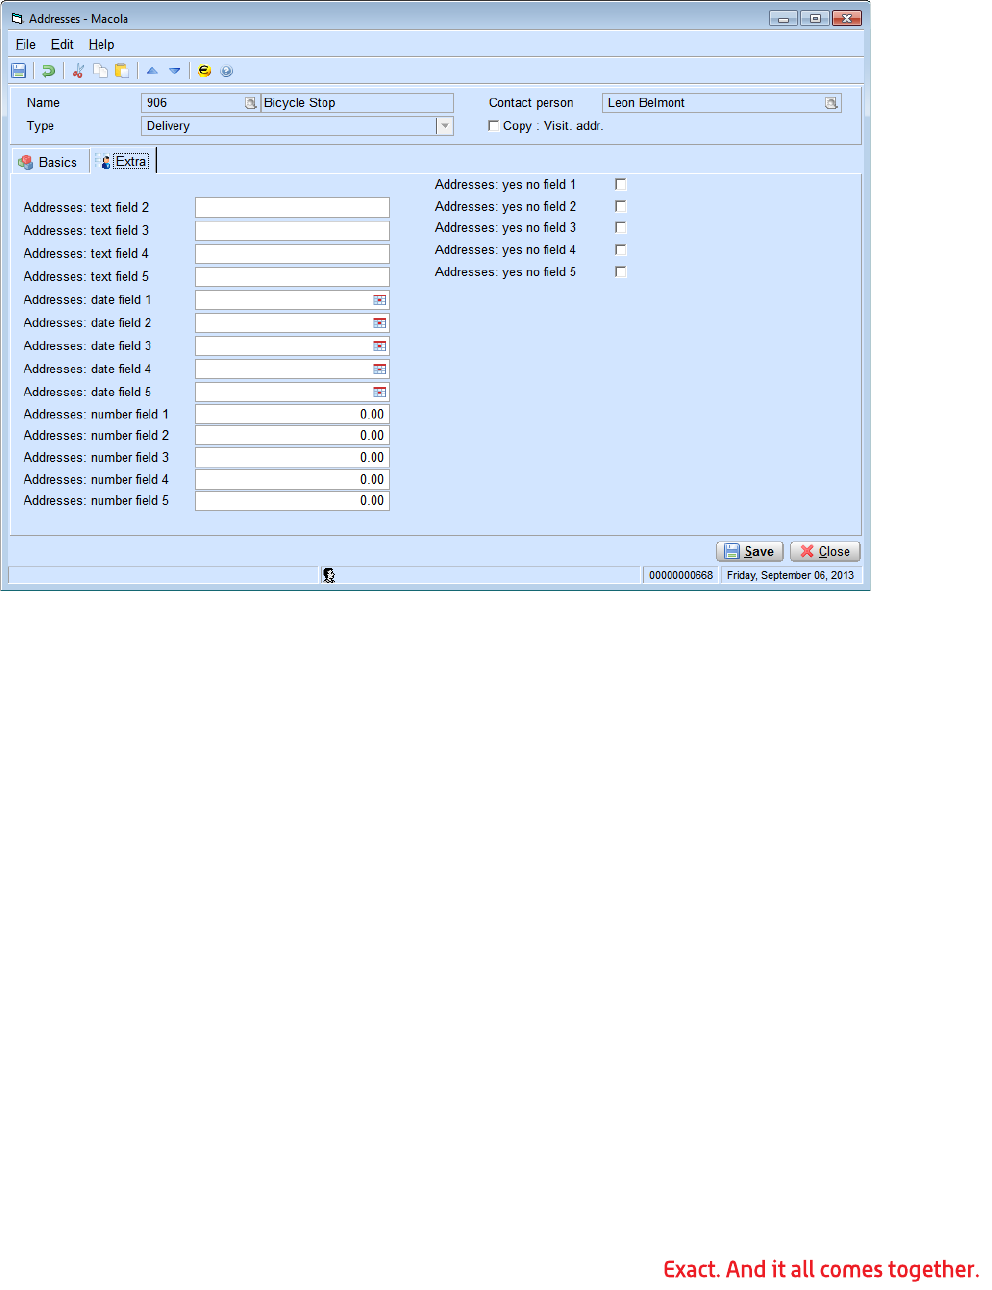
85
open. On the Maintain Customers screen click the Addresses tab. Double-click an existing
address to edit it, or click the Add New button to create a new address. Click the Extra tab
to access the account free fields.
Order Entry Header Setup
WMS can use any of the five user defined fields on the O/E order header to override the
carton or pallet label used when printing. These fields can be unhidden on the O/E order
header screen and labeled accordingly. This feature requires the Exact Macola ES
ScreenSet Designer module. Refer to the System Manager online help in Exact Macola ES
for instructions on using the ScreenSet Designer to unhide fields on the order header.
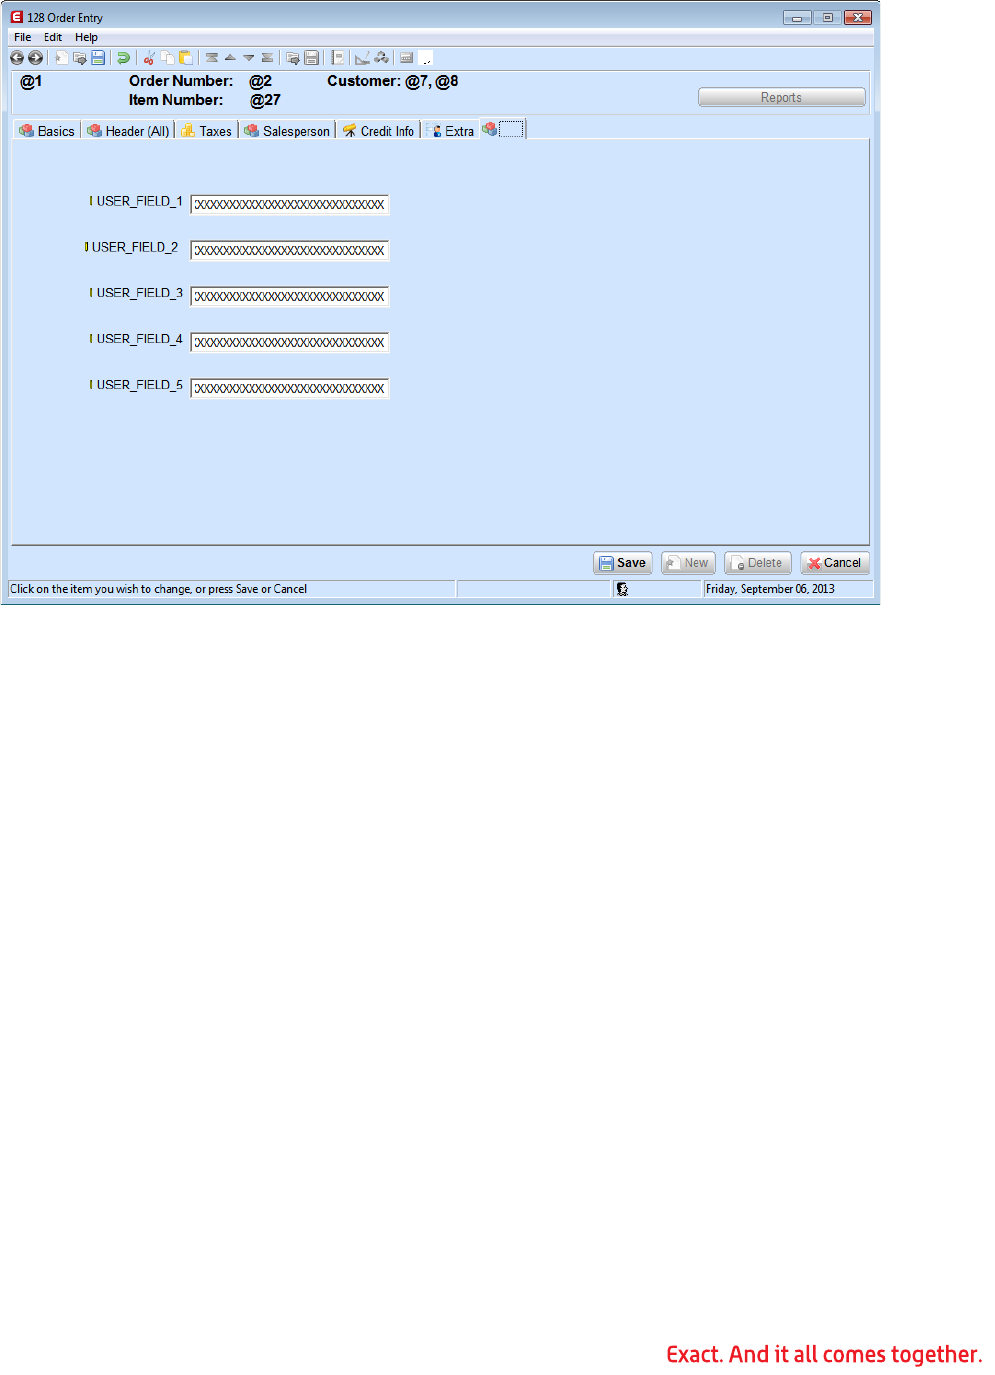
86
WMS uses the form name specified in these fields instead of the values specified in the
customer override file or the default label (Label Configuration) specified on the WMS
Control File Maintenance screen. If the Carton Label Override field or the Pallet Label
Override field is set to Not Defined, WMS reverts to the default name.
The user defined field you want to use must be specified in the Carton Label Override field
or the Pallet Label Override field on the WMS Control File Maintenance screen.
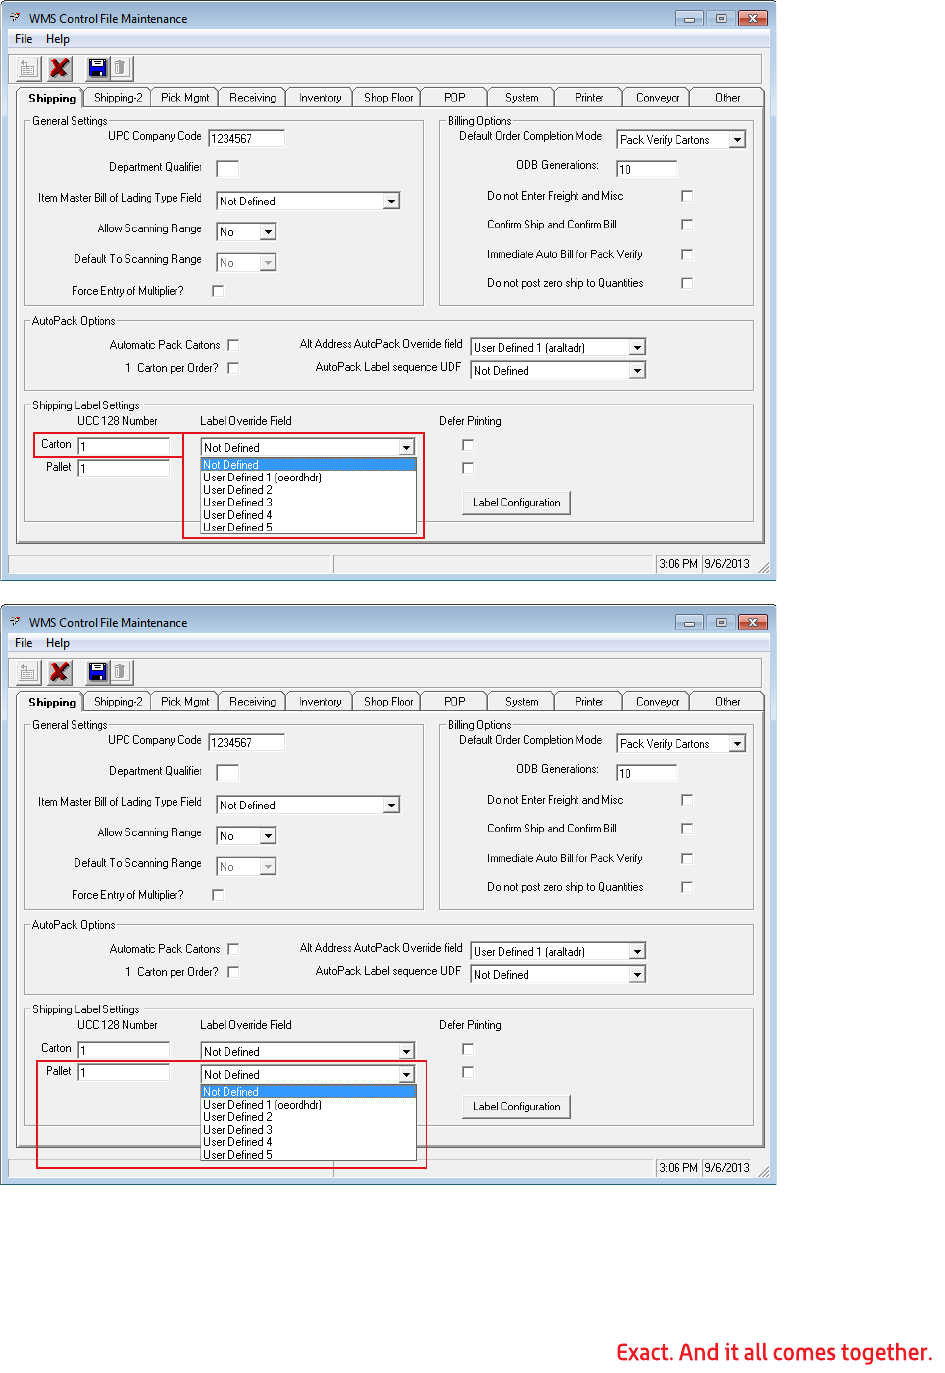
87
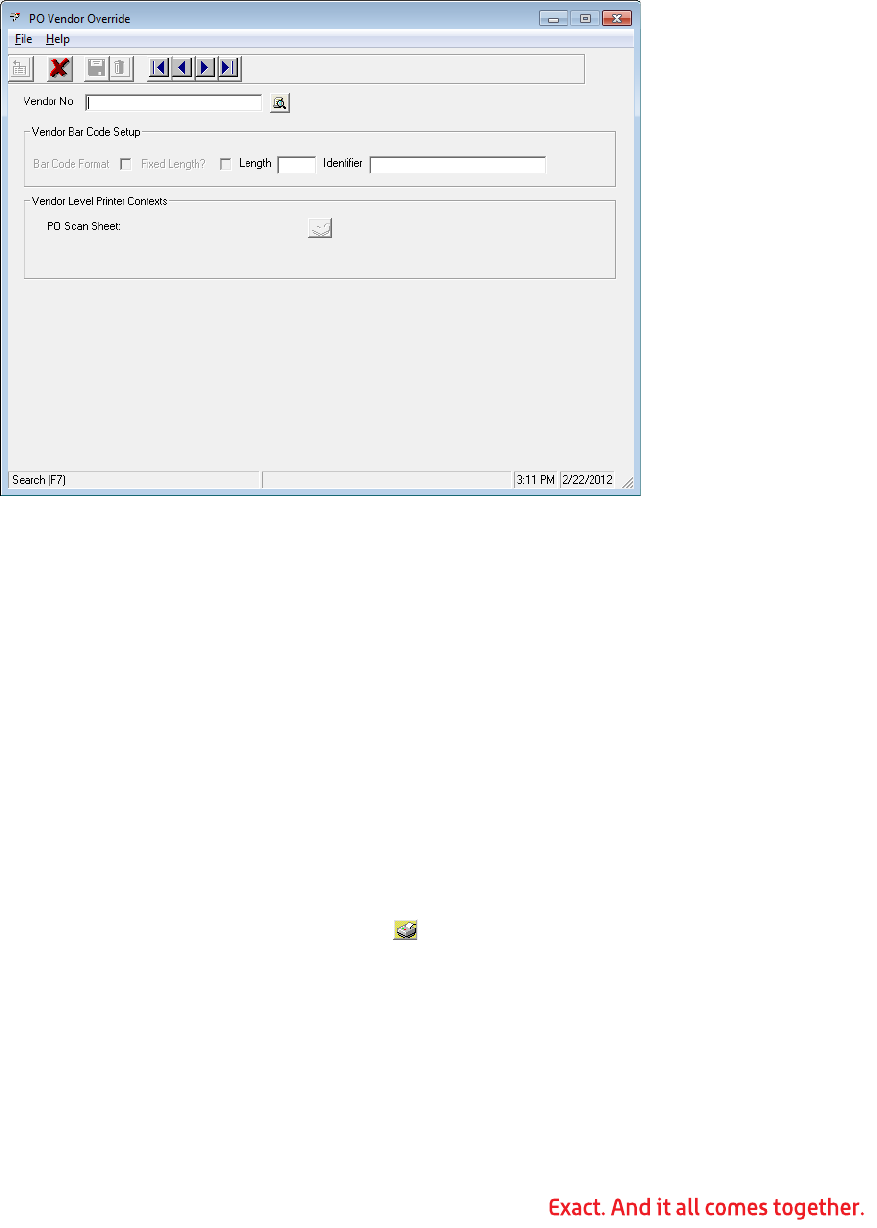
88
Chapter 5: WMS Setup - Purchase Order Receiving
Vendor Override Maintenance
WMS Vendor Override Maintenance overrides the system defaults with vendor specific
information.
1. To access Vendor Override Maintenance, in Exact Macola ES, on the System menu,
under the Distribution heading, select Purchase Order, WMS Vendor Override. (Or,
on the PO & RFQ menu, under the Entries heading, select WMS Vendor Override.)
2. Vendor No: Type the vendor’s Exact Macola ES A/P number.
3. Bar Code Format: Select this check box if the vendor supplies a multi-segment,
vendor specific bar code on products.
4. Fixed Length?: Select this check box if the vendor specific bar code is a fixed
length. This is used to help validate that the bar code scanned is in fact the vendor
specific bar code.
5. Length: Type the fixed length value for the length of the vendor specific bar code.
6. Identifier: Type the identifier code embedded in the bar code sent by the vendor,
if one exists.
7. PO Scan Sheet: Displays the default report name for the post PO scan sheet.
Click the Maintain Printer Context button to configure the report printing
settings.
The receiving function can automatically generate product labels for up to four levels:
unit, inner, case, and pallet. The product label setup section of the WMS control file
defines the default calculations for each layer. These can be overridden in the vendor
override for a vendor or in the vendor item override for a specific vendor item.
For each layer, the user specifies the label format, whether it is printed, how many copies,
which printer to use, and a default package code to use in conjunction with the bulk
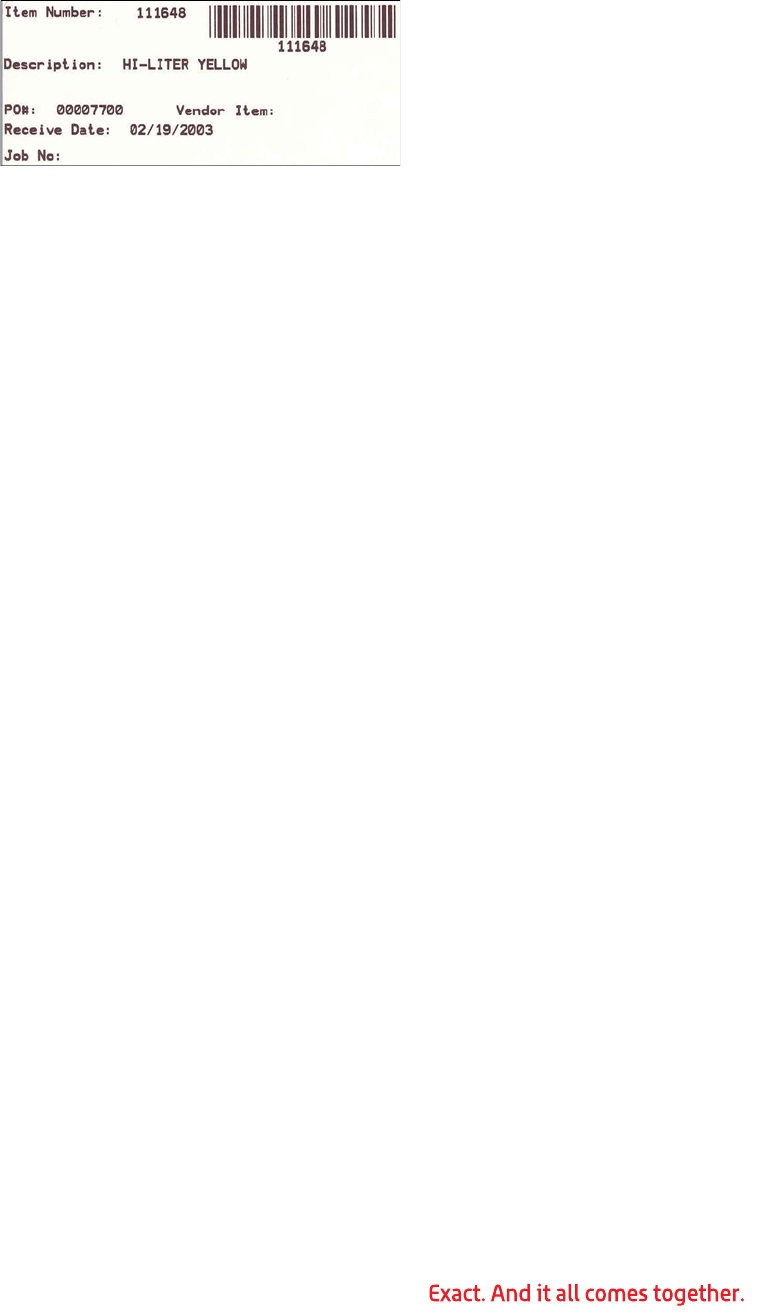
89
weight entry when calculating the number of labels required. Click a layer to change its
settings.
Sample Product Label
8. Label Type: Shows which layer is being changed. This field is set by the system
when the user selects an entry to modify.
9. Print (Y/N): Select Yes, No, or Prompt to indicate whether product labels should
be printed when product is received.
• Yes: Print automatically without waiting for user confirmation.
• No: Do not allow product labels to be printed.
• Prompt: Display the calculated quantity of labels and allow the user to override
the number of labels printed, as well as the case pack used for this layer.
10.Format: Type the form name to be used to print the product labels for this layer.
11.Copies: Type the number of copies of each product label that should be printed for
this layer.
12.Printer Name: Select the printer to use when printing the product labels for this
layer. The printer names must have been added previously on the WMS control file
Printer tab.
13.Pkg. Code: Select the package code to be used with the item number to find the
quantity per pack from WMS Bulk Weight Maintenance when calculating the num-
ber of labels required.
Vendor Bar Code Maintenance
Vendor Bar Code Maintenance allows multi-segmented vendor specific bar codes to be
defined. This setup defines how to break down the vendor bar code segments. A vendor
override indicates when a vendor bar code is in use.
90
1. To access Vendor Bar Code Maintenance, in Exact Macola ES, on the System menu,
under the Distribution heading, select Purchase Order, WMS Vendor Barcode. (Or
on the PO & RFQ menu, under the Entries heading, select WMS Vendor Barcode.)
2. Click the Add Barcode Segment button to add a new bar code segment defini-
tion. Double-click an existing entry to edit its settings.
3. Field Type: Select the type of data found in this segment from the list.
4. Start Byte: Type the starting position in the bar code for this segment. This is
automatically set to the next byte position, based on the segment definitions
already entered.
5. Length: Type the number of bytes that this segment contains.
Vendor Item Override Maintenance
The Vendor Item Override Maintenance functionality has been replaced with the Label
Configuration. Refer to “Label Configuration” on page 44 in Chapter 3.

91
Chapter 6: WMS Processing
Logging on to WMS
WMS is executed externally to Exact Macola ES. It is typically used at a packing station.
Because Exact Macola ES is not necessarily required on that workstation, the administra-
tor can prevent access to Exact Macola ES from the workstation.
1. Username: Type the user name.
2. Password: Type the password.
3. Press Enter.
Changing the User Warehouse
If the Allow Change Warehouse check box has been selected in the user’s entry in the
WMS Security File, he can change the warehouse that he is working in within WMS.
1. Log in to the WMS program.
2. Click File on the WMS menu, and then click Change Warehouse.
92
Note: You can also change the warehouse in WMS Inquiry by clicking the Whse Code link.
3. The Users Default Warehouse field displays the warehouse that the user is logged
into by default.
4. The Current Warehouse field displays the warehouse that the user is currently
logged into.
5. Type the warehouse to change to in the Warehouse field, and then click Ok.
6. To automatically reset the user to his default warehouse, click the Reset to
Default button.
Transaction History
The WMS Transaction History lists all actions performed by the user, including creating and
packing cartons, pallets, and shipments, closing shipments, and billing orders. To clear the
transaction history, click in the Transaction History pane. Click File on the WMS menu, and
then click Clear Transaction History.
RF Emulator
The WMS RF Emulator allows you to access the WMS functions at a workstation as if you
were using a handheld RF device.
To access the RF Emulator, in Exact Macola ES, on the OE & RMA menu, under the Billing/
Picking/Shipping heading, select Shipping, RF emulation.

93
Chapter 7: WMS Shipping Transactions
Pick Management (EPN Processing)
WMS Pick Management manages the picking and packing processes for the warehouse.
Orders are released to the pickers as electronic documents called EPNs (Electronic Pick
Notifications), which are designed to be used in an RF environment and guide the picker
through the warehouse to pick the necessary products.
An EPN is a pick work order comprised of one or more sales orders. An EPN can be created
as pick-to-pack, or it can be created as a stage pick with a separate stage pack.
A pick-to-pack EPN is created when product can be easily picked and then immediately
packed into a shipping container, either a carton or pallet. The cartons or pallets are
immediately labeled for shipping and are ready to be combined with other cartons or pal-
lets being shipped together. A typical scenario using a pick-to-pack EPN is an order that is
too large to be picked as part of a batch. As the products are placed on the pallet, they are
scanned and associated with the shipping pallet. The pallet can later be associated with a
shipment simply by scanning the pallet label.
A pick-to-stage EPN is created when it makes sense to pick the products, and then bring
them to a staging area where they are ultimately packed into cartons or pallets for ship-
ping. The pick-to-stage EPN indicates what products are to be picked and where to take
them for staging. A pick-to-stage EPN is always associated with a stage pack EPN.
A stage pack EPN is created to direct the packers about how to break out products that
have been brought to a staging area as the result of a pick-to-stage EPN. This can be done
on either an RF device or at a packing station and presents the pack out process in an
order-by-order basis.
An an example, pick-to-stage EPN and stage pack EPN can be used if a series of 20 similar
orders require quantities of the same basic items. In a large warehouse, sending a team
to pick those 20 orders individually is very inefficient because 20 passes through the
warehouse would have to be made for the same items. Instead, a bulk pick-to-stage EPN
can be created for the 20 orders. One pass through the warehouse can be made for the
items, with the total quantity of each item bought to a staging area. The stage pack is
then used to separate the items based on the quantity needed for each order.
A second example of a pick-to-stage/stage pack process is when an order is being picked
for a large number of items, but cannot be easily packaged in the aisle. Products might
require special packaging material that can be applied only at a packaging station. The
products need to be picked and taken to the packaging station. Using pick-to-stage, the
picker can be instructed about what to pick and where to bring the goods. In addition,
since the picker is scanning the products as they are being picked, any mistakes can be
caught before items are carried to the packing station, minimizing return trips to get the
correct item. The stage pack is used as a double check process in addition to tracking
which items are going into which cartons.
Note: O/E manufactured, pulled items are not supported with EPNs.
94
Creating a Pick-to-Pack EPN
1. In Exact Macola ES, on the OE & RMA menu, under the Billing/Picking/Shipping
heading, select Picking, Pick Management. This opens the Pick Management
screen.
2. Warehouse: Type the warehouse location.
3. Click the Sales Order Filter button on the toolbar. This opens the Sales Order Fil-
ter screen.
4. Customer: To filter based on customer, type a starting and ending customer num-
ber.
95
5. Order Number: To filter based on order number, type a starting and ending order
number.
6. PO Number: To filter based on purchase order number, type a starting and ending
purchase order number.
7. Cutoff: To restrict the orders to those shipping before a specific date, type the ship
date.
8. User Defined Query: If you have created user defined filters, you can select a fil-
ter from the list. (WMS prompts you to provide the appropriate criteria after you
click OK.)
9. Invoice Type Orders: Select this check box to include invoice orders.
10.Include Customers on Credit Hold: Select this check box to include customers
currently on credit hold.
11.Completely Available to Ship Orders Only: Select this check box to include
only orders that can be shipped complete.
Note: Click Save Defaults to save these filter settings as the default sales order filter cri-
teria.
12.Click OK.
13.WMS displays a list of orders that have items that have not yet been released and
that meet the criteria specified.
14.Click any column heading to sort the list by that column.
15.Pick Sub Type: Select the Pick To Pack option.
16.Pack Type: Select Cartons or Pallets from the list.
17.Individual Picks: If you select individual picks and have selected more than one
order, WMS generates a unique EPN for each order.
96
18.Bulk Pick: If you select bulk pick, WMS attempts to combine the orders into a sin-
gle EPN.
19.Group Orders by Customer: To create a unique bulk pick for each customer,
select this check box. If you clear this check box, the bulk pick is for multiple cus-
tomers.
20.Separate Pick Per Zone: To create a separate pick for each zone, select this
check box.
21.Priority: Allows a priority to be set for which EPNs get processed first. The choices
are Low, Medium, High, or Immediate. The default is Medium. When the user
presses the F2 key for next job in the EPN processing screen on the RF gun, WMS
brings up the highest priority EPN that is unassigned or assigned to the user.
Within a priority, an EPN assigned to the user takes precedence over an unassigned
EPN, but an higher priority unassigned EPN takes precedence over a lower priority
EPN that is assigned to a user.
22.Status: Sets the Status of the EPN: Open, Closed, Hold, and In Process. If set to
close, the EPN goes through the Close process and releases un-picked quantities
back as open to release to the sales order.
23.Assign to User: Allows the EPN to be assigned to a specific user.
24.Comment: Type a comment for this EPN, if desired.
25.Leave Un-Recommended Qtys Open: Select this check box if you do not want
WMS to generate a recommendation error for any quantities for which it cannot
make a recommendation. The un-recommended quantity is left open for a future
pick.
Note: If you attempt to create a pick or pick/pack for an order, and the Leave Un-Rec-
ommended Qtys Open check box is selected and the order cannot be fully recom-
mended, the order stays open. In the Order Number column, there is a minus ‘-’ sign to
the right of the order number if it was fully unable to be recommended, or there is an
asterisks ‘*’ to the right of the order number if it was partially recommended. The order is
still included in the list of open orders after the picks have been created. Stock must be
made available for the order to clear the ‘-’ or ‘*’.
26.Recommend Zone By Pkg Size: If you are using zones, select this check box to
group the quantity required into the number of tares, pack, and loose units
required. WMS recommends tare quantities first, and recommends them from
zones flagged as Tare. Pack quantities are recommended next, from pack zones,
followed by loose quantities from zones set up as type Loose.
27.Recommend for Specific Zone: Select a specific zone for which to create the
pick or select ALL Zones from the list to allow WMS to recommend from any zone.
28.Select the orders to be released:
•Select All: Selects every order within the list
•Deselect All: Un-selects every order in the list
•Toggle Selected: Changes the selection status for the highlighted range of
orders
29.When the list is correct, click the Create EPN(s) button.
30.WMS creates EPNs for the orders selected. It also attempts to make recommenda-
tions for products that are bin, serial, or lot controlled. If WMS is unable to make a
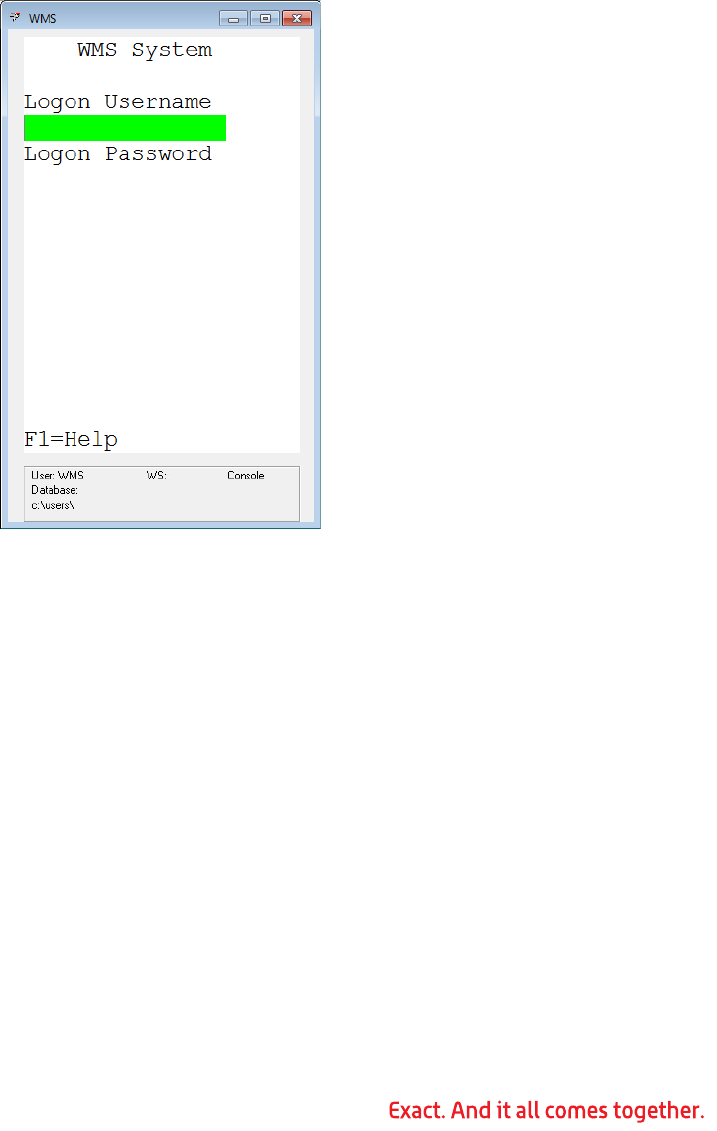
97
recommendation for one or more items, you receive a recommendation error. See
“Resolving Recommendation Errors” on page 114 for information about resolving
these conflicts.
31.Click the Close button to close the sales order selector and return to the EPN
selector screen.
32.WMS displays the EPNs that have been created.
Processing a Pick-to-Pack EPN
1. Log on to WMS on an RF handheld device.
2. If the order is not in your default warehouse, select Utility to change to the correct
warehouse. Type the correct warehouse location code in the To field, and then
press Enter.
3. Select Shipping, and then select EPN Pick.
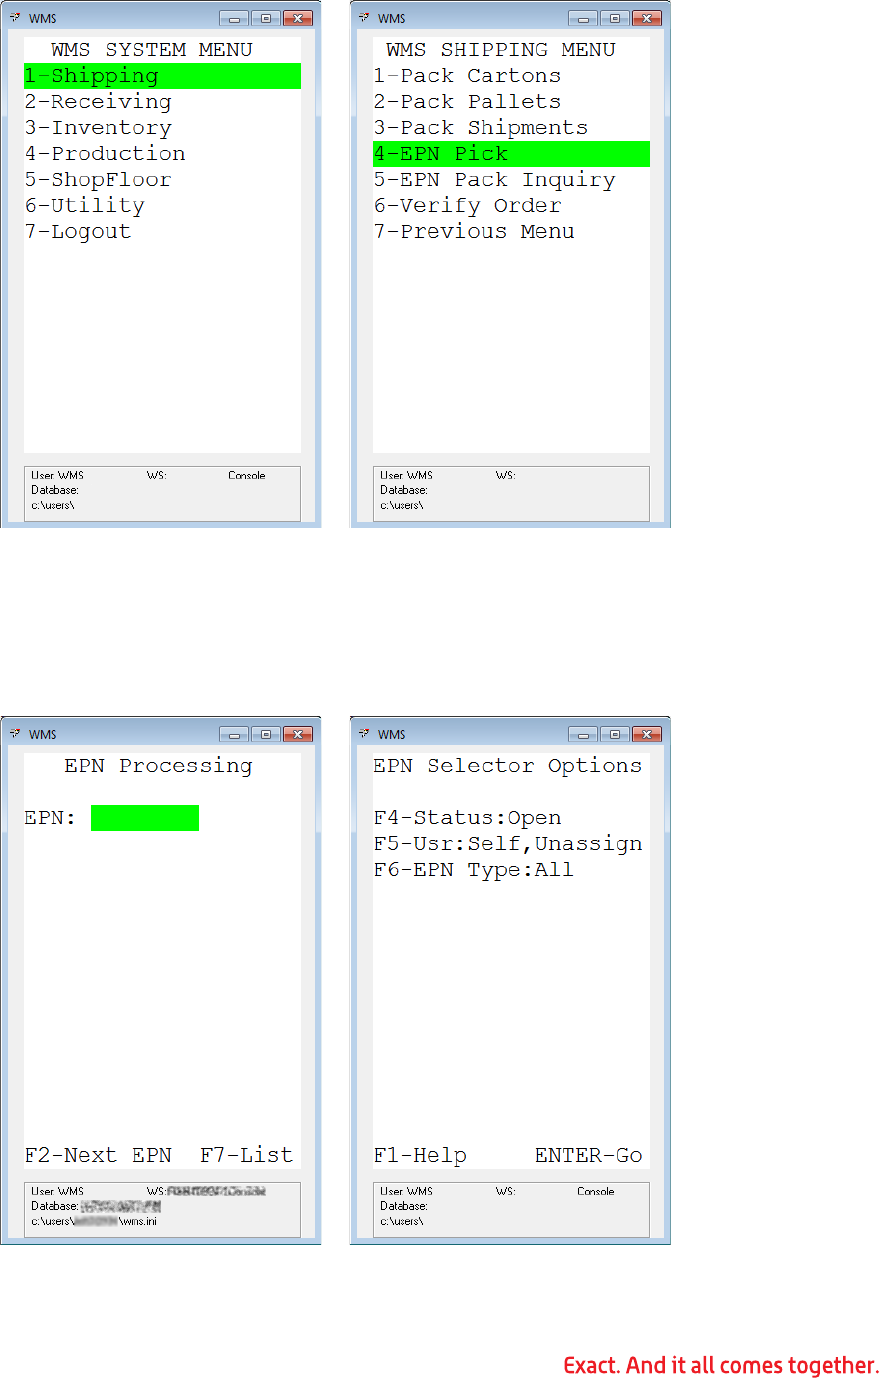
98
4. Press the F2 key on the EPN Processing screen for the highest priority, open EPN
assigned to you or currently unassigned.
- OR - Press the F7 key to access the EPN Selector Options screen and select from
a list of EPNs. On the EPN Selector Options screen, you can change the status, the
user, or the type of EPN.
5. Pressing the F4 key toggles the Status field among: Open | Hold | Open, Hold.

99
6. Pressing the F5 key toggles the User field among: Self, Unassigned | All | Self |
Unassigned.
7. Pressing the F6 key toggles the EPN Type field among: All | Stage Pick | Stage
Pack | Pick to Pack.
8. On the EPN Selector Options screen, press Enter to see a list of EPNs that meet
the criteria you specified. Select the EPN you want to process, and then press
Enter.
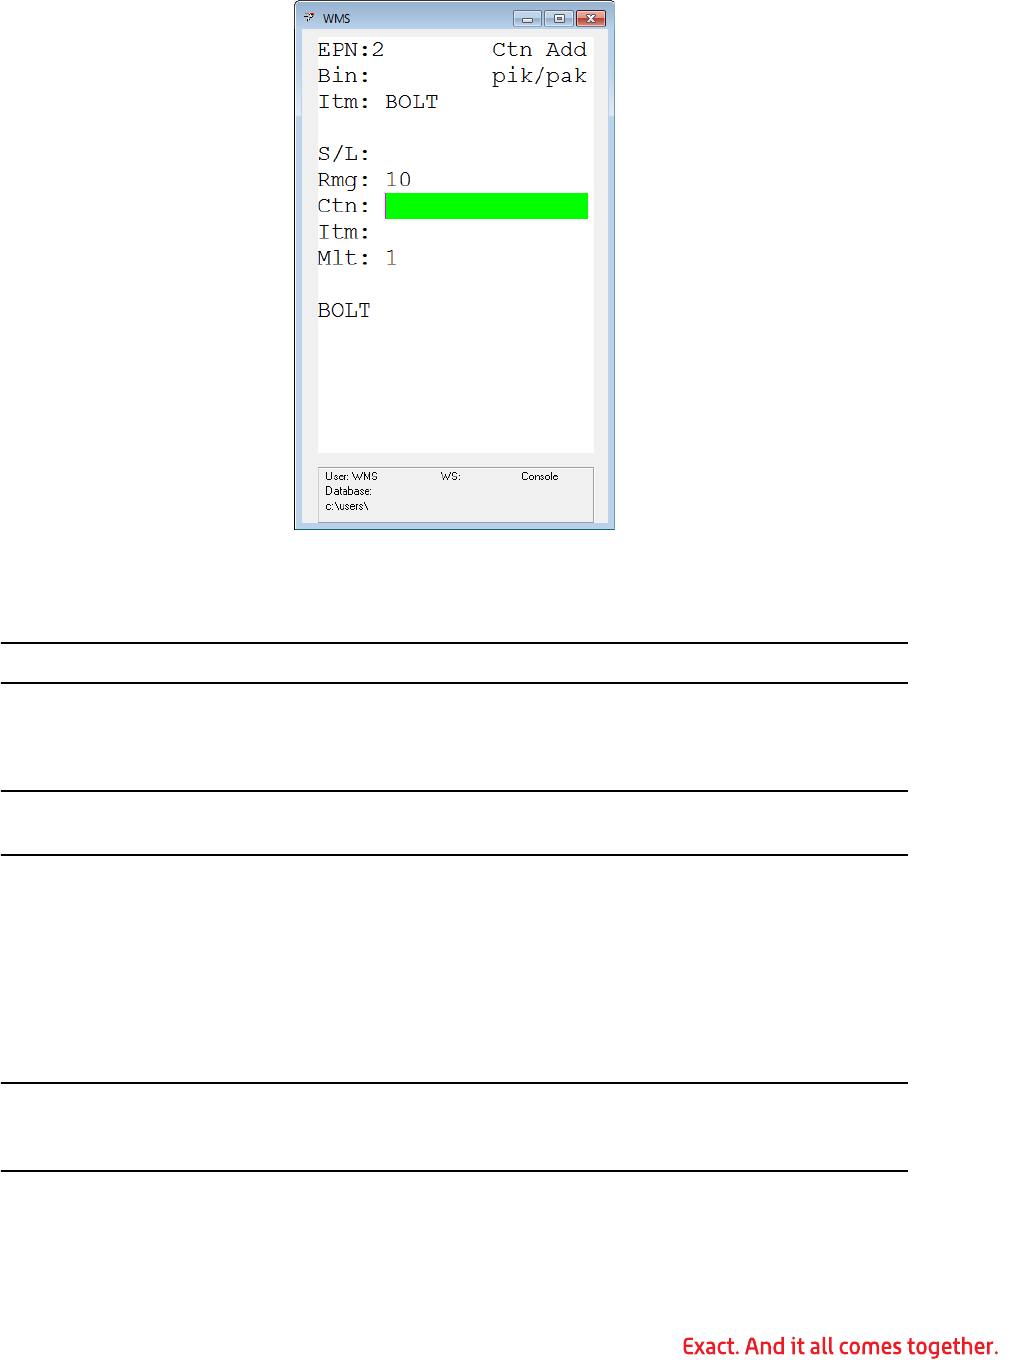
100
9. WMS displays the first item to be picked and packed.
10.The carton that items are to be packed in should be listed in the CTN field. Press
the F2 key to generate a new carton. WMS generates a carton number and prints a
bar coded customer specific shipping label to attach to the carton.
Note: If the label did not print correctly, press the F8 key to reprint it.
11.WMS prompts you to scan and validate that you are at the specified bin.
12.Scan the bin number.
Note: In a non-binned environment, the bin number displayed is the pick sequence value
from the inventory location file, and you are not prompted to verify the bin number.
13.WMS prompts you to scan and verify the item being picked and packed.
14.To enter a quantity for the item, press the F4 key. Type the new quantity in the Mlt
field, and then press Enter.
15.Scan the item. If the item is serialized or lotted, WMS prompts for the serial/lot
number to be scanned also.
16.When the item has been completely picked, WMS displays the next item.
Note: A down arrow indicates that there are additional records after the current one. An
up arrow indicates that there are additional records before the currently displayed record.
You can skip forward or backward by pressing the up or down arrow keys.
17.If you go to the specified location and the product is not available, you can display
a new recommendation by pressing the F3 key. This shows a list of reason codes to
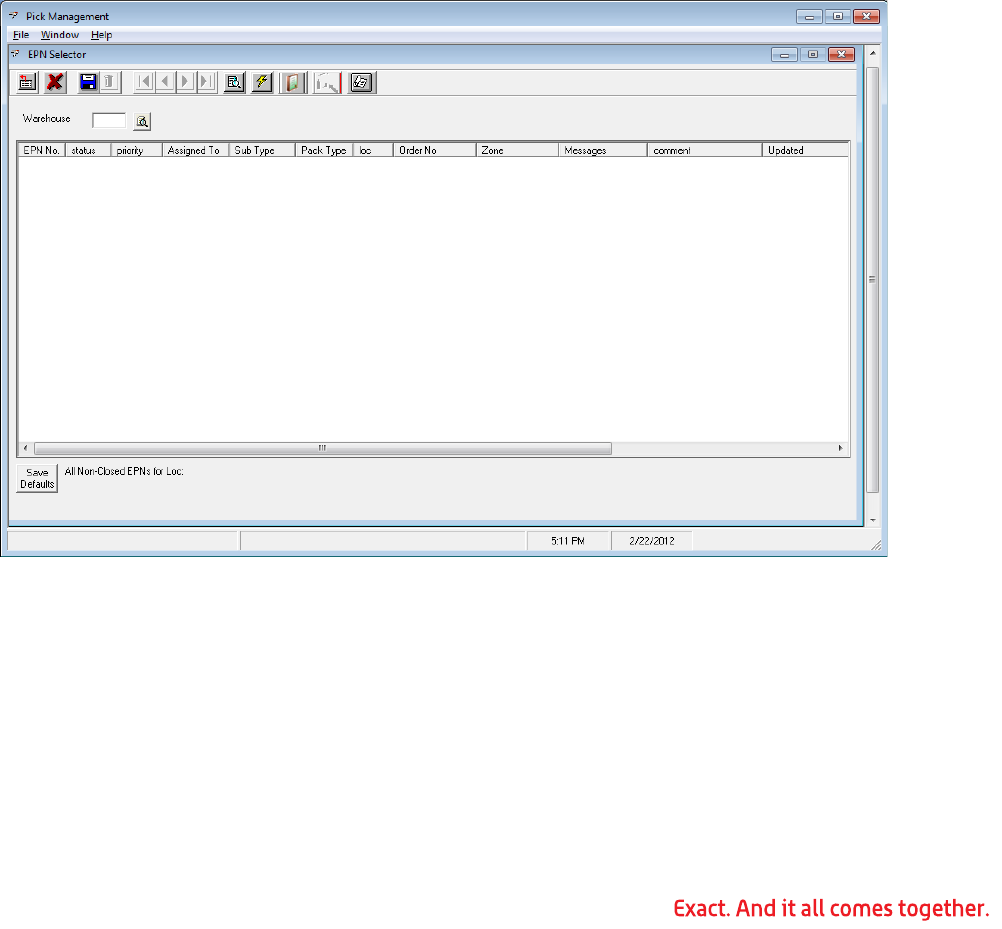
101
specify why you are rejecting the recommendation. Select the code that best
describes the reason that the recommendation is being rejected.
18.Press the F7 key to display the entire EPN.
19.Press the F5 key to enter remove mode.
20.Press the F2 key to start a new carton.
21.Press the F6 key to toggle the mode among carton, pallet, and shipment packing.
22.When the EPN has been completely picked, WMS displays a message that the EPN
is completed. Press Enter to accept the message.
23.Press Escape until you have exited to the EPN Processing screen.
24.Now that the cartons have been picked and packed, they need to be attached to a
shipment.
Creating a Pick-to-Stage and Stage Pack EPN
1. On the OE & RMA menu, under the Billing/Picking/Shipping heading, select Picking,
Pick Management.
2. Warehouse: Type the warehouse location in the Warehouse field.
3. Click the Sales Order Filter button on the toolbar. This opens the Sales Order Fil-
ter screen.
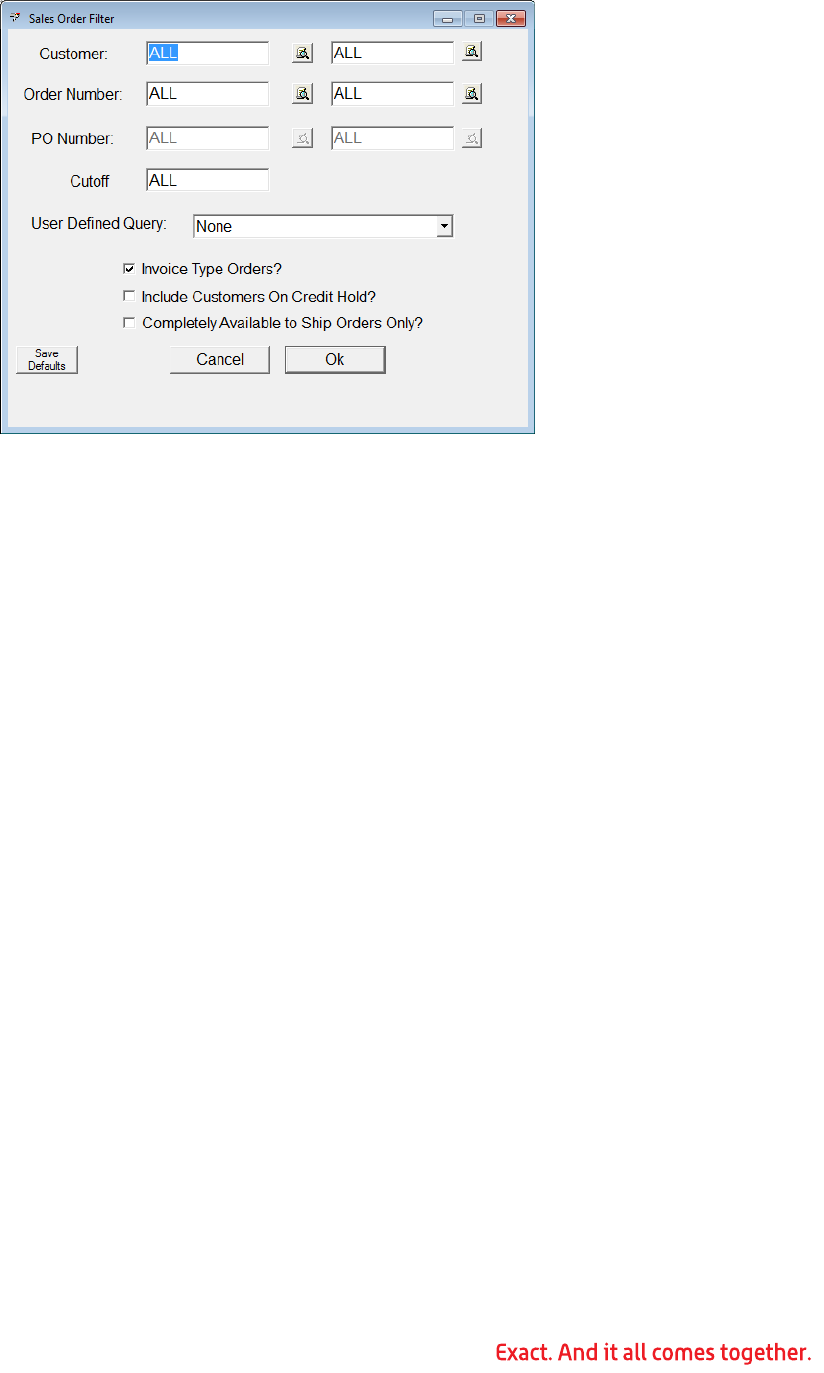
102
4. Customer: To filter based on customer, type a starting and ending customer num-
ber.
5. Order Number: To filter based on order number, type a starting and ending order
number.
6. PO Number: To filter based on purchase order number, type a starting and ending
purchase order number.
7. Cutoff: To restrict the orders to those shipping before a specific date, type the ship
date.
8. User Defined Query: If you have created user defined filters, you can select a fil-
ter from the list. (WMS prompts you to provide the appropriate criteria after you
click OK.)
9. Invoice Type Orders: Select this check box to include invoice orders.
10.Include Customers on Credit Hold: Select this check box to include customers
currently on credit hold.
11.Completely Available to Ship Orders Only: Select this check box to include
only orders that can be shipped complete.
12.Save Defaults button: Click to save these filter settings as the default sales order
filter criteria.
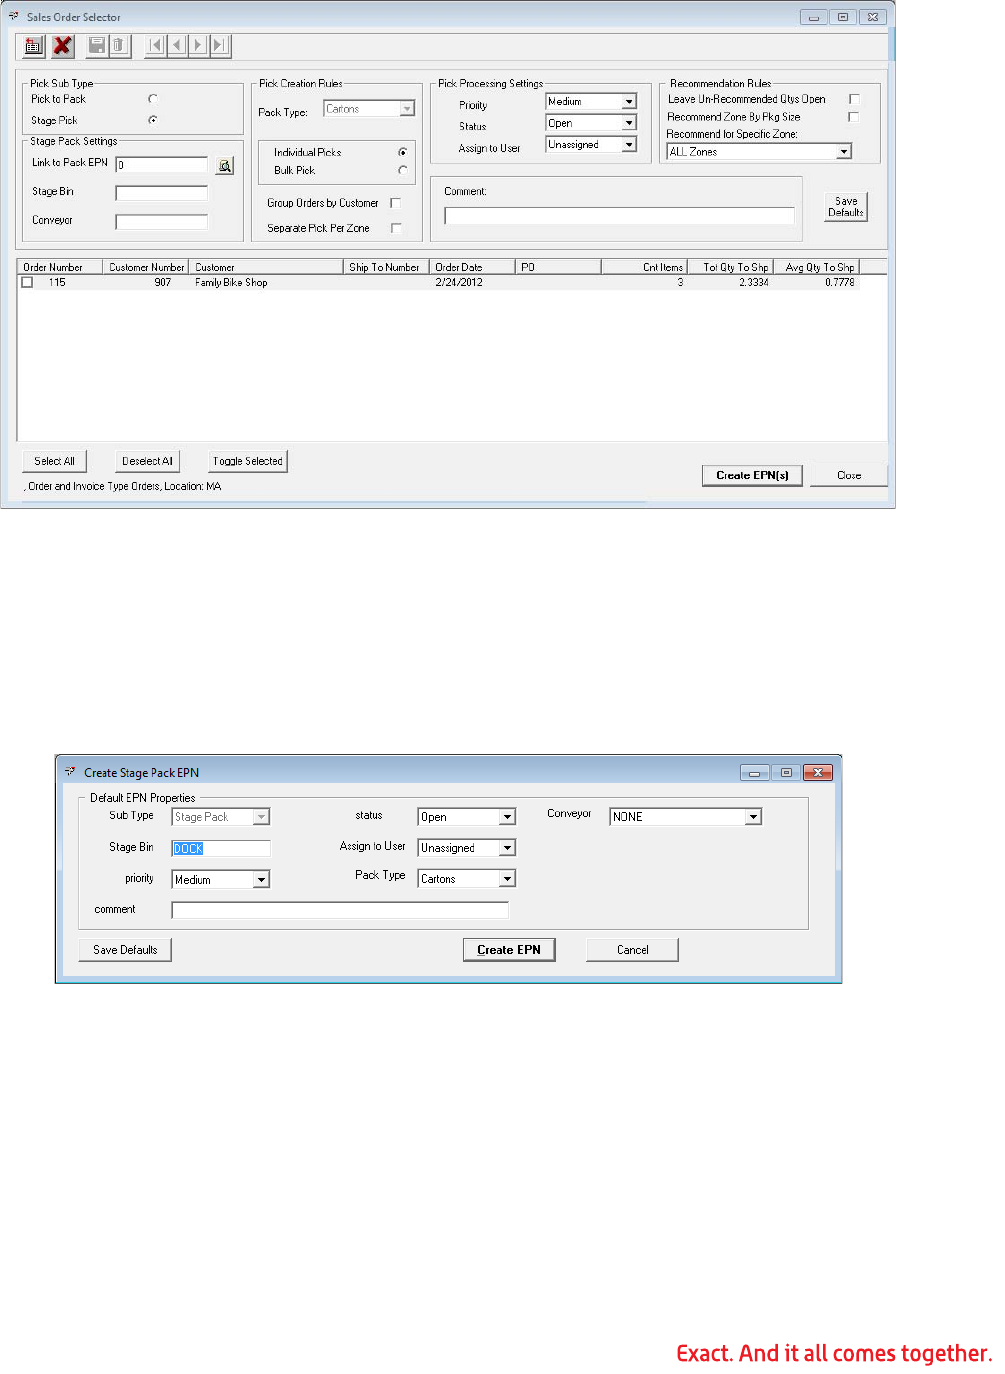
103
13.Click OK.
14.WMS displays a list of all orders that have items that have not yet been released
and that meet the criteria specified in the previous step.
15.Click any column heading to sort the list by that column.
16.Stage Pick: Select the Stage Pick option. This makes additional fields available.
17.Link to Pack EPN: If this stage pick feeds an existing stage pack, type the stage
pack number in the Link to Pack EPN field.
-OR- Press the F2 key to create a new stage pack for this stage pick.
a. On the Create Stage Pack EPN screen, you can specify the user, priority, and
pack type, as well as the stage bin for the product.
b. Comment: Type a comment for this stage pack in the Comment field, if
desired.
c. Conveyor: If you are using the WMS Conveyor Interface module to interface
with a conveyor management system, select the name of the conveyor to use
for this stage pack from the Conveyor list.
d. Click the Create EPN button to create the stage pack and return to the Sales
Order Selector screen.
104
18.Pack Type: The Pack Type field is automatically determined based on the stage
pack associated to the stage pick.
19.Individual Picks: If you choose Individual Picks and select more than one order,
WMS generates a unique EPN for each order.
20.Bulk Pick: If you choose Bulk Pick, WMS attempts to combine the orders into a
single EPN.
21.Group by Customer: When you select Bulk Pick, you can select Group by Cus-
tomer to create a unique bulk pick for each customer. If Group by Customer is not
selected, the bulk pick is for multiple customers.
22.Separate Pick Per Zone: To create a separate pick for each zone, select this
check box.
23.Priority: Sets the Status of the EPN: Open, Closed, Hold, and In Process. If set to
close, the EPN goes through the Close process and releases un-picked quantities
back as open to release to the sales order.
24.Status: Sets the Status of the EPN: Open, Closed, Hold, and In Process. If set to
close, the EPN goes through the Close process and releases un-picked quantities
back as open to release to the sales order.
25.Assign to User: Allows the EPN to be assigned to a specific user.
26.Leave Un-Recommended Qtys Open: Select this check box if you do not want
WMS to generate a recommendation error for any quantities for which it cannot
make a recommendation. The un-recommended quantity is left open for a future
pick.
Note: If you attempt to create a pick or pick/pack for an order, and the Leave Un-Rec-
ommended Qtys Open check box is selected and the order cannot be fully recom-
mended, the order stays open. In the Order Number column, there is a minus ‘-’ sign to
the right of the order number if it was fully unable to be recommended, or there is an
asterisks ‘*’ to the right of the order number if it was partially recommended. The order is
still included in the list of open orders after the picks have been created. Stock must be
made available for the order to clear the ‘-’ or ‘*’.
27.Recommend Zone By Pkg Size: If you are using zones, select the Recommend
Zone By Pkg Size check box to group the quantity required into the number of
tares, pack, and loose units required. WMS recommends tare quantities first, and
recommends from zones flagged as Tare. Pack quantities are recommended next,
from pack zones, followed by loose quantities from zones set up as type Loose.
28.Recommend for Specific Zone: Select a specific zone for which to create the
pick or select ALL Zones from the Recommend for Specific Zone list to allow WMS
to recommend from any zone.
29.Comment: Type a comment for this EPN, if desired.
30.To save these settings as the default for pick creation, click the Save Defaults
button.
31.Select the orders to be released:
• Click the check box beside the order number to select a single order or individ-
ual orders.
•Select All: Selects every order within the list.
•Deselect All: Un-selects every order in the list.
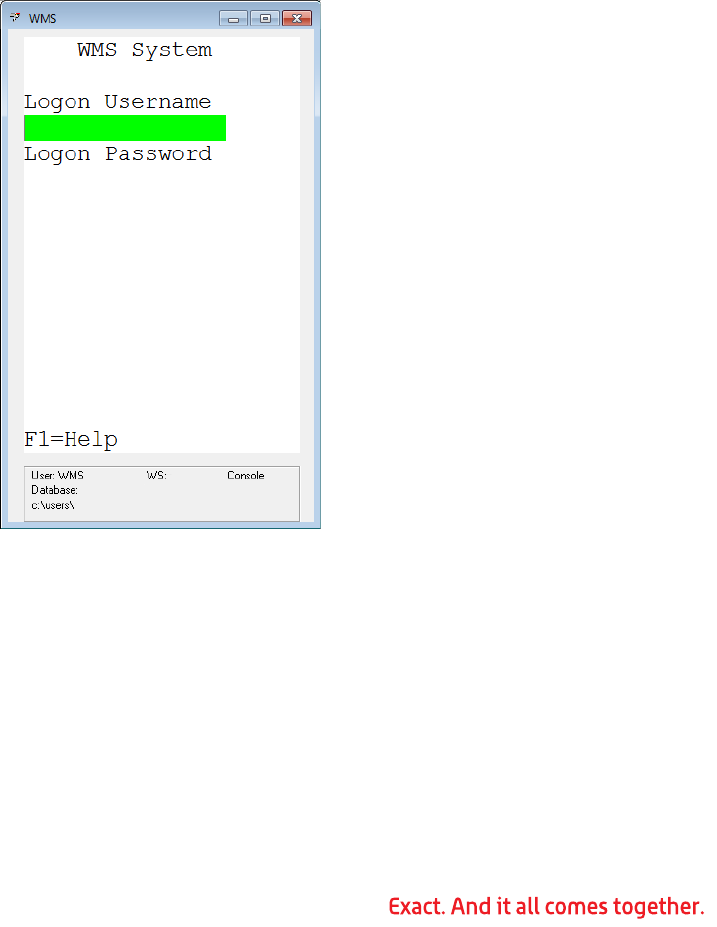
105
•Toggle Selected: Changes the selection status for the highlighted range of
orders.
32.When the list is correct, click the Create EPN(s) button.
33.WMS creates one or more stage pick EPNs for the orders selected. It attempts to
make recommendations for products that are bin, serial, or lot controlled. If WMS
is unable to make a recommendation for one or more items, it displays a recom-
mendation error. See “Resolving Recommendation Errors” on page 114 for infor-
mation about resolving these conflicts.
34.Click Close to return to the EPN Selector screen and see a list of the EPNs that
have been created.
Processing a Pick-To-Stage EPN
In a pick-to-stage, stage pack process, the picking process and the packing process are
two separate functions. After the pick-to-stage has been completed, the stage pack needs
to be processed. This can be done as products are brought to the staging area during the
pick-to-stage process, and can be done by the same or different users.
1. Log on to WMS on an RF handheld device.
2. If the order is not in your default warehouse, select Utility to change to the correct
warehouse. Type the correct warehouse location code in the To field, and then
press Enter.
3. Select Shipping, and then select EPN.
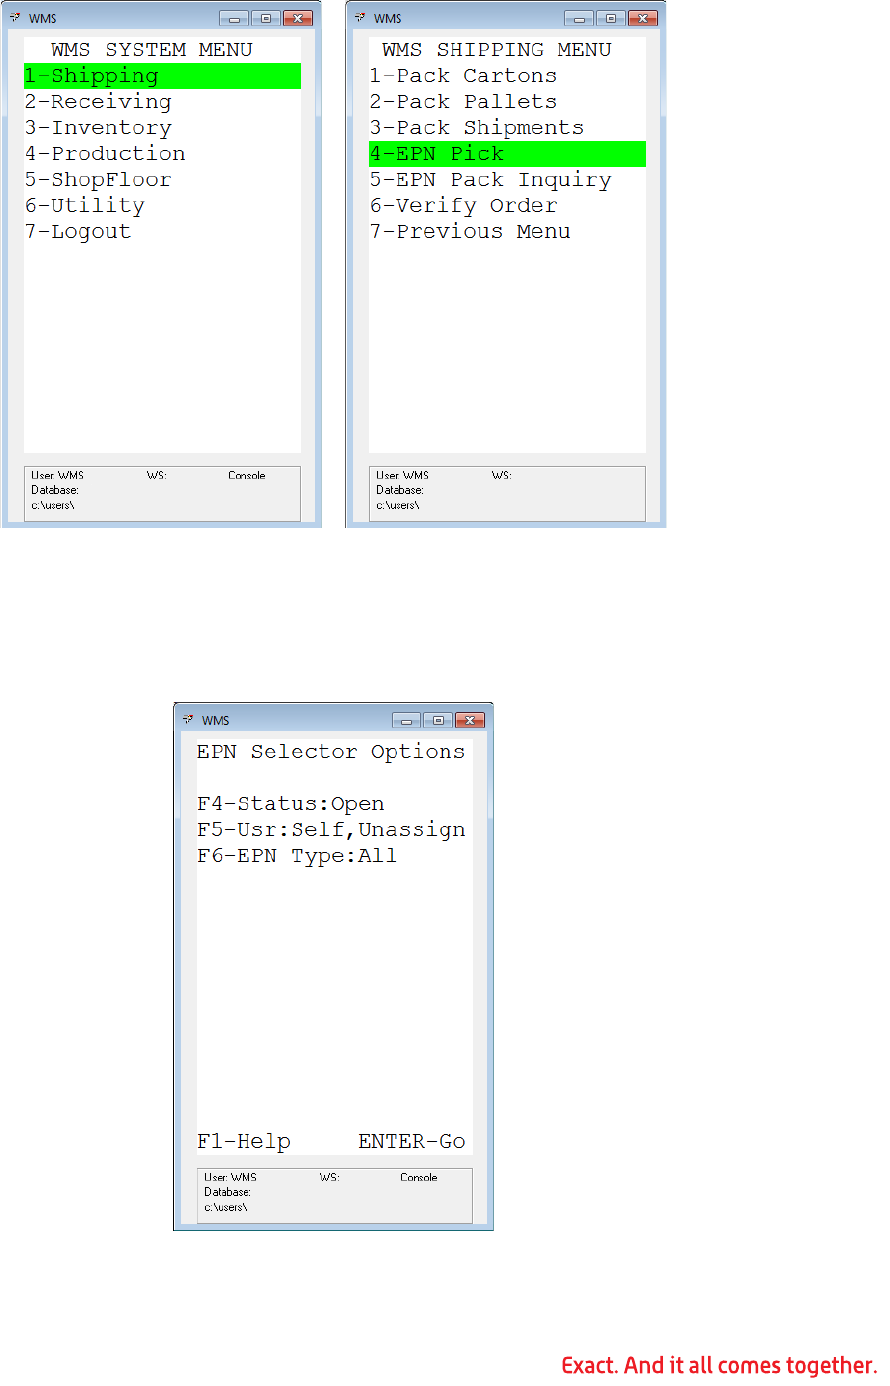
106
4. Press the F2 key on the EPN Processing screen for the highest priority, open EPN
assigned to you or currently unassigned.
- OR - Press the F7 key to access the EPN Selector Options screen and select from
a list of EPNs. On the EPN Selector Options screen, you can change the status, the
user, or the type of EPN.
5. Pressing the F4 key toggles the Status field among: Open | Hold | Open, Hold.

107
6. Pressing the F5 key toggles the User field among: Self, Unassigned | All | Self |
Unassigned.
7. Pressing the F6 key toggles the EPN Type field among: All | Stage Pick | Stage
Pack | Pick to Pack.
8. Press Enter on the EPN Selector Options screens to see a list of EPNs that meet
the criteria you specified. Select the EPN you want to process, and then press
Enter.
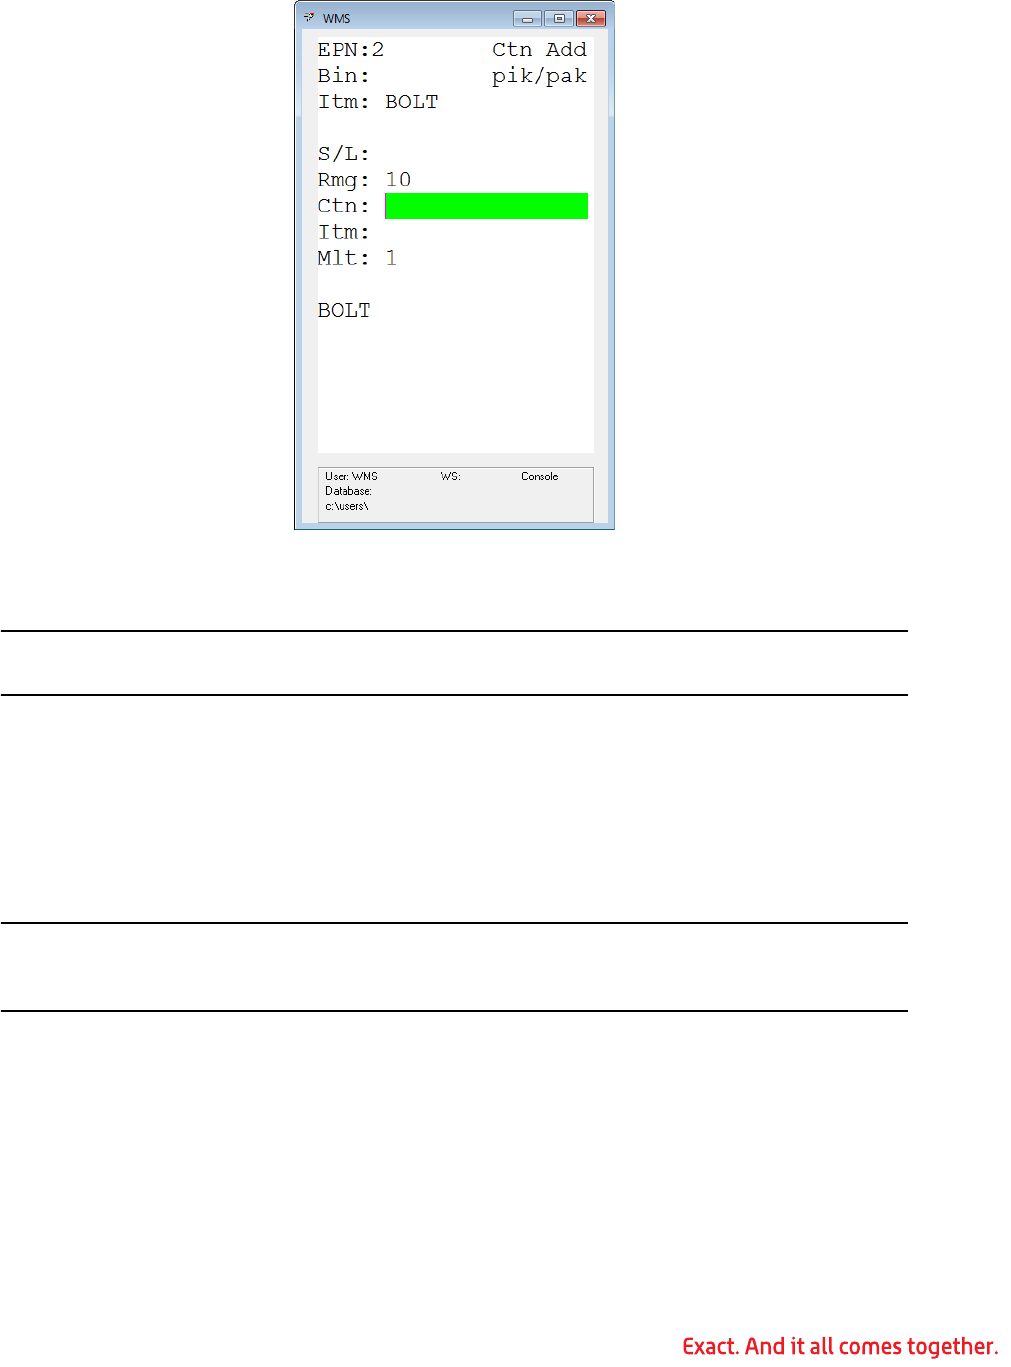
108
9. WMS displays the first item to be picked.
10.WMS prompts you to scan and validate that you are at the specified bin.
11.Scan the bin number.
Note: In a non-binned environment, the bin number displayed is the pick sequence value
from the inventory location file, and you are not prompted to verify the bin number.
12.WMS prompts you to scan and verify the item.
13.To enter a quantity for the item, press the F4 key. Type the new quantity in the Mlt
field, and then press Enter.
14.Scan the item. If the item is serialized or lotted, WMS prompts for the serial/lot
number to be scanned.
15.WMS displays the next item when the current item has been completely picked.
Note: A down arrow indicates that additional records exist after the current one. An up
arrow indicates that there are additional records before the current one. You can move
forward or backward by pressing the up and down arrow keys.
16.If you go to the specified bin and the product is not available, you can display a
new recommendation by pressing the F3 key. WMS also displays a list of reason
codes for rejecting the recommendation.
17.Select the code that best describes the reason that the recommendation is being
rejected.
18.Press the F7 key to display the entire EPN.
19.Press the F5 key to enter remove mode.
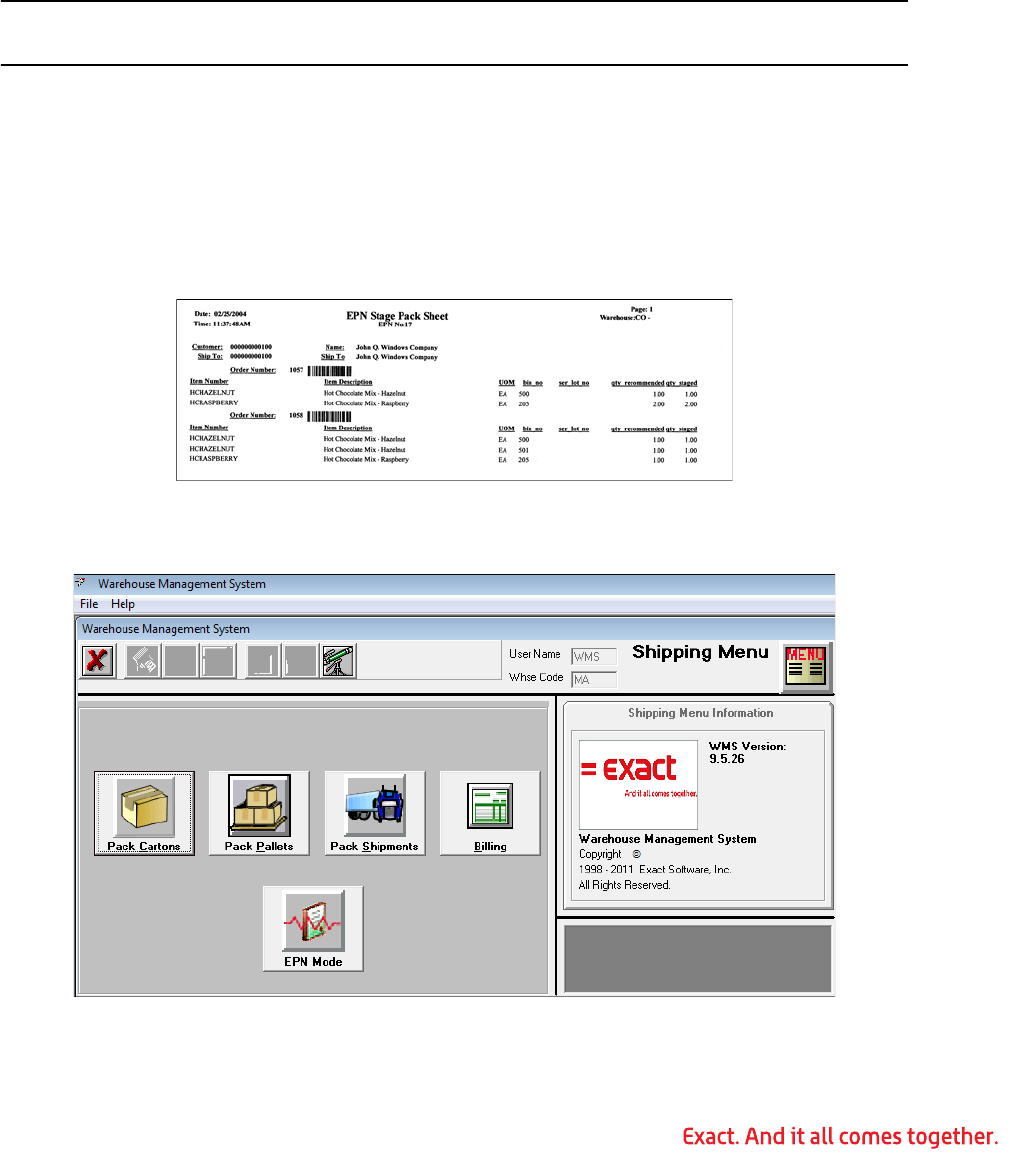
109
20.When the EPN has been completely picked, WMS displays a message that the EPN
is complete. Press Enter to accept the message. If the EPN has not been com-
pletely picked, you can drop off what you have picked, and press the F2 key to
transfer what you have picked to pack. Then, you can continue to pick more. You
can continue until the EPN has been completely picked. This is useful in a scenario
where you have more to pick than you can bring back to pack in one trip. This also
tells the system the packers can begin packing while the remainder of the EPN is
being picked.
21.Press Escape until you have exited to the EPN Processing screen.
Note: As the items are picked in a binned environment, an inventory transfer is processed
from the item bin to the stage bin.
Processing a Stage Pack EPN - Packing Station
In a pick-to-stage, stage pack process, the picking process and packing process are two
separate functions. During the stage pack process, items that have been picked during
one or more stage-to-pick process are packed into cartons or pallets and labeled accord-
ingly. When using a packing station, WMS prints a report to indicate what products are
needed for each order.
Sample EPN Stage Pack Sheet
1. Log on to WMS at the packing station.
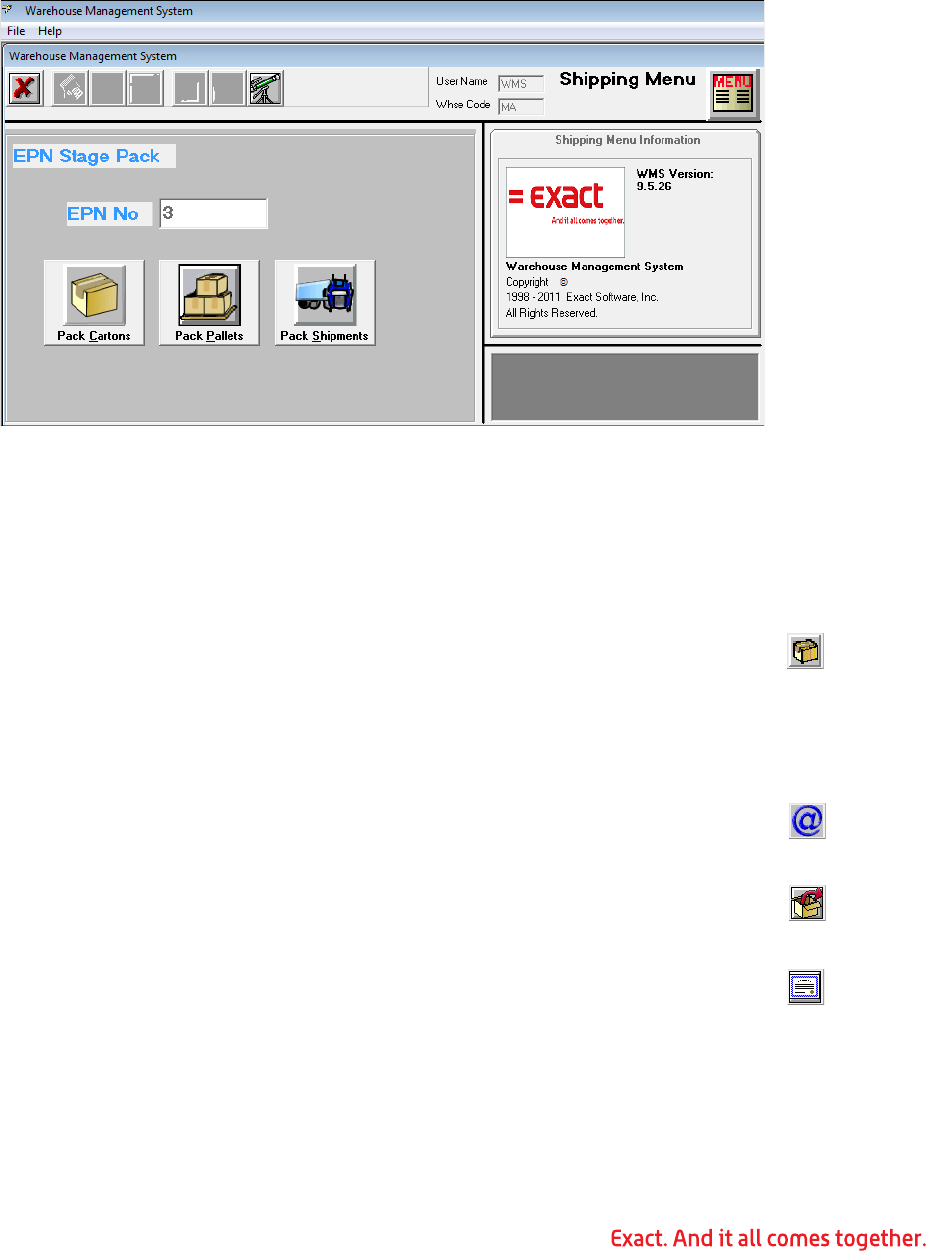
110
2. If the order is not in your default warehouse, select File from the WMS menu, and
then click Change Warehouse. Type the correct warehouse location code in the
Warehouse field, and then click OK.
3. Click the EPN Mode button on the WMS Shipping menu to open the EPN Stage
Pack screen.
4. EPN No: Type the stage pack EPN number to be processed, and then press Enter.
5. Click the button for the correct packing mode: Pack Cartons, Pack Pallets, or Pack
Shipments.
6. Scan the order number from the EPN scan sheet.
7. If the carton exists, you can scan the carton number.
To create a new carton, press the F2 key, or click the New Carton button;
WMS generates a new carton number and prints the appropriate customer
specific shipping label. If the label did not print correctly, press the F8 key
to reprint it, or click the Reprint Label button.
8. Scan or type the item being packed. If the item is serialized or lotted, WMS
prompts you to scan the serial/lot number as well.
9. To enter a quantity multiplier for the item, press the F4 key, or click the
Multiplier button. Type the item quantity to pack in this carton in the Mul-
tiplier field, and then press Enter.
10.To remove an item quantity from the carton, press the F5 key, or click the
Remove Mode button. Type the quantity in the Multiplier field, and then
press Enter.
11.When the order is complete, press the F11 key, or click the Verify Order
toolbar button. If you press the Escape key to exit the order, WMS auto-
matically verifies the order.
12.Proceed to the next order on the EPN until all orders have been packed.
13.After the cartons have been picked and packed, they need to be attached to a ship-
ment. See “Packing a Shipment” on page 128 for information.
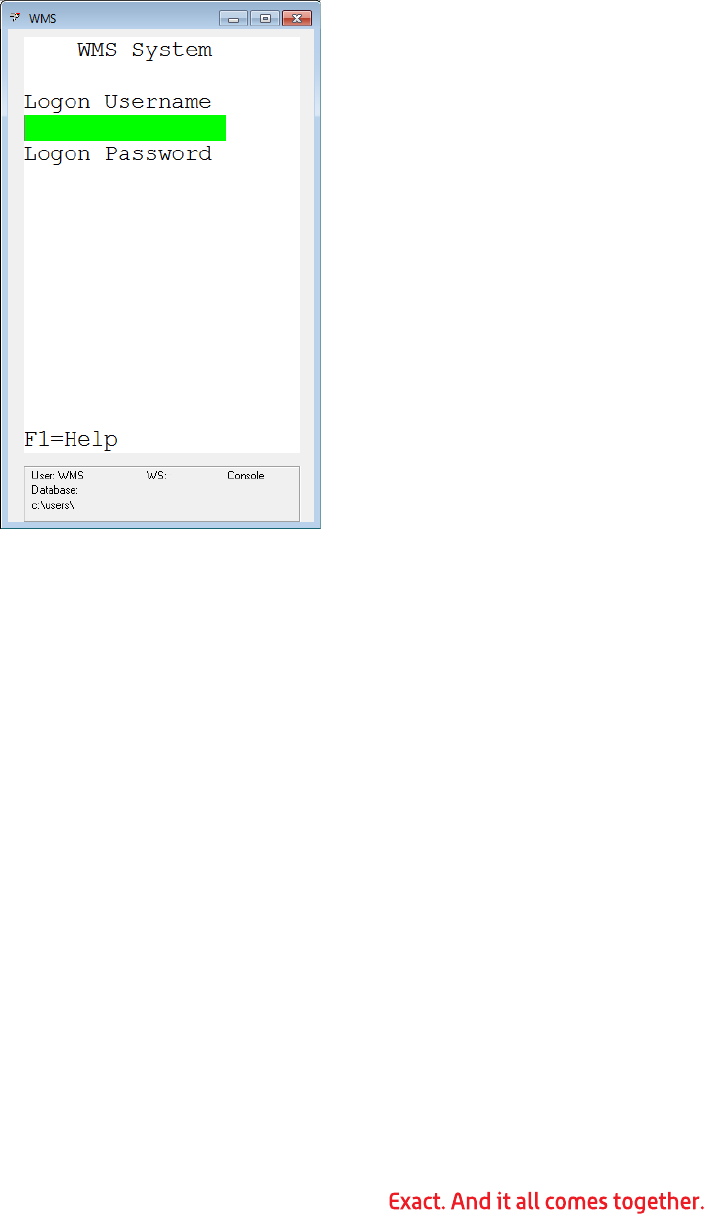
111
Processing a Stage Pack EPN - RF Client
In a pick-to-stage, stage pack process, the picking process and packing process are two
separate functions. The stage pack process packs the products that have been picked
from one or more stage-to-pick processes into cartons or pallets, and labels them accord-
ingly. If using an RF device, the device walks the user through the orders.
1. Log on to WMS on an RF handheld device.
2. If the order is not in your default warehouse, select Utility to change to the correct
warehouse. Type the correct warehouse location code in the To field, and then
press Enter.
3. Select Shipping, and then select EPN.

112
4. Press the F2 key on the EPN Processing screen for the highest priority, open EPN
assigned to you or currently unassigned.
-OR- Press the F7 key to access the EPN Selector Options screen and select from a
list of EPNs. On the EPN Selector Options screen, you can change the status, the
user, or the type of EPN.
5. Press the F4 key to toggle the Status field among: Open | Hold | Open, Hold.
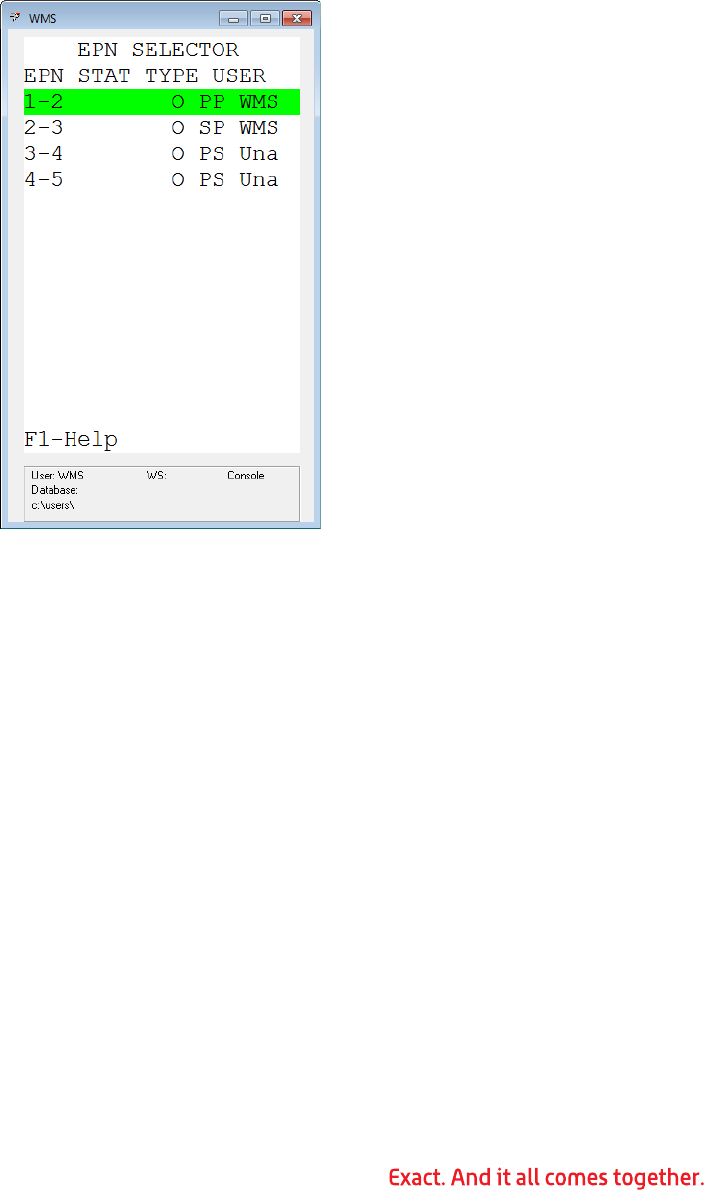
113
6. Press the F5 key to toggle the User field among: Self, Unassigned | All | Self |
Unassigned.
7. Press the F6 key to toggle the EPN Type field among: All | Stage Pick | Stage Pack
| Pick to Pack.
8. Press Enter on the EPN Selector Options screens to see a list of EPNs that meet
the criteria you specified. Select the EPN you want to process, and then press
Enter.
9. WMS displays the first item to be packed.
10.The carton that items are to be packed in should be listed in the CTN field. Press
the F2 key to generate a new carton. WMS generates a carton number and prints a
bar coded customer specific shipping label to attach to the carton. If the label did
not print correctly, press the F8 key to reprint it.
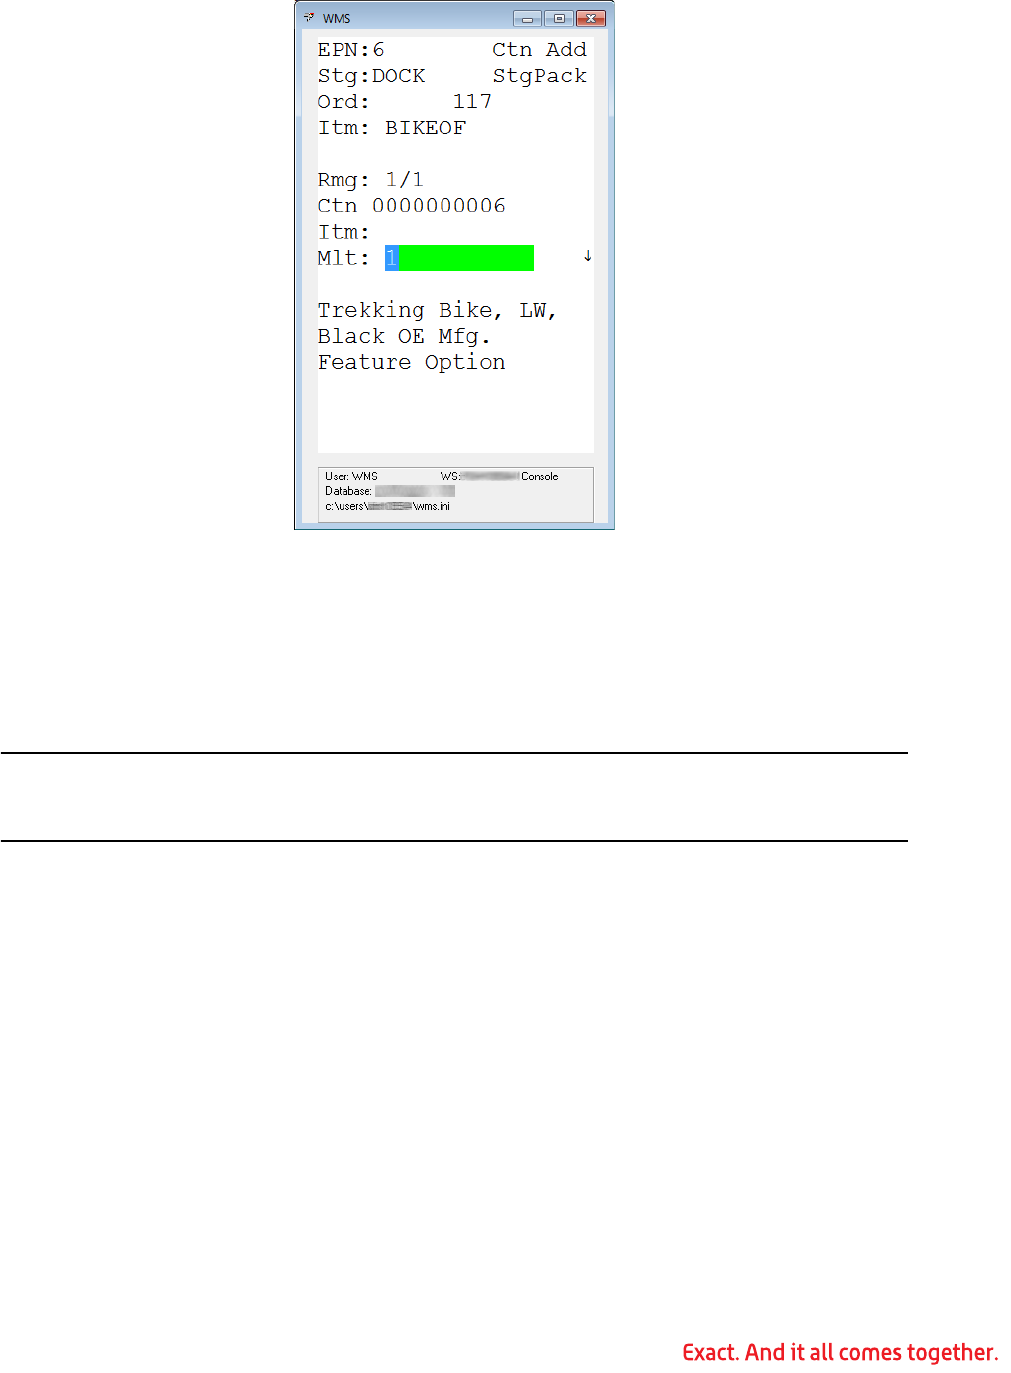
114
11.WMS prompts you to scan and verify the item being packed.
12.To enter a quantity for the item, press the F4 key. Type the new quantity in the Mlt
field, and then press Enter.
13.Scan the item. If the item is serialized or lotted, WMS prompts for the serial/lot
number to be scanned.
14.WMS displays the next item when the current item has been completely picked.
Note: A down arrow indicates that additional records exist after the current one. An up
arrow indicates that there are additional records before the current one. You can move
forward or backward by pressing the up and down arrow keys.
15.Press the F7 key to display the entire EPN.
16.Press the F5 key to enter remove mode.
17.When the EPN has been completely packed, WMS displays a message that the EPN
is complete. Press Enter to accept the message.
18.Press Escape until you have exited to the EPN Processing screen.
19.After the cartons are picked and packed, attach them to a shipment. See “Packing
a Shipment” on page 128 for information on packing shipments.
Resolving Recommendation Errors
Pick Management recommends the bin, serial, and lot to fill an order based on settings in
the WMS control file. An insufficient quantity on hand of a product results in an EPN rec-
ommendation error. To maximize the efficiency of the picking/packing process, recom-
mendation errors should be resolved before the picker receives the EPN. WMS
automatically places any EPN with recommendation errors on hold.
115
1. In Exact Macola ES, on the OE & RMA menu, under the Billing/Picking/Shipping
heading, select Picking, Pick Management.
2. Double-click the EPN with the recommendation error.
3. WMS displays all items required for the EPN. Items that have recommendation
errors have a status of “**Recmd Error**”. Click the status column heading to sort
the list by status. Click it a second time to sort in descending order, which brings all
items with errors to the top of the list.
116
4. Double-click an item with a recommendation error to display the EPN Item screen.
5. The EPN Item screen lists the orders for the selected EPN that require this item.
Press the F3 key to view the detail for an order.
6. Double-click a line to edit the quantity. Use the Edit Qty screen to change the
amount released.
7. Qty To Ship: Type the revised quantity to ship, and then click Ok.
117
8. Press the F6 key on the EPN Item screen to review the recommendation for an
order.
9. Select a row and click the Modify button to open the Modify Recommendations
screen.
10.If there are recommendations that can be changed, you can change them or click
Cancel.
11.On the View Recommendations screen, click Close.
12.On the EPN Item screen, press Ctrl+Enter on a line on the EPN Item screen to tog-
gle the quantity for an order between zero and the full released amount.
13.Press the F5 key on the EPN Item screen to remove the entire order from the EPN.
WMS prompts you to verify that you want to remove the order.
14.Click Yes to remove the order from the EPN. Click No to leave the order in the
EPN.
15.Use these tools to decide which orders should remain and which should be
removed. When the errors have been resolved, press Escape to return to the EPN
editor screen. Change the status on the EPN to Open, and then click the Save but-
ton.
Reviewing Rejected Recommendations
When an item is not available to be picked from a specific bin, serial or lot, the picker can
reject the recommendation. WMS prompts for a reject reason, and the information is writ-
ten to the rejected recommendations system. Based on the reason, that bin, serial, or lot
for that item can be marked unavailable until the rejected recommendation has been
reviewed and addressed.
To review the rejected recommendations, select File from the Pick Management screen,
and then click Review Rejected Recommendations.
118
WMS displays all open rejected recommendations. The quantity for the rejected recom-
mendations can be made available or unavailable. The record can be left open or marked
pending, closed, or deleted. The status codes control the recommendations displayed so
new entries can be easily distinguished from ones awaiting disposition.
Reviewing Negative Releases
A negative release occurs when a user reduces the quantity for a line item in Exact Macola
ES Order Entry below the quantity that has been released to an EPN. When this occurs,
the EPN needs to be reviewed to remove the quantity.
1. The Negative Release toolbar button is active when negative releases exist. Click
the Negative Release toolbar button.
2. WMS displays any EPN items with a negative release state.
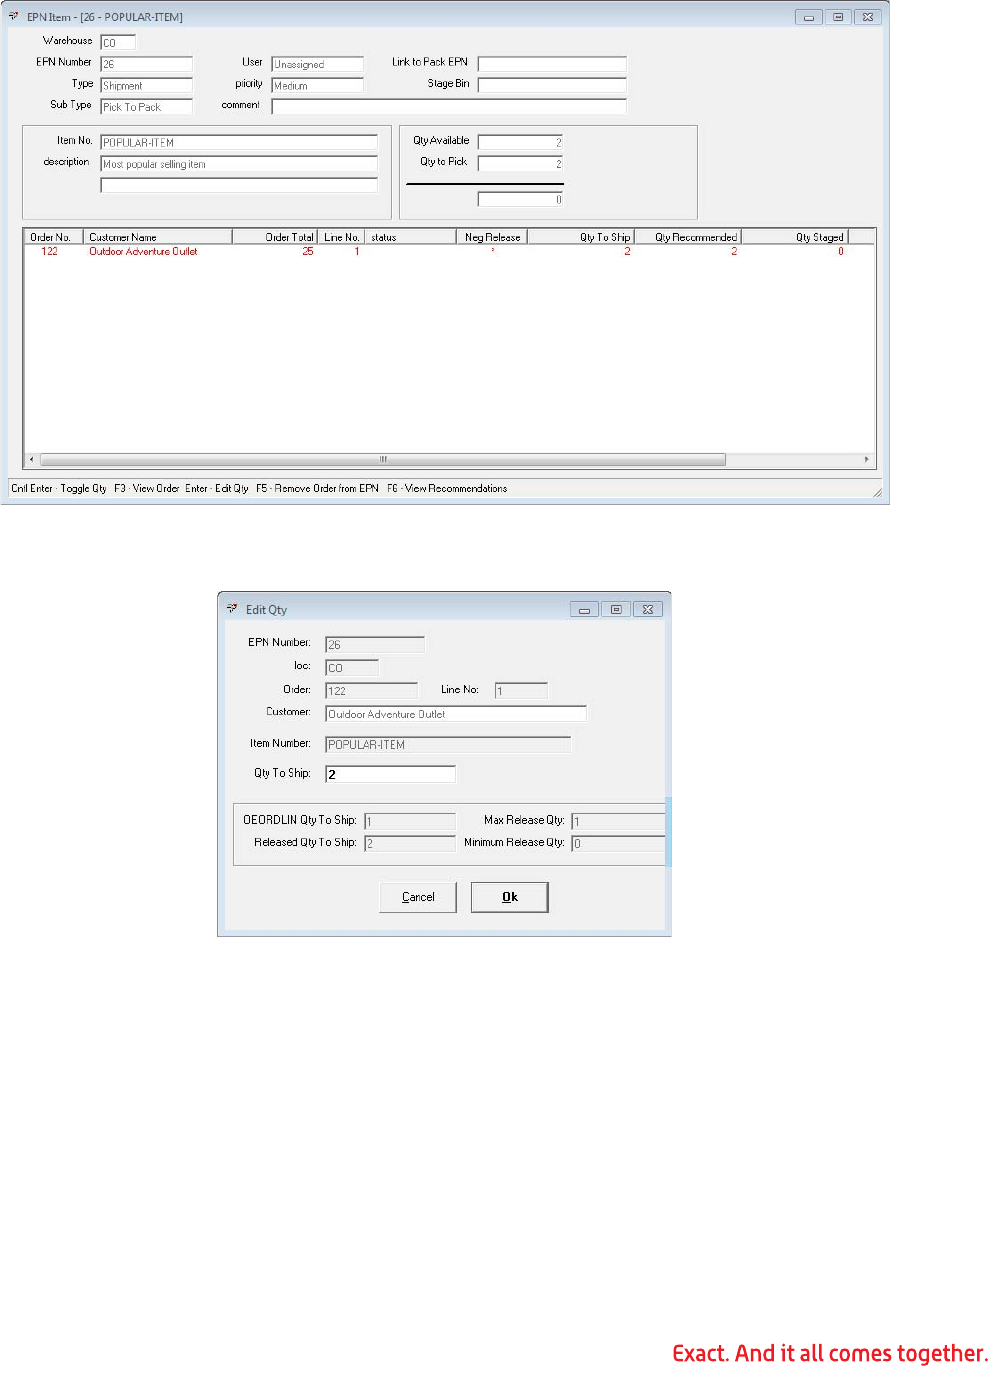
119
3. Double-click a line or press Enter to edit the quantity. Use the Edit Qty screen to
change the amount released.
4. Type the revised quantity to ship in the Qty to Ship field, and then click Ok. The
item is reprocessed through the recommendation system and the EPN updated.
Traditional Paper Pick Tickets
Although the Pick Management functions provide many advantages, WMS supports a tra-
ditional paper environment for sites that are more comfortable with paper picking tickets
or that do not have the RF infrastructure necessary to take full advantage of the Pick Man-
agement functions.
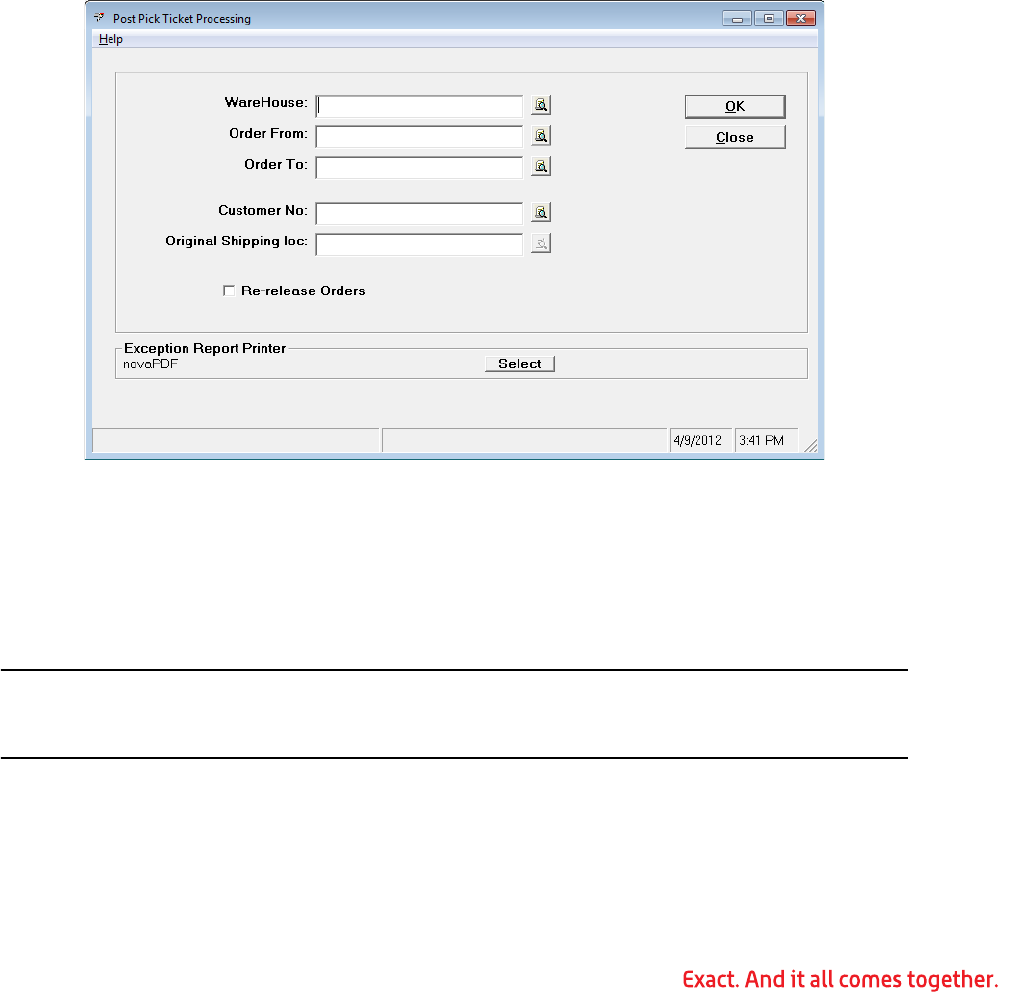
120
Printing a Pick Ticket
To print pick tickets, in Exact Macola ES, on the OE & RMA menu, under the Billing/Pick-
ing/Shipping heading, select Picking, Print Picking Tickets. Complete the pick ticket selec-
tion screen.
Releasing Orders to WMS using Post Pick Ticket Processing
Pick ticket processing is used to authorize WMS to ship a Exact Macola ES order. Only
those orders that have had pick tickets printed can be released to the Warehouse Manage-
ment System. In addition, if the WMS EDI ASN Data Collection module is installed and an
order for a customer configured for autopack is processed, WMS automatically performs
carton packing for the order, generating all of the compliant shipping labels required.
When an order for a customer configured for autopack is processed, WMS generates labels
for the remaining unpacked quantity for each line item that has had a pick ticket printed.
See “Reprinting Existing or Printing Additional Shipping Labels for an Order” on page 121
for more details.
1. On the OE & RMA menu, under the Billing/Picking/Shipping heading, select Picking,
Post Pick Ticket Process.
2. Warehouse: Type the warehouse to be processed. This field can be left blank to
process all warehouses.
3. Order From and Order To: Type an order number range, or leave the fields blank
to process all orders.
Note: If you do not need to restrict a release to a specific customer number and original
shipping location, you should leave these fields blank as they slow down the release pro-
cess.
4. Customer No: These fields are used to allow restricting the release to a specific
customer and original shipping location. If you have a range of orders (for example
100 through 200) with mixed customers, but only want to release a specific cus-
tomer, enter the customer number.

121
5. Original Shipping Loc: If you want to restrict to a specific original shipping loca-
tion, then enter one. Original shipping location means the original shipping location
in a DC/Mark for situations that would be the DC, not the ultimate store the order
is coded for.
Note: Any order within the range that has had a pick ticket printed and has not been pre-
viously sent to WMS is processed. In addition, any order within the range that has had a
change to the line item quantity to ship and the pick ticket printed is processed whether or
not the order has been previously released.
6. Re-release Orders: To force the orders within the range to be re-released even if
no quantity change has been made since the order was previously released, select
this check box. This is typically done when an order has been deleted from WMS.
7. Verify that the label printer and the exception report printer are set to the correct
locations, or click the Select button to change to the correct printer.
8. Click OK.
Reprinting Existing or Printing Additional Shipping Labels for an Order
Whether the label stock jammed while printing, someone tore one or more labels, or
something makes them unreadable, WMS has a number of ways to reprint existing ship-
ping labels for an order. Additional labels can also be printed if a customer increases the
quantity ordered after the labels have been generated for the order.
The autopack function prints labels for the unpacked quantity of each line item, so releas-
ing a new, higher quantity automatically generates the required labels during the normal
release process. This eliminates the need to manually print additional labels. Because this
can generate an over ship situation, printing additional labels is permitted only when the
WMS control file Over Ship Message field is set to W for warning. Additional labels should
be printed only when more labels are actually required, rather than as a method for
replacing damaged labels.
If a series of existing labels are damaged, the labels should be reprinted. WMS allows you
to reprint all labels for an order or all labels for an item on the order. Individual labels can
also be reprinted from the pack cartons function in WMS. If a single shipping label needs
to be reprinted, the pack cartons reprint is the recommended method. The following sec-
tions describe the methods for printing additional or replacement labels.
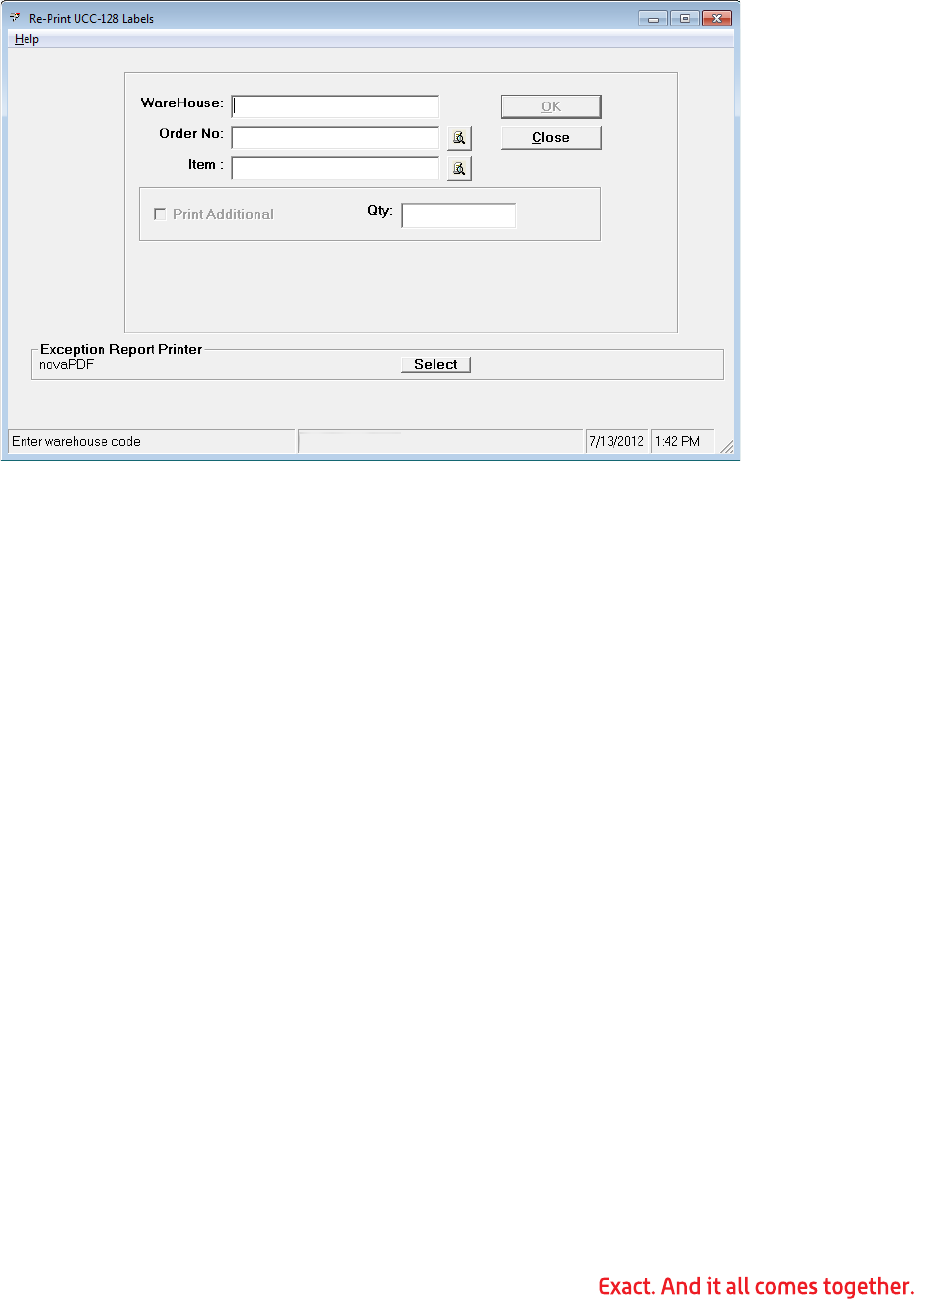
122
Reprinting a Series of Existing Shipping Labels
Re-Print UCC-128 Labels enables a user to reprint all labels for an order or all labels for a
particular item on an order.
1. In Exact Macola ES, on the OE & RMA menu, under the Billing/Picking/Shipping
heading, select Picking, WMS Re-print UCC-128 Label.
2. Warehouse: Type the warehouse code for the order to be reprinted.
3. Order No: Type the order number. Labels can be reprinted for only one order at a
time.
4. Item: Type the item number. If this field is left blank, the labels for all items on the
order are reprinted.
5. Verify that the correct label printer is selected. Click the Select button to change
printers if necessary.
6. Click the OK button. WMS reprints the requested labels.
Reprinting Individual Shipping Labels
Being able to reprint an individual label is convenient when you need to reprint only a few.
WMS can reprint a specific label during carton packing. This is true even when the label
was originally generated by the autopack function.
1. To reprint a single label, log on to the WMS packing station.
2. If the WMS EDI ASN Data Collection module is installed, select Pack Cartons from
the WMS menu. In pack verify mode, WMS automatically enters the pack verify
function. The instructions are the same for both modes.
3. Order No: Type the carton number to be reprinted. Either the 10-digit or 20-digit
carton number can be used.
4. WMS looks up the carton and automatically displays the order number.
5. Press the F8 key, or click the Reprint Label toolbar button.
6. Press the Escape key to exit the order.
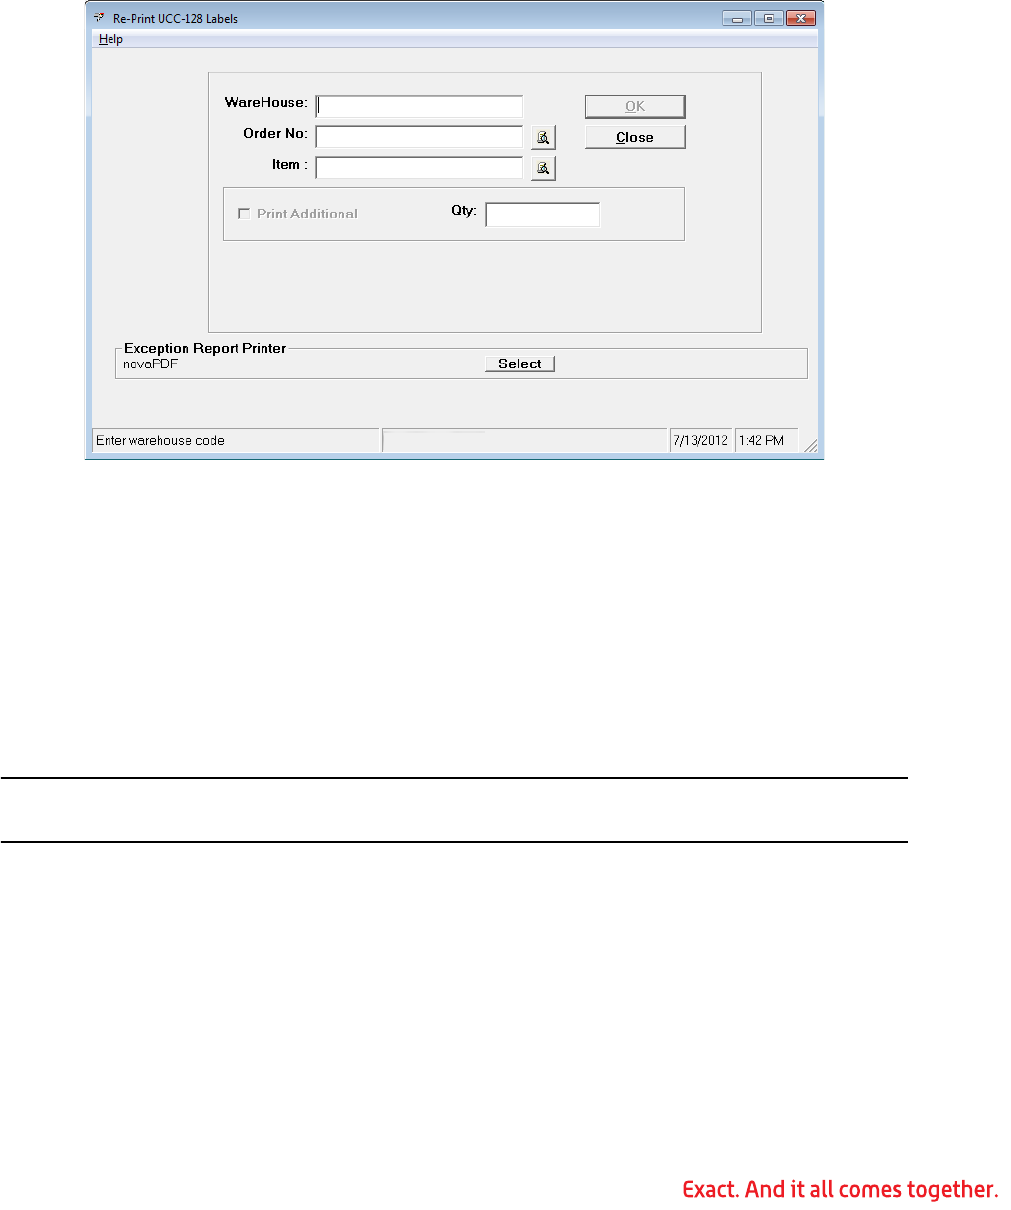
123
Printing Additional Shipping Labels
Printing additional shipping labels can cause an over ship situation. Therefore, this func-
tion is permitted only if the WMS control file Over Ship Message field is set to W for warn-
ing. In addition, printing additional shipping labels assumes that a standard quantity of an
item is packed into each carton. The rules determining the quantity placed in each carton
are the same as those used by the autopack function. This feature is available only if the
WMS EDI ASN Data Collection module is installed.
1. In Exact Macola ES, on the OE & RMA menu, under the Billing/Picking/Shipping
heading, select Picking, Re-Print UCC-128 Labels to print additional shipping labels.
2. Warehouse: Type the warehouse location for the order that needs additional
labels to be printed.
3. Order No: Type the order number. Additional labels can be printed only for one
order at a time.
4. Item: Type the item number to assign to the new labels.
5. Print Additional: Select this check box.
6. Qty: Type the number of additional labels to print.
Note: This is not the quantity of the item to be placed in each carton, but the actual num-
ber of cartons needed.
7. Click the OK button.
8. WMS prints the specified number of labels.
Generating a Completely New Set of Labels for an Order
While not a normal practice, it is sometimes advantageous to start over completely. The
most common reason for this is when a setup problem causes labels to be generated with
an incorrect case pack, which makes each of the labels incorrect. The quantity of labels
would generally be incorrect as well. WMS allows a user with sufficient rights to delete an
order from the shipping system so it can be reprocessed as though it had never been pro-
cessed before.
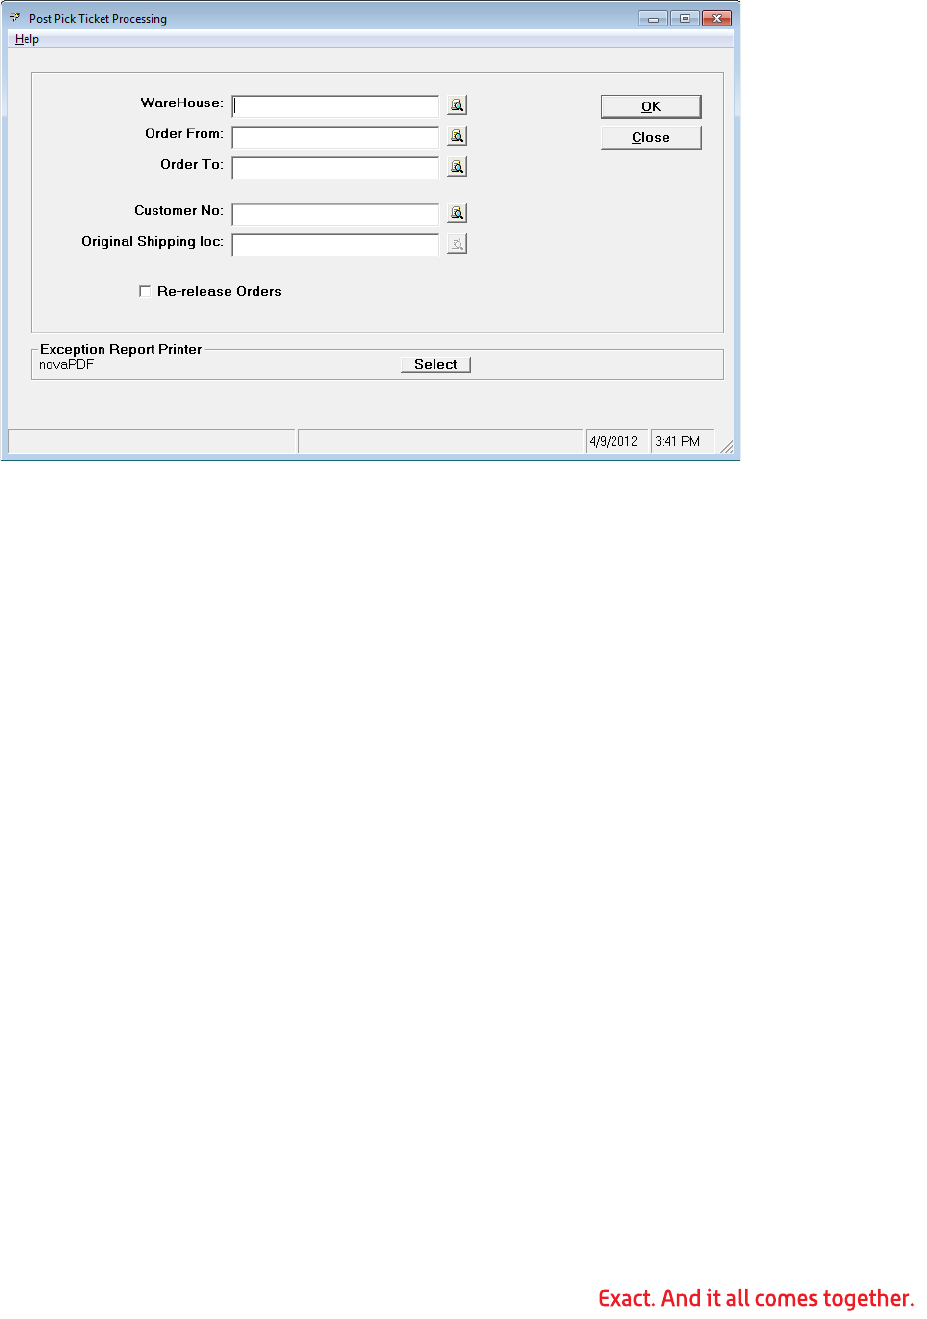
124
The first step in this process is to delete the order from WMS as detailed in “Deleting an
Order from WMS” on page 142. Once deleted, the order needs to be reprocessed into
WMS.
1. In Exact Macola ES, on the OE & RMA menu, under the Billing/Picking/Shipping
heading, select Picking, WMS Post Pick Ticket Processing.
2. Warehouse: Type the warehouse number for the orders to be re-released.
3. Order From and Order To: Type the range of the orders to be re-released.
4. Re-release Orders: Select this check box.
5. Verify that the correct label printer and exception report printer are specified. Click
the Select button to change the printer if necessary.
6. Click OK to continue.
7. WMS re-releases the orders within the range. Labels are generated for any order
that contains unpacked quantities and that is for a customer configured for auto-
pack. The quantity to pack for each line item on each picked order in the range
specified is updated to the current quantity to ship.
8. When processing is complete, click Close to exit.
Packing Cartons for a Pick and Pack Environment
The carton packing function is used in a pick and pack environment to pack multiple items
into a carton. UCC-128 labels are generated at this time.
1. Log on to the WMS packing station.
2. If the order is not in your default warehouse, select File from the WMS menu, and
then select Change Warehouse. Type the correct warehouse location code in the
Warehouse field, and then click OK.
3. Click the Pack Cartons button to open the Shipping Automation screen.
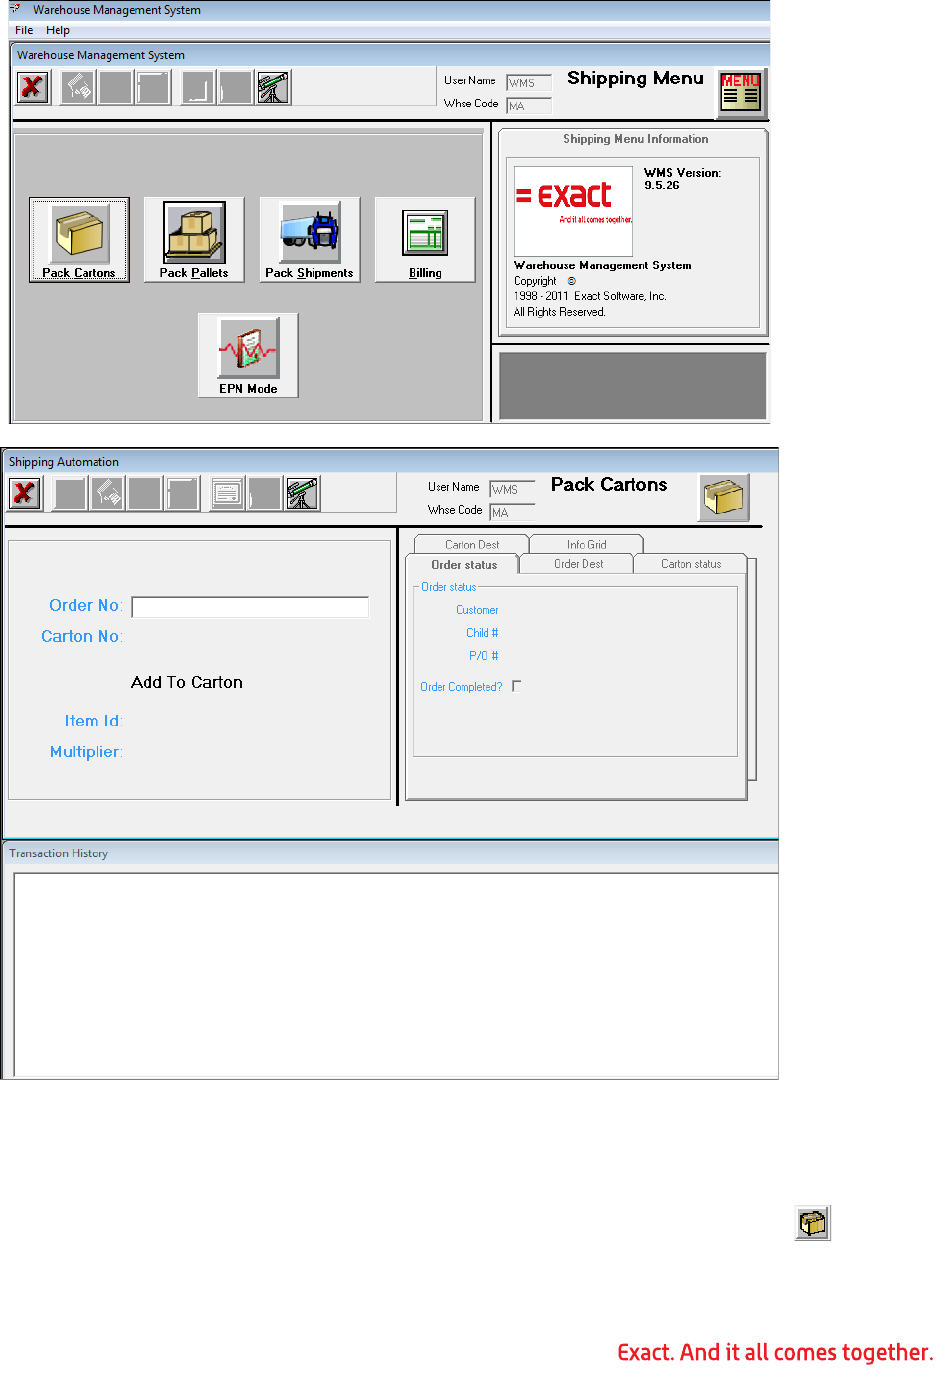
125
4. Order No: Type or scan the Exact Macola ES order number. To create a new carton
and generate a UCC-128 label, you must first specify the order number. WMS links
the carton number and the items placed into the carton to the order.
5. Press the F2 key, or click the New Carton button to create a new carton.
WMS generates and prints a UCC-128 label.

126
Note: If the label did not print correctly, press the F8 key, or click the Reprint Label but-
ton to reprint it.
6. Click the Multiplier button to specify a multiplier for the next item to be
processed. In the Multiplier field, type the quantity to multiply the next
item by. For example, if you enter a multiplier of 4, the next item case pack,
as defined in WMS Bulk Weight Maintenance, is multiplied by 4. If the item’s case
pack is defined as 6, then 24 eaches are packed into the carton.
7. Item Id: Scan or type one of the following: item number, UCC-14 (I-205) number,
UPC number, or any bar code that has been set up in WMS Bulk Weight Mainte-
nance.
8. Continue to type or scan the item IDs being packed into this carton. A transaction
history box at the bottom of the screen displays all transactions that have been
processed during the session.
Note: The history box is cleared when the session is completed and a new session begins.
It can also be cleared manually. To manually clear the transaction history, click in the
transaction history pane, and then select File, Clear Transaction History from the WMS
menu.
9. When the carton is fully packed, if needed, click the New Carton button to start a
new carton for this order.
10.To remove an item from a carton, press the F5 key, or click the Remove toolbar
button to enter remove from carton mode.
11.Item ID: Type or scan the item number, UCC-14 (I-205), or UPC number to be
removed from the carton.
12.If necessary, use the multiplier function to multiply the quantity removed.
13.Press Enter to remove the item.
14.Click the Add toolbar button to return to add to carton mode and pack more items.
Packing Pallets
The pack pallets function is used to pack cartons onto pallets. The cartons can have been
packed by carton packing or can have been automatically generated by the auto pack
function as a result of printing pick tickets. WMS can also automatically create a carton
around an item scanned directly onto a pallet.
1. Log on to WMS.
2. If the order is not in your default warehouse, select File from the WMS menu, and
then click Change Warehouse. Type the correct warehouse location code in the
Warehouse field, and then click OK.
3. Click the Pack Pallets button.
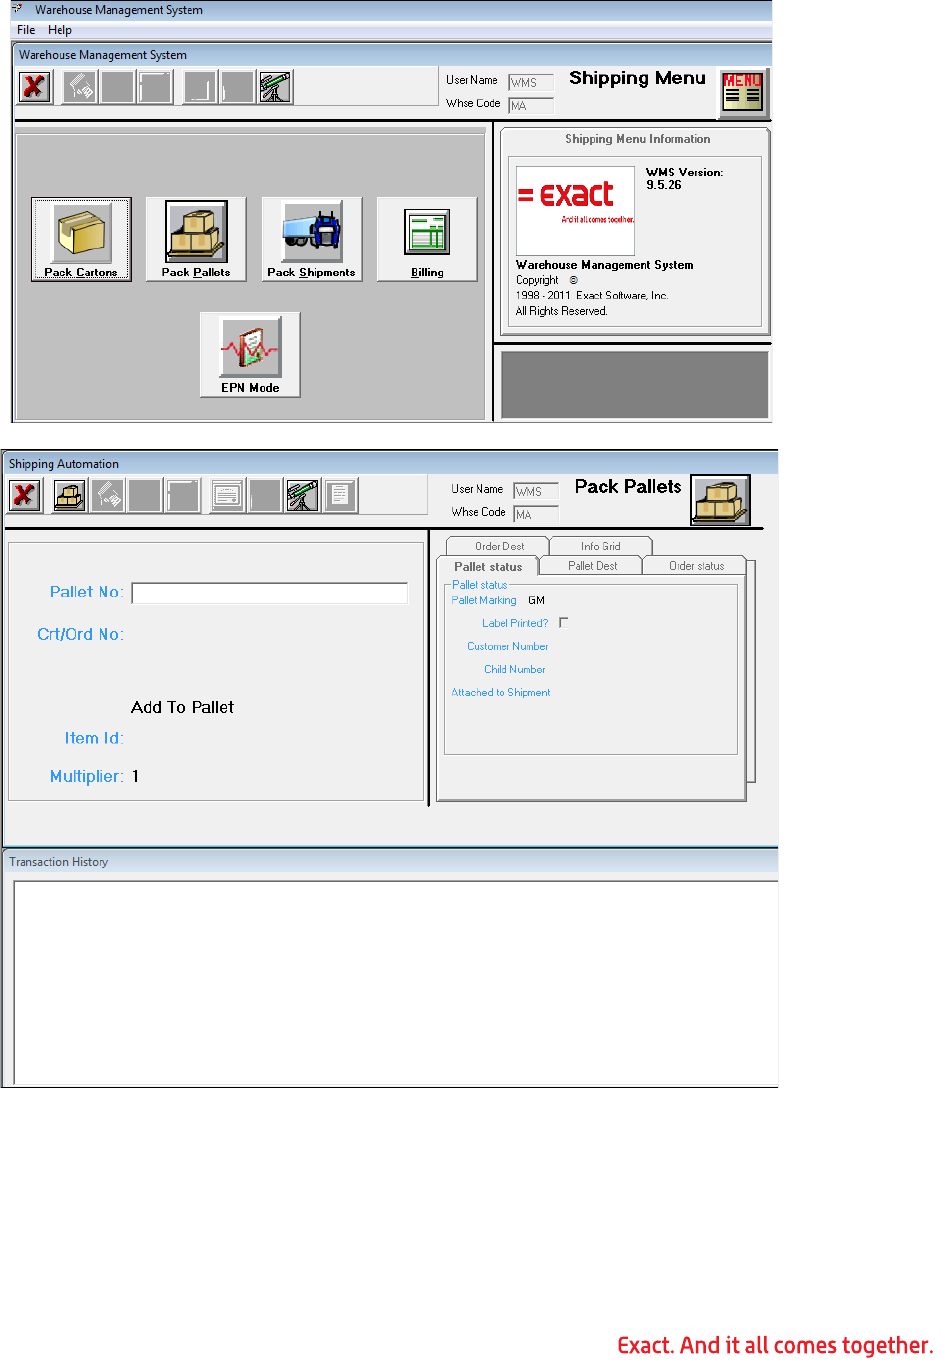
127
4. Press the F2 key, or click the New Pallet toolbar button to create a new pallet.
5. To attach cartons that were created by either carton packing or the auto pack func-
tion, scan or type the UCC-128 number of the carton in the Crt/Ord No field.
6. To attach an item directly to the pallet, type the order number in the Crt/Ord No
field.

128
7. In the Item Id field, type or scan the item number, UCC-14 (I-205) number, UPC
number, or any bar code that has been setup in WMS Bulk Weight maintenance.
8. If the customer is configured in Customer Override Maintenance to require carton
UCC-128 labels, a UCC-128 label is printed.
Note: If the label did not print correctly, press the F8 key, or click the Reprint Label but-
ton to reprint it.
9. Click the Multiplier button to specify a multiplier for the next item. In the Multi-
plier field, type the number of units of the next item added to the pallet.
Note: If the customer is configured to require carton UCC-128 labels, a single carton is
created to contain the multiplied quantity.
Packing a Shipment
Pack Shipments tells WMS what cartons and pallets were combined onto a truck. With this
function, a single Exact Macola ES order can be split into multiple shipments, or multiple
Exact Macola ES orders can be combined into one shipment.
Example 1: During back-to-school season, Target sends a single order for 5000 cartons of
note pads. These cartons will not fit in one truck. In fact, three trucks are lined up at the
dock to handle the order. WMS defines a shipment as all pallets or cartons being shipped
on one truck to the same customer destination. This destination might be a distribution
center that will ultimately re-route the cartons to many stores, but initially they are all
shipping to the same D/C. In this example, three shipments, and therefore three ASNs,
should be created, one for each truck.
Example 2: Federated sends a purchase order for 150 stores. Exact Macola ES creates 150
O/E orders. Of these orders, 50 are going to D/C 1, 60 to D/C 2 and 40 to D/C 3. Feder-
ated requires the orders going to D/C 1 to be treated as one shipment if they are all on
one truck. This would indicate three shipments and therefore three ASNs.
1. Log on to WMS.
2. If the order is not in your default warehouse, select File from the WMS menu, and
then click Change Warehouse. Type the correct warehouse location code in the
Warehouse field, and then click OK.
3. Click the Pack Shipments button.
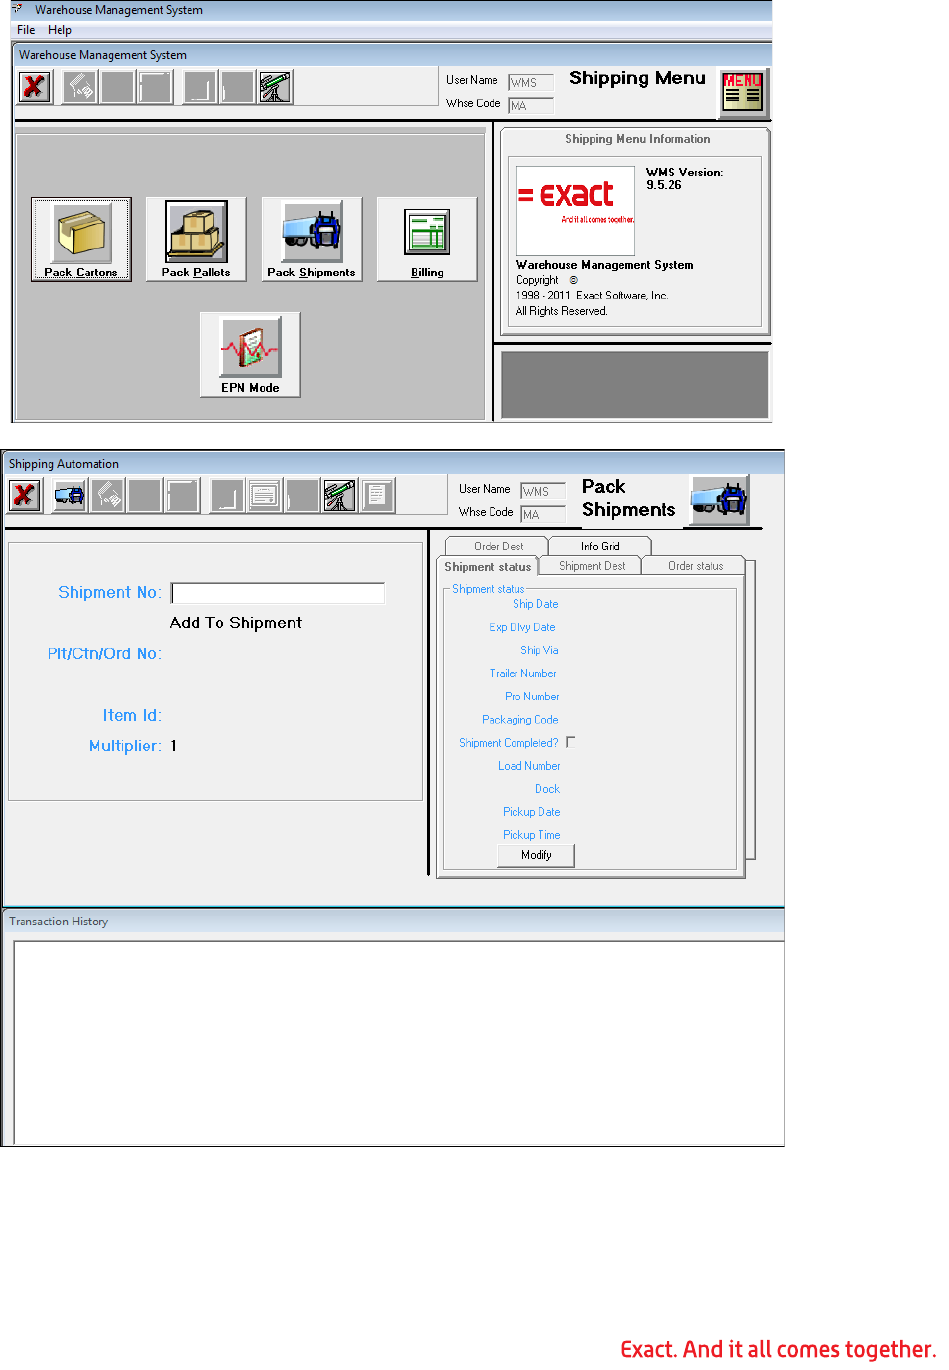
129
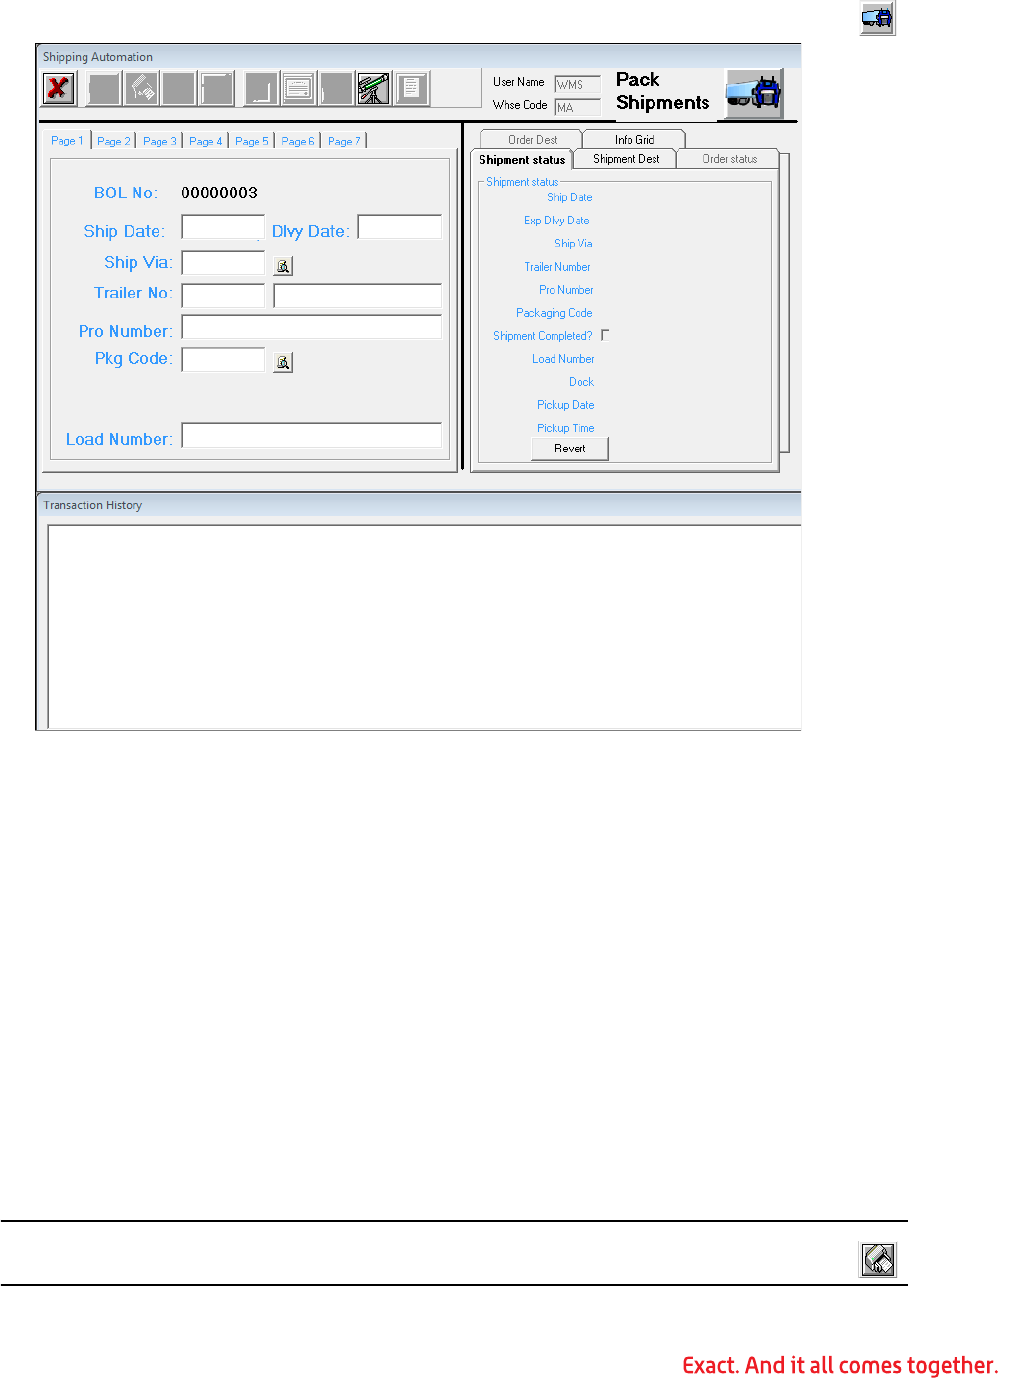
130
4. Press the F2 key to open a new shipment, or click the New Shipment tool-
bar button.
5. Ship Date: Type the shipment date. The shipment date defaults to today’s date if
not specified.
6. Exp Dlvy Date: Type the expected delivery date. The expected delivery date
defaults to today’s date if not specified.
7. Ship Via: Type the ship via code.
8. Trailer No: If shipping by truckload, type the trailer number.
9. Pro Number: If using an LTL carrier, type the carrier’s pro number.
10.Pkg Code: Enter or search for the package code. The (shipment level) code must
be set up in WMS Package Code Maintenance (see “WMS Package Code Mainte-
nance” on page 55).
11.Use Page 2 through Page 6 to enter information that might be needed on a bill of
lading or other report.
12.Once the fields are completed, press Enter. WMS prints a shipment tag label. This
label is for internal use only. The shipment tag represents a physical truck that is
loaded with orders going to a common destination.
Note: If the label did not print correctly, press the F8 key, or click the Reprint
Label button to reprint it.
131
13.Plt/Ctn/Ord: Scan or type a UCC-128 number in the pallet/carton/order field to
attach a carton or a pallet to the shipment. Type the order number to attach the
entire order to the shipment.
14.Item Id: If attaching an order, type or scan an item ID to pack the item directly
onto the shipment. The item is validated against the order and UCC-128 labels are
printed, if required.
Note: If the label did not print correctly, press the F8 key, or click the Reprint
Label button to reprint it.
15.To attach all existing cartons and pallets for an order to this shipment, click
the Verify toolbar button.
16.If the order completion mode for the customer is set to pack shipments, the
order is marked for completion when the shipment is completed; otherwise, the
order must be closed manually. See “Using WMS Order Billing” on page 134 for
information about manually completing orders.
17.The Freight and Misc fields are displayed only if the order completion mode for
the customer is set to pack shipments; if they are displayed, type the appropriate
values into the fields.
18.Press Enter.
19.When all cartons, pallets and orders have been attached to the shipment,
click the Complete Shipment toolbar button.
20.Click the Exit button when finished.
Packing Orders in Pack Verify Mode
WMS has many advanced options for handling the large, multi-order shipments that are
typical for EDI ASNs. However, WMS can also process individual orders efficiently. The
WMS pack verification mode is designed to streamline the process of handling individual
orders.
The mode is determined by settings in the WMS control file and the WMS customer over-
ride file. In pack verify mode, the user has all advanced options available, but when an
order is entered in Pack Cartons, WMS determines that the customer is configured for
pack verify, and Pack Cartons operates in that mode.
Packing an Order
1. Log on to WMS.
2. If the order is not in your default warehouse, select File from the WMS menu, and
then click Change Warehouse. Type the correct warehouse location code in the
Warehouse field, and then click OK.
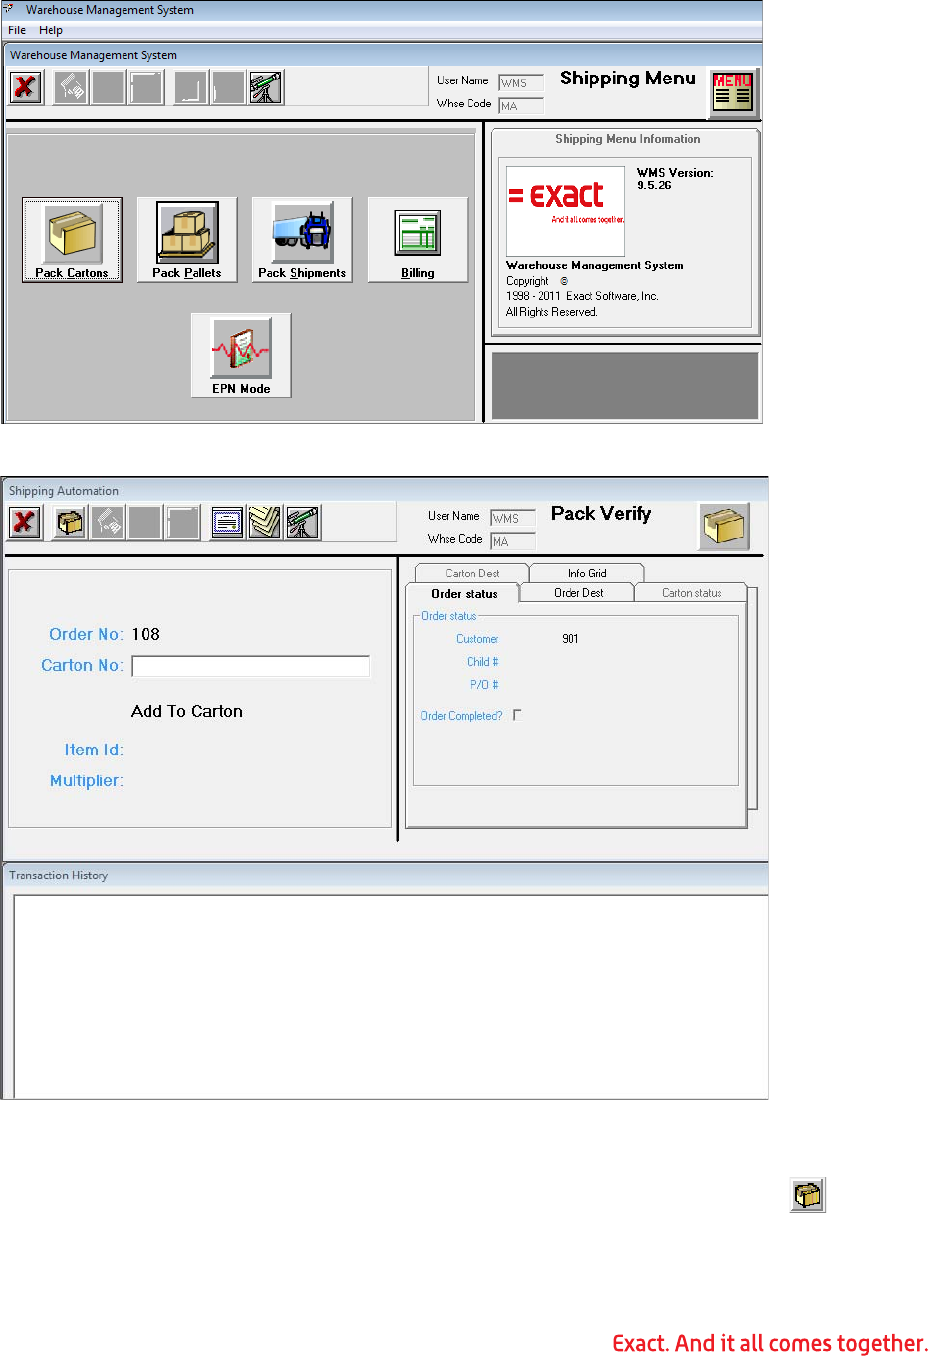
132
3. Click the Pack Cartons buttons.
4. Order No: Type or scan the order number.
5. Press the F2 key, or click the New Carton toolbar button, or to create a
new carton.
6. A shipping label is generated and printed.
133
Note: If the label did not print correctly, press the F8 key, or click the Reprint Label but-
ton to reprint it.
7. Multiplier: Press the F4 key, or click the Multiplier button to specify a
multiplier for the next item ID to be processed.
Type the quantity to multiply the next item entered by. For example, if you
enter a multiplier of 4, the next item case pack, as defined in WMS Bulk Weight
Maintenance, is multiplied by 4. If the item’s case pack is defined as 6, then 24
eaches are packed into the carton.
8. Item Id: Scan or type any of the following: item number, UCC-14 (I-205) number,
UPC number, or any bar code that has been set up in WMS Bulk Weight Mainte-
nance.
9. Continue to type or scan the item IDs being packed into this carton. A transaction
history box at the bottom of the screen displays all transactions that have been
processed during the session.
Note: The history box is cleared when the session is completed and a new session begins.
You can also clear it manually. To manually clear the transaction history, click in the trans-
action history frame, and then select File, Clear Transaction History from the WMS menu.
10.When the carton is fully packed, click the New Carton button to start a new carton
for this order.
11.To remove an item from a carton, press the F5 key, or click the Remove toolbar
button to enter remove from carton mode.
12.Item Id: Type or scan the item number, UCC-14 (I-205), or UPC number to be
removed from the carton.
13.If necessary, use the multiplier function to multiply the quantity removed.
14.Press Enter to remove the item.
15.Click the Add toolbar button to return to add to carton mode and pack more items.
Exiting an Order
When all cartons are packed, the order can be completed, or the user can exit the order to
work on another one. To complete the order, the user must have billing rights specified in
the WMS security file. If the user does not have billing rights or the order is not ready to
be completed and billed at this time, he can press Escape to exit the carton, and then
press Escape again to exit the order.
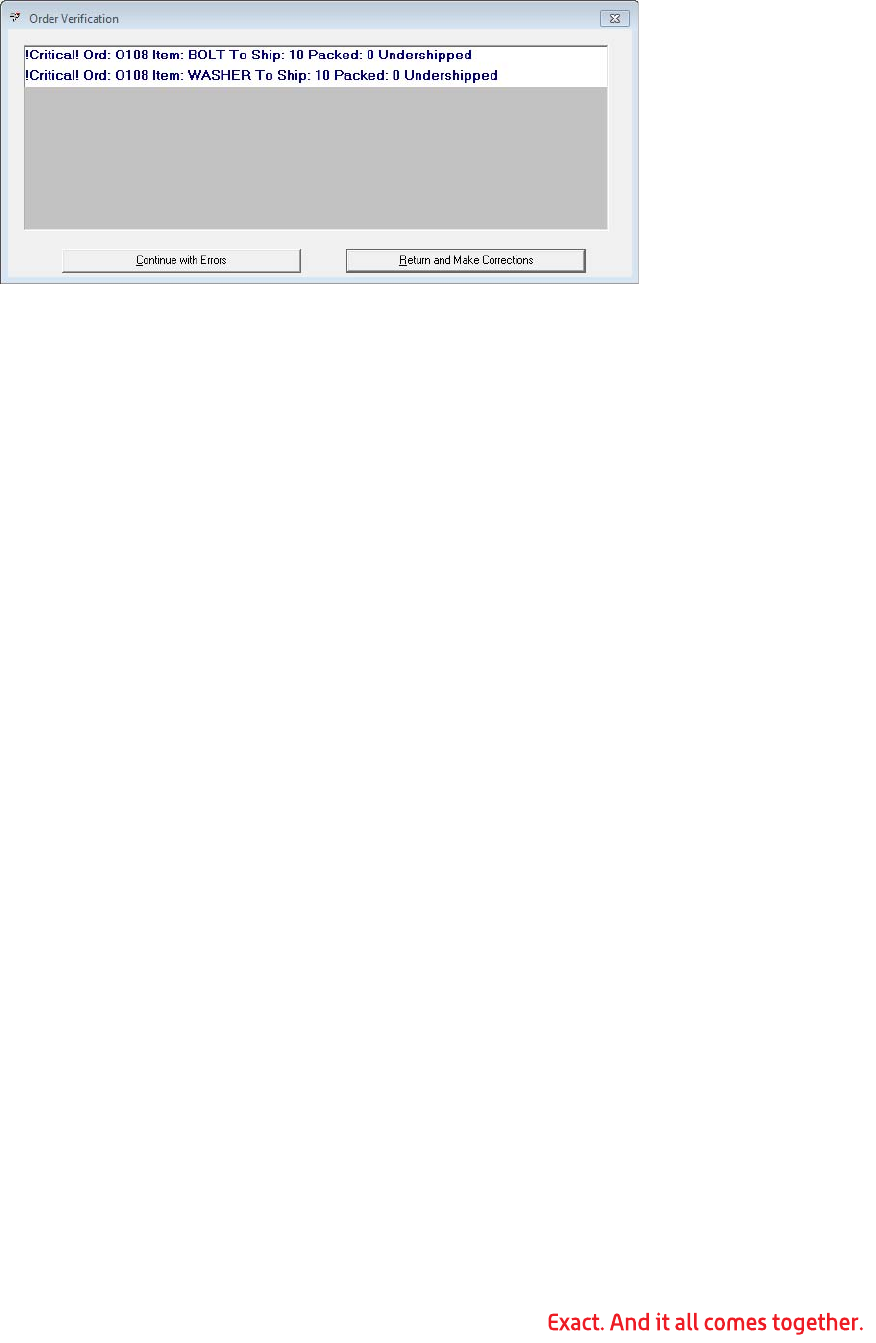
134
WMS verifies that the order is completely packed. An information box displays any errors
that are found.
•Click the Return and Make Corrections button if a correction needs to be made.
•Click the Continue with Errors button if the errors are acceptable.
WMS either returns the user to the order so corrections can be made, or returns the user
to the order number field to work on the next order.
Completing an Order
A user with WMS billing rights can complete the order. If the user also has pack cartons
rights, he can make corrections to the packaging, too. If the user does not have pack car-
tons rights, he can only complete the order or return it to a packer for corrections.
1. Order No: Type or scan the order number to be completed.
2. Press the F11 key, or click the Complete Order toolbar button.
3. WMS scans the order for errors, such as items that are under shipped or over
shipped, and display a window with any messages.
4. Click Return and Make Corrections to return to the carton packing/pack verify
screen if you have pack carton rights, or to the order number field if you do not.
5. If you click Continue with Errors, the order completion process continues and
then displays the complete order screen.
6. The complete order screen allows shipment information to be entered, including
the ship via code to be used for this order. If the ship via code entered requires
reports to print on shipment completion, the Page 2 to 6 tabs become active so you
can enter information to be printed on the bill of lading.
7. Press Enter when all the information is entered.
8. WMS generates any bill of lading reports that have been specified.
9. WMS returns to the Order No field so the next order can be processed.
10.When all orders have been processed, click the Update Macola button to finalize
the orders and pass the information to Exact Macola ES. See “Importing Billing
Selection Information using Bar Code for Distribution” on page 138 for information
about importing the selection information into Exact Macola ES.
Using WMS Order Billing
WMS requires orders to be processed through the WMS billing system to close a billing
cycle properly. This is required whether or not the selection information is passed to Exact
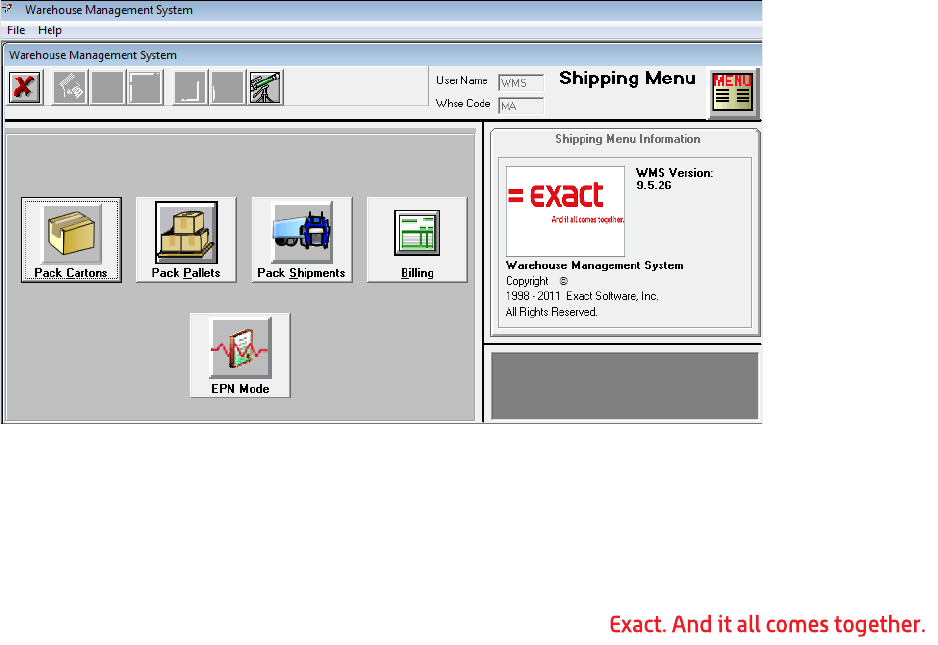
135
Macola ES. If not done properly, problems might occur when processing a backorder
against the order.
WMS does not actually select orders for billing in Exact Macola ES, but instead passes
information to Exact Macola ES using the Bar Code for Distribution module. The Bar Code
module allows WMS to transfer billing selection information to Exact Macola ES and is
therefore required to complete the automation process. See “Importing Billing Selection
Information using Bar Code for Distribution” on page 138 for detailed instructions about
importing the selection information.
WMS has three different modes for completing orders: WMS Billing; Pack Shipments; or
Pack Verify Cartons. The mode used is determined by the selection in the Default Order
Completion Mode field on the WMS Control File Maintenance screen (see page 22). (This
can be overridden for a specific customer in the customer override file.)
If the order completion mode flag is set to WMS billing, orders are flagged as complete
when a user specifically requests the order to be billed. If the order completion mode is
set to pack shipments, orders are flagged as complete when a shipment that includes the
order is completed. Pack shipments mode is convenient for companies that rarely split an
order into multiple shipments within a billing cycle, while WMS billing is best for compa-
nies that frequently split orders into multiple shipments within a billing cycle. The final
option is pack cartons verify mode, which indicates that an order is to be treated as an
individual shipment. Order completion is done immediately during carton packing, so
manual billing is not necessary.
Order Completion Mode is WMS Billing
1. Log on to WMS.
2. If the order is not in your default warehouse, select File from the WMS menu, and
then click Change Warehouse. Type the correct warehouse location code in the
Warehouse field, and then click OK.
3. Click the Billing button to open the Billing screen.
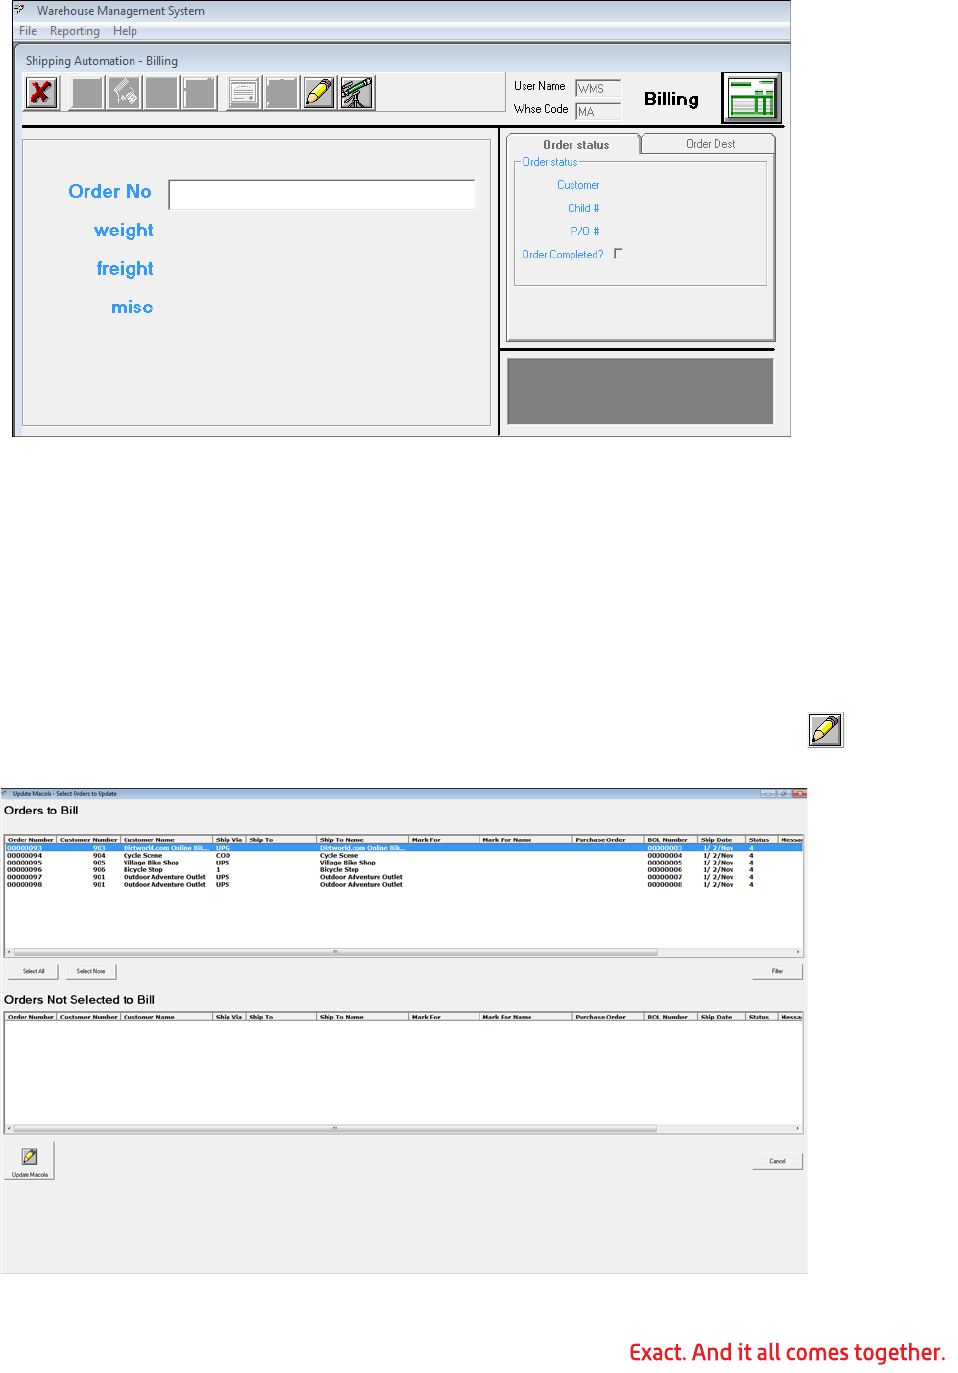
136
4. Order No: Type the order number.
5. WMS calculates the order weight based on the weight of the line items in the Exact
Macola ES Item Master.
6. Freight: Type the freight charges for the order, if any.
7. Misc: Type any miscellaneous charges for the order.
8. Press Enter.
9. WMS completes the order.
10.After all orders are complete, click the Update Macola toolbar button to
open a screen to select the orders to bill. By default, all orders flagged as
eligible to bill in WMS are in the top section (Orders to Bill).
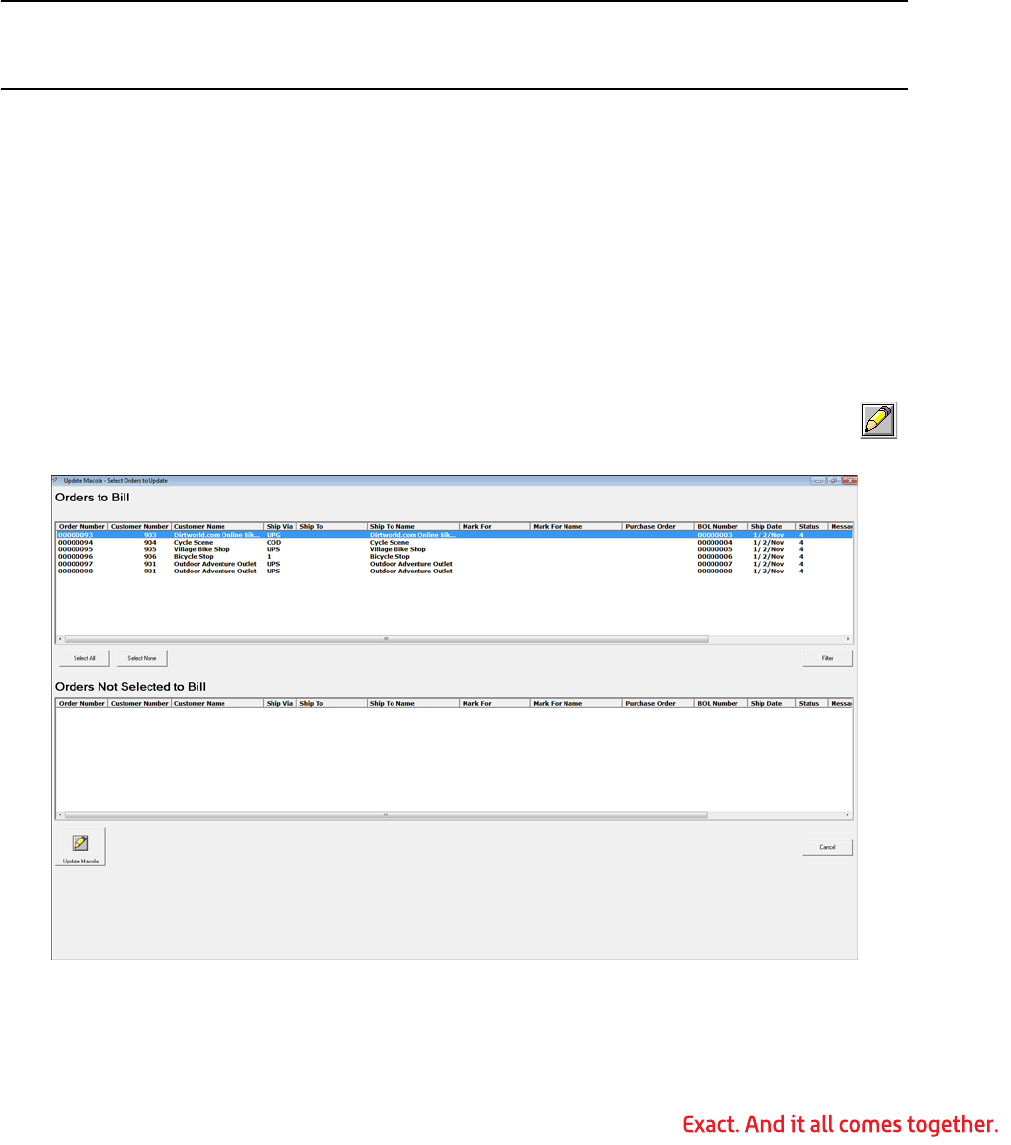
137
11.You can sort the orders by double-clicking any column heading.
12.If there are orders that you do not want to bill, you can use the mouse to click and
drag an order to the lower section (Orders Not Selected to Bill). You can hold the
Ctrl key and select non-sequential orders or hold the Shift key to select sequential
orders. You can also double-click an order to move it from one section to the other.
13.When you have the orders you want to bill in the top section (Orders to Bill), click
the Update Macola button. WMS creates the ODB files for Exact Macola ES Bar
Code to import. The Bar Code quick ship polling function can process the ODB files
for billing in Exact Macola ES.
Note: The orders are not selected for billing in Exact Macola ES until the Bar Code for Dis-
tribution quick ship function has been run. See “Importing Billing Selection Information
using Bar Code for Distribution” on page 138 for information about running that process.
Order Completion Mode is Shipment Completion
1. Log on to WMS.
2. If the order is not in your default warehouse, select File from the WMS menu, and
then click Change Warehouse. Type the correct warehouse location code in the
Warehouse field, and then click OK.
3. Click the Billing button.
4. In this mode, all orders are flagged for completion when a shipment that they are
attached to is completed.
5. After all orders are complete, click the Update Macola toolbar button to
open a screen to select the orders to bill. By default, all orders flagged as
eligible to bill in WMS are in the top section (Orders to Bill).
6. You can sort the orders by double-clicking any column heading.
7. If there are orders that you do not want to bill, you can use the mouse to click and
drag an order to the lower section (Orders Not Selected to Bill). You can hold the

138
Ctrl key and select non-sequential orders or hold the Shift key to select sequential
orders. You can also double-click an order to move it from one section to the other.
8. When you have the orders you want to bill in the top section (Orders to Bill), click
the Update Macola button. WMS creates the ODB files for Exact Macola ES Bar
Code to import. The Bar Code quick ship polling function can process the ODB files
for billing in Exact Macola ES.
Note: The orders are not selected for billing in Exact Macola ES until the Exact Macola ES
Bar Code for Distribution module quick ship function has been run. See “Importing Billing
Selection Information using Bar Code for Distribution” on page 138 for information about
that process.
Importing Billing Selection Information using Bar Code for Distribution
WMS does not select orders for billing like Order Entry does; instead, it interfaces with the
Exact Macola ES Bar Code for Distribution module to pass order selection information into
Exact Macola ES. Once the Update Macola function has been completed, the Exact Macola
ES Bar Code for Distribution module quick ship function can be used to import this infor-
mation into Exact Macola ES.
1. In Exact Macola ES, on the EDI & BC menu, under the Bar Code heading, select
Polling, Quick Ship.
2. Click the Start Polling button to begin the polling process. This process retrieves
all orders that were processed by the Update Macola function and select the Exact
Macola ES orders based on the information that was passed from WMS.
3. Once complete, the order is selected for billing. Please refer to the Exact Macola ES
O/E online help for instructions on completing the billing cycle.
Note: This program can be started on a dedicated machine and run continuously, which
allows WMS to send billing information to Exact Macola ES instantaneously. This is not
usually necessary, but is available if desired.
Generating an Advanced Ship Notice Using WMS Shipment Information
If the Exact Macola ES EDI Bar Code Holding File module and the WMS EDI ASN Data Col-
lection module are not both installed, ASN creation cannot use WMS shipment informa-
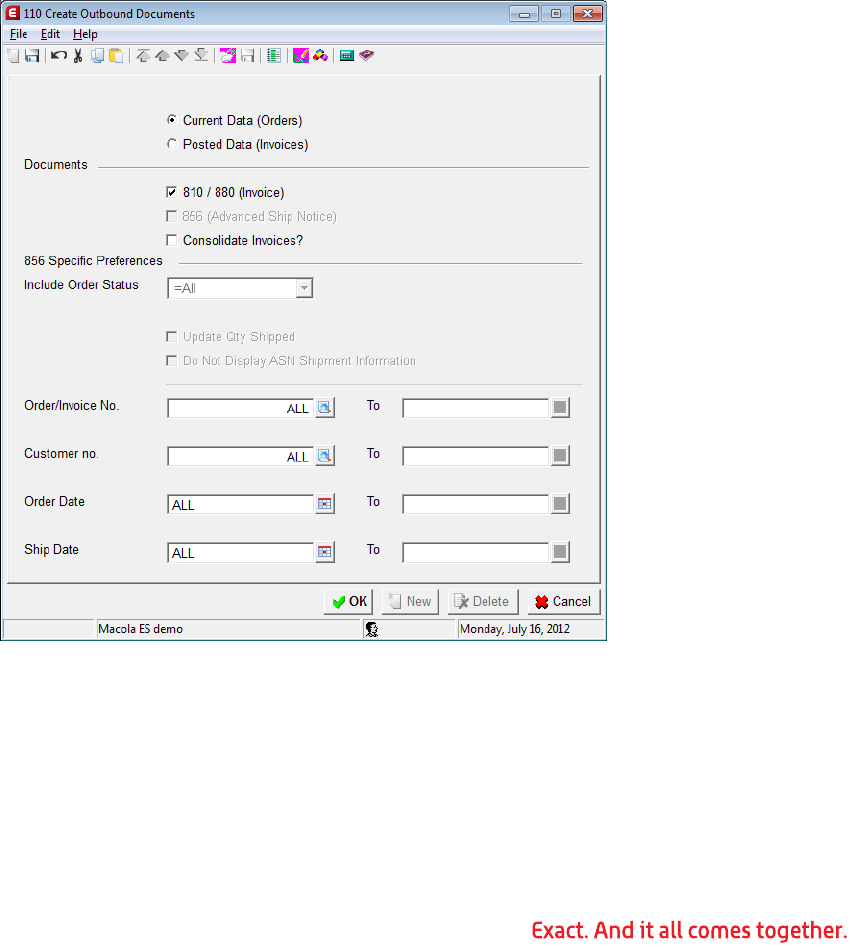
139
tion. Refer to the Exact Macola ES EDI online help for instructions on generating an ASN
without using WMS shipment information.
The Exact Macola ES EDI ASN module is used to generate an advanced ship notice. Before
an ASN can be created, the order must have been at least selected for billing if O/E is set
to Confirm Bill. If O/E is set to Confirm Ship, the order must have been at least shipped,
and if set to Confirm Pick the order must have been at least picked. The order can have
had the invoice printed, and it is possible to generate the ASN after the order has been
posted. However, since data on the O/E order cannot be changed after the invoice is
posted, it is generally recommended to create the ASN before the invoice is posted. This
allows incorrect or missing information on the order, such as the ship date or ship via
code, to be corrected so it can be included on the ASN.
If the WMS EDI ASN Data Collection module and the Exact Macola ES EDI Bar Code Inter-
face File module are installed, WMS can greatly simplify ASN creation in Exact Macola ES
by eliminating the need to manually enter all the carton and pallet information for a ship-
ment. The information collected by WMS is used during the ASN creation instead.
1. In Exact Macola ES, on the EDI & BC menu, under the EDI heading, select Out-
bound, Create.
a. If you are creating the ASN from an open order, select Current Data(Orders).
b. Tab to the starting Order/Invoice No field.
c. Type the first order number, if you are filtering by order number. To create
based on all orders, leave this set to All.

140
Note: Even if the invoice has been printed for the order, if the invoice has not been posted
yet, you must enter the order number here, not the invoice number.
d. Type the last order number in the ending Order/Invoice No field, if you are
filtering by order number. To create based on all orders, leave this set to All.
e. If you are creating the ASN from a posted invoice, select Posted Data
(Invoices).
f. Tab to the starting Order/Invoice No field. Type the first invoice number, if
you are filtering by invoice number. To create based on all invoices, leave this
set to All.
g. Type the last invoice number in the ending Order/Invoice No field, if you are
filtering by invoice number. To create based on all invoices, leave this set to All.
2. If you are filtering by customer number, type the starting customer number in the
starting Customer No field. To create based on all customers, leave this set to All.
3. If you are filtering by customer number, type the ending customer number in the
ending Customer No field. To create based on all customers, leave this set to All.
4. If you are filtering by order date, type the starting order date in the starting Order
Date field. To create based on all order dates, leave this set to All.
5. If you are filtering by order date, type the ending order date in the ending Order
Date field. To create based on all order dates, leave this set to All.
6. If you are filtering by O/E ship date, type the starting ship date in the starting Ship
Date field. To create based on all ship dates, leave this set to All.
7. If you are filtering by O/E ship date, type the ending ship date in the ending Ship
Date field. To create based on all ship dates, leave this set to All.
8. Select the 856 (Advanced Ship Notice) check box.
9. You can further refine which orders are included using the Include Order Status
field. To include all orders regardless of status, leave this set to All.
10.Click the OK button. Exact Macola ES EDI begins the ASN creation process.
11.If a flat file still exists from the last outbound creation, Exact Macola ES displays a
messaging prompting you to append, erase, or cancel:
• Append -- Saves the data already in the flat file and places the new data at the
end of it.
• Erase -- Deletes the data already in the flat file and replaces it with the new
data.
• Cancel -- Saves the data already in the flat file and does not create any new
data. Stops the ASN creation process.
12.Exact Macola ES sorts the orders based on the filter criteria specified and displays
the ASN Shipment Level Maintenance screen.
The ASN Shipment Level Maintenance screen allows you to enter or override certain ship-
ment details for this ASN. Although most or all of these fields have default information in
them, you can enter data in a field and have that override appear on the ASN only if the
format that you are using pulls data from that field. If the EDFORMAT.TXT lists that a ship-
ment value is pulled from a shipment level (S record) field in the EDBBCIFL table, then
you can normally override it on this screen. The information on this screen is only for the
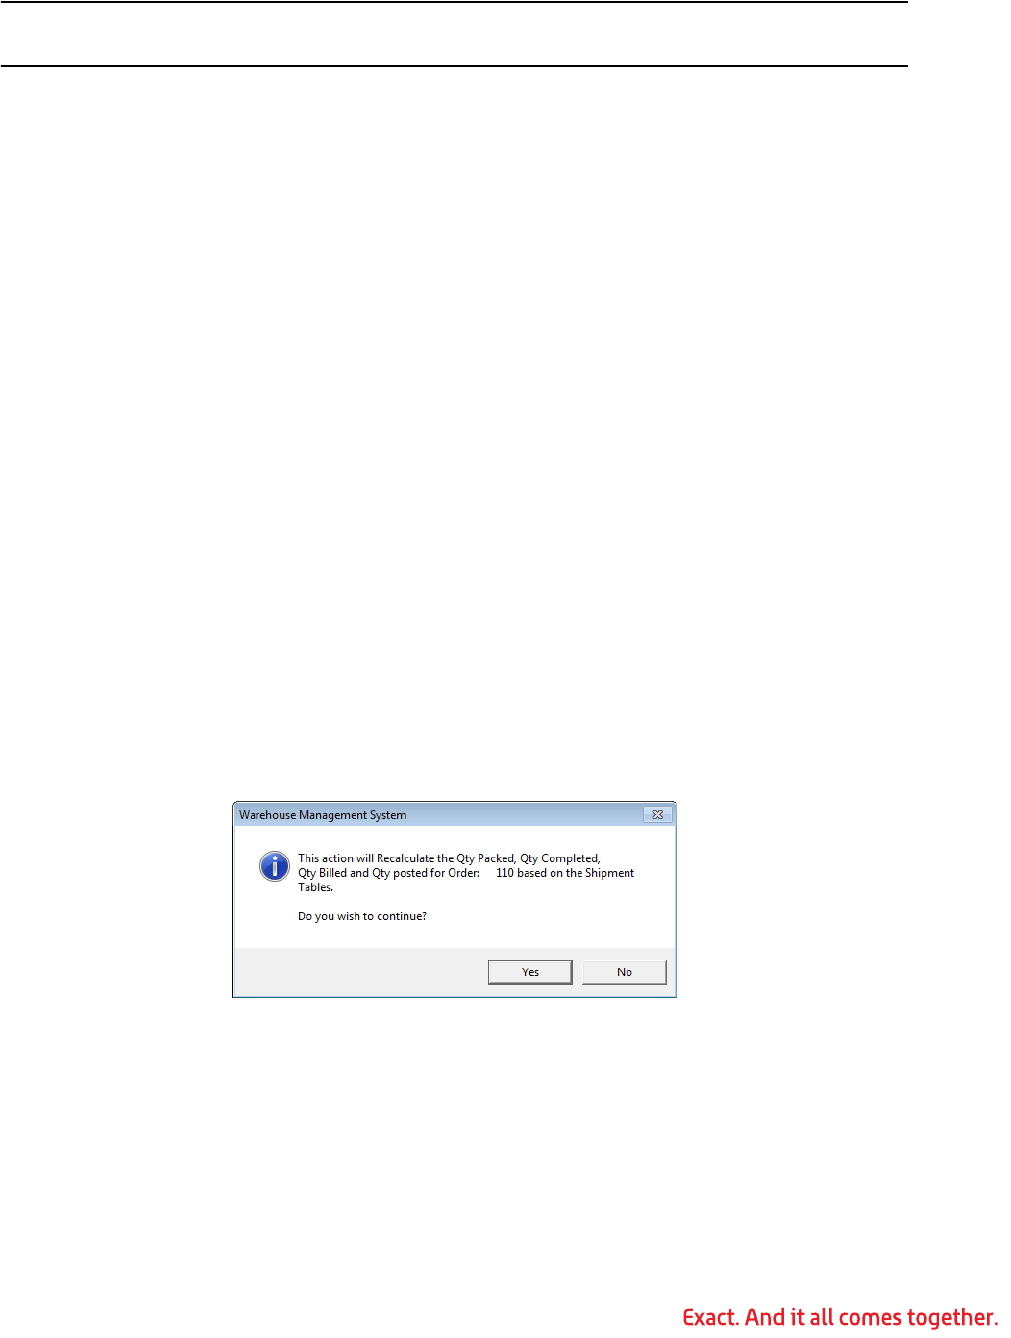
141
shipment level of the ASN. It does not affect the order, tare, pack, or item levels of the
ASN.
Note: The ASN Shipment Level Maintenance screen is displayed once for each ASN that is
created.
13.If the Misc Info button is active on the ASN Shipment Level Maintenance screen,
click it to enter information in the ASN misc fields. The data expected in a misc
field and the label displayed for the misc field are determined by the ASN format.
14.To continue with the ASN creation, click OK or press the Enter key.
15.When the ASN creation is complete, Exact Macola ES displays a message asking if
you want to print the transmission report. Click Yes to print the report, or No to
continue without printing the report.
16.The outbound creation closes automatically.
Recalculating the Totals for an Order in WMS
Although rare, the system total values for an order line item can become out of synch with
the transaction files. This is most likely to happen if a problem occurs during shipment
completion. A utility has been provided to recalculate the totals for the order when neces-
sary.
1. Log on to WMS as a user with mass deletion rights.
2. Press the F3 key, or click the WMS Inquiry toolbar button to launch the WMS
Inquiry.
3. Make sure that the current view is Order/Carton/Item. If not, select View from the
menu, and then click Order/Carton/Item.
4. Type the order number requiring re-calculation in the Order # field.
5. Right-click the order number in the list, and then click Re-calculate Order Totals.
6. WMS displays a message that the order totals will be recalculated. Click Yes to con-
tinue.
WMS recalculates the quantity packed, quantity completed, quantity billed, and quantity
posted for the order based on values in the shipment transaction table.
Closing WMS Orders when the Exact Macola ES Order has been Closed
WMS maintains its own order information. When an order is deleted from Exact Macola
ES, closed using the Exact Macola ES close order function, or automatically closed posting
the invoice, WMS must be informed that the order is no longer eligible for shipment. Nor-
mally the order would be updated in WMS using post pick ticket processing, but a pick
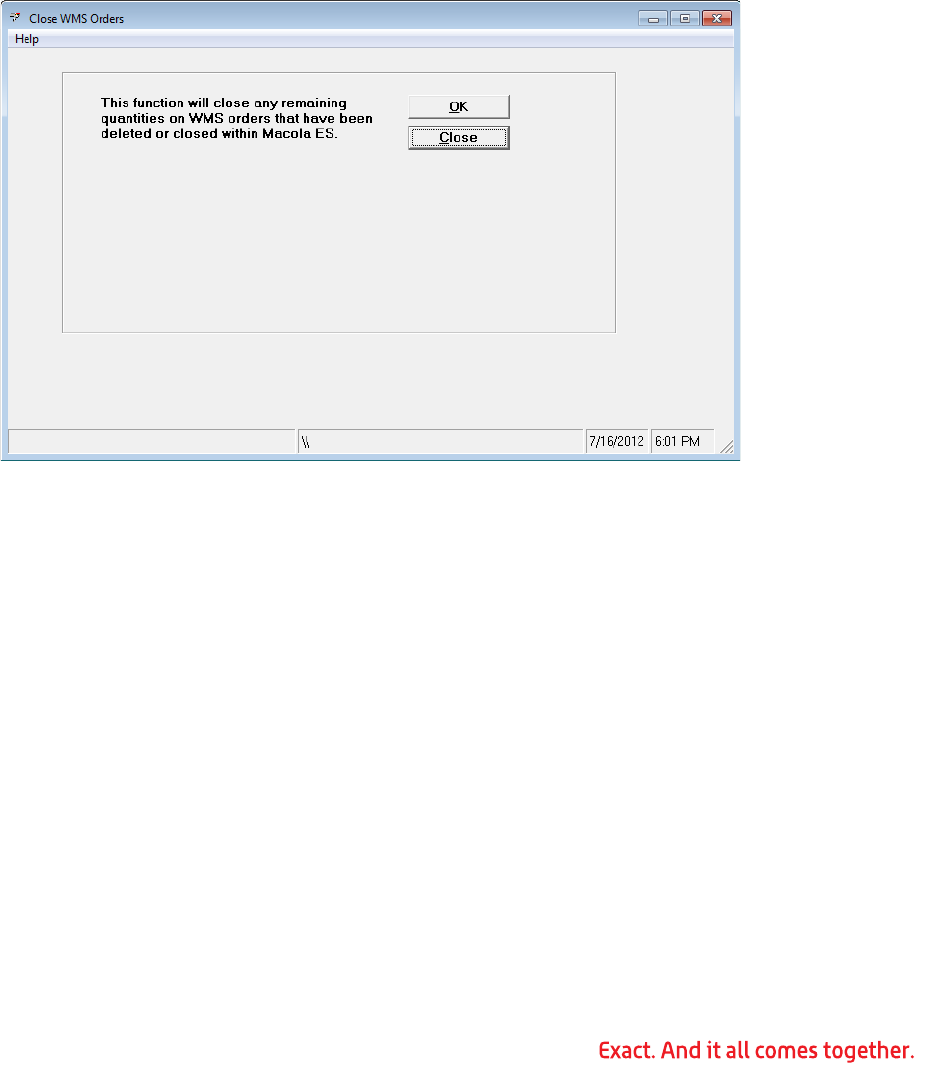
142
ticket cannot be generated for these orders, so another tool is needed. The Close WMS
Orders function searches all open WMS orders and closes any order that is not an open
Exact Macola ES order by reducing the quantity to ship to zero.
An exception report is printed to alert the user of any order that contains packed cartons
that have not been completed.
This function should be used after posting O/E invoices to A/R, or any time an order is
manually closed. If an order is deleted from Exact Macola ES, the order can be closed in
WMS using this function, or deleted using the WMS Inquiry mass deletion function. See
“Deleting an Order from WMS” on page 142 for information about the mass deletion func-
tion.
1. In Exact Macola ES, on the OE & RMA menu, under the Invoice & Process Orders
heading, select WMS Close Orders.
2. Click the OK button. WMS reads through all open WMS orders and reduces the
quantity to ship to zero on all line items for deleted or closed Exact Macola ES
orders.
Deleting an Order from WMS
When necessary, the work done on an order in WMS can be removed. This process should
not be taken lightly, and only certain users should be given access to this functionality.
1. Log on to WMS as a user with mass deletion rights.
2. Press the F3 key, click the WMS Inquiry toolbar button to launch the WMS
Inquiry.
3. Make sure that the current view is Order/Carton/Item. If not, select View from the
menu, and then click Order/Carton/Item.
4. Type the order number to be deleted in the Order # field.
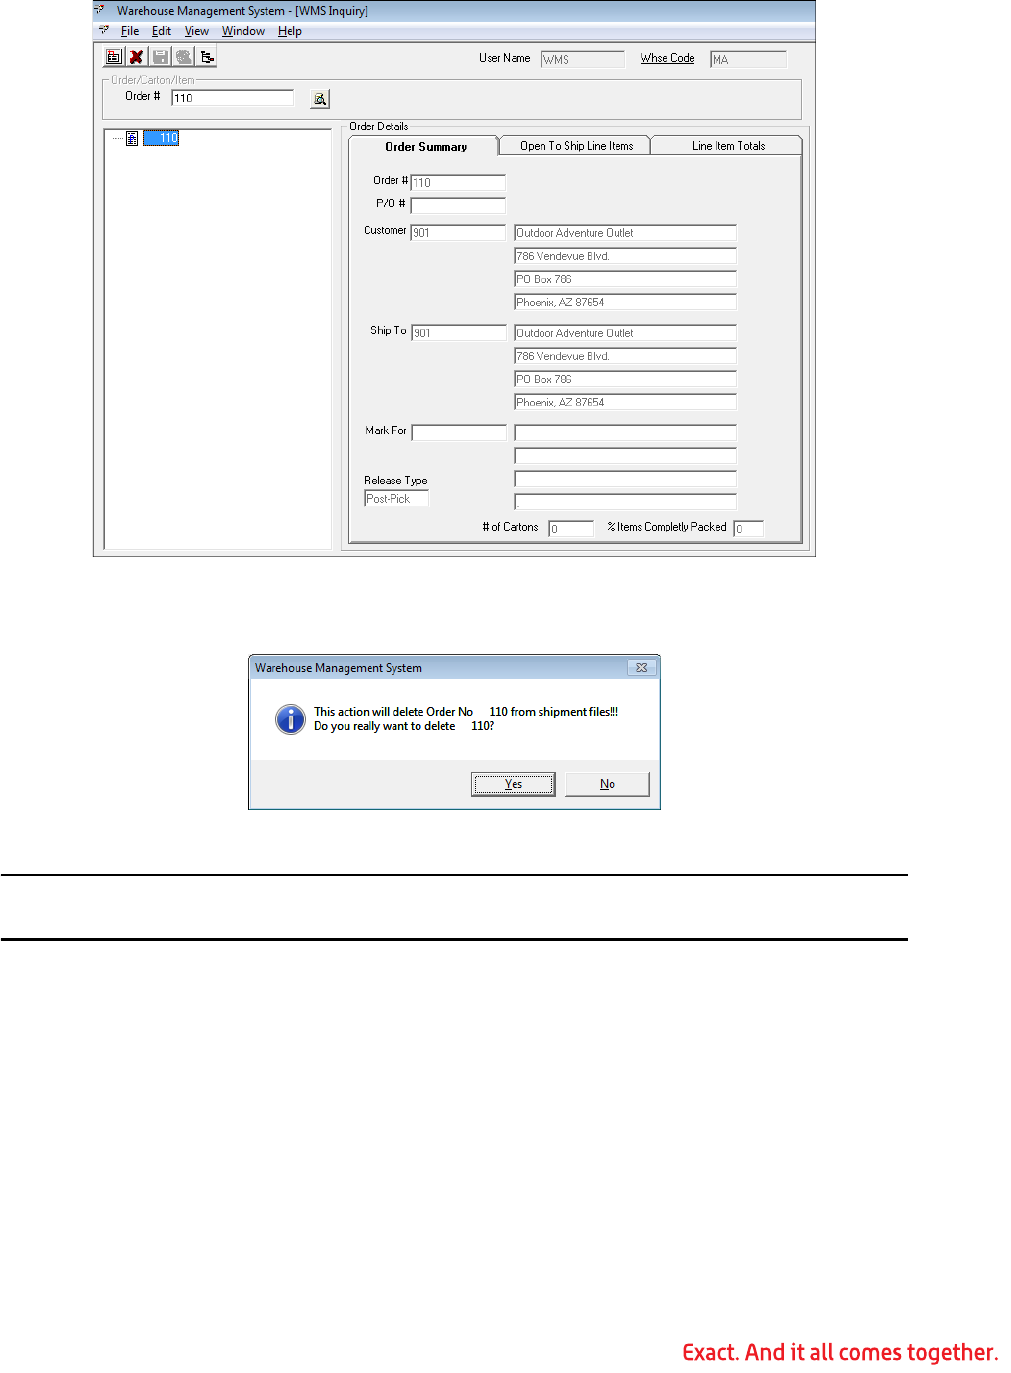
143
5. Right-click the order number in the list, and then click Delete.
6. WMS displays a message that the order will be deleted. Click Yes to continue.
7. WMS deletes the order and all associated cartons from the shipping system.
Note: If this order is attached to a completed shipment, the order cannot be deleted with-
out first re-opening the shipment.
8. Exit the inquiry when done.
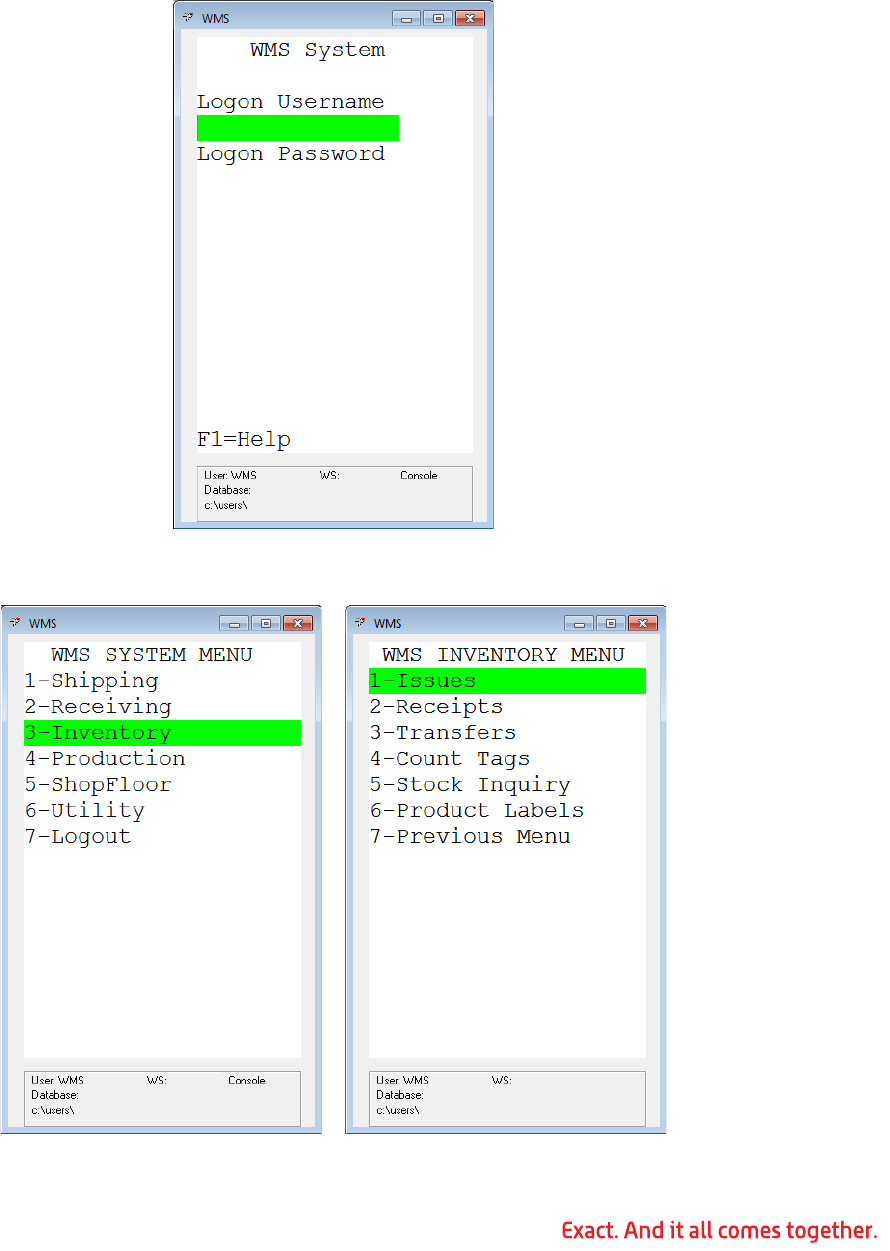
144
Chapter 8: WMS Inventory Transactions
Processing an Inventory Issue
1. Log in to WMS on an RF handheld device.
2. Select Inventory, and then select Issues.
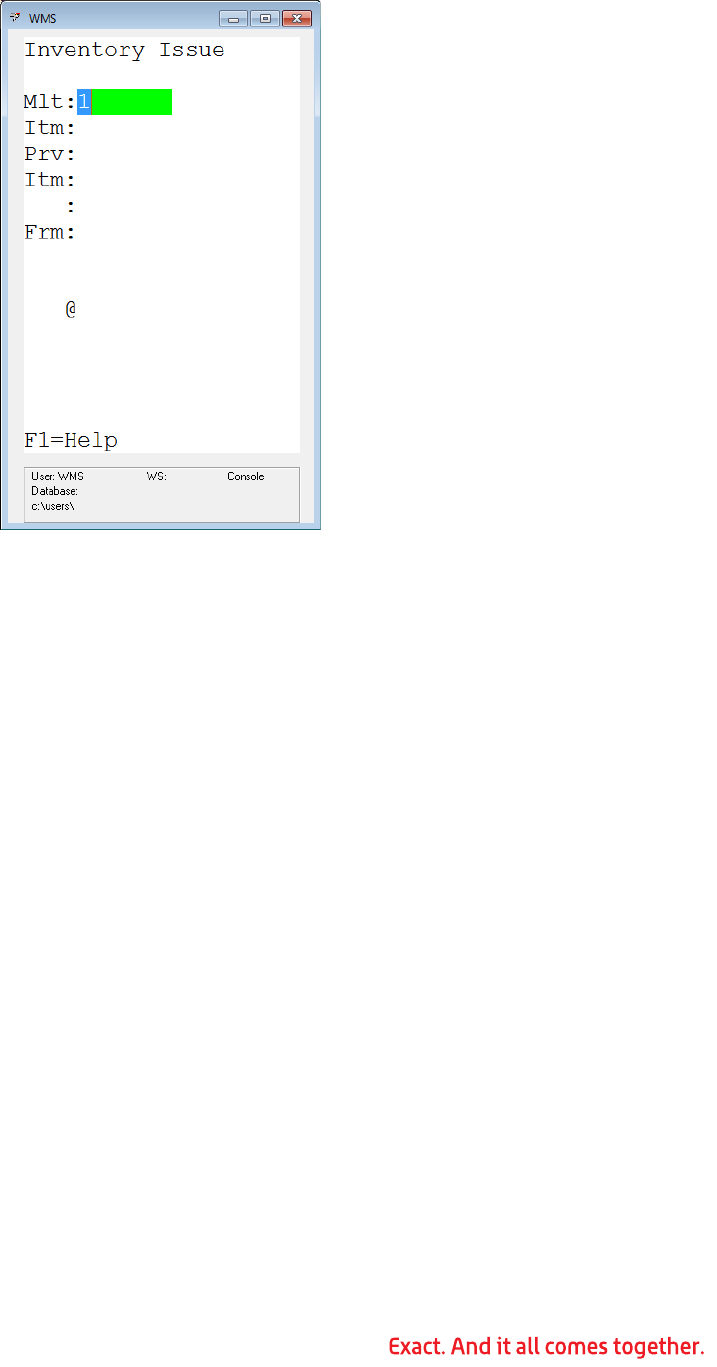
145
3. Mlt: Type the quantity to issue.
4. Itm: Type or scan an item number, UPC code, UCC-14, or any other bar code that
has been configured to represent the item.
5. If the item is binned/lotted, you are prompted for the bin/lot number.
6. WMS automatically processes the issue and removes the quantity from inventory.
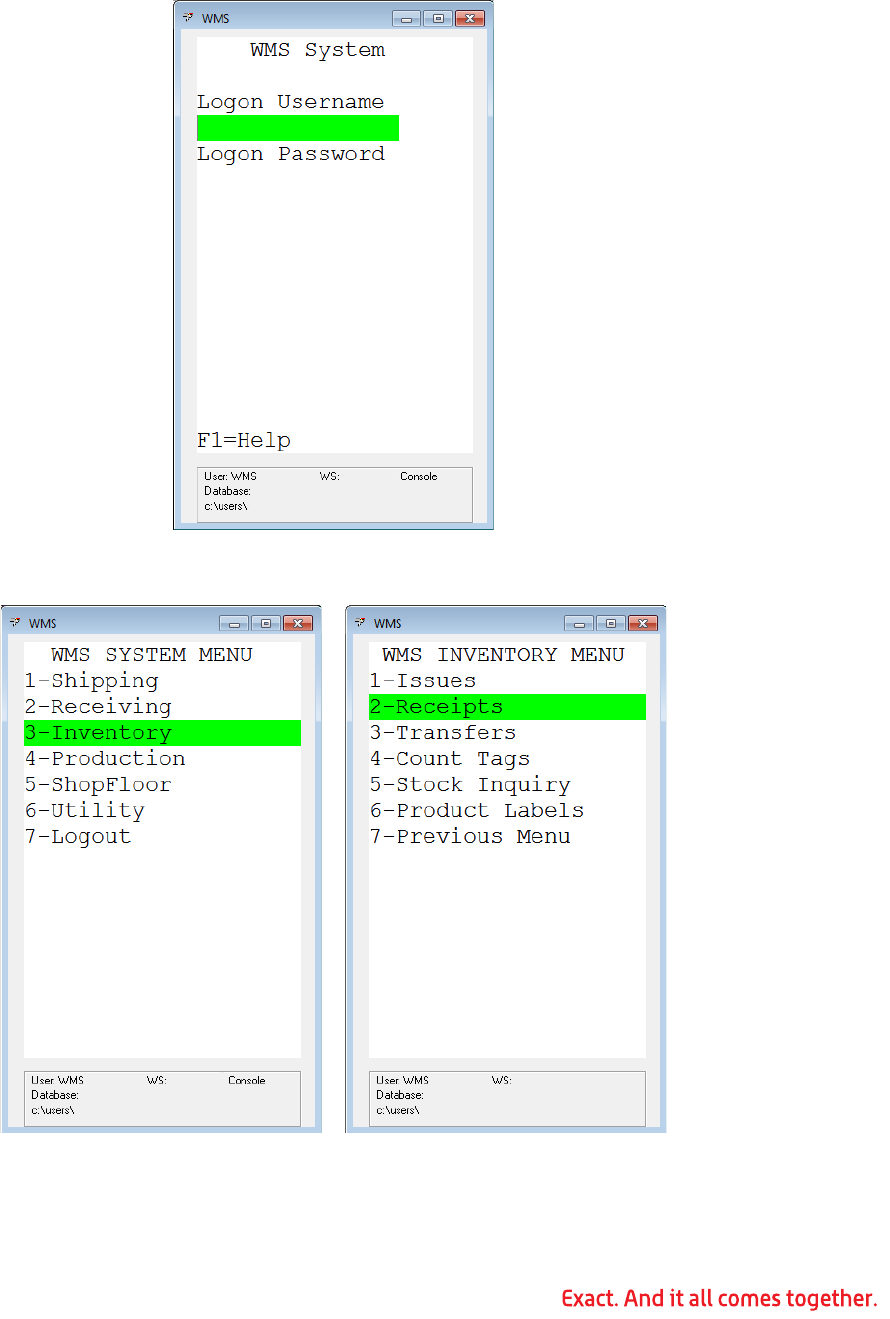
146
Processing an Inventory Receipt
1. Log in to WMS on an RF handheld device.
2. Select Inventory, and then select Receipts.
3. Mlt: Type the quantity to receive.

147
4. Itm: Type or scan an item number, UPC code, UCC-14, or any other bar code that
has been configured to represent the item.
5. If the item is binned/lotted, you are prompted for the bin/lot number.
6. WMS prints labels for the items. Depending on how you have WMS set up, you can
print one label for the transaction or one label for each item. (Refer to page 33
“Default Calculated Number of Labels to 1?”
7. WMS automatically processes the receipt and adds the quantity to inventory.
Processing an Inventory Transfer
1. Log in to WMS on an RF handheld device.
2. Select Inventory, and then select Transfers.
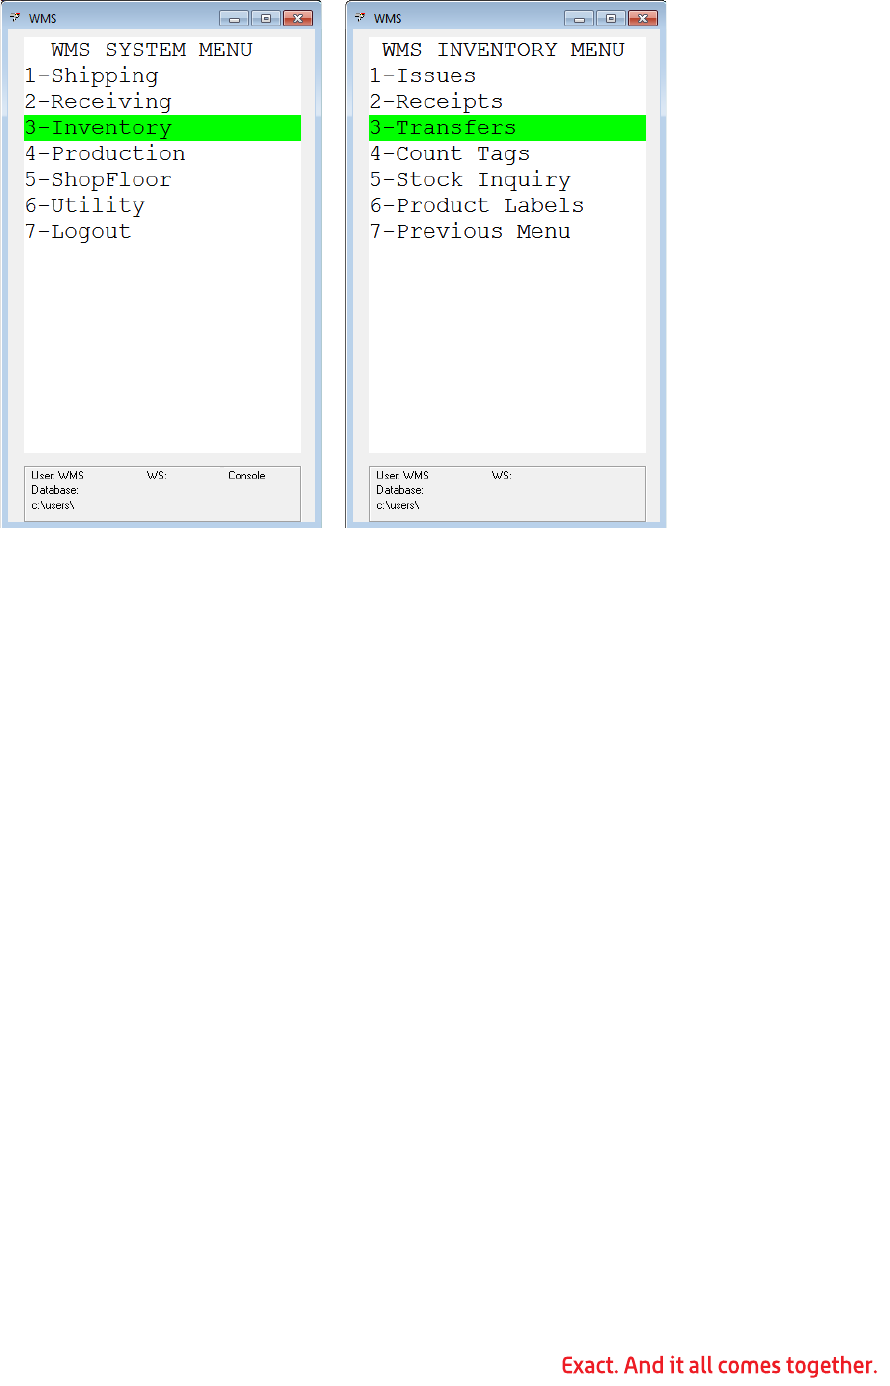
148
3. To: Type the warehouse to transfer product to. The From field is automatically set
to your current warehouse.
4. Mlt: Type the quantity to receive.
5. Itm: Type or scan an item number, UPC code, UCC-14, or any other bar code that
has been configured to represent the item.
6. If the transfer is for a binned item, WMS prompts for the bin to transfer product
from.
7. If the item being transferred is a binned item, WMS prompts for a bin to transfer
product to.
8. WMS automatically processes the transfer and moves the quantity in inventory.
Processing a Physical or Cycle Count
WMS allows you to enter count information with an RF device during a physical or cycle
count. See the Exact Macola ES I/M user guide or online Help for information about creat-
ing a physical or cycle count.
Once created, WMS can process the count as either a directed or a non-directed count.
Directed Count Processing
The directed count process is particularly useful in binned environments. The count should
be created with the sort by bin option activated. Each RF user is given a batch code and
range of tags to count.
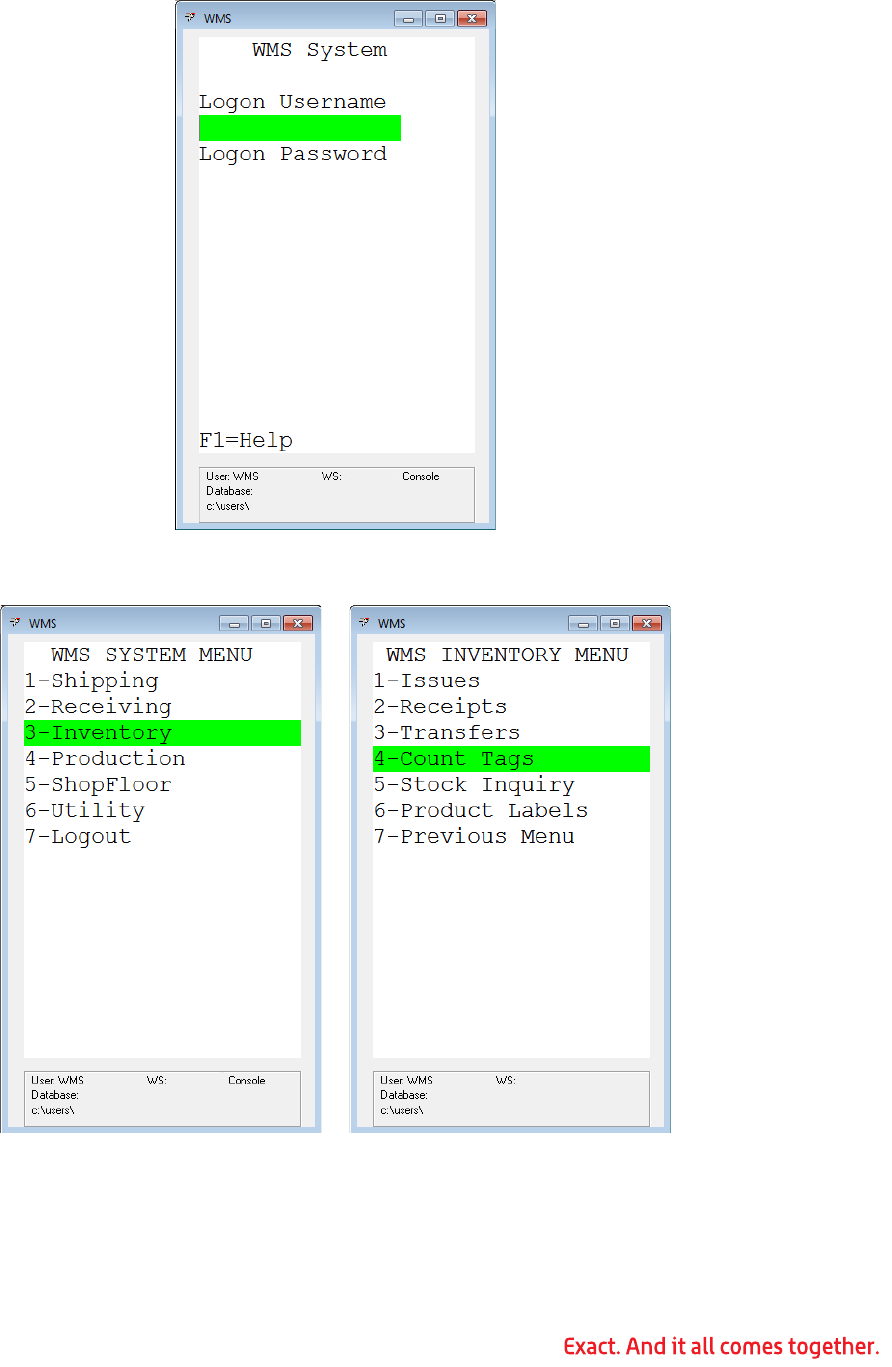
149
1. Log in to WMS on an RF handheld device.
2. Select Inventory, and then select Count Tags.
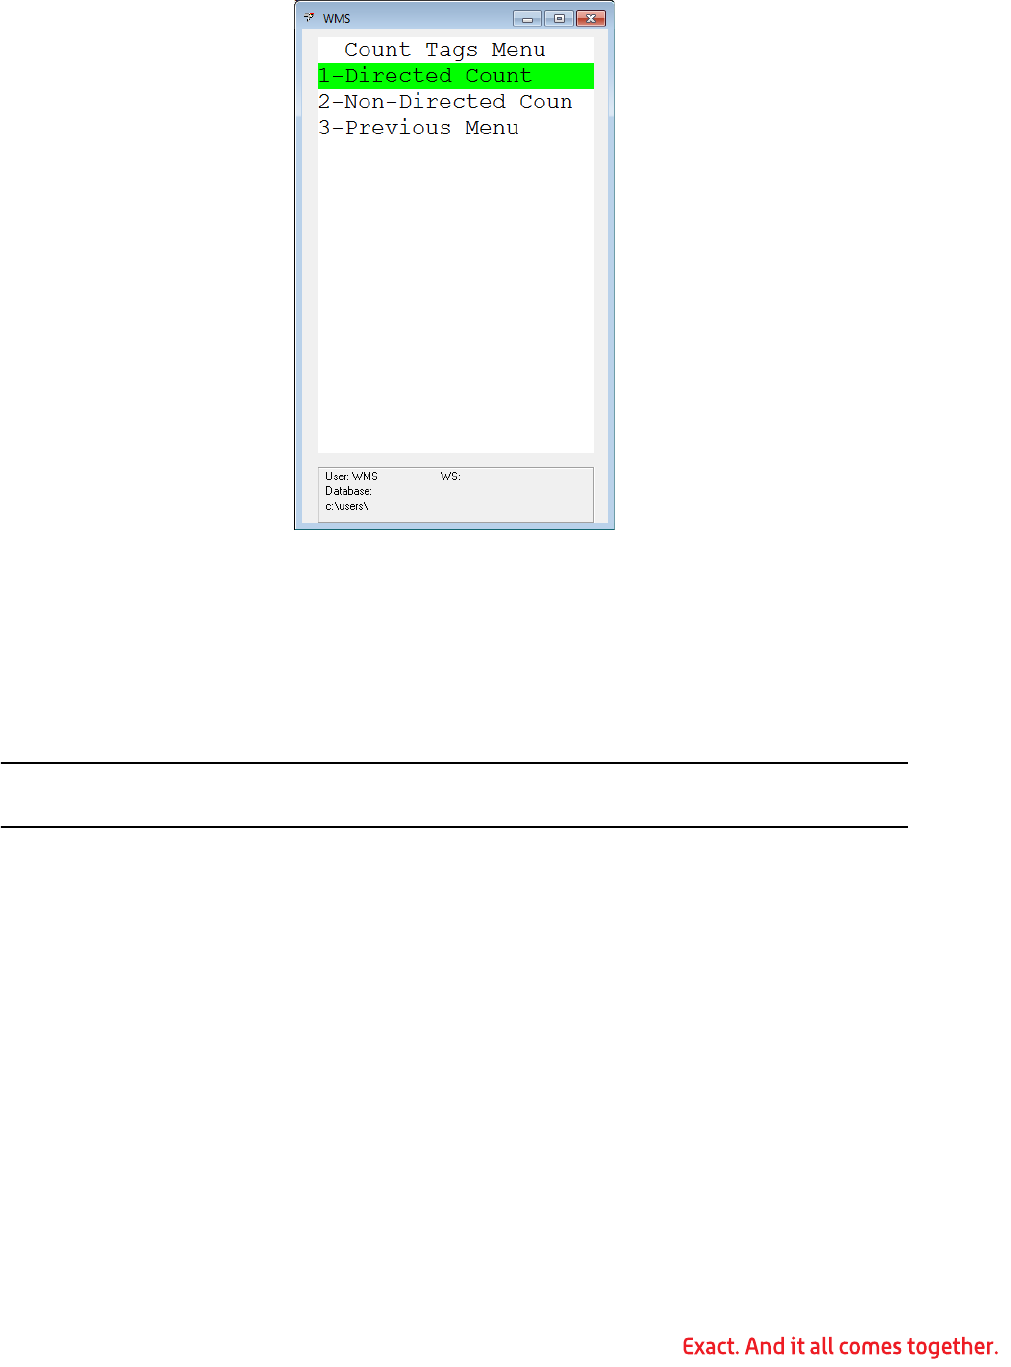
150
3. Select Directed Count from the Count Tags menu.
4. Batch #: Type the batch number.
5. Tag #: Type the starting tag number.
6. WMS displays the bin and item to count.
7. Mlt: Type the count.
8. Itm: Type the item number, UPC number, UCC-14 number, or any other bar code
that represents this item.
Note: If you type the UCC-14 case code, the quantity in the Mlt field should be the num-
ber of cases.
9. WMS validates that you are counting the correct item.
10.Scan the bin number to confirm that you are at the correct bin. If the wrong bin is
scanned, WMS generates an error message.
11.After the current count is entered, WMS directs you to the next item.
12.When finished with your range, press Escape or CLR to exit.
Non-Directed Count Processing
The non-directed count process is particularly useful for non-binned or full physical situa-
tions. Each RF user is given a batch to count and directed to a specific area or aisle of the
warehouse.

151
1. Log in to WMS on an RF handheld device.
2. Select Inventory, and then select Count Tags.
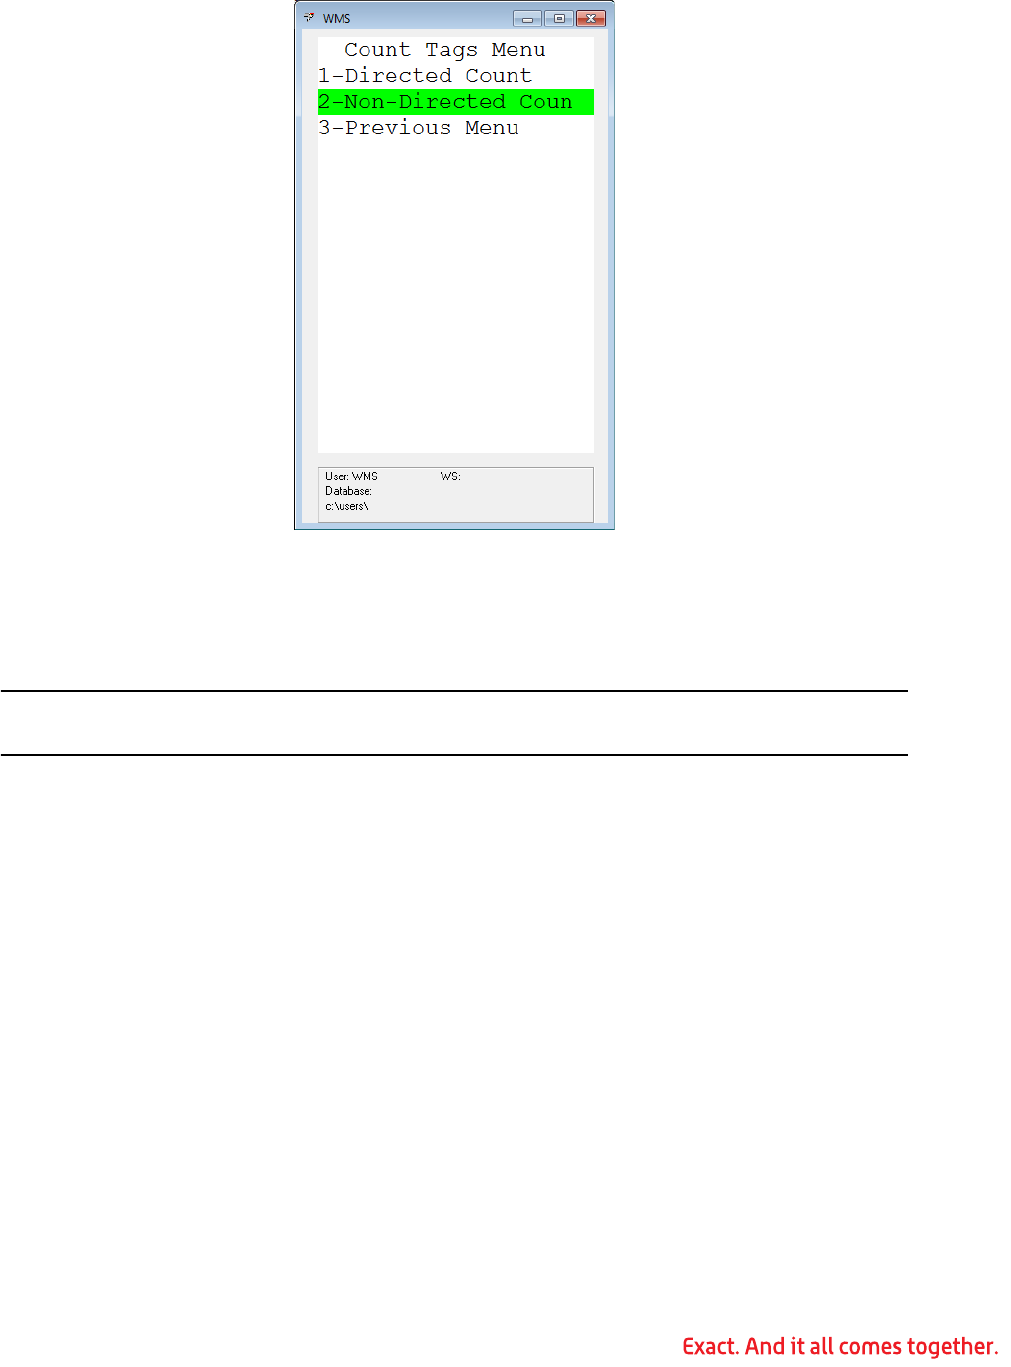
152
3. Select Non-Directed Count from the Count Tags menu.
4. Batch #: Type the batch code.
5. Mlt#: Type the counted quantity.
6. Itm#: Type or scan the item number, UPC number, UCC-14 number, or any other
bar code representing the item being counted.
Note: If you type a UCC-14 case code, the quantity in the Mlt# field should be the case
quantity.
7. If the item is binned, WMS prompts for a bin number. Type or scan the bin number.
8. WMS updates the tag for that item-bin combination.
9. When complete, press Escape or CLR to exit.
Viewing a Bin Stock Inquiry on RF Devices
Using a WMS RF device, an item can be located in a warehouse without going to a work-
station.
1. Log in to WMS on an RF handheld device.
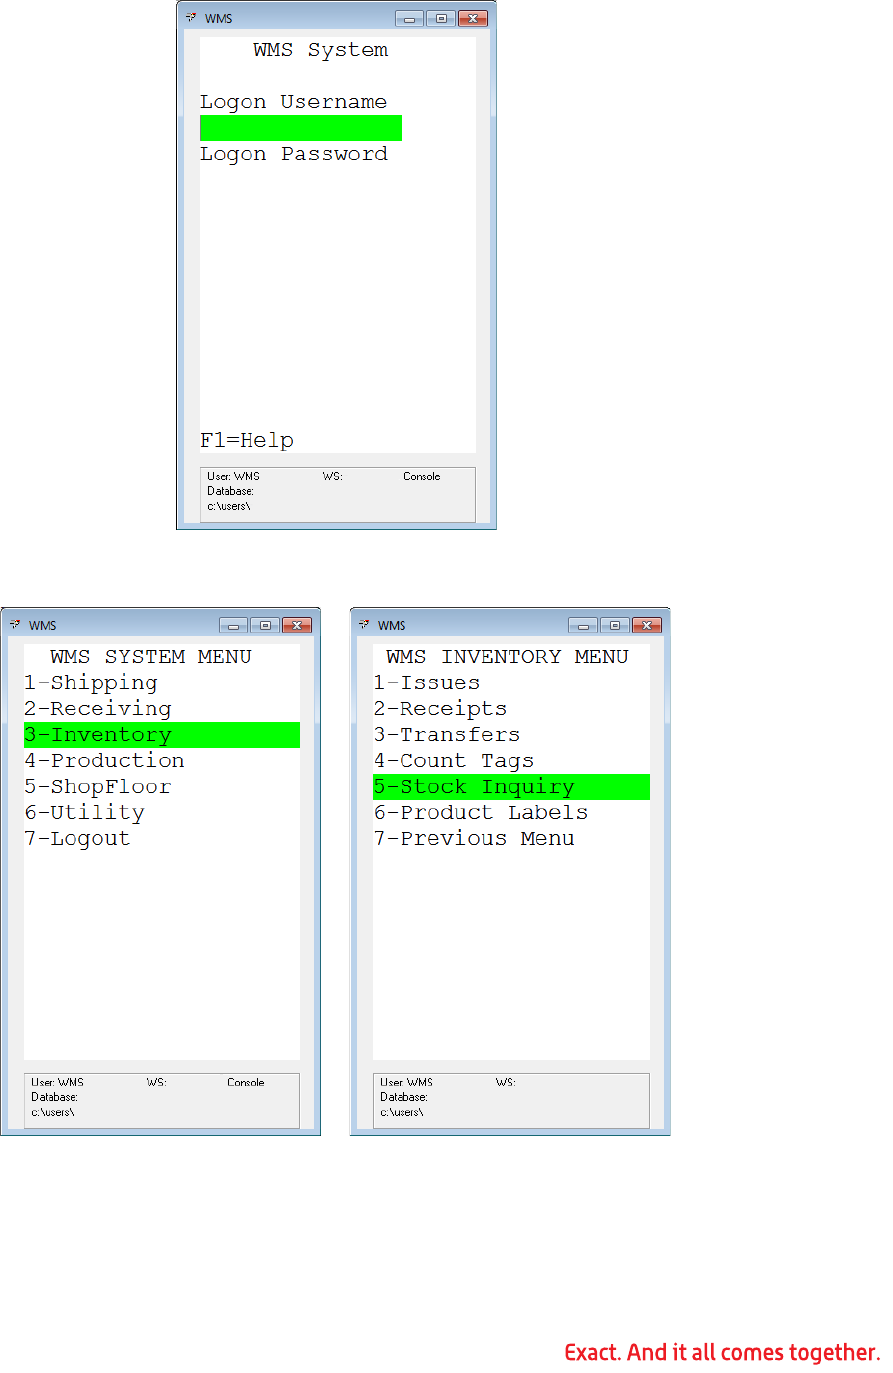
153
2. Select Inventory, and then select Stock Inquiry.
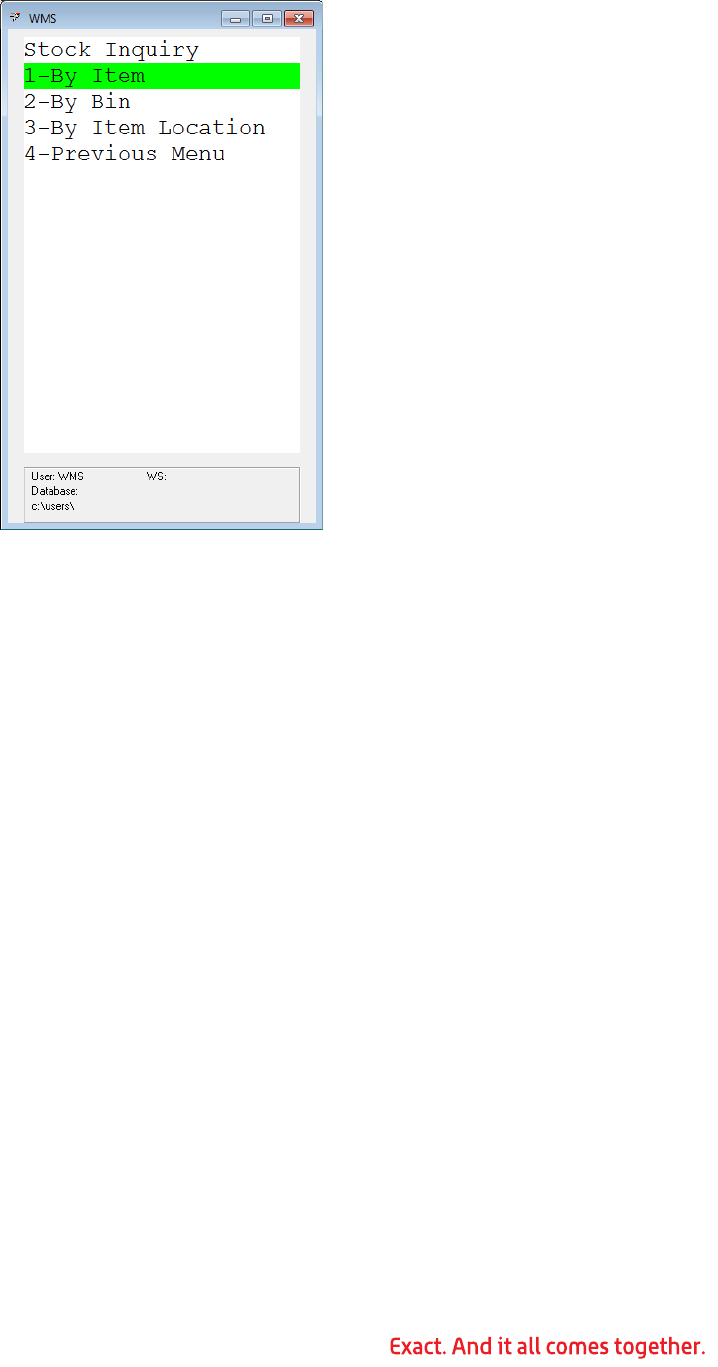
154
3. Select either By Item; By Bin; or By Item Location from the Stock Inquiry menu.
• By Item mode: In the Itm field, type or scan the item number, UPC number,
UCC-14 number, or any other bar code representing the item to be located.
WMS displays the item number, the total for the current warehouse, and the
location of the items, if bins are in use.
• By Bin mode: In the Bin field, type or scan the bin number. WMS displays the
items and quantity on hand in the bin.
• By Item Location mode: This version of the Stock Inquiry provides more of a
multi-level item view for an item. It shows other locations than the one that is
logged in, and drill down to bin and lot is possible. It also shows On Hand,
Available, WMS Available and other status values such as recommendations
and pending transactions (Vqty).
4. Press F6 to toggle between by item and by bin modes.
5. Press F8 to toggle between showing zero quantities and hiding zero quantities.
6. Use the up and down arrows to scroll through pages.
7. After reviewing the list, press the Escape or CLR key to exit.
Printing Product Labels
Using an RF handheld device, you can print ad hoc product labels if your WMS user secu-
rity is set to allow printing ad hoc inventory labels. Refer to “Inventory Tab” on page 19 for
information about this setup.
1. Log in to WMS on an RF handheld device.

155
2. Select Inventory, and then select Product Labels.
3. Mlt: Enter the number of labels to print.
4. Itm: Enter the item number.
5. Press the Escape to print the labels.
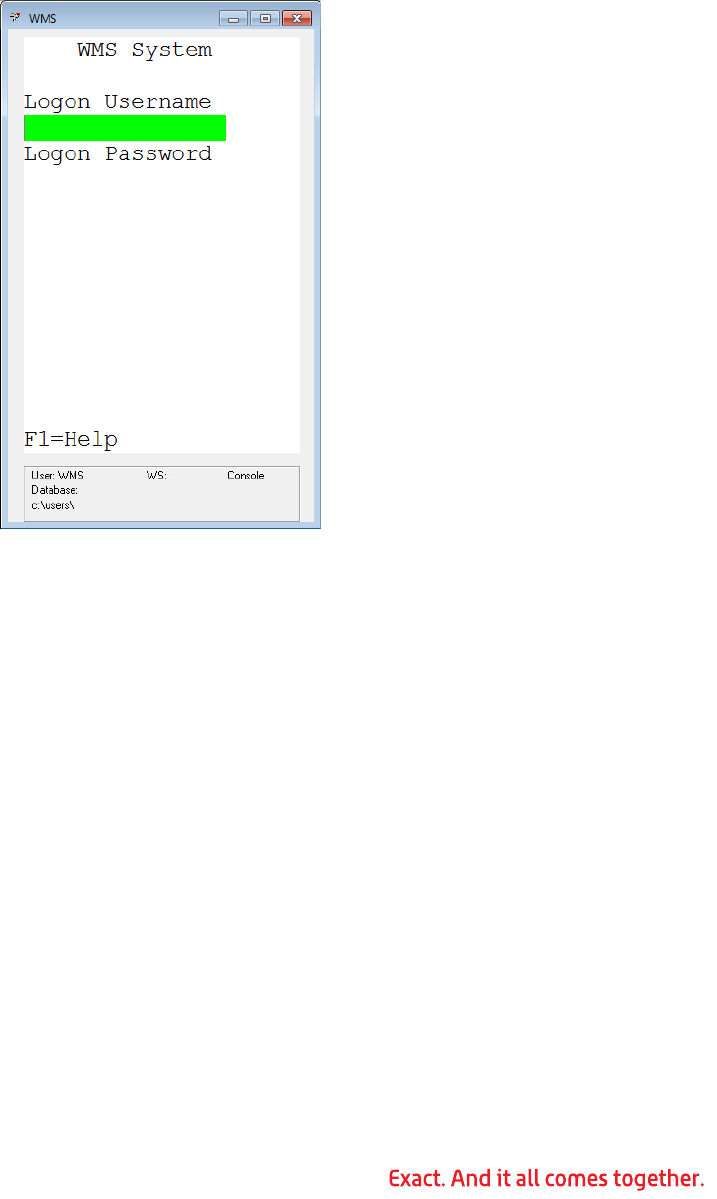
156
Chapter 9: WMS Purchase Order Receiving Transactions
Processing a Receipt Against a Purchase Order
The WMS receiving function processes receipts against a purchase order that was entered
in the Exact Macola ES Purchase Order package and can generate product labels.
1. Log in to WMS on an RF handheld device.
2. Select Receiving, and then select Receive P/Os.
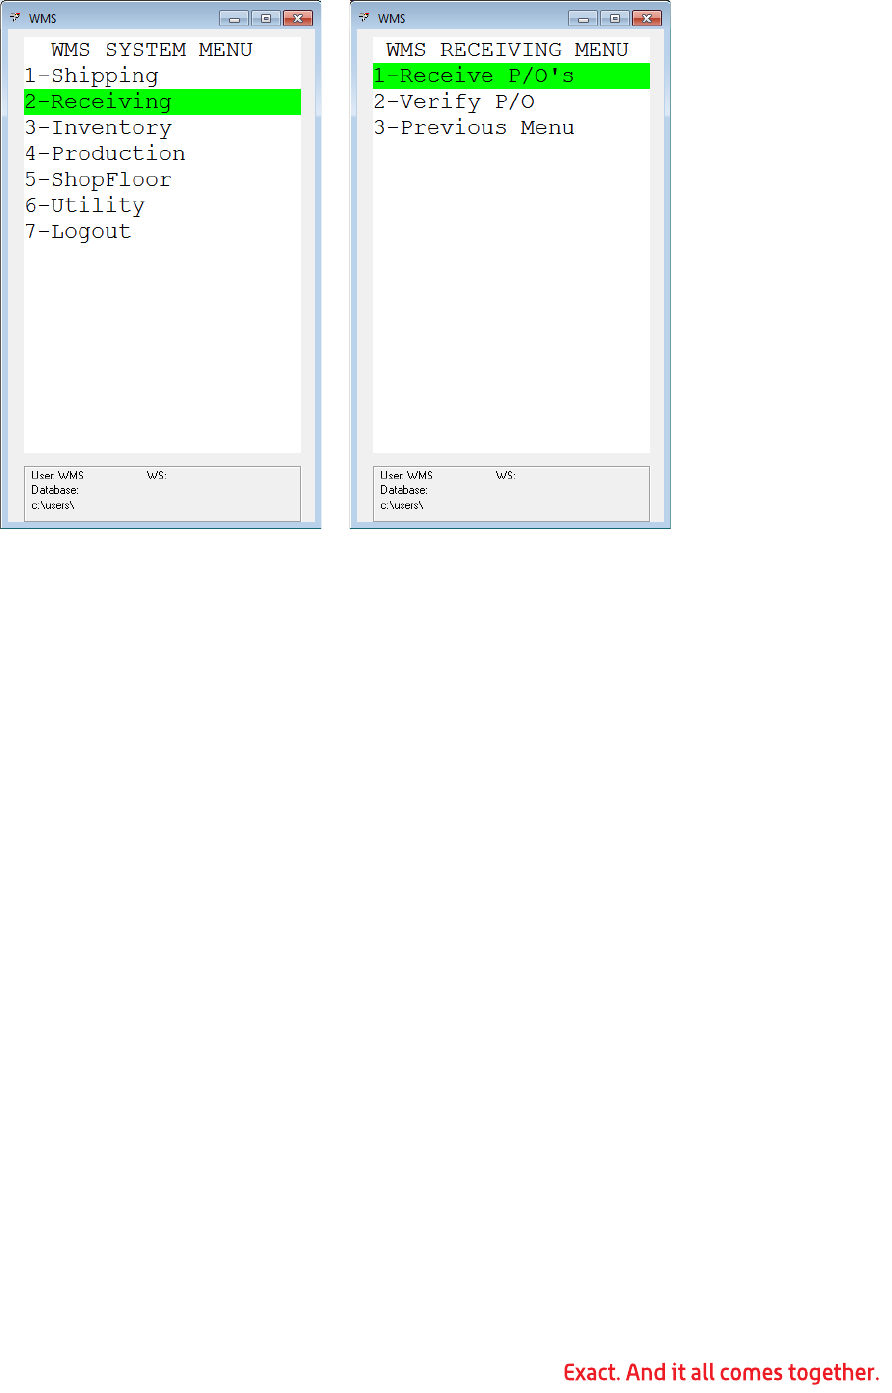
157
3. If you are using bins in Exact Macola ES, you can use the dock as bin mode in
WMS. If this option is turned on, WMS prompts for a dock; otherwise, it skips this
field.
Dock: Type the Exact Macola ES bin number that represents the dock to which you
are receiving product. All subsequent receipts are processed against this bin until
you change the dock.
4. PO: Type the purchase order number for the purchase order that you are receiv-
ing.
5. RLS: If this is a release against a blanket PO, type the release number.
6. If the vendor has been configured to print a warehouse PO scan sheet, WMS prints
it at this time.
7. Mlt: Press F4 to specify a multiplier for the next item, if necessary. Type the value
to multiply the next item quantity by.
8. Itm: Scan or type one of the following: item number, UCC-14 (I-205) number, UPC
number, or any bar code that has been set up in WMS Bulk Weight Maintenance.
9. If the same IM item number appears multiple times on the PO, WMS prompts you
to specify against which occurrence you are receiving.
10.If the item is lotted or serialized, WMS prompts for the lot or serial number. If you
typed a quantity in the Mlt field, enter serial numbers for the entire quantity. If
Auto Generate Serial Numbers is activated on the WMS control file Receiving tab,
WMS automatically generates serial numbers for the entire quantity.
11.WMS determines if putaway tags are in use and prints one if required.
12.WMS validates the item against the purchase order and determines if product
labels are required. If so, it either automatically prints them or prompts the user.
See “Overriding Product Labels When Prompting” on page 158 for details about
prompted product labels. Depending on how you have WMS set up, you can print

158
one label for the transaction or one label for each item. (Refer to page 33 “Default
Calculated Number of Labels to 1?”
13.To remove item quantities, press the F5 key. You can remove up to the total quan-
tity listed for an item on the PO. Press the F5 key again to return to add item
mode.
14.After entering all receipts, press the Escape or CLR key on the RF device.
15.WMS verifies if the purchase order has been fully received; if not, a list of items
that have not been fully received is displayed.
16.Use the up and down arrow keys to scroll through the list.
17.After reviewing, press the Escape or CLR key on the RF device.
Overriding Product Labels When Prompting
The WMS receiving function can produce product labels as receipts are entered. During
setup, labels are configured to print automatically, not to print at all, or to prompt the user
before printing. This can be set as a global default, overridden by vendor, and overridden
by vendor item; it can also be set differently for each PO layer. See “Receiving Tab” on
page 30 for information about the global settings. See “Vendor Override Maintenance” on
page 88 for information about overriding by vendor. See “Vendor Item Override Mainte-
nance” on page 90 for information about overriding by vendor item.
1. Itm: While entering receipts, type or scan the item code. WMS displays the PO
number, the item number, and the quantity being received.
2. For each layer set to prompt for product label printing, WMS displays the number
of labels to be printed, the item ID, and the quantity per label. If a layer is set not
to print or always to print, that layer is not displayed.
3. Use the up and down arrow keys to scroll through the entries.
4. Type Y or 1 to set the entry to print.
5. Type N or 0 to set the entry not to print.
6. Type C or 2 to change the entry.
7. If you choose to change an entry, WMS displays a screen showing the layer being
changed, the number of labels to be printed, and the item ID associated with those
labels.
8. You can type a new number of labels to print. This changes only the number of
labels for the layer, not the quantity received.
9. Use the arrow keys to select a different package code to use for the layer, which
changes the number of labels calculated and the item ID associated with the label.
10.Press Enter to save the change.
11.After making all changes, press Escape or CLR on the RF device. WMS prints the
labels.
Workstation Product Label Printing
WMS allows you to print item product labels from a workstation (in addition to printing
them from a handheld RF unit). WMS first calculates the total quantity to be considered
for printing, and then determines the number of labels necessary based on the total item
quantity and the WMS Bulk Weight Maintenance Items Per Pack field.
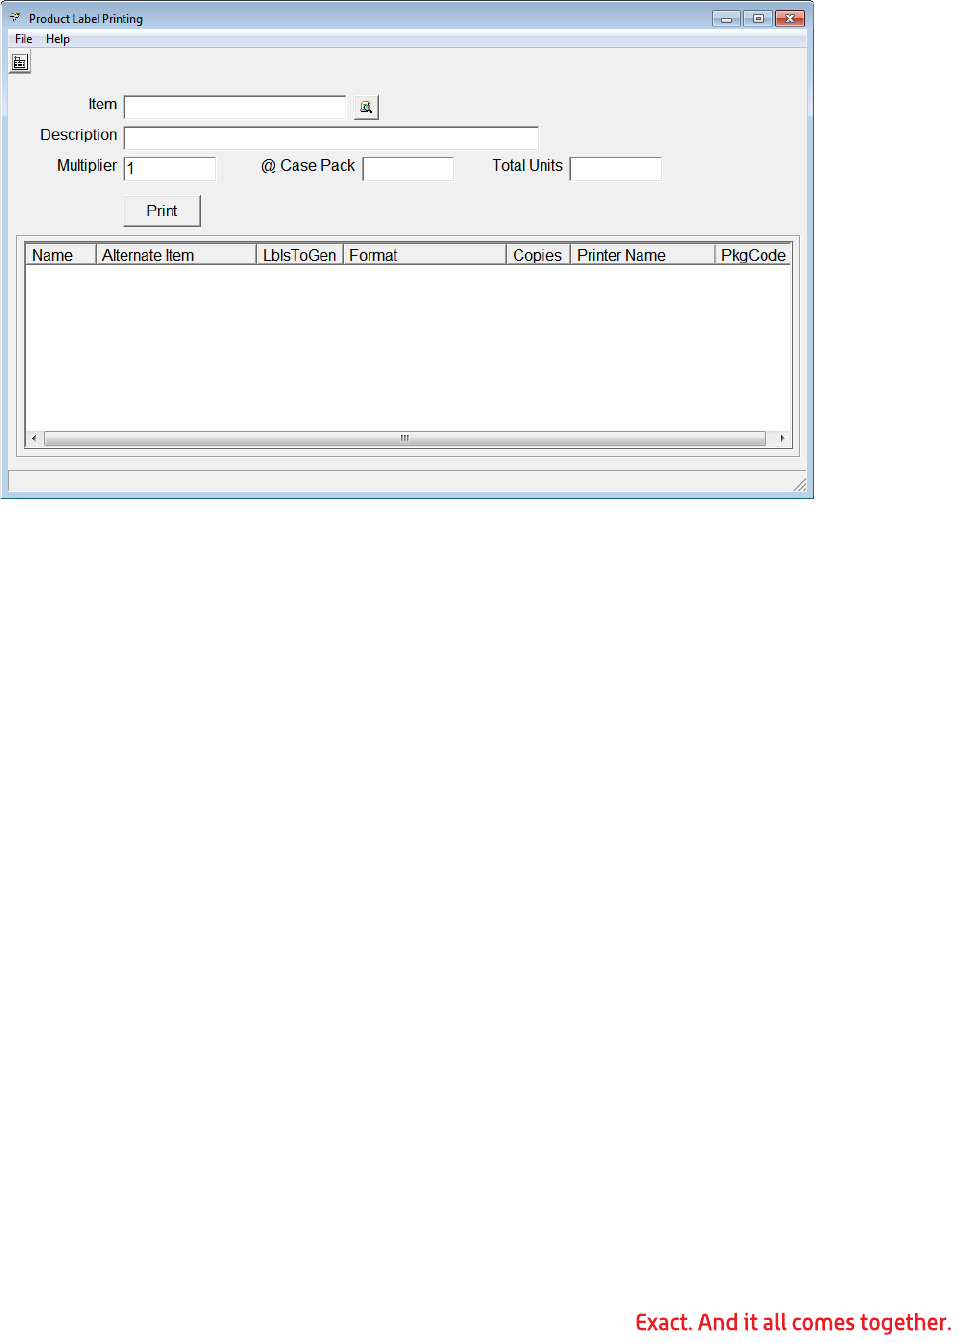
159
1. In Exact Macola ES, on the BOM & IM menu, under the Inventory Management
heading, select Print WMS Product Labels. The Product Label Printing screen opens.
2. Item: Scan the item ID or type it. WMS displays the item description in addition to
the product label configuration.
3. The Item Units field displays the number of units of the Macola item. If you entered
the Macola item number in the Item field, Item Units displays 1. If you entered the
item’s alternate ID, the Item Units field equals the WMS Bulk Weight Maintenance
Items Per Pack field. For example, if you entered the UCC-14 case code, the Item
Units field displays the item's case pack, or the number of stocking units in the car-
ton.
4. The Multiplier field defaults to 1, but can be overridden by entering the quantity of
the item for which you need to print labels, based on the Item Units field. For
example, if you entered a UCC-14 case code representing a 4-pack of the item,
enter the number of 4-packs for which you need labels. If you entered the Macola
item number, however, enter the number of individual stocking units of the item.
WMS multiplies the value in the Multiplier field by the value in the Item Units field
to determine the total quantity of the item for which to print labels.
5. The label configuration list box indicates the labels that are generated based on the
total quantity and the rules defined for each level in Label Configuration. For each
level, WMS divides the total item quantity by the level's quantity per, as defined in
the WMS Bulk Weight Maintenance Items Per Pack field for that level, to determine
the number of product labels to print. The number of labels to be printed for each
level is displayed in the LblToGen column.
6. To edit the label configuration for a level, double-click the level. WMS displays the
label configuration editor for that level. See “Label Configuration” on page 44 for
more information about defining label configurations.
7. Click the Print button. Labels are printed for any levels with the check box in the
Name column selected.

160
Verifying what is Open on a Purchase Order
There are several ways to display a verification screen for a purchase order. WMS auto-
matically displays a verification screen when a user finishes processing receipts and
escapes out of the purchase order. See “Processing a Receipt Against a Purchase Order”
on page 156 for more information.
During receiving, you can request a PO verification screen by pressing the F7 key in either
the Mlt or Itm field.
You can also use the following steps to verify a PO without having to enter receipts.
1. Log in to WMS on an RF handheld device.
2. Select Receiving, and then select Verify P/O.
161
3. PO: Type the purchase order number to verify.
4. RLS: If this is a release against a blanket PO, type the release number.
5. If the vendor has been configured to print a warehouse PO scan sheet, WMS prints
it at this time.
6. WMS displays a list of items for the PO which currently are not fully received.
7. Press the up and down arrow keys to scroll through the list.
8. After reviewing the list, press the Escape or CLR key on the RF device to exit.
162
Chapter 10: WMS Production Order Transactions
Entering Production for a Production Order
The WMS production function allows you to enter production for released production
orders on an RF device.
1. Log on to WMS on an RF handheld device.
2. Select Production.
3. Bin: If Receive to Staging Bin is activated in the WMS control file, WMS prompts
for a bin. Type the bin for the production.
4. Ord: Type the production order number.
5. Itm: WMS displays the item number for this order.
6. Qty: Type the quantity produced.
7. Order Complete: Type Y in the Order Complete field if the order is complete; type
N if the order is not complete.
8. If there is a lotted or serialized component in the parent item, WMS prompts for
the lot or serial information.
9. If the item is a binned item, WMS prompts for the bin information.
10.WMS returns to the Ord field for the next production transaction. Enter the next
transaction, or press Escape or CLR to return to the WMS System menu.

163
Chapter 11: WMS Shop Floor Transactions
Issuing Material to a Shop Order
1. Log on to WMS on an RF handheld device.
2. Select Shop Floor, and then select SFC Material.
164
3. Ord: Type the SFC order number.
4. Pth: If prompted, type the path.
5. Mlt: To enter a quantity for the item, press F4, and type the quantity.
6. Itm: Type the item number.
7. If the item is lotted or serialized, WMS prompts for the lot or serial number. If you
typed a quantity in the Mlt field, enter serial numbers for the entire quantity.
8. WMS returns to the Ord field for the next material issue. Continue issuing material
for the shop order, or press Escape or CLR to return to the WMS System menu.
Entering Activity for a Shop Order
1. Log on to WMS on an RF handheld device.
2. Select Shop Floor, and then select SFC Activity.
165
3. Bin: If prompted, type the bin number. This bin number is the default for subse-
quent activity transactions until you close the SFC Activity screen.
4. Ord: Type the order number.
5. Pth: If prompted, type the path number.
6. Opr: Type the operation number.
7. Dpt: If prompted, type the department number. Press the F7 key to search for a
department number. (For F7 to work, Override Department must be selected on
the WMS Control File Maintenance screen.)
8. Wct: If prompted, type the work center number. Press the F7 key to search for a
work center number. (For F7 to work, Override Work Center must be selected on
the WMS Control File Maintenance screen.)
9. Hrs: In the Labor section, type the number of labor hours. You cannot enter hours
exceeding 23.5. If you need to enter more than 23.5 hours, enter multiple transac-
tions to split the hours.
10.Emp: Type the employee number. This must be an employee who has been set up
as a manufacturing employee. Press the F7 key to search for the employee.
11.Grd: If prompted, enter the labor grade. Press the F7 key to search for the labor
grade. (For F7 to work, Override Labor Grade must be selected on the WMS Control
File Maintenance screen.)
12.Hrs: If the operation has a machine, type the number of machine hours in the Hrs
field in the Machine section.
13.No: If the operation has a machine, type the machine number in the No field.
14.Cmp: In the Quantities section, type the quantity complete in the Cmp field.
15.Opr Complete: If the operation is complete, type Y in the Opr Complete field; if
not type N.

166
16.Qty: Type the scrap quantity in the Qty field in the Scrap section.
17.Cde: If you entered a scrap quantity, type the scrap code. Press the F7 key to
search for the scrap code.
18.Qty: If the operation is a Y count point operation, type any rejected quantity in the
Qty field in the Rejected section.
19.Rsn: If you entered a rejected quantity, type a reject reason code. Press the F7
key to search for the scrap reason code.
20.NCM: If you entered a rejected quantity, type a non-conforming material location
in the NCM field. Press the F7 key to search for the NCM location.
21.Itm: If you entered a rejected quantity, type the reject item number in the Itm
field.
22.WMS returns to the Ord field to process the next activity transaction. Continue pro-
cessing transactions. Press Escape or CLR to return to the WMS System menu
when done.
Returning Material
1. Log in to WMS on an RF handheld device.
2. Select Shop Floor, and then select SFC Material.
3. Ord: Type the SFC order number.
4. Pth: If prompted, type the path.
5. Mlt: Type a negative quantity in the Mlt field.
6. Itm: Type the item number in the Itm field.
7. If the item is lotted or serialized, WMS prompts for the lot or serial number. If you
typed a negative quantity in the Mlt field, you need to enter serial numbers for the
entire quantity.
8. WMS returns to the Ord field for the next material issue or return. Continue issuing
or returning material for the shop order, or press Escape or CLR to return to the
WMS System menu.

167
Chapter 12: WMS Reports
Supplied Reports
The following reports are included with WMS:
_wmsBillingBinVerification.rpt: A Crystal report that lists any bins, serial items, or lot
items that would result in a negative quantity if the current billing was processed. These
errors should be corrected before proceeding with billing.
_wmsBillingOrder.rpt: A Crystal report that lists the orders and items that would be
billed by updating Exact Macola ES with the current billing information.
_wmsBolTare.rpt: A Crystal report designed to work with the standard bill of lading
form. (Form Number 3S 728, 728 or LS 728 available from the Exact Forms Department)
This report is designed to calculate based on pallets.
_wmsBolVics.rpt: A Crystal report that prints the standard VICs compliant bill of lading.
It requires the VICS preprocess program wms224.exe be executed before printing. The
ship via reports entry should be made with the Report field set as wms224, Type = Visual
Basic, Parameters should be blank. Printer and Copies are needed.
_wmsEDIDiagnostic.rpt: A Crystal report that is a diagnostic report designed to assist
technical support in troubleshooting problems that may occur during ASN generation.
Refer to WMS EDI/ASN Diagnostic Report for more information.
_wmsEPNStagePack.rpt: A Crystal report that is used in conjunction with a stage pack
at a packing station. It details, for this stage pack, what items are needed for each order.
_wmsPOScan.rpt: A Crystal report that prints a PO scan sheet.
_wmsPostPickAudit.rpt: A Crystal report that is used to print an audit report is there
are any exceptions caused by re-releasing orders with Post Pick Ticket Processing.
_wmsBolVicsWalm.rpt: A Crystal report that prints the Wal-Mart variation on the VICS
compliant Bill of Lading. It requires the VICS preprocess program wms224.exe be exe-
cuted before printing.
Interface to User Created Reports
Users can create their own reports for the Bill of Lading module. The interface can process
reports that are written using either Crystal Reports or Visual Basic.
Crystal Reports
Crystal Reports must be created to accept the bill of lading number as Parameter 0. The
parameter field must be created with the name bol_num.
The program sets the printer device, driver and port, and the number of copies to print
based on the ship via report entries and the currently active INI file.
Note: If the printer name is Preview, the system automatically forces Crystal to display
the report to the screen.
Visual Basic
When launching Visual Basic programs, the system uses command line options to pass
information to the called program. The following details the information provided in the
command line that must be parsed in the Visual Basic application.

168
/INI= <iniFileSpec>: INI filename and location
/BOL= <Bol Number>: Bill of lading (shipment) number to print
/PRINTER= <Printer Name>: The printer to print the report to
/COPIES= <Number of Copies>: The number of copies desired
Any options specified in the Parameters field of Ship Via Report Maintenance follow the
data path.

169
Chapter 13: WMS Inquiry
One of the most powerful features of the Warehouse Management System is the WMS
Inquiry. This is invaluable to shipping managers and personnel who need to review the
status of a shipment.
WMS Inquiry provides five views into the shipping system data. All views have a similar
format with an expandable tree view on the left and detailed information on the right.
Navigate among the available views by clicking View on the WMS Inquiry menu.
1. The PO/Order/Carton/Item view groups orders with the same customer and pur-
chase order number. This is commonly used when customers send EDI orders with
the same PO number for many stores. This view gives the shipping manager an
overview of the entire PO.
2. The Order/Carton/Item view is used to see the cartons that have been packed for a
specific order.
3. The Label/Pallet/Carton/Item view is used to determine what a specific UCC-128
label was used for. This is useful if a box is found in the warehouse with a label, but
no one knows what it was packed for.
4. The Shipment/Pallet/Carton view is used to see all pallets and cartons that have
been packed.
5. The Order/Shipment/Pallet/Carton/Item view is used to see all shipments for an
order, including the pallets and cartons on each shipment.
WMS Inquiry can be accessed from anywhere within WMS by clicking the telescope
button on the toolbar.
Inquiry by Order/Carton/Item
Click the order number in the tree to display summary line item information in the Order
Details section of the screen. Click an item to display detailed information about that item.

170
The inquiry uses color to provide easy visual identification of an item’s status. If an item
number is displayed in blue, that item is under shipped or not fully packed. An item num-
ber displayed in red is currently over shipped. If an item number is displayed in black, it
has been completely packed as ordered.

171
Appendix A: WMS and EDI Distribution Center Setup
This section describes the file settings that must be in place for WMS to correctly process
distribution centers for Exact Macola ES store orders. When using parent/child relation-
ships, all entries use the parent customer number.
DC Setup and the Customer Override File
If a customer override exists for the customer, the Distribution Center Qualifier field typi-
cally should be blank. If a value is entered in this field, WMS assumes that it can deter-
mine the distribution center from the EDI purchase order. Otherwise, WMS uses the Exact
Macola ES A/R customer delivery address and EDI ship-to cross-references entries for the
stores and distribution center to find the addresses and IDs to use when printing labels.
DC Setup and the A/R Customer Delivery Address
An A/R delivery address must exist for each store and each distribution center. For exam-
ple, if customer KMAR001 has three stores and one distribution center, it must have four
A/R alternate addresses, one for the DC (distribution center) and one for each store.
Delivery addresses work like alternate addresses in Progression SQL. You can use these
addresses as alternate ship to addresses for O/E orders. Each delivery address is linked to
an inventory location that can be different from the default location specified for the cus-
tomer. You must define a unique contact on the Contact Persons tab for each unique deliv-
ery address.
1. In Exact Macola ES, on the A/R menu, under the Customers heading, click Main-
tain. This open a browser showing a list of customer.
2. Select the customer to open and click Open. This opens the Maintain Customers
screen.
3. Click the Addresses tab.
4. Click the New button to the right of the list box. The Type search screen opens.
5. Select Delivery and click the Select button. The Addresses screen opens.
6. Select the Contact person for the new Delivery address. Press the F7 key or click
the Search button to search for existing customer contacts.
Note: If a delivery address already exists for this contact, Exact Macola ES does not allow
you to add a new address for the same contact. When you attempt to save the address,
Exact Macola ES displays “Data already exists”.
7. Copy: Visit. Addr.: This check box controls if the delivery address contains the
same information as the main visit address. If you want to enter different street,
city, and state information for the delivery address, clear the Copy: Visit. Addr.
check box and continue to the next step. If you want the delivery address to match
the information from the main visit address, select this check box and skip to step
14.
8. Address 1, Address 2, Address 3 fields, enter the street address portion of the
delivery address.
9. City: Enter the city of the address.

172
10.State: Enter the state of the address. Click the Search button, or press the F7 key
to search for existing states.
11.Zip Code: Enter the zip code for the address.
12.Country: Enter the Country for the address. Press the F7 key, or click the Search
button for existing countries.
13.Phone/Fax: Enter the phone and fax numbers for the address.
14.Location: Enter an inventory location to associate with this address.
Exact Macola ES uses the inventory location entered here as the default shipping
location when entering O/E orders for this customer to this address. You can
change the default location when you enter orders in O/E.
For example, you have several branches or outlets for your products that are
widely separated in distance, perhaps even in different states. When orders come
in from a customer, they are usually filled from only one of these outlets. So, if you
have two locations from which an item can be sold, one in Los Angeles and one in
New York, and the customer is located in New York, the order is going to be filled
from your New York warehouse. During the entry of the customer's order, when-
ever a stock item is being ordered, Exact Macola ES verifies that the item is actu-
ally stocked in the customer’s ordering location and that there is sufficient stock of
the item at that location to fill the order.
15.Address Code: Enter the Address Code for the address. This field is used to iden-
tify the address in the alternate address search screen. This can be the same code
that the customer uses for the location, or a code that you assign. You may wish to
include the Contact name in this code, as it allows users to determine existing con-
tact delivery addresses from the search.
16.FOB: Enter the FOB code for the address. Press the F7 key, or click the Search
button to search for existing FOB codes.
17.Ship Via: Enter the Ship Via code for the address. Press the F7 key, or click the
Search button to search for existing Ship Via codes.
18.UPS Zone: If you ship to this address using UPS, enter the UPS Zone for the
address.
19.Tax Schedule or Tax Code: You must enter either a Tax Schedule or a Tax Code
for each delivery address. If you are using tax codes, you can enter up to three tax
detail codes. Press the F7 key, or click the Search button to search for existing tax
schedules or tax detail codes.
20.Salesperson Number: Enter the Salesperson Number for the salesperson respon-
sible for the customer account. Press the F7 key, or click the Search button to
search for existing salespeople.
21.Click Save to save the record. If you receive the message “Data already exists”,
then a delivery address already exists for the selected Contact. You can change the
contact to one who does not have an associated delivery address, or return to the
Addresses tab screen and edit the existing delivery address for the desired contact.
DC Setup and the EDI Ship-To Cross-Reference
The EDI ship-to cross-reference defines the relationship between the ID that a customer
uses for a store or distribution center and the Exact Macola ES A/R customer delivery
address ID for that location. It also defines the distribution center that services a store. An
EDI ship-to cross-reference is required for each store and distribution center.
173
EDI Ship-To Cross-Reference
1. In Exact Macola ES, on the EDI & BC menu, under the Maintain heading, select
Ship Via.
2. In the EDI Ship-To Code field, type the customer’s ID for this location. This infor-
mation is found in either the fourth element of the N1 segment or in the SDQ seg-
ment of the EDI purchase order.
3. Type the Exact Macola ES A/R customer number in the Customer No field. This
must match the customer number specified in the EDI Trading Partner cross-refer-
ence.
4. If you have selected Each Store Mode=C in the EDI trading partner cross-refer-
ence, enter the Exact Macola ES A/R child customer number for this location in the
Ship-To Child Cust No field. If you have selected Each Store Mode=N in the EDI
trading partner cross-reference, this field is disabled.
5. In the Macola Ship-To Code field, type the Exact Macola ES A/R customer delivery
address ID for this location.
6. In the Alt Location Qualifier field, type DB if this cross-reference is for a store. If
this cross-reference is for a distribution center, leave this field blank.
7. In the Alternate Location field, type the distribution center number for this store. If
this cross-reference is for a DC, leave this field blank.
When a label is printed for the store, WMS uses the alternate location listed in the store’s
EDI ship-to cross-reference to find the EDI ship-to cross-reference for the DC. Then, WMS
uses the DC’s EDI ship-to cross-reference to find the A/R customer delivery address entry
for the DC so it can print the distribution center address in the ship to section of the label.
WMS uses the individual store’s address in the mark for section of the label, if required.

174
Appendix B: WMS File Maintenance
As orders and shipments are processed in WMS, data is written to various tables in the
database. Over time, these tables can become large, degrading performance. Setting up a
regular maintenance schedule to purge WMS related files can help prevent performance
issues. As with any system maintenance, these steps should be performed only after com-
pleting and verifying a full system backup.
WMS Purge Utility
The WMS Purge Utility purges the following files:
• OEPCKHDR: WMS Pack Header
• OEPCKLIN: Pack Line
• OESHPTBS: Bin Serial Lot
•OESHPTCL: Carton
• OESHPTCW: Catch Weight
•OESHPTIL: Item
• OESHPTSL: Shipment Transaction Shipment
•OESHPTTL: Pallet
•SSEPNHDR: EPN header
• SSEPNLIN: EPN line file
• SSEPNORD: EPN order file
•SSEPNPACK: EPN Pack file
• SSEPNRCO: EPN recommendation file
• SSPACKLANE: EPN conveyor pack file (Not used at all sites; only those who use
conveyor packing use this file)
Follow these steps to open the purge utility:
1. Open Exact Macola ES.
2. On the System menu, under the Utilities heading, select Distribution, WMS, Purge
Utility Program.
3. Purge Activity On and Before: Enter a date.
4. Click the Purge button.
The data is purged based on the date you enter. If the date specified is less than one year
old, a warning message is displayed asking you to verify that you want to purge the data.
Once you purge, that historical data is lost and can be retrieved only by restoring it from a
backup. You should never enter a date that would purge active shipments.
Manually Purging WMS Files
In addition to running the WMS purge utility, the OEBOLWRK table and VICS BOL table
need to be purged periodically. These tables are not cleared by the WMS purge utility and
must be manually initialized. To purge these tables, the following tables must be initialized
in Microsoft SQL Enterprise Manager:

175
• OEBOLWRK: Bill of Lading Processing File
• EDVICSHD: VICs BOL Header File
• EDVICSL1: VICs BOL Sub 1
• EDVICSL2: VICs BOL Sub 2
Refer to the Microsoft SQL Enterprise Manager online Help for information about initializ-
ing tables.
In addition to manually purging the tables listed above, the WMS log files should periodi-
cally be deleted or archived to a backup disk. The log files are located in the Log directory
in the WMS root.
•wmsTrace.log: contains information about WMS processing, including processing
time
•Err.log: all error messages that occur during WMS processing are written to this
file
•RF transaction logs: contain information about processes performed on RF guns.
The log filename is the end of the IP address, with a .LOG extension.
Purging the EDI Barcode Holding Interface File
If you are using the Exact Macola ES EDI ASN sub-module and EDI Barcode Holding Inter-
face sub-module, WMS writes shipment information to a table called EDBBCIFL. The ASN
creation process can then access the data in this table to return shipment related informa-
tion to the customer on the ASN. Over time, this table can become very large, degrading
ASN creation performance. Although no purge function exists in Exact Macola ES EDI or
WMS for maintenance of the EDBBCIFL EDI Barcode Interface file, it can be purged by ini-
tializing the table in System Manager.
Warning: You should have a full, verified system backup before completing these
steps. All users must be out of ASN creation and WMS shipment completion when
initializing the table. Therefore, it is recommended to perform this procedure
after completing all shipments and sending all ASNs for the day.
1. Open Exact Macola ES.
2. On the System menu, under the Company heading, select Table List.
3. Find and select the edbbcifl_sql EDI Bar Code Interface File row in the table.
4. Click the Delete All button.
Note: If there are no records in the table, the Delete All button is not displayed.
5. A message is displayed asking you to confirm that you want to delete the records.
Click Yes to initialize the file.
You now have an empty EDBBCIFL table to be used to generate new ASNs. If you need to
recreate an ASN, reopen the shipment in WMS, and then complete it again. The EDBBCIFL
records for that shipment are recreated.

176
Clearing Device Licenses
Open the Control File Maintenance screen. To view device licenses, click Help on the WMS
menu, and then click About. Click the Modules button. On the Registered Modules window,
click the Devices Currently In Use tab to view the number of devices in use in addition to
a list of the devices.
To clear the devices, click File on the WMS Control File Maintenance menu bar, and then
click Clear Device Licenses. All devices are reset and reconnects when they next log in to
WMS. If devices are logged in when you clear the devices licenses, they automatically
reconnect with the next transaction that they perform.

177
Appendix C: Troubleshooting
This section describes how to resolve the most common problems that occur in WMS. If
this section does not provide the solution to your problem, please contact your WMS sup-
port provider. Please note that the System Diagnostic Tool often helps your support tech-
nician assist you more effectively.
WMS Help/About Options
In addition to displaying the version of WMS installed, selecting Help and then clicking
About on a WMS screen gives access to several advanced troubleshooting tools. These are
typically used by support technicians to help you resolve problems.
WMS Help/About System Info
WMS System Info displays information about your system configuration that can be used
to troubleshoot problems.
1. On any WMS program screen, select Help from the menu bar, and then click About.
2. Click System Info.
3. WMS displays the Microsoft System Info window, which can be used to determine
your system configuration.
WMS Help/About Modules
The Modules button displays information about the WMS modules registered and the
device licenses in use.
1. On any WMS program screen, select Help from the menu bar, and then click About.
2. Click Modules.
3. The Modules tab lists all WMS modules and whether they are registered in this
installation.
4. The Devices Currently in Use tab displays the total number of WMS device licenses
in use and the name of the device using each license. See Clearing Device Licenses
for information about clearing the device licenses currently in use.
WMS Help/About Components
The Components button displays information about the program components used by
WMS. This information can be used to verify that you have the correct version of each
component installed, as well as where the file is located.
1. On any WMS program screen, select Help from the menu bar, and then click About.
2. Click Components.
3. WMS lists the path to each WMS component file, the version of the component
found, and the version of the component expected.
WMS Help/About Diagnostic
The Diagnostic button creates a report that support technicians can use to troubleshoot a
variety of problems.
1. On any WMS program screen, select Help from the menu bar, and then click About.
2. Click Diagnostic.

178
3. Specify a name for the diagnostic file and the location in which to save it.
4. WMS creates the diagnostic file, and then returns to the main WMS Help/About
screen.
WMS Help/About On-Line Support
At times support technicians might need to remotely access your computer to resolve a
problem you are having. WMS On-Line Support provides an easy way for them to do that
using Webex remote access.
1. On any WMS program screen, select Help from the menu bar, and then click About.
2. Click On-Line Support.
3. Enter the meeting ID provided by the support technician working with you, and
then click OK.
WMS Help/About Resolution
WMS checks a variety of Exact Macola ES files for item information. For example, if you
enter an item’s alternate ID when printing product labels, WMS checks the EDI item cross-
reference, OE customer item entry, WMS bulk weight entry, and IM item master record to
determine which type of item number you entered and find the relevant information about
that item. The WMS Resolution utility allows support technicians to determine how the
data you entered is being resolved, so they can pinpoint which setup needs to be cor-
rected when troubleshooting a problem.
1. On any WMS program screen, select Help from the menu bar, and then click About.
2. Click Resolution.
3. WMS displays the resolution information about the processes you have been per-
forming.
4. To clear the resolution information, click the Clear button. You can then perform
the problem process again, and WMS displays only the resolution information
about that individual process.
WMS EDI / ASN Diagnostic Report
WMS provides a diagnostic report designed to assist technical support in troubleshooting
problems during ASN generation. The report generates a listing of the information being
passed into Exact Macola ES from WMS. Providing this information allows your technical
support provider to determine where the problem is occurring and provides information
helpful in isolating the cause of the problem.
To print this report, select File from the WMS menu while in Pack Shipments or Pack Car-
tons. Click WMS EDI/ASN Diagnostic Report. Type the bill of lading number for the ship-
ment that is not processing correctly. A report containing all interface records is printed to
the screen. Either print the report or export it to a Microsoft Word file by clicking the
Export toolbar button, and then selecting Word as the file type.
Post Pick Ticket Process Trace Tool
The post pick ticket process program can generate a trace file designed to assist technical
support with troubleshooting problems with releasing orders, as well as tracking problems
with distribution center processing. To generate a trace file, select the Help, Trace Mode
option from post pick ticket processing before processing the order. Then process the

179
order normally. A file called WMSTrace.Log is created in the Exact Macola ES root direc-
tory.
WMS Update Utility
After updating Exact Macola ES, you must run the WMS Update Utility to determine if any
files need to be converted.
1. Open Exact Macola ES.
2. On the System menu, under the Utilities heading, select General, WMS File Utili-
ties.
3. Click the Start Update Process button.
4. WMS validates the WMS data directory and each individual file.
5. WMS validates each file and rebuild any that need to be rebuilt.
6. When complete, a log of what WMS has done is displayed.
Note: If necessary, you can also set the WMS root on this screen by clicking the Set WMS
Root button. Browse to the Exact Macola ES WMS root directory, and then click Open.
Troubleshooting FAQ
The following section discusses a number of common setup problems and the resolutions
for them.
Error 429 or 339 when running WMS program from Exact Macola ES menu
On some workstations, I am receiving an error 429 or 339 when I run a WMS program
from the Exact Macola ES menu.
The WMS programs are external to Exact Macola ES and require a number of Windows
controls that are not used by Exact Macola ES to be registered. The workstation setup pro-
gram must be run on any workstation that is going to run WMS. Running the workstation
install should update your Windows controls and allow the workstation to execute the
WMS programs. See your installation or upgrade manual for information about the work-
station setup program.
WMS program appears to hang at splash screen
When I run the main WMS program, the splash screen is displayed and the program
appears to hang.
WMS may have displayed an error message that is being completely hidden by the splash
screen. To determine if this is the case, modify the properties of the WMS desktop short-
cut. At the end of the current command in the Target field, add /NOSPLASH. This instructs
WMS not to display the splash screen at startup. If an error is being displayed, you will be
able to see it. Once the error is corrected, the program should begin to launch correctly.
Using BarTender, some carton labels print multiple copies
I am using the BarTender interface and when I print a carton label for a specific format, I
get multiple copies.
When the BarTender label format is created the number of copies can be specified in print
options. Use the full version of BarTender to open the format and change the number of
copies. Then save the format. This should correct this problem.

180
Department number missing from label
When I print the label, the department number is missing.
WMS uses the EDI capture file (EDCCAPFL) to determine if the department number was
sent in a REF segment. By selecting Use as Dept Qualifier in the Customer Override File
Department field and specifying a qualifier value of DP, WMS searches the EDI capture file
for a matching REF segment and return the associated department number on the label.
The PO number on the O/E order must match the PO number in the EDI capture file. If the
PO number on the order was changed, WMS cannot find the corresponding entry in the
EDI capture file. If the EDI capture file was purged or initialized after the O/E order was
created, WMS cannot find the department number.
If the department number is a constant value for the customer, Use as Fixed Dept can be
activated in the customer override. The value specified in the department number field is
used when printing the label.
If the setups above have been verified and the department number still does not print,
check External Label Maintenance to confirm that the Department Number field is shared
with BarTender. The share name in the label configuration is DEPT_NUMBER.
Error #3021
ERROR #3021 EITHER BOF OR EOF IS TRUE, OR THE CURRENT RECORD HAS BEEN
DELETED. REQUESTED OPERATION REQUIRES A CURRENT
OEWMSCTLW_C_PV_IMMED_AB SOURCELINE#20075
The WMS File Update needs to be run. Open Exact Macola ES, click the System menu,
under the Utilities heading, select General, WMS File Utilities. Click the Start Update but-
ton to update the WMS files.
Error #53 file not found
This error is returned if the value in the WMS control file the ODB Generations field is
lower than the number of the ODB file the system is trying to create. Creating the file
would exceed the number of ODB files that you have specified be saved. To correct this
problem, increase the value in the ODB Generations field. The maximum value for this
field is 999. Specifying a number higher than 999 in the WMS control file results in an
Error 6 Overflow.
Error #88 Incompatible mode
I get an error 88 Incompatible mode after clicking Start Update Process in WMS File Util-
ity.
WMS has encountered a lock by a workstation or by a gun. Make sure everyone is logged
out, including RF guns and workstations. This is not a registration error.
Error cannot connect to Macola database
When I try to log in to WMS, I get a Cannot Connect to Macola Database error.
Verify that your user name and password are set up in WMS Security Maintenance and
that your user has been granted access to the WMS functions.
Error exceeded allowable licenses
I am running the WMS Device Registration, and I now get an error that we have exceeded
our allowable licenses. We cannot determine what devices are consuming the registration.
How can I tell what devices are running?

181
Open the Control File Maintenance screen. To view device licenses, click Help on the WMS
menu, and then click About. Click the Modules button. On the Registered Modules window,
click the Devices Currently In Use tab to view the number of devices in use in addition to
a list of the devices.
To clear the devices, click File on the WMS Control File Maintenance menu bar, and then
click Clear Device Licenses. All devices are reset and reconnects when they next log in to
WMS. If devices are logged in when you clear the devices licenses, they automatically
reconnect with the next transaction that they perform.
Error Invalid File Name 20507
I get an Invalid File Name 20507 error when printing the BOL.
This message indicates a problem with the ship via reports record for this shipment. WMS
is trying to print a Crystal Report or VB program and cannot find it. Verify the report
name, parameters path, and that the report is located in the \wmsroot\CRW directory.
Check these for both the customer specific report and the default report for the carrier
listed on shipment in WMS.
If the customer is Wal-Mart, the parameters path must be set as Parameters = /R=
BOL_WALM /B= 5,5,19,19.
Runtime error 374
I just upgraded WMS. When I try to start WMS now, I get a runtime error 374 Failed to
activate control 'VB.Usercontrol'.
The SQLBX.OCX file is missing from the Bin directory on the workstation. Search the
workstation for SQLBX.OCX. More than one copy of the file might exist on the computer.
Copy the SQLBX.OCX to the Bin directory, and then register it. Depending on the version
of Windows installed on the workstation, it might also be necessary to reboot after regis-
tering the OCX file.
Weight calculation mis-match
The weight calculation in WMS does not seem to match the weight on the O/E order.
The weight in Order Entry is calculated using the item weight that was in Item Master at
the time that the order was created. This is true for both manually entered orders and
orders integrated by the EDI module.
The weight in WMS is calculated using the item weight listed in Item Master at the time
that the shipment is completed. If the item weight is changed in I/M after the order is cre-
ated but before the shipment is completed, WMS uses the new item weight.
ASNs created by the EDI module can return either the O/E order weight or the weight cal-
culated by WMS, depending on whether the ASN format is designed to pull the weight
from the O/E header file or from the EDI Barcode Holding file. The bulk weight cross-refer-
ence Pack Weight and Tare Weight fields are not used by ASN formats. If the correct
weight is calculated in WMS but not returned on the ASN, please contact EDI support for
assistance.
Error action cannot be completed
I get an error that the action cannot be completed because other application is busy.
WMS returns this error because BarTender has generated an error; however, the Bar-
Tender error message window is not visible on the screen. To make the BarTender error
visible, edit the properties of the WMS startup icon and add /btvisible to the command line
for wms100.exe. This allows you to toggle and see the BarTender message so you can

182
troubleshoot the problem with that application. Contact Seagull Scientific support at 425-
641-1408 for assistance with correcting the BarTender error.
BOL# not found OEBOLWRK message
WMS BOL# not found OEBOLWRK message during a WMS Inquiry
This error is returned if the pallet does not show as attached to the shipment in the ship-
ment/pallet/carton view in WMS Inquiry. To correct this error, initialize the OEBOLWRK file.
This is a work file and no loss of data occurs.
WMS Error 11_0012- 01
When a given order and carton number are entered by the user, WMS validates that the
order and carton number exist. Error 11_0012-01 “Order Number is not Authorized to
Ship” is returned when there is no carton that exists for that order, or no such order exists
in that carton.
You can also get this error if you fail to run the WMS post pick ticket process.
WMS Error No DDF Location Specified
The WMS .INI file is in a directory with a name longer than eight characters. The WMS
Inquiry does not support long file names. Place the .INI file in a directory with a name that
has eight or fewer characters, with no spaces. Right-click the WMS desktop icon and select
Properties. Change the command line path to the new location of the .INI file by adding /
ini=<file path>.
After purge, EDBBCIFL file still large
I ran the WMS Purge Utility, but my EDBBCIFL file is still large.
The EDBBCIFL EDI Bar Code Interface file is not purged by this process. Use the steps in
WMS File Maintenance to purge the EDBBCIFL file.

183
Appendix D: EDI File Usage
This section indicates the file and field usage of the Exact Macola ES EDI module when
used with WMS. Any field not mentioned is not used by WMS and should be set according
to the Exact Macola ES EDI user manual.
ASN Bulk Weight Cross-Reference
WMS uses this file to determine the items per pack in autopack mode, as follows:
1. Pick ticket is printed for the item.
2. If an EDI item cross-reference record exists for the customer and item being pro-
cessed, and the Package Code field is populated, the item level record for this
item-package code combination is used to determine the items per pack.
3. Otherwise, the default package code is used to determine the items per pack.
WMS uses this file to allow scanning and cross-referencing of any type of code to a
Exact Macola ES item number.
4. Populate the Alternate Item Number field with the code to be cross-referenced.
•UPC
• UCC-14 (I-205)
5. Populate the Alternate Item Qualifier field to indicate what type of code is being
used.
•UP = UPC
• UC = UCC-14 (I-205)
ASN Package Code Cross-Reference
At least one “S” package code type record must be specified.
• CTN25 = cardboard box
• PLT94 = wooden pallet
The most common “S” record should be set as default.
At least one “I” package code type record must be specified to use the ASN bulk weight
cross-reference.
If using auto-pack, one “I” package code type record must be set as default.
EDI Item Cross-Reference
If a Packaging Code is specified, the post pick ticket processing program uses it in auto-
pack mode to find the bulk weight file record to use in determining the quantity per pack.
For all other fields, refer to the EDFORMAT.TXT file included on the Exact Macola ES EDI
Trading Partner CD.
EDI Misc Charge Code Cross-Reference
Refer to the EDFORMAT.TXT file included on the Exact Macola ES EDI Trading Partner CD.

184
EDI Setup File
1 ASN/Order?: This check box should be cleared
1 ASN/BOL: This check box should be selected
ASN Module: This check box must be selected (This is controlled by a Exact Macola ES
EDI registration file)
Bar Code Holding File?: This check box must be selected (This is controlled by a Exact
Macola ES EDI registration file.)
EDI Ship-To Cross-Reference
For detailed information about distribution center settings, see “Appendix A: WMS and EDI
Distribution Center Setup” on page 171.
To associate a distribution center with a store:
1. Create an EDI ship-to cross-reference for the store:
a. Type the trading partner’s code for the store in the EDI Ship-To Code field.
b. Type the Exact Macola ES A/R customer ID in the Cust No field.
c. Type the Exact Macola ES A/R customer delivery address ID for the store in the
Macola Ship-To Code field.
d. Type DB in the Alt Location Qualifier field.
e. Type the trading partner’s code for the distribution center in the Alternate Loca-
tion field.
f. For all other fields, refer to the EDFORMAT.TXT file included on the Exact Macola
ES EDI Trading Partner CD.
2. Create an EDI ship-to cross-reference for the D/C:
a. Type the trading partner’s code for the distribution center in the EDI Ship-To
Code field.
b. Type the Exact Macola ES A/R customer ID in the Cust No field.
c. Type the Exact Macola ES A/R customer delivery address for the D/C in the
Macola Ship-To Code field.
d. For all other fields, refer to the EDFORMAT.TXT file included on the Exact Macola
ES EDI Trading Partner CD.
EDI Ship Via Cross-Reference
Refer to the EDFORMAT.TXT file included on the Exact Macola ES EDI Trading Partner CD.
EDI Trading Partner Cross-Reference
WMS uses the 856 check box to determine if it needs to write to the EDI Bar Code Holding
interface file for ASN creation.
On the Outbound Options tab, Ship To Distribution Center should be activated.
For all other fields, refer to the EDFORMAT.TXT file included on the Exact Macola ES EDI
Trading Partner CD.

185
Appendix E: Program and Command Line Options
This section documents the programs that comprise the Warehouse Management System.
Some of the programs have command line switches that you can used to change the oper-
ation of the program.
File Utilities (Initialize, Import, Export)
Program Details
Name: wms605.exe
Standard Installation Location: \ExactSoftware\Bin
Command Line Options
/MOD= <Mode>: Set program mode to INITIALIZE, IMPORT, EXPORT
PO Vendor Bar Code Definition
Program Details
Name: wms373.exe
Standard Installation Location: \ExactSoftware\Bin
Command Line Options
none
PO Vendor Item Override File Maintenance
Program Details
Name: wms377.exe
Standard Installation Location: \ExactSoftware\Bin
Command Line Options
none
PO Vendor Override
Program Details
Name: wms372.exe
Standard Installation Location: \ExactSoftware\Bin
Command Line Options
none
Post Purchase Order Print Processing
Program Details
Name: wms375.exe
Standard Installation Location: \ExactSoftware\Bin

186
Command Line Options
none
VICS Preprocess Program
Program Details
Name: wms224.exe
Standard Installation Location: \ExactSoftware\Bin
Command Line Options
/BOL= <Bol Number>: Bill of lading (shipment) number to print
/COPIES= <Number of Copies>: The number of copies to print
/PRINTER= <Printer Name>: The printer to print the report to
/DATAPATH= <Path to Data>: The path to the Exact Macola ES database (no DDF
attached)
/SQL: Connect to Exact Macola ES SQL database
/DATABASE= <SQL Database Name>: The name of the Exact Macola ES SQL database
/SERVER= <SQL Server Name>: The name of the Exact Macola ES SQL database server
/USER= <SQL UserName>: The user name to log in to the Exact Macola ES SQL database
/PASS= <SQL Password>: The password to log in to the Exact Macola ES SQL database
/R= <ReportName>: Name of the Crystal Report to run (Optional; if blank assumes
BOL_VICS)
/B= <W,X,Y,Z>: Line count for sections; W = Customer order first page, X = Customer
order other pages, Y = Class order first page, Z = Class order other pages.
/S: Save the data in the VICS work files when completed (used for assisting in modifying
the reports)
WMS Attached Workstation and RF Server Program
Program Details
Name: wms100.exe
Standard Installation Location: \ExactSoftware\Bin
Command Line Options
/SERVER: Start program in server mode
/INI= <path>: Uses specified .INI file in place of WMS.INI
/NOSPLASH: Don’t display the startup splash screen.
/LITE: Force execution of the Pack Verify Only mode
/USER= <UserName>: Ignored unless /SERVER is specified.
/PASSWORD= <Password>: Ignored unless /SERVER is specified.
/BTVISIBLE: If BarTender interface is active, load BarTender as a visible application
instead of as a hidden process.
187
WMS Bill of Lading Type Maintenance
Program Details
Name: wms162.exe
Standard Installation Location: \ExactSoftware\Bin
Command Line Options
none
WMS Bulk Weight Maintenance
Program Details
Name: wms151.exe
Standard Installation Location: \ExactSoftware\Bin
Command Line Options
none
WMS Control File Maintenance
Program Details
Name: wms161.exe
Standard Installation Location: \ExactSoftware\Bin
Command Line Options
none
WMS Customer Override Maintenance
Program Details
Name: wms163.exe
Standard Installation Location: \ExactSoftware\Bin
Command Line Options
none
WMS External Label Tools
Program Details
Name: wms604.exe
Standard Installation Location: \ExactSoftware\Bin
Command Line Options
none
WMS Inquiry
Program Details
Name: wms220.exe
188
Standard Installation Location: \ExactSoftware\Bin
Command Line Options
/Wxxx: Warehouse location
/U<UserName>: Force a user name
/INI<Explicit Path>: Uses specified .INI file in place of SASERVER.INI
WMS Package Code Maintenance
Program Details
Name: wms150.exe
Standard Installation Location: \ExactSoftware\Bin
Command Line Options
none
WMS Post Pick Ticket Processing Program
Program Details
Name: wms602.exe
Standard Installation Location: \ExactSoftware\Bin
Command Line Options
/TRACE: Forces WMS into Trace mode without requiring the user to select from the Help
menu
/REPRINT: Start program in reprint mode
/CLOSE: Start program in Close WMS Orders mode
/ON: Print labels using BarTender from Seagull Scientific
/eltroncharshift: Used with legacy Eltron Direct Printing on windows workstations that cut
the first character off when printing to a generic text printer
/PATH <path>: Location of BarTender formats
/INI= <path>: Location of .INI containing format of case packs and default label printer
/btvisible: Force BarTender to be visible
The following command options are used to automate the release of orders from another
application:
/noprompt: Run without putting up starting prompt screen
/rerelease: Select the re-release check box
/from=: From order number
/to=: To order number
/loc=: Set location
189
WMS Purge Utility
Program Details
Name: wms426.exe
Standard Installation Location: \ExactSoftware\Bin
Command Line Options
none
WMS Security Maintenance
Program Details
Name: wms168.exe
Standard Installation Location: \ExactSoftware\Bin
Command Line Options
none
WMS Ship Via Reports Maintenance
Program Details
Name: wms167.exe
Standard Installation Location: \ExactSoftware\Bin
Command Line Options
none
WMS Workstation Configuration Utility
Program Details
Name: wmscfg.exe
Standard Installation Location: \ExactSoftware\Bin
Command Line Options
none
190
Appendix F: Function Key Usage
WMS uses function keys consistently throughout the warehouse transaction entry func-
tions. The following defines each function key.
•F1 - Help
•F2 - New
•F3 - Launch Inquiry
• F4 - Enter Multiplier
• F5 - Add/Remove Mode Toggle
• F6 - Secondary Mode Toggle (Receipt Entry, toggles Accept / Reject Mode)
•F7 - RF Verify
• F8 - Reprint Label
•F9 - Exit
• F10 - Next Unprocessed Item (RF devices only)
• F11 - Verify / Complete Order (attached workstations only)
• F12 - Verify / Complete Shipment (attached workstations only)
Note: RF guns do not support function keys beyond F10.

191
Appendix G: External Label Field List
This section lists the fields that are available to print on shipping labels. The BarTender
field name must be used as the share name in BarTender for WMS to correctly print the
label.
Table 1: External Label Field List
Field Name BarTender Field Name
Bill of Lading Number BILL_OF_LADING
Order Type ORDER_TYPE
Order Number ORDER_NUMBER
P/O Number PO_NUMBER
Pro Number PRO_NUMBER
Department Number DEPT_NUMBER
Carrier CARRIER
UCC-128 Bar Code UCC128_BAR_CODE
UCC-128 Bar Code Display UCC128_DISPLAY
Warehouse Name WAREHOUSE_NAME
Warehouse Address 1 WAREHOUSE_ADDRESS_1
Warehouse Address 2 WAREHOUSE_ADDRESS_2
Warehouse City WAREHOUSE_CITY
Warehouse State WAREHOUSE_STATE
Warehouse Zip Code WAREHOUSE_ZIP_CODE
Warehouse Country WAREHOUSE_COUNTRY
Bill To Name BILL_TO_NAME
Bill To Address 1 BILL_TO_ADDRESS_1
Bill To Address 2 BILL_TO_ADDRESS_2
Bill To City BILL_TO_CITY
Bill To State BILL_TO_STATE
Bill To Zip 10 BILL_TO_ZIP
Bill To Zip 5 BILL_TO_ZIP_5
Bill To Country BILL_TO_COUNTRY
Ship To Name SHIP_TO_NAME
Ship To Address 1 SHIP_TO_ADDRESS_1
Ship To Address 2 SHIP_TO_ADDRESS_2

192
Ship To City SHIP_TO_CITY
Ship To State SHIP_TO_STATE
Ship To Zip 10 SHIP_TO_ZIP
Ship To Zip 5 SHIP_TO_ZIP_5
Ship To Country SHIP_TO_COUNTRY
Ship To Number SHIP_TO_NUMBER
Mark For Name MARK_FOR_NAME
Mark For Address 1 MARK_FOR_ADDRESS_1
Mark For Address 2 MARK_FOR_ADDRESS_2
Mark For City MARK_FOR_CITY
Mark For State MARK_FOR_STATE
Mark For Zip 10 MARK_FOR_ZIP
Mark For Zip 5 MARK_FOR_ZIP_5
Mark For Country MARK_FOR_COUNTRY
Mark For Number MARK_FOR_NUMBER
Case Pack CASE_PACK
Item Number ITEM_NUMBER
Item Description 1 ITEM_DESC_1
Item Description 2 ITEM_DESC_2
Customer Item Number CUST_ITEM_NUMBER
UPC UPC
Order Carton Number ORDER_CART_NUMBER
O/E Customer Item UDF 1 CUST_ITEM_UDF_1
O/E Customer Item UDF 2 CUST_ITEM_UDF_2
O/E Customer Item UDF 3 CUST_ITEM_UDF_3
O/E Customer Item UDF 4 CUST_ITEM_UDF_4
O/E Customer Item UDF 5 CUST_ITEM_UDF_5
Parent Customer Number PARENT_CUSTOMER
Parent Customer File UDF 1 PARENT_CUST_UDF_1
Parent Customer File UDF 2 PARENT_CUST_UDF_2
Parent Customer File UDF 3 PARENT_CUST_UDF_3
Table 1: External Label Field List
Field Name BarTender Field Name

193
Parent Customer File UDF 4 PARENT_CUST_UDF_4
Parent Customer File UDF 5 PARENT_CUST_UDF_5
Parent Customer File Note 1 PARENT_CUST_NOTE_1
Parent Customer File Note 2 PARENT_CUST_NOTE_2
Parent Customer File Note 3 PARENT_CUST_NOTE_3
Parent Customer File Note 4 PARENT_CUST_NOTE_4
Parent Customer File Note 5 PARENT_CUST_NOTE_5
Child Customer Number CHILD_CUSTOMER
Child Customer File UDF 1 CHILD_CUST_UDF_1
Child Customer File UDF 2 CHILD_CUST_UDF_2
Child Customer File UDF 3 CHILD_CUST_UDF_3
Child Customer File UDF 4 CHILD_CUST_UDF_4
Child Customer File UDF 5 CHILD_CUST_UDF_5
Child Customer File Note 1 CHILD_CUST_NOTE_1
Child Customer File Note 2 CHILD_CUST_NOTE_2
Child Customer File Note 3 CHILD_CUST_NOTE_3
Child Customer File Note 4 CHILD_CUST_NOTE_4
Child Customer File Note 5 CHILD_CUST_NOTE_5
Ship To A/R Alt Address UDF 1 S2_ALT_ADR_UDF_1
Ship To A/R Alt Address UDF 2 S2_ALT_ADR_UDF_2
Ship To A/R Alt Address UDF 3 S2_ALT_ADR_UDF_3
Ship To A/R Alt Address UDF 4 S2_ALT_ADR_UDF_4
Ship To A/R Alt Address UDF 5 S2_ALT_ADR_UDF_5
Mark For A/R Alt Address UDF 1 M4_ALT_ADR_UDF_1
Mark For A/R Alt Address UDF 2 M4_ALT_ADR_UDF_2
Mark For A/R Alt Address UDF 3 M4_ALT_ADR_UDF_3
Mark For A/R Alt Address UDF 4 M4_ALT_ADR_UDF_4
Mark For A/R Alt Address UDF 5 M4_ALT_ADR_UDF_5
Order Header UDF 1 ORDER_HDR_UDF_1
Order Header UDF 2 ORDER_HDR_UDF_2
Order Header UDF 3 ORDER_HDR_UDF_3
Table 1: External Label Field List
Field Name BarTender Field Name
194
Order Header UDF 4 ORDER_HDR_UDF_4
Order Header UDF 5 ORDER_HDR_UDF_5
Line Item UDF 1 ORDER_LINE_UDF_1
Line Item UDF 2 ORDER_LINE_UDF_2
Line Item UDF 3 ORDER_LINE_UDF_3
Line Item UDF 4 ORDER_LINE_UDF_4
Line Item UDF 5 ORDER_LINE_UDF_5
Exact Macola ES Ship To Num-
ber MAC_SHIP_TO_NUM
Exact Macola ES Mark For Num-
ber MAC_MARK_FOR_NUM
Order Carton Total Order_Carton_Total
Serial / Lot Number SERIAL_LOT_NUMBER
Expiration Date SL_EXPIRATION_DATE
Table 1: External Label Field List
Field Name BarTender Field Name
195
Appendix H: Wavelink Setup
Wavelink must be run as an application. However, when first installed it is setup to run as
a service. Follow these steps to disable the Wavelink service:
1. Browse to the Control Panel, Administrative Tools, and Services.
2. Double-click Wavelink Network Server, and then click Stop Service.
3. Select Disabled in the Startup Type field.
4. Click Apply.
5. Double-click Wavelink Server Startup Service, and then repeat the steps above.
Add Wavelink Server to the Startup Menu
1. Click Start on the Windows desktop, and then choose Programs, Wavelink Studio,
and Wavelink Studio Server. Right-click Wavelink Studio Server and select Copy.
2. Browse to Windows Explorer, Documents and Settings, All Users, Start Menu, Pro-
grams, Startup. Paste the Wavelink Studio Server shortcut in the Startup directory.
Add Menus to Wavelink Studio for WMS
1. Browse to Start, Programs, Wavelink Studio, and then click Wavelink Studio
Administrator.
2. Click the Utilities Menu and choose Program Manager Administrator.
3. Click the Wavelink Applications Information tab.
4. Type Applications in the Wavelink
Group Information field, and then
click the Add button next to it.
5. Menu Option: Type WMS System.
6. Applications Path: Type the path to
the WMSRFC.exe.
7. Arguments: Type the path to the
WMS.INI. For example:
/ini= c:\windows\WMS.ini.

196
8. Application Group: Choose Applica-
tions from the list.
9. If WMS.INI is not located in the Win-
dows directory of the local drive on
the Wavelink server, specify the cor-
rect location.
10.Click Add.
11.Click the Wavelink User Information
tab.
12.Current Wavelink User: Type the
user name and then click Add. This
can be the same as the user name
that is setup in the WMS Security File.
13.Click the Password button.
14.Old Password: Enter the old pass-
word.
15.New Password and Confirm Pass-
word: Enter the new password and
enter it again for confirmation. This
can be the same password as in the
WMS Security File. If the user name
and password are the same, type the
value into all three fields.
16.Click OK.
17.On the Wavelink User Information tab, click Applications under the Wavelink Appli-
cation Groups, and then click the >> button to add it.
18.Click Apply and then click OK.
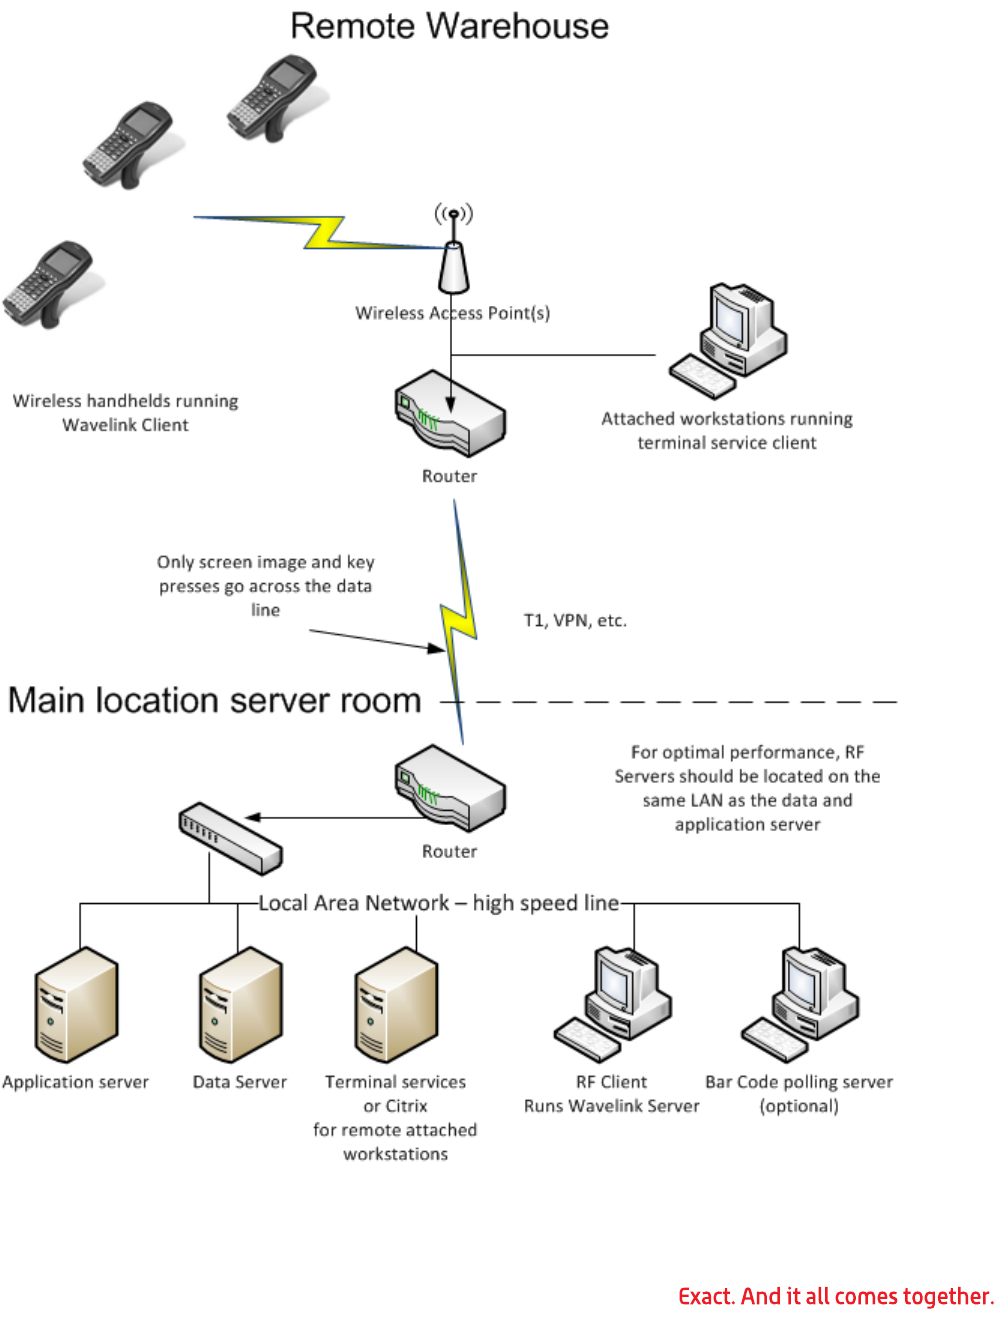
197
Appendix I: Remote Warehouse Hardware Diagram
198
Appendix J: Using BarTender Label Share Names
WMS uses the table name and field name as the BarTender share name for the label,
using the format tablename.fieldname. Both the table and field name must be lower case
and should be identical to the table and field name in SQL Enterprise Manager. For exam-
ple, if you needed to print the purchase order number on a P/O product label, the share
name would be poordhdr_sql.ord_no.
Labels can access fields in the following tables.
Please note that fields are accessible only when they are applicable to the process during
which the label is printed. For example, if you are printing product labels while processing
a receipt in SFC, the label does not access information from the PO order header table.
Label References
Row References
A transaction can contain multiple occurrences of certain types of information. For exam-
ple, when receiving, an item can list multiple serial or lot numbers. Row references allow
Exact Macola ES Table SQL Table Name
AP Vendor File cicmpy
ASN Bulk Weight File edablkfl_bw
EDI Item Cross-Reference File edcitmfl_sql
IM Item Category File imcatfil_sql
IM Inventory Location File iminvloc_sql
IM Item Master File imitmidx_sql
IM Item Location File imlocfil_sql
IM Serial/Lot Master File imlsmst_sql
OE Customer Item File oecusitm_sql
OE Order Header History File oehdrhst_sql
OE Order Line History File oelinhst_sql
OE Order Header File oeordhdr_sql
OE Order Line File oeordlin_sql
PO Order Header File poordhdr_sql
PO Order Line File poordlin_sql
POP Order File ppordfil_sql
SFC Order File sfordfil_sql
System Code File sycdefil_sql

199
you to specify which occurrence to print on the label. The following row references are
available for WMS labels.
When using a row reference on a label, you must specify not only the share name but also
the occurrence you want to include. This positional reference is separated from the share
name with a pipe character, such as row.ser_lot_no|1. To include the first three serial/lot
numbers for an item on the label, for example, you would include the following row refer-
ences:
• row.ser_lot_no|1
• row.ser_lot_no|2
• row.ser_lot_no|3
Calculated References
In some cases, it is necessary to include a calculated value on a label, such as the total
number of cartons. WMS includes a number of calculated references to enable you to
include this information on labels. These calculated references not only perform mathe-
matical calculations like the total quantity or number of cases, but can also be used to
print information such as the system date, system time, or case pack associated with the
transaction.
Row Reference Exact Macola ES Data
row.ord_no Order number
row.item_no Item number
row.bin_no Bin number
row.ser_lot_no Serial/lot number
row.qty Quantity
row.lot_exp Lot expiration date
Row.mfg_serlot Manufacturer's serial/lot number
Share Name Calculated Value Available For
calc.tot_qty Total quantity All labels
calc.date System date All labels
calc.timeampm System time in format
HH:MM AM/PM. Example:
10:23 AM
All labels
calc.time System time in format
HH:MM:SS. Example:
23:24:00
All labels
calc.number_of_cases Number of cases PO putaway labels
calc.case_pack Case pack PO putaway labels
calc.dock Dock PO putaway labels
200
Label Directives
Label directives provide additional instructions to the label generation process. To include
a label directive when designing the label in BarTender, add a text object with the share
name LabelDirectives outside the label's printable area. Enter the specific label directive,
such as ForceMinLabelQty, in the Screen Data field. To include multiple label directives,
separate each with a pipe, such as RowSort= ser_lot_no|ForceMinLabelQty.
RowSort Label Directive
The RowSort label directive is used to sort the rows that are available in the transaction
and affects the order in which rows are used by row references on the label. To sort a row,
specify RowSort for the label directive, and then list the row to be sorted. For example, to
sort the bin number rows, you would specify RowSort=bin_no in the Screen Data field.
Multiple data rows can be sorted by separating the rows with a commas, such as Row-
Sort=bin_no,ser_lot_no, which would sort both the bin number and serial/lot number
rows.
Note: Only fields that are available as row references can be sorted using the RowSort
label directive.
ForceMinLabelQty Label Directive
The ForceMinLabelQty label directive forces WMS to print as many labels as there are rows
of data. For example, if an item with three serial numbers is received, the user can choose
to print only one label. A label would be printed for the first serial number, but not the
other two. This can result in insufficient labels being printed for the transaction. If the
label is designed with the ForceMinLabelQty label directive, however, WMS automatically
prints three labels, one for each serial number. Using the ForceMinLabelQty label directive
ensures that enough labels are printed for the product being processed.
calc.primary_bin Primary bin PO putaway labels
calc.secondary_bin Secondary bin PO putaway labels
Share Name Calculated Value Available For
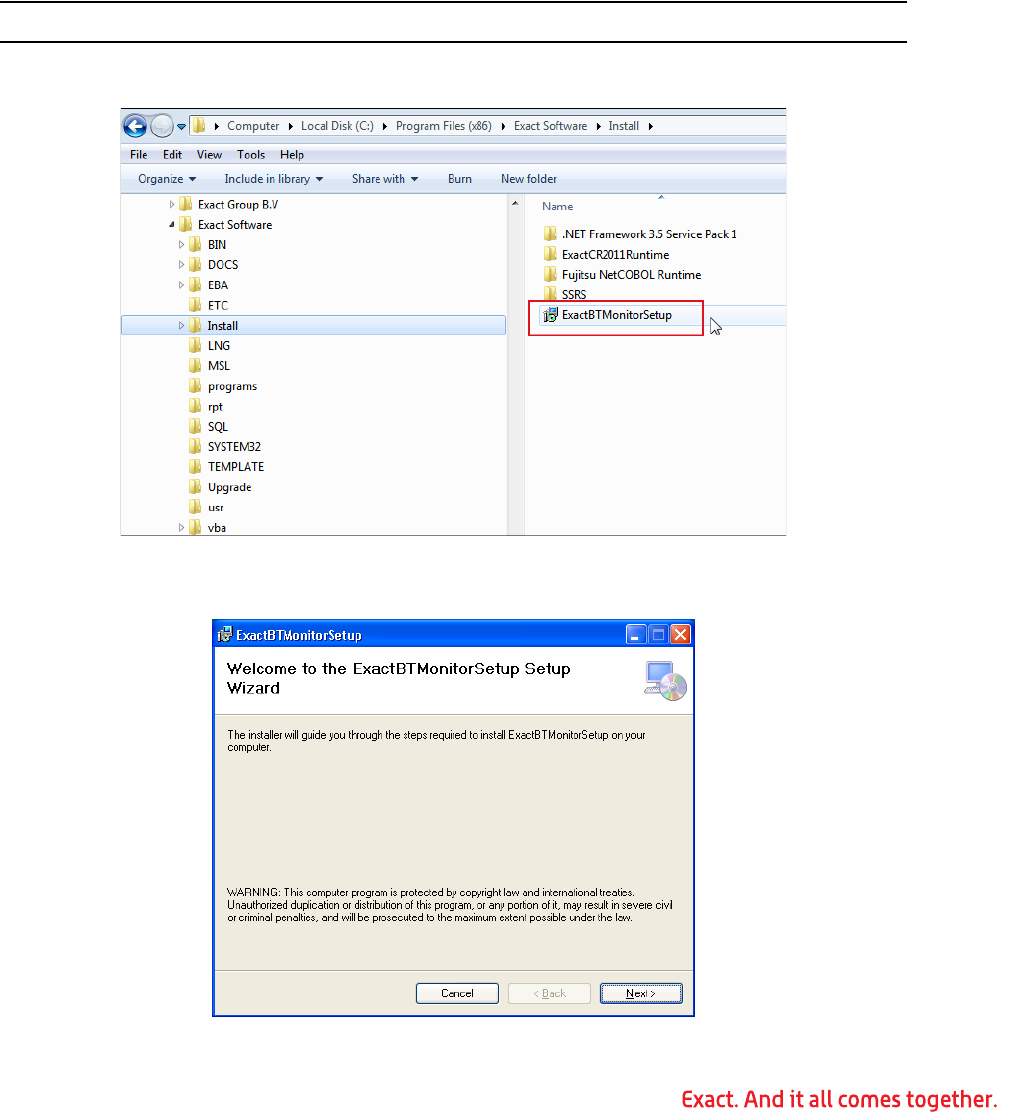
201
Appendix K: Installing the Exact Bartender Monitor Ser-
vice
There is a new Windows service that can be installed that will stop a running Bartender
service any time WMS or a WMS function is abnormally closed. This helps system perfor-
mance by keeping multiple Bartender services from running. WMS does this through a
Windows Service called “ExactBTMonitor”. This is a service that you should install on the
Wavelink server, so that it can stop Bartender services if an RF handheld device signal gets
dropped or is abnormally stopped.
Complete the following procedure to install the Exact Bartender Monitor Service.
Note: You should run the Exact Bartender Monitor Setup as an administrator user.
1. Using Windows Explorer, browse to the \Exact Software\Install folder.
2. Double-click the file called ExactBTMonitorSetup.msi. This starts the ExactBTMoni-
torSetup wizard.

202
3. Click Next.
4. Enter an installation Folder for the Exact Bartender Monitor Service. By default, the
folder is a new folder under the Exact Software folder: “\Exact Software\ExactBT-
MonitorSetup”. For Windows XP, this is the “C:\Program Files” folder. For Windows
7 and Windows 8, this is the “C:\Program Files (x86)” folder.
5. There is an option to install the Exact Bartender Monitor Service for your computer
profile and login only or to install it for everyone who logs in to the computer. You
should choose “Everyone”. (If you choose “Just me”, anyone else who logs in to the
computer will not be able to use the Exact Bartender Monitor Service.)
6. Click Next. Confirm the installation.
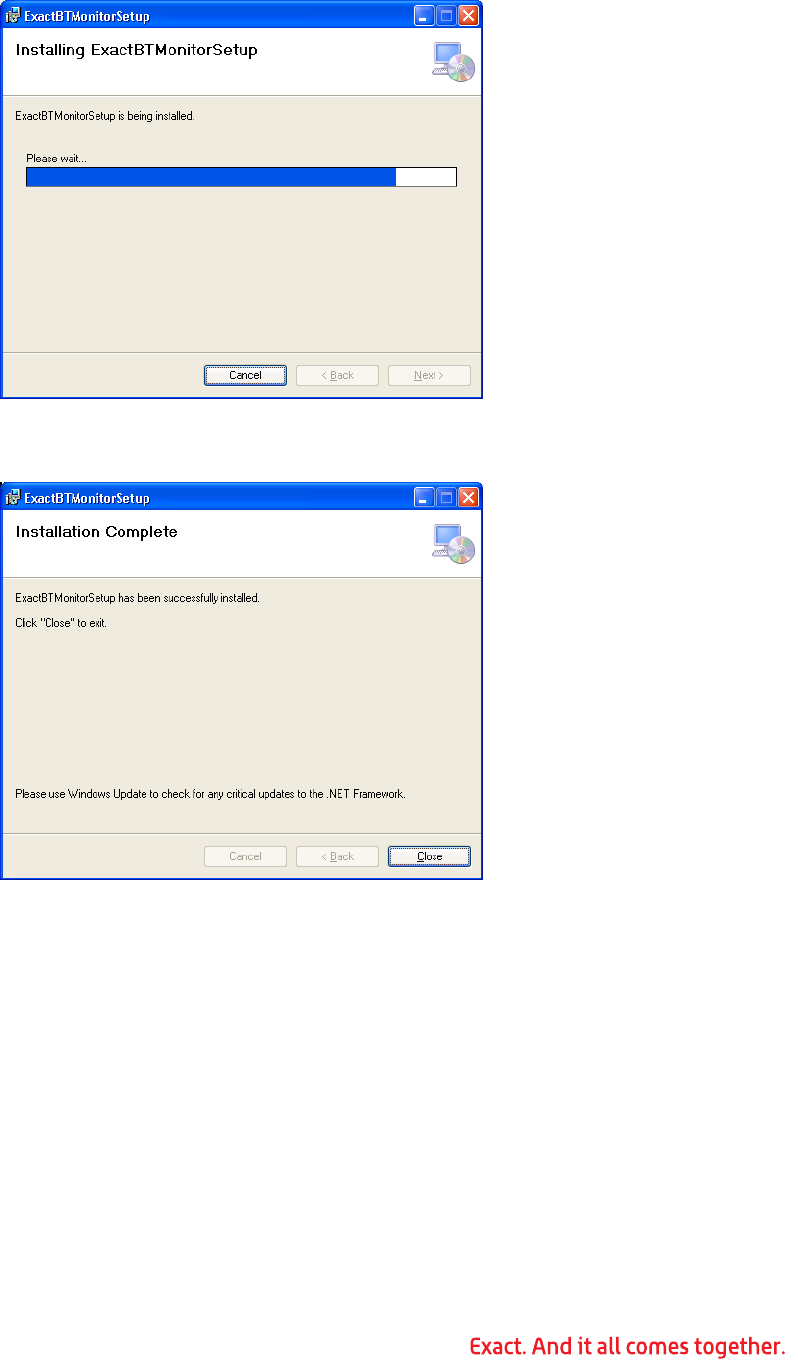
203
7. Click Next. The installation routine starts.
8. When finished, click Close to close the installation wizard. The installation wizard
creates a new folder “\ExactBTMonitorSetup” under the “\Exact Software” folder.
9. Run Windows Update to check for any critical updates to the Microsoft .NET Frame-
work.
10.When the Windows Update process is complete, you may need to reboot the work-
station.
11.Verify that the Exact Bartender Monitor Service (ExactBTMonitor) is running. Open
the Control Panel:
a. Click “Start”.
b. Select “Control Panel”.
c. When the Control Panel opens, click “Administrative Tools”.
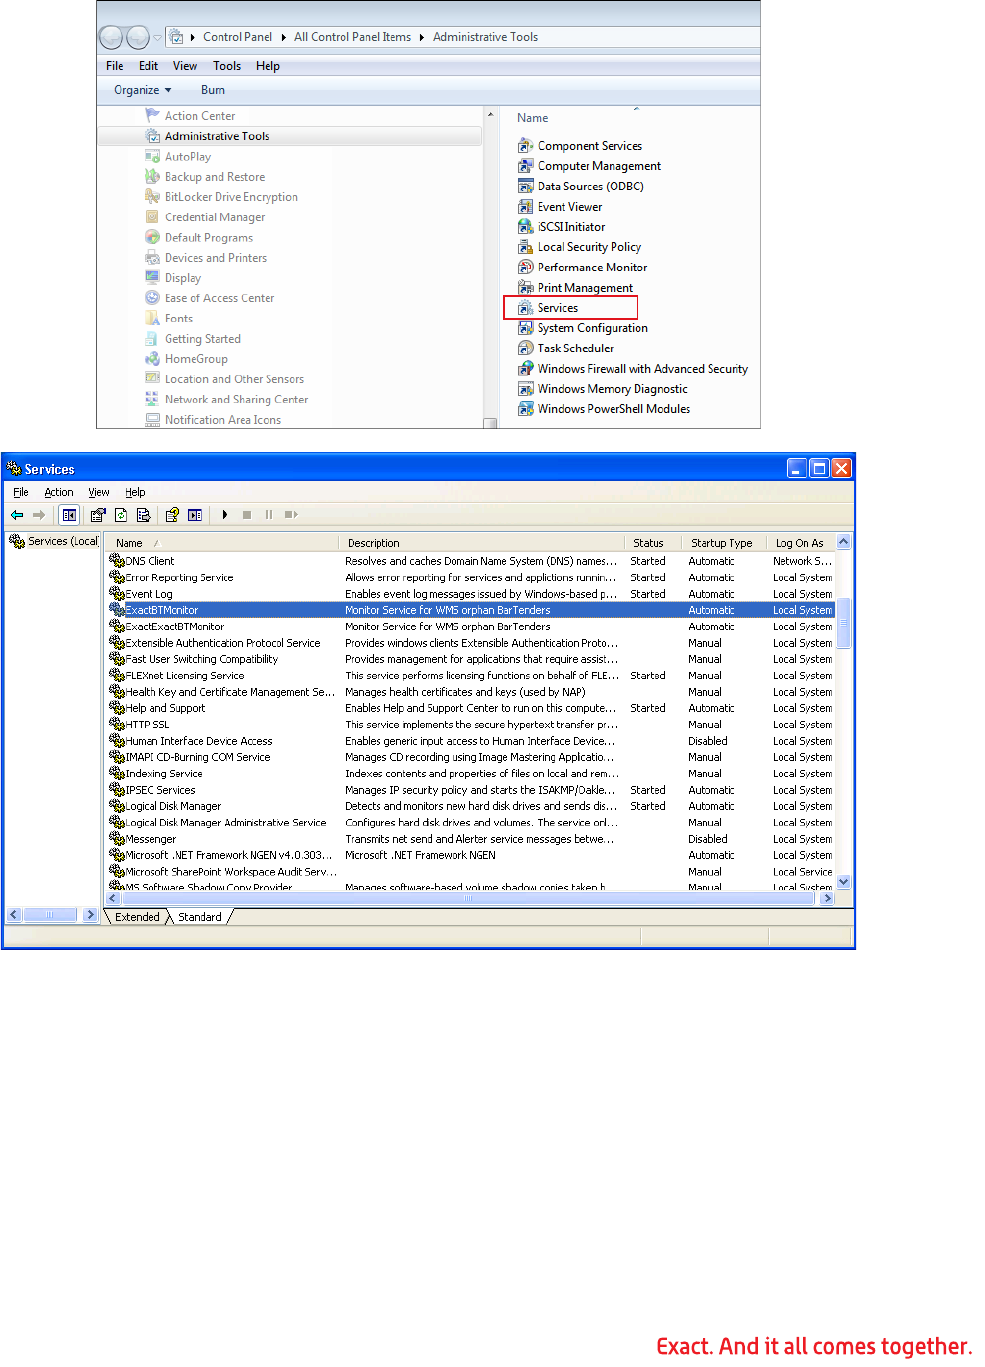
204
d. Double-click “Services”. This opens the Microsoft Windows Services.
e. The Status should be “Started”, and the Startup Type should be “Automatic”.
Note: After installation, the ExactBTMonitor service is not started until you
manually start it or reboot the workstation.
f. Close the Microsoft Windows Services and the Control Panel.
205
Glossary
These terms are used throughout the WMS software and user guide.
A/P Accounts Payable
A/R Accounts Receivable
ASN Advanced Ship Notice
B/C Bar Code
BOL Bill of Lading
DC distribution center
EDI Electronic Data Interchange
EPN Electronic Pick Notification
FTP File Transfer Protocol
I/M Inventory Management
O/E Order Entry
ODB file Open Document Database file
P/O Purchase Order
POP Production Order Processing
R/F Radio Frequency
SFC Shop Floor Control
UCC Uniform Commercial Code
UDF user defined field
VICS Voluntary Interindustry Commerce Solu-
tions

206
Index
Numerics
1 Carton Per Order? 24
856 (Advanced Ship Notice) 140
A
Add Barcode Segment button 90
Add Conveyor Information button 42
Add Variable button 61
Allow Any Order Number 32
Allow Any To Bin 32
Allow Change Warehouse 17
Allow Override of Default Bin 26
Alt Address AutoPack Override field 24, 84
Alt Identifier Code 72
Alternate Item Number 57
Alternate Item Qualifier 58
Ascend/Descend 28
Assign to User 96, 104
Assume Full Qty 29
Assume Remaining Qty 31, 32, 35, 37
Auto Advance 33
Auto Close on RF Error 38
Auto Generate Serial Numbers 31, 32, 35, 37
Auto Pack Cartons? 72
Automatic Pack Cartons 23
Automatically Use Empty Tags 33
AutoPack Label Sequence UDF 24
AutoPack Label sequence UDF 82
B
Bar Code Format 88
Billing 135, 137
Billing-Order Report 27
Bin Verification Report 27
BOL Type 76
Bulk Pick 96, 104
Bulk Weight Customer Prefix Lookup? 27
C
Capture Catch Weights 25
Carton Defer Printing 24
Carton Label Override Field 24
Carton UCC 128 Number 24
Change Companies 63
Change Warehouse 110, 135
Check Prev Oper Qty Complete 34
Class Code 76
Close BarTender button 65
Comment 96, 103, 104
Complete Order 134
Complete Shipment 131
Completely Available to Ship Orders Only 95, 102
Confirm Ship and Confirm Bill 23

207
Connect button 64
Continue with Errors 134
Conveyor 103
Conveyor Name 42
Copies 89
Copies (1 - 5) 78
Count Tags 19
Create Desktop Shortcut button 62
Create EPN 103
Create EPN(s) 96, 105
Crt/Ord No 127
Current Data(Orders) 139
Customer 94, 102
Customer Number 68, 70, 77
Cutoff 95, 102
D
DataBase 64
Default 56
Default Bin 43
Default Calculated Number of Labels to 1? 33
Default Operation to Y count 35
Default Order Completion Mode 22, 135
Default Package Code 67
Default Serial/Lot Mode 30, 32, 34, 37
Default Staging Bin 28
Department 71
Department Qualifier 22
Description 67, 69, 76
Display Department 35
Display Labor Grade 35
Display Work Center 35
Dist Center Qualifier 71
Distribution Center Start/Length 72
Do not Enter Freight and Misc 23
Do not post zero ship to Quantities 23
Do Not Use ODB Verify 38
E
EDI Cust Item X-Ref UPC Lookup? 27
EDI Diagnostic 27
EDI Package Code 56
Emergency Response Group # 76
Enable Inventory Management 19
Enable POP 21
Enable Purchase Order 19
Enable Shipping 18
Enable Shop Floor 20
Enter Completed Quantity 36
Enter Item ID 36, 37
Enter Labor Hours 36
Enter Rejected Quantities 36
Enter Scrap 36
EPN Mode 110
EPN No 110

208
Exp Dlvy Date 130
F
Features 44
Field Type 90
Fixed Length? 88
Force Entry of PO Multiplier 30
Force Multiplier 29, 31, 32, 33, 35, 37
Format 89
Freight 131, 136
From Bin 67
FTP Address 43
FTP Password 43
FTP Results File 44
FTP Send File 43
FTP User Name 43
Full Description 78
G
Group by Customer 104
Group Orders by Customer 96
H
Hazardous Materials Flag 76
Hide Zero Quantity Bins 33
I
I/M Ext Ser Num Field 26, 81
Identifier 88
Ignore Item Prefix 27
Ignore Multi-Bin, Serial and Lot Flags 25
Immediate Auto Bill for Pack Verify 23
Include Customers on Credit Hold 95, 102
Individual Picks 95, 104
Invoice Type Orders 95, 102
Issue Materials 20
Issues 19
Item 122, 123
Item Id 126, 128, 131, 133
Item Master Bill of Lading Type Field 22, 80
Item No 68
Item Number 57
Item Volume 57
Item Volume Height 57
Item Volume Length 56
Item Volume UOM 56
Item Volume Width 56
Items Per Pack 57
J
Jackpot Sort Lanes 43
L
Label Configuration button 25, 45
Label Name 75

209
Label Qty Format 25
Label Type 89
Language 17
Leave Qty
Not AvailAvailable 78
Leave Un-Recommended Qtys Open 96, 104
Length 88, 90
Level Code 56
Link to Pack EPN 103
Location 17, 67, 69
Logical Sort Lanes 43
M
Maintain Printer Context button 88
Mass Delete 17
Max Lines Per Page 75
Misc 131, 136
Misc Info 141
Multiplier 110, 126, 128, 133
Multi-Valued 69
N
New Carton 110, 125, 126, 132, 133
New Pallet 127
New Shipment 130
NMFC # 76
O
O/E Cust Item X-Ref Cust Item Lookup? 27
ODB Generations 23, 30, 32, 36, 37
One Carton per Order? 73
Order # 142
Order Billing 18
Order Completion Mode 72
Order From 124
Order No 122, 123, 125, 132, 134, 136
Order Number 95, 102
Order To 124
Order/Invoice No 139
Over Issue Message 35
Over Production Message 34, 36
Override Department 35
Override Labor Grade 36
Override Work Center 35
Overship Error 26
P
Pack Cartons 18, 124, 132
Pack Pallets 18, 126
Pack Shipments 18, 128
Pack Type 95, 104
Pack Weight 57
Package Code 56, 57, 68
Packs Per Tare 57
Pallet Defer Printing 25

210
Pallet Label Override Field 24
Pallet UCC 128 Number 24
Parameters - Visual Basic Only (1-5) 77
Password 17, 91
Physical Sort Lanes 43
Pick Order 28
Pick Sub Type 95
pick-to-pack EPN 93
pick-to-stage EPN 93
Pkg Code 130
Pkg. Code 89
Plt/Ctn/Ord 131
PO Number 95, 102
PO Scan Sheet 88
Polling Interval 44
Post Pick Audit 27
Posted Data (Invoices) 140
Print (Y/N) 89
Print Additional 123
Print Report button 79
Print Total Cartons 75
Printer (1 - 5) 78
Printer Name 89
Priority 96, 104
Pro Number 130
Product Labels 20
Prompt for Exp Date 31, 32, 35, 37
Prompt for MFG Serial/Lot No 31, 32, 35, 37
Prompt for Path 35
Prompt Screen button 61
Q
Qty 123
R
Reason Code 78
Receipts 19
Receive to Staging Bin 34, 36
Receiving Dock is Bin 30
Recommend Bin/Serial/Lot By 28
Recommend for Specific Zone 96, 104
Recommend Split Lots 28
Recommend Zone By Pkg Size 96, 104
Record Non-Bin Location 33
Register button 66
Remain in Transaction 36
Remove 126, 133
Remove button 66
Remove Mode 110
Report Activity 20
Report Name (1 - 5) 77
Report Production 21
Reprint Label 122, 130
Re-release Orders 124
Reset to Default 92

211
Return and Make Corrections 134
RFID Settings 70
Run BarTender button 65
S
Sales Order Filter 94, 101
SCAC Code 77
Scan Sheet 30
Send 856 Item Level 73
Send 856 Order Level 73
Send 856 Pack Level 73
Send 856 Ship Level 73
Send 856 Tare Level 73
Separate Pick Per Zone 96, 104
Server 64
Set Defaults button 64
Ship Date 130
Ship Via 130
Ship Via Code 77
Short Description 78
Shortcut Character 38
Single Valued 67
Skip Bin Validation 29
Skip Qty Checking on Recommendation 29
Sort Order 75
Specify Order Number 32
stage pack EPN 93
Stage Pack Report 29
Stage Pick 103
Start Byte 90
Start Polling 138
Status 67, 69, 96, 104
Std Variables button 60
Stock Inventory 20
System Folders Only 66
T
Tare Weight 57
Test BarTender button 65
To Bin 67
Tolerance % 26
Trailer No 130
Transfer Inventory 19
Type (1-5) 77
U
UCC-128 Required? 70
Undership Error 26
UPC Company Code 22
Update Macola 134, 136, 137
Use BarTender 65
Use EDI 2005 72
Use Item Pick Seq as Default Bin 26
Use Pick Management 28
User Defined 1 - 5 76

212
User Defined Filters button 29
User Defined Query 95, 102
User Name 17
Username 91
V
Validate DLL button 66
Vendor No 88
Verify 131
Verify Order 110
W
Warehouse 94, 101, 122, 123, 124, 126, 128, 131
Warehouse Zone 67, 68, 69
WMS Inquiry 141, 142
WMS Qty Checking on ISSUE/Xfer 32
WMS Root Folder 38
Z
ZoneCustomer ItemPkg Code Override button 67
Zones button 29
