Zimmer Periarticular Proximal Humeral Locking Plate Surgical Technique
2016-04-01
: Pdf Zimmer Periarticular Proximal Humeral Locking Plate Surgical Technique Zimmer_Periarticular_Proximal_Humeral_Locking_Plate_Surgical_Technique 3 2016 pdf
Open the PDF directly: View PDF ![]() .
.
Page Count: 21
Zimmer
®
Periarticular
Proximal Humeral
Locking Plate
Surgical Technique
The Science of the Landscape

1
Zimmer Periarticular Proximal Humeral Locking Plate
Surgical Technique Table of Contents
Introduction 2
Locking Plate Technology 2
Proximal Humeral Plate Indications 2
Fracture Classification 3
Plate Features 3
Surgical Technique 4
Required Instrumentation 4
Preoperative Preparation 4
Fracture Reduction 4
Surgical Approach 5
Reduction of Intra-articular Fragments 6
Plate Positioning 6
Screw Trajectory 9
Fracture Fixation 10
Wound Closure 14
Postoperative Treatment 14
Implant Removal 14
Surgical Pearls 14
Instruments and Implants 15
Order Information 18

2Zimmer Periarticular Proximal Humeral Locking Plate
Introduction
The Zimmer Periarticular Locking
Plate System combines locking screw
technology with periarticular plates to
create fixed-angle constructs for use in
comminuted fractures or where deficient
bone stock or poor bone quality is
encountered. The fixed-angle plate/
screw device can be used in osteopenic
bone and other areas where traditional
screw fixation may be compromised.
The Periarticular Locking Plates will
accommodate standard screws, as well
as locking screws with threaded heads
that allow the screw to be locked into the
plate. When necessary, interfragmentary
compression can be achieved using
standard screws in the dual
compression slots.
Cannulated screws and instruments
allow provisional fixation with guide pins
in the metaphysis. This helps ensure that
the threaded locking screw heads align
properly with the threaded plate holes.
All plate configurations contain locking
screw holes in the plate head, and
alternating locking and compression
screw slots in the shaft.
Locking Screw Technology
The heads of the locking screws contain
male threads while the holes in the
plates contain female threads. This
allows the screw head to be threaded
into the plate hole, locking the screw
into the plate. This technical innovation
provides the ability to create a fixed-
angle construct while using familiar
plating techniques.
Locking Plate Technology
By using locking screws in a bone plate,
a fixed-angle construct is created.
In osteopenic bone or fractures with
multiple fragments, secure bone
purchase with conventional screws may
be compromised. The locking screws do
not rely on bone/plate compression to
resist patient load, but function similarly
to multiple small angled blade plates.
In osteopenic bone or comminuted
fractures, the ability to lock screws into
a fixed-angle construct is imperative.
By combining locking screw holes with
compression screw slots in the shaft,
the plate can be used as both a locking
device and a fracture compression
device. If compression is desired, it
must be achieved first by inserting the
standard screws in the compression
screw slots before inserting any
locking screws.
The locking plate design does not
require compression between the plate
and bone to accommodate loading.
Therefore, purchase of the screws in
the bone can be achieved with a thread
profile that is shallower than that of
traditional screws. The shallow thread
profile, in turn, allows for screws with
a large core diameter to accommodate
loading with improved bending and
shear strength.
Indications
The Periarticular Locking Plate System is
indicated for temporary internal fixation
and stabilization of osteotomies and
fractures, including:
• Comminuted fractures
• Supracondylar fractures
• Intra-articular and extra-articular
condylar fractures
• Fractures in osteopenic bone
• Nonunions
• Malunions
3
Zimmer Periarticular Proximal Humeral Locking Plate
Fracture Classification
Refer to the OTA Fracture and Dislocation
Compendium, for more specific
information.
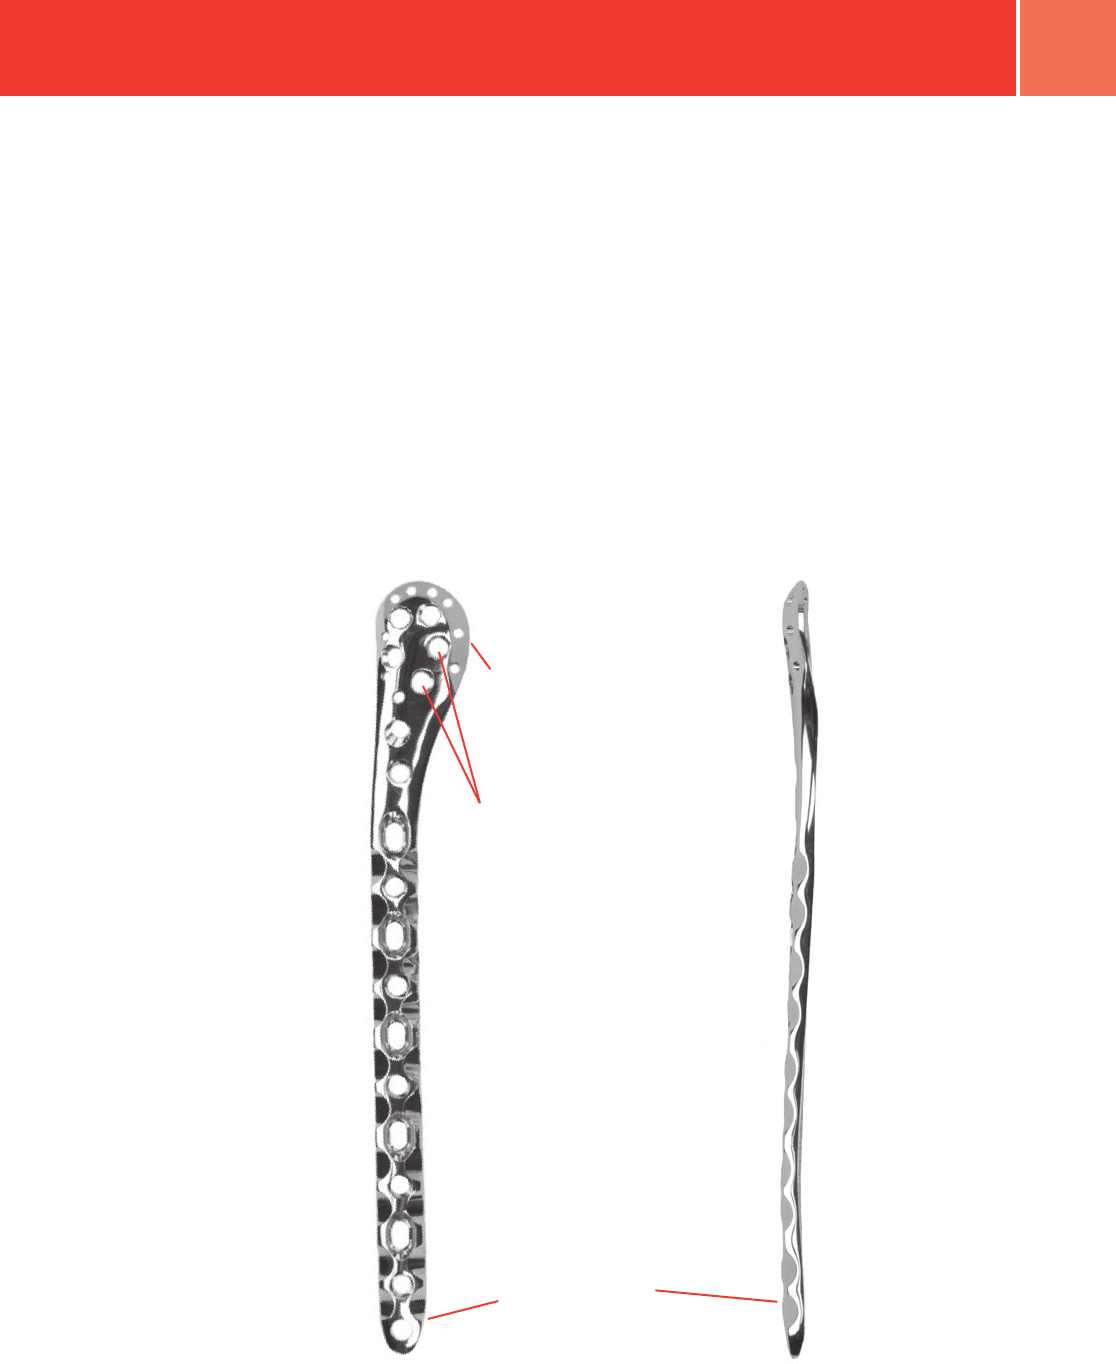
Plate Features
• Anatomically contoured plates are
precontoured to create a fit that
requires little or no additional
bending and helps with metaphyseal/
diaphyseal reduction
• Low plate profile facilitates fixation
without impinging soft tissue
• Dual compression slots will
accommodate periarticular screws
or conventional stainless screws and
allow bi-directional compression
The locking plate design does not
require compression between the plate
and bone to accommodate loading.
Therefore, purchase of screws in the
bone can be achieved with a thread
profile that is shallower than that of
traditional screws. The shallow thread
profile, in turn, allows for screws with
a large core diameter to accommodate
loading with improved bending and
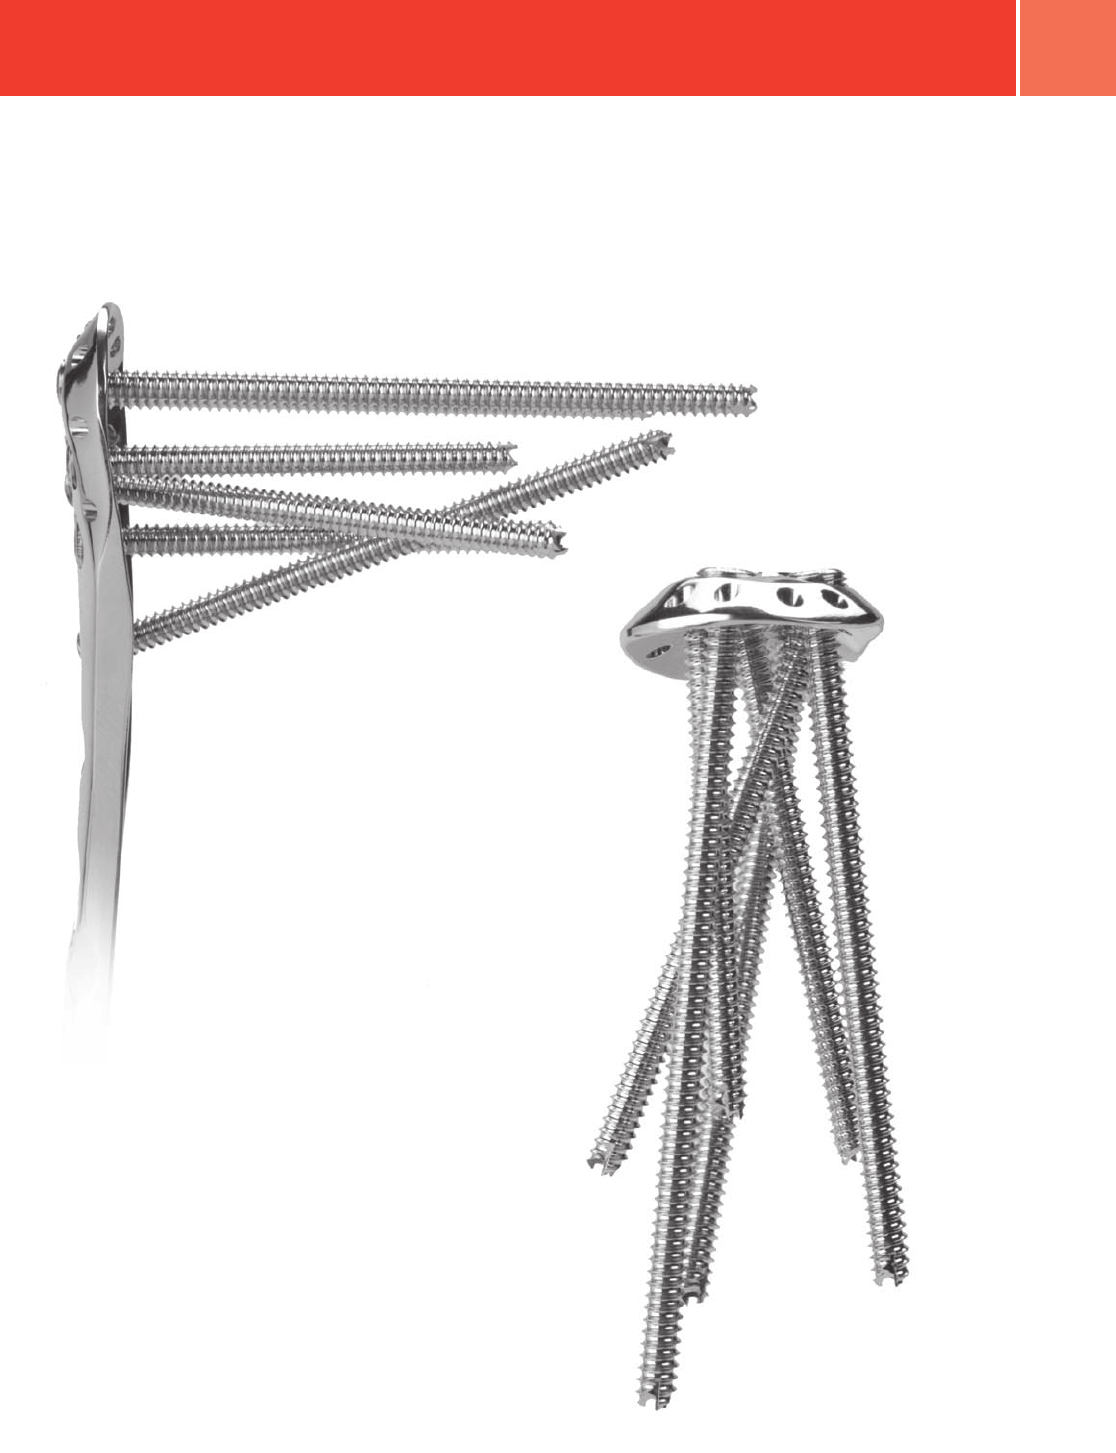
shear strength (Fig. 1).
Fig. 1
The anatomical shape of
the plate head matches
the shape of the proximal
humerus
Multiple locking holes in the
plate head allow placement
of the screws to capture
fragments while avoiding
lag screws that have been
placed outside the plate
Tapered Shaft design
allows for a minimally
invasive technique

4Zimmer Periarticular Proximal Humeral Locking Plate
Surgical Technique
Required Instrumentation
The following sets may be required for
application of the 3.5mm Periarticular
Locking Proximal Humeral Plate:
• Small Fragment Screw and
Instrument Set
• Basic Forceps Set
• 3.5mm/2.7mm Locking Screw and
Instrument Set
• 3.5mm Locking Proximal Humeral
Plate and Standard Jig Set
NOTE: The 2.7mm Locking Screws
should not be used with the 3.5mm
Locking Proximal Tibial Plate.
Preoperative Preparation
After assessing the fracture
radiographically and preparing a
preoperative plan, place the patient in
the beach chair position with the injured
shoulder resting on a translucent part of
the operating table (Fig. 2). Be sure that
the fluoroscope can be positioned to
visualize the proximal humerus in both
the lateral and A/P views.
X-rays and Classification
At least two x-rays of the glenohumeral
joint taken at right angles to each other
are mandatory to identify the fracture
type. X-rays in internal and external
rotation can be important if tuberosity
fractures are suspected. Traction views
can frequently help to clarify complex
fracture patterns. If standard x-rays do
not allow clear evaluation of the fracture
features, articular damage, displacement
and soft tissue damage, CT may be
helpful. You must be able to determine
whether the fracture runs through the
anatomical or surgical neck
of the humerus.
Recommended X-rays
AP View
The patient must be placed with the
posterior aspect of the injured side
against the x-ray plate, and the opposite
side must be elevated at least
30 degrees.
Lateral Anterior View
The lateral/anterior aspect of the injured
shoulder is placed against the x-ray
plate. The x-ray beam is then directed
posteriorly along the spine of the
scapula at 90 degrees to the direction
of the AP.
Axillary View
The patient is supine with the x-ray plate
placed above the injured shoulder.
Abduction of about 30 degrees
is needed.
Fracture Reduction
It is imperative that accurate reduction
of the fracture be obtained prior to and
maintained during application of the
proximal humeral plate. Intraoperative
x-ray visualization is critical in all planes.
Closed reduction should be tried under
image intensification. In acute fractures
and fracture dislocations, reduction is
often successful.
If closed reduction cannot be achieved,
assisted percutaneous reduction by
means of a joystick or hook, or open
reduction will be necessary in order to
obtain good alignment and
fracture fixation.
Exposing the Humerus
After radiographic verification of
preliminary reduction of the fracture, use
the preferred approach and technique to
expose the proximal humerus.
Fig. 2
5
Zimmer Periarticular Proximal Humeral Locking Plate
Fig. 3
On the distal shaft, especially in
comminuted fractures, the insertions
of the deltoid and pectoralis major may
have to be partially released, especially
for reduction and plate fixation on the
lateral aspect of the humerus. The plate
should lie dorsal to the long biceps
tendon and the lateral branch of the
anterior circumflex humeral artery.
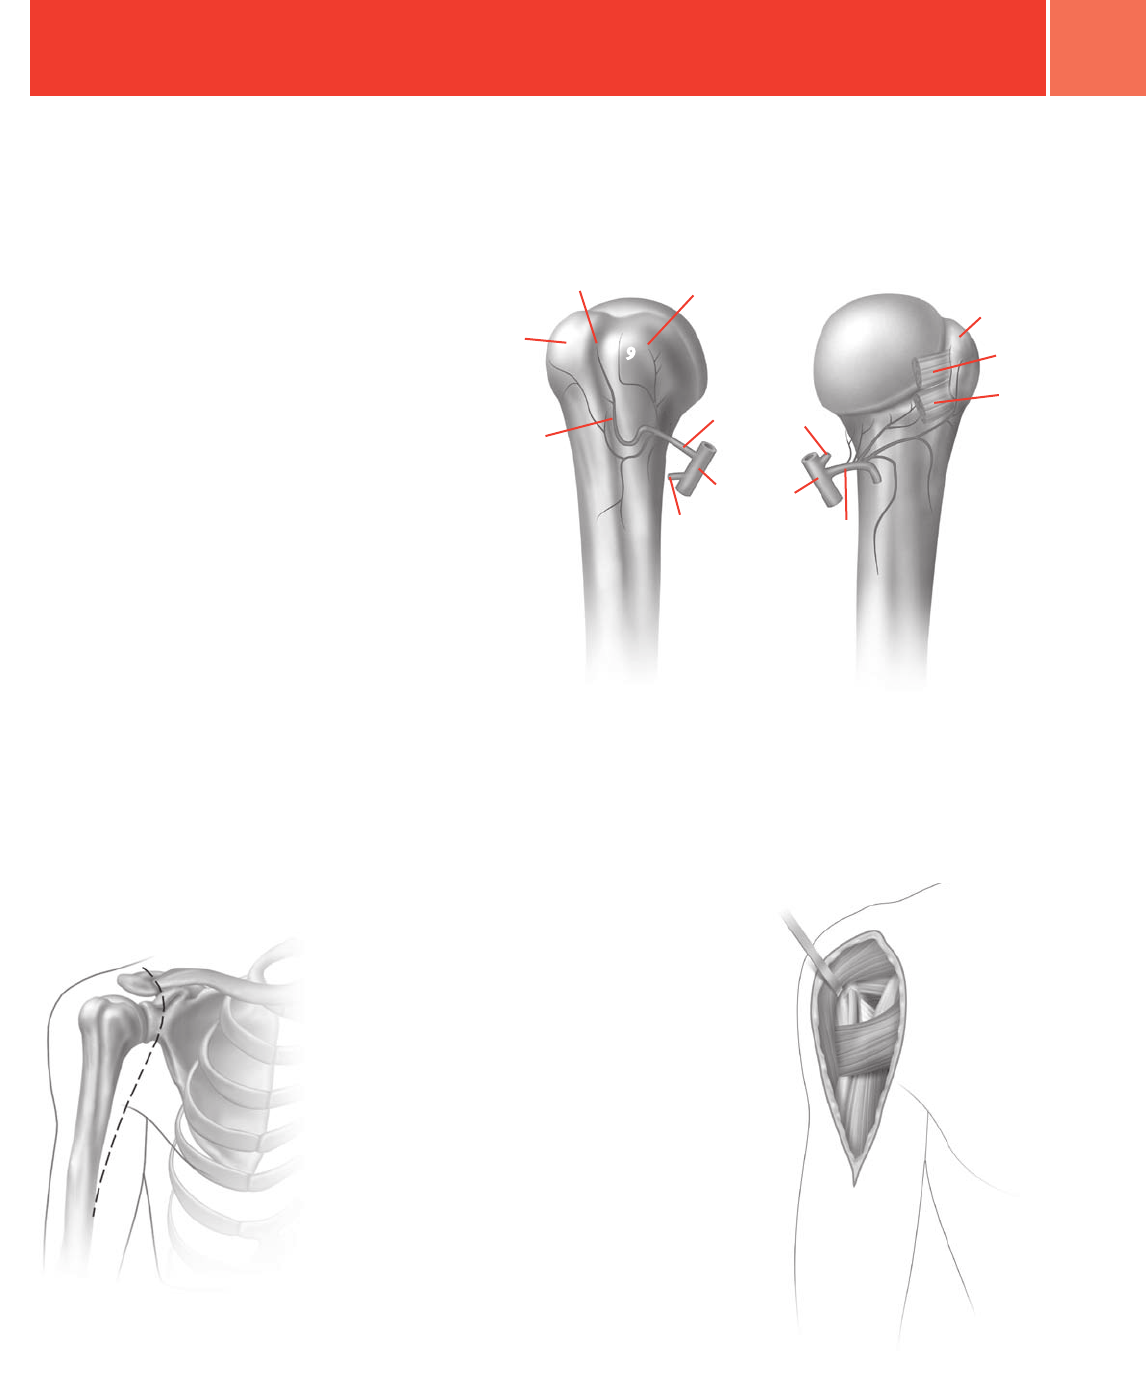
The position of this artery and the axillary
nerve should be noted, and damage
should be avoided (Fig. 4).
Retract the deltoid muscle to the
lateral side to look for the humeral
head (Fig. 5).
Fig. 5
Surgical Approach
Deltopectoral Approach
The standard approach for fixation of
fractures of the proximal humerus is
between the deltoid and the pectoral
muscles. Start the skin incision at the
coronoid process and continue it in a
slightly convex way toward the medial
side as far as the insertion of the deltoid
muscle on the lateral humeral shaft
(Fig. 3). The cephalic vein can usually
be identified proximally with its main
connections on the lateral side. Incise
the fascia medial to the vein and with the
arm slightly abducted. The fracture and
the humeral head can be palpated after
blunt separation of the deltoid muscle
from around the bursa, soft tissues and
fracture hematoma. After removal of the
hematoma, the long biceps tendon can
be identified under internal and external
rotation and will lead to identification
of the greater and lesser tuberosities.
Even if the tuberosities are fractured,
they will still have some connections
to the adjacent tissues and their
attached muscles.
1. Axillary artery
2. Posterior circumflex artery
3. Anterior circumflex artery
4. Anterolateral branch of the anterior circumflex artery
5. Greater tuberosity
6. Lesser tuberosity (anterior)
7. Tendon insertions a) infraspinatus, b) teres minor
8. Entry of anterolateral branch of the circumflex artery into the bone
9. Intertubular groove
Fig. 4
anterior view posterior view
1
2
3
6
8
5
4
9
1
2
3
5
7a
7b

6Zimmer Periarticular Proximal Humeral Locking Plate
Plate Positioning
Hold the appropriate Metaphyseal Jig on
the selected plate and finger tighten or
use the 2.5mm Screwdriver to tighten
the set screw (Fig. 6). Insert a 3.5mm
Standard Jig Sleeve into the center hole
of the Jig (Fig. 7) and thread the 1.6mm
Standard Cannula into the plate
hole (Fig. 8).
Before placing the plate on the bone,
thread the appropriate number of
Standard Cannulas into the proximal
holes in the head of the plate (Fig. 9).
It is easier to thread the cannulas into
the plate holes before the plate is
applied to the bone. The cannulas can
be used as handles to position the plate.
Fig. 8
Fig. 7
Reduction of Intra-articular
Fragments
It is imperative that accurate reduction
of the fracture be obtained prior to, or
through application of the plate, and
maintained during application of the
proximal humerus plate. Reduce the
intra-articular fragments using linear
bone clamps or Kirschner wires to
temporarily hold the reduction. Use
lag screws to secure the intra-articular
fragments. To help avoid inserting the lag
screws where they will interfere with the
plate placement, hold the plate on the
bone in its approximate position. Then
insert the lag screws as needed.
Fig. 6
Fig. 9

7
Zimmer Periarticular Proximal Humeral Locking Plate
Fig. 10
Use this construct to place the initial
1.6mm Drill Tip Guide Wire in the
metaphysis. Check plate placement –
visually and fluoroscopically if necessary.
Use anatomic landmarks and
fluoroscopic images to position the
plate. Because the humeral shaft
may not be aligned with the proximal
fragment, the plate head should be used
to determine the appropriate placement
of the plate. The plate head should
conform to the shape of the intact or
reconstructed proximal humerus. This
will determine the alignment of the shaft.
Note: The cannula inserter may be used
to tighten the cannula if necessary
(Fig. 10).
8Zimmer Periarticular Proximal Humeral Locking Plate
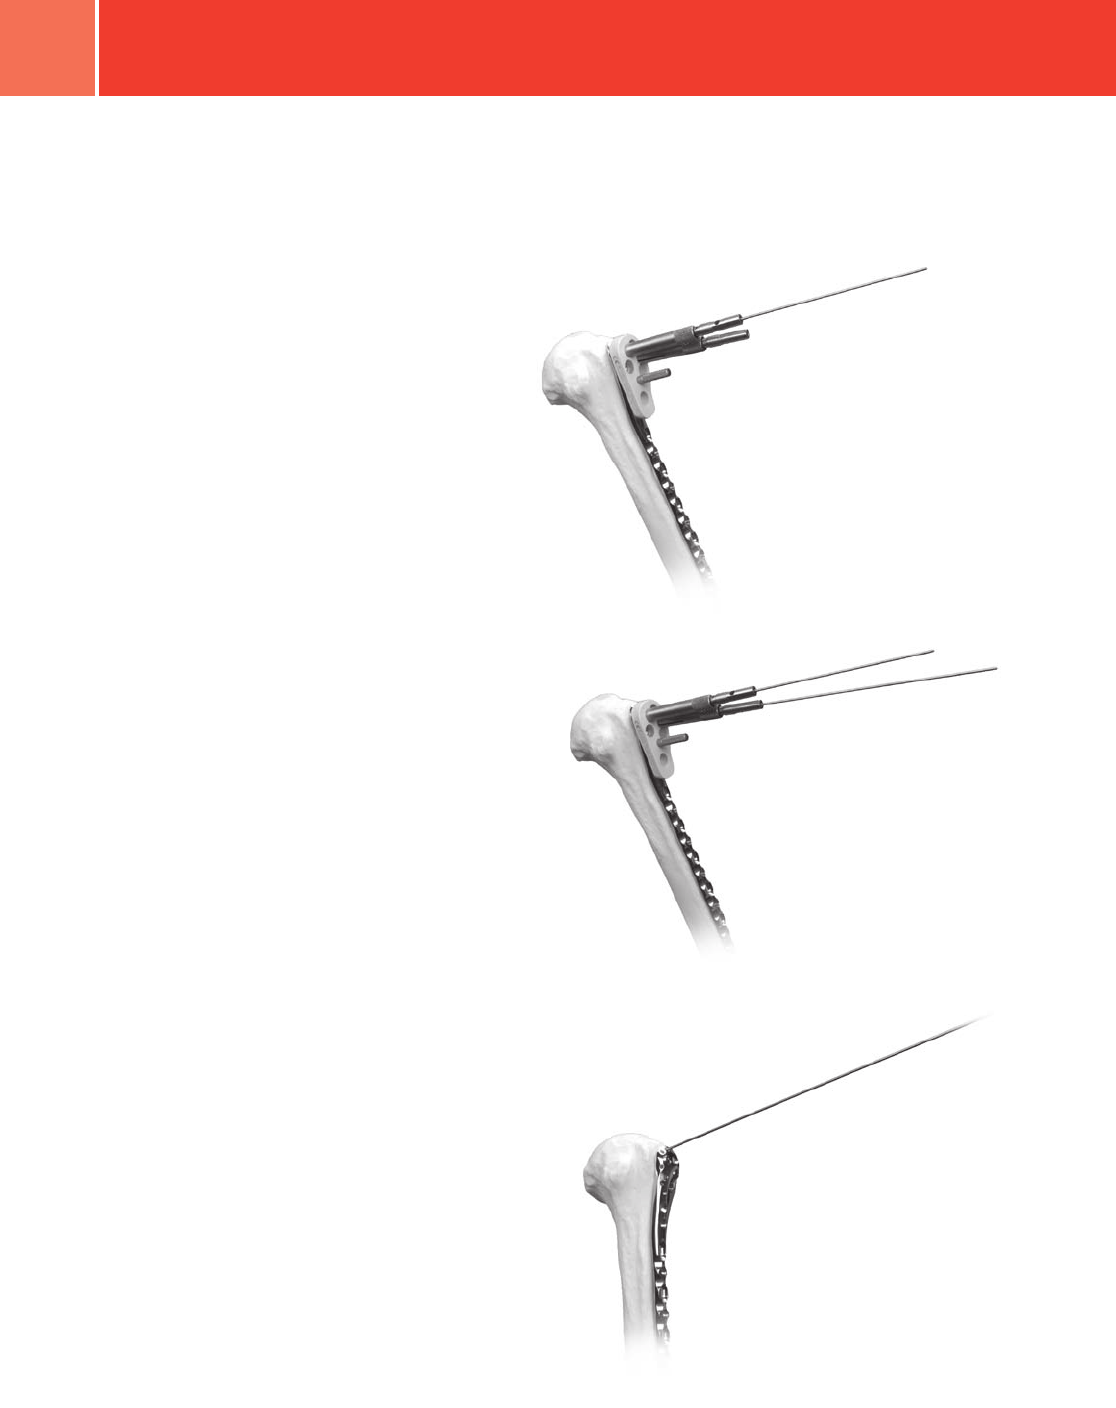
Hold the plate in the desired position
and insert a 1.6mm Drill Tip Guide Wire
through one of the Guide Wire Cannulas
until the tip engages or reaches the
subchondral bone (Fig. 11). Use the
fluoroscope to confirm the position
of the wire in both the A/P and lateral
planes. Adjust the wire location if
necessary. If preferred, use a linear bone
clamp or bone reduction instrument
to secure the plate.
When the first wire is satisfactory, rotate
the plate, if necessary. Then insert
Drill Tip Guide Wires through the other
proximal Guide Wire Cannulas to
help prevent rotation of the plate (Fig. 12).
NOTE: If desired, after removal of the
metaphyseal jig, additional 1.6mm Drill
Tip Guide Wires can be inserted through
the proximal K-wire holes to further
stabilize the plate (Fig. 13).
Use the fluoroscope for both A/P and
lateral views to confirm the position of
the plate head, shaft, and guide wires.
Fig. 11
Fig. 12
Fig. 13
9
Zimmer Periarticular Proximal Humeral Locking Plate
Screw Trajectory
10 Zimmer Periarticular Proximal Humeral Locking Plate
Fracture Fixation
Metaphyseal Screw Fixation
If required, lag screw reduction of a
fragment must be accomplished before
inserting any locking screws. The 3.5mm
Cannulated Conical Screws can be used
for lag screw fixation.
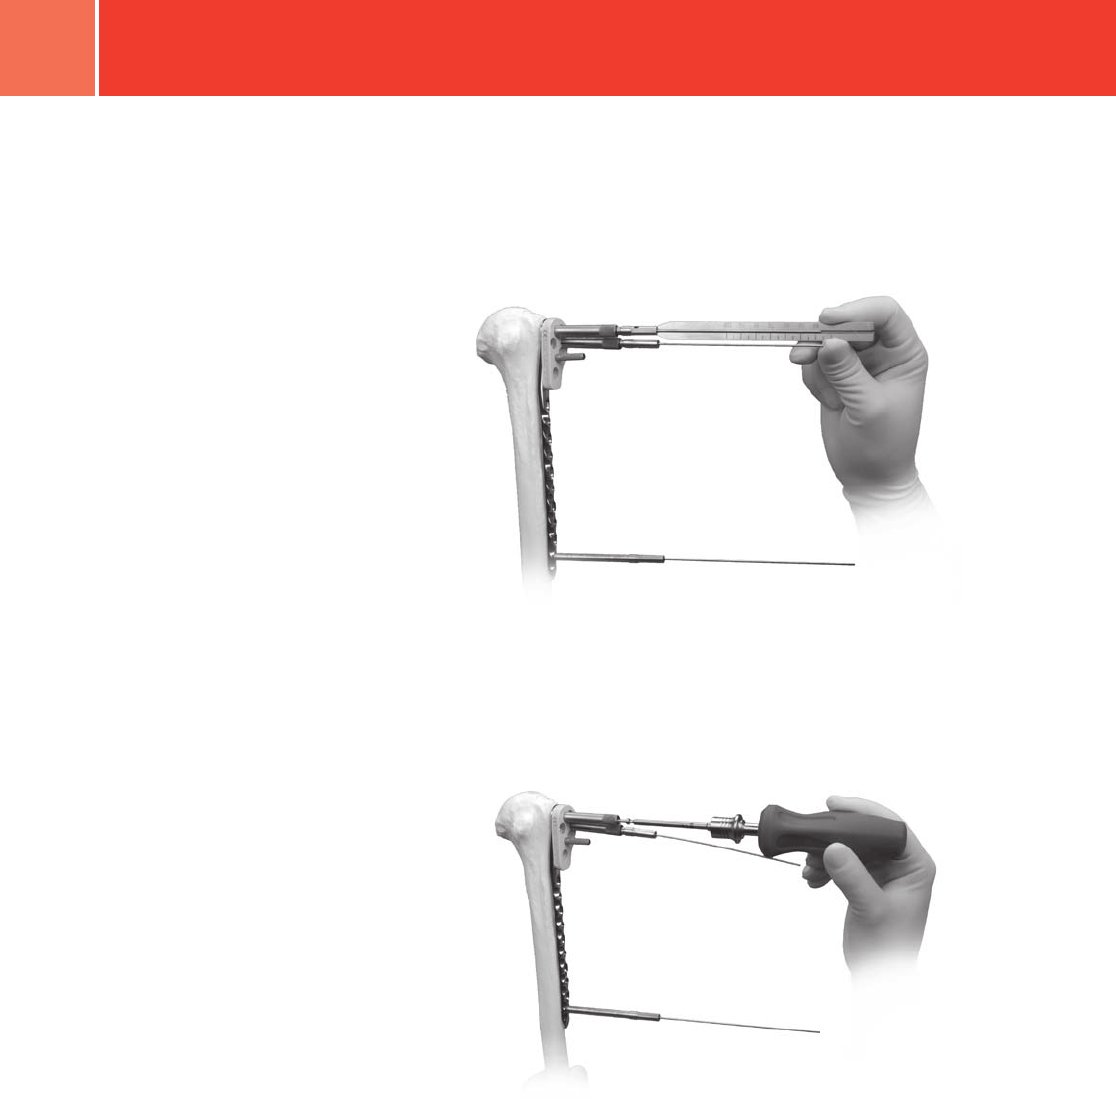
Slide the 3.5mm Cannulated Screw
Depth Gauge over the guide wires to
measure for the screw lengths (Fig. 14).
The tip of the gauge must contact the
end of the guide wire cannula for an
accurate measurement. This will position
the tip of the screw at the tip of the guide
wire. Read the proper screw length from
the guide.
Predrilling and tapping are typically not
necessary as the flutes of the screws
are self-drilling and self-tapping. If the
bone is dense, the lateral cortex can be
predrilled using the 2.7mm Cannulated
Drill and tapped using the 3.5mm
Cannulated Screw Tap.
Remove the Guide Wire Cannulas and
use the 2.5mm Hex-head Cannulated
Driver to insert a 3.5mm Cannulated
Conical or Cannulated Locking Screw
over each of the guide wires and into
as many proximal holes as necessary
(Fig. 15). Sleeves and cannulas may be
inserted into the additional proximal
plate holes if locked screws are
necessary in these holes.
Fig. 14
Fig. 15

11
Zimmer Periarticular Proximal Humeral Locking Plate
A driver shaft can be used to loosely
insert the screw under power, but the
final seating must be accomplished by
hand to avoid cross-threading of the
screws in the plate holes.
Follow the same procedure for each
proximal screw. Be sure that all screws
are securely tightened.
NOTE: Slide the Screwdriver Stop Ring
onto the screwdriver shaft and place it
at the level of the black ring etched on
the driver shaft (Fig. 16). Before the Blue
Stop Ring approaches the top of the
Jig Sleeve, power insertion must stop.
Screws must be seated by hand. The
Screwdriver Stop Ring is intended to be
a visual cue to stop power insertion of
locking screws.
NOTE: If the plate shifts during screw
insertion, all the pins and screws must
be removed and reinserted for the
screws to lock properly to the plate.
NOTE: If a plate screw impinges on
one of the intra-articular lag screws,
the lag screw must be removed and
repositioned.
Use direct or indirect reduction
techniques to reduce the proximal
humerus to the shaft. Confirm that the
arm is in proper rotation. Temporarily
secure the plate shaft to the bone with
plate holding forceps, a nonlocking
screw or the appropriate plate reduction
instrument.
If lag screws will be used through some
of the slots in the shaft, insert the first
lag screw to reduce the fracture or a
standard screw to reduce the plate to the
bone and compress the fracture.
Fig. 16
Black Ring
12 Zimmer Periarticular Proximal Humeral Locking Plate
Shaft Fixation
If both locking and nonlocking screws
will be used in the shaft, the nonlocking
screws must be inserted first. Insert
additional nonlocking screws through
the compression holes in the plate
as desired.
Apply the appropriate drill guide
([00-4808-035-01] 3.5mm/2.5mm
Double Drill Sleeve, [00-4808-035-02]
3.5mm/2.5mm Insert Drill Sleeve,
[00-4808-035-04] 3.5mm Universal
Drill Guide, [00-4808-035-05] 3.5mm
Compression Drill Guide) to one of the
nonlocking shaft slots, and use the
2.5mm QC Drill Bit [00-4806-110-25] to
drill through both cortices. Use the Depth
Gauge to measure the appropriate screw
length. Then insert a self-tapping screw.
Check the position of the screw with
the fluoroscope. Repeat this procedure
for each of the standard screws
to be inserted.
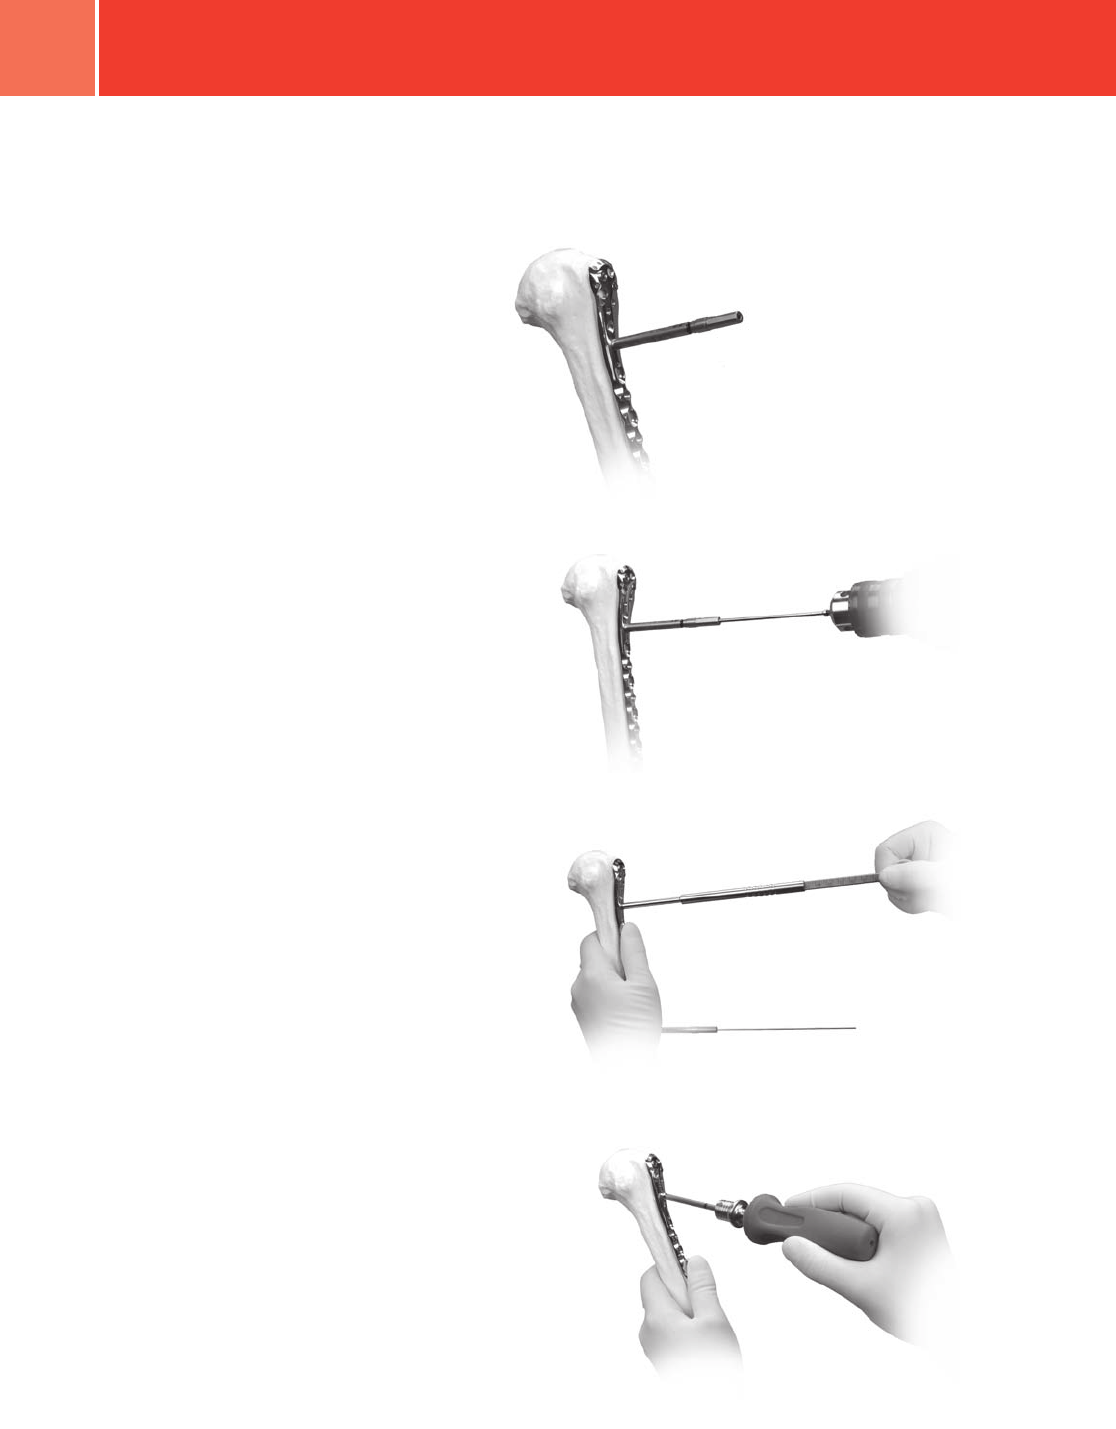
To insert solid locking screws, thread the
2.7mm Standard Cannula into the most
proximal shaft locking hole of the plate
(Fig. 17). Use the 2.7mm Standard Drill
through the cannula to drill a pilot hole
(Fig. 18). Check the depth and position
of the drill with fluoroscopic images.
Remove the cannula and use the Depth
Gauge to measure the appropriate screw
length (Fig. 19). Then insert the locking
screw (Fig. 20).
Tapping is typically not necessary as the
flutes of the screws are self-drilling and
self-tapping. If the bone is dense, the
lateral cortex can be tapped using the
3.5mm tap.
Insert locking screws as desired through
the remaining locking holes of the shaft
in the same manner.
Fig. 17
Fig. 18
Fig. 19
Fig. 20

13
Zimmer Periarticular Proximal Humeral Locking Plate
Strut Screw Fixation
A locking strut screw can be inserted
into the plate to buttress the medial
cortex. Insert the 1.6mm Standard
Cannula into the oblique locking hole
(Fig. 21). Then insert a 1.6mm Drill Tip
Guide Wire through the Cannula until
the tip engages or touches the medial
subchondral bone. Use the fluoroscope
to confirm the position of the wire in
both the A/P and lateral planes.
Slide the 3.5mm Cannulated Locking
Screw Depth Gauge over the guide wire
to measure for the screw length, making
sure that the tip of the gauge contacts
the end of the guide wire cannula
(Fig. 22). This will position the tip of the
screw at the tip of the guide wire. Read
the proper screw length from the guide.
Remove the Guide Wire Cannula and use
the 2.5mm Hex-head Cannulated Driver
to insert a Cannulated Locking Screw
over the guide wire (Fig. 23).
Make a final check of the limb alignment
and fracture reduction. Then make sure
that all locking screws in the head and
shaft are securely tightened before
closing (Fig. 24).
Fig. 21
Fig. 22
Fig. 23
Fig. 24

14 Zimmer Periarticular Proximal Humeral Locking Plate
Wound Closure
Use the appropriate method for surgical
closure of the incision.
Postoperative Treatment
Postoperative treatment with locking
plates does not differ from conventional
open reduction internal fixation
(ORIF) procedures.
Implant Removal
To remove locking screws, use the
Standard Hexagonal Screwdrivers
[00-2360-065-25, 00-2360-065-50] to
first unlock all screws from the plate and
then remove the screws completely.
Please refer to the package insert
for product information, including
contraindications, warnings, and
precautionary information.
Surgical Pearls
Depending upon the screw position in
the plate, the screw head may not be
flush with the plate surface. If unsure
that the screw is seated, loosen screw
and retighten.
If the locking screw is difficult to insert
or stops advancing before locking to the
plate, remove the screw and pre-drill with
the appropriate drill bit. Then reinsert the
screw. (This condition may be caused by
very dense or thick cortical bone.)
Cleaning of the cannulated instruments
is necessary for proper function. The
cleaning stylet can clear debris in the
cannulations and prevent binding of the
instruments. The cleaning brush should
be used postoperatively.
15
Zimmer Periarticular Proximal Humeral Locking Plate
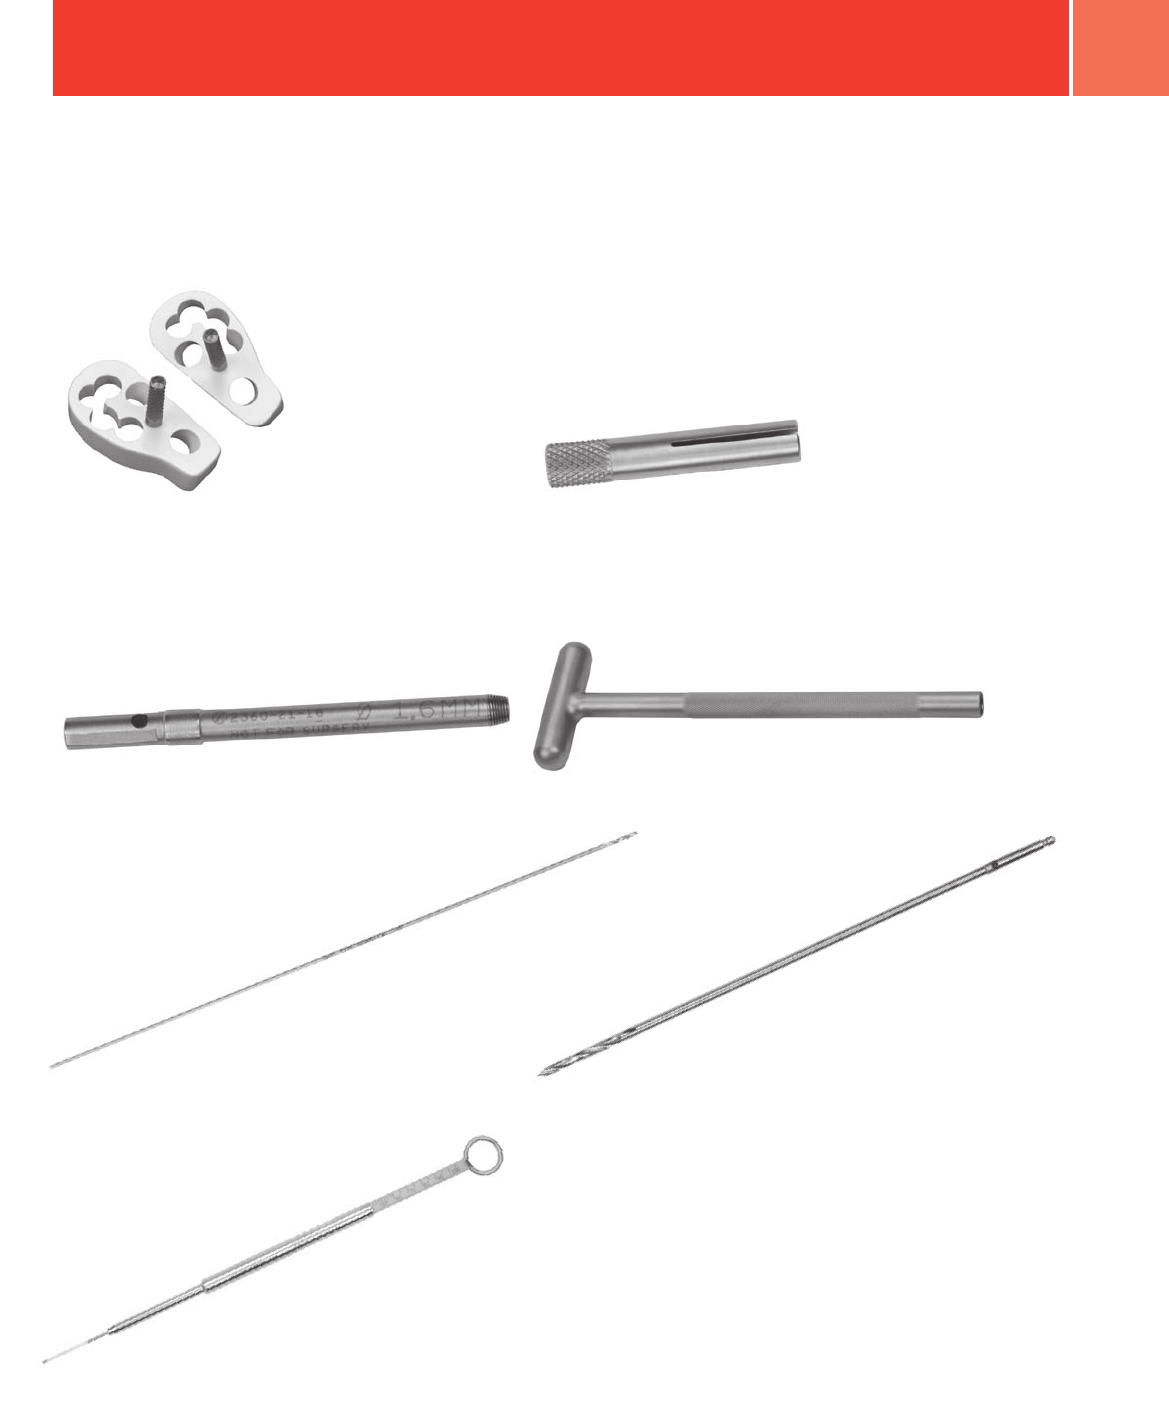
1.6mm Standard Cannula 00-2360-021-16
1.6mm Standard Drill Tip Guide Wire 00-2360-033-16
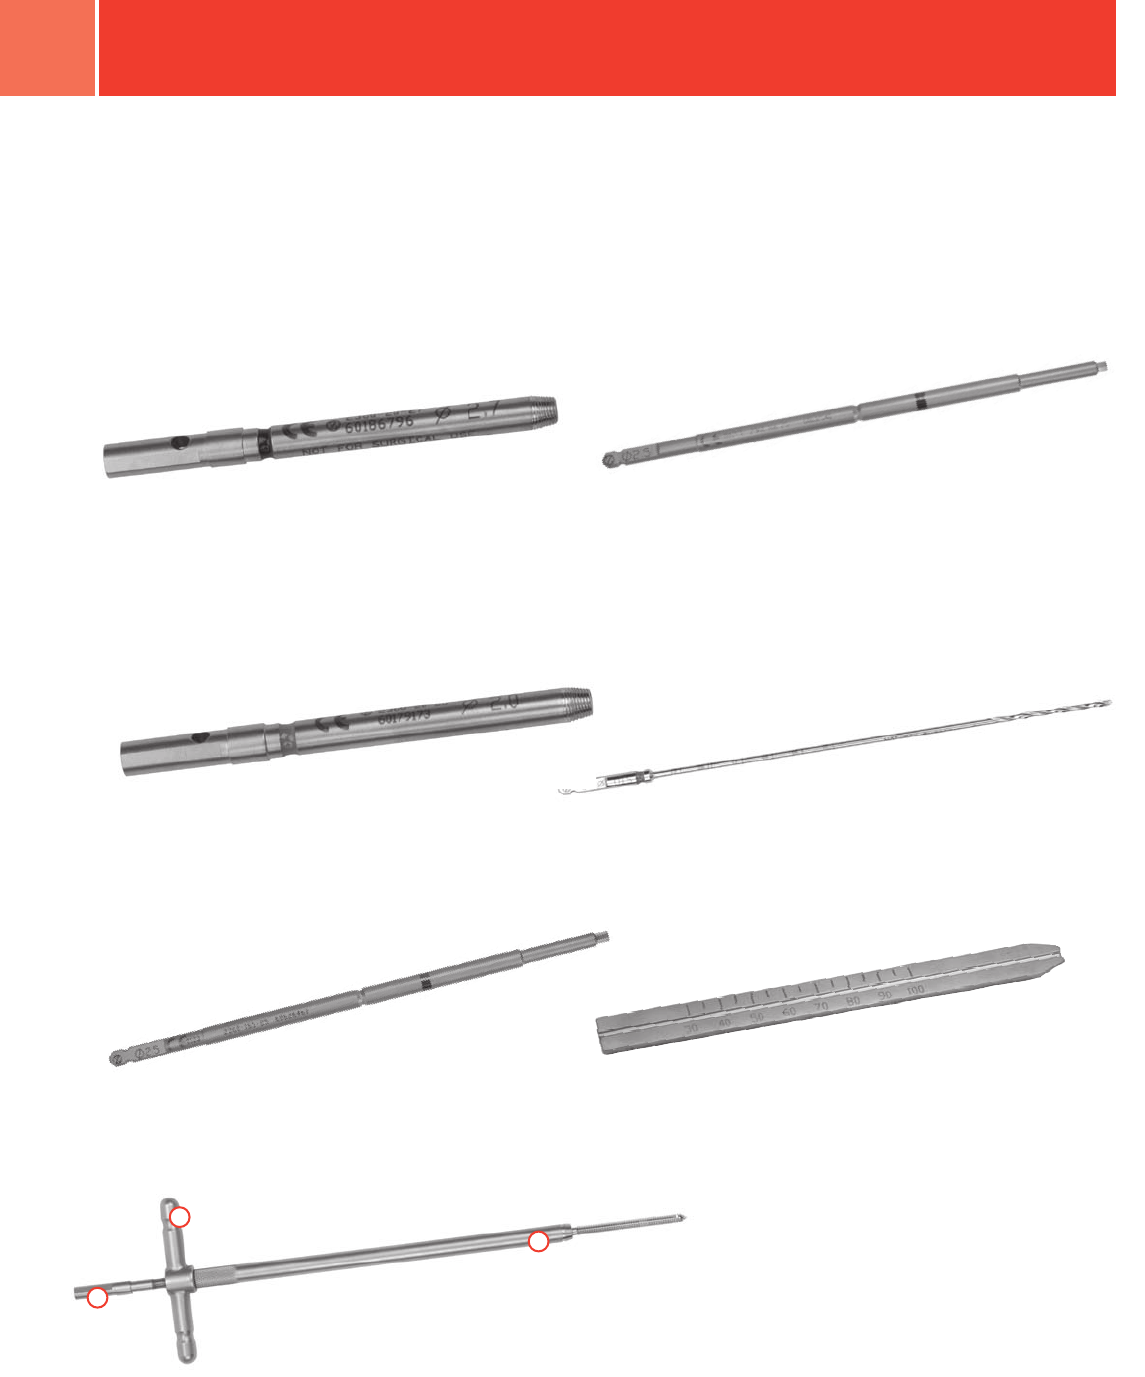
Instrument and Implants
Cannula Inserter 00-2360-088-00
3.5mm Standard Jig Sleeve 00-2360-093-04
3.5mm Proximal Humeral Plate Jig,
Right 00-2360-092-01, Left 00-2360-092-02
3.5mm/2.7mm Locking Screw Depth Gauge
00-2360-040-35
2.7 Standard Drill 00-2360-205-27
16 Zimmer Periarticular Proximal Humeral Locking Plate
2.0mm Standard Drill 00-2360-175-20
2.5mm Hex Standard Cannulated Screwdriver
00-2360-166-25
2.7mm Standard Cannula 00-2360-020-27
3.5mm / 2.7mm Locking Plate Reduction Instrument
00-2360-011-01
2.0mm Standard Cannula 00-2360-020-20
2.5mm Hex Standard Screwdriver 00-2360-165-25
3.5mm / 2.7mm Plate Reduction Sleeve 00-2360-011-02
Spin Knob 00-2360-011-03
1
3
2
1
2
3
3.5mm Cannulated Locking Screw Standard Depth Gauge
00-2360-041-35

17
Zimmer Periarticular Proximal Humeral Locking Plate
2.7mm Locking Screw Tap 00-2360-153-27 3.5mm Locking Screw Tap 00-2360-153-35
3.5mm Cannulated Locking Screw Tap 00-2360-154-35
Cleaning Brush 00-1147-076-00 Cleaning Stylet 00-1147-071-00

18 Zimmer Periarticular Proximal Humeral Locking Plate
Order Information
Part Number Description
00-2360-000-02 3.5mm/2.7mm Periarticular Locking
Instrument Set
00-2360-021-16 1.6mm Standard Cannula
00-2360-033-16 1.6mm Standard Drill Tip Guide Wire
00-2360-011-01 3.5mm / 2.7mm Locking Plate Reduction
Instrument
00-2360-011-02 3.5mm / 2.7mm Locking Plate Reduction
Sleeve
00-2360-011-03 Plate Reduction Spin Knob
00-2360-041-35 3.5mm Cannulated Locking Screw Depth
Gauge
00-2360-171-27 2.7mm Standard Cannulated Drill QC
00-1147-071-00 Cleaning Stylet
00-1147-076-00 Cleaning Brush
00-2360-165-25 2.5mm Hex Standard Screwdriver
00-2360-166-25 2.5mm Hex Standard Cannulated Screwdriver
00-2360-088-00 Cannula Inserter
00-2360-020-27 2.7mm Standard Cannula
00-2360-205-27 2.7mm Standard Drill
00-2360-040-35 3.5mm/2.7mm Locking Screw Standard
Depth Gauge
00-2360-020-20 2.0mm Standard Cannula
00-2360-093-04 3.5mm Standard Jig Sleeve
00-2360-175-20 2.0mm Standard Drill
00-2360-153-27 2.7mm Locking Screw Tap
00-2360-153-35 3.5mm Locking Screw Tap
00-2360-154-35 3.5mm Cannulated Locking Screw Tap
00-2358-040-05 3.5mm/2.7mm Locking Screw and
Instrument Case
00-4812-045-00 Large Hex Screwdriver
00-2360-065-00 2.5mm Screwdriver Stop Ring
00-2360-080-00 Torque Limiting Attachment
00-4811-035-01 Handle, QC, Phenolic
00-4812-035-00 Small Hex Screwdriver
00-1147-053-00 Cannulated Ratchet Handle
00-2359-000-02 3.5mm / 2.7mm Locking Screw Set
00-2359-030-36 3.5mm Cannulated Locking Screw 30mm Lng
00-2359-035-36 3.5mm Cannulated Locking Screw 35mm Lng
00-2359-040-36 3.5mm Cannulated Locking Screw 40mm Lng
00-2359-045-36 3.5mm Cannulated Locking Screw 45mm Lng
00-2359-050-36 3.5mm Cannulated Locking Screw 50mm Lng
00-2359-055-36 3.5mm Cannulated Locking Screw 55mm Lng
00-2359-060-36 3.5mm Cannulated Locking Screw 60mm Lng
00-2359-065-36 3.5mm Cannulated Locking Screw 65mm Lng
00-2359-070-36 3.5mm Cannulated Locking Screw 70mm Lng
00-2359-075-36 3.5mm Cannulated Locking Screw 75mm Lng
00-2359-080-36 3.5mm Cannulated Locking Screw 80mm Lng
00-2359-085-36 3.5mm Cannulated Locking Screw 85mm Lng
00-2359-090-36 3.5mm Cannulated Locking Screw 90mm Lng
00-2359-030-37 3.5mm Cannulated Conical Screw 30mm Lng
00-2359-035-37 3.5mm Cannulated Conical Screw 35mm Lng
00-2359-040-37 3.5mm Cannulated Conical Screw 40mm Lng
00-2359-045-37 3.5mm Cannulated Conical Screw 45mm Lng
00-2359-050-37 3.5mm Cannulated Conical Screw 50mm Lng
00-2359-055-37 3.5mm Cannulated Conical Screw 55mm Lng
00-2359-060-37 3.5mm Cannulated Conical Screw 60mm Lng
00-2359-065-37 3.5mm Cannulated Conical Screw 65mm Lng
00-2359-070-37 3.5mm Cannulated Conical Screw 70mm Lng
00-2359-012-35 3.5mm Locking Screw 12mm Lng
00-2359-014-35 3.5mm Locking Screw 14mm Lng
00-2359-016-35 3.5mm Locking Screw 16mm Lng
00-2359-018-35 3.5mm Locking Screw 18mm Lng
00-2359-020-35 3.5mm Locking Screw 20mm Lng
00-2359-022-35 3.5mm Locking Screw 22mm Lng
00-2359-024-35 3.5mm Locking Screw 24mm Lng
00-2359-026-35 3.5mm Locking Screw 26mm Lng
00-2359-028-35 3.5mm Locking Screw 28mm Lng
00-2359-030-35 3.5mm Locking Screw 30mm Lng
00-2359-032-35 3.5mm Locking Screw 32mm Lng
00-2359-034-35 3.5mm Locking Screw 34mm Lng
00-2359-036-35 3.5mm Locking Screw 36mm Lng
00-2359-038-35 3.5mm Locking Screw 38mm Lng
00-2359-040-35 3.5mm Locking Screw 40mm Lng
00-2359-042-35 3.5mm Locking Screw 42mm Lng
00-2359-044-35 3.5mm Locking Screw 44mm Lng
00-2359-046-35 3.5mm Locking Screw 46mm Lng
00-2359-048-35 3.5mm Locking Screw 48mm Lng

19
Zimmer Periarticular Proximal Humeral Locking Plate
00-2359-050-35 3.5mm Locking Screw 50mm Lng
00-2359-052-35 3.5mm Locking Screw 52mm Lng
00-2359-054-35 3.5mm Locking Screw 54mm Lng
00-2359-056-35 3.5mm Locking Screw 56mm Lng
00-2359-058-35 3.5mm Locking Screw 58mm Lng
00-2359-060-35 3.5mm Locking Screw 60mm Lng
00-2359-065-35 3.5mm Locking Screw 65mm Lng
00-2359-070-35 3.5mm Locking Screw 70mm Lng
00-2359-075-35 3.5mm Locking Screw 75mm Lng
00-2359-080-35 3.5mm Locking Screw 80mm Lng
00-2359-085-35 3.5mm Locking Screw 85mm Lng
00-2359-090-35 3.5mm Locking Screw 90mm Lng
00-2359-010-27 2.7mm Locking Screw 10mm Lng
00-2359-012-27 2.7mm Locking Screw 12mm Lng
00-2359-014-27 2.7mm Locking Screw 14mm Lng
00-2359-016-27 2.7mm Locking Screw 16mm Lng
00-2359-018-27 2.7mm Locking Screw 18mm Lng
00-2359-020-27 2.7mm Locking Screw 20mm Lng
00-2359-022-27 2.7mm Locking Screw 22mm Lng
00-2359-024-27 2.7mm Locking Screw 24mm Lng
00-2359-026-27 2.7mm Locking Screw 26mm Lng
00-2359-028-27 2.7mm Locking Screw 28mm Lng
00-2359-030-27 2.7mm Locking Screw 30mm Lng
00-2359-032-27 2.7mm Locking Screw 32mm Lng
00-2359-034-27 2.7mm Locking Screw 34mm Lng
00-2359-036-27 2.7mm Locking Screw 36mm Lng
00-2359-038-27 2.7mm Locking Screw 38mm Lng
00-2359-040-27 2.7mm Locking Screw 40mm Lng
00-2359-042-27 2.7mm Locking Screw 42mm Lng
00-2359-044-27 2.7mm Locking Screw 44mm Lng
00-2359-046-27 2.7mm Locking Screw 46mm Lng
00-2359-048-27 2.7mm Locking Screw 48mm Lng
00-2359-050-27 2.7mm Locking Screw 50mm Lng
00-2359-052-27 2.7mm Locking Screw 52mm Lng
00-2359-054-27 2.7mm Locking Screw 54mm Lng
00-2359-056-27 2.7mm Locking Screw 56mm Lng
00-2359-058-27 2.7mm Locking Screw 58mm Lng
00-2359-060-27 2.7mm Locking Screw 60mm Lng
00-2358-000-05 Prox Lat Hum Lock Plt Set
00-2358-002-04 Proximal Lateral Humeral Locking Plate,
4 Hole 90mm Lng, Left
00-2358-002-06 Proximal Lateral Humeral Locking Plate,
6 Hole 114mm Lng, Left
00-2358-002-08 Proximal Lateral Humeral Locking Plate,
8 Hole, 138mm Lng, Left
00-2358-002-12 Proximal Lateral Humeral Locking Plate,
12 Hole, 186mm Lng, Left
00-2358-002-16 Proximal Lateral Humeral Locking Plate,
16 Hole, 234mm Lng, Left
00-2358-001-04 Proximal Lateral Humeral Locking Plate,
4 Hole, 90mm Lng, Right
00-2358-001-06 Proximal Lateral Humeral Locking Plate,
6 Hole, 114mm Lng, Right
00-2358-001-08 Proximal Lateral Humeral Locking Plate,
8 Hole, 138mm Lng, Right
00-2358-001-12 Proximal Lateral Humeral Locking Plate,
12 Hole, 186mm Lng, Right
00-2358-001-16 Proximal Lateral Humeral Locking Plate,
16 Hole, 234mm Lng, Right
00-2360-000-14 Prox Lat Hum Plate Std/Jig Set
00-2360-092-01 Proximal Lateral Humeral Plate Jig, Right
00-2360-092-02 Proximal Lateral Humeral Plate Jig, Left
00-2358-030-05 Proximal Lateral Humeral Plate/Jig Case
00-2360-093-03 Standard Jig Set Screw

Contact your Zimmer representative or visit us at www.zimmer.com
97-2347-041-00 Rev.3 0903-T0 3ML Printed in USA ©2006, 2009, 2010 Zimmer, Inc.
+H124972347041001/$090330C10
