Zoom H4n Pro English
User Manual: Pdf Rent a Zoom H4n Pro Handy Recorder at LensProToGo.com
Open the PDF directly: View PDF ![]() .
.
Page Count: 156 [warning: Documents this large are best viewed by clicking the View PDF Link!]
© 2016 ZOOM CORPORATION
Copying or reprinting this manual in part
or in whole without permission is prohibited.
OPERATION MANUAL
Handy Recorder

001
Introduction / H4n Pro features
H4n Pro features
Introduction
• An all-in-one handy recorder.
The H4n Pro is lightweight (294 g) with a very compact design and is equipped
with high quality stereo condenser microphones arranged in an XY pickup
pattern, a built-in speaker, SD card recording, a mixer and internal effects.
You can enjoy recording and creating your own music anytime, anywhere with
the H4n Pro.
• Versatile eld recorder with multi-track capability.
The H4n Pro is capable of recording in several different operation modes.
STEREO mode enables high-quality stereo recording. 4CH mode can record 2
sound sources simultaneously in stereo. MTR mode allows playback of 4 tracks
and recording of 2 tracks simultaneously. You can use it as a eld recorder to
record melodies and band performances on-the-y and to capture sound effects.
You can also use it as a multitrack recorder to make songs by overdubbing instru-
ments and vocals. Furthermore, in STAMINA mode you can record in stereo for
up to 11 hours using batteries only.
• New 90/120°-variable XY stereo mic
The H4n Pro allows you to adjust the angle of the onboard microphones to address
a wider range of recording scenarios. Set the microphones to 120° for a wider area
of sound, or set them to 90° for a more focused sound source. Either way, the
mics retain their XY conguration, so you can record natural stereo sound with
no phase cancellation.
• Connect mics and guitars directly using combined XLR/
standard phone jacks
The H4n Pro includes input jacks for connections that can accommodate a variety
of recording styles. Microphones, including stereo mics and condensers, electric
guitars, basses and keyboards can all be connected directly.
• Use as an audio interface and SD card with a computer
An onboard USB 2.0 Hi-Speed port allows direct connection to a computer. You
can use it as an audio interface with built-in effects (sampling rate limited to 44.1
kHz when using the effects). You can also use the H4n Pro as an SD card reader
for your computer. You can transfer recorded les to your computer and use them
to create audio CDs or work with them in DAW software.
• Tuner, metronome, karaoke and various other functions
The tuner functions include not only a standard chromatic tuner, but also support
less common tunings, such as for 7-string guitars and 5-string basses. The metro-
nome function is convenient for practice and multitrack recording. You can also
use the H4n Pro as a practice device.
Use the SPEED function to adjust the playback speed from 50–150%. The
KARAOKE functions include center canceling for stereo les and variable key
control, making it valuable for language learning and voice training.
Thank you very much for purchasing our ZOOM H4n Pro Handy Recorder.
The H4n Pro has the following special features.
Please read this manual carefully to fully understand the functions of the H4n Pro so that you can make the most of it for many years.
After reading this manual, please keep it with the warranty in a safe place.
002
Introduction / Applications
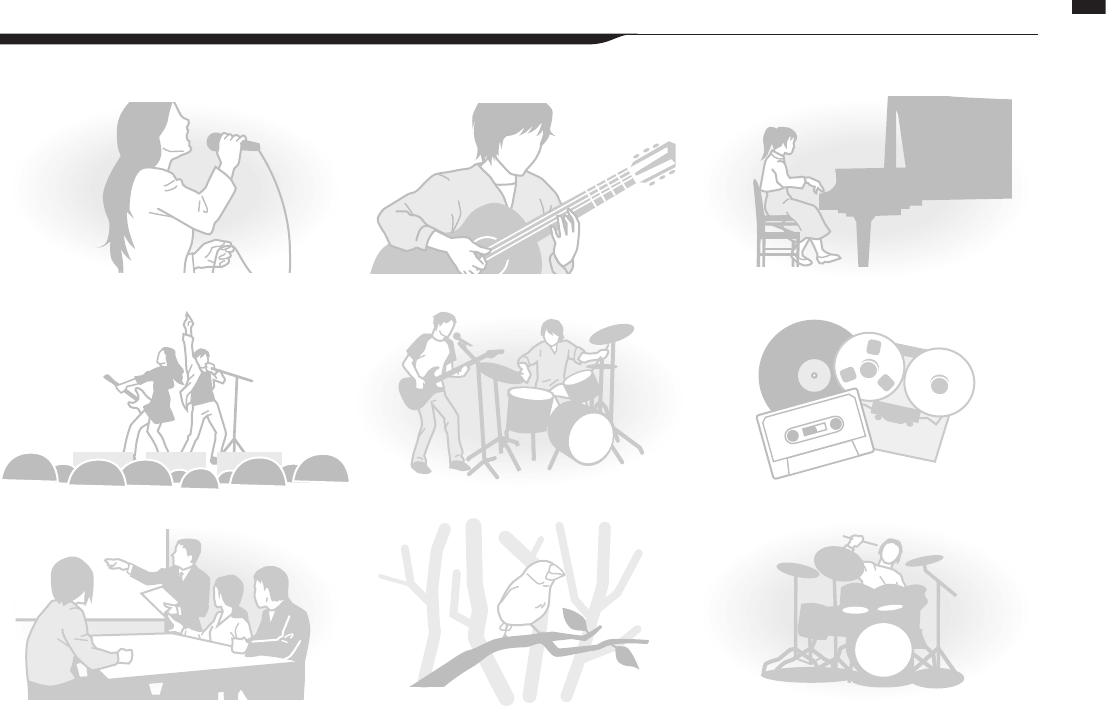
The H4n Pro is ideal for these applications
Vocal recording
Recording live performances
Recording meetings
Recording acoustic guitars
Band practices
Field recording
Piano recitals
Transferring analog sound sources to digital
Drum practice recording

003
Introduction / Contents
Contents
H4n Pro features .......................................................................................... 001
The H4n Pro is ideal for these applications .................................................. 002
Contents ....................................................................................................... 003
Safety precautions for users ........................................................................ 006
Copyright warnings ...................................................................................... 007
Getting started
1-1 RecordingowusingtheH4nPro ................................................. 009
1-2 Easy recording guide (STEREO mode) .......................................... 011
2-1 Names and functions of parts ........................................................ 013
3 Battery/Power setting .................................................................... 015
4-1 UsingthePOWER/HOLDswitchandturningthepoweron/o ..... 017
4-2 Using recording and transport buttons .......................................... 019
4-3 Using TRACK 1–4 buttons ............................................................. 020
4-4 Using INPUT MIC, 1 and 2 buttons ............................................... 021
4-5 Using REC LEVEL and VOLUME buttons ...................................... 022
4-6 Using the DIAL and the MENU button ........................................... 023
5-1 Loading an SD card ....................................................................... 025
5-2 Setting the date and time (DATE/TIME) ......................................... 026
6-1 Setup: Connecting external devices .............................................. 027
6-2 Setup: Built-in microphones .......................................................... 028
6-3 Setup: Built-in microphones/external mic with plug-in power ....... 029
6-4 Setup: INPUT 1/2 connections and phantom power ..................... 030
6-5 Using as a USB audio interface ..................................................... 031
6-6 Setup: Using as a USB SD card reader ......................................... 033
6-7 Setup: Built-in speaker .................................................................. 034
7-1 Mode overview ............................................................................... 035
7-2 Switchingandconrmingmodes .................................................. 036
7-3 Mode details .................................................................................. 037
8-1 Mode screens: STEREO and STAMINA modes............................. 038
8-2 Mode screens: 4CH mode ............................................................. 039
8-3 Mode screens: MTR mode ............................................................ 040
8-4 Mode screens: MAIN MENU .......................................................... 041
9 Optional remote control operation ................................................. 043
Operations
1-01 Settings/recording: Setting input sources and recording levels .... 045
1-02
Settings/recording: Recording in STEREO and STAMINA modes
... 047
1-03 Settings/recording: Recording format (REC FORMAT) ................ 049
1-04 Settings/recording: File name (FILE NAME) ................................... 050
1-05 Settings/recording: 4CH mode recording ...................................... 051
1-06-1 Settings/recording: MTR mode recording (REC MODE) ............... 053
1-06-2 Settings/recording: MTR mode recording (OVER WRITE) ............. 055
1-06-3 Settings/recording: MTR mode recording (ALWAYS NEW) ........... 056

004
Introduction / Contents
1-07 Settings/recording: TRACK MENU ................................................ 057
1-08-1 Settings/recording: Automatic re-recording (PUNCH IN/OUT) ..... 059
1-08-2 Settings/recording: Manual re-recording (PUNCH IN/OUT) .......... 061
2-01-1 Recording functions: AUTO REC ................................................... 063
2-01-2 Recording functions: AUTO REC STOP ........................................ 064
2-02 Recording functions: PRE REC...................................................... 065
2-03 Recording functions: LO CUT ........................................................ 066
2-04 Recording functions: COMP/LIMIT ................................................ 067
2-05 Recording functions: REC LEVEL AUTO ....................................... 069
2-06 Recording functions: MONITOR .................................................... 070
2-07 Recording functions: INPUT 1/2 LEVEL LINK................................ 071
2-08 Recording functions: MONO MIX .................................................. 072
2-09 Recording functions: MS STEREO MATRIX .................................. 073
3-01-1 Tuner: CHROMATIC TUNER .......................................................... 075
3-01-2 Tuner: other TUNER types ............................................................. 076
3-01-3 Tuner: TUNER CALIB ..................................................................... 077
3-01-4 Tuner: TUNER INPUT..................................................................... 078
3-02 Metronome (METRONOME)........................................................... 079
3-03-1 Eectsoverview ............................................................................. 081
3-03-2 Eects(EFFECT) ............................................................................ 083
3-03-3 Patch editing (EFFECT EDIT) ......................................................... 084
3-03-4 PRE AMP module editing (EFFECT EDIT: PRE AMP) .................... 085
3-03-5 EFX module editing (EFFECT EDIT: EFX) ....................................... 086
3-03-6 EFFECT EDIT: LEVEL/RENAME..................................................... 087
3-03-7 EFFECT EDIT: STORE ................................................................... 088
3-03-8 Importing patches from other projects (EFFECT IMPORT) ........... 089
3-04-1 Karaoke preparation (KARAOKE) ................................................... 091
3-04-2 Karaoke recording (KARAOKE) ...................................................... 093
4-01 Playback: File Playback (STEREO, 4CH and STAMINA modes) ... 094
4-02 Playback: PLAY MODE .................................................................. 095
4-03 Playback: Setting marks ................................................................ 096
4-04 Playback: AB REPEAT ................................................................... 097
4-05 Playback: SPEED ........................................................................... 099
4-06 Playback: MIXER............................................................................ 100
4-07 Playback:Playingles(MTRmode) ............................................... 101
4-08 Playback: Specifying a counter time ............................................. 102
5-01 Editing/Output: FOLDER SELECT ................................................. 103
5-02 Editing/Output: FILE SELECT ........................................................ 104
5-03 Editing/Output: FILE INFORMATION ............................................. 105
5-04 Editing/Output: FILE DELETE ........................................................ 106
5-05 Editing/Output: FILE DELETE ALL ................................................. 107
5-06 Editing/Output: FILE COPY............................................................ 108
5-07 Editing/Output: FILE RENAME ....................................................... 109
5-08 Editing/Output: FILE MP3 ENCODE .............................................. 111

005
Introduction / Contents
5-09 Editing/Output: FILE NORMALIZE ................................................. 112
5-10 Editing/Output: FILE STEREO ENCODE ........................................ 113
5-11 Editing/Output: MARK LIST ........................................................... 115
5-12 Editing/Output: DIVIDE .................................................................. 116
5-13 Editing/Output: MOVE ................................................................... 117
5-14 Editing/Output: NEW PROJECT .................................................... 118
5-15 Editing/Output: PROJECT SELECT ............................................... 119
5-16 Editing/Output: PROJECT DELETE ............................................... 120
5-17 Editing/Output: PROJECT RENAME.............................................. 121
5-18 Editing/Output: PROJECT COPY .................................................. 122
5-19 Editing/Output: PROJECT BOUNCE ............................................. 123
5-20 Editing/Output: PROJECT PROTECT ............................................ 125
6-01 Utilities: DISPLAY BACK LIGHT .................................................... 126
6-02 Utilities: MEMORY REC ................................................................. 127
6-03 Utilities: DISPLAY CONTRAST ...................................................... 129
6-04 Utilities: BATTERY TYPE................................................................ 130
6-05 Utilities: VERSION .......................................................................... 131
6-06 Utilities: FACTORY RESET............................................................. 132
6-07 Utilities: REMAIN ............................................................................ 133
6-08 Utilities: FORMAT ........................................................................... 134
6-09 Utilities: VERSION UP .................................................................... 135
6-10 Utilities: Using H2 and H4 SD cards .............................................. 136
Reference
Mainspecicationsbymode ....................................................................... 139
Settings available in each mode................................................................... 140
MTRmodeeecttypesandparameters ...................................................... 141
H4n Pro patch list ......................................................................................... 147
H4nProspecications ................................................................................. 149
Troubleshooting ........................................................................................... 150
Index ....................................................................................................... 151
006
Introduction / Safety precautions for users
Safety precautions for users
SAFETY PRECAUTIONS
In this manual, warning and caution symbols are used to
highlight dangers of accidents and troubles. Users should
read them to prevent accidents. The meanings of these sym-
bols are as follows:
If the users ignore this symbol and handle the de-
vice the wrong way, serious injury or death could
result.
If the users ignore this symbol and handle the de-
vice the wrong way, bodily injury and damage to
the equipment could result.
An action that is mandatory
An action that is prohibited
Please read through the following safety tips and precautions
to ensure hazard-free use of the H4n Pro.
Power requirements
AC adapter operation
Make sure to use only a DC5 center plus 1A
(ZOOM AD 14) AC adapter. The use of other
than the specied type could damage the unit
and pose a safety hazard.
Connect the AC adapter only to an AC outlet
that supplies the rated voltage required by the
adapter.
When disconnecting the AC adapter from the
AC outlet, make sure to grasp the adapter itself.
Never pull on the cable.
During lightning or when not using for an ex-
tended period, disconnect the AC adapter from
the AC outlet.
Battery operation
Use 2 commercially-available 1.5V AA batteries
(alkaline dry cell batteries or nickel metal hydride
batteries).
When not using for an extended period, remove
the batteries from the unit.
If battery leakage has occurred, wipe the battery
compartment and battery terminals carefully to
remove all remnant of battery uid.
When using the unit, the battery compartment
cover should be closed.
Install batteries with the correct +/− orientations.
Do not use new and old batteries together. Do
not use batteries of dierent brands or types
together.
Environment
To prevent unexpected troubles and malfunc-
tions, avoid using the H4n Pro in environments
where it will be exposed to:
• Extreme temperatures
• Heat sources such as radiators or stoves
• High humidity or moisture
• Excessive dust or sand
• Excessive vibration or shock
Handling
The H4n Pro is a precision instrument. Do not
exert undue pressure on the keys and other
controls. Take care not to drop or bump it, and
do not subject it to shock or excessive pressure,
which can cause serious trouble.
Take care that no foreign objects (coins, pins,
etc.) or liquids (water, alcoholic drinks or juice)
enter the unit.
Do not place the H4n Pro speaker close to other
precision instruments (watches and computers),
electronic medical instruments or magnetic cards.
Connecting cables and input and output jacks
You should always turn o the power to the H4n Pro
and all other equipment before connecting or discon-
necting any cables. Make sure to disconnect all con-
nection cables and the power cord before moving
the H4n Pro.
Alterations
Never open the case of the H4n Pro or attempt
to modify the product in any way since this
could result in damage to the unit.
Volume
Do not use the H4n Pro at a loud volume for
a long time since this could cause hearing im-
pairment.
USAGE PRECAUTIONS
Electrical interference
For safety considerations, the H4n Pro has been designed
to provide maximum protection against the emission of elec-
tromagnetic radiation from inside the device, and protection
from external interference. However, equipment that is very
susceptible to interference or that emits powerful electro-
magnetic waves should not be placed near the H4n Pro, as
the possibility of interference cannot be ruled out entirely.
With any type of digital control device, the H4n Pro included,
electromagnetic interference could cause malfunction and
could corrupt or destroy data. Care should be taken to mini-
mize the risk of damage.
Cleaning
Use a soft, dry cloth to clean the H4n Pro. If necessary,
slightly moisten the cloth. Do not use abrasive cleanser, wax,
or solvents (such as paint thinner or cleaning alcohol), since
these may dull the nish or damage the surface.
Breakdown and malfunction
If the unit becomes broken or malfunctions, immediately dis-
connect the AC adapter, turn the power o and disconnect
other cables. Contact the store where you bought the unit or
ZOOM service with the following information: product mod-
el, serial number and specic symptoms of breakdown or
malfunction, along with your name, address and telephone
number.
Please keep this manual in a convenient
place for future reference.

007
Introduction / Copyright warnings
Copyright warnings
■ Recording of live performances
Many artists and most live venues do not allow recording and photography and
will check for cameras and recorders at the entrance. Even if recording is allowed,
it is prohibited to sell, distribute, or upload to the Internet without the organizers
authorization. Copyright violation is a crime.
■ Music CDs and downloaded sound sources
Using music recorded on CDs and other media as well as downloaded sound
sources for purposes other than personal enjoyment (including, for example, play-
ing them in a concert hall or other location and altering songs) could be a violation
of copyright laws.
Zoom Corporation will not assume any responsibility related to infringements of
copyrights.
Trademarks:
• The SD and SDHC logos are trademarks.
• MPEG Layer-3 audio compression technology is licensed from Fraunhofer IIS and Sisvel
S.p.A.
• Windows®, Windows® 10, Windows®8, Windows® 7 and Windows Vista® are trademarks
or registered trademarks of Microsoft® Corporation.
• Macintosh and Mac OS are trademarks of Apple Inc.
• Other product names, registered trademarks and company names in this document are
the property of their respective companies.
For the purpose of improvement, product specications and appearance are subject to
change without notice.

008
Getting started
Getting started
〉〉〉〉 〉〉〉〉 〉〉〉〉
009
Operational overview / Recording ow using the H4n Pro
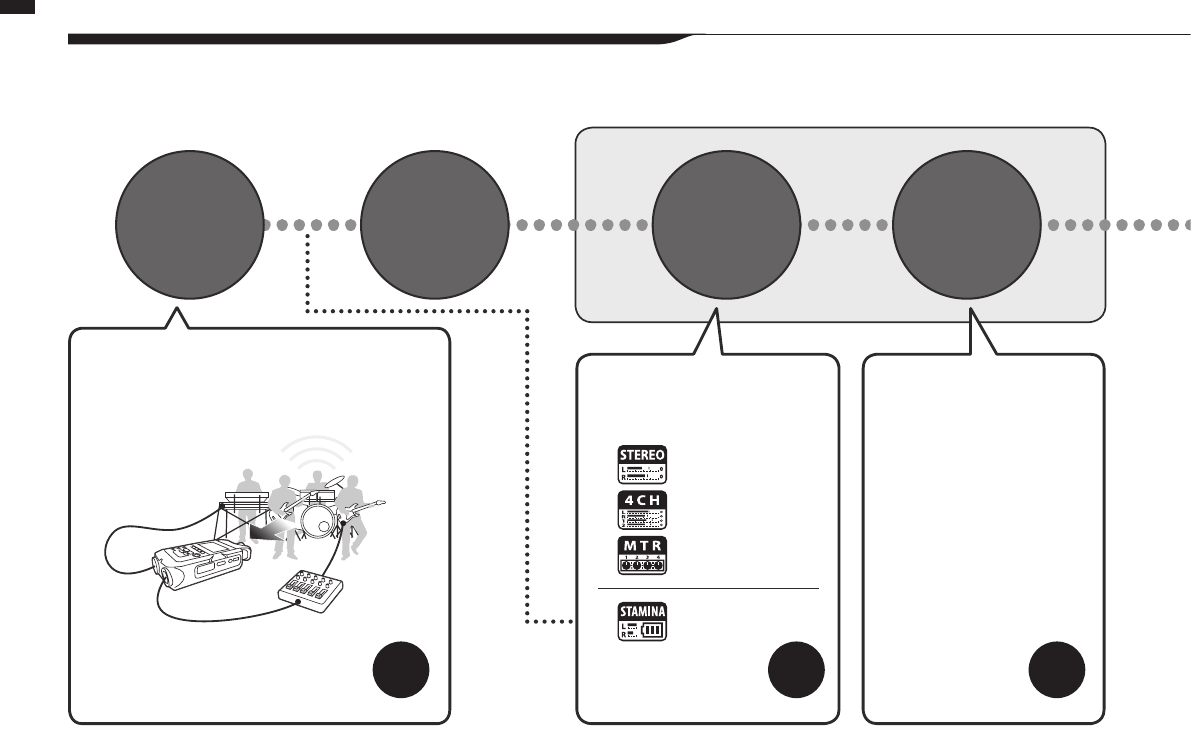
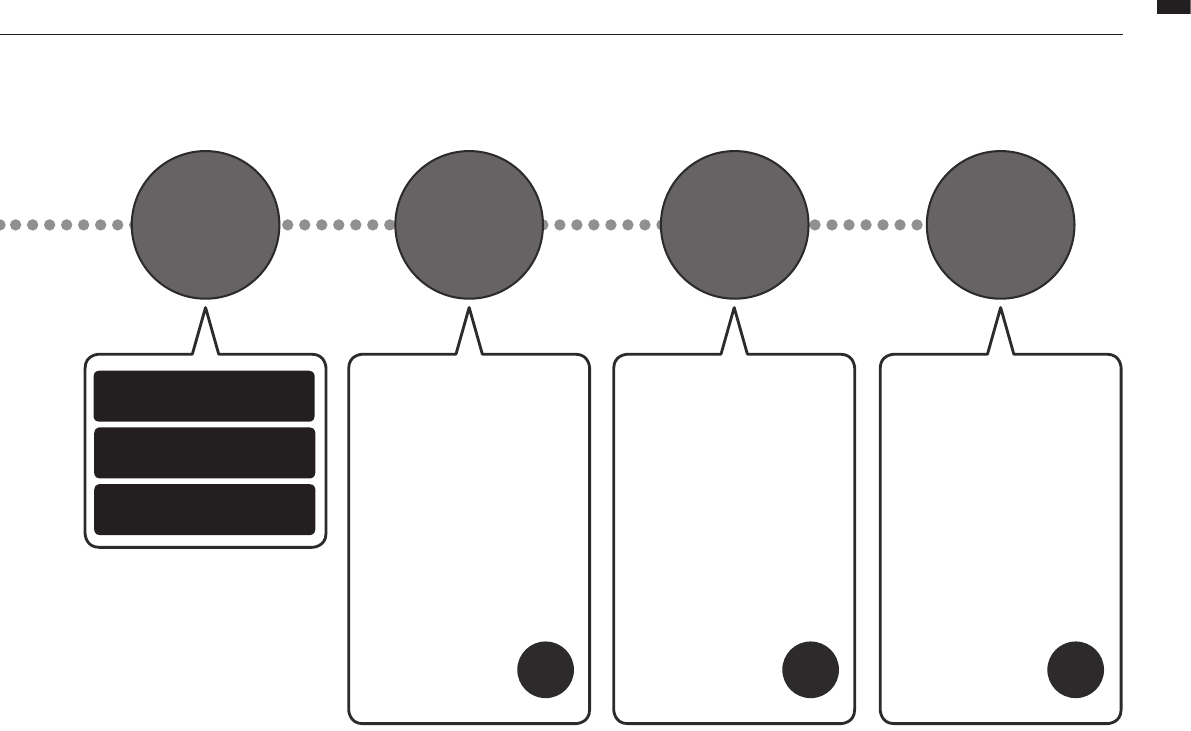
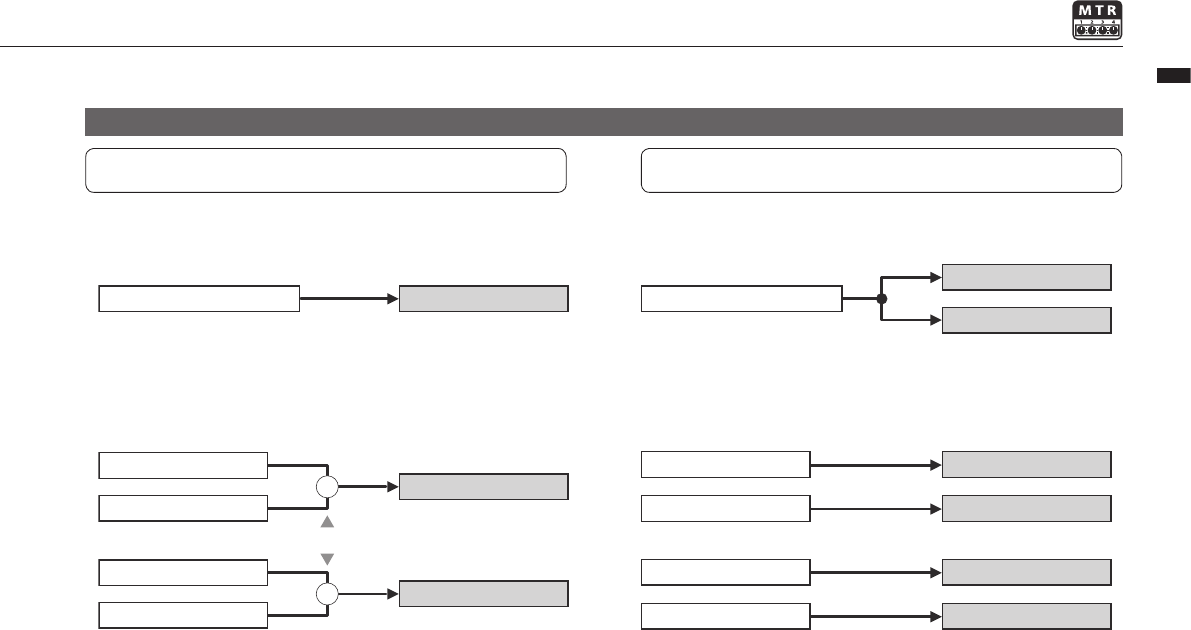
1-1 Recording ow using the H4n Pro
Operational overview
ThefollowingisthebasicowofrecordingoperationsfortheH4nPro.Dependingontherecordingapplication,
you can select which recording mode and audio quality setting is right for the situation.
In addition to the built-in mic, you can use the
external stereo mic input jack and INPUT 1 and 2
external input jacks. Phantom power and plug in
power are also supported.
You can select among 4 modes
according to the input source types,
and post-recording editing and output
needs.
Set-up
STEREO Mode
• AUTO REC
• REC LEVEL AUTO
• LO CUT
• COMP/LIMIT
• MONO MIX
• METRONOME
• EFFECT/PATCH
• KARAOKE etc.
4CH Mode
MTR Mode
STAMINA Mode
Set the recording level and other
settings as you like.
Connect
to other
audio
devices
Turn the
power on Select the
mode
Set the
recording
method
P.017
P.027 P.035 P.063-
〉〉〉〉 〉〉〉〉 〉〉〉〉
〉〉〉〉 〉〉〉〉 〉〉〉〉
010
Operational overview / Recording ow using the H4n Pro
• PLAY MODE
• AB REPEAT
• SPEED
• MARK LIST
etc.
Recording in STEREO/
STAMINA mode………...P.047
Recording in 4CH mode
...………P.051
Recording in MTR mode
…...……P.053
• PUNCH-IN/OUT
etc.
• FILE INFORMATION
• FILE MP3 ENCODE
• FILE STEREO ENCODE
• DIVIDE
• MOVE
• BOUNCE
etc.
Use these convenient ways to
swiftly review/playback parts of
recordings.
In MTR mode punch-in/out func-
tions allow you to re-record only
sections you want to correct.
Recordings are managed as les
and projects, and can be edited in
various ways.
Record Playback
and conrm
Re-record
Edit and
output
P.094- P.059- P.105-
〉〉〉〉
011
Operational overview / Easy recording guide
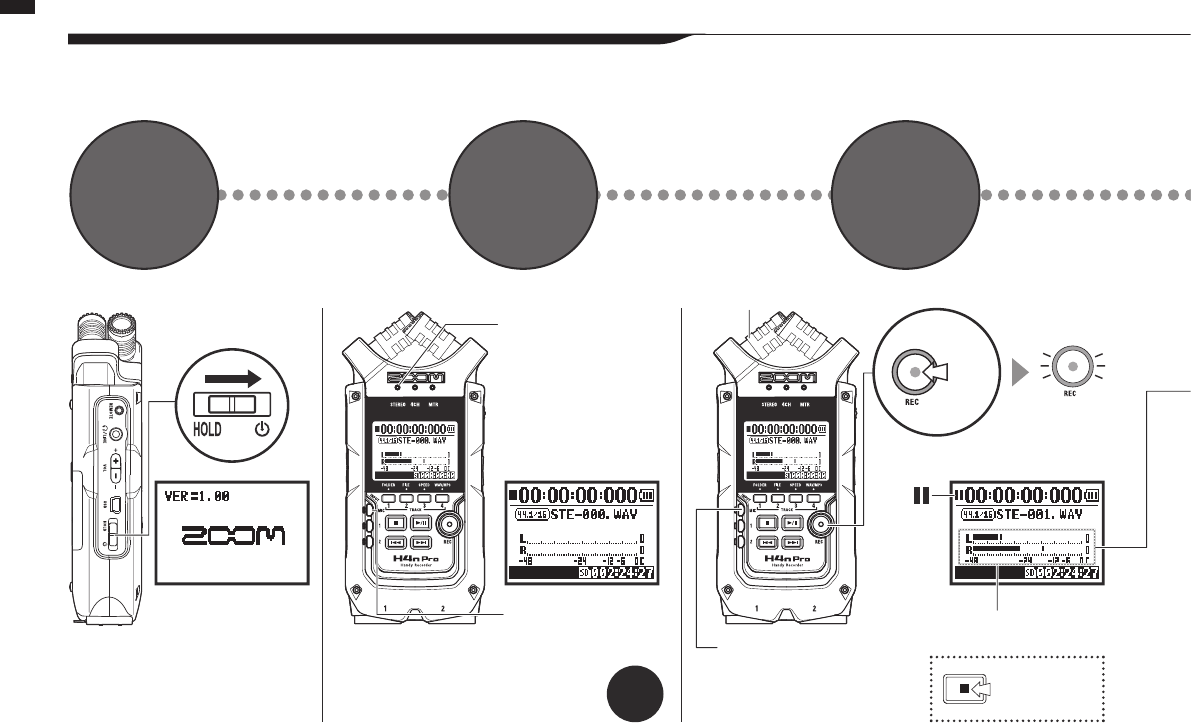
1-2 Easy recording guide (STEREO mode)
The following are basic recording instructions using the built-in stereo mic and built-in speaker in STEREO mode.
Turn the
power on
Move POWER
switch to ON
Left side Front panel
Stereo mode top screen
MIC button lit
*Input from built-in mic
MIC button lit
Monitor level meters
Press to stop
Recording
standby
Blinks
Blinks
Press
Input from
built-in mic
Ifmodeindicatororscreendierent
Newlemade
Stereo mode
indicator lit
Conrm
stereo
mode
Start
recording
standby
1 2 3
P.036
〉〉〉〉
〉〉〉〉
ー +
〉〉〉〉
012
Operational overview / Easy recording guide
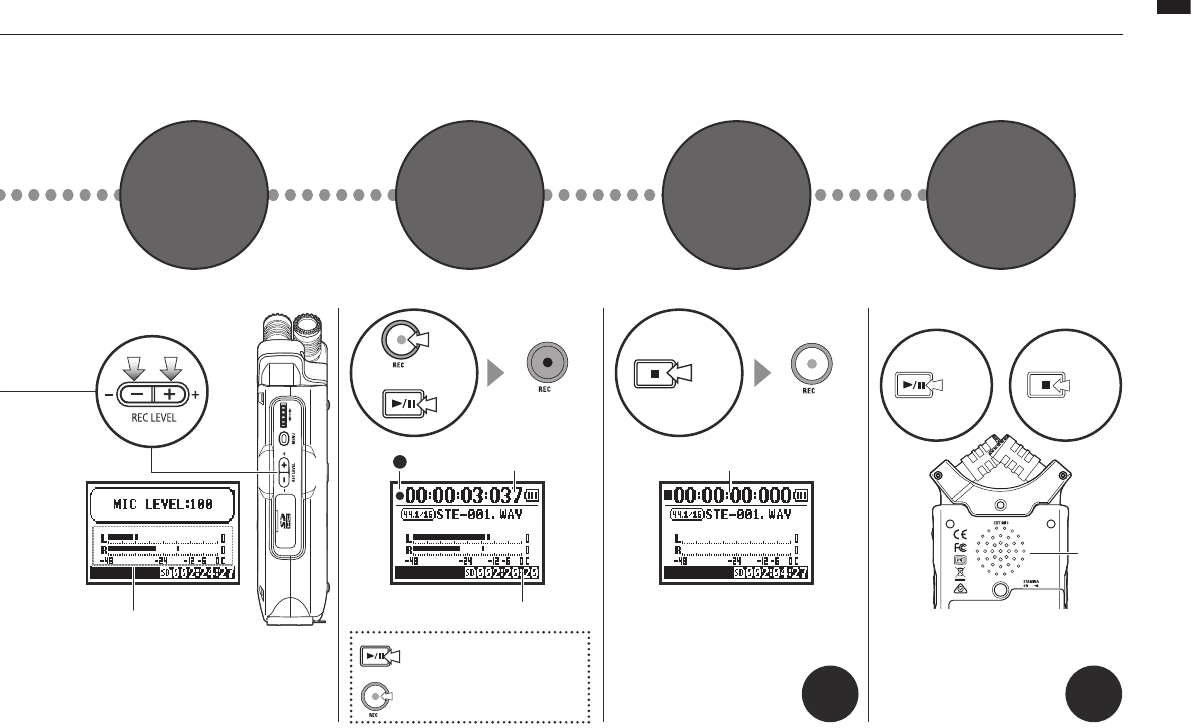
Adjust input level
Remaining recording time decreases
Recording
Counter
advances Counter returns to 00:00:00:000
Built-in
speaker
output
Pause/resume recording
Counter does not return to 0
Add mark
Add a mark when using WAV
leformat
Lit Unlit
or
Play Stop
Press Press Press Press
Stereo mode recording Stereo mode playback
Decrease Increase
Adjust
input level
Start
recording
Stop
recording Play it back
4 5 6 7
Right panel Back
P.047 P.094
013
Fundamentals / Names and functions of parts
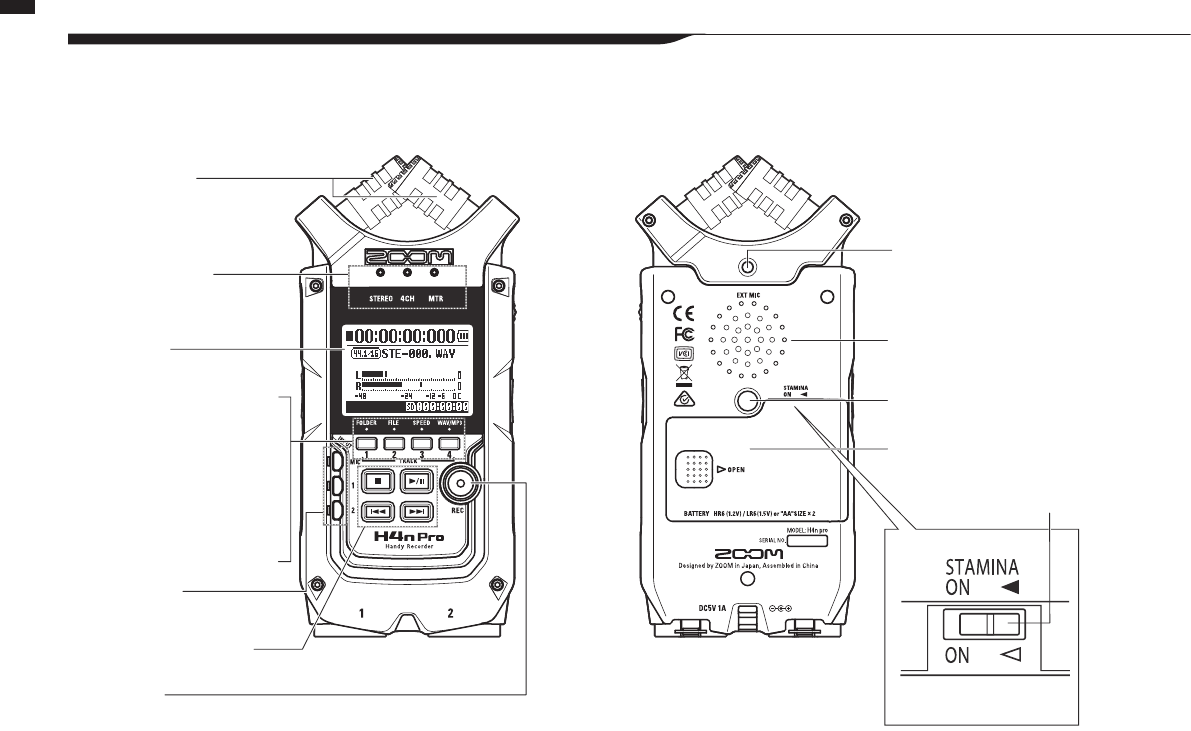
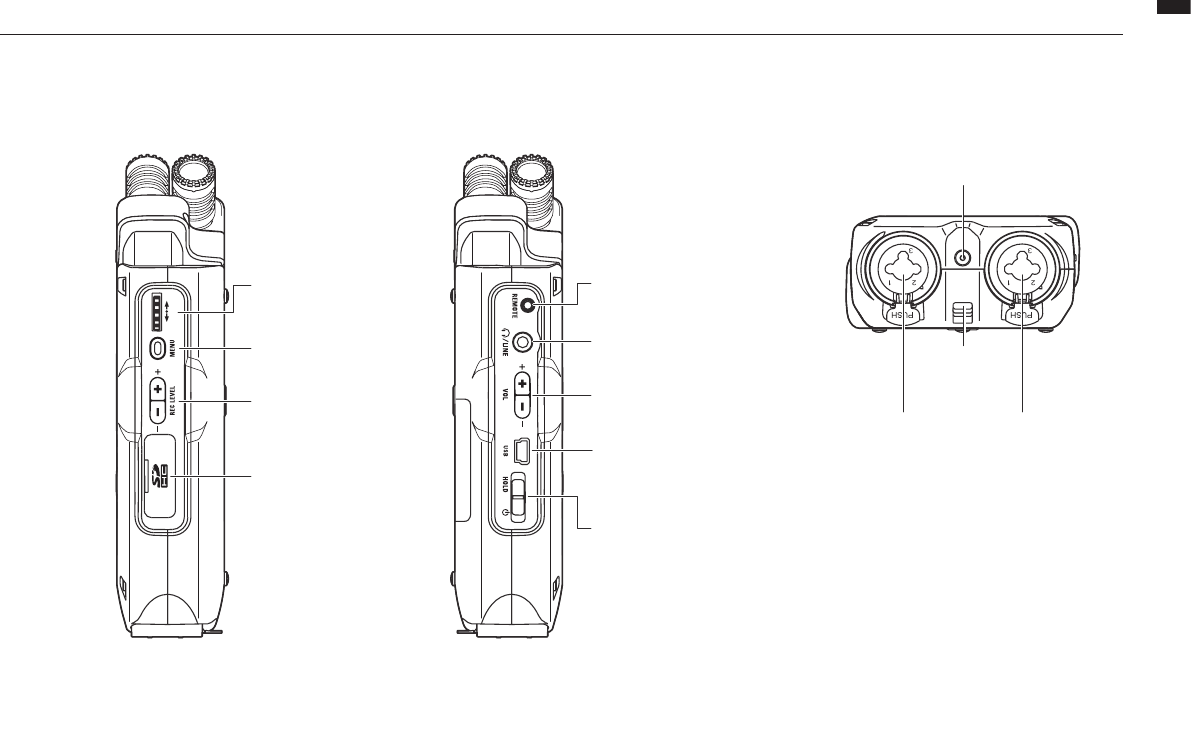
2-1 Names and functions of parts
Fundamentals
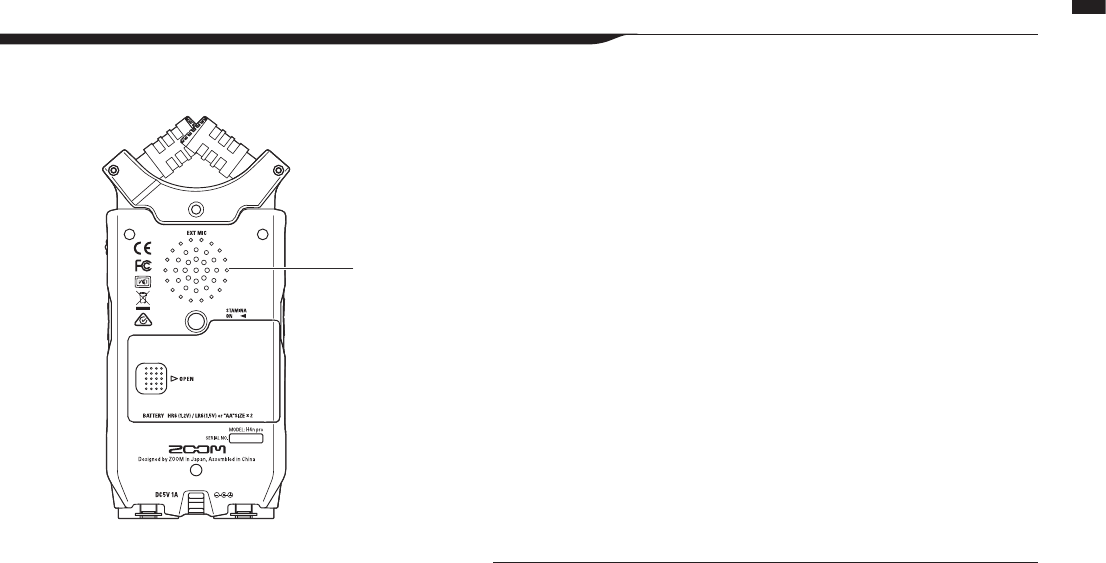
Front Back
Input jack for external stereo
mic that uses plug-in power
Built-in mono speaker
Threaded tripod mount
Battery cover
STAMINA switch
90/120° stereo
XY mic (built-in)
•STEREO/4CHmode
shortcut buttons
1 FOLDER
2 FILE
3 SPEED (Stereo mode)
4 WAV/MP3 (Stereo/4CH mode)
•MTRmodeTRACK
1–4 buttons
STEREO/4CH/MTR
mode indicators
Display with
backlight
INPUT
MIC, 1–2 buttons
Transport control buttons
REC button
014
Fundamentals / Names and functions of parts
Right side Left side Bottom
DIAL Optional remote
control jack
DC 5V AC adapter jack
Strap
attachment
hole
XLR/standard phone
input jack 1
XLR/standard phone
input jack 2
MENU button LINE/PHONE output
stereo mini jack
RECLEVEL(+/−) VOLUME(+/−)
SD card slot
USB jack
POWER/HOLD switch
015
Power / Battery/Power setting
3 Battery/Power setting
Power
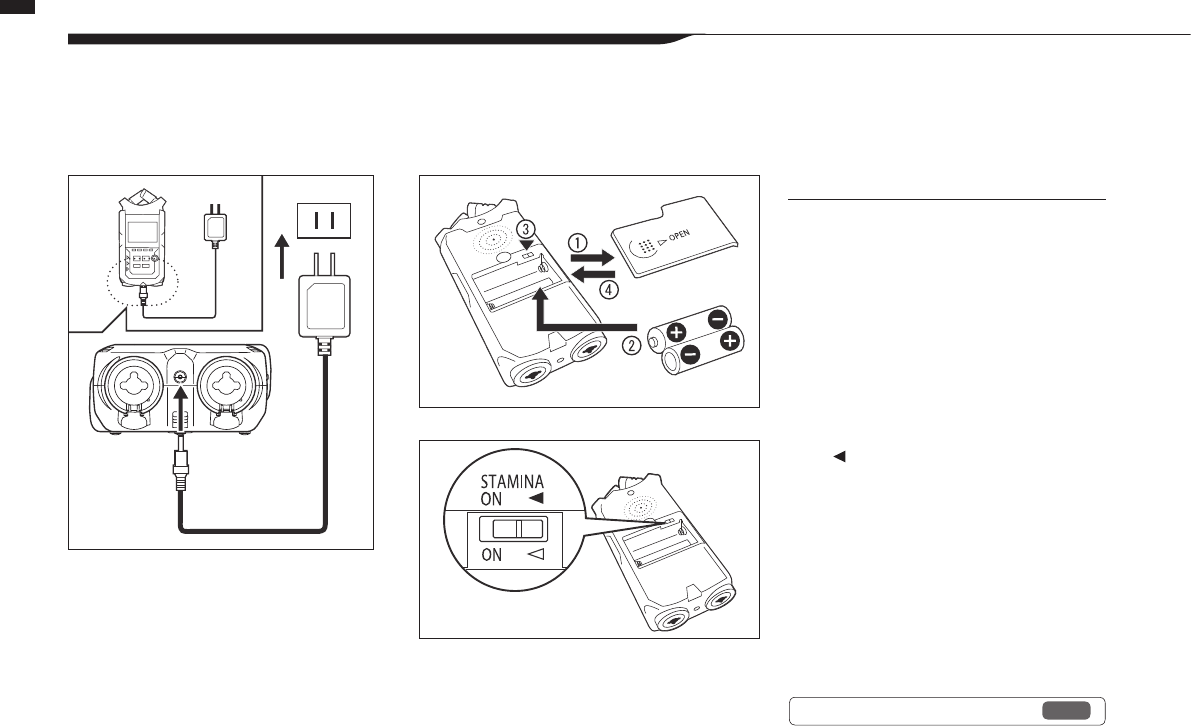
The H4n Pro can be powered by a standard power outlet or batteries.
• Using a standard power outlet • Using batteries
Always use the specied AC adapter.
Use of an AC adapter other
than the specied model
could cause malfunction.
SpeciedACadapter:
ZOOM AD-14A/D
Install two AA batteries. 1Open the battery
compartment cover.
NOTE:
Make sure the power is o!
Conrm that the power is o whenever you
open the battery compartment cover or
connect/disconnect the AC adapter. Failure to
do so could damage recording data.
2Insert the batteries.
(Follow the +/– orientation.)
3Set the STAMINA switch.
: Ordinary use
(using AC adapter or batteries)
ON: STAMINA mode on
(conserves power when using batteries)
4Close the battery
compartment cover.
Ref. ☞ Stamina mode explanation P.035
FULL
EMPTY
016
Power / Battery/Power setting
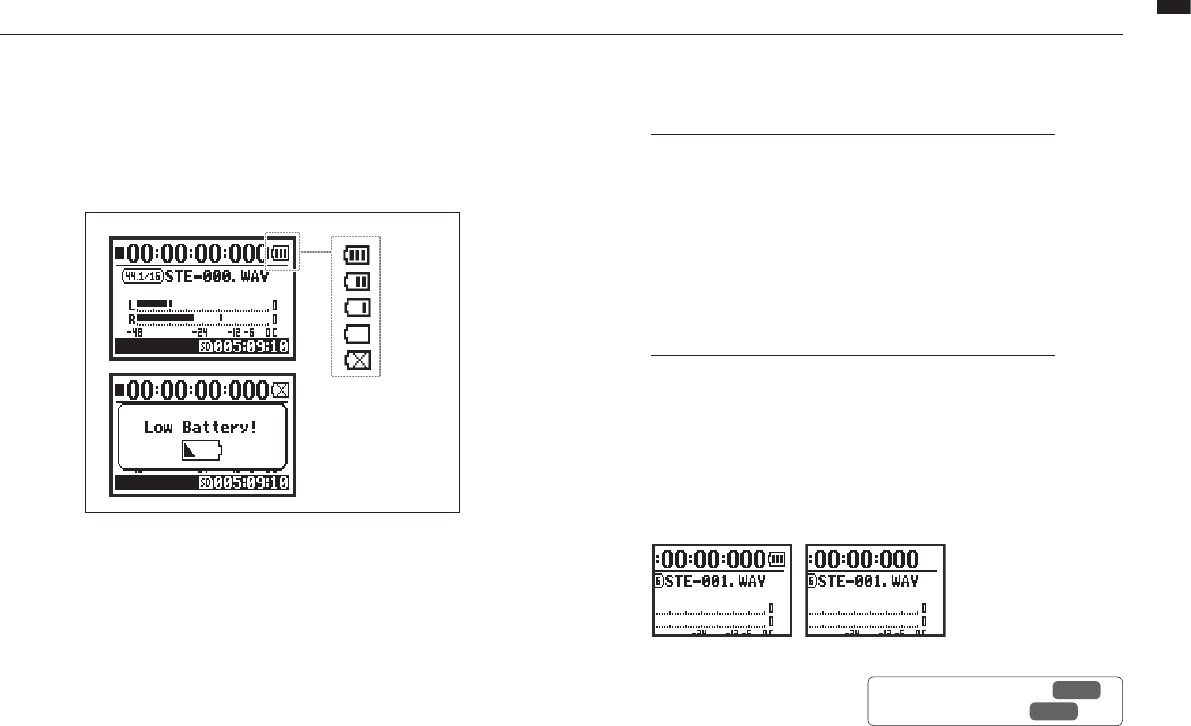
• Remaining battery charge
When a “Low Battery!” warning appears, immediately
turntheunitoandreplacethebatteries,orswitchto
an AC adapter.
If the remaining battery
charge becomes low,
“Low Battery” will be
shown every two sec-
onds and the unit will
soonturno.
NOTE:
Usable batteries
You can use conventional alkaline and nickel metal hydride
rechargeable batteries.
Power supply from USB
Connect a USB cable that is already connected to the
computer to the unit while it is o. Power will be supplied by
USB bus power and the unit will turn on automatically. This
function is only available when the H4n Pro is used as an SD
card reader or an audio interface.
HINT:
To measure the battery charge accurately
The remaining battery charge can be measured more
precisely by using the H4n Pro battery type setting.
Date and time setting retention
If the batteries die or the power supply is interrupted, the
H4n Pro will retain the date and time setting for about three
minutes. After this, these settings will be reset to their default
values.
Power supply indicator
Using batteries Using AC adapter
Ref. ☞ USB bus power P.033
Ref. ☞ Battery type P.130
017
Button operations / Using the POWER/HOLD switch and turning the power on/o
4-1
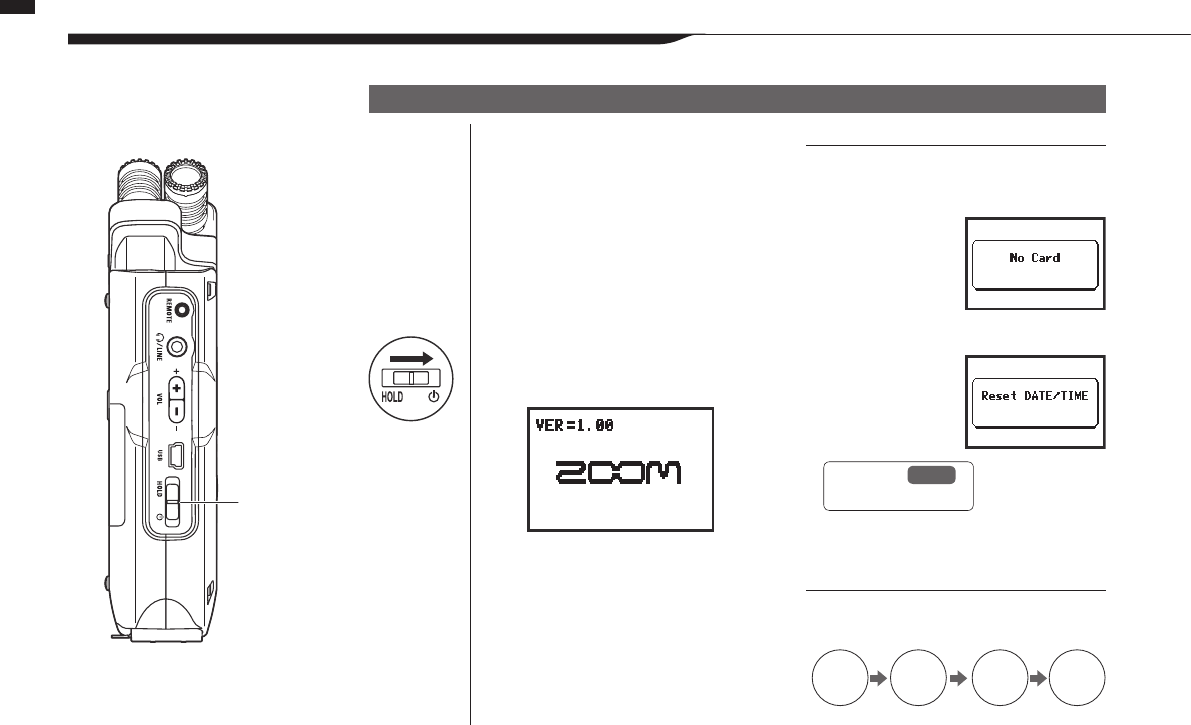
Using the POWER/HOLD switch and turning the power on/o
Button operations
Left side
POWER/HOLD
switch
1Turn all connected
equipment o rst.
2Insert an SD card.
3Slide the POWER
switch to turn the
power on and start up.
4Turn connected
instruments and
monitoring equipment
on in that order.
Turning the power on and starting up
NOTE:
• Before turning the power on, lower the
volume of instruments and monitors
connected to the H4n Pro.
• If the display reads
“No Card” when
starting up, make
sure that an SD
card is inserted
correctly.
• If the display says “Reset DATE/TIME”
when starting
up, the date and
time have been
set to their default
values.
Ref. ☞ P.026
Date and time setting
HINT: Turning multiple devices on
When many devices are connected, turn
them on in the following order.
Instruments
H4n Pro
ON ON ON ON
Mixer Amp
018
Button operations / Using the POWER/HOLD switch and turning the power on/o
1Turn the monitoring system and connected
instruments o in that order rst.
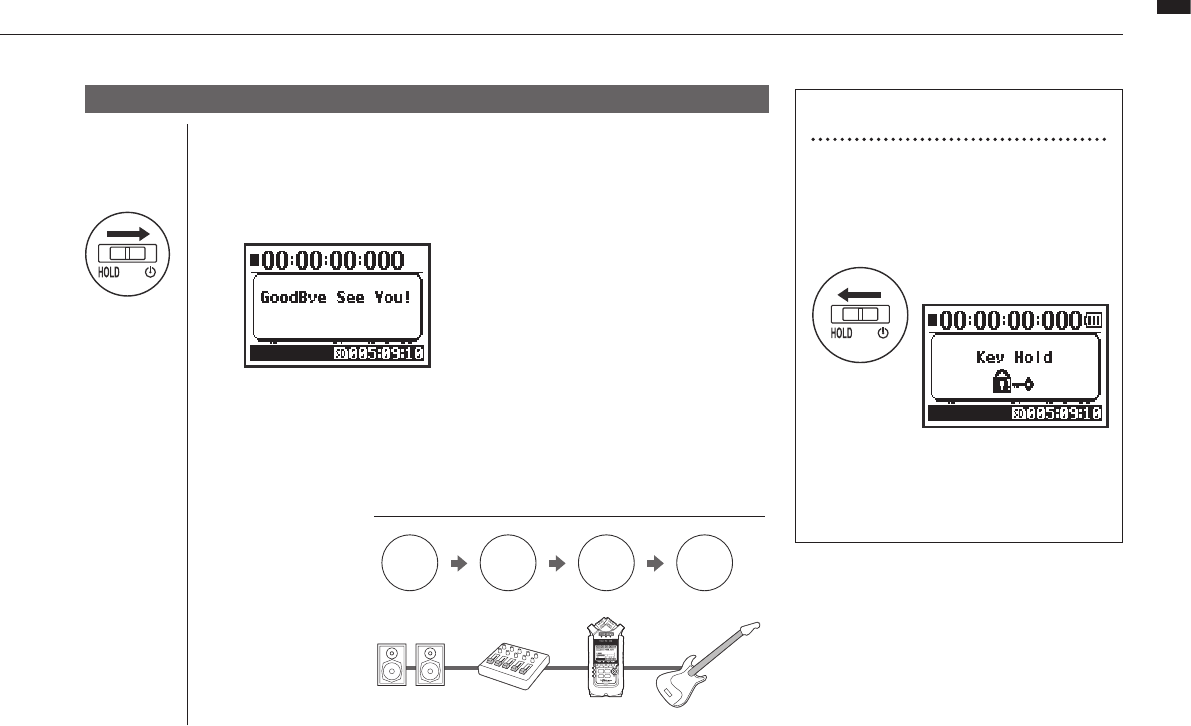
2Slide the POWER switch to turn the power o.
Turning the power o and shutting down
HINT: Order for turning o equipment
Instruments
H4n Pro
OFFOFFOFFOFF
➀ ➁ ➂ ➃
MixerAmp
HOLD Function
The H4n Pro features a HOLD function that
disables button operation to prevent misop-
eration during recording.
If you press any button while HOLD is
active, the screen will display “Key Hold” for
two seconds. To deactivate HOLD, slide the
POWER switch away from HOLD.
Slide the POWER switch
toward HOLD.
Activating the HOLD function
STEREO/4CH/STAMINA modes MTR mode
019
Button operations / Using recording and transport buttons
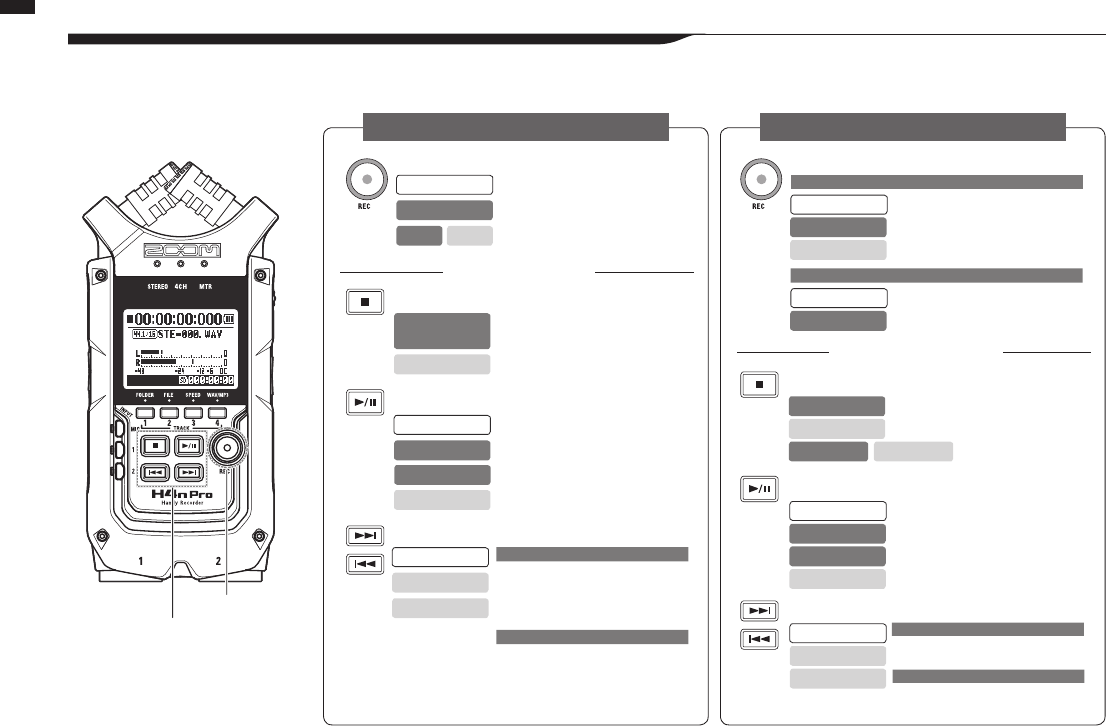
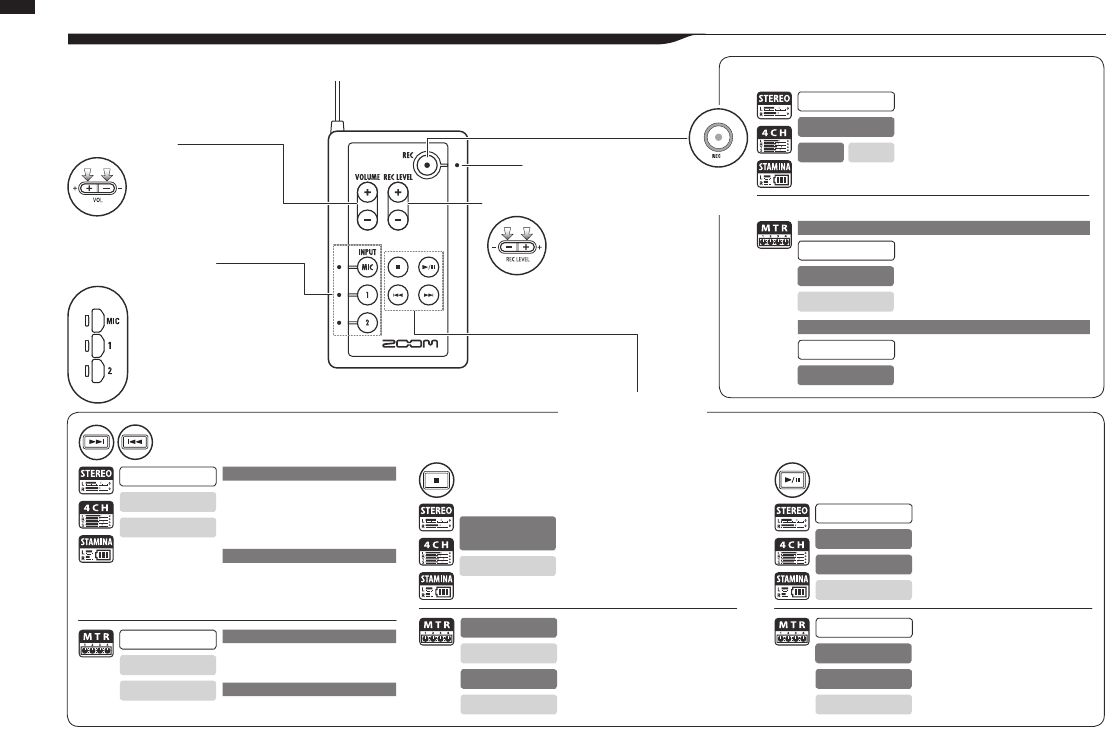
4-2 Using recording and transport buttons
The functions of the REC, STOP, PLAY/PAUSE, FF and REW buttons depend on the mode.
REC button REC button
STOP button
STOP button
PLAY/PAUSE button
PLAY/PAUSE button
FF/REW buttons
FF/REW button
Enter recording standby and reset counter
Enter recording standby
(Only when a track is in recording standby)
Stop recording and reset counter
Stop recording and stop counter
Start recording and counter
Stop recording (playback continues)
Start recording and start counter
Enter recording standby and reset counter
Stop playback and stop counter
Stop playback and stop counter
Stop recording/playback
Add mark (WAV les only)
Recording starts and counter continues
Start playback and start counter
Start playback
FF: Show next le
REW: Return to le beginning
(If there are marks, FF and REW jump to the
nearest mark)
FF: Skip forward one second
REW: Return to beginning
Search forward/backward
The longer the button is pressed, the faster
the search speed. Searching will stop at the
beginning or end of the le. Search forward/backward
Resume paused recording
Pause recording
(only when ALWAYS NEW recording)
Start recording and counter
Start recording and counter
Resume paused playback
Resume paused playback
Stopped
Stopped
Stopped
Stopped
Stopped
Stopped
Stopped
Recording standby
Recording/standby
OVER WRITE recording
ALWAYS NEW recording
Recording standby
Recording/recording
standby/paused
Recording
Recording/paused
Recording
Recording standby
Recording standby
Press for less than a second
Press for less than a second
Press for more than a second
Press for more than a second
Recording
Playing
Playing
Playing/paused
Playing
Playing/paused
Playback paused
Recording paused
Playing
Playing
Playing
Playback paused
Playback paused
Front
Transport buttons
REC button
Transport buttons
Transport buttons
MTR MODE STEREO/4CH/STAMINA MODE
020
Button operations / Using TRACK 1–4 buttons
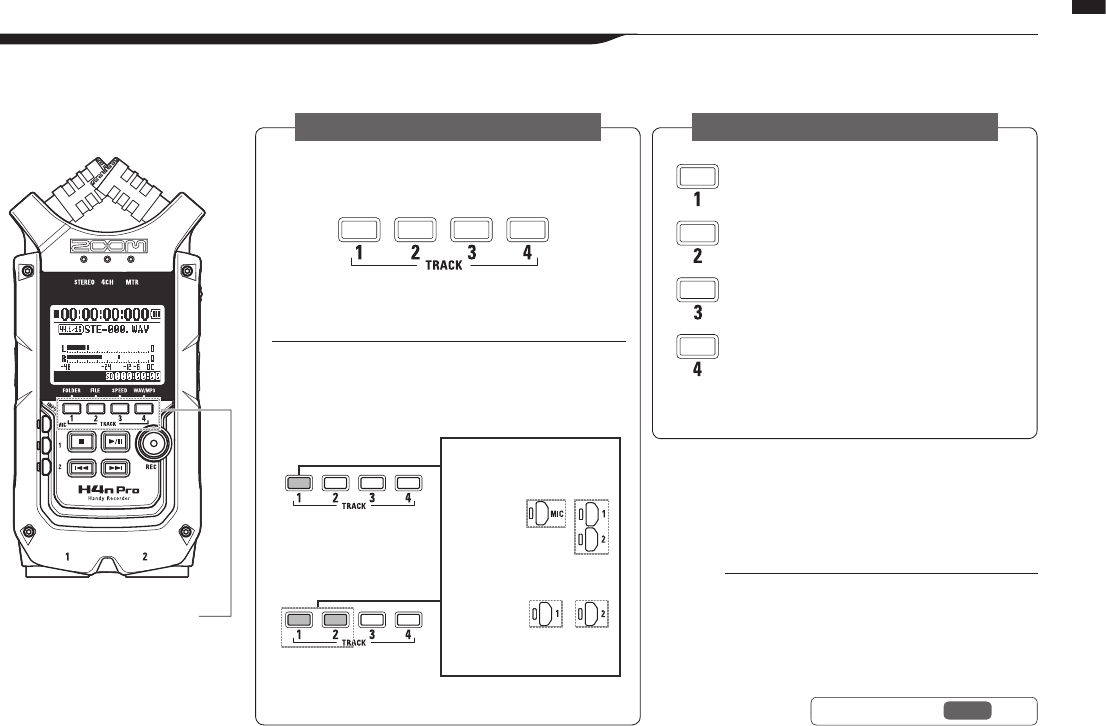
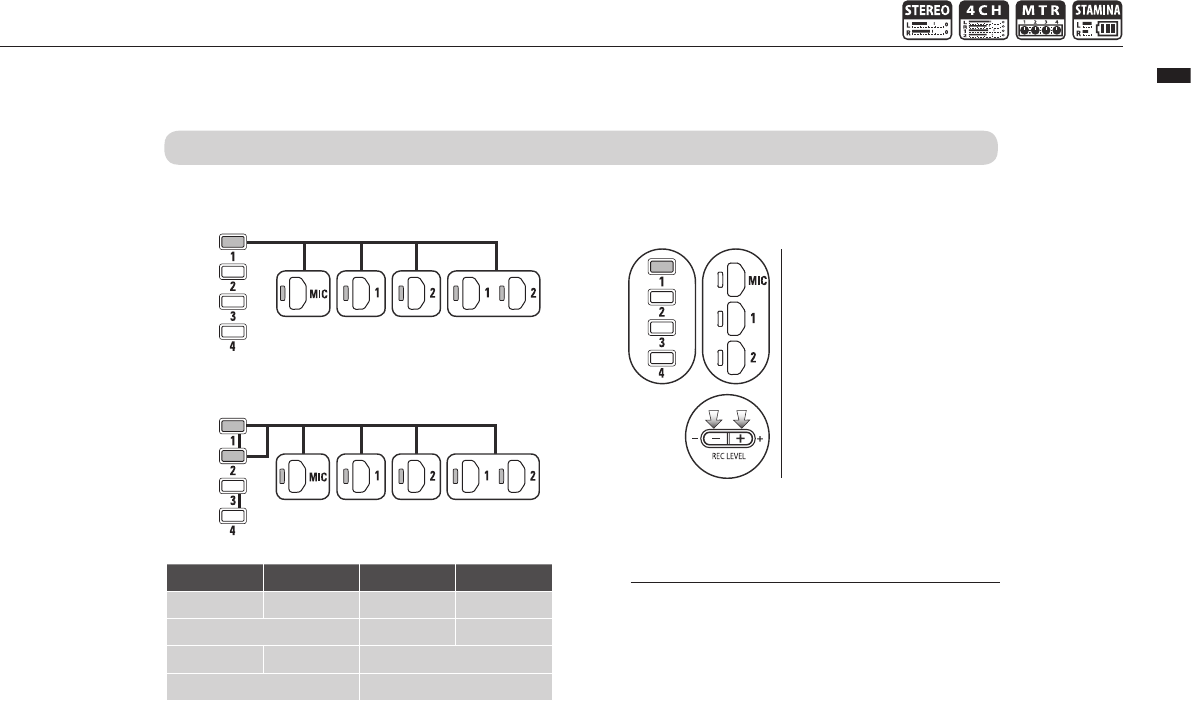
4-3 Using TRACK 1–4 buttons
TheofTRACK1-4buttonshavedierentfunctionsdependingontheMODE.
Front
TRACK 1-4
Switch between track recording and playback. Move to the
FOLDER SELECT menu
Move to the FILE menu
Move to the SPEED menu
(only STEREO MODE)
Move to the REC FORMAT menu
(STEREO MODE, 4CH MODE)
These operations are not available during
recording and playback.
Make track and the input source settings
When you start recording, press the track number you want to
record and the track becomes Recording Standby status. That
track button will then become illuminated.
After selecting the track, use the input source buttons to select
the input for that track. Using the INPUT button you can record
in mono, stereo or a combination of both.
Selecting one track
Selecting two tracks
Same for tracks 2-4
Same for tracks 3 and 4
Note: These operations are not possible
during recording and playback.
These are the four possible
input selections.
For stereo input
select MIC or 1
and 2
For mono input select
either 1 or 2
HINT:
When stereo link active
When tracks are stereo-linked, pressing the
button for one track will have the same eect
on the linked track.
Ref. ☞Stereo link P.058
STEREO/STAMINA MODE
4CH MODE
MTR MODE
021
Button operations / Using INPUT MIC, 1 and 2 buttons
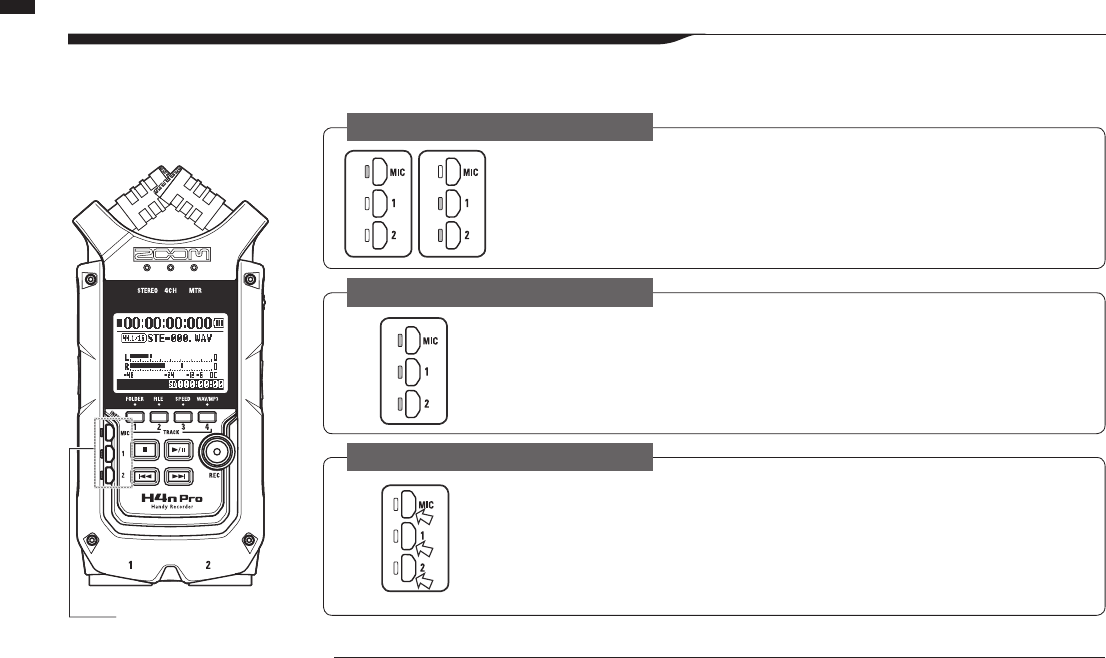
4-4 Using INPUT MIC, 1 and 2 buttons
Thesebuttonshavedierentfunctionsdependingonthevariousmodes.
HINT:
What is clipping? If the input level reaches the maximum that the H4n Pro can record (0 dB), the recorded
sound could be distorted. The recording level should be adjusted.
Select INPUT MIC, 1 or 2 and the corresponding button lights.
If you select INPUT 1 or 2, buttons will light after the selection. (Once lit, the buttons do not respond.)
Any other input source settings, such as REC LEVEL, will be made for the lit source.
Note: If the selected input clips, its button will blink.
Use all input sources. MIC, 1 and 2 all light.
When you switch to 4CH, the H4n Pro will receive two stereo inputs: one from MIC and one from 1 and
2 together. When you press a lit button, the channel input level is shown and you can adjust its recording
level (REC LEVEL).
Note: When an input clips the corresponding button blinks.
Set MIC, 1 and 2 individually for stereo and mono input. The corresponding
button lights.
You can select INPUT MIC, 1 and 2 individually.
• When you use the built-in or an external stereo microphone, select INPUT MIC.
• For stereo input using the external input jacks, use both INPUT 1 and 2. Press either INPUT 1 or 2 button
and then press another button.
Note: If the selected input clips, its button will blink.
INPUT 1 & 2
buttons
FRONT
022
Button operations / Using REC LEVEL and VOLUME buttons
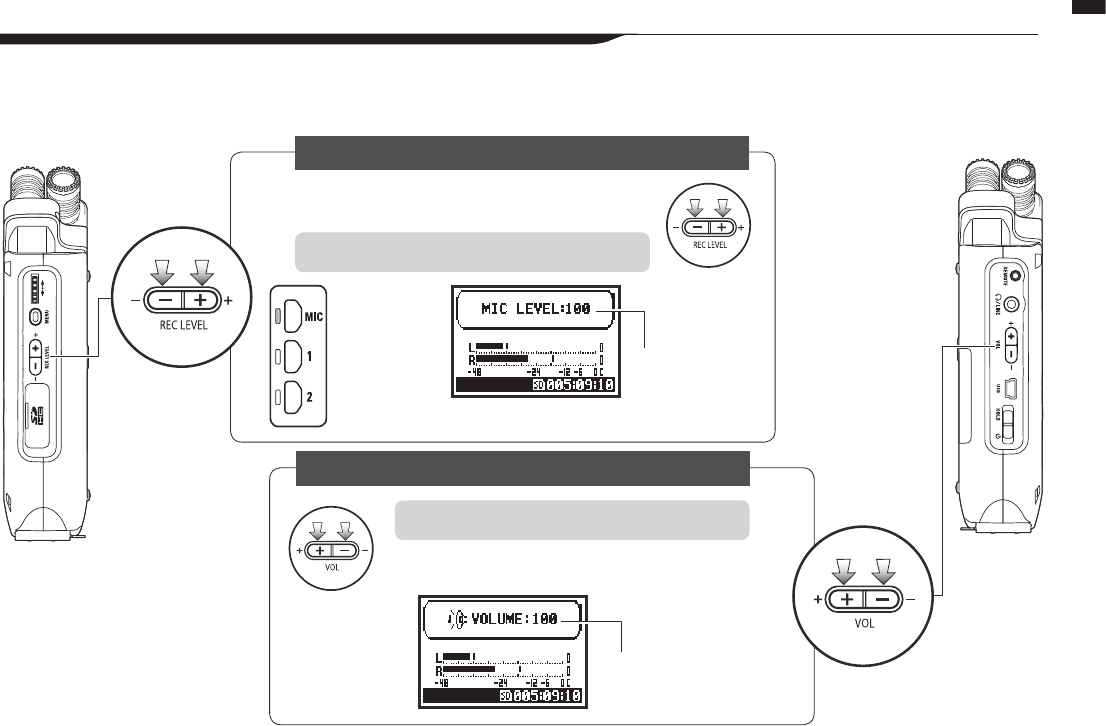
4-5 Using REC LEVEL and VOLUME buttons
These keys allow you to adjust the levels of recording input and output volume.
(All the modes are the same.)
LEFT SIDE RIGHT SIDE
Recording level
Volume
Recording level (all modes)
Volume (all modes)
The recording levels for INPUT 1 and 2 can be adjusted
from 1 to 100 with the (+/−) buttons.
The volume from the built-in speaker and output jacks
can be adjusted from 0 to 100 with the (+/−) buttons.
Press the INPUT
MIC, 1 or 2 button
to select an input
source to adjust its
recording level.
1–100
+: Increase sensitivity
(amplify)
–: Decrease sensitivity
(attenuate)
0–100
+: Increase volume
–: Decrease volume
Press REC LEVEL (+/−) to adjust
Press VOL (+/−) to adjust
Basic MENU button operation
Basic DIAL operations
023
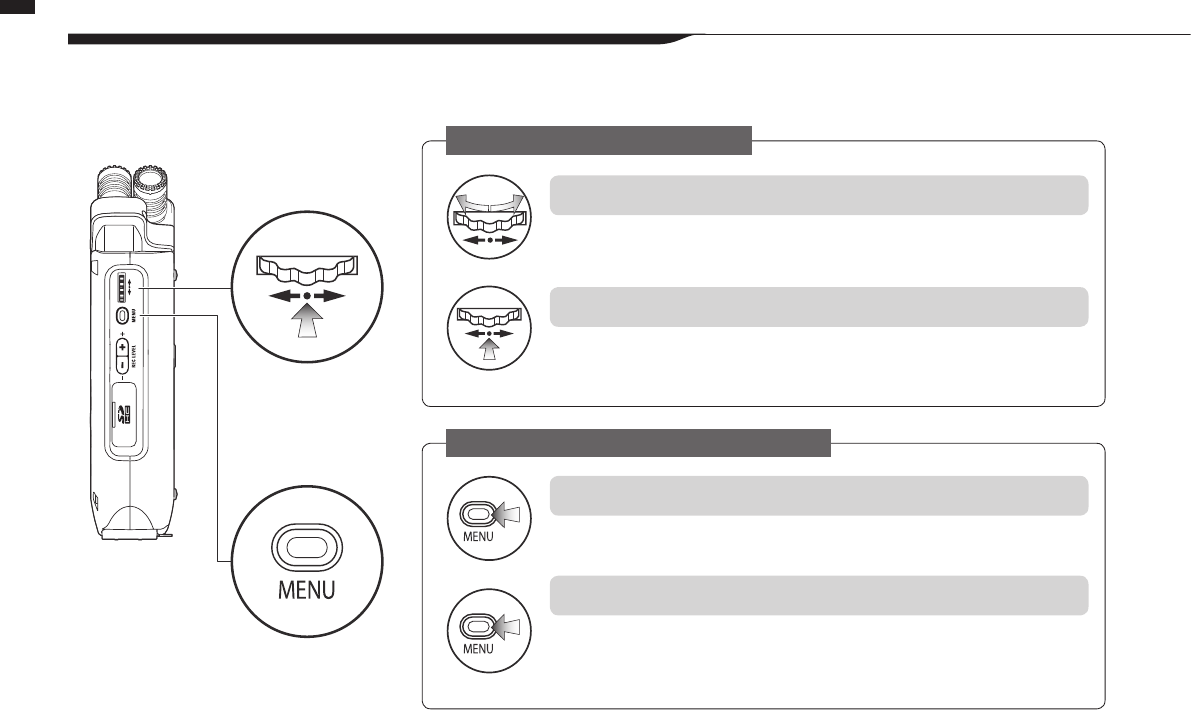
Button operations / Using the DIAL and the MENU button
4-6 Using the DIAL and the MENU button
The DIAL and the MENU button are used for various settings while recording and during playback.
Here are explanations about their basic operations.
RIGHT SIDE
Rotate the DIAL, and the cursor on the display will move with the DIAL
Press to DIAL and your selection will be conrmed.
➝ When there are additional selections, press to move to the next screen.
➝ When you complete selection, the screen returns to the previous one.
Press the MENU button to make settings for recording, playback and other functions.
Press the MENU button during any setting operation, to cancel the operation and return
to the previous screen.
To cancel a setting operation and return to the top screen of the mode, press the MENU
button for more than 2 seconds.
DIAL
MENU button
Select
Select
Long Press
Press
Rotate the DIAL to select an item
Press the DIAL to conrm the selection
Opening the MENU screen
Canceling a setting change
Operation when the [ ] cursor appears (date and time setting, changing le names, etc)
Selecting items in lists
024
Button operations / Using the DIAL and the MENU button
Turn the DIAL to move the
cursor.
Turn the DIAL to scroll
through a list.
Press the DIAL to change
numbers and letters.
Push the DIAL to conrm a
selection.
DIAL moves
DIAL moves
When the item is
highlighted, rotate
the DIAL to change
the numbers and let-
ters. Press the DIAL
toconrm.
The screen returns to
the previous one.
DIAL operation on the top screen
About the ➝ in selection lists
Turn the DIAL to
move the cursor
on the top screen.
Press to enable
counter adjust-
ment or open the setting menu.
(Only in MTR mode.)
When you see an
➝, there are more
selections on the
next screen.
Select the arrow
and press the DIAL to move to the next
screen.
025
Initial settings / Loading an SD card
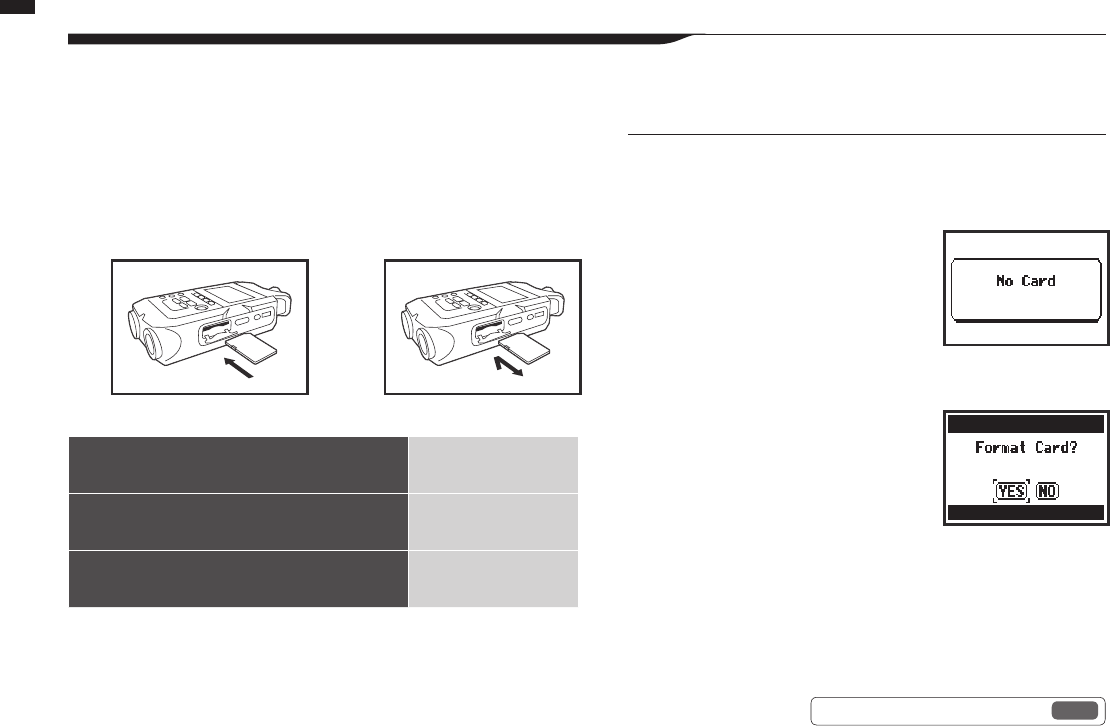
5-1 Loading an SD card
Initial settings
TheSDcardisrequiredtorecord.MakesuretoturnopowerbeforeinsertingorremovingtheSDcard.
How to install an SD card
1Make sure power is o.
2Insert the SD card into
the slot.
How to remove an SD card
1Make sure power is o.
2Push the SD card in to
remove it from the slot.
Ref. ☞ Using H2 and H4 SD cards P.136
NOTE:
TURN THE POWER OFF!
Never insert or remove an SD card while the power is on. This could
destroy data.
CAUTIONS WHEN INSERTING
SD CARDS
• You can use 16MB to 32GB SD cards.
For a list of operation-certied SD cards
please refer to the ZOOM website:
http://www.zoom.co.jp/
• If you use an SD card that was used
by a computer, digital camera or other
machine, formatting in the H4n Pro is
required.
• If “No Card” appears on the display at
startup, check if the SD card is correctly
inserted.
• When “Format Card” appears on the
display at startup, this means the SD card
has not been formatted in the H4n Pro. To
format it, press the DIAL and select YES.
• When the startup screen says “Card
Protect”, the card is write-protected. To
disable this, slide the lock switch on the
SD card.
No SD card warning when
starting up.
This warning will appear if an
SD card is not in a recognized
format. Select YES to format
the card. This will delete all of
its data.
SD card recording capacity (approximate)
4GB SDHC card Recording time
(approximate)
44.1 kHz/16-bit WAV
(stereo track) 380 minutes
44.1kHz/128kbps MP3
(stereo track) 68 hours
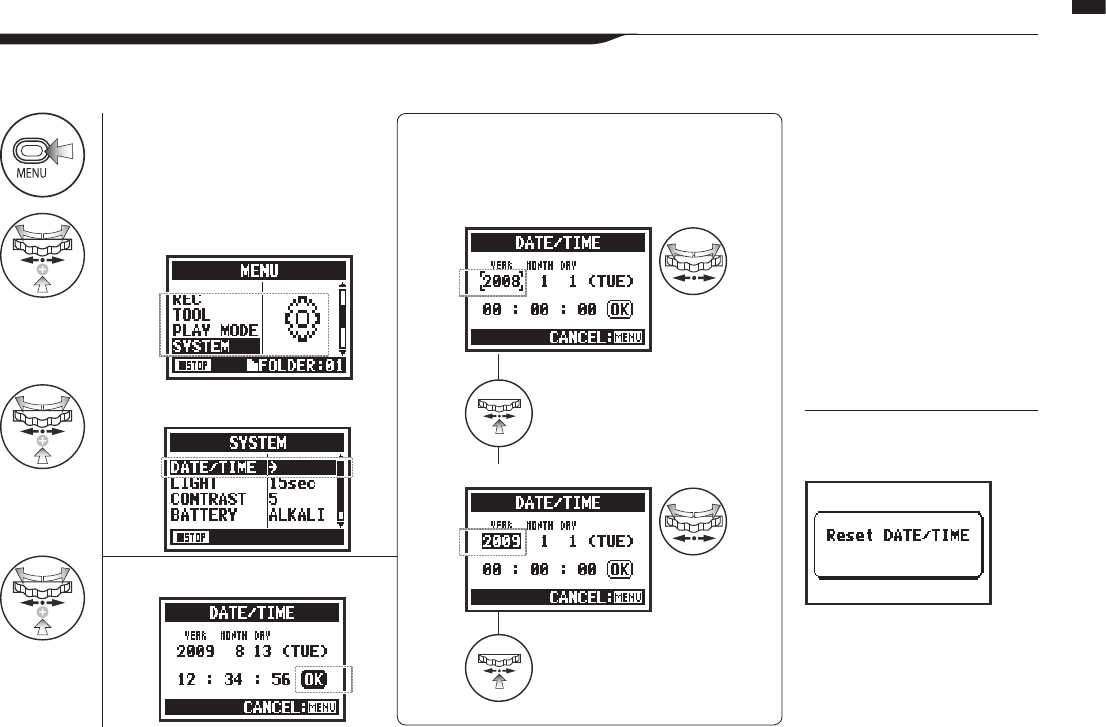
1Press. 4Set YEAR ➝ MONTH ➝ DAY ➝ TIME
(hour: minute: second)
2Select SYSTEM and press.
3Select DATE/TIME and press.
5Select OK and press.
026
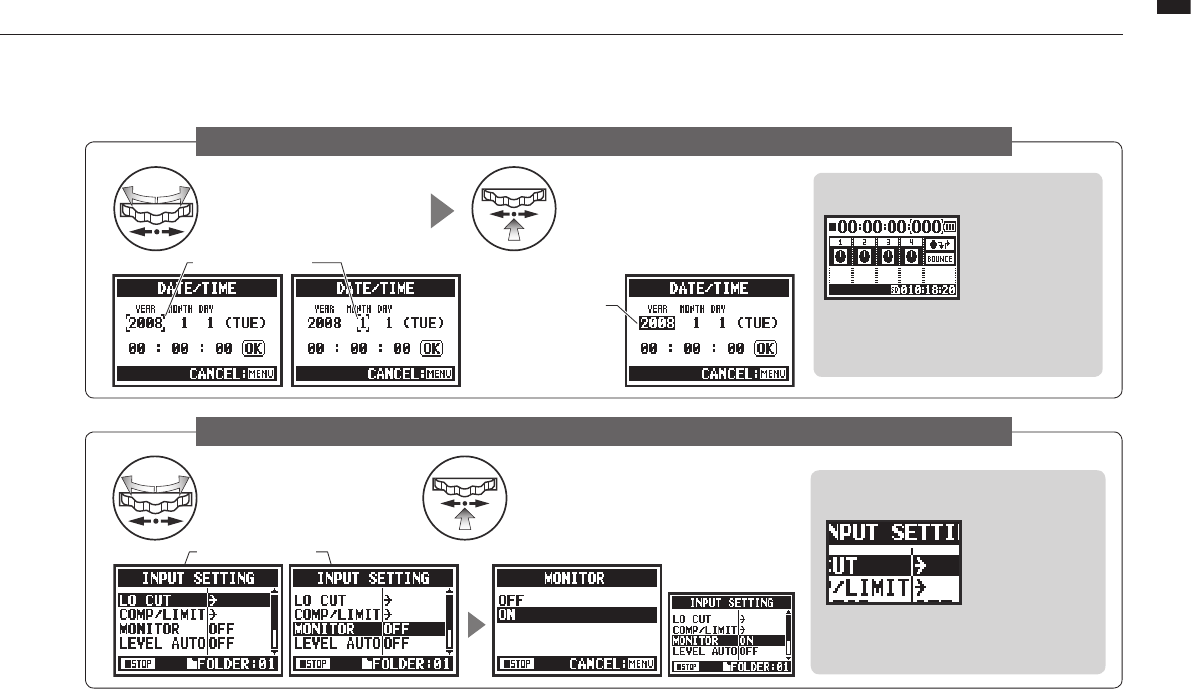
Initial settings / Setting the date and time (DATE/TIME)
5-2 Setting the date and time (DATE/TIME)
NOTE:
If “Reset DATE/TIME” appears
during startup, the date/time
needs to be set.
Select the item on DATE/TIME:
Change the value.
Press the DIAL.
The selected item value is highlighted.
Press the DIAL.
The cursor appears again.
Turn the DIAL to
select the item.
Turn the DIAL to
set the value.
• If no power source is connected
for more than three minutes, the
DATE/TIME setting will reset to
the default value.
• You cannot set this during
recording and playback.
Eachlewillautomaticallyrecordthedate/time.
Tofacilitatesearchingforlesbydate,besuretosetthedate/timeaftereverybatterychange.
027
Setup / Connecting external devices
6-1 Setup: Connecting external devices
Setup
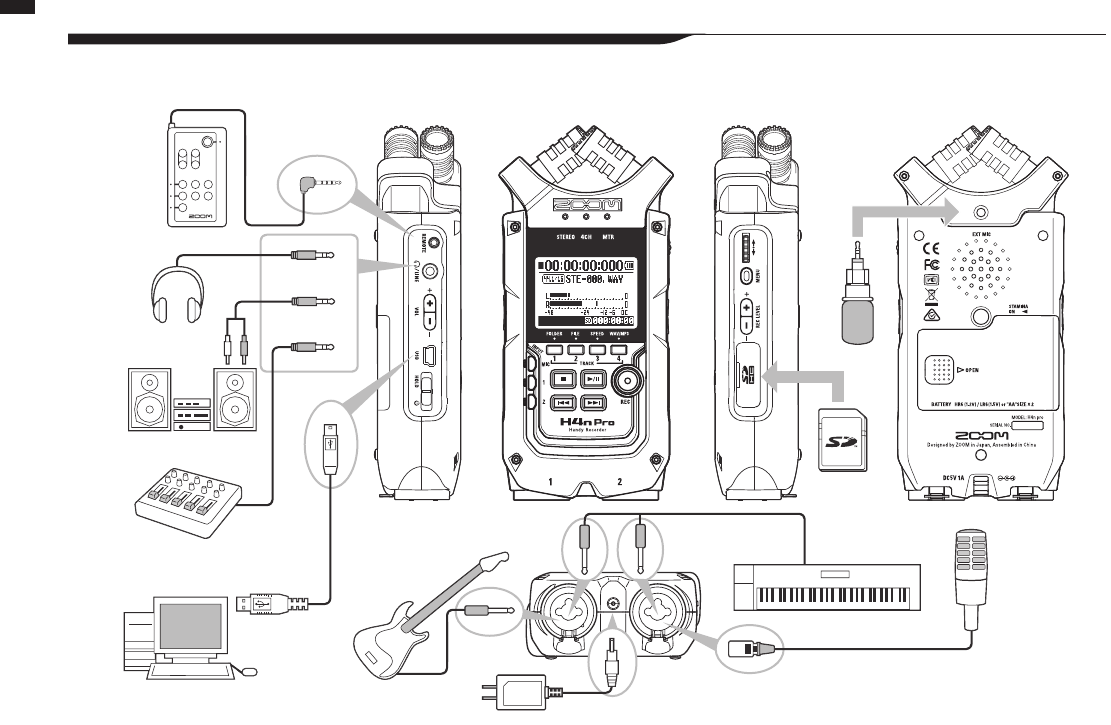
TheH4nProoersversatileconnectivitywithoptionsforanyrecordingapplication.
Remote control
(optional)
INPUT: mic
INPUT: instrument
Stereo mic
SD card
Headphones
Monitors
Mixer USB
INPUT: instrument
AC adapter specied for H4n Pro
Personal computer (PC)
028
Setup / Built-in microphones
6-2 Setup: Built-in microphones
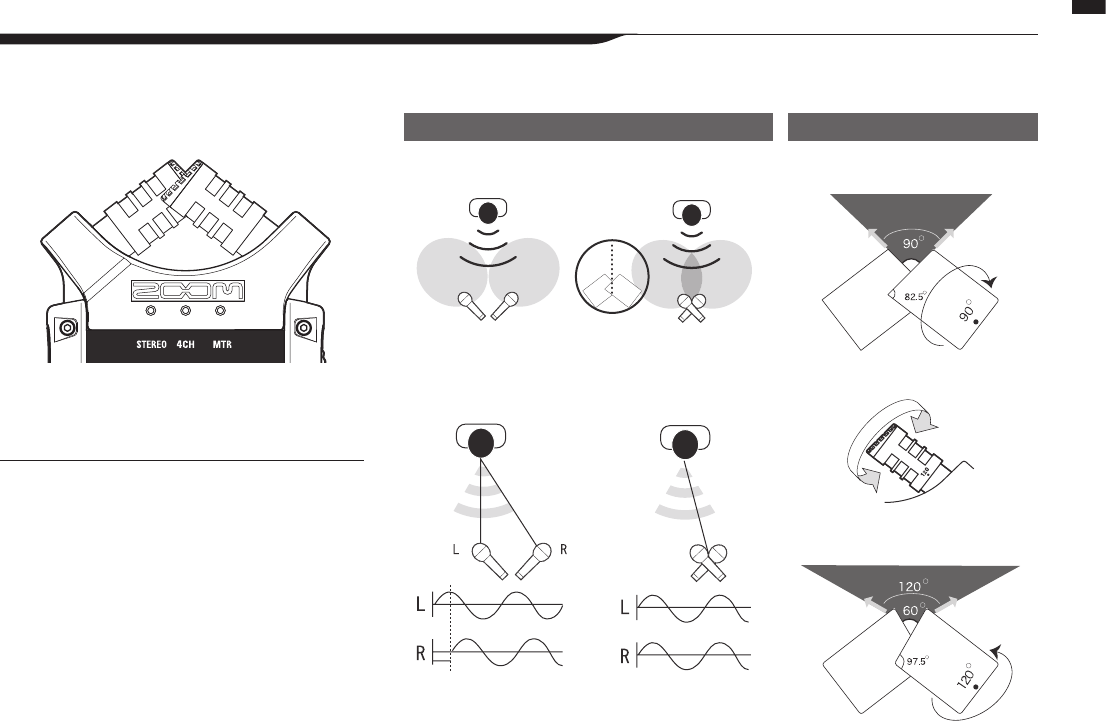
These are the special features of the H4n Pros built-in microphones.
Capturing the stereo image center Centered 90°
Wide 120°
Stereo images without phase cancellation.
Ordinary stereo mic placement
Ordinary stereo mic placement
H4n Pro stereo mic pair
H4n Pro stereo mic pair
Time lag
Movable
High quality microphones in an XY
pattern ensure a natural stereo image
when recording sounds.
Stereo recording is often done by placing two micro-
phones in a V-shaped conguration. Pointing microphones
outward will result in stereo separation, but the recording
will lack denition around the center, resulting in a poor
stereo image.
The H4n Pro utilizes an XY stereo mic conguration. By
placing two microphones in a crossed pattern (opposite
angles), the H4n Pro can cover a wide area and capture
sound sources in the center with clarity and denition.
Sounds reach both mics simultaneously, so no phase
cancellation occurs between right and left channels.
XY mic placement
90° or 120° directivity
1
Press.
2
Select
INPUT and
press.
3
Select
PLUG-IN
and press.
4
Select ON
and press.
029
Setup / Built-in microphones/external mic with plug-in power
6-3
Setup: Built-in microphones/external mic with plug-in power
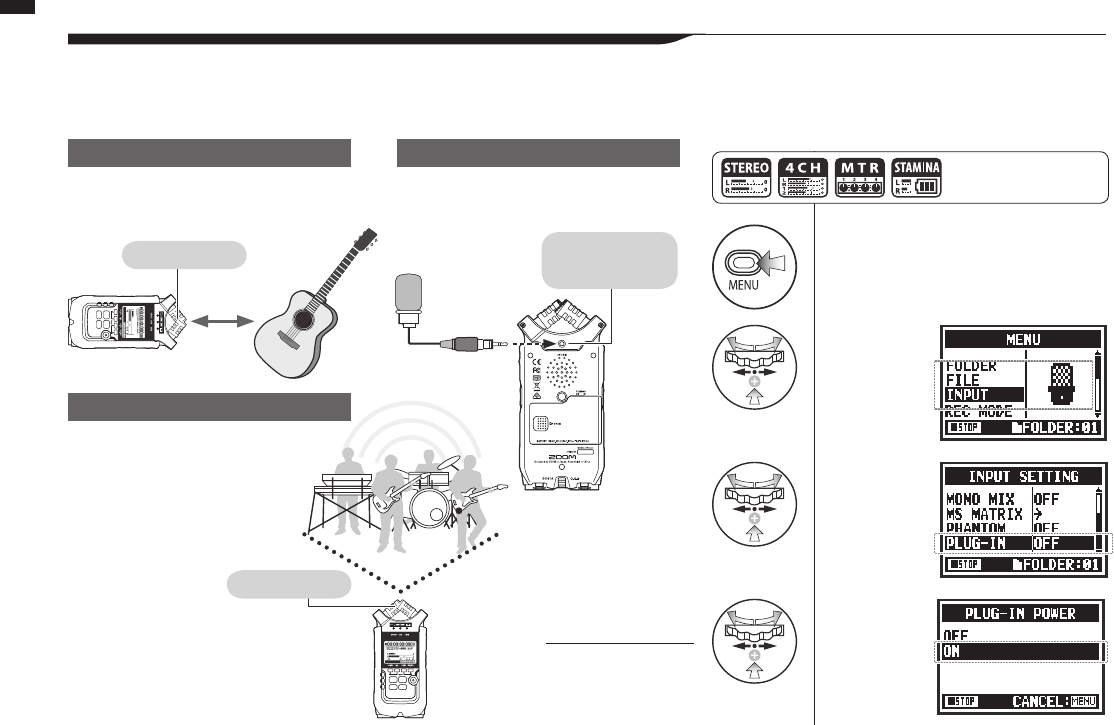
The input jack for the external microphone is suitable for microphones that require plug-in power.
Put the H4n Pro 30-50 cm from the sound
source.
Built-in
microphones
Built-in
microphones
* You cannot use
both the built-
in mics and an
external mic
together. Connect the
mic to the
INPUT MIC
jack.
INPUT MIC
Sound source
30-50 cm
External stereo
microphone input
jack with
plug-in power
Make sure the recording sound sources
are all located in zone covered by the
built-in microphones.
When you use an external microphone, be
sure to select the correct setting.
Setting PLUG-IN power
Press the MENU button for
more than 2 seconds, and start
operation from the top screen.
Close microphone recording
O microphone recording
Close microphone recording
NOTE:
Plug-in and phantom
power cannot be set
during recording and
playback.
1
Press.
2
Select
INPUT and
press.
3
Select
PHANTOM
and press.
4
Select the
voltage
and press.
030
Setup / INPUT 1/2 connections and phantom power
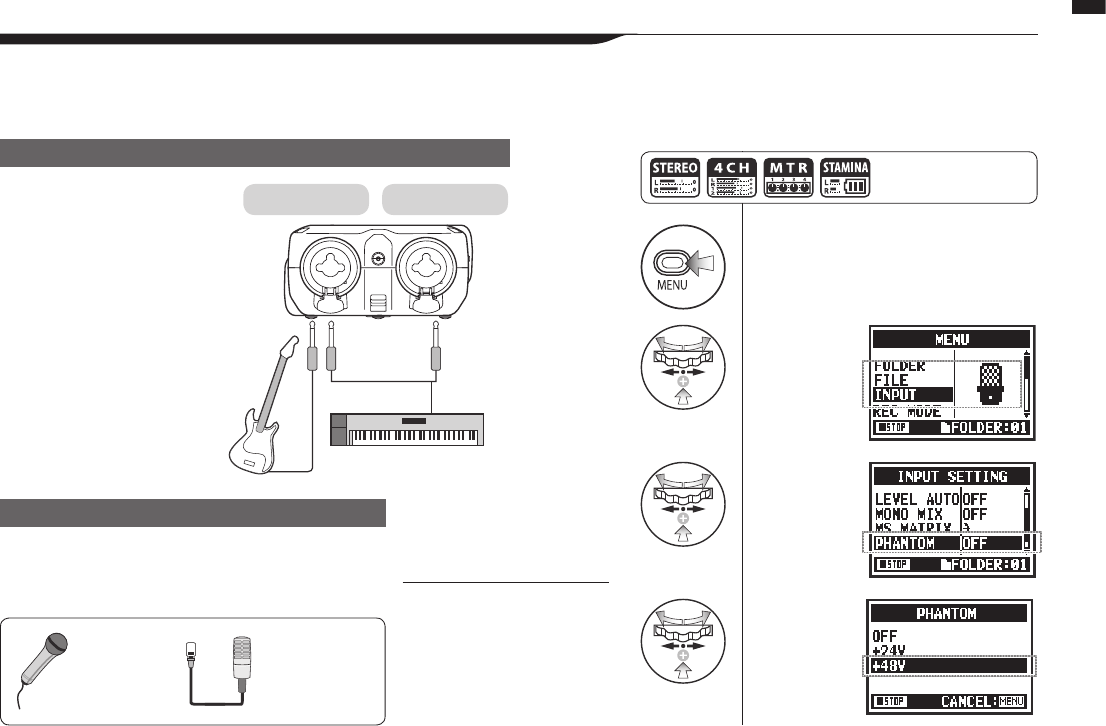
6-4 Setup: INPUT 1/2 connections and phantom power
Use INPUT 1 and 2 to connect to a guitar, bass or keyboard, for example.
You can directly plug a guitar
or a bass into either INPUT 1 or
INPUT 2.
Plug a keyboard with stereo
output into both INPUT 1 and 2.
Dynamic
microphone
Condenser
microphone
(phantom
power)
Connect microphones with XLR plugs to INPUT 1 and
INPUT 2. If you need phantom power, such as when using a
condenser microphone, make the following setting.
Setting PHANTOM power
Press the MENU button for
more than 2 seconds, and start
operation from the top screen.
Connecting instruments
INPUT 1 INPUT 2
Connecting microphones
NOTE:
Some condenser micro-
phones cannot operate with
+24V phantom power, but
compared to the +48V setting
this reduces power consump-
tion during battery operation.
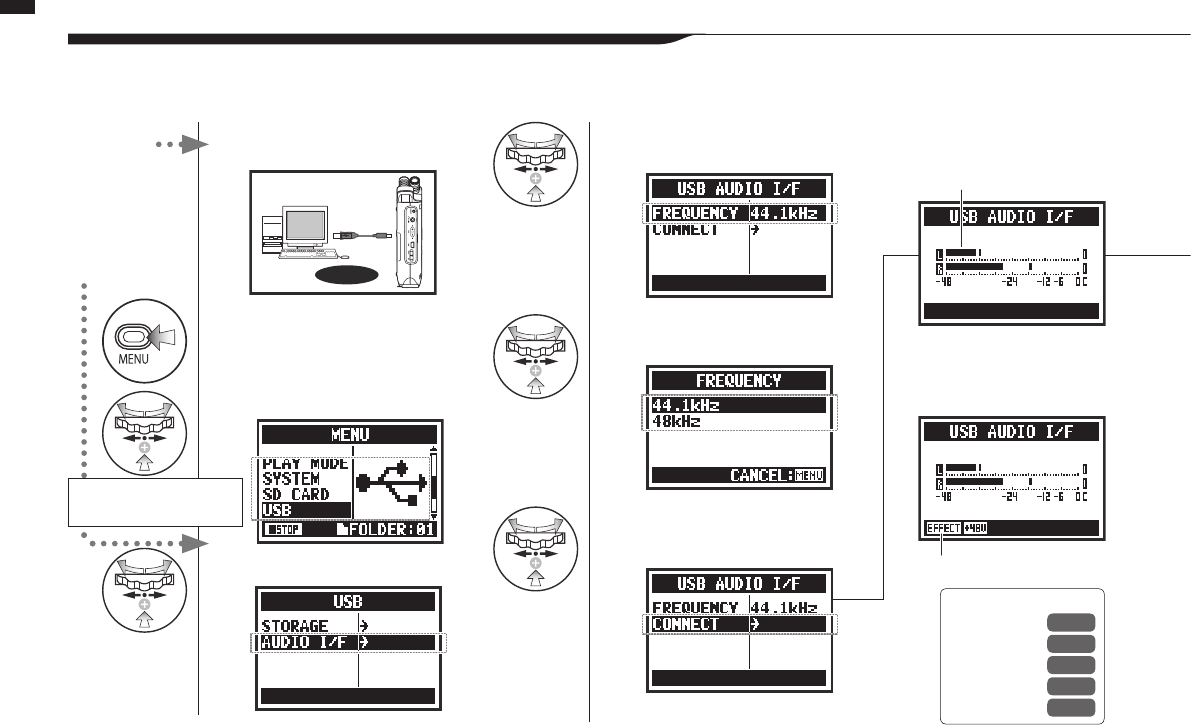
1Connect H4n Pro to
computer with USB cable.
USB
2Press when on the top
screen.
3Select USB and press.
4Select AUDIO I/F and press.
5Select FREQUENCY
and press.
6Select a sampling rate
and press.
7Select CONNECT and
press.
031
Setup / Using as a USB audio interface
6-5 Using as a USB audio interface
The H4n Pro can be used as a two-in/two-out USB interface at 44.1 or 48 kHz.
Input or output levels
Active function
Two channels can be sent and
received at 44.1 or 48 kHz while
connected to a computer.
Connect H4n Pro
to computer with
USB cable.
Power
ON already
Power OFF
H4n Pro starts up using USB
bus power, and USB setting
screen opens
Ref. ☞
EFFECT P.083
TUNER P.075
MONITOR P.070
PHANTOM P.030
PLUG-IN P.029
Selection of input source
When you select an input the corresponding
button lights, conrming the selection. To
turn off the input, press the corresponding
button so the light turns off.
To monitor input signals, you must turn
MONITOR on.
Note: If no input is selected and no input buttons are
lit, no signal is being sent to the computer.
032
Setup / Using as a USB audio interface
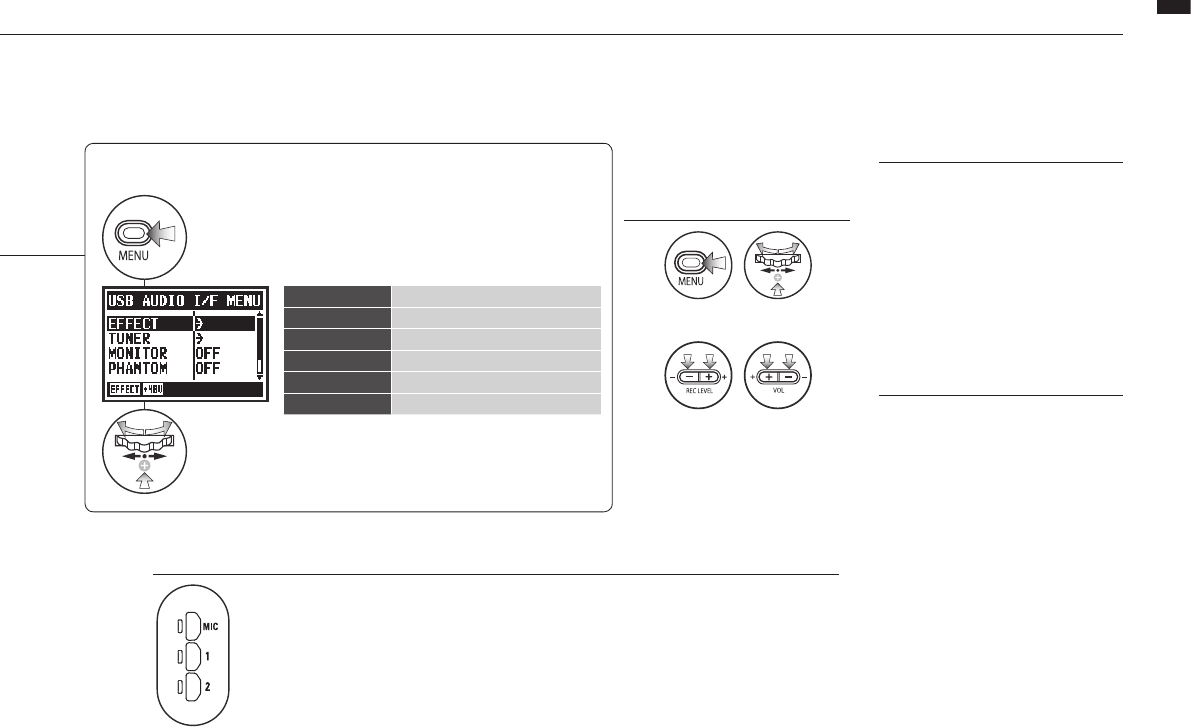
Adjust input and output levels
Open MENU and make settings
These buttons are usable
during setting
Button operation in AUDIO I/F menu
Press.
Select
and press.
AUDIO I/F MENU
EFFECT Useeects(only44.1kHz)
TUNER Use tuner
MONITOR Enable monitoring
PHANTOM Enable phantom power
PLUG-IN Enable plug-in power
DISCONNECT End connection
NOTE:
• You cannot change the sampling
rate while the computer identies
the H4n Pro as an audio interface.
• When connecting as an interface,
make sure the sampling rate (step
6) matches the recording software
and playback le.
• You cannot changed this setting
during recording and playback.
HINT:
Audio interface use
• You can record and playback
signals directly to and from your
DAW software using the H4n Pro.
• In this mode, you can use the
H4n Pros built-in eects on input
signals if the sampling rate is set
to 44.1kHz.
• No specic driver is needed to
use the H4n Pro as a USB audio
interface.
• When using a DAW or other soft-
ware, refer to its manual.
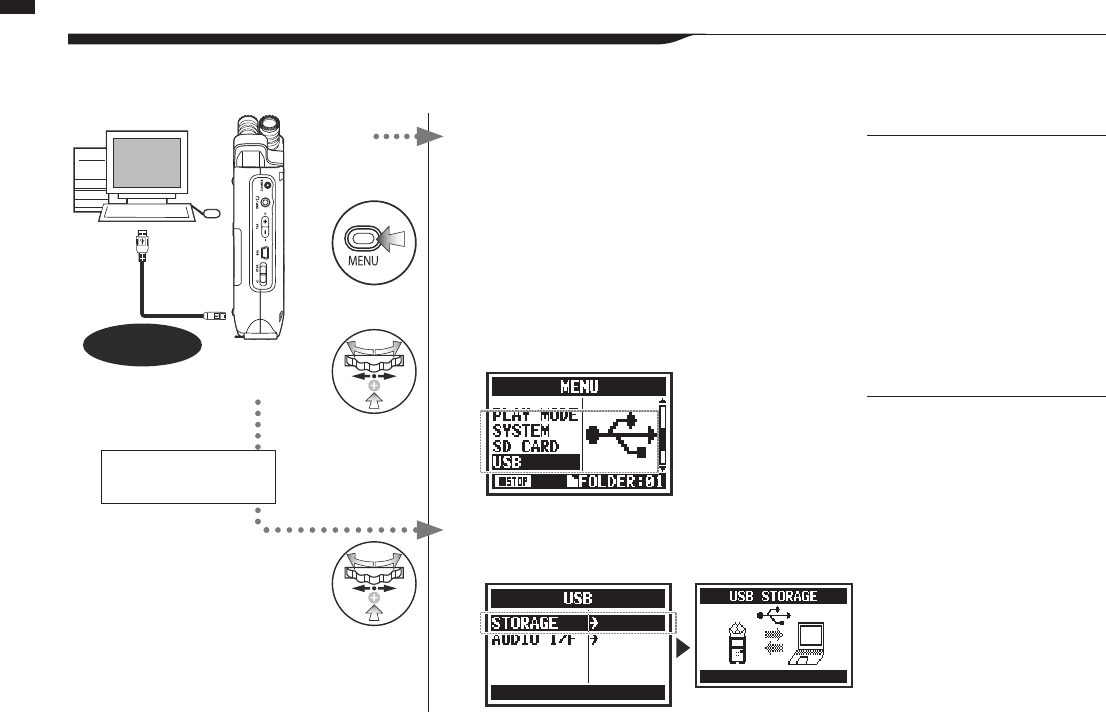
1Connect H4n Pro to computer
with USB cable.
2Press on the top screen.
3Select USB and press.
4Select STORAGE and press.
033
Setup / Using as a USB SD card reader
6-6 Setup: Using as a USB SD card reader
NOTE:
• Before physically unplugging the
USB cable (and H4n Pro) from
the computer, be sure to use
the “Safely Remove Hardware”
function on the computer rst.
Unplugging the USB cable (and
H4n Pro) without doing this could
damage les.
• Compatible operating systems:
Windows Vista and newer
Mac OS X (10.6 and newer)
HINT:
USB bus power
USB bus power is a way to supply
power from a computer through the
USB cable.
Connecting the H4n Pro by USB
when its power is o causes it to
automatically start up and show the
USB menu.
SD card reader use
• Use les recorded by the H4n
Pro on your computer.
• Use audio les created on a
computer on the H4n Pro.
When you use the H4n Pro as an SD card reader, make the following settings.
USB
Connect H4n Pro to
computer with USB cable.
Connection complete
Power ON
already
Power OFF
H4n Pro starts up using USB
bus power, and USB setting
screen opens
034
Setup / Built-in speaker
6-7 Setup: Built-in speaker
The H4n Pro is equipped with a built-in mono speaker.
H4n Pro built-in speaker
This is a mono speaker for playback. Use
it to easily play and listen to recorded
data without connecting headphones to
the LINE/PHONE jack.
NOTE:
Speaker output is disabled:
• When the LINE/PHONE jack is
connected
• When MONITOR setting is ON
• When in recording standby in
MTR mode
Speaker can be used:
• During le playback
• When used as an audio interface
• When nothing is connected to the
LINE/PHONE jack
035
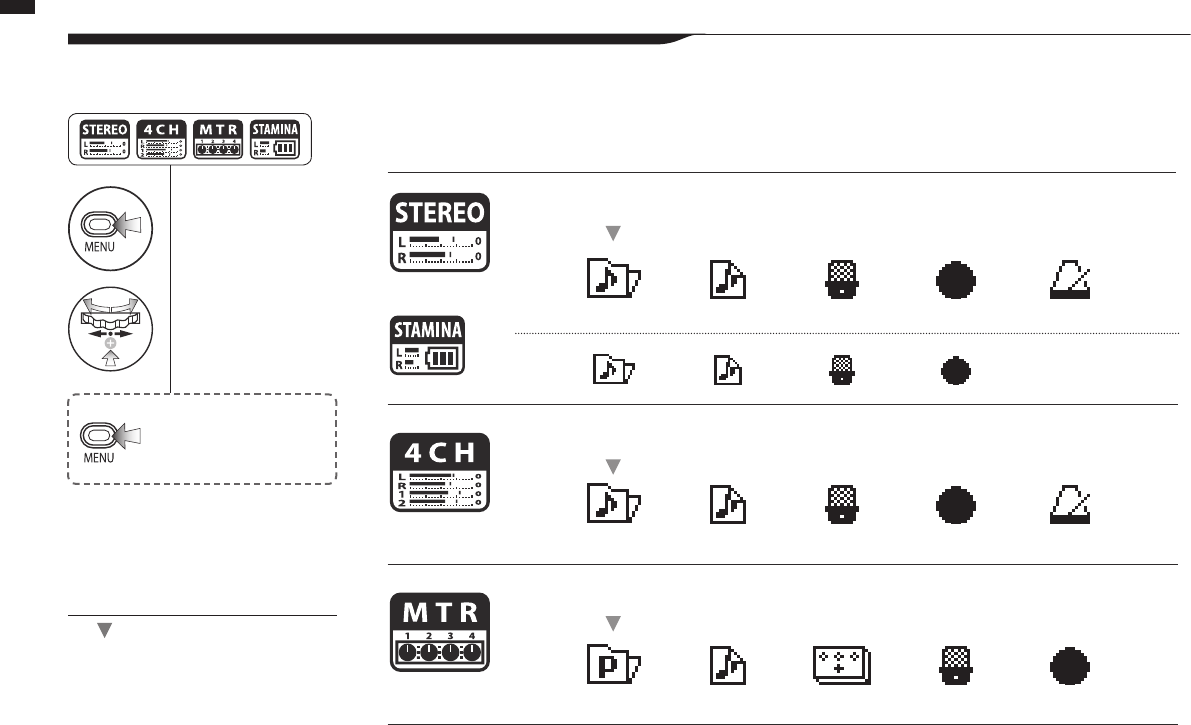
Mode overview
7-1 Mode overview
Mode overview
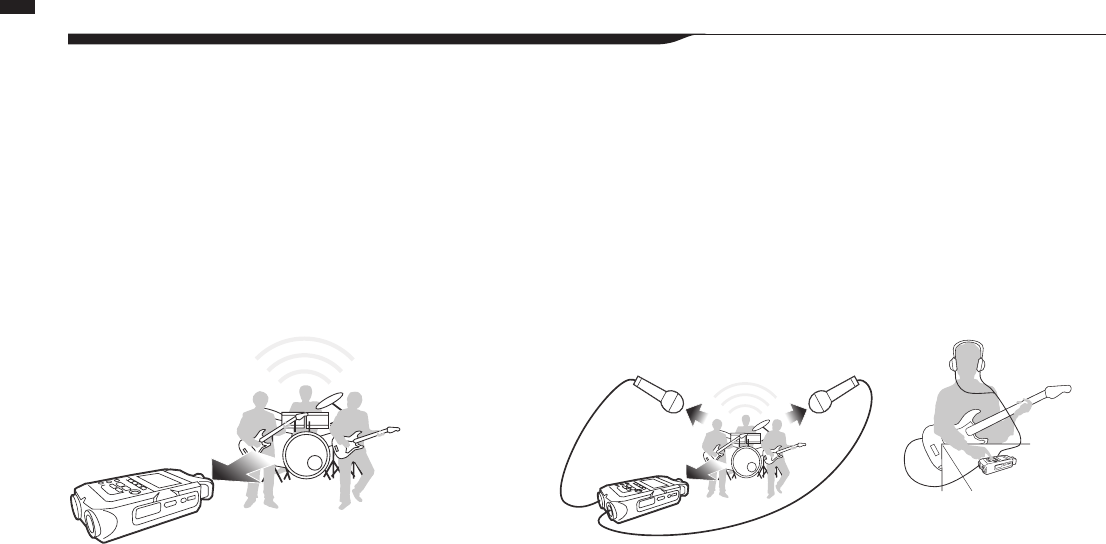
The H4n Pro has four operation modes: STEREO, STAMINA, 4CH (4-channel) and MTR (multitrack).
Choose the mode according to your need.
• STEREO mode
You can easily create a stereo recording
using the built-in microphones or an
external microphone.
The STEREO mode is convenient for
recording live band performances,
acoustic instruments, voices, lectures,
and subtle soundscapes. You can then
use it to play stereo WAV and MP3
les.
• STAMINA mode
This mode enables longer battery life.
STAMINA mode is similar to STEREO
mode, but has less functions.
The continuous usage time with alkaline
batteries is approximately 11 hours (but
could be less depending on usage).
When in STAMINA mode, the H4n
Pro can only record/playback in WAV
44.1kHz/16-bit and MP3 formats.
To enable STAMINA
mode when using batteries,
set the STAMINA switch
before turning the power on.
P015
•Fieldrecording
•Liveoutdoorrecording
•Atconferencesandinothersituations
whenchangingbatteriesisdicult
• 4CH mode
In 4CH mode, you can record two
stereo signals simultaneously. You
can capture live sounds via the built-
in mics and direct instruments via
external inputs at the same time.
•Simultaneous recording with both
line input and mics
•Surroundrecordingviafrontandrear
microphone placement
•Simultaneous recording of both
ambient and direct sound sources
•Recording both ambient and direct
sounds to add a live feel to recorded
performances
• MTR mode
You can record using effects in this
mode. You can also overdub record-
ings and use sound les previously
recorded using the other modes.
When creating a demo, you can record
backing tracks at home and record
instrumental tracks in the studio while
listening to the backing tracks.
•Recordingpartsonetrackatatime
•Overdubbing
•Recordingusingeects
•Mixingtracklevelsafterrecording
•Indoorandoutdoorrehearsals
•One-pass stereo recording of live
performances and rehearsals
•Directrecordingofasingleinstrument
•Fieldrecording
•Voicememos
•Recordingmeetings
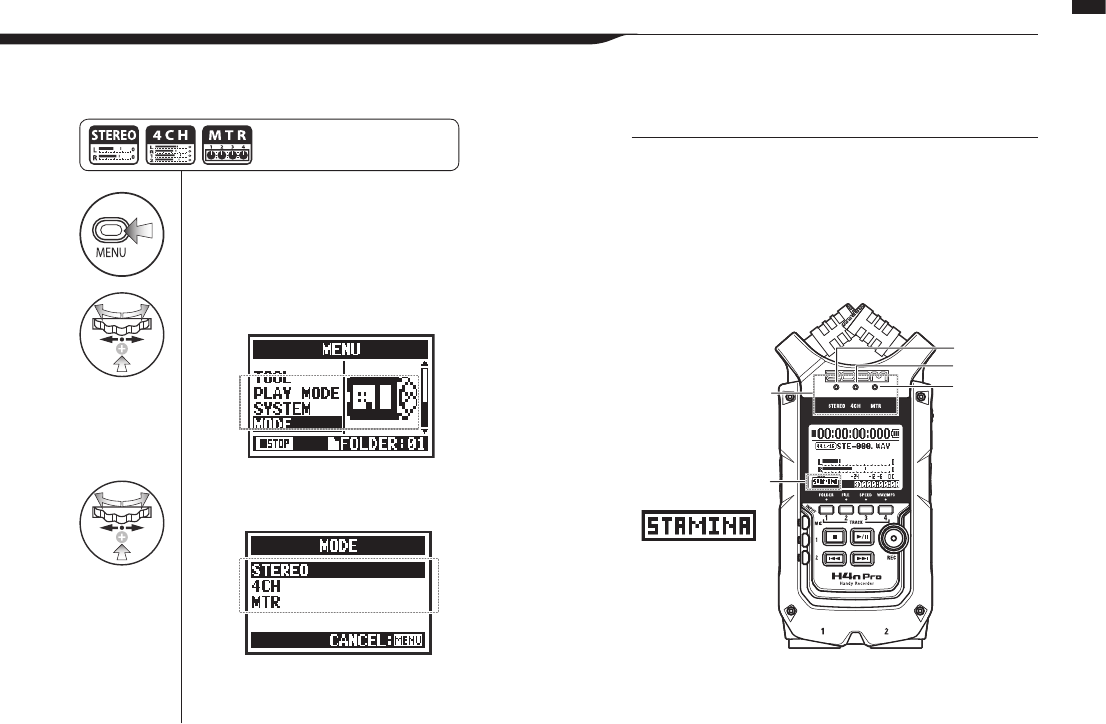
1Press.
2Select MODE and press.
3Select among STEREO, 4CH
and MTR modes and press.
036
Mode overview / Switching and conrming modes
7-2 Switching and conrming modes
Be sure to select the appropriate mode for your application.
Note: To engage
STAMINA mode,
use the switch
located in the battery
compartment.
STEREO
4CH
MTR
Mode indicators
STAMINA mode
indicator
HINT:
Mode conrmation
• The current mode is indicated by a mode indicator LED on
the front panel.
• The H4n Pro will power up in the same mode it was in
when turned o.
• When starting up for the rst time, the default mode is
STEREO.
Press the MENU button for more
than 2 seconds, and start opera-
tion from the top screen.
037
Mode overview / Mode details
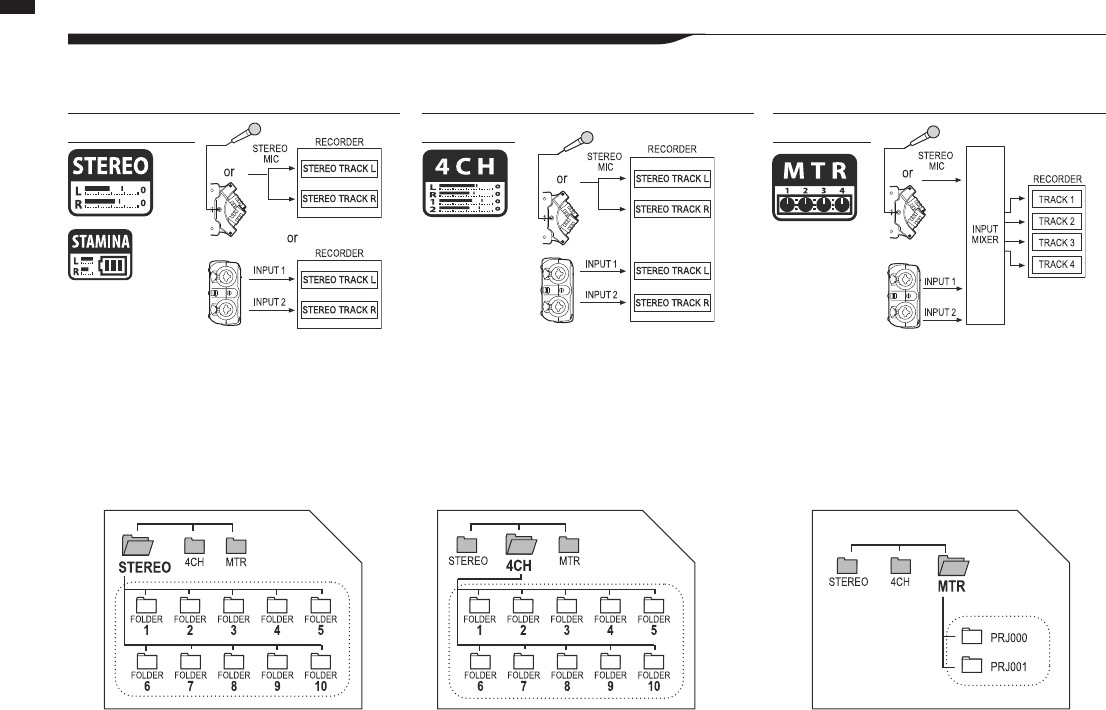
7-3 Mode details
In STEREO mode, you can select 2 different inputs
either INPUT MIC or INPUT 1 and 2, and record and
play one stereo le at a time.
Files are saved in one of the ten sub-folders in the
STEREO folder.
In STAMINA mode, the functions are limited to
maximize the battery life time.
In 4CH MODE, the H4n Pro records two stereo
WAV les: one stereo WAV le for the built-in
mic or stereo mic input and one stereo WAV le for
INPUT 1 and 2.
These FILES are saved in one of the ten 4CH
sub-folders.
You can record tracks in MONO or STEREO from
INPUT 1, INPUT 2 and a stereo microphone.
You can combine them with tracks recorded in other
modes and overdub existing tracks.
In MTR mode, project data and settings are saved as
a project in the MTR folder.
STEREO mode 4CH mode MTR mode
Inputandoutputlevelsaswellassavingandleformatsaredierentineachmode.
STAMINA MODE
▲
●
038
Mode screens / STEREO and STAMINA modes
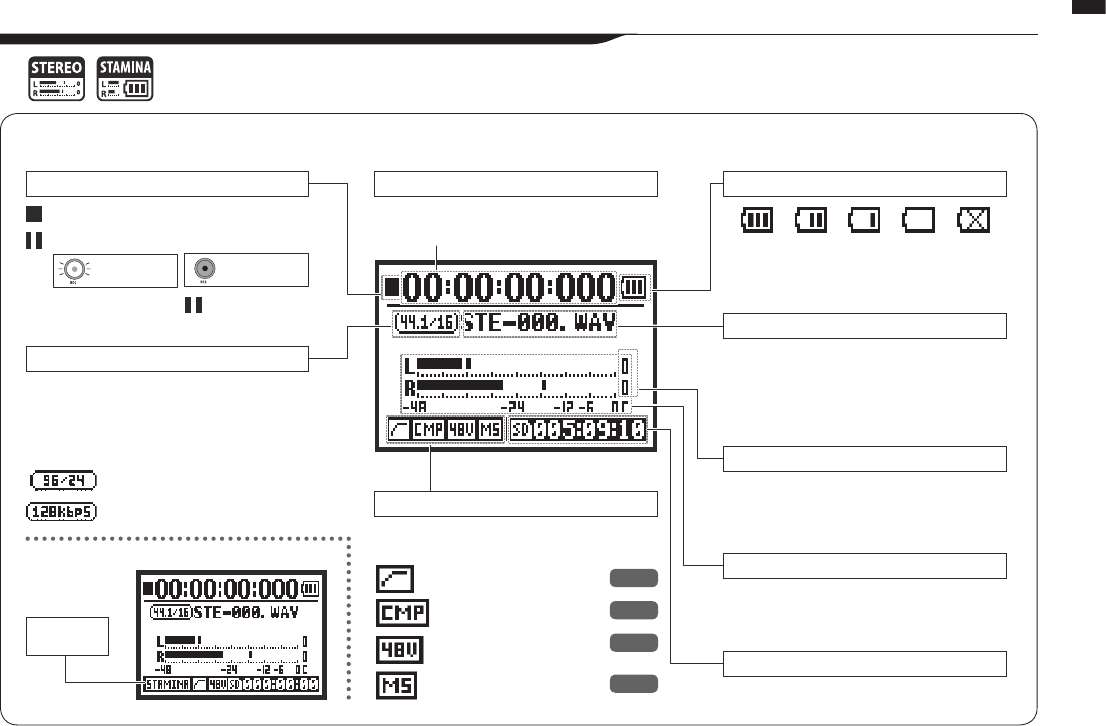
8-1 Mode screens: STEREO and STAMINA modes
Mode screens
• Explanation of the top screen
Recorder status
File format
Remaining battery life (when battery used)
Optional setting indicators
File names
Clipping indicators
Level meters
Remaining recording time
Remaining possible recording time on SD card
Recording and playback levels
The clip indicators “light” if the recording or play-
back level reaches 0 dB and remain lit until the le
ends or the stop button is pressed.
Name of le selected, being recorded or
playing back
If there is no le in any folder, “No Data” appears.
These icons appear on the display when
optional functions are ON.
Elapsed recording or playback time
(hours): (minutes): (seconds): (milliseconds)
Format of le selected, being recorded
or playing back
•WAVle:kHz/bit
•MP3le:bitrate
STAMINA MODE
Stamina
icon
If “Low Battery” appears on the display, it is time
to change the batteries.
Counter
Stopped
Recording standby
Blinks
Blinks
REC button
blinks
REC button
lights
Playing
Recording
Paused
96kHz/24-bit WAV indicator
128kbps MP3 indicator
LO CUT function
COMP/LIMIT function
Phantom power (48V/24V)
MS stereo matrix
P.066
P.067
P.030
P.073

▲
●
039
Mode screens / 4CH mode
8-2 Mode screens: 4CH mode
• Explanation of the top screen
Recorder status
Remaining recording time
File format
Optional setting indicators
Elapsed recording or playback time
(hours): (minutes): (seconds): (milliseconds)
These icons appear on the display when
optional functions are ON.
Remaining possible recording time on SD card
If “Low Battery” appears on the display, it is time to
change the batteries.
Name of le selected, being recorded or
playing back
If there is no le in any folder, “No Data” appears.
The clip indicators “light” if the recording or playback
level reaches 0 dB and remain lit until the le ends or
the stop button is pressed.
Input sources and recording and playback
levels
MIC ..... Input from either the built-in mics or an
external stereo mic
IN ........ Input from INPUT 1 and INPUT 2
Format of le selected, being
recorded or playing back
LO CUT function
COMP/LIMIT function
Phantom power (48V/24V)
MS stereo matrix
Stopped
Recording standby
Blinks
Blinks
REC button
blinks
REC button
lights
Playing
Recording
Paused
Counter
Remaining battery life (when battery used)
File names
Clipping indicators
Input sources and level meters
P.066
P.067
P.030
P.073
➀
➃
➁
➂
➀➁➂➃
●
▲
040
Mode screens / MTR mode
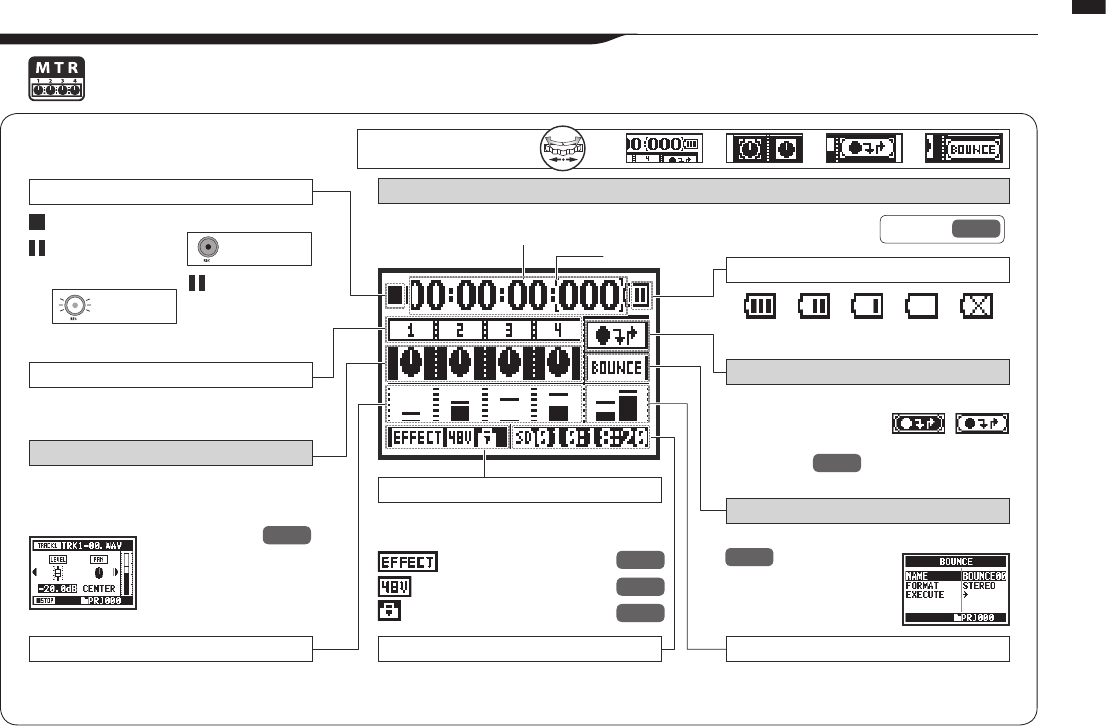
8-3 Mode screens: MTR mode
• Explanation of the top screen
Recorder status
Optional setting indicators
Remaining recording time L/R level meters
Track numbers
Level meters
Track menu icons
BOUNCE ICON
Counter
These icons appear on the display when
optional functions are ON.
Remaining possible recording time on SD card. These show the master left and right output
levels.
Icons are highlighted for tracks in recording
standby.
These show the recording or playback levels of
tracks 1-4.
Select an icon to access the track menu where
settings, including volume, panning and stereo/
mono, can be made.
If “Low Battery” appears on the display, it is time
to change the batteries.
Selecting this icon brings up the PUNCH IN/
OUT settings.
The icon only appears when recording in OVER
WRITE mode.
Selecting this icon brings up BOUNCE settings.
Counter function:
Specify a time
Stopped
Recording Standby
Blinks
Blinks
REC button
blinks
ALWAYS NEW
recording only
ALWAYS NEW
recording only
REC button
lights
Playing
Recording
Paused
DIAL operations
on top screen
Cursor
Remaining battery life (when battery used)
Auto punch in/out icon
P.057
P.056
P.123
Elapsed recording or playback time
(hours): (minutes): (seconds): (milliseconds)
Eects
Phantom power (48V/24V)
Protect function
P.083
P.030
P.125
Ref. ☞ P.102
1Press.
2Select item
and press.
041
Mode screens / MAIN MENU
8-4 Mode screens: MAIN MENU
This is a list of the menu items that appear for each mode when the MENU button is pressed.
FOLDER
STEREO mode
STAMINA mode
4CH mode
MTR mode
FOLDER
PROJECT
FILE
FILE
FILE
INPUT
INPUT
EFFECT
REC
REC
INPUT
TOOL
TOOL
REC MODE
HINT:
The icon marks the item rst shown in
the MENU after the unit is started or the
mode is switched. After the menu has
been opened previously, the last used
item will be shown rst.
Cancelling:
To return to the top, press
the MENU button more
than 2 seconds.
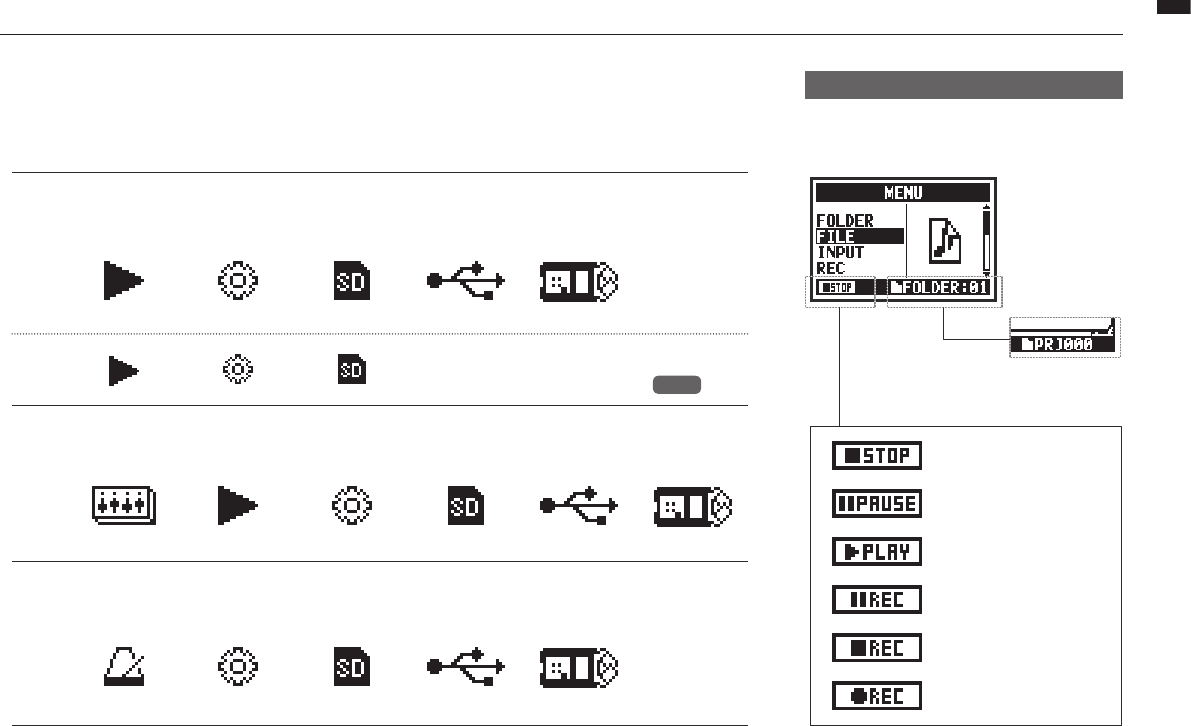
Information at MENU screen bottom
042
Mode screens / MAIN MENU
PLAY MODE
MIXER
TOOL
SYSTEM
PLAY MODE
SYSTEM
SD CARD
SYSTEM
SD CARD
USB
SD CARD
USB
MODE
USB MODE
MODE
Enable STAMINA mode with the STAMINA switch before
starting the unit when running on batteries.
P.015
On menu pages where recording and playback
are possible, the current status is shown at the
bottom left of the screen.
The current folder
number is shown at
the bottom right of
the screen, (in Ste-
reo, 4CH and Stam-
ina modes).
In MTR mode, the
current project name
is shown.
Stopped
Paused (playback)
Playing back
Recording standby/
paused
Recording standby
In MTR mode and OVER WRITE
recording
Recording
043
Optional / Remote control operation
9 Optional remote control operation
Optional
You can operate the H4n Pro from a distance with the optional remote control.
FF and REW buttons
STOP button PLAY/PAUSE button
VOLUME +/−
Indicator (red)
Transport buttons
REC
button
REC LEVEL +/−
INPUT MIC, 1 and 2
buttons and indicators
(green, yellow, red)
Select the input source
The indicator corresponding to the
button shows the input status.
Green: selected input source
Yellow: input level is over −6 dB
Red: input is clipping
1-100
+: increase sensitivity
(amplify)
−: decrease sensitivity
(attenuate)
0-100
+: increase (raise)
−: decrease (lower)
FF: Show next le
REW: Return to le beginning
(If there are marks, FF and REW jump to
the nearest mark)
Stop recording and reset counter to 0
Start playback and start counter
Enter recording standby and reset counter
to 0.
Stop recording (playback continues)
Start recording and start counter
Start recording and counter.
Add mark (WAV les only)
Enter recording standby
Recording starts and counter continues
Stop recording and counter
Start recording and counter
Resume paused recording
Resume paused playback
Start playback
Start recording and the counter begins
to move
Pause playback
While overwrite setting: Stops recording
While always new setting: Pauses recording
Stop playback and stop counter
Stop recording and stop counter
Stop playback and stop counter
Stop recording/playback
FF: Skip forward one second
REW: Return to beginning
Search forward/backward
The longer the button is pressed, the
faster the search speed. Searching will
stop at the beginning or end of the le.
Search forward/backward
Stopped
Stopped
Stopped
Stopped
Playing
Playing
Playing
Playing
Playing
Recording
Playback paused
Playing/paused
Playing/paused
Playing
Recording/recording
standby/paused
Recording
Recording
Recording standby
Recording standby
Recording standby
Recording/standby
Recording standby
Recording paused
Recording/paused
Press for less than one second
Press for less than one second
Press for more than one second
Press for more than one second
Playback paused
Playback paused
Remote control button operation
Recording and placing marks.
This can be used only when a track is in recording standby.
OVER WRITE recording
ALWAYS NEW recording
Stopped
Stopped
Stopped

044
Operations
Operations

1Select INPUT
and press.
* Selection is
possible when
stopped, recording or
in recording standby.
2Use REC LEVEL to
adjust the levels.
1Select INPUT and press.
The recording level of the
selected is shown
2Use REC LEVEL to adjust
the levels.
045
Operations / Settings/recording: Setting input sources and recording levels
1-01
Settings/recording: Setting input sources and recording levels
Operations
Make recording settings for the built-in mics and external input jacks.
HINT:
On the 4CH mode top screen, if you
press a REC LEVEL button, “REC
LEVEL TARGET” appears. Select
the input and adjust it.
HINT:
INPUT 1 and 2 recording levels
can be set independently.
STEREO MODE 4CH MODE
Use either MIC or INPUT 1 and 2 as the stereo input source. Use both MIC and INPUT 1 and 2 as stereo inputs.
Built-in microphones
(stereo)
Built-in microphones
(stereo)
INPUT 1 jack INPUT 1 jack
INPUT 2 jack INPUT 2 jack
Both light
at once
Lit
or
Selected
buttons light
All lit
Connecting an external microphone
sets input automatically
Connecting an external microphone
sets input automatically
External stereo
microphone
External stereo
microphone
or
or
Ref. ☞Recording functions:
INPUT 1/2 LEVEL LINK P.071
+
1Press the selected track
and input button.
2Use REC LEVEL to adjust
the level.
046
Operations / Settings/recording: Setting input sources and recording levels
MTR MODE
All tracks can be independently set for mono or stereo input.
Select input for each individual track and adjust.
Select input for two tracks and adjust.
Set the REC LEVEL
HINT:
In MTR mode, you can record multiple tracks sepa-
rately. You can also select any input for each track
when recording.
TRACK 1 TRACK 2 TRACK 3 TRACK 4
Mono Stereo Mono Mono
Stereo Mono Mono
Mono Mono Stereo
Stereo Stereo
1Press to enter recording
standby.
2Select input source and
press.
Press MIC to use the built-in mics, or
press INPUT 1 or 2 to use external
inputs.
3Adjust the recording level of
the input source.
4Press to start recording.
5Press to end recording.
047
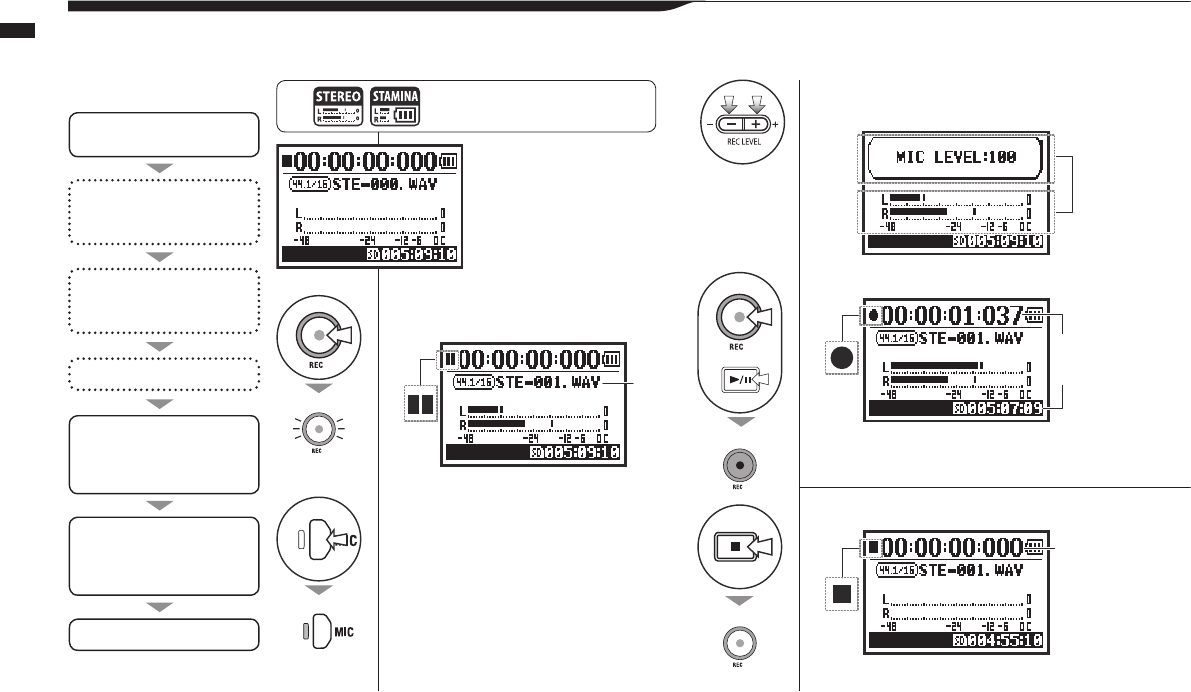
Operations / Settings/recording: Recording in STEREO and STAMINA modes
1-02
Settings/recording: Recording in STEREO and STAMINA modes
These are the steps to record in STEREO or STAMINA mode.
Conrm the mode
is STEREO.
1. Enter recording standby
2. Select input source
3. Adjust recording level of
source
Record
4. Start recording.
(Pause, resume recording,
add marks.)
Change recording settings.*
REC FORMAT,
FILE NAME TYPE
Use recording functions.*
AUTO REC/STOP, PRE REC,
REC LEVEL AUTO
Use METRONOME*
5. End recording
*You can record without making
these settings.
Recording process Press the MENU button for more
than 2 seconds, and start opera-
tion from the top screen.
The counter and
remaining time
start changing.
New le
name
Blinks
The counter
resets to 0.
STEREO MODE TOP
Blinks
Lit
Lit
Unlit
3Adjust the recording level of
the input source.
4Press to start recording.
5Press to end recording.
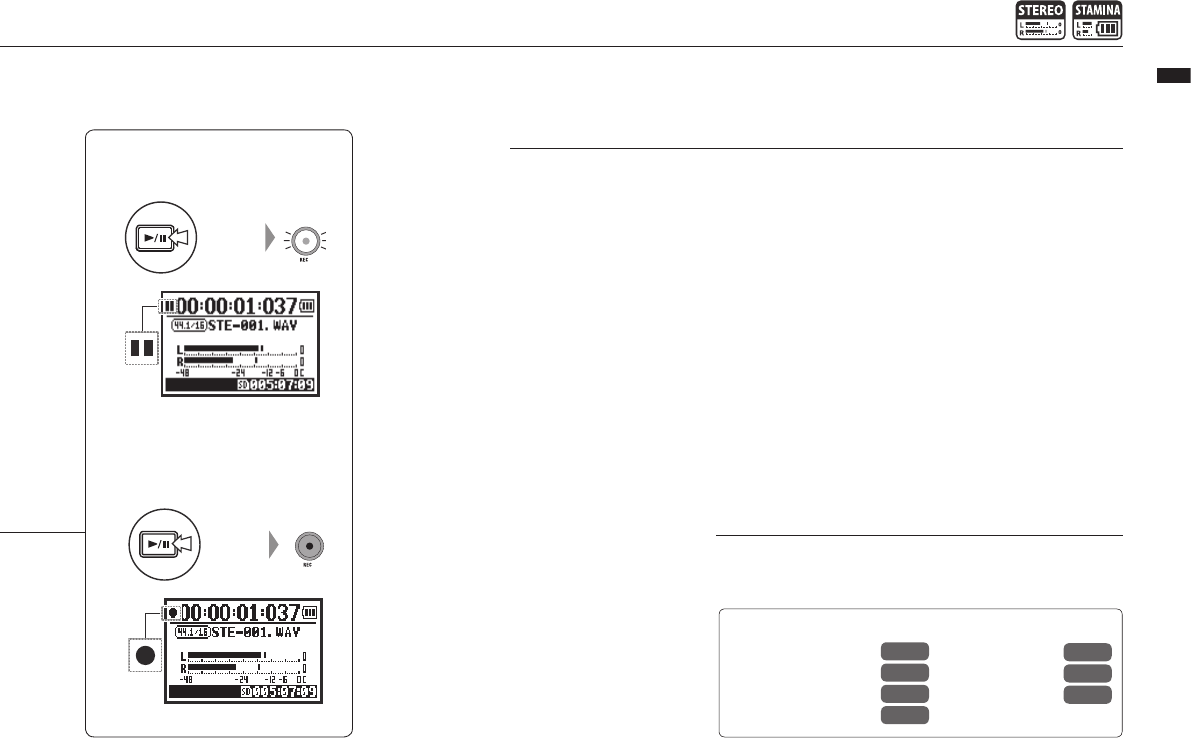
048
Operations / Settings/recording: Recording in STEREO and STAMINA modes
Pausing
RECORDING AGAIN
Press
Press
Ref. ☞
REC FORMAT P.049
Mark setting P.096
AUTO REC P.063
REC LEVEL AUTO P.069
FILE NAME P.050
METRONOME P.079
PRE REC P.065
HINT:
Recording format
In STEREO mode you can
record in 19 dierent WAV
and MP3 le formats. The
recording format must be
selected before recording
a le begins.
File naming
Recorded les are named
automatically. Choose from
two formats. The default
format is DEFAULT.
DEFAULT: STE-xxx
DATE: 090531-xxx
The recording date is in
yymmdd format.
Marks
When the recording format
is WAV, you can mark a
le by pressing the REC
button while recording. You
can move swiftly to marked
positions during playback.
When you pause recording
of a WAV le, a mark will be
added at the paused point.
NOTE:
During recording and playback, the recording format and le
name type cannot be changed.
Blinks
Blinks
Lit
Counter does not return to 0.
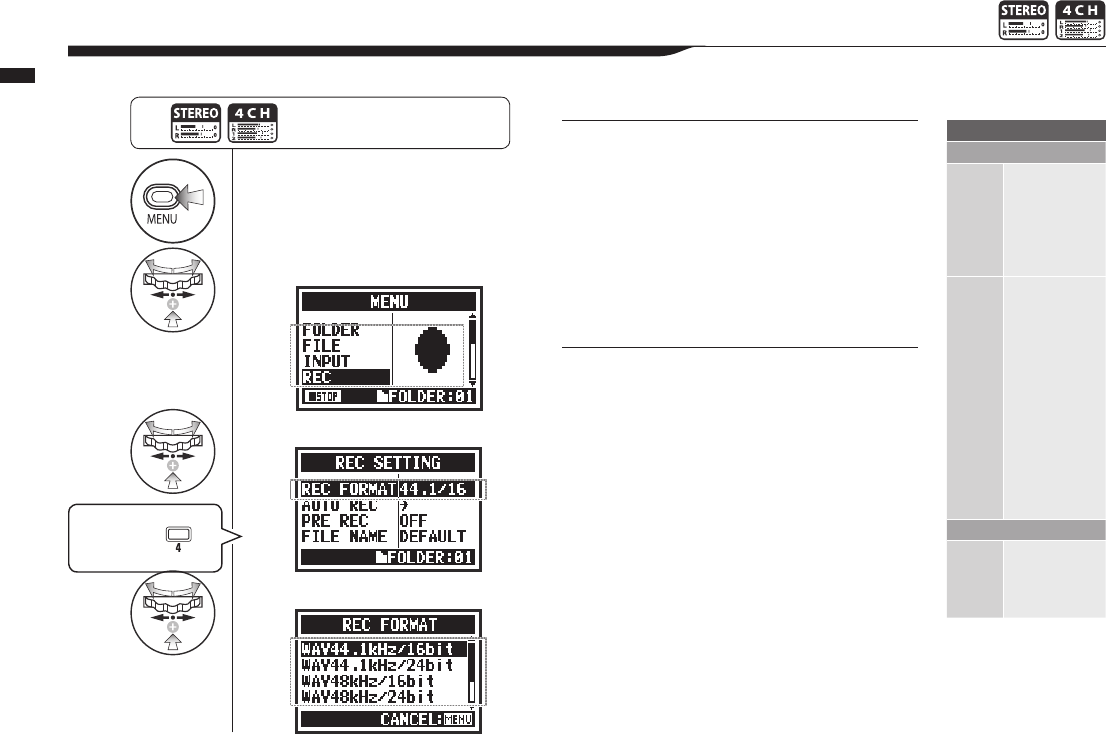
1Press.
2Select REC and press.
3
Select REC FORMAT and press.
4Select one and press.
049
Operations / Settings/recording: Recording format (REC FORMAT)
1-03
Settings/recording: Recording format (REC FORMAT)
Set the recording format (REC FORMAT) before recording.
NOTE:
How to use WAV and MP3 format
• WAV les with no compression are used for
high-quality sound recording. Since data is not
compressed, les are larger than MP3 les.
• MP3 les have lower sound quality because of
data compression, but are useful to save SD card
capacity and record more.
HINT:
Types of WAV les
44.1/48/96 kHz indicates the sampling rate of the
analog-to-digital conversion. 16/24-bit indicates the
bit depth of the analog-to-digital conversion.
The larger the number, the higher the sound
quality,and the larger the le size.
WAV les recorded in STEREO/4CH/STAMINA mode
comply with BWF (Broadcast Wave Format) and
include marks and creation dates.
Types of MP3 les
Select the bit rate, which is the amount of data per
second. The higher the number, the lower the rate of
compression and the better the sound quality. MP3
les that are more compressed occupy less space on
SD cards.
VBR (Variable Bit Rate) means the bit rate is automati-
cally adjusted based on the input information.
REC FORMAT
STEREO mode
WAV
44.1kHz/16bit
44.1kHz/24bit
48kHz/16bit
48kHz/24bit
96kHz/16bit
96kHz/24bit
MP3
48kbps
56kbps
64kbps
80kbps
96kbps
112kbps
128kbps
160kbps
192kbps
224kbps
256kbps
320kbps
VBR
4CH mode
WAV
44.1kHz/16bit
44.1kHz/24bit
48kHz/16bit
48kHz/24bit
Default:
WAV44.1 kHz/16bit
Press the MENU button for more
than 2 seconds, and start opera-
tion from the top screen.
Shortcut
Press TRACK
on the top screen.

1Press.
2Select REC and press.
3Select FILE NAME and press.
4Select and press.
050
Operations / Settings/recording: File name (FILE NAME)
1-04
Settings/recording: File name (FILE NAME)
Whenrecording,thelenameisautomaticallyassigned.Followtheseprocedurestochangetheformat.
The default setting
is DEFAULT.
Press the MENU button for more
than 2 seconds, and start opera-
tion from the top screen.
NOTE:
• You can set the DATE type only in STEREO
mode.
• You can use other le names in STEREO
and MTR mode. Use FILE RENAME to make
these settings.
Ref. ☞
FILE RENAME
P.109
File Name
STEREO mode
DEFAULT STE/MONO--xxx.wav/mp3 (STE: stereo, MONO: mono; XXX:
3-digit number; wav/mp3 extension)
DATE 090531-xxx.wav/mp3 (yymmdd; 3-digit number; wav/mp3 exten-
sion)
4CH mode
No change
4CH-xxxM.wav
File recorded using the built-in microphones
4CH-xxxI.wav
File recorded using
the external input
MTR mode
Stereo and
monoles
TRK1-××.wav (TRK: track number; 2-digit number, extension)
For
stereo tracks, track numbers like 12 for L and R are used.
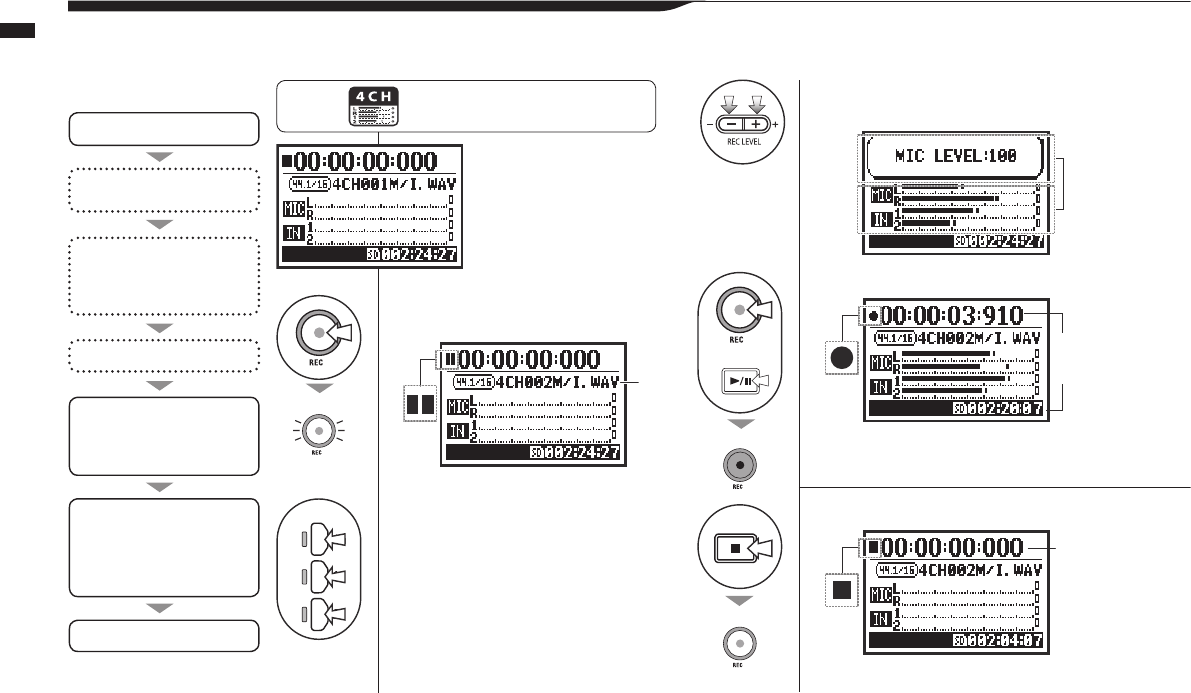
1Press to enter recording
standby.
2Select the input sources
and press.
3Adjust the recording level of
the input source.
4Press to start recording.
5Press to end recording.
051
Operations / Settings/recording: 4CH mode recording
1-05 Settings/recording: 4CH mode recording
This is the method to record 4 channels (2 stereo) from the built-in mic and the external input jacks.
Switch to 4CH mode
1. Enter recording standby
2. Select input source
3. Adjust recording level of
source
Record
4. Start recording.
(Pause, resume recording,
add marks.)
Change recording setting.*
REC FORMAT
Use recording functions.*
AUTO REC/STOP, PRE REC,
REC LEVEL AUTO
Use METRONOME*
5. End recording
*You can record without making
these settings.
STEREO
MODE TOP
Recording process Press the MENU button for more
than 2 seconds, and start opera-
tion from the top screen.
The counter and
remaining time
start changing.
The counter
resets to 0.
New le
name
Blinks
Blinks
Lit
Lit
Unlit
or
Select mic for
the built-in microphones
Select INPUT 1 or 2 for external
inputs
3Adjust the recording level of
the input source.
4Press to start recording.
5Press to end recording.
File name
052
Operations / Settings/recording: 4CH mode recording
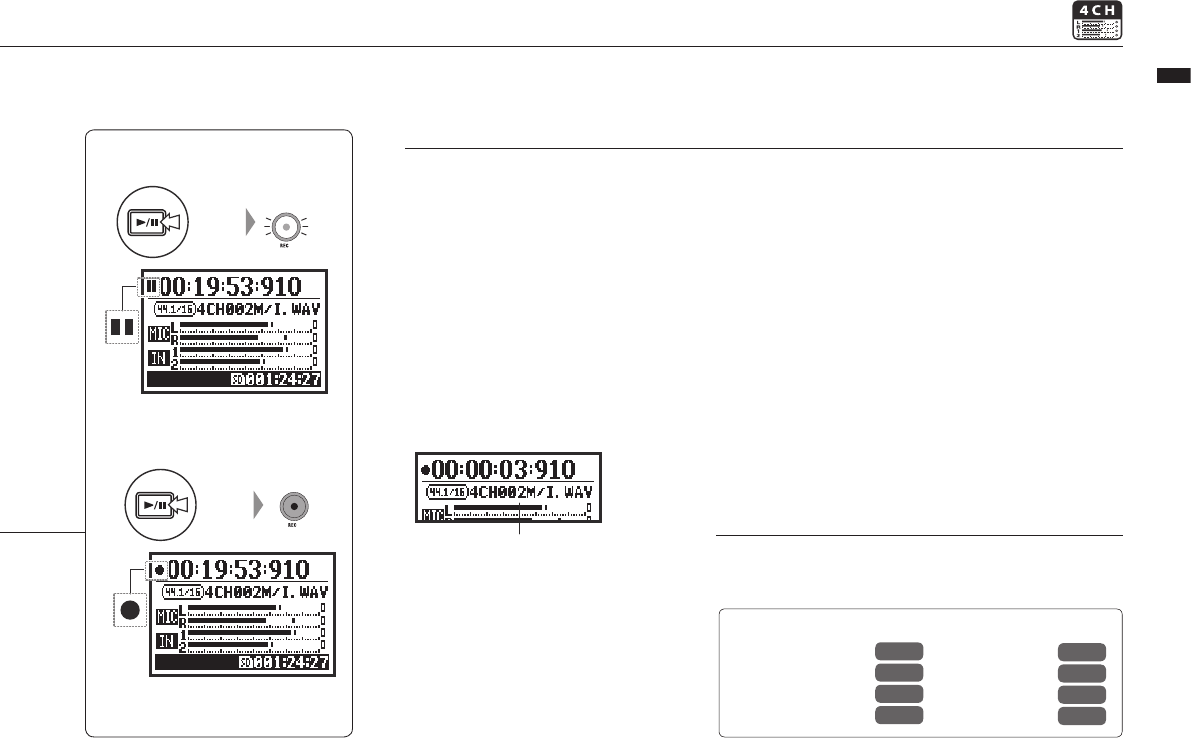
Pausing
RECORDING AGAIN
Press
Press
Ref. ☞
REC FORMAT P.049
Mark setting P.096
AUTO REC P.063
REC LEVEL AUTO P.069
FILE NAME P.050
METRONOME P.079
PRE REC P.065
Mode change P.036
HINT:
File naming
In 4CH mode the input from the
built-in and the external inputs
are saved separately as stereo
WAV les.
Those 2 les are always
managed as a pair and named
as follows according to the
input.
MIC le: 4CHxxxM.wav
INPUT 1/2 le: 4CHxxxI.wav
On screen, the 2 les are shown
together as M/I.
*Youcannotchangethelenames.
Recording format
Change before recording.
Marks
When the recording format is
WAV, you can mark a le by
pressing the REC button while
recording. You can move swiftly
to marked positions during play-
back. When you pause recording
of a WAV le, a mark will be
added at the paused point.
NOTE:
During recording and playback, the recording format and le
name type cannot be changed.
Blinks
Blinks
Lit
Counter does not return to 0.
Continue recording from the
paused position in the same le.
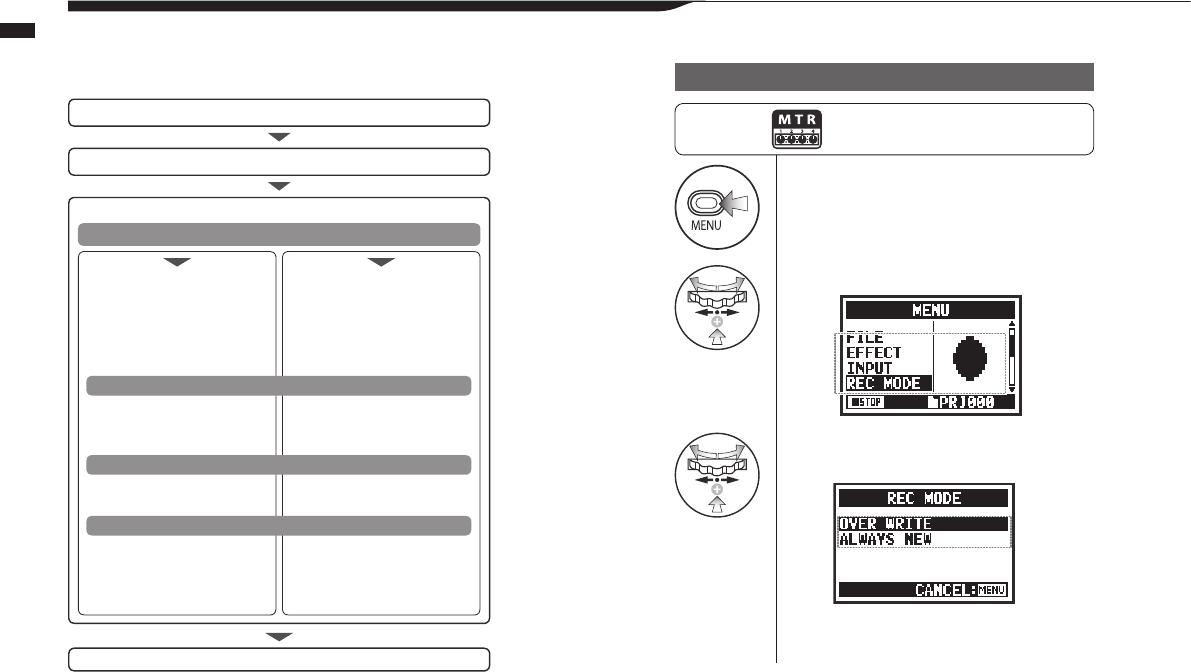
1Press.
2Select REC MODE and press.
3Select either OVER WRITE or
ALWAYS NEW and press.
053
Operations / Settings/recording: MTR mode recording (REC MODE)
1-06-1 Settings/recording: MTR mode recording (REC MODE)
Using multiple tracks, you can combine mono and stereo recordings.
Press the MENU button for more
than 2 seconds, and start opera-
tion from the top screen.
Set REC MODE to OVER WRITE or ALWAYS NEW
Change to MTR mode
Recording ow
Create a new PROJECT
Record the second track
*You can record without making these settings.
Record the rst track
OVER WRITE
(overwrite recordings)
Set up PUNCH IN/OUT*
Use the METRONOME*
Set up EFFECT*
Select the track to record
• Select the input source
• Adjust the recording level of
the source
Make settings (mix)
• TRACK MENU settings
Adjust the track
• LEVEL • PAN
ALWAYS NEW
(create new recordings)
Use the METRONOME*
Set up EFFECT*
Select the track to record
• Select the input source
• Adjust the recording level of
the source
Pause
Resume
Make settings (mix)
• TRACK MENU settings
Adjust the track
• LEVEL • PAN
Select the REC mode
Recording Standby
Start recording
End recording
+
+
054
Operations / Settings/recording: MTR mode recording (REC MODE)
Input sources and tracks
INPUT 1 or 2 INPUT 1 or 2
Built-in microphone L
Built-in microphone R
INPUT 1
INPUT 2
Built-in microphone L
Built-in microphone R
or or
INPUT 1
INPUT 2
TRACK
Track 1 or 3
Track 2 or 4
Track 1 or 3
Track 2 or 4
Track 1 or 3
Track 2 or 4
TRACK
TRACK
When recording only one track When recording two tracks
1. Input source is either INPUT 1 or INPUT 2 1. Input source is either INPUT 1 or INPUT 2
2. Input source is MIC or INPUT 1 and 2 2. Input source is MIC or INPUT 1 and 2
Recording is created by mixing signals from both sources
The same signal is sent to both tracks.
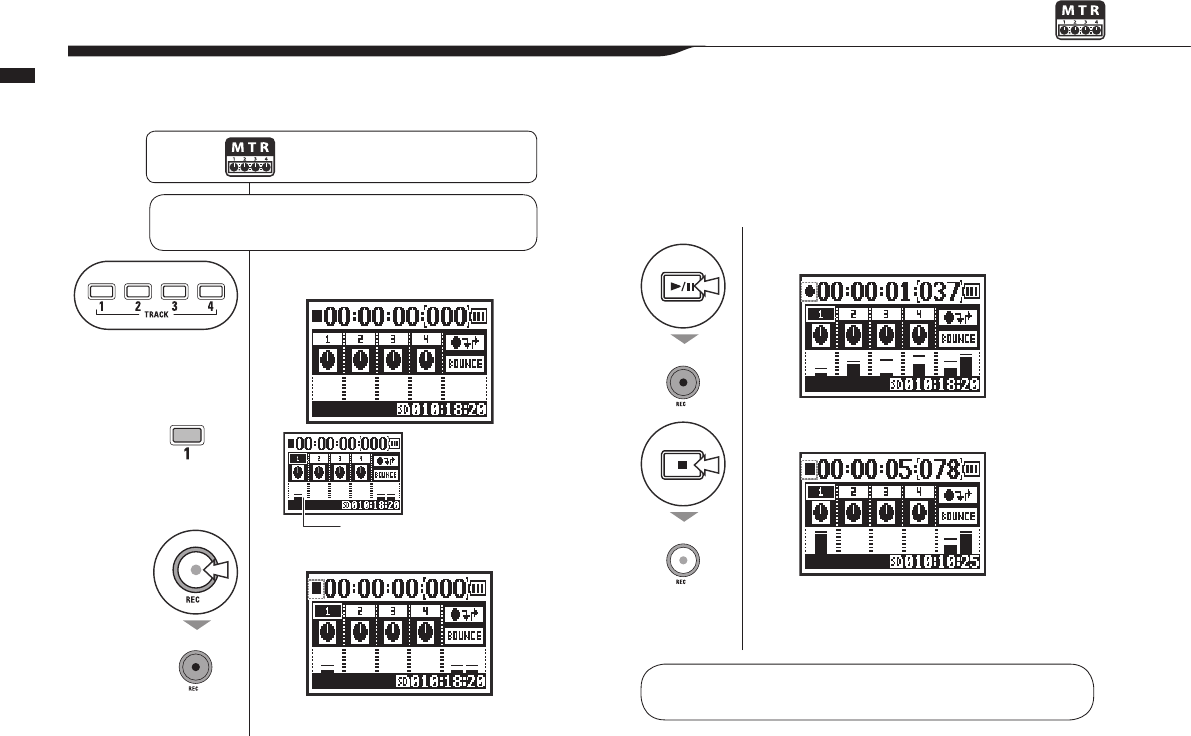
1Select the TRACK.
2Press.
Counter will not reset to 0.
3Press to start recording.
4Press to stop recording.
Counter does not reset to 0.
055
Operations / Settings/recording: MTR mode recording (OVER WRITE)
1-06-2
Settings/recording: MTR mode recording (OVER WRITE)
You can select from two recording modes.
UsingtheOVERWRITEmode,youcanoverwritenewsoundsontheexistingle.
Press the MENU button for more
than 2 seconds, and start opera-
tion from the top screen.
Make settings as needed ☞ Input setting ... P.054
☞ Recording functions ... P.057–
Shows input level
MTR
mode top
The selected
TRACK lights
Lit
Lit
Unlit
Use the REW button to return to the beginning of the le. Then, press the PLAY/
PAUSE button to listen to what you have just recorded.
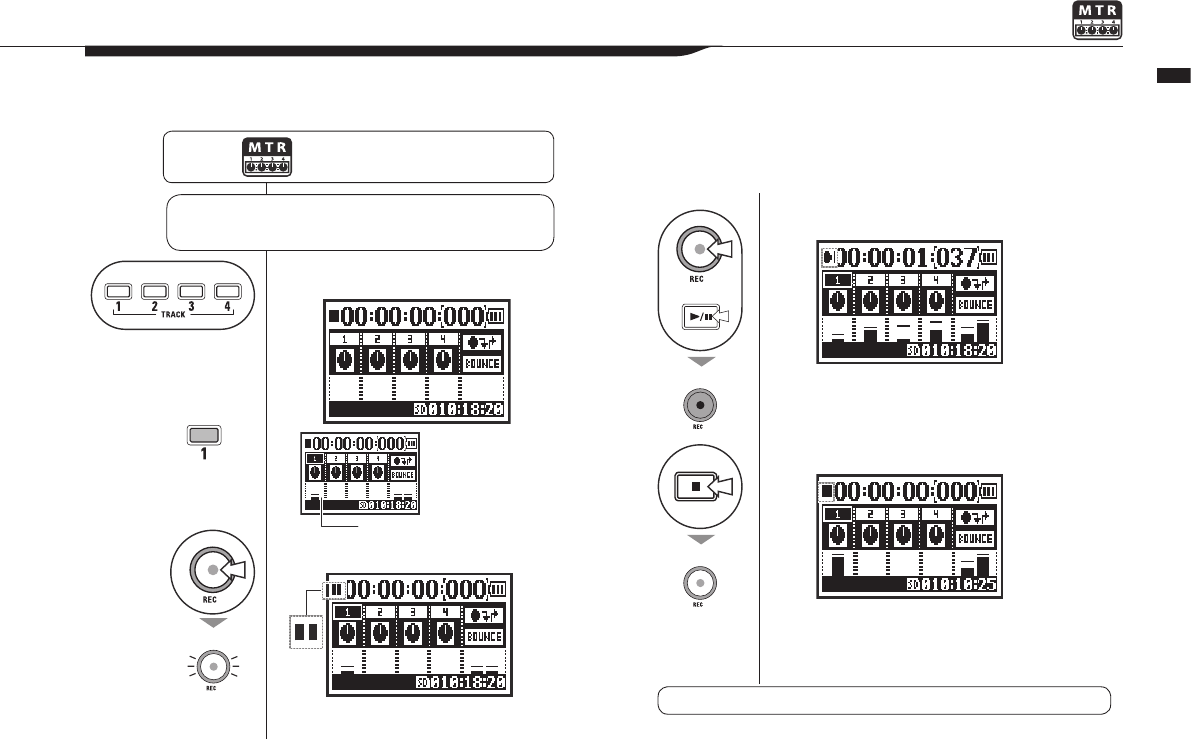
1Select the TRACK.
2Press.
Counter will not reset to 0.
3Press to start recording.
4Press to stop recording.
Counter does not reset to 0.
056
1-06-3
Settings/recording: MTR mode recording (ALWAYS NEW)
Operations / Settings/recording: MTR mode recording (ALWAYS NEW)
InALWAYSNEWmode,anewleismadeforeveryrecording.
Press the MENU button for more
than 2 seconds, and start opera-
tion from the top screen.
Make settings as needed ☞ Input setting ... P.054
☞ Recording functions ... P.057–
Shows input level
MTR
mode top
The selected
TRACK lights
Blinks
Blinks
Lit
Unlit
Use the PLAY/PAUSE button to listen to the recorded le.
or
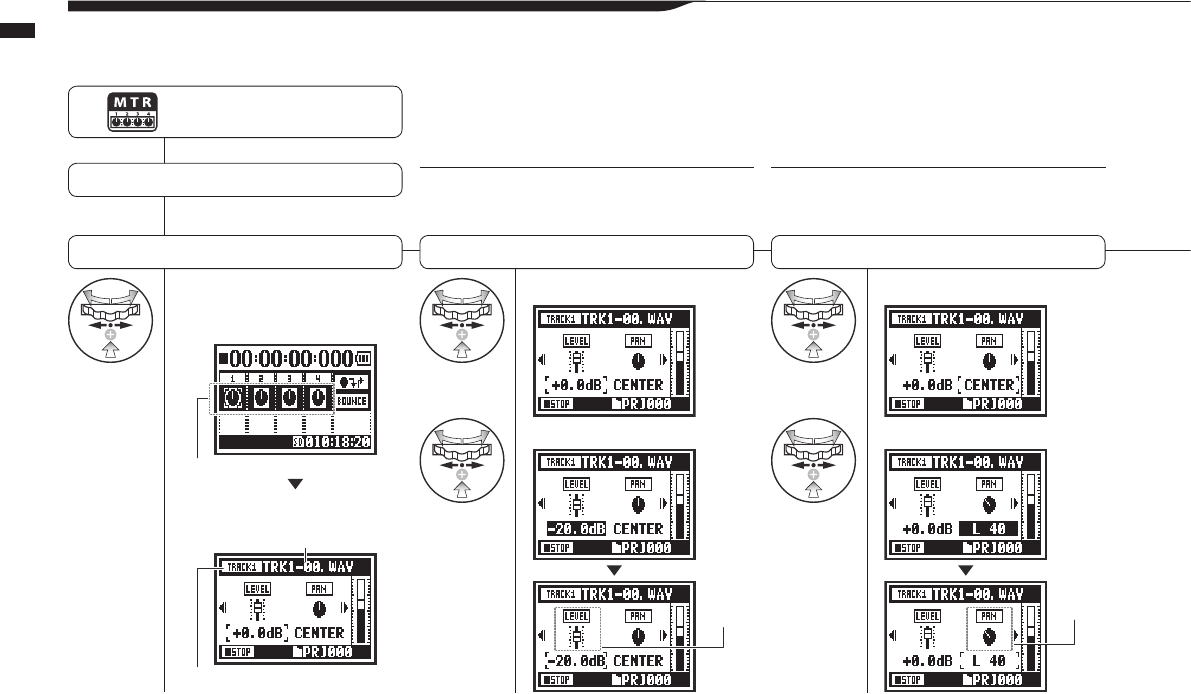
1On the top screen select
a track menu icon and
press.
Select LEVEL and press.
Set the value and press.
Select PAN and press.
Set the value and press.
057
Operations / Settings/recording: TRACK MENU
1-07 Settings/recording: TRACK MENU
This menu to set tracks is available only in MTR mode.
Linktrackstocreatestereotrackandsetoutputeects.
Adjust the track output level Adjust the panning
HINT: LEVEL
Set the track output level
Settingvalues:Mute,−48.0dB–+12.0dB
Default: 0.0dB
HINT: PAN
Set the left–right position of the track.
Setting values: L100 – C – R100
Default: C (Center)
Press the MENU button for more
than 2 seconds, and start opera-
tion from the top screen.
Select a project and start ……P.119
Select TRACK MENU
Track menu icon
TRACK MENU
Nameofleassignedtotrack
Currently selected track
Fader icon
changes
Pan icon
changes
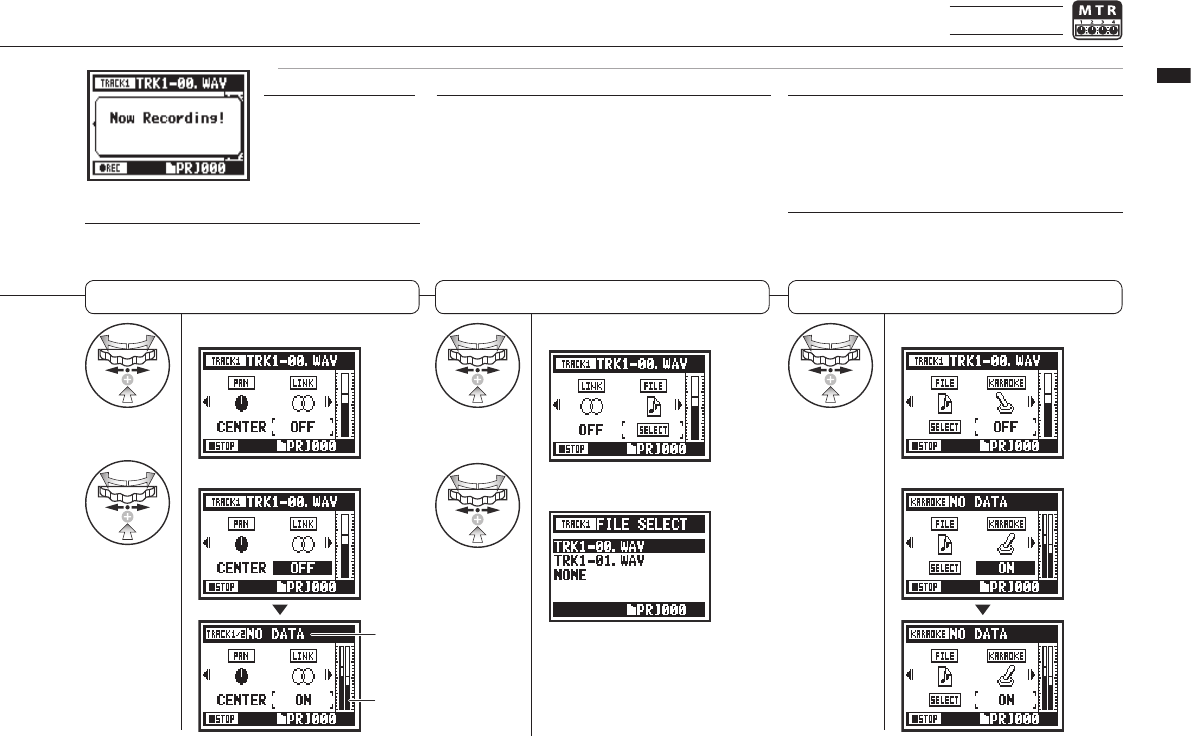
Select LINK and press.
Set the value and press.
Select FILE and press.
Select the le to be
assigned and press.
List of les with the matching format
that can be assigned
Select KARAOKE and press.
Set the value and press.
058
Operations / Settings/recording: TRACK MENU
MTR mode only
Setting stereo link Assigning les to tracks Setting KARAOKE
HINT: Stereo link
Turning stereo link ON creates a stereo track from tracks
1 and 2 or 3 and 4. Setting stereo link OFF creates mono
tracks. Setting values: ON/OFF (default: OFF)
HINT: Karaoke
You can only use the KARAOKE setting on one pair of stereo
tracks: either 1 and 2 or 3 and 4. In KARAOKE mode, you can
use KEY CONTROL and CENTER CANCEL functions.
Setting values: ON/OFF (default: OFF)
NOTE:
• You can only play mono les on mono tracks and stereo
les on stereo tracks.
• When LINK is turned ON, no le will be assigned to the
track, so “NO DATA” will appear.
• If you change it from ON to OFF, the previous PAN setting
is restored.
• When you change from OFF to ON, the LEVEL and PAN
settings are reset to their defaults.
NOTE:
STEREO LINK, FILE and
KARAOKE settings are not
available during recording
or playback for tracks that
are record ready.
NOTE:
• You cannot record on the KARAOKE track.
• If LINK is turned ON automatically when set to a mono track,
“NO DATA” will result.
• When a KARAOKE track has been set, you cannot set other
tracks to KARAOKE.
Since format
changed, “NO
DATA” appears.
Level meter becomes
stereo.
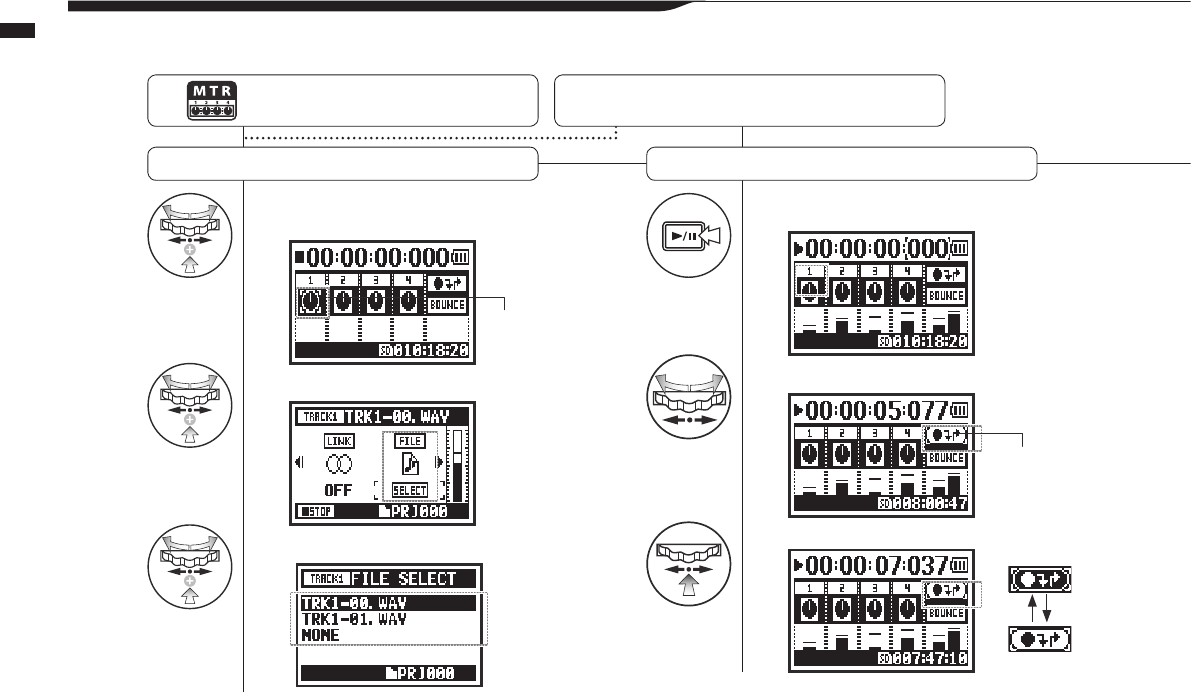
1On the top screen select the
track menu icon and press.
2Select FILE and press.
3Select the desired le and press.
4Press to start playback.
5
Select the punch in/out icon and press.
6Find the desired punch in point and press.
059
Operations / Settings/recording: Automatic re-recording (PUNCH IN/OUT)
1-08-1
Settings/recording: Automatic re-recording (PUNCH IN/OUT)
ThePUNCHIN/OUTfunctionallowsyoutopartiallyre-recordarecordedle.
Here we explain how to use PUNCH IN and PUNCH OUT automatically.
Press the MENU button for more
than 2 seconds, and start opera-
tion from the top screen.
Change the REC MODE
to OVER WRITE …………P.053
Assign les to tracks
Set the recording start (punch in) point
Track menu icon
Punch in/out icon
Icon changes
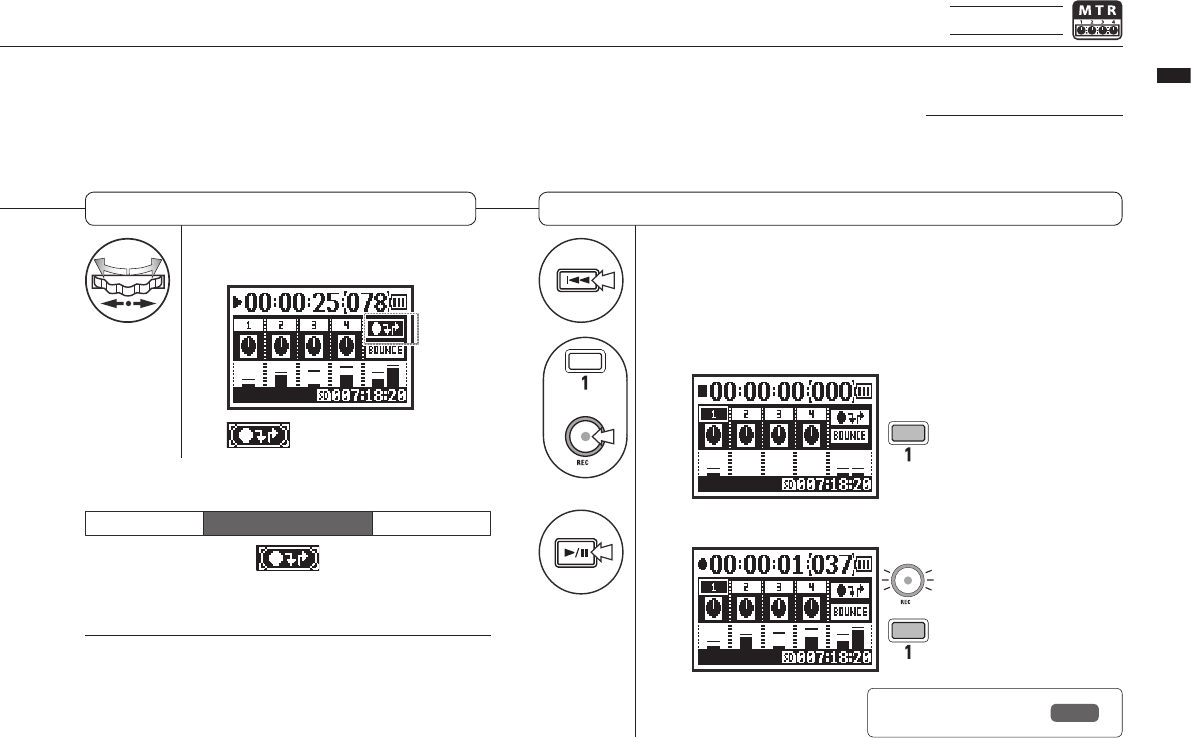
7Press the desired punch out
point. 8Rewind to the le beginning
(counter at 0) or to a position
before the punch in point.
+
9Press to put TRACK 1 into recording standby.
10
Press to start TRACK 1 playback/recording.
→●■
060
Operations / Settings/recording: Automatic re-recording (PUNCH IN/OUT)
MTR mode only
Set the recording end (punch out) point
Re-recording
HINT:
• You can set the punch in/out points while stopped by using
the counter. First set a time and move the cursor to the
punch in/out icon, and then press the DIAL.
• After setting the punch out point in step 7, pressing the
DIAL again will cancel all the settings.
NOTE:
Setting available only for
OVER WRITE recording in
MTR mode.
PUNCH OUT setting
conrmed
Part re-recorded
Punch in
Start Stop
Punch out
PLAY REC PLAY
1 When in punch in/out mode,
the track button lights during
recording and blinks in record-
ing standby.
When the track reaches the
punch in point, the REC light will
turn on and recording will start.
When the track reaches the
punch out point, the light will
blink and recording will stop.
Ref. ☞ Specifying a
counter time P.102
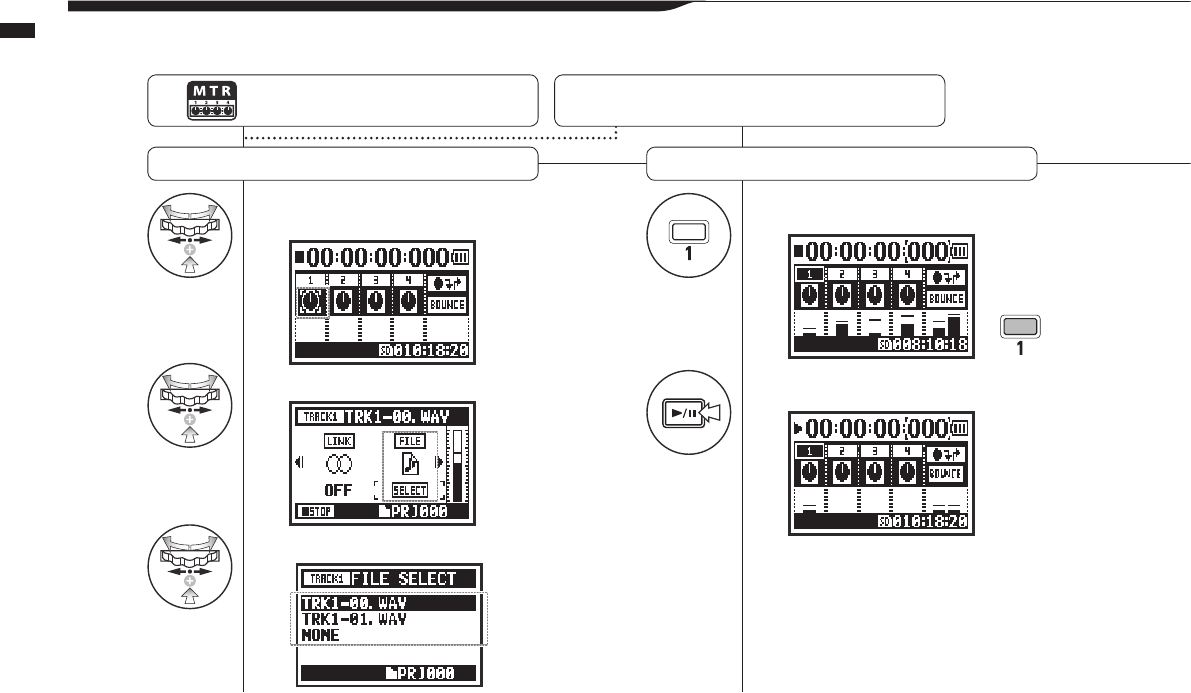
1On the top screen select the
track menu icon and press.
2Select FILE and press.
3Select the desired le and press.
4Press to enter recording standby.
5Press to start playback.
061
Operations / Settings/recording: Manual re-recording (PUNCH IN/OUT)
1-08-2
Settings/recording: Manual re-recording (PUNCH IN/OUT)
Using OVER WRITE recording in MTR mode, you can manually punch in and out.
Press the REC button during playback to start re-recording from that point.
Press the MENU button for more than 2
seconds, and start operation from the
top screen.
Change the REC MODE
to OVER WRITE …………P.053
Assign les to tracks Playback
Lit
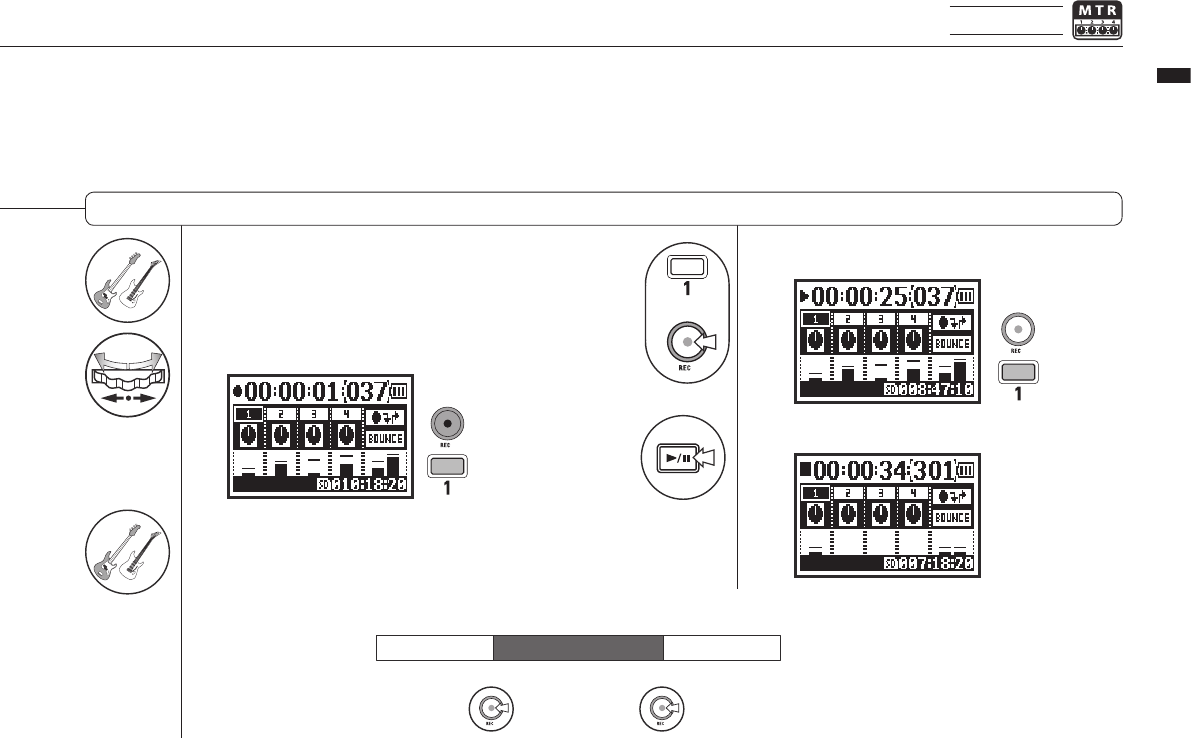
6Perform (not recording).
7Press to start recording.
8Perform (recording).
+
9Press to nish recording.
10
Press to stop playback.
→
▲
▲
062
Operations / Settings/recording: Manual re-recording (PUNCH IN/OUT)
MTR mode only
Re-recording (manually punching in/out)
Lit
Unlit
Lit
Lit
Re-recording
Start recording
Start Stop
Finish recording
PLAY REC PLAY
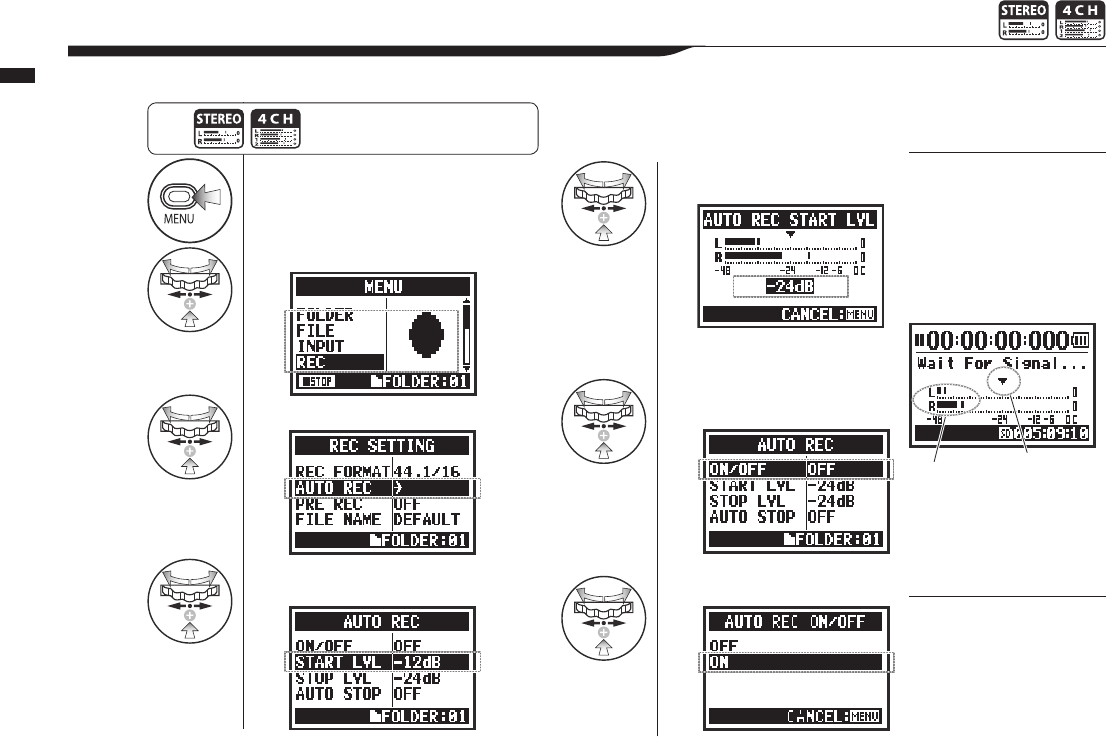
1Press.
2Select REC and press.
3
Select AUTO REC and press.
4
Select START LVL (starting level)
and press.
5Adjust the level.
6Select ON/OFF and
press.
7Select ON and press.
063
Operations / Recording functions: AUTO REC
2-01-1 Recording functions: AUTO REC
The H4n Pro can detect when the input level exceeds a preset level and automatically start recording from recording standby.
HINT:
“Wait for Signal” message
If the AUTO REC function is
ON, “Wait for Signal” appears
when in recording standby.
The unit is sensing whether
the input level exceeds the
recording start level.
NOTE:
• You cannot make this
setting during recording or
playback.
• You cannot use this func-
tion together with REC
LEVEL AUTO, PRE REC or
PRE COUNT.
When “Wait for Signal”
appears, you can press the
REC button to start recording
manually.
Press the MENU button for more than
2 seconds, and start operation from
the top screen.
Set the input level that will start
recording automatically.
Current input level Start level
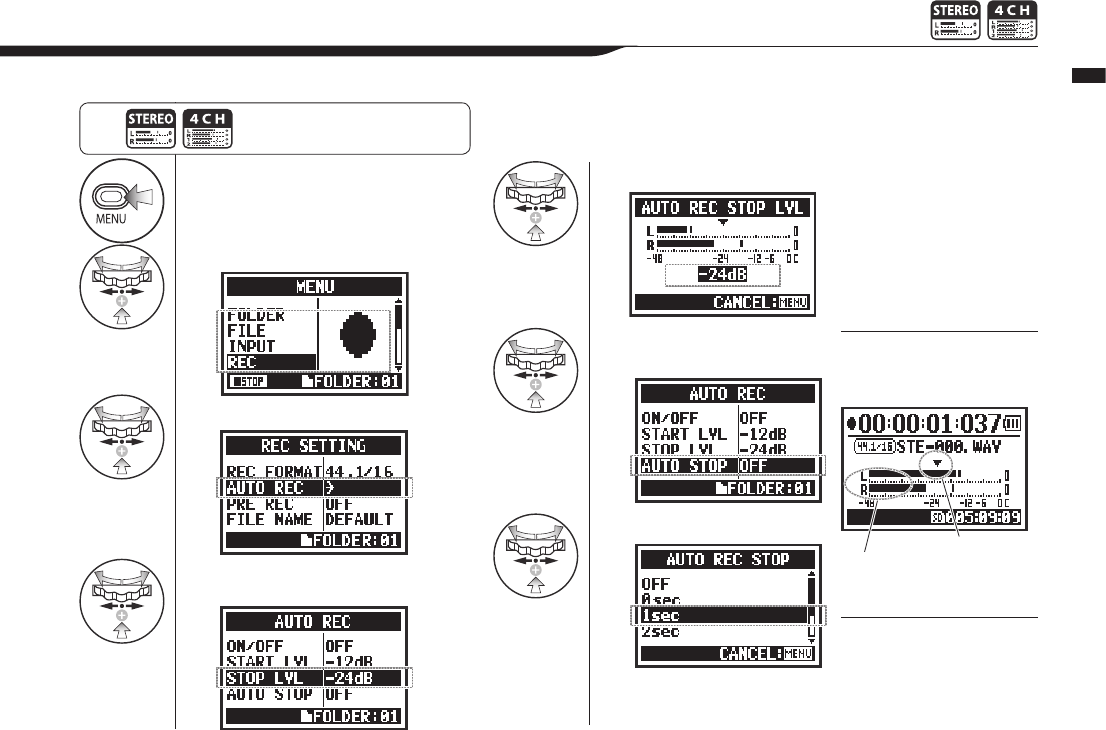
1Press.
2Select REC and press.
3
Select AUTO REC and press.
4
Select STOP LVL (stop level)
and press.
5Adjust the level.
6Select AUTO STOP
and press.
7Set the time.
064
Operations / Recording functions: AUTO REC STOP
2-01-2 Recording functions: AUTO REC STOP
When AUTO REC is ON and the H4n Pro is recording, it will automatically stop when the input level goes below the preset level.
HINT:
When AUTO STOP is on, a
stop level indicator appears
during recording.
HINT:
• You cannot make this
setting during recording or
playback.
•
Even when AUTO STOP is
on, you can press the STOP
button to stop recording.
Set the input level at which
recording will stop
Press the MENU button for more
than 2 seconds, and start operation
from the top screen.
Set the time (1-5 seconds) until
recording stops after the level
becomes lower than the STOP
LEVEL.
Current input level
Stop level
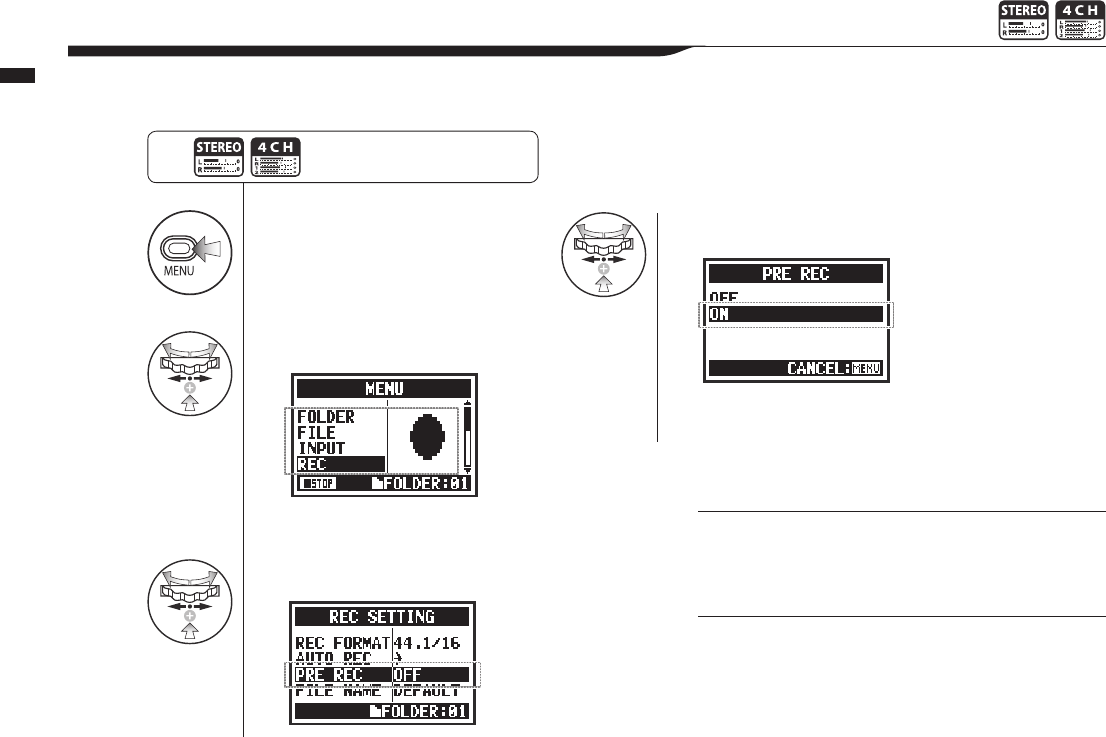
1Press.
2Select REC and press.
3
Select PRE REC and press.
4Select ON and press.
065
Operations / Recording functions: PRE REC
2-02 Recording functions: PRE REC
When PRE REC is ON, up to 2 seconds before the REC button is pressed will automatically be captured in the recording.
HINT:
When PRE REC is ON, the H4n Pro will pre-record audio two
seconds before the record button is pressed.
NOTE:
•
You cannot make this setting during recording and playback.
• When recording at 96 kHz in 4CH mode, the maximum
PRE REC time is one second.
• You cannot use this function together with AUTO REC and
PRE COUNT.
Press the MENU button for more
than 2 seconds, and start operation
from the top screen.
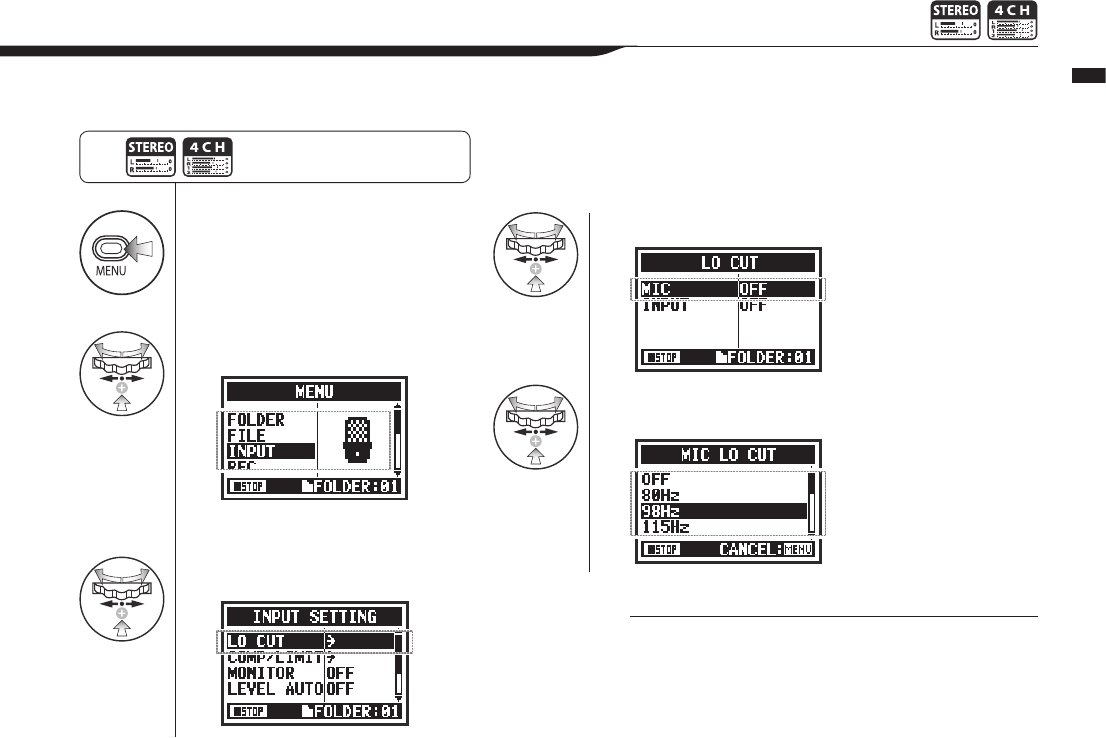
1Press.
2Select INPUT and press.
3
Select LO CUT and press.
4Select the input source and press.
5Select the cuto frequency and
press.
066
Operations / Recording functions: LO CUT
2-03 Recording functions: LO CUT
TheLOCUTltersettingallowsyoutoeliminatewindorblowingnoises.
HINT:
•
You can select from eleven LO CUT lter frequencies: OFF,
80, 98, 115, 133, 150, 168, 185, 203, 220, and 237 Hz.
When using higher values, you should test the eect before
recording.
•
The smaller the number, the lower the cut-o frequency.
Press the MENU button for more
than 2 seconds, and start operation
from the top screen.
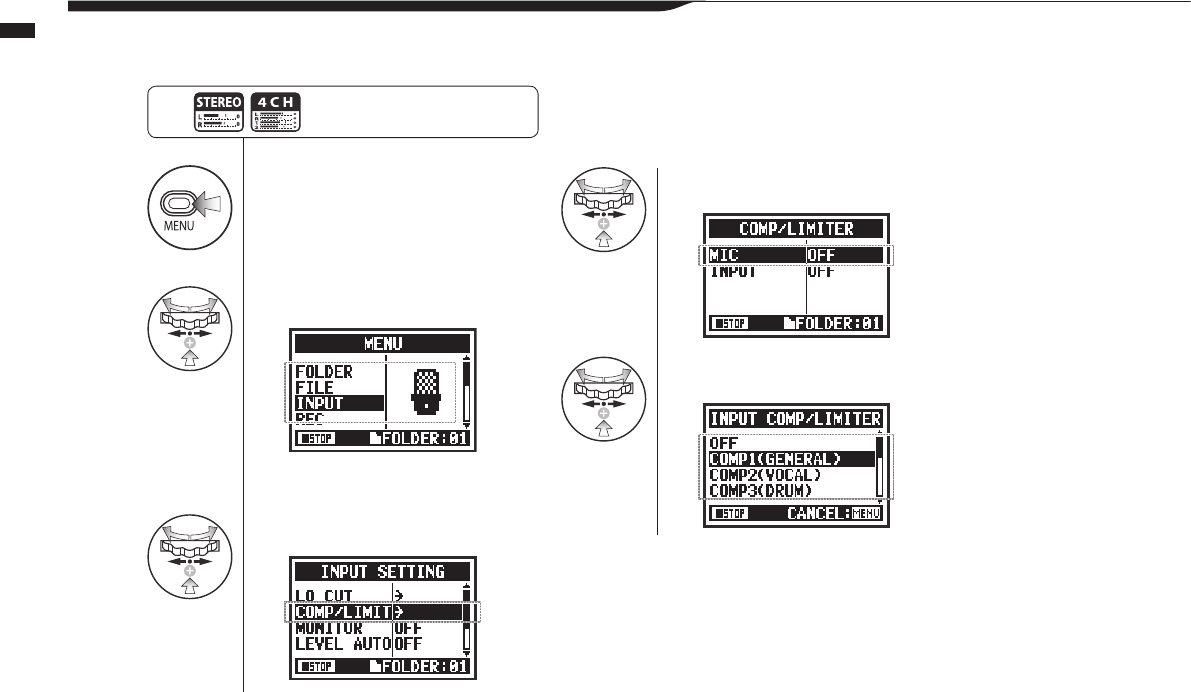
1Press.
2Select INPUT and press.
3
Select COMP/LIMIT and press.
4Select the setting input source.
5Select the setting target.
067
Operations / Recording functions: COMP/LIMIT
2-04 Recording functions: COMP/LIMIT
TheCOMP/LIMITfunctioncancompensateforvolumedierences.Foreachinputsource,low-levelinputsignalsareraisedandhigh-level
input signals are lowered when recording.
Press the MENU button for more
than 2 seconds, and start operation
from the top screen.
068
Operations / Recording functions: COMP/LIMIT
HINT
Type Explanation Threshold (dB) Ratio Output level
(dB)
Attack time
(ms)
Release time
(ms)
OFF Compressor and limiter OFF - - - - -
COMP1 (GENERAL) Standard compressor
These compressors reduce
high-level sounds and raise
the minimum level.
-48.7 9:1 +6.0 7.2 968
COMP2 (VOCAL) This compressor is good for vocals. -8.4 16:1 0 1.8 8.7
COMP3 (DRUM) This compressor is good for drums
and percussion. -48.2 7:1 +3.6 12.3 947
LIMIT1 (GENERAL) Standard limiter
Limiters compress when input
signalsexceedthexedlevel.
-14.4 60:1 0 6.4 528
LIMIT2 (CONCERT) Limiter good for live performance -13.8 32:1 +1.2 1.9 8.5
LIMIT3 (STUDIO) Limiter good for studio recording -12.0 8:1 +1.2 6.5 423
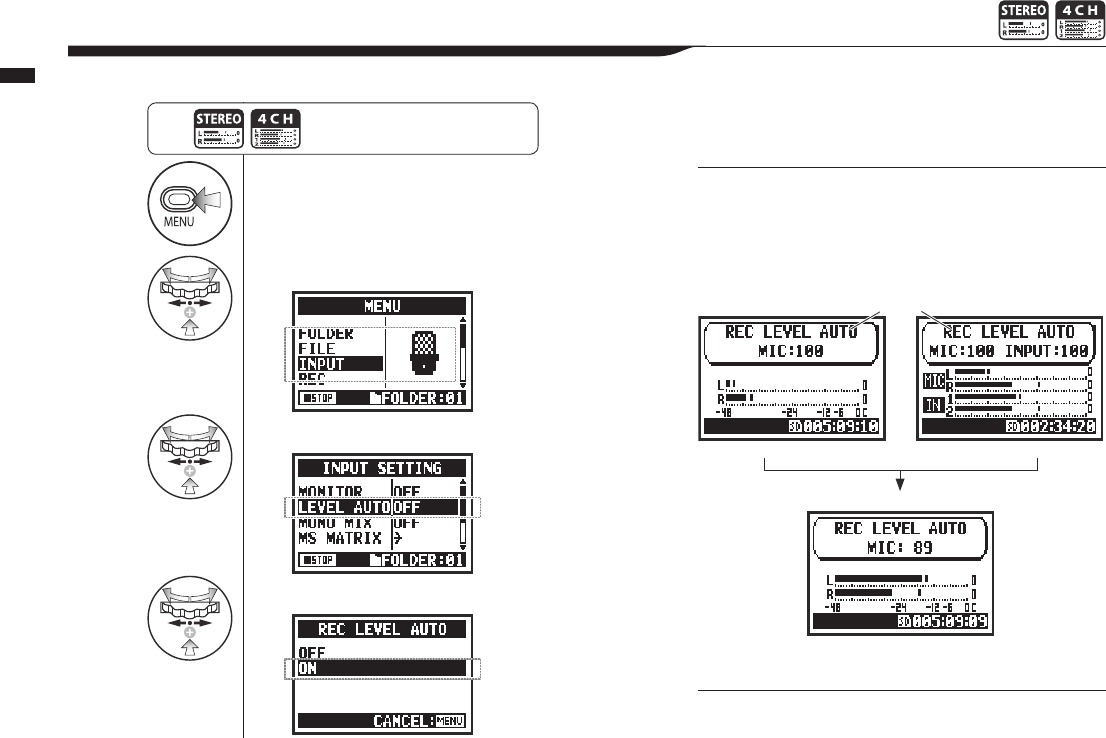
1Press.
2Select INPUT and press.
3
Select LEVEL AUTO and press.
4Select ON
.
069
Operations / Recording functions: REC LEVEL AUTO
2-05 Recording functions: REC LEVEL AUTO
This function automatically sets the level for recording.
Press the MENU button for more
than 2 seconds, and start operation
from the top screen.
HINT:
When REC LEVEL AUTO is used, the unit automatically
sets recording levels using signals present during recording
standby. If the volume surpasses 6 dB during recording, the
input level is automatically adjusted with the new level shown
on the screen for two seconds.
NOTE:
•
You cannot use this function together with AUTO REC.
•
You cannot make this setting during recording and playback.
Display in
recording standby Current input level
Stereo mode 4CH mode
Display when -6 dB is exceeded while recording
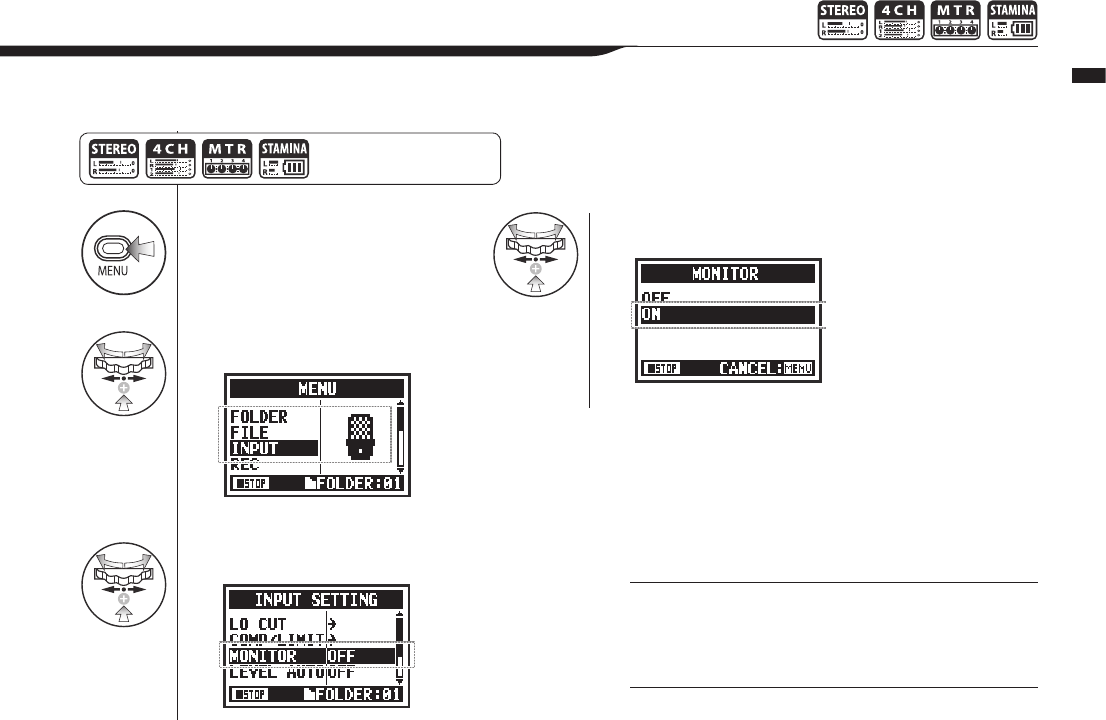
1Press.
2Select INPUT and press.
3
Select MONITOR and press.
4Select ON and press.
070
Operations / Recording functions: MONITOR
2-06 Recording functions: MONITOR
Turning on the MONITOR function allows you to monitor input signals at all times.
Press the MENU button for
more than 2 seconds, and start
operation from the top screen.
HINT:
You can always monitor the input source through the LINE/
PHONE stereo out mini jack when in recording standby.
NOTE:
You cannot monitor input sounds through the built-in speaker.
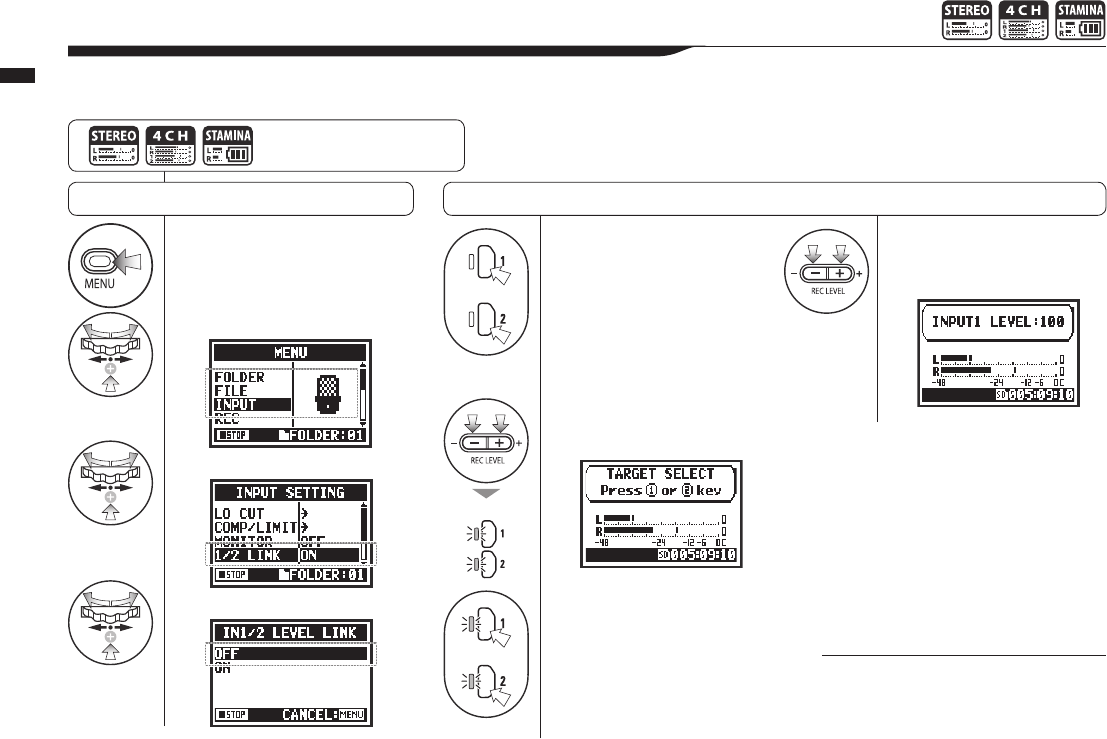
071
Operations / Recording functions: INPUT 1/2 LEVEL LINK
2-07 Recording functions: INPUT 1/2 LEVEL LINK
1Press.
2Select INPUT and press.
3
Select 1/2 LINK.
4
Select OFF
and press.
The recording levels for INPUT 1 and 2 can be set separately.
Thisisusefulwhenconnectingdierenttypesofmicstothesejacks.
NOTE:
This function can be used in STEREO, 4CH
and STAMINA modes only when MS MATRIX
and MONO MIX are OFF.
Preparation
Press the MENU button for
more than 2 seconds, and start
operation from the top screen.
or
5Press INPUT 1 or
INPUT 2.
6Press the REC LEVEL
buttons.
or
7
Press the button for the
input to adjust.
8Use the REC LEVEL
buttons to adjust the
recording level.
Set recording levels separately
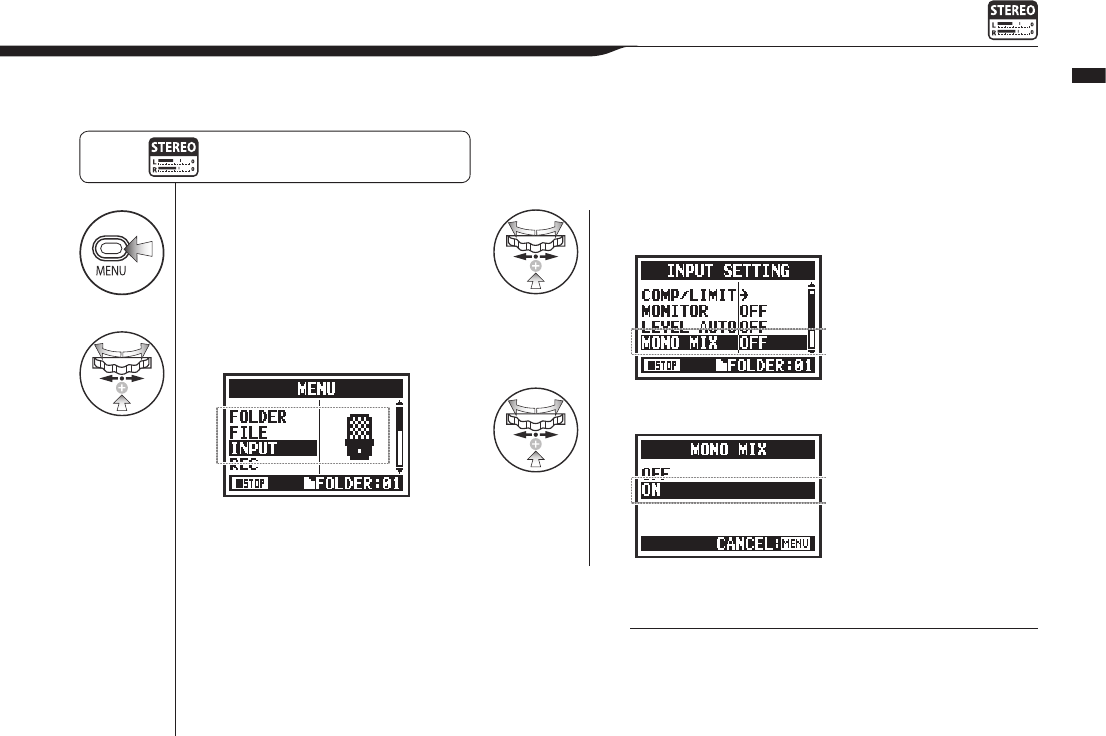
1Press.
2Select INPUT and press.
3Select MONO MIX and press.
4Select ON and press.
072
Operations / Recording functions: MONO MIX
2-08 Recording functions: MONO MIX
NOTE:
•
The names of les recorded with MONO MIX are formatted
like “MONO-xxx”.
•
You cannot use this function together with MS STEREO
MATRIX.
•
You cannot use this setting during recording and playback.
Press the MENU button for more
than 2 seconds, and start operation
from the top screen.
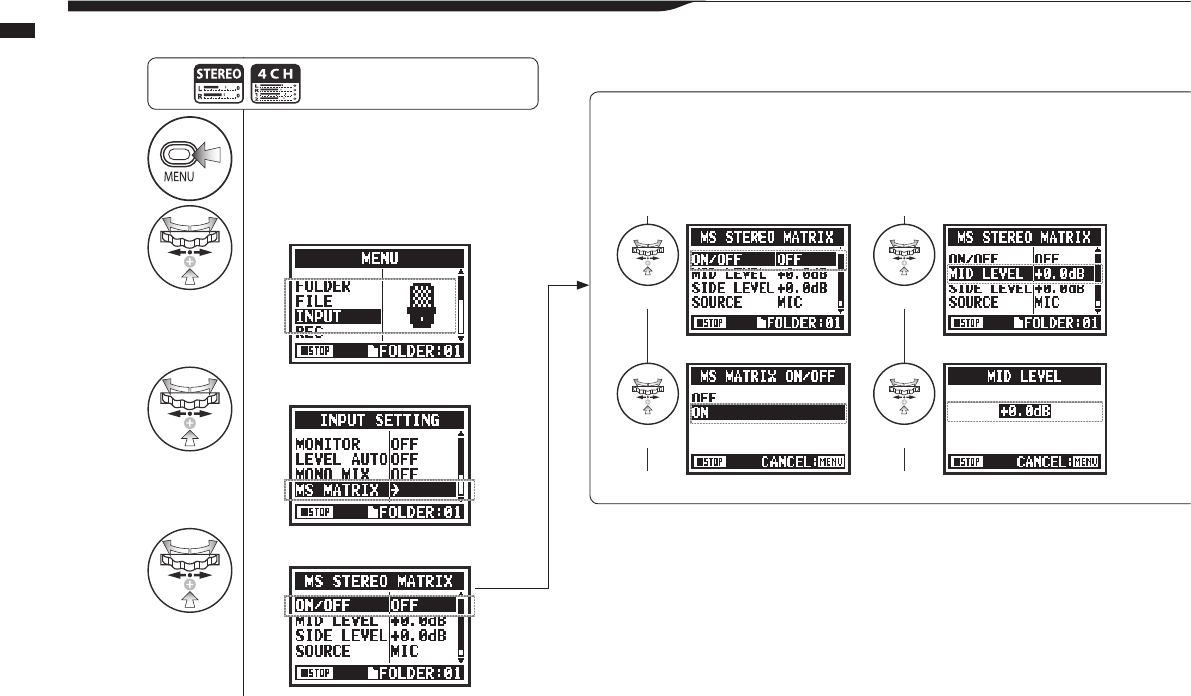
1Press.
2Select INPUT and press.
3
Select MS MATRIX and press.
4
Make each setting accordingly.
073
Operations / Recording functions: MS STEREO MATRIX
2-09 Recording functions: MS STEREO MATRIX
Thisfunctionenablesyoutoconvertstereomicrophonesignalswhenusingamid-siderecordingconguration.
Press the MENU button for more
than 2 seconds, and start operation
from the top screen.
ON/OFF MID LEVEL
Set MS STEREO MATRIX to ON or OFF. Set the level of the directional MID mic
that is pointed at the recording target.
Setting values: MUTE, −48.0 – +12.0 dB
Default: +0.0dB
Select Select
Select Adjust
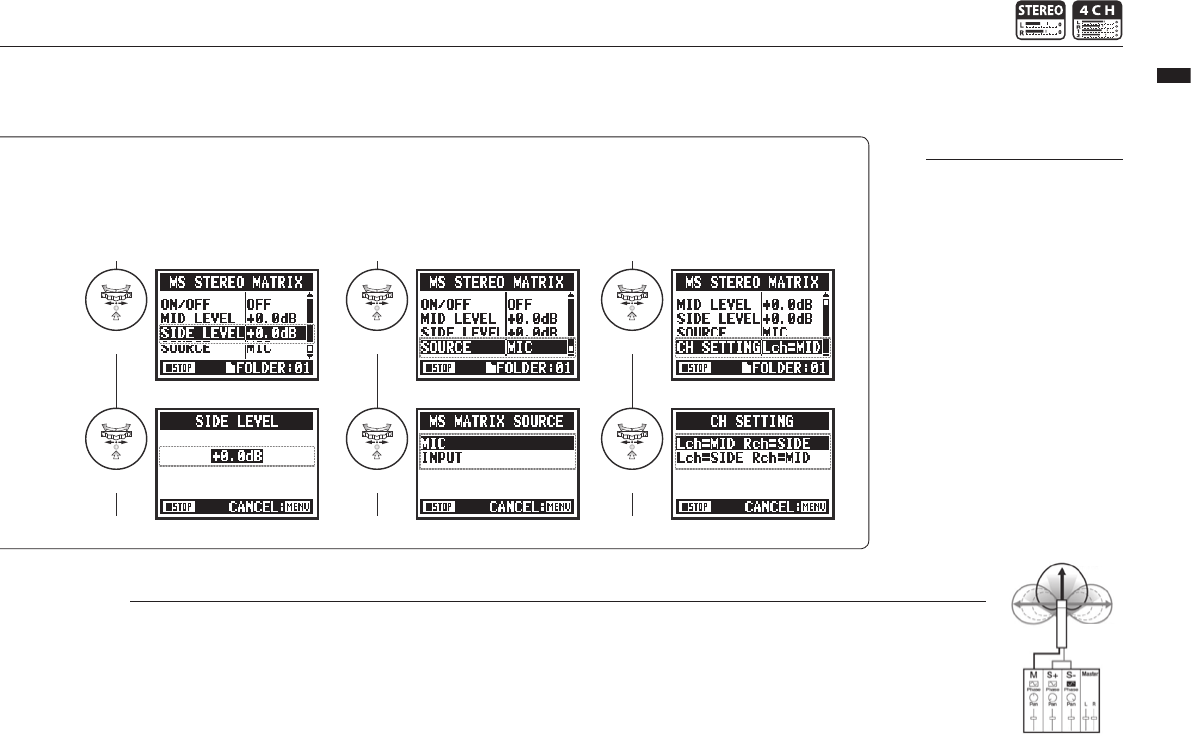
Mid mic
Side mic
074
Operations / Recording functions: MS STEREO MATRIX
NOTE
MS stereo format overview
This technique converts input from a directional mid mic, which
captures sound in the center, and a bidirectional side mic, which
captures sounds from the left and right, to stereo. You can change
the stereo width as you like by adjusting the side mic level.
Since this technique can capture a wide stereo image, it is
ideal for recording large open spaces with numerous sound
sources, including orchestras, live concerts and soundscapes.
This technique is also extremely eective when you want to
adjust room ambience. Since it oers a high degree of freedom,
it is used not only for studio recording but also for a wide range
of recording—even of rehearsals and live performances.
SIDE LEVEL SOURCE CH SETTING
Set the level of the bidirectional SIDE mic,
which is perpendicular to the MID mic.
Setting values: MUTE, −48.0 – +12.0dB
Default: +0.0dB
Set the input used (only in 4CH mode). Assign the MID and SIDE inputs to the left
(INPUT 1) and right (INPUT 2) channels.
NOTE:
You cannot use this function
together with MONO MIX.
Select Select
Select
Select
SelectAdjust
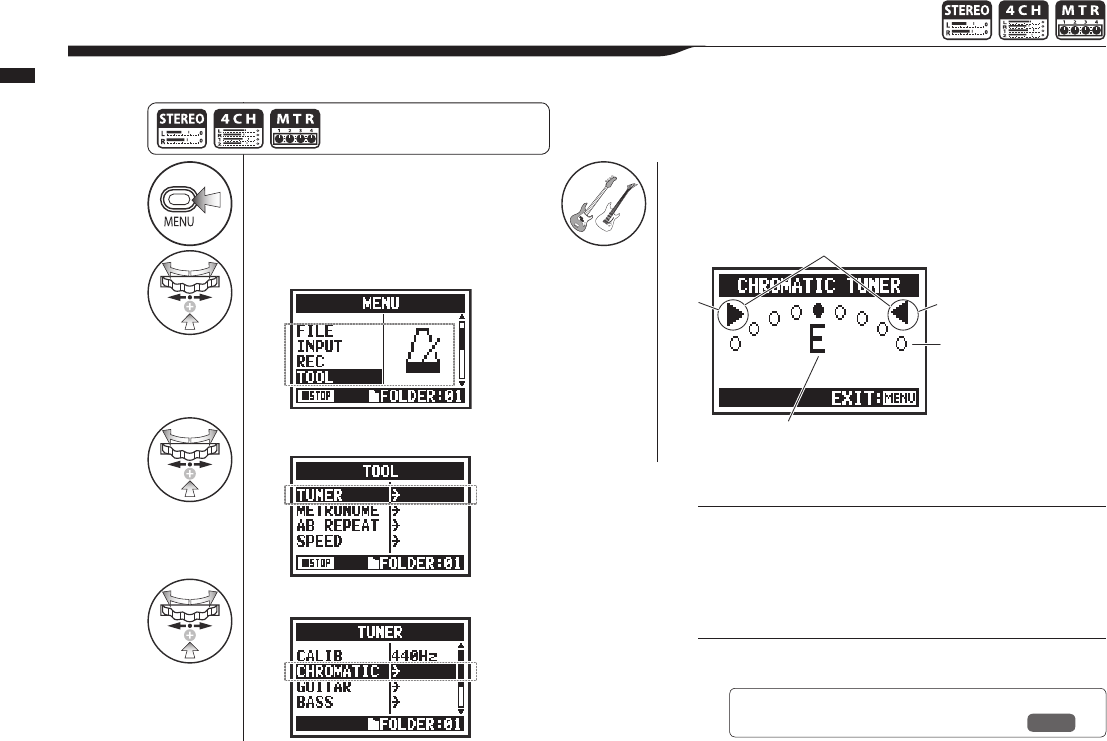
1Press.
2Select TOOL and press.
3
Select TUNER and press.
4
Select CHROMATIC and press.
5Tune the instrument.
075
Operations / Tuner: CHROMATIC TUNER
3-01-1 Tuner: CHROMATIC TUNER
The H4n Pro features a tuner with multiple tuning modes.
Press the MENU button for more
than 2 seconds, and start operation
from the top screen.
HINT:
• The input source signal that is currently selected is used
for tuning.
• In 4CH mode, at Step 4 select INPUT and set the input
source, and then continue to step 5.
NOTE:
This cannot be used during recording and playback.
High
Ref. ☞ Tuner display
String number/note name P.078
The indicators show whether the input signals are higher or lower
than the note shown.
Both marks light when the input signal matches the note.
These dots show how
much dierence there is
between the input signal
and the note .
This shows the name of the note nearest
to the input signal.
Low
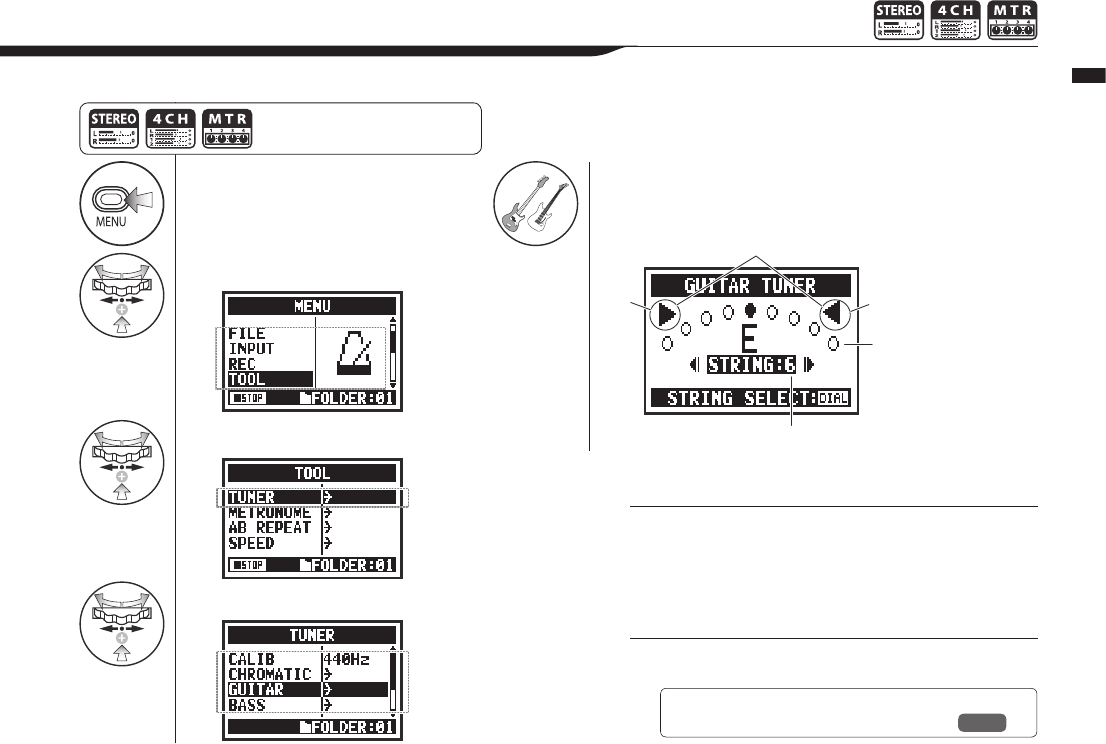
1Press.
2Select TOOL and press.
3
Select TUNER and press.
4
Select the tuning mode and press.
5Tuning.
076
Operations / Tuner: other TUNER types
3-01-2 Tuner: other TUNER types
In addition to CHROMATIC, the other tuning modes are GUITAR, BASS, OPEN A, OPEN D, OPEN E, OPEN G and DADGAD.
Press the MENU button for more
than 2 seconds, and start operation
from the top screen.
HINT:
• The input source signal that is currently selected is used
for tuning.
• In 4CH mode, at Step 4 select INPUT and set the input
source, and then continue to step 5.
NOTE:
This cannot be used during recording and playback.
The indicators show whether the input signals are higher or lower
than the note shown.
Both marks light when the input signal matches the note.
These dots show how
much dierence there is
between the input signal
and the note .
This is the string number currently
selected. Use the DIAL to change it.
Low High
Ref. ☞ Tuner display
String number/note name P.078
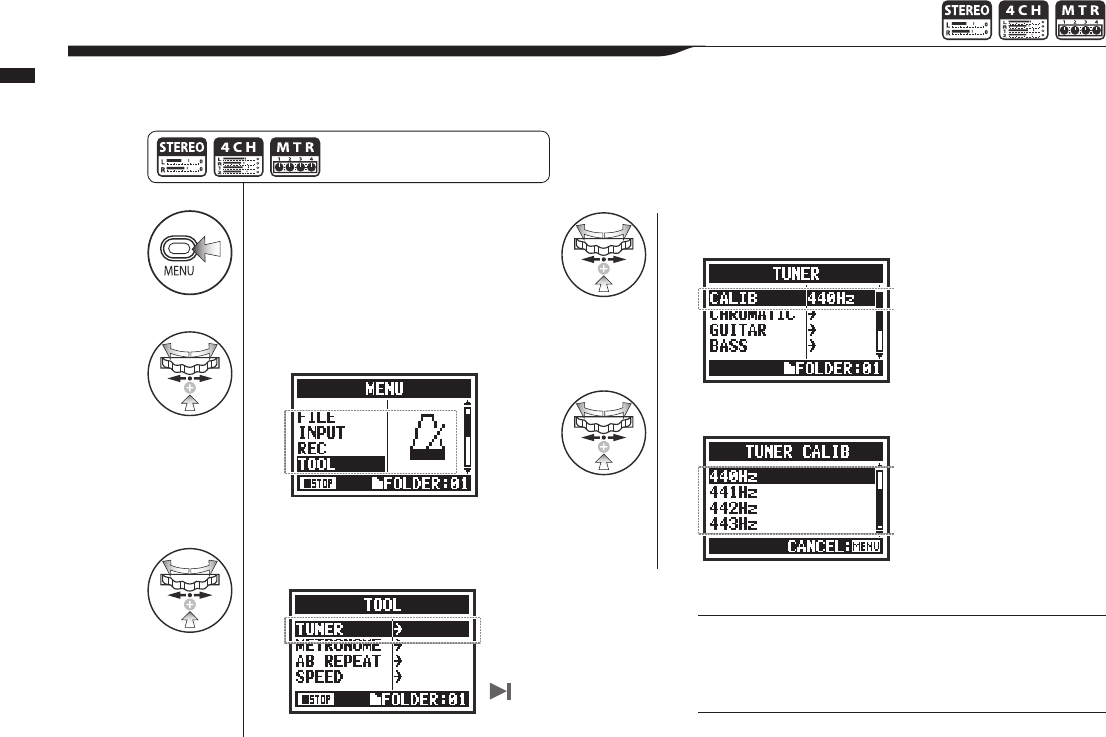
1Press.
2Select TOOL and press.
3
Select TUNER and press.
4Select CALIB and press.
5Select the frequency.
077
Operations / Tuner: TUNER CALIB
3-01-3 Tuner: TUNER CALIB
This function allows you to calibrate the tuner.
Press the MENU button for more
than 2 seconds, and start operation
from the top screen.
Use steps 1–3 for all
TUNER operations.
HINT:
• The default setting is 440Hz.
• Set this between 435Hz and 445Hz in 1Hz increments.
NOTE:
This cannot be used during recording and playback.
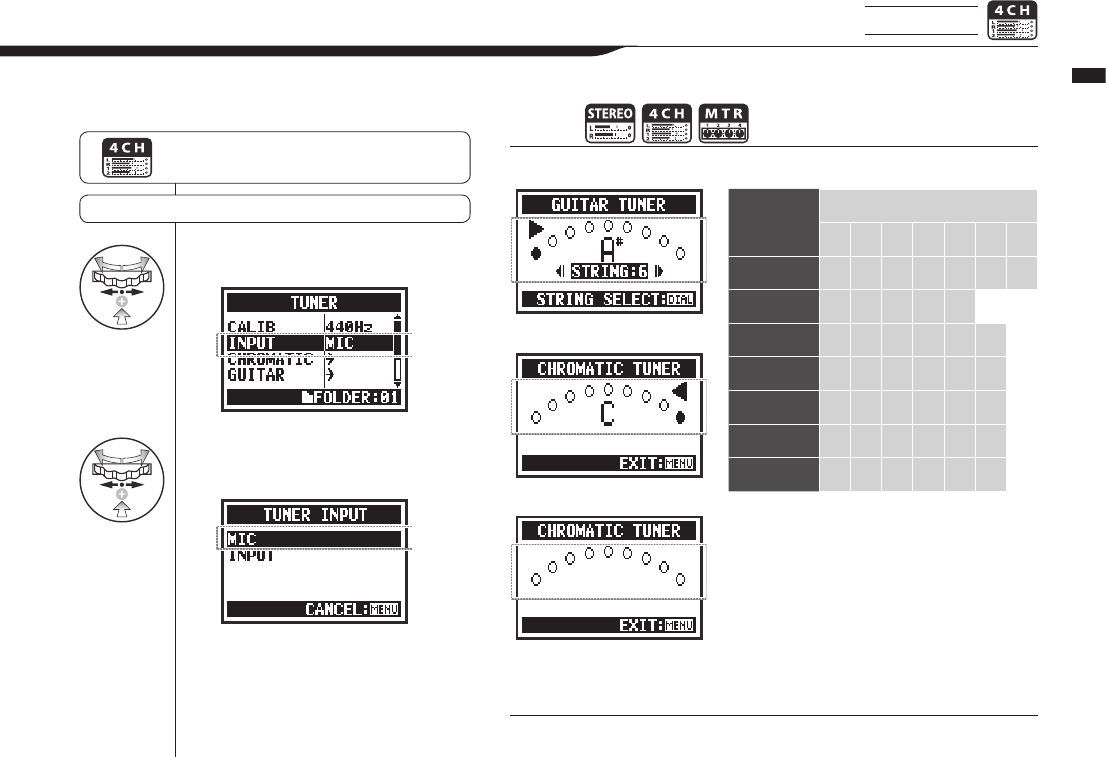
4Select INPUT and press.
5Select the input source and
press.
078
Operations / Tuner: TUNER INPUT
3-01-4 Tuner: TUNER INPUT 4CH mode only
Tuner type
String number/note name
1234567
GUITAR E B G D A E B
BASS G D A E B
OPEN A E C# A E A E
OPEN D D A F# D A D
OPEN E E B G# E B E
OPEN G D B G D G D
DADGAD D A G D A D
In 4CH mode you can select the input source for the tuner.
Press the MENU button for more than 2 seconds,
and start operation from the top screen.
TUNER … P.075
HINT:
NOTE:
This cannot be used during recording and playback.
When pitch is low
Tuner display Tuner types and string notes
When pitch is high
No input sound (chromatic)
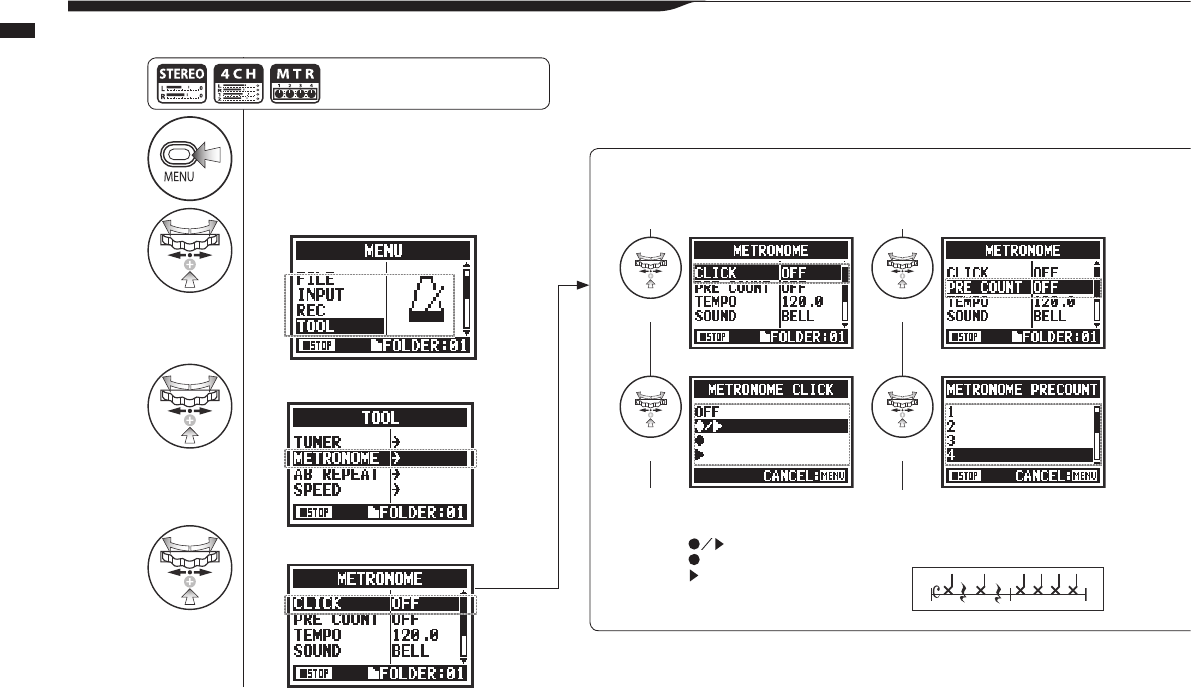
1Press.
2Select TOOL and press.
3
Select METRONOME and press.
4
Set each item.
079
Operations / Metronome (METRONOME)
3-02 Metronome (METRONOME)
The metronome has convenient functions such as a pre-count.
CLICK PRE COUNT
Thissettingturnsthemetronomeoorondur-
ing recording, playback or both. This setting
must be made before recording or playback.
Set the count used before recording starts.
This cannot be set if PRE REC or AUTO REC
is ON.
Count of SPECIAL
Select the condition
OFF
---Recording/playback
---Only when recording
---Only when playback
Set the count to OFF, 1-8
beats or SPECIAL.
Select Select
Select Select
Press the MENU button for more
than 2 seconds, and start operation
from the top screen.
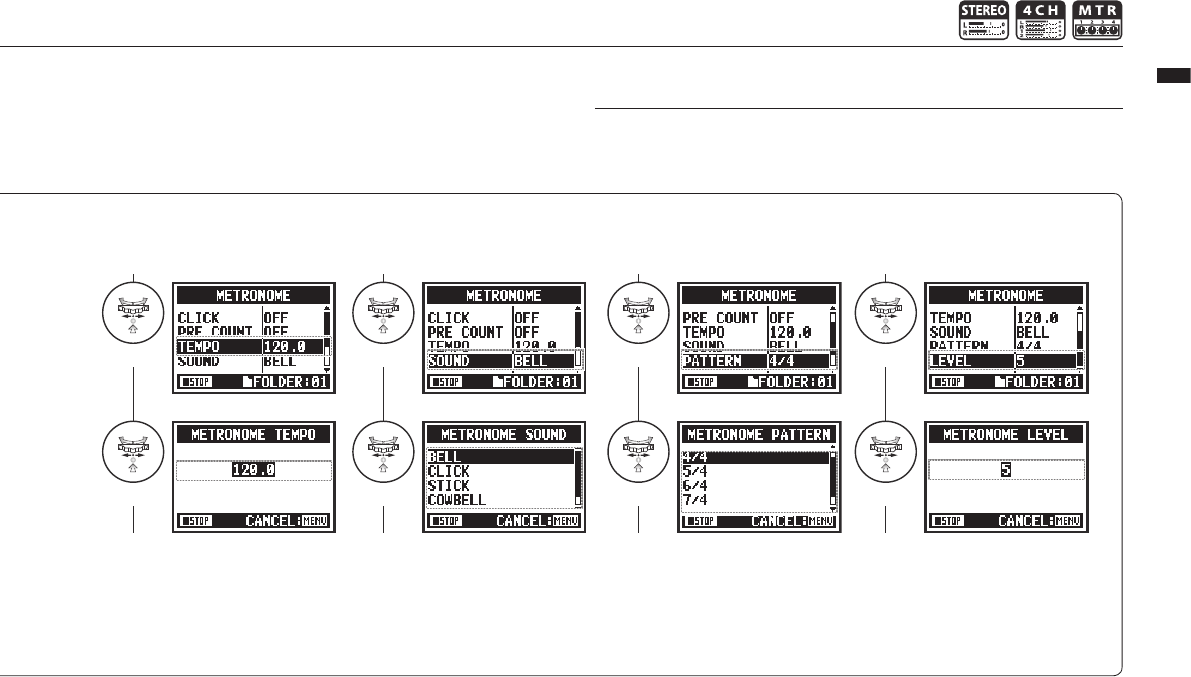
080
Operations / Metronome (METRONOME)
TEMPO SOUND PATTERN LEVEL
Default: 120.0
You can set this between
40.0 and 250.0 BPM in 0.1
increments.
Set the metronome speed.
Default: bell
You can select BELL,
CLICK, STICK, COWBELL
or HI-Q.
Set the metronome tone.
Default: 4/4.
You can this to 0/4 (no
accent), 1/4 – 8/4 or 6/8.
Set the pattern of the metronome.
You can select from eleven
levels.
Set the volume of the metronome.
NOTE:
The metronome starts at the beginning of recording and playback. If you start in the
middle of a song or track, the metronome beats may not be in sync with the song.
Select Select
Select
Select Select
Select SelectAdjust
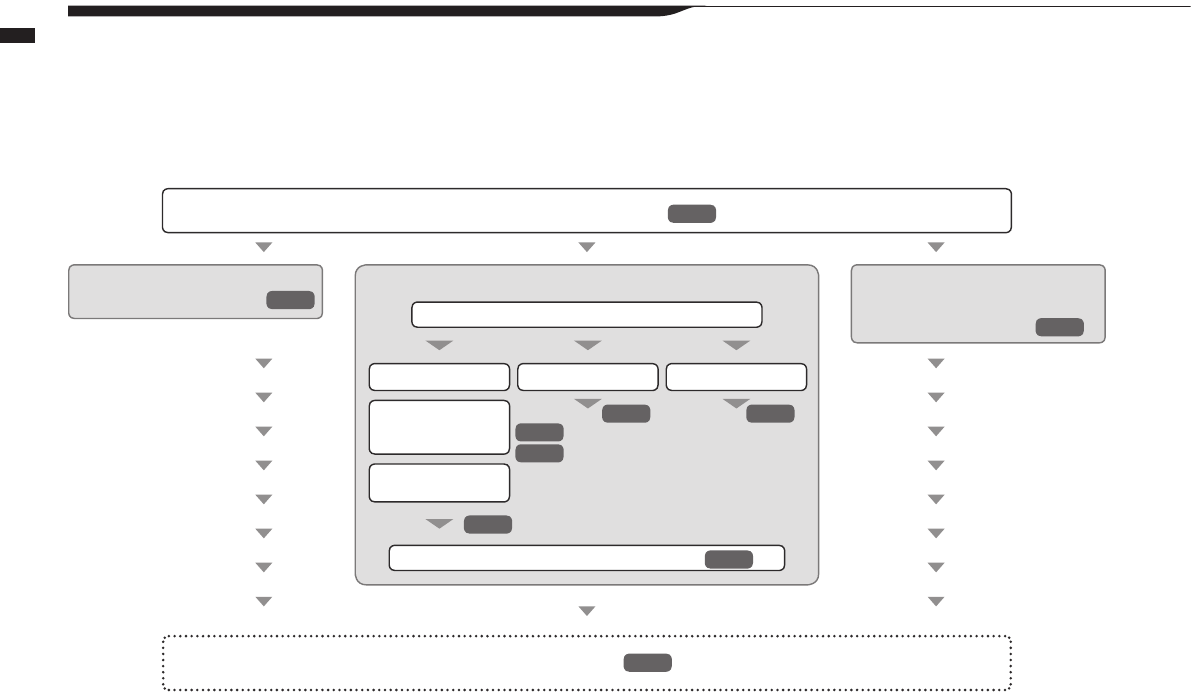
081
Operations / Eects overview
3-03-1 Eects overview
Thisisanoverviewabouthowtouseeects,includingtheprocessandinputandoutput.
Eect use process
Change to MTR mode
2. Edit a patch (EDIT)1. Use an eect
Use a preset as is
3. Import a patch
Select the mode:
• Import one (EACH)
• Import all (ALL)
Select the preset that is closest to the desired sound
Save the edited patch (STORE)
Record
Adjust the patch level
Edit modules
Select modules:
•PREAMP
•EFX
Adjust parameters
Change the patch name
P.036
P.087
P.053
P.085
P.086
P.141
P.087
P.088
P.089
P.083
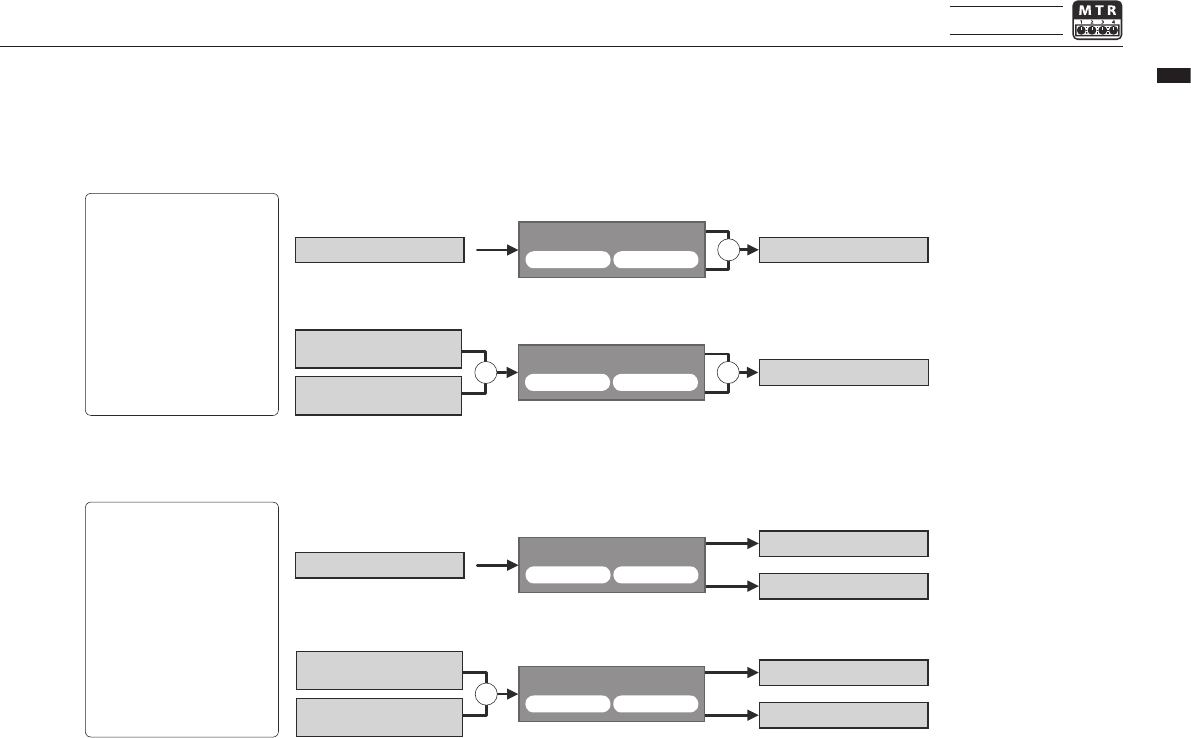
++
+
+
082
Operations / Eects overview
MTR mode only
Eect input and output
YoucanuseeectsinMTRmodeformonoandstereosignals.Theowofthesignalswill
change according to the input sources and recording tracks.
One recording
track
1. Input source is either INPUT 1 or 2
INPUT 1 or 2 TRACK
EFFECT
EFFECT
EFFECT
EFFECT
PRE AMP
PRE AMP
PRE AMP
PRE AMP
EFX
EFX
EFX
EFX
TRACK
TRACK
TRACK
TRACK
TRACK
Built-in MIC L or INPUT 1
Built-in MIC R or INPUT 2
INPUT 1 or 2
Built-in MIC L or INPUT 1
Built-in MIC R or INPUT 2
1. Input source is either INPUT 1 or 2
2. Input source is either MIC or INPUT 1 and 2
2. Input source is either MIC or INPUT 1 and 2
Two recording
tracks
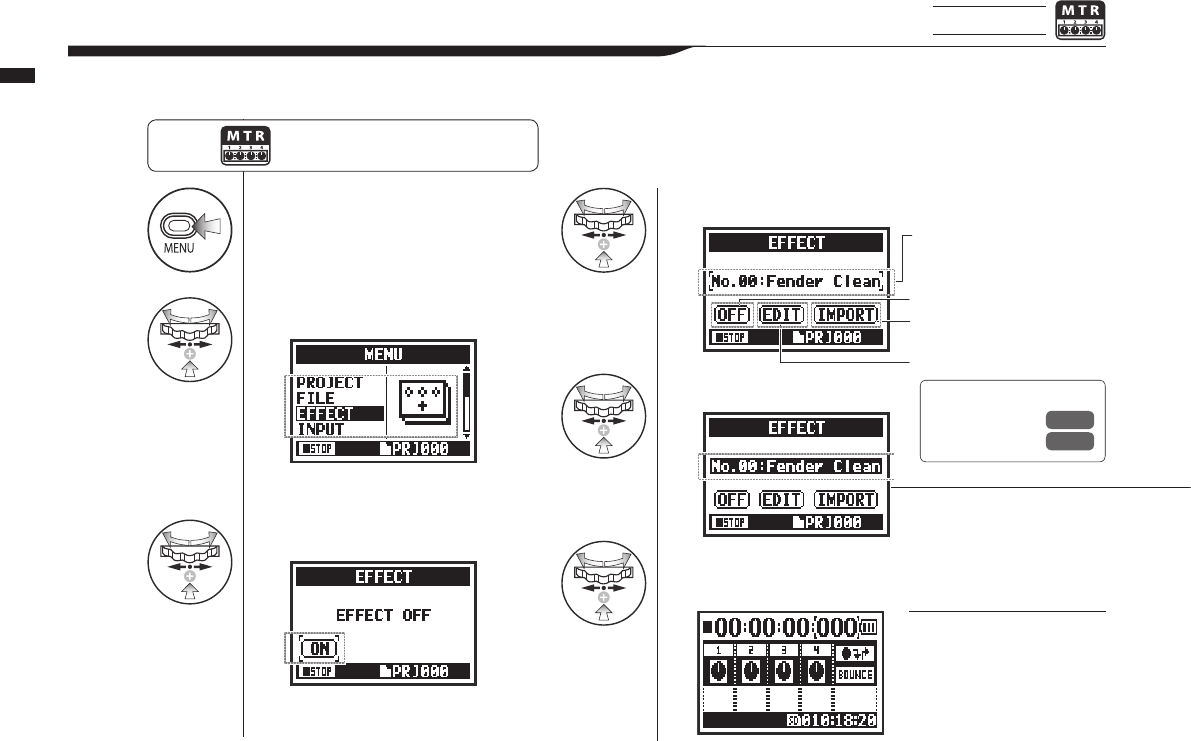
1Press.
2Select EFFECT and press.
3
Press ON and press.
4Select No.: (patch name) and press.
5
Select PATCH and press.
6
Press MENU for more
than two seconds to return
to the top screen.
083
Operations / Eects (EFFECT)
3-03-2 Eects (EFFECT) MTR mode only
Usingthe2EFFECTmodulesinMTRmode,youcanaddvariouseectstotheinputsignals.
NOTE:
PATCH
Eects module settings are
saved as a patch.
60 patches are available with
50 already programmed.
Press the MENU button for more
than 2 seconds, and start operation
from the top screen.
Patch number: patch name.
Turn EFFECT ON or OFF
IMPORT: Import a patch from
another project
EDIT: Create a new patch or
edit a patch
Ref. ☞
Patch list P.141
P.147
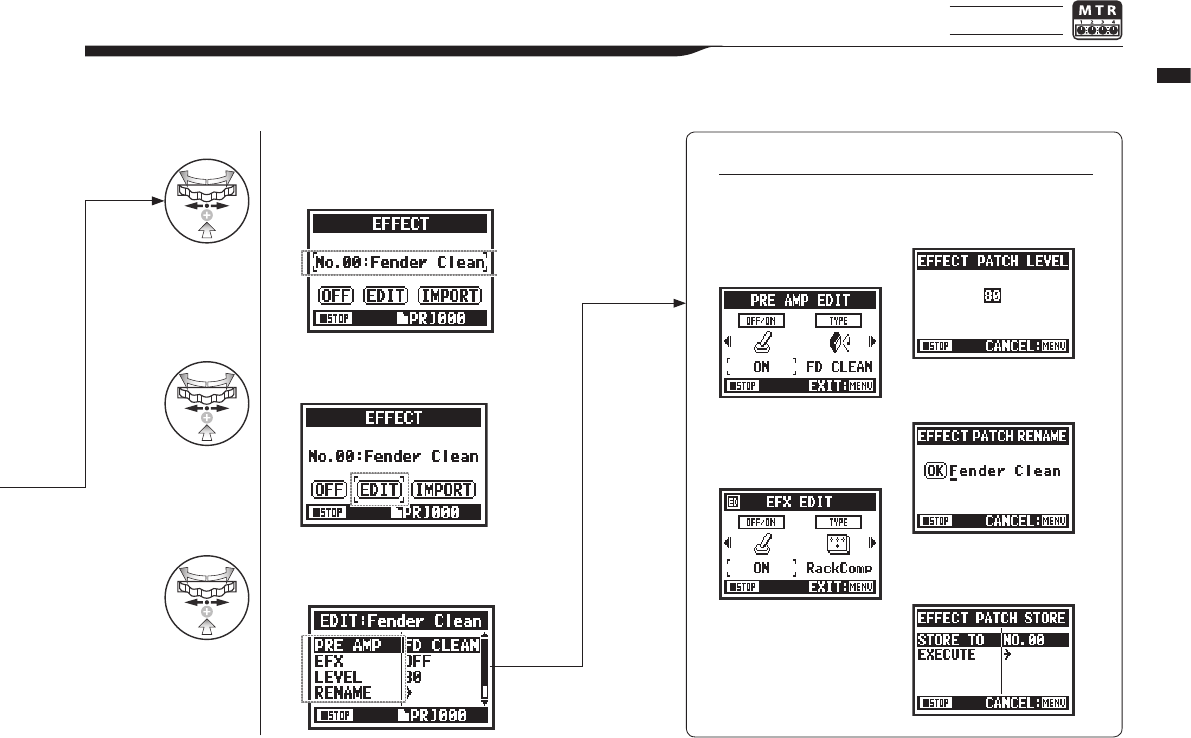
5Select the desired
No.:(patch name) and press.
6
Select EDIT and press.
7
Select the parameter that
you want to change and press.
084
Operations / Patch editing (EFFECT EDIT)
3-03-3 Patch editing (EFFECT EDIT) MTR mode only
Youcancreateyourownpatchbycombiningeectsandadjustingtheparametersettings.
EDIT MENU
PRE AMP LEVEL
RENAME
STORE
EFX
The PRE AMP module has
guitar and bass amp model-
ing eects.
Adjust the patch level.
Change the patch name.
Save the edited patch.
The EFX module has modula-
tion, chorus and delay eects.
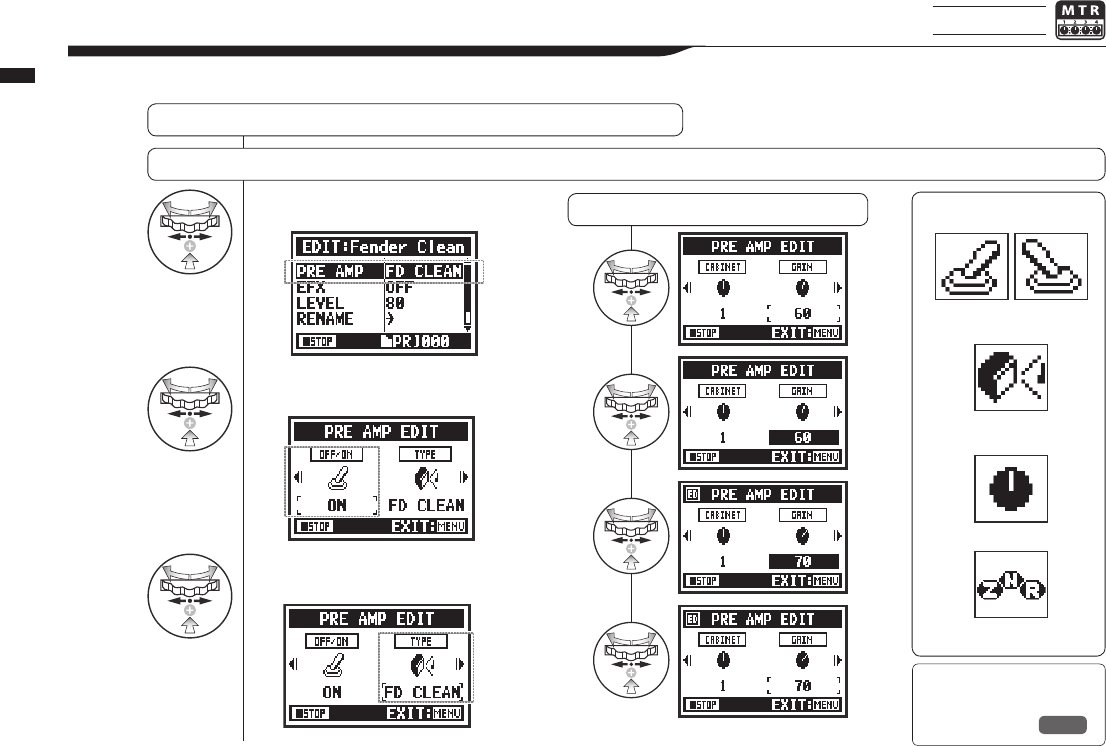
7Select PRE AMP and press.
8Press OFF/ON to turn the
PRE AMP module on.
9
Select the parameter to
edit and press.
085
Operations / Patch editing (EFFECT EDIT: PRE AMP)
3-03-4
PRE AMP module editing (EFFECT EDIT: PRE AMP)
MTR mode only
Youcaneditpreseteectpatchesasyoulike.
Adjust the PRE AMP module
Select the desired PATCH and edit it .... P.084
Adjust a parameter Icons
ZNR icon
CABINET, EQ, LEVEL, etc.
Set effect
AMP type
PRE AMP module
ON/OFF status
Ref. ☞
PRE AMP module parameters
P.141
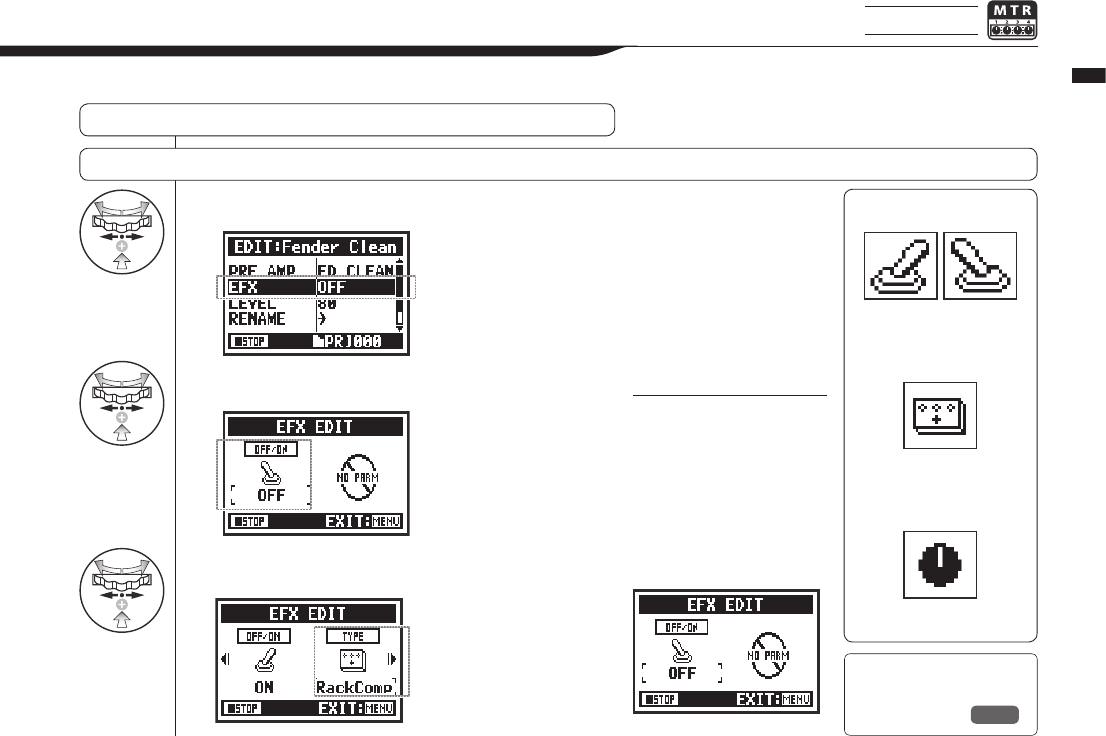
7Select EFX and press.
8Press OFF/ON to turn
the EFX module on.
9
Select the parameter to
edit and press.
086
Operations / Patch editing (EFFECT EDIT: EFX)
3-03-5 EFX module editing (EFFECT EDIT: EFX) MTR mode only
Adjust the EFX module
Select a patch close to the desired sound and edit it....P.084
Icons
Various parameters
Set effect
EFX type
EFX module
ON/OFF status
Ref. ☞
EFX module parameters
P.143
Editpatchparameterstomakethesoundclosertothedesiredeect.
HINT:
To select PRE AMP and EFX
modules, make setting after
changing the module status
ON.
Default: When a module
is OFF, no parameters or
settings are shown.
When OFF, you cannot
select modules.
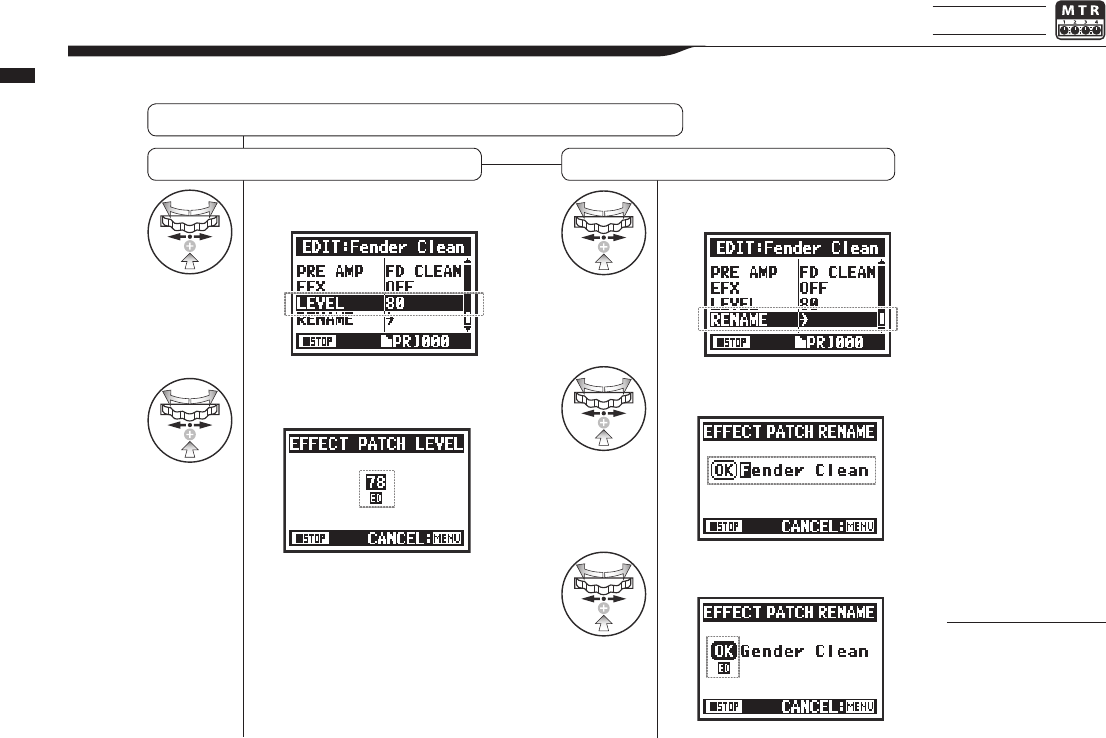
1Select LEVEL and press.
2Change the number and
press.
1Select RENAME and press.
2Change the PATCH name and
press.
3
Select OK and press.
087
Operations / EFFECT EDIT: LEVEL/RENAME
3-03-6 EFFECT EDIT: LEVEL/RENAME MTR mode only
Adjust the patch level and change the patch name.
EFFECT EDIT … P.084
NOTE:
Select STORE to save
the patch. To return to
the top without saving
the change, select
MENU.
RENAMELEVEL
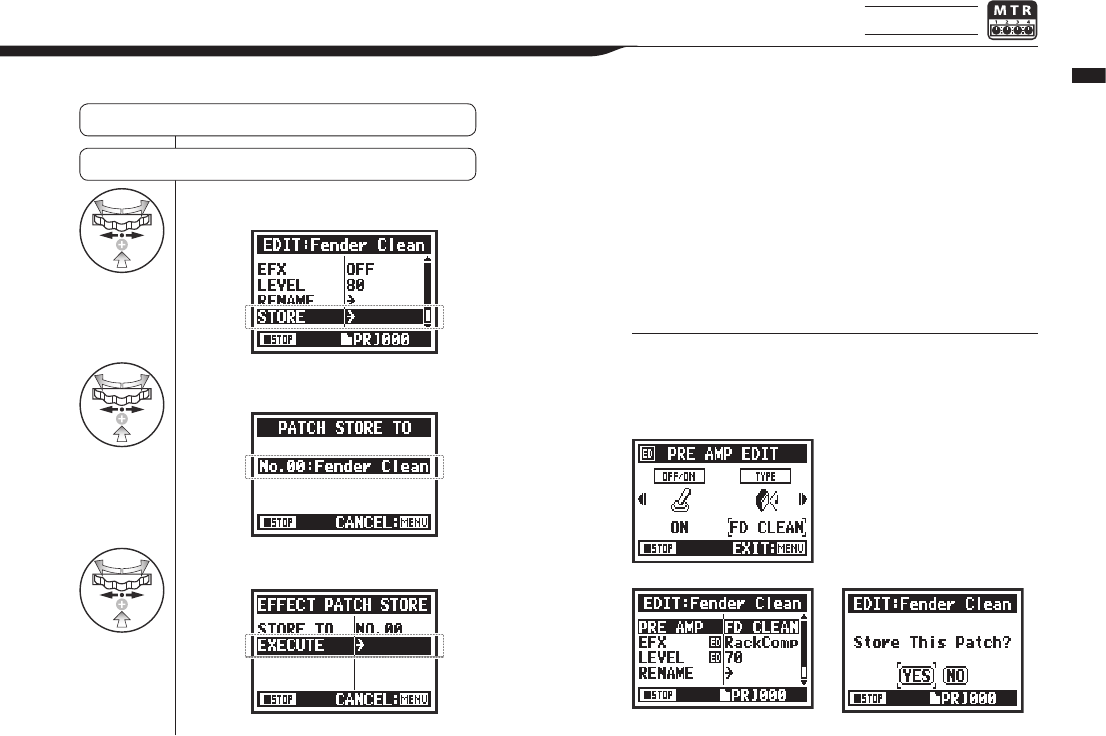
10 Select STORE and press.
11 Select the PATCH No. where
you want to save it and press.
12 Select EXECUTE and press.
088
Operations / EFFECT EDIT: STORE
3-03-7 EFFECT EDIT: STORE MTR mode only
STORE
EFFECT EDIT … P.084
HINT:
ED appears next to items you have edited until conrmed by
the STORE operation.
Not stored
(not saved)
Conrm with STORE
Selecting “YES” will over-
write the current patch.
To save without over-
writing an existing patch,
select an empty patch
during the STORE opera-
tion. Patches are saved
by project.
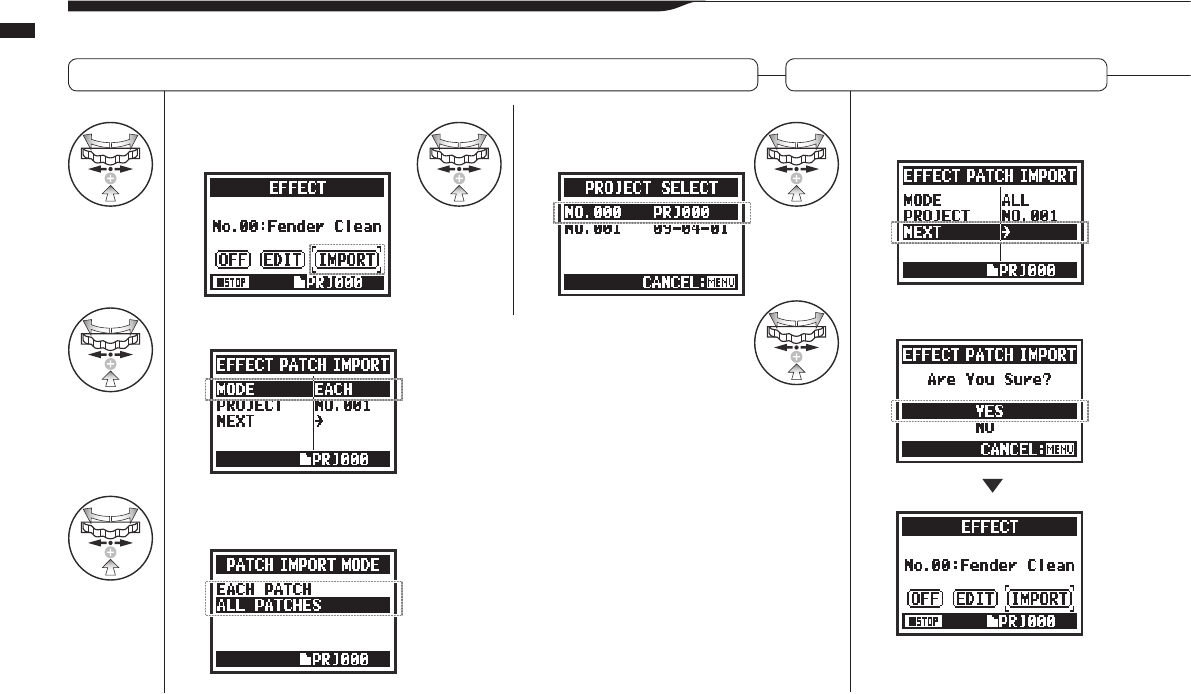
1Press IMPORT on
the EFFECT screen.
2
Select MODE and press.
3
Select the desired
mode and press.
4Select the project and
press. 5
Select NEXT and press.
6Select YES and press.
089
Operations / EFFECT EDIT: IMPORT
3-03-8 Importing patches from other projects (
EFFECT IMPORT
)
Youcanapplyaneditedandsavedeectpatchusedinanotherprojecttothecurrentproject.
Select eect ... P.083 (EFFECT) Import all patches (ALL)
All the patches from the project
selected at step 4 are imported
into the current project.
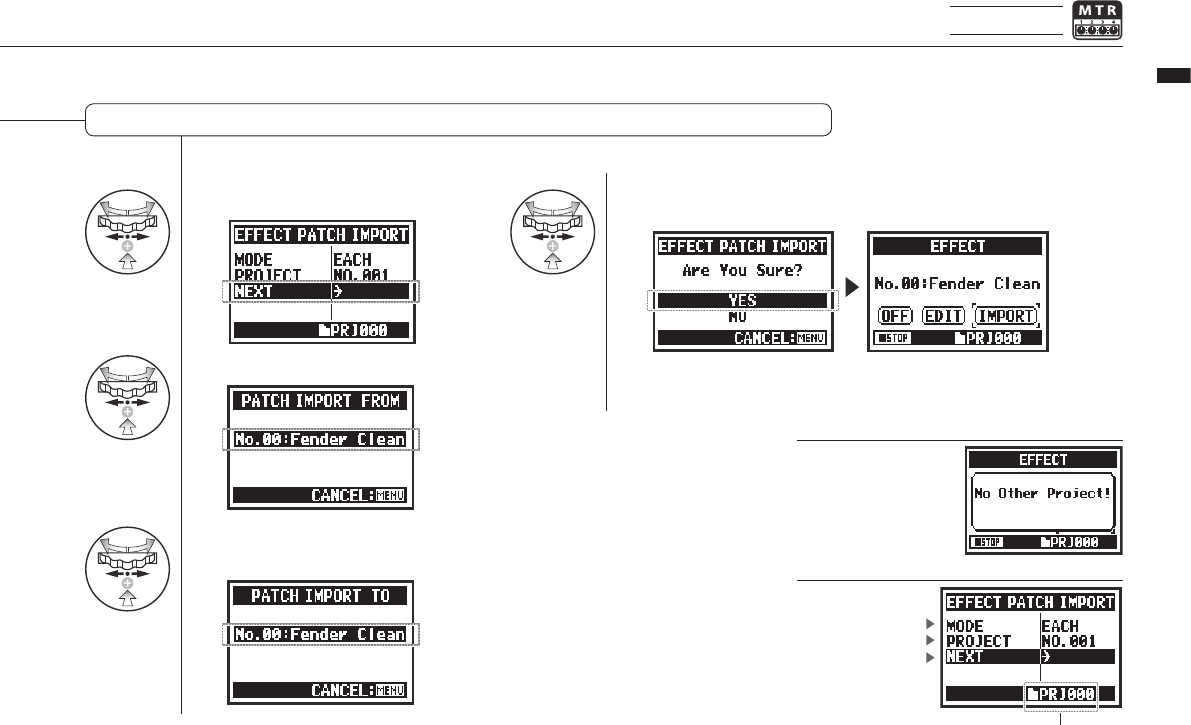
5Select NEXT and press.
6
Select a patch to import and press.
7
Select the patch you want to import it
to in the current project and press.
8Select YES and press.
090
Operations / EFFECT EDIT: IMPORT
MTR mode only
Import one patch (EACH)
NOTE:
HINT:
If there is no other
project when you press
IMPORT, “No Other
Project!” will appear.
Import mode
Import project
Start importing
Current PROJECT
The patch selected in step 6 is
imported into the current project.
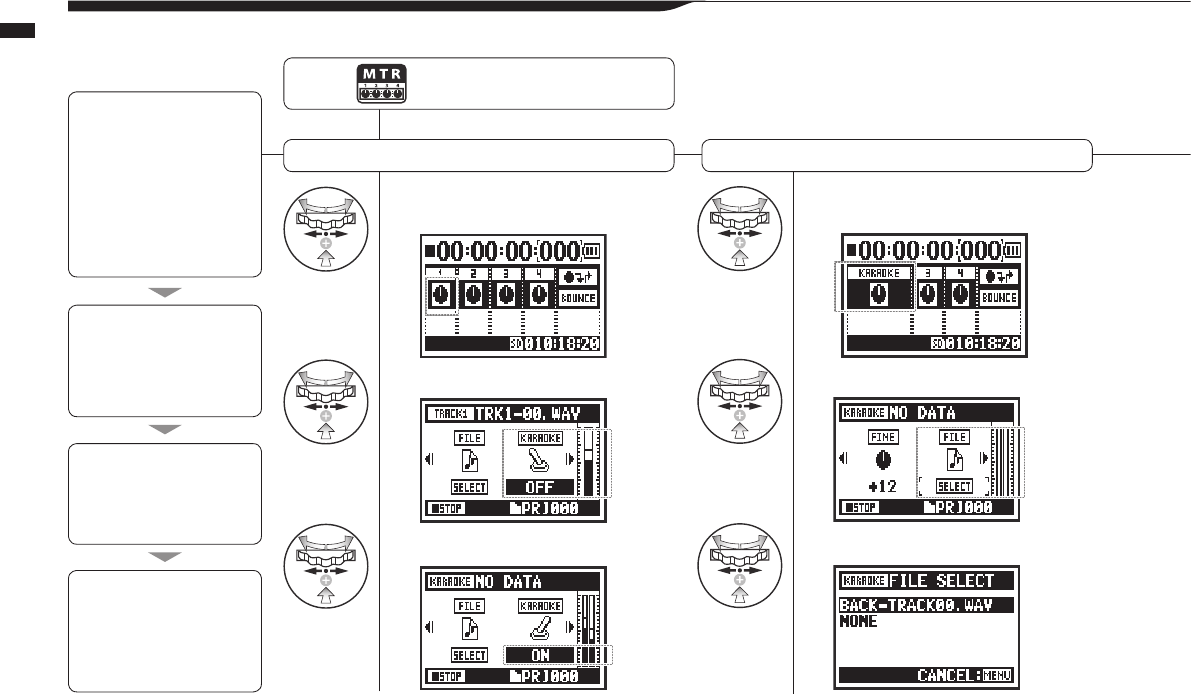
1Select a track menu icon
and press.
2
Select KARAOKE and press.
3
Select ON and press.
4Select the track menu icon
and press.
5
Select FILE and press.
6
Select the desired le and press.
091
Operations / Karaoke (KARAOKE)
3-04-1 Karaoke preparation (KARAOKE)
Usemusiclesofyourchoiceforkaraoke,thenrecordvocalsoradditionalguitarsoundswiththoseles.
Karaoke track preparation
Assign the desired le to the KARAOKE track
Press the MENU button for more
than 2 seconds, and start operation
from the top screen.
Karaoke process
Preparation
Karaoke setup
Adjust the karaoke tracks
Perform with karaoke
Prepare stereo les for the
background
Create a new project for
karaoke ………P.118
Import the le to the project
• LEVEL
• CENTER CANCEL
• KEY
• FINE
1. Select a track menu icon
and open the TRACK menu
2. Turn KARAOKE ON.
3. Assign les.
4. Connect a microphone
5. Make recording track
settings
6. Enable recording
• Playback
• Record
• Copy the le to the
project folder ……P.037
• Use the MOVE function ……P.117
(Prepare tracks for karaoke)
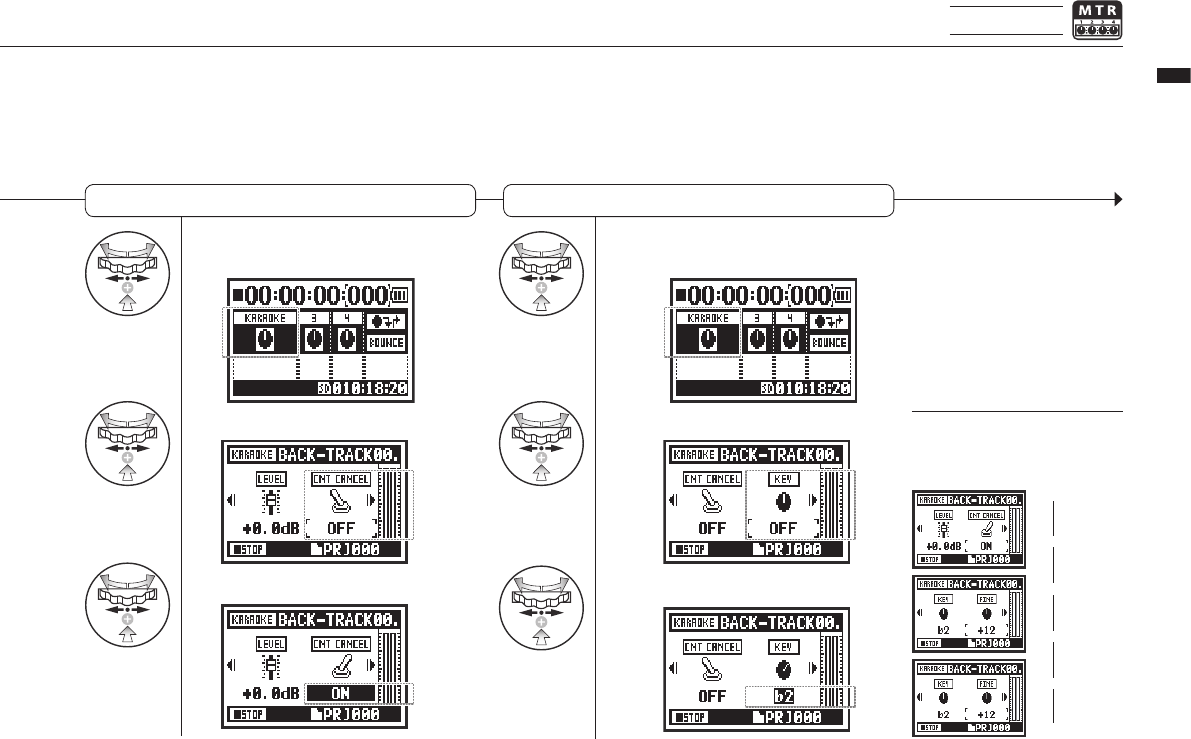
10
Select the track menu icon and
press.
11
Select KEY and press.
12
Adjust and press.
7Select the track menu icon
and press.
8
Select CNT CANCEL and press.
9
Select ON and press.
092
Operations / Karaoke (KARAOKE)
MTR mode only
Enable center cancelation on the KARAOKE track
Change the key of the KARAOKE track
HINT:
The KARAOKE track menu has
dierent contents than other
tracks.
CNT CANCEL
LEVEL
Continued on the next page
KEY
FINE
FILE
KARAOKE
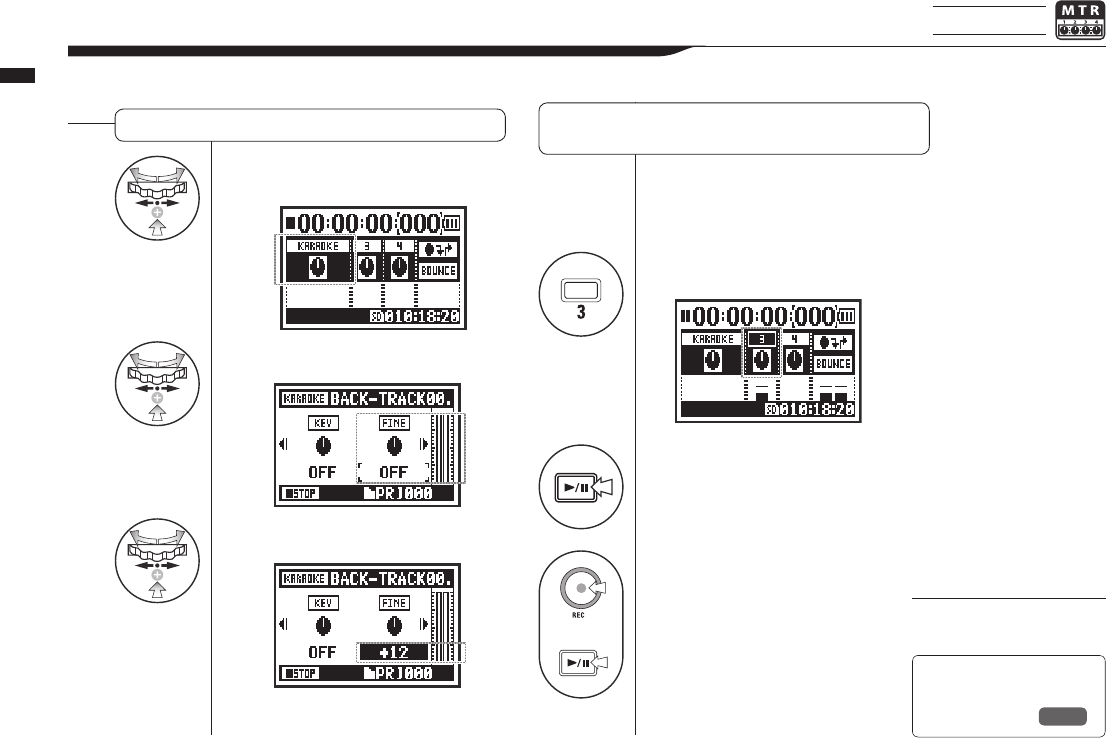
13Select the track menu
icon and press.
14Select FINE and press.
15
Adjust it and press.
1Connect a microphone.
Press the INPUT button corresponding to the
connected input jack.
2Select the track menu icon
and press.
3
Press to practice (no recording).
+
4Press the REC button to enter
recording standby.
Then, press the PLAY/PAUSE
button to start recording.
093
Operations / Karaoke (KARAOKE)
3-04-2 Karaoke recording (KARAOKE) MTR mode only
Fine adjustment of the KARAOKE track key Recording with KARAOKE
Ref. ☞
TRACK MENU
P.057
NOTE:
You cannot use this function
together with the EFFECT.

1Press.
2Select FILE and press.
3
Select the desired le and press.
4Select SELECT and press.
5Press to start playback.
094
Operations / Playback: File Playback (STEREO, 4CH and STAMINA modes)
4-01
Playback: File Playback (STEREO, 4CH and STAMINA modes)
Immediatelyafterrecording,youcanplaythelebypressingthePLAY/PAUSEbutton.
Followthesestepstocallupalelaterforplayback.
HINT:
• On the top screen you can move directly to step 3,
by pressing the TRACK 2 button.”
• If you press the PLAY/PAUSE button after selecting
a le, that le starts playback immediately.
• You can select les in folders directly using the
DIAL on the top screen.
Press the MENU button for
more than 2 seconds, and start
operation from the top screen.
Ref. ☞
FILE SELECT P.104
Conrmthele
name.
Shortcut
You can select
lesinfolderson
the top screen.
Shortcut
Press TRACK
on the top screen.
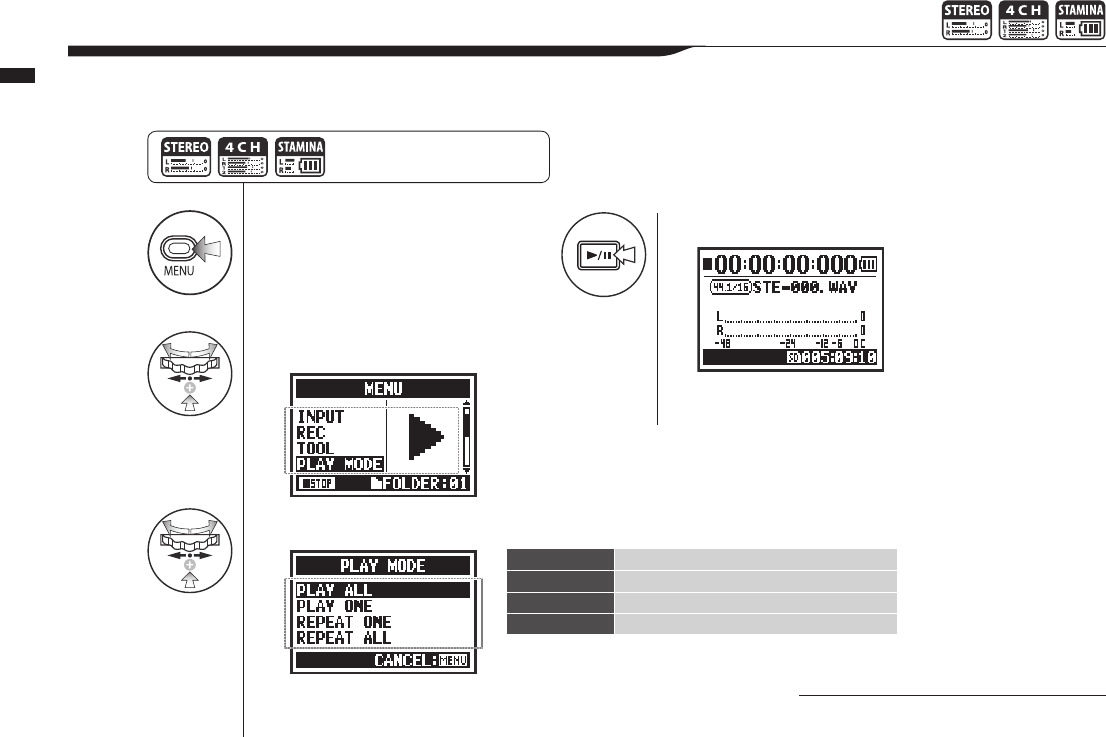
1Press.
2Select PLAY MODE and press.
3Select a play mode and press.
4Press to start playback.
Select the desired mode.
095
Operations / Playback: PLAY MODE
4-02 Playback: PLAY MODE
Inadditiontoordinaryplayback,youcanalsoplayjustonele,repeatplaybackofonele,andrepeatplaybackofallles.
NOTE:
You cannot change this setting during
recording and playback.
Press the MENU button for more
than 2 seconds, and start operation
from the top screen.
PLAY ALL Playallthelesinthefolder.
PLAY ONE Playonele.
REPEAT ONE Playonelerepeatrepeatedly.
REPEAT ALL Playalllesinthefolderrepeatedly.
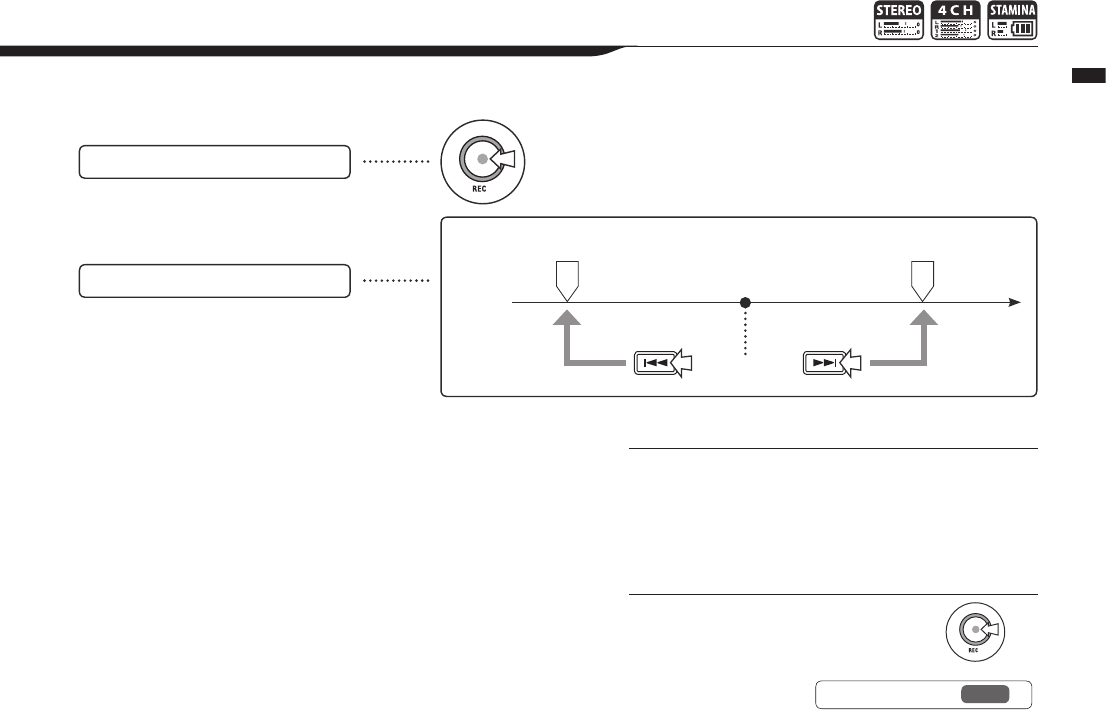
096
Operations / Playback: Setting marks
4-03 Playback: Setting marks
Duringleplaybackyoucanaddmarksatdesiredpoints.
You can move easily to those points during playback.
NOTE:
• The mark function can only be used for WAV format les.
• The maximum number of marks in one le is 99.
• Once a mark has been created it cannot be deleted.
HINT:
• Press the REC button during recording
to add a mark.
• You can check marks in the le in the
MARK LIST.
Adding marks During playback,
press the REC button.
Mark A Mark B
Playing les with marks
Press the FF and REW buttons to move
to mark positions in les with marks.
File
Current position
Ref. ☞ MARK LIST P.115
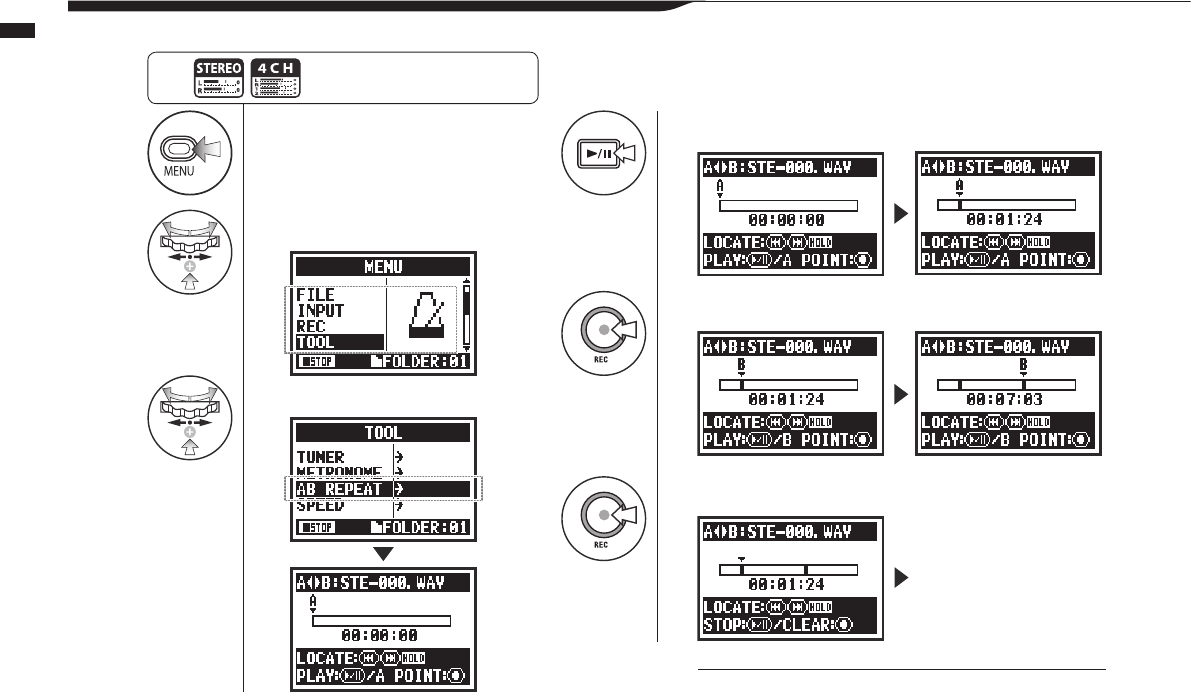
1Press.
2Select TOOL and press.
3Select AB REPEAT and press.
4Press to start playback.
Point A moves.
5Press to set point A.
A mark is placed at point A, then mark B appears and moves until set.
6Press to set point B.
Playback repeats
between the points.
097
Operations / Playback: AB REPEAT
4-04 Playback: AB REPEAT
TheABREPEATfunctionallowsyoutoplaybetweentwopointsinalerepeatedly.
Press the MENU button for more
than 2 seconds, and start operation
from the top screen.
HINT:
You can also set point A and B while stopped.
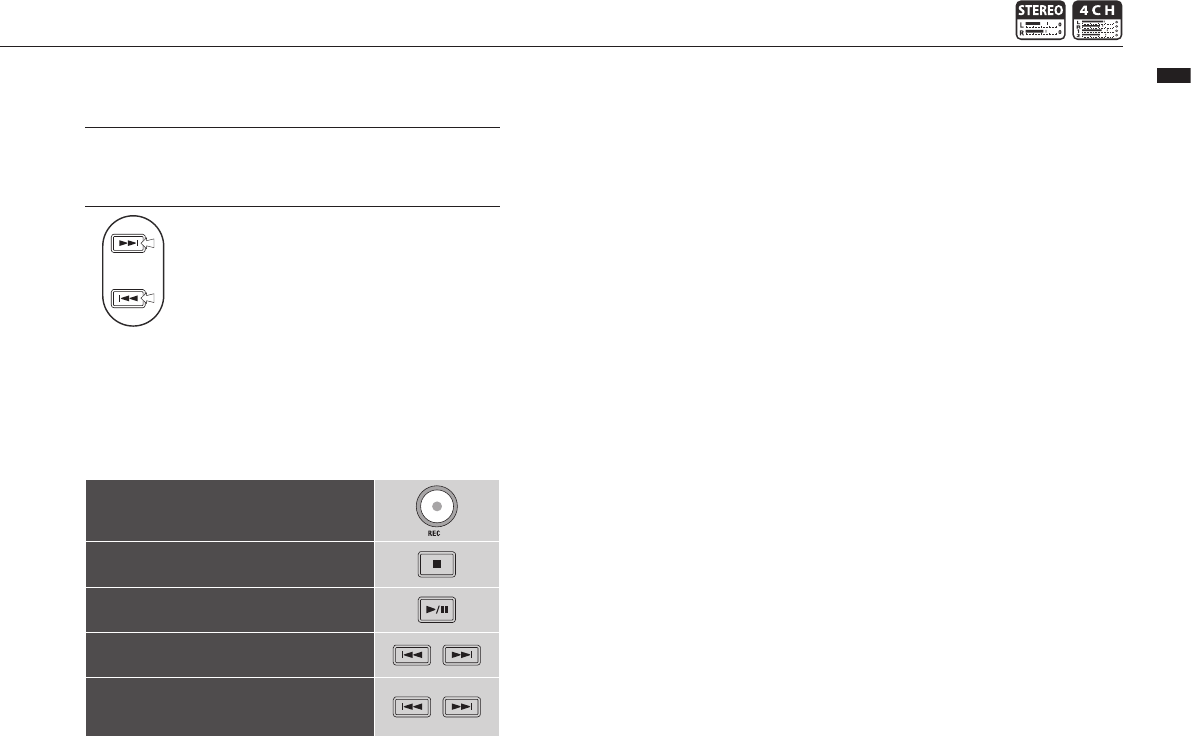
Press and
hold to
search.
098
Operations / Playback: AB REPEAT
NOTE:
During recording and playback, you cannot make any settings
after Step 3 of AB REPEAT.
HINT:
Caution:
When moving around using FF and REW
buttons, if you press the button for less than
2 seconds (quick press), it will move to the
next le. If there is a mark, it will move to the
next mark.
Press the FF and REW buttons for more than
2 seconds to search for a desired point.
After setting up A and B points, press the REC button to
cancel all settings.
Button functions with AB REPEAT
Set/clear A and B points
Stop
Play/Pausethele
Hold for more than one second to search
backward or forward
Pressbrieytoskiptothenextleinorder
(IfthereisamarkinaWAVle,however,
this will move to the nearest mark instead)
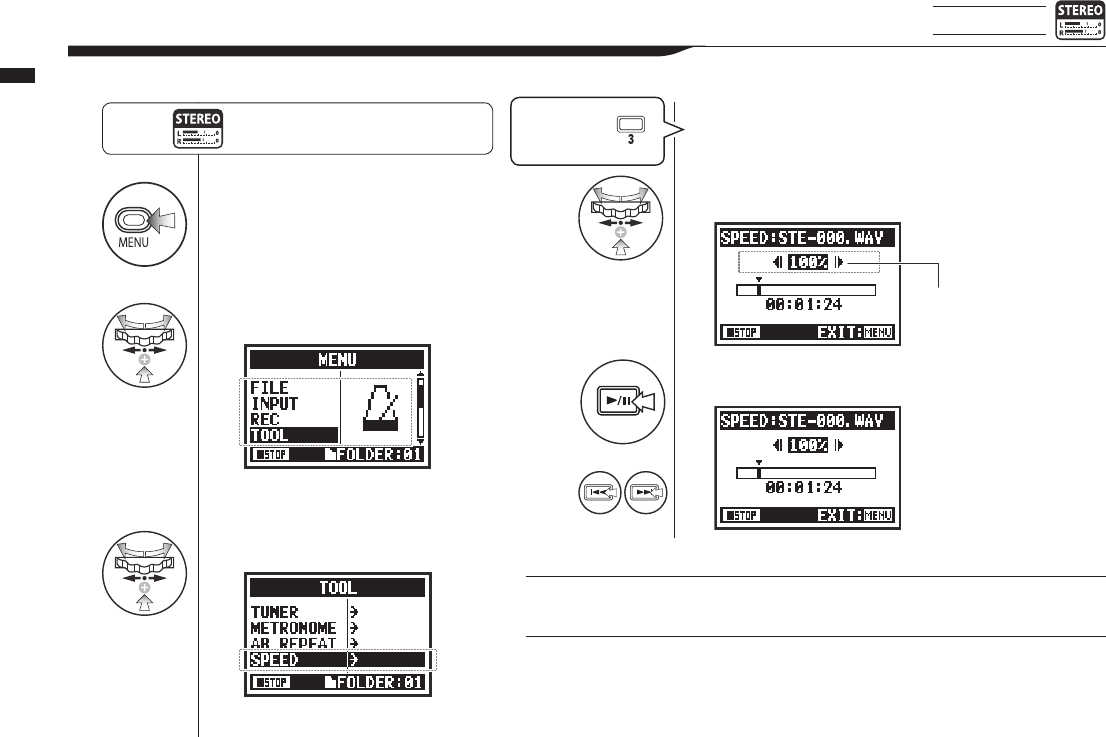
1Press.
2Select TOOL and press.
3
Select SPEED and press.
4Adjust the playback speed.
5Press to start playback.
or
You can set the playback speed
between 50% and 150% in
increments of 5%.
099
Operations / Playback: SPEED
4-05 Playback: SPEED
STEREO mode only
Youcanadjusttheplaybackspeedofale.
NOTE:
During recording and playback, you cannot make any settings after Step 3 of SPEED.
HINT:
• You can open this menu quickly by pressing the TRACK 3 button on the top screen
of the mode.
• You can set the playback speed between 50% and 150% in increments of 5%.
(default: 100%)
• You can move the playback location using the FF and REW buttons.
Press the MENU button for more
than 2 seconds, and start operation
from the top screen.
Shortcut
Press TRACK
on the top screen.
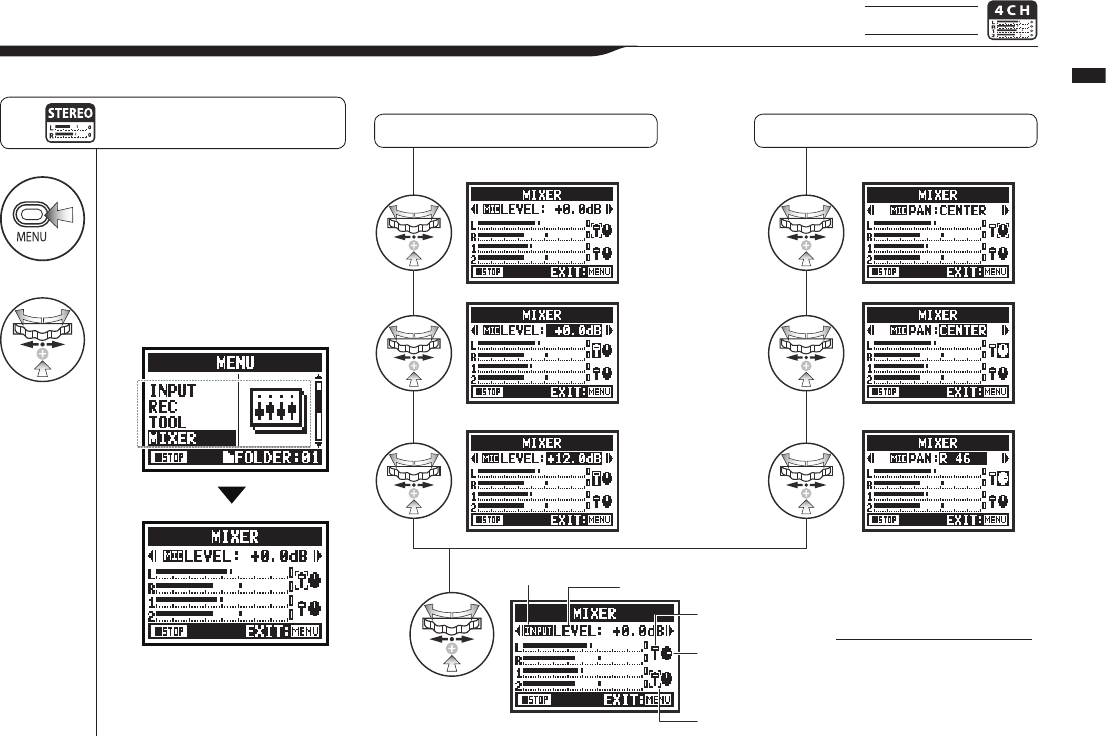
1Press.
2Select MIXER and
press.
100
Operations / Playback: MIXER
4-06 Playback: MIXER 4CH mode only
In4CHmodeyoucanusethemixertoadjusttheplaybackLEVELandPANsettingsoftwostereoles.
Press the MENU button for more
than 2 seconds, and start operation
from the top screen. LEVEL setting PAN setting
MUTE,−48.0dB–
+12.0dB
(default: 0.0dB)
L 100 – C – R 100
(default: C (center))
Shows if you are setting a
MIC or INPUT track Name of parameter where cursor is
positioned and its setting value
Fader icon
Pan pot icon
Cursor shows
parameter selected
Aftersetting,conrmwithicons
HINT:
The cursor cycles on the
MIXER screen from MIC
LEVEL to MIC PAN to INPUT
LEVEL to INPUT PAN.

+
+
+
+
+
101
Operations / Playback: Playing les (MTR mode)
4-07 Playback: Playing les (MTR mode) MTR mode only
MTRmodehasvariouswaystoplayles.Youcan,forexample,createandrecordlesseparately,assignthemtotracksandplaythem
back simultaneously.
Ref. ☞ TRACK MENU P.057
PLAY
REC
PLAY
PLAY
PLAY
REC
PLAY
NO FILE
NO FILE
REC
PLAY
PLAY
PLAY
PLAY
NO FILE
NO FILE
NO FILE
REC
PLAY
PLAY
PLAY
REC
NO FILE
PLAY
PLAY
PLAY
PLAY
PLAY
TRACK 1
TRK1-00.wav
TRK1-00.wav
Press
Press
Press
Press
Press
Press
PressPlayback
Second time
recording to
tracks
Initial track
recording
Next track
recording
Third track
recording
Last track
recording
Play 4 tracks
OVER WRITE
Guitar.wav
TRK1-01.wav
ALWAYS NEW
Assign other les
TRK1-00.wav
TRK2-00.wav
TRK3-00.wav
TRK4-00.wav
2
TRK2-00.wav
TRK2-00.wav
Bass.wav
3
TRK3-00.wav
TRK3-00.wav
TRK3-01.wav
4
TRK4-00.wav
TRK4-00.wav
TRK4-01.wav
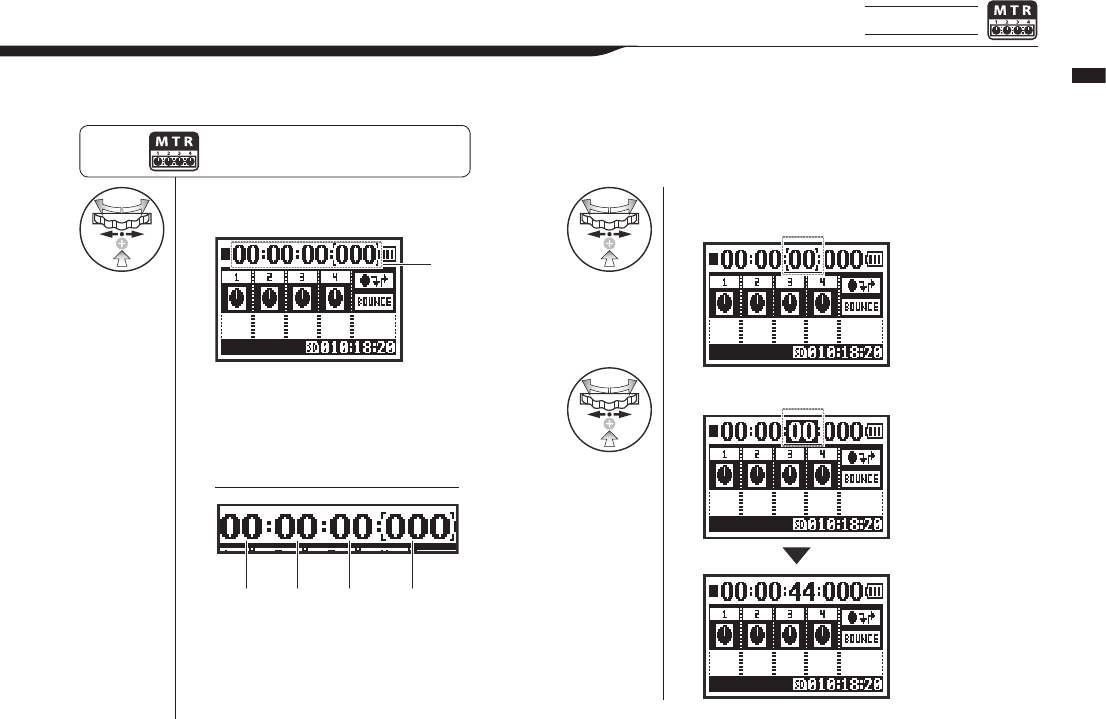
1Select the counter on the
top screen and press. 2Select the time to set
(hour, minute or second).
3Change the value and press.
102
Operations / Playback: Specifying a counter time
4-08 Playback: Specifying a counter time MTR mode only
Using the counter, you can specify any desired point in a recording.
Press the MENU button for more
than 2 seconds, and start operation
from the top screen.
HINT:
Hour: minute: second: millisecond
Counter
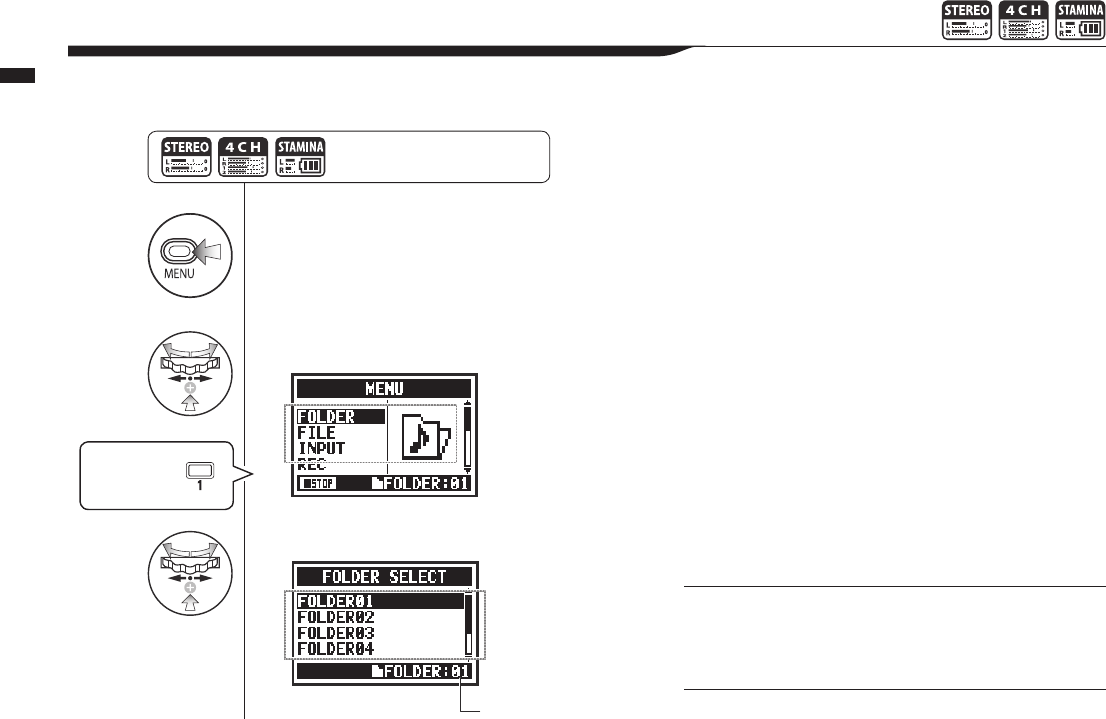
1Press.
2Select FOLDER and press.
3
Select a folder and press.
103
Operations / Editing/Output: FOLDER SELECT
5-01 Editing/Output: FOLDER SELECT
Selectthefolderthatcontainstheleyouwanttorecordwithorplay.
NOTE:
• You cannot use this setting during recording and playback.
• You can select any one of ten folders in STEREO, STAMINA
and 4CH modes.
HINT:
You can open the FOLDER SELECT screen by pressing the
TRACK 1 button on the top screen.
Press the MENU button for more
than 2 seconds, and start operation
from the top screen.
Shortcut
Press TRACK
on the top screen.
Current folder
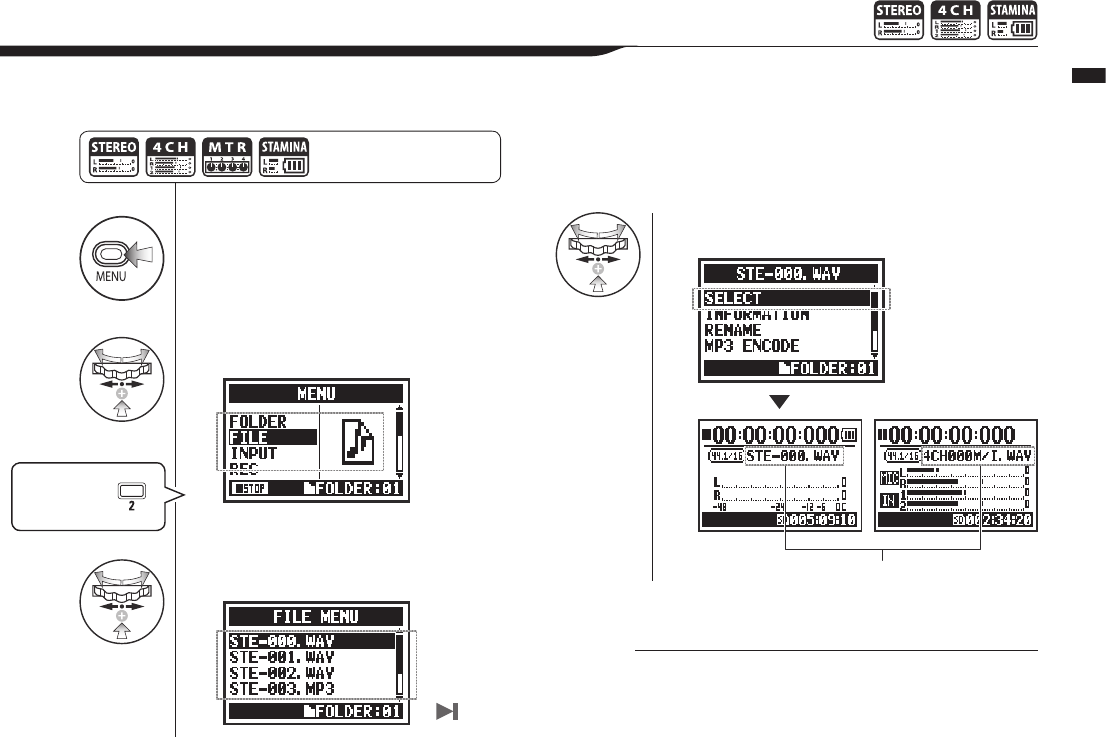
1Press.
2Select FILE and press.
3
Select a le and press.
4Select SELECT and press.
All FILE operations
are the same to here
104
Operations / Editing/Output: FILE SELECT
5-02 Editing/Output: FILE SELECT
Youcanselectlesforplaybackfromalelist.
HINT:
• You can also select les in the folder directly using the
DIAL on the top screen.
• You can press the TRACK 2 button on the top screen to
jump to le selection in step 3.
Verifythelename.
Shortcut
Press TRACK
on the top screen.
Press the MENU button for
more than 2 seconds, and start
operation from the top screen.
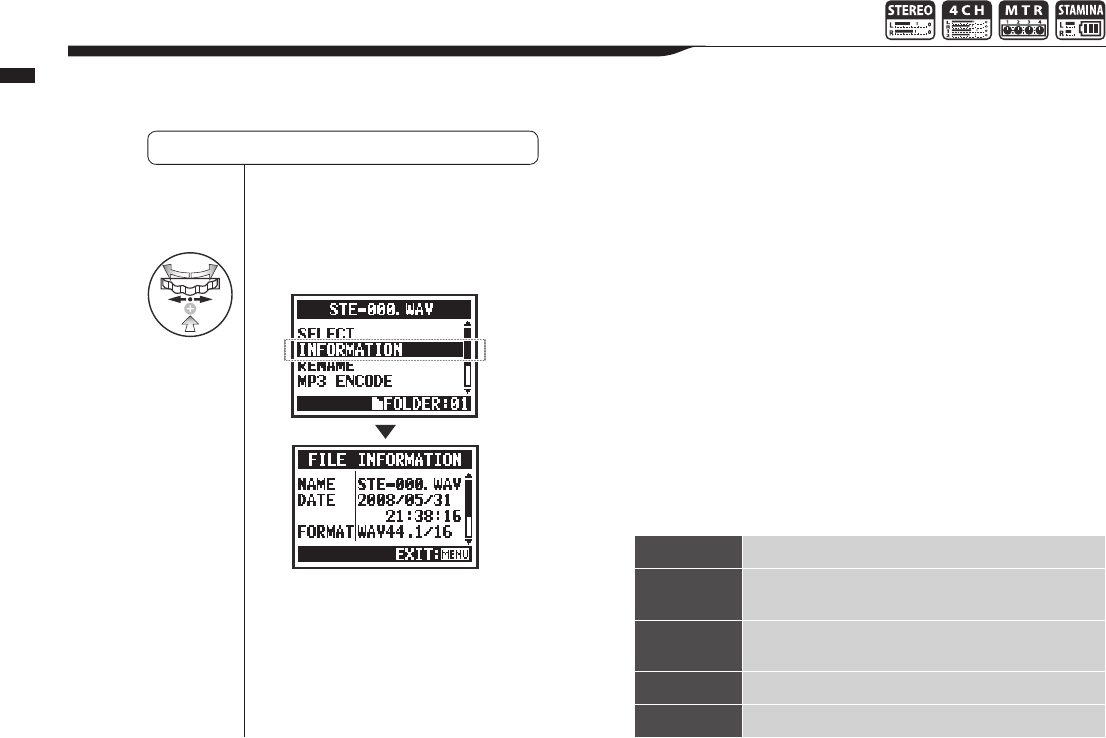
4Select INFORMATION and press.
105
Operations / Editing/Output: FILE INFORMATION
5-03 Editing/Output: FILE INFORMATION
Thisfunctiondisplaystheselectedleinformation.
Selecting les . . . P.104 FILE SELECT
NAME Nameofle
DATE Recordeddateofle(ormodicationdatewhencre-
ated by a computer or other device)
FORMAT Formatofle
(in MTR mode, MONO or STEREO shown)
SIZE File size (kB or MB)
TIME Recordingtimeofle

4Select DELETE and press.
5Select YES and press.
106
Operations / Editing/Output: FILE DELETE
5-04 Editing/Output: FILE DELETE
Youcandeleteaselectedle.
Selecting les . . . P.104 FILE SELECT
NOTE:
Be careful!
Once deleted, a le cannot be
recovered.
File to delete
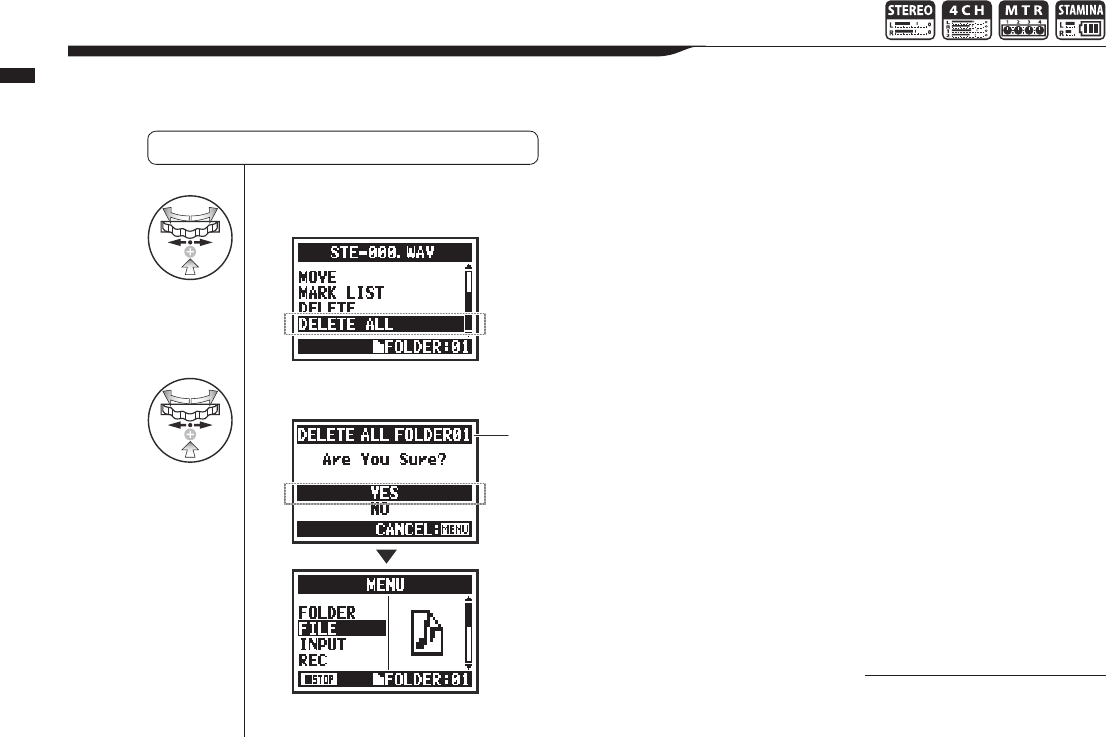
4Select DELETE ALL and press.
5Select YES and press.
107
Operations / Editing/Output: FILE DELETE ALL
5-05 Editing/Output: FILE DELETE ALL
Youcandeleteallthelesinafolderorproject.
Selecting les . . . P.104 FILE SELECT
NOTE:
Be careful!
Once deleted, les cannot be
recovered.
The name of the folder or
projectselected.Allles
in it will be deleted.
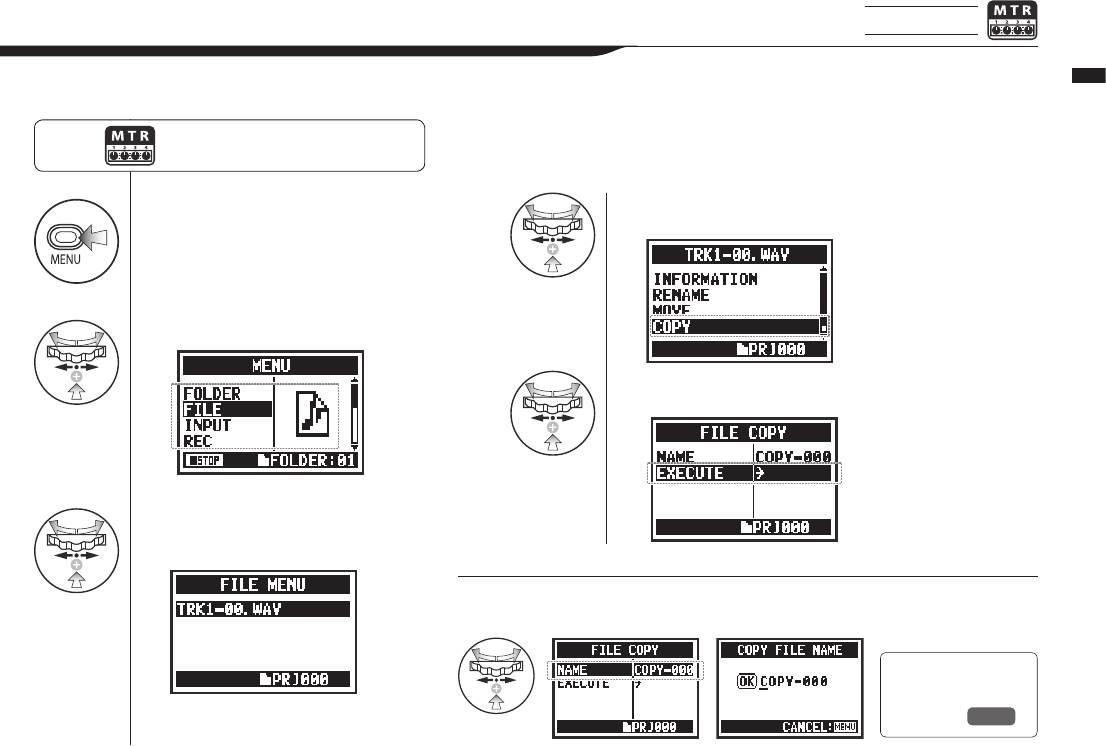
1Press.
2Select FILE and press.
3Select the desired le
and press.
4Select COPY and press.
5Select EXECUTE and press.
108
Operations / Editing/Output: FILE COPY
5-06 Editing/Output: FILE COPY MTR mode only
InMTRmodeyoucancopyles.Thecopiesaresavedinthesameprojectastheoriginalles.
This function is useful when you want to preserve the original copy.
HINT:
Changing le names: The default name given to copied les is COPY-XXX.
You can change it if necessary.
Press the MENU button for more
than 2 seconds, and start operation
from the top screen.
Ref. ☞
FILE RENAME
P.109
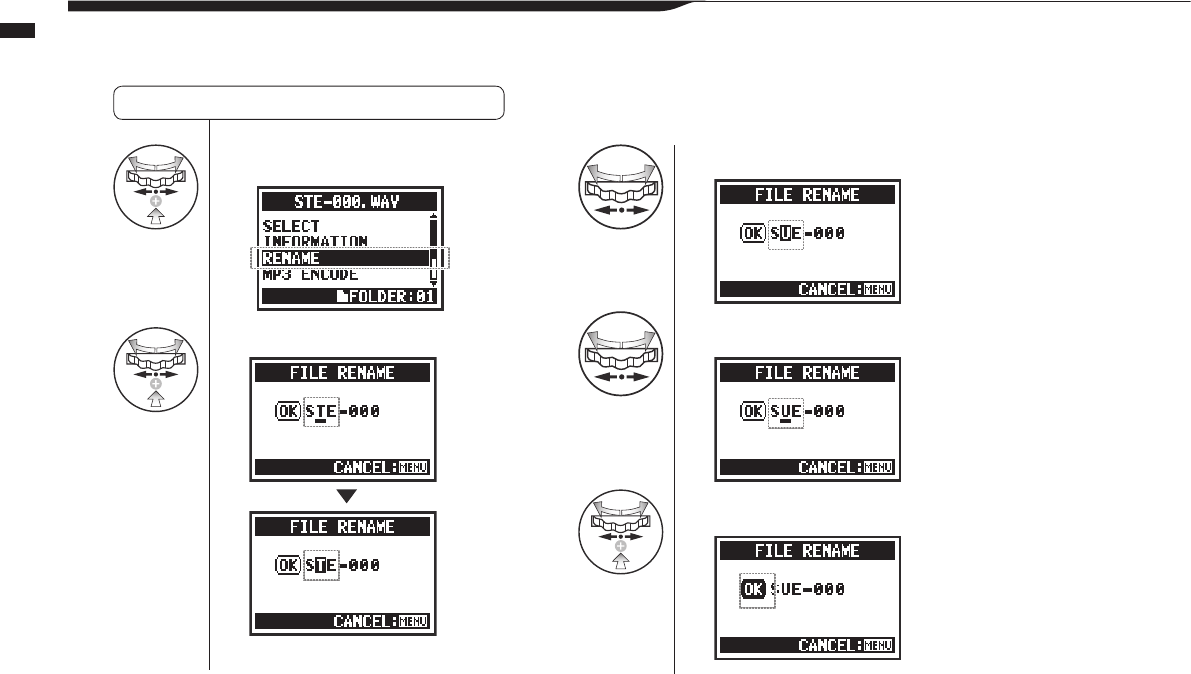
4Select RENAME and press.
5Select a character and press.
6Input a character and press.
7Press.
8Select OK and press.
109
Operations / Editing/Output: FILE RENAME
5-07 Editing/Output: FILE RENAME
InSTEREO,MTRandSTAMINAmodes,youcanchangethenamesofles.
Ifrecordedin4CHmode,lenamescannotbechanged.
Selecting les . . . P.104 FILE SELECT
Select a character
to change
Press the DIAL
to highlight the
character
Select a character with
the DIAL
PresstheDIALtoconrmthe
change.
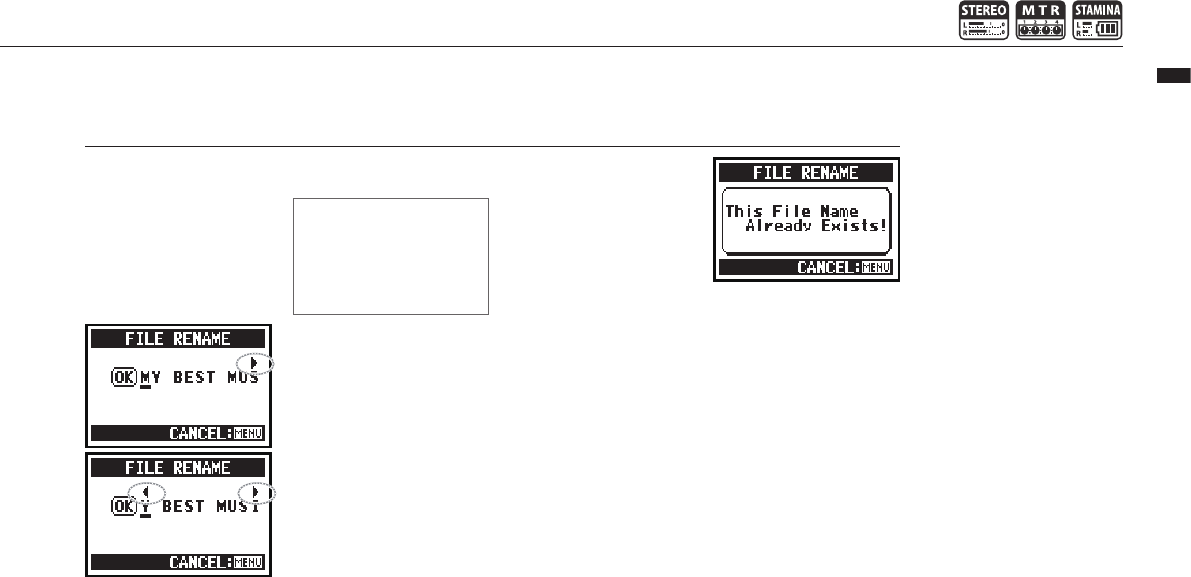
110
Operations / Editing/Output: FILE RENAME
HINT:
Display when more
than 12 characters
When the name of a le has
more than 12 characters,
a triangle mark appears
showing that letters that
can be selected are o the
screen.
NOTE:
If two les in the same folder
would have the same name,
“This File Name Already
Exists!” appears on the
display, and the previous
screen reopens and you will
need to change the name.
When changing letters, they
appear in the following order.
(space)!#$%&()+,-01234
56789;=@ABCDEFGHIJ
KLMNOPQRSTUVWXYZ
^_`abcdefghijklmnopqrst
uvwxyz{}˜
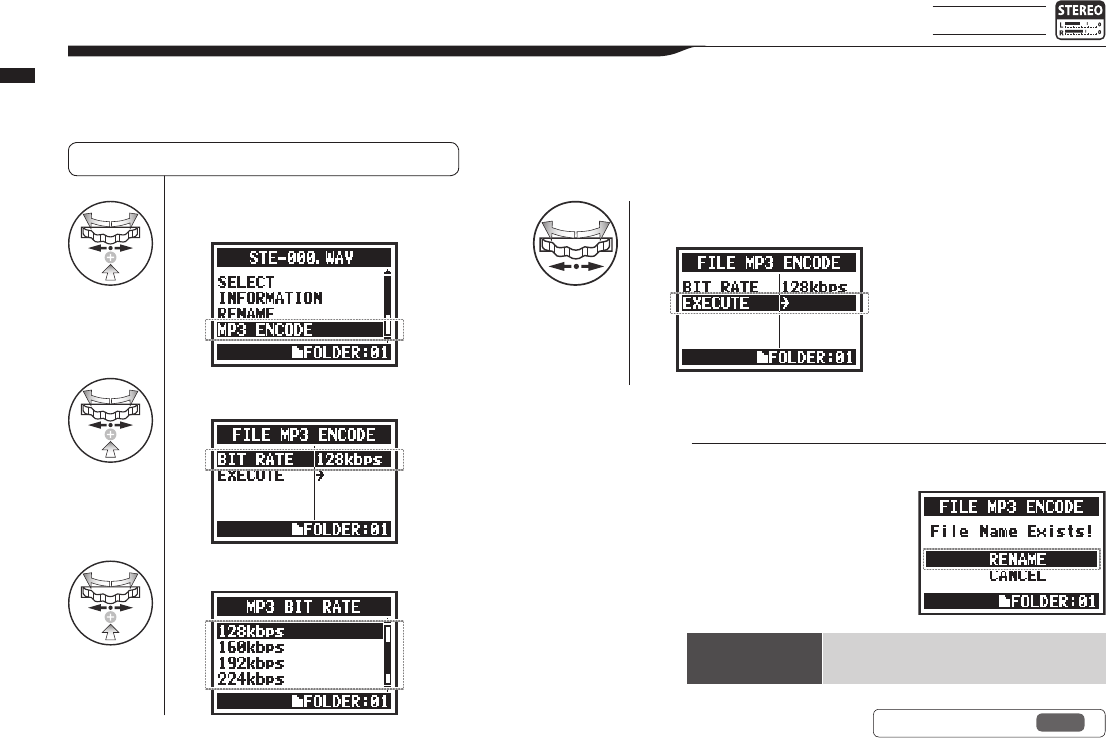
4Select MP3 ENCODE and press.
5Select BIT RATE and press.
6Select the desired bit rate and press.
7Select EXECUTE and press.
111
Operations / Editing/Output: FILE MP3 ENCODE
5-08 Editing/Output: FILE MP3 ENCODE
STEREO mode only
InSTEREOmodeyoucanconvertWAVlestoMP3formatatvariousbitrates.
Selecting les . . . P.104 FILE SELECT
HINT:
• The name of the encoded le automatically becomes “(orig-
inal le name).mp3”.
• You cannot have two les
with the same name. If the
screen says, “File Name
Exists!” select RENAME and
create a dierent name.
Bit rate that can be
selected (kbps)
48, 56, 64, 80, 96, 112, 128, 160, 192, 224,
256, 320, VBR (default: 128 kbps)
Ref. ☞ FILE RENAME P.109
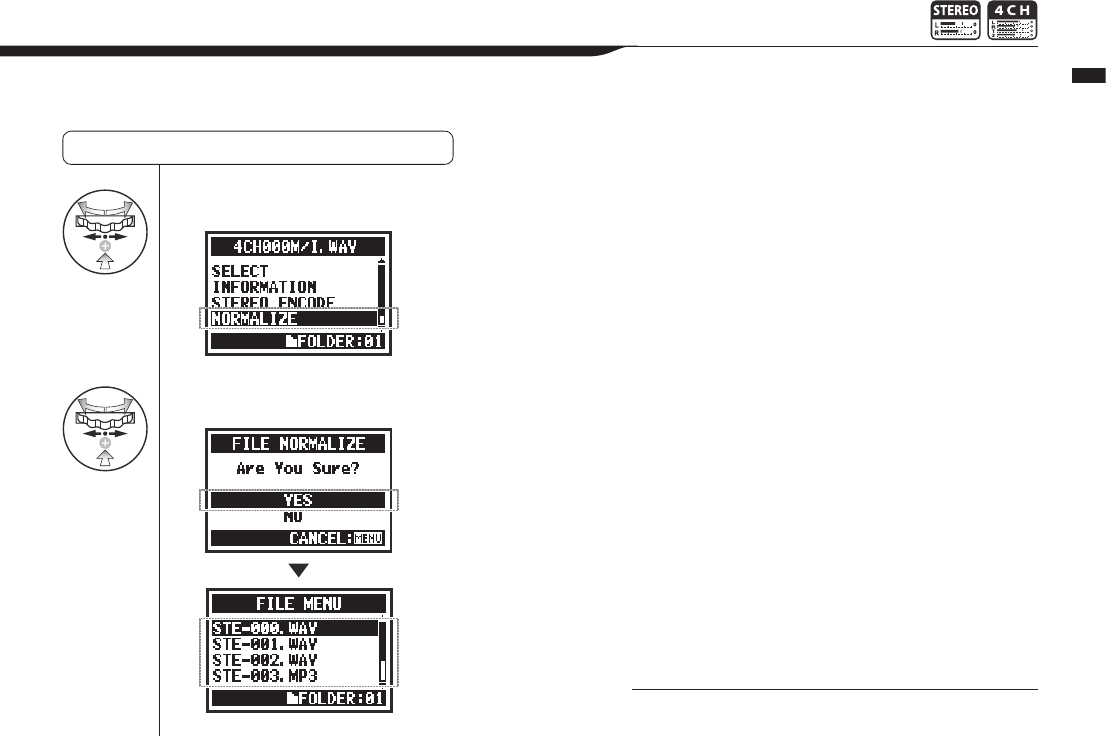
4Select NORMALIZE and press.
5Select YES and press.
112
Operations / Editing/Output: FILE NORMALIZE
5-09 Editing/Output: FILE NORMALIZE
Thisfunctionautomaticallyadjuststhevolumelevelofarecordedleforenhancedsoundquality
and audio consistency.
Selecting les . . . P.104 FILE SELECT
NOTE:
NORMALIZEfunctionisonlyavailableforlesrecordedin
WAV format
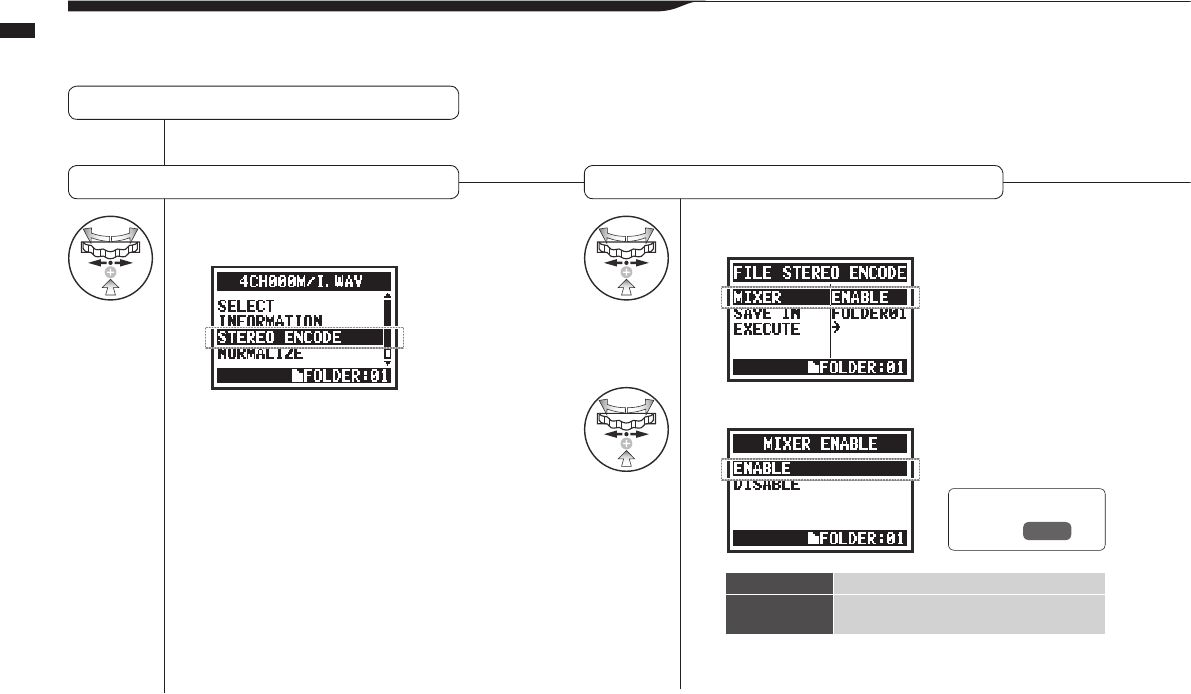
4Select STEREO ENCODE
and press. 5Select MIXER and press.
6Select and press.
113
Operations / Editing/Output: FILE STEREO ENCODE
5-10 Editing/Output: FILE STEREO ENCODE
Thisfunctionwillmixdowna4CHletoastereole.ThelewillbesavedinthefolderinSTEREOmode.
Selecting les . . . P.104 FILE SELECT
Select STEREO ENCODE Setup MIXER: Enable the MIXER before encoding.
Ref. ☞
MIXER P.100
ENABLE Use MIXER settings.
DISABLE DonotuseMIXERsettings.Twolesare
mixed equally.

7Select SAVE IN and press.
8Select the folder to save in
and press.
9Select EXECUTE and press.
114
Operations / Editing/Output: FILE STEREO ENCODE
4CH mode only
ExecuteSelect SAVE IN Select the STEREO mode folder where
youwanttosavetheencodedle.
HINT:
You cannot have two les
with the same name. If the
screen says “File Name
Exists!” select RENAME and
change the name.
The encoded le is stored in
the folder.
The le name automatically
given is the same as the
one in 4CH mode but M/I is
changed to MIX.
Ref. ☞
MIXER P.109
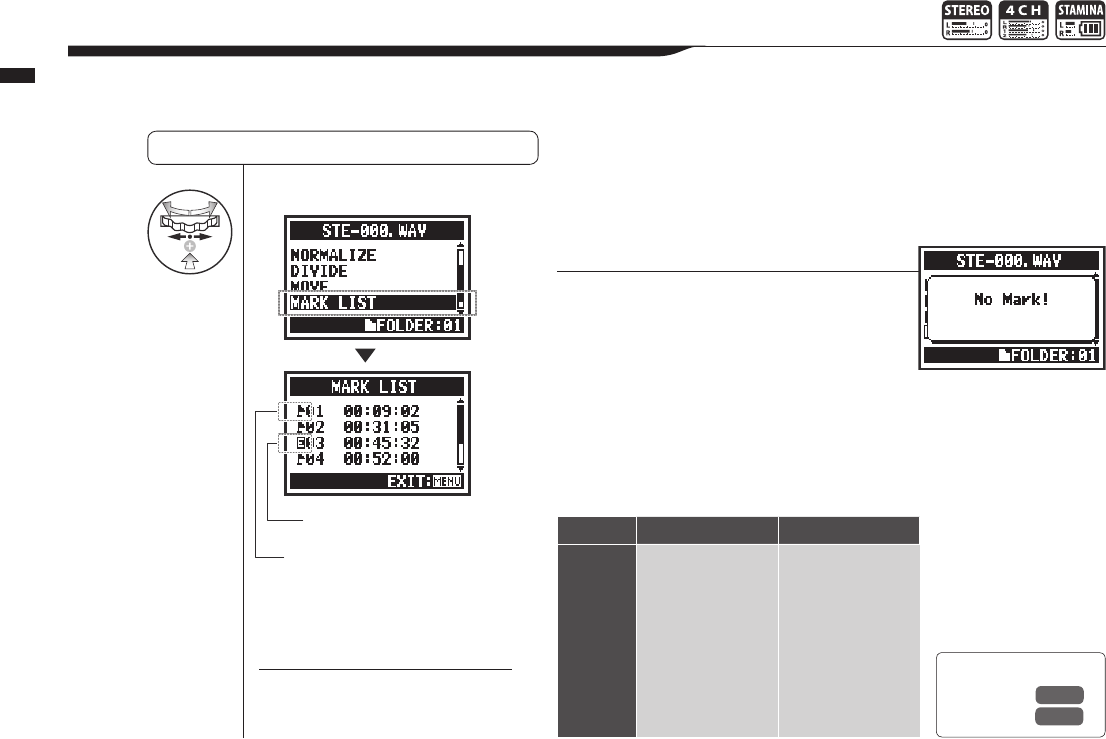
4Select MARK LIST and press.
115
Operations / Editing/Output: MARK LIST
5-11 Editing/Output: MARK LIST
YoucanviewalistofthemarksputinaWAVle.
Selecting les . . . P.104 FILE SELECT
HINT:
If there are no marks in the le,
“No Mark!” will appear on the display.
NOTE:
The H4n Pro will automatically place a
mark at point where sound drops out
during recording.
Sound dropouts (skipping) with SD cards
When recorded data is transferred to an SD card, sometimes the process-
ing speed is not fast enough and the sound drops out.
The processing speed depends on the mode, REC FORMAT setting, type of
SD card, etc. If the processing load is light, sound dropouts rarely happen,
Ref. ☞
REC FORMAT
P.049
Setting marks P.096
Stereo mode 4CH mode
Heavy
p
q
Light
WAV96kHz/24bit
WAV96kHz/16bit
WAV48kHz/24bit
WAV44.1kHz/24bit
WAV48kHz/16bit
WAV44.1kHz/16bit
MP3
WAV48kHz/24bit
WAV44.1kHz/24bit
WAV48kHz/16bit
WAV44.1kHz/16bit
This mark shows a sound
dropout.
This mark is user created.
but it the load is heavy,
they often happen. In
this case, change the
REC FORMAT to a
lighter setting.
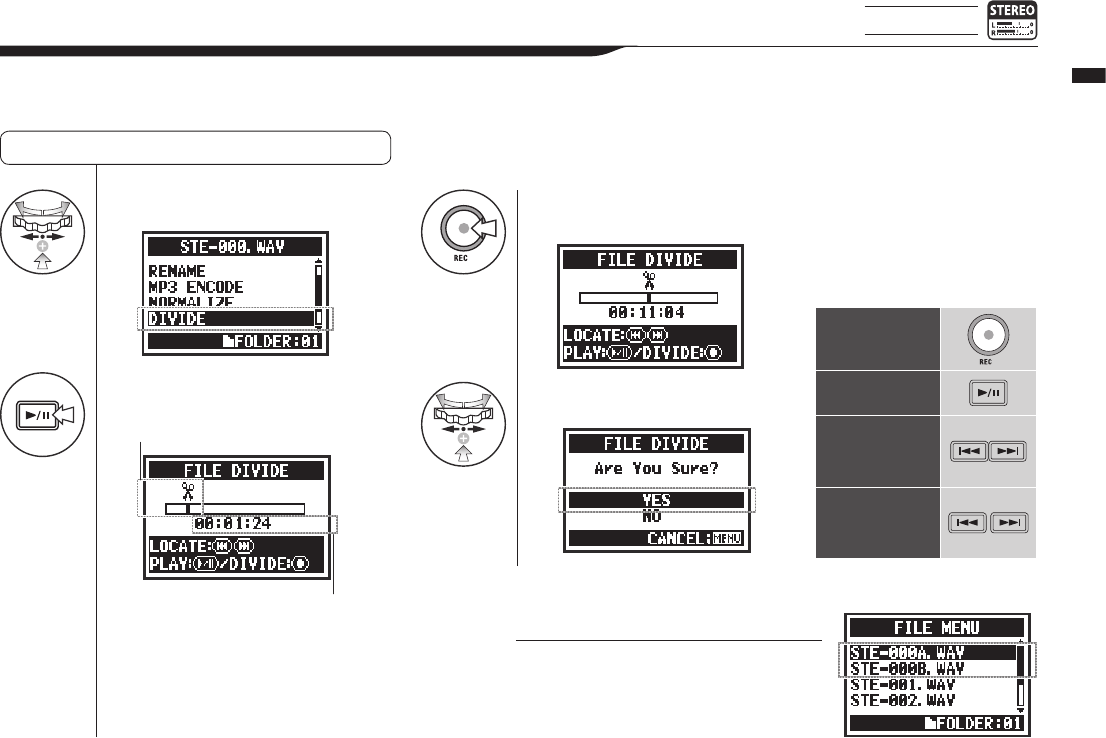
4Select DIVIDE and press.
5Press to start playback.
6Press at the desired
division point.
7Select Yes and press.
116
Operations / Editing/Output: DIVIDE
5-12 Editing/Output: DIVIDE
STEREO mode only
InSTEREOMODE,youcandividelesatanydesiredposition.
Selecting les . . . P.104 FILE SELECT
Currentletime
Currentleposition
Operation of buttons
with DIVIDE function
DIVIDE
Play or pause the le
Holding for more
than one second
to search forward/
backward
Press briey to skip
one second or jump
to the next mark in a
le with marks.
HINT:
The DIVIDE operation creates 2 les. “A” will
be added to the end of the le name of the
rst part and “B” will be added to the second.
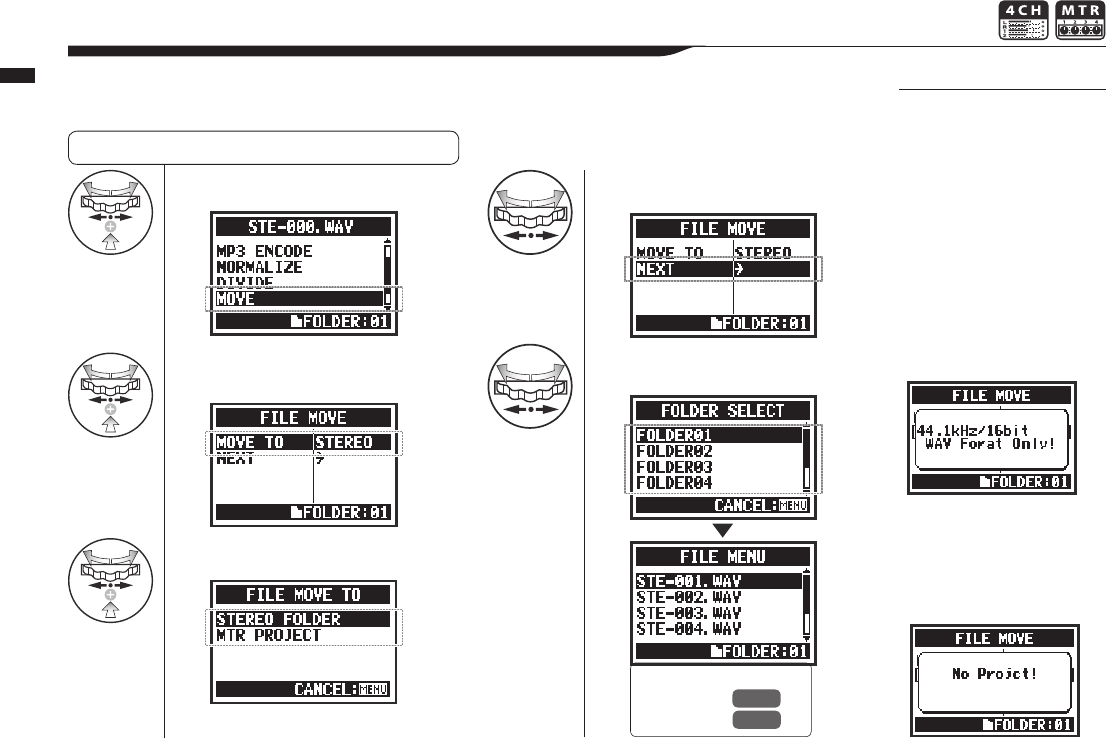
4Select MOVE and press.
5Select MOVE TO and
press.
6Select the destination.
7Select NEXT and press.
8Select the destination
folder (project).
117
Operations / Editing/Output: MOVE
5-13 Editing/Output: MOVE
Thisfunctionisusedtomovelestodierentfoldersandmodes.
Selecting les . . . P.104 FILE SELECT
HINT:
Movable le formats
• Only stereo les can be
moved to a stereo folder.
Mono les cannot be moved
to stereo folders.
• Only 4CH les can be
moved to 4CH folders.
• Only 44.1kHz/16bit les can
be moved MTR projects.
• If you try to move a le
in another format, “44.1
kHz/16 bit WAV Format
Only!” will appear on the
screen.
MOVE TO MTR PROJECT
To move a folder to an MTR
project, a project folder must
exist. If there is no project
folder, “No Project!” will appear
on the screen.
Ref. ☞
REC FORMAT P.118
FILE RENAME P.109
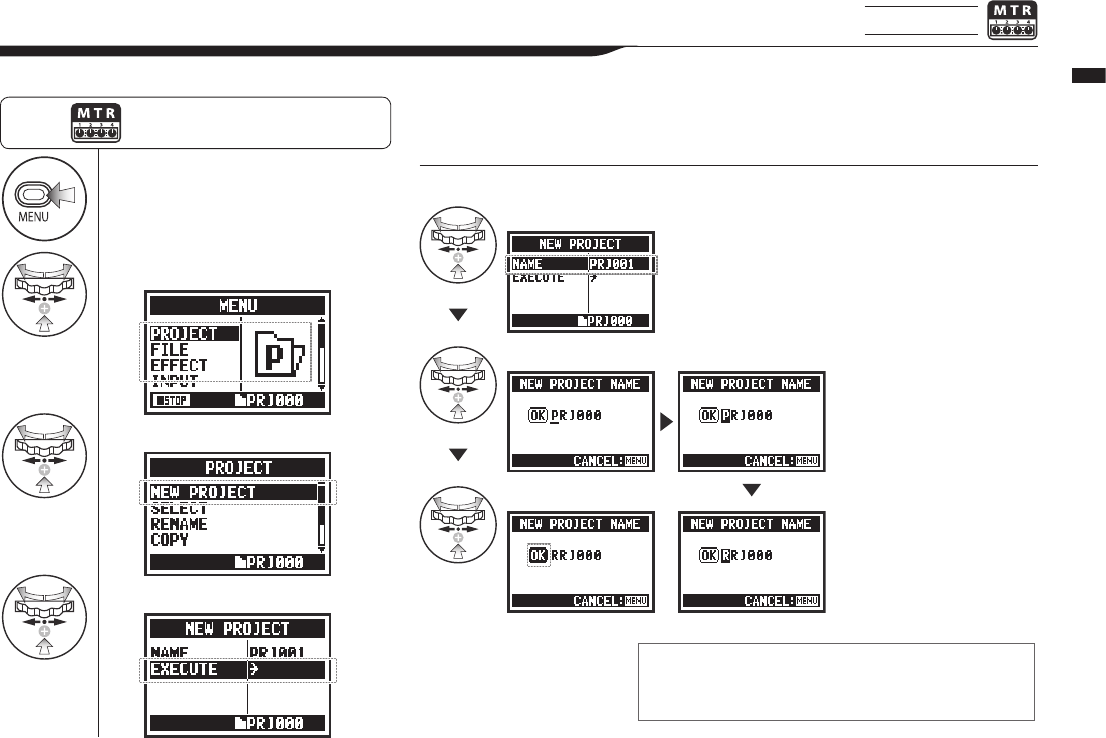
1Press.
2Select PROJECT and press.
3Select NEW PROJECT and press.
4Select EXECUTE and press.
118
Operations / Editing/Output: NEW PROJECT
5-14 Editing/Output: NEW PROJECT MTR mode only
InMTRmode,settings,includingforaudiotracksandeects,aresavedinprojects.First,wewillmakeanewproject
Press the MENU button for more
than 2 seconds, and start operation
from the top screen.
HINT:
To change the name of the new project. Project numbering
• The H4n Pro numbers
new projects automati-
cally.
• You cannot change this
number.
• You can use the same
name in multiple projects
Maximum number
of projects
You can create a maximum of 1000
projects. Each project name can
be up to 8 characters long. Characters are changed in the order above.
Select NAME and press.
Select a letter to change and press.
Select OK and press.
(space)!”#$%&()*+,-./0123456789:;=?@ABCDEF
GHIJKLMNOPQRSTUVWXYZ \ ^_`abcdefghijklmnop
qrstuvwxyz{¦}˜
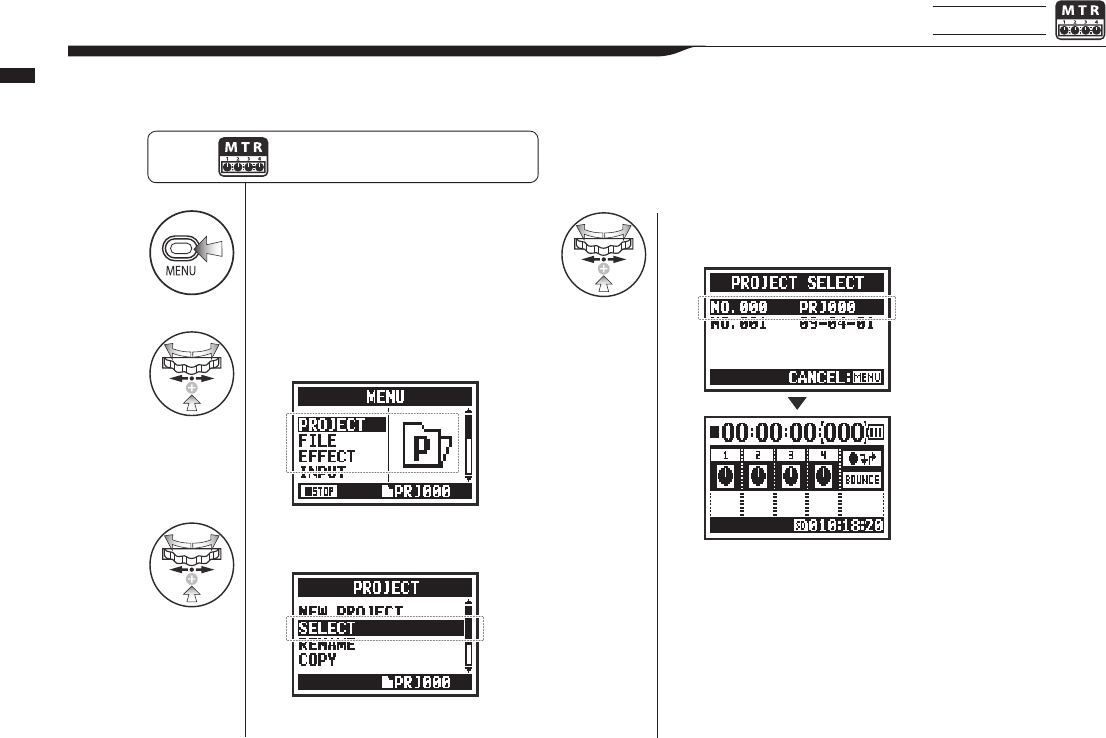
1Press.
2Select PROJECT and
press.
3
Select SELECT and
press.
4Select the desired project
and press.
119
Operations / Editing/Output: PROJECT SELECT
5-15 Editing/Output: PROJECT SELECT MTR mode only
Select a project stored on the SD card.
Press the MENU button for more
than 2 seconds, and start operation
from the top screen.
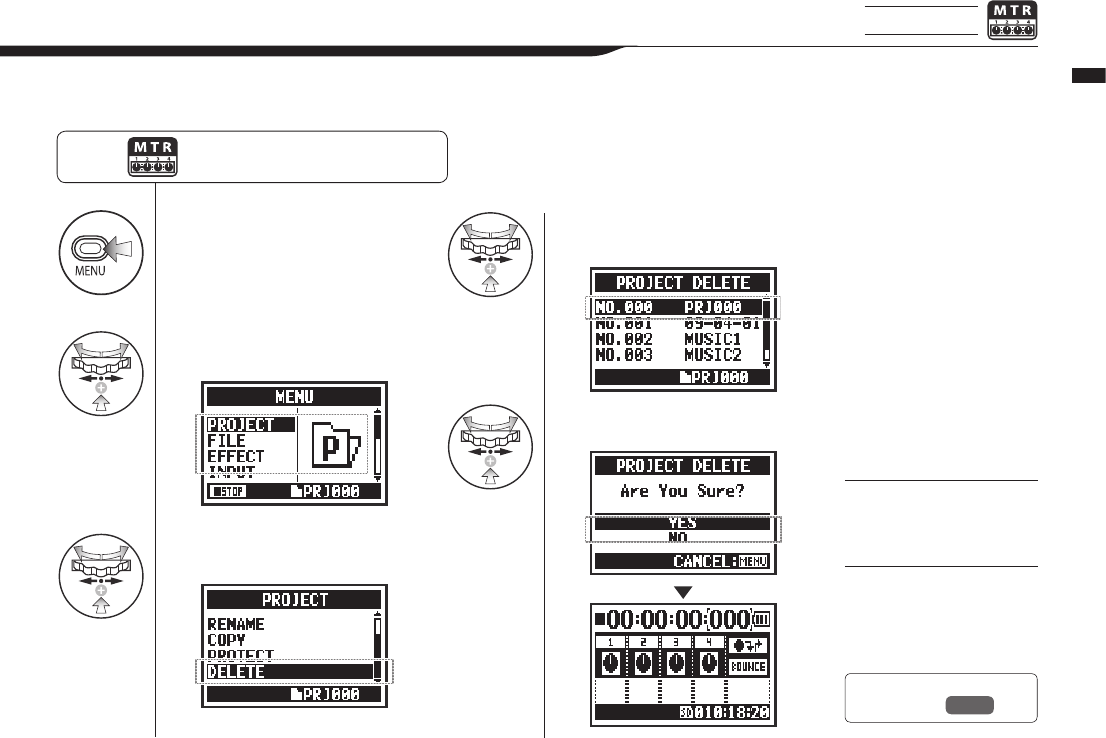
1Press.
2Select PROJECT and
press.
3
Select DELETE and
press.
4Select a project to be
deleted and press.
5Select YES and press.
120
Operations / Editing/Output: PROJECT DELETE
5-16 Editing/Output: PROJECT DELETE MTR mode only
This function will delete a project.
Press the MENU button for more
than 2 seconds, and start operation
from the top screen.
HINT:
You cannot delete a
protected project. You need
to end protection before
deletion.
NOTE:
Once deleted, you cannot
restore a project.
Ref. ☞
PROTECT P.125
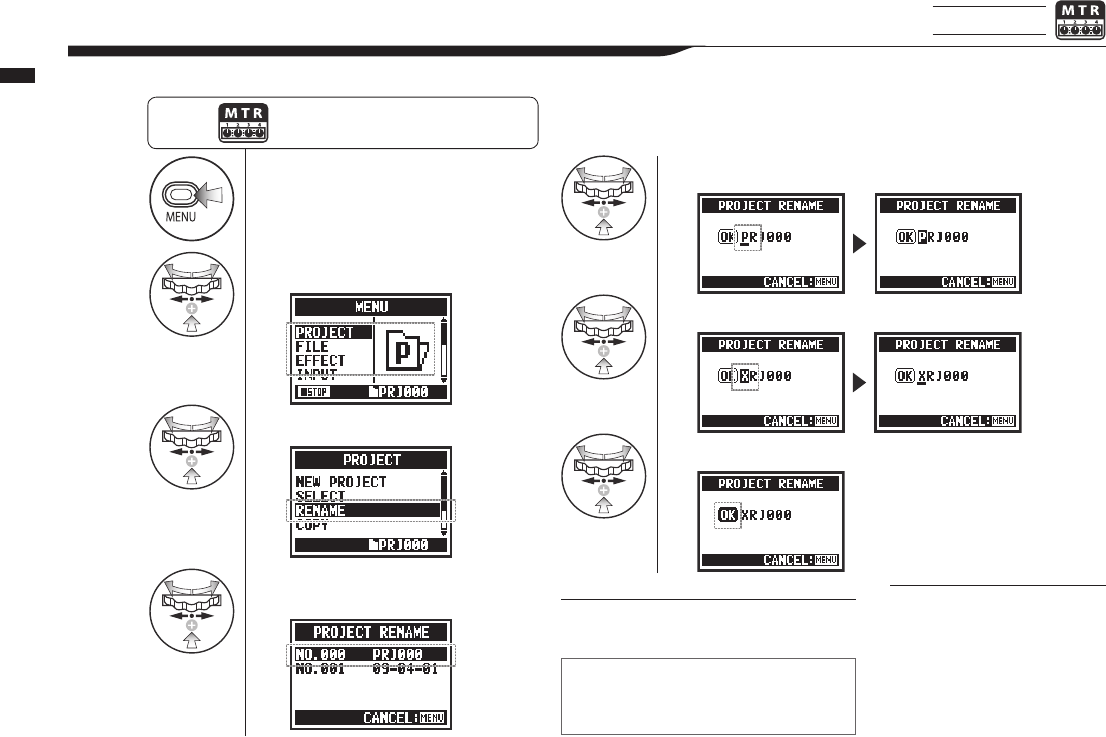
1Press.
2
Select PROJECT and press.
3
Select RENAME and press.
4
Select the project with the
name to change and press.
5Select a letter to change and press.
6Change the letter and press.
7Select OK and press.
121
Operations / Editing/Output: PROJECT RENAME
5-17 Editing/Output: PROJECT RENAME MTR mode only
You can change the name of a project.
Press the MENU button for more
than 2 seconds, and start operation
from the top screen.
HINT:
Project number
• The H4n Pro numbers new
projects automatically.
• You cannot change the
number.
• You can use the same name
in multiple projects.
(Space)!”#$%&()*+,-./0123456789:;=
?@ABCDEFGHIJKLMNOPQRSTUVWXY
Z \ ^_`abcdefghijklmnopqrstuvwxyz{¦}˜
Characters are changed in the following
order.
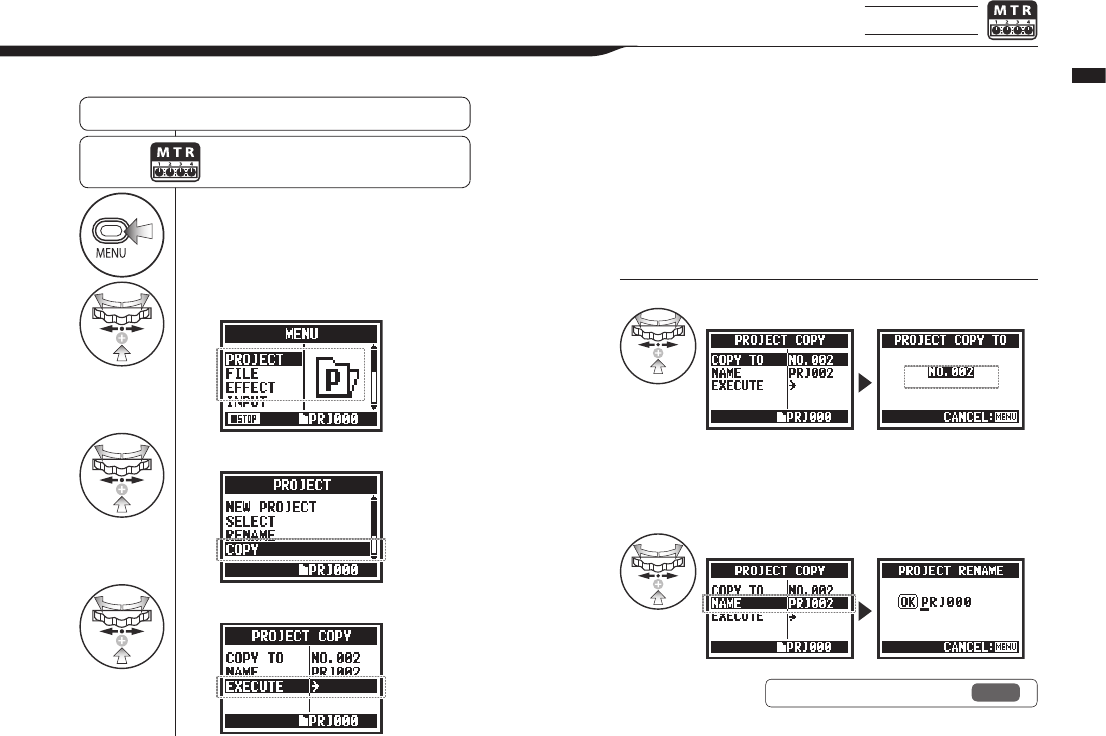
1Press.
2Select PROJECT and press.
3Select COPY and press.
4Select EXECUTE and press.
122
Operations / Editing/Output: PROJECT COPY
5-18 Editing/Output: PROJECT COPY MTR mode only
You can copy a project to create a new project with a new number.
Select a project and start operation
. . . P.119
Press the MENU button for more
than 2 seconds, and start operation
from the top screen.
HINT:
Change the number of the destination project
Change the name of the target project.
Automatically shows the
lowest unused number
Ref. ☞ PROJECT (RENAME) P.121
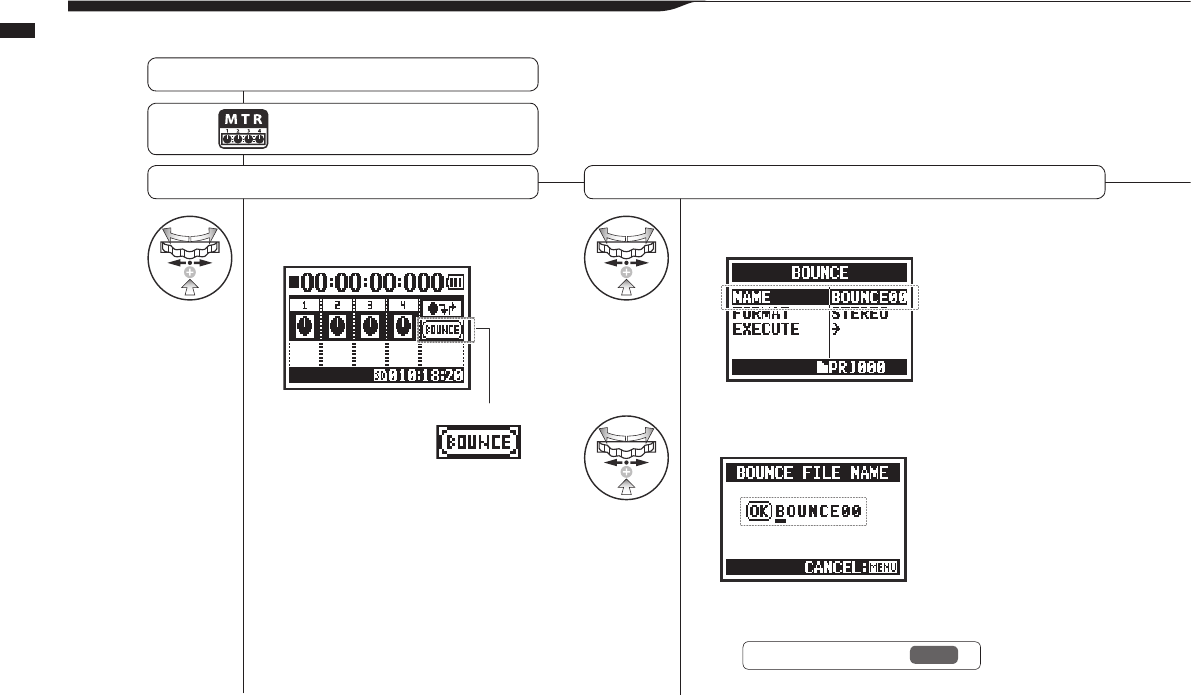
1Select BOUNCE on the top
screen and press. 2Select NAME and press.
3Change the name of the le.
123
Operations / Editing/Output: PROJECT BOUNCE
5-19 Editing/Output: PROJECT BOUNCE
You can combine tracks created in MTR mode and mix them down to one mono or stereo track.
Select a project and start operation
. . . P.119
Select BOUNCE Set the bounce le name Proceed to next step if no change. →
Press the MENU button for more
than 2 seconds, and start operation
from the top screen.
Ref. ☞ FILE RENAME P.109
The le will automatically be
given a name in “BOUNCEXX”
format.
BOUNCE icon
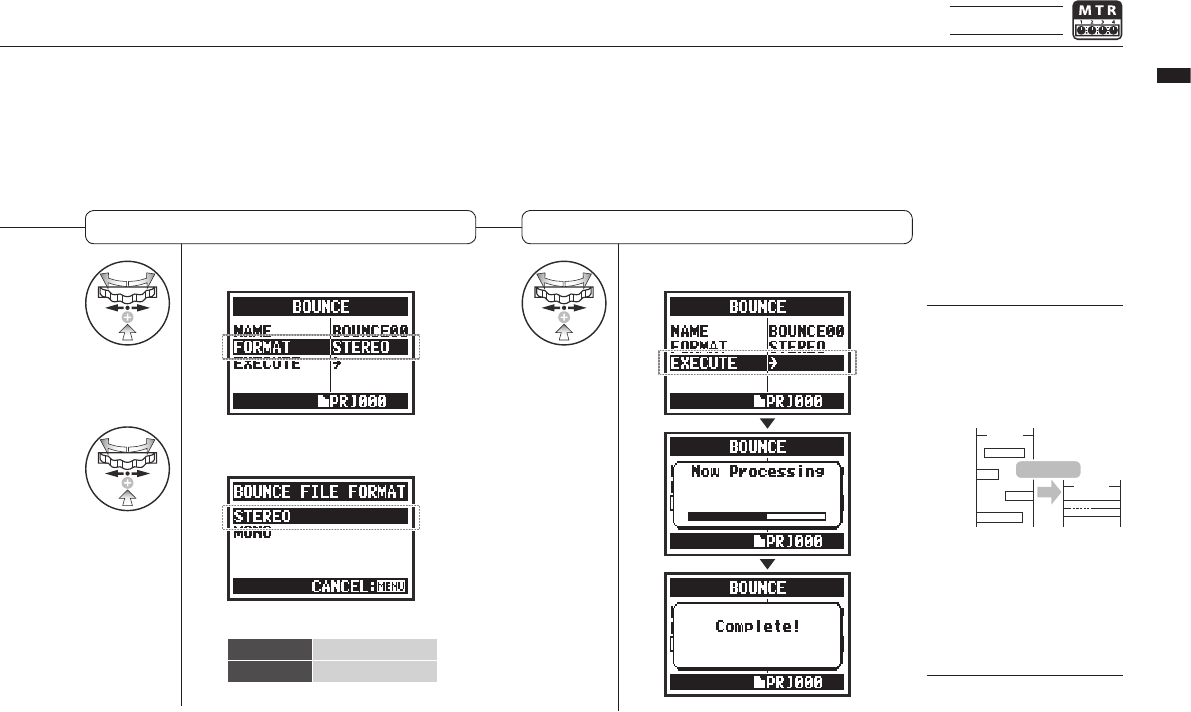
4Select FORMAT and press.
5Select the le type and
press.
6Select EXECUTE and press.
124
Operations / Editing/Output: PROJECT BOUNCE
MTR mode only
ExecutionSelect output le format: mono or stereo
HINT:
“Bouncing” means to
combine various music data
from dierent tracks and les
into a stereo or mono le.
NOTE:
You cannot use this function
during recording or playback.
Bouncing creates a new le in
the same project.
Track 1
Track 2
Track 3
Track 4
5 min
5 min
Stereole
BOUNCE
STEREO Stereole
MONO Monole
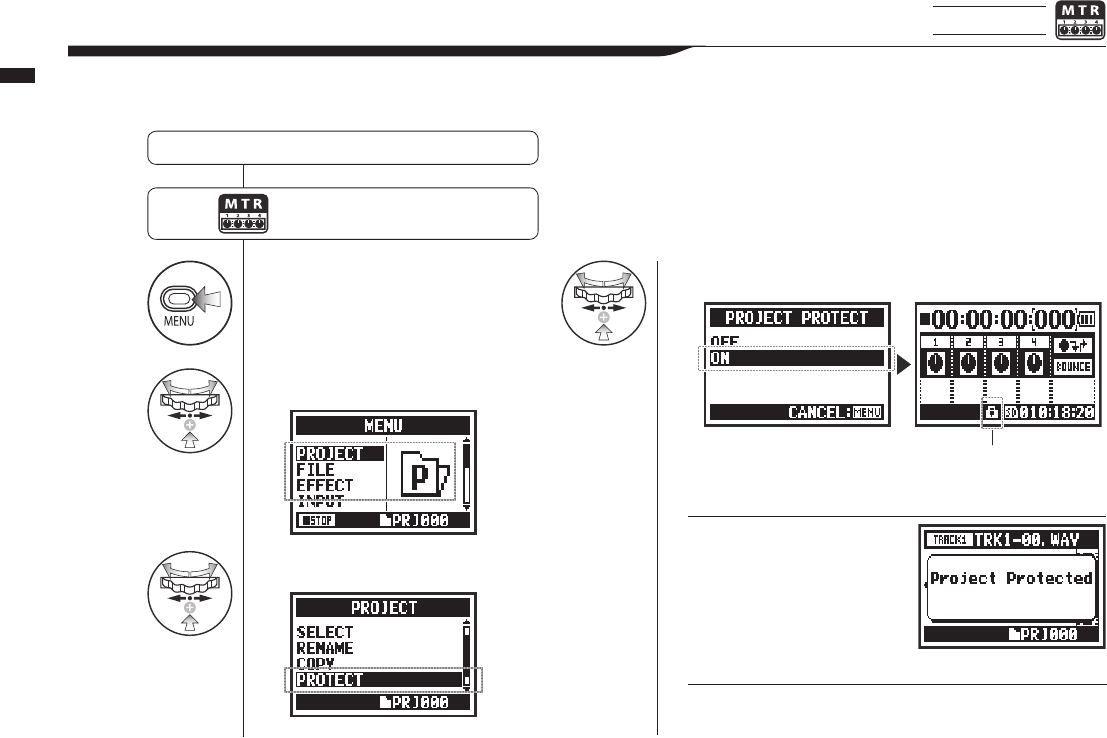
1Press.
2Select PROJECT and press.
3Select PROTECT and press.
4Select ON and press.
125
Operations / Editing/Output: PROJECT PROTECT
5-20 Editing/Output: PROJECT PROTECT MTR mode only
UsingthePROTECTfunctiononaprojectpreventsthedividingoftracksandchanginglesintheproject.
Select a project and start operation
. . . P.119
Press the MENU button for more
than 2 seconds, and start operation
from the top screen.
The mark shows the project is protected.
HINT:
If you try to change a le
assigned in a track,
“Project Protected” will appear
on the display.
HINT:
PROTECT is useful to prevent completed music from being
accidentally changed.
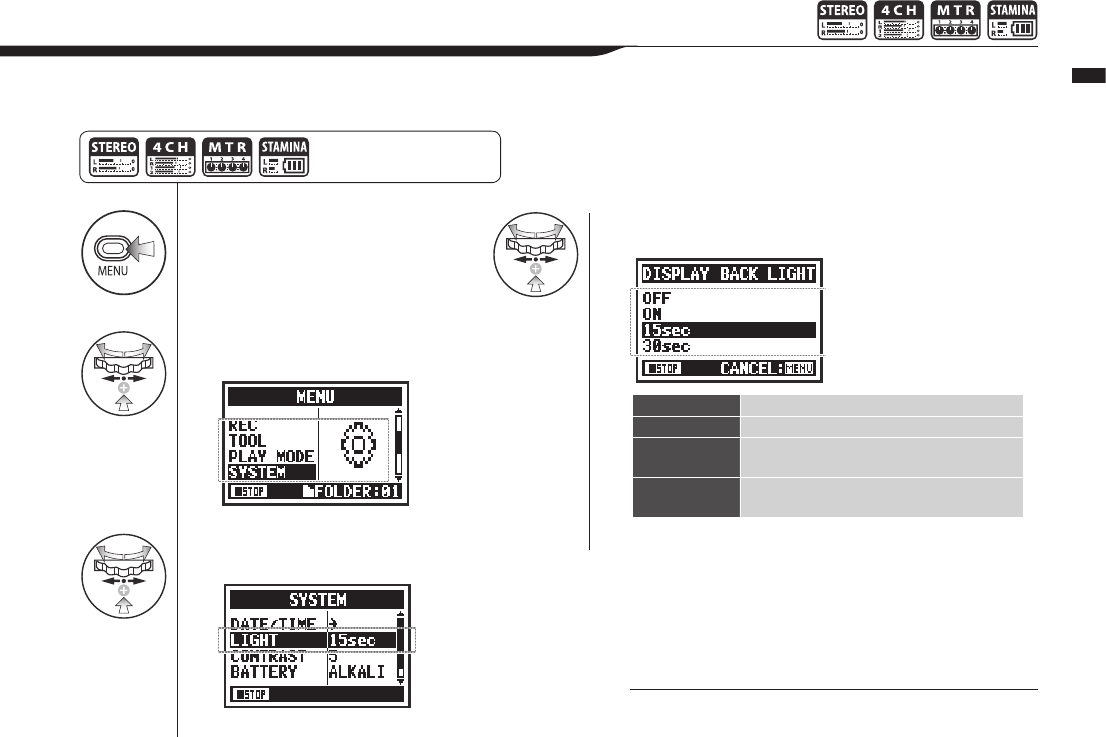
1Press.
2Select SYSTEM and
press.
3
Select LIGHT and
press.
4Select the desired time and press.
126
Operations / Utilities: DISPLAY BACK LIGHT
6-01
Utilities:
DISPLAY BACK LIGHT
You can set the time that the display backlight stays lit.
Press the MENU button for
more than 2 seconds, and start
operation from the top screen.
NOTE:
You cannot change this setting during recording or playback.
OFF Thebacklightstaysoallthetime.
ON The backlight stays on all the time.
15sec
(default)
The backlight stays on for 15 seconds after
the last key operation.
30sec The backlight stays on for 30 seconds after
the last key operation.
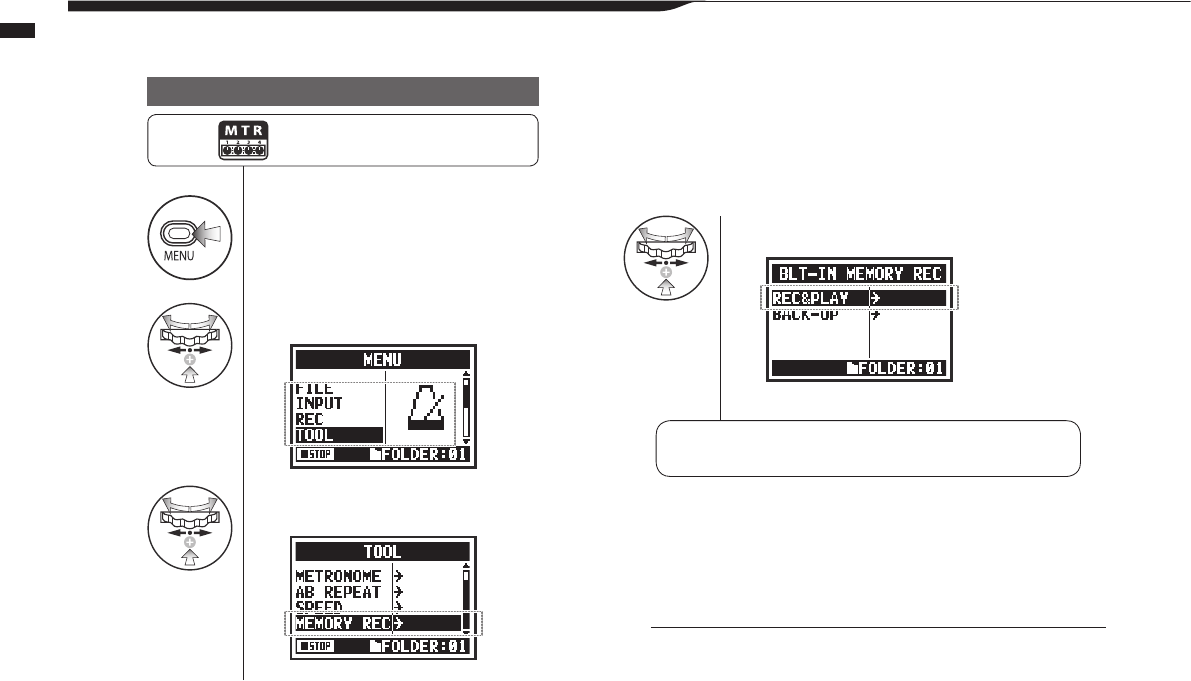
1Press.
2Select TOOL and press.
3Select MEMORY REC and
press.
4Select REC&PLAY.
Change the recording mode
Switch to MEMORY REC mode
127
Operations / Utilities: MEMORY REC
6-02 Utilities: MEMORY REC
Even without an SD card, the built-in memory can record up to 35 seconds.
This is useful for voice memos, for example.
NOTE:
Only one le can be recorded and the maximum time is 35 seconds.
Each time you record will erase the previous contents. Please be aware
of these restrictions.
When no SD card is loaded, press the
MENU button for at least 2 seconds and
start from the top screen.
Recording and playback ☞ Record P.047
☞ Playback P.094
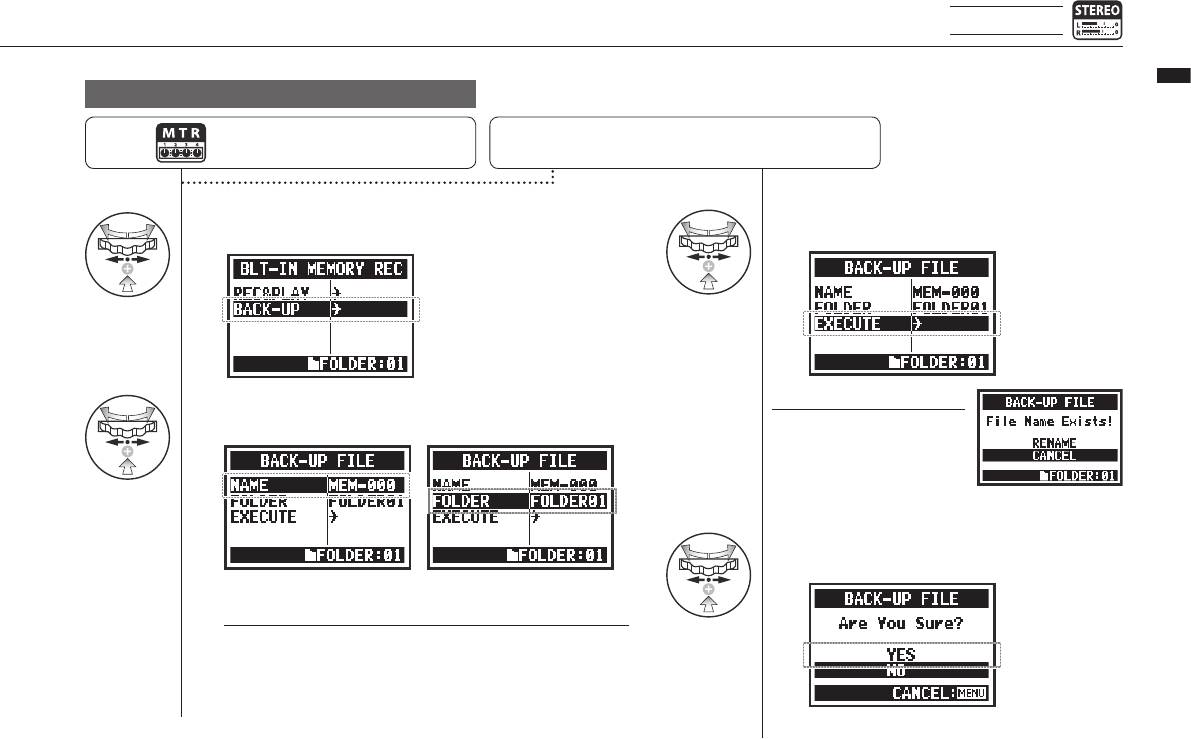
1Select BACKUP and press.
2Select NAME to change the le name, or select
FOLDER to change the destination folder.
3Select EXECUTE and press.
4When the conrmation screen
opens, select YES and press.
Transferring recordings to SD cards
NOTE:
If a le with the same name
already exists in the destina-
tion folder, a screen where
you can select RENAME or
CANCEL appears.
HINT:
The destination folder is a stereo mode folder.
Thistransferstheleto the SD cardand
deletes it from the built-in memory.
128
Operations / Utilities: MEMORY REC
STEREO mode only
After loading an SD, press the MENU
button for at least 2 seconds and start
from the top screen.
Open BLT-IN MEMORY REC screen … P.127
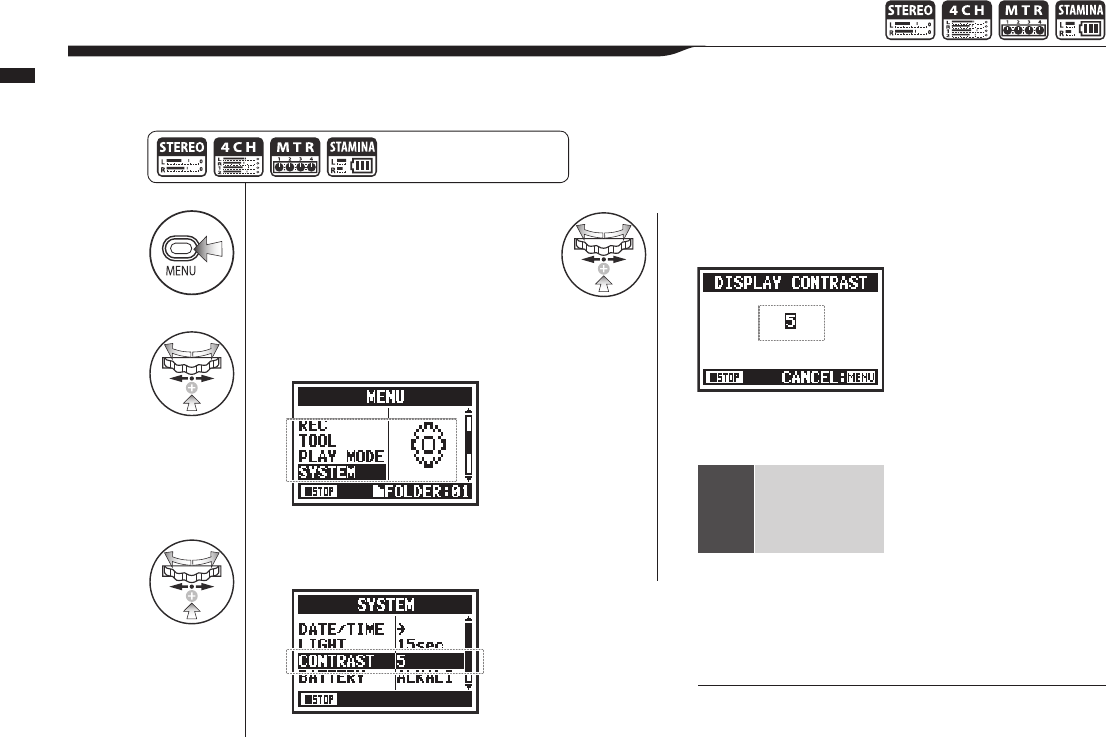
1Press.
2Select SYSTEM and
press.
3
Select CONTRAST and
press.
4Change the number
and press.
This can be set from 1 to 8. The
higher the number, the greater
the contrast (default: 5).
129
Operations / Utilities: DISPLAY CONTRAST
6-03 Utilities: DISPLAY CONTRAST
Follow these steps to adjust the display contrast.
NOTE:
You cannot change this setting during recording and
playback.
Press the MENU button for
more than 2 seconds, and start
operation from the top screen.
1
|
8
Low contrast
↑
↓
High contrast
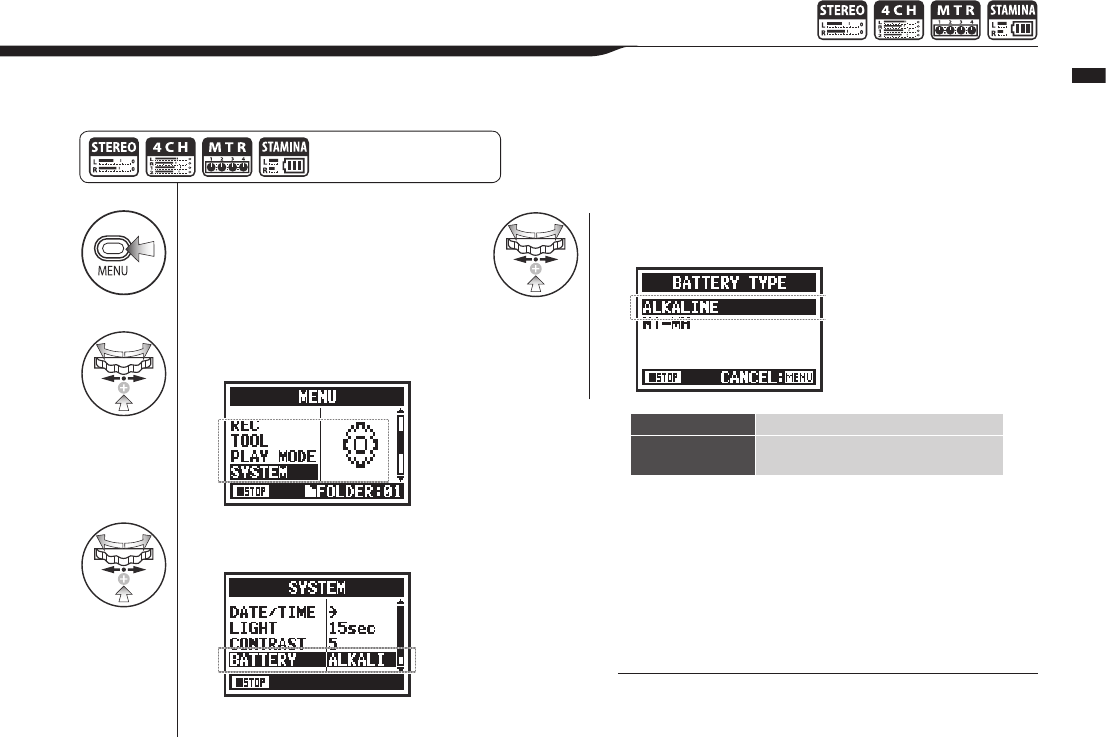
1Press.
2Select SYSTEM and
press.
3
Select BATTERY and
press.
4Select the battery type
and press.
NOTE:
Batteries that can be used
•
Use alkaline batteries or NiMH rechargeable batteries.
•
You cannot change this setting during recording and playback.
130
Operations / Utilities: BATTERY TYPE
6-04 Utilities: BATTERY TYPE
By setting the battery type, the H4n Pro can accurately display the remaining battery life.
Press the MENU button for
more than 2 seconds, and start
operation from the top screen.
ALKALINE Alkaline batteries (default)
Ni-MH Nickel metal hydride rechargeable
batteries
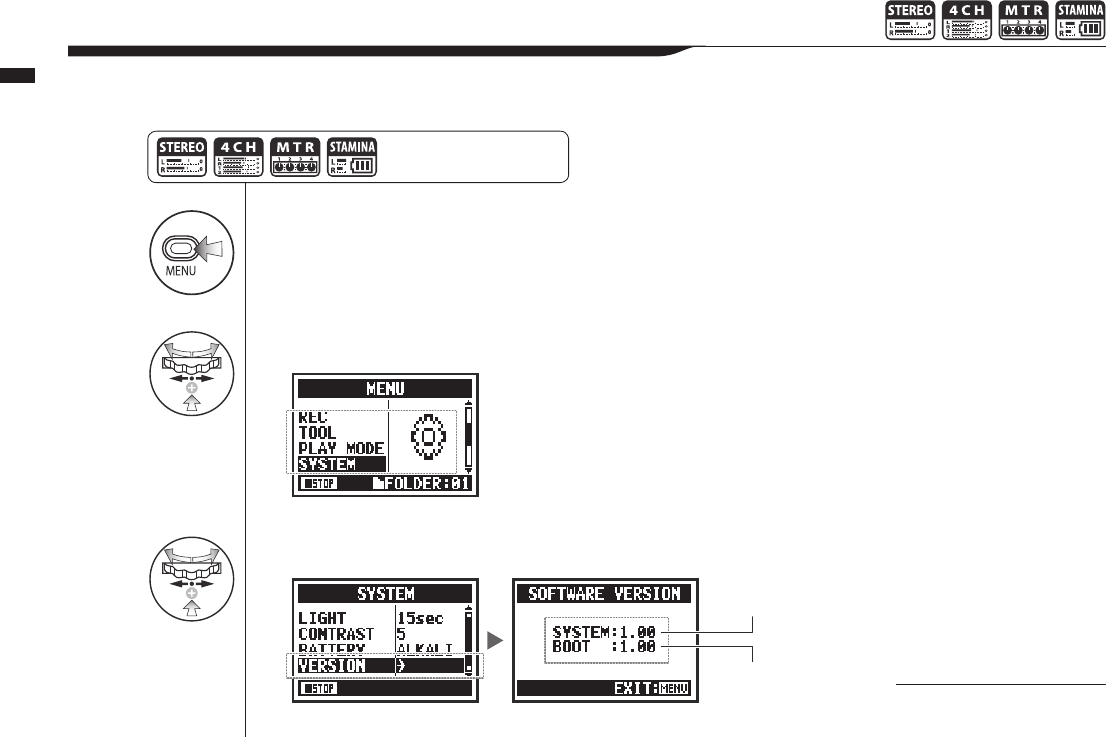
1Press.
2Select SYSTEM and press.
3
Select VERSION and press.
131
Operations / Utilities: VERSION
6-05 Utilities: VERSION
After startup, you can check the H4n Pro version.
System version
Boot program
version
NOTE:
You cannot use this during
recording and playback.
Press the MENU button for
more than 2 seconds, and start
operation from the top screen.
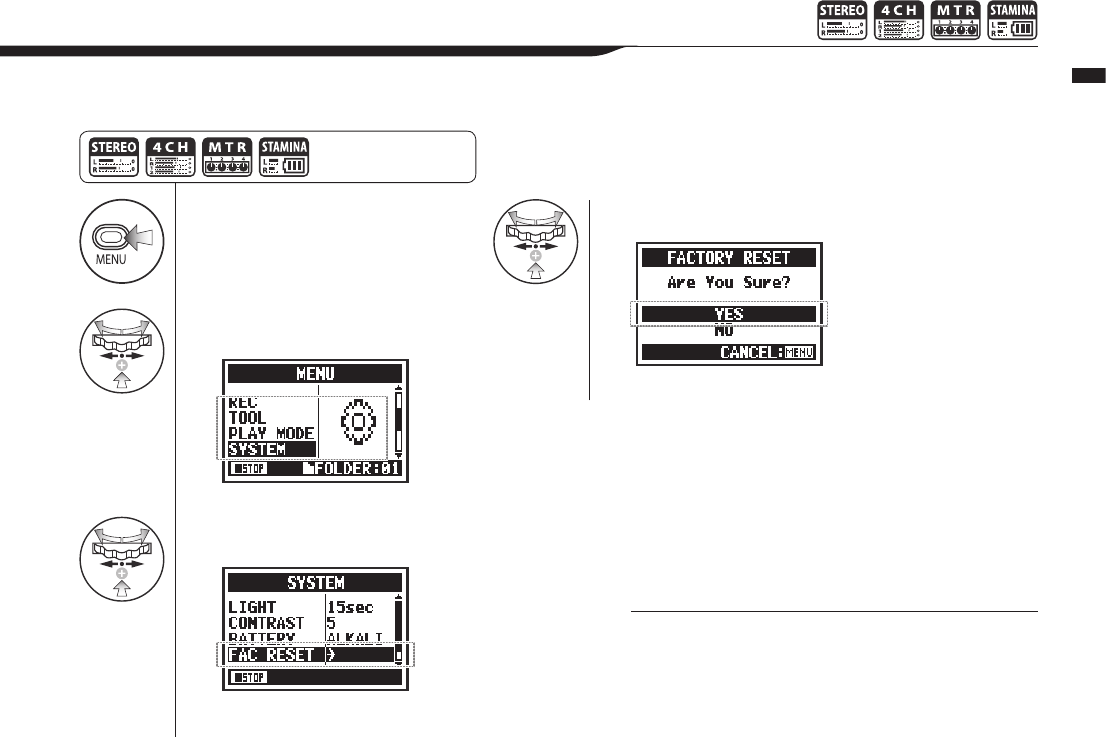
1Press.
2Select SYSTEM and
press.
3
Select FAC RESET
and press.
4Select YES and press.
132
Operations / Utilities: FACTORY RESET
6-06 Utilities: FACTORY RESET
This function restores all settings to their original defaults.
NOTE:
• You cannot use this function during recording and play-
back.
• Warning: if you use the FACTORY RESET function, all the
settings stored in this unit will be deleted. The settings will
be restored to their original defaults.
Press the MENU button for
more than 2 seconds, and start
operation from the top screen.
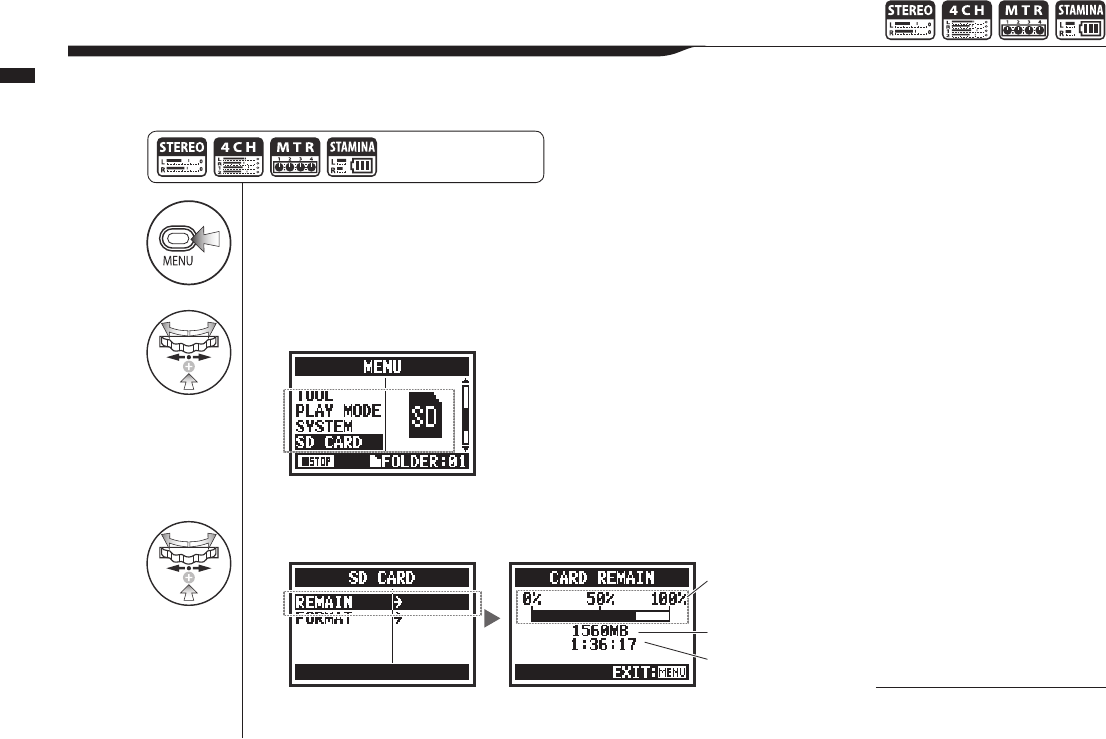
1Press.
2Select SD CARD and press.
3
Select REMAIN and press.
133
Operations / Utilities: REMAIN
6-07 Utilities: REMAIN
Press the MENU button for
more than 2 seconds, and start
operation from the top screen.
DothistoconrmtheremainingcapacityoftheSDCARD.
NOTE:
You cannot use this during recording
and playback.
Remaining capacity
meter
Remaining space (MB)
Remaining recording
time with the current
recording format.
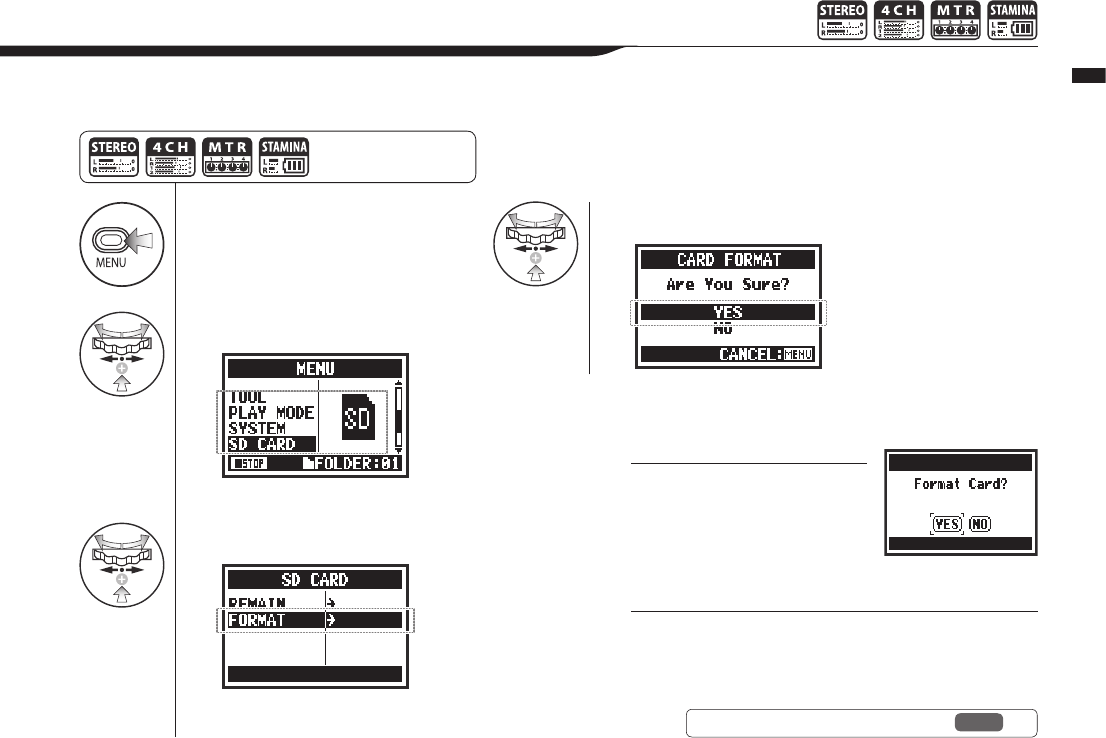
1Press.
2Select SD CARD and press.
3Select FORMAT and press.
4Select YES and press.
134
Operations / Utilities: FORMAT
6-08 Utilities: FORMAT
Press the MENU button for
more than 2 seconds, and start
operation from the top screen.
Use this function to format SD cards for the H4n Pro.
NOTE:
• You cannot use this function during recording and playback.
• Warning: All data will be deleted when you format the SD card.
• SD cards used in a computer or a digital camera should be
formatted by the H4n Pro before use with it.
HINT:
“Format Card?”
“Format Card?” appears during
startup if the loaded SD card is not
formatted for the H4n Pro.
Ref. ☞ Using H2 and H4 SD cards P.136
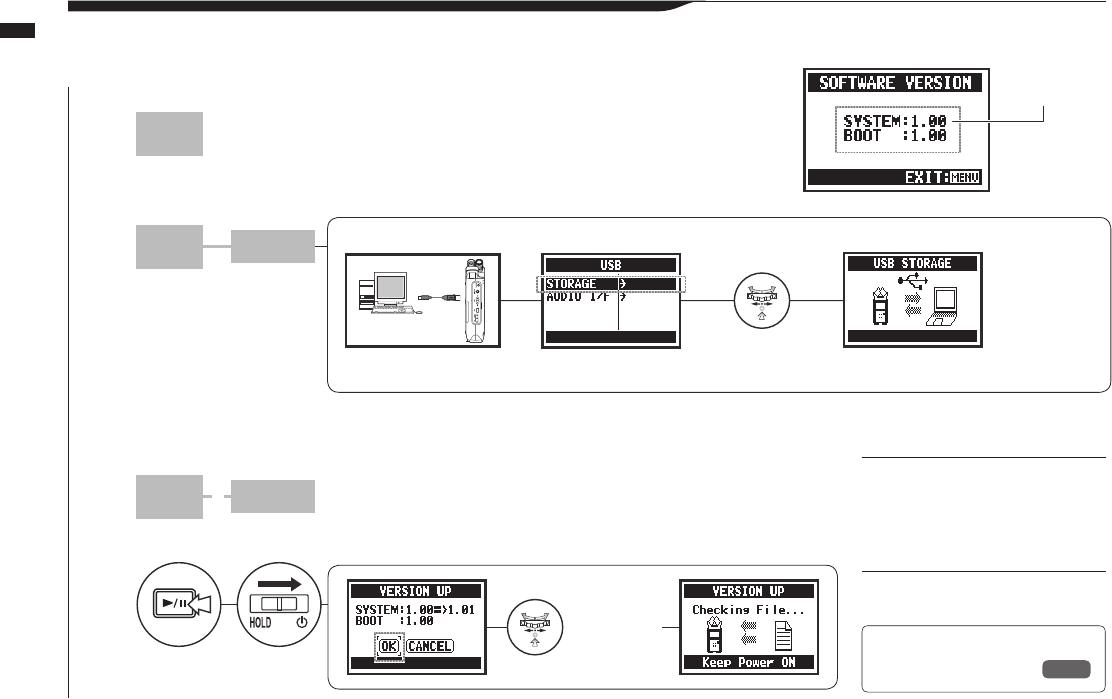
1PC
Open the ZOOM website on a computer and download the most
recent system software. (http://www.zoom.co.jp)
2
3
USB
PC H4nPro
Copy the downloaded system software to the
root directory of the SD card in the H4n Pro.
4PC H4nPro
Disconnect the PC and H4n Pro.
5+
135
Operations / Utilities: VERSION UP
6-09 Utilities: VERSION UP
If the H4n Pro (with an SD card) is connected to a computer (PC) that has access to the internet,
you can download H4n Pro software upgrades.
Connect the H4n Pro and
computer with a USB
cable.
Turn on while holding down
the PLAY/PAUSE button.
Main system
version
You can work with
data on the SD card
in the H4n Pro from
the computer.
Connect the H4n Pro to a
computer with a USB cable.
Select STORAGE
and press.
Select
OK and
press.
You can check the H4n Pro
version on the SYSTEM
(SOFTWARE) VERSION
screen.
HINT:
Connect to a computer and select
STORAGE. The H4n Pro will be
recognized as an SD card reader
and can be used as one.
NOTE:
Follow the computer procedures to
disconnect from it.
Ref. ☞
SYSTEM (VERSION) P.131
Use a USB cable to connect the H4n Pro and a computer.
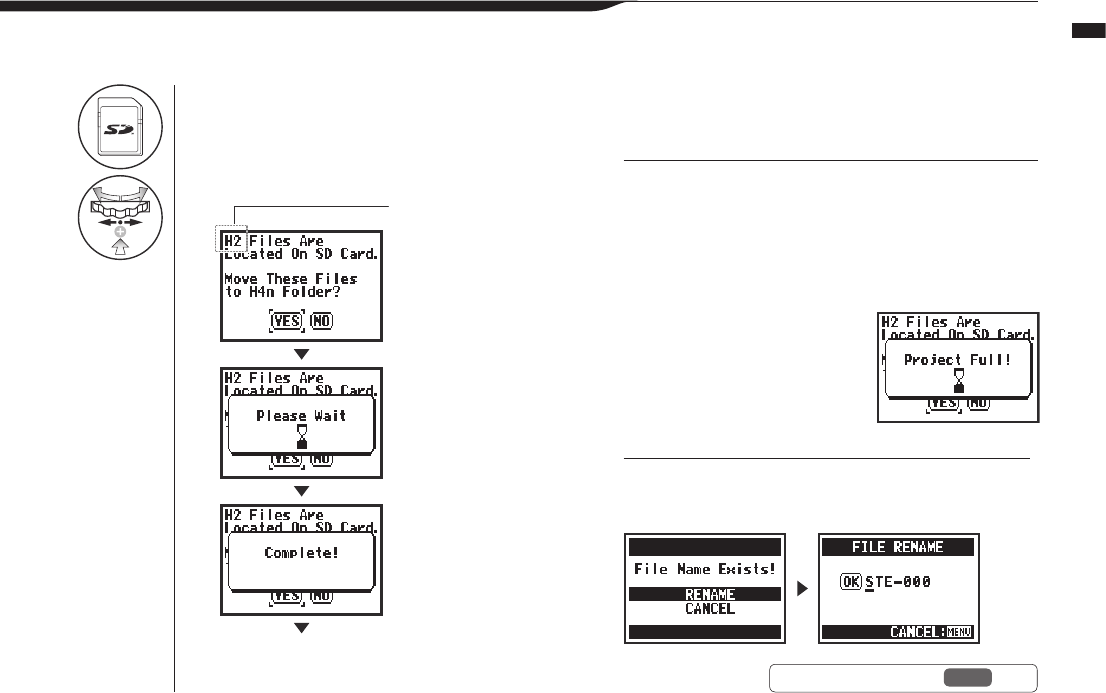
1Insert an H2/H4 SD card into the H4n Pro
and turn it on.
2Select YES to move the les.
136
Operations / Utilities: Using H2 and H4 SD cards
6-10 Utilities: Using H2 and H4 SD cards
IfyouloadSDcardsfromH2andH4recordersintheH4nPro,youcanmovetheirlesandprojectstotheH4nPro.
HINT:
“File Name Exists!”
If a le with the same name already exists in the destination folder,
select RENAME and change the name.
NOTE:
• H2/H4 stereo les and H4 projects will be moved to H4n Pro
stereo folders and MTR projects.
• After moving les to the H4n Pro folder, those SD cards will
not be recognized in the H2/H4 again.
• The projects are move in order from the lowest numbered to
the highest numbered.
• If the H4n Pro has more than 1000 projects in the unit after
transfer, “Project Full!” appears
and transfer stops.
• You must reduce the number
of projects on the H4n Pro to
continue transfer.
Ref. ☞ FILE RENAME P.109
“H4” if from an H4.
Startup continues

138
Reference
Reference
139
Reference / Main specications by mode
Main specications by mode
■ Main specications by mode
STEREO 4CH MTR STAMINA
Recording formats
Stereo WAV:
44.1/48/96kHz, 16/24-bit
Stereo MP3:
48, 56, 64, 80, 96, 112, 128, 160,
192, 224, 256 and 320 kbps,
VBR 44.1kHz
Stereo WAV × 2:
44.1/48kHz, 16/24-bit
44.1kHz/16-bit stereo and mono
WAV (4 tracks total) 44.1kHz/16-bit WAV (xed)
Maximum simultaneous
recording tracks 2 (one stereo track) 4 (two stereo tracks) 2 (one stereo or two mono tracks) 2 (one stereo track)
File capacity limit 2 GB (If a recording exceeds 2 GB, a new le will be created when recording in STEREO and 4CH modes.)
File creation during
recording
Always save new les (overwrite
recording not possible)
Always save new les (overwrite
recording not possible)
Select either to overwrite recordings
or save new les
Always save new les (overwrite
recording not possible)
File saving locations Save in 10 dedicated folders for
STEREO mode
Save in 10 dedicated folders for
4CH mode
Manage multiple les together as
projects
Save in 10 dedicated folders for
STEREO mode
Changinglenames Possible Not possible Possible Possible
Changing folder names Not possible Not possible Not possible Not possible
Mark functions Possible (WAV les only) Possible (WAV les only) Not possible Possible (WAV les only)
Reference
140
Reference / Settings available in each mode
Settings available in each mode
■ Menu items
SYSTEM STEREO 4CH MTR STAMINA
DATE/TIME ∆∆∆∆
LIGHT ○○○○
LCD CONTRAST ○○○○
BATTERY TYPE ○ ○ ○ ○
FACTORY RESET ∆∆∆∆
SD CARD STEREO 4CH MTR STAMINA
FORMAT ∆∆∆∆
REMAIN ∆∆∆∆
USB STEREO 4CH MTR STAMINA
AUDIO IF ∆∆∆—
STORAGE ∆∆∆—
MODE STEREO 4CH MTR STAMINA
MODE ∆∆∆—
FOLDER SELECT STEREO 4CH MTR STAMINA
FOLDER SELECT ∆ ∆ —∆
FILE STEREO 4CH MTR STAMINA
FILE INFORMATION
∆∆∆∆
FILE RENAME ∆∆∆∆
FILE MP3 ENCODE
∆———
NORMALIZE ∆∆ — —
DIVIDE ∆———
MOVE ∆∆∆—
MARK LIST ∆ ∆ —∆
FILE DELETE ∆∆∆∆
FILE DELETE ALL ∆∆∆∆
FILE STEREO ENCODE
—∆— —
FILE COPY — — ∆—
INPUT SETTING STEREO 4CH MTR STAMINA
LO CUT ○ ○ —○
COMP/LIMIT ○ ○ — —
MONITOR ○○○○
REC LEVEL AUTO
∆ ∆ —∆
MONO MIX ∆— — ∆
MS STEREO MATRIX
○ ○ — —
PHANTOM ○○○○
PLUG-IN POWER ○○○○
REC SETTING STEREO 4CH MTR STAMINA
REC FORMAT ∆ ∆ — —
AUTO REC ∆ ∆ —∆
PRE REC ∆ ∆ — —
FILE NAME ∆— — ∆
TOOL STEREO 4CH MTR STAMINA
TUNER ∆∆∆—
METRONOME* ○○○—
A-B REPEAT ∆ ∆ — —
SPEED ∆———
PLAY MODE STEREO 4CH MTR STAMINA
PLAY MODE ∆ ∆ —∆
REC MODE STEREO 4CH MTR STAMINA
REC MODE — — ∆—
EFFECT STEREO 4CH MTR STAMINA
EDIT — — ○—
IMPORT —— ∆—
PROJECT STEREO 4CH MTR STAMINA
NEW PROJECT — — ∆—
SELECT — — ∆—
RENAME — — ∆—
COPY — — ∆—
DELETE — — ∆—
PUNCH IN/OUT STEREO 4CH MTR STAMINA
PUNCH IN/OUT — — ○* —
BOUNCE STEREO 4CH MTR STAMINA
BOUNCE — — ∆—
○ ...This can be set during recording and playback (* indicates some exceptions).
∆...Thiscannotbesetduringrecordingandplayback.
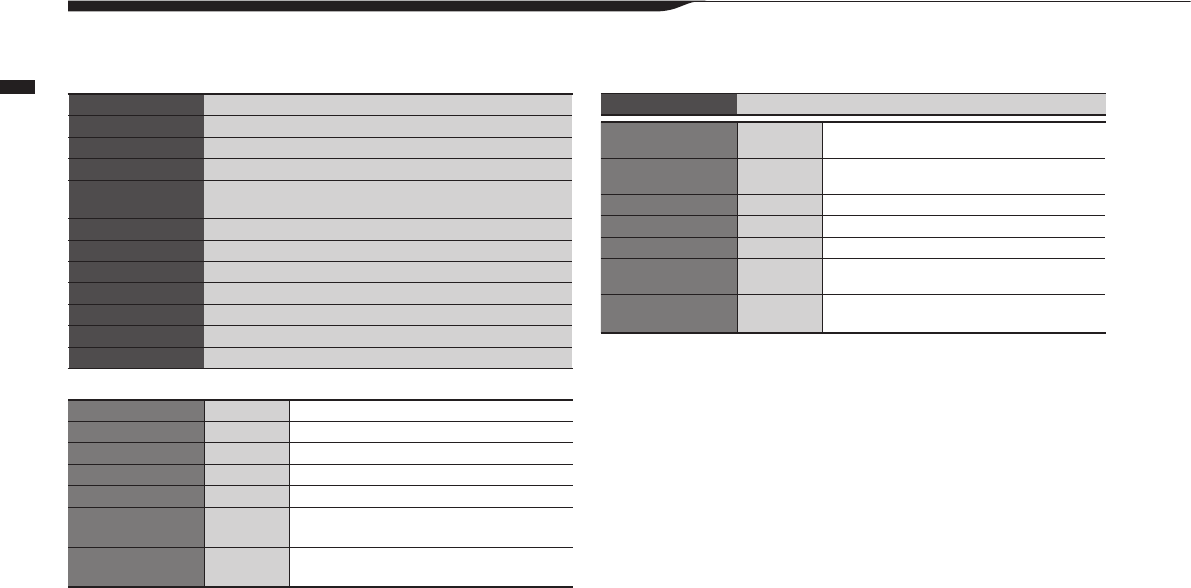
141
MTR mode eect types and parameters
Reference / MTR mode eect types and parameters
■ PREAMP module
● Guitar preamp eects
FD TWNR Models the sound of the Fender '65 Twin Reverb.
UK 30A Models the sound of an early class A British combo amp.
HW 100 Models the sound of the HIWATT CUSTOM 100.
FD TWEED Models the sound of the Fender '59 Bassman.
BGcrunch Models the sound of the Mesa Boogie Mark III combo
amp.
MScrunch Models the crunch sound of the Marshall JCM800 2203.
MS DRIVE Models the drive sound of the Marshall JCM800 2203.
XTASY BL Models the sound of the Bogner Ecstasy Blue channel.
SD+XTASY Combination of Bogner Ecstasy and SweetDrive.
TS+FDcmb Combination of Fender Combo amp and Ibanez TS-808.
GD+MSstk Combination of Marshall JCM800 and GoldDrive.
FZ+MSstk Combination of Marshall JCM800 and Fuzz.
The12eectsabovehavethesameparameters.
(1) CABINET 0–2 Adjusts the depth of the speaker cabinet sound.
(2) GAIN 0–100 Adjusts the preamp gain (distortion depth).
(3) BASS −12–+12 Adjusts the low-frequency boost/cut.
(4) MIDDLE −12–+12 Adjusts the middle-frequency boost/cut.
(5) TREBLE −12–+12 Adjusts the high-frequency boost/cut.
(6) LEVEL 1–100 Sets the level of the signal after the PREAMP
module.
(7) ZNR
(ZOOM Noise Reduction)
OFF, 1–16 Adjusts the sensitivity of ZOOM's original ZNR
noise reduction eect.
ACO SIM Makes electric guitar sound like an acoustic guitar
(1) TOP 0–10 Adjusts the string sound characteristic of acous-
tic guitars.
(2) BODY 0–10 Adjusts the body sound characteristic of acoustic
guitars.
(3) BASS −12–+12 Adjusts the low-frequency boost/cut.
(4) MIDDLE −12–+12 Adjusts the middle-frequency boost/cut.
(5) TREBLE −12–+12 Adjusts the high-frequency boost/cut.
(6) LEVEL 1–100 Sets the level of the signal after the PREAMP
module.
(7) ZNR
(ZOOM Noise Reduction)
OFF, 1–16 Adjusts the sensitivity of ZOOM's original ZNR
noise reduction eect.
• Manufacturer and product names shown in these tables are the trademarks and registered
trademarks of various companies. The names are used only to explain sonic characteristics
and do not indicate any aliation with Zoom Corporation.
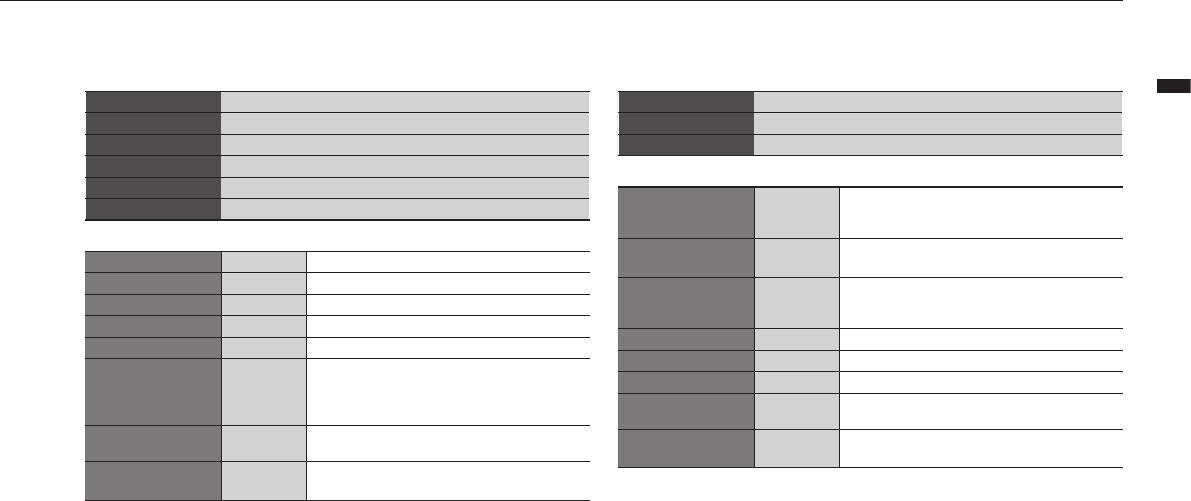
142
Reference / MTR mode eect types and parameters
● Bass preamp eects
SVT Models the sound of the Ampeg SVT.
BASSMAN Models the sound of the Fender Bassman 100.
SMR Models the sound of the SWR SM-900.
SUP-BASS Models the sound of the Marshall Super Bass.
SANSAMP Models the sound of the SansAmp Bass Driver DI.
TUBE PRE ZOOM original tube preamp sound
The6eectsabovehavethesameparameters.
(1) CABINET 0–2 Adjusts the depth of the speaker cabinet sound.
(2) GAIN 0–100 Adjusts the preamp gain (distortion depth).
(3) BASS −12–+12 Adjusts the low-frequency boost/cut.
(4) MIDDLE −12–+12 Adjusts the middle-frequency boost/cut.
(5) TREBLE −12–+12 Adjusts the high-frequency boost/cut.
(6) BALANCE 0–100
Adjusts the balance between the signals before
and after they pass through the module The
higher the value, the greater the post-module
signal amount.
(7) LEVEL 1–100 Sets the level of the signal after the PREAMP
module.
(8) ZNR
(ZOOM Noise Reduction)
OFF, 1–16 Adjusts the sensitivity of ZOOM's original ZNR
noise reduction eect.
· Manufacturer and product names shown in these tables are the trademarks and registered
trademarks of various companies. The names are used only to explain sonic characteristics
and do not indicate any aliation with Zoom Corporation.
● Mic preamp eects
VO MPRE
Preamp with characteristics good for vocal recording
AG MPRE
Preamp with characteristics good for acoustic guitar recording
FlatMPRE
Preamp with at characteristics
The3eectsabovehavethesameparameters.
(1) COMP OFF,
1–10
Adjusts the compression of the total signal level
by lowering high-level signals and raising low-
level signals.
(2) DE-ESSER OFF,
1–10 Adjusts the amount that sibilant sounds are cut.
(3) LOW CUT OFF,
1–10
Adjusts the frequency of the lter that cuts
low-frequency noise, which is easily picked up
by mics.
(4) BASS −12–+12 Adjusts the low-frequency boost/cut.
(5) MIDDLE −12–+12 Adjusts the middle-frequency boost/cut.
(6) TREBLE −12–+12 Adjusts the high-frequency boost/cut.
(7) LEVEL 1–100 Sets the level of the signal after the PREAMP
module.
(8) ZNR
(ZOOM Noise Reduction)
OFF,
1–16
Adjusts the sensitivity of ZOOM's original ZNR
noise reduction eect.
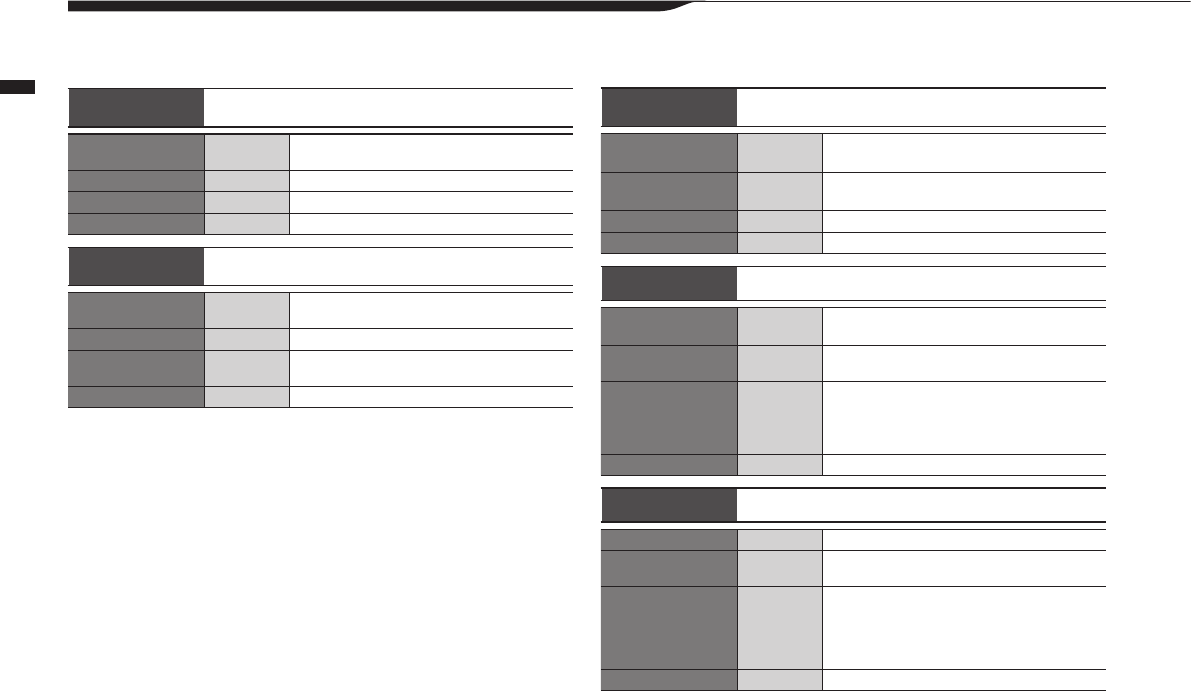
143
Reference / MTR mode eect types and parameters
MTR mode eect types and parameters
■ EFX modules
● Compressor/limiter eects
RackComp Compressors reduce high-level signals and raise the
minimum level.
(1) THRSHOLD 0–50 Sets the base level from which the compressor
operates.
(2) RATIO 1–10 Sets the compression ratio.
(3) ATTACK 1–10 Sets how quickly compression starts.
(4) LEVEL 2–100 Sets the level of the signal after the EFX module.
LIMITER Limiters compress when input signals exceed the xed
level.
(1) THRSHOLD 0–50 This sets the base level from which the limiter
operates.
(2) RATIO 1–10 Sets the compression ratio.
(3) RELEASE 1–10 Sets how quickly the limiter stops functioning
after the signal goes below the base level.
(4) LEVEL 2–100 Sets the level of the signal after the EFX module.
● Modulation eects
AUTO WAH This wah eect responds to changes in input signal
strength.
(1) POSITION Before,
After
Sets the insertion point of the EFX module.
Select before or after the PREAMP.
(2) SENSE −10–−1,
1–10 Sets the eect sensitivity.
(3) RESONANC 0–10 Sets the amount of resonance.
(4) LEVEL 2–100 Sets the level of the signal after the EFX module.
PHASER This eect varies the sound with phasing.
(1) POSITION Before,
After
Sets the insertion point of the EFX module.
Select before or after the PREAMP.
(2) RATE 0–50, ♪
(See P.146) Adjusts the speed of modulation.
(3) COLOR
4STAGE,
8STAGE,
INVERT4,
INVERT8
Select the eect sound type.
(4) LEVEL 2–100 Sets the level of the signal after the EFX module.
TREMOLO This eect raises and lowers the volume cyclically.
(1) DEPTH 0–50 Adjusts the modulation depth.
(2) RATE 0–50, ♪
(See P.146) Adjusts the speed of modulation.
(3) WAVE
UP 0–9
DOWN 0–9
TRI 0–9
Select the modulation waveform from UP (rising
sawtooth), DOWN (falling sawtooth) and TRI
(triangle) types.
The higher the number, the more the wave peaks
are clipped, emphasizing the eect.
(4) LEVEL 2–100 Sets the level of the signal after the EFX module.
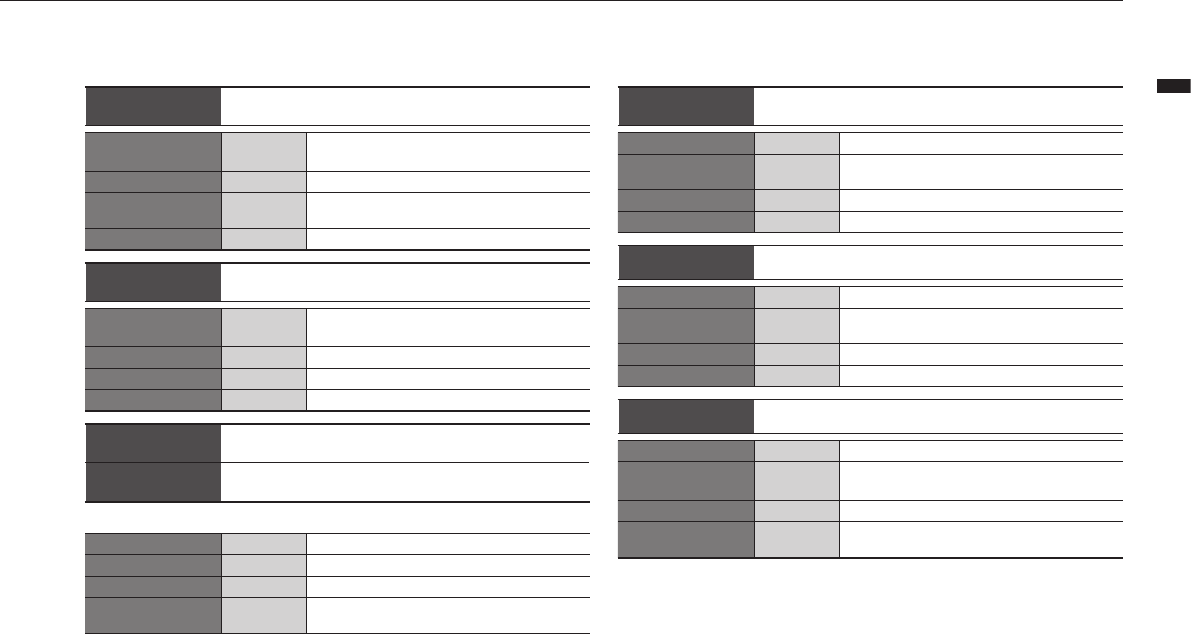
144
Reference / MTR mode eect types and parameters
RING MOD This eect creates a metallic sound. The FREQ setting can
drastically change the tone.
(1) POSITION Before,
After
Sets the insertion point of the EFX module.
Select before or after the PREAMP.
(2) FREQ 1–50 Sets the frequency of modulation.
(3) BALANCE 0–100 Adjusts the balance of the original and eect
sounds.
(4) LEVEL 2–100 Sets the level of the signal after the EFX module.
SLOW ATK This eect makes the attack of each note gradual, creating
a violin-like sound.
(1) POSITION Before,
After
Sets the insertion point of the EFX module.
Select before or after the PREAMP.
(2) TIME 1–50 Adjusts the attack time.
(3) CURVE 0–10 Sets the volume change curve of the attack.
(4) LEVEL 2–100 Sets the level of the signal after the EFX module.
CHORUS This mixes an eect sound that varies from the original
pitch, creating a varying thick sound.
ENSEMBLE This chorus ensemble eect features three-dimensional
movement.
The2eectsabovehavethesameparameters.
(1) DEPTH 0–100 Adjusts the modulation depth.
(2) RATE 0–50 Adjusts the speed of modulation.
(3) TONE 0–10 Adjusts the tone.
(4) MIX 0–100 Adjusts the amount of eect sound mixed with
the original sound.
FLANGER This eect adds modulation and strong undulations to the
sound.
(1) DEPTH 0–100 Adjusts the modulation depth.
(2) RATE 0–50, ♪
(See P.146) Adjusts the speed of modulation.
(3) RESONANC -10–+10 Sets the amount of modulation resonance.
(4) MANUAL 0–100 Adjusts the frequency band aected.
STEP This special eect changes the tone in steps.
(1) DEPTH 0–100 Adjusts the modulation depth.
(2) RATE 0–50, ♪
(See P.146) Adjusts the speed of modulation.
(3) RESONANC 0–10 Sets the amount of modulation resonance.
(4) SHAPE 0–10 Sets the eect sound envelope.
VIBE This eect automatically adds vibrato.
(1) DEPTH 0–100 Adjusts the modulation depth.
(2) RATE 0–50, ♪
(See P.146) Adjusts the speed of modulation.
(3) TONE 0–10 Adjusts the tone.
(4) BALANCE 0–100 Adjusts the balance of the original and eect
sounds.
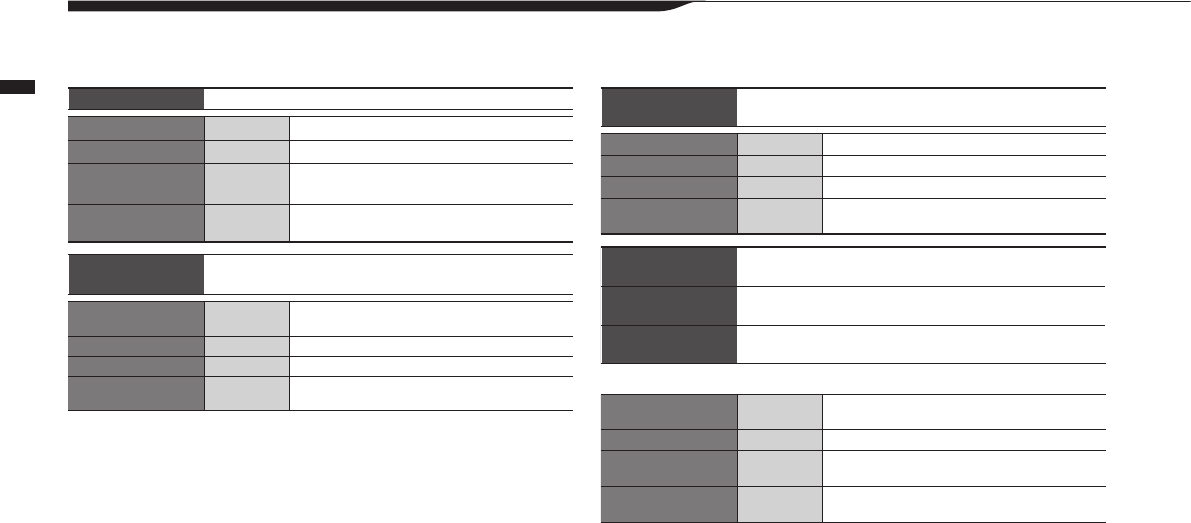
145
Reference / MTR mode eect types and parameters
MTR mode eect types and parameters
CRY This eect varies the sound like a talking modulator.
(1) RANGE 1–10 Adjusts the frequency band aected.
(2) RESONANC 0–10 Sets the amount of resonance.
(3) SENSE
−10–−1,
1–10
Sets the eect sensitivity.
(4) BALANCE 0–100 Adjusts the balance of the original and eect
sounds.
PITCH This eect shifts the pitch up or down
(1) SHIFT
−12–+12,
24
Sets the pitch shift in semitones.
(2) TONE 0–10 Adjusts the tone.
(3) FINE −25–+25 Adjusts the pitch shift in cents (1/100 semitone).
(4) BALANCE 0–100 Adjusts the balance of the original and eect
sounds.
● Delay/reverb eects
AIR This eect reproduces the reverberant atmosphere of a
room and provides spatial depth.
(1) SIZE 1–100 Sets the size of the space.
(2) REFLEX 0–10 Sets the amount of wall reections.
(3) TONE 0–10 Adjusts the tone.
(4) MIX 0–100 Adjusts the amount of eect sound mixed with
the original sound.
DELAY
This delay supports long delay times of up to 5000 ms.
ECHO This tape echo simulation supports long delay times of up
to 5000 ms.
ANALOG This warm analog delay simulation supports long delay
times of up to 5000 ms.
The3eectsabovehavethesameparameters.
(1) TIME
1–5000 ms,
♪
(See P.146) Sets the delay time.
(2) FEEDBACK 0–100 Adjusts the amount of feedback.
(3) HIDAMP 0–10 Adjusts the damping of high frequencies in the
delay sound.
(4) MIX 0–100 Adjusts the amount of eect sound mixed with
the original sound.
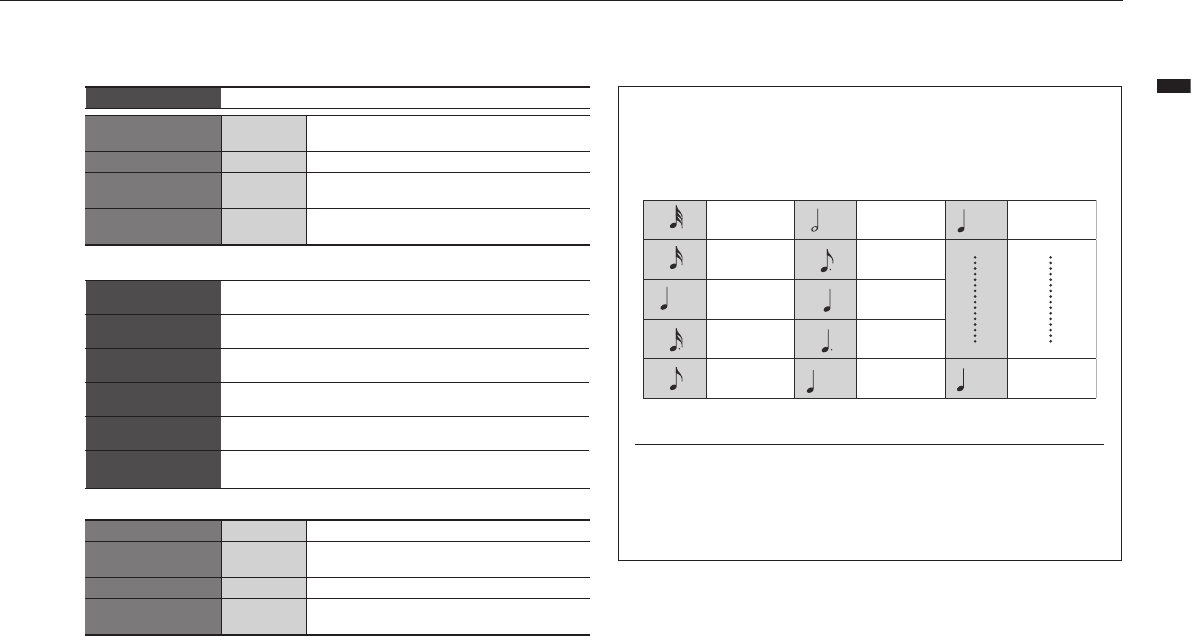
146
Reference / MTR mode eect types and parameters
RvsDelay This delay supports long delay times of up to 2500 ms.
(1) TIME
10–2500 ms,*
♪
(See P.146) Sets the delay time.
(2) FEEDBACK 0–100 Adjusts the amount of feedback.
(3) HIDAMP 0–10 Adjusts the damping of high frequencies in the
delay sound.
(4) MIX 0–100 Adjusts the amount of eect sound mixed with
the original sound.
*milliseconds
HALL
This reverb simulates the acoustics of a concert hall.
ROOM This reverb simulates the acoustics of a room.
SPRING This is a spring reverb simulation.
ARENA This simulates the acoustics of an arena-sized venue.
T ROOM This simulates the acoustics of a tiled room.
M SPRING This is a spring reverb simulation with a bright and clear
tone.
The6eectsabovehavethesameparameters.
(1) DECAY 1–30 Sets the reverb duration.
(2) PRE DLY 1–100 Sets the time between when the original sound is
input and reverb starts.
(3) TONE 0–10 Adjusts the tone.
(4) MIX 0–100 Adjusts the amount of eect sound mixed with
the original sound.
Note durations
Parameters with ♪ values allow you to make settings in note units
based on the metronome tempo. The lengths of the notes are as
follows.
Thirty-second
note
Sixteenth note
Eighth note
Dotted eighth
note
Half note
triplet
Quarter note
x 3
Quarter note
triplet Quarter note
Dotted six-
teenth note
Dotted
quarter note
Quarter note
x 2
Quarter note
x 20
x 2 x 20
x 33
3
NOTE
·
The note values that can be selected depend on the parameter.
· Certain combinations of tempo and note values could exceed
parameter ranges. If this occurs, the value will be halved or even
quartered to achieve the allowed range.
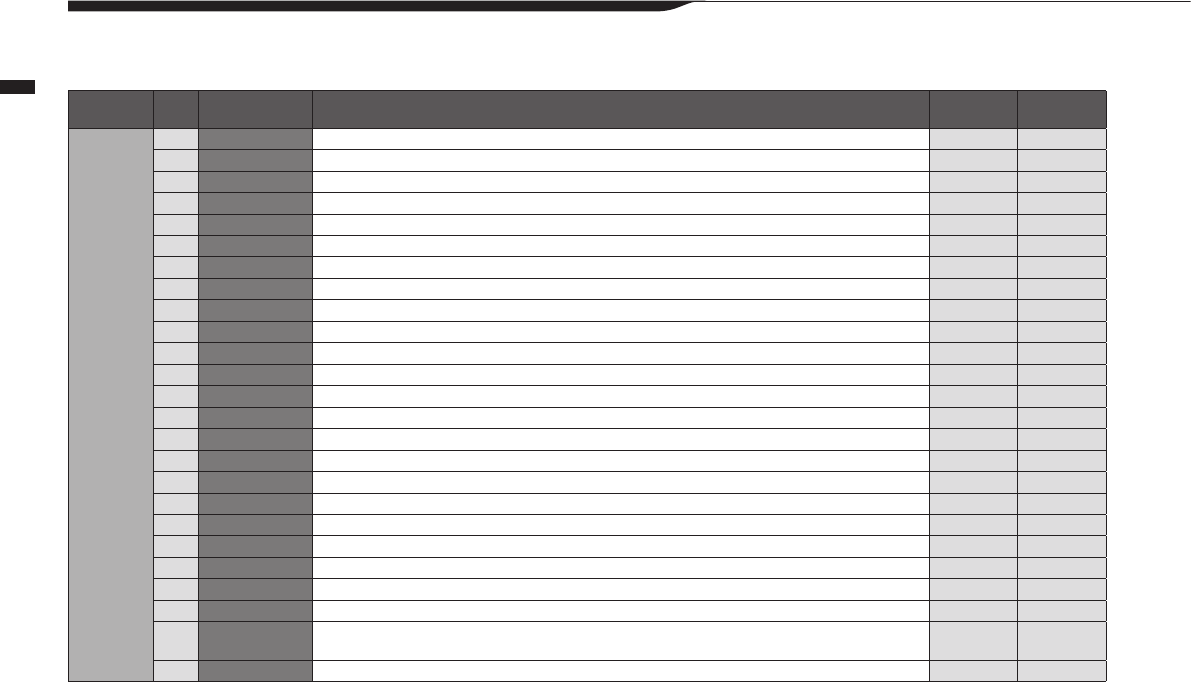
147
Reference / H4n Pro patch list
H4n Pro patch list
The patches in this list can be used in 4CH mode and when the H4n Pro is functioning as an audio interface (at 44.1kHz sampling rate).
Category No. Patch name Description PREAMP
module
EFX
module
Guitar 00 Tweed Clean This FD TWEED clean sound goes great with Stratocasters. FD TWEED SPRING
01 Liverpool A 60s revival sound is created by gently driving a Class A British combo amp. UK 30A AIR
02 Clean Chorus This clean sound is good for muted rhythmic and arpeggio playing. FD TWNR CHORUS
03 Clean Delay Using a long delay, this clean sound is good for sustained chords and arpeggios. FD TWNR ECHO
04 Clean Trem This clean sound varies the volume and can be said to be the original eect. HW 100 TREMOLO
05 Aco.Simulate
This acoustic guitar simulation is ideal for stroking.
Aco Sim AIR
06 Spy's Shadow
Wrapped in spring reverb, this twangy guitar sound is perfect for electric instruments.
FD TWNR M SPRING
07 Wah Cutting This funky rhythmic tone uses FD TWNR and AUTO WAH. FD TWNR AUTO WAH
08 Glossy Blues
This bewitching Fender '59 BASSMAN crunch sound follows the dynamics of the player.
FD TWEED ROOM
09 UK Crunch A sense of AIR is added to the natural crunch of a Class A British combo amp. UK 30A AIR
10 Box Of Edge U2's The Edge popularized this distinctive dotted-eighth-note delay eect (at 130 BPM). UK 30A ECHO
11 HW Crunch Crunch sound of a HIWATT CUSTOM 100. HW 100 ROOM
12 Melody Analog delay adds a natural sense of space to TS+FDcmb for a sound that suits simple melodies. TS+FDcmb ANALOG
13 ZEP Drive A classic Marshall crunch re-creates the sound of Led Zeppelin. MScrunch RackComp
14 Mellow Vibe MScrunch and Vibe combine to create a laid-back sound. MScrunch VIBE
15 70's Drive The sound of 70s rock. MS DRIVE ECHO
16 Boogie Drive The Mesa Boogie Mark III sound creates a mid-range thickness in this drive that is good for soloing. BGcrunch ROOM
17 MS Drive For the early sound of Van Halen, the Marshall is turned all the way up. GD+MSstk ARENA
18 XTASYRi SD+XTASY makes this great for metal ris. SD+XTASY OFF
19 Jet MS Drive Heavy Marshall distortion is combined with a anger for this epic sound. GD+MSstk FLANGER
20 Talking Guy This talking sound follows the guitar pickup position and picking dynamics. GD+MSstk CRY
21 Oct Lead Octave doubling below the original pitch creates a heavy impactful drive sound. GD+MSstk PITCH
22 Dirty Drive Fuzz gives this classic 70s progressive rock sound its powerful sustain. FZ+MSstk ANALOG
23 Fuzz Lead Vintage Marshall and fuzz eects combine to re-create the sweet and beautiful fuzz tone used by
Eric Johnson. FZ+MSstk ARENA
24 XTASY Lead This metal lead sound uses XTASY BL and ECHO eects. XTASY BL ECHO
148
Reference / H4n Pro patch list
Category No. Patch name Description PREAMP
module
EFX
module
Bass 25 SVT This is the perfect Ampeg SVT rock sound. SVT OFF
26 SMR The SWR SM-900 modeling provides a tight sound. SMR LIMITER
27 BASSMAN This classic sound uses Fender BASSMAN 100 modeling. BASSMAN OFF
28 SUP-BASS The showy drive sound of a Marshall Super Bass. SUP-BASS OFF
29 SANSAMP The SansAmp sound plays well with other instruments. SANSAMP OFF
30 TUBE PRE A thick TUBE PRE distortion sound. TUBE PRE OFF
31 Funk Wah Responding to changes in touch dynamics, this funk wah sound can be used in many situations. SMR AUTO WAH
32 Slap Comp Combining RackComp and TUBE PRE, this clean sound is perfect for slapping and tapping. TUBE PRE RackComp
33 Bass Phaser This go-to phaser sound combines PHASER and TUBE PRE eects. TUBE PRE PHASER
34 Fuzz Room The combination of SUP-BASS and ROOM eects make this fuzz sound for soloing. SUP-BASS ROOM
Mic 35
StandardComp
Standard compressor optimized for recording. FlatMPRE RackComp
36 Studio Comp Compressor suitable for vocal recording. VO MPRE RackComp
37 Chorus Vocal Deep chorus sound for solo vocals. VO MPRE CHORUS
38 Flange Vocal Flanger sound for soothing pop vocals. VO MPRE FLANGER
39 Light Vocal Perfect when seeking bright and articulate vocals. FlatMPRE ROOM
40 Spring Sound made distinctive with the eect of spring reverb. VO MPRE SPRING
41 Arena Deep reverb sounds like singing in an arena. VO MPRE ARENA
42 Doubling Conventional doubling eect. VO MPRE DELAY
43 Lead Vocal Delay suitable for main vocal parts. VO MPRE DELAY
44 Analog Echo Analog style echo sound for vocals using an analog delay model. VO MPRE ANALOG
45 Reverse Trip Trippy sound using a reverse delay. VO MPRE RvsDelay
46 AG Reverb Preamp and reverb combination optimized for mic recording of acoustic guitars. AG MPRE ARENA
47 AG Arpeggio
Preamp and chorus combination optimized for mic recording of acoustic guitar (playing arpeggios).
AG MPRE CHORUS
48 AG Ensemble
Preamp and ensemble combination optimized for mic recording of acoustic guitar (playing arpeggios).
AG MPRE ENSEMBLE
49 AG Lead
Preamp and delay combination optimized for mic recording of acoustic guitars (playing lead).
AG MPRE DELAY
50–59 EMPTY
Note: Company and product names in this patch list are trade names and trademarks of their respective owners and do not indicate any aliation with Zoom Corporation.
All product names and explanations identify products that were used for reference in the development of this product.
149
Reference / H4n Pro specications
H4n Pro specications
Recorder
STEREO mode
4CH mode MTR mode
Simultaneous recording tracks
2 4 2
Simultaneous playback tracks
2 4 4
Recording time
4GB (SDHC)
About 380 minutes (44.1kHz/16-bit stereo WAV tracks)
About 68 hours (44.1kHz/128kbps Stereo MP3 tracks)
Note: These recording times are approximations.
Actual times might be slightly shorter according to
recording conditions.
Maximum recording le size
2 GB
Projects 1000/card
Counter Hour: minute: second: millisecond
Other functions Punch-in/out, bounce, A-B repeat
Eects
Modules 2
Stereo/4CH mode: LO CUT, COMP/LIMITER
MTR mode: PRE AMP module, EFX module
Types 53
Patches 60
Tuners
Chromatic, Guitar, Bass, Open A/D/E/G
Metronome
Sounds 5
Rhythmic patterns Unaccented, 1/4–8/4, 6/8
Tempo range 40.0–250.0 BPM
A/D conversion
24-bit 128× oversampling
D/A conversion
24-bit 128× oversampling
Recording media
SD cards (16MB – 2GB), SDHC cards (4GB – 32GB)
Data types
WAV format
Recording/playback Quantization: 16/24-bit
Sampling frequencies: 44.1/48/96 kHz
MP3 format
Recording
Bit rates: 48, 56, 64, 80, 96, 112, 128, 160, 192,
224, 256, 320 kbps, VBR
Sampling frequency: 44.1 kHz
Playback
Bit rates: 32,40 48, 56, 64, 80, 96, 112, 128, 160, 192,
224, 256, 320 kbps, VBR
Sampling frequencies: 44.1/48 kHz
Display 128×64 dot matrix Full-dot LCD (with backlight)
Inputs
Built-in mics
Directionality Unidirectional
Sensitivity −45dB/1Pa at 1kHz
Input gain −16 dB – +51 dB
Maximum sound pressure input
140 dBspl
EXT MIC
Input gain −16 dB – +51 dB
Input impedance 2 kΩ or more
Supports plug-in power
INPUT 1 and 2
balanced input
Connector XLR (pin 2 hot)
Input gain −16 dB – +43 dB
Input impedance 3.0 kΩ or more
Maximum permissible input level
−6 dBu
EIN –120 dBu or less
INPUT 1 and 2
unbalanced input
Connector Standard phone
Input gain −30 dB – +32 dB
Input impedance 470 kΩ or more
Maximum permissible input level
+2 dBu
Outputs
LINE/PHONE
stereo mini jack
LINE output load impedance
10 kΩ or more
LINE rated output level −10 dBu
PHONE 20 mW + 20 mW (into 32Ω load)
Built-in speaker 400mW 8Ω mono speaker
Phantom power
48 V, 24 V, OFF
USB
USB 2.0 High Speed
Operation as mass storage or audio interface
USB functions can be powered using USB bus power
Power DC 5V 1A AC adapter (ZOOM AD-14), 2 AA batteries
Continuous
recording
time
STEREO mode
Using built-in mics at 44.1kHz/16-bit without headphones connected
About 6 hours using alkaline batteries or about 8 hours using NiMH
(2450mAh) batteries
STAMINA mode
Using built-in mics at 44.1kHz/16-bit without headphones connected
About 10 hours using alkaline batteries or about 12 hours using NiMH
(2450mAh) batteries
External
dimensions 73 (W) × 157.2 (D) × 37 (H) mm
Weight 294 g
Notes: 0 dBm = 0.755 Vrms
For the purpose of improvement, product specications and appearance are subject to
change without notice.

150
Reference / Troubleshooting
Troubleshooting
IfyouthinkthattheH4nProisoperatingstrangely,checkthefollowingitemsrst.
Recording/playback trouble
◆ There is no sound or output is very quiet
•
Check the connections to your monitoring system and its volume setting.
•
Conrm that the volume levels of tracks 1–4 are not too low.
◆ Recorder stops during playback
• If playback is started when a track is in recording standby, a temporary le is
created on the H4n Pro. If the remaining capacity of the SD card is low, the
temporary le may use all the remaining space, causing playback to stop. In this
case, end recording standby of the track.
◆ Sound from connected instruments cannot be heard or
is very quiet
• Check the input source settings. (→ P045)
• Conrm that the recording level settings are suitable. (→ P045)
• If INPUT 1 or 2 jacks are used, raise the output level of the connected device.
• When the monitor function (→ P070) is off, an input signal can only be moni-
tored if its track is set to recording standby or if the recorder is in recording
standby.
◆ Cannot record on a track
• Conrm that the REC button and that TRACK button are lit red.
• If a project is protected, recording is not possible. Use another project or turn
protection off. (→ P125)
• Conrm that an SD card is loaded in the slot.
• Conrm that the hold function is not activated. (→ P018)
• If “Card Protected!” appears on the display, the SD card write-protection is
enabled. Slide the write-protection switch on the SD card to disable write-
protection.
◆ Cannot bounce
• Conrm that the volume levels of tracks 1–4 are not too low.
• Conrm that the SD card has enough open space.
Other trouble
◆ Cannot use eects
• Conrm that the effects are on. Effects are off in MTR mode by default.
◆ Cannot use tuner
• Conrm that the jack to which the instrument is connected is selected as the
input source.
◆ Computer does not recognize it even though it is con-
nected to a USB port
• Conrm that the operating system is compatible. (→ P033)
• The operation mode must be set on the H4n Pro to allow the computer to rec-
ognize it. (→ P031)

151
Reference / Index
Index
4CH MODE
Details 35·37
Mode and top screen P39
Mode selection P36
Playback operation P94
Recording operation P51
A
AB repeat P97
Always New recording mode P56
AUDIO I/F (Audio interface), use as P31
AUTO PUNCH IN/OUT P59
AUTO REC P63
AUTO REC STOP P64
B
Battery/Power outlet setting P15
BATTERY TYPE P130
Bit rate P49
BOUNCE P123
Built-in microphones P28
Built-in speaker P34
C
Copyright warningsP7
CANCEL operation P23
CARIB/TUNER P77
CHROMATIC/TUNER P75
COMP/LIMIT P67
Connections P30
D
DATE/TIME P26
DAW software P32
DIVIDE P116
DIAL use as P23
DISPLAY
DISPLAY BACK LIGHT P126
DISPLAY CONTRAST P129
E
EFFECT P81−
EDIT P84
EDIT (EFX) P86
EDIT (LEVEL) P87
EDIT (PRE AMP) P85
EDIT (RENAME) P87
EDIT (STORE) P88
Eect types and parameters P141
Eects P81
IMPORT P89
Patch List P147
EFX module/EFFECT P86
F
FACTORY RESET P132
FILE
FILE (COPY) P108
FILE DELETE P106
FILE DELETE ALL P107
FILE INFORMATION P105
FILE MP3 ENCODE P111
FILE NAME P50
FILE NORMALIZE P112
FILE RENAME P109
FILE SELECT P104
FILE STEREO ENCODE P113
FILE/TRACK MENU P57
FOLDER SELECT P103
FORMAT 134

152
Reference / Index
H
HOLD switch P17
I
IMPORT/EFFECT P89
INPUT MIC12 buttons operations P21
INPUT/TUNER P78
K
KARAOKE
Preparation P91
Recording P93
Setting/TRACK MENU P57
L
LEVEL/EFFECT P87
LEVEL/TRACK MENU P57
Locator buttons operations P19
LO CUT P66
M
Manual PUNCH IN/OUT P61
MARK P96
MARK LIST P115
MENU
MAIN MENU P41
MENU button operations P23
METRONOME P79
MIXER P100
Mixing P57
MODE P35−42
MONITOR P70
MONO MIX P72
MOVE P117
MP3 ENCODE P111
MP3 le format P49
MS STEREO MATRIX P73
MTR MODE
Always new recording mode P56
Mode and top screen P40
Mode selection P36
Over write recording mode P55
Playback operations P101
Recording operations P53
TRACK MENU P57
N
NEW PROJECT P118
NORMALIZE P112
O
O-mic recording P29
On-mic recording P29
Over write recording mode P55
P
PATCH EDIT/EFFECT P84
Patch List P147
PAN/TRACK MENU P57
Phantom power P30
PLAY MODE P95
Plug-in power P29
POWER switch P17
Power On and O P17
PRE AMP/EFFECT P85
PRE REC P65
PROJECT
BOUNCE P123
COPY P122
DELETE P120

153
Reference / Index
Index
NEW PROJECT P118
RENAME P121
PROTECT P125
SELECT P119
PUNCH IN/OUT (Auto) P59
PUNCH IN/OUT (Manual) P61
R
REC FORMAT P49
REC LEVEL AUTO P69
REC LEVEL operations P22
REC button operations P19
Recording (stereo/stamina mode) P47
Recording (4CH mode) P51
Recording (MTR mode) P53
Recording track selection P45
REMAIN P133
Remote control (option) P43
RENAME/EFFECT P87
RENAME/FILE P109
RENAME/PROJECT P121
S
Safety precautions for users P6
Setting P27
SD CARD
Audio Interface, use as P31
H2, H4 SD card, use as P136
Checking available space on the SD card
P133
SD card reader, use as P33
Software version upgrading P135
SPEED P99
STAMINA MODE
Details P37,38
Mode and top screen P38
Mode setting P15·36
Playback operation P94
Recording operation P47
STEREO ENCODE P113
STEREO MODE
Details P37·38
Mode and top screen P38
Mode selection P36
Playback operation P94
Recording operation P47
STEREO LINK P58
STORAGE P33·133
STORE/EFFECT P88
T
TRACK MENU P57
TRACK 1234 buttons operations P20
TUNER
CARIB P77
CHROMATIC P75
GUITAR, OPEN G, DAGDAG P78
INPUT P78
TUNER types P78
U
USB connection
H4n Pro used as a SD card reader P33
H4n Pro used as an Audio Interface P31
USB bus power P31
V
VOLUME operations P22
WAV le format P49
Write-protect P125

154
This equipment has been tested and found to comply with the limits
for a Class B digital device, pursuant to Part 15 of the FCC Rules.
These limits are designed to provide reasonable protection against
harmful interference in a residential installation. This equipment
generates, uses, and can radiate radio frequency energy and, if not
installed and used in accordance with the instructions, may cause
harmful interference to radio communications. However, there is no
guarantee that interference will not occur in a particular installation. If
this equipment does cause harmful interference to radio or televi-sion
reception, which can be determined by turning the equipment off and
on, the user is encouraged to try to correct the interference by one or
more of the following measures:
The FCC regulation warning (for U.S.A.)
• Reorient or relocate the receiving antenna.
• Increase the separation between the equipment and receiver.
• Connect the equipment into an outlet on a circuit dierent from that to which the receiver is connected.
• Consult the dealer or an experienced radio/TV technician for help.
Declaration of Conformity
For EU Countries

Z2I-2675-01
ZOOM CORPORATION
4-4-3 Kanda-surugadai,
Chiyoda-ku, Tokyo 101-0062 Japan
Website http://www.zoom.co.jp
