Acts Users Manual
User Manual: Pdf
Open the PDF directly: View PDF ![]() .
.
Page Count: 141 [warning: Documents this large are best viewed by clicking the View PDF Link!]

AUTOMATED CASE
TRACKING SYSTEM
(ACTS)
USER’S MANUAL
Version 5.3
OPR: SAF/IGQ DATE: 2 Sep 2009
INSPECTOR
GENERAL
This page intentionally blank.
Table of Contents
CHAPTER 1- INTRODUCTION......................................................................................................................................8!
PURPOSE....................................................................................................................................................................8!
SUMMARY OF REVISIONS...........................................................................................................................................8!
The Manual..........................................................................................................................................................8!
ACTS. ...................................................................................................................................................................8!
PROPOSED CHANGES................................................................................................................................................8!
PROBLEM RESOLUTION .............................................................................................................................................8!
Troubleshooting. .................................................................................................................................................9!
Online Help..........................................................................................................................................................9!
Figure 1-1. Online Help Menu. ................................................................................................................................. 9!
Users Manual. .....................................................................................................................................................9!
Conflicting Guidance........................................................................................................................................10!
CHAPTER 2 – SETUP AND UTILITIES .....................................................................................................................11!
SYSTEM REQUIREMENTS.........................................................................................................................................11!
Hardware. ..........................................................................................................................................................11!
Software. ............................................................................................................................................................11!
System Settings................................................................................................................................................11!
ACTS SETUP ...........................................................................................................................................................12!
Add to Favorites................................................................................................................................................12!
Figure 2-1. Favorites. ............................................................................................................................................... 12!
Figure 2-2. Add Favorite.......................................................................................................................................... 13!
Create Desktop Shortcut Icon. .......................................................................................................................13!
Systematic Data Backup. ................................................................................................................................13!
CHAPTER 3 – ACCESSING ACTS.............................................................................................................................13!
SECURITY .................................................................................................................................................................14!
AVAILABILITY ............................................................................................................................................................14!
Who Can Access. .............................................................................................................................................14!
User Profiles and Responsibilities. ................................................................................................................14!
Login. ..................................................................................................................................................................16!
Figure 3-1. Login Screen......................................................................................................................................... 16!
Forgot Password...............................................................................................................................................17!
Figure 3-2. Forgot Password Screen. ................................................................................................................... 18!
Access denied...................................................................................................................................................18!
Logoff..................................................................................................................................................................18!
Figure 3-3. Logoff. .................................................................................................................................................... 19!
Timeout. .............................................................................................................................................................19!
Figure 3-4. Error—Session Expired Screen......................................................................................................... 20!
Concurrent access. ..........................................................................................................................................20!
CHAPTER 4 – OPENING MENU (HOME PAGE).....................................................................................................21!
INTRODUCTION .........................................................................................................................................................21!
Figure 4-1. Home Page. .......................................................................................................................................... 21!
Header................................................................................................................................................................21!
Menu bars........................................................................................................................................................................22!
Body....................................................................................................................................................................24!
Footer. ................................................................................................................................................................24!
CHAPTER 5 –CASE DATA ..........................................................................................................................................26!
INTRODUCTION .........................................................................................................................................................26!
GENERAL INFORMATION ..........................................................................................................................................26!
File Reference Number (FRNO). ...................................................................................................................26!
Figure 5-1. File Reference Number (FRNO)........................................................................................................ 26!
Dropdown Menus. ............................................................................................................................................26!
Check Boxes. ....................................................................................................................................................26!
Text Boxes.........................................................................................................................................................26!
Date Fields.........................................................................................................................................................27!
Apply vs Submit. ...............................................................................................................................................27!
Mandatory Fields. .............................................................................................................................................28!
Error Fields. .......................................................................................................................................................28!
Case Edit Sessions. .........................................................................................................................................29!
Browser Buttons. ..............................................................................................................................................30!
CREATE A CASE RECORD........................................................................................................................................31!
Figure 5-4. Create. ................................................................................................................................................... 31!
Before Creating a Case...................................................................................................................................31!
Figure 5-5. Before Creating a Case....................................................................................................................... 32!
Figure 5-6. Query For Duplicate—No Matching records.................................................................................... 33!
Figure 5-7. Query For Duplicate—Matching record. ........................................................................................... 34!
MAIN TAB.................................................................................................................................................................34!
Entering Data in the Main Tab........................................................................................................................34!
Figure 5-8. “Main” Tab—Create a Case. .............................................................................................................. 38!
SUSPENSE/DATES TAB............................................................................................................................................39!
Entering Data in the Suspense/Dates Tab...................................................................................................39!
Figure 5-9. “Suspenses/Dates” Tab. ..................................................................................................................... 42!
COMPLAINANT TAB..................................................................................................................................................43!
Figure 5-10. “Complainant” Tab. ............................................................................................................................ 43!
Entering Complainant Data.............................................................................................................................43!
SUBJECTS & ALLEGATIONS TAB..............................................................................................................................45!
Figure 5-11. “Subjects & Allegations” Tab............................................................................................................ 45!
Entering Subjects Data....................................................................................................................................46!
Figure 5-12. Allegations List. .................................................................................................................................. 47!
Entering Allegations. ........................................................................................................................................47!
CASE NOTES TAB....................................................................................................................................................48!
Figure 5-13. “Case Notes” Tab............................................................................................................................... 49!
Entering Case Notes........................................................................................................................................49!
Figure 5-14 Case note entry screen ....................................................................................................................... 50!
Figure 5-15. Case Notes History............................................................................................................................ 51!
ATTACHMENTS TAB.................................................................................................................................................52!
Figure 5-16. Attachments Tab. ............................................................................................................................... 52!
Attaching Files...................................................................................................................................................52!
Figure 5-17. Attachments Tab File Uploading Screen........................................................................................ 54!
Figure 5-18. Attachments Tab Categories drop down menu............................................................................. 54!
Figure 5-19. Attachments Tab after File is Uploaded. ........................................................................................ 55!
Printing Attached Files.....................................................................................................................................55!
Figure 5-20. Attachments Tab after File is Uploaded. ........................................................................................ 56!
EXITING THE CASE TABS .........................................................................................................................................57!
Figure 5-21. Validation Status—Successful......................................................................................................... 58!
Figure 5-22. Validation Status—Unsuccessful. ................................................................................................... 60!
CHAPTER 6 – SEARCH ...............................................................................................................................................61!
INTRODUCTION .........................................................................................................................................................61!
SEARCH FOR EXISTING CASE..................................................................................................................................61!
Figure 6-1. Search.................................................................................................................................................... 61!
ADVANCED SEARCHES ............................................................................................................................................62!
Figure 6-2. Advanced Searches Screen............................................................................................................... 62!
Predefined Searches........................................................................................................................................63!
Customized Searches......................................................................................................................................64!
Figure 6-3. Customized Searches Screen............................................................................................................ 65!
Saved Searches................................................................................................................................................65!
SEARCH RESULTS....................................................................................................................................................65!
Figure 6-4. Search Results Screen........................................................................................................................ 66!
Exiting the Case from Edit/NV Edit/View/Print Mode..................................................................................67!
Case Currently Being Edited. .......................................................................................................................................68!
Figure 6-5. Case Currently Being Edited Screen. ............................................................................................... 69!
CHAPTER 7 – ACTIONS ..............................................................................................................................................70!
INTRODUCTION .........................................................................................................................................................70!
Case Transition States ....................................................................................................................................70!
New................................................................................................................................................................................... 70!
Under Investigation. .......................................................................................................................................................70!
Completed. ......................................................................................................................................................................70!
Closed. .............................................................................................................................................................................71!
Discarded......................................................................................................................................................................... 71!
TRANSITION STATES ................................................................................................................................................72!
Figure 7-1. Transition States. .................................................................................................................................72!
INVESTIGATE ............................................................................................................................................................73!
Figure 7-2. Case Action Notice for Investigate. ................................................................................................... 73!
Figure 7-3. Additional Date Fields Available for Under Investigation............................................................... 74!
COMPLETE................................................................................................................................................................74!
Figure 7-4. Selecting Complete From Menu Bar................................................................................................. 75!
Figure 7-5. Case Action Notice for Complete Investigation............................................................................... 75!
CLOSE ......................................................................................................................................................................76!
Figure 7-6. Complaint Action Notice for Close Investigation. ............................................................................ 76!
Figure 7-7. Closed Case: Validation Status - Successful. ................................................................................. 77!
Figure 7-8. Record Disposition Information for Closed Case. ........................................................................... 77!
TRANSFER ................................................................................................................................................................79!
Figure 7-9. Transfer Information Screen............................................................................................................... 80!
Receiving Transferred Cases. ........................................................................................................................80!
Figure 7-10. Case Notify/Transfer Notice Screen. .............................................................................................. 81!
NOTIFY .....................................................................................................................................................................82!
Figure 7-11. Case Notify Information Screen....................................................................................................... 83!
Receiving Notifications. ...................................................................................................................................83!
Figure 7-12. Case Notification Notice.................................................................................................................... 84!
DISMISS ....................................................................................................................................................................85!
Figure 7-13. Complaint Action Notice for Dismiss............................................................................................... 85!
DISMISS/CLOSE .......................................................................................................................................................85!
Figure 7-14. Complaint Action Notice for Dismiss/Close. .................................................................................. 86!
ASSIST......................................................................................................................................................................86!
Figure 7-15. Complaint Action Notice for Assist. .................................................................................................87!
ASSIST/CLOSE .........................................................................................................................................................87!
Figure 7-16. Case Action Notice for Assist/Close. .............................................................................................. 87!
REFER ......................................................................................................................................................................88!
Figure 7-17. Case Action Notice for Refer............................................................................................................ 88!
DISCARD...................................................................................................................................................................89!
Figure 7-18. Case Action Notice for Discard Action............................................................................................ 89!
CHAPTER 8 - REPORTS ..............................................................................................................................................90!
INTRODUCTION .........................................................................................................................................................90!
STANDARDIZED REPORTS.......................................................................................................................................90!
Figure 8-1. Reports. ................................................................................................................................................. 90!
CASE FILE WORKSHEET (CFW) .............................................................................................................................90!
How to Access a Case File Worksheet.........................................................................................................90!
Figure 8-2. Search Results Screen........................................................................................................................ 91!
Figure 8-3. Typical Case File Worksheet Screen, View Mode.......................................................................... 93!
SUSPENSE REPORT .................................................................................................................................................93!
How to Access the Suspense Report............................................................................................................93!
Figure 8-4. Suspense Report Input Screen.......................................................................................................... 94!
Figure 8-5. Suspense Report Ouput Screen........................................................................................................ 95!
OPEN EDIT SESSIONS REPORT...............................................................................................................................95!
How to Access the Open Edit Sessions Report. .........................................................................................95!
Figure 8-6. Open Edit Sessions Report Input Screen......................................................................................... 96!
Figure 8-7. Open Edit Sessions Report Output Screen ..................................................................................... 97!
CASES NOT PURGED REPORT ................................................................................................................................97!

How to Access the Cases Not Purged Report.............................................................................................97!
Figure 8-8. Cases Not Purged Report Input Screen ........................................................................................... 97!
Figure 8-9. Cases Not Purged Report Output Screen........................................................................................ 98!
ACTS ADVANCED REPORTS ...................................................................................................................................98!
How to Access a Report..................................................................................................................................99!
Figure 8-10. ACTS Report Options Screen........................................................................................................ 100!
Figure 8-11. ACTS Report Input Screen (Contacts )................................................................................... 101!
Figure 8-12. ACTS Report Output Screen (Contacts )................................................................................ 102!
Figure 8-13. ACTS Report Output Screen (Complaints Sorted by Resolution State )........................... 103!
Figure 8-14. ACTS Export Results Screen......................................................................................................... 104!
Figure 8-15. ACTS Report Output Screen (Time to Complete/Close Investigations )........................... 105!
Figure 8-16. ACTS Report Output Screen (Case Summary Report )....................................................... 106!
RECORD RETENTION WORKSHEET .......................................................................................................................106!
How to Access the Record Retention Worksheet. ....................................................................................107!
Figure 8-17. ACTS Record Retention Worksheet ............................................................................................. 108!
ACTS USER DIRECTORY ......................................................................................................................................108!
Figure 8-18. ACTS User Directory Menu Selection. ......................................................................................... 109!
Figure 8-19. ACTS User Directory Export – MS Excel Workbook..................................................................109!
CHAPTER 9 ALERTS & SUSPENSES ....................................................................................................................109!
INTRODUCTION .......................................................................................................................................................109!
Figure 9-1. My Alerts & Suspenses ..................................................................................................................... 110!
Automatic Alerts..............................................................................................................................................110!
Suspenses. ......................................................................................................................................................111!
How to View Alerts and Suspenses.............................................................................................................112!
Figure 9-2. My Alerts and Suspenses Screen. .................................................................................................. 112!
CHAPTER 10 - ADMIN ................................................................................................................................................114!
INTRODUCTION .......................................................................................................................................................114!
PASSWORD ............................................................................................................................................................114!
Forgot Password.............................................................................................................................................114!
Expired Password...........................................................................................................................................114!
Disabled Password.........................................................................................................................................114!
Figure 10-1. Admin – ACTS Administrator. ........................................................................................................ 115!
Figure 10-2. Admin – Typical User. ..................................................................................................................... 115!
How to Change a Password. ........................................................................................................................116!
Figure 10-3. Change Password Screen.............................................................................................................. 116!
USER MANAGEMENT (ADMINISTRATOR FUNCTION).............................................................................................117!
Add User. .........................................................................................................................................................117!
Figure 10-4. Add a User. ....................................................................................................................................... 118!
Figure 10-5. Roles. ................................................................................................................................................. 118!
Figure 10-6. Add a User—Confirmation Success. ............................................................................................ 119!
Figure 10-7. Add a User—Unsuccessful. ........................................................................................................... 119!
Disable (or Enable) User...............................................................................................................................120!
Figure 10-8. User Management. .......................................................................................................................... 120!
Modify User. ....................................................................................................................................................121!
Reset Password..............................................................................................................................................121!
Figure 10-9. Reset Password—Confirmation. ................................................................................................... 122!
Delete Account................................................................................................................................................122!
Figure 10-10. Deleted User Has Assigned Complaints.................................................................................... 123!
CHAPTER 11 – MANAGING ACTS DATA.............................................................................................................. 124!
FOIA, PA, DISCOVERY, AND OUR REQUIREMENTS ............................................................................................124!
EXPORTING DATA ..................................................................................................................................................124!
Figure 11-1. Search Results Screen. .................................................................................................................. 124!
Creating the Export Records. .......................................................................................................................125!
Figure 11-2. Bulk Export Notice Screen.............................................................................................................. 125!
Figure 11-3. ACTS Exported Search Results Screen. ..................................................................................... 126!
Figure 11-4. Bulk Export Complete—Email Notification................................................................................... 126!
Figure 11-5. ACTS Export Complete—Email Message With Link to File...................................................... 127!
Figure 11-6. ACTS Export--MS Excel Workbook. ............................................................................................. 127!
PURGING DATA ......................................................................................................................................................127!
Purge Data.......................................................................................................................................................128!
Figure 11-7. Record Disposition Information Box (Suspenses/Dates Tab). ................................................. 128!
Figure 11-8. Record Retention Worksheet......................................................................................................... 129!
Figure 11-9. Confirm Purged Complaints Notice Screen................................................................................. 130!
Figure 11-10. IE Dialog Box—Reaffirmation of Purge...................................................................................... 130!
Figure 11-11 Purged Complaints Complete Notice Screen............................................................................. 131!
Figure 11-12. Printer Selection and Print Dialog Box. ...................................................................................... 131!
Figure 11-13. Destroyed Complaints Notice Window (printer friendly).......................................................... 132!
RESET TO NEW ......................................................................................................................................................132!
Reset to New...................................................................................................................................................132!
Figure 11-14. Reset complaint to new: Enter FRNO. ....................................................................................... 133!
Figure 11-15. Reset complaint to new. ............................................................................................................... 134!
Figure 11-16. Reset complaint to new: Confirmation........................................................................................ 135!
APPENDIX A – GLOSSARY OF TERMS ................................................................................................................ 136!
ATCH 1 – TROUBLESHOOTING TIPS.................................................................................................................... 137!
Can you access the application? .................................................................................................................137!
Can you login to the application?.................................................................................................................138!
Are you getting an error once you are in the application? .......................................................................138!
DEFECT REPORT....................................................................................................................................................138!
ATCH 2 - CONSOLIDATED SUMMARY OF ACTS INPUTS ...............................................................................140!
NOTES............................................................................................................................................................................ 141!
CHAPTER 1- INTRODUCTION
Purpose
The Automated Case Tracking System (ACTS) is an Air Force Inspector General (IG) tool to
capture all IG investigative and administrative activity Air Force-wide. ACTS is the primary
data collection tool for IGs at all levels, and was designed to assist IGs in tracking, managing,
and analyzing IG data in support of commanders at all levels. Case management and trend
analysis are the primary objectives. ACTS became the primary collection tool in Jan 2004. Prior
to that time, all case activity was tracked in ACTS II+.
The ACTS Users Manual implements AFI 90-301, Inspector General Complaints Resolution ,
and AFPD 90-3, Inspector General--The Complaints Resolution Program, only in relation to
data entry in ACTS. It is an illustrated roadmap, organized into 11 chapters, to help you become
familiar with ACTS features and common tasks. It provides specific instructions for the use of
ACTS. The appendix contains a glossary of terms commonly used in ACTS. This manual is
intended to supplement the online ACTS help menu.
Summary of Revisions
The Manual.
This manual replaces the SAF/IGQ ACTS User’s Guide, 14 Nov 2007.
ACTS.
ACTS stores all case data on a centralized database server. The server is accessible by
authorized users, with a valid users account, through the World Wide Web from any .mil
domain. The key benefit to this approach is ease of maintenance and accessibility of stored data.
Defects and problems are corrected centrally without requiring updates or checks of each client
computer. The system may be unavailable during times of preventive maintenance or central
server failures.
ACTS provides an intuitive, tab-oriented interface, coupled with efficient navigation. It allows
IGs to proactively manage cases by “watching” for adverse conditions in the business process
and “alerting” the action officer. These alerts allow AOs to focus on managing cases and urgent
issues.
Proposed Changes
ACTS Application Administrators will consolidate, evaluate, and forward recommendations for
changes to the ACTS application or this manual from lower level IGs to SAF/IGQ with the
command unit (CU) endorsement. A standardized input form is attached to this manual.
Chapter 3, Accessing ACTS, provides additional information about ACTS users and their roles.
Problem Resolution
Troubleshooting.
As with any information system, problems do occur. A software defect occurs when the
software is functioning, but does not work as specified. For example, if the system should
validate a date on or before today, but you enter today’s date and it gives you an error. A
network or server outage occurs when you cannot “get” to the application. For these types of
problems, contact SAF/IGQ through your next level administrator. See Attachment 1 for helpful
trouble shooting tips.
Online Help.
ACTS offers online help which is organized by topic (figure 1-1). Generally, ACTS topics are
selected on a page-by-page basis (e.g., a topic for Searching, a topic for the Home page, etc). If
you browse from topic to topic, the “Back” button in the upper right-hand corner of the help page
will return to the help topic previously viewed. If no other help topics have been viewed or you
were viewing the first help topic for this session, this button will be disabled. Clicking the
“Help” button in the upper right-hand corner of any page will open the ACTS online help to the
topic associated with that page. The “Index” tab contains a listing of every help topic and the
sections associated with each topic. Refer to Chapter 4, Opening Menu, for additional information
about the Online Help feature.
Figure 1-1. Online Help Menu.
Users Manual.
Select “HELP” from
any page for assistance
The ACTS Users Manual provides detailed step-by-step instructions for most processes
associated with ACTS. A hyperlinked Table of Contents allows users to navigate through the
manual electronically.
Conflicting Guidance.
If information contained in this manual or the online help does not provide satisfactory reference,
or a conflict exists with AFI 90-301 guidance, contact your next-higher level ACTS
administrator.
CHAPTER 2 – SETUP AND UTILITIES
System Requirements
Hardware.
Minimum hardware requirements to operate ACTS are:
• Pentium processor
• 128 megabytes of RAM
VGA or higher resolution video adapter (SVGA 256 color recommended);
1024 by 768
• resolution
• Mouse or compatible pointing device
Software.
• Users must have a dot mil (.mil) address and log in from a dot mil site
• Secure Sockets Layer (SSL) with 128-bit encryption
• Microsoft (MS) Internet Explorer (IE) 5.5 or higher with 128-bit encryption cipher strength.
JavaScript must be enabled.
• Microsoft (MS) Excel is required to view exported data files
To check your current version:
Step
Action
Step 1
• Open MS IE
Step 2
• Click on Help
Step 3
• Click on About Internet Explorer
Step 4
• The information in the display will provide the version and the cipher strength
System Settings.
Some versions of MS IE are automatically set to open web sites in existing panes. In other
words, if you have ACTS open (even minimized) and launch another web shortcut (i.e., your
local web site), the second site would open in the existing (ACTS) window, closing the ACTS
session, and causing you to lose any unsaved information. To preclude this, you may change one
of the MS IE options, so that if you launch a second Internet web site, it will open separately, not
in the existing window.
Step
Action
Step 1
• Open MS IE
Step 2
• Click on “Tools” in the menu bar
Step 3
• Select Internet Options
Step 4
• Select the Advanced tab
Step 5
• Under “Browsing” uncheck “Reuse windows for launching shortcuts”
Step 6
• Click on “Apply”
Step 7
• Click on “OK”
ACTS Setup
Add to Favorites.
Step
Action
Step 1
• Open your web browser
Step 2
• Enter the ACTS URL address (https://acts.hq.af.mil) in the web browser
Step 3
• When the page opens, ensure the your “Favorites” window is shown at the left of
the screen (Clicking on the Favorites button in the toolbar menu toggles the view
on and off)
Step 4
• Click on Add…
Figure 2-1. Favorites.
Step
Action
Step 5
• Type in the “Name” under which you wish to recall ACTS
Step 6
• Select the “Folder” in which you wish to add the shortcut (if any)
Step 7
• DO NOT check the “Make available offline” box. ACTS is a real-time server
application and will not be available offline
Step 8
• Click “OK”
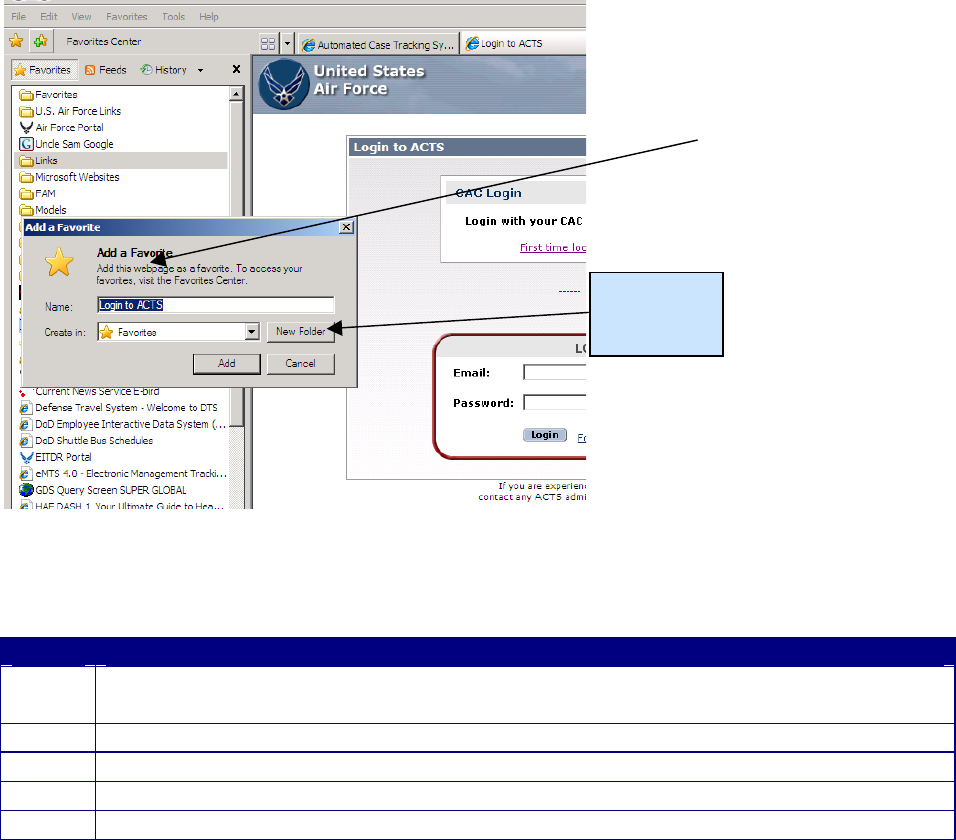
Figure 2-2. Add Favorite.
Create Desktop Shortcut Icon.
Step
Action
Step 1
• After you have added the ACTS URL to “Favorites”, right-click with the mouse
pointer on the ACTS “Favorite” you created in steps 1-8 above
Step 2
• Click on “Copy”
Step 3
• Minimize all open applications
Step 4
• Right-click with the mouse pointer on your desktop; then click on “Paste”
Step 5
• Validate the shortcut by clicking on it to ensure it opens ACTS
Systematic Data Backup.
All application files and data will be backed up according to the HAF Service Level Agreement.
The system may not be accessible during the backup. Should you notice that recent changes you
made are missing, please advise your application administrator to determine if a problem exists.
CHAPTER 3 – ACCESSING ACTS
Select
Folder, if
desired

Since ACTS is web-based, you may access the application as you would any other web site.
Security
The ACTS application uses Secure Sockets Layer (SSL) to encrypt communications between the
web browser and the server. SSL is recognized throughout the computer industry as one of the
most secure transmission mechanisms available. When connecting to ACTS, ensure that the
padlock icon ( ) is displayed in the lower right-hand corner of the web browser. The presence
of this icon indicates that ACTS has a secure connection. Additionally, each user has a distinct,
password-protected user account in ACTS, and ACTS was designed with hierarchal process-
based security. Users will be able to view/edit only records created at their user-level and below.
ACTS is fully compliant with all Air Force security regulations; however, each user is
responsible for safeguarding against unauthorized computer access IAW AFI 33-129, Web
Management and Internet Use; AFM 33-223, Identification and Authentication; AFI 33-202,
Volume 1, Network and Computer Security; CSC-STD-002-85, DoD Password Management
Guideline; and FIPS 197, Advanced Encryption Standard. When data entries are completed,
cases should be submitted and users should logoff.
Availability
Occasionally downtime for system maintenance will be necessary. Advisements of anticipated
downtime will be posted to the “Daily Message” section in the body of the Home Page. If the
frequency/duration of downtime or hours of availability impact your mission, please advise your
SAF or Command Unit (CU) Administrator.
Who Can Access.
ACTS fully supports multiple user access and will be available via the World Wide Web to all
Air Force IG Complaints Resolution staff members and trained state National Guard Joint Force
Headquarters IGs, subject to an application administrator enabling the account and successful
password-protected login. Users must also access ACTS from a .mil domain.
User Profiles and Responsibilities.
ACTS users will be assigned responsibilities based on their role and level of assignment (i.e.,
CU, NAF, installation). CUs may assign application administrators at each NAF or installation
level. It is up to each CU to decide how administrative privileges will be disseminated
throughout their subordinate units.

User Level
Privileges and Responsibilities
SAF Inspector
General
• Normal user of the ACTS system (Action Officers)
• Ensure compliance with password and AF security protocols
• Report problems/recommendations to SAF administrator
• Create cases
• Edit/view all cases in ACTS
SAF Application
Administrator
• Point of contact for difficulties experienced by SAF level users
• Manage SAF/IGQ (and below) user accounts
• Manage system content (home page advisements)
• Create cases
• Edit all cases in non-validation mode
• Edit/view all cases in ACTS
Command Unit
Inspector General
• Normal user of the ACTS system (Action Officers)
• Ensure compliance with password and AF security protocols
• Report problems/recommendations to CU application administrator
• Create cases
• Edit/view all cases assigned to user’s CU IG office
Command Unit
Application
Administrator
• Point of contact for difficulties experienced by CU, NAF or installation level
users
• Consolidate, evaluate, and report problems/recommendations to SAF
application administrator
• Manage CU, NAF and installation user accounts
• Edit CU, NAF and installation case file data in non-validation mode
• Create cases
• Edit/view all cases assigned to user’s CU IG office and below
NAF Inspector
General
• Normal user of the ACTS system (Action Officers)
• Ensure compliance with password and AF security protocols
• Report problems/recommendations to NAF application administrator
• Create cases
• Edit/view all cases assigned to user’s NAF IG office and below
NAF Application
Administrator
• Point of contact for difficulties experienced by NAF or installation level
users
• Consolidate, evaluate, and report problems/recommendations to CU
administrator
• Manage NAF and installation user accounts
• Create cases
• Edit/view all cases assigned to user’s NAF IG office and below
Installation
Inspector General
• Normal user of the ACTS system (Action Officers)
• Ensure compliance with password and AF security protocols
• Report problems/recommendations to installation application administrator
• Create cases
• Edit/view all cases assigned to user’s IG office
Installation
Application
Administrator
• Point of contact for difficulties experienced by installation level users
• Consolidate, evaluate, and report problems/recommendations to NAF or CU
administrator
• Manage installation user accounts
• Create cases
• Edit/view all cases assigned to user’s IG office
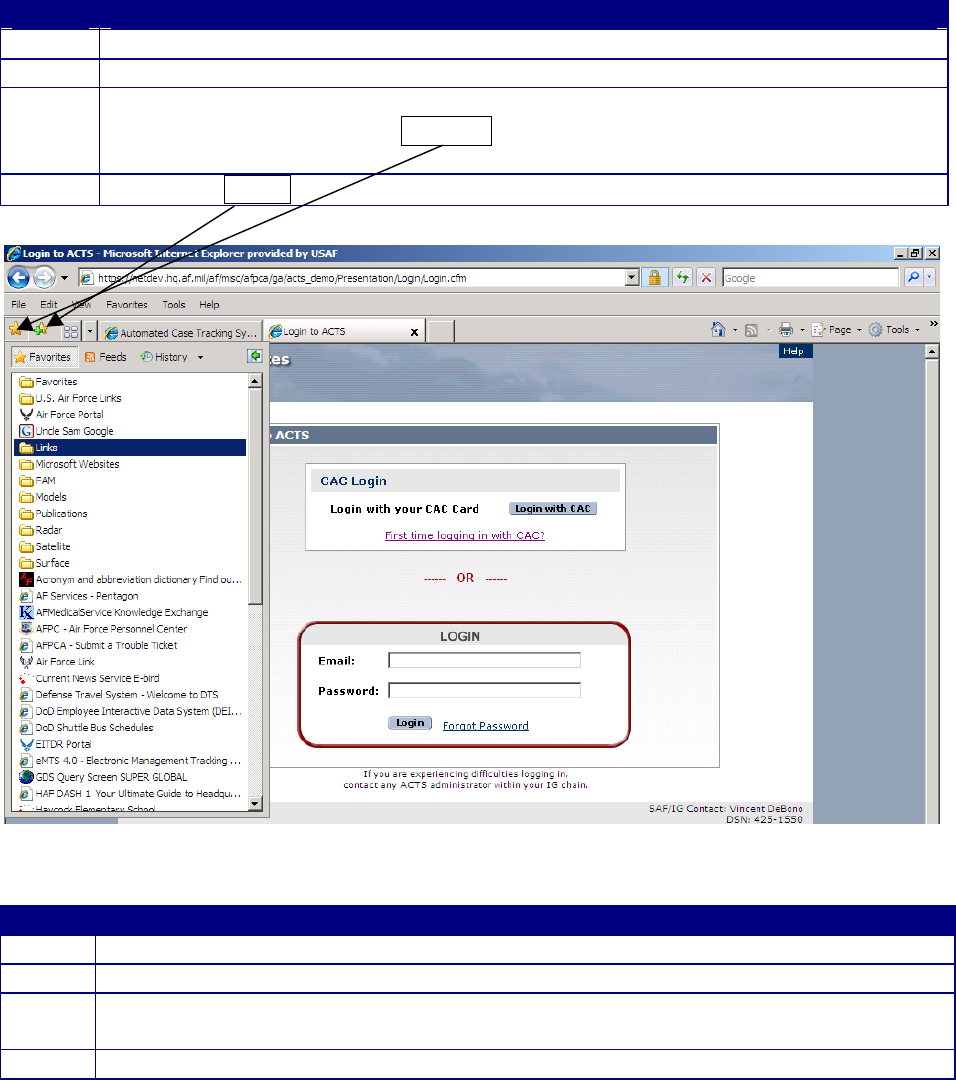
Login.
ACTS is a multi-user system that requires each user to login to the system using a Common
Access Card (CAC) and a unique username and password. Upon opening ACTS, the Login
Screen will appear (figure 3-1). All the ACTS screens display the standard Air Force security
warning in the lower left-hand corner, and your application administrator contact information in
the lower right-hand corner.
NOTE: Depending on web browser settings, when initially typing into the Email or Password
input box, users may be prompted to indicate whether they would like the browser to activate
“Auto Completion.” Unless you are comfortable using this feature, select “No”, in order to
minimize confusion.
Figure 3-1. Login Screen.
Field
Action
• Click the “Login with CAC” icon to login directly with your CAC. If it
is your first time, click “First time logging in with CAC?” That will take
you to the “First time to ACTS?” screen. Follow the procedures below
for a first-time login and click on “Associate CAC”. From then on you
can use CAC login with using your email and password.
Email
• Enter your full e-mail address in the Email block
Password
• First-time login: Enter the password assigned by your ACTS
administrator (one-time-only use). As soon as you have successfully
logged in, you will immediately be prompted to change your password.
Refer to online help or Chapter 10, Admin, for additional information
about changing your password. You will not be able to log in again,
unless you successfully change your password
• Subsequent login: Enter the password you created IAW Chapter 10. You
will be prompted to change your password every 90 days. Passwords
must comply with AF password protocol. Refer to online help or Chapter
10, Admin, for additional information about changing your password
• Click on “Login” to access the system
Forgot Password.
If you have forgotten your password, click on the “Forgot Password” link.
Field
Action
• Click on “Forgot Password”
Email
• Enter your user ID (full e-mail address) in the Email block (figure 3-2)
• Click on the “Submit” button to allow the system to verify your User ID.
A new Password will be e-mailed to you
• Or click on “Cancel” to return to the Login Screen without obtaining a
new password
• Using the password provided to you by email, follow the instructions
above for first-time login
Figure 3-2. Forgot Password Screen.
Access denied.
As with standard AF login protocol, you may be unable to access ACTS after
• Three successive failed login attempts
• Failure to change your system-administrator-provided password after initial login
• Failure to change your password when prompted (every 90 days)
• Failure to access your user account in 90 consecutive calendar days
• SAF or CU administrator disables your account
If you are unable to resolve access issues using the ACTS on-screen prompts, contact your
application administrator.
Logoff.
Users must ensure they logoff the system rather than simply closing the browser at the end of
each session. ACTS executes various clean-up activities when the user logs out of the system
that keep the system running efficiently. Additionally, failing to log out of the system can create
a security problem as your application session will remain open for up to 2 hours allowing any
user to sit down at your computer and use ACTS, even if you close your browser.
To exit ACTS, click on the “Logoff” button in the heading of the Home Page (figure 3-3), or any
ACTS screen. The Login Screen will appear (figure 3-1), and you may close your web browser
using accepted web protocol. Logoff ACTS whenever you leave your workstation, to preclude
compromise of protected or Privacy Act info or loss of data.
Figure 3-3. Logoff.
Timeout.
Your ACTS session will expire after 2 hours, unless there is communication with the ACTS
server (i.e. apply, submit, etc.). Users will be notified their session has expired (figure 3-4) and
prompted to Login again. Unsaved changes made prior to session expiration will be lost. Please
Logoff ACTS as soon as possible to avoid losing unsaved changes.
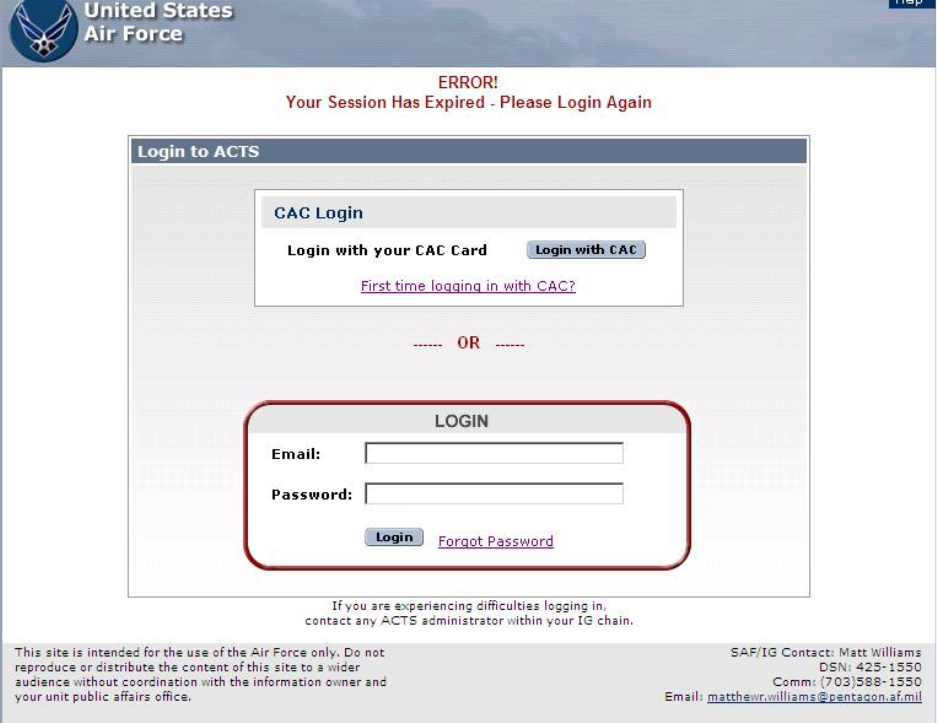
Figure 3-4. Error—Session Expired Screen.
Concurrent access.
Because all Air Force IG (complaints) staff members will share ACTS, the potential for
concurrent access to a single record exists. Built-in security measures provide notification that
another user is editing the case. To avoid potential loss of information, submit any case changes
and logoff whenever you leave your workstation or are temporarily interrupted. Refer to Chapter
6, Search, for additional information about edit sessions.
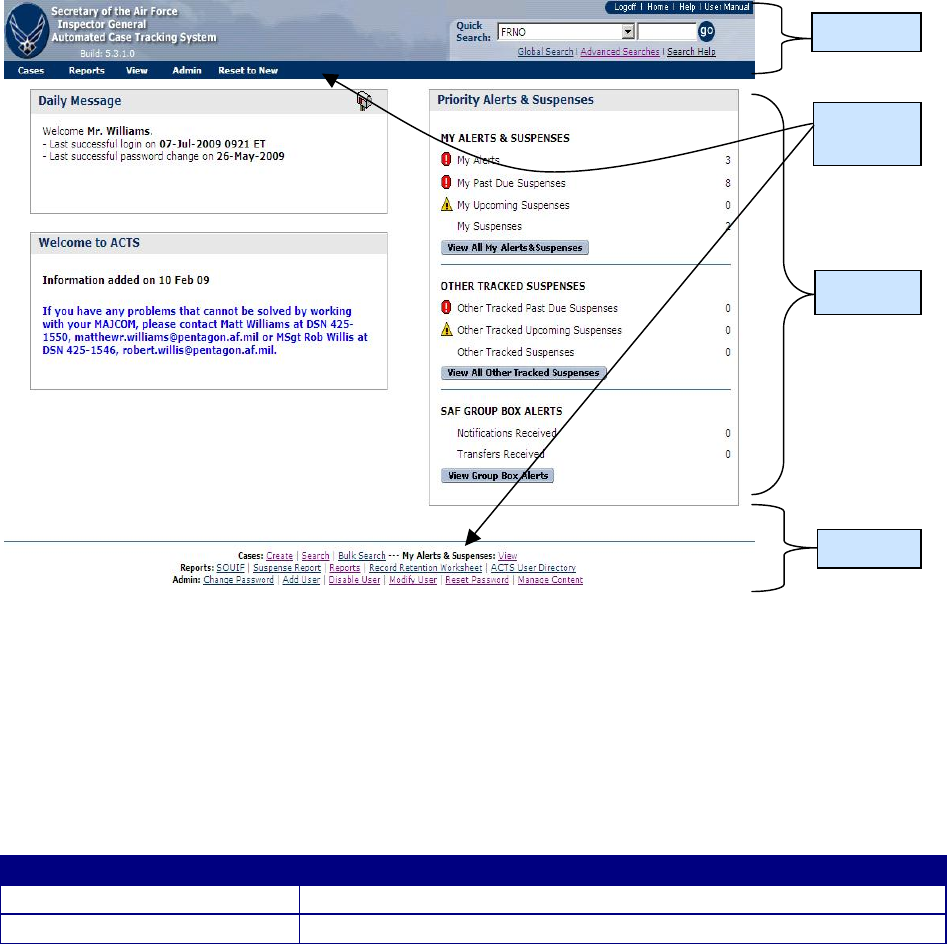
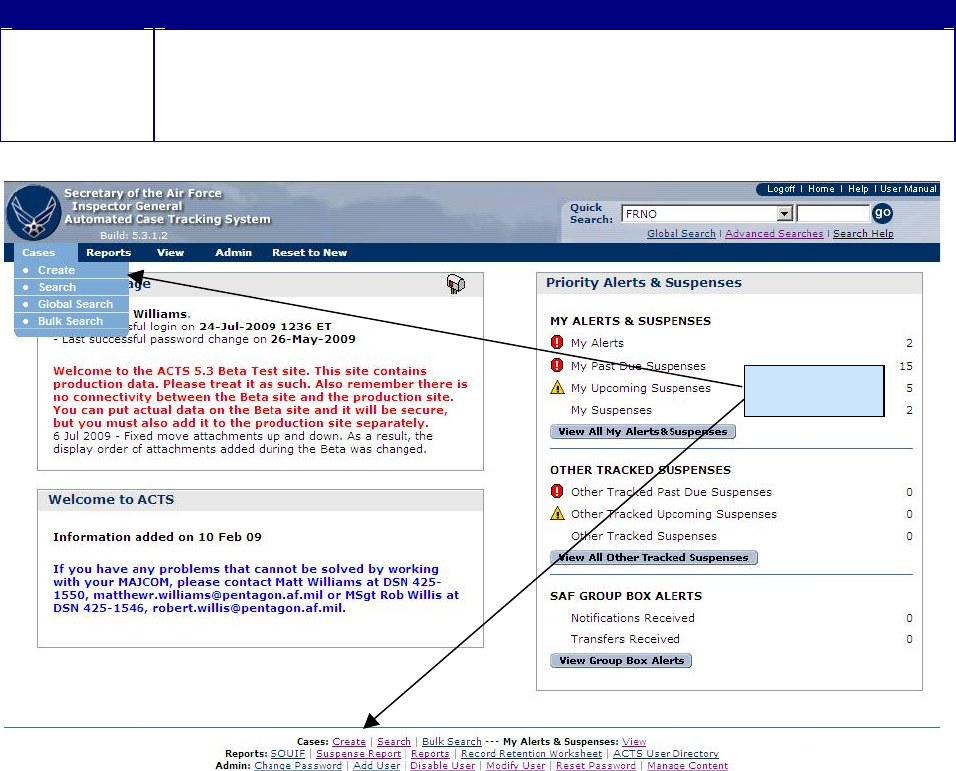
CHAPTER 4 – Opening Menu (Home Page)
Introduction
The home page greets every user after they successfully login to the system. The Home Page
serves as the “hub” of ACTS, providing a quick view of critical business conditions and
communicating important IG community information. Each section of the page has a different
function and each is described in more detail below.
Figure 4-1. Home Page.
Header.
Except for the Login page, the Header and Menu bars appear on each ACTS screen and are
visible at all times during your ACTS session. The Header identifies ACTS ownership and
version; and provides process navigation and action links. Following are the components of the
Home Page Header.
Section
Description
SAF/IGQ Info
• Identifies SAF/IGQ as the owner of the application
ACTS Version
• Identifies the current Generation and Version of ACTS
Body
Menu
Bars
Header
Footer
Logoff
• In the upper right-hand corner of the header, click on the
“Logoff” button to logoff ACTS when you wish to end your
session or when you will not make entries for the next 2 hours
(to avoid timeout and possible loss of unsaved data)
• Your session will end and the Login screen will appear when
you click on this button
Home
• In the upper right-hand corner of the header, click on the
“Home” button at any time during your session to access the
Home Page
Help
• In the upper right-hand corner of the header, click on the
“Help” button at any time during your active session to
access the ACTS online help
• The online help opens as an overlay to ACTS
• The online help provides information about the active page at
the time you click on the “Help” button. You may click on
the “Index” tab of the Online help to search “by section” or
“by topic”, indexed alphabetically by subject
• To return to the previous Online help screen, click on one of
the “Go Back” buttons at the top and bottom of each page of
the Online help
• To exit the Online help, click on one of the “Close” buttons at
the top and bottom of each page of the Online help
Users Manual
• In the upper right-hand corner of the header, click on “Users
Manual” button at any time during your active session to
access the ACTS Users Manual
Search
• Provides access to frequently used searches. Perform quick
searches by selecting a case field from the dropdown list and
entering a string on which to find a match. Click “Go” to
execute the search. The search will return results that find the
matching string in the chosen case field. The value defaults
to results containing the search string
− Search Results. Provides access to most recent search
result. Only visible when you have conducted a search
during the current session
− Advanced Searches. Provides access to advanced search
features; opens the “AdvancedSearches” screen. Refer
to Chapter 6 or “Search Help” for assistance in executing
advanced searches
− Search Help. Online help for performing searches
• Refer to Chapter 6, Search, or “Search Help” for additional
information about finding existing records
Menu bars.
Each page on the ACTS system includes a menu bar in the header and a similar menu bar
displayed in text format at the bottom of each screen (just above the footer). Scrolling over each
menu item in the header will display a dropdown of options to select that provide access to all
ACTS system functions. The “Actions” menu option is visible only when actively entering or
editing case data. Menu bar options will be covered more thoroughly in the chapters indicated
below.
Menu Bar Option
Description
Cases (Chapter 5)
• Provides access to basic case management functions to create and
search for cases. Click on “Cases” to create a new or search for an
existing case
• Refer to Chapter 5, Cases, or the Online help for additional information
about creating and editing cases; or Chapter 6, Search, for information
about locating existing case records
Actions (Chapter 7)
(Viewable only during
edit Session)
• Viewable only when a case is being created or edited. Options vary
depending on business processes
• Select this option to initiate an action concerning a case (investigate,
refer, transfer, notify, dismiss, discard, assist, complete or close)
• Refer to Chapter 7, Actions, or the Online help for additional information
about case Actions
Reports (Chapter 8)
• Provides access to case reports.
− Click on “Case File Worksheet” to print or view a Case File
Worksheet. You will be taken to the Search page where you will
enter the FRNO of the case file you wish to print
− Click on “Reports” to display the ACTS Report Options screen.
You will be able to choose between 11 pre-formatted reports,
displaying information for the time period and office as specified
in the criteria fields
− Click on “Record Retention Worksheet” to display a Record
Retention Worksheet that contains a listing of the records eligible
to be purged
− Click on “ACTS User Directory” to display a listing of the current
authorized users of the ACTS system
− Click on “SOUIF Query” to submit a file list of names for a report
to support the SOUIF process
− Click on “Suspense Reports” to display a list of suspenses by AO
or office
− Click on “Open Edit Sessions Report” to get a report of users with
open edit sessions
− Click on “Cases Not Purged Report” to
• Refer to Chapter 8, Reports, or the Online help for additional information
about Reports
My Alerts &
Suspenses (Chapter 9)
• Provides access to individual “My Alerts & Suspense” or the “Group
Inbox”
• Displays a notice indicating a critical event has occurred in the lifecycle
of a case. It also displays a notice indicating past due suspenses and
upcoming suspenses. Click on “View My Alerts & Suspense” to view
all alerts and suspenses
• Refer to Chapter 9, Alerts, or the Online help for additional information
about alerts
Admin (Chapter 10)
• Provides users and administrators access to administrative processes in
support of ACTS, including changing or resetting user passwords; and
adding, disabling, or modifying ACTS users accounts. Click on
“Admin” to change your password (or to manage user accounts and
content, if you are authorized to do so)
• Refer to Chapter 10, Admin, or the Online help for additional information
about administrative functions associated with ACTS
Body.
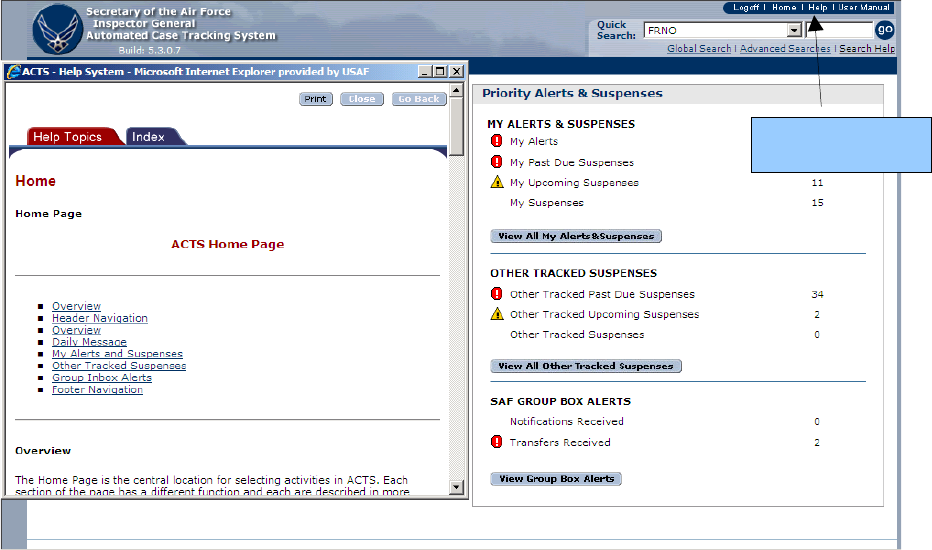
The Home Page Body includes system notices and the top five alerts.
Daily Message
• The Daily Message box (located in the left-hand corner, just below
the drop-down menu) annotates your last successful login to the
system and contains messages from the system administrator with
important information about the operation of ACTS or case
management practices
Greeting
• Under the Daily Message box is a space for information about the
current version of ACTS or other “static” information about the
operation of the system
Priority Alerts &
Suspenses
• The Priority Alerts & Suspenses box (located in the right-hand
corner, just below the drop-down menu) shows a list of the number
of “My Alerts”, “My Past Due Suspenses”, “My Upcoming
Suspenses”, and “My Suspenses” . An alert is an alarm indicating
a critical event has occurred in the lifecycle of a case. For
example, if a case has not been completed in 90 days, an alert will
appear for that case
• Use the “View All My Alerts & Suspeneses” button or the
“More…” link to see all of your alerts
• Refer to online help, or Chapter 9, Alerts & Suspenses, for
additional information about alerts
Footer.
Menu Bar
• The options available in the menu bar (above) are repeated in the
footer of the home page

Advisories
• Security, Privacy Act, and Website compliance notices; consent to
monitoring notice; and IG protected document statement
Application
Administrator Contact
Info
• Name, telephone, and email address for the next higher-level
ACTS System Administrator (e.g., next level for CU would be
SAF administrator). Click on the e-mail address to launch Outlook
for immediate email connectivity to the administrator
CHAPTER 5 –CASE DATA
Introduction
ACTS case data is organized into a set of six tabs: (a) Main, (b) Suspenses/Dates, (c)
Complainant, (d) Subjects & Allegations, (e) Case Notes, and (f) Attachments. Each tab
contains a logical group of case information. This chapter provides instructions for adding,
and/or updating records in ACTS.
General Information
File Reference Number (FRNO).
Each case entered into ACTS will bear a unique FRNO (figure 5-1) that will follow the case from
cradle to grave. ACTS will automatically generate an FRNO for a new case.
FRNOs will be assigned in the following format:
Calendar Year
Dash
Sequence Number
2007
-
00040
Figure 5-1. File Reference Number (FRNO).
Dropdown Menus.
Throughout the Case Data Forms, there are numerous dropdown menus/lists indicated by a
downward pointing arrow to the right of a blank data field ( ). For those dropdown
menus with lengthy lists, select the first item on the list and scroll down using the sliding scroll
bar or a wheel mouse to quickly move to that alphabetical or numerical section of the dropdown
menu.
After clicking in the block with the dropdown menu, you may type the first letter of the first
word of your selection and the list will automatically scroll to the first choice on that list which
starts with that letter. For instance, under “Status” typing an “N” will automatically select “Navy
(Active Duty)”, the first selection beginning with an “N.” Clicking on the selection with the
mouse-pointer will populate the field, or you may scroll down to the next selection, “Navy
(Reserve)”, and select it.
Check Boxes.
Check boxes are used throughout ACTS to select certain values. They are used on the “Main”
tab for “Originating Source”, “Functional Area” and “Special Interest Items.” Some items in the
“Special Interest Items” section are system selected, so you cannot change them. These boxes
are checked when you make various other selection on other tabs, such as originating source,
subject grade, or allegation. They are also used on the “Attachment” tab to select attachments to
open or print.
Text Boxes.
Text boxes are limited to a maximum of 4000 characters; however, it is not advisable to enter or
paste large amounts of information (like the entire contents of complaints, letters or emails) into
the text boxes. Rather it is more appropriate to summarize the content of the correspondence.
For instance, rather than paste a complainant acknowledgement or update memo into the text
box, an appropriate entry might be “Acknowledged complaint”, or “Sent interim reply to
complainant advising that the investigation was completed and undergoing higher level reviews.”
The author and date of the entry are automatically annotated if entered in “Case Notes.”
Note: If you choose to cut-and-paste information into ACTS data fields, do so from a “Text
Editor”, i.e., NotePad, WordPad, HTML. DO NOT use the XML Control Characters
ampersand ( & ) and less than ( < ) in any field. These characters entered in any field in the
ACTS database may cause errors when submitting the case for validation. This often happens
when cut-and-pasting, from MS Word, with text that includes quotation marks ( “ or ‘ ) or
when entering the characters ampersand ( & ) or less than ( < ).
Date Fields.
Date fields may be entered in any of the following formats: (D = Day, M = Month, and Y =
Year)
• DD MMM YYYY (alpha and numeric) 25 Jun 2007
• DD MMM YY (alpha and numeric) 25 Jun 07
• MM-DD-YY (numeric) 06-25-07
• Or using the pop-up calendar provided adjacent to the field ( )
Regardless of how they are entered, date fields will be reflected in ACTS in the following
format: DD MMM YYYY (alpha and numeric).
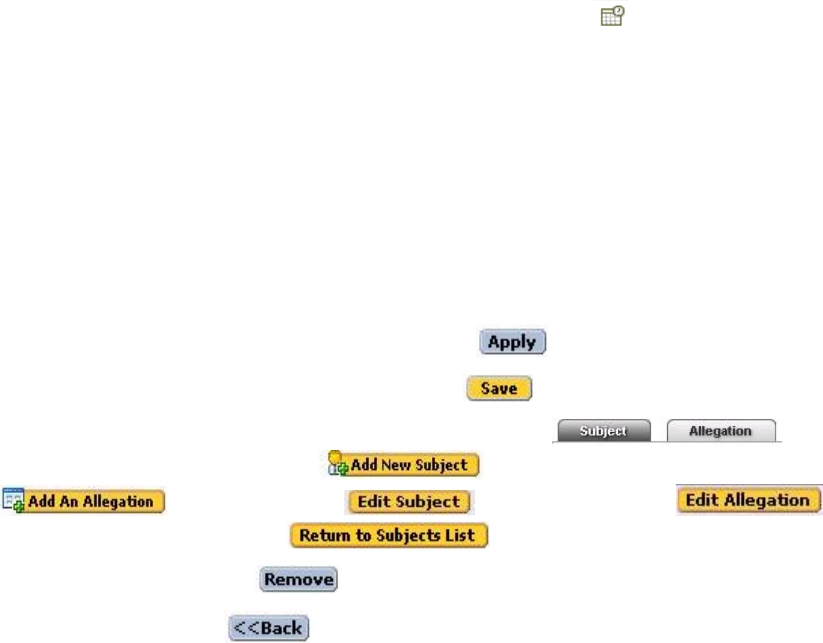
Apply vs Submit.
ACTS allows users to save work as they create or modify a case. These changes are stored in a
temporary location that is only visible to that user. ACTS saves data to its temporary location at
the following times:
• Whenever a tab is changed (e.g., switching from the “Main” tab to the “Complainant”
tab)
• Whenever the user clicks on the “Apply” button ( )
• Whenever the user clicks on the “Save” button ( )
• Switching between “Subject” and “Allegation” sub-tabs ( ),
clicking on “Add New Subject” ( ), “Add New Allegation” (
), “Edit Subject” ( ),“Edit Allegation” ( ),
and “Return to Subject List” ( ).
• Whenever the “Remove” ( ) button is clicked on the “Case Notes” tab
• Whenever the “Back” ( ) button is clicked on an attachment “Details” on the
“Attachment” tab

This functionality allows users to resume case edit sessions and prevents data loss in the event of
network or computer failure. For example, if your computer crashes, you will be able to resume
your edit session with a minimal data loss. But until the user submits a case (or submits changes
to a previously-submitted case), the data will not be reflected throughout the system, and will not
be responsive to a search by any user, including the originator. Consequently, case data may be
submitted numerous times throughout the life cycle of a case.
Mandatory Fields.
To ensure consistent and reliable data is entered into ACTS, some fields are mandatory. Case
data fields that MUST be filled in are identified with red text and marked with an asterisk (*).
Error Fields.
When a case is submitted, ACTS validates the case entry process by applying business rules
derived from AFI 90-301, allowing only consistent and correct data to be entered into the
system. If the case fails one or more of these validation rules, then the system will display a
message noting problems in the data entry and mark the errant field(s) with an exclamation point
and a red/pink background (figure 5-3). In most cases a user can correct the error by entering or
correcting the data as directed on the screen. For your convenience, error messages can be
hidden or shown anytime using the collapsible error message box above the tabs.
Case Error
Messages
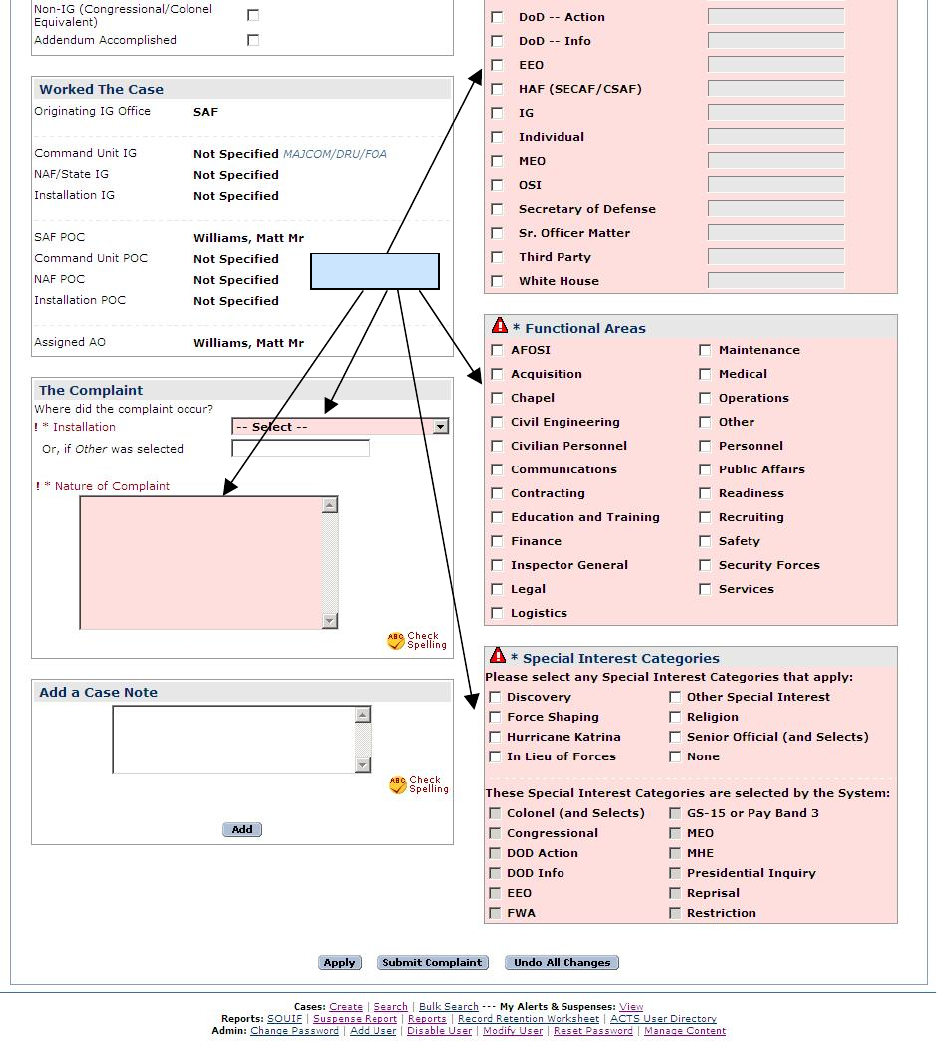
Figure 5-3. Error Message and Fields.Some error fields may not be immediately visible after an
unsuccessful submit action, generally because they are on a different tab than the “Main” tab. In
those instances, there is a link to the appropriate tab above the error message. Clicking the link
will take you to the tab with the errors, which will be highlighted in red.. For instance, to add a
Transfer Note, click on the Edit button in the Case Notify/Transfer History on the Main tab.
Case Edit Sessions.
Error Fields
When a user is editing a case, the data is “locked” while it is being edited. Other users can view
the case (if it was previously submitted), but will only see the data that existed prior to initiation
of the edit session, and will be able to edit it only by overriding the current edit session. You
may save an edit session and resume it at a later time, and ACTS will inform you about open edit
sessions through My Alerts & Suspenses (on the Home Page and/or on the My Alerts and
Suspenses page accessed through the dropdown menu). The record will remain locked until the
edit session is completed and submitted. There is no time limit on the amount of time an edit
session can remain open, however, it is highly recommended that you submit a case soon, if not
immediately, after an edit has taken place.
ACTS will not allow two users to simultaneously edit the same case. If you attempt to edit a
case that is being edited by another user, the system will display a notification (figure 6-4) asking
what you would like to do. If you elect to view the case, you will see the most recently
submitted version of the case. You will not see the user’s edit until it has been “submitted.” If
you elect to override the edit session, you will take over their session and any changes the user
made prior to your assuming the session will be carried over into your session. You will get the
most recent version of the case with the in-progress edits of the session you overrode. If you
attempt to edit a case that you already have open in an edit session, the system will prompt you
to either continue with the previous edit session or begin a new edit session with the most
recently submitted version of the case. Chapter 6, Search, contains additional information about
cases currently being edited.
TIP: Do not “override” another user’s session without coordinating with them. This option
was designed for emergency use only (e.g., an AO unexpectedly out of the office for an
extended period of time with an open edit session)
Browser Buttons.
As with any web-based action, using the “Stop” or “Back” button may cause screen display
errors or access delays. If you encounter an error, close the error screen and return to the home
page if possible. Closing the ACTS session may result in the loss of unsaved data.
Create a Case Record
IGs will immediately create an entry in ACTS for all contacts
Step
Action
Step 1
• Select the “Cases” tab in the Menu Bar, then click on “Create” in the
dropdown list (figure 5-4)
• Or, click on “Create” in the Menu Bar at the bottom of the Home Page
• The “Before Creating a Case” screen will open (figure 5-5)
Figure 5-4. Create.
Before Creating a Case.
ACTS allows users to search existing cases by complainant. Before entering a new case, IGs
should determine whether the complainant has already filed the same case within the IG system.
Following is an explanation of the screen options and procedures.
Create
Figure 5-5. Before Creating a Case.
Field
Action
Enter
Complainant
Name
(textboxes)
• If you don’t know if the case already exists, you may enter the
complainant’s, subject’s, or requestor’s LAST name and/or FIRST name to
“search” for a duplicate. You must enter at least one letter in at least one of
the name fields to initiate a search. You may also search by SSN.
• The search results will be displayed at the top of the screen
− A text message indicating that no records were found matching the case
(figure 5-6)
− Or limited information about any matching records (figure 5-7). Contact
the AO listed in the search results to determine if the case is a duplicate
Create New
Case
• If the case does not already exist in ACTS , click on the “Create New Case”
button
• The case “Main Tab” screen opens (figure 5-8)
How To
• If you need assistance in answering the question, click on the “Help” button (
)
• The ACTS Online help opens
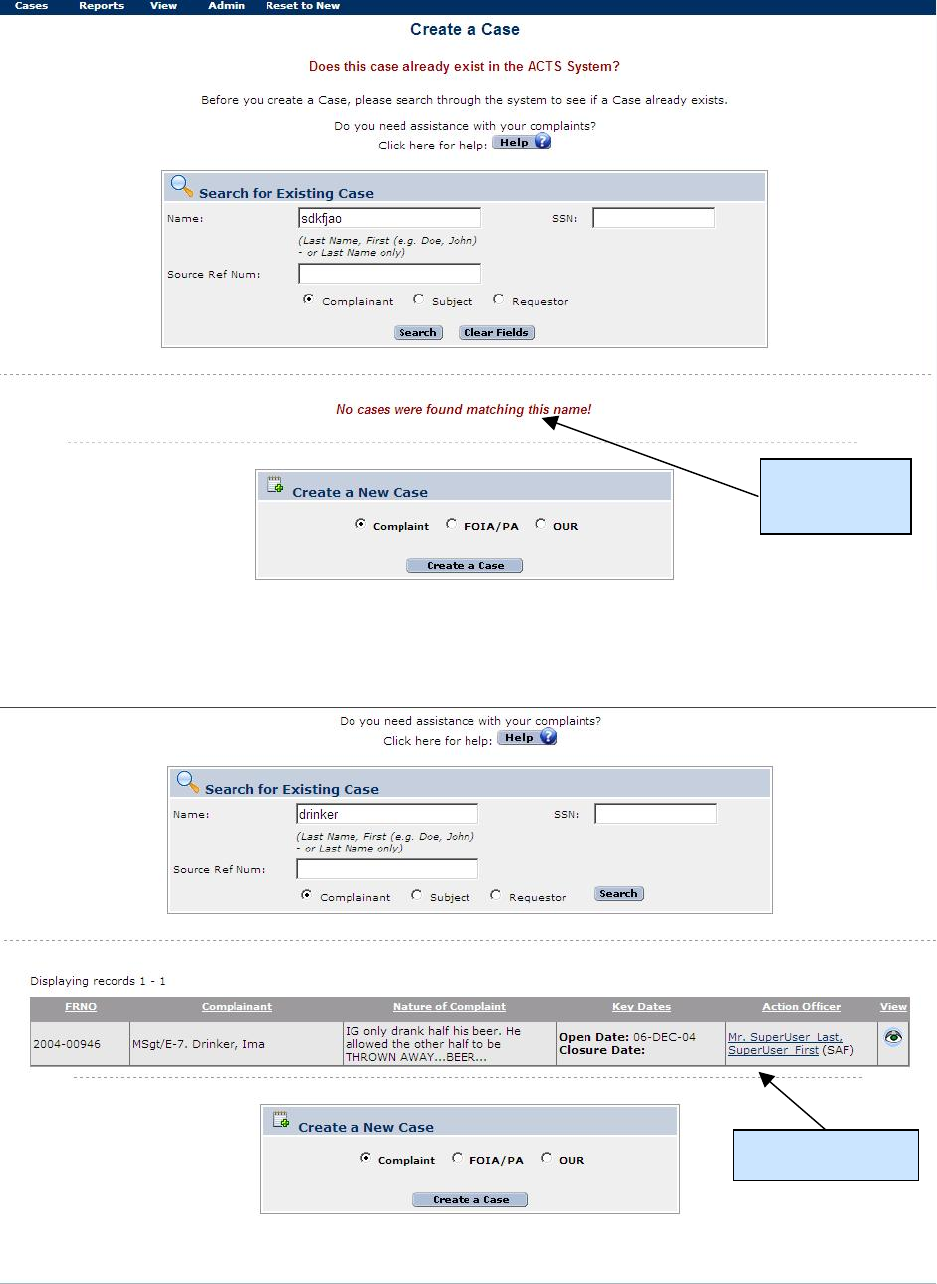
Figure 5-6. Query For Duplicate—No Matching records.
No matching
records
Matching record
Figure 5-7. Query For Duplicate—Matching record.
Main Tab.
The Main Tab (figure 5-8) is used to enter and/or view general information pertaining to an IG
case. The screen collects and displays the following information pertaining to the case: General
Info, Resolution Info (if closed), Worked the Case, Timelines, Case Categories, Special Interest
Categories, Originating Source, The Case, and Add a Case Note, Record Disposition
Information, in addition to auto-generated case identification information at the top and action
buttons at the bottom of the form.
Entering Data in the Main Tab.
Field
Description
Heading
• Data is automatically generated and not editable (read only)
• FRNO. File Reference Number is automatically generated and not editable.
• Number of Days Open. Number of days between TODAY and the “Open
Date”
• Case Status. Automatically generated and not editable. Reflects the current
status of the case. All cases in ACTS have a status that indicates their progress
through the cases resolution process. Refer to Chapter 7, Actions, for more
information on case transition states
• Complainant. Rank/grade, last name, and first name of the complainant, or
“Anonymous”
General Info
• Case Status. Described above. Field is automatically updated based on case
actions assigned by the AO and is not editable
• Anonymous Complainant (checkbox). Users may click on the checkbox to
indicate the complainant is anonymous. The checkbox is also located on the
Complainant tab
• Follow Up Indicator (checkbox). Users may check and uncheck the follow-up
box when a case has been completed or a case is closed.
• Non-IG Indicator (checkbox). Users may check the Non-IG box when the
record is associated with a non-IG Congressional or when recording non-IG
Colonel, or equivalent, adverse information. This box will not be checked for
cases received by the IG and referred to another grievance channel
• Overall Case Finding. Visible only in completed or closed investigations.
Options include NA, not substantiated investigation, and substantiated
investigation
• Command Unit Status. Text box to capture current status of case for progress
report; provides a brief snapshot of case status (not intended to replace case
notes). For closed cases, the field will be editable until the Follow-Up
Indicator box is un-checked
Resolution
Info
• Referral Organization (dropdown menu). Selected from dropdown list. If the
referral agency is not listed, enter “Other” as the referral agency, and annotate
the appropriate agency in the text box provided
• Case Resolution (dropdown menu). Visible only after case is closed, the
resolution is automatically entered for referral, dismiss, and assist
Discarded. Select one of the following options
− Duplicate
− Entered in error
Closed Investigation. Select one of the following options
− Substantiated investigation
− Not substantiated investigation
Worked the
Case
• Command Unit IG. If it can be determined, this field automatically populates
based on AO entering the case
• NAF/State IG. If it can be determined, this field automatically populates based
on AO entering the case
• Installation IG. If it can be determined, this field automatically populates based
on AO entering the case
• Assigned AO. This field automatically populates based on AO entering the
case
• Refer to Chapter 3, Accessing ACTS , or the on-line Help menu for additional
information
• Case Notify/Transfer History. ACTS automatically tracks case movement up
and down the IG chain, including transferring/receiving AO, date, and
notify/transfer note. The information in the history is viewable by all who
share visibility of the case, and is not editable after it has been submitted. The
notify/transfer history is visible only after notify or transfer actions have
occurred
TIP: Additional fields will be visible throughout the life cycle of the case,
depending on the case status. Refer to Chapter 7, Actions, for additional
information about mandatory fields for actions
• Functional Area List. Select one or more organizational functional area that
best approximates where each allegation occurred
• Special Interest Category. Select one or more special interest category that best
addresses each allegation.
Originating
Source
• Originating Source (dropdown menu) –Refers to the source of the case—the
person or group informing the IG about the case
− There are no restrictions on the number of sources a case can have,
or the number of times a particular type of case source can appear.
For example, a complainant might request assistance from two
congressmen and one senator, which would result in three
congressional/LLI case sources
− Click on the Add New Source button to enter additional sources
− All case sources except Individual, Third Party, SOUIF, IG, and CC
require a reference number. A case source reference number is the
identifier used by the source to track the case (e.g., SAF/LLI
number, DoD Hotline ID, etc.).
TIP: Case sources can be added to a case after it has been closed (to track
submission of the same case to multiple organizations—i.e., “shot
gunning”). They can be edited. Only three sources will be included in any
export of the case data
• Source Reference Number. The number assigned by the originating source, if
applicable
− Congress/LLI, CSAF, DoD Action/Info, OSI, EEO, MEO, SecDef,
and White House require a tracking number
− Enter one Source Reference Number (as required) per originating
source
• Point of Contact. The originating source POC, if applicable (e.g., DoD AO)
− Enter one POC (as required) per originating source
• Suspense Date. The due date assigned by the originating source, if applicable
(e.g., LLI suspense date)
− Enter one suspense date (as required) per originating source
− Suspense date is editable during all states of the case
TIP: For “Individual” sources, AOs may enter a projected interim response
date under “Suspense Date” to generate an alert
• Actual Response Date. The date the IG responds to the originating source, if
applicable, including the final response to the complainant
− Enter one Actual Response Date (as required) per originating source
− Actual response date is editable during all states of the case
• Comments. Text box to capture notes pertaining to the originating source
tasker. For instance, “provide draft copy of proposed final reply to SAF/LLI
through SAF/IGQ for release to constituent”
− Enter comments (as required) for each originating source

The Case
• Where did the case occur (dropdown menu)
− Installation (dropdown menu). Select the installation/location from the
dropdown menu that shows where the event enumerated in the case
occurred. Select “Other” if the allegation did not occur at a military
installation/location listed in the dropdown menu
− Other (text box). MANDATORY if “Other” was selected for the
“Installation” block
TIP: The data entered should reflect WHERE the allegation occurred, not where
the case was filed or where the complainant/subject are assigned
• Nature of Case (text box). Enter a narrative summary of the case allegations
from the complainant
TIP: Enter a succinct description of the major allegations the IG will address.
Because this information is used in generating some reports, the amount of text
is limited to approximately 400 characters. It is also recommended that
redaction criteria are applied regarding names and identifiable information
Add a Case
Note
• Text box captures notes pertaining to case actions. ACTS automatically assigns
date, author, and originating office to each case note
• When comments are entered, click on the Add button to save the case note.
The case note will no longer appear on the main tab. The case note can be
viewed by clicking the Case Notes tab
TIP: Case notes should be sufficiently detailed to provide a chronology of
administrative actions pertaining to the case, but should not include copies of
memos. An appropriate case note might include dates sent to and returned from
JA, summaries of conversations with the complainant about the status of the
case, or with staff members concerning determination of appropriate case actions
Record
Disposition
Info
• Disposition Date. Automatically generated; editable after closure. Computed
as 31 Dec two years from the year the case was “Closed.” Record will be
included on the Record Retention Worksheet on or after the computed date,
until the record is purged from the system (see Chapter 11, Managing ACTS
Data)
− You may update the Disposition Date after closure by
• Entering a date in the field
• Modifying the Retirement Date of any Colonel or equivalent
− Then Submitting the case
• Permanent (checkbox). Used to indicate that record should be held as
permanent IAW AFRIMS
• Moratorium (checkbox). Used to indicate that record will be held in the system
until date specified in Moratorium Disposition Date
• Moratorium Disposition Date (required if Moratorium is check). Record will
be included on the Record Retention Worksheet on or after the specified date
• Comments. Mandatory if Permanent or Moratorium is checked. Use to
articulate reasons for a non standard disposition schedule.
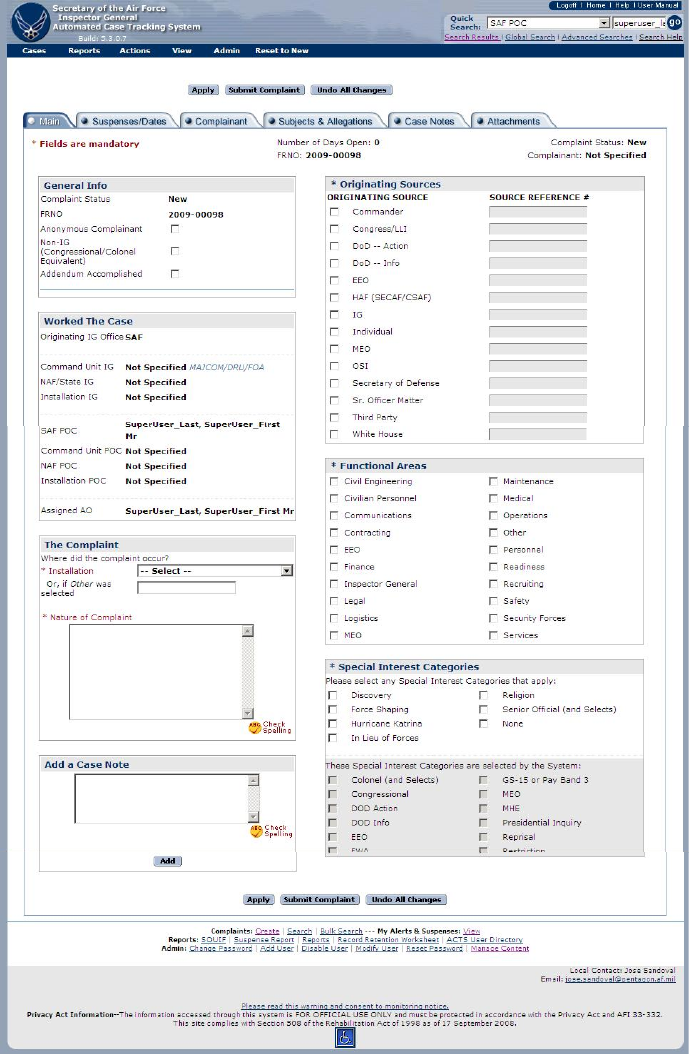
Figure 5-8. “Main” Tab—Create a Case.
Suspense/Dates Tab
The Suspenses/Dates Tab (figure 5-9) is used to enter and/or view information pertaining to any
dates or suspenses related to an IG case. ALL dates related to the case can be entered or found
on this tab. This screen contains the following information pertaining to the complainant:
Complainant, General Info, Work Contact Info, Home Contact Info, and Other Info, in addition
to auto-generated case identification information at the top and action buttons at the bottom of
the form.
Entering Data in the Suspense/Dates Tab.
Field
Description
Heading
• Data is automatically generated and not editable (read only)
• FRNO. File Reference Number is automatically generated and not editable.
• Number of Days Open. Number of days between TODAY and the “Open
Date”
• Case Status. Automatically generated and not editable. Reflects the current
status of the case. All cases in ACTS have a status that indicates their progress
through the cases resolution process. Refer to Chapter 7, Actions, for more
information on case transition states
• Complainant. Rank/grade, last name, and first name of the complainant, or
“Anonymous”
AOs
Tracking
This Case
• Name and rank of action officers tracking the suspenses of the case
Timelines
Suspenses
• Open Date. The date the case first entered Air Force IG channels. If the case
was reported by a higher level authority (DoD Hotline, SAF/LLI, HAF, etc),
record the date the case was submitted to that authority in the Case Notes for
historical information. Date is not editable after submitted.
• Analysis Complete Date. The date the case analysis was completed and/or
approved
• Tasking Date. The date an action was assigned (e.g., IO appointed). The field
is not mandatory until the Investigate action is specified, and the date is not
editable after submitted
• Pre-Fact Finding Complete Date. The date the IO training, the investigation
plan, the Judge Advocate (JA) coordination, etc., is complete
• Fact Finding Complete Date. The date all testimony and evidence gathering is
complete
• Report Writing Complete Date. The date the case file is complete, in the proper
format and the Investigating Officer signs the report of investigation. It is also
the date the case file is given to the IG for initial review. If the IG determines
that re-work is required, the report writing completion date is adjusted to
reflect the date the re-work is approved by the IG
• IG Quality Review Complete Date. The date the supporting IG/IGQ office
reviews the report for completeness, compliance, and objectivity
• Technical Review Complete Date. If required, the date the evidence, findings
and conclusions have been reviewed by a technical expert, determined to be
technically sufficient and returned to the Appointing Authority. This field is
optional for all investigations
• Legal Review Complete Date. The date the report of investigation (and
supporting documentation) is determined to be legally sufficient by the SJA
and returned to the Appointing Authority
• Completion Date. The date an appointing authority approves an ROI and
findings. The field, and all preceding fields (except Follow Up), are editable
until after a Complete action is initiated, and is not editable after submitted
• NAF/State IG Review Completion Date. Date that Numbered Air Force IG
complied with 90-301, for investigations closed at their level, or those being
forwarded to SAF/IGQ
• MAJCOM Review Complete Date. Date that Major Command IGs complied
with 90-301, for investigations closed at their level, or those being forwarded
to SAF/IGQ
• SAF/IGQ Review Complete Date. Date that SAF/IGQ completed actions IAW
90-301, for investigations closed at their level, being forwarded to IG, DoD,
Colonel investigations, or other cases as required
• DoD Review Submission Date. Field will only be visible and editable for cases
that meet the criteria for being reviewed by the DoD
• DoD Review Response Date. Field will only be visible and editable for cases
that meet the criteria for being reviewed by the DoD
• Closure Date. The date an IG received approval from the appointing authority,
or IG, DoD (for Reprisal and Restriction), for an investigation and the
complainant was notified of the final results. Follow-up actions may be
incomplete (e.g., notification to the subject’s commander, command action,
etc.). The field is not editable until after Closure action is initiated, and the
date is not editable after submitted
TIP: Additional fields will be visible throughout the life cycle of the case,
depending on the case status. Refer to Chapter 7, Actions, for additional
information about mandatory fields for actions
Source
Suspense
Date
• Suspense Date. The date the originating source requires a response. If there are
multiple sources with multiple suspense dates, enter only the earliest suspense
date.
• Response Date. The date a response was sent to the complaint source
individual/organization
Follow-Up
Suspense
Date
• Follow-Up Suspense Date. Date supplied by the AO as a follow up reminder.
This is a date indicating whether or not a complaint requires further follow-up
action. This date is intended as a "tickler" for the AO to remind him/her to
verify that all necessary follow-up actions have been taken..
Reporting
Suspenses
• Acknowledgement Due Complaint Date. The date complaint acknowledgement
of receipt of a case is due to the complainant. This must be done within 5 days
of receipt of a complaint.
• Interim Response Date. The date an interim response is due the complainant.
These are due to the complainant 60 days from receipt of the complaint and
every 60 days until a final response is due.
• Progress Report Due to HHQ – Reports due to higher headquarters for cases not
finalized by their suspense date and on the first of every month thereafter until
completion.
• Colonel Equivalent. Colonel equivalent notification due to SAF/IGQ.
• Reprisal/Restriction/Improper Mental Health - Notification of receipt of
reprisal, restriction or IMHE complaint due to next higher level
• DoD IG Notification - Notification of receipt of reprisal, restriction or IMHE
complaint due to DoD
• Complaint Analysis Due. Notification of results of complaint analysis and
intent to investigate or not due to next higher level.
• Reprisal/Restriction/Improper Mental Health Progress Report - Reprisal,
restriction or IMHE progress report due to next higher level.
• DoD Progress Report - Reprisal, restriction or IMHE progress report due to
DoD IG
• Hotline Progress Report - Hotline progress report due to next higher level
• Hotline Suspense Extension - Hotline suspense extension due to next higher
level.
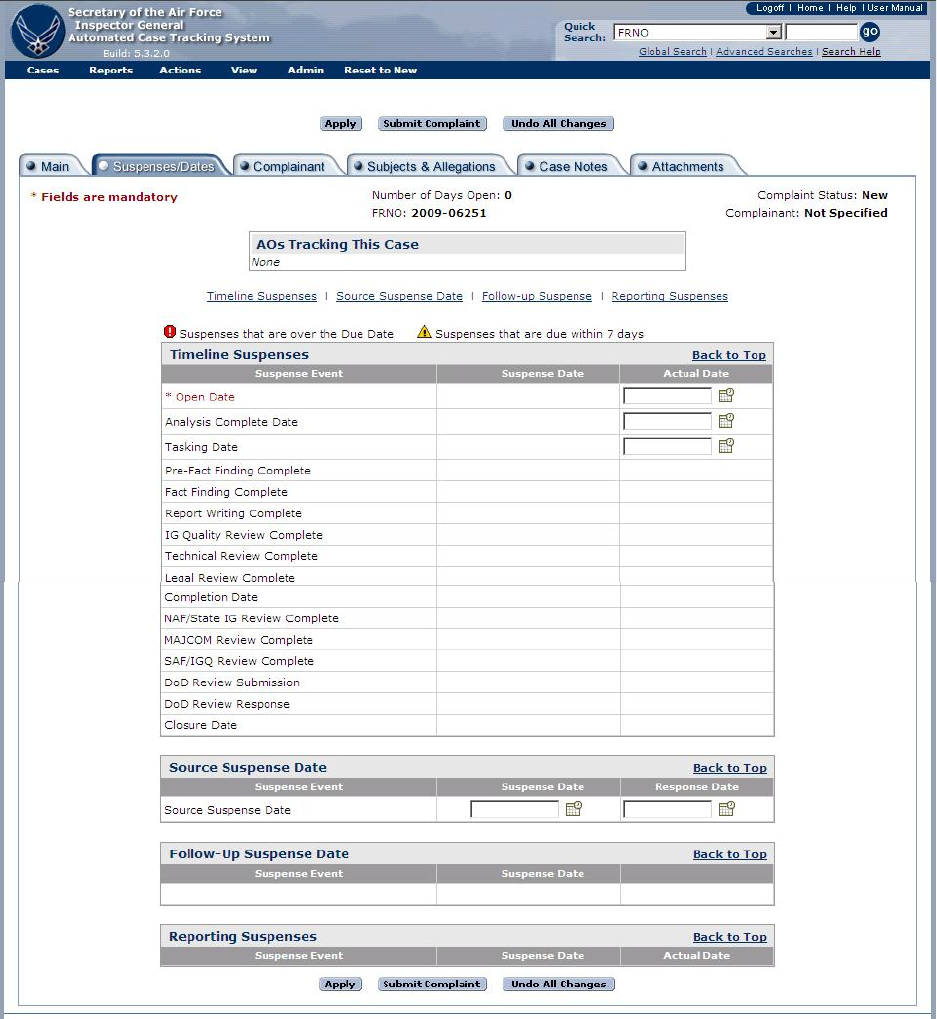
Figure 5-9. “Suspenses/Dates” Tab.
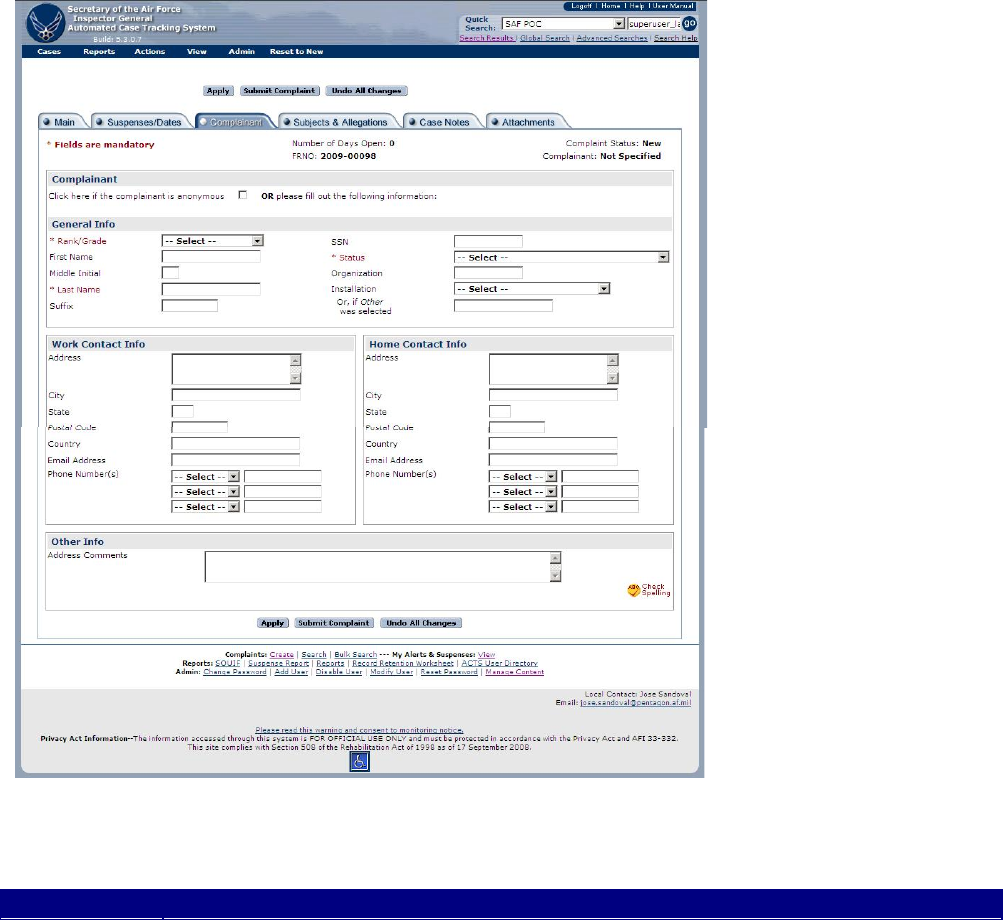
Complainant Tab.
The Complainant Tab (figure 5-9) is used to enter and/or view information pertaining to the
complainant in an IG case. This screen contains the following information pertaining to the
complainant: Complainant, General Info, Work Contact Info, Home Contact Info, and Other
Info, in addition to auto-generated case identification information at the top and action buttons at
the bottom of the form.
Figure 5-10. “Complainant” Tab.
Entering Complainant Data.
Field
Description

Complianant
• (Check Box). Click to indicate complainant is anonymous. No other entries
required pertaining to complainant. However, if any information is known, you
may enter it for the anonymous complainant
General Info
• Rank/Grade (dropdown menu). Select the complainant’s rank/grade from the
dropdown menu
TIP: Annotate any rank/grade not included in the list above in the “Address
Comments” at the bottom of the screen.
• First Name. Complainant’s first name
• Middle Initial. Complainant’s middle initial
• Last Name –Enter the complainant’s last name
• Suffix. Enter the complainant’s suffix, as applicable (e.g., Jr, Sr, etc.)
• SSN. Enter the complainant’s social security number, if known
• Status (dropdown menu). Select the complainant’s status
TIP: Annotate any status not included in the list above in the “Address
Comments” at the bottom of the screen
• Organization. Organization to which complainant is currently assigned
• Installation (dropdown menu). From the dropdown menu, select the
installation/location where the complainant is currently assigned for duty.
Select “Other” if the complainant’s installation/location is not listed in the
dropdown menu
• Other (text box). Enter the complainant’s duty location if “Other” was selected
for the “Installation” block
Work Contact
Info
• Address. Complainant’s business street address, City, State, Postal Code, and
Country
• Email Address. Complainant’s business email address
• Phone Number(s). Complainant’s business phone numbers
Home Contact
Info
• Address. Complainant’s home street address, City, State, Postal Code, and
Country
• Email Address. Complainant’s home email address
• Phone Number(s). Complainant’s contact phone numbers
Other Info
• Address Comments. Text box to capture notes pertaining to complainant’s
contact information. For instance, “call complainant’s home phone after 6 p.m.,
except on Sundays”; or “complainant relocating to AETC/IGQ, DSN 478-2217,
effective 1 Aug 07”
Subjects & Allegations Tab.
The Subjects & Allegations tab (figure 5-11) is used to enter and/or view information pertaining to
subjects and responsible management officials (RMOs) in an IG case. A subject is not required
to create a valid case; however, if specified, enter the subject data in this tab. This screen
contains two sub-tabs with fields for information pertaining to subjects. The Subject sub-tab
contains Subject General Info, Work Contact Info, and Other Info, in addition to auto-generated
case identification information at the top and action buttons at the bottom of the screen. Once
subject data is entered and saved, data can be added to the allegations sub-tab (figure 5-11). The
number of subjects and allegations assigned to a case is unlimited.
Figure 5-11. “Subjects & Allegations” Tab.
Entering Subjects Data.
Field
Description
Subject Sub-tab
Subject
General Info
• Duty Title. Subject’s current duty title
• Rank/Grade (dropdown menu). Select the complainant’s rank/grade from the
dropdown menu, unless the complainant is anonymous
TIP: Annotate any rank/grade not included in the list above in the “Address
Comments” at the bottom of the screen
• First Name. Subject’s first name
• Middle Initial. Subject’s middle initial
• Last Name. Subject’s last name
• Suffix. Enter the subject’s suffix, as applicable (e.g., Jr., Sr, III, etc.)
• SSN. Enter the subject’s social security number (MANDATORY for all
officer subjects and civilians equivalent to a colonel or higher)
• Status (dropdown menu). Select the subject’s/RMO’s status
TIP: Annotate any Status not included in the list above in the “Address
Comments” at the bottom of the screen
• Organization. Organization to which subject is assigned
• Installation (dropdown menu). From the dropdown menu, select the
installation/location where the subject is currently assigned for duty. Select
“Other” if the subject’s installation/location is not listed in the dropdown
menu
• Other (text box). Enter the subject’s duty location if “Other” was selected for
the “Installation” block
• Retirement Date. Enter retirement date for all Colonel or equivalent subjects.
This field remains editable after case closure. When a date is entered in this
field, and the user submits the case after closure, the Record Disposition Date
will be updated to reflect appropriate disposition date IAW AFRIMS
Work
Contact Info
• Address. Subject’s business street address, City, State, Postal Code, and
Country
• Email Address. Subject’s business email address
• Phone Number(s). Subject’s business phone numbers
Other Info
• Address Comments. Text box to capture notes pertaining to subject’s contact
information. For instance, call subject’s home phone after 6 p.m., except on
Sundays; or subject relocating to AETC/IGQ, DSN 478-2217, effective 1
Aug 07
Command
Action
Taken.
• Command Action Taken. Identify any command action taken against the
subject as a result of any substantiated allegation/s (LOR, LOC, LOA, verbal
counseling, etc)
Return to
Subject List
• Return to Subject. This button will take you back to the Subject List where
you can add another subject. It will only appear after data has been entered
in the subject field or allegations field and saved.
Add New
Subject
• Add New Subject – Clicking this button will open up the Subject and
Allegation sub-tabs so another subjects information can be entered. ACTS
supports an unlimited number of subjects per case.
Edit Subject
• Edit Subject – Clicking this button opens the subject sub-tab so the existing
subject information can be edited / added.
Figure 5-12. Allegations List.
Entering Allegations.
Clicking on the Allegations sub-tab brings up the Allegation List data entry screen. (figure 5-11).
From this screen, users can add allegation information for each subject and add additional
allegations.
Field
Description
Allegation Sub-tab
Add New
Allegation
• Opens the Allegations List data entry screen (figure 5-12), allowing users to
enter additional subjects. Enter each subject only once, even if there are
multiple allegations against him/her
•
Remove
• Deletes the corresponding allegation from case entry (NOTE: The user is
not asked to confirm deletion, and there is no un-do)
Allegation Sub -
tab
• Opens the allegation sub-tab (figure 5-12). Multiple allegations can be
assigned to each subject.
• Allegation number – The number of the allegation corresponding to the
allegation number in the ROI.
• Allegation (dropdown menu). MANDATORY if a subject is entered.
Select the appropriate allegation from the dropdown menu.
• Enter as many allegations as appropriate for each subject. For example, if
a subject allegedly reprised and abused his authority, and a second
subject allegedly reprised, abused authority and improperly referred for
mental health evaluation, you should show two allegations for subject
one and three allegations for subject two
• Investigation Finding. (dropdown menu) Not editable until an
investigation is completed. Options include “N/A”, “Substantiated”, or
“Not substantiated”
• Final Finding (dropdown menu). Records investigation findings after all
reviews are completed at higher levels, to document any overturned
findings. Field is not editable until investigation is completed and case is
closed
• Allegation Details. Provide allegation details (i.e. framed allegation).
Return to
Subject List
• Return to Subject. This button will take you back to the Subject List
where you can add another subject. It will only appear after data has
been entered in the subject field or allegations field and saved.
Case Notes Tab.
The Case Notes tab (figure 5-13) is used to enter and/or view IG notes pertaining to IG cases. This
screen contains a text box for entering and viewing a log of case notes, sorted in reverse
chronological order. Case Notes track the history of a case including Transfer/Notify history.
Figure 5-13. “Case Notes” Tab.
Entering Case Notes.
Button
Action
Case Notes
• Text box to capture notes pertaining to case actions. ACTS automatically
tracks the author, creation/modification date, and originating office of case
notes. Only the author of the note can edit a case note
Add New
Case Note
• Add New Case Note – Click this button to add a new case note. A text box
will open to add a case note. See figure 5-14
• Case notes may be added to a case after the case is closed but existing notes
are locked (read only) when a case is closed and cannot be edited
• Case notes may be added to cases in “view only” mode. However, once a
case note is added in “view only” mode, it cannot be edited or deleted.
• Case notes may be removed before the case is submitted. Once submitted a
case note cannot be removed. To delete the information in a case note,
remove the text and enter “Case note deleted”
• Case notes may be sorted by selecting the “Case Note History.” Default
setting is with the newest case note displayed toward the top of the page.
• The case note tab also displays all notifications and case transfers. See
Chapter 7 for details on how to transfer or notify a case.
Expand All
case notes
• Expand All Case Notes – All case notes will be “collapsed” initially and only
show the first 85 characters. Clicking the “expand all case notes” button
will expand the text boxes so the entire case note can be viewed.
Filter
Buttons
• The filter buttons allow users to filter the information displayed on the case
notes tab. Clicking the check box will display either the case note, notifies
or transfers.
Sort List
• The list of case notes/notifies/transfers can be sorted by author/sender,
, or by date created/sent,
.
• TIP: Case notes should be sufficiently detailed to provide a chronology of
actions pertaining to the case. Examples of significant events to record
include phone calls, status updates from the field, and issues that arise in
the resolution of a case.
Figure 5-14 Case note entry screen
Figure 5-15. Case Notes History.
Attachments Tab.
The Attachments tab (figure 5-16) is used to enter, view, or modify attachments pertaining to IG
cases. Users can attach any type of file into one of nine folders or their subfolders. Attached
files will reside on the ACTS server and will remain on the server until the case file is purged. It
can be downloadfor viewing (opened).
Figure 5-16. Attachments Tab.
Attaching Files
There are nine available folders for classification of attached files. The person that attached a
file is the only one who can delete the file. Up to five attachments can be added at one time.
File size is limited to 65 MB.
Folder
Explanation
Complaint
• The complaint (form 102) and any complainant provided attachments
for an Assist, Referral, or a Transfer will be placed in this folder.
Complaint Analysis
• The complaint analysis for an Assist, Referral, or a Transfer will be
placed in this folder.
Administrative
Documents
• Any administrative document (progress reports, interim responses, etc)
will be placed in this folder
Disposition/Resolution
Documents
• Documents relating to what was done to resolve the issue the
complainant had (i.e. email from finance saying the pay problem hac
been fixed) will be placed in this folder.
CDI’s,
• All files and documents relating to CDIs, will be placed in this
subfolder
MEO
• All files and documents relating to MEO complaints will be placed in
this subfolder
EEO
• All files and documents relating to CDIs, MEO, or EEO complaints
will be placed in the applicable subfolder
Congressional Inquiries
• All files and documents relating to Congressional Inquiries will be
placed in this subfolder
Investigation
• All files and documents relating to an IG Investigation will be placed in
the applicable subfolder. This file format matches the case file format
found in AFI 90-301.
Attaching and viewing Files for Individual Case Files.
Field/
Button
Action
Step 1
• Select “Add New Attachment” the “Add Attachment “ button at the top of the
Attachment tab. ” (figure 5-16).
Step 2
• The user will load the following information (figure 5-18):
• Category Select one of the nine main folders or sub folders
• Title This is the title of the attachment that will be displayed in the case file. This title does not have
to be the same as the files saved name.
• Description A description of the data that is included in the file.
• Complainant Provided Select this block if the file was provided by the complainant
• Document Visible only to SAF/IGQ Select this block if the document being loaded is sensitive.
With this block checked only personnel assigned to SAF/IGQ will be able to see that there is a file
loaded and be able to open it for viewing.
• Browse Selecting browse will open the user’s computer file directory.
Step 3
From your computer file directory, select the file you wish to upload to the case file,
then click open. The selected file storage location will now be displayed in the
“Attachment” window.
Step 4
• Click on the “Apply” or “Submit Complaint” button to complete the upload process.
Figure 5-17. Attachments Tab File Uploading Screen.
Figure 5-18. Attachments Tab Categories drop down menu.
What you want
the file called
A description
of what is in the
file
Identifies where
the file is
uploaded from
Select Apply to
complete
upload process
Category (see
Figure 18)
Figure 5-19. Attachments Tab after File is Uploaded.
Field/ Button
Action
• To view an attachment, click the “Open” button.
• To view details of an attachment, or to replace it with a new file, click the
“Details” button. This will take you back to the File Uploading Screen
(Figure 5-17) while in “edit” mode. You can rename the file or move it
between categories from this screen. It will display the file information
in “ view” mode.
• To delete an attachment, click on the “Delete” button. You cannot delete
files you did not upload.
• To reorder the attachments, click the “move up” or “move down” buttons.
• To print or open attachments, click the “Print/Open Attachments” button
Printing Attached Files
ACTS allows users to print/open up to five attachments at once. You must open the attachments
in the appropriate program before you can print them.
Field/ Button
Action
• To print or open attachments, click the “Print/Open Attachments” button
• Click on the “Select” check box to print a file. Click on the “Select All”
link to select all files to print.
Delete is only
available to the
person who
uploaded the file
Select Open to
view the file
Move Up/Move
down to change
order in a category
Select Details
to view details
and to move
file to new
category
Figure 5-20. Attachments Tab after File is Uploaded.
Exiting the Case Tabs
Button
Action
Apply
• The “Apply” button allows users to save data and return to the session at a
later time with additional or corrected information. Changes are saved to a
temporary location visible only to the originator until submitted. Data is
not searchable or validated until submitted
• An alert will be generated for the case indicating Edit Session in Progress
until the case is submitted
TIP: Changing from one tab to another applies changes.
Submit Case
• Records changes, validates data, and submits data to the ACTS system.
Once submitted some fields will be locked (read only) to enforce data
integrity and standardize the complaints resolution process.
• The user is notified that the validation is successful (figure 5-21) or
unsuccessful (figure 5-22)
− If successful, the user may return to the home page by clicking on
“Done”, “Return to Case”, or “Print Case File Worksheet.” Refer to
Chapter 8, Reports, or the on-line help menu for additional information.
− If unsuccessful, correct the errors and resubmit. The system will
generate an alert indicating Edit Session in Progress until the case is
successfully submitted
Undo All
Changes
• The system will remove all changes made since last submitted and releases
your lock on the case. Removes all data from the screen and removes the
data from the system.
TIP: For a new case, applied but not previously submitted, clicking on
“Undo All Changes” will remove all case data—there will be no record of it.
This is a good way to delete a case entered in error, if it has not been
submitted
Figure 5-21. Validation Status—Successful.
Links to Tabs with
Errors
Complaint Error
Description
Figure 5-22. Validation Status—Unsuccessful.
Error Field
(pink background
and exclamation
mark [!])
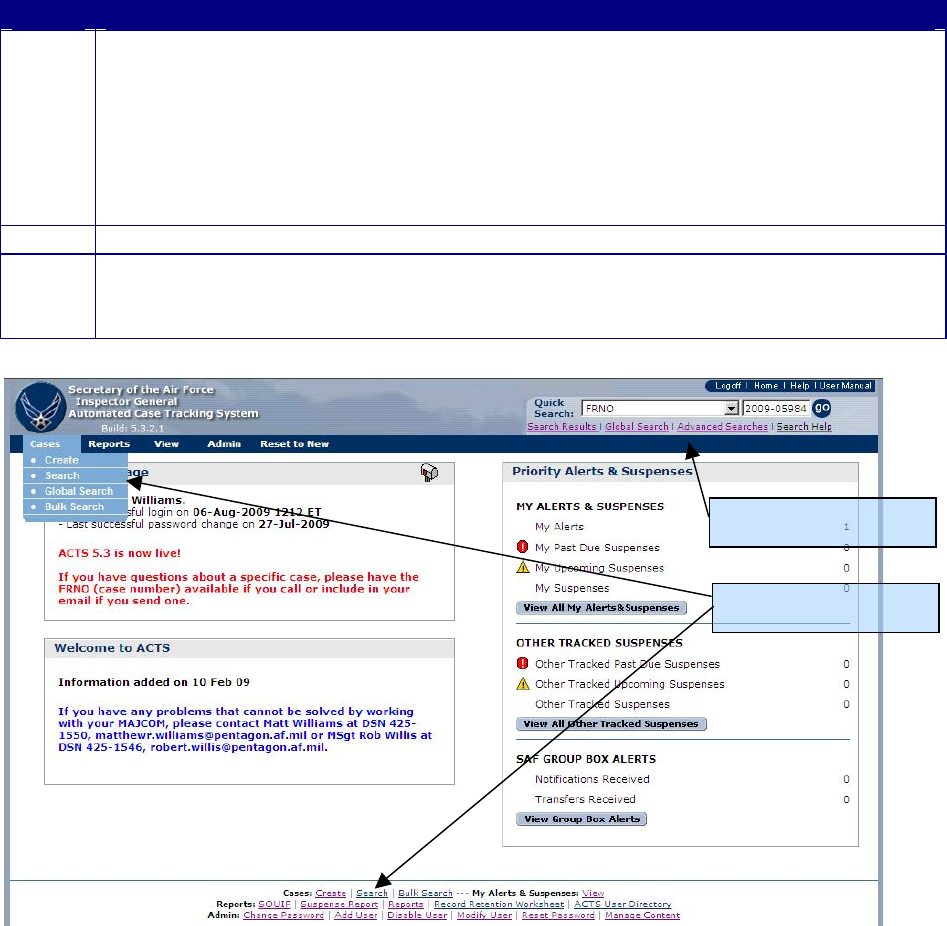
CHAPTER 6 – SEARCH
Introduction
ACTS provides various methods for locating existing records. Organizational hierarchy allows
users to view or edit only records owned by their IG office or the offices that report to them, or
records transferred to them for action.
Search for Existing Case
This section provides step-by-step instructions to assist you in finding records to download,
print, view, or modify.
Step
Action
Step 1
• Select the “Cases” tab in the Navigation Bar; then select “Search” from the
dropdown menu (figure 6-1)
• or click on “Search” in the Footer of the Home Page (figure 6-1)
• or click on “Advanced Searches” in the header (figure 6-1)
NOTE: The “Search” dropdown menu in the header of each ACTS screen is
discussed under Predefined Searches later in this chapter; and accessing cases via
alerts is addressed in Chapter 9 or the on-line help menu
Step 2
• The “Advanced Searches” screen opens (figure 6-2)
TIP: If the user has submitted a search during the current ACTS session, click on
“Search Results” in the header (figure 6-1) to view the most recent search results
screen (figure 6-3)
Figure 6-1. Search.
Search
Advanced Searches
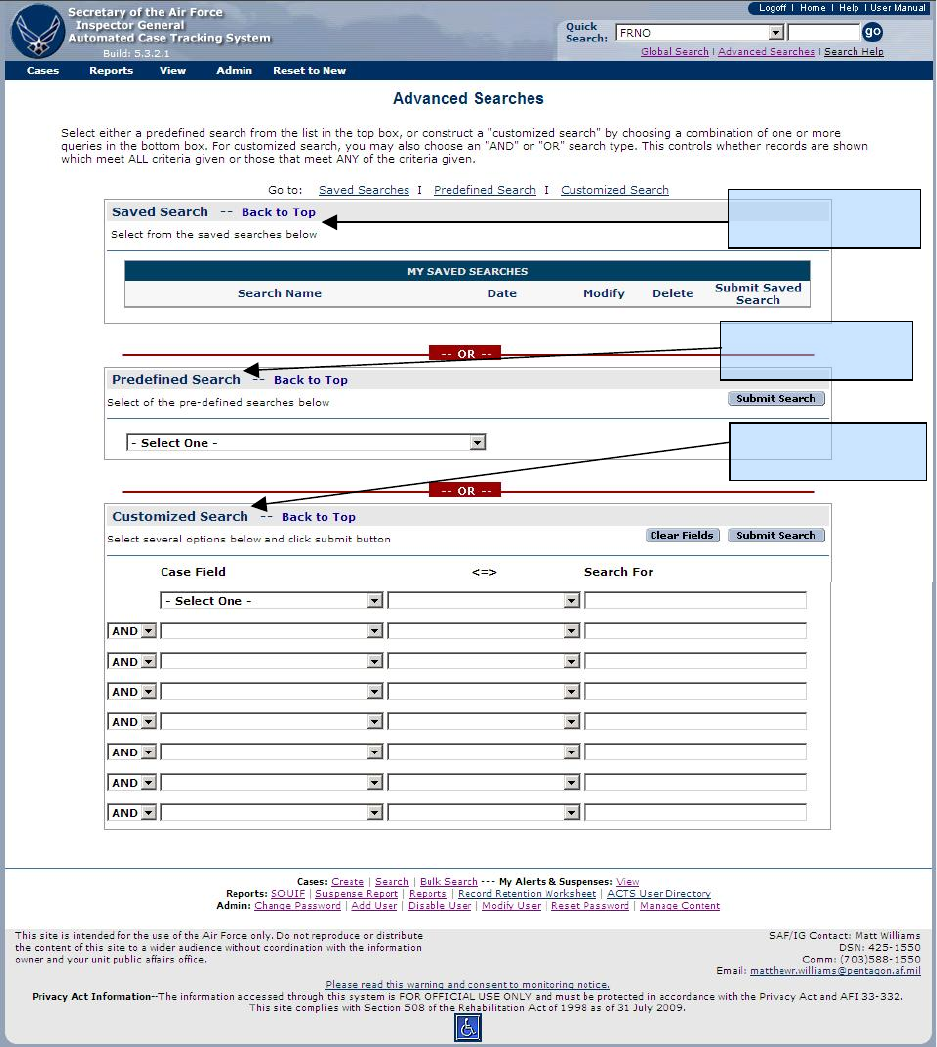
Advanced Searches
Using the Advanced Searches screen, a user may select from saved searches, predefined searches
or build an customized search. A record that has not been submitted will not be found using this
method of search and will be visible only by viewing the originating AO’s alerts. Refer to
Chapter 9 or the on-line help menu for additional information about alerts.
Figure 6-2. Advanced Searches Screen.
Predefined Search
Customized Search
Saved Search
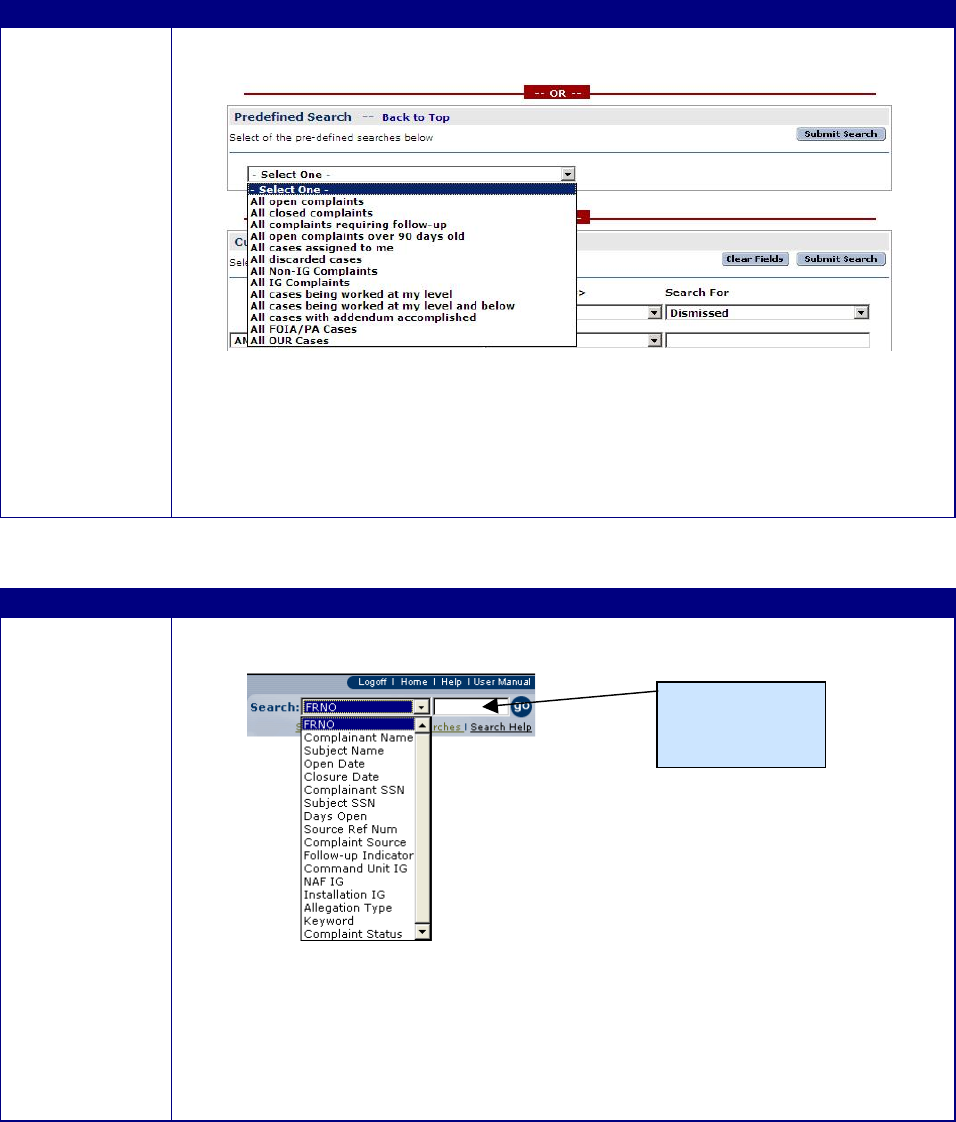
Predefined Searches
ACTS provides predefined searches as a shortcut to commonly used searches. They appear in a
dropdown menu in the middle of the Advanced Searches screen (figure 6-2).
Button
Action
Predefined
Search
• Select the desired criteria in the “Predefined Search” dropdown menu in
the body of the “Advanced Searches” screen.
•
• Click on the “Submit Predefined Search” button
• The “Search Results” screen opens (figure 6-3)
• To exit the “Other Searches” screen and return to the home page, click on
“Home” in the upper right-hand corner of the screen.
TIP: Discarded cases will not be included in search results unless “All
discarded cases” is the search option selected
ACTS also provides a means to initiate simple matching searches from any system screen
Button
Action
Quick Search
• Select the desired criteria in the “Search” dropdown menu in the header of
any ACTS screen.
• Enter a search string. Default criteria is “contains” (e.g., select “FRNO”
and type the search string “2007.” The search result will be all cases with
an FRNO containing “2007”)
• Click on the “Go” button
• The “Search Results” screen opens (figure 6-3)
Enter Search
String
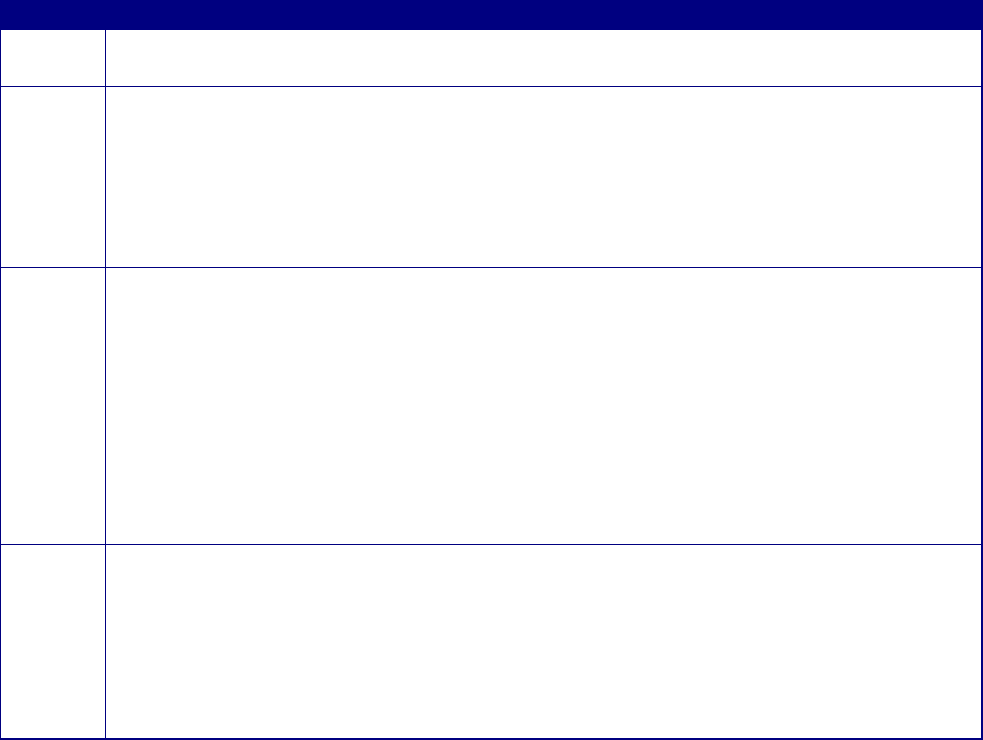
Customized Searches
From the Search screen, users may create advanced matching searches by combining fields,
operators, and text search strings.
Button
Action
Step 1
• Select the desired “Case Field” from the dropdown menu in the body of the “Other
Searches” screen.
Step 2
• Select the desired “Operator” from the dropdown menu in the body of the “Other
Searches” screen. Options include
• > The query results will be greater than the value specified
• < The query results will be less than the value specified (only used for date fields)
• = The query results will exactly match the value specified
• not equal The query results do not match the value exactly
• contains The query results contain the value specified in whole or in part
• is empty The field is blank
Step 3
• Under “Search For” enter a search string that satisfies the search result you seek
• Refine the search by adding up to seven additional criteria. Select “And” or “Or”
from the dropdown menu on subsequent lines of the advanced search menu; then
add a field, operator and search string to compose a search to meet your needs.
Some criteria, e.g. “complaint source type” have a separate drop down menu, since
there are specific types for that criterion. See figure 6.3
TIP: You can use a case field multiple times to compose a search query. For
instance you may have advanced customized search for cases where the open date
is greater than 1 Jun 07 and where the open date is less than 1 Jul 07. Users
cannot mix “And” and “Or” connectors in the same search
Step 4
• Click on the “Submit Search” button or on the “Clear Fields” button to clear the
Customized Search options previously entered
• The “Search Results” screen opens (figure 6-3)
• Click on “Modify Search” to change the criteria in step four above to submit a new
search.
• To exit the “Other Searches” screen and return to the home page, click on “Home” in
the upper right-hand corner of the screen.
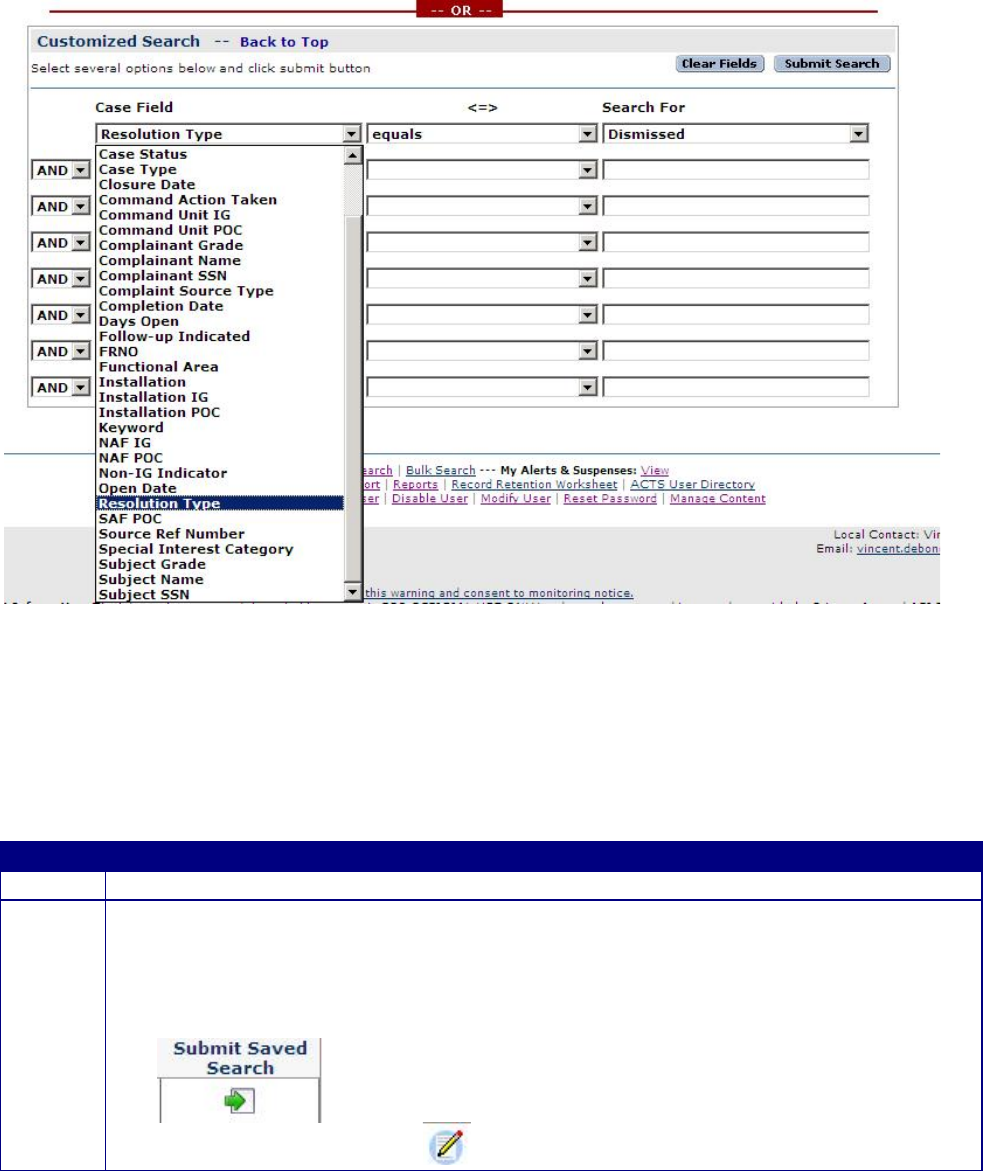
Figure 6-3. Customized Searches Screen.
Saved Searches
ACTS can save a customized search for frequently used search parameters (figure 6-2).
Button
Action
Step 1
• Follow steps one through four of “Customized Searches”.
Step 2
• Click on “Save this Search” to save the search for reuse.
• Put a title in the “Search Results Name” text box
• Click on “Save”
• Click on the “Submit Saved Search” button by your saved search on the “Advanced
Searches” page
•
• Click the “Modify” button to edit your saved search.
Search Results
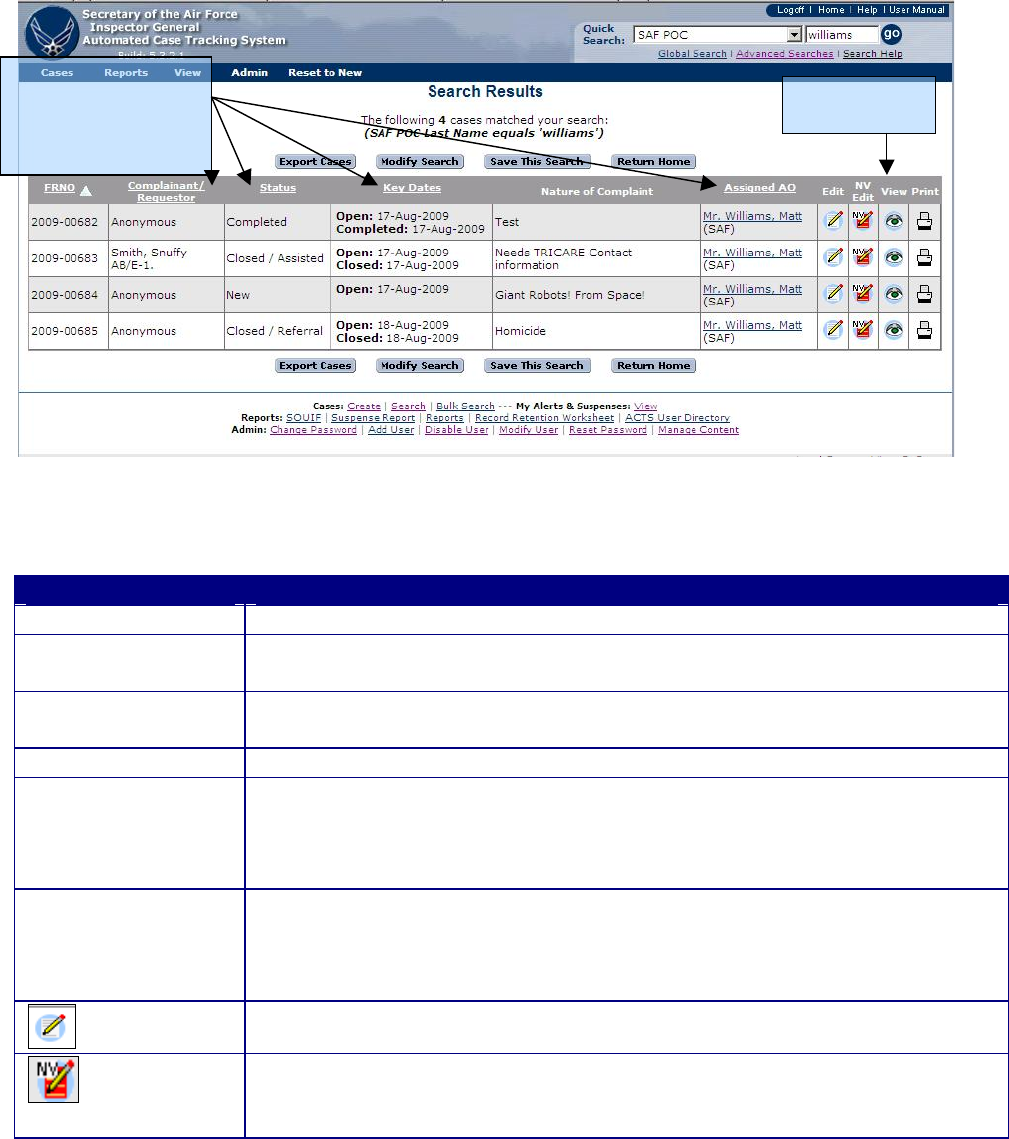
The “Search Results” screen layout (figure 6-4) is the same whether a user’s search was initiated
using predefined or advanced search features. If the search does not find the record(s) that meets
the search criteria, the search results screen will display a message, “*No matching cases found.”
Alternate gray and white bands on the Search Results screen separate the cases. This is merely a
tool to assist in reading the search results.
Figure 6-4. Search Results Screen.
Information and access may be limited if the case is no longer assigned to you or your office.
The following explains the fields and buttons visible in the search results screen (figure 6-3).
Field
Explanation
FRNO
• Case file reference number automatically assigned by ACTS
Complainant/
Requestor
• Complainant’s or Requestor’s grade/rank, last name and first initial
Subject (if searched
on)
• Subject’s grade/rank, last name and first name(s) if Subject Name was
searched on using a Global or Advanced Search
Key Dates
• Open date and closed date
Nature of Case
• The first three lines of text entered into the nature of case block
summarizing the case
TIP: Hold the mouse pointer over the nature of case text to
temporarily show the entire summary
Assigned AO
• Action officer currently assigned to the case
TIP: Click on the AO’s name to open an email to the AO. Hold the
mouse pointer over the AO’s name to temporarily show the AO’s duty
phone, if that information was entered in the AO’s user profile
• To edit the data in the selected record
Available only to SAF and CU administrators to edit/modify case data
without applying validation rules. A red warning notice appears at the
top of each data entry screen, advising the user that they are in non-
Click Underlined
heading to sort A-Z.
Click again to reverse
sort. Next sort
defaults to FRNO
Alpha order
Click to view
records
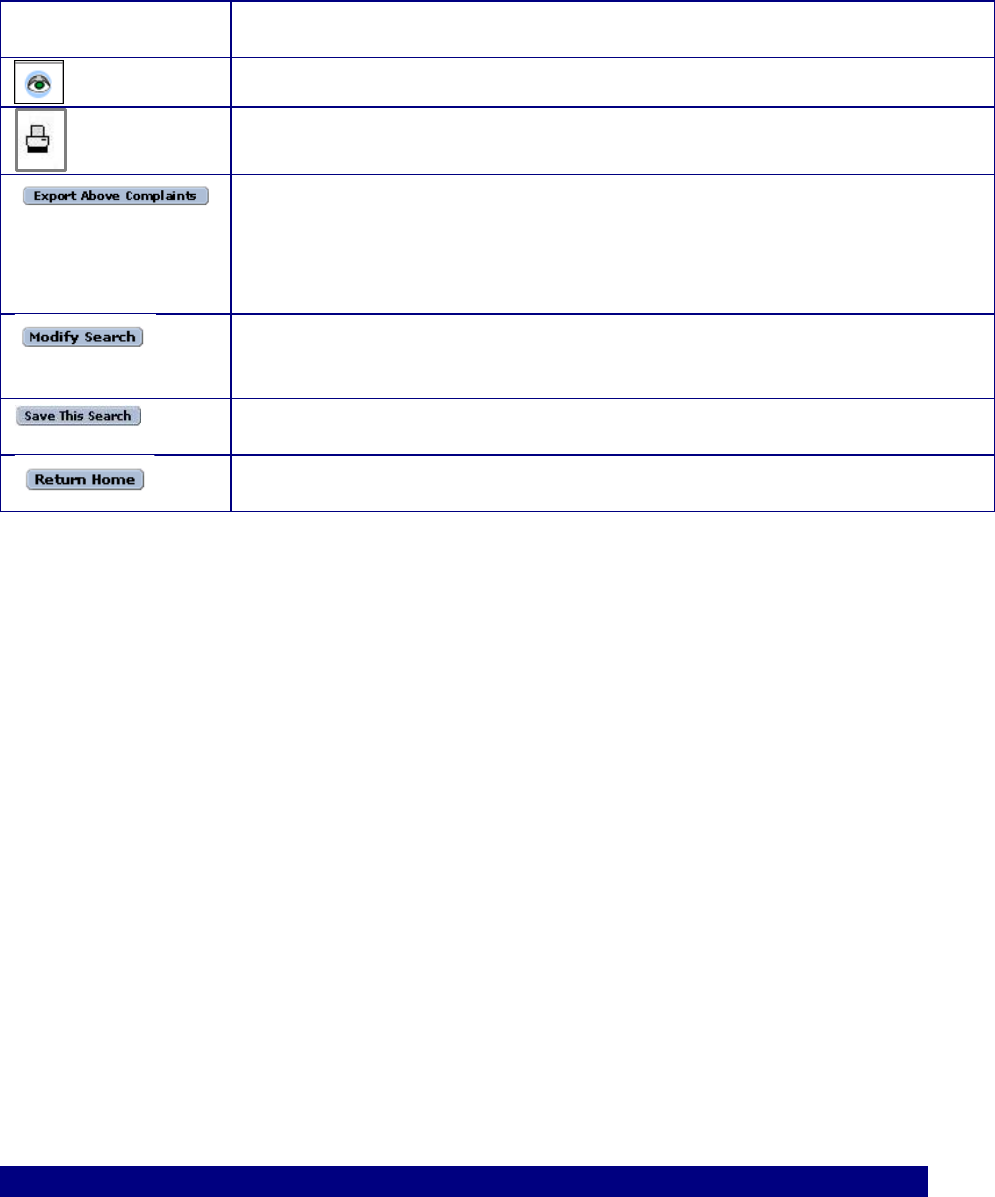
validation mode. Use this feature cautiously, as it may result in invalid
data entry
• To view (read-only) the case data tabs for the selected record
• To print a Case File Worksheet for the selected record
• To download all the data for the cases identified in the search results,
click on the “Export Above Cases” button at the bottom of the Search
Results screen. Refer to chapter 11 for additional information on
working with Exported data to create customized reports and statistical
analysis
• To modify the search results (return to the “Other Searches” screen),
click on the “Modify Search” button at the bottom of the Search Results
screen
• To save the search criteria and return to the “Advanced Search” page,
click on the “Save This Search” button
• To exit the search results and return to the Home Page, click on the
“Return Home” button at the bottom of the Search Results screen
TIP: To return to the last search result screen accessed during the current ACTS session,
click on “Search Results” in the header of any ACTS screen.
Exiting the Case from Edit/NV Edit/View/Print Mode.
When opened from “View”, options at the top and bottom of the page include “Modify”, “Print
Case File Worksheet”, and “Cancel.” If the user has NV Edit capabilities the “Modify in Non-
Validation Mode” option will appear at the bottom of the page. If opened from “Edit”or “NV
Edit”, the options are “Apply”, “Submit Complaint”, and “Undo All Changes.” The options are
described below.
TIP: Once an edit session is opened (“Edit”, ”Modify”, or “NV Edit”), an Alert will remind
the AO that an edit session is in progress. To save and close the current edit session, select
“Submit Complaint.” To cancel the current edit session without saving, select “Undo All
Changes”. (This action will undo any changes made since the last “Submit Complaint”
action.)
Button
Action

Modify
• To exit the read-only “View” mode and open the current case for
edit
TIP: Two users cannot modify a case simultaneously. Refer to
figure 6-5 and information in “Case Currently Being Edited”
paragraph following
Print Case File
Worksheet
• Click on the “Print Case File Worksheet” button to open and print
the worksheet. Once the Case File Worksheet is opened, you may
return to the previous screen by clicking on the “Close Window”
button
Cancel
• To exit the View mode and return to the Home Page, click on the
“Cancel” button at the bottom of the page
Modify in Non-
Validation Mode
• Available only to SAF and CU administrators to edit/modify case
data without applying the typical validation rules. A red warning
notice appears at the top of each data entry screen, advising that
the user is in non-validation mode. Use this feature cautiously, as
it may result in invalid data entry
TIP: Two users cannot modify a case simultaneously. Refer to
figure 6-4 and information in “Case Currently Being Edited”
paragraph following
Apply
• The “Apply” button allows users to save data and return to the
session at a later time with additional or corrected information
• Changes are saved to a temporary location visible only to the
originating AO until submitted
• Data is not validated until submitted
• An alert will be generated for the case indicating Edit Session in
Progress until the case is submitted
TIP: Changing from one screen to another applies changes.
Submit Complaint
• Records changes, validates data, and submits data to the ACTS
system.
• The user is notified that the validation is successful (figure 5-14) or
unsuccessful (figure 5-15)
− If successful, the user may return to the home page by
clicking on “Done” , “Edit Case”, or “Print Case File
Worksheet.” Refer to Chapter 8, Reports, or the on-line help
menu for additional information.
− If unsuccessful, correct the errors and resubmit. The system
will generate an alert indicating Edit Session in Progress
until the case is successfully submitted
Undo All Changes
• The system will remove all changes made since last submitted and
release your lock on the case. Removes all data from the screen
and removes the un-submitted changes from the system
Case Currently Being Edited.
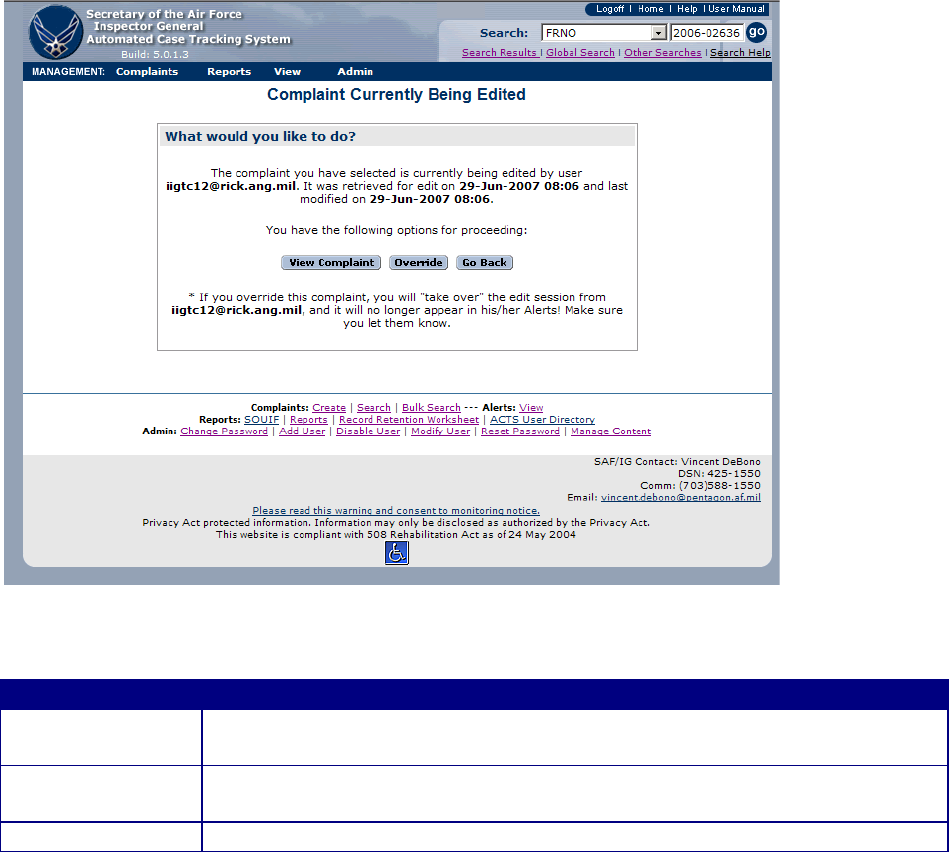
Two users cannot modify a case simultaneously. If you select a case to modify that is currently
being edited by you, you may resume the existing edit session, cancel the existing edit session, or
go back to the previous screen (figure 6-4).
Figure 6-5. Case Currently Being Edited Screen.
Button
Action
Resume previous
edit
• Reopens the previous edit session. The edit session remains open until
the case data is submitted
Cancel previous
edit
• Removes all changes that were made after the case was opened for edit
and before it was submitted
Go back
• Returns the user to the previous menu
TIP: If you open a case being edited by another user, depending on your hierarchical status
you may assume the edit session, including any changes made by the other user, and remove
the edit session from the other user. Do not resume or cancel another user’s edit session
without contacting them first.
CHAPTER 7 – ACTIONS
Introduction
Actions refer to the processes and resolutions that AOs use in the cases resolution process (i.e.,
Investigate, Refer, Assist, Dismiss, Transfer, Notify, and Discard). Actions ensure that business
rules are properly enforced when a change is made to the status of a case. This behavior ensures
that all cases move through the cases resolution process in a consistent and predictable manner,
allowing stakeholders of the complaint resolution to rely on the status information provided by
ACTS. The system will not allow users to move cases through the complaints resolution process
improperly. Actions are visible only when a case is being created or edited (not in the view
[read-only] mode); and must be submitted before they are recognized in the ACTS system.
When an action is selected, the system will redisplay the case, enabling certain fields, marking
others mandatory, locking some fields, and in some cases reassigning the case to another AO or
organization. The system will also display instructions about completing the action.
Case Transition States
All cases in ACTS are automatically assigned a status relative to the cases resolution process.
The diagram in figure 7-1 depicts the statuses and valid transitions between them. Following is a
brief overview of the automated statuses and actions associated with each.
New.
The case has been created and is awaiting resolution. Allowable actions include:
• Discard. Moves case to Discarded state
• Assist. Moves case to Completed state
• Assist/Close. Moves case to Closed state
• Dismiss. Moves case to Completed state
• Dismiss/Close. Moves case to Closed State
• Refer. Moves case to Completed state
• Transfer. Does not change state; moves ownership to receiving AO
• Investigate. Moves case to Under Investigation state
• Notify. Does not change state and does not change ownership
Under Investigation.
Select “Investigate” on the “Actions” tab of the Menu bar when an AO has analyzed the case and
determined an IG investigation is appropriate. Allowable actions include:
• Complete. Moves case to Completed state
• Transfer. Does not change state, but moves ownership to receiving AO
• Notify. Does not change state and does not change ownership
Completed.
All resolution actions will pass through the Completed state (figure 7-1). If investigated, select
“Complete” from the “Actions” tab on the Menu bar when investigative actions have been
completed IAW AFI 90-301. If “Dismiss” or “Refer” were selected as the resolution action, the
case will enter the completed state when the record is submitted for validation. Other allowable
actions include:
• Close. Moves case to Closed state
• Transfer. Does not change state; moves ownership to receiving AO
• Notify. Does not change state and does not change ownership
Closed.
Select “Close” from the “Actions” tab on the Menu bar when the resolution action is completed
IAW AFI 90-301, typically when the complainant has been notified of final response. The
Closed state is final. However, certain information may be entered after the case is closed, i.e.,
case notes.
Discarded.
The AO determined that the case was a duplicate or entry error. The system records the case, but
marks it such that it is ignored—it still responds to search if the AO searches for “all discarded
cases.” The Discarded state is final; there are no allowable actions.
Transition States
Figure 7-1. Transition States.
State
s
Action
s
Key
State
transition
No state
transition
Assist
New
Dismiss
Refer
Notify
Transfer
Investigate
Discard
Closed
Complete
d
Under
Investigation
Discarde
d
Complete
Close
Create
Dismiss/
Close
Assist/
Close
Investigate
Select “Investigate” when the complaint analysis of the allegations indicates an investigation is
warranted. When the Investigate action is submitted, ACTS will automatically reassign the
status from New to Under Investigation, and will generate alerts to assist the AO in tracking the
case until closure. Refer to Chapter 9, Alerts & Suspenses, or the online help menu for additional
information about alerts.
Step
Action
Step 1
• Open case in edit mode
Step 2
• Select “Investigate” from the “Actions” menu
Step 3
• The case opens with a Case Action Notice at the top of the screen (figure 7-2),
identifying the mandatory information
Step 4
• Click on the “Submit Complaint” button
− Successful submission results in a successful validation screen opening
(Figure 5-21) and case status changes to Under Investigation
− Unsuccessful submission will identify any errors that must be corrected
(Figure 5-22)
− Refer to the online help menu or Chapter 5 for additional information
about successful and unsuccessful validations
Figure 7-2. Case Action Notice for Investigate.
Once a record has been successfully submitted, and is Under Investigation, additional date fields
will open on the Suspenses/Dates tab to document the 14-Step Process (AFI 90-301) (figure 7-3).
As the investigation progresses, additional date fields will become available.
Figure 7-3. Additional Date Fields Available for Under Investigation.
Complete
Completed marks the next step in the ACTS complaints resolution process.
Step
Action
Step 1
• Open case in edit mode
Step 2
• Select “Complete” from the Actions tab on the Menu bar when the
investigation has been approved by the Appointing Authority and forwarded
to higher level (as appropriate) for review and follow-up
Step 3
• When “Complete” is selected for an investigation, the case opens with a Case
Action Notice on top of the screen (figure 7-4)
TIP: Investigations require entering at least one subject and allegation
Step 4
• Submitting the Case
− Successful submission results in a successful validation screen opening
(figure 5-21) and case status changes to Completed
− Unsuccessful submission will identify any errors that must be corrected
(figure 5-22)
• Refer to online help or Chapter 5 for additional information about successful
and unsuccessful validations. Reminder: changes are not visible up or
down the chain until successfully submitted
Figure 7-4. Selecting Complete From Menu Bar.
Figure 7-5. Case Action Notice for Complete Investigation.

Close
“Closed” marks the final step in the complaints resolution process.
Step
Action
Step 1
• Open case in edit mode
Step 2
• Select “Close” from the Actions tab on the Menu bar
Step 3
• The case opens with a Case Action Notice at the top of the screen (figure 7-6)
Step 4
• Click on the “Submit Complaint” button
• Successful submission results in a successful validation screen opening (figure 7-7).
Case status changes to Closed.
• A successful submission on a closed case will establish a record disposition date
based on the closure date. This date will be displayed on the validation screen
(figure 7-7), and the bottom of the Suspenses/Dates tab of the case (figure 7-9).
Unsuccessful submission will identify any errors that must be corrected (figure
5-22)
• Refer to the online help menu or Chapter 5 for additional information about
successful and unsuccessful validations
Step 5
• Print Case File Worksheet (if needed)
Figure 7-6. Complaint Action Notice for Close Investigation.
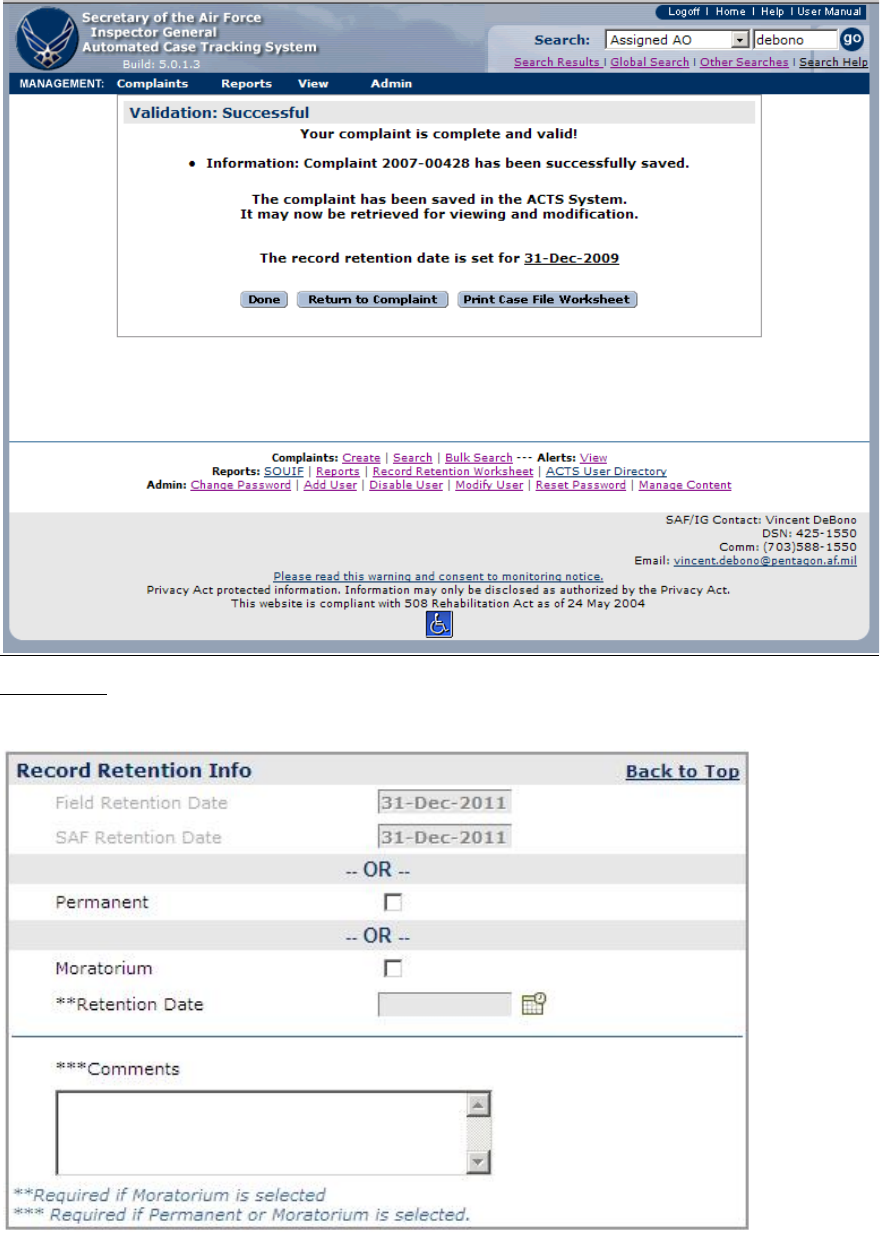
Figure 7-7. Closed Case: Validation Status - Successful.
Figure 7-8. Record Disposition Information for Closed Case.

Transfer
Transfer actions do not change case status. When submitted, ACTS will automatically generate
alerts to track the transfer action. Refer to Chapter 9, Alerts, or the online help menu for
additional information about alerts.
Step
Action
Step 1
• Open case in edit mode
Step 2
• Select “Transfer” from the Actions tab on the Menu bar
Step 3
• The Transfer Information screen opens (figure 7-9), to initiate the transfer.
Mandatory information is designated by an asterisk (*)
- Receiving Office Type. Dropdown list varies with sending office type
selected. Transfers are restricted to one level up or down the IG chain.
CUs can transfer to other CUs
- Receiving Office. Dropdown list varies with receiving office type
selected. Transfers are restricted to one level up or down the IG chain.
CUs can transfer to other CUs
- Receiving Action Officer. Dropdown list varies with receiving office
selected
- Transfer Note. Explains the reason for transferring the case
Step 4
• Click on the “Submit Complaint” button
• Successful submission results in a successful validation screen opening
(figure 5-21). Case status does not change; however, ACTS will generate an
alert to indicate case sent, until the receiving AO accepts the transfer by
opening the case in edit mode and submitting it
• Unsuccessful submission will identify any errors that must be corrected
(figure 5-22)
• Refer to the online help menu or Chapter 5 for additional information about
successful and unsuccessful validations
TIP: If an unsuccessful validation advises a user they neglected to add a
transfer Note, the user can select the “Case Notes” tab to enter the
transfer Note ; then resubmit the case
Cancel
Transfer
Action
• If a transfer action is begun prematurely, a user may exit the transfer
information screen by clicking on the “Back to Main Tab” button on the
left-hand side of the screen. To remove the transfer action, click on the
“Remove” button in the transfer history (Main Tab) or “Case Notes” tab
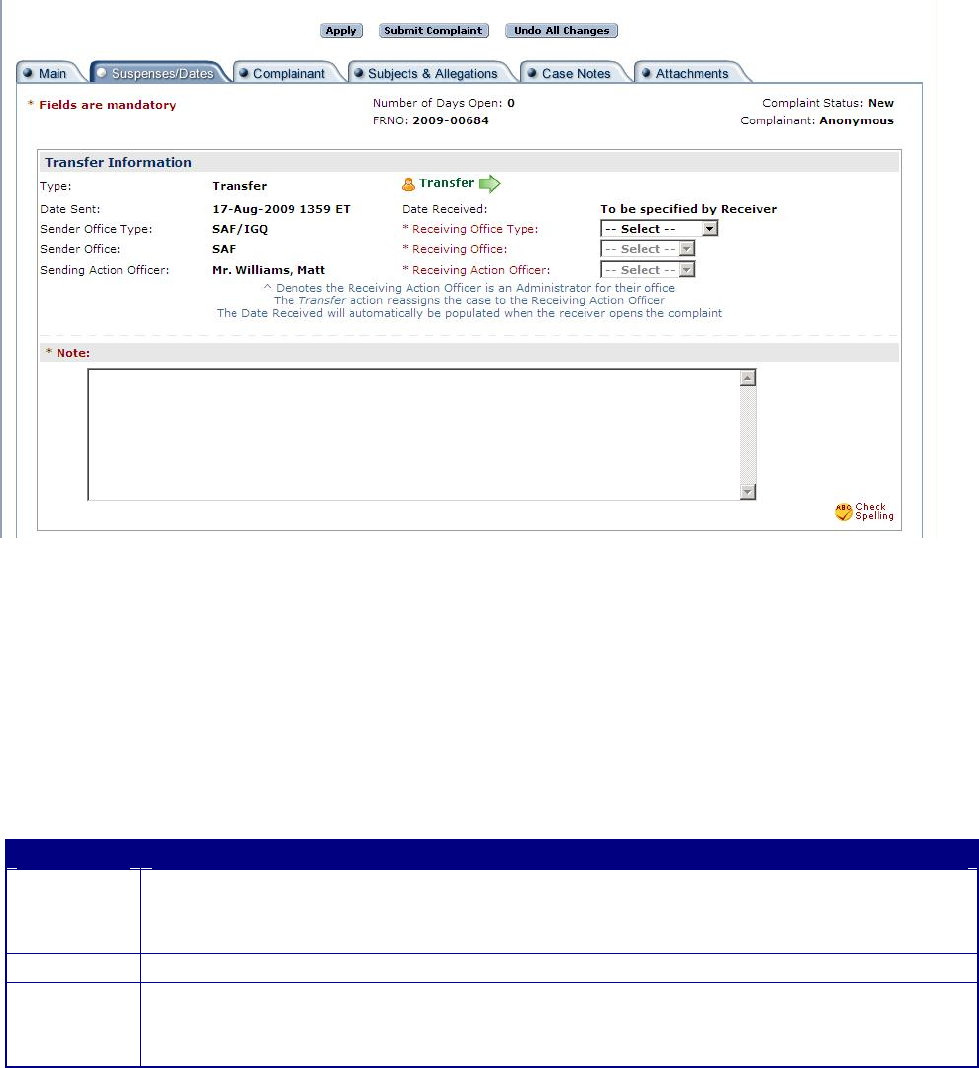
Figure 7-9. Transfer Information Screen.
Receiving Transferred Cases.
A “case sent” alert is automatically generated for the sending AO; and a “case received” alert is
generated for the receiving AO, whenever a case is successfully transferred. The alerts remain
visible to the respective AOs until the case is accepted by the receiving AO. The receiving AO
will receive all future alerts.
Step
Action
Step 1
• The receiving AO must open the transferred case in edit mode
• A Case Transfer Notice (figure 7-11) opens and displays instructions for accepting
the case, and the transfer note from the AO transferring it
Step 2
• Click on the “Proceed” button to open the case tabs
Step 3
• Click on the “Submit Complaint” button. The case sent/received alerts will be
removed
• View the transfer Note in the Case Notify/Transfer History and Case Notes
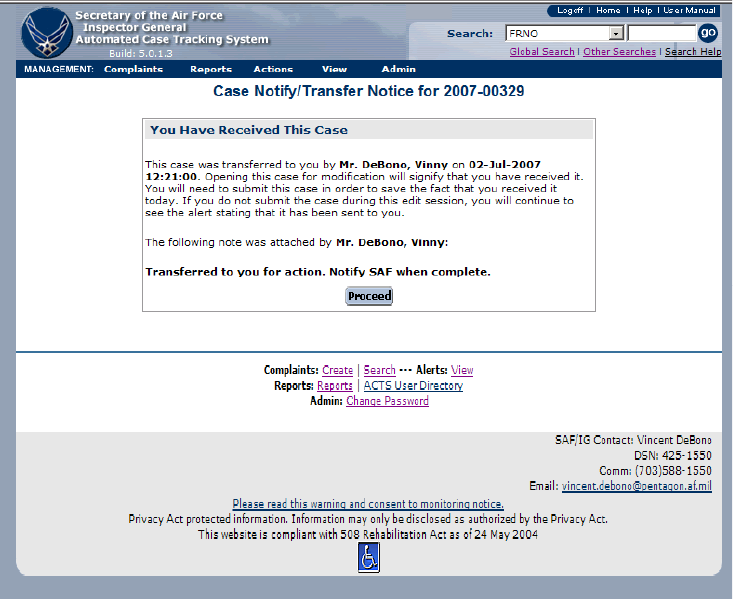
Figure 7-10. Case Notify/Transfer Notice Screen.
Notify
Select the “Notify” action when providing notifications up or down the IG chain. Unlike most
other ACTS Actions, Notify is not a resolution. Notify actions do not change the status or
ownership of the case. The sending AO retains ownership and will continue to receive alerts.
When a Notify action is submitted, ACTS will generate alerts to track the action. Refer to
Chapter 9, Alerts, or the online help menu for additional information about alerts.
TIP: Use “Notify” as a way of tracking and recording communication among IGs, rather
than sending email.
Step
Action
Step 1
• Open case in edit mode
Step 2
• Select “Notify” from the “Actions” tab on the Menu bar
Step 3
• The Notify Information screen opens (figure 7-11), to initiate the notification.
Mandatory information is designated by an asterisk (*)
- Receiving Office Type. Dropdown list varies with sending office type
selected. Notifies are restricted to one level up or down the IG chain.
CUs can notify other CUs
- Receiving Office. Dropdown list varies with receiving office type
selected. Notifies are restricted to one level up or down the IG chain.
CUs can notify other CUs
- Receiving Action Officer. Dropdown list varies with receiving office
selected
- Notify Note. Explains the reason for notification
Step 4
• Submit Complaint
• Successful submission results in a successful validation screen (figure 5-21).
Case status does not change; however, ACTS will generate an alert to
indicate case sent, until the receiving AO accepts the case by opening the
case in edit mode and submitting the case
• Unsuccessful submission will identify any errors that must be corrected
(figure 5-22)
• Refer to the online help menu or chapter 5 for additional information about
successful and unsuccessful validations
TIP: If an unsuccessful validation advises a user they neglected to add a
Notify note, the user must select “Edit” in the Case Notify/Transfer History
(Main Tab), add comments to the Notify Note block; then submit the case
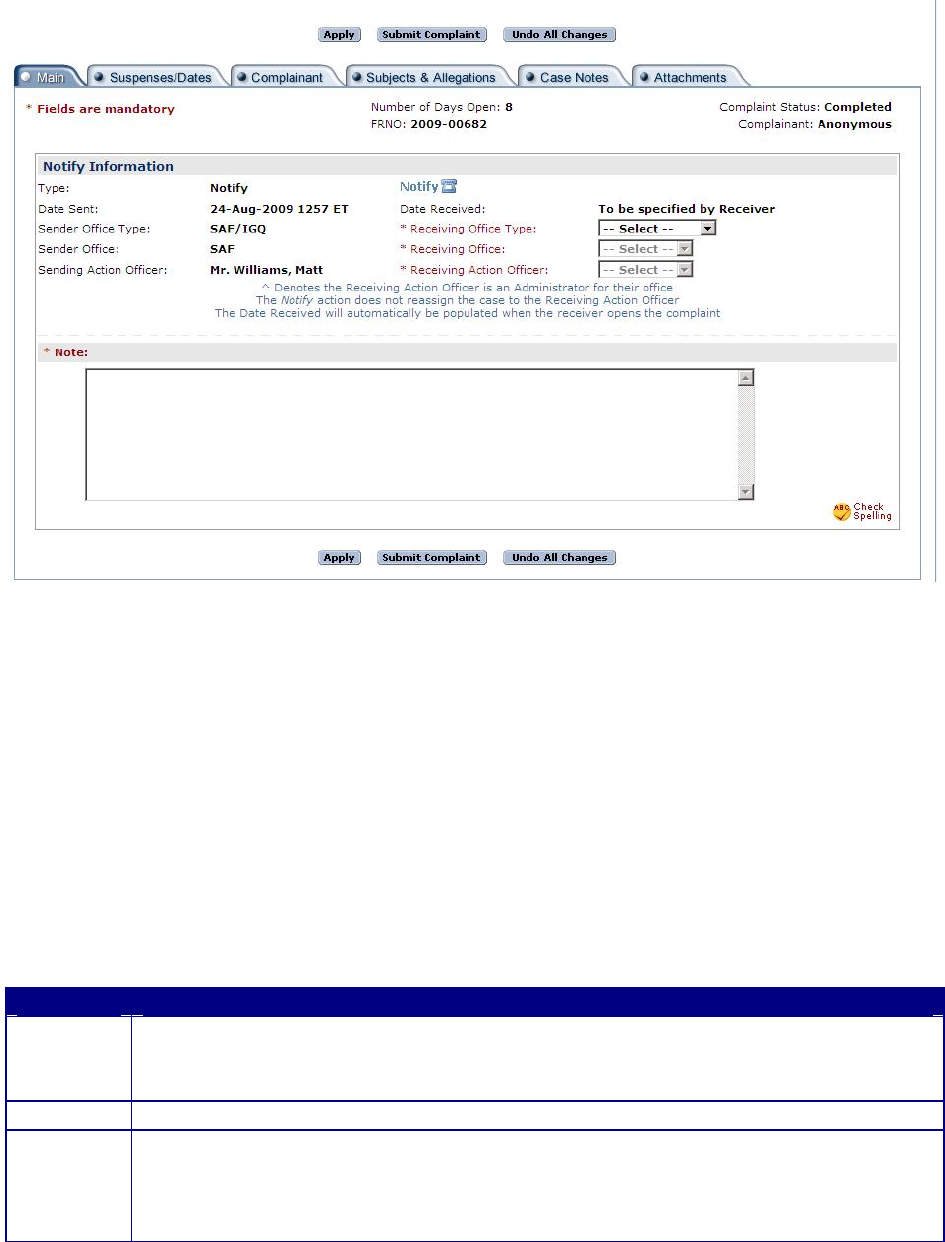
Figure 7-11. Case Notify Information Screen.
Receiving Notifications.
When an AO sends a notification, ACTS will generate an alert notifying the receiving AO that
“case received.” Ownership of the case will not be transferred.
Step
Action
Step 1
• The receiving AO must open the case in edit mode
• A Case Notification Notice (figure 7-12) opens and displays instructions for
receiving the notification, and the sending AO’s note
Step 2
• Click on the “Proceed” button to open the case
Step 3
• Click on the “Submit Complaint” button. Case sent/received alerts will be
removed
• View the notification Note in the Case Notify/Transfer History and Case
Notes
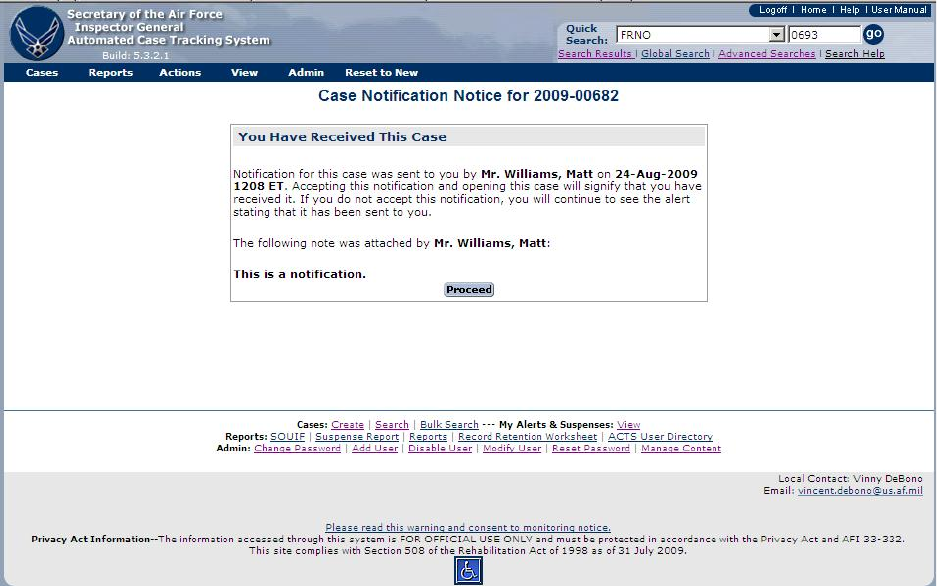
Figure 7-12. Case Notification Notice.
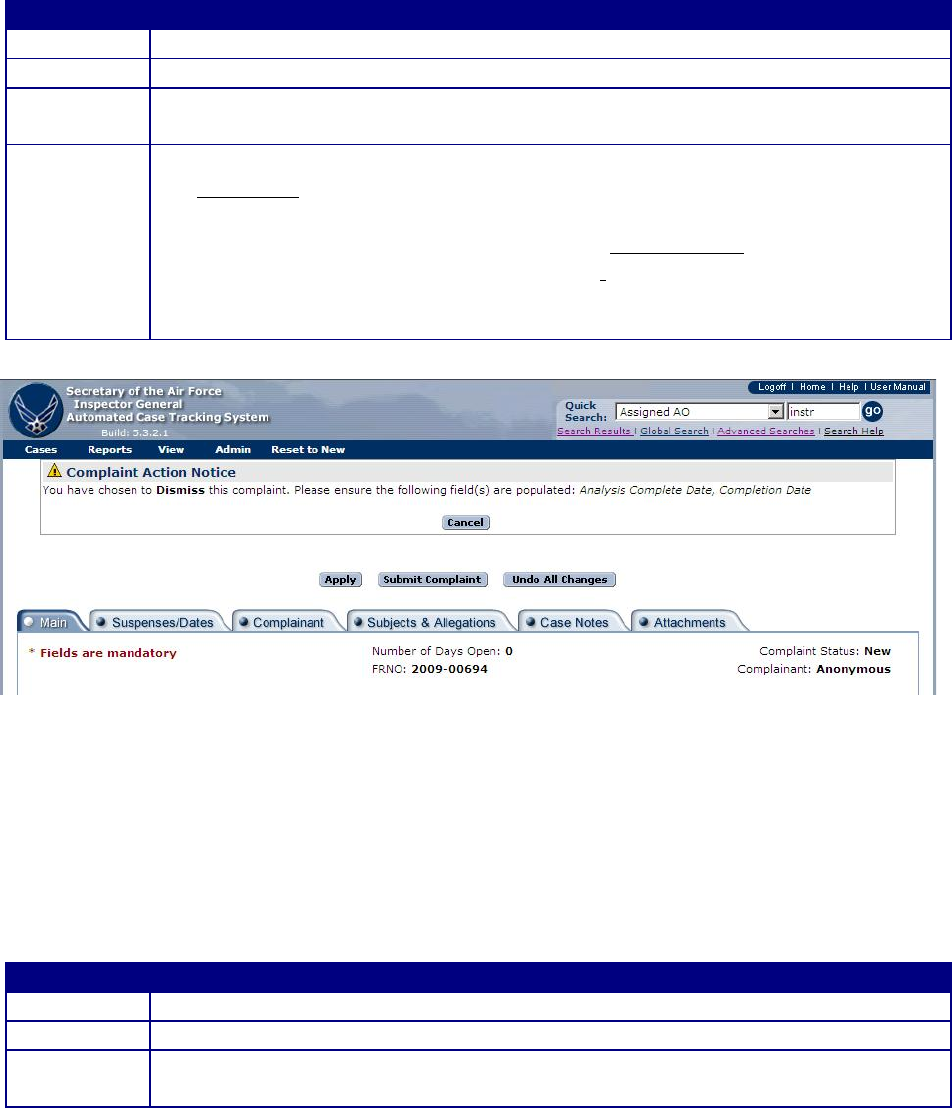
Dismiss
This action results in case being Completed. Only cases with a New status can be dismissed.
Step
Action
Step 1
• New case in edit mode
Step 2
• Select “Dismiss” from the “Actions” tab on the Menu bar
Step 3
• The case opens with a Case Action Notice at the top of the screen (figure 7-13)
identifying the mandatory information
Step 4
• Click on the “Submit Complaint” button
• Successful submission results in a successful validation screen opening
(figure 5-21). Case status changes to Completed. The follow-up suspense
may be added on the Suspenses/Dates tab Unsuccessful submission will
identify any errors that must be corrected (figure 5-22 )
• Refer to the online help menu or Chapter 5 for additional information about
successful and unsuccessful validations
Figure 7-13. Complaint Action Notice for Dismiss.
Dismiss/Close
This action results in case being Closed. Only cases with a New status can be dismissed.
Step
Action
Step 1
• New case in edit mode
Step 2
• Select “Dismiss/Close” from the “Actions” tab on the Menu bar
Step 3
• The case opens with a Case Action Notice at the top of the screen (figure 7-14)
identifying the mandatory information
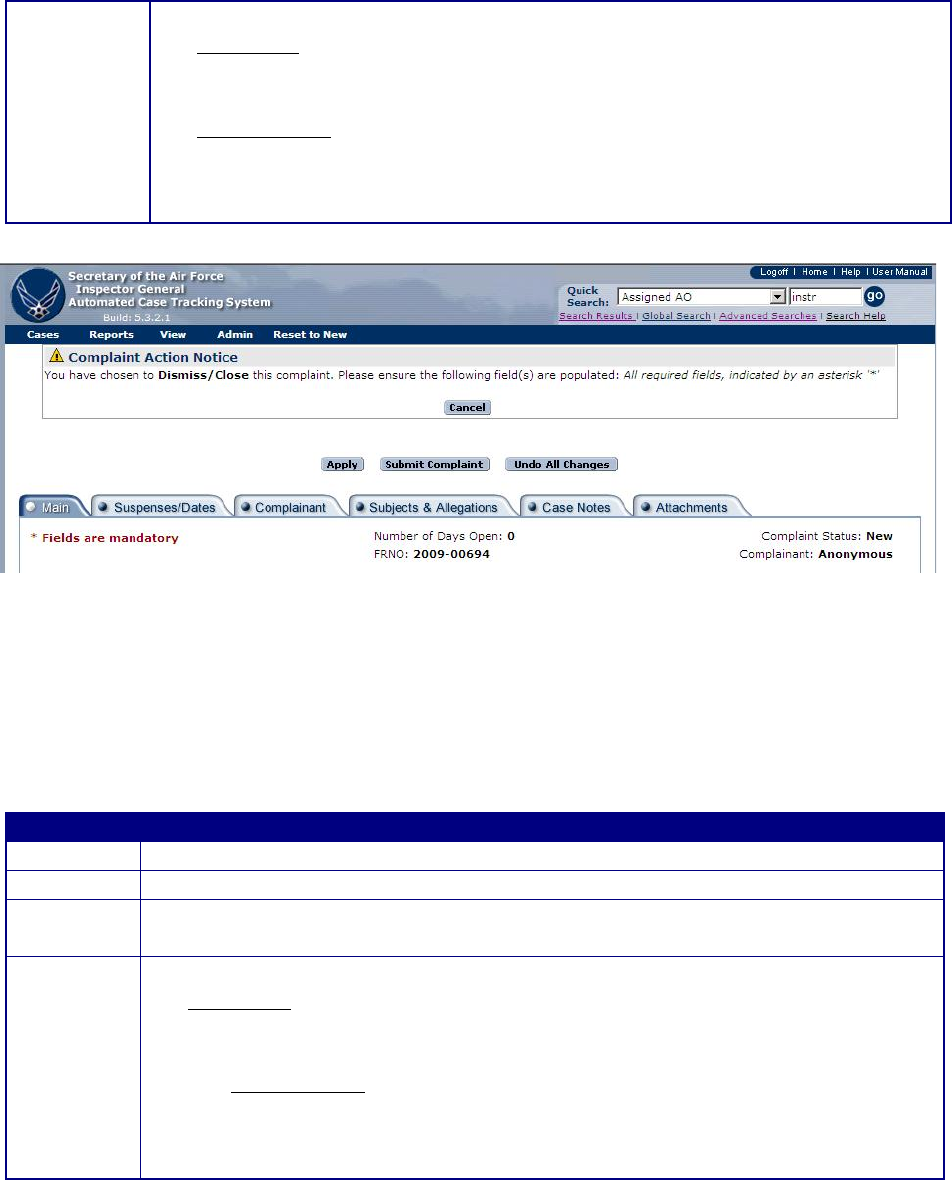
Step 4
• Click on the “Submit Complaint” button
• Successful submission results in a successful validation screen opening
(figure 5-21). Case status changes to Closed. The follow-up suspense may
be added on the Suspenses/Dates tab.
• Unsuccessful submission will identify any errors that must be corrected
(figure 5-22 )
• Refer to the online help menu or Chapter 5 for additional information about
successful and unsuccessful validations
Figure 7-14. Complaint Action Notice for Dismiss/Close.
Assist
This action moves the case status from New to Completed.
Step
Action
Step 1
• Open case in edit mode
Step 2
• Select “Assist” from the “Actions” tab on the Menu bar
Step 3
• The case opens with a Case Action Notice at the top of the screen (figure 7-15)
identifying the mandatory information
Step 4
• Click on the “Submit Complaint” button
• Successful submission results in a successful validation screen opening (figure
5-21). Case status changes to Completed. The follow-up suspense may be
added on the Suspenses/Dates tab.
− Unsuccessful submission will identify any errors that must be corrected
(figure 5-22)
• Refer to the online help menu or Chapter 5 for additional information about
successful and unsuccessful validations
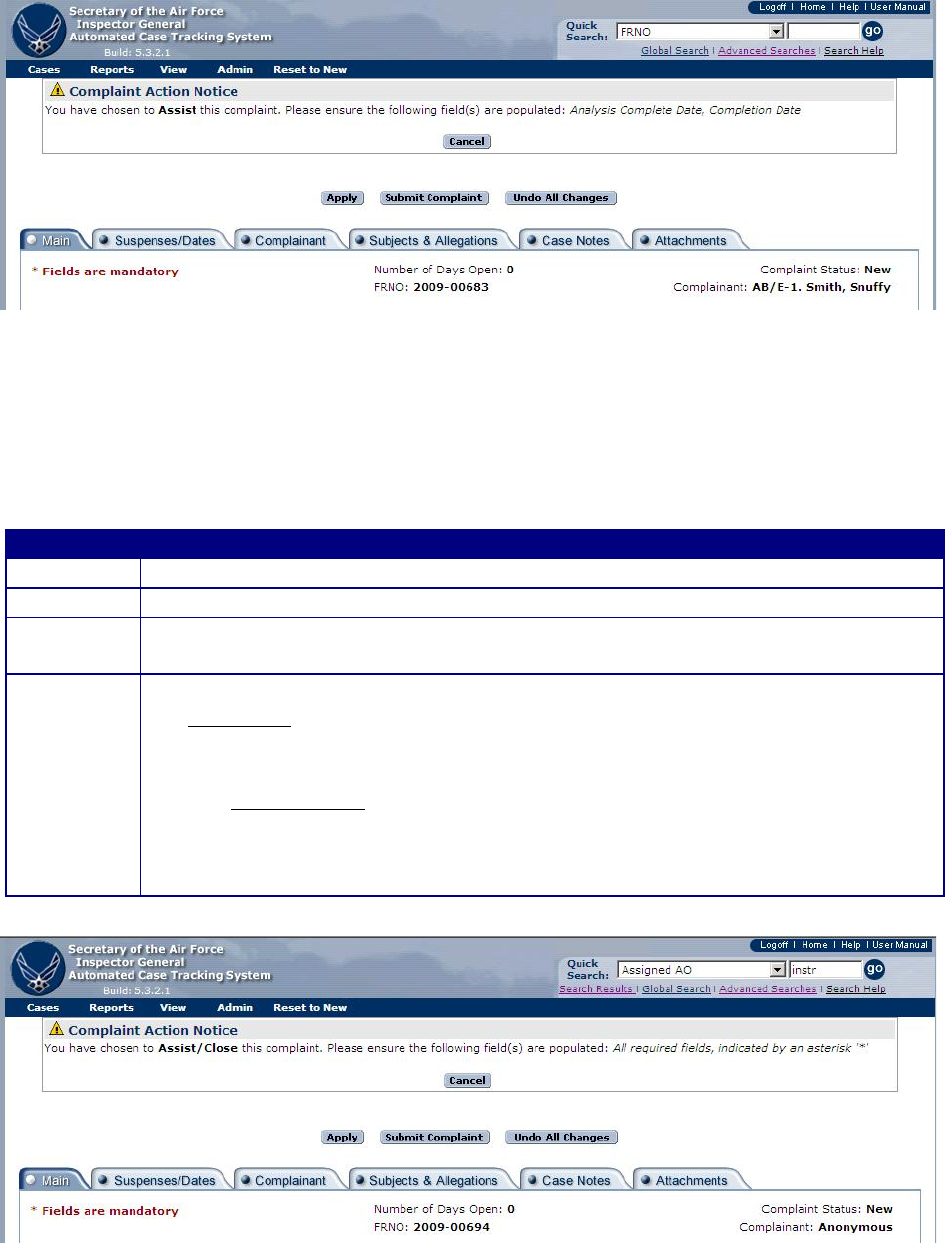
Figure 7-15. Complaint Action Notice for Assist.
Assist/Close
This action moves the case status from New to Closed.
Step
Action
Step 1
• Open case in edit mode
Step 2
• Select “Assist/Close” from the “Actions” tab on the Menu bar
Step 3
• The case opens with a Case Action Notice at the top of the screen (figure 7-16)
identifying the mandatory information
Step 4
• Click on the “Submit Complaint” button
• Successful submission results in a successful validation screen opening (figure
5-21). Case status changes to Closed. The follow-up suspense may be added
on the Suspenses/Dates tab.
− Unsuccessful submission will identify any errors that must be corrected
(figure 5-22)
• Refer to the online help menu or Chapter 5 for additional information about
successful and unsuccessful validations
Figure 7-16. Case Action Notice for Assist/Close.

Refer
This action moves the case status from New to Completed.
Step
Action
Step 1
• Open case in edit mode
Step 2
• Select “Refer” from the “Actions” tab on the Menu bar
Step 3
• The case opens with a Case Action Notice at the top of the screen (figure 7-17)
identifying the mandatory information
Step 4
• Click on the “Submit Complaint” button
• Successful submission results in a successful validation screen opening (figure
5-21). Case status changes to Completed. The follow-up suspense may be
added on the Suspenses/Dates tab.
• Unsuccessful submission will identify any errors that must be corrected (figure
5-22)
• Refer to the online help menu or Chapter 5 for additional information about
successful and unsuccessful validations
Figure 7-17. Case Action Notice for Refer.
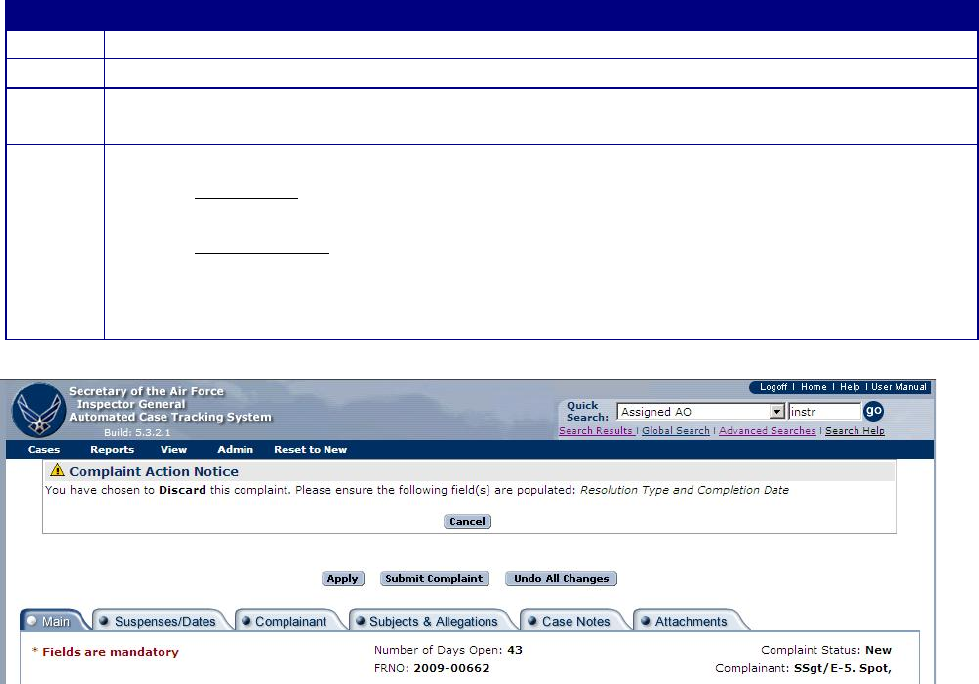
Discard
Discard a case if it was entered in error or if it was a duplicate entry. Only cases with a status of
“New” can be discarded. Discard action closes a case but does not remove it from ACTS for 90
days. Discarded cases are still searchable until they are purged using the advanced search feature
“All Discarded Cases.”
Step
Action
Step 1
• Open case in edit mode
Step 2
• Select “Discard” from the “Actions” tab on the Menu bar
Step 3
• The case opens with a Case Action Notice at the top of the screen (figure 7-18),
identifying the mandatory information
Step 4
• Submit Complaint
− Successful submission results in a successful validation screen opening (figure 5-
21) and case status change to Discarded
− Unsuccessful submission will identify any errors that must be corrected (figure
5-22)
• Refer to the online help menu or Chapter 5 for additional information about
successful and unsuccessful validations
Figure 7-18. Case Action Notice for Discard Action.
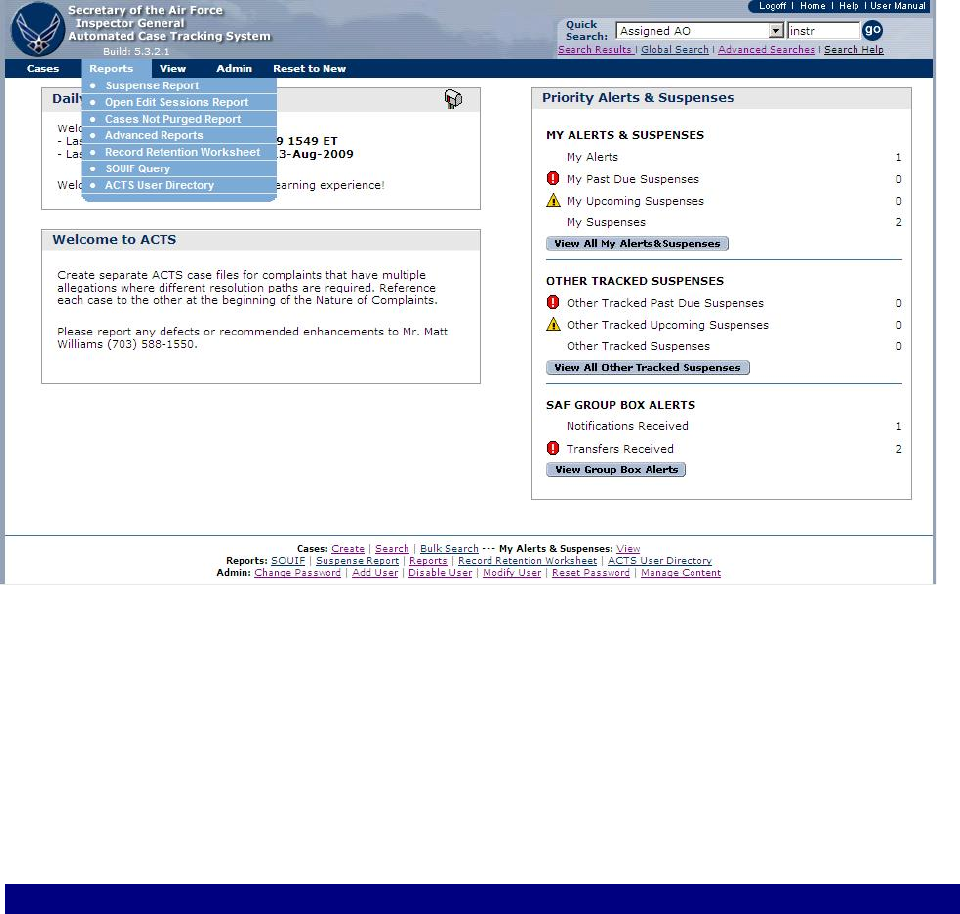
CHAPTER 8 - REPORTS
Introduction
A report is a written record or summary of specified data. It is an efficient way to present data in
a printed format.
Standardized Reports.
Standardized reports are available under the “Reports” tab on the “Management” menu bar (figure
8-1). Not all reports are available at all levels. Reports that are available at all levels include the
“Suspense Report”, “Advanced Reports”, “Record Retention Worksheet” and the “ACTS User
Directory”. The “Case File Worksheet” is a summary report of each case and is described in the
next section.
Figure 8-1. Reports.
Case File Worksheet (CFW)
The CFW is a printer friendly version of key case file information. The CFW serves as a cover
page for the paper case file, if necessary, and includes General Info; Complainant Information
(except address); Resolution (if closed); Milestone Dates (timeline); Originating Source(s);
Special Interest Categories; Allegation Summary; Subject General Info; Subject Allegations; and
Case Notes.
How to Access a Case File Worksheet.
Options
Action
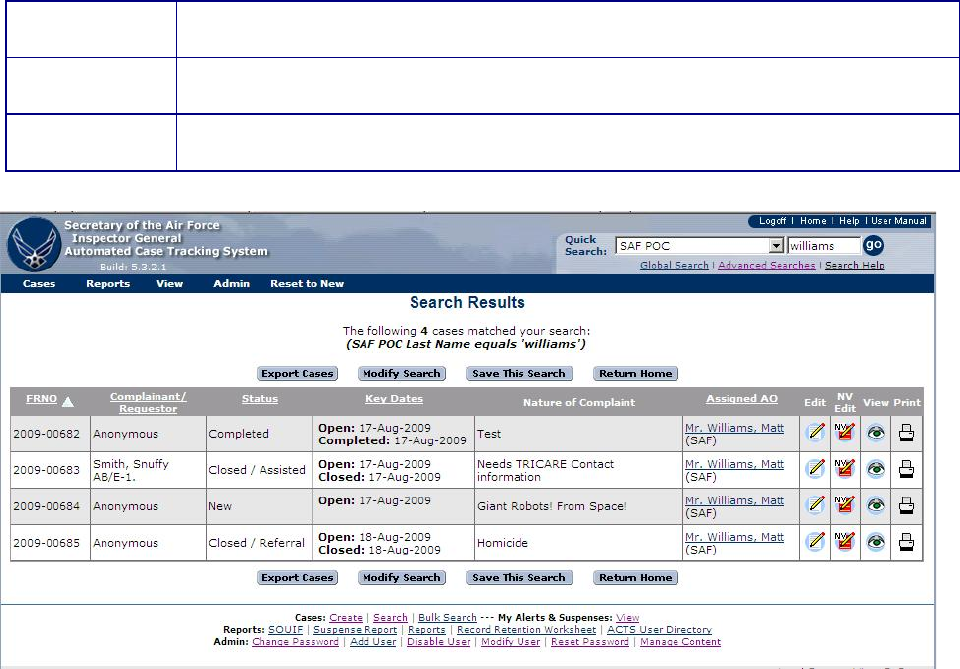
1
• Click on “Submit Complaint”
• Select “Print Case File Worksheet”
2
• From all search results with the exception of “Global Search”
• Select the print icon
3
• With a complaint open in view mode
• Select “Print Case File Worksheet”
Figure 8-2. Search Results Screen.
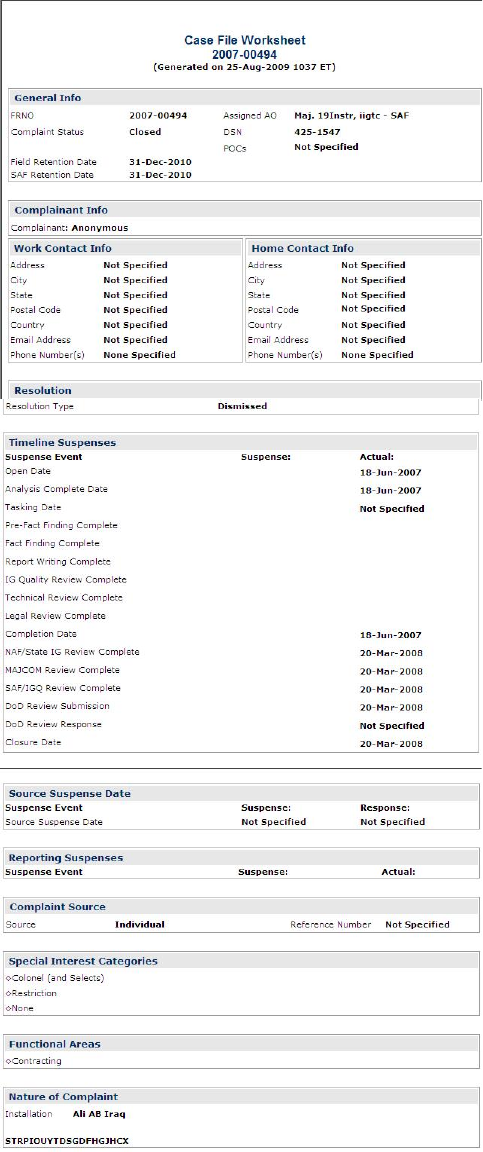
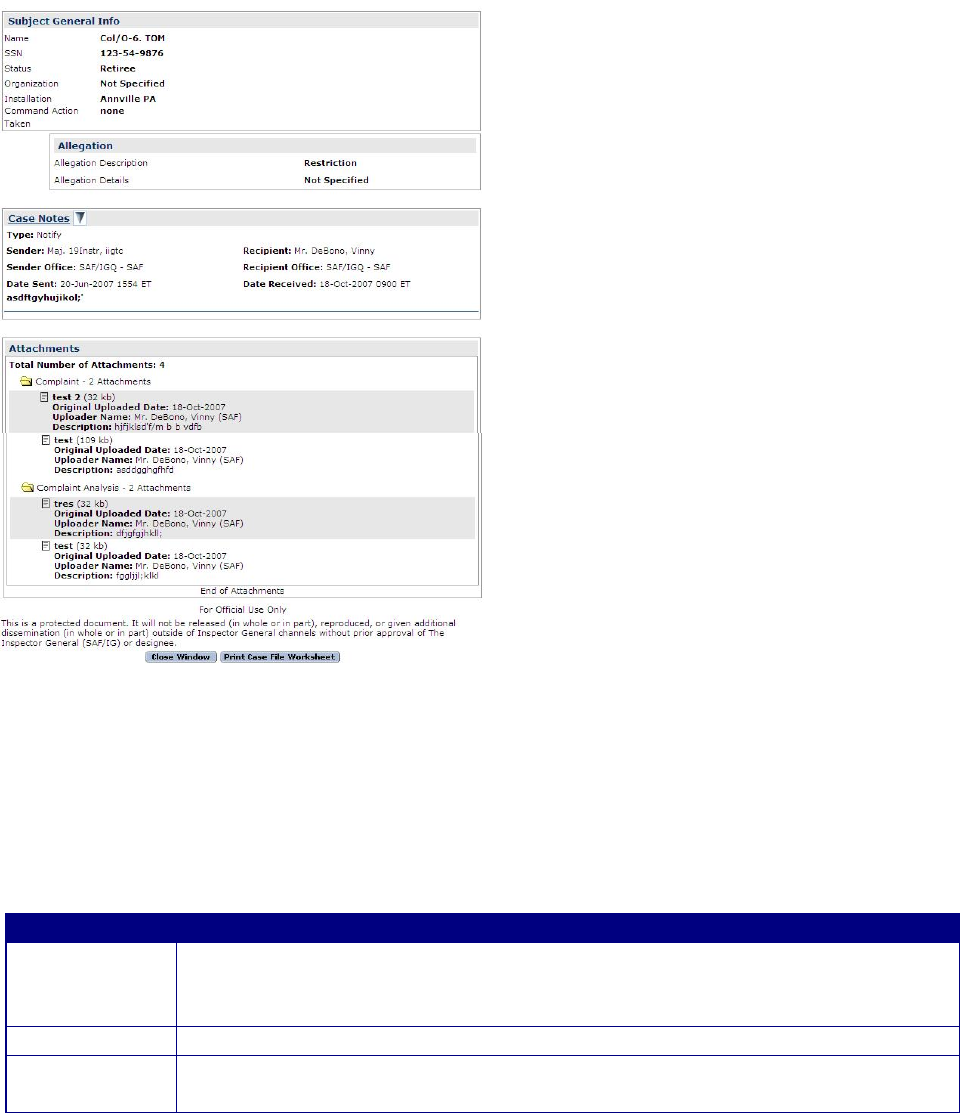
Figure 8-3. Typical Case File Worksheet Screen, View Mode.
Suspense Report
The Suspense Report is a report of upcoming suspenses. Depending on the level of the user, you
can access suspense for a specified period of time, a specified office as well as selecting a
specific AO.
How to Access the Suspense Report.
Options
Action
1
• Select “Reports” from the “Menu” bas
• Select “Suspense Reports” from the dropdown menu, this opens the
“Suspenses” page, figure 8.4
2
• Select a case status, start and stop date, office, AO, and exclusion filter.
3
• Select “Generate Report” to see the report results, figure 8.5
• Select “Reset to Defaults” to start over
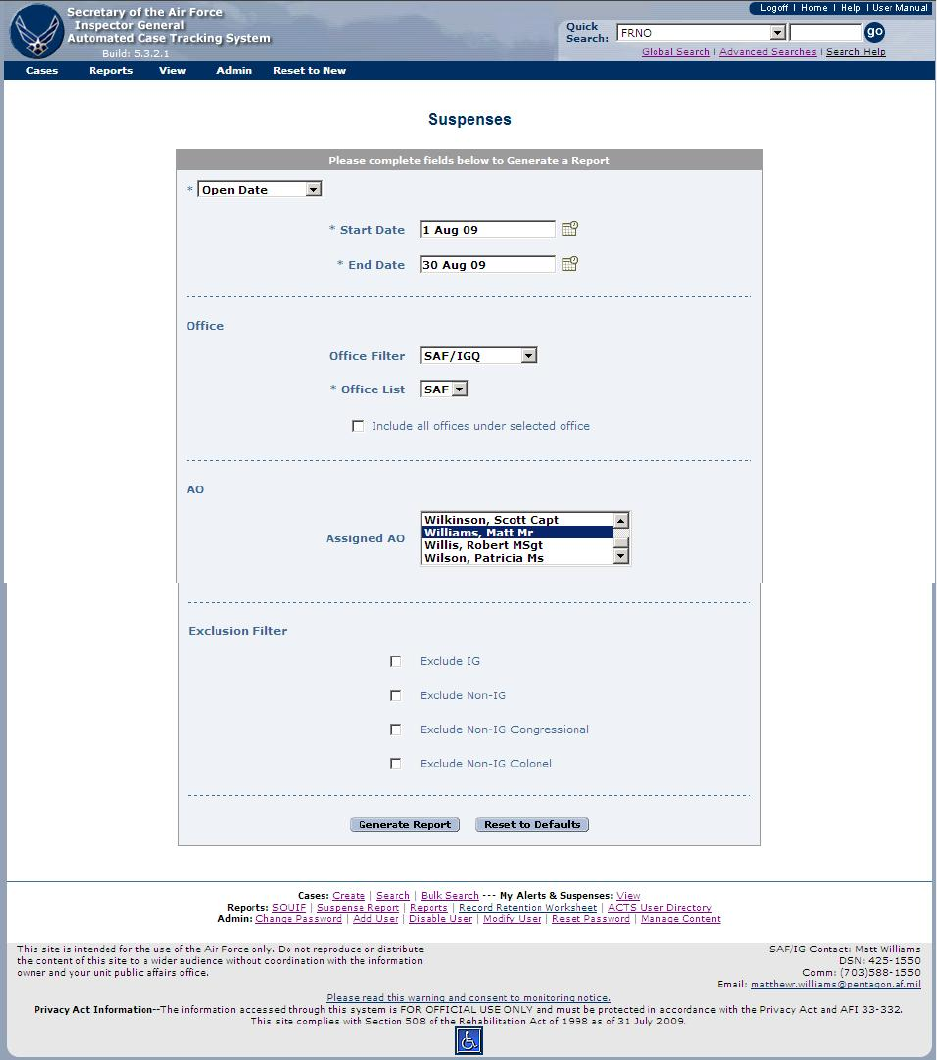
Figure 8-4. Suspense Report Input Screen
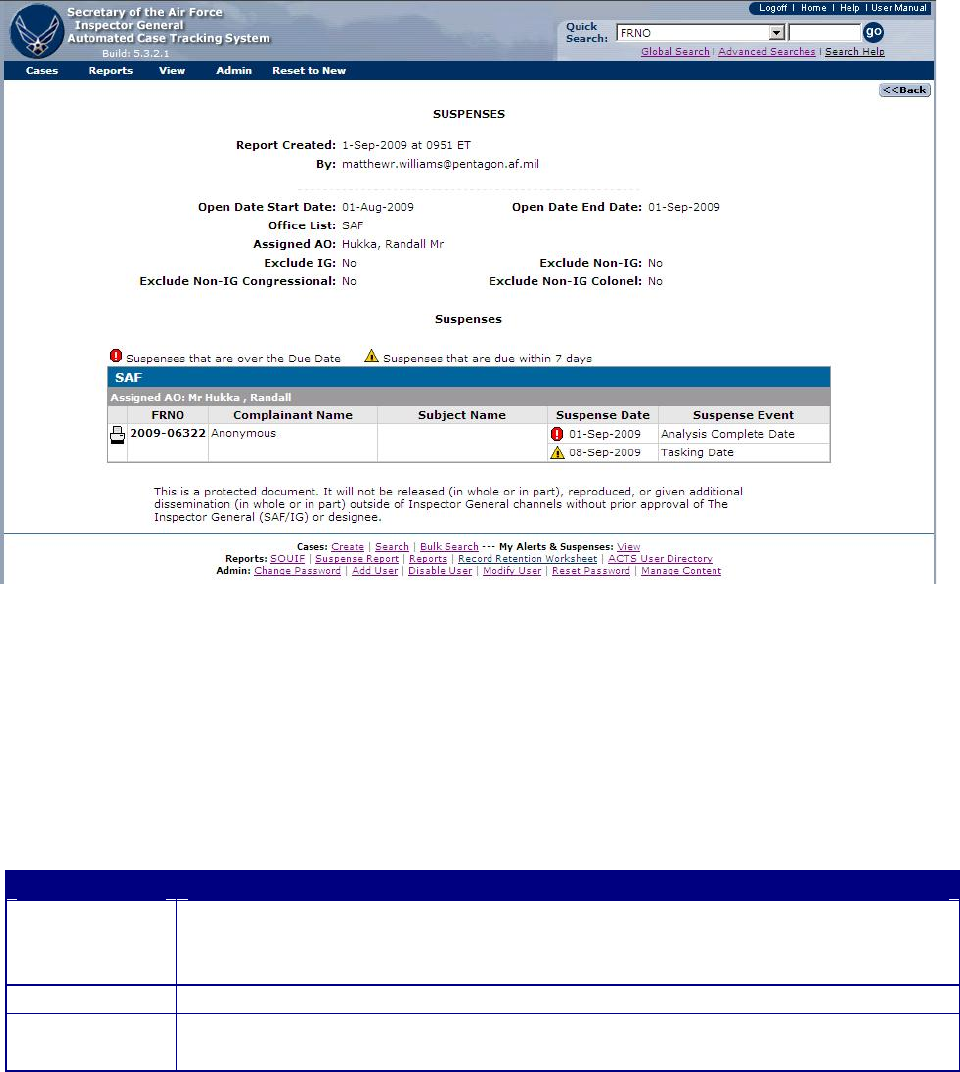
Figure 8-5. Suspense Report Ouput Screen
Open Edit Sessions Report
The Open Edit Sessions Report is a report of open edit sessions by users at a selected office
level. Not all users have access to the report.
How to Access the Open Edit Sessions Report.
Options
Action
1
• Select “Reports” from the “Menu” bas
• Select “Open Edit Sessions Report” from the dropdown menu, this opens
the “Open Edit Sessions” page, figure 8.6
2
• Select an office filter.
3
• Select “Generate Report” to see the report results, figure 8.7
• Select “Reset to Defaults” to start over
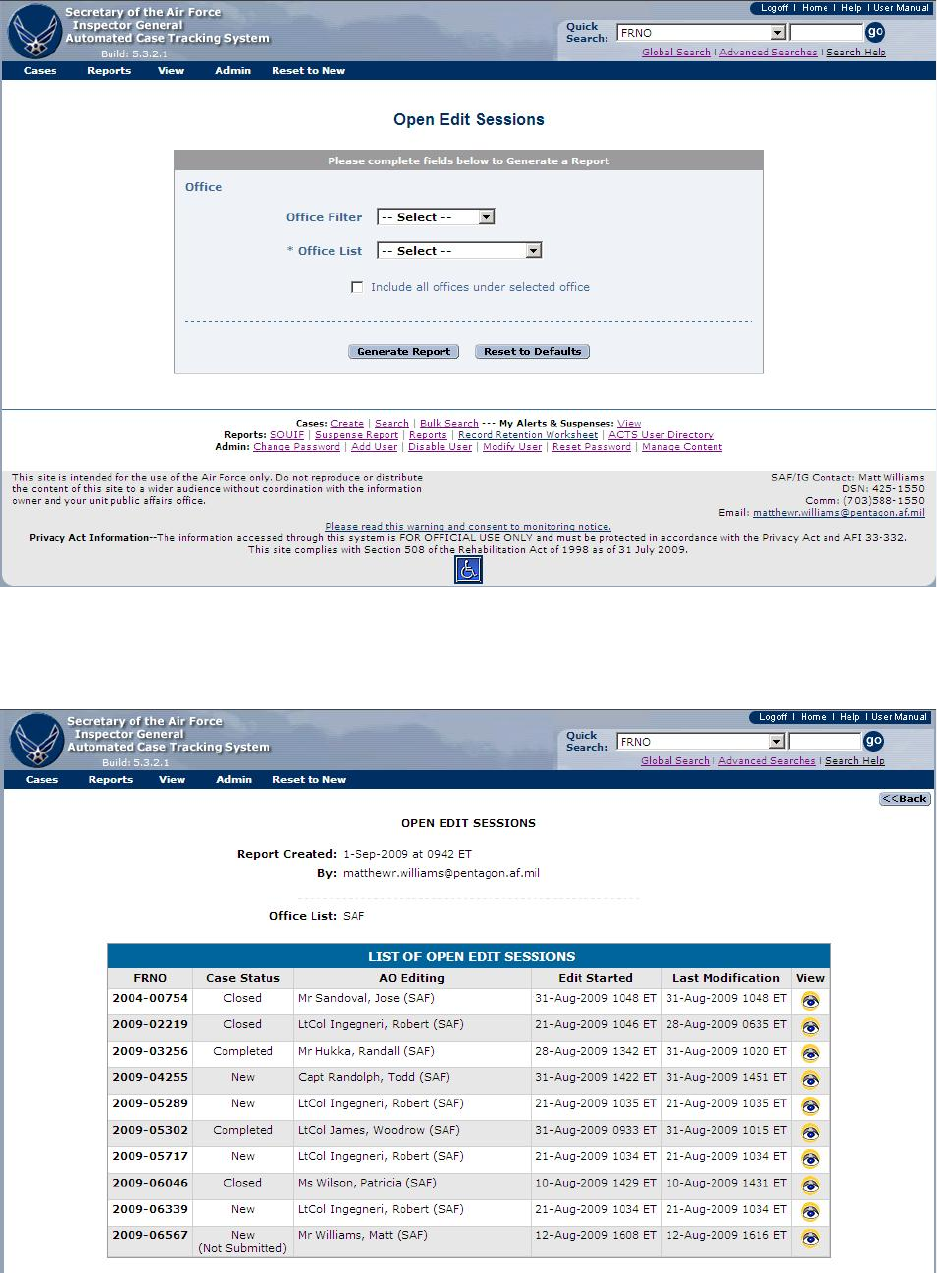
Figure 8-6. Open Edit Sessions Report Input Screen
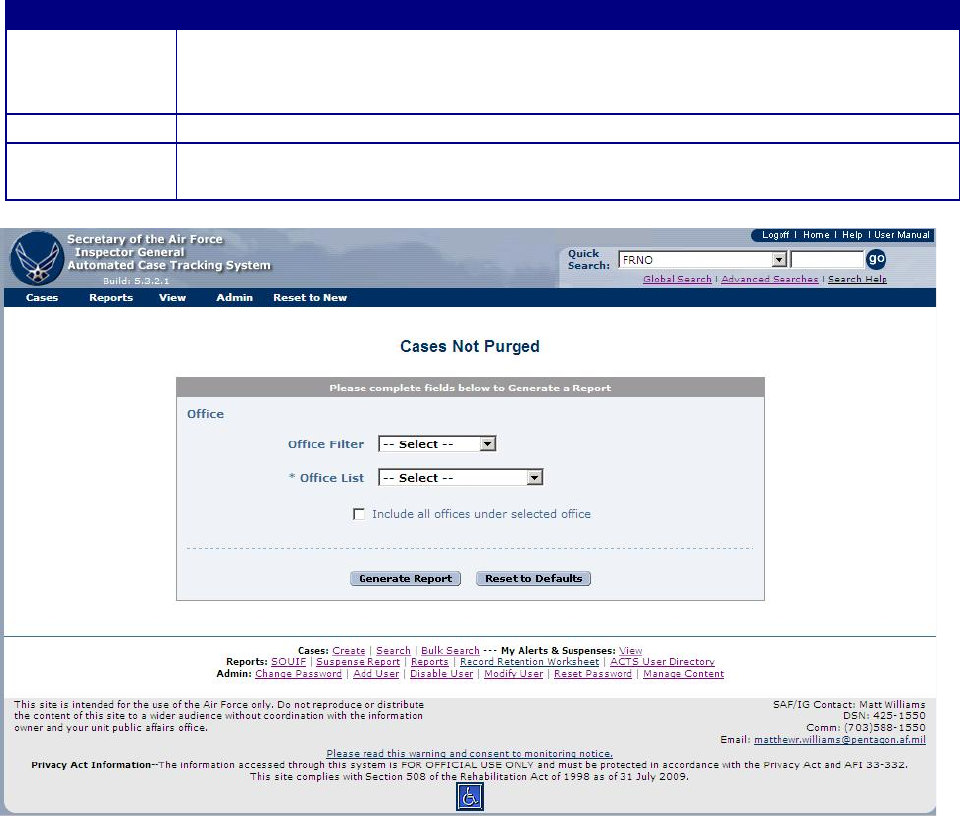
Figure 8-7. Open Edit Sessions Report Output Screen
Cases Not Purged Report
The Cases Not Purged Report is a report of all cases that have a record retention date that has
past, but the cases have not been purged. Not all users have access to the report.
How to Access the Cases Not Purged Report.
Options
Action
1
• Select “Reports” from the “Menu” bas
• Select “Cases Not Purged Report” from the dropdown menu, this opens the
“Cases Not Purged” page, figure 8.8
2
• Select an office filter.
3
• Select “Generate Report” to see the report results, figure 8.9
• Select “Reset to Defaults” to start over
Figure 8-8. Cases Not Purged Report Input Screen
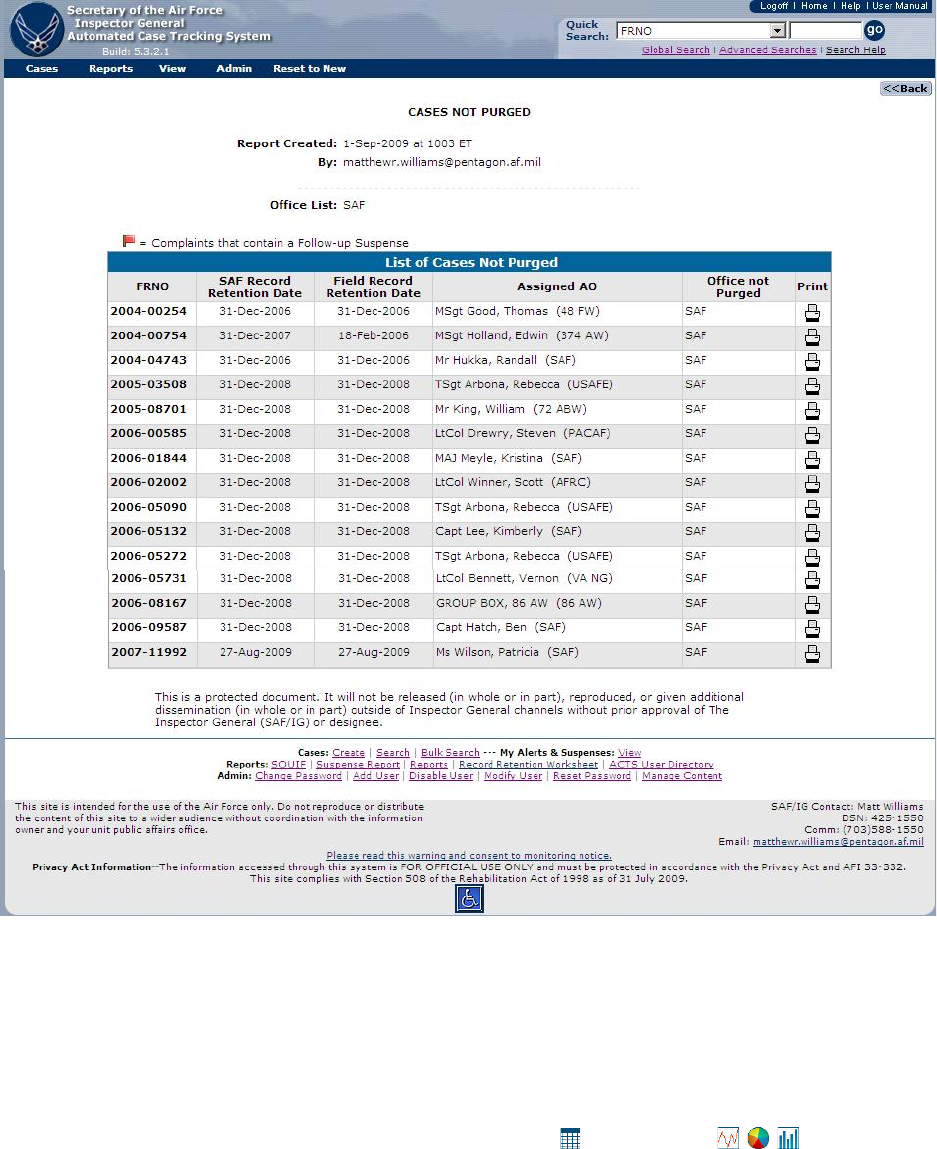
Figure 8-9. Cases Not Purged Report Output Screen
ACTS Advanced Reports
ACTS provides 16 pre-formatted statistical and informational reports, displaying information
based on filters input by the user. Reports may be tabular , or graphical . The user
will typically select a date range for the data to be reported, the offices to be included and other
filters depending on the report. The user will have the option to download the data used to create
the report for use in other applications.
How to Access a Report.
Step
Action
Step 1
• Click on Reports in the Menu bar, or Click on “Reports” in the Footer of
the Home Page
• Select “Advanced Reports” from the dropdown menu.
Step 2
• The “ACTS Report Options” screen opens (figure 8-10)
• Fifteen pre-formatted reports are available
Note: See figure 8-10 for descriptions of the reports
• Select the desired report option.
Step 3
• The appropriate input screen appears allowing you to filter your displayed
data (figure 8-11)
• Fill in the information requested on the input screen
• Click on the “Generate Report” button to view the selected
report (figures 8-12, 8-13, 8-14, and 8-15)
Step 4
• Copy/Save the graphic. Right click on the graphic image to “Copy” or
“Save target as…” if you desire to paste the image to another application
or save the graphic image for later use. You will not be able to
manipulate the image in any way other than re-sizing it
Step 5
• Export the data. Click on the “Export Report” button to
export the data used to generate the report, in MS Excel workbook format,
to your local machine or network.
• Click on the Complaint Export: Microsoft Excel File hyperlink (figure 8-16),
• “Open” the file
• “Save As” Excel format (file name.xls)
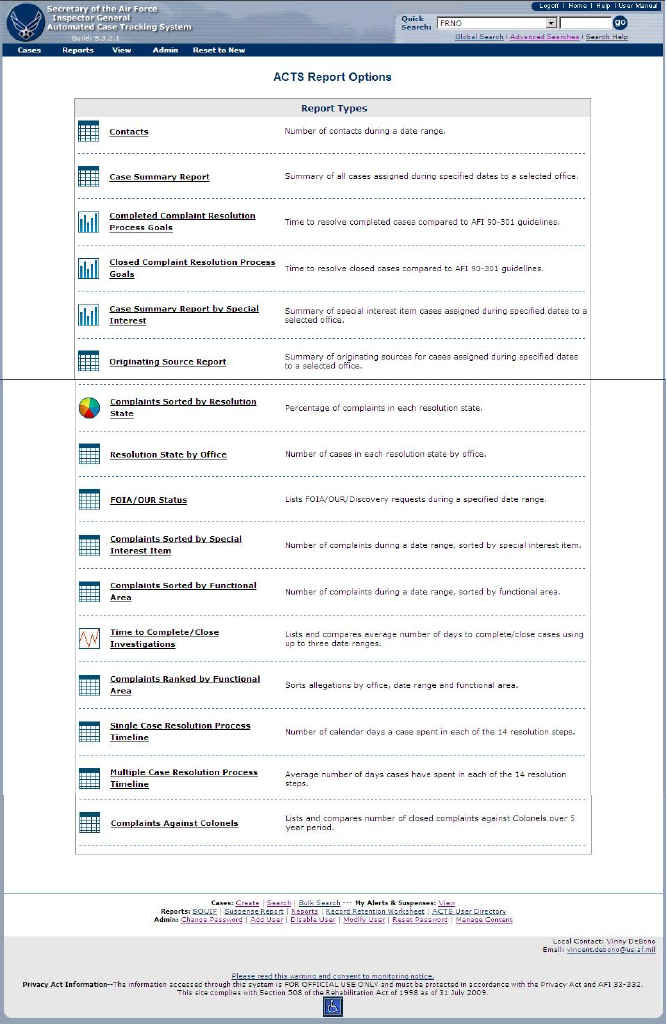
Figure 8-10. ACTS Report Options Screen.
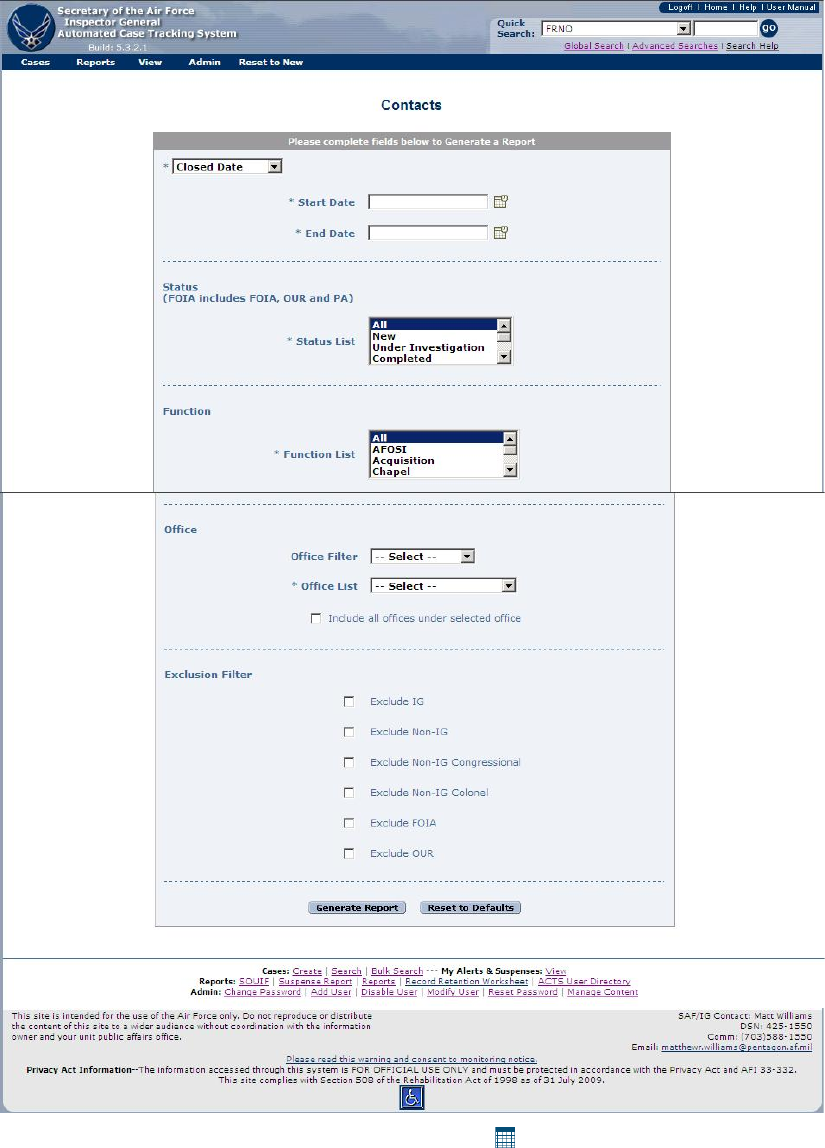
Figure 8-11. ACTS Report Input Screen (Contacts ).
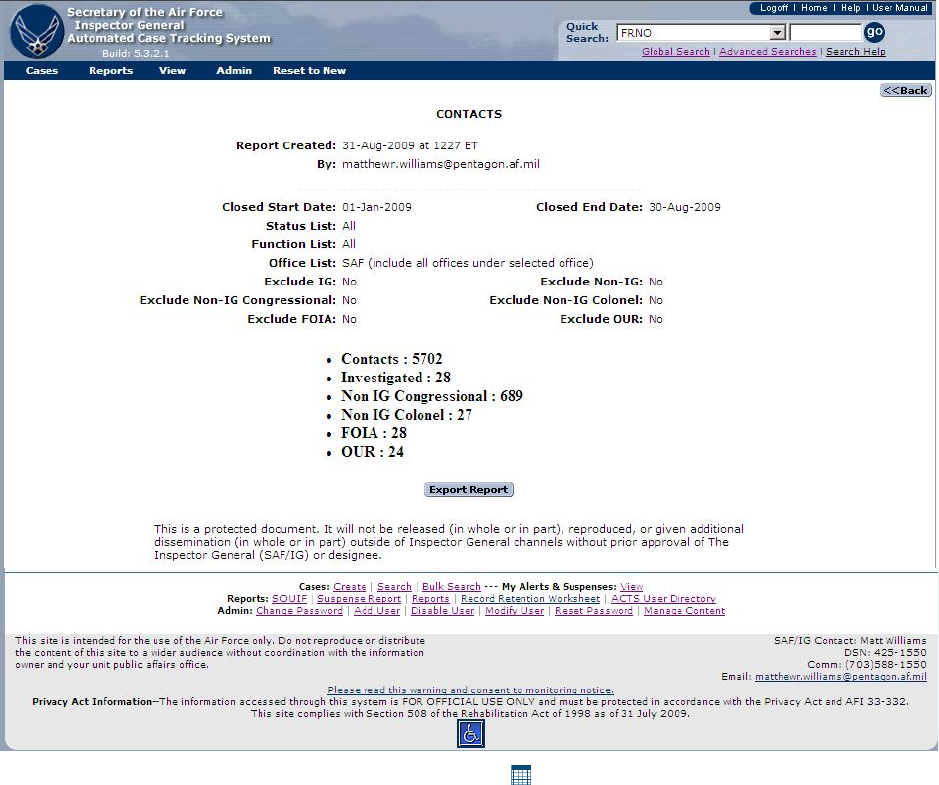
Figure 8-12. ACTS Report Output Screen (Contacts ).
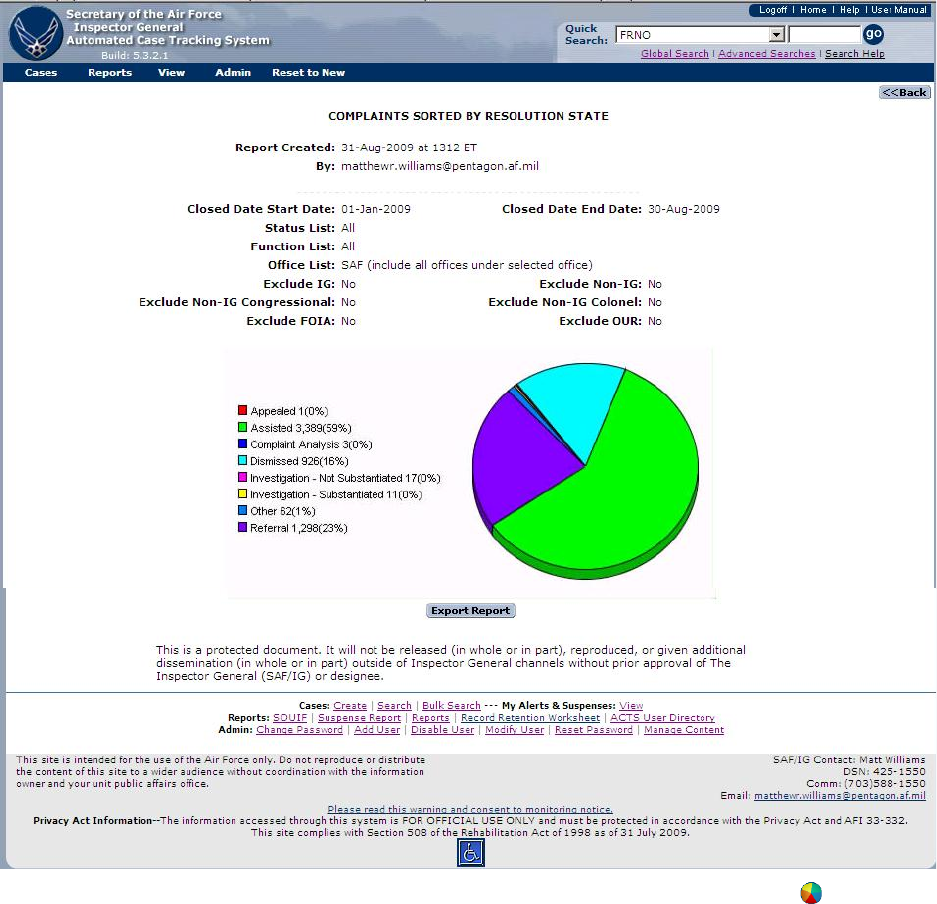
Figure 8-13. ACTS Report Output Screen (Complaints Sorted by Resolution State ).
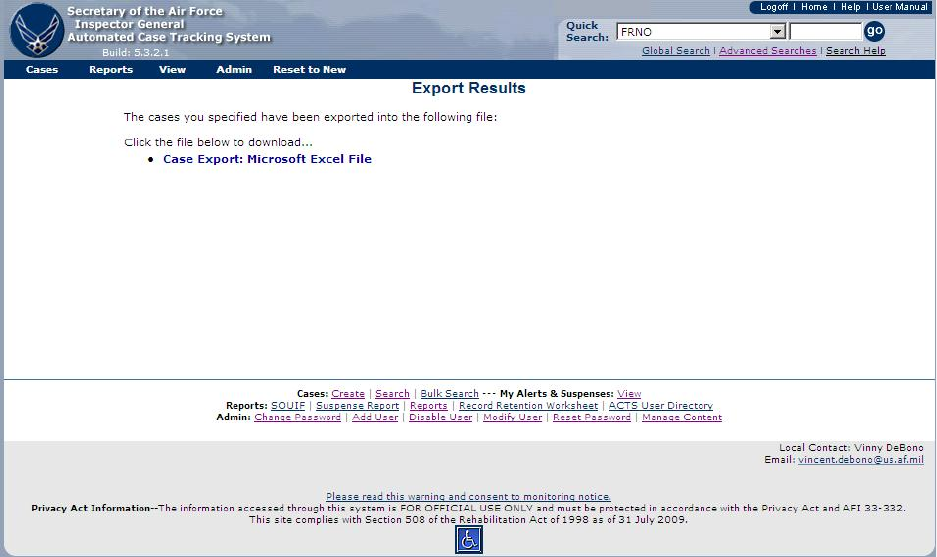
Figure 8-14. ACTS Export Results Screen.
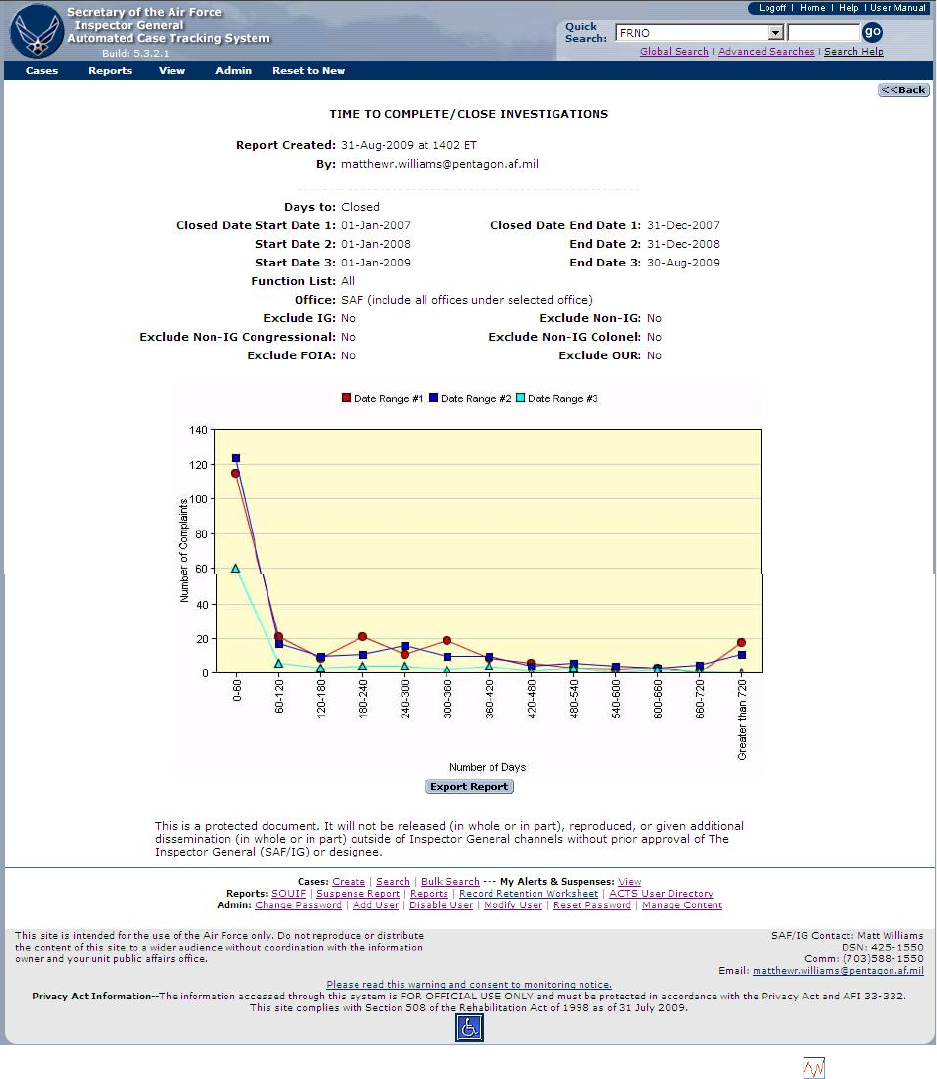
Figure 8-15. ACTS Report Output Screen (Time to Complete/Close Investigations ).
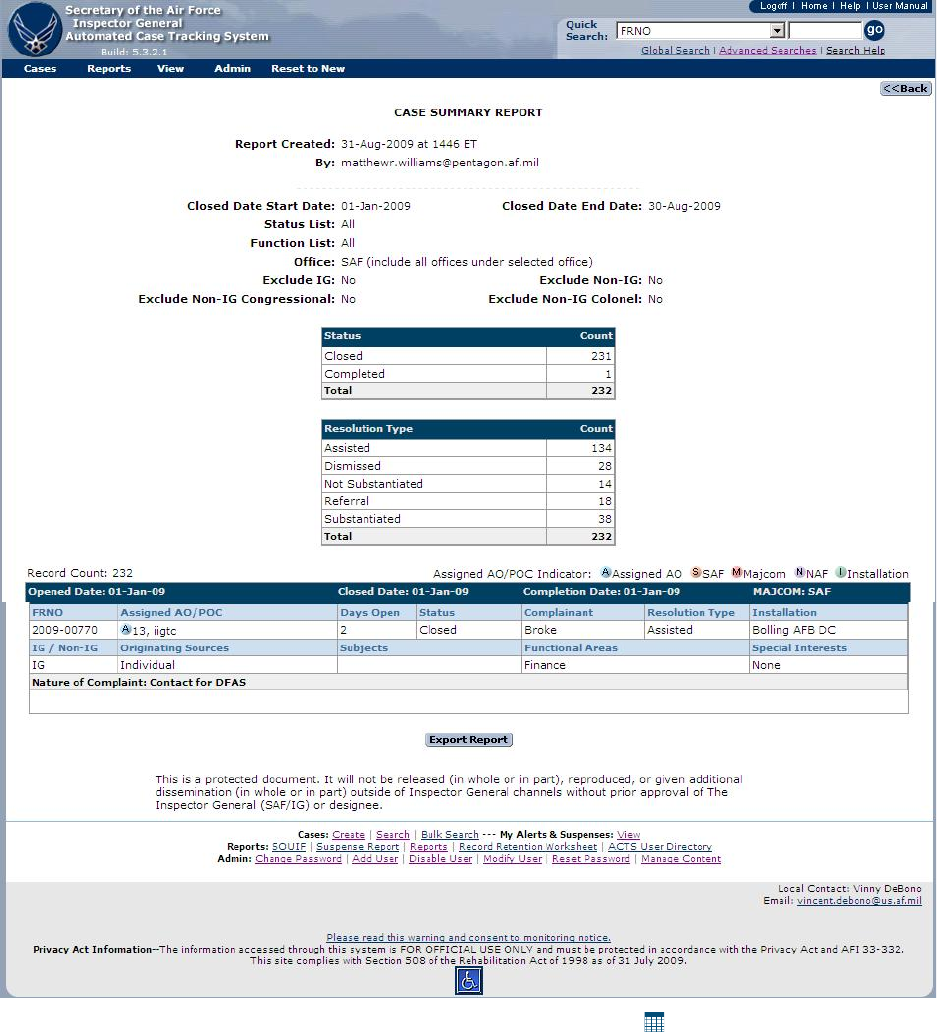
Figure 8-16. ACTS Report Output Screen (Case Summary Report ).
Record Retention Worksheet
The Record Retention Worksheet is used to display cases that are eligible to be purged because
their record retention date has passed. The user will be given the option to delete all IG, non-IG
and Colonel cases that are eligible to be purged. The user will also be given a list of discarded
cases and permanent cases that will not be deleted. Only records that your office has Created,
Transferred/Received, or Notified/Received will be displayed on your Record Retention
Worksheet. More details can be found in Chapter 11.
How to Access the Record Retention Worksheet.
Options
Action
1
• Select “Reports” from the “Menu” bas
• Select “Record Retention Worksheet” from the dropdown menu, this opens
the “Record Retention Worksheet” page, figure 8.17
2
• Select cases to be purged or check “select all”.
3
• Click on “Print Purged Cases” before deleting the cases
• Click on “Continue With Purge” to delete marked cases.

Figure 8-17. ACTS Record Retention Worksheet
ACTS User Directory
A listing of current ACTS users is available for download in MS Excel format.
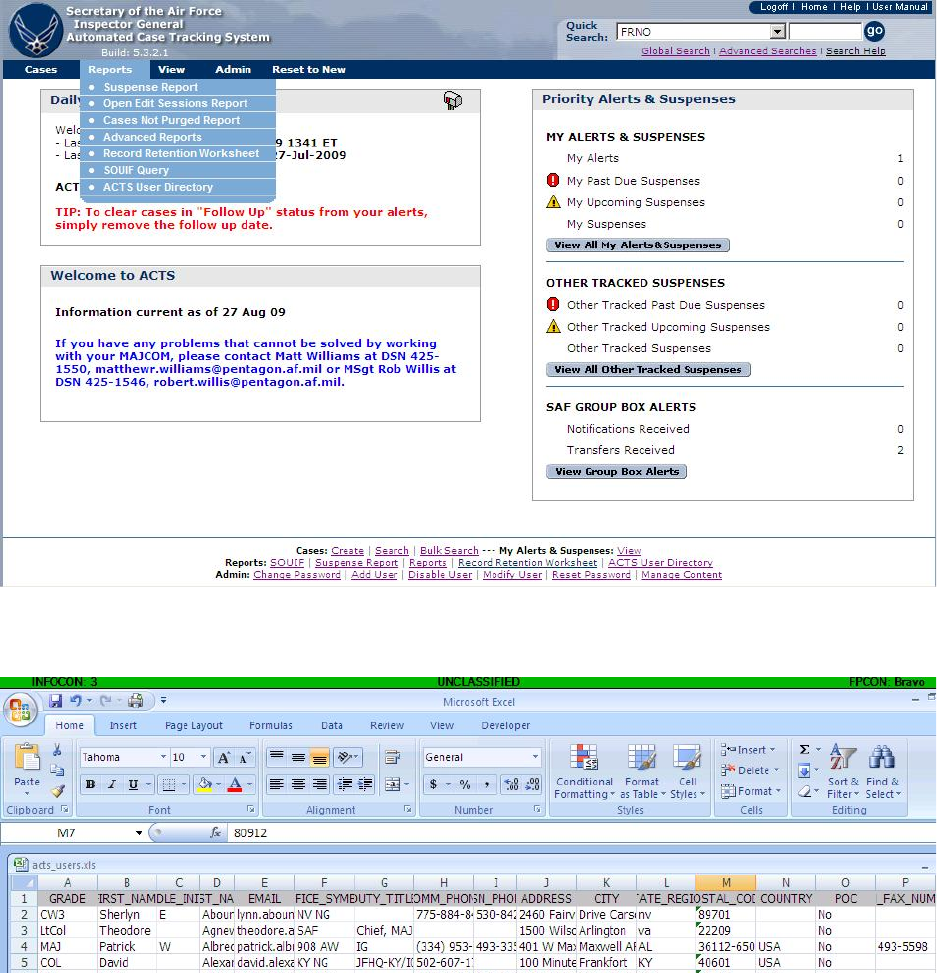
Figure 8-18. ACTS User Directory Menu Selection.
Figure 8-19. ACTS User Directory Export – MS Excel Workbook.
CHAPTER 9 ALERTS & SUSPENSES
Introduction
The Priority Alerts & Suspenses box on the Home Page displays notifications about complaints
being managed by an AO. Each alert is generated by the system and is intended as a reminder
that a critical event has occurred in the complaint resolution process. The suspenses are derived
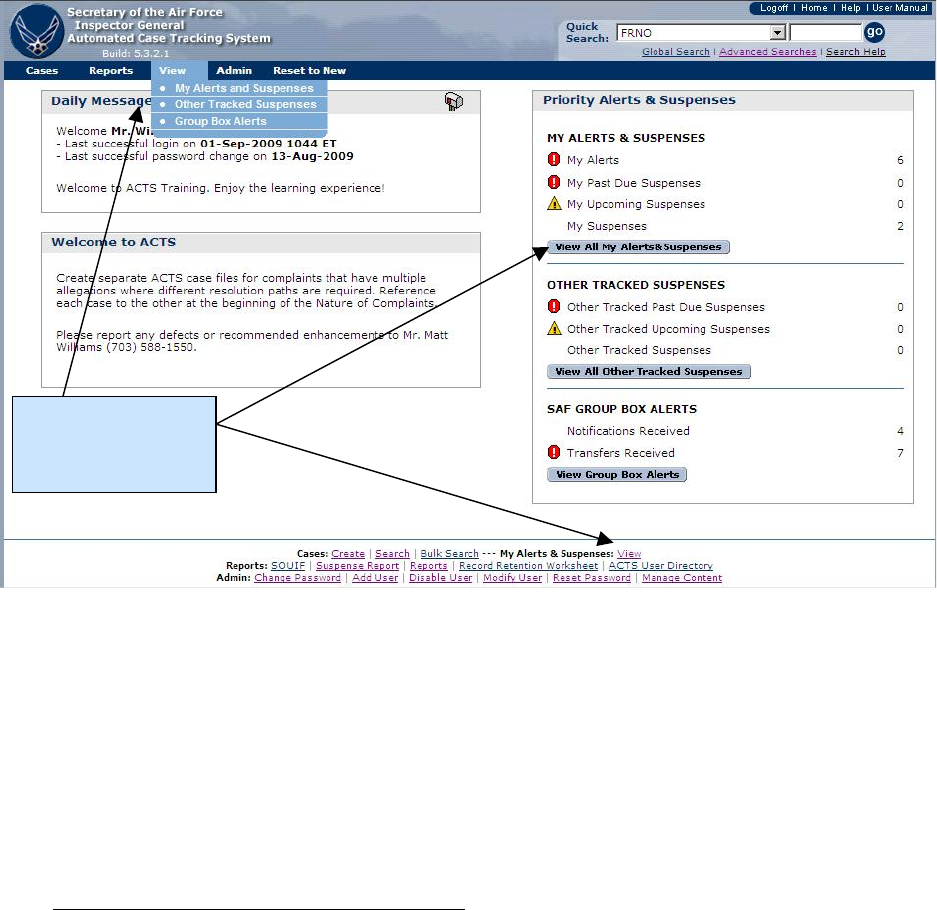
from the various suspenses found in AFI 90-301, such as in Table 2.1, The Complaint Resolution
Process.
ACTS may generate multiple alerts for a single complaint, and each will be shown separately.
Only five alerts are shown in the Priority Alerts box. Click on the “View All Alerts” button or
“More…” in the Priority Alerts box; use the Alerts drop-down menu on the menu bar; or click on
“View” in the footer of the home page to see all of your alerts.
Figure 9-1. My Alerts & Suspenses
Automatic Alerts.
Following are some examples of alert messages, and actions that might clear the alert:
• “New complaint must be tasked.” ACTS will generate an alert for all complaints with a
status of “New” if the complaint has not been assigned within 15 calendar days of its open
date. To clear, assign the case (assist, dismiss, refer, investigate, or discard)
• “Response to <complaint source name> due.” The system will create an alert of this type
for each complaint source on a complaint where today’s date is within four days of or
beyond the Expected Response Date (entered by the AO) and no Actual Response Date has
been specified. To clear the suspense, enter the Actual Response Date or edit the suspense
date
View My Alerts
and Suspenses
• “Check AFI 90-301 for Closure Requirements.” ACTS generates alerts for cases that were
investigated, when the investigation has been completed for more than 16 days and is not
closed. To clear the suspense, close the complaint
• “Edit Session in Progress.” This alert is generated when a complaint is opened in Edit or
NV Edit and is not removed until the user successfully “Submits” the complaint, or clicks
on “Undo All Changes.”
• “Complaint Sent.” An AO transferring or sending a notification will receive an alert
advising that the complaint was sent. As soon as the receiving AO opens the complaint in
edit mode and submits it, the complaint sent alert will automatically be removed
• “Complaint Received.” An AO receiving a transfer or notification will receive an alert
advising that a complaint was received. As soon as the receiving AO opens the complaint in
edit mode and submits it, the complaint received alert will automatically be removed
Suspenses.
Suspenses are automatically generated by the system. Suspenses can be removed from “My
Alerts and Suspenses” by filling in the date the action was completed. If you have a series of
similar suspenses, such as progress reports, filling in the date of the most recent action will
remove all similar suspenses from your alerts. For cases that have a follow-up suspense, it can
be removed be deleting the follow-up date, rather than filling in the date the case was
reviewed. Below are examples of some suspenses that will be generated by the system. The
suspense dates will be based on the case “open” date plus the maximum timeline calendar
days.
A
B
C
D
PHASE
STEP
PROCESS NAME
PROCESSING
TIMELINE
(calendar days)
Phase 1: Complaint
Analysis
1
Contact
< 7 Days
2
Conducting a Complaint
Analysis
< 20 Days
3
Tasking
< 7 Days
Phase 2: Investigation
4
Pre-Fact Finding
< 7 Days
5
Fact Finding
< 14 Days
6
Report Writing
< 25 Days
Phase 3: Quality Review
7
IG Quality Review
< 7 Days
8
Technical Review
< 7 Days
9
Legal Review
< 7 Days
10
Rework
< 7 Days
11
Closing the Case
< 7 Days
12
Command Action
N/A
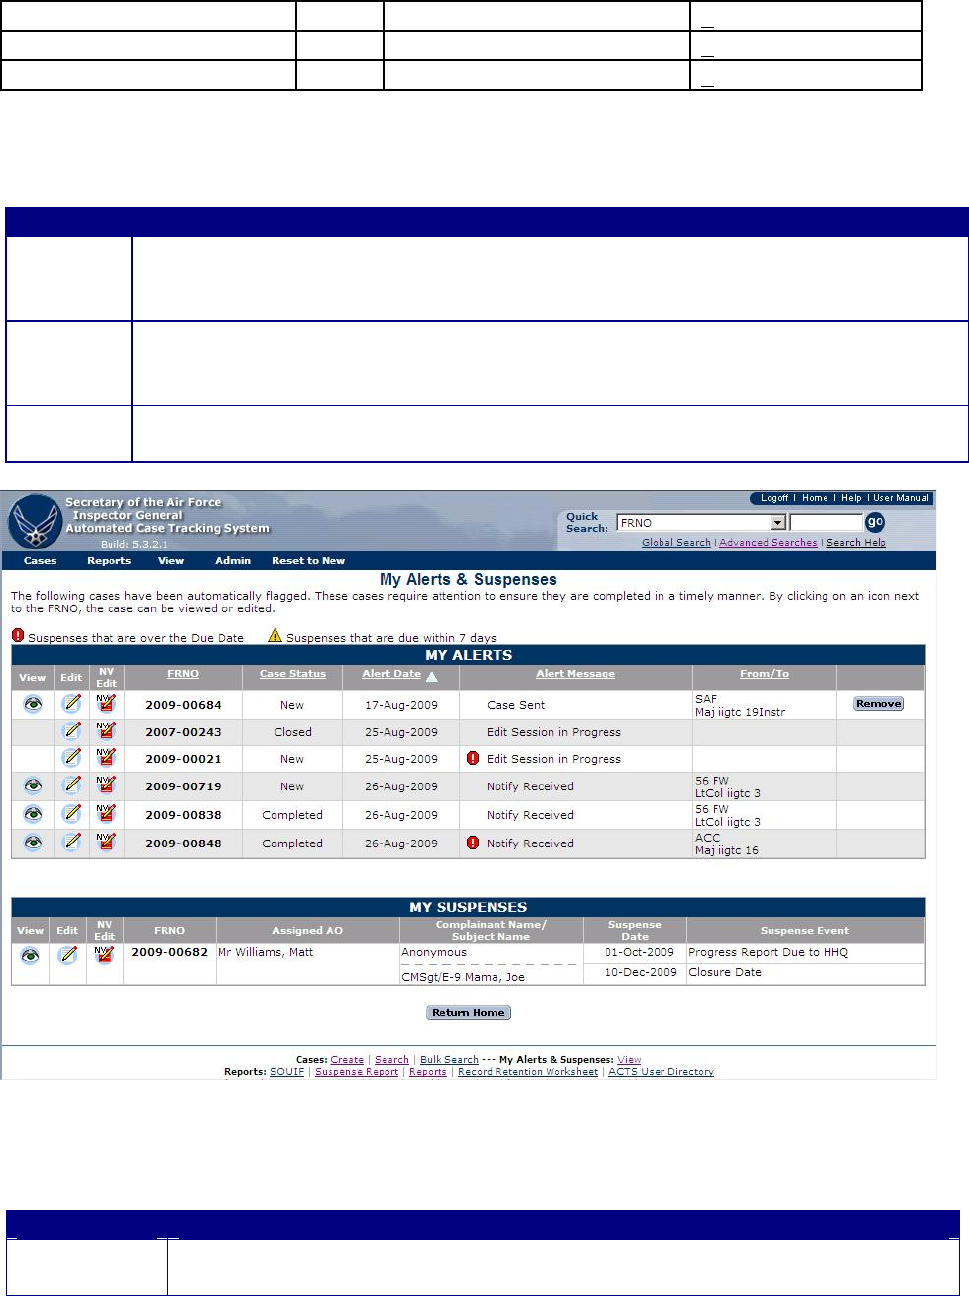
13
Higher Headquarters Review
< 10 Days
14
SAF/IGQ Review
< 10 Days
Total Processing Time
< 135 Days
How to View Alerts and Suspenses
Method
Action
Method 1
• Click on the “View All My Alerts & Suspenses” button in the Priority Alerts &
Suspenses box of the “Home Page” to see all the alerts and suspenses.
• The “ My Alerts & Suspenses” screen opens (figure 9-2)
Method 3
• Click on or put your mouse pointer over “ View” in the Navigation Bar
• Select “My Alerts and Suspense” from the dropdown menu
• The “My Alerts & Suspenses” screen opens (figure 9-2)
Method 4
• Click on “View” in the Footer of the Home Page
• The “My Alerts & Suspenses” screen opens (figure 9-2)
Figure 9-2. My Alerts and Suspenses Screen.
A description of the buttons and fields shown on the My Alerts screen follows.
Button/Field
Action
• Click on the appropriate button to View, Edit, or NV Edit
• Edit will be the only option, if an edit session is already in progress
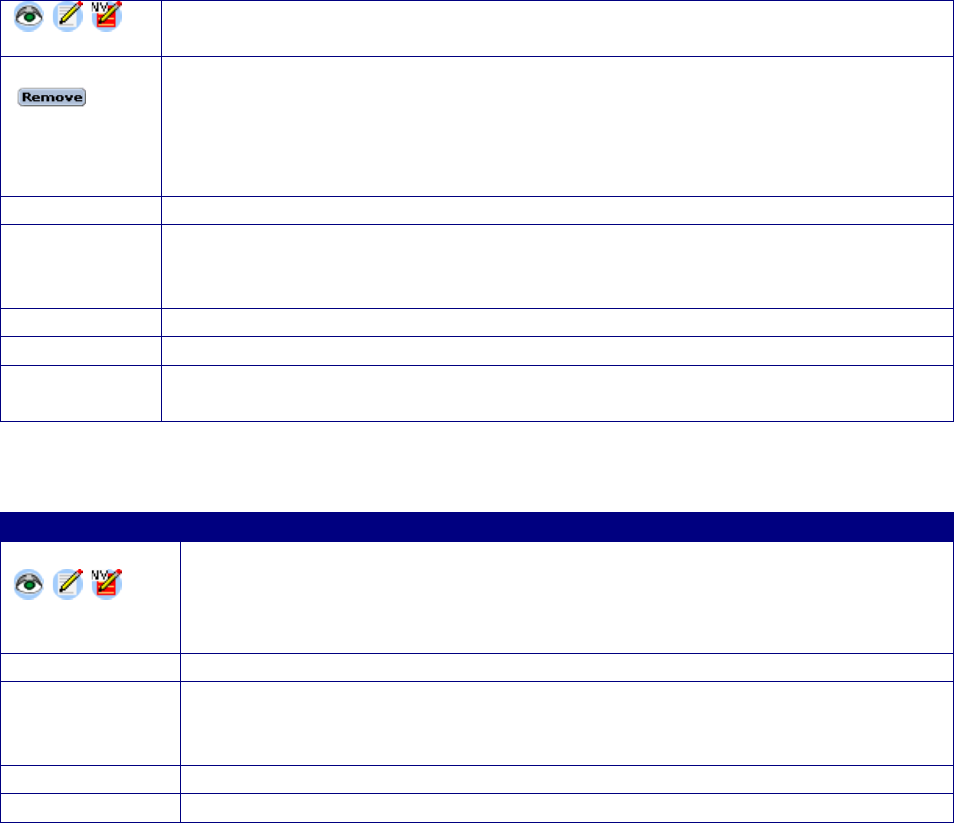
• The NV Edit mode is when data must be entered without validation. Only
SAF and CU administrators are authorized this option
Remove
• Clicking on the “Remove” button permanently removes the alert from the
system. The user is not asked to verify the removal, and there is no ‘Undo”
• “Remove” is not an option to clear an open edit session or an error
• You may also remove an alert by correcting the situation that caused the
alert
FRNO
• The unique file reference number for the complaint
Case Status
• The system-generated transition state of the complaint, relative to the
Complaints Resolution Process. Refer to the Online Help menu, or Chapter
7, Actions, for information about the transition states
Alert Date
• Date the alert was generated
Alert Message
• System-generated notification detailing why an alert was generated
From/To
• “From” shows the AO officer who sent a case (transfer) or a notification.
“To” shows the AO a transfer or notification was sent to.
A description of the buttons and fields shown on the My Suspense screen follows.
Button/Field
Action
• Click on the appropriate button to View, Edit, or NV Edit
• Edit will be the only option, if an edit session is already in progress
• The NV Edit mode is when data must be entered without validation.
Only SAF and CU administrators are authorized this option
Assigned AO
• The Action Officer currently assigned to the case
Complaintant
Name/Subject
Name
• The name of the complainant and subject in the case.
Suspense Date
• Date the suspense event is required to be completed
Suspense Event
• The action/event that must be completed by the suspense date
CHAPTER 10 - ADMIN
Introduction
The “Admin” tab on the Home Page Menu Bar provides users and administrators access to
administrative processes in support of ACTS. For administrators, actions include changing or
resetting user passwords; and adding, disabling, or modifying ACTS user accounts. Only the
Change Password function is available to normal users. ACTS administrators will be able to
access other features described in this chapter.
Password
Every user has a distinct, password-protected user account in ACTS. Passwords are initially
provided by an ACTS administrator (for one login only); then passwords must be changed to a
user-defined login password that adheres to standard Air Force password conventions. Users
may change their password at any time, but will be required to change it at least every 90 days.
ACTS will prompt users to change their passwords prior to the 90-day expiration.
Forgot Password.
Users who have forgotten their password may obtain a new temporary password by clicking on
“Forgot Password” on the Login Screen. ACTS will automatically generate a new password and
email it to the user. Step-by-step instructions are provided in Chapter 3, Accessing ACTS.
Expired Password.
Passwords expire every 90 days and cannot be reused within 6 months. When your password
expires, the system will allow you to login one time with the expired password, and immediately
prompt you to change it. Additionally, a User’s password will expire after one login, if the
password was provided by the ACTS Administrator. The user will be prompted to change the
password immediately after logging in.
Disabled Password.
A User’s password will be automatically disabled if the user
• has three successive unsuccessful login attempts
• does not access the ACTS system for 90 consecutive calendar days
A User’s password may be manually disabled or enabled by an ACTS Administrator, at their
discretion.
If your account becomes locked, contact your installation, NAF, CU or SAF administrator to
have it unlocked.
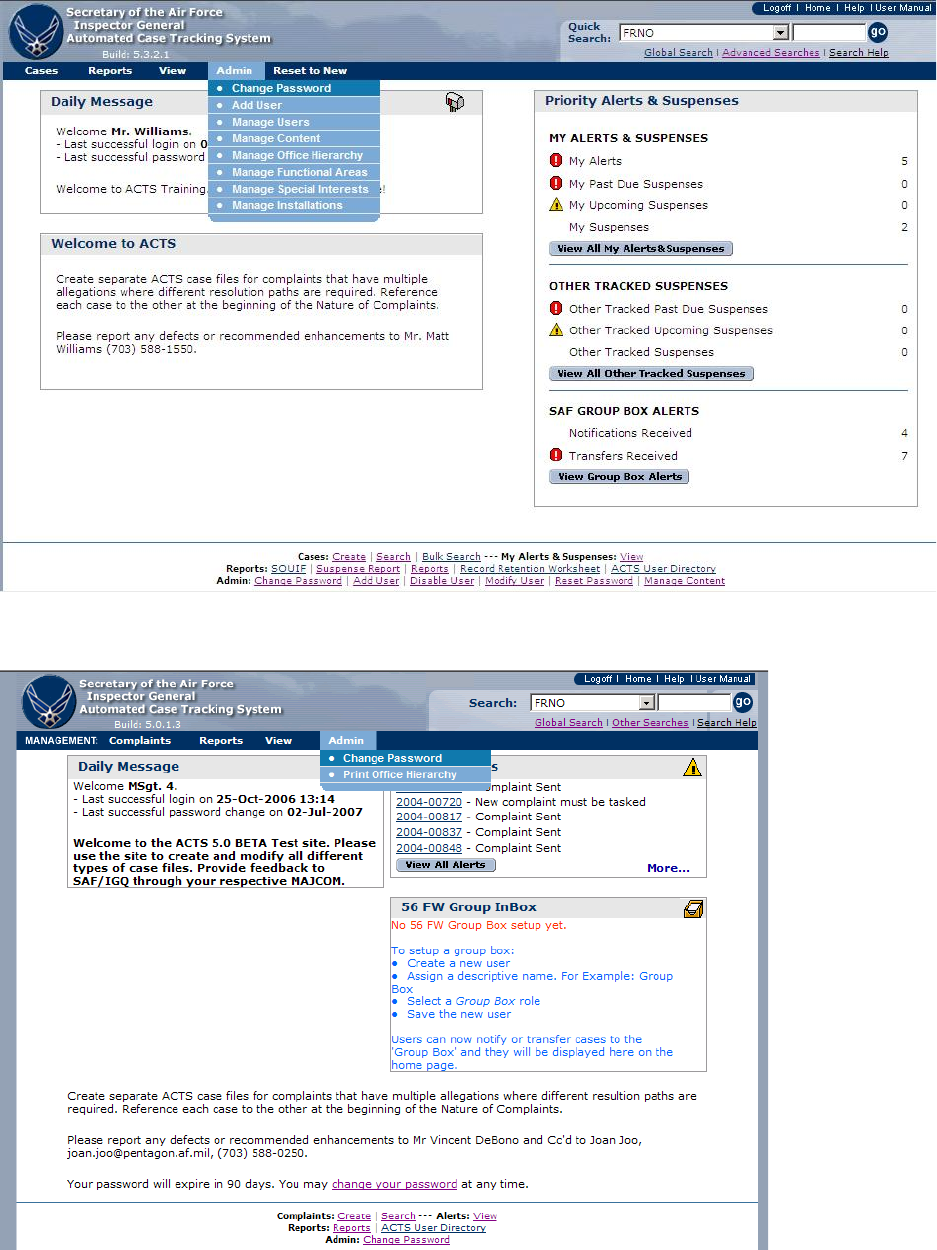
Figure 10-1. Admin – ACTS Administrator.
Figure 10-2. Admin – Typical User.

How to Change a Password.
Step
Action
Step 1
• Select the “Admin” tab in the Navigation Bar, then select “Change
Password” from the dropdown menu
• or Click on “Change Password” in the Footer of the Home Page
• The “Change Password” screen opens (figure 10-2)
Step 2
• Enter Old Password (Use Administrator-assigned password for initial login)
Step 3
• Enter New Password (User-defined IAW AF password protocol)
• 9 characters with a mix of; 2 upper case letters, 2 lower case letters, 2
numbers, and 2 special characters
Step 4
• Enter New Password again to Confirm Password
Step 5
• To SAVE the password, click on the “Save” button at the bottom of the
“Change Password” screen. Password will be changed to the user-defined
password (New Password)
Step 6
• To exit and return to the Home Page, click on the Cancel button at the
bottom of the Change Password screen. Password will not be changed
Figure 10-3. Change Password Screen.

User Management (Administrator Function)
Add User.
The “Add User” function allows ACTS Administrators to add users to the ACTS pool of users
within their hierarchy.
Step
Action
Step 1
• Select the “Admin” tab in the Navigation Bar, then select “Add User” from the
dropdown menu
• or Click on “Add User” in the Footer of the Home Page
The Add a User screen opens (figure 10-3) identifying mandatory information
NOTE: The most recently selected “Admin POC” in an office will show up
at the bottom of each page as the Local Contact for administrative assistance.
TIP: Include AO’s commercial and DSN phone numbers to enable other
AOs’ to contact an AO
Step 2
• To SAVE the new user, click on the “Save” button at the bottom of the “Add a
User” screen
• Successful save action results in the Add a User Confirmation Success screen
opening (figure 10-6). The screen assigns a temporary password to the added
user, which the administrator must provide to the added user
• Unsuccessful save action identifies the errors that must be corrected prior to
completing the action (figure 10-7)
Step 3
• To exit and return to the Home Page, click on the Cancel button at the bottom
of the Add a User screen. The new user will not be added
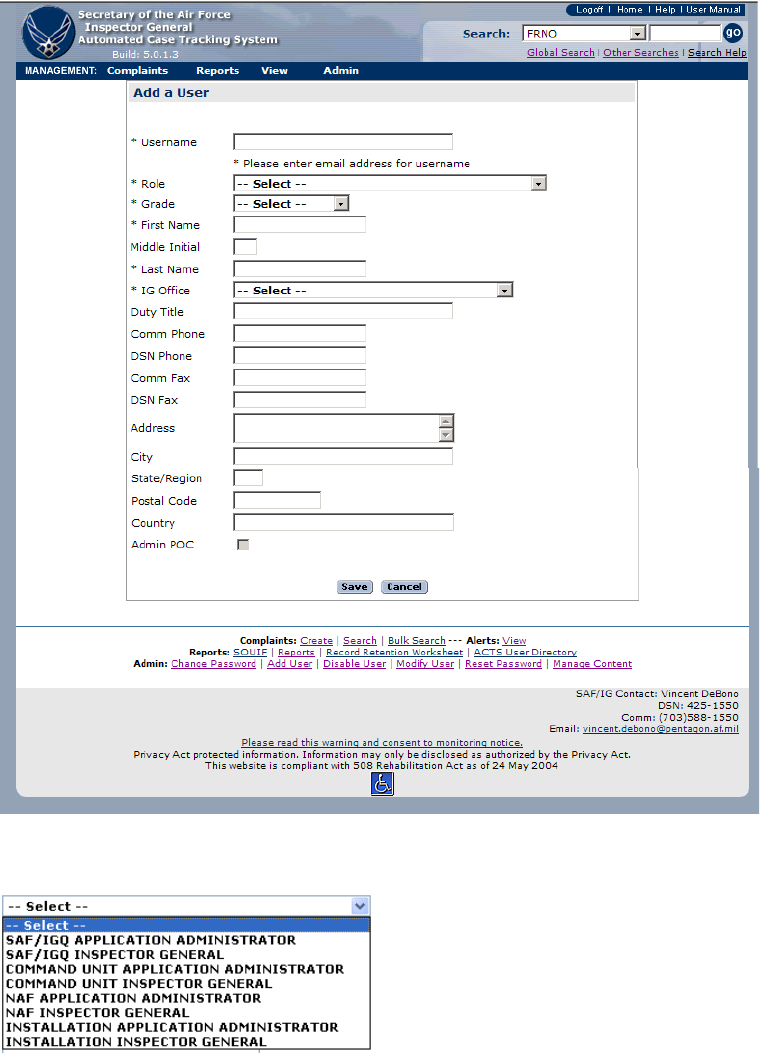
Figure 10-4. Add a User.
Figure 10-5. Roles.
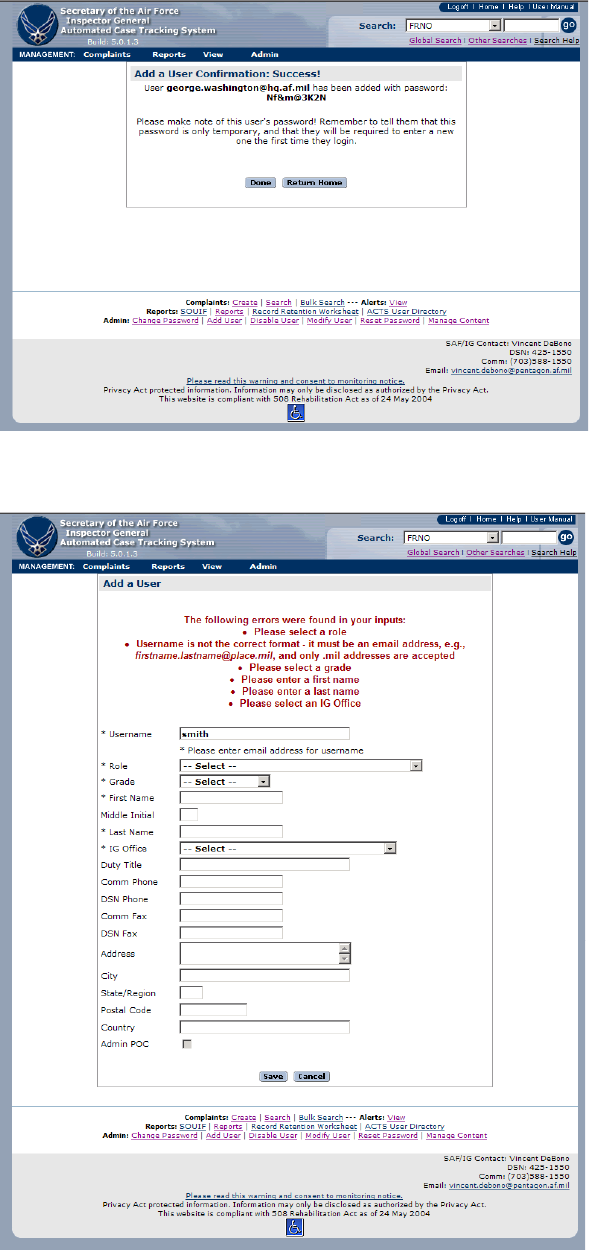
Figure 10-6. Add a User—Confirmation Success.
Figure 10-7. Add a User—Unsuccessful.
Disable (or Enable) User.
The “Disable User” function allows ACTS Administrators to disable users or enable users who
have been locked out of their user accounts. A user’s account will be automatically disabled if
the user has three successive unsuccessful login attempts or does not access the ACTS system for
90 consecutive calendar days. An ACTS Administrator can also manually disable an ACTS
user’s account. Only administrators can enable a locked user account. Administrators are
indicated by a checkmark ( ) on the User Management screen.
Step
Action
Step 1
• Select the “Admin” tab in the Navigation Bar, then select “Manage
Users” from the dropdown menu.
• or Click on “Disable User” in the Footer of the page.
• The User Management screen opens (figure 10-8) providing access to
all user accounts to which the administrator has access
Step 2
• Locate the user you wish to disable or enable
− An enabled account displays a closed lock ( )
− A disabled account displays an open lock ( )
• Click on the Disable button (padlock) to enable or disable the account
• Click on user’s e-mail address to open Outlook; notify the user that
his/her account has been enabled/disabled
• To exit and return to the Home Page, click on the Return Home
button at the bottom of the User Management screen
Figure 10-8. User Management.
Click to see
additional
records
Modify User.
The “Modify User” function allows ACTS Administrators to edit ACTS user information.
Step
Action
Step 1
• Select the “Admin” tab in the Navigation Bar, then select “Manage Users” from the
dropdown menu.
• or Click on “Modify User” in the Footer of the page
Step 2
• The User Management screen opens (figure 10-8) providing access to all user accounts
to which the administrator has access
Step 3
• In the Modify User column, click on the Edit button ( ) corresponding to the user
you want to modify. The Modify a User screen opens displaying all the information
in the Add a User screen (figure 10-3)
• Modify the information as required
Step 4
• To SAVE the modified user information, click on the “Save” button at the bottom of
the “Modify a User” screen
• Successful save action results in the Modify a User Confirmation Success screen
opening (similar to figure 10-6)
• Unsuccessful save action identifies errors that must be corrected prior to completing
the action (figure 10-7)
Step 5
• To exit and return to the Home Page, click on the Return Home button at the bottom
of the User Management screen
Reset Password
The “Reset Password” function allows ACTS Administrators to manually reset a user’s
password. This differs from the Change Password function, which permits users to change their
own passwords.
Action
Step 1
• Select the “Admin” tab in the Navigation Bar, then select “Manage Users” from the
dropdown menu.
• or Click on “Reset Password” in the Footer of the page
• The User Management screen (figure 10-8) opens and shows all users assigned to the
administrator opening the screen
Step 2
• Click on the Reset Password button ( ) corresponding to the user for whom you
want to reset a password. The reset password confirmation screen opens (figure 10-8)
assigning a new temporary password, which the administrator must provide to the
user for one-time login
TIP: Copy the text for the temporary password so it can easily be pasted into an
email to the user
Step 3
• Click on user’s e-mail address on the User Management screen to open Outlook and
notify the user of the new, one-time-login password
• There is no cancel action for the Reset Password function
Figure 10-9. Reset Password—Confirmation.
Delete Account.
An administrator will delete a user account when the user no longer needs access to ACTS. The
administrator must reassign open cases to another AO.
Step
Action
Step 1
• Select the “Admin” tab in the Navigation Bar, then select “Manage Users” from the
dropdown menu
• or click on “Disable User”, “Modify User”, or “Reset Password” in the Footer of
the page
• The User Management screen opens (figure 10-7) providing access to all user
accounts to which the administrator has access
Step 2
• Locate the user you wish to delete
• Click on the Delete button ( ) to permanently delete the account and remove the
user
• If ACTS has open cases assigned to the user that is being deleted, the system will
force the administrator deleting the account to reassign open cases and cases in
follow-up status to another AO (figure 10-10)
• If there are no open cases assigned to the user, there will not be any confirmation
that the user has been deleted
Step 3
• To reassign the cases, select the new AO
Step 4
• Select “Delete.” The cases will be reassigned to the new user
Step 5
• To exit and return to the Home Page, click on the Return Home button at the
bottom of the User Management screen
Figure 10-10. Deleted User Has Assigned Complaints.
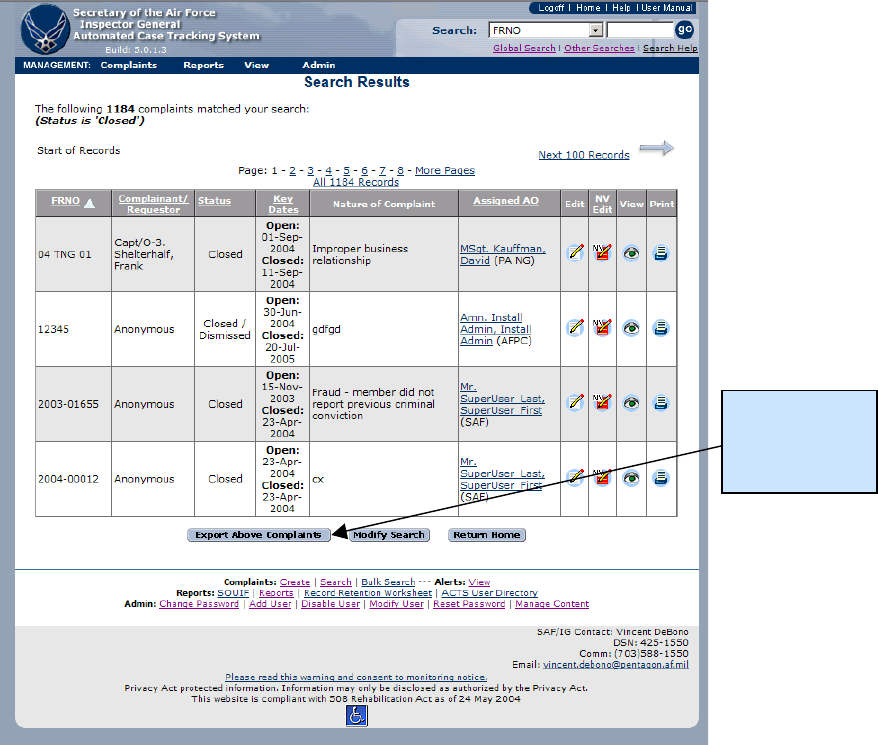
CHAPTER 11 – MANAGING ACTS DATA
FOIA, PA, Discovery, and OUR Requirements
ACTS records are subject to Freedom of Information Act (FOIA), Privacy Act (PA), Discovery,
and Official Use Requests (OUR) guidelines for collecting information and releasing Inspector
General documents. If ACTS data is determined to be responsive to a FOIA, Privacy Act, or
OUR request, print the Case File Worksheet and redact IAW DoD 5400.7/Air Force Supplement,
DoD Freedom of Information Act Program; AFI 33-332, AF Privacy Act Program; and/or AFI
90-301, Inspector General Complaints (for Discovery and OUR).
Exporting Data
The Export feature allows users to save a snapshot of the selected case file data for customized
reports and statistical analysis.
Figure 11-1. Search Results Screen.
Export
individual
case file data
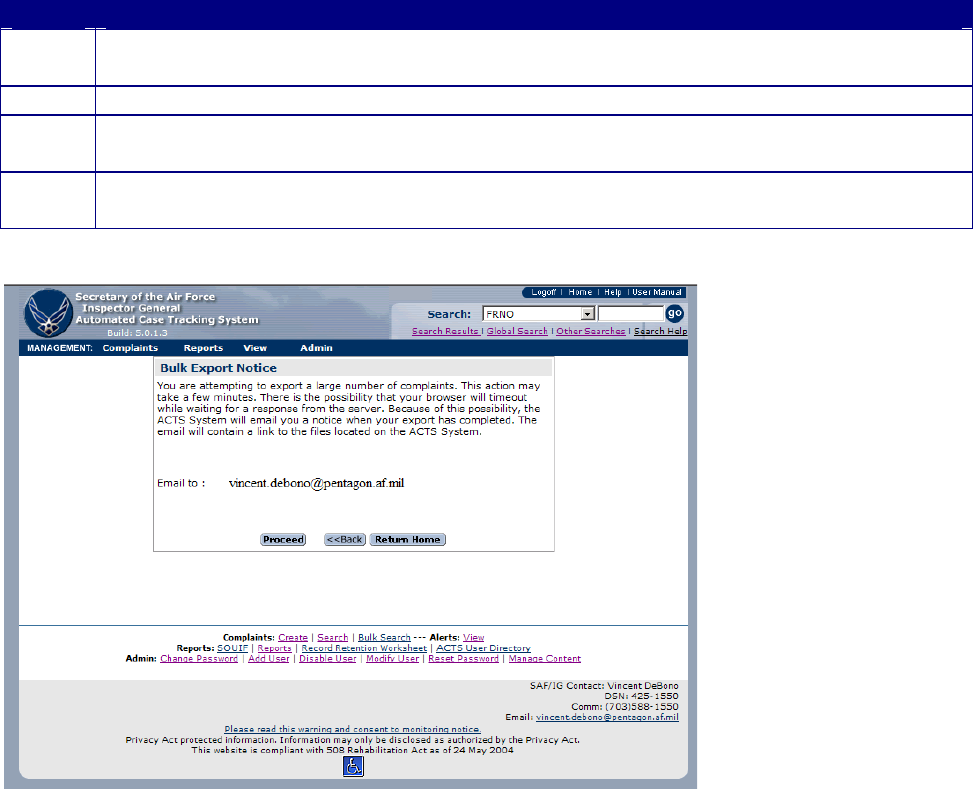
Creating the Export Records.
Clicking on the “Export Above Complaints” button on the Search Results screen (figure 11-1)
initiates the process of creating a Microsoft Excel “Workbook” consisting of five “Worksheets”,
named Complaints, Sources, Subjects, Allegations, and Case Notes, containing all the data in the
“search results” records. Creating the file may take several minutes. The user will be notified
that session time out may occur before the file is available for download and that an email will be
sent to the user with a link to the export file (figure 11-4). ACTS will provide a notice when the
file is available for download (figure 11-3). Clicking on the hyperlink in the ACTS notice screen
(figure 11-3) or the email (figure 11-5) will open the file within MS Excel (figure 11-6). Click on the
workbook tabs individually to view them. Save the temporary MS Excel file to the hard drive, or
network drive, before manipulating the data.
Step
Action
Step 1
• Initiate a search for the cases to be downloaded. The search results will be displayed
in the Search Results screen (figure 11-1)
Step 2
• Click on the “Export Above Complaints” button (figure 11-1)
Step 3
• The Bulk Export Notice screen appears (figure 11-2).
• Click on “Proceed” to acknowledge the warning that a session time out may occur
Step 4
• When the Export Results screen appears (figure 11-3), click on the “Complaint Export:
Microsoft Excel File” to open an MS Excel workbook containing the search results
Figure 11-2. Bulk Export Notice Screen.
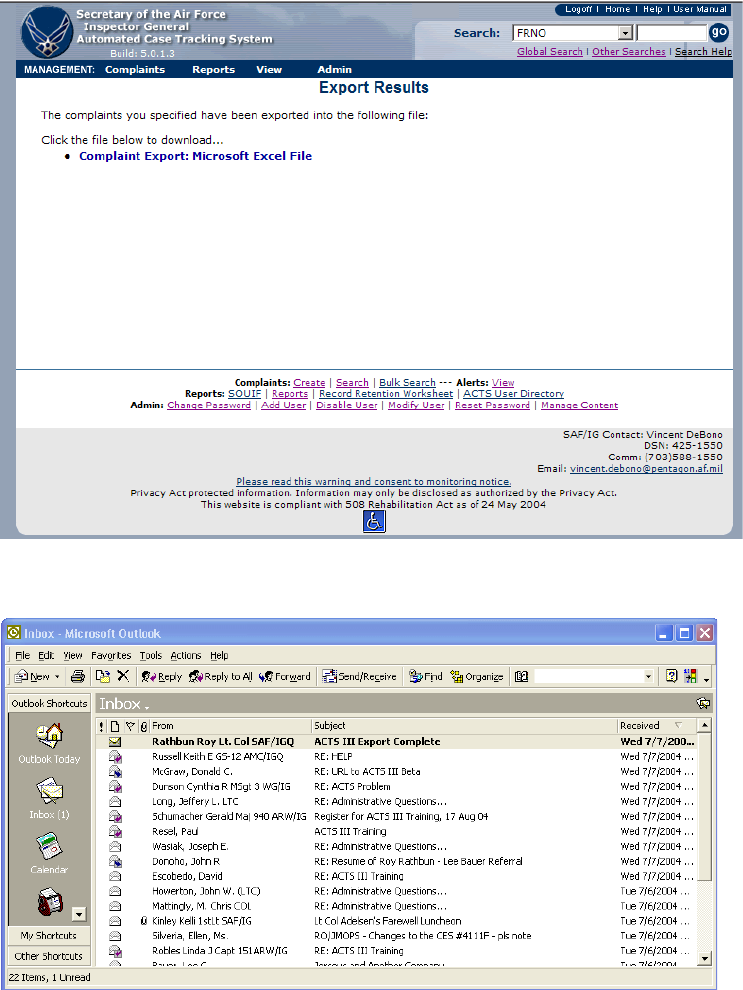
Figure 11-3. ACTS Exported Search Results Screen.
Figure 11-4. Bulk Export Complete—Email Notification
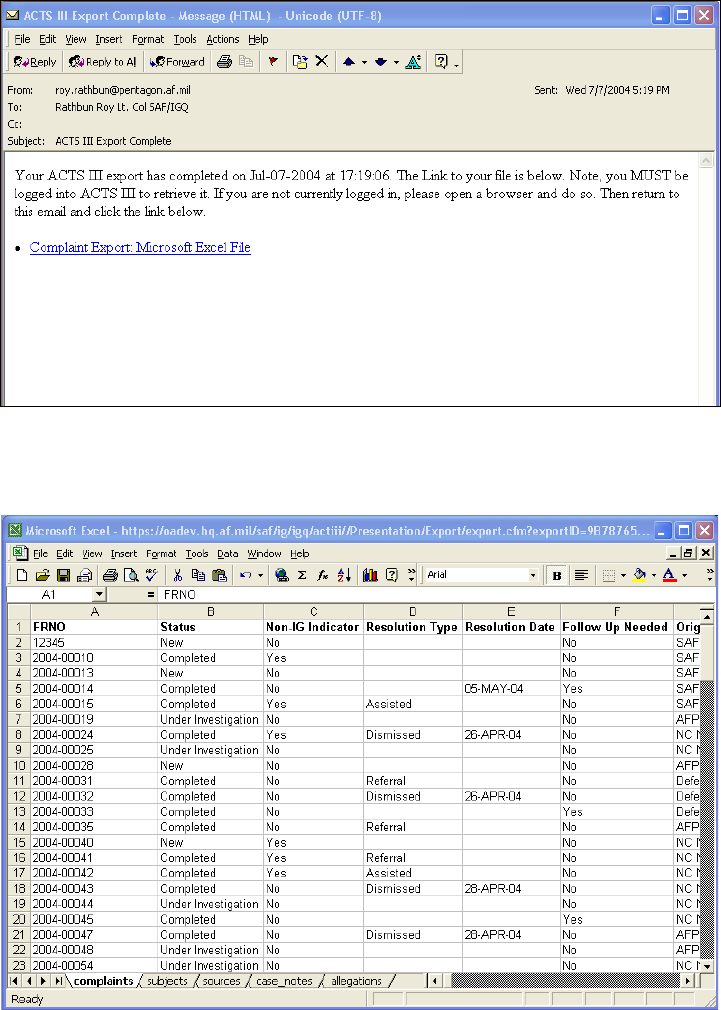
Figure 11-5. ACTS Export Complete—Email Message With Link to File.
Figure 11-6. ACTS Export--MS Excel Workbook.
Purging Data
Upon closing a complaint record in ACTS, the system will calculate a record Disposition Date
(figure 11-7) based on the Closure Date, entered by the user. The disposition date will remain
editable after case closure. The user may update the disposition date after closure by entering a
revised date in the field or modifying the retirement date of any colonel, or equivalent, subject
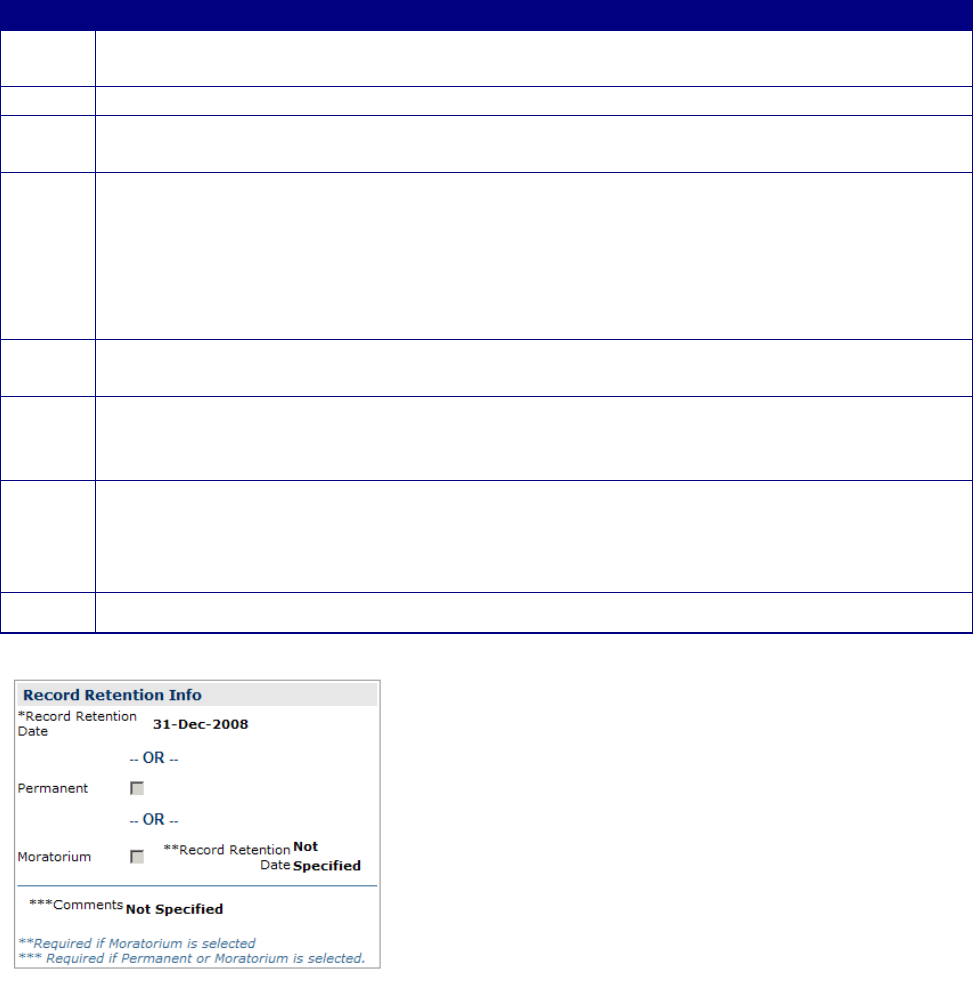
(figure 11-8). The record will appear on the Record Retention Worksheet (figure 11-9) as eligible for
purge on or after the disposition date in the system. Records that have been marked as
permanent or moratorium will be listed at the bottom of the sheet with appropriate disposition
dates (none for permanent) (figure 11-9). Only records that your office has Created,
Transferred/Received, or Notified/Received will be displayed on your Record Retention
Worksheet.
Purge Data
Step
Action
Step 1
• Click on “Record Retention Worksheet” in the Reports menu option on the Menu bar
or the footer menu bar (figure 8-1)
Step 2
• The Record Retention Worksheet notice screen appears (figure 11-9).
Step 3
• Print the Record Retention Worksheet by clicking the “Print Purged Complaints”
button and close the screen
Step 4
• Compare the Record Retention Worksheet with the case files stored in your office.
Annotate on the Record Retention Worksheet, using the check boxes for the records
that will be purged
• Open the Record Retention Worksheet in the system again and check the boxes in
the system to match the printed, verified Record Retention Worksheet
• Click on “Continue With Purge” (figure 11-9)
Step 5
• The Confirm Purged Complaints notice screen appears (figure 11-10)
• Click on “Continue With Purge”
Step 6
• An Internet Explorer dialog box will appear, requesting confirmation (figure 11-11)
• Clicking on “OK” will purge the records from the system and open the Purged
Complaints Notice Screen (figure 11-12)
Step 7
• Click on “Print Purged Complaints” to launch a new browser window with a printer
friendly version of the dated Destroyed Complaints record. A printer selection
dialog box will appear (figure 11-13)
• Click the “Print” button to print the Destroyed Complaints Record (figure 11-14)
Step 8
• Click on “Close Window” to return to the Purged Complaints Notice screen
Figure 11-7. Record Disposition Information Box (Suspenses/Dates Tab).
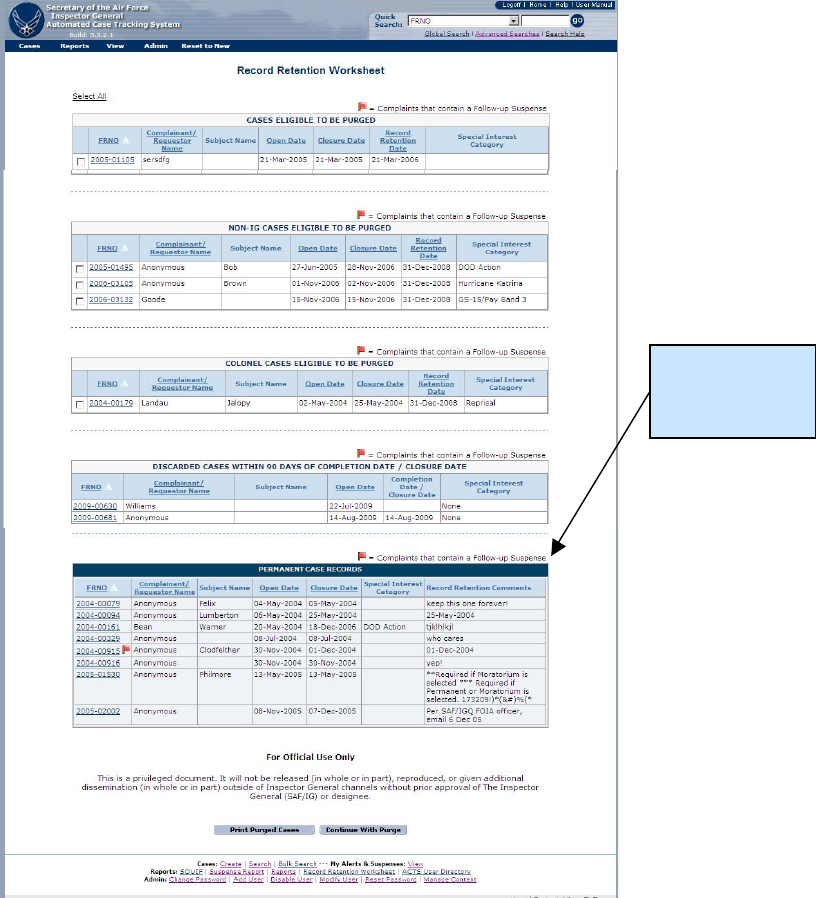
Figure 11-8. Record Retention Worksheet.
Permanent/
Moratorium
Records
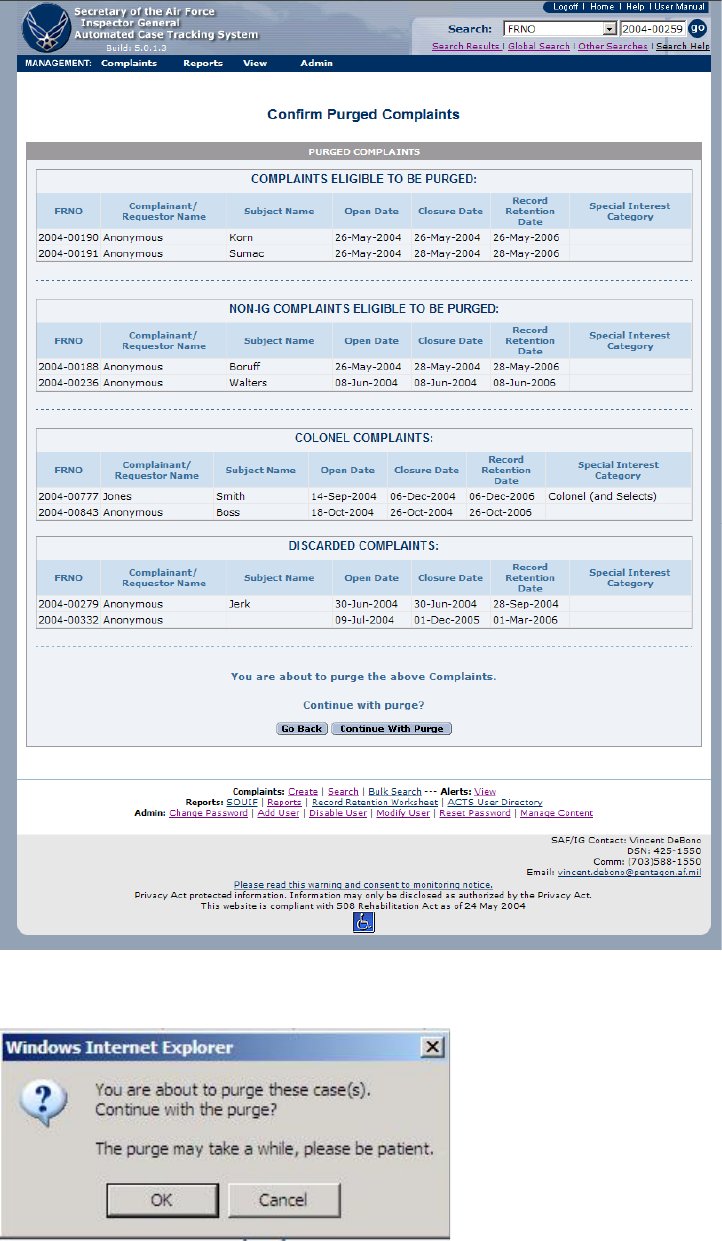
Figure 11-9. Confirm Purged Complaints Notice Screen.
Figure 11-10. IE Dialog Box—Reaffirmation of Purge.
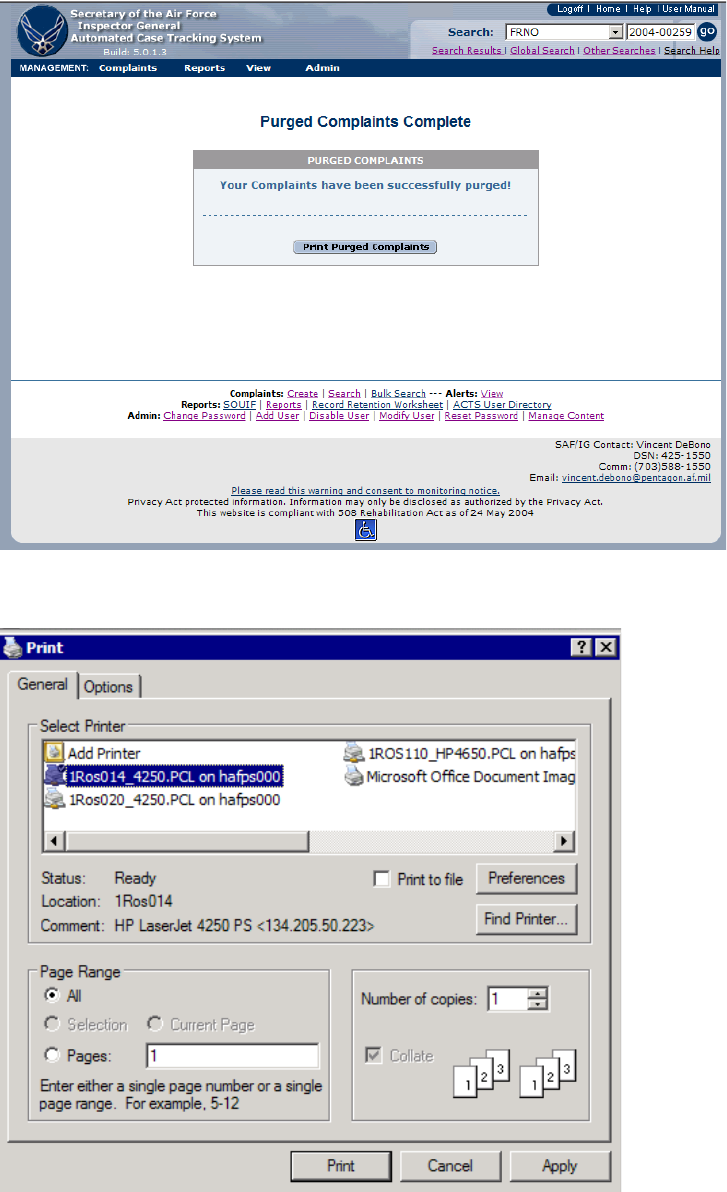
Figure 11-11 Purged Complaints Complete Notice Screen.
Figure 11-12. Printer Selection and Print Dialog Box.
Figure 11-13. Destroyed Complaints Notice Window (printer friendly).
Reset to New
On occasion, it may be necessary to “restart” an IG case. The reasons for this vary. However,
when it is necessary, this feature will allow certain users to take a case that is in “completed” or
even “closed” status and reset it to “new”, This action will delete the current values in certain
fields and replace them with new values.
Reset to New
Step
Action
Step 1
• Click on “Reset to New” on the Menu bar.
Step 2
• The “Reset Complaint to New: Enter FRNO” screen appears, figure 11-14.
Step 3
• Enter the FRNO of the case you want to reset.
Step 4
• The “Reset Complaint to New: Summary of Changes” screen appears, figure 11-15
• Ensure you understand the changes that will occur, the click “print casefile
worksheet” to preserve a record of the information that will be changed.
Step 5
• Click “Reset to New” to initiate the changes listed in figure 11-15
Step 6
• A successful validation screen will appear, figure 11-16.
Figure 11-14. Reset complaint to new: Enter FRNO.
Figure 11-15. Reset complaint to new.
Figure 11-16. Reset complaint to new: Confirmation.

APPENDIX A – GLOSSARY OF TERMS
Term
Explanation
Anonymous
Refers to anonymous complainants
Closed
Resolution actions are “Closed” when all actions IAW 90-301, are complete
and the complainant has been notified of the results. The Closed state is final;
there are no allowable actions on a closed complaint; however, you may
document the date all Follow Up actions were completed, change the
disposition date, update the retirement date of Colonel or equivalent subjects
and enter case notes
Command Action
Command/corrective action taken because of a substantiated allegation
Command Unit
(CU)
Major Commands, Forward Operating Agencies, and Direct Reporting Units
Complaint Status
The system generated status of the complaint, based on the actions selected by
the user (i.e., new, under investigation, completed, closed, discarded)
Completed
All resolution actions will pass through the “Completed” state. “Complete” the
action, i.e., Dismiss, Investigate, Refer, Assist, when all requirements IAW 90-
301 are complete.
Connectors
And / Or
Criteria
The combination of a complaint field, operators, and search string
Discarded
The IG determined that the complaint is a duplicate or entry error. The system
records the complaint, but marks it such that it is ignored
Error Field
Following unsuccessful submission, ACTS will notify the user why the
submission was unsuccessful. The fields that caused the submission to be
unsuccessful are referred to as error fields (identified with an exclamation mark
[!] and highlighted in pink/red)
File Reference
Number (or
FRNO)
A unique numeric identifier assigned to each case file by ACTS when the
ACTS file is created.
Notify
An action which creates an alerts for both the sender and receiver when a case
requires attention at another level without moving the ownership of the
complaint (e.g., a Colonel notification; or an investigation which requires
higher level quality review, but final action rests with the installation IG)
Home Page
The opening menu following successful login to ACTS
IG Action
Any duty related activity performed by the IG
NAF
Numbered Air Force
New
The complaint has been recorded and is awaiting assignment to an IG for
resolution
Open Date
The date the complaint entered the Air Force IG system. Record the date the
first contact with any Air Force IG occurred regarding the complaint; may be
earlier than the date of initial ACTS entry.
Operators
Components of an advanced search, used to identify the records sought (e.g.,
plus [+], greater than [>], less than [<], etc, where search might be: open date >
1 Jan 03, to retrieve all cases opened after 1 Jan 03)
Report
A report is a method for presenting retrieved, sorted data in a specific format
-
Resolution Type
Type of action that resolved the complaint
- Substantiated investigation
- Not substantiated investigation
- Dismissed – automatically generated
- Referral – automatically generated
- Assist – automatically generated
- Discarded—Entry Error
- Discarded—Duplicate
Source
Where the complaint originated
Transfer
An action that transfers ownership of the ACTS complaint record to an Action
Officer specified by the sender and creates alerts for both the sender and
receiver. Action is complete when receiver opens complaint record for edit and
subsequently submits the complaint for validation
ATCH 1 – TROUBLESHOOTING TIPS
Can you access the application?
What do you see on the screen when you access the correct URL?
Do you see a white screen with an error message?
Do you see the appropriate Login page?

If you see an error message, copy it into an email message or dictate it over the phone to
the person helping you.
If you cannot access the application at all, try to access the following URL:
http://webservices.hq.af.mil
What do you see?
Do you see your Host Name and IP (Internet Protocol Address)?
Copy what you see into an email message or dictate it over the phone to the person
helping you.
Can you login to the application?
If you see the appropriate Login page, try to login. What happens?
Are you allowed into the system?
Are you allowed into the system, but see some kind of error message?
Are you denied access? If so, what is the system telling you?
Is your username/password combination incorrect?
Is your account disabled or locked out for some reason?
Are you positive you are attempting to login into the system you think you are? Double-check
your URL!
If you see an error message, copy it into an email message or dictate it over the phone to
the person helping you.
Are you getting an error once you are in the application?
If you are able to login to the application, what is happening?
Do you see the appropriate Home Page?
Is there an error message on the Home Page?
If you are able to proceed with normal activities, like searching and opening a complaint, what is
happening?
Is the application responding appropriately?
Are you seeing an error message? Is it specific?
If you see an error message, copy it into an email message or dictate it over the phone to the
person helping you.
Defect Report
DEFECT REPORT/QUESTION
ACTS Release 5.00
Number:
Submitting
Organization:
Date Submitted:
Build:
Submitter:
Name/Phone
Date Received:
Headline
Summary:
Type:
Problem / Enhancement
Impact (Critical, High, Med, or Low):
Screenshot available:
Yes / No
Problem
Description
(include
screenshot, if
available):

ATCH 2 - CONSOLIDATED SUMMARY OF ACTS INPUTS
Submitted by (rank/name/org):_______________________________________ Date Submitted: ______________
Main
Topic/Function
Brief Discussion of Issue
Stance/Proposal
NOTES
