BRX User Manual, 3rd Edition Appendix F Appxf
User Manual: Pdf Appendix F BRX Do-more Platform User Manual and Inserts
Open the PDF directly: View PDF ![]() .
.
Page Count: 8
- Tips & Tricks
- C-more tag import
- Pointers, Indexing and Arrays
- Bit of Word, Data type conversion and Casting
- Formatting Date and Time on an HMI with String Scripting
- MATH, Logical Operations & statistical functions
- Simulation and PID Simulation
- Symbolic Constants
- Start Page replacement
- Moving Communications links to another PC
- Troubleshooting email with DMLogger
- Importing Program segments
- Keyboard Shortcuts

Appendix
Appendix
Appendix
F
F
F
In This Appendix...
Tips & Tricks .................................................................................................................................................. F-2
C-more tag import .................................................................................................................................... F-2
Pointers, Indexing and Arrays ................................................................................................................... F-2
Bit of Word, Data type conversion and Casting....................................................................................... F-2
Formatting Date and Time on an HMI with String Scripting .................................................................. F-2
MATH, Logical Operations & statistical functions .................................................................................... F-2
Simulation and PID Simulation ................................................................................................................. F-3
Symbolic Constants ................................................................................................................................... F-3
Start Page replacement ............................................................................................................................. F-3
Moving Communications links to another PC .......................................................................................... F-3
Troubleshooting email with DMLogger ................................................................................................... F-3
Importing Program segments ................................................................................................................... F-4
Keyboard Shortcuts ................................................................................................................................... F-4
Tips & Tricks

Appendix F: Tips & Tricks
BRX User Manual, 3rd Edition
F-2
1
2
3
4
5
6
7
8
9
10
11
12
13
14
15
A
B
C
D
E
F
G
Tips & Tricks
C-more tag import
To easily get your tags from a Do-more! Designer Project into a C-more HMI, in Do-more! Designer go to
File –> Export -> Element Documentation. Pick C-more Do-more! Driver Format WITH Structure Fields.
If you want C-more to reference elements that are used in your ladder program but do NOT have nicknames,
you can either assign them nicknames, or you can check the “Also export USED elements which do not have
a nickname” in the Export Element Documentation dialog box.
Pointers, Indexing and Arrays
In order to utilize a memory element as an array, it must be a Memory Block. Heap Items are singeltons and
cannot be utilized as an array. To see what elements can be used as an array or to create a custom item, go to
System Configuration -> Memory Configuration -> Memory blocks tab.
Addressing a Memory Block as an array is simple. Place brackets [ ] after the Memory Block name and use
a V memory element such as V0 as the index. IE D[V0], N[V5], UDT[V0], etc.
A handy trick for knowing how large the array is without hardcoding values is to use the DATAINFO
instruction.
Bit of Word, Data type conversion and Casting
Getting bits out of a word in Do-more! Designer is done with a method called Casting. More information
on Casting can be found in Do-more! Designer Help Topic DMD0309.
The basics of Casting a memory element are to use a “:” and an identifier or for Bit of Word, a number. IE
D0:1 is bit 1 of memory element D0. All Bits start at zero.
To simplify Casting, you can use the Cast Builder. When on a field that supports a memory element, press
the F9 key. Type your Source Element in the appropriate field and then in the bottom right corner, press the
“Show Cast Builder” button. Click the appropriate radio buttons and then press “Select”. It is that easy to
cast a memory element.
Other methods for doing memory type conversion is by using the ladder commands PUBLISH and
SUBSCRIBE. These will allow you to convert large areas of memory at once which is useful when you are
talking to a Modbus or DirectLogic device that utilizes untyped memory.
Formatting Date and Time on an HMI with String Scripting
If you want your date and time to look nice on your HMI, put the data into a string using STRPRINT and
the string scripting language. See Do-more! Designer Help Topic DMD0168 for a list of all string scripting
commands.
MATH, Logical Operations & statistical functions
The Do-more! MATH instruction is a very powerful feature. Do-more! Designer Help Topic DMD0085
covers the lists of functions that are available.
In addition to doing Arithmetic and Trigonometry, it can also do Logical and Bitwise operations. A few
minutes perusing this help topic can save you a lot of time.

Appendix F: Tips & Tricks
F-3
BRX User Manual, 3rd Edition
1
2
3
4
5
6
7
8
9
10
11
12
13
14
15
A
B
C
D
E
F
G
The most common issue when doing Math with a Do-more! processor is knowing that you must promote the
equation to Real (Floating Point) if you are using integers with a Real result. If the equation is integers, but
you wish to have a result that is a Real number you must use TOREAL() or add a decimal point to one of the
numbers; IE 2.0. See Help topic DMD0085 for more information on promoting numbers to Real format.
Simulation and PID Simulation
Do-more! Designer software comes with a separate Do-more! simulator application that runs the same
Do-more! control engine that is in the Do-more! CPUs. You can connect/disconnect and upload/download
to the simulator as you would with a Do-more! CPU. There is even a Run/Term/Stop mode switch and LED
indicators for power, Run and communication activity. This is a great tool to test your code before you ever
load it into your system.
The Simulator also has the ability to do simple PID simulation to learn how PID works!
See Do-more! Designer Help Topic DMD0234 for more information.
Symbolic Constants
Do-more! Designer supports the use of Symbolic Constants. A Symbolic Constant is where you assign a
nickname to a hard coded value. IE Sunday = 0, Monday = 1, Tuesday = 3, etc. Do-more! Designer Help
topic DMD0276 has more information on symbolic constants.
To assign a Symbolic Constant, go to Tools -> Documentation Editor and then press the “Symb” in the
toolbar of the Documentation Editor tab. This can help make your program much easier to read and
navigate.
You can add a nickname to a memory location that has a cast. For example you have a double word signed
number in D100 nicknamed “Dancer” for your dancer position. If you wanted to know that it was a negative,
you could use D100:31 which is the sign bit for D100. If you were to nickname D100:31 “Dancer_Neg”
you could use this nickname throughout your program and it would always refer to D100:31.
Start Page replacement
You can attach documents to your project to replace the content of the Start Page on a project-by-project
basis. This can be a PDF, Excel spreadsheet, .JPG, etc. A good example of this is the PID1.dmd example
project found in the Examples folder in Do-more! Designer.
Moving Communications links to another PC
You can move your communications links from one PC to another by copying the DmDComm.RST file that
is located in the Do-more\Designerx_x\Bin\ folder.
Troubleshooting email with DMLogger
In your Do-more! Designer ladder project, turn $EnableMsgDump bit ON & start Do-more! Logger from
Applications window in the Launchpad to troubleshoot email. This will send the server messages to your PC
so that you can see exactly where it is getting stuck at.
The DMLogger utility can also be useful for troubleshooting by placing STREAMOUT instructions in your
ladder code to send messages to the utility to let you know what is happening at various times.
Appendix F: Tips & Tricks
BRX User Manual, 3rd Edition
F-4
1
2
3
4
5
6
7
8
9
10
11
12
13
14
15
A
B
C
D
E
F
G
Importing Program segments
Use the #import mechanism in your Import Program text file so you can modularly create projects from
different source files. So MyProject.TXT could contain just 4 lines:
#include “SysConfigXYZZY.txt”
#include “MachineControl.txt”
#include “Library\NonLinearControlLibrary.txt”
#include “Library\CalendarLibrary.txt”
Keyboard Shortcuts
The following table lists the keystrokes (also known as Hot Keys or Accelerator Keys) available in the various
views of Do-more! Designer that can greatly enhance the usability of each view.
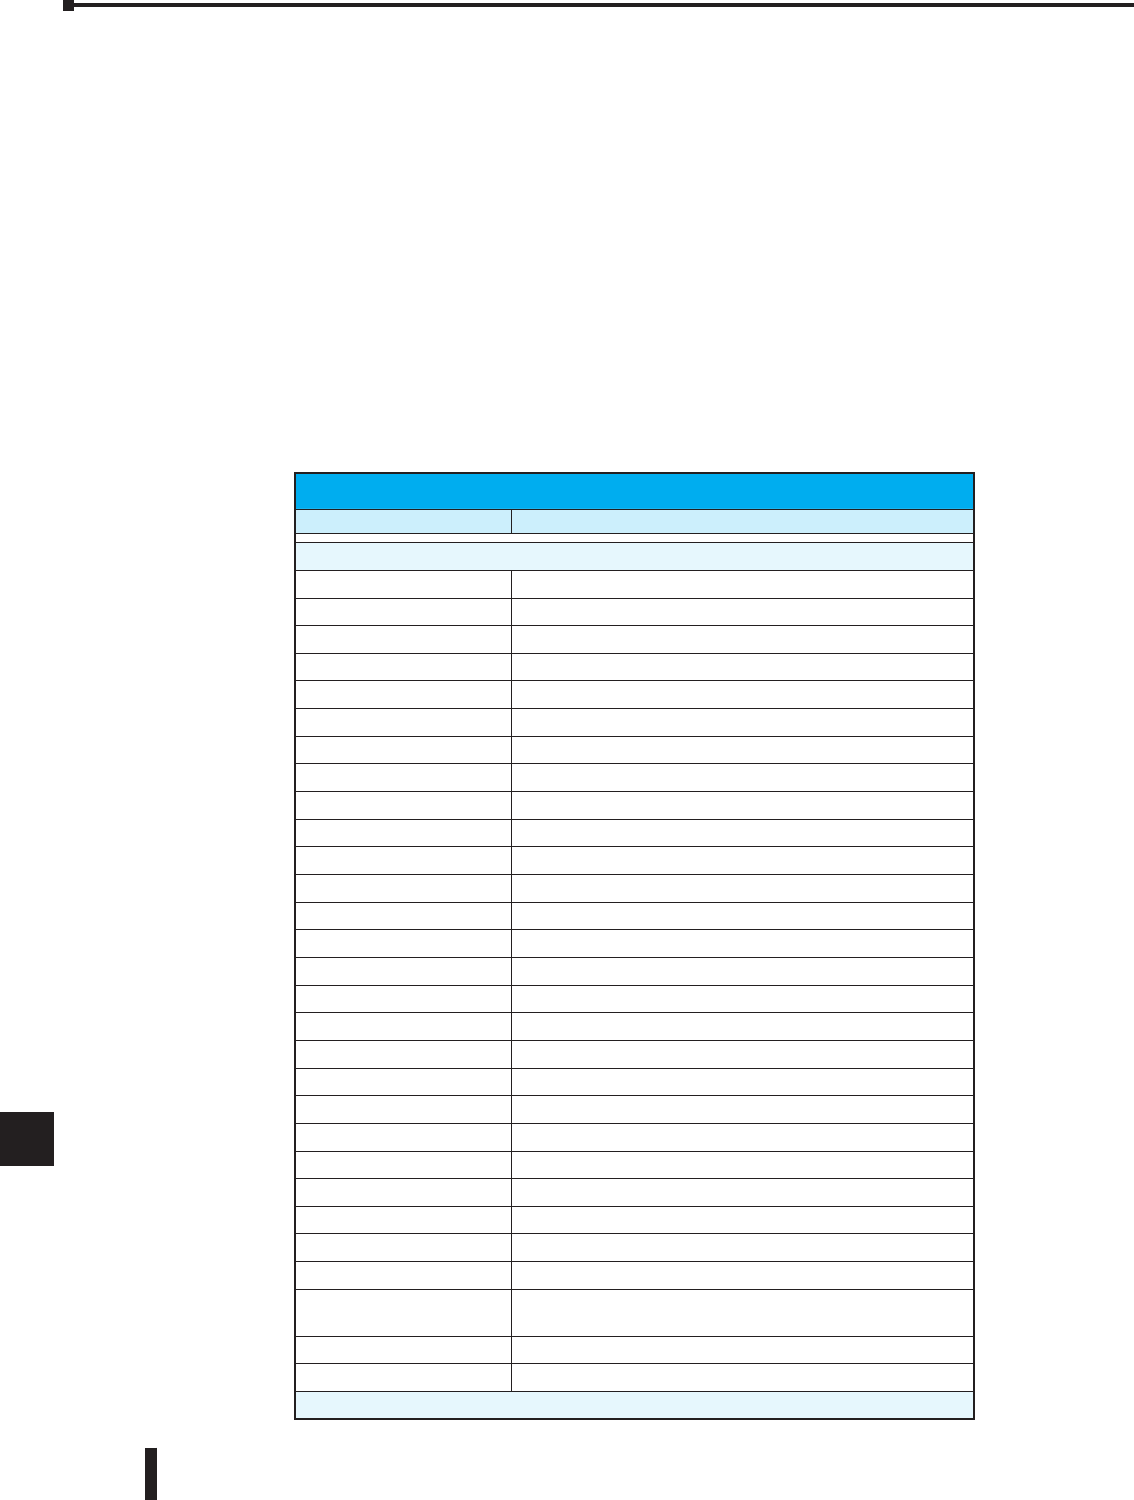
Keyboard Shortcuts
Shortcut Action
Ladder View
!Edit Not-Equal-To Contact
<Edit Less-Than Contact
=Edit Equal-To Contact
>Edit Great-Than-Or-Equal-To Contact
Ctrl+A Select All
Ctrl+C Copy into Clipboard
Ctrl+E Toggle Edit Mode
Ctrl+F Open Find Dialog
Ctrl+Shft+F Find Next
Ctrl+K Open Rung Comment Editor
Ctrl+P Print Current View
Ctrl+R Open Replace dialog
Ctrl+V Paste Clipboard into View
Ctrl+W Connect Wire to Output
Ctrl+X Cut into Clipboard
Ctrl+Z Open Edit History
Backspace Delete Instruction to Left then move Edit cursor to Left
Ctrl+Comma Goto Previous Instruction
Ctrl+Delete Cut into Clipboard
Delete Delete
Ctrl+Down Arrow Draw Wire Down
Ctrl+Shft+Down Arrow Delete Wire Down
Ctrl+End Goto Last Rung in Code Block
Ctrl+Shft+End Add from Current Location to End to Selection
Shft+End Add Next Rung to Selection
Ctrl+End Insert Row After Block Cursor
Enter Insert Row After Block Cursor, or Before Block Cursor if in
First Column
F12 Goto Element's Output Reference
Ctrl+F2 Edit Positive Differential Powerow Modier
Table continued on next page

Appendix F: Tips & Tricks
F-5
BRX User Manual, 3rd Edition
1
2
3
4
5
6
7
8
9
10
11
12
13
14
15
A
B
C
D
E
F
G
Keyboard Shortcuts (continued)
Class Description
Shft+F2 Edit Positive Differential Contact
F2 Edit Normally Open Contact
Ctrl+F3 Edit Negative Differential Powerow Modier
Shft+F3 Edit Negative Differential Contact
F3 Edit Normally Closed Contact
F4 Open Contact Instruction Browser
F5 Open Coil Instruction Browser
F7 Open Box Instruction Browser
F8 Accept Modied Rungs
Ctrl+Home Goto First Rung in Code-Block
Ctrl+Shft+Home Add from Current Location to Beginning to Selection
Shft+Home Add Previous Rung to Selection
Ctrl+Insert Copy into Clipboard
Shft+Insert Paste Clipboard into View
Insert Open Insert Rung, Row, Column dialog
Ctrl+Left Draw Wire to Left
Ctrl+Shft+Left Delete Wire to Left
Ctrl-Minus Goto Element's Previous Reference
Ctrl+Shft+Minus Zoom Out
Ctrl+Page Down Goto Next Modied Rung
Page Down Goto Next Rung
Ctrl+Page Up Goto Previous Modied Rung
Page Up Goto Previous Rung
Ctrl+Period Goto Next Instruction
Ctrl+Plus Goto Element's Previous Reference
Ctrl+Shft+Plus Zoom In
Ctrl+Right Draw Wire to Right
Ctrl+Shft+Right Delete Wire to Right
Ctrl+Up Draw Wire Up
Ctrl+Shft+Up Delete Wire Up
Main Programming Window
Ctrl+D Open Documentation Editor
Ctrl+L Open Ladder View
Ctrl+Shft+L Restore Default Window Layout
Ctrl+N Create New Project
Ctrl+O Open Project
Ctrl+Shft+R Open Set PLC Mode dialog
Ctrl+S Save Project to Disk
Ctrl+Shft+S Toggle View's Status On/Off
Ctrl+T Edit Title Page
Ctrl+Y Open Cross Reference View
F1 Launch Contextual Help
Ctrl+Shft+F2 Open Change Value dialog
Ctrl+ShftF3 New Data View
Ctrl+F9 Read Project from PLC
Shft+F9 Write Project to PLC
Table continued on next page
Appendix F: Tips & Tricks
BRX User Manual, 3rd Edition
F-6
1
2
3
4
5
6
7
8
9
10
11
12
13
14
15
A
B
C
D
E
F
G
Keyboard Shortcuts (continued)
Class Description
F9 Open Element Selection Tool
Data View
Ctrl+Shft+A Sort Elements Ascending
Ctrl+C Copy into Clipboard
Ctrl+ShftD Sort Elements Descending
Ctrl+V Copy Clipboard into View
Ctrl+X Cut into Clipboard
Ctrl+Delete Cut into Clipboard
Delete Delete
Ctrl+Enter Insert Element with Next ID
Ctrl+Shft+Enter Structure Field: Insert Element with Next Field
Structure: Insert Structure Fields
Ctrl+F2 Modify Element or Edit Cell
F2 Modify Element or Edit Cell
Shft+F6 Move to Format Selections
F6 Move to Format Selections
Shft+F9 Write Value to PLC
Ctrl+Insert Copy into Clipboard
Shft+Insert Paste Clipboard into View
Insert Insert Row
Project Browser
Ctrl+C Copy into Clipboard
Ctrl+V Copy Clipboard into View
Ctrl+X Cut into Clipboard
Ctrl+Delete Cut into Clipboard
Delete Delete
Ctrl+Insert Copy into Clipboard
Shft+Insert Paste Clipboard into View
Insert Open Create New Code-Block dialog
Rung Comment Editor
Ctrl+A Select All
Ctrl+F Goto Comment for Rung
Ctrl+G Goto Comment for Rung
Ctrl+End Goto Last Rung in Code Block
Ctrl+Home Goto First Rung in Code-Block
Ctrl+Page Down Go 5 Rungs Forward
Ctrl+Page Up Go 5 Rungs Back
Cross Reference View
Ctrl+F Open Find Dialog
Ctrl+Shft+F Find Next
Ctrl+P Print Current View
Trend View
F2 Open Add / Remove Elements dialog
Element Documentation Editor
Ctrl+C Copy into Clipboard
Table continued on next page
Appendix F: Tips & Tricks
F-7
BRX User Manual, 3rd Edition
1
2
3
4
5
6
7
8
9
10
11
12
13
14
15
A
B
C
D
E
F
G
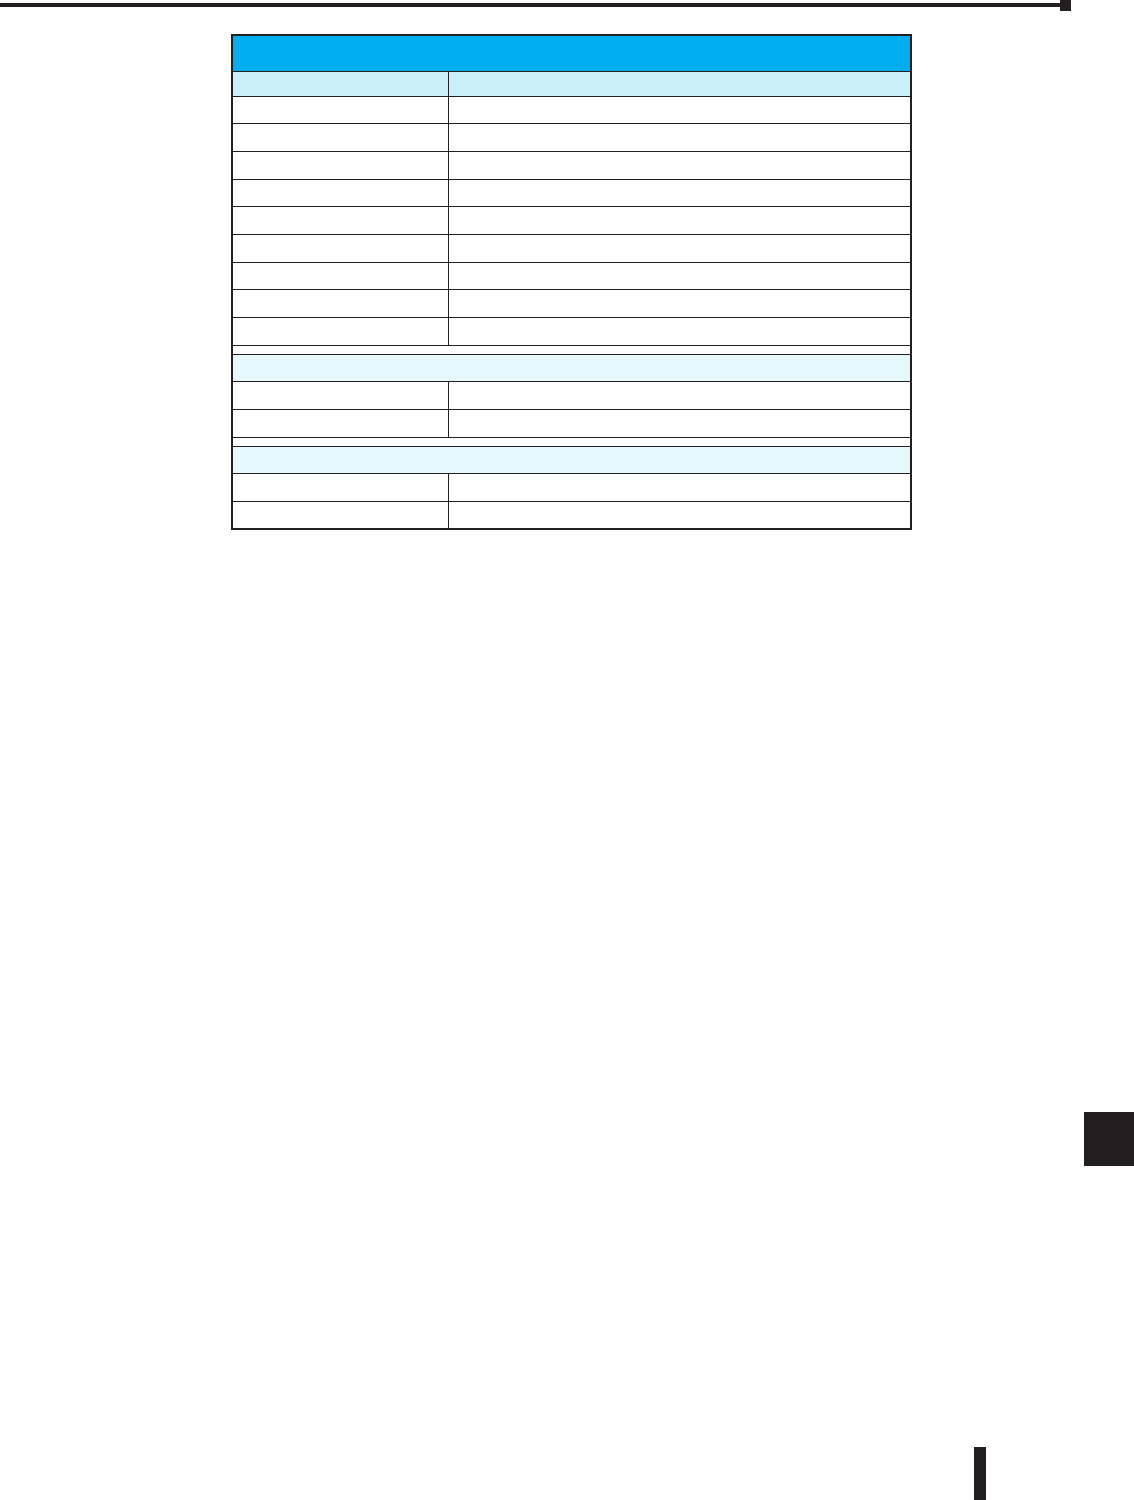
Keyboard Shortcuts (continued)
Class Description
Ctrl+F Open Find Dialog
Ctrl+Shft+F Find Next
Ctrl+P Print Current View
Ctrl+V Copy Clipboard into View
Ctrl+X Cut into Clipboard
Ctrl+Delete Cut into Clipboard
Delete Delete
Ctrl+Insert Copy into Clipboard
Shft+Insert Paste Clipboard into View
Change Value Dialog
Ctrl+F9 Read Value from PLC
Shft+F9 Write Value to PLC
Print Preview
Page Down Next Page
Page Up Previous Page

Appendix F: Tips & Tricks
BRX User Manual, 3rd Edition
F-8
1
2
3
4
5
6
7
8
9
10
11
12
13
14
15
A
B
C
D
E
F
G
Notes:
