C FS Deployment Guide
cFS%20Deployment%20Guide
cFS%20Deployment%20Guide
cFS%20Deployment%20Guide
cFS%20Deployment%20Guide
cFS%20Deployment%20Guide
User Manual: Pdf
Open the PDF directly: View PDF ![]() .
.
Page Count: 26
National Aeronautics and
Space Administration
CORE FLIGHT SOFTWARE
DEPLOYMENT GUIDE
582-2008-012
VERSION : 3.1
MAY, 2016
cFS Deployment Guide 582-2008-012 Version 3.1 May, 2016 - page 2
CONTENTS
1.0 Document Scope ................................................................................................................................... 5
2.0 Overview ............................................................................................................................................... 5
2.1 cFS Compatibility Chart .............................................................................................................. 5
3.0 Integrate the cFS Components ............................................................................................................. 5
3.1 The cfs Mission Tree .................................................................................................................. 6
3.2 Specify The Build Platform ......................................................................................................... 7
3.2.1 Select Target ..................................................................................................................... 7
3.2.2 Specify cFE File Extension ................................................................................................ 7
3.2.3 Specify App File Extension ................................................................................................ 7
3.3 Integrate The CFE ...................................................................................................................... 7
3.3.1 Removing CFE Table Services .......................................................................................... 7
3.4 Integrate The OSAL .................................................................................................................... 8
3.5 Integrate The PSP ...................................................................................................................... 8
3.6 Build the cFE, OSAL and PSP.................................................................................................... 9
3.7 Integrate The Applications ........................................................................................................ 10
3.7.1 Place Application In $APP_DIR ....................................................................................... 10
3.7.2 Add Application Name To Makefile .................................................................................. 11
3.7.3 Add Table Name(s) To Makefile ...................................................................................... 11
3.7.4 Add Application to Startup Script ..................................................................................... 11
4.0 Build The System ................................................................................................................................ 12
4.1 make clean ............................................................................................................................... 12
4.2 make config .............................................................................................................................. 12
4.3 make ......................................................................................................................................... 12
5.0 Start The System................................................................................................................................. 13
5.1 Compressed cFS Application Support ...................................................................................... 13
5.2 Mcp750-Vxworks6.4 Platform ................................................................................................... 13
5.3 PC-Linux Platform .................................................................................................................... 13
6.0 Building and Running The Open Source Delivery ............................................................................... 14
7.0 Building the Ground Database and Pages .......................................................................................... 14
7.1 Populating the global Directories .............................................................................................. 14
8.0 tools directory ...................................................................................................................................... 14
9.0 rdl directory ......................................................................................................................................... 14
10.0 prc directory ........................................................................................................................................ 15
11.0 Utility Procedure Configuration Setup ................................................................................................. 15
11.1 Populating the Local Directories ............................................................................................... 16
11.1.1 prc Directory ............................................................................................................... 16
11.1.2 rdl Directory ................................................................................................................ 17
11.2 Creating the CommaNd and telemetry databases .................................................................... 17
11.3 Creating the asist display pages ............................................................................................... 18
cFS Deployment Guide 582-2008-012 Version 3.1 May, 2016 - page 3
12.0 Running cFS Applications ................................................................................................................... 19
12.1 Log onto a test machine ........................................................................................................... 19
12.2 View fsw activity ....................................................................................................................... 19
12.3 Boot up the Board ..................................................................................................................... 19
12.4 Start the ground system ........................................................................................................... 19
12.5 Verify Default applications are running ..................................................................................... 19
12.6 Manually Start an Application ................................................................................................... 19
12.7 Manually Stop AN Application .................................................................................................. 19
12.8 Log off of the test machine ....................................................................................................... 20
13.0 Using STOL test procedures ............................................................................................................... 20
13.1 Editing and Creating a test procedure ...................................................................................... 20
13.2 Compiling a test procedure ....................................................................................................... 20
13.3 Executing a test ........................................................................................................................ 20
13.4 Viewing a test log ..................................................................................................................... 21
Appendix A Using the CMake Build System ................................................................................................ 22

cFS Deployment Guide 582-2008-012 Version 3.1 May, 2016 - page 4
Revision History
Revision
Number
Release
Date
Changes to Prior Revision
Editor
V1.0
07/08/08
Document renamed from CFSAppIntegrationGuide to CFS Deployment Guide
V1.0.
R.McGraw
V1.1
09/04/08
Minor updates to stay in sync with newly released cFE 5.2
For example, the cFE directory structure has changed resulting in changes to the
file copy steps of this document.
R. McGraw
V1.2
09/10/08
Added more detail regarding cFE and OSAL integration.
R. McGraw
V1.3
09/23/08
Added Section 4 to detail how to create and populate the test account with an
application in order to test or run it. Reformatted the file to utilize bullets so that
if anything changes after this, the section numbers will regenerate automatically.
W. Moleski
V1.4
11/20/08
The copy steps in section 3.5 were changed from using $CFS_MISSION/apps to
$CFE_APP_SRC.
Also there was a typo in the first copy step of 3.5c. (The CFS_MISSION_INC
was change to CFE_MISSION_INC).
Also a step was added in section 4.2 - "Make sure that the 'cfe_user_tlm.rdl' and
.......
Also changed some wording in other parts of the document.
R.McGraw/
W. Moleski
V1.5
12/2/08
Replaced $CFS_MISSION/apps with $CFE_APP_SRC in section 3.5c
R.McGraw
V1.6
12/3/08
Corrected the version number displayed on the front page
R.McGraw
V1.7
12/4/08
General improvements in the app integration section
R. McGraw
V1.8
06/4/09
Sections 1, 2 and 3 changed to support new CFS directory format.
R. McGraw
V1.9
06/8/09
Section 3.8e and f changed instructions to copy makefile from the for_build
directory, not the src directory.
R. McGraw
V2.0
06/18/09
Added compatibility chart and Load/Run instructions
R. McGraw
V2.1
07/8/09
Section 3.8c, changed CFE_MISSION_INC to CFS_MISSION_INC and added
Note. Moved paragraph related to compatibility from section 3.5 to 2.1. Section
3.0, removed two instances of “In general…”
R. McGraw
V2.2
07/09/09
Added to note in section 3.8 stating CFE_MISSION_INC was renamed to
CFS_MISSION_INC. Changed cFE 5.3 references to cFE 6.0
R. McGraw
V2.3
07/16/09
Changes to section 3.7
R. McGraw
V2.4
08/5/09
Removed asterisk and ‘future release’ from compatibility chart
R. McGraw
V2.5
10/13/09
Added text to note the location of application specific instructions if they exist
to Section 4.0 and 6.0.
W. Moleski
V2.6
10/28/09
Added text to Section 6 for populating the Global Directories and configuring
the cFE Utility procedures and some general instructions for cFE in general
since this document replaces the cFE Deployment Guide with this version.
W. Moleski
V2.7
03/23/10
Updated Section 6 to remove any specific text to the cFE/CFS Lab and make
more generic for a mission to follow.
W. Moleski
V2.8
09/30/10
Updated Section 3.8 and 4.0 to add instructions for where to find the table files
and how to build the default tables.
W. Moleski
V2.9
05/30/12
Updated the compatibility chart, corrected the linux/osx/cygwin platform
section, added information about the open source delivery
R. McGraw
V3.0
08/29/14
Updated sections 2-6 for makefile changes in mission tree delivered with cFE
6.4.0
R. McGraw
V3.1
05/23/16
Document renamed from CFS Deployment Guide to cFS Deployment Guide
Updated document title page to generic cFS title page
Updated Section 1.0 Document Scope
General formatting changes
Added appendix with CMake instructions
S.Strege
cFS Deployment Guide 582-2008-012 Version 3.1 May, 2016 - page 5
1.0 DOCUMENT SCOPE
This document describes in detail, the steps needed to setup, build, load, and run the core Flight System
(cFS) developed by NASA. These steps assume use of the “GSFC Classic Build” system. There is an
appendix to this document that includes information on how to setup and build the cFS using the CMake
build system.
2.0 OVERVIEW
The core Flight System (cFS) is made up of the following components:
cFE (core Flight Executive)
OSAL (Operating System Abstraction Layer)
CFE_PSP (Platform Support Package, a.k.a. PSP)
cFS Applications
This document will provide the details needed to integrate all four components and also describe how to
build and run on the supported platforms.
2.1 CFS COMPATIBILITY CHART
GSFC Classic
Build
cFE
PSP
OSAL
cFS Apps
N/A
4.2.1
use arch delivered w/cFE
2.9
1.x
N/A
5.0.x
use arch delivered w/cFE
2.10
1.x
1.0
5.1.x
use arch delivered w/cFE
2.11
1.x
1.1
5.2.x
use arch delivered w/cFE
2.12
1.x
2.0
6.0.x
1.0
3.0
2.0+
2.0
6.1.x
1.1
3.3+
2.0+
2.0
6.2.x
1.1
3.5+
2.0+
2.0
6.3.x
1.1
3.5+
2.0+
3.0.x
6.4.x
1.2
4.1.1+
2.0+
6.5.0
6.5.0
1.3
4.2.0
2.0+
3.0 INTEGRATE THE CFS COMPONENTS
To build and run the cFS, the four components mentioned in section 2.0 need to be integrated into the
cFS mission tree (a.k.a. the mission template). The mission tree is a directory tree that contains
makefiles, documentation and placeholder directories for the four components.
The open-source release of the cFE contains the cFE and the PSP, both integrated into the mission tree.
See the readme file delivered with the open-source release for more detail.
Integrating each of the four cFS components is done in a similar way. Place a copy of the component in
the recommended directory (or elsewhere on your file system) and set the corresponding environment
variable to its location.

cFS Deployment Guide 582-2008-012 Version 3.1 May, 2016 - page 6
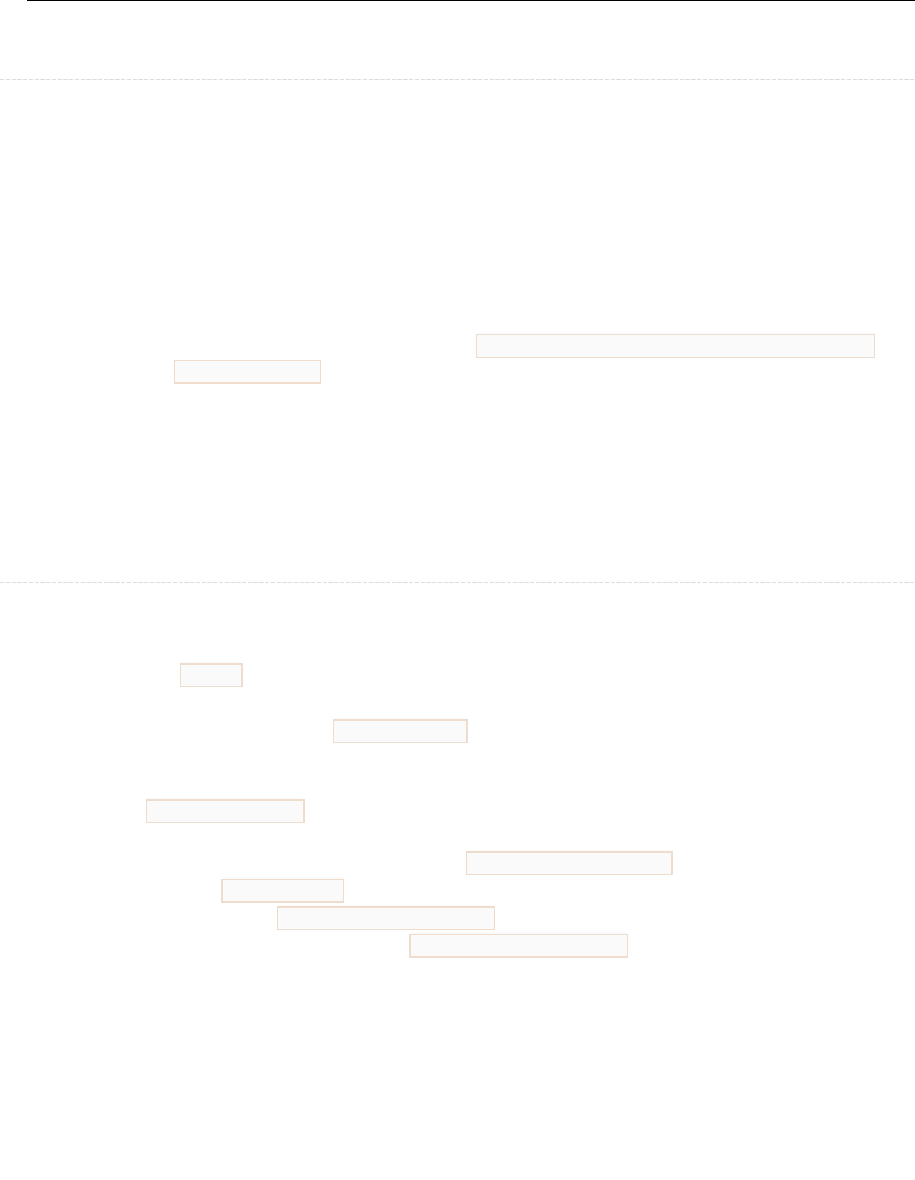
3.1 THE CFS MISSION TREE
The mission tree provides the framework for integrating the four cFS components. Figure 3.1 shows the
main directories of the mission tree.
Figure 3.1 The top level directories of the mission tree
The top level “mission” directory is typically renamed to match the project name.
The build directory contains a subdirectory for each build platform. The default setup contains one build
platforms, cpu1, for a pc-linux environment. This directory contains makefiles, configuration files and the
cFE startup script (mentioned later). The cpu1 directory can be copied for other CPU configurations i.e. cpu2
and cpu3 as shown in Figure 3.1. The configuration files will need to be modified accordingly for the target
platform.
The cpux directory names are typically renamed to specify the target platform. A typical flight project may
have three build platforms such as COTS, ETU and FLIGHT.
The setvars.sh file contains the following environment variables to define the location of each of the four
components:
export CFS_MISSION=`pwd`
export APP_DIR=$CFS_MISSION/apps
export CFE_DIR=$CFS_MISSION/cfe
export OSAL_DIR=$CFS_MISSION/osal
export PSP_DIR=$CFS_MISSION/psp
The app, cfe, osal and psp directories are intended to hold the directory tree of each component. It is
recommended (but not required) for new projects to follow this directory structure. If one of the components
is located elsewhere on the file system, the setvars.sh file must specify the location.
cFS Deployment Guide 582-2008-012 Version 3.1 May, 2016 - page 7
3.2 SPECIFY THE BUILD PLATFORM
To specify the build platform follow these steps:
3.2.1 Select Target
Select the target platform by editing the mission/build/cpux/cfe/cfe-config.mak. The target platform
is selected by choosing a supported CFE_PSP and OS. There are four platforms supported by cFS.
They are PC-Linux, MCP750/vxWorks6.4, Rad750/vxWorks6.4 and MCF5235/RTEMS. Refer to
the file comments for more detail.
3.2.2 Specify cFE File Extension
Specify the extension for the cFE core executable file by editing the $CFS_MISSION/build/
cpux/Makefile. Set the extension to “bin” for Linux and “o” for vxWorks.
CFE_CORE_EXE_TYPE:=bin
3.2.3 Specify App File Extension
Specify the extension for the application object files by editing the $CFS_MISSION/build/
cpux/Makefile. Set the extension to “so” for Linux and “o” for vxWorks.
CFS_APP_EXE_TYPE:=so
3.3 INTEGRATE THE CFE
To integrate the cFE into the mission template, the entire cfe-project directory tree can be placed in the
mission template ($CFS_MISSION/cfe) directory or another location on the file system. Set the
CFE_DIR variable in the setvars.sh file to the top directory in the cFE tree. If the recommended
directory is used, set the variable to:
export CFE_DIR=$CFS_MISSION/cfe
The following file copy steps are performed later by the “make config” step. There is no need to do
this manually. They are shown here because they are needed to integrate the cFE.
cd $CFE_DIR (defined in previous step)
cp fsw/cfe-core/src/inc/cfe_es_perfids.h $CFS_MISSION/build/mission_inc
cp fsw/mission_inc/cfe_mission_cfg.h $CFS_MISSION/build/mission_inc
cp fsw/platform_inc/cpux/cfe_msgids.h $CFS_MISSION/build/cpux/inc
cp fsw/platform_inc/cpux/cfe_platform_cfg.h $CFS_MISSION/build/cpux/inc
3.3.1 Removing CFE Table Services
It is possible to build the CFE without including Table Services. This is only applicable if the
mission does not intend to use any cFS applications that require CFE type table services, or the
mission intends to provide custom table services. If CFE Table Services are removed, the CFE
makefile will no longer try to make the Table Services application and the link makefile will no
cFS Deployment Guide 582-2008-012 Version 3.1 May, 2016 - page 8
longer include the Table Services object module in the CFE-CORE. Even if excluded from the build,
the Table Services source and header files will remain in the CFE source tree.
The environment variable EXCLUDE_CFE_TBL in the setvars.sh file controls whether, or not, the
CFE Table Services application is included in the CFE-CORE. The value of EXCLUDE_CFE_TBL
must be set equal to TRUE to cause Table Services to be excluded from the CFE-CORE. Any
definition of EXCLUDE_CFE_TBL that does not set the value equal to TRUE (or no definition at
all) will result in the inclusion of Table Services. The default setvars.sh file contains the line "#
EXCLUDE_CFE_TBL=TRUE", but note that the "#" symbol marks this line as a comment. Simply
remove the "#" symbol to enable the definition that excludes CFE Table Services.
Removing Table Services reduces the size of the CFE-CORE load file and also reduces the amount
of RAM memory required to load the cFE. Each development environment will have unique savings.
The numbers from a test performed using an MCP-750 platform with a GCC compiler are provided
here for reference:
Size of cFE binary load file with Table Services: 830,969
Size of cFE binary load file w/o Table services: 721,466
Amount of available RAM after loading cFE with Table Services: 76,513,488
Amount of available RAM after loading cFE w/o Table Services: 77,151,984
3.4 INTEGRATE THE OSAL
To integrate the OSAL into the mission template, place the entire OSAL directory on the file system
and specify the location in the setvars.sh file. The entire OSAL directory tree can be placed in the
mission template ($CFS_MISSION/osal) directory or any other location on the file system. Set the
OSAL_DIR variable in the setvars.sh file to the top directory in the OSAL tree. If the mission template
directory is used, set the variable to
export OSAL_DIR=$CFS_MISSION/osal
The copy command shown below is performed later by the “make config” step. There is no need to do
this manually. It is shown here because it is needed to integrate the OSAL.
cd $OSAL_DIR (defined in previous step)
cp build/inc/osconfig.h $CFS_MISSION/build/cpux/inc
3.5 INTEGRATE THE PSP
To integrate the CFE_PSP (cFE Platform Support Package) into the mission template, the entire
cfe_psp directory tree can be placed in the mission template ($CFS_MISSION/psp) directory or any
other location on the filesystem. Set the PSP_DIR variable in the setvars.sh file to the top directory in
the cfe_psp tree. If the mission template directory is used, set the variable to:
export PSP_DIR=$CFS_MISSION/psp
cFS Deployment Guide 582-2008-012 Version 3.1 May, 2016 - page 9
3.6 BUILD THE CFE, OSAL AND PSP
Although it is not necessary, it is possible to build the cFE, OSAL and PSP before integrating
applications.
Go to the top directory in the mission template (where the setvars.sh file is located).
Run the setvars script:
[... mission]$source setvars.sh
cd into the $CFS_MISSION/build/cpux directory:
[... mission]$ cd $CFS_MISSION/build/cpux
Type ‘make clean’ at the prompt:
[... cpux]$ make clean
To let the make process copy the cFE and OSAL configuration files, type ‘make config’ at the prompt.
Typically this step is needed only one time, just prior to building the code the first time.
[... cpux]$ make config
Use ‘make distclean’ to undo the ‘make config’ steps.
If necessary, adjust the cFE and OSAL configuration files in the /mission/build area. For location and
filename details, see the earlier steps to integrate the cFE and OSAL.
Type ‘make’ at the prompt:
[... cpux]$ make
Verify that the cfe-core executable file is present in the $CFS_MISSION/build/cpux/exe directory.
For vxworks, the cfe-core executable is cfe-core.o. For linux, the executable is core-linux.bin.
cFS Deployment Guide 582-2008-012 Version 3.1 May, 2016 - page 10
3.7 INTEGRATE THE APPLICATIONS
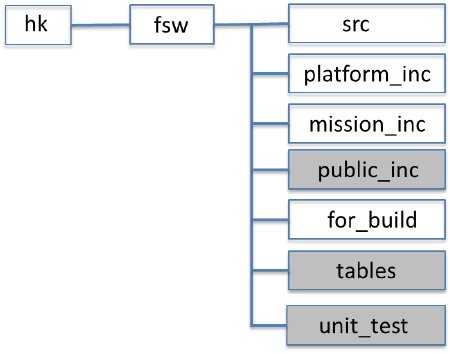
All applications running on the cFE middleware must have the following directory structure.
Directories shaded in grey are optional.
Figure 3.7 Mission Tree application directory structure
The src directory contains all c files and private header files for the app.
The platform_inc directory contains header files that may be tailored by the mission and have the
scope of a single cpu. This would include the msgids.h file and the platform configuration file.
The mission_inc directory contains header files that may be tailored by the mission and will be the
same across all cpus. This would include a mission configuration file if applicable.
The public_inc directory contains header files that may be accessed by other applications and have the
scope of a single cpu. This would include files that may define structures, constants or function
prototypes that are needed by other applications on the same cpu. For example, the cfs_lib app contains
a header file named cfs_utils.h in its public_inc directory.
The for_build directory contains the low level makefile needed to build the app. It must follow a
specific format. Use an existing cFS makefile as a template. This file will be copied to the
mission/build area. If the application uses tables, a table makefile is also contained in this directory and
must be copied to the mission/build area.
The unit_test directory will contain all the files needed to run the unit test as well as files that show the
results of running the unit test. This would include a makefile, driver files, output files and a gcov file
for each c file.
The tables directory must contain the source files for the application’s default table definitions. If the
application does not have any tables, this directory will not exist.
To integrate a cFS Application into the mission template, follow the steps below.
3.7.1 Place Application In $APP_DIR
Copy the entire application directory tree to the directory specified by $APP_DIR in the setvars.sh.
By default, the APP_DIR is set to $CFS_MISSION/apps.
cFS Deployment Guide 582-2008-012 Version 3.1 May, 2016 - page 11
3.7.2 Add Application Name To Makefile
Add the name of the application to the THE_APPS environment variable in the Makefile located in
the $CFS_MISSION/build/cpux directory.
NOTE: The application name to specify here is the top level directory name of the application.
For example:
THE_APPS:= hk
Multiple applications must be separated by a space.
3.7.3 Add Table Name(s) To Makefile
If the applications has table source files that need to be converted to loadable table files, add the
application name to the THE_TBLS environment variable in the Makefile located in the
$CFS_MISSION/build/cpux directory.
NOTE: The application name to specify here is the top level directory name of the application.
For example:
THE_TBLS:= hk
Application names must be separated by a space.
3.7.4 Add Application to Startup Script
Edit the cfe_es_startup.scr (located in $CFS_MISSION/build/cpux/exe) to include the applications
that need to be started after the cFE initializes. Be sure the filenames listed in each entry have the
correct extension (.o for vxworks, .so for pc-linux). Also add an entry for each application library
(such as cfs_lib) that needs to be loaded. See the comments in the file for more detail.
NOTE: This completes the steps needed to integrate an application. It is no longer necessary to
manually copy the application files or make the application directories in the build area. This is done
by the ‘make config’ step mentioned later. The steps executed by the ‘make config’ step are listed
here just to give insight into the make process.
The ‘make config’ command will copy the application header files.
cp $APP_DIR/hk/fsw/mission_inc/*.h $CFS_MISSION_INC
cp $APP_DIR/hk/fsw/platform_inc/*.h $CFS_MISSION/build/cpux/inc
cp $APP_DIR/hk/fsw/public_inc/*.h $APP_DIR/inc
The ‘make config’ command will create the application directory in the build area.
[/mission/build/cpux]$mkdir hk
The ‘make config’ command will copy the application makefiles from the APP_DIR area to
the new directory in the build area.
cp $APP_DIR/hk/fsw/for_build/Makefile $CFS_MISSION/build/cpux/hk
cp $APP_DIR/hk/fsw/for_build/hktables.mak $CFS_MISSION/build/cpux/hk
cFS Deployment Guide 582-2008-012 Version 3.1 May, 2016 - page 12
4.0 BUILD THE SYSTEM
This sections describes how to build the entire system which includes the applications, cFE, OSAL
and PSP. Prior to building any of the supplied CFS or cFE applications, the user should check for any
specific instructions required for building that application. These instructions can be found under the
<appname>/docs directory.
NOTE: If errors occur during the make process, check the following:
- Be sure the environment variables in the mission/build/cpux/cfe/cfe-config.mak are set.
- Be sure the environment variables in the mission/setvars.sh are properly set.
- Be sure the $PATH to the compiler is set.
(Typically gcc for desktop runs and ccppc for vxworks runs)
Add Application Name
4.1 MAKE CLEAN
Type 'make clean' in the $CFS_MISSION/build/cpux directory to remove object and executable
files from the $CFS_MISSION/build/cpux/exe directory:
[/mission/build/cpux]$ make clean
4.2 MAKE CONFIG
To perform the file-copy steps (mentioned earlier) for the application header files and the cFE
header and configuration files type ‘make config’ in the $CFS_MISSION/build/cpux directory:
[/mission/build/cpux]$ make config
NOTE: To undo the ‘make config’ steps, type ‘make distclean’ or ‘make realclean’. This will
delete the files that were copied by the ‘make config’ command and remove the directories
that were created.
NOTE: If changes to configuration files in the /mission/build area have been made, this command
may overwrite those changes with the original files from /mission/cfe/fsw area.
4.3 MAKE
To build the system, including the cFE, OSAL, PSP and all the applications type 'make' in the
$CFS_MISSION/build/cpux directory:
[/mission/build/cpux]$ make
NOTE: The make command copies the cfe_es_startup.scr file, the object files and the loadable
table files to the directory specified by environment variable CFS_PROM_APPS defined in the
/mission/build/cpu1/Makefile.
cFS Deployment Guide 582-2008-012 Version 3.1 May, 2016 - page 13
5.0 START THE SYSTEM
The cFE requires a Non-Volatile disk volume (EEPROM, Flash, or Hard disk) and a Volatile (RAM) disk to
operate. The Non-Volatile disk is used to store the cFE Application Startup file, cFS Applications, and Table
images. The Volatile disk is used to store runtime logs, data files, and new cFS Applications and Tables.
Because the cFE runs on many different platforms, it must be able to deal with different file system types and
different paths. The cFE accomplishes this by using a file system abstraction. The cFE “/cf” directory must be
mapped to a directory on the targets non-volatile disk. The cFE “/ram” directory must be mapped to a
directory on the targets volatile disk. For desktop runs, the /ram directory may be mapped to the PC’s hard
drive. This mapping is specified in file cfe_psp_voltab.c located in the PSP area. For example, on the pc-linux
platform, this file is located in the $PSP_DIR/fsw/pc-linux/src directory.
5.1 COMPRESSED CFS APPLICATION SUPPORT
The cFE supports loading compressed cFS Application files. The files must be compressed with the "gzip"
utility. An example: "$ gzip ci.o". This will produce the file "ci.o.gz". When the cFE code detects the ".gz"
file extension, it will uncompress the cFS application when loading it.
5.2 MCP750-VXWORKS6.4 PLATFORM
For running on the MCP750, transfer the files to the target. Using FTP, transfer the cfe-core.o (which
includes the cFE, OSAL and PSP) the cfe_es_startup.scr and all applications to the CF:0/apps directory on
the target. Here is an example of how to load the cfe-core.o via ftp.
$ ftp 192.168.1.4
ftp> username: target
ftp> username: target
ftp> password: password
ftp> cd "CF:0"
ftp> cd "apps"
ftp> binary
ftp> put cfe-core.o
To start the cFE, press the reset button on the front panel of the target board.
5.3 PC-LINUX PLATFORM
On the PC-Linux platform, during the execution of the ‘make’ command, the application object files were
copied to the non-volatile directory (/mission/build/cpu1/exe/cf/apps). During initialization, the cFE will read
this directory when starting the applications.
You’ll need to run as root to use the linux real time scheduler. Without this, the task priority settings on the
applications will not be supported. It is also needed to set the message queue depths (Software Bus Pipes) in
POSIX.
cFS Deployment Guide 582-2008-012 Version 3.1 May, 2016 - page 14
To run the cFE, type the following from the exe directory:
[/mission/build/cpu1]$ cd exe
[/mission/build/cpu1/exe]$ su
password: <enter root password here>
[/mission/build/cpu1/exe]# ./core-linux.bin PO 1
6.0 BUILDING AND RUNNING THE OPEN SOURCE DELIVERY
The latest cFE open source software delivery can be found on Sourceforge.net at the following url :
http://sourceforge.net/projects/coreflightexec/. This delivery contains the mission template and the four
components listed above in section 3.0. All components are fully integrated. Refer to the cfe-x.x.x-
OSS-readme.txt file for instructions on how to build and run the open source delivery.
7.0 BUILDING THE GROUND DATABASE AND PAGES
The rdl templates and procedures for the cFE and each application that you wish to execute must be
built into the ASIST database. The steps below provide instructions for building the command and
telemetry databases as well as the ASIST display pages necessary. Also, any specific instructions
required for building an application’s ground database files can be found under the <appname>/docs
directory.
The steps below assume that MKS is installed on the ASIST machine and the user understands how to
create sandboxes for the applications being integrated into the ground database. Also, the steps below
assume that the user is logged onto a test machine using the test account.
7.1 POPULATING THE GLOBAL DIRECTORIES
If this is not the first time that the cFE ground databases are being installed on the test machine, only
the updated components (if applicable) need to be reinstalled into each directory. If any of the files
have been modified on the test machine, those modifications need to be merged with the updated files
from the MKS repository.
8.0 TOOLS DIRECTORY
1. Extract the ‘global/tools’ files from MKS into the DESTINATION ‘global/tools’ directory.
2. Change the file permissions for all scripts to make them executable.(chmod 777 <filename>)
3. Add the DESTINATION directory to the account PATH variable in order to use the scripts
located in this directory in the following steps.
9.0 RDL DIRECTORY
1. Extract the ‘global/rdl’ files from MKS into the DESTINATION ‘global/rdl’ directory.
2. Change the file permissions on all files so that they are writable. (chmod 666 *.rdl)

cFS Deployment Guide 582-2008-012 Version 3.1 May, 2016 - page 15
10.0 PRC DIRECTORY
1. Extract the ‘global/prc’ files from MKS into the DESTINATION ‘global/prc’ directory.
2. Change the file permissions on all procedures so that they are writable. (chmod 666 *.prc)
3. Compile all procedures by entering the command “stol_compiler <filename>”.
NOTE: The ASIST ground station must be running in order to compile the procedures. Also, if
you have any of the Utility Procedures contained in this directory, these will have to be
compiled after performing the configuration specified in 6.1.4 below.
11.0 UTILITY PROCEDURE CONFIGURATION SETUP
The cFE has a set of utility procedures that utilize the configurable definitions contained in the
‘global/prc/cfe_utils.h’ file in the MKS repository. The utility procedures are:
cfe_fsw_utils.prc
clear_spacecraft_status.prc
create_tbl_file_from_cvt.prc
does_file_exist.prc
file_attr_del.prc
file_attr_get.prc
file_attr_put.prc
file_compare.prc
fill_in_spacecraft_status.prc
fsw_does_file_exist.prc
get_file_to_cvt.prc
get_tbl_to_cvt.prc
load_start_app.prc
load_table.prc
move_file.prc
send_that_to_command.prc
user_startup.prc
ut_runproc.prc
The definitions that should be modified with mission specific information are:
1. #define SC “SCX”
This definition specifies the spacecraft portion of the ASIST command and telemetry
database items. i.e., SCX_CPU1_ES_DELETEAPP or SCX_CPU3_ES_CMDPC
2. #define CPU_CFG “CPU”
This definition specifies the cpu or processor ID portion of the ASIST command and
telemetry database items. i.e., SCX_CPU1_ES_DELETEAPP or SCX_CPU3_ES_CMDPC
3. #define CFE_SC 66
This definition specifies the spacecraft ID to use for the mission. This definition is used by
the ut_setupevt and ut_setupevents directives to allow the ASIST database to capture Event
messages in STOL test procedures.
4. #define MISSION “CFE”
This definition specifies the mission currently being used. There are several utility
procedures that contain mission specific code that checks this definition in order to perform
mission specific actions. (see user_startup.prc)
cFS Deployment Guide 582-2008-012 Version 3.1 May, 2016 - page 16
5. local numCPUs = 3
This variable specifies the number of CPUs that the mission currently has defined in the
ASIST command and telemetry database items. i.e., SCX_CPU1_ES_DELETEAPP or
SCX_CPU3_ES_CMDPC
6. #define GDS_EXISTS
This definition is used in the ut_runproc utility to display status for the GDS. If this
definition exists in the cfe_utils.h file, the ut_runproc expects several GDS telemetry items
to be defined in the ASIST telemetry database. If the GDS does not exist for your mission,
this definition SHOULD NOT be included in cfe_utils.h.
11.1 POPULATING THE LOCAL DIRECTORIES
If this is not the first time that the cFE ground databases are being installed on the test machine, only
the updated components (if applicable) need to be reinstalled into each directory. If any of the files
have been modified on the test machine, those modifications need to be merged with the updated files
from the MKS repository.
11.1.1 prc Directory
If you are installing the cFE for the first time on the test machine, the following steps must be
performed:
1. Extract the ‘local/prc/temple/template*.prc’ files from MKS into the DESTINATION
‘prc/template’ directory. Change the file permissions on the copied files so that they are
writable. (chmod 666 *.prc)
2. Extract the ‘local/prc’ files from MKS into the DESTINATION ‘prc’ directory. Change the
file permissions on the copied files so that they are writable. (chmod 666 *.prc)
3. Create a link to the following files located in the appropriate flight software directory(ies).
The directories listed below as <xxx_path> are the locations where the cFE and OSAL MKS
repositories were created. The actual locations may vary depending upon the mission or OS.
ln -s <cfe_path>fsw/mission_inc/cfe_mission_cfg.h .
ln -s <cfe_path>fsw/platform_inc/cpux/cfe_platform_cfg.h .
ln -s <osal_path>build/inc /osconfig.h .
For each cFE or cFS application you are going to run that contains any STOL procedure files, you will
need to copy them into the appropriate directories on the ASIST machine and compile them. The
instructions below help you do this.
1. Copy the procedure templates from the application’s sandbox to the DESTINATION
‘prc/template’ directory. Change the file permissions on the copied files so that they are
writable. (chmod 666 *.prc)
2. Copy any procedures from the application’s sandbox to the DESTINATION ‘prc’ directory.
Change the file permissions on the copied files so that they are writable. (chmod 666 *.prc)
3. Create links to any include files needed by the procedures copied above by entering the
command “ln –s <application_sandbox_path>/*.h .”.
Normally the files are located in the <app>/fsw/platform_inc or mission_inc directories.
However, there are some instances where include files from the <app>/fsw/src directory
are needed.
4. Startup ASIST and compile the procedures just copied into the $WORK/prc’ directory in
Step 2 above by entering the command “stol_compiler <procedure_name>”.
5. Traverse into the template directory.
6. Generate the application test procedures from the templates by entering the command
“create_proc <template_filename> “scid” “cpu”
cFS Deployment Guide 582-2008-012 Version 3.1 May, 2016 - page 17
7. Traverse up to the prc directory.
8. Compile all the procedures generated in the above step by entering “stol_compiler
<procedure_filename>”. If any errors appear, you should edit the template, regenerate and
recompile the procedure.
11.1.2 rdl Directory
If you are installing the cFE for the first time on the test machine, the following steps must be
performed:
1. Extract the ‘template*.rdl’ files from MKS into the DESTINATION ‘rdl/template’ directory.
2. Copy the cFEBuildMsgIds.h file located in the DESTINATION‘global/tools’ directory to the
DESTINATION ‘rdl/template’ directory by entering the command
“cp <destination>/global/tools/cFEBuildMsgIds.h .”
3. Extract the ‘local/rdl’ files from MKS into DESTINATION ‘rdl’ directory
4. Create links to the cFE include files used by most of the rdl files by entering the following
commands:
ln -s ../prc/cfe_mission_cfg.h .
ln -s ../prc/cfe_platform_cfg.h .
ln -s ../prc/osconfig.h .
For each cFE or cFS application you are going to run that contains rdl files, you will need to copy
them into the appropriate directories on the ASIST machine and regenerate the rdl files. The
instructions below help you do this.
1. Create a sandbox for the application being tested or executed. The type of sandbox to create
depends upon whether you are testing a certain version of the application (Build) or the
application trunk (Regular).
2. After the sandbox is created, copy the rdl templates from the application’s sandbox to the
DESTINATION ‘rdl/template’ directory by entering the command:
cp <sandbox_path>/test_and_ground/asist/rdl/template/*.rdl $WORK/rdl/template
3. Edit the cFEBuildMsgIds.h file and add the message IDs for your application to the
appropriate places in the file.
4. Enter the command “cd $WORK/rdl/” to move to that directory.
5. Create links to any of the application include files required by the rdl files. These links were
created in the $WORK/prc directory previously. Thus, we should link to these files by
entering the command “ln –s ../prc/<filename> .
11.2 CREATING THE COMMAND AND TELEMETRY DATABASES
In order to send commands and receive telemetry for an application, the application’s command and
telemetry packet specifications must be generated into the ASIST databases. Follow the steps below to
accomplish this.
1. Generate the rdl files from the templates by entering the command:
create_rdl <template_filename> “scid” “cpu”
i.e., create_rdl template_tlm_TST_MM_HK_TLM.rdl “SCX” “CPU3”
2. Move the generated rdl files up one directory to the ‘rdl’ directory.
3. Move up to the ‘rdl’ directory.
4. Make sure that the user command and telemetry files specifying the contents of your
databases contain entries to match the filenames of the rdls generated above in step 1. If they
do not, you must edit these files so that they include these files.
5. Compile the command database by entering ‘dbcmpcmd’ on the command line. If there were
NO errors, proceed to the next step. Otherwise, correct any errors and repeat the above steps
until a clean compile is achieved.
cFS Deployment Guide 582-2008-012 Version 3.1 May, 2016 - page 18
6. Load the command database by entering ‘dbloadcmd’ on the command line.
7. Compile the telemetry database by entering ‘dbcmptlm’ on the command line. If there were
NO errors, proceed to the next step. Otherwise, correct any errors and repeat the above steps
until a clean compile is achieved.
8. Load the telemetry database by entering ‘dbloadtlm’ on the command line.
9. Start or re-start ASIST. Verify your database changes by opening the CMD and/or TLM
Database Browser and selecting the ID that you changed.
11.3 CREATING THE ASIST DISPLAY PAGES
The ASIST display pages for a cFS application are delivered for SCX_CPU1. These pages will need
to be modified for the mission using them. The steps below help you do this.
1. Copy the ‘sam/fmt/*.fmt’ files from the application’s sandbox to the DESTINATION
‘sam/fmt’ directory.
2. Start ASIST and select the Page Editor from the Editors menu and log into the Page Editor.
3. Open each of the application’s display pages one at a time and edit the DDOs to specify the
mission mnemonics contained in the ASIST database.
For example, the Data Storage Command PC counter would be specified as
SCX_CPU1_DS_CMDPC in the DS_HK page as delivered. For GPM, this would
need to change to GC_DS_CMDPC.

cFS Deployment Guide 582-2008-012 Version 3.1 May, 2016 - page 19
12.0 RUNNING CFS APPLICATIONS
The instructions below are basic instructions to get an app running in the lab.
12.1 LOG ONTO A TEST MACHINE
Log onto the test account on the ASIST test machine configured in Section 6 above.
12.2 VIEW FSW ACTIVITY
In one of the terminal windows, open a UART or minicom window. This window will show you any
output that the fsw writes to the UART.
12.3 BOOT UP THE BOARD
NOTE: This step is not required if you have not rebuilt the cFE, or any of the applications that start
automatically.
If you have rebuilt the cFE or an application, perform a power-on reset on the board in order to run
the latest version of the fsw.
12.4 START THE GROUND SYSTEM
To start the ground system, double click the asist icon on the test machine’s desktop. After ASIST
comes up, connect to the cpu in order to start commanding and receiving telemetry.
12.5 VERIFY DEFAULT APPLICATIONS ARE RUNNING
Verify cFE and any automatically started applications are running by viewing the initialization
events. Also, you can type ‘i’ in the UART window to list the applications that are running.
12.6 MANUALLY START AN APPLICATION
NOTE: The developer is responsible for copying the object file to the $WORK/apps/cpux directory
on the ASIST test machine.
Normally, applications will be started automatically for missions. However, to manually start an
application, follow the steps below:
a. In the STOL command window type the following:
s load_start_app(“yy”, “CPUx”)
where yy is the the object file name in capital letters without the extension and
x is the cpu you wish to start your application on.
b. Verify that the app initializes. The version number should be included in the initialization event.
12.7 MANUALLY STOP AN APPLICATION
To manually stop an application, a cFE ES command is provided. Issue the ES_DeleteApp
command and specify the name of the application you wish to stop as an argument.

cFS Deployment Guide 582-2008-012 Version 3.1 May, 2016 - page 20
12.8 LOG OFF OF THE TEST MACHINE
a. Close out the minicom window and exit out of the UART machine session.
b. Shutdown ASIST by entering cfe_shutdown in the STOL command window.
c. Ensure that you are not editing any files, have exited any running programs and have terminated
any remote logins.
d. Log off of the ASIST test machine.
13.0 USING STOL TEST PROCEDURES
13.1 EDITING AND CREATING A TEST PROCEDURE
A test procedure for cFS testing consists of a template file that is used to generate the actual test
procedures executed for a particular spacecraft cpu. These template procedures reside in the
$WORK/prc/template directory
a. In a terminal window, enter the command ‘cd $WORK/prc/template” to move to that directory.
Use your favorite text editor to edit the desired template file.
b. After making the desired changes to the template file, you need to create the actual test
procedure that you will execute. To do this, enter the command “create_proc
<templateFileName> “<spacecraft name>” “<CPU name>””. E.g., create_proc
template_es_appctrl.prc “SCX” “CPU2”
c. The above step creates your test procedure file and moves it up one directory into the
$WORK/prc directory.
13.2 COMPILING A TEST PROCEDURE
In order for a test procedure to compile, the ASIST ground software must be up and running.
a. Before a test procedure can be executed, it must be compiled. In a terminal window, enter the
command ‘cd $WORK/prc’ to move to that directory. Enter the command “stol_compiler
<test_procedure_name>”.
E.g., stol_compiler scx_cpu2_es_appctrl.prc
b. The compiler will report any errors in the terminal window. If errors exist, you need to go back
to Step 5.1 to edit the template file and regenerate the actual procedure.
c. If there are no errors, the test procedure is ready to execute.
13.3 EXECUTING A TEST
a. In the STOL command window, enter the following command:
s ut_runproc(“<test_proc_name_without_extension>”)
E.g., s ut_runproc(“scx_cpu2_app_ctrl”)
b. The test procedure should begin to execute.
c. When the procedure completes, the test log will be ready for examination.
cFS Deployment Guide 582-2008-012 Version 3.1 May, 2016 - page 21
13.4 VIEWING A TEST LOG
a. In another terminal window, traverse to the $WORK/test_logs directory.
b. There are four (4) logs generated for each test procedure execution (loge, logf, logp & logr).
c. View the logp file. This file contains the output for each step in the test procedure. Also, the
requirement report contained at the end of this file will indicate which requirements passed or
failed.
cFS Deployment Guide 582-2008-012 Version 3.1 May, 2016 - page 22
Appendix A Using the CMake Build System
Prerequisites
The build uses 3rd party applications and libraries to provide some base functionality.
For libraries the "-dev" (Debian/Ubuntu) or "-devel" (RedHat/CentOS) versions of
these packages should be installed in order to compile source code using these
libraries.
gcc, make, libc-dev, etc. - Standard prerequisites for any build environment.
Ubuntu provides a meta package called "build-essential" that depends on all the
basics.
o For Ubuntu 64-bit Host machine you may need to install the multilib
tools for 32-bit compatibility: sudo apt-get install gcc-multilib
g++-multilib
cmake - The build system uses this. Any recent version should work.
libexpat (XML parser) - Although this is not required by the current build, a
future CFE build using electronic data sheets will require this. Any recent
version should work.
git - Required if you want to access the official CFS distribution directly from
the CFS community source repositories.
Mission Configuration
Before any builds can be done, the mission configuration must be created. This is
centralized in a directory below the top level source directory. The directory is
identified by a _defs suffix in the directory name.
The example build provides a sample_defs directory that is simply an example that
can be modified to suit the project needs. This contains:
The targets.cmake file that describes the target architecture and apps to use
on each CPU (important)
Global configuration file to serve as cfe_mission_cfg.h
OS-specific osconfig.h files for OSAL as required by the mission
Platform-specific cfe_platform_cfg.h files as required by the mission
Startup scripts for each CPU - cfe_es_startup.scr as required by the mission
Any other project specific files, such as table source files or generic data files
can be placed here.
Note that the build scripts support using more than one "defs" directory within a single
project. This is intended to support different mixtures of processor-in-the-loop and
hardware-in-the-loop style debugging environments. However, in this case, the
directory cannot be automatically determined by the build system and must be
selected by the user at preparation time. This more advanced use case will be detailed
later.
cFS Deployment Guide 582-2008-012 Version 3.1 May, 2016 - page 23
1.1.1.1 Examples
An extremely simple targets.cmake file to build the core flight executive and the
sample_app for a single CPU:
SET(MISSION_NAME "SampleMission")
SET(SPACECRAFT_ID 42)
SET(TGT1_NAME cpu1)
SET(TGT1_APPLIST sample_app)
SET(TGT1_FILELIST cfe_es_startup.scr)
This file is setting up some CMake variables that have special meaning to the build
scripts:
MISSION_NAME and SPACECRAFT_ID are compiled into the executable and
potentially used at run time by any application. In particular, the value specified
for SPACECRAFT_ID will be returned by CFE_PSP_GetSpacecraftId().
TGT1_NAME provides a name for the first CPU. The build scripts will also look for
a cross-compiler toolchain file by the same name, in this case toolchain-
cpu1.cmake, to use for building the binaries used on this CPU. Important: The
toolchain can also be specified by the TGT1_PLATFORM variable, which will
override this if present. This allows the name and toolchain to specified
independently.
TGT1_APPLIST provides a space-separated list of applications to build for the
target CPU. The application source code must be in a directory of the same
name in one of the search path locations in the build scripts. These paths will
be searched to find the source code for this application.
TGT1_FILELIST is a space-separated list of files to copy to the target during
the make install process. Note: Name clashes are common here, since all
targets typically use a cfe_es_startup.scr to start the applications. This is
handled by allowing a prefix to the filename to indicate which cpu the file
belongs to. For instance, cpu1_cfe_es_startup.scr will be copied
to cpu1 ascfe_es_startup.scr during the installation step.
A slightly more complex example that mimics the configuration on the original GSFC
makefiles is included in the jph-sample-missionbranch in git.
Preparing to build cFS
The build procedure always uses "out-of-tree" builds; all generated files are stored in a
separate directory from the source code. This is important for version control
purposes, as the build will not modify or add any files within the source tree, and
multiple builds can be done from a single source tree.

cFS Deployment Guide 582-2008-012 Version 3.1 May, 2016 - page 24
A special prep target is implemented in the example top-level makefile to facilitate
setting up a new build directory. This in turn calls "cmake" with the right options to set
up the build.
Special variables used by the top-level makefile wrapper:
O: Specifies the output directory, may be absolute or relative. If not specified
then "build" is assumed.
SIMULATION: If set, this will override the architecture(s) specified in the targets
file. The "native" keyword here will indicate to use the host machine's native
compiler (e.g. /usr/bin/gcc) for all compilation tasks. For any other
keyword/string, the scripts will search for a file called "toolchain-
KEYWORD.cmake" that specifies the details of the toolchain. "i686-rtems4.11",
"powerpc-440-linux-gnu" and "arm-cortexa8_neon-linux-gnueabi" are included
as examples of how this works.
1.1.1.2 Examples
To prepare a normal build for the target hardware:
make prep
To prepare a workstation simulation build (this overrides cross-compilation such that
all binaries are built to run directly on the native host platform):
make SIMULATION=native O=build-sim prep
To prepare a "processor-in-the-loop" simulation build, assuming that the target
processor toolchain is defined by "arm-cortexa8_neon-linux-gnueabi":
make SIMULATION=arm-cortexa8_neon-linux-gnueabi O=build-pil prep
NOTE: For any of these builds, the O variable can be supplied or modified to override
the default output directory. This allows all the builds to coexist simultaneously from
the same source tree.
For ALL builds, once the prep step has been completed, the variables used (such as
"SIMULATION") are cached and therefore DO NOT need to be passed with any future
invocation of the "make" commands. This is important because it allows the makefiles
to be easily called from an IDE without needing to set up specific environment
variables first.
After this initial preparation step, CMake is not used again unless the build scripts are
modified. However, dependencies are built into the generated makefiles such that
CMake is generally run automatically when necessary. The only major exception to this
is if a source file is added to a build script that was using "wildcards" or shell glob
commands to find source files. In this specific case of source file additions with no
modifications to existing build scripts, the prep step will need to be manually re-run to
pick up the new added files.

cFS Deployment Guide 582-2008-012 Version 3.1 May, 2016 - page 25
Building and Installing
The cFS mission binary files may be generated by simply running:
make
The CMake build scripts will generate the binary files in a deep build tree based on the
original location of the source file from which it was built. This is generally not suitable
for copying to a target machine, so an "install" target is also implemented to make this
process easier:
make install
Will copy all the generated executable files (typically the "core" executable plus any
loadable object files and/or configuration files specified in the mission configuration) to
a common directory. The directory structure is organized by CPU name so that it is
easy to copy the entire tree to a target, or the directory could be NFS mounted in the
case of Linux targets.
Note that the default "all" target (which generates the binaries) is also a prerequisite
of the "install" target, so running "make install" directly is generally sufficient to build
the entire project.
Writing CMakeLists files for applications
Every application or module is expected to provide a CMakeLists.txt file at the top
level of the respective source tree, containing the recipe for building that module.
The CMake build system provides two useful functions that can be used to simplify this
task for most modules:
add_cfe_app(app_name source1.c source2.c ...)
add_cfe_tables(app_name table1 table2 ...)
The add_cfe_app function will generate rules to compile and link the given source files
into a module named app_name, using the configured cross compiler and all relevant
switches/settings defined by the build system. The resulting module file will be
installed to all targets that have app_name listed in their respective configuration
in targets.cmake.
The add_cfe_tables function will generate rules to compile a source file for each table
name specified, then execute the appropriate conversion tool (such as elf2cfetbl) on
the binary file to produce a CFE table file with a .tbl extension. The final tbl file will
be installed to the target directory.
Since table files are generally customized for mission-specific operation (as opposed to
using an example table file "as-is" from the source distribution)
cFS Deployment Guide 582-2008-012 Version 3.1 May, 2016 - page 26
the add_cfe_tables function will first search the mission-specific areas of the source
tree for matching filenames. These mission-specific source files will be given
preference over source files contained within the application module source tree, which
are assumed to be "example" files. (In general, the CMake build system discourages
modifying original source files for mission-specific purposes).
The following paths are searched, in order, for each table definition:
${MISSION_DEFS}/tables/${CPUNAME}_${TBL}.c
${MISSION_SOURCE_DIR}/tables/${CPUNAME}_${TBL}.c
${MISSION_DEFS}/tables/${TBL}.c
${MISSION_SOURCE_DIR}/tables/${TBL}.c
Where MISSION_SOURCE_DIR is the mission top level source
directory, MISSION_DEFS represents the "defs" directory
(containing targets.cmake and others), CPUNAME represents the name of the CPU,
and TBL represents the name of the table as indicated in
the add_cfe_tables command.
For a more concrete example, using the "sample_defs" configuration, if an application
recipe contains the lineadd_cfe_tables(myapp table1), the following will be
searched (relative to ${MISSION_SOURCE_DIR}):
sample_defs/tables/cpu1_table1.c
tables/cpu1_table1.c
sample_defs/tables/table1.c
tables/table1.c
Note that by searching first for filenames prefixed with the CPU name
i.e. cpu1_table1.c, this allows different definitions of the table to be used on other
CPUs, such as cpu2_table1.c if the application were also utilized on a cpu
named cpu2.
