Camel Manual 2.4.0
User Manual: Pdf
Open the PDF directly: View PDF ![]() .
.
Page Count: 673 [warning: Documents this large are best viewed by clicking the View PDF Link!]
- Apache Camel
- Table of Contents
- Introduction
- Quickstart
- Getting Started with Apache Camel
- Architecture
- Enterprise Integration Patterns
- CookBook
- Bean Integration
- @RecipientList Annotation
- Using Exchange Pattern Annotations
- Visualisation
- Business Activity Monitoring
- Extract Transform Load (ETL)
- Mock Component
- Testing
- Camel Test
- Spring Testing
- Camel Guice
- Templating
- Database
- Parallel Processing and Ordering
- Asynchronous Processing
- Implementing Virtual Topics on other JMS providers
- What's the Camel Transport for CXF
- Integrate Camel into CXF transport layer
- Configure the destination and conduit
- Example Using Camel as a load balancer for CXF
- Complete Howto and Example for attaching Camel to CXF
- Introduction
- Using a Producer
- Tutorials
- Tutorial on Spring Remoting with JMS
- Preface
- Prerequisites
- Distribution
- About
- Create the Camel Project
- Writing the Server
- Writing The Clients
- Using the Camel Maven Plugin
- Using Camel JMX
- See Also
- Tutorial - camel-example-reportincident
- Introduction
- Motivation for this tutorial
- The use-case
- Parts
- Links
- Part 1
- Prerequisites
- Initial Project Setup
- Developing the WebService
- End of part 1
- Resources
- Links
- Part 2
- Adding Camel
- Logging the "Hello World"
- Write to file - easy with the same code style
- Fully java based configuration of endpoints
- Lessons learned
- Reducing code lines
- Reducing even more code lines
- Message Translation
- First part of the solution
- End of part 2
- Resources
- Links
- Part 3
- Recap
- Adding the Event Driven Consumer
- Sending the email
- Unit testing mail
- Adding new unit test
- End of part 3
- Resources
- Links
- Part 4
- Introduction
- Routing
- Unit testing
- Adding the File Backup
- Sending the email
- Conclusion
- Resources
- Links
- Better JMS Transport for CXF Webservice using Apache Camel
- Tutorial using Axis 1.4 with Apache Camel
- Tutorial on using Camel in a Web Application
- Tutorial Business Partners
- Background and Introduction
- Let's Get Started!
- Step 1: Initial Maven build
- Step 2: Get Sample Files
- Step 3: XSD and JAXB Beans for the Canonical XML Format
- Step 4: Initial Work on Customer 1 Input (XML over FTP)
- Step 5: Initial Work on Customer 2 Input (CSV over HTTP)
- Step 6: Initial Work on Customer 3 Input (Excel over e-mail)
- Step 7: Put this all together into Camel routes for the Customer Input
- Step 8: Create a unit test for the Customer Input Routes
- Languages Supported Appendix
- Pattern Appendix
- Messaging Systems
- Messaging Channels
- Dead Letter Channel
- Redelivery
- About moving Exchange to dead letter queue and using handled
- About moving Exchange to dead letter queue and using the original message
- OnRedelivery
- Redelivery default values
- Redelivery header
- Samples
- How can I modify the Exchange before redelivery?
- Guaranteed Delivery
- Message Bus
- Message Construction
- Event Message
- Request Reply
- Return Address
- Message Routing
- Content Based Router
- Message Filter
- Dynamic Router
- Recipient List
- Sending to multiple recipients in parallel
- Stop continuing in case one recipient failed
- Ignore invalid endpoints
- Using custom AggregationStrategy
- Using custom thread pool
- Using method call as recipient list
- Splitter
- Stop processing in case of exception
- Aggregator
- Aggregator options
- Exchange Properties
- About AggregationStrategy
- About completion
- Persistent AggregationRepository
- Examples
- See also
- Resequencer
- Batch Resequencing
- Stream Resequencing
- Further Examples
- Composed Message Processor
- Scatter-Gather
- Routing Slip
- Ignore invalid endpoints
- Expression supporting
- Throttler
- Asynchronous delaying
- Sampling Throttler
- Loop
- Message Transformation
- Sort
- Messaging Endpoints
- Messaging Mapper
- Event Driven Consumer
- Polling Consumer
- ConsumerTemplate
- Scheduled Poll Components
- ScheduledPollConsumer Options
- About error handling and scheduled polling consumers
- See Also
- Competing Consumers
- Enabling Competing Consumers with JMS
- Message Dispatcher
- Selective Consumer
- Durable Subscriber
- Idempotent Consumer
- Options
- Transactional Client
- Camel 1.x - Database Sample
- Camel 1.x - JMS Sample
- Camel 1.x - Spring based configuration
- Camel 2.0 - Database Sample
- Camel 2.0 - JMS Sample
- Using multiple routes with different propagation behaviors
- System Management
- Log
- Component Appendix
- ActiveMQ Component
- ActiveMQ Journal Component
- AMQP
- Atom Component
- Bean Component
- Bean Validation Component
- Browse Component
- Cache Component
- URI format
- Options
- Sending/Receiving Messages to/from the cache
- Cache Usage Samples
- Example 1: Configuring the cache
- Example 2: Adding keys to the cache
- Example 2: Updating existing keys in a cache
- Example 3: Deleting existing keys in a cache
- Example 4: Deleting all existing keys in a cache
- Example 5: Notifying any changes registering in a Cache to Processors and other Producers
- Example 6: Using Processors to selectively replace payload with cache values
- Example 7: Getting an entry from the Cache
- Example 8: Checking for an entry in the Cache
- Cometd Component
- Crypto component for Digital Signatures
- CXF Component
- URI format
- Options
- Configure the CXF endpoints with Spring
- How to make the camel-cxf component use log4j instead of java.util.logging
- How to let camel-cxf response message with xml start document
- How to consume a message from a camel-cxf endpoint in POJO data format
- How to prepare the message for the camel-cxf endpoint in POJO data format
- How to deal with the message for a camel-cxf endpoint in PAYLOAD data format
- How to get and set SOAP headers in POJO mode
- How to get and set SOAP headers in PAYLOAD mode
- SOAP headers are not available in MESSAGE mode
- How to throw a SOAP Fault from Camel
- How to propagate a camel-cxf endpoint's request and response context
- Attachment Support
- CXF Bean Component (2.0 or later)
- CXFRS Component
- DataSet Component
- Direct Component
- Esper
- Event Component
- File Component - Camel 2.0 onwards
- URI format
- URI Options
- Move and Delete operations
- Message Headers
- Batch Consumer
- Common gotchas with folder and filenames
- Filename Expression
- Consuming files from folders where others drop files directly
- Samples
- Read from a directory and write to another directory
- Reading recursive from a directory and write the another
- Reading from a directory and the default move operation
- Read from a directory and process the message in java
- Read files from a directory and send the content to a jms queue
- Writing to files
- Write to subdirectory using Exchange.FILE_NAME
- Using expression for filenames
- Avoiding reading the same file more than once (idempotent consumer)
- Filter using org.apache.camel.component.file.GenericFileFilter
- Sorting using Comparator
- Sorting using sortBy
- Using GenericFileProcessStrategy
- Debug logging
- See Also
- Flatpack Component
- Flatpack DataFormat
- Freemarker
- FTP/SFTP/FTPS Component - Camel 2.0 onwards
- Camel Components for Google App Engine
- HDFS Component
- Hibernate Component
- HL7 Component
- HTTP Component
- URI format
- HttpEndpoint Options
- HttpComponent Options
- Message Headers
- Message Body
- Response code
- HttpOperationFailedException
- Calling using GET or POST
- How to get access to HttpServletRequest and HttpServletResponse
- Configuring URI to call
- Configuring URI Parameters
- How to set the http method (GET/POST/PUT/DELETE/HEAD/OPTIONS/TRACE) to the HTTP producer
- Using client tineout - SO_TIMEOUT
- Configuring a Proxy
- Configuring charset
- Using throwExceptionOnFailure=false to get any response back
- Disabling Cookies
- Advanced Usage
- See Also
- iBATIS
- IRC Component
- JavaSpace Component
- JBI Component
- JCR Component
- JDBC Component
- Jetty Component
- Jing Component
- JMS Component
- URI format
- Notes
- Options
- Message Mapping between JMS and Camel
- Message format when sending
- Message format when receiving
- About using Camel to send and receive messages and JMSReplyTo
- Reuse endpoint and send to different destinations computed at runtime
- Configuring different JMS providers
- Concurrent Consuming
- Enabling Transacted Consumption
- Using JMSReplyTo for late replies
- Using a request timeout
- Samples
- See Also
- JPA Component
- JT/400 Component
- LDAP Component
- Log Component
- Lucene (Indexer and Search) Component
- Mail Component
- URI format
- Options
- SSL support
- Defaults changed in Camel 1.4
- Defaults changed in Camel 1.5
- Mail Message Content
- Headers take precedence over pre-configured recipients
- Multiple recipients for easier configuration
- Setting sender name and email
- SUN JavaMail
- Samples
- Sending mail with attachment sample
- SSL sample
- Consuming mails with attachment sample
- See Also
- MINA Component
- Mock Component
- MSV Component
- Nagios
- Netty Component
- NMR Component
- Quartz Component
- Quickfix Component
- Printer Component
- URI format
- Options
- Sending Messages to a Printer
- Usage Samples
- Example 1: Printing text based payloads on a Default printer using letter stationary and one-sided mode
- Example 2: Printing GIF based payloads on a Remote printer using A4 stationary and one-sided mode
- Example 3: Printing JPEG based payloads on a Remote printer using Japanese Postcard stationary and one-sided mode
- Properties Component
- Using PropertyPlaceholder
- Ref Component
- Restlet Component
- RMI Component
- RSS Component
- Scalate
- SEDA Component
- Servlet Component
- Smooks
- EDI DataFormat
- SMPP Component
- SNMP Component
- Spring Integration Component
- Stream Component
- String Template
- SQL Component
- Test Component
- Timer Component
- Validation Component
- Velocity
- VM Component
- XMPP Component
- XQuery
- XSLT
- Labels

Apache Camel
USER GUIDE
Version 2.4.0
Copyright 2007-2010, Apache Software Foundation
1

Table of Contents
Table of Contents......................................................................... ii
Chapter 1
Introduction ...................................................................................1
Chapter 2
Quickstart.......................................................................................1
Chapter 3
Getting Started..............................................................................7
Chapter 4
Architecture................................................................................ 18
Chapter 5
Enterprise Integration Patterns.............................................. 30
Chapter 6
Cook Book ................................................................................... 35
Chapter 7
Tutorials....................................................................................... 90
Chapter 8
Language Appendix.................................................................. 195
Chapter 9
Pattern Appendix..................................................................... 245
Chapter 10
Component Appendix ............................................................. 361
Index ................................................................................................0
ii APACHE CAMEL

CHAPTER 1
°°°°
Introduction
Apache Camel is a powerful open source integration framework based on known Enterprise
Integration Patterns with powerful Bean Integration.
Camel lets you create the Enterprise Integration Patterns to implement routing and mediation
rules in either a Java based Domain Specific Language (or Fluent API), via Spring based Xml
Configuration files or via the Scala DSL. This means you get smart completion of routing rules
in your IDE whether in your Java, Scala or XML editor.
Apache Camel uses URIs so that it can easily work directly with any kind of Transport or
messaging model such as HTTP, ActiveMQ, JMS, JBI, SCA, MINA or CXF Bus API together with
working with pluggable Data Format options. Apache Camel is a small library which has minimal
dependencies for easy embedding in any Java application. Apache Camel lets you work with the
same API regardless which kind of Transport used, so learn the API once and you will be able
to interact with all the Components that is provided out-of-the-box.
Apache Camel has powerful Bean Binding and integrated seamless with popular frameworks
such as Spring and Guice.
Apache Camel has extensive Testing support allowing you to easily unit test your routes.
Apache Camel can be used as a routing and mediation engine for the following projects:
• Apache ServiceMix which is the most popular and powerful distributed open source
ESB and JBI container
• Apache ActiveMQ which is the most popular and powerful open source message
broker
• Apache CXF which is a smart web services suite (JAX-WS)
• Apache MINA a networking framework
So don't get the hump, try Camel today!
CHAPTER 1 - INTRODUCTION 1

CHAPTER 2
°°°°
Quickstart
To start using Apache Camel quickly, you can read through some simple examples in this
chapter. For readers who would like a more thorough introduction, please skip ahead to
Chapter 3.
WALK THROUGH AN EXAMPLE CODE
This mini-guide takes you through the source code of a simple example.
Camel can be configured either by using Spring or directly in Java - which this example does.
We start with creating a CamelContext - which is a container for Components, Routes etc:
CamelContext context = new DefaultCamelContext();
There is more than one way of adding a Component to the CamelContext. You can add
components implicitly - when we set up the routing - as we do here for the FileComponent:
context.addRoutes(new RouteBuilder() {
public void configure() {
from("test-jms:queue:test.queue").to("file://test");
// set up a listener on the file component
from("file://test").process(new Processor() {
public void process(Exchange e) {
System.out.println("Received exchange: " + e.getIn());
}
});
}
});
or explicitly - as we do here when we add the JMS Component:
ConnectionFactory connectionFactory = new
ActiveMQConnectionFactory("vm://localhost?broker.persistent=false");
// Note we can explicity name the component
context.addComponent("test-jms",
JmsComponent.jmsComponentAutoAcknowledge(connectionFactory));
1CHAPTER 2 - QUICKSTART

The above works with any JMS provider. If we know we are using ActiveMQ we can use an
even simpler form using the activeMQComponent() method while specifying the brokerURL
used to connect to ActiveMQ
camelContext.addComponent("activemq",
activeMQComponent("vm://localhost?broker.persistent=false"));
In normal use, an external system would be firing messages or events directly into Camel
through one if its Components but we are going to use the ProducerTemplate which is a really
easy way for testing your configuration:
ProducerTemplate template = context.createProducerTemplate();
Next you must start the camel context. If you are using Spring to configure the camel context
this is automatically done for you; though if you are using a pure Java approach then you just
need to call the start() method
camelContext.start();
This will start all of the configured routing rules.
So after starting the CamelContext, we can fire some objects into camel:
for (int i = 0; i < 10; i++) {
template.sendBody("test-jms:queue:test.queue","Test Message: " + i);
}
WHAT HAPPENS?
From the ProducerTemplate - we send objects (in this case text) into the CamelContext to the
Component test-jms:queue:test.queue. These text objects will be converted automatically into
JMS Messages and posted to a JMS Queue named test.queue. When we set up the Route, we
configured the FileComponent to listen of the test.queue.
The File FileComponent will take messages off the Queue, and save them to a directory
named test. Every message will be saved in a file that corresponds to its destination and message
id.
Finally, we configured our own listener in the Route - to take notifications from the
FileComponent and print them out as text.
That's it!
If you have the time then use 5 more minutes to Walk through another example that
demonstrates the Spring DSL (XML based) routing.
CHAPTER 2 - QUICKSTART 2
Camel 1.4.0 change
In Camel 1.4.0, CamelTemplate has been marked as @deprecated.
ProducerTemplate should be used instead and its created from the CamelContext
itself.
ProducerTemplate template = context.createProducerTemplate();
WALK THROUGH ANOTHER EXAMPLE
Introduction
We continue the walk from Walk through an Example. This time we take a closer look at the
routing and explains a few pointers so you wont walk into a bear trap, but can enjoy a walk
after hours to the local pub for a large beer
First we take a moment to look at the Enterprise Integration Patterns that is the base
pattern catalog for integrations. In particular we focus on the Pipes and Filters EIP pattern, that
is a central pattern. This is used for: route through a sequence of processing steps, each
performing a specific function - much like the Java Servlet Filters.
Pipes and filters
In this sample we want to process a message in a sequence of steps where each steps can
perform their specific function. In our example we have a JMS queue for receiving new orders.
When an order is received we need to process it in several steps:
▪validate
▪register
▪send confirm email
This can be created in a route like this:
<route>
<from uri="jms:queue:order"/>
<pipeline>
<bean ref="validateOrder"/>
<bean ref="registerOrder"/>
<bean ref="sendConfirmEmail"/>
</pipeline>
</route>
Where as the bean ref is a reference for a spring bean id, so we define our beans using
regular Spring XML as:
3CHAPTER 2 - QUICKSTART
Pipeline is default
In the route above we specify pipeline but it can be omitted as its default, so
you can write the route as:
<route>
<from uri="jms:queue:order"/>
<bean ref="validateOrder"/>
<bean ref="registerOrder"/>
<bean ref="sendConfirmEmail"/>
</route>
This is commonly used not to state the pipeline.
An example where the pipeline needs to be used, is when using a multicast and "one" of
the endpoints to send to (as a logical group) is a pipeline of other endpoints. For example.
<route>
<from uri="jms:queue:order"/>
<multicast>
<to uri="log:org.company.log.Category"/>
<pipeline>
<bean ref="validateOrder"/>
<bean ref="registerOrder"/>
<bean ref="sendConfirmEmail"/>
</pipeline>
</multicast>
</route>
The above sends the order (from jms:queue:order) to two locations at the same time,
our log component, and to the "pipeline" of beans which goes one to the other. If you
consider the opposite, sans the <pipeline>
<route>
<from uri="jms:queue:order"/>
<multicast>
<to uri="log:org.company.log.Category"/>
<bean ref="validateOrder"/>
<bean ref="registerOrder"/>
<bean ref="sendConfirmEmail"/>
</multicast>
</route>
you would see that multicast would not "flow" the message from one bean to the next, but
rather send the order to all 4 endpoints (1x log, 3x bean) in parallel, which is not (for this
CHAPTER 2 - QUICKSTART 4
example) what we want. We need the message to flow to the validateOrder, then to the
registerOrder, then the sendConfirmEmail so adding the pipeline, provides this facility.
<bean id="validateOrder" class="com.mycompany.MyOrderValidator"/>
Our validator bean is a plain POJO that has no dependencies to Camel what so ever. So you
can implement this POJO as you like. Camel uses rather intelligent Bean Binding to invoke your
POJO with the payload of the received message. In this example we will not dig into this how
this happens. You should return to this topic later when you got some hands on experience
with Camel how it can easily bind routing using your existing POJO beans.
So what happens in the route above. Well when an order is received from the JMS queue
the message is routed like Pipes and Filters:
1. payload from the JMS is sent as input to the validateOrder bean
2. the output from validateOrder bean is sent as input to the registerOrder bean
3. the output from registerOrder bean is sent as input to the sendConfirmEmail bean
Using Camel Components
In the route lets imagine that the registration of the order has to be done by sending data to a
TCP socket that could be a big mainframe. As Camel has many Components we will use the
camel-mina component that supports TCP connectivity. So we change the route to:
<route>
<from uri="jms:queue:order"/>
<bean ref="validateOrder"/>
<to uri="mina:tcp://mainframeip:4444?textline=true"/>
<bean ref="sendConfirmEmail"/>
</route>
What we now have in the route is a to type that can be used as a direct replacement for the
bean type. The steps is now:
1. payload from the JMS is sent as input to the validateOrder bean
2. the output from validateOrder bean is sent as text to the mainframe using TCP
3. the output from mainframe is sent back as input to the sendConfirmEmai bean
What to notice here is that the to is not the end of the route (the world ) in this
example it's used in the middle of the Pipes and Filters. In fact we can change the bean types to
to as well:
5CHAPTER 2 - QUICKSTART

<route>
<from uri="jms:queue:order"/>
<to uri="bean:validateOrder"/>
<to uri="mina:tcp://mainframeip:4444?textline=true"/>
<to uri="bean:sendConfirmEmail"/>
</route>
As the to is a generic type we must state in the uri scheme which component it is. So we must
write bean: for the Bean component that we are using.
Conclusion
This example was provided to demonstrate the Spring DSL (XML based) as opposed to the
pure Java DSL from the first example. And as well to point about that the to doesn't have to be
the last node in a route graph.
This example is also based on the in-only message exchange pattern. What you must
understand as well is the in-out message exchange pattern, where the caller expects a
response. We will look into this in another example.
See also
▪Examples
▪Tutorials
▪User Guide
CHAPTER 2 - QUICKSTART 6

CHAPTER 3
°°°°
Getting Started with Apache
Camel
THE ENTERPRISE INTEGRATION PATTERNS (EIP) BOOK
The purpose of a "patterns" book is not to advocate new techniques that the authors have
invented, but rather to document existing best practices within a particular field. By doing this,
the authors of a patterns book hope to spread knowledge of best practices and promote a
vocabulary for discussing architectural designs.
One of the most famous patterns books is Design Patterns: Elements of Reusable Object-oriented
Software by Erich Gamma, Richard Helm, Ralph Johnson and John Vlissides. Some people refer
to this as the "gang of four" book, partly to distinguish this book from other books that use
"Design Patterns" in their titles and, perhaps, partly because they cannot remember the names
of all four authors.
Since the publication of Design Patterns, many other patterns books, of varying quality, have been
written. One famous patterns book is called Enterprise Integration Patterns: Designing, Building, and
Deploying Messaging Solutions by Gregor Hohpe and Bobby Woolfe. It is common for people to
refer to this book as EIP, which is an acronym of its title. As the subtitle of EIP suggests, the
book focusses on design patterns for asynchronous messaging systems. The book discusses 65
patterns. Each pattern is given a textual name and most are also given a graphical symbol. The
graphical symbols are intended to be used in architectural diagrams.
THE CAMEL PROJECT
Camel (http://activemq.apache.org/camel/) is an open-source, Java-based project that is a part of
the Apache ActiveMQ project. Camel provides a class library that, according to its
documentation, can be used to implement 31 design patterns in the EIP book. I am not sure
why the Camel documentation discusses only 31 of the 65 EIP design patterns. Perhaps this is
due to incomplete documentation. Or perhaps it means that the Camel project, which is less
than 1 year old at the time of writing, is not yet as feature rich as the EIP book.
Because Camel implements many of the design patterns in the EIP book, it would be a good
idea for people who work with Camel to read the EIP book.
7CHAPTER 3 - GETTING STARTED WITH APACHE CAMEL

ONLINE DOCUMENTATION FOR CAMEL
The Camel project was started in early 2007. At the time of writing, the Camel project is too
young for there to be published books available on how to use Camel. Instead, the only source
of documentation seems to the documentation page on the Apache Camel website.
Here in early 2010 the Camel project have been successful for the last couple of years and
thus there are now books available about Camel. We have gathered a list of books here.
Problems with Camel's online documentation
Currently, the online documentation for the Apache Camel project suffers from two problems.
First, the documentation is incomplete. Second, there is no clearly specified reading order to
the documentation. For example, there is no table of contents. Instead, documentation is
fragmented over a collection of 100+ web pages, and hypertext links haphazardly tie these web
pages to each other. This documentation might suffice as reference material for people already
familiar with Camel but it does not qualify as a tutorial for beginners.
The problems with the documentation are unlikely to be due to, say, its author(s) lacking
writing ability. Rather, it is more likely that the problems are due to the author(s) lack of time. I
expect Camel's documentation will improve over time. I am writing this overview of Camel to
partially counter some of the problems that currently afflict the Camel documentation. In
particular, this document aims to serve as a (so far, incomplete) "beginner's guide to Camel". As
such, this document tries to complement, rather than compete with, the online Camel
documentation.
A useful tip for navigating the online documentation
There is one useful hint I can provide for reading the online Camel documentation. Each
documentation page has a logo at the top, and immediately underneath this is a think reddish
bar that contains some hypertext links. The Hypertext links on left side of this reddish bar
indicate your position in documentation. For example, If you are on the "Languages"
documentation page then the left-hand side of the reddish bar contains the following links.
Apache Camel > Documentation > Architecture > Languages
As you might expect, clicking on "Apache Camel" takes you back to the home page of the
Apache Camel project, and clicking on "Documentation" takes you to the main documentation
page. You can interpret the "Architeture" and "Languages" buttons as indicating you are in the
"Languages" section of the "Architecture" chapter. Doing this gives you at least some sense of
where you are within the documentation. If you are patient then you can spend a few hours
clicking on all the hypertext links you can find in the documentation pages, bookmark each page
with a hierarchical name (for example, you might bookmark the above page with the name
"Camel – Arch – Languages") and then you can use your bookmarks to serve as a primitive
table of contents for the online Camel documentation.
CHAPTER 3 - GETTING STARTED WITH APACHE CAMEL 8

Camel in Action book
If you are on the lookup for a comprehensive and organized documentation, then
we can recommend the Camel in Action book, which is the Camel bible.
ONLINE JAVADOC DOCUMENTATION
The Apache Camel website provides Javadoc documentation. It is important to note that the
Javadoc documentation is spread over several independent Javadoc hierarchies rather than being
all contained in a single Javadoc hierarchy. In particular, there is one Javadoc hierarchy for the
core APIs of Camel, and a separate Javadoc hierarchy for each communications technology
supported by Camel. For example, if you will be using Camel with ActiveMQ and FTP then you
need to look at the Javadoc hierarchies for the core API and Spring API.
CONCEPTS AND TERMINOLOGY FUNDAMENTAL TO CAMEL
I said in Section 3.1 ("Problems with Camel's online documentation") that the online Camel
documentation does not provide a tutorial for beginners. Because of this, in this section I try to
explain some of the concepts and terminology that are fundamental to Camel. This section is
not a complete Camel tutorial, but it is a first step in that direction.
Endpoint
The term endpoint is often used when talking about inter-process communication. For example,
in client-server communication, the client is one endpoint and the server is the other endpoint.
Depending on the context, an endpoint might refer to an address, such as a host:port pair for
TCP-based communication, or it might refer to a software entity that is contactable at that
address. For example, if somebody uses "www.example.com:80" as an example of an endpoint,
they might be referring to the actual port at that host name (that is, an address), or they might
be referring to the web server (that is, software contactable at that address). Often, the
distinction between the address and software contactable at that address is not an important
one.
Some middleware technologies make it possible for several software entities to be contactable
at the same physical address. For example, CORBA is an object-oriented, remote-procedure-
call (RPC) middleware standard. If a CORBA server process contains several objects then a
client can communicate with any of these objects at the same physical address (host:port), but a
client communicates with a particular object via that object's logical address (called an IOR in
CORBA terminology), which consists of the physical address (host:port) plus an id that uniquely
identifies the object within its server process. (An IOR contains some additional information
that is not relevant to this present discussion.) When talking about CORBA, some people may
use the term "endpoint" to refer to a CORBA server's physical address, while other people may
9CHAPTER 3 - GETTING STARTED WITH APACHE CAMEL
use the term to refer to the logical address of a single CORBA object, and other people still
might use the term to refer to any of the following:
• The physical address (host:port) of the CORBA server process
• The logical address (host:port plus id) of a CORBA object.
• The CORBA server process (a relatively heavyweight software entity)
• A CORBA object (a lightweight software entity)
Because of this, you can see that the term endpoint is ambiguous in at least two ways.
First, it is ambiguous because it might refer to an address or to a software entity
contactable at that address. Second, it is ambiguous in the granularity of what it refers
to: a heavyweight versus lightweight software entity, or physical address versus logical
address. It is useful to understand that different people use the term endpoint in
slightly different (and hence ambiguous) ways because Camel's usage of this term
might be different to whatever meaning you had previously associated with the term.
Camel provides out-of-the-box support for endpoints implemented with many
different communication technologies. Here are some examples of the Camel-
supported endpoint technologies.
• A JMS queue.
• A web service.
• A file. A file may sound like an unlikely type of endpoint, until you realize that in some
systems one application might write information to a file and, later, another
application might read that file.
• An FTP server.
• An email address. A client can send a message to an email address, and a server can
read an incoming message from a mail server.
• A POJO (plain old Java object).
In a Camel-based application, you create (Camel wrappers around) some endpoints
and connect these endpoints with routes, which I will discuss later in Section 4.8
("Routes, RouteBuilders and Java DSL"). Camel defines a Java interface called
Endpoint. Each Camel-supported endpoint has a class that implements this
Endpoint interface. As I discussed in Section 3.3 ("Online Javadoc documentation"),
Camel provides a separate Javadoc hierarchy for each communications technology
supported by Camel. Because of this, you will find documentation on, say, the
JmsEndpoint class in the JMS Javadoc hierarchy, while documentation for, say, the
FtpEndpoint class is in the FTP Javadoc hierarchy.
CamelContext
ACamelContext object represents the Camel runtime system. You typically have one
CamelContext object in an application. A typical application executes the following steps.
1. Create a CamelContext object.
2. Add endpoints – and possibly Components, which are discussed in Section 4.5
("Components") – to the CamelContext object.
3. Add routes to the CamelContext object to connect the endpoints.
CHAPTER 3 - GETTING STARTED WITH APACHE CAMEL 10
4. Invoke the start() operation on the CamelContext object. This starts Camel-
internal threads that are used to process the sending, receiving and processing of
messages in the endpoints.
5. Eventually invoke the stop() operation on the CamelContext object. Doing this
gracefully stops all the endpoints and Camel-internal threads.
Note that the CamelContext.start() operation does not block indefinitely.
Rather, it starts threads internal to each Component and Endpoint and then
start() returns. Conversely, CamelContext.stop() waits for all the threads
internal to each Endpoint and Component to terminate and then stop()
returns.
If you neglect to call CamelContext.start() in your application then messages
will not be processed because internal threads will not have been created.
If you neglect to call CamelContext.stop() before terminating your application
then the application may terminate in an inconsistent state. If you neglect to call
CamelContext.stop() in a JUnit test then the test may fail due to messages not
having had a chance to be fully processed.
CamelTemplate
Camel used to have a class called CamelClient, but this was renamed to be
CamelTemplate to be similar to a naming convention used in some other open-source
projects, such as the TransactionTemplate and JmsTemplate classes in Spring.
The CamelTemplate class is a thin wrapper around the CamelContext class. It has
methods that send a Message or Exchange – both discussed in Section 4.6 ("Message and
Exchange")) – to an Endpoint – discussed in Section 4.1 ("Endpoint"). This provides a way to
enter messages into source endpoints, so that the messages will move along routes – discussed
in Section 4.8 ("Routes, RouteBuilders and Java DSL") – to destination endpoints.
The Meaning of URL, URI, URN and IRI
Some Camel methods take a parameter that is a URI string. Many people know that a URI is
"something like a URL" but do not properly understand the relationship between URI and URL,
or indeed its relationship with other acronyms such as IRI and URN.
Most people are familiar with URLs (uniform resource locators), such as "http://...", "ftp://...",
"mailto:...". Put simply, a URL specifies the location of a resource.
AURI (uniform resource identifier) is a URL or a URN. So, to fully understand what URI means,
you need to first understand what is a URN.
URN is an acronym for uniform resource name. There are may "unique identifier" schemes in the
world, for example, ISBNs (globally unique for books), social security numbers (unique within a
country), customer numbers (unique within a company's customers database) and telephone
numbers. Each "unique identifier" scheme has its own notation. A URN is a wrapper for
different "unique identifier" schemes. The syntax of a URN is "urn:<scheme-name>:<unique-
11 CHAPTER 3 - GETTING STARTED WITH APACHE CAMEL

identifier>". A URN uniquely identifies a resource, such as a book, person or piece of equipment.
By itself, a URN does not specify the location of the resource. Instead, it is assumed that a
registry provides a mapping from a resource's URN to its location. The URN specification does
not state what form a registry takes, but it might be a database, a server application, a wall chart
or anything else that is convenient. Some hypothetical examples of URNs are
"urn:employee:08765245", "urn:customer:uk:3458:hul8" and
"urn:foo:0000-0000-9E59-0000-5E-2". The <scheme-name> ("employee", "customer" and "foo"
in these examples) part of a URN implicitly defines how to parse and interpret the <unique-
identifier> that follows it. An arbitrary URN is meaningless unless: (1) you know the semantics
implied by the <scheme-name>, and (2) you have access to the registry appropriate for the
<scheme-name>. A registry does not have to be public or globally accessible. For example,
"urn:employee:08765245" might be meaningful only within a specific company.
To date, URNs are not (yet) as popular as URLs. For this reason, URI is widely misused as a
synonym for URL.
IRI is an acronym for internationalized resource identifier. An IRI is simply an internationalized
version of a URI. In particular, a URI can contain letters and digits in the US-ASCII character
set, while a IRI can contain those same letters and digits, and also European accented characters,
Greek letters, Chinese ideograms and so on.
Components
Component is confusing terminology; EndpointFactory would have been more appropriate because
aComponent is a factory for creating Endpoint instances. For example, if a Camel-based
application uses several JMS queues then the application will create one instance of the
JmsComponent class (which implements the Component interface), and then the application
invokes the createEndpoint() operation on this JmsComponent object several times.
Each invocation of JmsComponent.createEndpoint() creates an instance of the
JmsEndpoint class (which implements the Endpoint interface). Actually, application-level
code does not invoke Component.createEndpoint() directly. Instead, application-level
code normally invokes CamelContext.getEndpoint(); internally, the CamelContext
object finds the desired Component object (as I will discuss shortly) and then invokes
createEndpoint() on it.
Consider the following code.
myCamelContext.getEndpoint("pop3://john.smith@mailserv.example.com?password=myPassword");
The parameter to getEndpoint() is a URI. The URI prefix (that is, the part before ":")
specifies the name of a component. Internally, the CamelContext object maintains a mapping
from names of components to Component objects. For the URI given in the above example,
the CamelContext object would probably map the pop3 prefix to an instance of the
MailComponent class. Then the CamelContext object invokes
createEndpoint("pop3://john.smith@mailserv.example.com?password=myPassword")
CHAPTER 3 - GETTING STARTED WITH APACHE CAMEL 12

on that MailComponent object. The createEndpoint() operation splits the URI into its
component parts and uses these parts to create and configure an Endpoint object.
In the previous paragraph, I mentioned that a CamelContext object maintains a mapping
from component names to Component objects. This raises the question of how this map is
populated with named Component objects. There are two ways of populating the map. The
first way is for application-level code to invoke CamelContext.addComponent(String
componentName, Component component). The example below shows a single
MailComponent object being registered in the map under 3 different names.
Component mailComponent = new org.apache.camel.component.mail.MailComponent();
myCamelContext.addComponent("pop3", mailComponent);
myCamelContext.addComponent("imap", mailComponent);
myCamelContext.addComponent("smtp", mailComponent);
The second (and preferred) way to populate the map of named Component objects in the
CamelContext object is to let the CamelContext object perform lazy initialization. This
approach relies on developers following a convention when they write a class that implements
the Component interface. I illustrate the convention by an example. Let's assume you write a
class called com.example.myproject.FooComponent and you want Camel to
automatically recognize this by the name "foo". To do this, you have to write a properties file
called "META-INF/services/org/apache/camel/component/foo" (without a ".properties" file
extension) that has a single entry in it called class, the value of which is the fully-scoped name
of your class. This is shown below.
Listing 1.Listing 1. META-INF/services/org/apache/camel/component/fooMETA-INF/services/org/apache/camel/component/foo
class=com.example.myproject.FooComponent
If you want Camel to also recognize the class by the name "bar" then you write another
properties file in the same directory called "bar" that has the same contents. Once you have
written the properties file(s), you create a jar file that contains the
com.example.myproject.FooComponent class and the properties file(s), and you add
this jar file to your CLASSPATH. Then, when application-level code invokes
createEndpoint("foo:...") on a CamelContext object, Camel will find the "foo""
properties file on the CLASSPATH, get the value of the class property from that properties
file, and use reflection APIs to create an instance of the specified class.
As I said in Section 4.1 ("Endpoint"), Camel provides out-of-the-box support for numerous
communication technologies. The out-of-the-box support consists of classes that implement the
Component interface plus properties files that enable a CamelContext object to populate
its map of named Component objects.
Earlier in this section I gave the following example of calling
CamelContext.getEndpoint().
13 CHAPTER 3 - GETTING STARTED WITH APACHE CAMEL
myCamelContext.getEndpoint("pop3://john.smith@mailserv.example.com?password=myPassword");
When I originally gave that example, I said that the parameter to getEndpoint() was a URI.
I said that because the online Camel documentation and the Camel source code both claim the
parameter is a URI. In reality, the parameter is restricted to being a URL. This is because when
Camel extracts the component name from the parameter, it looks for the first ":", which is a
simplistic algorithm. To understand why, recall from Section 4.4 ("The Meaning of URL, URI,
URN and IRI") that a URI can be a URL or a URN. Now consider the following calls to
getEndpoint.
myCamelContext.getEndpoint("pop3:...");
myCamelContext.getEndpoint("jms:...");
myCamelContext.getEndpoint("urn:foo:...");
myCamelContext.getEndpoint("urn:bar:...");
Camel identifies the components in the above example as "pop3", "jms", "urn" and "urn". It
would be more useful if the latter components were identified as "urn:foo" and "urn:bar" or,
alternatively, as "foo" and "bar" (that is, by skipping over the "urn:" prefix). So, in practice you
must identify an endpoint with a URL (a string of the form "<scheme>:...") rather than with a
URN (a string of the form "urn:<scheme>:..."). This lack of proper support for URNs means the
you should consider the parameter to getEndpoint() as being a URL rather than (as
claimed) a URI.
Message and Exchange
The Message interface provides an abstraction for a single message, such as a request, reply
or exception message.
There are concrete classes that implement the Message interface for each Camel-supported
communications technology. For example, the JmsMessage class provides a JMS-specific
implementation of the Message interface. The public API of the Message interface provides
get- and set-style methods to access the message id,body and individual header fields of a
messge.
The Exchange interface provides an abstraction for an exchange of messages, that is, a
request message and its corresponding reply or exception message. In Camel terminology, the
request, reply and exception messages are called in,out and fault messages.
There are concrete classes that implement the Exchange interface for each Camel-supported
communications technology. For example, the JmsExchange class provides a JMS-specific
implementation of the Exchange interface. The public API of the Exchange interface is quite
limited. This is intentional, and it is expected that each class that implements this interface will
provide its own technology-specific operations.
Application-level programmers rarely access the Exchange interface (or classes that
implement it) directly. However, many classes in Camel are generic types that are instantiated
CHAPTER 3 - GETTING STARTED WITH APACHE CAMEL 14

on (a class that implements) Exchange. Because of this, the Exchange interface appears a
lot in the generic signatures of classes and methods.
Processor
The Processor interface represents a class that processes a message. The signature of this
interface is shown below.
Listing 2.Listing 2. ProcessorProcessor
package org.apache.camel;
public interface Processor {
void process(Exchange exchange) throws Exception;
}
Notice that the parameter to the process() method is an Exchange rather than a
Message. This provides flexibility. For example, an implementation of this method initially
might call exchange.getIn() to get the input message and process it. If an error occurs
during processing then the method can call exchange.setException().
An application-level developer might implement the Processor interface with a class that
executes some business logic. However, there are many classes in the Camel library that
implement the Processor interface in a way that provides support for a design pattern in the
EIP book. For example, ChoiceProcessor implements the message router pattern, that is, it
uses a cascading if-then-else statement to route a message from an input queue to one of
several output queues. Another example is the FilterProcessor class which discards
messages that do not satisfy a stated predicate (that is, condition).
Routes, RouteBuilders and Java DSL
Aroute is the step-by-step movement of a Message from an input queue, through arbitrary
types of decision making (such as filters and routers) to a destination queue (if any). Camel
provides two ways for an application developer to specify routes. One way is to specify route
information in an XML file. A discussion of that approach is outside the scope of this document.
The other way is through what Camel calls a Java DSL (domain-specific language).
Introduction to Java DSL
For many people, the term "domain-specific language" implies a compiler or interpreter that can
process an input file containing keywords and syntax specific to a particular domain. This is not
the approach taken by Camel. Camel documentation consistently uses the term "Java DSL"
instead of "DSL", but this does not entirely avoid potential confusion. The Camel "Java DSL" is a
class library that can be used in a way that looks almost like a DSL, except that it has a bit of
Java syntactic baggage. You can see this in the example below. Comments afterwards explain
some of the constructs used in the example.
15 CHAPTER 3 - GETTING STARTED WITH APACHE CAMEL

Listing 3.Listing 3. Example of Camel's "Java DSL"Example of Camel's "Java DSL"
RouteBuilder builder = new RouteBuilder() {
public void configure() {
from("queue:a").filter(header("foo").isEqualTo("bar")).to("queue:b");
from("queue:c").choice()
.when(header("foo").isEqualTo("bar")).to("queue:d")
.when(header("foo").isEqualTo("cheese")).to("queue:e")
.otherwise().to("queue:f");
}
};
CamelContext myCamelContext = new DefaultCamelContext();
myCamelContext.addRoutes(builder);
The first line in the above example creates an object which is an instance of an anonymous
subclass of RouteBuilder with the specified configure() method.
The CamelContext.addRoutes(RouterBuilder builder) method invokes
builder.setContext(this) – so the RouteBuilder object knows which
CamelContext object it is associated with – and then invokes builder.configure().
The body of configure() invokes methods such as from(),filter(),choice(),
when(),isEqualTo(),otherwise() and to().
The RouteBuilder.from(String uri) method invokes getEndpoint(uri) on the
CamelContext associated with the RouteBuilder object to get the specified Endpoint
and then puts a FromBuilder "wrapper" around this Endpoint. The
FromBuilder.filter(Predicate predicate) method creates a
FilterProcessor object for the Predicate (that is, condition) object built from the
header("foo").isEqualTo("bar") expression. In this way, these operations
incrementally build up a Route object (with a RouteBuilder wrapper around it) and add it
to the CamelContext object associated with the RouteBuilder.
Critique of Java DSL
The online Camel documentation compares Java DSL favourably against the alternative of
configuring routes and endpoints in a XML-based Spring configuration file. In particular, Java
DSL is less verbose than its XML counterpart. In addition, many integrated development
environments (IDEs) provide an auto-completion feature in their editors. This auto-completion
feature works with Java DSL, thereby making it easier for developers to write Java DSL.
However, there is another option that the Camel documentation neglects to consider: that of
writing a parser that can process DSL stored in, say, an external file. Currently, Camel does not
provide such a DSL parser, and I do not know if it is on the "to do" list of the Camel
maintainers. I think that a DSL parser would offer a significant benefit over the current Java
DSL. In particular, the DSL would have a syntactic definition that could be expressed in a
relatively short BNF form. The effort required by a Camel user to learn how to use DSL by
reading this BNF would almost certainly be significantly less than the effort currently required
to study the API of the RouterBuilder classes.
CHAPTER 3 - GETTING STARTED WITH APACHE CAMEL 16
Want to know more about Camel
The Camel in Action book, contains a free chapter 1, which is highly recommended to read to
get more familiar with Camel. After all three authors have worked on this chapter, it has been
reviewed extensively at four different occasions by a professional review panel, and had two
passes of copy editing. What we are saying is that it is 100+ hours of work which nobody every
would voluntarily would have used to write on these wiki pages about Camel.
17 CHAPTER 3 - GETTING STARTED WITH APACHE CAMEL

CHAPTER 4
°°°°
Architecture
Camel uses a Java based Routing Domain Specific Language (DSL) or an Xml Configuration to
configure routing and mediation rules which are added to a CamelContext to implement the
various Enterprise Integration Patterns.
At a high level Camel consists of a CamelContext which contains a collection of Component
instances. A Component is essentially a factory of Endpoint instances. You can explicitly
configure Component instances in Java code or an IoC container like Spring or Guice, or they
can be auto-discovered using URIs.
An Endpoint acts rather like a URI or URL in a web application or a Destination in a JMS
system; you can communicate with an endpoint; either sending messages to it or consuming
messages from it. You can then create a Producer or Consumer on an Endpoint to exchange
messages with it.
The DSL makes heavy use of pluggable Languages to create an Expression or Predicate to
make a truly powerful DSL which is extensible to the most suitable language depending on your
needs. The following languages are supported
• Bean Language for using Java for expressions
• Constant
• the unified EL from JSP and JSF
• Header
• JXPath
• Mvel
• OGNL
• Property
• Scala DSL
• Scripting Languages such as
◦BeanShell
◦JavaScript
◦Groovy
◦Python
◦PHP
◦Ruby
• Simple
◦File Language
• SQL
• XPath
CHAPTER 4 - ARCHITECTURE 18
• XQuery
Most of these languages is also supported used as Annotation Based Expression Language.
For a full details of the individual languages see the Language Appendix
URIS
Camel makes extensive use of URIs to allow you to refer to endpoints which are lazily created
by a Component if you refer to them within Routes
Current Supported URIs
Component / ArtifactId / URI Description
ActiveMQ / activemq-camel
activemq:[topic:]destinationName
For JMS Messaging with Apache
ActiveMQ
ActiveMQ Journal / activemq-core
activemq.journal:directory-on-filesystem
Uses ActiveMQ's fast disk
journaling implementation to store
message bodies in a rolling log file
AMQP / camel-amqp
amqp:[topic:]destinationName
For Messaging with AMQP
protocol
Atom / camel-atom
atom:uri
Working with Apache Abdera for
atom integration, such as
consuming an atom feed.
Bean / camel-core
bean:beanName[?method=someMethod]
Uses the Bean Binding to bind
message exchanges to beans in the
Registry. Is also used for exposing
and invoking POJO (Plain Old Java
Objects).
Bean Validation / camel-bean-validator
bean-validator:something
Validates the payload of a message
using the Java Validation API (JSR
303 and JAXP Validation) and its
reference implementation
Hibernate Validator
19 CHAPTER 4 - ARCHITECTURE
Browse / camel-core
browse:someName
Provides a simple
BrowsableEndpoint which can be
useful for testing, visualisation tools
or debugging. The exchanges sent
to the endpoint are all available to
be browsed.
Cache / camel-cache
cache://cachename[?options]
The cache component facilitates
creation of caching endpoints and
processors using EHCache as the
cache implementation.
Class / camel-core
class:className[?method=someMethod]
Uses the Bean Binding to bind
message exchanges to beans in the
Registry. Is also used for exposing
and invoking POJO (Plain Old Java
Objects).
Cometd / camel-cometd
cometd://host:port/channelname
Used to deliver messages using the
jetty cometd implementation of the
bayeux protocol
Crypto (Digital Signatures) / camel-crypto
crypto:sign:name[?options]
crypto:verify:name[?options]
Used to sign and verify exchanges
using the Signature Service of the
Java Cryptographic Extension.
CXF / camel-cxf
cxf:address[?serviceClass=...]
Working with Apache CXF for
web services integration
CXFRS / camel-cxf
cxfrs:address[?resourcesClasses=...]
Working with Apache CXF for
REST services integration
DataSet / camel-core
dataset:name
For load & soak testing the DataSet
provides a way to create huge
numbers of messages for sending
to Components or asserting that
they are consumed correctly
CHAPTER 4 - ARCHITECTURE 20
Direct / camel-core
direct:name
Synchronous call to another
endpoint
EJB / camel-ejb
ejb:ejbName[?method=someMethod]
Uses the Bean Binding to bind
message exchanges to EJBs. It
works like the Bean component
but just for accessing EJBs.
Supports EJB 3.0 onwards.
Esper / camel-esper in camel-extra
esper:name
Working with the Esper Library for
Event Stream Processing
Event / camel-spring
event://default
spring-event://default
Working with Spring
ApplicationEvents
Exec / camel-exec
exec://executable[?options] For executing system commands
File / camel-core
file://nameOfFileOrDirectory
Sending messages to a file or
polling a file or directory. Camel
1.x use this link File.
Flatpack / camel-flatpack
flatpack:[fixed|delim]:configFile
Processing fixed width or delimited
files or messages using the FlatPack
library
Freemarker / camel-freemarker
freemarker:someTemplateResource
Generates a response using a
Freemarker template
FTP / camel-ftp
ftp://host[:port]/fileName
Sending and receiving files over
FTP. Camel 1.x use this link
FTP.
21 CHAPTER 4 - ARCHITECTURE
FTPS / camel-ftp
ftps://host[:port]/fileName
Sending and receiving files over FTP
Secure (TLS and SSL).
GAuth / camel-gae
gauth://name[?options]
Used by web applications to
implement an OAuth consumer.
See also Camel Components for
Google App Engine.
GHttp / camel-gae
ghttp://hostname[:port][/path][?options]
ghttp:///path[?options]
Provides connectivity to the URL
fetch service of Google App Engine
but can also be used to receive
messages from servlets. See also
Camel Components for Google
App Engine.
GLogin / camel-gae
glogin://hostname[:port][?options]
Used by Camel applications outside
Google App Engine (GAE) for
programmatic login to GAE
applications. See also Camel
Components for Google App
Engine.
GTask / camel-gae
gtask://queue-name
Supports asynchronous message
processing on Google App Engine
by using the task queueing service
as message queue. See also Camel
Components for Google App
Engine.
GMail / camel-gae
gmail://user@gmail.com[?options]
gmail://user@googlemail.com[?options]
Supports sending of emails via the
mail service of Google App Engine.
See also Camel Components for
Google App Engine.
HDFS / camel-hdfs in camel-hdfs
hdfs://path[?options]
For reading/writing from/to an
HDFS filesystem
Hibernate / camel-hibernate in camel-extra
hibernate://entityName
For using a database as a queue via
the Hibernate library
CHAPTER 4 - ARCHITECTURE 22

HL7 / camel-hl7
mina:tcp://hostname[:port]
For working with the HL7 MLLP
protocol and the HL7 model using
the HAPI library
HTTP / camel-http
http://hostname[:port]
For calling out to external HTTP
servers
iBATIS / camel-ibatis
ibatis://sqlOperationName
Performs a query, poll, insert,
update or delete in a relational
database using Apache iBATIS
IMap / camel-mail
imap://hostname[:port] Receiving email using IMap
IRC / camel-irc
irc:host[:port]/#room For IRC communication
JavaSpace / camel-javaspace
javaspace:jini://host?spaceName=mySpace?...
Sending and receiving messages
through JavaSpace
JBI / servicemix-camel
jbi:serviceName
For JBI integration such as working
with Apache ServiceMix
JCR / camel-jcr
jcr://user:password@repository/path/to/node
Storing a message in a JCR
(JSR-170) compliant repository like
Apache Jackrabbit
JDBC / camel-jdbc
jdbc:dataSourceName?options
For performing JDBC queries and
operations
23 CHAPTER 4 - ARCHITECTURE

Jetty / camel-jetty
jetty:url For exposing services over HTTP
JMS / camel-jms
jms:[topic:]destinationName Working with JMS providers
JPA / camel-jpa
jpa://entityName
For using a database as a queue via
the JPA specification for working
with OpenJPA, Hibernate or
TopLink
JT/400 / camel-jt400
jt400://user:pwd@system/<path_to_dtaq>
For integrating with data queues on
an AS/400 (aka System i, IBM i, i5,
...) system
LDAP / camel-ldap
ldap:host[:port]?base=...[&scope=<scope>]
Performing searches on LDAP
servers (<scope> must be one of
object|onelevel|subtree)
Log / camel-core
log:loggingCategory[?level=ERROR]
Uses Jakarta Commons Logging to
log the message exchange to some
underlying logging system like log4j
Lucene / camel-lucene
lucene:searcherName:insert[?analyzer=<analyzer>]
lucene:searcherName:query[?analyzer=<analyzer>]
Uses Apache Lucene to perform
Java-based indexing and full text
based searches using advanced
analysis/tokenization capabilities
Mail / camel-mail
mail://user-info@host:port Sending and receiving email
MINA / camel-mina
[tcp|udp|vm]:host[:port] Working with Apache MINA
CHAPTER 4 - ARCHITECTURE 24

Mock / camel-core
mock:name
For testing routes and mediation
rules using mocks
MSV / camel-msv
msv:someLocalOrRemoteResource
Validates the payload of a message
using the MSV Library
Nagios / camel-nagios
nagios://host[:port]?options
Sending passive checks to Nagios
using JSendNSCA
Netty / camel-netty
netty:tcp//host[:port]?options
netty:udp//host[:port]?options
Working with TCP and UDP
protocols using Java NIO based
capabilities offered by the JBoss
Netty community project
NMR / servicemix-nmr
nmr://serviceName
Integration with the Normalized
Message Router BUS in ServiceMix
4.x
POP / camel-mail
pop3://user-info@host:port
Receiving email using POP3 and
JavaMail
Printer / camel-printer
lpr://host:port/path/to/printer[?options]
The printer component facilitates
creation of printer endpoints to
local, remote and wireless printers.
The endpoints provide the ability
to print camel directed payloads
when utilized on camel routes.
Properties / camel-core
properties://key[?options]
The properties component
facilitates using property
placeholders directly in endpoint
uri definitions.
25 CHAPTER 4 - ARCHITECTURE

Quartz / camel-quartz
quartz://groupName/timerName
Provides a scheduled delivery of
messages using the Quartz
scheduler
Quickfix / camel-quickfix
quickfix-server:config file
quickfix-client:config-file
Implementation of the QuickFix for
Java engine which allow to send/
receive FIX messages
Ref / camel-core
ref:name
Component for lookup of existing
endpoints bound in the Registry.
Restlet / camel-restlet
restlet:restletUrl[?options]
Component for consuming and
producing Restful resources using
Restlet
RMI / camel-rmi
rmi://host[:port] Working with RMI
RNC / camel-jing
rnc:/relativeOrAbsoluteUri
Validates the payload of a message
using RelaxNG Compact Syntax
RNG / camel-jing
rng:/relativeOrAbsoluteUri
Validates the payload of a message
using RelaxNG
RSS / camel-rss
rss:uri
Working with ROME for RSS
integration, such as consuming an
RSS feed.
Scalate / scalate-camel
scalate:templateName
Uses the given Scalate template to
transform the message
CHAPTER 4 - ARCHITECTURE 26
SEDA / camel-core
seda:name
Asynchronous call to another
endpoint in the same Camel
Context
SERVLET / camel-servlet
servlet:uri
For exposing services over HTTP
through the servlet which is
deployed into the Web container.
SFTP / camel-ftp
sftp://host[:port]/fileName
Sending and receiving files over
SFTP (FTP over SSH). Camel 1.x
use this link FTP.
Smooks / camel-smooks in camel-extra
unmarshal(edi)
For working with EDI parsing using
the Smooks library
SMTP / camel-mail
smtp://user-info@host[:port]
Sending email using SMTP and
JavaMail
SMPP / camel-smpp
smpp://user-info@host[:port]?options
To send and receive SMS using
Short Messaging Service Center
using the JSMPP library
SNMP / camel-snmp
snmp://host[:port]?options
Polling OID values and receiving
traps using SNMP via SNMP4J
library
SpringIntegration / camel-spring-integration
spring-integration:defaultChannelName
The bridge component of Camel
and Spring Integration
SQL / camel-sql
sql:select * from table where id=#
Performing SQL queries using
JDBC
27 CHAPTER 4 - ARCHITECTURE

Stream / camel-stream
stream:[in|out|err|file]
Read or write to an input/output/
error/file stream rather like unix
pipes
StringTemplate / camel-stringtemplate
string-template:someTemplateResource
Generates a response using a String
Template
TCP / camel-mina
mina:tcp://host:port
Working with TCP protocols using
Apache MINA
Test / camel-spring
test:expectedMessagesEndpointUri
Creates a Mock endpoint which
expects to receive all the message
bodies that could be polled from
the given underlying endpoint
Timer / camel-core
timer://name A timer endpoint
UDP / camel-mina
mina:udp://host:port
Working with UDP protocols using
Apache MINA
Validation / camel-spring
validation:someLocalOrRemoteResource
Validates the payload of a message
using XML Schema and JAXP
Validation
Velocity / camel-velocity
velocity:someTemplateResource
Generates a response using an
Apache Velocity template
VM / camel-core
vm:name
Asynchronous call to another
endpoint in the same JVM
CHAPTER 4 - ARCHITECTURE 28
XMPP / camel-xmpp
xmpp://host:port/room Working with XMPP and Jabber
XQuery / camel-saxon
xquery:someXQueryResource
Generates a response using an
XQuery template
XSLT / camel-spring
xslt:someTemplateResource
Generates a response using an
XSLT template
For a full details of the individual components see the Component Appendix
29 CHAPTER 4 - ARCHITECTURE
CHAPTER 5
°°°°
Enterprise Integration Patterns
Camel supports most of the Enterprise Integration Patterns from the excellent book of the
same name by Gregor Hohpe and Bobby Woolf. Its a highly recommended book, particularly
for users of Camel.
PATTERN INDEX
There now follows a list of the Enterprise Integration Patterns from the book along with
examples of the various patterns using Apache Camel
Messaging Systems
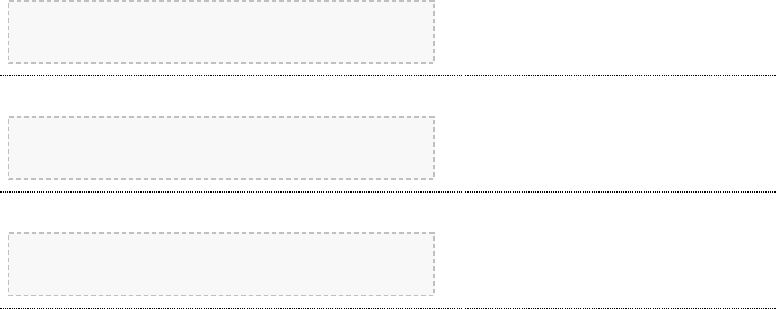
Message
Channel
How does one application communicate with another using
messaging?
Message How can two applications connected by a message channel
exchange a piece of information?
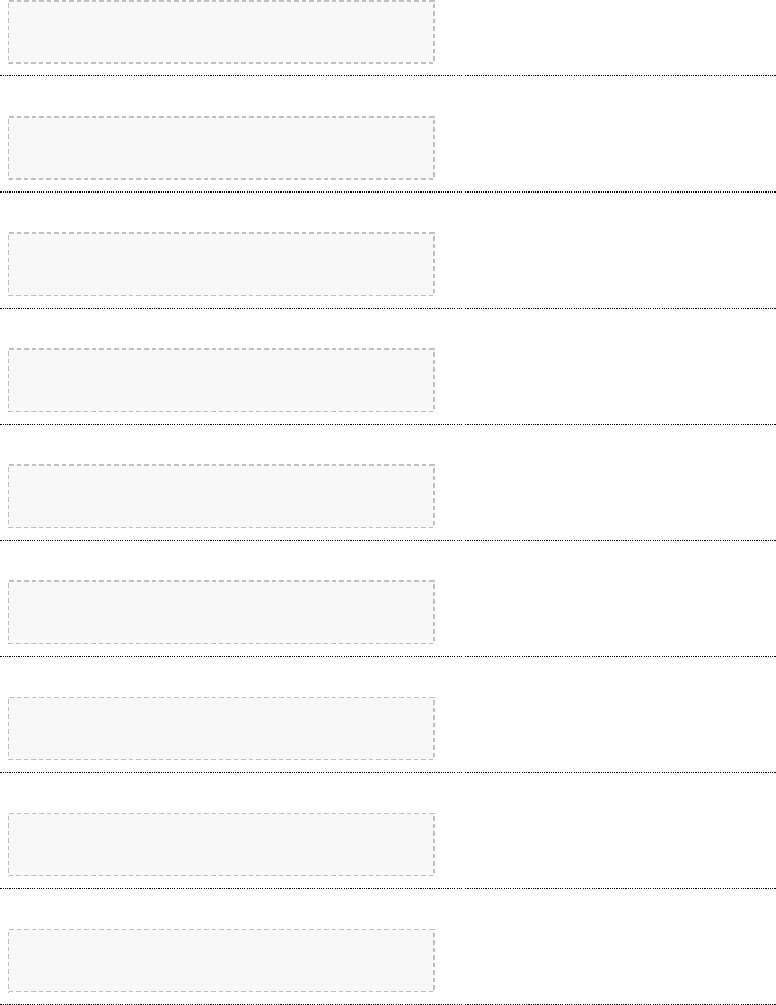
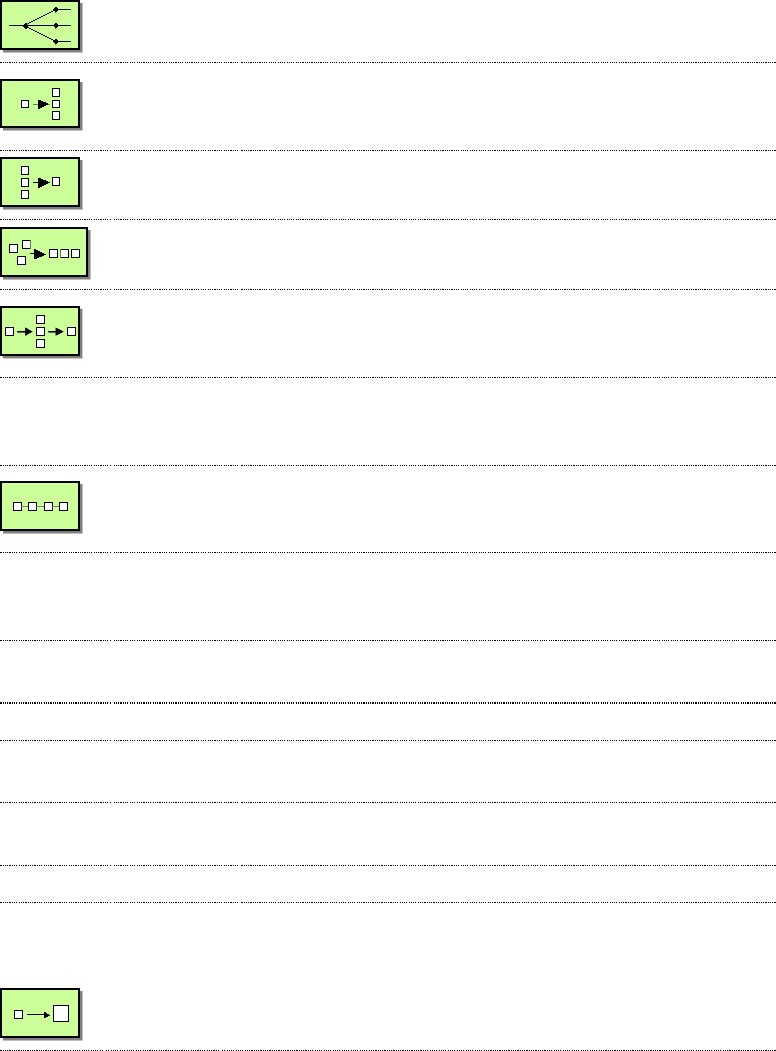
Pipes and
Filters
How can we perform complex processing on a message while
maintaining independence and flexibility?
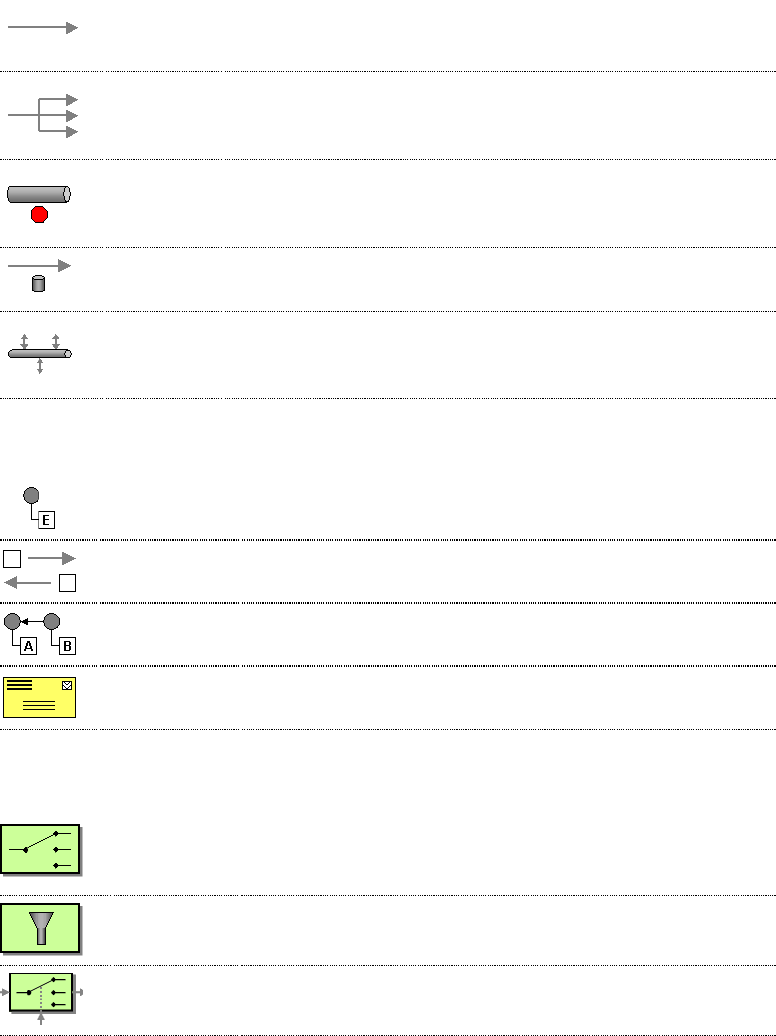
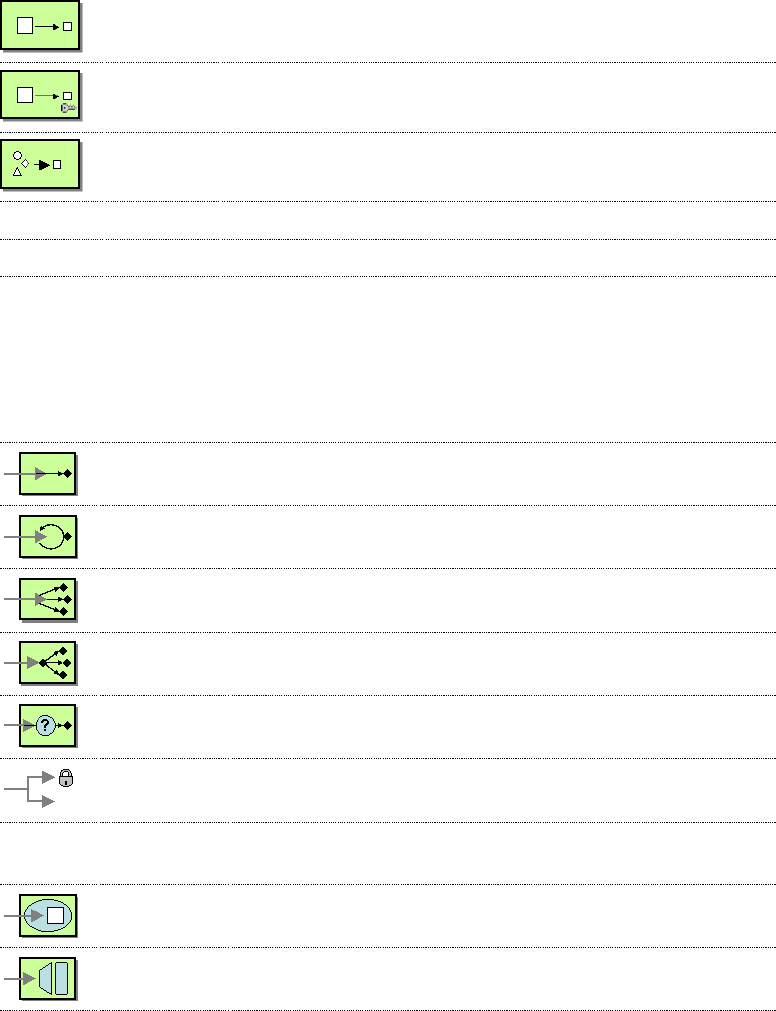
Message
Router
How can you decouple individual processing steps so that
messages can be passed to different filters depending on a set of
conditions?
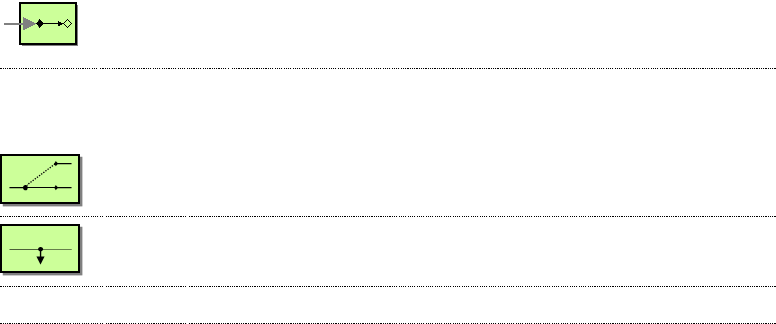
Message
Translator
How can systems using different data formats communicate with
each other using messaging?
Message
Endpoint
How does an application connect to a messaging channel to send
and receive messages?
CHAPTER 5 - ENTERPRISE INTEGRATION PATTERNS 30
Messaging Channels
Point to
Point
Channel
How can the caller be sure that exactly one receiver will receive
the document or perform the call?
Publish
Subscribe
Channel
How can the sender broadcast an event to all interested
receivers?
Dead
Letter
Channel
What will the messaging system do with a message it cannot
deliver?
Guaranteed
Delivery
How can the sender make sure that a message will be delivered,
even if the messaging system fails?
Message
Bus
What is an architecture that enables separate applications to
work together, but in a de-coupled fashion such that applications
can be easily added or removed without affecting the others?
Message Construction
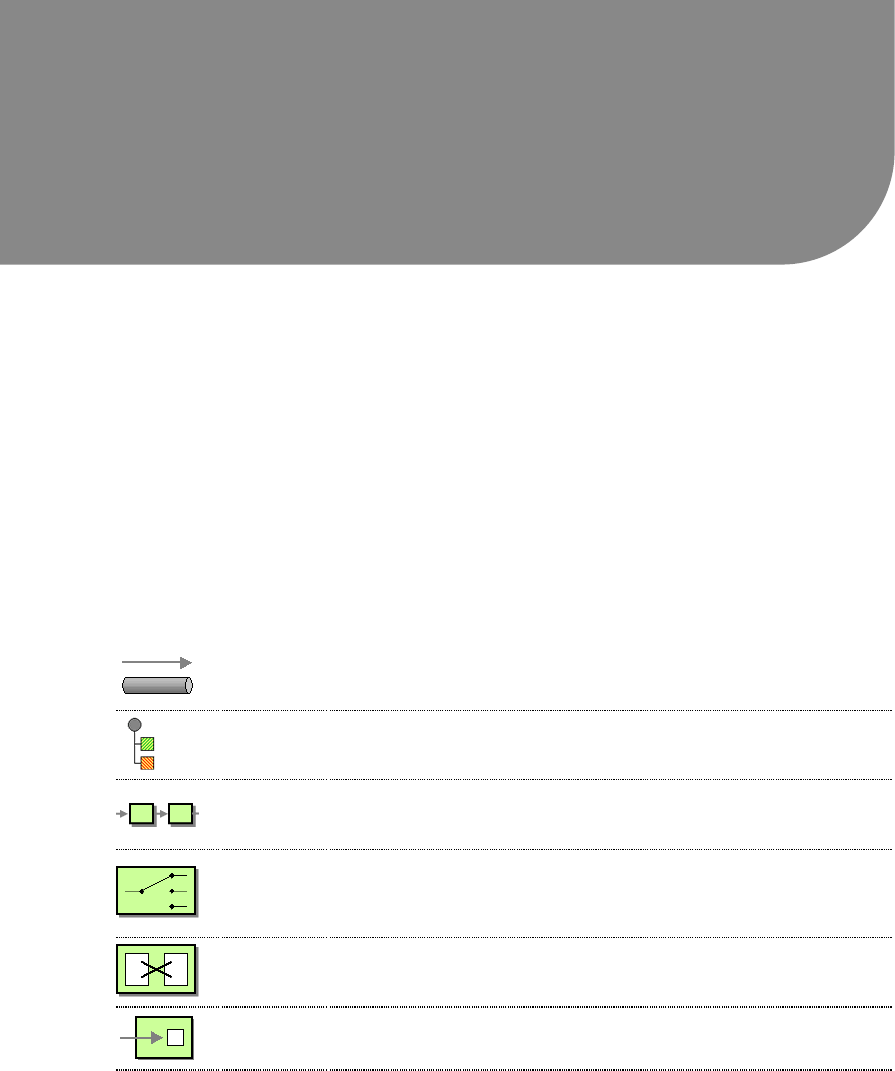
Event Message How can messaging be used to transmit events from one
application to another?
Request Reply When an application sends a message, how can it get a
response from the receiver?
Correlation
Identifier
How does a requestor that has received a reply know which
request this is the reply for?
Return
Address How does a replier know where to send the reply?
Message Routing
Content
Based
Router
How do we handle a situation where the implementation of a
single logical function (e.g., inventory check) is spread across
multiple physical systems?
Message
Filter How can a component avoid receiving uninteresting messages?
Dynamic
Router
How can you avoid the dependency of the router on all
possible destinations while maintaining its efficiency?
31 CHAPTER 5 - ENTERPRISE INTEGRATION PATTERNS
Recipient
List
How do we route a message to a list of (static or dynamically)
specified recipients?
Splitter
How can we process a message if it contains multiple
elements, each of which may have to be processed in a
different way?
Aggregator How do we combine the results of individual, but related
messages so that they can be processed as a whole?
Resequencer How can we get a stream of related but out-of-sequence
messages back into the correct order?
Composed
Message
Processor
How can you maintain the overall message flow when
processing a message consisting of multiple elements, each of
which may require different processing?
Scatter-
Gather
How do you maintain the overall message flow when a
message needs to be sent to multiple recipients, each of which
may send a reply?
Routing Slip
How do we route a message consecutively through a series of
processing steps when the sequence of steps is not known at
design-time and may vary for each message?
Throttler
How can I throttle messages to ensure that a specific endpoint
does not get overloaded, or we don't exceed an agreed SLA
with some external service?
Sampling How can I sample one message out of many in a given period
to avoid downstream route does not get overloaded?
Delayer How can I delay the sending of a message?
Load
Balancer How can I balance load across a number of endpoints?
Multicast How can I route a message to a number of endpoints at the
same time?
Loop How can I repeat processing a message in a loop?
Message Transformation
Content
Enricher
How do we communicate with another system if the message
originator does not have all the required data items available?
CHAPTER 5 - ENTERPRISE INTEGRATION PATTERNS 32
Content
Filter
How do you simplify dealing with a large message, when you are
interested only in a few data items?
Claim
Check
How can we reduce the data volume of message sent across the
system without sacrificing information content?
Normalizer How do you process messages that are semantically equivalent,
but arrive in a different format?
Sort How can I sort the body of a message?
Validate How can I validate a message?
Messaging Endpoints
Messaging
Mapper
How do you move data between domain objects and the
messaging infrastructure while keeping the two independent of
each other?
Event Driven
Consumer
How can an application automatically consume messages as they
become available?
Polling
Consumer
How can an application consume a message when the
application is ready?
Competing
Consumers
How can a messaging client process multiple messages
concurrently?
Message
Dispatcher
How can multiple consumers on a single channel coordinate
their message processing?
Selective
Consumer
How can a message consumer select which messages it wishes
to receive?
Durable
Subscriber
How can a subscriber avoid missing messages while it's not
listening for them?
Idempotent
Consumer How can a message receiver deal with duplicate messages?
Transactional
Client
How can a client control its transactions with the messaging
system?
Messaging
Gateway
How do you encapsulate access to the messaging system from
the rest of the application?
33 CHAPTER 5 - ENTERPRISE INTEGRATION PATTERNS
Service
Activator
How can an application design a service to be invoked both via
various messaging technologies and via non-messaging
techniques?
System Management
Detour How can you route a message through intermediate steps to
perform validation, testing or debugging functions?
Wire
Tap
How do you inspect messages that travel on a point-to-point
channel?
Log How can I log processing a message?
For a full breakdown of each pattern see the Book Pattern Appendix
CHAPTER 5 - ENTERPRISE INTEGRATION PATTERNS 34

CookBook
This document describes various recipes for working with Camel
• Bean Integration describes how to work with beans and Camel in a loosely coupled
way so that your beans do not have to depend on any Camel APIs
◦Annotation Based Expression Language binds expressions to method
parameters
◦Bean Binding defines which methods are invoked and how the Message is
converted into the parameters of the method when it is invoked
◦Bean Injection for injecting Camel related resources into your POJOs
◦Parameter Binding Annotations for extracting various headers, properties
or payloads from a Message
◦POJO Consuming for consuming and possibly routing messages from Camel
◦POJO Producing for producing camel messages from your POJOs
◦RecipientList Annotation for creating a Recipient List from a POJO method
◦Using Exchange Pattern Annotations describes how pattern annotations can
be used to change the behaviour of method invocations
• Hiding Middleware describes how to avoid your business logic being coupled to any
particular middleware APIs allowing you to easily switch from in JVM SEDA to JMS,
ActiveMQ, Hibernate, JPA, JDBC, iBATIS or JavaSpace etc.
• Visualisation describes how to visualise your Enterprise Integration Patterns to help
you understand your routing rules
• Business Activity Monitoring (BAM) for monitoring business processes across systems
• Extract Transform Load (ETL) to load data into systems or databases
• Testing for testing distributed and asynchronous systems using a messaging approach
◦Camel Test for creating test cases using a single Java class for all your
configuration and routing
◦Spring Testing uses Spring Test together with either XML or Java Config to
dependency inject your test classes
◦Guice uses Guice to dependency inject your test classes
• Templating is a great way to create service stubs to be able to test your system
without some back end system.
• Database for working with databases
• Parallel Processing and Ordering on how using parallel processing and SEDA or JMS
based load balancing can be achieved.
• Asynchronous Processing in Camel Routes.
• Implementing Virtual Topics on other JMS providers shows how to get the effect of
Virtual Topics and avoid issues with JMS durable topics
• Camel Transport for CXF describes how to put the Camel context into the CXF
transport layer.
35 COOKBOOK
• Fine Grained Control Over a Channel describes how to deliver a sequence of
messages over a single channel and then stopping any more messages being sent over
that channel. Typically used for sending data over a socket and then closing the
socket.
• EventNotifier to log details about all sent Exchanges shows how to let Camels
EventNotifier log all sent to endpoint events and how long time it took.
BEAN INTEGRATION
Camel supports the integration of beans and POJOs in a number of ways
Bean Binding
Whenever Camel invokes a bean method, either via the Bean component, Spring Remoting or
POJO Consuming then the Bean Binding mechanism is used to figure out what method to use
(if it is not explicit) and how to bind the Message to the parameters possibly using the
Parameter Binding Annotations
Annotations
If a bean is defined in Spring XML or scanned using the Spring 2.5 component scanning
mechanism and a <camelContext> is used or a CamelBeanPostProcessor then we process a
number of Camel annotations to do various things such as injecting resources or producing,
consuming or routing messages.
• POJO Consuming to consume and possibly route messages from Camel
• POJO Producing to make it easy to produce camel messages from your POJOs
• RecipientList Annotation for creating a Recipient List from a POJO method
• RoutingSlip Annotation for creating a Routing Slip for a POJO method
• Bean Injection to inject Camel related resources into your POJOs
• Using Exchange Pattern Annotations describes how the pattern annotations can be
used to change the behaviour of method invocations with Spring Remoting or POJO
Producing
Spring Remoting
We support a Spring Remoting provider which uses Camel as the underlying transport
mechanism. The nice thing about this approach is we can use any of the Camel transport
Components to communicate between beans. It also means we can use Content Based Router
and the other Enterprise Integration Patterns in between the beans; in particular we can use
Message Translator to be able to convert what the on-the-wire messages look like in addition
to adding various headers and so forth.
COOKBOOK 36
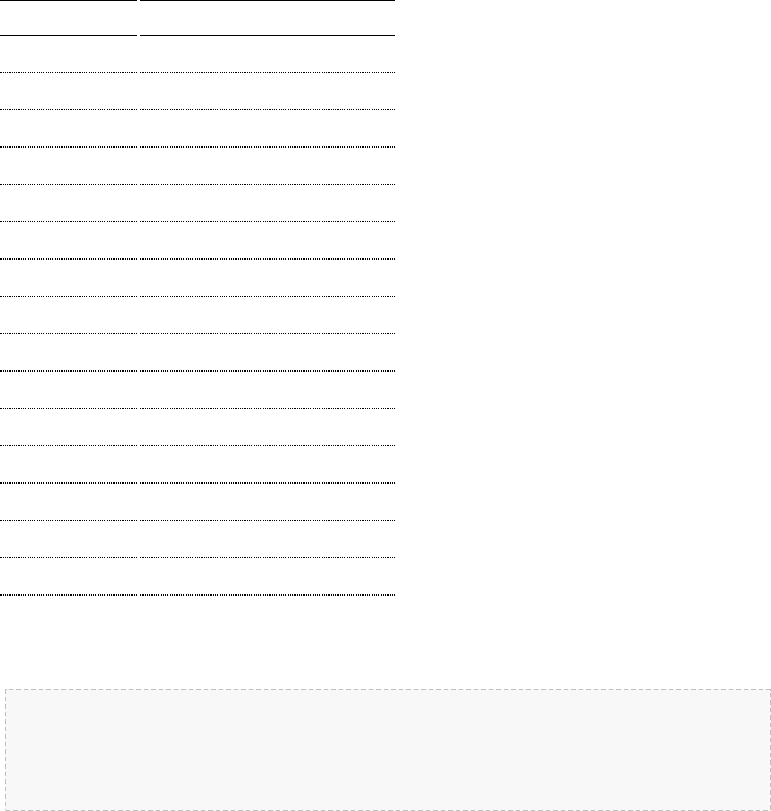
Bean Component
The Bean component supports the creation of a proxy via ProxyHelper to a Java interface;
which the implementation just sends a message containing a BeanInvocation to some Camel
endpoint.
Then there is a server side implementation which consumes a message and uses the Bean
Binding to bind the message to invoke a method passing in its parameters.
Annotation Based Expression Language
You can also use any of the Languages supported in Camel to bind expressions to method
parameters when using Bean Integration. For example you can use any of these annotations:
Annotation Description
@Bean Inject a Bean expression
@BeanShell Inject a BeanShell expression
@Constant Inject a Constant expression
@EL Inject an EL expression
@Groovy Inject a Groovy expression
@Header Inject a Header expression
@JavaScript Inject a JavaScript expression
@MVEL Inject a Mvel expression
@OGNL Inject an OGNL expression
@PHP Inject a PHP expression
@Python Inject a Python expression
@Ruby Inject a Ruby expression
@Simple Inject an Simple expression
@XPath Inject an XPath expression
@XQuery Inject an XQuery expression
Example:
public class Foo {
@MessageDriven(uri = "activemq:my.queue")
public void doSomething(@XPath("/foo/bar/text()")String correlationID, @Body
37 COOKBOOK

String body) {
// process the inbound message here
}
}
Advanced example using @Bean
And an example of using the the @Bean binding annotation, where you can use a Pojo where
you can do whatever java code you like:
public class Foo {
@MessageDriven(uri = "activemq:my.queue")
public void doSomething(@Bean("myCorrelationIdGenerator")String correlationID,
@Body String body) {
// process the inbound message here
}
}
And then we can have a spring bean with the id myCorrelationIdGenerator where we
can compute the id.
public class MyIdGenerator {
private UserManager userManager;
public String generate(@Header(name = "user")String user, @Body String payload)
throws Exception {
User user = userManager.lookupUser(user);
String userId = user.getPrimaryId();
String id = userId + generateHashCodeForPayload(payload);
return id;
}
}
The Pojo MyIdGenerator has one public method that accepts two parameters. However we
have also annotated this one with the @Header and @Body annotation to help Camel know
what to bind here from the Message from the Exchange being processed.
Of course this could be simplified a lot if you for instance just have a simple id generator.
But we wanted to demonstrate that you can use the Bean Binding annotations anywhere.
public class MySimpleIdGenerator {
public static int generate() {
// generate a unique id
return 123;
COOKBOOK 38
}
}
And finally we just need to remember to have our bean registered in the Spring Registry:
<bean id="myCorrelationIdGenerator" class="com.mycompany.MySimpleIdGenerator"/>
Example using Groovy
In this example we have an Exchange that has a User object stored in the in header. This User
object has methods to get some user information. We want to use Groovy to inject an
expression that extracts and concats the fullname of the user into the fullName parameter.
public void doSomething(@Groovy("$request.header['user'].firstName
$request.header['user'].familyName) String fullName, @Body String body) {
// process the inbound message here
}
Groovy supports GStrings that is like a template where we can insert $ placeholders that will
be evaluated by Groovy.
Bean Binding
The Bean Binding in Camel defines both which methods are invoked and also how the Message
is converted into the parameters of the method when it is invoked.
Choosing the method to invoke
The binding of a Camel Message to a bean method call can occur in different ways, order if
importance:
• if the message contains the header CamelBeanMethodName
(org.apache.camel.MethodName in Camel 1.x) then that method is invoked,
converting the body to whatever the argument is to the method
• the method name can be specified explicitly in the DSL or when using POJO
Consuming
•Camel 2.0: if the bean has a method that is marked with @Handler annotation
then that method is selected
• if the bean can be converted to a Processor using the Type Converter mechanism
then this is used to process the message. This mechanism is used by the ActiveMQ
component to allow any JMS MessageListener to be invoked directly by Camel
39 COOKBOOK

without having to write any integration glue code. You can use the same mechanism
to integrate Camel into any other messaging/remoting frameworks.
• if the body of the message can be converted to a BeanInvocation (the default payload
used by the ProxyHelper) - then that its used to invoke the method and pass the
arguments
• otherwise the type of the method body is used to try find a method which matches;
an error is thrown if a single method cannot be chosen unambiguously.
• you can also use Exchange as the parameter itself, but then the return type must be
void.
In case where Camel will not be able to choose a method to invoke an
AmbiguousMethodCallException is thrown.
By default the return value is set on the outbound message body.
Parameter binding
When a method have been chosen to be invoked Camel will bind to the parameters of the
method.
The following Camel specific types is automatic binded:
▪org.apache.camel.Exchange
▪org.apache.camel.Message
▪Camel 2.0: org.apache.camel.CamelContext
▪org.apache.camel.TypeConverter
▪Camel 2.0: org.apache.camel.spi.Registry
▪java.lang.Exception
So if you declare any of the given type above they will be provided by Camel. A note on the
Exception is that it will bind to the caught exception of the Exchange. So its often usable if
you use a Pojo to handle a given using using eg an onException route.
What is most interresting is that Camel will also try to bind the body of the Exchange to the
first parameter of the method signature (albeit not of any of the types above). So if we for
instance declare e parameter as: String body then Camel will bind the IN body to this type.
Camel will also automatic type convert to the given type declared.
Okay lets show some examples.
Below is just a simple method with a body binding. Camel will bind the IN body to the body
parameter and convert it to a String type.
public String doSomething(String body)
And in this sample we got one of the automatic binded type as well, for instance the
Registry that we can use to lookup beans.
COOKBOOK 40

public String doSomething(String body, Registry registry)
And we can also use Exchange as well:
public String doSomething(String body, Exchange exchange)
You can have multiple types as well
public String doSomething(String body, Exchange exchange, TypeConverter converter)
And imagine you use a Pojo to handle a given custom exception InvalidOrderException
then we can bind that as well:
Notice we can bind to it even if we use a sub type of java.lang.Exception as Camel still
knows its an exception and thus can bind the caused exception (if any exists).
public String badOrder(String body, InvalidOrderException invalid)
So what about headers and other stuff? Well now it gets a bit tricky so we can use annotations
to help us. See next section for details.
Binding Annotations
You can use the Parameter Binding Annotations to customize how parameter values are
created from the Message
Examples
For example a Bean such as:
public class Bar {
public String doSomething(String body) {
// process the in body and return whatever you want
return "Bye World";
}
Or the Exchange example. Notice that the return type must be void when there is only a
single parameter:
public class Bar {
public void doSomething(Exchange exchange) {
41 COOKBOOK

// process the exchange
exchange.getIn().setBody("Bye World");
}
@Handler
Available as of Camel 2.0
You can mark a method in your bean with the @Handler annotation to indicate that this
method should be used for Bean Binding.
This has the advantage as you do not have to specify the method name in the Camel route. And
thus you do not run into problems when you rename the method name using an IDE that don't
find all references.
public class Bar {
@Handler
public String doSomething(String body) {
// process the in body and return whatever you want
return "Bye World";
}
POJO consuming
For example you could use POJO Consuming to write a bean like this
public class Foo {
@Consume(uri = "activemq:my.queue")
public void doSomething(String body) {
// process the inbound message here
}
}
Here Camel with subscribe to an ActiveMQ queue, then convert the message payload to a
String (so dealing with TextMessage, ObjectMessage and BytesMessage in JMS), then process
this method.
Bean Injection
We support the injection of various resources using @EndpointInject. This can be used to
inject
COOKBOOK 42
@Consume requires camel-spring
Using the @Consume annotations requires camel-spring that uses the
org.apache.camel.spring.CamelBeanPostProcessor to perform the
setup for this consumer and the needed bean bindings.
@MessageDriven is @deprecated
The @MessageDriven has been replaced with @Consume in Camel 1.5.0 or newer.
Its now marked as @deprecated and will be removed in Camel 2.0.
• Endpoint instances which can be used for testing when used with Mock endpoints; see
the Spring Testing for an example.
• ProducerTemplate instances for POJO Producing
• client side proxies for POJO Producing which is a simple approach to Spring
Remoting
Parameter Binding Annotations
Annotations can be used to define an Expression or to extract various headers, properties or
payloads from a Message when invoking a bean method (see Bean Integration for more detail of
how to invoke bean methods) together with being useful to help disambiguate which method to
invoke.
If no annotations are used then Camel assumes that a single parameter is the body of the
message. Camel will then use the Type Converter mechanism to convert from the expression
value to the actual type of the parameter.
The core annotations are as follows
Annotation Meaning Parameter
@Body To bind to an inbound message body
@ExchangeException To bind to an Exception set on the exchange
(Camel 2.0)
@Header To bind to an inbound message header String name
of the header
@Headers To bind to the Map of the inbound message
headers
@OutHeaders To bind to the Map of the outbound message
headers
43 COOKBOOK

camel-core
The annotations below are all part of camel-core and thus does not require
camel-spring or Spring. These annotations can be used with the Bean
component or when invoking beans in the DSL
@Property To bind to a named property on the exchange
String name
of the
property
@Properties To bind to the property map on the exchange
@Handler
Camel 2.0: Not part as a type parameter but
stated in this table anyway to spread the good word
that we have this annotation in Camel now. See
more at Bean Binding.
The follow annotations @Headers,@OutHeaders and @Properties binds to the backing
java.util.Map so you can alter the content of these maps directly, for instance using the
put method to add a new entry. See the OrderService class at Exception Clause for such an
example.
Example
In this example below we have a @Consume consumer (like message driven) that consumes
JMS messages from the activemq queue. We use the @Header and @Body parameter binding
annotations to bind from the JMSMessage to the method parameters.
public class Foo {
@Consume(uri = "activemq:my.queue")
public void doSomething(@Header(name = "JMSCorrelationID")String correlationID,
@Body String body) {
// process the inbound message here
}
}
In the above Camel will extract the value of Message.getJMSCorrelationID(), then using the
Type Converter to adapt the value to the type of the parameter if required - it will inject the
parameter value for the correlationID parameter. Then the payload of the message will be
converted to a String and injected into the body parameter.
You don't need to use the @Consume annotation; as you could use the Camel DSL to
route to the beans method
COOKBOOK 44
Using the DSL to invoke the bean method
Here is another example which does not use POJO Consuming annotations but instead uses
the DSL to route messages to the bean method
public class Foo {
public void doSomething(@Header(name = "JMSCorrelationID")String correlationID,
@Body String body) {
// process the inbound message here
}
}
The routing DSL then looks like this
from("activemq:someQueue").
to("bean:myBean");
Here myBean would be looked up in the Registry (such as JNDI or the Spring
ApplicationContext), then the body of the message would be used to try figure out what
method to call.
If you want to be explicit you can use
from("activemq:someQueue").
to("bean:myBean?methodName=doSomething");
And here we have a nifty example for you to show some great power in Camel. You can mix
and match the annotations with the normal parameters, so we can have this example with
annotations and the Exchange also:
public void doSomething(@Header(name = "user")String user, @Body String body,
Exchange exchange) {
exchange.getIn().setBody(body + "MyBean");
}
Annotation Based Expression Language
You can also use any of the Languages supported in Camel to bind expressions to method
parameters when using Bean Integration. For example you can use any of these annotations:
Annotation Description
@Bean Inject a Bean expression
@BeanShell Inject a BeanShell expression
@Constant Inject a Constant expression
45 COOKBOOK
@EL Inject an EL expression
@Groovy Inject a Groovy expression
@Header Inject a Header expression
@JavaScript Inject a JavaScript expression
@MVEL Inject a Mvel expression
@OGNL Inject an OGNL expression
@PHP Inject a PHP expression
@Python Inject a Python expression
@Ruby Inject a Ruby expression
@Simple Inject an Simple expression
@XPath Inject an XPath expression
@XQuery Inject an XQuery expression
Example:
public class Foo {
@MessageDriven(uri = "activemq:my.queue")
public void doSomething(@XPath("/foo/bar/text()")String correlationID, @Body
String body) {
// process the inbound message here
}
}
Advanced example using @Bean
And an example of using the the @Bean binding annotation, where you can use a Pojo where
you can do whatever java code you like:
public class Foo {
@MessageDriven(uri = "activemq:my.queue")
public void doSomething(@Bean("myCorrelationIdGenerator")String correlationID,
@Body String body) {
// process the inbound message here
}
}
COOKBOOK 46

And then we can have a spring bean with the id myCorrelationIdGenerator where we
can compute the id.
public class MyIdGenerator {
private UserManager userManager;
public String generate(@Header(name = "user")String user, @Body String payload)
throws Exception {
User user = userManager.lookupUser(user);
String userId = user.getPrimaryId();
String id = userId + generateHashCodeForPayload(payload);
return id;
}
}
The Pojo MyIdGenerator has one public method that accepts two parameters. However we
have also annotated this one with the @Header and @Body annotation to help Camel know
what to bind here from the Message from the Exchange being processed.
Of course this could be simplified a lot if you for instance just have a simple id generator.
But we wanted to demonstrate that you can use the Bean Binding annotations anywhere.
public class MySimpleIdGenerator {
public static int generate() {
// generate a unique id
return 123;
}
}
And finally we just need to remember to have our bean registered in the Spring Registry:
<bean id="myCorrelationIdGenerator" class="com.mycompany.MySimpleIdGenerator"/>
Example using Groovy
In this example we have an Exchange that has a User object stored in the in header. This User
object has methods to get some user information. We want to use Groovy to inject an
expression that extracts and concats the fullname of the user into the fullName parameter.
public void doSomething(@Groovy("$request.header['user'].firstName
$request.header['user'].familyName) String fullName, @Body String body) {
// process the inbound message here
}
47 COOKBOOK
Groovy supports GStrings that is like a template where we can insert $ placeholders that will
be evaluated by Groovy.
@MessageDriven or @Consume
To consume a message you use either the @MessageDriven annotation or from 1.5.0 the
@Consume annotation to mark a particular method of a bean as being a consumer method.
The uri of the annotation defines the Camel Endpoint to consume from.
e.g. lets invoke the onCheese() method with the String body of the inbound JMS message
from ActiveMQ on the cheese queue; this will use the Type Converter to convert the JMS
ObjectMessage or BytesMessage to a String - or just use a TextMessage from JMS
public class Foo {
@Consume(uri="activemq:cheese")
public void onCheese(String name) {
...
}
}
The Bean Binding is then used to convert the inbound Message to the parameter list used to
invoke the method .
What this does is basically create a route that looks kinda like this
from(uri).bean(theBean, "methodName");
Using context option to apply only a certain CamelContext
Available as of Camel 2.0
See the warning above.
You can use the context option to specify which CamelContext the consumer should
only apply for. For example:
@Consume(uri="activemq:cheese", context="camel-1")
public void onCheese(String name) {
The consumer above will only be created for the CamelContext that have the context id =
camel-1. You set this id in the XML tag:
<camelContext id="camel-1" ...>
COOKBOOK 48
@MessageDriven is @deprecated
@MessageDriven is deprecated in Camel 1.x. You should use @Consume instead.
Its removed in Camel 2.0.
When using more than one CamelContext
When you use more than 1 CamelContext you might end up with each of them
creating a POJO Consuming.
In Camel 2.0 there is a new option on @Consume that allows you to specify
which CamelContext id/name you want it to apply for.
Using an explicit route
If you want to invoke a bean method from many different endpoints or within different complex
routes in different circumstances you can just use the normal routing DSL or the Spring XML
configuration file.
For example
from(uri).beanRef("myBean","methodName");
which will then look up in the Registry and find the bean and invoke the given bean name. (You
can omit the method name and have Camel figure out the right method based on the method
annotations and body type).
Use the Bean endpoint
You can always use the bean endpoint
from(uri).to("bean:myBean?method=methodName");
Which approach to use?
Using the @MessageDriven/@Consume annotations are simpler when you are creating a
simple route with a single well defined input URI.
However if you require more complex routes or the same bean method needs to be
invoked from many places then please use the routing DSL as shown above.
There are two different ways to send messages to any Camel Endpoint from a POJO
49 COOKBOOK

@EndpointInject
To allow sending of messages from POJOs you can use @EndpointInject() annotation. This will
inject either a ProducerTemplate or CamelTemplate so that the bean can send message
exchanges.
e.g. lets send a message to the foo.bar queue in ActiveMQ at some point
public class Foo {
@EndpointInject(uri="activemq:foo.bar")
ProducerTemplate producer;
public void doSomething() {
if (whatever) {
producer.sendBody("<hello>world!</hello>");
}
}
}
The downside of this is that your code is now dependent on a Camel API, the
ProducerTemplate. The next section describes how to remove this
Hiding the Camel APIs from your code using @Produce
We recommend Hiding Middleware APIs from your application code so the next option might
be more suitable.
You can add the @Produce annotation to an injection point (a field or property setter) using a
ProducerTemplate or using some interface you use in your business logic. e.g.
public interface MyListener {
String sayHello(String name);
}
public class MyBean {
@Produce(uri = "activemq:foo")
protected MyListener producer;
public void doSomething() {
// lets send a message
String response = producer.sayHello("James");
}
}
Here Camel will automatically inject a smart client side proxy at the @Produce annotation - an
instance of the MyListener instance. When we invoke methods on this interface the method call
is turned into an object and using the Camel Spring Remoting mechanism it is sent to the
endpoint - in this case the ActiveMQ endpoint to queue foo; then the caller blocks for a
response.
COOKBOOK 50

If you want to make asynchronous message sends then use an @InOnly annotation on the
injection point.
@RECIPIENTLIST ANNOTATION
As of 1.5.0 we now support the use of @RecipientList on a bean method to easily create a
dynamic Recipient List using a Java method.
Simple Example using @Consume
package com.acme.foo;
public class RouterBean {
@Consume(uri = "activemq:foo")
@RecipientList
public String[] route(String body) {
return new String[]{"activemq:bar","activemq:whatnot"};
}
}
For example if the above bean is configured in Spring when using a <camelContext>
element as follows
<?xml version="1.0" encoding="UTF-8"?>
<beans xmlns="http://www.springframework.org/schema/beans"
xmlns:xsi="http://www.w3.org/2001/XMLSchema-instance"
xsi:schemaLocation="
http://www.springframework.org/schema/beans http://www.springframework.org/
schema/beans/spring-beans-2.5.xsd
http://activemq.apache.org/camel/schema/spring http://activemq.apache.org/camel/
schema/spring/camel-spring.xsd
">
<camelContext xmlns="http://activemq.apache.org/camel/schema/spring"/>
<bean id="myRecipientList" class="com.acme.foo.RouterBean"/>
</beans>
then a route will be created consuming from the foo queue on the ActiveMQ component
which when a message is received the message will be forwarded to the endpoints defined by
the result of this method call - namely the bar and whatnot queues.
51 COOKBOOK

How it works
The return value of the @RecipientList method is converted to either a java.util.Collection /
java.util.Iterator or array of objects where each element is converted to an Endpoint or a String,
or if you are only going to route to a single endpoint then just return either an Endpoint object
or an object that can be converted to a String. So the following methods are all valid
@RecipientList
public String[] route(String body) { ... }
@RecipientList
public List<String> route(String body) { ... }
@RecipientList
public Endpoint route(String body) { ... }
@RecipientList
public Endpoint[] route(String body) { ... }
@RecipientList
public Collection<Endpoint> route(String body) { ... }
@RecipientList
public URI route(String body) { ... }
@RecipientList
public URI[] route(String body) { ... }
Then for each endpoint or URI the message is forwarded a separate copy to that endpoint.
You can then use whatever Java code you wish to figure out what endpoints to route to; for
example you can use the Bean Binding annotations to inject parts of the message body or
headers or use Expression values on the message.
More Complex Example Using DSL
In this example we will use more complex Bean Binding, plus we will use a separate route to
invoke the Recipient List
public class RouterBean2 {
@RecipientList
public String route(@Header("customerID")String custID String body) {
if (custID == null)return null;
return "activemq:Customers.Orders." + custID;
}
}
public class MyRouteBuilder extends RouteBuilder {
protected void configure() {
from("activemq:Orders.Incoming").recipientList(bean("myRouterBean","route"));
COOKBOOK 52

}
}
Notice how we are injecting some headers or expressions and using them to determine the
recipients using Recipient List EIP.
See the Bean Integration for more details.
USING EXCHANGE PATTERN ANNOTATIONS
When working with POJO Producing or Spring Remoting you invoke methods which typically
by default are InOut for Request Reply. That is there is an In message and an Out for the result.
Typically invoking this operation will be synchronous, the caller will block until the server
returns a result.
Camel has flexible Exchange Pattern support - so you can also support the Event Message
pattern to use InOnly for asynchronous or one way operations. These are often called 'fire and
forget' like sending a JMS message but not waiting for any response.
From 1.5 onwards Camel supports annotations for specifying the message exchange pattern
on regular Java methods, classes or interfaces.
Specifying InOnly methods
Typically the default InOut is what most folks want but you can customize to use InOnly using
an annotation.
public interface Foo {
Object someInOutMethod(String input);
String anotherInOutMethod(Cheese input);
@InOnly
void someInOnlyMethod(Document input);
}
The above code shows three methods on an interface; the first two use the default InOut
mechanism but the someInOnlyMethod uses the InOnly annotation to specify it as being a
oneway method call.
Class level annotations
You can also use class level annotations to default all methods in an interface to some pattern
such as
@InOnly
public interface Foo {
53 COOKBOOK

void someInOnlyMethod(Document input);
void anotherInOnlyMethod(String input);
}
Annotations will also be detected on base classes or interfaces. So for example if you created a
client side proxy for
public class MyFoo implements Foo {
...
}
Then the methods inherited from Foo would be InOnly.
Overloading a class level annotation
You can overload a class level annotation on specific methods. A common use case for this is if
you have a class or interface with many InOnly methods but you want to just annote one or
two methods as InOut
@InOnly
public interface Foo {
void someInOnlyMethod(Document input);
void anotherInOnlyMethod(String input);
@InOut
String someInOutMethod(String input);
}
In the above Foo interface the someInOutMethod will be InOut
Using your own annotations
You might want to create your own annotations to represent a group of different bits of
metadata; such as combining synchrony, concurrency and transaction behaviour.
So you could annotate your annotation with the @Pattern annotation to default the
exchange pattern you wish to use.
For example lets say we want to create our own annotation called @MyAsyncService
@Retention(RetentionPolicy.RUNTIME)
@Target({ElementType.TYPE, ElementType.METHOD})
// lets add the message exchange pattern to it
@Pattern(ExchangePattern.InOnly)
// lets add some other annotations - maybe transaction behaviour?
COOKBOOK 54
public @interface MyAsyncService {
}
Now we can use this annotation and Camel will figure out the correct exchange pattern...
public interface Foo {
void someInOnlyMethod(Document input);
void anotherInOnlyMethod(String input);
@MyAsyncService
String someInOutMethod(String input);
}
When writing software these days, its important to try and decouple as much middleware code
from your business logic as possible.
This provides a number of benefits...
• you can choose the right middleware solution for your deployment and switch at any
time
• you don't have to spend a large amount of time learning the specifics of any particular
technology, whether its JMS or JavaSpace or Hibernate or JPA or iBATIS whatever
For example if you want to implement some kind of message passing, remoting, reliable load
balancing or asynchronous processing in your application we recommend you use Camel
annotations to bind your services and business logic to Camel Components which means you
can then easily switch between things like
• in JVM messaging with SEDA
• using JMS via ActiveMQ or other JMS providers for reliable load balancing, grid or
publish and subscribe
• for low volume, but easier administration since you're probably already using a
database you could use
◦Hibernate or JPA to use an entity bean / table as a queue
◦iBATIS to work with SQL
◦JDBC for raw SQL access
• use JavaSpace
How to decouple from middleware APIs
The best approach when using remoting is to use Spring Remoting which can then use any
messaging or remoting technology under the covers. When using Camel's implementation you
can then use any of the Camel Components along with any of the Enterprise Integration
Patterns.
55 COOKBOOK
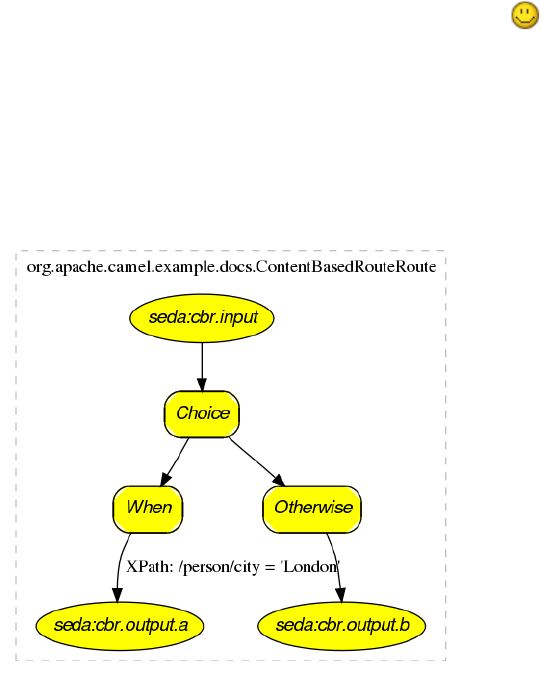
Another approach is to bind Java beans to Camel endpoints via the Bean Integration. For
example using POJO Consuming and POJO Producing you can avoid using any Camel APIs to
decouple your code both from middleware APIs and Camel APIs!
VISUALISATION
Camel supports the visualisation of your Enterprise Integration Patterns using the GraphViz
DOT files which can either be rendered directly via a suitable GraphViz tool or turned into
HTML, PNG or SVG files via the Camel Maven Plugin.
Here is a typical example of the kind of thing we can generate
If you click on the actual generated htmlyou will see that you can navigate from an EIP node
to its pattern page, along with getting hover-over tool tips ec.
How to generate
See Camel Dot Maven Goal or the other maven goals Camel Maven Plugin
For OS X users
If you are using OS X then you can open the DOT file using graphviz which will then
automatically re-render if it changes, so you end up with a real time graphical representation of
the topic and queue hierarchies!
COOKBOOK 56

Also if you want to edit the layout a little before adding it to a wiki to distribute to your
team, open the DOT file with OmniGraffle then just edit away
BUSINESS ACTIVITY MONITORING
The Camel BAM module provides a Business Activity Monitoring (BAM) framework for
testing business processes across multiple message exchanges on different Endpoint instances.
For example if you have a simple system which you submit Purchase Orders into system A
and then receive Invoices from system B, you might want to test that for a specific Purchase
Order you receive a matching Invoice from system B within a specific time period.
How Camel BAM Works
What Camel BAM does is use a Correlation Identifier on an input message to determine which
Process Instance a message belongs to. The process instance is an entity bean which can maintain
state for each Activity (where an activity typically maps to a single endpoint, such as the receipt
of Purchase orders, or the receipt of Invoices).
You can then add rules which are fired when a message is received on any activity such as to
set time expectations, or to perform real time reconciliation of values across activities etc.
Simple Example
The following example shows how to perform some time based rules on a simple business
process of 2 activities A and B (which maps to the Purchase Order and Invoice example above).
If you want to experiment with this scenario you could edit the Test Case which defines the
activities and rules, then tests that they work.
return new ProcessBuilder(jpaTemplate, transactionTemplate) {
public void configure() throws Exception {
// lets define some activities, correlating on an XPath on the message bodies
ActivityBuilder a = activity("seda:a").name("a")
.correlate(xpath("/hello/@id"));
ActivityBuilder b = activity("seda:b").name("b")
.correlate(xpath("/hello/@id"));
// now lets add some rules
b.starts().after(a.completes())
.expectWithin(seconds(1))
.errorIfOver(seconds(errorTimeout)).to("mock:overdue");
}
};
57 COOKBOOK
As you can see in the above example, we define two activities first, then we define rules on
when we expect the activities on an individual process instance to complete by along with the
time at which we should assume there is an error. The ProcessBuilder is-a RouteBuilder and
can be added to any CamelContext
Complete Example
For a complete example please see the BAM Example which is part of the standard Camel
Examples
Use Cases
In the world of finance a common requirement is tracking financial trades. Often a trader will
submit a Front Office Trade which then flows through the Middle Office and Back Office
through various systems to settle the trade so that money is exchanged. You may wish to add
tests that front and back office trades match up within a time period; if they don't match or a
back office trade does not arrive within a required amount of time, you might want to fire off
an alarm.
EXTRACT TRANSFORM LOAD (ETL)
The ETL (Extract, Transform, Load) is a mechanism for loading data into systems or databases
using some kind of Data Format from a variety of sources; often files then using Pipes and
Filters, Message Translator and possible other Enterprise Integration Patterns.
So you could query data from various Camel Components such as File, HTTP or JPA,
perform multiple patterns such as Splitter or Message Translator then send the messages to
some other Component.
To show how this all fits together, try the ETL Example
MOCK COMPONENT
Testing of distributed and asynchronous processing is notoriously difficult. The Mock, Test and
DataSet endpoints work great with the Camel Testing Framework to simplify your unit and
integration testing using Enterprise Integration Patterns and Camel's large range of Components
together with the powerful Bean Integration.
The Mock component provides a powerful declarative testing mechanism, which is similar to
jMock in that it allows declarative expectations to be created on any Mock endpoint before a
test begins. Then the test is run, which typically fires messages to one or more endpoints, and
finally the expectations can be asserted in a test case to ensure the system worked as expected.
This allows you to test various things like:
• The correct number of messages are received on each endpoint,
• The correct payloads are received, in the right order,
COOKBOOK 58
• Messages arrive on an endpoint in order, using some Expression to create an order
testing function,
• Messages arrive match some kind of Predicate such as that specific headers have
certain values, or that parts of the messages match some predicate, such as by
evaluating an XPath or XQuery Expression.
Note that there is also the Test endpoint which is a Mock endpoint, but which uses a second
endpoint to provide the list of expected message bodies and automatically sets up the Mock
endpoint assertions. In other words, it's a Mock endpoint that automatically sets up its
assertions from some sample messages in a File or database, for example.
URI format
mock:someName[?options]
Where someName can be any string that uniquely identifies the endpoint.
You can append query options to the URI in the following format,
?option=value&option=value&...
Options
Option Default Description
reportGroup null A size to use a throughput logger for reporting
Simple Example
Here's a simple example of Mock endpoint in use. First, the endpoint is resolved on the
context. Then we set an expectation, and then, after the test has run, we assert that our
expectations have been met.
MockEndpoint resultEndpoint = context.resolveEndpoint("mock:foo", MockEndpoint.class);
resultEndpoint.expectedMessageCount(2);
// send some messages
...
// now lets assert that the mock:foo endpoint received 2 messages
resultEndpoint.assertIsSatisfied();
You typically always call the assertIsSatisfied() method to test that the expectations were met
after running a test.
Camel will by default wait 20 seconds when the assertIsSatisfied() is invoked. This
can be configured by setting the setResultWaitTime(millis) method.
59 COOKBOOK
Setting expectations
You can see from the javadoc of MockEndpoint the various helper methods you can use to set
expectations. The main methods are as follows:
Method Description
expectedMessageCount(int) To define the expected message count on the
endpoint.
expectedMinimumMessageCount(int) To define the minimum number of expected
messages on the endpoint.
expectedBodiesReceived(...) To define the expected bodies that should be
received (in order).
expectedHeaderReceived(...) To define the expected header that should be
received
expectsAscending(Expression)
To add an expectation that messages are received in
order, using the given Expression to compare
messages.
expectsDescending(Expression)
To add an expectation that messages are received in
order, using the given Expression to compare
messages.
expectsNoDuplicates(Expression)
To add an expectation that no duplicate messages
are received; using an Expression to calculate a
unique identifier for each message. This could be
something like the JMSMessageID if using JMS, or
some unique reference number within the message.
Here's another example:
resultEndpoint.expectedBodiesReceived("firstMessageBody","secondMessageBody",
"thirdMessageBody");
Adding expectations to specific messages
In addition, you can use the message(int messageIndex) method to add assertions about a
specific message that is received.
For example, to add expectations of the headers or body of the first message (using zero-
based indexing like java.util.List), you can use the following code:
resultEndpoint.message(0).header("foo").isEqualTo("bar");
COOKBOOK 60
There are some examples of the Mock endpoint in use in the camel-core processor tests.
A Spring Example
First, here's the spring.xml file
<camelContext xmlns="http://camel.apache.org/schema/spring">
<route>
<from uri="file:src/test/data?noop=true"/>
<filter>
<xpath>/person/city = 'London'</xpath>
<to uri="mock:matched"/>
</filter>
</route>
</camelContext>
<bean id="myBean" class="org.apache.camel.spring.mock.MyAssertions" scope="singleton"/>
As you can see, it defines a simple routing rule which consumes messages from the local src/
test/data directory. The noop flag just means not to delete or move the file after its been
processed.
Also note we instantiate a bean called myBean, here is the source of the MyAssertions
bean.
public class MyAssertions implements InitializingBean {
@EndpointInject(uri = "mock:matched")
private MockEndpoint matched;
@EndpointInject(uri = "mock:notMatched")
private MockEndpoint notMatched;
public void afterPropertiesSet() throws Exception {
// lets add some expectations
matched.expectedMessageCount(1);
notMatched.expectedMessageCount(0);
}
public void assertEndpointsValid() throws Exception {
// now lets perform some assertions that the test worked as we expect
Assert.assertNotNull("Should have a matched endpoint", matched);
Assert.assertNotNull("Should have a notMatched endpoint", notMatched);
MockEndpoint.assertIsSatisfied(matched, notMatched);
}
}
The bean is injected with a bunch of Mock endpoints using the @EndpointInject annotation, it
then sets a bunch of expectations on startup (using Spring's InitializingBean interface
and afterPropertiesSet() method) before the CamelContext starts up.
61 COOKBOOK

Then in our test case (which could be JUnit or TesNG) we lookup myBean in Spring (or
have it injected into our test) and then invoke the assertEndpointsValid() method on
it to verify that the mock endpoints have their assertions met. You could then inspect the
message exchanges that were delivered to any of the endpoints using the
getReceivedExchanges() method on the Mock endpoint and perform further assertions or
debug logging.
Here is the actual JUnit test case we use.
See Also
• Configuring Camel
• Component
• Endpoint
• Getting Started
• Spring Testing
TESTING
Testing is a crucial activity in any piece of software development or integration. Typically Camel
Riders use various different technologies wired together in a variety of patterns with different
expression languages together with different forms of Bean Integration and Dependency
Injection so its very easy for things to go wrong! . Testing is the crucial weapon to ensure
that things work as you would expect.
Camel is a Java library so you can easily wire up tests in whatever unit testing framework
you use (JUnit 3.x, 4.x or TestNG). However the Camel project has tried to make the testing
of Camel as easy and powerful as possible so we have introduced the following features.
Testing mechanisms
The following mechanisms are supported
Name Description
Camel
Test
is a library letting you easily create Camel test cases using a single Java class for all
your configuration and routing without using Spring or Guice for Dependency
Injection which does not require an in depth knowledge of Spring+SpringTest or
Guice
Spring
Testing
uses Spring Test together with either XML or Java Config to dependency inject
your test classes
Guice uses Guice to dependency inject your test classes
In all approaches the test classes look pretty much the same in that they all reuse the Camel
binding and injection annotations.
COOKBOOK 62

Camel Test Example
Here is the Camel Test example.
public class FilterTest extends CamelTestSupport {
@EndpointInject(uri = "mock:result")
protected MockEndpoint resultEndpoint;
@Produce(uri = "direct:start")
protected ProducerTemplate template;
public void testSendMatchingMessage() throws Exception {
String expectedBody = "<matched/>";
resultEndpoint.expectedBodiesReceived(expectedBody);
template.sendBodyAndHeader(expectedBody, "foo","bar");
resultEndpoint.assertIsSatisfied();
}
public void testSendNotMatchingMessage() throws Exception {
resultEndpoint.expectedMessageCount(0);
template.sendBodyAndHeader("<notMatched/>","foo","notMatchedHeaderValue");
resultEndpoint.assertIsSatisfied();
}
@Override
protected RouteBuilder createRouteBuilder() {
return new RouteBuilder() {
public void configure() {
from("direct:start").filter(header("foo").isEqualTo("bar")).to("mock:result");
}
};
}
}
Notice how it derives from the Camel helper class CamelTestSupport but has no Spring or
Guice dependency injection configuration but instead overrides the createRouteBuilder()
method.
Spring Test with XML Config Example
Here is the Spring Testing example using XML Config.
63 COOKBOOK

@ContextConfiguration
public class FilterTest extends AbstractJUnit38SpringContextTests {
@EndpointInject(uri = "mock:result")
protected MockEndpoint resultEndpoint;
@Produce(uri = "direct:start")
protected ProducerTemplate template;
@DirtiesContext
public void testSendMatchingMessage() throws Exception {
String expectedBody = "<matched/>";
resultEndpoint.expectedBodiesReceived(expectedBody);
template.sendBodyAndHeader(expectedBody, "foo","bar");
resultEndpoint.assertIsSatisfied();
}
@DirtiesContext
public void testSendNotMatchingMessage() throws Exception {
resultEndpoint.expectedMessageCount(0);
template.sendBodyAndHeader("<notMatched/>","foo","notMatchedHeaderValue");
resultEndpoint.assertIsSatisfied();
}
}
Notice that we use @DirtiesContext on the test methods to force Spring Testing to
automatically reload the CamelContext after each test method - this ensures that the tests
don't clash with each other (e.g. one test method sending to an endpoint that is then reused in
another test method).
Also notice the use of @ContextConfiguration to indicate that by default we should
look for the FilterTest-context.xml on the classpath to configure the test case which looks like
this
<beans xmlns="http://www.springframework.org/schema/beans"
xmlns:xsi="http://www.w3.org/2001/XMLSchema-instance"
xmlns:context="http://www.springframework.org/schema/context"
xsi:schemaLocation="
http://www.springframework.org/schema/beans http://www.springframework.org/
schema/beans/spring-beans-2.5.xsd
http://camel.apache.org/schema/spring http://camel.apache.org/schema/spring/
camel-spring.xsd
">
<camelContext xmlns="http://camel.apache.org/schema/spring">
<route>
<from uri="direct:start"/>
COOKBOOK 64

<filter>
<xpath>$foo = 'bar'</xpath>
<to uri="mock:result"/>
</filter>
</route>
</camelContext>
</beans>
Spring Test with Java Config Example
Here is the Spring Testing example using Java Config. For more information see Spring Java
Config.
@ContextConfiguration(
locations =
"org.apache.camel.spring.javaconfig.patterns.FilterTest$ContextConfig",
loader = JavaConfigContextLoader.class)
public class FilterTest extends AbstractJUnit4SpringContextTests {
@EndpointInject(uri = "mock:result")
protected MockEndpoint resultEndpoint;
@Produce(uri = "direct:start")
protected ProducerTemplate template;
@DirtiesContext
@Test
public void testSendMatchingMessage() throws Exception {
String expectedBody = "<matched/>";
resultEndpoint.expectedBodiesReceived(expectedBody);
template.sendBodyAndHeader(expectedBody, "foo","bar");
resultEndpoint.assertIsSatisfied();
}
@DirtiesContext
@Test
public void testSendNotMatchingMessage() throws Exception {
resultEndpoint.expectedMessageCount(0);
template.sendBodyAndHeader("<notMatched/>","foo","notMatchedHeaderValue");
resultEndpoint.assertIsSatisfied();
}
@Configuration
public static class ContextConfig extends SingleRouteCamelConfiguration {
65 COOKBOOK
@Bean
public RouteBuilder route() {
return new RouteBuilder() {
public void configure() {
from("direct:start").filter(header("foo").isEqualTo("bar")).to("mock:result");
}
};
}
}
}
This is similar to the XML Config example above except that there is no XML file and instead
the nested ContextConfig class does all of the configuration; so your entire test case is
contained in a single Java class. We currently have to reference by class name this class in the
@ContextConfiguration which is a bit ugly. Please vote for SJC-238 to address this and
make Spring Test work more cleanly with Spring JavaConfig.
Its totally optional but for the ContextConfig implementation we derive from
SingleRouteCamelConfiguration which is a helper Spring Java Config class which will
configure the CamelContext for us and then register the RouteBuilder we create.
Testing endpoints
Camel provides a number of endpoints which can make testing easier.
Name Description
DataSet
For load & soak testing this endpoint provides a way to create huge numbers of
messages for sending to Components and asserting that they are consumed
correctly
Mock For testing routes and mediation rules using mocks and allowing assertions to be
added to an endpoint
Test Creates a Mock endpoint which expects to receive all the message bodies that
could be polled from the given underlying endpoint
The main endpoint is the Mock endpoint which allows expectations to be added to different
endpoints; you can then run your tests and assert that your expectations are met at the end.
Stubbing out physical transport technologies
If you wish to test out a route but want to avoid actually using a real physical transport (for
example to unit test a transformation route rather than performing a full integration test) then
the following endpoints can be useful.
Name Description
COOKBOOK 66
Direct
Direct invocation of the consumer from the producer so that single threaded
(non-SEDA) in VM invocation is performed which can be useful to mock out
physical transports
SEDA
Delivers messages asynchonously to consumers via a
java.util.concurrent.BlockingQueue which is good for testing asynchronous
transports
Testing existing routes
Camel provides some features to aid during testing of existing routes where you cannot or will
not use Mock etc. For example you may have a production ready route which you want to test
with some 3rd party API which sends messages into this route.
Name Description
NotifyBuilder
Allows you to be notified when a certain condition has occurred. For
example when the route has completed 5 messages. You can build complex
expressions to match your criteria when to be notified.
AdviceWith
Allows you to advice or enhance an existing route using a RouteBuilder
style. For example you can add interceptors to intercept sending outgoing
messages to assert those messages are as expected.
CAMEL TEST
As a simple alternative to using Spring Testing or Guice the camel-test module was
introduced into the Camel 2.0 trunk so you can perform powerful Testing of your Enterprise
Integration Patterns easily.
Adding to your pom.xml
To get started using Camel Test you will need to add an entry to your pom.xml
<dependency>
<groupId>org.apache.camel</groupId>
<artifactId>camel-test</artifactId>
<version>${camel-version}</version>
<scope>test</scope>
</dependency>
You might also want to add commons-logging and log4j to ensure nice logging messages (and
maybe adding a log4j.properties file into your src/test/resources directory).
67 COOKBOOK

<dependency>
<groupId>commons-logging</groupId>
<artifactId>commons-logging</artifactId>
<scope>test</scope>
</dependency>
<dependency>
<groupId>log4j</groupId>
<artifactId>log4j</artifactId>
<scope>test</scope>
</dependency>
Writing your test
You firstly need to derive from the class CamelTestSupport and typically you will need to
override the createRouteBuilder() method to create routes to be tested.
Here is an example.
public class FilterTest extends CamelTestSupport {
@EndpointInject(uri = "mock:result")
protected MockEndpoint resultEndpoint;
@Produce(uri = "direct:start")
protected ProducerTemplate template;
public void testSendMatchingMessage() throws Exception {
String expectedBody = "<matched/>";
resultEndpoint.expectedBodiesReceived(expectedBody);
template.sendBodyAndHeader(expectedBody, "foo","bar");
resultEndpoint.assertIsSatisfied();
}
public void testSendNotMatchingMessage() throws Exception {
resultEndpoint.expectedMessageCount(0);
template.sendBodyAndHeader("<notMatched/>","foo","notMatchedHeaderValue");
resultEndpoint.assertIsSatisfied();
}
@Override
protected RouteBuilder createRouteBuilder() {
return new RouteBuilder() {
public void configure() {
from("direct:start").filter(header("foo").isEqualTo("bar")).to("mock:result");
}
COOKBOOK 68

};
}
}
Notice how you can use the various Camel binding and injection annotations to inject individual
Endpoint objects - particularly the Mock endpoints which are very useful for Testing. Also you
can inject producer objects such as ProducerTemplate or some application code interface for
sending messages or invoking services.
JNDI
Camel uses a Registry to allow you to configure Component or Endpoint instances or Beans
used in your routes. If you are not using Spring or [OSGi] then JNDI is used as the default
registry implementation.
So you will also need to create a jndi.properties file in your src/test/resources
directory so that there is a default registry available to initialise the CamelContext.
Here is an example jndi.properties file
java.naming.factory.initial = org.apache.camel.util.jndi.CamelInitialContextFactory
See Also
• Testing
• Mock
SPRING TESTING
Testing is a crucial part of any development or integration work. The Spring Framework offers
a number of features that makes it easy to test while using Spring for Inversion of Control
which works with JUnit 3.x, JUnit 4.x or TestNG.
We can reuse Spring for IoC and the Camel Mock and Test endpoints to create
sophisticated integration tests that are easy to run and debug inside your IDE.
For example here is a simple unit test
import org.apache.camel.CamelContext;
import org.apache.camel.component.mock.MockEndpoint;
import org.springframework.beans.factory.annotation.Autowired;
import org.springframework.test.context.ContextConfiguration;
import org.springframework.test.context.junit38.AbstractJUnit38SpringContextTests;
@ContextConfiguration
public class MyCamelTest extends AbstractJUnit38SpringContextTests {
69 COOKBOOK
@Autowired
protected CamelContext camelContext;
public void testMocksAreValid() throws Exception {
MockEndpoint.assertIsSatisfied(camelContext);
}
}
This test will load a Spring XML configuration file called MyCamelTest-context.xml from
the classpath in the same package structure as the MyCamelTest class and initialize it along with
any Camel routes we define inside it, then inject the CamelContext instance into our test case.
For instance, like this maven folder layout:
src/main/java/com/mycompany/MyCamelTest.class
src/main/resources/com/mycompany/MyCamelTest-context.xml
You can overload the method createApplicationContext to provide the Spring
ApplicationContext that isn't following the above default. For instance:
protected AbstractXmlApplicationContext createApplicationContext() {
return new ClassPathXmlApplicationContext("/config/MySpringConfig.xml");
}
Then the test method will then run which invokes the
MockEndpoint.assertIsSatisfied(camelContext) method which asserts that all of the Mock and
Test endpoints have their expectations met.
xml}
Spring Test with Java Config Example
You can completely avoid using an XML configuration file by using Spring Java Config.
Here is an example using Java Config.
@ContextConfiguration(
locations =
"org.apache.camel.spring.javaconfig.patterns.FilterTest$ContextConfig",
loader = JavaConfigContextLoader.class)
public class FilterTest extends AbstractJUnit4SpringContextTests {
@EndpointInject(uri = "mock:result")
protected MockEndpoint resultEndpoint;
@Produce(uri = "direct:start")
protected ProducerTemplate template;
COOKBOOK 70

@DirtiesContext
@Test
public void testSendMatchingMessage() throws Exception {
String expectedBody = "<matched/>";
resultEndpoint.expectedBodiesReceived(expectedBody);
template.sendBodyAndHeader(expectedBody, "foo","bar");
resultEndpoint.assertIsSatisfied();
}
@DirtiesContext
@Test
public void testSendNotMatchingMessage() throws Exception {
resultEndpoint.expectedMessageCount(0);
template.sendBodyAndHeader("<notMatched/>","foo","notMatchedHeaderValue");
resultEndpoint.assertIsSatisfied();
}
@Configuration
public static class ContextConfig extends SingleRouteCamelConfiguration {
@Bean
public RouteBuilder route() {
return new RouteBuilder() {
public void configure() {
from("direct:start").filter(header("foo").isEqualTo("bar")).to("mock:result");
}
};
}
}
}
This is similar to the XML Config example above except that there is no XML file and instead
the nested ContextConfig class does all of the configuration; so your entire test case is
contained in a single Java class. We currently have to reference by class name this class in the
@ContextConfiguration which is a bit ugly. Please vote for SJC-238 to address this and
make Spring Test work more cleanly with Spring JavaConfig.
Adding more Mock expectations
If you wish to programmatically add any new assertions to your test you can easily do so with
the following. Notice how we use @EndpointInject to inject a Camel endpoint into our code
then the Mock API to add an expectation on a specific message.
@ContextConfiguration
public class MyCamelTest extends AbstractJUnit38SpringContextTests {
71 COOKBOOK
@Autowired
protected CamelContext camelContext;
@EndpointInject(uri = "mock:foo")
protected MockEndpoint foo;
public void testMocksAreValid() throws Exception {
// lets add more expectations
foo.message(0).header("bar").isEqualTo("ABC");
MockEndpoint.assertIsSatisfied(camelContext);
}
}
Further processing the received messages
Sometimes once a Mock endpoint has received some messages you want to then process them
further to add further assertions that your test case worked as you expect.
So you can then process the received message exchanges if you like...
@ContextConfiguration
public class MyCamelTest extends AbstractJUnit38SpringContextTests {
@Autowired
protected CamelContext camelContext;
@EndpointInject(uri = "mock:foo")
protected MockEndpoint foo;
public void testMocksAreValid() throws Exception {
// lets add more expectations...
MockEndpoint.assertIsSatisfied(camelContext);
// now lets do some further assertions
List<Exchange> list = foo.getReceivedExchanges();
for (Exchange exchange : list) {
Message in = exchange.getIn();
...
}
}
}
Sending and receiving messages
It might be that the Enterprise Integration Patterns you have defined in either Spring XML or
using the Java DSL do all of the sending and receiving and you might just work with the Mock
COOKBOOK 72

endpoints as described above. However sometimes in a test case its useful to explicitly send or
receive messages directly.
To send or receive messages you should use the Bean Integration mechanism. For example
to send messages inject a ProducerTemplate using the @EndpointInject annotation then call the
various send methods on this object to send a message to an endpoint. To consume messages
use the @MessageDriven annotation on a method to have the method invoked when a message
is received.
public class Foo {
@EndpointInject(uri="activemq:foo.bar")
ProducerTemplate producer;
public void doSomething() {
// lets send a message!
producer.sendBody("<hello>world!</hello>");
}
// lets consume messages from the 'cheese' queue
@MessageDriven(uri="activemq:cheese")
public void onCheese(String name) {
...
}
}
See Also
• a real example test case using Mock and Spring along with its Spring XML
• Bean Integration
• Mock endpoint
• Test endpoint
CAMEL GUICE
As of 1.5 we now have support for Google Guice as a dependency injection framework. To use
it just be dependent on camel-guice.jar which also depends on the following jars.
Dependency Injecting Camel with Guice
The GuiceCamelContext is designed to work nicely inside Guice. You then need to bind it
using some Guice Module.
The camel-guice library comes with a number of reusable Guice Modules you can use if you
wish - or you can bind the GuiceCamelContext yourself in your own module.
• CamelModule is the base module which binds the GuiceCamelContext but leaves it
up you to bind the RouteBuilder instances
73 COOKBOOK

• CamelModuleWithRouteTypes extends CamelModule so that in the constructor of
the module you specify the RouteBuilder classes or instances to use
• CamelModuleWithMatchingRoutes extends CamelModule so that all bound
RouteBuilder instances will be injected into the CamelContext or you can supply an
optional Matcher to find RouteBuilder instances matching some kind of predicate.
So you can specify the exact RouteBuilder instances you want
Injector injector = Guice.createInjector(new
CamelModuleWithRouteTypes(MyRouteBuilder.class, AnotherRouteBuilder.class));
// if required you can lookup the CamelContext
CamelContext camelContext = injector.getInstance(CamelContext.class);
Or inject them all
Injector injector = Guice.createInjector(new CamelModuleWithRouteTypes());
// if required you can lookup the CamelContext
CamelContext camelContext = injector.getInstance(CamelContext.class);
You can then use Guice in the usual way to inject the route instances or any other dependent
objects.
Bootstrapping with JNDI
A common pattern used in J2EE is to bootstrap your application or root objects by looking
them up in JNDI. This has long been the approach when working with JMS for example -
looking up the JMS ConnectionFactory in JNDI for example.
You can follow a similar pattern with Guice using the GuiceyFruit JNDI Provider which lets
you bootstrap Guice from a jndi.properties file which can include the Guice Modules to
create along with environment specific properties you can inject into your modules and objects.
If the jndi.properties is conflict with other component, you can specify the jndi
properties file name in the Guice Main with option -j or -jndiProperties with the properties file
location to let Guice Main to load right jndi properties file.
Configuring Component, Endpoint or RouteBuilder instances
You can use Guice to dependency inject whatever objects you need to create, be it an
Endpoint, Component, RouteBuilder or arbitrary bean used within a route.
The easiest way to do this is to create your own Guice Module class which extends one of
the above module classes and add a provider method for each object you wish to create. A
provider method is annotated with @Provides as follows
public class MyModule extends CamelModuleWithMatchingRoutes {
COOKBOOK 74
@Provides
@JndiBind("jms")
JmsComponent jms(@Named("activemq.brokerURL")String brokerUrl) {
return JmsComponent.jmsComponent(new ActiveMQConnectionFactory(brokerUrl));
}
}
You can optionally annotate the method with @JndiBind to bind the object to JNDI at some
name if the object is a component, endpoint or bean you wish to refer to by name in your
routes.
You can inject any environment specific properties (such as URLs, machine names,
usernames/passwords and so forth) from the jndi.properties file easily using the @Named
annotation as shown above. This allows most of your configuration to be in Java code which is
typesafe and easily refactorable - then leaving some properties to be environment specific (the
jndi.properties file) which you can then change based on development, testing, production etc.
Creating multiple RouteBuilder instances per type
It is sometimes useful to create multiple instances of a particular RouteBuilder with different
configurations.
To do this just create multiple provider methods for each configuration; or create a single
provider method that returns a collection of RouteBuilder instances.
For example
import org.apache.camel.guice.CamelModuleWithMatchingRoutes;
import com.google.common.collect.Lists;
public class MyModule extends CamelModuleWithMatchingRoutes {
@Provides
@JndiBind("foo")
Collection<RouteBuilder> foo(@Named("fooUrl")String fooUrl) {
return Lists.newArrayList(new MyRouteBuilder(fooUrl), new
MyRouteBuilder("activemq:CheeseQueue"));
}
}
See Also
• there are a number of Examples you can look at to see Guice and Camel being used
such as Guice JMS Example
• Guice Maven Plugin for running your Guice based routes via Maven
75 COOKBOOK

TEMPLATING
When you are testing distributed systems its a very common requirement to have to stub out
certain external systems with some stub so that you can test other parts of the system until a
specific system is available or written etc.
A great way to do this is using some kind of Template system to generate responses to
requests generating a dynamic message using a mostly-static body.
There are a number of templating components you could use
• Freemarker
• Scalate
• StringTemplate
• Velocity
• XQuery
• XSLT
Example
Here's a simple example showing how we can respond to InOut requests on the My.Queue
queue on ActiveMQ with a template generated response. The reply would be sent back to the
JMSReplyTo Destination.
from("activemq:My.Queue").
to("velocity:com/acme/MyResponse.vm");
If you want to use InOnly and consume the message and send it to another destination you
could use
from("activemq:My.Queue").
to("velocity:com/acme/MyResponse.vm").
to("activemq:Another.Queue");
See Also
• Mock for details of mock endpoint testing (as opposed to template based stubs).
DATABASE
Camel can work with databases in a number of different ways. This document tries to outline
the most common approaches.
Database endpoints
Camel provides a number of different endpoints for working with databases
COOKBOOK 76
• JPA for working with hibernate, openjpa or toplink. When consuming from the
endpoints entity beans are read (and deleted/updated to mark as processed) then
when producing to the endpoints they are written to the database (via insert/update).
• iBATIS similar to the above but using Apache iBATIS
• JDBC similar though using explicit SQL
Database pattern implementations
Various patterns can work with databases as follows
• Idempotent Consumer
• Aggregator
• BAM for business activity monitoring
PARALLEL PROCESSING AND ORDERING
It is a common requirement to want to use parallel processing of messages for throughput and
load balancing, while at the same time process certain kinds of messages in order.
How to achieve parallel processing
You can send messages to a number of Camel Components to achieve parallel processing and
load balancing such as
• SEDA for in-JVM load balancing across a thread pool
• ActiveMQ or JMS for distributed load balancing and parallel processing
• JPA for using the database as a poor mans message broker
When processing messages concurrently, you should consider ordering and concurrency issues.
These are described below
Concurrency issues
Note that there is no concurrency or locking issue when using ActiveMQ, JMS or SEDA by
design; they are designed for highly concurrent use. However there are possible concurrency
issues in the Processor of the messages i.e. what the processor does with the message?
For example if a processor of a message transfers money from one account to another
account; you probably want to use a database with pessimistic locking to ensure that operation
takes place atomically.
77 COOKBOOK

Ordering issues
As soon as you send multiple messages to different threads or processes you will end up with
an unknown ordering across the entire message stream as each thread is going to process
messages concurrently.
For many use cases the order of messages is not too important. However for some
applications this can be crucial. e.g. if a customer submits a purchase order version 1, then
amends it and sends version 2; you don't want to process the first version last (so that you
loose the update). Your Processor might be clever enough to ignore old messages. If not you
need to preserve order.
Recommendations
This topic is large and diverse with lots of different requirements; but from a high level here are
our recommendations on parallel processing, ordering and concurrency
• for distributed locking, use a database by default, they are very good at it
• to preserve ordering across a JMS queue consider using Exclusive Consumers in the
ActiveMQ component
• even better are Message Groups which allows you to preserve ordering across
messages while still offering parallelisation via the JMSXGrouopID header to
determine what can be parallelized
• if you receive messages out of order you could use the Resequencer to put them
back together again
A good rule of thumb to help reduce ordering problems is to make sure each single can be
processed as an atomic unit in parallel (either without concurrency issues or using say, database
locking); or if it can't, use a Message Group to relate the messages together which need to be
processed in order by a single thread.
Using Message Groups with Camel
To use a Message Group with Camel you just need to add a header to the output JMS message
based on some kind of Correlation Identifier to correlate messages which should be processed
in order by a single thread - so that things which don't correlate together can be processed
concurrently.
For example the following code shows how to create a message group using an XPath
expression taking an invoice's product code as the Correlation Identifier
from("activemq:a").setHeader("JMSXGroupID", xpath("/invoice/
productCode")).to("activemq:b");
You can of course use the Xml Configuration if you prefer
COOKBOOK 78

ASYNCHRONOUS PROCESSING
Overview
Camel supports a more complex asynchronous processing model. The asynchronous
processors implement the AsyncProcessor interface which is derived from the more
synchronous Processor interface. There are advantages and disadvantages when using
asynchronous processing when compared to using the standard synchronous processing model.
Advantages:
• Processing routes that are composed fully of asynchronous processors do not use up
threads waiting for processors to complete on blocking calls. This can increase the
scalability of your system by reducing the number of threads needed to process the
same workload.
• Processing routes can be broken up into SEDA processing stages where different
thread pools can process the different stages. This means that your routes can be
processed concurrently.
Disadvantages:
• Implementing asynchronous processors is more complex than implementing the
synchronous versions.
When to Use
We recommend that processors and components be implemented the more simple
synchronous APIs unless you identify a performance of scalability requirement that dictates
otherwise. A Processor whose process() method blocks for a long time would be good
candidates for being converted into an asynchronous processor.
Interface Details
public interface AsyncProcessor extends Processor {
boolean process(Exchange exchange, AsyncCallback callback);
}
The AsyncProcessor defines a single process() method which is very similar to it's
synchronous Processor.process() brethren. Here are the differences:
• A non-null AsyncCallback MUST be supplied which will be notified when the
exchange processing is completed.
• It MUST not throw any exceptions that occurred while processing the exchange.
Any such exceptions must be stored on the exchange's Exception property.
• It MUST know if it will complete the processing synchronously or asynchronously.
The method will return true if it does complete synchronously, otherwise it returns
false.
79 COOKBOOK
Supported versions
The information on this page applies for the Camel 1.x and Camel 2.4 onwards. In
Camel 1.x the asynchronous processing is only implemented for JBI where as in
Camel 2.4 onwards we have implemented it in many other areas.
• When the processor has completed processing the exchange, it must call the
callback.done(boolean sync) method. The sync parameter MUST match
the value returned by the process() method.
Implementing Processors that Use the AsyncProcessor API
All processors, even synchronous processors that do not implement the AsyncProcessor
interface, can be coerced to implement the AsyncProcessor interface. This is usually done when
you are implementing a Camel component consumer that supports asynchronous completion of
the exchanges that it is pushing through the Camel routes. Consumers are provided a
Processor object when created. All Processor object can be coerced to a AsyncProcessor using
the following API:
Processor processor = ...
AsyncProcessor asyncProcessor = AsyncProcessorTypeConverter.convert(processor);
For a route to be fully asynchronous and reap the benefits to lower Thread usage, it must start
with the consumer implementation making use of the asynchronous processing API. If it called
the synchronous process() method instead, the consumer's thread would be forced to be
blocked and in use for the duration that it takes to process the exchange.
It is important to take note that just because you call the asynchronous API, it does not
mean that the processing will take place asynchronously. It only allows the possibility that it can
be done without tying up the caller's thread. If the processing happens asynchronously is
dependent on the configuration of the Camel route.
Normally, the the process call is passed in an inline inner AsyncCallback class instance which
can reference the exchange object that was declared final. This allows it to finish up any post
processing that is needed when the called processor is done processing the exchange. See
below for an example.
final Exchange exchange = ...
AsyncProcessor asyncProcessor = ...
asyncProcessor.process(exchange, new AsyncCallback() {
public void done(boolean sync) {
if (exchange.isFailed()) {
... // do failure processing.. perhaps rollback etc.
}else {
COOKBOOK 80

... // processing completed successfully, finish up
// perhaps commit etc.
}
}
});
Asynchronous Route Sequence Scenarios
Now that we have understood the interface contract of the AsyncProcessor, and have seen
how to make use of it when calling processors, lets looks a what the thread model/sequence
scenarios will look like for some sample routes.
The Jetty component's consumers support async processing by using continuations. Suffice
to say it can take a http request and pass it to a camel route for async processing. If the
processing is indeed async, it uses Jetty continuation so that the http request is 'parked' and the
thread is released. Once the camel route finishes processing the request, the jetty component
uses the AsyncCallback to tell Jetty to 'un-park' the request. Jetty un-parks the request, the http
response returned using the result of the exchange processing.
Notice that the jetty continuations feature is only used "If the processing is indeed async".
This is why AsyncProcessor.process() implementations MUST accurately report if request is
completed synchronously or not.
The jhc component's producer allows you to make HTTP requests and implement the
AsyncProcessor interface. A route that uses both the jetty asynchronous consumer and the jhc
asynchronous producer will be a fully asynchronous route and has some nice attributes that can
be seen if we take a look at a sequence diagram of the processing route. For the route:
from("jetty:http://localhost:8080/service").to("jhc:http://localhost/service-impl");
The sequence diagram would look something like this:
81 COOKBOOK
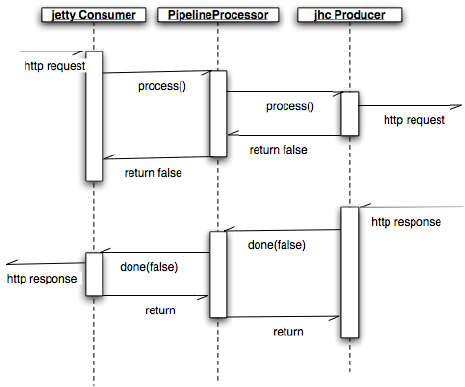
The diagram simplifies things by making it looks like processors implement the
AsyncCallback interface when in reality the AsyncCallback interfaces are inline inner classes, but
it illustrates the processing flow and shows how 2 separate threads are used to complete the
processing of the original http request. The first thread is synchronous up until processing hits
the jhc producer which issues the http request. It then reports that the exchange processing
will complete async since it will use a NIO to complete getting the response back. Once the jhc
component has received a full response it uses AsyncCallback.done() method to notify
the caller. These callback notifications continue up until it reaches the original jetty consumer
which then un-parks the http request and completes it by providing the response.
Mixing Synchronous and Asynchronous Processors
It is totally possible and reasonable to mix the use of synchronous and asynchronous
processors/components. The pipeline processor is the backbone of a Camel processing route. It
glues all the processing steps together. It is implemented as an AsyncProcessor and supports
interleaving synchronous and asynchronous processors as the processing steps in the pipeline.
Lets say we have 2 custom processors, MyValidator and MyTransformation, both of which
are synchronous processors. Lets say we want to load file from the data/in directory validate
them with the MyValidator() processor, Transform them into JPA java objects using
MyTransformation and then insert them into the database using the JPA component. Lets say
that the transformation process takes quite a bit of time and we want to allocate 20 threads to
do parallel transformations of the input files. The solution is to make use of the thread
processor. The thread is AsyncProcessor that forces subsequent processing in asynchronous
thread from a thread pool.
The route might look like:
COOKBOOK 82
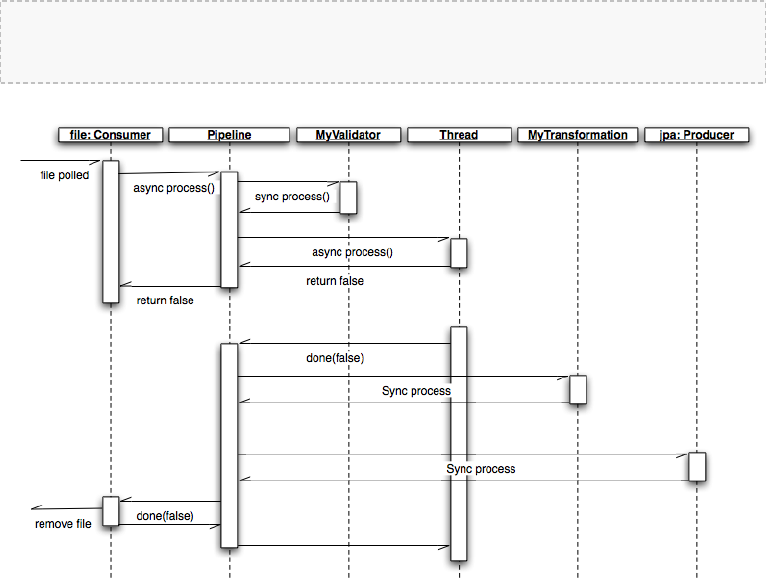
from("file:data/in").process(new MyValidator()).thread(20).process(new
MyTransformation()).to("jpa:PurchaseOrder");
The sequence diagram would look something like this:
You would actually have multiple threads executing the 2nd part of the thread sequence.
Staying synchronous in an AsyncProcessor
Generally speaking you get better throughput processing when you process things
synchronously. This is due to the fact that starting up an asynchronous thread and doing a
context switch to it adds a little bit of of overhead. So it is generally encouraged that
AsyncProcessors do as much work as they can synchronously. When they get to a step that
would block for a long time, at that point they should return from the process call and let the
caller know that it will be completing the call asynchronously.
IMPLEMENTING VIRTUAL TOPICS ON OTHER JMS
PROVIDERS
ActiveMQ supports Virtual Topics since durable topic subscriptions kinda suck (see this page
for more detail) mostly since they don't support Competing Consumers.
Most folks want Queue semantics when consuming messages; so that you can support
Competing Consumers for load balancing along with things like Message Groups and Exclusive
Consumers to preserve ordering or partition the queue across consumers.
83 COOKBOOK
However if you are using another JMS provider you can implement Virtual Topics by
switching to ActiveMQ or you can use the following Camel pattern.
First here's the ActiveMQ approach.
• send to activemq:topic:VirtualTopic.Orders
• for consumer A consume from activemq:Consumer.A.VirtualTopic.Orders
When using another message broker use the following pattern
• send to jms:Orders
• add this route with a to() for each logical durable topic subscriber
from("jms:Orders").to("jms:Consumer.A","jms:Consumer.B", ...);
• for consumer A consume from jms:Consumer.A
WHAT'S THE CAMEL TRANSPORT FOR CXF
In CXF you offer or consume a webservice by defining it´s address. The first part of the
address specifies the protocol to use. For example address="http://localhost:90000" in an
endpoint configuration means your service will be offered using the http protocol on port 9000
of localhost. When you integrate Camel Tranport into CXF you get a new transport "camel".
So you can specify address="camel://direct:MyEndpointName" to bind the CXF service address
to a camel direct endpoint.
Technically speaking Camel transport for CXF is a component which implements the CXF
transport API with the Camel core library. This allows you to use camel´s routing engine and
integration patterns support smoothly together with your CXF services.
INTEGRATE CAMEL INTO CXF TRANSPORT LAYER
To include the Camel Tranport into your CXF bus you use the CamelTransportFactory. You
can do this in Java as well as in Spring.
Setting up the Camel Transport in Spring
You can use the following snippet in your applicationcontext if you want to configure anything
special. If you only want to activate the camel transport you do not have to do anything in your
application context. As soon as you include the camel-cxf jar in your app cxf will scan the jar
and load a CamelTransportFactory for you.
<bean class="org.apache.camel.component.cxf.transport.CamelTransportFactory">
<property name="bus" ref="cxf" />
<property name="camelContext" ref="camelContext" />
<!-- checkException new added in Camel 2.1 and Camel 1.6.2 -->
COOKBOOK 84
<!-- If checkException is true , CamelDestination will check the outMessage's
exception and set it into camel exchange. You can also override this value
in CamelDestination's configuration. The default value is false.
This option should be set true when you want to leverage the camel's error
handler to deal with fault message -->
<property name="checkException" value="true" />
<property name="transportIds">
<list>
<value>http://cxf.apache.org/transports/camel</value>
</list>
</property>
</bean>
Integrating the Camel Transport in a programmatic way
Camel transport provides a setContext method that you could use to set the Camel context
into the transport factory. If you want this factory take effect, you need to register the factory
into the CXF bus. Here is a full example for you.
import org.apache.cxf.Bus;
import org.apache.cxf.BusFactory;
import org.apache.cxf.transport.ConduitInitiatorManager;
import org.apache.cxf.transport.DestinationFactoryManager;
...
BusFactory bf = BusFactory.newInstance();
Bus bus = bf.createBus();
CamelTransportFactory camelTransportFactory = new CamelTransportFactory();
camelTransportFactory.setCamelContext(context)
// register the conduit initiator
ConduitInitiatorManager cim = bus.getExtension(ConduitInitiatorManager.class);
cim.registerConduitInitiator(CamelTransportFactory.TRANSPORT_ID,
camelTransportFactory);
// register the destination factory
DestinationFactoryManager dfm = bus.getExtension(DestinationFactoryManager.class);
dfm.registerDestinationFactory(CamelTransportFactory.TRANSPORT_ID,
camelTransportFactory);
// set or bus as the default bus for cxf
BusFactory.setDefaultBus(bus);
CONFIGURE THE DESTINATION AND CONDUIT
Namespace
The elements used to configure an Camel transport endpoint are defined in the namespace
http://cxf.apache.org/transports/camel. It is commonly referred to using the
prefix camel. In order to use the Camel transport configuration elements you will need to add
85 COOKBOOK
the lines shown below to the beans element of your endpoint's configuration file. In addition,
you will need to add the configuration elements' namespace to the xsi:schemaLocation
attribute.
Listing 4.Listing 4. Adding the Configuration NamespaceAdding the Configuration Namespace
<beans ...
xmlns:camel="http://cxf.apache.org/transports/camel
...
xsi:schemaLocation="...
http://cxf.apache.org/transports/camel
http://cxf.apache.org/transports/camel.xsd
...>
The destination element
You configure an Camel transport server endpoint using the camel:destination element
and its children. The camel:destination element takes a single attribute, name, the
specifies the WSDL port element that corresponds to the endpoint. The value for the name
attribute takes the form portQName.camel-destination. The example below shows the
camel:destination element that would be used to add configuration for an endpoint that
was specified by the WSDL fragment <port binding="widgetSOAPBinding"
name="widgetSOAPPort> if the endpoint's target namespace was
http://widgets.widgetvendor.net.
Listing 5.Listing 5. camel:destination Elementcamel:destination Element
...
<camel:destination name="{http://widgets/
widgetvendor.net}widgetSOAPPort.http-destination>
<camelContext id="context" xmlns="http://activemq.apache.org/camel/schema/spring">
<route>
<from uri="direct:EndpointC" />
<to uri="direct:EndpointD" />
</route>
</camelContext>
</camel:destination>
...
The camel:destination element has a number of child elements that specify configuration
information. They are described below.
Element Description
camel-
spring:camelContext You can specify the camel context in the camel destination
COOKBOOK 86

camel:camelContextRef The camel context id which you want inject into the camel
destination
The conduit element
You configure an Camel transport client using the camel:conduit element and its children.
The camel:conduit element takes a single attribute, name, that specifies the WSDL port
element that corresponds to the endpoint. The value for the name attribute takes the form
portQName.camel-conduit. For example, the code below shows the camel:conduit
element that would be used to add configuration for an endpoint that was specified by the
WSDL fragment <port binding="widgetSOAPBinding"
name="widgetSOAPPort> if the endpoint's target namespace was
http://widgets.widgetvendor.net.
Listing 6.Listing 6. http-conf:conduit Elementhttp-conf:conduit Element
...
<camelContext id="conduit_context" xmlns="http://activemq.apache.org/camel/schema/
spring">
<route>
<from uri="direct:EndpointA" />
<to uri="direct:EndpointB" />
</route>
</camelContext>
<camel:conduit name="{http://widgets/widgetvendor.net}widgetSOAPPort.camel-conduit">
<camel:camelContextRef>conduit_context</camel:camelContextRef>
</camel:conduit>
<camel:conduit name="*.camel-conduit">
<!-- you can also using the wild card to specify the camel-conduit that you want to
configure -->
...
</camel:conduit>
...
The camel:conduit element has a number of child elements that specify configuration
information. They are described below.
Element Description
camel-
spring:camelContext You can specify the camel context in the camel conduit
camel:camelContextRef The camel context id which you want inject into the
camel conduit
87 COOKBOOK

EXAMPLE USING CAMEL AS A LOAD BALANCER FOR CXF
This example show how to use the camel load balance feature in CXF, and you need load the
configuration file in CXF and publish the endpoints on the address "camel://direct:EndpointA"
and "camel://direct:EndpointB"
<beans xmlns="http://www.springframework.org/schema/beans"
xmlns:xsi="http://www.w3.org/2001/XMLSchema-instance"
xmlns:camel="http://cxf.apache.org/transports/camel"
xsi:schemaLocation="
http://www.springframework.org/schema/beans
http://www.springframework.org/schema/beans/spring-beans-2.5.xsd
http://cxf.apache.org/transports/camel http://cxf.apache.org/transports/
camel.xsd
http://camel.apache.org/schema/cxf http://camel.apache.org/schema/cxf/
cxfEndpoint.xsd
http://camel.apache.org/schema/spring http://camel.apache.org/schema/spring/
camel-spring.xsd
">
<bean id = "roundRobinRef"
class="org.apache.camel.processor.loadbalancer.RoundRobinLoadBalancer" />
<camelContext id="dest_context" xmlns="http://camel.apache.org/schema/spring">
<route>
<from uri="jetty:http://localhost:9091/GreeterContext/GreeterPort"/>
<loadBalance ref="roundRobinRef">
<to uri="direct:EndpointA"/>
<to uri="direct:EndpointB"/>
</loadBalance>
</route>
</camelContext>
<!-- Inject the camel context to the Camel transport's destination -->
<camel:destination name="{http://apache.org/
hello_world_soap_http}CamelPort.camel-destination">
<camel:camelContextRef>dest_context</camel:camelContextRef>
</camel:destination>
</beans>
COMPLETE HOWTO AND EXAMPLE FOR ATTACHING
CAMEL TO CXF
Better JMS Transport for CXF Webservice using Apache Camel
COOKBOOK 88

Introduction
When sending an Exchange to an Endpoint you can either use a Route or a ProducerTemplate.
This works fine in many scenarios. However you may need to guarantee that an exchange is
delivered to the same endpoint that you delivered a previous exchange on. For example in the
case of delivering a batch of exchanges to a MINA socket you may need to ensure that they are
all delivered through the same socket connection. Furthermore once the batch of exchanges
have been delivered the protocol requirements may be such that you are responsible for
closing the socket.
Using a Producer
To achieve fine grained control over sending exchanges you will need to program directly to a
Producer. Your code will look similar to:
CamelContext camelContext = ...
// Obtain an endpoint and create the producer we will be using.
Endpoint endpoint = camelContext.getEndpoint("someuri:etc");
Producer producer = endpoint.createProducer();
producer.start();
try {
// For each message to send...
Object requestMessage = ...
Exchange exchangeToSend = producer.createExchange();
exchangeToSend().setBody(requestMessage);
producer.process(exchangeToSend);
...
}finally {
// Tidy the producer up.
producer.stop();
}
In the case of using Apache MINA the producer.stop() invocation will cause the socket to be
closed.
89 INTRODUCTION

Tutorials
There now follows the documentation on camel tutorials
• OAuth Tutorial
This tutorial demonstrates how to implement OAuth for a web application with
Camel's gauth component. The sample application of this tutorial is also online at
http://gauthcloud.appspot.com/
• Tutorial for Camel on Google App Engine
This tutorial demonstrates the usage of the Camel Components for Google App
Engine. The sample application of this tutorial is also online at
http://camelcloud.appspot.com/
• Tutorial on Spring Remoting with JMS
This tutorial is focused on different techniques with Camel for Client-Server
communication.
• Report Incident - This tutorial introduces Camel steadily and is based on a real life
integration problem
This is a very long tutorial beginning from the start; its for entry level to Camel. Its
based on a real life integration, showing how Camel can be introduced in an existing
solution. We do this in baby steps. The tutorial is currently work in progress, so
check it out from time to time. The tutorial explains some of the inner building blocks
Camel uses under the covers. This is good knowledge to have when you start using
Camel on a higher abstract level where it can do wonders in a few lines of routing
DSL.
• Using Camel with ServiceMix a tutorial on using Camel inside Apache ServiceMix.
• Better JMS Transport for CXF Webservice using Apache Camel Describes how to
use the Camel Transport for CXF to attach a CXF Webservice to a JMS Queue
• Tutorial how to use good old Axis 1.4 with Camel
This tutorial shows that Camel does work with the good old frameworks such as
AXIS that is/was widely used for WebService.
• Tutorial on using Camel in a Web Application
This tutorial gives an overview of how to use Camel inside Tomcat, Jetty or any other
servlet engine
• Tutorial on Camel 1.4 for Integration
Another real-life scenario. The company sells widgets, with a somewhat unique
business process (their customers periodically report what they've purchased in order
to get billed). However every customer uses a different data format and protocol.
This tutorial goes through the process of integrating (and testing!) several customers
and their electronic reporting of the widgets they've bought, along with the company's
response.
TUTORIALS 90
• Tutorial how to build a Service Oriented Architecture using Camel with OSGI -
Updated 20/11/2009
The tutorial has been designed in two parts. The first part introduces basic concept to
create a simple SOA solution using Camel and OSGI and deploy it in a OSGI Server
like Apache Felix Karaf and Spring DM Server while the second extends the
ReportIncident tutorial part 4 to show How we can separate the different layers
(domain, service, ...) of an application and deploy them in separate bundles. The Web
Application has also be modified in order to communicate to the OSGI bundles.
• Examples
While not actual tutorials you might find working through the source of the various
Examples useful
TUTORIAL ON SPRING REMOTING WITH JMS
PREFACE
This tutorial aims to guide the reader through the stages of creating a project which uses Camel
to facilitate the routing of messages from a JMS queue to a Spring service. The route works in a
synchronous fashion returning a response to the client.
• Tutorial on Spring Remoting with JMS
• Preface
• Prerequisites
• Distribution
• About
• Create the Camel Project
• Update the POM with Dependencies
• Writing the Server
• Create the Spring Service
• Define the Camel Routes
• Configure Spring
• AOP Enabled Server
• Run the Server
• Writing The Clients
• Client Using The ProducerTemplate
• Client Using Spring Remoting
• Client Using Message Endpoint EIP Pattern
• Run the Clients
• Using the Camel Maven Plugin
• Using Camel JMX
• See Also
91 TUTORIALS
Thanks
This tutorial was kindly donated to Apache Camel by Martin Gilday.
PREREQUISITES
This tutorial uses Maven to setup the Camel project and for dependencies for artifacts.
DISTRIBUTION
This sample is distributed with the Camel distribution as examples/camel-example-
spring-jms.
ABOUT
This tutorial is a simple example that demonstrates more the fact how well Camel is seamless
integrated with Spring to leverage the best of both worlds. This sample is client server solution
using JMS messaging as the transport. The sample has two flavors of servers and also for clients
demonstrating different techniques for easy communication.
The Server is a JMS message broker that routes incoming messages to a business service that
does computations on the received message and returns a response.
The EIP patterns used in this sample are:
Pattern Description
Message
Channel We need a channel so the Clients can communicate with the server.
Message The information is exchanged using the Camel Message interface.
Message
Translator
This is where Camel shines as the message exchange between the Server and
the Clients are text based strings with numbers. However our business service
uses int for numbers. So Camel can do the message translation automatically.
Message
Endpoint
It should be easy to send messages to the Server from the the clients. This is
archived with Camels powerful Endpoint pattern that even can be more
powerful combined with Spring remoting. The tutorial have clients using each
kind of technique for this.
Point to
Point
Channel
We using JMS queues so there are only one receive of the message exchange
TUTORIALS 92
Event
Driven
Consumer
Yes the JMS broker is of course event driven and only reacts when the client
sends a message to the server.
We use the following Camel components:
Component Description
ActiveMQ We use Apache ActiveMQ as the JMS broker on the Server side
Bean We use the bean binding to easily route the messages to our business
service. This is a very powerful component in Camel.
File In the AOP enabled Server we store audit trails as files.
JMS Used for the JMS messaging
CREATE THE CAMEL PROJECT
mvn archetype:create -DgroupId=org.example -DartifactId=CamelWithJmsAndSpring
Update the POM with Dependencies
First we need to have dependencies for the core Camel jars, its spring, jms components and
finally ActiveMQ as the message broker.
<!-- required by both client and server -->
<dependency>
<groupId>org.apache.camel</groupId>
<artifactId>camel-core</artifactId>
</dependency>
<dependency>
<groupId>org.apache.camel</groupId>
<artifactId>camel-jms</artifactId>
</dependency>
<dependency>
<groupId>org.apache.camel</groupId>
<artifactId>camel-spring</artifactId>
</dependency>
<dependency>
<groupId>org.apache.activemq</groupId>
<artifactId>activemq-camel</artifactId>
</dependency>
As we use spring xml configuration for the ActiveMQ JMS broker we need this dependency:
93 TUTORIALS
For the purposes of the tutorial a single Maven project will be used for both the
client and server. Ideally you would break your application down into the
appropriate components.
<!-- xbean is required for ActiveMQ broker configuration in the spring xml file -->
<dependency>
<groupId>org.apache.xbean</groupId>
<artifactId>xbean-spring</artifactId>
</dependency>
And dependencies for the AOP enable server example. These dependencies are of course only
needed if you need full blown AOP stuff using AspejctJ with bytecode instrumentation.
<!-- required jars for aspectj AOP support -->
<dependency>
<groupId>org.springframework</groupId>
<artifactId>spring-aop</artifactId>
<version>${spring-version}</version>
</dependency>
<dependency>
<groupId>org.aspectj</groupId>
<artifactId>aspectjrt</artifactId>
<version>1.6.2</version>
</dependency>
<dependency>
<groupId>org.aspectj</groupId>
<artifactId>aspectjweaver</artifactId>
<version>1.6.2</version>
</dependency>
<dependency>
<groupId>cglib</groupId>
<artifactId>cglib-nodep</artifactId>
<version>2.1_3</version>
</dependency>
WRITING THE SERVER
Create the Spring Service
For this example the Spring service (= our business service) on the server will be a simple
multiplier which trebles in the received value.
TUTORIALS 94
public interface Multiplier {
/**
* Multiplies the given number by a pre-defined constant.
*
* @param originalNumber The number to be multiplied
* @return The result of the multiplication
*/
int multiply(int originalNumber);
}
And the implementation of this service is:
@Service(value = "multiplier")
public class Treble implements Multiplier {
public int multiply(final int originalNumber) {
return originalNumber * 3;
}
}
Notice that this class has been annotated with the @Service spring annotation. This ensures
that this class is registered as a bean in the registry with the given name multiplier.
Define the Camel Routes
public class ServerRoutes extends RouteBuilder {
@Override
public void configure() throws Exception {
// route from the numbers queue to our business that is a spring bean
registered with the id=multiplier
// Camel will introspect the multiplier bean and find the best candidate of
the method to invoke.
// You can add annotations etc to help Camel find the method to invoke.
// As our multiplier bean only have one method its easy for Camel to find the
method to use.
from("jms:queue:numbers").to("multiplier");
// Camel has several ways to configure the same routing, we have defined some
of them here below
// as above but with the bean: prefix
//from("jms:queue:numbers").to("bean:multiplier");
// beanRef is using explicity bean bindings to lookup the multiplier bean and
invoke the multiply method
95 TUTORIALS

//from("jms:queue:numbers").beanRef("multiplier","multiply");
// the same as above but expressed as a URI configuration
//from("activemq:queue:numbers").to("bean:multiplier?methodName=multiply");
}
}
This defines a Camel route from the JMS queue named numbers to the Spring bean named
multiplier. Camel will create a consumer to the JMS queue which forwards all received
messages onto the the Spring bean, using the method named multiply.
Configure Spring
The Spring config file is placed under META-INF/spring as this is the default location used
by the Camel Maven Plugin, which we will later use to run our server.
First we need to do the standard scheme declarations in the top. In the camel-server.xml we
are using spring beans as the default bean: namespace and springs context:. For configuring
ActiveMQ we use broker: and for Camel we of course have camel:. Notice that we don't
use version numbers for the camel-spring schema. At runtime the schema is resolved in the
Camel bundle. If we use a specific version number such as 1.4 then its IDE friendly as it would
be able to import it and provide smart completion etc. See Xml Reference for further details.
<beans xmlns="http://www.springframework.org/schema/beans"
xmlns:xsi="http://www.w3.org/2001/XMLSchema-instance"
xmlns:context="http://www.springframework.org/schema/context"
xmlns:camel="http://camel.apache.org/schema/spring"
xmlns:broker="http://activemq.apache.org/schema/core"
xsi:schemaLocation="
http://www.springframework.org/schema/beans http://www.springframework.org/
schema/beans/spring-beans-2.5.xsd
http://www.springframework.org/schema/context http://www.springframework.org/
schema/context/spring-context-2.5.xsd
http://camel.apache.org/schema/spring http://camel.apache.org/schema/spring/
camel-spring.xsd
http://activemq.apache.org/schema/core http://activemq.apache.org/schema/core/
activemq-core.xsd">
We use Spring annotations for doing IoC dependencies and its component-scan features comes
to the rescue as it scans for spring annotations in the given package name:
<!-- let Spring do its IoC stuff in this package -->
<context:component-scan base-package="org.apache.camel.example.server"/>
Camel will of course not be less than Spring in this regard so it supports a similar feature for
scanning of Routes. This is configured as shown below.
TUTORIALS 96

Notice that we also have enabled the JMXAgent so we will be able to introspect the Camel
Server with a JMX Console.
<!-- declare a camel context that scans for classes that is RouteBuilder
in the package org.apache.camel.example.server -->
<camel:camelContext id="camel">
<camel:package>org.apache.camel.example.server</camel:package>
<!-- enable JMX connector so we can connect to the server and browse mbeans -->
<!-- Camel will log at INFO level the service URI to use for connecting with
jconsole -->
<camel:jmxAgent id="agent" createConnector="true"/>
</camel:camelContext>
The ActiveMQ JMS broker is also configured in this xml file. We set it up to listen on TCP port
61610.
<!-- lets configure the ActiveMQ JMS broker server to listen on TCP 61610 -->
<broker:broker useJmx="false" persistent="false" brokerName="localhost">
<broker:transportConnectors>
<broker:transportConnector name="tcp" uri="tcp://localhost:61610"/>
</broker:transportConnectors>
</broker:broker>
As this examples uses JMS then Camel needs a JMS component that is connected with the
ActiveMQ broker. This is configured as shown below:
<!-- lets configure the Camel ActiveMQ to use the ActiveMQ broker declared above -->
<bean id="jms" class="org.apache.activemq.camel.component.ActiveMQComponent">
<property name="brokerURL" value="tcp://localhost:61610"/>
</bean>
Notice: The JMS component is configured in standard Spring beans, but the gem is that the
bean id can be referenced from Camel routes - meaning we can do routing using the JMS
Component by just using jms: prefix in the route URI. What happens is that Camel will find in
the Spring Registry for a bean with the id="jms". Since the bean id can have arbitrary name you
could have named it id="jmsbroker" and then referenced to it in the routing as
from="jmsbroker:queue:numbers).to("multiplier");
We use the vm protocol to connect to the ActiveMQ server as its embedded in this
application.
component-
scan
Defines the package to be scanned for Spring stereotype annotations, in this
case, to load the "multiplier" bean
camel-
context
Defines the package to be scanned for Camel routes. Will find the
ServerRoutes class and create the routes contained within it
jms bean Creates the Camel JMS component
97 TUTORIALS
AOP Enabled Server
The example has an enhanced Server example that uses fullblown AspejctJ AOP for doing a
audit tracking of invocations of the business service.
We leverage Spring AOP support in the {{camel-server-aop.xml} configuration file. First we
must declare the correct XML schema's to use:
<beans xmlns="http://www.springframework.org/schema/beans"
xmlns:xsi="http://www.w3.org/2001/XMLSchema-instance"
xmlns:aop="http://www.springframework.org/schema/aop"
xmlns:camel="http://camel.apache.org/schema/spring"
xmlns:context="http://www.springframework.org/schema/context"
xmlns:broker="http://activemq.apache.org/schema/core"
xsi:schemaLocation="
http://www.springframework.org/schema/beans http://www.springframework.org/
schema/beans/spring-beans-2.5.xsd
http://www.springframework.org/schema/aop http://www.springframework.org/
schema/aop/spring-aop-2.5.xsd
http://www.springframework.org/schema/context http://www.springframework.org/
schema/context/spring-context-2.5.xsd
http://camel.apache.org/schema/spring http://camel.apache.org/schema/spring/
camel-spring.xsd
http://activemq.apache.org/schema/core http://activemq.apache.org/schema/core/
activemq-core.xsd">
Then we include all the existing configuration from the normal server example:
<!-- let Spring do its IoC stuff in this package -->
<context:component-scan base-package="org.apache.camel.example.server"/>
<!-- lets configure the ActiveMQ JMS broker server to listen on TCP 61610 -->
<broker:broker useJmx="false" persistent="false" brokerName="localhost">
<broker:transportConnectors>
<broker:transportConnector name="tcp" uri="tcp://localhost:61610"/>
</broker:transportConnectors>
</broker:broker>
<!-- lets configure the Camel JMS consumer to use the ActiveMQ broker declared above
-->
<bean id="jms" class="org.apache.camel.component.jms.JmsComponent">
<property name="connectionFactory">
<bean class="org.apache.activemq.ActiveMQConnectionFactory">
<property name="brokerURL" value="tcp://localhost:61610"/>
</bean>
</property>
</bean>
Then we enable the AspejctJ AOP auto proxy feature of Spring that will scan for classes
annotated with the @Aspect annotation:
TUTORIALS 98

<!-- turn on AspejctJ AOP to weave all @Aspects beans declared in this spring xml file
-->
<aop:aspectj-autoproxy/>
Then we define our Audit tracker bean that does the actual audit logging. It's also the class that
is annotated with the @Aspect so Spring will pick this up, as the aspect.
<!-- Aspect that tracks all the invocations of the business service -->
<bean id="AuditTracker" class="org.apache.camel.example.server.AuditTracker">
<!-- define what store to use for audit backup -->
<property name="store" ref="AuditStore"/>
</bean>
And the gem is that we inject the AuditTracker aspect bean with a Camel endpoint that defines
where the audit should be stored. Noticed how easy it is to setup as we have just defined an
endpoint URI that is file based, meaning that we stored the audit tracks as files. We can change
this tore to any Camel components as we wish. To store it on a JMS queue simply change the
URI to jms:queue:audit.
<!-- declare a camel context that scans for classes that is RouteBuilder
in the package org.apache.camel.example.server -->
<camel:camelContext id="camel">
<camel:package>org.apache.camel.example.server</camel:package>
<!-- enable JMX connector so we can connect to the server and browse mbeans -->
<!-- Camel will log at INFO level the service URI to use for connecting with
jconsole -->
<camel:jmxAgent id="agent" createConnector="true"/>
<!-- the audit store endpoint is configued as file based.
In Camel 2.0 the endpoint should be defined in camel context -->
<camel:endpoint id="AuditStore" uri="file://target/store"/>
</camel:camelContext>
And the full blown Aspejct for the audit tracker java code:
/**
* For audit tracking of all incoming invocations of our business (Multiplier)
*/
@Aspect
public class AuditTracker {
// endpoint we use for backup store of audit tracks
private Endpoint store;
@Required
public void setStore(Endpoint store) {
this.store = store;
}
99 TUTORIALS

@Before("execution(int org.apache.camel.example.server.Multiplier.multiply(int))
&& args(originalNumber)")
public void audit(int originalNumber) throws Exception {
String msg = "Someone called us with this number " + originalNumber;
System.out.println(msg);
// now send the message to the backup store using the Camel Message Endpoint
pattern
Exchange exchange = store.createExchange();
exchange.getIn().setBody(msg);
store.createProducer().process(exchange);
}
}
Run the Server
The Server is started using the org.apache.camel.spring.Main class that can start
camel-spring application out-of-the-box. The Server can be started in several flavors:
▪as a standard java main application - just start the
org.apache.camel.spring.Main class
▪using maven jave:exec
▪using camel:run
In this sample as there are two servers (with and without AOP) we have prepared some
profiles in maven to start the Server of your choice.
The server is started with:
mvn compile exec:java -PCamelServer
Or for the AOP enabled Server example:
mvn compile exec:java -PCamelServerAOP
WRITING THE CLIENTS
This sample has three clients demonstrating different Camel techniques for communication
▪CamelClient using the ProducerTemplate for Spring template style coding
▪CamelRemoting using Spring Remoting
▪CamelEndpoint using the Message Endpoint EIP pattern using a neutral Camel API
Client Using The ProducerTemplate
We will initially create a client by directly using ProducerTemplate. We will later create a
client which uses Spring remoting to hide the fact that messaging is being used.
TUTORIALS 100
<beans xmlns="http://www.springframework.org/schema/beans"
xmlns:xsi="http://www.w3.org/2001/XMLSchema-instance"
xmlns:camel="http://camel.apache.org/schema/spring"
xsi:schemaLocation="
http://www.springframework.org/schema/beans http://www.springframework.org/
schema/beans/spring-beans-2.5.xsd
http://camel.apache.org/schema/spring http://camel.apache.org/schema/spring/
camel-spring.xsd">
<camel:camelContext id="camel">
<camel:template id="camelTemplate"/>
</camel:camelContext>
<!-- Camel JMSProducer to be able to send messages to a remote Active MQ server -->
<bean id="jms" class="org.apache.activemq.camel.component.ActiveMQComponent">
<property name="brokerURL" value="tcp://localhost:61610"/>
</bean>
The client will not use the Camel Maven Plugin so the Spring XML has been placed in src/main/
resources to not conflict with the server configs.
camelContext The Camel context is defined but does not contain any routes
template The ProducerTemplate is used to place messages onto the JMS queue
jms bean This initialises the Camel JMS component, allowing us to place messages
onto the queue
And the CamelClient source code:
public static void main(final String[] args) throws Exception {
System.out.println("Notice this client requires that the CamelServer is already
running!");
ApplicationContext context = new
ClassPathXmlApplicationContext("camel-client.xml");
// get the camel template for Spring template style sending of messages (=
producer)
ProducerTemplate camelTemplate = (ProducerTemplate)
context.getBean("camelTemplate");
System.out.println("Invoking the multiply with 22");
// as opposed to the CamelClientRemoting example we need to define the service URI
in this java code
int response = (Integer)camelTemplate.sendBody("jms:queue:numbers",
ExchangePattern.InOut, 22);
System.out.println("... the result is: " + response);
101 TUTORIALS

System.exit(0);
}
The ProducerTemplate is retrieved from a Spring ApplicationContext and used to
manually place a message on the "numbers" JMS queue. The exchange pattern
(ExchangePattern.InOut) states that the call should be synchronous, and that we will
receive a response.
Before running the client be sure that both the ActiveMQ broker and the CamelServer
are running.
Client Using Spring Remoting
Spring Remoting "eases the development of remote-enabled services". It does this by allowing
you to invoke remote services through your regular Java interface, masking that a remote
service is being called.
<!-- Camel proxy for a given service, in this case the JMS queue
In Camel 2.0 , the proxy should be defined in camelContext. -->
<camel:proxy
id="multiplierProxy"
serviceInterface="org.apache.camel.example.server.Multiplier"
serviceUrl="jms:queue:numbers"/>
The snippet above only illustrates the different and how Camel easily can setup and use Spring
Remoting in one line configurations.
The proxy will create a proxy service bean for you to use to make the remote invocations.
The serviceInterface property details which Java interface is to be implemented by the
proxy. serviceUrl defines where messages sent to this proxy bean will be directed. Here we
define the JMS endpoint with the "numbers" queue we used when working with Camel template
directly. The value of the id property is the name that will be the given to the bean when it is
exposed through the Spring ApplicationContext. We will use this name to retrieve the
service in our client. I have named the bean multiplierProxy simply to highlight that it is not the
same multiplier bean as is being used by CamelServer. They are in completely independent
contexts and have no knowledge of each other. As you are trying to mask the fact that
remoting is being used in a real application you would generally not include proxy in the name.
And the Java client source code:
public static void main(final String[] args) {
System.out.println("Notice this client requires that the CamelServer is already
running!");
ApplicationContext context = new
ClassPathXmlApplicationContext("camel-client-remoting.xml");
// just get the proxy to the service and we as the client can use the "proxy" as
TUTORIALS 102

it was
// a local object we are invoking. Camel will under the covers do the remote
communication
// to the remote ActiveMQ server and fetch the response.
Multiplier multiplier = (Multiplier)context.getBean("multiplierProxy");
System.out.println("Invoking the multiply with 33");
int response = multiplier.multiply(33);
System.out.println("... the result is: " + response);
System.exit(0);
}
Again, the client is similar to the original client, but with some important differences.
1. The Spring context is created with the new camel-client-remoting.xml
2. We retrieve the proxy bean instead of a ProducerTemplate. In a non-trivial
example you would have the bean injected as in the standard Spring manner.
3. The multiply method is then called directly. In the client we are now working to an
interface. There is no mention of Camel or JMS inside our Java code.
Client Using Message Endpoint EIP Pattern
This client uses the Message Endpoint EIP pattern to hide the complexity to communicate to
the Server. The Client uses the same simple API to get hold of the endpoint, create an
exchange that holds the message, set the payload and create a producer that does the send and
receive. All done using the same neutral Camel API for all the components in Camel. So if the
communication was socket TCP based you just get hold of a different endpoint and all the java
code stays the same. That is really powerful.
Okay enough talk, show me the code!
public static void main(final String[] args) throws Exception {
System.out.println("Notice this client requires that the CamelServer is already
running!");
ApplicationContext context = new
ClassPathXmlApplicationContext("camel-client.xml");
CamelContext camel = (CamelContext) context.getBean("camel");
// get the endpoint from the camel context
Endpoint endpoint = camel.getEndpoint("jms:queue:numbers");
// create the exchange used for the communication
// we use the in out pattern for asynchronized exchange where we expect a response
Exchange exchange = endpoint.createExchange(ExchangePattern.InOut);
// set the input on the in body
// must you correct type to match the expected type of an Integer object
exchange.getIn().setBody(11);
103 TUTORIALS

// to send the exchange we need an producer to do it for us
Producer producer = endpoint.createProducer();
// start the producer so it can operate
producer.start();
// let the producer process the exchange where it does all the work in this
oneline of code
System.out.println("Invoking the multiply with 11");
producer.process(exchange);
// get the response from the out body and cast it to an integer
int response = exchange.getOut().getBody(Integer.class);
System.out.println("... the result is: " + response);
// stop and exit the client
producer.stop();
System.exit(0);
}
Switching to a different component is just a matter of using the correct endpoint. So if we had
defined a TCP endpoint as: "mina:tcp://localhost:61610" then its just a matter of
getting hold of this endpoint instead of the JMS and all the rest of the java code is exactly the
same.
Run the Clients
The Clients is started using their main class respectively.
▪as a standard java main application - just start their main class
▪using maven jave:exec
In this sample we start the clients using maven:
mvn compile exec:java -PCamelClient
mvn compile exec:java -PCamelClientRemoting
mvn compile exec:java -PCamelClientEndpoint
Also see the Maven pom.xml file how the profiles for the clients is defined.
USING THE CAMEL MAVEN PLUGIN
The Camel Maven Plugin allows you to run your Camel routes directly from Maven. This
negates the need to create a host application, as we did with Camel server, simply to start up
the container. This can be very useful during development to get Camel routes running quickly.
Listing 7.Listing 7. pom.xmlpom.xml
<build>
<plugins>
<plugin>
TUTORIALS 104
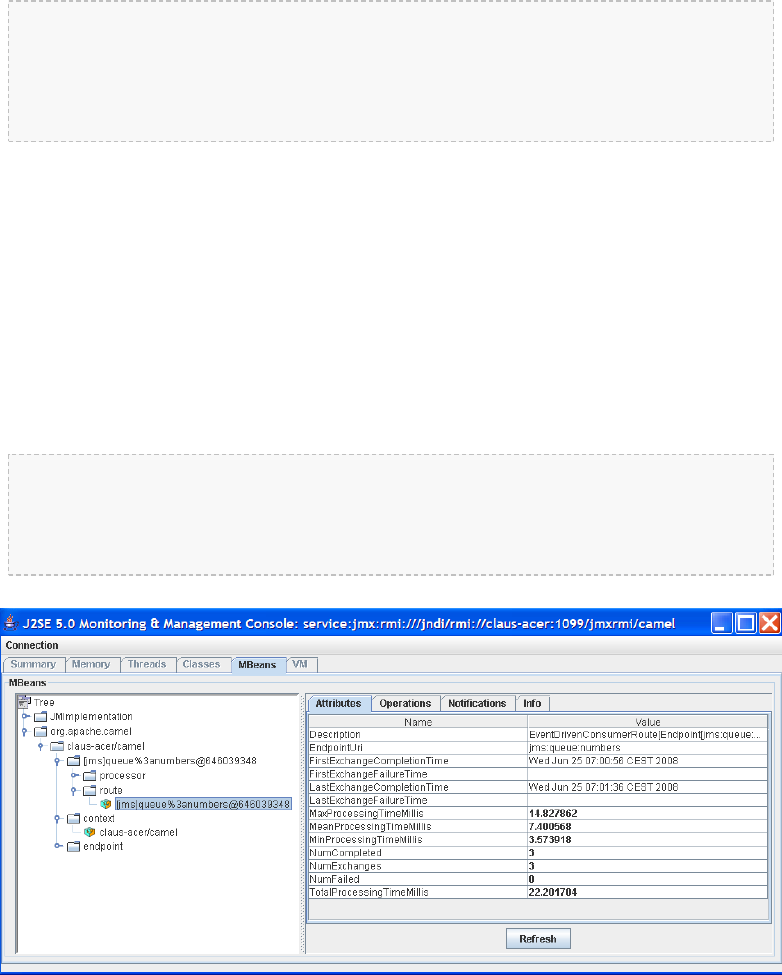
<groupId>org.apache.camel</groupId>
<artifactId>camel-maven-plugin</artifactId>
</plugin>
</plugins>
</build>
All that is required is a new plugin definition in your Maven POM. As we have already placed
our Camel config in the default location (camel-server.xml has been placed in META-INF/
spring/) we do not need to tell the plugin where the route definitions are located. Simply run
mvn camel:run.
USING CAMEL JMX
Camel has extensive support for JMX and allows us to inspect the Camel Server at runtime. As
we have enabled the JMXAgent in our tutorial we can fire up the jconsole and connect to the
following service URI: service:jmx:rmi:///jndi/rmi://localhost:1099/
jmxrmi/camel. Notice that Camel will log at INFO level the JMX Connector URI:
...
DefaultInstrumentationAgent INFO JMX connector thread started on
service:jmx:rmi:///jndi/rmi://claus-acer:1099/jmxrmi/camel
...
In the screenshot below we can see the route and its performance metrics:
SEE ALSO
• Spring Remoting with JMS Example on Amin Abbaspour's Weblog
105 TUTORIALS

TUTORIAL - CAMEL-EXAMPLE-REPORTINCIDENT
INTRODUCTION
Creating this tutorial was inspired by a real life use-case I discussed over the phone with a
colleague. He was working at a client whom uses a heavy-weight integration platform from a
very large vendor. He was in talks with developer shops to implement a new integration on this
platform. His trouble was the shop tripled the price when they realized the platform of choice.
So I was wondering how we could do this integration with Camel. Can it be done, without
tripling the cost .
This tutorial is written during the development of the integration. I have decided to start off
with a sample that isn't Camel's but standard Java and then plugin Camel as we goes. Just as
when people needed to learn Spring you could consume it piece by piece, the same goes with
Camel.
The target reader is person whom hasn't experience or just started using Camel.
MOTIVATION FOR THIS TUTORIAL
I wrote this tutorial motivated as Camel lacked an example application that was based on the
web application deployment model. The entire world hasn't moved to pure OSGi deployments
yet.
THE USE-CASE
The goal is to allow staff to report incidents into a central administration. For that they use
client software where they report the incident and submit it to the central administration. As
this is an integration in a transition phase the administration should get these incidents by email
whereas they are manually added to the database. The client software should gather the
incident and submit the information to the integration platform that in term will transform the
report into an email and send it to the central administrator for manual processing.
The figure below illustrates this process. The end users reports the incidents using the client
applications. The incident is sent to the central integration platform as webservice. The
integration platform will process the incident and send an OK acknowledgment back to the
client. Then the integration will transform the message to an email and send it to the
administration mail server. The users in the administration will receive the emails and take it
from there.
TUTORIALS 106
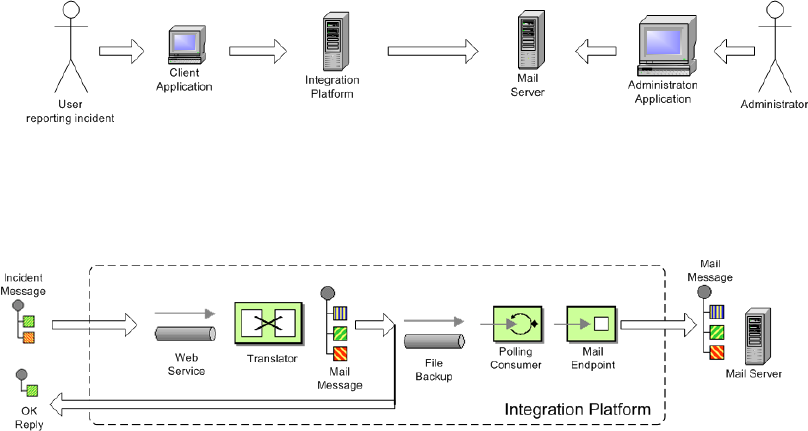
In EIP patterns
We distill the use case as EIP patterns:
PARTS
This tutorial is divided into sections and parts:
Section A: Existing Solution, how to slowly use Camel
Part 1 - This first part explain how to setup the project and get a webservice exposed using
Apache CXF. In fact we don't touch Camel yet.
Part 2 - Now we are ready to introduce Camel piece by piece (without using Spring or any
XML configuration file) and create the full feature integration. This part will introduce different
Camel's concepts and How we can build our solution using them like :
▪CamelContext
▪Endpoint, Exchange & Producer
▪Components : Log, File
Part 3 - Continued from part 2 where we implement that last part of the solution with the
event driven consumer and how to send the email through the Mail component.
Section B: The Camel Solution
Part 4 - We now turn into the path of Camel where it excels - the routing.
Part 5 - Is about how embed Camel with Spring and using CXF endpoints directly in Camel
LINKS
▪Introduction
▪Part 1
▪Part 2
107 TUTORIALS
Using Axis 2
See this blog entry by Sagara demonstrating how to use Apache Axis 2 instead of
Apache CXF as the web service framework.
▪Part 3
▪Part 4
▪Part 5
PART 1
PREREQUISITES
This tutorial uses the following frameworks:
• Maven 2.0.9
• Apache Camel 1.4.0
• Apache CXF 2.1.1
• Spring 2.5.5
Note: The sample project can be downloaded, see the resources section.
INITIAL PROJECT SETUP
We want the integration to be a standard .war application that can be deployed in any web
container such as Tomcat, Jetty or even heavy weight application servers such as WebLogic or
WebSphere. There fore we start off with the standard Maven webapp project that is created
with the following long archetype command:
mvn archetype:create -DgroupId=org.apache.camel
-DartifactId=camel-example-reportincident -DarchetypeArtifactId=maven-archetype-webapp
Notice that the groupId etc. doens't have to be org.apache.camel it can be
com.mycompany.whatever. But I have used these package names as the example is an official
part of the Camel distribution.
Then we have the basic maven folder layout. We start out with the webservice part where
we want to use Apache CXF for the webservice stuff. So we add this to the pom.xml
<properties>
<cxf-version>2.1.1</cxf-version>
</properties>
TUTORIALS 108

<dependency>
<groupId>org.apache.cxf</groupId>
<artifactId>cxf-rt-core</artifactId>
<version>${cxf-version}</version>
</dependency>
<dependency>
<groupId>org.apache.cxf</groupId>
<artifactId>cxf-rt-frontend-jaxws</artifactId>
<version>${cxf-version}</version>
</dependency>
<dependency>
<groupId>org.apache.cxf</groupId>
<artifactId>cxf-rt-transports-http</artifactId>
<version>${cxf-version}</version>
</dependency>
DEVELOPING THE WEBSERVICE
As we want to develop webservice with the contract first approach we create our .wsdl file. As
this is a example we have simplified the model of the incident to only include 8 fields. In real life
the model would be a bit more complex, but not to much.
We put the wsdl file in the folder src/main/webapp/WEB-INF/wsdl and name the
file report_incident.wsdl.
<?xml version="1.0" encoding="ISO-8859-1"?>
<wsdl:definitions xmlns:soap="http://schemas.xmlsoap.org/wsdl/soap/"
xmlns:tns="http://reportincident.example.camel.apache.org"
xmlns:xs="http://www.w3.org/2001/XMLSchema"
xmlns:http="http://schemas.xmlsoap.org/wsdl/http/"
xmlns:wsdl="http://schemas.xmlsoap.org/wsdl/"
targetNamespace="http://reportincident.example.camel.apache.org">
<!-- Type definitions for input- and output parameters for webservice -->
<wsdl:types>
<xs:schema targetNamespace="http://reportincident.example.camel.apache.org">
<xs:element name="inputReportIncident">
<xs:complexType>
<xs:sequence>
<xs:element type="xs:string"
name="incidentId"/>
<xs:element type="xs:string"
name="incidentDate"/>
<xs:element type="xs:string"
name="givenName"/>
<xs:element type="xs:string"
name="familyName"/>
<xs:element type="xs:string"
name="summary"/>
<xs:element type="xs:string"
109 TUTORIALS

name="details"/>
<xs:element type="xs:string"
name="email"/>
<xs:element type="xs:string"
name="phone"/>
</xs:sequence>
</xs:complexType>
</xs:element>
<xs:element name="outputReportIncident">
<xs:complexType>
<xs:sequence>
<xs:element type="xs:string"
name="code"/>
</xs:sequence>
</xs:complexType>
</xs:element>
</xs:schema>
</wsdl:types>
<!-- Message definitions for input and output -->
<wsdl:message name="inputReportIncident">
<wsdl:part name="parameters" element="tns:inputReportIncident"/>
</wsdl:message>
<wsdl:message name="outputReportIncident">
<wsdl:part name="parameters" element="tns:outputReportIncident"/>
</wsdl:message>
<!-- Port (interface) definitions -->
<wsdl:portType name="ReportIncidentEndpoint">
<wsdl:operation name="ReportIncident">
<wsdl:input message="tns:inputReportIncident"/>
<wsdl:output message="tns:outputReportIncident"/>
</wsdl:operation>
</wsdl:portType>
<!-- Port bindings to transports and encoding - HTTP, document literal
encoding is used -->
<wsdl:binding name="ReportIncidentBinding" type="tns:ReportIncidentEndpoint">
<soap:binding transport="http://schemas.xmlsoap.org/soap/http"/>
<wsdl:operation name="ReportIncident">
<soap:operation
soapAction="http://reportincident.example.camel.apache.org/ReportIncident"
style="document"/>
<wsdl:input>
<soap:body parts="parameters" use="literal"/>
</wsdl:input>
<wsdl:output>
<soap:body parts="parameters" use="literal"/>
</wsdl:output>
</wsdl:operation>
</wsdl:binding>
<!-- Service definition -->
TUTORIALS 110

<wsdl:service name="ReportIncidentService">
<wsdl:port name="ReportIncidentPort"
binding="tns:ReportIncidentBinding">
<soap:address
location="http://reportincident.example.camel.apache.org"/>
</wsdl:port>
</wsdl:service>
</wsdl:definitions>
CXF wsdl2java
Then we integration the CXF wsdl2java generator in the pom.xml so we have CXF generate
the needed POJO classes for our webservice contract.
However at first we must configure maven to live in the modern world of Java 1.5 so we must
add this to the pom.xml
<!-- to compile with 1.5 -->
<plugin>
<groupId>org.apache.maven.plugins</groupId>
<artifactId>maven-compiler-plugin</artifactId>
<configuration>
<source>1.5</source>
<target>1.5</target>
</configuration>
</plugin>
And then we can add the CXF wsdl2java code generator that will hook into the compile goal so
its automatic run all the time:
<!-- CXF wsdl2java generator, will plugin to the compile goal
-->
<plugin>
<groupId>org.apache.cxf</groupId>
<artifactId>cxf-codegen-plugin</artifactId>
<version>${cxf-version}</version>
<executions>
<execution>
<id>generate-sources</id>
<phase>generate-sources</phase>
<configuration>
<sourceRoot>${basedir}/target/
generated/src/main/java</sourceRoot>
<wsdlOptions>
<wsdlOption>
<wsdl>${basedir}/src/main/webapp/WEB-INF/wsdl/report_incident.wsdl</wsdl>
</wsdlOption>
</wsdlOptions>
111 TUTORIALS

</configuration>
<goals>
<goal>wsdl2java</goal>
</goals>
</execution>
</executions>
</plugin>
You are now setup and should be able to compile the project. So running the mvn compile
should run the CXF wsdl2java and generate the source code in the folder &{basedir}/
target/generated/src/main/java that we specified in the pom.xml above. Since its in
the target/generated/src/main/java maven will pick it up and include it in the build
process.
Configuration of the web.xml
Next up is to configure the web.xml to be ready to use CXF so we can expose the webservice.
As Spring is the center of the universe, or at least is a very important framework in today's Java
land we start with the listener that kick-starts Spring. This is the usual piece of code:
<!-- the listener that kick-starts Spring -->
<listener>
<listener-class>org.springframework.web.context.ContextLoaderListener</listener-class>
</listener>
And then we have the CXF part where we define the CXF servlet and its URI mappings to
which we have chosen that all our webservices should be in the path /webservices/
<!-- CXF servlet -->
<servlet>
<servlet-name>CXFServlet</servlet-name>
<servlet-class>org.apache.cxf.transport.servlet.CXFServlet</servlet-class>
<load-on-startup>1</load-on-startup>
</servlet>
<!-- all our webservices are mapped under this URI pattern -->
<servlet-mapping>
<servlet-name>CXFServlet</servlet-name>
<url-pattern>/webservices/*</url-pattern>
</servlet-mapping>
Then the last piece of the puzzle is to configure CXF, this is done in a spring XML that we link
to fron the web.xml by the standard Spring contextConfigLocation property in the
web.xml
TUTORIALS 112

<!-- location of spring xml files -->
<context-param>
<param-name>contextConfigLocation</param-name>
<param-value>classpath:cxf-config.xml</param-value>
</context-param>
We have named our CXF configuration file cxf-config.xml and its located in the root of
the classpath. In Maven land that is we can have the cxf-config.xml file in the src/
main/resources folder. We could also have the file located in the WEB-INF folder for
instance <param-value>/WEB-INF/cxf-config.xml</param-value>.
Getting rid of the old jsp world
The maven archetype that created the basic folder structure also created a sample .jsp file
index.jsp. This file src/main/webapp/index.jsp should be deleted.
Configuration of CXF
The cxf-config.xml is as follows:
<beans xmlns="http://www.springframework.org/schema/beans"
xmlns:xsi="http://www.w3.org/2001/XMLSchema-instance"
xmlns:jaxws="http://cxf.apache.org/jaxws"
xsi:schemaLocation="
http://www.springframework.org/schema/beans http://www.springframework.org/
schema/beans/spring-beans-2.0.xsd
http://cxf.apache.org/jaxws http://cxf.apache.org/schemas/jaxws.xsd">
<import resource="classpath:META-INF/cxf/cxf.xml"/>
<import resource="classpath:META-INF/cxf/cxf-extension-soap.xml"/>
<import resource="classpath:META-INF/cxf/cxf-servlet.xml"/>
<!-- implementation of the webservice -->
<bean id="reportIncidentEndpoint"
class="org.apache.camel.example.reportincident.ReportIncidentEndpointImpl"/>
<!-- export the webservice using jaxws -->
<jaxws:endpoint id="reportIncident"
implementor="#reportIncidentEndpoint"
address="/incident"
wsdlLocation="/WEB-INF/wsdl/report_incident.wsdl"
endpointName="s:ReportIncidentPort"
serviceName="s:ReportIncidentService"
xmlns:s="http://reportincident.example.camel.apache.org"/>
</beans>
The configuration is standard CXF and is documented at the Apache CXF website.
The 3 import elements is needed by CXF and they must be in the file.
113 TUTORIALS

Noticed that we have a spring bean reportIncidentEndpoint that is the implementation
of the webservice endpoint we let CXF expose.
Its linked from the jaxws element with the implementator attribute as we use the # mark to
identify its a reference to a spring bean. We could have stated the classname directly as
implementor="org.apache.camel.example.reportincident.ReportIncidentEndpoint"
but then we lose the ability to let the ReportIncidentEndpoint be configured by spring.
The address attribute defines the relative part of the URL of the exposed webservice.
wsdlLocation is an optional parameter but for persons like me that likes contract-first we
want to expose our own .wsdl contracts and not the auto generated by the frameworks, so
with this attribute we can link to the real .wsdl file. The last stuff is needed by CXF as you could
have several services so it needs to know which this one is. Configuring these is quite easy as all
the information is in the wsdl already.
Implementing the ReportIncidentEndpoint
Phew after all these meta files its time for some java code so we should code the implementor
of the webservice. So we fire up mvn compile to let CXF generate the POJO classes for our
webservice and we are ready to fire up a Java editor.
You can use mvn idea:idea or mvn eclipse:eclipse to create project files for
these editors so you can load the project. However IDEA has been smarter lately and can load
a pom.xml directly.
As we want to quickly see our webservice we implement just a quick and dirty as it can get.
At first beware that since its jaxws and Java 1.5 we get annotations for the money, but they
reside on the interface so we can remove them from our implementations so its a nice plain
POJO again:
package org.apache.camel.example.reportincident;
/**
* The webservice we have implemented.
*/
public class ReportIncidentEndpointImpl implements ReportIncidentEndpoint {
public OutputReportIncident reportIncident(InputReportIncident parameters) {
System.out.println("Hello ReportIncidentEndpointImpl is called from " +
parameters.getGivenName());
OutputReportIncident out = new OutputReportIncident();
out.setCode("OK");
return out;
}
}
We just output the person that invokes this webservice and returns a OK response. This class
should be in the maven source root folder src/main/java under the package name
TUTORIALS 114

org.apache.camel.example.reportincident. Beware that the maven archetype
tool didn't create the src/main/java folder, so you should create it manually.
To test if we are home free we run mvn clean compile.
Running our webservice
Now that the code compiles we would like to run it in a web container, so we add jetty to our
pom.xml so we can run mvn jetty:run:
<properties>
...
<jetty-version>6.1.1</jetty-version>
</properties>
<build>
<plugins>
...
<!-- so we can run mvn jetty:run -->
<plugin>
<groupId>org.mortbay.jetty</groupId>
<artifactId>maven-jetty-plugin</artifactId>
<version>${jetty-version}</version>
</plugin>
Notice: We use Jetty v6.1.1 as never versions has troubles on my laptop. Feel free to try a
newer version on your system, but v6.1.1 works flawless.
So to see if everything is in order we fire up jetty with mvn jetty:run and if everything
is okay you should be able to access http://localhost:8080.
Jetty is smart that it will list the correct URI on the page to our web application, so just click on
the link. This is smart as you don't have to remember the exact web context URI for your
application - just fire up the default page and Jetty will help you.
So where is the damn webservice then? Well as we did configure the web.xml to instruct
the CXF servlet to accept the pattern /webservices/* we should hit this URL to get the
attention of CXF: http://localhost:8080/camel-example-reportincident/
webservices.
115 TUTORIALS

Hitting the webservice
Now we have the webservice running in a standard .war application in a standard web container
such as Jetty we would like to invoke the webservice and see if we get our code executed.
Unfortunately this isn't the easiest task in the world - its not so easy as a REST URL, so we
need tools for this. So we fire up our trusty webservice tool SoapUI and let it be the one to fire
the webservice request and see the response.
Using SoapUI we sent a request to our webservice and we got the expected OK response
and the console outputs the System.out so we are ready to code.
Remote Debugging
Okay a little sidestep but wouldn't it be cool to be able to debug your code when its fired up
under Jetty? As Jetty is started from maven, we need to instruct maven to use debug mode.
Se we set the MAVEN_OPTS environment to start in debug mode and listen on port 5005.
MAVEN_OPTS=-Xmx512m -XX:MaxPermSize=128m -Xdebug
-Xrunjdwp:transport=dt_socket,server=y,suspend=n,address=5005
Then you need to restart Jetty so its stopped with ctrl + c. Remember to start a new shell to
pickup the new environment settings. And start jetty again.
Then we can from our IDE attach a remote debugger and debug as we want.
First we configure IDEA to attach to a remote debugger on port 5005:
TUTORIALS 116
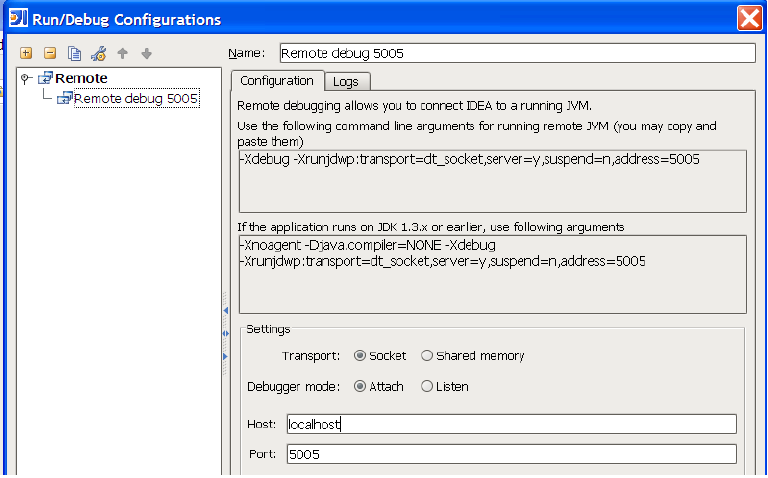
Then we set a breakpoint in our code ReportIncidentEndpoint and hit the SoapUI
once again and we are breaked at the breakpoint where we can inspect the parameters:
117 TUTORIALS
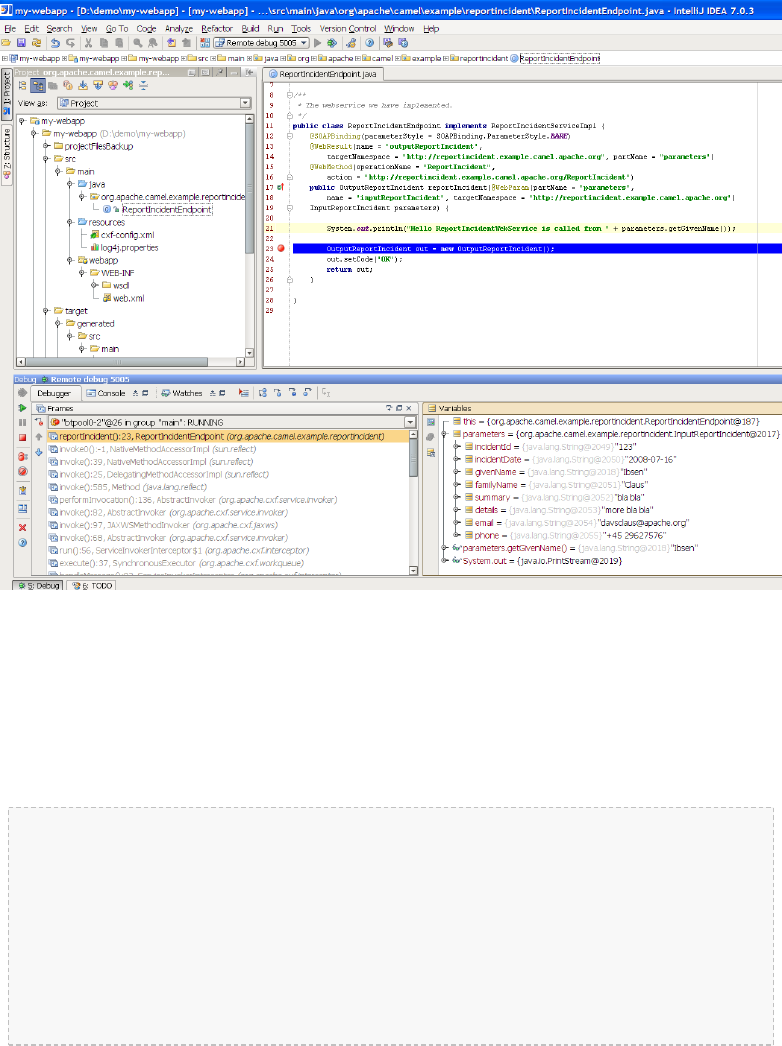
Adding a unit test
Oh so much hard work just to hit a webservice, why can't we just use an unit test to invoke
our webservice? Yes of course we can do this, and that's the next step.
First we create the folder structure src/test/java and src/test/resources. We
then create the unit test in the src/test/java folder.
package org.apache.camel.example.reportincident;
import junit.framework.TestCase;
/**
* Plain JUnit test of our webservice.
*/
public class ReportIncidentEndpointTest extends TestCase {
}
TUTORIALS 118

Here we have a plain old JUnit class. As we want to test webservices we need to start and
expose our webservice in the unit test before we can test it. And JAXWS has pretty decent
methods to help us here, the code is simple as:
import javax.xml.ws.Endpoint;
...
private static String ADDRESS = "http://localhost:9090/unittest";
protected void startServer() throws Exception {
// We need to start a server that exposes or webservice during the unit testing
// We use jaxws to do this pretty simple
ReportIncidentEndpointImpl server = new ReportIncidentEndpointImpl();
Endpoint.publish(ADDRESS, server);
}
The Endpoint class is the javax.xml.ws.Endpoint that under the covers looks for a
provider and in our case its CXF - so its CXF that does the heavy lifting of exposing out
webservice on the given URL address. Since our class ReportIncidentEndpointImpl implements
the interface ReportIncidentEndpoint that is decorated with all the jaxws annotations it
got all the information it need to expose the webservice. Below is the CXF wsdl2java generated
interface:
/*
*
*/
package org.apache.camel.example.reportincident;
import javax.jws.WebMethod;
import javax.jws.WebParam;
import javax.jws.WebResult;
import javax.jws.WebService;
import javax.jws.soap.SOAPBinding;
import javax.jws.soap.SOAPBinding.ParameterStyle;
import javax.xml.bind.annotation.XmlSeeAlso;
/**
* This class was generated by Apache CXF 2.1.1
* Wed Jul 16 12:40:31 CEST 2008
* Generated source version: 2.1.1
*
*/
/*
*
*/
@WebService(targetNamespace = "http://reportincident.example.camel.apache.org", name =
119 TUTORIALS
"ReportIncidentEndpoint")
@XmlSeeAlso({ObjectFactory.class})
@SOAPBinding(parameterStyle = SOAPBinding.ParameterStyle.BARE)
public interface ReportIncidentEndpoint {
/*
*
*/
@SOAPBinding(parameterStyle = SOAPBinding.ParameterStyle.BARE)
@WebResult(name = "outputReportIncident", targetNamespace =
"http://reportincident.example.camel.apache.org", partName = "parameters")
@WebMethod(operationName = "ReportIncident", action =
"http://reportincident.example.camel.apache.org/ReportIncident")
public OutputReportIncident reportIncident(
@WebParam(partName = "parameters", name = "inputReportIncident",
targetNamespace = "http://reportincident.example.camel.apache.org")
InputReportIncident parameters
);
}
Next up is to create a webservice client so we can invoke our webservice. For this we actually
use the CXF framework directly as its a bit more easier to create a client using this framework
than using the JAXWS style. We could have done the same for the server part, and you should
do this if you need more power and access more advanced features.
import org.apache.cxf.jaxws.JaxWsProxyFactoryBean;
...
protected ReportIncidentEndpoint createCXFClient() {
// we use CXF to create a client for us as its easier than JAXWS and works
JaxWsProxyFactoryBean factory = new JaxWsProxyFactoryBean();
factory.setServiceClass(ReportIncidentEndpoint.class);
factory.setAddress(ADDRESS);
return (ReportIncidentEndpoint) factory.create();
}
So now we are ready for creating a unit test. We have the server and the client. So we just
create a plain simple unit test method as the usual junit style:
public void testRendportIncident() throws Exception {
startServer();
ReportIncidentEndpoint client = createCXFClient();
InputReportIncident input = new InputReportIncident();
input.setIncidentId("123");
input.setIncidentDate("2008-07-16");
input.setGivenName("Claus");
TUTORIALS 120

input.setFamilyName("Ibsen");
input.setSummary("bla bla");
input.setDetails("more bla bla");
input.setEmail("davsclaus@apache.org");
input.setPhone("+45 2962 7576");
OutputReportIncident out = client.reportIncident(input);
assertEquals("Response code is wrong","OK", out.getCode());
}
Now we are nearly there. But if you run the unit test with mvn test then it will fail. Why!!!
Well its because that CXF needs is missing some dependencies during unit testing. In fact it
needs the web container, so we need to add this to our pom.xml.
<!-- cxf web container for unit testing -->
<dependency>
<groupId>org.apache.cxf</groupId>
<artifactId>cxf-rt-transports-http-jetty</artifactId>
<version>${cxf-version}</version>
<scope>test</scope>
</dependency>
Well what is that, CXF also uses Jetty for unit test - well its just shows how agile, embedable
and popular Jetty is.
So lets run our junit test with, and it reports:
mvn test
Tests run: 1, Failures: 0, Errors: 0, Skipped: 0
[INFO] BUILD SUCCESSFUL
Yep thats it for now. We have a basic project setup.
END OF PART 1
Thanks for being patient and reading all this more or less standard Maven, Spring, JAXWS and
Apache CXF stuff. Its stuff that is well covered on the net, but I wanted a full fledged tutorial on
a maven project setup that is web service ready with Apache CXF. We will use this as a base
for the next part where we demonstrate how Camel can be digested slowly and piece by piece
just as it was back in the times when was introduced and was learning the Spring framework
that we take for granted today.
RESOURCES
• Apache CXF user guide•
121 TUTORIALS
Name Size Creator Creation
Date Comment
tutorial_reportincident_part-
one.zi...
14
kB
Claus
Ibsen
Jul 17,
2008 23:34
LINKS
▪Introduction
▪Part 1
▪Part 2
▪Part 3
▪Part 4
▪Part 5
PART 2
ADDING CAMEL
In this part we will introduce Camel so we start by adding Camel to our pom.xml:
<properties>
...
<camel-version>1.4.0</camel-version>
</properties>
<!-- camel -->
<dependency>
<groupId>org.apache.camel</groupId>
<artifactId>camel-core</artifactId>
<version>${camel-version}</version>
</dependency>
That's it, only one dependency for now.
Now we turn towards our webservice endpoint implementation where we want to let Camel
have a go at the input we receive. As Camel is very non invasive its basically a .jar file then we
can just grap Camel but creating a new instance of DefaultCamelContext that is the
hearth of Camel its context.
CamelContext camel = new DefaultCamelContext();
In fact we create a constructor in our webservice and add this code:
TUTORIALS 122
Synchronize IDE
If you continue from part 1, remember to update your editor project settings since
we have introduce new .jar files. For instance IDEA has a feature to synchronize
with Maven projects.
private CamelContext camel;
public ReportIncidentEndpointImpl() throws Exception {
// create the camel context that is the "heart" of Camel
camel = new DefaultCamelContext();
// add the log component
camel.addComponent("log",new LogComponent());
// start Camel
camel.start();
}
LOGGING THE "HELLO WORLD"
Here at first we want Camel to log the givenName and familyName parameters we
receive, so we add the LogComponent with the key log. And we must start Camel before
its ready to act.
Then we change the code in the method that is invoked by Apache CXF when a webservice
request arrives. We get the name and let Camel have a go at it in the new method we create
sendToCamel:
public OutputReportIncident reportIncident(InputReportIncident parameters) {
String name = parameters.getGivenName() + " " + parameters.getFamilyName();
// let Camel do something with the name
sendToCamelLog(name);
OutputReportIncident out = new OutputReportIncident();
out.setCode("OK");
return out;
}
Next is the Camel code. At first it looks like there are many code lines to do a simple task of
logging the name - yes it is. But later you will in fact realize this is one of Camels true power. Its
concise API. Hint: The same code can be used for any component in Camel.
123 TUTORIALS
Component Documentation
The Log and File components is documented as well, just click on the links. Just
return to this documentation later when you must use these components for real.
private void sendToCamelLog(String name) {
try {
// get the log component
Component component = camel.getComponent("log");
// create an endpoint and configure it.
// Notice the URI parameters this is a common pratice in Camel to configure
// endpoints based on URI.
// com.mycompany.part2 = the log category used. Will log at INFO level as
default
Endpoint endpoint = component.createEndpoint("log:com.mycompany.part2");
// create an Exchange that we want to send to the endpoint
Exchange exchange = endpoint.createExchange();
// set the in message payload (=body) with the name parameter
exchange.getIn().setBody(name);
// now we want to send the exchange to this endpoint and we then need a
producer
// for this, so we create and start the producer.
Producer producer = endpoint.createProducer();
producer.start();
// process the exchange will send the exchange to the log component, that
will process
// the exchange and yes log the payload
producer.process(exchange);
// stop the producer, we want to be nice and cleanup
producer.stop();
}catch (Exception e) {
// we ignore any exceptions and just rethrow as runtime
throw new RuntimeException(e);
}
}
Okay there are code comments in the code block above that should explain what is happening.
We run the code by invoking our unit test with maven mvn test, and we should get this log
line:
TUTORIALS 124
INFO: Exchange[BodyType:String, Body:Claus Ibsen]
WRITE TO FILE - EASY WITH THE SAME CODE STYLE
Okay that isn't to impressive, Camel can log Well I promised that the above code style can
be used for any component, so let's store the payload in a file. We do this by adding the file
component to the Camel context
// add the file component
camel.addComponent("file",new FileComponent());
And then we let camel write the payload to the file after we have logged, by creating a new
method sendToCamelFile. We want to store the payload in filename with the incident id so
we need this parameter also:
// let Camel do something with the name
sendToCamelLog(name);
sendToCamelFile(parameters.getIncidentId(), name);
And then the code that is 99% identical. We have change the URI configuration when we create
the endpoint as we pass in configuration parameters to the file component.
And then we need to set the output filename and this is done by adding a special header to the
exchange. That's the only difference:
private void sendToCamelFile(String incidentId, String name) {
try {
// get the file component
Component component = camel.getComponent("file");
// create an endpoint and configure it.
// Notice the URI parameters this is a common pratice in Camel to configure
// endpoints based on URI.
// file://target instructs the base folder to output the files. We put in
the target folder
// then its actumatically cleaned by mvn clean
Endpoint endpoint = component.createEndpoint("file://target");
// create an Exchange that we want to send to the endpoint
Exchange exchange = endpoint.createExchange();
// set the in message payload (=body) with the name parameter
exchange.getIn().setBody(name);
// now a special header is set to instruct the file component what the
output filename
// should be
125 TUTORIALS

exchange.getIn().setHeader(FileComponent.HEADER_FILE_NAME, "incident-" +
incidentId + ".txt");
// now we want to send the exchange to this endpoint and we then need a
producer
// for this, so we create and start the producer.
Producer producer = endpoint.createProducer();
producer.start();
// process the exchange will send the exchange to the file component, that
will process
// the exchange and yes write the payload to the given filename
producer.process(exchange);
// stop the producer, we want to be nice and cleanup
producer.stop();
}catch (Exception e) {
// we ignore any exceptions and just rethrow as runtime
throw new RuntimeException(e);
}
}
After running our unit test again with mvn test we have a output file in the target folder:
D:\demo\part-two>type target\incident-123.txt
Claus Ibsen
FULLY JAVA BASED CONFIGURATION OF ENDPOINTS
In the file example above the configuration was URI based. What if you want 100% java setter
based style, well this is of course also possible. We just need to cast to the component specific
endpoint and then we have all the setters available:
// create the file endpoint, we cast to FileEndpoint because then we can do
// 100% java settter based configuration instead of the URI sting based
// must pass in an empty string, or part of the URI configuration if
wanted
FileEndpoint endpoint = (FileEndpoint)component.createEndpoint("");
endpoint.setFile(new File("target/subfolder"));
endpoint.setAutoCreate(true);
That's it. Now we have used the setters to configure the FileEndpoint that it should store
the file in the folder target/subfolder. Of course Camel now stores the file in the subfolder.
D:\demo\part-two>type target\subfolder\incident-123.txt
Claus Ibsen
TUTORIALS 126
LESSONS LEARNED
Okay I wanted to demonstrate how you can be in 100% control of the configuration and usage
of Camel based on plain Java code with no hidden magic or special XML or other configuration
files. Just add the camel-core.jar and you are ready to go.
You must have noticed that the code for sending a message to a given endpoint is the same
for both the log and file, in fact any Camel endpoint. You as the client shouldn't bother with
component specific code such as file stuff for file components, jms stuff for JMS messaging etc.
This is what the Message Endpoint EIP pattern is all about and Camel solves this very very nice -
a key pattern in Camel.
REDUCING CODE LINES
Now that you have been introduced to Camel and one of its masterpiece patterns solved
elegantly with the Message Endpoint its time to give productive and show a solution in fewer
code lines, in fact we can get it down to 5, 4, 3, 2 .. yes only 1 line of code.
The key is the ProducerTemplate that is a Spring'ish xxxTemplate based producer.
Meaning that it has methods to send messages to any Camel endpoints. First of all we need to
get hold of such a template and this is done from the CamelContext
private ProducerTemplate template;
public ReportIncidentEndpointImpl() throws Exception {
...
// get the ProducerTemplate thst is a Spring'ish xxxTemplate based producer
for very
// easy sending exchanges to Camel.
template = camel.createProducerTemplate();
// start Camel
camel.start();
}
Now we can use template for sending payloads to any endpoint in Camel. So all the logging
gabble can be reduced to:
template.sendBody("log:com.mycompany.part2.easy", name);
And the same goes for the file, but we must also send the header to instruct what the output
filename should be:
String filename = "easy-incident-" + incidentId + ".txt";
template.sendBodyAndHeader("file://target/subfolder", name,
FileComponent.HEADER_FILE_NAME, filename);
127 TUTORIALS
REDUCING EVEN MORE CODE LINES
Well we got the Camel code down to 1-2 lines for sending the message to the component that
does all the heavy work of wring the message to a file etc. But we still got 5 lines to initialize
Camel.
camel = new DefaultCamelContext();
camel.addComponent("log",new LogComponent());
camel.addComponent("file",new FileComponent());
template = camel.createProducerTemplate();
camel.start();
This can also be reduced. All the standard components in Camel is auto discovered on-the-fly
so we can remove these code lines and we are down to 3 lines.
Okay back to the 3 code lines:
camel = new DefaultCamelContext();
template = camel.createProducerTemplate();
camel.start();
Later will we see how we can reduce this to ... in fact 0 java code lines. But the 3 lines will do
for now.
MESSAGE TRANSLATION
Okay lets head back to the over goal of the integration. Looking at the EIP diagrams at the
introduction page we need to be able to translate the incoming webservice to an email. Doing
so we need to create the email body. When doing the message translation we could put up our
sleeves and do it manually in pure java with a StringBuilder such as:
private String createMailBody(InputReportIncident parameters) {
StringBuilder sb = new StringBuilder();
sb.append("Incident ").append(parameters.getIncidentId());
sb.append(" has been reported on the ").append(parameters.getIncidentDate());
sb.append(" by ").append(parameters.getGivenName());
sb.append(" ").append(parameters.getFamilyName());
// and the rest of the mail body with more appends to the string builder
return sb.toString();
}
But as always it is a hardcoded template for the mail body and the code gets kinda ugly if the
mail message has to be a bit more advanced. But of course it just works out-of-the-box with
just classes already in the JDK.
TUTORIALS 128
Component auto discovery
When an endpoint is requested with a scheme that Camel hasn't seen before it will
try to look for it in the classpath. It will do so by looking for special Camel
component marker files that reside in the folder META-INF/services/org/
apache/camel/component. If there are files in this folder it will read them as
the filename is the scheme part of the URL. For instance the log component is
defined in this file META-INF/services/org/apache/component/log
and its content is:
class=org.apache.camel.component.log.LogComponent
The class property defines the component implementation.
Tip: End-users can create their 3rd party components using the same technique and have
them been auto discovered on-the-fly.
Lets use a template language instead such as Apache Velocity. As Camel have a component
for Velocity integration we will use this component. Looking at the Component List overview
we can see that camel-velocity component uses the artifactId camel-velocity so therefore
we need to add this to the pom.xml
<dependency>
<groupId>org.apache.camel</groupId>
<artifactId>camel-velocity</artifactId>
<version>${camel-version}</version>
</dependency>
And now we have a Spring conflict as Apache CXF is dependent on Spring 2.0.8 and camel-
velocity is dependent on Spring 2.5.5. To remedy this we could wrestle with the pom.xml
with excludes settings in the dependencies or just bring in another dependency camel-
spring:
<dependency>
<groupId>org.apache.camel</groupId>
<artifactId>camel-spring</artifactId>
<version>${camel-version}</version>
</dependency>
In fact camel-spring is such a vital part of Camel that you will end up using it in nearly all
situations - we will look into how well Camel is seamless integration with Spring in part 3. For
now its just another dependency.
129 TUTORIALS
We create the mail body with the Velocity template and create the file src/main/
resources/MailBody.vm. The content in the MailBody.vm file is:
Incident $body.incidentId has been reported on the $body.incidentDate by
$body.givenName $body.familyName.
The person can be contact by:
- email: $body.email
- phone: $body.phone
Summary: $body.summary
Details:
$body.details
This is an auto generated email. You can not reply.
Letting Camel creating the mail body and storing it as a file is as easy as the following 3 code
lines:
private void generateEmailBodyAndStoreAsFile(InputReportIncident parameters) {
// generate the mail body using velocity template
// notice that we just pass in our POJO (= InputReportIncident) that we
// got from Apache CXF to Velocity.
Object response = template.sendBody("velocity:MailBody.vm", parameters);
// Note: the response is a String and can be cast to String if needed
// store the mail in a file
String filename = "mail-incident-" + parameters.getIncidentId() + ".txt";
template.sendBodyAndHeader("file://target/subfolder", response,
FileComponent.HEADER_FILE_NAME, filename);
}
What is impressive is that we can just pass in our POJO object we got from Apache CXF to
Velocity and it will be able to generate the mail body with this object in its context. Thus we
don't need to prepare anything before we let Velocity loose and generate our mail body.
Notice that the template method returns a object with out response. This object contains
the mail body as a String object. We can cast to String if needed.
If we run our unit test with mvn test we can in fact see that Camel has produced the file
and we can type its content:
D:\demo\part-two>type target\subfolder\mail-incident-123.txt
Incident 123 has been reported on the 2008-07-16 by Claus Ibsen.
The person can be contact by:
- email: davsclaus@apache.org
- phone: +45 2962 7576
Summary: bla bla
TUTORIALS 130

Details:
more bla bla
This is an auto generated email. You can not reply.
FIRST PART OF THE SOLUTION
What we have seen here is actually what it takes to build the first part of the integration flow.
Receiving a request from a webservice, transform it to a mail body and store it to a file, and
return an OK response to the webservice. All possible within 10 lines of code. So lets wrap it
up here is what it takes:
/**
* The webservice we have implemented.
*/
public class ReportIncidentEndpointImpl implements ReportIncidentEndpoint {
private CamelContext camel;
private ProducerTemplate template;
public ReportIncidentEndpointImpl() throws Exception {
// create the camel context that is the "heart" of Camel
camel = new DefaultCamelContext();
// get the ProducerTemplate thst is a Spring'ish xxxTemplate based producer
for very
// easy sending exchanges to Camel.
template = camel.createProducerTemplate();
// start Camel
camel.start();
}
public OutputReportIncident reportIncident(InputReportIncident parameters) {
// transform the request into a mail body
Object mailBody = template.sendBody("velocity:MailBody.vm", parameters);
// store the mail body in a file
String filename = "mail-incident-" + parameters.getIncidentId() + ".txt";
template.sendBodyAndHeader("file://target/subfolder", mailBody,
FileComponent.HEADER_FILE_NAME, filename);
// return an OK reply
OutputReportIncident out = new OutputReportIncident();
out.setCode("OK");
return out;
}
131 TUTORIALS
}
Okay I missed by one, its in fact only 9 lines of java code and 2 fields.
END OF PART 2
I know this is a bit different introduction to Camel to how you can start using it in your
projects just as a plain java .jar framework that isn't invasive at all. I took you through the
coding parts that requires 6 - 10 lines to send a message to an endpoint, buts it's important to
show the Message Endpoint EIP pattern in action and how its implemented in Camel. Yes of
course Camel also has to one liners that you can use, and will use in your projects for sending
messages to endpoints. This part has been about good old plain java, nothing fancy with Spring,
XML files, auto discovery, OGSi or other new technologies. I wanted to demonstrate the basic
building blocks in Camel and how its setup in pure god old fashioned Java. There are plenty of
eye catcher examples with one liners that does more than you can imagine - we will come
there in the later parts.
Okay part 3 is about building the last pieces of the solution and now it gets interesting since
we have to wrestle with the event driven consumer.
Brew a cup of coffee, tug the kids and kiss the wife, for now we will have us some fun with the
Camel. See you in part 3.
RESOURCES
•Name Size Creator Creation Date Comment
part-two.zip 17 kB Claus Ibsen Jul 19, 2008 00:52
LINKS
▪Introduction
▪Part 1
▪Part 2
▪Part 3
▪Part 4
▪Part 5
TUTORIALS 132

PART 3
RECAP
Lets just recap on the solution we have now:
public class ReportIncidentEndpointImpl implements ReportIncidentEndpoint {
private CamelContext camel;
private ProducerTemplate template;
public ReportIncidentEndpointImpl() throws Exception {
// create the camel context that is the "heart" of Camel
camel = new DefaultCamelContext();
// get the ProducerTemplate thst is a Spring'ish xxxTemplate based producer
for very
// easy sending exchanges to Camel.
template = camel.createProducerTemplate();
// start Camel
camel.start();
}
/**
* This is the last solution displayed that is the most simple
*/
public OutputReportIncident reportIncident(InputReportIncident parameters) {
// transform the request into a mail body
Object mailBody = template.sendBody("velocity:MailBody.vm", parameters);
// store the mail body in a file
String filename = "mail-incident-" + parameters.getIncidentId() + ".txt";
template.sendBodyAndHeader("file://target/subfolder", mailBody,
FileComponent.HEADER_FILE_NAME, filename);
// return an OK reply
OutputReportIncident out = new OutputReportIncident();
out.setCode("OK");
return out;
}
}
This completes the first part of the solution: receiving the message using webservice, transform
it to a mail body and store it as a text file.
What is missing is the last part that polls the text files and send them as emails. Here is where
some fun starts, as this requires usage of the Event Driven Consumer EIP pattern to react when
new files arrives. So lets see how we can do this in Camel. There is a saying: Many roads lead to
Rome, and that is also true for Camel - there are many ways to do it in Camel.
133 TUTORIALS

ADDING THE EVENT DRIVEN CONSUMER
We want to add the consumer to our integration that listen for new files, we do this by
creating a private method where the consumer code lives. We must register our consumer in
Camel before its started so we need to add, and there fore we call the method
addMailSenderConsumer in the constructor below:
public ReportIncidentEndpointImpl() throws Exception {
// create the camel context that is the "heart" of Camel
camel = new DefaultCamelContext();
// get the ProducerTemplate thst is a Spring'ish xxxTemplate based producer
for very
// easy sending exchanges to Camel.
template = camel.createProducerTemplate();
// add the event driven consumer that will listen for mail files and process
them
addMailSendConsumer();
// start Camel
camel.start();
}
The consumer needs to be consuming from an endpoint so we grab the endpoint from Camel
we want to consume. It's file://target/subfolder. Don't be fooled this endpoint
doesn't have to 100% identical to the producer, i.e. the endpoint we used in the previous part
to create and store the files. We could change the URL to include some options, and to make it
more clear that it's possible we setup a delay value to 10 seconds, and the first poll starts after
2 seconds. This is done by adding
?consumer.delay=10000&consumer.initialDelay=2000 to the URL.
When we have the endpoint we can create the consumer (just as in part 1 where we created a
producer}. Creating the consumer requires a Processor where we implement the java code
what should happen when a message arrives. To get the mail body as a String object we can use
the getBody method where we can provide the type we want in return.
Sending the email is still left to be implemented, we will do this later. And finally we must
remember to start the consumer otherwise its not active and won't listen for new files.
private void addMailSendConsumer() throws Exception {
// Grab the endpoint where we should consume. Option - the first poll starts
after 2 seconds
Endpoint endpint = camel.getEndpoint("file://target/
subfolder?consumer.initialDelay=2000");
// create the event driven consumer
// the Processor is the code what should happen when there is an event
// (think it as the onMessage method)
Consumer consumer = endpint.createConsumer(new Processor() {
TUTORIALS 134
URL Configuration
The URL configuration in Camel endpoints is just like regular URL we know from
the Internet. You use ? and & to set the options.
Camel Type Converter
Why don't we just cast it as we always do in Java? Well the biggest advantage when
you provide the type as a parameter you tell Camel what type you want and Camel
can automatically convert it for you, using its flexible Type Converter mechanism.
This is a great advantage, and you should try to use this instead of regular type
casting.
public void process(Exchange exchange) throws Exception {
// get the mail body as a String
String mailBody = exchange.getIn().getBody(String.class);
// okay now we are read to send it as an email
System.out.println("Sending email..." + mailBody);
}
});
// star the consumer, it will listen for files
consumer.start();
}
Before we test it we need to be aware that our unit test is only catering for the first part of the
solution, receiving the message with webservice, transforming it using Velocity and then storing
it as a file - it doesn't test the Event Driven Consumer we just added. As we are eager to see it
in action, we just do a common trick adding some sleep in our unit test, that gives our Event
Driven Consumer time to react and print to System.out. We will later refine the test:
public void testRendportIncident() throws Exception {
...
OutputReportIncident out = client.reportIncident(input);
assertEquals("Response code is wrong","OK", out.getCode());
// give the event driven consumer time to react
Thread.sleep(10 * 1000);
}
We run the test with mvn clean test and have eyes fixed on the console output.
During all the output in the console, we see that our consumer has been triggered, as we want.
135 TUTORIALS

2008-07-19 12:09:24,140 [mponent@1f12c4e] DEBUG FileProcessStrategySupport - Locking
the file: target\subfolder\mail-incident-123.txt ...
Sending email...Incident 123 has been reported on the 2008-07-16 by Claus Ibsen.
The person can be contact by:
- email: davsclaus@apache.org
- phone: +45 2962 7576
Summary: bla bla
Details:
more bla bla
This is an auto generated email. You can not reply.
2008-07-19 12:09:24,156 [mponent@1f12c4e] DEBUG FileConsumer - Done processing file:
target\subfolder\mail-incident-123.txt. Status is: OK
SENDING THE EMAIL
Sending the email requires access to a SMTP mail server, but the implementation code is very
simple:
private void sendEmail(String body) {
// send the email to your mail server
String url =
"smtp://someone@localhost?password=secret&to=incident@mycompany.com";
template.sendBodyAndHeader(url, body, "subject","New incident reported");
}
And just invoke the method from our consumer:
// okay now we are read to send it as an email
System.out.println("Sending email...");
sendEmail(mailBody);
System.out.println("Email sent");
UNIT TESTING MAIL
For unit testing the consumer part we will use a mock mail framework, so we add this to our
pom.xml:
<!-- unit testing mail using mock -->
<dependency>
<groupId>org.jvnet.mock-javamail</groupId>
<artifactId>mock-javamail</artifactId>
TUTORIALS 136
<version>1.7</version>
<scope>test</scope>
</dependency>
Then we prepare our integration to run with or without the consumer enabled. We do this to
separate the route into the two parts:
▪receive the webservice, transform and save mail file and return OK as repose
▪the consumer that listen for mail files and send them as emails
So we change the constructor code a bit:
public ReportIncidentEndpointImpl() throws Exception {
init(true);
}
public ReportIncidentEndpointImpl(boolean enableConsumer) throws Exception {
init(enableConsumer);
}
private void init(boolean enableConsumer) throws Exception {
// create the camel context that is the "heart" of Camel
camel = new DefaultCamelContext();
// get the ProducerTemplate thst is a Spring'ish xxxTemplate based producer
for very
// easy sending exchanges to Camel.
template = camel.createProducerTemplate();
// add the event driven consumer that will listen for mail files and process
them
if (enableConsumer) {
addMailSendConsumer();
}
// start Camel
camel.start();
}
Then remember to change the ReportIncidentEndpointTest to pass in false in the
ReportIncidentEndpointImpl constructor.
And as always run mvn clean test to be sure that the latest code changes works.
ADDING NEW UNIT TEST
We are now ready to add a new unit test that tests the consumer part so we create a new test
class that has the following code structure:
137 TUTORIALS

/**
* Plain JUnit test of our consumer.
*/
public class ReportIncidentConsumerTest extends TestCase {
private ReportIncidentEndpointImpl endpoint;
public void testConsumer() throws Exception {
// we run this unit test with the consumer, hence the true parameter
endpoint = new ReportIncidentEndpointImpl(true);
}
}
As we want to test the consumer that it can listen for files, read the file content and send it as
an email to our mailbox we will test it by asserting that we receive 1 mail in our mailbox and
that the mail is the one we expect. To do so we need to grab the mailbox with the mockmail
API. This is done as simple as:
public void testConsumer() throws Exception {
// we run this unit test with the consumer, hence the true parameter
endpoint = new ReportIncidentEndpointImpl(true);
// get the mailbox
Mailbox box = Mailbox.get("incident@mycompany.com");
assertEquals("Should not have mails", 0, box.size());
How do we trigger the consumer? Well by creating a file in the folder it listen for. So we could
use plain java.io.File API to create the file, but wait isn't there an smarter solution? ... yes Camel
of course. Camel can do amazing stuff in one liner codes with its ProducerTemplate, so we
need to get a hold of this baby. We expose this template in our ReportIncidentEndpointImpl
but adding this getter:
protected ProducerTemplate getTemplate() {
return template;
}
Then we can use the template to create the file in one code line:
// drop a file in the folder that the consumer listen
// here is a trick to reuse Camel! so we get the producer template and just
// fire a message that will create the file for us
endpoint.getTemplate().sendBodyAndHeader("file://target/
subfolder?append=false", "Hello World",
FileComponent.HEADER_FILE_NAME, "mail-incident-test.txt");
Then we just need to wait a little for the consumer to kick in and do its work and then we
should assert that we got the new mail. Easy as just:
TUTORIALS 138

// let the consumer have time to run
Thread.sleep(3 * 1000);
// get the mock mailbox and check if we got mail ;)
assertEquals("Should have got 1 mail", 1, box.size());
assertEquals("Subject wrong","New incident reported",
box.get(0).getSubject());
assertEquals("Mail body wrong","Hello World", box.get(0).getContent());
}
The final class for the unit test is:
/**
* Plain JUnit test of our consumer.
*/
public class ReportIncidentConsumerTest extends TestCase {
private ReportIncidentEndpointImpl endpoint;
public void testConsumer() throws Exception {
// we run this unit test with the consumer, hence the true parameter
endpoint = new ReportIncidentEndpointImpl(true);
// get the mailbox
Mailbox box = Mailbox.get("incident@mycompany.com");
assertEquals("Should not have mails", 0, box.size());
// drop a file in the folder that the consumer listen
// here is a trick to reuse Camel! so we get the producer template and just
// fire a message that will create the file for us
endpoint.getTemplate().sendBodyAndHeader("file://target/
subfolder?append=false", "Hello World",
FileComponent.HEADER_FILE_NAME, "mail-incident-test.txt");
// let the consumer have time to run
Thread.sleep(3 * 1000);
// get the mock mailbox and check if we got mail ;)
assertEquals("Should have got 1 mail", 1, box.size());
assertEquals("Subject wrong","New incident reported",
box.get(0).getSubject());
assertEquals("Mail body wrong","Hello World", box.get(0).getContent());
}
}
END OF PART 3
Okay we have reached the end of part 3. For now we have only scratched the surface of what
Camel is and what it can do. We have introduced Camel into our integration piece by piece and
139 TUTORIALS

slowly added more and more along the way. And the most important is: you as the
developer never lost control. We hit a sweet spot in the webservice implementation
where we could write our java code. Adding Camel to the mix is just to use it as a regular java
code, nothing magic. We were in control of the flow, we decided when it was time to translate
the input to a mail body, we decided when the content should be written to a file. This is very
important to not lose control, that the bigger and heavier frameworks tend to do. No names
mentioned, but boy do developers from time to time dislike these elephants. And Camel is no
elephant.
I suggest you download the samples from part 1 to 3 and try them out. It is great basic
knowledge to have in mind when we look at some of the features where Camel really excel -
the routing domain language.
From part 1 to 3 we touched concepts such as::
▪Endpoint
▪URI configuration
▪Consumer
▪Producer
▪Event Driven Consumer
▪Component
▪CamelContext
▪ProducerTemplate
▪Processor
▪Type Converter
RESOURCES
•Name Size Creator Creation Date Comment
part-three.zip 18 kB Claus Ibsen Jul 20, 2008 03:34
LINKS
▪Introduction
▪Part 1
▪Part 2
▪Part 3
▪Part 4
▪Part 5
TUTORIALS 140

PART 4
INTRODUCTION
This section is about regular Camel. The examples presented here in this section is much more
in common of all the examples we have in the Camel documentation.
ROUTING
Camel is particular strong as a light-weight and agile routing and mediation framework. In
this part we will introduce the routing concept and how we can introduce this into our
solution.
Looking back at the figure from the Introduction page we want to implement this routing.
Camel has support for expressing this routing logic using Java as a DSL (Domain Specific
Language). In fact Camel also has DSL for XML and Scala. In this part we use the Java DSL as its
the most powerful and all developers know Java. Later we will introduce the XML version that
is very well integrated with Spring.
Before we jump into it, we want to state that this tutorial is about Developers not
loosing control. In my humble experience one of the key fears of developers is that they are
forced into a tool/framework where they loose control and/or power, and the possible is now
impossible. So in this part we stay clear with this vision and our starting point is as follows:
▪We have generated the webservice source code using the CXF wsdl2java generator
and we have our ReportIncidentEndpointImpl.java file where we as a Developer feels
home and have the power.
So the starting point is:
/**
* The webservice we have implemented.
*/
public class ReportIncidentEndpointImpl implements ReportIncidentEndpoint {
/**
* This is the last solution displayed that is the most simple
*/
public OutputReportIncident reportIncident(InputReportIncident parameters) {
// WE ARE HERE !!!
return null;
}
}
Yes we have a simple plain Java class where we have the implementation of the webservice. The
cursor is blinking at the WE ARE HERE block and this is where we feel home. More or less any
Java Developers have implemented webservices using a stack such as: Apache AXIS, Apache
CXF or some other quite popular framework. They all allow the developer to be in control and
141 TUTORIALS
If you have been reading the previous 3 parts then, this quote applies:
you must unlearn what you have learned
Master Yoda, Star Wars IV
So we start all over again!
implement the code logic as plain Java code. Camel of course doesn't enforce this to be any
different. Okay the boss told us to implement the solution from the figure in the Introduction
page and we are now ready to code.
RouteBuilder
RouteBuilder is the hearth in Camel of the Java DSL routing. This class does all the heavy
lifting of supporting EIP verbs for end-users to express the routing. It does take a little while to
get settled and used to, but when you have worked with it for a while you will enjoy its power
and realize it is in fact a little language inside Java itself. Camel is the only integration
framework we are aware of that has Java DSL, all the others are usually only XML based.
As an end-user you usually use the RouteBuilder as of follows:
▪create your own Route class that extends RouteBuilder
▪implement your routing DSL in the configure method
So we create a new class ReportIncidentRoutes and implement the first part of the routing:
import org.apache.camel.builder.RouteBuilder;
public class ReportIncidentRoutes extends RouteBuilder {
public void configure() throws Exception {
// direct:start is a internal queue to kick-start the routing in our example
// we use this as the starting point where you can send messages to
direct:start
from("direct:start")
// to is the destination we send the message to our velocity endpoint
// where we transform the mail body
.to("velocity:MailBody.vm");
}
}
What to notice here is the configure method. Here is where all the action is. Here we have
the Java DSL langauge, that is expressed using the fluent builder syntax that is also known
from Hibernate when you build the dynamic queries etc. What you do is that you can stack
methods separating with the dot.
TUTORIALS 142
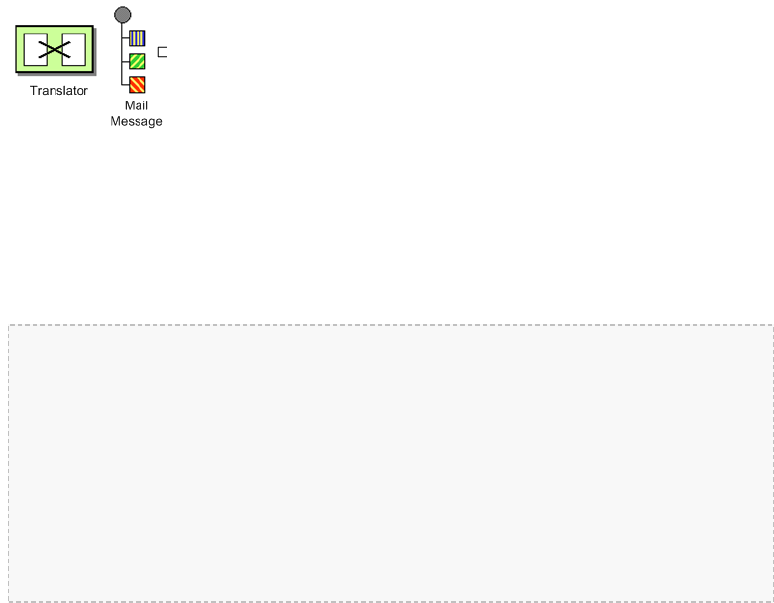
In the example above we have a very common routing, that can be distilled from pseudo
verbs to actual code with:
▪from A to B
▪From Endpoint A To Endpoint B
▪from("endpointA").to("endpointB")
▪from("direct:start").to("velocity:MailBody.vm");
from("direct:start") is the consumer that is kick-starting our routing flow. It will wait for
messages to arrive on the direct queue and then dispatch the message.
to("velocity:MailBody.vm") is the producer that will receive a message and let Velocity
generate the mail body response.
So what we have implemented so far with our ReportIncidentRoutes RouteBuilder is this
part of the picture:
Adding the RouteBuilder
Now we have our RouteBuilder we need to add/connect it to our CamelContext that is the
hearth of Camel. So turning back to our webservice implementation class
ReportIncidentEndpointImpl we add this constructor to the code, to create the CamelContext
and add the routes from our route builder and finally to start it.
private CamelContext context;
public ReportIncidentEndpointImpl() throws Exception {
// create the context
context = new DefaultCamelContext();
// append the routes to the context
context.addRoutes(new ReportIncidentRoutes());
// at the end start the camel context
context.start();
}
Okay how do you use the routes then? Well its just as before we use a ProducerTemplate to
send messages to Endpoints, so we just send to the direct:start endpoint and it will take it
from there.
So we implement the logic in our webservice operation:
143 TUTORIALS
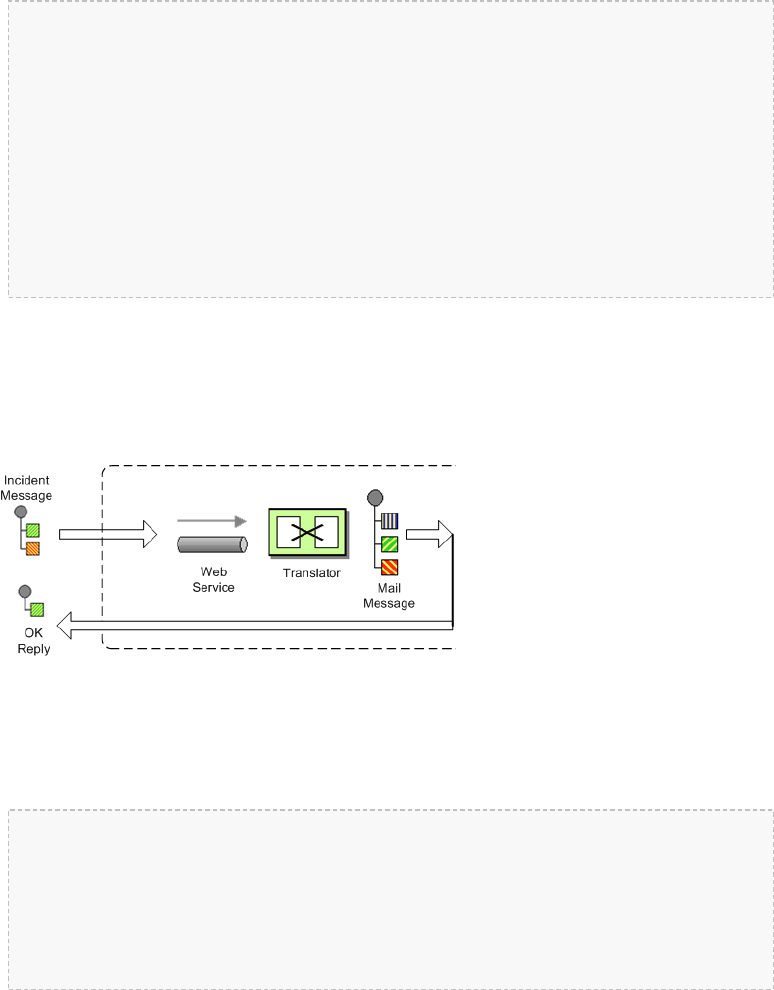
/**
* This is the last solution displayed that is the most simple
*/
public OutputReportIncident reportIncident(InputReportIncident parameters) {
Object mailBody = context.createProducerTemplate().sendBody("direct:start",
parameters);
System.out.println("Body:" + mailBody);
// return an OK reply
OutputReportIncident out = new OutputReportIncident();
out.setCode("OK");
return out;
}
Notice that we get the producer template using the createProducerTemplate method on
the CamelContext. Then we send the input parameters to the direct:start endpoint and it
will route it to the velocity endpoint that will generate the mail body. Since we use direct as
the consumer endpoint (=from) and its a synchronous exchange we will get the response
back from the route. And the response is of course the output from the velocity endpoint.
We have now completed this part of the picture:
UNIT TESTING
Now is the time we would like to unit test what we got now. So we call for camel and its great
test kit. For this to work we need to add it to the pom.xml
<dependency>
<groupId>org.apache.camel</groupId>
<artifactId>camel-core</artifactId>
<version>1.4.0</version>
<scope>test</scope>
<type>test-jar</type>
</dependency>
After adding it to the pom.xml you should refresh your Java Editor so it pickups the new jar.
Then we are ready to create out unit test class.
We create this unit test skeleton, where we extend this class ContextTestSupport
TUTORIALS 144
About creating ProducerTemplate
In the example above we create a new ProducerTemplate when the
reportIncident method is invoked. However in reality you should only create
the template once and re-use it. See this FAQ entry.
package org.apache.camel.example.reportincident;
import org.apache.camel.ContextTestSupport;
import org.apache.camel.builder.RouteBuilder;
/**
* Unit test of our routes
*/
public class ReportIncidentRoutesTest extends ContextTestSupport {
}
ContextTestSupport is a supporting unit test class for much easier unit testing with
Apache Camel. The class is extending JUnit TestCase itself so you get all its glory. What we
need to do now is to somehow tell this unit test class that it should use our route builder as
this is the one we gonna test. So we do this by implementing the createRouteBuilder
method.
@Override
protected RouteBuilder createRouteBuilder() throws Exception {
return new ReportIncidentRoutes();
}
That is easy just return an instance of our route builder and this unit test will use our routes.
We then code our unit test method that sends a message to the route and assert that its
transformed to the mail body using the Velocity template.
public void testTransformMailBody() throws Exception {
// create a dummy input with some input data
InputReportIncident parameters = createInput();
// send the message (using the sendBody method that takes a parameters as the
input body)
// to "direct:start" that kick-starts the route
// the response is returned as the out object, and its also the body of the
response
Object out = context.createProducerTemplate().sendBody("direct:start",
parameters);
// convert the response to a string using camel converters. However we could
145 TUTORIALS
It is quite common in Camel itself to unit test using routes defined as an anonymous
inner class, such as illustrated below:
protected RouteBuilder createRouteBuilder() throws Exception {
return new RouteBuilder() {
public void configure() throws Exception {
// TODO: Add your routes here, such as:
from("jms:queue:inbox").to("file://target/out");
}
};
}
The same technique is of course also possible for end-users of Camel to create parts of your
routes and test them separately in many test classes.
However in this tutorial we test the real route that is to be used for production, so we just
return an instance of the real one.
also have casted it to
// a string directly but using the type converters ensure that Camel can
convert it if it wasn't a string
// in the first place. The type converters in Camel is really powerful and you
will later learn to
// appreciate them and wonder why its not build in Java out-of-the-box
String body = context.getTypeConverter().convertTo(String.class, out);
// do some simple assertions of the mail body
assertTrue(body.startsWith("Incident 123 has been reported on the 2008-07-16
by Claus Ibsen."));
}
/**
* Creates a dummy request to be used for input
*/
protected InputReportIncident createInput() {
InputReportIncident input = new InputReportIncident();
input.setIncidentId("123");
input.setIncidentDate("2008-07-16");
input.setGivenName("Claus");
input.setFamilyName("Ibsen");
input.setSummary("bla bla");
input.setDetails("more bla bla");
input.setEmail("davsclaus@apache.org");
input.setPhone("+45 2962 7576");
return input;
}
TUTORIALS 146
ADDING THE FILE BACKUP
The next piece of puzzle that is missing is to store the mail body as a backup file. So we turn
back to our route and the EIP patterns. We use the Pipes and Filters pattern here to chain the
routing as:
public void configure() throws Exception {
from("direct:start")
.to("velocity:MailBody.vm")
// using pipes-and-filters we send the output from the previous to the next
.to("file://target/subfolder");
}
Notice that we just add a 2nd .to on the newline. Camel will default use the Pipes and Filters
pattern here when there are multi endpoints chained liked this. We could have used the
pipeline verb to let out stand out that its the Pipes and Filters pattern such as:
from("direct:start")
// using pipes-and-filters we send the output from the previous to the next
.pipeline("velocity:MailBody.vm","file://target/subfolder");
But most people are using the multi .to style instead.
We re-run out unit test and verifies that it still passes:
Running org.apache.camel.example.reportincident.ReportIncidentRoutesTest
Tests run: 1, Failures: 0, Errors: 0, Skipped: 0, Time elapsed: 1.157 sec
But hey we have added the file producer endpoint and thus a file should also be created as the
backup file. If we look in the target/subfolder we can see that something happened.
On my humble laptop it created this folder: target\subfolder\ID-claus-acer. So the file
producer create a sub folder named ID-claus-acer what is this? Well Camel auto
generates an unique filename based on the unique message id if not given instructions to use a
fixed filename. In fact it creates another sub folder and name the file as: target\subfolder\ID-
claus-acer\3750-1219148558921\1-0 where 1-0 is the file with the mail body. What we want is
to use our own filename instead of this auto generated filename. This is archived by adding a
header to the message with the filename to use. So we need to add this to our route and
compute the filename based on the message content.
Setting the filename
For starters we show the simple solution and build from there. We start by setting a constant
filename, just to verify that we are on the right path, to instruct the file producer what filename
to use. The file producer uses a special header FileComponent.HEADER_FILE_NAME to
set the filename.
147 TUTORIALS

What we do is to send the header when we "kick-start" the routing as the header will be
propagated from the direct queue to the file producer. What we need to do is to use the
ProducerTemplate.sendBodyAndHeader method that takes both a body and a
header. So we change out webservice code to include the filename also:
public OutputReportIncident reportIncident(InputReportIncident parameters) {
// create the producer template to use for sending messages
ProducerTemplate producer = context.createProducerTemplate();
// send the body and the filename defined with the special header key
Object mailBody = producer.sendBodyAndHeader("direct:start", parameters,
FileComponent.HEADER_FILE_NAME, "incident.txt");
System.out.println("Body:" + mailBody);
// return an OK reply
OutputReportIncident out = new OutputReportIncident();
out.setCode("OK");
return out;
}
However we could also have used the route builder itself to configure the constant filename as
shown below:
public void configure() throws Exception {
from("direct:start")
.to("velocity:MailBody.vm")
// set the filename to a constant before the file producer receives the
message
.setHeader(FileComponent.HEADER_FILE_NAME, constant("incident.txt"))
.to("file://target/subfolder");
}
But Camel can be smarter and we want to dynamic set the filename based on some of the input
parameters, how can we do this?
Well the obvious solution is to compute and set the filename from the webservice
implementation, but then the webservice implementation has such logic and we want this
decoupled, so we could create our own POJO bean that has a method to compute the
filename. We could then instruct the routing to invoke this method to get the computed
filename. This is a string feature in Camel, its Bean binding. So lets show how this can be done:
Using Bean Language to compute the filename
First we create our plain java class that computes the filename, and it has 100% no
dependencies to Camel what so ever.
/**
* Plain java class to be used for filename generation based on the reported incident
TUTORIALS 148

*/
public class FilenameGenerator {
public String generateFilename(InputReportIncident input) {
// compute the filename
return "incident-" + input.getIncidentId() + ".txt";
}
}
The class is very simple and we could easily create unit tests for it to verify that it works as
expected. So what we want now is to let Camel invoke this class and its generateFilename with
the input parameters and use the output as the filename. Pheeeww is this really possible out-of-
the-box in Camel? Yes it is. So lets get on with the show. We have the code that computes the
filename, we just need to call it from our route using the Bean Language:
public void configure() throws Exception {
from("direct:start")
// set the filename using the bean language and call the FilenameGenerator
class.
// the 2nd null parameter is optional methodname, to be used to avoid
ambiguity.
// if not provided Camel will try to figure out the best method to invoke,
as we
// only have one method this is very simple
.setHeader(FileComponent.HEADER_FILE_NAME,
BeanLanguage.bean(FilenameGenerator.class, null))
.to("velocity:MailBody.vm")
.to("file://target/subfolder");
}
Notice that we use the bean language where we supply the class with our bean to invoke.
Camel will instantiate an instance of the class and invoke the suited method. For completeness
and ease of code readability we add the method name as the 2nd parameter
.setHeader(FileComponent.HEADER_FILE_NAME,
BeanLanguage.bean(FilenameGenerator.class, "generateFilename"))
Then other developers can understand what the parameter is, instead of null.
Now we have a nice solution, but as a sidetrack I want to demonstrate the Camel has other
languages out-of-the-box, and that scripting language is a first class citizen in Camel where it etc.
can be used in content based routing. However we want it to be used for the filename
generation.
149 TUTORIALS
Using a script language to set the filename
We could do as in the previous parts where we send the computed filename as a message
header when we "kick-start" the route. But we want to learn new stuff so we look for a
different solution using some of Camels many Languages. As OGNL is a favorite language of
mine (used by WebWork) so we pick this baby for a Camel ride. For starters we must add it
to our pom.xml:
<dependency>
<groupId>org.apache.camel</groupId>
<artifactId>camel-ognl</artifactId>
<version>${camel-version}</version>
</dependency>
And remember to refresh your editor so you got the new .jars.
We want to construct the filename based on this syntax: mail-incident-#ID#.txt
where #ID# is the incident id from the input parameters. As OGNL is a language that can
invoke methods on bean we can invoke the getIncidentId() on the message body and
then concat it with the fixed pre and postfix strings.
In OGNL glory this is done as:
"'mail-incident-' + request.body.incidentId + '.txt'"
where request.body.incidentId computes to:
▪request is the IN message. See the OGNL for other predefined objects
available
▪body is the body of the in message
▪incidentId will invoke the getIncidentId() method on the body.
The rest is just more or less regular plain code where we can concat
strings.
Now we got the expression to dynamic compute the filename on the fly we need to set it on
our route so we turn back to our route, where we can add the OGNL expression:
public void configure() throws Exception {
from("direct:start")
// we need to set the filename and uses OGNL for this
.setHeader(FileComponent.HEADER_FILE_NAME,
OgnlExpression.ognl("'mail-incident-' + request.body.incidentId + '.txt'"))
TUTORIALS 150
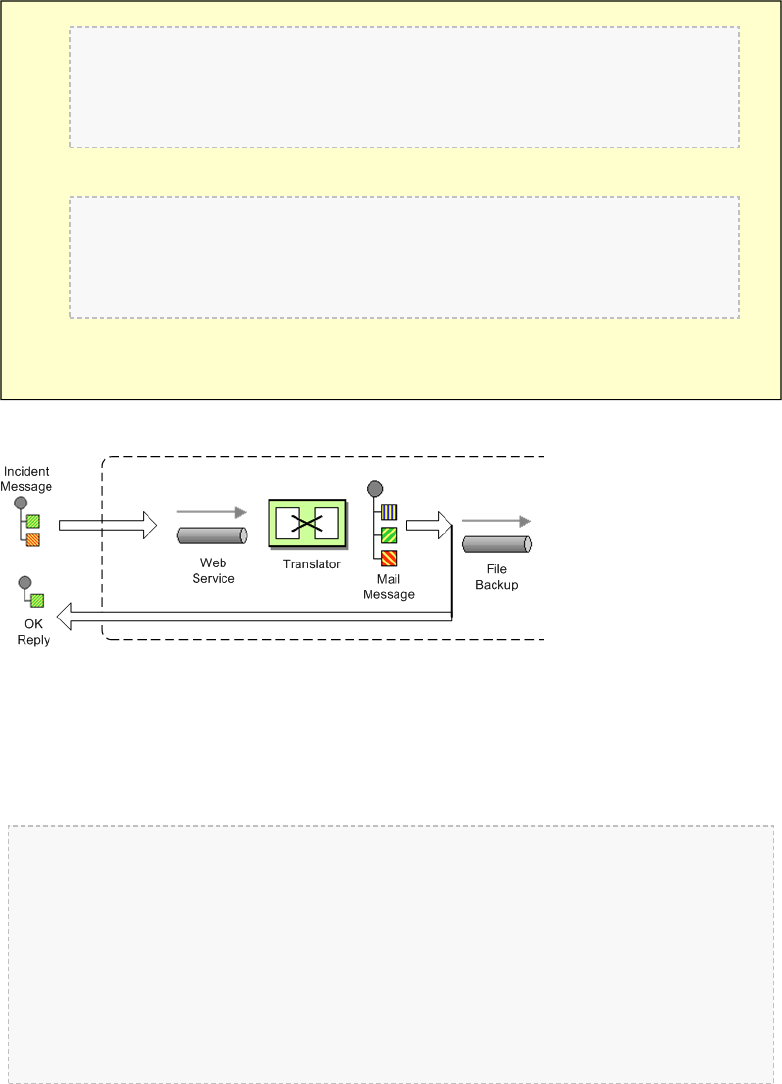
// using pipes-and-filters we send the output from the previous
to the next
.pipeline("velocity:MailBody.vm","file://target/subfolder");
}
And since we are on Java 1.5 we can use the static import of ognl so we have:
import static org.apache.camel.language.ognl.OgnlExpression.ognl;
...
.setHeader(FileComponent.HEADER_FILE_NAME, ognl("'mail-incident-' +
request.body.incidentId + '.txt'"))
Notice the import static also applies for all the other languages, such as the Bean Language
we used previously.
Whatever worked for you we have now implemented the backup of the data files:
SENDING THE EMAIL
What we need to do before the solution is completed is to actually send the email with the mail
body we generated and stored as a file. In the previous part we did this with a File consumer,
that we manually added to the CamelContext. We can do this quite easily with the routing.
import org.apache.camel.builder.RouteBuilder;
public class ReportIncidentRoutes extends RouteBuilder {
public void configure() throws Exception {
// first part from the webservice -> file backup
from("direct:start")
.setHeader(FileComponent.HEADER_FILE_NAME, bean(FilenameGenerator.class,
"generateFilename"))
.to("velocity:MailBody.vm")
.to("file://target/subfolder");
151 TUTORIALS
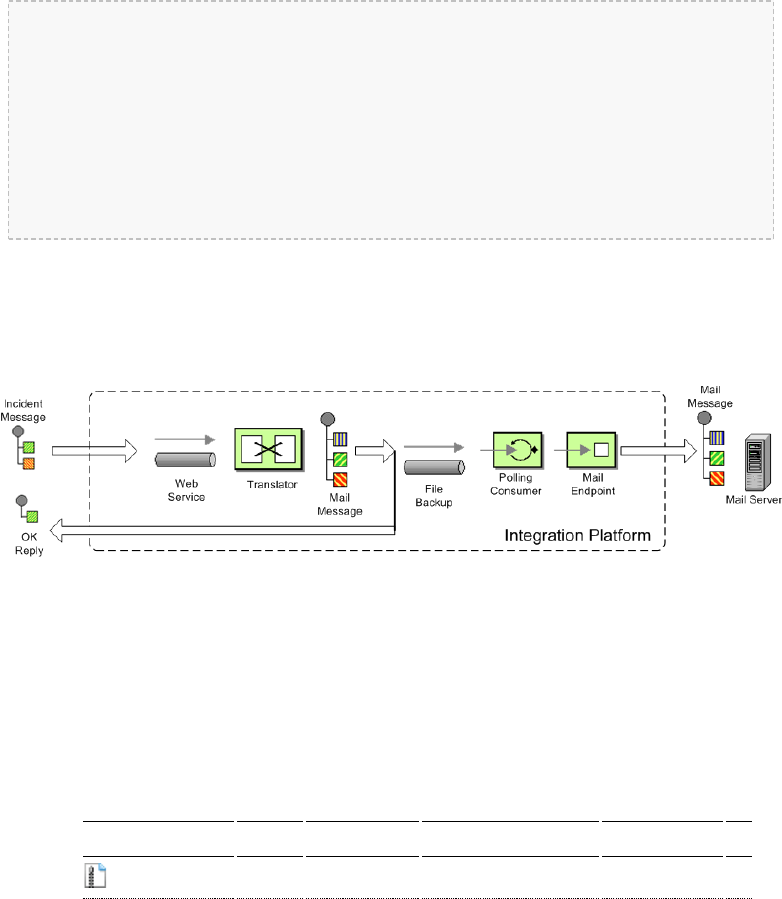
// second part from the file backup -> send email
from("file://target/subfolder")
// set the subject of the email
.setHeader("subject", constant("new incident reported"))
// send the email
.to("smtp://someone@localhost?password=secret&to=incident@mycompany.com");
}
}
The last 3 lines of code does all this. It adds a file consumer from("file://target/
subfolder"), sets the mail subject, and finally send it as an email.
The DSL is really powerful where you can express your routing integration logic.
So we completed the last piece in the picture puzzle with just 3 lines of code.
We have now completed the integration:
CONCLUSION
We have just briefly touched the routing in Camel and shown how to implement them using
the fluent builder syntax in Java. There is much more to the routing in Camel than shown
here, but we are learning step by step. We continue in part 5. See you there.
RESOURCES
•Name Size Creator Creation Date Comment
part-four.zip 11 kB Claus Ibsen Aug 25, 2008 07:24
LINKS
▪Introduction
▪Part 1
▪Part 2
▪Part 3
TUTORIALS 152

▪Part 4
▪Part 5
BETTER JMS TRANSPORT FOR CXF WEBSERVICE USING
APACHE CAMEL
Configuring JMS in Apache CXF before Version 2.1.3 is possible but not really easy or nice. This
article shows how to use Apache Camel to provide a better JMS Transport for CXF.
Update: Since CXF 2.1.3 there is a new way of configuring JMS (Using the
JMSConfigFeature). It makes JMS config for CXF as easy as with Camel. Using Camel for JMS is
still a good idea if you want to use the rich feature of Camel for routing and other Integration
Scenarios that CXF does not support.
You can find the original announcement for this Tutorial and some additional info on
Christian Schneider´s Blog
So how to connect Apache Camel and CXF
The best way to connect Camel and CXF is using the Camel transport for CXF. This is a camel
module that registers with cxf as a new transport. It is quite easy to configure.
<bean class="org.apache.camel.component.cxf.transport.CamelTransportFactory">
<property name="bus" ref="cxf" />
<property name="camelContext" ref="camelContext" />
<property name="transportIds">
<list>
<value>http://cxf.apache.org/transports/camel</value>
</list>
</property>
</bean>
This bean registers with CXF and provides a new transport prefix camel:// that can be used in
CXF address configurations. The bean references a bean cxf which will be already present in
your config. The other refrenceis a camel context. We will later define this bean to provide the
routing config.
How is JMS configured in Camel
In camel you need two things to configure JMS. A ConnectionFactory and a JMSComponent. As
ConnectionFactory you can simply set up the normal Factory your JMS provider offers or bind
a JNDI ConnectionFactory. In this example we use the ConnectionFactory provided by
ActiveMQ.
153 TUTORIALS

<bean id="jmsConnectionFactory" class="org.apache.activemq.ActiveMQConnectionFactory">
<property name="brokerURL" value="tcp://localhost:61616" />
</bean>
Then we set up the JMSComponent. It offers a new transport prefix to camel that we simply
call jms. If we need several JMSComponents we can differentiate them by their name.
<bean id="jms" class="org.apache.camel.component.jms.JmsComponent">
<property name="connectionFactory" ref="jmsConnectionFactory" />
<property name="useMessageIDAsCorrelationID" value="true"/>
</bean>
You can find more details about the JMSComponent at the Camel Wiki. For example you find
the complete configuration options and a JNDI sample there.
Setting up the CXF client
We will configure a simple CXF webservice client. It will use stub code generated from a wsdl.
The webservice client will be configured to use JMS directly. You can also use a direct: Endpoint
and do the routing to JMS in the Camel Context.
<client id="CustomerService" xmlns="http://cxf.apache.org/jaxws"
xmlns:customer="http://customerservice.example.com/"
serviceName="customer:CustomerServiceService"
endpointName="customer:CustomerServiceEndpoint"
address="camel:jms:queue:CustomerService"
serviceClass="com.example.customerservice.CustomerService">
</client>
We explicitly configure serviceName and endpointName so they are not read from the wsdl.
The names we use are arbitrary and have no further function but we set them to look nice. The
serviceclass points to the service interface that was generated from the wsdl. Now the
important thing is address. Here we tell cxf to use the camel transport, use the JmsComponent
who registered the prefix "jms" and use the queue "CustomerService".
Setting up the CamelContext
As we do not need additional routing an empty CamelContext bean will suffice.
<camelContext id="camelContext" xmlns="http://activemq.apache.org/camel/schema/spring">
</camelContext>
TUTORIALS 154
Running the Example
• Download the example project here
• Follow the readme.txt
Conclusion
As you have seen in this example you can use Camel to connect services to JMS easily while
being able to also use the rich integration features of Apache Camel.
TUTORIAL USING AXIS 1.4 WITH APACHE CAMEL
• Tutorial using Axis 1.4 with Apache Camel
• Prerequisites
• Distribution
• Introduction
• Setting up the project to run Axis
• Maven 2
• wsdl
• Configuring Axis
• Running the Example
• Integrating Spring
• Using Spring
• Integrating Camel
• CamelContext
• Store a file backup
• Running the example
• Unit Testing
• Smarter Unit Testing with Spring
• Unit Test calling WebService
• Annotations
• The End
• See Also
Prerequisites
This tutorial uses Maven 2 to setup the Camel project and for dependencies for artifacts.
Distribution
This sample is distributed with the Camel 1.5 distribution as examples/camel-example-
axis.
155 TUTORIALS

Introduction
Apache Axis is/was widely used as a webservice framework. So in line with some of the other
tutorials to demonstrate how Camel is not an invasive framework but is flexible and integrates
well with existing solution.
We have an existing solution that exposes a webservice using Axis 1.4 deployed as web
applications. This is a common solution. We use contract first so we have Axis generated
source code from an existing wsdl file. Then we show how we introduce Spring and Camel to
integrate with Axis.
This tutorial uses the following frameworks:
• Maven 2.0.9
• Apache Camel 1.5.0
• Apache Axis 1.4
• Spring 2.5.5
Setting up the project to run Axis
This first part is about getting the project up to speed with Axis. We are not touching Camel or
Spring at this time.
Maven 2
Axis dependencies is available for maven 2 so we configure our pom.xml as:
<dependency>
<groupId>org.apache.axis</groupId>
<artifactId>axis</artifactId>
<version>1.4</version>
</dependency>
<dependency>
<groupId>org.apache.axis</groupId>
<artifactId>axis-jaxrpc</artifactId>
<version>1.4</version>
</dependency>
<dependency>
<groupId>org.apache.axis</groupId>
<artifactId>axis-saaj</artifactId>
<version>1.4</version>
</dependency>
<dependency>
<groupId>axis</groupId>
<artifactId>axis-wsdl4j</artifactId>
<version>1.5.1</version>
</dependency>
TUTORIALS 156
<dependency>
<groupId>commons-discovery</groupId>
<artifactId>commons-discovery</artifactId>
<version>0.4</version>
</dependency>
<dependency>
<groupId>log4j</groupId>
<artifactId>log4j</artifactId>
<version>1.2.14</version>
</dependency>
Then we need to configure maven to use Java 1.5 and the Axis maven plugin that generates the
source code based on the wsdl file:
<!-- to compile with 1.5 -->
<plugin>
<groupId>org.apache.maven.plugins</groupId>
<artifactId>maven-compiler-plugin</artifactId>
<configuration>
<source>1.5</source>
<target>1.5</target>
</configuration>
</plugin>
<plugin>
<groupId>org.codehaus.mojo</groupId>
<artifactId>axistools-maven-plugin</artifactId>
<configuration>
<sourceDirectory>src/main/resources/</sourceDirectory>
<packageSpace>com.mycompany.myschema</packageSpace>
<testCases>false</testCases>
<serverSide>true</serverSide>
<subPackageByFileName>false</subPackageByFileName>
</configuration>
<executions>
<execution>
<goals>
<goal>wsdl2java</goal>
</goals>
</execution>
</executions>
</plugin>
wsdl
We use the same .wsdl file as the Tutorial-Example-ReportIncident and copy it to src/main/
webapp/WEB-INF/wsdl
157 TUTORIALS

<?xml version="1.0" encoding="ISO-8859-1"?>
<wsdl:definitions xmlns:soap="http://schemas.xmlsoap.org/wsdl/soap/"
xmlns:tns="http://reportincident.example.camel.apache.org"
xmlns:xs="http://www.w3.org/2001/XMLSchema"
xmlns:http="http://schemas.xmlsoap.org/wsdl/http/"
xmlns:wsdl="http://schemas.xmlsoap.org/wsdl/"
targetNamespace="http://reportincident.example.camel.apache.org">
<!-- Type definitions for input- and output parameters for webservice -->
<wsdl:types>
<xs:schema targetNamespace="http://reportincident.example.camel.apache.org">
<xs:element name="inputReportIncident">
<xs:complexType>
<xs:sequence>
<xs:element type="xs:string"
name="incidentId"/>
<xs:element type="xs:string"
name="incidentDate"/>
<xs:element type="xs:string"
name="givenName"/>
<xs:element type="xs:string"
name="familyName"/>
<xs:element type="xs:string"
name="summary"/>
<xs:element type="xs:string"
name="details"/>
<xs:element type="xs:string"
name="email"/>
<xs:element type="xs:string"
name="phone"/>
</xs:sequence>
</xs:complexType>
</xs:element>
<xs:element name="outputReportIncident">
<xs:complexType>
<xs:sequence>
<xs:element type="xs:string"
name="code"/>
</xs:sequence>
</xs:complexType>
</xs:element>
</xs:schema>
</wsdl:types>
<!-- Message definitions for input and output -->
<wsdl:message name="inputReportIncident">
<wsdl:part name="parameters" element="tns:inputReportIncident"/>
</wsdl:message>
<wsdl:message name="outputReportIncident">
<wsdl:part name="parameters" element="tns:outputReportIncident"/>
</wsdl:message>
<!-- Port (interface) definitions -->
<wsdl:portType name="ReportIncidentEndpoint">
TUTORIALS 158

<wsdl:operation name="ReportIncident">
<wsdl:input message="tns:inputReportIncident"/>
<wsdl:output message="tns:outputReportIncident"/>
</wsdl:operation>
</wsdl:portType>
<!-- Port bindings to transports and encoding - HTTP, document literal
encoding is used -->
<wsdl:binding name="ReportIncidentBinding" type="tns:ReportIncidentEndpoint">
<soap:binding transport="http://schemas.xmlsoap.org/soap/http"/>
<wsdl:operation name="ReportIncident">
<soap:operation
soapAction="http://reportincident.example.camel.apache.org/ReportIncident"
style="document"/>
<wsdl:input>
<soap:body parts="parameters" use="literal"/>
</wsdl:input>
<wsdl:output>
<soap:body parts="parameters" use="literal"/>
</wsdl:output>
</wsdl:operation>
</wsdl:binding>
<!-- Service definition -->
<wsdl:service name="ReportIncidentService">
<wsdl:port name="ReportIncidentPort"
binding="tns:ReportIncidentBinding">
<soap:address
location="http://reportincident.example.camel.apache.org"/>
</wsdl:port>
</wsdl:service>
</wsdl:definitions>
Configuring Axis
Okay we are now setup for the contract first development and can generate the source file. For
now we are still only using standard Axis and not Spring nor Camel. We still need to setup Axis
as a web application so we configure the web.xml in src/main/webapp/WEB-INF/
web.xml as:
<servlet>
<servlet-name>axis</servlet-name>
<servlet-class>org.apache.axis.transport.http.AxisServlet</servlet-class>
</servlet>
<servlet-mapping>
<servlet-name>axis</servlet-name>
159 TUTORIALS

<url-pattern>/services/*</url-pattern>
</servlet-mapping>
The web.xml just registers Axis servlet that is handling the incoming web requests to its servlet
mapping. We still need to configure Axis itself and this is done using its special configuration file
server-config.wsdd. We nearly get this file for free if we let Axis generate the source
code so we run the maven goal:
mvn axistools:wsdl2java
The tool will generate the source code based on the wsdl and save the files to the following
folder:
.\target\generated-sources\axistools\wsdl2java\org\apache\camel\example\reportincident
deploy.wsdd
InputReportIncident.java
OutputReportIncident.java
ReportIncidentBindingImpl.java
ReportIncidentBindingStub.java
ReportIncidentService_PortType.java
ReportIncidentService_Service.java
ReportIncidentService_ServiceLocator.java
undeploy.wsdd
This is standard Axis and so far no Camel or Spring has been touched. To implement our
webservice we will add our code, so we create a new class
AxisReportIncidentService that implements the port type interface where we can
implement our code logic what happens when the webservice is invoked.
package org.apache.camel.example.axis;
import org.apache.camel.example.reportincident.InputReportIncident;
import org.apache.camel.example.reportincident.OutputReportIncident;
import org.apache.camel.example.reportincident.ReportIncidentService_PortType;
import java.rmi.RemoteException;
/**
* Axis webservice
*/
public class AxisReportIncidentService implements ReportIncidentService_PortType {
public OutputReportIncident reportIncident(InputReportIncident parameters) throws
RemoteException {
System.out.println("Hello AxisReportIncidentService is called from " +
parameters.getGivenName());
OutputReportIncident out = new OutputReportIncident();
TUTORIALS 160

out.setCode("OK");
return out;
}
}
Now we need to configure Axis itself and this is done using its server-config.wsdd file.
We nearly get this for for free from the auto generated code, we copy the stuff from
deploy.wsdd and made a few modifications:
<?xml version="1.0" encoding="UTF-8"?>
<deployment xmlns="http://xml.apache.org/axis/wsdd/" xmlns:java="http://xml.apache.org/
axis/wsdd/providers/java">
<!-- global configuration -->
<globalConfiguration>
<parameter name="sendXsiTypes" value="true"/>
<parameter name="sendMultiRefs" value="true"/>
<parameter name="sendXMLDeclaration" value="true"/>
<parameter name="axis.sendMinimizedElements" value="true"/>
</globalConfiguration>
<handler name="URLMapper" type="java:org.apache.axis.handlers.http.URLMapper"/>
<!-- this service is from deploy.wsdd -->
<service name="ReportIncidentPort" provider="java:RPC" style="document"
use="literal">
<parameter name="wsdlTargetNamespace"
value="http://reportincident.example.camel.apache.org"/>
<parameter name="wsdlServiceElement" value="ReportIncidentService"/>
<parameter name="schemaUnqualified"
value="http://reportincident.example.camel.apache.org"/>
<parameter name="wsdlServicePort" value="ReportIncidentPort"/>
<parameter name="className"
value="org.apache.camel.example.reportincident.ReportIncidentBindingImpl"/>
<parameter name="wsdlPortType" value="ReportIncidentService"/>
<parameter name="typeMappingVersion" value="1.2"/>
<operation name="reportIncident" qname="ReportIncident"
returnQName="retNS:outputReportIncident"
xmlns:retNS="http://reportincident.example.camel.apache.org"
returnType="rtns:>outputReportIncident"
xmlns:rtns="http://reportincident.example.camel.apache.org"
soapAction="http://reportincident.example.camel.apache.org/
ReportIncident" >
<parameter qname="pns:inputReportIncident"
xmlns:pns="http://reportincident.example.camel.apache.org"
type="tns:>inputReportIncident"
xmlns:tns="http://reportincident.example.camel.apache.org"/>
</operation>
<parameter name="allowedMethods" value="reportIncident"/>
<typeMapping
xmlns:ns="http://reportincident.example.camel.apache.org"
qname="ns:>outputReportIncident"
161 TUTORIALS

type="java:org.apache.camel.example.reportincident.OutputReportIncident"
serializer="org.apache.axis.encoding.ser.BeanSerializerFactory"
deserializer="org.apache.axis.encoding.ser.BeanDeserializerFactory"
encodingStyle=""
/>
<typeMapping
xmlns:ns="http://reportincident.example.camel.apache.org"
qname="ns:>inputReportIncident"
type="java:org.apache.camel.example.reportincident.InputReportIncident"
serializer="org.apache.axis.encoding.ser.BeanSerializerFactory"
deserializer="org.apache.axis.encoding.ser.BeanDeserializerFactory"
encodingStyle=""
/>
</service>
<!-- part of Axis configuration -->
<transport name="http">
<requestFlow>
<handler type="URLMapper"/>
<handler
type="java:org.apache.axis.handlers.http.HTTPAuthHandler"/>
</requestFlow>
</transport>
</deployment>
The globalConfiguration and transport is not in the deploy.wsdd file so you gotta write
that yourself. The service is a 100% copy from deploy.wsdd. Axis has more configuration to it
than shown here, but then you should check the Axis documentation.
What we need to do now is important, as we need to modify the above configuration to use
our webservice class than the default one, so we change the classname parameter to our class
AxisReportIncidentService:
<parameter name="className"
value="org.apache.camel.example.axis.AxisReportIncidentService"/>
Running the Example
Now we are ready to run our example for the first time, so we use Jetty as the quick web
container using its maven command:
mvn jetty:run
Then we can hit the web browser and enter this URL: http://localhost:8080/
camel-example-axis/services and you should see the famous Axis start page with the
text And now... Some Services.
TUTORIALS 162

Clicking on the .wsdl link shows the wsdl file, but what. It's an auto generated one and not
our original .wsdl file. So we need to fix this ASAP and this is done by configuring Axis in the
server-config.wsdd file:
<service name="ReportIncidentPort" provider="java:RPC" style="document"
use="literal">
<wsdlFile>/WEB-INF/wsdl/report_incident.wsdl</wsdlFile>
...
We do this by adding the wsdlFile tag in the service element where we can point to the real
.wsdl file.
Integrating Spring
First we need to add its dependencies to the pom.xml.
<dependency>
<groupId>org.springframework</groupId>
<artifactId>spring-web</artifactId>
<version>2.5.5</version>
</dependency>
Spring is integrated just as it would like to, we add its listener to the web.xml and a context
parameter to be able to configure precisely what spring xml files to use:
<context-param>
<param-name>contextConfigLocation</param-name>
<param-value>
classpath:axis-example-context.xml
</param-value>
</context-param>
<listener>
<listener-class>org.springframework.web.context.ContextLoaderListener</listener-class>
</listener>
Next is to add a plain spring XML file named axis-example-context.xml in the src/main/
resources folder.
<?xml version="1.0" encoding="UTF-8"?>
<beans xmlns="http://www.springframework.org/schema/beans"
xmlns:xsi="http://www.w3.org/2001/XMLSchema-instance"
xsi:schemaLocation="
http://www.springframework.org/schema/beans http://www.springframework.org/
schema/beans/spring-beans-2.5.xsd">
</beans>
163 TUTORIALS
The spring XML file is currently empty. We hit jetty again with mvn jetty:run just to make
sure Spring was setup correctly.
Using Spring
We would like to be able to get hold of the Spring ApplicationContext from our webservice so
we can get access to the glory spring, but how do we do this? And our webservice class
AxisReportIncidentService is created and managed by Axis we want to let Spring do this. So we
have two problems.
We solve these problems by creating a delegate class that Axis creates, and this delegate
class gets hold on Spring and then gets our real webservice as a spring bean and invoke the
service.
First we create a new class that is 100% independent from Axis and just a plain POJO. This is
our real service.
package org.apache.camel.example.axis;
import org.apache.camel.example.reportincident.InputReportIncident;
import org.apache.camel.example.reportincident.OutputReportIncident;
/**
* Our real service that is not tied to Axis
*/
public class ReportIncidentService {
public OutputReportIncident reportIncident(InputReportIncident parameters) {
System.out.println("Hello ReportIncidentService is called from " +
parameters.getGivenName());
OutputReportIncident out = new OutputReportIncident();
out.setCode("OK");
return out;
}
}
So now we need to get from AxisReportIncidentService to this one ReportIncidentService using
Spring. Well first of all we add our real service to spring XML configuration file so Spring can
handle its lifecycle:
<?xml version="1.0" encoding="UTF-8"?>
<beans xmlns="http://www.springframework.org/schema/beans"
xmlns:xsi="http://www.w3.org/2001/XMLSchema-instance"
xsi:schemaLocation="
http://www.springframework.org/schema/beans http://www.springframework.org/
schema/beans/spring-beans-2.5.xsd">
TUTORIALS 164
<bean id="incidentservice"
class="org.apache.camel.example.axis.ReportIncidentService"/>
</beans>
And then we need to modify AxisReportIncidentService to use Spring to lookup the spring bean
id="incidentservice" and delegate the call. We do this by extending the spring class
org.springframework.remoting.jaxrpc.ServletEndpointSupport so the
refactored code is:
package org.apache.camel.example.axis;
import org.apache.camel.example.reportincident.InputReportIncident;
import org.apache.camel.example.reportincident.OutputReportIncident;
import org.apache.camel.example.reportincident.ReportIncidentService_PortType;
import org.springframework.remoting.jaxrpc.ServletEndpointSupport;
import java.rmi.RemoteException;
/**
* Axis webservice
*/
public class AxisReportIncidentService extends ServletEndpointSupport implements
ReportIncidentService_PortType {
public OutputReportIncident reportIncident(InputReportIncident parameters) throws
RemoteException {
// get hold of the spring bean from the application context
ReportIncidentService service = (ReportIncidentService)
getApplicationContext().getBean("incidentservice");
// delegate to the real service
return service.reportIncident(parameters);
}
}
To see if everything is okay we run mvn jetty:run.
In the code above we get hold of our service at each request by looking up in the application
context. However Spring also supports an init method where we can do this once. So we
change the code to:
public class AxisReportIncidentService extends ServletEndpointSupport implements
ReportIncidentService_PortType {
private ReportIncidentService service;
@Override
protected void onInit() throws ServiceException {
165 TUTORIALS

// get hold of the spring bean from the application context
service = (ReportIncidentService)
getApplicationContext().getBean("incidentservice");
}
public OutputReportIncident reportIncident(InputReportIncident parameters) throws
RemoteException {
// delegate to the real service
return service.reportIncident(parameters);
}
}
So now we have integrated Axis with Spring and we are ready for Camel.
Integrating Camel
Again the first step is to add the dependencies to the maven pom.xml file:
<dependency>
<groupId>org.apache.camel</groupId>
<artifactId>camel-core</artifactId>
<version>1.5.0</version>
</dependency>
<dependency>
<groupId>org.apache.camel</groupId>
<artifactId>camel-spring</artifactId>
<version>1.5.0</version>
</dependency>
Now that we have integrated with Spring then we easily integrate with Camel as Camel works
well with Spring.
We choose to integrate Camel in the Spring XML file so we add the camel namespace and the
schema location:
xmlns:camel="http://activemq.apache.org/camel/schema/spring"
http://activemq.apache.org/camel/schema/spring http://activemq.apache.org/camel/schema/
spring/camel-spring.xsd"
CamelContext
CamelContext is the heart of Camel its where all the routes, endpoints, components, etc. is
registered. So we setup a CamelContext and the spring XML files looks like:
TUTORIALS 166

Camel does not require Spring
Camel does not require Spring, we could easily have used Camel without Spring,
but most users prefer to use Spring also.
<?xml version="1.0" encoding="UTF-8"?>
<beans xmlns="http://www.springframework.org/schema/beans"
xmlns:xsi="http://www.w3.org/2001/XMLSchema-instance"
xmlns:camel="http://activemq.apache.org/camel/schema/spring"
xsi:schemaLocation="
http://www.springframework.org/schema/beans http://www.springframework.org/
schema/beans/spring-beans-2.5.xsd
http://activemq.apache.org/camel/schema/spring http://activemq.apache.org/
camel/schema/spring/camel-spring.xsd">
<bean id="incidentservice"
class="org.apache.camel.example.axis.ReportIncidentService"/>
<camel:camelContext id="camel">
<!-- TODO: Here we can add Camel stuff -->
</camel:camelContext>
</beans>
Store a file backup
We want to store the web service request as a file before we return a response. To do this we
want to send the file content as a message to an endpoint that produces the file. So we need to
do two steps:
▪configure the file backup endpoint
▪send the message to the endpoint
The endpoint is configured in spring XML so we just add it as:
<camel:camelContext id="camelContext">
<!-- endpoint named backup that is configued as a file component -->
<camel:endpoint id="backup" uri="file://target?append=false"/>
</camel:camelContext>
In the CamelContext we have defined our endpoint with the id backup and configured it use
the URL notation that we know from the internet. Its a file scheme that accepts a context
and some options. The contest is target and its the folder to store the file. The option is just
as the internet with ? and & for subsequent options. We configure it to not append, meaning
than any existing file will be overwritten. See the File component for options and how to use
the camel file endpoint.
167 TUTORIALS

Next up is to be able to send a message to this endpoint. The easiest way is to use a
ProducerTemplate. A ProducerTemplate is inspired by Spring template pattern with for
instance JmsTemplate or JdbcTemplate in mind. The template that all the grunt work and
exposes a simple interface to the end-user where he/she can set the payload to send. Then the
template will do proper resource handling and all related issues in that regard. But how do we
get hold of such a template? Well the CamelContext is able to provide one. This is done by
configuring the template on the camel context in the spring XML as:
<camel:camelContext id="camelContext">
<!-- producer template exposed with this id -->
<camel:template id="camelTemplate"/>
<!-- endpoint named backup that is configued as a file component -->
<camel:endpoint id="backup" uri="file://target?append=false"/>
</camel:camelContext>
Then we can expose a ProducerTemplate property on our service with a setter in the Java
code as:
public class ReportIncidentService {
private ProducerTemplate template;
public void setTemplate(ProducerTemplate template) {
this.template = template;
}
And then let Spring handle the dependency inject as below:
<bean id="incidentservice"
class="org.apache.camel.example.axis.ReportIncidentService">
<!-- set the producer template to use from the camel context below -->
<property name="template" ref="camelTemplate"/>
</bean>
Now we are ready to use the producer template in our service to send the payload to the
endpoint. The template has many sendXXX methods for this purpose. But before we send
the payload to the file endpoint we must also specify what filename to store the file as. This is
done by sending meta data with the payload. In Camel metadata is sent as headers. Headers is
just a plain Map<String, Object>. So if we needed to send several metadata then we
could construct an ordinary HashMap and put the values in there. But as we just need to send
one header with the filename Camel has a convenient send method sendBodyAndHeader so
we choose this one.
public OutputReportIncident reportIncident(InputReportIncident parameters) {
System.out.println("Hello ReportIncidentService is called from " +
TUTORIALS 168

parameters.getGivenName());
String data = parameters.getDetails();
// store the data as a file
String filename = parameters.getIncidentId() + ".txt";
// send the data to the endpoint and the header contains what filename it
should be stored as
template.sendBodyAndHeader("backup", data, "org.apache.camel.file.name",
filename);
OutputReportIncident out = new OutputReportIncident();
out.setCode("OK");
return out;
}
The template in the code above uses 4 parameters:
▪the endpoint name, in this case the id referring to the endpoint defined in Spring XML
in the camelContext element.
▪the payload, can be any kind of object
▪the key for the header, in this case a Camel keyword to set the filename
▪and the value for the header
Running the example
We start our integration with maven using mvn jetty:run. Then we open a browser and
hit http://localhost:8080. Jetty is so smart that it display a frontpage with links to the
deployed application so just hit the link and you get our application. Now we hit append
/services to the URL to access the Axis frontpage. The URL should be
http://localhost:8080/camel-example-axis/services.
You can then test it using a web service test tools such as SoapUI.
Hitting the service will output to the console
2008-09-06 15:01:41.718::INFO: Started SelectChannelConnector @ 0.0.0.0:8080
[INFO] Started Jetty Server
Hello ReportIncidentService is called from Ibsen
And there should be a file in the target subfolder.
dir target /b
123.txt
169 TUTORIALS

Unit Testing
We would like to be able to unit test our ReportIncidentService class. So we add junit to
the maven dependency:
<dependency>
<groupId>junit</groupId>
<artifactId>junit</artifactId>
<version>3.8.2</version>
<scope>test</scope>
</dependency>
And then we create a plain junit testcase for our service class.
package org.apache.camel.example.axis;
import junit.framework.TestCase;
import org.apache.camel.example.reportincident.InputReportIncident;
import org.apache.camel.example.reportincident.OutputReportIncident;
/**
* Unit test of service
*/
public class ReportIncidentServiceTest extends TestCase {
public void testIncident() {
ReportIncidentService service = new ReportIncidentService();
InputReportIncident input = createDummyIncident();
OutputReportIncident output = service.reportIncident(input);
assertEquals("OK", output.getCode());
}
protected InputReportIncident createDummyIncident() {
InputReportIncident input = new InputReportIncident();
input.setEmail("davsclaus@apache.org");
input.setIncidentId("12345678");
input.setIncidentDate("2008-07-13");
input.setPhone("+45 2962 7576");
input.setSummary("Failed operation");
input.setDetails("The wrong foot was operated.");
input.setFamilyName("Ibsen");
input.setGivenName("Claus");
return input;
}
}
Then we can run the test with maven using: mvn test. But we will get a failure:
TUTORIALS 170

Running org.apache.camel.example.axis.ReportIncidentServiceTest
Hello ReportIncidentService is called from Claus
Tests run: 1, Failures: 0, Errors: 1, Skipped: 0, Time elapsed: 0.235 sec <<< FAILURE!
Results :
Tests in error:
testIncident(org.apache.camel.example.axis.ReportIncidentServiceTest)
Tests run: 1, Failures: 0, Errors: 1, Skipped: 0
What is the problem? Well our service uses a CamelProducer (the template) to send a message
to the file endpoint so the message will be stored in a file. What we need is to get hold of such
a producer and inject it on our service, by calling the setter.
Since Camel is very light weight and embedable we are able to create a CamelContext and
add the endpoint in our unit test code directly. We do this to show how this is possible:
private CamelContext context;
@Override
protected void setUp() throws Exception {
super.setUp();
// CamelContext is just created like this
context = new DefaultCamelContext();
// then we can create our endpoint and set the options
FileEndpoint endpoint = new FileEndpoint();
// the endpoint must have the camel context set also
endpoint.setCamelContext(context);
// our output folder
endpoint.setFile(new File("target"));
// and the option not to append
endpoint.setAppend(false);
// then we add the endpoint just in java code just as the spring XML, we
register it with the "backup" id.
context.addSingletonEndpoint("backup", endpoint);
// finally we need to start the context so Camel is ready to rock
context.start();
}
@Override
protected void tearDown() throws Exception {
super.tearDown();
// and we are nice boys so we stop it to allow resources to clean up
context.stop();
}
So now we are ready to set the ProducerTemplate on our service, and we get a hold of that
baby from the CamelContext as:
171 TUTORIALS

public void testIncident() {
ReportIncidentService service = new ReportIncidentService();
// get a producer template from the camel context
ProducerTemplate template = context.createProducerTemplate();
// inject it on our service using the setter
service.setTemplate(template);
InputReportIncident input = createDummyIncident();
OutputReportIncident output = service.reportIncident(input);
assertEquals("OK", output.getCode());
}
And this time when we run the unit test its a success:
Results :
Tests run: 1, Failures: 0, Errors: 0, Skipped: 0
We would like to test that the file exists so we add these two lines to our test method:
// should generate a file also
File file = new File("target/" + input.getIncidentId() + ".txt");
assertTrue("File should exists", file.exists());
Smarter Unit Testing with Spring
The unit test above requires us to assemble the Camel pieces manually in java code. What if we
would like our unit test to use our spring configuration file axis-example-context.xml
where we already have setup the endpoint. And of course we would like to test using this
configuration file as this is the real file we will use. Well hey presto the xml file is a spring
ApplicationContext file and spring is able to load it, so we go the spring path for unit testing.
First we add the spring-test jar to our maven dependency:
<dependency>
<groupId>org.springframework</groupId>
<artifactId>spring-test</artifactId>
<scope>test</scope>
</dependency>
And then we refactor our unit test to be a standard spring unit class. What we need to do is to
extend AbstractJUnit38SpringContextTests instead of TestCase in our unit test.
Since Spring 2.5 embraces annotations we will use one as well to instruct what our xml
configuration file is located:
TUTORIALS 172

@ContextConfiguration(locations = "classpath:axis-example-context.xml")
public class ReportIncidentServiceTest extends AbstractJUnit38SpringContextTests {
What we must remember to add is the classpath: prefix as our xml file is located in src/
main/resources. If we omit the prefix then Spring will by default try to locate the xml file
in the current package and that is org.apache.camel.example.axis. If the xml file is located
outside the classpath you can use file: prefix instead. So with these two modifications we can
get rid of all the setup and teardown code we had before and now we will test our real
configuration.
The last change is to get hold of the producer template and now we can just refer to the
bean id it has in the spring xml file:
<!-- producer template exposed with this id -->
<camel:template id="camelTemplate"/>
So we get hold of it by just getting it from the spring ApplicationContext as all spring users is
used to do:
// get a producer template from the the spring context
ProducerTemplate template = (ProducerTemplate)
applicationContext.getBean("camelTemplate");
// inject it on our service using the setter
service.setTemplate(template);
Now our unit test is much better, and a real power of Camel is that is fits nicely with Spring
and you can use standard Spring'ish unit test to test your Camel applications as well.
Unit Test calling WebService
What if you would like to execute a unit test where you send a webservice request to the
AxisReportIncidentService how do we unit test this one? Well first of all the code is
merely just a delegate to our real service that we have just tested, but nevertheless its a good
question and we would like to know how. Well the answer is that we can exploit that fact that
Jetty is also a slim web container that can be embedded anywhere just as Camel can. So we add
this to our pom.xml:
<dependency>
<groupId>org.mortbay.jetty</groupId>
<artifactId>jetty</artifactId>
<version>${jetty-version}</version>
<scope>test</scope>
</dependency>
173 TUTORIALS

Then we can create a new class AxisReportIncidentServiceTest to unit test with Jetty.
The code to setup Jetty is shown below with code comments:
public class AxisReportIncidentServiceTest extends TestCase {
private Server server;
private void startJetty() throws Exception {
// create an embedded Jetty server
server = new Server();
// add a listener on port 8080 on localhost (127.0.0.1)
Connector connector = new SelectChannelConnector();
connector.setPort(8080);
connector.setHost("127.0.0.1");
server.addConnector(connector);
// add our web context path
WebAppContext wac = new WebAppContext();
wac.setContextPath("/unittest");
// set the location of the exploded webapp where WEB-INF is located
// this is a nice feature of Jetty where we can point to src/main/webapp
wac.setWar("./src/main/webapp");
server.setHandler(wac);
// then start Jetty
server.setStopAtShutdown(true);
server.start();
}
@Override
protected void setUp() throws Exception {
super.setUp();
startJetty();
}
@Override
protected void tearDown() throws Exception {
super.tearDown();
server.stop();
}
}
Now we just need to send the incident as a webservice request using Axis. So we add the
following code:
public void testReportIncidentWithAxis() throws Exception {
// the url to the axis webservice exposed by jetty
URL url = new URL("http://localhost:8080/unittest/services/
ReportIncidentPort");
TUTORIALS 174

// Axis stuff to get the port where we can send the webservice request
ReportIncidentService_ServiceLocator locator = new
ReportIncidentService_ServiceLocator();
ReportIncidentService_PortType port = locator.getReportIncidentPort(url);
// create input to send
InputReportIncident input = createDummyIncident();
// send the webservice and get the response
OutputReportIncident output = port.reportIncident(input);
assertEquals("OK", output.getCode());
// should generate a file also
File file = new File("target/" + input.getIncidentId() + ".txt");
assertTrue("File should exists", file.exists());
}
protected InputReportIncident createDummyIncident() {
InputReportIncident input = new InputReportIncident();
input.setEmail("davsclaus@apache.org");
input.setIncidentId("12345678");
input.setIncidentDate("2008-07-13");
input.setPhone("+45 2962 7576");
input.setSummary("Failed operation");
input.setDetails("The wrong foot was operated.");
input.setFamilyName("Ibsen");
input.setGivenName("Claus");
return input;
}
And now we have an unittest that sends a webservice request using good old Axis.
Annotations
Both Camel and Spring has annotations that can be used to configure and wire trivial settings
more elegantly. Camel has the endpoint annotation @EndpointInjected that is just what
we need. With this annotation we can inject the endpoint into our service. The annotation
takes either a name or uri parameter. The name is the bean id in the Registry. The uri is the
URI configuration for the endpoint. Using this you can actually inject an endpoint that you have
not defined in the camel context. As we have defined our endpoint with the id backup we use
the name parameter.
@EndpointInject(name = "backup")
private ProducerTemplate template;
Camel is smart as @EndpointInjected supports different kinds of object types. We like
the ProducerTemplate so we just keep it as it is.
Since we use annotations on the field directly we do not need to set the property in the spring
xml file so we change our service bean:
175 TUTORIALS

<bean id="incidentservice"
class="org.apache.camel.example.axis.ReportIncidentService"/>
Running the unit test with mvn test reveals that it works nicely.
And since we use the @EndpointInjected that refers to the endpoint with the id
backup directly we can loose the template tag in the xml, so its shorter:
<bean id="incidentservice"
class="org.apache.camel.example.axis.ReportIncidentService"/>
<camel:camelContext id="camelContext">
<!-- producer template exposed with this id -->
<camel:template id="camelTemplate"/>
<!-- endpoint named backup that is configued as a file component -->
<camel:endpoint id="backup" uri="file://target?append=false"/>
</camel:camelContext>
And the final touch we can do is that since the endpoint is injected with concrete endpoint to
use we can remove the "backup" name parameter when we send the message. So we change
from:
// send the data to the endpoint and the header contains what filename it
should be stored as
template.sendBodyAndHeader("backup", data, "org.apache.camel.file.name",
filename);
To without the name:
// send the data to the endpoint and the header contains what filename it
should be stored as
template.sendBodyAndHeader(data, "org.apache.camel.file.name", filename);
Then we avoid to duplicate the name and if we rename the endpoint name then we don't forget
to change it in the code also.
The End
This tutorial hasn't really touched the one of the key concept of Camel as a powerful routing
and mediation framework. But we wanted to demonstrate its flexibility and that it integrates
well with even older frameworks such as Apache Axis 1.4.
Check out the other tutorials on Camel and the other examples.
TUTORIALS 176

Note that the code shown here also applies to Camel 1.4 so actually you can get started
right away with the released version of Camel. As this time of writing Camel 1.5 is work in
progress.
See Also
▪Tutorials
▪Examples
TUTORIAL ON USING CAMEL IN A WEB APPLICATION
Camel has been designed to work great with the Spring framework; so if you are already a
Spring user you can think of Camel as just a framework for adding to your Spring XML files.
So you can follow the usual Spring approach to working with web applications; namely to
add the standard Spring hook to load a /WEB-INF/applicationContext.xml file. In that
file you can include your usual Camel XML configuration.
Step1: Edit your web.xml
To enable spring add a context loader listener to your /WEB-INF/web.xml file
<?xml version="1.0" encoding="UTF-8"?>
<web-app xmlns="http://java.sun.com/xml/ns/javaee"
xmlns:xsi="http://www.w3.org/2001/XMLSchema-instance"
xsi:schemaLocation="http://java.sun.com/xml/ns/javaee http://java.sun.com/xml/
ns/javaee/web-app_2_5.xsd"
version="2.5">
<listener>
<listener-class>org.springframework.web.context.ContextLoaderListener</listener-class>
</listener>
</web-app>
This will cause Spring to boot up and look for the /WEB-INF/applicationContext.xml
file.
Step 2: Create a /WEB-INF/applicationContext.xml file
Now you just need to create your Spring XML file and add your camel routes or configuration.
For example
177 TUTORIALS
<?xml version="1.0" encoding="UTF-8"?>
<beans xmlns="http://www.springframework.org/schema/beans"
xmlns:xsi="http://www.w3.org/2001/XMLSchema-instance"
xmlns:context="http://www.springframework.org/schema/context"
xsi:schemaLocation="
http://www.springframework.org/schema/beans
http://www.springframework.org/schema/beans/spring-beans-2.5.xsd
http://www.springframework.org/schema/context
http://www.springframework.org/schema/context/spring-context-2.5.xsd
http://camel.apache.org/schema/spring
http://camel.apache.org/schema/spring/camel-spring.xsd">
<camelContext xmlns="http://camel.apache.org/schema/spring">
<route>
<from uri="seda:foo"/>
<to uri="mock:results"/>
</route>
</camelContext>
</beans>
Then boot up your web application and you're good to go!
Hints and Tips
If you use Maven to build your application your directory tree will look like this...
src/main/webapp/WEB-INF
web.xml
applicationContext.xml
To enable more rapid development we hightly recommend the jetty:run maven plugin.
Please refer to the help for more information on using jetty:run - but briefly if you add the
following to your pom.xml
<build>
<plugins>
<plugin>
<groupId>org.mortbay.jetty</groupId>
<artifactId>maven-jetty-plugin</artifactId>
<configuration>
<webAppConfig>
<contextPath>/</contextPath>
</webAppConfig>
<scanIntervalSeconds>10</scanIntervalSeconds>
</configuration>
</plugin>
</plugins>
</build>
TUTORIALS 178
Then you can run your web application as follows
mvn jetty:run
Then Jetty will also monitor your target/classes directory and your src/main/webapp directory
so that if you modify your spring XML, your web.xml or your java code the web application will
be restarted, re-creating your Camel routes.
If your unit tests take a while to run, you could miss them out when running your web
application via
mvn -Dtest=false jetty:run
TUTORIAL BUSINESS PARTNERS
BACKGROUND AND INTRODUCTION
Business Background
So there's a company, which we'll call Acme. Acme sells widgets, in a fairly unusual way. Their
customers are responsible for telling Acme what they purchased. The customer enters into
their own systems (ERP or whatever) which widgets they bought from Acme. Then at some
point, their systems emit a record of the sale which needs to go to Acme so Acme can bill them
for it. Obviously, everyone wants this to be as automated as possible, so there needs to be
integration between the customer's system and Acme.
Sadly, Acme's sales people are, technically speaking, doormats. They tell all their prospects,
"you can send us the data in whatever format, using whatever protocols, whatever. You just
can't change once it's up and running."
The result is pretty much what you'd expect. Taking a random sample of 3 customers:
• Customer 1: XML over FTP
• Customer 2: CSV over HTTP
• Customer 3: Excel via e-mail
Now on the Acme side, all this has to be converted to a canonical XML format and submitted
to the Acme accounting system via JMS. Then the Acme accounting system does its stuff and
sends an XML reply via JMS, with a summary of what it processed (e.g. 3 line items accepted,
line item #2 in error, total invoice $123.45). Finally, that data needs to be formatted into an e-
mail, and sent to a contact at the customer in question ("Dear Joyce, we received an invoice on
1/2/08. We accepted 3 line items totaling $123.45, though there was an error with line items
#2 [invalid quantity ordered]. Thank you for your business. Love, Acme.").
So it turns out Camel can handle all this:
• Listen for HTTP, e-mail, and FTP files
179 TUTORIALS

Under Construction
This tutorial is a work in progress.
• Grab attachments from the e-mail messages
• Convert XML, XLS, and CSV files to a canonical XML format
• read and write JMS messages
• route based on company ID
• format e-mails using Velocity templates
• send outgoing e-mail messages
Tutorial Background
This tutorial will cover all that, plus setting up tests along the way.
Before starting, you should be familiar with:
• Camel concepts including the CamelContext, Routes, Components and Endpoints,
and Enterprise Integration Patterns
• Configuring Camel with the XML or Java DSL
You'll learn:
• How to set up a Maven build for a Camel project
• How to transform XML, CSV, and Excel data into a standard XML format with Camel
◦How to write POJOs (Plain Old Java Objects), Velocity templates, and XSLT
stylesheets that are invoked by Camel routes for message transformation
• How to configure simple and complex Routes in Camel, using either the XML or the
Java DSL format
• How to set up unit tests that load a Camel configuration and test Camel routes
• How to use Camel's Data Formats to automatically convert data between Java objects
and XML, CSV files, etc.
• How to send and receive e-mail from Camel
• How to send and receive JMS messages from Camel
• How to use Enterprise Integration Patterns including Message Router and Pipes and
Filters
◦How to use various languages to express content-based routing rules in
Camel
• How to deal with Camel messages, headers, and attachments
You may choose to treat this as a hands-on tutorial, and work through building the code and
configuration files yourself. Each of the sections gives detailed descriptions of the steps that
need to be taken to get the components and routes working in Camel, and takes you through
tests to make sure they are working as expected.
But each section also links to working copies of the source and configuration files, so if you
don't want the hands-on approach, you can simply review and/or download the finished files.
TUTORIALS 180
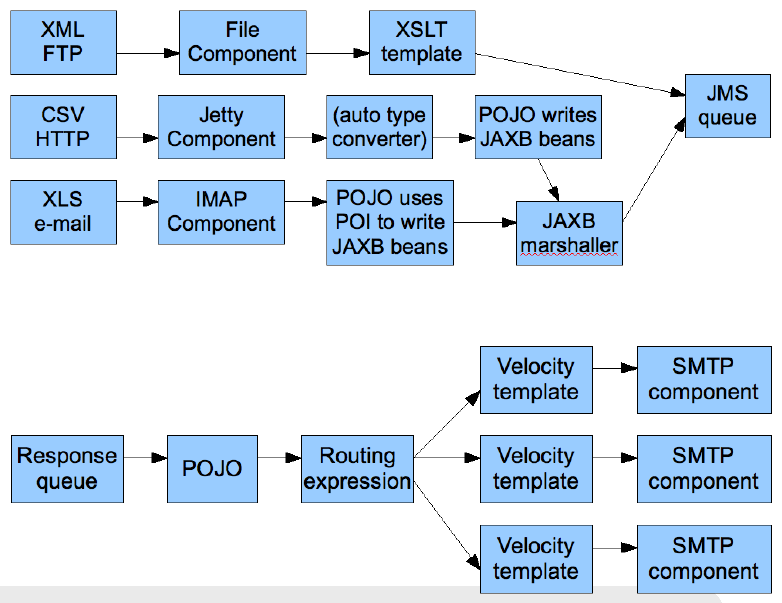
High-Level Diagram
Here's more or less what the integration process looks like.
First, the input from the customers to Acme:
And then, the output from Acme to the customers:
Tutorial Tasks
To get through this scenario, we're going to break it down into smaller pieces, implement and
test those, and then try to assemble the big scenario and test that.
Here's what we'll try to accomplish:
1. Create a Maven build for the project
2. Get sample files for the customer Excel, CSV, and XML input
3. Get a sample file for the canonical XML format that Acme's accounting system uses
4. Create an XSD for the canonical XML format
5. Create JAXB POJOs corresponding to the canonical XSD
6. Create an XSLT stylesheet to convert the Customer 1 (XML over FTP) messages to
the canonical format
181 TUTORIALS

7. Create a unit test to ensure that a simple Camel route invoking the XSLT stylesheet
works
8. Create a POJO that converts a List<List<String>> to the above JAXB POJOs
◦Note that Camel can automatically convert CSV input to a List of Lists of
Strings representing the rows and columns of the CSV, so we'll use this
POJO to handle Customer 2 (CSV over HTTP)
9. Create a unit test to ensure that a simple Camel route invoking the CSV processing
works
10. Create a POJO that converts a Customer 3 Excel file to the above JAXB POJOs
(using POI to read Excel)
11. Create a unit test to ensure that a simple Camel route invoking the Excel processing
works
12. Create a POJO that reads an input message, takes an attachment off the message, and
replaces the body of the message with the attachment
◦This is assuming for Customer 3 (Excel over e-mail) that the e-mail contains
a single Excel file as an attachment, and the actual e-mail body is throwaway
13. Build a set of Camel routes to handle the entire input (Customer -> Acme) side of
the scenario.
14. Build unit tests for the Camel input.
15. TODO: Tasks for the output (Acme -> Customer) side of the scenario
LET'S GET STARTED!
Step 1: Initial Maven build
We'll use Maven for this project as there will eventually be quite a few dependencies and it's
nice to have Maven handle them for us. You should have a current version of Maven (e.g. 2.0.9)
installed.
You can start with a pretty empty project directory and a Maven POM file, or use a simple
JAR archetype to create one.
Here's a sample POM. We've added a dependency on camel-core, and set the compile
version to 1.5 (so we can use annotations):
Listing 8.Listing 8. pom.xmlpom.xml
<?xml version="1.0" encoding="UTF-8"?>
<project xmlns="http://maven.apache.org/POM/4.0.0">
<modelVersion>4.0.0</modelVersion>
<groupId>org.apache.camel.tutorial</groupId>
<artifactId>business-partners</artifactId>
<version>1.0-SNAPSHOT</version>
<name>Camel Business Partners Tutorial</name>
<dependencies>
<dependency>
TUTORIALS 182

<artifactId>camel-core</artifactId>
<groupId>org.apache.camel</groupId>
<version>1.4.0</version>
</dependency>
</dependencies>
<build>
<plugins>
<plugin>
<groupId>org.apache.maven.plugins</groupId>
<artifactId>maven-compiler-plugin</artifactId>
<configuration>
<source>1.5</source>
<target>1.5</target>
</configuration>
</plugin>
</plugins>
</build>
</project>
Step 2: Get Sample Files
You can make up your own if you like, but here are the "off the shelf" ones. You can save
yourself some time by downloading these to src/test/resources in your Maven project.
• Customer 1 (XML): input-customer1.xml
• Customer 2 (CSV): input-customer2.csv
• Customer 3 (Excel): input-customer3.xls
• Canonical Acme XML Request: canonical-acme-request.xml
• Canonical Acme XML Response: TODO
If you look at these files, you'll see that the different input formats use different field names and/
or ordering, because of course the sales guys were totally OK with that. Sigh.
Step 3: XSD and JAXB Beans for the Canonical XML Format
Here's the sample of the canonical XML file:
<?xml version="1.0" encoding="UTF-8"?>
<invoice xmlns="http://activemq.apache.org/camel/tutorial/partners/invoice">
<partner-id>2</partner-id>
<date-received>9/12/2008</date-received>
<line-item>
<product-id>134</product-id>
<description>A widget</description>
<quantity>3</quantity>
<item-price>10.45</item-price>
<order-date>6/5/2008</order-date>
</line-item>
<!-- // more line-item elements here -->
183 TUTORIALS

<order-total>218.82</order-total>
</invoice>
If you're ambitions, you can write your own XSD (XML Schema) for files that look like this, and
save it to src/main/xsd.
Solution: If not, you can download mine, and save that to save it to src/main/xsd.
Generating JAXB Beans
Down the road we'll want to deal with the XML as Java POJOs. We'll take a moment now to
set up those XML binding POJOs. So we'll update the Maven POM to generate JAXB beans
from the XSD file.
We need a dependency:
<dependency>
<artifactId>camel-jaxb</artifactId>
<groupId>org.apache.camel</groupId>
<version>1.4.0</version>
</dependency>
And a plugin configured:
<plugin>
<groupId>org.codehaus.mojo</groupId>
<artifactId>jaxb2-maven-plugin</artifactId>
<executions>
<execution>
<goals>
<goal>xjc</goal>
</goals>
</execution>
</executions>
</plugin>
That should do it (it automatically looks for XML Schemas in src/main/xsd to generate
beans for). Run mvn install and it should emit the beans into target/generated-
sources/jaxb. Your IDE should see them there, though you may need to update the
project to reflect the new settings in the Maven POM.
Step 4: Initial Work on Customer 1 Input (XML over FTP)
To get a start on Customer 1, we'll create an XSLT template to convert the Customer 1
sample file into the canonical XML format, write a small Camel route to test it, and build that
TUTORIALS 184

into a unit test. If we get through this, we can be pretty sure that the XSLT template is valid and
can be run safely in Camel.
Create an XSLT template
Start with the Customer 1 sample input. You want to create an XSLT template to generate
XML like the canonical XML sample above – an invoice element with line-item elements
(one per item in the original XML document). If you're especially clever, you can populate the
current date and order total elements too.
Solution: My sample XSLT template isn't that smart, but it'll get you going if you don't
want to write one of your own.
Create a unit test
Here's where we get to some meaty Camel work. We need to:
• Set up a unit test
• That loads a Camel configuration
• That has a route invoking our XSLT
• Where the test sends a message to the route
• And ensures that some XML comes out the end of the route
The easiest way to do this is to set up a Spring context that defines the Camel stuff, and then
use a base unit test class from Spring that knows how to load a Spring context to run tests
against. So, the procedure is:
Set Up a Skeletal Camel/Spring Unit Test
1. Add dependencies on Camel-Spring, and the Spring test JAR (which will automatically
bring in JUnit 3.8.x) to your POM:
<dependency>
<artifactId>camel-spring</artifactId>
<groupId>org.apache.camel</groupId>
<version>1.4.0</version>
</dependency>
<dependency>
<artifactId>spring-test</artifactId>
<groupId>org.springframework</groupId>
<version>2.5.5</version>
<scope>test</scope>
</dependency>
2. Create a new unit test class in src/test/java/your-package-here, perhaps
called XMLInputTest.java
185 TUTORIALS
3. Make the test extend Spring's AbstractJUnit38SpringContextTests class, so it can load
a Spring context for the test
4. Create a Spring context configuration file in src/test/resources, perhaps
called XMLInputTest-context.xml
5. In the unit test class, use the class-level @ContextConfiguration annotation to
indicate that a Spring context should be loaded
◦By default, this looks for a Context configuration file called
TestClassName-context.xml in a subdirectory corresponding to the
package of the test class. For instance, if your test class was
org.apache.camel.tutorial.XMLInputTest, it would look for
org/apache/camel/tutorial/XMLInputTest-context.xml
◦To override this default, use the locations attribute on the
@ContextConfiguration annotation to provide specific context file
locations (starting each path with a / if you don't want it to be relative to
the package directory). My solution does this so I can put the context file
directly in src/test/resources instead of in a package directory
under there.
6. Add a CamelContext instance variable to the test class, with the @Autowired
annotation. That way Spring will automatically pull the CamelContext out of the
Spring context and inject it into our test class.
7. Add a ProducerTemplate instance variable and a setUp method that instantiates it
from the CamelContext. We'll use the ProducerTemplate later to send messages to
the route.
protected ProducerTemplate<Exchange> template;
protected void setUp() throws Exception {
super.setUp();
template = camelContext.createProducerTemplate();
}
8. Put in an empty test method just for the moment (so when we run this we can see
that "1 test succeeded")
9. Add the Spring <beans> element (including the Camel Namespace) with an empty
<camelContext> element to the Spring context, like this:
<?xml version="1.0" encoding="UTF-8"?>
<beans xmlns="http://www.springframework.org/schema/beans"
xmlns:xsi="http://www.w3.org/2001/XMLSchema-instance"
xsi:schemaLocation="http://www.springframework.org/schema/beans
http://www.springframework.org/schema/beans/
spring-beans-2.5.xsd
http://activemq.apache.org/camel/schema/spring
http://activemq.apache.org/camel/schema/spring/
camel-spring-1.4.0.xsd">
TUTORIALS 186
<camelContext id="camel" xmlns="http://activemq.apache.org/camel/schema/
spring">
</camelContext>
</beans>
Test it by running mvn install and make sure there are no build errors. So far it doesn't test
much; just that your project and test and source files are all organized correctly, and the one
empty test method completes successfully.
Solution: Your test class might look something like this:
• src/test/java/org/apache/camel/tutorial/XMLInputTest.java
• src/test/resources/XMLInputTest-context.xml (same as just above)
Flesh Out the Unit Test
So now we're going to write a Camel route that applies the XSLT to the sample Customer 1
input file, and makes sure that some XML output comes out:
1. Save the input-customer1.xml file to src/test/resources
2. Save your XSLT file (created in the previous step) to src/main/resources
3. Write a Camel Route, either right in the Spring XML, or using the Java DSL (in
another class under src/test/java somewhere). This route should use the Pipes
and Filters integration pattern to:
1. Start from the endpoint direct:start (which lets the test conveniently pass
messages into the route)
2. Call the endpoint xslt:YourXSLTFile.xsl (to transform the message with the
specified XSLT template)
3. Send the result to the endpoint mock:finish (which lets the test verify the
route output)
4. Add a test method to the unit test class that:
1. Get a reference to the Mock endpoint mock:finish using code like this:
MockEndpoint finish = MockEndpoint.resolve(camelContext,
"mock:finish");
2. Set the expectedMessageCount on that endpoint to 1
3. Get a reference to the Customer 1 input file, using code like this:
InputStream in =
XMLInputTest.class.getResourceAsStream("/input-partner1.xml");
assertNotNull(in);
4. Send that InputStream as a message to the direct:start endpoint,
using code like this:
187 TUTORIALS
template.sendBody("direct:start", in);
Note that we can send the sample file body in several formats (File,
InputStream, String, etc.) but in this case an InputStream is pretty
convenient.
5. Ensure that the message made it through the route to the final endpoint, by
testing all configured Mock endpoints like this:
MockEndpoint.assertIsSatisfied(camelContext);
6. If you like, inspect the final message body using some code like
finish.getExchanges().get(0).getIn().getBody().
▪If you do this, you'll need to know what format that body is –
String, byte array, InputStream, etc.
5. Run your test with mvn install and make sure the build completes successfully.
Solution: Your finished test might look something like this:
• src/test/java/org/apache/camel/tutorial/XMLInputTest.java
• For XML Configuration:
◦src/test/resources/XMLInputTest-context.xml
• Or, for Java DSL Configuration:
◦src/test/resources/XMLInputTest-dsl-context.xml
◦src/test/java/org/apache/camel/tutorial/routes/XMLInputTestRoute.java
Step 5: Initial Work on Customer 2 Input (CSV over HTTP)
To get a start on Customer 2, we'll create a POJO to convert the Customer 2 sample CSV data
into the JAXB POJOs representing the canonical XML format, write a small Camel route to test
it, and build that into a unit test. If we get through this, we can be pretty sure that the CSV
conversion and JAXB handling is valid and can be run safely in Camel.
Create a CSV-handling POJO
To begin with, CSV is a known data format in Camel. Camel can convert a CSV file to a List
(representing rows in the CSV) of Lists (representing cells in the row) of Strings (the data for
each cell). That means our POJO can just assume the data coming in is of type
List<List<String>>, and we can declare a method with that as the argument.
Looking at the JAXB code in target/generated-sources/jaxb, it looks like an
Invoice object represents the whole document, with a nested list of LineItemType objects
for the line items. Therefore our POJO method will return an Invoice (a document in the
canonical XML format).
So to implement the CSV-to-JAXB POJO, we need to do something like this:
TUTORIALS 188

Test Base Class
Once your test class is working, you might want to extract things like the
@Autowired CamelContext, the ProducerTemplate, and the setUp method to a
custom base class that you extend with your other tests.
1. Create a new class under src/main/java, perhaps called CSVConverterBean.
2. Add a method, with one argument of type List<List<String>> and the return
type Invoice
◦You may annotate the argument with @Body to specifically designate it as
the body of the incoming message
3. In the method, the logic should look roughly like this:
1. Create a new Invoice, using the method on the generated
ObjectFactory class
2. Loop through all the rows in the incoming CSV (the outer List)
3. Skip the first row, which contains headers (column names)
4. For the other rows:
1. Create a new LineItemType (using the ObjectFactory
again)
2. Pick out all the cell values (the Strings in the inner List) and put
them into the correct fields of the LineItemType
▪Not all of the values will actually go into the line item in
this example
▪You may hardcode the column ordering based on the
sample data file, or else try to read it dynamically from
the headers in the first line
▪Note that you'll need to use a JAXB
DatatypeFactory to create the
XMLGregorianCalendar values that JAXB uses for
the date fields in the XML – which probably means
using a SimpleDateFormat to parse the date and
setting that date on a GregorianCalendar
3. Add the line item to the invoice
5. Populate the partner ID, date of receipt, and order total on the Invoice
6. Throw any exceptions out of the method, so Camel knows something went
wrong
7. Return the finished Invoice
Solution: Here's an example of what the CSVConverterBean might look like.
189 TUTORIALS

Create a unit test
Start with a simple test class and test Spring context like last time, perhaps based on the name
CSVInputTest:
Listing 9.Listing 9. CSVInputTest.javaCSVInputTest.java
/**
* A test class the ensure we can convert Partner 2 CSV input files to the
* canonical XML output format, using JAXB POJOs.
*/
@ContextConfiguration(locations = "/CSVInputTest-context.xml")
public class CSVInputTest extends AbstractJUnit38SpringContextTests {
@Autowired
protected CamelContext camelContext;
protected ProducerTemplate<Exchange> template;
protected void setUp() throws Exception {
super.setUp();
template = camelContext.createProducerTemplate();
}
public void testCSVConversion() {
// TODO
}
}
Listing 10.Listing 10. CSVInputTest-context.xmlCSVInputTest-context.xml
<?xml version="1.0" encoding="UTF-8"?>
<beans xmlns="http://www.springframework.org/schema/beans"
xmlns:xsi="http://www.w3.org/2001/XMLSchema-instance"
xsi:schemaLocation="http://www.springframework.org/schema/beans
http://www.springframework.org/schema/beans/
spring-beans-2.5.xsd
http://activemq.apache.org/camel/schema/spring
http://activemq.apache.org/camel/schema/spring/
camel-spring-1.4.0.xsd">
<camelContext id="camel" xmlns="http://activemq.apache.org/camel/schema/spring">
<!-- TODO -->
</camelContext>
</beans>
Now the meaty part is to flesh out the test class and write the Camel routes.
1. Update the Maven POM to include CSV Data Format support:
<dependency>
<artifactId>camel-csv</artifactId>
<groupId>org.apache.camel</groupId>
<version>1.4.0</version>
</dependency>
TUTORIALS 190
2. Write the routes (right in the Spring XML context, or using the Java DSL) for the
CSV conversion process, again using the Pipes and Filters pattern:
1. Start from the endpoint direct:CSVstart (which lets the test conveniently
pass messages into the route). We'll name this differently than the starting
point for the previous test, in case you use the Java DSL and put all your
routes in the same package (which would mean that each test would load
the DSL routes for several tests.)
2. This time, there's a little preparation to be done. Camel doesn't know that
the initial input is a CSV, so it won't be able to convert it to the expected
List<List<String>> without a little hint. For that, we need an
unmarshal transformation in the route. The unmarshal method (in the
DSL) or element (in the XML) takes a child indicating the format to
unmarshal; in this case that should be csv.
3. Next invoke the POJO to transform the message with a
bean:CSVConverter endpoint
4. As before, send the result to the endpoint mock:finish (which lets the test
verify the route output)
5. Finally, we need a Spring <bean> element in the Spring context XML file
(but outside the <camelContext> element) to define the Spring bean
that our route invokes. This Spring bean should have a name attribute that
matches the name used in the bean endpoint (CSVConverter in the
example above), and a class attribute that points to the CSV-to-JAXB
POJO class you wrote above (such as,
org.apache.camel.tutorial.CSVConverterBean). When
Spring is in the picture, any bean endpoints look up Spring beans with the
specified name.
3. Write a test method in the test class, which should look very similar to the previous
test class:
1. Get the MockEndpoint for the final endpoint, and tell it to expect one
message
2. Load the Partner 2 sample CSV file from the ClassPath, and send it as the
body of a message to the starting endpoint
3. Verify that the final MockEndpoint is satisfied (that is, it received one
message) and examine the message body if you like
▪Note that we didn't marshal the JAXB POJOs to XML in this test,
so the final message should contain an Invoice as the body. You
could write a simple line of code to get the Exchange (and
Message) from the MockEndpoint to confirm that.
4. Run this new test with mvn install and make sure it passes and the build completes
successfully.
Solution: Your finished test might look something like this:
• src/test/java/org/apache/camel/tutorial/CSVInputTest.java
• For XML Configuration:
191 TUTORIALS

◦src/test/resources/CSVInputTest-context.xml
• Or, for Java DSL Configuration:
◦src/test/resources/CSVInputTest-dsl-context.xml
◦src/test/java/org/apache/camel/tutorial/routes/CSVInputTestRoute.java
Step 6: Initial Work on Customer 3 Input (Excel over e-mail)
To get a start on Customer 3, we'll create a POJO to convert the Customer 3 sample Excel
data into the JAXB POJOs representing the canonical XML format, write a small Camel route
to test it, and build that into a unit test. If we get through this, we can be pretty sure that the
Excel conversion and JAXB handling is valid and can be run safely in Camel.
Create an Excel-handling POJO
Camel does not have a data format handler for Excel by default. We have two options – create
an Excel DataFormat (so Camel can convert Excel spreadsheets to something like the CSV
List<List<String>> automatically), or create a POJO that can translate Excel data
manually. For now, the second approach is easier (if we go the DataFormat route, we need
code to both read and write Excel files, whereas otherwise read-only will do).
So, we need a POJO with a method that takes something like an InputStream or
byte[] as an argument, and returns in Invoice as before. The process should look
something like this:
1. Update the Maven POM to include POI support:
<dependency>
<artifactId>poi</artifactId>
<groupId>org.apache.poi</groupId>
<version>3.1-FINAL</version>
</dependency>
2. Create a new class under src/main/java, perhaps called
ExcelConverterBean.
3. Add a method, with one argument of type InputStream and the return type
Invoice
◦You may annotate the argument with @Body to specifically designate it as
the body of the incoming message
4. In the method, the logic should look roughly like this:
1. Create a new Invoice, using the method on the generated
ObjectFactory class
2. Create a new HSSFWorkbook from the InputStream, and get the first
sheet from it
3. Loop through all the rows in the sheet
4. Skip the first row, which contains headers (column names)
TUTORIALS 192
5. For the other rows:
1. Create a new LineItemType (using the ObjectFactory
again)
2. Pick out all the cell values and put them into the correct fields of
the LineItemType (you'll need some data type conversion
logic)
▪Not all of the values will actually go into the line item in
this example
▪You may hardcode the column ordering based on the
sample data file, or else try to read it dynamically from
the headers in the first line
▪Note that you'll need to use a JAXB
DatatypeFactory to create the
XMLGregorianCalendar values that JAXB uses for
the date fields in the XML – which probably means
setting the date from a date cell on a
GregorianCalendar
3. Add the line item to the invoice
6. Populate the partner ID, date of receipt, and order total on the Invoice
7. Throw any exceptions out of the method, so Camel knows something went
wrong
8. Return the finished Invoice
Solution: Here's an example of what the ExcelConverterBean might look like.
Create a unit test
The unit tests should be pretty familiar now. The test class and context for the Excel bean
should be quite similar to the CSV bean.
1. Create the basic test class and corresponding Spring Context XML configuration file
2. The XML config should look a lot like the CSV test, except:
◦Remember to use a different start endpoint name if you're using the Java
DSL and not use separate packages per test
◦You don't need the unmarshal step since the Excel POJO takes the raw
InputStream from the source endpoint
◦You'll declare a <bean> and endpoint for the Excel bean prepared above
instead of the CSV bean
3. The test class should look a lot like the CSV test, except use the right input file name
and start endpoint name.
Solution: Your finished test might look something like this:
• src/test/java/org/apache/camel/tutorial/ExcelInputTest.java
• For XML Configuration:
◦src/test/resources/ExcelInputTest-context.xml
193 TUTORIALS
Logging
You may notice that your tests emit a lot less output all of a sudden. The
dependency on POI brought in Log4J and configured commons-logging to use it, so
now we need a log4j.properties file to configure log output. You can use the
attached one (snarfed from ActiveMQ) or write your own; either way save it to
src/main/resources to ensure you continue to see log output.
• Or, for Java DSL Configuration:
◦src/test/resources/ExcelInputTest-dsl-context.xml
◦src/test/java/org/apache/camel/tutorial/routes/ExcelInputTestRoute.java
Step 7: Put this all together into Camel routes for the Customer Input
With all the data type conversions working, the next step is to write the real routes that listen
for HTTP, FTP, or e-mail input, and write the final XML output to an ActiveMQ queue. Along
the way these routes will use the data conversions we've developed above.
So we'll create 3 routes to start with, as shown in the diagram back at the beginning:
1. Accept XML orders over FTP from Customer 1 (we'll assume the FTP server dumps
files in a local directory on the Camel machine)
2. Accept CSV orders over HTTP from Customer 2
3. Accept Excel orders via e-mail from Customer 3 (we'll assume the messages are sent
to an account we can access via IMAP)
...
Step 8: Create a unit test for the Customer Input Routes
TUTORIALS 194

Languages Supported Appendix
To support flexible and powerful Enterprise Integration Patterns Camel supports various
Languages to create an Expression or Predicate within either the Routing Domain Specific
Language or the Xml Configuration. The following languages are supported
BEAN LANGUAGE
The purpose of the Bean Language is to be able to implement an Expression or Predicate using
a simple method on a bean.
So the idea is you specify a bean name which will then be resolved in the Registry such as
the Spring ApplicationContext then a method is invoked to evaluate the Expression or
Predicate.
If no method name is provided then one is attempted to be chosen using the rules for Bean
Binding; using the type of the message body and using any annotations on the bean methods.
The Bean Binding rules are used to bind the Message Exchange to the method parameters;
so you can annotate the bean to extract headers or other expressions such as XPath or
XQuery from the message.
Using Bean Expressions from the Java DSL
from("activemq:topic:OrdersTopic").
filter().method("myBean","isGoldCustomer").
to("activemq:BigSpendersQueue");
Using Bean Expressions from XML
<route>
<from uri="activemq:topic:OrdersTopic"/>
<filter>
<method bean="myBean" method="isGoldCustomer"/>
<to uri="activemq:BigSpendersQueue"/>
</filter>
</route>
195 LANGUAGES SUPPORTED APPENDIX
Writing the expression bean
The bean in the above examples is just any old Java Bean with a method called
isGoldCustomer() that returns some object that is easily converted to a boolean value in this
case, as its used as a predicate.
So we could implement it like this...
public class MyBean {
public boolean isGoldCustomer(Exchange exchange) {
...
}
}
We can also use the Bean Integration annotations. For example you could do...
public boolean isGoldCustomer(String body) {...}
or
public boolean isGoldCustomer(@Header(name = "foo")Integer fooHeader) {...}
So you can bind parameters of the method to the Exchange, the Message or individual headers,
properties, the body or other expressions.
Non registry beans
As of Camel 1.5 the Bean Language also supports invoking beans that isn't registered in the
Registry. This is usable for quickly to invoke a bean from Java DSL where you don't need to
register the bean in the Registry such as the Spring ApplicationContext.
Camel can instantiate the bean and invoke the method if given a class or invoke an already
existing instance. This is illustrated from the example below:
NOTE This bean DSL is supported since Camel 2.0-M2
from("activemq:topic:OrdersTopic").
filter().expression(BeanLanguage(MyBean.class, "isGoldCustomer")).
to("activemq:BigSpendersQueue");
The 2nd parameter isGoldCustomer is an optional parameter to explicit set the method
name to invoke. If not provided Camel will try to invoke the best suited method. If case of
ambiguity Camel will thrown an Exception. In these situations the 2nd parameter can solve this
problem. Also the code is more readable if the method name is provided. The 1st parameter
can also be an existing instance of a Bean such as:
LANGUAGES SUPPORTED APPENDIX 196

private MyBean my;
from("activemq:topic:OrdersTopic").
filter().expression(BeanLanguage.bean(my, "isGoldCustomer")).
to("activemq:BigSpendersQueue");
In Camel 2.2 onwards you can avoid the BeanLanguage and have it just as:
private MyBean my;
from("activemq:topic:OrdersTopic").
filter().expression(bean(my, "isGoldCustomer")).
to("activemq:BigSpendersQueue");
Which also can be done in a bit shorter and nice way:
private MyBean my;
from("activemq:topic:OrdersTopic").
filter().method(my, "isGoldCustomer").
to("activemq:BigSpendersQueue");
Other examples
We have some test cases you can look at if it'll help
• MethodFilterTest is a JUnit test case showing the Java DSL use of the bean expression
being used in a filter
• aggregator.xml is a Spring XML test case for the Aggregator which uses a bean
method call to test for the completion of the aggregation.
Dependencies
The Bean language is part of camel-core.
CONSTANT EXPRESSION LANGUAGE
The Constant Expression Language is really just a way to specify constant strings as a type of
expression.
Available as of Camel 1.5
Example usage
The setHeader element of the Spring DSL can utilize a constant expression like:
197 LANGUAGES SUPPORTED APPENDIX

<route>
<from uri="seda:a"/>
<setHeader headerName="theHeader">
<constant>the value</constant>
</setHeader>
<to uri="mock:b"/>
</route>
in this case, the Message coming from the seda:a Endpoint will have 'theHeader' header set to
the constant value 'the value'.
And the same example using Java DSL:
from("seda:a").setHeader("theHeader", constant("the value")).to("mock:b");
Dependencies
The Constant language is part of camel-core.
EL
Camel supports the unified JSP and JSF Expression Language via the JUEL to allow an Expression
or Predicate to be used in the DSL or Xml Configuration.
For example you could use EL inside a Message Filter in XML
<route>
<from uri="seda:foo"/>
<filter>
<el>${in.headers.foo == 'bar'}</el>
<to uri="seda:bar"/>
</filter>
</route>
You could also use slightly different syntax, e.g. if the header name is not a valid identifier:
<route>
<from uri="seda:foo"/>
<filter>
<el>${in.headers['My Header'] == 'bar'}</el>
<to uri="seda:bar"/>
</filter>
</route>
You could use EL to create an Predicate in a Message Filter or as an Expression for a Recipient
List
LANGUAGES SUPPORTED APPENDIX 198
Variables
Variable Type Description
exchange Exchange the Exchange object
in Message the exchange.in message
out Message the exchange.out message
Samples
You can use EL dot notation to invoke operations. If you for instance have a body that contains
a POJO that has a getFamiliyName method then you can construct the syntax as follows:
"$in.body.familyName"
Dependencies
To use EL in your camel routes you need to add the a dependency on camel-juel which
implements the EL language.
If you use maven you could just add the following to your pom.xml, substituting the version
number for the latest & greatest release (see the download page for the latest versions).
<dependency>
<groupId>org.apache.camel</groupId>
<artifactId>camel-juel</artifactId>
<version>1.6.1</version>
</dependency>
HEADER EXPRESSION LANGUAGE
The Header Expression Language allows you to extract values of named headers.
Available as of Camel 1.5
Example usage
The recipientList element of the Spring DSL can utilize a header expression like:
<route>
<from uri="direct:a" />
<!-- use comma as a delimiter for String based values -->
<recipientList delimiter=",">
199 LANGUAGES SUPPORTED APPENDIX
<header>myHeader</header>
</recipientList>
</route>
In this case, the list of recipients are contained in the header 'myHeader'.
And the same example in Java DSL:
from("direct:a").recipientList(header("myHeader"));
And with a slightly different syntax where you use the builder to the fullest (i.e. avoid using
parameters but using stacked operations, notice that header is not a parameter but a stacked
method call)
from("direct:a").recipientList().header("myHeader");
Dependencies
The Header language is part of camel-core.
JXPATH
Camel supports JXPath to allow XPath expressions to be used on beans in an Expression or
Predicate to be used in the DSL or Xml Configuration. For example you could use JXPath to
create an Predicate in a Message Filter or as an Expression for a Recipient List.
From 1.3 of Camel onwards you can use XPath expressions directly using smart completion
in your IDE as follows
from("queue:foo").filter().
jxpath("/in/body/foo").
to("queue:bar")
Variables
Variable Type Description
this Exchange the Exchange object
in Message the exchange.in message
out Message the exchange.out message
LANGUAGES SUPPORTED APPENDIX 200

Using XML configuration
If you prefer to configure your routes in your Spring XML file then you can use JXPath
expressions as follows
<beans xmlns="http://www.springframework.org/schema/beans"
xmlns:xsi="http://www.w3.org/2001/XMLSchema-instance"
xsi:schemaLocation="
http://www.springframework.org/schema/beans http://www.springframework.org/
schema/beans/spring-beans-2.0.xsd
http://camel.apache.org/schema/spring http://camel.apache.org/schema/spring/
camel-spring.xsd">
<camelContext id="camel" xmlns="http://activemq.apache.org/camel/schema/spring">
<route>
<from uri="activemq:MyQueue"/>
<filter>
<jxpath>in/body/name = 'James'</xpath>
<to uri="mqseries:SomeOtherQueue"/>
</filter>
</route>
</camelContext>
</beans>
Examples
Here is a simple example using a JXPath expression as a predicate in a Message Filter
from("direct:start").
filter().jxpath("in/body/name='James'").
to("mock:result");
JXPATH INJECTION
You can use Bean Integration to invoke a method on a bean and use various languages such as
JXPath to extract a value from the message and bind it to a method parameter.
For example
public class Foo {
@MessageDriven(uri = "activemq:my.queue")
public void doSomething(@JXPath("in/body/foo")String correlationID, @Body String
body) {
// process the inbound message here
}
}
201 LANGUAGES SUPPORTED APPENDIX

Dependencies
To use JXpath in your camel routes you need to add the a dependency on camel-jxpath
which implements the JXpath language.
If you use maven you could just add the following to your pom.xml, substituting the version
number for the latest & greatest release (see the download page for the latest versions).
<dependency>
<groupId>org.apache.camel</groupId>
<artifactId>camel-jxpath</artifactId>
<version>1.4.0</version>
</dependency>
MVEL
Avialable in Camel 2.0
Camel allows Mvel to be used as an Expression or Predicate the DSL or Xml Configuration.
You could use Mvel to create an Predicate in a Message Filter or as an Expression for a
Recipient List
You can use Mvel dot notation to invoke operations. If you for instance have a body that
contains a POJO that has a getFamiliyName method then you can construct the syntax as
follows:
"request.body.familyName"
// or
"getRequest().getBody().getFamilyName()"
Variables
Variable Type Description
this Exchange the Exchange is the root object
exchange Exchange the Exchange object
exception Throwable the Exchange exception (if any)
exchangeId String the exchange id
fault Message the Fault message (if any)
request Message the exchange.in message
response Message the exchange.out message (if any)
properties Map the exchange properties
LANGUAGES SUPPORTED APPENDIX 202

property(name) Object the property by the given name
property(name, type) Type the property by the given name as the given type
Samples
For example you could use Mvel inside a Message Filter in XML
<route>
<from uri="seda:foo"/>
<filter>
<mvel>request.headers.foo == 'bar'</mvel>
<to uri="seda:bar"/>
</filter>
</route>
And the sample using Java DSL:
from("seda:foo").filter().mvel("request.headers.foo == 'bar'").to("seda:bar");
Dependencies
To use Mvel in your camel routes you need to add the a dependency on camel-mvel which
implements the Mvel language.
If you use maven you could just add the following to your pom.xml, substituting the version
number for the latest & greatest release (see the download page for the latest versions).
<dependency>
<groupId>org.apache.camel</groupId>
<artifactId>camel-mvel</artifactId>
<version>2.0.0</version>
</dependency>
OGNL
Camel allows OGNL to be used as an Expression or Predicate the DSL or Xml Configuration.
You could use OGNL to create an Predicate in a Message Filter or as an Expression for a
Recipient List
You can use OGNL dot notation to invoke operations. If you for instance have a body that
contains a POJO that has a getFamiliyName method then you can construct the syntax as
follows:
203 LANGUAGES SUPPORTED APPENDIX
"request.body.familyName"
// or
"getRequest().getBody().getFamilyName()"
Variables
Variable Type Description
this Exchange the Exchange is the root object
exchange Exchange the Exchange object
exception Throwable the Exchange exception (if any)
exchangeId String the exchange id
fault Message the Fault message (if any)
request Message the exchange.in message
response Message the exchange.out message (if any)
properties Map the exchange properties
property(name) Object the property by the given name
property(name, type) Type the property by the given name as the given type
Samples
For example you could use OGNL inside a Message Filter in XML
<route>
<from uri="seda:foo"/>
<filter>
<ognl>request.headers.foo = 'bar'</ognl>
<to uri="seda:bar"/>
</filter>
</route>
And the sample using Java DSL:
from("seda:foo").filter().ognl("request.headers.foo = 'bar'").to("seda:bar");
LANGUAGES SUPPORTED APPENDIX 204

Dependencies
To use OGNL in your camel routes you need to add the a dependency on camel-ognl which
implements the OGNL language.
If you use maven you could just add the following to your pom.xml, substituting the version
number for the latest & greatest release (see the download page for the latest versions).
<dependency>
<groupId>org.apache.camel</groupId>
<artifactId>camel-ognl</artifactId>
<version>1.4.0</version>
</dependency>
PROPERTY EXPRESSION LANGUAGE
The Property Expression Language allows you to extract values of named exchange properties.
Available as of Camel 2.0
Example usage
The recipientList element of the Spring DSL can utilize a property expression like:
<route>
<from uri="direct:a" />
<recipientList>
<property>myProperty</property>
</recipientList>
</route>
In this case, the list of recipients are contained in the property 'myProperty'.
And the same example in Java DSL:
from("direct:a").recipientList(property("myProperty"));
And with a slightly different syntax where you use the builder to the fullest (i.e. avoid using
parameters but using stacked operations, notice that property is not a parameter but a stacked
method call)
from("direct:a").recipientList().property("myProperty");
Dependencies
The Property language is part of camel-core.
205 LANGUAGES SUPPORTED APPENDIX
SCRIPTING LANGUAGES
Camel supports a number of scripting languages which can be used to create an Expression or
Predicate via the standard JSR 223 which is a standard part of Java 6.
The following scripting languages are integrated into the DSL:
• BeanShell
• JavaScript
• Groovy
• Python
• PHP
• Ruby
However any JSR 223 scripting language can be used using the generic DSL methods.
ScriptContext
The JSR-223 scripting languages ScriptContext is pre configured with the following attributes all
set at ENGINE_SCOPE:
Attribute Type Value
context org.apache.camel.CamelContext The Camel Context
exchange org.apache.camel.Exchange The current Exchange
request org.apache.camel.Message The IN message
response org.apache.camel.Message The OUT message
Attributes
You can add your own attributes with the attribute(name, value) DSL method, such
as:
In the sample below we add an attribute user that is an object we already have instantiated
as myUser. This object has a getFirstName() method that we want to set as header on the
message. We use the groovy language to concat the first and last name into a single string that
is returned.
from("direct:in").setHeader("name").groovy("'$user.firstName
$user.lastName'").attribute("user", myUser).to("seda:users");
Any scripting language
Camel can run any JSR-223 scripting languages using the script DSL method such as:
LANGUAGES SUPPORTED APPENDIX 206

from("direct:in").setHeader("firstName").script("jaskel",
"user.firstName").attribute("user", myUser).to("seda:users");
This is a bit different using the Spring DSL where you use the expression element that
doesn't support setting attributes (yet):
<from uri="direct:in"/>
<setHeader headerName="firstName">
<expression language="jaskel">user.firstName</expression>
</setHeader>
<to uri="seda:users"/>
Dependencies
To use scripting languages in your camel routes you need to add the a dependency on camel-
script which integrates the JSR-223 scripting engine.
If you use maven you could just add the following to your pom.xml, substituting the version
number for the latest & greatest release (see the download page for the latest versions).
<dependency>
<groupId>org.apache.camel</groupId>
<artifactId>camel-script</artifactId>
<version>1.4.0</version>
</dependency>
SEE ALSO
• Languages
• DSL
• Xml Configuration
BEANSHELL
Camel supports BeanShell among other Scripting Languages to allow an Expression or Predicate
to be used in the DSL or Xml Configuration.
To use a BeanShell expression use the following Java code
... beanShell("someBeanShellExpression") ...
For example you could use the beanShell function to create an Predicate in a Message Filter
or as an Expression for a Recipient List
207 LANGUAGES SUPPORTED APPENDIX

ScriptContext
The JSR-223 scripting languages ScriptContext is pre configured with the following attributes all
set at ENGINE_SCOPE:
Attribute Type Value
context org.apache.camel.CamelContext The Camel Context
exchange org.apache.camel.Exchange The current Exchange
request org.apache.camel.Message The IN message
response org.apache.camel.Message The OUT message
Attributes
You can add your own attributes with the attribute(name, value) DSL method, such
as:
In the sample below we add an attribute user that is an object we already have instantiated
as myUser. This object has a getFirstName() method that we want to set as header on the
message. We use the groovy language to concat the first and last name into a single string that
is returned.
from("direct:in").setHeader("name").groovy("'$user.firstName
$user.lastName'").attribute("user", myUser).to("seda:users");
Any scripting language
Camel can run any JSR-223 scripting languages using the script DSL method such as:
from("direct:in").setHeader("firstName").script("jaskel",
"user.firstName").attribute("user", myUser).to("seda:users");
This is a bit different using the Spring DSL where you use the expression element that
doesn't support setting attributes (yet):
<from uri="direct:in"/>
<setHeader headerName="firstName">
<expression language="jaskel">user.firstName</expression>
</setHeader>
<to uri="seda:users"/>
LANGUAGES SUPPORTED APPENDIX 208

Dependencies
To use scripting languages in your camel routes you need to add the a dependency on camel-
script which integrates the JSR-223 scripting engine.
If you use maven you could just add the following to your pom.xml, substituting the version
number for the latest & greatest release (see the download page for the latest versions).
<dependency>
<groupId>org.apache.camel</groupId>
<artifactId>camel-script</artifactId>
<version>1.4.0</version>
</dependency>
JAVASCRIPT
Camel supports JavaScript/ECMAScript among other Scripting Languages to allow an Expression
or Predicate to be used in the DSL or Xml Configuration.
To use a JavaScript expression use the following Java code
... javaScript("someJavaScriptExpression") ...
For example you could use the javaScript function to create an Predicate in a Message Filter
or as an Expression for a Recipient List
Example
In the sample below we use JavaScript to create a Predicate use in the route path, to route
exchanges from admin users to a special queue.
from("direct:start")
.choice()
.when().javaScript("request.headers.get('user') ==
'admin'").to("seda:adminQueue")
.otherwise()
.to("seda:regularQueue");
And a Spring DSL sample as well:
<route>
<from uri="direct:start"/>
<choice>
<when>
<javaScript>request.headers.get('user') == 'admin'</javaScript>
<to uri="seda:adminQueue"/>
</when>
209 LANGUAGES SUPPORTED APPENDIX
<otherwise>
<to uri="seda:regularQueue"/>
</otherwise>
</choice>
</route>
ScriptContext
The JSR-223 scripting languages ScriptContext is pre configured with the following attributes all
set at ENGINE_SCOPE:
Attribute Type Value
context org.apache.camel.CamelContext The Camel Context
exchange org.apache.camel.Exchange The current Exchange
request org.apache.camel.Message The IN message
response org.apache.camel.Message The OUT message
Attributes
You can add your own attributes with the attribute(name, value) DSL method, such
as:
In the sample below we add an attribute user that is an object we already have instantiated
as myUser. This object has a getFirstName() method that we want to set as header on the
message. We use the groovy language to concat the first and last name into a single string that
is returned.
from("direct:in").setHeader("name").groovy("'$user.firstName
$user.lastName'").attribute("user", myUser).to("seda:users");
Any scripting language
Camel can run any JSR-223 scripting languages using the script DSL method such as:
from("direct:in").setHeader("firstName").script("jaskel",
"user.firstName").attribute("user", myUser).to("seda:users");
This is a bit different using the Spring DSL where you use the expression element that
doesn't support setting attributes (yet):
LANGUAGES SUPPORTED APPENDIX 210

<from uri="direct:in"/>
<setHeader headerName="firstName">
<expression language="jaskel">user.firstName</expression>
</setHeader>
<to uri="seda:users"/>
Dependencies
To use scripting languages in your camel routes you need to add the a dependency on camel-
script which integrates the JSR-223 scripting engine.
If you use maven you could just add the following to your pom.xml, substituting the version
number for the latest & greatest release (see the download page for the latest versions).
<dependency>
<groupId>org.apache.camel</groupId>
<artifactId>camel-script</artifactId>
<version>1.4.0</version>
</dependency>
GROOVY
Camel supports Groovy among other Scripting Languages to allow an Expression or Predicate
to be used in the DSL or Xml Configuration.
To use a Groovy expression use the following Java code
... groovy("someGroovyExpression") ...
For example you could use the groovy function to create an Predicate in a Message Filter or
as an Expression for a Recipient List
Example
// lets route if a line item is over $100
from("queue:foo").filter(groovy("request.lineItems.any { i -> i.value > 100
}")).to("queue:bar")
And the Spring DSL:
<route>
<from uri="queue:foo"/>
<filter>
211 LANGUAGES SUPPORTED APPENDIX
<groovy>request.lineItems.any { i -> i.value > 100 }</groovy>
<to uri="queue:bar"/>
</filter>
</route>
ScriptContext
The JSR-223 scripting languages ScriptContext is pre configured with the following attributes all
set at ENGINE_SCOPE:
Attribute Type Value
context org.apache.camel.CamelContext The Camel Context
exchange org.apache.camel.Exchange The current Exchange
request org.apache.camel.Message The IN message
response org.apache.camel.Message The OUT message
Attributes
You can add your own attributes with the attribute(name, value) DSL method, such
as:
In the sample below we add an attribute user that is an object we already have instantiated
as myUser. This object has a getFirstName() method that we want to set as header on the
message. We use the groovy language to concat the first and last name into a single string that
is returned.
from("direct:in").setHeader("name").groovy("'$user.firstName
$user.lastName'").attribute("user", myUser).to("seda:users");
Any scripting language
Camel can run any JSR-223 scripting languages using the script DSL method such as:
from("direct:in").setHeader("firstName").script("jaskel",
"user.firstName").attribute("user", myUser).to("seda:users");
This is a bit different using the Spring DSL where you use the expression element that
doesn't support setting attributes (yet):
LANGUAGES SUPPORTED APPENDIX 212

<from uri="direct:in"/>
<setHeader headerName="firstName">
<expression language="jaskel">user.firstName</expression>
</setHeader>
<to uri="seda:users"/>
Dependencies
To use scripting languages in your camel routes you need to add the a dependency on camel-
script which integrates the JSR-223 scripting engine.
If you use maven you could just add the following to your pom.xml, substituting the version
number for the latest & greatest release (see the download page for the latest versions).
<dependency>
<groupId>org.apache.camel</groupId>
<artifactId>camel-script</artifactId>
<version>1.4.0</version>
</dependency>
PYTHON
Camel supports Python among other Scripting Languages to allow an Expression or Predicate
to be used in the DSL or Xml Configuration.
To use a Python expression use the following Java code
... python("somePythonExpression") ...
For example you could use the python function to create an Predicate in a Message Filter or
as an Expression for a Recipient List
Example
In the sample below we use Python to create a Predicate use in the route path, to route
exchanges from admin users to a special queue.
from("direct:start")
.choice()
.when().python("request.headers['user'] == 'admin'").to("seda:adminQueue")
.otherwise()
.to("seda:regularQueue");
And a Spring DSL sample as well:
213 LANGUAGES SUPPORTED APPENDIX

<route>
<from uri="direct:start"/>
<choice>
<when>
<python>request.headers['user'] == 'admin'</python>
<to uri="seda:adminQueue"/>
</when>
<otherwise>
<to uri="seda:regularQueue"/>
</otherwise>
</choice>
</route>
ScriptContext
The JSR-223 scripting languages ScriptContext is pre configured with the following attributes all
set at ENGINE_SCOPE:
Attribute Type Value
context org.apache.camel.CamelContext The Camel Context
exchange org.apache.camel.Exchange The current Exchange
request org.apache.camel.Message The IN message
response org.apache.camel.Message The OUT message
Attributes
You can add your own attributes with the attribute(name, value) DSL method, such
as:
In the sample below we add an attribute user that is an object we already have instantiated
as myUser. This object has a getFirstName() method that we want to set as header on the
message. We use the groovy language to concat the first and last name into a single string that
is returned.
from("direct:in").setHeader("name").groovy("'$user.firstName
$user.lastName'").attribute("user", myUser).to("seda:users");
Any scripting language
Camel can run any JSR-223 scripting languages using the script DSL method such as:
LANGUAGES SUPPORTED APPENDIX 214
from("direct:in").setHeader("firstName").script("jaskel",
"user.firstName").attribute("user", myUser).to("seda:users");
This is a bit different using the Spring DSL where you use the expression element that
doesn't support setting attributes (yet):
<from uri="direct:in"/>
<setHeader headerName="firstName">
<expression language="jaskel">user.firstName</expression>
</setHeader>
<to uri="seda:users"/>
Dependencies
To use scripting languages in your camel routes you need to add the a dependency on camel-
script which integrates the JSR-223 scripting engine.
If you use maven you could just add the following to your pom.xml, substituting the version
number for the latest & greatest release (see the download page for the latest versions).
<dependency>
<groupId>org.apache.camel</groupId>
<artifactId>camel-script</artifactId>
<version>1.4.0</version>
</dependency>
PHP
Camel supports PHP among other Scripting Languages to allow an Expression or Predicate to
be used in the DSL or Xml Configuration.
To use a PHP expression use the following Java code
... php("somePHPExpression") ...
For example you could use the php function to create an Predicate in a Message Filter or as an
Expression for a Recipient List
ScriptContext
The JSR-223 scripting languages ScriptContext is pre configured with the following attributes all
set at ENGINE_SCOPE:
Attribute Type Value
215 LANGUAGES SUPPORTED APPENDIX
context org.apache.camel.CamelContext The Camel Context
exchange org.apache.camel.Exchange The current Exchange
request org.apache.camel.Message The IN message
response org.apache.camel.Message The OUT message
Attributes
You can add your own attributes with the attribute(name, value) DSL method, such
as:
In the sample below we add an attribute user that is an object we already have instantiated
as myUser. This object has a getFirstName() method that we want to set as header on the
message. We use the groovy language to concat the first and last name into a single string that
is returned.
from("direct:in").setHeader("name").groovy("'$user.firstName
$user.lastName'").attribute("user", myUser).to("seda:users");
Any scripting language
Camel can run any JSR-223 scripting languages using the script DSL method such as:
from("direct:in").setHeader("firstName").script("jaskel",
"user.firstName").attribute("user", myUser).to("seda:users");
This is a bit different using the Spring DSL where you use the expression element that
doesn't support setting attributes (yet):
<from uri="direct:in"/>
<setHeader headerName="firstName">
<expression language="jaskel">user.firstName</expression>
</setHeader>
<to uri="seda:users"/>
Dependencies
To use scripting languages in your camel routes you need to add the a dependency on camel-
script which integrates the JSR-223 scripting engine.
If you use maven you could just add the following to your pom.xml, substituting the version
number for the latest & greatest release (see the download page for the latest versions).
LANGUAGES SUPPORTED APPENDIX 216

<dependency>
<groupId>org.apache.camel</groupId>
<artifactId>camel-script</artifactId>
<version>1.4.0</version>
</dependency>
RUBY
Camel supports Ruby among other Scripting Languages to allow an Expression or Predicate to
be used in the DSL or Xml Configuration.
To use a Ruby expression use the following Java code
... ruby("someRubyExpression") ...
For example you could use the ruby function to create an Predicate in a Message Filter or as
an Expression for a Recipient List
Example
In the sample below we use Ruby to create a Predicate use in the route path, to route
exchanges from admin users to a special queue.
from("direct:start")
.choice()
.when().ruby("$request.headers['user'] == 'admin'").to("seda:adminQueue")
.otherwise()
.to("seda:regularQueue");
And a Spring DSL sample as well:
<route>
<from uri="direct:start"/>
<choice>
<when>
<ruby>$request.headers['user'] == 'admin'</ruby>
<to uri="seda:adminQueue"/>
</when>
<otherwise>
<to uri="seda:regularQueue"/>
</otherwise>
</choice>
</route>
217 LANGUAGES SUPPORTED APPENDIX
ScriptContext
The JSR-223 scripting languages ScriptContext is pre configured with the following attributes all
set at ENGINE_SCOPE:
Attribute Type Value
context org.apache.camel.CamelContext The Camel Context
exchange org.apache.camel.Exchange The current Exchange
request org.apache.camel.Message The IN message
response org.apache.camel.Message The OUT message
Attributes
You can add your own attributes with the attribute(name, value) DSL method, such
as:
In the sample below we add an attribute user that is an object we already have instantiated
as myUser. This object has a getFirstName() method that we want to set as header on the
message. We use the groovy language to concat the first and last name into a single string that
is returned.
from("direct:in").setHeader("name").groovy("'$user.firstName
$user.lastName'").attribute("user", myUser).to("seda:users");
Any scripting language
Camel can run any JSR-223 scripting languages using the script DSL method such as:
from("direct:in").setHeader("firstName").script("jaskel",
"user.firstName").attribute("user", myUser).to("seda:users");
This is a bit different using the Spring DSL where you use the expression element that
doesn't support setting attributes (yet):
<from uri="direct:in"/>
<setHeader headerName="firstName">
<expression language="jaskel">user.firstName</expression>
</setHeader>
<to uri="seda:users"/>
LANGUAGES SUPPORTED APPENDIX 218

Dependencies
To use scripting languages in your camel routes you need to add the a dependency on camel-
script which integrates the JSR-223 scripting engine.
If you use maven you could just add the following to your pom.xml, substituting the version
number for the latest & greatest release (see the download page for the latest versions).
<dependency>
<groupId>org.apache.camel</groupId>
<artifactId>camel-script</artifactId>
<version>1.4.0</version>
</dependency>
SIMPLE EXPRESSION LANGUAGE
The Simple Expression Language was a really simple language you can use, but has since grown
more powerful. Its primarily intended for being a really small and simple language for evaluating
Expression and Predicate without requiring any new dependencies or knowledge of XPath; so
its ideal for testing in camel-core. Its ideal to cover 95% of the common use cases when you
need a little bit of expression based script in your Camel routes.
However for much more complex use cases you are generally recommended to choose a
more expressive and powerful language such as:
• JavaScript
• EL
• OGNL
• Mvel
• Groovy
• one of the supported Scripting Languages
The simple language uses ${body} placeholders for complex expressions where the
expression contains constant literals. The ${ } placeholders can be omitted if the expression is
only the token itself.
To get the body of the in message: "body", or "in.body" or "${body}".
A complex expression must use ${ } placeholders, such as: "Hello
${in.header.name} how are you?".
You can have multiple tokens in the same expression: "Hello ${in.header.name}
this is ${in.header.me} speaking".
However you can not nest tokens (i.e. having another ${ } placeholder in an existing, is not
allowed).
Variables
Variable Type Description
219 LANGUAGES SUPPORTED APPENDIX
File language is now merged with Simple language
From Camel 2.2 onwards, the File Language is now merged with Simple language
which means you can use all the file syntax directly within the simple language.
exchangeId String Camel 2.3: the exchange id
id String the input message id
body Object the input body
in.body Object the input body
body.OGNL Object Camel 2.3: the input body invoked using a Camel
OGNL expression.
in.body.OGNL Object Camel 2.3: the input body invoked using a Camel
OGNL expression.
bodyAs(type)Type Camel 2.3: Converts the body to the given type
determined by its classname
out.body Object the output body
header.foo Object refer to the input foo header
headers.foo Object refer to the input foo header
in.header.foo Object refer to the input foo header
in.headers.foo Object refer to the input foo header
header.foo[bar] Object Camel 2.3: regard input foo header as a map and
perform lookup on the map with bar as key
in.header.foo[bar] Object Camel 2.3: regard input foo header as a map and
perform lookup on the map with bar as key
in.headers.foo[bar] Object Camel 2.3: regard input foo header as a map and
perform lookup on the map with bar as key
header.foo.OGNL Object Camel 2.3: refer to the input foo header and invoke its
value using a Camel OGNL expression.
in.header.foo.OGNL Object Camel 2.3: refer to the input foo header and invoke its
value using a Camel OGNL expression.
in.headers.foo.OGNL Object Camel 2.3: refer to the input foo header and invoke its
value using a Camel OGNL expression.
out.header.foo Object refer to the out header foo
LANGUAGES SUPPORTED APPENDIX 220
out.headers.foo Object refer to the out header foo
property.foo Object refer to the foo property on the exchange
sys.foo String refer to the system property
sysenv.foo String Camel 2.3: refer to the system environment
exception Object
Camel 2.4: Refer to the exception object on the
exchange, is null if no exception set on exchange. Will
fallback and grab caught exceptions
(Exchange.EXCEPTION_CAUGHT) if the Exchange
has any.
exception.OGNL Object Camel 2.4: Refer to the exchange exception invoked
using a Camel OGNLE expression object
exception.message String
Camel 2.0. Refer to the exception.message on the
exchange, is null if no exception set on exchange. Will
fallback and grab caught exceptions
(Exchange.EXCEPTION_CAUGHT) if the Exchange
has any.
date:command:pattern String
Camel 1.5. Date formatting using the
java.text.SimpleDataFormat patterns.
Supported commands are: now for current timestamp,
in.header.xxx or header.xxx to use the Date object
in the IN header with the key xxx. out.header.xxx to
use the Date object in the OUT header with the key xxx.
bean:bean expression Object
Camel 1.5. Invoking a bean expression using the Bean
language. Specifying a method name you must use dot as
separator. In Camel 2.0 we also support the
?method=methodname syntax that is used by the Bean
component.
properties:locations:key String
Camel 2.3: Lookup a property with the given key. The
locations option is optional. See more at Using
PropertyPlaceholder.
threadName String Camel 2.3: Returns the name of the current thread.
Can be used for logging purpose.
OGNL support
Available as of Camel 2.3
221 LANGUAGES SUPPORTED APPENDIX

The Simple and Bean language now supports a Camel OGNL notation for invoking beans in
a chain like fashion.
Suppose the Message IN body contains a POJO which has a getAddress() method.
Then you can use Camel OGNL notation to access the address object:
simple("${body.address}")
simple("${body.address.street}")
simple("${body.address.zip}")
Camel understands the shorthand names for getters, but you can invoke any method or use the
real name such as:
simple("${body.address}")
simple("${body.getAddress.getStreet}")
simple("${body.address.getZip}")
simple("${body.doSomething}")
You can also use the null safe operator (?.) to avoid NPE if for example the body does NOT
have an address
simple("${body?.address?.street}")
Its also possible to index in Map or List types, so you can do:
simple("${body[foo].name}")
To assume the body is Map based and lookup the value with foo as key, and invoke the
getName method on that value.
Suppose there was no value with the key foo then you can use the elvis operator to avoid
the NPE as shown:
simple("${body[foo]?.name}")
You can also access List types, for example to get lines from the address you can do:
simple("${body.address.lines[0]}")
simple("${body.address.lines[1]}")
simple("${body.address.lines[2]}")
There is a special last keyword which can be used to get the last value from a list.
simple("${body.address.lines[last]}")
LANGUAGES SUPPORTED APPENDIX 222
And to get the 2nd last you can subtract a number, so we can use last-1 to indicate this:
simple("${body.address.lines[last-1]}")
And the 3rd last is of course:
simple("${body.address.lines[last-2]}")
And yes you can combine this with the operator support as shown below:
simple("${body.address.zip} > 1000")
Operator support
Available as of Camel 2.0
We added a basic set of operators supported in the simple language in Camel 2.0. The parser is
limited to only support a single operator.
To enable it the left value must be enclosed in ${ }. The syntax is:
${leftValue} OP rightValue
Where the rightValue can be a String literal enclosed in ' ',null, a constant value or
another expression enclosed in ${ }.
Camel will automatically type convert the rightValue type to the leftValue type, so its able to eg.
convert a string into a numeric so you can use > comparison for numeric values.
The following operators is supported:
Operator Description
== equals
> greater than
>= greater than or equals
< less than
<= less than or equals
!= not equals
contains For testing if contains in a string based value
not
contains For testing if not contains in a string based value
223 LANGUAGES SUPPORTED APPENDIX
regex For matching against a given regular expression pattern defined as a String
value
not regex For not matching against a given regular expression pattern defined as a String
value
in For matching if in a set of values, each element must be separated by comma.
not in For matching if not in a set of values, each element must be separated by
comma.
is For matching if the left hand side type is an instanceof the value.
not is For matching if the left hand side type is not an instanceof the value.
range For matching if the left hand side is within a range of values defined as
numbers: from..to
not range For matching if the left hand side is not within a range of values defined as
numbers: from..to
And the following operators can be used to group expressions:
Operator Description
and and is used to group two expressions
or or is used to group two expressions
Notice: Currently and or or can only be used once in a simple language expression. This
might change in the future.
The syntax for AND is:
${leftValue} OP rightValue and ${leftValue} OP rightValue
And the syntax for OR is:
${leftValue} OP rightValue or ${leftValue} OP rightValue
Some examples:
simple("${in.header.foo} == 'foo'")
// ' ' can be omitted
simple("${in.header.foo} == foo")
// here Camel will type convert '100' into the type of in.header.bar and if its an
Integer '100' will also be converter to an Integer
simple("${in.header.bar} == '100'")
LANGUAGES SUPPORTED APPENDIX 224

simple("${in.header.bar} == 100")
// 100 will be converter to the type of in.header.bar so we can do > comparison
simple("${in.header.bar} > 100")
// testing for null
simple("${in.header.baz} == null")
// testing for not null
simple("${in.header.baz} != null")
And a bit more advanced example where the right value is another expression
simple("${in.header.date} == ${date:now:yyyyMMdd}")
simple("${in.header.type} == ${bean:orderService?method=getOrderType}")
And an example with contains, testing if the title contains the word Camel
simple("${in.header.title} contains 'Camel'")
And an example with regex, testing if the number header is a 4 digit value:
simple("${in.header.number} regex '\d{4}'")
And finally an example if the header equals any of the values in the list. Each element must be
separated by comma, and no space around.
This also works for numbers etc, as Camel will convert each element into the type of the left
hand side.
simple("${in.header.type} in 'gold,silver'")
And for all the last 3 we also support the negate test using not:
simple("${in.header.type} not in 'gold,silver'")
And you can test for if the type is a certain instance, eg for instance a String
simple("${in.header.type} is 'java.lang.String'")
We have added a shorthand for all java.lang types so you can write it as:
simple("${in.header.type} is String")
225 LANGUAGES SUPPORTED APPENDIX
Ranges is also supported. The range interval requires numbers and both from and end is
inclusive. For instance to test whether a value is between 100 and 199:
simple("${in.header.number} range 100..199")
Notice we use .. in the range without spaces. Its based on the same syntax as Groovy.
Using and / or
If you have two expressions you can combine them with the and or or operator.
For instance:
simple("${in.header.title} contains 'Camel' and ${in.header.type'} == 'gold'")
And of course the or is also supported. The sample example would be:
simple("${in.header.title} contains 'Camel' or ${in.header.type'} == 'gold'")
Notice: Currently and or or can only be used once in a simple language expression. This
might change in the future.
So you cannot do:
simple("${in.header.title} contains 'Camel' and ${in.header.type'} == 'gold' and
${in.header.number} range 100..200")
Samples
In the Spring XML sample below we filter based on a header value:
<from uri="seda:orders">
<filter>
<simple>in.header.foo</simple>
<to uri="mock:fooOrders"/>
</filter>
</from>
The Simple language can be used for the predicate test above in the Message Filter pattern,
where we test if the in message has a foo header (a header with the key foo exists). If the
expression evaluates to true then the message is routed to the mock:foo endpoint,
otherwise its lost in the deep blue sea .
The same example in Java DSL:
LANGUAGES SUPPORTED APPENDIX 226
Can be used in Spring XML
As the Spring XML does not have all the power as the Java DSL with all its various
builder methods, you had to resort to use some other languages
for testing with simple operators. Now you can do this with the simple language. In
the sample below we want to test if the header is a widget order:
<from uri="seda:orders">
<filter>
<simple>${in.header.type} == 'widget'</simple>
<to uri="bean:orderService?method=handleWidget"/>
</filter>
</from>
from("seda:orders")
.filter().simple("in.header.foo").to("seda:fooOrders");
You can also use the simple language for simple text concatenations such as:
from("direct:hello").transform().simple("Hello ${in.header.user} how are
you?").to("mock:reply");
Notice that we must use ${ } placeholders in the expression now to let Camel be able to parse
it correctly.
And this sample uses the date command to output current date.
from("direct:hello").transform().simple("The today is ${date:now:yyyyMMdd} and its
a great day.").to("mock:reply");
And in the sample below we invoke the bean language to invoke a method on a bean to be
included in the returned string:
from("direct:order").transform().simple("OrderId:
${bean:orderIdGenerator}").to("mock:reply");
Where orderIdGenerator is the id of the bean registered in the Registry. If using Spring
then its the Spring bean id.
If we want to declare which method to invoke on the order id generator bean we must
prepend .method name such as below where we invoke the generateId method.
227 LANGUAGES SUPPORTED APPENDIX

from("direct:order").transform().simple("OrderId:
${bean:orderIdGenerator.generateId}").to("mock:reply");
And in Camel 2.0 we can use the ?method=methodname option that we are familiar with
the Bean component itself:
from("direct:order").transform().simple("OrderId:
${bean:orderIdGenerator?method=generateId}").to("mock:reply");
And from Camel 2.3 onwards you can also convert the body to a given type, for example to
ensure its a String you can do:
<transform>
<simple>Hello ${bodyAs(String)} how are you?</simple>
</transform>
There is a few types which have a shorthand notation, hence why we can use String instead
of java.lang.String. These are: byte[], String, Integer, Long. All other
types must use their FQN name, e.g. org.w3c.dom.Document.
Its also possible to lookup a value from a header Map in Camel 2.3 onwards:
<transform>
<simple>The gold value is ${header.type[gold]}</simple>
</transform>
In the code above we lookup the header with name type and regard it as a java.util.Map
and we then lookup with the key gold and return the value.
If the header is not convertible to Map an exception is thrown. If the header with name type
does not exists null is returned.
Dependencies
The Bean language is part of camel-core.
FILE EXPRESSION LANGUAGE
Available as of Camel 1.5
The File Expression Language is an extension to the Simple language, adding file related
capabilities. These capabilities is related to common use cases working with file path and names.
The goal is to allow expression to be used with the File and FTP components for setting
dynamic file patterns for both consumer and producer.
LANGUAGES SUPPORTED APPENDIX 228
File language is now merged with Simple language
From Camel 2.2 onwards, the file language is now merged with Simple language
which means you can use all the file syntax directly within the simple language.
Syntax
This language is an extension to the Simple language so the Simple syntax applies also. So the
table below only lists the additional.
As opposed to Simple language File Language also supports Constant expressions so you can
enter a fixed filename.
All the file tokens uses the same expression name as the method on the java.io.File
object, for instance file:absolute refers to the java.io.File.getAbsolute()
method. Notice that not all expressions is supported by the current Exchange. For instance the
FTP component supports some of the options, where as the File component support all of
them.
Expression Type File
Consumer
File
Producer
FTP
Consumer
FTP
Producer Description
file:name String yes no yes no refers to the file name (is relative to the
starting directory, see note below)
file:name.ext String yes no yes no Camel 2.3: refers to the file extension only
file:name.noext String yes no yes no
refers to the file name with no extension
(is relative to the starting directory, see
note below)
file:onlyname String yes no yes no Camel 2.0: refers to the file name only with
no leading paths.
file:onlyname.noext String yes no yes no Camel 2.0: refers to the file name only with
no extension and with no leading paths.
file:ext String yes no yes no Camel 1.6.1/Camel 2.0: refers to the file
extension only
file:parent String yes no yes no refers to the file parent
file:path String yes no yes no refers to the file path
file:absolute Boolean yes no no no Camel 2.0: refers to whether the file is
regarded as absolute or relative
file:absolute.path String yes no no no refers to the absolute file path
file:length Long yes no yes no refers to the file length returned as a Long
type
file:modified Date yes no yes no Camel 2.0: refers to the file last modified
returned as a Date type
date:command:pattern String yes yes yes yes
for date formatting using the
java.text.SimepleDataFormat
patterns. Is an extension to the Simple
language. Additional command is: file
(consumers only) for the last modified
timestamp of the file. Notice: all the
commands from the Simple language can
also be used.
229 LANGUAGES SUPPORTED APPENDIX
File token example
Relative paths
We have a java.io.File handle for the file hello.txt in the following relative
directory: .\filelanguage\test. And we configure out endpoint to use this starting
directory .\filelanguage. The the file tokens will return as:
Expression Returns
file:name test\hello.txt
file:name.ext txt
file:name.noext test\hello
file:onlyname hello.txt
file:onlyname.noext hello
file:ext txt
file:parent filelanguage\test
file:path filelanguage\test\hello.txt
file:absolute false
file:absolute.path \workspace\camel\camel-core\target\filelanguage\test\hello.txt
Absolute paths
We have a java.io.File handle for the file hello.txt in the following absolute
directory: \workspace\camel\camel-core\target\filelanguage\test. And
we configure out endpoint to use the absolute starting directory
\workspace\camel\camel-core\target\filelanguage. The the file tokens will
return as:
Expression Returns
file:name test\hello.txt
file:name.ext txt
file:name.noext test\hello
file:onlyname hello.txt
file:onlyname.noext hello
file:ext txt
LANGUAGES SUPPORTED APPENDIX 230
file:parent \workspace\camel\camel-core\target\filelanguage\test
file:path \workspace\camel\camel-core\target\filelanguage\test\hello.txt
file:absolute true
file:absolute.path \workspace\camel\camel-core\target\filelanguage\test\hello.txt
Samples
You can enter a fixed Constant expression such as myfile.txt:
fileName="myfile.txt"
Lets assume we use the file consumer to read files and want to move the read files to backup
folder with the current date as a sub folder. This can be archived using an expression like:
fileName="backup/${date:now:yyyyMMdd}/${file:name.noext}.bak"
relative folder names is also supported so suppose the backup folder should be a sibling folder
then you can append .. as:
fileName="../backup/${date:now:yyyyMMdd}/${file:name.noext}.bak"
As this is an extension to the Simple language we have access to all the goodies from this
language also, so in this use case we want to use the in.header.type as a parameter in the
dynamic expression:
fileName="../backup/${date:now:yyyyMMdd}/type-${in.header.type}/
backup-of-${file:name.noext}.bak"
If you have a custom Date you want to use in the expression then Camel supports retrieving
dates from the message header.
fileName="orders/
order-${in.header.customerId}-${date:in.header.orderDate:yyyyMMdd}.xml"
And finally we can also use a bean expression to invoke a POJO class that generates some
String output (or convertible to String) to be used:
fileName="uniquefile-${bean:myguidgenerator.generateid}.txt"
231 LANGUAGES SUPPORTED APPENDIX
And of course all this can be combined in one expression where you can use the File Language,
Simple and the Bean language in one combined expression. This is pretty powerful for those
common file path patterns.
Dependencies
The File language is part of camel-core.
SQL
The SQL support is added by JoSQL and is primarily used for performing SQL queries on in-
memory objects. If you prefer to perform actual database queries then check out the JPA
component.
Camel supports SQL to allow an Expression or Predicate to be used in the DSL or Xml
Configuration. For example you could use SQL to create an Predicate in a Message Filter or as
an Expression for a Recipient List.
from("queue:foo").setBody().sql("select * from MyType").to("queue:bar")
And the spring DSL:
<from uri="queue:foo"/>
<setBody>
<sql>select * from MyType</sql>
</setBody>
<to uri="queue:bar"/>
Variables
Variable Type Description
exchange Exchange the Exchange object
in Message the exchange.in message
out Message the exchange.out message
the property
key Object the Exchange properties
the header key Object the exchange.in headers
the variable key Object if any additional variables is added using setVariables
method
LANGUAGES SUPPORTED APPENDIX 232
Can be used in Spring XML
In Camel 2.2 you can use the File Language directly from the Simple language which
makes a Content Based Router more easy to do in Spring XML, where we can
route based on file extensions as shown below:
<from uri="file://input/orders"/>
<choice>
<when>
<simple>${file:ext} == 'txt'</simple>
<to uri="bean:orderService?method=handleTextFiles"/>
</when>
<when>
<simple>${file:ext} == 'xml'</simple>
<to uri="bean:orderService?method=handleXmlFiles"/>
</when>
<otherwise>
<to uri="bean:orderService?method=handleOtherFiles"/>
</otherwise>
</choice>
Dependencies
To use SQL in your camel routes you need to add the a dependency on camel-josql which
implements the SQL language.
If you use maven you could just add the following to your pom.xml, substituting the version
number for the latest & greatest release (see the download page for the latest versions).
<dependency>
<groupId>org.apache.camel</groupId>
<artifactId>camel-josql</artifactId>
<version>1.4.0</version>
</dependency>
XPATH
Camel supports XPath to allow an Expression or Predicate to be used in the DSL or Xml
Configuration. For example you could use XPath to create an Predicate in a Message Filter or
as an Expression for a Recipient List.
from("queue:foo").
filter().xpath("//foo")).
to("queue:bar")
233 LANGUAGES SUPPORTED APPENDIX
from("queue:foo").
choice().xpath("//foo")).to("queue:bar").
otherwise().to("queue:others");
Namespaces
In 1.3 onwards you can easily use namespaces with XPath expressions using the Namespaces
helper class.
Namespaces ns = new Namespaces("c","http://acme.com/cheese");
from("direct:start").filter().
xpath("/c:person[@name='James']", ns).
to("mock:result");
Variables
Variables in XPath is defined in different namespaces. The default namespace is
http://camel.apache.org/schema/spring.
Namespace URI Local
part Type Description
http://camel.apache.org/xml/in/ in Message the exchange.in
message
http://camel.apache.org/xml/out/ out Message the exchange.out
message
http://camel.apache.org/xml/variables/
environment-variables env Object OS environment
variables
http://camel.apache.org/xml/variables/system-
properties system Object Java System
properties
http://camel.apache.org/xml/variables/
exchange-property Object the exchange
property
Camel will resolve variables according to either:
▪namespace given
▪no namespace given
LANGUAGES SUPPORTED APPENDIX 234
Namespace given
If the namespace is given then Camel is instructed exactly what to return. However when
resolving either in or out Camel will try to resolve a header with the given local part first, and
return it. If the local part has the value body then the body is returned instead.
No namespace given
If there is no namespace given then Camel resolves only based on the local part. Camel will try
to resolve a variable in the following steps:
▪from variables that has been set using the variable(name, value) fluent
builder
▪from message.in.header if there is a header with the given key
▪from exchange.properties if there is a property with the given key
Functions
Camel adds the following XPath functions that can be used to access the exchange:
Function Argument Type Description
in:body none Object Will return the in message body.
in:header the header name Object Will return the in message header.
out:body none Object Will return the out message body.
out:header the header name Object Will return the out message header.
Here's an example showing some of these functions in use.
from("direct:start").choice()
.when().xpath("in:header('foo') = 'bar'").to("mock:x")
.when().xpath("in:body() = '<two/>'").to("mock:y")
.otherwise().to("mock:z");
Using XML configuration
If you prefer to configure your routes in your Spring XML file then you can use XPath
expressions as follows
<beans xmlns="http://www.springframework.org/schema/beans"
xmlns:xsi="http://www.w3.org/2001/XMLSchema-instance"
xsi:schemaLocation="
http://www.springframework.org/schema/beans http://www.springframework.org/
schema/beans/spring-beans-2.0.xsd
http://camel.apache.org/schema/spring http://camel.apache.org/schema/spring/
235 LANGUAGES SUPPORTED APPENDIX

camel-spring.xsd">
<camelContext id="camel" xmlns="http://activemq.apache.org/camel/schema/spring"
xmlns:foo="http://example.com/person">
<route>
<from uri="activemq:MyQueue"/>
<filter>
<xpath>/foo:person[@name='James']</xpath>
<to uri="mqseries:SomeOtherQueue"/>
</filter>
</route>
</camelContext>
</beans>
Notice how we can reuse the namespace prefixes, foo in this case, in the XPath expression for
easier namespace based XPath expressions!
See also this discussion on the mailinglist about using your own namespaces with xpath
Setting result type
The XPath expression will return a result type using native XML objects such as
org.w3c.dom.NodeList. But many times you want a result type to be a String. To do this
you have to instruct the XPath which result type to use.
In Java DSL:
xpath("/foo:person/@id",String.class)
In Spring DSL you use the resultType attribute to provide a fully qualified classname:
<xpath resultType="java.lang.String">/foo:person/@id</xpath>
In @XPath:
Available as of Camel 2.1
@XPath(value = "concat('foo-',//order/name/)", resultType = String.class) String name)
Where we use the xpath function concat to prefix the order name with foo-. In this case we
have to specify that we want a String as result type so the concat function works.
Examples
Here is a simple example using an XPath expression as a predicate in a Message Filter
LANGUAGES SUPPORTED APPENDIX 236

from("direct:start").
filter().xpath("/person[@name='James']").
to("mock:result");
If you have a standard set of namespaces you wish to work with and wish to share them across
many different XPath expressions you can use the NamespaceBuilder as shown in this example
// lets define the namespaces we'll need in our filters
Namespaces ns = new Namespaces("c","http://acme.com/cheese")
.add("xsd","http://www.w3.org/2001/XMLSchema");
// now lets create an xpath based Message Filter
from("direct:start").
filter(ns.xpath("/c:person[@name='James']")).
to("mock:result");
In this sample we have a choice construct. The first choice evaulates if the message has a header
key type that has the value Camel.
The 2nd choice evaluates if the message body has a name tag <name> which values is Kong.
If neither is true the message is routed in the otherwise block:
from("direct:in").choice()
// using $headerName is special notation in Camel to get the header key
.when().xpath("$type = 'Camel'")
.to("mock:camel")
// here we test for the body name tag
.when().xpath("//name = 'Kong'")
.to("mock:donkey")
.otherwise()
.to("mock:other")
.end();
And the spring XML equivalent of the route:
<camelContext id="camel" xmlns="http://camel.apache.org/schema/spring">
<route>
<from uri="direct:in"/>
<choice>
<when>
<xpath>$type = 'Camel'</xpath>
<to uri="mock:camel"/>
</when>
<when>
<xpath>//name = 'Kong'</xpath>
<to uri="mock:donkey"/>
</when>
<otherwise>
<to uri="mock:other"/>
</otherwise>
237 LANGUAGES SUPPORTED APPENDIX

</choice>
</route>
</camelContext>
XPATH INJECTION
You can use Bean Integration to invoke a method on a bean and use various languages such as
XPath to extract a value from the message and bind it to a method parameter.
The default XPath annotation has SOAP and XML namespaces available. If you want to use
your own namespace URIs in an XPath expression you can use your own copy of the XPath
annotation to create whatever namespace prefixes you want to use.
import java.lang.annotation.ElementType;
import java.lang.annotation.Retention;
import java.lang.annotation.RetentionPolicy;
import java.lang.annotation.Target;
import org.w3c.dom.NodeList;
import org.apache.camel.component.bean.XPathAnnotationExpressionFactory;
import org.apache.camel.language.LanguageAnnotation;
import org.apache.camel.language.NamespacePrefix;
@Retention(RetentionPolicy.RUNTIME)
@Target({ElementType.FIELD, ElementType.METHOD, ElementType.PARAMETER})
@LanguageAnnotation(language = "xpath", factory =
XPathAnnotationExpressionFactory.class)
public @interface MyXPath {
String value();
// You can add the namespaces as the default value of the annotation
NamespacePrefix[] namespaces() default {
@NamespacePrefix(prefix = "n1", uri = "http://example.org/ns1"),
@NamespacePrefix(prefix = "n2", uri = "http://example.org/ns2")};
Class<?> resultType() default NodeList.class;
}
i.e. cut and paste upper code to your own project in a different package and/or annotation
name then add whatever namespace prefix/uris you want in scope when you use your
annotation on a method parameter. Then when you use your annotation on a method
parameter all the namespaces you want will be available for use in your XPath expression.
NOTE this feature is supported from Camel 1.6.1.
For example
LANGUAGES SUPPORTED APPENDIX 238

public class Foo {
@MessageDriven(uri = "activemq:my.queue")
public void doSomething(@Path("/ns1:foo/ns2:bar/text()")String correlationID,
@Body String body) {
// process the inbound message here
}
}
Using XPathBuilder without an Exchange
Available as of Camel 2.3
You can now use the org.apache.camel.builder.XPathBuilder without the
need for an Exchange. This comes handy if you want to use it as a helper to do custom xpath
evaluations.
It requires that you pass in a CamelContext since a lot of the moving parts inside the
XPathBuilder requires access to the Camel Type Converter and hence why CamelContext is
needed.
For example you can do something like this:
boolean matches = XPathBuilder.xpath("/foo/bar/@xyz").matches(context, "<foo><bar
xyz='cheese'/></foo>"));
This will match the given predicate.
You can also evaluate for example as shown in the following three examples:
String name = XPathBuilder.xpath("foo/bar").evaluate(context,
"<foo><bar>cheese</bar></foo>",String.class);
Integer number = XPathBuilder.xpath("foo/bar").evaluate(context,
"<foo><bar>123</bar></foo>",Integer.class);
Boolean bool = XPathBuilder.xpath("foo/bar").evaluate(context,
"<foo><bar>true</bar></foo>",Boolean.class);
Evaluating with a String result is a common requirement and thus you can do it a bit simpler:
String name = XPathBuilder.xpath("foo/bar").evaluate(context,
"<foo><bar>cheese</bar></foo>");
Using Saxon with XPathBuilder
Available as of Camel 2.3
You need to add camel-saxon as dependency to your project.
239 LANGUAGES SUPPORTED APPENDIX

Its now easier to use Saxon with the XPathBuilder which can be done in several ways as
shown below.
Where as the latter ones are the easiest ones.
Using a factory
// create a Saxon factory
XPathFactory fac = new net.sf.saxon.xpath.XPathFactoryImpl();
// create a builder to evaluate the xpath using the saxon factory
XPathBuilder builder = XPathBuilder.xpath("tokenize(/foo/bar, '_')[2]").factory(fac);
// evaluate as a String result
String result = builder.evaluate(context, "<foo><bar>abc_def_ghi</bar></foo>");
assertEquals("def", result);
Using ObjectModel
// create a builder to evaluate the xpath using saxon based on its object model uri
XPathBuilder builder = XPathBuilder.xpath("tokenize(/foo/bar,
'_')[2]").objectModel("http://saxon.sf.net/jaxp/xpath/om");
// evaluate as a String result
String result = builder.evaluate(context, "<foo><bar>abc_def_ghi</bar></foo>");
assertEquals("def", result);
The easy one
// create a builder to evaluate the xpath using saxon
XPathBuilder builder = XPathBuilder.xpath("tokenize(/foo/bar, '_')[2]").saxon();
// evaluate as a String result
String result = builder.evaluate(context, "<foo><bar>abc_def_ghi</bar></foo>");
assertEquals("def", result);
Setting a custom XPathFactory using System Property
Available as of Camel 2.3
Camel now supports reading the JVM system property
javax.xml.xpath.XPathFactory that can be used to set a custom XPathFactory to
use.
This unit test shows how this can be done to use Saxon instead:
// set system property with the XPath factory to use which is Saxon
System.setProperty(XPathFactory.DEFAULT_PROPERTY_NAME + ":" +"http://saxon.sf.net/
jaxp/xpath/om", "net.sf.saxon.xpath.XPathFactoryImpl");
LANGUAGES SUPPORTED APPENDIX 240
// create a builder to evaluate the xpath using saxon
XPathBuilder builder = XPathBuilder.xpath("tokenize(/foo/bar, '_')[2]");
// evaluate as a String result
String result = builder.evaluate(context, "<foo><bar>abc_def_ghi</bar></foo>");
assertEquals("def", result);
Camel will log at INFO level if it uses a non default XPathFactory such as:
XPathBuilder INFO Using system property
javax.xml.xpath.XPathFactory:http://saxon.sf.net/jaxp/xpath/om with value:
net.sf.saxon.xpath.XPathFactoryImpl when creating XPathFactory
Dependencies
The XPath language is part of camel-core.
XQUERY
Camel supports XQuery to allow an Expression or Predicate to be used in the DSL or Xml
Configuration. For example you could use XQuery to create an Predicate in a Message Filter or
as an Expression for a Recipient List.
from("queue:foo").filter().
xquery("//foo")).
to("queue:bar")
You can also use functions inside your query, in which case you need an explicit type
conversion (or you will get a org.w3c.dom.DOMException: HIERARCHY_REQUEST_ERR) by
passing the Class as a second argument to the xquery() method.
from("direct:start").
recipientList().xquery("concat('mock:foo.', /person/@city)",String.class);
Variables
The IN message body will be set as the contextItem. Besides this these Variables is also
added as parameters:
Variable Type Description Support
version
exchange Exchange The current Exchange
241 LANGUAGES SUPPORTED APPENDIX
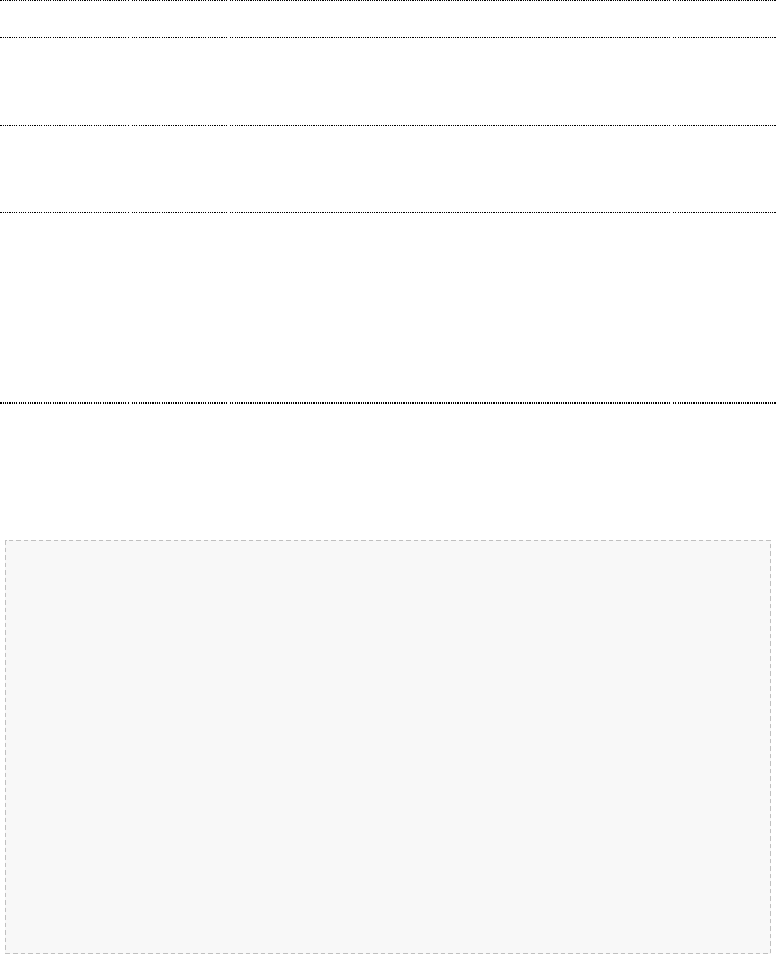
in.body Object The In message's body >= 1.6.1
out.body Object The OUT message's body (if any) >= 1.6.1
in.headers.* Object
You can access the value of exchange.in.headers
with key foo by using the variable which name is
in.headers.foo
>=1.6.1
out.headers.* Object
You can access the value of exchange.out.headers
with key foo by using the variable which name is
out.headers.foo variable
>=1.6.1
key name Object
Any exchange.properties and exchange.in.headers
(exchange.in.headers support was removed since
camel 1.6.1) and any additional parameters set
using setParameters(Map). These parameters
is added with they own key name, for instance if
there is an IN header with the key name foo then
its added as foo.
Using XML configuration
If you prefer to configure your routes in your Spring XML file then you can use XPath
expressions as follows
<beans xmlns="http://www.springframework.org/schema/beans"
xmlns:xsi="http://www.w3.org/2001/XMLSchema-instance"
xmlns:foo="http://example.com/person"
xsi:schemaLocation="
http://www.springframework.org/schema/beans http://www.springframework.org/
schema/beans/spring-beans-2.0.xsd
http://camel.apache.org/schema/spring http://camel.apache.org/schema/spring/
camel-spring.xsd">
<camelContext id="camel" xmlns="http://activemq.apache.org/camel/schema/spring">
<route>
<from uri="activemq:MyQueue"/>
<filter>
<xquery>/foo:person[@name='James']</xquery>
<to uri="mqseries:SomeOtherQueue"/>
</filter>
</route>
</camelContext>
</beans>
Notice how we can reuse the namespace prefixes, foo in this case, in the XPath expression for
easier namespace based XQuery expressions!
When you use functions in your XQuery expression you need an explicit type conversion
which is done in the xml configuration via the @type attribute:
LANGUAGES SUPPORTED APPENDIX 242

<xquery type="java.lang.String">concat('mock:foo.', /person/@city)</xquery>
Using XQuery as an endpoint
Sometimes an XQuery expression can be quite large; it can essentally be used for Templating.
So you may want to use an XQuery Endpoint so you can route using XQuery templates.
The following example shows how to take a message of an ActiveMQ queue (MyQueue) and
transform it using XQuery and send it to MQSeries.
<camelContext id="camel" xmlns="http://camel.apache.org/schema/spring">
<route>
<from uri="activemq:MyQueue"/>
<to uri="xquery:com/acme/someTransform.xquery"/>
<to uri="mqseries:SomeOtherQueue"/>
</route>
</camelContext>
Examples
Here is a simple example using an XQuery expression as a predicate in a Message Filter
from("direct:start").filter().xquery("/person[@name='James']").to("mock:result");
This example uses XQuery with namespaces as a predicate in a Message Filter
Namespaces ns = new Namespaces("c","http://acme.com/cheese");
from("direct:start").
filter().xquery("/c:person[@name='James']", ns).
to("mock:result");
Learning XQuery
XQuery is a very powerful language for querying, searching, sorting and returning XML. For
help learning XQuery try these tutorials
• Mike Kay's XQuery Primer
• the W3Schools XQuery Tutorial
You might also find the XQuery function reference useful
243 LANGUAGES SUPPORTED APPENDIX

Dependencies
To use XQuery in your camel routes you need to add the a dependency on camel-saxon
which implements the XQuery language.
If you use maven you could just add the following to your pom.xml, substituting the version
number for the latest & greatest release (see the download page for the latest versions).
<dependency>
<groupId>org.apache.camel</groupId>
<artifactId>camel-saxon</artifactId>
<version>1.4.0</version>
</dependency>
LANGUAGES SUPPORTED APPENDIX 244
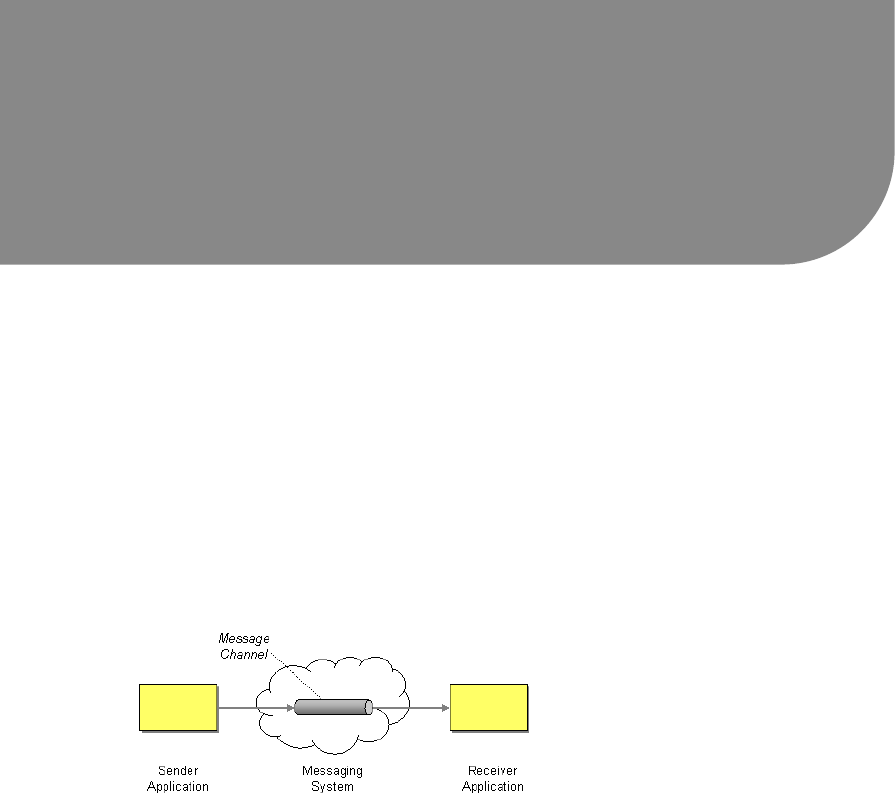
CHAPTER 9
°°°°
Pattern Appendix
There now follows a breakdown of the various Enterprise Integration Patterns that Camel
supports
MESSAGING SYSTEMS
Message Channel
Camel supports the Message Channel from the EIP patterns. The Message Channel is an internal
implementation detail of the Endpoint interface and all interactions with the Message Channel
are via the Endpoint interfaces.
For more details see
• Message
• Message Endpoint
Using This Pattern
If you would like to use this EIP Pattern then please read the Getting Started, you may also find
the Architecture useful particularly the description of Endpoint and URIs. Then you could try
out some of the Examples first before trying this pattern out.
Message
Camel supports the Message from the EIP patterns using the Message interface.
245 CHAPTER 9 - PATTERN APPENDIX
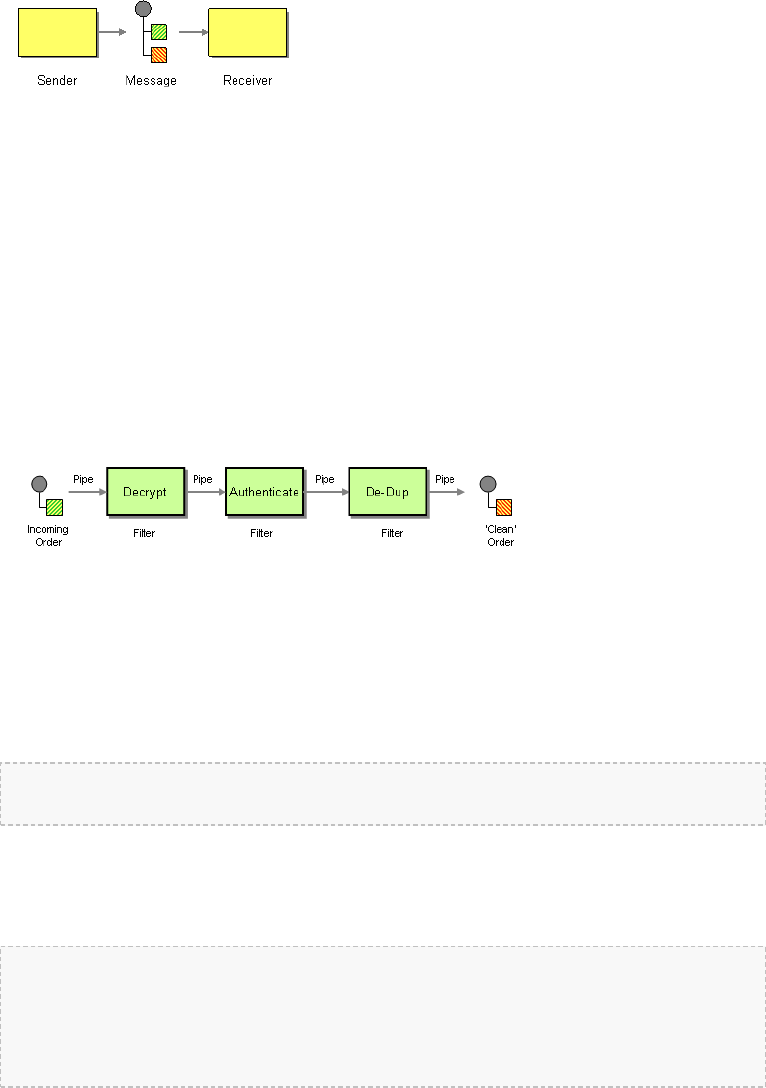
To support various message exchange patterns like one way Event Message and Request
Reply messages Camel uses an Exchange interface which has a pattern property which can be
set to InOnly for an Event Message which has a single inbound Message, or InOut for a
Request Reply where there is an inbound and outbound message.
Using This Pattern
If you would like to use this EIP Pattern then please read the Getting Started, you may also find
the Architecture useful particularly the description of Endpoint and URIs. Then you could try
out some of the Examples first before trying this pattern out.
Pipes and Filters
Camel supports the Pipes and Filters from the EIP patterns in various ways.
With Camel you can split your processing across multiple independent Endpoint instances
which can then be chained together.
Using Routing Logic
You can create pipelines of logic using multiple Endpoint or Message Translator instances as
follows
from("direct:a").pipeline("direct:x","direct:y","direct:z","mock:result");
Though pipeline is the default mode of operation when you specify multiple outputs in Camel.
The opposite to pipeline is multicast; which fires the same message into each of its outputs.
(See the example below).
In Spring XML you can use the <pipeline/> element as of 1.4.0 onwards
<route>
<from uri="activemq:SomeQueue"/>
<pipeline>
<bean ref="foo"/>
<bean ref="bar"/>
CHAPTER 9 - PATTERN APPENDIX 246

<to uri="activemq:OutputQueue"/>
</pipeline>
</route>
In the above the pipeline element is actually unnecessary, you could use this...
<route>
<from uri="activemq:SomeQueue"/>
<bean ref="foo"/>
<bean ref="bar"/>
<to uri="activemq:OutputQueue"/>
</route>
Its just a bit more explicit. However if you wish to use <multicast/> to avoid a pipeline - to send
the same message into multiple pipelines - then the <pipeline/> element comes into its own.
<route>
<from uri="activemq:SomeQueue"/>
<multicast>
<pipeline>
<bean ref="something"/>
<to uri="log:Something"/>
</pipeline>
<pipeline>
<bean ref="foo"/>
<bean ref="bar"/>
<to uri="activemq:OutputQueue"/>
</pipeline>
</multicast>
</route>
In the above example we are routing from a single Endpoint to a list of different endpoints
specified using URIs. If you find the above a bit confusing, try reading about the Architecture or
try the Examples
Using This Pattern
If you would like to use this EIP Pattern then please read the Getting Started, you may also find
the Architecture useful particularly the description of Endpoint and URIs. Then you could try
out some of the Examples first before trying this pattern out.
Message Router
The Message Router from the EIP patterns allows you to consume from an input destination,
evaluate some predicate then choose the right output destination.
247 CHAPTER 9 - PATTERN APPENDIX
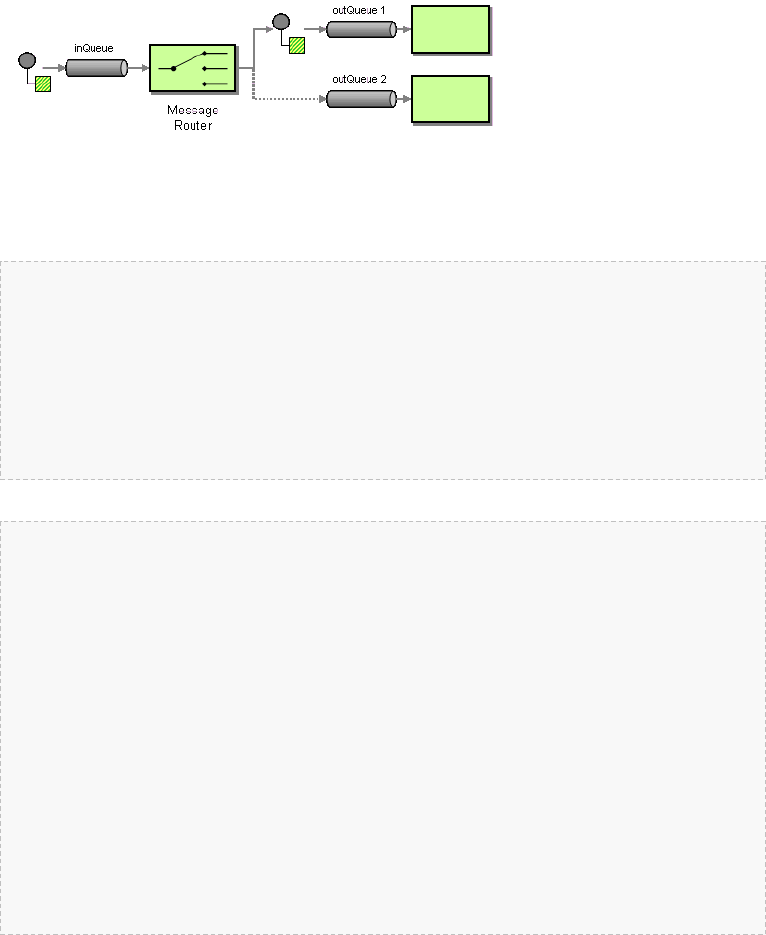
The following example shows how to route a request from an input queue:a endpoint to
either queue:b,queue:c or queue:d depending on the evaluation of various Predicate
expressions
Using the Fluent Builders
RouteBuilder builder = new RouteBuilder() {
public void configure() {
errorHandler(deadLetterChannel("mock:error"));
from("seda:a").choice().when(header("foo").isEqualTo("bar")).to("seda:b")
.when(header("foo").isEqualTo("cheese")).to("seda:c").otherwise().to("seda:d");
}
};
Using the Spring XML Extensions
<camelContext errorHandlerRef="errorHandler" streamCache="false" id="camel"
xmlns="http://camel.apache.org/schema/spring">
<route>
<from uri="seda:a"/>
<choice>
<when>
<xpath>$foo = 'bar'</xpath>
<to uri="seda:b"/>
</when>
<when>
<xpath>$foo = 'cheese'</xpath>
<to uri="seda:c"/>
</when>
<otherwise>
<to uri="seda:d"/>
</otherwise>
</choice>
</route>
</camelContext>
Choice without otherwise
If you use a choice without adding an otherwise, any unmatched exchanges will be
dropped by default. If you prefer to have an exception for an unmatched exchange, you can add
athrowFault to the otherwise.
CHAPTER 9 - PATTERN APPENDIX 248
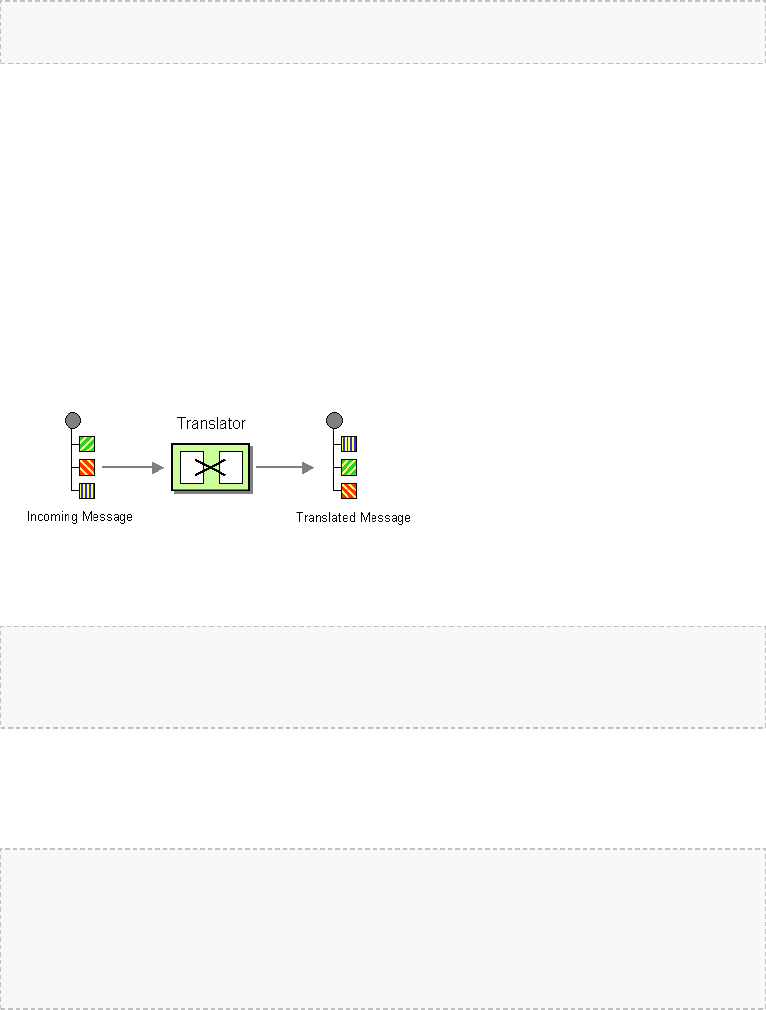
....otherwise().throwFault("No matching when clause found on choice block");
Using This Pattern
If you would like to use this EIP Pattern then please read the Getting Started, you may also find
the Architecture useful particularly the description of Endpoint and URIs. Then you could try
out some of the Examples first before trying this pattern out.
Message Translator
Camel supports the Message Translator from the EIP patterns by using an arbitrary Processor
in the routing logic, by using a bean to perform the transformation, or by using transform() in
the DSL. You can also use a Data Format to marshal and unmarshal messages in different
encodings.
Using the Fluent Builders
You can transform a message using Camel's Bean Integration to call any method on a bean in
your Registry such as your Spring XML configuration file as follows
from("activemq:SomeQueue").
beanRef("myTransformerBean","myMethodName").
to("mqseries:AnotherQueue");
Where the "myTransformerBean" would be defined in a Spring XML file or defined in JNDI etc.
You can omit the method name parameter from beanRef() and the Bean Integration will try to
deduce the method to invoke from the message exchange.
or you can add your own explicit Processor to do the transformation
from("direct:start").process(new Processor() {
public void process(Exchange exchange) {
Message in = exchange.getIn();
in.setBody(in.getBody(String.class) + " World!");
}
}).to("mock:result");
or you can use the DSL to explicitly configure the transformation
249 CHAPTER 9 - PATTERN APPENDIX

from("direct:start").transform(body().append(" World!")).to("mock:result");
Use Spring XML
You can also use Spring XML Extensions to do a transformation. Basically any Expression
language can be substituted inside the transform element as shown below
<camelContext xmlns="http://camel.apache.org/schema/spring">
<route>
<from uri="direct:start"/>
<transform>
<simple>${in.body} extra data!</simple>
</transform>
<to uri="mock:end"/>
</route>
</camelContext>
Or you can use the Bean Integration to invoke a bean
<route>
<from uri="activemq:Input"/>
<bean ref="myBeanName" method="doTransform"/>
<to uri="activemq:Output"/>
</route>
You can also use Templating to consume a message from one destination, transform it with
something like Velocity or XQuery and then send it on to another destination. For example
using InOnly (one way messaging)
from("activemq:My.Queue").
to("velocity:com/acme/MyResponse.vm").
to("activemq:Another.Queue");
If you want to use InOut (request-reply) semantics to process requests on the My.Queue
queue on ActiveMQ with a template generated response, then sending responses back to the
JMSReplyTo Destination you could use this.
from("activemq:My.Queue").
to("velocity:com/acme/MyResponse.vm");
For further examples of this pattern in use you could look at one of the JUnit tests
• TransformTest
• TransformViaDSLTest
• TransformProcessorTest
• TransformWithExpressionTest (test resource)
CHAPTER 9 - PATTERN APPENDIX 250
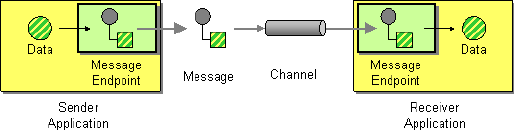
Using This Pattern
If you would like to use this EIP Pattern then please read the Getting Started, you may also find
the Architecture useful particularly the description of Endpoint and URIs. Then you could try
out some of the Examples first before trying this pattern out.
Message Endpoint
Camel supports the Message Endpoint from the EIP patterns using the Endpoint interface.
When using the DSL to create Routes you typically refer to Message Endpoints by their
URIs rather than directly using the Endpoint interface. Its then a responsibility of the
CamelContext to create and activate the necessary Endpoint instances using the available
Component implementations.
For more details see
• Message
Using This Pattern
If you would like to use this EIP Pattern then please read the Getting Started, you may also find
the Architecture useful particularly the description of Endpoint and URIs. Then you could try
out some of the Examples first before trying this pattern out.
MESSAGING CHANNELS
Point to Point Channel
Camel supports the Point to Point Channel from the EIP patterns using the following
components
• SEDA for in-VM seda based messaging
• JMS for working with JMS Queues for high performance, clustering and load balancing
• JPA for using a database as a simple message queue
• XMPP for point-to-point communication over XMPP (Jabber)
• and others
251 CHAPTER 9 - PATTERN APPENDIX
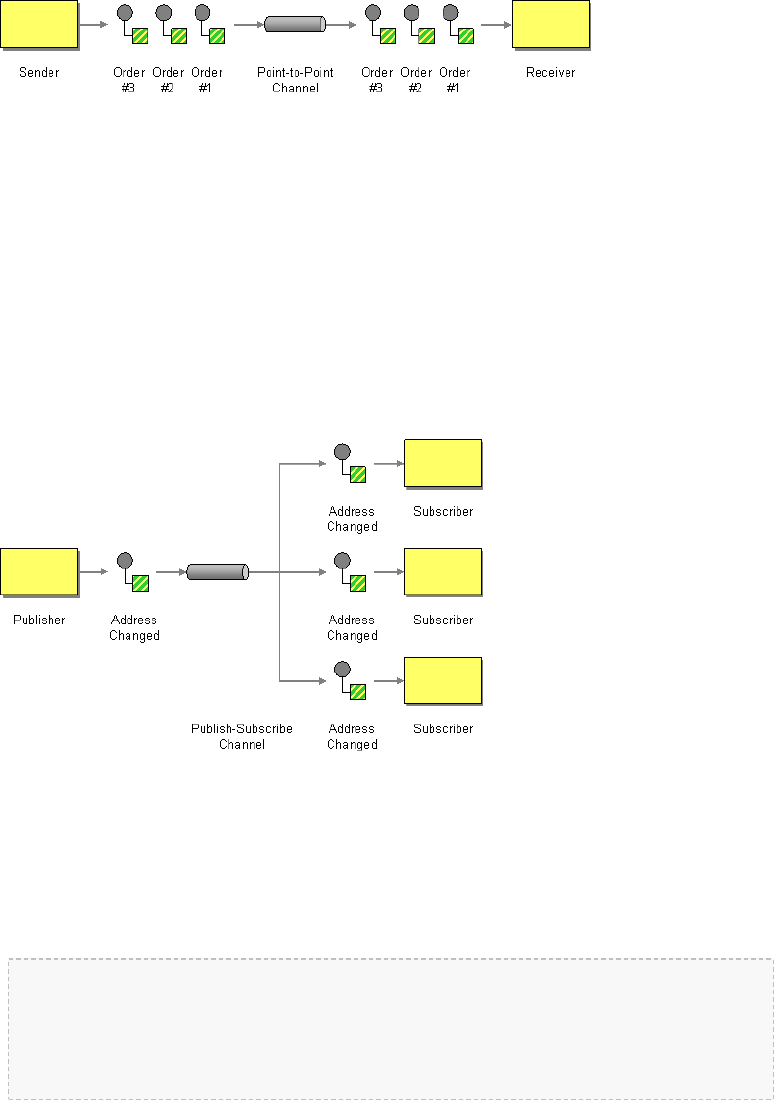
Using This Pattern
If you would like to use this EIP Pattern then please read the Getting Started, you may also find
the Architecture useful particularly the description of Endpoint and URIs. Then you could try
out some of the Examples first before trying this pattern out.
Publish Subscribe Channel
Camel supports the Publish Subscribe Channel from the EIP patterns using the following
components
• JMS for working with JMS Topics for high performance, clustering and load balancing
• XMPP when using rooms for group communication
Using Routing Logic
Another option is to explicitly list the publish-subscribe relationship in your routing logic; this
keeps the producer and consumer decoupled but lets you control the fine grained routing
configuration using the DSL or Xml Configuration.
Using the Fluent Builders
RouteBuilder builder = new RouteBuilder() {
public void configure() {
errorHandler(deadLetterChannel("mock:error"));
from("seda:a").multicast().to("seda:b","seda:c","seda:d");
CHAPTER 9 - PATTERN APPENDIX 252
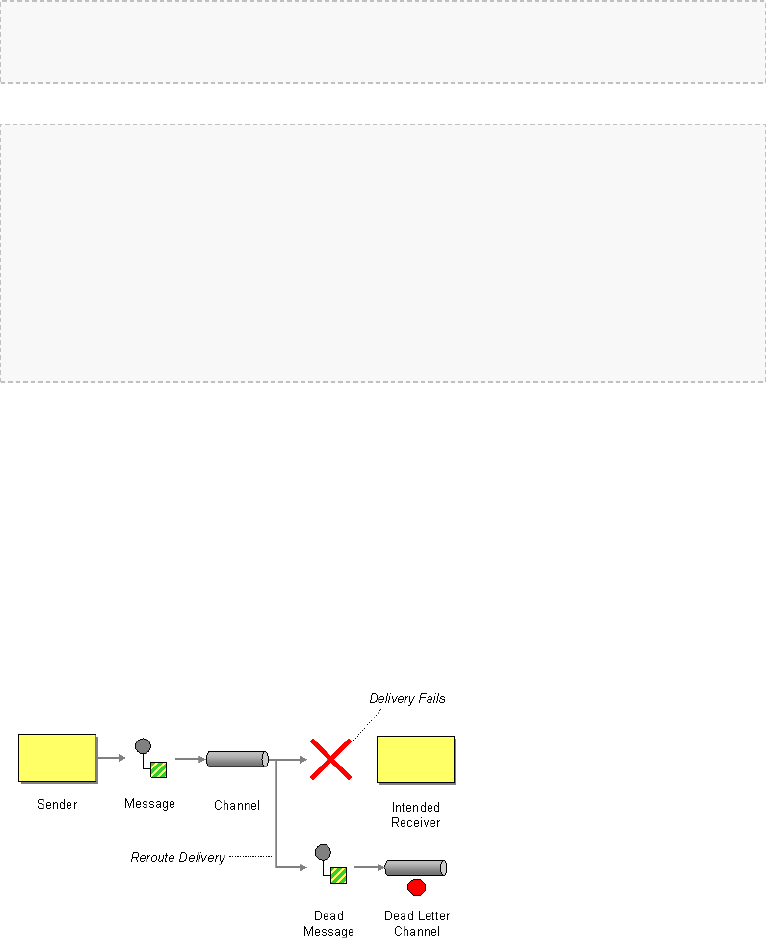
}
};
Using the Spring XML Extensions
<camelContext errorHandlerRef="errorHandler" streamCache="false" id="camel"
xmlns="http://camel.apache.org/schema/spring">
<route>
<from uri="seda:a"/>
<multicast>
<to uri="seda:b"/>
<to uri="seda:c"/>
<to uri="seda:d"/>
</multicast>
</route>
</camelContext>
Using This Pattern
If you would like to use this EIP Pattern then please read the Getting Started, you may also find
the Architecture useful particularly the description of Endpoint and URIs. Then you could try
out some of the Examples first before trying this pattern out.
DEAD LETTER CHANNEL
Camel supports the Dead Letter Channel from the EIP patterns using the DeadLetterChannel
processor which is an Error Handler.
Redelivery
It is common for a temporary outage or database deadlock to cause a message to fail to
process; but the chances are if its tried a few more times with some time delay then it will
253 CHAPTER 9 - PATTERN APPENDIX

Difference between Dead Letter Channel and Default Error
Handler
The major difference is that Dead Letter Channel has a dead letter queue that
whenever an Exchange could not be processed is moved to. It will always moved
failed exchanges to this queue.
Unlike the Default Error Handler that does not have a dead letter queue. So whenever an
Exchange could not be processed the error is propagated back to the client.
Notice: You can adjust this behavior of whether the client should be notified or not with
the handled option.
complete fine. So we typically wish to use some kind of redelivery policy to decide how many
times to try redeliver a message and how long to wait before redelivery attempts.
The RedeliveryPolicy defines how the message is to be redelivered. You can customize
things like
• how many times a message is attempted to be redelivered before it is considered a
failure and sent to the dead letter channel
• the initial redelivery timeout
• whether or not exponential backoff is used (i.e. the time between retries increases
using a backoff multiplier)
• whether to use collision avoidance to add some randomness to the timings
• delay pattern a new option in Camel 2.0, see below for details.
Once all attempts at redelivering the message fails then the message is forwarded to the dead
letter queue.
About moving Exchange to dead letter queue and using handled
Handled on Dead Letter Channel was introduced in Camel 2.0, this feature does not exist in
Camel 1.x
When all attempts of redelivery have failed the Exchange is moved to the dead letter queue
(the dead letter endpoint). The exchange is then complete and from the client point of view it
was processed. As such the Dead Letter Channel have handled the Exchange.
For instance configuring the dead letter channel as:
errorHandler(deadLetterChannel("jms:queue:dead").maximumRedeliveries(3).redeliverDealy(5000));
The Dead Letter Channel above will clear the caused exception when the Exchange is moved to
the jms:queue:dead destination and the client will not notice the failure.
By default handled is true.
CHAPTER 9 - PATTERN APPENDIX 254
How to let the client notice the error?
If you want to move the message to the dead letter queue and also let the client notice the
error, then you can configure the Dead Letter Channel to not handle the error. For example:
errorHandler(deadLetterChannel("jms:queue:dead").maximumRedeliveries(3).redeliverDealy(5000).handled(false));
When all attempts of redelivery have failed the Exchange is moved to the dead letter queue
(the dead letter endpoint). As the Dead Letter Channel
is configured to not handle it, it will mark the Exchange as failed so the client will be notified of
this error.
About moving Exchange to dead letter queue and using the original message
Available as of Camel 2.0
The option useOriginalMessage is used for routing the original input message instead of
the current message that potentially is modified during routing.
For instance if you have this route:
from("jms:queue:order:input")
.to("bean:validateOrder");
.to("bean:transformOrder")
.to("bean:handleOrder");
The route listen for JMS messages and validates, transforms and handle it. During this the
Exchange payload is transformed/modified. So in case something goes wrong and we want to
move the message to another JMS destination, then we can configure our Dead Letter Channel
with the useOriginalBody option. But when we move the Exchange to this destination we
do not know in which state the message is in. Did the error happen in before the
transformOrder or after? So to be sure we want to move the original input message we
received from jms:queue:order:input. So we can do this by enabling the
useOriginalMessage option as shown below:
// will use original body
errorHandler(deadLetterChannel("jms:queue:dead")
.useOriginalMessage().mamimumRedeliveries(5).redeliverDelay(5000);
Then the messages routed to the jms:queue:dead is the original input. If we want to
manually retry we can move the JMS message from the failed to the input queue, with no
problem as the message is the same as the original we received.
OnRedelivery
Available in Camel 1.6.0 onwards
255 CHAPTER 9 - PATTERN APPENDIX

Handled
See also Exception Clause for more details on the handled policy as this feature
was first introduced here and thus we have more docuemntation and samples there.
When Dead Letter Channel is doing redeliver its possible to configure a Processor that is
executed just before every redelivery attempt. This can be used for the situations where you
need to alter the message before its redelivered. See below for sample.
Redelivery default values
In Camel 2.0 redelivery is disabled by default, as opposed to Camel 1.x in which Dead Letter
Channel is configured with maximumRedeliveries=5.
The default redeliver policy will use the following values:
• maximumRedeliveries=0 (in Camel 1.x the default value is 5)
• redeliverDelay=1000L (1 second, new as of Camel 2.0)
◦use initialRedeliveryDelay for previous versions
• maximumRedeliveryDelay = 60 * 1000L (60 seconds)
• And the exponential backoff and collision avoidance is turned off.
• The retriesExhaustedLogLevel are set to LoggingLevel.ERROR
• The retryAttemptedLogLevel are set to LoggingLevel.DEBUG
• Stack traces is logged for exhausted messages from Camel 2.2 onwards.
• Handled exceptions is not logged from Camel 2.3 onwards
The maximum redeliver delay ensures that a delay is never longer than the value, default 1
minute. This can happen if you turn on the exponential backoff.
The maximum redeliveries is the number of re delivery attempts. By default Camel will try
to process the exchange 1 + 5 times. 1 time for the normal attempt and then 5 attempts as
redeliveries.
Setting the maximumRedeliveries to a negative value such as -1 will then always redelivery
(unlimited).
Setting the maximumRedeliveries to 0 will disable any re delivery attempt.
Camel will log delivery failures at the DEBUG logging level by default. You can change this by
specifying retriesExhaustedLogLevel and/or retryAttemptedLogLevel. See
ExceptionBuilderWithRetryLoggingLevelSetTest for an example.
In Camel 2.0 you can turn logging of stack traces on/off. If turned off Camel will still log the
redelivery attempt. Its just much less verbose.
Redeliver Delay Pattern
Available as of Camel 2.0
Delay pattern is used as a single option to set a range pattern for delays. If used then the
CHAPTER 9 - PATTERN APPENDIX 256
onException and onRedeliver
In Camel 2.0 we also added support for per onException to set a
onRedeliver. That means you can do special on redelivery for different
exceptions, as opposed to onRedelivery set on Dead Letter Channel can be viewed
as a global scope.
following options does not apply: (delay, backOffMultiplier, useExponentialBackOff,
useCollisionAvoidance, maximumRedeliveryDelay).
The idea is to set groups of ranges using the following syntax: limit:delay;limit
2:delay 2;limit 3:delay 3;...;limit N:delay N
Each group has two values separated with colon
▪limit = upper limit
▪delay = delay in millis
And the groups is again separated with semi colon.
The rule of thumb is that the next groups should have a higher limit than the previous
group.
Lets clarify this with an example:
delayPattern=5:1000;10:5000;20:20000
That gives us 3 groups:
▪5:1000
▪10:5000
▪20:20000
Resulting in these delays for redelivery attempt:
▪Attempt number 0..4 = 0 millis (as the first group start with 5)
▪Attempt number 5..9 = 1000 millis (the first group)
▪Attempt number 10..19 = 5000 millis (the second group)
▪Attempt number 20.. = 20000 millis (the last group)
You can start a group with limit 0 to eg have a starting delay:
delayPattern=0:1000;5:5000
▪Attempt number 0..4 = 1000 millis (the first group)
▪Attempt number 5.. = 5000 millis (the last group)
There is no requirement that the next delay should be higher than the previous. You can use
any delay value you like. For example with delayPattern=0:5000;3:1000 we start with
5 sec delay and then later reduce that to 1 second.
Redelivery header
When a message is redelivered the DeadLetterChannel will append a customizable header to
the message to indicate how many times its been redelivered.
In Camel 1.x: The header is org.apache.camel.redeliveryCount.
257 CHAPTER 9 - PATTERN APPENDIX
In Camel 2.0: The header is CamelRedeliveryCounter, which is also defined on the
Exchange.REDELIVERY_COUNTER.
And a boolean flag whether it is being redelivered or not (first attempt)
In Camel 1.x: The header org.apache.camel.Redelivered contains a boolean if the
message is redelivered or not.
In Camel 2.0: The header CamelRedelivered contains a boolean if the message is
redelivered or not, which is also defined on the Exchange.REDELIVERED.
Which endpoint failed
Available as of Camel 2.1
When Camel routes messages it will decorate the Exchange with a property that contains
the last endpoint Camel send the Exchange to:
String lastEndpointUri = exchange.getProperty(Exchange.TO_ENDPOINT, String.class);
The Exchange.TO_ENDPOINT have the constant value CamelToEndpoint.
This information is updated when Camel sends a message to any endpoint. So if it exists its
the last endpoint which Camel send the Exchange to.
When for example processing the Exchange at a given Endpoint and the message is to be
moved into the dead letter queue, then Camel also decorates the Exchange with another
property that contains that last endpoint:
String failedEndpointUri = exchange.getProperty(Exchange.FAILURE_ENDPOINT,
String.class);
The Exchange.FAILURE_ENDPOINT have the constant value
CamelFailureEndpoint.
This allows for example you to fetch this information in your dead letter queue and use that
for error reporting.
This is useable if the Camel route is a bit dynamic such as the dynamic Recipient List so you
know which endpoints failed.
Notice: These information is kept on the Exchange even if the message was successfully
processed by a given endpoint, and then later fails for example in a local Bean processing
instead. So beware that this is a hint that helps pinpoint errors.
from("activemq:queue:foo")
.to("http://someserver/somepath")
.beanRef("foo");
CHAPTER 9 - PATTERN APPENDIX 258

Now suppose the route above and a failure happens in the foo bean. Then the
Exchange.TO_ENDPOINT and Exchange.FAILURE_ENDPOINT will still contain the
value of http://someserver/somepath.
Samples
The following example shows how to configure the Dead Letter Channel configuration using
the DSL
RouteBuilder builder = new RouteBuilder() {
public void configure() {
// using dead letter channel with a seda queue for errors
errorHandler(deadLetterChannel("seda:errors"));
// here is our route
from("seda:a").to("seda:b");
}
};
You can also configure the RedeliveryPolicy as this example shows
RouteBuilder builder = new RouteBuilder() {
public void configure() {
// configures dead letter channel to use seda queue for errors and use at most
2 redelveries
// and exponential backoff
errorHandler(deadLetterChannel("seda:errors").maximumRedeliveries(2).useExponentialBackOff());
// here is our route
from("seda:a").to("seda:b");
}
};
How can I modify the Exchange before redelivery?
In Camel 1.6.0 we added support directly in Dead Letter Channel to set a Processor that is
executed before each redelivery attempt.
When Dead Letter Channel is doing redeliver its possible to configure a Processor that is
executed just before every redelivery attempt. This can be used for the situations where you
need to alter the message before its redelivered.
Here we configure the Dead Letter Channel to use our processor
MyRedeliveryProcessor to be executed before each redelivery.
// we configure our Dead Letter Channel to invoke
// MyRedeliveryProcessor before a redelivery is
259 CHAPTER 9 - PATTERN APPENDIX

// attempted. This allows us to alter the message before
errorHandler(deadLetterChannel("mock:error").maximumRedeliveries(5)
.onRedelivery(new MyRedeliverPrcessor())
// setting delay to zero is just to make unit teting faster
.redeliveryDelay(0L));
And this is the processor MyRedeliveryProcessor where we alter the message.
// This is our processor that is executed before every redelivery attempt
// here we can do what we want in the java code, such as altering the message
public class MyRedeliverPrcessor implements Processor {
public void process(Exchange exchange) throws Exception {
// the message is being redelivered so we can alter it
// we just append the redelivery counter to the body
// you can of course do all kind of stuff instead
String body = exchange.getIn().getBody(String.class);
int count = exchange.getIn().getHeader("CamelRedeliveryCounter",
Integer.class);
exchange.getIn().setBody(body + count);
}
}
Using This Pattern
If you would like to use this EIP Pattern then please read the Getting Started, you may also find
the Architecture useful particularly the description of Endpoint and URIs. Then you could try
out some of the Examples first before trying this pattern out.
▪Error Handler
▪Exception Clause
Guaranteed Delivery
Camel supports the Guaranteed Delivery from the EIP patterns using the following components
• File for using file systems as a persistent store of messages
• JMS when using persistent delivery (the default) for working with JMS Queues and
Topics for high performance, clustering and load balancing
• JPA for using a database as a persistence layer
CHAPTER 9 - PATTERN APPENDIX 260
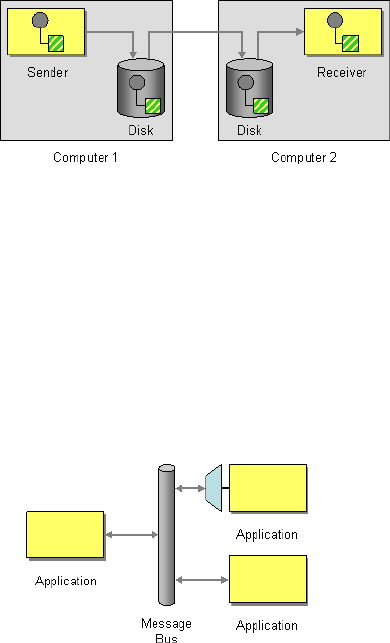
Using This Pattern
If you would like to use this EIP Pattern then please read the Getting Started, you may also find
the Architecture useful particularly the description of Endpoint and URIs. Then you could try
out some of the Examples first before trying this pattern out.
Message Bus
Camel supports the Message Bus from the EIP patterns. You could view Camel as a Message
Bus itself as it allows producers and consumers to be decoupled.
Folks often assume that a Message Bus is a JMS though so you may wish to refer to the JMS
component for traditional MOM support.
Also worthy of node is the XMPP component for supporting messaging over XMPP (Jabber)
Using This Pattern
If you would like to use this EIP Pattern then please read the Getting Started, you may also find
the Architecture useful particularly the description of Endpoint and URIs. Then you could try
out some of the Examples first before trying this pattern out.
261 CHAPTER 9 - PATTERN APPENDIX
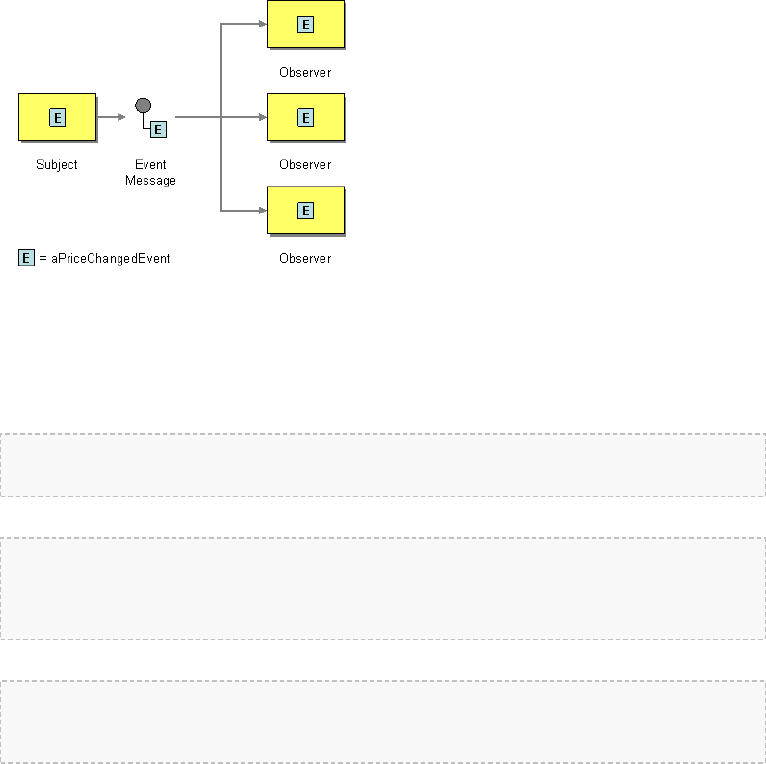
Message Construction
EVENT MESSAGE
Camel supports the Event Message from the EIP patterns by supporting the Exchange Pattern
on a Message which can be set to InOnly to indicate a oneway event message. Camel
Components then implement this pattern using the underlying transport or protocols.
The default behaviour of many Components is InOnly such as for JMS or SEDA
Explicitly specifying InOnly
If you are using a component which defaults to InOut you can override the Exchange Pattern
for an endpoint using the pattern property.
foo:bar?exchangePattern=InOnly
From 2.0 onwards on Camel you can specify the Exchange Pattern using the dsl.
from("mq:someQueue").
inOnly().
bean(Foo.class);
or you can invoke an endpoint with an explicit pattern
from("mq:someQueue").
inOnly("mq:AnotherQueue");
CHAPTER 9 - PATTERN APPENDIX 262
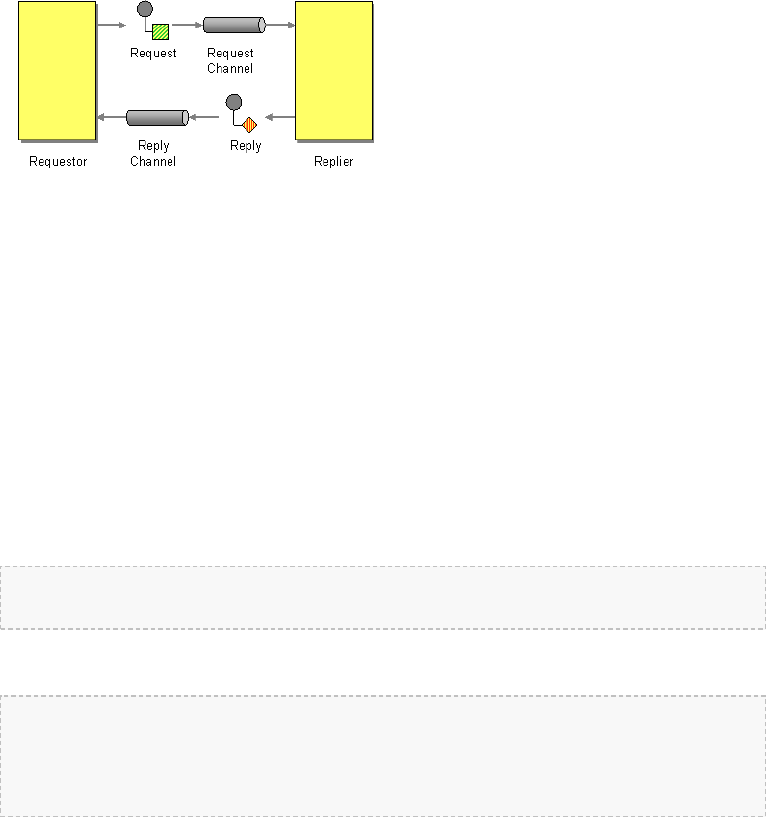
Using This Pattern
If you would like to use this EIP Pattern then please read the Getting Started, you may also find
the Architecture useful particularly the description of Endpoint and URIs. Then you could try
out some of the Examples first before trying this pattern out.
REQUEST REPLY
Camel supports the Request Reply from the EIP patterns by supporting the Exchange Pattern
on a Message which can be set to InOut to indicate a request/reply. Camel Components then
implement this pattern using the underlying transport or protocols.
For example when using JMS with InOut the component will by default perform these
actions
• create by default a temporary inbound queue
• set the JMSReplyTo destination on the request message
• set the JMSCorrelationID on the request message
• send the request message
• consume the response and associate the inbound message to the request using the
JMSCorrelationID (as you may be performing many concurrent request/responses).
Explicitly specifying InOut
When consuming messages from JMS a Request-Reply is indicated by the presence of the
JMSReplyTo header.
You can explicitly force an endpoint to be in Request Reply mode by setting the exchange
pattern on the URI. e.g.
jms:MyQueue?exchangePattern=InOut
NOTE
From Camel 1.5.1 you can specify the exchange pattern in DSL rule or Spring configuration.
// Send to an endpoint using InOut
from("direct:testInOut").inOut("mock:result");
// Send to an endpoint using InOut
263 CHAPTER 9 - PATTERN APPENDIX

from("direct:testInOnly").inOnly("mock:result");
// Set the exchange pattern to InOut, then send it from direct:inOnly to mock:result
endpoint
from("direct:testSetToInOnlyThenTo").inOnly().to("mock:result");
from("direct:testSetToInOutThenTo").inOut().to("mock:result");
// Or we can pass the pattern as a parameter to the to() method
from("direct:testToWithInOnlyParam").to(ExchangePattern.InOnly, "mock:result");
from("direct:testToWithInOutParam").to(ExchangePattern.InOut, "mock:result");
from("direct:testToWithRobustInOnlyParam").to(ExchangePattern.RobustInOnly,
"mock:result");
// Set the exchange pattern to InOut, then send it on
from("direct:testSetExchangePatternInOnly").setExchangePattern(ExchangePattern.InOnly).to("mock:result");
<camelContext xmlns="http://camel.apache.org/schema/spring">
<!-- Send the exchange as InOnly -->
<route>
<from uri="direct:testInOut"/>
<inOut uri="mock:result"/>
</route>
<!-- Send the exchange as InOnly -->
<route>
<from uri="direct:testInOnly"/>
<inOnly uri="mock:result"/>
</route>
<!-- lets set the exchange pattern then send it on -->
<route>
<from uri="direct:testSetToInOnlyThenTo"/>
<setExchangePattern pattern="InOnly"/>
<to uri="mock:result"/>
</route>
<route>
<from uri="direct:testSetToInOutThenTo"/>
<setExchangePattern pattern="InOut"/>
<to uri="mock:result"/>
</route>
<route>
<from uri="direct:testSetExchangePatternInOnly"/>
<setExchangePattern pattern="InOnly"/>
<to uri="mock:result"/>
</route>
<!-- Lets pass the pattern as an argument in the to element -->
<route>
<from uri="direct:testToWithInOnlyParam"/>
<to uri="mock:result" pattern="InOnly"/>
CHAPTER 9 - PATTERN APPENDIX 264
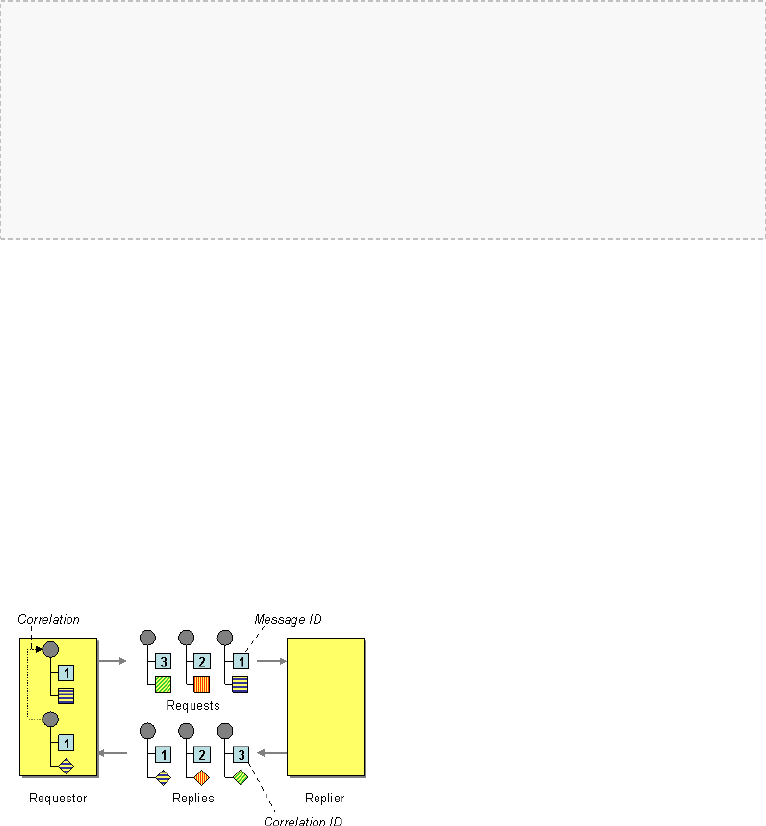
</route>
<route>
<from uri="direct:testToWithInOutParam"/>
<to uri="mock:result" pattern="InOut"/>
</route>
<route>
<from uri="direct:testToWithRobustInOnlyParam"/>
<to uri="mock:result" pattern="RobustInOnly"/>
</route>
</camelContext>
Using This Pattern
If you would like to use this EIP Pattern then please read the Getting Started, you may also find
the Architecture useful particularly the description of Endpoint and URIs. Then you could try
out some of the Examples first before trying this pattern out.
Correlation Identifier
Camel supports the Correlation Identifier from the EIP patterns by getting or setting a header
on a Message.
When working with the ActiveMQ or JMS components the correlation identifier header is
called JMSCorrelationID. You can add your own correlation identifier to any message
exchange to help correlate messages together to a single conversation (or business process).
The use of a Correlation Identifier is key to working with the Camel Business Activity
Monitoring Framework and can also be highly useful when testing with simulation or canned
data such as with the Mock testing framework
See Also
• BAM
265 CHAPTER 9 - PATTERN APPENDIX
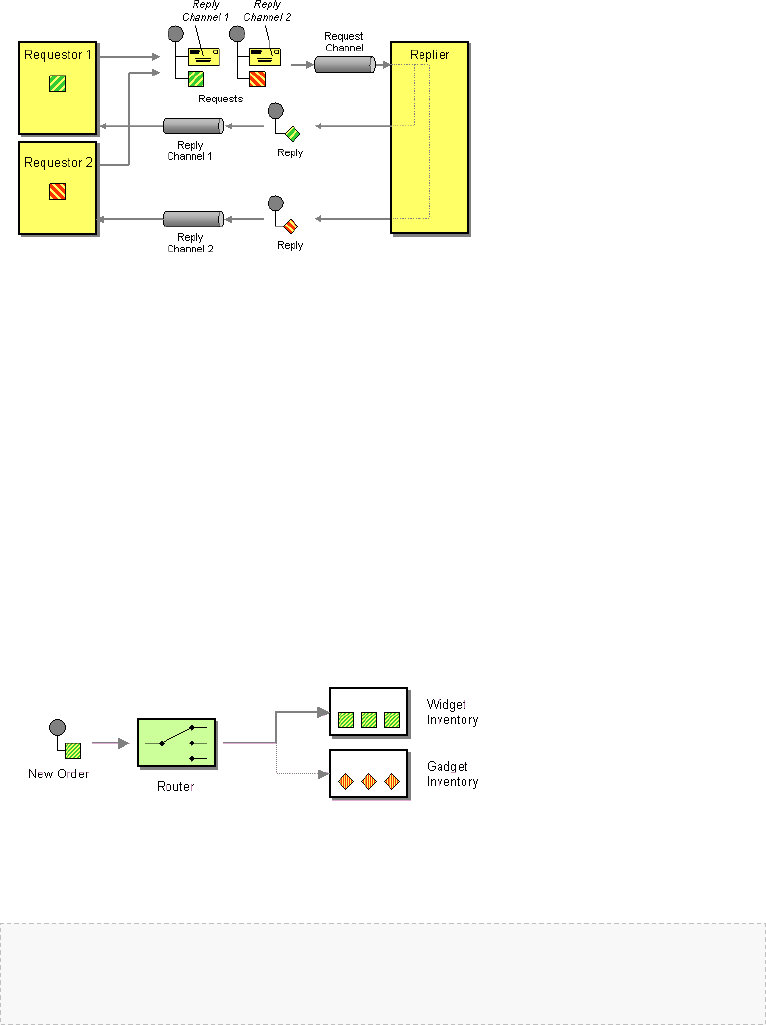
RETURN ADDRESS
Camel supports the Return Address from the EIP patterns by using the JMSReplyTo header.
For example when using JMS with InOut the component will by default return to the address
given in JMSReplyTo.
Using This Pattern
If you would like to use this EIP Pattern then please read the Getting Started, you may also find
the Architecture useful particularly the description of Endpoint and URIs. Then you could try
out some of the Examples first before trying this pattern out.
MESSAGE ROUTING
Content Based Router
The Content Based Router from the EIP patterns allows you to route messages to the correct
destination based on the contents of the message exchanges.
The following example shows how to route a request from an input seda:a endpoint to
either seda:b,seda:c or seda:d depending on the evaluation of various Predicate
expressions
Using the Fluent Builders
RouteBuilder builder = new RouteBuilder() {
public void configure() {
errorHandler(deadLetterChannel("mock:error"));
CHAPTER 9 - PATTERN APPENDIX 266

from("seda:a").choice().when(header("foo").isEqualTo("bar")).to("seda:b")
.when(header("foo").isEqualTo("cheese")).to("seda:c").otherwise().to("seda:d");
}
};
Using the Spring XML Extensions
<camelContext errorHandlerRef="errorHandler" streamCache="false" id="camel"
xmlns="http://camel.apache.org/schema/spring">
<route>
<from uri="seda:a"/>
<choice>
<when>
<xpath>$foo = 'bar'</xpath>
<to uri="seda:b"/>
</when>
<when>
<xpath>$foo = 'cheese'</xpath>
<to uri="seda:c"/>
</when>
<otherwise>
<to uri="seda:d"/>
</otherwise>
</choice>
</route>
</camelContext>
For further examples of this pattern in use you could look at the junit test case
Using This Pattern
If you would like to use this EIP Pattern then please read the Getting Started, you may also find
the Architecture useful particularly the description of Endpoint and URIs. Then you could try
out some of the Examples first before trying this pattern out.
Message Filter
The Message Filter from the EIP patterns allows you to filter messages
The following example shows how to create a Message Filter route consuming messages
from an endpoint called queue:a which if the Predicate is true will be dispatched to queue:b
267 CHAPTER 9 - PATTERN APPENDIX
Using the Fluent Builders
RouteBuilder builder = new RouteBuilder() {
public void configure() {
errorHandler(deadLetterChannel("mock:error"));
from("seda:a").filter(header("foo").isEqualTo("bar")).to("seda:b");
}
};
You can of course use many different Predicate languages such as XPath, XQuery, SQL or
various Scripting Languages. Here is an XPath example
from("direct:start").
filter().xpath("/person[@name='James']").
to("mock:result");
Using the Spring XML Extensions
<camelContext errorHandlerRef="errorHandler" streamCache="false" id="camel"
xmlns="http://camel.apache.org/schema/spring">
<route>
<from uri="seda:a"/>
<filter>
<xpath>$foo = 'bar'</xpath>
<to uri="seda:b"/>
</filter>
</route>
</camelContext>
For further examples of this pattern in use you could look at the junit test case
Using stop
Available as of Camel 2.0
Stop is a bit different than a message filter as it will filter out all messages. Stop is convenient
to use in a Content Based Router when you for example need to stop further processing in one
of the predicates.
In the example below we do not want to route messages any further that has the word Bye
in the message body. Notice how we prevent this in the when predicate by using the
.stop().
from("direct:start")
.choice()
.when(body().contains("Hello")).to("mock:hello")
.when(body().contains("Bye")).to("mock:bye").stop()
CHAPTER 9 - PATTERN APPENDIX 268
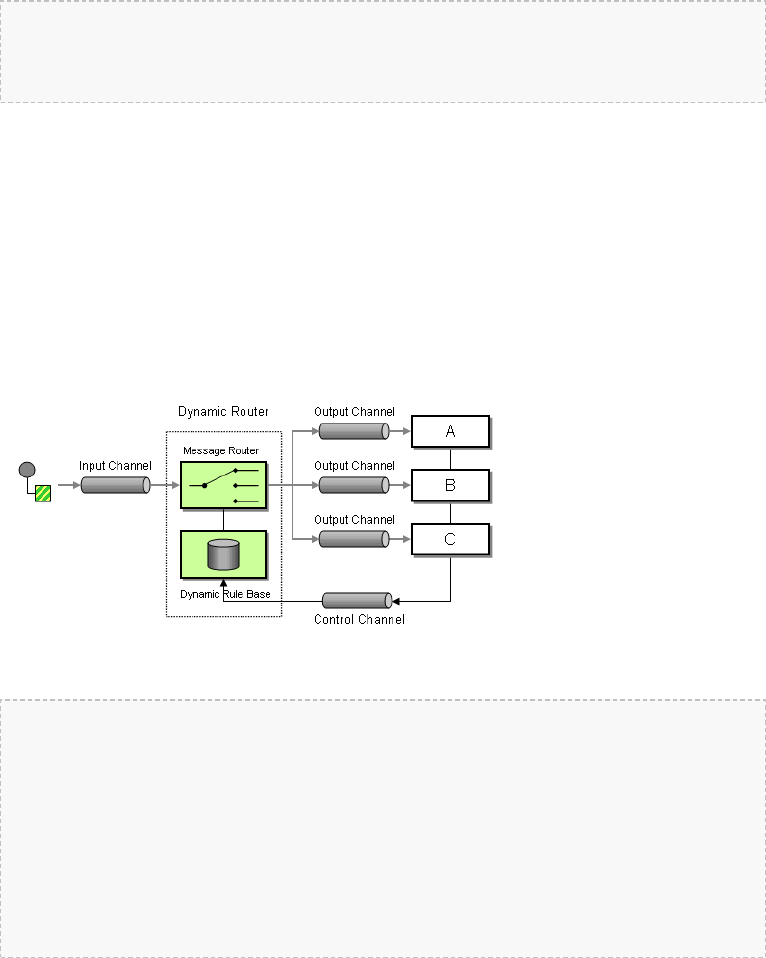
.otherwise().to("mock:other")
.end()
.to("mock:result");
Using This Pattern
If you would like to use this EIP Pattern then please read the Getting Started, you may also find
the Architecture useful particularly the description of Endpoint and URIs. Then you could try
out some of the Examples first before trying this pattern out.
Dynamic Router
The Dynamic Router from the EIP patterns allows you to route messages while avoiding the
dependency of the router on all possible destinations while maintaining its efficiency.
The simplest way to implement this is to use the RecipientList Annotation on a Bean method
to determine where to route the message.
public class MyDynamicRouter {
@Consume(uri = "activemq:foo")
@RecipientList
public List<String> route(@XPath("/customer/id")String customerId,
@Header("Location")String location, Document body) {
// query a database to find the best match of the endpoint based on the input
parameteres
...
}
}
In the above we can use the Parameter Binding Annotations to bind different parts of the
Message to method parameters or use an Expression such as using XPath or XQuery.
The method can be invoked in a number of ways as described in the Bean Integration such
as
• POJO Producing
269 CHAPTER 9 - PATTERN APPENDIX
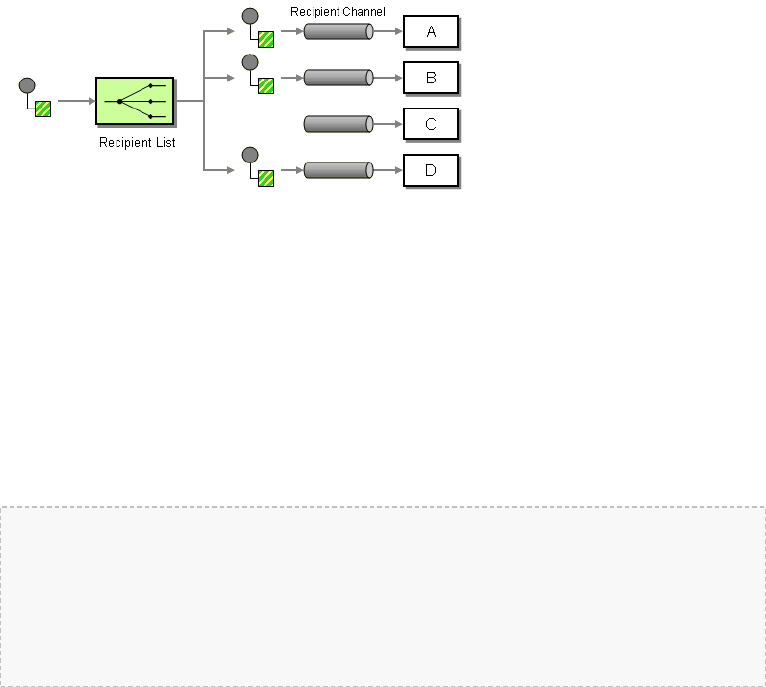
• Spring Remoting
• Bean component
Using This Pattern
If you would like to use this EIP Pattern then please read the Getting Started, you may also find
the Architecture useful particularly the description of Endpoint and URIs. Then you could try
out some of the Examples first before trying this pattern out.
Recipient List
The Recipient List from the EIP patterns allows you to route messages to a number of
dynamically specified recipients.
The recipients will receive a copy of the same Exchange and Camel will execute them
sequentially.
Static Recipient List
The following example shows how to route a request from an input queue:a endpoint to a
static list of destinations
Using Annotations
You can use the RecipientList Annotation on a POJO to create a Dynamic Recipient List. For
more details see the Bean Integration.
Using the Fluent Builders
RouteBuilder builder = new RouteBuilder() {
public void configure() {
errorHandler(deadLetterChannel("mock:error"));
from("seda:a").multicast().to("seda:b","seda:c","seda:d");
}
};
Using the Spring XML Extensions
CHAPTER 9 - PATTERN APPENDIX 270

<camelContext errorHandlerRef="errorHandler" streamCache="false" id="camel"
xmlns="http://camel.apache.org/schema/spring">
<route>
<from uri="seda:a"/>
<multicast>
<to uri="seda:b"/>
<to uri="seda:c"/>
<to uri="seda:d"/>
</multicast>
</route>
</camelContext>
Dynamic Recipient List
Usually one of the main reasons for using the Recipient List pattern is that the list of recipients
is dynamic and calculated at runtime. The following example demonstrates how to create a
dynamic recipient list using an Expression (which in this case it extracts a named header value
dynamically) to calculate the list of endpoints which are either of type Endpoint or are
converted to a String and then resolved using the endpoint URIs.
Using the Fluent Builders
RouteBuilder builder = new RouteBuilder() {
public void configure() {
errorHandler(deadLetterChannel("mock:error"));
from("seda:a").recipientList(header("foo"));
}
};
The above assumes that the header contains a list of endpoint URIs. The following takes a single
string header and tokenizes it
from("direct:a").recipientList(
header("recipientListHeader").tokenize(","));
Iteratable value
The dynamic list of recipients that are defined in the header must be iteratable such as:
▪java.util.Collection
▪java.util.Iterator
▪arrays
▪org.w3c.dom.NodeList
▪Camel 1.6.0: a single String with values separated with comma
▪any other type will be regarded as a single value
271 CHAPTER 9 - PATTERN APPENDIX

Using the Spring XML Extensions
<camelContext errorHandlerRef="errorHandler" streamCache="false" id="camel"
xmlns="http://camel.apache.org/schema/spring">
<route>
<from uri="seda:a"/>
<recipientList>
<xpath>$foo</xpath>
</recipientList>
</route>
</camelContext>
For further examples of this pattern in use you could look at one of the junit test case
Using delimiter in Spring XML
Available as of Camel 1.6.0
In Spring DSL you can set the delimiter attribute for setting a delimiter to be used if the
header value is a single String with multiple separated endpoints. By default Camel uses comma
as delimiter, but this option lets you specify a customer delimiter to use instead.
<route>
<from uri="direct:a" />
<!-- use comma as a delimiter for String based values -->
<recipientList delimiter=",">
<header>myHeader</header>
</recipientList>
</route>
So if myHeader contains a String with the value "activemq:queue:foo,
activemq:topic:hello , log:bar" then Camel will split the String using the
delimiter given in the XML that was comma, resulting into 3 endpoints to send to. You can use
spaces between the endpoints as Camel will trim the value when it lookup the endpoint to send
to.
Note: In Java DSL you use the tokenizer to archive the same. The route above in Java
DSL:
from("direct:a").recipientList(header("myHeader").tokenize(","));
In Camel 2.1 its a bit easier as you can pass in the delimiter as 2nd parameter:
from("direct:a").recipientList(header("myHeader"), "#");
CHAPTER 9 - PATTERN APPENDIX 272
Sending to multiple recipients in parallel
Available as of Camel 2.2
The Recipient List now supports parallelProcessing that for example Splitter also
supports. You can use it to use a thread pool to have concurrent tasks sending the Exchange to
multiple recipients concurrently.
from("direct:a").recipientList(header("myHeader")).parallelProcessing();
And in Spring XML its an attribute on the recipient list tag.
<route>
<from uri="direct:a"/>
<recipientList parallelProcessing="true">
<header>myHeader</header>
</recipientList>
</route>
Stop continuing in case one recipient failed
Available as of Camel 2.2
The Recipient List now supports stopOnException that for example Splitter also
supports. You can use it to stop sending to any further recipients in case any recipient failed.
from("direct:a").recipientList(header("myHeader")).stopOnException();
And in Spring XML its an attribute on the recipient list tag.
<route>
<from uri="direct:a"/>
<recipientList stopOnException="true">
<header>myHeader</header>
</recipientList>
</route>
Note: You can combine parallelProcessing and stopOnException and have them
both true.
Ignore invalid endpoints
Available as of Camel 2.3
The Recipient List now supports ignoreInvalidEndpoints which the Routing Slip
also supports. You can use it to skip endpoints which is invalid.
273 CHAPTER 9 - PATTERN APPENDIX

from("direct:a").recipientList(header("myHeader")).ignoreInvalidEndpoints();
And in Spring XML its an attribute on the recipient list tag.
<route>
<from uri="direct:a"/>
<recipientList ignoreInvalidEndpoints="true">
<header>myHeader</header>
</recipientList>
</route>
Then lets say the myHeader contains the following two endpoints direct:foo,xxx:bar.
The first endpoint is valid and works. However the 2nd is invalid and will just be ignored. Camel
logs at INFO level about, so you can see why the endpoint was invalid.
Using custom AggregationStrategy
Available as of Camel 2.2
You can now use you own AggregationStrategy with the Recipient List. However its
not that often you need that. What its good for is that in case you are using Request Reply
messaging then the replies from the recipient can be aggregated. By default Camel uses
UseLatestAggregationStrategy which just keeps that last received reply. What if you
must remember all the bodies that all the recipients send back, then you can use your own
custom aggregator that keeps those. Its the same principle as with the Aggregator EIP so check
it out for details.
from("direct:a")
.recipientList(header("myHeader")).aggregationStrategy(new
MyOwnAggregationStrategy())
.to("direct:b");
And in Spring XML its an attribute on the recipient list tag.
<route>
<from uri="direct:a"/>
<recipientList strategyRef="myStrategy">
<header>myHeader</header>
</recipientList>
<to uri="direct:b"/>
</route>
<bean id="myStrategy" class="com.mycompany.MyOwnAggregationStrategy"/>
CHAPTER 9 - PATTERN APPENDIX 274

Using custom thread pool
Available as of Camel 2.2
This is only needed when you use parallelProcessing. By default Camel uses a
thread pool with 10 threads. Notice this is subject to change when we overhaul thread pool
management and configuration later (hopefully in Camel 2.2).
You configure this just as you would with the custom aggregation strategy.
Using method call as recipient list
You can use a Bean to provide the recipients, for example:
from("activemq:queue:test").recipientList().method(MessageRouter.class, "routeTo");
And then MessageRouter:
public class MessageRouter {
public String routeTo() {
String queueName = "activemq:queue:test2";
return queueName;
}
}
When you use a Bean then do not also use the @RecipientList annotation as this will in
fact add yet another recipient list, so you end up having two. Do not do like this.
public class MessageRouter {
@RecipientList
public String routeTo() {
String queueName = "activemq:queue:test2";
return queueName;
}
}
Well you should only do like that above (using @RecipientList) if you route just route to a
Bean which you then want to act as a recipient list.
So the original route can be changed to:
from("activemq:queue:test").bean(MessageRouter.class, "routeTo");
Which then would invoke the routeTo method and detect its annotated with
@RecipientList and then act accordingly as if it was a recipient list EIP.
275 CHAPTER 9 - PATTERN APPENDIX
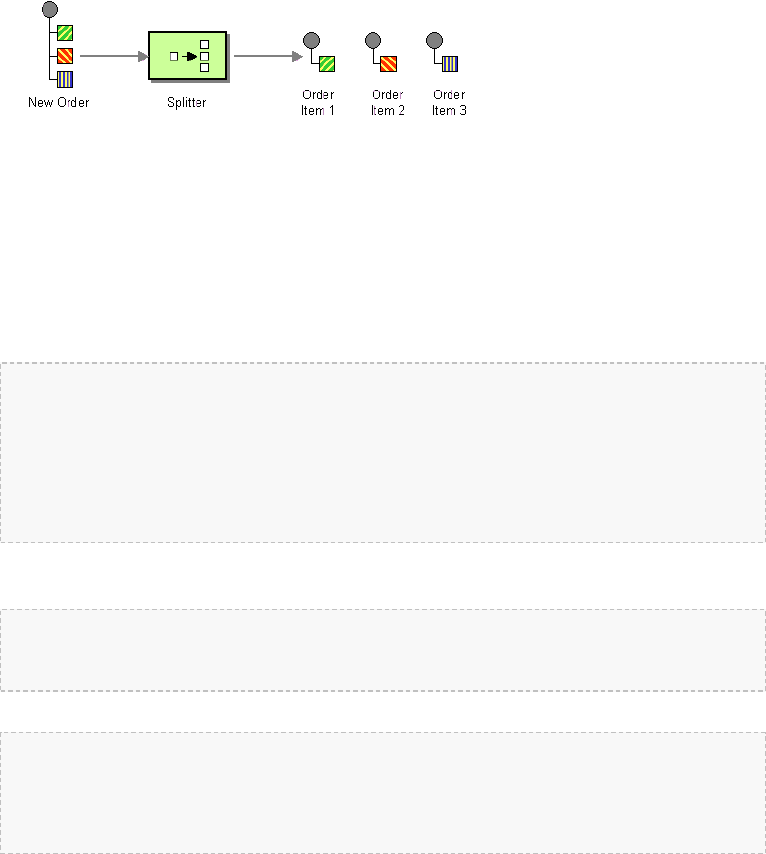
Using This Pattern
If you would like to use this EIP Pattern then please read the Getting Started, you may also find
the Architecture useful particularly the description of Endpoint and URIs. Then you could try
out some of the Examples first before trying this pattern out.
Splitter
The Splitter from the EIP patterns allows you split a message into a number of pieces and
process them individually
As of Camel 2.0, you need to specify a Splitter as split(). In earlier versions of Camel,
you need to use splitter().
Example
The following example shows how to take a request from the queue:a endpoint the split it
into pieces using an Expression, then forward each piece to queue:b
Using the Fluent Builders
RouteBuilder builder = new RouteBuilder() {
public void configure() {
errorHandler(deadLetterChannel("mock:error"));
from("seda:a").split(body(String.class).tokenize("\n")).to("seda:b");
}
};
The splitter can use any Expression language so you could use any of the Languages Supported
such as XPath, XQuery, SQL or one of the Scripting Languages to perform the split. e.g.
from("activemq:my.queue").split(xpath("//foo/
bar")).convertBodyTo(String.class).to("file://some/directory")
Using the Spring XML Extensions
<camelContext errorHandlerRef="errorHandler" streamCache="false" id="camel"
xmlns="http://camel.apache.org/schema/spring">
<route>
<from uri="seda:a"/>
CHAPTER 9 - PATTERN APPENDIX 276
What does the splitter return?
The Splitter will by default return the last splitted message. You can override this
by suppling your own strategy as an AggregationStrategy. There is a sample
on this page (Split aggregate request/reply sample). Notice its the same strategy as
the Aggregator supports. This Splitter can be viewed as having a build in light weight
Aggregator.
<split>
<xpath>/invoice/lineItems</xpath>
<to uri="seda:b"/>
</split>
</route>
</camelContext>
For further examples of this pattern in use you could look at one of the junit test case
Using Tokenizer from Spring XML Extensions
Avaiaible as of Camel 2.0
You can use the tokenizer expression in the Spring DSL to split bodies or headers using a
token. This is a common use-case, so we provided a special tokenizer tag for this.
In the sample below we split the body using a @ as separator. You can of course use comma or
space or even a regex pattern, also set regex=true.
<camelContext id="camel" xmlns="http://camel.apache.org/schema/spring">
<route>
<from uri="direct:start"/>
<split>
<tokenize token="@"/>
<to uri="mock:result"/>
</split>
</route>
</camelContext>
Splitting the body in Spring XML is a bit harder as you need to use the Simple language to
dictate this
<split>
<simple>${body}</simple>
<to uri="mock:result"/>
</split>
277 CHAPTER 9 - PATTERN APPENDIX
Message Headers
The following headers is set on each Exchange that are split:
header type description
org.apache.camel.splitCounter int
Camel 1.x: A split counter that
increases for each Exchange being
split. The counter starts from 0.
org.apache.camel.splitSize int
Camel 1.x: The total number of
Exchanges that was splitted. This
header is not applied for stream based
splitting.
Exchange properties
The following properties is set on each Exchange that are split:
header type description
org.apache.camel.splitCounter int
Camel 1.6.2: A split counter that
increases for each Exchange being
split. The counter starts from 0.
org.apache.camel.splitSize int
Camel 1.6.2: The total number of
Exchanges that was splitted. This
header is not applied for stream
based splitting.
CamelSplitIndex int
Camel 2.0: A split counter that
increases for each Exchange being
split. The counter starts from 0.
CamelSplitSize int
Camel 2.0: The total number of
Exchanges that was splitted. This
header is not applied for stream
based splitting.
CamelSplitComplete boolean Camel 2.4: Whether or not this
Exchange is the last.
Parallel execution of distinct 'parts'
If you want to execute all parts in parallel you can use special notation of split() with two
arguments, where the second one is a boolean flag if processing should be parallel. e.g.
CHAPTER 9 - PATTERN APPENDIX 278

XPathBuilder xPathBuilder = new XPathBuilder("//foo/bar");
from("activemq:my.queue").split(xPathBuilder, true).to("activemq:my.parts");
In Camel 2.0 the boolean option has been refactored into a builder method
parallelProcessing so its easier to understand what the route does when we use a
method instead of true|false.
XPathBuilder xPathBuilder = new XPathBuilder("//foo/bar");
from("activemq:my.queue").split(xPathBuilder).parallelProcessing().to("activemq:my.parts");
Stream based
Available as of Camel 1.5
You can split streams by enabling the streaming mode using the streaming builder
method.
from("direct:streaming").split(body().tokenize(",")).streaming().to("activemq:my.parts");
Specifying a custom aggregation strategy
Available as of Camel 2.0
This is specified similar to the Aggregator.
Specifying a custom ThreadPoolExecutor
You can customize the underlying ThreadPoolExecutor used in the parallel splitter. In the Java
DSL try something like this:
Camel 1.x:
XPathBuilder xPathBuilder = new XPathBuilder("//foo/bar");
ThreadPoolExecutor threadPoolExecutor = new ThreadPoolExecutor(8, 16, 0L,
TimeUnit.MILLISECONDS, new LinkedBlockingQueue());
from("activemq:my.queue").split(xPathBuilder, true,
threadPoolExecutor).to("activemq:my.parts");
In the Spring XML try this:
Available as of Camel 1.6.0
Listing 11.Listing 11. Spring DSLSpring DSL
279 CHAPTER 9 - PATTERN APPENDIX

<camelContext id="camel" xmlns="http://camel.apache.org/schema/spring">
<route>
<from uri="direct:parallel-custom-pool"/>
<split executorServiceRef="myThreadPoolExecutor">
<xpath>/invoice/lineItems</xpath>
<to uri="mock:result"/>
</split>
</route>
</camelContext>
<!-- There's an easier way of specifying constructor args, just can't remember it
at the moment... old Spring syntax will do for now! -->
<bean id="myThreadPoolExecutor" class="java.util.concurrent.ThreadPoolExecutor">
<constructor-arg index="0" value="8"/>
<constructor-arg index="1" value="16"/>
<constructor-arg index="2" value="0"/>
<constructor-arg index="3" value="MILLISECONDS"/>
<constructor-arg index="4"><bean
class="java.util.concurrent.LinkedBlockingQueue"/></constructor-arg>
</bean>
Camel 2.x:
XPathBuilder xPathBuilder = new XPathBuilder("//foo/bar");
ThreadPoolExecutor threadPoolExecutor = new ThreadPoolExecutor(8, 16, 0L,
TimeUnit.MILLISECONDS, new LinkedBlockingQueue());
from("activemq:my.queue").split(xPathBuilder).parallelProcessing().executeService(threadPoolExecutor).to("activemq:my.parts");
Using a Pojo to do the splitting
As the Splitter can use any Expression to do the actual splitting we leverage this fact and use a
method expression to invoke a Bean to get the splitted parts.
The Bean should return a value that is iterable such as: java.util.Collection,
java.util.Iterator or an array.
In the route we define the Expression as a method call to invoke our Bean that we have
registered with the id mySplitterBean in the Registry.
from("direct:body")
// here we use a POJO bean mySplitterBean to do the split of the payload
.split().method("mySplitterBean","splitBody")
.to("mock:result");
from("direct:message")
// here we use a POJO bean mySplitterBean to do the split of the message
// with a certain header value
.split().method("mySplitterBean","splitMessage")
.to("mock:result");
CHAPTER 9 - PATTERN APPENDIX 280

And the logic for our Bean is as simple as. Notice we use Camel Bean Binding to pass in the
message body as a String object.
public class MySplitterBean {
/**
* The split body method returns something that is iteratable such as a
java.util.List.
*
* @param body the payload of the incoming message
* @return a list containing each part splitted
*/
public List<String> splitBody(String body) {
// since this is based on an unit test you can of cause
// use different logic for splitting as Camel have out
// of the box support for splitting a String based on comma
// but this is for show and tell, since this is java code
// you have the full power how you like to split your messages
List<String> answer = new ArrayList<String>();
String[] parts = body.split(",");
for (String part : parts) {
answer.add(part);
}
return answer;
}
/**
* The split message method returns something that is iteratable such as a
java.util.List.
*
* @param header the header of the incoming message with the name user
* @param body the payload of the incoming message
* @return a list containing each part splitted
*/
public List<Message> splitMessage(@Header(value = "user")String header, @Body
String body) {
// we can leverage the Parameter Binding Annotations
// http://camel.apache.org/parameter-binding-annotations.html
// to access the message header and body at same time,
// then create the message that we want, splitter will
// take care rest of them.
// *NOTE* this feature requires Camel version >= 1.6.1
List<Message> answer = new ArrayList<Message>();
String[] parts = header.split(",");
for (String part : parts) {
DefaultMessage message = new DefaultMessage();
message.setHeader("user", part);
message.setBody(body);
answer.add(message);
}
return answer;
}
}
281 CHAPTER 9 - PATTERN APPENDIX

Split aggregate request/reply sample
This sample shows how you can split an Exchange, process each splitted message, aggregate and
return a combined response to the original caller using request/reply.
The route below illustrates this and how the split supports a aggregationStrategy to
hold the in progress processed messages:
// this routes starts from the direct:start endpoint
// the body is then splitted based on @ separator
// the splitter in Camel supports InOut as well and for that we need
// to be able to aggregate what response we need to send back, so we provide our
// own strategy with the class MyOrderStrategy.
from("direct:start")
.split(body().tokenize("@"), new MyOrderStrategy())
// each splitted message is then send to this bean where we can process it
.to("bean:MyOrderService?method=handleOrder")
// this is important to end the splitter route as we do not want to do more
routing
// on each splitted message
.end()
// after we have splitted and handled each message we want to send a single
combined
// response back to the original caller, so we let this bean build it for us
// this bean will receive the result of the aggregate strategy: MyOrderStrategy
.to("bean:MyOrderService?method=buildCombinedResponse")
And the OrderService bean is as follows:
public static class MyOrderService {
private static int counter;
/**
* We just handle the order by returning a id line for the order
*/
public String handleOrder(String line) {
LOG.debug("HandleOrder: " + line);
return "(id=" + ++counter + ",item=" + line + ")";
}
/**
* We use the same bean for building the combined response to send
* back to the original caller
*/
public String buildCombinedResponse(String line) {
LOG.debug("BuildCombinedResponse: " + line);
return "Response[" + line + "]";
}
}
And our custom aggregationStrategy that is responsible for holding the in progress
aggregated message that after the splitter is ended will be sent to the
CHAPTER 9 - PATTERN APPENDIX 282

buildCombinedResponse method for final processing before the combined response can
be returned to the waiting caller.
/**
* This is our own order aggregation strategy where we can control
* how each splitted message should be combined. As we do not want to
* loos any message we copy from the new to the old to preserve the
* order lines as long we process them
*/
public static class MyOrderStrategy implements AggregationStrategy {
public Exchange aggregate(Exchange oldExchange, Exchange newExchange) {
// put order together in old exchange by adding the order from new exchange
if (oldExchange == null) {
// the first time we aggregate we only have the new exchange,
// so we just return it
return newExchange;
}
String orders = oldExchange.getIn().getBody(String.class);
String newLine = newExchange.getIn().getBody(String.class);
LOG.debug("Aggregate old orders: " + orders);
LOG.debug("Aggregate new order: " + newLine);
// put orders together separating by semi colon
orders = orders + ";" + newLine;
// put combined order back on old to preserve it
oldExchange.getIn().setBody(orders);
// return old as this is the one that has all the orders gathered until now
return oldExchange;
}
}
So lets run the sample and see how it works.
We send an Exchange to the direct:start endpoint containing a IN body with the String
value: A@B@C. The flow is:
HandleOrder: A
HandleOrder: B
Aggregate old orders: (id=1,item=A)
Aggregate new order: (id=2,item=B)
HandleOrder: C
Aggregate old orders: (id=1,item=A);(id=2,item=B)
Aggregate new order: (id=3,item=C)
BuildCombinedResponse: (id=1,item=A);(id=2,item=B);(id=3,item=C)
Response to caller: Response[(id=1,item=A);(id=2,item=B);(id=3,item=C)]
283 CHAPTER 9 - PATTERN APPENDIX
Stop processing in case of exception
Available as of Camel 2.1
The Splitter will by default continue to process the entire Exchange even in case of one of
the splitted message will thrown an exception during routing.
For example if you have an Exchange with 1000 rows that you split and route each sub
message. During processing of these sub messages an exception is thrown at the 17th. What
Camel does by default is to process the remainder 983 messages. You have the chance to
remedy or handle this in the AggregationStrategy.
But sometimes you just want Camel to stop and let the exception be propagated back, and
let the Camel error handler handle it. You can do this in Camel 2.1 by specifying that it should
stop in case of an exception occurred. This is done by the stopOnException option as
shown below:
from("direct:start")
.split(body().tokenize(",")).stopOnException()
.process(new MyProcessor())
.to("mock:split");
And using XML DSL you specify it as follows:
<route>
<from uri="direct:start"/>
<split stopOnException="true">
<tokenize token=","/>
<process ref="myProcessor"/>
<to uri="mock:split"/>
</split>
</route>
Using This Pattern
If you would like to use this EIP Pattern then please read the Getting Started, you may also find
the Architecture useful particularly the description of Endpoint and URIs. Then you could try
out some of the Examples first before trying this pattern out.
Aggregator
This applies for Camel version 2.3 or newer. If you use an older version then
use this Aggregator link instead.
The Aggregator from the EIP patterns allows you to combine a number of messages
together into a single message.
CHAPTER 9 - PATTERN APPENDIX 284
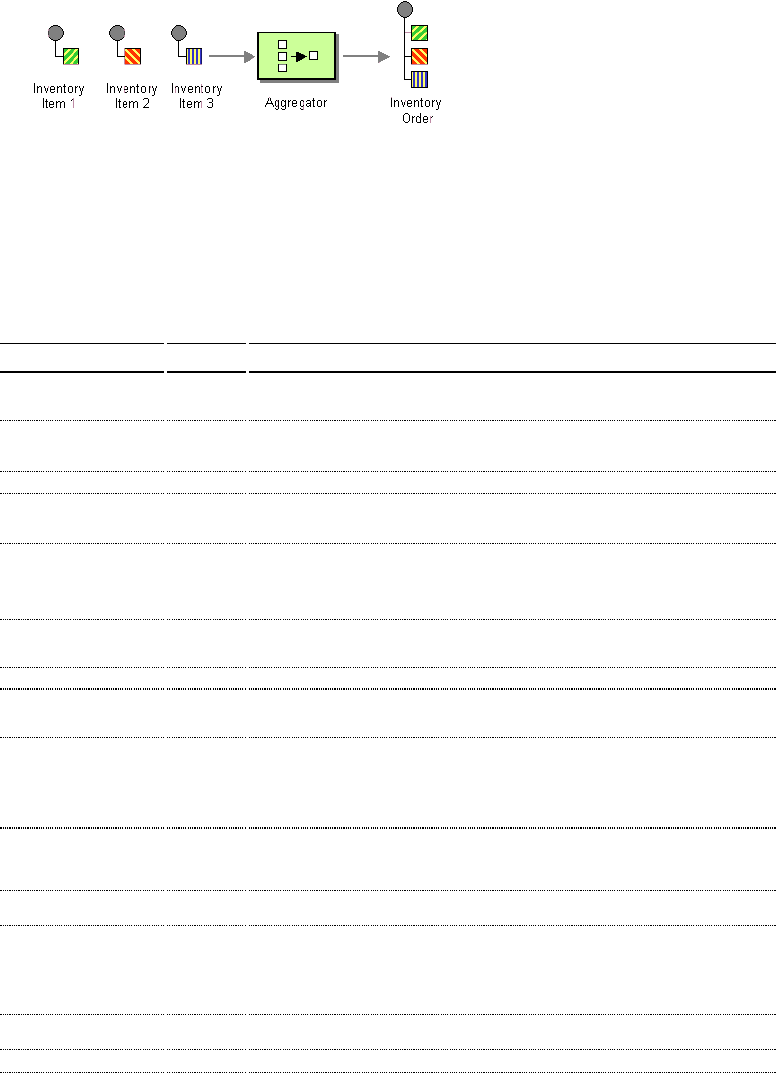
A correlation Expression is used to determine the messages which should be aggregated
together. If you want to aggregate all messages into a single message, just use a constant
expression. An AggregationStrategy is used to combine all the message exchanges for a single
correlation key into a single message exchange.
Aggregator options
The aggregator supports the following options:
Option Default Description
correlationExpression
Mandatory Expression which evaluates the correlation key to use for aggregation. The Exchange which has the same
correlation key is aggregated together. If the correlation key could not be evaluated an Exception is thrown. You can
disable this by using the ignoreBadCorrelationKeys option.
aggregationStrategy
Mandatory AggregationStrategy which is used to merge the incoming Exchange with the existing already merged
exchanges. At first call the oldExchang parameter is null. On subsequent invocations the oldExchnage contains
the merged exchanges and newExchange is of course the new incoming Exchange.
strategyRef A reference to lookup the AggregationStrategy in the Registry.
completionSize
Number of messages aggregated before the aggregation is complete. This option can be set as either a fixed value or
using an Expression which allows you to evaluate a size dynamically - will use Integer as result. If both are set Camel
will fallback to use the fixed value if the Expression result was null or 0.
completionTimeout
Time in millis that an aggregated exchange should be inactive before its complete. Camel has a background task that runs
once a minute to check for inactive aggregated exchanges. This option can be set as either a fixed value or using an
Expression which allows you to evaluate a timeout dynamically - will use Long as result. If both are set Camel will
fallback to use the fixed value if the Expression result was null or 0. You cannot use this option together with
completionInterval, only one of the can be used.
completionInterval
A repeating period in millis by which the aggregator will complete all current aggregated exchanges. Camel has a
background tasks which is trigger every period. You cannot use this option together with completionTimeout, only one
of the can be used.
completionPredicate A Predicate to indicate when an aggregated exchange is complete.
completionFromBatchConsumer false
This option is if the exchanges is coming from a Batch Consumer. Then when enabled the Aggregator2 will use the batch
size determined by the Batch Consumer in the message header CamelBatchSize. See more details at Batch
Consumer. This can be used to aggregate all files consumed from a File endpoint in that given poll.
eagerCheckCompletion false
Whether or not to eager check for completion when a new incoming Exchange has been received. This option
influences the behavior of the completionPredicate option as the Exchange being passed in changes accordingly.
When false the Exchange passed in the Predicate is the aggregated Exchange which means any information you may
store on the aggregated Exchange from the AggregationStrategy is avail for the Predicate. When true the
Exchange passed in the Predicate is the incoming Exchange, which means you can access data from the incoming
Exchange.
groupExchanges false
If enabled then Camel will group all aggregated Exchanges into a single combined
org.apache.camel.impl.GroupedExchange holder class that holds all the aggregated Exchanges. And as a
result only one Exchange is being sent out from the aggregator. Can be used to combine many incomming Exchanges
into a single output Exchange without coding a custom AggregationStrategy yourself.
ignoreInvalidCorrelationKeys false Whether or not to ignore correlation keys which could not be evaluated to a value. By default Camel will thrown an
Exception, but you can enable this option and ignore the situation instead.
closeCorrelationKeyOnCompletion
Whether or not too late Exchange should be accepted or not. You can enable this to indicate that if a correlation key
has already been completed, then any new exchanges with the same correlation key be denied. Camel will then throw a
closedCorrelationKeyException exception. When using this option you pass in a integer which is a
number for a LRUCache which keeps that last X number of closed correlation keys. You can pass in 0 or a negative
value to indicate a unbounded cache. By passing in a number you are ensured that cache wont grown too big if you use a
log of different correlation keys.
aggregationRepository Allows you to plugin you own implementation of org.apache.camel.spi.AggregationRepository which
keeps track of the current inflight aggregated exchanges. Camel uses by default a memory based implementation.
aggregationRepositoryRef Reference to lookup a aggregationRepository in the Registry.
285 CHAPTER 9 - PATTERN APPENDIX
parallelProcessing false
When aggregated are completed they are being send out of the aggregator. This option indicates whether or not Camel
should use a thread pool with multiple threads for concurrency. If not custom thread pool has been specified then
Camel creates a default pool with 10 concurrent threads.
executorService If using parallelProcessing you can specify a custom thread pool to be used. In fact also if you are not using
parallelProcessing this custom thread pool is used to send out aggregated exchanges as well.
executorServiceRef Reference to lookup a executorService in the Registry
Exchange Properties
The following properties is set on each Exchange that are aggregated:
header type description
CamelAggregatedSize int The total number of Exchanges aggregated into this combined Exchange.
CamelAggregatedCompletedBy String Indicator how the aggregation was completed as a value of either: predicate,size,consumer,timeout or
interval.
About AggregationStrategy
The AggregationStrategy is used for aggregate the old (lookup by its correlation id) and
the new exchanges together into a single exchange. Possible implementations include
performing some kind of combining or delta processing, such as adding line items together into
an invoice or just using the newest exchange and removing old exchanges such as for state
tracking or market data prices; where old values are of little use.
Notice the aggregation strategy is a mandatory option and must be provided to the
aggregator.
About completion
When aggregation Exchanges at some point you need to indicate that the aggregated exchanges
is complete, so they can be send out of the aggregator. Camel allows you to indicate
completion in various ways as follows:
▪completionTimeout - Is an inactivity timeout in which is triggered if no new exchanges
has been aggregated for that particular correlation key within the period.
▪completionInterval - Once every X period all the current aggregated exchanges is
completed.
▪completionSize - Is a number indicating that after X aggregated exchanges its
complete.
▪completionPredicate - Runs a Predicate when a new exchange is aggregated to
determine if we are complete or not
▪completionFromBatchConsumer - Special option for Batch Consumer which allows
you to complete when all the messages from the batch has been aggregated. |
Notice that all the completion ways are per correlation key. And you can combine them in any
way your like. Its basically the first which triggers that wins. So you can use a completion size
together with a completion timeout. Only completionTimeout and completionInterval cannot
be used at the same time.
CHAPTER 9 - PATTERN APPENDIX 286

Notice the completion is a mandatory option and must be provided to the aggregator. If not
provided Camel will thrown an Exception on startup.
Persistent AggregationRepository
The aggregator provides a pluggable repository which you can implement your own
org.apache.camel.spi.AggregationRepository.
If you need persistent repository then you can use the Camel HawtDB component.
Examples
See some examples from the old Aggregator which is somewhat similar to this new aggregator.
Using completionTimeout
In this example we want to aggregate all incoming messages and after 3 seconds of inactivity we
want the aggregation to complete. This is done using the completionTimeout option as
shown:
from("direct:start")
// aggregate all exchanges correlated by the id header.
// Aggregate them using the BodyInAggregatingStrategy strategy which
// and after 3 seconds of inactivity them timeout and complete the aggregation
// and send it to mock:aggregated
.aggregate(header("id"), new BodyInAggregatingStrategy()).completionTimeout(3000)
.to("mock:aggregated");
And the same example using Spring XML:
<camelContext id="camel" xmlns="http://camel.apache.org/schema/spring">
<route>
<from uri="direct:start"/>
<aggregate strategyRef="aggregatorStrategy" completionTimeout="3000">
<correlationExpression>
<simple>header.id</simple>
</correlationExpression>
<to uri="mock:aggregated"/>
</aggregate>
</route>
</camelContext>
<bean id="aggregatorStrategy"
class="org.apache.camel.processor.BodyInAggregatingStrategy"/>
287 CHAPTER 9 - PATTERN APPENDIX
Setting options in Spring XML
Many of the options are configurable as attributes on the <aggregate> tag when
using Spring XML.
Using completionSize
In this example we want to aggregate all incoming messages and when we have 3 messages
aggregated (in the same correlation group) we want the aggregation to complete. This is done
using the completionSize option as shown:
from("direct:start")
// aggregate all exchanges correlated by the id header.
// Aggregate them using the BodyInAggregatingStrategy strategy which
// and after 3 messages has been aggregated then complete the aggregation
// and send it to mock:aggregated
.aggregate(header("id"), new BodyInAggregatingStrategy()).completionSize(3)
.to("mock:aggregated");
And the same example using Spring XML:
<camelContext id="camel" xmlns="http://camel.apache.org/schema/spring">
<route>
<from uri="direct:start"/>
<aggregate strategyRef="aggregatorStrategy" completionSize="3">
<correlationExpression>
<simple>header.id</simple>
</correlationExpression>
<to uri="mock:aggregated"/>
</aggregate>
</route>
</camelContext>
<bean id="aggregatorStrategy"
class="org.apache.camel.processor.BodyInAggregatingStrategy"/>
Using completionPredicate
In this example we want to aggregate all incoming messages and use a Predicate to determine
when we are complete. The Predicate can be evaluated using either the aggregated exchange
(default) or the incoming exchange. We will so both situations as examples. We start with the
default situation as shown:
from("direct:start")
// aggregate all exchanges correlated by the id header.
CHAPTER 9 - PATTERN APPENDIX 288

// Aggregate them using the BodyInAggregatingStrategy strategy which
// and when the aggregated body contains A+B+C then complete the aggregation
// and send it to mock:aggregated
.aggregate(header("id"), new
BodyInAggregatingStrategy()).completionPredicate(body().contains("A+B+C"))
.to("mock:aggregated");
And the same example using Spring XML:
<camelContext id="camel" xmlns="http://camel.apache.org/schema/spring">
<route>
<from uri="direct:start"/>
<aggregate strategyRef="aggregatorStrategy">
<correlationExpression>
<simple>header.id</simple>
</correlationExpression>
<completionPredicate>
<simple>${body} contains 'A+B+C'</simple>
</completionPredicate>
<to uri="mock:aggregated"/>
</aggregate>
</route>
</camelContext>
<bean id="aggregatorStrategy"
class="org.apache.camel.processor.BodyInAggregatingStrategy"/>
And the other situation where we use the eagerCheckCompletion option to tell Camel to
use the incoming Exchange. Notice how we can just test in the completion predicate that the
incoming message is the END message:
from("direct:start")
// aggregate all exchanges correlated by the id header.
// Aggregate them using the BodyInAggregatingStrategy strategy
// do eager checking which means the completion predicate will use the incoming
exchange
// which allows us to trigger completion when a certain exchange arrived which is
the
// END message
.aggregate(header("id"), new BodyInAggregatingStrategy())
.eagerCheckCompletion().completionPredicate(body().isEqualTo("END"))
.to("mock:aggregated");
And the same example using Spring XML:
<camelContext id="camel" xmlns="http://camel.apache.org/schema/spring">
<route>
<from uri="direct:start"/>
<aggregate strategyRef="aggregatorStrategy" eagerCheckCompletion="true">
289 CHAPTER 9 - PATTERN APPENDIX

<correlationExpression>
<simple>header.id</simple>
</correlationExpression>
<completionPredicate>
<simple>${body} == 'END'</simple>
</completionPredicate>
<to uri="mock:aggregated"/>
</aggregate>
</route>
</camelContext>
<bean id="aggregatorStrategy"
class="org.apache.camel.processor.BodyInAggregatingStrategy"/>
Using dynamic completionTimeout
In this example we want to aggregate all incoming messages and after a period of inactivity we
want the aggregation to complete. The period should be computed at runtime based on the
timeout header in the incoming messages. This is done using the completionTimeout
option as shown:
from("direct:start")
// aggregate all exchanges correlated by the id header.
// Aggregate them using the BodyInAggregatingStrategy strategy which
// and the timeout header contains the timeout in millis of inactivity them
timeout and complete the aggregation
// and send it to mock:aggregated
.aggregate(header("id"), new
BodyInAggregatingStrategy()).completionTimeout(header("timeout"))
.to("mock:aggregated");
And the same example using Spring XML:
<camelContext id="camel" xmlns="http://camel.apache.org/schema/spring">
<route>
<from uri="direct:start"/>
<aggregate strategyRef="aggregatorStrategy">
<correlationExpression>
<simple>header.id</simple>
</correlationExpression>
<completionTimeout>
<header>timeout</header>
</completionTimeout>
<to uri="mock:aggregated"/>
</aggregate>
</route>
</camelContext>
CHAPTER 9 - PATTERN APPENDIX 290

<bean id="aggregatorStrategy"
class="org.apache.camel.processor.BodyInAggregatingStrategy"/>
Note: You can also add a fixed timeout value and Camel will fallback to use this value if the
dynamic value was null or 0.
Using dynamic completionSize
In this example we want to aggregate all incoming messages based on a dynamic size per
correlation key. The size is computed at runtime based on the mySize header in the incoming
messages. This is done using the completionSize option as shown:
from("direct:start")
// aggregate all exchanges correlated by the id header.
// Aggregate them using the BodyInAggregatingStrategy strategy which
// and the header mySize determines the number of aggregated messages should
trigger the completion
// and send it to mock:aggregated
.aggregate(header("id"), new
BodyInAggregatingStrategy()).completionSize(header("mySize"))
.to("mock:aggregated");
And the same example using Spring XML:
<camelContext id="camel" xmlns="http://camel.apache.org/schema/spring">
<route>
<from uri="direct:start"/>
<aggregate strategyRef="aggregatorStrategy">
<correlationExpression>
<simple>header.id</simple>
</correlationExpression>
<completionSize>
<header>mySize</header>
</completionSize>
<to uri="mock:aggregated"/>
</aggregate>
</route>
</camelContext>
<bean id="aggregatorStrategy"
class="org.apache.camel.processor.BodyInAggregatingStrategy"/>
Note: You can also add a fixed size value and Camel will fallback to use this value if the
dynamic value was null or 0.
291 CHAPTER 9 - PATTERN APPENDIX
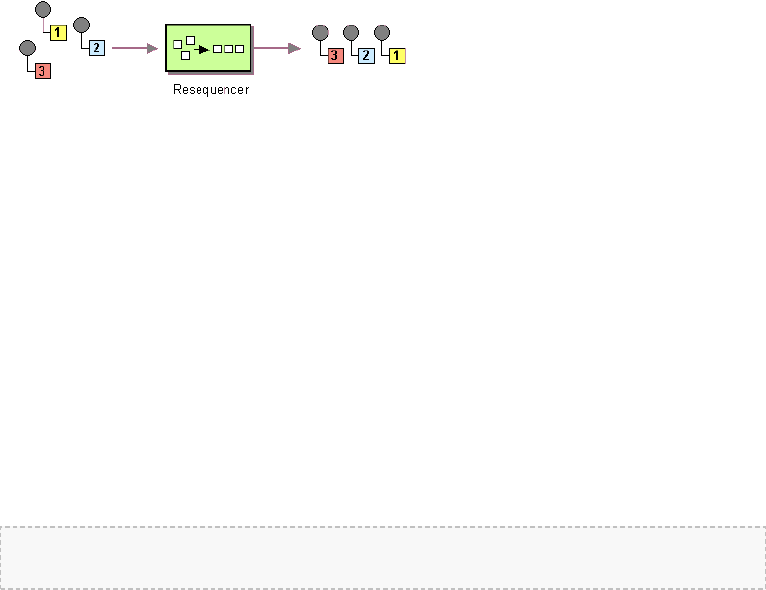
Using This Pattern
If you would like to use this EIP Pattern then please read the Getting Started, you may also find
the Architecture useful particularly the description of Endpoint and URIs. Then you could try
out some of the Examples first before trying this pattern out.
See also
▪The Loan Broker Example which uses an aggregator
▪Blog post by Torsten Mielke about using the aggregator correctly.
▪The old Aggregator
▪HawtDB for persistence support
▪Aggregate Example for an example application
Resequencer
The Resequencer from the EIP patterns allows you to reorganise messages based on some
comparator. By default in Camel we use an Expression to create the comparator; so that you
can compare by a message header or the body or a piece of a message etc.
Camel supports two resequencing algorithms:
•Batch resequencing collects messages into a batch, sorts the messages and sends
them to their output.
•Stream resequencing re-orders (continuous) message streams based on the
detection of gaps between messages.
By default the Resequencer does not support duplicate messages and will only keep the last
message, in case a message arrives with the same message expression. However in the batch
mode you can enable it to allow duplicates.
Batch Resequencing
The following example shows how to use the batch-processing resequencer so that messages
are sorted in order of the body() expression. That is messages are collected into a batch
(either by a maximum number of messages per batch or using a timeout) then they are sorted
in order and then sent out to their output.
Using the Fluent Builders
from("direct:start").resequence(body()).to("mock:result");
This is equvalent to
CHAPTER 9 - PATTERN APPENDIX 292

from("direct:start").resequence(body()).batch().to("mock:result");
The batch-processing resequencer can be further configured via the size() and timeout()
methods.
from("direct:start").resequence(body()).batch().size(300).timeout(4000L).to("mock:result")
This sets the batch size to 300 and the batch timeout to 4000 ms (by default, the batch size is
100 and the timeout is 1000 ms). Alternatively, you can provide a configuration object.
from("direct:start").resequence(body()).batch(new BatchResequencerConfig(300,
4000L)).to("mock:result")
So the above example will reorder messages from endpoint direct:a in order of their bodies,
to the endpoint mock:result.
Typically you'd use a header rather than the body to order things; or maybe a part of the body.
So you could replace this expression with
resequencer(header("mySeqNo"))
for example to reorder messages using a custom sequence number in the header mySeqNo.
You can of course use many different Expression languages such as XPath, XQuery, SQL or
various Scripting Languages.
You can also use multiple expressions; so you could for example sort by priority first then
some other custom header
resequence(header("mySeqNo"), header("MyCustomerRating"))
Using the Spring XML Extensions
<camelContext id="camel" xmlns="http://camel.apache.org/schema/spring">
<route>
<from uri="direct:start" />
<resequence>
<simple>body</simple>
<to uri="mock:result" />
<!--
batch-config can be ommitted for default (batch) resequencer settings
-->
<batch-config batchSize="300" batchTimeout="4000" />
</resequence>
</route>
</camelContext>
293 CHAPTER 9 - PATTERN APPENDIX

Allow Duplicates
Available as of Camel 2.4
In the batch mode, you can now allow duplicates. In Java DSL there is a
allowDuplicates() method and in Spring XML there is an allowDuplicates=true
attribute on the <batch-config/> you can use to enable it.
Reverse
Available as of Camel 2.4
In the batch mode, you can now reverse the expression ordering. By default the order is
based on 0..9,A..Z, which would let messages with low numbers be ordered first, and thus also
also outgoing first. In some cases you want to reverse order, which is now possible.
In Java DSL there is a reverse() method and in Spring XML there is an reverse=true
attribute on the <batch-config/> you can use to enable it.
Resequence JMS messages based on JMSPriority
Available as of Camel 2.4
It's now much easier to use the Resequencer to resequence messages from JMS queues
based on JMSPriority. For that to work you need to use the two new options
allowDuplicates and reverse.
from("jms:queue:foo")
// sort by JMSPriority by allowing duplicates (message can have same JMSPriority)
// and use reverse ordering so 9 is first output (most important), and 0 is last
// use batch mode and fire every 3th second
.resequence(header("JMSPriority")).batch().timeout(3000).allowDuplicates().reverse()
.to("mock:result");
Notice this is only possible in the batch mode of the Resequencer.
Stream Resequencing
The next example shows how to use the stream-processing resequencer. Messages are re-
ordered based on their sequence numbers given by a seqnum header using gap detection and
timeouts on the level of individual messages.
Using the Fluent Builders
from("direct:start").resequence(header("seqnum")).stream().to("mock:result");
CHAPTER 9 - PATTERN APPENDIX 294

The stream-processing resequencer can be further configured via the capacity() and
timeout() methods.
from("direct:start").resequence(header("seqnum")).stream().capacity(5000).timeout(4000L).to("mock:result")
This sets the resequencer's capacity to 5000 and the timeout to 4000 ms (by default, the
capacity is 100 and the timeout is 1000 ms). Alternatively, you can provide a configuration
object.
from("direct:start").resequence(header("seqnum")).stream(new
StreamResequencerConfig(5000, 4000L)).to("mock:result")
The stream-processing resequencer algorithm is based on the detection of gaps in a message
stream rather than on a fixed batch size. Gap detection in combination with timeouts removes
the constraint of having to know the number of messages of a sequence (i.e. the batch size) in
advance. Messages must contain a unique sequence number for which a predecessor and a
successor is known. For example a message with the sequence number 3 has a predecessor
message with the sequence number 2 and a successor message with the sequence number 4.
The message sequence 2,3,5 has a gap because the sucessor of 3 is missing. The resequencer
therefore has to retain message 5 until message 4 arrives (or a timeout occurs).
If the maximum time difference between messages (with successor/predecessor relationship
with respect to the sequence number) in a message stream is known, then the resequencer's
timeout parameter should be set to this value. In this case it is guaranteed that all messages of a
stream are delivered in correct order to the next processor. The lower the timeout value is
compared to the out-of-sequence time difference the higher is the probability for out-of-
sequence messages delivered by this resequencer. Large timeout values should be supported by
sufficiently high capacity values. The capacity parameter is used to prevent the resequencer
from running out of memory.
By default, the stream resequencer expects long sequence numbers but other sequence
numbers types can be supported as well by providing a custom expression.
public class MyFileNameExpression implements Expression {
public String getFileName(Exchange exchange) {
return exchange.getIn().getBody(String.class);
}
public Object evaluate(Exchange exchange) {
// parser the file name with YYYYMMDD-DNNN pattern
String fileName = getFileName(exchange);
String[] files = fileName.split("-D");
Long answer = Long.parseLong(files[0]) * 1000 + Long.parseLong(files[1]);
return answer;
}
295 CHAPTER 9 - PATTERN APPENDIX

public <T> T evaluate(Exchange exchange, Class<T> type) {
Object result = evaluate(exchange);
return exchange.getContext().getTypeConverter().convertTo(type, result);
}
}
from("direct:start").resequence(new
MyFileNameExpression()).stream().timeout(500).to("mock:result");
or custom comparator via the comparator() method
ExpressionResultComparator<Exchange> comparator = new MyComparator();
from("direct:start").resequence(header("seqnum")).stream().comparator(comparator).to("mock:result");
or via a StreamResequencerConfig object.
ExpressionResultComparator<Exchange> comparator = new MyComparator();
StreamResequencerConfig config = new StreamResequencerConfig(100, 1000L, comparator);
from("direct:start").resequence(header("seqnum")).stream(config).to("mock:result");
Using the Spring XML Extensions
<camelContext id="camel" xmlns="http://camel.apache.org/schema/spring">
<route>
<from uri="direct:start"/>
<resequence>
<simple>in.header.seqnum</simple>
<to uri="mock:result" />
<stream-config capacity="5000" timeout="4000"/>
</resequence>
</route>
</camelContext>
Further Examples
For further examples of this pattern in use you could look at the batch-processing resequencer
junit test case and the stream-processing resequencer junit test case
CHAPTER 9 - PATTERN APPENDIX 296
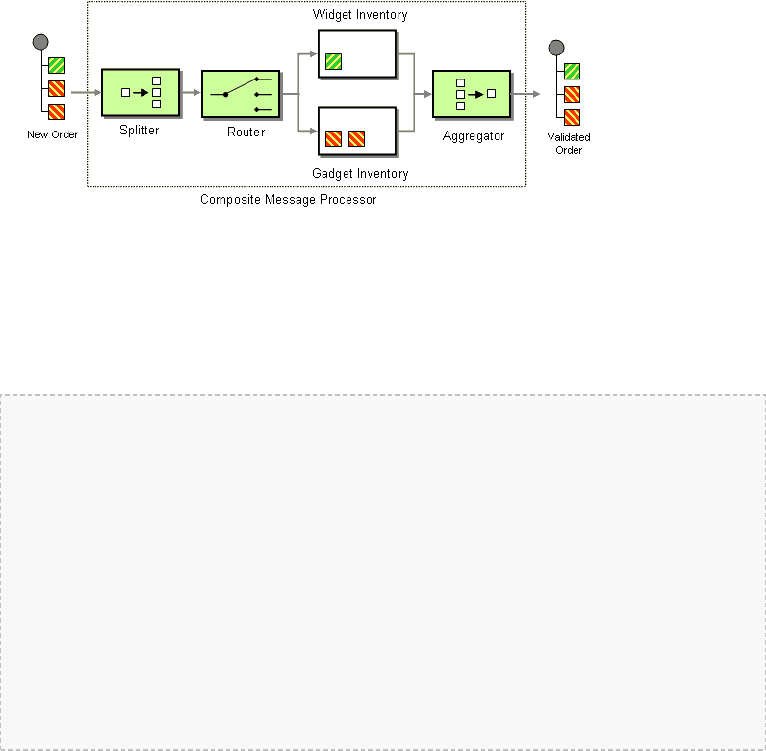
Using This Pattern
If you would like to use this EIP Pattern then please read the Getting Started, you may also find
the Architecture useful particularly the description of Endpoint and URIs. Then you could try
out some of the Examples first before trying this pattern out.
Composed Message Processor
The Composed Message Processor from the EIP patterns allows you to process a composite
message by splitting it up, routing the sub-messages to appropriate destinations and the re-
aggregating the responses back into a single message.
Available in Camel 1.5.
Example
In this example we want to check that a multipart order can be filled. Each part of the order
requires a check at a different inventory.
// split up the order so individual OrderItems can be validated by the appropriate bean
from("direct:start")
.split().body()
.choice()
.when().method("orderItemHelper","isWidget")
.to("bean:widgetInventory")
.otherwise()
.to("bean:gadgetInventory")
.end()
.to("seda:aggregate");
// collect and re-assemble the validated OrderItems into an order again
from("seda:aggregate")
.aggregate(new
MyOrderAggregationStrategy()).header("orderId").completionTimeout(1000L)
.to("mock:result");
To do this we split up the order using a Splitter. The Splitter then sends individual
OrderItems to a Content Based Router which checks the item type. Widget items get sent
297 CHAPTER 9 - PATTERN APPENDIX
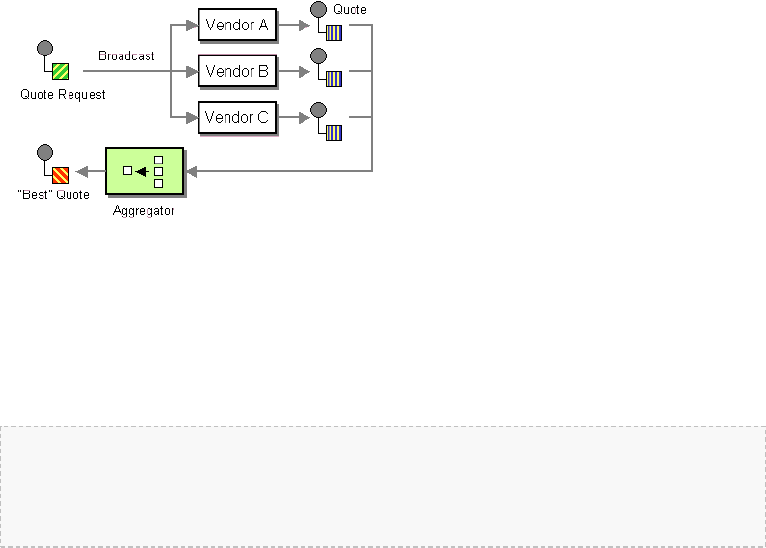
for checking in the widgetInventory bean and gadgets get sent to the
gadgetInventory bean. Once these OrderItems have been validated by the appropriate
bean, they are sent on to the Aggregator which collects and re-assembles the validated
OrderItems into an order again.
When an order is sent it contains a header with the order id. We use this fact when we
aggregate, as we configure this .header("orderId") on the aggregate DSL to instruct
Camel to use the header with the key orderId as correlation expression.
For full details, check the example source here:
camel-core/src/test/java/org/apache/camel/processor/ComposedMessageProcessorTest.java
Using This Pattern
If you would like to use this EIP Pattern then please read the Getting Started, you may also find
the Architecture useful particularly the description of Endpoint and URIs. Then you could try
out some of the Examples first before trying this pattern out.
Scatter-Gather
The Scatter-Gather from the EIP patterns allows you to route messages to a number of
dynamically specified recipients and re-aggregate the responses back into a single message.
Available in Camel 1.5.
Dynamic Scatter-Gather Example
In this example we want to get the best quote for beer from several different vendors. We use
a dynamic Recipient List to get the request for a quote to all vendors and an Aggregator to pick
the best quote out of all the responses. The routes for this are defined as:
<camelContext id="camel" xmlns="http://camel.apache.org/schema/spring">
<route>
<from uri="direct:start"/>
<recipientList>
CHAPTER 9 - PATTERN APPENDIX 298

<header>listOfVendors</header>
</recipientList>
</route>
<route>
<from uri="seda:quoteAggregator"/>
<aggregate strategyRef="aggregatorStrategy" completionTimeout="1000">
<correlationExpression>
<header>quoteRequestId</header>
</correlationExpression>
<to uri="mock:result"/>
</aggregate>
</route>
</camelContext>
So in the first route you see that the Recipient List is looking at the listOfVendors header
for the list of recipients. So, we need to send a message like
Map<String,Object> headers = new HashMap<String,Object>();
headers.put("listOfVendors","bean:vendor1, bean:vendor2, bean:vendor3");
headers.put("quoteRequestId","quoteRequest-1");
template.sendBodyAndHeaders("direct:start","<quote_request item=\"beer\"/>", headers);
This message will be distributed to the following Endpoints: bean:vendor1,
bean:vendor2, and bean:vendor3. These are all beans which look like
public class MyVendor {
private int beerPrice;
@Produce(uri = "seda:quoteAggregator")
private ProducerTemplate quoteAggregator;
public MyVendor(int beerPrice) {
this.beerPrice = beerPrice;
}
public void getQuote(@XPath("/quote_request/@item")String item, Exchange
exchange) throws Exception {
if ("beer".equals(item)) {
exchange.getIn().setBody(beerPrice);
quoteAggregator.send(exchange);
}else {
throw new Exception("No quote available for "+ item);
}
}
}
and are loaded up in Spring like
299 CHAPTER 9 - PATTERN APPENDIX

<bean id="aggregatorStrategy"
class="org.apache.camel.spring.processor.scattergather.LowestQuoteAggregationStrategy"/>
<bean id="vendor1" class="org.apache.camel.spring.processor.scattergather.MyVendor">
<constructor-arg>
<value>1</value>
</constructor-arg>
</bean>
<bean id="vendor2" class="org.apache.camel.spring.processor.scattergather.MyVendor">
<constructor-arg>
<value>2</value>
</constructor-arg>
</bean>
<bean id="vendor3" class="org.apache.camel.spring.processor.scattergather.MyVendor">
<constructor-arg>
<value>3</value>
</constructor-arg>
</bean>
Each bean is loaded with a different price for beer. When the message is sent to each bean
endpoint, it will arrive at the MyVendor.getQuote method. This method does a simple
check whether this quote request is for beer and then sets the price of beer on the exchange
for retrieval at a later step. The message is forwarded on to the next step using POJO
Producing (see the @Produce annotation).
At the next step we want to take the beer quotes from all vendors and find out which one
was the best (i.e. the lowest!). To do this we use an Aggregator with a custom aggregation
strategy. The Aggregator needs to be able to compare only the messages from this particular
quote; this is easily done by specifying a correlationExpression equal to the value of the
quoteRequestId header. As shown above in the message sending snippet, we set this header to
quoteRequest-1. This correlation value should be unique or you may include responses
that are not part of this quote. To pick the lowest quote out of the set, we use a custom
aggregation strategy like
public class LowestQuoteAggregationStrategy implements AggregationStrategy {
public Exchange aggregate(Exchange oldExchange, Exchange newExchange) {
// the first time we only have the new exchange
if (oldExchange == null) {
return newExchange;
}
if (oldExchange.getIn().getBody(int.class) <
newExchange.getIn().getBody(int.class)) {
return oldExchange;
}else {
return newExchange;
}
CHAPTER 9 - PATTERN APPENDIX 300
}
}
Finally, we expect to get the lowest quote of $1 out of $1, $2, and $3.
result.expectedBodiesReceived(1); // expect the lowest quote
You can find the full example source here:
camel-spring/src/test/java/org/apache/camel/spring/processor/scattergather/
camel-spring/src/test/resources/org/apache/camel/spring/processor/scattergather/scatter-
gather.xml
Static Scatter-Gather Example
You can lock down which recipients are used in the Scatter-Gather by using a static Recipient
List. It looks something like this
from("direct:start").multicast().to("seda:vendor1","seda:vendor2","seda:vendor3");
from("seda:vendor1").to("bean:vendor1").to("seda:quoteAggregator");
from("seda:vendor2").to("bean:vendor2").to("seda:quoteAggregator");
from("seda:vendor3").to("bean:vendor3").to("seda:quoteAggregator");
from("seda:quoteAggregator")
.aggregate(header("quoteRequestId"), new
LowestQuoteAggregationStrategy()).to("mock:result")
A full example of the static Scatter-Gather configuration can be found in the Loan Broker
Example.
Using This Pattern
If you would like to use this EIP Pattern then please read the Getting Started, you may also find
the Architecture useful particularly the description of Endpoint and URIs. Then you could try
out some of the Examples first before trying this pattern out.
Routing Slip
The Routing Slip from the EIP patterns allows you to route a message consecutively through a
series of processing steps where the sequence of steps is not known at design time and can
vary for each message.
301 CHAPTER 9 - PATTERN APPENDIX
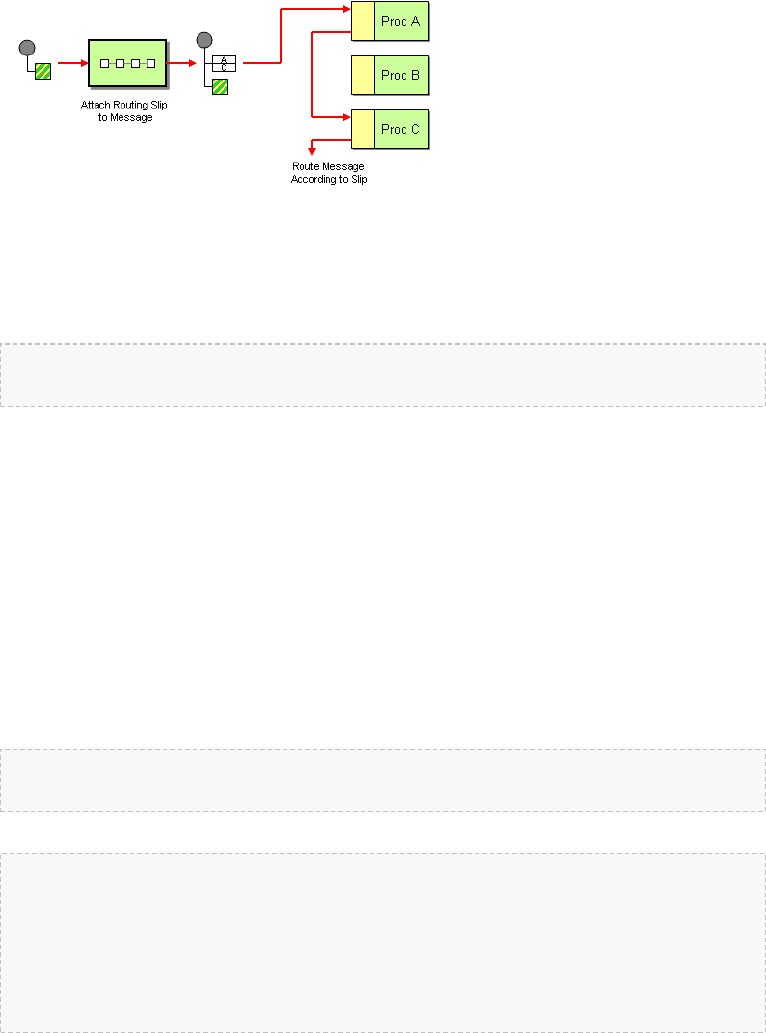
Example
The following route will take any messages sent to the Apache ActiveMQ queue SomeQueue
and pass them into the Routing Slip pattern.
from("activemq:SomeQueue").routingSlip("headerName");
Messages will be checked for the existance of the "headerName" header. The value of this
header should be a comma-delimited list of endpoint URIs you wish the message to be routed
to. The Message will be routed in a pipeline fashion (i.e. one after the other).
Note: In Camel 1.x the default header name routingSlipHeader has been
@deprecated and is removed in Camel 2.0. We feel that the DSL needed to express, the
header it uses to locate the destinations, directly in the DSL to not confuse readers. So the
header name must be provided.
Configuration options
Here we set the header name and the URI delimiter to something different.
Using the Fluent Builders
from("direct:c").routingSlip("aRoutingSlipHeader","#");
Using the Spring XML Extensions
<camelContext id="buildRoutingSlip" xmlns="http://activemq.apache.org/camel/schema/
spring">
<route>
<from uri="direct:c"/>
<routingSlip headerName="aRoutingSlipHeader" uriDelimiter="#"/>
</route>
</camelContext>
CHAPTER 9 - PATTERN APPENDIX 302

Ignore invalid endpoints
Available as of Camel 2.3
The Routing Slip now supports ignoreInvalidEndpoints which the Recipient List
also supports. You can use it to skip endpoints which is invalid.
from("direct:a").routingSlip("myHeader").ignoreInvalidEndpoints();
And in Spring XML its an attribute on the recipient list tag.
<route>
<from uri="direct:a"/>
<routingSlip headerName="myHeader" ignoreInvalidEndpoints="true"/>
</route>
Then lets say the myHeader contains the following two endpoints direct:foo,xxx:bar.
The first endpoint is valid and works. However the 2nd is invalid and will just be ignored. Camel
logs at INFO level about, so you can see why the endpoint was invalid.
Expression supporting
Available as of Camel 2.4
The Routing Slip now supports to take the expression parameter as the Recipient List does.
You can tell the camel the expression that you want to use to get the routing slip.
from("direct:a").routingSlip(header("myHeader")).ignoreInvalidEndpoints();
And in Spring XML its an attribute on the recipient list tag.
<route>
<from uri="direct:a"/>
<!--NOTE from Camel 2.4.0, you need to specify the expression element inside of
the routingSlip element -->
<routingSlip ignoreInvalidEndpoints="true">
<header>myHeader</header>
</routingSlip>
</route>
Further Examples
For further examples of this pattern in use you could look at the routing slip test cases.
303 CHAPTER 9 - PATTERN APPENDIX

Availability
This pattern is available as of Camel version 1.3.
Using This Pattern
If you would like to use this EIP Pattern then please read the Getting Started, you may also find
the Architecture useful particularly the description of Endpoint and URIs. Then you could try
out some of the Examples first before trying this pattern out.
Throttler
The Throttler Pattern allows you to ensure that a specific endpoint does not get overloaded, or
that we don't exceed an agreed SLA with some external service.
Using the Fluent Builders
from("seda:a").throttle(3).timePeriodMillis(10000).to("log:result","mock:result");
So the above example will throttle messages all messages received on seda:a before being sent
to mock:result ensuring that a maximum of 3 messages are sent in any 10 second window.
Note that typically you would often use the default time period of a second. So to throttle
requests at 100 requests per second between two endpoints it would look more like this...
from("seda:a").throttle(100).to("seda:b");
For further examples of this pattern in use you could look at the junit test case
Using the Spring XML Extensions
<route>
<from uri="seda:a" />
<throttle maximumRequestsPerPeriod="3" timePeriodMillis="10000">
<to uri="mock:result" />
</throttle>
</route>
Asynchronous delaying
Available as of Camel 2.4
You can let the Throttler use non blocking asynchronous delaying, which means Camel will
use a scheduler to schedule a task to be executed in the future. The task will then continue
routing. This allows the caller thread to not block and be able to service other messages etc.
CHAPTER 9 - PATTERN APPENDIX 304

from("seda:a").throttle(100).asyncDelayed().to("seda:b");
Using This Pattern
If you would like to use this EIP Pattern then please read the Getting Started, you may also find
the Architecture useful particularly the description of Endpoint and URIs. Then you could try
out some of the Examples first before trying this pattern out.
SAMPLING THROTTLER
Available as of Camel 2.1
A sampling throttler allowing you to extract a sample of exchanges from the traffic through a
route.
It is configured with a sampling period during which only a single exchange is allowed to pass
through. All other exchanges will be stopped.
Will by default use a sample period of 1 seconds.
Samples
You use this EIP with the sample DSL as show in these samples.
Using the Fluent Builders
These samples also show how you can use the different syntax to configure the sampling
period:
from("direct:sample").sample().to("mock:result");
from("direct:sample-configured").sample(1, TimeUnit.SECONDS).to("mock:result");
from("direct:sample-configured-via-dsl").sample().samplePeriod(1).timeUnits(TimeUnit.SECONDS).to("mock:result");
Using the Spring XML Extensions
And the same example in Spring XML is:
<route>
<from uri="direct:sample"/>
<sample samplePeriod="1" units="seconds">
<to uri="mock:result"/>
</sample>
</route>
And since it uses a default of 1 second you can omit this configuration in case you also want to
use 1 second
305 CHAPTER 9 - PATTERN APPENDIX
<route>
<from uri="direct:sample"/>
<!-- will by default use 1 second period -->
<sample>
<to uri="mock:result"/>
</sample>
</route>
Using This Pattern
If you would like to use this EIP Pattern then please read the Getting Started, you may also find
the Architecture useful particularly the description of Endpoint and URIs. Then you could try
out some of the Examples first before trying this pattern out.
See Also
▪Throttler
▪Aggregator
Delayer
The Delayer Pattern allows you to delay the delivery of messages to some destination.
Using the Fluent Builders
from("seda:b").delay(1000).to("mock:result");
So the above example will delay all messages received on seda:b 1 second before sending
them to mock:result.
You can of course use many different Expression languages such as XPath, XQuery, SQL or
various Scripting Languages. You can just delay things a fixed amount of time from the point at
which the delayer receives the message. For example to delay things 2 seconds
delayer(2000)
The above assume that the delivery order is maintained and that the messages are delivered in
delay order. If you want to reorder the messages based on delivery time, you can use the
Resequencer with this pattern. For example
from("activemq:someQueue").resequencer(header("MyDeliveryTime")).delay("MyRedeliveryTime").to("activemq:aDelayedQueue");
CHAPTER 9 - PATTERN APPENDIX 306
The Delayer in Camel 1.x works a bit differently than Camel 2.0 onwards.
In Camel 1.x the expression is used to calculate an absolute time in millis.
So if you want to wait 3 sec from now and want to use the expression for that you have to
set the absolute time as currentTimeInMillis() + 3000.
In Camel 2.0 the expression is a value in millis to wait from the current time, so the
expression should just be 3000.
However in both Camel 1.x and 2.0 you can use a long value for a fixed value to indicate the
delay in millis.
See the Spring DSL samples for Delayer in Camel 1.x vs. Camel 2.0.
Camel 2.0 - Spring DSL
The sample below demonstrates the delay in Spring DSL:
<camelContext id="camel" xmlns="http://camel.apache.org/schema/spring">
<route>
<from uri="seda:a"/>
<delay>
<header>MyDelay</header>
</delay>
<to uri="mock:result"/>
</route>
<route>
<from uri="seda:b"/>
<delay>
<constant>1000</constant>
</delay>
<to uri="mock:result"/>
</route>
</camelContext>
Camel 1.x - Spring DSL
The delayer is using slightly different names in Camel 1.x:
<delayer>
<delayTime>3000</delayTime>
</expression>
</delayer>
The empty tag </expression> is needed to fulfill the XSD validation as its an optional
element and we use JAXB annotations to generated the XSD in Camel and some combinations
is hard to auto generate with optional elements.
307 CHAPTER 9 - PATTERN APPENDIX

For further examples of this pattern in use you could look at the junit test case
Asynchronous delaying
Available as of Camel 2.4
You can let the Delayer use non blocking asynchronous delaying, which means Camel will
use a scheduler to schedule a task to be executed in the future. The task will then continue
routing. This allows the caller thread to not block and be able to service other messages etc.
From Java DSL
You use the asyncDelayed() to enable the async behavior.
from("activemq:queue:foo").delay(1000).asyncDelayed().to("activemq:aDelayedQueue");
From Spring XML
You use the asyncDelayed="true" attribute to enable the async behavior.
<route>
<from uri="activemq:queue:foo"/>
<delay asyncDelayed="true">
<constant>1000</constant>
</delay>
<to uri="activemq:aDealyedQueue"/>
</route>
Creating a custom delay
You can use an expression to determine when to send a message using something like this
from("activemq:foo").
delay().method("someBean","computeDelay").
to("activemq:bar");
then the bean would look like this...
public class SomeBean {
public long computeDelay() {
long delay = 0;
// use java code to compute a delay value in millis
return delay;
CHAPTER 9 - PATTERN APPENDIX 308
}
}
Using This Pattern
If you would like to use this EIP Pattern then please read the Getting Started, you may also find
the Architecture useful particularly the description of Endpoint and URIs. Then you could try
out some of the Examples first before trying this pattern out.
Load Balancer
The Load Balancer Pattern allows you to delegate to one of a number of endpoints using a
variety of different load balancing policies.
Build in load balancing policies
Camel has out of the box the following policies:
Policy Description
Round
Robin
The exchanges is selected in a round robin fashion. This is a well known and
classic policy. This spreads the load even.
Random A random endpoint is selected for each exchange
Sticky
Sticky load balancing using an Expression to calculate a correlation key to
perform the sticky load balancing; rather like jsessionid in the web or
JMSXGroupID in JMS.
Topic Topic which sends to all destinations (rather like JMS Topics)
Failover Camel 2.0: In case of failures the exchange is tried on the next endpoint.
Round Robin
Camel 1.x behavior
The round robin load balancer can actually be used to failover with Camel 1.x. This is no longer
possible in Camel 2.x as the underlying Error Handler foundation has been significantly
overhauled in Camel 2.x. Frankly the round robin load balancer in Camel 1.x was not thought
to be used in a failover scenario.
Camel 2.x behavior
The round robin load balancer is not meant to work with failover, for that you should use the
dedicated failover load balancer. The round robin load balancer will only change to next
endpoint per message.
309 CHAPTER 9 - PATTERN APPENDIX
The round robin load balancer is statefull as it keeps state which endpoint to use next time.
Using the Fluent Builders
from("direct:start").loadBalance().
roundRobin().to("mock:x","mock:y","mock:z");
Using the Spring configuration
<camelContext id="camel" xmlns="http://camel.apache.org/schema/spring">
<route>
<from uri="direct:start"/>
<loadBalance>
<roundRobin/>
<to uri="mock:x"/>
<to uri="mock:y"/>
<to uri="mock:z"/>
</loadBalance>
</route>
</camelContext>
So the above example will load balance requests from direct:start to one of the available
mock endpoint instances, in this case using a round robbin policy.
For further examples of this pattern in use you could look at the junit test case
Failover
Available as of Camel 2.0
The failover load balancer is capable of trying the next processor in case an Exchange failed
with an exception during processing.
You can configure the failover with a list of specific exception to only failover. If you do not
specify any exceptions it will failover over any exceptions. It uses the same strategy for
matching exceptions as the Exception Clause does for the onException.
It has the following options:
Option Type Default Description
CHAPTER 9 - PATTERN APPENDIX 310

inheritErrorHandler boolean true
Camel 2.3: Whether or not the Error
Handler configured on the route should
be used or not. You can disable it if you
want the failover to trigger immediately
and failover to the next endpoint. On
the other hand if you have this option
enabled, then Camel will first let the
Error Handler try to process the
message. The Error Handler may have
been configured to redelivery and use
delays between attempts. If you have
enabled a number of redeliveries then
Camel will try to redeliver to the
same endpoint, and only failover to
the next endpoint, when the Error
Handler is exhausted.
maximumFailoverAttempts int -1
Camel 2.3: A value to indicate after X
failver attempts we should exhaust (give
up). Use -1 to indicate newer give up
and always try to failover. Use 0 to
newer failover. And use e.g. 3 to
failover at most 3 times before giving
up. This option can be used whether or
not round robin is enabled or not.
roundRobin boolean false
Camel 2.3: Whether or not the
failover load balancer should
operate in round robin mode or not. If
not, then it will always start from the
first endpoint when a new message is to
be processed. In other words it restart
from the top for every message. If
round robin is enabled, then it keeps
state and will continue with the next
endpoint in a round robin fashion.
When using round robin it will not stick
to last known good endpoint, it will
always pick the next endpoint to use.
Camel 2.2 or older behavior
The current implement of failover load balancer is a simple logic which always tries the first
endpoint, and in case of an exception being thrown it tries the next in the list, and so forth. It
has no state, and the next message will thus always start with the first endpoint.
311 CHAPTER 9 - PATTERN APPENDIX

Camel 2.3 onwards behavior
The failover load balancer now supports round robin mode, which allows you to failover in
a round robin fashion. See the roundRobin option.
Here is a sample to failover only if a IOException related exception was thrown:
from("direct:start")
// here we will load balance if IOException was thrown
// any other kind of exception will result in the Exchange as failed
// to failover over any kind of exception we can just omit the exception
// in the failOver DSL
.loadBalance().failover(IOException.class)
.to("direct:x","direct:y","direct:z");
You can specify multiple exceptions to failover as the option is varargs, for instance:
// enable redelivery so failover can react
errorHandler(defaultErrorHandler().maximumRedeliveries(5));
from("direct:foo").
loadBalance().failover(IOException.class, MyOtherException.class)
.to("direct:a","direct:b");
Using failover in Spring DSL
Failover can also be used from Spring DSL and you configure it as:
<route errorHandlerRef="myErrorHandler">
<from uri="direct:foo"/>
<loadBalance>
<failover>
<exception>java.io.IOException</exception>
<exception>com.mycompany.MyOtherException</exception>
</failover>
<to uri="direct:a"/>
<to uri="direct:b"/>
</loadBalance>
</route>
Using failover in round robin mode
An example using Java DSL:
from("direct:start")
// Use failover load balancer in stateful round robin mode
// which mean it will failover immediately in case of an exception
CHAPTER 9 - PATTERN APPENDIX 312
Redelivery must be enabled
In Camel 2.2 or older the failover load balancer requires you have enabled Camel
Error Handler to use redelivery. In Camel 2.3 onwards this is not required as such,
as you can mix and match. See the inheritErrorHandler option.
// as it does NOT inherit error handler. It will also keep retrying as
// its configured to newer exhaust.
.loadBalance().failover(-1, false,true).
to("direct:bad","direct:bad2","direct:good","direct:good2");
And the same example using Spring XML:
<route>
<from uri="direct:start"/>
<loadBalance>
<!-- failover using stateful round robin,
which will keep retrying forever those 4 endpoints until success.
You can set the maximumFailoverAttempt to break out after X attempts -->
<failover roundRobin="true"/>
<to uri="direct:bad"/>
<to uri="direct:bad2"/>
<to uri="direct:good"/>
<to uri="direct:good2"/>
</loadBalance>
</route>
Using This Pattern
If you would like to use this EIP Pattern then please read the Getting Started, you may also find
the Architecture useful particularly the description of Endpoint and URIs. Then you could try
out some of the Examples first before trying this pattern out.
Multicast
The Multicast allows to route the same message to a number of endpoints and process them in
a different way. The main difference between the Multicast and Splitter is that Splitter will split
the message into several pieces but the Multicast will not modify the request message.
Example
The following example shows how to take a request from the direct:a endpoint , then
multicast these request to direct:x,direct:y,direct:z.
313 CHAPTER 9 - PATTERN APPENDIX

Disabled inheritErrorHandler
You can configure inheritErrorHandler=false if you want to failover to
the next endpoint as fast as possible. By disabling the Error Handler you ensure it
does not intervene which allows the failover load balancer to handle failover
asap. By also enabling roundRobin mode, then it will keep retrying until it
success. You can then configure the maximumFailoverAttempts option to a
high value to let it eventually exhaust (give up) and fail.
Using the Fluent Builders
from("direct:a").multicast().to("direct:x","direct:y","direct:z");
Stop processing in case of exception
Available as of Camel 2.1
The Multicast will by default continue to process the entire Exchange even in case one of the
multicasted messages will thrown an exception during routing.
For example if you want to multicast to 3 destinations and the 2nd destination fails by an
exception. What Camel does by default is to process the remainder destinations. You have the
chance to remedy or handle this in the AggregationStrategy.
But sometimes you just want Camel to stop and let the exception be propagated back, and
let the Camel error handler handle it. You can do this in Camel 2.1 by specifying that it should
stop in case of an exception occurred. This is done by the stopOnException option as
shown below:
from("direct:start")
.multicast()
.stopOnException().to("direct:foo","direct:bar","direct:baz")
.end()
.to("mock:result");
from("direct:foo").to("mock:foo");
from("direct:bar").process(new MyProcessor()).to("mock:bar");
from("direct:baz").to("mock:baz");
And using XML DSL you specify it as follows:
<route>
<from uri="direct:start"/>
CHAPTER 9 - PATTERN APPENDIX 314
<multicast stopOnException="true">
<to uri="direct:foo"/>
<to uri="direct:bar"/>
<to uri="direct:baz"/>
</multicast>
<to uri="mock:result"/>
</route>
<route>
<from uri="direct:foo"/>
<to uri="mock:foo"/>
</route>
<route>
<from uri="direct:bar"/>
<process ref="myProcessor"/>
<to uri="mock:bar"/>
</route>
<route>
<from uri="direct:baz"/>
<to uri="mock:baz"/>
</route>
Using This Pattern
If you would like to use this EIP Pattern then please read the Getting Started, you may also find
the Architecture useful particularly the description of Endpoint and URIs. Then you could try
out some of the Examples first before trying this pattern out.
LOOP
The Loop allows to process the a message a number of times and possibly process them in a
different way. Useful mostly for testing.
For each iteration two properties are set on the Exchange that could be used by
processors down the pipeline to process the Message in different ways.
Property Description
CamelIterationCount Camel 1.x: Total number of iterations to be run
CamelIterationIndex Camel 1.x: Index of the current iteration (0 based)
CamelLoopSize Camel 2.0: Total number of loops
CamelLoopIndex Camel 2.0: Index of the current iteration (0 based)
that could be used by processors down the pipeline to process the Message in different ways.
315 CHAPTER 9 - PATTERN APPENDIX
Examples
The following example shows how to take a request from the direct:x endpoint , then send
the message repetitively to mock:result. The number of times the message is sent is either
passed as an argument to loop(), or determined at runtime by evaluating an expression. The
expression must evaluate to an int, otherwise a RuntimeCamelException is thrown.
Using the Fluent Builders
Pass loop count as an argument
from("direct:a").loop(8).to("mock:result");
Use expression to determine loop count
from("direct:b").loop(header("loop")).to("mock:result");
Use expression to determine loop count
from("direct:c").loop().xpath("/hello/@times").to("mock:result");
Using the Spring XML Extensions
Pass loop count as an argument
<route>
<from uri="direct:a"/>
<loop>
<constant>8</constant>
<to uri="mock:result"/>
</loop>
</route>
Use expression to determine loop count
<route>
<from uri="direct:b"/>
<loop>
<header>loop</header>
<to uri="mock:result"/>
</loop>
</route>
For further examples of this pattern in use you could look at one of the junit test case
CHAPTER 9 - PATTERN APPENDIX 316
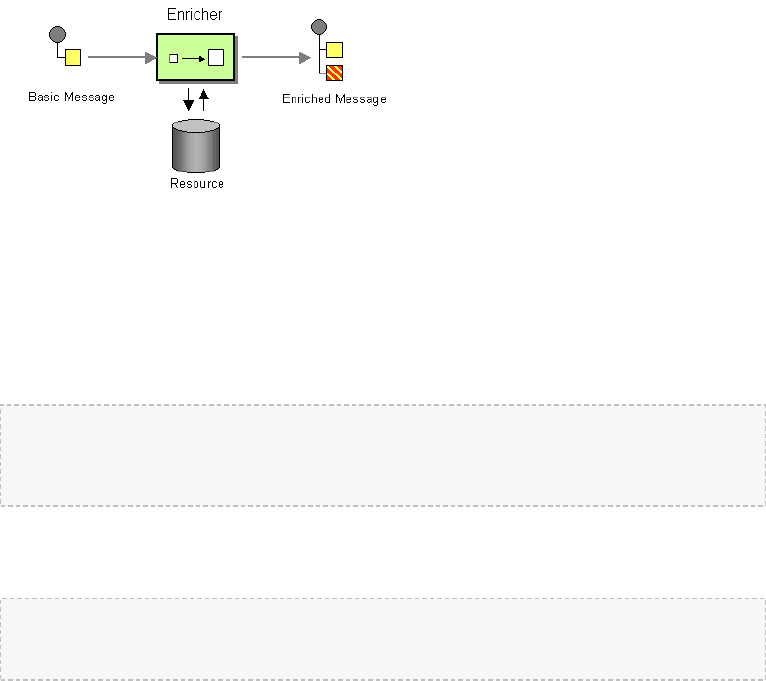
Using This Pattern
If you would like to use this EIP Pattern then please read the Getting Started, you may also find
the Architecture useful particularly the description of Endpoint and URIs. Then you could try
out some of the Examples first before trying this pattern out.
MESSAGE TRANSFORMATION
Content Enricher
Camel supports the Content Enricher from the EIP patterns using a Message Translator, an
artibrary Processor in the routing logic or using the enrich DSL element to enrich the message.
Content enrichment using a Message Translator or a Processor
Using the Fluent Builders
You can use Templating to consume a message from one destination, transform it with
something like Velocity or XQuery and then send it on to another destination. For example
using InOnly (one way messaging)
from("activemq:My.Queue").
to("velocity:com/acme/MyResponse.vm").
to("activemq:Another.Queue");
If you want to use InOut (request-reply) semantics to process requests on the My.Queue
queue on ActiveMQ with a template generated response, then sending responses back to the
JMSReplyTo Destination you could use this.
from("activemq:My.Queue").
to("velocity:com/acme/MyResponse.vm");
Here is a simple example using the DSL directly to transform the message body
317 CHAPTER 9 - PATTERN APPENDIX
from("direct:start").setBody(body().append(" World!")).to("mock:result");
In this example we add our own Processor using explicit Java code
from("direct:start").process(new Processor() {
public void process(Exchange exchange) {
Message in = exchange.getIn();
in.setBody(in.getBody(String.class) + " World!");
}
}).to("mock:result");
Finally we can use Bean Integration to use any Java method on any bean to act as the
transformer
from("activemq:My.Queue").
beanRef("myBeanName","myMethodName").
to("activemq:Another.Queue");
For further examples of this pattern in use you could look at one of the JUnit tests
• TransformTest
• TransformViaDSLTest
Using Spring XML
<route>
<from uri="activemq:Input"/>
<bean ref="myBeanName" method="doTransform"/>
<to uri="activemq:Output"/>
</route>
Content enrichment using the enrich DSL element
Camel comes with two flavors of content enricher in the DSL
▪enrich
▪pollEnrich
enrich is using a Producer to obtain the additional data. It is usually used for Request Reply
messaging, for instance to invoke an external web service.
poolEnrich on the other hand is using a Polling Consumer to obtain the additional data. It is
usually used for Event Message messaging, for instance to read a file or download a FTP file.
This feature is available since Camel 2.0
Using the Fluent Builders
CHAPTER 9 - PATTERN APPENDIX 318

AggregationStrategy aggregationStrategy = ...
from("direct:start")
.enrich("direct:resource", aggregationStrategy)
.to("direct:result");
from("direct:resource")
...
The content enricher (enrich) retrieves additional data from a resource endpoint in order to
enrich an incoming message (contained in the orginal exchange). An aggregation strategy is used
to combine the original exchange and the resource exchange. The first parameter of the
AggregationStrategy.aggregate(Exchange, Exchange) method corresponds
to the the original exchange, the second parameter the resource exchange. The results from
the resource endpoint are stored in the resource exchange's out-message. Here's an example
template for implementing an aggregation strategy.
public class ExampleAggregationStrategy implements AggregationStrategy {
public Exchange aggregate(Exchange original, Exchange resource) {
Object originalBody = original.getIn().getBody();
Object resourceResponse = resource.getOut().getBody();
Object mergeResult = ... // combine original body and resource response
if (original.getPattern().isOutCapable()) {
original.getOut().setBody(mergeResult);
}else {
original.getIn().setBody(mergeResult);
}
return original;
}
}
Using this template the original exchange can be of any pattern. The resource exchange created
by the enricher is always an in-out exchange.
Using Spring XML
The same example in the Spring DSL
<camelContext id="camel" xmlns="http://camel.apache.org/schema/spring">
<route>
<from uri="direct:start"/>
<enrich uri="direct:resource" strategyRef="aggregationStrategy"/>
<to uri="direct:result"/>
</route>
<route>
<from uri="direct:resource"/>
...
</route>
319 CHAPTER 9 - PATTERN APPENDIX
</camelContext>
<bean id="aggregationStrategy" class="..." />
Aggregation strategy is optional
The aggregation strategy is optional. If you do not provide it Camel will by default just use the
body obtained from the resource.
from("direct:start")
.enrich("direct:resource")
.to("direct:result");
In the route above the message send to the direct:result endpoint will contain the
output from the direct:resource as we do not use any custom aggregation.
And in Spring DSL you just omit the strategyRef attribute:
<route>
<from uri="direct:start"/>
<enrich uri="direct:resource"/>
<to uri="direct:result"/>
</route>
Content enrich using pollEnrich
The pollEnrich works just as the enrich however as it uses a Polling Consumer we have
3 methods when polling
▪receive
▪receiveNoWait
▪receive(timeout)
By default Camel will use the receiveNoWait.
If there is no data then the newExchange in the aggregation strategy is null.
You can pass in a timeout value that determines which method to use
▪timeout is -1 or negative then receive is selected
▪timeout is 0 then receiveNoWait is selected
▪otherwise receive(timeout) is selected
The timeout values is in millis.
The sample below reads a file based on a JMS message that contains a header with the filename.
CHAPTER 9 - PATTERN APPENDIX 320
Data from current Exchange not used
pollEnrich does not access any data from the current Exchange which means
when polling it cannot use any of the existing headers you may have set on the
Exchange. For example you cannot set a filename in the Exchange.FILE_NAME
header and use pollEnrich to consume only that file. For that you must set the
filename in the endpoint URI.
from("activemq:queue:order")
.setHeader(Exchange.FILE_NAME, header("orderId"))
.pollEnrich("file://order/data/additional")
.to("bean:processOrder");
And if we want to wait at most 20 seconds for the file to be ready we can use a timeout:
from("activemq:queue:order")
.setHeader(Exchange.FILE_NAME, header("orderId"))
.pollEnrich("file://order/data/additional", 20000)
.to("bean:processOrder");
And yes pollEnrich also supports the aggregation strategy so we can pass it in as an
argument too:
.pollEnrich("file://order/data/additional", 20000, aggregationStrategy)
Using This Pattern
If you would like to use this EIP Pattern then please read the Getting Started, you may also find
the Architecture useful particularly the description of Endpoint and URIs. Then you could try
out some of the Examples first before trying this pattern out.
Content Filter
Camel supports the Content Filter from the EIP patterns using one of the following mechanisms
in the routing logic to transform content from the inbound message.
• Message Translator
• invoking a Java bean
• Processor object
321 CHAPTER 9 - PATTERN APPENDIX
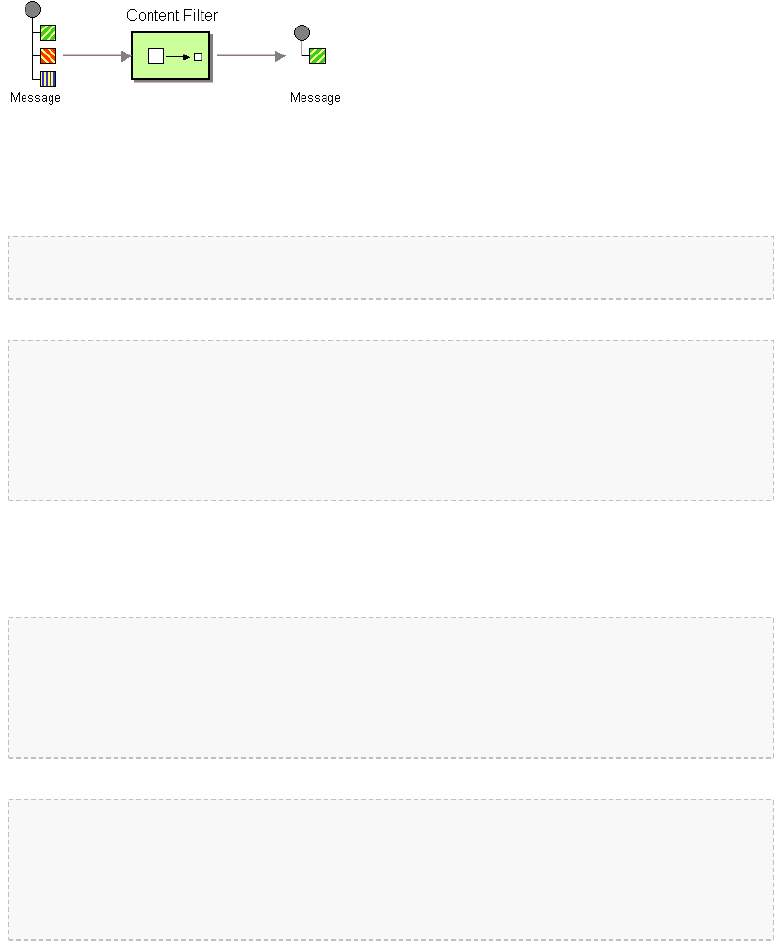
A common way to filter messages is to use an Expression in the DSL like XQuery, SQL or
one of the supported Scripting Languages.
Using the Fluent Builders
Here is a simple example using the DSL directly
from("direct:start").setBody(body().append(" World!")).to("mock:result");
In this example we add our own Processor
from("direct:start").process(new Processor() {
public void process(Exchange exchange) {
Message in = exchange.getIn();
in.setBody(in.getBody(String.class) + " World!");
}
}).to("mock:result");
For further examples of this pattern in use you could look at one of the JUnit tests
• TransformTest
• TransformViaDSLTest
Using Spring XML
<route>
<from uri="activemq:Input"/>
<bean ref="myBeanName" method="doTransform"/>
<to uri="activemq:Output"/>
</route>
You can also use XPath to filter out part of the message you are interested in:
<route>
<from uri="activemq:Input"/>
<setBody><xpath resultType="org.w3c.dom.Document">//foo:bar</xpath></setBody>
<to uri="activemq:Output"/>
</route>
CHAPTER 9 - PATTERN APPENDIX 322

Using This Pattern
If you would like to use this EIP Pattern then please read the Getting Started, you may also find
the Architecture useful particularly the description of Endpoint and URIs. Then you could try
out some of the Examples first before trying this pattern out.
Claim Check
The Claim Check from the EIP patterns allows you to replace message content with a claim
check (a unique key), which can be used to retrieve the message content at a later time. The
message content is stored temporarily in a persistent store like a database or file system. This
pattern is very useful when message content is very large (thus it would be expensive to send
around) and not all components require all information.
It can also be useful in situations where you cannot trust the information with an outside
party; in this case, you can use the Claim Check to hide the sensitive portions of data.
Available in Camel 1.5.
Example
In this example we want to replace a message body with a claim check, and restore the body at
a later step.
from("direct:start").to("bean:checkLuggage","mock:testCheckpoint",
"bean:dataEnricher","mock:result");
The example route is pretty simple - its just a Pipeline. In a real application you would have
some other steps where the mock:testCheckpoint endpoint is in the example.
The message is first sent to the checkLuggage bean which looks like
public static final class CheckLuggageBean {
public void checkLuggage(Exchange exchange, @Body String body, @XPath("/order/
@custId")String custId) {
// store the message body into the data store, using the custId as the claim
check
323 CHAPTER 9 - PATTERN APPENDIX

dataStore.put(custId, body);
// add the claim check as a header
exchange.getIn().setHeader("claimCheck", custId);
// remove the body from the message
exchange.getIn().setBody(null);
}
}
This bean stores the message body into the data store, using the custId as the claim check. In
this example, we're just using a HashMap to store the message body; in a real application you
would use a database or file system, etc. Next the claim check is added as a message header for
use later. Finally we remove the body from the message and pass it down the pipeline.
The next step in the pipeline is the mock:testCheckpoint endpoint which is just used
to check that the message body is removed, claim check added, etc.
To add the message body back into the message, we use the dataEnricher bean which
looks like
public static final class DataEnricherBean {
public void addDataBackIn(Exchange exchange, @Header("claimCheck")String
claimCheck) {
// query the data store using the claim check as the key and add the data
// back into the message body
exchange.getIn().setBody(dataStore.get(claimCheck));
// remove the message data from the data store
dataStore.remove(claimCheck);
// remove the claim check header
exchange.getIn().removeHeader("claimCheck");
}
}
This bean queries the data store using the claim check as the key and then adds the data back
into the message. The message body is then removed from the data store and finally the claim
check is removed. Now the message is back to what we started with!
For full details, check the example source here:
camel-core/src/test/java/org/apache/camel/processor/ClaimCheckTest.java
Using This Pattern
If you would like to use this EIP Pattern then please read the Getting Started, you may also find
the Architecture useful particularly the description of Endpoint and URIs. Then you could try
out some of the Examples first before trying this pattern out.
CHAPTER 9 - PATTERN APPENDIX 324
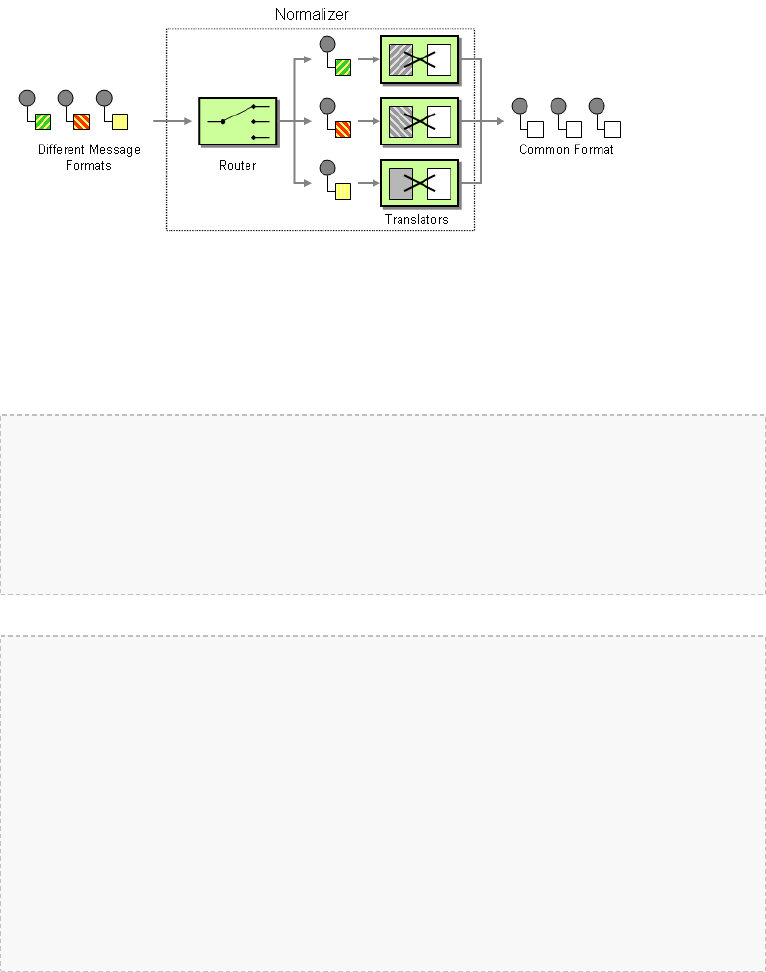
Normalizer
Camel supports the Normalizer from the EIP patterns by using a Message Router in front of a
number of Message Translator instances.
Example
This example shows a Message Normalizer that converts two types of XML messages into a
common format. Messages in this common format are then filtered.
Using the Fluent Builders
// we need to normalize two types of incoming messages
from("direct:start")
.choice()
.when().xpath("/employee").to("bean:normalizer?method=employeeToPerson")
.when().xpath("/customer").to("bean:normalizer?method=customerToPerson")
.end()
.to("mock:result");
In this case we're using a Java bean as the normalizer. The class looks like this
public class MyNormalizer {
public void employeeToPerson(Exchange exchange, @XPath("/employee/name/text()")
String name) {
exchange.getOut().setBody(createPerson(name));
}
public void customerToPerson(Exchange exchange, @XPath("/customer/@name")String
name) {
exchange.getOut().setBody(createPerson(name));
}
private String createPerson(String name) {
return "<person name=\"" + name + "\"/>";
}
}
Using the Spring XML Extensions
325 CHAPTER 9 - PATTERN APPENDIX

The same example in the Spring DSL
<camelContext id="camel" xmlns="http://camel.apache.org/schema/spring">
<route>
<from uri="direct:start"/>
<choice>
<when>
<xpath>/employee</xpath>
<to uri="bean:normalizer?method=employeeToPerson"/>
</when>
<when>
<xpath>/customer</xpath>
<to uri="bean:normalizer?method=customerToPerson"/>
</when>
</choice>
<to uri="mock:result"/>
</route>
</camelContext>
<bean id="normalizer" class="org.apache.camel.processor.MyNormalizer"/>
See Also
• Message Router
• Content Based Router
• Message Translator
Using This Pattern
If you would like to use this EIP Pattern then please read the Getting Started, you may also find
the Architecture useful particularly the description of Endpoint and URIs. Then you could try
out some of the Examples first before trying this pattern out.
SORT
Available as of Camel 2.0
Sort can be used to sort a message. Imagine you consume text files and before processing
each file you want to be sure the content is sorted.
Sort will by default sort the body using a default comparator that handles numeric values or
uses the string representation. You can provide your own comparator, and even an expression
to return the value to be sorted. Sort requires the value returned from the expression
evaluation is convertible to java.util.List as this is required by the JDK sort operation.
CHAPTER 9 - PATTERN APPENDIX 326

Using from Java DSL
In the route below it will read the file content and tokenize by line breaks so each line can be
sorted.
from("file://inbox").sort(body().tokenize("\n")).to("bean:MyServiceBean.processLine");
You can pass in your own comparator as a 2nd argument:
from("file://inbox").sort(body().tokenize("\n"), new
MyReverseComparator()).to("bean:MyServiceBean.processLine");
Using from Spring DSL
In the route below it will read the file content and tokenize by line breaks so each line can be
sorted.
<route>
<from uri="file://inbox"/>
<sort>
<tokenizer token="\n"/>
</sort>
<beanRef ref="myServiceBean" method="processLine"/>
</route>
And to use our own comparator we can refer to it as a spring bean:
<route>
<from uri="file://inbox"/>
<sort comparatorRef="myReverseComparator">
<tokenizer token="\n"/>
</sort>
<beanRef ref="MyServiceBean" method="processLine"/>
</route>
<bean id="myReverseComparator" class="com.mycompany.MyReverseComparator"/>
Using This Pattern
If you would like to use this EIP Pattern then please read the Getting Started, you may also find
the Architecture useful particularly the description of Endpoint and URIs. Then you could try
out some of the Examples first before trying this pattern out.
327 CHAPTER 9 - PATTERN APPENDIX
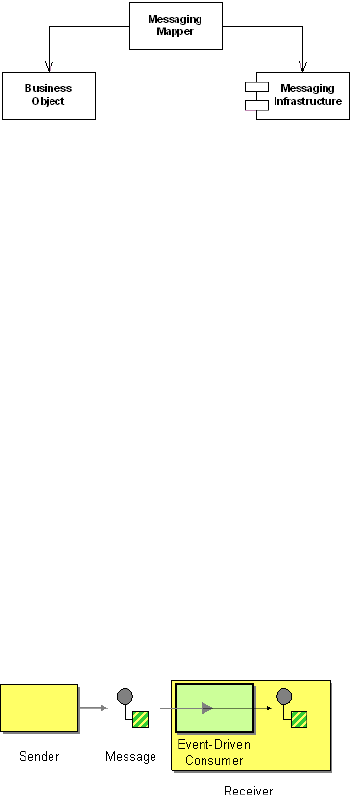
MESSAGING ENDPOINTS
Messaging Mapper
Camel supports the Messaging Mapper from the EIP patterns by using either Message Translator
pattern or the Type Converter module.
See also
• Message Translator
• Type Converter
• CXF for JAX-WS support for binding business logic to messaging & web services
• Pojo
• Bean
Using This Pattern
If you would like to use this EIP Pattern then please read the Getting Started, you may also find
the Architecture useful particularly the description of Endpoint and URIs. Then you could try
out some of the Examples first before trying this pattern out.
Event Driven Consumer
Camel supports the Event Driven Consumer from the EIP patterns. The default consumer
model is event based (i.e. asynchronous) as this means that the Camel container can then
manage pooling, threading and concurrency for you in a declarative manner.
The Event Driven Consumer is implemented by consumers implementing the Processor
interface which is invoked by the Message Endpoint when a Message is available for processing.
For more details see
• Message
• Message Endpoint
CHAPTER 9 - PATTERN APPENDIX 328
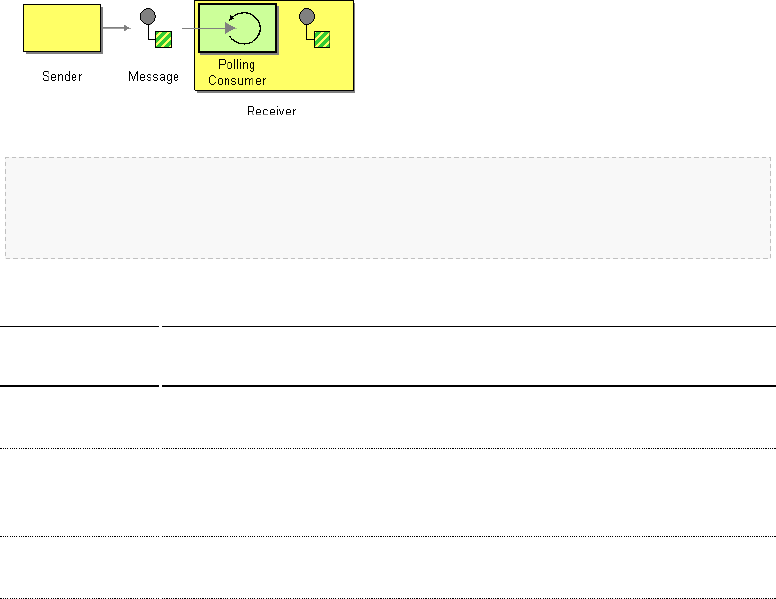
Using This Pattern
If you would like to use this EIP Pattern then please read the Getting Started, you may also find
the Architecture useful particularly the description of Endpoint and URIs. Then you could try
out some of the Examples first before trying this pattern out.
Polling Consumer
Camel supports implementing the Polling Consumer from the EIP patterns using the
PollingConsumer interface which can be created via the Endpoint.createPollingConsumer()
method.
So in your Java code you can do
Endpoint endpoint = context.getEndpoint("activemq:my.queue");
PollingConsumer consumer = endpoint.createPollingConsumer();
Exchange exchange = consumer.receive();
Notice in Camel 2.0 we have introduced the ConsumerTemplate.
There are 3 main polling methods on PollingConsumer
Method
name Description
receive() Waits until a message is available and then returns it; potentially blocking
forever
receive(long)
Attempts to receive a message exchange, waiting up to the given
timeout and returning null if no message exchange could be received
within the time available
receiveNoWait() Attempts to receive a message exchange immediately without waiting
and returning null if a message exchange is not available yet
ConsumerTemplate
Available as of Camel 2.0
The ConsumerTemplate is a template much like Spring's JmsTemplate or JdbcTemplate
supporting the Polling Consumer EIP. With the template you can consume Exchanges from an
Endpoint.
329 CHAPTER 9 - PATTERN APPENDIX

The template supports the 3 operations above, but also including convenient methods for
returning the body, etc consumeBody.
The example from above using ConsumerTemplate is:
Exchange exchange = consumerTemplate.receive("activemq:my.queue");
Or to extract and get the body you can do:
Object body = consumerTemplate.receiveBody("activemq:my.queue");
And you can provide the body type as a parameter and have it returned as the type:
String body = consumerTemplate.receiveBody("activemq:my.queue",String.class);
You get hold of a ConsumerTemplate from the CamelContext with the
createConsumerTemplate operation:
ConsumerTemplate consumer = context.createConsumerTemplate();
Using ConsumerTemplate with Spring DSL
With the Spring DSL we can declare the consumer in the CamelContext with the
consumerTemplate tag, just like the ProducerTemplate. The example below illustrates this:
<camelContext id="camel" xmlns="http://camel.apache.org/schema/spring">
<!-- define a producer template -->
<template id="producer"/>
<!-- define a consumer template -->
<consumerTemplate id="consumer"/>
<route>
<from uri="seda:foo"/>
<to id="result" uri="mock:result"/>
</route>
</camelContext>
Then we can get leverage Spring to inject the ConsumerTemplate in our java class. The
code below is part of an unit test but it shows how the consumer and producer can work
together.
@ContextConfiguration
public class SpringConsumerTemplateTest extends AbstractJUnit38SpringContextTests {
CHAPTER 9 - PATTERN APPENDIX 330

@Autowired
private ProducerTemplate producer;
@Autowired
private ConsumerTemplate consumer;
@EndpointInject(ref = "result")
private MockEndpoint mock;
public void testConsumeTemplate() throws Exception {
// we expect Hello World received in our mock endpoint
mock.expectedBodiesReceived("Hello World");
// we use the producer template to send a message to the seda:start endpoint
producer.sendBody("seda:start","Hello World");
// we consume the body from seda:start
String body = consumer.receiveBody("seda:start",String.class);
assertEquals("Hello World", body);
// and then we send the body again to seda:foo so it will be routed to the mock
// endpoint so our unit test can complete
producer.sendBody("seda:foo", body);
// assert mock received the body
mock.assertIsSatisfied();
}
}
Timer based polling consumer
In this sample we use a Timer to schedule a route to be started every 5th second and invoke
our bean MyCoolBean where we implement the business logic for the Polling Consumer.
Here we want to consume all messages from a JMS queue, process the message and send them
to the next queue.
First we setup our route as:
MyCoolBean cool = new MyCoolBean();
cool.setProducer(template);
cool.setConsumer(consumer);
from("timer://foo?period=5000").bean(cool, "someBusinessLogic");
from("activemq:queue.foo").to("mock:result");
And then we have out logic in our bean:
331 CHAPTER 9 - PATTERN APPENDIX

public static class MyCoolBean {
private int count;
private ConsumerTemplate consumer;
private ProducerTemplate producer;
public void setConsumer(ConsumerTemplate consumer) {
this.consumer = consumer;
}
public void setProducer(ProducerTemplate producer) {
this.producer = producer;
}
public void someBusinessLogic() {
// loop to empty queue
while (true) {
// receive the message from the queue, wait at most 3 sec
String msg = consumer.receiveBody("activemq:queue.inbox", 3000,
String.class);
if (msg == null) {
// no more messages in queue
break;
}
// do something with body
msg = "Hello " + msg;
// send it to the next queue
producer.sendBodyAndHeader("activemq:queue.foo", msg, "number", count++);
}
}
}
Scheduled Poll Components
Quite a few inbound Camel endpoints use a scheduled poll pattern to receive messages and
push them through the Camel processing routes. That is to say externally from the client the
endpoint appears to use an Event Driven Consumer but internally a scheduled poll is used to
monitor some kind of state or resource and then fire message exchanges.
Since this a such a common pattern, polling components can extend the
ScheduledPollConsumer base class which makes it simpler to implement this pattern.
There is also the Quartz Component which provides scheduled delivery of messages using
the Quartz enterprise scheduler.
For more details see:
• PollingConsumer
• Scheduled Polling Components
◦ScheduledPollConsumer
◦File
CHAPTER 9 - PATTERN APPENDIX 332
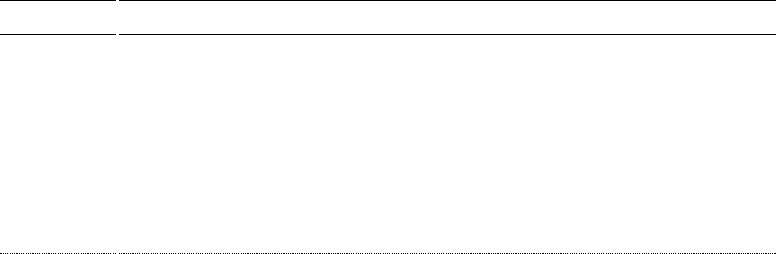
◦FTP
◦JPA
◦Mail
◦iBATIS]
◦Quartz
ScheduledPollConsumer Options
The ScheduledPollConsumer supports the following options:
Option Description
pollStrategy
Camel 2.0: A pluggable
org.apache.camel.PollingConsumerPollStrategy allowing you
to provide your custom implementation to control error handling usually
occurred during the poll operation before an Exchange have been created
and being routed in Camel. In other words the error occurred while the
polling was gathering information, for instance access to a file network failed
so Camel cannot access it to scan for files. The default implementation will log
the caused exception at WARN level and ignore it.
About error handling and scheduled polling consumers
ScheduledPollConsumer is scheduled based and its run method is invoked periodically based
on schedule settings. But errors can also occur when a poll being executed. For instance if
Camel should poll a file network, and this network resource is not available then a
java.io.IOException could occur. As this error happens before any Exchange has been
created and prepared for routing, then the regular Error handling in Camel does not apply. So
what does the consumer do then? Well the exception is propagated back to the run method
where its handled. Camel will by default log the exception at WARN level and then ignore it. At
next schedule the error could have been resolved and thus being able to poll the endpoint
successfully.
Controlling the error handling using
PollingConsumerPollStrategy
Available as of Camel 2.0
org.apache.camel.PollingConsumerPollStrategy is a pluggable strategy that
you can configure on the ScheduledPollConsumer. The default implementation
org.apache.camel.impl.DefaultPollingConsumerPollStrategy will log the
caused exception at WARN level and then ignore this issue.
The strategy interface provides the following 3 methods
▪begin
333 CHAPTER 9 - PATTERN APPENDIX

▪void begin(Consumer consumer, Endpoint endpoint)
▪begin (Camel 2.3)
▪boolean begin(Consumer consumer, Endpoint endpoint)
▪commit
▪void commit(Consumer consumer, Endpoint endpoint)
▪rollback
▪boolean rollback(Consumer consumer, Endpoint
endpoint, int retryCounter, Exception e) throws
Exception
In Camel 2.3 onwards the begin method returns a boolean which indicates whether or not to
skipping polling. So you can implement your custom logic and return false if you do not want
to poll this time.
The most interesting is the rollback as it allows you do handle the caused exception and
decide what to do.
For instance if we want to provide a retry feature to a scheduled consumer we can
implement the PollingConsumerPollStrategy method and put the retry logic in the
rollback method. Lets just retry up till 3 times:
public boolean rollback(Consumer consumer, Endpoint endpoint, int retryCounter,
Exception e) throws Exception {
if (retryCounter < 3) {
// return true to tell Camel that it should retry the poll immediately
return true;
}
// okay we give up do not retry anymore
return false;
}
Notice that we are given the Consumer as a parameter. We could use this to restart the
consumer as we can invoke stop and start:
// error occurred lets restart the consumer, that could maybe resolve the issue
consumer.stop();
consumer.start();
Notice: If you implement the begin operation make sure to avoid throwing exceptions as in
such a case the poll operation is not invoked and Camel will invoke the rollback directly.
Configuring an Endpoint to use PollingConsumerPollStrategy
To configure an Endpoint to use a custom PollingConsumerPollStrategy you use the
option pollStrategy. For example in the file consumer below we want to use our custom
strategy defined in the Registry with the bean id myPoll:
CHAPTER 9 - PATTERN APPENDIX 334
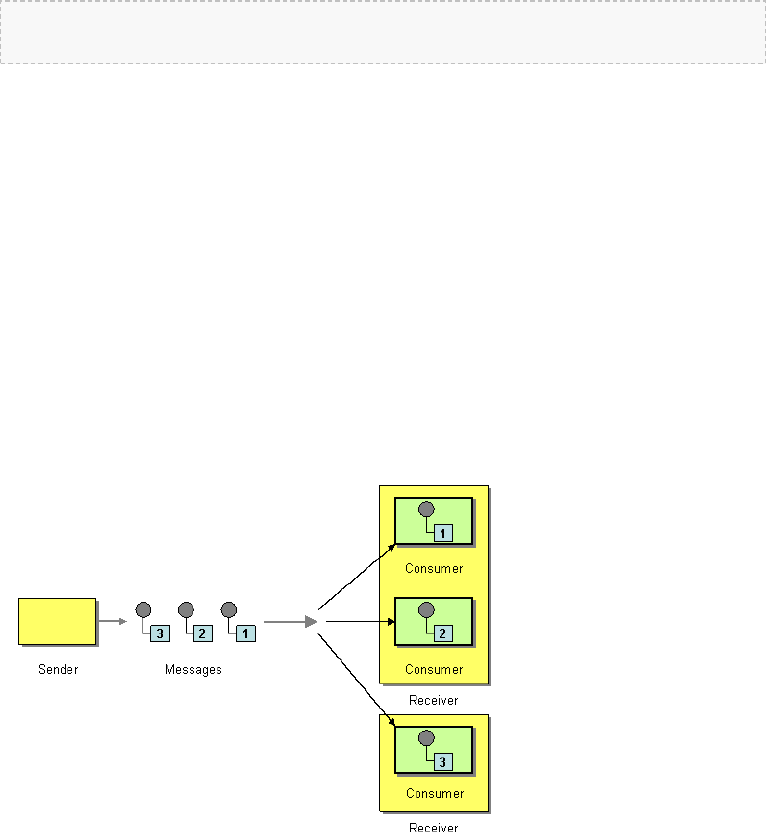
from("file://inbox/?pollStrategy=#myPoll").to("activemq:queue:inbox")
Using This Pattern
If you would like to use this EIP Pattern then please read the Getting Started, you may also find
the Architecture useful particularly the description of Endpoint and URIs. Then you could try
out some of the Examples first before trying this pattern out.
See Also
▪POJO Consuming
▪Batch Consumer
Competing Consumers
Camel supports the Competing Consumers from the EIP patterns using a few different
components.
You can use the following components to implement competing consumers:-
• SEDA for SEDA based concurrent processing using a thread pool
• JMS for distributed SEDA based concurrent processing with queues which support
reliable load balancing, failover and clustering.
Enabling Competing Consumers with JMS
To enable Competing Consumers you just need to set the concurrentConsumers
property on the JMS endpoint.
For example
335 CHAPTER 9 - PATTERN APPENDIX
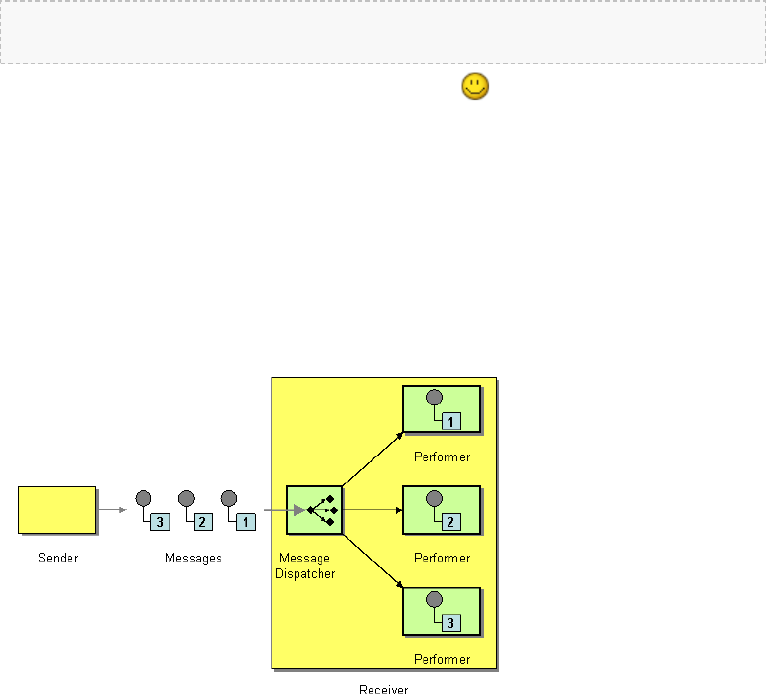
from("jms:MyQueue?concurrentConsumers=5").bean(SomeBean.class);
Or just run multiple JVMs of any ActiveMQ or JMS route
Using This Pattern
If you would like to use this EIP Pattern then please read the Getting Started, you may also find
the Architecture useful particularly the description of Endpoint and URIs. Then you could try
out some of the Examples first before trying this pattern out.
Message Dispatcher
Camel supports the Message Dispatcher from the EIP patterns using various approaches.
You can use a component like JMS with selectors to implement a Selective Consumer as the
Message Dispatcher implementation. Or you can use an Endpoint as the Message Dispatcher
itself and then use a Content Based Router as the Message Dispatcher.
See Also
• JMS
• Selective Consumer
• Content Based Router
• Endpoint
CHAPTER 9 - PATTERN APPENDIX 336
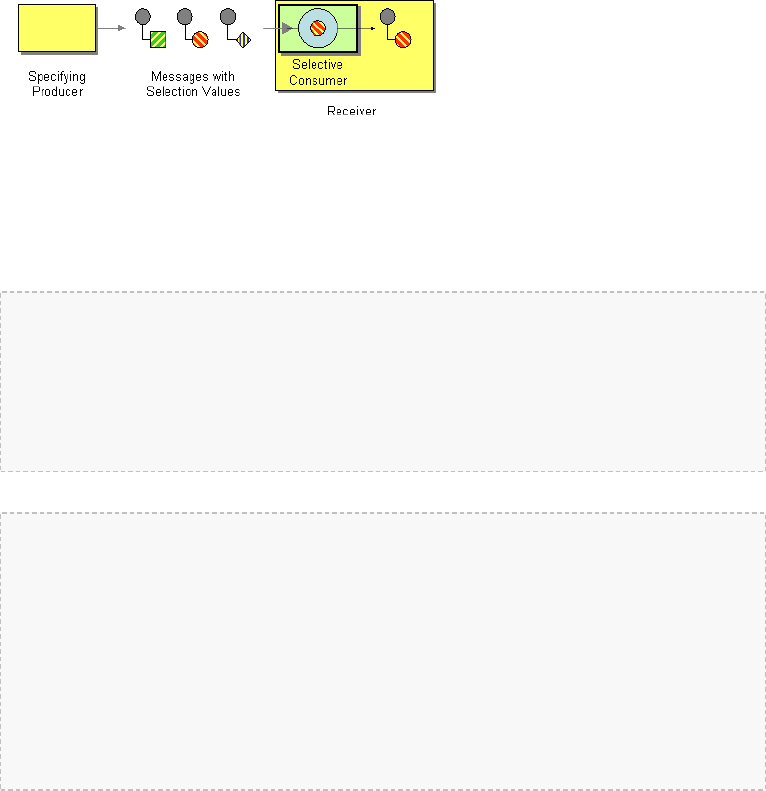
Using This Pattern
If you would like to use this EIP Pattern then please read the Getting Started, you may also find
the Architecture useful particularly the description of Endpoint and URIs. Then you could try
out some of the Examples first before trying this pattern out.
Selective Consumer
The Selective Consumer from the EIP patterns can be implemented in two ways
The first solution is to provide a Message Selector to the underlying URIs when creating
your consumer. For example when using JMS you can specify a selector parameter so that the
message broker will only deliver messages matching your criteria.
The other approach is to use a Message Filter which is applied; then if the filter matches the
message your consumer is invoked as shown in the following example
Using the Fluent Builders
RouteBuilder builder = new RouteBuilder() {
public void configure() {
errorHandler(deadLetterChannel("mock:error"));
from("seda:a").filter(header("foo").isEqualTo("bar")).process(myProcessor);
}
};
Using the Spring XML Extensions
<bean id="myProcessor" class="org.apache.camel.builder.MyProcessor"/>
<camelContext errorHandlerRef="errorHandler" streamCache="false" id="camel"
xmlns="http://camel.apache.org/schema/spring">
<route>
<from uri="seda:a"/>
<filter>
<xpath>$foo = 'bar'</xpath>
<process ref="myProcessor"/>
</filter>
</route>
</camelContext>
337 CHAPTER 9 - PATTERN APPENDIX
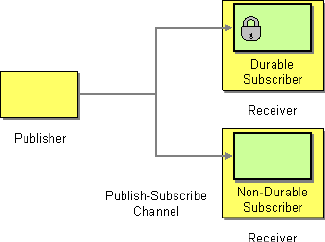
Using This Pattern
If you would like to use this EIP Pattern then please read the Getting Started, you may also find
the Architecture useful particularly the description of Endpoint and URIs. Then you could try
out some of the Examples first before trying this pattern out.
Durable Subscriber
Camel supports the Durable Subscriber from the EIP patterns using the JMS component which
supports publish & subscribe using Topics with support for non-durable and durable
subscribers.
Another alternative is to combine the Message Dispatcher or Content Based Router with
File or JPA components for durable subscribers then something like Queue for non-durable.
See Also
• JMS
• File
• JPA
• Message Dispatcher
• Selective Consumer
• Content Based Router
• Endpoint
Using This Pattern
If you would like to use this EIP Pattern then please read the Getting Started, you may also find
the Architecture useful particularly the description of Endpoint and URIs. Then you could try
out some of the Examples first before trying this pattern out.
CHAPTER 9 - PATTERN APPENDIX 338

Idempotent Consumer
The Idempotent Consumer from the EIP patterns is used to filter out duplicate messages.
This pattern is implemented using the IdempotentConsumer class. This uses an Expression
to calculate a unique message ID string for a given message exchange; this ID can then be
looked up in the MessageIdRepository to see if it has been seen before; if it has the message is
consumed; if its not then the message is processed and the ID is added to the repository.
The Idempotent Consumer essentially acts like a Message Filter to filter out duplicates.
Camel will add the message id eagerly to the repository to detect duplication also for
Exchanges currently in progress.
On completion Camel will remove the message id from the repository if the Exchange failed,
otherwise it stays there.
Options
The Idempotent Consumer has the following options:
Option Default Description
eager true
Camel 2.0: Eager controls whether Camel adds the message to the
repository before or after the exchange has been processed. If
enabled before then Camel will be able to detect duplicate messages
even when messages are currently in progress. By disabling Camel
will only detect duplicates when a message has successfully been
processed.
Using the Fluent Builders
The following example will use the header myMessageId to filter out duplicates
RouteBuilder builder = new RouteBuilder() {
public void configure() {
errorHandler(deadLetterChannel("mock:error"));
from("seda:a").idempotentConsumer(header("myMessageId"),
MemoryIdempotentRepository.memoryIdempotentRepository(200))
.to("seda:b");
}
};
The above example will use an in-memory based MessageIdRepository which can easily run out
of memory and doesn't work in a clustered environment. So you might prefer to use the JPA
based implementation which uses a database to store the message IDs which have been
processed
from("direct:start").idempotentConsumer(
header("messageId"),
339 CHAPTER 9 - PATTERN APPENDIX
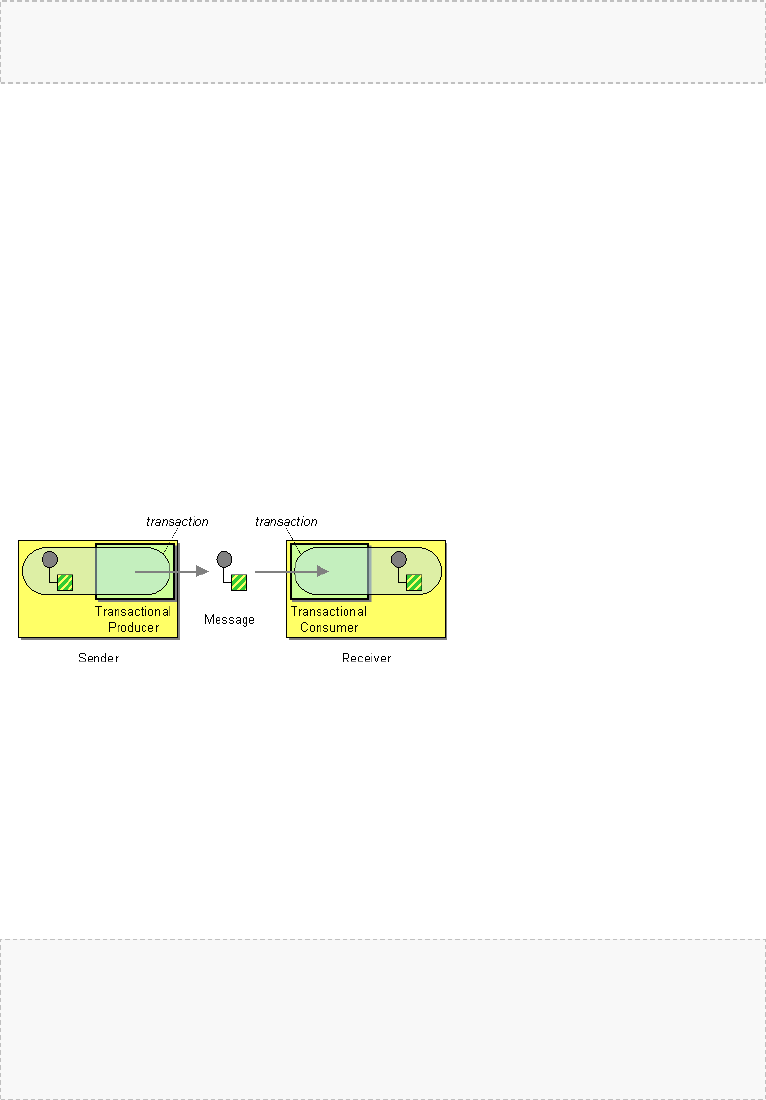
jpaMessageIdRepository(lookup(JpaTemplate.class), PROCESSOR_NAME)
).to("mock:result");
In the above example we are using the header messageId to filter out duplicates and using
the collection myProcessorName to indicate the Message ID Repository to use. This name
is important as you could process the same message by many different processors; so each may
require its own logical Message ID Repository.
For further examples of this pattern in use you could look at the junit test case
Using This Pattern
If you would like to use this EIP Pattern then please read the Getting Started, you may also find
the Architecture useful particularly the description of Endpoint and URIs. Then you could try
out some of the Examples first before trying this pattern out.
Transactional Client
Camel recommends supporting the Transactional Client from the EIP patterns using spring
transactions.
Transaction Oriented Endpoints (Camel Toes) like JMS support using a transaction for both
inbound and outbound message exchanges. Endpoints that support transactions will participate
in the current transaction context that they are called from.
You should use the SpringRouteBuilder to setup the routes since you will need to setup the
spring context with the TransactionTemplates that will define the transaction manager
configuration and policies.
For inbound endpoint to be transacted, they normally need to be configured to use a Spring
PlatformTransactionManager. In the case of the JMS component, this can be done by looking it
up in the spring context.
You first define needed object in the spring configuration.
<bean id="jmsTransactionManager"
class="org.springframework.jms.connection.JmsTransactionManager">
<property name="connectionFactory" ref="jmsConnectionFactory" />
</bean>
<bean id="jmsConnectionFactory"
CHAPTER 9 - PATTERN APPENDIX 340
Convention over configuration
In Camel 2.0 onwards we have improved the default configuration reducing the
number of Spring XML gobble you need to configure.
In this wiki page we provide the Camel 1.x examples and the same 2.0 example that
requires less XML setup.
Configuration of Redelivery
The redelivery in transacted mode is not handled by Camel but by the backing
system (the transaction manager). In such cases you should resort to the backing
system how to configure the redelivery.
class="org.apache.activemq.ActiveMQConnectionFactory">
<property name="brokerURL" value="tcp://localhost:61616"/>
</bean>
Then you look them up and use them to create the JmsComponent.
PlatformTransactionManager transactionManager = (PlatformTransactionManager)
spring.getBean("jmsTransactionManager");
ConnectionFactory connectionFactory = (ConnectionFactory)
spring.getBean("jmsConnectionFactory");
JmsComponent component = JmsComponent.jmsComponentTransacted(connectionFactory,
transactionManager);
component.getConfiguration().setConcurrentConsumers(1);
ctx.addComponent("activemq", component);
Transaction Policies
Outbound endpoints will automatically enlist in the current transaction context. But what if you
do not want your outbound endpoint to enlist in the same transaction as your inbound
endpoint? The solution is to add a Transaction Policy to the processing route. You first have to
define transaction policies that you will be using. The policies use a spring TransactionTemplate
under the covers for declaring the transaction demarcation to use. So you will need to add
something like the following to your spring xml:
<bean id="PROPAGATION_REQUIRED"
class="org.apache.camel.spring.spi.SpringTransactionPolicy">
<property name="transactionManager" ref="jmsTransactionManager"/>
</bean>
341 CHAPTER 9 - PATTERN APPENDIX

<bean id="PROPAGATION_REQUIRES_NEW"
class="org.apache.camel.spring.spi.SpringTransactionPolicy">
<property name="transactionManager" ref="jmsTransactionManager"/>
<property name="propagationBehaviorName" value="PROPAGATION_REQUIRES_NEW"/>
</bean>
Then in your SpringRouteBuilder, you just need to create new SpringTransactionPolicy objects
for each of the templates.
public void configure() {
...
Policy requried = bean(SpringTransactionPolicy.class, "PROPAGATION_REQUIRED"));
Policy requirenew = bean(SpringTransactionPolicy.class,
"PROPAGATION_REQUIRES_NEW"));
...
}
Once created, you can use the Policy objects in your processing routes:
// Send to bar in a new transaction
from("activemq:queue:foo").policy(requirenew).to("activemq:queue:bar");
// Send to bar without a transaction.
from("activemq:queue:foo").policy(notsupported ).to("activemq:queue:bar");
Camel 1.x - Database Sample
In this sample we want to ensure that two endpoints is under transaction control. These two
endpoints inserts data into a database.
The sample is in its full as a unit test.
First of all we setup the usual spring stuff in its configuration file. Here we have defined a
DataSource to the HSQLDB and a most importantly
the Spring DataSoruce TransactionManager that is doing the heavy lifting of ensuring our
transactional policies. You are of course free to use any
of the Spring based TransactionMananger, eg. if you are in a full blown J2EE container you could
use JTA or the WebLogic or WebSphere specific managers.
We use the required transaction policy that we define as the PROPOGATION_REQUIRED
spring bean. And as last we have our book service bean that does the business logic
and inserts data in the database as our core business logic.
CHAPTER 9 - PATTERN APPENDIX 342
<!-- datasource to the database -->
<bean id="dataSource"
class="org.springframework.jdbc.datasource.DriverManagerDataSource">
<property name="driverClassName" value="org.hsqldb.jdbcDriver"/>
<property name="url" value="jdbc:hsqldb:mem:camel"/>
<property name="username" value="sa"/>
<property name="password" value=""/>
</bean>
<!-- spring transaction manager -->
<bean id="txManager"
class="org.springframework.jdbc.datasource.DataSourceTransactionManager">
<property name="dataSource" ref="dataSource"/>
</bean>
<!-- policy for required transaction used in our Camel routes -->
<bean id="PROPAGATION_REQUIRED"
class="org.apache.camel.spring.spi.SpringTransactionPolicy">
<property name="transactionManager" ref="txManager"/>
<property name="propagationBehaviorName" value="PROPAGATION_REQUIRED"/>
</bean>
<!-- bean for book business logic -->
<bean id="bookService" class="org.apache.camel.spring.interceptor.BookService">
<property name="dataSource" ref="dataSource"/>
</bean>
In our Camel route that is Java DSL based we setup the transactional policy, wrapped as a
Policy.
// Notice that we use the SpringRouteBuilder that has a few more features than
// the standard RouteBuilder
return new SpringRouteBuilder() {
public void configure() throws Exception {
// lookup the transaction policy
SpringTransactionPolicy required = lookup("PROPAGATION_REQUIRED",
SpringTransactionPolicy.class);
// use this error handler instead of DeadLetterChannel that is the default
// Notice: transactionErrorHandler is in SpringRouteBuilder
if (isUseTransactionErrorHandler()) {
// useTransactionErrorHandler is only used for unit testing to reuse code
// for doing a 2nd test without this transaction error handler, so ignore
// this. For spring based transaction, end users are encouraged to use the
// transaction error handler instead of the default DeadLetterChannel.
errorHandler(transactionErrorHandler(required));
}
Then we are ready to define our Camel routes. We have two routes: 1 for success conditions,
and 1 for a forced rollback condition.
This is after all based on a unit test.
343 CHAPTER 9 - PATTERN APPENDIX

// set the required policy for this route
from("direct:okay").policy(required).
setBody(constant("Tiger in Action")).beanRef("bookService").
setBody(constant("Elephant in Action")).beanRef("bookService");
// set the required policy for this route
from("direct:fail").policy(required).
setBody(constant("Tiger in Action")).beanRef("bookService").
setBody(constant("Donkey in Action")).beanRef("bookService");
As its a unit test we need to setup the database and this is easily done with Spring JdbcTemplate
Error formatting macro: snippet: java.lang.IndexOutOfBoundsException: Index: 20, Size: 20
And our core business service, the book service, will accept any books except the Donkeys.
public class BookService {
private SimpleJdbcTemplate jdbc;
public BookService() {
}
public void setDataSource(DataSource ds) {
jdbc = new SimpleJdbcTemplate(ds);
}
public void orderBook(String title) throws Exception {
if (title.startsWith("Donkey")) {
throw new IllegalArgumentException("We don't have Donkeys, only Camels");
}
// create new local datasource to store in DB
jdbc.update("insert into books (title) values (?)", title);
}
}
Then we are ready to fire the tests. First to commit condition:
public void testTransactionSuccess() throws Exception {
template.sendBody("direct:okay","Hello World");
int count = jdbc.queryForInt("select count(*) from books");
assertEquals("Number of books", 3, count);
}
And lastly the rollback condition since the 2nd book is a Donkey book:
public void testTransactionRollback() throws Exception {
try {
template.sendBody("direct:fail","Hello World");
CHAPTER 9 - PATTERN APPENDIX 344

}catch (RuntimeCamelException e) {
// expected as we fail
assertIsInstanceOf(RuntimeCamelException.class, e.getCause());
assertTrue(e.getCause().getCause() instanceof IllegalArgumentException);
assertEquals("We don't have Donkeys, only Camels",
e.getCause().getCause().getMessage());
}
int count = jdbc.queryForInt("select count(*) from books");
assertEquals("Number of books", 1, count);
}
Camel 1.x - JMS Sample
In this sample we want to listen for messages on a queue and process the messages with our
business logic java code and send them along. Since its based on a unit test the destination is a
mock endpoint.
This time we want to setup the camel context and routes using the Spring XML syntax.
<!-- here we define our camel context -->
<camel:camelContext id="myroutes">
<!-- and now our route using the XML syntax -->
<camel:route errorHandlerRef="errorHandler">
<!-- 1: from the jms queue -->
<camel:from uri="activemq:queue:okay"/>
<!-- 2: setup the transactional boundaries to require a transaction -->
<camel:transacted ref="PROPAGATION_REQUIRED"/>
<!-- 3: call our business logic that is myProcessor -->
<camel:process ref="myProcessor"/>
<!-- 4: if success then send it to the mock -->
<camel:to uri="mock:result"/>
</camel:route>
</camel:camelContext>
<!-- this bean is our business logic -->
<bean id="myProcessor"
class="org.apache.camel.component.jms.tx.JMSTransactionalClientTest$MyProcessor"/>
Since the rest is standard XML stuff its nothing fancy now for the reader:
<!-- the transactional error handler -->
<bean id="errorHandler"
class="org.apache.camel.spring.spi.TransactionErrorHandlerBuilder">
<property name="springTransactionPolicy" ref="PROPAGATION_REQUIRED"/>
</bean>
<bean id="jmsConnectionFactory" class="org.apache.activemq.ActiveMQConnectionFactory">
<property name="brokerURL"
value="vm://localhost?broker.persistent=false&broker.useJmx=false"/>
345 CHAPTER 9 - PATTERN APPENDIX

</bean>
<bean id="jmsTransactionManager"
class="org.springframework.jms.connection.JmsTransactionManager">
<property name="connectionFactory" ref="jmsConnectionFactory"/>
</bean>
<bean id="jmsConfig" class="org.apache.camel.component.jms.JmsConfiguration">
<property name="connectionFactory" ref="jmsConnectionFactory"/>
<property name="transactionManager" ref="jmsTransactionManager"/>
<property name="transacted" value="true"/>
<property name="concurrentConsumers" value="1"/>
</bean>
<bean id="activemq" class="org.apache.activemq.camel.component.ActiveMQComponent">
<property name="configuration" ref="jmsConfig"/>
</bean>
<bean id="PROPAGATION_REQUIRED"
class="org.apache.camel.spring.spi.SpringTransactionPolicy">
<property name="transactionManager" ref="jmsTransactionManager"/>
</bean>
Our business logic is set to handle the incomming messages and fail the first two times. When
its a success it responds with a Bye World message.
public static class MyProcessor implements Processor {
private int count;
public void process(Exchange exchange) throws Exception {
if (++count <= 2) {
throw new IllegalArgumentException("Forced Exception number " + count + ",
please retry");
}
exchange.getIn().setBody("Bye World");
exchange.getIn().setHeader("count", count);
}
}
And our unit test is tested with this java code. Notice that we expect the Bye World
message to be delivered at the 3rd attempt.
MockEndpoint mock = getMockEndpoint("mock:result");
mock.expectedMessageCount(1);
mock.expectedBodiesReceived("Bye World");
// success at 3rd attempt
mock.message(0).header("count").isEqualTo(3);
template.sendBody("activemq:queue:okay","Hello World");
mock.assertIsSatisfied();
CHAPTER 9 - PATTERN APPENDIX 346

Camel 1.x - Spring based configuration
In Camel 1.4 we have introduced the concept of configuration of the error handlers using
spring XML configuration. The sample below demonstrates that you can configure transaction
error handlers in Spring XML as spring beans. These can then be set as global, per route based
or per policy based error handler. The latter has been demonstrated in the samples above. This
sample is the database sample configured in Spring XML.
Notice that we have defined two error handler, one per route. The first route uses the
transaction error handler, and the 2nd uses no error handler at all.
<!-- here we define our camel context -->
<camel:camelContext id="myroutes">
<!-- first route with transaction error handler -->
<!-- here we refer to our transaction error handler we define in this Spring XML
file -->
<!-- in this route the transactionErrorHandler is used -->
<camel:route errorHandlerRef="transactionErrorHandler">
<!-- 1: from the jms queue -->
<camel:from uri="activemq:queue:okay"/>
<!-- 2: setup the transactional boundaries to require a transaction -->
<camel:transacted ref="required"/>
<!-- 3: call our business logic that is myProcessor -->
<camel:process ref="myProcessor"/>
<!-- 4: if success then send it to the mock -->
<camel:to uri="mock:result"/>
</camel:route>
<!-- 2nd route with no error handling -->
<!-- this route doens't use error handler, in fact the spring bean with id
noErrorHandler -->
<camel:route errorHandlerRef="noErrorHandler">
<camel:from uri="activemq:queue:bad"/>
<camel:to uri="log:bad"/>
</camel:route>
</camel:camelContext>
The following snippet is the Spring XML configuration to setup the error handlers in pure
spring XML:
<!-- camel policy we refer to in our route -->
<bean id="required" class="org.apache.camel.spring.spi.SpringTransactionPolicy">
<property name="transactionTemplate" ref="PROPAGATION_REQUIRED"/>
</bean>
<!-- the standard spring transaction template for required -->
<bean id="PROPAGATION_REQUIRED"
class="org.springframework.transaction.support.TransactionTemplate">
<property name="transactionManager" ref="jmsTransactionManager"/>
</bean>
347 CHAPTER 9 - PATTERN APPENDIX

<!-- the transaction error handle we refer to from the route -->
<bean id="transactionErrorHandler"
class="org.apache.camel.spring.spi.TransactionErrorHandlerBuilder">
<property name="transactionTemplate" ref="PROPAGATION_REQUIRED"/>
</bean>
<!-- the no error handler -->
<bean id="noErrorHandler" class="org.apache.camel.builder.NoErrorHandlerBuilder"/>
DelayPolicy (@deprecated)
DelayPolicy is a new policy introduced in Camel 1.5, to replaces the RedeliveryPolicy used in
Camel 1.4. Notice the transactionErrorHandler can be configured with a DelayPolicy
to set a fixed delay in millis between each redelivery attempt. Camel does this by sleeping the
delay until transaction is marked for rollback and the caused exception is rethrown.
This allows a simple redelivery interval that can be configured for development mode or
light production to avoid a rapid redelivery strategy that can exhaust a system that constantly
fails.
The DelayPolicy is @deprecated and removed in Camel 2.0. All redelivery configuration
should be configured on the back system.
We strongly recommend that you configure the backing system for
correct redelivery policy in your environment.
Camel 2.0 - Database Sample
In this sample we want to ensure that two endpoints is under transaction control. These two
endpoints inserts data into a database.
The sample is in its full as a unit test.
First of all we setup the usual spring stuff in its configuration file. Here we have defined a
DataSource to the HSQLDB and a most importantly
the Spring DataSoruce TransactionManager that is doing the heavy lifting of ensuring our
transactional policies. You are of course free to use any
of the Spring based TransactionMananger, eg. if you are in a full blown J2EE container you could
use JTA or the WebLogic or WebSphere specific managers.
As we use the new convention over configuration we do not need to configure a
transaction policy bean, so we do not have any PROPAGATION_REQUIRED beans.
All the beans needed to be configured is standard Spring beans only, eg. there are no Camel
specific configuration at all.
<!-- this example uses JDBC so we define a data source -->
<bean id="dataSource"
CHAPTER 9 - PATTERN APPENDIX 348
class="org.springframework.jdbc.datasource.DriverManagerDataSource">
<property name="driverClassName" value="org.hsqldb.jdbcDriver"/>
<property name="url" value="jdbc:hsqldb:mem:camel"/>
<property name="username" value="sa"/>
<property name="password" value=""/>
</bean>
<!-- spring transaction manager -->
<!-- this is the transaction manager Camel will use for transacted routes -->
<bean id="txManager"
class="org.springframework.jdbc.datasource.DataSourceTransactionManager">
<property name="dataSource" ref="dataSource"/>
</bean>
<!-- bean for book business logic -->
<bean id="bookService" class="org.apache.camel.spring.interceptor.BookService">
<property name="dataSource" ref="dataSource"/>
</bean>
Then we are ready to define our Camel routes. We have two routes: 1 for success conditions,
and 1 for a forced rollback condition.
This is after all based on a unit test. Notice that we mark each route as transacted using the
transacted tag.
<camelContext id="camel" xmlns="http://camel.apache.org/schema/spring">
<route>
<from uri="direct:okay"/>
<!-- we mark this route as transacted. Camel will lookup the spring
transaction manager
and use it by default. We can optimally pass in arguments to specify a
policy to use
that is configured with a spring transaction manager of choice. However
Camel supports
convention over configuration as we can just use the defaults out of the
box and Camel
that suites in most situations -->
<transacted/>
<setBody>
<constant>Tiger in Action</constant>
</setBody>
<bean ref="bookService"/>
<setBody>
<constant>Elephant in Action</constant>
</setBody>
<bean ref="bookService"/>
</route>
<route>
<from uri="direct:fail"/>
<!-- we mark this route as transacted. See comments above. -->
<transacted/>
<setBody>
349 CHAPTER 9 - PATTERN APPENDIX

<constant>Tiger in Action</constant>
</setBody>
<bean ref="bookService"/>
<setBody>
<constant>Donkey in Action</constant>
</setBody>
<bean ref="bookService"/>
</route>
</camelContext>
That is all that is needed to configure a Camel route as being transacted. Just remember to use
the transacted DSL. The rest is standard Spring XML to setup the transaction manager.
Camel 2.0 - JMS Sample
In this sample we want to listen for messages on a queue and process the messages with our
business logic java code and send them along. Since its based on a unit test the destination is a
mock endpoint.
First we configure the standard Spring XML to declare a JMS connection factory, a JMS
transaction manager and our ActiveMQ component that we use in our routing.
<!-- setup JMS connection factory -->
<bean id="jmsConnectionFactory" class="org.apache.activemq.ActiveMQConnectionFactory">
<property name="brokerURL"
value="vm://localhost?broker.persistent=false&broker.useJmx=false"/>
</bean>
<!-- setup spring jms TX manager -->
<bean id="jmsTransactionManager"
class="org.springframework.jms.connection.JmsTransactionManager">
<property name="connectionFactory" ref="jmsConnectionFactory"/>
</bean>
<!-- define our activemq component -->
<bean id="activemq" class="org.apache.activemq.camel.component.ActiveMQComponent">
<property name="connectionFactory" ref="jmsConnectionFactory"/>
<!-- define the jms consumer/producer as transacted -->
<property name="transacted" value="true"/>
<!-- setup the transaction manager to use -->
<!-- if not provided then Camel will automatic use a JmsTransactionManager,
however if you
for instance use a JTA transaction manager then you must configure it -->
<property name="transactionManager" ref="jmsTransactionManager"/>
</bean>
And then we configure our routes. Notice that all we have to do is mark the route as
transacted using the transacted tag.
CHAPTER 9 - PATTERN APPENDIX 350

<camelContext xmlns="http://camel.apache.org/schema/spring">
<route>
<!-- 1: from the jms queue -->
<from uri="activemq:queue:okay"/>
<!-- 2: mark this route as transacted -->
<transacted/>
<!-- 3: call our business logic that is myProcessor -->
<process ref="myProcessor"/>
<!-- 4: if success then send it to the mock -->
<to uri="mock:result"/>
</route>
</camelContext>
<bean id="myProcessor"
class="org.apache.camel.component.jms.tx.JMSTransactionalClientTest$MyProcessor"/>
USING MULTIPLE ROUTES WITH DIFFERENT
PROPAGATION BEHAVIORS
Available as of Camel 2.2
Suppose you want to route a message through two routes and by which the 2nd route should
run in its own transaction. How do you do that? You use propagation behaviors for that where
you configure it as follows:
▪The first route use PROPAGATION_REQUIRED
▪The second route use PROPAGATION_REQUIRES_NEW
This is configured in the Spring XML file:
<bean id="PROPAGATION_REQUIRED"
class="org.apache.camel.spring.spi.SpringTransactionPolicy">
<property name="transactionManager" ref="txManager"/>
<property name="propagationBehaviorName" value="PROPAGATION_REQUIRED"/>
</bean>
<bean id="PROPAGATION_REQUIRES_NEW"
class="org.apache.camel.spring.spi.SpringTransactionPolicy">
<property name="transactionManager" ref="txManager"/>
<property name="propagationBehaviorName" value="PROPAGATION_REQUIRES_NEW"/>
</bean>
Then in the routes you use transacted DSL to indicate which of these two propagations it uses.
from("direct:mixed")
// using required
.transacted("PROPAGATION_REQUIRED")
// all these steps will be okay
.setBody(constant("Tiger in Action")).beanRef("bookService")
.setBody(constant("Elephant in Action")).beanRef("bookService")
351 CHAPTER 9 - PATTERN APPENDIX
Transaction error handler
When a route is marked as transacted using transacted Camel will automatic use
the TransactionErrorHandler as Error Handler. It supports basically the same
feature set as the DefaultErrorHandler, so you can for instance use Exception
Clause as well.
.setBody(constant("Lion in Action")).beanRef("bookService")
// continue on route 2
.to("direct:mixed2");
from("direct:mixed2")
// using a different propagation which is requires new
.transacted("PROPAGATION_REQUIRES_NEW")
// tell Camel that if this route fails then only rollback this last route
// by using (rollback only *last*)
.onException(Exception.class).markRollbackOnlyLast().end()
// this step will be okay
.setBody(constant("Giraffe in Action")).beanRef("bookService")
// this step will fail with donkey
.setBody(constant("Donkey in Action")).beanRef("bookService");
Notice how we have configured the onException in the 2nd route to indicate in case of any
exceptions we should handle it and just rollback this transaction.
This is done using the markRollbackOnlyLast which tells Camel to only do it for the
current transaction and not globally.
See Also
• Error handling in Camel
• TransactionErrorHandler
• Error Handler
• JMS
Using This Pattern
If you would like to use this EIP Pattern then please read the Getting Started, you may also find
the Architecture useful particularly the description of Endpoint and URIs. Then you could try
out some of the Examples first before trying this pattern out.
CHAPTER 9 - PATTERN APPENDIX 352
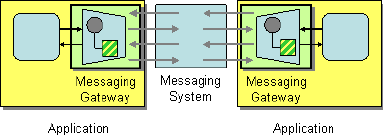
Messaging Gateway
Camel has several endpoint components that support the Messaging Gateway from the EIP
patterns.
Components like Bean and CXF provide a a way to bind a Java interface to the message
exchange.
However you may want to read the Using CamelProxy documentation as a true Messaging
Gateway EIP solution.
Another approach is to use @Produce which you can read about in POJO Producing which
also can be used as a Messaging Gateway EIP solution.
See Also
• Bean
• CXF
• Using CamelProxy
• POJO Producing
• Spring Remoting
Using This Pattern
If you would like to use this EIP Pattern then please read the Getting Started, you may also find
the Architecture useful particularly the description of Endpoint and URIs. Then you could try
out some of the Examples first before trying this pattern out.
Service Activator
Camel has several endpoint components that support the Service Activator from the EIP
patterns.
353 CHAPTER 9 - PATTERN APPENDIX
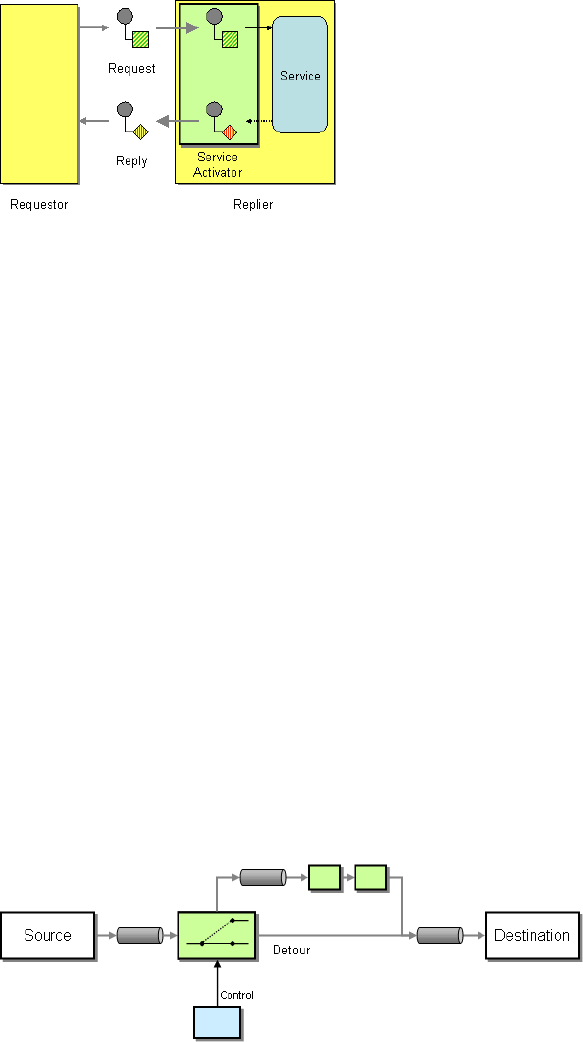
Components like Bean, CXF and Pojo provide a a way to bind the message exchange to a
Java interface/service where the route defines the endpoints and wires it up to the bean.
In addition you can use the Bean Integration to wire messages to a bean using annotation.
See Also
• Bean
• Pojo
• CXF
Using This Pattern
If you would like to use this EIP Pattern then please read the Getting Started, you may also find
the Architecture useful particularly the description of Endpoint and URIs. Then you could try
out some of the Examples first before trying this pattern out.
SYSTEM MANAGEMENT
Detour
The Detour from the EIP patterns allows you to send messages through additional steps if a
control condition is met. It can be useful for turning on extra validation, testing, debugging code
when needed.
Available in Camel 1.5.
CHAPTER 9 - PATTERN APPENDIX 354

Example
In this example we essentially have a route like
from("direct:start").to("mock:result") with a conditional detour to the
mock:detour endpoint in the middle of the route..
from("direct:start").choice()
.when().method("controlBean","isDetour").to("mock:detour").end()
.to("mock:result");
whether the detour is turned on or off is decided by the ControlBean. So, when the detour
is on the message is routed to mock:detour and then mock:result. When the detour is
off, the message is routed to mock:result.
For full details, check the example source here:
camel-core/src/test/java/org/apache/camel/processor/DetourTest.java
Using This Pattern
If you would like to use this EIP Pattern then please read the Getting Started, you may also find
the Architecture useful particularly the description of Endpoint and URIs. Then you could try
out some of the Examples first before trying this pattern out.
Wire Tap
The Wire Tap from the EIP patterns allows you to route messages to a separate tap location
while it is forwarded to the ultimate destination.
WireTap node
Available as of Camel 2.0
In Camel 2.0 we have introduced a new wireTap node for properly doing wire taps.
Camel will copy the original Exchange and set its Exchange Pattern to InOnly as we want the
tapped Exchange to be sent as a fire and forget style. The tapped Exchange is then send in a
separate thread so it can run in parallel with the original
We have extended the wireTap to support two flavors when tapping an Exchange
355 CHAPTER 9 - PATTERN APPENDIX

▪send a copy of the original Exchange (the traditional wire tap)
▪send a new Exchange, allowing you to populate the Exchange beforehand
Sending a copy (traditional wire tap)
Using the Fluent Builders
from("direct:start")
.to("log:foo")
.wireTap("direct:tap")
.to("mock:result");
Using the Spring XML Extensions
<route>
<from uri="direct:start"/>
<to uri="log:foo"/>
<wireTap uri="direct:tap"/>
<to uri="mock:result"/>
</route>
Sending a new Exchange
Using the Fluent Builders
Camel supports either a processor or an Expression to populate the new Exchange. Using
processor gives you full power how the Exchange is populated as you can set properties,
headers etc. The Expression can only be used to set the IN body.
From Camel 2.3 onwards the Expression or Processor is pre populated with a copy of the
original Exchange which allows you to access the original message when you prepare the new
Exchange to be sent. You can use the copy option to indicate if you want this or not (default is
enabled). If your turn copy=false then it works as in Camel 2.2 or older, where the
Exchange always will be empty.
Below is the processor variation shown. This example is from Camel 2.3, where we disable
copy by passing in false. This will create a new empty Exchange.
from("direct:start")
.wireTap("direct:foo",false,new Processor() {
public void process(Exchange exchange) throws Exception {
exchange.getIn().setBody("Bye World");
exchange.getIn().setHeader("foo","bar");
}
}).to("mock:result");
CHAPTER 9 - PATTERN APPENDIX 356

from("direct:foo").to("mock:foo");
And the Expression variation. This example is from Camel 2.3, where we disable copy by
passing in false. This will create a new empty Exchange.
from("direct:start")
.wireTap("direct:foo",false, constant("Bye World"))
.to("mock:result");
from("direct:foo").to("mock:foo");
Using the Spring XML Extensions
The processor variation, notice we use a processorRef attribute to refer to a spring bean
with this id:
<route>
<from uri="direct:start2"/>
<wireTap uri="direct:foo" processorRef="myProcessor"/>
<to uri="mock:result"/>
</route>
And the Expression variation, where the expression is defined in the body tag:
<route>
<from uri="direct:start"/>
<wireTap uri="direct:foo">
<body><constant>Bye World</constant></body>
</wireTap>
<to uri="mock:result"/>
</route>
And this variation accesses the body of the original message and creates a new Exchange which
is based on the Expression.
It will create a new Exchange and have the body contain "Bye ORIGINAL BODY MESSAGE
HERE"
<route>
<from uri="direct:start"/>
<wireTap uri="direct:foo">
<body><simple>Bye ${body}</simple></body>
</wireTap>
<to uri="mock:result"/>
</route>
357 CHAPTER 9 - PATTERN APPENDIX

Camel 1.x
The following example shows how to route a request from an input queue:a endpoint to the
wire tap location queue:tap it is received by queue:b
Using the Fluent Builders
RouteBuilder builder = new RouteBuilder() {
public void configure() {
errorHandler(deadLetterChannel("mock:error"));
from("seda:a").multicast().to("seda:tap","seda:b");
}
};
Using the Spring XML Extensions
<camelContext errorHandlerRef="errorHandler" streamCache="false" id="camel"
xmlns="http://camel.apache.org/schema/spring">
<route>
<from uri="seda:a"/>
<multicast>
<to uri="seda:tap"/>
<to uri="seda:b"/>
</multicast>
</route>
</camelContext>
Further Example
For another example of this pattern in use you could look at the wire tap test case.
Using This Pattern
If you would like to use this EIP Pattern then please read the Getting Started, you may also find
the Architecture useful particularly the description of Endpoint and URIs. Then you could try
out some of the Examples first before trying this pattern out.
LOG
How can I log processing a Message?
Camel provides many ways to log processing a message. Here is just some examples:
▪You can use the Log component which logs the Message content.
▪You can use the Tracer which trace logs message flow.
▪You can also use a Processor or Bean and log from Java code.
CHAPTER 9 - PATTERN APPENDIX 358

▪You can use the log DSL.
Using log DSL
And in Camel 2.2 you can use the log DSL which allows you to use Simple language to
construct a dynamic message which gets logged.
For example you can do
from("direct:start").log("Processing ${id}").to("bean:foo");
Which will construct a String message at runtime using the Simple language. The log message
will by logged at INFO level using the route id as the log name. By default a route is named
route-1,route-2 etc. But you can use the routeId("myCoolRoute") to set a route
name of choice.
The log DSL have overloaded methods to set the logging level and/or name as well.
from("direct:start").log(LoggingLevel.DEBUG, "Processing ${id}").to("bean:foo");
For example you can use this to log the file name being processed if you consume files.
from("file://target/files").log(LoggingLevel.DEBUG, "Processing file
${file:name}").to("bean:foo");
Using log DSL from Spring
In Spring DSL its also easy to use log DSL as shown below:
<route id="foo">
<from uri="direct:foo"/>
<log message="Got ${body}"/>
<to uri="mock:foo"/>
</route>
The log tag has attributes to set the message,loggingLevel and logName. For example:
<route id="baz">
<from uri="direct:baz"/>
<log message="Me Got ${body}" loggingLevel="FATAL" logName="cool"/>
<to uri="mock:baz"/>
</route>
359 CHAPTER 9 - PATTERN APPENDIX
Difference between log in the DSL and Log component
The log DSL is much lighter and meant for logging human logs such as Starting
to do ... etc. It can only log a message based on the Simple language. On the
other hand Log component is a full fledged component which involves using
endpoints and etc. The Log component is meant for logging the Message itself and
you have many URI options to control what you would like to be logged.
Using This Pattern
If you would like to use this EIP Pattern then please read the Getting Started, you may also find
the Architecture useful particularly the description of Endpoint and URIs. Then you could try
out some of the Examples first before trying this pattern out.
CHAPTER 9 - PATTERN APPENDIX 360
CHAPTER 10
°°°°
Component Appendix
There now follows the documentation on each Camel component.
ACTIVEMQ COMPONENT
The ActiveMQ component allows messages to be sent to a JMS Queue or Topic; or messages
to be consumed from a JMS Queue or Topic using Apache ActiveMQ.
This component is based on the JMS Component and uses Spring's JMS support for
declarative transactions, using Spring's JmsTemplate for sending and a
MessageListenerContainer for consuming. All the options from the JMS component
also applies for this component.
To use this component make sure you have the activemq.jar or activemq-
core.jar on your classpath along with any Camel dependencies such as camel-core.jar,
camel-spring.jar and camel-jms.jar.
URI format
activemq:[queue:|topic:]destinationName
Where destinationName is an ActiveMQ queue or topic name. By default, the
destinationName is interpreted as a queue name. For example, to connect to the queue,
FOO.BAR, use:
activemq:FOO.BAR
You can include the optional queue: prefix, if you prefer:
activemq:queue:FOO.BAR
To connect to a topic, you must include the topic: prefix. For example, to connect to the
topic, Stocks.Prices, use:
361 CHAPTER 10 - COMPONENT APPENDIX

activemq:topic:Stocks.Prices
Options
See Options on the JMS component as all these options also apply for this component.
Configuring the Connection Factory
The following test case shows how to add an ActiveMQComponent to the CamelContext using
the activeMQComponent() method while specifying the brokerURL used to connect to
ActiveMQ
camelContext.addComponent("activemq",
activeMQComponent("vm://localhost?broker.persistent=false"));
Configuring the Connection Factory using Spring XML
You can configure the ActiveMQ broker URL on the ActiveMQComponent as follows
<beans xmlns="http://www.springframework.org/schema/beans"
xmlns:xsi="http://www.w3.org/2001/XMLSchema-instance"
xsi:schemaLocation="
http://www.springframework.org/schema/beans http://www.springframework.org/
schema/beans/spring-beans-2.0.xsd
http://camel.apache.org/schema/spring http://camel.apache.org/schema/spring/
camel-spring.xsd">
<camelContext xmlns="http://camel.apache.org/schema/spring">
</camelContext>
<bean id="activemq" class="org.apache.activemq.camel.component.ActiveMQComponent">
<property name="brokerURL" value="tcp://somehost:61616"/>
</bean>
</beans>
Using connection pooling
When sending to an ActiveMQ broker using Camel it's recommended to use a pooled
connection factory to handle efficient pooling of JMS connections, sessions and producers. This
is documented in the page ActiveMQ Spring Support .
You can grab ActiveMQ's
org.apache.activemq.pool.PooledConnectionFactory with maven:
CHAPTER 10 - COMPONENT APPENDIX 362

<dependency>
<groupId>org.apache.activemq</groupId>
<artifactId>activemq-pool</artifactId>
<version>5.3.2</version>
</dependency>
And then setup the activemq Camel component as follows:
<bean id="jmsConnectionFactory"
class="org.apache.activemq.ActiveMQConnectionFactory">
<property name="brokerURL" value="tcp://localhost:61616" />
</bean>
<bean id="pooledConnectionFactory"
class="org.apache.activemq.pool.PooledConnectionFactory">
<property name="maxConnections" value="8" />
<property name="maximumActive" value="500" />
<property name="connectionFactory" ref="jmsConnectionFactory" />
</bean>
<bean id="jmsConfig" class="org.apache.camel.component.jms.JmsConfiguration">
<property name="connectionFactory" ref="pooledConnectionFactory"/>
<property name="transacted" value="false"/>
<property name="concurrentConsumers" value="10"/>
</bean>
<bean id="activemq"
class="org.apache.activemq.camel.component.ActiveMQComponent">
<property name="configuration" ref="jmsConfig"/>
</bean>
Invoking MessageListener POJOs in a Camel route
The ActiveMQ component also provides a helper Type Converter from a JMS MessageListener
to a Processor. This means that the Bean component is capable of invoking any JMS
MessageListener bean directly inside any route.
So for example you can create a MessageListener in JMS like this....
public class MyListener implements MessageListener {
public void onMessage(Message jmsMessage) {
// ...
}
}
Then use it in your Camel route as follows
363 CHAPTER 10 - COMPONENT APPENDIX

from("file://foo/bar").
bean(MyListener.class);
That is, you can reuse any of the Camel Components and easily integrate them into your JMS
MessageListener POJO!
Consuming Advisory Messages
ActiveMQ can generates Advisory messages which are put in topics that you can consume. Such
messages can help you to send alarm in case you detect slow consumers
or to build statistics (nber of messages/produced per day, ...). The following Spring DSL example
shows you how to read messages from Connection Topic :
The route start by reading the topic : ActiveMQ.Advisory.Connection. To watch another
topic, simply change the name according to the name provided in ActiveMQ Advisory Messages
documentation. The parameter mapJmsMessage=false allows to convert the
org.apache.activemq.command.ActiveMqMessage object from the jms queue.
Next, the body received is converted into a String for the example purpose and a carriage
return is added. Finally, the string is added to a file
<route>
<from uri="activemq:topic:ActiveMQ.Advisory.Connection?mapJmsMessage=false"/>
<convertBodyTo type="java.lang.String"/>
<transform>
<simple>${in.body} </simple>
</transform>
<to uri="file://data/activemq/
?fileExist=Append&fileName=advisoryConnection-${date:now:yyyyMMdd}.txt" />
</route>
If you produce consume a message on a queue, you should see the following files under data/
activemq folder :
advisoryConnection-20100312.txt
advisoryProducer-20100312.txt
and containing string :
ActiveMQMessage {commandId = 0, responseRequired = false, messageId =
ID:dell-charles-3258-1268399815140-1:0:0:0:221, originalDestination = null,
originalTransactionId = null, producerId = ID:dell-charles-3258-1268399815140-1:0:0:0,
destination = topic://ActiveMQ.Advisory.Connection,
transactionId = null, expiration = 0, timestamp = 0, arrival = 0, brokerInTime =
1268403383468, brokerOutTime = 1268403383468, correlationId = null,
replyTo = null, persistent = false, type = Advisory, priority = 0, groupID = null,
groupSequence = 0, targetConsumerId = null, compressed = false,
userID = null, content = null, marshalledProperties =
org.apache.activemq.util.ByteSequence@17e2705, dataStructure =
CHAPTER 10 - COMPONENT APPENDIX 364

ConnectionInfo {commandId = 1, responseRequired = true, connectionId =
ID:dell-charles-3258-1268399815140-2:50, clientId =
ID:dell-charles-3258-1268399815140-14:0, userName = , password = *****, brokerPath =
null, brokerMasterConnector = false, manageable = true,
clientMaster = true}, redeliveryCounter = 0, size = 0, properties =
{originBrokerName=master, originBrokerId=ID:dell-charles-3258-1268399815140-0:0,
originBrokerURL=vm://master}, readOnlyProperties = true, readOnlyBody = true,
droppable = false}
Getting Component JAR
You need these dependencies
▪camel-jms
▪activemq-camel
camel-jms
You must have the camel-jms as dependency as ActiveMQ is an extension to the JMS
component.
<dependency>
<groupId>org.apache.camel</groupId>
<artifactId>camel-jms</artifactId>
<version>1.6.0</version>
</dependency>
The ActiveMQ Camel component is released with the ActiveMQ project itself.
For Maven 2 users you simply just need to add the following dependency to your project.
ActiveMQ 5.2 or later
<dependency>
<groupId>org.apache.activemq</groupId>
<artifactId>activemq-camel</artifactId>
<version>5.2.0</version>
</dependency>
ActiveMQ 5.1.0
For 5.1.0 its in the activemq-core library
365 CHAPTER 10 - COMPONENT APPENDIX

<dependency>
<groupId>org.apache.activemq</groupId>
<artifactId>activemq-core</artifactId>
<version>5.1.0</version>
</dependency>
Alternatively you can download the component jar directly from the Maven repository:
• activemq-camel-5.2.0.jar
• activemq-core-5.1.0.jar
ActiveMQ 4.x
For this version you must use the JMS component instead. Please be careful to use a pooling
connection factory as described in the JmsTemplate Gotchas
See Also
• Configuring Camel
• Component
• Endpoint
• Getting Started
ACTIVEMQ JOURNAL COMPONENT
The ActiveMQ Journal Component allows messages to be stored in a rolling log file and then
consumed from that log file. The journal aggregates and batches up concurrent writes so that to
overhead of writing and waiting for the disk sync is relatively constant regardless of how many
concurrent writes are being done. Therefore, this component supports and encourages you to
use multiple concurrent producers to the same journal endpoint.
Each journal endpoint uses a different log file and therefore write batching (and the
associated performance boost) does not occur between multiple endpoints.
This component only supports 1 active consumer on the endpoint. After the message is
processed by the consumer's processor, the log file is marked and only subsequent messages in
the log file will get delivered to consumers.
URI format
activemq.journal:directoryName[?options]
So for example, to send to the journal located in the /tmp/data directory you would use the
following URI:
CHAPTER 10 - COMPONENT APPENDIX 366
activemq.journal:/tmp/data
Options
Name Default
Value Description
syncConsume false
If set to true, when the journal is marked after a message is
consumed, wait till the Operating System has verified the
mark update is safely stored on disk.
syncProduce true If set to true, wait till the Operating System has verified the
message is safely stored on disk.
You can append query options to the URI in the following format,
?option=value&option=value&...
Expected Exchange Data Types
The consumer of a Journal endpoint generates DefaultExchange objects with the in message :
• header "journal" : set to the endpoint uri of the journal the message came from
• header "location" : set to a Location which identifies where the recored was stored
on disk
• body : set to ByteSequence which contains the byte array data of the stored message
The producer to a Journal endpoint expects an Exchange with an In message where the body
can be converted to a ByteSequence or a byte[].
See Also
• Configuring Camel
• Component
• Endpoint
• Getting Started
AMQP
The AMQP component supports the AMQP protocol via the Qpid project.
Maven users will need to add the following dependency to their pom.xml for this
component:
<dependency>
<groupId>org.apache.camel</groupId>
367 CHAPTER 10 - COMPONENT APPENDIX

<artifactId>camel-ampq</artifactId>
<version>x.x.x</version>
<!-- use the same version as your Camel core version -->
</dependency>
URI format
amqp:[queue:|topic:]destinationName[?options]
You can specify all of the various configuration options of the JMS component after the
destination name.
See Also
• Configuring Camel
• Component
• Endpoint
• Getting Started
ATOM COMPONENT
The atom: component is used for polling atom feeds.
Camel will default poll the feed every 60th seconds.
Note: The component currently only supports polling (consuming) feeds.
Maven users will need to add the following dependency to their pom.xml for this
component:
<dependency>
<groupId>org.apache.camel</groupId>
<artifactId>camel-atom</artifactId>
<version>x.x.x</version>
<!-- use the same version as your Camel core version -->
</dependency>
URI format
atom://atomUri[?options]
Where atomUri is the URI to the atom feed to poll.
CHAPTER 10 - COMPONENT APPENDIX 368
Options
Property Default Description
splitEntries true
If true Camel will poll the feed and for the
subsequent polls return each entry poll by
poll. If the feed contains 7 entries then
Camel will return the first entry on the first
poll, the 2nd entry on the next poll, until no
more entries where as Camel will do a new
update on the feed. If false then Camel
will poll a fresh feed on every invocation.
filter true
Is only used by the split entries to filter the
entries to return. Camel will default use the
UpdateDateFilter that only return
new entries from the feed. So the client
consuming from the feed never receives the
same entry more than once. The filter will
return the entries ordered by the newest
last.
lastUpdate null
Is only used by the filter, as the starting
timestamp for selection never entries (uses
the entry.updated timestamp). Syntax
format is: yyyy-MM-ddTHH:MM:ss.
Example: 2007-12-24T17:45:59.
feedHeader true Sets whether to add the Abdera Feed
object as a header.
sortEntries false
If splitEntries is true, this sets
whether to sort those entries by updated
date.
consumer.delay 60000 Delay in millis between each poll.
consumer.initialDelay 1000 Millis before polling starts.
consumer.userFixedDelay false
If true, use fixed delay between pools,
otherwise fixed rate is used. See
ScheduledExecutorService in JDK for
details.
You can append query options to the URI in the following format,
?option=value&option=value&...
369 CHAPTER 10 - COMPONENT APPENDIX
Exchange data format
Camel will set the In body on the returned Exchange with the entries. Depending on the
splitEntries flag Camel will either return one Entry or a List<Entry>.
Option Value Behavior
splitEntries true Only a single entry from the currently being processed feed is
set: exchange.in.body(Entry)
splitEntries false The entire list of entries from the feed is set:
exchange.in.body(List<Entry>)
Camel can set the Feed object on the In header (see feedHeader option to disable this):
Message Headers
Camel atom uses these headers.
Header Description
org.apache.camel.component.atom.feed
Camel 1.x: When consuming the
org.apache.abdera.model.Feed
object is set to this header.
CamelAtomFeed
Camel 2.0: When consuming the
org.apache.abdera.model.Feed
object is set to this header.
Samples
In this sample we poll James Strachan's blog.
from("atom://http://macstrac.blogspot.com/feeds/posts/default").to("seda:feeds");
In this sample we want to filter only good blogs we like to a SEDA queue. The sample also
shows how to setup Camel standalone, not running in any Container or using Spring.
// This is the CamelContext that is the heart of Camel
private CamelContext context;
@Override
protected CamelContext createCamelContext() throws Exception {
// We initialize Camel
SimpleRegistry registry = new SimpleRegistry();
// First we register a blog service in our bean registry
registry.put("blogService",new BlogService());
CHAPTER 10 - COMPONENT APPENDIX 370

// Then we create the camel context with our bean registry
context = new DefaultCamelContext(registry);
// Then we add all the routes we need using the route builder DSL syntax
context.addRoutes(createRouteBuilder());
// And finally we must start Camel to let the magic routing begins
context.start();
return context;
}
/**
* This is the route builder where we create our routes in the advanced Camel DSL
syntax
*/
protected RouteBuilder createRouteBuilder() throws Exception {
return new RouteBuilder() {
public void configure() throws Exception {
// We pool the atom feeds from the source for further processing in the
seda queue
// we set the delay to 1 second for each pool as this is a unit test also
and we can
// not wait the default poll interval of 60 seconds.
// Using splitEntries=true will during polling only fetch one Atom Entry
at any given time.
// As the feed.atom file contains 7 entries, using this will require 7
polls to fetch the entire
// content. When Camel have reach the end of entries it will refresh the
atom feed from URI source
// and restart - but as Camel by default uses the UpdatedDateFilter it
will only deliver new
// blog entries to "seda:feeds". So only when James Straham updates his
blog with a new entry
// Camel will create an exchange for the seda:feeds.
from("atom:file:src/test/data/
feed.atom?splitEntries=true&consumer.delay=1000").to("seda:feeds");
// From the feeds we filter each blot entry by using our blog service class
from("seda:feeds").filter().method("blogService",
"isGoodBlog").to("seda:goodBlogs");
// And the good blogs is moved to a mock queue as this sample is also used
for unit testing
// this is one of the strengths in Camel that you can also use the mock
endpoint for your
// unit tests
from("seda:goodBlogs").to("mock:result");
}
};
}
/**
* This is the actual junit test method that does the assertion that our routes is
371 CHAPTER 10 - COMPONENT APPENDIX

working
* as expected
*/
@Test
public void testFiltering() throws Exception {
// Get the mock endpoint
MockEndpoint mock = context.getEndpoint("mock:result", MockEndpoint.class);
// There should be two good blog entries from the feed
mock.expectedMinimumMessageCount(2);
// Asserts that the above expectations is true, will throw assertions exception if
it failed
// Camel will default wait max 20 seconds for the assertions to be true,if the
conditions
// is true sooner Camel will continue
mock.assertIsSatisfied();
}
/**
* Services for blogs
*/
public class BlogService {
/**
* Tests the blogs if its a good blog entry or not
*/
public boolean isGoodBlog(Exchange exchange) {
Entry entry = exchange.getIn().getBody(Entry.class);
String title = entry.getTitle();
// We like blogs about Camel
boolean good = title.toLowerCase().contains("camel");
return good;
}
}
See Also
• Configuring Camel
• Component
• Endpoint
• Getting Started
BEAN COMPONENT
The bean: component binds beans to Camel message exchanges.
CHAPTER 10 - COMPONENT APPENDIX 372
URI format
bean:beanID[?options]
Where beanID can be any string which is used to look up the bean in the Registry
Options
Name Type Default Description
method String null
The method name that bean will be
invoked. If not provided, Camel will
try to pick the method itself. In case
of ambiguity an exception is thrown.
See Bean Binding for more details.
cache boolean false
If enabled, Camel will cache the
result of the first Registry look-up.
Cache can be enabled if the bean in
the Registry is defined as a singleton
scope.
multiParameterArray boolean false
Camel 1.5: How to treat the
parameters which are passed from
the message body; if it is true, the
In message body should be an array
of parameters.
You can append query options to the URI in the following format,
?option=value&option=value&...
Using
The object instance that is used to consume messages must be explicitly registered with the
Registry. For example, if you are using Spring you must define the bean in the Spring
configuration, spring.xml; or if you don't use Spring, put the bean in JNDI.
// lets populate the context with the services we need
// note that we could just use a spring.xml file to avoid this step
JndiContext context = new JndiContext();
context.bind("bye",new SayService("Good Bye!"));
CamelContext camelContext = new DefaultCamelContext(context);
Once an endpoint has been registered, you can build Camel routes that use it to process
exchanges.
373 CHAPTER 10 - COMPONENT APPENDIX

// lets add simple route
camelContext.addRoutes(new RouteBuilder() {
public void configure() {
from("direct:hello").to("bean:bye");
}
});
Abean: endpoint cannot be defined as the input to the route; i.e. you cannot consume from it,
you can only route from some inbound message Endpoint to the bean endpoint as output. So
consider using a direct: or queue: endpoint as the input.
You can use the createProxy() methods on ProxyHelper to create a proxy that will
generate BeanExchanges and send them to any endpoint:
Endpoint endpoint = camelContext.getEndpoint("direct:hello");
ISay proxy = ProxyHelper.createProxy(endpoint, ISay.class);
String rc = proxy.say();
assertEquals("Good Bye!", rc);
And the same route using Spring DSL:
<route>
<from uri="direct:hello">
<to uri="bean:bye"/>
</route>
Bean as endpoint
Camel also supports invoking Bean as an Endpoint. In the route below:
<camelContext id="camel" xmlns="http://camel.apache.org/schema/spring">
<route>
<from uri="direct:start"/>
<to uri="myBean"/>
<to uri="mock:results"/>
</route>
</camelContext>
<bean id="myBean" class="org.apache.camel.spring.bind.ExampleBean"/>
What happens is that when the exchange is routed to the myBean Camel will use the Bean
Binding to invoke the bean.
The source for the bean is just a plain POJO:
public class ExampleBean {
CHAPTER 10 - COMPONENT APPENDIX 374

public String sayHello(String name) {
return "Hello " + name + "!";
}
}
Camel will use Bean Binding to invoke the sayHello method, by converting the Exchange's In
body to the String type and storing the output of the method on the Exchange Out body.
Bean Binding
How bean methods to be invoked are chosen (if they are not specified explicitly through the
method parameter) and how parameter values are constructed from the Message are all
defined by the Bean Binding mechanism which is used throughout all of the various Bean
Integration mechanisms in Camel.
See Also
• Configuring Camel
• Component
• Endpoint
• Getting Started
• Class component
• Bean Binding
• Bean Integration
BEAN VALIDATION COMPONENT
Available as of Camel 2.3
The Validation component performs bean validation of the message body using the Java Bean
Validation API (JSR 303). Camel uses the reference implementation, which is Hibernate
Validator.
Maven users will need to add the following dependency to their pom.xml for this
component:
<dependency>
<groupId>org.apache.camel</groupId>
<artifactId>camel-bean-validator</artifactId>
<version>x.x.x</version>
<!-- use the same version as your Camel core version -->
</dependency>
375 CHAPTER 10 - COMPONENT APPENDIX
URI format
bean-validator:something[?options]
or
bean-validator://something[?options]
Where something must be present to provide a valid url
You can append query options to the URI in the following format,
?option=value&option=value&...
URI Options
Option Default Description
group javax.validation.groups.Default The custom validation group to use.
messageInterpolator org.hibernate.validator.engine.
ResourceBundleMessageInterpolator
Reference to a custom
javax.validation.MessageInterpolator in the Registry.
traversableResolver org.hibernate.validator.engine.resolver.
DefaultTraversableResolver
Reference to a custom
javax.validation.TraversableResolver in the Registry.
constraintValidatorFactory org.hibernate.validator.engine.
ConstraintValidatorFactoryImpl
Reference to a custom
javax.validation.ConstraintValidatorFactory in the
Registry.
Example
Assumed we have a java bean with the following annotations
Listing 12.Listing 12. Car.javaCar.java
public class Car {
@NotNull
private String manufacturer;
@NotNull
@Size(min = 5, max = 14, groups = OptionalChecks.class)
private String licensePlate;
// getter and setter
}
and an interface definition for our custom validation group
Listing 13.Listing 13. OptionalChecks.javaOptionalChecks.java
public interface OptionalChecks {
}
CHAPTER 10 - COMPONENT APPENDIX 376

with the following Camel route, only the @NotNull constraints on the attributes
manufacturer and licensePlate will be validated (Camel uses the default group
javax.validation.groups.Default).
from("direct:start")
.to("bean-validator://x")
.to("mock:end")
If you want to check the constraints from the group OptionalChecks, you have to define
the route like this
from("direct:start")
.to("bean-validator://x?group=OptionalChecks")
.to("mock:end")
If you want to check the constraints from both groups, you have to define a new interface first
Listing 14.Listing 14. AllChecks.javaAllChecks.java
@GroupSequence({Default.class, OptionalChecks.class})
public interface AllChecks {
}
and then your route definition should looks like this
from("direct:start")
.to("bean-validator://x?group=AllChecks")
.to("mock:end")
And if you have to provide your own message interpolator, traversable resolver and constraint
validator factory, you have to write a route like this
<bean id="myMessageInterpolator" class="my.ConstraintValidatorFactory" />
<bean id="myTraversableResolver" class="my.TraversableResolver" />
<bean id="myConstraintValidatorFactory" class="my.ConstraintValidatorFactory" />
from("direct:start")
.to("bean-validator://x?group=AllChecks&messageInterpolator=#myMessageInterpolator&traversableResolver=#myTraversableResolver&constraintValidatorFactory=#myConstraintValidatorFactory")
.to("mock:end")
It's also possible to describe your constraints as XML and not as Java annotations. In this case,
you have to provide the file META-INF/validation.xml which could looks like this
Listing 15.Listing 15. validation.xmlvalidation.xml
<?xml version="1.0" encoding="UTF-8"?>
<validation-config
xmlns="http://jboss.org/xml/ns/javax/validation/configuration"
377 CHAPTER 10 - COMPONENT APPENDIX

xmlns:xsi="http://www.w3.org/2001/XMLSchema-instance"
xsi:schemaLocation="http://jboss.org/xml/ns/javax/validation/configuration">
<default-provider>org.hibernate.validator.HibernateValidator</default-provider>
<message-interpolator>org.hibernate.validator.engine.ResourceBundleMessageInterpolator</message-interpolator>
<traversable-resolver>org.hibernate.validator.engine.resolver.DefaultTraversableResolver</traversable-resolver>
<constraint-validator-factory>org.hibernate.validator.engine.ConstraintValidatorFactoryImpl</constraint-validator-factory>
<constraint-mapping>/constraints-car.xml</constraint-mapping>
</validation-config>
and the constraints-car.xml file
Listing 16.Listing 16. constraints-car.xmlconstraints-car.xml
<?xml version="1.0" encoding="UTF-8"?>
<constraint-mappings xmlns:xsi="http://www.w3.org/2001/XMLSchema-instance"
xsi:schemaLocation="http://jboss.org/xml/ns/javax/validation/mapping
validation-mapping-1.0.xsd"
xmlns="http://jboss.org/xml/ns/javax/validation/mapping">
<default-package>org.apache.camel.component.bean.validator</default-package>
<bean class="CarWithoutAnnotations" ignore-annotations="true">
<field name="manufacturer">
<constraint annotation="javax.validation.constraints.NotNull"
/>
</field>
<field name="licensePlate">
<constraint annotation="javax.validation.constraints.NotNull"
/>
<constraint annotation="javax.validation.constraints.Size">
<groups>
<value>org.apache.camel.component.bean.validator.OptionalChecks</value>
</groups>
<element name="min">5</element>
<element name="max">14</element>
</constraint>
</field>
</bean>
</constraint-mappings>
See Also
• Configuring Camel
• Component
• Endpoint
CHAPTER 10 - COMPONENT APPENDIX 378

• Getting Started
BROWSE COMPONENT
Available as of Camel 2.0
The Browse component provides a simple BrowsableEndpoint which can be useful for
testing, visualisation tools or debugging. The exchanges sent to the endpoint are all available to
be browsed.
URI format
browse:someName
Where someName can be any string to uniquely identify the endpoint.
Sample
In the route below, we insert a browse: component to be able to browse the Exchanges that
are passing through:
from("activemq:order.in").to("browse:orderReceived").to("bean:processOrder");
We can now inspect the received exchanges from within the Java code:
private CamelContext context;
public void inspectRecievedOrders() {
BrowsableEndpoint browse = context.getEndpoint("browse:orderReceived",
BrowsableEndpoint.class);
List<Exchange> exchanges = browse.getExchanges();
...
// then we can inspect the list of received exchanges from Java
for (Exchange exchange : exchanges) {
String payload = exchange.getIn().getBody();
...
}
}
See Also
• Configuring Camel
• Component
• Endpoint
• Getting Started
379 CHAPTER 10 - COMPONENT APPENDIX
CACHE COMPONENT
Available as of Camel 2.1
The cache component enables you to perform caching operations using EHCache as the
Cache Implementation. The cache itself is created on demand or if a cache of that name already
exists then it is simply utilized with its original settings.
This component supports producer and event based consumer endpoints.
The Cache consumer is an event based consumer and can be used to listen and respond to
specific cache activities. If you need to perform selections from a pre-existing cache, used the
processors defined for the cache component.
Maven users will need to add the following dependency to their pom.xml for this
component:
<dependency>
<groupId>org.apache.camel</groupId>
<artifactId>camel-cache</artifactId>
<version>x.x.x</version>
<!-- use the same version as your Camel core version -->
</dependency>
URI format
cache://cacheName[?options]
You can append query options to the URI in the following format,
?option=value&option=value&...
Options
Name Default Value Description
maxElementsInMemory 1000 The numer of elements that may be stored in the defined cache
memoryStoreEvictionPolicy MemoryStoreEvictionPolicy.LFU
The number of elements that may be stored in the defined cache. Options include
▪MemoryStoreEvictionPolicy.LFU - Least frequently used
▪MemoryStoreEvictionPolicy.LRU - Least recently used
▪MemoryStoreEvictionPolicy.FIFO - first in first out, the oldest
element by creation time
overflowToDisk true Specifies whether cache may overflow to disk
eternal false Sets whether elements are eternal. If eternal, timeouts are ignored and the
element is never expired.
timeToLiveSeconds 300 The maximum time between creation time and when an element expires.
Is only used if the element is not eternal
timeToIdleSeconds 300 The maximum amount of time between accesses before an element expires
diskPersistent true Whether the disk store persists between restarts of the Virtual Machine.
The default value is false.
diskExpiryThreadIntervalSeconds 120 The number of seconds between runs of the disk expiry thread. The default value
is 120 seconds
CHAPTER 10 - COMPONENT APPENDIX 380
cacheManagerFactory null Camel 2.3: If you want to use a custom factory which instantiates and creates the
EHCache net.sf.ehcache.CacheManager.
Sending/Receiving Messages to/from the cache
Message Headers
Header Description
CACHE_OPERATION
The operation to be performed on the cache. The valid options are
▪GET
▪CHECK
▪ADD
▪UPDATE
▪DELETE
▪DELETEALL
The GET and CHECK requires Camel 2.3 onwards.
CACHE_KEY The cache key used to store the Message in the cache. The cache key is optional if the CACHE_OPERATION is DELETEALL
Cache Producer
Sending data to the cache involves the ability to direct payloads in exchanges to be stored in a
pre-existing or created-on-demand cache. The mechanics of doing this involve
▪setting the Message Exchange Headers shown above.
▪ensuring that the Message Exchange Body contains the message directed to the cache
Cache Consumer
Receiving data from the cache involves the ability of the CacheConsumer to listen on a pre-
existing or created-on-demand Cache using an event Listener and receive automatic
notifications when any cache activity take place (i.e ADD/UPDATE/DELETE/DELETEALL). Upon
such an activity taking place
▪an exchange containing Message Exchange Headers and a Message Exchange Body
containing the just added/updated payload is placed and sent.
▪in case of a DELETEALL operation, the Message Exchange Header CACHE_KEY and
the Message Exchange Body are not populated.
Cache Processors
There are a set of nice processors with the ability to perform cache lookups and selectively
replace payload content at the
▪body
▪token
▪xpath level
381 CHAPTER 10 - COMPONENT APPENDIX

Cache Usage Samples
Example 1: Configuring the cache
from("cache://MyApplicationCache" +
"?maxElementsInMemory=1000" +
"&memoryStoreEvictionPolicy=" +
"MemoryStoreEvictionPolicy.LFU" +
"&overflowToDisk=true"+
"&eternal=true"+
"&timeToLiveSeconds=300" +
"&timeToIdleSeconds=true"+
"&diskPersistent=true"+
"&diskExpiryThreadIntervalSeconds=300")
Example 2: Adding keys to the cache
RouteBuilder builder = new RouteBuilder() {
public void configure() {
from("direct:start")
.setHeader("CACHE_OPERATION", constant("ADD"))
.setHeader("CACHE_KEY", constant("Ralph_Waldo_Emerson"))
.to("cache://TestCache1")
}
};
Example 2: Updating existing keys in a cache
RouteBuilder builder = new RouteBuilder() {
public void configure() {
from("direct:start")
.setHeader("CACHE_OPERATION", constant("UPDATE"))
.setHeader("CACHE_KEY", constant("Ralph_Waldo_Emerson"))
.to("cache://TestCache1")
}
};
CHAPTER 10 - COMPONENT APPENDIX 382

Example 3: Deleting existing keys in a cache
RouteBuilder builder = new RouteBuilder() {
public void configure() {
from("direct:start")
.setHeader("CACHE_OPERATION", constant("DELETE"))
.setHeader("CACHE_KEY", constant("Ralph_Waldo_Emerson"))
.to("cache://TestCache1")
}
};
Example 4: Deleting all existing keys in a cache
RouteBuilder builder = new RouteBuilder() {
public void configure() {
from("direct:start")
.setHeader("CACHE_OPERATION", constant("DELETEALL"))
.to("cache://TestCache1");
}
};
Example 5: Notifying any changes registering in a Cache to
Processors and other Producers
RouteBuilder builder = new RouteBuilder() {
public void configure() {
from("cache://TestCache1")
.process(new Processor() {
public void process(Exchange exchange)
throws Exception {
String operation = (String) exchange.getIn().getHeader("CACHE_OPERATION");
String key = (String) exchange.getIn().getHeader("CACHE_KEY");
Object body = exchange.getIn().getBody();
// Do something
}
})
}
};
383 CHAPTER 10 - COMPONENT APPENDIX

Example 6: Using Processors to selectively replace payload with
cache values
RouteBuilder builder = new RouteBuilder() {
public void configure() {
//Message Body Replacer
from("cache://TestCache1")
.filter(header("CACHE_KEY").isEqualTo("greeting"))
.process(new CacheBasedMessageBodyReplacer("cache://TestCache1","farewell"))
.to("direct:next");
//Message Token replacer
from("cache://TestCache1")
.filter(header("CACHE_KEY").isEqualTo("quote"))
.process(new CacheBasedTokenReplacer("cache://TestCache1","novel","#novel#"))
.process(new CacheBasedTokenReplacer("cache://TestCache1","author","#author#"))
.process(new CacheBasedTokenReplacer("cache://TestCache1","number","#number#"))
.to("direct:next");
//Message XPath replacer
from("cache://TestCache1").
.filter(header("CACHE_KEY").isEqualTo("XML_FRAGMENT"))
.process(new CacheBasedXPathReplacer("cache://TestCache1","book1","/books/book1"))
.process (new CacheBasedXPathReplacer("cache://TestCache1","book2","/books/book2"))
.to("direct:next");
}
};
Example 7: Getting an entry from the Cache
from("direct:start")
// Prepare headers
.setHeader(CacheConstants.CACHE_OPERATION,
constant(CacheConstants.CACHE_OPERATION_GET))
.setHeader(CacheConstants.CACHE_KEY, constant("Ralph_Waldo_Emerson")).
.to("cache://TestCache1").
// Check if entry was not found
.choice().when(header(CacheConstants.CACHE_ELEMENT_WAS_FOUND).isNull()).
// If not found, get the payload and put it to cache
.to("cxf:bean:someHeavyweightOperation").
.setHeader(CacheConstants.CACHE_OPERATION,
constant(CacheConstants.CACHE_OPERATION_ADD))
.setHeader(CacheConstants.CACHE_KEY, constant("Ralph_Waldo_Emerson"))
.to("cache://TestCache1")
.end()
.to("direct:nextPhase");
CHAPTER 10 - COMPONENT APPENDIX 384

Example 8: Checking for an entry in the Cache
Note: CHECK command tests existence of the entry in the cache but doesn't place message to
the body.
from("direct:start")
// Prepare headers
.setHeader(CacheConstants.CACHE_OPERATION,
constant(CacheConstants.CACHE_OPERATION_CHECK))
.setHeader(CacheConstants.CACHE_KEY, constant("Ralph_Waldo_Emerson")).
.to("cache://TestCache1").
// Check if entry was not found
.choice().when(header(CacheConstants.CACHE_ELEMENT_WAS_FOUND).isNull()).
// If not found, get the payload and put it to cache
.to("cxf:bean:someHeavyweightOperation").
.setHeader(CacheConstants.CACHE_OPERATION,
constant(CacheConstants.CACHE_OPERATION_ADD))
.setHeader(CacheConstants.CACHE_KEY, constant("Ralph_Waldo_Emerson"))
.to("cache://TestCache1")
.end();
COMETD COMPONENT
The cometd: component is a transport for working with the jetty implementation of the
cometd/bayeux protocol.
Using this component in combination with the dojo toolkit library it's possible to push Camel
messages directly into the browser using an AJAX based mechanism.
Maven users will need to add the following dependency to their pom.xml for this
component:
<dependency>
<groupId>org.apache.camel</groupId>
<artifactId>camel-cometd</artifactId>
<version>x.x.x</version>
<!-- use the same version as your Camel core version -->
</dependency>
URI format
cometd://host:port/channelName[?options]
The channelName represents a topic that can be subscribed to by the Camel endpoints.
385 CHAPTER 10 - COMPONENT APPENDIX
Examples
cometd://localhost:8080/service/mychannel
cometds://localhost:8443/service/mychannel
where cometds: represents an SSL configured endpoint.
See this blog entry by David Greco who contributed this component to Apache Camel, for a
full sample.
Options
Name Default
Value Description
resourceBase
The root directory for the web resources or
classpath. Use the protocol file: or classpath:
depending if you want that the component loads
the resource from file system or classpath.
Classpath is required for OSGI deployment where
the resources are packaged in the jar
timeout 240000
The server side poll timeout in milliseconds. This is
how long the server will hold a reconnect request
before responding.
interval 0 The client side poll timeout in milliseconds. How
long a client will wait between reconnects
maxInterval 30000
The max client side poll timeout in milliseconds. A
client will be removed if a connection is not
received in this time.
multiFrameInterval 1500 The client side poll timeout, if multiple connections
are detected from the same browser.
jsonCommented true
If true, the server will accept JSON wrapped in a
comment and will generate JSON wrapped in a
comment. This is a defence against Ajax Hijacking.
logLevel 1 0=none, 1=info, 2=debug.
You can append query options to the URI in the following format,
?option=value&option=value&...
Here is some examples on How to pass the parameters
For file (for webapp resources located in the Web Application directory -->
cometd://localhost:8080?resourceBase=file./webapp
CHAPTER 10 - COMPONENT APPENDIX 386

For classpath (when by example the web resources are packaged inside the webapp folder -->
cometd://localhost:8080?resourceBase=classpath:webapp
See Also
• Configuring Camel
• Component
• Endpoint
• Getting Started
CRYPTO COMPONENT FOR DIGITAL SIGNATURES
Available as of Camel 2.3
Using Camel cryptographic endpoints and Java's Cryptographic extension it is easy to create
Digital Signatures for Exchanges. Camel provides a pair of flexible endpoints which get used in
concert to create a signature for an exchange in one part of the exchange's workflow and then
verify the signature in a later part of the workflow.
Maven users will need to add the following dependency to their pom.xml for this
component:
<dependency>
<groupId>org.apache.camel</groupId>
<artifactId>camel-crypto</artifactId>
<version>x.x.x</version>
<!-- use the same version as your Camel core version -->
</dependency>
Introduction
Digital signatures make use Asymmetric Cryptographic techniques to sign messages. From a
(very) high level, the algorithms use pairs of complimentary keys with the special property that
data encrypted with one key can only be decrypted with the other. One, the private key, is
closely guarded and used to 'sign' the message while the other, public key, is shared around to
anyone interested in verifying your messages. Messages are signed by encrypting a digest of the
message with the private key. This encrypted digest is transmitted along with the message. On
the other side the verifier recalculates the message digest and uses the public key to decrypt
the the digest in the signature. If both digest match the verifier knows only the holder of the
private key could have created the signature.
Camel uses the Signature service from the Java Cryptographic Extension to do all the heavy
cryptographic lifting required to create exchange signatures. The following are some excellent
sources for explaining the mechanics of Cryptography, Message digests and Digital Signatures
and how to leverage them with the JCE.
▪Bruce Schneier's Applied Cryptography
387 CHAPTER 10 - COMPONENT APPENDIX
▪Beginning Cryptography with Java by David Hook
▪The ever insightful, Wikipedia Digital_signatures
URI format
As mentioned Camel provides a pair of crypto endpoints to create and verify signatures
crypto:sign:name[?options]
crypto:verify:name[?options]
•crypto:sign creates the signature and stores it in the Header keyed by the
constant Exchange.SIGNATURE, i.e. "CamelDigitalSignature".
•crypto:verify will read in the contents of this header and do the verification
calculation.
In order to correctly function, sign and verify need to share a pair of keys, sign requiring a
PrivateKey and verify a PublicKey (or a Certificate containing one). Using the JCE
is is very simple to generate these key pairs but it is usually most secure to use a KeyStore to
house and share your keys. The DSL is very flexible about how keys are supplied and provides a
number of mechanisms.
Note a crypto:sign endpoint is typically defined in one route and the complimentary
crypto:verify in another, though for simplicity in the examples they appear one after the
other. It goes without saying that both sign and verify should be configured identically.
Options
Name Type Default Description
algorithm String DSA The name of the JCE Signature algorithm that will be used.
alias String null An alias name that will be used to select a key from the keystore.
bufferSize Integer 2048 the size of the buffer used in the signature process.
certificate Certificate null A Certificate used to verify the signature of the exchange's payload. Either this or a Public Key is required.
keystore KeyStore null A reference to a JCE Keystore that stores keys and certificates used to sign and verify.
provider String null The name of the JCE Security Provider that should be used.
privateKey PrivatKey null The private key used to sign the exchange's payload.
publicKey PublicKey null The public key used to verify the signature of the exchange's payload.
secureRandom secureRandom null A reference to a SecureRandom object that wil lbe used to initialize the Signature service.
password char[] null The password for the keystore.
Using
1) Raw keys
The most basic way to way to sign an verify an exchange is with a KeyPair as follows.
CHAPTER 10 - COMPONENT APPENDIX 388

from("direct:keypair").to("crypto:sign://basic?privateKey=#myPrivateKey",
"crypto:verify://basic?publicKey=#myPublicKey", "mock:result");
The same can be achieved with the Spring XML Extensions using references to keys
<route>
<from uri="direct:keypair"/>
<to uri="crypto:sign://basic?privateKey=#myPrivateKey" />
<to uri="crypto:verify://basic?publicKey=#myPublicKey" />
<to uri="mock:result"/>
</route>
2) KeyStores and Aliases.
The JCE provides a very versatile KeyStore for housing pairs of PrivateKeys and Certificates
keeping them encrypted and password protected. They can be retrieved from it by applying an
alias to the retrieval apis. There are a number of ways to get keys and Certificates into a
keystore most often this is done with the external 'keytool' application. This is a good example
of using keytool to create a KeyStore with a self signed Cert and Private key.
The examples use a Keystore with a key and cert aliased by 'bob'. The password for the
keystore and the key is 'letmein'
The following shows how to use a Keystore via the Fluent builders, it also shows how to
load and initialize the keystore.
from("direct:keystore").to("crypto:sign://keystore?keystore=#keystore&alias=bob&password=letmein",
"crypto:verify://keystore?keystore=#keystore&alias=bob", "mock:result");
Again in Spring a ref is used to lookup an actual keystore instance.
<route>
<from uri="direct:keystore"/>
<to
uri="crypto:sign://keystore?keystore=#keystore&alias=bob&password=letmein" />
<to uri="crypto:verify://keystore?keystore=#keystore&alias=bob" />
<to uri="mock:result"/>
</route>
3) Changing JCE Provider and Algorithm
Changing the Signature algorithm or the Security provider is a simple matter of specifying their
names. You will need to also use Keys that are compatible with the algorithm you choose.
389 CHAPTER 10 - COMPONENT APPENDIX

KeyPairGenerator keyGen = KeyPairGenerator.getInstance("RSA");
keyGen.initialize(512, new SecureRandom());
keyPair = keyGen.generateKeyPair();
PrivateKey privateKey = keyPair.getPrivate();
PublicKey publicKey = keyPair.getPublic();
// we can set the keys explicitly on the endpoint instances.
context.getEndpoint("crypto:sign://rsa?algorithm=MD5withRSA",
DigitalSignatureEndpoint.class).setPrivateKey(privateKey);
context.getEndpoint("crypto:verify://rsa?algorithm=MD5withRSA",
DigitalSignatureEndpoint.class).setPublicKey(publicKey);
from("direct:algorithm").to("crypto:sign://rsa?algorithm=MD5withRSA",
"crypto:verify://rsa?algorithm=MD5withRSA", "mock:result");
from("direct:provider").to("crypto:sign://provider?privateKey=#myPrivateKey&provider=SUN",
"crypto:verify://provider?publicKey=#myPublicKey&provider=SUN", "mock:result");
or
<route>
<from uri="direct:algorithm"/>
<to uri="crypto:sign://rsa?algorithm=MD5withRSA&privateKey=#rsaPrivateKey" />
<to uri="crypto:verify://rsa?algorithm=MD5withRSA&publicKey=#rsaPublicKey" />
<to uri="mock:result"/>
</route>
<route>
<from uri="direct:provider"/>
<to uri="crypto:sign://provider?privateKey=#myPrivateKey&provider=SUN" />
<to uri="crypto:verify://provider?publicKey=#myPublicKey&provider=SUN" />
<to uri="mock:result"/>
</route>
4) Changing the Signature Mesasge Header
It may be desirable to change the message header used to store the signature. A different
header name can be specified in the route definition as follows
from("direct:signature-header").to("crypto:sign://another?privateKey=#myPrivateKey&signatureHeader=AnotherDigitalSignature",
"crypto:verify://another?publicKey=#myPublicKey&signatureHeader=AnotherDigitalSignature",
"mock:result");
or
CHAPTER 10 - COMPONENT APPENDIX 390

<route>
<from uri="direct:signature-header"/>
<to
uri="crypto:sign://another?privateKey=#myPrivateKey&signatureHeader=AnotherDigitalSignature"
/>
<to
uri="crypto:verify://another?publicKey=#myPublicKey&signatureHeader=AnotherDigitalSignature"
/>
<to uri="mock:result"/>
</route>
5) Changing the buffersize
In case you need to update the size of the buffer...
from("direct:buffersize").to("crypto:sign://buffer?privateKey=#myPrivateKey&buffersize=1024",
"crypto:verify://buffer?publicKey=#myPublicKey&buffersize=1024", "mock:result");
or
<route>
<from uri="direct:buffersize" />
<to uri="crypto:sign://buffer?privateKey=#myPrivateKey&buffersize=1024" />
<to uri="crypto:verify://buffer?publicKey=#myPublicKey&buffersize=1024" />
<to uri="mock:result"/>
</route>
6) Supplying Keys dynamically.
When using a Recipient list or similar EIP the recipient of an exchange can vary dynamically.
Using the same key across all recipients may neither be feasible or desirable. It would be useful
to be able to specify the signature keys dynamically on a per exchange basis. The exchange
could then be dynamically enriched with the key of its target recipient prior to signing. To
facilitate this the signature mechanisms allow for keys to be supplied dynamically via the
message headers below
•Exchange.SIGNATURE_PRIVATE_KEY,"CamelSignaturePrivateKey"
•Exchange.SIGNATURE_PUBLIC_KEY_OR_CERT,
"CamelSignaturePublicKeyOrCert"
from("direct:headerkey-sign").to("crypto:sign://alias");
from("direct:headerkey-verify").to("crypto:verify://alias", "mock:result");
or
391 CHAPTER 10 - COMPONENT APPENDIX

<route>
<from uri="direct:headerkey-sign"/>
<to uri="crypto:sign://headerkey" />
</route>
<route>
<from uri="direct:headerkey-verify"/>
<to uri="crypto:verify://headerkey" />
<to uri="mock:result"/>
</route>
Better again would be to dynamically supply a keystore alias. Again the alias can be supplied in a
message header
•Exchange.KEYSTORE_ALIAS,"CamelSignatureKeyStoreAlias"
from("direct:alias-sign").to("crypto:sign://alias?keystore=#keystore");
from("direct:alias-verify").to("crypto:verify://alias?keystore=#keystore",
"mock:result");
or
<route>
<from uri="direct:alias-sign"/>
<to uri="crypto:sign://alias?keystore=#keystore" />
</route>
<route>
<from uri="direct:alias-verify"/>
<to uri="crypto:verify://alias?keystore=#keystore" />
<to uri="mock:result"/>
</route>
The header would be set as follows
Exchange unsigned = getMandatoryEndpoint("direct:alias-sign").createExchange();
unsigned.getIn().setBody(payload);
unsigned.getIn().setHeader(DigitalSignatureConstants.KEYSTORE_ALIAS, "bob");
unsigned.getIn().setHeader(DigitalSignatureConstants.KEYSTORE_PASSWORD,
"letmein".toCharArray());
template.send("direct:alias-sign", unsigned);
Exchange signed = getMandatoryEndpoint("direct:alias-sign").createExchange();
signed.getIn().copyFrom(unsigned.getOut());
signed.getIn().setHeader(KEYSTORE_ALIAS, "bob");
template.send("direct:alias-verify", signed);
See Also
• Configuring Camel
• Component
• Endpoint
CHAPTER 10 - COMPONENT APPENDIX 392

• Getting Started
• Crypto Crypto is also available as a Data Format
CXF COMPONENT
The cxf: component provides integration with Apache CXF for connecting to JAX-WS services
hosted in CXF.
• CXF Component
• URI format
• Options
• The descriptions of the dataformats
• How to enable CXF's LoggingOutInterceptor in MESSAGE mode
• Description of relayHeaders option
• Available in Release 1.6.1 and after (only in POJO mode)
• Changes since Release 2.0
• Configure the CXF endpoints with Spring
• How to make the camel-cxf component use log4j instead of java.util.logging
• How to let camel-cxf response message with xml start document
• How to consume a message from a camel-cxf endpoint in POJO data format
• How to prepare the message for the camel-cxf endpoint in POJO data format
• How to deal with the message for a camel-cxf endpoint in PAYLOAD data format
• How to get and set SOAP headers in POJO mode
• How to get and set SOAP headers in PAYLOAD mode
• SOAP headers are not available in MESSAGE mode
• How to throw a SOAP Fault from Camel
• How to propagate a camel-cxf endpoint's request and response context
• Attachment Support
• CXF Bean Component ( 2.0 or later)
• URI format
• Options
• Headers
• A Working Sample
• See Also
Maven users will need to add the following dependency to their pom.xml for this component:
<dependency>
<groupId>org.apache.camel</groupId>
<artifactId>camel-cxf</artifactId>
<version>x.x.x</version>
<!-- use the same version as your Camel core version -->
</dependency>
393 CHAPTER 10 - COMPONENT APPENDIX
CXF dependencies
If you want to learn about CXF dependencies you can checkout the WHICH-JARS
text file.
URI format
cxf:bean:cxfEndpoint[?options]
Where cxfEndpoint represents a bean ID that references a bean in the Spring bean registry.
With this URI format, most of the endpoint details are specified in the bean definition.
cxf://someAddress[?options]
Where someAddress specifies the CXF endpoint's address. With this URI format, most of
the endpoint details are specified using options.
For either style above, you can append options to the URI as follows:
cxf:bean:cxfEndpoint?wsdlURL=wsdl/hello_world.wsdl&dataFormat=PAYLOAD
Options
Name Description Example Required? Default Value
wsdlURL The location of the WSDL. file://local/wsdl/hello.wsdl or wsdl/
hello.wsdl No WSDL is obtained from endpoint address by default.
serviceClass
The name of the SEI (Service Endpoint Interface) class. This
class can have, but does not require, JSR181 annotations.
Since 2.0, this option is only required by POJO mode. If
the wsdlURL option is provided, serviceClass is not required
for PAYLOAD and MESSAGE mode. When wsdlURL option
is used without serviceClass, the serviceName and
portName (endpointName for Spring configuration) options
MUST be provided.
Since 2.0, it is possible to use #notation to reference a
serviceClass object instance from the registry. E.g.
serviceClass=#beanName.
Please be advised that the referenced object
cannot be a Proxy (Spring AOP Proxy is OK) as it
relies on Object.getClass().getName() method
for non Spring AOP Proxy.
org.apache.camel.Hello Yes
serviceClassInstance
In 1.6 or later (will be deprecated in 2.0),
serviceClassInstance works like
serviceClass=#beanName, which looks up a
serviceObject instance from the registry.
serviceClassInstance=beanName
No (use either
serviceClass or
serviceClassInstance)
serviceName The service name this service is implementing, it maps to the
wsdl:service@name.{http:­//org.apache.camel}ServiceName
Only if more than one
serviceName in WSDL
present, and it is required for
camel-cxf consumer since
camel 2.2
CHAPTER 10 - COMPONENT APPENDIX 394
portName The port name this service is implementing, it maps to the
wsdl:port@name.{http:­//org.apache.camel}PortName
Only if more than one
portName under the
serviceName is present,
and it is required for camel-
cxf consumer since camel 2.2
dataFormat Which data type messages the CXF endpoint supports POJO,PAYLOAD,MESSAGE No POJO
relayHeaders
Available since 1.6.1. Please see the Description of
relayHeaders option section for this option in 2.0.
Should a CXF endpoint relay headers along the route.
Currently only available when dataFormat=POJO
true,false No true
wrapped Which kind of operation that CXF endpoint producer will
invoke true,false No false
setDefaultBus Will set the default bus when CXF endpoint create a bus by
itself true,false No false
bus
New in 2.0, use #notation to reference a bus object from
the registry. The referenced object must be an instance of
org.apache.cxf.Bus.
bus=#busName No Default bus created by CXF Bus Factory
cxfBinding
New in 2.0, use #notation to reference a CXF binding
object from the registry. The referenced object must be an
instance of
org.apache.camel.component.cxf.CxfBinding.
cxfBinding=#bindingName No An instance of
org.apache.camel.component.cxf.DefaultCxfBinding
headerFilterStrategy
New in 2.0, use #notation to reference a header filter
strategy object from the registry. The referenced object
must be an instance of
org.apache.camel.spi.HeaderFilterStrategy.
headerFilterStrategy=#strategyName No An instance of
org.apache.camel.component.cxf.CxfHeaderFilterStrategy
loggingFeatureEnabled New in 2.3, this option enables CXF Logging Feature which
writes inbound and outbound SOAP messages to log. loggingFeatureEnabled=true No false
defaultOperationName
New in 2.4, this option will set the default operationName
that will be used by the CxfProducer which invokes the
remote service.
defaultOperationName=greetMe No null
defaultOperationNameSpace
New in 2.4, this option will set the default
operationNamespace that will be used by the CxfProducer
which invokes the remote service.
defaultOperationNamespace{{=
http://apache.org/hello_world_soap_http
}} No null
The serviceName and portName are QNames, so if you provide them be sure to prefix
them with their {namespace} as shown in the examples above.
NOTE From CAMEL 1.5.1 , the serviceClass for a CXF producer (that is, the to
endpoint) should be a Java interface.
The descriptions of the dataformats
DataFormat Description
POJO POJOs (Plain old Java objects) are the Java parameters to the method being invoked on the target server. Both Protocol and Logical JAX-WS handlers
are supported.
PAYLOAD PAYLOAD is the message payload (the contents of the soap:body) after message configuration in the CXF endpoint is applied. Only Protocol JAX-
WS handler is supported. Logical JAX-WS handler is not supported.
MESSAGE MESSAGE is the raw message that is received from the transport layer. JAX-WS handler is not supported.
You can determine the data format mode of an exchange by retrieving the exchange property,
CamelCXFDataFormat. The exchange key constant is defined in
org.apache.camel.component.cxf.CxfConstants.DATA_FORMAT_PROPERTY.
How to enable CXF's LoggingOutInterceptor in MESSAGE mode
CXF's LoggingOutInterceptor outputs outbound message that goes on the wire to
logging system (Java Util Logging). Since the LoggingOutInterceptor is in PRE_STREAM
395 CHAPTER 10 - COMPONENT APPENDIX

phase (but PRE_STREAM phase is removed in MESSAGE mode), you have to configure
LoggingOutInterceptor to be run during the WRITE phase. The following is an example.
<bean id="loggingOutInterceptor"
class="org.apache.cxf.interceptor.LoggingOutInterceptor">
<!-- it really should have been user-prestream but CXF does have such phase!
-->
<constructor-arg value="write"/>
</bean>
<cxf:cxfEndpoint id="serviceEndpoint" address="http://localhost:9002/helloworld"
serviceClass="org.apache.camel.component.cxf.HelloService">
<cxf:outInterceptors>
<ref bean="loggingOutInterceptor"/>
</cxf:outInterceptors>
<cxf:properties>
<entry key="dataFormat" value="MESSAGE"/>
</cxf:properties>
</cxf:cxfEndpoint>
Description of relayHeaders option
There are in-band and out-of-band on-the-wire headers from the perspective of a JAXWS
WSDL-first developer.
The in-band headers are headers that are explicitly defined as part of the WSDL binding
contract for an endpoint such as SOAP headers.
The out-of-band headers are headers that are serialized over the wire, but are not explicitly
part of the WSDL binding contract.
Headers relaying/filtering is bi-directional.
When a route has a CXF endpoint and the developer needs to have on-the-wire headers,
such as SOAP headers, be relayed along the route to be consumed say by another JAXWS
endpoint, then relayHeaders should be set to true, which is the default value.
Available in Release 1.6.1 and after (only in POJO mode)
The relayHeaders=true express an intent to relay the headers. The actual decision on
whether a given header is relayed is delegated to a pluggable instance that implements the
MessageHeadersRelay interface. A concrete implementation of
MessageHeadersRelay will be consulted to decide if a header needs to be relayed or not.
There is already an implementation of SoapMessageHeadersRelay which binds itself to
well-known SOAP name spaces. Currently only out-of-band headers are filtered, and in-band
headers will always be relayed when relayHeaders=true. If there is a header on the wire,
whose name space is unknown to the runtime, then a fall back
CHAPTER 10 - COMPONENT APPENDIX 396

DefaultMessageHeadersRelay will be used, which simply allows all headers to be
relayed.
The relayHeaders=false setting asserts that all headers in-band and out-of-band will
be dropped.
You can plugin your own MessageHeadersRelay implementations overriding or adding
additional ones to the list of relays. In order to override a preloaded relay instance just make
sure that your MessageHeadersRelay implementation services the same name spaces as
the one you looking to override. Also note, that the overriding relay has to service all of the
name spaces as the one you looking to override, or else a runtime exception on route start up
will be thrown as this would introduce an ambiguity in name spaces to relay instance mappings.
<cxf:cxfEndpoint ...>
<cxf:properties>
<entry key="org.apache.camel.cxf.message.headers.relays">
<list>
<ref bean="customHeadersRelay"/>
</list>
</entry>
</cxf:properties>
</cxf:cxfEndpoint>
<bean id="customHeadersRelay"
class="org.apache.camel.component.cxf.soap.headers.CustomHeadersRelay"/>
Take a look at the tests that show how you'd be able to relay/drop headers here:
https://svn.apache.org/repos/asf/camel/branches/camel-1.x/components/camel-cxf/src/test/
java/org/apache/camel/component/cxf/soap/headers/CxfMessageHeadersRelayTest.java
Changes since Release 2.0
•POJO and PAYLOAD modes are supported. In POJO mode, only out-of-band message
headers are available for filtering as the in-band headers have been processed and
removed from header list by CXF. The in-band headers are incorporated into the
MessageContentList in POJO mode. The camel-cxf component does make
any attempt to remove the in-band headers from the MessageContentList as it
does in 1.6.1. If filtering of in-band headers is required, please use PAYLOAD mode or
plug in a (pretty straightforward) CXF interceptor/JAXWS Handler to the CXF
endpoint.
• The Message Header Relay mechanism has been merged into
CxfHeaderFilterStrategy. The relayHeaders option, its semantics, and
default value remain the same, but it is a property of
CxfHeaderFilterStrategy.
Here is an example of configuring it.
397 CHAPTER 10 - COMPONENT APPENDIX

<bean id="dropAllMessageHeadersStrategy"
class="org.apache.camel.component.cxf.CxfHeaderFilterStrategy">
<!-- Set relayHeaders to false to drop all SOAP headers -->
<property name="relayHeaders" value="false"/>
</bean>
Then, your endpoint can reference the CxfHeaderFilterStrategy.
<route>
<from
uri="cxf:bean:routerNoRelayEndpoint?headerFilterStrategy=#dropAllMessageHeadersStrategy"/>
<to
uri="cxf:bean:serviceNoRelayEndpoint?headerFilterStrategy=#dropAllMessageHeadersStrategy"/>
</route>
• The MessageHeadersRelay interface has changed slightly and has been renamed
to MessageHeaderFilter. It is a property of CxfHeaderFilterStrategy.
Here is an example of configuring user defined Message Header Filters:
<bean id="customMessageFilterStrategy"
class="org.apache.camel.component.cxf.CxfHeaderFilterStrategy">
<property name="messageHeaderFilters">
<list>
<!-- SoapMessageHeaderFilter is the built in filter. It can be
removed by omitting it. -->
<bean
class="org.apache.camel.component.cxf.SoapMessageHeaderFilter"/>
<!-- Add custom filter here -->
<bean
class="org.apache.camel.component.cxf.soap.headers.CustomHeaderFilter"/>
</list>
</property>
</bean>
• Other than relayHeaders, there are new properties that can be configured in
CxfHeaderFilterStrategy.
Name Description type Required? Default
value
relayHeaders All message headers will be processed by Message Header
Filters boolean No true (1.6.1
behavior)
relayAllMessageHeaders All message headers will be propagated (without processing by
Message Header Filters) boolean No false (1.6.1
behavior)
allowFilterNamespaceClash
If two filters overlap in activation namespace, the property
control how it should be handled. If the value is true, last one
wins. If the value is false, it will throw an exception
boolean No false (1.6.1
behavior)
CHAPTER 10 - COMPONENT APPENDIX 398

Configure the CXF endpoints with Spring
You can configure the CXF endpoint with the Spring configuration file shown below, and you
can also embed the endpoint into the camelContext tags. When you are invoking the
service endpoint, you can set the operationName and operationNameSpace headers to
explicitly state which operation you are calling.
<beans xmlns="http://www.springframework.org/schema/beans"
xmlns:xsi="http://www.w3.org/2001/XMLSchema-instance"
xmlns:cxf="http://activemq.apache.org/camel/schema/cxfEndpoint"
xsi:schemaLocation="
http://www.springframework.org/schema/beans
http://www.springframework.org/schema/beans/spring-beans-2.0.xsd
http://activemq.apache.org/camel/schema/cxfEndpoint
http://activemq.apache.org/camel/schema/cxf/camel-cxf-1.6.0.xsd
http://activemq.apache.org/camel/schema/spring
http://activemq.apache.org/camel/schema/spring/camel-spring.xsd ">
<cxf:cxfEndpoint id="routerEndpoint" address="http://localhost:9003/CamelContext/
RouterPort"
serviceClass="org.apache.hello_world_soap_http.GreeterImpl"/>
<cxf:cxfEndpoint id="serviceEndpoint" address="http://localhost:9000/SoapContext/
SoapPort"
wsdlURL="testutils/hello_world.wsdl"
serviceClass="org.apache.hello_world_soap_http.Greeter"
endpointName="s:SoapPort"
serviceName="s:SOAPService"
xmlns:s="http://apache.org/hello_world_soap_http" />
<camelContext id="camel" xmlns="http://activemq.apache.org/camel/schema/spring">
<route>
<from uri="cxf:bean:routerEndpoint" />
<to uri="cxf:bean:serviceEndpoint" />
</route>
</camelContext>
</beans>
NOTE In Camel 2.x we change to use {{http:­//camel.apache.org/schema/cxf}} as the CXF
endpoint's target namespace.
<beans xmlns="http://www.springframework.org/schema/beans"
xmlns:xsi="http://www.w3.org/2001/XMLSchema-instance"
xmlns:cxf="http://camel.apache.org/schema/cxf"
xsi:schemaLocation="
http://www.springframework.org/schema/beans http://www.springframework.org/
schema/beans/spring-beans-2.0.xsd
http://camel.apache.org/schema/cxf http://camel.apache.org/schema/cxf/
camel-cxf.xsd
http://camel.apache.org/schema/spring http://camel.apache.org/schema/spring/
camel-spring.xsd ">
...
Be sure to include the JAX-WS schemaLocation attribute specified on the root beans
element. This allows CXF to validate the file and is required. Also note the namespace
399 CHAPTER 10 - COMPONENT APPENDIX
declarations at the end of the <cxf:cxfEndpoint/> tag--these are required because the
combined {namespace}localName syntax is presently not supported for this tag's attribute
values.
The cxf:cxfEndpoint element supports many additional attributes:
Name Value
PortName The endpoint name this service is implementing, it maps to the wsdl:port@name. In the format of ns:PORT_NAME where ns is a namespace prefix valid
at this scope.
serviceName The service name this service is implementing, it maps to the wsdl:service@name. In the format of ns:SERVICE_NAME where ns is a namespace
prefix valid at this scope.
wsdlURL The location of the WSDL. Can be on the classpath, file system, or be hosted remotely.
bindingId The bindingId for the service model to use.
address The service publish address.
bus The bus name that will be used in the JAX-WS endpoint.
serviceClass The class name of the SEI (Service Endpoint Interface) class which could have JSR181 annotation or not.
It also supports many child elements:
Name Value
cxf:inInterceptors The incoming interceptors for this endpoint. A list of <bean> or <ref>.
cxf:inFaultInterceptors The incoming fault interceptors for this endpoint. A list of <bean> or <ref>.
cxf:outInterceptors The outgoing interceptors for this endpoint. A list of <bean> or <ref>.
cxf:outFaultInterceptors The outgoing fault interceptors for this endpoint. A list of <bean> or <ref>.
cxf:properties A properties map which should be supplied to the JAX-WS endpoint. See below.
cxf:handlers A JAX-WS handler list which should be supplied to the JAX-WS endpoint. See below.
cxf:dataBinding You can specify the which DataBinding will be use in the endpoint. This can be supplied using the Spring <bean
class="MyDataBinding"/> syntax.
cxf:binding You can specify the BindingFactory for this endpoint to use. This can be supplied using the Spring <bean
class="MyBindingFactory"/> syntax.
cxf:features The features that hold the interceptors for this endpoint. A list of {{<bean>}}s or {{<ref>}}s
cxf:schemaLocations The schema locations for endpoint to use. A list of {{<schemaLocation>}}s
cxf:serviceFactory The service factory for this endpoint to use. This can be supplied using the Spring <bean class="MyServiceFactory"/> syntax
You can find more advanced examples which show how to provide interceptors , properties
and handlers here:
http://cwiki.apache.org/CXF20DOC/jax-ws-configuration.html
NOTE
You can use cxf:properties to set the camel-cxf endpoint's dataFormat and setDefaultBus
properties from spring configuration file.
<cxf:cxfEndpoint id="testEndpoint" address="http://localhost:9000/router"
serviceClass="org.apache.camel.component.cxf.HelloService"
endpointName="s:PortName"
serviceName="s:ServiceName"
xmlns:s="http://www.example.com/test">
<cxf:properties>
<entry key="dataFormat" value="MESSAGE"/>
<entry key="setDefaultBus" value="true"/>
</cxf:properties>
</cxf:cxfEndpoint>
CHAPTER 10 - COMPONENT APPENDIX 400

How to make the camel-cxf component use log4j instead of java.util.logging
CXF's default logger is java.util.logging. If you want to change it to log4j, proceed as
follows. Create a file, in the classpath, named META-INF/cxf/
org.apache.cxf.logger. This file should contain the fully-qualified name of the class,
org.apache.cxf.common.logging.Log4jLogger, with no comments, on a single
line.
How to let camel-cxf response message with xml start document
If you are using some soap client such as PHP, you will get this kind of error, because CXF
doesn't add the XML start document "<?xml version="1.0" encoding="utf-8"?>"
Error:sendSms: SoapFault exception: [Client] looks like we got no XML document in
[...]
To resolved this issue, you just need to tell StaxOutInterceptor to write the XML start
document for you.
public class WriteXmlDeclarationInterceptor extends
AbstractPhaseInterceptor<SoapMessage> {
public WriteXmlDeclarationInterceptor() {
super(Phase.PRE_STREAM);
addBefore(StaxOutInterceptor.class.getName());
}
public void handleMessage(SoapMessage message) throws Fault {
message.put("org.apache.cxf.stax.force-start-document", Boolean.TRUE);
}
}
You can add a customer interceptor like this and configure it into you camel-cxf endpont
<cxf:cxfEndpoint id="routerEndpoint" address="http://localhost:9003/CamelContext/
RouterPort"
serviceClass="org.apache.hello_world_soap_http.GreeterImpl">
<cxf:outInterceptors>
<!-- This interceptor will force the CXF server send the XML start document
to client -->
<bean class="org.apache.camel.component.cxf.WriteXmlDeclarationInterceptor"/>
</cxf:outInterceptors>
</cxf:cxfEndpoint>
Or adding a message header for it like this if you are using Camel 2.4.
401 CHAPTER 10 - COMPONENT APPENDIX

// set up the response context which force start document
Map<String,Object> map = new HashMap<String,Object>();
map.put("org.apache.cxf.stax.force-start-document",Boolean.TRUE);
exchange.getOut().setHeader(Client.RESPONSE_CONTEXT, map);
How to consume a message from a camel-cxf endpoint in POJO data format
The camel-cxf endpoint consumer POJO data format is based on the cxf invoker, so the
message header has a property with the name of CxfConstants.OPERATION_NAME and
the message body is a list of the SEI method parameters.
public class PersonProcessor implements Processor {
private static final transient Log LOG = LogFactory.getLog(PersonProcessor.class);
@SuppressWarnings("unchecked")
public void process(Exchange exchange) throws Exception {
LOG.info("processing exchange in camel");
BindingOperationInfo boi =
(BindingOperationInfo)exchange.getProperty(BindingOperationInfo.class.toString());
if (boi != null) {
LOG.info("boi.isUnwrapped" + boi.isUnwrapped());
}
// Get the parameters list which element is the holder.
MessageContentsList msgList = (MessageContentsList)exchange.getIn().getBody();
Holder<String> personId = (Holder<String>)msgList.get(0);
Holder<String> ssn = (Holder<String>)msgList.get(1);
Holder<String> name = (Holder<String>)msgList.get(2);
if (personId.value == null || personId.value.length() == 0) {
LOG.info("person id 123, so throwing exception");
// Try to throw out the soap fault message
org.apache.camel.wsdl_first.types.UnknownPersonFault personFault =
new org.apache.camel.wsdl_first.types.UnknownPersonFault();
personFault.setPersonId("");
org.apache.camel.wsdl_first.UnknownPersonFault fault =
new org.apache.camel.wsdl_first.UnknownPersonFault("Get the null value
of person name", personFault);
// Since camel has its own exception handler framework, we can't throw the
exception to trigger it
// We just set the fault message in the exchange for camel-cxf component
handling and return
exchange.getOut().setFault(true);
exchange.getOut().setBody(fault);
return;
}
name.value = "Bonjour";
ssn.value = "123";
CHAPTER 10 - COMPONENT APPENDIX 402

LOG.info("setting Bonjour as the response");
// Set the response message, first element is the return value of the
operation,
// the others are the holders of method parameters
exchange.getOut().setBody(new Object[] {null, personId, ssn, name});
}
}
How to prepare the message for the camel-cxf endpoint in POJO data
format
The camel-cxf endpoint producer is based on the cxf client API. First you need to specify
the operation name in the message header, then add the method parameters to a list, and
initialize the message with this parameter list. The response message's body is a
messageContentsList, you can get the result from that list.
NOTE After Camel 1.5 , we change the message body from object array to message
content list. If you still want to get the object array from the message body, you can get the
body using message.getbody(Object[].class), as follows:
Exchange senderExchange = new DefaultExchange(context, ExchangePattern.InOut);
final List<String> params = new ArrayList<String>();
// Prepare the request message for the camel-cxf procedure
params.add(TEST_MESSAGE);
senderExchange.getIn().setBody(params);
senderExchange.getIn().setHeader(CxfConstants.OPERATION_NAME, ECHO_OPERATION);
Exchange exchange = template.send("direct:EndpointA", senderExchange);
org.apache.camel.Message out = exchange.getOut();
// The response message's body is an MessageContentsList which first element is the
return value of the operation,
// If there are some holder parameters, the holder parameter will be filled in the
reset of List.
// The result will be extract from the MessageContentsList with the String class type
MessageContentsList result = (MessageContentsList)out.getBody();
LOG.info("Received output text: " + result.get(0));
Map<String,Object> responseContext =
CastUtils.cast((Map)out.getHeader(Client.RESPONSE_CONTEXT));
assertNotNull(responseContext);
assertEquals("We should get the response context here","UTF-8",
responseContext.get(org.apache.cxf.message.Message.ENCODING));
assertEquals("Reply body on Camel is wrong","echo " + TEST_MESSAGE, result.get(0));
403 CHAPTER 10 - COMPONENT APPENDIX

How to deal with the message for a camel-cxf endpoint in PAYLOAD data
format
PAYLOAD means that you process the payload message from the SOAP envelope. You can use
the Header.HEADER_LIST as the key to set or get the SOAP headers and use the
List<Element> to set or get SOAP body elements.
Camel 1.x branch, you can get the List<Element> and header from the CXF Message, but if
you want to set the response message, you need to create the CXF message using the CXF
API.
protected RouteBuilder createRouteBuilder() {
return new RouteBuilder() {
public void configure() {
from(SIMPLE_ENDPOINT_URI +
"&dataFormat=PAYLOAD").to("log:info").process(new Processor() {
public void process(final Exchange exchange) throws Exception {
Message inMessage = exchange.getIn();
if (inMessage instanceof CxfMessage) {
CxfMessage cxfInMessage = (CxfMessage) inMessage;
CxfMessage cxfOutMessage = (CxfMessage) exchange.getOut();
List<Element> inElements =
cxfInMessage.getMessage().get(List.class);
List<Element> outElements = new ArrayList<Element>();
XmlConverter converter = new XmlConverter();
String documentString = ECHO_RESPONSE;
if (inElements.get(0).getLocalName().equals("echoBoolean")) {
documentString = ECHO_BOOLEAN_RESPONSE;
}
org.apache.cxf.message.Exchange ex =
((CxfExchange)exchange).getExchange();
Endpoint ep = ex.get(Endpoint.class);
org.apache.cxf.message.Message response =
ep.getBinding().createMessage();
Document outDocument = converter.toDOMDocument(documentString);
outElements.add(outDocument.getDocumentElement());
response.put(List.class, outElements);
cxfOutMessage.setMessage(response);
}
}
});
}
};
}
Change in 2.0, There is no more CxfMessage, we just use the common Camel
DefaultMessageImpl under layer. Message.getBody() will return an
org.apache.camel.component.cxf.CxfPayload object, which has getters for
SOAP message headers and Body elements. This change enables decoupling the native CXF
message from the Camel message.
CHAPTER 10 - COMPONENT APPENDIX 404

protected RouteBuilder createRouteBuilder() {
return new RouteBuilder() {
public void configure() {
from(SIMPLE_ENDPOINT_URI +
"&dataFormat=PAYLOAD").to("log:info").process(new Processor() {
@SuppressWarnings("unchecked")
public void process(final Exchange exchange) throws Exception {
CxfPayload<SoapHeader> requestPayload =
exchange.getIn().getBody(CxfPayload.class);
List<Element> inElements = requestPayload.getBody();
List<Element> outElements = new ArrayList<Element>();
// You can use a customer toStringConverter to turn a CxfPayLoad
message into String as you want
String request = exchange.getIn().getBody(String.class);
XmlConverter converter = new XmlConverter();
String documentString = ECHO_RESPONSE;
if (inElements.get(0).getLocalName().equals("echoBoolean")) {
documentString = ECHO_BOOLEAN_RESPONSE;
assertEquals("Get a wrong request", ECHO_BOOLEAN_REQUEST,
request);
}else {
assertEquals("Get a wrong request", ECHO_REQUEST, request);
}
Document outDocument = converter.toDOMDocument(documentString);
outElements.add(outDocument.getDocumentElement());
// set the payload header with null
CxfPayload<SoapHeader> responsePayload = new
CxfPayload<SoapHeader>(null, outElements);
exchange.getOut().setBody(responsePayload);
}
});
}
};
}
How to get and set SOAP headers in POJO mode
POJO means that the data format is a "list of Java objects" when the Camel-cxf endpoint
produces or consumes Camel exchanges. Even though Camel expose message body as POJOs
in this mode, Camel-cxf still provides access to read and write SOAP headers. However, since
CXF interceptors remove in-band SOAP headers from Header list after they have been
processed, only out-of-band SOAP headers are available to Camel-cxf in POJO mode.
The following example illustrate how to get/set SOAP headers. Suppose we have a route
that forwards from one Camel-cxf endpoint to another. That is, SOAP Client -> Camel -> CXF
service. We can attach two processors to obtain/insert SOAP headers at (1) before request
goes out to the CXF service and (2) before response comes back to the SOAP Client.
Processor (1) and (2) in this example are InsertRequestOutHeaderProcessor and
InsertResponseOutHeaderProcessor. Our route looks like this:
405 CHAPTER 10 - COMPONENT APPENDIX

<route>
<from uri="cxf:bean:routerRelayEndpointWithInsertion"/>
<process ref="InsertRequestOutHeaderProcessor" />
<to uri="cxf:bean:serviceRelayEndpointWithInsertion"/>
<process ref="InsertResponseOutHeaderProcessor" />
</route>
In 2.x SOAP headers are propagated to and from Camel Message headers. The Camel
message header name is "org.apache.cxf.headers.Header.list" which is a constant defined in CXF
(org.apache.cxf.headers.Header.HEADER_LIST). The header value is a List of CXF SoapHeader
objects (org.apache.cxf.binding.soap.SoapHeader). The following snippet is the
InsertResponseOutHeaderProcessor (that insert a new SOAP header in the response message).
The way to access SOAP headers in both InsertResponseOutHeaderProcessor and
InsertRequestOutHeaderProcessor are actually the same. The only difference between the two
processors is setting the direction of the inserted SOAP header.
public static class InsertResponseOutHeaderProcessor implements Processor {
@SuppressWarnings("unchecked")
public void process(Exchange exchange) throws Exception {
List<SoapHeader> soapHeaders =
(List)exchange.getIn().getHeader(Header.HEADER_LIST);
// Insert a new header
String xml = "<?xml version=\"1.0\" encoding=\"utf-8\"?><outofbandHeader "
+"xmlns=\"http://cxf.apache.org/outofband/Header\"
hdrAttribute=\"testHdrAttribute\" "
+"xmlns:soap=\"http://schemas.xmlsoap.org/soap/envelope/\"
soap:mustUnderstand=\"1\">"
+
"<name>New_testOobHeader</name><value>New_testOobHeaderValue</value></outofbandHeader>";
SoapHeader newHeader = new SoapHeader(soapHeaders.get(0).getName(),
DOMUtils.readXml(new StringReader(xml)).getDocumentElement());
// make sure direction is OUT since it is a response message.
newHeader.setDirection(Direction.DIRECTION_OUT);
//newHeader.setMustUnderstand(false);
soapHeaders.add(newHeader);
}
}
In 1.x SOAP headers are not propagated to and from Camel Message headers. Users have to
go deeper into CXF APIs to access SOAP headers. Also, accessing the SOAP headers in a
request message is slight different than in a response message. The
InsertRequestOutHeaderProcessor and InsertResponseOutHeaderProcessor are as follow.
CHAPTER 10 - COMPONENT APPENDIX 406

public static class InsertRequestOutHeaderProcessor implements Processor {
public void process(Exchange exchange) throws Exception {
CxfMessage message = exchange.getIn().getBody(CxfMessage.class);
Message cxf = message.getMessage();
List<SoapHeader> soapHeaders = (List)cxf.get(Header.HEADER_LIST);
// Insert a new header
String xml = "<?xml version=\"1.0\" encoding=\"utf-8\"?><outofbandHeader "
+"xmlns=\"http://cxf.apache.org/outofband/Header\"
hdrAttribute=\"testHdrAttribute\" "
+"xmlns:soap=\"http://schemas.xmlsoap.org/soap/envelope/\"
soap:mustUnderstand=\"1\">"
+
"<name>New_testOobHeader</name><value>New_testOobHeaderValue</value></outofbandHeader>";
SoapHeader newHeader = new SoapHeader(soapHeaders.get(0).getName(),
DOMUtils.readXml(new
StringReader(xml)).getDocumentElement());
// make sure direction is IN since it is a request message.
newHeader.setDirection(Direction.DIRECTION_IN);
//newHeader.setMustUnderstand(false);
soapHeaders.add(newHeader);
}
}
public static class InsertResponseOutHeaderProcessor implements Processor {
public void process(Exchange exchange) throws Exception {
CxfMessage message = exchange.getIn().getBody(CxfMessage.class);
Map responseContext = (Map)message.getMessage().get(Client.RESPONSE_CONTEXT);
List<SoapHeader> soapHeaders = (List)responseContext.get(Header.HEADER_LIST);
// Insert a new header
String xml = "<?xml version=\"1.0\" encoding=\"utf-8\"?><outofbandHeader "
+"xmlns=\"http://cxf.apache.org/outofband/Header\"
hdrAttribute=\"testHdrAttribute\" "
+"xmlns:soap=\"http://schemas.xmlsoap.org/soap/envelope/\"
soap:mustUnderstand=\"1\">"
+
"<name>New_testOobHeader</name><value>New_testOobHeaderValue</value></outofbandHeader>";
SoapHeader newHeader = new SoapHeader(soapHeaders.get(0).getName(),
DOMUtils.readXml(new StringReader(xml)).getDocumentElement());
// make sure direction is OUT since it is a response message.
newHeader.setDirection(Direction.DIRECTION_OUT);
//newHeader.setMustUnderstand(false);
soapHeaders.add(newHeader);
}
}
407 CHAPTER 10 - COMPONENT APPENDIX

How to get and set SOAP headers in PAYLOAD mode
We've already shown how to access SOAP message (CxfPayload object) in PAYLOAD mode
(See "How to deal with the message for a camel-cxf endpoint in PAYLOAD data format").
In 2.x Once you obtain a CxfPayload object, you can invoke the CxfPayload.getHeaders()
method that returns a List of DOM Elements (SOAP headers).
from(routerEndpointURI).process(new Processor() {
@SuppressWarnings("unchecked")
public void process(Exchange exchange) throws Exception {
CxfPayload<SoapHeader> payload = exchange.getIn().getBody(CxfPayload.class);
List<Element> elements = payload.getBody();
assertNotNull("We should get the elements here", elements);
assertEquals("Get the wrong elements size", 1, elements.size());
assertEquals("Get the wrong namespace URI","http://camel.apache.org/pizza/
types",
elements.get(0).getNamespaceURI());
List<SoapHeader> headers = payload.getHeaders();
assertNotNull("We should get the headers here", headers);
assertEquals("Get the wrong headers size", headers.size(), 1);
assertEquals("Get the wrong namespace URI",
((Element)(headers.get(0).getObject())).getNamespaceURI(),
"http://camel.apache.org/pizza/types");
}
})
.to(serviceEndpointURI);
*In 1.x" You can get/set to the CXF Message by the key "org.apache.cxf.headers.Header.list"
which is a constant defined in CXF (org.apache.cxf.headers.Header.HEADER_LIST).
from(routerEndpointURI).process(new Processor() {
@SuppressWarnings("unchecked")
public void process(Exchange exchange) throws Exception {
Message inMessage = exchange.getIn();
CxfMessage message = (CxfMessage) inMessage;
List<Element> elements = message.getMessage().get(List.class);
assertNotNull("We should get the payload elements here" , elements);
assertEquals("Get the wrong elements size" , elements.size(), 1);
assertEquals("Get the wrong namespace URI" ,
elements.get(0).getNamespaceURI(), "http://camel.apache.org/pizza/types");
List<SoapHeader> headers =
CastUtils.cast((List<?>)message.getMessage().get(Header.HEADER_LIST));
assertNotNull("We should get the headers here", headers);
assertEquals("Get the wrong headers size", headers.size(), 1);
assertEquals("Get the wrong namespace URI" ,
((Element)(headers.get(0).getObject())).getNamespaceURI(), "http://camel.apache.org/
pizza/types");
}
CHAPTER 10 - COMPONENT APPENDIX 408

})
.to(serviceEndpointURI);
SOAP headers are not available in MESSAGE mode
SOAP headers are not available in MESSAGE mode as SOAP processing is skipped.
How to throw a SOAP Fault from Camel
If you are using a camel-cxf endpoint to consume the SOAP request, you may need to
throw the SOAP Fault from the camel context.
Basically, you can use the throwFault DSL to do that; it works for POJO,PAYLOAD and
MESSAGE data format.
You can define the soap fault like this
SOAP_FAULT = new SoapFault(EXCEPTION_MESSAGE, SoapFault.FAULT_CODE_CLIENT);
Element detail = SOAP_FAULT.getOrCreateDetail();
Document doc = detail.getOwnerDocument();
Text tn = doc.createTextNode(DETAIL_TEXT);
detail.appendChild(tn);
Then throw it as you like
from(routerEndpointURI).setFaultBody(constant(SOAP_FAULT));
If your CXF endpoint is working in the MESSAGE data format, you could set the the SOAP
Fault message in the message body and set the response code in the message header.
from(routerEndpointURI).process(new Processor() {
public void process(Exchange exchange) throws Exception {
Message out = exchange.getOut();
// Set the message body with the
out.setBody(this.getClass().getResourceAsStream("SoapFaultMessage.xml"));
// Set the response code here
out.setHeader(org.apache.cxf.message.Message.RESPONSE_CODE, new Integer(500));
}
});
NOTE the response code setting only works in Camel's version >= 1.5.1
409 CHAPTER 10 - COMPONENT APPENDIX

How to propagate a camel-cxf endpoint's request and response context
cxf client API provides a way to invoke the operation with request and response context. If you
are using a camel-cxf endpoint producer to invoke the outside web service, you can set the
request context and get response context with the following code:
CxfExchange exchange = (CxfExchange)template.send(getJaxwsEndpointUri(), new
Processor() {
public void process(final Exchange exchange) {
final List<String> params = new ArrayList<String>();
params.add(TEST_MESSAGE);
// Set the request context to the inMessage
Map<String,Object> requestContext = new HashMap<String,Object>();
requestContext.put(BindingProvider.ENDPOINT_ADDRESS_PROPERTY,
JAXWS_SERVER_ADDRESS);
exchange.getIn().setBody(params);
exchange.getIn().setHeader(Client.REQUEST_CONTEXT , requestContext);
exchange.getIn().setHeader(CxfConstants.OPERATION_NAME,
GREET_ME_OPERATION);
}
});
org.apache.camel.Message out = exchange.getOut();
// The output is an object array, the first element of the array is the
return value
Object\[\] output = out.getBody(Object\[\].class);
LOG.info("Received output text: " + output\[0\]);
// Get the response context form outMessage
Map<String,Object> responseContext =
CastUtils.cast((Map)out.getHeader(Client.RESPONSE_CONTEXT));
assertNotNull(responseContext);
assertEquals("Get the wrong wsdl opertion name","{http://apache.org/
hello_world_soap_http}greetMe",
responseContext.get("javax.xml.ws.wsdl.operation").toString());
Attachment Support
POJO Mode: Both SOAP with Attachment and MTOM are supported (see example in
Payload Mode for enabling MTOM). However, SOAP with Attachment is not tested. Since
attachments are marshalled and unmarshalled into POJOs, users typically do not need to deal
with the attachment themself. Attachments are propagated to Camel message's attachments
since 2.1. So, it is possible to retreive attachments by Camel Message API
DataHandler Message.getAttachment(String id)
.
Payload Mode: MTOM is supported since 2.1. Attachments can be retrieve by Camel
Message APIs mentioned above. SOAP with Attachment is not supported as there is no SOAP
processing in this mode.
CHAPTER 10 - COMPONENT APPENDIX 410

To enable MTOM, set the CXF endpoint property "mtom_enabled" to true. (I believe you
can only do it with Spring.)
<cxf:cxfEndpoint id="routerEndpoint" address="http://localhost:9091/jaxws-mtom/hello"
wsdlURL="mtom.wsdl"
serviceName="ns:HelloService"
endpointName="ns:HelloPort"
xmlns:ns="http://apache.org/camel/cxf/mtom_feature">
<cxf:properties>
<!-- enable mtom by setting this property to true -->
<entry key="mtom-enabled" value="true"/>
<!-- set the camel-cxf endpoint data fromat to PAYLOAD mode -->
<entry key="dataFormat" value="PAYLOAD"/>
</cxf:properties>
You can produce a Camel message with attachment to send to a CXF endpoint in Payload
mode.
Exchange exchange = context.createProducerTemplate().send("direct:testEndpoint",new
Processor() {
public void process(Exchange exchange) throws Exception {
exchange.setPattern(ExchangePattern.InOut);
List<Element> elements = new ArrayList<Element>();
elements.add(DOMUtils.readXml(new
StringReader(MtomTestHelper.REQ_MESSAGE)).getDocumentElement());
CxfPayload<SoapHeader> body = new CxfPayload<SoapHeader>(new
ArrayList<SoapHeader>(),
elements);
exchange.getIn().setBody(body);
exchange.getIn().addAttachment(MtomTestHelper.REQ_PHOTO_CID,
new DataHandler(new ByteArrayDataSource(MtomTestHelper.REQ_PHOTO_DATA,
"application/octet-stream")));
exchange.getIn().addAttachment(MtomTestHelper.REQ_IMAGE_CID,
new DataHandler(new ByteArrayDataSource(MtomTestHelper.requestJpeg, "image/
jpeg")));
}
});
// process response
CxfPayload<SoapHeader> out = exchange.getOut().getBody(CxfPayload.class);
Assert.assertEquals(1, out.getBody().size());
Map<String,String> ns = new HashMap<String,String>();
ns.put("ns", MtomTestHelper.SERVICE_TYPES_NS);
411 CHAPTER 10 - COMPONENT APPENDIX

ns.put("xop", MtomTestHelper.XOP_NS);
XPathUtils xu = new XPathUtils(ns);
Element ele = (Element)xu.getValue("//ns:DetailResponse/ns:photo/xop:Include",
out.getBody().get(0),
XPathConstants.NODE);
String photoId = ele.getAttribute("href").substring(4); // skip "cid:"
ele = (Element)xu.getValue("//ns:DetailResponse/ns:image/xop:Include",
out.getBody().get(0),
XPathConstants.NODE);
String imageId = ele.getAttribute("href").substring(4); // skip "cid:"
DataHandler dr = exchange.getOut().getAttachment(photoId);
Assert.assertEquals("application/octet-stream", dr.getContentType());
MtomTestHelper.assertEquals(MtomTestHelper.RESP_PHOTO_DATA,
IOUtils.readBytesFromStream(dr.getInputStream()));
dr = exchange.getOut().getAttachment(imageId);
Assert.assertEquals("image/jpeg", dr.getContentType());
BufferedImage image = ImageIO.read(dr.getInputStream());
Assert.assertEquals(560, image.getWidth());
Assert.assertEquals(300, image.getHeight());
You can also consume a Camel message received from a CXF endpoint in Payload mode.
public static class MyProcessor implements Processor {
@SuppressWarnings("unchecked")
public void process(Exchange exchange) throws Exception {
CxfPayload<SoapHeader> in = exchange.getIn().getBody(CxfPayload.class);
// verify request
Assert.assertEquals(1, in.getBody().size());
Map<String,String> ns = new HashMap<String,String>();
ns.put("ns", MtomTestHelper.SERVICE_TYPES_NS);
ns.put("xop", MtomTestHelper.XOP_NS);
XPathUtils xu = new XPathUtils(ns);
Element ele = (Element)xu.getValue("//ns:Detail/ns:photo/xop:Include",
in.getBody().get(0),
XPathConstants.NODE);
String photoId = ele.getAttribute("href").substring(4); // skip "cid:"
Assert.assertEquals(MtomTestHelper.REQ_PHOTO_CID, photoId);
ele = (Element)xu.getValue("//ns:Detail/ns:image/xop:Include",
in.getBody().get(0),
XPathConstants.NODE);
String imageId = ele.getAttribute("href").substring(4); // skip "cid:"
Assert.assertEquals(MtomTestHelper.REQ_IMAGE_CID, imageId);
CHAPTER 10 - COMPONENT APPENDIX 412

DataHandler dr = exchange.getIn().getAttachment(photoId);
Assert.assertEquals("application/octet-stream", dr.getContentType());
MtomTestHelper.assertEquals(MtomTestHelper.REQ_PHOTO_DATA,
IOUtils.readBytesFromStream(dr.getInputStream()));
dr = exchange.getIn().getAttachment(imageId);
Assert.assertEquals("image/jpeg", dr.getContentType());
MtomTestHelper.assertEquals(MtomTestHelper.requestJpeg,
IOUtils.readBytesFromStream(dr.getInputStream()));
// create response
List<Element> elements = new ArrayList<Element>();
elements.add(DOMUtils.readXml(new
StringReader(MtomTestHelper.RESP_MESSAGE)).getDocumentElement());
CxfPayload<SoapHeader> body = new CxfPayload<SoapHeader>(new
ArrayList<SoapHeader>(),
elements);
exchange.getOut().setBody(body);
exchange.getOut().addAttachment(MtomTestHelper.RESP_PHOTO_CID,
new DataHandler(new ByteArrayDataSource(MtomTestHelper.RESP_PHOTO_DATA,
"application/octet-stream")));
exchange.getOut().addAttachment(MtomTestHelper.RESP_IMAGE_CID,
new DataHandler(new ByteArrayDataSource(MtomTestHelper.responseJpeg,
"image/jpeg")));
}
}
Message Mode: Attachments are not supported as it does not process the message at all.
CXF BEAN COMPONENT (2.0 OR LATER)
The cxfbean: component allows other Camel endpoints to send exchange and invoke Web
service bean objects. (Currently, it only supports JAXRS, JAXWS(new to
camel2.1) annotated service bean.)
Note:CxfBeanEndpoint is a ProcessorEndpoint so it has no consumers. It works
similarly to a Bean component.
URI format
cxfbean:serviceBeanRef
Where serviceBeanRef is a registry key to look up the service bean object. If
serviceBeanRef references a List object, elements of the List are the service bean
objects accepted by the endpoint.
413 CHAPTER 10 - COMPONENT APPENDIX
Options
Name Description Example Required? Default Value
cxfBeanBinding
CXF bean binding specified by the #notation. The referenced object must be
an instance of
org.apache.camel.component.cxf.cxfbean.CxfBeanBinding.
cxfBinding=#bindingName No An instance of
org.apache.camel.component.cxf.cxfbean.DefaultCxfBeanBinding
bus CXF bus reference specified by the #notation. The referenced object must be
an instance of org.apache.cxf.Bus.bus=#busName No Default bus created by CXF Bus Factory
headerFilterStrategy Header filter strategy specified by the #notation. The referenced object must
be an instance of org.apache.camel.spi.HeaderFilterStrategy.headerFilterStrategy=#strategyName No An instance of
org.apache.camel.component.cxf.CxfHeaderFilterStrategy
setDefaultBus Will set the default bus when CXF endpoint create a bus by itself. true,false No false
populateFromClass
Since 2.3, the wsdlLocation annotated in the POJO is ignored (by default)
unless this option is set to false. Prior to 2.3, the wsdlLocation annotated
in the POJO is always honored and it is not possible to ignore.
true,false No true
Headers
Name Description Type Required? Default
Value
In/
Out Examples
CamelHttpCharacterEncoding
(before 2.0-m2:
CamelCxfBeanCharacterEncoding)
Character encoding String No None In ISO-8859-1
CamelContentType (before 2.0-m2:
CamelCxfBeanContentType)Content type String No */*In text/xml
CamelHttpBaseUri
(2.0-m3 and before:
CamelCxfBeanRequestBasePath)
The value of this header will be set in
the CXF message as the
Message.BASE_PATH property. It
is needed by CXF JAX-RS processing.
Basically, it is the scheme, host and
port portion of the request URI.
String Yes
The Endpoint
URI of the
source
endpoint in the
Camel
exchange
In http://localhost:9000
CamelHttpPath (before 2.0-m2:
CamelCxfBeanRequestPath) Request URI's path String Yes None In consumer/123
CamelHttpMethod (before 2.0-m2:
CamelCxfBeanVerb)RESTful request verb String Yes None In GET,PUT,POST,
DELETE
CamelHttpResponseCode HTTP response code Integer No None Out 200
Note: Currently, CXF Bean component has (only) been tested with Jetty
HTTP component it can understand headers from Jetty HTTP component
without requiring conversion.
A Working Sample
This sample shows how to create a route that starts a Jetty HTTP server. The route sends
requests to a CXF Bean and invokes a JAXRS annotated service.
First, create a route as follows. The from endpoint is a Jetty HTTP endpoint that is listening
on port 9000. Notice that the matchOnUriPrefix option must be set to true because
RESTful request URI will not match the endpoint's URI http:­//localhost:9000 exactly.
<route>
<from uri="jetty:http://localhost:9000?matchOnUriPrefix=true" />
<to uri="cxfbean:customerServiceBean" />
</route>
CHAPTER 10 - COMPONENT APPENDIX 414

The to endpoint is a CXF Bean with bean name customerServiceBean. The name will be
looked up from the registry. Next, we make sure our service bean is available in Spring registry.
We create a bean definition in the Spring configuration. In this example, we create a List of
service beans (of one element). We could have created just a single bean without a List.
<util:list id="customerServiceBean">
<bean class="org.apache.camel.component.cxf.jaxrs.testbean.CustomerService" />
</util:list>
<bean class="org.apache.camel.wsdl_first.PersonImpl" id="jaxwsBean" />
That's it. Once the route is started, the web service is ready for business. A HTTP client can
make a request and receive response.
url = new URL("http://localhost:9000/customerservice/orders/223/products/323");
in = url.openStream();
assertEquals("{\"Product\":{\"description\":\"product 323\",\"id\":323}}",
CxfUtils.getStringFromInputStream(in));
See Also
• Configuring Camel
• Component
• Endpoint
• Getting Started
CXFRS COMPONENT
The cxfrs: component provides integration with Apache CXF for connecting to JAX-RS
services hosted in CXF.
Maven users will need to add the following dependency to their pom.xml for this
component:
<dependency>
<groupId>org.apache.camel</groupId>
<artifactId>camel-cxf</artifactId>
<version>x.x.x</version> <!-- use the same version as your Camel core version -->
</dependency>
415 CHAPTER 10 - COMPONENT APPENDIX

URI format
cxfrs://address?options
Where address represents the CXF endpoint's address
cxfrs:bean:rsEndpoint
Where rsEndpoint represents the spring bean's name which presents the CXFRS client or
server
For either style above, you can append options to the URI as follows:
cxfrs:bean:cxfEndpoint?resourceClass=org.apache.camel.rs.Example
Options
Name Description Example Required? default
value
resourcesClass
The resource classes
which you want to
export as REST service
resourcesClass=org.apache.camel.rs.Example1,org.apache.camel.rs.Exchange2 No None
httpClientAPI
new to Camel 2.1 If
it is true, the
CxfRsProducer will use
the HttpClientAPI to
invoke the service
If it is false, the
CxfRsProducer will use
the ProxyClientAPI to
invoke the service
httpClientAPI=true No true
You can also configure the CXF REST endpoint through the spring configuration. Since there
are lots of difference between the CXF REST client and CXF REST Server, we provides
different configuration for them.
Please check out the schema file and CXF REST user guide for more information.
How to configure the REST endpoint in Camel ?
In camel-cxf schema file, there are two elements for the REST endpoint definition.
cxf:rsServer for REST consumer, cxf:rsClient for REST producer.
You can find an camel REST service route configuration example here.
<beans xmlns="http://www.springframework.org/schema/beans"
xmlns:xsi="http://www.w3.org/2001/XMLSchema-instance"
xmlns:cxf="http://camel.apache.org/schema/cxf"
xmlns:jaxrs="http://cxf.apache.org/jaxrs"
xsi:schemaLocation="
http://www.springframework.org/schema/beans http://www.springframework.org/
CHAPTER 10 - COMPONENT APPENDIX 416

schema/beans/spring-beans-2.5.xsd
http://camel.apache.org/schema/cxf http://camel.apache.org/schema/cxf/
camel-cxf.xsd
http://cxf.apache.org/jaxrs http://cxf.apache.org/schemas/jaxrs.xsd
http://camel.apache.org/schema/spring http://camel.apache.org/schema/spring/
camel-spring.xsd
">
<!-- Defined the real JAXRS back end service -->
<jaxrs:server id="restService"
address="http://localhost:9002/rest"
staticSubresourceResolution="true">
<jaxrs:serviceBeans>
<ref bean="customerService"/>
</jaxrs:serviceBeans>
</jaxrs:server>
<bean id="jsonProvider" class="org.apache.cxf.jaxrs.provider.JSONProvider"/>
<bean id="customerService"
class="org.apache.camel.component.cxf.jaxrs.testbean.CustomerService" />
<!-- Defined the server endpoint to create the cxf-rs consumer -->
<cxf:rsServer id="rsServer" address="http://localhost:9000/route"
serviceClass="org.apache.camel.component.cxf.jaxrs.testbean.CustomerService" />
<!-- Defined the client endpoint to create the cxf-rs consumer -->
<cxf:rsClient id="rsClient" address="http://localhost:9002/rest"
serviceClass="org.apache.camel.component.cxf.jaxrs.testbean.CustomerService"/>
<!-- The camel route context -->
<camelContext id="camel" xmlns="http://camel.apache.org/schema/spring">
<route>
<from uri="cxfrs://bean://rsServer"/>
<!-- We can remove this configure as the CXFRS producer is using the HttpAPI by
default -->
<setHeader headerName="CamelCxfRsUsingHttpAPI">
<constant>True</constant>
</setHeader>
<to uri="cxfrs://bean://rsClient"/>
</route>
</camelContext>
</beans>
How to consumer the REST request in Camel ?
CXF JAXRS front end implements the JAXRS(JSR311) API, so we can export the resources
classes as a REST service. And we leverage the CXF Invoker API to turn a REST request into a
normal Java object method invocation.
Unlike the camel-restlet, you don't need to specify the URI template within your restlet
endpoint, CXF take care of the REST request URI to resource class method mapping according
417 CHAPTER 10 - COMPONENT APPENDIX

to the JSR311 specification. All you need to do in Camel is delegate this method request to a
right processor or endpoint.
Here is an example
protected RouteBuilder createRouteBuilder() throws Exception {
return new RouteBuilder() {
public void configure() {
errorHandler(new NoErrorHandlerBuilder());
from(CXF_RS_ENDPOINT_URI).process(new Processor() {
public void process(Exchange exchange) throws Exception {
Message inMessage = exchange.getIn();
// Get the operation name from in message
String operationName =
inMessage.getHeader(CxfConstants.OPERATION_NAME, String.class);
if ("getCustomer".equals(operationName)) {
String httpMethod = inMessage.getHeader(Exchange.HTTP_METHOD,
String.class);
assertEquals("Get a wrong http method","GET", httpMethod);
String path = inMessage.getHeader(Exchange.HTTP_PATH,
String.class);
// The parameter of the invocation is stored in the body of in
message
String id = (String) inMessage.getBody(String.class);
if ("/customerservice/customers/126".equals(path))
{
Customer customer = new Customer();
customer.setId(Long.parseLong(id));
customer.setName("Willem");
// We just put the response Object into the out message
body
exchange.getOut().setBody(customer);
}else {
Response r = Response.status(404).entity("Can't found the
customer with uri " + path).build();
throw new WebApplicationException(r);
}
}
if ("updateCustomer".equals(operationName)) {
String httpMethod = inMessage.getHeader(Exchange.HTTP_METHOD,
String.class);
assertEquals("Get a wrong http method","PUT", httpMethod);
Customer customer = inMessage.getBody(Customer.class);
assertNotNull("The customer should not be null.", customer);
// Now you can do what you want on the customer object
assertEquals("Get a wrong customer name.","Mary",
customer.getName());
// set the response back
exchange.getOut().setBody(Response.ok().build());
}
}
});
CHAPTER 10 - COMPONENT APPENDIX 418

}
};
}
How to invoke the REST service through camel-cxfrs producer ?
CXF JAXRS front end implements a proxy based client API, with this API you can invoke the
remote REST service through a proxy.
camel-cxfrs producer is based on this proxy API.
So, you just need to specify the operation name in the message header and prepare the
parameter in the message body, camel-cxfrs producer will generate right REST request for you.
Here is an example
Exchange exchange = template.send("direct://proxy",new Processor() {
public void process(Exchange exchange) throws Exception {
exchange.setPattern(ExchangePattern.InOut);
Message inMessage = exchange.getIn();
// set the operation name
inMessage.setHeader(CxfConstants.OPERATION_NAME, "getCustomer");
// using the proxy client API
inMessage.setHeader(CxfConstants.CAMEL_CXF_RS_USING_HTTP_API, Boolean.FALSE);
// set the parameters , if you just have one parameter
// camel will put this object into an Object[] itself
inMessage.setBody("123");
}
});
// get the response message
Customer response = (Customer) exchange.getOut().getBody();
assertNotNull("The response should not be null ", response);
assertEquals("Get a wrong customer id ",String.valueOf(response.getId()), "123");
assertEquals("Get a wrong customer name", response.getName(), "John");
CXF JAXRS front end also provides a http centric client API, You can also invoke this API from
camel-cxfrs producer. You need to specify the HTTP_PATH and Http method and let the
the producer know to use the http centric client by using the URI option httpClientAPI or
set the message header with CxfConstants.CAMEL_CXF_RS_USING_HTTP_API. You can
turn the response object to the type class that you specify with
CxfConstants.CAMEL_CXF_RS_RESPONSE_CLASS.
Exchange exchange = template.send("direct://http",new Processor() {
public void process(Exchange exchange) throws Exception {
419 CHAPTER 10 - COMPONENT APPENDIX

exchange.setPattern(ExchangePattern.InOut);
Message inMessage = exchange.getIn();
// using the http central client API
inMessage.setHeader(CxfConstants.CAMEL_CXF_RS_USING_HTTP_API, Boolean.TRUE);
// set the Http method
inMessage.setHeader(Exchange.HTTP_METHOD, "GET");
// set the relative path
inMessage.setHeader(Exchange.HTTP_PATH, "/customerservice/customers/
123");
// Specify the response class , cxfrs will use InputStream as the response
object type
inMessage.setHeader(CxfConstants.CAMEL_CXF_RS_RESPONSE_CLASS, Customer.class);
// since we use the Get method, so we don't need to set the message body
inMessage.setBody(null);
}
});
// get the response message
Customer response = (Customer) exchange.getOut().getBody();
assertNotNull("The response should not be null ", response);
assertEquals("Get a wrong customer id ",String.valueOf(response.getId()), "123");
assertEquals("Get a wrong customer name", response.getName(), "John");
From Camel 2.1, we also support to specify the query parameters from cxfrs URI for the
CXFRS http centric client.
Exchange exchange = template.send("cxfrs://http://localhost:9003/
testQuery?httpClientAPI=true&q1=12&q2=13"
To support the Dynamical routing, you can override the URI's query parameters by using the
CxfConstants.CAMEL_CXF_RS_QUERY_MAP header to set the parameter map for it.To
support the Dynamical routing, you can override the URI's query parameters by using the
CxfConstants.CAMEL_CXF_RS_QUERY_MAP header to set the parameter map for it.
Map<String,String> queryMap = new LinkedHashMap<String,String>();
queryMap.put("q1","new");
queryMap.put("q2","world");
inMessage.setHeader(CxfConstants.CAMEL_CXF_RS_QUERY_MAP, queryMap);
DATASET COMPONENT
Testing of distributed and asynchronous processing is notoriously difficult. The Mock, Test and
DataSet endpoints work great with the Camel Testing Framework to simplify your unit and
integration testing using Enterprise Integration Patterns and Camel's large range of Components
together with the powerful Bean Integration.
CHAPTER 10 - COMPONENT APPENDIX 420
The DataSet component (available since 1.3.0) provides a mechanism to easily perform load &
soak testing of your system. It works by allowing you to create DataSet instances both as a
source of messages and as a way to assert that the data set is received.
Camel will use the throughput logger when sending dataset's.
URI format
dataset:name[?options]
Where name is used to find the DataSet instance in the Registry
Camel ships with a support implementation of
org.apache.camel.component.dataset.DataSet, the
org.apache.camel.component.dataset.DataSetSupport class, that can be used
as a base for implementing your own DataSet. Camel also ships with a default implementation,
the org.apache.camel.component.dataset.SimpleDataSet that can be used for
testing.
Options
Option Default Description
produceDelay 3
Allows a delay in ms to be specified, which causes
producers to pause in order to simulate slow producers.
Uses a minimum of 3 ms delay unless you set this option to
-1 to force no delay at all.
consumeDelay 0Allows a delay in ms to be specified, which causes
consumers to pause in order to simulate slow consumers.
preloadSize 0Sets how many messages should be preloaded (sent) before
the route completes its initialization.
initialDelay 1000 Camel 2.1: Time period in millis to wait before starting
sending messages.
minRate 0 Wait till that the minimum rate of messages is raised
You can append query options to the URI in the following format,
?option=value&option=value&...
Configuring DataSet
Camel will lookup in the Registry for a bean implementing the DataSet interface. So you can
register your own DataSet as:
421 CHAPTER 10 - COMPONENT APPENDIX
<bean id="myDataSet" class="com.mycompany.MyDataSet">
<property name="size" value="100"/>
</bean>
Example
For example, to test that a set of messages are sent to a queue and then consumed from the
queue without losing any messages:
// send the dataset to a queue
from("dataset:foo").to("activemq:SomeQueue");
// now lets test that the messages are consumed correctly
from("activemq:SomeQueue").to("dataset:foo");
The above would look in the Registry to find the foo DataSet instance which is used to create
the messages.
Then you create a DataSet implementation, such as using the SimpleDataSet as
described below, configuring things like how big the data set is and what the messages look like
etc.
Properties on SimpleDataSet
Property Type Description
defaultBody Object
Specifies the default message body. For SimpleDataSet it is a
constant payload; though if you want to create custom
payloads per message, create your own derivation of
DataSetSupport.
reportGroup long
Specifies the number of messages to be received before
reporting progress. Useful for showing progress of a large
load test.
size long Specifies how many messages to send/consume.
Load testing ActiveMQ with Camel
There is an example of load testing an ActiveMQ queue using Camel in the ActiveMQ source
code repository. The code lives at this location:
• https://svn.apache.org/repos/asf/activemq/trunk/activemq-camel-loadtest/
You can grab the code as follows:
CHAPTER 10 - COMPONENT APPENDIX 422
svn co https://svn.apache.org/repos/asf/activemq/trunk/activemq-camel-loadtest/
Then try running the test case:
cd activemq-camel-loadtest
mvn clean install
To see how the test is defined, see the Spring XML file
Error formatting macro: snippet: java.lang.IndexOutOfBoundsException: Index: 20, Size: 20
See Also
• Configuring Camel
• Component
• Endpoint
• Getting Started
• Spring Testing
DIRECT COMPONENT
The direct: component provides direct, synchronous invocation of any consumers when a
producer sends a message exchange.
This endpoint can be used to connect existing routes in the same camel context.
URI format
direct:someName[?options]
Where someName can be any string to uniquely identify the endpoint
Options
Name Default
Value Description
allowMultipleConsumers true
@deprecated If set to false, then when
a second consumer is started on the
endpoint, an IllegalStateException
is thrown. Will be removed in Camel
2.1: Direct endpoint does not support
multiple consumers.
423 CHAPTER 10 - COMPONENT APPENDIX
Asynchronous
The SEDA component provides asynchronous invocation of any consumers when a
producer sends a message exchange.
Connection to other camel contexts
The VM component provides connections between Camel contexts as long they run
in the same JVM.
You can append query options to the URI in the following format,
?option=value&option=value&...
Samples
In the route below we use the direct component to link the two routes together:
from("activemq:queue:order.in").to("bean:orderServer?method=validate").to("direct:processOrder");
from("direct:processOrder").to("bean:orderService?method=process").to("activemq:queue:order.out");
And the sample using spring DSL:
<route>
<from uri="activemq:queue:order.in"/>
<to uri="bean:orderService?method=validate"/>
<to uri="direct:processOrder"/>
</route>
<route>
<from uri="direct:processOrder"/>
<to uri="bean:orderService?method=process"/>
<to uri="activemq:queue:order.out"/>
</route>
See also samples from the SEDA component, how they can be used together.
See Also
• Configuring Camel
• Component
• Endpoint
• Getting Started
CHAPTER 10 - COMPONENT APPENDIX 424
▪SEDA
▪VM
ESPER
The Esper component supports the Esper Library for Event Stream Processing. The camel-
esper library is provided by the Camel Extra project which hosts all *GPL related components
for Camel.
URI format
esper:name[?options]
When consuming from an Esper endpoint you must specify a pattern or eql statement to
query the event stream.
For example
from("esper://cheese?pattern=every event=MyEvent(bar=5)").
to("activemq:Foo");
Options
Name Default Value Description
pattern The Esper Pattern expression as a String to filter events
eql The Esper EQL expression as a String to filter events
You can append query options to the URI in the following format,
?option=value&option=value&...
Demo
There is a demo which shows how to work with ActiveMQ, Camel and Esper in the Camel
Extra project
See Also
• Configuring Camel
• Component
• Endpoint
• Getting Started
425 CHAPTER 10 - COMPONENT APPENDIX
• Esper Camel Demo
EVENT COMPONENT
The event: component provides access to the Spring ApplicationEvent objects. This allows
you to publish ApplicationEvent objects to a Spring ApplicationContext or to consume them.
You can then use Enterprise Integration Patterns to process them such as Message Filter.
URI format
spring-event://default
If you use Camel 1.x then you may need to remove the // to get it working with the Spring
event notification
spring-event:default
See Also
• Configuring Camel
• Component
• Endpoint
• Getting Started
FILE COMPONENT - CAMEL 2.0 ONWARDS
The File component provides access to file systems, allowing files to be processed by any other
Camel Components or messages from other components to be saved to disk.
URI format
file:directoryName[?options]
or
file://directoryName[?options]
Where directoryName represents the underlying file directory.
CHAPTER 10 - COMPONENT APPENDIX 426
Using Camel 1.x
This documentation is only for Camel 2.0 or newer. If you are using Camel 1.x then
see this link instead.
You can append query options to the URI in the following format,
?option=value&option=value&...
URI Options
Common
Name Default
Value Description
autoCreate true Automatically create missing directories in the file's pathname. For the file consumer, that means creating the starting directory. For the file
producer, it means the directory to where the files should be written.
bufferSize 128kb Write buffer sized in bytes.
fileName null
Use Expression such as File Language to dynamically set the filename. For consumers, it's used as a filename filter. For producers, it's used to
evaluate the filename to write. If an expression is set, it take precedence over the CamelFileName header. (Note: The header itself can
also be an Expression). The expression options support both String and Expression types. If the expression is a String type, it is
always evaluated using the File Language. If the expression is an Expression type, the specified Expression type is used - this allows
you, for instance, to use OGNL expressions. For the consumer, you can use it to filter filenames, so you can for instance consume today's file
using the File Language syntax: mydata-${date:now:yyyyMMdd}.txt.
flatten false
Flatten is used to flatten the file name path to strip any leading paths, so it's just the file name. This allows you to consume recursively into
sub-directories, but when you eg write the files to another directory they will be written in a single directory. Setting this to true on the
producer enforces that any file name recived in CamelFileName header will be stripped for any leading paths.
Consumer only
Name Default
Value Description
initialDelay 1000 Milliseconds before polling the file/directory starts.
delay 500 Milliseconds before the next poll of the file/directory.
useFixedDelay false Set to true to use fixed delay between pools, otherwise fixed rate is used. See ScheduledExecutorService in JDK
for details.
recursive false If a directory, will look for files in all the sub-directories as well.
delete false If true, the file will be deleted after it is processed
noop false
If true, the file is not moved or deleted in any way. This option is good for readonly data, or for ETL type
requirements. If noop=true, Camel will set idempotent=true as well, to avoid consuming the same files over
and over again.
preMove null Use Expression such as File Language to dynamically set the filename when moving it before processing. For
example to move in-progress files into the order directory set this value to order.
move .camel Use Expression such as File Language to dynamically set the filename when moving it after processing. To move files
into a .done subdirectory just enter .done.
moveFailed null
Use Expression such as File Language to dynamically set the filename when moving failed files after processing.
To move files into a error subdirectory just enter error.Note: When moving the files to another location it
can/will handle the error when you move it to another location so Camel cannot pick up the file again.
include null Is used to include files, if filename matches the regex pattern.
exclude null Is used to exclude files, if filename matches the regex pattern.
427 CHAPTER 10 - COMPONENT APPENDIX
Only directories
Camel 2.0 only support endpoints configured with a starting directory. So the
directoryName must be a directory.
If you want to consume a single file only, you can use the fileName option, e.g. by
setting fileName=thefilename.
Also, the starting directory must not contain dynamic expressions with ${ }
placeholders. Again use the fileName option to specify the dynamic part of the
filename.
In Camel 1.x you could also configure a file and this caused more harm than good as it could
lead to confusing situations.
Avoid reading files currently being written by another application
Beware the JDK File IO API is a bit limited in detecting whether another application
is currently writing/copying a file. And the implementation can be different
depending on OS platform as well. This could lead to that Camel thinks the file is
not locked by another process and start consuming it. Therefore you have to do
you own investigation what suites your environment. To help with this Camel
provides different readLock options that you can use. See also the section
Consuming files from folders where others drop files directly.
idempotent false
Option to use the Idempotent Consumer EIP pattern to let Camel skip already processed files. Will by default use a
memory based LRUCache that holds 1000 entries. If noop=true then idempotent will be enabled as well to avoid
consuming the same files over and over again.
idempotentRepository null Pluggable repository as a org.apache.camel.processor.idempotent.MessageIdRepository class. Will by default use
MemoryMessageIdRepository if none is specified and idempotent is true.
inProgressRepository memory
Pluggable in-progress repository as a org.apache.camel.processor.idempotent.MessageIdRepository class. The in-
progress repository is used to account the current in progress files being consumed. By default a memory based
repository is used.
filter null
Pluggable filter as a org.apache.camel.component.file.GenericFileFilter class. Will skip files if
filter returns false in its accept() method. Camel also ships with an ANT path matcher filter in the
camel-spring component. More details in section below.
sorter null Pluggable sorter as a java.util.Comparator<org.apache.camel.component.file.GenericFile> class.
sortBy null Built-in sort using the File Language. Supports nested sorts, so you can have a sort by file name and as a 2nd group
sort by modified date. See sorting section below for details.
readLock markerFile
Used by consumer, to only poll the files if it has exclusive read-lock on the file (i.e. the file is not in-progress or being
written). Camel will wait until the file lock is granted.
This option provides the build in strategies:
▪markerFile is the behaviour from Camel 1.x, where Camel will create a marker file and hold a
lock on the marker file. This option is not avail for the FTP component.
▪changed is using file length/modification timestamp to detect whether the file is currently being
copied or not. Will at least use 1 sec. to determine this, so this option cannot consume files as
fast as the others, but can be more reliable as the JDK IO API cannot always determine whether a
file is currently being used by another process. This option is not avail for the FTP component.
▪fileLock is for using java.nio.channels.FileLock. This option is not avail for the
FTP component.
▪rename is for using a try to rename the file as a test if we can get exclusive read-lock.
▪none is for no read locks at all.
CHAPTER 10 - COMPONENT APPENDIX 428
readLockTimeout ▪
Optional timeout in milliseconds for the read-lock, if supported by the read-lock. If the read-lock could not be
granted and the timeout triggered, then Camel will skip the file. At next poll Camel, will try the file again, and this
time maybe the read-lock could be granted. Use a value of 0 or lower to indicate forever. In Camel 2.0 the default
value is 0. In Camel 2.1 the default value is 10000. Currently fileLock,changed and rename support the
timeout.
exclusiveReadLockStrategy null Pluggable read-lock as a
org.apache.camel.component.file.GenericFileExclusiveReadLockStrategy implementation.
processStrategy null
A pluggable org.apache.camel.component.file.GenericFileProcessStrategy allowing you to
implement your own readLock option or similar. Can also be used when special conditions must be met before a
file can be consumed, such as a special ready file exists. If this option is set then the readLock option does not
apply.
maxMessagesPerPoll 0
An integer that defines the maximum number of messages to gather per poll. By default, no maximum is set. Can be
used to set a limit of e.g. 1000 to avoid having the server read thousands of files as it starts up. Set a value of 0 or
negative to disabled it.
Default behavior for file consumer
• By default the file is locked for the duration of the processing.
• After the route has completed, files are moved into the .camel subdirectory, so
that they appear to be deleted.
• The File Consumer will always skip any file whose name starts with a dot, such as .,
.camel,.m2 or .groovy.
• Only files (not directories) are matched for valid filename, if options such as:
include or exclude are used.
Producer only
Name Default
Value Description
fileExist Override
What to do if a file already exists with the same name. The following values can be specified: Override,Append,Fail and
Ignore.Override, which is the default, replaces the existing file. Append adds content to the existing file. Fail throws a
GenericFileOperationException, indicating that there is already an existing file. Ignore silently ignores the
problem and does not override the existing file, but assumes everything is okay.
tempPrefix null
This option is used to write the file using a temporary name and then, after the write is complete, rename it to the real name.
Can be used to identify files being written and also avoid consumers (not using exclusive read locks) reading in progress files.
Is often used by FTP when uploading big files.
tempFileName null Camel 2.1: The same as tempPrefix option but offering a more fine grained control on the naming of the temporary
filename as it uses the File Language.
keepLastModified false
Camel 2.2: Will keep the last modified timestamp from the source file (if any). Will use the
Exchange.FILE_LAST_MODIFIED header to located the timestamp. This header can contain either a
java.util.Date or long with the timestamp. If the timestamp exists and the option is enabled it will set this timestamp
on the written file. Note: This option only applies to the file producer. You cannot use this option with any of the ftp
producers.
eagerDeleteTargetFile true
Camel 2.3: Whether or not to eagerly delete any existing target file. This option only applies when you use
fileExists=Override and the tempFileName option as well. You can use this to disable (set it to false) deleting the
target file before the temp file is written. For example you may write big files and want the target file to exists during the
temp file is being written. This ensure the target file is only deleted until the very last moment, just before the temp file is
being renamed to the target filename.
Default behavior for file producer
• By default it will override any existing file, if one exist with the same name.
429 CHAPTER 10 - COMPONENT APPENDIX
Override is now default
In Camel 1.x the Append is the default for the file producer. We have changed this
to Override in Camel 2.0 as this is also the default file operation using
java.io.File.
And also the default for the FTP library we use in the camel-ftp component.
Move and Delete operations
Any move or delete operations is executed after (post command) the routing has completed;
so during processing of the Exchange the file is still located in the inbox folder.
Lets illustrate this with an example:
from("file://inbox?move=.done").to("bean:handleOrder");
When a file is dropped in the inbox folder, the file consumer notices this and creates a new
FileExchange that is routed to the handleOrder bean. The bean then processes the
File object. At this point in time the file is still located in the inbox folder. After the bean
completes, and thus the route is completed, the file consumer will perform the move operation
and move the file to the .done sub-folder.
The move and preMove options should be a directory name, which can be either relative
or absolute. If relative, the directory is created as a sub-folder from within the folder where the
file was consumed.
By default, Camel will move consumed files to the .camel sub-folder relative to the
directory where the file was consumed.
If you want to delete the file after processing, the route should be:
from("file://inobox?delete=true").to("bean:handleOrder");
We have introduced a pre move operation to move files before they are processed. This
allows you to mark which files have been scanned as they are moved to this sub folder before
being processed.
from("file://inbox?preMove=inprogress").to("bean:handleOrder");
You can combine the pre move and the regular move:
from("file://inbox?preMove=inprogress&move=.done").to("bean:handleOrder");
So in this situation, the file is in the inprogress folder when being processed and after it's
processed, it's moved to the .done folder.
CHAPTER 10 - COMPONENT APPENDIX 430
Fine grained control over Move and PreMove option
The move and preMove option is Expression-based, so we have the full power of the File
Language to do advanced configuration of the directory and name pattern.
Camel will, in fact, internally convert the directory name you enter into a File Language
expression. So when we enter move=.done Camel will convert this into:
${file:parent}/.done/${file:onlyname}. This is only done if Camel detects that
you have not provided a ${ } in the option value yourself. So when you enter a ${ } Camel will
not convert it and thus you have the full power.
So if we want to move the file into a backup folder with today's date as the pattern, we can
do:
move=backup/${date:now:yyyyMMdd}/${file:name}
About moveFailed
The moveFailed option allows you to move files that could not be processed succesfully
to another location such as a error folder of your choice. For example to move the files in an
error folder with a timestamp you can use moveFailed=/error/
${file:name.noext}-${date:now:yyyyMMddHHmmssSSS}.${file:ext}.
See more examples at File Language
Message Headers
The following headers are supported by this component:
File producer only
Header Description
CamelFileName
Specifies the name of the file to write (relative to the endpoint
directory). The name can be a String; a String with a File
Language or Simple expression; or an Expression object. If it's null
then Camel will auto-generate a filename based on the message unique
ID.
File consumer only
Header Description
431 CHAPTER 10 - COMPONENT APPENDIX
CamelFileName
Name of the consumed file as a relative file path with
offset from the starting directory configured on the
endpoint.
CamelFileNameOnly Only the file name (the name with no leading paths).
CamelFileNameProduced
The actual absolute filepath (path + name) for the output
file that was written. This header is set by Camel and its
purpose is providing end-users with the name of the file
that was written.
CamelFileAbsolute
Aboolean option specifying whether the consumed file
denotes an absolute path or not. Should normally be
false for relative paths. Absolute paths should normally
not be used but we added to the move option to allow
moving files to absolute paths. But can be used elsewhere
as well.
CamelFileAbsolutePath The absolute path to the file. For relative files this path
holds the relative path instead.
CamelFilePath
The file path. For relative files this is the starting directory
+ the relative filename. For absolute files this is the
absolute path.
CamelFileRelativePath The relative path.
CamelFileParent The parent path.
CamelFileLength Along value containing the file size.
CamelFileLastModified ADate value containing the last modified timestamp of
the file.
Batch Consumer
This component implements the Batch Consumer.
Exchange Properties, file consumer only
As the file consumer is BatchConsumer it supports batching the files it polls. By batching it
means that Camel will add some properties to the Exchange so you know the number of files
polled the current index in that order.
Property Description
CamelBatchSize The total number of files that was polled in this batch.
CHAPTER 10 - COMPONENT APPENDIX 432
CamelBatchIndex The current index of the batch. Starts from 0.
CamelBatchComplete Aboolean value indicating the last Exchange in the batch. Is
only true for the last entry.
This allows you for instance to know how many files exists in this batch and for instance let the
Aggregator aggregate this number of files.
Common gotchas with folder and filenames
When Camel is producing files (writing files) there are a few gotchas affecting how to set a
filename of your choice. By default, Camel will use the message ID as the filename, and since the
message ID is normally a unique generated ID, you will end up with filenames such as: ID-
MACHINENAME-2443-1211718892437-1-0. If such a filename is not desired, then you
must provide a filename in the CamelFileName message header. The constant,
Exchange.FILE_NAME, can also be used.
The sample code below produces files using the message ID as the filename:
from("direct:report").to("file:target/reports");
To use report.txt as the filename you have to do:
from("direct:report").setHeader(Exchange.FILE_NAME, constant("report.txt")).to(
"file:target/reports");
... the same as above, but with CamelFileName:
from("direct:report").setHeader("CamelFileName", constant("report.txt")).to(
"file:target/reports");
And a syntax where we set the filename on the endpoint with the fileName URI option.
from("direct:report").to("file:target/reports/?fileName=report.txt");
Filename Expression
Filename can be set either using the expression option or as a string-based File Language
expression in the CamelFileName header. See the File Language for syntax and samples.
Consuming files from folders where others drop files directly
Beware if you consume files from a folder where other applications write files directly. Take a
look at the different readLock options to see what suits your use cases. The best approach is
433 CHAPTER 10 - COMPONENT APPENDIX

however to write to another folder and after the write move the file in the drop folder.
However if you write files directly to the drop folder then the option changed could better
detect whether a file is currently being written/copied as it uses a file changed algorithm to see
whether the file size / modification changes over a period of time. The other read lock options
rely on Java File API that sadly is not always very good at detecting this.
Samples
Read from a directory and write to another directory
from("file://inputdir/?delete=true").to("file://outputdir")
Listen on a directory and create a message for each file dropped there. Copy the contents to
the outputdir and delete the file in the inputdir.
Reading recursive from a directory and write the another
from("file://inputdir/?recursive=true&delete=true").to("file://outputdir")
Listen on a directory and create a message for each file dropped there. Copy the contents to
the outputdir and delete the file in the inputdir. Will scan recursively into sub-
directories. Will lay out the files in the same directory structure in the outputdir as the
inputdir, including any sub-directories.
inputdir/foo.txt
inputdir/sub/bar.txt
Will result in the following output layout:
outputdir/foo.txt
outputdir/sub/bar.txt
Using flatten
If you want to store the files in the outputdir directory in the same directory, disregarding the
source directory layout (e.g. to flatten out the path), you just add the flatten=true option
on the file producer side:
CHAPTER 10 - COMPONENT APPENDIX 434

from("file://inputdir/?recursive=true&delete=true").to("file://outputdir?flatten=true")
Will result in the following output layout:
outputdir/foo.txt
outputdir/bar.txt
Reading from a directory and the default move operation
Camel will by default move any processed file into a .camel subdirectory in the directory the
file was consumed from.
from("file://inputdir/?recursive=true&delete=true").to("file://outputdir")
Affects the layout as follows:
before
inputdir/foo.txt
inputdir/sub/bar.txt
after
inputdir/.camel/foo.txt
inputdir/sub/.camel/bar.txt
outputdir/foo.txt
outputdir/sub/bar.txt
Read from a directory and process the message in java
from("file://inputdir/").process(new Processor() {
public void process(Exchange exchange) throws Exception {
Object body = exchange.getIn().getBody();
// do some business logic with the input body
}
});
The body will be a File object that points to the file that was just dropped into the
inputdir directory.
435 CHAPTER 10 - COMPONENT APPENDIX
Read files from a directory and send the content to a jms queue
from("file://inputdir/").convertBodyTo(String.class).to("jms:test.queue")
By default the file endpoint sends a FileMessage which contains a File object as the body.
If you send this directly to the JMS component the JMS message will only contain the File
object but not the content. By converting the File to a String, the message will contain the
file contents what is probably what you want.
The route above using Spring DSL:
<route>
<from uri="file://inputdir/"/>
<convertBodyTo type="java.lang.String"/>
<to uri="jms:test.queue"/>
</route>
Writing to files
Camel is of course also able to write files, i.e. produce files. In the sample below we receive
some reports on the SEDA queue that we processes before they are written to a directory.
public void testToFile() throws Exception {
MockEndpoint mock = getMockEndpoint("mock:result");
mock.expectedMessageCount(1);
mock.expectedFileExists("target/test-reports/report.txt");
template.sendBody("direct:reports","This is a great report");
assertMockEndpointsSatisfied();
}
protected JndiRegistry createRegistry() throws Exception {
// bind our processor in the registry with the given id
JndiRegistry reg = super.createRegistry();
reg.bind("processReport",new ProcessReport());
return reg;
}
protected RouteBuilder createRouteBuilder() throws Exception {
return new RouteBuilder() {
public void configure() throws Exception {
// the reports from the seda queue is processed by our processor
// before they are written to files in the target/reports directory
from("direct:reports").processRef("processReport").to("file://target/
test-reports", "mock:result");
}
};
CHAPTER 10 - COMPONENT APPENDIX 436

}
private class ProcessReport implements Processor {
public void process(Exchange exchange) throws Exception {
String body = exchange.getIn().getBody(String.class);
// do some business logic here
// set the output to the file
exchange.getOut().setBody(body);
// set the output filename using java code logic, notice that this is done by
setting
// a special header property of the out exchange
exchange.getOut().setHeader(Exchange.FILE_NAME, "report.txt");
}
}
Write to subdirectory using Exchange.FILE_NAME
Using a single route, it is possible to write a file to any number of subdirectories. If you have a
route setup as such:
<route>
<from uri="bean:myBean"/>
<to uri="file:/rootDirectory"/>
</route>
You can have myBean set the header Exchange.FILE_NAME to values such as:
Exchange.FILE_NAME = hello.txt => /rootDirectory/hello.txt
Exchange.FILE_NAME = foo/bye.txt => /rootDirectory/foo/bye.txt
This allows you to have a single route to write files to multiple destinations.
Using expression for filenames
In this sample we want to move consumed files to a backup folder using today's date as a sub-
folder name:
from("file://inbox?move=backup/${date:now:yyyyMMdd}/${file:name}").to("...");
See File Language for more samples.
437 CHAPTER 10 - COMPONENT APPENDIX

Avoiding reading the same file more than once (idempotent consumer)
Camel supports Idempotent Consumer directly within the component so it will skip already
processed files. This feature can be enabled by setting the idempotent=true option.
from("file://inbox?idempotent=true").to("...");
By default Camel uses a in memory based store for keeping track of consumed files, it uses a
least recently used cache storing holding up to 1000 entries. You can plugin your own
implementation of this store by using the idempotentRepository option using the #sign
in the value to indicate it's a referring to a bean in the Registry with the specified id.
<!-- define our store as a plain spring bean -->
<bean id="myStore" class="com.mycompany.MyIdempotentStore"/>
<route>
<from uri="file://inbox?idempotent=true&idempotentRepository=#myStore"/>
<to uri="bean:processInbox"/>
</route>
Camel will log at DEBUG level if it skips a file because it has been consumed before:
DEBUG FileConsumer is idempotent and the file has been consumed before. Will skip this
file: target\idempotent\report.txt
Using a file based idempotent repository
In this section we will use the file based idempotent repository
org.apache.camel.processor.idempotent.FileIdempotentRepository
instead of the in-memory based that is used as default.
This repository uses a 1st level cache to avoid reading the file repository. It will only use the file
repository to store the content of the 1st level cache. Thereby the repository can survive
server restarts. It will load the content of the file into the 1st level cache upon startup. The file
structure is very simple as it store the key in separate lines in the file. By default, the file store
has a size limit of 1mb when the file grew larger Camel will truncate the file store be rebuilding
the content by flushing the 1st level cache in a fresh empty file.
We configure our repository using Spring XML creating our file idempotent repository and
define our file consumer to use our repository with the idempotentRepository using #
sign to indicate Registry lookup:
<!-- this is our file based idempotent store configured to use the .filestore.dat as
file -->
<bean id="fileStore"
CHAPTER 10 - COMPONENT APPENDIX 438
class="org.apache.camel.processor.idempotent.FileIdempotentRepository">
<!-- the filename for the store -->
<property name="fileStore" value="target/fileidempotent/.filestore.dat"/>
<!-- the max filesize in bytes for the file. Camel will trunk and flush the cache
if the file gets bigger -->
<property name="maxFileStoreSize" value="512000"/>
<!-- the number of elements in our store -->
<property name="cacheSize" value="250"/>
</bean>
<camelContext id="camel" xmlns="http://camel.apache.org/schema/spring">
<route>
<from uri="file://target/fileidempotent/
?idempotent=true&idempotentRepository=#fileStore&move=done/${file:name}"/>
<to uri="mock:result"/>
</route>
</camelContext>
Using a JPA based idempotent repository
In this section we will use the JPA based idempotent repository instead of the in-memory based
that is used as default.
First we need a persistence-unit in META-INF/persistence.xml where we need to
use the class
org.apache.camel.processor.idempotent.jpa.MessageProcessed as model.
<persistence-unit name="idempotentDb" transaction-type="RESOURCE_LOCAL">
<class>org.apache.camel.processor.idempotent.jpa.MessageProcessed</class>
<properties>
<property name="openjpa.ConnectionURL" value="jdbc:derby:target/
idempotentTest;create=true"/>
<property name="openjpa.ConnectionDriverName"
value="org.apache.derby.jdbc.EmbeddedDriver"/>
<property name="openjpa.jdbc.SynchronizeMappings" value="buildSchema"/>
<property name="openjpa.Log" value="DefaultLevel=WARN, Tool=INFO"/>
</properties>
</persistence-unit>
Then we need to setup a Spring jpaTemplate in the spring XML file:
<!-- this is standard spring JPA configuration -->
<bean id="jpaTemplate" class="org.springframework.orm.jpa.JpaTemplate">
<property name="entityManagerFactory" ref="entityManagerFactory"/>
</bean>
<bean id="entityManagerFactory"
439 CHAPTER 10 - COMPONENT APPENDIX

class="org.springframework.orm.jpa.LocalEntityManagerFactoryBean">
<!-- we use idempotentDB as the persitence unit name defined in the
persistence.xml file -->
<property name="persistenceUnitName" value="idempotentDb"/>
</bean>
And finally we can create our JPA idempotent repository in the spring XML file as well:
<!-- we define our jpa based idempotent repository we want to use in the file consumer
-->
<bean id="jpaStore"
class="org.apache.camel.processor.idempotent.jpa.JpaMessageIdRepository">
<!-- Here we refer to the spring jpaTemplate -->
<constructor-arg index="0" ref="jpaTemplate"/>
<!-- This 2nd parameter is the name (= a cateogry name).
You can have different repositories with different names -->
<constructor-arg index="1" value="FileConsumer"/>
</bean>
And yes then we just need to refer to the jpaStore bean in the file consumer endpoint using
the [[idempotentRepository}} using the #syntax option:
<route>
<from uri="file://inbox?idempotent=true&idempotentRepository=#jpaStore"/>
<to uri="bean:processInbox"/>
</route>
Filter using org.apache.camel.component.file.GenericFileFilter
Camel supports pluggable filtering strategies. You can then configure the endpoint with such a
filter to skip certain files being processed.
In the sample we have build our own filter that skips files starting with skip in the filename:
public class MyFileFilter implements GenericFileFilter {
public boolean accept(GenericFile pathname) {
// we dont accept any files starting with skip in the name
return !pathname.getFileName().startsWith("skip");
}
}
And then we can configure our route using the filter attribute to reference our filter (using #
notation) that we have defines in the spring XML file:
<!-- define our sorter as a plain spring bean -->
<bean id="myFilter" class="com.mycompany.MyFileSorter"/>
CHAPTER 10 - COMPONENT APPENDIX 440

<route>
<from uri="file://inbox?filter=#myFilter"/>
<to uri="bean:processInbox"/>
</route>
Filtering using ANT path matcher
The ANT path matcher is shipped out-of-the-box in the camel-spring jar. So you need to
depend on camel-spring if you are using Maven.
The reasons is that we leverage Spring's AntPathMatcher to do the actual matching.
The file paths is matched with the following rules:
▪?matches one character
▪*matches zero or more characters
▪** matches zero or more directories in a path
The sample below demonstrates how to use it:
<camelContext xmlns="http://camel.apache.org/schema/spring">
<template id="camelTemplate"/>
<!-- use myFilter as filter to allow setting ANT paths for which files to scan for
-->
<endpoint id="myFileEndpoint" uri="file://target/
antpathmatcher?recursive=true&filter=#myAntFilter"/>
<route>
<from ref="myFileEndpoint"/>
<to uri="mock:result"/>
</route>
</camelContext>
<!-- we use the antpath file filter to use ant paths for includes and exlucde -->
<bean id="myAntFilter"
class="org.apache.camel.component.file.AntPathMatcherGenericFileFilter">
<!-- include and file in the subfolder that has day in the name -->
<property name="includes" value="**/subfolder/**/*day*"/>
<!-- exclude all files with bad in name or .xml files. Use comma to seperate
multiple excludes -->
<property name="excludes" value="**/*bad*,**/*.xml"/>
</bean>
Sorting using Comparator
Camel supports pluggable sorting strategies. This strategy it to use the build in
java.util.Comparator in Java. You can then configure the endpoint with such a
comparator and have Camel sort the files before being processed.
441 CHAPTER 10 - COMPONENT APPENDIX

In the sample we have built our own comparator that just sorts by file name:
public class MyFileSorter implements Comparator<GenericFile> {
public int compare(GenericFile o1, GenericFile o2) {
return o1.getFileName().compareToIgnoreCase(o2.getFileName());
}
}
And then we can configure our route using the sorter option to reference to our sorter
(mySorter) we have defined in the spring XML file:
<!-- define our sorter as a plain spring bean -->
<bean id="mySorter" class="com.mycompany.MyFileSorter"/>
<route>
<from uri="file://inbox?sorter=#mySorter"/>
<to uri="bean:processInbox"/>
</route>
Sorting using sortBy
Camel supports pluggable sorting strategies. This strategy it to use the File Language to
configure the sorting. The sortBy option is configured as follows:
sortBy=group 1;group 2;group 3;...
Where each group is separated with semi colon. In the simple situations you just use one
group, so a simple example could be:
sortBy=file:name
This will sort by file name, you can reverse the order by prefixing reverse: to the group, so
the sorting is now Z..A:
sortBy=reverse:file:name
As we have the full power of File Language we can use some of the other parameters, so if we
want to sort by file size we do:
sortBy=file:size
You can configure to ignore the case, using ignoreCase: for string comparison, so if you
want to use file name sorting but to ignore the case then we do:
CHAPTER 10 - COMPONENT APPENDIX 442
URI options can reference beans using the # syntax
In the Spring DSL route about notice that we can refer to beans in the Registry by
prefixing the id with #. So writing sorter=#mySorter, will instruct Camel to go
look in the Registry for a bean with the ID, mySorter.
sortBy=ignoreCase:file:name
You can combine ignore case and reverse, however reverse must be specified first:
sortBy=reverse:ignoreCase:file:name
In the sample below we want to sort by last modified file, so we do:
sortBy=file:modifed
And then we want to group by name as a 2nd option so files with same modifcation is sorted by
name:
sortBy=file:modifed;file:name
Now there is an issue here, can you spot it? Well the modified timestamp of the file is too fine
as it will be in milliseconds, but what if we want to sort by date only and then subgroup by
name?
Well as we have the true power of File Language we can use the its date command that
supports patterns. So this can be solved as:
sortBy=date:file:yyyyMMdd;file:name
Yeah, that is pretty powerful, oh by the way you can also use reverse per group, so we could
reverse the file names:
sortBy=date:file:yyyyMMdd;reverse:file:name
Using GenericFileProcessStrategy
The option processStrategy can be used to use a custom
GenericFileProcessStrategy that allows you to implement your own begin,commit
and rollback logic.
443 CHAPTER 10 - COMPONENT APPENDIX
For instance lets assume a system writes a file in a folder you should consume. But you should
not start consuming the file before another ready file have been written as well.
So by implementing our own GenericFileProcessStrategy we can implement this
as:
▪In the begin() method we can test whether the special ready file exists. The begin
method returns a boolean to indicate if we can consume the file or not.
▪in the commit() method we can move the actual file and also delete the ready file.
Debug logging
This component has log level TRACE that can be helpful if you have problems.
See Also
• Configuring Camel
• Component
• Endpoint
• Getting Started
▪File Language
▪FTP2
FLATPACK COMPONENT
The Flatpack component supports fixed width and delimited file parsing via the FlatPack library.
Notice: This component only supports consuming from flatpack files to Object model. You
can not (yet) write from Object model to flatpack format.
Maven users will need to add the following dependency to their pom.xml for this
component:
<dependency>
<groupId>org.apache.camel</groupId>
<artifactId>camel-flatpack</artifactId>
<version>x.x.x</version>
<!-- use the same version as your Camel core version -->
</dependency>
URI format
flatpack:[delim|fixed]:flatPackConfig.pzmap.xml[?options]
Or for a delimited file handler with no configuration file just use
CHAPTER 10 - COMPONENT APPENDIX 444
flatpack:someName[?options]
You can append query options to the URI in the following format,
?option=value&option=value&...
URI Options
Name Default
Value Description
delimiter , The default character delimiter for delimited files.
textQualifier " The text qualifier for delimited files.
ignoreFirstRecord true Whether the first line is ignored for delimited files
(for the column headers).
splitRows true As of Camel 1.5, the component can either process
each row one by one or the entire content at once.
Examples
•flatpack:fixed:foo.pzmap.xml creates a fixed-width endpoint using the
foo.pzmap.xml file configuration.
•flatpack:delim:bar.pzmap.xml creates a delimited endpoint using the
bar.pzmap.xml file configuration.
•flatpack:foo creates a delimited endpoint called foo with no file configuration.
Message Headers
Camel will store the following headers on the IN message:
Header Description
camelFlatpackCounter The current row index. For splitRows=false the
counter is the total number of rows.
Message Body
The component delivers the data in the IN message as a
org.apache.camel.component.flatpack.DataSetList object that has
converters for java.util.Map or java.util.List.
Usually you want the Map if you process one row at a time (splitRows=true). Use List
445 CHAPTER 10 - COMPONENT APPENDIX

for the entire content (splitRows=false), where each element in the list is a Map.
Each Map contains the key for the column name and its corresponding value.
For example to get the firstname from the sample below:
Map row = exchange.getIn().getBody(Map.class);
String firstName = row.get("FIRSTNAME");
However, you can also always get it as a List (even for splitRows=true). The same
example:
List data = exchange.getIn().getBody(List.class);
Map row = (Map)data.get(0);
String firstName = row.get("FIRSTNAME");
Header and Trailer records
In Camel 1.5 onwards the header and trailer notions in Flatpack are supported. However, you
must use fixed record IDs:
•header for the header record (must be lowercase)
•trailer for the trailer record (must be lowercase)
The example below illustrates this fact that we have a header and a trailer. You can omit one or
both of them if not needed.
<RECORD id="header" startPosition="1" endPosition="3" indicator="HBT">
<COLUMN name="INDICATOR" length="3"/>
<COLUMN name="DATE" length="8"/>
</RECORD>
<COLUMN name="FIRSTNAME" length="35" />
<COLUMN name="LASTNAME" length="35" />
<COLUMN name="ADDRESS" length="100" />
<COLUMN name="CITY" length="100" />
<COLUMN name="STATE" length="2" />
<COLUMN name="ZIP" length="5" />
<RECORD id="trailer" startPosition="1" endPosition="3" indicator="FBT">
<COLUMN name="INDICATOR" length="3"/>
<COLUMN name="STATUS" length="7"/>
</RECORD>
Using the endpoint
A common use case is sending a file to this endpoint for further processing in a separate route.
For example:
CHAPTER 10 - COMPONENT APPENDIX 446
<camelContext xmlns="http://activemq.apache.org/camel/schema/spring">
<route>
<from uri="file://someDirectory"/>
<to uri="flatpack:foo"/>
</route>
<route>
<from uri="flatpack:foo"/>
...
</route>
</camelContext>
You can also convert the payload of each message created to a Map for easy Bean Integration
FLATPACK DATAFORMAT
The Flatpack component ships with the Flatpack data format that can be used to format
between fixed width or delimited text messages to a List of rows as Map.
▪marshal = from List<Map<String, Object>> to OutputStream (can be
converted to String)
▪unmarshal = from java.io.InputStream (such as a File or String) to a
java.util.List as an
org.apache.camel.component.flatpack.DataSetList instance.
The result of the operation will contain all the data. If you need to process each row
one by one you can split the exchange, using Splitter.
Notice: The Flatpack library does currently not support header and trailers for the marshal
operation.
Options
The data format has the following options:
Option Default Description
definition null
The flatpack pzmap configuration file. Can be
omitted in simpler situations, but its preferred to
use the pzmap.
fixed false Delimited or fixed.
ignoreFirstRecord true Whether the first line is ignored for delimited files
(for the column headers).
textQualifier " If the text is qualified with a char such as ".
delimiter , The delimiter char (could be ;,or similar)
447 CHAPTER 10 - COMPONENT APPENDIX

parserFactory null Uses the default Flatpack parser factory.
Usage
To use the data format, simply instantiate an instance and invoke the marhsal or unmarshal
operation in the route builder:
FlatpackDataFormat fp = new FlatpackDataFormat();
fp.setDefinition(new ClassPathResource("INVENTORY-Delimited.pzmap.xml"));
...
from("file:order/in").unmarshal(df).to("seda:queue:neworder");
The sample above will read files from the order/in folder and unmarshal the input using the
Flatpack configuration file INVENTORY-Delimited.pzmap.xml that configures the
structure of the files. The result is a DataSetList object we store on the SEDA queue.
FlatpackDataFormat df = new FlatpackDataFormat();
df.setDefinition(new ClassPathResource("PEOPLE-FixedLength.pzmap.xml"));
df.setFixed(true);
df.setIgnoreFirstRecord(false);
from("seda:people").marshal(df).convertBodyTo(String.class).to("jms:queue:people");
In the code above we marshal the data from a Object representation as a List of rows as
Maps. The rows as Map contains the column name as the key, and the the corresponding
value. This structure can be created in Java code from e.g. a processor. We marshal the data
according to the Flatpack format and convert the result as a String object and store it on a
JMS queue.
Dependencies
To use Flatpack in your camel routes you need to add the a dependency on camel-flatpack
which implements this data format.
If you use maven you could just add the following to your pom.xml, substituting the version
number for the latest & greatest release (see the download page for the latest versions).
<dependency>
<groupId>org.apache.camel</groupId>
<artifactId>camel-flatpack</artifactId>
<version>1.5.0</version>
</dependency>
CHAPTER 10 - COMPONENT APPENDIX 448
See Also
• Configuring Camel
• Component
• Endpoint
• Getting Started
FREEMARKER
Available as of Camel 1.6
The freemarker: component allows you to process a message using a Freemarker
template. This can be ideal when using Templating to generate responses for requests.
Maven users will need to add the following dependency to their pom.xml for this
component:
<dependency>
<groupId>org.apache.camel</groupId>
<artifactId>camel-freemarker</artifactId>
<version>x.x.x</version>
<!-- use the same version as your Camel core version -->
</dependency>
URI format
freemarker:templateName[?options]
Where templateName is the classpath-local URI of the template to invoke; or the complete
URL of the remote template (eg: file://folder/myfile.ftl).
You can append query options to the URI in the following format,
?option=value&option=value&...
Options
Option Default Description
contentCache true Cache for the resource content when its loaded.
encoding null Character encoding of the resource content.
Headers
Camel will store a reference to the resource in the message header in the key
org.apache.camel.freemarker.resource. The Resource is an
449 CHAPTER 10 - COMPONENT APPENDIX
org.springframework.core.io.Resource object. And the key
org.apache.camel.freemarker.resourceUri holds the templateName as a
String object.
Note From Camel 2.1 and Camel 1.6.2, freemarker endpoint will not store these headers
into to message, as these header will cause some side effect on the dynamic templates feature.
Headers set during the Freemarker evaluation are returned to the message and added as
headers. Then its kinda possible to return values from Freemarker to the Message.
An example: Set the header value of fruit in the Freemarker template:
${request.setHeader('fruit', 'Apple')}
The header, fruit, is now accessible from the message.out.headers.
Freemarker Context
Camel will provide exchange information in the Freemarker context (just a Map). The
Exchange is transfered as:
key value
exchange The Exchange itself.
headers The headers of the In message.
camelContext The Camel Context.
request The In message.
body The In message body.
response The Out message (only for InOut message exchange pattern).
Hot reloading
The Freemarker template resource is by default not hot reloadable for both file and classpath
resources (expanded jar). If you set contentCache=false, then Camel will not cache the
resource and hot reloading is thus enabled. This scenario can be used in development.
Dynamic templates
Available as of Camel 2.1
Camel provides two headers by which you can define a different resource location for a
template or the template content itself. If any of these headers is set then Camel uses this over
the endpoint configured resource. This allows you to provide a dynamic template at runtime.
Header Type Description
CHAPTER 10 - COMPONENT APPENDIX 450

CamelFreemarkerResourceUri String Camel 2.1: A URI for the template resource to
use instead of the endpoint configured.
CamelFreemarkerTemplate String Camel 2.1: The template to use instead of the
endpoint configured.
Samples
For example you could use something like:
from("activemq:My.Queue").
to("freemarker:com/acme/MyResponse.ftl");
To use a Freemarker template to formulate a response for a message for InOut message
exchanges (where there is a JMSReplyTo header).
If you want to use InOnly and consume the message and send it to another destination you
could use:
from("activemq:My.Queue").
to("freemarker:com/acme/MyResponse.ftl").
to("activemq:Another.Queue");
And to disable the content cache, e.g. for development usage where the .ftl template should
be hot reloaded:
from("activemq:My.Queue").
to("freemarker:com/acme/MyResponse.ftl?contentCache=false").
to("activemq:Another.Queue");
And a file-based resource:
from("activemq:My.Queue").
to("freemarker:file://myfolder/MyResponse.ftl?contentCache=false").
to("activemq:Another.Queue");
In Camel 2.1 it's possible to specify what template the component should use dynamically via
a header, so for example:
from("direct:in").
setHeader("CamelFreemarkerResourceUri").constant("path/to/my/template.ftl").
to("freemarker:dummy");
451 CHAPTER 10 - COMPONENT APPENDIX

The Email Sample
In this sample we want to use Freemarker templating for an order confirmation email. The
email template is laid out in Freemarker as:
Dear ${headers.lastName}, ${headers.firstName}
Thanks for the order of ${headers.item}.
Regards Camel Riders Bookstore
${body}
And the java code:
private Exchange createLetter() {
Exchange exchange = context.getEndpoint("direct:a").createExchange();
Message msg = exchange.getIn();
msg.setHeader("firstName","Claus");
msg.setHeader("lastName","Ibsen");
msg.setHeader("item","Camel in Action");
msg.setBody("PS: Next beer is on me, James");
return exchange;
}
@Test
public void testFreemarkerLetter() throws Exception {
MockEndpoint mock = getMockEndpoint("mock:result");
mock.expectedMessageCount(1);
mock.expectedBodiesReceived("Dear Ibsen, Claus\n\nThanks for the order of Camel in
Action.\n\nRegards Camel Riders Bookstore\nPS: Next beer is on me, James");
template.send("direct:a", createLetter());
mock.assertIsSatisfied();
}
protected RouteBuilder createRouteBuilder() throws Exception {
return new RouteBuilder() {
public void configure() throws Exception {
from("direct:a").to("freemarker:org/apache/camel/component/freemarker/
letter.ftl").to("mock:result");
}
};
}
See Also
• Configuring Camel
• Component
• Endpoint
• Getting Started
CHAPTER 10 - COMPONENT APPENDIX 452
FTP/SFTP/FTPS COMPONENT - CAMEL 2.0 ONWARDS
This component provides access to remote file systems over the FTP and SFTP protocols.
Maven users will need to add the following dependency to their pom.xml for this
component:
<dependency>
<groupId>org.apache.camel</groupId>
<artifactId>camel-ftp</artifactId>
<version>x.x.x</version>
<!-- use the same version as your Camel core version -->
</dependency>
URI format
ftp://[username@]hostname[:port]/directoryname[?options]
sftp://[username@]hostname[:port]/directoryname[?options]
ftps://[username@]hostname[:port]/directoryname[?options]
Where directoryname represents the underlying directory. Can contain nested folders.
The username is currently only possible to provide in the hostname parameter.
If no username is provided, then anonymous login is attempted using no password.
If no port number is provided, Camel will provide default values according to the protocol (ftp
= 21, sftp = 22, ftps = 2222).
You can append query options to the URI in the following format,
?option=value&option=value&...
URI Options
The options below are exclusive for the FTP2 component.
Name Default
Value Description
password null Specifies the password to use to log in to the remote file system.
binary false Specifies the file transfer mode, BINARY or ASCII. Default is ASCII (false).
disconnect false Camel 2.2: Whether or not to disconnect from remote FTP server right after use. Can be used for both
consumer and producer.
localWorkDirectory null
When consuming, a local work directory can be used to store the remote file content directly in local files,
to avoid loading the content into memory. This is beneficial, if you consume a very big remote file and thus
can conserve memory. See below for more details.
passiveMode false FTP and FTPS only: Specifies whether to use passive mode connections. Default is active mode
(false).
securityProtocol TLS
FTPS only: Sets the underlying security protocol. The following values are defined:
TLS: Transport Layer Security
SSL: Secure Sockets Layer
disableSecureDataChannelDefaults false
Camel 2.4: FTPS only: Whether or not to disable using default values for execPbsz and execProt
when using secure data transfer. You can set this option to true if you want to be in absolute full control
what the options execPbsz and execProt should be used.
453 CHAPTER 10 - COMPONENT APPENDIX
Using Camel 1.x
If you are using Camel 1.x then see this link for documentation.
This page is only for Camel 2.0 or newer.
Using FTPS
The FTPS component is only available in Camel 2.2 or newer.
FTPS (also known as FTP Secure) is an extension to FTP that adds support for the
Transport Layer Security (TLS) and the Secure Sockets Layer (SSL) cryptographic
protocols.
Libraries used
This component uses two different libraries for the actual FTP work. FTP and FTPS
uses Apache Commons Net while SFTP uses JCraft JSCH.
execProt null
Camel 2.4: FTPS only: This option specifies the protection level. If option useSecureDataChannel
has been enabled and this option has not been explicit set, then value Pis used. Possible values are:
C: Clear
S: Safe (SSL protocol only)
E: Confidential (SSL protocol only)
P: Private
execPbsz null Camel 2.4: FTPS only: This option specifies the buffer size of the secure data channel. If option
useSecureDataChannel has been enabled and this option has not been explicit set, then value 0is used.
isImplicit false FTPS only: Sets the security mode(implicit/explicit). Default is explicit (false).
knownHostsFile null SFTP only: Sets the known_hosts file, so that the SFTP endpoint can do host key verification.
privateKeyFile null SFTP only: Set the private key file to that the SFTP endpoint can do private key verification.
privateKeyFilePassphrase null SFTP only: Set the private key file passphrase to that the SFTP endpoint can do private key verification.
strictHostKeyChecking no
SFTP only: Camel 2.2: Sets whether to use strict host key checking. Possible values are: no,yes and
ask.ask does not make sense to use as Camel cannot answer the question for you as its meant for human
intervention. Note: The default in Camel 2.1 and below was ask.
maximumReconnectAttempts 3 Specifies the maximum reconnect attempts Camel performs when it tries to connect to the remote FTP
server. Use 0 to disable this behavior.
reconnectDelay 1000 Delay in millis Camel will wait before performing a reconnect attempt.
connectTimeout 10000 Camel 2.4: Is the connect timeout in millis. This corresponds to using ftpClient.connectTimeout
for the FTP/FTPS. For SFTP this option is also used when attempting to connect.
soTimeout null FTP and FTPS Only: Camel 2.4: Is the SocketOptions.SO_TIMEOUT value in millis. Note SFTP
will automatic use the connectTimeout as the soTimeout.
timeout 30000 FTP and FTPS Only: Camel 2.4: Is the data timeout in millis. This corresponds to using
ftpClient.dataTimeout for the FTP/FTPS. For SFTP there is no data timeout.
ftpClient null FTP and FTPS Only: Camel 2.1: Allows you to use a custom
org.apache.commons.net.ftp.FTPClient instance.
ftpClientConfig null FTP and FTPS Only: Camel 2.1: Allows you to use a custom
org.apache.commons.net.ftp.FTPClientConfig instance.
ftpClient.trustStore.file null FTPS Only: Sets the trust store file, so that the FTPS client can look up for trusted certificates.
ftpClient.trustStore.type JKS FTPS Only: Sets the trust store type.
ftpClient.trustStore.algorithm SunX509 FTPS Only: Sets the trust store algorithm.
CHAPTER 10 - COMPONENT APPENDIX 454
ftpClient.trustStore.password null FTPS Only: Sets the trust store password.
ftpClient.keyStore.file null FTPS Only: Sets the key store file, so that the FTPS client can look up for the private certificate.
ftpClient.keyStore.type JKS FTPS Only: Sets the key store type.
ftpClient.keyStore.algorithm SunX509 FTPS Only: Sets the key store algorithm.
ftpClient.keyStore.password null FTPS Only: Sets the key store password.
ftpClient.keyStore.keyPassword null FTPS Only: Sets the private key password.
You can configure additional options on the ftpClient and ftpClientConfig from the
URI directly by using the ftpClient. or ftpClientConfig. prefix.
For example to set the setDataTimeout on the FTPClient to 30 seconds you can do:
from("ftp://foo@myserver?password=secret&ftpClient.dataTimeout=30000").to("bean:foo");
You can mix and match and have use both prefixes, for example to configure date format or
timezones.
from("ftp://foo@myserver?password=secret&ftpClient.dataTimeout=30000&ftpClientConfig.serverLanguageCode=fr").to("bean:foo");
You can have as many of these options as you like.
See the documentation of the Apache Commons FTP FTPClientConfig for possible options
and more details.
And as well for Apache Commons FTP FTPClient.
If you do not like having many and long configuration in the url you can refer to the
ftpClient or ftpClientConfig to use by letting Camel lookup in the Registry for it.
For example:
<bean id="myConfig" class="org.apache.commons.net.ftp.FTPClientConfig">
<property name="lenientFutureDates" value="true"/>
<property name="serverLanguageCode" value="fr"/>
</bean>
And then let Camel lookup this bean when you use the # notation in the url.
from("ftp://foo@myserver?password=secret&ftpClientConfig=#myConfig").to("bean:foo");
More URI options
Examples
ftp://someone@someftpserver.com/public/upload/images/
holiday2008?password=secret&binary=true
ftp://someoneelse@someotherftpserver.co.uk:12049/reports/2008/
455 CHAPTER 10 - COMPONENT APPENDIX
FTPS component default trust store
By default, the FTPS component trust store accept all certificates. If you only want
trust selective certificates, you have to configure the trust store with the
ftpClient.trustStore.xxx options or by configuring a custom
ftpClient.
See File2 as all the options there also applies for this component.
password=secret&binary=false
ftp://publicftpserver.com/download
Default when consuming files
The FTP consumer will by default leave the consumed files untouched on the remote FTP
server. You have to configure it explicit if you want it to delete the files or move them to
another location. For example you can use delete=true to delete the files, or use
move=.done to move the files into a hidden done sub directory.
The regular File consumer is different as it will by default move files to a .camel sub
directory. The reason Camel does not do this by default for the FTP consumer is that it may
lack permissions by default to be able to move or delete files.
limitations
The option readLock can be used to force Camel not to consume files that is currently in
the progress of being written. However, this option is turned off by default, as it requires that
the user has write access. And there is only a few options supported for FTP.
There are other solutions to avoid consuming files that are currently being written over FTP;
for instance, you can write to a temporary destination and move the file after it has been
written.
When moving files using move or preMove option the files are restricted to the
FTP_ROOT folder. That prevents you from moving files outside the FTP area. If you want to
move files to another area you can use soft links and move files into a soft linked folder.
Message Headers
The following message headers can be used to affect the behavior of the component
Header Description
CHAPTER 10 - COMPONENT APPENDIX 456
FTP Consumer does not support concurrency
The FTP consumer (with the same endpoint) does not support concurrency (the
backing FTP client is not thread safe).
You can use multiple FTP consumers to poll from different endpoints. It is only a
single endpoint that does not support concurrent consumers.
The FTP producer does not have this issue, it supports concurrency.
In the future we will add consumer pooling to Camel to allow this consumer to support
concurrency as well.
More information
This component is an extension of the File2 component. So there are more samples
and details on the File2 component page.
CamelFileName Specifies the output file name (relative to the endpoint directory) to be used for the output message when sending to the endpoint. If this is
not present and no expression either, then a generated message ID is used as the filename instead.
CamelFileNameProduced The actual absolute filepath (path + name) for the output file that was written. This header is set by Camel and its purpose is providing end-
users the name of the file that was written.
CamelFileBatchIndex Current index out of total number of files being consumed in this batch.
CamelFileBatchSize Total number of files being consumed in this batch.
CamelFileHost The remote hostname.
CamelFileLocalWorkPath Path to the local work file, if local work directory is used.
About timeouts
The two set of libraries (see top) has different API for setting timeout. You can use the
connectTimeout option for both of them to set a timeout in millis to establish a network
connection. An individual soTimeout can also be set on the FTP/FTPS, which corresponds to
using ftpClient.soTimeout. Notice SFTP will automatically use connectTimeout as
its soTimeout. The timeout option only applies for FTP/FTSP as the data timeout, which
corresponds to the ftpClient.dataTimeout value. All timeout values are in millis.
Using Local Work Directory
Camel supports consuming from remote FTP servers and downloading the files directly into a
local work directory. This avoids reading the entire remote file content into memory as it is
streamed directly into the local file using FileOutputStream.
Camel will store to a local file with the same name as the remote file, though with
.inprogress as extension while the file is being downloaded. Afterwards, the file is renamed
457 CHAPTER 10 - COMPONENT APPENDIX

to remove the .inprogress suffix. And finally, when the Exchange is complete the local file
is deleted.
So if you want to download files from a remote FTP server and store it as files then you
need to route to a file endpoint such as:
from("ftp://someone@someserver.com?password=secret&localWorkDirectory=/
tmp").to("file://inbox");
Samples
In the sample below we set up Camel to download all the reports from the FTP server once
every hour (60 min) as BINARY content and store it as files on the local file system.
protected RouteBuilder createRouteBuilder() throws Exception {
return new RouteBuilder() {
public void configure() throws Exception {
// we use a delay of 60 minutes (eg. once pr. hour we poll the FTP server
long delay = 60 * 60 * 1000L;
// from the given FTP server we poll (= download) all the files
// from the public/reports folder as BINARY types and store this as files
// in a local directory. Camel will use the filenames from the FTPServer
// notice that the FTPConsumer properties must be prefixed with
"consumer." in the URL
// the delay parameter is from the FileConsumer component so we should use
consumer.delay as
// the URI parameter name. The FTP Component is an extension of the File
Component.
from("ftp://scott@localhost/public/reports?password=tiger&binary=true&consumer.delay="
+ delay).
to("file://target/test-reports");
}
};
}
And the route using Spring DSL:
<route>
<from uri="ftp://scott@localhost/public/
reports?password=tiger&binary=true&delay=60000"/>
<to uri="file://target/test-reports"/>
</route>
CHAPTER 10 - COMPONENT APPENDIX 458
Optimization by renaming work file
The route above is ultra efficient as it avoids reading the entire file content into
memory. It will download the remote file directly to a local file stream. The
java.io.File handle is then used as the Exchange body. The file producer
leverages this fact and can work directly on the work file java.io.File handle
and perform a java.io.File.rename to the target filename. As Camel knows
it's a local work file, it can optimize and use a rename instead of a file copy, as the
work file is meant to be deleted anyway.
Consuming a remote FTPS server (implicit SSL) and client
authentication
from("ftps://admin@localhost:2222/public/camel?password=admin&securityProtocol=SSL&isImplicit=true
&ftpClient.keyStore.file=./src/test/resources/server.jks
&ftpClient.keyStore.password=password&ftpClient.keyStore.keyPassword=password")
.to("bean:foo");
Consuming a remote FTPS server (explicit TLS) and a custom
trust store configuration
from("ftps://admin@localhost:2222/public/camel?password=admin&ftpClient.trustStore.file=./
src/test/resources/server.jks&ftpClient.trustStore.password=password")
.to("bean:foo");
Filter using org.apache.camel.component.file.GenericFileFilter
Camel supports pluggable filtering strategies. This strategy it to use the build in
org.apache.camel.component.file.GenericFileFilter in Java. You can then
configure the endpoint with such a filter to skip certain filters before being processed.
In the sample we have build our own filter that only accepts files starting with report in the
filename.
public class MyFileFilter implements GenericFileFilter {
public boolean accept(GenericFile file) {
// we only want report files
return file.getFileName().startsWith("report");
}
}
459 CHAPTER 10 - COMPONENT APPENDIX

And then we can configure our route using the filter attribute to reference our filter (using #
notation) that we have defines in the spring XML file:
<!-- define our sorter as a plain spring bean -->
<bean id="myFilter" class="com.mycompany.MyFileFilter"/>
<route>
<from uri="ftp://someuser@someftpserver.com?password=secret&filter=#myFilter"/>
<to uri="bean:processInbox"/>
</route>
Filtering using ANT path matcher
The ANT path matcher is a filter that is shipped out-of-the-box in the camel-spring jar. So
you need to depend on camel-spring if you are using Maven.
The reason is that we leverage Spring's AntPathMatcher to do the actual matching.
The file paths are matched with the following rules:
▪?matches one character
▪*matches zero or more characters
▪** matches zero or more directories in a path
The sample below demonstrates how to use it:
<camelContext xmlns="http://camel.apache.org/schema/spring">
<template id="camelTemplate"/>
<!-- use myFilter as filter to allow setting ANT paths for which files to scan for
-->
<endpoint id="myFTPEndpoint" uri="ftp://admin@localhost:20123/
antpath?password=admin&recursive=true&delay=10000&initialDelay=2000&filter=#myAntFilter"/>
<route>
<from ref="myFTPEndpoint"/>
<to uri="mock:result"/>
</route>
</camelContext>
<!-- we use the AntPathMatcherRemoteFileFilter to use ant paths for includes and
exlucde -->
<bean id="myAntFilter"
class="org.apache.camel.component.file.AntPathMatcherGenericFileFilter">
<!-- include and file in the subfolder that has day in the name -->
<property name="includes" value="**/subfolder/**/*day*"/>
<!-- exclude all files with bad in name or .xml files. Use comma to seperate
multiple excludes -->
<property name="excludes" value="**/*bad*,**/*.xml"/>
</bean>
CHAPTER 10 - COMPONENT APPENDIX 460
Debug logging
This component has log level TRACE that can be helpful if you have problems.
See Also
• Configuring Camel
• Component
• Endpoint
• Getting Started
▪File2
CAMEL COMPONENTS FOR GOOGLE APP ENGINE
The Camel components for Google App Engine (GAE) are part of the camel-gae project and
provide connectivity to GAE's cloud computing services. They make the GAE cloud computing
environment accessible to applications via Camel interfaces. Following this pattern for other
cloud computing environments could make it easier to port Camel applications from one cloud
computing provider to another. The following table lists the cloud computing services provided
by Google and the supporting Camel components. The documentation of each component can
be found by following the link in the Camel Component column.
GAE
service
Camel
component Component description
URL fetch
service ghttp Provides connectivity to the GAE URL fetch service but can
also be used to receive messages from servlets.
Task
queueing
service
gtask Supports asynchronous message processing on GAE by using
the task queueing service as message queue.
Mail
service gmail Supports sending of emails via the GAE mail service. Receiving
mails is not supported yet but will be added later.
Memcache
service Not supported yet.
XMPP
service Not supported yet.
Images
service Not supported yet.
Datastore
service Not supported yet.
461 CHAPTER 10 - COMPONENT APPENDIX
Tutorials
• A good starting point for using Camel on GAE is the Tutorial for Camel
on Google App Engine
• The OAuth tutorial demonstrates how to implement OAuth in web
applications.
Accounts
service
gauth
glogin
These components interact with the Google Accounts API for
authentication and authorization. Google Accounts is not
specific to Google App Engine but is often used by GAE
applications for implementing security. The gauth component
is used by web applications to implement a Google-specific
OAuth consumer. This component can also be used to
OAuth-enable non-GAE web applications. The glogin
component is used by Java clients (outside GAE) for
programmatic login to GAE applications. For instructions how
to protect GAE applications against unauthorized access refer
to the Security for Camel GAE applications page.
Camel context
Setting up a SpringCamelContext on Google App Engine differs between Camel 2.1 and
Camel 2.2. The problem is that usage of the Camel-specific Spring configuration XML schema
from the http://camel.apache.org/schema/spring namespace requires JAXB and
Camel 2.1 depends on a Google App Engine SDK version that doesn't support JAXB yet.
• Camel 2.1 depends on the Google App Engine SDK 1.2.6 which doesn't support
JAXB. Refer to the Camel 2.1 subsection for instructions how to set up a
SpringCamelContext with Camel 2.1 on GAE.
• Camel 2.2 depends on the Google App Engine SDK 1.2.8, the first version that
introduces support for JAXB. Refer to the Camel 2.2 or higher subsection for
instructions how to set up a SpringCamelContext with Camel 2.2 on GAE.
• Camel 2.3 depends on the Google App Engine SDK 1.3.2.
In all versions, JMX must be disabled because the javax.management package isn't on the
App Engine JRE whitelist.
Camel 2.1
camel-gae 2.1 comes with the following CamelContext implementations.
•org.apache.camel.component.gae.context.GaeDefaultCamelContext
(extends org.apache.camel.impl.DefaultCamelContext)
CHAPTER 10 - COMPONENT APPENDIX 462

•org.apache.camel.component.gae.context.GaeSpringCamelContext
(extends org.apache.camel.spring.SpringCamelContext)
Both disable JMX before startup. The GaeSpringCamelContext additionally provides
setter methods adding route builders as shown in the next example.
Listing 17.Listing 17. appctx.xmlappctx.xml
<beans xmlns="http://www.springframework.org/schema/beans"
xmlns:xsi="http://www.w3.org/2001/XMLSchema-instance"
xsi:schemaLocation="
http://www.springframework.org/schema/beans
http://www.springframework.org/schema/beans/spring-beans-2.5.xsd">
<bean id="camelContext"
class="org.apache.camel.component.gae.context.GaeSpringCamelContext">
<property name="routeBuilder" ref="myRouteBuilder" />
</bean>
<bean id="myRouteBuilder"
class="org.example.MyRouteBuilder">
</bean>
</beans>
Alternatively, use the routeBuilders property of the GaeSpringCamelContext for
setting a list of route builders. Using this approach, a SpringCamelContext can be
configured on GAE without the need for JAXB.
Camel 2.2 or higher
With Camel 2.2, applications can use the http://camel.apache.org/schema/spring
namespace for configuring a SpringCamelContext but still need to disable JMX. Here's an
example.
Listing 18.Listing 18. appctx.xmlappctx.xml
<beans xmlns="http://www.springframework.org/schema/beans"
xmlns:xsi="http://www.w3.org/2001/XMLSchema-instance"
xmlns:camel="http://camel.apache.org/schema/spring"
xsi:schemaLocation="
http://www.springframework.org/schema/beans
http://www.springframework.org/schema/beans/spring-beans-2.5.xsd
http://camel.apache.org/schema/spring
http://camel.apache.org/schema/spring/camel-spring.xsd">
<camel:camelContext id="camelContext">
<camel:jmxAgent id="agent" disabled="true" />
<camel:routeBuilder ref="myRouteBuilder"/>
</camel:camelContext>
463 CHAPTER 10 - COMPONENT APPENDIX

<bean id="myRouteBuilder"
class="org.example.MyRouteBuilder">
</bean>
</beans>
The web.xml
Running Camel on GAE requires usage of the CamelHttpTransportServlet from
camel-servlet. The following example shows how to configure this servlet together with a
Spring application context XML file.
Listing 19.Listing 19. web.xmlweb.xml
<web-app
xmlns="http://java.sun.com/xml/ns/javaee"
xmlns:xsi="http://www.w3.org/2001/XMLSchema-instance"
xmlns:web="http://java.sun.com/xml/ns/javaee/web-app_2_5.xsd"
xsi:schemaLocation="
http://java.sun.com/xml/ns/javaee
http://java.sun.com/xml/ns/javaee/web-app_2_5.xsd" version="2.5">
<servlet>
<servlet-name>CamelServlet</servlet-name>
<servlet-class>org.apache.camel.component.servlet.CamelHttpTransportServlet</servlet-class>
<init-param>
<param-name>contextConfigLocation</param-name>
<param-value>appctx.xml</param-value>
</init-param>
</servlet>
<!--
Mapping used for external requests
-->
<servlet-mapping>
<servlet-name>CamelServlet</servlet-name>
<url-pattern>/camel/*</url-pattern>
</servlet-mapping>
<!--
Mapping used for web hooks accessed by task queueing service.
-->
<servlet-mapping>
<servlet-name>CamelServlet</servlet-name>
<url-pattern>/worker/*</url-pattern>
</servlet-mapping>
</web-app>
CHAPTER 10 - COMPONENT APPENDIX 464
The location of the Spring application context XML file is given by the
contextConfigLocation init parameter. The appctx.xml file must be on the classpath.
The servlet mapping makes the Camel application accessible under
http://<appname>.appspot.com/camel/... when deployed to Google App Engine
where <appname> must be replaced by a real GAE application name. The second servlet
mapping is used internally by the task queueing service for background processing via web
hooks. This mapping is relevant for the gtask component and is explained there in more detail.
HDFS COMPONENT
The hdfs component enables you to read and write messages from/to an HDFS file system.
HDFS is the distributed file system at the heart of Hadoop.
It can only be built using JDK1.6 or later because this is a strict requirement for Hadoop itself.
This component is hosted at http://github.com/dgreco/camel-hdfs. We decided to put it
temporarily on this github because currently Camel is being built and tested using JDK1.5 and
for this reason we couldn't put that component into the Camel official distribution. Hopefully,
as soon Camel will allow to use JDK1.6 for building and testing we will put it into the trunk.
This component is developed and tested using the latest Camel snapshot, but it should work
seamlessly with the latest Camel GA version (at the time of writing 2.1.0)
URI format
hdfs://hostname[:port][/path][?options]
You can append query options to the URI in the following format,
?option=value&option=value&...
The path is treated in the following way:
1. as a consumer, if it's a file, it just reads the file, otherwise if it represents a directory it
scans all the file under the path satisfying the configured pattern. All the files under
that directory must be of the same type.
2. as a producer, if at least one split strategy is defined, the path is considered a
directory and under that directory the producer creates a different file per split
named seg0, seg1, seg2, etc.
Options
Name Default
Value Description
overwrite true The file can be overwritten
bufferSize 4096 The buffer size used by HDFS
465 CHAPTER 10 - COMPONENT APPENDIX

replication 3 The HDFS replication factor
blockSize 67108864 The size of the HDFS blocks
fileType NORMAL_FILE
It can be SEQUENCE_FILE,
MAP_FILE, ARRAY_FILE, or
BLOOMMAP_FILE, see Hadoop
fileSystemType HDFS It can be LOCAL for local filesystem
keyType NULL The type for the key in case of
sequence or map files. See below.
valueType TEXT The type for the key in case of
sequence or map files. See below.
splitStrategy
A string describing the strategy on
how to split the file based on different
criteria. See below.
openedSuffix opened
When a file is opened for reading/
writing the file is renamed with this
suffix to avoid to read it during the
writing phase.
readSuffix read
Once the file has been read is
renamed with this suffix to avoid to
read it again.
initialDelay 0
For the consumer, how much to wait
(milliseconds)
before to start scanning the directory.
delay 0 The interval (milliseconds) between the directory
scans.
pattern * The pattern used for scanning the
directory
chunkSize 4096
When reading a normal file, this is split
into chunks producing a message per
chunk
KeyType and ValueType
• NULL it means that the key or the value is absent
• BYTE for writing a byte, the java Byte class is mapped into a BYTE
• BYTES for writing a sequence of bytes. It maps the java ByteBuffer class
CHAPTER 10 - COMPONENT APPENDIX 466
• INT for writing java integer
• FLOAT for writing java float
• LONG for writing java long
• DOUBLE for writing java double
• TEXT for writing java strings
BYTES is also used with everything else, for example, in Camel a file is sent around as an
InputStream, int this case is written in a sequence file or a map file as a sequence of bytes.
Splitting Strategy
In the current version of Hadoop (0.20.1) opening a file in append mode is disabled since it's not
enough reliable. So, for the moment, it's only possible to create new files. The Camel HDFS
endpoint tries to solve this problem in this way:
• If the split strategy option has been defined, the actual file name will become a
directory name and a <file name>/seg0 will be initially created.
• Every time a splitting condition is met a new file is created with name <original file
name>/segN where N is 1, 2, 3, etc.
The splitStrategy option is defined as a string with the following syntax:
splitStrategy=<ST>:<value>,<ST>:<value>,*
where <ST> can be:
BYTES a new file is created, and the old is closed when the number of written bytes is more
than <value>
MESSAGES a new file is created, and the old is closed when the number of written messages is
more than <value>
IDLE a new file is created, and the old is closed when no writing happened in the last <value>
milliseconds
for example:
hdfs://localhost/tmp/simple-file?splitStrategy=IDLE:1000,BYTES:5
it means: a new file is created either when it has been idle for more than 1 second or if more
than 5 bytes have been written. So, running hadoop fs -ls /tmp/simple-file you'll find the
following files seg0, seg1, seg2, etc
HIBERNATE COMPONENT
The hibernate: component allows you to work with databases using Hibernate as the object
relational mapping technology to map POJOs to database tables. The camel-hibernate
library is provided by the Camel Extra project which hosts all *GPL related components for
Camel.
467 CHAPTER 10 - COMPONENT APPENDIX
Sending to the endpoint
Sending POJOs to the hibernate endpoint inserts entities into the database. The body of the
message is assumed to be an entity bean that you have mapped to a relational table using the
hibernate .hbm.xml files.
If the body does not contain an entity bean, use a Message Translator in front of the
endpoint to perform the necessary conversion first.
Consuming from the endpoint
Consuming messages removes (or updates) entities in the database. This allows you to use a
database table as a logical queue; consumers take messages from the queue and then delete/
update them to logically remove them from the queue.
If you do not wish to delete the entity when it has been processed, you can specify
consumeDelete=false on the URI. This will result in the entity being processed each poll.
If you would rather perform some update on the entity to mark it as processed (such as to
exclude it from a future query) then you can annotate a method with @Consumed which will
be invoked on your entity bean when the entity bean is consumed.
URI format
hibernate:[entityClassName][?options]
For sending to the endpoint, the entityClassName is optional. If specified it is used to help
use the [Type Conversion] to ensure the body is of the correct type.
For consuming the entityClassName is mandatory.
You can append query options to the URI in the following format,
?option=value&option=value&...
Options
Name Default
Value Description
entityType entityClassName Is the provided entityClassName from
the URI.
consumeDelete true
Option for HibernateConsumer only.
Specifies whether or not the entity is
deleted after it is consumed.
CHAPTER 10 - COMPONENT APPENDIX 468
consumeLockEntity true
Option for HibernateConsumer only.
Specifies whether or not to use
exclusive locking of each entity while
processing the results from the
pooling.
flushOnSend true
Option for HibernateProducer only.
Flushes the EntityManager after the
entity bean has been persisted.
maximumResults -1
Option for HibernateConsumer only.
Set the maximum number of results
to retrieve on the Query.
consumer.delay 500 Option for HibernateConsumer only.
Delay in millis between each poll.
consumer.initialDelay 1000 Option for HibernateConsumer only.
Millis before polling starts.
consumer.userFixedDelay false
Option for HibernateConsumer only.
Set to true to use fixed delay
between polls, otherwise fixed rate is
used. See ScheduledExecutorService
in JDK for details.
See Also
• Configuring Camel
• Component
• Endpoint
• Getting Started
HL7 COMPONENT
The hl7 component is used for working with the HL7 MLLP protocol and the HL7 model using
the HAPI library.
This component supports the following:
▪HL7 MLLP codec for Mina
▪Agnostic data format using either plain String objects or HAPI HL7 model objects.
▪Type Converter from/to HAPI and String
▪HL7 DataFormat using HAPI library
▪Even more easy-of-use as its integrated well with the camel-mina component.
Maven users will need to add the following dependency to their pom.xml for this component:
469 CHAPTER 10 - COMPONENT APPENDIX
<dependency>
<groupId>org.apache.camel</groupId>
<artifactId>camel-hl7</artifactId>
<version>x.x.x</version>
<!-- use the same version as your Camel core version -->
</dependency>
HL7 MLLP protocol
HL7 is often used with the HL7 MLLP protocol that is a text based TCP socket based protocol.
This component ships with a Mina Codec that conforms to the MLLP protocol so you can easily
expose a HL7 listener that accepts HL7 requests over the TCP transport.
To expose a HL7 listener service we reuse the existing camel-mina component where we
just use the HL7MLLPCodec as codec.
The HL7 MLLP codec has the following options:
Name Default
Value Description
startByte 0x0b The start byte spanning the HL7 payload. Is the HL7
default value of 0x0b (11 decimal).
endByte1 0x1c The first end byte spanning the HL7 payload. Is the HL7
default value of 0x1c (28 decimal).
endByte2 0x0d The 2nd end byte spanning the HL7 payload. Is the HL7
default value of 0x0d (13 decimal).
charset JVM
Default
The encoding (is a charset name) to use for the codec. If
not provided, Camel will use the JVM default Charset.
convertLFtoCR true
Will convert \n to \r (0x0d, 13 decimal) as HL7 usually
uses \r as segment terminators. The HAPI library
requires the use of \r.
validate true Camel 2.0: Whether HAPI Parser should validate or
not.
Exposing a HL7 listener
In our Spring XML file, we configure an endpoint to listen for HL7 requests using TCP:
<endpoint id="hl7listener"
uri="mina:tcp://localhost:8888?sync=true&codec=hl7codec"/>
CHAPTER 10 - COMPONENT APPENDIX 470

Notice we configure it to use camel-mina with TCP on the localhost on port 8888. We
use sync=true to indicate that this listener is synchronous and therefore will return a HL7
response to the caller. Then we setup mina to use our HL7 codec with codec=hl7codec.
Notice that hl7codec is just a Spring bean ID, so we could have named it
mygreatcodecforhl7 or whatever. The codec is also set up in the Spring XML file:
<bean id="hl7codec" class="org.apache.camel.component.hl7.HL7MLLPCodec">
<property name="charset" value="iso-8859-1"/>
</bean>
And here we configure the charset encoding to use, and iso-8859-1 is commonly used.
The endpoint hl7listener can then be used in a route as a consumer, as this java DSL
example illustrates:
from("hl7socket").to("patientLookupService");
This is a very simple route that will listen for HL7 and route it to a service named
patientLookupService that is also a Spring bean ID we have configured in the Spring XML
as:
<bean id="patientLookupService"
class="com.mycompany.healtcare.service.PatientLookupService"/>
And another powerful feature of Camel is that we can have our busines logic in POJO classes
that is not at all tied to Camel as shown here:
public class PatientLookupService {
public Message lookupPatient(Message input) throws HL7Exception {
QRD qrd = (QRD)input.get("QRD");
String patientId = qrd.getWhoSubjectFilter(0).getIDNumber().getValue();
// find patient data based on the patient id and create a HL7 model object
with the response
Message response = ... create and set response data
return response
}
Notice that this class is just using imports from the HAPI library and none from Camel.
HL7 Model using java.lang.String
The HL7MLLP codec uses plain String as data format. And Camel uses Type Converter to
convert from/to strings to the HAPI HL7 model objects. However, you can use the plain
String objects if you prefer, for instance if you need to parse the data yourself.
See samples for such an example.
471 CHAPTER 10 - COMPONENT APPENDIX

HL7 Model using HAPI
The HL7 model is Java objects from the HAPI library. Using this library, we can encode and
decode from the EDI format (ER7) that is mostly used with HL7.
With this model you can code with Java objects instead of the EDI based HL7 format that can
be hard for humans to read and understand.
The ER7 sample below is a request to lookup a patient with the patient ID, 0101701234.
MSH|^~\\&|MYSENDER|MYRECEIVER|MYAPPLICATION||200612211200||QRY^A19|1234|P|2.4
QRD|200612211200|R|I|GetPatient|||1^RD|0101701234|DEM||
Using the HL7 model we can work with the data as a
ca.uhn.hl7v2.model.Message.Message object.
To retrieve the patient ID for the patient in the ER7 above, you can do this in java code:
Message msg = exchange.getIn().getBody(Message.class);
QRD qrd = (QRD)msg.get("QRD");
String patientId = qrd.getWhoSubjectFilter(0).getIDNumber().getValue();
Camel has built-in type converters, so when this operation is invoked:
Message msg = exchange.getIn().getBody(Message.class);
Camel will convert the received HL7 data from String to Message. This is powerful when
combined with the HL7 listener, then you as the end-user don't have to work with byte[],
String or any other simple object formats. You can just use the HAPI HL7 model objects.
HL7 DataFormat
The HL7 component ships with a HL7 data format that can be used to format between
String and HL7 model objects.
▪marshal = from Message to byte stream (can be used when returning as response
using the HL7 MLLP codec)
▪unmarshal = from byte stream to Message (can be used when receiving streamed
data from the HL7 MLLP
To use the data format, simply instantiate an instance and invoke the marhsal or unmarshl
operation in the route builder:
DataFormat hl7 = new HL7DataFormat();
...
from("direct:hl7in").marshal(hl7).to("jms:queue:hl7out");
CHAPTER 10 - COMPONENT APPENDIX 472
In the sample above, the HL7 is marshalled from a HAPI Message object to a byte stream and
put on a JMS queue.
The next example is the opposite:
DataFormat hl7 = new HL7DataFormat();
...
from("jms:queue:hl7out").unmarshal(hl7).to("patientLookupService");
Here we unmarshal the byte stream into a HAPI Message object that is passed to our patient
lookup service.
Notice there is a shorthand syntax in Camel for well-known data formats that is commonly
used.
Then you don't need to create an instance of the HL7DataFormat object:
from("direct:hl7in").marshal().hl7().to("jms:queue:hl7out");
from("jms:queue:hl7out").unmarshal().hl7().to("patientLookupService");
Message Headers
The unmarshal operation adds these MSH fields as headers on the Camel message:
Camel 1.x
Key MSH field Example
hl7.msh.sendingApplication MSH-3 MYSERVER
hl7.msh.sendingFacility MSH-4 MYSERVERAPP
hl7.msh.receivingApplication MSH-5 MYCLIENT
hl7.msh.receivingFacility MSH-6 MYCLIENTAPP
hl7.msh.timestamp MSH-7 20071231235900
hl7.msh.security MSH-8 null
hl7.msh.messageType MSH-9-1 ADT
hl7.msh.triggerEvent MSH-9-2 A01
hl7.msh.messageControl MSH-10 1234
hl7.msh.processingId MSH-11 P
hl7.msh.versionId MSH-12 2.4
473 CHAPTER 10 - COMPONENT APPENDIX
Camel 2.0
Key MSH field Example
CamelHL7SendingApplication MSH-3 MYSERVER
CamelHL7SendingFacility MSH-4 MYSERVERAPP
CamelHL7ReceivingApplication MSH-5 MYCLIENT
CamelHL7ReceivingFacility MSH-6 MYCLIENTAPP
CamelHL7Timestamp MSH-7 20071231235900
CamelHL7Security MSH-8 null
CamelHL7MessageType MSH-9-1 ADT
CamelHL7TriggerEvent MSH-9-2 A01
CamelHL7MessageControl MSH-10 1234
CamelHL7ProcessingId MSH-11 P
CamelHL7VersionId MSH-12 2.4
All headers are String types. If a header value is missing, its value is null.
Options
The HL7 Data Format supports the following options:
Option Default Description
validate true Camel 2.0: Whether the HAPI Parser should validate.
Dependencies
To use HL7 in your camel routes you need to add a dependency on camel-hl7, which
implements this data format.
If you use Maven, you could just add the following to your pom.xml, substituting the
version number for the latest & greatest release (see the download page for the latest
versions).
<dependency>
<groupId>org.apache.camel</groupId>
<artifactId>camel-hl7</artifactId>
<version>2.2.0</version>
</dependency>
CHAPTER 10 - COMPONENT APPENDIX 474

Since HAPI 0.6, the library has been split into a base library and several structures libraries, one
for each HL7v2 message version:
• v2.1 structures library
• v2.2 structures library
• v2.3 structures library
• v2.3.1 structures library
• v2.4 structures library
• v2.5 structures library
• v2.5.1 structures library
• v2.6 structures library
By default camel-hl7 only references the HAPI base library. Applications are responsible for
including structures libraries themselves. For example, if a application works with HL7v2
message versions 2.4 and 2.5 then the following dependencies must be added:
<dependency>
<groupId>ca.uhn.hapi</groupId>
<artifactId>hapi-structures-v24</artifactId>
<version>1.0</version>
</dependency>
<dependency>
<groupId>ca.uhn.hapi</groupId>
<artifactId>hapi-structures-v25</artifactId>
<version>1.0</version>
</dependency>
OSGi
An OSGi bundle containing the base library, all structures libraries and required dependencies
(on the bundle classpath) can be downloaded from the HAPI Maven repository as well.
<dependency>
<groupId>ca.uhn.hapi</groupId>
<artifactId>hapi-osgi-base</artifactId>
<version>1.0.1</version>
</dependency>
Samples
In the following example we send a HL7 request to a HL7 listener and retrieves a response. We
use plain String types in this example:
String line1 =
"MSH|^~\\&|MYSENDER|MYRECEIVER|MYAPPLICATION||200612211200||QRY^A19|1234|P|2.4";
String line2 = "QRD|200612211200|R|I|GetPatient|||1^RD|0101701234|DEM||";
475 CHAPTER 10 - COMPONENT APPENDIX

StringBuilder in = new StringBuilder();
in.append(line1);
in.append("\n");
in.append(line2);
String out =
(String)template.requestBody("mina:tcp://127.0.0.1:8888?sync=true&codec=#hl7codec",
in.toString());
In the next sample, we want to route HL7 requests from our HL7 listener to our business logic.
We have our business logic in a plain POJO that we have registered in the registry as
hl7service = for instance using Spring and letting the bean id = hl7service.
Our business logic is a plain POJO only using the HAPI library so we have these operations
defined:
public class MyHL7BusinessLogic {
// This is a plain POJO that has NO imports whatsoever on Apache Camel.
// its a plain POJO only importing the HAPI library so we can much easier work
with the HL7 format.
public Message handleA19(Message msg) throws Exception {
// here you can have your business logic for A19 messages
assertTrue(msg instanceof QRY_A19);
// just return the same dummy response
return createADR19Message();
}
public Message handleA01(Message msg) throws Exception {
// here you can have your business logic for A01 messages
assertTrue(msg instanceof ADT_A01);
// just return the same dummy response
return createADT01Message();
}
}
Then we set up the Camel routes using the RouteBuilder as follows:
DataFormat hl7 = new HL7DataFormat();
// we setup or HL7 listener on port 8888 (using the hl7codec) and in sync mode so we
can return a response
from("mina:tcp://127.0.0.1:8888?sync=true&codec=#hl7codec")
// we use the HL7 data format to unmarshal from HL7 stream to the HAPI Message
model
// this ensures that the camel message has been enriched with hl7 specific headers
to
// make the routing much easier (see below)
.unmarshal(hl7)
// using choice as the content base router
CHAPTER 10 - COMPONENT APPENDIX 476

.choice()
// where we choose that A19 queries invoke the handleA19 method on our
hl7service bean
.when(header("CamelHL7TriggerEvent").isEqualTo("A19"))
.beanRef("hl7service","handleA19")
.to("mock:a19")
// and A01 should invoke the handleA01 method on our hl7service bean
.when(header("CamelHL7TriggerEvent").isEqualTo("A01")).to("mock:a01")
.beanRef("hl7service","handleA01")
.to("mock:a19")
// other types should go to mock:unknown
.otherwise()
.to("mock:unknown")
// end choice block
.end()
// marhsal response back
.marshal(hl7);
Notice that we use the HL7 DataFormat to enrich our Camel Message with the MSH fields
preconfigued on the Camel Message. This lets us much more easily define our routes using the
fluent builders.
If we do not use the HL7 DataFormat, then we do not gains these headers and we must resort
to a different technique for computing the MSH trigger event (= what kind of HL7 message it
is). This is a big advantage of the HL7 DataFormat over the plain HL7 type converters.
Sample using plain String objects
In this sample we use plain String objects as the data format, that we send, process and
receive. As the sample is part of a unit test, there is some code for assertions, but you should
be able to understand what happens. First we send the plain string, Hello World, to the
HL7MLLPCodec and receive the response as a plain string, Bye World.
MockEndpoint mock = getMockEndpoint("mock:result");
mock.expectedBodiesReceived("Bye World");
// send plain hello world as String
Object out =
template.requestBody("mina:tcp://127.0.0.1:8888?sync=true&codec=#hl7codec", "Hello
World");
assertMockEndpointsSatisfied();
// and the response is also just plain String
assertEquals("Bye World", out);
Here we process the incoming data as plain String and send the response also as plain String:
477 CHAPTER 10 - COMPONENT APPENDIX
from("mina:tcp://127.0.0.1:8888?sync=true&codec=#hl7codec")
.process(new Processor() {
public void process(Exchange exchange) throws Exception {
// use plain String as message format
String body = exchange.getIn().getBody(String.class);
assertEquals("Hello World", body);
// return the response as plain string
exchange.getOut().setBody("Bye World");
}
})
.to("mock:result");
See Also
• Configuring Camel
• Component
• Endpoint
• Getting Started
HTTP COMPONENT
The http: component provides HTTP based endpoints for consuming external HTTP
resources (as a client to call external servers using HTTP).
Maven users will need to add the following dependency to their pom.xml for this
component:
<dependency>
<groupId>org.apache.camel</groupId>
<artifactId>camel-http</artifactId>
<version>x.x.x</version>
<!-- use the same version as your Camel core version -->
</dependency>
URI format
http:hostname[:port][/resourceUri][?options]
Will by default use port 80 for HTTP and 443 for HTTPS.
You can append query options to the URI in the following format,
?option=value&option=value&...
CHAPTER 10 - COMPONENT APPENDIX 478
camel-http vs camel-jetty
You can only produce to endpoints generated by the HTTP component. Therefore
it should never be used as input into your camel Routes. To bind/expose an HTTP
endpoint via a HTTP server as input to a camel route, you can use the Jetty
Component
HttpEndpoint Options
Name Default
Value Description
throwExceptionOnFailure true Camel 2.0: Option to disable throwing the HttpOperationFailedException in case of failed responses from the
remote server. This allows you to get all responses regardles of the HTTP status code.
bridgeEndpoint false
Camel 2.1: If the option is true , HttpProducer will ignore the Exchange.HTTP_URI header, and use the endpoint's URI
for request. You may also set the throwExcpetionOnFailure to be false to let the HttpProducer send all the fault
response back.
Camel 2.3: If the option is true, HttpProducer and CamelServlet will skip the gzip processing if the content-encoding is
"gzip".
disableStreamCache false
Camel 2.3: DefaultHttpBinding will copy the request input stream into a stream cache and put it into message body if
this option is false to support read it twice, otherwise DefaultHttpBinding will set the request input stream direct into the
message body.
httpBindingRef null Reference to a org.apache.camel.component.http.HttpBinding in the Registry. From Camel 2.3 onwards
prefer to use the httpBinding option.
httpBinding null Camel 2.3: Reference to a org.apache.camel.component.http.HttpBinding in the Registry.
httpClientConfigurerRef null Reference to a org.apache.camel.component.http.HttpClientConfigurer in the Registry. From Camel
2.3 onwards prefer to use the httpClientConfigurer option.
httpClientConfigurer null Camel 2.3: Reference to a org.apache.camel.component.http.HttpClientConfigurer in the Registry.
httpClient.XXX null Setting options on the HttpClientParams. For instance httpClient.soTimeout=5000 will set the SO_TIMEOUT to
5 seconds.
clientConnectionManager null Camel 2.3: To use a custom org.apache.http.conn.ClientConnectionManager.
The following authentication options can also be set on the HttpEndpoint:
Camel 2.2 or older: Setting Authentication and Proxy
Name Default Value Description
username null Username for authentication.
password null Password for authentication.
domain null Camel 2.1: Domain for NTML Authentication. This option must be used to force NTML authentication.
proxyHost null Camel 1.6.2: The proxy host name
proxyPort null Camel 1.6.2: The proxy port number
proxyUsername null Camel 1.6.2: Username for proxy authentication
proxyPassword null Camel 1.6.2: Password for proxy authentication
Camel 2.3 or newer: HttpConfiguration - Setting
Authentication and Proxy
Name Default Value Description
479 CHAPTER 10 - COMPONENT APPENDIX

authMethod null Authentication method, either as Basic,Digest or NTLM.
authMethodPriority null Priority of authentication methods. Is a list separated with comma. For example: Basic,Digest to exclude NTLM.
authUsername null Username for authentication
authPassword null Password for authentication
authDomain null Domain for NTML authentication
authHost null Optional host for NTML authentication
proxyHost null The proxy host name
proxyPort null The proxy port number
proxyAuthMethod null Authentication method for proxy, either as Basic,Digest or NTLM.
proxyAuthUsername null Username for proxy authentication
proxyAuthPassword null Password for proxy authentication
proxyAuthDomain null Domain for proxy NTML authentication
proxyAuthHost null Optional host for proxy NTML authentication
When using authentication you must provide the choice of method for the authMethod or
authProxyMethod options.
You can configure the proxy and authentication details on either the HttpComponent or the
HttpEndoint. Values provided on the HttpEndpoint will take precedence over
HttpComponent. Its most likely best to configure this on the HttpComponent which
allows you to do this once.
The HTTP component uses convention over configuration which means that if you have not
explicit set a authMethodPriority then it will fallback and use the select(ed)
authMethod as priority as well. So if you use authMethod.Basic then the
auhtMethodPriority will be Basic only.
HttpComponent Options
Name Default Value Description
httpBinding null To use a custom org.apache.camel.component.http.HttpBinding.
httpClientConfigurer null To use a custom org.apache.camel.component.http.HttpClientConfigurer.
httpConnectionManager null To use a custom org.apache.commons.httpclient.HttpConnectionManager.
httpConfiguration null Camel 2.3: To use a custom org.apache.camel.component.http.HttpConfiguration
HttpConfiguration contains all the options listed in the table above under the section
HttpConfiguration - Setting Authentication and Proxy.
Message Headers
Camel 1.x
Name Type Description
HttpProducer.HTTP_URI String Camel 1.6.0: URI to call. Will override existing URI set directly on the endpoint. Is set on the In message.
HttpProducer.HTTP_RESPONSE_CODE int The HTTP response code from the external server. Is 200 for OK. Is set on the Out message.
HttpProducer.QUERY String URI parameters. Will override existing URI parameters set directly on the endpoint. Is set on the In message.
CHAPTER 10 - COMPONENT APPENDIX 480
Camel 2.x
Name Type Description
Exchange.HTTP_URI String URI to call. Will override existing URI set directly on the endpoint.
Exchange.HTTP_PATH String
Request URI's path, the header will be used to build the request URI with the HTTP_URI.
Camel 2.3.0: If the path is start with "/", http producer will try to find the relative path based
on the Exchange.HTTP_BASE_URI header or the exchange.getFromEndpoint().getEndpointUri();
Exchange.HTTP_QUERY String URI parameters. Will override existing URI parameters set directly on the endpoint.
Exchange.HTTP_RESPONSE_CODE int The HTTP response code from the external server. Is 200 for OK.
Exchange.HTTP_CHARACTER_ENCODING String Character encoding.
Exchange.CONTENT_TYPE String The HTTP content type. Is set on both the IN and OUT message to provide a content type, such
as text/html.
Exchange.CONTENT_ENCODING String The HTTP content encoding. Is set on both the IN and OUT message to provide a content
encoding, such as gzip.
Exchange.HTTP_SERVLET_REQUEST HttpServletRequest Camel 2.3: The HttpServletRequest object.
Exchange.HTTP_SERVLET_RESPONSE HttpServletResponse Camel 2.3: The HttpServletResponse object.
Message Body
Camel will store the HTTP response from the external server on the OUT body. All headers
from the IN message will be copied to the OUT message, so headers are preserved during
routing. Additionally Camel will add the HTTP response headers as well to the OUT message
headers.
Response code
Camel will handle according to the HTTP response code:
▪Response code is in the range 100..299, Camel regards it as a success response.
▪Response code is in the range 300..399, Camel regards it as a redirection response
and will throw a HttpOperationFailedException with the information.
▪Response code is 400+, Camel regards it as an external server failure and will throw a
HttpOperationFailedException with the information.
HttpOperationFailedException
This exception contains the following information:
▪The HTTP status code
▪The HTTP status line (text of the status code)
▪Redirect location, if server returned a redirect
▪Response body as a java.lang.String, if server provided a body as response
Calling using GET or POST
In Camel 1.5 the following algorithm is used to determine if either GET or POST HTTP
method should be used:
1. Use method provided in header.
481 CHAPTER 10 - COMPONENT APPENDIX
throwExceptionOnFailure
The option, throwExceptionOnFailure, can be set to false to prevent the
HttpOperationFailedException from being thrown for failed response
codes. This allows you to get any response from the remote server.
There is a sample below demonstrating this.
2. GET if query string is provided in header.
3. GET if endpoint is configured with a query string.
4. POST if there is data to send (body is not null).
5. GET otherwise.
How to get access to HttpServletRequest and HttpServletResponse
Available as of Camel 2.0
You can get access to these two using the Camel type converter system using
NOTE from Camel 2.3.0 you can get the request and response not just from the processor
after the camel-jetty or camel-cxf endpoint.
HttpServletRequest request = exchange.getIn().getBody(HttpServletRequest.class);
HttpServletRequest response = exchange.getIn().getBody(HttpServletResponse.class);
Configuring URI to call
You can set the HTTP producer's URI directly form the endpoint URI. In the route below,
Camel will call out to the external server, oldhost, using HTTP.
from("direct:start")
.to("http://oldhost");
And the equivalent Spring sample:
<camelContext xmlns="http://activemq.apache.org/camel/schema/spring">
<route>
<from uri="direct:start"/>
<to uri="http://oldhost"/>
</route>
</camelContext>
In Camel 1.5.1 you can override the HTTP endpoint URI by adding a header with the key,
HttpProducer.HTTP_URI, on the message.
CHAPTER 10 - COMPONENT APPENDIX 482

from("direct:start")
.setHeader(org.apache.camel.component.http.HttpProducer.HTTP_URI,
constant("http://newhost"))
.to("http://oldhost");
In the sample above Camel will call the http://newhost despite the endpoint is configured with
http://oldhost.
And the same code in Camel 2.0:
from("direct:start")
.setHeader(HttpConstants.HTTP_URI, constant("http://newhost"))
.to("http://oldhost");
Where Constants is the class, org.apache.camel.component.http.Constants.
Configuring URI Parameters
Camel 1.x
The http producer supports URI parameters to be sent to the HTTP server. The URI
parameters can either be set directly on the endpoint URI or as a header with the key
HttpProducer.QUERY on the message.
from("direct:start")
.to("http://oldhost?order=123&detail=short");
Or options provided in a header:
from("direct:start")
.setHeader(HttpConstants.HTTP_QUERY, constant("order=123&detail=short"))
.to("http://oldhost");
Camel 2.x
The http producer supports URI parameters to be sent to the HTTP server. The URI
parameters can either be set directly on the endpoint URI or as a header with the key
Exchange.HTTP_QUERY on the message.
from("direct:start")
.to("http://oldhost?order=123&detail=short");
Or options provided in a header:
483 CHAPTER 10 - COMPONENT APPENDIX

from("direct:start")
.setHeader(Exchange.HTTP_QUERY, constant("order=123&detail=short"))
.to("http://oldhost");
How to set the http method (GET/POST/PUT/DELETE/HEAD/OPTIONS/
TRACE) to the HTTP producer
The HTTP component provides a way to set the HTTP request method by setting the message
header. Here is an example;
Camel 1.x
from("direct:start")
.setHeader(HttpConstants.HTTP_METHOD,
constant(org.apache.camel.component.http.HttpMethods.POST))
.to("http://www.google.com")
.to("mock:results");
Camel 2.x
from("direct:start")
.setHeader(Exchange.HTTP_METHOD,
constant(org.apache.camel.component.http.HttpMethods.POST))
.to("http://www.google.com")
.to("mock:results");
The method can be written a bit shorter using the string constants:
.setHeader("CamelHttpMethod", constant("POST"))
And the equivalent Spring sample:
<camelContext xmlns="http://activemq.apache.org/camel/schema/spring">
<route>
<from uri="direct:start"/>
<setHeader headerName="CamelHttpMethod">
<constant>POST</constant>
</setHeader>
<to uri="http://www.google.com"/>
<to uri="mock:results"/>
</route>
</camelContext>
Using client tineout - SO_TIMEOUT
See the unit test in this link
CHAPTER 10 - COMPONENT APPENDIX 484

Configuring a Proxy
Only for >= Camel 1.6.2
The HTTP component provides a way to configure a proxy.
from("direct:start")
.to("http://oldhost?proxyHost=www.myproxy.com&proxyPort=80");
There is also support for proxy authentication via the proxyUsername and
proxyPassword options.
Using proxy settings outside of URI
*Only for >= Camel 1.6.2 and < Camel 2.2.0 *
The HTTP component will detect Java System Properties for http.proxyHost and
http.proxyPort and use them if provided.
See more at SUN http proxy documentation.
To avoid the System properties conflicts, from Camel 2.2.0 you can only set the proxy
configure from CameContext or URI.
Java DSL :
context.getProperties().put("http.proxyHost","172.168.18.9");
context.getProperties().put("http.proxyPort" "8080");
Spring XML
<camelContext>
<properties>
<property key="http.proxyHost" value="172.168.18.9"/>
<property key="http.proxyPort" value="8080"/>
</properties>
</camelContext>
Camel will first set the settings from Java System or CamelContext Properties and then the
endpoint proxy options if provided.
So you can override the system properties with the endpoint options.
Configuring charset
If you are using POST to send data you can configure the charset using the Exchange
property:
exchange.setProperty(Exchange.CHARSET_NAME, "iso-8859-1");
485 CHAPTER 10 - COMPONENT APPENDIX

Sample with scheduled poll
The sample polls the Google homepage every 10 seconds and write the page to the file
message.html:
from("timer://foo?fixedRate=true&delay=0&period=10000")
.to("http://www.google.com")
.setHeader(FileComponent.HEADER_FILE_NAME, "message.html").to("file:target/
google");
URI Parameters from the endpoint URI
In this sample we have the complete URI endpoint that is just what you would have typed in a
web browser. Multiple URI parameters can of course be set using the &character as separator,
just as you would in the web browser. Camel does no tricks here.
// we query for Camel at the Google page
template.sendBody("http://www.google.com/search?q=Camel",null);
URI Parameters from the Message
Map headers = new HashMap();
headers.put(HttpProducer.QUERY, "q=Camel&lr=lang_en");
// we query for Camel and English language at Google
template.sendBody("http://www.google.com/search",null, headers);
In the header value above notice that it should not be prefixed with ?and you can separate
parameters as usual with the &char.
Getting the Response Code
You can get the HTTP response code from the HTTP component by getting the value from the
Out message header with HttpProducer.HTTP_RESPONSE_CODE.
Exchange exchange = template.send("http://www.google.com/search",new Processor() {
public void process(Exchange exchange) throws Exception {
exchange.getIn().setHeader(HttpProducer.QUERY,
constant("hl=en&q=activemq"));
}
});
CHAPTER 10 - COMPONENT APPENDIX 486

Message out = exchange.getOut();
int responseCode = out.getHeader(HttpProducer.HTTP_RESPONSE_CODE, Integer.class);
Using throwExceptionOnFailure=false to get any response back
Available as of Camel 2.0
In the route below we want to route a message that we enrich with data returned from a
remote HTTP call. As we want any response from the remote server, we set the
throwExceptionOnFailure option to false so we get any response in the
AggregationStrategy. As the code is based on a unit test that simulates a HTTP status
code 404, there is some assertion code etc.
// We set throwExceptionOnFailure to false to let Camel return any response from the
remove HTTP server without thrown
// HttpOperationFailedException in case of failures.
// This allows us to handle all responses in the aggregation strategy where we can
check the HTTP response code
// and decide what to do. As this is based on an unit test we assert the code is 404
from("direct:start").enrich("http://localhost:8222/
myserver?throwExceptionOnFailure=false&user=Camel",new AggregationStrategy() {
public Exchange aggregate(Exchange original, Exchange resource) {
// get the response code
Integer code = resource.getIn().getHeader(Exchange.HTTP_RESPONSE_CODE,
Integer.class);
assertEquals(404, code.intValue());
return resource;
}
}).to("mock:result");
// this is our jetty server where we simulate the 404
from("jetty://http://localhost:8222/myserver")
.process(new Processor() {
public void process(Exchange exchange) throws Exception {
exchange.getOut().setBody("Page not found");
exchange.getOut().setHeader(Exchange.HTTP_RESPONSE_CODE, 404);
}
});
Disabling Cookies
To disable cookies you can set the HTTP Client to ignore cookies by adding this URI option:
httpClient.cookiePolicy=ignoreCookies
487 CHAPTER 10 - COMPONENT APPENDIX

Advanced Usage
If you need more control over the HTTP producer you should use the HttpComponent
where you can set various classes to give you custom behavior.
Setting MaxConnectionsPerHost
The HTTP Component has a
org.apache.commons.httpclient.HttpConnectionManager where you can
configure various global configuration for the given component.
By global, we mean that any endpoint the component creates has the same shared
HttpConnectionManager. So, if we want to set a different value for the max connection
per host, we need to define it on the HTTP component and not on the endpoint URI that we
usually use. So here comes:
First, we define the http component in Spring XML. Yes, we use the same scheme name,
http, because otherwise Camel will auto-discover and create the component with default
settings. What we need is to overrule this so we can set our options. In the sample below we
set the max connection to 5 instead of the default of 2.
<bean id="http" class="org.apache.camel.component.http.HttpComponent">
<property name="camelContext" ref="camel"/>
<property name="httpConnectionManager" ref="myHttpConnectionManager"/>
</bean>
<bean id="myHttpConnectionManager"
class="org.apache.commons.httpclient.MultiThreadedHttpConnectionManager">
<property name="params" ref="myHttpConnectionManagerParams"/>
</bean>
<bean id="myHttpConnectionManagerParams"
class="org.apache.commons.httpclient.params.HttpConnectionManagerParams">
<property name="defaultMaxConnectionsPerHost" value="5"/>
</bean>
And then we can just use it as we normally do in our routes:
<camelContext id="camel" xmlns="http://camel.apache.org/schema/spring" trace="true">
<route>
<from uri="direct:start"/>
<to uri="http://www.google.com"/>
<to uri="mock:result"/>
</route>
</camelContext>
CHAPTER 10 - COMPONENT APPENDIX 488

Using HTTPS to authenticate gotchas
An end user reported that he had problem with authenticating with HTTPS. The problem was
eventually resolved when he discovered the HTTPS server did not return a HTTP code 401
Authorization Required. The solution was to set the following URI option:
httpClient.authenticationPreemptive=true
Accepting self signed certifications from remote server
See this link from a mailing list discussion with some code to outline how to do this with the
Apache Commons HTTP API.
Setting up SSL for HTTP Client
Basically camel-http component is built on the top of Apache HTTP client, and you can
implement a custom
org.apache.camel.component.http.HttpClientConfigurer to do some
configuration on the http client if you need full control of it.
However if you just want to specify the keystore and truststore you can do this with Apache
HTTP HttpClientConfigurer, for example:
Protocol authhttps = new Protocol("https",new AuthSSLProtocolSocketFactory(
new URL("file:my.keystore"), "mypassword",
new URL("file:my.truststore"), "mypassword"), 443);
Protocol.registerProtocol("https", authhttps);
And then you need to create a class that implements HttpClientConfigurer, and
registers https protocol providing a keystore or truststore per example above. Then, from your
camel route builder class you can hook it up like so:
HttpComponent httpComponent = getContext().getComponent("http", HttpComponent.class);
httpComponent.setHttpClientConfigurer(new MyHttpClientConfigurer());
If you are doing this using the Spring DSL, you can specify your HttpClientConfigurer
using the URI. For example:
<bean id="myHttpClientConfigurer"
class="my.https.HttpClientConfigurer">
</bean>
<to uri="https://myhostname.com:443/
myURL?httpClientConfigurerRef=myHttpClientConfigurer"/>
489 CHAPTER 10 - COMPONENT APPENDIX

As long as you implement the HttpClientConfigurer and configure your keystore and truststore
as described above, it will work fine.
See Also
• Configuring Camel
• Component
• Endpoint
• Getting Started
▪Jetty
IBATIS
The ibatis: component allows you to query, poll, insert, update and delete data in a relational
database using Apache iBATIS.
Maven users will need to add the following dependency to their pom.xml for this
component:
<dependency>
<groupId>org.apache.camel</groupId>
<artifactId>camel-ibatis</artifactId>
<version>x.x.x</version>
<!-- use the same version as your Camel core version -->
</dependency>
URI format
ibatis:statementName[?options]
Where statementName is the name in the iBATIS XML configuration file which maps to
the query, insert, update or delete operation you wish to evaluate.
You can append query options to the URI in the following format,
?option=value&option=value&...
This component will by default load the iBatis SqlMapConfig file from the root of the
classpath and expected named as SqlMapConfig.xml.
It uses Spring resource loading so you can define it using classpath,file or http as
prefix to load resources with those schemes.
In Camel 2.2 you can configure this on the iBatisComponent with the
setSqlMapConfig(String) method.
CHAPTER 10 - COMPONENT APPENDIX 490
Options
Option Type Default Description
consumer.onConsume String null
Statements to run
after consuming. Can
be used, for
example, to update
rows after they have
been consumed and
processed in Camel.
See sample later.
Multiple statements
can be separated
with comma.
consumer.useIterator boolean true
If true each row
returned when
polling will be
processed
individually. If
false the entire
List of data is set
as the IN body.
consumer.routeEmptyResultSet boolean false
Camel 2.0: Sets
whether empty
result set should be
routed or not. By
default, empty result
sets are not routed.
statementType StatementType null
Camel 1.6.1/2.0:
Mandatory to specify
for IbatisProducer to
control which iBatis
SqlMapClient
method to invoke.
The enum values
are:
QueryForObject,
QueryForList,
Insert,Update,
Delete.
491 CHAPTER 10 - COMPONENT APPENDIX
maxMessagesPerPoll int 0
Camel 2.0: An
integer to define a
maximum messages
to gather per poll.
By default, no
maximum is set. Can
be used to set a limit
of e.g. 1000 to avoid
when starting up the
server that there are
thousands of files.
Set a value of 0 or
negative to disabled
it.
Message Headers
Camel will populate the result message, either IN or OUT with a header with the
operationName used:
Header Type Description
org.apache.camel.ibatis.queryName String
Camel 1.x: The
statementName used
(for example: insertAccount).
CamelIBatisStatementName String
Camel 2.0: The
statementName used
(for example: insertAccount).
CamelIBatisResult Object
Camel 1.6.2/2.0: The
response returned from
iBatis in any of the
operations. For instance an
INSERT could return the
auto-generated key, or
number of rows etc.
Message Body
Camel 1.6.1: The response from iBatis will be set as OUT body
Camel 1.6.2/2.0: The response from iBatis will only be set as body if it's a SELECT
statement. That means, for example, for INSERT statements Camel will not replace the body.
CHAPTER 10 - COMPONENT APPENDIX 492

This allows you to continue routing and keep the original body. The response from iBatis is
always stored in the header with the key CamelIBatisResult.
Samples
For example if you wish to consume beans from a JMS queue and insert them into a database
you could do the following:
from("activemq:queue:newAccount").
to("ibatis:insertAccount?statementType=Insert");
Notice we have to specify the statementType, as we need to instruct Camel which
SqlMapClient operation to invoke.
Where insertAccount is the iBatis ID in the SQL map file:
<!-- Insert example, using the Account parameter class -->
<insert id="insertAccount" parameterClass="Account">
insert into ACCOUNT (
ACC_ID,
ACC_FIRST_NAME,
ACC_LAST_NAME,
ACC_EMAIL
)
values (
#id#, #firstName#, #lastName#, #emailAddress#
)
</insert>
Using StatementType for better control of IBatis
Available as of Camel 1.6.1/2.0
When routing to an iBatis endpoint you want more fine grained control so you can control
whether the SQL statement to be executed is a SELEECT,UPDATE,DELETE or INSERT etc.
This is now possible in Camel 1.6.1/2.0. So for instance if we want to route to an iBatis
endpoint in which the IN body contains parameters to a SELECT statement we can do:
from("direct:start")
.to("ibatis:selectAccountById?statementType=QueryForObject")
.to("mock:result");
In the code above we can invoke the iBatis statement selectAccountById and the IN body
should contain the account id we want to retrieve, such as an Integer type.
We can do the same for some of the other operations, such as QueryForList:
493 CHAPTER 10 - COMPONENT APPENDIX

from("direct:start")
.to("ibatis:selectAllAccounts?statementType=QueryForList")
.to("mock:result");
And the same for UPDATE, where we can send an Account object as IN body to iBatis:
from("direct:start")
.to("ibatis:updateAccount?statementType=Update")
.to("mock:result");
Scheduled polling example
Since this component does not support scheduled polling, you need to use another mechanism
for triggering the scheduled polls, such as the Timer or Quartz components.
In the sample below we poll the database, every 30 seconds using the Timer component and
send the data to the JMS queue:
from("timer://pollTheDatabase?delay=30000").to("ibatis:selectAllAccounts?statementType=QueryForList").to("activemq:queue:allAccounts");
And the iBatis SQL map file used:
<!-- Select with no parameters using the result map for Account class. -->
<select id="selectAllAccounts" resultMap="AccountResult">
select * from ACCOUNT
</select>
Using onConsume
This component supports executing statements after data have been consumed and processed
by Camel. This allows you to do post updates in the database. Notice all statements must be
UPDATE statements. Camel supports executing multiple statements whose name should be
separated by comma.
The route below illustrates we execute the consumeAccount statement data is
processed. This allows us to change the status of the row in the database to processed, so we
avoid consuming it twice or more.
from("ibatis:selectUnprocessedAccounts?consumer.onConsume=consumeAccount").to("mock:results");
And the statements in the sqlmap file:
CHAPTER 10 - COMPONENT APPENDIX 494

<select id="selectUnprocessedAccounts" resultMap="AccountResult">
select * from ACCOUNT where PROCESSED = false
</select>
<update id="consumeAccount" parameterClass="Account">
update ACCOUNT set PROCESSED = true where ACC_ID = #id#
</update>
See Also
• Configuring Camel
• Component
• Endpoint
• Getting Started
IRC COMPONENT
The irc component implements an IRC (Internet Relay Chat) transport.
Maven users will need to add the following dependency to their pom.xml for this
component:
<dependency>
<groupId>org.apache.camel</groupId>
<artifactId>camel-irc</artifactId>
<version>x.x.x</version>
<!-- use the same version as your Camel core version -->
</dependency>
URI format
irc:nick@host[:port]/#room[?options]
In Camel 2.0, you can also use the following format:
irc:nick@host[:port]?channels=#channel1,#channel2,#channel3[?options]
You can append query options to the URI in the following format,
?option=value&option=value&...
495 CHAPTER 10 - COMPONENT APPENDIX
Options
Name Description Example Default
Value
channels Camel 2.0: Comma separated list of IRC channels to join. channels=#channel1,#channel2 null
nickname The nickname used in chat. irc:MyNick@irc.server.org#channel or
irc:irc.server.org#channel?nickname=MyUser null
username The IRC server user name. irc:MyUser@irc.server.org#channel or
irc:irc.server.org#channel?username=MyUser Same as nickname.
password The IRC server password. password=somepass None
realname The IRC user's actual name. realname=MyName None
colors Whether or not the server supports color codes. true, false true
onReply Whether or not to handle general responses to commands or
informational messages. true, false false
onNick Handle nickname change events. true, false true
onQuit Handle user quit events. true, false true
onJoin Handle user join events. true, false true
onKick Handle kick events. true, false true
onMode Handle mode change events. true, false true
onPart Handle user part events. true, false true
onTopic Handle topic change events. true, false true
onPrivmsg Handle message events. true, false true
trustManager Camel 2.0: The trust manager used to verify the SSL server's
certificate. trustManager=#referenceToTrustManagerBean
The default trust
manager, which
accepts all
certificates, will be
used.
keys
Camel 2.2: Comma separated list of IRC channel keys. Important
to be listed in same order as channels. When joining multiple
channels with only some needing keys just insert an empty value for
that channel.
irc:MyNick@irc.server.org/
#channel?keys=chankey null
SSL Support
As of Camel 2.0, you can also connect to an SSL enabled IRC server, as follows:
ircs:host[:port]/#room?username=user&password=pass
By default, the IRC transport uses SSLDefaultTrustManager. If you need to provide your own
custom trust manager, use the trustManager parameter as follows:
ircs:host[:port]/
#room?username=user&password=pass&trustManager=#referenceToMyTrustManagerBean
Using keys
Available as of Camel 2.2
Some irc rooms requires you to provide a key to be able to join that channel. The key is just
a secret word.
CHAPTER 10 - COMPONENT APPENDIX 496

For example we join 3 channels where as only channel 1 and 3 uses a key.
irc:nick@irc.server.org?channels=#chan1,#chan2,#chan3&keys=chan1Key,,chan3key
See Also
• Configuring Camel
• Component
• Endpoint
• Getting Started
JAVASPACE COMPONENT
Available as of Camel 2.1
The javaspace component is a transport for working with any JavaSpace compliant
implementation and this component has been tested with both the Blitz implementation and the
GigaSpace implementation .
This component can be used for sending and receiving any object inheriting from the Jini
net.jini.core.entry.Entry class. It is also possible to pass the bean ID of a template
that can be used for reading/taking the entries from the space.
This component can be used for sending/receiving any serializable object acting as a sort of
generic transport. The JavaSpace component contains a special optimization for dealing with the
BeanExchange. It can be used to invoke a POJO remotely, using a JavaSpace as a transport.
This latter feature can provide a simple implementation of the master/worker pattern, where a
POJO provides the business logic for the worker.
Look at the test cases for examples of various use cases for this component.
Maven users will need to add the following dependency to their pom.xml for this
component:
<dependency>
<groupId>org.apache.camel</groupId>
<artifactId>camel-javaspace</artifactId>
<version>x.x.x</version>
<!-- use the same version as your Camel core version -->
</dependency>
URI format
javaspace:jini://host[?options]
497 CHAPTER 10 - COMPONENT APPENDIX

You can append query options to the URI in the following format,
?option=value&option=value&...
Examples
Sending and Receiving Entries
//Sending route
from("direct:input").to("javaspace:jini://localhost?spaceName=mySpace");
//Receiving Route
from("javaspace:jini://localhost?spaceName=mySpace&templateId=template&verb=take&concurrentConsumers=1")
In this case the payload can be any object that inherits from the Jini Entry type.
Sending and receiving serializable objects
Using the preceding routes, it is also possible to send and receive any serializable object. The
JavaSpace component detects that the payload is not a Jini Entry and then it automatically
wraps the payload with a Camel Jini Entry. In this way, a JavaSpace can be used as a generic
transport mechanism.
Using JavaSpace as a remote invocation transport
The JavaSpace component has been tailored to work in combination with the Camel bean
component. It is therefore possible to call a remote POJO using JavaSpace as the transport:
from("direct:input").to("javaspace:jini://localhost?spaceName=mySpace");
//Client side
from("javaspace:jini://localhost?concurrentConsumers=10&spaceName=mySpace").to("pojo:pojo");
//Server side
In the code there are two test cases showing how to use a POJO to realize the master/worker
pattern. The idea is to use the POJO to provide the business logic and rely on Camel for
sending/receiving requests/replies with the proper correlation.
Options
Name Default Value Description
CHAPTER 10 - COMPONENT APPENDIX 498
spaceName null Specifies the JavaSpace name.
verb take
Specifies the verb for getting
JavaSpace entries. The values can be:
take or read.
transactional false
If true, sending and receiving
entries is performed within a
transaction.
transactionalTimeout Long.MAX_VALUE Specifies the transaction timeout.
concurrentConsumers 1
Specifies the number of concurrent
consumers getting entries from the
JavaSpace.
templateId null
If present, this option specifies the
Spring bean ID of the template to
use for reading/taking entries.
See Also
• Configuring Camel
• Component
• Endpoint
• Getting Started
JBI COMPONENT
The jbi component is implemented by the ServiceMix Camel module and provides integration
with a JBI Normalized Message Router, such as the one provided by Apache ServiceMix.
The following code:
from("jbi:endpoint:http://foo.bar.org/MyService/MyEndpoint")
Automatically exposes a new endpoint to the bus, where the service QName is
{http://foo.bar.org}MyService and the endpoint name is MyEndpoint (see URI-
format).
When a JBI endpoint appears at the end of a route, for example:
to("jbi:endpoint:http://foo.bar.org/MyService/MyEndpoint")
The messages sent by this producer endpoint are sent to the already deployed JBI endpoint.
499 CHAPTER 10 - COMPONENT APPENDIX
See below for information about how to use StreamSource types from
ServiceMix in Camel.
URI format
jbi:service:serviceNamespace[sep]serviceName[?options]
jbi:endpoint:serviceNamespace[sep]serviceName[sep]endpointName[?options]
jbi:name:endpointName[?options]
The separator that should be used in the endpoint URL is:
•/(forward slash), if serviceNamespace starts with http://, or
•:(colon), if serviceNamespace starts with urn:foo:bar.
For more details of valid JBI URIs see the ServiceMix URI Guide.
Using the jbi:service: or jbi:endpoint: URI formats sets the service QName on
the JBI endpoint to the one specified. Otherwise, the default Camel JBI Service QName is used,
which is:
{http://activemq.apache.org/camel/schema/jbi}endpoint
You can append query options to the URI in the following format,
?option=value&option=value&...
Examples
jbi:service:http://foo.bar.org/MyService
jbi:endpoint:urn:foo:bar:MyService:MyEndpoint
jbi:endpoint:http://foo.bar.org/MyService/MyEndpoint
jbi:name:cheese
URI options
Name Default value Description
mep MEP of the Camel
Exchange
Allows users to override the MEP set on
the Exchange object. Valid values for this
option are in-only,in-out,robust-
in-out and in-optional-out.
CHAPTER 10 - COMPONENT APPENDIX 500

operation
Value of the
jbi.operation
header property
Specifies the JBI operation for the
MessageExchange. If no value is
supplied, the JBI binding will use the value of
the jbi.operation header property.
serialization basic
Default value (basic) will check if headers
are serializable by looking at the type,
setting this option to strict will detect
objects that can not be serialized although
they implement the Serializable
interface. Set to nocheck to disable this
check altogether, note that this should only
be used for in-memory transports like
SEDAFlow, otherwise you can expect to get
NotSerializableException thrown
at runtime.
convertException false
false: send any exceptions thrown from
the Camel route back unmodified
true: convert all exceptions to a JBI
FaultException (can be used to avoid non-
serializable exceptions or to implement
generic error handling
Examples
jbi:service:http://foo.bar.org/MyService?mep=in-out (override the MEP, use InOut
JBI MessageExchanges)
jbi:endpoint:urn:foo:bar:MyService:MyEndpoint?mep=in (override the MEP, use
InOnly JBI MessageExchanges)
jbi:endpoint:urn:foo:bar:MyService:MyEndpoint?operation={http://www.mycompany.org}AddNumbers
(overide the operation for the JBI Exchange to {http://www.mycompany.org}AddNumbers)
Using Stream bodies
If you are using a stream type as the message body, you should be aware that a stream is only
capable of being read once. So if you enable DEBUG logging, the body is usually logged and thus
read. To deal with this, Camel has a streamCaching option that can cache the stream,
enabling you to read it multiple times.
from("jbi:endpoint:http://foo.bar.org/MyService/
MyEndpoint").streamCaching().to("xslt:transform.xsl", "bean:doSomething");
501 CHAPTER 10 - COMPONENT APPENDIX

From Camel 1.5 onwards, the stream caching is default enabled, so it is not necessary to set
the streamCaching() option.
In Camel 2.0 we store big input streams (by default, over 64K) in a temp file using
CachedOutputStream. When you close the input stream, the temp file will be deleted.
Creating a JBI Service Unit
If you have some Camel routes that you want to deploy inside JBI as a Service Unit, you can use
the JBI Service Unit Archetype to create a new Maven project for the Service Unit.
If you have an existing Maven project that you need to convert into a JBI Service Unit, you
may want to consult ServiceMix Maven JBI Plugins for further help. The key steps are as follows:
• Create a Spring XML file at src/main/resources/camel-context.xml to
bootstrap your routes inside the JBI Service Unit.
• Change the POM file's packaging to jbi-service-unit.
Your pom.xml should look something like this to enable the jbi-service-unit
packaging:
<project xmlns="http://maven.apache.org/POM/4.0.0" xmlns:xsi="http://www.w3.org/2001/
XMLSchema-instance"
xsi:schemaLocation="http://maven.apache.org/POM/4.0.0 http://maven.apache.org/
maven-v4_0_0.xsd">
<modelVersion>4.0.0</modelVersion>
<groupId>myGroupId</groupId>
<artifactId>myArtifactId</artifactId>
<packaging>jbi-service-unit</packaging>
<version>1.0-SNAPSHOT</version>
<name>A Camel based JBI Service Unit</name>
<url>http://www.myorganization.org</url>
<properties>
<camel-version>1.0.0</camel-version>
<servicemix-version>3.3</servicemix-version>
</properties>
<dependencies>
<dependency>
<groupId>org.apache.servicemix</groupId>
<artifactId>servicemix-camel</artifactId>
<version>${servicemix-version}</version>
</dependency>
<dependency>
<groupId>org.apache.servicemix</groupId>
<artifactId>servicemix-core</artifactId>
<version>${servicemix-version}</version>
CHAPTER 10 - COMPONENT APPENDIX 502

<scope>provided</scope>
</dependency>
</dependencies>
<build>
<defaultGoal>install</defaultGoal>
<plugins>
<plugin>
<groupId>org.apache.maven.plugins</groupId>
<artifactId>maven-compiler-plugin</artifactId>
<configuration>
<source>1.5</source>
<target>1.5</target>
</configuration>
</plugin>
<!-- creates the JBI deployment unit -->
<plugin>
<groupId>org.apache.servicemix.tooling</groupId>
<artifactId>jbi-maven-plugin</artifactId>
<version>${servicemix-version}</version>
<extensions>true</extensions>
</plugin>
</plugins>
</build>
</project>
See Also
• Configuring Camel
• Component
• Endpoint
• Getting Started
• ServiceMix Camel module
• Using Camel with ServiceMix
• Cookbook on using Camel with ServiceMix
JCR COMPONENT
The jcr component allows you to add nodes to a JCR (JSR-170) compliant content repository
(for example, Apache Jackrabbit ).
Maven users will need to add the following dependency to their pom.xml for this
component:
503 CHAPTER 10 - COMPONENT APPENDIX

<dependency>
<groupId>org.apache.camel</groupId>
<artifactId>camel-jcr</artifactId>
<version>x.x.x</version>
<!-- use the same version as your Camel core version -->
</dependency>
URI format
jcr://user:password@repository/path/to/node
Usage
The repository element of the URI is used to look up the JCR Repository object in the
Camel context registry.
If a message is sent to a JCR producer endpoint:
• A new node is created in the content repository,
• All the message properties of the IN message are transformed to JCR Value
instances and added to the new node,
• The node's UUID is returned in the OUT message.
Message properties
All message properties are converted to node properties, except for the
CamelJcrNodeName property (you can refer to JcrConstants.NODE_NAME in your
code), which is used to determine the node name.
Example
The snippet below creates a node named node under the /home/test node in the content
repository. One additional attribute is added to the node as well: my.contents.property
which will contain the body of the message being sent.
from("direct:a").setProperty(JcrConstants.JCR_NODE_NAME, constant("node"))
.setProperty("my.contents.property", body()).to("jcr://user:pass@repository/home/
test");
See Also
• Configuring Camel
• Component
CHAPTER 10 - COMPONENT APPENDIX 504
• Endpoint
• Getting Started
JDBC COMPONENT
The jdbc component enables you to access databases through JDBC, where SQL queries and
operations are sent in the message body. This component uses the standard JDBC API, unlike
the SQL Component component, which uses spring-jdbc.
Maven users will need to add the following dependency to their pom.xml for this
component:
<dependency>
<groupId>org.apache.camel</groupId>
<artifactId>camel-jdbc</artifactId>
<version>x.x.x</version>
<!-- use the same version as your Camel core version -->
</dependency>
URI format
jdbc:dataSourceName[?options]
This component only supports producer endpoints.
You can append query options to the URI in the following format,
?option=value&option=value&...
Options
Name Default
Value Description
readSize 0/
2000
The default maximum
number of rows that can be
read by a polling query. The
default value is 2000 for
Camel 1.5.0 or older. In
newer releases the default
value is 0.
505 CHAPTER 10 - COMPONENT APPENDIX
This component can only be used to define producer endpoints, which means that
you cannot use the JDBC component in a from() statement.
statement.<xxx> null
Camel 2.1: Sets additional
options on the
java.sql.Statement
that is used behind the scenes
to execute the queries. For
instance,
statement.maxRows=10.
For detailed documentation,
see the
java.sql.Statement
javadoc documentation.
useJDBC4ColumnNameAndLabelSemantics true
Camel 1.6.3/2.2: Sets
whether to use JDBC 4/3
column label/name semantics.
You can use this option to
turn it false in case you
have issues with your JDBC
driver to select data. This
only applies when using SQL
SELECT using aliases (e.g.
SQL SELECT id as
identifier, name as
given_name from
persons).
Result
The result is returned in the OUT body as an ArrayList<HashMap<String,
Object>>. The List object contains the list of rows and the Map objects contain each row
with the String key as the column name.
Note: This component fetches ResultSetMetaData to be able to return the column
name as the key in the Map.
CHAPTER 10 - COMPONENT APPENDIX 506
Message Headers
Header Description
CamelJdbcRowCount If the query is a SELECT, query the row count is returned
in this OUT header.
CamelJdbcUpdateCount If the query is an UPDATE, query the update count is
returned in this OUT header.
Samples
In the following example, we fetch the rows from the customer table.
First we register our datasource in the Camel registry as testdb:
JndiRegistry reg = super.createRegistry();
reg.bind("testdb", ds);
return reg;
Then we configure a route that routes to the JDBC component, so the SQL will be executed.
Note how we refer to the testdb datasource that was bound in the previous step:
// lets add simple route
public void configure() throws Exception {
from("direct:hello").to("jdbc:testdb?readSize=100");
}
Or you can create a DataSource in Spring like this:
<camelContext id="camel" xmlns="http://camel.apache.org/schema/spring">
<route>
<from uri="timer://kickoff?period=10000"/>
<setBody>
<constant>select * from customer</constant>
</setBody>
<to uri="jdbc:testdb"/>
<to uri="mock:result"/>
</route>
</camelContext>
<!-- Just add a demo to show how to bind a date source for camel in Spring-->
<bean id="testdb" class="org.springframework.jdbc.datasource.DriverManagerDataSource">
<property name="driverClassName" value="org.hsqldb.jdbcDriver"/>
<property name="url" value="jdbc:hsqldb:mem:camel_jdbc" />
<property name="username" value="sa" />
<property name="password" value="" />
</bean>
507 CHAPTER 10 - COMPONENT APPENDIX

We create an endpoint, add the SQL query to the body of the IN message, and then send the
exchange. The result of the query is returned in the OUT body:
// first we create our exchange using the endpoint
Endpoint endpoint = context.getEndpoint("direct:hello");
Exchange exchange = endpoint.createExchange();
// then we set the SQL on the in body
exchange.getIn().setBody("select * from customer order by ID");
// now we send the exchange to the endpoint, and receives the response from Camel
Exchange out = template.send(endpoint, exchange);
// assertions of the response
assertNotNull(out);
assertNotNull(out.getOut());
ArrayList<HashMap<String,Object>> data = out.getOut().getBody(ArrayList.class);
assertNotNull("out body could not be converted to an ArrayList - was: "
+ out.getOut().getBody(), data);
assertEquals(2, data.size());
HashMap<String,Object> row = data.get(0);
assertEquals("cust1", row.get("ID"));
assertEquals("jstrachan", row.get("NAME"));
row = data.get(1);
assertEquals("cust2", row.get("ID"));
assertEquals("nsandhu", row.get("NAME"));
If you want to work on the rows one by one instead of the entire ResultSet at once you need
to use the Splitter EIP such as:
from("direct:hello")
// here we split the data from the testdb into new messages one by one
// so the mock endpoint will receive a message per row in the table
.to("jdbc:testdb").split(body()).to("mock:result");
Sample - Polling the database every minute
If we want to poll a database using the JDBC component, we need to combine it with a polling
scheduler such as the Timer or Quartz etc. In the following example, we retrieve data from the
database every 60 seconds:
from("timer://foo?period=60000").setBody(constant("select * from
customer")).to("jdbc:testdb").to("activemq:queue:customers");
See Also
• Configuring Camel
CHAPTER 10 - COMPONENT APPENDIX 508
• Component
• Endpoint
• Getting Started
▪SQL
JETTY COMPONENT
Supports non blocking Request Reply producer in Camel 2.1 onwards
The jetty component provides HTTP-based endpoints for consuming HTTP requests. That
is, the Jetty component behaves as a simple Web server.
In Camel 2.1 the jetty component also provides non blocking Request Reply for
producing HTTP requests. That is it can also acts as HTTP client sending to a remote HTTP
server and use non blocking in this process. See more at ToAsync and the HTTP Async
Example.
URI format
jetty:http://hostname[:port][/resourceUri][?options]
You can append query options to the URI in the following format,
?option=value&option=value&...
Options
Name Default
Value Description
sessionSupport false Specifies whether to enable the session manager on the server
side of Jetty.
httpClient.XXX null
Camel 1.6.0/2.0: Configuration of Jetty's HttpClient. For
example, setting httpClient.idleTimeout=30000 sets
the idle timeout to 30 seconds.
httpBindingRef null
Camel 1.6.0/2.0: Reference to an
org.apache.camel.component.http.HttpBinding
in the Registry. HttpBinding can be used to customize how
a response should be written.
matchOnUriPrefix false
Camel 2.0: Whether or not the CamelServlet should try
to find a target consumer by matching the URI prefix if no
exact match is found.
509 CHAPTER 10 - COMPONENT APPENDIX
handlers null
Camel 1.6.1/2.0: Specifies a comma-delimited set of
org.mortbay.jetty.Handler instances in your Registry
(such as your Spring ApplicationContext). These
handlers are added to the Jetty servlet context (for example,
to add security).
chunked true
Camel 2.2: If this option is false Jetty servlet will disable the
HTTP streaming and set the content-length header on the
response
enableJmx false
Camel 2.3: If this option is true, Jetty JMX support will be
enabled for this endpoint. See Jetty JMX support for more
details.
disableStreamCache false
Camel 2.3: Determines whether or not the raw input stream
from Jetty is cached or not (Camel will read the stream into a
in memory/overflow to file, Stream caching) cache. By default
Camel will cache the Jetty input stream to support reading it
multiple times to ensure it Camel can retrieve all data from the
stream. However you can set this option to true when you
for example need to access the raw stream, such as streaming
it directly to a file or other persistent store.
DefaultHttpBinding will copy the request input stream into a stream cache and put it into
message body if this option is false to support reading the stream multiple times. |
Message Headers
Camel uses the same message headers as the HTTP component.
From Camel 2.2, it also uses (Exchange.HTTP_CHUNKED,CamelHttpChunked) header to turn
on or turn off the chuched encoding on the camel-jetty consumer.
Camel also populates all request.parameter and request.headers. For example, given a client
request with the URL, http://myserver/myserver?orderid=123, the exchange will
contain a header named orderid with the value 123. This feature was introduced in Camel
1.5.
From Camel 1.6.3 and Camel 2.2.0, you can get the request.parameter from the message
header not only from Get Method, but also other HTTP method.
Usage
The Jetty component only supports consumer endpoints. Therefore a Jetty endpoint URI
should be used only as the input for a Camel route (in a from() DSL call). To issue HTTP
requests against other HTTP endpoints, use the HTTP Component
CHAPTER 10 - COMPONENT APPENDIX 510
Sample
In this sample we define a route that exposes a HTTP service at
http://localhost:8080/myapp/myservice:
from("jetty:http://localhost:9080/myapp/myservice").process(new MyBookService());
Our business logic is implemented in the MyBookService class, which accesses the HTTP
request contents and then returns a response.
Note: The assert call appears in this example, because the code is part of an unit test.
public class MyBookService implements Processor {
public void process(Exchange exchange) throws Exception {
// just get the body as a string
String body = exchange.getIn().getBody(String.class);
// we have access to the HttpServletRequest here and we can grab it if we need
it
HttpServletRequest req = exchange.getIn().getBody(HttpServletRequest.class);
assertNotNull(req);
// for unit testing
assertEquals("bookid=123", body);
// send a html response
exchange.getOut().setBody("<html><body>Book 123 is Camel in
Action</body></html>");
}
}
The following sample shows a content-based route that routes all requests containing the URI
parameter, one, to the endpoint, mock:one, and all others to mock:other.
from("jetty:" + serverUri)
.choice()
.when().simple("in.header.one").to("mock:one")
.otherwise()
.to("mock:other");
So if a client sends the HTTP request, http://serverUri?one=hello, the Jetty
component will copy the HTTP request parameter, one to the exchange's in.header. We
can then use the simple language to route exchanges that contain this header to a specific
endpoint and all others to another. If we used a language more powerful than Simple--such as
EL or OGNL--we could also test for the parameter value and do routing based on the header
value as well.
511 CHAPTER 10 - COMPONENT APPENDIX
Usage of localhost
When you specify localhost in a URL, Camel exposes the endpoint only on the
local TCP/IP network interface, so it cannot be accessed from outside the machine
it operates on.
If you need to expose a Jetty endpoint on a specific network interface, the numerical IP
address of this interface should be used as the host. If you need to expose a Jetty endpoint
on all network interfaces, the 0.0.0.0 address should be used.
Session Support
The session support option, sessionSupport, can be used to enable a HttpSession
object and access the session object while processing the exchange. For example, the following
route enables sessions:
<route><from uri="jetty:http://0.0.0.0/myapp/myservice/
?sessionSupport=true"/><processRef ref="myCode"/><route>
The myCode Processor can be instantiated by a Spring bean element:
<bean id="myCode"class="com.mycompany.MyCodeProcessor"/>
Where the processor implementation can access the HttpSession as follows:
publicvoid process(Exchange exchange)throwsException { HttpSession session =
((HttpExchange)exchange).getRequest().getSession(); ... }
SSL Support (HTTPS)
Jetty provides SSL support out of the box. To enable Jetty to run in SSL mode, simply format
the URI with the https:// prefix---for example:
<from uri="jetty:https://0.0.0.0/myapp/myservice/"/>
Jetty also needs to know where to load your keystore from and what passwords to use in
order to load the correct SSL certificate. Set the following JVM System Properties:
until Camel 2.2
•jetty.ssl.keystore specifies the location of the Java keystore file, which
contains the Jetty server's own X.509 certificate in a key entry. A key entry stores the
X.509 certificate (effectively, the public key) and also its associated private key.
CHAPTER 10 - COMPONENT APPENDIX 512

•jetty.ssl.password the store password, which is required to access the
keystore file (this is the same password that is supplied to the keystore command's
-storepass option).
•jetty.ssl.keypassword the key password, which is used to access the
certificate's key entry in the keystore (this is the same password that is supplied to
the keystore command's -keypass option).
from Camel 2.3 onwards
•org.eclipse.jetty.ssl.keystore specifies the location of the Java keystore
file, which contains the Jetty server's own X.509 certificate in a key entry. A key entry
stores the X.509 certificate (effectively, the public key) and also its associated private
key.
•org.eclipse.jetty.ssl.password the store password, which is required to
access the keystore file (this is the same password that is supplied to the keystore
command's -storepass option).
•org.eclipse.jetty.ssl.keypassword the key password, which is used to
access the certificate's key entry in the keystore (this is the same password that is
supplied to the keystore command's -keypass option).
For details of how to configure SSL on a Jetty endpoint, read the following documentation at
the Jetty Site:
Error formatting macro: clickable: java.lang.AbstractMethodError http://docs.codehaus.org/
display/JETTY/How+to+configure+SSL
Some SSL properties aren't exposed directly by Camel, however Camel does expose the
underlying SslSocketConnector, which will allow you to set properties like needClientAuth for
mutual authentication requiring a client certificate or wantClientAuth for mutual authentication
where a client doesn't need a certificate but can have one. There's a slight difference between
Camel 1.6.x and 2.x:
Camel 1.x
<bean id="jetty"class="org.apache.camel.component.jetty.JettyHttpComponent"> <property
name="sslSocketConnector"> <bean
class="org.mortbay.jetty.security.SslSocketConnector"> <property
name="password"value="..."/> <property name="keyPassword"value="..."/> <property
name="keystore"value="..."/> <property name="wantClientAuth"value="..."/> <property
name="truststore"value="..."/> </bean> </property> </bean>
until Camel 2.2
<bean id="jetty"class="org.apache.camel.component.jetty.JettyHttpComponent"> <property
name="sslSocketConnectors"> <map> <entry key="8043"> <bean
class="org.mortbay.jetty.security.SslSocketConnector"> <property
name="password"value="..."/> <property name="keyPassword"value="..."/> <property
name="keystore"value="..."/> <property name="needClientAuth"value="..."/> <property
name="truststore"value="..."/> </bean> </entry> </map> </property> </bean>
from Camel 2.3 onwards
513 CHAPTER 10 - COMPONENT APPENDIX

<bean id="jetty"class="org.apache.camel.component.jetty.JettyHttpComponent"> <property
name="sslSocketConnectors"> <map> <entry key="8043"> <bean
class="org.eclipse.jetty.server.ssl.SslSocketConnector"> <property
name="password"value="..."/> <property name="keyPassword"value="..."/> <property
name="keystore"value="..."/> <property name="needClientAuth"value="..."/> <property
name="truststore"value="..."/> </bean> </entry> </map> </property> </bean>
The value you use as keys in the above map is the port you configure Jetty to listen on.
Default behavior for returning HTTP status codes
The default behavior of HTTP status codes is defined by the
org.apache.camel.component.http.DefaultHttpBinding class, which handles
how a response is written and also sets the HTTP status code.
If the exchange was processed successfully, the 200 HTTP status code is returned.
If the exchange failed with an exception, the 500 HTTP status code is returned, and the
stacktrace is returned in the body. If you want to specify which HTTP status code to return, set
the code in the HttpProducer.HTTP_RESPONSE_CODE header of the OUT message.
Customizing HttpBinding
Available as of Camel 1.5.1/2.0
By default, Camel uses the
org.apache.camel.component.http.DefaultHttpBinding to handle how a
response is written. If you like, you can customize this behavior either by implementing your
own HttpBinding class or by extending DefaultHttpBinding and overriding the
appropriate methods.
The following example shows how to customize the DefaultHttpBinding in order to
change how exceptions are returned:
public class MyHttpBinding extends DefaultHttpBinding {
@Override
public void doWriteExceptionResponse(Throwable exception, HttpServletResponse
response) throws IOException {
// we override the doWriteExceptionResponse as we only want to alter the
binding how exceptions is
// written back to the client.
// we just return HTTP 200 so the client thinks its okay
response.setStatus(200);
// and we return this fixed text
response.getWriter().write("Something went wrong but we dont care");
}
}
CHAPTER 10 - COMPONENT APPENDIX 514

We can then create an instance of our binding and register it in the Spring registry as follows:
<bean id="mybinding"class="com.mycompany.MyHttpBinding"/>
And then we can reference this binding when we define the route:
<route><from uri="jetty:http://0.0.0.0:8080/myapp/
myservice?httpBindingRef=mybinding"/><to uri="bean:doSomething"/></route>
Jetty handlers and security configuration
Available as of Camel 1.6.1/2.0: You can configure a list of Jetty handlers on the
endpoint, which can be useful for enabling advanced Jetty security features. These handlers are
configured in Spring XML as follows:
<-- Jetty Security handling --><bean
id="userRealm"class="org.mortbay.jetty.plus.jaas.JAASUserRealm"><property
name="name"value="tracker-users"/><property
name="loginModuleName"value="ldaploginmodule"/></bean><bean
id="constraint"class="org.mortbay.jetty.security.Constraint"><property
name="name"value="BASIC"/><property name="roles"value="tracker-users"/><property
name="authenticate"value="true"/></bean><bean
id="constraintMapping"class="org.mortbay.jetty.security.ConstraintMapping"><property
name="constraint"ref="constraint"/><property name="pathSpec"value="/*"/></bean><bean
id="securityHandler"class="org.mortbay.jetty.security.SecurityHandler"><property
name="userRealm"ref="userRealm"/><property
name="constraintMappings"ref="constraintMapping"/></bean>
And from Camel 2.3 onwards you can configure a list of Jetty handlers as follows:
<-- Jetty Security handling --><bean
id="constraint"class="org.eclipse.jetty.http.security.Constraint"><property
name="name"value="BASIC"/><property name="roles"value="tracker-users"/><property
name="authenticate"value="true"/></bean><bean
id="constraintMapping"class="org.eclipse.jetty.security.ConstraintMapping"><property
name="constraint"ref="constraint"/><property name="pathSpec"value="/*"/></bean><bean
id="securityHandler"class="org.eclipse.jetty.security.ConstraintSecurityHandler"><property
name="authenticator"><bean
class="org.eclipse.jetty.security.authentication.BasicAuthenticator"/></property><property
name="constraintMappings"><list><ref
bean="constraintMapping"/></list></property></bean>
You can then define the endpoint as:
from("jetty:http://0.0.0.0:9080/myservice?handlers=securityHandler")
515 CHAPTER 10 - COMPONENT APPENDIX

If you need more handlers, set the handlers option equal to a comma-separated list of bean
IDs.
How to return a custom HTTP 500 reply message
You may want to return a custom reply message when something goes wrong, instead of the
default reply message Camel Jetty replies with.
You could use a custom HttpBinding to be in control of the message mapping, but often it
may be easier to use Camel's Exception Clause to construct the custom reply message. For
example as show here, where we return Dude something went wrong with HTTP error
code 500:
from("jetty://http://localhost:8234/myserver")
// use onException to catch all exceptions and return a custom reply message
.onException(Exception.class)
.handled(true)
// create a custom failure response
.transform(constant("Dude something went wrong"))
// we must remember to set error code 500 as handled(true)
// otherwise would let Camel thing its a OK response (200)
.setHeader(Exchange.HTTP_RESPONSE_CODE, constant(500))
.end()
// now just force an exception immediately
.throwException(new IllegalArgumentException("I cannot do this"));
Multi-part Form support
From Camel 2.3.0, camel-jetty support to multipart form post out of box. The submitted form-
data are mapped into the message header. Camel-jetty creates an attachment for each uploaded
file. The file name is mapped to the name of the attachment. The content type is set as the
content type of the attachment file name. You can find the example here.
// Set the jetty temp directory which store the file for multi part form
// camel-jetty will clean up the file after it handled the request.
// The option works rightly from Camel 2.4.0
getContext().getProperties().put("CamelJettyTempDir","target");
from("jetty://http://localhost:9080/test").process(new Processor() {
public void process(Exchange exchange) throws Exception {
Message in = exchange.getIn();
assertEquals("Get a wrong attachement size", 1, in.getAttachments().size());
// The file name is attachment id
DataHandler data = in.getAttachment("NOTICE.txt");
assertNotNull("Should get the DataHandle NOTICE.txt", data);
assertEquals("Get a wrong content type","text/plain", data.getContentType());
CHAPTER 10 - COMPONENT APPENDIX 516

assertTrue("We should get the data from the DataHandle", data.getDataSource()
.getInputStream().available() > 0);
// The other form date can be get from the message header
exchange.getOut().setBody(in.getHeader("comment"));
}
});
Jetty JMX support
From Camel 2.3.0, camel-jetty supports the enabling of Jetty's JMX capabilities at the
component and endpoint level with the endpoint configuration taking priority. Note that JMX
must be enabled within the Camel context in order to enable JMX support in this component
as the component provides Jetty with a reference to the MBeanServer registered with the
Camel context. Because the camel-jetty component caches and reuses Jetty resources for a
given protocol/host/port pairing, this configuration option will only be evaluated during the
creation of the first endpoint to use a protocol/host/port pairing. For example, given two
routes created from the following XML fragments, JMX support would remain enabled for all
endpoints listening on "https://0.0.0.0".
<from uri="jetty:https://0.0.0.0/myapp/myservice1/?enableJmx=true"/>
<from uri="jetty:https://0.0.0.0/myapp/myservice2/?enableJmx=false"/>
The camel-jetty component also provides for direct configuration of the Jetty MBeanContainer.
Jetty creates MBean names dynamically. If you are running another instance of Jetty outside of
the Camel context and sharing the same MBeanServer between the instances, you can provide
both instances with a reference to the same MBeanContainer in order to avoid name collisions
when registering Jetty MBeans.
See Also
• Configuring Camel
• Component
• Endpoint
• Getting Started
▪HTTP
517 CHAPTER 10 - COMPONENT APPENDIX
JING COMPONENT
The Jing component uses the Jing Library to perform XML validation of the message body using
either
• RelaxNG XML Syntax
• RelaxNG Compact Syntax
Maven users will need to add the following dependency to their pom.xml for this component:
<dependency>
<groupId>org.apache.camel</groupId>
<artifactId>camel-jing</artifactId>
<version>x.x.x</version>
<!-- use the same version as your Camel core version -->
</dependency>
Note that the MSV component can also support RelaxNG XML syntax.
URI format
rng:someLocalOrRemoteResource
rnc:someLocalOrRemoteResource
Where rng means use the RelaxNG XML Syntax whereas rnc means use RelaxNG Compact
Syntax. The following examples show possible URI values
Example Description
rng:foo/bar.rng References the XML file foo/bar.rng on the classpath
rnc: http://foo.com/
bar.rnc
References the RelaxNG Compact Syntax file from the URL,
http://foo.com/bar.rnc
You can append query options to the URI in the following format,
?option=value&option=value&...
Options
Option Default Description
useDom false Camel 2.0: Specifies whether DOMSource/DOMResult or
SaxSource/SaxResult should be used by the validator.
Example
The following example shows how to configure a route from the endpoint direct:start which
then goes to one of two endpoints, either mock:valid or mock:invalid based on whether
CHAPTER 10 - COMPONENT APPENDIX 518

or not the XML matches the given RelaxNG Compact Syntax schema (which is supplied on the
classpath).
<camelContext xmlns="http://camel.apache.org/schema/spring">
<route>
<from uri="direct:start"/>
<doTry>
<to uri="rnc:org/apache/camel/component/validator/jing/schema.rnc"/>
<to uri="mock:valid"/>
<doCatch>
<exception>org.apache.camel.ValidationException</exception>
<to uri="mock:invalid"/>
</doCatch>
<doFinally>
<to uri="mock:finally"/>
</doFinally>
</doTry>
</route>
</camelContext>
See Also
• Configuring Camel
• Component
• Endpoint
• Getting Started
JMS COMPONENT
The JMS component allows messages to be sent to (or consumed from) a JMS Queue or Topic.
The implementation of the JMS Component uses Spring's JMS support for declarative
transactions, using Spring's JmsTemplate for sending and a
MessageListenerContainer for consuming.
Maven users will need to add the following dependency to their pom.xml for this
component:
<dependency>
<groupId>org.apache.camel</groupId>
<artifactId>camel-jms</artifactId>
<version>x.x.x</version>
<!-- use the same version as your Camel core version -->
</dependency>
519 CHAPTER 10 - COMPONENT APPENDIX
Using ActiveMQ
If you are using Apache ActiveMQ, you should prefer the ActiveMQ component as
it has been particularly optimized for ActiveMQ. All of the options and samples on
this page are also valid for the ActiveMQ component.
URI format
jms:[temp:][queue:|topic:]destinationName[?options]
Where destinationName is a JMS queue or topic name. By default, the
destinationName is interpreted as a queue name. For example, to connect
to the queue, FOO.BAR, use:
jms:FOO.BAR
You can include the optional queue: prefix, if you prefer:
jms:queue:FOO.BAR
To connect to a topic, you must include the topic: prefix. For example, to
connect to the topic, Stocks.Prices, use:
jms:topic:Stocks.Prices
You can append query options to the URI in the following format,
?option=value&option=value&...
Using Temporary Destinations
As of Camel 1.4.0, you can access temporary queues using the following URL format:
jms:temp:queue:foo
Or temporary topics using the following URL format:
jms:temp:topic:bar
CHAPTER 10 - COMPONENT APPENDIX 520
This URL format enables multiple routes or processors or beans to refer to the same
temporary destination. For example, you can create three temporary destinations and use them
in routes as inputs or outputs by referring to them by name.
Notes
If you wish to use durable topic subscriptions, you need to specify both clientId and
durableSubscriptionName. Note that the value of the clientId must be unique and
can only be used by a single JMS connection instance in your entire network. You may prefer to
use Virtual Topics instead to avoid this limitation. More background on durable messaging here.
When using message headers, the JMS specification states that header names must be valid
Java identifiers. So, by default, Camel ignores any headers that do not match this rule. So try to
name your headers as if they are valid Java identifiers. One benefit of doing this is that you can
then use your headers inside a JMS Selector (whose SQL92 syntax mandates Java identifier
syntax for headers).
From Camel 1.4 onwards, a simple strategy for mapping header names is used by default.
The strategy is to replace any dots in the header name with the underscore character and to
reverse the replacement when the header name is restored from a JMS message sent over the
wire. What does this mean? No more losing method names to invoke on a bean component, no
more losing the filename header for the File Component, and so on.
The current header name strategy for accepting header names in Camel is as follows:
▪Replace all dots with underscores (for example,
org.apache.camel.MethodName becomes
org_apache_camel_MethodName).
▪Test if the name is a valid java identifier using the JDK core classes.
▪If the test success, the header is added and sent over the wire; otherwise it is
dropped (and logged at DEBUG level).
In Camel 2.0 this strategy has been change a bit to use the following replacement strategy:
▪Dots are replaced by _DOT_ and the replacement is reversed when Camel consume
the message
▪Hyphen is replaced by _HYPHEN_ and the replacement is reversed when Camel
consumes the message
Options
You can configure many different properties on the JMS endpoint which map to properties on
the JMSConfiguration POJO. Note: Many of these properties map to properties on Spring JMS,
which Camel uses for sending and receiving messages. So you can get more information about
these properties by consulting the relevant Spring documentation.
The options is divided into two tables, the first one with the most common options used.
The latter contains the rest.
521 CHAPTER 10 - COMPONENT APPENDIX
If you are using ActiveMQ
Note that the JMS component reuses Spring 2's JmsTemplate for sending
messages. This is not ideal for use in a non-J2EE container and typically requires
some caching in the JMS provider to avoid performance being lousy.
So if you intend to use Apache ActiveMQ as your Message Broker - which is a good choice as
ActiveMQ rocks , then we recommend that you either
• Use the ActiveMQ component, which is already configured to use
ActiveMQ efficiently, or
• Use the PoolingConnectionFactory in ActiveMQ.
For Consuming Messages cacheLevelName settings are vital!
If you are using Spring before 2.5.1 and Camel before 1.3.0, you might want to set
the cacheLevelName to be CACHE_CONSUMER for maximum performance.
Due to a bug in earlier Spring versions causing a lack of transactional integrity, previous
versions of Camel and Camel versions from 1.3.0 onwwards when used with Spring versions
earlier than 2.5.1 will default to using CACHE_CONNECTION. See the JIRAs CAMEL-163 and
CAMEL-294.
Also, if you are using XA resources or running in a J2EE container, you may want to set
the cacheLevelName to be CACHE_NONE as we have found that when using JBoss with
TibCo EMS and JTA/XA you must disable caching.
Another user reports problems using WebSphere MQ 6.0.2.5, Camel 1.6.0 and Spring
2.5.6. The application does not use XA and is not running inside a J2EE Container, but the
cacheLevelName=CACHE_NONE setting seems to solve the problem with WebSphere
MQ.
See also more about JmsTemplate gotchas.
Most commonly used options
Option Default
Value Description
autoStartup true Specifies whether the consumer container should auto-startup.
clientId null
Sets the JMS client ID to use. Note that this value, if specified, must be unique and can only be used by a single JMS
connection instance. It is typically only required for durable topic subscriptions. You may prefer to use Virtual Topics
instead.
concurrentConsumers 1 Specifies the default number of concurrent consumers.
disableReplyTo false
If true, a producer will behave like a InOnly exchange with the exception that JMSReplyTo header is sent out and not
be suppressed like in the case of InOnly. Like InOnly the producer will not wait for a reply. A consumer with this flag
will behave like InOnly. This feature can be used to bridge InOut requests to another queue so that a route on the
other queue will send it´s response directly back to the original JMSReplyTo.
CHAPTER 10 - COMPONENT APPENDIX 522
For users with Camel 1.6.1 or older
JMS consumers have a bad default in Camel 1.6.1 or older. The
maxMessagesPerTask is set to 1, whereas it really should be -1.
This issue causes Spring to create a new thread after it has processed a message,
causing the thread count to rise continuously. You can see this in the log where a
new thread name is used.
To remedy this, change a route such as:
<from uri="jms:queue:foo"/>
By adding the maxMessagesPerTask option and setting its value to -1, as follows:
<from uri="jms:queue:foo&maxMessagesPerTask=-1"/>
This has been fixed in Camel 1.6.2/2.0.
durableSubscriptionName null The durable subscriber name for specifying durable topic subscriptions.
maxConcurrentConsumers 1 Specifies the maximum number of concurrent consumers.
preserveMessageQos false
Camel 2.0: Set to true, if you want to send message using the QoS settings specified on the message, instead of the
QoS settings on the JMS endpoint. The following three headers are considered JMSPriority,JMSDeliveryMode,
and JMSExpiration. You can provide all or only some of them. If not provided, Camel will fall back to use the values
from the endpoint instead. So, when using this option, the headers override the values from the endpoint. The
explicitQosEnabled option, by contrast, will only use options set on the endpoint, and not values from the message
header.
replyTo null Provides an explicit ReplyTo destination, which overrides any incoming value of Message.getJMSReplyTo().
requestTimeout 20000 The timeout for sending messages (in milliseconds). The default is 20 seconds.
selector null
Sets the JMS Selector, which is an SQL 92 predicate that is used to filter messages within the broker. You may have to
encode special characters such as = as %3D Before Camel 2.3.0, we don't support this option in
CamelConsumerTemplate
timeToLive null When sending messages, specifies the time-to-live of the message (in milliseconds).
transacted false Specifies whether to use transacted mode for sending/receiving messages using the InOnly Exchange Pattern.
testConnectionOnStartup false
Camel 2.1: Specifies whether to test the connection on startup. This ensures that when Camel starts that all the JMS
consumers have a valid connection to the JMS broker. If a connection cannot be granted then Camel throws an exception
on startup. This ensure that Camel is not started with failed connections.
All the other options
Option Default
Value Description
acceptMessagesWhileStopping false Specifies whether the consumer accept messages while it is stopping.
acknowledgementModeName AUTO_ACKNOWLEDGE The JMS acknowledgement name, which is one of: TRANSACTED,CLIENT_ACKNOWLEDGE,AUTO_ACKNOWLEDGE,
DUPS_OK_ACKNOWLEDGE
acknowledgementMode -1 The JMS acknowledgement mode defined as an Integer. Allows you to set vendor-specific extensions to the
acknowledgment mode. For the regular modes, it is preferable to use the acknowledgementModeName instead.
523 CHAPTER 10 - COMPONENT APPENDIX

alwaysCopyMessage false
If true, Camel will always make a JMS message copy of the message when it is passed to the producer for sending. Copying
the message is needed in some situations, such as when a replyToDestinationSelectorName is set (incidentally,
Camel will set the alwaysCopyMessage option to true, if a replyToDestinationSelectorName is set)
cacheLevelName CACHE_CONSUMER Sets the cache level by name for the underlying JMS resources. Possible values are: CACHE_AUTO,CACHE_CONNECTION,
CACHE_CONSUMER,CACHE_NONE, and CACHE_SESSION. See the Spring documentation and see the warning above.
cacheLevel -1 Sets the cache level by ID for the underlying JMS resources.
consumerType Default
The consumer type to use, which can be one of: Simple,Default or ServerSessionPool. The consumer type
determines which Spring JMS listener to use. Default will use
org.springframework.jms.listener.DefaultMessageListenerContainer,Simple will use
org.springframework.jms.listener.SimpleMessageListenerContainer, and ServerSessionPool
will use
org.springframework.jms.listener.serversession.ServerSessionMessageListenerContainer.
If the option, useVersion102=true, Camel will use the JMS 1.0.2 Spring classes instead. ServerSessionPool is
@deprecated and will be removed in Camel 2.0.
connectionFactory null The default JMS connection factory to use for the listenerConnectionFactory and
templateConnectionFactory, if neither is specified.
deliveryMode 2 Specifies the delivery mode when sending, where 1 = non-persistent, and 2 = persistent.
deliveryPersistent true Specifies whether persistent delivery is used by default.
destination null Camel 2.0: Specifies the JMS Destination object to use on this endpoint.
destinationName null Camel 2.0: Specifies the JMS destination name to use on this endpoint.
destinationResolver null A pluggable org.springframework.jms.support.destination.DestinationResolver that allows you to
use your own resolver (for example, to lookup the real destination in a JNDI registry).
eagerLoadingOfProperties false
Enables eager loading of JMS properties as soon as a message is received, which is generally inefficient, because the JMS
properties might not be required. But this feature can sometimes catch early any issues with the underlying JMS provider
and the use of JMS properties. This feature can also be used for testing purposes, to ensure JMS properties can be
understood and handled correctly.
exceptionListener null Specifies the JMS Exception Listener that is to be notified of any underlying JMS exceptions.
explicitQosEnabled false
Set if the deliveryMode,priority or timeToLive qualities of service should be used when sending messages. This
option is based on Spring's JmsTemplate. The deliveryMode,priority and timeToLive options are applied to
the current endpoint. This contrasts with the preserveMessageQos option, which operates at message granularity,
reading QoS properties exclusively from the Camel In message headers.
exposeListenerSession true Specifies whether the listener session should be exposed when consuming messages.
idleTaskExecutionLimit 1
Specifies the limit for idle executions of a receive task, not having received any message within its execution. If this limit is
reached, the task will shut down and leave receiving to other executing tasks (in the case of dynamic scheduling; see the
maxConcurrentConsumers setting).
jmsMessageType null
Camel 2.0: Allows you to force the use of a specific javax.jms.Message implementation for sending JMS messages.
Possible values are: Bytes,Map,Object,Stream,Text. By default, Camel would determine which JMS message type to
use from the In body type. This option allows you to specify it.
jmsKeyFormatStrategy default
Camel 2.0: Pluggable strategy for encoding and decoding JMS keys so they can be compliant with the JMS specification.
Camel provides two implementations out of the box: default and passthrough. The default strategy will safely
marshal dots and hyphens (.and -). The passthrough strategy leaves the key as is. Can be used for JMS brokers which
do not care whether JMS header keys contain illegal characters. You can provide your own implementation of the
org.apache.camel.component.jms.JmsKeyFormatStrategy and refer to it using the #notation.
jmsOperations null Allows you to use your own implementation of the org.springframework.jms.core.JmsOperations interface.
Camel uses JmsTemplate as default. Can be used for testing purpose, but not used much as stated in the spring API docs.
lazyCreateTransactionManager true Camel 2.0: If true, Camel will create a JmsTransactionManager, if there is no transactionManager injected
when option transacted=true.
listenerConnectionFactory null The JMS connection factory used for consuming messages.
mapJmsMessage true Camel 1.6.2/2.0: Specifies whether Camel should auto map the received JMS message to an appropiate payload type,
such as javax.jms.TextMessage to a String etc. See section about how mapping works below for more details.
maxMessagesPerTask -1 The number of messages per task. -1 is unlimited.
messageConverter null
Camel 1.6.2/2.0: To use a custom Spring
org.springframework.jms.support.converter.MessageConverter so you can be 100% in control how to
map to/from a javax.jms.Message.
messageIdEnabled true When sending, specifies whether message IDs should be added.
messageTimestampEnabled true Specifies whether timestamps should be enabled by default on sending messages.
password null The password for the connector factory.
priority 4 Values greater than 1 specify the message priority when sending (where 0 is the lowest priority and 9 is the highest). The
explicitQosEnabled option must also be enabled in order for this option to have any effect.
pubSubNoLocal false Specifies whether to inhibit the delivery of messages published by its own connection.
receiveTimeout None The timeout for receiving messages (in milliseconds).
CHAPTER 10 - COMPONENT APPENDIX 524

recoveryInterval 5000 Specifies the interval between recovery attempts, i.e. when a connection is being refreshed, in milliseconds. The default is
5000 ms, that is, 5 seconds.
replyToTempDestinationAffinity producer
Defines the component-created temporary replyTo destination sharing strategy. Possible values are: component,
endpoint or producer.component = a single temp queue is shared among all producers for a given component
instance; endpoint = a single temp queue is shared among all producers for a given endpoint instance; producer = a
single temp queue is created for each producer.
replyToDestinationSelectorName null Sets the JMS Selector using the fixed name to be used so you can filter out your own replies from the others when using a
shared queue (that is, if you are not using a temporary reply queue).
replyToDeliveryPersistent true Specifies whether to use persistent delivery by default for replies.
serverSessionFactory null @deprecated - will be removed in Camel 2.0. The JMS ServerSessionFactory, if you wish to use
ServerSessionFactory for consumption
subscriptionDurable false Enabled by default, if you specify a durableSubscriberName and a clientId.
taskExecutor null Allows you to specify a custom task executor for consuming messages.
templateConnectionFactory null The JMS connection factory used for sending messages.
transactedInOut false @deprecated: Specifies whether to use transacted mode for sending messages using the InOut Exchange Pattern. Applies
only to producer endpoints. See section Enabling Transacted Consumption for more details.
transactionManager null The Spring transaction manager to use.
transactionName null The name of the transaction to use.
transactionTimeout null The timeout value of the transaction, if using transacted mode.
transferException false
Camel 2.0: If enabled and you are using Request Reply messaging (InOut) and an Exchange failed on the consumer side,
then the caused Exception will be send back in response as a javax.jms.ObjectMessage. If the client is Camel,
the returned Exception is rethrown. This allows you to use Camel JMS as a bridge in your routing - for example, using
persistent queues to enable robust routing. Notice that if you also have transferExchange enabled, this option takes
precedence. The caught exception is required to be serializable. The original Exception on the consumer side can be
wrapped in an outer exception such as org.apache.camel.RuntimeCamelException when returned to the
producer.
transferExchange false
Camel 2.0: You can transfer the exchange over the wire instead of just the body and headers. The following fields are
transferred: In body, Out body, Fault body, In headers, Out headers, Fault headers, exchange properties, exchange
exception. This requires that the objects are serializable. Camel will exclude any non-serializable objects and log it at WARN
level.
username null The username for the connector factory.
useMessageIDAsCorrelationID false
Specifies whether JMSMessageID should always be used as JMSCorrelationID for InOut messages. Be careful:
When this option is set camel will ignore the incoming correlation id and always use the message id instead. Camel will by
default use a GUID.
useVersion102 false @deprecated: Specifies whether the old JMS API should be used. Will be removed in Camel 2.2, as JMS API 1.0.2 is no
longer provided in Spring 3.0.
Message Mapping between JMS and Camel
Camel automatically maps messages between javax.jms.Message and
org.apache.camel.Message.
When sending a JMS message, Camel converts the message body to the following JMS
message types:
Body Type JMS Message Comment
String javax.jms.TextMessage
org.w3c.dom.Node javax.jms.TextMessage The DOM will be
converted to String.
Map javax.jms.MapMessage
java.io.Serializable javax.jms.ObjectMessage
byte[] javax.jms.BytesMessage
525 CHAPTER 10 - COMPONENT APPENDIX
java.io.File javax.jms.BytesMessage
java.io.Reader javax.jms.BytesMessage
java.io.InputStream javax.jms.BytesMessage
java.nio.ByteBuffer javax.jms.BytesMessage
When receiving a JMS message, Camel converts the JMS message to the following body type:
JMS Message Body Type
javax.jms.TextMessage String
javax.jms.BytesMessage byte[]
javax.jms.MapMessage Map<String, Object>
javax.jms.ObjectMessage Object
Disabling auto-mapping of JMS messages
Available as of Camel 1.6.2/2.0
You can use the mapJmsMessage option to disable the auto-mapping above. If disabled,
Camel will not try to map the received JMS message, but instead uses it directly as the payload.
This allows you to avoid the overhead of mapping and let Camel just pass through the JMS
message. For instance, it even allows you to route javax.jms.ObjectMessage JMS
messages with classes you do not have on the classpath.
Using a custom MessageConverter
Available as of Camel 1.6.2/2.0
You can use the messageConverter option to do the mapping yourself in a Spring
org.springframework.jms.support.converter.MessageConverter class.
For example, in the route below we use a custom message converter when sending a
message to the JMS order queue:
from("file://inbox/
order").to("jms:queue:order?messageConverter=#myMessageConverter");
You can also use a custom message converter when consuming from a JMS destination.
Controlling the mapping strategy selected
Available as of Camel 2.0
CHAPTER 10 - COMPONENT APPENDIX 526

You can use the jmsMessageType option on the endpoint URL to force a specific
message type for all messages.
In the route below, we poll files from a folder and send them as javax.jms.TextMessage
as we have forced the JMS producer endpoint to use text messages:
from("file://inbox/order").to("jms:queue:order?jmsMessageType=Text");
You can also specify the message type to use for each messabe by setting the header with the
key CamelJmsMessageType. For example:
from("file://inbox/order").setHeader("CamelJmsMessageType",
JmsMessageType.Text).to("jms:queue:order");
The possible values are defined in the enum class,
org.apache.camel.jms.JmsMessageType.
Message format when sending
The exchange that is sent over the JMS wire must conform to the JMS Message spec.
For the exchange.in.header the following rules apply for the header keys:
▪Keys starting with JMS or JMSX are reserved.
▪exchange.in.headers keys must be literals and all be valid Java identifiers (do
not use dots in the key name).
▪From Camel 1.4 until Camel 1.6.x, Camel automatically replaces all dots with
underscores in key names. This replacement is reversed when Camel consumes JMS
messages.
▪From Camel 2.0 onwards, Camel replaces dots & hyphens and the reverse when
when consuming JMS messages:
.is replaced by _DOT_ and the reverse replacement when Camel consumes the
message.
-is replaced by _HYPHEN_ and the reverse replacement when Camel consumes the
message.
▪See also the option jmsKeyFormatStrategy introduced in Camel 2.0, which
allows you to use your own custom strategy for formatting keys.
For the exchange.in.header, the following rules apply for the header values:
▪The values must be primitives or their counter objects (such as Integer,Long,
Character). The types, String,CharSequence,Date,BigDecimal and
BigInteger are all converted to their toString() representation. All other
types are dropped.
Camel will log with category org.apache.camel.component.jms.JmsBinding at
DEBUG level if it drops a given header value. For example:
527 CHAPTER 10 - COMPONENT APPENDIX
2008-07-09 06:43:04,046 [main ] DEBUG JmsBinding
- Ignoring non primitive header: order of class:
org.apache.camel.component.jms.issues.DummyOrder with value: DummyOrder{orderId=333,
itemId=4444, quantity=2}
Message format when receiving
Camel adds the following properties to the Exchange when it receives a message:
Property Type Description
org.apache.camel.jms.replyDestination javax.jms.Destination The reply
destination.
Camel adds the following JMS properties to the In message headers when it receives a JMS
message:
Header Type Description
JMSCorrelationID String The JMS correlation ID.
JMSDeliveryMode int The JMS delivery mode.
JMSDestination javax.jms.Destination The JMS destination.
JMSExpiration long The JMS expiration.
JMSMessageID String The JMS unique message ID.
JMSPriority int
The JMS priority (with 0 as the
lowest priority and 9 as the
highest).
JMSRedelivered boolean Is the JMS message redelivered.
JMSReplyTo javax.jms.Destination The JMS reply-to destination.
JMSTimestamp long The JMS timestamp.
JMSType String The JMS type.
JMSXGroupID String The JMS group ID.
As all the above information is standard JMS you can check the JMS documentation for further
details.
About using Camel to send and receive messages and JMSReplyTo
The JMS component is complex and you have to pay close attention to how it works in some
cases. So this is a short summary of some of the areas/pitfalls to look for.
When Camel sends a message using its JMSProducer, it checks the following conditions:
CHAPTER 10 - COMPONENT APPENDIX 528
▪The message exchange pattern,
▪Whether a JMSReplyTo was set in the endpoint or in the message headers,
▪Whether any of the following options have been set on the JMS endpoint:
disableReplyTo,preserveMessageQos,explicitQosEnabled.
All this can be a tad complex to understand and configure to support your use case.
JmsProducer
The JmsProducer behaves as follows, depending on configuration:
Exchange
Pattern
Other
options Description
InOut -
Camel will expect a reply, set a temporary JMSReplyTo,
and after sending the message, it will start to listen for the
reply message on the temporary queue.
InOut JMSReplyTo
is set
Camel will expect a reply and, after sending the message, it
will start to listen for the reply message on the specified
JMSReplyTo queue.
InOnly -Camel will send the message and not expect a reply.
InOnly JMSReplyTo
is set
Camel sees this as a contradiction and will suppress the
JMSReplyTo. In fact, Camel will disable it by clearing it
before sending. Camel will send the message and not
expect a reply. Camel logs this in the log at WARN level and
you should see: WARN JmsProducer - Disabling
JMSReplyTo as this Exchange is not OUT
capable with JMSReplyTo: myReplyQueue to
destination: myQueue.Note: You can use the
preserveMessageQos=true setting or the
explicitQosEnabled=true setting to force Camel to
send the JMSReplyTo anyway, and the WARN log will
disappear.
JmsConsumer
The JmsConsumer behaves as follows, depending on configuration:
Exchange
Pattern Other options Description
InOut -Camel will send the reply back to the
JMSReplyTo queue.
529 CHAPTER 10 - COMPONENT APPENDIX
InOnly -Camel will not send a reply back, as the
pattern is InOnly.
-disableReplyTo=true This option suppresses replies.
So pay attention to the message exchange pattern set on your exchanges.
If you send a message to a JMS destination in the middle of your route you can specify the
exchange pattern to use, see more at Request Reply.
This is useful if you want to send an InOnly message to a JMS topic:
from("activemq:queue:in")
.to("bean:validateOrder")
.to(ExchangePattern.InOnly, "activemq:topic:order")
.to("bean:handleOrder");
Reuse endpoint and send to different destinations computed at runtime
Available as of Camel 1.6.2/2.0
If you need to send messages to a lot of different JMS destinations, it makes sense to reuse a
JMS endpoint and specify the real destination in a message header. This allows Camel to reuse
the same endpoint, but send to different destinations. This greatly reduces the number of
endpoints created and economizes on memory and thread resources.
You can specify the destination in the following headers:
Header Type Description
CamelJmsDestination javax.jms.Destination Camel 2.0: A
destination object.
CamelJmsDestinationName String Camel 1.6.2/2.0:
The destination name.
For example, the following route shows how you can compute a destination at run time and
use it to override the destination appearing in the JMS URL:
from("file://inbox")
.to("bean:computeDestination")
.to("activemq:queue:dummy");
The queue name, dummy, is just a placeholder. It must be provided as part of the JMS endpoint
URL, but it will be ignored in this example.
In the computeDestination bean, specify the real destination by setting the
CamelJmsDestinationName header as follows:
CHAPTER 10 - COMPONENT APPENDIX 530

public void setJmsHeader(Exchange exchange) {
String id = ....
exchange.getIn().setHeader("CamelJmsDestinationName","order:" + id");
}
Then Camel will read this header and use it as the destination instead of the one configured on
the endpoint. So, in this example Camel sends the message to activemq:queue:order:2,
assuming the id value was 2.
If both the CamelJmsDestination and the CamelJmsDestinationName headers
are set, CamelJmsDestination takes priority.
Configuring different JMS providers
You can configure your JMS provider in Spring XML as follows:
<camelContext id="camel" xmlns="http://camel.apache.org/schema/spring">
</camelContext>
<bean id="activemq" class="org.apache.camel.component.jms.JmsComponent">
<property name="connectionFactory">
<bean class="org.apache.activemq.ActiveMQConnectionFactory">
<property name="brokerURL" value="vm://localhost?broker.persistent=false"/>
</bean>
</property>
</bean>
Basically, you can configure as many JMS component instances as you wish and give them a
unique name using the id attribute. The preceding example configures an activemq
component. You could do the same to configure MQSeries, TibCo, BEA, Sonic and so on.
Once you have a named JMS component, you can then refer to endpoints within that
component using URIs. For example for the component name, activemq, you can then refer
to destinations using the URI format, activemq:[queue:|topic:]destinationName.
You can use the same approach for all other JMS providers.
This works by the SpringCamelContext lazily fetching components from the spring context
for the scheme name you use for Endpoint URIs and having the Component resolve the
endpoint URIs.
Using JNDI to find the ConnectionFactory
If you are using a J2EE container, you might need to look up JNDI to find the JMS
ConnectionFactory rather than use the usual <bean> mechanism in Spring. You can do
this using Spring's factory bean or the new Spring XML namespace. For example:
531 CHAPTER 10 - COMPONENT APPENDIX

<bean id="weblogic" class="org.apache.camel.component.jms.JmsComponent">
<property name="connectionFactory" ref="myConnectionFactory"/>
</bean>
<jee:jndi-lookup id="myConnectionFactory" jndi-name="jms/connectionFactory"/>
See The jee schema in the Spring reference documentation for more details about JNDI lookup.
Using JNDI to lookup the physical queues
You need to use the destinationResolver option to use the Spring JNDI resolver that
can lookup in the JNDI, or use your own custom implementation.
See this nabble post for more details: http://www.nabble.com/JMS-queue---JNDI-instead-of-
physical-name-td24484994.html
Using WebSphere MQ
See this link at nabble for details of how a Camel user configured JMS to connect to remote
WebSphere MQ brokers.
Concurrent Consuming
A common requirement with JMS is to consume messages concurrently in multiple threads in
order to make an application more responsive. You can set the concurrentConsumers
option to specify the number of threads servicing the JMS endpoint, as follows:
from("jms:SomeQueue?concurrentConsumers=20").
bean(MyClass.class);
You can configure this option in one of the following ways:
• On the JmsComponent,
• On the endpoint URI or,
• By invoking setConcurrentConsumers() directly on the JmsEndpoint.
Enabling Transacted Consumption
A common requirement is to consume from a queue in a transaction and then process the
message using the Camel route. To do this, just ensure that you set the following properties on
the component/endpoint:
•transacted = true
•transactionManager = a Transsaction Manager - typically the
JmsTransactionManager
CHAPTER 10 - COMPONENT APPENDIX 532

See also the Transactional Client EIP pattern for further details.
Using JMSReplyTo for late replies
Avaiable as of Camel 2.0
When using Camel as a JMS listener, it sets an Exchange property with the value of the
ReplyTo javax.jms.Destination object, having the key ReplyTo. You can obtain this
Destination as follows:
Destination replyDestination =
exchange.getIn().getHeader(JmsConstants.JMS_REPLY_DESTINATION, Destination.class);
And then later use it to send a reply using regular JMS or Camel.
// we need to pass in the JMS component, and in this sample we use ActiveMQ
JmsEndpoint endpoint = JmsEndpoint.newInstance(replyDestination,
activeMQComponent);
// now we have the endpoint we can use regular Camel API to send a message to it
template.sendBody(endpoint, "Here is the late reply.");
A different solution to sending a reply is to provide the replyDestination object in the
same Exchange property when sending. Camel will then pick up this property and use it for the
real destination. The endpoint URI must include a dummy destination, however. For example:
// we pretend to send it to some non existing dummy queue
template.send("activemq:queue:dummy, new Processor() {
public void process(Exchange exchange) throws Exception {
// and here we override the destination with the ReplyTo destination
object so the message is sent to there instead of dummy
exchange.getIn().setHeader(JmsConstants.JMS_DESTINATION, replyDestination);
exchange.getIn().setBody("Here is the late reply.");
}
}
Using a request timeout
In the sample below we send a Request Reply style message Exchange (we use the
requestBody method = InOut) to the slow queue for further processing in Camel and we
wait for a return reply:
// send a in-out with a timeout for 5 sec
Object out = template.requestBody("activemq:queue:slow?requestTimeout=5000","Hello
World");
533 CHAPTER 10 - COMPONENT APPENDIX
Transaction and Request Reply over JMS
Note that when using Request Reply over JMS you cannot use a single transaction;
as JMS will not send any messages until a commit is performed, the server side
won't receive anything at all until the transaction commits. So, with request/
response you must commit a transaction after sending the first request and then use
a separate transaction for receiving the response.
This is why the transacted property applies only to the InOnly message Exchange Pattern
(MEP). If you want to use transactions for the InOut MEP as well, you must set
transactedInOut=true.
To recap: if you have transacted=true,transactedInOut=false and are
sending an InOut, the Exchange will not use transactions.
Samples
JMS is used in many examples for other components as well. But we provide a few samples
below to get started.
Receiving from JMS
In the following sample we configure a route that receives JMS messages and routes the
message to a POJO:
from("jms:queue:foo").
to("bean:myBusinessLogic");
You can of course use any of the EIP patterns so the route can be context based. For example,
here's how to filter an order topic for the big spenders:
from("jms:topic:OrdersTopic").
filter().method("myBean","isGoldCustomer").
to("jms:queue:BigSpendersQueue");
Sending to a JMS
In the sample below we poll a file folder and send the file content to a JMS topic. As we want
the content of the file as a TextMessage instead of a BytesMessage, we need to convert
the body to a String:
CHAPTER 10 - COMPONENT APPENDIX 534

from("file://orders").
convertBodyTo(String.class).
to("jms:topic:OrdersTopic");
Using Annotations
Camel also has annotations so you can use POJO Consuming and POJO Producing.
Spring DSL sample
The preceding examples use the Java DSL. Camel also supports Spring XML DSL. Here is the
big spender sample using Spring DSL:
<route>
<from uri="jms:topic:OrdersTopic"/>
<filter>
<method bean="myBean" method="isGoldCustomer"/>
<to uri="jms:queue:BigSpendersQueue"/>
</filter>
</route>
Other samples
JMS appears in many of the examples for other components and EIP patterns, as well in this
Camel documentation. So feel free to browse the documentation. If you have time, check out
the this tutorial that uses JMS but focuses on how well Spring Remoting and Camel works
together Tutorial-JmsRemoting.
Using JMS as a Dead Letter Queue storing Exchange
Available as of Camel 2.0
Normally, when using JMS as the transport, it only transfers the body and headers as the
payload. If you want to use JMS with a Dead Letter Channel, using a JMS queue as the Dead
Letter Queue, then normally the caused Exception is not stored in the JMS message. You can,
however, use the transferExchange option on the JMS dead letter queue to instruct Camel
to store the entire Exchange in the queue as a javax.jms.ObjectMessage that holds a
org.apache.camel.impl.DefaultExchangeHolder. This allows you to consume
from the Dead Letter Queue and retrieve the caused exception from the Exchange property
with the key Exchange.EXCEPTION_CAUGHT. The demo below illustrates this:
535 CHAPTER 10 - COMPONENT APPENDIX

// setup error handler to use JMS as queue and store the entire Exchange
errorHandler(deadLetterChannel("jms:queue:dead?transferExchange=true"));
Then you can consume from the JMS queue and analyze the problem:
from("jms:queue:dead").to("bean:myErrorAnalyzer");
// and in our bean
String body = exchange.getIn().getBody();
Exception cause = exchange.getProperty(Exchange.EXCEPTION_CAUGHT, Exception.class);
// the cause message is
String problem = cause.getMessage();
Using JMS as a Dead Letter Channel storing error only
You can use JMS to store the cause error message or to store a custom body, which you can
initialize yourself. The following example uses the Message Translator EIP to do a
transformation on the failed exchange before it is moved to the JMS dead letter queue:
// we sent it to a seda dead queue first
errorHandler(deadLetterChannel("seda:dead"));
// and on the seda dead queue we can do the custom transformation before its sent to
the JMS queue
from("seda:dead").transform(exceptionMessage()).to("jms:queue:dead");
Here we only store the original cause error message in the transform. You can, however, use
any Expression to send whatever you like. For example, you can invoke a method on a Bean or
use a custom processor.
See Also
• Configuring Camel
• Component
• Endpoint
• Getting Started
▪Transactional Client
▪Bean Integration
▪Tutorial-JmsRemoting
▪JMSTemplate gotchas
CHAPTER 10 - COMPONENT APPENDIX 536

JPA COMPONENT
The jpa component enables you to store and retrieve Java objects from persistent storage
using EJB 3's Java Persistence Architecture (JPA), which is a standard interface layer that wraps
Object/Relational Mapping (ORM) products such as OpenJPA, Hibernate, TopLink, and so on.
Maven users will need to add the following dependency to their pom.xml for this
component:
<dependency>
<groupId>org.apache.camel</groupId>
<artifactId>camel-jpa</artifactId>
<version>x.x.x</version>
<!-- use the same version as your Camel core version -->
</dependency>
Sending to the endpoint
You can store a Java entity bean in a database by sending it to a JPA producer endpoint. The
body of the In message is assumed to be an entity bean (that is, a POJO with an @Entity
annotation on it).
If the body does not contain an entity bean, put a Message Translator in front of the
endpoint to perform the necessary conversion first.
Consuming from the endpoint
Consuming messages from a JPA consumer endpoint removes (or updates) entity beans in the
database. This allows you to use a database table as a logical queue: consumers take messages
from the queue and then delete/update them to logically remove them from the queue.
If you do not wish to delete the entity bean when it has been processed, you can specify
consumeDelete=false on the URI. This will result in the entity being processed each poll.
If you would rather perform some update on the entity to mark it as processed (such as to
exclude it from a future query) then you can annotate a method with @Consumed which will
be invoked on your entity bean when the entity bean is consumed.
URI format
jpa:[entityClassName][?options]
For sending to the endpoint, the entityClassName is optional. If specified, it helps the Type
Converter to ensure the body is of the correct type.
For consuming, the entityClassName is mandatory.
537 CHAPTER 10 - COMPONENT APPENDIX
You can append query options to the URI in the following format,
?option=value&option=value&...
Options
Name Default
Value Description
entityType entityClassName Overrides the entityClassName from
the URI.
persistenceUnit camel The JPA persistence unit used by
default.
consumeDelete true
JPA consumer only: If true, the
entity is deleted after it is consumed; if
false, the entity is not deleted.
consumeLockEntity true
JPA consumer only: Specifies
whether or not to set an exclusive
lock on each entity bean while
processing the results from polling.
flushOnSend true
JPA producer only: Flushes the
EntityManager after the entity bean has
been persisted.
maximumResults -1
JPA consumer only: Set the
maximum number of results to
retrieve on the Query.
transactionManager null
Camel 1.6.1/2.0: Specifies the
transaction manager to use. If none
provided, Camel will use a
JpaTransactionManager by
default. Can be used to set a JTA
transaction manager (for integration
with an EJB container).
consumer.delay 500 JPA consumer only: Delay in
milliseconds between each poll.
consumer.initialDelay 1000 JPA consumer only: Milliseconds
before polling starts.
CHAPTER 10 - COMPONENT APPENDIX 538
consumer.useFixedDelay false
JPA consumer only: Set to true
to use fixed delay between polls,
otherwise fixed rate is used. See
ScheduledExecutorService in JDK for
details.
maxMessagesPerPoll 0
Camel 2.0: JPA consumer only:
An integer value to define the
maximum number of messages to
gather per poll. By default, no
maximum is set. Can be used to avoid
polling many thousands of messages
when starting up the server. Set a
value of 0 or negative to disable.
consumer.query JPA consumer only: To use a
custom query when consuming data.
consumer.namedQuery JPA consumer only: To use a
named query when consuming data.
consumer.nativeQuery
JPA consumer only: To use a
custom native query when consuming
data.
Message Headers
Camel adds the following message headers to the exchange:
Header Type Description
CamelJpaTemplate JpaTemplate
Camel 2.0: The JpaTemplate object that
is used to access the entity bean. You need this
object in some situations, for instance in a type
converter or when you are doing some
custom processing.
Configuring EntityManagerFactory
Its strongly advised to configure the JPA component to use a specific
EntityManagerFactory instance. If failed to do so each JpaEndpoint will auto create
their own instance of EntityManagerFactory which most often is not what you want.
For example, you can instantiate a JPA component that references the myEMFactory
entity manager factory, as follows:
539 CHAPTER 10 - COMPONENT APPENDIX

<bean id="jpa" class="org.apache.camel.component.jpa.JpaComponent">
<property name="entityManagerFactory" ref="myEMFactory"/>
</bean>
In Camel 2.3 the JpaComponent will auto lookup the EntityManagerFactory from
the Registry which means you do not need to configure this on the JpaComponent as shown
above. You only need to do so if there is ambiguity, in which case Camel will log a WARN.
Configuring TransactionManager
Its strongly advised to configure the TransactionManager instance used by the JPA
component. If failed to do so each JpaEndpoint will auto create their own instance of
TransactionManager which most often is not what you want.
For example, you can instantiate a JPA component that references the
myTransactionManager transaction manager, as follows:
<bean id="jpa" class="org.apache.camel.component.jpa.JpaComponent">
<property name="entityManagerFactory" ref="myEMFactory"/>
<property name="transactionManager" ref="myTransactionManager"/>
</bean>
In Camel 2.3 the JpaComponent will auto lookup the TransactionManager from the
Registry which means you do not need to configure this on the JpaComponent as shown
above. You only need to do so if there is ambiguity, in which case Camel will log a WARN.
Using a consumer with a named query
For consuming only selected entities, you can use the consumer.namedQuery URI query
option. First, you have to define the named query in the JPA Entity class:
@Entity
@NamedQuery(name = "step1", query = "select x from MultiSteps x where x.step = 1")
public class MultiSteps {
...
}
After that you can define a consumer uri like this one:
from("jpa://org.apache.camel.examples.MultiSteps?consumer.namedQuery=step1")
.to("bean:myBusinessLogic");
CHAPTER 10 - COMPONENT APPENDIX 540

Using a consumer with a query
For consuming only selected entities, you can use the consumer.query URI query option.
You only have to define the query option:
from("jpa://org.apache.camel.examples.MultiSteps?consumer.query=select o from
org.apache.camel.examples.MultiSteps o where o.step = 1")
.to("bean:myBusinessLogic");
Using a consumer with a native query
For consuming only selected entities, you can use the consumer.nativeQuery URI query
option. You only have to define the native query option:
from("jpa://org.apache.camel.examples.MultiSteps?consumer.nativeQuery=select * from
MultiSteps where step = 1")
.to("bean:myBusinessLogic");
If you use the native query option, you will receive an object array in the message body.
Example
See Tracer Example for an example using JPA to store traced messages into a database.
See Also
• Configuring Camel
• Component
• Endpoint
• Getting Started
▪Tracer Example
JT/400 COMPONENT
The jt400 component allows you to exchanges messages with an AS/400 system using data
queues. This components is only available in Camel 1.5 and above.
Maven users will need to add the following dependency to their pom.xml for this
component:
<dependency>
<groupId>org.apache.camel</groupId>
<artifactId>camel-jt400</artifactId>
<version>x.x.x</version>
541 CHAPTER 10 - COMPONENT APPENDIX
<!-- use the same version as your Camel core version -->
</dependency>
URI format
jt400://user:password@system/QSYS.LIB/LIBRARY.LIB/QUEUE.DTAQ[?options]
You can append query options to the URI in the following format,
?option=value&option=value&...
URI options
Name Default
value Description
ccsid
default
system
CCSID
Specifies the CCSID to use for the
connection with the AS/400 system.
format text
Specifies the data format for sending
messages
valid options are: text (represented by
String) and binary (represented by
byte[])
consumer.delay 500 Delay in milliseconds between each poll.
consumer.initialDelay 1000 Milliseconds before polling starts.
consumer.userFixedDelay false
true to use fixed delay between polls,
otherwise fixed rate is used. See
ScheduledExecutorService in JDK for
details.
Usage
When configured as a consumer endpoint, the endpoint will poll a data queue on a remote
system. For every entry on the data queue, a new Exchange is sent with the entry's data in
the In message's body, formatted either as a String or a byte[], depending on the format.
For a provider endpoint, the In message body contents will be put on the data queue as either
raw bytes or text.
CHAPTER 10 - COMPONENT APPENDIX 542

Example
In the snippet below, the data for an exchange sent to the direct:george endpoint will be
put in the data queue PENNYLANE in library BEATLES on a system named LIVERPOOL.
Another user connects to the same data queue to receive the information from the data queue
and forward it to the mock:ringo endpoint.
public class Jt400RouteBuilder extends RouteBuilder {
@Override
public void configure() throws Exception {
from("direct:george").to("jt400://GEORGE:EGROEG@LIVERPOOL/QSYS.LIB/BEATLES.LIB/
PENNYLANE.DTAQ");
from("jt400://RINGO:OGNIR@LIVERPOOL/QSYS.LIB/BEATLES.LIB/
PENNYLANE.DTAQ").to("mock:ringo");
}
}
See Also
• Configuring Camel
• Component
• Endpoint
• Getting Started
LDAP COMPONENT
The ldap component allows you to perform searches in LDAP servers using filters as the
message payload.
This component uses standard JNDI (javax.naming package) to access the server.
Maven users will need to add the following dependency to their pom.xml for this
component:
<dependency>
<groupId>org.apache.camel</groupId>
<artifactId>camel-ldap</artifactId>
<version>x.x.x</version>
<!-- use the same version as your Camel core version -->
</dependency>
URI format
ldap:ldapServerBean[?options]
543 CHAPTER 10 - COMPONENT APPENDIX
The ldapServerBean portion of the URI refers to a DirContext bean in the registry. The LDAP
component only supports producer endpoints, which means that an ldap URI cannot appear
in the from at the start of a route.
You can append query options to the URI in the following format,
?option=value&option=value&...
Options
Name Default
Value Description
base ou=system The base DN for searches.
scope subtree Specifies how deeply to search the tree of entries, starting at the
base DN. Value can be object,onelevel, or subtree.
Result
The result is returned in the Out body as a
ArrayList<javax.naming.directory.SearchResult> object.
DirContext
The URI, ldap:ldapserver, references a Spring bean with the ID, ldapserver. The
ldapserver bean may be defined as follows:
<bean id="ldapserver" class="javax.naming.directory.InitialDirContext"
scope="prototype">
<constructor-arg>
<props>
<prop key="java.naming.factory.initial">com.sun.jndi.ldap.LdapCtxFactory</prop>
<prop key="java.naming.provider.url">ldap://localhost:10389</prop>
<prop key="java.naming.security.authentication">none</prop>
</props>
</constructor-arg>
</bean>
The preceding example declares a regular Sun based LDAP DirContext that connects
anonymously to a locally hosted LDAP server.
Samples
Following on from the Spring configuration above, the code sample below sends an LDAP
request to filter search a group for a member. The Common Name is then extracted from the
response.
CHAPTER 10 - COMPONENT APPENDIX 544
DirContext objects are not required to support concurrency by contract. It is
therefore important that the directory context is declared with the setting,
scope="prototype", in the bean definition or that the context supports
concurrency. In the Spring framework, prototype scoped objects are instantiated
each time they are looked up.
Camel 1.6.1 and Camel 2.0 include a fix to support concurrency for LDAP
producers. ldapServerBean contexts are now looked up each time a request is sent
to the LDAP server. In addition, the contexts are released as soon as the producer
completes.
ProducerTemplate<Exchange> template = exchange
.getContext().createProducerTemplate();
Collection<?> results = (Collection<?>) (template
.sendBody(
"ldap:ldapserver?base=ou=mygroup,ou=groups,ou=system",
"(member=uid=huntc,ou=users,ou=system)"));
if (results.size() > 0) {
// Extract what we need from the device's profile
Iterator<?> resultIter = results.iterator();
SearchResult searchResult = (SearchResult) resultIter
.next();
Attributes attributes = searchResult
.getAttributes();
Attribute deviceCNAttr = attributes.get("cn");
String deviceCN = (String) deviceCNAttr.get();
...
If no specific filter is required - for example, you just need to look up a single entry - specify a
wildcard filter expression. For example, if the LDAP entry has a Common Name, use a filter
expression like:
(cn=*)
See Also
• Configuring Camel
545 CHAPTER 10 - COMPONENT APPENDIX

• Component
• Endpoint
• Getting Started
LOG COMPONENT
The log: component logs message exchanges to the underlying logging mechanism.
Camel uses commons-logging which allows you to configure logging via
• Log4j
• JDK 1.4 logging
• Avalon
• SimpleLog - a simple provider in commons-logging
Refer to the commons-logging user guide for a more complete overview of how to use and
configure commons-logging.
URI format
log:loggingCategory[?options]
Where loggingCategory is the name of the logging category to use. You can append query
options to the URI in the following format, ?option=value&option=value&...
For example, a log endpoint typically specifies the logging level using the level option, as
follows:
log:org.apache.camel.example?level=DEBUG
The default logger logs every exchange (regular logging). But Camel also ships with the
Throughput logger, which is used whenever the groupSize option is specified.
Options
Option Default Type Description
level INFO String Logging level to use. Possible values: FATAL,
ERROR,WARN,INFO,DEBUG,TRACE,OFF
groupSize null Integer
An integer that specifies a group size for
throughput logging. By default, regular logging is
used.
CHAPTER 10 - COMPONENT APPENDIX 546
Also a log in the DSL
In Camel 2.2 onwards there is a log directly in the DSL, but it has a different
purpose. Its meant for lightweight and human logs. See more details at LogEIP.
Formatting
The log formats the execution of exchanges to log lines.
By default, the log uses LogFormatter to format the log output, where LogFormatter
has the following options:
Option Default Description
showAll false
Quick option for turning all options on.
(multiline, maxChars has to be manually set if to
be used)
showExchangeId false Show the unique exchange ID.
showExchangePattern true Camel 2.3: Shows the Message Exchange
Pattern (or MEP for short).
showProperties false Show the exchange properties.
showHeaders false Show the In message headers.
showBodyType true Show the In body Java type.
showBody true Show the In body.
showOut false If the exchange has an Out message, show the
Out message.
showException false Camel 2.0: If the exchange has an exception,
show the exception message (no stack trace).
showCaughtException false
Camel 2.0: If the exchange has a caught
exception, show the exception message (no stack
trace). A caught exception is stored as a property
on the exchange and for instance a doCatch can
catch exceptions. See Try Catch Finally.
showStackTrace false Camel 2.0: Show the stack trace, if an exchange
has an exception.
547 CHAPTER 10 - COMPONENT APPENDIX
showFuture false
Camel 2.1: Whether Camel should show
java.util.concurrent.Future bodies
or not. If enabled Camel could potentially wait
until the Future task is done. Will by default
not wait.
multiline false If true, each piece of information is logged on a
new line.
maxChars Camel 2.0: Limits the number of characters
logged per line.
Regular logger sample
In the route below we log the incoming orders at DEBUG level before the order is processed:
from("activemq:orders").to("log:com.mycompany.order?level=DEBUG").to("bean:processOrder");
Or using Spring XML to define the route:
<route>
<from uri="activemq:orders"/>
<to uri="log:com.mycompany.order?level=DEBUG"/>
<to uri="bean:processOrder"/>
</route>
Regular logger with formatter sample
In the route below we log the incoming orders at INFO level before the order is processed.
from("activemq:orders").
to("log:com.mycompany.order?showAll=true&multiline=true").to("bean:processOrder");
Throughput logger sample
In the route below we log the throughput of the incoming orders at DEBUG level grouped by
10 messages.
from("activemq:orders").
to("log:com.mycompany.order?level=DEBUG?groupSize=10").to("bean:processOrder");
CHAPTER 10 - COMPONENT APPENDIX 548
See Also
• Configuring Camel
• Component
• Endpoint
• Getting Started
• Tracer
• How do I use log4j
• How do I use Java 1.4 logging
• LogEIP for using log directly in the DSL for human logs.
LUCENE (INDEXER AND SEARCH) COMPONENT
Available as of Camel 2.2
The lucene component is based on the Apache Lucene project. Apache Lucene is a
powerful high-performance, full-featured text search engine library written entirely in Java. For
more details about Lucene, please see the following links
• http://lucene.apache.org/java/docs/
• http://lucene.apache.org/java/docs/features.html
The lucene component in camel facilitates integration and utilization of Lucene endpoints in
enterprise integration patterns and scenarios. The lucene component does the following
• builds a searchable index of documents when payloads are sent to the Lucene
Endpoint
• facilitates performing of indexed searches in Camel
This component only supports producer endpoints.
Maven users will need to add the following dependency to their pom.xml for this
component:
<dependency>
<groupId>org.apache.camel</groupId>
<artifactId>camel-lucene</artifactId>
<version>x.x.x</version>
<!-- use the same version as your Camel core version -->
</dependency>
URI format
lucene:searcherName:insert[?options]
lucene:searcherName:query[?options]
You can append query options to the URI in the following format,
?option=value&option=value&...
549 CHAPTER 10 - COMPONENT APPENDIX
Insert Options
Name Default Value Description
analyzer StandardAnalyzer
An Analyzer builds TokenStreams, which analyze
text. It thus represents a policy for extracting index
terms from text. The value for analyzer can be any
class that extends the abstract class
org.apache.lucene.analysis.Analyzer. Lucene also
offers a rich set of analyzers out of the box
indexDir ./indexDirectory
A file system directory in which index files are
created upon analysis of the document by the
specified analyzer
srcDir null
An optional directory containing files to be used to
be analyzed and added to the index at producer
startup.
Query Options
Name Default Value Description
analyzer StandardAnalyzer
An Analyzer builds TokenStreams, which analyze
text. It thus represents a policy for extracting index
terms from text. The value for analyzer can be any
class that extends the abstract class
org.apache.lucene.analysis.Analyzer. Lucene also
offers a rich set of analyzers out of the box
indexDir ./indexDirectory
A file system directory in which index files are
created upon analysis of the document by the
specified analyzer
maxHits 10 An integer value that limits the result set of the
search operation
Sending/Receiving Messages to/from the cache
Message Headers
Header Description
QUERY The Lucene Query to performed on the index. The query may include wildcards
and phrases
CHAPTER 10 - COMPONENT APPENDIX 550
Lucene Producers
This component supports 2 producer endpoints.
•insert - The insert producer builds a searchable index by analyzing the body in
incoming exchanges and associating it with a token ("content").
•query - The query producer performs searches on a pre-created index. The query
uses the searchable index to perform score & relevance based searches. Queries are
sent via the incoming exchange contains a header property name called 'QUERY'. The
value of the header property 'QUERY' is a Lucene Query. For more details on how to
create Lucene Queries check out http://lucene.apache.org/java/3_0_0/
queryparsersyntax.html
Lucene Processor
There is a processor called LuceneQueryProcessor available to perform queries against lucene
without the need to create a producer.
Lucene Usage Samples
Example 1: Creating a Lucene index
RouteBuilder builder = new RouteBuilder() {
public void configure() {
from("direct:start").
to("lucene:whitespaceQuotesIndex:insert?analyzer=#whitespaceAnalyzer&indexDir=#whitespace&srcDir=#load_dir").
to("mock:result");
}
};
Example 2: Loading properties into the JNDI registry in the
Camel Context
@Override
protected JndiRegistry createRegistry() throws Exception {
JndiRegistry registry =
new JndiRegistry(createJndiContext());
registry.bind("whitespace",new File("./whitespaceIndexDir"));
registry.bind("load_dir",
new File("src/test/resources/sources"));
registry.bind("whitespaceAnalyzer",
551 CHAPTER 10 - COMPONENT APPENDIX

new WhitespaceAnalyzer());
return registry;
}
...
CamelContext context = new DefaultCamelContext(createRegistry());
Example 2: Performing searches using a Query Producer
RouteBuilder builder = new RouteBuilder() {
public void configure() {
from("direct:start").
setHeader("QUERY", constant("Seinfeld")).
to("lucene:searchIndex:query?analyzer=#whitespaceAnalyzer&indexDir=#whitespace&maxHits=20").
to("direct:next");
from("direct:next").process(new Processor() {
public void process(Exchange exchange) throws Exception {
Hits hits = exchange.getIn().getBody(Hits.class);
printResults(hits);
}
private void printResults(Hits hits) {
LOG.debug("Number of hits: " + hits.getNumberOfHits());
for (int i = 0; i < hits.getNumberOfHits(); i++) {
LOG.debug("Hit " + i + " Index Location:" +
hits.getHit().get(i).getHitLocation());
LOG.debug("Hit " + i + " Score:" + hits.getHit().get(i).getScore());
LOG.debug("Hit " + i + " Data:" + hits.getHit().get(i).getData());
}
}
}).to("mock:searchResult");
}
};
Example 3: Performing searches using a Query Processor
RouteBuilder builder = new RouteBuilder() {
public void configure() {
try {
from("direct:start").
setHeader("QUERY", constant("Rodney Dangerfield")).
process(new LuceneQueryProcessor("target/stdindexDir", analyzer, null,
20)).
to("direct:next");
}catch (Exception e) {
CHAPTER 10 - COMPONENT APPENDIX 552
e.printStackTrace();
}
from("direct:next").process(new Processor() {
public void process(Exchange exchange) throws Exception {
Hits hits = exchange.getIn().getBody(Hits.class);
printResults(hits);
}
private void printResults(Hits hits) {
LOG.debug("Number of hits: " + hits.getNumberOfHits());
for (int i = 0; i < hits.getNumberOfHits(); i++) {
LOG.debug("Hit " + i + " Index Location:" +
hits.getHit().get(i).getHitLocation());
LOG.debug("Hit " + i + " Score:" +
hits.getHit().get(i).getScore());
LOG.debug("Hit " + i + " Data:" + hits.getHit().get(i).getData());
}
}
}).to("mock:searchResult");
}
};
MAIL COMPONENT
The mail component provides access to Email via Spring's Mail support and the underlying
JavaMail system.
Maven users will need to add the following dependency to their pom.xml for this
component:
<dependency>
<groupId>org.apache.camel</groupId>
<artifactId>camel-mail</artifactId>
<version>x.x.x</version>
<!-- use the same version as your Camel core version -->
</dependency>
URI format
Mail endpoints can have one of the following URI formats (for the protocols, SMTP, POP3, or
IMAP, respectively):
smtp://[username@]host[:port][?options]
pop3://[username@]host[:port][?options]
imap://[username@]host[:port][?options]
553 CHAPTER 10 - COMPONENT APPENDIX
Geronimo mail .jar
We have discovered that the geronimo mail .jar (v1.6) has a bug when polling
mails with attachments. It cannot correctly identify the Content-Type. So, if you
attach a .jpeg file to a mail and you poll it, the Content-Type is resolved as
text/plain and not as image/jpeg. For that reason, we have added an
org.apache.camel.component.ContentTypeResolver SPI interface
which enables you to provide your own implementation and fix this bug by
returning the correct Mime type based on the file name. So if the file name ends
with jpeg/jpg, you can return image/jpeg.
You can set your custom resolver on the MailComponent instance or on the
MailEndpoint instance. This feature is added in Camel 1.6.2/2.0.
POP3 or IMAP
POP3 has some limitations and end users are encouraged to use IMAP if possible.
Using mock-mail for testing
You can use a mock framework for unit testing, which allows you to test without
the need for a real mail server. However you should remember to not include the
mock-mail when you go into production or other environments where you need to
send mails to a real mail server. Just the presence of the mock-javamail.jar on the
classpath means that it will kick in and avoid sending the mails.
The mail component also supports secure variants of these protocols (layered over SSL). You
can enable the secure protocols by adding sto the scheme:
smtps://[username@]host[:port][?options]
pop3s://[username@]host[:port][?options]
imaps://[username@]host[:port][?options]
You can append query options to the URI in the following format,
?option=value&option=value&...
Sample endpoints
Typically, you specify a URI with login credentials as follows (taking SMTP as an example):
CHAPTER 10 - COMPONENT APPENDIX 554
smtp://[username@]host[:port][?password=somepwd]
Alternatively, it is possible to specify both the user name and the password as query options:
smtp://host[:port]?password=somepwd&username=someuser
For example:
smtp://mycompany.mailserver:30?password=tiger&username=scott
Default ports
As of Camel 1.4, default port numbers are supported. If the port number is omitted, Camel
determines the port number to use based on the protocol.
Protocol Default Port Number
SMTP 25
SMTPS 465
POP3 110
POP3S 995
IMAP 143
IMAPS 993
Options
Property Default Description
host The host name or IP address to connect to.
port See DefaultPorts The TCP port number to connect on.
username The user name on the email server.
password null The password on the email server.
ignoreUriScheme false If false, Camel uses the scheme to determine the transport protocol (POP, IMAP, SMTP etc.)
defaultEncoding null The default encoding to use for Mime Messages.
contentType text/plain New option in Camel 1.5. The mail message content type. Use text/html for HTML mails.
folderName INBOX The folder to poll.
destination username@host @deprecated Use the to option instead. The TO recipients (receivers of the email).
to username@host As of Camel 1.4, the TO recipients (the receivers of the mail). Separate multiple email addresses
with a comma.
CC null As of Camel 1.4, the CC recipients (the receivers of the mail). Separate multiple email addresses
with a comma.
BCC null As of Camel 1.4, the BCC recipients (the receivers of the mail). Separate multiple email addresses
with a comma.
555 CHAPTER 10 - COMPONENT APPENDIX

from camel@localhost The FROM email address.
subject As of Camel 2.3, the Subject of the message being sent. Note: Setting the subject in the header
takes precedence over this option.
deleteProcessedMessages true/false
Deletes the messages after they have been processed. This is done by setting the DELETED flag on
the mail message. If false, the SEEN flag is set instead. As of Camel 1.5, the default setting is
false. This option is named delete in Camel 2.0 onwards.
delete false Camel 2.0: Deletes the messages after they have been processed. This is done by setting the
DELETED flag on the mail message. If false, the SEEN flag is set instead.
processOnlyUnseenMessages false/true
As of Camel 1.4, it is possible to configure a consumer endpoint so that it processes only unseen
messages (that is, new messages) or all messages. Note that Camel always skips deleted messages.
Setting this option to true will filter to only unseen messages. As of Camel 1.5, the default setting
is true. POP3 does not support the SEEN flag, so this option is not supported in POP3; use IMAP
instead. This option is named unseen in Camel 2.0 onwards.
unseen true Camel 2.0: Is used to fetch only unseen messages (that is, new messages). Note that POP3 does
not support the SEEN flag; use IMAP instead.
fetchSize -1
As of Camel 1.4, this option sets the maximum number of messages to consume during a poll.
This can be used to avoid overloading a mail server, if a mailbox folder contains a lot of messages.
Default value of -1 means no fetch size and all messages will be consumed. Setting the value to 0 is
a special corner case, where Camel will not consume any messages at all.
alternateBodyHeader mail_alternateBody
Camel 1.6.1: Specifies the key to an IN message header that contains an alternative email body.
For example, if you send emails in text/html format and want to provide an alternative mail body
for non-HTML email clients, set the alternative mail body with this key as a header. In Camel 2.0,
this option has been renamed to alternativeBodyHeader.
alternativeBodyHeader CamelMailAlternativeBody
Camel 2.0: Specifies the key to an IN message header that contains an alternative email body. For
example, if you send emails in text/html format and want to provide an alternative mail body for
non-HTML email clients, set the alternative mail body with this key as a header.
debugMode false As of Camel 1.4, it is possible to enable debug mode on the underlying mail framework. The SUN
Mail framework logs the debug messages to System.out by default.
connectionTimeout 30000 As of Camel 1.4, the connection timeout can be configured in milliseconds. Default is 30 seconds.
consumer.initialDelay 1000 Milliseconds before the polling starts.
consumer.delay 60000
As of Camel 1.4, the default consumer delay is now 60 seconds. Camel will therefore only poll the
mailbox once a minute to avoid overloading the mail server. The default value in Camel 1.3 is 500
milliseconds.
consumer.useFixedDelay false Set to true to use a fixed delay between polls, otherwise fixed rate is used. See
ScheduledExecutorService in JDK for details.
mail.XXX null
As of Camel 2.0, you can set any additional java mail properties. For instance if you want to set a
special property when using POP3 you can now provide the option directly in the URI such as:
mail.pop3.forgettopheaders=true. You can set multiple such options, for example:
mail.pop3.forgettopheaders=true&mail.mime.encodefilename=true.
maxMessagesPerPoll 0
Camel 2.0: Specifies the maximum number of messages to gather per poll. By default, no
maximum is set. Can be used to set a limit of e.g. 1000 to avoid downloading thousands of files
when the server starts up. Set a value of 0 or negative to disable this option.
javaMailSender null
Camel 2.0: Specifies a pluggable
org.springframework.mail.javamail.JavaMailSender instance in order to use a
custom email implementation. If none provided, Camel uses the default,
org.springframework.mail.javamail.JavaMailSenderImpl.
dummyTrustManager false
As of Camel 1.4, when testing SSL connections, you can enable the dummy trust manager by
setting this option to true. When the dummy trust manager is enabled, the mail client skips the
server certificate check.
ignoreUnsupportedCharset false
Camel 2.0: Option to let Camel ignore unsupported charset in the local JVM when sending mails.
If the charset is unsupported then charset=XXX (where XXX represents the unsupported
charset) is removed from the content-type and it relies on the platform default instead.
SSL support
The underlying mail framework is responsible for providing SSL support. Camel uses SUN
JavaMail, which only trusts certificates issued by well known Certificate Authorities. So if you
issue your own certificate, you have to import it into the local Java keystore file (see
SSLNOTES.txt in JavaMail for details).
CHAPTER 10 - COMPONENT APPENDIX 556
Warning
Enabling this option makes the email connection completely insecure. The connection
becomes vulnerable to a man-in-the-middle attack, which implies that your login
credentials can be stolen. Do not use this option in a production environment.
Defaults changed in Camel 1.4
As of Camel 1.4 the default consumer delay is now 60 seconds. Camel will therefore only poll
the mailbox once a minute to avoid overloading the mail server. The default value in Camel 1.3
is 500 milliseconds.
Defaults changed in Camel 1.5
In Camel 1.5 the following default options have changed:
▪deleteProcessedMessages is now false, as we felt Camel should not delete
mails on the mail server by default.
▪processOnlyUnseenMessages is now true, as we felt Camel should only poll
new mails by default.
Mail Message Content
Camel uses the message exchange's IN body as the MimeMessage text content. The body is
converted to String.class.
Camel copies all of the exchange's IN headers to the MimeMessage headers.
The subject of the MimeMessage can be configured using a header property on the IN
message. The code below demonstrates this:
from("direct:a").setHeader("subject", constant(subject)).to("smtp://james2@localhost");
The same applies for other MimeMessage headers such as recipients, so you can use a header
property as To:
Map<String,Object> map = new HashMap<String,Object>();
map.put("To","davsclaus@apache.org");
map.put("From","jstrachan@apache.org");
map.put("Subject","Camel rocks");
String body = "Hello Claus.\nYes it does.\n\nRegards James.";
template.sendBodyAndHeaders("smtp://davsclaus@apache.org", body, map);
557 CHAPTER 10 - COMPONENT APPENDIX

Headers take precedence over pre-configured recipients
From Camel 1.5 onwards, the recipients specified in the message headers always take
precedence over recipients pre-configured in the endpoint URI. The idea is that if you provide
any recipients in the message headers, that is what you get. The recipients pre-configured in the
endpoint URI are treated as a fallback.
In the sample code below, the email message is sent to davsclaus@apache.org,
because it takes precedence over the pre-configured recipient, info@mycompany.com. Any
CC and BCC settings in the endpoint URI are also ignored and those recipients will not receive
any mail. The choice between headers and pre-configured settings is all or nothing: the mail
component either takes the recipients exclusively from the headers or exclusively from the pre-
configured settings. It is not possible to mix and match headers and pre-configured settings.
Map<String,Object> headers = new HashMap<String,Object>();
headers.put("to","davsclaus@apache.org");
template.sendBodyAndHeaders("smtp://admin@localhost?to=info@mycompany.com",
"Hello World", headers);
Multiple recipients for easier configuration
As of Camel 1.5, it is possible to set multiple recipients using a comma-separated or a
semicolon-separated list. This applies both to header settings and to settings in an endpoint
URI. For example:
Map<String,Object> headers = new HashMap<String,Object>();
headers.put("to","davsclaus@apache.org ; jstrachan@apache.org ;
ningjiang@apache.org");
The preceding example uses a semicolon, ;, as the separator character.
Setting sender name and email
You can specify recipients in the format, name <email>, to include both the name and the
email address of the recipient.
For example, you define the following headers on the a Message:
Map headers = new HashMap();
map.put("To","Claus Ibsen <davsclaus@apache.org>");
map.put("From","James Strachan <jstrachan@apache.org>");
map.put("Subject","Camel is cool");
CHAPTER 10 - COMPONENT APPENDIX 558

SUN JavaMail
SUN JavaMail is used under the hood for consuming and producing mails.
We encourage end-users to consult these references when using either POP3 or IMAP
protocol. Note particularly that POP3 has a much more limited set of features than IMAP.
▪SUN POP3 API
▪SUN IMAP API
▪And generally about the MAIL Flags
Samples
We start with a simple route that sends the messages received from a JMS queue as emails. The
email account is the admin account on mymailserver.com.
from("jms://queue:subscription").to("smtp://admin@mymailserver.com?password=secret");
In the next sample, we poll a mailbox for new emails once every minute. Notice that we use
the special consumer option for setting the poll interval, consumer.delay, as 60000
milliseconds = 60 seconds.
from("imap://admin@mymailserver.com?password=secret&processOnlyUnseenMessages=true&consumer.delay=60000").to("seda://mails");
In this sample we want to send a mail to multiple recipients. This feature was introduced in
camel 1.4:
// all the recipients of this mail are:
// To: camel@riders.org , easy@riders.org
// CC: me@you.org
// BCC: someone@somewhere.org
String recipients =
"&To=camel@riders.org,easy@riders.org&CC=me@you.org&BCC=someone@somewhere.org";
from("direct:a").to("smtp://you@mymailserver.com?password=secret&From=you@apache.org"
+ recipients);
Sending mail with attachment sample
The mail component supports attachments, which is a feature that was introduced in Camel 1.4.
In the sample below, we send a mail message containing a plain text message with a logo file
attachment.
// create an exchange with a normal body and attachment to be produced as email
Endpoint endpoint =
context.getEndpoint("smtp://james@mymailserver.com?password=secret");
559 CHAPTER 10 - COMPONENT APPENDIX

Attachments are not support by all Camel components
The Attachments API is based on the Java Activation Framework and is generally only
used by the Mail API. Since many of the other Camel components do not support
attachments, the attachments could potentially be lost as they propagate along the
route. The rule of thumb, therefore, is to add attachments just before sending a
message to the mail endpoint.
// create the exchange with the mail message that is multipart with a file and a Hello
World text/plain message.
Exchange exchange = endpoint.createExchange();
Message in = exchange.getIn();
in.setBody("Hello World");
in.addAttachment("logo.jpeg",new DataHandler(new FileDataSource("src/test/data/
logo.jpeg")));
// create a producer that can produce the exchange (= send the mail)
Producer producer = endpoint.createProducer();
// start the producer
producer.start();
// and let it go (processes the exchange by sending the email)
producer.process(exchange);
SSL sample
In this sample, we want to poll our Google mail inbox for mails. To download mail onto a local
mail client, Google mail requires you to enable and configure SSL. This is done by logging into
your Google mail account and changing your settings to allow IMAP access. Google have
extensive documentation on how to do this.
from("imaps://imap.gmail.com?username=YOUR_USERNAME@gmail.com&password=YOUR_PASSWORD"
+
"&deleteProcessedMessages=false&processOnlyUnseenMessages=true&consumer.delay=60000").to("log:newmail");
The preceding route polls the Google mail inbox for new mails once every minute and logs the
received messages to the newmail logger category.
Running the sample with DEBUG logging enabled, we can monitor the progress in the logs:
2008-05-08 06:32:09,640 DEBUG MailConsumer - Connecting to MailStore
imaps//imap.gmail.com:993 (SSL enabled), folder=INBOX
2008-05-08 06:32:11,203 DEBUG MailConsumer - Polling mailfolder:
imaps//imap.gmail.com:993 (SSL enabled), folder=INBOX
CHAPTER 10 - COMPONENT APPENDIX 560

2008-05-08 06:32:11,640 DEBUG MailConsumer - Fetching 1 messages. Total 1 messages.
2008-05-08 06:32:12,171 DEBUG MailConsumer - Processing message: messageNumber=[332],
from=[James Bond <007@mi5.co.uk>], to=YOUR_USERNAME@gmail.com], subject=[...
2008-05-08 06:32:12,187 INFO newmail - Exchange[MailMessage: messageNumber=[332],
from=[James Bond <007@mi5.co.uk>], to=YOUR_USERNAME@gmail.com], subject=[...
Consuming mails with attachment sample
In this sample we poll a mailbox and store all attachments from the mails as files. First, we
define a route to poll the mailbox. As this sample is based on google mail, it uses the same
route as shown in the SSL sample:
from("imaps://imap.gmail.com?username=YOUR_USERNAME@gmail.com&password=YOUR_PASSWORD"
+
"&deleteProcessedMessages=false&processOnlyUnseenMessages=true&consumer.delay=60000").process(new
MyMailProcessor());
Instead of logging the mail we use a processor where we can process the mail from java code:
public void process(Exchange exchange) throws Exception {
// the API is a bit clunky so we need to loop
Map<String, DataHandler> attachments = exchange.getIn().getAttachments();
if (attachments.size() > 0) {
for (String name : attachments.keySet()) {
DataHandler dh = attachments.get(name);
// get the file name
String filename = dh.getName();
// get the content and convert it to byte[]
byte[] data =
exchange.getContext().getTypeConverter().convertTo(byte[].class, dh.getInputStream());
// write the data to a file
FileOutputStream out = new FileOutputStream(filename);
out.write(data);
out.flush();
out.close();
}
}
}
As you can see the API to handle attachments is a bit clunky but it's there so you can get the
javax.activation.DataHandler so you can handle the attachments using standard
API.
See Also
• Configuring Camel
561 CHAPTER 10 - COMPONENT APPENDIX

• Component
• Endpoint
• Getting Started
MINA COMPONENT
The mina: component is a transport for working with Apache MINA
Maven users will need to add the following dependency to their pom.xml for this
component:
<dependency>
<groupId>org.apache.camel</groupId>
<artifactId>camel-mina</artifactId>
<version>x.x.x</version>
<!-- use the same version as your Camel core version -->
</dependency>
URI format
mina:tcp://hostname[:port][?options]
mina:udp://hostname[:port][?options]
mina:vm://hostname[:port][?options]
From Camel 1.3 onwards you can specify a codec in the Registry using the codec option. If you
are using TCP and no codec is specified then the textline flag is used to determine if text
line based codec or object serialization should be used instead. By default the object
serialization is used.
For UDP if no codec is specified the default uses a basic ByteBuffer based codec.
The VM protocol is used as a direct forwarding mechanism in the same JVM. See the MINA
VM-Pipe API documentation for details.
A Mina producer has a default timeout value of 30 seconds, while it waits for a response
from the remote server.
In normal use, camel-mina only supports marshalling the body content—message headers
and exchange properties are not sent.
However, the option, transferExchange, does allow you to transfer the exchange itself over
the wire. See options below.
You can append query options to the URI in the following format,
?option=value&option=value&...
CHAPTER 10 - COMPONENT APPENDIX 562

Options
Option Default
Value Description
codec null As of 1.3, you can refer to a named ProtocolCodecFactory instance in your Registry such as your Spring
ApplicationContext, which is then used for the marshalling.
codec null Camel 2.0: You must use the #notation to look up your codec in the Registry. For example, use #myCodec to look up a
bean with the id value, myCodec.
disconnect false Camel 2.3: Whether or not to disconnect(close) from Mina session right after use. Can be used for both consumer and
producer.
textline false Only used for TCP. If no codec is specified, you can use this flag in 1.3 or later to indicate a text line based codec; if not
specified or the value is false, then Object Serialization is assumed over TCP.
textlineDelimiter DEFAULT
Camel 1.6.0/2.0 Only used for TCP and if textline=true. Sets the text line delimiter to use. Possible values are:
DEFAULT,AUTO,WINDOWS,UNIX or MAC. If none provided, Camel will use DEFAULT. This delimiter is used to mark the
end of text.
sync false/true
As of 1.3, you can configure the exchange pattern to be either InOnly (default) or InOut. Setting sync=true means a
synchronous exchange (InOut), where the client can read the response from MINA (the exchange Out message). The default
value has changed in Camel 1.5 to true. In older releases, the default value is false.
lazySessionCreation See description As of 1.3, sessions can be lazily created to avoid exceptions, if the remote server is not up and running when the Camel
producer is started. From Camel 2.0 onwards, the default is true. In Camel 1.x, the default is false.
timeout 30000 As of 1.3, you can configure the timeout that specifies how long to wait for a response from a remote server. The timeout
unit is in milliseconds, so 60000 is 60 seconds. The timeout is only used for Mina producer.
encoding JVM Default As of 1.3, you can configure the encoding (a charset name) to use for the TCP textline codec and the UDP protocol. If not
provided, Camel will use the JVM default Charset.
transferExchange false
Only used for TCP. As of 1.3, you can transfer the exchange over the wire instead of just the body. The following fields are
transferred: In body, Out body, fault body, In headers, Out headers, fault headers, exchange properties, exchange exception.
This requires that the objects are serializable. Camel will exclude any non-serializable objects and log it at WARN level.
minaLogger false As of 1.3, you can enable the Apache MINA logging filter. Apache MINA uses slf4j logging at INFO level to log all input
and output.
filters null
As of 2.0, you can set a list of Mina IoFilters to register. The filters value must be one of the following:
•Camel 2.2: comma-separated list of bean references (e.g. #filterBean1,#filterBean2) where
each bean must be of type org.apache.mina.common.IoFilter.
•Camel 2.0: a reference to a bean of type List<org.apache.mina.common.IoFilter>.
encoderMaxLineLength -1 As of 2.1, you can set the textline protocol encoder max line length. By default the default value of Mina itself is used which
are Integer.MAX_VALUE.
decorderMaxLineLength -1 As of 2.1, you can set the textline protocol decoder max line length. By default the default value of Mina itself is used which
are 1024.
producerPoolSize 16
1.6.2 (only in 1.6.x): The TCP producer is now thread safe and supports concurrency much better. This option allows
you to configure the number of threads in its thread pool for concurrent producers. Note: Camel 2.0 have a pooled service
which ensured it was already thread safe and supported concurrency already. So this is a special patch for 1.6.x.
allowDefaultCodec true
The mina component installs a default codec if both, codec is null and textline is false. Setting
allowDefaultCodec to false prevents the mina component from installing a default codec as the first element in the
filter chain. This is useful in scenarios where another filter must be the first in the filter chain, like the SSL filter.
disconnectOnNoReply true Camel 2.3: If sync is enabled then this option dictates MinaConsumer if it should disconnect where there is no reply to
send back.
noReplyLogLevel WARN Camel 2.3: If sync is enabled this option dictates MinaConsumer which logging level to use when logging a there is no reply
to send back. Values are: FATAL, ERROR, INFO, DEBUG, OFF.
Default behavior changed
In Camel 2.0 the codec option must use #notation for lookup of the codec bean in the
Registry.
In Camel 2.0 the lazySessionCreation option now defaults to true.
In Camel 1.5 the sync option has changed its default value from false to true, as we felt
it was confusing for end-users when they used MINA to call remote servers and Camel
wouldn't wait for the response.
563 CHAPTER 10 - COMPONENT APPENDIX
In Camel 1.4 or later codec=textline is no longer supported. Use the
textline=true option instead.
Using a custom codec
See the Mina documentation how to write your own codec. To use your custom codec with
camel-mina, you should register your codec in the Registry; for example, by creating a bean
in the Spring XML file. Then use the codec option to specify the bean ID of your codec. See
HL7 that has a custom codec.
Sample with sync=false
In this sample, Camel exposes a service that listens for TCP connections on port 6200. We use
the textline codec. In our route, we create a Mina consumer endpoint that listens on port
6200:
from("mina:tcp://localhost:6200?textline=true&sync=false").to("mock:result");
As the sample is part of a unit test, we test it by sending some data to it on port 6200.
MockEndpoint mock = getMockEndpoint("mock:result");
mock.expectedBodiesReceived("Hello World");
template.sendBody("mina:tcp://localhost:6200?textline=true&sync=false", "Hello World");
assertMockEndpointsSatisfied();
Sample with sync=true
In the next sample, we have a more common use case where we expose a TCP service on port
6201 also use the textline codec. However, this time we want to return a response, so we set
the sync option to true on the consumer.
from("mina:tcp://localhost:9201?textline=true&sync=true").process(new Processor() {
public void process(Exchange exchange) throws Exception {
String body = exchange.getIn().getBody(String.class);
exchange.getOut().setBody("Bye " + body);
}
});
Then we test the sample by sending some data and retrieving the response using the
template.requestBody() method. As we know the response is a String, we cast it to
String and can assert that the response is, in fact, something we have dynamically set in our
processor code logic.
CHAPTER 10 - COMPONENT APPENDIX 564

String response =
(String)template.requestBody("mina:tcp://localhost:9201?textline=true&sync=true",
"World");
assertEquals("Bye World", response);
Sample with Spring DSL
Spring DSL can, of course, also be used for MINA. In the sample below we expose a TCP
server on port 5555:
<route>
<from uri="mina:tcp://localhost:5555?textline=true"/>
<to uri="bean:myTCPOrderHandler"/>
</route>
In the route above, we expose a TCP server on port 5555 using the textline codec. We let the
Spring bean with ID, myTCPOrderHandler, handle the request and return a reply. For
instance, the handler bean could be implemented as follows:
public String handleOrder(String payload) {
...
return "Order: OK"
}
Configuring Mina endpoints using Spring bean style
Available as of Camel 2.0
Configuration of Mina endpoints is now possible using regular Spring bean style configuration
in the Spring DSL.
However, in the underlying Apache Mina toolkit, it is relatively difficult to set up the
acceptor and the connector, because you can not use simple setters. To resolve this difficulty,
we leverage the MinaComponent as a Spring factory bean to configure this for us. If you
really need to configure this yourself, there are setters on the MinaEndpoint to set these
when needed.
The sample below shows the factory approach:
<!-- Creating mina endpoints is a bit complex so we reuse MinaComponnet
as a factory bean to create our endpoint, this is the easiest to do -->
<bean id="myMinaFactory" class="org.apache.camel.component.mina.MinaComponent">
<!-- we must provide a camel context so we refer to it by its id -->
<constructor-arg index="0" ref="myCamel"/>
</bean>
565 CHAPTER 10 - COMPONENT APPENDIX

<!-- This is our mina endpoint configured with spring, we will use the factory above
to create it for us. The goal is to invoke the createEndpoint method with the
mina configuration parameter we defined using the constructor-arg option -->
<bean id="myMinaEndpoint"
factory-bean="myMinaFactory"
factory-method="createEndpoint">
<!-- and here we can pass it our configuration -->
<constructor-arg index="0" ref="myMinaConfig"/>
</bean>
<!-- this is our mina configuration with plain properties -->
<bean id="myMinaConfig" class="org.apache.camel.component.mina.MinaConfiguration">
<property name="protocol" value="tcp"/>
<property name="host" value="localhost"/>
<property name="port" value="1234"/>
<property name="sync" value="false"/>
</bean>
And then we can refer to our endpoint directly in the route, as follows:
<route>
<!-- here we route from or mina endpoint we have defined above -->
<from ref="myMinaEndpoint"/>
<to uri="mock:result"/>
</route>
Closing Session When Complete
Available as of Camel 1.6.1
When acting as a server you sometimes want to close the session when, for example, a
client conversion is finished. To instruct Camel to close the session, you should add a header
with the key CamelMinaCloseSessionWhenComplete set to a boolean true value.
For instance, the example below will close the session after it has written the bye message
back to the client:
from("mina:tcp://localhost:8080?sync=true&textline=true").process(new
Processor() {
public void process(Exchange exchange) throws Exception {
String body = exchange.getIn().getBody(String.class);
exchange.getOut().setBody("Bye " + body);
exchange.getOut().setHeader(MinaConsumer.HEADER_CLOSE_SESSION_WHEN_COMPLETE, true);
}
});
CHAPTER 10 - COMPONENT APPENDIX 566

Get the IoSession for message
Available since Camel 2.1
You can get the IoSession from the message header with this key
MinaEndpoint.HEADER_MINA_IOSESSION, and also get the local host address with the key
MinaEndpoint.HEADER_LOCAL_ADDRESS and remote host address with the key
MinaEndpoint.HEADER_REMOTE_ADDRESS.
Configuring Mina filters
Available since Camel 2.0
Filters permit you to use some Mina Filters, such as SslFilter. You can also implement
some customized filters. Please note that codec and logger are also implemented as Mina
filters of type, IoFilter. Any filters you may define are appended to the end of the filter
chain; that is, after codec and logger.
For instance, the example below will send a keep-alive message after 10 seconds of inactivity:
public class KeepAliveFilter extends IoFilterAdapter {
@Override
public void sessionCreated(NextFilter nextFilter, IoSession session)
throws Exception {
session.setIdleTime(IdleStatus.BOTH_IDLE, 10);
nextFilter.sessionCreated(session);
}
@Override
public void sessionIdle(NextFilter nextFilter, IoSession session,
IdleStatus status) throws Exception {
session.write("NOOP"); // NOOP is a FTP command for keep alive
nextFilter.sessionIdle(session, status);
}
}
As Camel Mina may use a request-reply scheme, the endpoint as a client would like to drop
some message, such as greeting when the connection is established. For example, when you
connect to an FTP server, you will get a 220 message with a greeting (220 Welcome to
Pure-FTPd). If you don't drop the message, your request-reply scheme will be broken.
public class DropGreetingFilter extends IoFilterAdapter {
@Override
public void messageReceived(NextFilter nextFilter, IoSession session,
Object message) throws Exception {
if (message instanceof String) {
String ftpMessage = (String) message;
// "220" is given as greeting. "200 Zzz" is given as a response to "NOOP"
(keep alive)
567 CHAPTER 10 - COMPONENT APPENDIX

if (ftpMessage.startsWith("220") || or ftpMessage.startsWith("200 Zzz")) {
// Dropping greeting
return;
}
}
nextFilter.messageReceived(session, message);
}
}
Then, you can configure your endpoint using Spring DSL:
<bean id="myMinaFactory" class="org.apache.camel.component.mina.MinaComponent">
<constructor-arg index="0" ref="camelContext" />
</bean>
<bean id="myMinaEndpoint"
factory-bean="myMinaFactory"
factory-method="createEndpoint">
<constructor-arg index="0" ref="myMinaConfig"/>
</bean>
<bean id="myMinaConfig" class="org.apache.camel.component.mina.MinaConfiguration">
<property name="protocol" value="tcp" />
<property name="host" value="localhost" />
<property name="port" value="2121" />
<property name="sync" value="true" />
<property name="minaLogger" value="true" />
<property name="filters" ref="listFilters"/>
</bean>
<bean id="listFilters" class="java.util.ArrayList" >
<constructor-arg>
<list value-type="org.apache.mina.common.IoFilter">
<bean class="com.example.KeepAliveFilter"/>
<bean class="com.example.DropGreetingFilter"/>
</list>
</constructor-arg>
</bean>
See Also
• Configuring Camel
• Component
• Endpoint
• Getting Started
▪Camel Netty
CHAPTER 10 - COMPONENT APPENDIX 568
MOCK COMPONENT
Testing of distributed and asynchronous processing is notoriously difficult. The Mock, Test and
DataSet endpoints work great with the Camel Testing Framework to simplify your unit and
integration testing using Enterprise Integration Patterns and Camel's large range of Components
together with the powerful Bean Integration.
The Mock component provides a powerful declarative testing mechanism, which is similar to
jMock in that it allows declarative expectations to be created on any Mock endpoint before a
test begins. Then the test is run, which typically fires messages to one or more endpoints, and
finally the expectations can be asserted in a test case to ensure the system worked as expected.
This allows you to test various things like:
• The correct number of messages are received on each endpoint,
• The correct payloads are received, in the right order,
• Messages arrive on an endpoint in order, using some Expression to create an order
testing function,
• Messages arrive match some kind of Predicate such as that specific headers have
certain values, or that parts of the messages match some predicate, such as by
evaluating an XPath or XQuery Expression.
Note that there is also the Test endpoint which is a Mock endpoint, but which uses a second
endpoint to provide the list of expected message bodies and automatically sets up the Mock
endpoint assertions. In other words, it's a Mock endpoint that automatically sets up its
assertions from some sample messages in a File or database, for example.
URI format
mock:someName[?options]
Where someName can be any string that uniquely identifies the endpoint.
You can append query options to the URI in the following format,
?option=value&option=value&...
Options
Option Default Description
reportGroup null A size to use a throughput logger for reporting
Simple Example
Here's a simple example of Mock endpoint in use. First, the endpoint is resolved on the
context. Then we set an expectation, and then, after the test has run, we assert that our
expectations have been met.
569 CHAPTER 10 - COMPONENT APPENDIX
MockEndpoint resultEndpoint = context.resolveEndpoint("mock:foo", MockEndpoint.class);
resultEndpoint.expectedMessageCount(2);
// send some messages
...
// now lets assert that the mock:foo endpoint received 2 messages
resultEndpoint.assertIsSatisfied();
You typically always call the assertIsSatisfied() method to test that the expectations were met
after running a test.
Camel will by default wait 20 seconds when the assertIsSatisfied() is invoked. This
can be configured by setting the setResultWaitTime(millis) method.
Setting expectations
You can see from the javadoc of MockEndpoint the various helper methods you can use to set
expectations. The main methods are as follows:
Method Description
expectedMessageCount(int) To define the expected message count on the
endpoint.
expectedMinimumMessageCount(int) To define the minimum number of expected
messages on the endpoint.
expectedBodiesReceived(...) To define the expected bodies that should be
received (in order).
expectedHeaderReceived(...) To define the expected header that should be
received
expectsAscending(Expression)
To add an expectation that messages are received in
order, using the given Expression to compare
messages.
expectsDescending(Expression)
To add an expectation that messages are received in
order, using the given Expression to compare
messages.
expectsNoDuplicates(Expression)
To add an expectation that no duplicate messages
are received; using an Expression to calculate a
unique identifier for each message. This could be
something like the JMSMessageID if using JMS, or
some unique reference number within the message.
Here's another example:
CHAPTER 10 - COMPONENT APPENDIX 570

resultEndpoint.expectedBodiesReceived("firstMessageBody","secondMessageBody",
"thirdMessageBody");
Adding expectations to specific messages
In addition, you can use the message(int messageIndex) method to add assertions about a
specific message that is received.
For example, to add expectations of the headers or body of the first message (using zero-
based indexing like java.util.List), you can use the following code:
resultEndpoint.message(0).header("foo").isEqualTo("bar");
There are some examples of the Mock endpoint in use in the camel-core processor tests.
A Spring Example
First, here's the spring.xml file
<camelContext xmlns="http://camel.apache.org/schema/spring">
<route>
<from uri="file:src/test/data?noop=true"/>
<filter>
<xpath>/person/city = 'London'</xpath>
<to uri="mock:matched"/>
</filter>
</route>
</camelContext>
<bean id="myBean" class="org.apache.camel.spring.mock.MyAssertions" scope="singleton"/>
As you can see, it defines a simple routing rule which consumes messages from the local src/
test/data directory. The noop flag just means not to delete or move the file after its been
processed.
Also note we instantiate a bean called myBean, here is the source of the MyAssertions
bean.
public class MyAssertions implements InitializingBean {
@EndpointInject(uri = "mock:matched")
private MockEndpoint matched;
@EndpointInject(uri = "mock:notMatched")
private MockEndpoint notMatched;
public void afterPropertiesSet() throws Exception {
571 CHAPTER 10 - COMPONENT APPENDIX

// lets add some expectations
matched.expectedMessageCount(1);
notMatched.expectedMessageCount(0);
}
public void assertEndpointsValid() throws Exception {
// now lets perform some assertions that the test worked as we expect
Assert.assertNotNull("Should have a matched endpoint", matched);
Assert.assertNotNull("Should have a notMatched endpoint", notMatched);
MockEndpoint.assertIsSatisfied(matched, notMatched);
}
}
The bean is injected with a bunch of Mock endpoints using the @EndpointInject annotation, it
then sets a bunch of expectations on startup (using Spring's InitializingBean interface
and afterPropertiesSet() method) before the CamelContext starts up.
Then in our test case (which could be JUnit or TesNG) we lookup myBean in Spring (or
have it injected into our test) and then invoke the assertEndpointsValid() method on
it to verify that the mock endpoints have their assertions met. You could then inspect the
message exchanges that were delivered to any of the endpoints using the
getReceivedExchanges() method on the Mock endpoint and perform further assertions or
debug logging.
Here is the actual JUnit test case we use.
See Also
• Configuring Camel
• Component
• Endpoint
• Getting Started
• Spring Testing
MSV COMPONENT
The MSV component performs XML validation of the message body using the MSV Library and
any of the supported XML schema languages, such as XML Schema or RelaxNG XML Syntax.
Maven users will need to add the following dependency to their pom.xml for this
component:
<dependency>
<groupId>org.apache.camel</groupId>
<artifactId>camel-msv</artifactId>
<version>x.x.x</version>
CHAPTER 10 - COMPONENT APPENDIX 572
<!-- use the same version as your Camel core version -->
</dependency>
Note that the Jing component also supports RelaxNG Compact Syntax
URI format
msv:someLocalOrRemoteResource[?options]
Where someLocalOrRemoteResource is some URL to a local resource on the classpath
or a full URL to a remote resource or resource on the file system. For example
msv:org/foo/bar.rng
msv:file:../foo/bar.rng
msv:http://acme.com/cheese.rng
You can append query options to the URI in the following format,
?option=value&option=value&...
Options
Option Default Description
useDom true
Camel 2.0: Whether DOMSource/DOMResult or SaxSource/
SaxResult should be used by the validator. Note: DOM must be
used by the MSV component.
Example
The following example shows how to configure a route from endpoint direct:start which
then goes to one of two endpoints, either mock:valid or mock:invalid based on whether
or not the XML matches the given RelaxNG XML Schema (which is supplied on the classpath).
<camelContext xmlns="http://camel.apache.org/schema/spring">
<route>
<from uri="direct:start"/>
<doTry>
<to uri="msv:org/apache/camel/component/validator/msv/schema.rng"/>
<to uri="mock:valid"/>
<doCatch>
<exception>org.apache.camel.ValidationException</exception>
<to uri="mock:invalid"/>
</doCatch>
573 CHAPTER 10 - COMPONENT APPENDIX
<doFinally>
<to uri="mock:finally"/>
</doFinally>
</doTry>
</route>
</camelContext>
See Also
• Configuring Camel
• Component
• Endpoint
• Getting Started
NAGIOS
Available as of Camel 2.3
The Nagios component allows you to send passive checks to Nagios.
Maven users will need to add the following dependency to their pom.xml for this
component:
<dependency>
<groupId>org.apache.camel</groupId>
<artifactId>camel-nagios</artifactId>
<version>x.x.x</version>
<!-- use the same version as your Camel core version -->
</dependency>
URI format
nagios://host[:port][?Options]
Camel provides two abilities with the Nagios component. You can send passive check messages
by sending a message to its endpoint.
Camel also provides a EventNotifer which allows you to send notifications to Nagios.
Options
Name Default
Value Description
host none This is the address of the Nagios host where checks should be send.
port The port number of the host.
CHAPTER 10 - COMPONENT APPENDIX 574
password Password to be authenticated when sending checks to Nagios.
connectionTimeout 5000 Connection timeout in millis.
timeout 5000 Sending timeout in millis.
nagiosSettings To use an already configured com.googlecode.jsendnsca.core.NagiosSettings object.
sendSync true Whether or not to use synchronous when sending a passive check. Setting it to false will allow Camel to continue routing the
message and the passive check message will be send asynchronously.
Headers
Name Description
CamelNagiosHostName This is the address of the Nagios host where checks should be send. This header will override any existing hostname configured on the
endpoint.
CamelNagiosLevel This is the severity level. You can use values CRITICAL, WARNING, OK. Camel will by default use OK.
CamelNagiosServiceName The servie name. Will default use the CamelContext name.
Sending message examples
You can send a message to Nagios where the message payload contains the message. By default
it will be OK level and use the CamelContext name as the service name. You can overrule these
values using headers as shown above.
For example we send the Hello Nagios message to Nagios as follows:
template.sendBody("direct:start","Hello Nagios");
from("direct:start").to("nagios:127.0.0.1:5667?password=secret").to("mock:result");
To send a CRITICAL message you can send the headers such as:
Map headers = new HashMap();
headers.put(NagiosConstants.LEVEL, "CRITICAL");
headers.put(NagiosConstants.HOST_NAME, "myHost");
headers.put(NagiosConstants.SERVICE_NAME, "myService");
template.sendBodyAndHeaders("direct:start","Hello Nagios", headers);
Using NagiosEventNotifer
The Nagios component also provides an EventNotifer which you can use to send events to
Nagios. For example we can enable this from Java as follows:
NagiosEventNotifier notifier = new NagiosEventNotifier();
notifier.getConfiguration().setHost("localhost");
notifier.getConfiguration().setPort(5667);
notifier.getConfiguration().setPassword("password");
CamelContext context = ...
575 CHAPTER 10 - COMPONENT APPENDIX

context.getManagementStrategy().addEventNotifier(notifier);
return context;
In Spring XML its just a matter of defining a Spring bean with the type EventNotifier and
Camel will pick it up as documented here: Advanced configuration of CamelContext using
Spring.
See Also
• Configuring Camel
• Component
• Endpoint
• Getting Started
NETTY COMPONENT
Available as of Camel 2.3
The netty component in Camel is a socket communication component, based on the JBoss
Netty community offering (available under an Apache 2.0 license).
Netty is a NIO client server framework which enables quick and easy development of network
applications such as protocol servers and clients.
Netty greatly simplifies and streamlines network programming such as TCP and UDP socket
server.
This camel component supports both producer and consumer endpoints.
The netty component has several options and allows fine-grained control of a number of
TCP/UDP communication parameters (buffer sizes, keepAlives, tcpNoDelay etc) and facilitates
both In-Only and In-Out communication on a Camel route.
Maven users will need to add the following dependency to their pom.xml for this
component:
<dependency>
<groupId>org.apache.camel</groupId>
<artifactId>camel-netty</artifactId>
<version>x.x.x</version>
<!-- use the same version as your Camel core version -->
</dependency>
URI format
The URI scheme for a netty component is as follows
CHAPTER 10 - COMPONENT APPENDIX 576
netty:tcp://localhost:99999[?options]
netty:udp://remotehost:99999/[?options]
This component supports producer and consumer endpoints for both TCP and UDP.
You can append query options to the URI in the following format,
?option=value&option=value&...
Options
Name Default
Value Description
keepAlive true Setting to ensure socket is not closed due to inactivity
tcpNoDelay true Setting to improve TCP protocol performance
broadcast false Setting to choose Multicast over UDP
connectTimeout 10000 Time to wait for a socket connection to be available. Value is in millis.
timeout 30000 Time to wait for a response to be received on a connection. Value is in millis.
reuseAddress true Setting to facilitate socket multiplexing
sync true Setting to set endpoint as one-way or request-response
ssl false Setting to specify whether SSL encryption is applied to this endpoint
sendBufferSize 65536
bytes The TCP/UDP buffer sizes to be used during outbound communication. Size is bytes.
receiveBufferSize 65536
bytes The TCP/UDP buffer sizes to be used during inbound communication. Size is bytes.
corePoolSize 10 The number of allocated threads at component startup. Defaults to 10
maxPoolSize 100 The maximum number of threads that may be allocated to this endpoint. Defaults to 100
disconnect false Whether or not to disconnect(close) from Netty Channel right after use. Can be used for both consumer and producer.
lazyChannelCreation true Channels can be lazily created to avoid exceptions, if the remote server is not up and running when the Camel producer is
started.
transferExchange false
Only used for TCP. You can transfer the exchange over the wire instead of just the body. The following fields are transferred:
In body, Out body, fault body, In headers, Out headers, fault headers, exchange properties, exchange exception. This requires
that the objects are serializable. Camel will exclude any non-serializable objects and log it at WARN level.
disconnectOnNoReply true If sync is enabled then this option dictates NettyConsumer if it should disconnect where there is no reply to send back.
noReplyLogLevel WARN If sync is enabled this option dictates NettyConsumer which logging level to use when logging a there is no reply to send back.
Values are: FATAL, ERROR, INFO, DEBUG, OFF.
allowDefaultCodec true Camel 2.4: The netty component installs a default codec if both, encoder/deocder is null and textline is false. Setting
allowDefaultCodec to false prevents the netty component from installing a default codec as the first element in the filter chain.
textline false Camel 2.4: Only used for TCP. If no codec is specified, you can use this flag to indicate a text line based codec; if not
specified or the value is false, then Object Serialization is assumed over TCP.
delimiter LINE Camel 2.4: The delimiter to use for the textline codec. Possible values are LINE and NULL.
decoderMaxLineLength 1024 Camel 2.4: The max line length to use for the textline codec.
autoAppendDelimiter true Camel 2.4: Whether or not to auto append missing end delimiter when sending using the textline codec.
encoding null Camel 2.4: The encoding (a charset name) to use for the textline codec. If not provided, Camel will use the JVM default
Charset.
Registry based Options
Codec Handlers and SSL Keystores can be enlisted in the Registry, such as in the Spring XML
file.
The values that could be passed in, are the following:
577 CHAPTER 10 - COMPONENT APPENDIX
Name Description
passphrase password setting to use in order to encrypt/decrypt payloads sent using SSH
keyStoreFormat keystore format to be used for payload encryption. Defaults to "JKS" if not set
securityProvider Security provider to be used for payload encryption. Defaults to "SunX509" if not set.
keyStoreFile Client side certificate keystore to be used for encryption
trustStoreFile Server side certificate keystore to be used for encryption
sslHandler Reference to a class that could be used to return an SSL Handler
encoder A custom Handler class that can be used to perform special marshalling of outbound payloads. Must override
org.jboss.netty.channel.ChannelDownStreamHandler.
encorders A list of encoder to be used. You can use a String which have values separated by comma, and have the values be looked up in the Registry. Just
remember to prefix the value with # so Camel knows it should lookup.
decoder A custom Handler class that can be used to perform special marshalling of inbound payloads. Must override
org.jboss.netty.channel.ChannelUpStreamHandler.
decoders A list of decorder to be used. You can use a String which have values separated by comma, and have the values be looked up in the Registry. Just
remember to prefix the value with # so Camel knows it should lookup.
Sending Messages to/from a Netty endpoint
Netty Producer
In Producer mode, the component provides the ability to send payloads to a socket endpoint
using either TCP or UDP protocols (with optional SSL support).
The producer mode supports both one-way and request-response based operations.
Netty Consumer
In Consumer mode, the component provides the ability to:
▪listen on a specified socket using either TCP or UDP protocols (with optional SSL
support),
▪receive requests on the socket using text/xml, binary and serialized object based
payloads and
▪send them along on a route as message exchanges.
The consumer mode supports both one-way and request-response based operations.
Usage Samples
A UDP Netty endpoint using Request-Reply and serialized
object payload
RouteBuilder builder = new RouteBuilder() {
public void configure() {
from("netty:udp://localhost:5155?sync=true")
CHAPTER 10 - COMPONENT APPENDIX 578

.process(new Processor() {
public void process(Exchange exchange) throws Exception {
Poetry poetry = (Poetry) exchange.getIn().getBody();
poetry.setPoet("Dr. Sarojini Naidu");
exchange.getOut().setBody(poetry);
}
}
}
};
A TCP based Netty consumer endpoint using One-way
communication
RouteBuilder builder = new RouteBuilder() {
public void configure() {
from("netty:tcp://localhost:5150")
.to("mock:result");
}
};
An SSL/TCP based Netty consumer endpoint using Request-
Reply communication
JndiRegistry registry = new JndiRegistry(createJndiContext());
registry.bind("password","changeit");
registry.bind("ksf",new File("src/test/resources/keystore.jks"));
registry.bind("tsf",new File("src/test/resources/keystore.jks"));
context.createRegistry(registry);
context.addRoutes(new RouteBuilder() {
public void configure() {
String netty_ssl_endpoint =
"netty:tcp://localhost:5150sync=true&ssl=true&passphrase=#password"
+"&keyStoreFile=#ksf&trustStoreFile=#tsf";
String return_string =
"When You Go Home, Tell Them Of Us And Say,"
+"For Your Tomorrow, We Gave Our Today.";
from(netty_ssl_endpoint)
.process(new Processor() {
public void process(Exchange exchange) throws Exception {
exchange.getOut().setBody(return_string);
}
}
579 CHAPTER 10 - COMPONENT APPENDIX

}
});
Using Multiple Codecs
In certain cases it may be necessary to add chains of encoders and decoders to the netty
pipeline. To add multpile codecs to a camel netty endpoint the 'encoders' and 'decoders' uri
parameters should be used. Like the 'encoder' and 'decoder' parameters they are used to supply
references (to lists of ChannelUpstreamHandlers and ChannelDownstreamHandlers) that
should be added to the pipeline. Note that if encoders is specified then the encoder param will
be ignored, similarly for decoders and the decoder param.
The lists of codecs need to be added to the Camel's registry so they can be resolved when
the endpoint is created.
LengthFieldBasedFrameDecoder lengthDecoder = new LengthFieldBasedFrameDecoder(1048576,
0, 4, 0, 4);
StringDecoder stringDecoder = new StringDecoder();
registry.bind("length-decoder", lengthDecoder);
registry.bind("string-decoder", stringDecoder);
LengthFieldPrepender lengthEncoder = new LengthFieldPrepender(4);
StringEncoder stringEncoder = new StringEncoder();
registry.bind("length-encoder", lengthEncoder);
registry.bind("string-encoder", stringEncoder);
List<ChannelUpstreamHandler> decoders = new ArrayList<ChannelUpstreamHandler>();
decoders.add(lengthDecoder);
decoders.add(stringDecoder);
List<ChannelDownstreamHandler> encoders = new ArrayList<ChannelDownstreamHandler>();
encoders.add(lengthEncoder);
encoders.add(stringEncoder);
registry.bind("encoders", encoders);
registry.bind("decoders", decoders);
Spring's native collections support can be used to specify the codec lists in an application
context
<util:list id="decoders" list-class="java.util.LinkedList">
<bean class="org.jboss.netty.handler.codec.frame.LengthFieldBasedFrameDecoder">
<constructor-arg value="1048576"/>
<constructor-arg value="0"/>
<constructor-arg value="4"/>
<constructor-arg value="0"/>
<constructor-arg value="4"/>
CHAPTER 10 - COMPONENT APPENDIX 580

</bean>
<bean class="org.jboss.netty.handler.codec.string.StringDecoder"/>
</util:list>
<util:list id="encoders" list-class="java.util.LinkedList">
<bean class="org.jboss.netty.handler.codec.frame.LengthFieldPrepender">
<constructor-arg value="4"/>
</bean>
<bean class="org.jboss.netty.handler.codec.string.StringEncoder"/>
</util:list>
<bean id="length-encoder"
class="org.jboss.netty.handler.codec.frame.LengthFieldPrepender">
<constructor-arg value="4"/>
</bean>
<bean id="string-encoder"
class="org.jboss.netty.handler.codec.string.StringEncoder"/>
<bean id="length-decoder"
class="org.jboss.netty.handler.codec.frame.LengthFieldBasedFrameDecoder">
<constructor-arg value="1048576"/>
<constructor-arg value="0"/>
<constructor-arg value="4"/>
<constructor-arg value="0"/>
<constructor-arg value="4"/>
</bean>
<bean id="string-decoder"
class="org.jboss.netty.handler.codec.string.StringDecoder"/>
</beans>
The bean names can then be used in netty endpoint definitions either as a comma separated list
or contained in a List e.g.
from("direct:multiple-codec").to("netty:tcp://localhost:5150?encoders=#encoders&sync=false");
from("netty:tcp://localhost:5150?decoders=#length-decoder,#string-decoder&sync=false").to("mock:multiple-codec");
}
};
}
}
or via spring.
<camelContext id="multiple-netty-codecs-context" xmlns="http://camel.apache.org/schema/
spring">
<route>
<from uri="direct:multiple-codec"/>
<to uri="netty:tcp://localhost:5150?encoders=#encoders&sync=false"/>
581 CHAPTER 10 - COMPONENT APPENDIX

</route>
<route>
<from
uri="netty:tcp://localhost:5150?decoders=#length-decoder,#string-decoder&sync=false"/>
<to uri="mock:multiple-codec"/>
</route>
</camelContext>
Closing Channel When Complete
When acting as a server you sometimes want to close the channel when, for example, a client
conversion is finished.
You can do this by simply setting the endpoint option disconnect=true.
However you can also instruct Camel on a per message basis as follows.
To instruct Camel to close the channel, you should add a header with the key
CamelNettyCloseChannelWhenComplete set to a boolean true value.
For instance, the example below will close the channel after it has written the bye message back
to the client:
from("netty:tcp://localhost:8080").process(new Processor() {
public void process(Exchange exchange) throws Exception {
String body = exchange.getIn().getBody(String.class);
exchange.getOut().setBody("Bye " + body);
// some condition which determines if we should close
if (close) {
exchange.getOut().setHeader(NettyConstants.NETTY_CLOSE_CHANNEL_WHEN_COMPLETE, true);
}
}
});
See Also
• Configuring Camel
• Component
• Endpoint
• Getting Started
▪MINA
NMR COMPONENT
The nmr component is an adapter to the Normalized Message Router (NMR) in ServiceMix,
which is intended for use by Camel applications deployed directly into the OSGi container. By
CHAPTER 10 - COMPONENT APPENDIX 582

contrast, the JBI component is intended for use by Camel applications deployed into the
ServiceMix JBI container.
Installing
The NMR component is provided with Apache ServiceMix. It is not distributed with Camel. To
install the NMR component in ServiceMix, enter the following command in the ServiceMix
console window:
features install nmr
You also need to instantiate the NMR component. You can do this by editing your Spring
configuration file, META-INF/spring/*.xml, and adding the following bean instance:
<beans xmlns:osgi="http://www.springframework.org/schema/osgi" ... >
...
<bean id="nmr" class="org.apache.servicemix.camel.nmr.ServiceMixComponent">
<property name="nmr">
<osgi:reference interface="org.apache.servicemix.nmr.api.NMR" />
</property>
</bean>
...
</beans>
NMR consumer and producer endpoints
The following code:
from("nmr:MyServiceEndpoint")
Automatically exposes a new endpoint to the bus with endpoint name MyServiceEndpoint
(see URI-format).
When an NMR endpoint appears at the end of a route, for example:
to("nmr:MyServiceEndpoint")
The messages sent by this producer endpoint are sent to the already deployed JBI endpoint.
URI format
nmr:endpointName
583 CHAPTER 10 - COMPONENT APPENDIX
URI Options
Option Default
Value Description
synchronous false
When this is set to true on a consumer endpoint, an
incoming, synchronous NMR Exchange will be handled on the
sender's thread instead of being handled on a new thread of
the NMR endpoint's thread pool
Examples
from("nmr:MyServiceEndpoint")
from("nmr:MyServiceEndpoint?synchronous=true").to("nmr:AnotherEndpoint")
Using Stream bodies
If you are using a stream type as the message body, you should be aware that a stream is only
capable of being read once. So if you enable DEBUG logging, the body is usually logged and thus
read. To deal with this, Camel has a streamCaching option that can cache the stream,
enabling you to read it multiple times.
from("nmr:MyEndpoint").streamCaching().to("xslt:transform.xsl","bean:doSomething");
From Camel 1.5 onwards, the stream caching is default enabled, so it is not necessary to set
the streamCaching() option.
In Camel 2.0 we store big input streams (by default, over 64K) in a temp file using
CachedOutputStream. When you close the input stream, the temp file will be deleted.
See Also
• Configuring Camel
• Component
• Endpoint
• Getting Started
QUARTZ COMPONENT
The quartz: component provides a scheduled delivery of messages using the Quartz
scheduler.
Each endpoint represents a different timer (in Quartz terms, a Trigger and JobDetail).
CHAPTER 10 - COMPONENT APPENDIX 584
Maven users will need to add the following dependency to their pom.xml for this
component:
<dependency>
<groupId>org.apache.camel</groupId>
<artifactId>camel-quartz</artifactId>
<version>x.x.x</version>
<!-- use the same version as your Camel core version -->
</dependency>
URI format
quartz://timerName?options
quartz://groupName/timerName?options
quartz://groupName/timerName/cronExpression (@deprecated)
quartz://groupName/timerName/?cron=expression (Camel 2.0)
quartz://timerName?cron=expression (Camel 2.0)
The component uses either a CronTrigger or a SimpleTrigger. If no cron expression is
provided, the component uses a simple trigger. If no groupName is provided, the quartz
component uses the Camel group name.
You can append query options to the URI in the following format,
?option=value&option=value&...
Options
Parameter Default Description
cron None Specifies a cron expression (not compatible
with the trigger.* or job.* options).
trigger.repeatCount 0 SimpleTrigger: How many times should the
timer repeat?
trigger.repeatInterval 0 SimpleTrigger: The amount of time in
milliseconds between repeated triggers.
job.name null Sets the job name.
job.XXX null Sets the job option with the XXX setter
name.
trigger.XXX null Sets the trigger option with the XXX setter
name.
585 CHAPTER 10 - COMPONENT APPENDIX
Using cron expressions
Configuring the cron expression in Camel 1.x is based on path separators. We
changed this to an URI option in Camel 2.0, allowing a more elegant configuration.
Also it is not possible to use the /cron special character (for increments) in
Camel 1.x, which Camel 2.0 also fixes.
stateful false Uses a Quartz StatefulJob instead of
the default job.
fireNow false
New to Camel 2.2.0, if it is true will fire the
trigger when the route is start when using
SimpleTrigger.
For example, the following routing rule will fire two timer events to the mock:results
endpoint:
from("quartz://myGroup/
myTimerName?trigger.repeatInterval=2&trigger.repeatCount=1").routeId("myRoute").to("mock:result");
When using a StatefulJob, the JobDataMap is re-persisted after every execution of the job, thus
preserving state for the next execution.
Configuring quartz.properties file
By default Quartz will look for a quartz.properties file in the root of the classpath. If you
are using WAR deployments this means just drop the quartz.properties in WEB-INF/
classes.
However the Camel Quartz component also allows you to configure properties:
Parameter Default Type Description
properties null Properties
Camel 2.4: You can configure a
java.util.Propoperties
instance.
propertiesFile null String Camel 2.4: File name of the
properties to load from the classpath
To do this you can configure this in Spring XML as follows
<bean id="quartz" class="org.apache.camel.component.QuartzComponent">
<property name="propertiesFile" value="com/mycompany/myquartz.properties"/>
</bean>
CHAPTER 10 - COMPONENT APPENDIX 586
Starting the Quartz scheduler
Available as of Camel 2.4
The Quartz component offers an option to let the Quartz scheduler be started delayed, or
not auto started at all.
Parameter Default Type Description
startDelayedSeconds 0 int Camel 2.4: Seconds to wait before
starting the quartz scheduler.
autoStartScheduler true boolean Camel 2.4: Whether or not the
scheduler should be auto started.
To do this you can configure this in Spring XML as follows
<bean id="quartz" class="org.apache.camel.component.QuartzComponent">
<property name="startDelayedSeconds" value="5"/>
</bean>
Clustering
Available as of Camel 2.4
If you use Quartz in clustered mode, e.g. the JobStore is clustered. Then from Camel 2.4
onwards the Quartz component will not pause/remove triggers when a node is being stopped/
shutdown. This allows the trigger to keep running on the other nodes in the cluster.
Message Headers
Camel adds the getters from the Quartz Execution Context as header values. The following
headers are added:
calendar,fireTime,jobDetail,jobInstance,jobRuntTime,
mergedJobDataMap,nextFireTime,previousFireTime,refireCount,result,
scheduledFireTime,scheduler,trigger,triggerName,triggerGroup.
The fireTime header contains the java.util.Date of when the exchange was fired.
Using Cron Triggers
Avaiable as of Camel 2.0
Quartz supports Cron-like expressions for specifying timers in a handy format. You can use
these expressions in the cron URI parameter; though to preserve valid URI encoding we allow
+ to be used instead of spaces. Quartz provides a little tutorial on how to use cron
expressions.
For example, the following will fire a message every five minutes starting at 12pm (noon) to
6pm on weekdays:
587 CHAPTER 10 - COMPONENT APPENDIX
from("quartz://myGroup/myTimerName?cron=0+0/
5+12-18+?+*+MON-FRI").to("activemq:Totally.Rocks");
which is equivalent to using the cron expression
0 0/5 12-18 ? * MON-FRI
The following table shows the URI character encodings we use to preserve valid URI syntax:
URI Character Cron character
+Space
Using Cron Triggers in Camel 1.x
@deprecated
Quartz supports Cron-like expressions for specifying timers in a handy format. You can use
these expressions in the URI; though to preserve valid URI encoding we allow /to be used
instead of spaces and $to be used instead of ?.
For example, the following endpoint URI will fire a message at 12pm (noon) every day
from("quartz://myGroup/myTimerName/0/0/12/*/*/$").to("activemq:Totally.Rocks");
which is equivalent to using the cron expression
0 0 12 * * ?
The following table shows the URI character encodings we use to preserve valid URI syntax:
URI Character Cron character
/Space
$ ?
See Also
• Configuring Camel
• Component
• Endpoint
• Getting Started
• Timer
CHAPTER 10 - COMPONENT APPENDIX 588
QUICKFIX COMPONENT
Available as of Camel 2.0
The quickfix component is an implementation of the QuickFix engine for Java . This engine
allows to connect to a FIX server which is used to exchange financial messages according to FIX
protocol standard.
Maven users will need to add the following dependency to their pom.xml for this
component:
<dependency>
<groupId>org.apache.camel</groupId>
<artifactId>camel-quickfix</artifactId>
<version>x.x.x</version>
<!-- use the same version as your Camel core version -->
</dependency>
Note: The component can be used to send/receives messages to a FIX server.
URI format
quickfix-server:config file
quickfix-client:config file
Where config file is the location (in your classpath) of the quickfix configuration file used to
configure the engine at the startup.
Note: Information about parameters available for quickfix can be found on QuickFixJ web
site.
The quickfix-server endpoint must be used to receive from FIX server FIX messages and
quickfix-client endpoint in the case that you want to send messages to a FIX gateway.
Warning: You cannot use a quickfix engine to send or receive messages in both direction
as the FIX protocol handle logon/logout sessions with heartbeat messages which are send to
verify if the server or client is still alive in only one direction.
Exchange data format
The QuickFixJ engine is like CXF component a messaging bus using MINA as protocol layer to
create the socket connection with the FIX engine gateway.
When QuickFixJ engine receives a message, then it create a QuickFix.Message instance
which is next received by the camel endpoint. This object is a 'mapping object' created from a
FIX message formatted initially as a collection of key value pairs data. You can use this object or
you can use the method 'toString' to retrieve the original FIX message.
Note: Alternatively, you can use camel bindy dataformat to transform the FIX message into
your own java POJO
589 CHAPTER 10 - COMPONENT APPENDIX
When a message must be send to QuickFix, then you must create a QuickFix.Message
instance.
Samples
Direction : to FIX gateway
<route>
<from uri="activemq:queue:fix"/>
<bean ref="fixService" method="createFixMessage" /> // bean method in charge to
transform message into a QuickFix.Message
<to uri="quickfix-client:META-INF/quickfix/client.cfg" /> // Quickfix engine who will
send the FIX messages to the gateway
Direction : from FIX gateway
<from uri="quickfix-server:META-INF/quickfix/server.cfg"/> // QuickFix engine who will
receive the message from FIX gateway
<bean ref="fixService" method="parseFixMessage" /> // bean method parsing the
QuickFix.Message
<to uri="uri="activemq:queue:fix"/>" />
See Also
• Configuring Camel
• Component
• Endpoint
• Getting Started
PRINTER COMPONENT
Available as of Camel 2.1
The printer component provides a way to direct payloads on a route to a printer.
Obviously the payload has to be a formatted piece of payload in order for the component to
appropriately print it. The objective is to be able to direct specific payloads as jobs to a line
printer in a camel flow.
This component only supports a camel producer endpoint.
The functionality allows for the payload to be printed on a default printer, named local,
remote or wirelessly linked printer using the javax printing API under the covers.
Maven users will need to add the following dependency to their pom.xml for this
component:
CHAPTER 10 - COMPONENT APPENDIX 590
<dependency>
<groupId>org.apache.camel</groupId>
<artifactId>camel-printer</artifactId>
<version>x.x.x</version>
<!-- use the same version as your Camel core version -->
</dependency>
URI format
Since the URI scheme for a printer has not been standardized (the nearest thing to a standard
being the IETF print standard) and therefore not uniformly applied by vendors, we have chosen
"lpr" as the scheme.
lpr://localhost/default[?options]
lpr://remotehost:port/path/to/printer[?options]
You can append query options to the URI in the following format,
?option=value&option=value&...
Options
Name Default Value Description
mediaSize MediaSizeName.NA_LETTER
Sets the stationary as defined by
enumeration settings in the
javax.print.attribute.standard.MediaSizeName
API. The default setting is to use North
American Letter sized stationary
copies 1 Sets number of copies based on the
javax.print.attribute.standard.Copies API
sides Sides.ONE_SIDED
Sets one sided or two sided printing based
on the javax.print.attribute.standard.Sides
API
flavor DocFlavor.BYTE_ARRAY Sets DocFlavor based on the
javax.print.DocFlavor API
mimeType AUTOSENSE Sets mimeTypes supported by the
javax.print.DocFlavor API
591 CHAPTER 10 - COMPONENT APPENDIX

Sending Messages to a Printer
Printer Producer
Sending data to the printer is very straightforward and involves creating a producer endpoint
that can be sent message exchanges on in route.
Usage Samples
Example 1: Printing text based payloads on a Default printer
using letter stationary and one-sided mode
RouteBuilder builder = new RouteBuilder() {
public void configure() {
from(file://inputdir/?delete=true)
.to("lpr://localhost/default?copies=2" +
"&flavor=DocFlavor.INPUT_STREAM&" +
"&mimeType=AUTOSENSE" +
"&mediaSize=na-letter" +
"&sides=one-sided")
}};
Example 2: Printing GIF based payloads on a Remote printer
using A4 stationary and one-sided mode
RouteBuilder builder = new RouteBuilder() {
public void configure() {
from(file://inputdir/?delete=true)
.to("lpr://remotehost/sales/salesprinter" +
"?copies=2&sides=one-sided" +
"&mimeType=GIF&mediaSize=iso-a4" +
"&flavor=DocFlavor.INPUT_STREAM")
}};
Example 3: Printing JPEG based payloads on a Remote printer
using Japanese Postcard stationary and one-sided mode
RouteBuilder builder = new RouteBuilder() {
public void configure() {
CHAPTER 10 - COMPONENT APPENDIX 592

from(file://inputdir/?delete=true)
.to("lpr://remotehost/sales/salesprinter" +
"?copies=2&sides=one-sided" +
"&mimeType=JPEG" +
"&mediaSize=japanese-postcard" +
"&flavor=DocFlavor.INPUT_STREAM")
}};
PROPERTIES COMPONENT
Available as of Camel 2.3
URI format
properties:key[?options]
Where key is the key for the property to lookup
Options
Name Type Default Description
cache boolean true Whether or not to cache loaded properties.
locations String null
A list of locations to load properties. You can use
comma to separate multiple locations. This option
will override any default locations and only use
the locations from this option.
USING PROPERTYPLACEHOLDER
Available as of Camel 2.3
Camel now provides a new PropertiesComponent in camel-core which allows you
to use property placeholders when defining Camel Endpoint URIs.
This works much like you would do if using Spring's <property-placeholder> tag.
However Spring have a limitation which prevents 3rd party frameworks to leverage Spring
property placeholders to the fullest. See more at How do I use Spring Property Placeholder
with Camel XML.
The property placeholder is generally in use when doing:
▪lookup or creating endpoints
▪lookup of beans in the Registry
593 CHAPTER 10 - COMPONENT APPENDIX

▪additional supported in Spring XML (see below in examples)
Syntax
The syntax to use Camel's property placeholder is to use {{key}} for example {{file.uri}}
where file.uri is the property key.
You can use property placeholders in parts of the endpoint URI's which for example you can
use placeholders for parameters in the URIs.
PropertyResolver
As usually Camel provides a pluggable mechanism which allows 3rd part to provide their own
resolver to lookup properties. Camel provides a default implementation
org.apache.camel.component.properties.DefaultPropertiesResolver
which is capable of loading properties from the file system, classpath or Registry. You can prefix
the locations with either:
▪ref: Camel 2.4: to lookup in the Registry
▪file: to load the from file system
▪classpath: to load from classpath (this is also the default if no prefix is provided)
Defining location
The PropertiesResolver need to know a location(s) where to resolve the properties.
You can define 1 to many locations. If you define the location in a single String property you can
separate multiple locations with comma such as:
pc.setLocation("com/mycompany/myprop.properties,com/mycompany/other.properties");
Configuring in Java DSL
You have to create and register the PropertiesComponent under the name
properties such as:
PropertiesComponent pc = new PropertiesComponent();
pc.setLocation("classpath:com/mycompany/myprop.properties");
context.addComponent("properties", pc);
Configuring in Spring XML
Spring XML offers two variations to configure. You can define a spring bean as a
PropertiesComponent which resembles the way done in Java DSL. Or you can use the
<propertyPlaceholder> tag.
CHAPTER 10 - COMPONENT APPENDIX 594

<bean id="properties"
class="org.apache.camel.component.properties.PropertiesComponent">
<property name="location" value="classpath:com/mycompany/myprop.properties"/>
</bean>
Using the <propertyPlaceholder> tag makes the configuration a bit more fresh such as:
<camelContext ...>
<propertyPlaceholder id="properties" location="com/mycompany/myprop.properties"/>
</camelContext>
Using a Properties from the Registry
Available as of Camel 2.4
For example in OSGi you may want to expose a service which returns the properties as a
java.util.Properties object.
Then you could setup the Properties component as follows:
<propertyPlaceholder id="properties" location="ref:myProperties"/>
Where myProperties is the id to use for lookup in the OSGi registry. Notice we use the
ref: prefix to tell Camel that it should lookup the properties for the Registry.
Examples using properties component
When using property placeholders in the endpoint URIs you can either use the properties:
component or define the placeholders directly in the URI. We will show example of both cases,
starting with the former.
// properties
cool.end=mock:result
// route
from("direct:start").to("properties:{{cool.end}}");
You can also use placeholders as a part of the endpoint uri:
// properties
cool.foo=result
// route
from("direct:start").to("properties:mock:{{cool.foo}}");
In the example above the to endpoint will be resolved to mock:result.
595 CHAPTER 10 - COMPONENT APPENDIX

You can also have properties with refer to each other such as:
// properties
cool.foo=result
cool.concat=mock:#{cool.foo}
// route
from("direct:start").to("properties:mock:{{cool.concat}}");
Notice how cool.concat refer to another property.
The properties: component also offers you to override and provide a location in the
given uri using the locations option:
from("direct:start").to("properties:bar.end?locations=com/mycompany/
bar.properties");
Examples
You can also use property placeholders directly in the endpoint uris without having to use
properties:.
// properties
cool.foo=result
// route
from("direct:start").to("mock:{{cool.foo}}");
And you can use them in multiple wherever you want them:
// properties
cool.start=direct:start
cool.showid=true
cool.result=result
// route
from("{{cool.start}}")
.to("log:{{cool.start}}?showBodyType=false&showExchangeId={{cool.showid}}")
.to("mock:{{cool.result}}");
You can also your property placeholders when using ProducerTemplate for example:
template.sendBody("{{cool.start}}","Hello World");
CHAPTER 10 - COMPONENT APPENDIX 596

Example with Simple language
The Simple language now also support using property placeholders, for example in the route
below:
// properties
cheese.quote=Camel rocks
// route
from("direct:start")
.transform().simple("Hi ${body} do you think ${properties:cheese.quote}?");
You can also specify the location in the Simple language for example:
// bar.properties
bar.quote=Beer tastes good
// route
from("direct:start")
.transform().simple("Hi ${body}. ${properties:com/mycompany/
bar.properties:bar.quote}.");
Additional property placeholder supported in Spring XML
The property placeholders is also supported in many of the Camel Spring XML tags such as
<package>, <packageScan>, <contextScan>, <jmxAgent>, <endpoint>,
<routeBuilder>, <proxy> and the others.
The example below has property placeholder in the <jmxAgent> tag:
<camelContext id="camel" xmlns="http://camel.apache.org/schema/spring">
<propertyPlaceholder id="properties" location="org/apache/camel/spring/
jmx.properties"/>
<!-- we can use propery placeholders when we define the JMX agent -->
<jmxAgent id="agent" registryPort="{{myjmx.port}}"
usePlatformMBeanServer="{{myjmx.usePlatform}}"
createConnector="true"
statisticsLevel="RoutesOnly"
/>
<route>
<from uri="seda:start"/>
<to uri="mock:result"/>
</route>
</camelContext>
You can also define property placeholders in the various attributes on the <camelContext> tag
such as trace as shown here:
597 CHAPTER 10 - COMPONENT APPENDIX

<camelContext trace="{{foo.trace}}" xmlns="http://camel.apache.org/schema/spring">
<propertyPlaceholder id="properties" location="org/apache/camel/spring/processor/
myprop.properties"/>
<template id="camelTemplate" defaultEndpoint="{{foo.cool}}"/>
<route>
<from uri="direct:start"/>
<setHeader headerName="{{foo.header}}">
<simple>${in.body} World!</simple>
</setHeader>
<to uri="mock:result"/>
</route>
</camelContext>
Unit tests
See the unit tests in camel-core and camel-spring
▪PropertiesComponentTest.java
▪PropertiesComponentEndpointTest.java
▪PropertiesComponentSimpleLanguageTest.java
▪SpringPropertiesComponentTest.xml
▪SpringPropertiesComponent2Test.xml
▪SpringPropertiesComponent3Test.xml
See Also
• Configuring Camel
• Component
• Endpoint
• Getting Started
REF COMPONENT
The ref: component is used for lookup of existing endpoints bound in the Registry.
URI format
ref:someName
Where someName is the name of an endpoint in the Registry (usually, but not always, the
Spring registry). If you are using the Spring registry, someName would be the bean ID of an
endpoint in the Spring registry.
CHAPTER 10 - COMPONENT APPENDIX 598

Runtime lookup
This component can be used when you need dynamic discovery of endpoints in the Registry
where you can compute the URI at runtime. Then you can look up the endpoint using the
following code:
// lookup the endpoint
String myEndpointRef = "bigspenderOrder";
Endpoint endpoint = context.getEndpoint("ref:" + myEndpointRef);
Producer producer = endpoint.createProducer();
Exchange exchange = producer.createExchange();
exchange.getIn().setBody(payloadToSend);
// send the exchange
producer.process(exchange);
...
And you could have a list of endpoints defined in the Registry such as:
<camelContext id="camel" xmlns="http://activemq.apache.org/camel/schema/spring">
<endpoint id="normalOrder" uri="activemq:order.slow"/>
<endpoint id="bigspenderOrder" uri="activemq:order.high"/>
...
</camelContext>
Sample
In the sample below we use the ref: in the URI to reference the endpoint with the spring ID,
endpoint2:
<bean id="mybean" class="org.apache.camel.spring.example.DummyBean">
<property name="endpoint" ref="endpoint1"/>
</bean>
<camelContext id="camel" xmlns="http://camel.apache.org/schema/spring">
<endpoint id="endpoint1" uri="direct:start"/>
<endpoint id="endpoint2" uri="mock:end"/>
<route>
<from ref="endpoint1"/>
<to uri="ref:endpoint2"/>
</route>
</camelContext>
You could, of course, have used the ref attribute instead:
<to ref="endpoint2"/>
599 CHAPTER 10 - COMPONENT APPENDIX
Which is the more common way to write it.
See Also
• Configuring Camel
• Component
• Endpoint
• Getting Started
RESTLET COMPONENT
The Restlet component provides Restlet based endpoints for consuming and producing
RESTful resources.
Maven users will need to add the following dependency to their pom.xml for this
component:
<dependency>
<groupId>org.apache.camel</groupId>
<artifactId>camel-restlet</artifactId>
<version>x.x.x</version>
<!-- use the same version as your Camel core version -->
</dependency>
URI format
restlet:restletUrl[?options]
Format of restletUrl:
protocol://hostname[:port][/resourcePattern]
Restlet promotes decoupling of protocol and application concerns. The reference
implementation of Restlet Engine supports a number of protocols. However, we have tested
the HTTP protocol only. The default port is port 80. We do not automatically switch default
port based on the protocol yet.
You can append query options to the URI in the following format,
?option=value&option=value&...
Options
Name Default Value Description
CHAPTER 10 - COMPONENT APPENDIX 600
headerFilterStrategy=#refName
(2.x or later)
An instance of
RestletHeaderFilterStrategy
Use the #notation (headerFilterStrategy=#refName) to reference a header filter
strategy in the Camel Registry. The strategy will be plugged into the restlet binding if it is
HeaderFilterStrategyAware.
restletBindingRef (1.x),
restletBinding=#refName (2.x or
later)
An instance of
DefaultRestletBinding The bean ID of a RestletBinding object in the Camel Registry.
restletMethod GET
On a producer endpoint, specifies the request method to use. On a consumer endpoint,
specifies that the endpoint consumes only restletMethod requests. The string value is
converted to org.restlet.data.Method by the Method.valueOf(String) method.
restletMethods (2.x or later)None
Consumer only Specify one or more methods separated by commas (e.g.
restletMethods=post,put) to be serviced by a restlet consumer endpoint. If both
restletMethod and restletMethods options are specified, the restletMethod
setting is ignored.
restletRealmRef (1.x),
restletRealm=#refName (2.x or
later)
null The bean ID of the Realm Map in the Camel Registry.
restletUriPatterns=#refName
(2.x or later)None
Consumer only Specify one ore more URI templates to be serviced by a restlet
consumer endpoint, using the #notation to reference a List<String> in the Camel
Registry. If a URI pattern has been defined in the endpoint URI, both the URI pattern
defined in the endpoint and the restletUriPatterns option will be honored.
Message Headers
Camel 1.x
Name Type Description
org.apache.camel.restlet.auth.login String Login name for basic authentication. It is set on the IN message by the application and gets filtered
before the restlet request header by Camel.
org.apache.camel.restlet.auth.password String Password name for basic authentication. It is set on the IN message by the application and gets filtered
before the restlet request header by Camel.
org.apache.camel.restlet.mediaType String
Specifies the content type, which can be set on the OUT message by the application/processor. The
value is the content-type of the response message. If this header is not set, the content-type is
set based on the object type of the OUT message body.
org.apache.camel.restlet.queryString String The query string of the request URI. It is set on the IN message by DefaultRestletBinding when
the restlet component receives a request.
org.apache.camel.restlet.responseCode
String
or
Integer
The response code can be set on the OUT message by the application/processor. The value is the
response code of the response message. If this header is not set, the response code is set by the restlet
runtime engine.
org.restlet.* Attributes of a restlet message that get propagated to Camel IN headers.
Camel 2.x
Name Type Description
Content-Type String
Specifies the content type, which can be set on the OUT message by the application/processor. The value is the content-type
of the response message. If this header is not set, the content type is based on the object type of the OUT message body. In Camel
2.3 onward, if the Content-Type header is specified in the Camel IN message, the value of the header determine the content type
for the Restlet request message. Otherwise, it is defaulted to "application/x-www-form-urlencoded'. Prior to release 2.3, it is not
possible to change the request content type default.
CamelHttpMethod String The HTTP request method. This is set in the IN message header.
CamelHttpQuery String The query string of the request URI. It is set on the IN message by DefaultRestletBinding when the restlet component
receives a request.
CamelHttpRsponseCode
String
or
Integer
The response code can be set on the OUT message by the application/processor. The value is the response code of the response
message. If this header is not set, the response code is set by the restlet runtime engine.
CamelHttpUri String The HTTP request URI. This is set in the IN message header.
601 CHAPTER 10 - COMPONENT APPENDIX
CamelRestletLogin String Login name for basic authentication. It is set on the IN message by the application and gets filtered before the restlet request
header by Camel.
CamelRestletPassword String Password name for basic authentication. It is set on the IN message by the application and gets filtered before the restlet request
header by Camel.
org.restlet.* Attributes of a Restlet message that get propagated to Camel IN headers.
Message Body
Camel will store the restlet response from the external server on the OUT body. All headers
from the IN message will be copied to the OUT message, so that headers are preserved during
routing.
Samples
Restlet Endpoint with Authentication
The following route starts a restlet consumer endpoint that listens for POST requests on
http://localhost:8080. The processor creates a response that echoes the request body and the
value of the id header.
from("restlet:http://localhost:9080/
securedOrders?restletMethod=post&restletRealm=#realm").process(new Processor() {
public void process(Exchange exchange) throws Exception {
exchange.getOut().setBody(
"received [" + exchange.getIn().getBody()
+"] as an order id = "
+ exchange.getIn().getHeader("id"));
}
});
The restletRealm setting (in 2.x, use the #notation, that is,
restletRealm=#refName)in the URI query is used to look up a Realm Map in the registry.
If this option is specified, the restlet consumer uses the information to authenticate user logins.
Only authenticated requests can access the resources. In this sample, we create a Spring
application context that serves as a registry. The bean ID of the Realm Map should match the
restletRealmRef.
<util:map id="realm">
<entry key="admin" value="foo" />
<entry key="bar" value="foo" />
</util:map>
The following sample starts a direct endpoint that sends requests to the server on
http://localhost:8080 (that is, our restlet consumer endpoint).
CHAPTER 10 - COMPONENT APPENDIX 602

// Note: restletMethod and restletRealmRef are stripped
// from the query before a request is sent as they are
// only processed by Camel.
from("direct:start-auth").to("restlet:http://localhost:9080/
securedOrders?restletMethod=post");
That is all we need. We are ready to send a request and try out the restlet component:
final String id = "89531";
Map<String,Object> headers = new HashMap<String,Object>();
headers.put(RestletConstants.RESTLET_LOGIN, "admin");
headers.put(RestletConstants.RESTLET_PASSWORD, "foo");
headers.put("id", id);
String response = (String) template.requestBodyAndHeaders("direct:start-auth",
"<order foo='1'/>", headers);
The sample client sends a request to the direct:start-auth endpoint with the following
headers:
•CamelRestletLogin (used internally by Camel)
•CamelRestletPassword (used internally by Camel)
•id (application header)
The sample client gets a response like the following:
received [<order foo='1'/>] as an order id = 89531
Single restlet endpoint to service multiple methods and URI
templates (2.0 or later)
It is possible to create a single route to service multiple HTTP methods using the
restletMethods option. This snippet also shows how to retrieve the request method from
the header:
from("restlet:http://localhost:9080/users/{username}?restletMethods=post,get")
.process(new Processor() {
public void process(Exchange exchange) throws Exception {
// echo the method
exchange.getOut().setBody(exchange.getIn().getHeader(Exchange.HTTP_METHOD,
String.class));
}
});
In addition to servicing multiple methods, the next snippet shows how to create an endpoint
that supports multiple URI templates using the restletUriPatterns option. The request
603 CHAPTER 10 - COMPONENT APPENDIX
Note
org.apache.camel.restlet.auth.login and
org.apache.camel.restlet.auth.password will not be propagated as
Restlet header.
URI is available in the header of the IN message as well. If a URI pattern has been defined in the
endpoint URI (which is not the case in this sample), both the URI pattern defined in the
endpoint and the restletUriPatterns option will be honored.
from("restlet:http://localhost:9080?restletMethods=post,get&restletUriPatterns=#uriTemplates")
.process(new Processor() {
public void process(Exchange exchange) throws Exception {
// echo the method
String uri = exchange.getIn().getHeader(Exchange.HTTP_URI, String.class);
String out = exchange.getIn().getHeader(Exchange.HTTP_METHOD,
String.class);
if ("http://localhost:9080/users/homer".equals(uri)) {
exchange.getOut().setBody(out + " " +
exchange.getIn().getHeader("username",String.class));
}else if ("http://localhost:9080/atom/collection/foo/component/
bar".equals(uri)) {
exchange.getOut().setBody(out + " " + exchange.getIn().getHeader("id",
String.class)
+" " + exchange.getIn().getHeader("cid",
String.class));
}
}
});
The restletUriPatterns=#uriTemplates option references the List<String>
bean defined in the Spring XML configuration.
<bean id="uriTemplates">
<list>
<value>/users/{username}</value>
<value>/atom/collection/{id}/component/{cid}</value>
</list>
</bean>
RMI COMPONENT
The rmi: component binds PojoExchanges to the RMI protocol (JRMP).
Since this binding is just using RMI, normal RMI rules still apply regarding what methods can
be invoked. This component supports only PojoExchanges that carry a method invocation from
CHAPTER 10 - COMPONENT APPENDIX 604
an interface that extends the Remote interface. All parameters in the method should be either
Serializable or Remote objects.
Maven users will need to add the following dependency to their pom.xml for this
component:
<dependency>
<groupId>org.apache.camel</groupId>
<artifactId>camel-rmi</artifactId>
<version>x.x.x</version>
<!-- use the same version as your Camel core version -->
</dependency>
URI format
rmi://rmi-regisitry-host:rmi-registry-port/registry-path[?options]
For example:
rmi://localhost:1099/path/to/service
You can append query options to the URI in the following format,
?option=value&option=value&...
Options
Name Default
Value Description
method null As of Camel 1.3, you can set the name of the method to
invoke.
Using
To call out to an existing RMI service registered in an RMI registry, create a route similar to the
following:
from("pojo:foo").to("rmi://localhost:1099/foo");
To bind an existing camel processor or service in an RMI registry, define an RMI endpoint as
follows:
605 CHAPTER 10 - COMPONENT APPENDIX

RmiEndpoint endpoint= (RmiEndpoint) endpoint("rmi://localhost:1099/bar");
endpoint.setRemoteInterfaces(ISay.class);
from(endpoint).to("pojo:bar");
Note that when binding an RMI consumer endpoint, you must specify the Remote interfaces
exposed.
See Also
• Configuring Camel
• Component
• Endpoint
• Getting Started
RSS COMPONENT
The rss: component is used for polling RSS feeds. Camel will default poll the feed every 60th
seconds.
Maven users will need to add the following dependency to their pom.xml for this
component:
<dependency>
<groupId>org.apache.camel</groupId>
<artifactId>camel-rss</artifactId>
<version>x.x.x</version>
<!-- use the same version as your Camel core version -->
</dependency>
Note: The component currently only supports polling (consuming) feeds.
New in Camel 2.0
URI format
rss:rssUri
Where rssUri is the URI to the RSS feed to poll.
You can append query options to the URI in the following format,
?option=value&option=value&...
CHAPTER 10 - COMPONENT APPENDIX 606
Using camel-rss in OSGi environment
Camel-rss uses ROME 1.0 and below. This library has class loading issues in OSGi
environment. We submitted issue 142 to ROME.
You can also find patched version in this repository. One thing you have to change
is version - patched version is marked as 1.0-osgi.
Options
Property Default Description
splitEntries true
If true, Camel splits a feed into its
individual entries and returns each entry,
poll by poll. For example, if a feed contains
seven entries, Camel returns the first entry
on the first poll, the second entry on the
second poll, and so on. When no more
entries are left in the feed, Camel contacts
the remote RSS URI to obtain a new feed. If
false, Camel obtains a fresh feed on
every poll and returns all of the feed's
entries.
filter true
Use in combination with the
splitEntries option in order to filter
returned entries. By default, Camel applies
the UpdateDateFilter filter, which
returns only new entries from the feed,
ensuring that the consumer endpoint never
receives an entry more than once. The
filter orders the entries chronologically,
with the newest returned last.
lastUpdate null
Use in combination with the filter
option to block entries earlier than a
specific date/time (uses the
entry.updated timestamp). The format
is: yyyy-MM-ddTHH:MM:ss. Example:
2007-12-24T17:45:59.
feedHeader true Specifies whether to add the ROME
SyndFeed object as a header.
607 CHAPTER 10 - COMPONENT APPENDIX
sortEntries false
If splitEntries is true, this specifies
whether to sort the entries by updated
date.
consumer.delay 60000 Delay in milliseconds between each poll.
consumer.initialDelay 1000 Milliseconds before polling starts.
consumer.userFixedDelay false
Set to true to use fixed delay between
pools, otherwise fixed rate is used. See
ScheduledExecutorService in JDK for
details.
Exchange data types
Camel initializes the In body on the Exchange with a ROME SyndFeed. Depending on the
value of the splitEntries flag, Camel returns either a SyndFeed with one SyndEntry
or a java.util.List of SyndEntrys.
Option Value Behavior
splitEntries true A single entry from the current feed is set in the exchange.
splitEntries false The entire list of entries from the current feed is set in the
exchange.
Message Headers
Header Description
org.apache.camel.component.rss.feed Camel 1.x: The entire SyncFeed
object.
CamelRssFeed Camel 2.0: The entire SyncFeed
object.
RSS Dataformat
The RSS component ships with an RSS dataformat that can be used to convert between String
(as XML) and ROME RSS model objects.
• marshal = from ROME SyndFeed to XML String
• unmarshal = from XML String to ROME SyndFeed
A route using this would look something like this:
CHAPTER 10 - COMPONENT APPENDIX 608

from("rss:file:src/test/data/
rss20.xml?splitEntries=false&consumer.delay=1000").marshal().rss().to("mock:marshal");
The purpose of this feature is to make it possible to use Camel's lovely built-in expressions for
manipulating RSS messages. As shown below, an XPath expression can be used to filter the RSS
message:
// only entries with Camel in the title will get through the filter
from("rss:file:src/test/data/rss20.xml?splitEntries=true&consumer.delay=100")
.marshal().rss().filter().xpath("//item/
title[contains(.,'Camel')]").to("mock:result");
Merging multiple incoming feeds
To merge multiple incoming feeds into a single feed, you can apply the custom aggregator,
AggregationCollection, provided with camel-rss. For example:
Error formatting macro: snippet: java.lang.IndexOutOfBoundsException: Index: 20, Size: 20
Here we use a SEDA queue to gather up entries from two RSS feeds. The entries are then fed
into the custom aggregator which combines these entries into a single ROME SyndFeed
object.
Filtering entries
You can filter out entries quite easily using XPath, as shown in the data format section above.
You can also exploit Camel's Bean Integration to implement your own conditions. For instance,
a filter equivalent to the XPath example above would be:
// only entries with Camel in the title will get through the filter
from("rss:file:src/test/data/rss20.xml?splitEntries=true&consumer.delay=100").
filter().method("myFilterBean","titleContainsCamel").to("mock:result");
The custom bean for this would be:
public static class FilterBean {
public boolean titleContainsCamel(@Body SyndFeed feed) {
SyndEntry firstEntry = (SyndEntry) feed.getEntries().get(0);
return firstEntry.getTitle().contains("Camel");
}
}
See Also
• Configuring Camel
609 CHAPTER 10 - COMPONENT APPENDIX
• Component
• Endpoint
• Getting Started
SCALATE
Available as of Camel 2.3
The scalate: component allows you to process a message using Scalate template, which
supports either SSP or Scaml format templates. This can be ideal when using Templating to
generate responses for requests.
Maven users will need to add the following dependency to their pom.xml for this
component:
<dependency>
<groupId>org.fusesource.scalate</groupId>
<artifactId>scalate-camel</artifactId>
<version>1.0</version>
</dependency>
URI format
scalate:templateName[?options]
Where templateName is the classpath-local URI of the template to invoke; or the complete
URL of the remote template (eg: file://folder/myfile.ssp).
You can append query options to the URI in the following format,
?option=value&option=value&...
Message Headers
The scalate component sets a couple headers on the message (you can't set these yourself and
from Camel 2.1 scalate component will not set these headers which will cause some side effect
on the dynamic template support):
Header Description
CamelScalateResource
The resource as an
org.springframework.core.io.Resource
object.
CamelScalateResourceUri The templateName as a String object.
Headers set during the Scalate evaluation are returned to the message and added as headers.
Then its kinda possible to return values from Scalate to the Message.
CHAPTER 10 - COMPONENT APPENDIX 610
For example, to set the header value of fruit in the Scalate template .tm:
<% in.setHeader('fruit', 'Apple') %>
The fruit header is now accessible from the message.out.headers.
Scalate Context
Camel will provide exchange information in the Scalate context (just a Map). The Exchange is
transfered as:
key value
exchange The Exchange itself.
headers The headers of the In message.
camelContext The Camel Context intance.
request The In message.
in The In message.
body The In message body.
out The Out message (only for InOut message exchange pattern).
response The Out message (only for InOut message exchange pattern).
Hot reloading
The Scalate template resource is, by default, hot reloadable for both file and classpath resources
(expanded jar).
Dynamic templates
Camel provides two headers by which you can define a different resource location for a
template or the template content itself. If any of these headers is set then Camel uses this over
the endpoint configured resource. This allows you to provide a dynamic template at runtime.
Header Type Description
CamelScalateResourceUri String An URI for the template resource to use instead of
the endpoint configured.
CamelScalateTemplate String The template to use instead of the endpoint
configured.
611 CHAPTER 10 - COMPONENT APPENDIX

Samples
For example you could use something like
from("activemq:My.Queue").
to("scalate:com/acme/MyResponse.ssp");
To use a Scalate template to formulate a response to a message for InOut message exchanges
(where there is a JMSReplyTo header).
If you want to use InOnly and consume the message and send it to another destination, you
could use the following route:
from("activemq:My.Queue").
to("scalate:com/acme/MyResponse.scaml").
to("activemq:Another.Queue");
It's possible to specify what template the component should use dynamically via a header, so for
example:
from("direct:in").
setHeader("CamelScalateResourceUri").constant("path/to/my/template.scaml").
to("scalate:dummy");
It's possible to specify a template directly as a header the component should use dynamically via
a header, so for example:
from("direct:in").
setHeader("CamelScalateTemplate").constant("<%@ attribute body: Object %>\nHi this
is a scalate template that can do templating ${body}").
to("scalate:dummy");
The Email Sample
In this sample we want to use Scalate templating for an order confirmation email. The email
template is laid out in Scalate as:
<%@ attribute in: org.apache.camel.scala.RichMessage %>
Dear ${in("lastName"}, ${in("firstName")}
Thanks for the order of ${in("item")}.
Regards Camel Riders Bookstore
${in.body}
CHAPTER 10 - COMPONENT APPENDIX 612
See Also
• Configuring Camel
• Component
• Endpoint
• Getting Started
SEDA COMPONENT
The seda: component provides asynchronous SEDA behavior, so that messages are exchanged
on a BlockingQueue and consumers are invoked in a separate thread from the producer.
Note that queues are only visible within a single CamelContext. If you want to communicate
across CamelContext instances (for example, communicating between Web applications),
see the VM component.
This component does not implement any kind of persistence or recovery, if the VM
terminates while messages are yet to be processed. If you need persistence, reliability or
distributed SEDA, try using either JMS or ActiveMQ.
URI format
seda:someName[?options]
Where someName can be any string that uniquely identifies the endpoint within the current
CamelContext.
You can append query options to the URI in the following format,
?option=value&option=value&...
Options
Name Default Description
size
The maximum size (= capacity
of the number of messages it
can max hold) of the SEDA
queue. The default value in
Camel 2.2 or older is 1000.
From Camel 2.3 onwards the
size is unbounded by default.
concurrentConsumers 1
Camel 1.6.1/2.0: Number
of concurrent threads
processing exchanges.
613 CHAPTER 10 - COMPONENT APPENDIX
Synchronous
The Direct component provides synchronous invocation of any consumers when a
producer sends a message exchange.
Same URI must be used for both producer and consumer
An exactly identical SEDA endpoint URI must be used for both the producer
endpoint and the consumer endpoint. Otherwise Camel will create a second SEDA
endpoint, even thought the someName portion of the URI is identical. For example:
from("direct:foo").to("seda:bar?concurrentConsumers=5");
from("seda:bar?concurrentConsumers=5").to("file://output");
Notice that we have to use the full URI including options in both the producer and
consumer.
waitForTaskToComplete IfReplyExpected
Camel 2.0: Option to specify
whether the caller should wait
for the async task to complete
or not before continuing. The
following three options are
supported: Always,Never
or IfReplyExpected. The
first two values are self-
explanatory. The last value,
IfReplyExpected, will
only wait if the message is
Request Reply based. The
default option is
IfReplyExpected. See
more information about Async
messaging.
CHAPTER 10 - COMPONENT APPENDIX 614

timeout 30000
Camel 2.0: Timeout in millis
a seda producer will at most
waiting for an async task to
complete. See
waitForTaskToComplete
and Async for more details. In
Camel 2.2 you can now
disable timeout by using 0 or a
negative value.
multipleConsumers false
Camel 2.2: Specifies
whether multiple consumers is
allowed or not. If enabled you
can use SEDA for a pubsub
kinda style messaging. Send a
message to a seda queue and
have multiple consumers
receive a copy of the message.
limitConcurrentConsumers true
Camel 2.3: Whether to limit
the concurrentConsumers to
maximum 500. If its configured
with a higher number an
exception will be thrown. You
can disable this check by
turning this option off.
Changes in Camel 2.0
In Camel 2.0 the SEDA component supports using Request Reply, where the caller will wait for
the Async route to complete. For instance:
from("mina:tcp://0.0.0.0:9876?textline=true&sync=true").to("seda:input");
from("seda:input").to("bean:processInput").to("bean:createResponse");
In the route above, we have a TCP listener on port 9876 that accepts incoming requests. The
request is routed to the seda:input queue. As it is a Request Reply message, we wait for
the response. When the consumer on the seda:input queue is complete, it copies the
response to the original message response.
Camel 1.x does not have this feature implemented, the SEDA queues in Camel 1.x will
never wait.
615 CHAPTER 10 - COMPONENT APPENDIX
Camel 2.0 - 2.2: Works only with 2 endpoints
Using Request Reply over SEDA or VM only works with 2 endpoints. You cannot
chain endpoints by sending to A -> B -> C etc. Only between A -> B. The reason is
the implementation logic is fairly simple. To support 3+ endpoints makes the logic
much more complex to handle ordering and notification between the waiting
threads properly.
This has been improved in Camel 2.3 onwards, which allows you to chain as many
endpoints as you like.
Concurrent consumers
By default, the SEDA endpoint uses a single consumer thread, but you can configure it to use
concurrent consumer threads. So instead of thread pools you can use:
from("seda:stageName?concurrentConsumers=5").process(...)
Difference between thread pools and concurrent consumers
The thread pool is a pool that can increase/shrink dynamically at runtime depending on load,
whereas the concurrent consumers are always fixed.
Thread pools
Be aware that adding a thread pool to a SEDA endpoint by doing something like:
from("seda:stageName").thread(5).process(...)
Can wind up with two BlockQueues: one from the SEDA endpoint, and one from the
workqueue of the thread pool, which may not be what you want. Instead, you might want to
consider configuring a Direct endpoint with a thread pool, which can process messages both
synchronously and asynchronously. For example:
from("direct:stageName").thread(5).process(...)
You can also directly configure number of threads that process messages on a SEDA endpoint
using the concurrentConsumers option.
CHAPTER 10 - COMPONENT APPENDIX 616
Sample
In the route below we use the SEDA queue to send the request to this async queue to be able
to send a fire-and-forget message for further processing in another thread, and return a
constant reply in this thread to the original caller.
public void configure() throws Exception {
from("direct:start")
// send it to the seda queue that is async
.to("seda:next")
// return a constant response
.transform(constant("OK"));
from("seda:next").to("mock:result");
}
Here we send a Hello World message and expects the reply to be OK.
Object out = template.requestBody("direct:start","Hello World");
assertEquals("OK", out);
The "Hello World" message will be consumed from the SEDA queue from another thread for
further processing. Since this is from a unit test, it will be sent to a mock endpoint where we
can do assertions in the unit test.
Using multipleConsumers
Available as of Camel 2.2
In this example we have defined two consumers and registered them as spring beans.
<!-- define the consumers as spring beans -->
<bean id="consumer1" class="org.apache.camel.spring.example.FooEventConsumer"/>
<bean id="consumer2" class="org.apache.camel.spring.example.AnotherFooEventConsumer"/>
<camelContext id="camel" xmlns="http://camel.apache.org/schema/spring">
<!-- define a shared endpoint which the consumers can refer to instead of using
url -->
<endpoint id="foo" uri="seda:foo?multipleConsumers=true"/>
</camelContext>
Since we have specified multipleConsumers=true on the seda foo endpoint we can have
those two consumers receive their own copy of the message as a kind of pub-sub style
messaging.
As the beans are part of an unit test they simply send the message to a mock endpoint, but
notice how we can use @Consume to consume from the seda queue.
617 CHAPTER 10 - COMPONENT APPENDIX

public class FooEventConsumer {
@EndpointInject(uri = "mock:result")
private ProducerTemplate destination;
@Consume(ref = "foo")
public void doSomething(String body) {
destination.sendBody("foo" + body);
}
}
See Also
• Configuring Camel
• Component
• Endpoint
• Getting Started
▪VM
▪Direct
▪Async
SERVLET COMPONENT
The servlet: component provides HTTP based endpoints for consuming HTTP requests that
arrive at a HTTP endpoint and this endpoint is bound to a published Servlet.
Note: This component is new to Camel 2.0-M3.
Maven users will need to add the following dependency to their pom.xml for this
component:
<dependency>
<groupId>org.apache.camel</groupId>
<artifactId>camel-servlet</artifactId>
<version>x.x.x</version>
<\!-\- use the same version as your Camel core version \-->
</dependency>
URI format
servlet://relative_path[?options]
You can append query options to the URI in the following format,
?option=value&option=value&...
CHAPTER 10 - COMPONENT APPENDIX 618
Options
Name Default
Value Description
httpBindingRef null
Reference to an
org.apache.camel.component.http.HttpBinding
in the Registry. A HttpBinding implementation can be used
to customize how to write a response.
matchOnUriPrefix false
Whether or not the CamelServlet should try to find a
target consumer by matching the URI prefix, if no exact match
is found.
servletName null
Specifies the servlet name that the servlet endpoint will bind
to. If there is no servlet name specified, the servlet endpoint
will be bind to first published Servlet
Message Headers
Camel will apply the same Message Headers as the HTTP component.
Camel will also populate all request.parameter and request.headers. For
example, if a client request has the URL, http://myserver/myserver?orderid=123,
the exchange will contain a header named orderid with the value 123.
Usage
You can only consume from endpoints generated by the Servlet component. Therefore, it
should only be used as input into your camel routes. To issue HTTP requests against other
HTTP endpoints, use the HTTP Component
Sample
In this sample, we define a route that exposes a HTTP service at
http://localhost:8080/camel/services/hello.
First, you need to publish the CamelHttpTransportServlet through the normal Web Container,
or OSGi Service.
Use the Web.xml file to publish the CamelHttpTransportServlet as follows:
<web-app>
<servlet>
<servlet-name>CamelServlet</servlet-name>
<display-name>Camel Http Transport Servlet</display-name>
<servlet-class>
619 CHAPTER 10 - COMPONENT APPENDIX

org.apache.camel.component.servlet.CamelHttpTransportServlet
</servlet-class>
</servlet>
<servlet-mapping>
<servlet-name>CamelServlet</servlet-name>
<url-pattern>/services/*</url-pattern>
</servlet-mapping>
</web-app>
Use an Activator to publish the CamelHttpTransportServlet on the OSGi platform
import java.util.Dictionary;
import java.util.Hashtable;
import javax.servlet.Servlet;
import org.apache.camel.component.servlet.CamelHttpTransportServlet;
import org.apache.commons.logging.Log;
import org.apache.commons.logging.LogFactory;
import org.osgi.framework.BundleActivator;
import org.osgi.framework.BundleContext;
import org.osgi.framework.ServiceReference;
import org.osgi.service.http.HttpContext;
import org.osgi.service.http.HttpService;
import org.springframework.osgi.context.BundleContextAware;
public final class ServletActivator implements BundleActivator, BundleContextAware {
private static final transient Log LOG = LogFactory.getLog(ServletActivator.class);
private static boolean registerService;
/**
* HttpService reference.
*/
private ServiceReference httpServiceRef;
/**
* Called when the OSGi framework starts our bundle
*/
public void start(BundleContext bc) throws Exception {
registerServlet(bc);
}
/**
* Called when the OSGi framework stops our bundle
*/
public void stop(BundleContext bc) throws Exception {
if (httpServiceRef != null) {
bc.ungetService(httpServiceRef);
httpServiceRef = null;
CHAPTER 10 - COMPONENT APPENDIX 620

}
}
protected void registerServlet(BundleContext bundleContext) throws Exception {
httpServiceRef =
bundleContext.getServiceReference(HttpService.class.getName());
if (httpServiceRef != null && !registerService) {
LOG.info("Regist the servlet service");
final HttpService httpService =
(HttpService)bundleContext.getService(httpServiceRef);
if (httpService != null) {
// create a default context to share between registrations
final HttpContext httpContext = httpService.createDefaultHttpContext();
// register the hello world servlet
final Dictionary<String,String> initParams = new Hashtable<String,
String>();
initParams.put("matchOnUriPrefix","false");
initParams.put("servlet-name","camelServlet");
httpService.registerServlet("/camel/services",// alias
(Servlet)new CamelHttpTransportServlet(), // register servlet
initParams, // init params
httpContext // http context
);
registerService = true;
}
}
}
public void setBundleContext(BundleContext bc) {
try {
registerServlet(bc);
}catch (Exception e) {
LOG.error("Can't register the servlet, the reason is " + e);
}
}
}
Then you can define your route as follows:
from("servlet:///hello?matchOnUriPrefix=true").process(new Processor() {
public void process(Exchange exchange) throws Exception {
String contentType = exchange.getIn().getHeader(Exchange.CONTENT_TYPE,
String.class);
String path = exchange.getIn().getHeader(Exchange.HTTP_PATH, String.class);
assertEquals("Get a wrong content type", CONTENT_TYPE, contentType);
String charsetEncoding =
exchange.getIn().getHeader(Exchange.HTTP_CHARACTER_ENCODING, String.class);
assertEquals("Get a wrong charset name","UTF-8", charsetEncoding);
exchange.getOut().setHeader(Exchange.CONTENT_TYPE, contentType + ";
charset=UTF-8");
exchange.getOut().setHeader("PATH", path);
621 CHAPTER 10 - COMPONENT APPENDIX

exchange.getOut().setBody("<b>Hello World</b>");
}
});
Since we are binding the Http transport with a published servlet, and we don't know the
servlet's application context path, the camel-servlet endpoint uses the relative path to
specify the endpoint's URL. A client can access the camel-servlet endpoint through the
servlet publish address: ("http://localhost:8080/camel/services") +
RELATIVE_PATH("/hello").
See Also
• Configuring Camel
• Component
• Endpoint
• Getting Started
▪HTTP
SMOOKS
The smooks component supports the Smooks Library for EDI parsing. The camel-smooks
library is provided by the Camel Extra project which hosts all *GPL related components for
Camel.
It is only the EDI parsing feature that is implemented in this component. The other features
from Smooks are covered in existing camel components.
Parsing from any given data source to EDI is implemented using Camel Data Format.
EDI DATAFORMAT
This component ships with a EDI dataformat that can be used to format from a
java.io.InputStream to XML as a org.w3c.Document Object.
• marshal = currently not supported by Smooks
• unmarshal = from stream to XML (can be used when reading EDI files)
The EDIDataFormat must be configued with either a:
•setSmooksConfig(configfile) = a fully Smooks configuration file
•setMappingModel(modelfile) = just the mapping model xml file and Camel
will use a default Smooks configuration
To use the data format simply instantiate an instance, set the configuration (above) and invoke
the unmarshal operation in the route builder:
CHAPTER 10 - COMPONENT APPENDIX 622
Specify the relative path for camel-servlet endpoint
DataFormat edi = new EDIDataFormat();
edi.setMappingModel("my-order-mapping.xml");
...
from("file://edi/in").
unmarshal(edi).
to("jms:queue:edi");
And you can also provide the full Smooks configuration file where you can configure Smooks as
you want, in case the default configuration isn't useful:
DataFormat edi = new EDIDataFormat();
edi.setSmooksConfig("my-smooks-config.xml");
...
from("file://edi/in").
unmarshal(edi).
to("jms:queue:edi");
Dependencies
To use EDI in your camel routes you need to add the a dependency on camel-smooks
which implements this data format.
This component is hosted at the Camel Extra project since the Smooks library uses a
licenses which cant be included directly in an Apache project.
SMPP COMPONENT
This component provides access to an SMSC (Short Message Service Center) over the SMPP
protocol to send and receive SMS. The JSMPP is used.
Maven users will need to add the following dependency to their pom.xml for this
component:
<dependency>
<groupId>org.apache.camel</groupId>
<artifactId>camel-smpp</artifactId>
<version>x.x.x</version>
<!-- use the same version as your Camel core version -->
</dependency>
623 CHAPTER 10 - COMPONENT APPENDIX
Using Camel 2.2 onwards
This component is only available for Camel 2.2 or newer.
URI format
smpp://[username@]hostname[:port][?options]
smpps://[username@]hostname[:port][?options]
If no username is provided, then Camel will provide the default value smppclient.
If no port number is provided, then Camel will provide the default value 2775.
Camel 2.3: If the protocol name is "smpps", camel-smpp with try to use SSLSocket to init a
connection to the server.
You can append query options to the URI in the following format,
?option=value&option=value&...
URI Options
Name Default
Value Description
password password Specifies the password to use to log in to the SMSC.
systemType cp This parameter is used to categorize the type of ESME (External Short Message Entity) that is binding to the SMSC (max. 13
characters).
encoding ISO-8859-1 Defines the encoding scheme of the short message user data.
enquireLinkTimer 5000 Defines the interval in milliseconds between the confidence checks. The confidence check is used to test the communication
path between an ESME and an SMSC.
transactionTimer 10000 Defines the maximum period of inactivity allowed after a transaction, after which an SMPP entity may assume that the
session is no longer active. This timer may be active on either communicating SMPP entity (i.e. SMSC or ESME).
initialReconnectDelay 5000 Defines the initial delay in milliseconds after the consumer/producer tries to reconnect to the SMSC, after the connection
was lost.
reconnectDelay 5000 Defines the interval in milliseconds between the reconnect attempts, if the connection to the SMSC was lost and the
previous was not succeed.
registeredDelivery 1
Is used to request an SMSC delivery receipt and/or SME originated acknowledgements. The following values are defined:
0: No SMSC delivery receipt requested.
1: SMSC delivery receipt requested where final delivery outcome is success or failure.
2: SMSC delivery receipt requested where the final delivery outcome is delivery failure.
serviceType CMT
The service type parameter can be used to indicate the SMS Application service associated with the message. The following
generic service_types are defined:
CMT: Cellular Messaging
CPT: Cellular Paging
VMN: Voice Mail Notification
VMA: Voice Mail Alerting
WAP: Wireless Application Protocol
USSD: Unstructured Supplementary Services Data
sourceAddr 1616 Defines the address of SME (Short Message Entity) which originated this message.
destAddr 1717 Defines the destination SME address. For mobile terminated messages, this is the directory number of the recipient MS.
CHAPTER 10 - COMPONENT APPENDIX 624
sourceAddrTon 0
Defines the type of number (TON) to be used in the SME originator address parameters. The following TON values are
defined:
0: Unknown
1: International
2: National
3: Network Specific
4: Subscriber Number
5: Alphanumeric
6: Abbreviated
destAddrTon 0
Defines the type of number (TON) to be used in the SME destination address parameters. The following TON values are
defined:
0: Unknown
1: International
2: National
3: Network Specific
4: Subscriber Number
5: Alphanumeric
6: Abbreviated
sourceAddrNpi 0
Defines the numeric plan indicator (NPI) to be used in the SME originator address parameters. The following NPI values are
defined:
0: Unknown
1: ISDN (E163/E164)
2: Data (X.121)
3: Telex (F.69)
6: Land Mobile (E.212)
8: National
9: Private
10: ERMES
13: Internet (IP)
18: WAP Client Id (to be defined by WAP Forum)
destAddrNpi 0
Defines the numeric plan indicator (NPI) to be used in the SME destination address parameters. The following NPI values
are defined:
0: Unknown
1: ISDN (E163/E164)
2: Data (X.121)
3: Telex (F.69)
6: Land Mobile (E.212)
8: National
9: Private
10: ERMES
13: Internet (IP)
18: WAP Client Id (to be defined by WAP Forum)
priorityFlag 1
Allows the originating SME to assign a priority level to the short message. Four Priority Levels are supported:
0: Level 0 (lowest) priority
1: Level 1 priority
2: Level 2 priority
3: Level 3 (highest) priority
replaceIfPresentFlag 0
Used to request the SMSC to replace a previously submitted message, that is still pending delivery. The SMSC will replace
an existing message provided that the source address, destination address and service type match the same fields in the new
message. The following replace if present flag values are defined:
0: Don't replace
1: Replace
typeOfNumber 0
Defines the type of number (TON) to be used in the SME. The following TON values are defined:
0: Unknown
1: International
2: National
3: Network Specific
4: Subscriber Number
5: Alphanumeric
6: Abbreviated
numberingPlanIndicator 0
Defines the numeric plan indicator (NPI) to be used in the SME. The following NPI values are defined:
0: Unknown
1: ISDN (E163/E164)
2: Data (X.121)
3: Telex (F.69)
6: Land Mobile (E.212)
8: National
9: Private
10: ERMES
13: Internet (IP)
18: WAP Client Id (to be defined by WAP Forum)
You can have as many of these options as you like.
625 CHAPTER 10 - COMPONENT APPENDIX

smpp://smppclient@localhost:2775?password=password&enquireLinkTimer=3000&transactionTimer=5000&systemType=consumer
Message Headers
The following message headers can be used to affect the behavior of the SMPP producer
Header Description
CamelSmppDestAddr
Defines the destination SME address. For
mobile terminated messages, this is the
directory number of the recipient MS.
CamelSmppDestAddrTon
Defines the type of number (TON) to be used
in the SME destination address parameters.
The following TON values are defined:
0: Unknown
1: International
2: National
3: Network Specific
4: Subscriber Number
5: Alphanumeric
6: Abbreviated
CamelSmppDestAddrNpi
Defines the numeric plan indicator (NPI) to be
used in the SME destination address
parameters. The following NPI values are
defined:
0: Unknown
1: ISDN (E163/E164)
2: Data (X.121)
3: Telex (F.69)
6: Land Mobile (E.212)
8: National
9: Private
10: ERMES
13: Internet (IP)
18: WAP Client Id (to be defined by WAP
Forum)
CamelSmppSourceAddr Defines the address of SME (Short Message
Entity) which originated this message.
CHAPTER 10 - COMPONENT APPENDIX 626

CamelSmppSourceAddrTon
Defines the type of number (TON) to be used
in the SME originator address parameters. The
following TON values are defined:
0: Unknown
1: International
2: National
3: Network Specific
4: Subscriber Number
5: Alphanumeric
6: Abbreviated
CamelSmppSourceAddrNpi
Defines the numeric plan indicator (NPI) to be
used in the SME originator address
parameters. The following NPI values are
defined:
0: Unknown
1: ISDN (E163/E164)
2: Data (X.121)
3: Telex (F.69)
6: Land Mobile (E.212)
8: National
9: Private
10: ERMES
13: Internet (IP)
18: WAP Client Id (to be defined by WAP
Forum)
CamelSmppServiceType
The service type parameter can be used to
indicate the SMS Application service associated
with the message. The following generic
service_types are defined:
CMT: Cellular Messaging
CPT: Cellular Paging
VMN: Voice Mail Notification
VMA: Voice Mail Alerting
WAP: Wireless Application Protocol
USSD: Unstructured Supplementary Services
Data
627 CHAPTER 10 - COMPONENT APPENDIX

CamelSmppRegisteredDelivery
Is used to request an SMSC delivery receipt
and/or SME originated acknowledgements. The
following values are defined:
0: No SMSC delivery receipt requested.
1: SMSC delivery receipt requested where final
delivery outcome is success or failure.
2: SMSC delivery receipt requested where the
final delivery outcome is delivery failure.
CamelSmppPriorityFlag
Allows the originating SME to assign a priority
level to the short message. Four Priority Levels
are supported:
0: Level 0 (lowest) priority
1: Level 1 priority
2: Level 2 priority
3: Level 3 (highest) priority
CamelSmppScheduleDeliveryTime
This parameter specifies the scheduled time at
which the message delivery should be first
attempted. It defines either the absolute date
and time or relative time from the current
SMSC time at which delivery of this message
will be attempted by the SMSC. It can be
specified in either absolute time format or
relative time format. The encoding of a time
format is specified in chapter 7.1.1. in the smpp
specification v3.4.
CamelSmppValidityPeriod
The validity period parameter indicates the
SMSC expiration time, after which the message
should be discarded if not delivered to the
destination. It can be defined in absolute time
format or relative time format. The encoding
of absolute and relative time format is specified
in chapter 7.1.1 in the smpp specification v3.4.
CHAPTER 10 - COMPONENT APPENDIX 628
CamelSmppReplaceIfPresentFlag
The replace if present flag parameter is used to
request the SMSC to replace a previously
submitted message, that is still pending
delivery. The SMSC will replace an existing
message provided that the source address,
destination address and service type match the
same fields in the new message. The following
values are defined:
0: Don't replace
1: Replace
The following message headers are used by the SMPP producer to set the response from the
SMSC in the message header
Header Description
CamelSmppId the id to identify the submitted short message for later use (delivery
receipt, query sm, cancel sm, replace sm).
The following message headers are used by the SMPP consumer to set the request data from
the SMSC in the message header
Header Description
CamelSmppSequenceNumber
only for alert notification, deliver sm
and data sm: A sequence number allows a
response PDU to be correlated with a request
PDU. The associated SMPP response PDU
must preserve this field.
CamelSmppCommandId
only for alert notification, deliver sm
and data sm: The command id field
identifies the particular SMPP PDU. For the
complete list of defined values see chapter
5.1.2.1 in the smpp specification v3.4.
CamelSmppSourceAddr
only for alert notification, deliver sm
and data sm: Defines the address of SME
(Short Message Entity) which originated this
message.
629 CHAPTER 10 - COMPONENT APPENDIX

CamelSmppSourceAddrNpi
only for alert notification and data
sm: Defines the numeric plan indicator (NPI)
to be used in the SME originator address
parameters. The following NPI values are
defined:
0: Unknown
1: ISDN (E163/E164)
2: Data (X.121)
3: Telex (F.69)
6: Land Mobile (E.212)
8: National
9: Private
10: ERMES
13: Internet (IP)
18: WAP Client Id (to be defined by WAP
Forum)
CamelSmppSourceAddrTon
only for alert notification and data
sm: Defines the type of number (TON) to be
used in the SME originator address
parameters. The following TON values are
defined:
0: Unknown
1: International
2: National
3: Network Specific
4: Subscriber Number
5: Alphanumeric
6: Abbreviated
CamelSmppEsmeAddr
only for alert notification: Defines the
destination ESME address. For mobile
terminated messages, this is the directory
number of the recipient MS.
CHAPTER 10 - COMPONENT APPENDIX 630

CamelSmppEsmeAddrNpi
only for alert notification: Defines the
numeric plan indicator (NPI) to be used in the
ESME originator address parameters. The
following NPI values are defined:
0: Unknown
1: ISDN (E163/E164)
2: Data (X.121)
3: Telex (F.69)
6: Land Mobile (E.212)
8: National
9: Private
10: ERMES
13: Internet (IP)
18: WAP Client Id (to be defined by WAP
Forum)
CamelSmppEsmeAddrTon
only for alert notification: Defines the
type of number (TON) to be used in the ESME
originator address parameters. The following
TON values are defined:
0: Unknown
1: International
2: National
3: Network Specific
4: Subscriber Number
5: Alphanumeric
6: Abbreviated
CamelSmppId
only for smsc delivery receipt and
data sm: The message ID allocated to the
message by the SMSC when originally
submitted.
CamelSmppDelivered
only for smsc delivery receipt: Number
of short messages delivered. This is only
relevant where the original message was
submitted to a distribution list.The value is
padded with leading zeros if necessary.
CamelSmppDoneDate
only for smsc delivery receipt: The time
and date at which the short message reached
it's final state. The format is as follows:
YYMMDDhhmm.
631 CHAPTER 10 - COMPONENT APPENDIX

CamelSmppStatus
only for smsc delivery receipt and
data sm: The final status of the message. The
following values are defined:
DELIVRD: Message is delivered to destination
EXPIRED: Message validity period has
expired.
DELETED: Message has been deleted.
UNDELIV: Message is undeliverable
ACCEPTD: Message is in accepted state (i.e.
has been manually read on behalf of the
subscriber by customer service)
UNKNOWN: Message is in invalid state
REJECTD: Message is in a rejected state
CamelSmppError
only for smsc delivery receipt: Where
appropriate this may hold a Network specific
error code or an SMSC error code for the
attempted delivery of the message. These
errors are Network or SMSC specific and are
not included here.
CamelSmppSubmitDate
only for smsc delivery receipt: The time
and date at which the short message was
submitted. In the case of a message which has
been replaced, this is the date that the original
message was replaced. The format is as
follows: YYMMDDhhmm.
CamelSmppSubmitted
only for smsc delivery receipt: Number
of short messages originally submitted. This is
only relevant when the original message was
submitted to a distribution list.The value is
padded with leading zeros if necessary.
CamelSmppDestAddr
only for deliver sm and data sm:
Defines the destination SME address. For
mobile terminated messages, this is the
directory number of the recipient MS.
CHAPTER 10 - COMPONENT APPENDIX 632

CamelSmppScheduleDeliveryTime
only for deliver sm and data sm: This
parameter specifies the scheduled time at
which the message delivery should be first
attempted. It defines either the absolute date
and time or relative time from the current
SMSC time at which delivery of this message
will be attempted by the SMSC. It can be
specified in either absolute time format or
relative time format. The encoding of a time
format is specified in Section 7.1.1. in the smpp
specification v3.4.
CamelSmppValidityPeriod
only for deliver sm: The validity period
parameter indicates the SMSC expiration time,
after which the message should be discarded if
not delivered to the destination. It can be
defined in absolute time format or relative
time format. The encoding of absolute and
relative time format is specified in Section 7.1.1
in the smpp specification v3.4.
CamelSmppServiceType
only for deliver sm and data sm: The
service type parameter indicates the SMS
Application service associated with the
message.
CamelSmppRegisteredDelivery
only for data sm: Is used to request an
delivery receipt and/or SME originated
acknowledgements. The following values are
defined:
0: No SMSC delivery receipt requested.
1: SMSC delivery receipt requested where final
delivery outcome is success or failure.
2: SMSC delivery receipt requested where the
final delivery outcome is delivery failure.
633 CHAPTER 10 - COMPONENT APPENDIX
CamelSmppDestAddrNpi
only for data sm: Defines the numeric plan
indicator (NPI) in the destination address
parameters. The following NPI values are
defined:
0: Unknown
1: ISDN (E163/E164)
2: Data (X.121)
3: Telex (F.69)
6: Land Mobile (E.212)
8: National
9: Private
10: ERMES
13: Internet (IP)
18: WAP Client Id (to be defined by WAP
Forum)
CamelSmppDestAddrTon
only for data sm: Defines the type of
number (TON) in the destination address
parameters. The following TON values are
defined:
0: Unknown
1: International
2: National
3: Network Specific
4: Subscriber Number
5: Alphanumeric
6: Abbreviated
Samples
A route which sends an SMS using the Java DSL:
from("direct:start")
.to("smpp://smppclient@localhost:2775?password=password&enquireLinkTimer=3000&transactionTimer=5000&systemType=producer");
A route which sends an SMS using the Spring XML DSL:
<route>
<from uri="direct:start"/>
<to
uri="smpp://smppclient@localhost:2775?password=password&enquireLinkTimer=3000&transactionTimer=5000&systemType=producer"/>
</route>
CHAPTER 10 - COMPONENT APPENDIX 634
JSMPP library
See the documentation of the JSMPP Library for more details about the underlying
library.
A route which receives an SMS using the Java DSL:
from("smpp://smppclient@localhost:2775?password=password&enquireLinkTimer=3000&transactionTimer=5000&systemType=consumer")
.to("bean:foo");
A route which receives an SMS using the Spring XML DSL:
<route>
<from
uri="smpp://smppclient@localhost:2775?password=password&enquireLinkTimer=3000&transactionTimer=5000&systemType=consumer"/>
<to uri="bean:foo"/>
</route>
Debug logging
This component has log level DEBUG, which can be helpful in debugging problems. If you use
log4j, you can add the following line to your configuration:
log4j.logger.org.apache.camel.component.smpp=DEBUG
See Also
• Configuring Camel
• Component
• Endpoint
• Getting Started
SNMP COMPONENT
Available as of Camel 2.1
The snmp: component gives you the ability to poll SNMP capable devices or receiving
traps.
Maven users will need to add the following dependency to their pom.xml for this
component:
635 CHAPTER 10 - COMPONENT APPENDIX
SMSC simulator
If you need an SMSC simulator for your test, you can use the simulator provided by
Logica.
<dependency>
<groupId>org.apache.camel</groupId>
<artifactId>camel-snmp</artifactId>
<version>x.x.x</version>
<!-- use the same version as your Camel core version -->
</dependency>
URI format
snmp://hostname[:port][?Options]
The component supports polling OID values from an SNMP enabled device and receiving traps.
You can append query options to the URI in the following format,
?option=value&option=value&...
Options
Name Default
Value Description
type none The type of action you want to perform. Actually you can enter here POLL or TRAP. The value POLL will instruct the endpoint to poll a
given host for the supplied OID keys. If you put in TRAP you will setup a listener for SNMP Trap Events.
address none This is the IP address and the port of the host to poll or where to setup the Trap Receiver. Example: 127.0.0.1:162
protocol none Here you can select which protocol to use. By default it will be udp protocol but you may want to use tcp as well
retries 2 Defines how often a retry is made before canceling the request.
timeout 1500 Sets the timeout value for the request in millis.
snmpVersion 0(which means
SNMPv1) Sets the snmp version for the request.
snmpCommunity public Sets the community octet string for the snmp request.
delay 60 seconds Defines the delay in seconds between to poll cycles.
oids none
Defines which values you are interested in. Please have a look at the Wikipedia to get a better understanding. You may provide a single
OID or a coma separated list of OIDs. Example:
oids="1.3.6.1.2.1.1.3.0,1.3.6.1.2.1.25.3.2.1.5.1,1.3.6.1.2.1.25.3.5.1.1.1,1.3.6.1.2.1.43.5.1.1.11.1"
The result of a poll
Given the situation, that I poll for the following OIDs:
Listing 20.Listing 20. oidsoids
CHAPTER 10 - COMPONENT APPENDIX 636
1.3.6.1.2.1.1.3.0
1.3.6.1.2.1.25.3.2.1.5.1
1.3.6.1.2.1.25.3.5.1.1.1
1.3.6.1.2.1.43.5.1.1.11.1
The result will be the following:
Listing 21.Listing 21. Result of toString conversionResult of toString conversion
<?xml version="1.0" encoding="UTF-8"?>
<snmp>
<entry>
<oid>1.3.6.1.2.1.1.3.0</oid>
<value>6 days, 21:14:28.00</value>
</entry>
<entry>
<oid>1.3.6.1.2.1.25.3.2.1.5.1</oid>
<value>2</value>
</entry>
<entry>
<oid>1.3.6.1.2.1.25.3.5.1.1.1</oid>
<value>3</value>
</entry>
<entry>
<oid>1.3.6.1.2.1.43.5.1.1.11.1</oid>
<value>6</value>
</entry>
<entry>
<oid>1.3.6.1.2.1.1.1.0</oid>
<value>My Very Special Printer Of Brand Unknown</value>
</entry>
</snmp>
As you maybe recognized there is one more result than requested....1.3.6.1.2.1.1.1.0.
This one is filled in by the device automatically in this special case. So it may absolutely happen,
that you receive more than you requested...be prepared.
Examples
Polling a remote device:
snmp:192.168.178.23:161?protocol=udp&type=POLL&oids=1.3.6.1.2.1.1.5.0
Setting up a trap receiver (Note that no OID info is needed here!):
snmp:127.0.0.1:162?protocol=udp&type=TRAP
Routing example in Java: (converts the SNMP PDU to XML String)
637 CHAPTER 10 - COMPONENT APPENDIX
from("snmp:192.168.178.23:161?protocol=udp&type=POLL&oids=1.3.6.1.2.1.1.5.0").
convertBodyTo(String.class).
to("activemq:snmp.states");
See Also
• Configuring Camel
• Component
• Endpoint
• Getting Started
SPRING INTEGRATION COMPONENT
The spring-integration: component provides a bridge for Camel components to talk to
spring integration endpoints.
Maven users will need to add the following dependency to their pom.xml for this
component:
<dependency>
<groupId>org.apache.camel</groupId>
<artifactId>camel-spring-integration</artifactId>
<version>x.x.x</version>
<!-- use the same version as your Camel core version -->
</dependency>
URI format
spring-integration:defaultChannelName[?options]
Where defaultChannelName represents the default channel name which is used by the
Spring Integration Spring context. It will equal to the inputChannel name for the Spring
Integration consumer and the outputChannel name for the Spring Integration provider.
You can append query options to the URI in the following format,
?option=value&option=value&...
Options
Name Description Example Required Default
Value
CHAPTER 10 - COMPONENT APPENDIX 638
inputChannel
The Spring integration input channel name
that this endpoint wants to consume from,
where the specified channel name is
defined in the Spring context.
inputChannel=requestChannel No
outputChannel
The Spring integration output channel
name that is used to send messages to the
Spring integration context.
outputChannel=replyChannel No
inOut The exchange pattern that the Spring
integration endpoint should use. inOut=true No
inOnly for the Spring
integration consumer and
outOnly for the Spring
integration provider
consumer.delay Delay in milliseconds between each poll. consumer.delay=60000 No 500
consumer.initialDelay Milliseconds before polling starts. consumer.initialDelay=10000 No 1000
consumer.userFixedDelay
Specify true to use fixed delay between
polls, otherwise fixed rate is used. See the
JavaScheduledExecutorService class for
details.
consumer.userFixedDelay=false No false
Usage
The Spring integration component is a bridge that connects Camel endpoints with Spring
integration endpoints through the Spring integration's input channels and output channels. Using
this component, we can send Camel messages to Spring Integration endpoints or receive
messages from Spring integration endpoints in a Camel routing context.
Examples
Using the Spring integration endpoint
You can set up a Spring integration endpoint using a URI, as follows:
<beans:beans xmlns="http://www.springframework.org/schema/integration"
xmlns:xsi="http://www.w3.org/2001/XMLSchema-instance"
xmlns:beans="http://www.springframework.org/schema/beans"
xsi:schemaLocation="http://www.springframework.org/schema/beans
http://www.springframework.org/schema/beans/
spring-beans-2.5.xsd
http://www.springframework.org/schema/integration
http://www.springframework.org/schema/integration/
spring-integration-1.0.xsd
http://camel.apache.org/schema/spring
http://camel.apache.org/schema/spring/camel-spring.xsd">
<channel id="inputChannel"/>
<channel id="outputChannel"/>
<channel id="onewayChannel"/>
<service-activator input-channel="inputChannel"
ref="helloService"
method="sayHello"/>
<service-activator input-channel="onewayChannel"
639 CHAPTER 10 - COMPONENT APPENDIX

ref="helloService"
method="greet"/>
<beans:bean id="helloService"
class="org.apache.camel.component.spring.integration.HelloWorldService"/>
<camelContext id="camel" xmlns="http://camel.apache.org/schema/spring">
<route>
<from uri="direct:twowayMessage"/>
<!-- Using the & as the separator of & -->
<to
uri="spring-integration:inputChannel?inOut=true&inputChannel=outputChannel"/>
</route>
<route>
<from uri="direct:onewayMessage"/>
<to uri="spring-integration:onewayChannel?inOut=false"/>
</route>
</camelContext>
<channel id="requestChannel"/>
<channel id="responseChannel"/>
<beans:bean id="myProcessor"
class="org.apache.camel.component.spring.integration.MyProcessor"/>
<camelContext id="camel" xmlns="http://camel.apache.org/schema/spring">
<route>
<!-- Using the & as the separator of & -->
<from
uri="spring-integration://requestChannel?outputChannel=responseChannel&inOut=true"/>
<process ref="myProcessor"/>
</route>
</camelContext>
Or directly using a Spring integration channel name:
<beans:beans xmlns="http://www.springframework.org/schema/integration"
xmlns:xsi="http://www.w3.org/2001/XMLSchema-instance"
xmlns:beans="http://www.springframework.org/schema/beans"
xsi:schemaLocation="http://www.springframework.org/schema/beans
http://www.springframework.org/schema/beans/
spring-beans-2.5.xsd
http://www.springframework.org/schema/integration
http://www.springframework.org/schema/integration/
spring-integration-1.0.xsd
http://camel.apache.org/schema/spring
http://camel.apache.org/schema/spring/camel-spring.xsd">
<channel id="outputChannel"/>
<camelContext id="camel" xmlns="http://camel.apache.org/schema/spring">
<route>
CHAPTER 10 - COMPONENT APPENDIX 640

<!-- camel will create a spring integration endpoint automatically -->
<from uri="outputChannel"/>
<to uri="mock:result"/>
</route>
</camelContext>
The Source and Target adapter
Spring integration also provides the Spring integration's source and target adapters, which can
route messages from a Spring integration channel to a Camel endpoint or from a Camel
endpoint to a Spring integration channel.
This example uses the following namespaces:
<beans:beans xmlns="http://www.springframework.org/schema/integration"
xmlns:beans="http://www.springframework.org/schema/beans"
xmlns:xsi="http://www.w3.org/2001/XMLSchema-instance"
xmlns:camel-si="http://camel.apache.org/schema/spring/integration"
xsi:schemaLocation="
http://www.springframework.org/schema/beans
http://www.springframework.org/schema/beans/spring-beans-2.5.xsd
http://www.springframework.org/schema/integration
http://www.springframework.org/schema/integration/spring-integration-1.0.xsd
http://camel.apache.org/schema/spring/integration
http://camel.apache.org/schema/spring/integration/camel-spring-integration.xsd
http://camel.apache.org/schema/spring
http://camel.apache.org/schema/spring/camel-spring.xsd
">
You can bind your source or target to a Camel endpoint as follows:
<!-- Create the camel context here -->
<camelContext id="camelTargetContext" xmlns="http://camel.apache.org/schema/spring">
<route>
<from uri="direct:EndpointA" />
<to uri="mock:result" />
</route>
<route>
<from uri="direct:EndpointC"/>
<process ref="myProcessor"/>
</route>
</camelContext>
<!-- We can bind the camelTarget to the camel context's endpoint by specifying the
camelEndpointUri attribute -->
<camel-si:camelTarget id="camelTargetA" camelEndpointUri="direct:EndpointA"
expectReply="false">
<camel-si:camelContextRef>camelTargetContext</camel-si:camelContextRef>
</camel-si:camelTarget>
641 CHAPTER 10 - COMPONENT APPENDIX

<camel-si:camelTarget id="camelTargetB" camelEndpointUri="direct:EndpointC"
replyChannel="channelC" expectReply="true">
<camel-si:camelContextRef>camelTargetContext</camel-si:camelContextRef>
</camel-si:camelTarget>
<camel-si:camelTarget id="camelTargetD" camelEndpointUri="direct:EndpointC"
expectReply="true">
<camel-si:camelContextRef>camelTargetContext</camel-si:camelContextRef>
</camel-si:camelTarget>
<beans:bean id="myProcessor"
class="org.apache.camel.component.spring.integration.MyProcessor"/>
<camelContext id="camelSourceContext" xmlns="http://camel.apache.org/schema/spring">
<route>
<from uri="direct:OneWay"/>
<to uri="direct:EndpointB" />
</route>
<route>
<from uri="direct:TwoWay"/>
<to uri="direct:EndpointC" />
</route>
</camelContext>
<!-- camelSource will redirect the message coming for direct:EndpointB to the spring
requestChannel channelA -->
<camel-si:camelSource id="camelSourceA" camelEndpointUri="direct:EndpointB"
requestChannel="channelA" expectReply="false">
<camel-si:camelContextRef>camelSourceContext</camel-si:camelContextRef>
</camel-si:camelSource>
<!-- camelSource will redirect the message coming for direct:EndpointC to the spring
requestChannel channelB
then it will pull the response from channelC and put the response message back to
direct:EndpointC -->
<camel-si:camelSource id="camelSourceB" camelEndpointUri="direct:EndpointC"
requestChannel="channelB" replyChannel="channelC" expectReply="true">
<camel-si:camelContextRef>camelSourceContext</camel-si:camelContextRef>
</camel-si:camelSource>
See Also
• Configuring Camel
• Component
• Endpoint
• Getting Started
CHAPTER 10 - COMPONENT APPENDIX 642
STREAM COMPONENT
The stream: component provides access to the System.in,System.out and
System.err streams as well as allowing streaming of file and URL.
Maven users will need to add the following dependency to their pom.xml for this
component:
<dependency>
<groupId>org.apache.camel</groupId>
<artifactId>camel-stream</artifactId>
<version>x.x.x</version>
<!-- use the same version as your Camel core version -->
</dependency>
URI format
stream:in[?options]
stream:out[?options]
stream:err[?options]
stream:header[?options]
In addition, the file and url endpoint URIs are supported in Camel 2.0:
stream:file?fileName=/foo/bar.txt
stream:url[?options]
If the stream:header URI is specified, the stream header is used to find the stream to
write to. This option is available only for stream producers (that is, it cannot appear in
from()).
You can append query options to the URI in the following format,
?option=value&option=value&...
Options
Name Default
Value Description
delay 0 Initial delay in milliseconds before consuming or
producing the stream.
encoding JVM
Default
As of 1.4, you can configure the encoding (is a
charset name) to use text-based streams (for
example, message body is a String object). If not
provided, Camel uses the JVM default Charset.
643 CHAPTER 10 - COMPONENT APPENDIX
promptMessage null
Camel 2.0: Message prompt to use when reading
from stream:in; for example, you could set this
to Enter a command:
promptDelay 0 Camel 2.0: Optional delay in milliseconds before
showing the message prompt.
initialPromptDelay 2000
Camel 2.0: Initial delay in milliseconds before
showing the message prompt. This delay occurs
only once. Can be used during system startup to
avoid message prompts being written while other
logging is done to the system out.
fileName null
Camel 2.0: When using the stream:file URI
format, this option specifies the filename to stream
to/from.
scanStream false
Camel 2.0: To be used for continuously reading
a stream such as the unix tail command.
Camel 2.4: will retry opening the file if it is
overwritten, like tail --retry
scanStreamDelay 0 Camel 2.0: Delay in milliseconds between read
attempts when using scanStream.
Message content
The stream: component supports either String or byte[] for writing to streams. Just add
either String or byte[] content to the message.in.body.
The special stream:header URI is used for custom output streams. Just add a
java.io.OutputStream object to message.in.header in the key header.
See samples for an example.
Samples
In the following sample we route messages from the direct:in endpoint to the
System.out stream:
@Test
public void testStringContent() throws Exception {
template.sendBody("direct:in","Hello Text World\n");
}
@Test
public void testBinaryContent() {
CHAPTER 10 - COMPONENT APPENDIX 644

template.sendBody("direct:in","Hello Bytes World\n".getBytes());
}
protected RouteBuilder createRouteBuilder() {
return new RouteBuilder() {
public void configure() {
from("direct:in").to("stream:out");
}
};
}
The following sample demonstrates how the header type can be used to determine which
stream to use. In the sample we use our own output stream, MyOutputStream.
private OutputStream mystream = new MyOutputStream();
private StringBuffer sb = new StringBuffer();
@Test
public void testStringContent() {
template.sendBody("direct:in","Hello");
// StreamProducer appends \n in text mode
assertEquals("Hello\n", sb.toString());
}
@Test
public void testBinaryContent() {
template.sendBody("direct:in","Hello".getBytes());
// StreamProducer is in binary mode so no \n is appended
assertEquals("Hello", sb.toString());
}
protected RouteBuilder createRouteBuilder() {
return new RouteBuilder() {
public void configure() {
from("direct:in").setHeader("stream", constant(mystream)).
to("stream:header");
}
};
}
private class MyOutputStream extends OutputStream {
public void write(int b) throws IOException {
sb.append((char)b);
}
}
The following sample demonstrates how to continuously read a file stream (analogous to the
UNIX tail command):
645 CHAPTER 10 - COMPONENT APPENDIX
from("stream:file?fileName=/server/logs/
server.log&scanStream=true&scanStreamDelay=1000").to("bean:logService?method=parseLogLine");
See Also
• Configuring Camel
• Component
• Endpoint
• Getting Started
STRING TEMPLATE
The string-template: component allows you to process a message using a String Template.
This can be ideal when using Templating to generate responses for requests.
Maven users will need to add the following dependency to their pom.xml for this
component:
<dependency>
<groupId>org.apache.camel</groupId>
<artifactId>camel-stringtemplate</artifactId>
<version>x.x.x</version>
<!-- use the same version as your Camel core version -->
</dependency>
URI format
string-template:templateName[?options]
Where templateName is the classpath-local URI of the template to invoke; or the complete
URL of the remote template.
You can append query options to the URI in the following format,
?option=value&option=value&...
Options
Option Default Description
contentCache false New option in Camel 1.4. Cache for the resource content
when its loaded.
CHAPTER 10 - COMPONENT APPENDIX 646
Headers
Camel will store a reference to the resource in the message header with key,
org.apache.camel.stringtemplate.resource. The Resource is an
org.springframework.core.io.Resource object.
Hot reloading
The string template resource is by default hot-reloadable for both file and classpath resources
(expanded jar). If you set contentCache=true, Camel loads the resource only once and
hot-reloading is not possible. This scenario can be used in production when the resource never
changes.
StringTemplate Attributes
Camel will provide exchange information as attributes (just a java.util.Map) to the string
template. The Exchange is transfered as:
key value
exchange The Exchange itself.
headers The headers of the In message.
camelContext The Camel Context.
request The In message.
in The In message.
body The In message body.
out The Out message (only for InOut message exchange pattern).
response The Out message (only for InOut message exchange pattern).
Samples
For example you could use a string template as follows in order to formulate a response to a
message:
from("activemq:My.Queue").
to("string-template:com/acme/MyResponse.tm");
647 CHAPTER 10 - COMPONENT APPENDIX
The Email Sample
In this sample we want to use a string template to send an order confirmation email. The email
template is laid out in StringTemplate as:
Dear $headers.lastName$, $headers.firstName$
Thanks for the order of $headers.item$.
Regards Camel Riders Bookstore
$body$
And the java code is as follows:
private Exchange createLetter() {
Exchange exchange = context.getEndpoint("direct:a").createExchange();
Message msg = exchange.getIn();
msg.setHeader("firstName","Claus");
msg.setHeader("lastName","Ibsen");
msg.setHeader("item","Camel in Action");
msg.setBody("PS: Next beer is on me, James");
return exchange;
}
@Test
public void testVelocityLetter() throws Exception {
MockEndpoint mock = getMockEndpoint("mock:result");
mock.expectedMessageCount(1);
mock.expectedBodiesReceived("Dear Ibsen, Claus! Thanks for the order of Camel in
Action. Regards Camel Riders Bookstore PS: Next beer is on me, James");
template.send("direct:a", createLetter());
mock.assertIsSatisfied();
}
protected RouteBuilder createRouteBuilder() throws Exception {
return new RouteBuilder() {
public void configure() throws Exception {
from("direct:a").to("string-template:org/apache/camel/component/
stringtemplate/letter.tm").to("mock:result");
}
};
}
See Also
• Configuring Camel
• Component
• Endpoint
• Getting Started
CHAPTER 10 - COMPONENT APPENDIX 648
SQL COMPONENT
The sql: component allows you to work with databases using JDBC queries. The difference
between this component and JDBC component is that in case of SQL the query is a property of
the endpoint and it uses message payload as parameters passed to the query.
This component uses spring-jdbc behind the scenes for the actual SQL handling.
Maven users will need to add the following dependency to their pom.xml for this
component:
<dependency>
<groupId>org.apache.camel</groupId>
<artifactId>camel-sql</artifactId>
<version>x.x.x</version>
<!-- use the same version as your Camel core version -->
</dependency>
URI format
The SQL component uses the following endpoint URI notation:
sql:select * from table where id=# order by name[?options]
Notice that the standard ?symbol that denotes the parameters to an SQL query is substituted
with the #symbol, because the ?symbol is used to specify options for the endpoint. The ?
symbol replacement can be configured on endpoint basis.
You can append query options to the URI in the following format,
?option=value&option=value&...
Options
Option Type Default Description
dataSourceRef String null Camel 1.5.1/2.0: Reference to a
DataSource to look up in the registry.
placeholder String #
Camel 2.4: Specifies a character that will
be replaced to ?in SQL query. Notice, that
it is simple String.replaceAll()
operation and no SQL parsing is involved
(quoted strings will also change)
649 CHAPTER 10 - COMPONENT APPENDIX
The SQL component can only be used to define producer endpoints. In other
words, you cannot define an SQL endpoint in a from() statement.
template.<xxx> null
Sets additional options on the Spring
JdbcTemplate that is used behind the
scenes to execute the queries. For instance,
template.maxRows=10. For detailed
documentation, see the JdbcTemplate
javadoc documentation.
Treatment of the message body
The SQL component tries to convert the message body to an object of
java.util.Iterator type and then uses this iterator to fill the query parameters (where
each query parameter is represented by a #symbol (or configured placeholder) in the endpoint
URI). If the message body is not an array or collection, the conversion results in an iterator that
iterates over only one object, which is the body itself.
For example, if the message body is an instance of java.util.List, the first item in the
list is substituted into the first occurrence of #in the SQL query, the second item in the list is
substituted into the second occurrence of #, and so on.
Result of the query
For select operations, the result is an instance of List<Map<String, Object>> type,
as returned by the JdbcTemplate.queryForList() method. For update operations, the result is
the number of updated rows, returned as an Integer.
Header values
When performing update operations, the SQL Component stores the update count in the
following message headers:
Header Description
SqlProducer.UPDATE_COUNT Camel 1.x: The number of rows updated for update
operations, returned as an Integer object.
CamelSqlUpdateCount Camel 2.0: The number of rows updated for update
operations, returned as an Integer object.
CHAPTER 10 - COMPONENT APPENDIX 650

CamelSqlRowCount Camel 2.0: The number of rows returned for
select operations, returned as an Integer object.
Configuration in Camel 1.5.0 or lower
The SQL component must be configured before it can be used. In Spring, you can configure it as
follows:
<bean id="sql" class="org.apache.camel.component.sql.SqlComponent">
<property name="dataSource" ref="myDS"/>
</bean>
<bean id="myDS" class="org.springframework.jdbc.datasource.DriverManagerDataSource">
<property name="driverClassName" value="com.mysql.jdbc.Driver" />
<property name="url" value="jdbc:mysql://localhost:3306/ds" />
<property name="username" value="username" />
<property name="password" value="password" />
</bean>
Configuration in Camel 1.5.1 or higher
You can now set a reference to a DataSource in the URI directly:
sql:select * from table where id=# order by name?dataSourceRef=myDS
Sample
In the sample below we execute a query and retrieve the result as a List of rows, where each
row is a Map<String, Object and the key is the column name.
First, we set up a table to use for our sample. As this is based on an unit test, we do it java
code:
// this is the database we create with some initial data for our unit test
jdbcTemplate.execute("create table projects (id integer primary key,"
+"project varchar(10), license varchar(5))");
jdbcTemplate.execute("insert into projects values (1, 'Camel', 'ASF')");
jdbcTemplate.execute("insert into projects values (2, 'AMQ', 'ASF')");
jdbcTemplate.execute("insert into projects values (3, 'Linux', 'XXX')");
Then we configure our route and our sql component. Notice that we use a direct endpoint
in front of the sql endpoint. This allows us to send an exchange to the direct endpoint with
the URI, direct:simple, which is much easier for the client to use than the long sql: URI.
651 CHAPTER 10 - COMPONENT APPENDIX

Note that the DataSource is looked up up in the registry, so we can use standard Spring
XML to configure our DataSource.
from("direct:simple")
.to("sql:select * from projects where license = # order by id?dataSourceRef=jdbc/
myDataSource")
.to("mock:result");
And then we fire the message into the direct endpoint that will route it to our sql
component that queries the database.
MockEndpoint mock = getMockEndpoint("mock:result");
mock.expectedMessageCount(1);
// send the query to direct that will route it to the sql where we will execute the
query
// and bind the parameters with the data from the body. The body only contains one
value
// in this case (XXX) but if we should use multi values then the body will be iterated
// so we could supply a List<String> instead containing each binding value.
template.sendBody("direct:simple","XXX");
mock.assertIsSatisfied();
// the result is a List
List received = assertIsInstanceOf(List.class,
mock.getReceivedExchanges().get(0).getIn().getBody());
// and each row in the list is a Map
Map row = assertIsInstanceOf(Map.class, received.get(0));
// and we should be able the get the project from the map that should be Linux
assertEquals("Linux", row.get("PROJECT"));
We could configure the DataSource in Spring XML as follows:
<jee:jndi-lookup id="myDS" jndi-name="jdbc/myDataSource"/>
See Also
• Configuring Camel
• Component
• Endpoint
• Getting Started
▪JDBC
CHAPTER 10 - COMPONENT APPENDIX 652
TEST COMPONENT
Testing of distributed and asynchronous processing is notoriously difficult. The Mock, Test and
DataSet endpoints work great with the Camel Testing Framework to simplify your unit and
integration testing using Enterprise Integration Patterns and Camel's large range of Components
together with the powerful Bean Integration.
The test component extends the Mock component to support pulling messages from another
endpoint on startup to set the expected message bodies on the underlying Mock endpoint. That
is, you use the test endpoint in a route and messages arriving on it will be implicitly compared
to some expected messages extracted from some other location.
So you can use, for example, an expected set of message bodies as files. This will then set up
a properly configured Mock endpoint, which is only valid if the received messages match the
number of expected messages and their message payloads are equal.
URI format
test:expectedMessagesEndpointUri
Where expectedMessagesEndpointUri refers to some other Component URI that the
expected message bodies are pulled from before starting the test.
Example
For example, you could write a test case as follows:
from("seda:someEndpoint").
to("test:file://data/expectedOutput?noop=true");
If your test then invokes the MockEndpoint.assertIsSatisfied(camelContext) method, your test
case will perform the necessary assertions.
Here is a real example test case using Mock and Spring along with its Spring XML.
To see how you can set other expectations on the test endpoint, see the Mock component.
See Also
• Configuring Camel
• Component
• Endpoint
• Getting Started
• Spring Testing
653 CHAPTER 10 - COMPONENT APPENDIX
TIMER COMPONENT
The timer: component is used to generate message exchanges when a timer fires You can
only consume events from this endpoint.
URI format
timer:name[?options]
Where name is the name of the Timer object, which is created and shared across endpoints.
So if you use the same name for all your timer endpoints, only one Timer object and thread
will be used.
You can append query options to the URI in the following format,
?option=value&option=value&...
Note: The IN body of the generated exchange is null. So
exchange.getIn().getBody() returns null.
Options
Name Default
Value Description
time null
Ajava.util.Date the first event should be generated. If
using the URI, the pattern expected is: yyyy-MM-dd
HH:mm:ss or yyyy-MM-dd'T'HH:mm:ss.
pattern null Camel 1.6.2/2.0: Allows you to specify a custom Date
pattern to use for setting the time option using URI syntax.
period 1000 If greater than 0, generate periodic events every period
milliseconds.
delay 0
The number of milliseconds to wait before the first event is
generated. Should not be used in conjunction with the time
option.
fixedRate false Events take place at approximately regular intervals, separated
by the specified period.
daemon true Specifies whether or not the thread associated with the timer
endpoint runs as a daemon.
CHAPTER 10 - COMPONENT APPENDIX 654
Advanced Scheduler
See also the Quartz component that supports much more advanced scheduling.
Specify time in human friendly format
In Camel 2.3 onwards you can specify the time in human friendly syntax.
Exchange Properties
When the timer is fired, it adds the following information as properties to the Exchange:
Name Type Description
org.apache.camel.timer.name String The value of the name option.
org.apache.camel.timer.time Date The value of the time option.
org.apache.camel.timer.period long The value of the period
option.
org.apache.camel.timer.firedTime Date Camel 1.5: The time when
the consumer fired.
Message Headers
When the timer is fired, it adds the following information as headers to the IN message
Name Type Description
firedTime java.util.Date Camel 1.5: The time when the consumer fired
Sample
To set up a route that generates an event every 60 seconds:
from("timer://foo?fixedRate=true&period=60000").to("bean:myBean?method=someMethodName");
The above route will generate an event and then invoke the someMethodName method on
the bean called myBean in the Registry such as JNDI or Spring.
And the route in Spring DSL:
655 CHAPTER 10 - COMPONENT APPENDIX
<route>
<from uri="timer://foo?fixedRate=true&period=60000"/>
<to uri="bean:myBean?method=someMethodName"/>
</route>
See Also
• Configuring Camel
• Component
• Endpoint
• Getting Started
• Quartz
VALIDATION COMPONENT
The Validation component performs XML validation of the message body using the JAXP
Validation API and based on any of the supported XML schema languages, which defaults to
XML Schema
Note that the Jing component also supports the following useful schema languages:
• RelaxNG Compact Syntax
• RelaxNG XML Syntax
The MSV component also supports RelaxNG XML Syntax.
URI format
validator:someLocalOrRemoteResource
Where someLocalOrRemoteResource is some URL to a local resource on the classpath
or a full URL to a remote resource or resource on the file system which contains the XSD to
validate against. For example:
•msv:org/foo/bar.xsd
•msv:file:../foo/bar.xsd
•msv:http://acme.com/cheese.xsd
•validator:com/mypackage/myschema.xsd
Options
Option Default Description
CHAPTER 10 - COMPONENT APPENDIX 656
useDom false
Camel 2.0: Whether DOMSource/DOMResult or
SaxSource/SaxResult should be used by the
validator.
useSharedSchema true
Camel 2.3: Whether the Schema instance should be
shared or not. This option is introduced to work
around a JDK 1.6.x bug. Xerces should not have this
issue.
Example
The following example shows how to configure a route from endpoint direct:start which
then goes to one of two endpoints, either mock:valid or mock:invalid based on whether
or not the XML matches the given schema (which is supplied on the classpath).
<camelContext xmlns="http://camel.apache.org/schema/spring">
<route>
<from uri="direct:start"/>
<doTry>
<to uri="validator:org/apache/camel/component/validator/schema.xsd"/>
<to uri="mock:valid"/>
<doCatch>
<exception>org.apache.camel.ValidationException</exception>
<to uri="mock:invalid"/>
</doCatch>
<doFinally>
<to uri="mock:finally"/>
</doFinally>
</doTry>
</route>
</camelContext>
See Also
• Configuring Camel
• Component
• Endpoint
• Getting Started
VELOCITY
The velocity: component allows you to process a message using an Apache Velocity template.
This can be ideal when using Templating to generate responses for requests.
Maven users will need to add the following dependency to their pom.xml for this
component:
657 CHAPTER 10 - COMPONENT APPENDIX
<dependency>
<groupId>org.apache.camel</groupId>
<artifactId>camel-velocity</artifactId>
<version>x.x.x</version>
<!-- use the same version as your Camel core version -->
</dependency>
URI format
velocity:templateName[?options]
Where templateName is the classpath-local URI of the template to invoke; or the complete
URL of the remote template (eg: file://folder/myfile.vm).
You can append query options to the URI in the following format,
?option=value&option=value&...
Options
Option Default Description
loaderCache true Velocity based file loader cache.
contentCache New option in Camel 1.4: Cache for the resource content when it is loaded. By default, it's false in Camel 1.x. By default, it's true
in Camel 2.x.
encoding null New option in Camel 1.6: Character encoding of the resource content.
propertiesFile null New option in Camel 2.1: The URI of the properties file which is used for VelocityEngine initialization.
Message Headers
The velocity component sets a couple headers on the message (you can't set these yourself and
from Camel 2.1 velocity component will not set these headers which will cause some side effect
on the dynamic template support):
Header Description
org.apache.camel.velocity.resource Camel 1.x: The resource as an org.springframework.core.io.Resource object.
org.apache.camel.velocity.resourceUri Camel 1.x: The templateName as a String object.
CamelVelocityResource Camel 2.0: The resource as an org.springframework.core.io.Resource object.
CamelVelocityResourceUri Camel 2.0: The templateName as a String object.
In Camel 1.4 headers set during the Velocity evaluation are returned to the message and added
as headers. Then its kinda possible to return values from Velocity to the Message.
For example, to set the header value of fruit in the Velocity template .tm:
$in.setHeader('fruit', 'Apple')
The fruit header is now accessible from the message.out.headers.
CHAPTER 10 - COMPONENT APPENDIX 658
Velocity Context
Camel will provide exchange information in the Velocity context (just a Map). The Exchange
is transfered as:
key value
exchange The Exchange itself.
headers The headers of the In message.
camelContext The Camel Context intance.
request The In message.
in The In message.
body The In message body.
out The Out message (only for InOut message exchange pattern).
response The Out message (only for InOut message exchange pattern).
Hot reloading
The Velocity template resource is, by default, hot reloadable for both file and classpath
resources (expanded jar). If you set contentCache=true, Camel will only load the
resource once, and thus hot reloading is not possible. This scenario can be used in production,
when the resource never changes.
Dynamic templates
Available as of Camel 2.1
Camel provides two headers by which you can define a different resource location for a
template or the template content itself. If any of these headers is set then Camel uses this over
the endpoint configured resource. This allows you to provide a dynamic template at runtime.
Header Type Description
CamelVelocityResourceUri String Camel 2.1: A URI for the template resource to use instead of the endpoint configured.
CamelVelocityTemplate String Camel 2.1: The template to use instead of the endpoint configured.
Samples
For example you could use something like
from("activemq:My.Queue").
to("velocity:com/acme/MyResponse.vm");
659 CHAPTER 10 - COMPONENT APPENDIX

To use a Velocity template to formulate a response to a message for InOut message exchanges
(where there is a JMSReplyTo header).
If you want to use InOnly and consume the message and send it to another destination, you
could use the following route:
from("activemq:My.Queue").
to("velocity:com/acme/MyResponse.vm").
to("activemq:Another.Queue");
And to use the content cache, e.g. for use in production, where the .vm template never
changes:
from("activemq:My.Queue").
to("velocity:com/acme/MyResponse.vm?contentCache=true").
to("activemq:Another.Queue");
And a file based resource:
from("activemq:My.Queue").
to("velocity:file://myfolder/MyResponse.vm?contentCache=true").
to("activemq:Another.Queue");
In Camel 2.1 it's possible to specify what template the component should use dynamically via
a header, so for example:
from("direct:in").
setHeader("CamelVelocityResourceUri").constant("path/to/my/template.vm").
to("velocity:dummy");
In Camel 2.1 it's possible to specify a template directly as a header the component should use
dynamically via a header, so for example:
from("direct:in").
setHeader("CamelVelocityTemplate").constant("Hi this is a velocity template that can
do templating ${body}").
to("velocity:dummy");
The Email Sample
In this sample we want to use Velocity templating for an order confirmation email. The email
template is laid out in Velocity as:
Dear ${headers.lastName}, ${headers.firstName}
CHAPTER 10 - COMPONENT APPENDIX 660
Thanks for the order of ${headers.item}.
Regards Camel Riders Bookstore
${body}
And the java code:
private Exchange createLetter() {
Exchange exchange = context.getEndpoint("direct:a").createExchange();
Message msg = exchange.getIn();
msg.setHeader("firstName","Claus");
msg.setHeader("lastName","Ibsen");
msg.setHeader("item","Camel in Action");
msg.setBody("PS: Next beer is on me, James");
return exchange;
}
@Test
public void testVelocityLetter() throws Exception {
MockEndpoint mock = getMockEndpoint("mock:result");
mock.expectedMessageCount(1);
mock.expectedBodiesReceived("Dear Ibsen, Claus\n\nThanks for the order of Camel in
Action.\n\nRegards Camel Riders Bookstore\nPS: Next beer is on me, James");
template.send("direct:a", createLetter());
mock.assertIsSatisfied();
}
protected RouteBuilder createRouteBuilder() throws Exception {
return new RouteBuilder() {
public void configure() throws Exception {
from("direct:a").to("velocity:org/apache/camel/component/velocity/
letter.vm").to("mock:result");
}
};
}
See Also
• Configuring Camel
• Component
• Endpoint
• Getting Started
661 CHAPTER 10 - COMPONENT APPENDIX

VM COMPONENT
The vm: component provides asynchronous SEDA behavior so that messages are exchanged
on a BlockingQueue and consumers are invoked in a separate thread pool to the producer.
This component differs from the SEDA component in that VM supports communication
across CamelContext instances, so you can use this mechanism to communicate across web
applications, provided that the camel-core.jar is on the system/boot classpath.
This component is an extension to the SEDA component.
URI format
vm:someName[?options]
Where someName can be any string to uniquely identify the endpoint within the JVM (or at
least within the classloader which loaded the camel-core.jar)
You can append query options to the URI in the following format,
?option=value&option=value&...
Options
See the SEDA component for options and other important usage as the same rules applies for
this VM component.
Samples
In the route below we send the exchange to the VM queue that is working across
CamelContext instances:
from("direct:in").bean(MyOrderBean.class).to("vm:order.email");
And then in another Camel context such as deployed as in another .war application:
from("vm:order.email").bean(MyOrderEmailSender.class);
See Also
• Configuring Camel
• Component
• Endpoint
• Getting Started
▪SEDA
CHAPTER 10 - COMPONENT APPENDIX 662
XMPP COMPONENT
The xmpp: component implements an XMPP (Jabber) transport.
Maven users will need to add the following dependency to their pom.xml for this
component:
<dependency>
<groupId>org.apache.camel</groupId>
<artifactId>camel-xmpp</artifactId>
<version>x.x.x</version>
<!-- use the same version as your Camel core version -->
</dependency>
URI format
xmpp://[login@]hostname[:port][/participant][?Options]
The component supports both room based and private person-person conversations.
The component supports both producer and consumer (you can get messages from XMPP or
send messages to XMPP). Consumer mode supports rooms starting from camel-1.5.0.
You can append query options to the URI in the following format,
?option=value&option=value&...
Options
Name Description
room
If this option is specified, the component will connect to MUC (Multi
User Chat). Usually, the domain name for MUC is different from the
login domain. For example, if you are superman@jabber.org and
want to join the krypton room, then the room URL is
krypton@conference.jabber.org. Note the conference
part.
Starting from camel-1.5.0, it is not a requirement to provide the full
room JID. If the room parameter does not contain the @symbol, the
domain part will be discovered and added by Camel
user User name (without server name). If not specified, anonymous login
will be attempted.
password Password.
resource XMPP resource. The default is Camel.
663 CHAPTER 10 - COMPONENT APPENDIX
createAccount If true, an attempt to create an account will be made. Default is
false.
participant JID (Jabber ID) of person to receive messages. room parameter has
precedence over participant.
nickname Use nickname when joining room. If room is specified and nickname is
not, user will be used for the nickname.
serviceName Camel 1.6/2.0 The name of the service you are connecting to. For
Google Talk, this would be gmail.com.
Headers and setting Subject or Language
Camel sets the message IN headers as properties on the XMPP message. You can configure a
HeaderFilterStategy if you need custom filtering of headers.
In Camel 1.6.2/2.0 the Subject and Language of the XMPP message are also set if they
are provided as IN headers.
Examples
User superman to join room krypton at jabber server with password, secret:
xmpp://superman@jabber.org/?room=krypton@conference.jabber.org&password=secret
User superman to send messages to joker:
xmpp://superman@jabber.org/joker@jabber.org?password=secret
Routing example in Java:
from("timer://kickoff?period=10000").
setBody(constant("I will win!\n Your Superman.")).
to("xmpp://superman@jabber.org/joker@jabber.org?password=secret");
Consumer configuration, which writes all messages from joker into the queue, evil.talk.
from("xmpp://superman@jabber.org/joker@jabber.org?password=secret").
to("activemq:evil.talk");
Consumer configuration, which listens to room messages (supported from camel-1.5.0):
CHAPTER 10 - COMPONENT APPENDIX 664

from("xmpp://superman@jabber.org/?password=secret&room=krypton@conference.jabber.org").
to("activemq:krypton.talk");
Room in short notation (no domain part; for camel-1.5.0+):
from("xmpp://superman@jabber.org/?password=secret&room=krypton").
to("activemq:krypton.talk");
When connecting to the Google Chat service, you'll need to specify the serviceName as well
as your credentials (as of Camel 1.6/2.0):
// send a message from fromuser@gmail.com to touser@gmail.com
from("direct:start").
to("xmpp://talk.google.com:5222/
touser@gmail.com?serviceName=gmail.com&user=fromuser&password=secret").
to("mock:result");
See Also
• Configuring Camel
• Component
• Endpoint
• Getting Started
XQUERY
The xquery: component allows you to process a message using an XQuery template. This can
be ideal when using Templating to generate respopnses for requests.
Maven users will need to add the following dependency to their pom.xml for this
component:
<dependency>
<groupId>org.apache.camel</groupId>
<artifactId>camel-saxon</artifactId>
<version>x.x.x</version>
<!-- use the same version as your Camel core version -->
</dependency>
URI format
xquery:templateName
665 CHAPTER 10 - COMPONENT APPENDIX
Where templateName is the classpath-local URI of the template to invoke; or the complete
URL of the remote template.
For example you could use something like this:
from("activemq:My.Queue").
to("xquery:com/acme/mytransform.xquery");
To use an XQuery template to formulate a response to a message for InOut message
exchanges (where there is a JMSReplyTo header).
If you want to use InOnly, consume the message, and send it to another destination, you
could use the following route:
from("activemq:My.Queue").
to("xquery:com/acme/mytransform.xquery").
to("activemq:Another.Queue");
See Also
• Configuring Camel
• Component
• Endpoint
• Getting Started
XSLT
The xslt: component allows you to process a message using an XSLT template. This can be
ideal when using Templating to generate respopnses for requests.
URI format
xslt:templateName[?options]
Where templateName is the classpath-local URI of the template to invoke; or the complete
URL of the remote template. Refer to the Spring Documentation for more detail of the URI
syntax
You can append query options to the URI in the following format,
?option=value&option=value&...
Here are some example URIs
URI Description
CHAPTER 10 - COMPONENT APPENDIX 666
xslt:com/acme/mytransform.xsl refers to the file com/acme/mytransform.xsl on the classpath
xslt:file:///foo/bar.xsl refers to the file /foo/bar.xsl
xslt:http://acme.com/cheese/foo.xsl refers to the remote http resource
Maven users will need to add the following dependency to their pom.xml for this component:
<dependency>
<groupId>org.apache.camel</groupId>
<artifactId>camel-spring</artifactId>
<version>x.x.x</version>
<!-- use the same version as your Camel core version -->
</dependency>
Options
Name Default
Value Description
converter null Option to override default XmlConverter. Will lookup for the converter in the Registry. The provided converted must be
of type org.apache.camel.converter.jaxp.XmlConverter.
transformerFactory null Camel 1.6 Option to override default TransformerFactory. Will lookup for the transformerFactory in the Registry. The
provided transformer factory must be of type javax.xml.transform.TransformerFactory.
transformerFactoryClass null Camel 1.6 Option to override default TransformerFactory. Will create a TransformerFactoryClass instance and set it to
the converter.
uriResolver null
Camel 2.3: Allows you to use a custom javax.xml.transformation.URIResolver. Camel will by default use
its own implementation org.apache.camel.builder.xml.XsltUriResolver which is capable of loading from
classpath.
resultHandlerFactory null Camel 2.3: Allows you to use a custom org.apache.camel.builder.xml.ResultHandlerFactory which
is capable of using custom org.apache.camel.builder.xml.ResultHandler types.
failOnNullBody true Camel 2.3: Whether or not to throw an exception if the input body is null.
output string
Camel 2.3: Option to specify which output type to use. Possible values are: string, bytes, DOM, file. The
first three options are all in memory based, where as file is streamed directly to a java.io.File. For file you
must specify the filename in the IN header with the key Exchange.XSLT_FILE_NAME which is also
CamelXsltFileName. Also any paths leading to the filename must be created beforehand, otherwise an exception is
thrown at runtime.
Using XSLT endpoints
For example you could use something like
from("activemq:My.Queue").
to("xslt:com/acme/mytransform.xsl");
667 CHAPTER 10 - COMPONENT APPENDIX

To use an XSLT template to formulate a response for a message for InOut message exchanges
(where there is a JMSReplyTo header).
If you want to use InOnly and consume the message and send it to another destination you
could use the following route:
from("activemq:My.Queue").
to("xslt:com/acme/mytransform.xsl").
to("activemq:Another.Queue");
Getting Parameters into the XSLT to work with
By default, all headers are added as parameters which are available in the XSLT.
To do this you will need to declare the parameter so it is then useable.
<setHeader headerName="myParam"><constant>42</constant></setHeader>
<to uri="xslt:MyTransform.xsl"/>
And the XSLT just needs to declare it at the top level for it to be available:
<xsl: ...... >
<xsl:param name="myParam"/>
<xsl:template ...>
Spring XML versions
To use the above examples in Spring XML you would use something like
<camelContext xmlns="http://activemq.apache.org/camel/schema/spring">
<route>
<from uri="activemq:My.Queue"/>
<to uri="xslt:org/apache/camel/spring/processor/example.xsl"/>
<to uri="activemq:Another.Queue"/>
</route>
</camelContext>
There is a test case along with its Spring XML if you want a concrete example.
Using xsl:include
Camel 1.6.2/2.2 or older
If you use xsl:include in your XSL files then in Camel 2.2 or older it uses the default
CHAPTER 10 - COMPONENT APPENDIX 668

javax.xml.transform.URIResolver which means it can only lookup files from file
system, and its does that relative from the JVM starting folder.
For example this include:
<xsl:include href="staff_template.xsl"/>
Will lookup the staff_tempkalte.xsl file from the starting folder where the application
was started.
Camel 1.6.3/2.3 or newer
Now Camel provides its own implementation of URIResolver which allows Camel to load
included files from the classpath and more intelligent than before.
For example this include:
<xsl:include href="staff_template.xsl"/>
Will now be located relative from the starting endpoint, which for example could be:
.to("xslt:org/apache/camel/component/xslt/staff_include_relative.xsl")
Which means Camel will locate the file in the classpath as org/apache/camel/
component/xslt/staff_template.xsl.
This allows you to use xsl include and have xsl files located in the same folder such as we do in
the example org/apache/camel/component/xslt.
You can use the following two prefixes classpath: or file: to instruct Camel to look
either in classpath or file system. If you omit the prefix then Camel uses the prefix from the
endpoint configuration. If that neither has one, then classpath is assumed.
You can also refer back in the paths such as
<xsl:include href="../staff_other_template.xsl"/>
Which then will resolve the xsl file under org/apache/camel/component.
Notes on using XSTL and Java Versions
Here are some observations from Sameer, a Camel user, which he kindly shared with us:
In case anybody faces issues with the XSLT endpoint please review these points.
I was trying to use an xslt endpoint for a simple transformation from one xml to
another using a simple xsl. The output xml kept appearing (after the xslt processor
in the route) with outermost xml tag with no content within.
669 CHAPTER 10 - COMPONENT APPENDIX

No explanations show up in the DEBUG logs. On the TRACE logs however I did
find some error/warning indicating that the XMLConverter bean could no be
initialized.
After a few hours of cranking my mind, I had to do the following to get it to work
(thanks to some posts on the users forum that gave some clue):
1. Use the transformerFactory option in the route ("xslt:my-
transformer.xsl?transformerFactory=tFactory") with the
tFactory bean having bean defined in the spring context for
class="org.apache.xalan.xsltc.trax.TransformerFactoryImpl".
2. Added the Xalan jar into my maven pom.
My guess is that the default xml parsing mechanism supplied within the JDK (I am
using 1.6.0_03) does not work right in this context and does not throw up any error
either. When I switched to Xalan this way it works. This is not a Camel issue, but
might need a mention on the xslt component page.
Another note, jdk 1.6.0_03 ships with JAXB 2.0 while Camel needs 2.1. One
workaround is to add the 2.1 jar to the jre/lib/endorsed directory for the
jvm or as specified by the container.
Hope this post saves newbie Camel riders some time.
See Also
• Configuring Camel
• Component
• Endpoint
• Getting Started
Labels parameters
LABELS
Enter labels to add to this page:
Add Done
Looking for a label? Just start typing.
Powered by a free Atlassian Confluence Open Source Project License granted to
Apache Software Foundation. Evaluate Confluence today.
• Atlassian Confluence 3.2, the Enterprise Wiki: Intranet software for documentation
and knowledge management
• | Report a bug
• | Atlassian News
CHAPTER 10 - COMPONENT APPENDIX 670
