Cg3lib Windows Installation Guide
cg3lib%20windows%20installation%20guide
User Manual: Pdf
Open the PDF directly: View PDF ![]() .
.
Page Count: 12
Summary
Downloads ......................................................................................................................................................... 2
Installation ......................................................................................................................................................... 3
Visual Studio 2017: ........................................................................................................................................ 3
Windows 10 SDK: ........................................................................................................................................... 3
Qt/Qt Creator: ............................................................................................................................................... 4
Boost: ............................................................................................................................................................. 5
Eigen3: ........................................................................................................................................................... 5
libQGLViewer: ................................................................................................................................................ 5
Qt Creator configuration ................................................................................................................................... 6
Compiling the base project ................................................................................................................................ 8
CGAL .................................................................................................................................................................. 9
Notes ............................................................................................................................................................... 12

Downloads
You can download the following files concurrently. Once you have downloaded them, follow the
“Installation” section instructions.
• Download Qt/Qt Creator from https://www.qt.io/download. Select “Open source” download.
• Download Visual Studio Community 2017 from https://www.visualstudio.com/it/downloads/.
• Download Boost from http://www.boost.org/users/download/. Select the Windows version zip
archive (for example boost_1_66_0.zip).
• Download libQGLViewer from http://libqglviewer.com/download.html. Select the Windows version
zip archive file (you have to accept license agreement).
• Download Eigen3 from http://eigen.tuxfamily.org/. Get the lastest stable version zip archive file.
Now the latest stable release is Eigen 3.3.4.
• Download Windows 10 SDK (it contains the debugger for MSVC2017 and some utilities) from
https://developer.microsoft.com/en-us/windows/downloads/windows-10-sdk
Note that you could start installing the required components in any order, except for libQGLViewer and
Windows 10 SDK which should be installed in the end. Indeed, libQGLViewer needs Qt/Qt Creator and Visual
Studio 2017 to be compiled and Windows 10 SDK needs Visual Studio 2017 to be installed.

Installation
Visual Studio 2017:
Execute the installation .exe file, then open the “Single components” (in italian “Singoli componenti”)
tab. Select the following components and proceed with the installation:
Windows 10 SDK:
Wait for the installation of Visual Studio 2017.
Execute the installation .exe file, then select the “Debugging Tools for Windows” component, as
shown below.
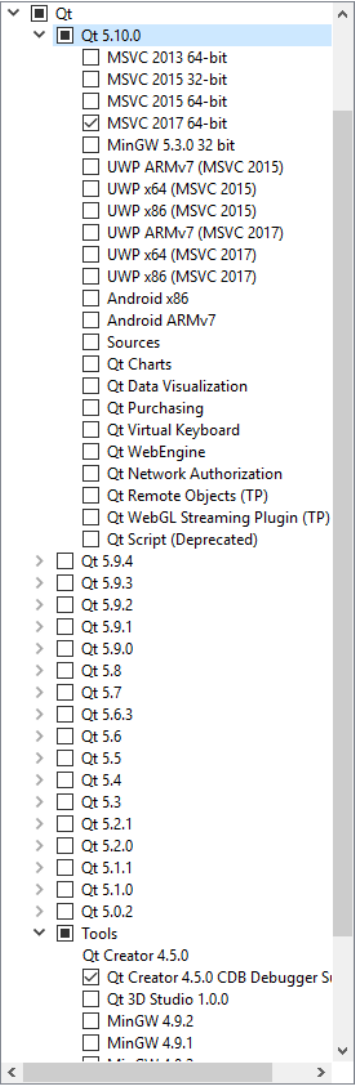
Qt/Qt Creator:
Execute the installation .exe file, choose a installation path with no spaces (“C:\Qt” for example).
Select the following components and proceed with the installation:
• Qt 5.10.0 > MSVC 2017 64-bit
• Tools > Qt Creator 4.5.0 (you dont have to select it, it is set by default)
• Tools > Qt Creator 4.5.0 CDB Debugger Support

Boost:
BINARIES option, that is the preferred and easiest one:
NOTE: you must choose this if you need to install CGAL!
Download boost binary release for MSVC2017 (you should check it in the readme file) from the
sourceforge page https://sourceforge.net/projects/boost/files/boost-binaries/: for example
“boost_1_66_0-msvc-14.1-64.exe”. Run the file and install it in the folder “C:\libs\”. If you want to
install it in a different path, follow the blue text in section “Compiling the project”.
HEADER-ONLY option:
Note: do not choose this option if you need to install CGAL!
Extract the content of the zip file (boost_1_66_0.zip) in “C:\libs\” and change the directory name to
“boost” (that directory must contain the main files of boost, not a directory that contains them). If
you want to install it in a different path, follow the blue text in section “Compiling the project”.
Eigen3:
Extract the content of the zip file (eigen-eigen-5a0156e40feb.zip) in “C:\libs\” and change the
directory name to “eigen3” (that directory must contain the main files of eigen, not a directory that
contains them). If you want to install it in a different path, follow the blue text in section “Compiling
the project”.
libQGLViewer:
Extract the content of the zip file (libQGLViewer-2.7.1.zip) in “C:\libs\” and change the directory
name to “libQGLViewer” (that directory must contain the main files of libQGLViewer, not a directory
that contains them).
If you want to install it in a different path, follow the blue text in section “Compiling the project”.
Wait for the installation of Qt/Qt Creator and Visual Studio 2017. Follow the instructions in “Qt
Creator configuration” section to be sure that Qt Creator can compile a project with MSVC2017: the
kit must be the one with the 64-bit compiler MSVC2017 and with the 64-bit debugger CDB.
Once you have installed these two components, open with Qt Creator the project (.pro) file:
“C:\libs\libQGLViewer\QGLViewer\QGLViewer.pro”
Obviously, if you have chosen to install it in a different path, you have to open the correct file. For
example the path could be “C:\Programmi\libQGLViewer-2.7.1\QGLViewer\QGLViewer.pro”.
Once you have loaded the project, click the button “Configure Project”. Build the project with Qt
Creator by clicking on the following button, placed in the left-bottom corner of Qt Creator:
If the build succeeds, then you have correctly installed libQGLViewer.
Qt Creator configuration
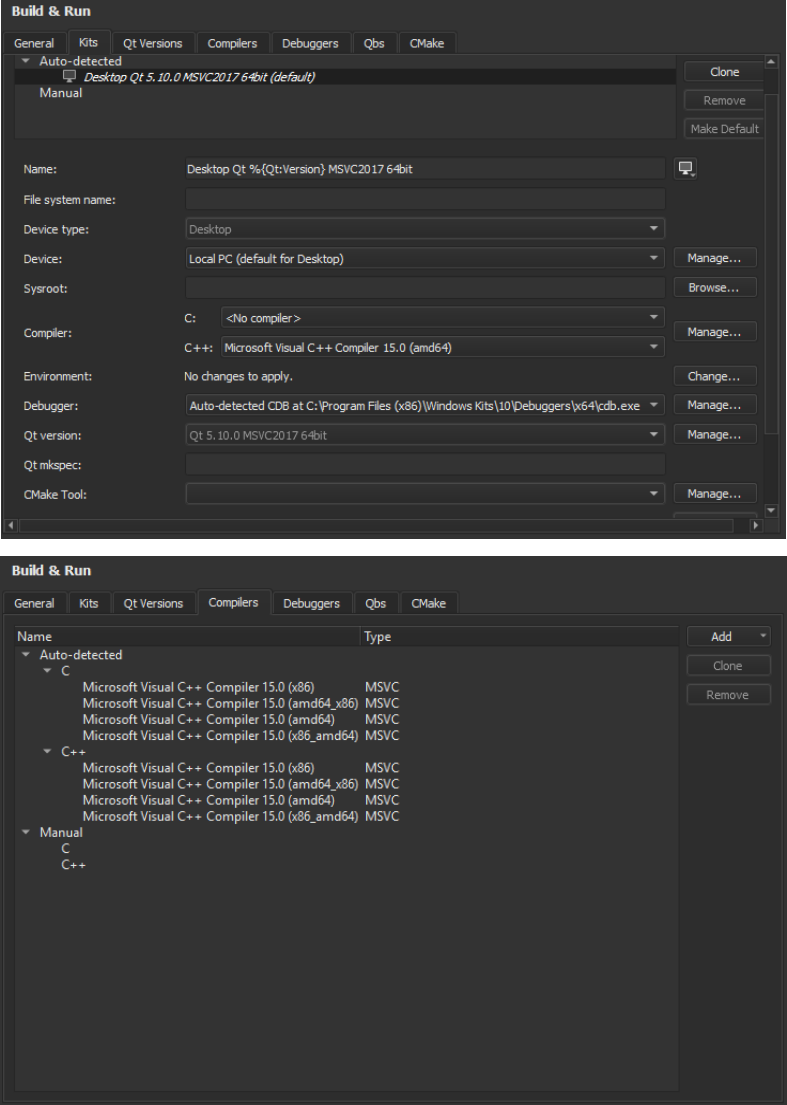
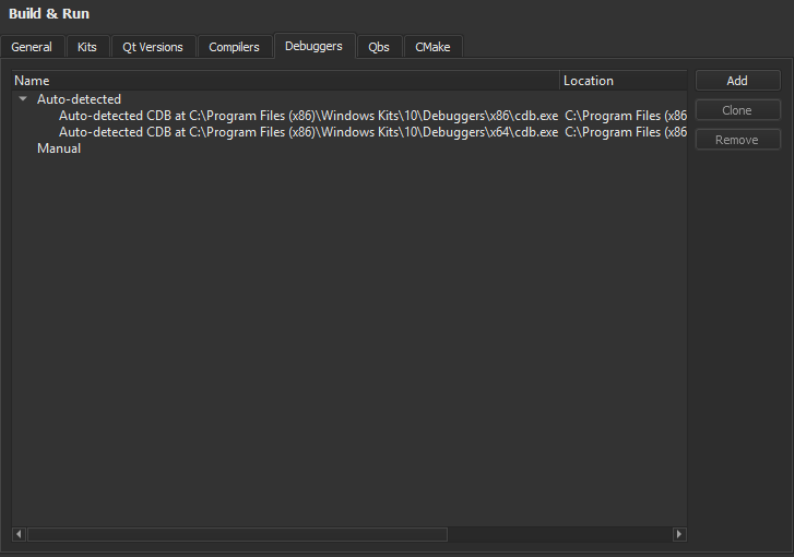
Open Qt Creator. It should automatically detect MSVC2017 compiler and debugger. Be careful if you have
MinGW or other compiler installed on your computer.
You can check in Options > Tools > Build & Run. In the images shown below, you can find how a configuration
should appear in the tab “Kits”, “Compilers” and “Debuggers”.
Compiling the base project
If you have placed the libraries in the default folders, you do not need to set any environment variable and
you can skip the blue text shown below. The default folders for the libraries are:
C:\libs\libQGLViewer
C:\libs\boost
C:\libs\eigen3
In the case you have placed Boost, Eigen or libQGLViewer in different folders than “C:\libs\”, you have to set
the following environment variables (you can just set the ones you need, obviously putting your own path of
the library):
QGLVIEWER_HOME = C:\Programmi\libQGLViewer-2.7.1
BOOST_HOME = C:\Programmi\boost_1_66_0
EIGEN_HOME = C:\Programmi\eigen3
You can set the environment variables by adding values to “System variables” form in the window in “’My
Computer’ properties > Advanced > Environment variables”. You can also access to this window by searching
in Windows 10 search bar “Environment variables” (italian: “Variabili di ambiente”) and, once selected the
entry in the menu, clicking on the button “Environment variables”.
Run git clone for the repository https://github.com/cg3hci/cg3libBaseProject. You should place it in a folder
with no spaces in the path (“C:\Workspace\Qt\YourProject\” for example).
Load the project file “cg3libBaseProject.pro” in the project folder (“C:\Workspace\Qt\YourProject\
cg3libBaseProject.pro” for example). Click the button “Configure project” (the kit must be the one with the
64-bit compiler MSVC2017 and with the 64-bit debugger CDB).
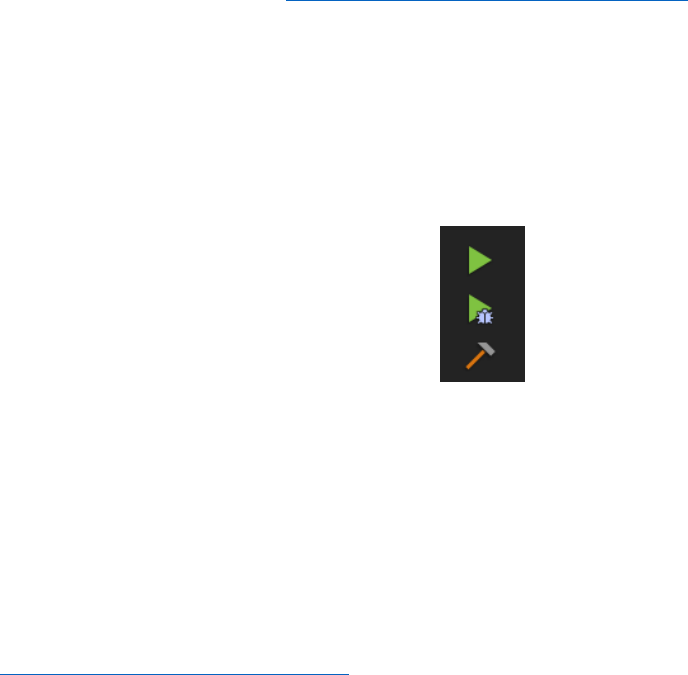
You can finally execute the base project Clicking “play” button in the bottom-left corner of the IDE (the first
one in the following image).
You can test the debugger by clicking the second button in the image above.
Note that, when a process is attached to a debugger, it seems impossible (with this configuration in Windows)
to see the standard output (the output in the Qt console/terminal). Try to use the function qDebug() instead
of std::cout, it should work.
If you see that, you have successfully configured your Qt project to run the base project and the basic
functions of cg3lib.
With the same configuration you should be able to run also the cg3samples project:
https://github.com/cg3hci/cg3samples.
CGAL
For having additional functions, you can install an important computer graphics library: CGAL. Download
CGAL and CMake from https://www.cgal.org/download/windows.html and https://cmake.org/download/.
Note: for installing CGAL you must have followed the BINARIES option in “Installation > Boost” section. In
the case you did not followed it, you should delete the header-only boost folder and reinstall it following
BINARIES option instructions. Otherwise, you could compile the header-only boost library.
Run CMake exe file and install it.
Obviously, if you want to install it in another path instead of “C:\libs”, use your own one in all the steps.
Run CGAL exe file: choose the path “C:\libs\CGAL”, choose 64-bit, select “All users” and check the checkbox
“CGAL_DIR” and “Add CGAL/auxiliary/gmp/lib to the PATH”. When finishing the installation, probably an
error will be raised because the program could not change the PATH. We have to do it manually, see right
below.
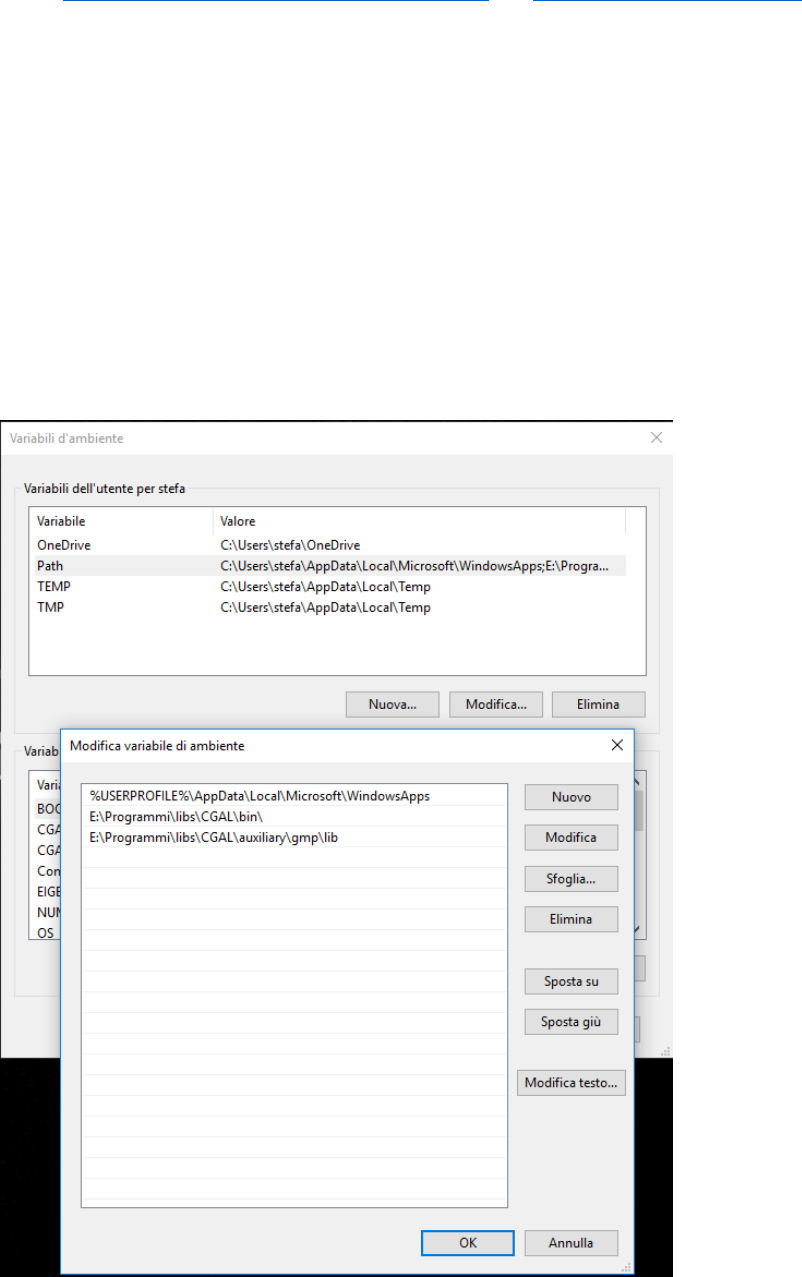
Add to the “PATH” environment variable (user form), as shown in the image below, the following entries:
C:\libs\CGAL\bin and C:\libs\CGAL\auxiliary\gmp\lib.
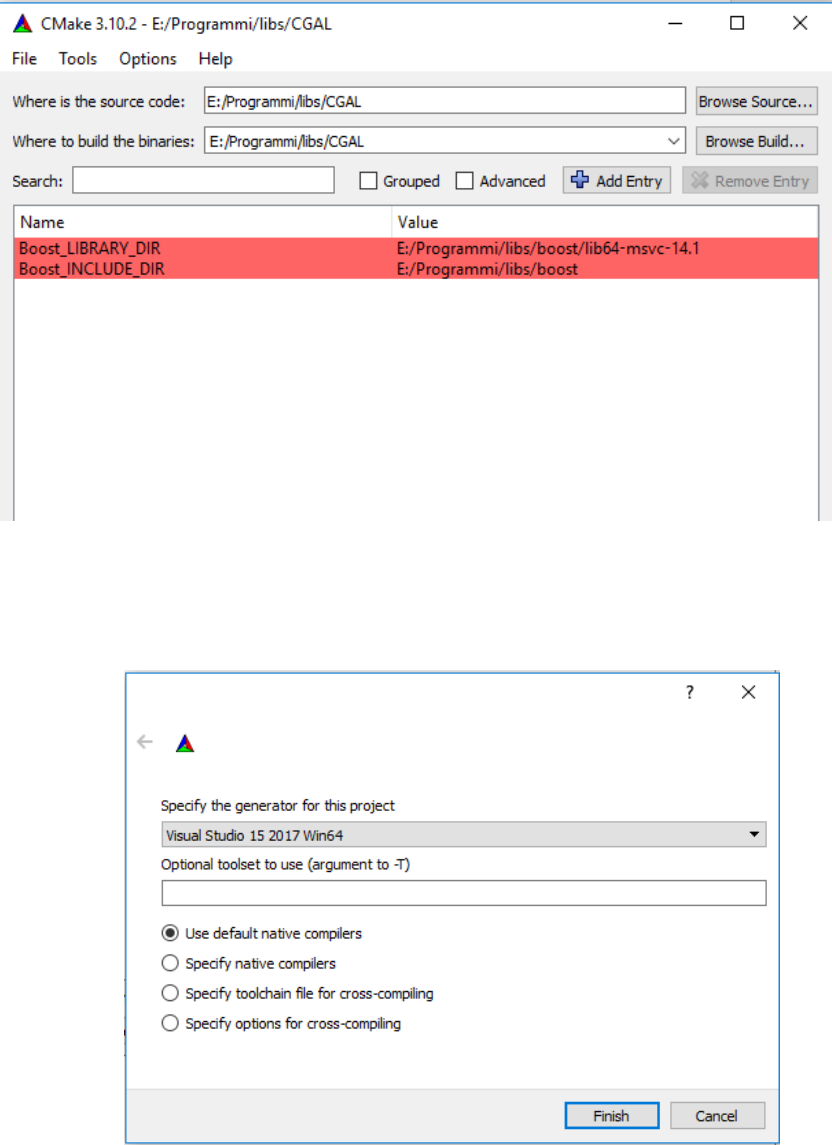
1. Open CMake (the GUI) and set:
- “Where is the source code" <- “C:/libs/CGAL”
- "Where to build the binaries" <- “C:/libs/CGAL”
2. In CMake, add the following entries, as shown in the image below:
- Boost_INCLUDE_DIR = "C:/libs/boost”
- Boost_LIBRARY_DIR = " C:/libs/boost/lib64-msvc-xx.0" (for example lib64-msvc-14.1)
3. Click the button "Configure" and, when asked, select the generator “Visual Studio 15 2017 Win64”
with the option “use native compilers”.

When you click finish, you should wait for the configuration to be done: “Configuring done” is the
message you should expect at this point.
4. Click "Generate" (do not worry about the red lines in CMake, the important thing is that you have in
the output “Generation done”).
5. Open the file “C:\libs\CGAL\CGAL.sln” with Visual Studio 2017. Build the project ALL_BUILD both in
Debug and Release mode. You can find the selector in the toolbar:
If everything went fine, you will get, for both the builds, the message:
========== Compilazione: 5 completate, 0 non riuscite, 0 aggiornate, 4 ignorate ==========
Note: if you want the working examples and other CGAL functionalities, you could put CMake entries for
Eigen3, QGLViewer and Qt.
In the case you have placed CGAL in a different folder than “C:\libs\”, you have to set the following
environment variable:
CGAL_HOME = C:\Programmi\CGAL-4.10.2
Try to compile the project. If it does not compile, verify in cgal.pri that the library names (Boost and CGAL)
are the same that have been obtained by building the Boost and CGAL projects. Indeed the names of the
compiled libraries could be different if compiled with different versions of MSVC/Boost/CGAL.
When compiled with MSVC2017 (vc141), boost 1.66.00, CGAL 4.10.2, you get the following compiled
libraries:
• CGAL-vc140-mt-gd-4.10.2.lib (DEBUG)
• CGAL-vc140-mt-4.10.2.lib (RELEASE)
• boost_system-vc141-mt-gd-x64-1_66.lib (DEBUG)
• boost_log-vc141-mt-gd-x64-1_66.lib (DEBUG)
• boost_thread-vc141-mt-gd-x64-1_66.lib (DEBUG)
• boost_system-vc141-mt-x64-1_66.lib (RELEASE)
• boost_log-vc141-mt-x64-1_66.lib (RELEASE)
• lboost_thread-vc141-mt-x64-1_66.lib (RELEASE)
If you use other compiler versions, you should have to change the names of the libraries in the cgal.pri file.

