Chipsec Manual
User Manual: Pdf
Open the PDF directly: View PDF ![]() .
.
Page Count: 1
- CHIPSEC
- Installation
- Using CHIPSEC
- CHIPSEC Components and Structure
- Core components
- Platform Configuration
- chipsec.cfg.avn.xml
- chipsec.cfg.bdw.xml
- chipsec.cfg.byt.xml
- chipsec.cfg.chipsec_cfg.xsd
- chipsec.cfg.cht.xml
- chipsec.cfg.common.xml
- chipsec.cfg.hsw.xml
- chipsec.cfg.hsx.xml
- chipsec.cfg.iommu.xml
- chipsec.cfg.ivt.xml
- chipsec.cfg.jkt.xml
- chipsec.cfg.kbl.xml
- chipsec.cfg.qrk.xml
- chipsec.cfg.skl.xml
- chipsec.cfg.template.xml
- OS/Environment Helpers
- HW Abstraction Layer (HAL)
- chipsec.hal.acpi module
- chipsec.hal.acpi_tables module
- chipsec.hal.cmos module
- chipsec.hal.cpu module
- chipsec.hal.cpuid module
- chipsec.hal.ec module
- chipsec.hal.hal_base module
- chipsec.hal.igd module
- chipsec.hal.interrupts module
- chipsec.hal.io module
- chipsec.hal.iobar module
- chipsec.hal.iommu module
- chipsec.hal.mmio module
- chipsec.hal.msgbus module
- chipsec.hal.msr module
- chipsec.hal.paging module
- chipsec.hal.pci module
- chipsec.hal.pcidb module
- chipsec.hal.physmem module
- chipsec.hal.smbus module
- chipsec.hal.spd module
- chipsec.hal.spi module
- chipsec.hal.spi_descriptor module
- chipsec.hal.spi_uefi module
- chipsec.hal.tpm module
- chipsec.hal.tpm12_commands module
- chipsec.hal.ucode module
- chipsec.hal.uefi module
- chipsec.hal.uefi_common module
- chipsec.hal.uefi_platform module
- chipsec.hal.uefi_search module
- chipsec.hal.vmm module
- Utility command-line scripts
- chipsec.utilcmd.acpi_cmd module
- chipsec.utilcmd.chipset_cmd module
- chipsec.utilcmd.cmos_cmd module
- chipsec.utilcmd.cpu_cmd module
- chipsec.utilcmd.decode_cmd module
- chipsec.utilcmd.desc_cmd module
- chipsec.utilcmd.ec_cmd module
- chipsec.utilcmd.igd_cmd module
- chipsec.utilcmd.interrupts_cmd module
- chipsec.utilcmd.io_cmd module
- chipsec.utilcmd.iommu_cmd module
- chipsec.utilcmd.mem_cmd module
- chipsec.utilcmd.mmcfg_cmd module
- chipsec.utilcmd.mmio_cmd module
- chipsec.utilcmd.msgbus_cmd module
- chipsec.utilcmd.msr_cmd module
- chipsec.utilcmd.pci_cmd module
- chipsec.utilcmd.smbus_cmd module
- chipsec.utilcmd.spd_cmd module
- chipsec.utilcmd.spi_cmd module
- chipsec.utilcmd.spidesc_cmd module
- chipsec.utilcmd.ucode_cmd module
- chipsec.utilcmd.uefi_cmd module
- chipsec.utilcmd.vmm_cmd module
- Auxiliary components
- Executable build scripts
- CHIPSEC Modules
- Introduction
- Modules Description
- chipsec.modules.common.secureboot.variables module
- chipsec.modules.common.uefi.access_uefispec module
- chipsec.modules.common.uefi.s3bootscript module
- chipsec.modules.common.bios_kbrd_buffer module
- chipsec.modules.common.bios_smi module
- chipsec.modules.common.bios_ts module
- chipsec.modules.common.bios_wp module
- chipsec.modules.common.ia32cfg module
- chipsec.modules.common.rtclock module
- chipsec.modules.common.smm module
- chipsec.modules.common.smrr module
- chipsec.modules.common.spi_desc module
- chipsec.modules.common.spi_fdopss module
- chipsec.modules.common.spi_lock module
- chipsec.modules.tools.cpu.sinkhole module
- chipsec.modules.tools.secureboot.te module
- chipsec.modules.tools.smm.rogue_mmio_bar module
- chipsec.modules.tools.smm.smm_ptr module
- chipsec.modules.tools.uefi.blacklist module
- chipsec.modules.tools.uefi.s3script_modify module
- chipsec.modules.tools.uefi.uefivar_fuzz module
- chipsec.modules.tools.uefi.whitelist module
- chipsec.modules.tools.vmm.hv.define module
- chipsec.modules.tools.vmm.hv.hypercall module
- chipsec.modules.tools.vmm.hv.hypercallfuzz module
- chipsec.modules.tools.vmm.hv.synth_dev module
- chipsec.modules.tools.vmm.hv.synth_kbd module
- chipsec.modules.tools.vmm.hv.vmbus module
- chipsec.modules.tools.vmm.hv.vmbusfuzz module
- chipsec.modules.tools.vmm.vbox.vbox_crash_apicbase module
- chipsec.modules.tools.vmm.xen.define module
- chipsec.modules.tools.vmm.xen.hypercall module
- chipsec.modules.tools.vmm.xen.hypercallfuzz module
- chipsec.modules.tools.vmm.xen.xsa188 module
- chipsec.modules.tools.vmm.common module
- chipsec.modules.tools.vmm.cpuid_fuzz module
- chipsec.modules.tools.vmm.hypercallfuzz module
- chipsec.modules.tools.vmm.iofuzz module
- chipsec.modules.tools.vmm.msr_fuzz module
- chipsec.modules.tools.vmm.pcie_fuzz module
- chipsec.modules.tools.vmm.pcie_overlap_fuzz module
- chipsec.modules.tools.vmm.venom module
- chipsec.modules.memconfig module
- chipsec.modules.remap module
- chipsec.modules.smm_dma module

CHIPSEC
version 1.3.0
Platform Security Assesment Framework
March 18, 2017

Contents
CHIPSEC 1
Installation 1
Windows Installation 1
Linux Installation 3
Mac OS X Installation 4
UEFI Shell Installation 5
Using CHIPSEC 6
Command Line Usage 7
Using CHIPSEC as a Python Package 8
Compiling CHIPSEC Executables on Windows 8
Writing Your Own Modules 9
CHIPSEC Components and Structure 10
Core components 10
Platform Configuration 11
OS/Environment Helpers 13
HW Abstraction Layer (HAL) 14
Utility command-line scripts 20
Auxiliary components 29
Executable build scripts 29
CHIPSEC Modules 29
Introduction 29
Modules Description 29
i

CHIPSEC
Welcome to the CHIPSEC documentation!
CHIPSEC is a framework for analyzing platform level security of hardware, devices, system firmware, low-level
protection mechanisms, and the configuration of various platform components.
It contains a set of modules, including simple tests for hardware protections and correct configuration, tests for
vulnerabilities in firmware and platform components, security assessment and fuzzing tools for various platform
devices and interfaces, and tools acquiring critical firmware and device artifacts.
CHIPSEC can run on Windows, Linux, Mac OS and UEFI shell. Mac OS support is Alpha.
Warning
Chipsec should only be used on test systems!
It should not be installed/deployed on production end-user systems.
There are multiple reasons for that:
1. Chipsec kernel drivers provide direct access to hardware resources to user-mode applications (for example,
access to physical memory). When installed on production systems this could allow malware to access privileged
hardware resources.
2. The driver is distributed as source code. In order to load it on Operating System which requires kernel drivers
to be signed (for example, 64 bit versions of Microsoft Windows 7 and higher), it is necessary to enable
TestSigning (or equivalent) mode and sign the driver executable with test signature. Enabling TestSigning (or
equivalent) mode turns off an important OS kernel protection and should not be done on production systems.
3. Due to the nature of access to hardware, if any chipsec module issues incorrect access to hardware
resources, Operating System can hang or panic.
Installation
CHIPSEC supports Windows, Linux, and UEFI shell. Circumstances surrounding the target platform may change
which of these environments is most appropriate. When running CHIPSEC on client PC systems, Windows may be
preferred. However, sometimes it may be preferable to assess platform security without interfering with the normal
operating system. In these instances, CHIPSEC may be run from a bootable USB thumb drive - either a Live Linux
image or a UEFI shell.
Windows Installation
CHIPSEC supports the following versions:
• Windows 7, 8, 8.1, 10 x86 and 64-bit
• Windows Server 2008, 2012, 2016 x86 and 64-bit
Please follow the steps below to install CHIPSEC framework on Windows:
1. Install Python
2. Install pywin32 and setuptools packages:
pip install setuptools
pip install pywin32
CHIPSEC
1

To build chipsec executables, you may optionally want to install py2exe:
pip install py2exe
To get colored console output, you may optionally want to install WConio.
3. Build CHIPSEC kernel driver. Please follow the instructions in \drivers\win7\readme. Skip this step if you
already have chipsec_hlpr.sys driver binary for your version of Windows
4. Copy CHIPSEC driver (chipsec_hlpr.sys) to proper directory \chipsec\helper\win\win7_<arch>
where <arch> is "x86" or "amd64" (default path is \chipsec\helper\win\win7_amd64)
5. Install CHIPSEC framework
To automatically install from PyPI:
pip install chipsec
To manually install CHIPSEC as a package:
git clone https://github.com/chipsec/chipsec
python setup.py install
Note
When installing CHIPSEC on Windows, the driver isn't built automatically (as when installing on Linux).
You'll need to build Windows driver and copy it to proper directory (see steps 3 and 4) prior to installing
CHIPSEC
6. Turn off kernel driver signature checks
Windows 10 64-bit / Windows 8, 8.1 64-bit (with Secure Boot enabled) / Windows Server 2016 64-bit /
Windows Server 2012 64-bit (with Secure Boot enabled):
• In CMD.EXE: shutdown /r /t 0 /o
• Navigate: Troubleshooting > Advanced Settings > Startup Options > Reboot
• After reset choose F7 "Disable driver signature checks"
Alternatively, disable Secure Boot in the BIOS setup screen then disable driver signature checks as with
Secure Boot disabled
Windows 7 64-bit / Windows Server 2008 64-bit / Windows 8 (with Secure Boot disabled) / Windows Server
2012 (with Secure Boot disabled):
Boot in Test mode (allows self-signed certificates)
• Start CMD.EXE as Adminstrator
•BcdEdit /set TESTSIGNING ON
• Reboot
If that doesn't work, run these additional commands:
BcdEdit /set noIntegrityChecks ON
BcdEdit /set loadoptions DISABLE_INTEGRITY_CHECKS
Alternatively, press F8 when booting Windows and choose "No driver signatures enforcement" option to turn
off driver signature checks
7. Run CHIPSEC
• Launch CMD.EXE as Administrator
• You can use commands below to run CHIPSEC. CHIPSEC will automatically load the driver and unload it
when done.
CHIPSEC
2

python chipsec_main.py
python chipsec_util.py
• If CHIPSEC is used as a standalone tool, run above commands from where CHIPSEC is.
Note
You can manually register and start CHIPSEC service/driver. CHIPSEC will attempt to connect to already
running chipsec service.
To create and start chipsec service (in CMD.EXE)
sc create chipsec binpath=<path_to_sys> type=kernel DisplayName="Chipsec driver"
sc start chipsec
Then to stop and delete chipsec service:
sc stop chipsec
sc delete chipsec
Linux Installation
Tested on:
• Fedora LXDE 64bit
• Ubuntu 64bit
• Debian 64bit and 32bit
• Linux UEFI Validation (LUV)
Installing necessary packages
You will need to install or update the following dependencies before installing CHIPSEC:
# yum install kernel kernel-devel-$(uname -r) python python-devel gcc nasm redhat-rpm -config
or
# apt-get install build-essential python-dev python gcc \
linux-headers-$(uname -r) nasm
You can use CHIPSEC on a desired Linux distribution or create a live Linux image on a USB flash drive and boot to
it. For example, you can use liveusb-creator to create live Fedora image on a USB drive
You will also need to install setuptools package:
pip install setuptools
Installing from PyPI
1. Installing CHIPSEC from PyPI will automatically build all necessary components including kernel module and
install CHIPSEC as a package. CHIPSEC will automatically load the kernel module and unload it when done.
# pip install chipsec
2. Now you can use these commands from any directory to run CHIPSEC:
# sudo chipsec_main
# sudo chipsec_util
# sudo python -m chipsec_main
Linux Installation
3

# sudo python -m chipsec_util
Installing Manually
Clone chipsec Git repository and install it as a package:
# git clone https://github.com/chipsec/chipsec
# python setup.py install
# sudo chipsec_main
To use CHIPSEC in place without installing it:
# python setup.py build_ext -i
# sudo python chipsec_main.py
Note
To use CHIPSEC without installing it using setup.py, just build kernel module and helper components in place:
# make -C ../drivers/linux
# cp ../drivers/linux/chipsec.ko ../chipsec/helper/linux/
# make -C ../chipsec/helper/linux/
Mac OS X Installation
Warning
Mac OS X support is currently in Alpha release
Please follow the steps below to install CHIPSEC on Mac OS X.
1. Before installing CHIPSEC, install XCode, Python 2.7, PIP and setuptools packages. Please see instructions
here: http://docs.python-guide.org/en/latest/starting/install/osx/
2. Turn the System Integrity Protection (SIP) off. See Configuring SIP
Installing From PyPI
Installing CHIPSEC from PyPI will automatically build all necessary components including kernel module and install
CHIPSEC as a package. CHIPSEC will automatically load the kernel extension module.
# pip install chipsec
# sudo chipsec_main
Installing Manually
Clone chipsec Git repository and install it as a package:
# git clone https://github.com/chipsec/chipsec
# python setup.py install
# sudo chipsec_main
To use CHIPSEC in place without installing it:
# python setup.py build_ext -i
Mac OS X Installation
4

# sudo python chipsec_main.py
Note
You can build chipsec.kext on your own and load it using kextutil. Please follow the instructions in
drivers/osx/README.
When done, unload the driver and re-enable the System Integrity Protection
# kextunload -b com.google.chipsec
UEFI Shell Installation
Installing CHIPSEC for UEFI Shell
1. Extract contents of __install__/UEFI/chipsec_uefi_<arch>.zip to the EFI drive which can be either
USB flash drive (e.g. DUET USB drive) or HDD/SSD hard drive (e.g. EFI System Partition). <arch> should
correspond to your UEFI shell and can be x64, ia32 or i586. This will create /efi/Tools directory with
Python.efi and /efi/StdLib with subdirectories
2. Copy contents of CHIPSEC anywhere on the EFI drive (for example, to chipsec directory in root). The
contents of your drive should look like follows:
\
efi\
boot\
bootx64.efi
StdLib\
lib\
python.27\
[lots of python files and directories]
Tools\
Python.efi
chipsec\
chipsec\
chipsec_main.py
chipsec_util.py
...
Note
The EFI drive should already include a UEFI Shell binary in /efi/boot. On 64-bit platforms the shell will
likely be named bootx64.efi
3. Run your UEFI shell
• If UEFI shell is on the USB removable drive, you'll need to boot off of the USB drive (rebooting will
load UEFI shell).
• If your UEFI firmware allows booting from any file, choose to boot from your UEFI shell binary from
the UEFI firmware setup options
• Some systems have embedded UEFI shell which can be booted from setup options
UEFI Shell Installation
5

4. Run CHIPSEC in UEFI shell
1. fs0:
2. python chipsec_main.py or python chipsec_util.py
(OPTIONAL) Extending CHIPSEC functionality for UEFI
Skip this section if you don't plan on extending native UEFI functionality for CHIPSEC.
Native functions accessing HW resources are built directly into Python UEFI port in built-in edk2 module. If you want
to add more native functionality to Python UEFI port for chipsec, you'll need to re-build Python for UEFI:
1. Check out AppPkg with Python 2.7.2 port for UEFI from SVN
• You'll also need to check out StdLib and StdLibPrivateInternalFiles packages from SVN
• Alternatively download latest EADK (EDK II Application Development Kit). EADK includes
AppPkg/StdLib/StdLibPrivateInternalFiles. Unfortunately, EADK Alpha 2 doesn't have
Python 2.7.2 port so you'll need to check it out SVN.
2. Add functionality to Python port for UEFI
• Python 2.7.2 port for UEFI is in <UDK>\AppPkg\Applications\Python
• All chipsec related functions are in
<UDK>\AppPkg\Applications\Python\Efi\edk2module.c (#ifdef CHIPSEC)
• Asm functions are in <UDK>\AppPkg\Applications\Python\Efi\cpu.asm e.g. <UDK> is
C:\UDK2010.SR1
• Add cpu.asm under the Efi section in PythonCore.inf
3. Build <UDK>/AppPkg with Python
• Read instructions in <UDK>\AppPkg\ReadMe.txt and
<UDK>\AppPkg\Applications\Python\PythonReadMe.txt
• Binaries of AppPkg and Python will be in <UDK>\Build\AppPkg\DEBUG_MYTOOLS\X64\
4. Create directories and copy Python files on DUET USB drive
• Read instructions in <UDK>\AppPkg\Applications\Python\PythonReadMe.txt
(OPTIONAL) Building bootable USB thumb drive with UEFI Shell
You can build bootable USB drive with UEFI shell using EDK DUET environment:
1. Download UDK from Tianocore (Tested with UDK2010.SR1)
2. Follow instructions in DuetPkg/ReadMe.txt to create a bootable USB thumb drive with UEFI Shell (DUET)
Using CHIPSEC
CHIPSEC should be launched as Administrator/root.
• In command shell, run
Using CHIPSEC
6

# python chipsec_main.py
# python chipsec_util.py
• For help, run
# python chipsec_main.py --help
# python chipsec_util.py help
Command Line Usage
•Command Line Usage
# chipsec_main.py [options]
Options
-m --module specify module to run (example: -m common.bios_wp)
-a --module_args additional module arguments, format is 'arg0,arg1..'
-v --verbose verbose mode
-d --debug show debug output
-l --log output to log file
Advanced Options
-p --platform explicitly specify platform code. Should be among the supported platforms: [ SNB | IVB |
KBL | JKT | BYT | QRK | BDW | IVT | AVN | CHT | HSW | SKL | HSX ]
-n --no_driver chipsec won't need kernel mode functions so don't load chipsec driver
-i --ignore_platform run chipsec even if the platform is not recognized
-j --json specify filename for JSON output.
-x --xml specify filename for xml output (JUnit style).
-t --moduletype run tests of a specific type (tag).
--list_tags list all the available options for -t,--moduletype
-I --include specify additional path to load modules from
--failfast fail on any exception and exit (don't mask exceptions)
--no_time don't log timestamps
Exit Code
CHIPSEC returns an integer exit code:
• Exit code is 0: all modules ran successfully and passed
Command Line Usage
7

• Exit code is not 0: each bit means the following:
• Bit 0: SKIPPED at least one module was skipped
• Bit 1: WARNING at least one module had a warning
• Bit 2: DEPRECATED at least one module uses deprecated API
• Bit 3: FAIL at least one module failed
• Bit 4: ERROR at least one module wasn't able to run
• Bit 5: EXCEPTION at least one module thrown an unexpected exception
CHIPSEC will automatically attempt to create and start its service, including load its kernel-mode driver. If chipsec
service is already running then it will attempt to connect to the existing service.
Use --no-driver command-line option if you want CHIPSEC to use native OS API rather than own kernel
module. This option can also be used if loading kernel module is not needed to use desired functionality.
Use -m --module to run a specific module (e.g. security check, a tool or a PoC..):
•# python chipsec_main.py -m common.bios_wp
•# python chipsec_main.py -m common.spi_lock
•# python chipsec_main.py -m common.smrr
• You can also use CHIPSEC to access various hardware resources:
# python chipsec_util.py
Using CHIPSEC as a Python Package
Install CHIPSEC manually or from PyPI as described in the Installation section.
You can then use CHIPSEC from your Python project or from the Python shell:
>>> import chipsec_main
>>> chipsec_main.main()
>>> chipsec_main.main(['-m','common.bios_wp'])
>>> import chipsec_util
>>> chipsec_util.main()
>>> chipsec_util.main(['spi','info'])
Compiling CHIPSEC Executables on Windows
Directories bin/<arch> (where <arch> is x86 or amd64) should already contain compiled CHIPSEC binaries:
chipsec_main.exe, chipsec_util.exe
• To run all security tests run chipsec_main.exe from bin directory:
# chipsec_main.exe
• To access hardware resources run chipsec_util.exe from bin directory:
# chipsec_util.exe
If directory bin doesn't exist, then you can compile CHIPSEC executables:
• Install py2exe package from http://www.py2exe.org
• From the scripts directory run build_exe_<arch>.py as follows:
Using CHIPSEC as a Python Package
8

# python build_exe_<arch>.py py2exe
•chipsec_main.exe, chipsec_util.exe executables and required libraries will be created in
bin/<arch> directory
Writing Your Own Modules
Your module class should subclass BaseModule and implement at least the methods named is_supported and
run. When chipsec_main runs, it will first run is_supported and if that returns true, then it will call run.
As of CHIPSEC version 1.2.0, CHIPSEC implements an abstract name for platform controls. Module authors are
encouraged to create controls in the XML configuration files for important platform configuration information and then
use get_control and set_control within modules. This abstraction allows modules to test for the abstract
control without knowning which register provides it. (This is especially important for test reuse across platform
generations.)
Most modules read some platform configuration and then pass or fail based on the result. For example:
1. Define the control in the platform XML file (in chispec/cfg):
<control name="BiosLockEnable" register="BC" field="BLE" desc="BIOS Lock Enable"/>
2. Get the current status of the control:
ble = chipsec.chipset.get_control( self.cs, 'BiosLockEnable' )
3. React based on the status of the control:
if ble: self.logger.log_passed_check("BIOS Lock is set.")
else: self.logger.log_failed_check("BIOS Lock is not set.")
4. Return:
if ble: return ModuleResult.PASSED
else: return ModuleResult.FAILED
When a module calls get_control or set_control, CHIPSEC will look up the control in the platform XML file,
look up the corresponding register/field, and call chipsec.chipset.read_register_field or
chipsec_chipset.write_register_field. This allows modules to be written for abstract controls that could
be in different registers on differnet platforms.
The CHIPSEC HAL and other APIs are also available within these modules. See the next sections for details about
the available functionality.
Copy your module into the chipsec/modules/ directory structure
• Modules specific to a certain platform should implement is_supported function which returns True for the
platforms the module is applicable to
• Modules specific to a certain platform can also be located in chipsec/modules/<platform_code>
directory, for example chipsec/modules/hsw. Supported plaforms and their code can be found by running
chipesec_main.py --help
• Modules common to all platform which CHIPSEC supports can be located in chipsec/modules/common
directory
If a new platform needs to be added:
• Modify chipsec/chipset.py to include the Device ID for the platform you are adding
• Review the platform datasheet and include appropriate information in an XML configuration file for the platform.
Place this file in chipsec/cfg. Registers that are correctly defined in common.xml will be inherited and do not
need to be added. Use common.xml as an example. It is based on the 4th Generation Intel Core platform
(Haswell).
Writing Your Own Modules
9
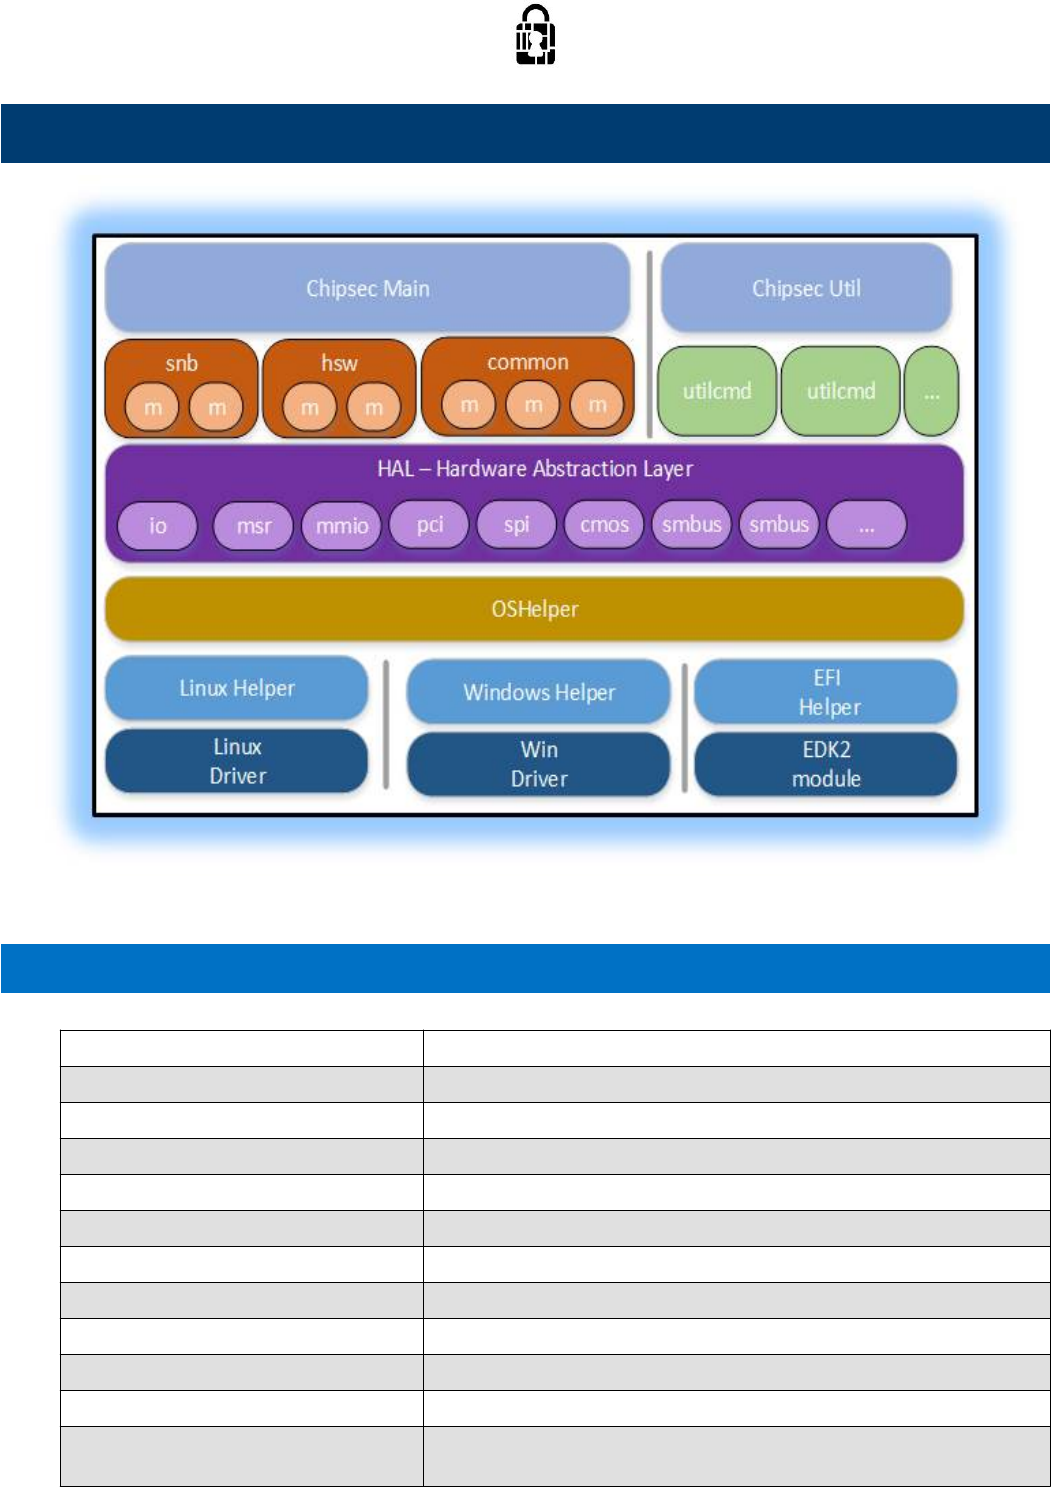
CHIPSEC Components and Structure
Core components
chipsec_main.py main application logic and automation functions
chipsec_util.py utility functions (access to various hardware resources)
chipsec/chipset.py chipset detection
chipsec/command.py base class for util commands
chipsec/defines.py common defines
chipsec/file.py reading from/writing to files
chipsec/logger.py logging functions
chipsec/module.py generic functions to import and load modules
chipsec/module_common.py base class for modules
chipsec/xmlout.py support for JUnit compatible XML output (-x command-line option)
chipsec/helper/helpers.py registry of supported OS helpers
chipsec/helper/oshelper.py OS helper: wrapper around platform specific code that invokes
kernel driver
CHIPSEC Components and Structure
10

Platform Configuration
chipsec/cfg/ platform specific configuration xml files
chipsec/cfg/common.xml common configuration
chipsec/cfg/<platform>.xml configuration for a specific <platform>
chipsec.cfg.avn.xml
XML configuration for Avoton based platforms
• Intel(R) Atom(TM) Processor C2000 Product Family for Microserver, September 2014
http://www.intel.com/content/www/us/en/processors/atom/atom-c2000-microserver-datasheet.html
chipsec.cfg.bdw.xml
XML configuration for Broadwell based platforms
chipsec.cfg.byt.xml
XML configuration for Bay Trail based platforms
• Intel(R) Atom(TM) Processor E3800 Product Family Datasheet, May 2016, Revision 4.0
http://www.intel.com/content/www/us/en/embedded/products/bay-trail/atom-e3800-family-datasheet.html
chipsec.cfg.chipsec_cfg.xsd
XML Schema for platform configuration XML files
chipsec.cfg.cht.xml
XML configuration for Cherry Trail and Braswell SoCs
• Intel(R) Atom(TM) Processor Z8000 series datasheet
http://www.intel.com/content/www/us/en/processors/atom/atom-z8000-datasheet-vol-2.html
• N-series Intel(R) Pentium(R) and Celeron(R) Processors Datasheet
http://www.intel.com/content/dam/www/public/us/en/documents/datasheets/pentium-celeron-n-series-datasheet-vol-2.pdf
chipsec.cfg.common.xml
Common (default) XML platform configuration file
Platform Configuration
11

chipsec.cfg.hsw.xml
XML configuration file for Haswell based platforms
chipsec.cfg.hsx.xml
XML configuration file for Haswell Server based platforms
chipsec.cfg.iommu.xml
XML configuration file for Intel Virtualization Technology for Directed I/O (VT-d)
• Section 10 of Intel Virtualization Technology for Directed I/O
http://www.intel.com/content/dam/www/public/us/en/documents/product-specifications/vt-directed-io-spec.pdf
chipsec.cfg.ivt.xml
XML configuration file for Ivytown (Ivy Bridge-E) based platforms
chipsec.cfg.jkt.xml
XML configuration file for Jaketown (Sandy Bridge-E) based platforms
chipsec.cfg.kbl.xml
XML configuration file for Kaby Lake based platforms
• 7th Generation Intel(R) Processor Families for U/Y-Platforms
• 7th Generation Intel(R) Processor Families I/O for U/Y-Platforms
•http://www.intel.com/content/www/us/en/processors/core/core-technical-resources.html
chipsec.cfg.qrk.xml
XML configuration for Quark based platforms
chipsec.cfg.skl.xml
XML configuration file for Skylake based platforms
• 6th Generation Intel(R) Processor Datasheet for U/Y-Platforms
Platform Configuration
12

• 6th Generation Intel(R) Processor I/O Datasheet for U/Y-Platforms
• 6th Generation Intel(R) Processor Datasheet for S-Platforms
• 6th Generation Intel(R) Processor Datasheet for H-Platforms
• Intel(R) 100 Series Chipset Family Platform Controller Hub (PCH)
•http://www.intel.com/content/www/us/en/processors/core/core-technical-resources.html
chipsec.cfg.template.xml
Template for XML configuration file
OS/Environment Helpers
chipsec.helper.efi.efihelper module
On UEFI use the efi package functions
chipsec.helper.linux.helper module
chipsec.helper.osx.helper module
chipsec.helper.rwe.rwehelper module
Management and communication with Windows kernel mode driver which provides access to hardware resources
Note
On Windows you need to install pywin32 Python extension corresponding to your Python version:
http://sourceforge.net/projects/pywin32/
chipsec.helper.win.win32helper module
Management and communication with Windows kernel mode driver which provides access to hardware resources
OS/Environment Helpers
13

Note
On Windows you need to install pywin32 Python extension corresponding to your Python version:
http://sourceforge.net/projects/pywin32/
chipsec.helper.helpers module
chipsec.helper.oshelper module
Abstracts support for various OS/environments, wrapper around platform specific code that invokes kernel driver
HW Abstraction Layer (HAL)
Components responsible for access to hardware (Hardware Abstraction Layer)
chipsec.hal.acpi module
HAL component providing access to and decoding of ACPI tables
chipsec.hal.acpi_tables module
HAL component decoding various ACPI tables
chipsec.hal.cmos module
CMOS memory specific functions (dump, read/write)
usage:
>>> cmos.dump_low()
>>> cmos.dump_high()
>>> cmos.dump()
>>> cmos.read_cmos_low( offset )
>>> cmos.write_cmos_low( offset, value )
>>> cmos.read_cmos_high( offset )
>>> cmos.write_cmos_high( offset, value )
chipsec.hal.cpu module
CPU related functionality
HW Abstraction Layer (HAL)
14

chipsec.hal.cpuid module
CPUID information
usage:
>>> cpuid(0)
chipsec.hal.ec module
Access to Embedded Controller (EC)
Usage:
>>> write_command( command )
>>> write_data( data )
>>> read_data()
>>> read_memory( offset )
>>> write_memory( offset, data )
>>> read_memory_extended( word_offset )
>>> write_memory_extended( word_offset, data )
>>> read_range( start_offset, size )
>>> write_range( start_offset, buffer )
chipsec.hal.hal_base module
Base for HAL Components
chipsec.hal.igd module
Working with Intel processor Integrated Graphics Device (IGD)
usage:
>>> gfx_aperture_dma_read(0x80000000, 0x100)
chipsec.hal.interrupts module
Functionality encapsulating interrupt generation CPU Interrupts specific functions (SMI, NMI)
usage:
>>> send_SMI_APMC( 0xDE )
>>> send_NMI()
chipsec.hal.io module
Access to Port I/O
usage:
>>> read_port_byte( 0x61 )
>>> read_port_word( 0x61 )
>>> read_port_dword( 0x61 )
>>> write_port_byte( 0x71, 0 )
HW Abstraction Layer (HAL)
15

>>> write_port_word( 0x71, 0 )
>>> write_port_dword( 0x71, 0 )
chipsec.hal.iobar module
I/O BAR access (dump, read/write)
usage:
>>> get_IO_BAR_base_address( bar_name )
>>> read_IO_BAR_reg( bar_name, offset, size )
>>> write_IO_BAR_reg( bar_name, offset, size, value )
>>> dump_IO_BAR( bar_name )
chipsec.hal.iommu module
Access to IOMMU engines
chipsec.hal.mmio module
Access to MMIO (Memory Mapped IO) BARs and Memory-Mapped PCI Configuration Space (MMCFG)
usage:
>>> read_MMIO_reg(cs, bar_base, 0x0, 4 )
>>> write_MMIO_reg(cs, bar_base, 0x0, 0xFFFFFFFF, 4 )
>>> read_MMIO( cs, bar_base, 0x1000 )
>>> dump_MMIO( cs, bar_base, 0x1000 )
Access MMIO by BAR name:
>>> read_MMIO_BAR_reg( cs, 'MCHBAR', 0x0, 4 )
>>> write_MMIO_BAR_reg( cs, 'MCHBAR', 0x0, 0xFFFFFFFF, 4 )
>>> get_MMIO_BAR_base_address( cs, 'MCHBAR' )
>>> is_MMIO_BAR_enabled( cs, 'MCHBAR' )
>>> is_MMIO_BAR_programmed( cs, 'MCHBAR' )
>>> dump_MMIO_BAR( cs, 'MCHBAR' )
>>> list_MMIO_BARs( cs )
Access Memory Mapped Config Space:
>>> get_MMCFG_base_address(cs)
>>> read_mmcfg_reg( cs, 0, 0, 0, 0x10, 4 )
>>> read_mmcfg_reg( cs, 0, 0, 0, 0x10, 4, 0xFFFFFFFF )
DEPRECATED: Access MMIO by BAR id:
>>> read_MMIOBAR_reg( cs, mmio.MMIO_BAR_MCHBAR, 0x0 )
>>> write_MMIOBAR_reg( cs, mmio.MMIO_BAR_MCHBAR, 0xFFFFFFFF )
>>> get_MMIO_base_address( cs, mmio.MMIO_BAR_MCHBAR )
chipsec.hal.msgbus module
Access to message bus (IOSF sideband) interface registers on Intel SoCs
References: - Intel(R) Atom(TM) Processor E3800 Product Family Datasheet, May 2016, Revision 4.0
HW Abstraction Layer (HAL)
16

http://www.intel.com/content/www/us/en/embedded/products/bay-trail/atom-e3800-family-datasheet.html
(sections 3.6 and 13.4.6 - 13.4.8)
• Intel(R) Atom(TM) Processor D2000 and N2000 Series Datasheet, Volume 2, July 2012, Revision 003
http://www.intel.com/content/dam/doc/datasheet/atom-d2000-n2000-vol-2-datasheet.pdf (section 1.10.2)
usage:
>>> msgbus_reg_read( port, register )
>>> msgbus_reg_write( port, register, data )
>>> msgbus_read_message( port, register, opcode )
>>> msgbus_write_message( port, register, opcode, data )
>>> msgbus_send_message( port, register, opcode, data )
chipsec.hal.msr module
Access to CPU resources (for each CPU thread): Model Specific Registers (MSR), IDT/GDT
usage:
>>> read_msr( 0x8B )
>>> write_msr( 0x79, 0x12345678 )
>>> get_IDTR( 0 )
>>> get_GDTR( 0 )
>>> dump_Descriptor_Table( 0, DESCRIPTOR_TABLE_CODE_IDTR )
>>> IDT( 0 )
>>> GDT( 0 )
>>> IDT_all()
>>> GDT_all()
chipsec.hal.paging module
chipsec.hal.pci module
Access to of PCI/PCIe device hierarchy - enumerating PCI/PCIe devices - read/write access to PCI configuration
headers/registers - enumerating PCI expansion (option) ROMs - identifying PCI/PCIe devices MMIO and I/O ranges
(BARs)
usage:
>>> self.cs.pci.read_byte( 0, 0, 0, 0x88 )
>>> self.cs.pci.write_byte( 0, 0, 0, 0x88, 0x1A )
>>> self.cs.pci.enumerate_devices()
>>> self.cs.pci.enumerate_xroms()
>>> self.cs.pci.find_XROM( 2, 0, 0, True, True, 0xFED00000 )
>>> self.cs.pci.get_device_bars( 2, 0, 0 )
>>> self.cs.pci.get_DIDVID( 2, 0, 0 )
>>> self.cs.pci.is_enabled( 2, 0, 0 )
chipsec.hal.pcidb module
HW Abstraction Layer (HAL)
17

Note
THIS FILE WAS GENERATED
Auto generated from:
http://www.pcidatabase.com/vendors.php?sort=id http://www.pcidatabase.com/reports.php?type=csv
chipsec.hal.physmem module
Access to physical memory
usage:
>>> read_physical_mem( 0xf0000, 0x100 )
>>> write_physical_mem( 0xf0000, 0x100, buffer )
>>> write_physical_mem_dowrd( 0xf0000, 0xdeadbeef )
>>> read_physical_mem_dowrd( 0xfed40000 )
chipsec.hal.smbus module
Access to SMBus Controller
chipsec.hal.spd module
Access to Memory (DRAM) Serial Presence Detect (SPD) EEPROM
References:
http://www.jedec.org/sites/default/files/docs/4_01_02R19.pdf
http://www.jedec.org/sites/default/files/docs/4_01_02_10R17.pdf
http://www.jedec.org/sites/default/files/docs/4_01_02_11R24.pdf
http://www.jedec.org/sites/default/files/docs/4_01_02_12R23A.pdf
http://www.simmtester.com/page/news/showpubnews.asp?num=184
http://www.simmtester.com/page/news/showpubnews.asp?num=153
http://www.simmtester.com/page/news/showpubnews.asp?num=101
http://en.wikipedia.org/wiki/Serial_presence_detect
chipsec.hal.spi module
Access to SPI Flash parts
usage:
>>> read_spi( spi_fla, length )
>>> write_spi( spi_fla, buf )
>>> erase_spi_block( spi_fla )
Note
!! IMPORTANT: Size of the data chunk used in SPI read cycle (in bytes) default = maximum 64 bytes (remainder
is read in 4 byte chunks)
HW Abstraction Layer (HAL)
18

If you want to change logic to read SPI Flash in 4 byte chunks: SPI_READ_WRITE_MAX_DBC = 4
@TBD: SPI write cycles operate on 4 byte chunks (not optimized yet)
Approximate performance (on 2-core SMT Intel Core i5-4300U (Haswell) CPU 1.9GHz): SPI read: ~7 sec per
1MB (with DBC=64)
chipsec.hal.spi_descriptor module
SPI Flash Descriptor binary parsing functionality
usage:
>>> fd = read_file( fd_file )
>>> parse_spi_flash_descriptor( fd )
chipsec.hal.spi_uefi module
UEFI firmware image parsing and manipulation functionality
usage:
>>> parse_uefi_region_from_file(_uefi, filename, fwtype, outpath):
chipsec.hal.tpm module
Trusted Platform Module (TPM) HAL component
https://trustedcomputinggroup.org
chipsec.hal.tpm12_commands module
Definition for TPMv1.2 commands to use with TPM HAL
TCG PC Client TPM Specification TCG TPM v1.2 Specification
continueselftest (command_argv)
TPM_ContinueSelfTest informs the TPM that it should complete self-test of all TPM functions. The TPM may
return success immediately and then perform the self-test, or it may perform the self-test and then return success
or failure.
getcap (command_argv)
Returns current information regarding the TPM CapArea - Capabilities Area SubCapSize - Size of SubCapabilities
SubCap - Subcapabilities
nvread (command_argv)
Read a value from the NV store Index, Offset, Size
pcrread (command_argv)
The TPM_PCRRead operation provides non-cryptographic reporting of the contents of a named PCR
startup (command_argv)
Execute a tpm_startup command. TPM_Startup is always preceded by TPM_Init, which is the physical indication
(a system wide reset) that TPM initialization is necessary Type of Startup to be used: 1: TPM_ST_CLEAR 2:
TPM_ST_STATE 3: TPM_ST_DEACTIVATED
HW Abstraction Layer (HAL)
19

chipsec.hal.ucode module
Microcode update specific functionality (for each CPU thread)
usage:
>>> ucode_update_id( 0 )
>>> load_ucode_update( 0, ucode_buf )
>>> update_ucode_all_cpus( 'ucode.pdb' )
>>> dump_ucode_update_header( 'ucode.pdb' )
chipsec.hal.uefi module
Main UEFI component using platform specific and common UEFI functionality
chipsec.hal.uefi_common module
Common UEFI/EFI functionality including UEFI variables, Firmware Volumes, Secure Boot variables, S3 boot-script,
UEFI tables, etc.
chipsec.hal.uefi_platform module
Platform specific UEFI functionality (parsing platform specific EFI NVRAM, capsules, etc.)
UEFI_VARIABLE_STORE_HEADER_SIZE = 28
EFI_VARIABLE_HEADER_AUTH = "<HBBI28sIIIHH8s" EFI_VARIABLE_HEADER_AUTH_SIZE =
struct.calcsize(EFI_VARIABLE_HEADER_AUTH)
EFI_VARIABLE_HEADER = "<HBBIIIIHH8s" EFI_VARIABLE_HEADER_SIZE =
struct.calcsize(EFI_VARIABLE_HEADER)
chipsec.hal.uefi_search module
UEFI image search auxilliary functionality
usage:
>>> chipsec.hal.uefi_search.check_match_criteria(efi_module, match_criteria, self.logger)
chipsec.hal.vmm module
VMM specific functionality 1. Hypervisor hypercall interfaces 2. Second-level Address Translation (SLAT) 3. VirtIO
devices 4. ...
Utility command-line scripts
CHIPSEC utilities provide the capability for manual testing and direct hardware access.
Utility command-line scripts
20

Warning
DIRECT HARDWARE ACCESS PROVIDED BY THESE UTILITIES COULD MAKE YOUR SYSTEM
UNBOOTABLE. MAKE SURE YOU KNOW WHAT YOU ARE DOING!
Note
All numeric values in the instructions are in hex.
chipsec.utilcmd.acpi_cmd module
Command-line utility providing access to ACPI tables
class ACPICommand (argv, cs=None)
Bases: chipsec.command.BaseCommand
>>> chipsec_util acpi list
>>> chipsec_util acpi table <name>|<file_path>
Examples:
>>> chipsec_util acpi list
>>> chipsec_util acpi table XSDT
>>> chipsec_util acpi table acpi_table.bin
chipsec.utilcmd.chipset_cmd module
usage as a standalone utility:
>>> chipsec_util platform
class PlatformCommand (argv, cs=None)
Bases: chipsec.command.BaseCommand
chipsec_util platform
chipsec.utilcmd.cmos_cmd module
class CMOSCommand (argv, cs=None)
Bases: chipsec.command.BaseCommand
>>> chipsec_util cmos dump
>>> chipsec_util cmos readl|writel|readh|writeh <byte_offset> [byte_val]
Examples:
>>> chipsec_util cmos dump
>>> chipsec_util cmos rl 0x0
>>> chipsec_util cmos wh 0x0 0xCC
Utility command-line scripts
21

chipsec.utilcmd.cpu_cmd module
class CPUCommand (argv, cs=None)
Bases: chipsec.command.BaseCommand
>>> chipsec_util cpu info
>>> chipsec_util cpu cr <cpu_id> <cr_number> [value]
>>> chipsec_util cpu cpuid <eax> [ecx]
>>> chipsec_util cpu pt [paging_base_cr3]
Examples:
>>> chipsec_util cpu info
>>> chipsec_util cpu cr 0 0
>>> chipsec_util cpu cr 0 4 0x0
>>> chipsec_util cpu cpuid 40000000
>>> chipsec_util cpu pt
chipsec.utilcmd.decode_cmd module
CHIPSEC can parse an image file containing data from the SPI flash (such as the result of chipsec_util spi dump).
This can be critical in forensic analysis.
Examples:
chipsec_util decode spi.bin vss
This will create multiple log files, binaries, and directories that correspond to the sections, firmware volumes, files,
variables, etc. stored in the SPI flash.
class DecodeCommand (argv, cs=None)
Bases: chipsec.command.BaseCommand
>>> chipsec_util decode <rom> [fw_type]
For a list of fw types run:
>>> chipsec_util decode types
Examples:
>>> chipsec_util decode spi.bin vss
chipsec.utilcmd.desc_cmd module
The idt and gdt commands print the IDT and GDT, respectively.
class GDTCommand (argv, cs=None)
Bases: chipsec.command.BaseCommand
>>> chipsec_util idt|gdt|ldt [cpu_id]
Examples:
>>> chipsec_util idt 0
>>> chipsec_util gdt
class IDTCommand (argv, cs=None)
Bases: chipsec.command.BaseCommand
>>> chipsec_util idt|gdt|ldt [cpu_id]
Utility command-line scripts
22

Examples:
>>> chipsec_util idt 0
>>> chipsec_util gdt
class LDTCommand (argv, cs=None)
Bases: chipsec.command.BaseCommand
>>> chipsec_util idt|gdt|ldt [cpu_id]
Examples:
>>> chipsec_util idt 0
>>> chipsec_util gdt
chipsec.utilcmd.ec_cmd module
class ECCommand (argv, cs=None)
Bases: chipsec.command.BaseCommand
>>> chipsec_util ec dump [<size>]
>>> chipsec_util ec command <command>
>>> chipsec_util ec read <start_offset> [<size>]
>>> chipsec_util ec write <offset> <byte_val>
>>> chipsec_util ec index [<offset>]
Examples:
>>> chipsec_util ec dump
>>> chipsec_util ec command 0x001
>>> chipsec_util ec read 0x2F
>>> chipsec_util ec write 0x2F 0x00
>>> chipsec_util ec index
chipsec.utilcmd.igd_cmd module
The igd command allows memory read/write operations using igd dma.
class IgdCommand (argv, cs=None)
Bases: chipsec.command.BaseCommand
>>> chipsec_util igd
>>> chipsec_util igd dmaread <address> [width] [file_name]
>>> chipsec_util igd dmawrite <address> <width> <value|file_name>
Examples:
>>> chipsec_util igd dmaread 0x20000000 4
>>> chipsec_util igd dmawrite 0x2217F1000 0x4 deadbeef
chipsec.utilcmd.interrupts_cmd module
class NMICommand (argv, cs=None)
Bases: chipsec.command.BaseCommand
>>> chipsec_util nmi
Examples:
Utility command-line scripts
23

>>> chipsec_util nmi
class SMICommand (argv, cs=None)
Bases: chipsec.command.BaseCommand
>>> chipsec_util smi count
>>> chipsec_util smi <thread_id> <SMI_code> <SMI_data> [RAX] [RBX] [RCX] [RDX] [RSI] [RDI]
Examples:
>>> chipsec_util smi count
>>> chipsec_util smi 0x0 0xDE 0x0
>>> chipsec_util smi 0x0 0xDE 0x0 0xAAAAAAAAAAAAAAAA ..
chipsec.utilcmd.io_cmd module
The io command allows direct access to read and write I/O port space.
class PortIOCommand (argv, cs=None)
Bases: chipsec.command.BaseCommand
>>> chipsec_util io list
>>> chipsec_util io <io_port> <width> [value]
Examples:
>>> chipsec_util io list
>>> chipsec_util io 0x61 1
>>> chipsec_util io 0x430 byte 0x0
chipsec.utilcmd.iommu_cmd module
Command-line utility providing access to IOMMU engines
class IOMMUCommand (argv, cs=None)
Bases: chipsec.command.BaseCommand
>>> chipsec_util iommu list
>>> chipsec_util iommu config [iommu_engine]
>>> chipsec_util iommu status [iommu_engine]
>>> chipsec_util iommu enable|disable <iommu_engine>
>>> chipsec_util iommu pt
Examples:
>>> chipsec_util iommu list
>>> chipsec_util iommu config VTD
>>> chipsec_util iommu status GFXVTD
>>> chipsec_util iommu enable VTD
>>> chipsec_util iommu pt
chipsec.utilcmd.mem_cmd module
The mem command provides direct access to read and write physical memory.
class MemCommand (argv, cs=None)
Bases: chipsec.command.BaseCommand
Utility command-line scripts
24

>>> chipsec_util mem <op> <physical_address> <length> [value|buffer_file]
>>>
>>> <physical_address> : 64-bit physical address
>>> <op> : read|readval|write|writeval|allocate|pagedump
>>> <length> : byte|word|dword or length of the buffer from <buffer_file>
>>> <value> : byte, word or dword value to be written to memory at <physical_address>
>>> <buffer_file> : file with the contents to be written to memory at <physical_address>
Examples:
>>> chipsec_util mem <op> <physical_address> <length> [value|file]
>>> chipsec_util mem readval 0xFED40000 dword
>>> chipsec_util mem read 0x41E 0x20 buffer.bin
>>> chipsec_util mem writeval 0xA0000 dword 0x9090CCCC
>>> chipsec_util mem write 0x100000000 0x1000 buffer.bin
>>> chipsec_util mem write 0x100000000 0x10 000102030405060708090A0B0C0D0E0F
>>> chipsec_util mem allocate 0x1000
>>> chipsec_util mem pagedump 0xFED00000 0x100000
chipsec.utilcmd.mmcfg_cmd module
The mmcfg command allows direct access to memory mapped config space.
class MMCfgCommand (argv, cs=None)
Bases: chipsec.command.BaseCommand
>>> chipsec_util mmcfg <bus> <device> <function> <offset> <width> [value]
Examples:
>>> chipsec_util mmcfg 0 0 0 0x88 4
>>> chipsec_util mmcfg 0 0 0 0x88 byte 0x1A
>>> chipsec_util mmcfg 0 0x1F 0 0xDC 1 0x1
>>> chipsec_util mmcfg 0 0 0 0x98 dword 0x004E0040
chipsec.utilcmd.mmio_cmd module
class MMIOCommand (argv, cs=None)
Bases: chipsec.command.BaseCommand
>>> chipsec_util mmio list
>>> chipsec_util mmio dump <MMIO_BAR_name>
>>> chipsec_util mmio read <MMIO_BAR_name> <offset> <width>
>>> chipsec_util mmio write <MMIO_BAR_name> <offset> <width> <value>
Examples:
>>> chipsec_util mmio list
>>> chipsec_util mmio dump MCHBAR
>>> chipsec_util mmio read SPIBAR 0x74 0x4
>>> chipsec_util mmio write SPIBAR 0x74 0x4 0xFFFF0000
chipsec.utilcmd.msgbus_cmd module
class MsgBusCommand (argv, cs=None)
Bases: chipsec.command.BaseCommand
>>> chipsec_util msgbus read <port> <register>
>>> chipsec_util msgbus write <port> <register> <value>
Utility command-line scripts
25

>>> chipsec_util msgbus message <port> <register> <opcode> [value]
>>>
>>> <port> : message bus port of the target unit
>>> <register>: message bus register/offset in the target unit port
>>> <value> : value to be written to the message bus register/offset
>>> <opcode> : opcode of the message on the message bus
Examples:
>>> chipsec_util msgbus read 0x3 0x2E
>>> chipsec_util msgbus write 0x3 0x27 0xE0000001
>>> chipsec_util msgbus message 0x3 0x2E 0x10
>>> chipsec_util msgbus message 0x3 0x2E 0x11 0x0
chipsec.utilcmd.msr_cmd module
The msr command allows direct access to read and write MSRs.
class MSRCommand (argv, cs=None)
Bases: chipsec.command.BaseCommand
>>> chipsec_util msr <msr> [eax] [edx] [cpu_id]
Examples:
>>> chipsec_util msr 0x3A
>>> chipsec_util msr 0x8B 0x0 0x0 0
chipsec.utilcmd.pci_cmd module
The pci command can enumerate PCI/PCIe devices, enumerate expansion ROMs and allow direct access to PCI
configuration registers via bus/device/function.
class PCICommand (argv, cs=None)
Bases: chipsec.command.BaseCommand
>>> chipsec_util pci enumerate
>>> chipsec_util pci <bus> <device> <function> <offset> [width] [value]
>>> chipsec_util pci dump [<bus> <device> <function>]
>>> chipsec_util pci xrom [<bus> <device> <function>] [xrom_address]
Examples:
>>> chipsec_util pci enumerate
>>> chipsec_util pci 0 0 0 0x00
>>> chipsec_util pci 0 0 0 0x88 byte 0x1A
>>> chipsec_util pci 0 0x1F 0 0xDC 1 0x1
>>> chipsec_util pci 0 0 0 0x98 dword 0x004E0040
>>> chipsec_util pci dump
>>> chipsec_util pci dump 0 0 0
>>> chipsec_util pci xrom
>>> chipsec_util pci xrom 3 0 0 0xFEDF0000
chipsec.utilcmd.smbus_cmd module
class SMBusCommand (argv, cs=None)
Bases: chipsec.command.BaseCommand
>>> chipsec_util smbus read <device_addr> <start_offset> [size]
>>> chipsec_util smbus write <device_addr> <offset> <byte_val>
Utility command-line scripts
26

Examples:
>>> chipsec_util smbus read 0xA0 0x0 0x100
chipsec.utilcmd.spd_cmd module
class SPDCommand (argv, cs=None)
Bases: chipsec.command.BaseCommand
>>> chipsec_util spd detect
>>> chipsec_util spd dump [device_addr]
>>> chipsec_util spd read <device_addr> <offset>
>>> chipsec_util spd write <device_addr> <offset> <byte_val>
Examples:
>>> chipsec_util spd detect
>>> chipsec_util spd dump DIMM0
>>> chipsec_util spd read 0xA0 0x0
>>> chipsec_util spd write 0xA0 0x0 0xAA
chipsec.utilcmd.spi_cmd module
CHIPSEC includes functionality for reading and writing the SPI flash. When an image file is created from reading the
SPI flash, this image can be parsed to reveal sections, files, variables, etc.
Warning
Particular care must be taken when using the spi write and spi erase functions. These could make your system
unbootable.
A basic forensic operation might be to dump the entire SPI flash to a file. This is accomplished as follows:
# python chipsec_util.py spi dump rom.bin
The file rom.bin will contain the full binary of the SPI flash. It can then be parsed using the decode util command.
class SPICommand (argv, cs=None)
Bases: chipsec.command.BaseCommand
>>> chipsec_util spi info|dump|read|write|erase|disable-wp [flash_address] [length] [file]
Examples:
>>> chipsec_util spi info
>>> chipsec_util spi dump rom.bin
>>> chipsec_util spi read 0x700000 0x100000 bios.bin
>>> chipsec_util spi write 0x0 flash_descriptor.bin
>>> chipsec_util spi disable-wp
chipsec.utilcmd.spidesc_cmd module
class SPIDescCommand (argv, cs=None)
Bases: chipsec.command.BaseCommand
>>> chipsec_util spidesc [rom]
Utility command-line scripts
27

Examples:
>>> chipsec_util spidesc spi.bin
chipsec.utilcmd.ucode_cmd module
class UCodeCommand (argv, cs=None)
Bases: chipsec.command.BaseCommand
>>> chipsec_util ucode id|load|decode [ucode_update_file (in .PDB or .BIN format)] [cpu_id]
Examples:
>>> chipsec_util ucode id
>>> chipsec_util ucode load ucode.bin 0
>>> chipsec_util ucode decode ucode.pdb
chipsec.utilcmd.uefi_cmd module
The uefi command provides access to UEFI variables, both on the live system and in a SPI flash image file.
class UEFICommand (argv, cs=None)
Bases: chipsec.command.BaseCommand
>>> chipsec_util uefi types
>>> chipsec_util uefi var-list
>>> chipsec_util uefi var-find <name>|<GUID>
>>> chipsec_util uefi var-read|var-write|var-delete <name> <GUID> <efi_variable_file>
>>> chipsec_util uefi decode <rom_file> [fwtype]
>>> chipsec_util uefi nvram[-auth] <rom_file> [fwtype]
>>> chipsec_util uefi keys <keyvar_file>
>>> chipsec_util uefi tables
>>> chipsec_util uefi s3bootscript [script_address]
>>> chipsec_util uefi assemble <GUID> freeform none|lzma|tiano <raw_file> <uefi_file>
>>> chipsec_util uefi insert_before|insert_after|replace|remove <GUID> <rom> <new_rom> <uefi_file>
Examples:
>>> chipsec_util uefi types
>>> chipsec_util uefi var-list
>>> chipsec_util uefi var-find PK
>>> chipsec_util uefi var-read db D719B2CB-3D3A-4596-A3BC-DAD00E67656F db.bin
>>> chipsec_util uefi var-write db D719B2CB-3D3A-4596-A3BC-DAD00E67656F db.bin
>>> chipsec_util uefi var-delete db D719B2CB-3D3A-4596-A3BC-DAD00E67656F
>>> chipsec_util uefi decode uefi.rom
>>> chipsec_util uefi nvram uefi.rom vss_auth
>>> chipsec_util uefi keys db.bin
>>> chipsec_util uefi tables
>>> chipsec_util uefi s3bootscript
>>> chipsec_util uefi assemble AAAAAAAA-BBBB-CCCC-DDDD-EEEEEEEEEEEE freeform lzma uefi.raw mydriver.efi
>>> chipsec_util uefi replace AAAAAAAA-BBBB-CCCC-DDDD-EEEEEEEEEEEE bios.bin new_bios.bin mydriver.efi
chipsec.utilcmd.vmm_cmd module
class VMMCommand (argv, cs=None)
Bases: chipsec.command.BaseCommand
>>> chipsec_util vmm hypercall <rax> <rbx> <rcx> <rdx> <rdi> <rsi> [r8] [r9] [r10] [r11]
>>> chipsec_util vmm hypercall <eax> <ebx> <ecx> <edx> <edi> <esi>
Utility command-line scripts
28

>>> chipsec_util vmm pt|ept <ept_pointer>
>>> chipsec_util vmm virtio [<bus>:<device>.<function>]
Examples:
>>> chipsec_util vmm hypercall 32 0 0 0 0 0
>>> chipsec_util vmm pt 0x524B01E
>>> chipsec_util vmm virtio
>>> chipsec_util vmm virtio 0:6.0
Auxiliary components
setup.py setup script to install CHIPSEC as a package
Executable build scripts
<CHIPSEC_ROOT>/scripts/build_exe_*.py make files to build Windows executables
CHIPSEC Modules
Introduction
chipsec/modules/ modules including tests or tools (that's where most of the chipsec
functionality is)
chipsec/modules/common/ modules common to all platforms
chipsec/modules/<platform >/modules specific to <platform>
chipsec/modules/tools/ security tools based on CHIPSEC framework (fuzzers, etc.)
A CHIPSEC module is just a python class that inherits from BaseModule and implements is_supported and run.
Modules are stored under the chipsec installation directory in a subdirectory "modules". The "modules" directory
contains one subdirectory for each chipset that chipsec supports. There is also a directory for common modules that
should apply to every platform.
Internally the chipsec application uses the concept of a module name, which is a string of the form:
common.bios_wp. This means module common.bios_wp is a python script called bios_wp.py that is stored at
<ROOT_DIR>\chipsec\modules\common\.
Modules can be mapped to one or more security vulnerabilities being checked. Consult the documentation for an
individual module for more information.
Modules Description
Auxiliary components
29

chipsec.modules.common.secureboot.variables module
UEFI 2.4 spec Section 28
Verify that all Secure Boot key/whitelist/blacklist UEFI variables are authenticated (BS+RT+AT) and protected from
unauthorized modification.
Use '-a modify' option for the module to also try to write/corrupt the variables.
chipsec.modules.common.uefi.access_uefispec module
Checks protection of UEFI variables defined in the UEFI spec to have certain permissions.
Returns failure if variable attributes are not as defined in table 11 "Global Variables" of the UEFI spec.
chipsec.modules.common.uefi.s3bootscript module
Checks protections of the S3 resume boot-script implemented by the UEFI based firmware
References:
VU#976132 UEFI implementations do not properly secure the EFI S3 Resume Boot Path boot script
Technical Details of the S3 Resume Boot Script Vulnerability by Intel Security's Advanced Threat Research team.
Attacks on UEFI Security by Rafal Wojtczuk and Corey Kallenberg.
Attacking UEFI Boot Script by Rafal Wojtczuk and Corey Kallenberg.
Exploiting UEFI boot script table vulnerability by Dmytro Oleksiuk.
Usage:
>>> chipsec_main.py -m common.uefi.s3bootscript [-a <script_address>]
Examples:
>>> chipsec_main.py -m common.uefi.s3bootscript
>>> chipsec_main.py -m common.uefi.s3bootscript -a 0x00000000BDE10000
chipsec.modules.common.bios_kbrd_buffer module
DEFCON 16: Bypassing Pre-boot Authentication Passwords by Instrumenting the BIOS Keyboard Buffer by
Jonathan Brossard
Checks for BIOS/HDD password exposure through BIOS keyboard buffer.
Checks for exposure of pre-boot passwords (BIOS/HDD/pre-bot authentication SW) in the BIOS keyboard buffer.
chipsec.modules.common.bios_smi module
The module checks that SMI events configuration is locked down - Global SMI Enable/SMI Lock - TCO SMI
Enable/TCO Lock
References:
Setup for Failure: Defeating SecureBoot by Corey Kallenberg, Xeno Kovah, John Butterworth, Sam Cornwell
Auxiliary components
30

Summary of Attacks Against BIOS and Secure Boot (https://www.defcon.org/images/defcon-22/dc-22-presentations/
Bulygin-Bazhaniul-Furtak-Loucaides/DEFCON-22-Bulygin-Bazhaniul-Furtak-Loucaides-Summary-of-attacks-against
-BIOS-UPDATED.pdf)
chipsec.modules.common.bios_ts module
Checks for BIOS Interface Lock including Top Swap Mode
BIOS Boot Hijacking and VMware Vulnerabilities Digging by Bing Sun
chipsec.modules.common.bios_wp module
The BIOS region in flash can be protected either using SMM-based protection or using configuration in the SPI
controller. However, the SPI controller configuration is set once and locked, which would prevent writes later.
This module does check both mechanisms. In order to pass this test using SPI controller configuration, the SPI
Protected Range registers (PR0-4) will need to cover the entire BIOS region. Often, if this configuration is used at
all, it is used only to protect part of the BIOS region (usually the boot block). If other important data (eg. NVRAM) is
not protected, however, some vulnerabilities may be possible.
A Tale of One Software Bypass of Windows 8 Secure Boot described just such an attack. In a system where certain
BIOS data was not protected, malware may be able to write to the Platform Key stored on the flash, thereby
disabling secure boot.
SMM based write protection is controlled from the BIOS Control Register. When the BIOS Write Protect Disable bit
is set (sometimes called BIOSWE or BIOS Write Enable), then writes are allowed. When cleared, it can also be
locked with the BIOS Lock Enable (BLE) bit. When locked, attempts to change the WPD bit will result in generation
of an SMI. This way, the SMI handler can decide whether to perform the write.
As demonstrated in the Speed Racer issue, a race condition may exist between the outstanding write and
processing of the SMI that is generated. For this reason, the EISS bit (sometimes called SMM_BWP or SMM BIOS
Write Protection) must be set to ensure that only SMM can write to the SPI flash.
This module common.bios_wp will fail if SMM-based protection is not correctly configured and SPI protected ranges
(PR registers) do not protect the entire BIOS region.
chipsec.modules.common.ia32cfg module
Tests that IA-32/IA-64 architectural features are configured and locked, including IA32 Model Specific Registers
(MSRs)
Reference: Intel Software Developer's Manual
chipsec.modules.common.rtclock module
Checks for RTC memory locks. Since we do not know what RTC memory will be used for on a specific platform, we
return WARNING (rather than FAILED) if the memory is not locked.
chipsec.modules.common.smm module
Auxiliary components
31

In 2006, Security Issues Related to Pentium System Management Mode outlined a configuration issue where
compatibility SMRAM was not locked on some platforms. This means that ring 0 software was able to modify
System Management Mode (SMM) code and data that should have been protected.
In Compatability SMRAM (CSEG), access to memory is defined by the SMRAMC register. When SMRAMC[D_LCK]
is not set by the BIOS, SMRAM can be accessed even when the CPU is not in SMM. Such attacks were also
described in Using CPU SMM to Circumvent OS Security Functions and Using SMM for Other Purposes.
This CHIPSEC module simply reads SMRAMC and checks that D_LCK is set.
chipsec.modules.common.smrr module
Researchers demonstrated a way to use CPU cache to effectively change values in SMRAM in Attacking SMM
Memory via Intel CPU Cache Poisoning and Getting into the SMRAM: SMM Reloaded . If ring 0 software can make
SMRAM cacheable and then populate cache lines at SMBASE with exploit code, then when an SMI is triggered, the
CPU could execute the exploit code from cache. System Management Mode Range Registers (SMRRs) force
non-cachable behavior and block access to SMRAM when the CPU is not in SMM. These registers need to be
enabled/configured by the BIOS.
This module checks to see that SMRRs are enabled and configured.
chipsec.modules.common.spi_desc module
The SPI Flash Descriptor indicates read/write permissions for devices to access regions of the flash memory. This
module simply reads the Flash Descriptor and checks that software cannot modify the Flash Descriptor itself. If
software can write to the Flash Descriptor, then software could bypass any protection defined by it. While often used
for debugging, this should not be the case on production systems.
This module checks that software cannot write to the flash descriptor.
chipsec.modules.common.spi_fdopss module
Checks for SPI Controller Flash Descriptor Security Override Pin Strap (FDOPSS). On some systems, this may be
routed to a jumper on the motherboard.
chipsec.modules.common.spi_lock module
The configuration of the SPI controller, including protected ranges (PR0-PR4), is locked by HSFS[FLOCKDN] until
reset. If not locked, the controller configuration may be bypassed by reprogramming these registers.
This vulnerability (not setting FLOCKDN) is also checked by other tools, including flashrom and Copernicus by
MITRE (ref: Copernicus: Question Your Assumptions about BIOS Security http://www.mitre.org/capabilities/cybersec
urity/overview/cybersecurity-blog/copernicus-question-your-assumptions-about).
This module checks that the SPI Flash Controller configuration is locked.
chipsec.modules.tools.cpu.sinkhole module
This module checks if CPU is affected by 'The SMM memory sinkhole' vulnerability by Christopher Domas
Auxiliary components
32

NOTE: The system may hang when running this test. In that case, the mitigation to this issue is likely working but we
may not be handling the exception generated.
References:
The Memory Sinkhole by Christopher Domas: https://www.blackhat.com/docs/us-15/materials/us-15-Domas-The-Me
mory-Sinkhole-Unleashing-An-x86-Design-Flaw-Allowing-Universal-Privilege-Escalation.pdf (presentation) and https
://www.blackhat.com/docs/us-15/materials/us-15-Domas-The-Memory-Sinkhole-Unleashing-An-x86-Design-Flaw-All
owing-Universal-Privilege-Escalation-wp.pdf (whitepaper).
chipsec.modules.tools.secureboot.te module
Tool to test for 'TE Header' vulnerability in Secure Boot implementations as described in All Your Boot Are Belong
To Us
Usage:
chipsec_main.py -m tools.secureboot.te [-a <mode>,<cfg_file>,<efi_file>]
•<mode>
•generate_te (default) convert PE EFI binary <efi_file> to TE binary
•replace_bootloader replace bootloader files listed in <cfg_file> on ESP with
modified <efi_file>
•restore_bootloader restore original bootloader files from .bak files
•<cfg_file> path to config file listing paths to bootloader files to replace
•<efi_file> path to EFI binary to convert to TE binary. If no file path is provided, the tool will look for
Shell.efi
Examples:
Convert Shell.efi PE/COFF EFI executable to TE executable:
chipsec_main.py -m tools.secureboot.te -a generate_te,Shell.efi
Replace bootloaders listed in te.cfg file with TE version of Shell.efi executable:
chipsec_main.py -m tools.secureboot.te -a replace_bootloader,te.cfg,Shell.efi
Restore bootloaders listed in te.cfg file:
chipsec_main.py -m tools.secureboot.te -a restore_bootloader,te.cfg
chipsec.modules.tools.smm.rogue_mmio_bar module
Experimental module that may help checking SMM firmware for MMIO BAR hijacking vulnerabilities described in the
following presentation:
BARing the System: New vulnerabilities in Coreboot & UEFI based systems by Intel Advanced Threat Research
team at RECon Brussels 2017
Usage:
chipsec_main -m tools.smm.rogue_mmio_bar [-a <smi_start:smi_end>,<b:d.f>]
•smi_start:smi_end: range of SMI codes (written to IO port 0xB2)
•b:d.f: PCIe bus/device/function in b:d.f format (in hex)
Example:
Auxiliary components
33

>>> chipsec_main.py -m tools.smm.rogue_mmio_bar -a 0x00:0x80
>>> chipsec_main.py -m tools.smm.rogue_mmio_bar -a 0x00:0xFF,0:1C.0
chipsec.modules.tools.smm.smm_ptr module
CanSecWest 2015 A New Class of Vulnerability in SMI Handlers of BIOS/UEFI Firmware
A tool to test SMI handlers for pointer validation vulnerabilities
Usage: chipsec_main -m tools.smm.smm_ptr -l log.txt \
[-a <mode>,<config_file>|<smic_start:smic_end>,<size>,<address>]
•mode: SMI fuzzing mode
•config = use SMI configuration file <config_file>
•fuzz = fuzz all SMI handlers with code in the range <smic_start:smic_end>
•fuzzmore = fuzz mode + pass 2nd-order pointers within buffer to SMI handlers
•size: size of the memory buffer (in Hex)
•address: physical address of memory buffer to pass in GP regs to SMI handlers (in Hex)
•smram = option passes address of SMRAM base (system may hang in this mode!)
In config mode, SMI configuration file should have the following format
SMI_code=<SMI code> or *
SMI_data=<SMI data> or *
RAX=<value of RAX> or * or PTR or VAL
RBX=<value of RBX> or * or PTR or VAL
RCX=<value of RCX> or * or PTR or VAL
RDX=<value of RDX> or * or PTR or VAL
RSI=<value of RSI> or * or PTR or VAL
RDI=<value of RDI> or * or PTR or VAL
[PTR_OFFSET=<offset to pointer in the buffer>]
[SIG=<signature>]
[SIG_OFFSET=<offset to signature in the buffer>]
[Name=<SMI name>]
[Desc=<SMI description>]
Where
•[]: optional line
•*: Don't Care (the module will replace * with 0x0)
•PTR: Physical address SMI handler will write to (the module will replace PTR with physical address provided as
a command-line argument)
•VAL: Value SMI handler will write to PTR address (the module will replace VAL with hardcoded
_FILL_VALUE_xx)
chipsec.modules.tools.uefi.blacklist module
This module checks current contents of UEFI firmware ROM or specified firmware image for black-listed EFI binaries
which can be EFI firmware volumes, EFI executable binaries (PEI modules, DXE drivers..) or EFI sections. The
module can find EFI binaries by their UI names, EFI GUIDs, MD5/SHA-1/SHA-256 hashes or contents matching
specified regular expressions.
Important! This module can only detect what it knows about from its config file. If a bad or vulnerable binary is not
detected then its 'signature' needs to be added to the config.
Auxiliary components
34

Usage:
chipsec_main.py -i -m tools.uefi.blacklist [-a <fw_image>,<blacklist>]
•fw_image Full file path to UEFI firmware image. If not specified, the module will dump firmware
image directly from ROM
•blacklist JSON file with configuration of black-listed EFI binaries (default = blacklist.json).
Config file should be located in the same directory as this module
Examples:
>>> chipsec_main.py -m tools.uefi.blacklist
Dumps UEFI firmware image from flash memory device, decodes it and checks for black-listed EFI modules defined
in the default config blacklist.json
>>> chipsec_main.py -i --no_driver -m tools.uefi.blacklist -a uefi.rom,blacklist.json
Decodes uefi.rom binary with UEFI firmware image and checks for black-listed EFI modules defined in
blacklist.json config
Note: -i and --no_driver arguments can be used in this case because the test does not depend on the
platform and no kernel driver is required when firmware image is specified
chipsec.modules.tools.uefi.s3script_modify module
This module will attempt to modify the S3 Boot Script on the platform. Doing this could cause the platform to
malfunction. Use with care!
Usage:
Replacing existing opcode:
chipsec_main.py -m tools.uefi.s3script_modify \
-a replace_op,<reg_opcode>,<address>,<value>
<reg_opcode> = pci_wr|mmio_wr|io_wr|pci_rw|mmio_rw|io_rw
chipsec_main.py -m tools.uefi.s3script_modify -a replace_op,mem[,<address>,<value>]
chipsec_main.py -m tools.uefi.s3script_modify -a replace_op,dispatch
chipsec_main.py -m tools.uefi.s3script_modify -a replace_op,dispatch_ep
Adding new opcode:
chipsec_main.py -m tools.uefi.s3script_modify \
-a add_op,<reg_opcode>,<address>,<value>,<width>
<reg_opcode> = pci_wr|mmio_wr|io_wr
chipsec_main.py -m tools.uefi.s3script_modify -a add_op,dispatch[,<entrypoint>]
Examples:
>>> chipsec_main.py -m tools.uefi.s3script_modify -a replace_op,<reg_opcode>,<address>,<value>
>>> <reg_opcode> = pci_wr|mmio_wr|io_wr|pci_rw|mmio_rw|io_rw
The option will look for a script opcode that writes to PCI config, MMIO or I/O registers and modify the opcode to
write the given value to the register with the given address.
After executing this, if the system is vulnerable to boot script modification, the hardware configuration will have
changed according to given <reg_opcode>.
>>> chipsec_main.py -m tools.uefi.s3script_modify -a replace_op,mem
The option will look for a script opcode that writes to memory and modify the opcode to write the given value to the
given address.
Auxiliary components
35

By default this test will allocate memory and write write 0xB007B007 that location.
After executing this, if the system is vulnerable to boot script modification, you should find the given value in the
allocated memory location.
>>> chipsec_main.py -m tools.uefi.s3script_modify -a replace_op,dispatch
The option will look for a dispatch opcode in the script and modify the opcode to point to a different entry point. The
new entry point will contain a HLT instruction.
After executing this, if the system is vulnerable to boot script modification, the system should hang on resume from
S3.
>>> chipsec_main.py -m tools.uefi.s3script_modify -a replace_op,dispatch_ep
The option will look for a dispatch opcode in the script and will modify memory at the entry point for that opcode. The
modified instructions will contain a HLT instruction.
After executing this, if the system is vulnerable to dispatch opcode entry point modification, the system should hang
on resume from S3.
>>> chipsec_main.py -m tools.uefi.s3script_modify -a add_op,<reg_opcode>,<address>,<value>,<width>
>>> <reg_opcode> = pci_wr|mmio_wr|io_wr
The option will add a new opcode which writes to PCI config, MMIO or I/O registers with specified values.
>>> chipsec_main.py -m tools.uefi.s3script_modify -a add_op,dispatch
The option will add a new DISPATCH opcode to the script with entry point to either existing or newly allocated
memory.
chipsec.modules.tools.uefi.uefivar_fuzz module
The module is fuzzing UEFI Variable interface.
The module is using UEFI SetVariable interface to write new UEFI variables to SPI flash NVRAM with randomized
name/attributes/GUID/data/size.
Note: this module modifies contents of non-volatile SPI flash memory (UEFI Variable NVRAM). This may render
system unbootable if firmware doesn't properly handle variable update/delete operations.
Usage:
chipsec_main -m tools.uefi.uefivar_fuzz [-a <options>]
Options:
[-a <test>,<iterations>,<seed>,<test_case>] - test which UEFI variable interface to fuzz
(all, name, guid, attrib, data, size)
•iterations number of tests to perform (default = 1000)
•seed RNG seed to use
•test_case test case # to skip to (combined with seed, can be used to skip to failing test)
All module arguments are optional
Examples: >>> chipsec_main.py -m tools.uefi.uefivar_fuzz
>>> chipsec_main.py -m tools.uefi.uefivar_fuzz -a all,100000
>>> chipsec_main.py -m tools.uefi.uefivar_fuzz -a data,1000,123456789
>>> chipsec_main.py -m tools.uefi.uefivar_fuzz -a name,1,123456789,94
Auxiliary components
36

chipsec.modules.tools.uefi.whitelist module
The module can generate a list of EFI executables from (U)EFI firmware file or extracted from flash ROM, and then
later check firmware image in flash ROM or file against this list of [expected/whitelisted] executables
Usage:
chipsec_main -m tools.uefi.whitelist [-a generate|check,<json>,<fw_image>]
•generate Generates a list of EFI executable binaries from the UEFI
firmware image (default)
•check Decodes UEFI firmware image and checks all EFI executable
binaries against a specified list
•json JSON file with configuration of white-listed EFI
executables (default = efilist.json)
•fw_image Full file path to UEFI firmware image. If not specified,
the module will dump firmware image directly from ROM
Examples:
>>> chipsec_main -m tools.uefi.whitelist
Creates a list of EFI executable binaries in efilist.json from the firmware image extracted from ROM
>>> chipsec_main -i -n -m tools.uefi.whitelist -a generate,efilist.json,uefi.rom
Creates a list of EFI executable binaries in efilist.json from uefi.rom firmware binary
>>> chipsec_main -i -n -m tools.uefi.whitelist -a check,efilist.json,uefi.rom
Decodes uefi.rom UEFI firmware image binary and checks all EFI executables in it against a list defined in
efilist.json
Note: -i and -n arguments can be used when specifying firmware file because the module doesn't depend on the
platform and doesn't need kernel driver
chipsec.modules.tools.vmm.hv.define module
Hyper-V specific defines
chipsec.modules.tools.vmm.hv.hypercall module
Hyper-V specific hypercall functionality
getrandbits (k) → x. Generates a long int with k random bits.
chipsec.modules.tools.vmm.hv.hypercallfuzz module
Hyper-V hypercall fuzzer
Usage:
chipsec_main.py -i -m tools.vmm.hv.hypercall -a <mode>[,<vector>,<iterations>] -l log.txt
•mode fuzzing mode
•= status-fuzzing finding parameters with hypercall success status
Auxiliary components
37

•= params-info shows input parameters valid ranges
•= params-fuzzing parameters fuzzing based on their valid ranges
•= custom-fuzzing fuzzing of known hypercalls
•vector hypercall vector
•iterations number of hypercall iterations
Note: the fuzzer is incompatibe with native VMBus driver (vmbus.sys). To use it, remove vmbus.sys
getrandbits (k) → x. Generates a long int with k random bits.
chipsec.modules.tools.vmm.hv.synth_dev module
Hyper-V VMBus synthetic device generic fuzzer
Usage:
Print channel offers:
chipsec_main.py -i -m tools.vmm.hv.synth_dev -a info
Fuzzing device with specified relid:
chipsec_main.py -i -m tools.vmm.hv.synth_dev -a fuzz,<relid> -l log.txt
Note: the fuzzer is incompatibe with native VMBus driver (vmbus.sys). To use it, remove vmbus.sys
getrandbits (k) → x. Generates a long int with k random bits.
chipsec.modules.tools.vmm.hv.synth_kbd module
Hyper-V VMBus synthetic keyboard fuzzer. Fuzzes inbound ring buffer in VMBus virtual keyboard device.
Usage:
chipsec_main.py -i -m tools.vmm.hv.synth_kbd -a fuzz -l log.txt
Note: the fuzzer is incompatibe with native VMBus driver (vmbus.sys). To use it, remove vmbus.sys
getrandbits (k) → x. Generates a long int with k random bits.
chipsec.modules.tools.vmm.hv.vmbus module
Hyper-V VMBus functionality
getrandbits (k) → x. Generates a long int with k random bits.
chipsec.modules.tools.vmm.hv.vmbusfuzz module
Hyper-V VMBus generic fuzzer
Usage:
chipsec_main.py -i -m tools.vmm.hv.vmbusfuzz -a fuzz,<parameters> -l log.txt
Parameters:
•all fuzzing all bytes
Auxiliary components
38

•hv fuzzing HyperV message header
•vmbus fuzzing HyperV message body / VMBUS message
•<pos>,<size> fuzzing number of bytes at specific position
Note: the fuzzer is incompatibe with native VMBus driver (vmbus.sys). To use it, remove vmbus.sys
getrandbits (k) → x. Generates a long int with k random bits.
chipsec.modules.tools.vmm.vbox.vbox_crash_apicbase module
PoC test for Host OS Crash when writing to IA32_APIC_BASE MSR (Oracle VirtualBox CVE-2015-0377)
http://www.oracle.com/technetwork/topics/security/cpujan2015-1972971.html
Usage:
chipsec_main.py -i -m tools.vmm.vbox_crash_apicbase
chipsec.modules.tools.vmm.xen.define module
Xen specific defines
chipsec.modules.tools.vmm.xen.hypercall module
Xen specific hypercall functionality
getrandbits (k) → x. Generates a long int with k random bits.
chipsec.modules.tools.vmm.xen.hypercallfuzz module
Xen hypercall fuzzer
Usage:
chipsec_main.py -i -m tools.vmm.xen.hypercallfuzz \
-a <mode>[,<vector>,<iterations>] -l log.txt
•mode fuzzing mode
•= help prints this help
•= info hypervisor information
•= fuzzing fuzzing specified hypercall
•= fuzzing-all fuzzing all hypercalls
•= fuzzing-all-randomly fuzzing random hypercalls
•vector code or name of a hypercall to be fuzzed (use info)
•iterations number of fuzzing iterations
Examples:
chipsec_main.py -i -m tools.vmm.xen.hypercallfuzz -a sched_op,10 -l log.txt
chipsec_main.py -i -m tools.vmm.xen.hypercallfuzz -a xen_version,50 -l log.txt
chipsec_main.py -i -m tools.vmm.xen.hypercallfuzz -a set_timer_op,10,0x10000000 -l log.txt
Auxiliary components
39

getrandbits (k) → x. Generates a long int with k random bits.
chipsec.modules.tools.vmm.xen.xsa188 module
Proof-of-concept module for Xen XSA-188 (https://xenbits.xen.org/xsa/advisory-188.html) CVE-2016-7154: "use
after free in FIFO event channel code" Discovered by Mikhail Gorobets
This module triggers host crash on vulnerable Xen 4.4
Usage:
chipsec_main.py -m tools.vmm.xen.xsa188
chipsec.modules.tools.vmm.common module
Common functionality for VMM related modules/tools
getrandbits (k) → x. Generates a long int with k random bits.
chipsec.modules.tools.vmm.cpuid_fuzz module
Simple CPUID VMM emulation fuzzer
Usage:
chipsec_main.py -i -m tools.vmm.cpuid_fuzz -l log.txt
chipsec.modules.tools.vmm.hypercallfuzz module
Pretty simple VMM hypercall fuzzer
Usage:
chipsec_main.py -i -m tools.vmm.hypercallfuzz \
[-a <mode>,<vector_reg>,<maxval>,<iterations>] -l log.txt
•mode hypercall fuzzing mode
•= exhaustive fuzz all arguments exhaustively in range [0:<maxval>] (default)
•= random send random values in all registers in range [0:<maxval>]
•vector_reg hypercall vector register
•maxval maximum value of each register
•iterations number of iterations in random mode
chipsec.modules.tools.vmm.iofuzz module
Simple port I/O VMM emulation fuzzer
Usage:
chipsec_main.py -i -m tools.vmm.iofuzz [-a <mode>,<count>,<iterations>] -l log.txt
Auxiliary components
40

chipsec.modules.tools.vmm.msr_fuzz module
Simple CPU Module Specific Register (MSR) VMM emulation fuzzer
Usage:
chipsec_main.py -i -m tools.vmm.msr_fuzz [-a random] -l log.txt
chipsec.modules.tools.vmm.pcie_fuzz module
Simple PCIe device Memory-Mapped I/O (MMIO) and I/O ranges VMM emulation fuzzer
Usage:
chipsec_main.py -i -m tools.vmm.pcie_fuzz -l log.txt
chipsec.modules.tools.vmm.pcie_overlap_fuzz module
PCIe device Memory-Mapped I/O (MMIO) ranges VMM emulation fuzzer which first overlaps MMIO BARs of all
available PCIe devices then fuzzes them by writing garbage if corresponding option is enabled
Usage:
chipsec_main.py -i -m tools.vmm.pcie_overlap_fuzz -l log.txt
chipsec.modules.tools.vmm.venom module
QEMU VENOM vulnerability DoS PoC test Module is based on PoC by Marcus Meissner
(https://marc.info/?l=oss-security&m=143155206320935&w=2)
Usage:
chipsec_main.py -i -m tools.vmm.venom
chipsec.modules.memconfig module
This module verifies memory map secure configuration, i.e. that memory map registers are correctly configured and
locked down.
chipsec.modules.remap module
Preventing & Detecting Xen Hypervisor Subversions by Joanna Rutkowska & Rafal Wojtczuk
Check Memory Remapping Configuration
chipsec.modules.smm_dma module
Just like SMRAM needs to be protected from software executing on the CPU, it also needs to be protected from
devices that have direct access to DRAM (DMA). Protection from DMA is configured through proper programming of
SMRAM memory range. If BIOS does not correctly configure and lock the configuration, then malware could
Auxiliary components
41

reprogram configuration and open SMRAM area to DMA access, allowing manipulation of memory that should have
been protected.
DMA attacks were discussed in Programmed I/O accesses: a threat to Virtual Machine Monitors? and System
Management Mode Design and Security Issues. This is also discussed in Summary of Attack against BIOS and
Secure Boot https://www.defcon.org/images/defcon-22/dc-22-presentations/Bulygin-Bazhaniul-Furtak-Loucaides/DE
FCON-22-Bulygin-Bazhaniul-Furtak-Loucaides-Summary-of-attacks-against-BIOS-UPDATED.pdf
This module examines the configuration and locking of SMRAM range configuration protecting from DMA attacks. If
it fails, then DMA protection may not be securely configured to protect SMRAM.
Auxiliary components
42
