Mackie DL1608 Reference Guide Dlseries Rg
User Manual: Pdf Mackie DL1608 Reference Guide Mackie - DL1608 - Reference Guide
Open the PDF directly: View PDF ![]() .
.
Page Count: 212 [warning: Documents this large are best viewed by clicking the View PDF Link!]
- Cover Page
- Important Safety Instructions
- Table of Contents
- Chapter 1: Welcome
- Chapter 2: Mixer Hardware : Front Panel
- Chapter 3: Mixer Hardware : Rear Panel
- Chapter 4: Mixer Hardware : Wireless Setup
- Chapter 5: Mackie Master Fader Software
- Chapter 6: Mixer View : Channel Strips
- Chapter 7: Mixer View : Master Fader
- Chapter 8: Level Setting Procedure
- Chapter 9: Channel View : EQ
- Introduction
- EQ On / Off
- Modern / Vintage
- Polarity Invert
- Modern EQ Introduction
- Modern EQ Swipe Zone
- Modern EQ Gain, Frequency and Q [Bandwidth]
- Modern EQ Shelf / Bell
- Modern EQ HPF On / OFF and Frequency
- Modern EQ at a Glance
- Vintage EQ Introduction
- Vintage EQ Swipe Zone
- Vintage EQ HPF Frequency Buttons
- Vintage EQ Gain and Frequency
- Vintage EQ at a Glance
- Chapter 10: Channel View : Gate and Compression
- Introduction
- Gate On / Off
- Modern / Vintage
- Compressor On / Off
- Modern / Vintage
- Modern Gate and Compressor Introduction
- Modern Gate and Compressor Swipe Zone
- Modern Gate Display and Settings
- Modern Gate Meters
- Modern Compressor Display and Settings
- Soft Knee / Hard Knee Compression
- Modern Compressor Meters
- Modern Gate at a Glance
- Modern Compressor at a Glance
- Vintage Gate and Compressor Introduction
- Vintage Gate and Compressor Swipe Zone
- Vintage Gate Settings
- Vintage Compressor Settings
- Vintage Gate / Compressor VU Meters
- Vintage Gate at a Glance
- Vintage Compressor at a Glance
- Chapter 11: Channel View : FX
- Chapter 12: Channel View : Output Graphic EQ
- Chapter 13: Channel View : Output Parametric EQ
- Introduction
- EQ On / Off
- Modern / Vintage
- Modern PEQ Introduction
- Modern PEQ Swipe Zone
- Modern PEQ Gain, Frequency and Q [Bandwidth]
- Modern PEQ Shelf / Bell
- Modern PEQ HPF On / Off, Frequency and Selectable Slope
- Modern PEQ LPF On / Off, Frequency and Selectable Slope
- Modern PEQ at a Glance
- Vintage PEQ Introduction
- Vintage PEQ Swipe Zone
- Vintage PEQ HPF Frequency Buttons
- Vintage PEQ Gain and Frequency
- Vintage PEQ at a Glance
- Chapter 14: Channel View : Output Compressor/Limiter/Delay
- Introduction
- Output Compressor / Limiter On / Off
- Modern / Vintage
- Output Alignment Delay
- Modern Output Compressor / Limiter Introduction
- Modern Output Compressor / Limiter Swipe Zone
- Modern Output Compressor / Limiter Display and Settings
- Soft Knee / Hard Knee Compression
- Modern Output Compressor / Limiter Meters
- Vintage Output Compressor / Limiter Introduction
- Vintage Output Compressor / Limiter Swipe Zone
- Vintage Output Compressor / Limiter Display and Settings
- Vintage Output Compressor / Limiter VU Meter
- Chapter 15: Mixer View : Navigation Bar
- Chapter 16: Mackie My Fader Software
- Appendix A : Service Information
- Appendix B : iOS Optimizations
- Appendix C : Technical Information
- Appendix D : Hookup Diagrams
- Appendix E : Release Notes
- Appendix F : Glossary Of Terms
- Warranty Statement
- GPL Statement
- Open Source Code
- Rear Cover
Mackie DL806 and DL1608 Reference Guide
1
Mackie DL806 and DL1608 Reference Guide
2
1. Read these instructions.
2. Keep these instructions.
3. Heed all warnings.
4. Follow all instructions.
5. Do not use this apparatus near water.
6. Clean only with a dry cloth.
7. Do not block any ventilation openings. Install in accordance with the manufacturer’s
instructions.
8. Do not install near any heat sources such as radiators, heat registers, stoves, or other
apparatus (including amplifiers) that produce heat.
9. Do not defeat the safety purpose of the polarized or grounding-type plug. A polarized
plug has two blades with one wider than the other. A grounding-type plug has two
blades and a third grounding prong. The wide blade or the third prong are provided for
your safety. If the provided plug does not fit into your outlet, consult an electrician for
replacement of the obsolete outlet.
10.
Protect the power cord from being walked on or pinched particularly at plugs, convenience
receptacles, and the point where they exit from the apparatus.
11.
Only use attachments/accessories specified by the manufacturer.
12.
Use only with a cart, stand, tripod, bracket, or table specified
by the manufacturer, or sold with the apparatus. When a cart
is used, use caution when moving the cart/apparatus combina-
tion to avoid injury from tip-over.
13.
Unplug this apparatus during lightning storms or when unused
for long periods of time.
14.
Refer all servicing to qualified service personnel. Servicing is required when the ap-
paratus has been damaged in any way, such as power-supply cord or plug is damaged,
liquid has been spilled or objects have fallen into the apparatus, the apparatus has been
exposed to rain or moisture, does not operate normally, or has been dropped.
15.
This apparatus shall not be exposed to dripping or splashing, and no object filled with
liquids, such as vases or beer glasses, shall be placed on the apparatus.
PORTABLE CART
WARNING
CAUTION
The lightning flash with arrowhead symbol within an
equilateral triangle is intended to alert the user to the
prescence of uninsulated “dangerous voltage” within the
product’s enclosure, that may be of significant magnitude
to constitute a risk of electric shock to persons.
RISK OF ELECTRIC SHOCK! DO NOT OPEN!
CAUTION: TO REDUCE THE RISK OF ELECTRIC SHOCK DO
NOT REMOVE COVER (OR BACK). NO USER-SERVICEABLE
PARTS INSIDE. REFER SERVICING TO QUALIFIED PERSONNEL.
The exclamation point within an equilateral triangle is
intended to alert the user of the prescence of important
operating and maintaining (servicing) instructions in the
literature accompanying the appliance.
Laite on liitettävä suojakoskettimilla varustettuun pistorasiaan.
Apparatet må tilkoples jordet stikkontakt.
Apparaten skall anslutas till jordat uttag.
16.
Do not overload wall outlets and extension cords as this can result in a risk of fire or
electric shock.
17.
The MAINS plug or an appliance coupler is used as the disconnect device, so the discon-
nect device shall remain readily operable.
18. NOTE: This equipment has been tested and found to comply with the limits for a Class
B digital device, pursuant to part 15 of the FCC Rules. These limits are designed to
provide reasonable protection against harmful interference in a residential installation.
This equipment generates, uses, and can radiate radio frequency energy and, if not
installed and used in accordance with the instructions, may cause harmful interference
to radio communications. However, there is no guarantee that interference will not
occur in a particular installation.
If this equipment does cause harmful interference to radio or television reception,
which can be determined by turning the equipment off and on, the user is encouraged
to try to correct the interference by one or more of the following measures:
• Reorientorrelocatethereceivingantenna.
• Increasetheseparationbetweentheequipmentandthereceiver.
• Connecttheequipmentintoanoutletonacircuitdifferentfromthattowhichthe
receiver is connected.
• Consultthedealeroranexperiencedradio/TVtechnicianforhelp.
CAUTION: Changes or modifications to this device not expressly approved by LOUD
Technologies Inc. could void the user's authority to operate the equipment under FCC
rules.
19.
This apparatus does not exceed the Class A/Class B (whichever is applicable)
limits
for radio noise emissions from digital apparatus as
set out in the radio interference
regulations of the Canadian Department
of Communications.
ATTENTION —
Le présent appareil numérique n’émet pas de bruits radioélectriques dépas-
sant las limites applicables aux appareils numériques de class A/de class B (selon le cas)
prescrites dans le réglement sur le brouillage radioélectrique édicté par les ministere des
communications du Canada.
20.
Exposure to extremely high noise levels may cause permanent hearing loss. Individuals
vary considerably in susceptibility to noise-induced hearing loss, but nearly everyone will
lose some hearing if exposed to sufficiently intense noise for a period of time. The U.S.
Government’s Occupational Safety and Health Administration (OSHA) has specified the
permissible noise level exposures shown in the following chart.
According to OSHA, any exposure in excess of these permissible limits could result in
some hearing loss. To ensure against potentially dangerous exposure to high sound
pressure levels, it is recommended that all persons exposed to equipment capable of
producing high sound pressure levels use hearing protectors while the equipment is in
operation. Ear plugs or protectors in the ear canals or over the ears must be worn when
operating the equipment in order to prevent permanent hearing loss if exposure is in
excess of the limits set forth here:
Duration, per
day in hours Sound Level dBA,
Slow Response Typical Example
8 90 Duo in small club
6 92
4 95 Subway Train
3 97
2 100 Veryloudclassicalmusic
1.5 102
1 105 Ben screaming at Troy about deadlines
0.5 110
0.25 or less 115 Loudest parts at a rock concert
WARNING — To reduce the risk of fire or electric shock, do not
expose this apparatus to rain or moisture.
Correct Disposal of this product: This symbol indicates that this product should not be disposed of with your household waste, according to the WEEE Directive
(2012/19/EU) and your national law. This product should be handed over to an authorized collection site for recycling waste electrical and electronic equipment (EEE). Improper handling
of this type of waste could have a possible negative impact on the environment and human health due to potentially hazardous substances that are generally associated with EEE. At the
same time, your cooperation in the correct disposal of this product will contribute to the effective usage of natural resources. For more information about where you can drop off your waste
equipment for recycling, please contact your local city office, waste authority, or your household waste disposal service.
Important Safety Instructions

Mackie DL806 and DL1608 Reference Guide
3
Table of Contents
Important Safety Instructions ...................................................................................................... 2
Table Of Contents .......................................................................................................................... 3
Chapter 1: Welcome ....................................................................................................................... 8
Master Fader V2.1 / My Fader V2.1 ............................................................................................................. 8
About This Guide ......................................................................................................................................... 8
Features ...................................................................................................................................................... 9
Introduction ............................................................................................................................................... 10
Architecture Overview .............................................................................................................................. 11
DL Series Mixer ......................................................................................................................... 11
iPad ............................................................................................................................................ 11
Master Fader app ...................................................................................................................... 11
Chapter 2: Mixer Hardware : Front Panel ................................................................................... 12
Introduction ............................................................................................................................................... 12
iPad Dock Connector ................................................................................................................................. 12
iPad Tray and Tray Inserts ......................................................................................................................... 13
PadLock™ .................................................................................................................................................... 16
Front Panel Introduction........................................................................................................................... 17
Gain Knobs ................................................................................................................................................. 17
Sig / OL LEDs .............................................................................................................................................. 17
Phones Output Jack................................................................................................................................... 18
Phones Knob .............................................................................................................................................. 18
Chapter 3: Mixer Hardware : Rear Panel ....................................................................................19
Rear Panel Introduction ............................................................................................................................ 19
Power Connector ....................................................................................................................................... 19
Power Switch .............................................................................................................................................. 20
Power LED .................................................................................................................................................. 20
Phantom Power Switch ............................................................................................................................. 20
Phantom Power LED .................................................................................................................................. 21
XLR and 1/4" Inputs ................................................................................................................................... 21
L/R Main Outs ............................................................................................................................................. 22
Aux Sends ................................................................................................................................................... 22
Kensington Lock ........................................................................................................................................ 23
Network Connector ................................................................................................................................... 23
Force Update Button ................................................................................................................................. 24
Chapter 4: Mixer Hardware : Wireless Setup ............................................................................25
Introduction ............................................................................................................................................... 25
Wi-Fi Router................................................................................................................................................ 25
Network Connectivity ............................................................................................................................... 25
Connect .................................................................................................................................................... 26
Router Settings .......................................................................................................................................... 28

Mackie DL806 and DL1608 Reference Guide
4
Chapter 5: Mackie Master Fader Software ................................................................................ 29
Introduction ............................................................................................................................................... 29
Downloading and Installing the Master Fader App ................................................................................ 29
Updating the Master Fader App ............................................................................................................... 30
Updating the Firmware ............................................................................................................................. 31
Lingo .................................................................................................................................................... 32
Tapping, Dragging, Flicking, Swiping and Pinching .............................................................. 32
Two Main Views ......................................................................................................................... 33
Mixer View ......................................................................................................................... 33
Channel View ..................................................................................................................... 34
Grow & Glow, Current Parameter Display and The Swipe Zone ............................................ 35
Chapter 6: Mixer View : Channel Strips ...................................................................................... 37
Introduction ............................................................................................................................................... 37
The Swipe Zone .......................................................................................................................................... 37
EQ Curve .................................................................................................................................................... 38
Mute .................................................................................................................................................... 38
Pan .................................................................................................................................................... 38
Gain Reduction Meter ............................................................................................................................... 38
Channel Faders and Input Meters ............................................................................................................ 39
Selected Output Indicators ....................................................................................................................... 39
Solo .................................................................................................................................................... 40
Channel ID Button ..................................................................................................................................... 40
FX [Reverb / Delay] .................................................................................................................................... 43
iPad / Playback ........................................................................................................................................... 44
Chapter 7: Mixer View : Master Fader......................................................................................... 46
Introduction ............................................................................................................................................... 46
Output Selector / Output Channels ......................................................................................................... 46
Graphic EQ.................................................................................................................................................. 47
Mute .................................................................................................................................................... 47
Balance .................................................................................................................................................... 48
Aux/FX Send Conguration Menu ............................................................................................................ 48
Output Gain Reduction Meter .................................................................................................................. 50
Master Fader and Output Meters ............................................................................................................. 50
Record and Solo ......................................................................................................................................... 51
Master ID Button........................................................................................................................................ 53
Linking Auxes ............................................................................................................................................ 55
Chapter 8: Level Setting Procedure ...........................................................................................56
Introduction ............................................................................................................................................... 56
Level Setting Procedure ............................................................................................................................ 56
Headphones ............................................................................................................................................... 57

Mackie DL806 and DL1608 Reference Guide
5
Chapter 9: Channel View : EQ ...................................................................................................... 58
Introduction ............................................................................................................................................... 58
EQ On / O .................................................................................................................................................. 59
Modern / Vintage ....................................................................................................................................... 59
Polarity Invert ............................................................................................................................................ 59
Modern EQ Introduction ........................................................................................................................... 60
Modern EQ Swipe Zone ............................................................................................................................. 60
Modern EQ Gain, Frequency and Q [Bandwidth] .................................................................................... 61
Low Shelving – Band 1 .............................................................................................................. 61
Low-Mid Peaking – Band 2 ....................................................................................................... 61
High-Mid Peaking – Band 3 ...................................................................................................... 62
High Shelving – Band 4 ............................................................................................................ 62
Modern EQ Shelf / Bell ............................................................................................................................... 63
Modern EQ HPF On / O and Frequency .................................................................................................. 64
Modern EQ at a Glance .............................................................................................................................. 65
Vintage EQ Introduction ........................................................................................................................... 66
Vintage EQ Swipe Zone ............................................................................................................................. 66
Vintage EQ HPF Frequency Buttons ......................................................................................................... 66
Vintage EQ Gain and Frequency ............................................................................................................... 67
Vintage EQ at a Glance .............................................................................................................................. 67
Chapter 10: Channel View : Gate and Compression ..................................................................68
Introduction ............................................................................................................................................... 68
Gate On / O............................................................................................................................................... 69
Modern / Vintage ....................................................................................................................................... 69
Compressor On / O .................................................................................................................................. 69
Modern / Vintage ....................................................................................................................................... 69
Modern Gate and Compressor Introduction ........................................................................................... 69
Modern Gate and Compressor Swipe Zone ............................................................................................. 70
Modern Gate Display and Settings .......................................................................................................... 70
Modern Gate Meters.................................................................................................................................. 70
Modern Compressor Display and Settings .............................................................................................. 71
Soft Knee / Hard Knee Compression ........................................................................................................ 71
Modern Compressor Meters ..................................................................................................................... 71
Modern Gate at a Glance ........................................................................................................................... 71
Modern Compressor at a Glance .............................................................................................................. 71
Vintage Gate and Compressor Introduction ........................................................................................... 72
Vintage Gate and Compressor Swipe Zone ............................................................................................. 72
Vintage Gate Settings ............................................................................................................................... 73
Vintage Compressor Settings ................................................................................................................... 73
Vintage Gate / Compressor VU Meters ..................................................................................................... 74
Vintage Gate at a Glance ........................................................................................................................... 74
Vintage Compressor at a Glance .............................................................................................................. 74
Chapter 11: Channel View : FX .................................................................................................... 75
Introduction ............................................................................................................................................... 75
The Swipe Zone .......................................................................................................................................... 75
FX View .................................................................................................................................................... 76
Reverb Type ................................................................................................................................................ 78
Reverb Sliders ............................................................................................................................................ 79
Delay Type .................................................................................................................................................. 80
Delay Sliders .............................................................................................................................................. 81

Mackie DL806 and DL1608 Reference Guide
6
Chapter 12: Channel View : Output Graphic EQ ........................................................................ 82
Introduction ............................................................................................................................................... 82
The Swipe Zone .......................................................................................................................................... 82
Graphic EQ On / O .................................................................................................................................... 82
31-Band EQ................................................................................................................................................. 83
2X .................................................................................................................................................... 83
Draw .................................................................................................................................................... 83
Zeroing the GEQ ........................................................................................................................................ 84
Graphic EQ at a Glance .............................................................................................................................. 84
Chapter 13: Channel View : Output Parametric EQ ................................................................... 85
Introduction ............................................................................................................................................... 85
EQ On / O .................................................................................................................................................. 86
Modern / Vintage ....................................................................................................................................... 86
Modern PEQ Introduction ......................................................................................................................... 87
Modern PEQ Swipe Zone ........................................................................................................................... 87
Modern PEQ Gain, Frequency and Q [Bandwidth] .................................................................................. 88
Low Shelving – Band 1 .............................................................................................................. 88
Low-Mid Peaking – Band 2 ....................................................................................................... 88
High-Mid Peaking – Band 3 ...................................................................................................... 89
High Shelving – Band 4 ............................................................................................................ 89
Modern PEQ Shelf / Bell ............................................................................................................................ 90
Modern PEQ HPF On / O, Frequency and Selectable Slope ................................................................. 91
Modern PEQ LPF On / O, Frequency and Selectable Slope .................................................................. 92
Modern PEQ at a Glance ............................................................................................................................ 93
Vintage PEQ Introduction ......................................................................................................................... 94
Vintage PEQ Swipe Zone ........................................................................................................................... 94
Vintage PEQ HPF Frequency Buttons ....................................................................................................... 94
Vintage PEQ Gain and Frequency ............................................................................................................ 95
Vintage PEQ at a Glance ............................................................................................................................ 95
Chapter 14: Channel View : Output Compressor / Limiter / Delay ........................................... 96
Introduction ............................................................................................................................................... 96
Output Compressor / Limiter On / O ...................................................................................................... 96
Modern / Vintage ....................................................................................................................................... 96
Output Alignment Delay ........................................................................................................................... 97
Modern Output Compressor / Limiter Introduction ............................................................................... 98
Modern Output Compressor / Limiter Swipe Zone ................................................................................. 98
Modern Output Compressor / Limiter Display and Settings .................................................................. 98
Soft Knee / Hard Knee Compression ........................................................................................................ 99
Modern Output Compressor / Limiter Meters ......................................................................................... 99
Vintage Output Compressor / Limiter Introduction ............................................................................... 99
Vintage Output Compressor / Limiter Swipe Zone ................................................................................. 99
Vintage Output Compressor / Limiter Display and Settings ................................................................ 100
Vintage Output Compressor / Limiter VU Meter ................................................................................... 100
Chapter 15: Mixer View : Navigation Bar .................................................................................101
Introduction ............................................................................................................................................. 101
Mixer .................................................................................................................................................. 101
Current Parameter Display ..................................................................................................................... 101
Tools .................................................................................................................................................. 101
Devices ..................................................................................................................................... 102

Mackie DL806 and DL1608 Reference Guide
7
Settings .................................................................................................................................... 108
Help .......................................................................................................................................... 114
File System ............................................................................................................................................... 115
Shows ................................................................................................................................... 115
Snapshots ................................................................................................................................ 117
Channel Safes .......................................................................................................................... 119
Current Show vs Oine Shows .............................................................................................. 121
Random Notes and Other Musings ....................................................................................... 124
Presets ................................................................................................................................... 125
Factory Presets vs User Presets..............................................................................................126
Channel Presets vs DSP Presets ............................................................................................. 129
Quick Access Panel .................................................................................................................................. 132
Clear Solo................................................................................................................................. 132
Eects Controls ....................................................................................................................... 133
Mute Group Control ................................................................................................................ 134
View Group Control ................................................................................................................ 139
Chapter 16: Mackie My Fader Software ...................................................................................142
Introduction ............................................................................................................................................. 142
Downloading, Installing and Updating the My Fader app ................................................................... 142
Using My Fader ........................................................................................................................................ 142
My Fader vs Master Fader ....................................................................................................................... 143
Tools .................................................................................................................................................. 151
Shows .................................................................................................................................................. 154
My Fader Wrap-Up ................................................................................................................................... 154
Appendix A: Service Information ............................................................................................. 155
Troubleshooting ...................................................................................................................................... 155
Repair .................................................................................................................................................. 156
Appendix B: iOS Optimizations ................................................................................................ 157
iPad Optimizations .................................................................................................................................. 157
iPhone / iPod touch Optimizations ........................................................................................................ 165
Appendix C: Technical Information .......................................................................................... 170
Specications ........................................................................................................................................... 170
Dimensions .............................................................................................................................................. 174
Block Diagram .......................................................................................................................................... 179
Appendix D: Hookup Diagrams ................................................................................................180
Appendix E: Release Notes .......................................................................................................186
Appendix F: Glossary Of Terms .................................................................................................202
Warranty Statement / GPL Statement / Open Source Code ........................................... 210-211
Mackie DL806 and DL1608 Reference Guide
8
Chapter 1: Welcome
Master Fader V2.1 / My Fader V2.1
This is the new-and-improved version of the DL Series Reference Guide. The goal of our ninja-like
Engineering team is to continue to make your experience even better, so the DL Series mixers and
Master Fader / My Fader apps may be updated at any time. Be sure you are always using the latest version
of each, as specic releases are designed to work together. This version of the Reference Guide is written
and designed to pair with Master Fader V2.1, My Fader V2.1 and the corresponding mixer rmware installed
by these apps. With so many frequent changes, some screen shots may look slightly dierent than what
you see within these pages and there could be some functional dierences, as well.
About This Guide
***We strongly encourage checking out the Quick Start Guide before diving into this Reference Guide***
It is a great way to familiarize yourself with the basic ideas of the DL806 and DL1608, how to switch between
views, add color to a mix, gates & compressors, FX, graphic EQ and much more. Once you do that, this will be
a breeze!
This guide is designed to be accessible, with subsections as complete as practical to minimize having to leaf
back and forth looking for the whole story. The entire guide does not need to be read to gure out how to
use this console. However, a certain amount of familiarity with analog mixing consoles, their features, and
commonly used signal processing (compressors, limiters, gates, EQs) is assumed.
This guide provides the following resources:
• AgeneraloverviewoftheDL806andDL1608’sfacilitiesandfeatures.
• Dissection-by-dissectiondescriptionofeachinputandoutput,everynookandcranny
and — by golly — each doodad, too!
• DetaileddescriptionofeachscreenontheMackieMasterFaderiPadapp.
• AnentirechapterdedicatedtoMyFaderiPhoneandiPodtouchapp.
• Anentirechapterdedicatedtothelevelsettingprocedure.
• Hookupdiagramsdepictingsomeofthemorecommonsetups.
• Bottomline:thereisaTONofstuinhere.Wewouldbedumbfoundediftherewasanythingmissing.
Asthesayinggoes,“apicturetellsa1000words”.Withthatthoughtinmind,weaddedquiteafew
pictures, screen shots, illustrations and other images throughout to accompany the text.
This icon marks information that is critically important or unique! For your own good, read and
remember them because there is pop quiz built in to the Master Fader app. To conrm your
knowledge of these features, the app will not function until all answers are correct. Ok, maybe
that’snotentirelyaccurate(orevensomewhataccurate),butitISagoodideatopayspecial
attentiontotheseareasintheReferenceGuidemarkedwiththe“VERYIMPORTANT”handicon.
There’sanillustrationofamicroscope,so,ofcourse,you’regoingtogetmoredetailed
information when you see this little guy. There are explanations of features and practical
tips listed here.
It’sagoodideatopayattentiontotextdisplayednexttoanoteicon,asthisicondraws
attentiontocertainfeaturesandfunctionsrelatingtotheusageofthemixer,theiPad
and/or Master Fader app.
This seems like as good a place as any to have our rst note together (and I will cherish
this moment forever)! Whether you have a DL806 or a DL1608 mixer, this is THE place
to be! This Reference Guide covers both mixers. The dierences between the two are
noted throughout. If not specically noted, operation is the same for both mixers.

Mackie DL806 and DL1608 Reference Guide
9
Features
• Provenhardwarethatsoundsgreat
•Onyxmicpreamps
•High-endCirrusLogic®converters
•Ultralow-noise,high-headroomdesign
•Auxsendsformonitormixes
•MasterL/Routputformains
• Tonsofbuilt-inprocessing
•Choiceofpowerful,touch-sensitiveplug-ins
•4-bandEQ,gateandcompressiononinputs
•31-bandGEQandcomp/limiteronoutputs
•Globalreverbanddelay
• Wirelessmixing
•Seamlesswiredtowirelessmixing
•Tunetheroomfromanywhere
•Getonstagetoringoutmonitors
•Personalmonitormixingwithaccesscontrolability
•Useupto10iOSdevicessimultaneously
• TotalcontrolfromyouriPad,iPhoneoriPodtouch
•IntuitiveMasterFader™appforalliPadmodels
•MyFader™appforquickcontrolfromiPhoneoriPodtouch
•“Grow&Glow”visualfeedback
•Presetandsnapshotrecall
•RecordthemixtotheiPadforinstantsharing
•Integratemusicfromanyappintothemix
•
Install friendly features
•PadLock™featurelocksdowniPadforpermanentinstalls
•IndustrystandardKensingtonlocksecuresmixer
•Compactfootprintsavepreciousworkspace
•15.5"x11.5"x3.9"(394mmx292mmx99mm)
•7.9lb(3.6kg)[DL1608]/6.9lb(3.1kg)[DL806]
•Lightningand30-pinversionsavailable
Wi-Firouterrequiredforwirelessoperation.Wi-FirouterandiPad,iPodtouchoriPhonenotincluded.
WirelesscontrolsupportedfromalliPadmodels.
DLseriesmixerswithLightningdocksupportwiredcontrolfromiPad(4thgeneration)andiPadmini(requiresoptionaliPadminitrayaccessory).
DLseriesmixerswith30-pindocksupportwiredcontrolfromiPad(1stgeneration),iPad2andiPad(3rdgeneration).
WirelesscontrolsupportedfromiPodtouch(4thand5thgeneration),iPhone4,iPhone4SandiPhone5.
iPadmustbedockedandtheappmustsupportbackgroundaudioplayback.
iPadisatrademarkofAppleInc.,registeredintheU.S.andothercountries.

Mackie DL806 and DL1608 Reference Guide
10
Introduction
Nearly25yearsago,MackierevolutionizedtheproaudioworldbyunleashingtheCR160416-channel
mixer. Today, Mackie redenes live mixing by combining the power of a digital mixer with the ease and
portabilityofaniPad.Thinkofitastoday’sCR1604...butdigitalandunplugged.
• Control the mix from anywhere
WiththeMackieDLSeriesmixer’sseamlesswiredtowirelessmixingcapabilities,youcanmixwirelesslyin
realtimefromanywhereinthevenueonyouriPad,iPhoneoriPodtouch.Thebar,thebathroom,theback
closet. Instantly adjust mix functions from tuning front of house trouble spots to ringing out stage monitors.
DLseriesmixersaccommodateiPadscontainingeitheraLightningor30-pinconnector.
• Control the mix from your iPad
DesignedspecicallyfortheiPad,theMasterFaderappbringsground-breakingDAWmixingfeaturesand
functionality to the live environment. With this intuitive breakthrough app, you can create mix snapshots,
channelpresetsandevenrecordstereotracksstraighttoyouriPad.Plus,with“GrowandGlow”givingyou
visualindicationofthefunctionyou’recontrolling,youcanbecondentthatyou’realwaysincontrol.
• Proven hardware that sounds great
BycombiningouragshipOnyxmicpreampswiththeperformanceof24-bitCirrusLogicAD/DA
converters,theMackieDL806andDL1608deliverunparalleledsoundquality.Addtothatmultiple
balanced outputs, and you have a mixer that not only provides incredible dynamic range, delity
and transparency, but also great versatility and outstanding value.
• Tons of built-in processing
TheDLSeriesmixersareloadedwithachoiceofpowerfulplug-insoneverychannel,soyouwon’tneed
to set up additional racks of outboard gear. With just the touch of a nger, you have total control over
4-bandEQ,compressionandgateplug-ins.Plus,sweetenyoursoundwithafull-featuredreverbandtap
delay or adjust your mix to the room with the 31-band graphic EQ and limiter on the main and aux outs.
• Peace of mind with access control, mute groups and view groups
CustomizewhatcontrolsareavailabletoeachiOSdevice.Greatforprovidingtherightlevelofaccessfor
those with less experience, access limits even provides a password lock for ultimate protection.
Fourindividualmutegroupsareavailablefromthequickaccesspanelfor,well,quickaccess.Assignspecic
input and output channels to these mute groups for customizable control of channel muting.
Only see the channels you want to see by assigning input channels to one or more of four separate view
groups. This not only improves organization and allows for faster navigation, it is perfect for hiding channels
from on-stage musicians when paired with access limiting.
• Multiple iOS devices support
Supporting up to 10 iOS devices simultaneously, the Mackie DL Series allows multiple engineers to
controlthemix.Plus,itgivesbandmemberstheabilitytoadjusttheirownmonitorswithMyFaderon
theiriPhoneoriPodtouch.Now,thebandcandialinthemixtheywanttohearinrealtimerightonstage.
• Forward looking design
The sleek and low prole Mackie DL806 and DL1608 are rooted in design innovation. Its powerfully small
formatdestroystheindustry’snotionthat“biggerisbetter”byallowingmoderntechnologytoeliminate
the need for bulky boards and racks of gear.
Mackie DL806 and DL1608 Reference Guide
11
Architecture Overview
Attheverycore,theDLSeriessystemconsistsofthreeseparateparts:theDLSeriesmixer,aniPad
and the Master Fader app. Each of these three components are equally important, none more so than
theother.Youcanplaywitheachcomponentseparately,butyouwon’tbeabletoaccomplishmuch.
Together,though,youbecomeMr.Mix-A-Lot,theenvyofengineersateveryvenuetheworldover.
It’simportanttonotethattheDL806and/orDL1608isthedigitalmixer,whileoneormoreiOSdevices
controlsit.AllDSPprocessingandroutingtakeplaceinthemixeritself,meaningit’snotjusta“dock”.
Let’stakeaquicklookateach,whattheyareandhowtheyrelatetoeachother.
DL Series Mixer — Every mixer in the universe has input and output jacks. The DL Series are no dierent.
In addition to input and output jacks, this mixer contains gain knobs and accompanying SIG/OL LEDs.
Ontherearpanelarethepowerconnectorandnetworkconnector.Powerand48Vphantompower
switchesandLEDsroundoutthemixer.Unlikemostothermixers,though,theDLSeriesmixersdon’thave
traditionalcontrolsandwon’tworkwithoutaniPadandtheMasterFaderapp.Feelfreetomakeall
the connections you want, but you need more to control it. Mixer details begin on the next page.
iPad—TheAppleiPad.Suchacool,innovativeproduct,huh?Sendandreceiveemail,surftheweb,
download and install apps for gaming, business, education, entertainment, social networking, sports,
travel,musicandmore.Allthisfromnearlyanywhereintheworld!Holdonasecond...whatwasthat
lastone?Music?Yep,music.ThisiswheretheMasterFaderappcomesintoplay.TheiPadisatoolthat
allows us to create the best user experience for you, a blank canvas for the Master Fader app.
Master Fader App — This is the third piece of the puzzle. Forgo the burden of carrying around a big, bulky
deskwithhundredsofknobs.ADLSeriesmixerwithiPadandMasterFaderapparethewaytogo!Andwith
wireless capability, feel free to walk the venue creating mixes on the y utilizing the large, full-color screen
touchUI.MixingwirelesslyontheyonanapponaniPad?Thatsoundsout-of-this-world!Itmustbeslow
anddiculttocomprehend,though,right?Wrong.TheMasterFaderappisfast,uidandintuitive.Don’t
believeus?DownloadandinstalltheMasterFaderappforfreeandseeforyourself...youdon’tevenneeda
mixer to test drive the app!
Anadditionalhardwarecomponenttoaddtothemixisawirelessrouter.Oneofthemain
reasons for utilizing a DL Series mixer is for its wireless capabilities. It certainly is possible
without one, but then you would be missing out on one of the coolest features of
the mixer. More on the router later.
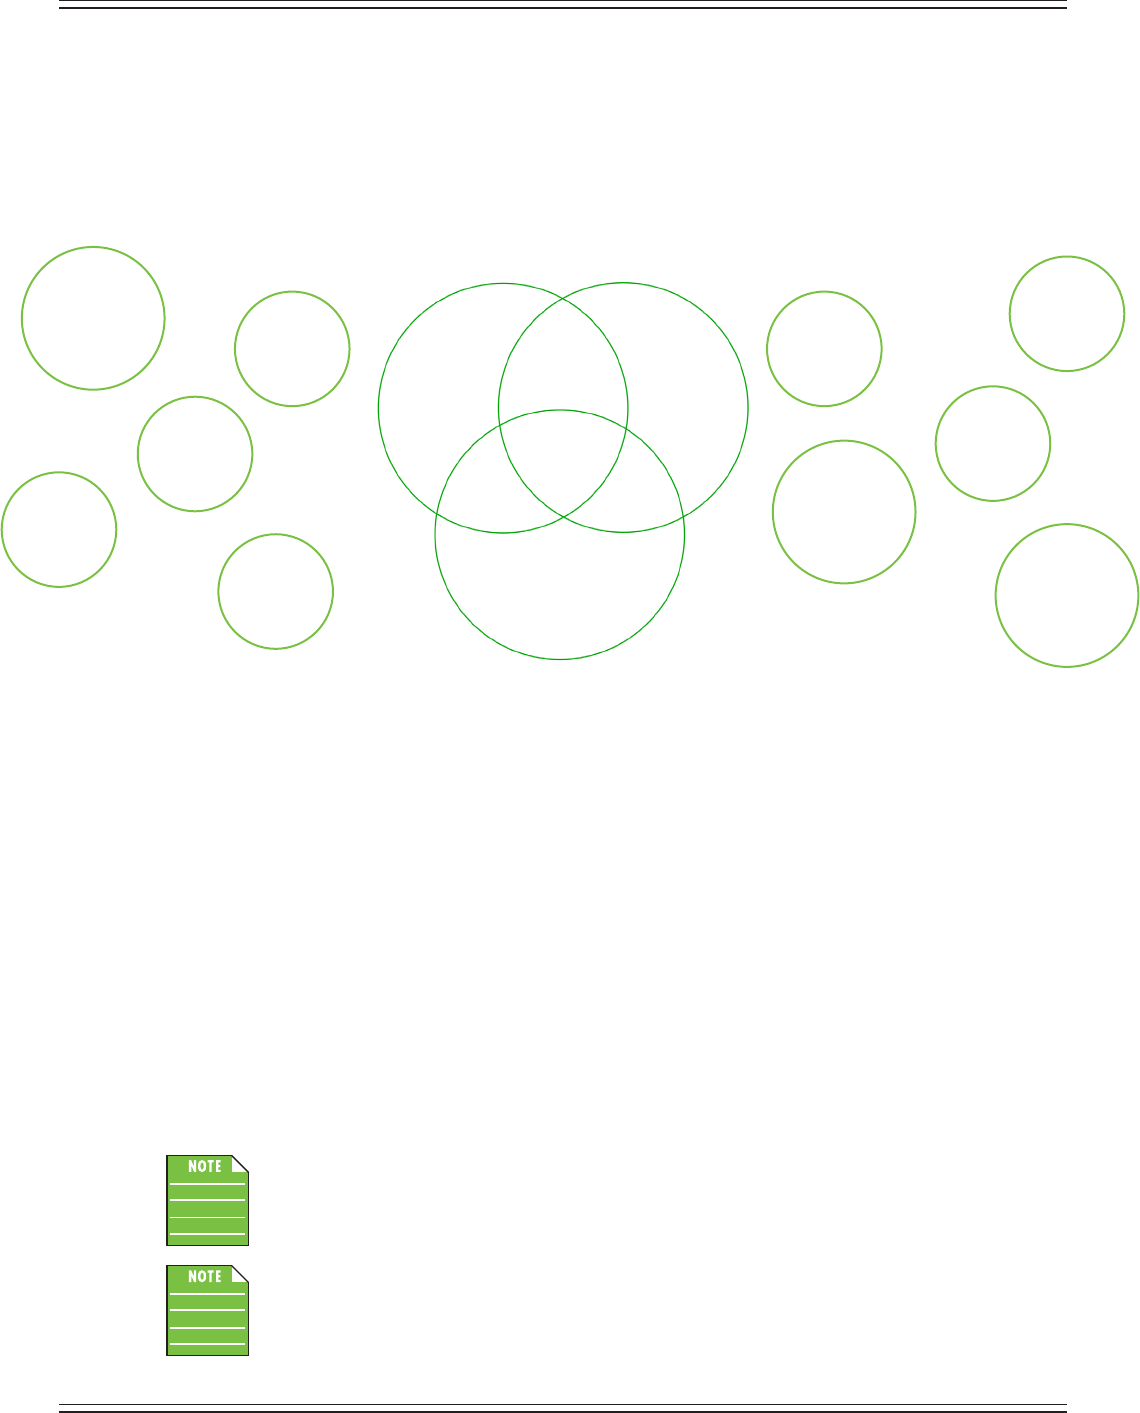
Asnotedabove,atleastoneiPadisnecessarytoutilizeaDLSeriesmixer.However,up
to10iOSdevicesmaybeconnectedtoitwirelessly.ThisincludesanygenerationiPad,
aniPadmini,anygenerationiPhoneand/oraniPodtouch.Youcanevenmixandmatch!
Wireless
Original iPad
Wireless
iPad 2
Wireless
iPad
(3rd generation)
Future
Wireless
iOS Device
Wireless
iPad
(4th generation) Wireless
iPhone 4S
Wireless
iPad mini
Wireless
iPhone 5
Wireless
iPod touch
Wireless
iPhone 4 Master Fader App
Match
Made in
Heaven
One
Piece
Missing
One
Piece
Missing
Impossible
Mission
DL Series
Mixer
Wired
iPad
Mackie DL806 and DL1608 Reference Guide
12
Chapter 2: Mixer Hardware : Front Panel
Introduction
We’regoingtostartthingsowithalookatthemixer:itsfeatures,howandwheretomakeconnections,
signalow,andthennishowithanin-depthcommentaryregardingtheEthernetconnector.Let’skick
oourfrontpanelhardwarediscussionwiththeiPaddockconnector.
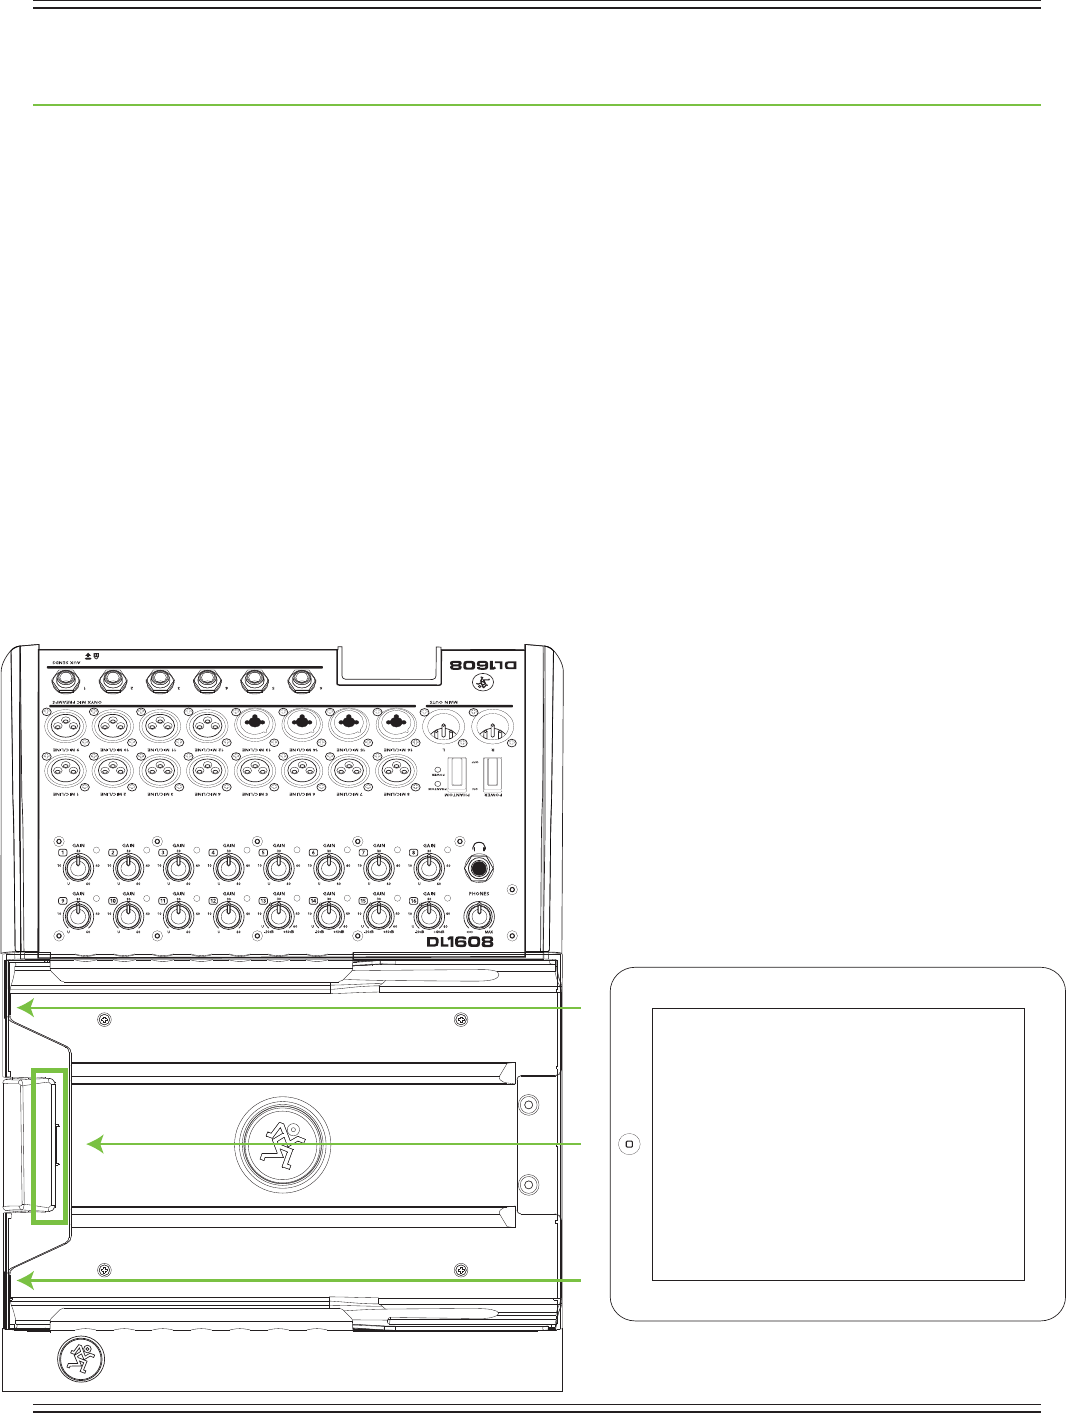
iPad Dock Connector
Onthefarleftofthemixer(outlinedbytheverticalgreenrectanglebelow)istheiPaddockconnector.
DLseriesmixerswithLightningdocksupportwiredcontrolfromiPad(4thgeneration)andiPadmini
(requiresoptionaliPadminitrayaccessory).DLseriesmixerswith30-pindocksupportwiredcontrol
fromiPad(1stgeneration),iPad2andiPad(3rdgeneration).
IfusinganiPad2,iPad(3rdgeneration)oriPad(4thgeneration),slidetheiPadrighttoleft,faceup,home
buttonontheleftuntilitmateswiththeiPaddockconnector.IfusinganoriginaliPadorminiiPad,thetray
insertwillneedtoberemovedrst.SeethenextthreepageswhichexplaintheiPadtrayandtrayinserts.
This connection serves multiple purposes. For one, recording and playback are possible when
aniPadisconnectedtothemixer.Foranother,aslongasthemixerispluggedinandturnedon,
theiPadwillcharge.Andmostimportantly,MasterFaderworkssanswirelessrouterwhendocked.
[Recordingandplaybackaredetailedinupcomingchapters].Plus,itjustlookscoolwhenthetwo
aremarriedtogether,connectedasone.Perfection.Bliss.Doitandyou’llseewhatwemean.

Mackie DL806 and DL1608 Reference Guide
13
iPad Tray and Tray Inserts
ThelargestareaonthemixeristheiPadtraywiththedocktoitsleft.TheiPadtrayisapartoftheDLSeries
mixerandcannotberemoved.TheiPadslidesintothetrayandmateswiththedockconnectoronthemixer.
One of the really cool things about these mixers is that it seamlessly transitions from wired to wireless
operation.Therefore,thetrayishighly-durabletowithstandrepetitiveinsertionandremovalofaniPad.
It does this by using a tray and insert design.
ItneedstonotonlyaccommodatethecurrentiPaddesigns,butalsobereadyforfuturevariations.
TheintegratedtraytstheoriginaliPad,whiletrayinsertsareaddedtotallotheriPads(including
theiPadmini).Forboththetrayandinserts,theamazingtisachievedbyutilizingtwocenterrails
andcurvedsupportsonthesides.TherearealsotwoguidesabovetheiPadcreatingtheperfectalignment
needed for docking.
TheresultisthatalliPadversionsaresupported.Additionally,itisreadyforanynewiPaddesignwithjustthe
additionofanewtrayinsert.Havingsaidthat,wecan’tpredictthefuture;ifwecouldwewouldallberetired
zillionaires, traveling the world over. We do our best to plan for all possiblities, but there are no guarantees.
DLSeriesmixerscomeequippedwithastandardiPadtrayinsertalreadyinstalledandscreweddown.
ThefollowingisalistofallcurrentiPadmodelsandwhatinsert(ifany)isneededtodockit:
Original iPad – no tray insert necessary; the included tray insert needs to be removed.
[See directions listed below].
iPad 2, iPad (3rd generation), iPad (4th generation) – standard tray insert (included with mixer).
iPad mini – iPad mini tray insert (sold separately). The included iPad tray insert needs to removed
and replaced with an iPad mini tray insert. [See directions on the next page].
ThetrayinsertisnotnecessarilydependentonwhattypeofconnectortheiPadhas.
Inotherwords,whileaniPad2andiPad(3rdgeneration)[both30-pinconnectors]
andiPad(4thgeneration)[Lightningconnector]havedierentconnectors,allthree
modelsrequiretheincludedstandardtrayinsert.Havingsaidthat,alloriginaliPads
havea30-pinconnectorandallrequirethattheincludedtrayinsertberemoved.Likewise,alliPad
minis have a Lightning connector and require that the included tray insert be removed and replaced
withaniPadminitrayinsert.
Mackie DL806 and DL1608 Reference Guide
14
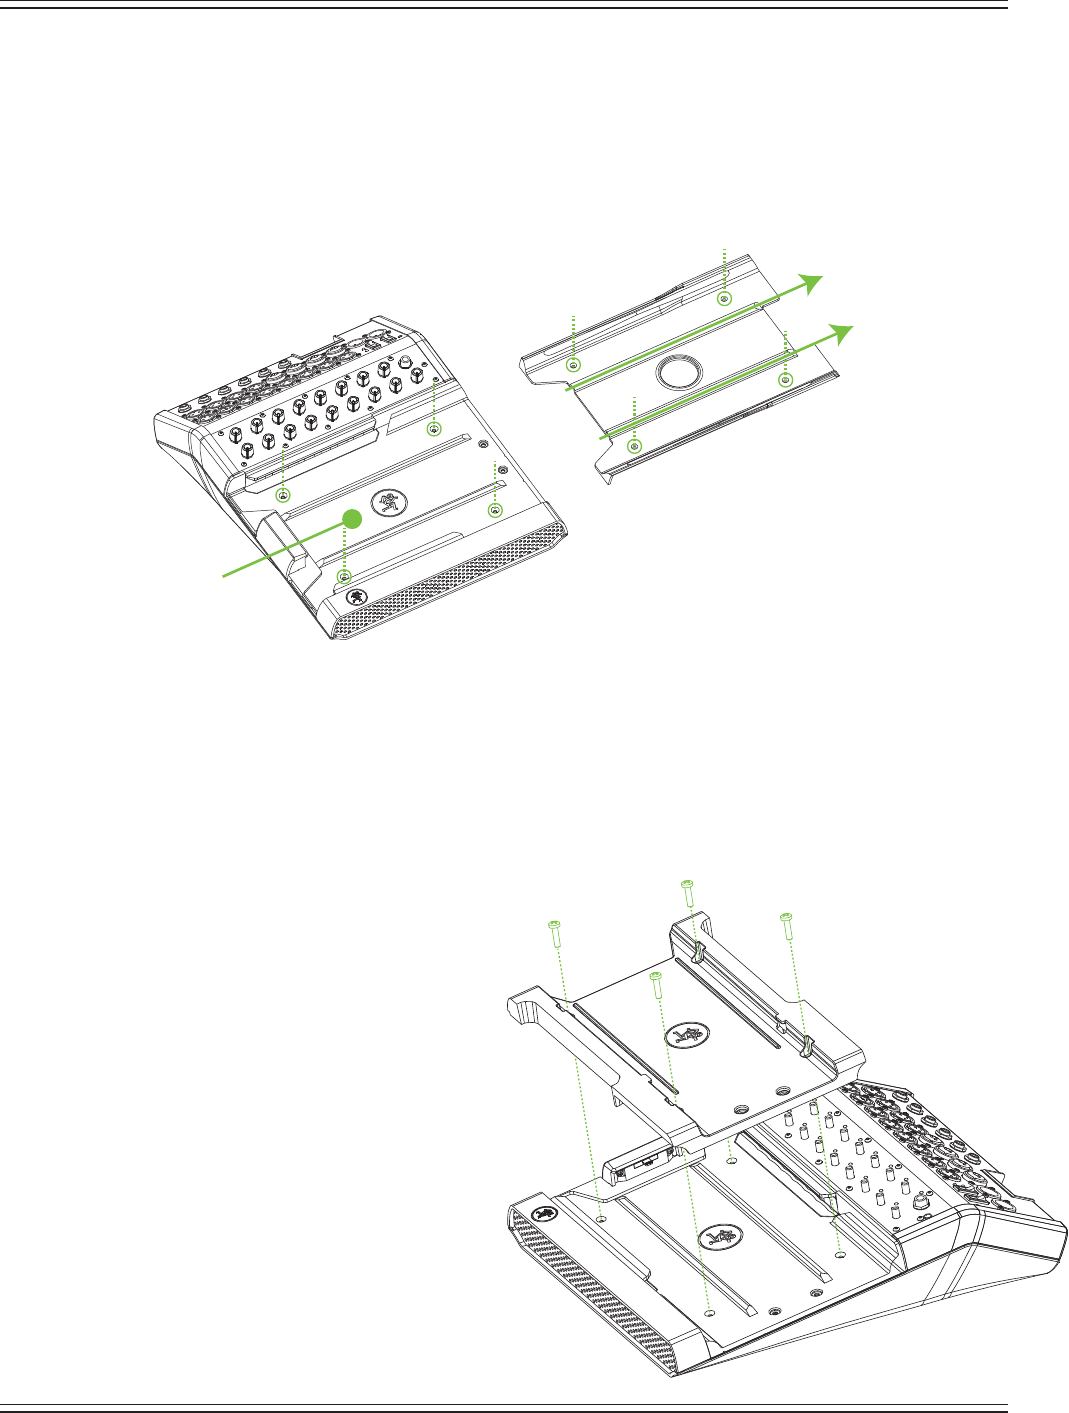
Here’showtoremovetheiPadtray(ifmixingwithanoriginaliPad):
(1) remove the four screws holding the tray insert to the mixer, numbered 1 to 4 in the illustration below.
(2)slidethetrayinsertoutfromthemixerandSAVEITSOMEWHERESAFE!Shouldyoueverupgrade
toaniPad2,iPad(3rdgeneration),oriPad(4thgeneration)thetraywillbenecessary.
(3)putthescrewsbackintothemixerfromwhereyoujustremovedthem.Thiswaytheycan’tgetlost.
WithdierentdimensionsthantheotheriPads,theiPadminidoesn’tttheincludediPadtray...it’stoosmall!
Don’tfret,though;we’vegotyoucovered.Asmentionedonthepreviouspage,aniPadminimaybedocked
to a DL Series mixer with a Lightning connector, but it requires a mini tray insert (sold separately).
Here’showtoinstalltheiPadminitray:
(1) remove the four screws from the mixer,
as seen in the illustration to the right.
(2) If applicable, slide the tray insert out from
themixerandSAVEITSOMEWHERESAFE!
ShouldyoudecidetodockaniPad2,iPad
(3rdgeneration),oriPad(4thgeneration)
to the mixer, the tray will be necessary.
(3)placetheiPadminitrayinsertontop
of the mixer, making sure to line up the
sides and the screw holes.
(4) put the screws back into the mixer
from where you just removed them
(asdisplayedbelow)toholdtheiPad
mini tray insert into place.
(5) for the complete iPad mini tray kit
installation instructions, click here!
1
2
3Tray Insert
Tray
4
1
2
3
4
Mackie DL806 and DL1608 Reference Guide
15
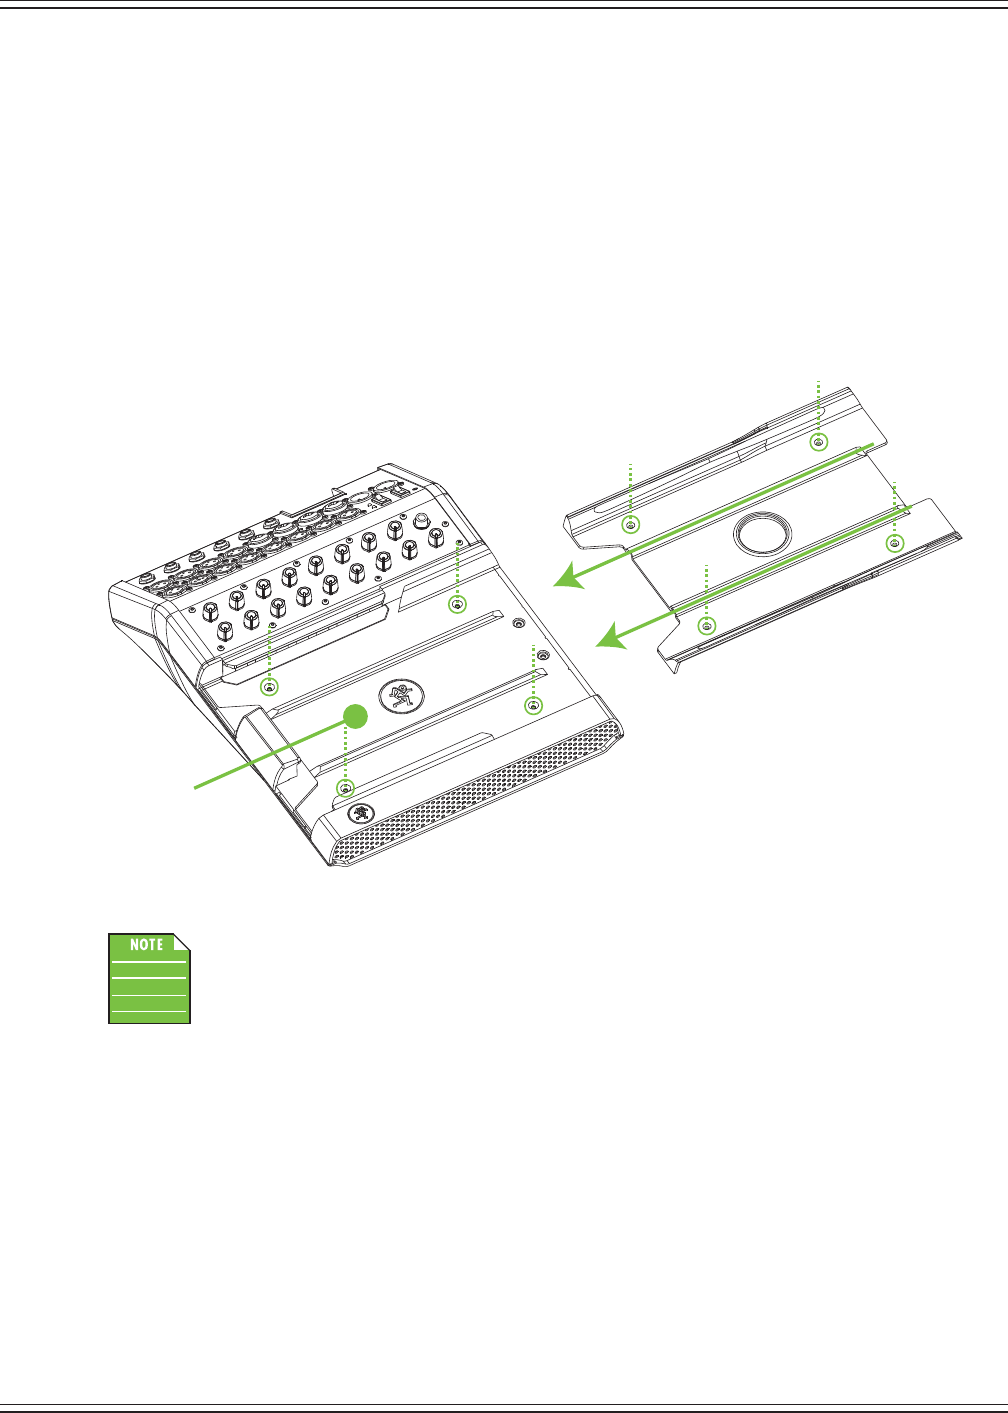
IfyouhadbeenmixingwithanoriginaliPadoriPadmini,butwouldratheruseaniPad2,iPad(3rd
generation)oriPad(4thgeneration),theincludediPadtraywillneedtobereinstalled.TheiPadtray
insert onlyneedstobereinstalledifyouaremixingwiththeiPad2,iPad(3rdgeneration)oriPad
(4thgeneration).Here’showtoreinstalltheiPadtray:
(1) remove the four screws from the mixer, numbered 1 to 4 in the illustration below.
(2)removetheiPadminitrayinsert(ifapplicable).
(3) slide the included standard tray insert into the mixer as displayed below.
(4) put the screws back into the mixer from where you just removed them to hold the tray insert into place.
TheiPadtrayinsertdoesn’tneedtobelockeddownIfswitchingregularlybetweeniPads.
Instead, hand-tighten the screws to the mixer before sliding the tray insert back in.
This way
theycan’tgetlostandyou’restillabletoslidethetrayinsertinandoutasneeded.
1
2
3
4
1
2
3
4
Tray Insert
Tray
Mackie DL806 and DL1608 Reference Guide
16
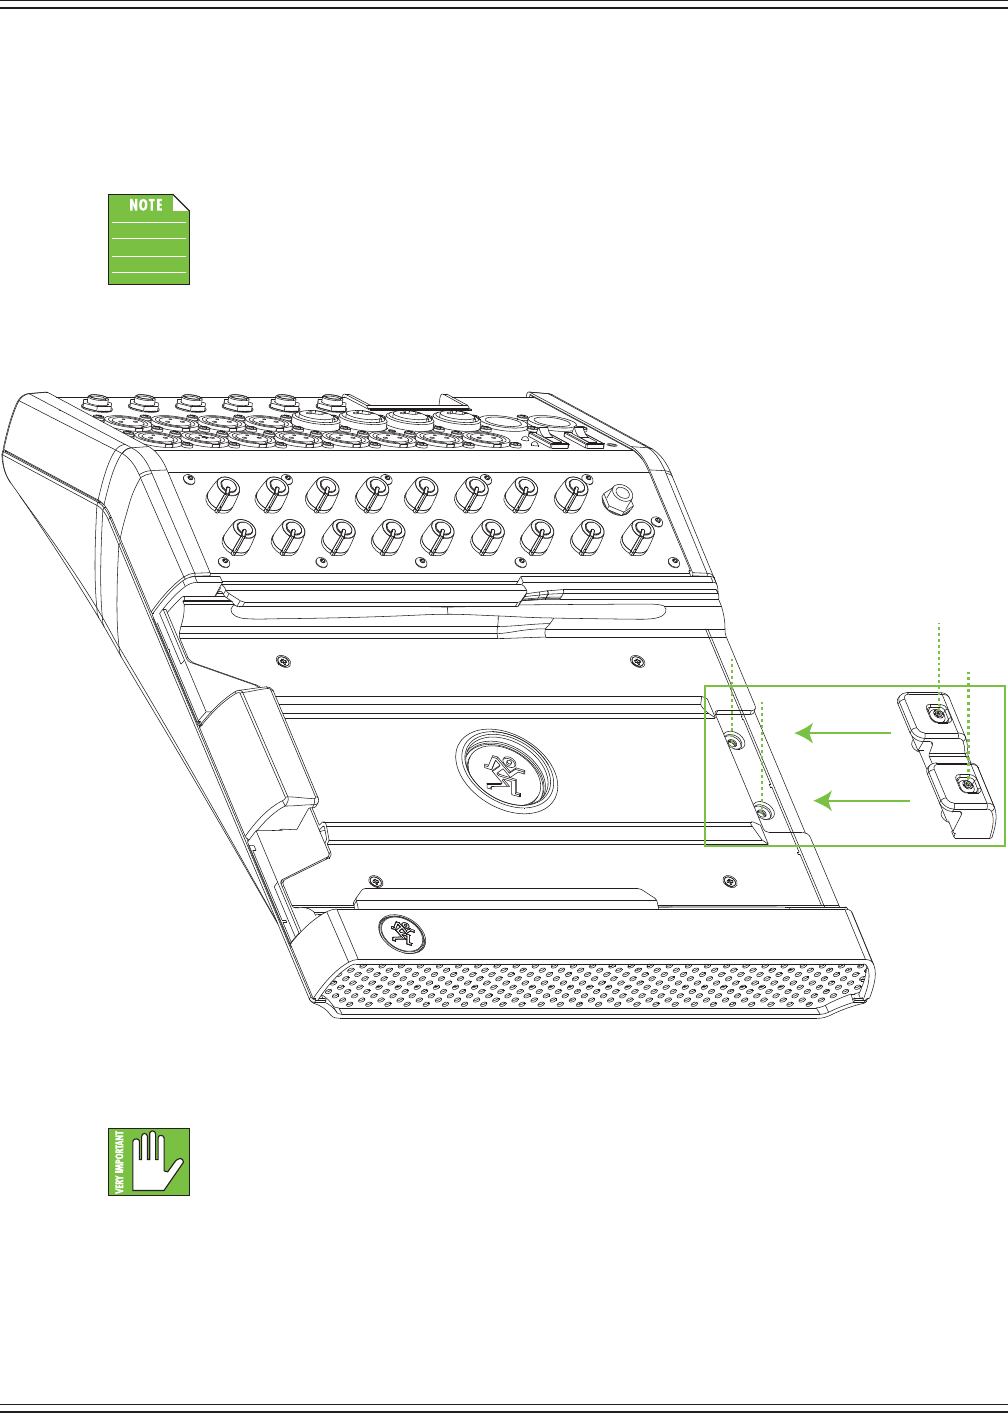
PadLock™
AlsoincludedwiththemixerisaPadLock.ThisisusedtolocktheiPadintoplaceonthemixer.
OnemightusethisforxedinstallswhereadedicatediPadisusedand(Pad)lockedtothemixer.
OrleavethePadLockosotheiPadmaybeconvenientlytransferredinandoutofthemixer.
AfterdockingtheiPad(notshown),thePadLockneedstobeattachedbymovingitright
toleft[horizontalgreenarrows],NOT downward. This ensures that the foam compresses
againsttheiPadandholdsitsolidlyinplace.Thenhand-tighteneachofthetwosecurity
screwsdown[verticalgreendottedlines]usingthesuppliedwrench.
WhilethePadLockprovidessomelevelofsecurity,itisNOTfoolprooforguaranteed
protection.LOUDTechnologiesInc.isnotresponsiblefortheloss,theft,damageor
destructionofyourDLSeriesmixeroriPadwhetheraPadLockhasbeenusedornot.
Mackie DL806 and DL1608 Reference Guide
17
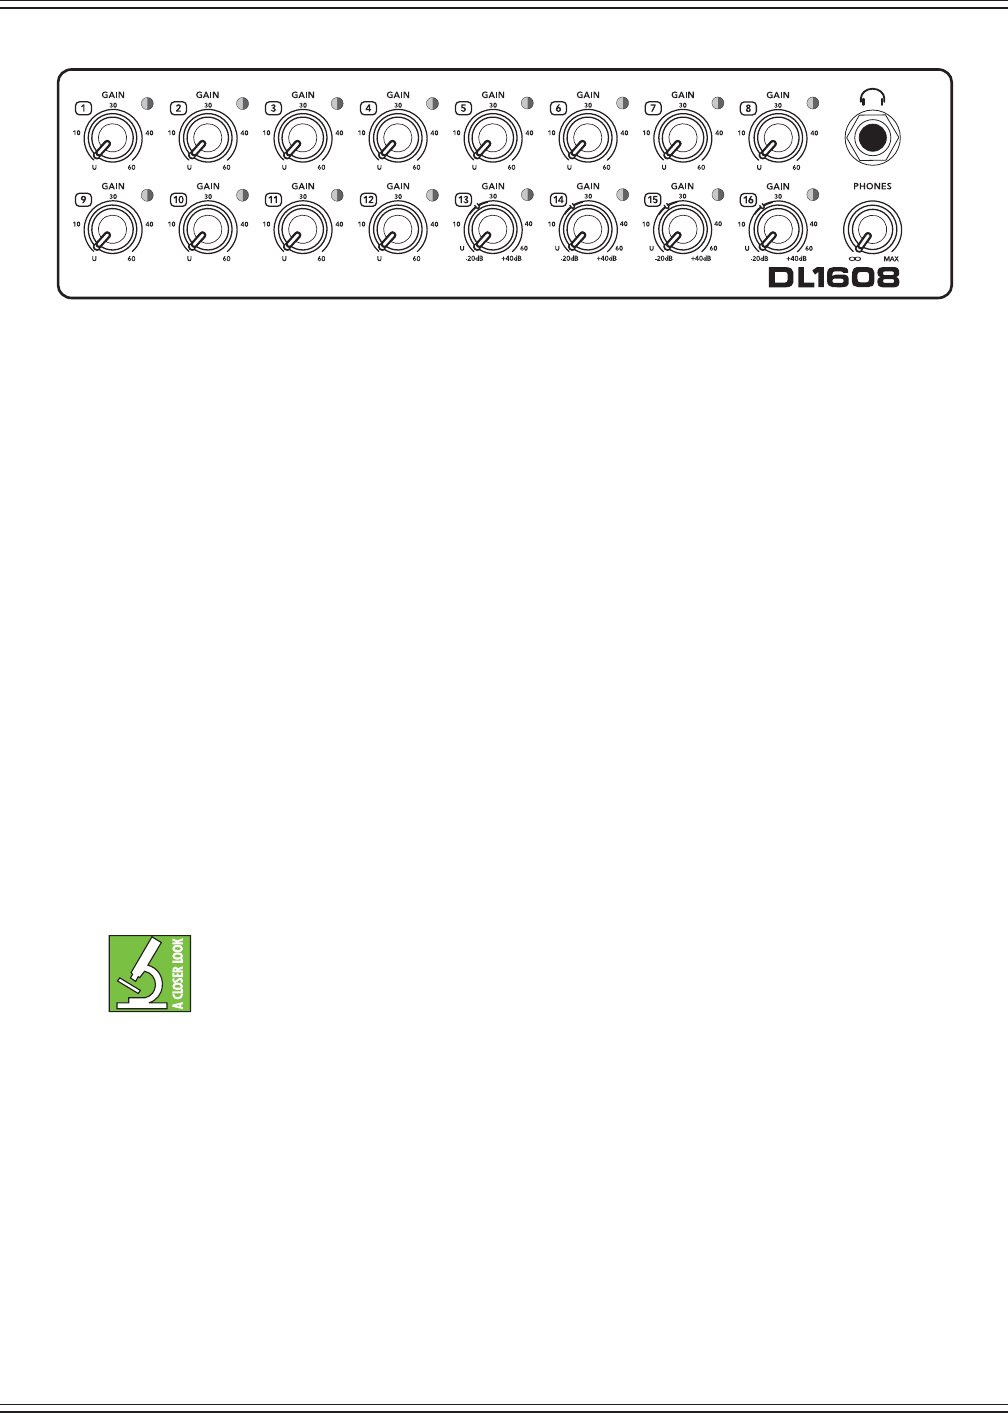
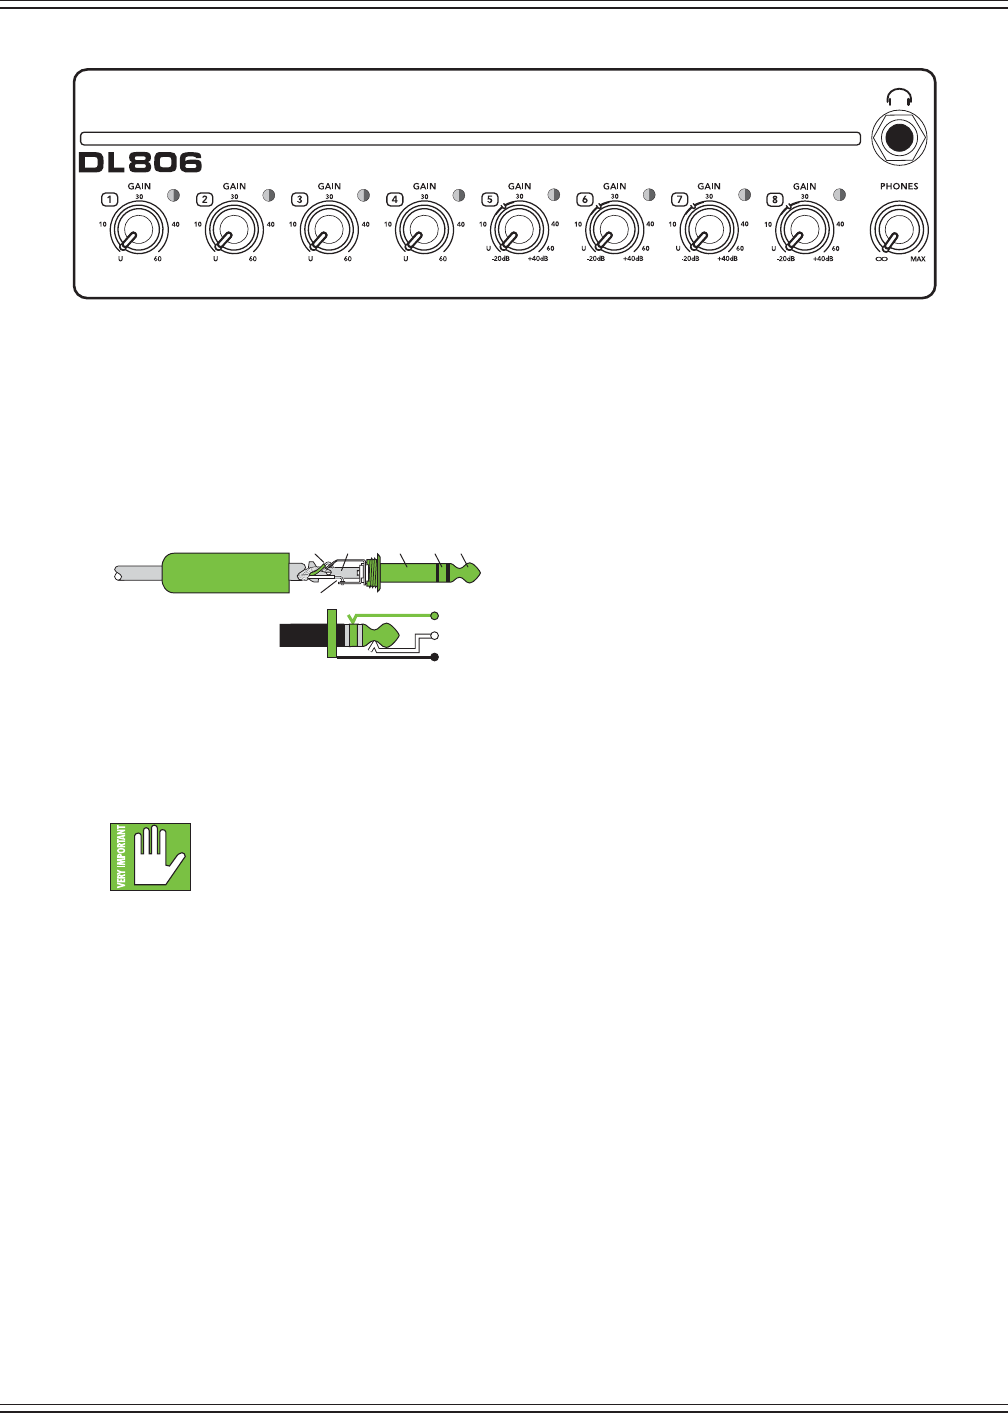
Front Panel Introduction
Each DL1608 mixer is outtted with 16 gain knobs, 16 sig / OL LEDs, one phones output jack and one
phones knob. Each DL806 mixer is outtted with eight gain knobs, eight sig / OL LEDs, one phones output
jackandonephonesknob.Let’stakealookateachofthesefeatures,startingwiththegainknobs.
Gain Knobs
The gain knobs adjust the input sensitivity of the mic and mic/line inputs. This allows signals
from the outside world to be adjusted to run through each channel at optimal internal operating
levels.
Allchannelsmayacceptabalancedmicorline-levelsignalusinganXLRconnector,while
channels 13-16
[ontheDL1608;
channels 5-8
ontheDL806]
alsoaccept1/4"line-levelsignals.
Thegainknobsareanalogcontrols,andarethereforeNOTrecallable.
If a balanced mic or line-level signal is connected to any channel, there is 0 dB of gain with the knob fully
down, ramping up to 60 dB of gain fully up.
Ifa1/4"line-levelsignalisconnected,thereis20dBofattenuationwiththeknobfullydownand40dB
ofgainfullyup,withunitygain“U”at10:00
This 20 dB of attenuation can be very handy when inserting a hot signal from a line-level source. Without
this“virtualpad,”thereismorechanceofchannelclipping.
Because of the low-noise, high-headroom Onyx mic preamps, it is possible to use the mixer
strictly as a wireless system and store the mixer away (in an equipment room, for example).
Just make sure to LOWER the gain knobs a touch to gain extra headroom before clipping.
Sig / OL LEDs
Thisdual-coloredLEDwillilluminategreenwhenthechannel’sinputsignalispresent,indicatingsignal.
It will remain lit so long as there is signal above –20 dBu present in that channel.
Thisdual-coloredLEDwillilluminateredwhenthechannel’sinputsignalistoohigh,indicatingasignal
overload. This should be avoided, as distortion will occur. If the OL LED comes on regularly, check that
the gain knob is set correctly for the input device. The signal is at –3 dB before hard clip begins.
DL1608 Front Panel
Mackie DL806 and DL1608 Reference Guide
18
Phones Output Jack
This1/4"TRSconnectorsuppliestheoutputtostereoheadphones.Thevolumeiscontrolledwiththe
phones knob located right below the output jack.
The phones output follows standard conventions:
Tip = Left channel
Ring = Right channel
Sleeve = Ground
Phones Knob
This knob is used to adjust the volume from the phones output jack, from o to maximum gain (max).
Thephonesknobisananalogcontrol,andisthereforeNOTrecallable.
Warning: The headphone amp is loud and could cause permanent hearing damage.
Evenintermediatelevelsmaybepainfullyloudwithsomeheadphones.BECAREFUL!
Alwaysturnthephonesknoballthewaydownbeforeconnectingheadphones,soloing
a channel or doing anything new that may aect the headphone volume. Then turn it up slowly as
you listen carefully.
SLEEVE
TIPSLEEVE
TIP
RING
RING
TIP
SLEEVERING
DL806 Front Panel
Mackie DL806 and DL1608 Reference Guide
19
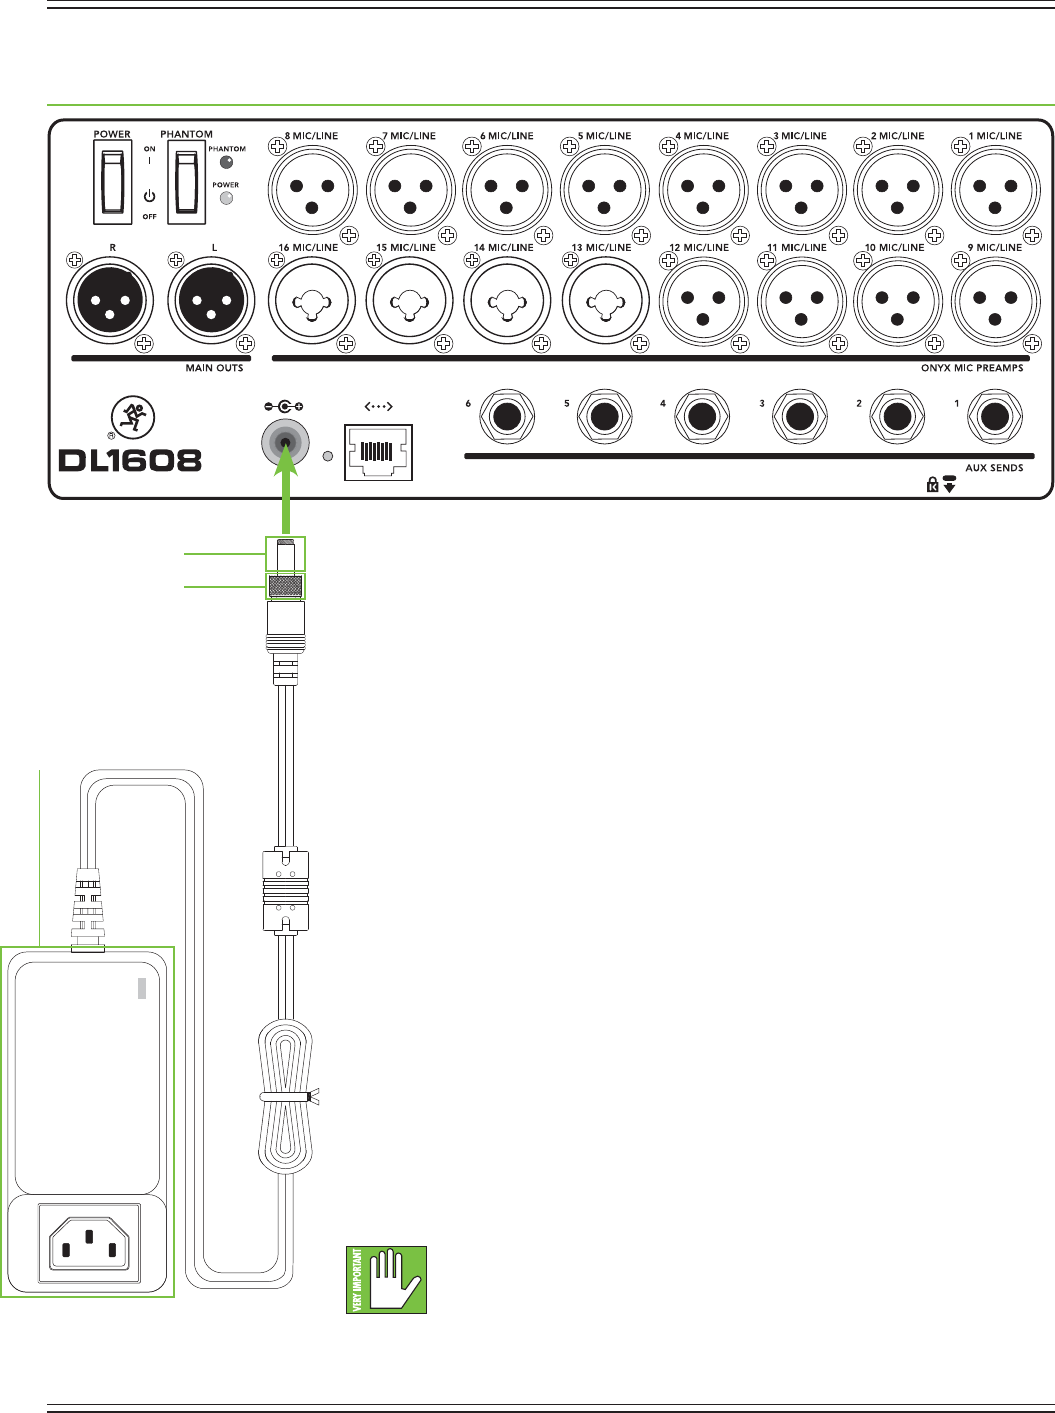
Chapter 3: Mixer Hardware : Rear Panel
Rear Panel Introduction
Each DL Series mixer is outtted with a power connector, a power switch
(and corresponding LED), a phantom power switch (and corresponding LED),
L/RXLRmainoutputjacks,aKensingtonlock,anetworkconnectorandaforce
update button. In fact, the only functional dierence between the two is that the
DL1608 has 16 input jacks and six aux sends jacks, whereas the DL806 has eight
input jacks and four aux send jacks. Even though those numbers may vary slightly,
theirfunctionisthesame.Let’stakealook,shallwe?
Power Connector
The DL Series mixers have a universal external power supply that accepts any
ACvoltagerangingfrom100VACto240VAC.Noneedforvoltageselectswitches.
Itwillworkvirtuallyanywhereintheworld.That’swhywecallita“PlanetEarth”
power supply! It is less susceptible to voltage sags or spikes compared to
conventional power supplies, and provides greater electromagnetic isolation
andbetterprotectionagainstAClinenoise.
Anexternal12VDC
powersupply[akaThePowerBlock]andalinecordareincluded
withthemixer.Alockingbarrelconnectorresidesattheendofthecordattachedto
ThePowerBlock.Attachittothepowerconnectoronthemixerandrotatethe
outer ring clockwise to lock. Do not over-tighten! Screw until there is resistance, then
stop.ConnectthefemaleendofthelinecordtoThePowerBlockandplugthemale
endintoalivegroundedACoutlet.AnLEDonThePowerBlockwillilluminategreen
to indicate success (whether the mixer is powered on or not).
Warning:Disconnectingtheplug’sgroundpinisdangerous.Don’tdoit!
Infact,it’sabadideatoremove anything from (or add anything to)
ThePowerBlockorlinecord.Again,don’tdoit!
DL1608 Rear Panel
Barrel Connector
The
Power
Block
Locking Outer Ring

Mackie DL806 and DL1608 Reference Guide
20
Power Switch
Pressthetopofthisrockerswitchintoturnthemixeronand
press the bottom of this switch to turn the
mixer o.
Asageneralguide,themixershouldbeturnedonrst,beforeanyexternalpowerampliers
orpoweredspeakers.Assuch,itshouldalsobeturnedolast.Thiswillreducethepossibility
ofanyturn-onorturn-othumpsinthePA.
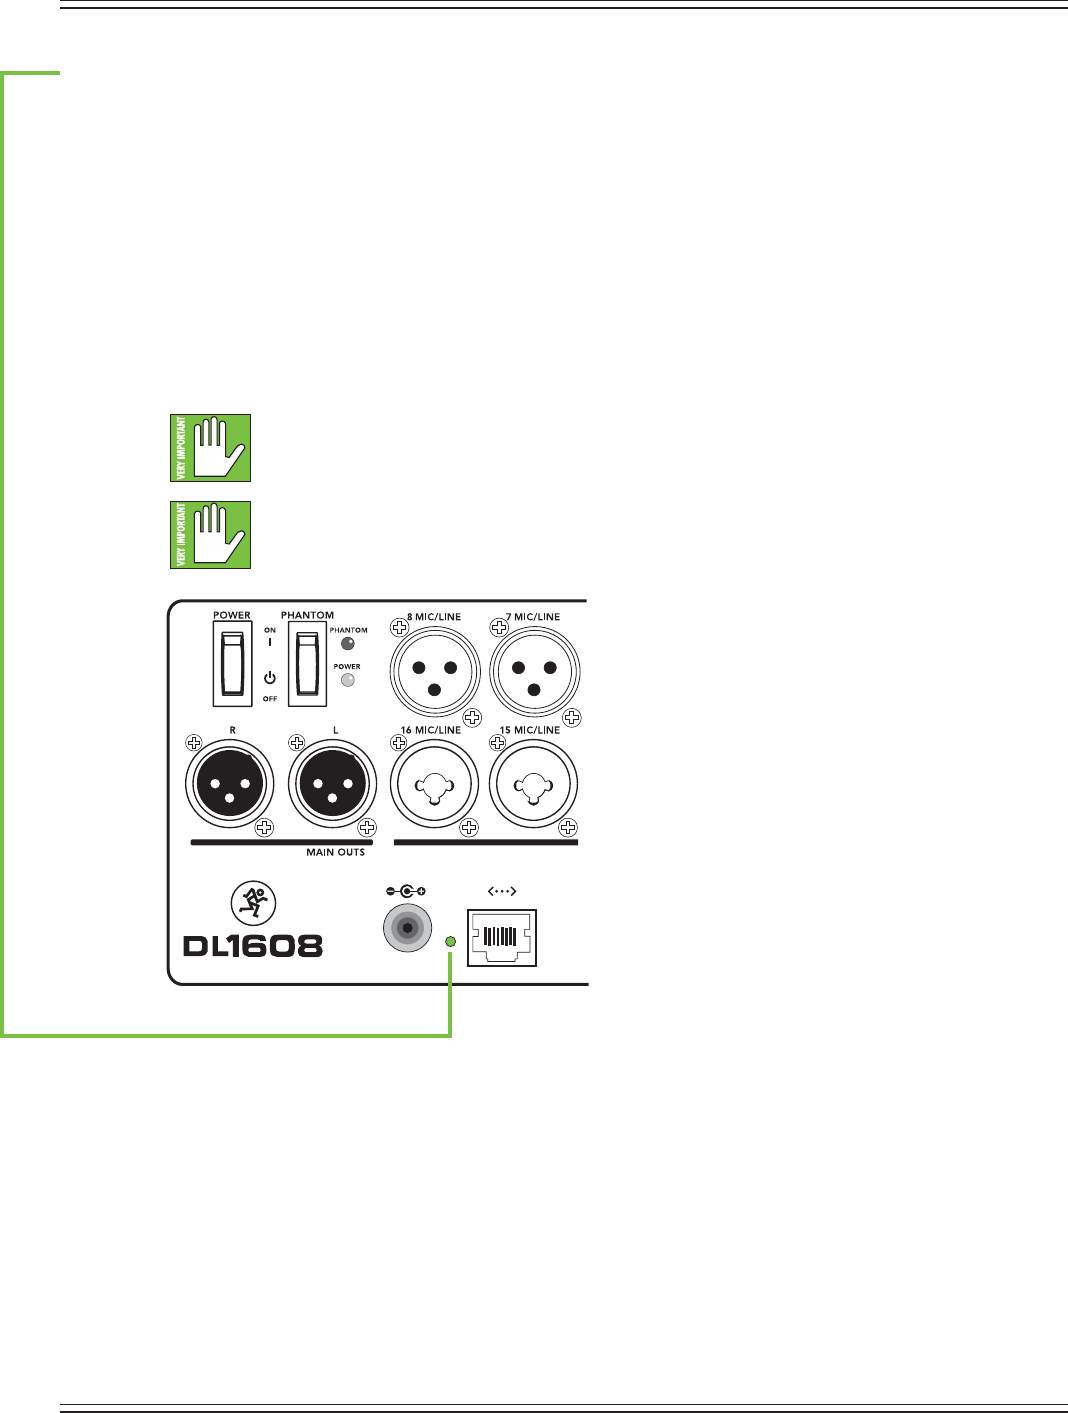
Power LED
This LED will illuminate green when the mixer is turned on
.Ifitdoesnotturnon,conrmthatThePower
Blockandlinecordareconnectedcorrectly(toeachother,themixerandtheACoutlet),thelocalACmains
supply is active and that the power switch is on.
Phantom Power Switch
Pressthetopofthisrockerswitchinifanymicrophonerequiresphantompower.(Alwayschecktheposition
ofthisswitchbeforeconnectingmicrophones.)Thisisaglobalswitchthataectsallmicchannels’XLRjacks
at once.
Pressthebottomofthisswitchintoturnthephantompowero.
Most modern professional condenser mics require 48V phantom power which lets the mixer send
low-currentDCvoltagetothemic’selectronicsthroughthesamewiresthatcarryaudio.(Semi-pro
condensermicsoftenhavebatteriestoaccomplishthesamething.)“Phantom”owesitsnametoan
abilitytobe“unseen”bydynamicmics[ShureSM57/SM58,forexample],whichdonotneedexternal
power and are not aected by it, anyway.
Neverplugsingle-ended(unbalanced)orribbonmicrophonesintothemicinputjacks
when phantom power is on. Do not plug instrument outputs into the mic XLR input jacks
with phantom power on unless you know for certain that it is safe to do. When phantom
power is engaged, be sure that the master fader is down when connecting microphones
tothemicinputstopreventpopsfromgettingthroughthePA.
It is not a good idea to enable the phantom power unless it is actually needed. Line-level
sources may be particularly unhappy when they are subjected to 48V phantom powering.
Manymusicalinstrumentampsandkeyboardswith“directoutputs”tthisdescription.
It takes approximately 15 seconds for the phantom power to shut o completely.
Do not add or remove any inputs until the phantom power LED is completely o
or mics could be ruined.
DL806 Rear Panel
Mackie DL806 and DL1608 Reference Guide
21
Phantom Power LED
This LED will illuminate red when phantom power is engaged
. If it does not turn on, conrm that the
phantompowerswitchison,thatThePowerBlockandlinecordareconnectedcorrectly(toeachother,
themixerandtheACoutlet),thelocalACmainssupplyisactiveandthatthepowerswitchison.
It takes approximately 15 seconds for the phantom power to shut o completely.
Do not add or remove any inputs until the phantom power LED is completely o
or mics could be ruined.
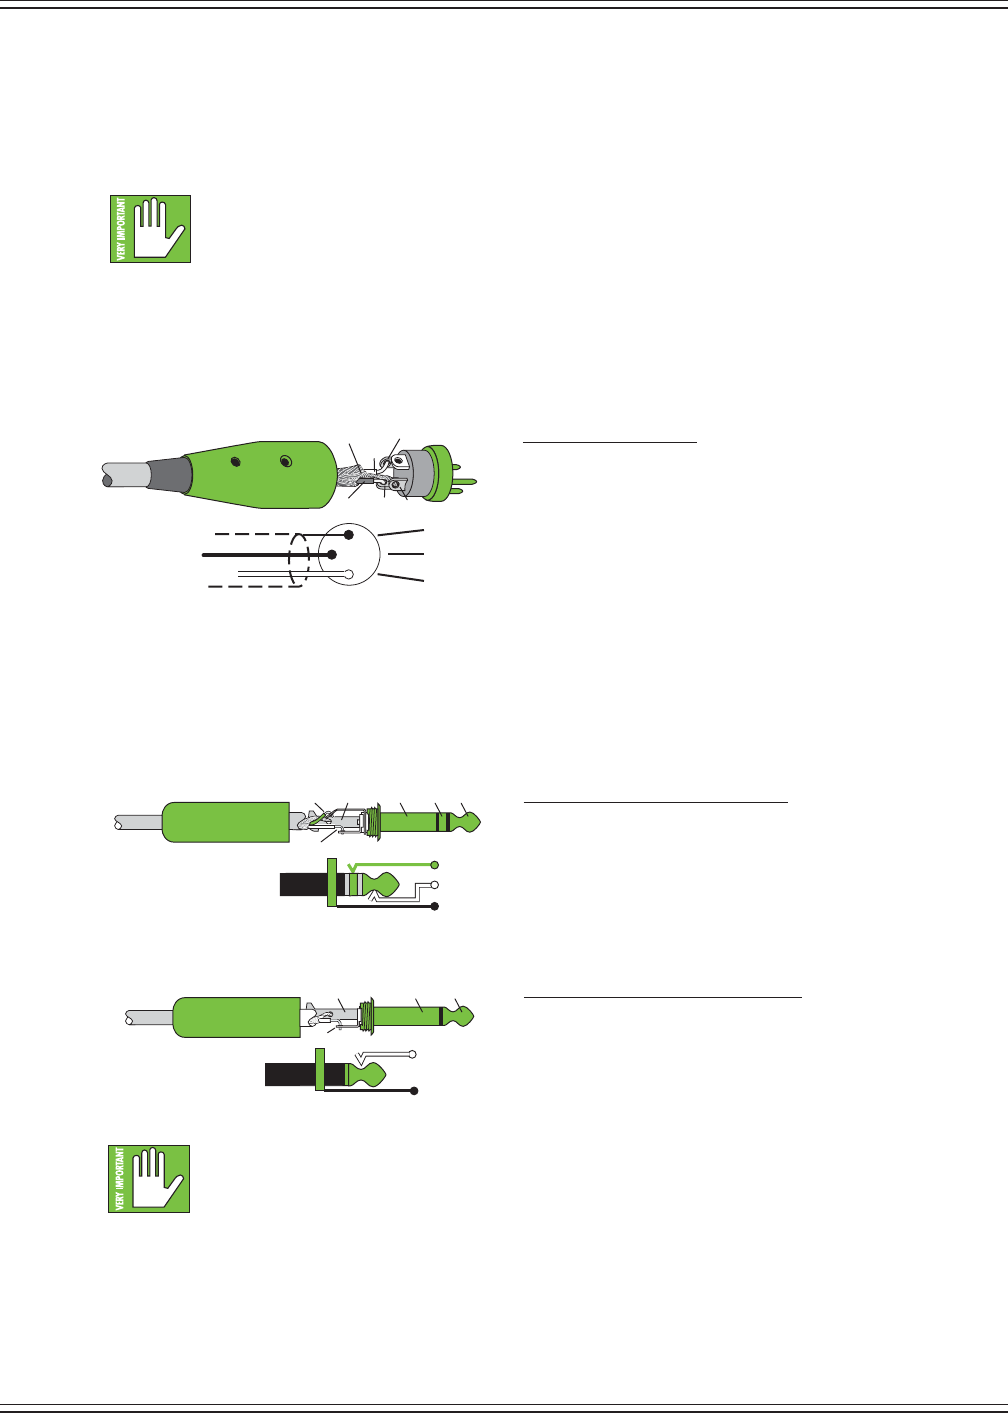
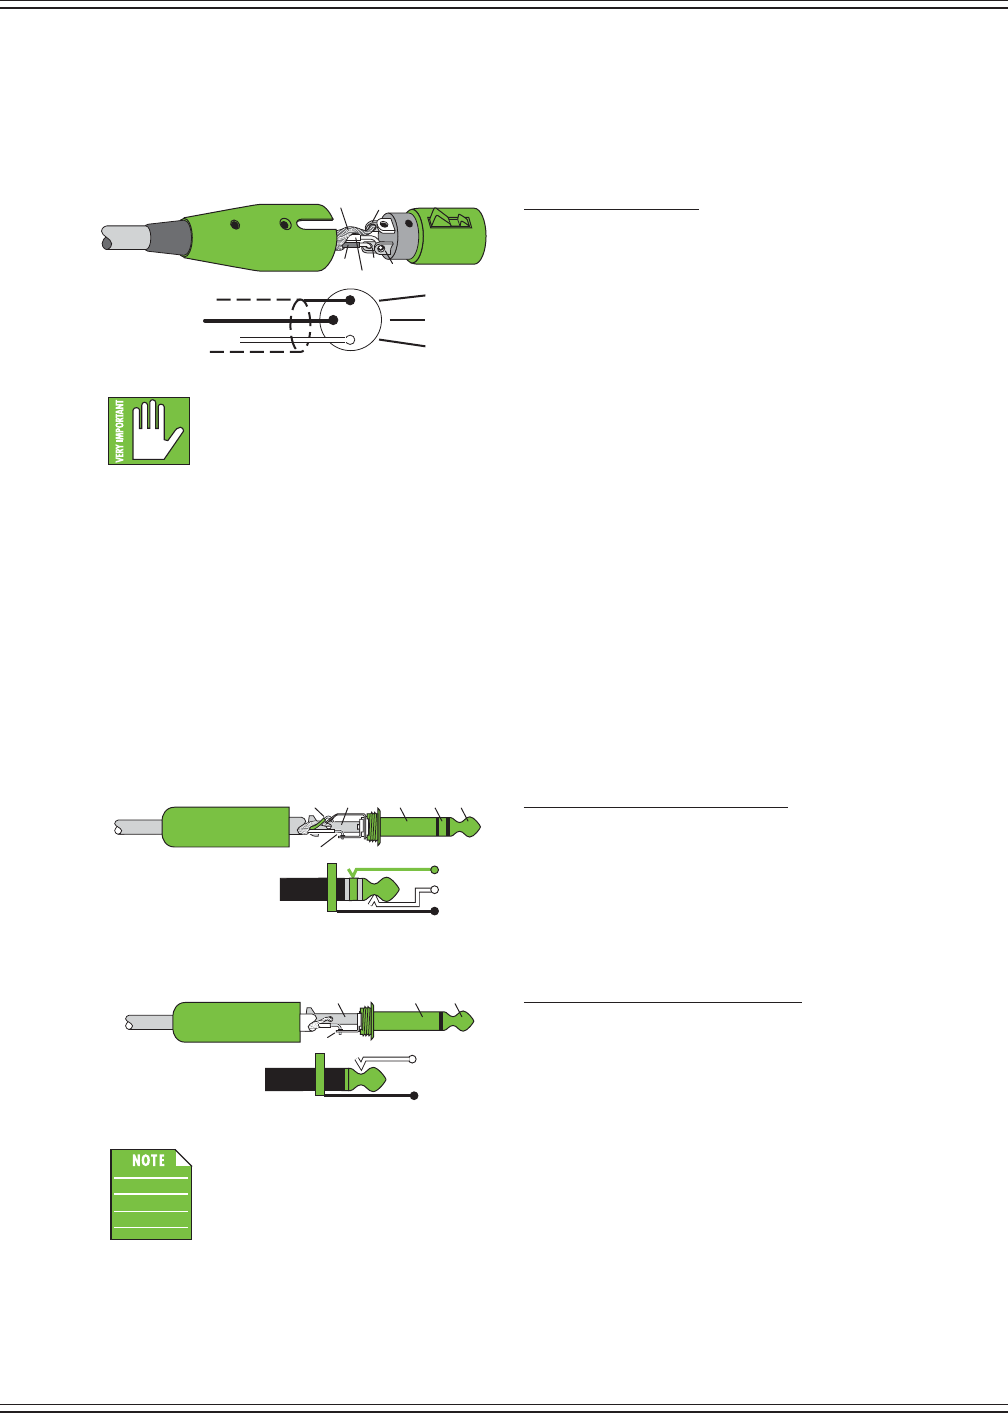
XLR and 1/4" Inputs
Allchannelsmayacceptabalancedmicorline-levelsignalusinganXLRconnector.
Theyarewiredasfollows,accordingtostandardsspeciedbytheAES(AudioEngineeringSociety).
XLR Balanced Wiring:
Pin1=Shield(ground)
Pin2=Positive(+orhot)
Pin3=Negative(–orcold)
In addition to accepting balanced mic or line-level signals using an XLR connector, channels 13-16
[ontheDL1608;
channels 5-8
ontheDL806]mayalsoaccept1/4"line-levelsignalsdrivenbybalanced
or unbalanced sources.
Toconnectbalancedlinestotheseinputs,usea1/4"Tip-Ring-Sleeve(TRS)plug.“TRS”standsfor
Tip-Ring-Sleeve,thethreeconnectionpointsavailableonastereo1/4"orbalancedphonejackorplug.
TRS jacks and plugs are used for balanced signals and stereo headphones and are wired as follows:
1/4"TRSBalancedMonoWiring:
Sleeve = Shield
Tip=Hot(+)
Ring=Cold(–)
Toconnectunbalancedlinestotheseinputs,usea1/4"mono(TS)phoneplug,wiredasfollows:
1/4"TSUnbalancedMonoWiring:
Sleeve = Shield
Tip=Hot(+)
Youmaybewell-versedinsettinglevelsonmostanalogand/ordigitalconsoles,butthe
DLSeriesmixersarequiteunique.Itwouldbewisetocheckout“Chapter8:LevelSetting
Procedure”(pages56-57)thersttimeyousetlevelsonthismixer.Thanksinadvance!
2
31
SHIELD
COLD
HOT
SHIELD
COLD
HOT
3
2
1
SLEEVE
TIPSLEEVE
TIP
RING
RING
TIP
SLEEVERING
SLEEVE
TIP
TIPSLEEVE
TIP
SLEEVE
Mackie DL806 and DL1608 Reference Guide
22
L/R Main Outs
The male XLR connectors provide a balanced line-level signal that represent the end of the mixer, where
thefullymixedstereosignalenterstherealworld.Connectthesetotheleftandrightline-levelinputsof
powered speakers or to the left and right line-level inputs of an amplier (with speakers already attached).
XLR Balanced Wiring:
Pin1=Shield(ground)
Pin2=Positive(+orhot)
Pin3=Negative(–orcold)
Youmaybewell-versedinsettinglevelsonmostanalogand/ordigitalconsoles,butthe
DLSeriesmixersarequiteunique.Itwouldbewisetocheckout“Chapter8:LevelSetting
Procedure”(pages56-57)thersttimeyousetlevelsonthismixer.Thanksinadvance!
Aux Sends
These1/4"connectorsallowyoutosendbalancedandunbalancedline-leveloutputstoexternaleects
devices, headphone ampliers, or stage monitors. These could either be passive stage monitors powered
byanexternalamplier,orpoweredstagemonitorswithbuilt-inpowerampliers.Youmayrunseparate
aux mixes since all aux sends are independent of each other. There are four aux sends on a DL806 mixer
and six aux sends on a DL1608 mixer.
Toconnectbalancedlinestotheseinputs,usea1/4"Tip-Ring-Sleeve(TRS)plug.“TRS”standsfor
Tip-Ring-Sleeve,thethreeconnectionpointsavailableonastereo1/4"orbalancedphonejackorplug.
TRS jacks and plugs are used for balanced signals and stereo headphones and are wired as follows:
1/4"TRSBalancedMonoWiring:
Sleeve = Shield
Tip=Hot(+)
Ring=Cold(–)
Toconnectunbalancedlinestotheseinputs,usea1/4"mono(TS)phoneplug,wiredasfollows:
1/4"TSUnbalancedMonoWiring:
Sleeve = Shield
Tip=Hot(+)
Unbalancedcablescanbenoisy.Iftheinputofthenextdeviceinthechainsupports
balanced cables, we highly recommend using those instead of unbalanced cables
to connect gear.
2
1
SHIELD
COLD
HOT
3
SHIELD
COLD
HOT
3
2
1
SLEEVE
TIPSLEEVE
TIP
RING
RING
TIP
SLEEVERING
SLEEVE
TIP
TIPSLEEVE
TIP
SLEEVE
Mackie DL806 and DL1608 Reference Guide
23
Kensington Lock
AnoptionalKensingtonLockprovidesanextralevelofsecurityshouldthemixerbeleftalone,
unwatched. There are a wide variety of cable apparatuses to choose from to secure your mixer
viatheKensingtonLocksecurityslot.Feelfreetodecideonwhattypeworksbestforyouby
perusingtheKensingtonwebsite:http://www.kensington.com/
WhiletheKensingtoncableandlockprovidesomelevelofsecurity,itisNOTfoolproofor
guaranteedprotection.LOUDTechnologiesInc.isnotresponsiblefortheloss,theft,damage
ordestructionofyourmixeroriPadwhetheraKensingtonLockhasbeenusedornot.
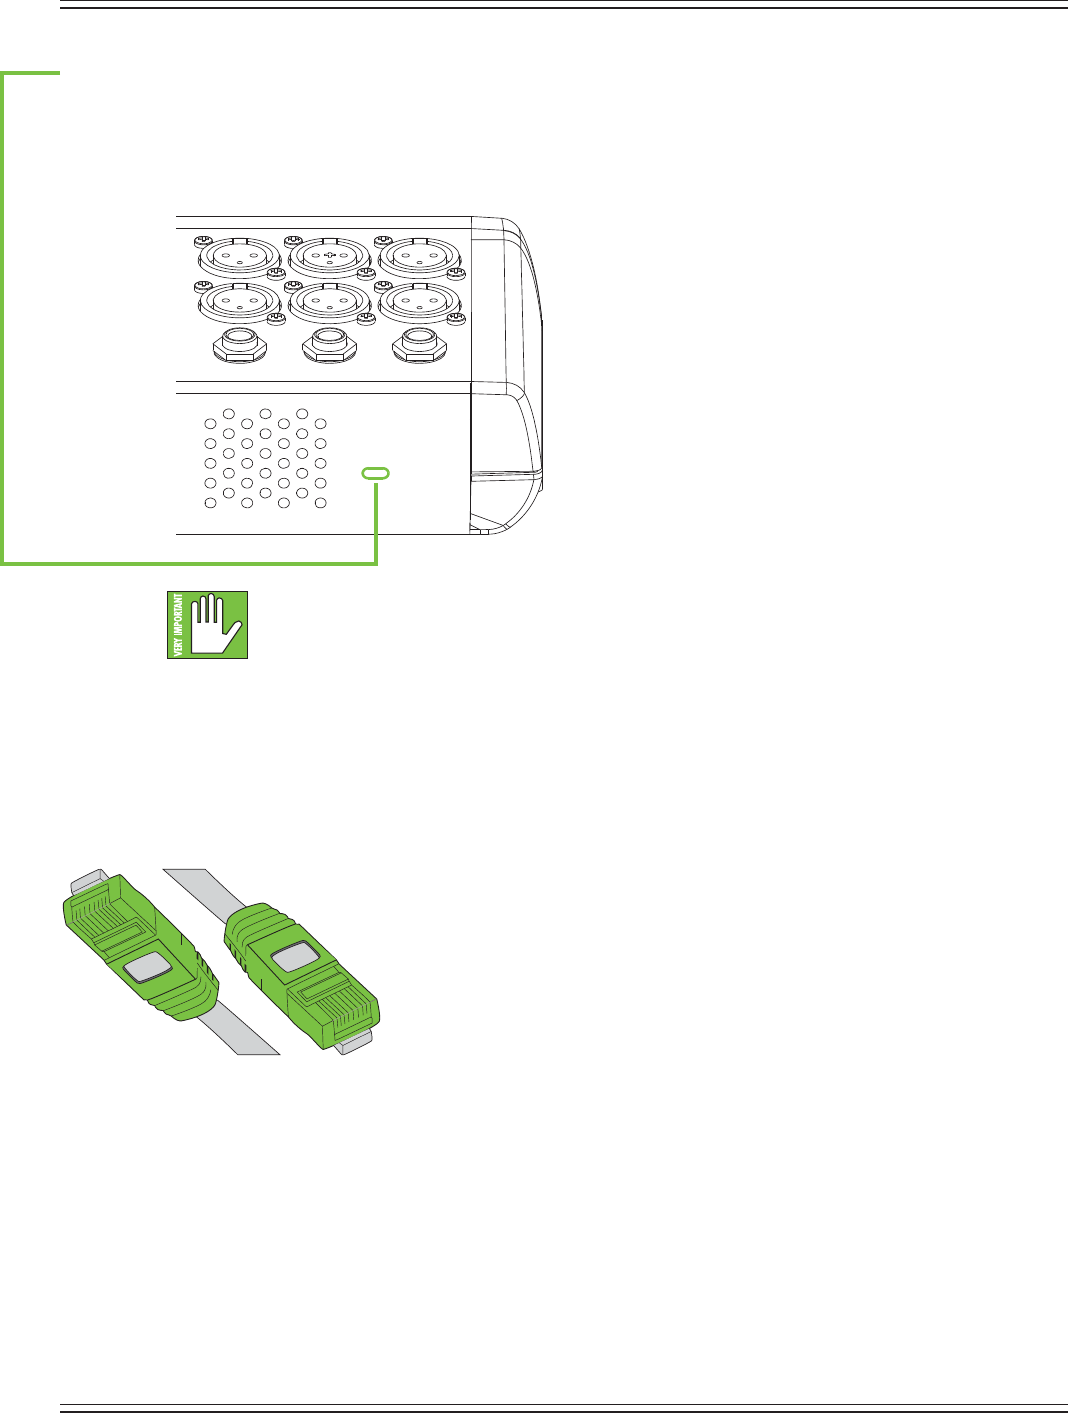
Network Connector
The 100MB network connector is conveniently located next to the power
connector. Its purpose in life is to connect the mixer to a Wi-Fi router via
CAT5Ethernetcable,thusenablingwirelesscontrol.
PlugoneendoftheCAT5Ethernetcableintothemixer’snetworkconnector
andtheotherendoftheCAT5EthernetcableintoaLANportontherouter,
NOTaWANport.Mostroutersallowtheuseofeitherastraight-wiredcable
orcrossovercable,butIfyouhaveachoice,astraight-wiredCAT5Ethernet
cable is the way to go to ensure smooth operation with any router.
Thisisallwe’regivingyoufornow.Directionsforsettinguptherestoftherouterbeginonchapter4.
That seems like such a long way o, but it starts on page 25!
Mackie DL806 and DL1608 Reference Guide
24
Force Update Button
The force update button is tucked in right between the power connector and network connector.
In a perfect world, this button would just sit there without a care in the world, umbrella drink in hand,
beach, surf and sun on a daily basis. In all likelihood, this button will live his / her dream out, while the
rest of us can only dream of such a life.
The DL Series mixers and Master Fader app do a great job at letting you know when either (or both)
the software and rmware need updating, but this button here forces a complete rmware update
if the need ever arrives.
Here’showtoforcearmwareupdate:rst,turnthemixero.Now,withaballpointpenorapaperclip,
poke the force update button, then power up the mixer with the button depressed. The mixer will boot and
youwillbepromptedwithanupdatebubblethenexttimeaniPad(withtheMasterFaderapp)isconnected
to the mixer.
Nowthatyouknowhowtoforceanupdate,here’safriendlyreminderthatyoushouldlet
the button remain peaceful, calm and tranquil, only forcing a rmware update if instructed
by Mackie Tech Support. Thank you for listening!
SaveanycurrentshowtoyouriPadbeforeforcinganupdateoryoumayloseit.
The show and your sanity!

Mackie DL806 and DL1608 Reference Guide
25
Chapter 4: Mixer Hardware : Wireless Setup
Introduction
Doyouwantwirelesscontrolofyourmixer?Ofcourseyoudo!Let’sdiginandgettheroutersetup,
asthisisquiteanimportantfeatureoftheDLSeries.Upto10iOSdevicesmaybeconnectedtothe
network,andthereforeyoumaycontrolthemixerwirelessly[viaWi-Fi]orwired.
Wi-Fi Router
Forwirelesscontrol,allthat’snecessaryistoconnectthemixertoaWi-Firouter.Whileitispossibleto
utilize an existing wireless network, a dedicated Wi-Fi router will give you complete control, resulting
in the best possible performance.
Ifyoudon’talreadyhaveaWi-Firouter,nearlyanyWi-Firouterfoundatareputableocesupplystore
(or other similar business) will work. When selecting a new router (or checking out your current router)
pleasemakesureithasALLofthefollowingfeatures:
(1) CAT5 Connection — MakesuretheWi-FirouterconnectsviaCAT5Ethernetcable,notUSB.
Most routers allow the use of either a straight-wired cable or crossover cable, but If you have a choice,
astraight-wiredCAT5Ethernetcableisthewaytogotoensuresmoothoperationwithanyrouter.
(2) DHCP — TherouterneedstobeabletoassignanIPaddresstoadevice[theDL806orDL1608,
forexample]connectedtotheEthernetport.Inmostcases,therouterwillhandlethistask.
However,therearesomeroutersthatcan’tcompletethissimpleassignmentandshouldnotbeused.
Routers with a single Ethernet port often will not work well with the DL Series mixers for this reason.
(3) 802.11n / 5GHz — Believe it or not, those numbers are not just a bunch of mumbo jumbo.
ThosenumbersreectaWi-Fimode[802.11n]andband[5GHz]thatwepreferandstronglysuggest.
Wi-Fi mode 802.11g and band 2.4GHz also work, but all the cool kids are using 802.11n and 5GHz.
Thisisoftenpackagedas“DualBand”.
(4) Brand — We are not in the business of suggesting what Wi-Fi router to go with,
butchoosingonewithaninstantlyrecognizable,quality,trustworthynamedoesn’thurt.
Someexampleswe’veheardof:
•Apple
•Belkin
•D-Link
•Linksys
•NETGEAR
Network Connectivity
Nowit’stimetoconnecttothenetwork.Herearethestepstogetsomeconnectivity.
Connectivitybeforecreativity!
(1) CAT5 Connection — PlugoneendoftheCAT5Ethernetcableintothenetworkconnectoronthemixer
andtheotherendintoaLANportontherouter,NOTaWANport.Readthatsentenceagain.
(2) Power to the Router — Therouterneedstobepowereduprstbeforeanythingelse.Plugitin
andipthepowerswitchtothe“on”position.<--ok,thatmighthavebeenacrueltrick.Wirelessrouters
often power up when plugged in with no power switch to ip.
(3) The Waiting — Give the router a little time to boot up and do its thing. We know, we know,
thewaitingisthehardestpart.SomehowIdon’tthinkTomPettywassingingaboutwirelessrouter
bootuptimes.Thisshouldn’ttakemorethan5-10seconds.
(3) Power to the Mixer — Go ahead and power up the mixer.
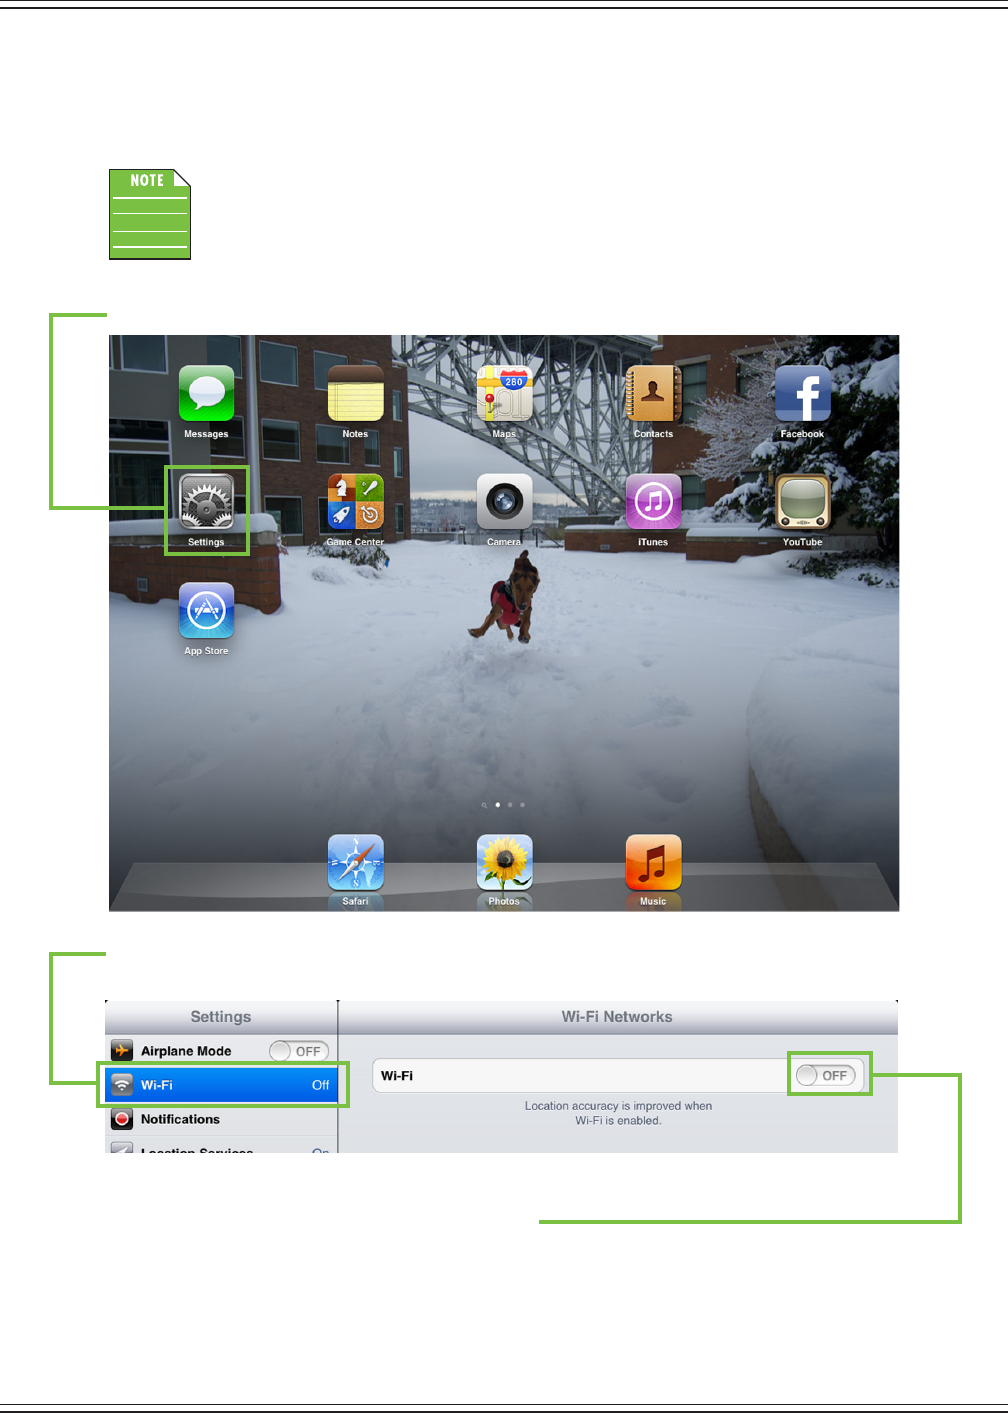
Mackie DL806 and DL1608 Reference Guide
26
Connect
Atthispointintime,we’rereadytodialinthesettingsoftheiPad.StartbyturningtheiPadon
(ifit’snotalready).
YoushouldhavetofollowtheseinstructionsonlyonceforeachiPadconnectedtotherouter.
Afterthattheyshouldconnectautomatically.
Tap“Settings”ontheiPad.
Settingslandsyouhere.SelectWi-Fibytouchingit.NoticethatWi-Fiis“O”atthispoint,butwe’regoingto
x that.
Drag the Wi-Fi on/o slider right to the on position.
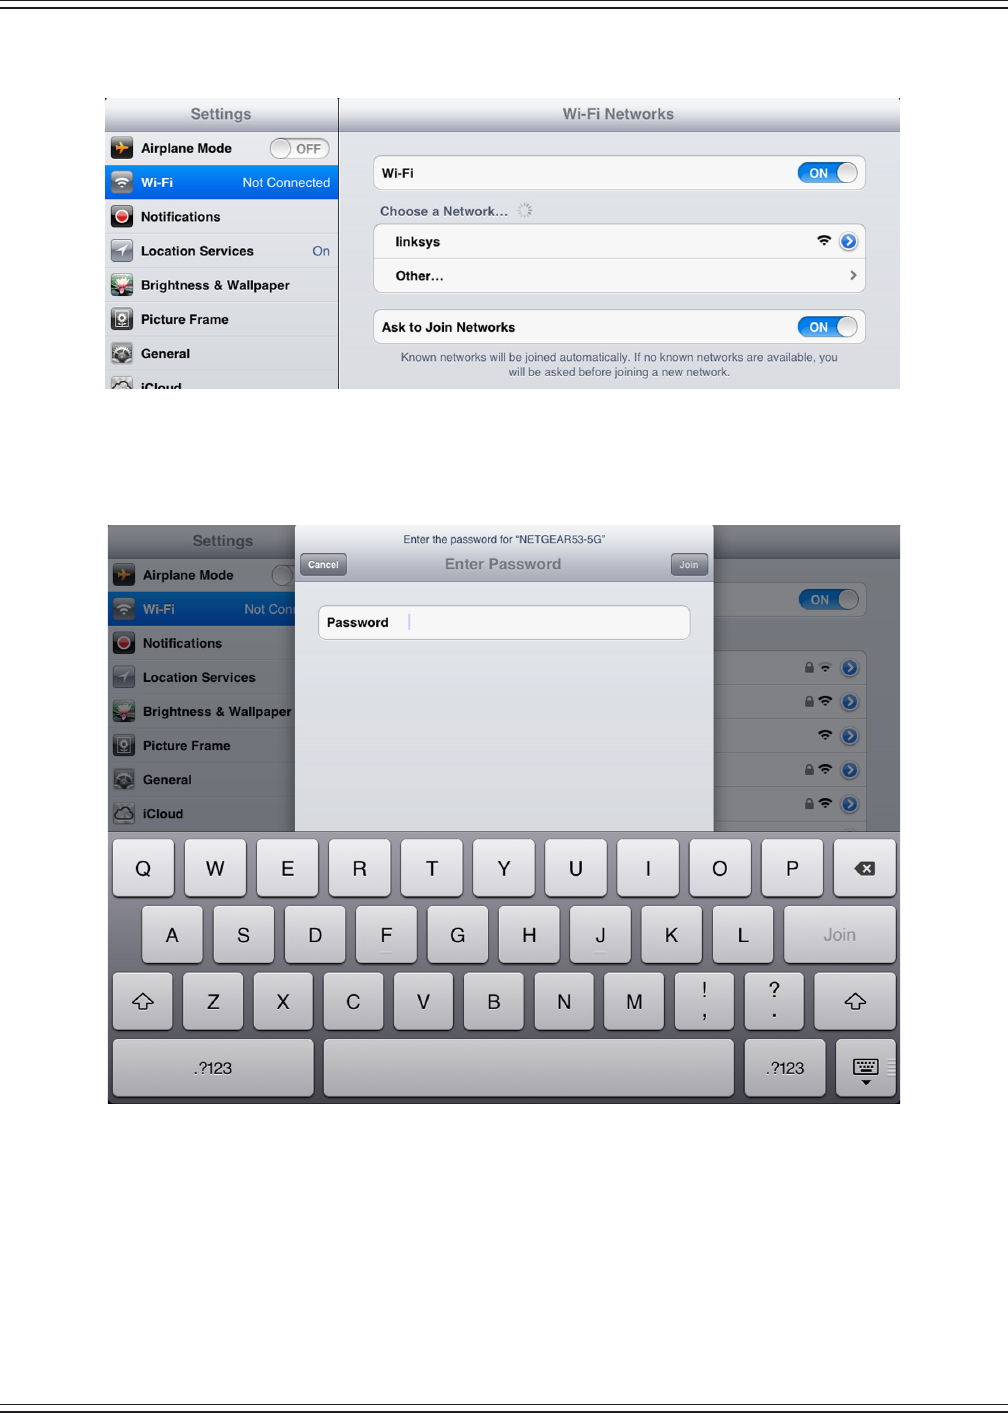
Mackie DL806 and DL1608 Reference Guide
27
Checkouttheviewbelow.TheiPadissearchingfor(andsettinguptheconnectionto)therouter.
Itshouldbenotedherethat(bydefault)manyrouterswillNOTbepasswordprotected.
In the occurrence that yours has a pre-congured password from the factory, you should be able
tolocateitonthebottomofthewirelessrouterandtypeitinthespaceprovidedontheiPad.
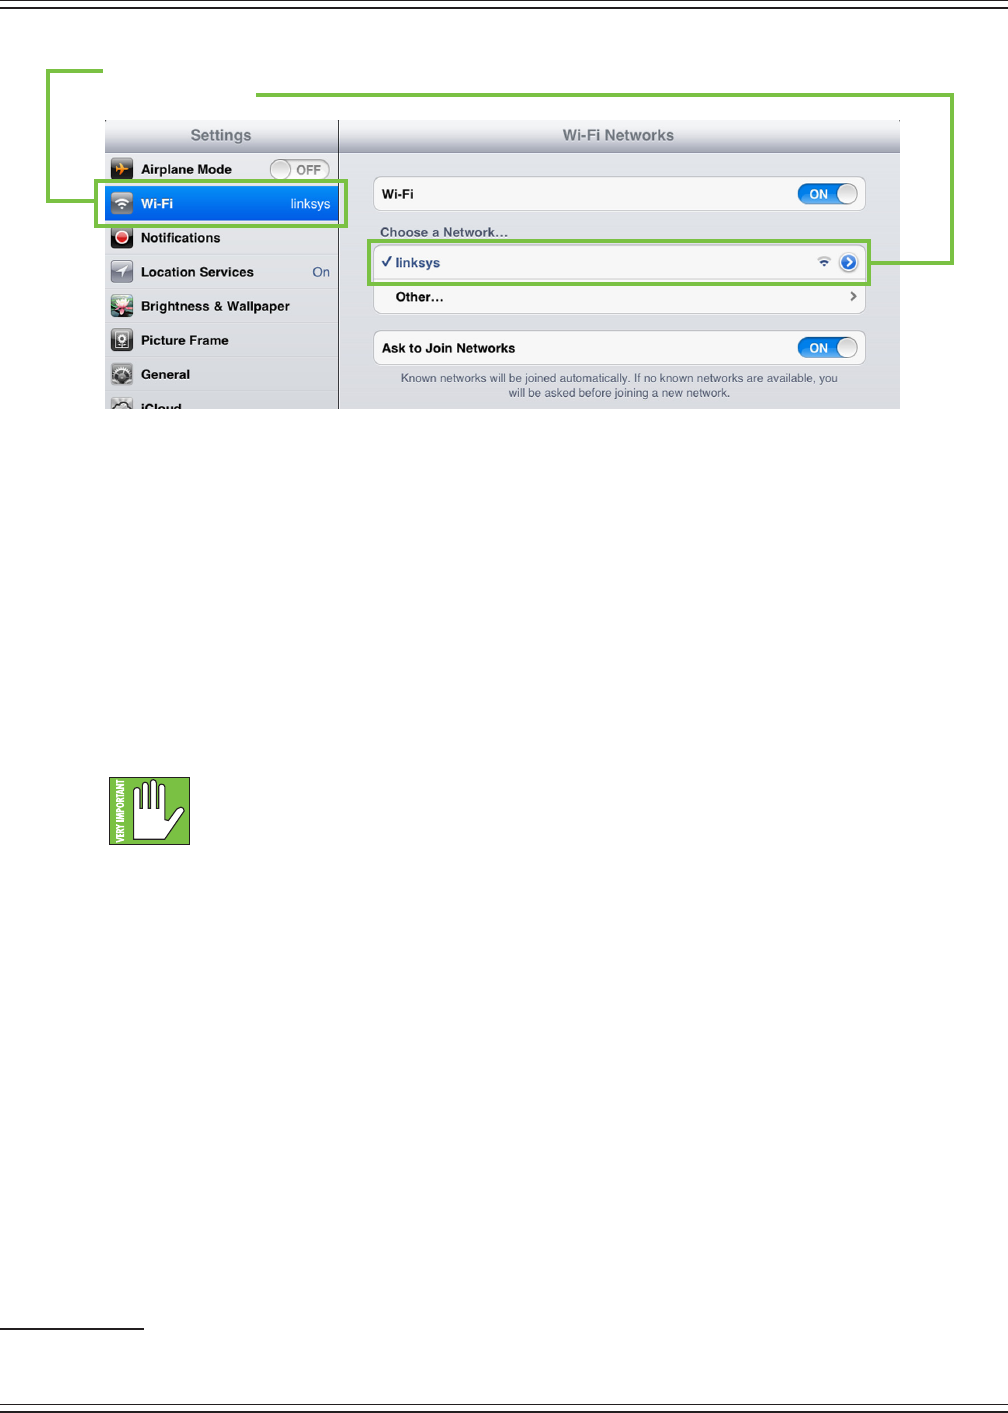
Mackie DL806 and DL1608 Reference Guide
28
Checkitout...you’regoodtogo!Withyourassistance,theiPadfoundtherouteranddialedinthe
Wi-Fi connection!
NowgobackandlaunchtheMasterFaderapp.It’sthateasy!
Router Settings
Default router settings are typically ne, but most Wi-Fi routers may be customized to ensure high
performanceandasecurenetwork.We’lloutlinesomecommonroutersettingstoadjust,
but since each brand is dierent, refer to its manual to learn how to adjust these settings.
(1) SSID —SSIDstandsforServiceSetIdentication.CreateanamefortheWi-Finetworkhere.
(2) Security — Youwillneedtoselectasecuritymodeandpassword.Wesuggestusing
WPA[Wi-FiProtectedAccess]forsecuritypurposesandapasswordthatiseasyforyouto
recall, but dicult for others to hack.
This prevents strangers from joining your network and controlling the mixer,
so pick a good password!
(3) Band — No,we’renotheretotalkaboutyourfavoriterockband.Rather,weareheretochoose
the Wi-Fi band. If you are in Wi-Fi mode 802.11n, you might be requested to choose a Wi-Fi band.
Here, we prefer and strongly suggest 5GHz. However, 2.4GHz also works.
(4) Enable Auto Channel Selection1 — Lookforasettingnamed“AutoChannelSelection”(orsimilar)
and enable it. The Wi-Fi channel with the least interference will be selected automatically.
This should set you up nicely with no issues at all, so feel free to exit out of settings at this point.
Ifyoudesiremoreinformation,refertotheTroubleshootingsectioninAppendixA:ServiceInformation
on pages 155-156.
1EnableAutoChannelSelectionisanadvancedoptionthatisusuallyautomaticallyenabled.Ifyouseeit,
ensure that it is enabled.
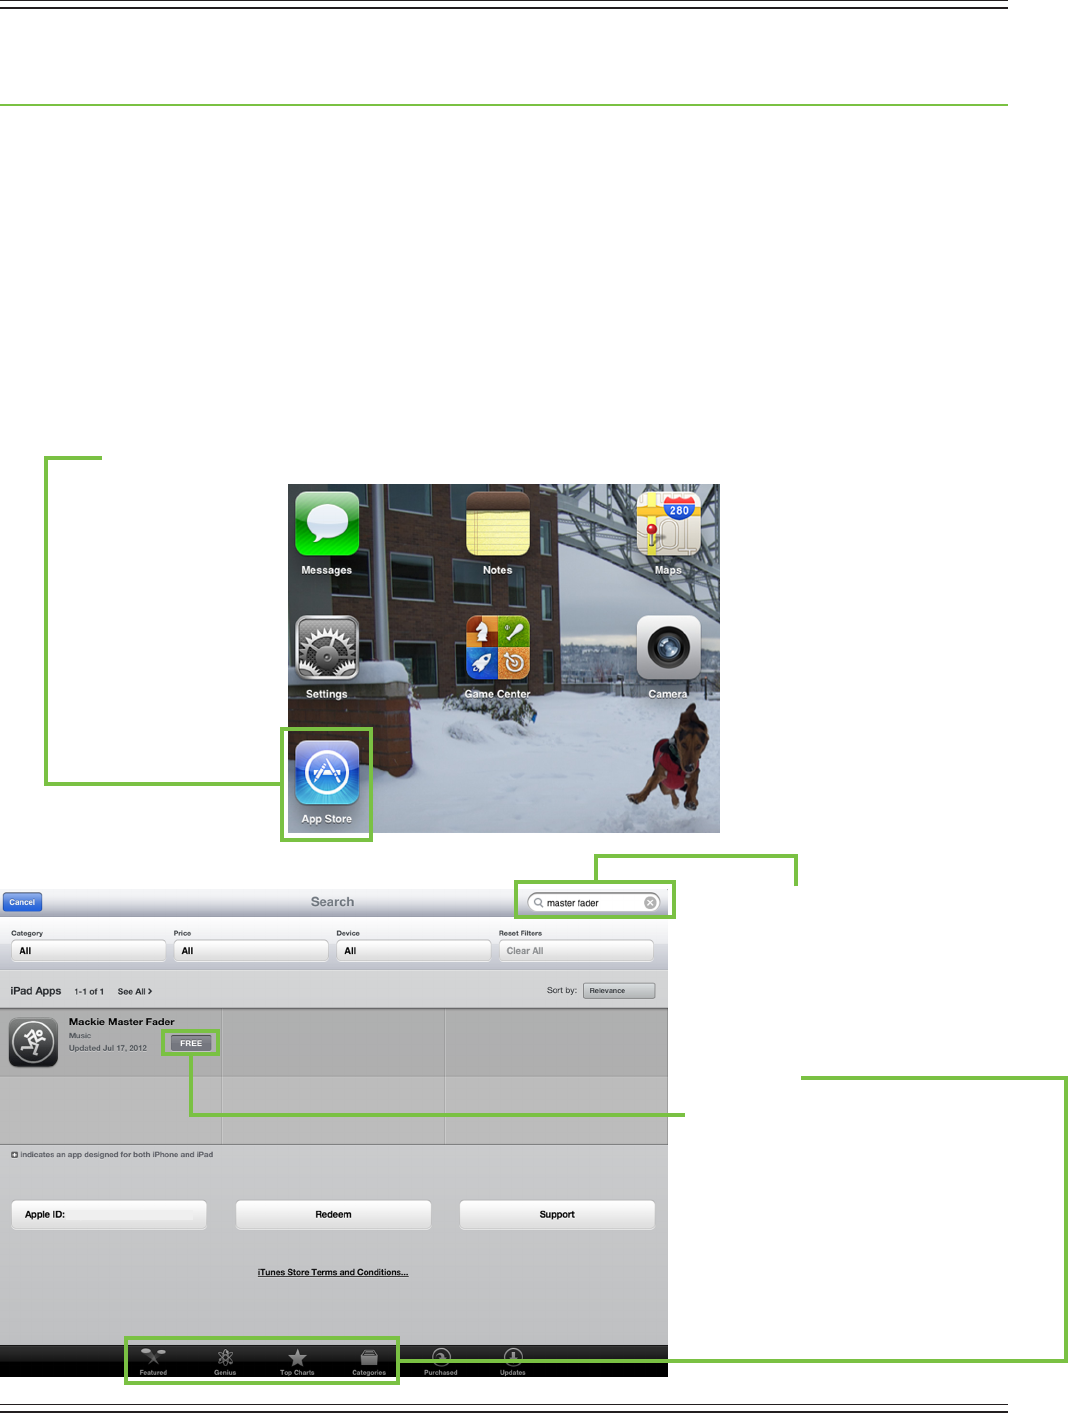
Mackie DL806 and DL1608 Reference Guide
29
Chapter 5: Mackie Master Fader Software
Introduction
Asmentionedearlier,theDL806orDL1608isthedigitalmixer,andoneormoreiOSdevicescontrolsit.
AllDSPprocessingandroutingtakesplaceinthemixeritself,meaningit’snotjusta“dock”.TheMaster
FaderappforiPadiswhereyou“control”themix.IfaniPhoneand/oriPodtouchisconnected(wirelessly),
youwillneedtofollowthesesameinstructionsaslistedhere,butsubstitute“MasterFader”with“MyFader”.
MoreinformationaboutMyFaderisoutlinedinChapter15.
Downloading and Installing the Master Fader App
ThereareacoupleofwaystodownloadandinstalltheMasterFaderapp.ViaiTunesonMacorPC,for
example.However,theeasiestandfastestwaytodownloadandinstallitisdirectlyfromtheiPad.You’ve
downloadedappsonaniPadbeforeandit’sthesamemethodtodownloadthisone,aswell.Here’show:
WithagoodinternetconnectionviaWi-Fi,3GorLTE,turnontheiPadandopenuptheAppStore.
Type“masterfader”inthesearch
box located near the top-right
corner of the screen followed by
a carriage return.
The search box is available in
“Featured”,“Genius”,“TopCharts”and
“Categories”,butNOT“Purchased”
or“Updates”.
NowtaptheFREEbutton.
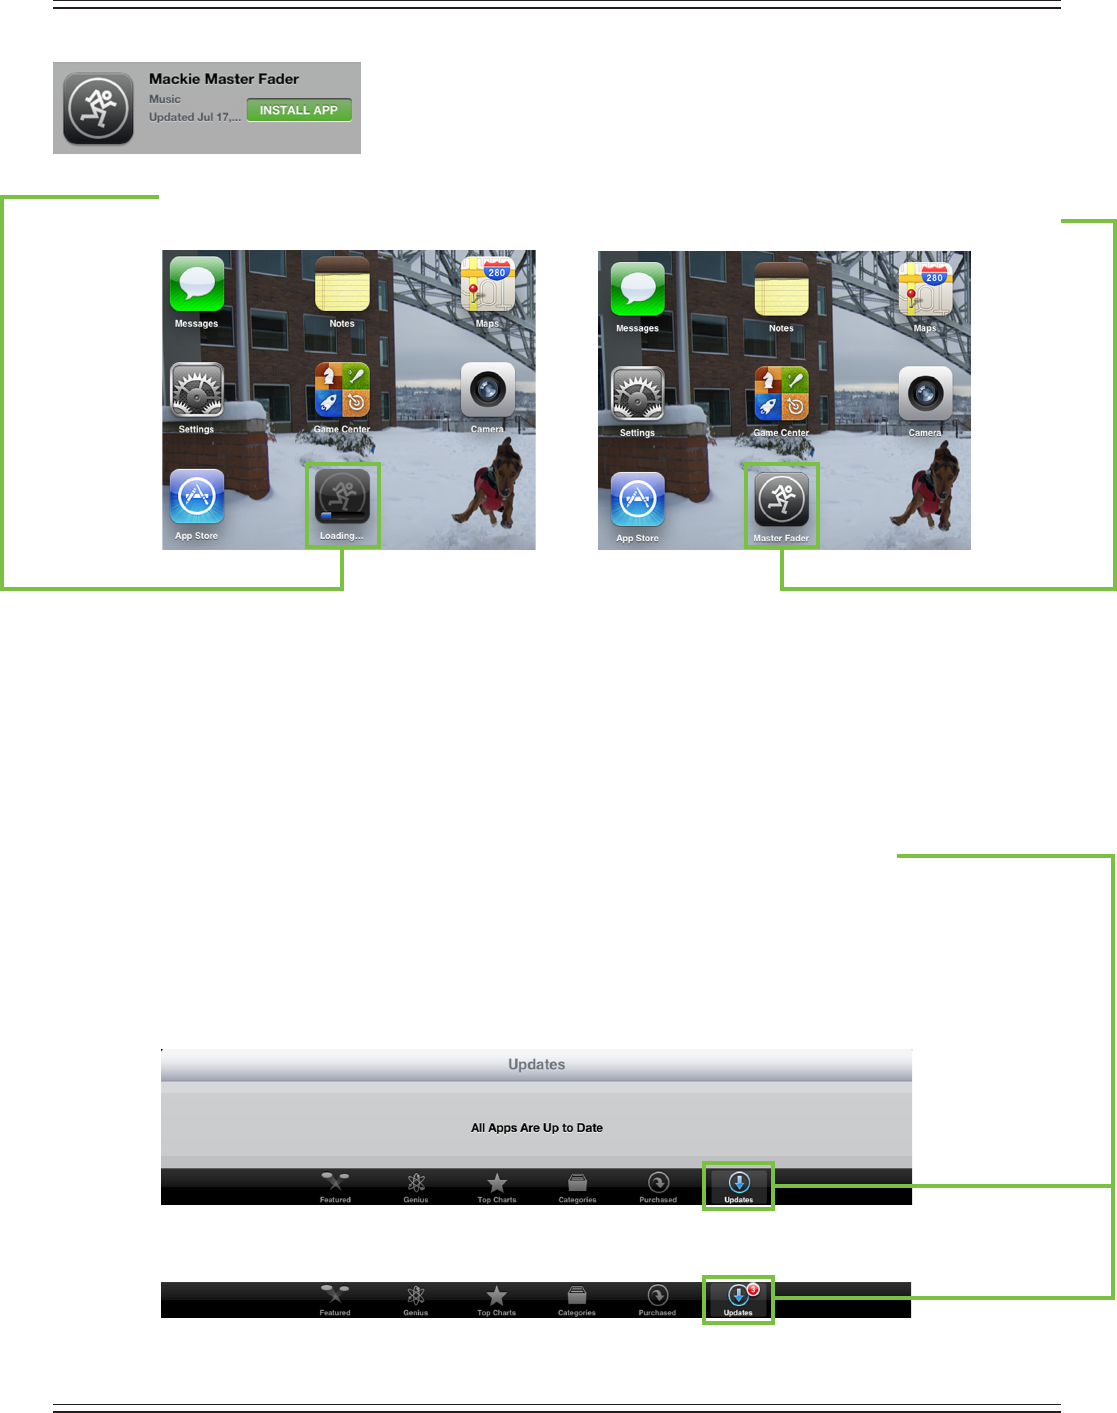
Mackie DL806 and DL1608 Reference Guide
30
ThisthenturnsintoagreenINSTALLAPPbutton.ToinstalltheMasterFaderapp
toaniPad,tapthegreenINSTALLAPPbuttonandenteryourAppleIDpassword
when prompted.
The blue line underneath the Master Fader app icon shows the progress of the download.
Once the blue progress line disappears, the download is complete and the Master Fader app is ready for use.
The item located directly to the right of the Master Fader icon (and just below the camera) is another app
thatwe’recurrentlyworkingon;it’scalled‘AngryDogs’.Aaaah,justkidding!It’sactuallyDLSeriesProduct
Manager,Ben’sdog–Rocky–playingintheSeattlesnow...andpeoplethoughtitonlyrainedhere.Sheesh!
Updating the Master Fader App
ItispossiblethattheMasterFaderapphasalreadybeendownloadedandinstalled.Inthiscase,you’re
probablygoodtogo.However,itisagoodideatogototheAppStoretocheckforupdates.Youwillwant
the latest and greatest version for the absolute best in functionality and versatility.
OnceintheAppStore,taptheUpdatebuttonlocatednearthebottom-rightoftheiPad.
TherstscreenshotbelowshowsaniPadwithallappsuptodate.Thesecondscreenshotbelowdisplays
threeappsthatneedupdating(whichmayormaynotincludetheMasterFaderapp).TappingtheUpdate
button here will horizontally display the icon, name and description of changes of each app needing an
update.IfyouseeMasterFaderlisted,tapthegrayUPDATEbuttononthefarright,followedbytypingin
yourpassword.Orbetteryet,tapthegrayUpdateAllbuttonintheupper-rightcornerofthescreen.
Theupdateswillcommence.Don’tdoanythinguntilthedownloadshavecompleted.
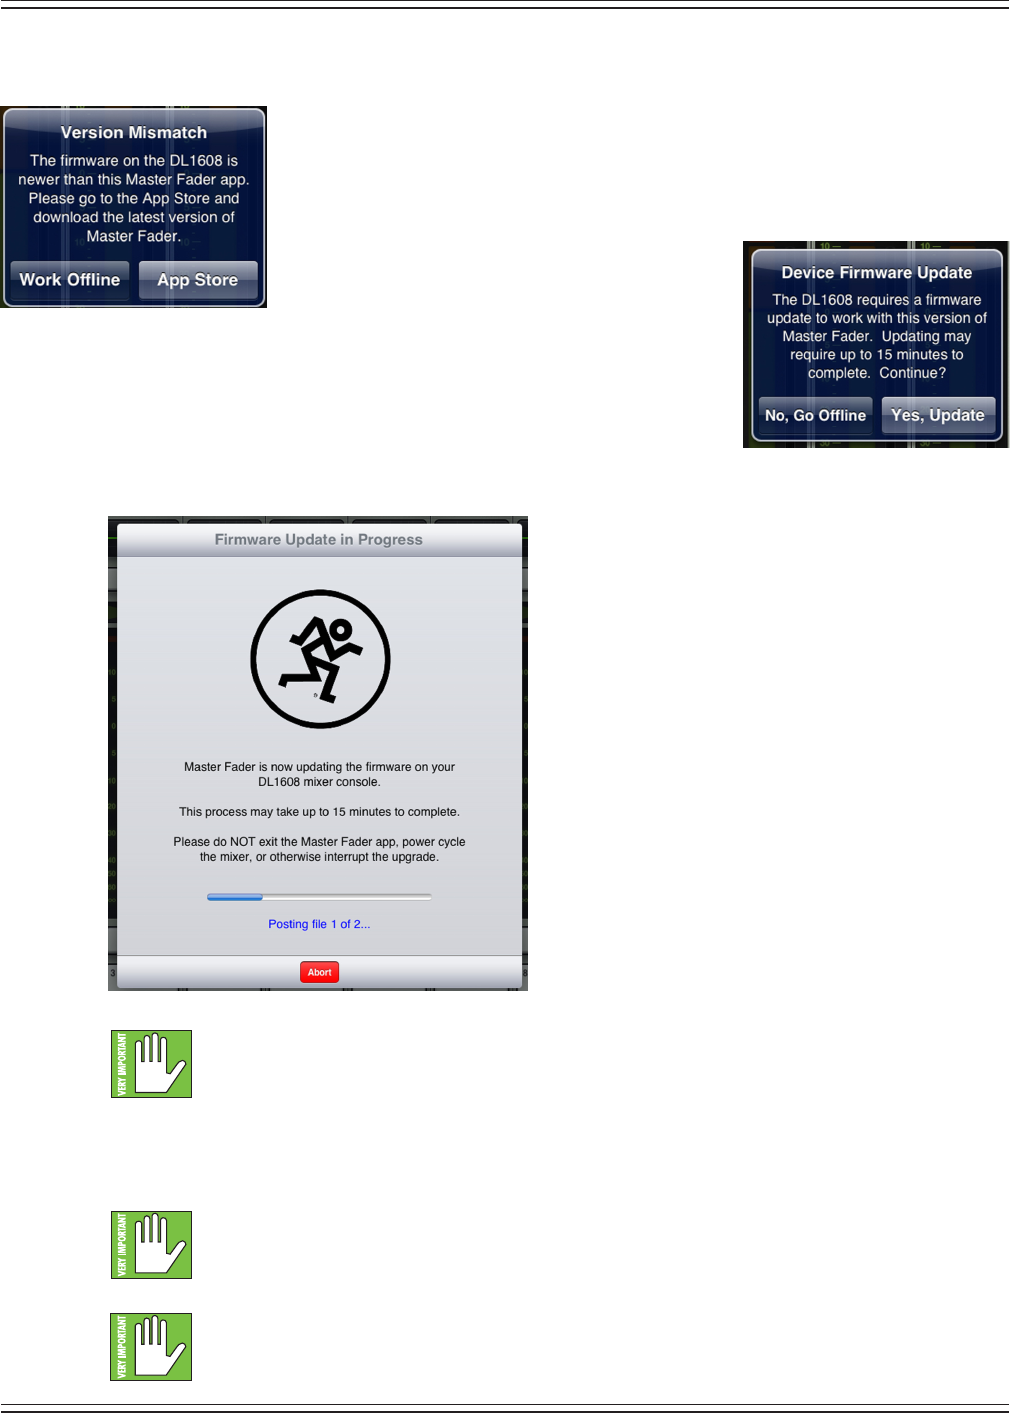
Mackie DL806 and DL1608 Reference Guide
31
Updating the Firmware
The Master Fader app automatically compares the app and rmware versions
each time the app connects to the mixer. In order to operate properly, the rmware
and app versions must match. If the Master Fader app is older than the rmware
versioninthemixer,youwillbepromptedtoupdatetheapp.TaptheAppStore
button on the popup and update as described on the previous page.
If the rmware version in the mixer is older than the
Master Fader app, you will be prompted to update
the rmware. The latest rmware is built into the
Master Fader app, so there is nothing additional to
download. Just follow the on-screen prompts.
Be sure you have up to 15 minutes to spare, as the
rmware update sometimes takes that long.
Onceyou’vemadethedecisiontoupdatethermware,an
imagesimilartowhatisshownbelowwillappearontheiPad.
Thewarning“PleasedoNOTexittheMasterFaderapp,powercyclethemixer,orotherwise
interrupttheupgrade”hasseveralmeanings.Forexample:(1)takingasnapshotofthe
screen, (2) checking email, (3) updating apps, calendar, notes, (4) checking the score of the
game, (5) updating the status of your favorite social networking site, etc. Instead, wait until
aftertheupdatehascompletedtotweet“Justupdatedmy@MackieGear#DL806#DL1608rmware,
#mylifeiscomplete!”Ilearnedthehardwaysoyoudon’thaveto.Eatasandwich,quaabeer,orwhatever
else you need to do to occupy your time during the rmware upgrade.
Thermwareupgrademayoccurwiredorwirelessly.Chooseoneortheotherandgowithit;
doNOTchangefromonetotheotherhalfwaythroughtheupgrade.
Doyouseetheredbuttoncenteredatthebottomofthescreenthatreads“Abort”?
Yeah,you’regoingtowanttogoaheadandleavethatalone.Thereshouldbenoreason
toabortthermwareupgrade.Frankly,I’mnotevensurewhyit’sthereifwedon’twant
anyonetotouchit.Leaveito,right?Alas,Idigress...
Master Fader App
Needs an Update
Mixer Firmware
Needs an Update
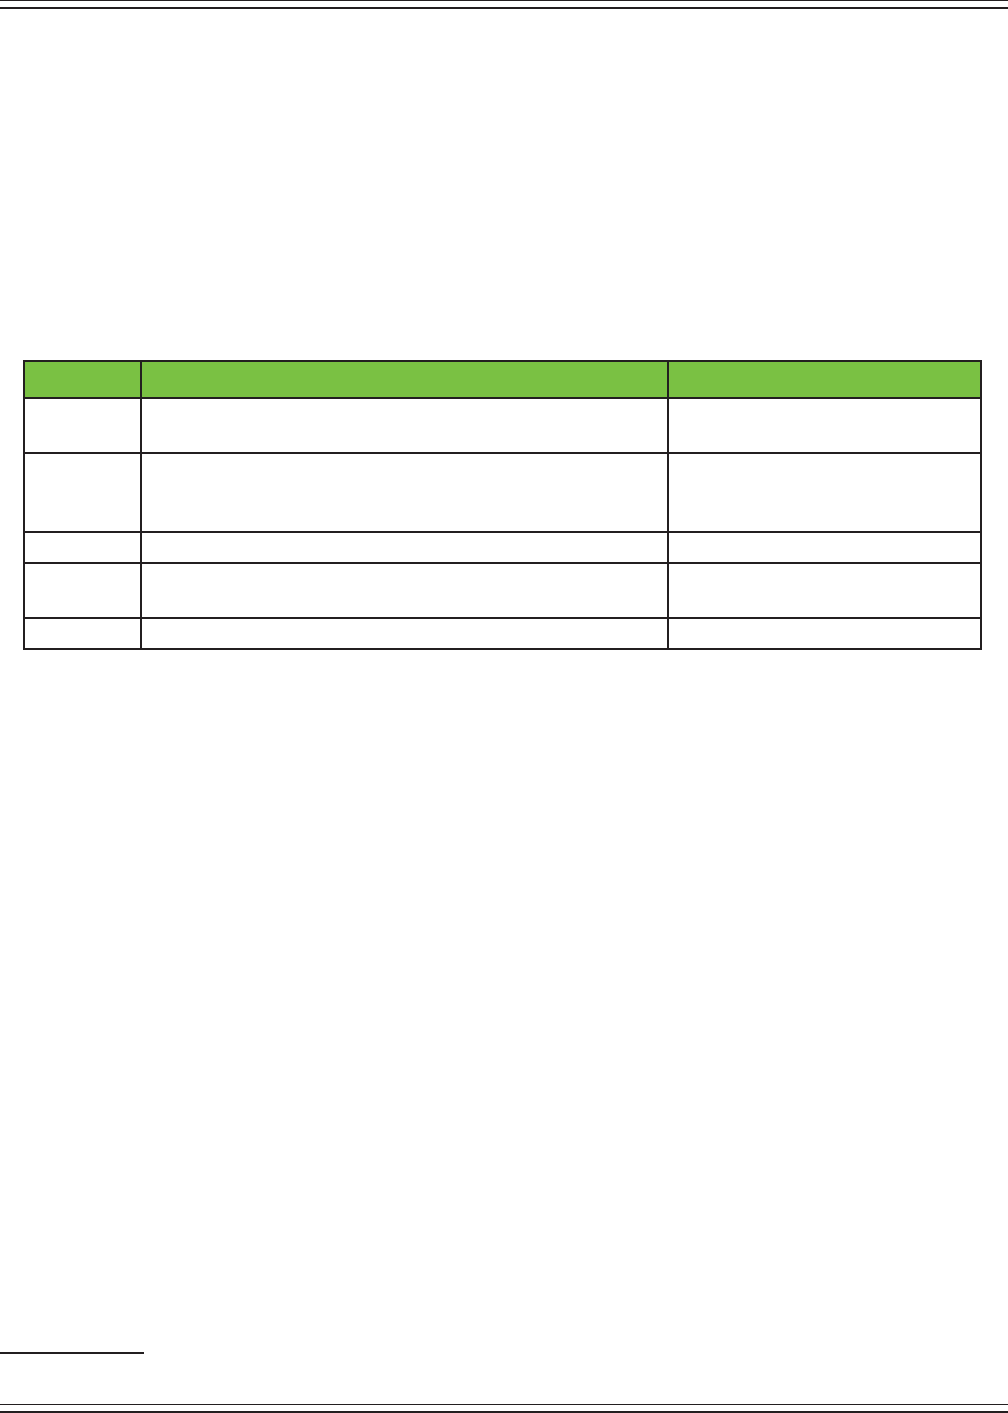
Mackie DL806 and DL1608 Reference Guide
32
Lingo
BeforedivingintothefeaturesandfunctionsoftheMasterFaderapp,let’stakeafewminutestoget
acquainted with the wording that will be used throughout this Reference Guide. Doing so will minimize
confusion and increase productivity, a great combination!
Tapping, Dragging, Flicking, Swiping, and Pinching2
YoualreadyhaveaniPad...youwouldn’tbeusingthismixerotherwise!Gettingaroundthe
MasterFaderappissimilartogettingaroundtheiPadandmanyoftheotherappsyoucurrently
utilize.Let’sgooverthefunctionsyouwillbeusing:
There are a multitude of things to tap: mute and solo buttons, the presets and snapshots buttons
andotherbuttonsscatteredthroughoutthechannelview[EQ,gateandcompressor,andmany
more].Infact,youhavealreadytappedafewthings:theAppStoreicon,theFREEandINSTALL
buttons, etc. The Master Fader app works in similar fashion. In most cases, it is tap to engage, tap
again to disengage.
Some things may be double-tapped to reset to their default settings. For example, pans will be
centered, EQ will be set to 0 dB gain, etc.
Dragging is how to adjust faders, pans, EQ, gate, compressor and FX settings, graphic EQ and the
outputselectortonamejustafew.KeepangerontheiPadanddragtheselecteditemtothe
desireddestination.Youwillbecomeamasterdraggerofthemasterfaderinnotime!
Flickingissimilartodragging,but“faster”.Infact,ickingcouldbecomparedtoaslapshotinhockey.
Flicking will be used mostly to view a dierent set of channels or in a mixer view swipe zone when a
“slower”dragjustisn’tfastenough.Wegetit.Youhaveplacestogo,peopletosee.Flickaway.
Swiping will become second nature, as this is how to switch between channel views. Swiping may be
compared to the aforementioned ick, but instead of being like a slap shot in hockey, a swipe is more
likesweeping.That’saneasywaytorememberit:swiping=sweeping!Thereisawholepagededicated
toswiping,appropriatelytitled“TheSwipeZone”.Readallaboutitonpage36.
Pinchingistheonlyfunctionyouprobablywillnotuseawholelot.Theonlythingsthatget
pinched are the EQ balls to adjust their Q and a loaf to get rid of waste and relieve tension.
2 These gestures apply with the My Fader app, too.
Gesture Action Examples
Tap To press or touch a control or item
(analogous to a single mouse click)
Adjusttools,mute,polarity,
ID buttons, etc.
Drag To press down and slowly drag the feature to the desired
spot (that is, move side-to-side and up and down)
Adjustfaders,pans,
channel view sliders, etc. and to
view a dierent set of channels
Flick Averyfastdrag View a dierent set of channels
Swipe To make a sweeping motion with your
nger side-to-side or up and down
Navigatebetweenchannelviews;
refertoTheSwipeZoneonpage36
Pinch Usetwongerstopinchopen[zoomin]orclose[zoomout] AdjustEQQ
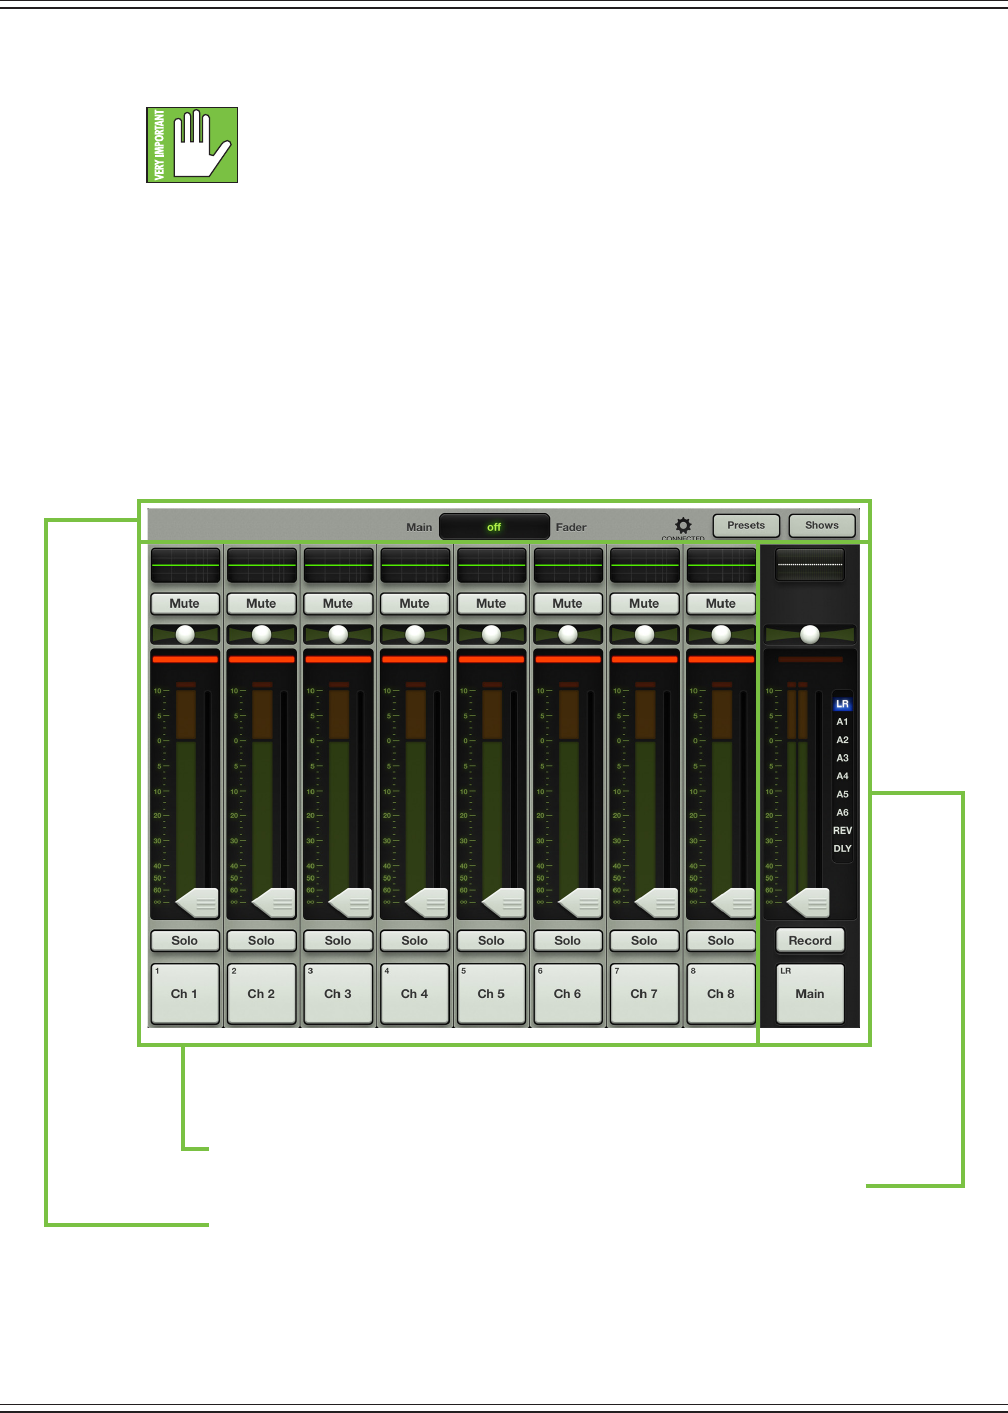
Mackie DL806 and DL1608 Reference Guide
33
Two Main Views
Throughout this Reference Guide we will be talking quite a bit about views. The good
thing, though, is that there are only two main views in the Master Fader app: mixer view
and channel view. This is just an overview of what you can accomplish with each view.
Soon enough we will go through each of these in detail in the upcoming sections.
Let’stakeaquickpeekatwhateachonelookslikeandwhateachrepresents.
This is important so focus!
Mixer View
Themixerviewisexactlywhatitsoundslike;it’saviewofthemixer!Thekeymixing
controlsofeveryinputandoutputfortheDLSeriesmixersexisthere.Allchannelstrips
(plusthereverb,delayandiPadchannelstrips)arepresentalongwithathumbnail
viewofeachchannel’sEQcurve,mute,panslider,gainreductionmeter,faderlevel,
input meters, selected output indicator, solo and channel name and image.
Mixer View
Visible and ready for action in the mixer view are:
(1) the channel strips which occupy the majority of the screen.
(2) the master fader strip which resides vertically on the far right of the screen.
(3) the navigation bar which lies horizontally at the top of the screen.
So the mixer view is where you adjust the key mixing controls for all channels at once.
If you would like to adjust the individual channel processing, you need to go to the
channel view. Tapping the EQ curve at the top of any channel leads you there.
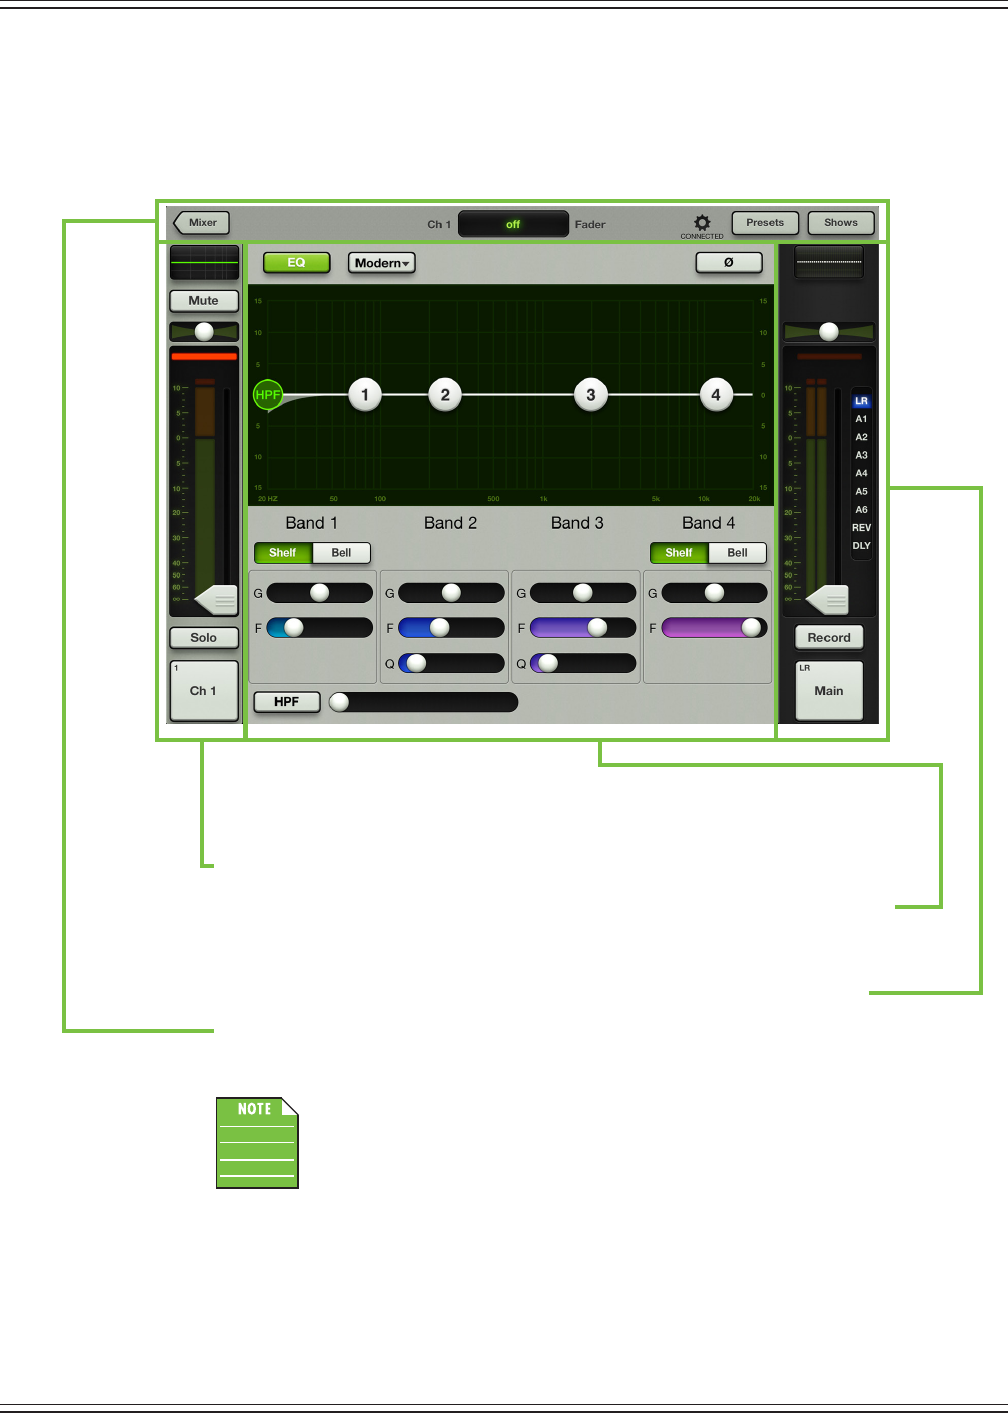
Mackie DL806 and DL1608 Reference Guide
34
Channel View
ThechannelviewhandlesallDSP-relatedactivities.Itisinthechannelviewwhereallplug-in
processing is adjusted on individual channel inputs and outputs. This includes channel EQ,
channel gate and compression, FX, graphic EQ and output compression and limiting.
Channel View
Visible and ready for action in all input channel views are:
(1) the channel fader which resides vertically on the far left of the screen.
(2) the channel processor which occupies the majority of the screen. Swipe up or
down to switch between processors or left and right to switch between channels.
Readthatlastsentenceagain.It’simportant!
(3) the master fader strip which resides vertically on the far right of the screen.
(4) the navigation bar which lies horizontally at the top of the screen.
Speaking of the navigation bar...
Thereisaneasywaytodeterminewhichviewyou’rein.Lookintheupper-left
corneroftheiPad.Ifitisnothingbutgray,thenyouareinthemixerview.Butif
youseeabuttonwiththeword“Mixer”init(asinthiscase),thenyouareinthe
channelview.Youmaytapthemixerbuttontoreturntothemixerview.
Nowthatyouknowthebasicsofthemixerviewandchannelview,therearejustafew
more things to cover before we look at every single screen and control in thoroughly
exhaustive detail.
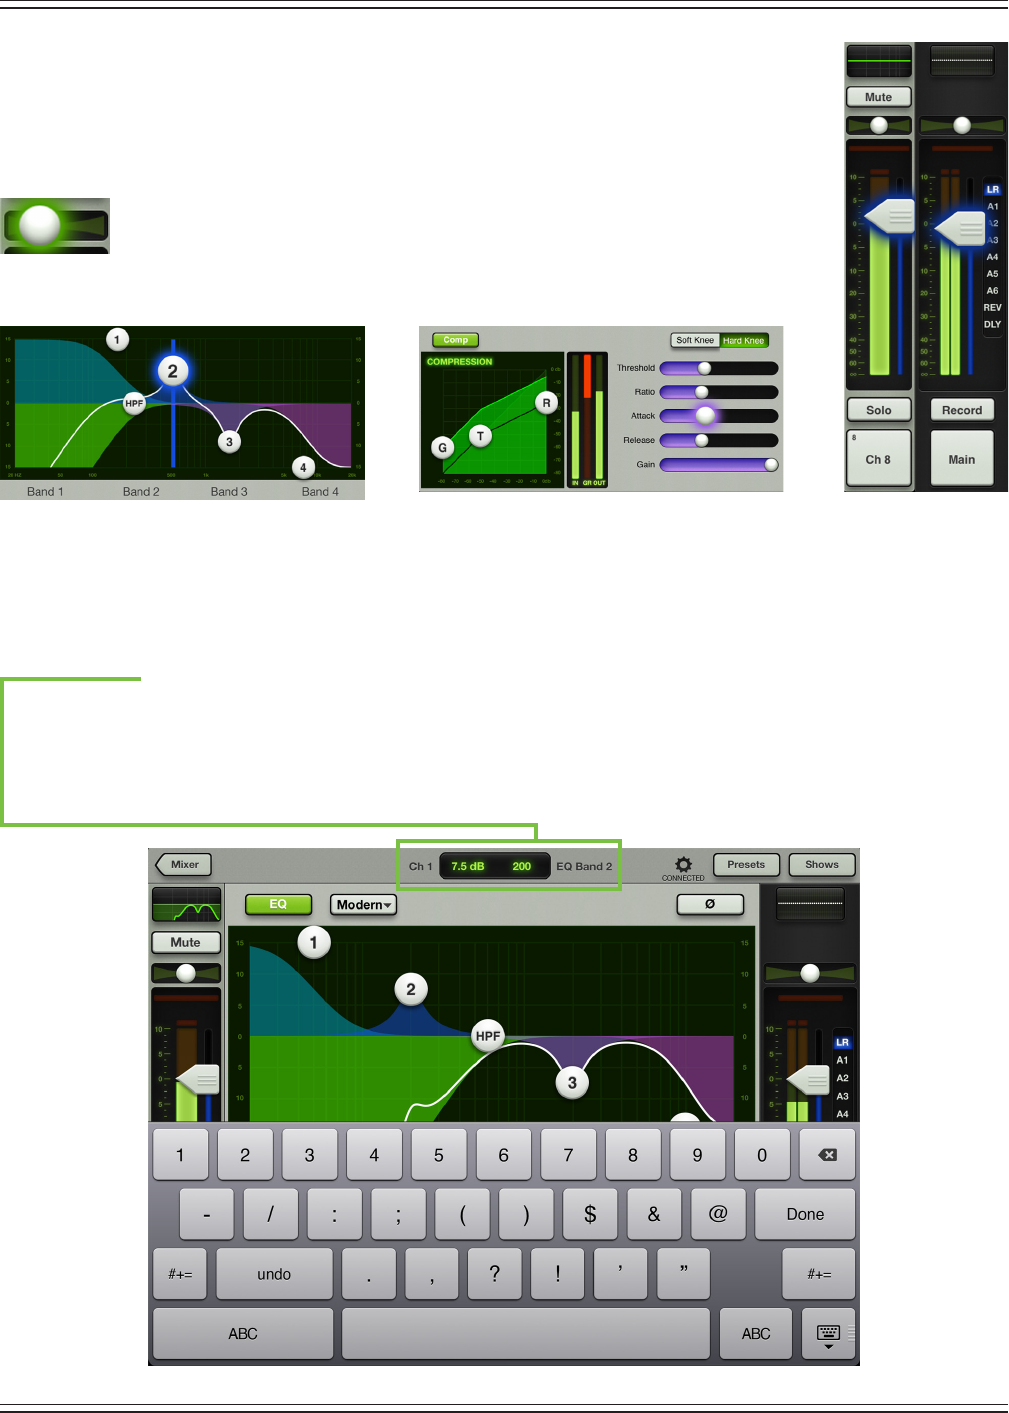
Mackie DL806 and DL1608 Reference Guide
35
Grow & Glow, Current Parameter Display and The Swipe Zone
The following are key paradigms built into the Master Fader app to help
simplify your mixing world. These exist on all screens and are important
concepts to understand.
Grow & Glow —Whenmakingchangestothemix,certaincontrols“Grow&
Glow”toindicatethattheyarebeingadjusted.Thisbuildsyourcondenceinthat
the controls you are adjusting are under your power, including faders, EQ balls,
gate and compressor balls, graphic EQ sliders and more. There are multiple
examplesofthe“Grow&Glow”featuredisplayedonthispage.
Current Parameter Display — The current parameter display is conveniently located dead-center on
the navigation bar at the top of whatever view is open. It constantly updates to display the channel and
the value of the current parameter being adjusted. However, this is not just a point of reference. Tap the
current parameter display and a keyboard appears. Here you may enter the exact value you would like
for that parameter. Sometimes multiple parameters may be changed. For example, both the gain and
frequency may be updated on each EQ band, as seen below.
Pan Grow
& Glow
Fader Grow
& Glow
Band 2 Grow & Glow [EQ]
(Alsoofnotehereistheverticalline;ithelps
determinetheband’scurrentfrequency).
Attack Slider Grow & Glow
[Compressor]
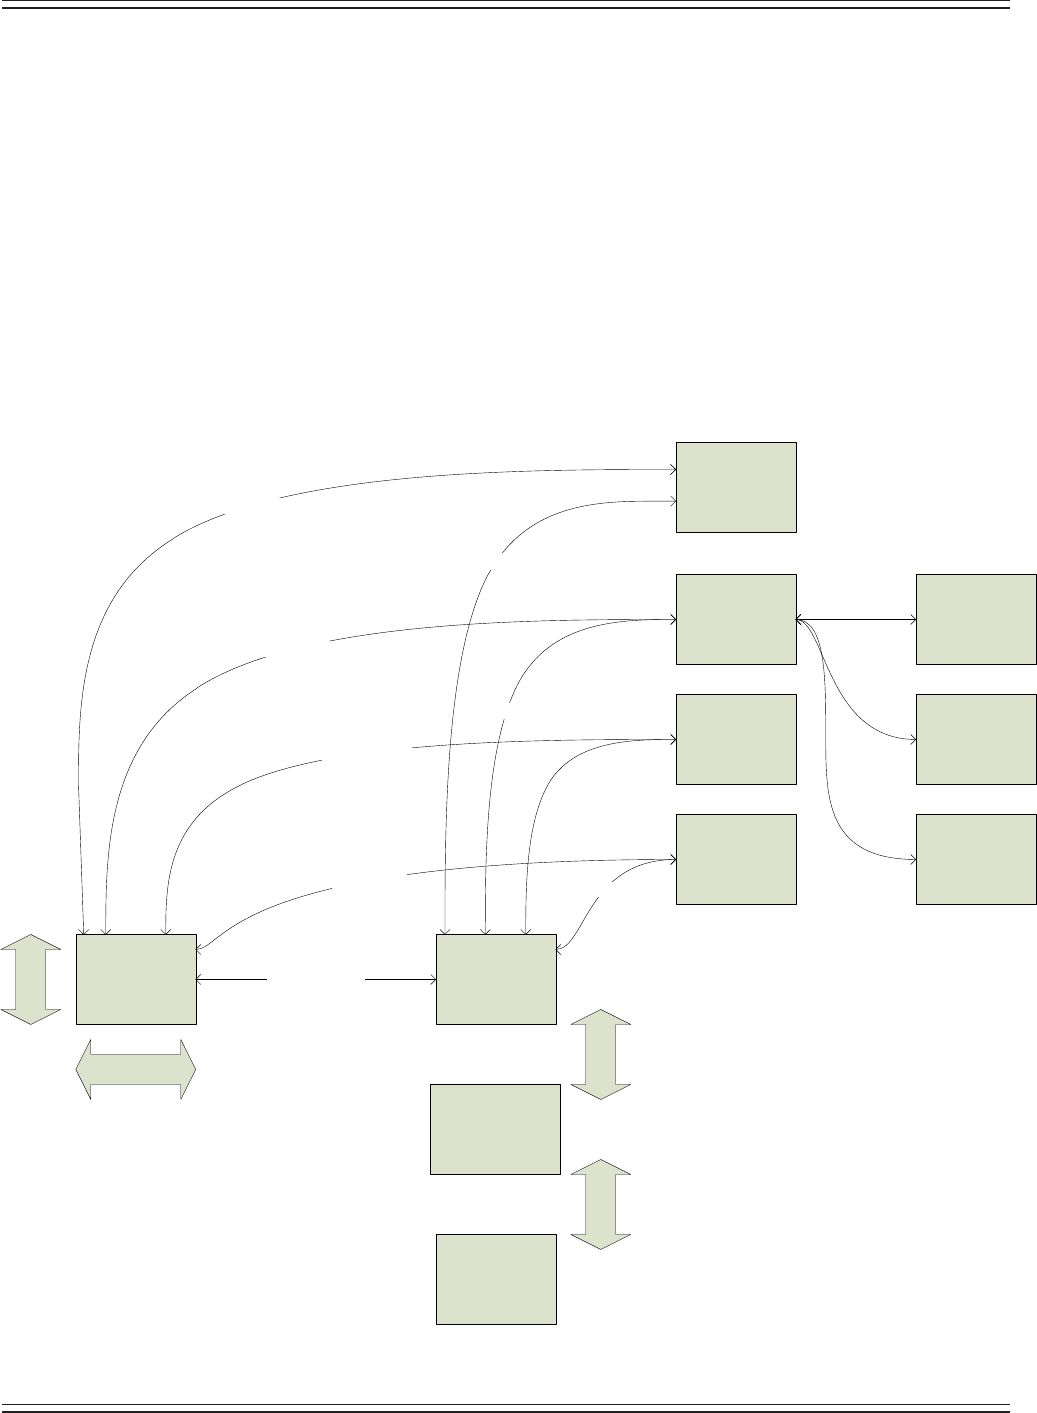
Mackie DL806 and DL1608 Reference Guide
36
The Swipe Zone — Swiping, dragging and icking are the keys to navigating the Master Fader app
and the swipe zone exists in nearly every single view. While in the mixer view, the swipe zone exists
anywhere on the black background of a channel. Swipe left or right to display any of the input
channels,thetwoFXchannelsandiPadchannel.Amaximumofninechannels(includingthe
master fader) may be displayed at a single time.
In a channel view, the swipe zone exists anywhere on the gray background. On input channels,
swipe up and down to switch between the EQ, gate and compressor and FX views and left and
right to stay on the same view, but switch between input channels. Swipe up and down on the
output channels to switch between graphic EQ and the output compressor / limiter.
There is no swipe zone in tools, presets and shows.
Thescreenowshownbelow[saythattentimesfast!]displayswhatisdescribedaboveandprovides
anoverviewofallthedierentviewsontheMasterFaderapp.We’llcovertheswipezoneforeach
view in detail, but wanted you to have an overview of what you can expect from the coming pages.
Master Fader app Screen Flow
Mixer View
Drag / Flick
Scroll Mixer
Channels
Output Selector
EQ (Inputs)
GEQ (Outputs)
Channel View
Channel View
Swipe
Scroll DSP View
Swipe
Scroll DSP View
EQ / Mixer Button
Devices
Preset View
Preset Button
Tools View
Tools Button
Tools Button
Settings
Help
Preset Button
Touch and
Release
Shows View
Shows Button
Shows Button
QAP Button
QAP Button
Gate/Comp (Inputs)
Comp/Delay (Outputs)
FX (Inputs)
PEQ (Outputs)
Channel View
Quick
Access
Panel
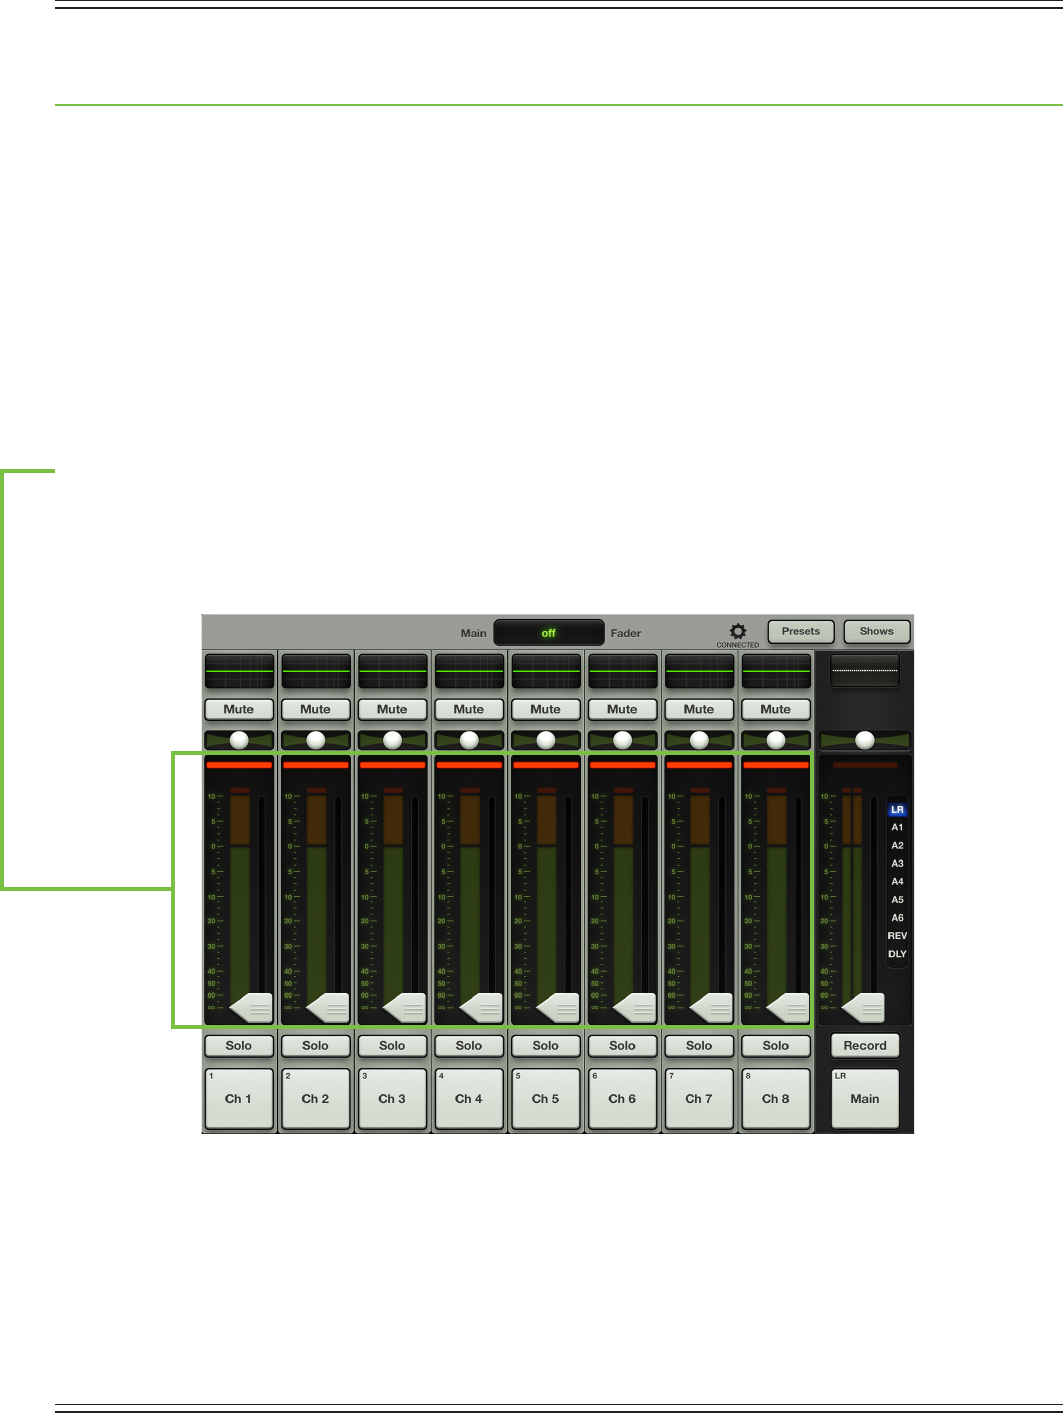
Mackie DL806 and DL1608 Reference Guide
37
Chapter 6: Mixer View : Channel Strips
Introduction
Themixerviewcontains16channelfaders[ontheDL1608;eightontheDL806],twoFXchannelfaders
[onereverb,onedelay]andoneiPadchannelfader.Eachchannelstriplooksandfunctionsexactlylike
theothersexceptfortheFXandiPadchannels.
These faders may be seen in both the mixer view and channel view. In the mixer view, all faders
arereadilyavailable,whileinthechannelviewitisthecurrentchannel’sfaderstripthatisdisplayed
along with whatever digital signal processing is taking place for that channel.
The mixer view displays eight channels at a time, as well as the navigation bar and master fader.
Take a look at the image below. It is the rst visual you will see when booting up the Master Fader app
for the rst time.
The Swipe Zone
Here in the mixer view, drag or ick left or right anywhere in the background of the outlined area
[belowthepansandabovethesolobuttons]toviewallchannelfaders,thetwoFXchannelfaders
andoneiPadchannelfader.
Let’slookatoneofthechannelfadersrst,discussingeachofitsfeaturestoptobottom.Wewillthentake
alookattheFXandiPadchannelsandgooverhowandwhythey’redierentthanthechannelfaders.
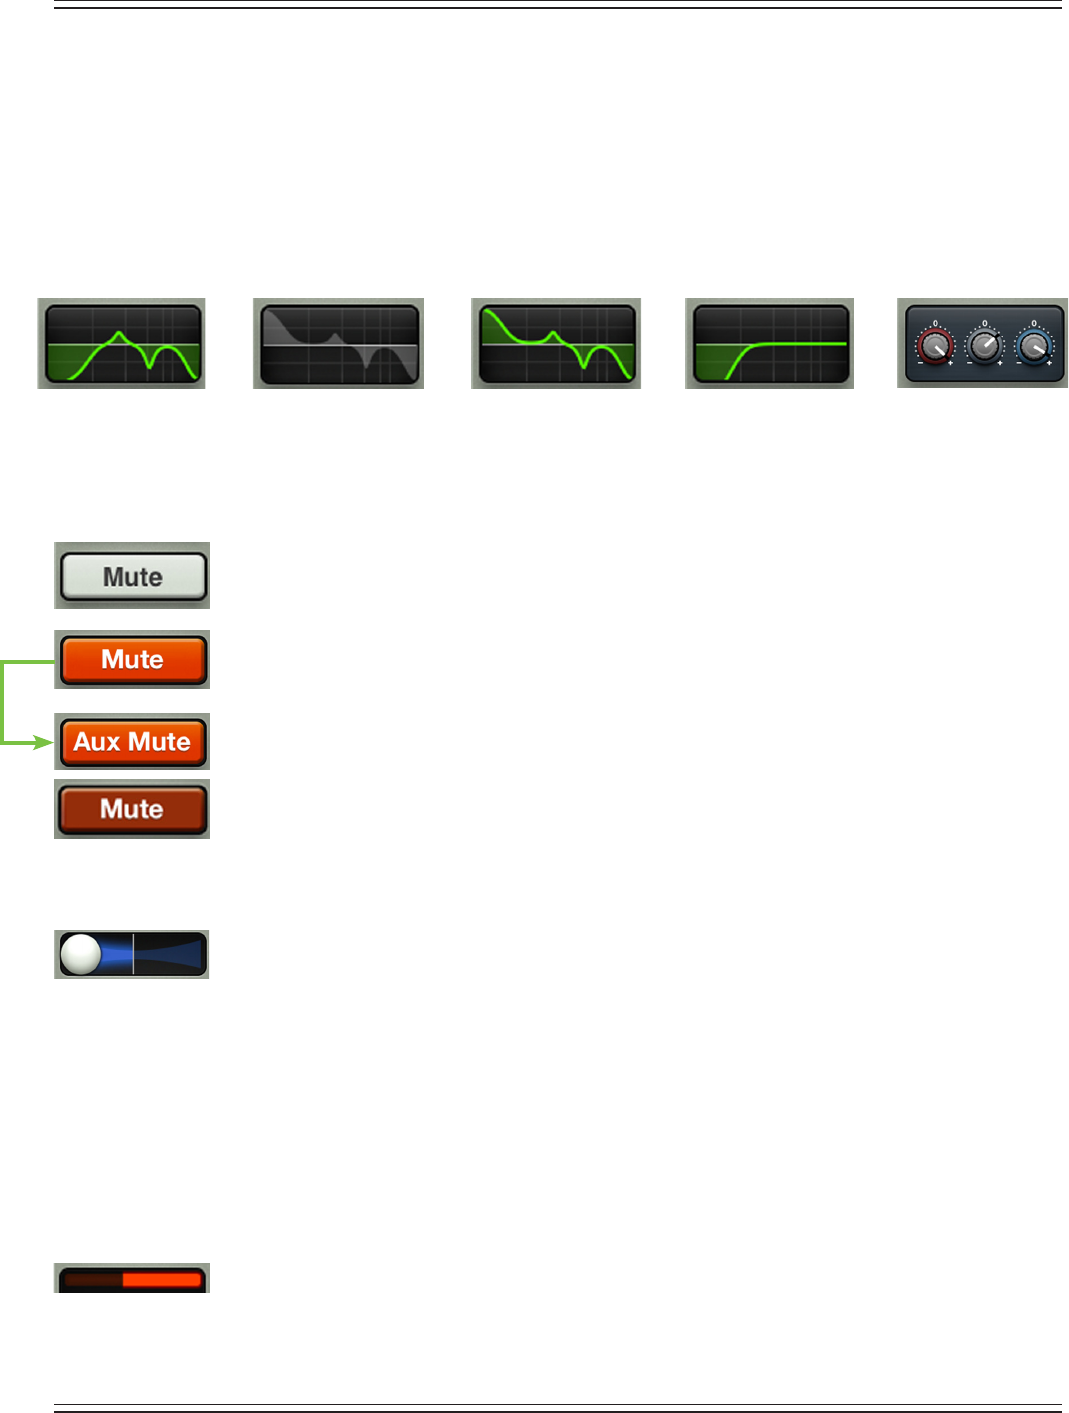
Mackie DL806 and DL1608 Reference Guide
38
EQ Curve
AtthetopofeachchannelfaderisathumbnailviewofthecurrentEQprocessingthat’sappliedtoeach
channel (whether the EQ is currently engaged or not).Tappingachannel’sEQcurvewillchangetheoutlook
fromthemixerviewtothatchannel’schannelview.Assuch,tappingachannel’sEQcurveinthechannel
viewwillchangetheoutlookfromthatchannel’schannelviewtothemixerview.
Asseenbelow,therearevepossiblescenariosregardingtheEQcurvedependingonwhetherthe
EQand/orHPFareenabled.Eachonemaylookunique,butitisthesameexactEQineachoftheve
dierent scenarios. The EQ curve will illuminate green when engaged and is gray when disengaged. To learn
moreaboutEQandHPF,checkoutchapter9startingonpage58.
Mute
Mute buttons do just what they sound like they do. They mute – turn o – the signal on the
channel(s).Engagingachannel’smuteswitchprovidesthesameresultsasslidingthechannel
fader all the way down.
Mute buttons illuminate red when engaged and are gray when disengaged.
Pleasenotethatmutingachannelmutesitallonalloutputs,notjusttheoutputthatiscurrently
shown...unlesstheuserde-selectsUseLRMuteforaparticularaux/FXsend,inwhichcaseaux
mutes (or FX mutes) and main mix mutes may be controlled independently for each channel.
MoreinformationaboutUseLRMutemaybefoundonpages48-49.
Inputs muted by mute groups will illuminate oxblood red. More information about mute groups
may be found on pages 134-138.
Pan
Panallowsyoutoadjusthowmuchofthechannelissenttotheleftversustheright
outputs.Touchanddragachannel’spansliderleftorrighttomakeadjustments.
Touchedpanswill“grow&glow”toindicatethattheyarebeingadjusted.Thepan
may be centered by double-tapping the pan ball.
Thepancontrolemploysadesigncalled“ConstantLoudness.”Ifachannelispannedhardleft(orright)
and then panned to the center, the signal is attenuated 3 dB to maintain the same apparent loudness.
Otherwise, the sound would appear much louder when panned center.
Panisonlyavailableonstereooutputs,includingLRandlinkedauxes.Foreachlinkedaux,theuser
mayde-selectUseLRPantocontroltheauxpansandmainmixpansindependentlyforeachchannel.
MoreinformationaboutUseLRPanmaybefoundonpage49.
Gain Reduction Meter
The gain reduction meter displays the input channel gain reduction from the gate and compressor.
The single meter shows the sum of the total reduction applied by the gate and compressor.
Itilluminatesfromrighttoleftandis20dBwhenfullylit.What’smore,simplytapachannel’sgain
reductionmeterinthemixerviewforquickaccesstothatchannel’sdynamicsview.Assuch,tapping
achannel’sgainreductionmeterinthechannelviewwillchangetheoutlookfromthatchannel’s
channel view to the mixer view. To learn more about dynamics, check out chapter 10 starting on page 68.
MODERN EQ ON MODERN EQ OFF MODERN EQ ON MODERN EQ OFF VINTAGE EQ ON/OFF
HPF ON HPF OFF HPF OFF HPF ON HPF ON/OFF
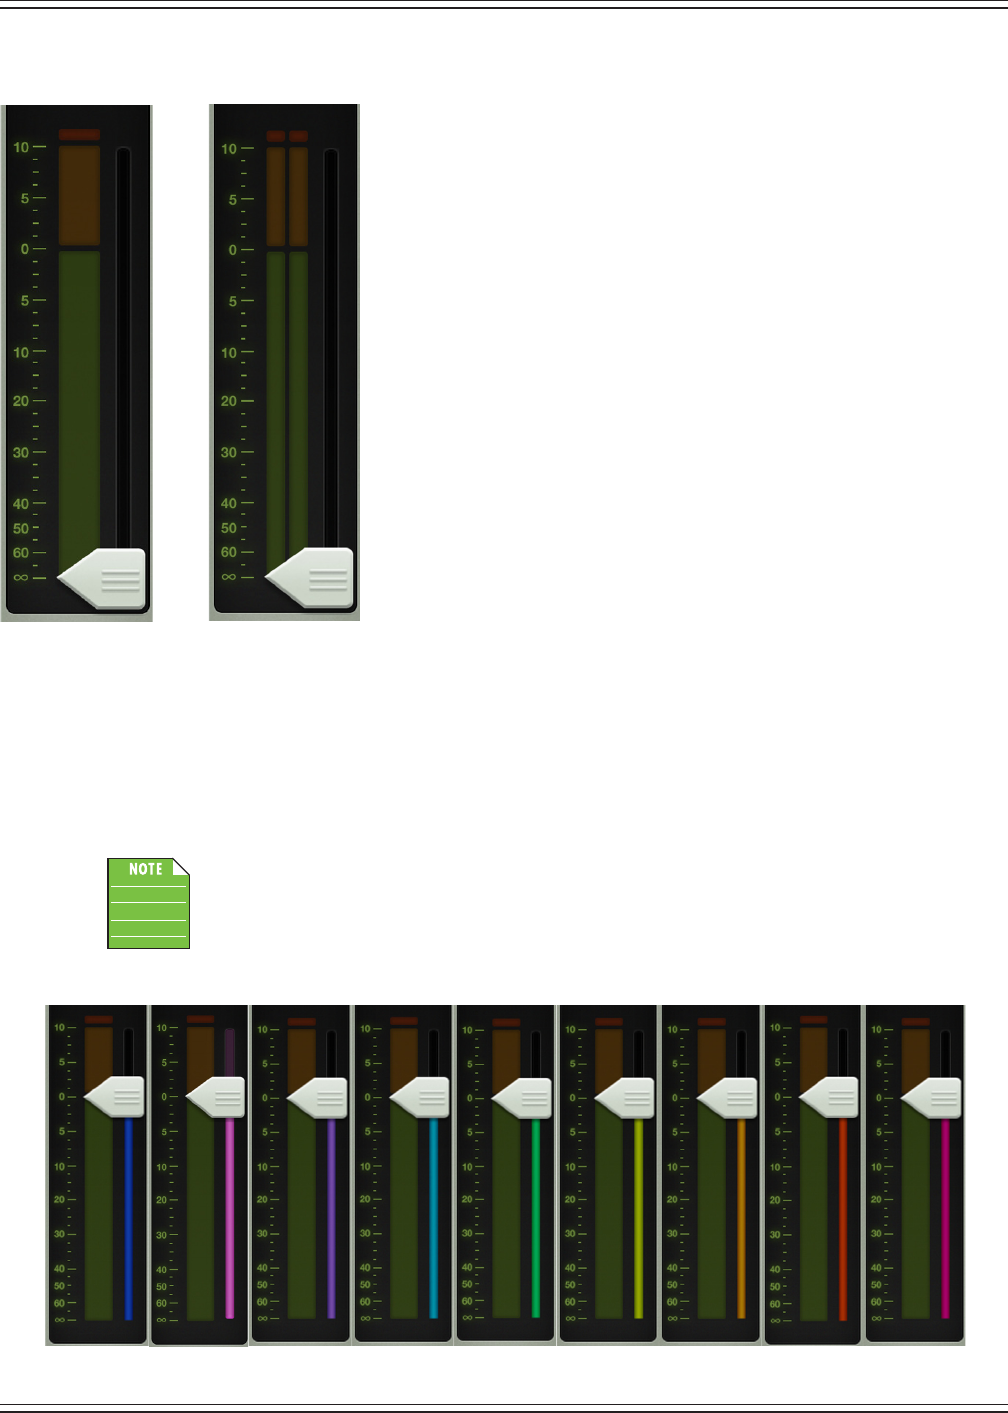
Mackie DL806 and DL1608 Reference Guide
39
Channel Faders and Input Meters
The touch sensitive faders adjust the level of each channel going to the
selectedoutput.Adjustmentsaremadebytouchinganddraggingchannel
fadersupanddown.Touchedchannelfaderswill“grow&glow”toindicate
thattheyarebeingadjusted.Thefaderlevelrangesfrom–∞to+10dBas
indicated by the scale on the left.
The input meters (next to each channel fader) display the input signal
leveltothechannelbeforeallchannelprocessing.Changesmadeto
the EQ, mute and fader do not aect these meters. This meter should
remain green with the occasional bump into the yellow zone. Turn down
the gain knob if the input meter remains consistently yellow. If the input
istoohigh[overloading],aclipindicatoratthetopofthemeterwill
illuminatered.Ifclippingoccurs,reducethegain.Unlinkedchannels
display mono meters, while linked channels display stereo meters.
How to link channels is discussed on page 42.
Red[clipping]=–3dBFS
Green to yellow = –18 dBFS
Green[bottom]=–90dBFS
Selected Output Indicators
Directly to the right of each input meter (and underneath each fader cap) are the selected output indicators.
These vary by color for clear indication of which output type is currently selected.
The output type will be discussed in greater detail in the master fader section, starting on page 46.
There is no way you would ever see the image as shown below. It is just a point of reference.
Asmentionedabove,eachselectedoutputhasadierentcolorforclearindicationofwhich
output type is currently selected. This is especially useful in the mixer view.
LR AUX 1 AUX 2 AUX 3 AUX 4 AUX 5 AUX 6 REV DLY
Mono Stereo
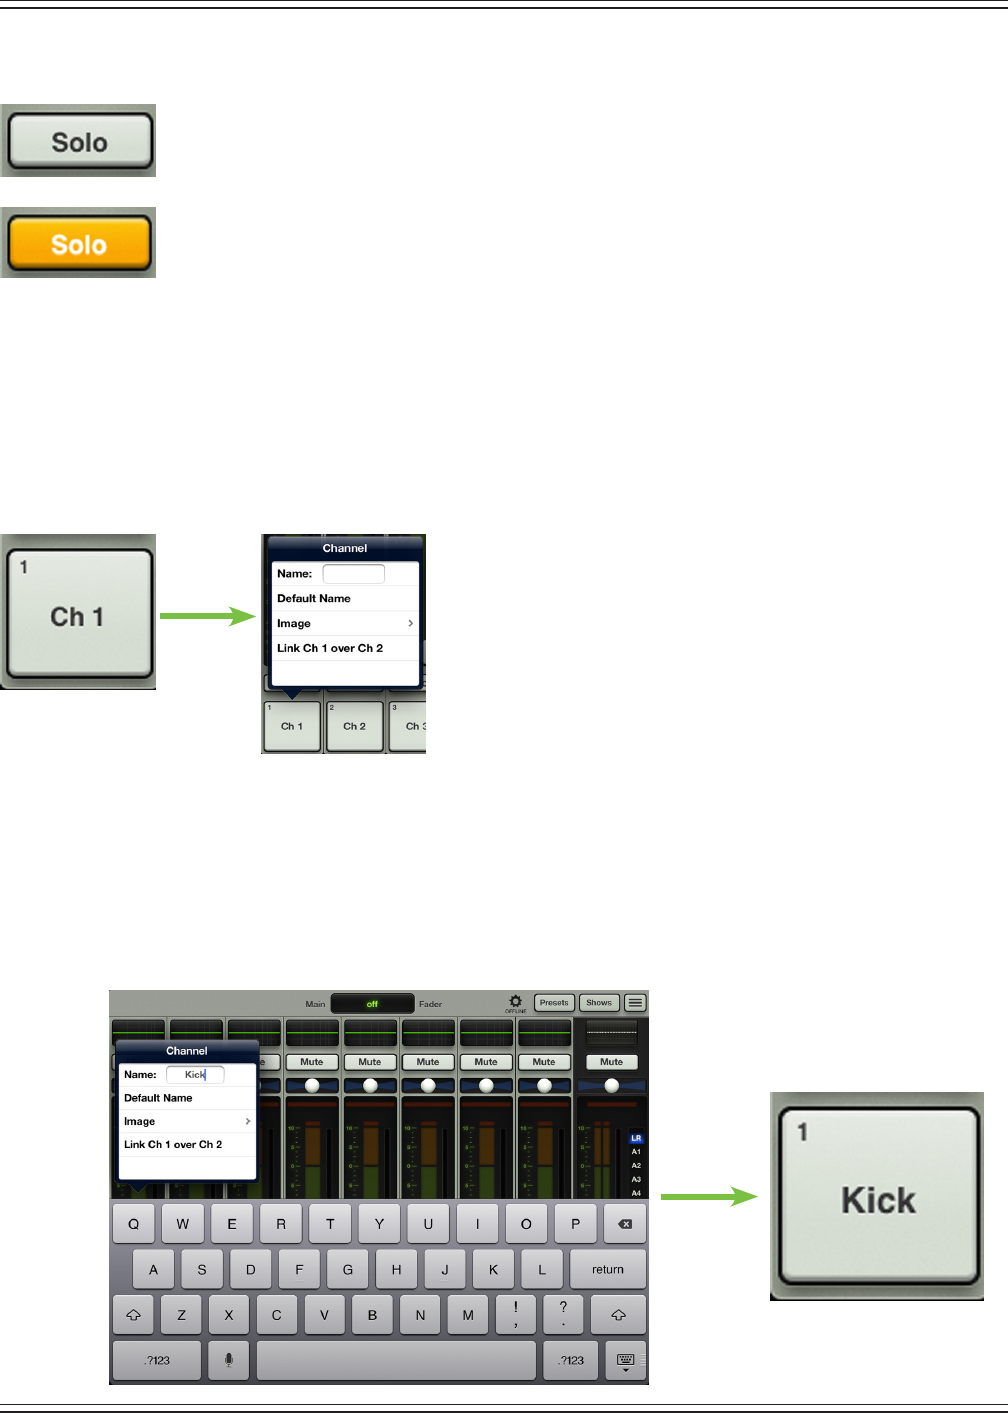
Mackie DL806 and DL1608 Reference Guide
40
Solo
Solo oers the opportunity to audition channel(s) before they are added to the mix. Whenever a
channel’ssolobuttonisengaged,onlythesoloedchannel(s)maybeheardintheheadphones.
Solo buttons illuminate orange when engaged and are gray when disengaged.
InputchannelsolobuttonsarePFLwhichstandsforpre-faderlisten.Therefore,thelevelofthechannel
fader does not aect the level heard in the headphones.
Soloisalsopost-EQ,soifasoloedchannel’sEQisengaged,theEQsettingswillbeheard.But,solois
unaected by the position of the mute button.
If no channels are soloed, you will hear the LR signal through the headphones.
Channel ID Button
Each channel ID button name and image is user-editable.
Additionally,usersmayalsolinktwoadjoiningchannels
together into a single channel strip. Simply tap the button
at the very bottom of the channel strip to reveal a popover
that allows editing of the name and image and option to
link channels.
Let’sstartwiththename.Tapinthenameboxtobringuptheblinkingcursorandkeyboard
(as seen in the image below). Simply type in the name you want for that channel followed by
a carriage return. If the name is too long to t, the button scrolls, displaying the entire name.
Forfamiliarity,thisisthesamekeyboardthatisusedformessagingoremailingfromtheiPad.
Itgoeswithoutsayingthattapping“DefaultName”changesthatchannel’snamebacktoitsdefaultname.
True story.
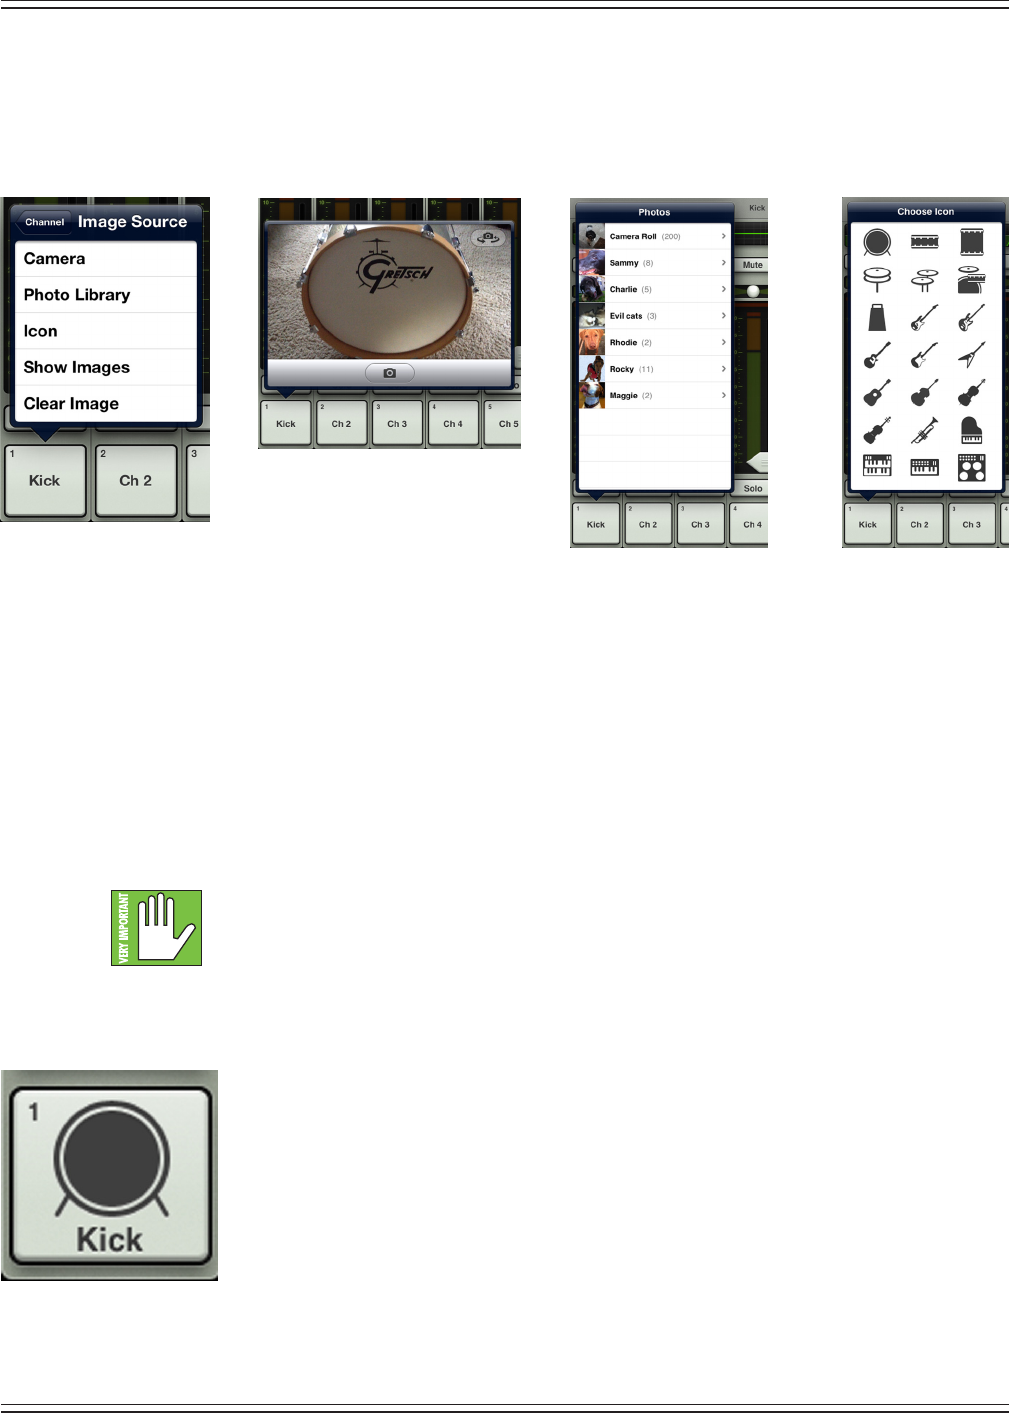
Mackie DL806 and DL1608 Reference Guide
41
Anopengrayboxwithonlythechannel’snameworks,butlet’sspiceitupwithanimage.Showimages
are kept in sync which means that all connected devices will display the new image once its been added,
whether or not it was already on that device. There are several ways to choose an image. From the channel
popover,tap“Image”torevealanewpopoverasseenbelowleft[ImageSource].Youwillbepresented
with ve choices:
Camera — Ifyou’refamiliarwithhowthecameraontheiPadworks,thenyou’reinluck...thisone
works the exact same way! The encircled camera icon in the middle of the gray bar snaps the picture
andtheiconintheupper-rightcornerselectsbetweenthefrontandbackcameraontheiPad.
[CameraisunavailableontherstgenerationiPad].
Photo Library — HereyoumayselectfromallthephotosthatcurrentlyresideonyouriPad.
Icon — Or select from a multitude of built-in icons at your disposal.
Show Images — This allows you to select the channel image from photos that are currently in use
on the current show. The list will display all images currently in use. Tap the photo you would like to
use from this list.
Amaximumof64imagesmaybeusedpershow.However,ifthesameimageisused
on multiple channels, it only counts as one image (if the image has been selected from show
images and not multiple times from the photo library). Icons do not count toward the 64.
Moreinformationaboutthelesystem[shows,snapshots,etc.]beginsonpage115.
Clear Image — Believe it or not, tapping here will clear the image for that channel. This removes the
imagefromthechanneland,ifitisn’tusedelsewhere,fromtheCurrentShowandtheShowImageslist.
Since we already named channel 1 the kick drum, we might as well go with the
kickdrumicontoboot,right?Tapthekickdrumiconintheupper-leftcorner.
Channel1isset:nameandimage.
Asseeninalloftheseimages,asmallnumberresidesIntheupper-leftcorner
regardless of name and/or image. This number represents each channel and
itcannotbechangedorremoved.Trustus,it’sforthebest,asitisforeasy
identication of each mic pre.
Image Source
Icon
Photo Library
Camera
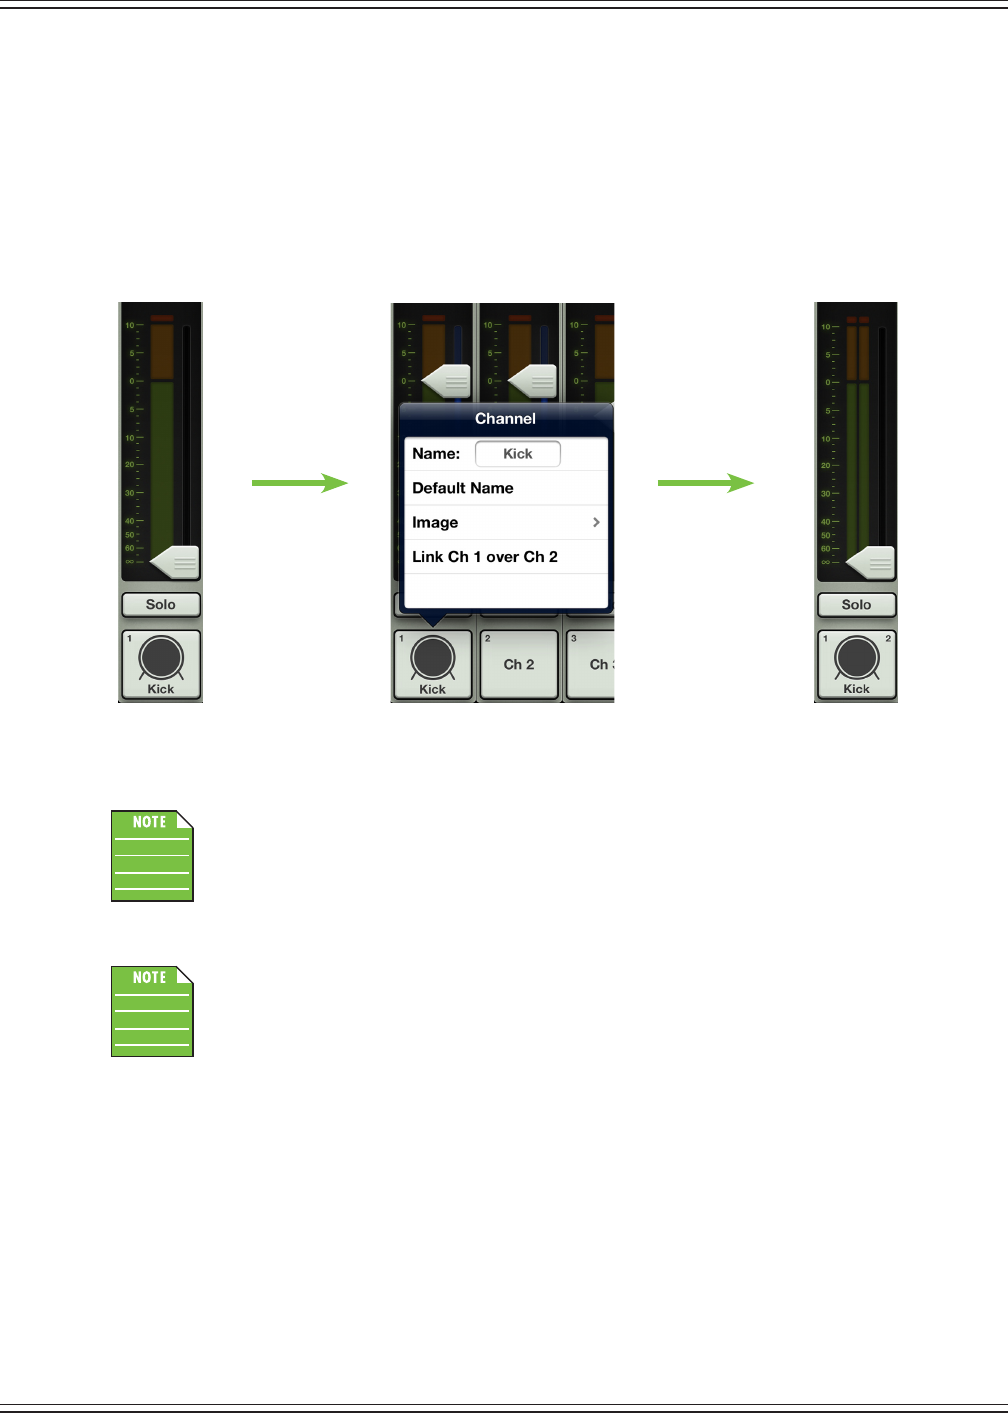
Mackie DL806 and DL1608 Reference Guide
42
Asmentionedpreviously,twoadjoiningmonoinputchannelsmaybelinkedtogetherintoasinglestereo
channel strip. This is ideal for stereo input sources such as keyboards, submixer outputs, vocal processors
and more. When linked, the level control, EQ, gate and compressor are adjusted with a single set of controls!
Linkingchannelsiseasy.AftertappingaChannelIDbutton,youwillseeanoptionto“LinkChXoverChX”.
Tapit!Apopoverwilldisplayaskingyoutoconrm.Avisualdierencebetweenunlinkedandlinked
channels is displayed below. Follow the same steps outlined above to unlink channels.
Odd-numberedchannelswilllinktothenext(even-numbered)channel[e.g.1-2,3-4,etc],
while even-numbered channels will link to the previous (odd-numbered) channel
[e.g.10-9,12-11,etc].
Thenewlinkedchannelwilltakeonalloftheattributes[EQsettings,gateandcompressor
settings,delayandreverbsettings,etc.]ofthetappedChannelIDbutton.Inotherwords,
if you link channel 1 over 2, the resulting stereo channel will take on all of the settings of
channel 1. However, if you link channel 2 over channel 1, the resulting stereo channel will
take on all of the settings of channel 2.
Unlinked Linked
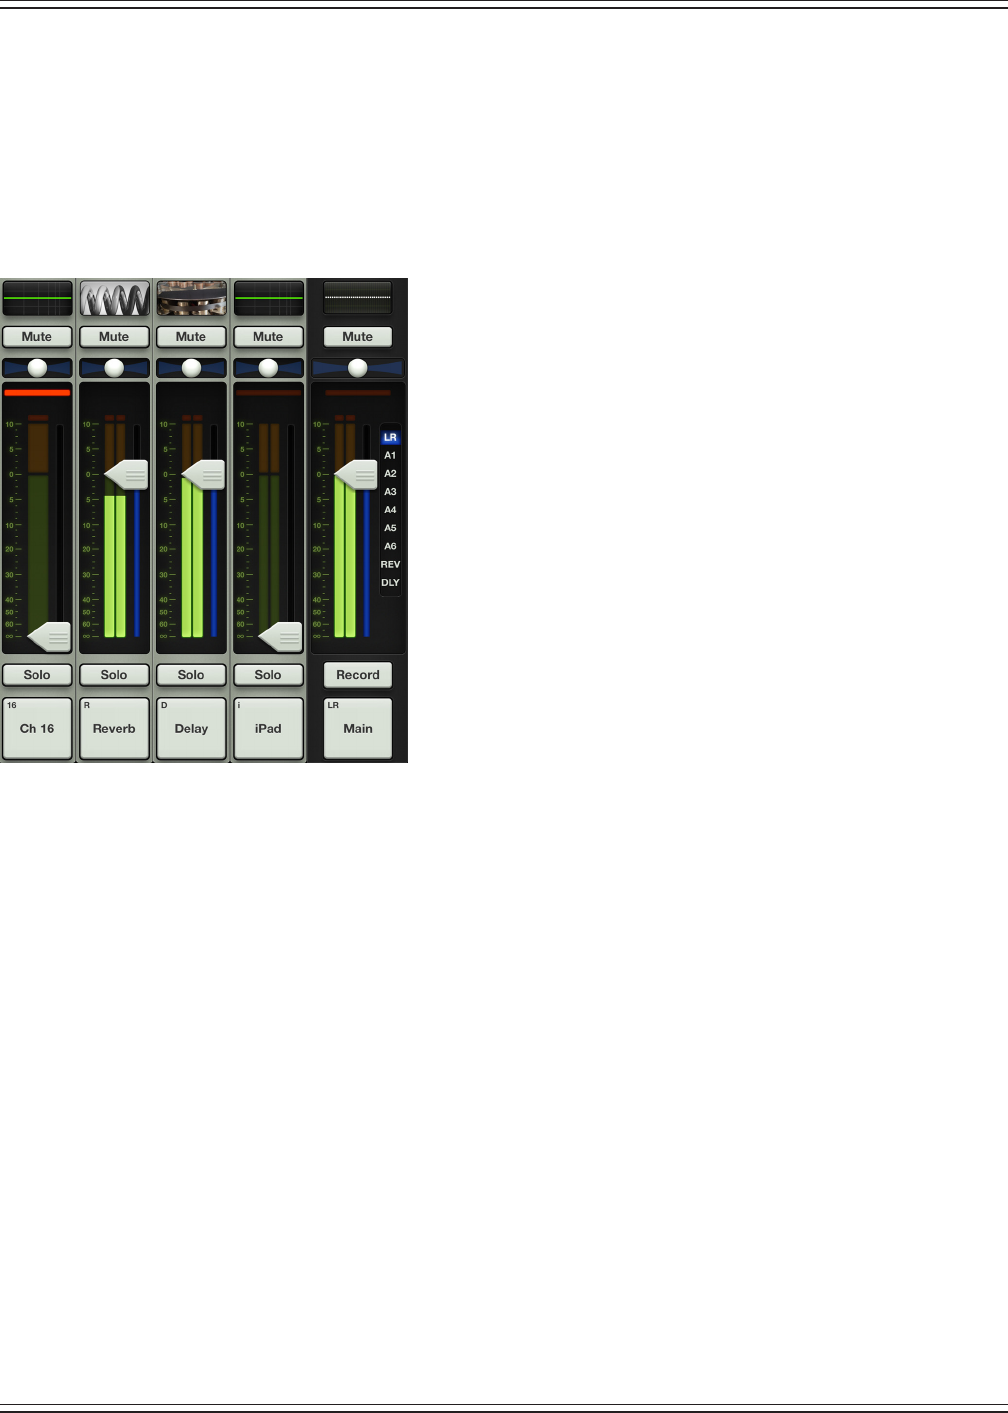
Mackie DL806 and DL1608 Reference Guide
43
FX [Reverb / Delay]
Nowlet’stakealookatthereverbanddelaychannelstripssincetheyoperateslightlydierentthan
the channel strips. To get here, ick or drag left anywhere in the mixer view swipe zone until the
FX channels appear. The dierences between the input channel strips and FX channel strips are
notedbelow.Channel16wasleftintheimageonpurposetoeasilyseetheside-by-sidedierence
between an input channel strip and an FX channel strip.
Eects Display — The EQ curve is replaced with an image
of the currently selected reverb and delay eect type. Simply
tappingtheimagewilltakeyoustraighttothateect’scontrols.
Balance Slider — The pan slider becomes a balance slider on these
two channels, now acting as a stereo balance. It allows you to adjust
how much of the left or right output signals are heard. Touch and
dragtheslidersleftorrighttomakeadjustments.Centerittohear
the output equally from the left and right sides. The balance may
be centered by double-tapping the balance ball.
No Gain Reduction Meters — There are no dynamics on FX
channels, so the gain reduction meters are not shown.
No High-Pass Filter — There is no high-pass lter on FX channels,
so it will be absent in the EQ view for these two channels.
Stereo Meters — Because the FX channels are stereo returns,
the meters are shown in stereo, not mono.
To learn more about FX, check out chapter 11 starting on page 75.
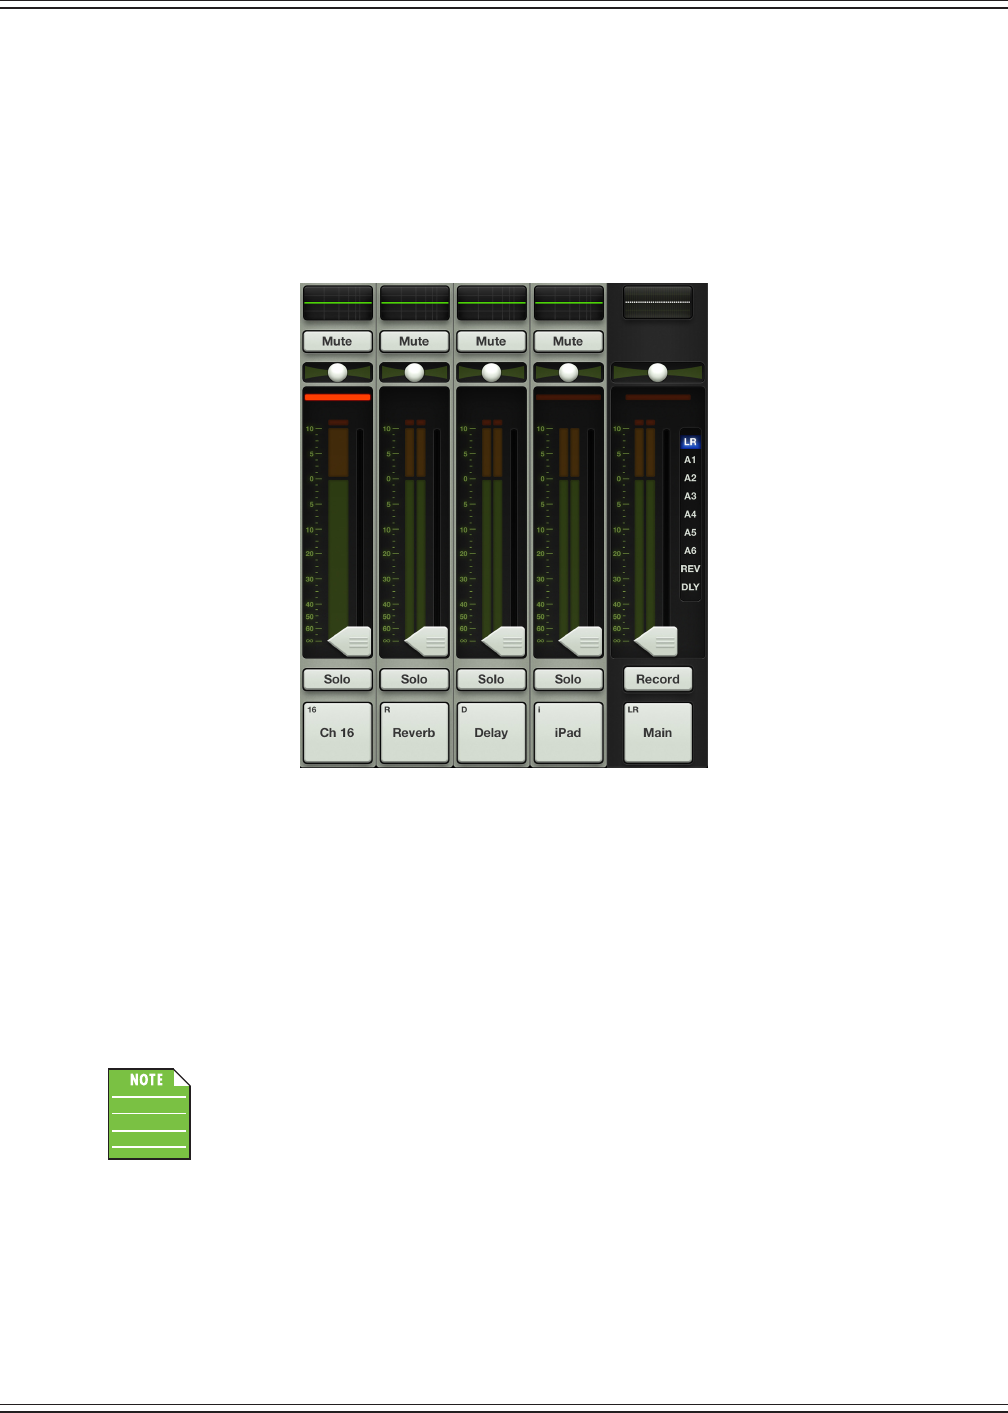
Mackie DL806 and DL1608 Reference Guide
44
iPad / Playback
Nowlet’stakealookattheiPadchannelstripsinceitoperatesslightlydierentthantheinputchannel
strips.Togethere,ickordragleftanywhereinthemixerviewswipezoneuntiltheiPadchannelappears.
ThedierencesbetweentheinputchannelstripsandiPadchannelstriparenotedbelow.Channel16was
left in the image on purpose to easily see the side-by-side dierence between an input channel strip and the
iPadchannelstrip.TheonlydierencesbetweentheiPadchannelandinputchannelsisthattheiPad
channeldoesnothaveaHPForgateanditdefaultsasastereochannel(butmaybeunlinkedtomaketwo
separatemonoiPadchannels).Otherwise,theyaretotallythesame.Takealookbelow:
Balance Slider — ThepansliderbecomesabalancesliderontheiPadchannel,nowactingasastereo
balance (but pan when unlinked). It allows you to adjust how much of the left or right output signals are
heard.Touchanddragtheslidersleftorrighttomakeadjustments.Centerittoheartheoutputequally
from the left and right sides. The balance may be centered by double-tapping the balance ball.
No High-Pass Filter — Thereisnohigh-passlterontheiPadchannel,soitwillbeabsentintheEQview
for this channel.
Stereo Meters — SincetheiPadchannelisastereochannel,themetersareshowninstereo,notmono.
AlsoofnoteistheabsenceofaclippingLED.ThisisbecausethedigitalinputfromaniPaddoesn’tclip.
ThedefaultsettingisasinglestereoiPadchannel.However,itmaybeunlinkedtomake
twoseparatemonoiPadchannels.Thisisidealforisolatingclicktracksandbackingtracks,
for example. In this example, the drummer would receive the click track and backing tracks,
while the rest of the band and audience would hear only the backing tracks.
UnlinkingtheiPadchanneliseasy.AftertappingtheiPadChannelIDbutton,youwillseeanoption
to“UnlinkiPad1andiPad2”.Tapit!Apopoverwilldisplayaskingyoutoconrm.Followthesame
stepsoutlinedabovetolinktheiPadchannel.
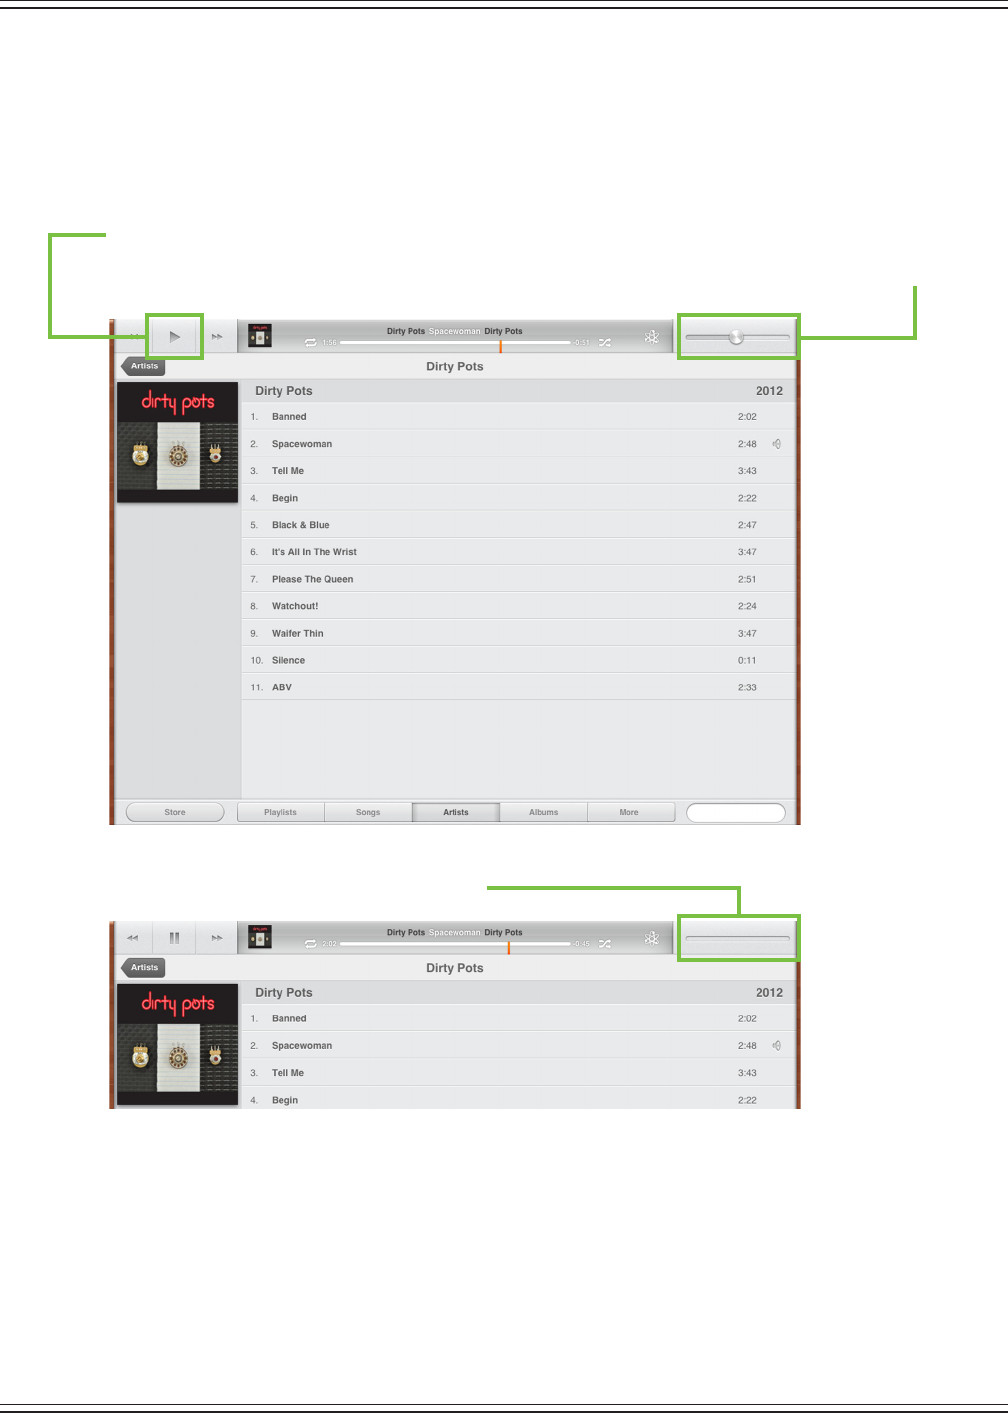
Mackie DL806 and DL1608 Reference Guide
45
TheiPadchannelcontrolsthelevelandEQfromtheiPadmusiclibrary(oranyotheraudioapp
ontheiPadthatsupportsbackgroundaudioplayback).It’seasy,justfollowtheseinstructions:
(1) — MakesurethattheiPadisattachedtothemixerforplayback,asitwillnotworkinWi-Fimode.
(2) — OpentheaudioappofyourchoiceontheiPadbytappingitsicon;thiscouldbethemusicapp,
yourfavoritemultitrackDAW,Spotifyandmore.
(3) — Taptheplaybuttontobeginplayback(ifit’snotalreadyplaying).
NoticethatthevolumesliderISavailable.ThisisbecausetheiPadisNOTyetattachedtothemixer.
Once attached, the volume slider disappears.
The volume is now changed with the Master Fader app.
(4) — PressthehomebuttonontheiPadtoexittheapp.
(5) — Tap the Master Fader app to relaunch the program and control the source in the mix.
Everything will be just as you left it. This is where you control the volume and EQ.
HeedouradviceandraisetheiPadchannelfaderslowly.MostmasteredmusiccomingotheiPadisloud.
Asthefaderrises,soshouldthemusicinyourspeakersandheadphones.
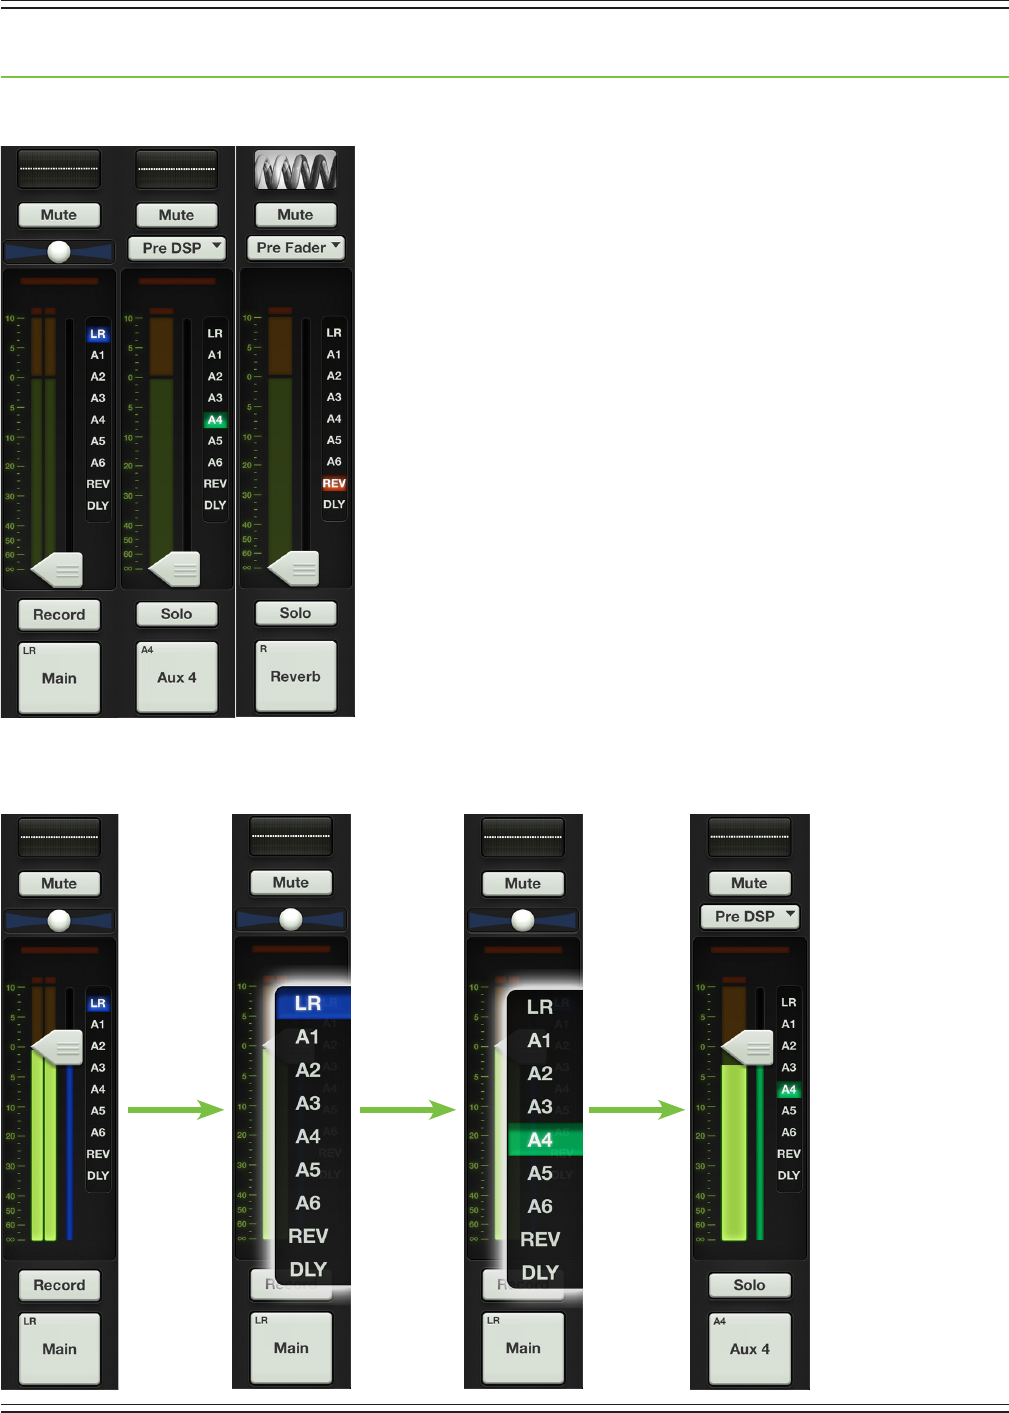
Mackie DL806 and DL1608 Reference Guide
46
Chapter 7: Mixer View : Master Fader
Introduction
The master fader is arguably the most important tool of the mixer. So much
so, in fact, that the master fader is always displayed no matter what view is
shown.Asseenintheimageontheleft,themasterfaderhasthree
dierentviewsbasedonwhattypeofoutputisselected.Pleasenotethat
there is no way you would ever see the image as shown, as only one output
may be selected at any given time. The image is just a point of reference.
The output selector has the most important role (and we just showed an
imagewiththreedierentoutputsselected),sowe’llstartthere.Afterthat,
we will head back to the top of the master fader and work our way down.
Output Selector / Output Channels
The mixer view shows a fader for each channel. Initially, this fader
controls the level to the LR output. But how do you control the level
goingtotheauxsends?Orhowabouttheauxmasterlevel?Simple.
Usetheoutputselectortoswitchbetweenoutputs.
Selectfromoneofthefollowingoutputs:LR,A1-A6,reverbanddelay
[ontheDL1608;LR,A1-A4,reverbanddelayontheDL806].
The currently selected output is illuminated, but changing the
selected output is easy. Simply touch the output selector and it will
immediately grow & glow. Move your nger to the desired output and
release. Or you could just tap the output you desire and it will change
justlikethat<snapsngers>.Seetheimagebelowforanexampleof
changingoutputsfromLRtoaux4.Noticealsohowtheoutputselector
really“pops”foreasy-to-changeaccess.
LR AUXES FX
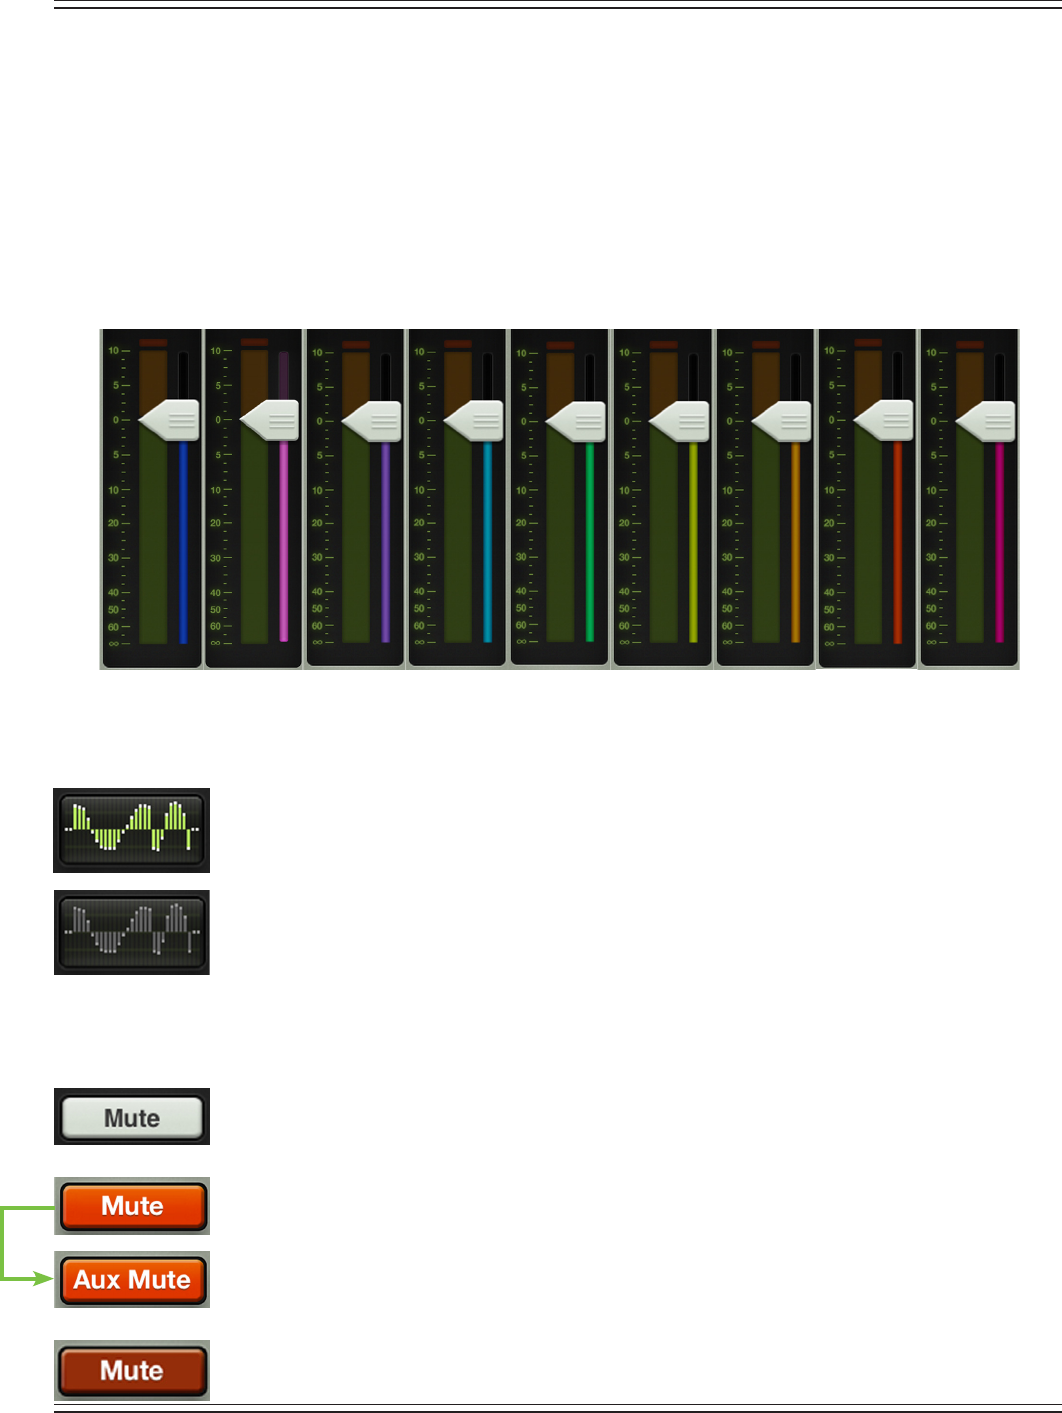
Mackie DL806 and DL1608 Reference Guide
47
Once a dierent output has been selected, the channel faders will change to show the level going
to the newly selected output. Similarly, the master fader will change to show the controls of the newly
selected output.
Here,themixerviewactslikeawindowwhereyoumayviewandchangeoneoutput’smixatatime.
Nomatterwhichoutputiscurrentlyselected,theothersarestillthere,astheywere.
The thin illuminated strip underneath the master fader cap also helps indicate which output type is currently
selected;thecolorvariesandisdependentontheselectedoutput.Thisisthesameindicatorthatisalsoon
display underneath the fader cap of each input fader. See below for the various colors that represent each
selected output, but know that there is no way you would ever see the image as shown below, as only one
output may be selected at any given time. The image is just a point of reference.
Graphic EQ
The master fader EQ displays the current graphic EQ settings. The graphic EQ display
illuminates green when engaged and is gray when disengaged.
Tappingthemasterfader’sgraphicEQdisplaywillchangetheoutlookfromthemixerview
tothechannelviewforthecurrentlyselectedoutput.Assuch,tappingthegraphicEQcurveinthe
channel view will change the outlook back to the mixer view. The graphic EQ is available with all
selected outputs, except reverb and delay.
To learn more about the graphic EQ, check out chapter 12 starting on page 82.
Mute
The master fader mute button works exactly like a channel mute, except it mutes the output.
Useitasabreakswitchtomutemonitors(oreventhemainPA)whenthebandtakesabreak,
for example. The mute button is available when any output is selected.
The mute button illuminates red when engaged and is gray when disengaged.
Theusermayde-selectUseLRMuteforaparticularaux/FXsendtocontroltheauxmutes
(or FX mutes) and main mix mutes independently for each channel. More information about
UseLRMutemaybefoundonpages48-49.
Outputs muted via group mutes will illuminate oxblood red. More information about mute
groups may be found on page 134-138.
LR AUX 1 AUX 2 AUX 3 AUX 4 AUX 5 AUX 6 REV DLY
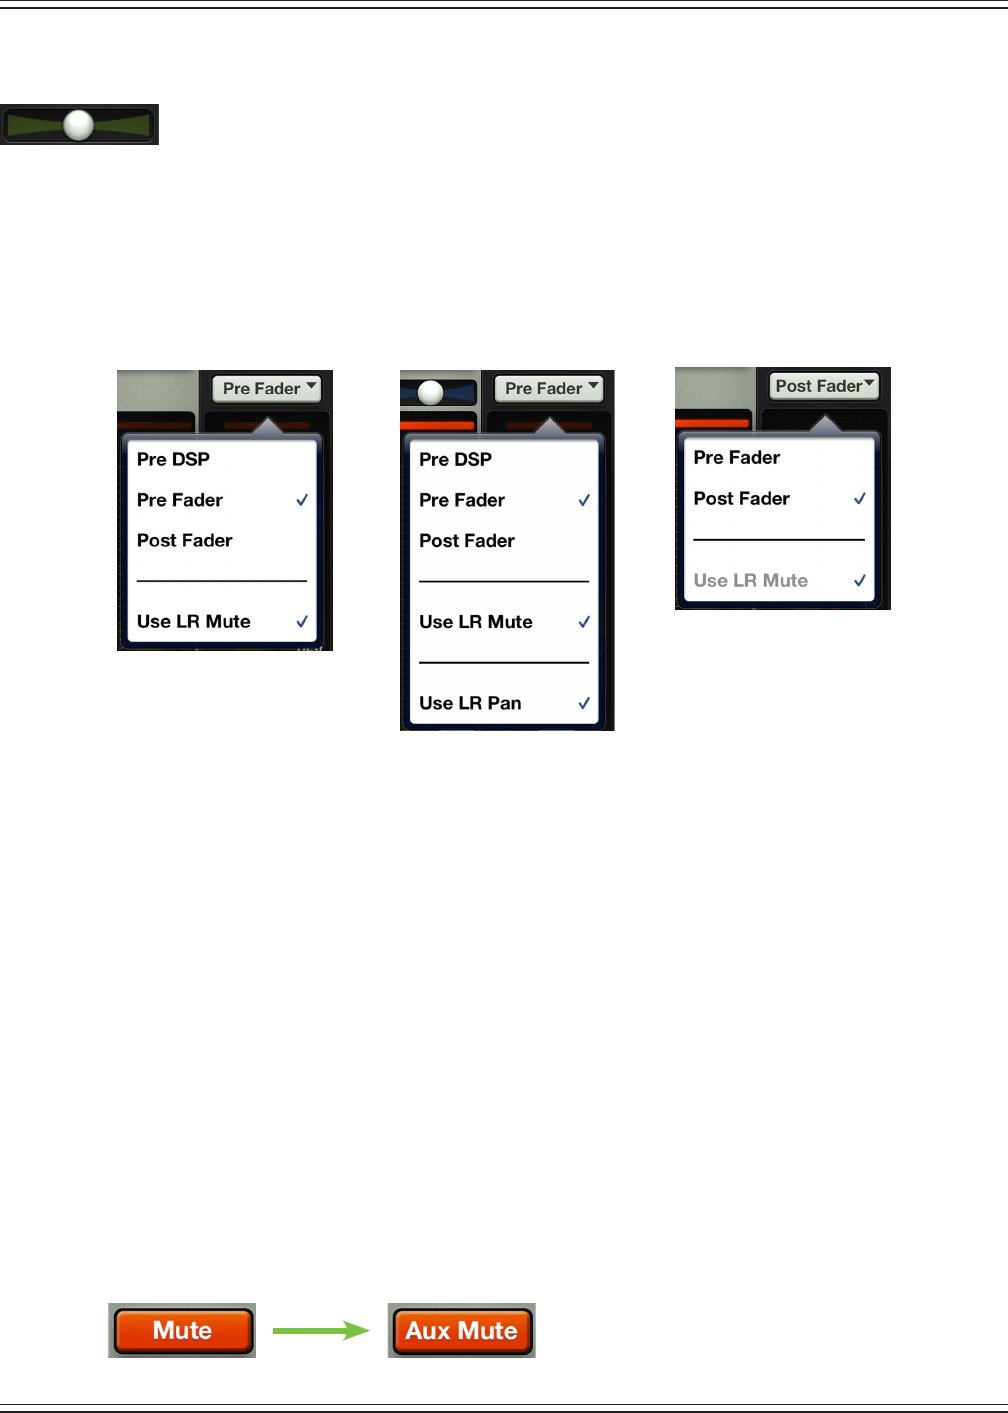
Mackie DL806 and DL1608 Reference Guide
48
Balance
When LR is the selected output, the balance slider controls how much of the output signal is sent
to the left versus the right outputs. Touch and drag the slider left or right to make adjustments.
Tappingthemasterfader’sbalanceballtwicewillcenterit.
Aux/FX Send Conguration Menu
When the selected output is anything other than LR, the balance control is replaced with a button
displaying settings for that aux or FX send. Here is where the source for each aux and FX send may be
conguredasPreDSP,PreFaderorPostFader.Simplytapthebuttontodisplaythecongurationmenu.
Nowtapwhichsettingyouprefer:
Pre DSP —PreDSPisidealwhenusingtheauxesformonitormixesandyouwantcompressionandother
eectsinthemainmix,butnotthemonitors.PreDSPisavailableinallauxes,butnottheFX.
Pre Fader —LikePreDSP,PreFaderisalsoidealwhenusingtheauxesformonitormixes,
butunlikePreDSP,PreFaderaddsgate,compressionandEQtoboththemainmixand
themonitors.Thelevelisnotaectedbythesettingoftheassociatedchannelfader.PreFader
isavailableinalloutputs,includingFX.PreFaderisthedefaultsettingfortheauxsends.
Post Fader —PostFaderisforexternalandinternalFX;thePostFaderlevelisaectedbythechannelDSP
and the setting of the associated channel fader. Sends connected this way are also useful for recording
sends.PostFaderisavailableinalloutputs,includingFX.PostFaderisthedefaultsettingfortheFXsends.
Therearetwootheroutputoptionstochoosefrom,UseLRMuteandUseLRPan.Let’stakealookateach.
Use LR Mute —WhenUseLRMuteisenabled[indicatedwithaP],theauxsendssharethesamemutes
as the LR main mix.
WhenUseLRMuteisdisabled[indicatedwithnoP],userscancontrolauxmutesandmainmixmutes
independently for each channel.
Toseethedierence,de-selectUseLRMutebytappingit.Apop-overwillaskyoutoconrmthechange.
Thechannelmutebuttonswillnowshow“AuxMute”indicatingthatyoumaynowmutechannelsonthe
selectedauxwithoutaectingthechannel’smuteonanyotheroutput,includingtheLRmute.
Unlinked (Mono) Aux Linked (Stereo) Aux FX Output
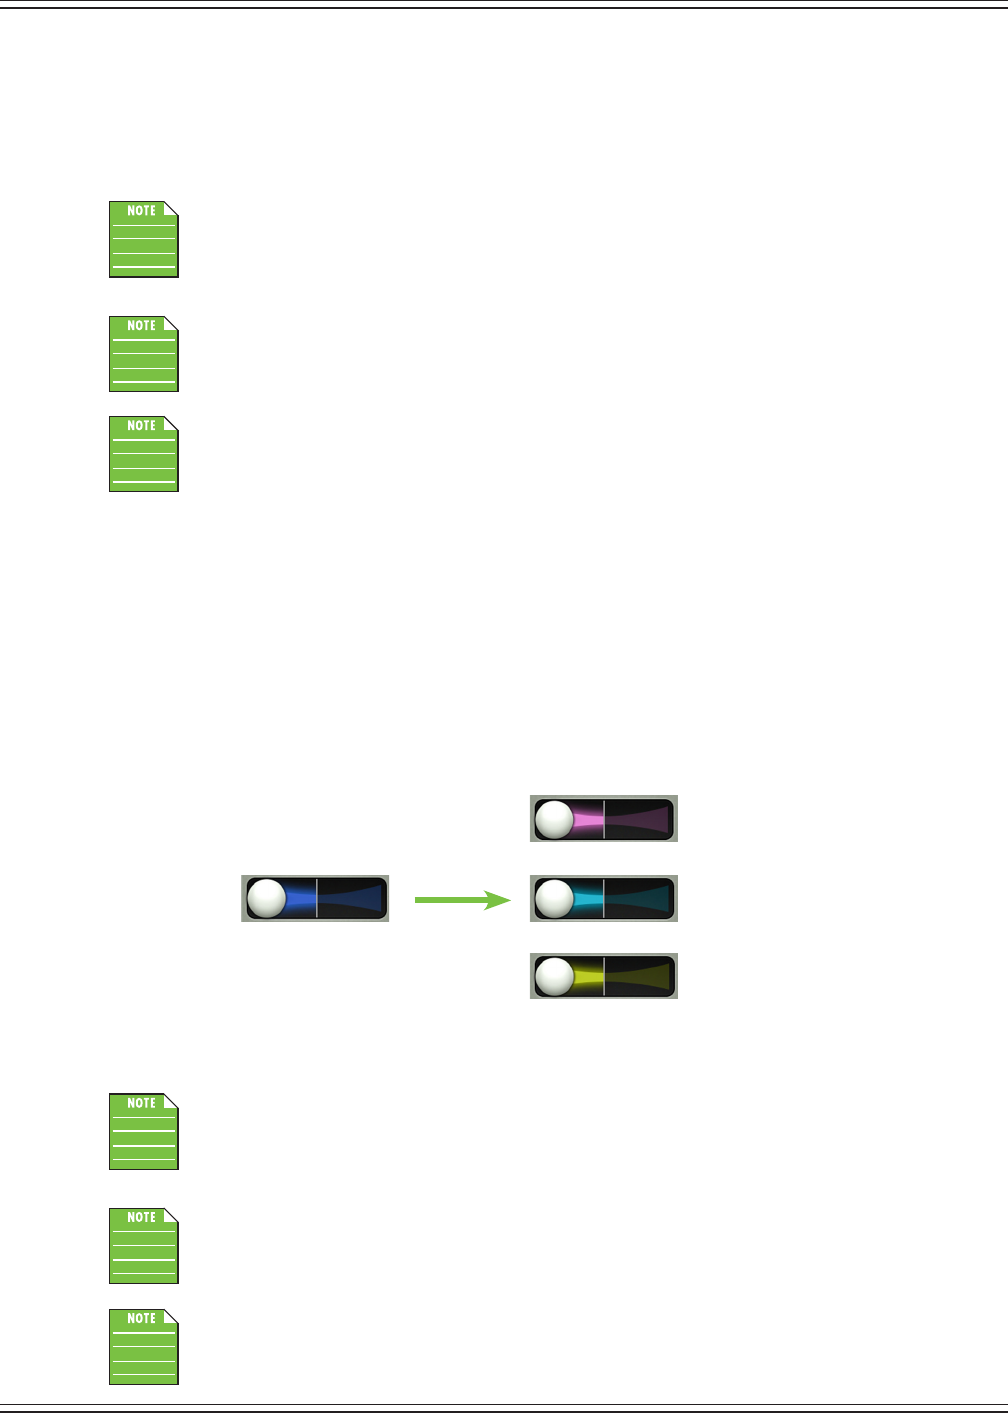
Mackie DL806 and DL1608 Reference Guide
49
WhyuseauxmutesinsteadofLRmutes?Whenyouneedtocontrolauxmutesandmainmixmutes
independently for each channel and aux send. For example, FOH will use the auxes to communicate
with the band without the the audience hearing the conversation coming through the main mix.
TheyshouldbeenjoyingafrostybeveragewhilethehousemusicpumpsthroughthemainPA.
Or perhaps the band members are mixing their own monitors...they have control over their own mute!
UseLRMuteisthedefaultsettingforallauxandFXoutputs.
When rst disabled, the aux mutes take on the same settings as the LR mutes, so no audible
change is heard.
UseLRmuteisautomaticwhenpostfaderisselected.Thisiswhythesettingisgrayedout.
Use LR Pan [Stereo Auxes only] —WhenUseLRPanisenabled[indicatedwithaP],theauxpans
share the same pans as the LR main mix.
WhenUseLRPanisdisabled[indicatedwithnoP],userscancontrolauxpansandmainmixpans
independently for each channel.
Toseethedierence,rstmovethechannel1panfarleftontheLRoutput.Nowselectanauxandlinkthe
corresponding auxes together (as described at the end of this chapter, page 55). The color of the channel
panswillbeblue,indicatingthattheselectedstereoauxisnowusingtheLRpans.De-selectUseLRPanby
tappingit.Apop-overwillaskyoutoconrmthechange.Nowyouwillseetheauxpansmatchingthe
selected aux color indicating that these are independent of the LR pans.
Whyuseauxpans?Aperformermayrequestapersonalpanfortheirin-earmonitorsthatdiersfromtheLR
pan. The aux pan gives the performer exactly what they want without aecting the LR mix.
UseLRPanisthedefaultsettingforallauxandFXoutputs.
When rst disabled, the aux pans take on the same settings as the LR pans, so no audible
change is heard.
Asjustmentioned,beingabletochoosepanselectionisonlyavailablewhenauxesarelinked.
That is described in detail at the end of this chapter (on page 55).
Aux 1 / Aux 2 Pan
Aux 3 / Aux 4 PanLR Pan
Aux 5 / Aux 6 Pan
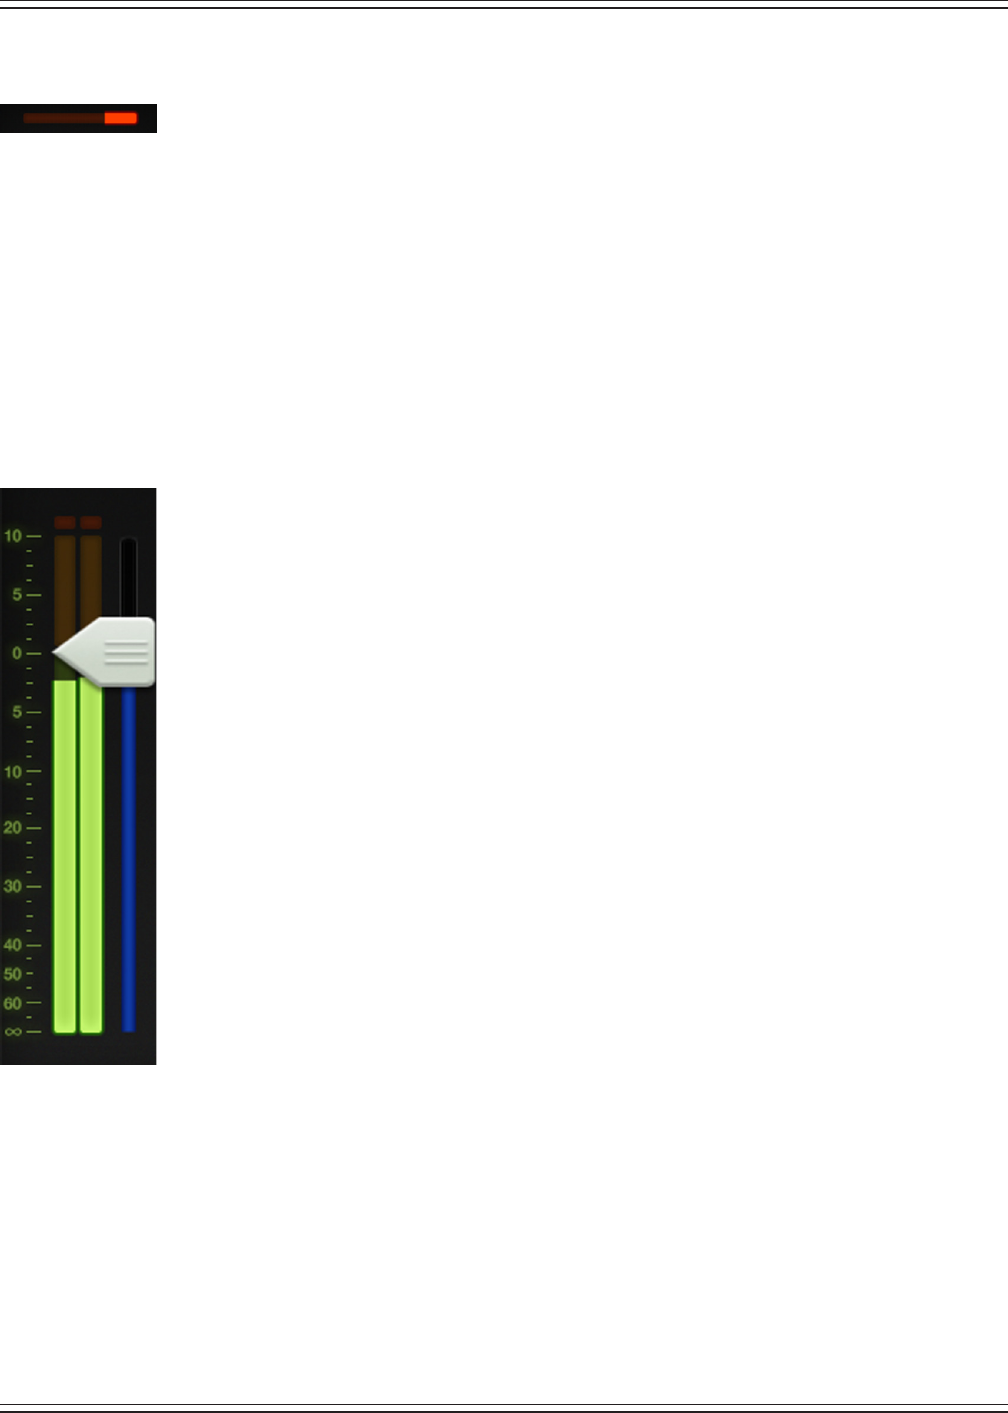
Mackie DL806 and DL1608 Reference Guide
50
Output Gain Reduction Meter
Like channel faders, the output gain reduction meter shows the amount of gain reduction applied
totheoutputbythecompressor/limiter.Outputchannelsdonotcontaingates.What’smore,
simply tap the output gain reduction meter in the mixer view for quick access to the compressor / limiter
view.Assuch,tappingtheoutputgainreductionmeterinthechannelviewwillchangetheoutlookfrom
thechannelviewtothemixerview.AnyoneelsethinkofKITTfromKnight Rider when looking at the gain
reductionmeter?
To learn more about the output compressor / limiter, check out chapter 13 starting on page 96.
Master Fader and Output Meters
Asdiscussed,themasterfaderadjuststheoutputleveloftheLR,theauxmastersandthereverb
and delay master sends, depending on which output is selected. While one fader controls the
output level of each output, each output is independent of the others. Once the selected output
has been chosen, touch and drag the master fader up and down to make adjustments.
The output meter displays the output signal level. The output meter is presented in mono
or stereo depending on the selected output. It is stereo for LR and linked auxes and FX sends.
UnlinkedauxesandFXsendsarepresentedinmono.
Speaking of FX, if reverb or delay is selected, the fader controls the master send into the
corresponding FX processor.
This meter should remain green with the occasional bump into the yellow zone. The output
meters are post-fader, so if there is too much yellow (or any red clipping), lower the master
faderuntilit’sgoneandchecktheinputchannels,aswell.
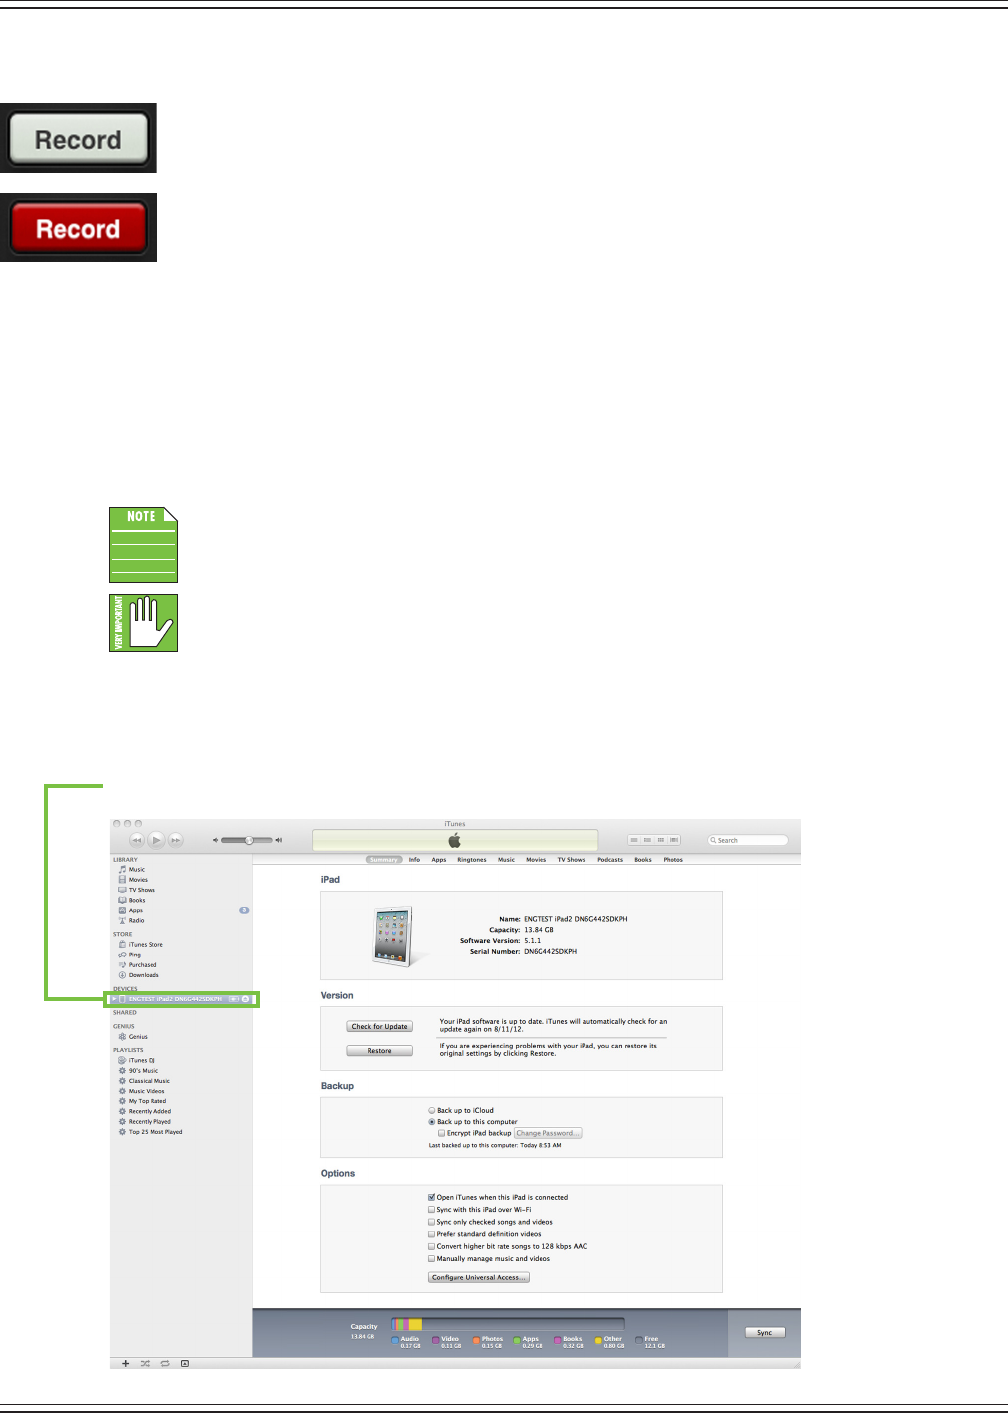
Mackie DL806 and DL1608 Reference Guide
51
Record and Solo
If the selected output is LR (and the iPad is attached to the mixer), a record button resides
belowthemasterfader.ThisallowsyoutoeasilyrecordtheLRoutputontheiPad.
Record is unavailable in Wi-Fi mode.
Pressingrecordwillbeginrecordingimmediately.Therecordbuttonilluminates
red when engaged and is gray when disengaged.
Pressingthebuttonasecondtimeasksyoutoconrmyourwishtostoptherecording,thenasks
you to name this masterpiece. If you would prefer to think this recording never occurred – it happens,
we know – it may be discarded at this point.
The stereo recording is automatically saved as a .wav le within the application. In addition to the
name, this .wav le also includes the date and time the recording started.
Noworriesiftheselectedoutputischangedduringrecording.
Recording will continue on as if nothing happened until recording is stopped manually.
MasterFadersupportsbackgroundrecording.ThismeansthatyoumaypresstheiPad’s
home button to leave the app or switch to another app while Master Fader continues to record.
Sogoaheadandcheckyouremailortweetabouttheshowtoyourheart’scontent.
Generally speaking, master fader can be used for recording while other audio apps are used
for playback. Because every app is dierent, testing your desired combination of apps before
usingthemonamissioncriticalshowisstronglysuggested!Also,youshouldNOTrecordin
multipleappssimultaneously;strangethingsmighthappenwiththerecordedles.
UseiTunestoretrieverecordingsooftheiPadbyfollowingtheinstructionsbelow:
(1) — ConnecttheiPadtoyouriTunesaccountviaMacorPC.
(2) — SelectyouriPadinthelist.
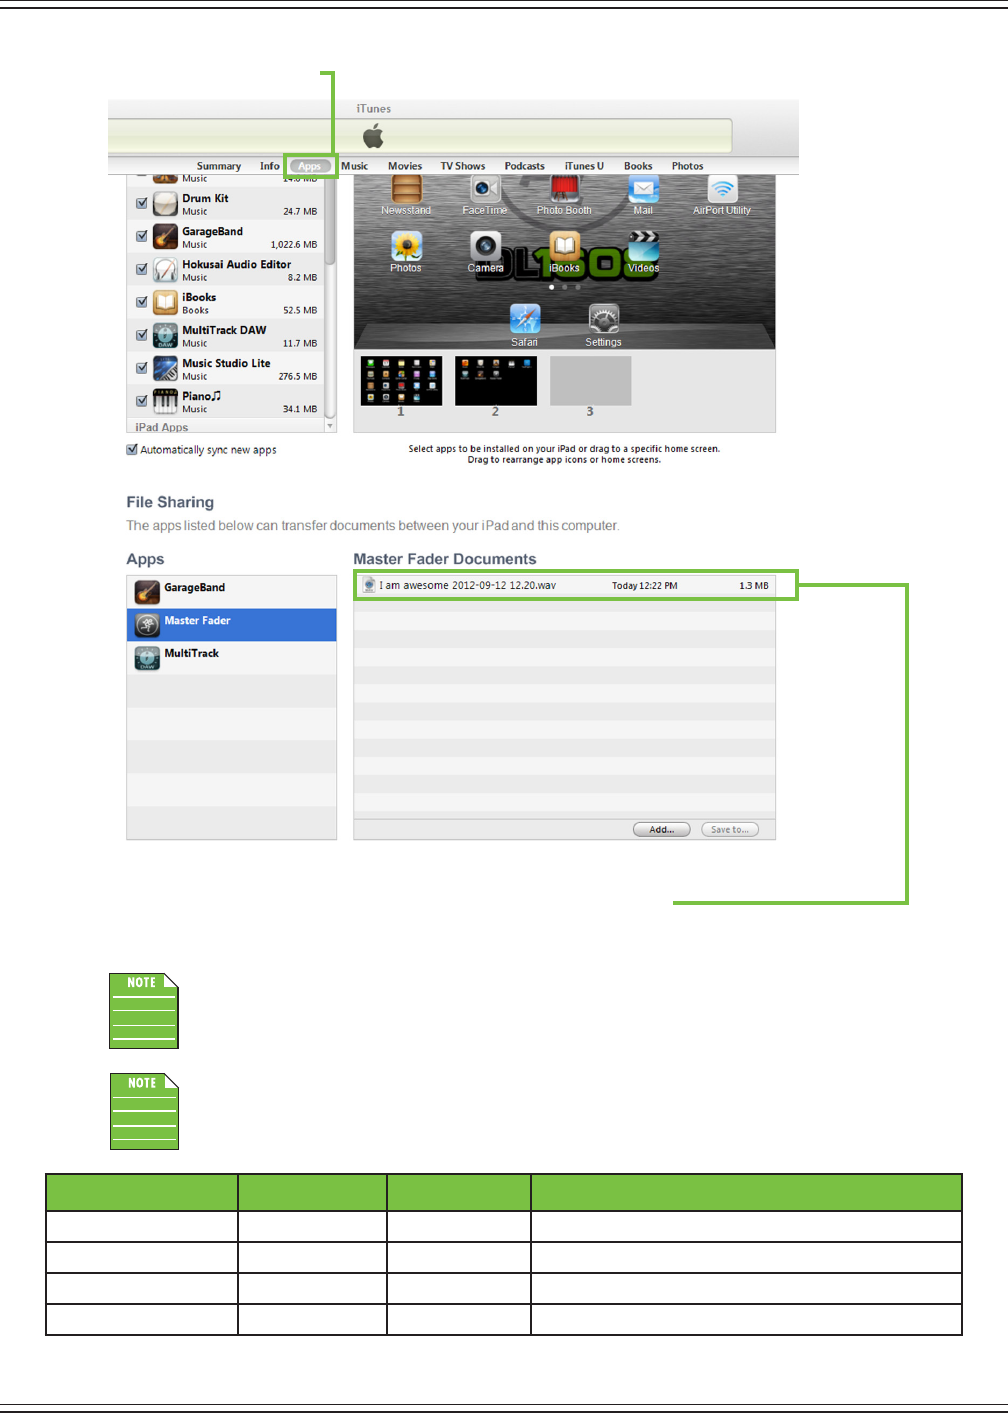
Mackie DL806 and DL1608 Reference Guide
52
(3) — Go to the apps tab.
(4) — Drag and drop the recordings from the list to your hard drive.
TodeletearecordingotheiPad,selecttherecordingfromthelistiniTunesandpressthedelete
key on the keyboard.
Recording is limited to 4 GB and will stop when the limit is reached. See the table below
for the maximum recording time based upon the chosen sample rate and bit depth.
Sample Rate Bit Depth File Size Maximum Stereo Recording Time
44.1k 16-bit 4 GB 6 hours, 17 minutes
44.1k 24-bit 4 GB 4 hours, 11 minutes
48k 16-bit 4 GB 5 hours, 47 minutes
48k 24-bit 4 GB 3 hours, 51 minutes
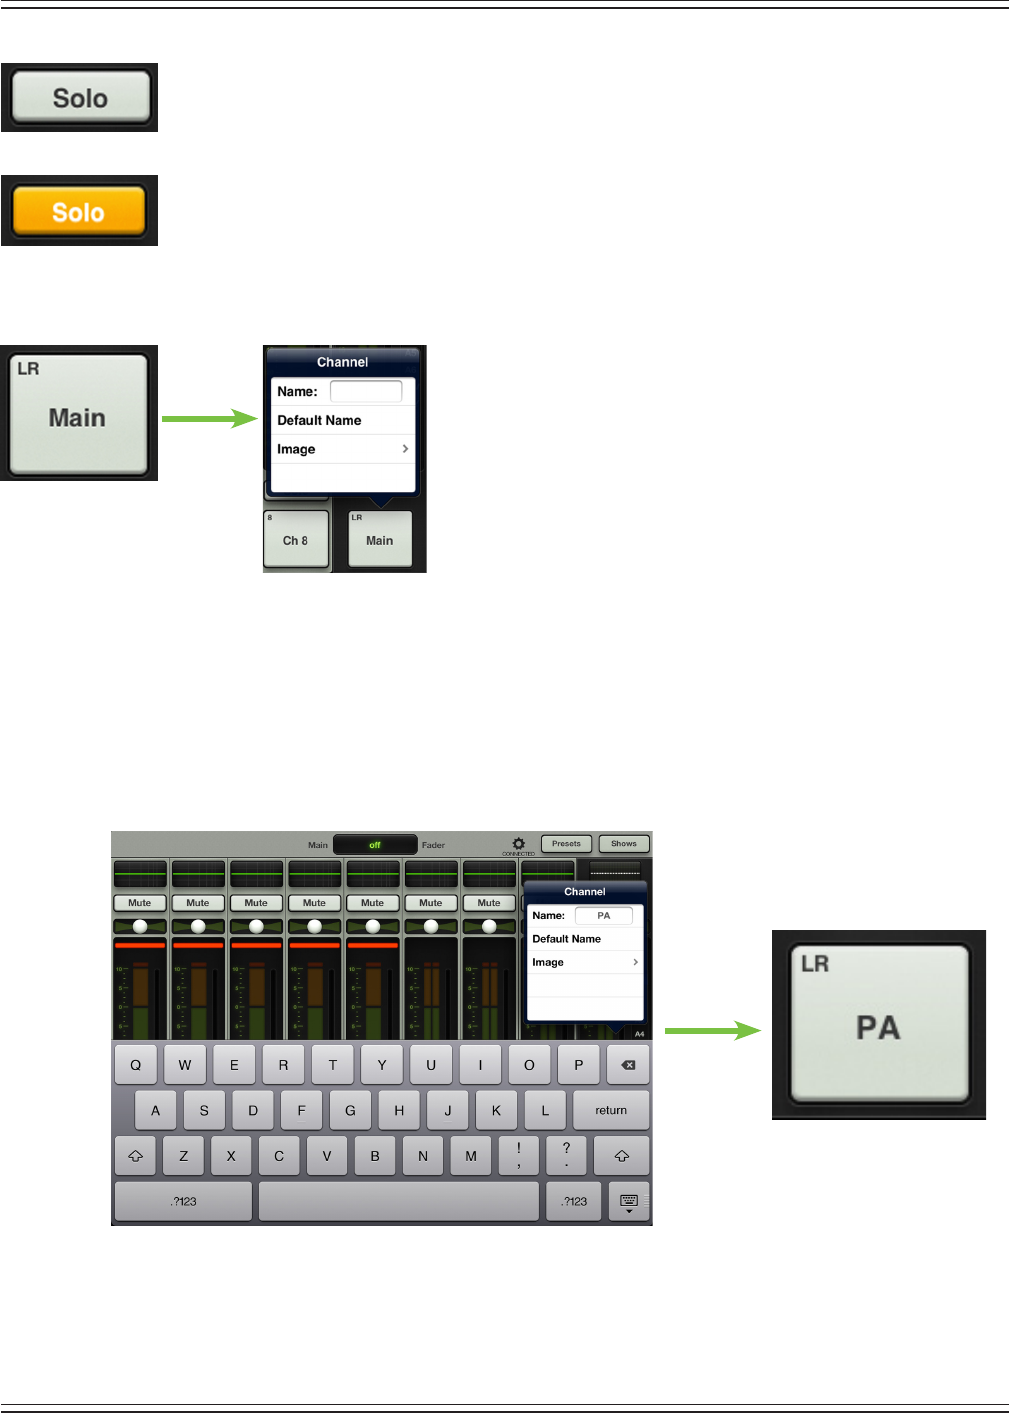
Mackie DL806 and DL1608 Reference Guide
53
If the selected output is anything other than LR, the record button will be replaced with a solo
button. Soloing oers the opportunity to audition the selected output and make any necessary
leveladjustmentstotheinputs.TheoutputsoloisAFL,sothefaderlevelwillaectthesignal
you hear in the headphones.
The solo button illuminates orange when engaged and is gray when disengaged.
Master ID Button
Themasterfader’snameandimageissimilartothatofachannel
strip’snameandimage.
Likethechannelfaders,themasterfader’snameandimageisalso
user-editable.Additionally,usersmayalsolinktwoadjoiningauxes
together. Simply tap the button at the bottom of the master fader
to reveal a popover that allows editing of the name and image and
option to link auxes.
Let’sstartwiththename.Tapinthenameboxtobringuptheblinkingcursorandkeyboard(asseenin
theimagebelow).Simplytypeinthenameyouwantfollowedbyacarriagereturn.Notethetextchange
betweenthebuttonshowntotheleft[“Main”]versustheoneasshownbelow[“PA”].
If the name is too long to t, the button scrolls, displaying the entire name.
Forfamiliarity,thisisthesamekeyboardthatisusedformessagingoremailingfromtheiPad.
Itgoeswithoutsayingthattapping“DefaultName”changesthemasterfader’snameback
to its default name.
Asseeninalloftheseimages,asmallnameresidesintheupper-leftcornerofthemasterIDbutton
regardless of the name and/or image. This system name represents each output and it cannot be
changedorremoved.Trustus,it’sforthebest,asitisforeasyidenticationofeachoutput,evenafter
you rename it something goofy.
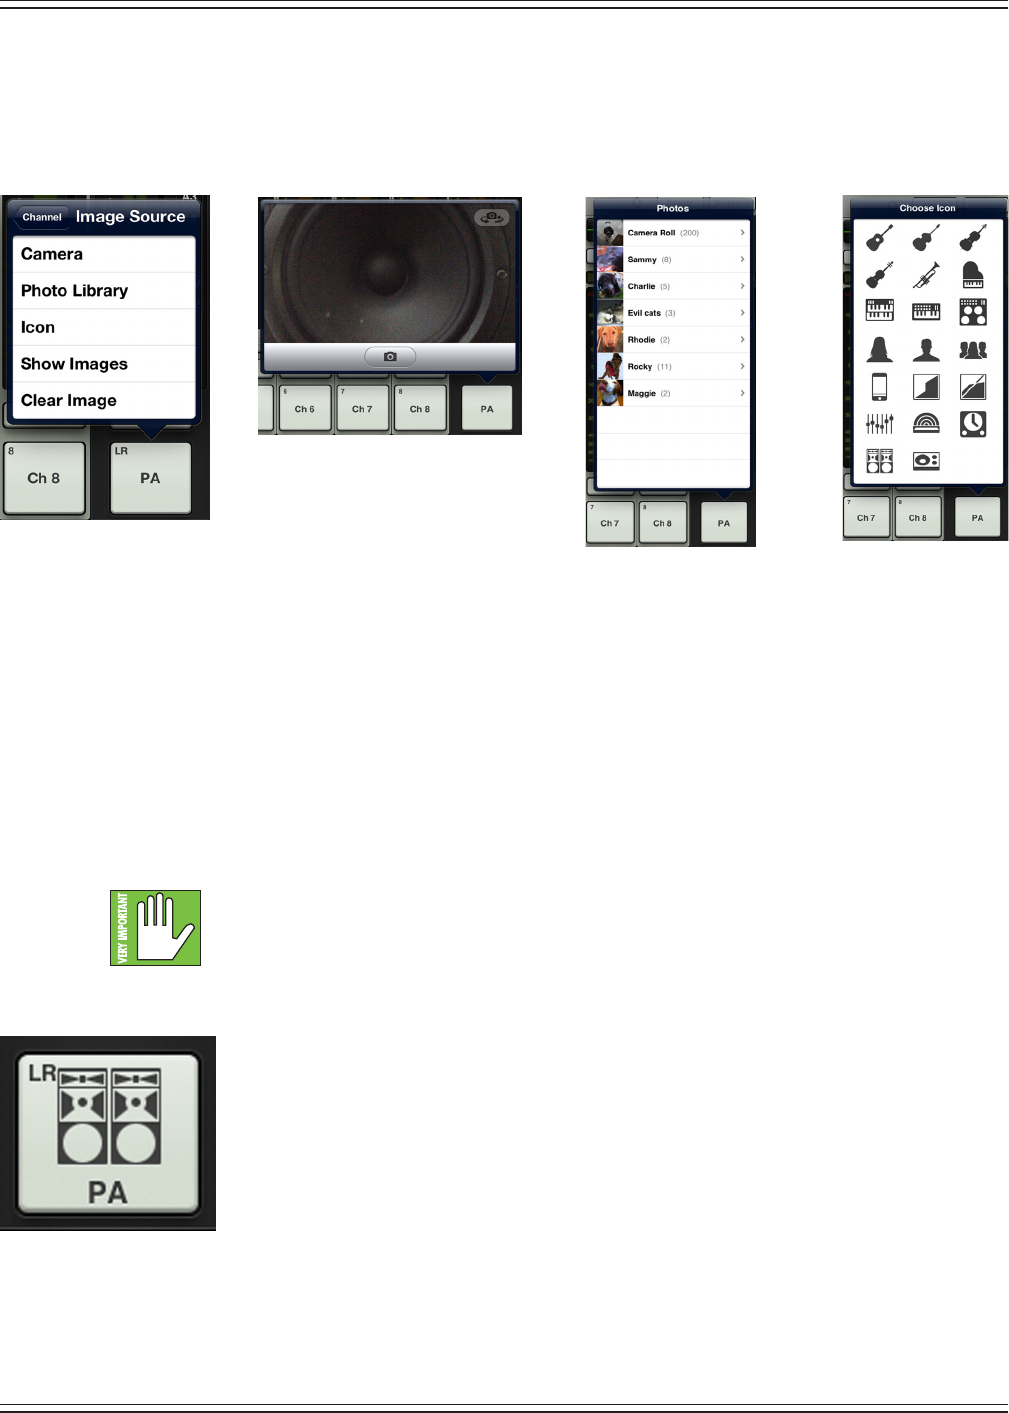
Mackie DL806 and DL1608 Reference Guide
54
Anopengrayboxwithonlythemasterfader’snameworks,butlet’sspiceitupwithanimage.Showimages
are kept in sync which means that all connected devices will display the new image once its been added,
whether or not it was already on that device. There are several ways to choose an image. From the popover,
tap“Image”torevealanewpopoverasseenbelowleft[ImageSource].Youwillbepresentedwithve
choices:
Camera — Ifyou’refamiliarwithhowthecameraontheiPadworks,thenyou’reinluck...thisone
works the exact same way! The encircled camera icon in the middle of the gray bar snaps the picture
andtheiconintheupper-rightcornerselectsbetweenthefrontandbackcameraontheiPad.
[CameraisunavailableontherstgenerationiPad].
Photo Library — HereyoumayselectfromallthephotosthatcurrentlyresideonyouriPad.
Icon — Or select from a multitude of built-in icons at your disposal.
Show Images — This allows you to select the master fader image from photos that are currently in use
on the current show. The list will display all images currently in use. Tap the photo you would like to use
from this list.
Amaximumof64imagesmaybeusedpershow.However,Ifthesameimageisused
on multiple channels, it only counts as one image (if the image has been selected from show
images and not multiple times from the photo library). Icons do not count toward the 64.
Moreinformationaboutthelesystem[shows,snapshots,etc.]beginsonpage115.
Clear Image — Believe it or not, tapping here will clear the image for that channel.
SincewealreadynamedthemasterfaderthePA,wemightaswellgowiththePAiconto
boot,right?TapthePAiconinthelower-leftcorner.Themasterfaderisset:nameandimage.
Image Source
Icon
Photo Library
Camera
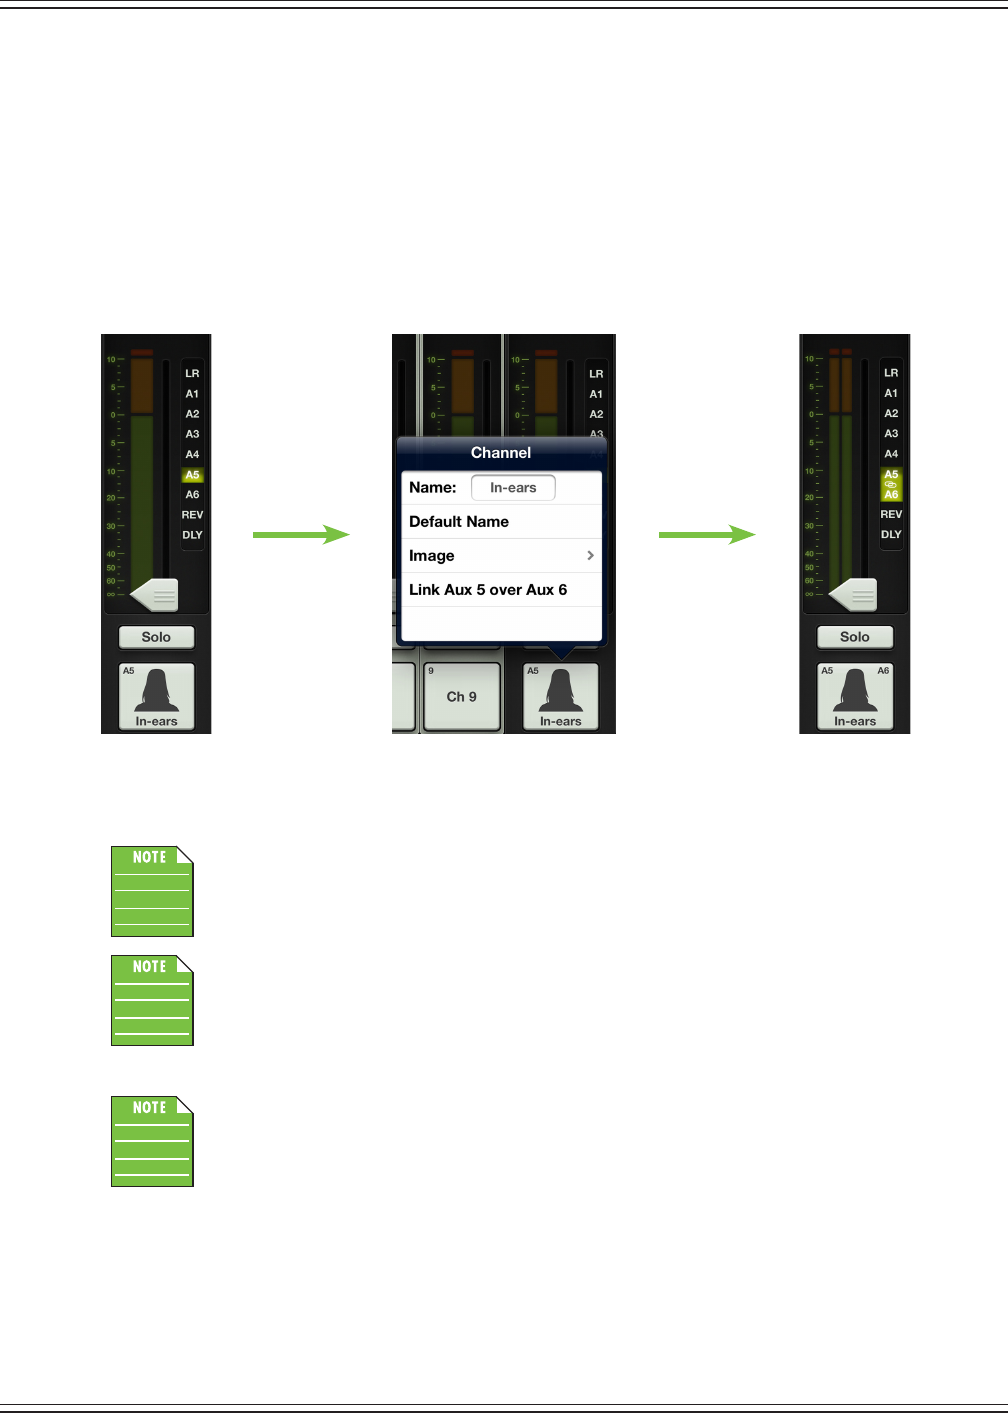
Mackie DL806 and DL1608 Reference Guide
55
Linking Auxes
Asmentionedpreviously,twoseparatemonoauxesmaybelinkedtogetherintoasinglestereoaux.
This is ideal for using in-ear monitors or other stereo output destinations such as broadcast feeds,
recording devices and more. When linked, the level control, graphic EQ and output compressor/limiter
are adjusted with a single set of controls!
Linking auxes is easy. First you need to select the aux you want to link (as described at the beginning of
thischapter).Nowtaptheaux’sMasterIDbutton;youwillseeanoptionto“LinkAuxXoverAuxX”.Tapit!
Apopoverwilldisplayaskingyoutoconrm.Avisualofthesestepsisdisplayedbelow.Followthesame
steps outlined above to unlink auxes.
Odd-numberedauxeswilllinktothenext(even-numbered)aux[1-2,3-4,5-6],while
even-numberedauxeswilllinktotheprevious(odd-numbered)aux[6-5,4-3,2-1].
Thelinkedoverauxwilltakeonalloftheattributes[graphicEQsettings,outputcompressor/
limitersettings,auxsendoutputrouting,etc.]ofthetappedMasterID(aux)button.Inother
words, if you link aux 1 over 2, the resulting stereo aux will take on all of the settings of aux 1.
However, if you link aux 2 over aux 1, the resulting stereo aux will take on all of the settings of
aux 2.
With linked auxes, users have the ability to choose whether to use aux pans or the LR pan.
Make your choice in the aux/FX send conguration menu. More information may be found
on pages 48-49.
Unlinked Linked
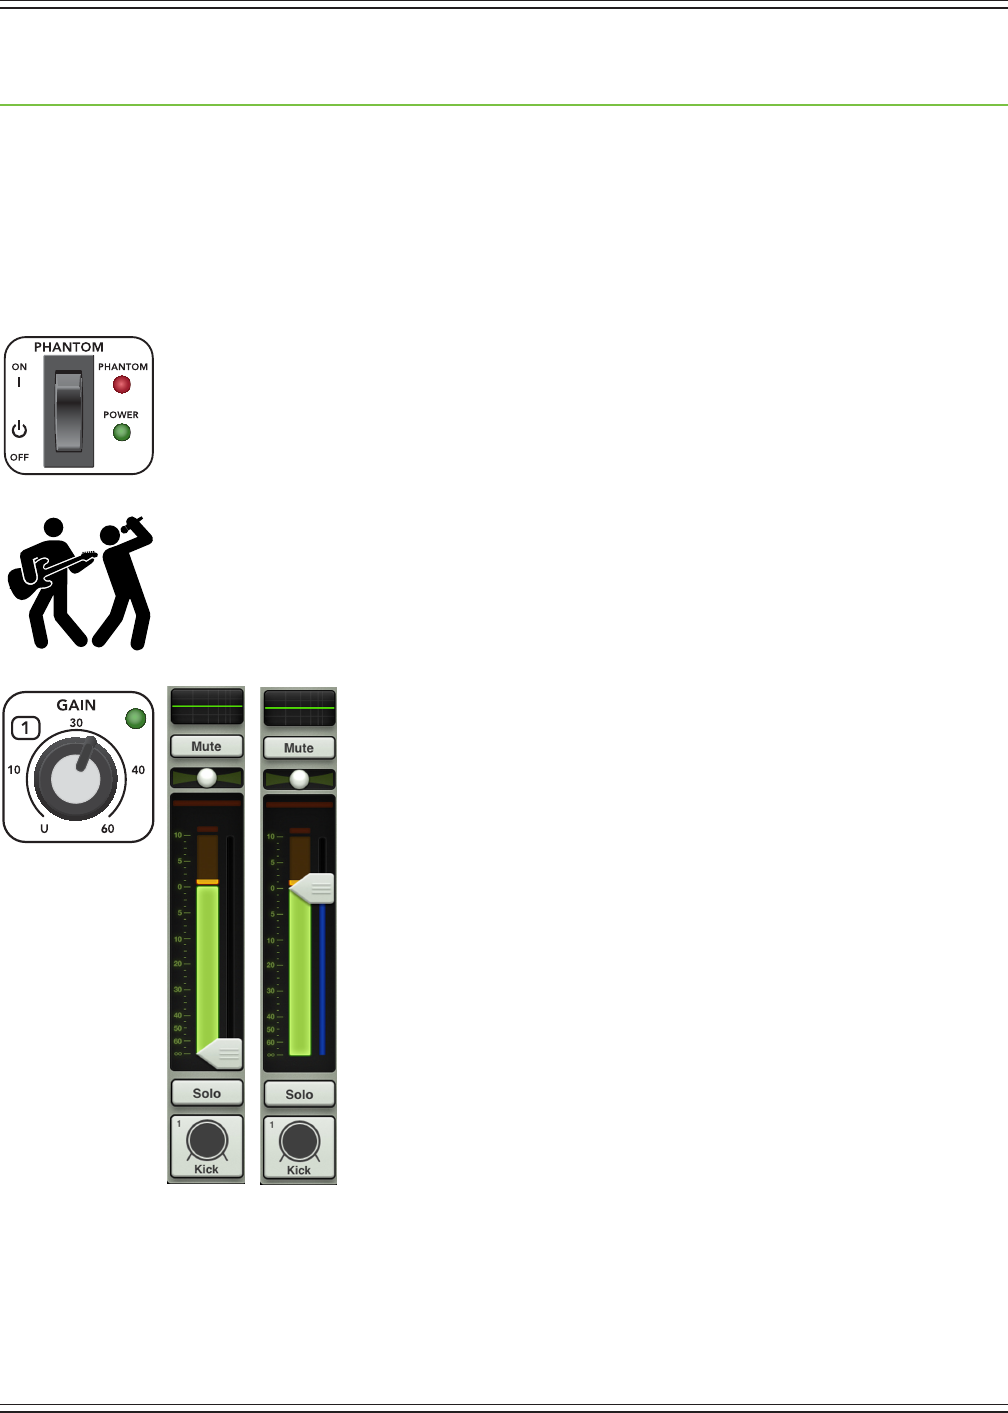
Mackie DL806 and DL1608 Reference Guide
56
Chapter 8: Level Setting Procedure
Introduction
Ifyou’rereadingthisfronttoback,nowseemslikeagreattimetodiscusshowtosetthelevels,aswejust
completed chapters 3 and 4 (which dealt with the hardware) and chapters 7 and 8 (which detailed the
channelsstripsandmasterfader).However,ifyoudidn’treadthosechapters,butalreadyhaveagriponthe
mixerandMasterFaderappandjustwanttolearnhowtosetthelevels,thisistheplace...eitherway,let’sgo!
Level Setting Procedure
(1) Phantom Power — If any connected mics require an extra 48V of power, engage
the phantom power switch on the rear panel of the mixer.
(2) Let There Be Rock — Useyourvoice,playtheinstrument,orplaytheline-level
source at the same volume as it would be during normal use...and keep it going!
(3) Raising Gain and Watching Meters — Turn the gain knob clockwise until
the input meters bounce between green and yellow, the colors of our beloved
hometownSeattleSupersonics[RIP].TheaccompanyingLEDwillilluminate
green (to indicate signal).
ThissameLEDmayilluminatered(toindicateclipping).Clippingcreates
undesirable distortion and should be avoided at all costs. If this LED
illuminates red frequently, turn the gain down.
(4) The Raising of the Fader, Part I — Raise the channel fader to 0 dB.
(5) Rinse and Repeat — Repeat steps 2-4 for each channel with signal.
Step 3 Step 4
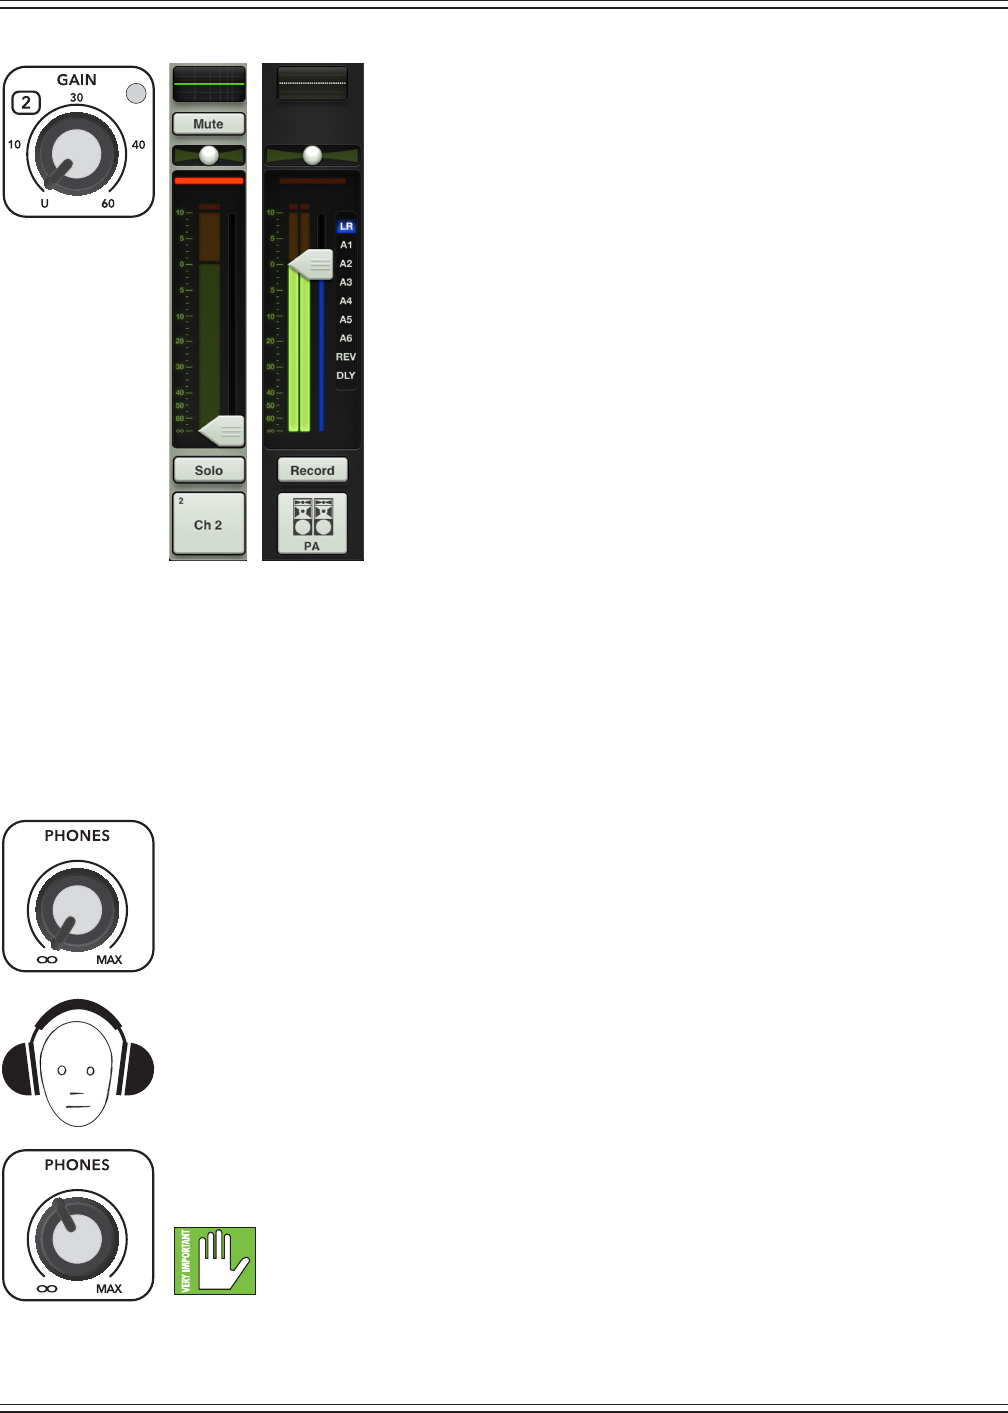
Mackie DL806 and DL1608 Reference Guide
57
(6) Less Than Zero — The gain knob should be completely
counter-clockwise and channel fader all the way down for each
channel not in use.
(7) The Raising of the Fader, Part II — Slowly raise the master fader
tothedesiredamount.Youshouldnowseeoutputmetersandhear
signalthroughthespeakers.Hopefullyit’smusictoyourears...otherwise
it’sgoingtobealongnight.
Headphones
Hereishowtogetthesamesoundtoapairofcans...andbycanswemeanheadphones.Pervert.
(1) First Things First — Follow the level setting procedure starting on the previous page.
(2) Hearing Aid — We like your ears and are quite sure that you do, too.
Make sure the phones knob is fully counter-clockwise before continuing.
(3) Cover Thy Ears — Release yourself from the outside world by putting on the headphones.
(4) As the Knob Turns — Turn the phones knob clockwise until you hear music through the cans.
(5) The Obligatory Warning — The headphone amp is loud and could cause
permanent hearing damage. Even intermediate levels may be painfully loud with
someheadphones.BECAREFUL!Alwaysturnthephonesknoballthewaydown
before connecting headphones, soloing a channel or doing anything new that may
aect the headphone volume. Then turn it up slowly as you listen carefully.
Step 6 Step 7

Mackie DL806 and DL1608 Reference Guide
58
Chapter 9: Channel View : EQ
Introduction
The equalizer area accesses all EQ-related parameters such as EQ for the selected channel (including gain,
frequencyandQ),ahigh-passlter(HPF)andpolarityinvert.Theinputchannels,reverb,delayandiPad
channels all have up to 4-band EQ with high shelving, high-mid peaking, low-mid peaking and low shelving.
Shelvingmeansthatthecircuitryboostsorcutsallfrequenciespastthespeciedfrequency.Peakingmeans
thatcertainfrequenciesforma“hill”aroundthecenterfrequency.Allchannelinputsalsohaveahigh-pass
lter[HPF].
YoucanreallyupsetthingswithtoomuchEQ.EachEQbandhasalotofboostandcut
because that is needed on occasion. But if the EQ is maxed on every channel, the mix turns
to mush. Equalize subtly, using cut, as well as boost. If you nd yourself repeatedly using
a lot of boost or cut, consider altering the sound source, such as placing a mic dierently,
trying a dierent kind of mic, a dierent vocalist, changing the strings, gargling, or all of the above.
There are actually two dierent types of EQ to choose from on each channel: clean, surgical modern EQ
andclassicsoundingvintageEQ.That’sright,youcanmixandmatchtoheart’scontent!Wewilldissect
boththemodernandvintageEQsseparately,butlet’sbeginbytakingapeekatwhatfeaturesapply
to both. Modern EQ is discussed further on pages 60-65, while more information about the vintage EQ
may be found on pages 66-67.
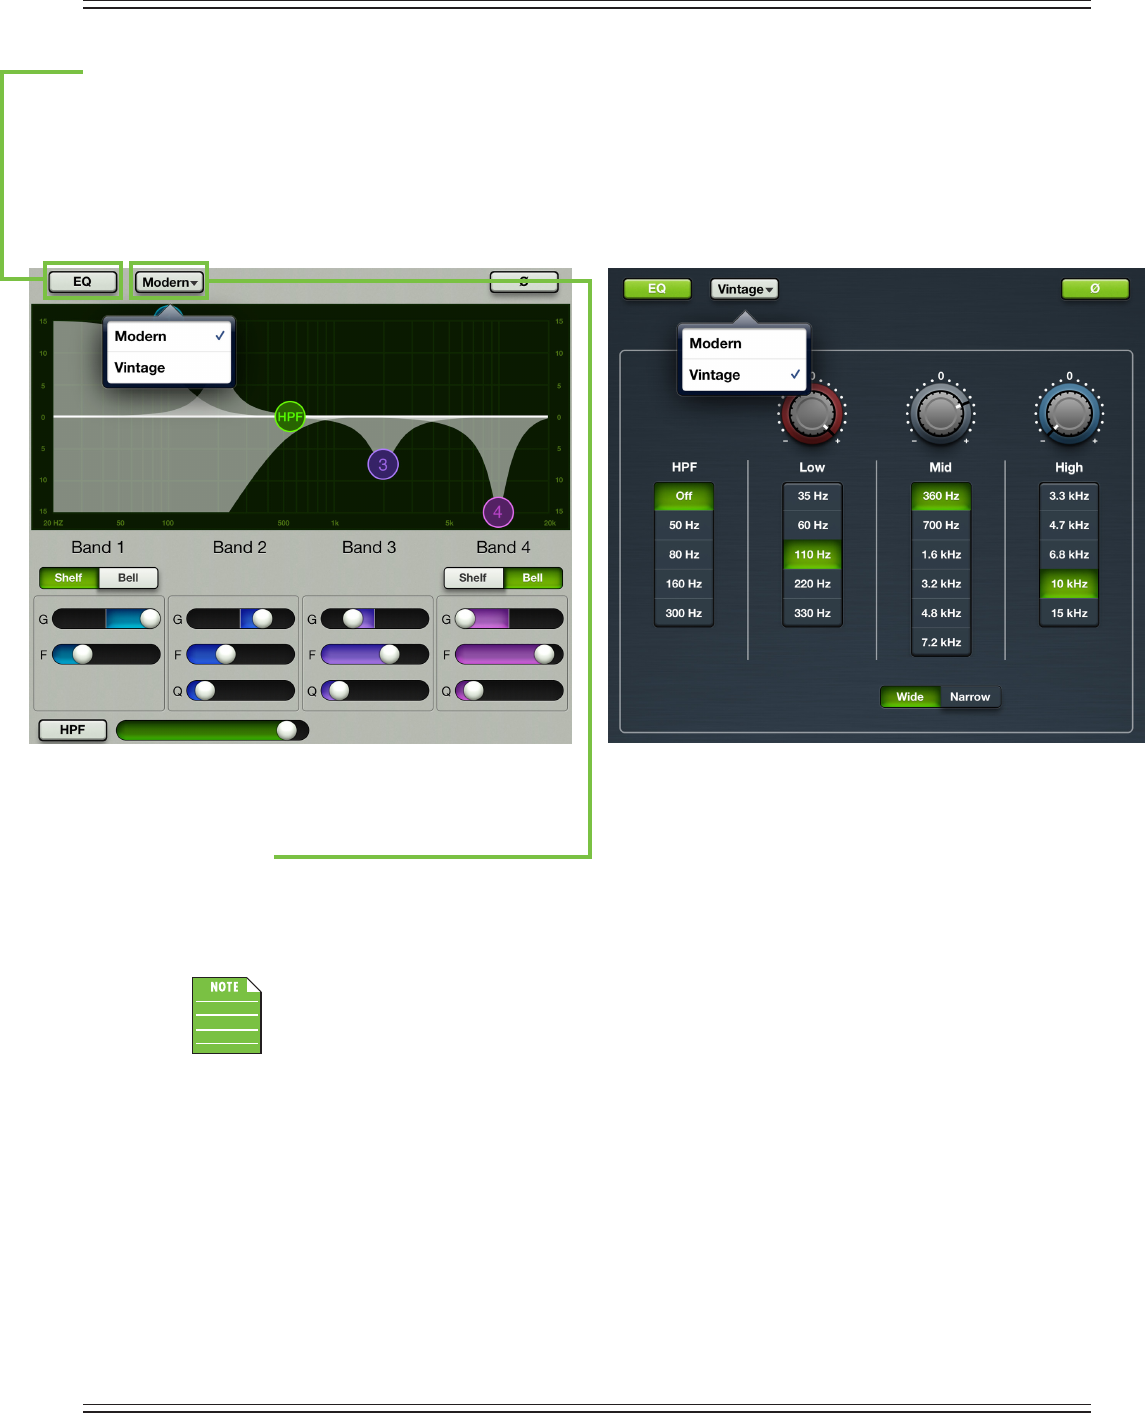
Mackie DL806 and DL1608 Reference Guide
59
EQ On / O
The EQ on/o button – near the upper-left corner of the screen – allows for true bypass of the EQ circuitry
to ensure that there is no coloration of the signal if the EQ is not needed. When this button is disengaged,
theEQcontrolshavenoeectonthesignal.YoumayusethisbuttontomakeanA/Bcomparisonbetween
theEQ’dsignalandthesignalwithoutEQ.PressthisbuttontoturnEQonoro.Itwillilluminategreenwhen
engagedandisgraywhendisengaged.Additionally,theEQcurveatthetopofthechannelfaderswitches
betweengreen[engaged]andgray[disengaged].
Modern / Vintage
The modern/vintage button is located directly to the right of the EQ on/o button. It displays the EQ type
currentlyinuse,with“Modern”asthedefaultEQ.TapthisbuttontorevealthetwoEQtypes,thentapthe
EQ you would like for the selected channel. The image will change to reect the EQ type chosen.
YoucanswitchbetweenEQtypeswhileaudiopassesandthesettingswillmatchascloselyas
possible, but the sound will change.
Polarity Invert
Thepolarityinvertbutton[Ø]–locatedintheupperrighthandcornerofthescreen,justbelow
thetoolsandpresetsbuttons–allowsforindividualchannelactivationof180˚polarityinversion;
itisavailableonallinputchannels.Pressthepolarityinvertbuttontoturnpolarityinvertonoro.
It will illuminate green when engaged and is gray when disengaged.
Vintage EQModern EQ
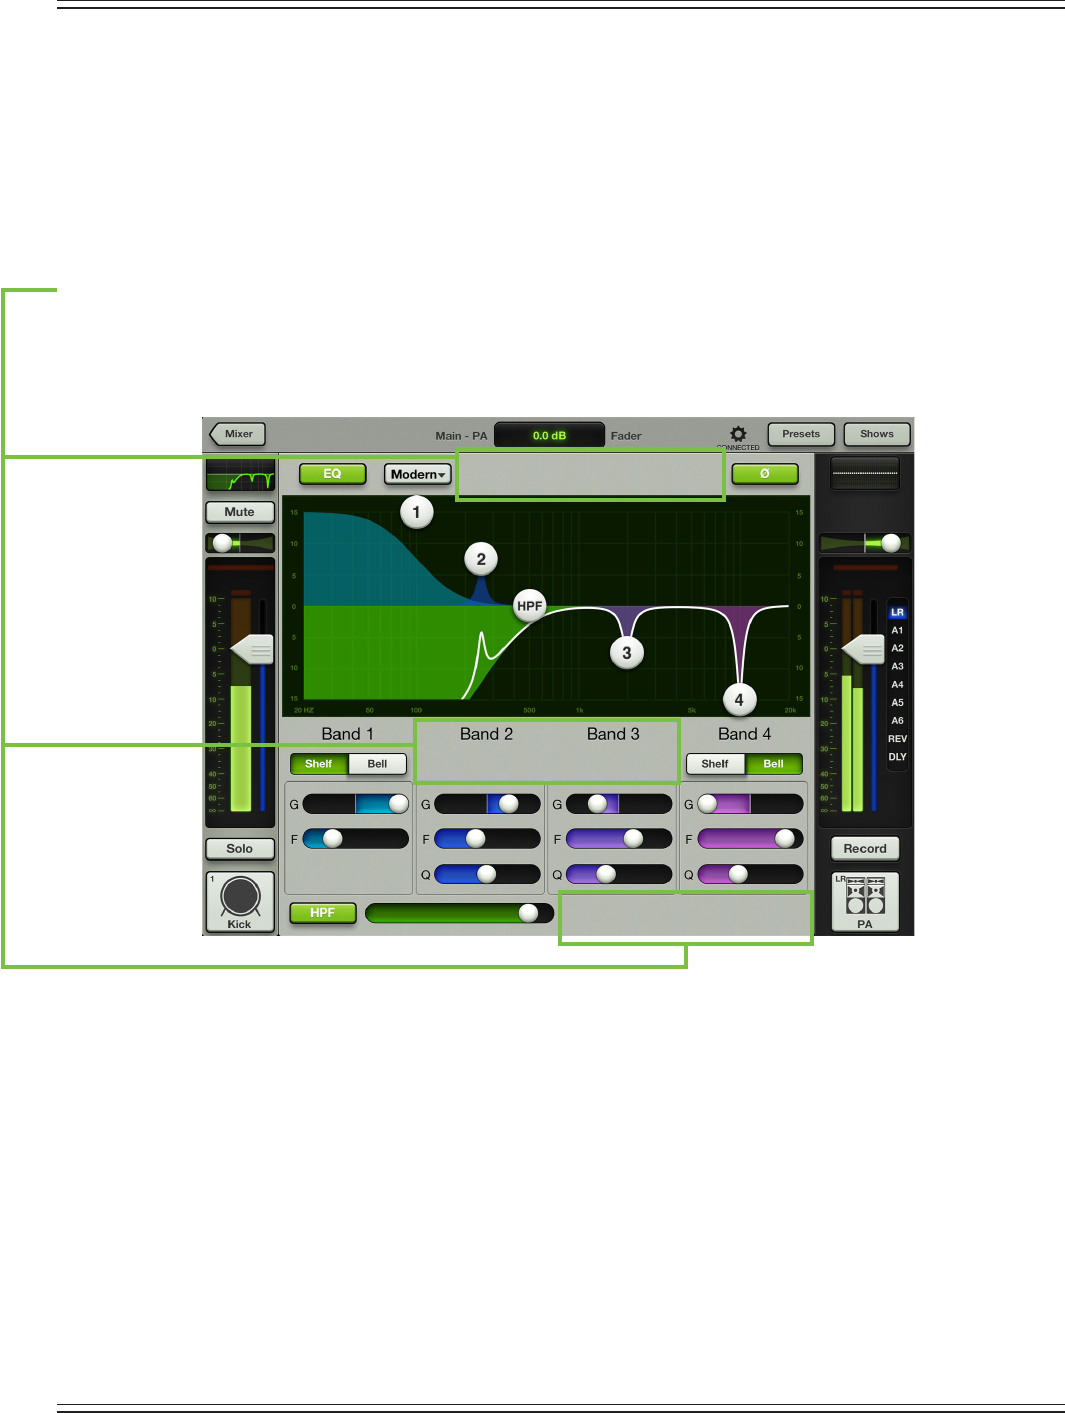
Mackie DL806 and DL1608 Reference Guide
60
Modern EQ Introduction
Asmentionedpreviously,themodernEQisdesignedforclean,surgicalprocessing;it’sgreatfordialingin
anice,tightsound.Assuch,eachofthefourbandshasadjustablegainandfrequency,whilebands2and3
alsohaveadjustableQ(bandwidth).[Bands1and4alsohaveadjustableQ(bandwidth)whenin‘Bell’mode].
Bands 1 and 4 may be independently switched to shelving bands using the switches located between the
EQ graph and band sliders. The shelves have adjustable gain and frequency, which is the –3 dB point from
theshelf.Nowforadetailed(let’ssay“surgical”)lookatthemodernEQ.
Modern EQ Swipe Zone
Here in the Modern EQ view, swipe anywhere in the gray areas outlined below. Swiping up displays
thatchannel’sgateandcompressorview.Swipingdowndisplaysthatchannel’sFXview.Andswiping
left and right changes channels.
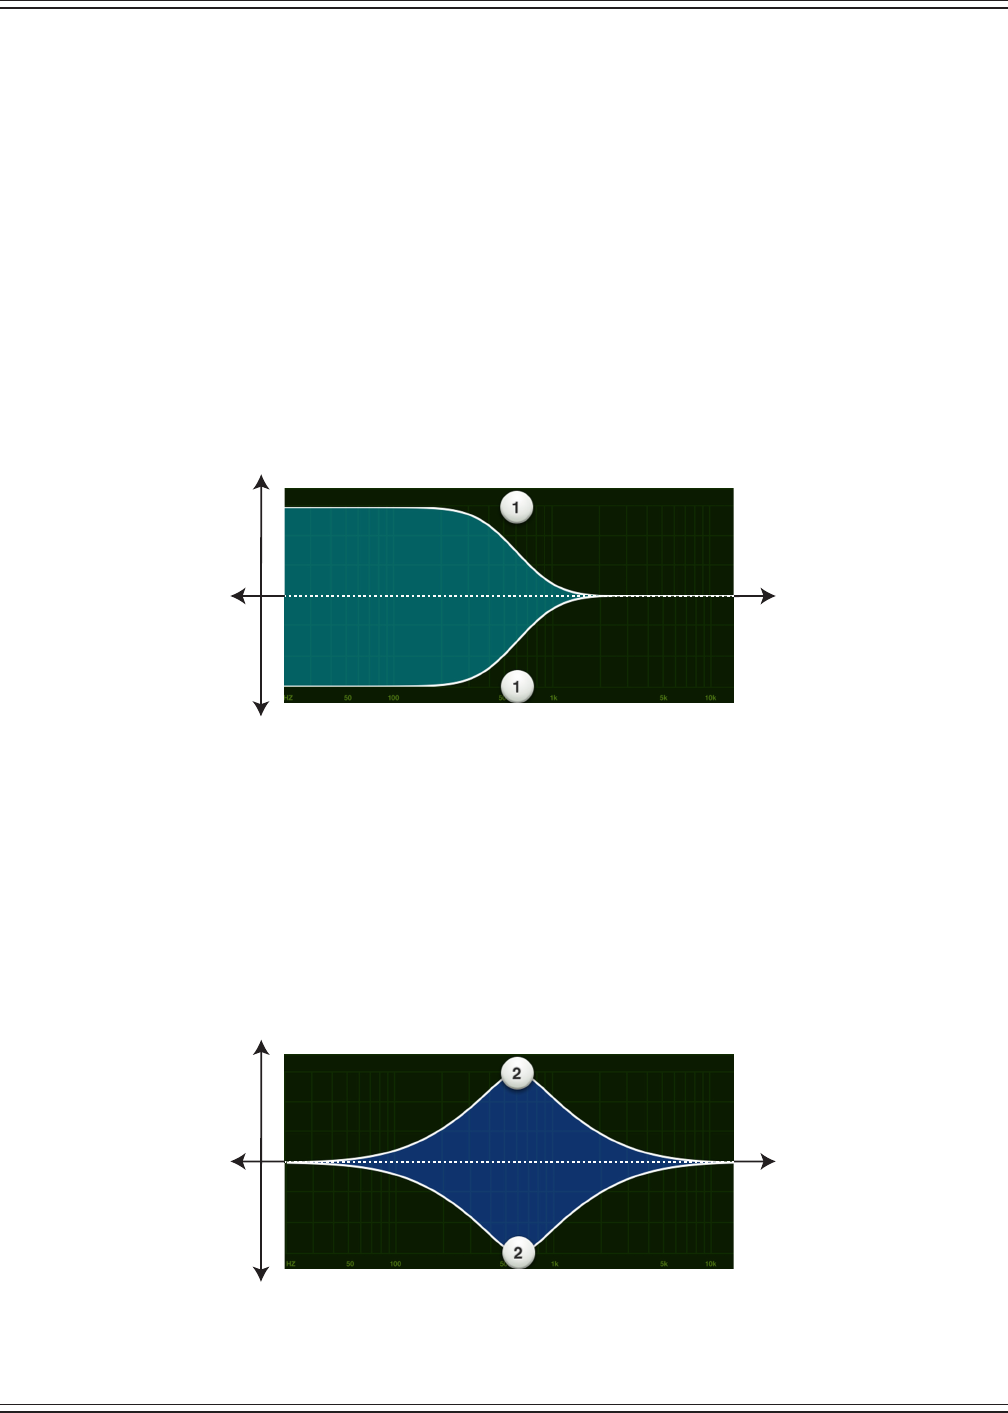
Mackie DL806 and DL1608 Reference Guide
61
Modern EQ Gain, Frequency and Q [Bandwidth]
The gain and frequency may be changed by moving any of the four numbered balls (representing
each band) until the desired sound has been achieved. Moving a ball vertically changes the gain
by up to ±15 dB. Moving a ball horizontally changes the frequency, ranging from 20 Hz to 20 kHz.
ThereisaShelf/Belloptionforbands1and4anditisdescribedindetailonpage63.Q[bandwidth]
is changed by pinching the ball. Double-tap an EQ ball to reset its gain to zero.
Low Shelving – Band 1
The low EQ provides up to 15 dB of boost or cut from 20 Hz to 20 kHz. This frequency represents
the punch in bass drums, bass guitar, fat synth patches, and some really serious male singers who
eat raw beef for breakfast.
Low-Mid Peaking – Band 2
The low-mid EQ provides up to 15 dB of boost or cut from 20 Hz to 20 kHz. Frequencies aected
typically include the male vocal range as well as the fundamentals and harmonics of many
lower-timbred instruments.
Gain (+)
Gain (–)
Frequency (+)Frequency (–)
Gain (+)
Gain (–)
Frequency (+)Frequency (–)
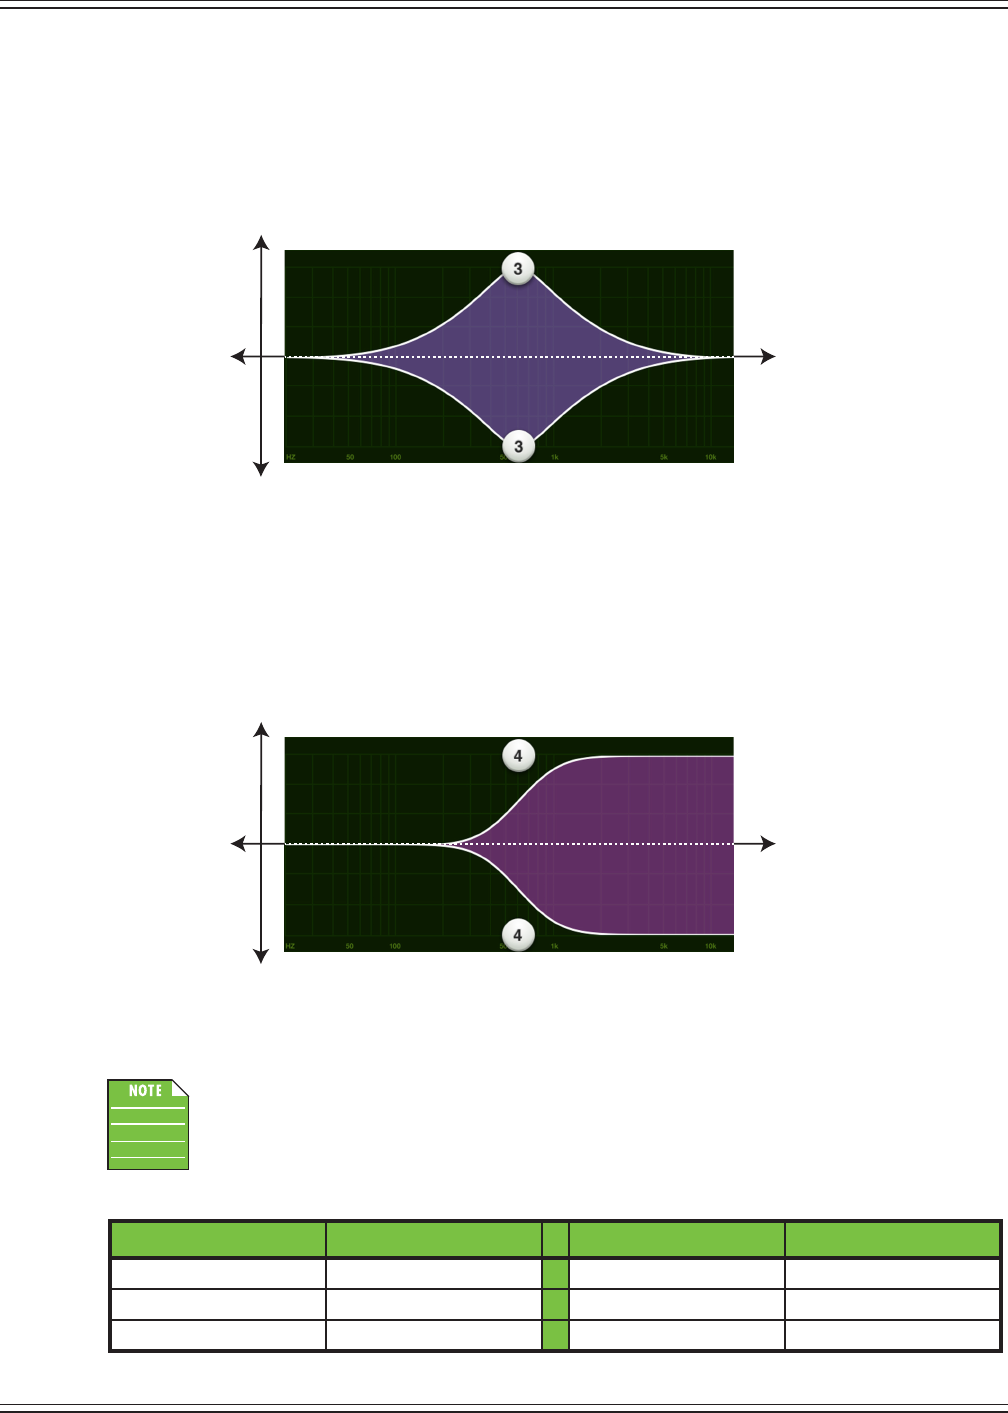
Mackie DL806 and DL1608 Reference Guide
62
High-Mid Peaking – Band 3
The high-mid EQ provides up to 15 dB of boost or cut from 20 Hz to 20 kHz. Midrange EQ is often
thought of as the most dynamic because the frequencies that dene any particular sound are
almost always found within this range. For example, the female vocal range as well as the
fundamentals and harmonics of many higher-timbred instruments.
High Shelving – Band 4
ThehighEQprovidesupto15dBofboostorcutfrom20Hzto20kHz.Useittoaddsizzletocymbals,
an overall sense of transparency, or an edge to keyboards, vocals, guitar and bacon frying. Turn it
down a little to reduce sibilance or harsh treble.
AlthoughtheQcontroldoesadjustthebandwidthofalter,theQvalueitselfisdimensionless;
it has no unit of measurement. Some equalizers use the fractional bandwidth of the lter,
measuredinoctaves,toexpressthisparameter.Thetwoparametersareinverselyrelated;
a high Q value corresponds to a small fractional bandwidth. The following table lists some
equivalent Q and fractional bandwidth values.
Q BW (oct) Q BW (oct)
0.7 2 2.871 1/2
1.414 1 4.318 1/3
2.145 2/3 15 1/10
Gain (+)
Gain (–)
Frequency (+)Frequency (–)
Gain (+)
Gain (–)
Frequency (+)Frequency (–)
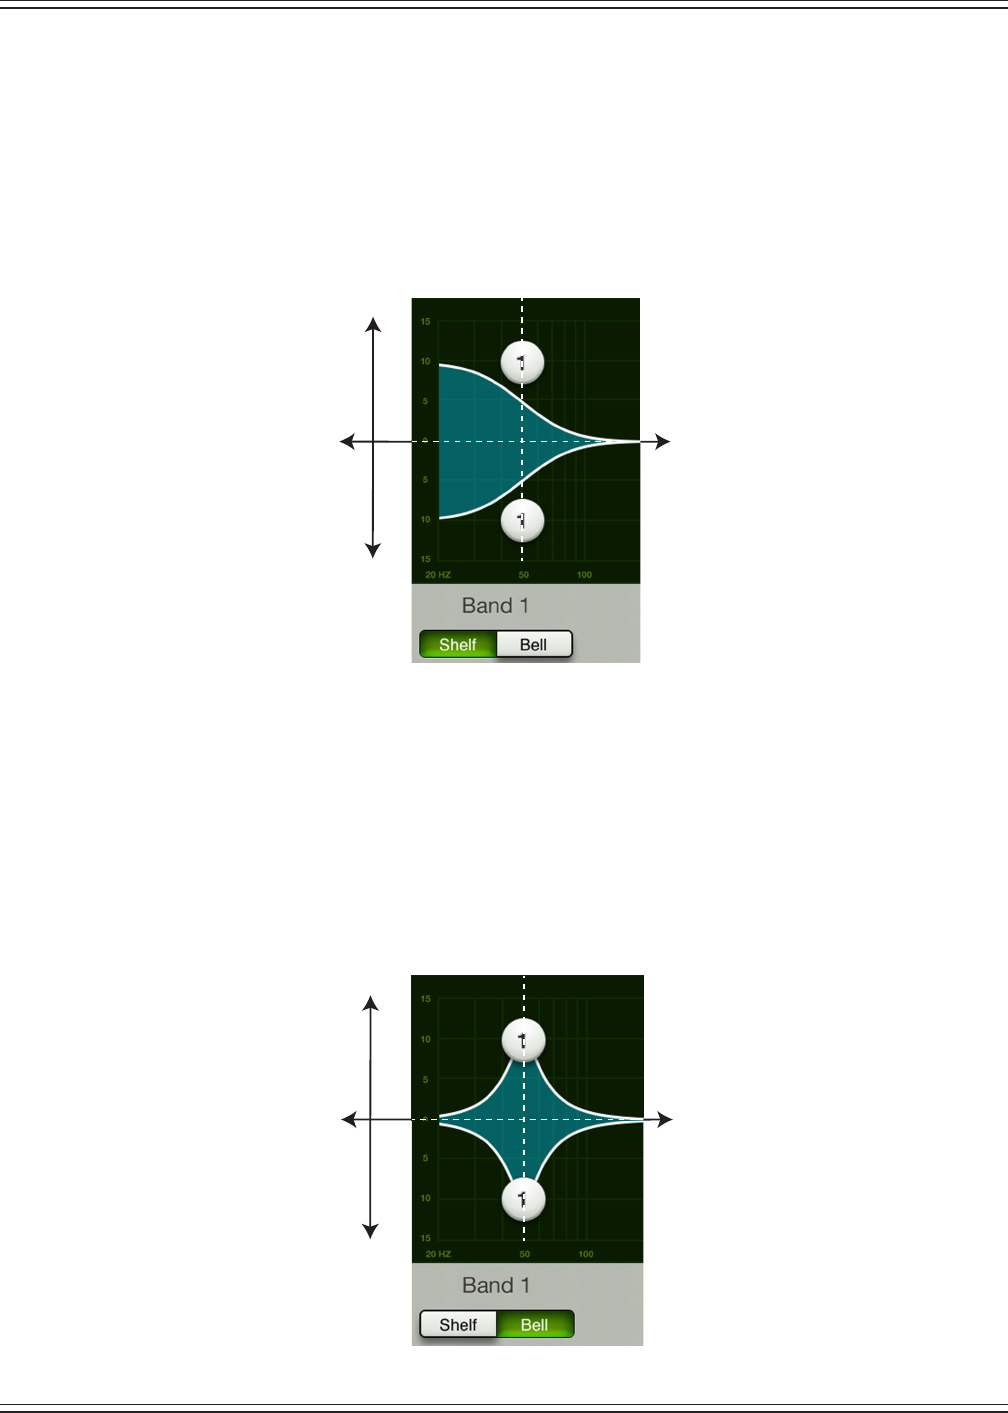
Mackie DL806 and DL1608 Reference Guide
63
Modern EQ Shelf / Bell
AShelf/Belloptionisavailableonbands1and4.Simplytapwhichsettingyouprefer.
The chosen setting will illuminate green when engaged, while the other option will be grayed out.
When engaged, the EQ becomes a shelving lter rather than a parametric lter. Shelf boosts
frequenciesfromthecut-opointupwards.Agentleroll-omaybeassumedwithshelf.
The Q control becomes inactive when shelf is engaged.
Shelf EQ
Bell boosts frequencies near the cut-o point then slowly decreases until it reaches a gain of zero.
When engaged, the EQ becomes a parametric lter rather than a shelving lter. The Q control
becomes active when bell is engaged. In fact, a smaller Q value results in a wider curve, while a
larger Q value results in a narrower curve where frequencies may be zoomed in on more precisely.
AsmallerQisgenerallyintendedformoremusicalpurposes,whilealargerQisgenerallyusedwhen
decreasing problem frequencies.
Bell EQ
Gain (+)
Gain (–)
Frequency (+)
Cut-Off
Point
Frequency (–)
Gain (+)
Gain (–)
Frequency (+)
Cut-Off
Point
Frequency (–)
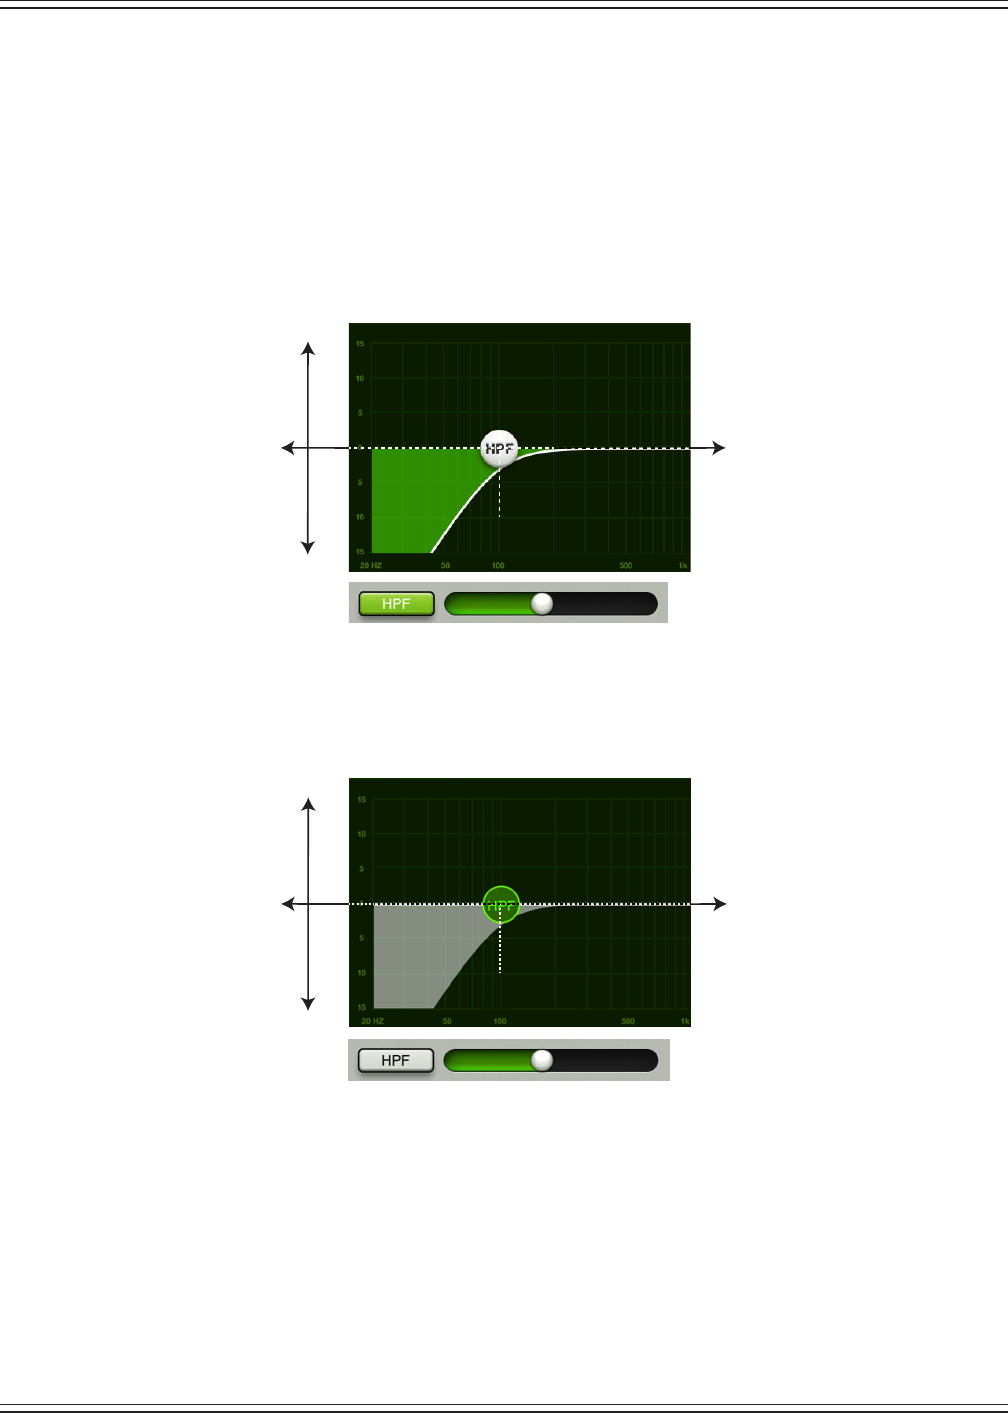
Mackie DL806 and DL1608 Reference Guide
64
Modern EQ HPF On / O and Frequency
High-pass lters are utilized to cut out low frequencies. The high-pass lter control adjusts the cut-o
frequency for the lter. Frequencies below the cut-o frequency are attenuated at a rate of 12 dB/octave.
TheslopefortheHPFisadjustablebyslidingtheHPFballorHPFsliderleftandright
.SimplytaptheHPF
button – near the lower-left corner of the screen – to engage the high-pass lter. It will illuminate green
when engaged and is gray when disengaged.
High-Pass Filter (Engaged)
High-Pass Filter (Disengaged)
Gain (+)
High-Pass
Filter
Gain (–)
Frequency (+)
Cut-Off
Point
Frequency (–)
Gain (+)
High-Pass
Filter
Gain (–)
Frequency (+)
Cut-Off
Point
Frequency (–)
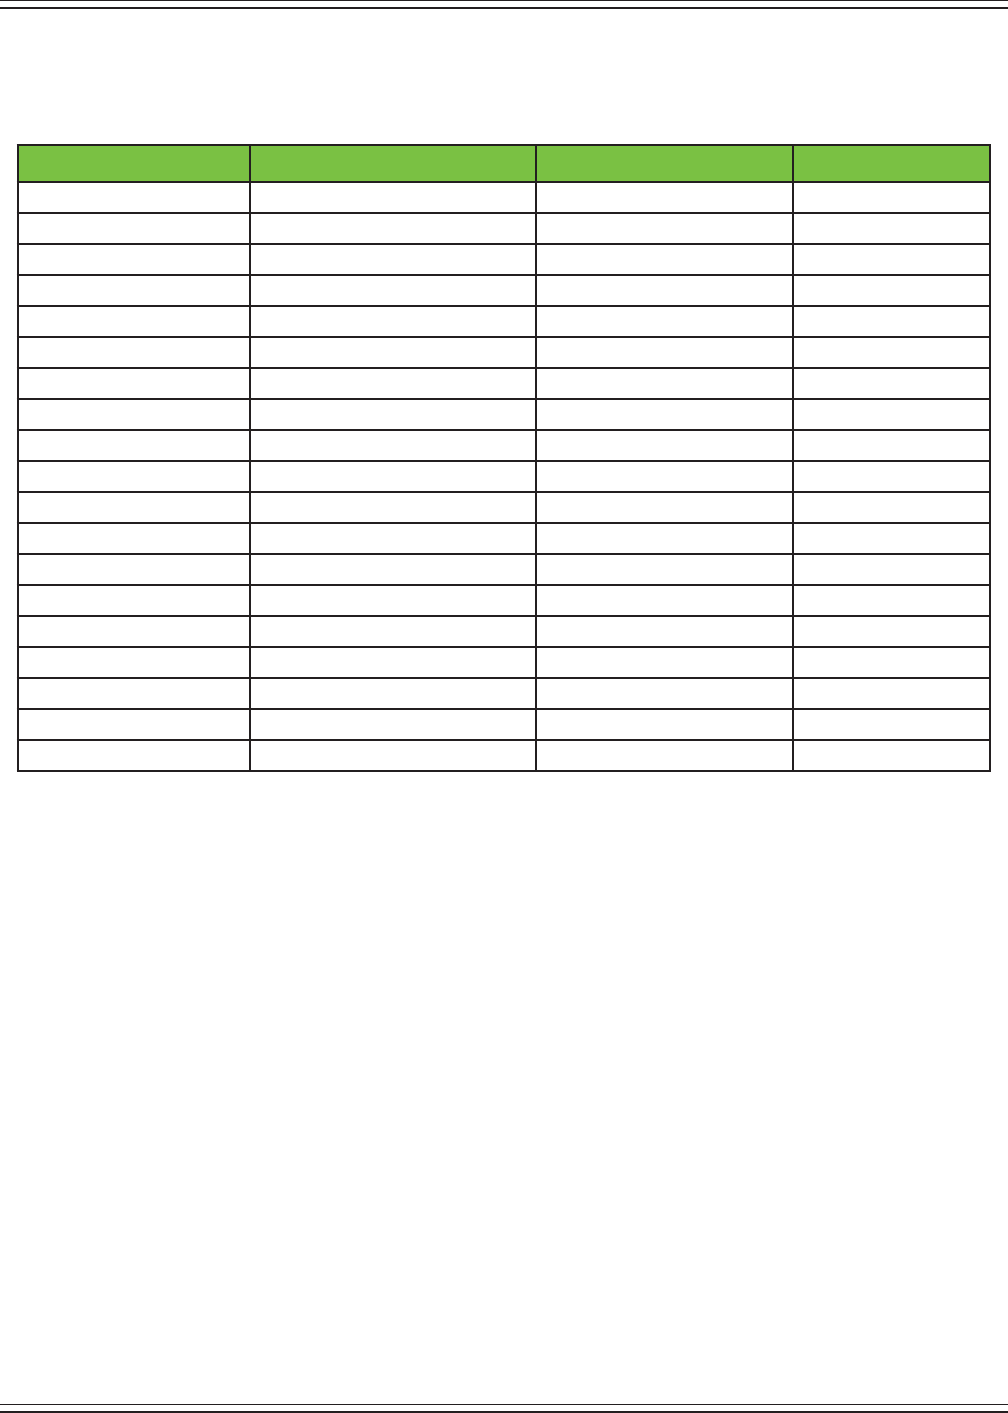
Mackie DL806 and DL1608 Reference Guide
65
Modern EQ at a Glance
Parameter Low Value Limit High Value Limit Default
PolarityInvert O On O
HPFEnable O On On
HPFFrequency 20 Hz 700 Hz 100 Hz
HPFSlope – – 18 dB/octave
EQ Enable O On On
High Band Type Parametric Shelf Shelf
Low Band Type Parametric Shelf Shelf
High Gain –15 dB +15dB 0 dB
High Freq 20 Hz 20 kHz 12 kHz
High Q / Shelf Slope 0.5 16 2
High Mid Gain –15 dB +15dB 0 dB
High Mid Freq 20 Hz 20 kHz 2 kHz
High Mid Q 0.5 16 2
Low Mid Gain –15 dB +15dB 0 dB
Low Mid Freq 20 Hz 20 kHz 250 Hz
Low Mid Q 0.5 16 2
Low Gain –15 dB +15dB 0 dB
Low Freq 20 Hz 20 kHz 80 Hz
Low Q / Shelf Slope 0.5 16 2
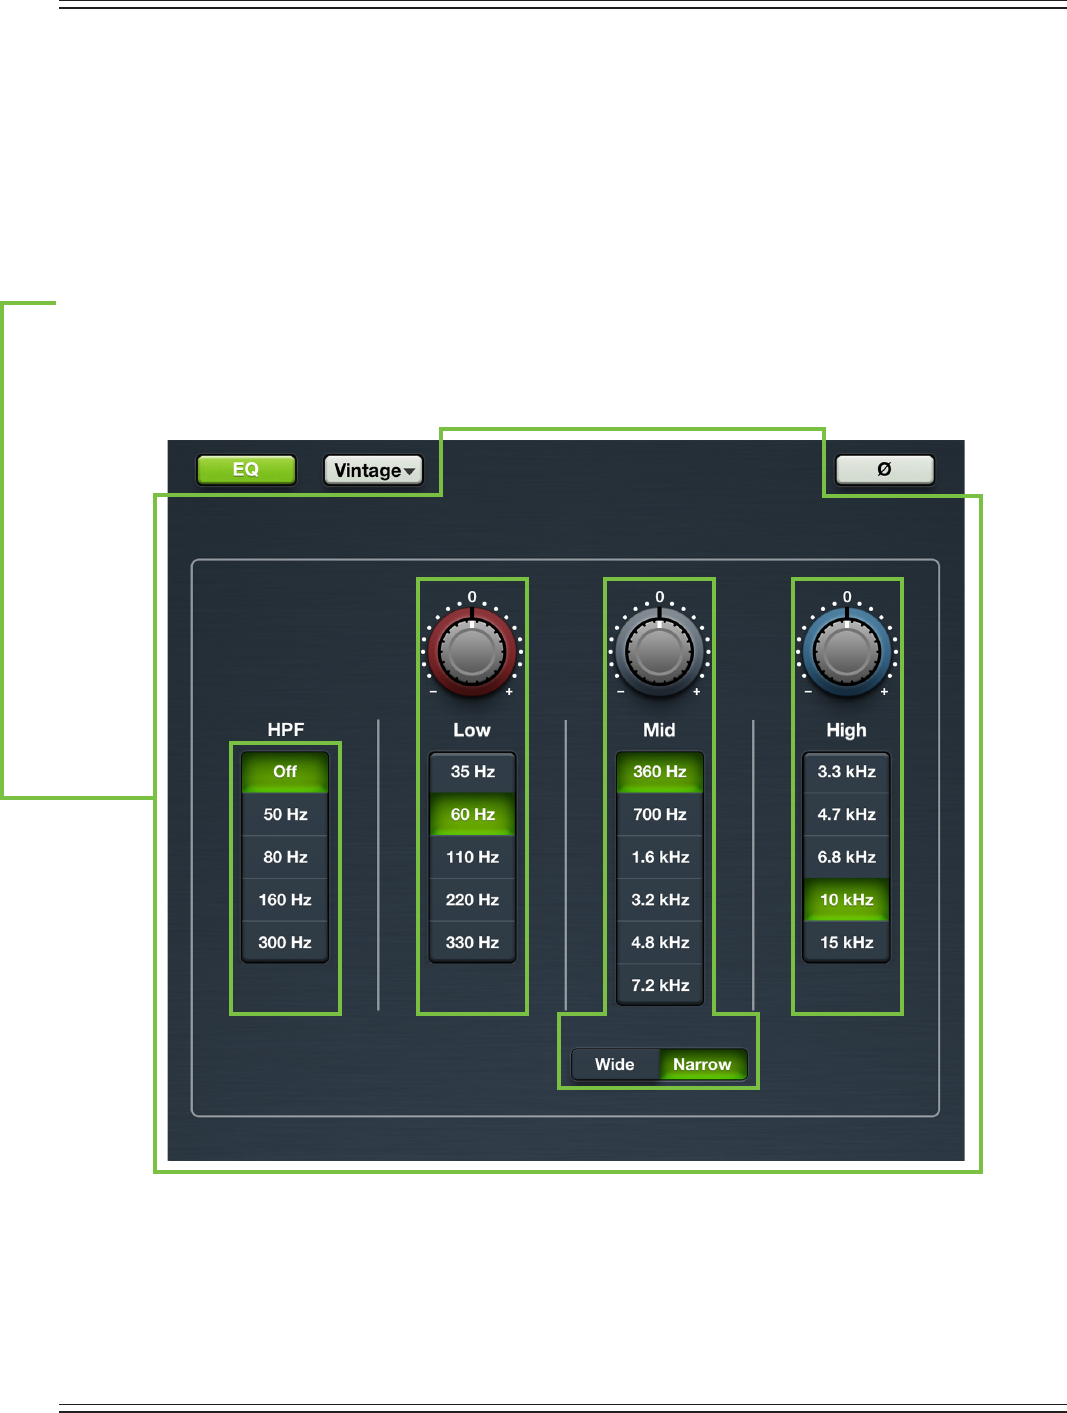
Mackie DL806 and DL1608 Reference Guide
66
Vintage EQ Introduction
Many of our audio engineer friends and other pro audio gear heads yearn for the ease of use and sound
ofyesteryear.That’sright,thevintageEQwascreatedwithyouinmind...buteveryuserwillloveusingit!
It meticulously recreates the feel and sound of EQ of classic consoles. The vintage EQ captures the unique
interactions between the shelving bands and the gain and frequency-dependent Q structure of the
parametric band to deliver the clarity and sheen of classic EQ designs. The vintage EQ is great for shaping
the tone of bass, guitars and other instruments. The screen shot below displays the default vintage EQ
settings.Let’stakealookateachoftheselectionsstartingontheleftwiththeHPFandworkingourway
right to the high EQ.
Vintage EQ Swipe Zone
Here in the Vintage EQ view, swipe anywhere in the dark gray areas outlined below. Swiping up displays
thatchannel’sgateandcompressorview.Swipingdowndisplaysthatchannel’sFXview.Andswiping
left and right changes channels.
Vintage EQ HPF Frequency Buttons
High-pass lters are utilized to cut out low frequencies. The high-pass lter control adjusts the cut-o
frequency for the lter. Frequencies below the cut-o frequency are attenuated at a rate of 18 dB/octave.
TheslopeoftheHPFisengagedby
tappinganyfrequencybuttonotherthan“O”.Thecurrentselection
will illuminate green.
Vintage EQ Gain and Frequency
ThegainforeachEQbandmaybechangedbydraggingup[increasesgain]anddown[decreasesgain]
over the knob until the desired gain has been achieved. The gain may be changed by approximately
±15dB...it’svintage,sonothingisexact! Double-tap a gain knob to reset its gain to zero. Each EQ band
here has a vertical row of frequency buttons located underneath its gain knob. Simply tap the frequency
button you desire for each band. The frequency ranges from 35 Hz to 15 kHz. The gain (but not the
frequency) may also be manually entered via the current parameter display.
Low
The low EQ provides approximately 15 dB of boost or cut from 35 Hz to 330 Hz. This frequency
represents the punch in bass drums, bass guitar, fat synth patches, and some really serious male
singers who eat raw beef for breakfast.
Mid
The mid EQ provides approximately 15 dB of boost or cut from 360 Hz to 7.2 kHz. Frequencies aected
typically include guitar, piano and the fundamentals and harmonics of many instruments.
Wide / Narrow
Below the mid EQ vertical frequency strip is a wide / narrow button. Generally speaking, wide is
used for broad tone-shaping while narrow is more precise. Select what you would prefer the mid
frequencyQ[bandwidth]tosoundlike.
High
ThehighEQprovidesapproximately15dBofboostorcutfrom3.3kHzto15kHz.Useittoadd
sizzle to cymbals, an overall sense of transparency, or an edge to keyboards, vocals, guitar
and bacon frying. Select a lower frequency to reduce sibilance or harsh treble.
Vintage EQ at a Glance
Parameter Low Value Limit High Value Limit Default
PolarityInvert O On O
HPFEnable O On On
HPFFrequency O•50Hz•80Hz•160Hz•300Hz 80 Hz
HPFSlope O 300 Hz 18 dB/octave
EQ Enable O On On
High Shelf Gain –15 dB +15dB 0 dB
High Shelf Freq 3.3kHz•4.7kHz•6.8kHz•10kHz•15kHz 10 kHz
Mid Gain –15 dB +15dB 0 dB
Mid Freq 360Hz•700Hz•1.6kHz•3.2kHz•4.8kHz•7.2kHz 360 Hz
Mid Q Wide Narrow Narrow
Low Shelf Gain –15 dB +15dB 0 dB
Low Shelf Freq 35Hz•60Hz•110Hz•220Hz•330Hz 60 Hz
Mackie DL806 and DL1608 Reference Guide
67
Vintage EQ Gain and Frequency
ThegainforeachEQbandmaybechangedbydraggingup[increasesgain]anddown[decreasesgain]
over the knob until the desired gain has been achieved. The gain may be changed by approximately
±15dB...it’svintage,sonothingisexact! Double-tap a gain knob to reset its gain to zero. Each EQ band
here has a vertical row of frequency buttons located underneath its gain knob. Simply tap the frequency
button you desire for each band. The frequency ranges from 35 Hz to 15 kHz. The gain (but not the
frequency) may also be manually entered via the current parameter display.
Low
The low EQ provides approximately 15 dB of boost or cut from 35 Hz to 330 Hz. This frequency
represents the punch in bass drums, bass guitar, fat synth patches, and some really serious male
singers who eat raw beef for breakfast.
Mid
The mid EQ provides approximately 15 dB of boost or cut from 360 Hz to 7.2 kHz. Frequencies aected
typically include guitar, piano and the fundamentals and harmonics of many instruments.
Wide / Narrow
Below the mid EQ vertical frequency strip is a wide / narrow button. Generally speaking, wide is
used for broad tone-shaping while narrow is more precise. Select what you would prefer the mid
frequencyQ[bandwidth]tosoundlike.
High
ThehighEQprovidesapproximately15dBofboostorcutfrom3.3kHzto15kHz.Useittoadd
sizzle to cymbals, an overall sense of transparency, or an edge to keyboards, vocals, guitar
and bacon frying. Select a lower frequency to reduce sibilance or harsh treble.
Vintage EQ at a Glance
Parameter Low Value Limit High Value Limit Default
PolarityInvert O On O
HPFEnable O On On
HPFFrequency O•50Hz•80Hz•160Hz•300Hz 80 Hz
HPFSlope O 300 Hz 18 dB/octave
EQ Enable O On On
High Shelf Gain –15 dB +15dB 0 dB
High Shelf Freq 3.3kHz•4.7kHz•6.8kHz•10kHz•15kHz 10 kHz
Mid Gain –15 dB +15dB 0 dB
Mid Freq 360Hz•700Hz•1.6kHz•3.2kHz•4.8kHz•7.2kHz 360 Hz
Mid Q Wide Narrow Narrow
Low Shelf Gain –15 dB +15dB 0 dB
Low Shelf Freq 35Hz•60Hz•110Hz•220Hz•330Hz 60 Hz

Mackie DL806 and DL1608 Reference Guide
68
Chapter 10: Channel View : Gate and Compression
Introduction
Gates are typically used to reduce leakage from open microphones. Signals below the threshold level are
muted, while signals above the threshold get to pass through. The range control changes the rule slightly.
Signals below the threshold are attenuated by the amount of the range setting, while signals above the
threshold get to pass through.
The operation of the gate is further modied by the attack, hold, and release controls. In order to open
the gate, the trigger signal must exceed the threshold for at least the duration of the attack time. This is
useful for helping the gate discriminate between something that is short duration and long duration,
such as hi-hat leakage into one of the tom-tom mikes.
Once the gate has opened, the hold time begins. The hold timer resets any time the input signal crosses
thethresholdagain,aslongasitremainsabovethethresholdforlongerthantheattacksetting.Afterthe
hold time passes, the gain falls at a rate determined by the release setting. The range control allows the
gate to remain partly open, even if the input is below the threshold.
Compressorsareusedtoreduceorlimittransientpeaksinasignal.Ifthesignalistoohot,turnitdown,
otherwiseleaveitalone.Astheinputleveltothecompressorincreases,theoutputlevelincreases
linearlyuntilthethresholdpointisreached.Afterthatpoint,theoutputlevelnolongerincreaseslinearly.
Instead, it increases at a reduced rate determined by the ratio setting.
Theattackandreleasecontrolsaecttherateofthegainchange;attackaectstherateoftheonset
of gain reduction and release aects the recovery rate once the transient has passed.
For stereo linked channels, the gain reduction is applied equally to both the left and right side.
There are actually two dierent types of gates and compressors to choose from on each channel:
clean,surgicalmoderndynamicsandclassicsoundingvintagedynamics.That’sright,youcanmix
andmatchtoheart’scontent!Wewilldissectboththemodernandvintagedynamicsseparately,but
let’sbeginbytakingapeekatwhatfeaturesapplytoboth.Moderngatesandcompressorsarediscussed
further on pages 69-71, while more information about the vintage gates and compressors may be found
on pages 72-74.
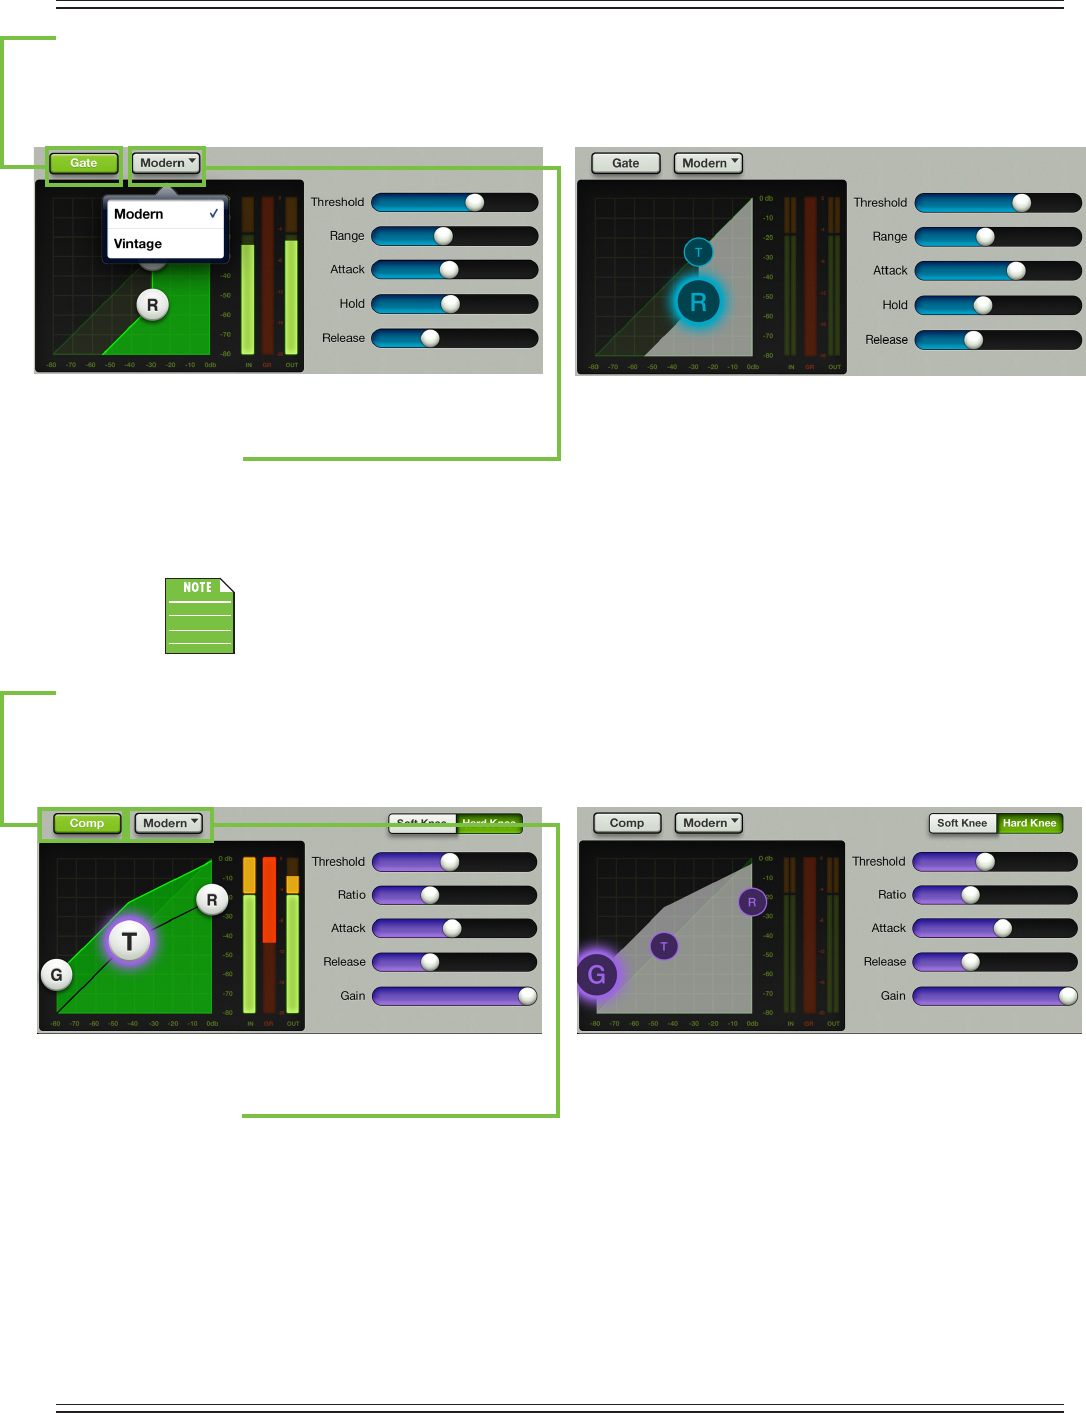
Mackie DL806 and DL1608 Reference Guide
69
Gate On / O
PresstheGatebuttontoturnthegateonoro.Itwillilluminategreenwhenengagedandisgraywhen
disengaged.Noticetheinputandoutputmetersbelow,aswell.Thereismonometeringforinputsand
outputs on unlinked channels and stereo metering for inputs and outputs on linked channels.
GATE ON / MONO METERS GATE OFF / STEREO METERS
Modern / Vintage
The modern/vintage button is located directly to the right of the gate on/o button. It displays the gate type
currentlyinuse,with“Modern”asthedefaultgate.Tapthisbuttontorevealthetwogatetypes,thentapthe
gate you would like for the selected channel. The controls will change to reect the gate type chosen.
Youcanswitchbetweengateandcompressortypeswhileaudiopassesandthesettingswill
match as closely as possible, but the sound will change.
Compressor On / O
PresstheCompbuttontoturnthecompressoronoro.Itwillilluminategreenwhenengagedandisgray
whendisengaged.Noticetheinputandoutputmetersbelow,aswell.Thereismonometeringforinputsand
outputs on unlinked channels and stereo metering for inputs and outputs on linked channels.
COMPRESSOR ON / MONO METERS COMPRESSOR OFF / STEREO METERS
Modern / Vintage
The modern/vintage button is located directly to the right of the comp on/o button. It displays the
compressortypecurrentlyinuse,with“Modern”asthedefaultcompressor.Tapthisbuttontorevealthe
two compressor types, then tap the compressor you would like for the selected channel. The image will
change to reect the compressor type chosen.
Modern Gate and Compressor Introduction
Asmentionedpreviously,moderndynamicsweredesignedforclean,surgicalprocessing;they’regreat
fordialinginanice,tightsound.Assuch,therange,attack,releaseandratiofeaturesmaybene-tuned
whenmoderndynamicsareutilized.Nowforadetailed(let’ssay“surgical”)lookatmoderndynamics.
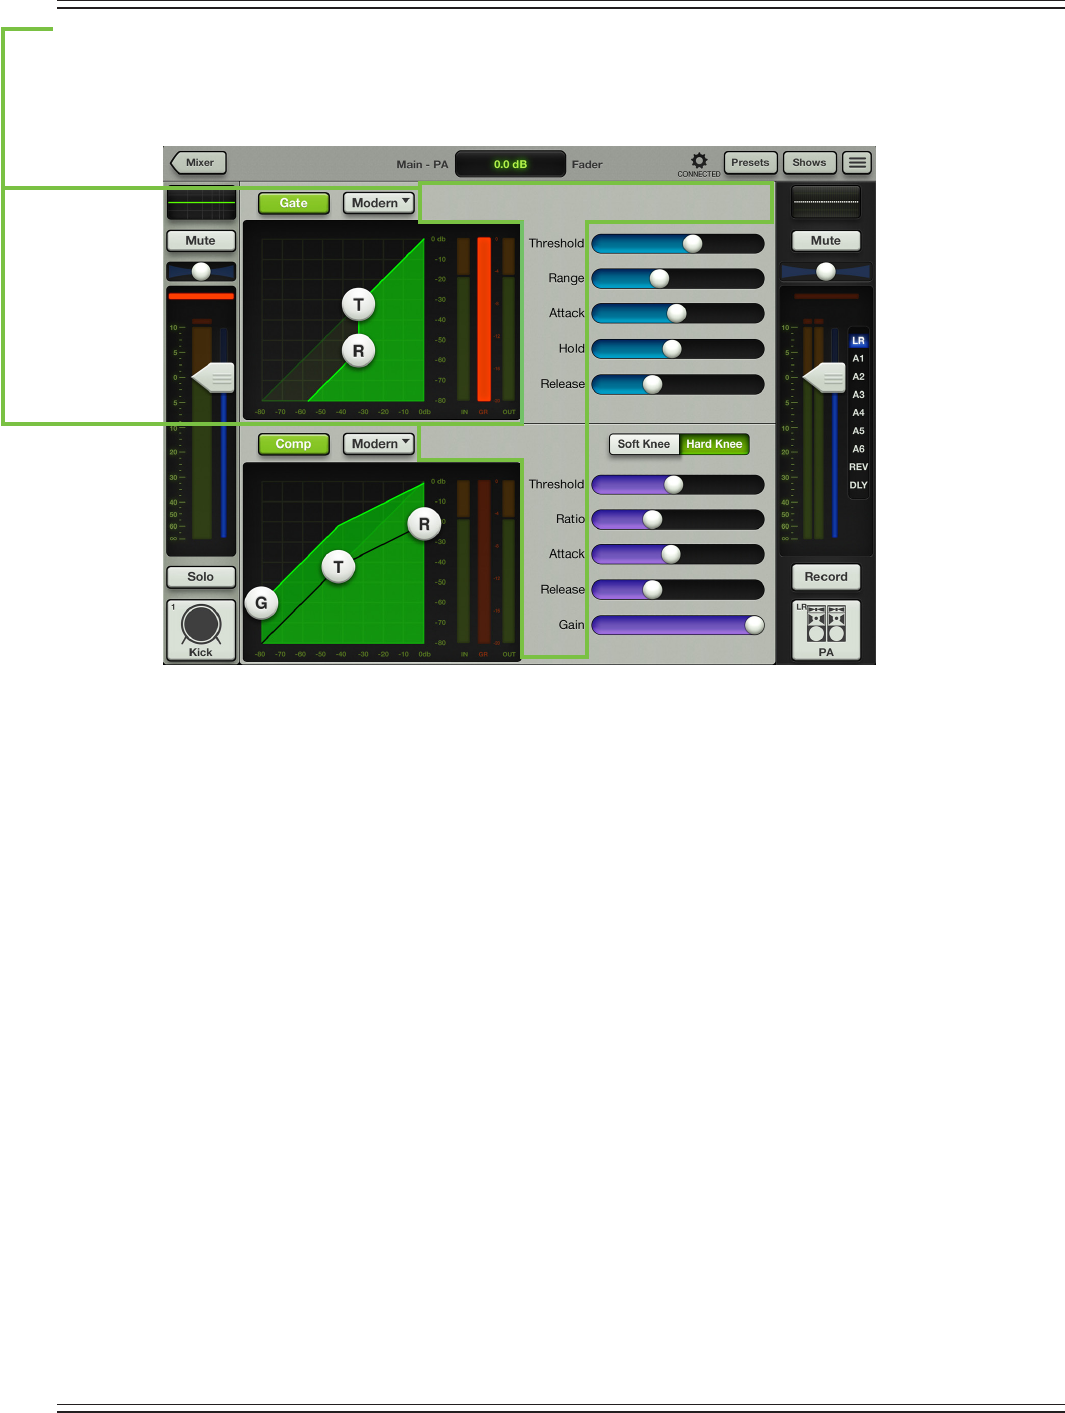
Mackie DL806 and DL1608 Reference Guide
70
Modern Gate and Compressor Swipe Zone
Here in the modern gate and compression view, swipe anywhere in the gray areas outlined below.
Swipingupdisplaysthatchannel’sFXview.Swipingdowndisplaysthatchannel’sEQview.
Andswipingleftandrightchangeschannels.
Modern Gate Display and Settings
The gate for each channel may be adjusted by moving the threshold and range balls or moving any
oftheveslidersleftandright.Additionally,exactsettingsmaybeenteredintothecurrentparameter
display.Thegatemaybeadjustedwhetherthegateisonoro.TheiPadchannelonlyhasacompressor,
not a gate.
Threshold — Threshold determines the level at which the gate acts on the incoming signal.
The range of the threshold setting varies from –80 dBFS to 0 dBFS.
Range — Range determines how far the gain drops once the signal is below threshold. Setting the
range control to something in the 10-20 dB range allows some amount of signal leakage when the
gate is closed, which may make its action more subtle (less abrupt) and therefore less noticeable.
The range of the gated signal varies from 0 dB to 60 dB.
Attack —Attackdetermineshowquicklythegateopensoncethesignalisabovethreshold.
Short attack times allow triggering on short transients, while longer attack times cause these
transients to be ignored. The range of the attack time varies from 0 ms to 300 ms.
Hold — Hold sets a xed time that the gate remains open once the signal drops below the threshold
setting. During the hold time, the gain is held constant, whereas during the release time, the gain
is falling at the release rate. The range of the hold time varies from 0 seconds to 5 seconds.
Release — Release determines how long it takes for the gain to fall to the setting of the range control
once the signal falls below threshold and the hold time elapses. The range of the release speed varies
from 50 ms to 3 seconds.
Modern Gate Meters
These three meters show the input level, amount of gain reduction and output level. The input and
output meters range from –80 dBFS to 0 dBFS. The reduction meter of the gate ranges from 0 to 20 dB.
Mono metering is displayed for inputs and outputs on unlinked channels and stereo metering is displayed
for inputs and outputs on linked channels.
Mackie DL806 and DL1608 Reference Guide
71
Modern Compressor Display and Settings
The compressor for each channel may be adjusted by moving the gain, threshold and ratio balls
ormovinganyoftheveslidersleftandright.Additionally,exactsettingsmaybeenteredinto
the current parameter display. The compressor may be adjusted whether the compressor is on or o.
TheiPadchannelonlyhasacompressor,notagate.
Threshold — Threshold sets the threshold of the compressor in dB below 0 dBFS.
The range of the threshold setting varies from –80 dBFS to 0 dBFS.
Ratio — Ratio sets the amount of gain reduction applied as the signal exceeds the threshold level.
The range of the ratio of the compressor varies from 1:1 to inf:1.
Attack — Attackdetermineshowquicklythecompressorreactsoncethesignalisabovethreshold.
Short attack times allow compressing on short transients, while longer attack times cause these transients
to be ignored. The range of the attack time varies from 0 ms to 300 ms.
Release — Release determines how long it takes for the compressor to end gain reduction once the signal
drops back below the threshold. The range of the release speed varies from 50 ms to 3 seconds.
Gain — Gain adds make-up gain to the output of the compressor. This is useful to make the
apparent volume of the signal the same with the compressor in and out of the signal chain.
The range of the make-up gain varies from 0 dB to 20 dB.
Soft Knee / Hard Knee Compression
This switch sets the shape of the gain reduction curve at the threshold level. When set to hard, the gain
reduction curve changes abruptly at the threshold level. When set to soft, the gain reduction curve changes
gently as it transitions to the nal ratio amount.
Modern Compressor Meters
These three meters show the input level, amount of gain reduction and output level. The input and output
meters range from –80 dBFS to 0 dBFS. The reduction meter of the compressor ranges from 0 to 20 dB.
Mono metering is displayed for inputs and outputs on unlinked channels and stereo metering is displayed
for inputs and outputs on linked channels.
Modern Gate at a Glance
Modern Compressor at a Glance
Parameter Low Value High Value Default
Gate Enable O On On
Threshold –80 dBFS 0 dBFS –80 dBFS
Attack 0 ms 300 ms 0.1 ms
Release 50 ms 3 s 250 ms
Range 0 dB 60 dB 60 dB
Hold 0 ms 5 s 0 ms
Parameter Low Value High Value Default
CompEnable O On On
Threshold –80 dBFS 0 dBFS 0 dBFS
Ratio 1 : 1 INF:1 2 : 1
Gain 0 dB 20 dB 0 dB
Attack 0 ms 300 ms 0.1 ms
Release 50 ms 3 s 250 ms
Knee Soft Hard Soft
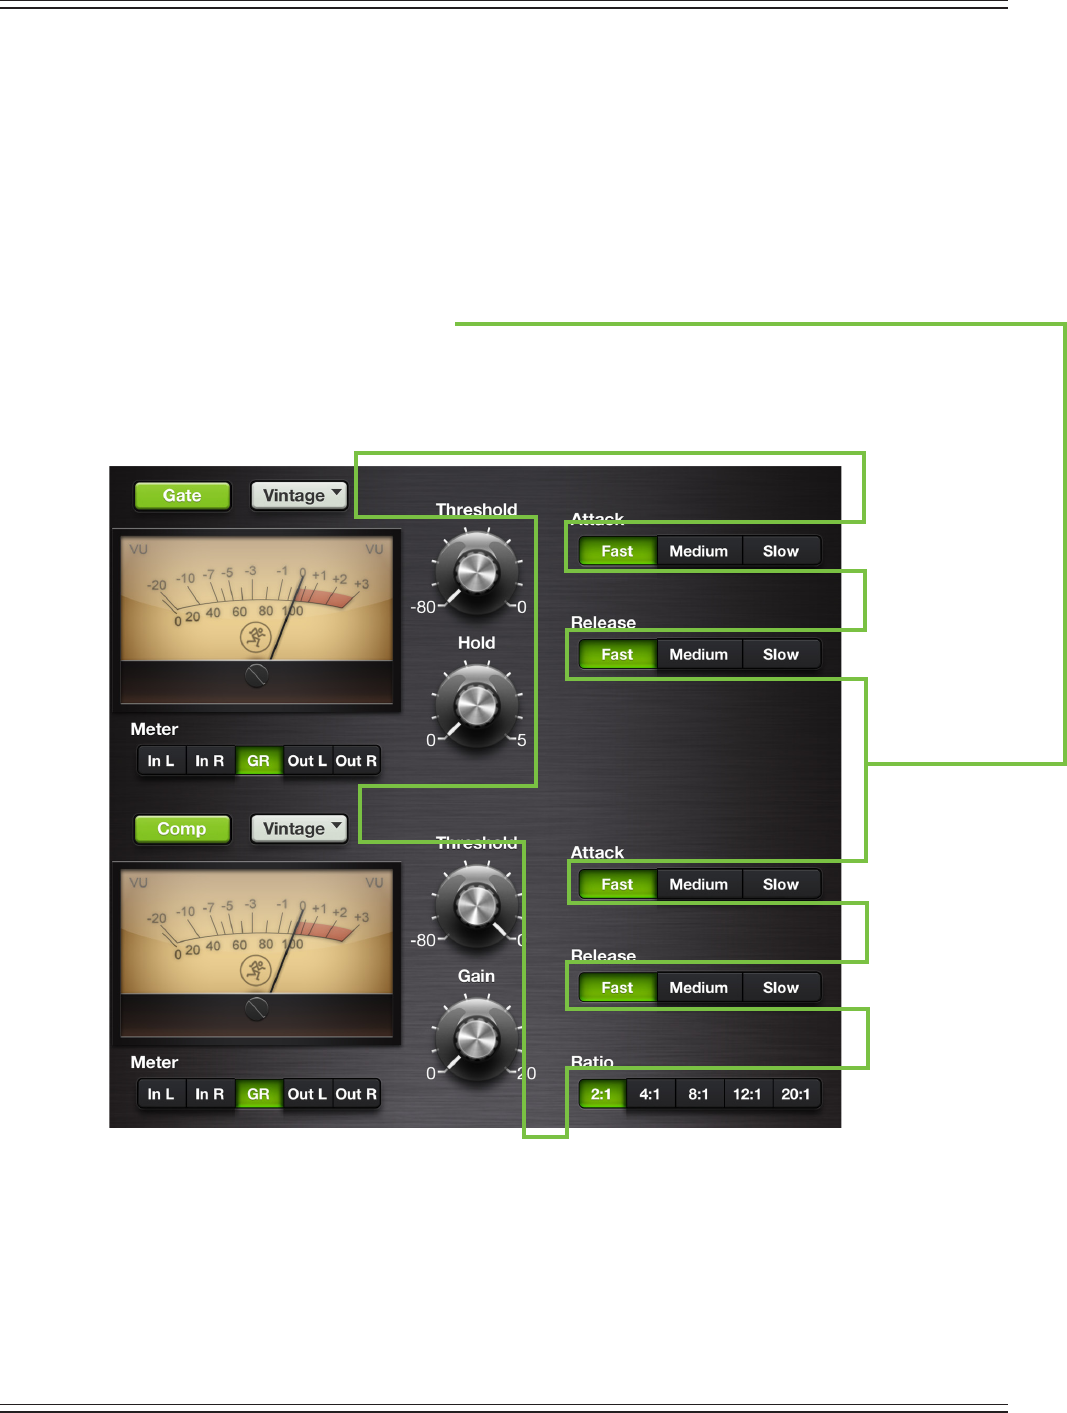
Mackie DL806 and DL1608 Reference Guide
72
Vintage Gate and Compressor Introduction
Many of our audio engineer friends and other pro audio gear heads yearn for the ease of use and sound
ofyesteryear.That’sright,thevintagegateandcompressorwerecreatedwithyouinmind...buteveryuser
will love using it! It meticulously recreates the feel and sound of gates and compressors of classic consoles.
The vintage gate and compressor provide a lightning-fast attack, non-linear attack/release and program
dependent release making them great for drums, slap bass and other transient sources. The screen shot
below displays the default vintage dynamic settings.
Vintage Gate and Compressor Swipe Zone
HereintheVintageGateandCompressionview,swipeanywhereinthedarkgrayareasoutlinedbelow.
Swipingupdisplaysthatchannel’sgateandcompressorview.Swipingdowndisplaysthatchannel’s
FXview.Andswipingleftandrightchangeschannels.Seepage70fortheSwipeZoneoftheModern
GateandCompressionview.

Mackie DL806 and DL1608 Reference Guide
73
Vintage Gate Settings
Eachchannel’sthresholdandholdlevelsmaybechangedbydraggingup[increaseslevel]anddown
[decreaseslevel]overtheirrespectiveknobsuntilthedesiredlevelhasbeenachieved.Totheright
are two horizontal rows of buttons for the attack and release. Simply tap the button you desire for
the attack and release time. The current selection will illuminate green. The threshold and hold settings
(but not the attack and release settings) may also be manually entered via the current parameter display.
Therangeisxed.Thegatemaybeadjustedwhetheritisonoro.TheiPadchannelonlyhasacompressor,
not a gate.
Threshold — Threshold determines the level at which the gate acts on the incoming signal.
The range of the threshold setting varies from –80 dBFS to 0 dBFS.
Hold — Hold sets a xed time that the gate remains open once the signal drops below the threshold
setting. During the hold time, the gain is held constant, whereas during the release time, the gain
is falling at the release rate. The range of the hold time varies from 0 seconds to 5 seconds.
Attack —Attackdetermineshowquicklythegateopensoncethesignalisabovethreshold.
Short attack times allow triggering on short transients, while longer attack times cause these
transientstobeignored.Choosebetweenafast,mediumorslowattacktime.
Release — Release determines how long it takes for the gain to fall to the setting of the range
controloncethesignalfallsbelowthresholdandtheholdtimeelapses.Choosebetweenafast,
medium or slow release time.
Vintage Compressor Settings
Eachchannel’sthresholdandgainlevelsmaybechangedbydraggingup[increaseslevel]anddown
[decreaseslevel]overtheirrespectiveknobsuntilthedesiredlevelhasbeenachieved.Totheright
are three horizontal rows of buttons for the attack, release and ratio. Simply tap the button you desire
for the attack, release and ratio. The current selection will illuminate green. The threshold and gain
settings (but not the attack, release and ratio settings) may also be manually entered via the current
parameterdisplay.Thecompressormaybeadjustedwhetheritisonoro.TheiPadchannelonlyhas
a compressor, not a gate.
Threshold — Threshold sets the threshold of the compressor in dB below 0 dBFS.
The range of the threshold setting varies from –80 dBFS to 0 dBFS.
Gain — Gain adds make-up gain to the output of the compressor. This is useful to make the
apparent volume of the signal the same with the compressor in and out of the signal chain.
The range of the make-up gain varies from 0 dB to 20 dB.
Attack — Attackdetermineshowquicklythecompressorreactsoncethesignalisabovethreshold.
Short attack times allow compressing on short transients, while longer attack times cause these
transientstobeignored.Choosebetweenafast,mediumorslowattacktime.
Release — Release determines how long it takes for the compressor to end gain reduction once
thesignaldropsbackbelowthethreshold.Choosebetweenafast,mediumorslowreleasetime.
Ratio — Ratio sets the amount of gain reduction applied as the signal exceeds the threshold level.
Choosebetween2:1,4:1,8:1,12:1and20:1.
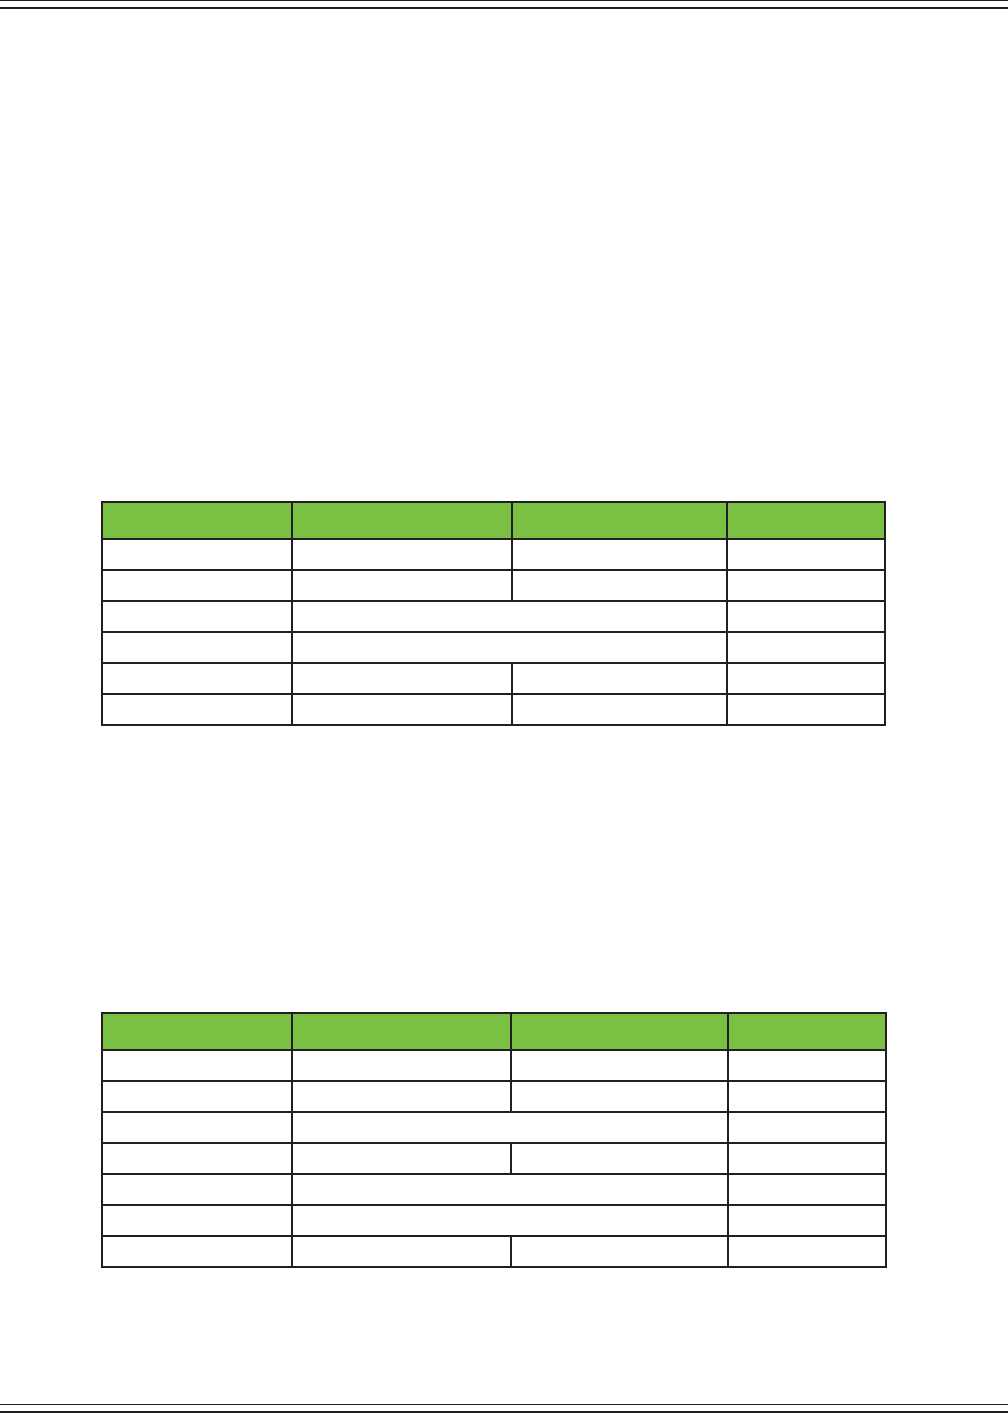
Mackie DL806 and DL1608 Reference Guide
74
Vintage Gate / Compressor VU Meters
Tocompletetheclassiclookofthevintagedynamics,thegateandcompressorareoutttedwithVUmeters.
What’smore,underneatheachVUmeterisasetofbuttonstoselectbetweendisplayingtheinputlevel,
amount of gain reduction or output level. The input and output meters range from –20 dBu to 0 dBu.
The reduction meter of the gate and compressor ranges from 0 to 20 dB. Mono metering is displayed
for inputs and outputs on unlinked channels and stereo metering is displayed for inputs and outputs
on linked channels.
Vintage Gate at a Glance
Vintage Compressor at a Glance
Parameter Low Value High Value Default
Gate Enable O On On
Threshold –80 dBFS 0 dBFS –80 dBFS
Attack 0.025ms[Fast]•12.5ms[Med]•75ms[Slow] Fast
Release 50ms[Fast]•500ms[Med]•3s[Slow] Fast
Range – – 90 dB
Hold 0 ms 5000 ms 0 ms
Parameter Low Value High Value Default
CompEnable O On On
Threshold –80 dBFS 0 dBFS 0 dBFS
Ratio 2:1•4:1•8:1•12:1•20:1 2 : 1
Gain 0 dB 20 dB 0 dB
Attack Fast•Medium•Slow Fast
Release Fast•Medium•Slow Fast
Knee – – Soft
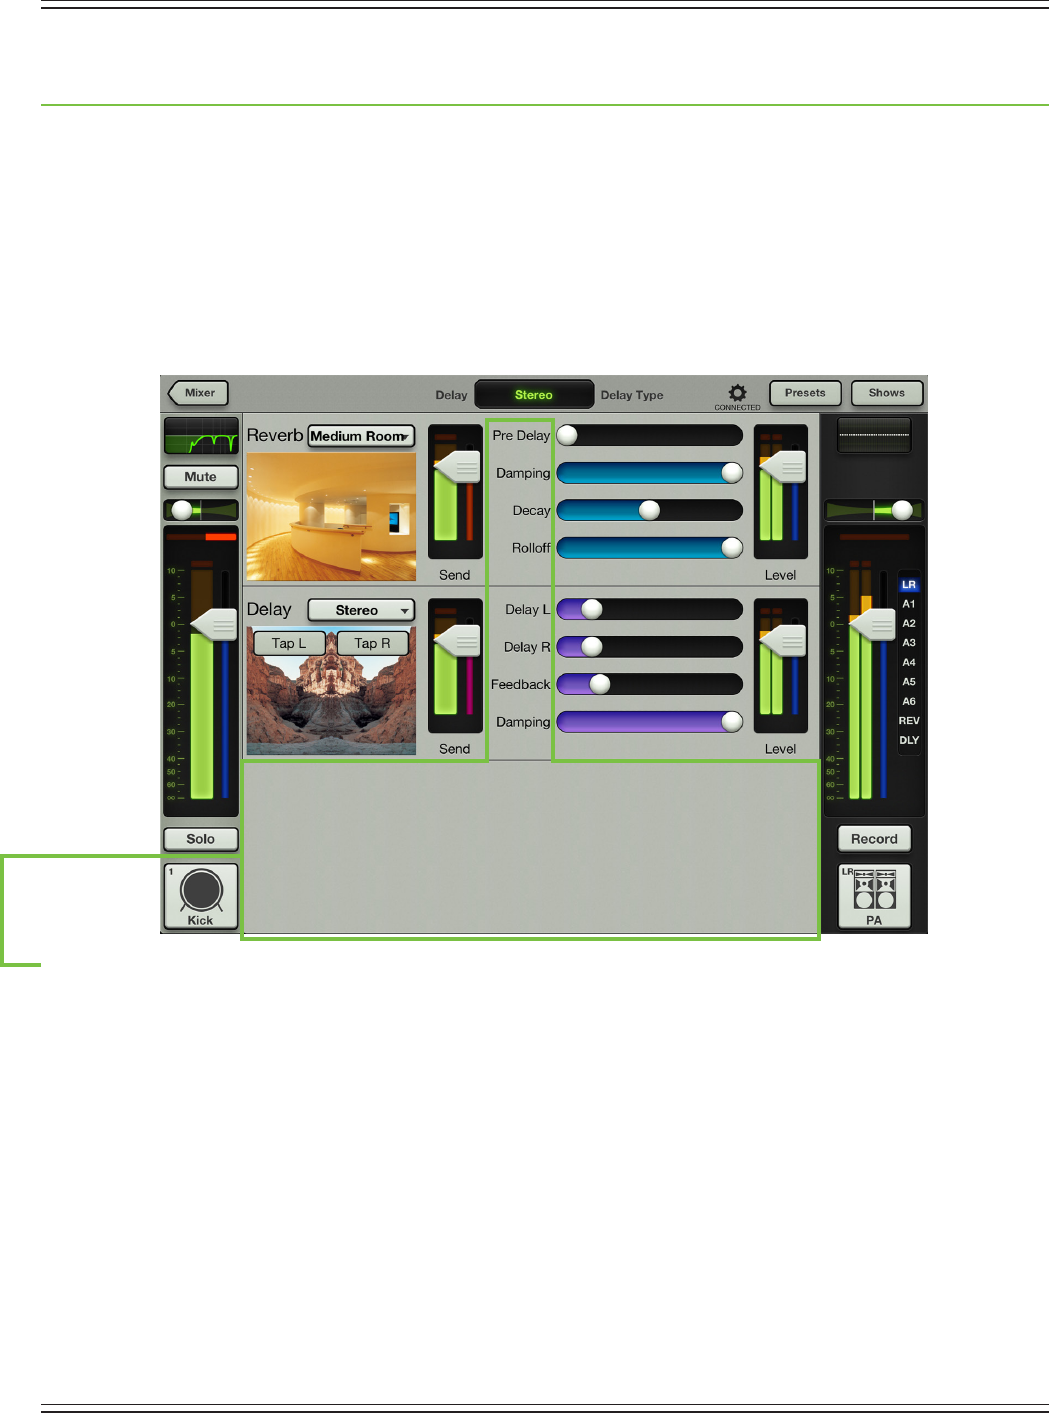
Mackie DL806 and DL1608 Reference Guide
75
Chapter 11: Channel View : FX
Introduction
The DL Series mixers have one reverb and one delay and these may be fed from any combination of
channels. There are a wide variety of reverb and delay types at your disposal on the Master Fader app.
Asseenintheimagebelow,theMasterFaderappfollowsstandardFXsendandreturnconguration
so the learning curve is kept to a minimum.
The FX are essentially conjoined, reverb on top, delay just below. The sends and returns for the current
channel are displayed here. This allows you to easily adjust both FX in one convenient location for each
selectedchannel;channel1inthisexample.
The Swipe Zone
Here in the FX view, swipe anywhere in the gray area outlined above. Swiping up displays that
channel’sEQview.Swipingdowndisplaysthatchannel’sgateandcompressionview.Andswiping
left and right changes channels.
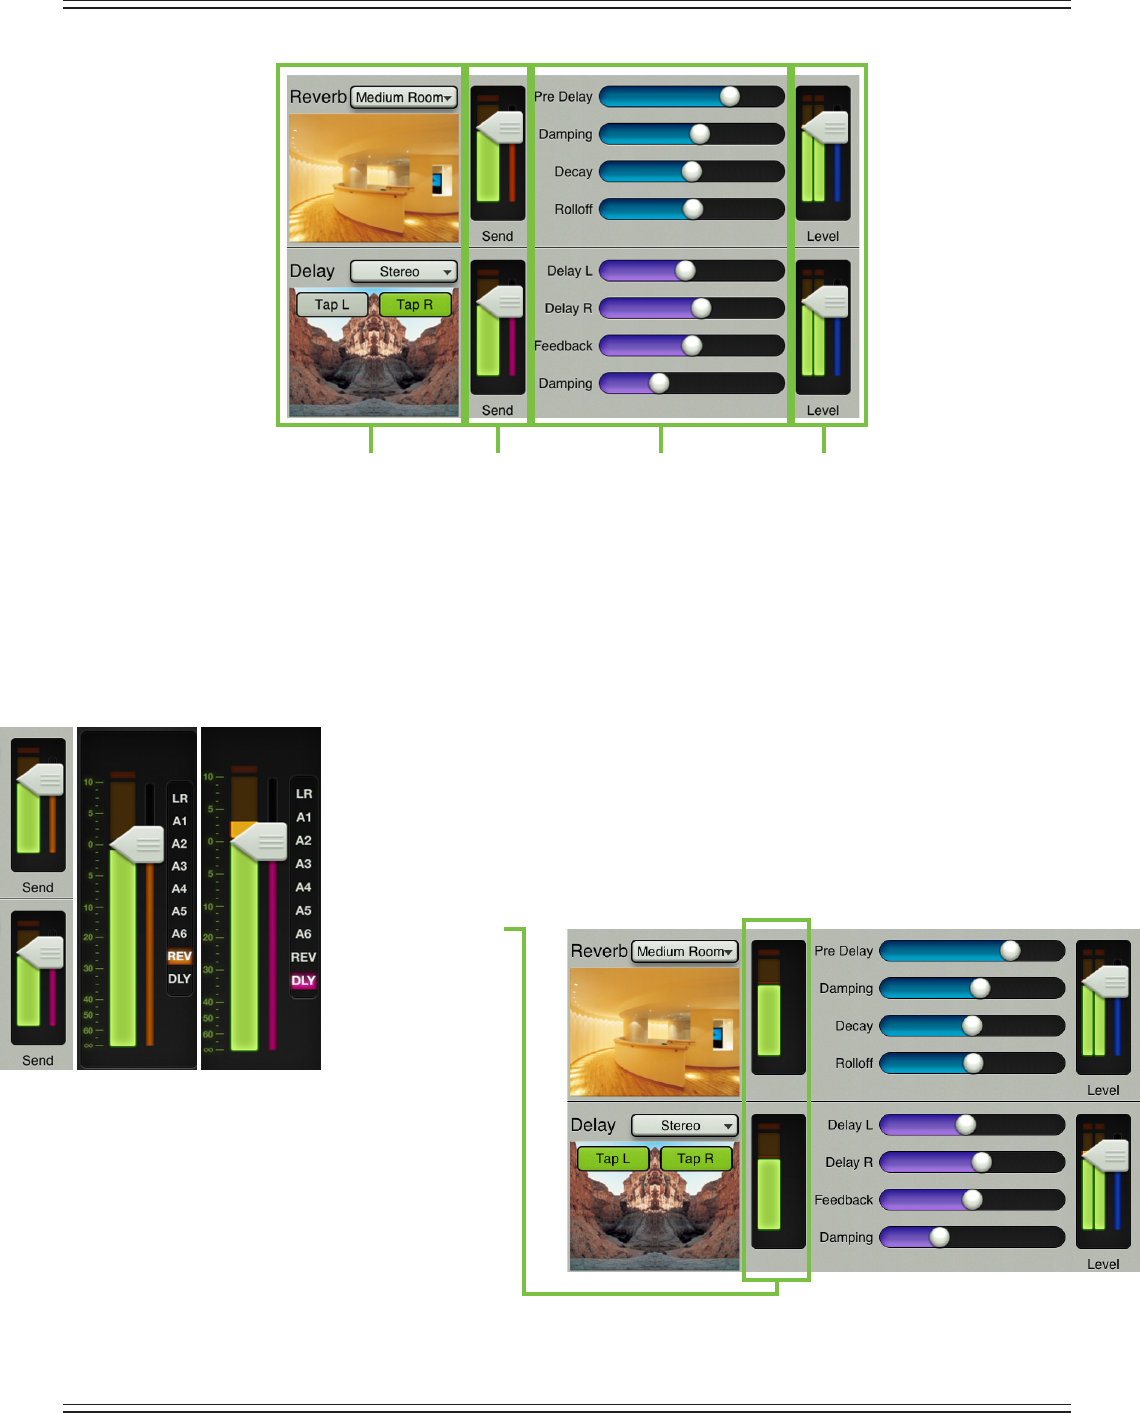
Mackie DL806 and DL1608 Reference Guide
76
FX View
From left to right, each eect displays the following:
Eect Type — The reverb and delay each display the currently selected eect type (as a button
which reveals a popover when tapped) and an accompanying image. These selections are global
and aect all channels sent to the eects as there is only one reverb and one delay on the mixer.
Eect types are described in more detail in a few pages.
FX Sends — There are two vertical send channel faders and meters, one for each eect.
These control the level being sent to the eect from the current channel.
Noticeintheimagetotheleftthatthecolorofeachsendfadermatches
the color of the reverb and delay output selector.
The reverb and delay send meters display the summed signals from all channel
sendspost-sendmaster.Putanotherway,thisshowsthetotalsignalgoinginto
the FX processor regardless of the current channel being adjusted.
There are no reverb or delay sends from the reverb and delay returns, so when either
the reverb or delay is the current channel, there are no send faders shown as seen in the
image to the right.
FX Settings — The reverb and delay have multiple sliders which are used to alter the selected eect.
These sliders change dependent on which eect type is chosen for each channel. These sliders are global
and aect all channels sent to the eects as there is only one reverb and one delay on the mixer.
The various FX controls for each FX type are described in more detail in a few pages.
EFFECT TYPE FX SENDS FX SETTINGS FX RETURNS
SENDS REV DLY
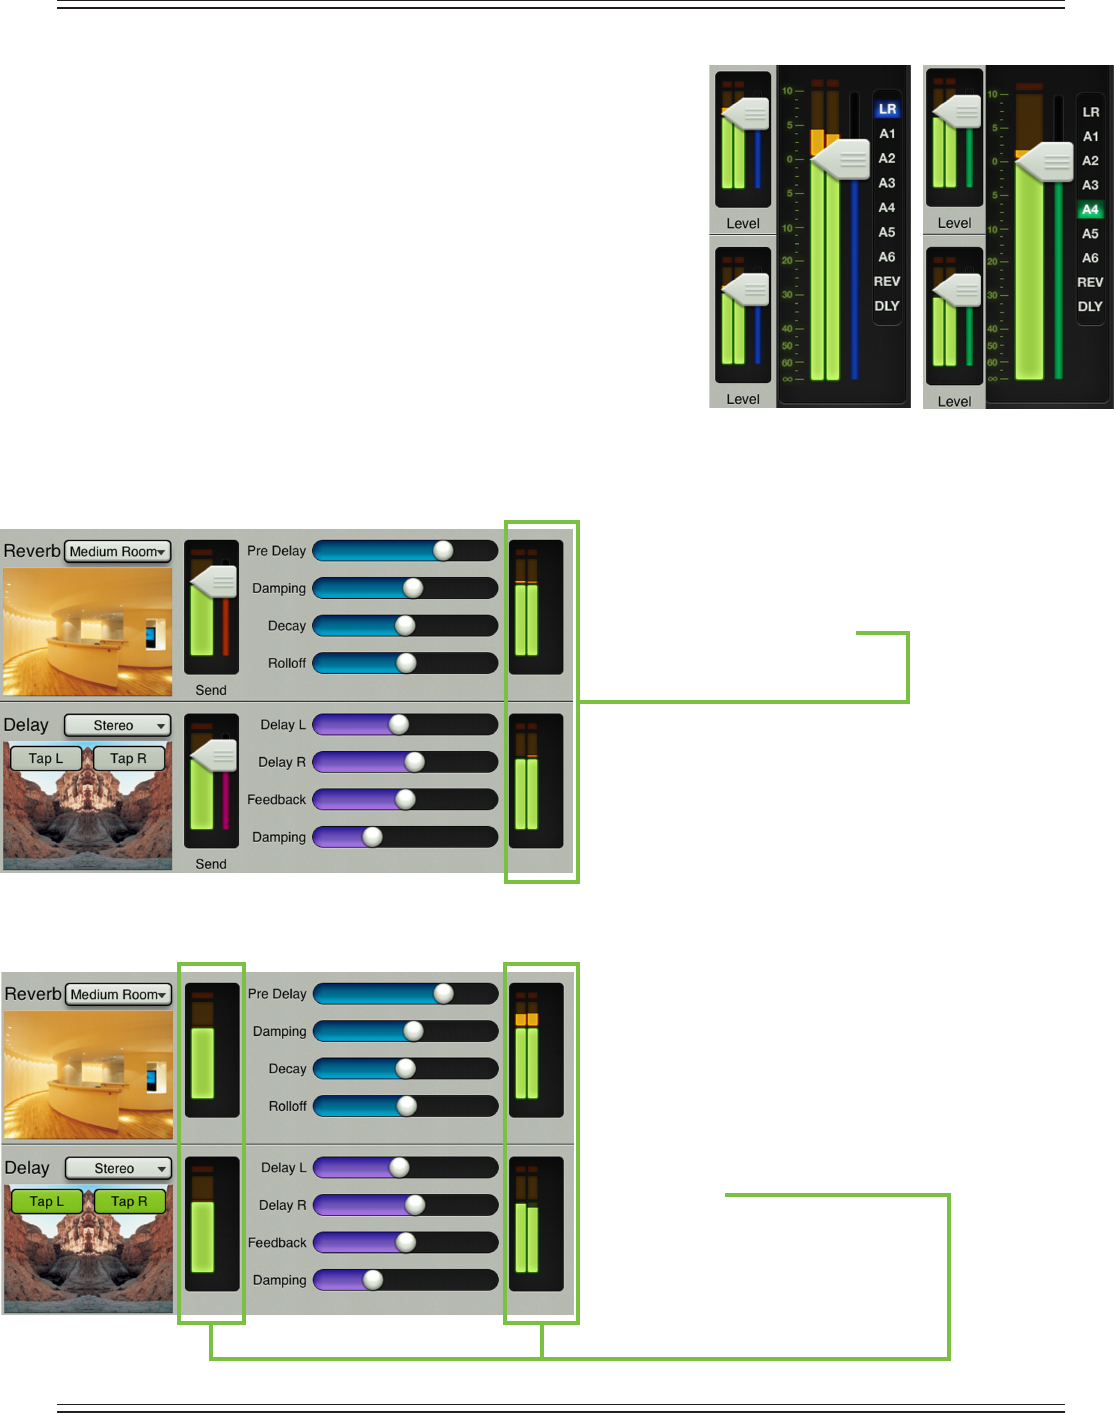
Mackie DL806 and DL1608 Reference Guide
77
FX Returns — There are two vertical return channel faders and
meters, one for each eect. These control the return level from
theeecttotheselectedoutput.Youhaveseenthesebefore,
astheyarethesamefadersdisplayedinthemixerview.Apair
exists[oneforreverb,onefordelay]foreachselectedoutput.
UnliketheFXsends,thecoloroftheselectedoutputindicator
will change based on the selected output for the FX returns.
See the image to the right for one example.
Navigatetothereverbreturnchannel,thenmovethechannel
faderupanddown.Noticethatitalsomovesthereverbreturn
fader up and down. This is because they are both showing the
samelevel.Assuch,movingthereturnreverbfaderupand
down also moves the reverb channel fader up and down.
This works with the delay return channel and delay return
fader, as well.
There are no reverb or delay returns to the reverb
and delay sends (which would be crazy...and it avoids
a feedback loop), so when either the reverb or delay
send is the selected output, there are no return faders
as seen in the image to the left.
The astute reader may ask if there are no sends from
returns and no returns from sends, what if one selects
an eect return as the current channel and an eect
send as the selected output. Good question! The image
on the left shows the FX with no sends and no returns.
Of course you may still adjust the global controls.
Ifyouwanttowitnessthisforyourselfhere’show
in two simple steps: (1) go to either the reverb channel
or delay channel and (2), select reverb or delay as the
output. Done!
LR AUX 4
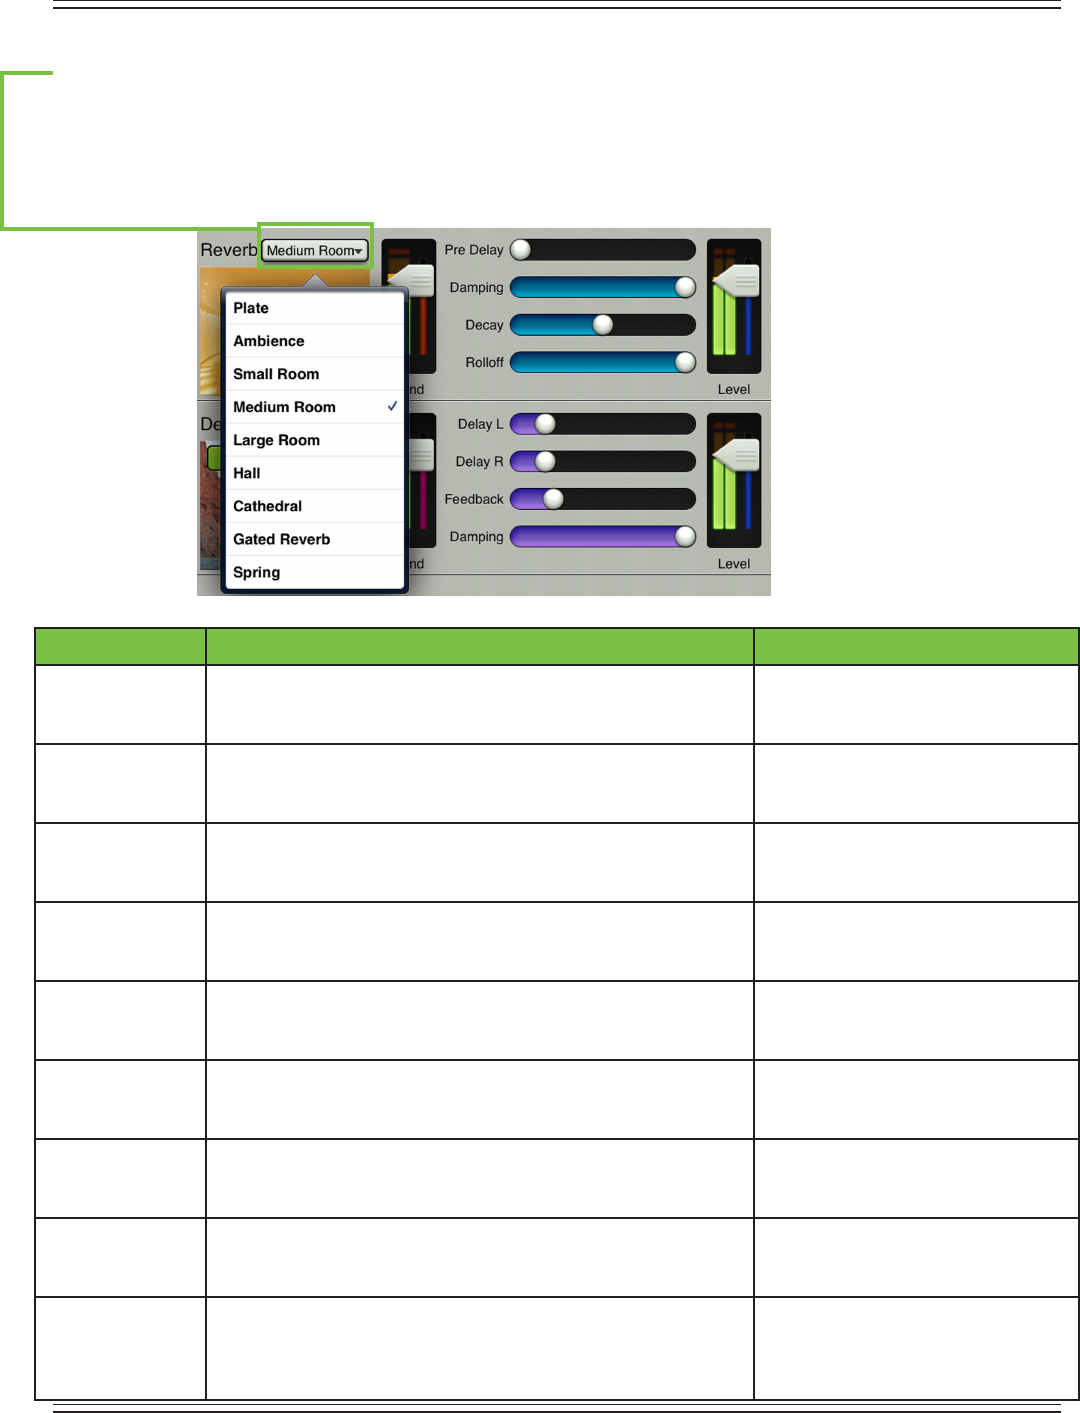
Mackie DL806 and DL1608 Reference Guide
78
Reverb Type
Reverb simulates the eect of room variations. The Master Fader app comes with nine reverb types to
choose from: plate, ambience, small room, medium room, large room, hall, cathedral, gated reverb and
spring.Abuttondisplayingthecurrentreverbtypemaybetappedtorevealtheotherreverbtypes.Tap
the reverb you would like for the selected channel. The image will change to reect the reverb type chosen.
Reverb Type Description Examples
Plate Platereverbsemulatevintagemechanicalreverberationthatis
generated with a metal plate. Its sound is characterized by lots
of early reections and no pre-delay.
Perfectforthickeningpercussive
instruments, such as a snare drum, or
tight vocal arrangements.
Ambience Ambienceisthesurroundingsoundeld.
This reverb adds depth and space.
Ambienceisgoodforscoringmovie
soundtracks and post-rock bands
utilizing a lot of depth in their sound.
Small Room The small room reverb simulates the reverberation
(persistence of sound) in a typical small room. Small rooms are
typicallycoined“dead”roomswithlittletonoreverb.
Some artists record guitars (and/
or bass) from a bathroom to get a
“punchier”soundoutoftheiramp.
Medium Room The medium room reverb simulates the reverberation
(persistence of sound) in a typical medium room.
Amediumroomwouldbegood
for thickening up a bass sound
without it sounding muddy.
Large Room The large room reverb simulates the reverberation
(persistence of sound) in a typical large room. Large rooms are
typicallycoined“live”roomssincetheyhavealotofreverb.
Sound tends to carry in large rooms
with a lot of open space. This works
well for a good, boomy kick sound.
Hall This reverb is characterized by its large, spacious
sound, long pre delay and vibrant tone.
Addslifetoacousticinstruments
and vocals from solos to full-on
symphonies and choirs.
Cathedral This reverb emulates the extremely long tails, dense diusion
and long pre-delays and reections that would be found in a
very large, stone-walled house of worship.
Gives amazing depth to choirs,
wind instruments, organs and
soft acoustic guitars.
Gated Reverb Gated reverbs incorporate an age-old trick whereby an
extremely dense reverb is processed through a fast gate for an
interesting, albeit articial, sound.
Most often used to fatten snare
drums and toms without clutter.
Spring Aspringreverbusesatransduceratoneendofaspringanda
pickup at the other end to create and capture vibrations in a
metal spring. The longer the spring, the longer the decay time
of the reverberation.
Spring reverbs are typically used on
guitar ampliers or organs in a rock
band format.

Mackie DL806 and DL1608 Reference Guide
79
Reverb Sliders
The following is a list of sliders available for each selected reverb. Slide left to decrease the reverb time
and slide right to increase the reverb time.
Pre Delay (All) — When listening to a live performance, direct sounds are reached rst, followed by
reverberation caused by room reections. The pre delay is the amount of time between when the direct
sounds arrive and when the reections arrive. The range is 0 ms to 300 ms.
The speed of sound is approximately 340 meters per second (1100 feet per second). This means that
inonemillisecond,ittravels0.34meters(110feet).Asaroughidea,thinkof1msasthetimeittakes
for sound to travel one foot.
Damping (All) — Damping increases or decreases the decay time of the higher frequencies relative
to the overall decay time. That is, the amount of sound reections that make up the reverb. Lower values
sound“thinner,”whilehighervaluesgiveasmoother-soundingdecay.Therangeis500Hzto20kHz.
Decay (All) — This represents the decay time of the reverb. The range will vary depending on the
reverb chosen.
Rollo (All except Gated Reverb) — This provides a 24 dB/octave low-pass lter at the output of the
reverb. This allows the level of the audio range to be rolled o above the frequency set by this slider.
The range is 500 Hz to 20 kHz.
Release (Gated Reverb) — Release is the amount of time it takes for attenuation to happen.
The range is 50 ms to 3000 ms.
Parameter Low Value High Value Default
PreDelay 0 ms 300 ms 0 ms
Damping 500 Hz 20 kHz 20 kHz
Decay 0.1 s – 4.0 s 1.3 s – 10.0 s 2.00 s
Rollo 500 Hz 20 kHz 20 kHz
Release 50 ms 3000 ms 250 ms
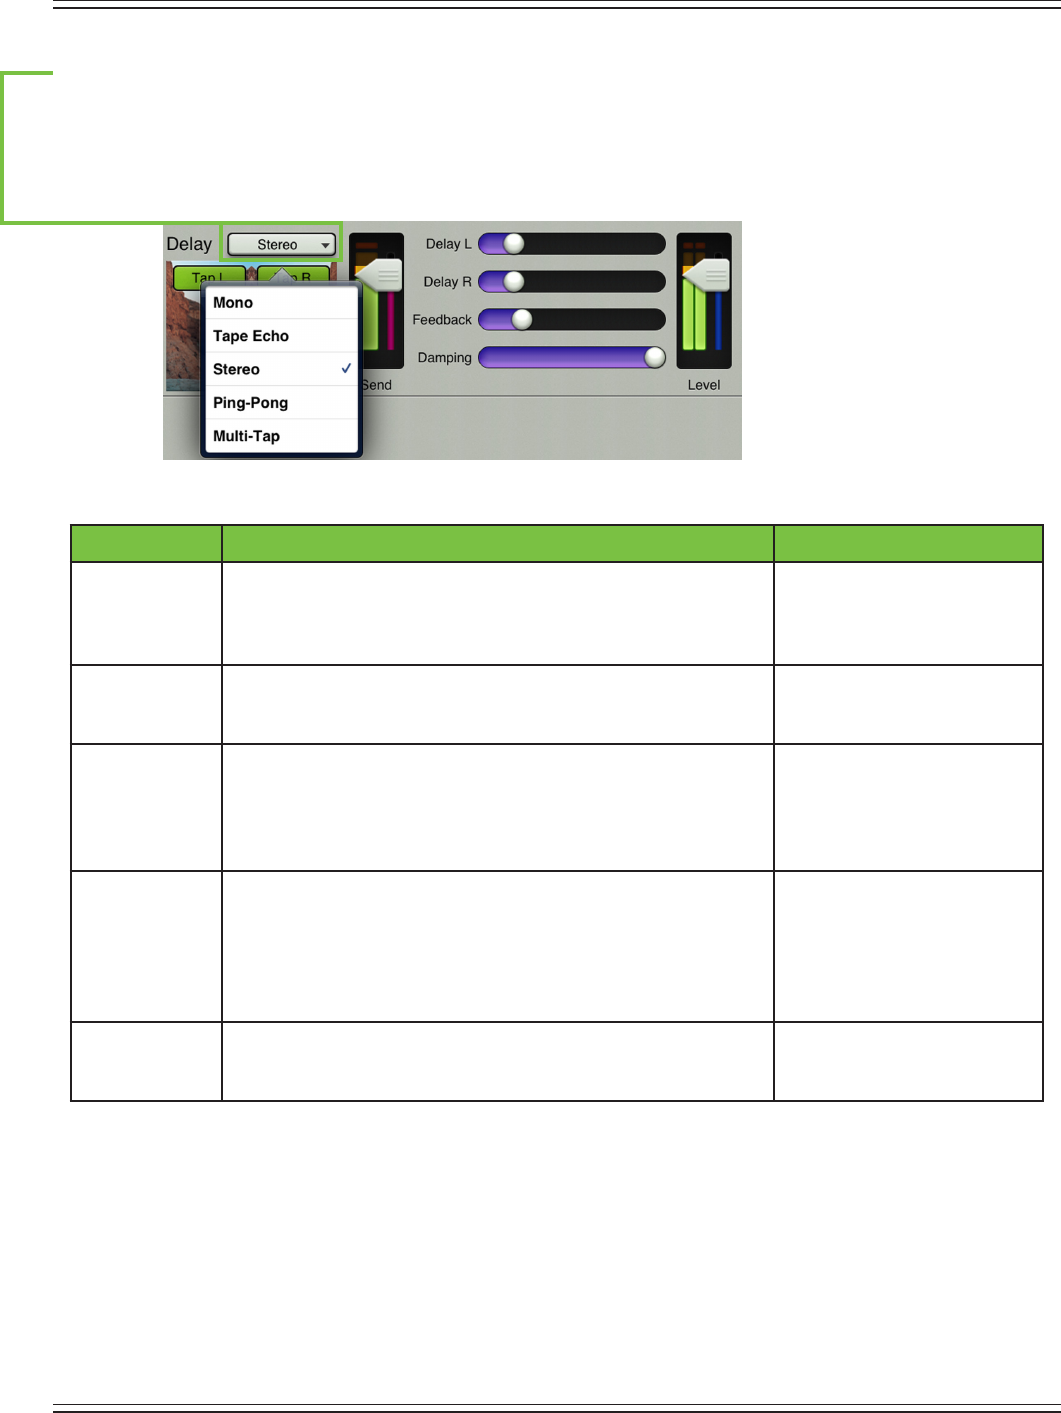
Mackie DL806 and DL1608 Reference Guide
80
Delay Type
Delay allows adjustment of the eect delay. The Master Fader app comes with ve delays to choose from:
mono,tapeecho,stereo,ping-pongandmulti-tap.Abuttondisplayingthecurrentdelaytypemaybe
tapped to reveal the other delay types. Tap the delay you would like for the selected channel. The image
will change to reect the delay type chosen.
Delay Type Description Examples
Mono The mono delay provides an echo eect with a mono delay line. Mono delay is great for added
depthandspace.PinkFloyd
guitarist David Gilmour is one
of the kings of delay.
Tape Echo Tape Echo provides a single, relatively rapid delay of the original
signal, with the added warmth that vintage tape-based echo
units provided.
Often used on vocals for a
1950’s-erafeel,oronguitars
for a surf-type tone.
Stereo The stereo delay is a stereo version of the mono delay, with a left
and right input and a left and right output. Each side (left and
right) has its own set of controls).
Aguitaristwithdualoutputs
(orA/Bswitcher)cancreate
interesting stereo delays,
settingeachamp’sdelaytimes
independent of the other one.
Ping-Pong The ping pong delay works the same as the stereo delay,
with the exception that the feedback is routed to the opposite
channel, producing a bouncing sound as the delayed signal
bounces from left to right.
Similar to the stereo delay
example, but instead of each
delay being set independently
of the other, this creates a
steady ping-pong delay with
varying speed.
Multi-Tap This allows you to create two delays with dierent lengths. With added feedback, you can
create very interesting eects
on a guitar solo.
Mackie DL806 and DL1608 Reference Guide
81
Delay Sliders
The following is a list of sliders available for each selected delay. Slide left to decrease the delay time and
sliderighttoincreasethedelaytime.Somedelayshavea‘tap’functioninwhichcaseyoutapthe‘tap’
button at the rate you would like the delay.
Delay (Mono, Tape Echo) — This slider sets the current delay time in milliseconds, from 10 ms to 1600 ms.
Atapbuttonresidesintheupper-leftcornerofthedelayimageifyouwouldrathertapthepreferred
delay tempo.
Delay L (Stereo, Ping-Pong) — This slider sets the left side current delay time in milliseconds, from
10msto1600ms.Ataplbuttonresidesintheupper-leftcornerofthedelayimageifyouwouldrather
tap the preferred delay tempo.
Delay R (Stereo, Ping-Pong) — This slider sets the right side current delay time in milliseconds, from
10msto1600ms.Ataprbuttonresidesintheupper-rightcornerofthedelayimageifyouwouldrather
tap the preferred delay tempo.
Delay 1 (Multi-Tap) — Thisslidersetsonedelaytimeinmilliseconds,from10msto1600ms.Atap1button
resides in the upper-left corner of the delay image if you would rather tap the preferred delay tempo.
Delay 2 (Multi-Tap) — This slider sets a second delay time in milliseconds, from 10 ms to 1600 ms.
Atap2buttonresidesintheupper-rightcornerofthedelayimageifyouwouldrathertapthepreferred
delay tempo.
Feedback (All) — This controls how much of the delayed signal is routed back to the input of the delay
section, to create multiple echoes. The feedback gain is less than one, so each time the signal is fed back,
thedelayedsignalbecomesquieter(sotheechowon’tgoonforever).Itrangesfrom0%to100%.
Damping (All) — This applies a low-pass lter to the delayed signal and rolls o the higher frequencies.
It ranges from 500 Hz to 20 kHz.
Parameter Low Value High Value Default
Delay 10 ms 1.6 s 250 ms
Delay L 10 ms 1.6 s 250 ms
Delay R 10 ms 1.6 s 250 ms
Delay 1 10 ms 1.6 s 250 ms
Delay 2 10 ms 1.6 s 250 ms
Feedback 0% 100% 20%
Damping 500 Hz 20 kHz 20 kHz
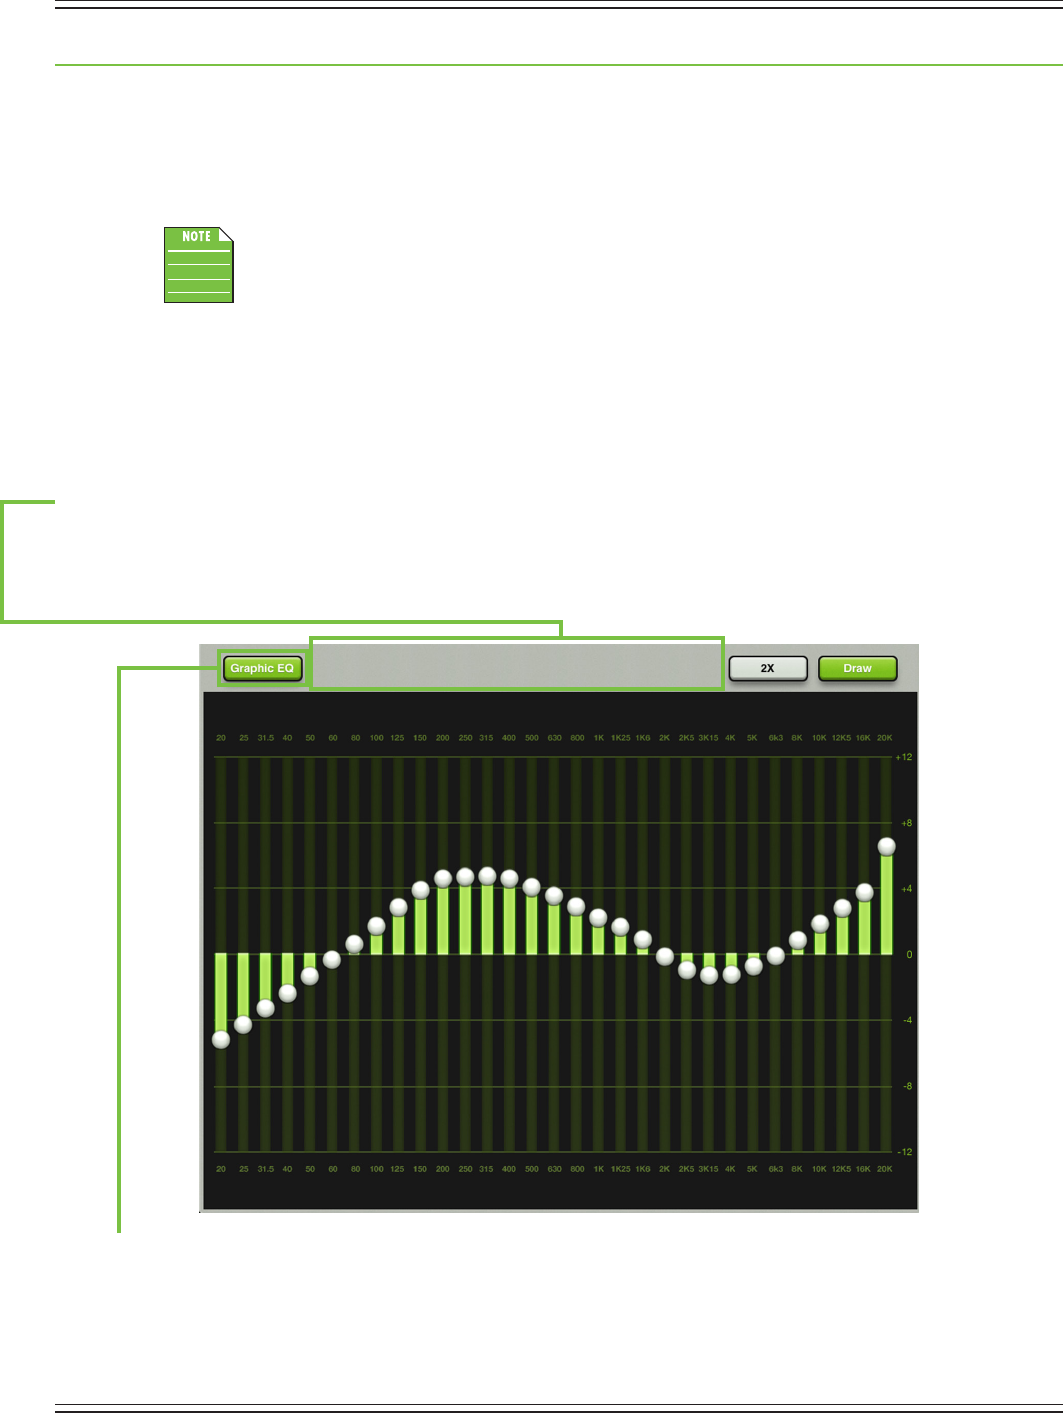
Mackie DL806 and DL1608 Reference Guide
82
Chapter 12: Channel View : Output Graphic EQ
Introduction
GraphicEQisagreattoolforreallydialinginthesoundyou’relookingforortosquelchfeedbackfrom
monitors.Arrivaliseasy.Simplytapthegraphic/parametricEQcurveatthetopofthemasterfaderchannel
from the mixer view or from any input channel view.
ThedefaultoutputEQviewmaybechangedinTools>Settings>DefaultOutputEQView
forevenfasteraccess.[Seepage113formoreinformation].
What’smore,youdon’thavetodecidebetweenutilizingGEQorPEQ...useoneortheotherorboth
simultaneously!ThisextraexibilityallowsyoutotakeadvantageofeachoutputEQ’sstrengths
by choosing the right tool for the job. For example, if you prefer to ght feedback with the graphic EQ,
you may continue to do so while also utilizing the parametric EQ for general tone shaping. Or perhaps
youwouldratherusetheparametricEQtoghtfeedbackandusethegraphicEQtotunetheroom?
The graphic EQ looks and works similarly to that of a typical 31-band graphic EQ.
The Swipe Zone
Here in the graphic EQ view, swipe anywhere in the gray area outlined below. Swiping up displays
the output compressor / limiter view. Swiping down displays the parametric EQ. Swiping left and
right does nothing.
Graphic EQ On / O
The graphic EQ button is located near the upper-left corner of the screen. This allows for true bypass of the
graphic EQ circuitry to ensure that there is no coloration of the signal if the graphic EQ is not needed. When
thisbuttonisdisengaged,thegraphicEQcontrolshavenoeectonthesignal.Youmayusethisbuttonto
makeanA/BcomparisonbetweentheEQ’dsignalandthesignalwithoutgraphicEQ.PressthegraphicEQ
button to turn graphic EQ on or o. It will illuminate green when engaged and is gray when disengaged.
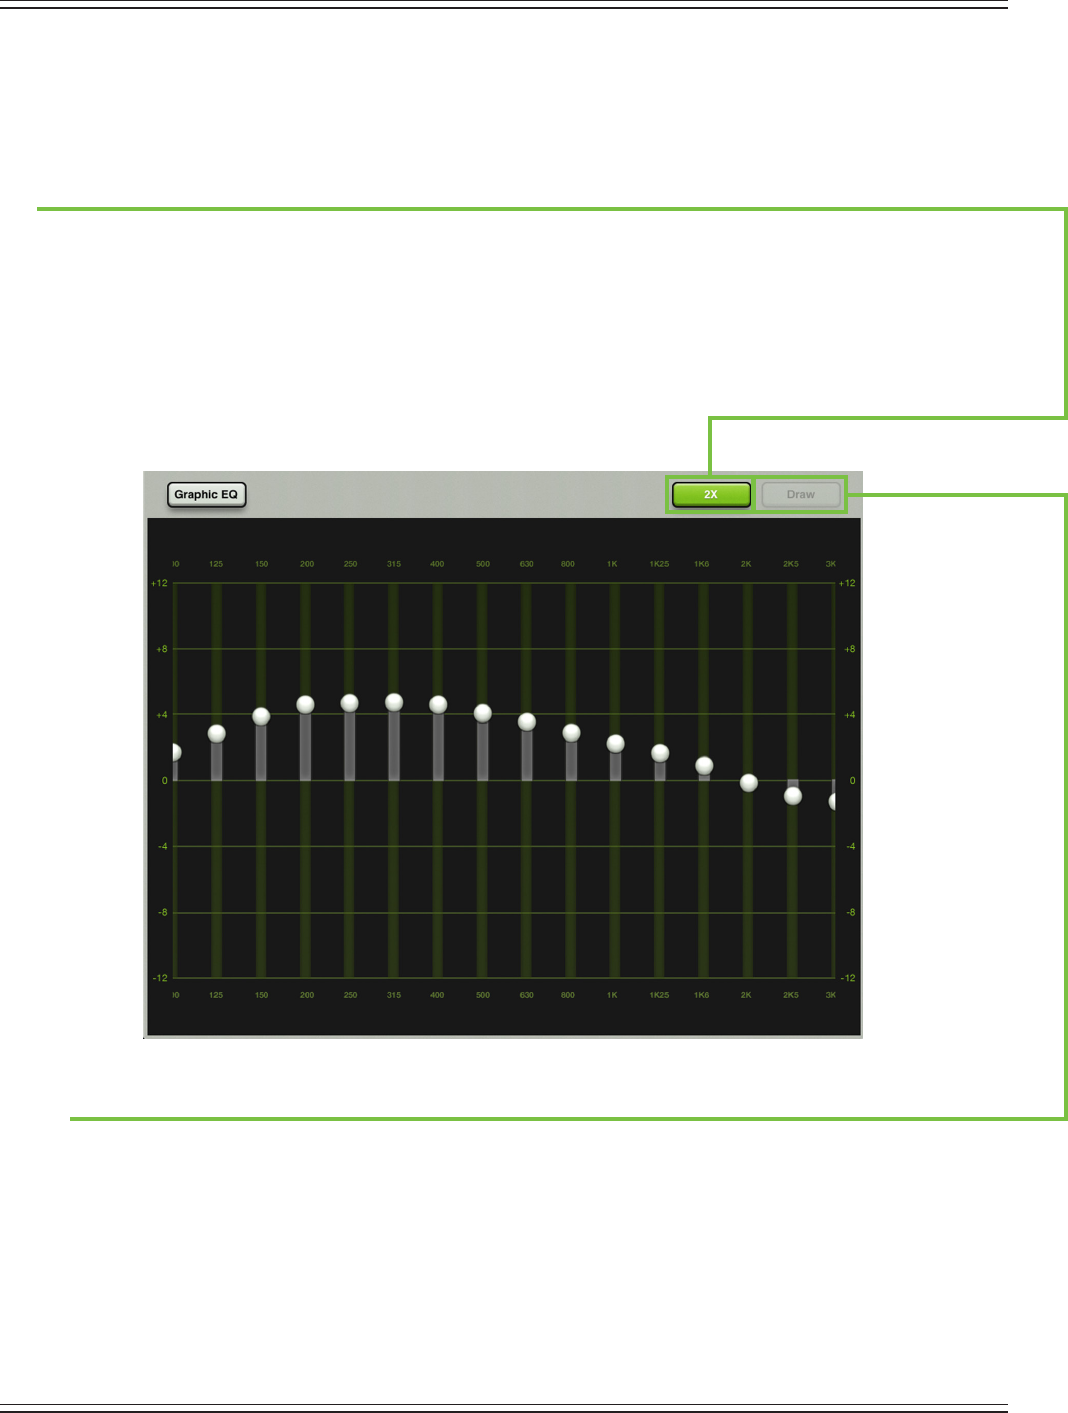
Mackie DL806 and DL1608 Reference Guide
83
31-Band EQ
There are 31 graphic EQ balls ranging from 20 Hz to 20 kHz. Moving a ball vertically changes that
frequency’sgainbyupto±12dB.Dragtheseslidersupordownuntilthedesiredsoundhasbeen
achieved.Tappingaband’sgraphicEQballtwicewillzeroit.
2X
The 2X button is located near the upper-right corner of the screen, just left of the draw button.
This allows you to zoom in on the graphic EQ, perfect for our friends with sausage ngers and/or
mixingwiththeiPadmini.Swipeleftandrighttoviewandadjusttheremainingbands.
Pressthe2Xbuttontoturnthe2Xzoomfunctiononoro.Itwillilluminategreenwhenengaged
(asseenbelow)andisgraywhendisengaged(asseenonthepreviouspage).Notethatdraw
(detailed below) is unavailable when in 2X mode (as seen below).
Draw
The draw button is located near the upper-right corner of the screen. This allows you to draw an
EQ curve over the display (regardless of where the slider balls currently reside) and the sliders will
snap to the corresponding position.
Engage draw to quickly create a basic GEQ outline, then disengage draw to ne-tune any of the
31 bands one-by-one, as needed.
Pressthedrawbuttontoturnthedrawfunctiononoro.Itwillilluminategreenwhenengaged
(asseenonthepreviouspage)andisgraywhendisengaged.Notethatdrawisunavailablewhen
in 2X mode (as seen above).
Mackie DL806 and DL1608 Reference Guide
84
Zeroing the GEQ
Imagine how long it might take to reset each of the 31 bands on the graphic EQ to ±0 dB. The factory
default preset for graphic EQ will do that for you in a few easy steps. First, you should already be on the
graphicsEQview;ifyou’rereadingthischapter,Igatherthatyou’realreadythere!Now(1)tapthepresets
buttonintheupper-rightcorneroftheiPad,(2)oncethere,makesurethe“GEQ”button(notthe“Output”
button) is green, then (3) tap the factory default button, (4) tap recall, and (5) tap the yes button. Done!
Alotmoreinformationaboutpresetsstartsonpage125.
Graphic EQ at a Glance
Parameter Low Value High Value Default
GEQENABLE OFF ON OFF
20 Hz Gain –12 dB 12 dB 0 dB
25 Hz Gain –12 dB 12 dB 0 dB
31.5 Hz Gain –12 dB 12 dB 0 dB
40 Hz Gain –12 dB 12 dB 0 dB
50 Hz Gain –12 dB 12 dB 0 dB
63 Hz Gain –12 dB 12 dB 0 dB
80 Hz Gain –12 dB 12 dB 0 dB
100 Hz Gain –12 dB 12 dB 0 dB
125 Hz Gain –12 dB 12 dB 0 dB
160 Hz Gain –12 dB 12 dB 0 dB
200 Hz Gain –12 dB 12 dB 0 dB
250 Hz Gain –12 dB 12 dB 0 dB
315 Hz Gain –12 dB 12 dB 0 dB
400 Hz Gain –12 dB 12 dB 0 dB
500 Hz Gain –12 dB 12 dB 0 dB
630 Hz Gain –12 dB 12 dB 0 dB
800 Hz Gain –12 dB 12 dB 0 dB
1 kHz Gain –12 dB 12 dB 0 dB
1.25 kHz Gain –12 dB 12 dB 0 dB
1.6 kHz Gain –12 dB 12 dB 0 dB
2 kHz Gain –12 dB 12 dB 0 dB
2.5 kHz Gain –12 dB 12 dB 0 dB
3.15 kHz Gain –12 dB 12 dB 0 dB
4 kHz Gain –12 dB 12 dB 0 dB
5 kHz Gain –12 dB 12 dB 0 dB
6.3 kHz Gain –12 dB 12 dB 0 dB
8 kHz Gain –12 dB 12 dB 0 dB
10 kHz Gain –12 dB 12 dB 0 dB
12.5 kHz Gain –12 dB 12 dB 0 dB
16 kHz Gain –12 dB 12 dB 0 dB
20 kHz Gain –12 dB 12 dB 0 dB
Master –12 dB 12 dB 0 dB
Mackie DL806 and DL1608 Reference Guide
85
Chapter 13: Channel View : Output Parametric EQ
Introduction
Theparametricequalizerisagreattoolfordialinginthesoundyou’relookingforortosquelchfeedback
frommonitors.Alloutputchannels(LR,auxs1-4/6)haveupto4-bandEQwithhighshelving,high-mid
peaking,low-midpeakingandlowshelvingandahigh-passlter(HPF)andlow-passlter(LPF),bothwith
selectable slopes.
YoucanreallyupsetthingswithtoomuchEQ.EachEQbandhasalotofboostandcut
because that is needed on occasion. But if the EQ is maxed on every channel, the mix turns
to mush. Equalize subtly, using cut, as well as boost. If you nd yourself repeatedly using
a lot of boost or cut, consider altering the sound source, such as placing a mic dierently,
trying a dierent kind of mic, a dierent vocalist, changing the strings, gargling, or all of the above.
There are actually two dierent types of parametric EQ to choose from on each output: clean, surgical
modernPEQandclassicsoundingvintagePEQ.That’sright,youcanmixandmatchtoheart’scontent!
WewilldissectboththemodernandvintagePEQsseparately,butlet’sbeginbytakingapeekatwhat
featuresapplytoboth.ModernPEQisdiscussedfurtheronpages87-93,whilemoreinformationabout
thevintagePEQmaybefoundonpages94-95.
Arrivaliseasy.Simplytapthegraphic/parametricEQcurveatthetopofthemasterfaderchannel
from the mixer view or from any input channel view.
ThedefaultoutputEQviewmaybechangedinTools>Settings>DefaultOutputEQView
forevenfasteraccess.[Seepage113formoreinformation].
What’smore,youdon’thavetodecidebetweenutilizingPEQorGEQ...useoneortheotherorboth
simultaneously!ThisextraexibilityallowsyoutotakeadvantageofeachoutputEQ’sstrengthsbychoosing
the right tool for the job. For example, if you prefer to ght feedback with the graphic EQ, you may continue
to do so while also utilizing the parametric EQ for general tone shaping. Or perhaps you would rather
usetheparametricEQtoghtfeedbackandusethegraphicEQtotunetheroom?Theparametric
EQ looks and works similarly to that of the channel input EQ with just a couple of minor dierences.
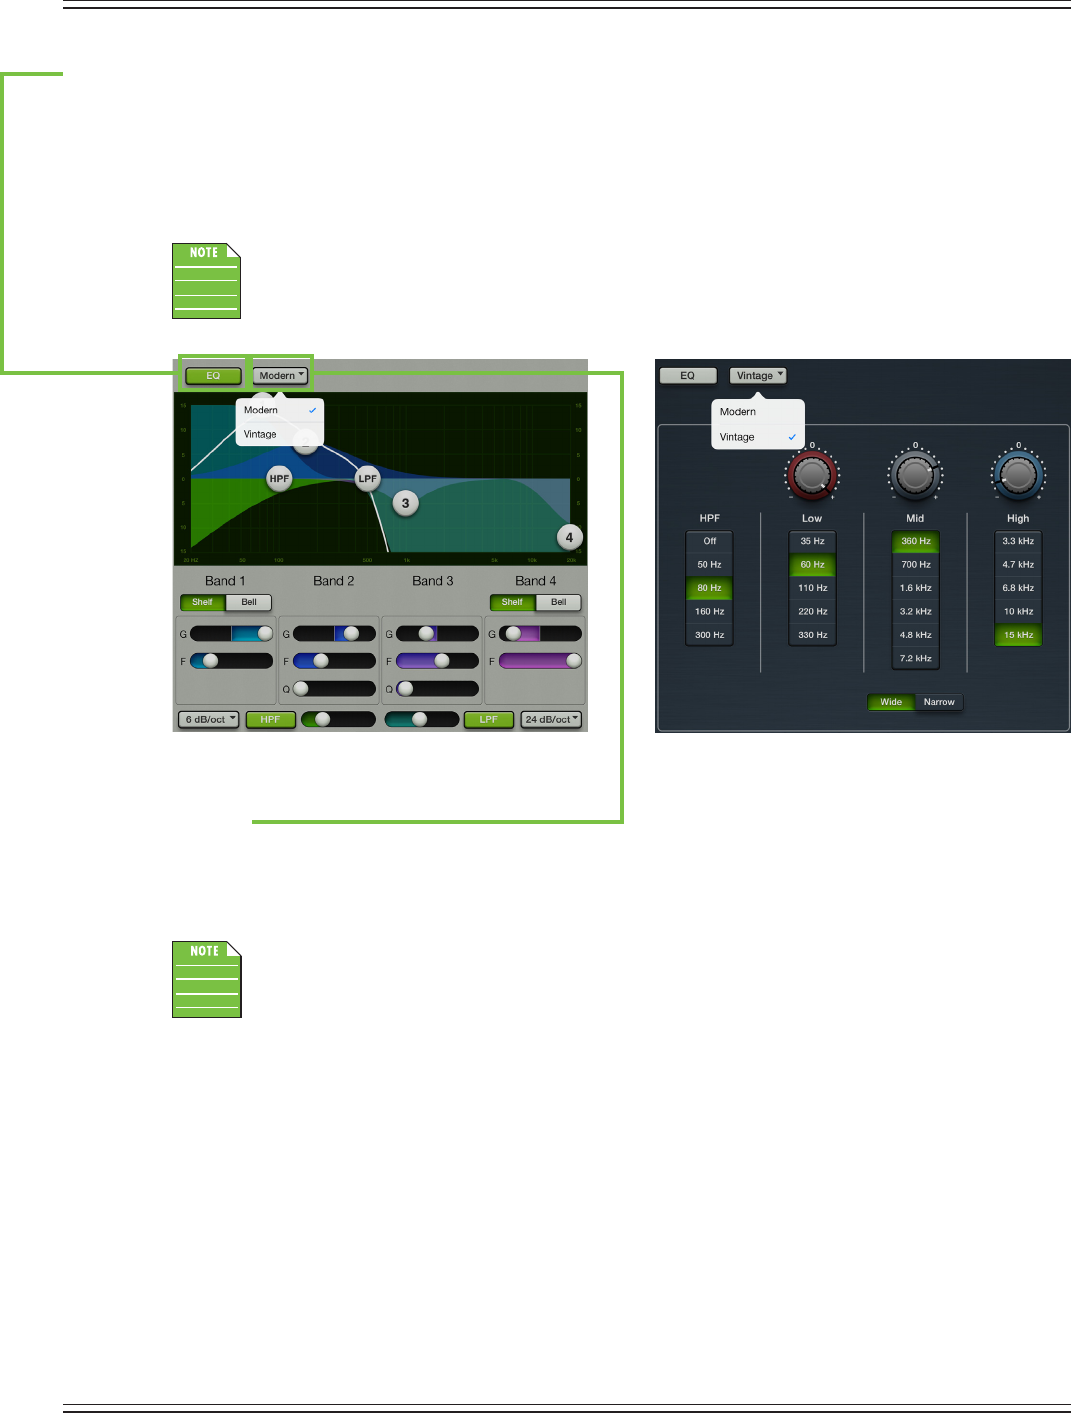
Mackie DL806 and DL1608 Reference Guide
86
EQ On / O
The EQ on/o button – near the upper-left corner of the screen – allows for true bypass of the parametric
EQ circuitry to ensure that there is no coloration of the signal if the parametric EQ is not needed. When
thisbuttonisdisengaged,theparametricEQcontrolshavenoeectonthesignal.Youmayusethisbutton
tomakeanA/BcomparisonbetweentheEQ’dsignalandthesignalwithoutparametricEQ.PresstheEQ
button to turn parametric EQ on or o. It will illuminate green when engaged and is gray when disengaged.
TheHPFandLPFoperateindependentlyofthe4-bandEQ.Inotherwords,theEQon/obutton
onlyaectsthe4-bandEQ.ItwillnotturntheHPForLPFonando.Thisgivesyoumoreoptions
and exibility with the output parametric EQ.
Modern / Vintage
The modern/vintage button is located directly to the right of the EQ on/o button. It displays the parametric
EQtypecurrentlyinuse,with“Modern”asthedefaultEQ.TapthisbuttontorevealthetwoPEQtypes,then
tapthePEQyouwouldlikefortheselectedchannel.TheimagewillchangetoreectthePEQtypechosen.
YoucanswitchbetweenparametricEQtypeswhileaudiopassesandthesettingswillmatchas
closely as possible, but the sound will change.
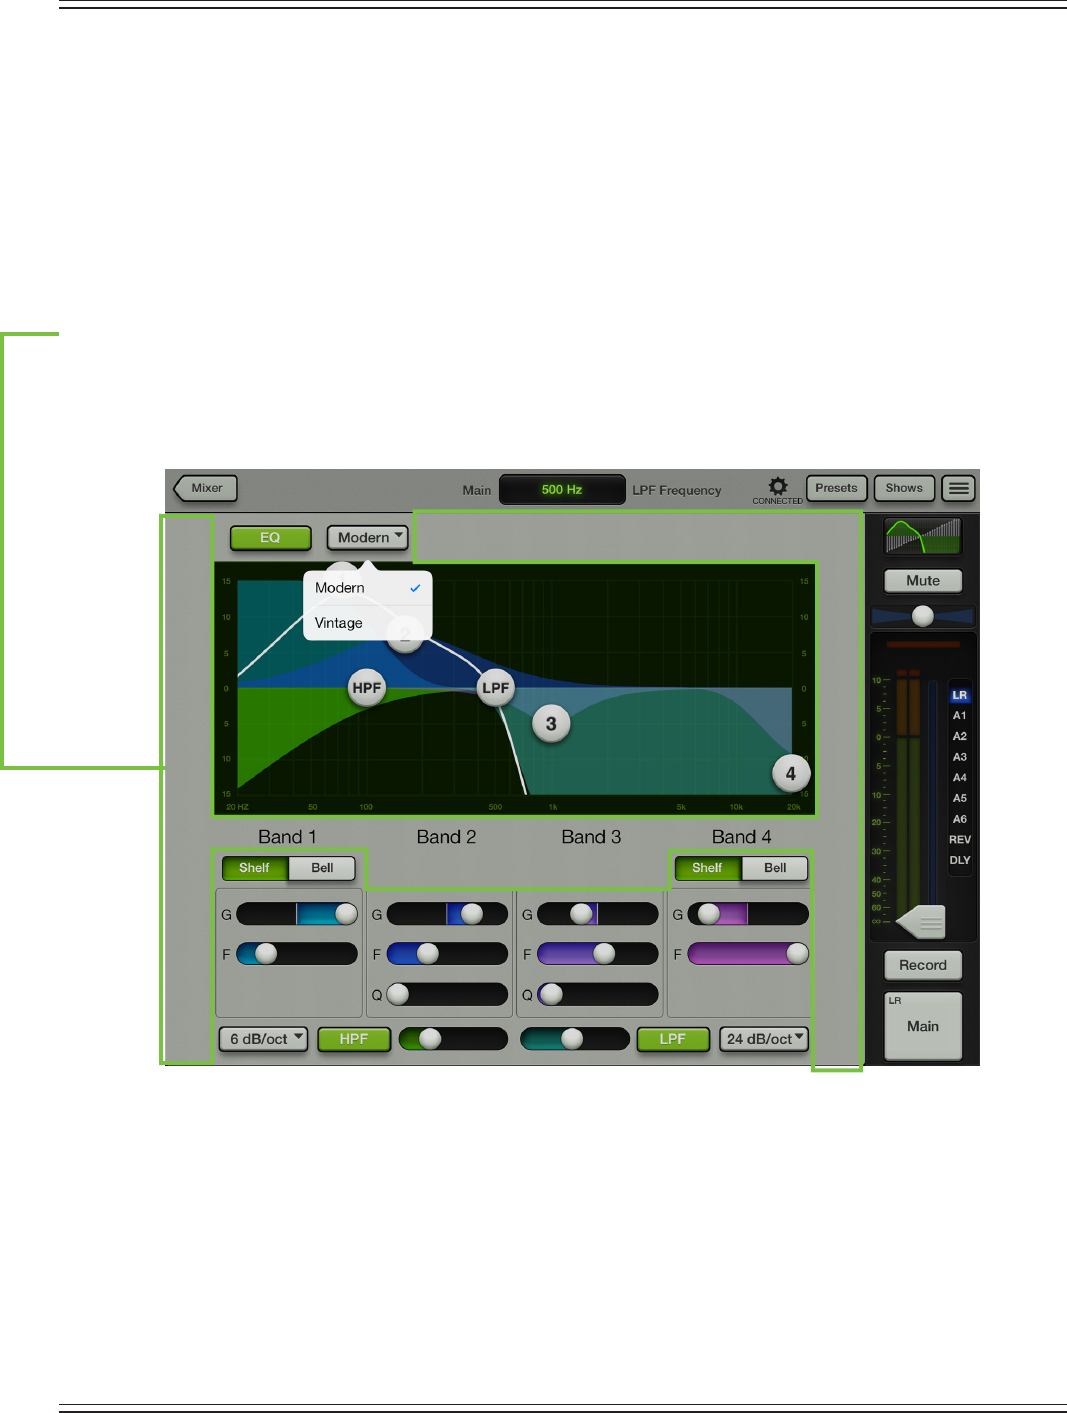
Mackie DL806 and DL1608 Reference Guide
87
Modern PEQ Introduction
Asmentionedpreviously,themodernEQisdesignedforclean,surgicalprocessing;it’sgreatfordialingin
anice,tightsound.Assuch,eachofthefourbandshasadjustablegainandfrequency,whilebands2and3
alsohaveadjustableQ(bandwidth).[Bands1and4alsohaveadjustableQ(bandwidth)whenin‘Bell’mode].
Bands 1 and 4 may be independently switched to shelving bands using the switches located between the
EQ graph and band sliders. The shelves have adjustable gain and frequency, which is the –3 dB point from
theshelf.Nowforadetailed(let’ssay“surgical”)lookatthemodernEQ.
Modern PEQ Swipe Zone
Here in the parametric EQ view, swipe anywhere in the gray area outlined below. Swiping up displays
the graphic EQ. Swiping down displays the output compressor / limiter view. Swiping left and right
does nothing.
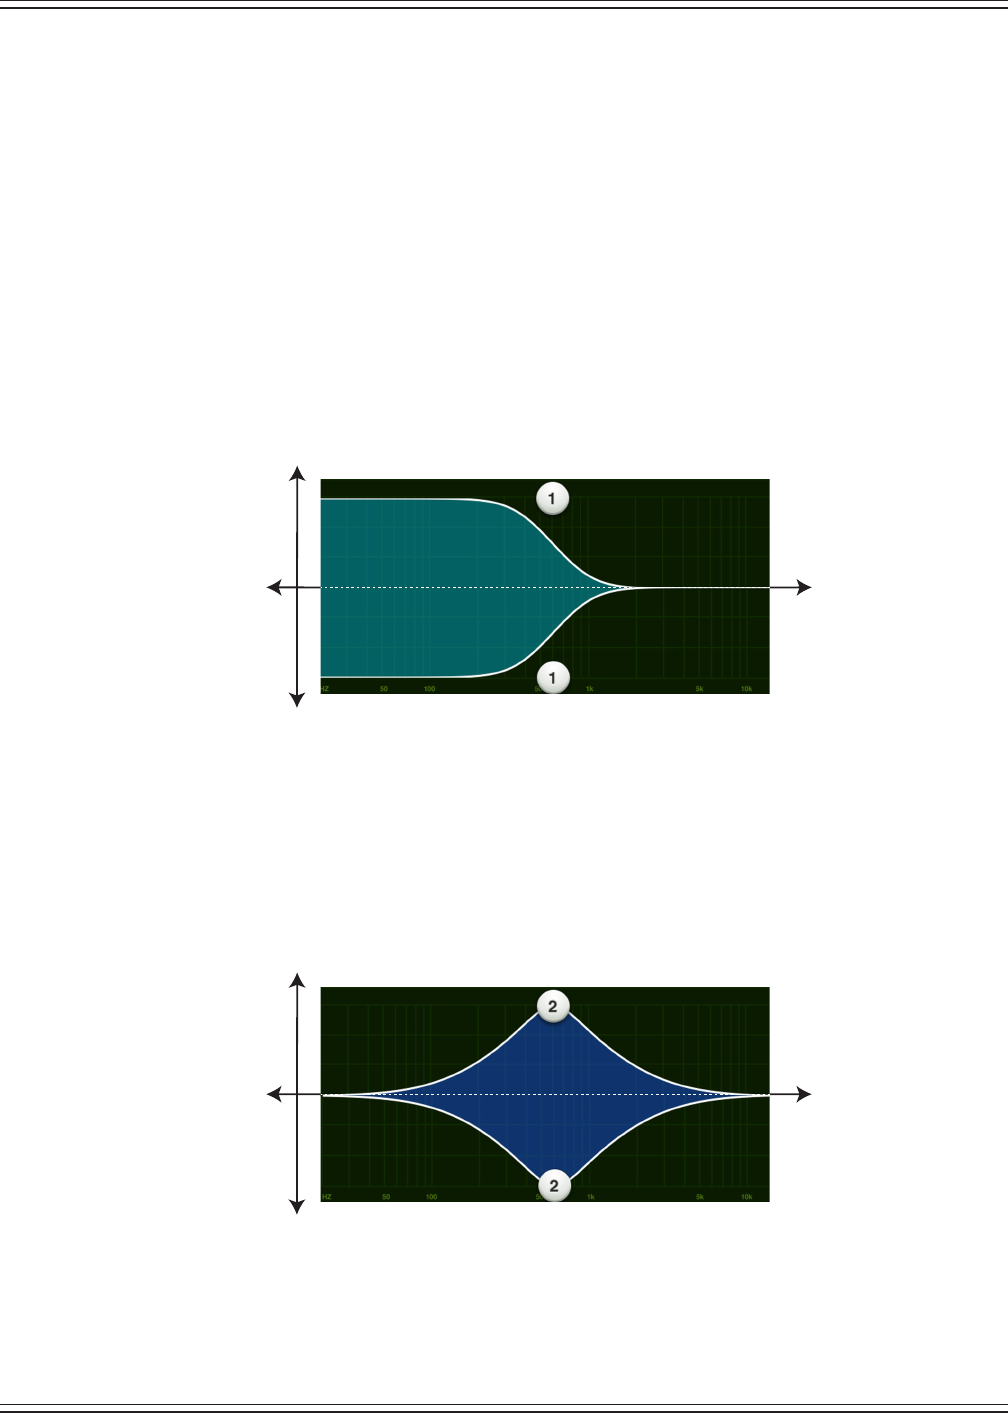
Mackie DL806 and DL1608 Reference Guide
88
Modern PEQ Gain, Frequency and Q [Bandwidth]
The gain and frequency may be changed by moving any of the four numbered balls (representing
each band) until the desired sound has been achieved. Moving a ball vertically changes the gain
by up to ±15 dB. Moving a ball horizontally changes the frequency, ranging from 20 Hz to 20 kHz.
ThereisaShelf/Belloptionforbands1and4anditisdescribedindetailonpage90.Q[bandwidth]
ischangedbypinchingtheball.NarrowQisgreatforghtingfeedback.Double-tapanEQballtoreset
its gain to zero.
Low Shelving – Band 1
The low EQ provides up to 15 dB of boost or cut from 20 Hz to 20 kHz. This frequency represents
the punch in bass drums, bass guitar, fat synth patches, and some really serious male singers who
eat raw beef for breakfast.
Low-Mid Peaking – Band 2
The low-mid EQ provides up to 15 dB of boost or cut from 20 Hz to 20 kHz. Frequencies aected
typically include the male vocal range as well as the fundamentals and harmonics of many
lower-timbred instruments.
Gain (+)
Gain (–)
Frequency (+)Frequency (–)
Gain (+)
Gain (–)
Frequency (+)Frequency (–)
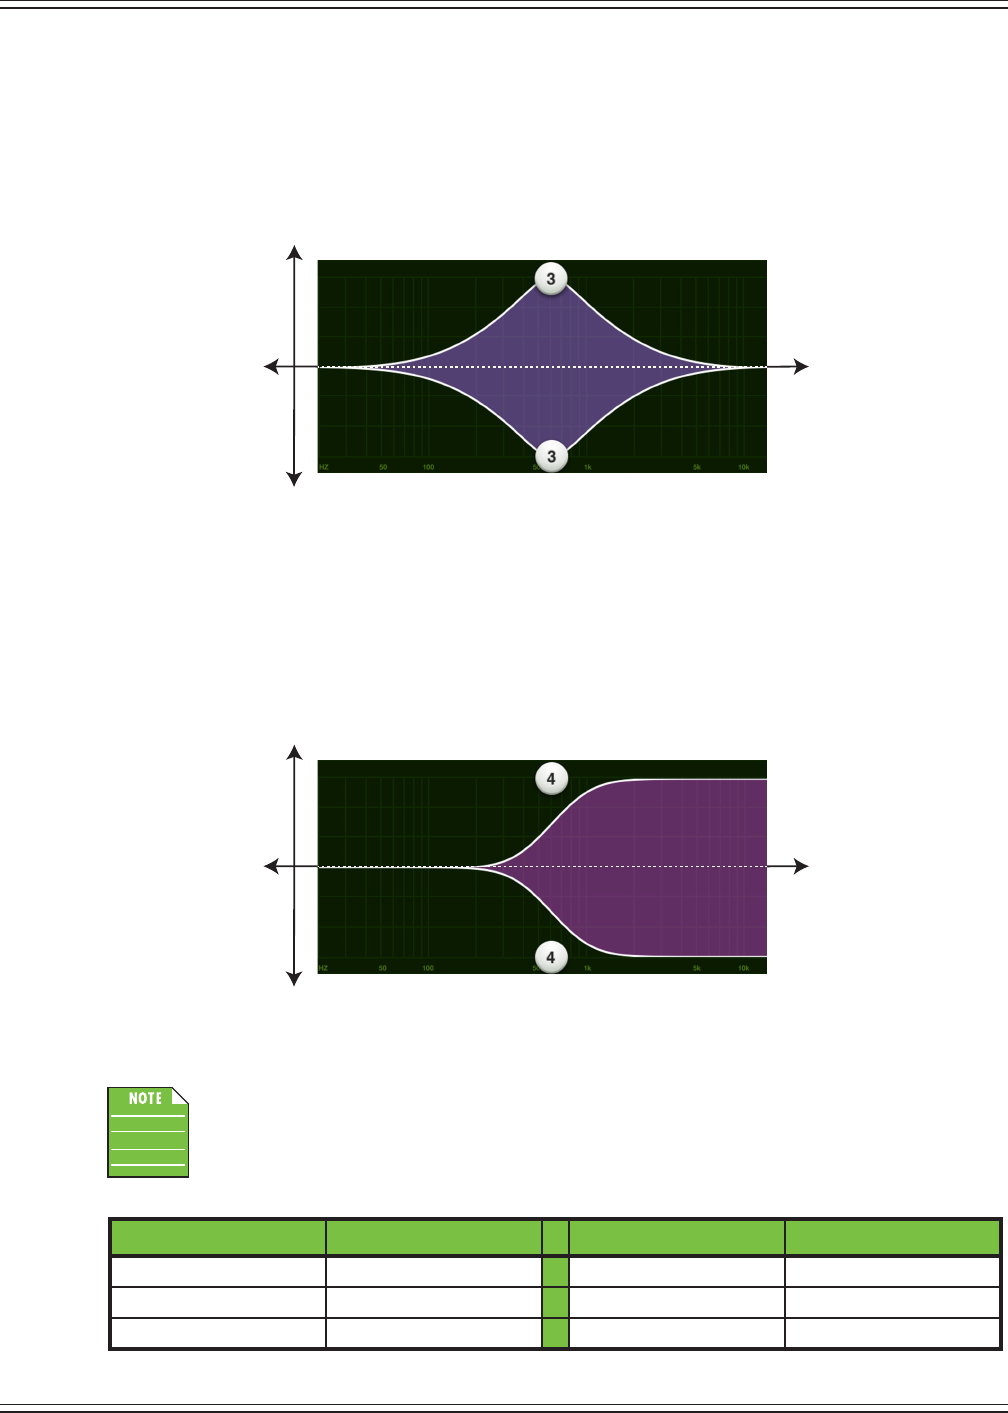
Mackie DL806 and DL1608 Reference Guide
89
High-Mid Peaking – Band 3
The high-mid EQ provides up to 15 dB of boost or cut from 20 Hz to 20 kHz. Midrange EQ is often
thought of as the most dynamic because the frequencies that dene any particular sound are
almost always found within this range. For example, the female vocal range as well as the
fundamentals and harmonics of many higher-timbred instruments.
High Shelving – Band 4
ThehighEQprovidesupto15dBofboostorcutfrom20Hzto20kHz.Useittoaddsizzletocymbals,
an overall sense of transparency, or an edge to keyboards, vocals, guitar and bacon frying. Turn it
down a little to reduce sibilance or harsh treble.
AlthoughtheQcontroldoesadjustthebandwidthofalter,theQvalueitselfisdimensionless;
it has no unit of measurement. Some equalizers use the fractional bandwidth of the lter,
measuredinoctaves,toexpressthisparameter.Thetwoparametersareinverselyrelated;
a high Q value corresponds to a small fractional bandwidth. The following table lists some
equivalent Q and fractional bandwidth values.
Q BW (oct) Q BW (oct)
0.7 2 2.871 1/2
1.414 1 4.318 1/3
2.145 2/3 15 1/10
Gain (+)
Gain (–)
Frequency (+)Frequency (–)
Gain (+)
Gain (–)
Frequency (+)Frequency (–)
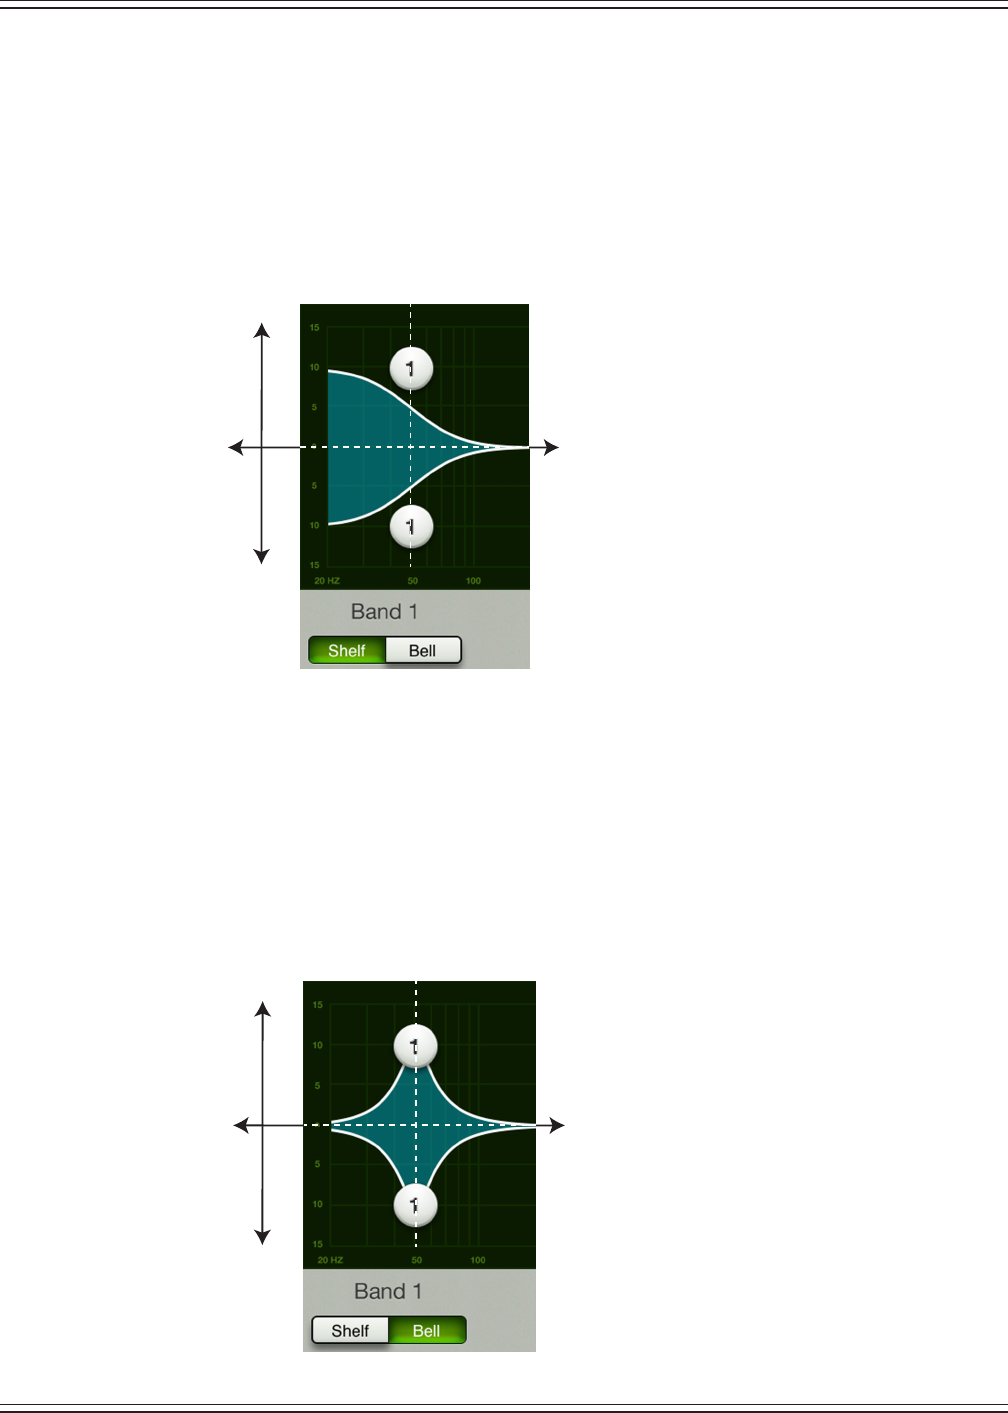
Mackie DL806 and DL1608 Reference Guide
90
Modern PEQ Shelf / Bell
AShelf/Belloptionisavailableonbands1and4.Simplytapwhichsettingyouprefer.
The chosen setting will illuminate green when engaged, while the other option will be grayed out.
When engaged, the EQ becomes a shelving lter rather than a parametric lter. Shelf boosts
frequenciesfromthecut-opointupwards.Agentleroll-omaybeassumedwithshelf.
The Q control becomes inactive when shelf is engaged.
Bell boosts frequencies near the cut-o point then slowly decreases until it reaches a gain of zero.
When engaged, the EQ becomes a parametric lter rather than a shelving lter. The Q control
becomes active when bell is engaged. In fact, a smaller Q value results in a wider curve, while a
larger Q value results in a narrower curve where frequencies may be zoomed in on more precisely.
AsmallerQisgenerallyintendedformoremusicalpurposes,whilealargerQisgenerallyusedwhen
decreasing problem frequencies.
Gain (+)
Gain (–)
Frequency (+)
Cut-Off
Point
Frequency (–)
Shelf EQ
Gain (+)
Gain (–)
Frequency (+)
Cut-Off
Point
Frequency (–)
Bell EQ
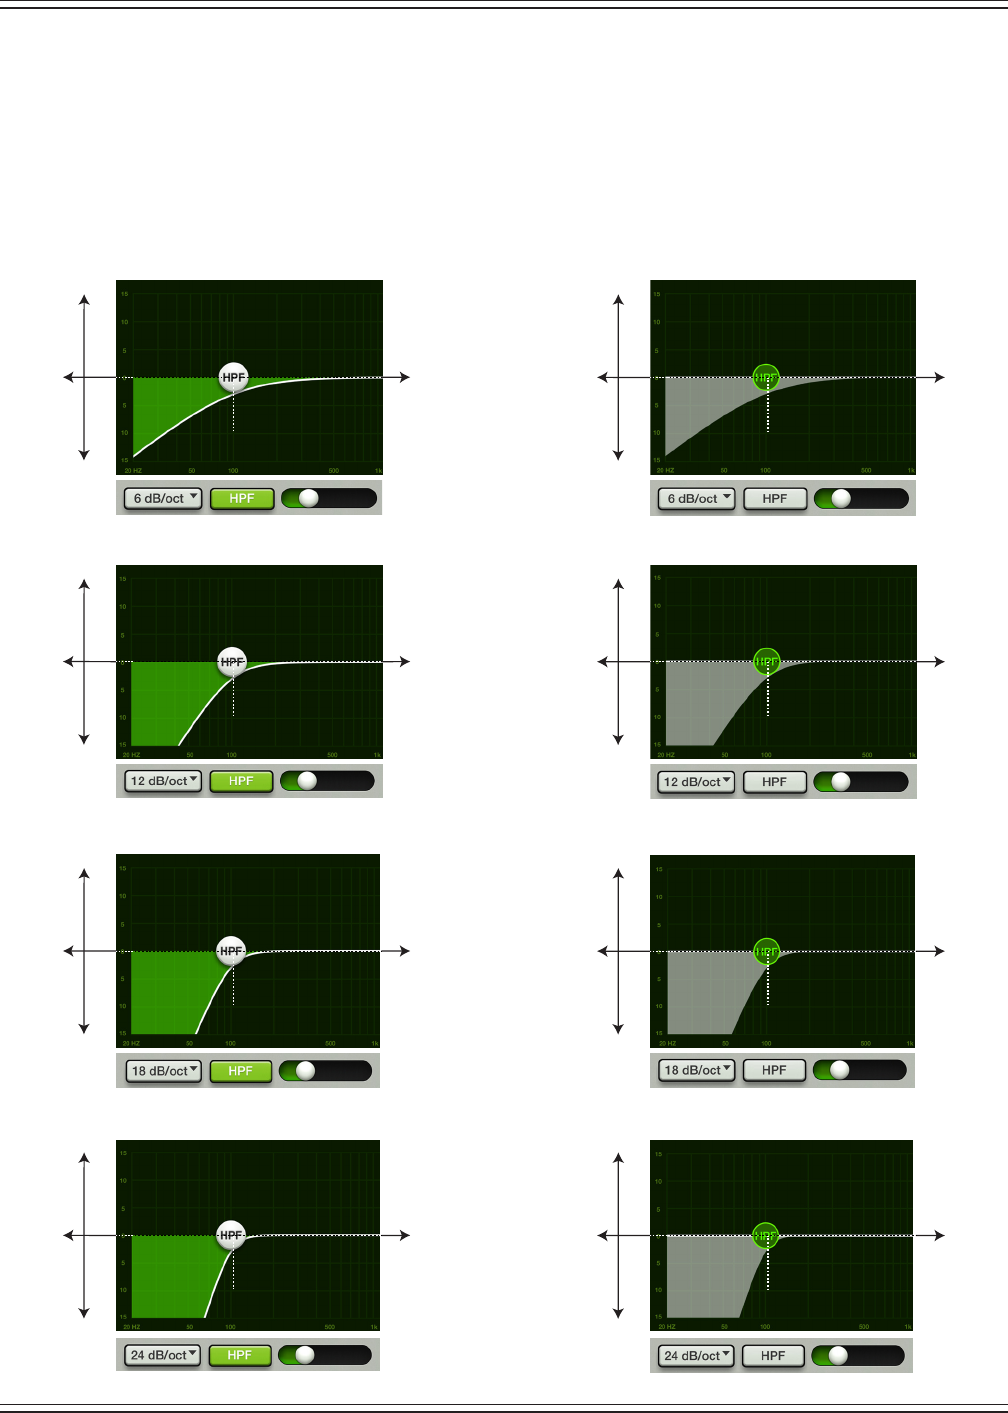
Mackie DL806 and DL1608 Reference Guide
91
Modern PEQ HPF On / O, Frequency and Selectable Slope
High-pass lters are utilized to cut out low frequencies. For example, remove the low-frequency content
fromstagemonitors.Thishelpsthemonitorscutthroughbetterforaclearer,crispersound.Additionally,
they are louder since fewer lows are being pushed through. The high-pass lter control adjusts the cut-o
frequency for the lter. Frequencies below the cut-o frequency are attenuated at a rate of 12 dB/octave
(default).
TheslopefortheHPFisadjustablebyslidingtheHPFballorHPFsliderleftandright
. Simply tap
theHPFbutton–nearthelower-leftcornerofthescreen–toengagethehigh-passlter.Itwillilluminate
greenwhenengagedandisgraywhendisengaged.TheslopefortheHPFisadjustablebytappingtheslope
buttonandselectingtheslopedesiredfromthemenu[6,12,18and24dB/octave],allowingyoutochoose
between a gentle slope or a steep one.
HPF ON at a 6 dB/oct slope
HPF ON at a 18 dB/oct slope
HPF ON at a 12 dB/oct slope
HPF ON at a 24 dB/oct slope
HPF OFF at a 6 dB/oct slope
HPF OFF at a 18 dB/oct slope
HPF OFF at a 12 dB/oct slope
HPF OFF at a 24 dB/oct slope
Gain (+)
High-Pass
Filter
Gain (–)
Frequency (+)
Cut-Off
Point
Frequency (–)
Gain (+)
High-Pass
Filter
Gain (–)
Frequency (+)
Cut-Off
Point
Frequency (–)
Gain (+)
High-Pass
Filter
Gain (–)
Frequency (+)
Cut-Off
Point
Frequency (–)
Gain (+)
High-Pass
Filter
Gain (–)
Frequency (+)
Cut-Off
Point
Frequency (–)
Gain (+)
High-Pass
Filter
Gain (–)
Frequency (+)
Cut-Off
Point
Frequency (–)
Gain (+)
High-Pass
Filter
Gain (–)
Frequency (+)
Cut-Off
Point
Frequency (–)
Gain (+)
High-Pass
Filter
Gain (–)
Frequency (+)
Cut-Off
Point
Frequency (–)
Gain (+)
High-Pass
Filter
Gain (–)
Frequency (+)
Cut-Off
Point
Frequency (–)
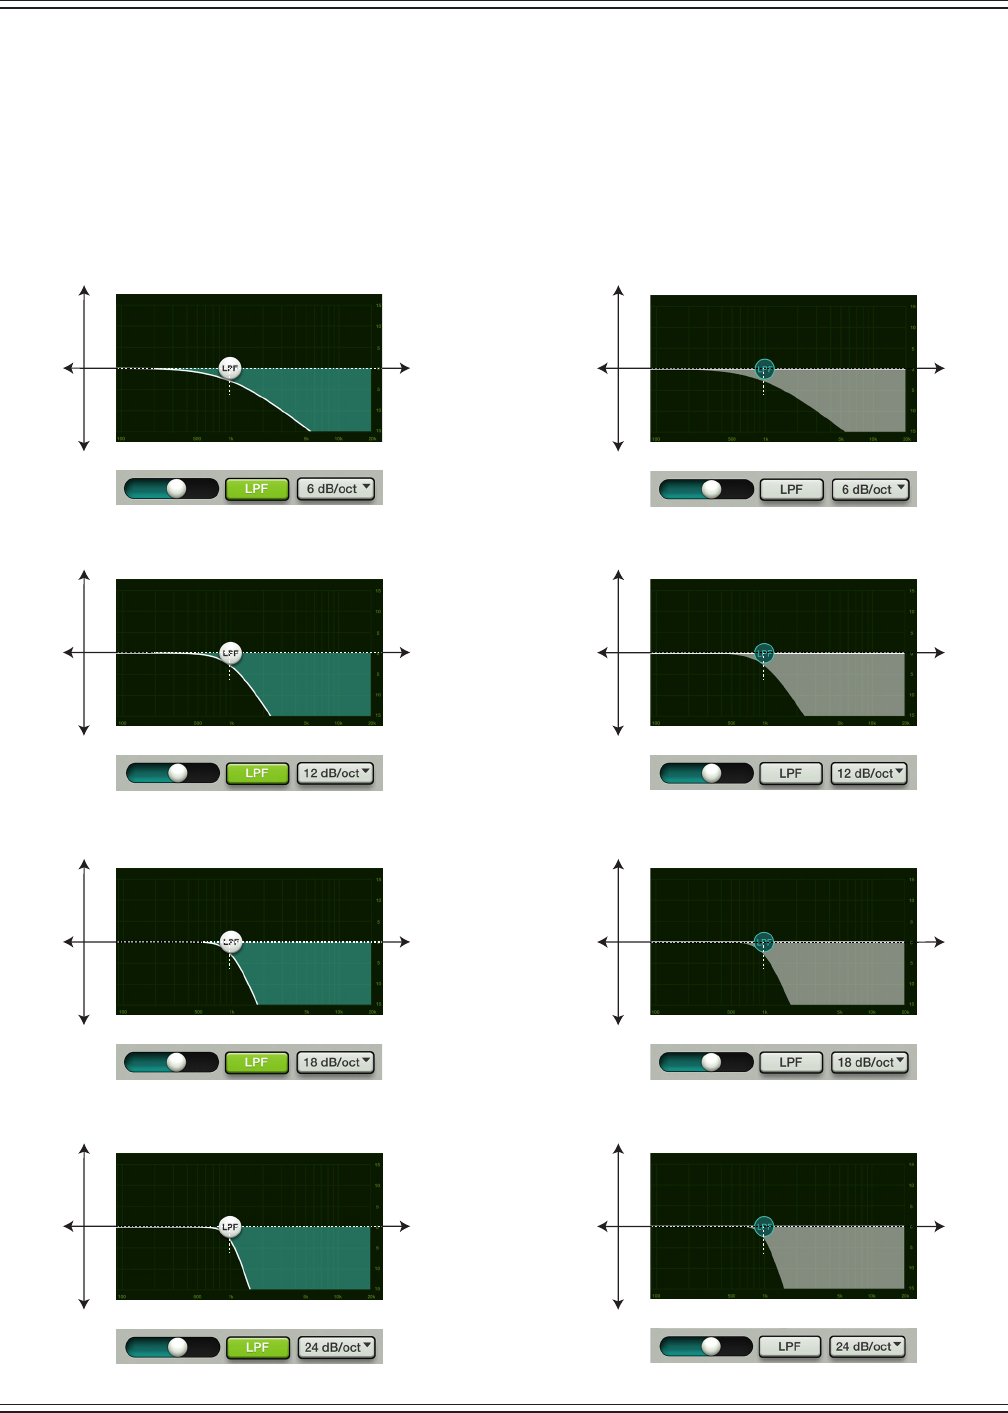
Mackie DL806 and DL1608 Reference Guide
92
Modern PEQ LPF On / O, Frequency and Selectable Slope
Low-pass lters are utilized to cut out high frequencies. For example, remove the high-frequency
contentfromsubwooferfeeds.Whysendsubwoofersmaterialtheyarenotdesignedtoreproduce?
The low-pass lter control adjusts the cut-o frequency for the lter. Frequencies above the cut-o
frequency are attenuated at a rate of 12 dB/octave (default).
TheslopefortheLPFisadjustablebysliding
theLPFballorLPFsliderleftandright
.SimplytaptheLPFbutton–nearthelower-rightcornerofthe
screen – to engage the low-pass lter. It will illuminate green when engaged and is gray when disengaged.
TheslopefortheLPFisadjustablebytappingtheslopebuttonandselectingtheslopedesiredfromthe
menu[6,12,18and24dB/octave],allowingyoutochoosebetweenagentleslopeorasteepone.
LPF ON at a 6 dB/oct slope
LPF ON at a 18 dB/oct slope
LPF ON at a 12 dB/oct slope
LPF ON at a 24 dB/oct slope
LPF OFF at a 6 dB/oct slope
LPF OFF at a 18 dB/oct slope
LPF OFF at a 12 dB/oct slope
LPF OFF at a 24 dB/oct slope
Gain (+)
Low-Pass
Filter
Gain (–)
Frequency (+)
Cut-Off
Point
Frequency (–)
Gain (+)
Low-Pass
Filter
Gain (–)
Frequency (+)
Cut-Off
Point
Frequency (–)
Gain (+)
Low-Pass
Filter
Gain (–)
Frequency (+)
Cut-Off
Point
Frequency (–)
Gain (+)
Low-Pass
Filter
Gain (–)
Frequency (+)
Cut-Off
Point
Frequency (–)
Gain (+)
Low-Pass
Filter
Gain (–)
Frequency (+)
Cut-Off
Point
Frequency (–)
Gain (+)
Low-Pass
Filter
Gain (–)
Frequency (+)
Cut-Off
Point
Frequency (–)
Gain (+)
Low-Pass
Filter
Gain (–)
Frequency (+)
Cut-Off
Point
Frequency (–)
Gain (+)
Low-Pass
Filter
Gain (–)
Frequency (+)
Cut-Off
Point
Frequency (–)
Mackie DL806 and DL1608 Reference Guide
93
Modern PEQ at a Glance
Parameter Low Value Limit High Value Limit Default
HPFEnable O On O
HPFFrequency 20 Hz 20 kHz 20 Hz
HPFSlope O•6dB/oct•12dB/oct•18dB/oct•24dB/oct 18 dB/octave
EQ Enable O On On
High Band Type Parametric Shelf Bell
Low Band Type Parametric Shelf Bell
High Gain –15 dB +15dB 0 dB
High Freq 20 Hz 20 kHz 12 kHz
High Q / Shelf Slope 0.5 16 2
High Mid Gain –15 dB +15dB 0 dB
High Mid Freq 20 Hz 20 kHz 2 kHz
High Mid Q 0.5 16 2
Low Mid Gain –15 dB +15dB 0 dB
Low Mid Freq 20 Hz 20 kHz 250 Hz
Low Mid Q 0.5 16 2
Low Gain –15 dB +15dB 0 dB
Low Freq 20 Hz 20 kHz 80 Hz
Low Q / Shelf Slope 0.5 16 2
LPFEnable O On O
LPFFrequency 20 Hz 20 kHz 20 kHz
LPFSlope O•6dB/oct•12dB/oct•18dB/oct•24dB/oct 18 dB/octave
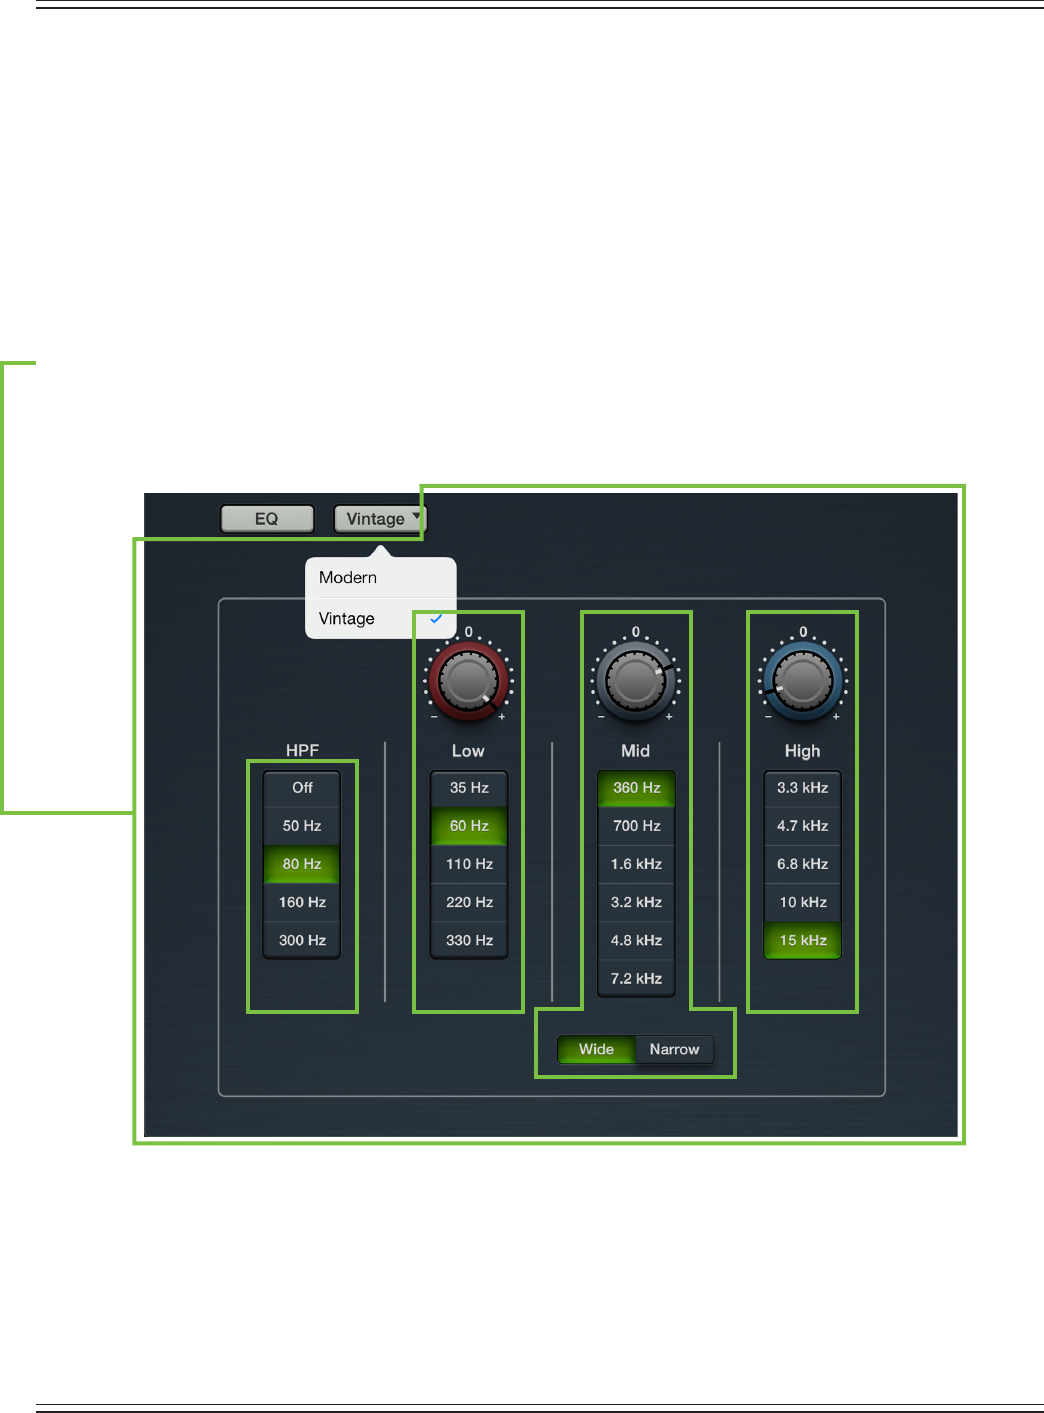
Mackie DL806 and DL1608 Reference Guide
94
Vintage PEQ Introduction
Many of our audio engineer friends and other pro audio gear heads yearn for the ease of use and sound
ofyesteryear.That’sright,thevintageEQwascreatedwithyouinmind...buteveryuserwillloveusingit!
It meticulously recreates the feel and sound of EQ of classic consoles. The vintage EQ captures the unique
interactions between the shelving bands and the gain and frequency-dependent Q structure of the
parametric band to deliver the clarity and sheen of classic EQ designs. The vintage EQ is great for shaping
the general tone of the output while the graphic EQ ghts o feedback. The screen shot below displays
thedefaultvintageEQsettings.Let’stakealookateachoftheselectionsstartingontheleftwiththe
HPFandworkingourwayrighttothehighEQ.
Vintage PEQ Swipe Zone
Here in the Vintage EQ view, swipe anywhere in the dark gray areas outlined below. Swiping up displays
thatchannel’sgateandcompressorview.Swipingdowndisplaysthatchannel’sFXview.Andswiping
left and right changes channels.
Vintage PEQ HPF Frequency Buttons
High-pass lters are utilized to cut out low frequencies. The high-pass lter control adjusts the cut-o
frequency for the lter. Frequencies below the cut-o frequency are attenuated at a rate of 18 dB/octave.
TheslopeoftheHPFisengagedby
tappinganyfrequencybuttonotherthan“O”.Thecurrentselection
will illuminate green.
Mackie DL806 and DL1608 Reference Guide
95
Vintage PEQ Gain and Frequency
ThegainforeachEQbandmaybechangedbydraggingup[increasesgain]anddown[decreasesgain]
over the knob until the desired gain has been achieved. The gain may be changed by approximately
±15dB...it’svintage,sonothingisexact! Double-tap a gain knob to reset its gain to zero. Each EQ band
here has a vertical row of frequency buttons located underneath its gain knob. Simply tap the frequency
button you desire for each band. The frequency ranges from 35 Hz to 15 kHz. The gain (but not the
frequency) may also be manually entered via the current parameter display.
Low
The low EQ provides approximately 15 dB of boost or cut from 35 Hz to 330 Hz. This frequency
represents the punch in bass drums, bass guitar, fat synth patches, and some really serious male
singers who eat raw beef for breakfast.
Mid
The mid EQ provides approximately 15 dB of boost or cut from 360 Hz to 7.2 kHz. Frequencies aected
typically include guitar, piano and the fundamentals and harmonics of many instruments.
Wide / Narrow
Below the mid EQ vertical frequency strip is a wide / narrow button. Generally speaking, wide is
used for broad tone-shaping while narrow is more precise. Select what you would prefer the mid
frequencyQ[bandwidth]tosoundlike.
High
ThehighEQprovidesapproximately15dBofboostorcutfrom3.3kHzto15kHz.Useittoadd
sizzle to cymbals, an overall sense of transparency, or an edge to keyboards, vocals, guitar
and bacon frying. Select a lower frequency to reduce sibilance or harsh treble.
Vintage PEQ at a Glance
Parameter Low Value Limit High Value Limit Default
HPFEnable O On On
HPFFrequency O•50Hz•80Hz•160Hz•300Hz O
EQ Enable O On On
High Shelf Gain –15 dB +15dB 0 dB
High Shelf Freq 3.3kHz•4.7kHz•6.8kHz•10kHz•15kHz 10 kHz
Mid Gain –15 dB +15dB 0 dB
Mid Freq 360Hz•700Hz•1.6kHz•3.2kHz•4.8kHz•7.2kHz 360 Hz
Mid Q Wide Narrow Narrow
Low Shelf Gain –15 dB +15dB 0 dB
Low Shelf Freq 35Hz•60Hz•110Hz•220Hz•330Hz 60 Hz
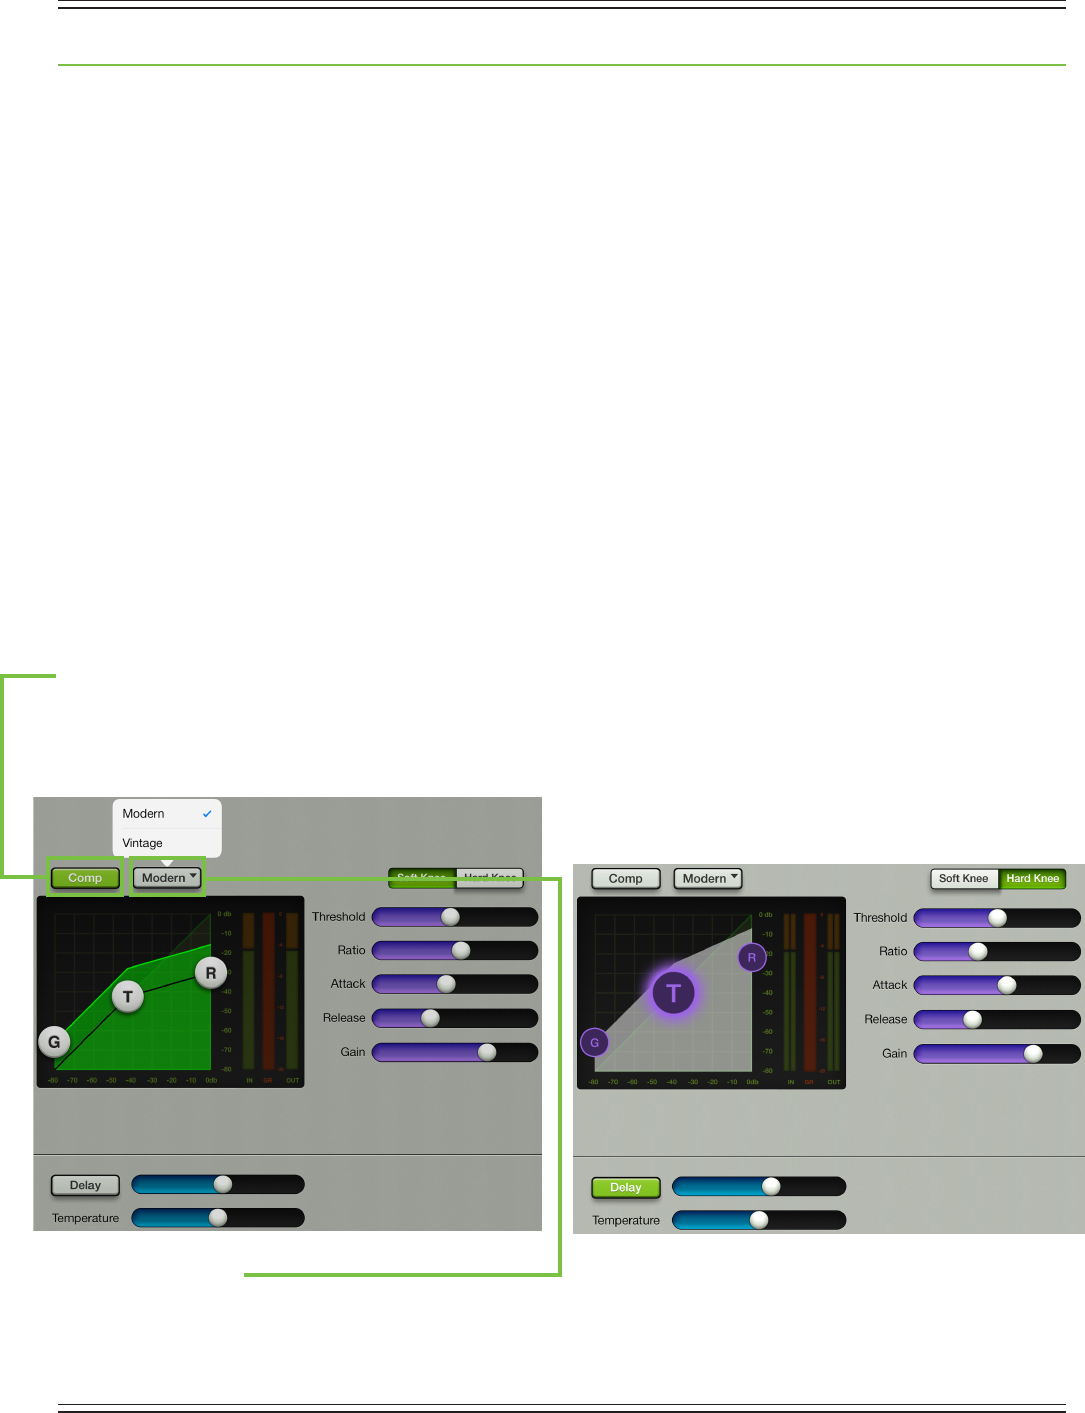
Mackie DL806 and DL1608 Reference Guide
96
Chapter 14: Channel View : Output Compressor / Limiter / Delay
Introduction
The output compressor / limiter looks and functions similar to that of the channel compressor, except
(1) the output compressor / limiter aects and alters the sound of everything passing through the selected
output and (2) the output compressor / limiter output is in stereo.
Compressorsareusedtoreduceorlimittransientpeaksinasignal.Ifthesignalistoohot,turnit
down,otherwiseleaveitalone.Astheinputleveltothecompressorincreases,theoutputlevel
increaseslinearlyuntilthethresholdpointisreached.Afterthatpoint,theoutputlevelnolonger
increases linearly. Instead, it increases at a reduced rate determined by the ratio setting.
With limiters, signals below a specied input level are allowed to pass unaected while attenuating
the peaks of stronger signals that exceed the input levels.
Theattackandreleasecontrolsaecttherateofthegainchange;attackaectstherateofthe
onset of gain reduction and release aects the recovery rate once the transient has passed.
For stereo linked auxes, the gain reduction is applied equally to both the left and right side.
There are actually two dierent types of output compressor / limiters to choose from on each channel:
the clean, surgical modern output compressor / limiter and classic sounding vintage output compressor /
limiter.That’sright,youcanmixandmatchtoheart’scontent!Wewilldissectboththemodernandvintage
outputcompressor/limiterseparately,butlet’sbeginbytakingapeekatwhatfeaturesapplytoboth.
The modern output compressor / limiter is discussed further on pages 96-99, while more information
about the vintage output compressor / limiter may be found on pages 99-100.
Output Compressor / Limiter On / O
PresstheCompbuttontoturnthecompressoronoro.Itwillilluminategreenwhenengagedandisgray
whendisengaged.Noticetheinputandoutputmetersbelow,aswell.Thereismonometeringonunlinked
auxes and stereo metering on the LR and linked aux outputs.
Modern / Vintage
The modern / vintage button is located directly to the right of the comp on / o button. It displays
thecompressortypecurrentlyinuse,with“Modern”asthedefault.Tapthisbuttontorevealthe
two compressor types, then tap the compressor you would like. The image will change to reect
the compressor type chosen.
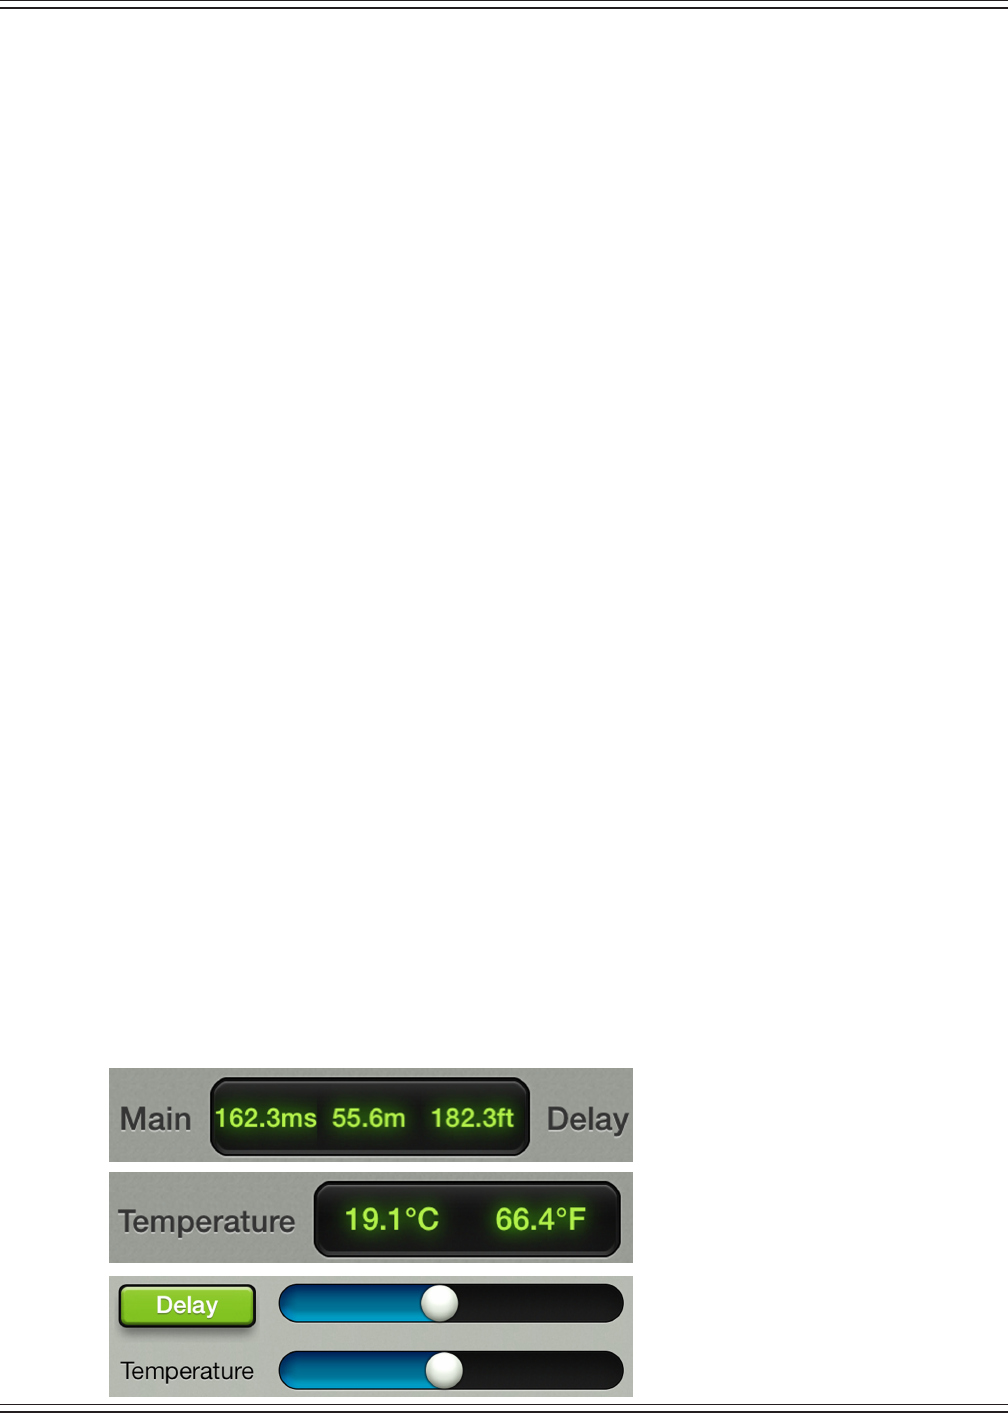
Mackie DL806 and DL1608 Reference Guide
97
Output Alignment Delay
Locatedatthebottomofthescreenistheoutputalignmentdelay.It’susedtotime-alignthesoundwhen
there are speakers that are not near each other. If two speakers are playing the same sound (the mains and,
say, a stage monitor or loudspeaker in another room) that are physically distant from each other, the sound
cangetmuddledsincethesoundfromeachloudspeakerishittingyourearsatdierenttimes.Additionally,
there are sound sources on stage – drums, for example – that are so loud that the audience can hear them
even before they reach the loudspeakers. Therefore, most professionals align every speaker on the stage to
the drums so all sounds arrive simultaneously.
Here are a few more examples in which the output alignment delay is handy:
Delay Stacks—SometimesadditionalspeakersarenecessaryinordertosupportthemainPA.
Perhapsit’saclubwithmultiplerooms,oranoutdoorconcertwithabeergardenlocatedup
onthelawn,oracryroominaHouseofWorship.Applyingalignmentdelaytothesedelaystacks
ensures that the sonic experience is the same throughout the venue.
For setup, the user will set a delay time based on the distance and a given temperature.
Astheshowgoeson,theroomwillheatupfromtheglowoftheamptubesandgrowingaudience...
or the temperature might drop at an outdoor venue after the sun disappears. The engineer may simply
adjustthetemperatureandthedelaytimeadjustsautomatically.Afterall,thetemperatureischanging,
not the (already) xed distance between the speakers!
Stage Monitors — Band members hear the drum kit itself, as well as the drums coming through
the monitors. Delaying the monitors to align these dierent sources improves intelligibility.
Main PA — Like the band, audience members located close to the stage also hear the stage drums
andthemonitors.DelayingthemainPAbacktothedrumsimprovesintelligibilityforthesefront
row warriors.
Fill Speakers—ThemainPAstackdoesn’talwayscoverallspotsofavenue.Architecturalfeatures
like balconies, alcoves, etc. are often simply not covered, or the sound is undesirable in those areas.
TherstfewrowsofanaudienceisanothercommonplaceforthemainPAtomiss.Fillspeakers
areusedtocovertheseareasandaligningthemwiththePAistheonlywaytoensurepropersound
throughout the venue.
The delay time ranges from a low of 0.0 ms (m, ft) to a maximum of 350.0 ms (115.8 m, 380.1 ft).
Thetemperaturerangesfromalowof0.0˚C(32.0˚F)uptoamaximumof40.0˚C(104.0˚F).
Thesemaybeadjustedbymovingtheslidersleftandright.Additionally,exactsettingsmaybeentered
into the current parameter display. The output alignment delay may be adjusted whether the output
compressor / limiter is on or o. The output alignment delay is accessible on the main LR and all aux sends.
Thereisnooutputalignmentdelayonthereverbanddelayoutputs.PresstheDelaybuttontoturn
the output alignment delay on or o. It will illuminate green when engaged and is gray when disengaged.
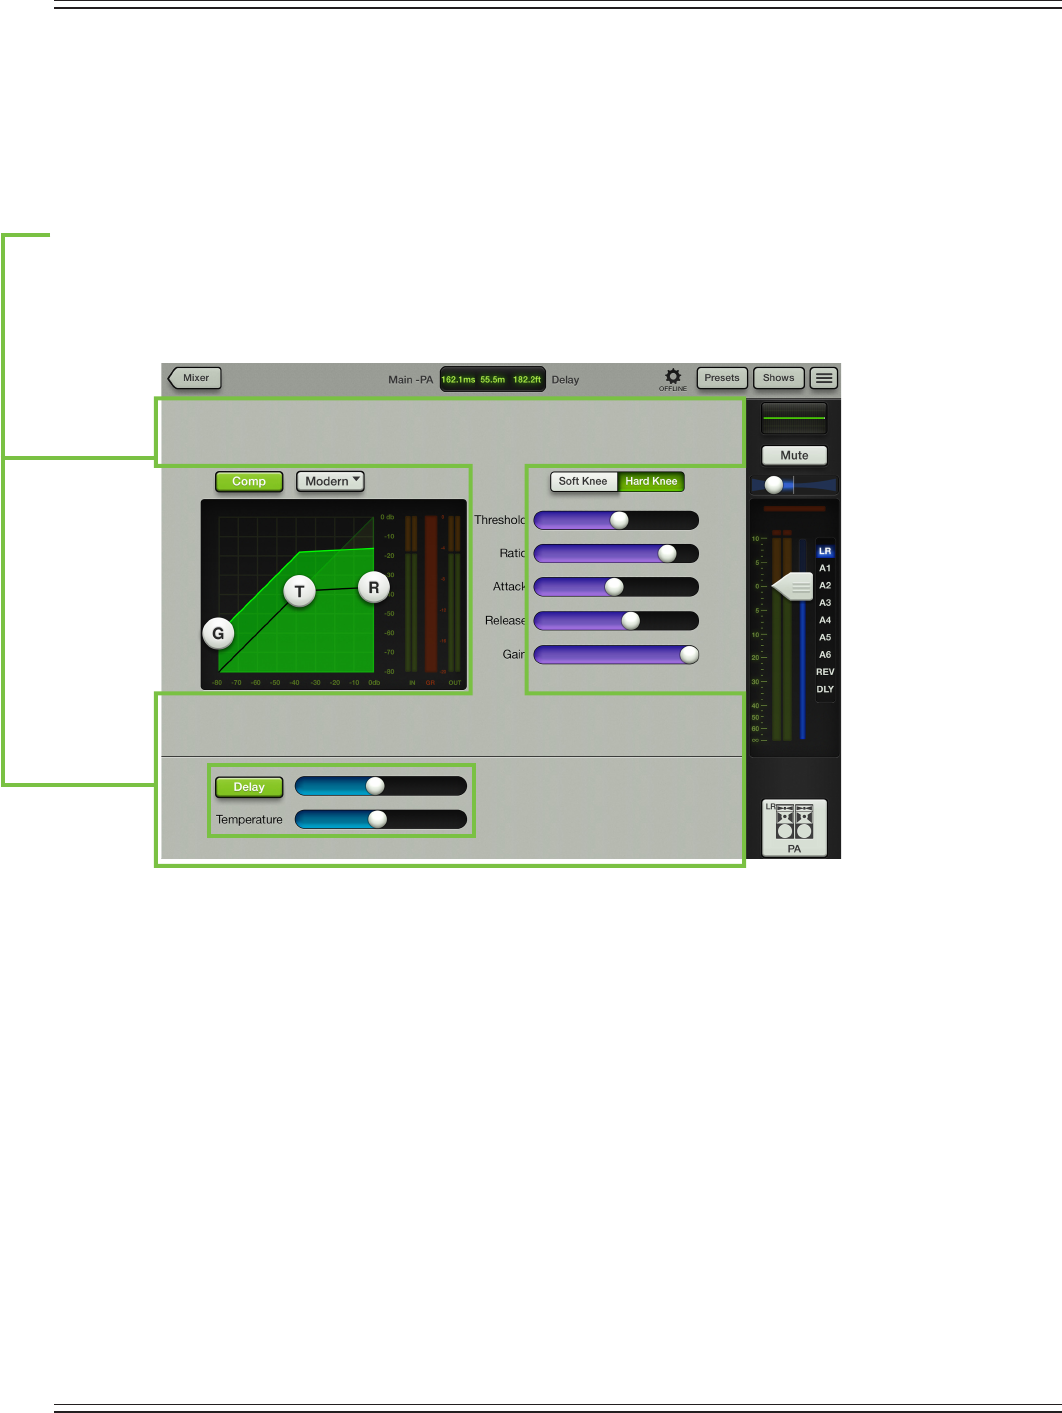
Mackie DL806 and DL1608 Reference Guide
98
Modern Output Compressor / Limiter Introduction
Asmentionedpreviously,themodernoutputcompressor/limiterisdesignedforclean,surgicalprocessing;
it’sgreatfordialinginanice,tightsound.Assuch,theattack,releaseandratiofeaturesmaybene-tuned
whenthemodernoutputcompressor/limiterisutilized.Nowforadetailed(let’ssay“surgical”)lookatthe
modern output compressor / limiter.
Modern Output Compressor / Limiter Swipe Zone
Here in the output compressor / limiter view, swipe anywhere in the gray areas outlined below. Swiping
up displays the parametric EQ. Swiping down displays the output compressor / limiter view. Swiping left
andrightdoesnothing.Seepage99fortheSwipeZoneoftheVintageOutputCompressor/Limiterview.
Modern Output Compressor / Limiter Display and Settings
The output compressor for each selected output may be adjusted by moving the gain, threshold and ratio
ballsormovinganyoftheveslidersleftandright.Additionally,exactsettingsmaybeenteredintothe
current parameter display. The output compressor may be adjusted whether the output compressor is on
or o. There is no output compressor for the reverb and delay outputs.
Threshold — Threshold sets the threshold of the compressor in dB below 0 dBFS.
The range of the threshold setting varies from –60 dBFS to 0 dBFS.
Ratio — Ratio sets the amount of gain reduction applied as the signal exceeds the threshold level.
The range of the ratio of the compressor varies from 1:1 to inf:1.
Attack —Attackdetermineshowquicklythecompressorreactsoncethesignalisabovethreshold.
Short attack times allow compressing on short transients, while longer attack times cause these
transients to be ignored. The range of the attack time varies from 0.1 ms to 300 ms.
Release — Release determines how long it takes for the compressor to end gain reduction once the
signal drops back below the threshold. The range of the release speed varies from 50 ms to 3 seconds.
Gain — Gain adds make-up gain to the output of the compressor. This is useful to make the apparent
volume of the signal the same with the compressor in and out of the signal chain. The range of the
make-up gain varies from 0 dB to 20 dB.
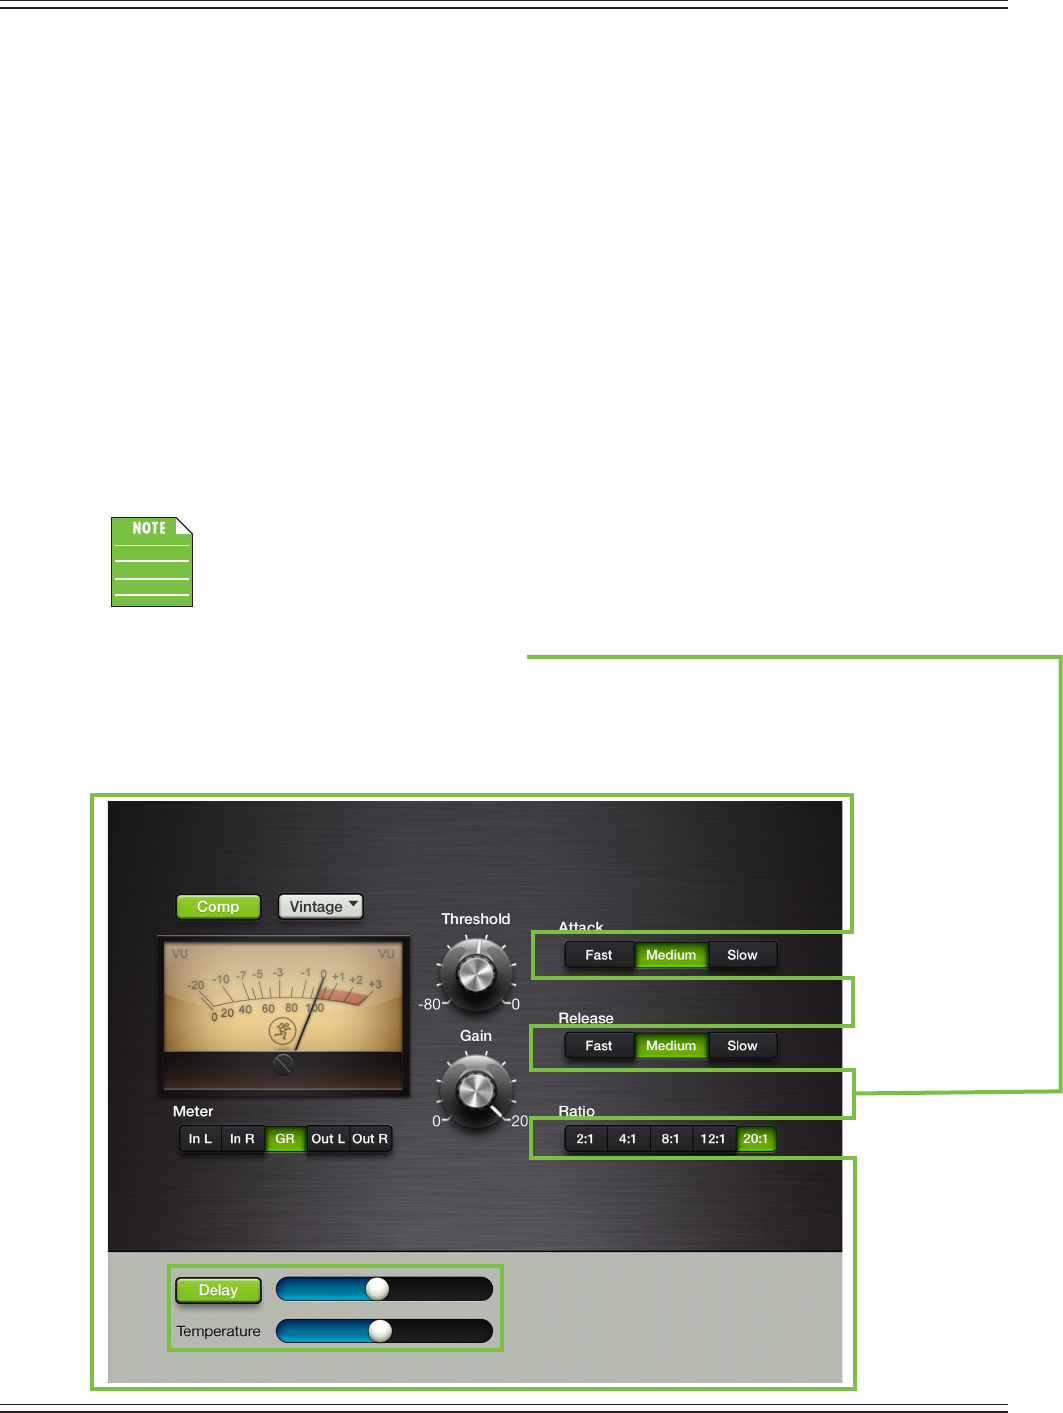
Mackie DL806 and DL1608 Reference Guide
99
Soft Knee / Hard Knee Compression
This switch sets the shape of the gain reduction curve at the threshold level. When set to hard, the gain
reduction curve changes abruptly at the threshold level. When set to soft, the gain reduction curve changes
gently as it transitions to the nal ratio amount.
Modern Output Compressor / Limiter Meters
These three meters show the input level, amount of gain reduction and output level. The input
and output meters range from –80 dBFS to 0 dBFS. The reduction meter ranges from 0 to 20 dB.
Mono metering is displayed for inputs and outputs on unlinked auxes and stereo metering is
displayed for inputs and outputs on linked auxes.
Vintage Output Compressor / Limiter Introduction
Many of our audio engineer friends and other pro audio gear heads yearn for the ease of use and sound
ofyesteryear.That’sright,thevintageoutputcompressor/limiterwascreatedwithyouinmind...butevery
user will love using it! It meticulously recreates the feel and sound of output compressor / limiters of classic
consoles. The vintage output compressor / limiter provides a lightning-fast attack, non-linear attack / release
and program dependent release.
Dynamics may be dialed in on each channel, but the output compressor / limiter will change
thesoundoftheentireoutput.It’sbesttoswitchbetweenthemodernandvintageoutput
compressor / limiter settings and use the one that sounds best to your ears.
Vintage Output Compressor / Limiter Swipe Zone
Here in the output compressor / limiter view, swipe anywhere in the dark gray areas outlined below.
Swiping up displays the parametric EQ. Swiping down displays the output compressor / limiter view.
Swipingleftandrightdoesnothing.Seepage98fortheSwipeZoneoftheModernOutput
Compressor/Limiterview.

Mackie DL806 and DL1608 Reference Guide
100
Vintage Output Compressor / Limiter Display and Settings
Eachchannel’sthresholdandgainlevelsmaybechangedbydraggingup[increaseslevel]anddown
[decreaseslevel]overtheirrespectiveknobsuntilthedesiredlevelhasbeenachieved.Totheright
are three horizontal rows of buttons for the attack, release and ratio. Simply tap the button you desire
for the attack, release and ratio. The current selection will illuminate green. The threshold and gain
settings (but not the attack, release and ratio settings) may also be manually entered via the current
parameter display. The compressor may be adjusted whether the compressor is on or o.
Threshold — Threshold sets the threshold of the compressor in dB below 0 dBFS.
The range of the threshold setting varies from –80 dBFS to 0 dBFS.
Gain — Gain adds make-up gain to the output of the compressor. This is useful to make the
apparent volume of the signal the same with the compressor in and out of the signal chain.
The range of the make-up gain varies from 0 dB to 20 dB.
Attack — Attackdetermineshowquicklythecompressorreactsoncethesignalisabovethreshold.
Short attack times allow compressing on short transients, while longer attack times cause these
transientstobeignored.Choosebetweenafast,mediumorslowattacktime.
Release — Release determines how long it takes for the compressor to end gain reduction once
thesignaldropsbackbelowthethreshold.Choosebetweenafast,mediumorslowreleasetime.
Ratio — Ratio sets the amount of gain reduction applied as the signal exceeds the threshold level.
Choosebetween2:1,4:1,8:1,12:1and20:1.
Vintage Output Compressor / Limiter VU Meter
Tocompletetheclassiclook,thevintageoutputcompressor/limiterisoutttedwithaVUmeter.
What’smore,underneaththeVUmeterisasetofthreebuttonstoselectbetweendisplayingthe
input level, amount of gain reduction or output level. The input and output meters range from
–20 dBu to 0 dBu. The reduction meter ranges from 0 to 20 dB. Mono metering is displayed for inputs
and outputs on unlinked auxes and stereo metering is displayed for inputs and outputs on linked auxes.
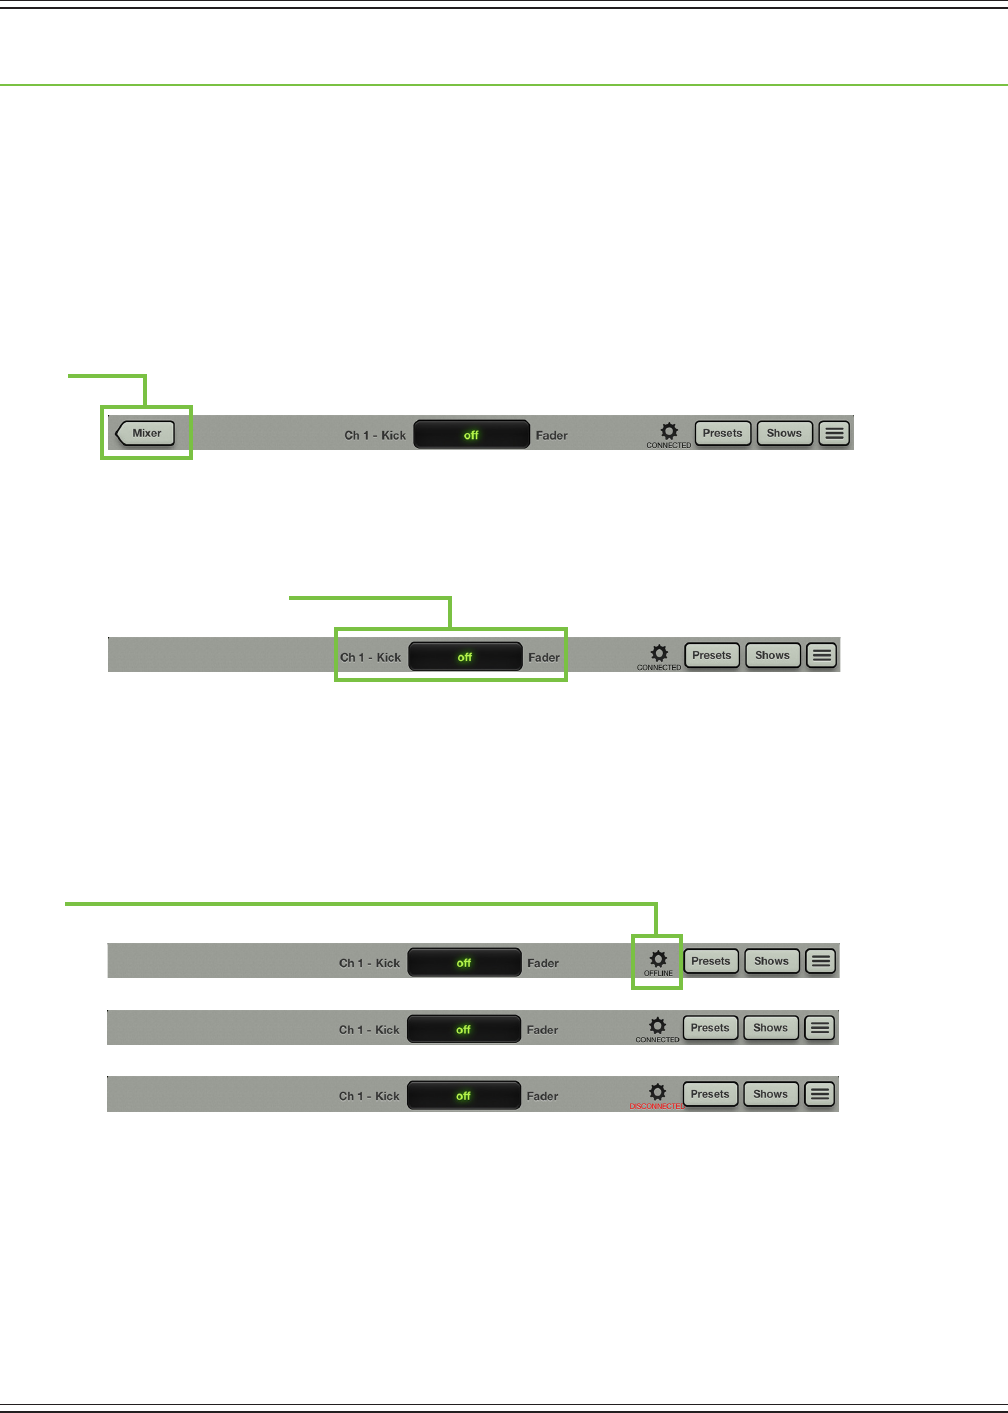
Mackie DL806 and DL1608 Reference Guide
101
Chapter 15: Mixer View : Navigation Bar
Introduction
Justhowimportantisthenavigationbar?It’ssoimportantthatitisalwaysavailableregardlessofwhat
viewiscurrentlydisplayed.Wantmore?Notonlyisitalwaysavailable,butitisrightontopinplainsight!
Notatthebottomortuckedawayinsomecorner.It’sabannerannouncing(andawaiting)yourchoice.
Interestingly,though,therearenofadershere;EQ,gatesandcompressorsandFXliveelsewhere,etc.
Think of the navigation bar as the brains behindtheoperation.Amixerbuttontakesyoubacktothe
mixer view, there are a wide variety of options to choose from in the tools section and the navigation
bar also hosts presets, shows, snapshots and channel safes selection, too.
Mixer
Themixerbuttonisonlydisplayedwhenworkingwithinachannelview[EQ,gateandcompressor,
FX,graphicEQandcompressor/limiter].Simplytapthemixerbuttontoreturntothemixerview.
If a mixer button is not displayed (as displayed in the image below), then you are already in the mixer view.
Current Parameter Display
Here,thecurrentparameterdisplayshowsthecurrentchannelsystemname[Ch1]–itscrollsif
thenameistoolongtot,displayingtheentirename–followedbythecustomusername[Kick],
thecurrentparametervalue[o]andcurrentparametername[Fader]forjustabouteverycontrol
orparameterasitisadjusted.Also,ifyouwanttotypeinanexactvalueforaparameter,touch
thechannel’sparameteryouwouldliketoupdatesoitappearsinthecurrentparameterdisplay.
Next,tapthecurrentparameterdisplay;akeyboardappears.Simplytypeintheexactvalueyouwould
likeforthatchannel’sparameterfollowedbyacarriagereturn.
Tools
Thegeariconiswhereyouaccessthetools.Thinkofitasa“settings”-typearea.Butbeforewegetinto
thosesettings,let’stalkaboutonemoreveryimportantthingthetoolsbuttondoes.Textwillalways
be located underneath the icon and it will state the current connection status of the Master Fader app.
Asseenintheimagesabove,itcouldstateoneofthreestatuses:
Oine—TheMasterFaderappisNOTcommunicatingwithamixerbecauseithasbeencongured
assuch.OinecouldevenbedisplayedwhenaniPadisphysicallyconnectedtoamixer.
Connected — The Master Fader app is connected to the mixer, either wired or wirelessly.
Disconnected — The Master Fader app is trying to connect wirelessly to the mixer, but is unable to connect.
These will make more sense when we discuss devices, starting on the next page.
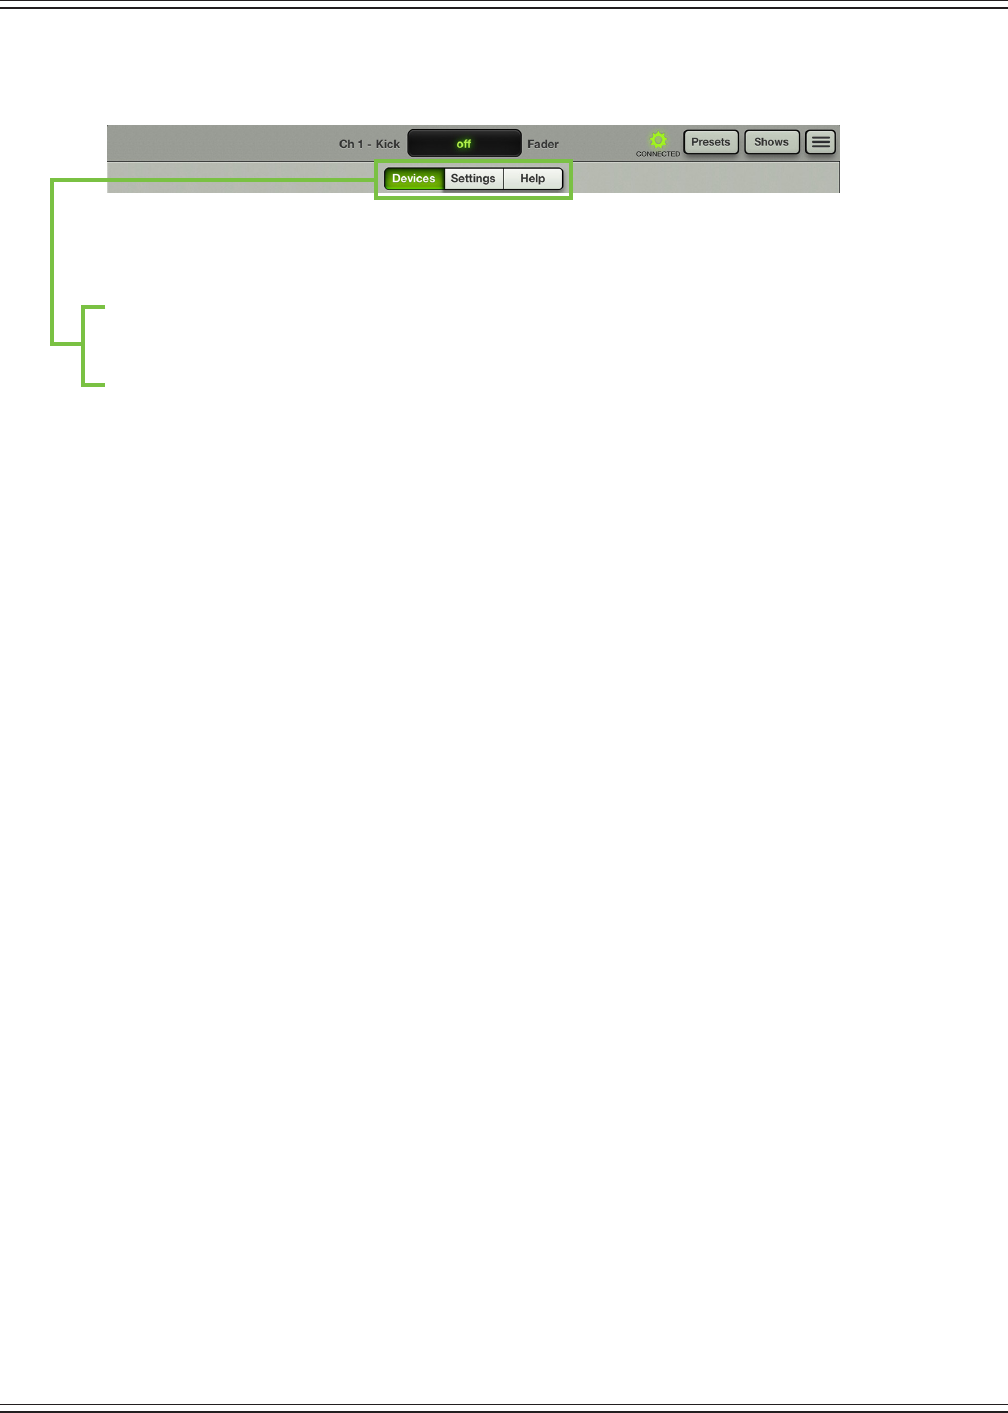
Mackie DL806 and DL1608 Reference Guide
102
When tapped, the tools menu will appear and the tools icon will illuminate green, as seen in the
image below .
When tools is disengaged, the icon is gray.
Tap the tools icon to reveal the following options:
(1) Devices
(2) Settings
(3) Help
Aswegothrougheachofthesesections,noticethatthecurrentselectionilluminatesgreen.When
nished, tap the tools button again to return to the previous view, be it the mixer view or a channel view.
Devices
DevicesiswhereyouselectaDLSeriesmixertocontrolfromtheMasterFaderapponthisiPad,
whether wired or wirelessly. Or you may choose to work oine. This could be to demo the Master
Fader app or prepare a mix prior to the next gig. Simply select from a list of all discovered consoles
available for control. The list of available devices to select from is divided into three sections:
Oine, Wired and Wireless.
Oine—Select“WorkOine/Demo”toseverallcontrolfromaDLSeriesmixer.AniPadthat
is oine will not control a mixer, whether physically connected to the mixer or not. In fact,
theiPadneednotbeanywherenearthemixer.Youcouldbe35,000feetupintheairtraveling
to your next gig setting up snapshots, shows and presets. Oine, of course! Oine is also where
youtestdrivetheMasterFaderapp[forfree!]beforepurchasingaDL806orDL1608.
Wired—AwirediPadisusingthewiredconnectiontocontrolthemixer.OnlyoneiPadmay
bewiredpermixer.Therefore,onlyoneitemwilleverbeshowninthewiredlist.IftheiPad
isnotdockedwithamixer,thewords“NoConnectedDevice”willbedisplayed.
Wireless — The wireless list will display all DL Series mixers available for wireless control from
theMasterFaderapp.ChooseoneDLSeriesmixertoconnecttoandthencontrolitfromtheiPad.
AwirelessiPadisconnectedtothemixer(viaWi-Fi),butnotphysicallydockedwiththemixer.
Ifitis,thedevicewillchangeautomaticallytowired.Upto10iPadsmayselectthedeviceto
connect to wirelessly.
The Master Fader app recalls the last device you selected for wireless control. If it is not available,
it will be shown as disconnected and will try to reconnect until it becomes available or you select
toworkoineordocktheiPad.
Let’swalkthroughthevariouswaystoconnectaniPadtoamixer.Therststepiseasy...turnthepage!
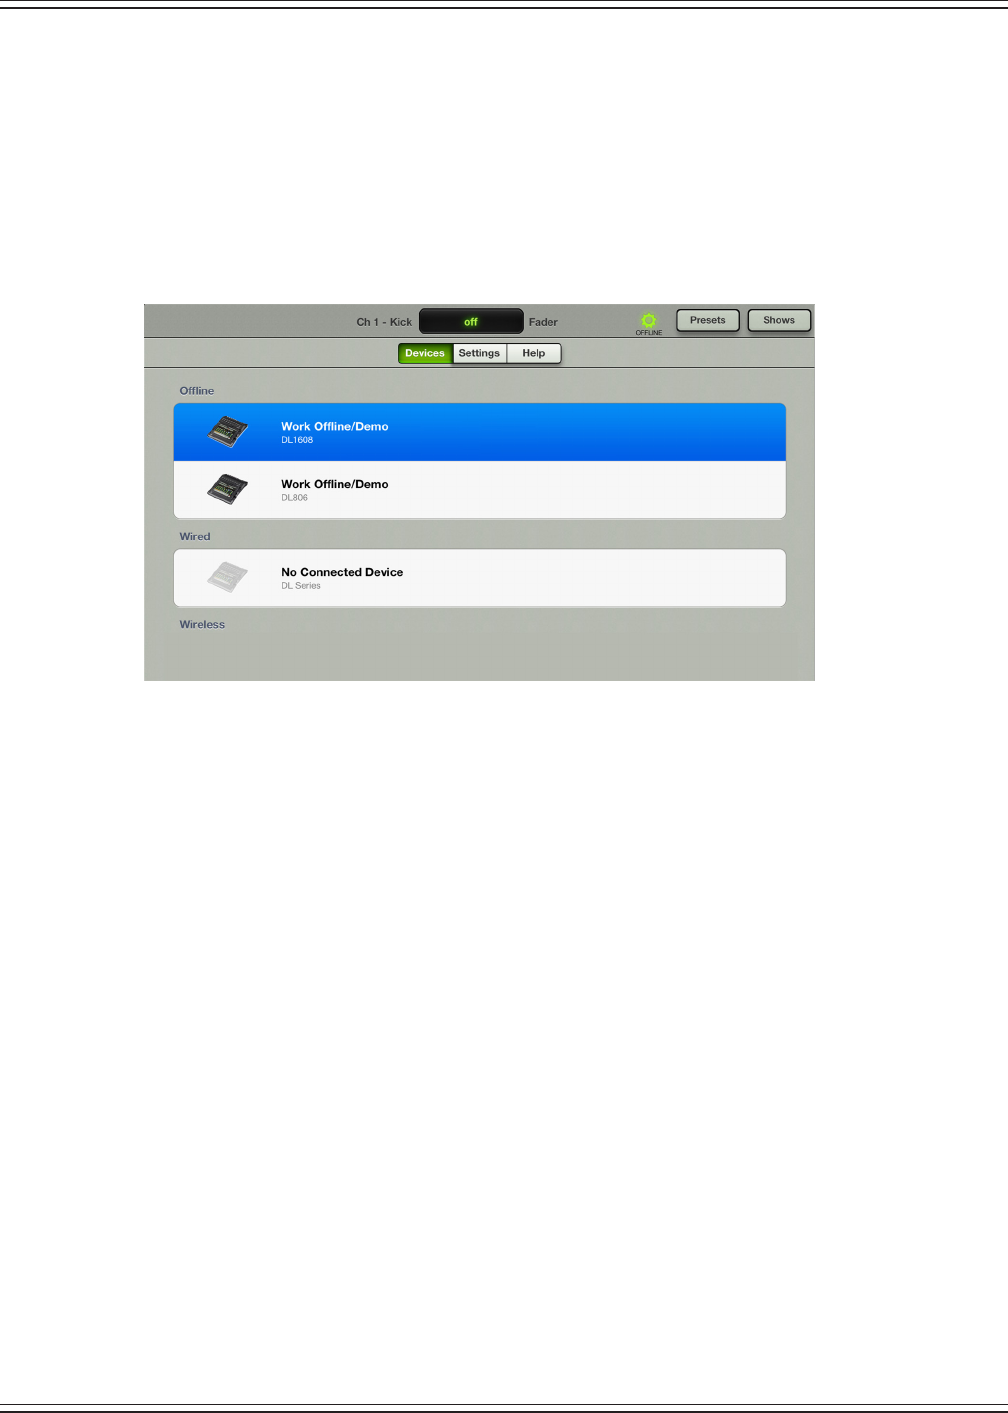
Mackie DL806 and DL1608 Reference Guide
103
Oine — This is what the devices list displays when you rst re up the Master Fader app (before
theiPadisconnectedtothemixerandpriortothemixerbeingconnectedtotheWi-Firouter).
The“WorkOine/Demo”deviceisselectedandhighlightedblue.Thisisaboutasbasicasthedevices
screen gets, so it seems like a great place to start! In this particular case, there is nothing else to choose
from;infact,trytoselectthewiredconnectionbytappingit.Noticethatitjustbouncesbacktooine.
The wired mixer is grayed out indicating that it is not available for selection. This is because there is no
wired device, nor any wireless options at this point. This mode is perfect for conguring a complete
show oine or to test drive the Master Fader app before buying the accompanying DL806 or DL1608.
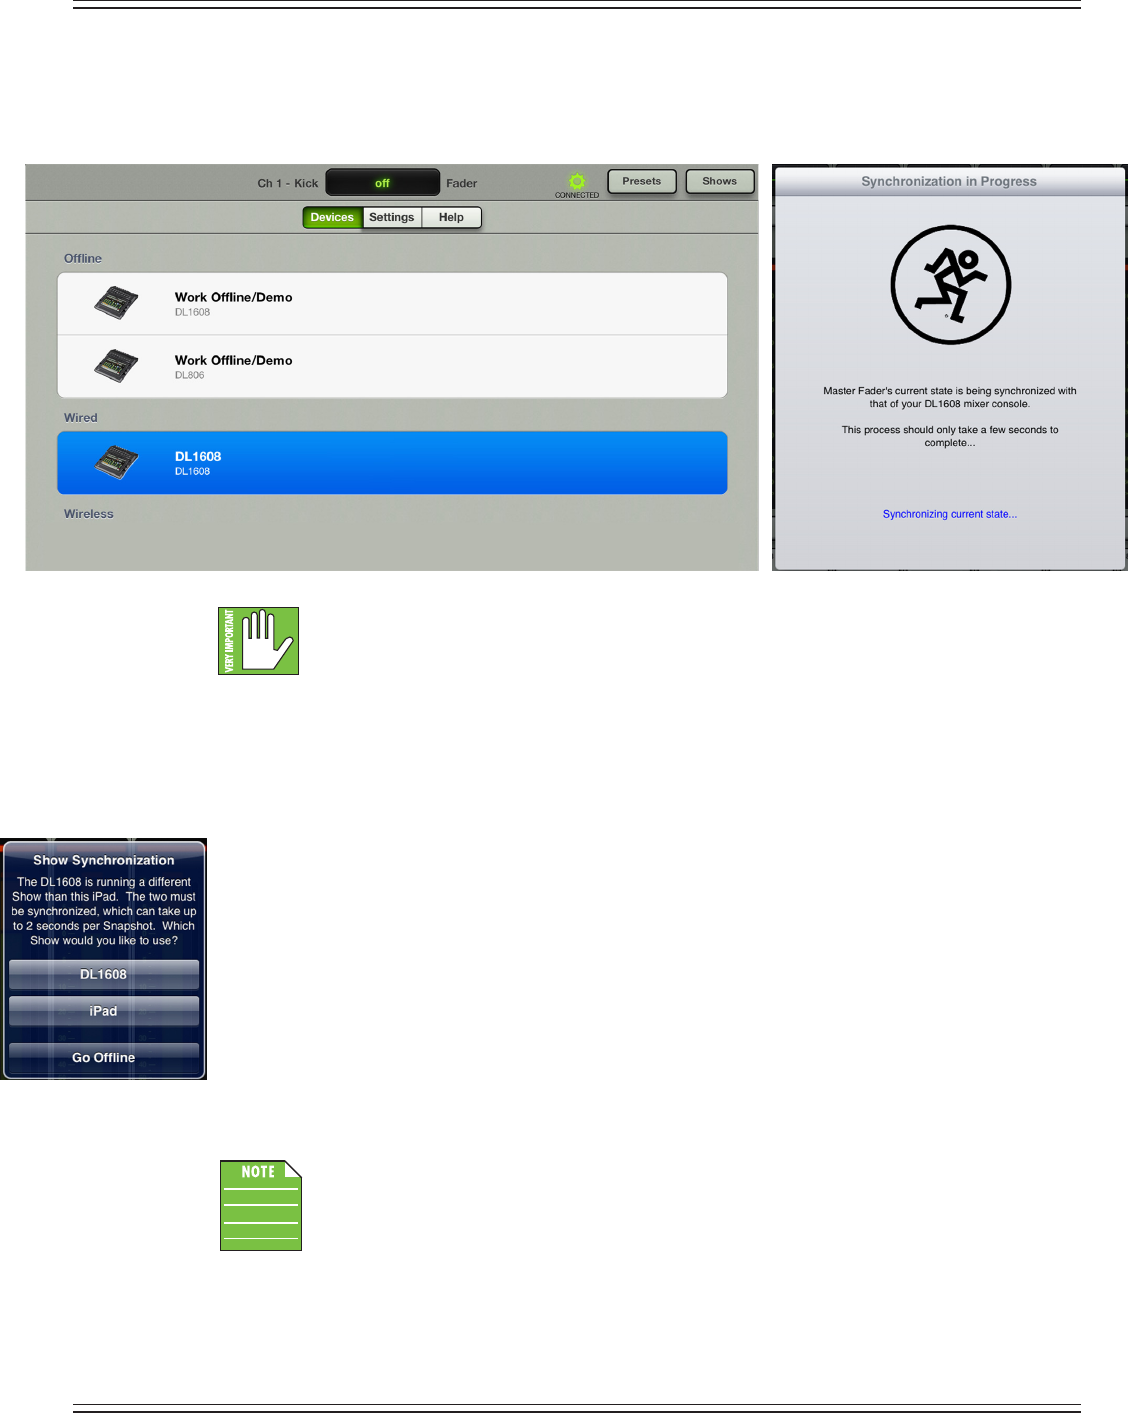
Mackie DL806 and DL1608 Reference Guide
104
Wired I—SlidetheiPadintothemixer.Youwillseethatthewireddevicechangestodisplaythename
of the DL Series mixer and it is automatically selected. When this happens, a pop-up appears indicating
that the console is connecting and synchronizing the current show and then the current state.
TheCURRENTshowontheiPadmustmatchtheCURRENTshowonthemixer.Iftheydonot,
you will be asked to select between the two so they are synced. Why would shows not be
synced?Well,oneexamplecouldbethatcurrentshow(X)wasusedatagig.Thebandand
crewthenpackupforthenextshow,buttheengineerwantstomakesometweaksforthenextnight’s
performance.Theengineermakesafewchangesandstoresanewsnapshotoine;thisshownow
diersfromtheCURRENTshowthatisstillonthemixer.WhatwillhappenwhentheiPadisreunited
withthemixeronceagain?Theengineerwillbeaskedwhichonetouse:thecurrentshowonthemixer
[X,taptheDL806/1608button]orthecurrentshowontheiPad[Y,taptheiPadbutton].Inthiscase,
theengineerwouldchoosetheiPadsinceitcontainsthelatestchanges
.
DL806/DL1608–tappingtheDL806/DL1608buttonhereisconsideredPULLINGthecurrentshow
fromthemixerandcopyingittotheiPad.NotethatthepreviouscurrentshowontheiPadisreplaced,
but an oine copy of the previous show will remain. It will take about two seconds per snapshot to
synchronizetheshows.AllconnectediOSdeviceswillautomaticallysyncwiththecurrentshow.
iPad–tappingtheiPadbuttonhereisconsideredPUSHINGthecurrentshowfromtheiPadand
copying it to the mixer. It will take about two seconds per snapshot to synchronize the shows.
AllconnectediOSdeviceswillautomaticallysyncwiththecurrentshow.
Go Oine – tapping the Go Oine button here allows you time to gure things out before
deciding which show to use.
YouwillalsoreceivetheShowSynchronizationnoticationthersttimeyoupowerontheDLSeries
mixer if you tried out the Master Fader app prior to purchasing the mixer.
EachiPadthatisoineisunique.Inotherwords,multiplevaryingsnapshotsandshowsmay
becreatedoneachiPad.Thisissomethingtobeawareofwhenreconnecting.
Switch between the oine and wired device selections and notice that the Master Fader app re-syncs
withtheconsole’scurrentstateeverytimeyoureconnect.TheDLSeriesmixerisshowninfullcolorin
bothdevices[oineandwired]indicatingthateithermaybeselected.Therouterhasn’tbeensetup
yet,sotherearen’tanywirelessoptionsatthispoint.

Mackie DL806 and DL1608 Reference Guide
105
Wired II—IfyouconnecttheWi-Firouter,powercycletheconsole[rememberthattheconsole
needstobepoweredonAFTERtherouter]andconnecttheiPadtothewirelessnetworkasdescribed
inchapter4[“MixerHardware:WirelessSetup”,pages25-28],youwillseetheDLSeriesmixerappear
in the wireless section available for wireless control. This may take a few moments to appear.
Again,though,sincetheiPadiswired,youwillbeunabletochangeovertowirelesscontrol.
TrytoselectthewirelessDLSeriesmixerbytappingit.Noticethatitjustbouncesbacktothewired
device. This is indicated by a grayed out DL806 or DL1608 icon in the wireless selection. However, the
oineiconisnotgrayedout,indicatingthatitisavailableforselection.Youmightdecidetowork
oinesoyourchangesdon’taectthemixofthegigcurrentlytakingplace.
Wireless—RemovetheiPadfromthemixerandselecttheDLSeriesmixerfromthewirelesslistso
ithighlightsblue.FeelfreetowanderthevenueandmixwiththiswirelessiPad.BecausetheiPadis
wireless,workingwiredisnotanoptionuntiltheiPadisreattachedtothemixer.Assuch,theDL806
or DL1608 icon in the wired list is grayed out. However, the oine selection is not grayed out, indicating
thatitisavailableforselection.Youmightdecidetoworkoinesoyourchangesdon’taectthemix
of the gig currently taking place.
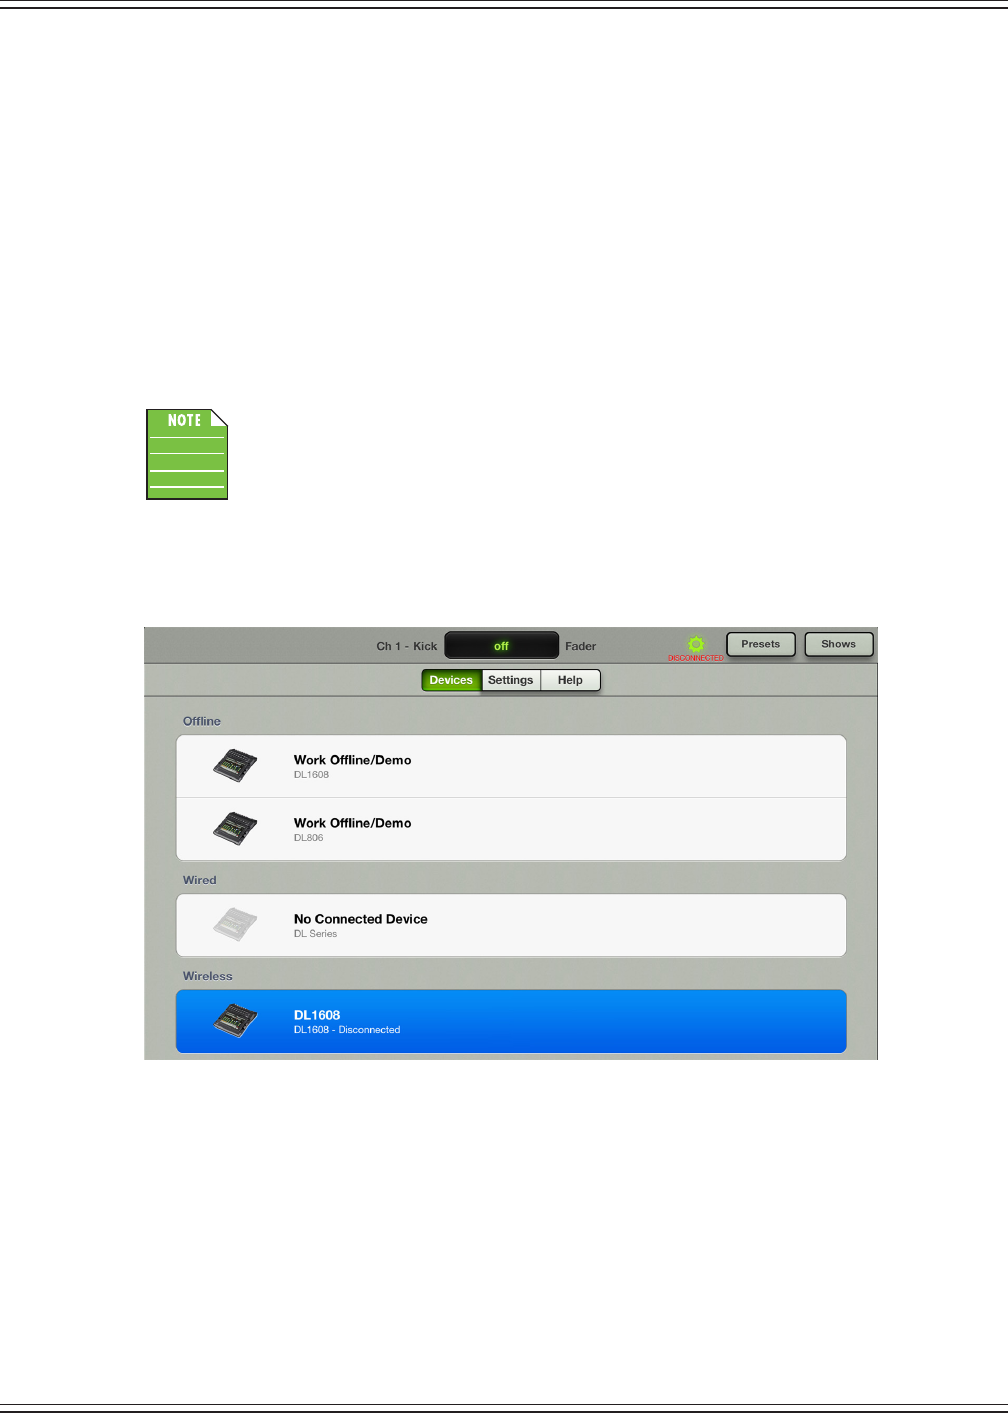
Mackie DL806 and DL1608 Reference Guide
106
Disconnected—Let’strysomething.Turnthemixeroandseewhatchanges.Noticethatthe
mixerislistedas“Disconnected”inthewirelesslist.Additionally,ared“disconnected”appearsunder
the tools icon.
Sohowdoesdisconnecteddierfromoine?Gladyouasked!Disconnectedmeansthatyouaretrying
toconnecttoamixerwirelessly,butcan’tatthistime.Themostlikelycauseforthisintherealworld
is that you have wandered just out of range of the wireless router. However, it could also be caused
by some kids moshing in the pit accidentally unplugging the mixer from its power source. Oops!
But the Master Fader app remembers that you were once connected and it is trying to reconnect.
We know because the DL Series mixer icon is still there and the wireless selection is highlighted blue.
If you would prefer to stay permanently disconnected (even when the mixer returns to the
wirelessnetwork)simplyselect“WorkOine/Demo”fromthedeviceslist.Ifyoudothis,youwill
eventually see the mixer disappear from the wireless list. This is because it is not currently available
ANDyouarenolongertryingtoconnecttoit.
Be patient. The wireless device will not immediately disappear after it is powered o.
ThisisoneofthesafetyfeaturesoftheiPadauto-discovery.Itisnormaltoseedeviceshang
around longer than you might expect.
Obviously, since we are walking around the room mixing wirelessly, there is no wired device
available. This is indicated with a grayed out DL806 or DL1608 icon and text explaining that
thereis“NoConnectedDevice”.

Mackie DL806 and DL1608 Reference Guide
107
YoushouldnowknowhowtosetupyouriPadindevices.Goaheadandexperimentwithit,
switching between the three selections. The more you do it, the more familiar it becomes.
Plus,it’ssoftware:youcan’tbreakit!
Also,noticeinalloftheexamplesthatthetextunderneaththetoolsicondisplaysexactlywhatthe
stateoftheiPadisin...and will be no matter what view you are in.Tools>Devicesisjusttheplace
tosetupeachiPad.
IfyoubelievethattheiPadshouldbeconnectedwhenwireless,pleasefollowthestepsoutlined
below in order:
(1)ConnecttheiPadwiredjusttoensurethattheappworks.
(2)Followthedirectionsagainaslistedin“Chapter4:MixerHardware:WirelessSetup”(pages25-28),
step-by-step.Didthatwork?
(3)You’rehere,sothatdidn’twork.Nowreviewthedevicessectionwhichwejustdetailed
(pages102-107).Areyougoodtogonow?
(4)Wellshoot,let’strysomethingelseout.HeadovertotheTroubleshootingsectioninAppendixA:
ServiceInformationonpage155.Thatworked,right?
(5)Darn,we’verunoutofoptions.TimetocontactoursplendidTechnicalSupportHeroes.
ThecontactinformationisbuiltrightintotheMasterFaderapp!Justgoto:Tools>Help>Support.
Page114explainsthisingreaterdetail.
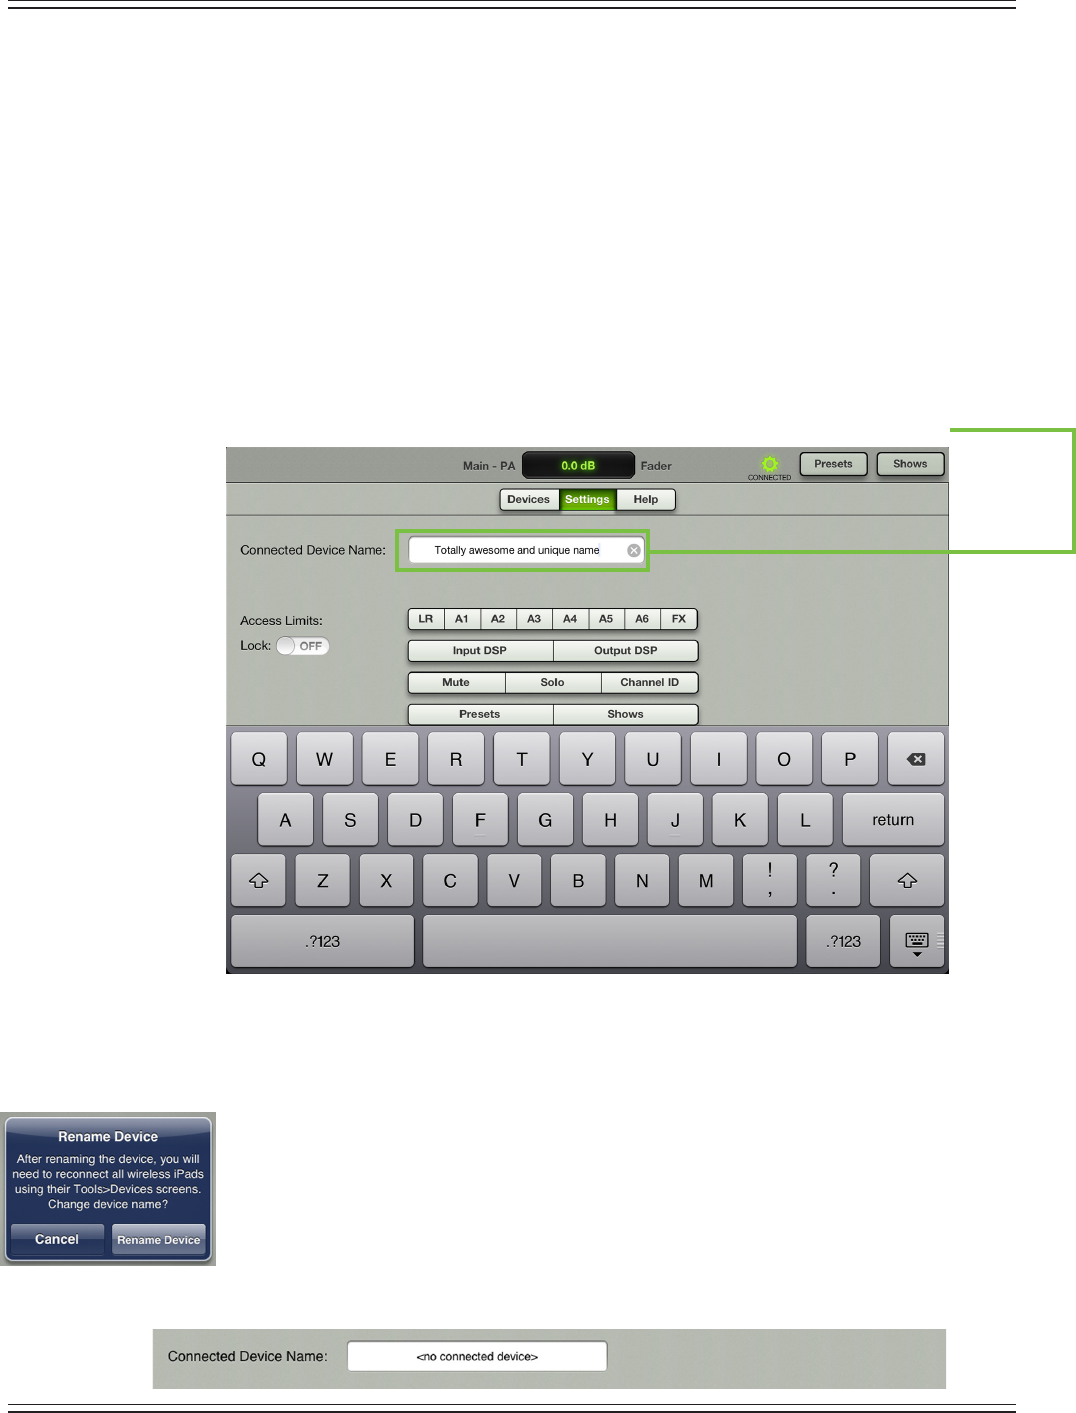
Mackie DL806 and DL1608 Reference Guide
108
Settings
There are two types of settings available:
(1)SettingsthatonlyaecttheiPad.
(2)SettingsthataretransferredtotheconsoleandaecteveryiPadconnectedtoit.
Connected Device Name — Rename the mixerhere.Yes,youarephysicallychangingthename
ontheiPad,butitisindeedthemixeryou’renaming.Whynamethemixeranythingelseotherthan
“DL806”or“DL1608”?Well,youmighthavetwoDLSeriesmixersandwanttoidentifybetweenthem
onthewirelessnetwork.ThemixermaybenamedfromeitherawiredorwirelessiPad.Amaximum
of 54 characters may be used when naming the mixer.
Asahardwaresetting,thenameisstoredinthemixer,isglobaltothemixerandthereforeaects
allconnectediPads.Itisnotchangedbyshoworsnapshotchanges.
Renaming from a wired iPad:
(1)Typeinthenameyouwanttocallthemixerfollowedbytappingthe“return”button.
(2)ThewirediPadstaysconnectedwiththenewname.However,allwirelessiPadsbecome
disconnected and you will need to reconnect them as discussed previously in the devices
section (on pages 102-107).
Renaming from a wireless iPad:
(1)Typeinthenameyouwanttocallthemixerfollowedbytappingthe“return”button.
(2)Aconrmationdialogwillappear.
(3)IfthereisawirediPad,itstaysconnectedandreceivesthenewname.However,allwireless
iPadsbecomedisconnectedandyouwillneedtoreconnectthemasdiscussedpreviouslyin
the devices section (on pages 102-107).
Tobeclear,thisisthenameofthemixeryouarecurrentlyconnectedto;ifyouarenotconnected
toamixer,theconnecteddevicenameis“<noconnecteddevice>”asseenintheimagebelow.
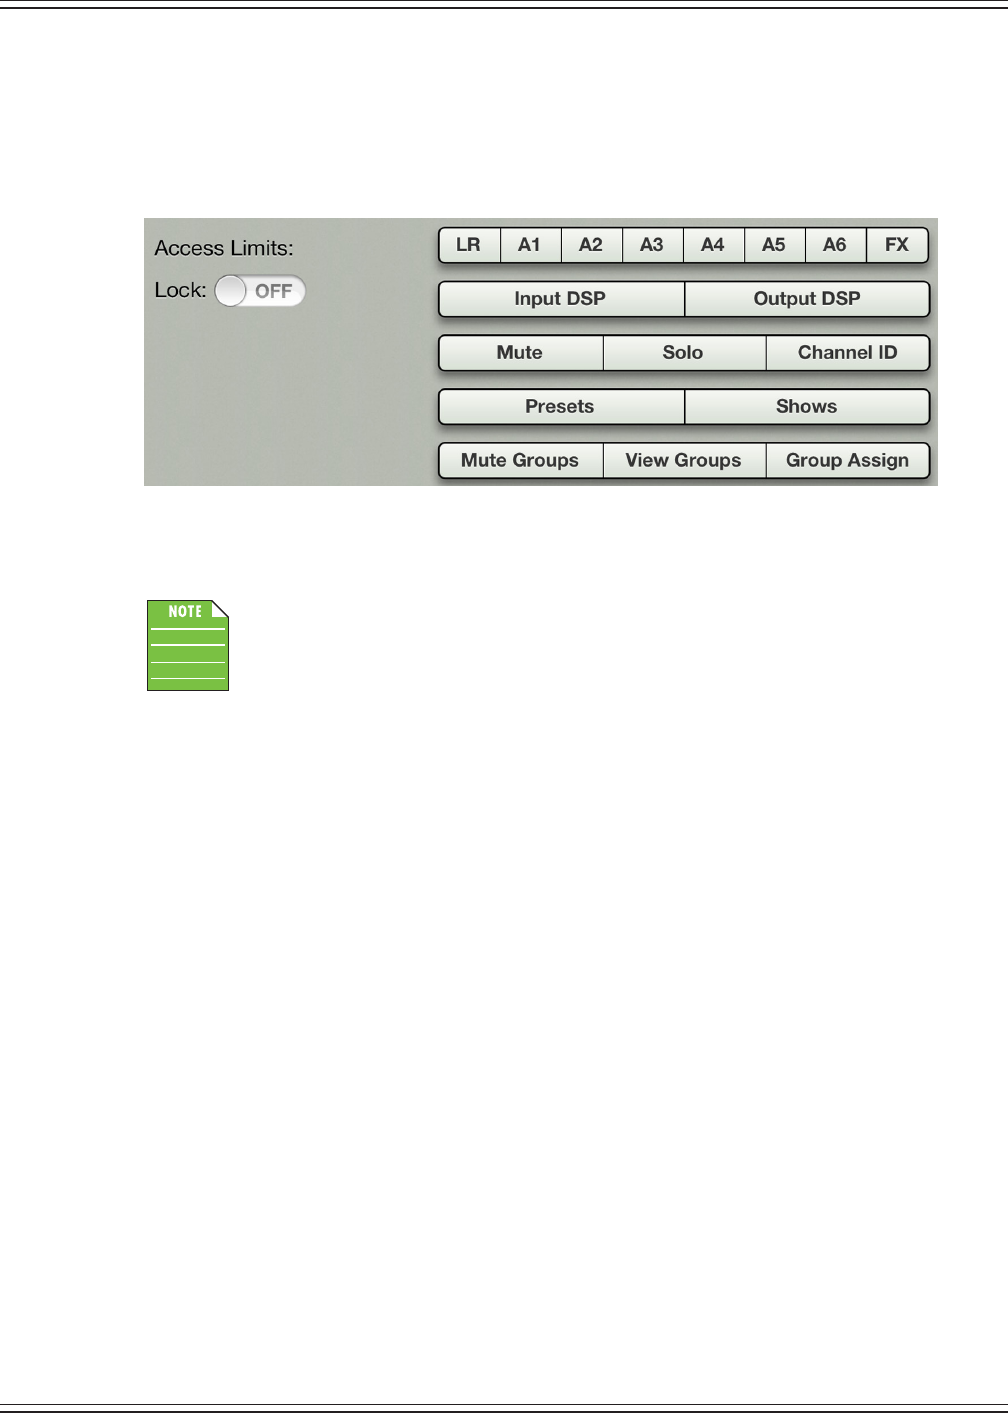
Mackie DL806 and DL1608 Reference Guide
109
Access Limits—ThissetofbuttonsallowsyoutolimitaccesstoavarietyofcontrolsoneachiPad.
Thisisusefulinmultiplesituations.Forexample,eachmemberofabandwithaniPadcanaccessand
changeonlythecontrolsyouchoose.Thesingerwon’tbethrilledaboutit,butweallknowthatyou’re
the one who really runs the show! This feature works great for FOH and monitor engineers, as well.
EachcanhavetheirowniPad,butwithouttheabilitytoaccessandruineachother’salready
glorious settings.
Withnoaccesslimitsbuttonspressed,theiPadcanaccessallcontrols.Withoneormorebuttons
pressed,thecorrespondingcontrolcannotbeaccessedorchangedfromthatiPad.Thefunction
of the limiting buttons is described below.
AccesslimitsaresetoneachiPad.Nomatterwhatmixerisconnected(orevenwhen
working oine) the limits will take eect.
•LR,A1-A6[ontheDL1608;LR,A1-A4ontheDL806]—Pressinganyoftheoutputbuttonswill
prevent access to the corresponding output in the output selector. They will appear grayed out
and cannot be selected. These are the most common limits, preventing any unwarranted changes
to the selected outputs. If either side of a linked aux send is access limited, the stereo aux will be
grayed out in the output selector.
•FX—LimitingtheFXpreventsaccesstoboththereverbanddelayeectsendsANDthereverb
and delay channel view screen. However, the eect returns for any unlimited output may still
be adjusted, allowing the total amount of reverb for the output to be adjusted.
BUT,theuserwillnothavetheabilitytochangeanyoftheglobalreverbordelaycontrols.
•InputDSP—Whenengaged,theuserwillnotbeabletoaccesstheinputchannelviewsforEQ,
gate and compressor. If the FX limit is also engaged, they will not be able to access the input
channel view at all and the EQ curve at the top of each channel will be grayed out.
•OutputDSP—Whenengaged,theuserwillnotbeabletoaccesstheoutputchannelviewsfor
graphicEQandcompressor/limiter.Additionally,thegraphicEQcurveatthetopofthemaster
fader will be grayed out.
•Mute/Solo/ChannelID—Thesebuttonswilllimitaccesstothecorrespondingchannelcontrols
and gray them out.
•Presets/Shows—Thesebuttonswilllimitaccesstothepresetand/orshowscreensandgrayout
the corresponding button.

Mackie DL806 and DL1608 Reference Guide
110
•MuteGroups/ViewGroups/GroupAssign—Thesebuttonswilllimitaccesstothecorresponding
groupcontrolsandgraythemout.That’stheshortversion.Let’stakeacloserlookatthesethree
access limits in detail, starting on the far right with group assign.
•GroupAssign—Oncetheuserhasconguredthechannelsassignedtothemuteand
view groups, enable the group assign limit to prevent any changes to those assignments.
The band will still be able to enable and disable mute masters and view groups, but they
won’tbeabletomakechangestothemuteandviewselectgroupassignments.Slick!
•MuteGroups—Enablingthemutegroupslimitbuttonwillpreventaccesstothemute
group masters. This is useful for when FOH may need to use mute groups for the show,
buttheydon’twantthebandmembersaccidentally(orpurposefully!)enablingamute
group with their iOS device.
•ViewGroups—Enablingtheviewgroupslimitbuttonwillpreventaccesstothe
viewgroupselects.Afterassigningchannelstothevariousviewgroups,selectthe
correspondingviewgrouponeachbandmember’siOSdeviceandenabletheview
groups access limits button so the band members can only view what channels pertain
tothem.It’sfoolproof...evenfortheleadsinger!Hardtobelieve,butit’strue.
See pages 132-141 for more information about mute groups and view groups.
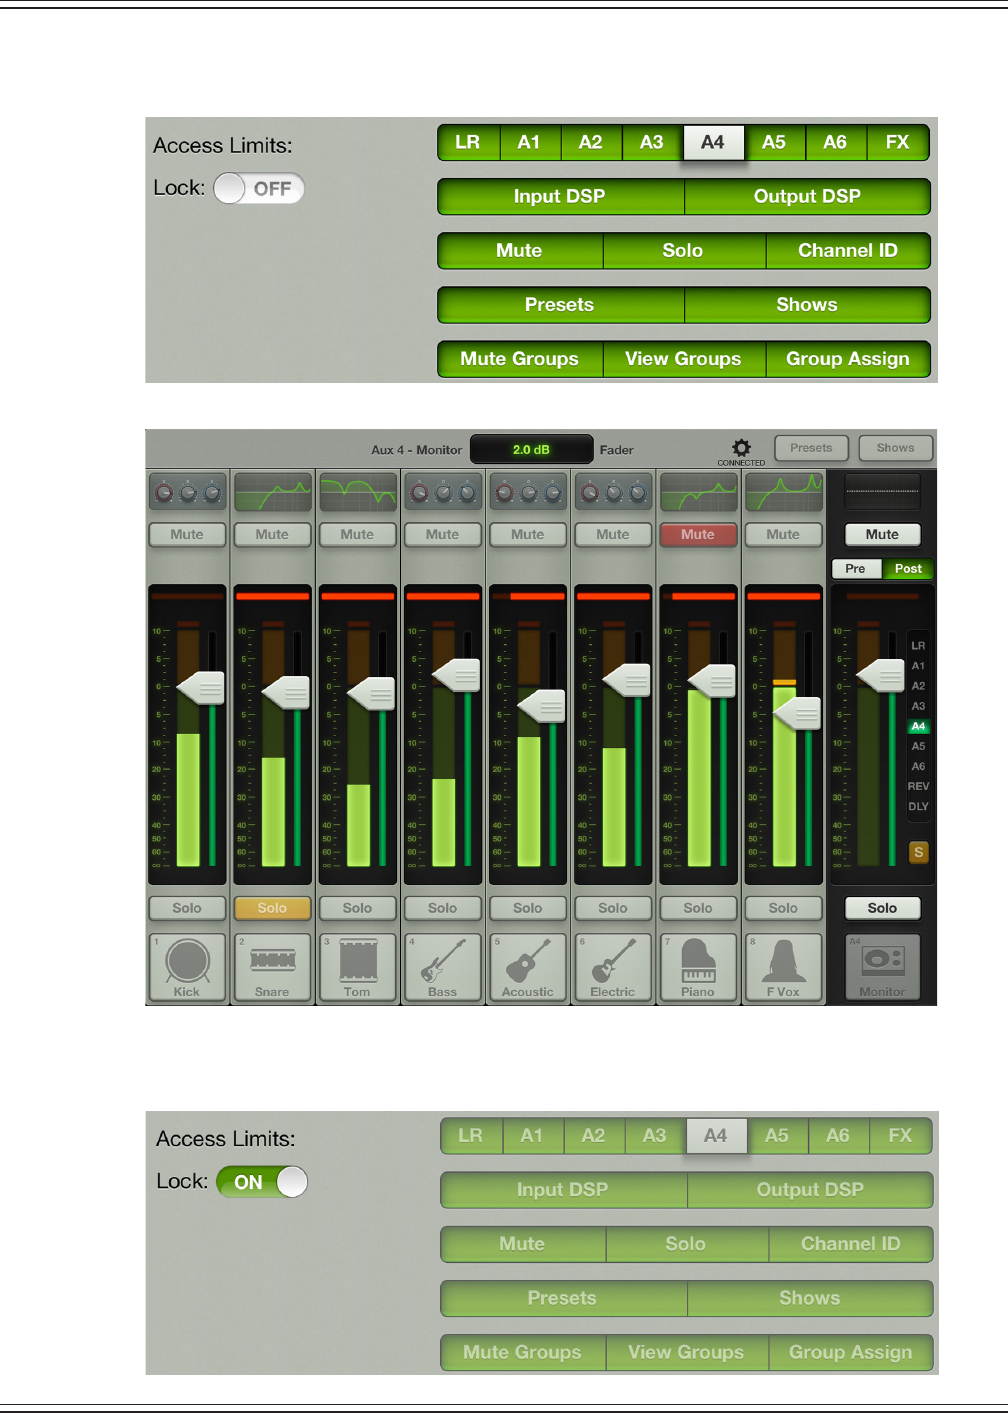
Mackie DL806 and DL1608 Reference Guide
111
ThefollowingscreenshotsshowsatotallylockeddowniPadwithaccesstoaux4only.Youcanseethe
mixer view shows these limits with grayed out controls.
Additionally,alockswitchallowstheengineertolimitchangestotheaccesslimitscontrolsby
setting a four character passcode. Simply congure the access limits as desired and change the
lockswitchtoON.
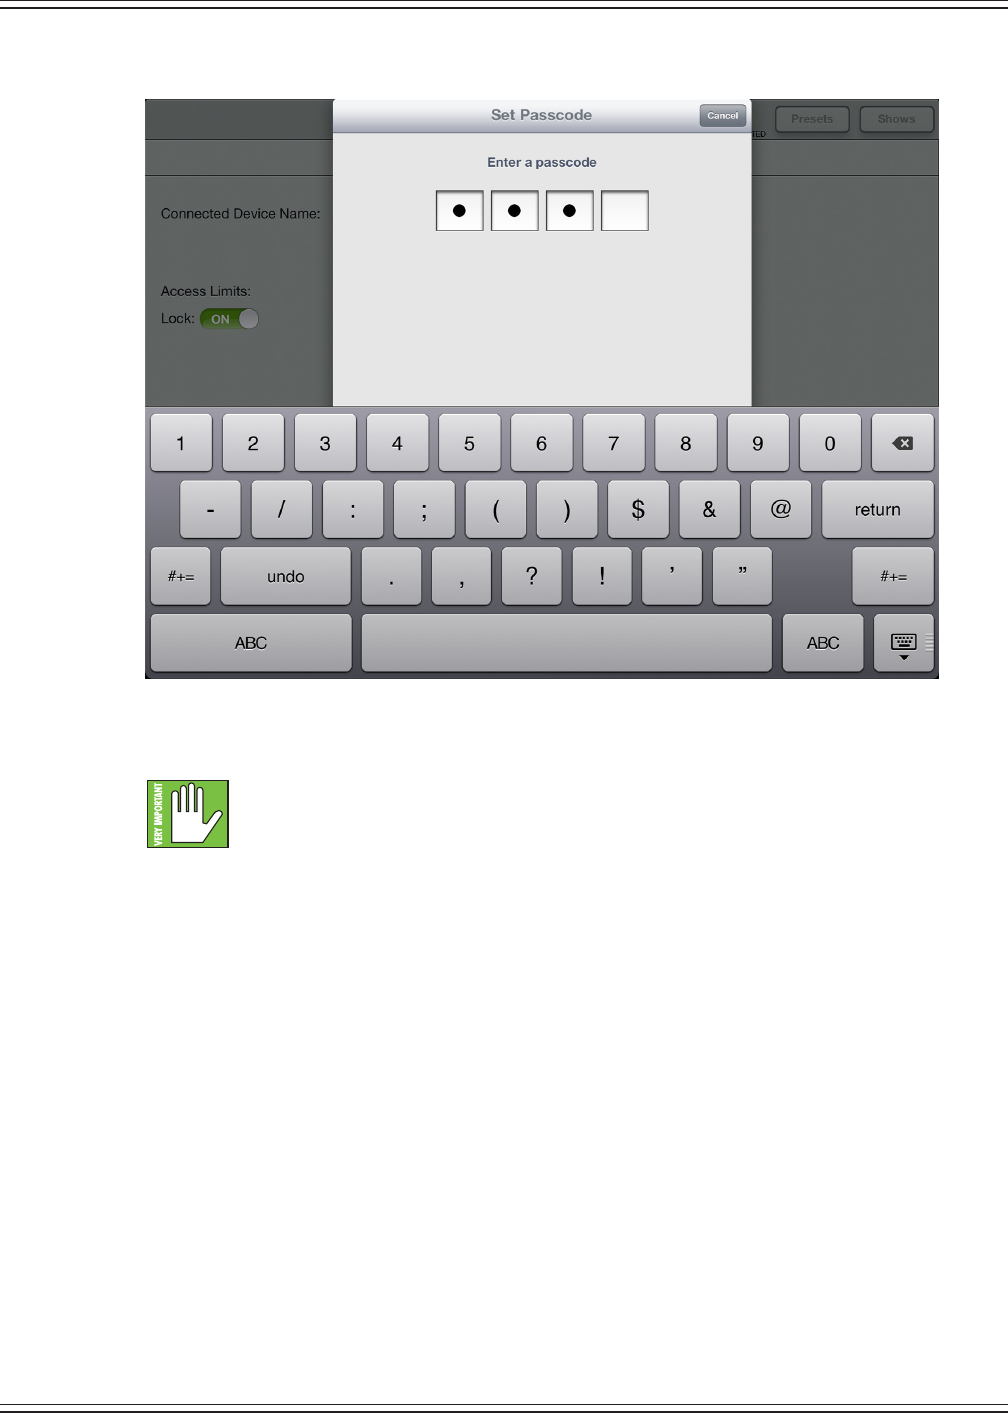
Mackie DL806 and DL1608 Reference Guide
112
Atthistime,youwillbepromptedtoenterandconrmafourcharacterpasscode.
The access limit controls will now be grayed out, preventing any unwarranted changes.
To adjust them again, change the lock switch back to OFF and enter the four character passcode.
Be sure to remember the passcode! If you forget, you will not be able to access these
controlseveragain!Readthatagain...noaccesstothelimitcontrolsifyoulockitandcan’t
recall the passcode. Ok, ok, you can access them again, but you will need to uninstall and
thenre-downloadandinstalltheMasterFaderapptoresettheapp.Unfortunately,thiswillalsodelete
all stored snapshots, shows and presets, as well as any recordings not yet copied to the hard drive.
Yeah,webetyou’llrememberthatpasscodenow!
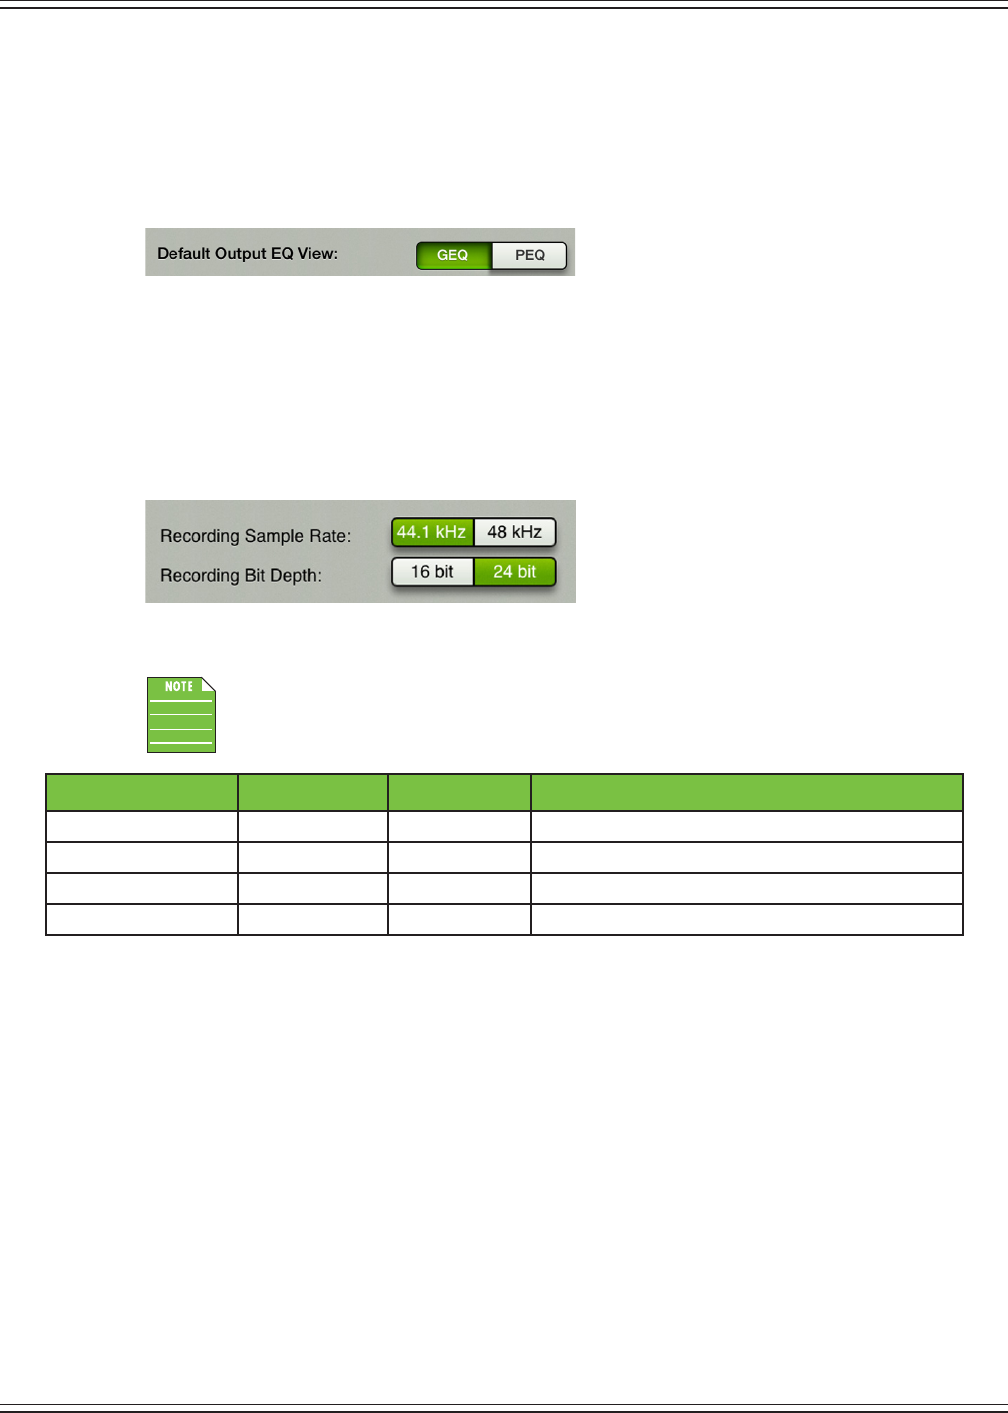
Mackie DL806 and DL1608 Reference Guide
113
Default Output EQ View — The main LR and each aux send both feature graphic EQ and parametric
EQ. Of course tapping the output EQ takes you to that view, but you get to decide whether the graphic
EQorparametricEQisthedefault.Thecurrentsettingsarelocatedunderneath‘AccessLimits’.Simply
tap which setting you prefer. The chosen setting will illuminate green when engaged, while the other
option will be grayed out. Whichever output EQ view is chosen, you can always swipe in the output
view to get to the other.
Recording Sample Rate and Bit Depth—Youareabletochoosethequalityoftherecordingsample
rate[44.1kHzor48kHz]andrecordingbitdepthsettings[16bitor24bit].Thecurrentsettingsare
locatedunderneath‘DefaultOutputEQView’.Simplytapwhichsettingsyouprefer.Thechosensettings
willilluminategreenwhenengaged,whiletheotheroptionwillbegrayedout.Notethatthesesettings
cannot be changed while recording is in progress. See the recording section on pages 51-52 for more
informationaboutrecordingashowtoaniPad.
Recording is limited to 4 GB and will stop when the limit is reached. See the table below
for the maximum recording time based upon the chosen sample rate and bit depth.
Sample Rate Bit Depth File Size Maximum Stereo Recording Time
44.1k 16-bit 4 GB 6 hours, 17 minutes
44.1k 24-bit 4 GB 4 hours, 11 minutes
48k 16-bit 4 GB 5 hours, 47 minutes
48k 24-bit 4 GB 3 hours, 51 minutes
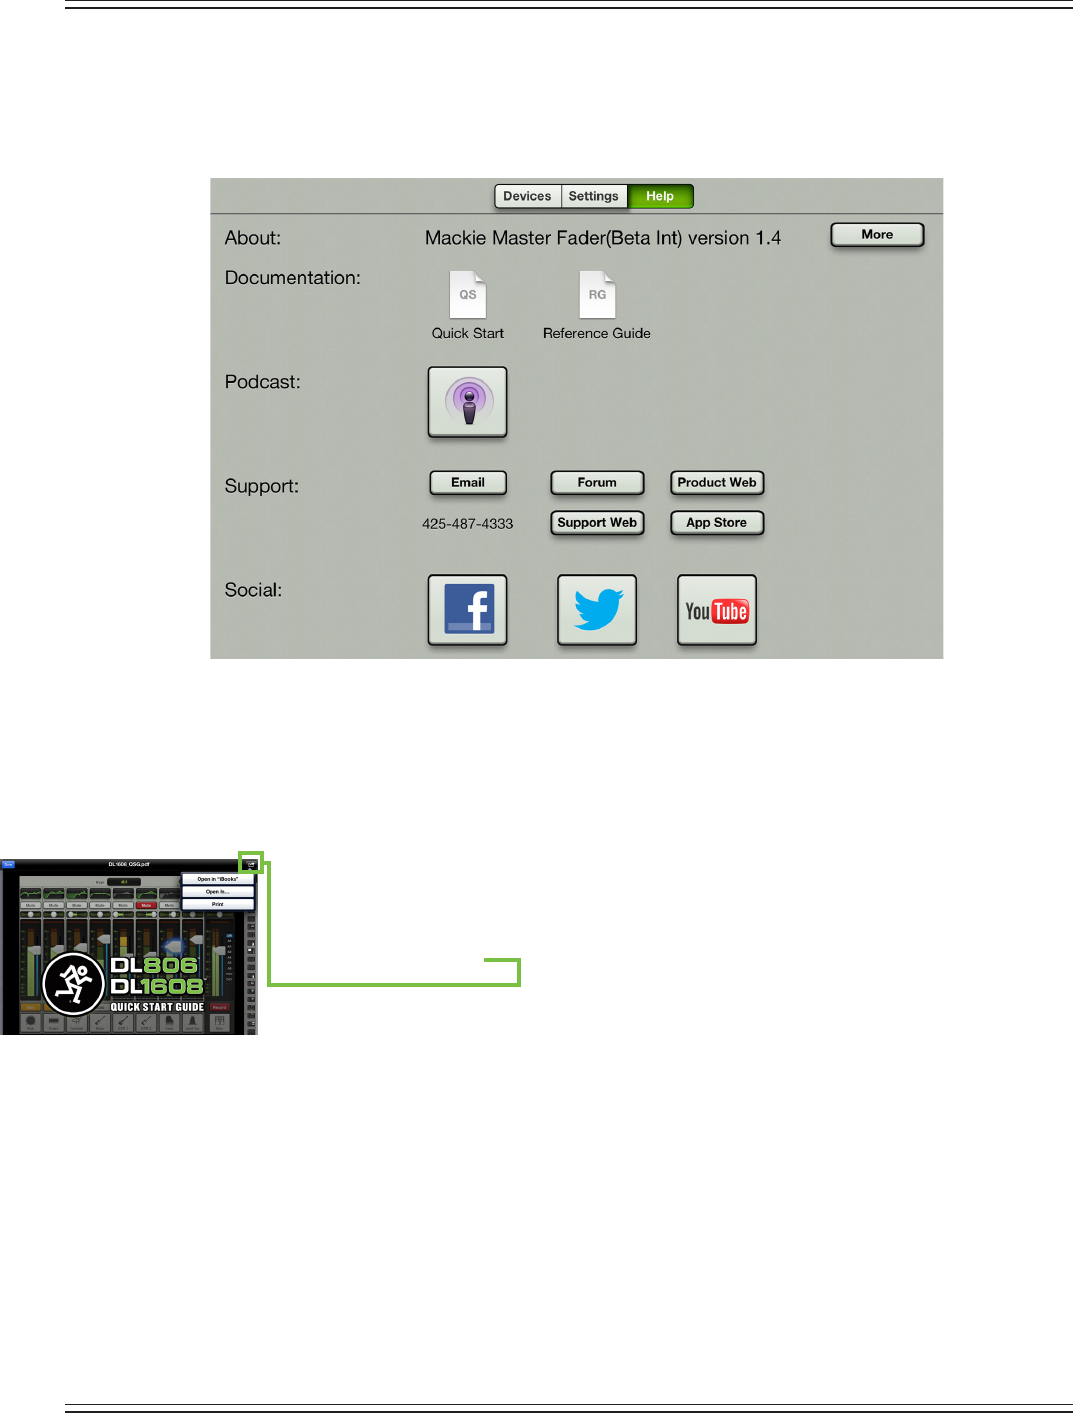
Mackie DL806 and DL1608 Reference Guide
114
Help
We’rewithyoueverystepofthewayandhere’swheretogoifyouneedfurtherassistanceorsimply
want to seek additional information about the DL Series mixers. There is plenty enough to go around
for everyone and we share nice!
The list below describes all of the goodies as shown in the image above:
About—AboutdisplaystheMasterFaderAppversionthatiscurrentlyinstalledontheiPad.
More — Tap the more button to reveal detailed version information about the app and rmware
of the connected device. For the most part, this information is useless mumbo jumbo. There is
no need to go here unless requested by Technical Support.
Documentation—Needalittleinformation?TaptheQuickStartGuidelinktoopenit
(asseenintheimagetotheleft).OrmaybeyouneedALOTofinformation.Inthiscase,
tap the Reference Guide link instead. If you prefer to view either (and/or save either) in
iBooks,GoodReader,AdobeReader,etc.,justtapthecurvedrightarrowintheupper-right
corner of the document.
Printingthedocumentsfromhereisalsoanoption.
Podcast—TapthePodcastlinktoopentheiTunespodcastpageiniTunesoronthePodcastapp
ifithasbeendownloadedandinstalledontheiPad.YouwillhaveaccesstoalloftheDLSeries
mixers podcast videos right here at your ngertips. This a great way to familiarize yourself with all
aspects regarding the DL Series mixers and Master Fader app.
Support—Soyouneedtotalktosomeoneandyourpsychiatristdoesn’tknowtherstthing
aboutproaudio?We’vegotyourback!Supportprovidesallthephonenumbers,emailaddresses,
forumlinksandotherURLsthatyoucouldeverneed.
Social — Well, all the kids are doing it and we are, too. If you have a Facebook account you
should‘like’us.IfyouhaveaTwitteraccount,youshould‘follow’us.Andifyoulikewatching
awesomevideos,checkoutsomeofourYouTubevideos.Socialshowsyoutheway.
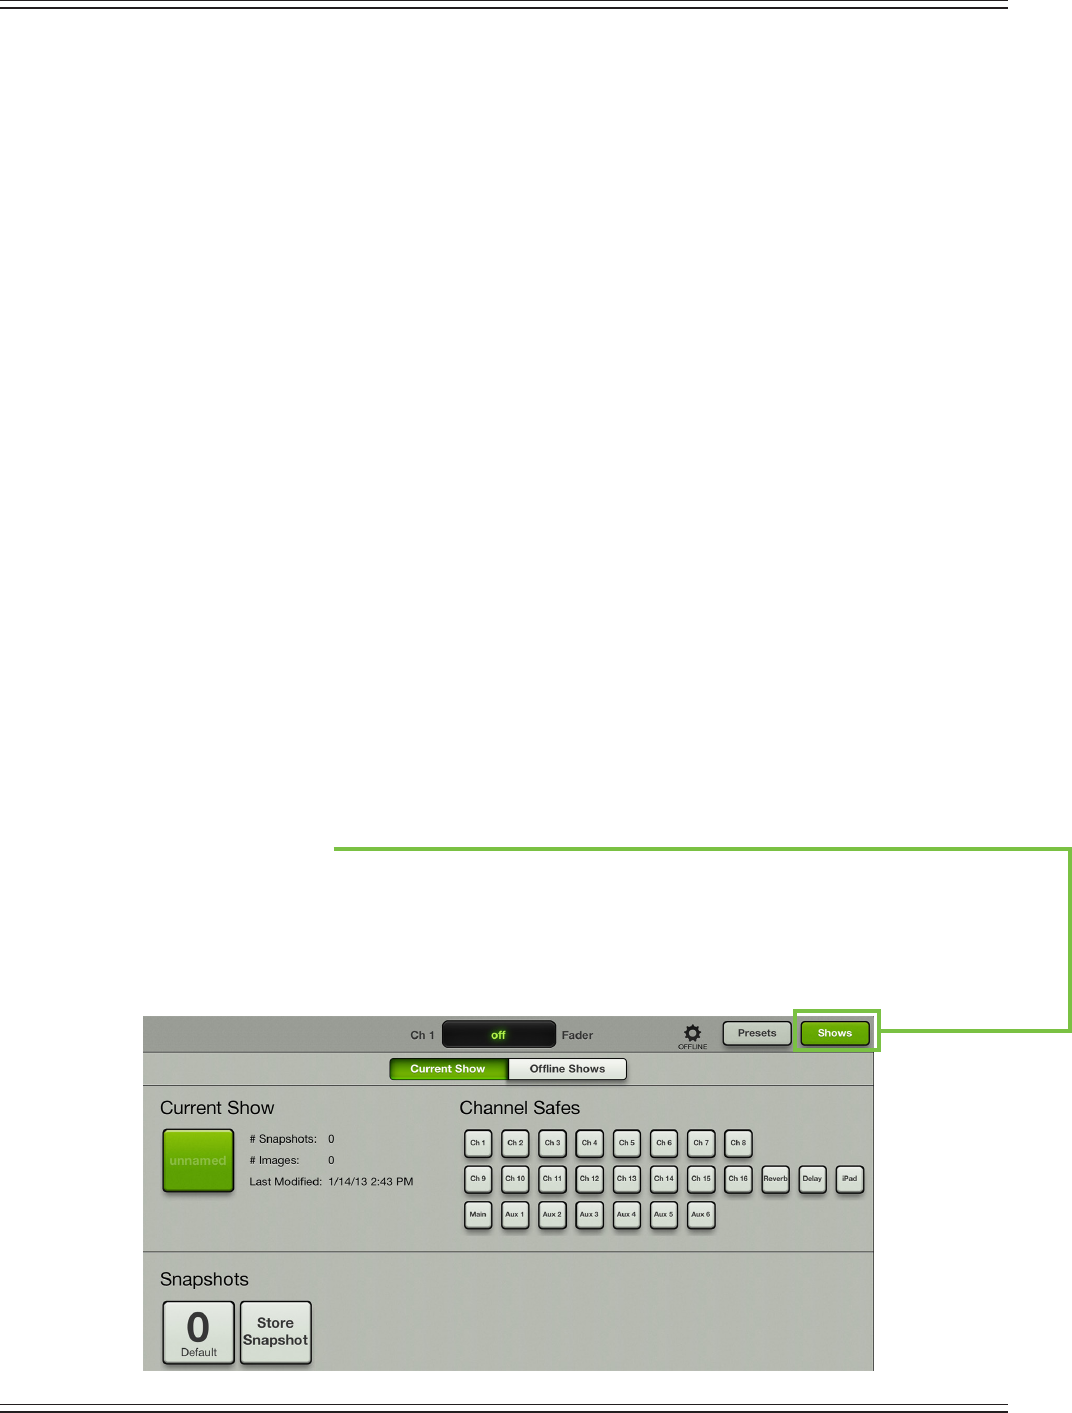
Mackie DL806 and DL1608 Reference Guide
115
File System
The DL806 and DL1608 save every parameter associated with its operation with the exception
of the power switch, gain and phone knobs. The current state of all parameters is constantly stored
so the console powers on in the same state as when it was turned o, just like an analog console.
The le system consists of the following:
(1) Current State —
When the DL806 or DL1608 mixer is turned on, it wakes in the state
that it was in when it was powered o.
(2) Shows [pages 115-117, 121-124]—Ashowiscomprisedofmultiplesnapshotsinorder.
Multiple shows may be created, but only one show is loaded at a time.
(3) Snapshots [pages 117-119] —
Asnapshotisjustthat:a“photograph”ofthecurrentstate
of the mixer.
(4) Channel Safes [pages 119-120]—Channelsafesallowselectedchannelstoberemoved
from snapshot recall, leaving them unchanged.
(5) Presets [pages 125-131] —
Presetssaveinputandoutputparametersonindividualchannels
andonparticularDSPblockssuchasEQ,dynamics,input,output,FX,etc.
Shows
OneofthemostimportantfacetsoftheMasterFaderistheabilitytocreateshows.Atypicalconcert
consists of the headliner and the supporting act. Since the support act kicks o the show and warms
upthecrowd,itmakessensetostartthere.Creatingshowsisnotjustforconcerts,though.Feelfree
tosetupmultipleshowsforconferences,churchservices,theaterproductionsandmore!Asmentioned
above, a show is comprised of multiple snapshots in order with one show loaded on the mixer at any
giventime.ThisiscalledtheCurrentShow.Theamountofshowsthatmaybecreatedislimitedonly
bytheavailablespaceontheiPad,withupto99snapshotspershow.Creatingshowsiseasyandwill
makeyourlifeinnitelybetter,solet’srunthroughsomestepstoseehowit’sdone.Pleasefollow
along slowly, carefully and step-by-step!
Step 1 — Tap shows:
Therststepistheeasiest:tapthe“Shows”buttonintheupperright-handcorneroftheiPad;
the image below is similar to what you should see upon your rst trip to the show zone. The button
will illuminate green, indicating your presence in the shows section. The absence of anything mixer-ey
likealsoindicatesthesame.ThemixeralwayshasaCurrentShowloaded,soifthisisyourrstvisit,
youwillseeanemptyCurrentShow.Ifso,thereisnoneedtocreateanewshowjustyet.Instead,we
will create some new snapshots that will make up your rst show.
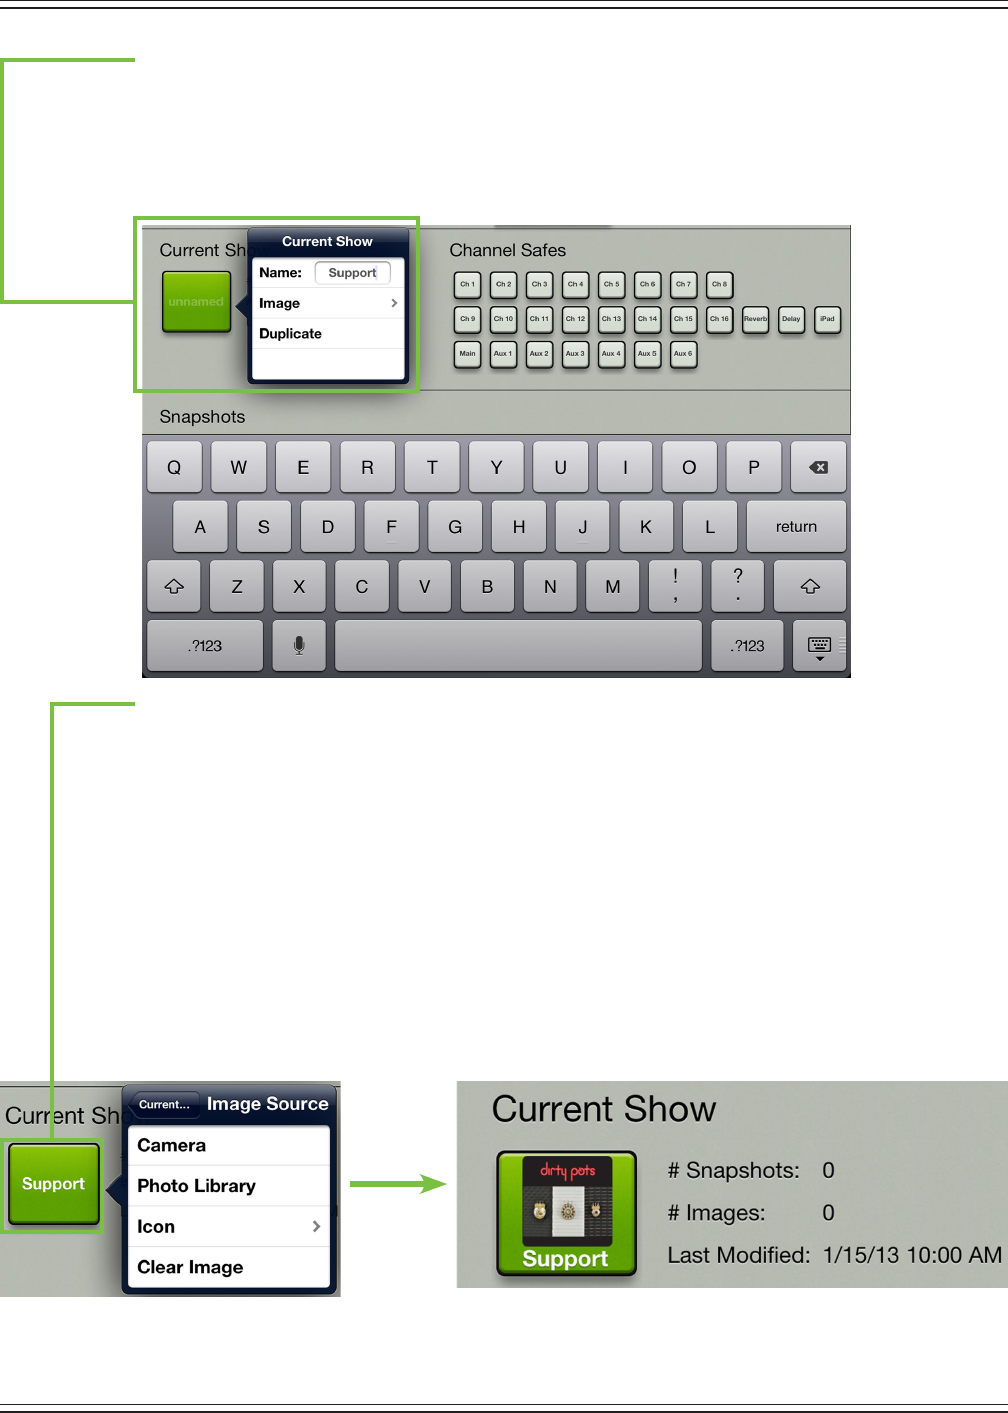
Mackie DL806 and DL1608 Reference Guide
116
Step 2 — Name the show:
Eachnewshowbeginsas“unnamed”.However,withmultipleshows,
tryingtondtheexact“unnamed”showthatyouwantcouldprovetobedicult,tosaytheleast.
Solet’snameit.Tapthegreen“unnamed”buttontorevealapopover,asseenbelow.
Tapinsideoftheblank“Name:”boxtorevealtheonscreenkeyboard,thennamethecurrentlyselected
showasyousodesire.Tapthe“return”keywhensatisedwiththename.Ifthenameistoolongto
t, the button scrolls, displaying the entire name
.
Step 3 — Looks are everything:
Looksareeverything...orsoI’veheard.Let’ssaythemixerisontour
wherethesupportactandheadlinermaychangeonanygivennight.It’snotfarfromtherealmof
possibilities and happens more often than folks might think. Therefore, it might be helpful to not just
name the show, but also select an image, so as not to open the wrong show...oops! Tap the show button
torevealthepopoveragain.Thistime,insteadofnamingtheshow,tap“Image”insteadtorevealanew
popover,asseenbelow.Youwillbepresentedwiththreechoices:
Camera — Ifyou’refamiliarwithhowthecameraontheiPadworks,thenyou’reinluck...this
one works the exact same way! The encircled camera icon in the middle of the gray bar snaps
the picture and the icon in the upper-right corner selects between the front and back camera
ontheiPad.[CameraisunavailableontherstgenerationiPad].
Photo Library — HereyoumayselectfromallthephotosthatcurrentlyresideonyouriPad.
Icon — Or select from a multitude of built-in icons at your disposal.
Clear Image — Believe it or not, tapping here will clear the image for the show.
Asyoucanseeintheexampleabove,DirtyPotsarethesupportact,sowesnaggedtheiralbumcover
fromthephotolibrary.Noticethattheshownowsays“Support”insteadof“unnamed”.Also,eachshow
isdateandtime-stamped;itwilldisplaythenumberofsnapshotsandimagesusedineachshow,aswell.

Mackie DL806 and DL1608 Reference Guide
117
Youmayhavenoticedathirdchoiceinthepopoverwhentheshowsbuttonistapped–Duplicate.
Duplicate will create an exact copy of the current show. This is useful in situations where two (or more)
shows may be quite similar, with only a few minor changes between them. For example, a band could
havealongsetlistandshortsetlist.Aftercreatingtheshowcontainingthelongsetlist,duplicateit
anddeletethesnapshotsfromtheshowthatwon’tbeusedwhenthebandplaysthesongsontheshort
setlist.Anotherscenarioissettingshowsformultiplevenues.Savetherstshowbynamingitasthe
rst venue, duplicate it at the next venue, make the appropriate changes and save it by naming this as
the second venue and so on and so forth. When the band makes return visits to each of the venues,
the settings are readily available at the tap of a button! Why do the same work multiple times instead
ofjustduplicatingtheoriginalandthentweakingthecopyasneeded?It’sbesttowaituntilsnapshots
havebeencreatedfortheshowbeforeyouduplicate.Sowhataresnapshots...?
Snapshots
Asmentionedearlier,asnapshotisjustthat:a“photograph”ofthecurrentstateofthemixer.
Sowhywouldyoucreatesnapshots?Foroneexample,abandcouldcreatesnapshotsforevery
song. Or snapshots could be created with and without FX. Snapshots may be created for in-between
song banter. Snapshots may be created for each scene in a musical or other theater performance.
Houses of worship may create snapshots containing key changes of each service. The possibilities
are unlimited!
The following is a list of features that may be snapshot:
•Inputchannelsettings
•FXchannelsettings
•Auxchannelsettings
•MainLRchannelsettings
•ChannelID
The following is a list of features that may not be snapshot:
•Solo
•AccessLimits
•BoardSettings
Ok,that’swhattheyare,buthowdoyoucreatethem?
Step 4 — Creating snapshots:
Creatingsnapshotsiseasy.Simplysetfaderlevels,EQ,gates/comp,etc.
for each snapshot that you are going to want to recall
at a later time.
Asuser-friendlyascreatingsnapshotsmaybewithMasterFader,ifthisisyourrsttime
creating them, it might be best to start o simple until you get the hang of it. Go ahead
and move some faders around, name some channel inputs and load up a couple of images,
as well. If feeling brave, set some EQs, gates and compressor levels, too.
NowreturntotheShowsviewbytappingit.Atthebottomoftheshowsviewyoushouldseeasection
labeled“Snapshots”.Itmaybemostlybarrennow,butwillllupsoon.Thisareaiscalledthesnapshot
list.Atthebeginningofthesnapshotlistisabuttonlabeled“0-Default”andattheendofthesnapshot
listisabuttonlabeled“StoreSnapshot”.Tappingthe“StoreSnapshot”buttonwillstorethecurrentstate
oftheconsole[thefaders,EQs,gatesandcompressors,etc.thatyoujustset]intoanewsnapshotand
movethe“StoreSnapshot”buttontotheendofthesnapshotlist.Doingthisissimilartopressinga
“Store”buttononotherconsoles.
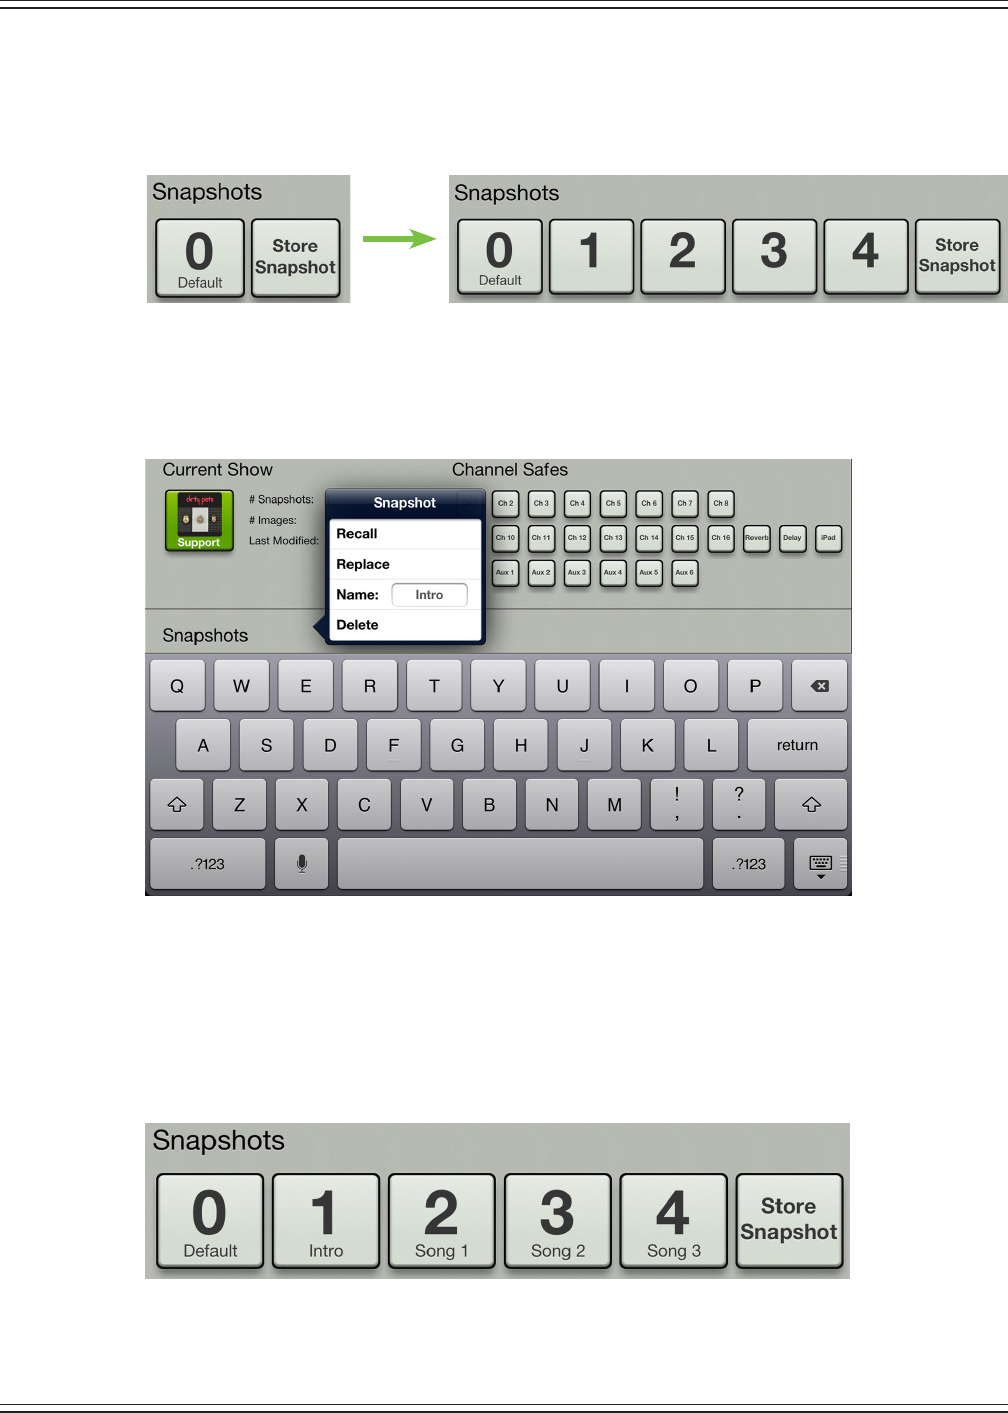
Mackie DL806 and DL1608 Reference Guide
118
Repeat this step a couple more times. Go back to the mixer view and channel view to change the mixer
settings,andstorethesesnapshotsintheshowsviewasindicatedabove.Atthispoint,thesnapshot
list will look somewhat like the image below (depending upon the number of snapshots you took,
of course!).
Step 5 — Naming snapshots:
Youcreatedabunchofsnapshotsforyourrstshow,buthowdoyou
knowwhateachonerepresents?Bynamingthem,ofcourse!
Touching a snapshot button (other than
“0-Default”or“StoreSnapshot”)willdisplayapopoverwiththefollowingoptions
.
Tapinsideoftheblank“Name:”boxtorevealtheonscreenkeyboard,thennamethecurrentlyselected
snapshotasyousodesire.Tapthe“return”keywhensatisedwiththename.Ifthenameistoolongto
t, the button scrolls, displaying the entire name.
Noticethatthenumberremains,evenoncethesnapshothasbeennamed.Thishelpskeepthe
snapshots in order, regardless of name.
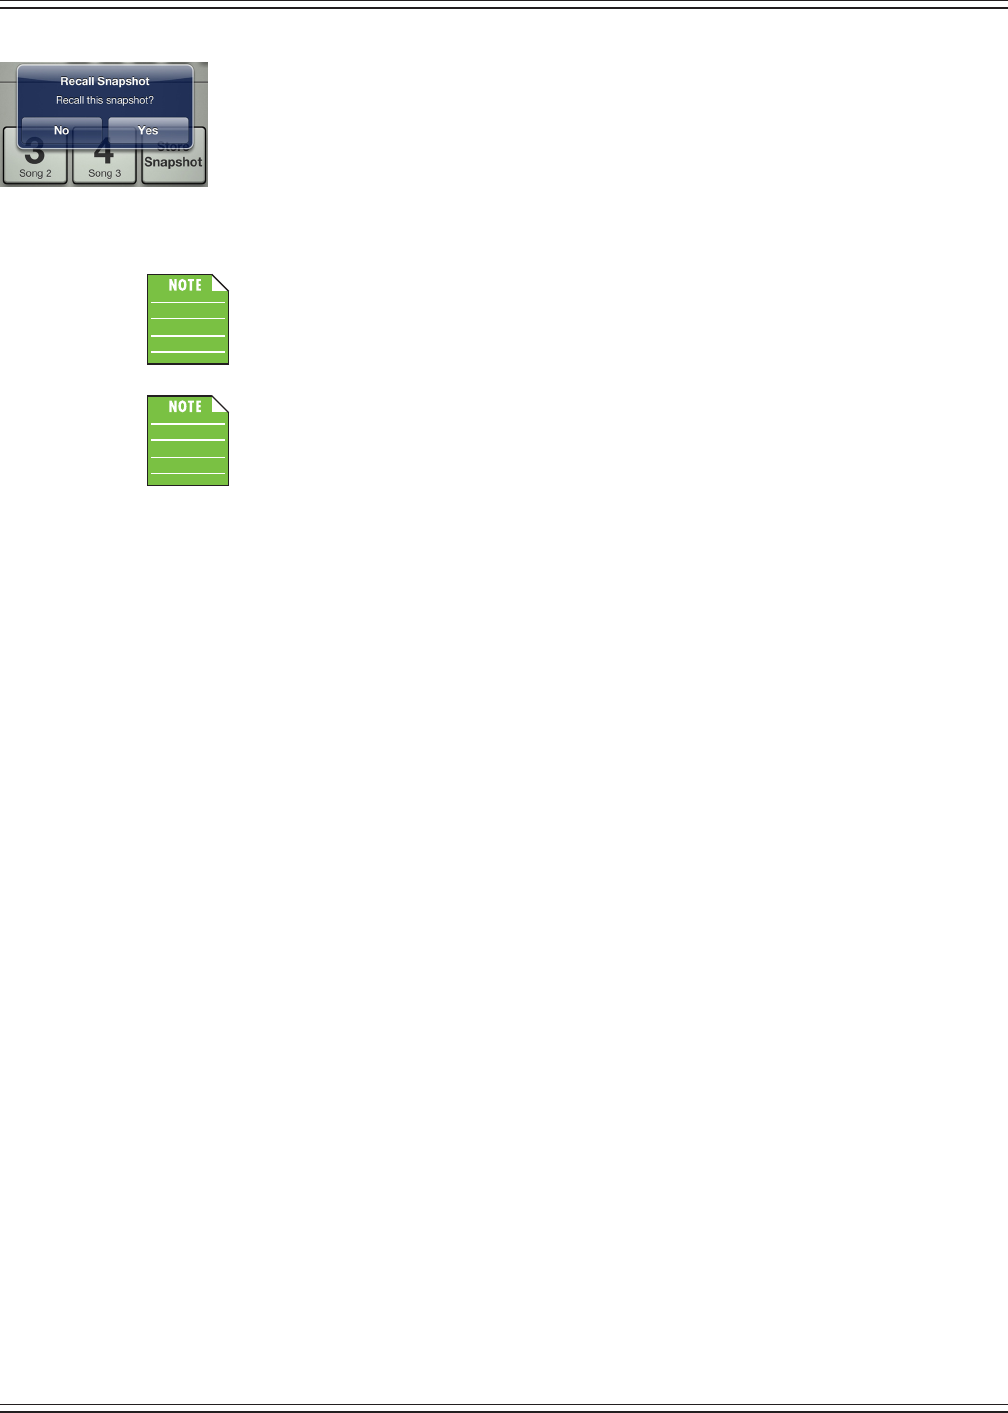
Mackie DL806 and DL1608 Reference Guide
119
Step 6 — Recalling snapshots:
Nowthatyou’vecreatedandnamedthesnapshots,
it’stimetorecallthem!
On recall, all appropriate console parameters change to match
the stored snapshot. In our example, recall each of the snapshots, starting with the Intro.
Tap the Intro button to reveal the popover as shown on the previous page, tap the Recall
buttontorevealaconrmationdialogasseentotheleft,thentaptheYesbuttontorecall
thesnapshot.Nowgobacktothemixerandchannelviews.Thesettingsyoucreatedfor
theIntrosnapshotwillberecalled.Dothesamethingwitheachsnapshot[Song1,Song2,Song3,etc.]
going back and revisiting the mixer and channel view each time to see the changes – wait for it – recalled!
Recallingsnapshot“0-Default”willsettheMasterFadertoitsdefault(which–forall
intentsandpurposes–isazeroedoutboard).Snapshot“0-Default”isalwayslistedrst
andcannotbereplaced,renamedordeleted;onlyrecalled
.
Input and output channel linking may be stored and recalled in snapshots so that a pair of
channels could be linked in one snapshot and unlinked in another.
Channel Safes
On the right-hand side of the shows view are small channel safe buttons. Engaged selections
will be removed from snapshot recall, leaving the corresponding channels or outputs unchanged.
These will illuminate green when engaged and are gray when disengaged. The following are available
for channel safes:
•Channelinputs
•Reverb[Controlsreverbsendandreturn]
•Delay[Controlsdelaysendandreturn]
•iPad
•MainLR
•Auxsends
When recalling a snapshot (including snapshot 0 - Default), the Master Fader app will not change any
parametersonsafechannels.Channelsafesettingsareglobalandappliedtoallsnapshotsintheshow.
They are saved and recalled with the show and recalled via power cycle.
Channelsafeswillstillbeindividuallytouchableforeachchannelandoutputregardlessoflinkedstate.
Linking or unlinking channels does not change the safe button states. If either channel of a linked pair
is marked safe in the shows screen, both will be treated as safe and not aected by the snapshot recall.
Similarly, when recalling a snapshot that unlinks the pair of channels, both will be treated as safe and
notaectedbytherecall.Soifyougetitwrongnoharmnofoul;simplymarkbothassafeorneither
of the channels as safe and recall again.
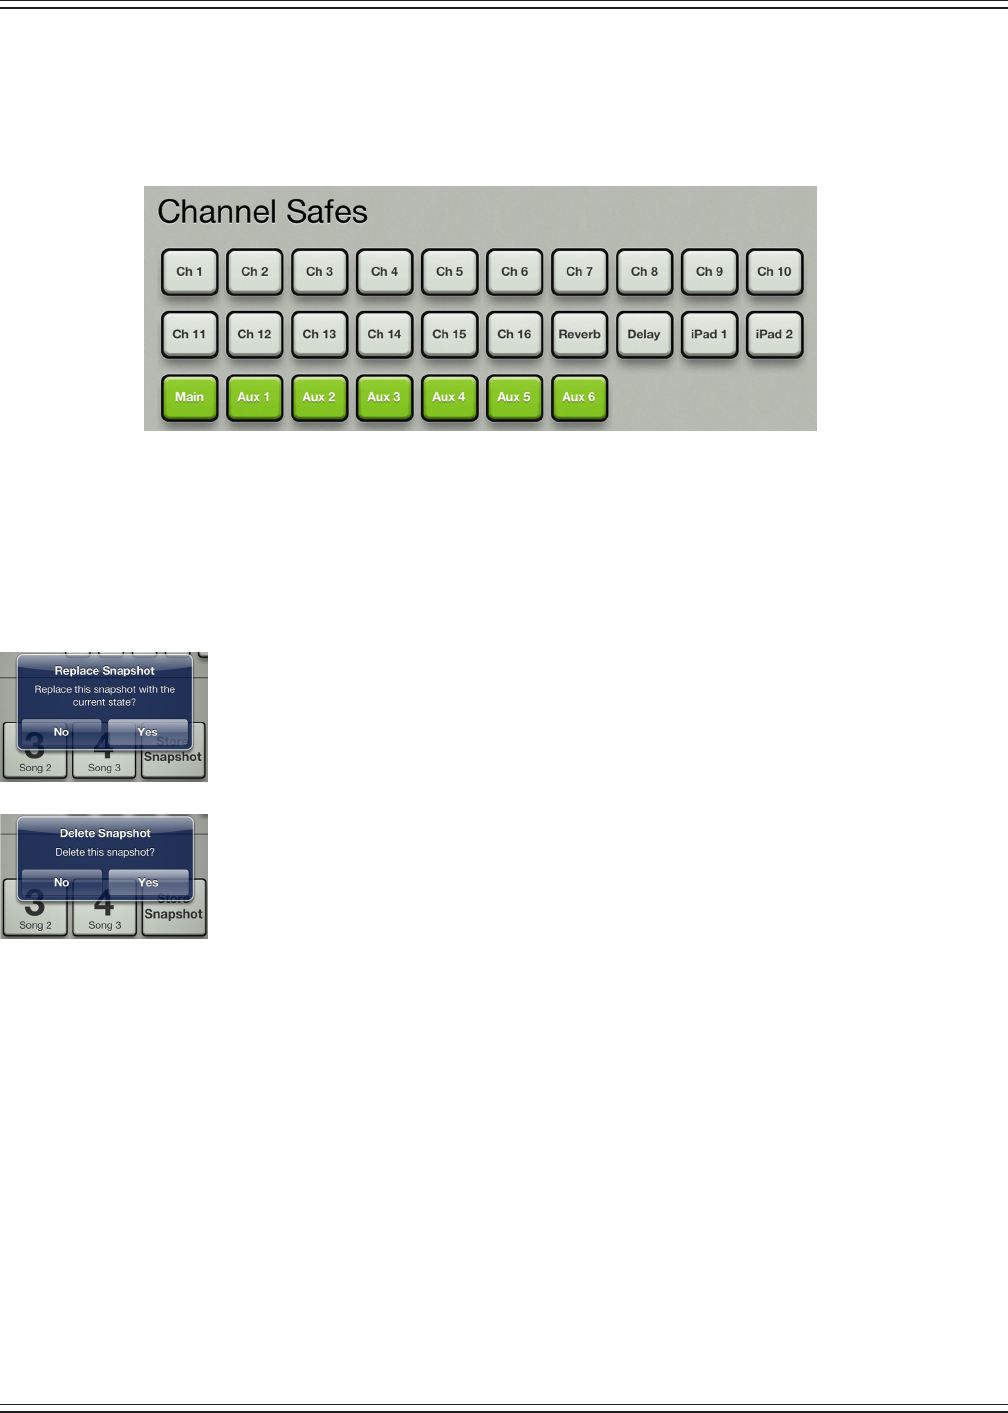
Mackie DL806 and DL1608 Reference Guide
120
Step 7 — Setting channel safes:
Let’sgiveitashottounderstandhowthisfunctionsalittlebetter.
Acommonscenarioforusingchannelsafesisonoutputs.Thisway,thesettingsonallinputchannels
willrecall,buttheoutputsettings[graphicEQandoutputcompressor/limiter]willnot.Selectall
outputs (as seen in the image below).
Nowthatwe’vesetchannelsafes,goaheadandrecallthesnapshotsagain[step6,previouspage].
There should now be no changes to the output settings when recalling any of the snapshots
(assuming,ofcourse,thatyoumadechangestotheoutputswhencreatingthesnapshots[step4,
threepagesback]).
Step 8 — Remaining snapshot popover choices:
Youmightbewonderingwhattheothersnapshot
popoverchoicesaccomplish.Well,you’reinluck,asheretheyare!
Replace — Saves the current state of the console over the selected snapshot. This is useful
in situations where the settings on a snapshot might be close to where you want them,
butnotquiteexactlywhereyouwantthem.Makeyourtweaks,thenselect“replace”to
replacethesnapshotwiththeupdatesfornexttime.Aconrmationdialogwillappear.
Delete — The delete button deletes the currently selected snapshot. This is a permanent
deletion with no undo, so a conrmation dialog helps prevent accidents.
DL1608 Channel Safes
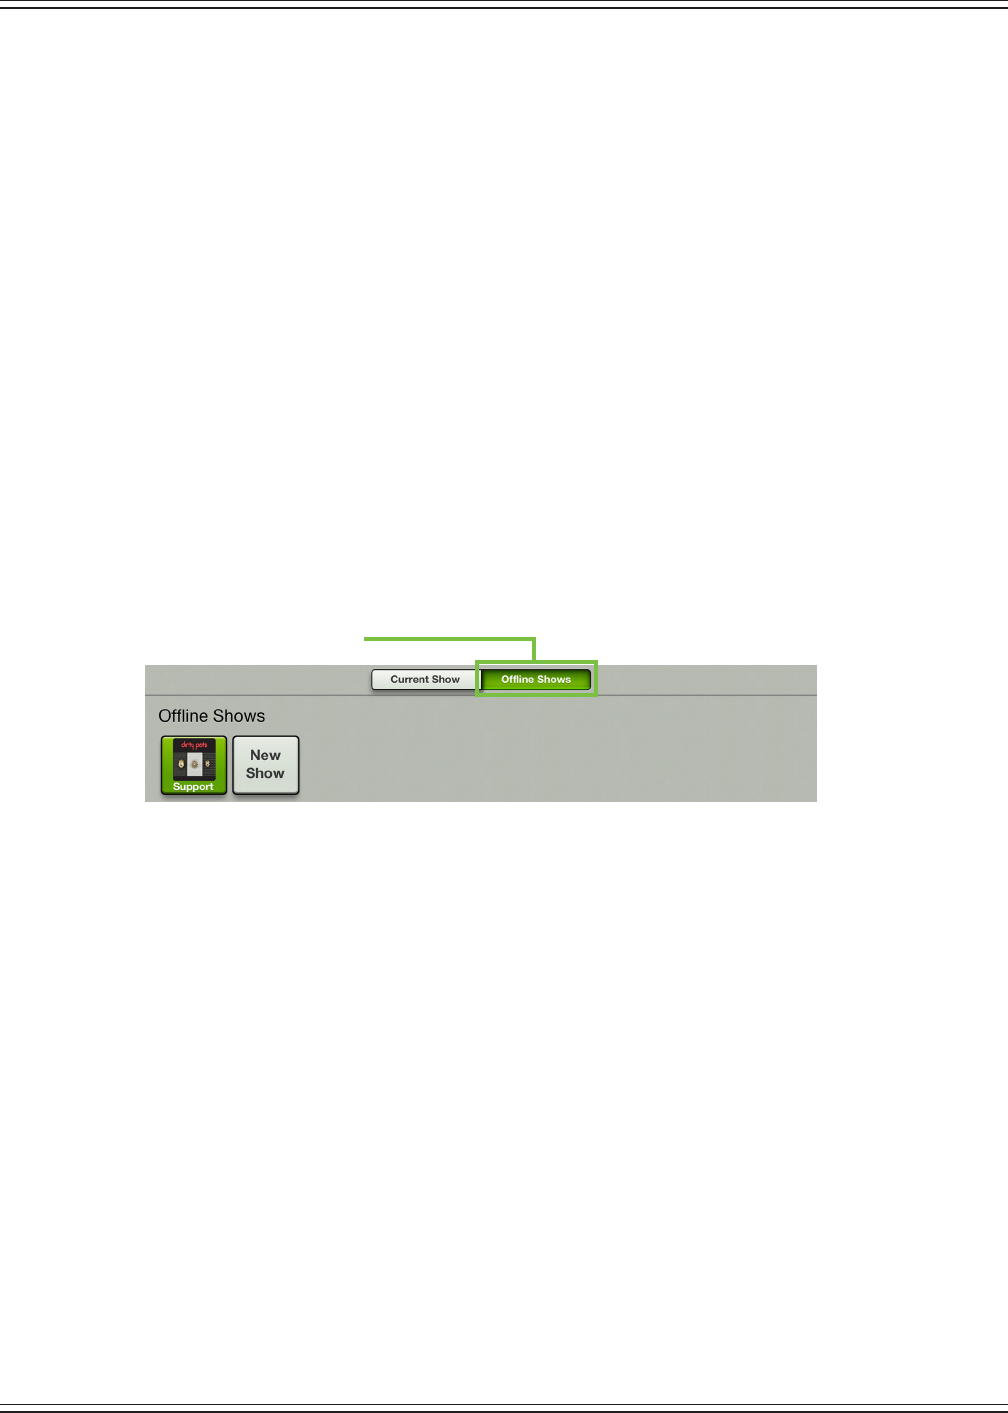
Mackie DL806 and DL1608 Reference Guide
121
Current Show vs Oine Shows
Soyou’vesuccessfullycreatedyourrstshow...congratulations!Creatingadditionalshowswill
beabreeze,butlet’stakeaquickpeekathowitworks.Asmentionedearlier,atalltimesthere
isasingleshowloadedonthemixer.WecallthistheCurrentShow.Additionaloineshows
may be created and stored, each with their own set of snapshots.
Here’sonewaytounderstandthedierencebetweencurrentshowsandoineshows:envision
your High School days. The textbook you have with you in the classroom would be considered the
currentshow.Eachpage[snapshot]islledwithdierentinformation,buttheyareallnecessaryto
makeupthetextbook[show].
Ok,sothetextbookyouhaveinclasswithyouisconsideredtheshowandit’scomprisedofXnumber
ofpageswitheachpageconsideredanothersnapshot.Sowhat(andwhere)areoineshows?Easy!
The various textbooks you have in your locker would be akin to oine shows. They are available when
youneedthem,butyoudon’tneedthematthemoment;youonlyneedthetextbook[show]forthe
classyou’recurrentlyin.And,ofcourse,eachtextbook[show]inyourlockeriscomprisedofmany
pages[snapshots].So,inourexample,wenamedthecurrentshow“Support”andchosetheDirtyPots
albumartworkfortheimage.Additionally,the“Support”showiscomprisedofsnapshotsnamed“Intro”,
“Song1”,“Song2”,etc...
Makesense?Ifso,let’smakeanothershow,thistimefortheheadliningband!
Step 9 — Creating additional shows: Start by tapping the shows button again.
Next,tap“OineShows”.
Here you can see all shows that have been created (which is why we strongly suggest giving each
showanameandimage!).Whatwillnotbeshownhereiseachshow’ssnapshots.Thesnapshotlist
will not be displayed until a show is loaded. The button of the currently loaded show will be green.

Mackie DL806 and DL1608 Reference Guide
122
Attheendoftheshowlistisagraybuttonlabeled“NewShow”.Tapthisbuttontocreateanewshow
andmovethe“NewShow”buttontotheendoftheshowlist.Youwillbepromptedimmediatelyto
name this new show.
Inthisexample,wenamedit“Headliner”.Type“Headliner”inthenameeldfollowedbytapping
the return key to see an image similar to what is displayed below.
Atthispointtheshowhasbeencreated,butitisstillanOineShow.IthastobetheCurrentShow
inordertoviewandloadsnapshots.That’seasy!JusttaptheHeadlinerbuttontorevealapopover
similar to what is displayed at the top of this page. From there tap the Load button to reveal an image
similar to what may be seen below.
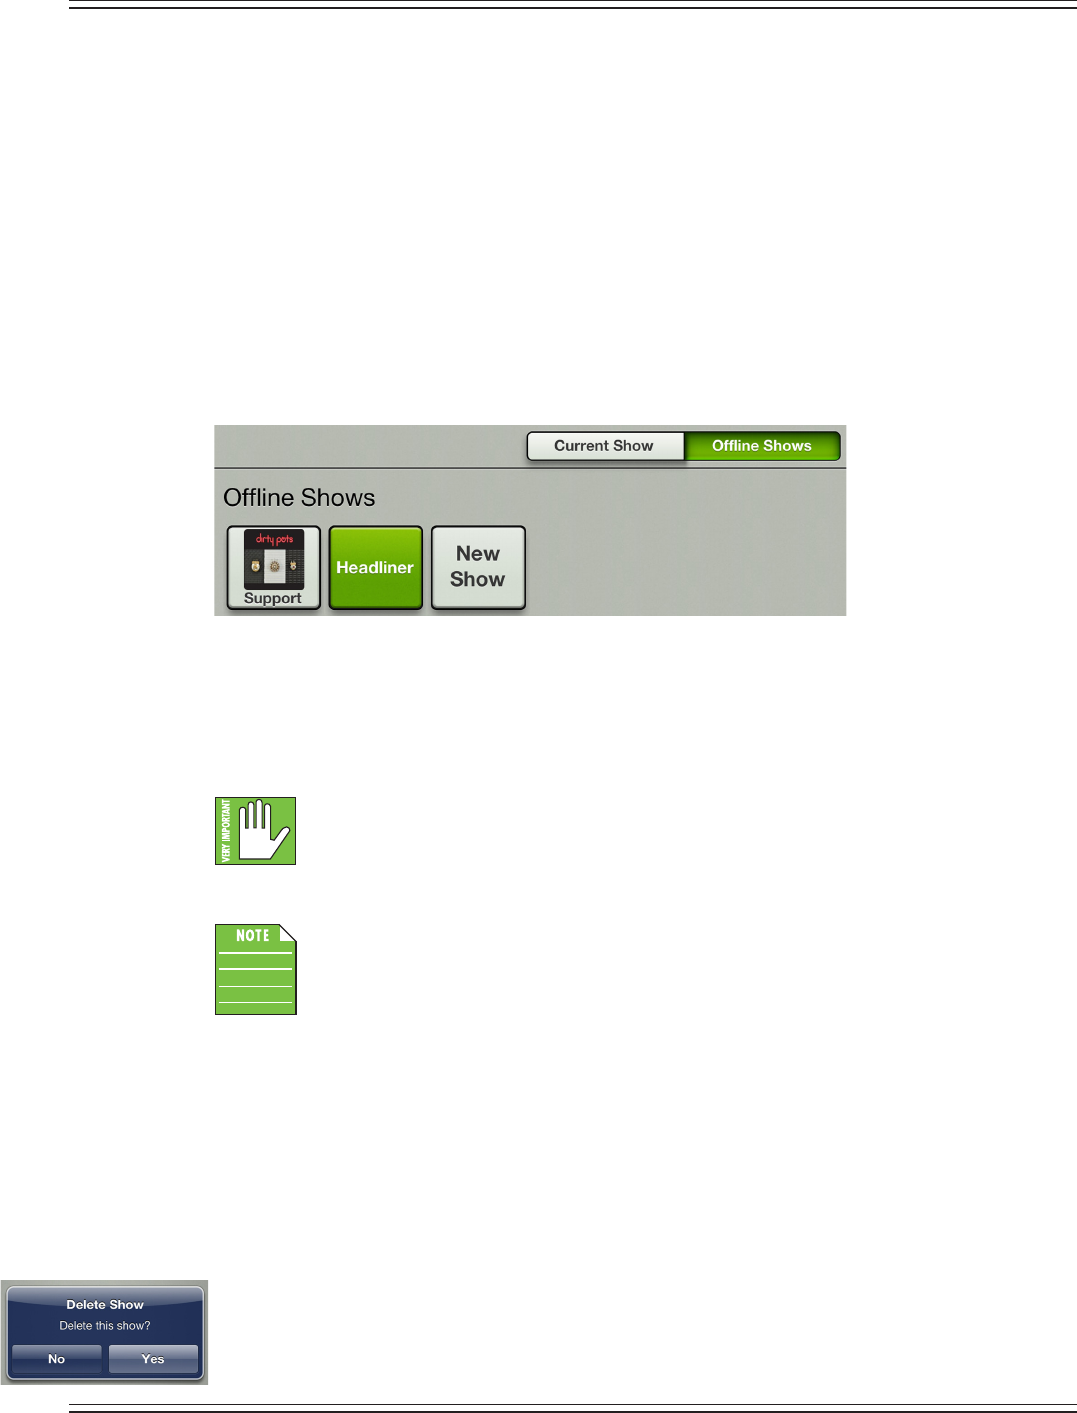
Mackie DL806 and DL1608 Reference Guide
123
BeforetappingtheYesbutton,let’sdiscusstheloadbuttonforamoment...butonlyforamoment!
Load—Loadisanoptionwedidnotseeinthe“CurrentShows”section.That’sbecausethecurrent
showistheloadedshow!Loadisonlyavailableinthe“OineShows”sectionandwillloadtheselected
show(includingallofthesnapshotsassociatedwiththeshow)astheCurrentShow.
Ok,nowtaptheYesbutton!
Afterloading,theCurrentShowwilldisplaytheHeadlinershowandallofitssnapshots.Nowtap
theOineShowsbuttontoseeanimagesimilartowhatisdisplayedbelow.NoticethatSupport
is no longer the green button...Headliner is!
Load time is all dependent on the number of stored snapshots on the show and it can take up
to two seconds per snapshot to transfer. The current state of the console is not changed on a show
load, audio still passes and you can still adjust all mix controls. However, in reality, you will probably
want to wait to recall a snapshot from the new show after loading the show completes.
Asareminder,loading a show will replace the current show on the mixer with the new show.
AllconnectediOSdeviceswillalsoloadthenewshow.Thiswillcreateacopyofiton
each iOS device so it may be used oine in the future, if needed.
Atthispoint,anewshowhasbeencreatedandnamed,butit’stimetocreatesomesnapshots.
Simplyfollowthesamestepsasyoudidfortheoriginalshow[Support-DirtyPots,page117].
That’sbasicallyit.Whentappinganunloadedshow[graybutton],theonlyotherchoicesinthepopover
includeDuplicate,Name,ImageandDelete.TherstthreeworkexactlyliketheydofortheCurrent
Show. If you need a refresher, please refer back to pages 116-117. Only Oine Shows may be deleted,
nottheCurrentShow.Solet’stakeaganderatDelete.
Delete—Asmentionedabove,thedeletebuttondeletesthecurrentlyselectedshowandallofits
snapshots. This is a permanent deletion with no undo, so a conrmation dialog helps prevent accidents.
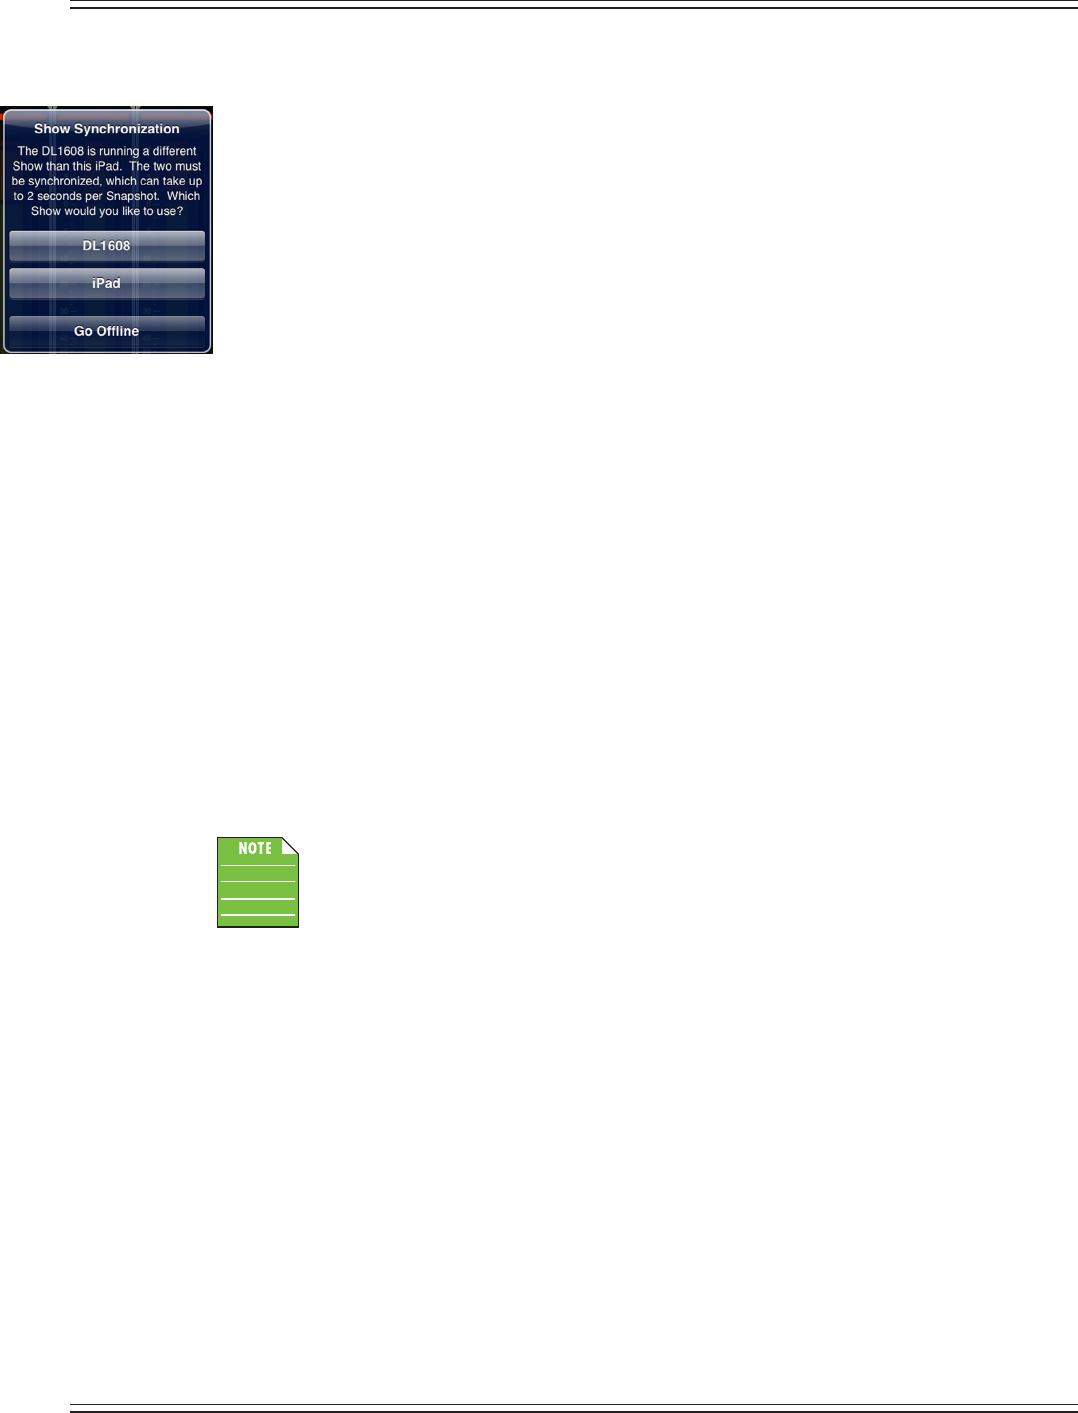
Mackie DL806 and DL1608 Reference Guide
124
Random Notes and Other Musings
To Push or to Pull, That is the Question —
TheCURRENTshowontheiPadmustmatchtheCURRENT
show on the mixer. If they do not, you will be asked to select between the two so they are synced.
Whywouldshowsnotbesynced?Well,oneexamplecouldbethatcurrentshow(X)wasusedatagig.
The band and crew then pack up for the next show, but the engineer wants to make some tweaks for
thenextnight’sperformance.Theengineermakesafewchangesandstoresanewsnapshotoine;
thisshownowdiersfromtheCURRENTshowthatisstillonthemixer.Whatwillhappenwhenthe
iPadisreunitedwiththemixeronceagain?Theengineerwillbeaskedwhichonetouse:thecurrent
showonthemixer[X,taptheDL806/1608button]orthecurrentshowontheiPad[Y,taptheiPad
button].Inthiscase,theengineerwouldchoosetheiPadsinceitcontainsthelatestchanges
.
DL806/DL1608–tappingtheDL806/DL1608buttonhereisconsideredPULLINGthecurrent
showfromthemixerandcopyingittotheiPad.Notethatthepreviouscurrentshowonthe
iPadisreplaced,butanoinecopyofthepreviousshowwillremain.Itwilltakeabouttwo
secondspersnapshottosynchronizetheshows.AllconnectediOSdeviceswillautomatically
sync with the current show.
iPad–tappingtheiPadbuttonhereisconsideredPUSHINGthecurrentshowfromtheiPad
and copying it to the mixer. It will take about two seconds per snapshot to synchronize
theshows.AllconnectediOSdeviceswillautomaticallysyncwiththecurrentshow.
Go Oine – tapping the Go Oine button here allows you time to gure things out before
deciding which show to use.
YouwillalsoreceivetheShowSynchronizationnoticationthersttimeyoupowerontheDLSeries
mixer if you tried out the Master Fader app prior to purchasing the mixer.
EachiPadthatisoineisunique.Inotherwords,multiplevaryingsnapshotsandshows
maybecreatedoneachiPad.Thisissomethingtobeawareofwhenreconnecting.
64: it’s not just a number, kids — Amaximumof64imagesmaybeusedpershow.However,Ifthe
same image is used on multiple IDs/snapshots, it only counts as one image (if the image has been
selected from show images and not the photo library). Show images do not count toward the 64,
nor do icons.
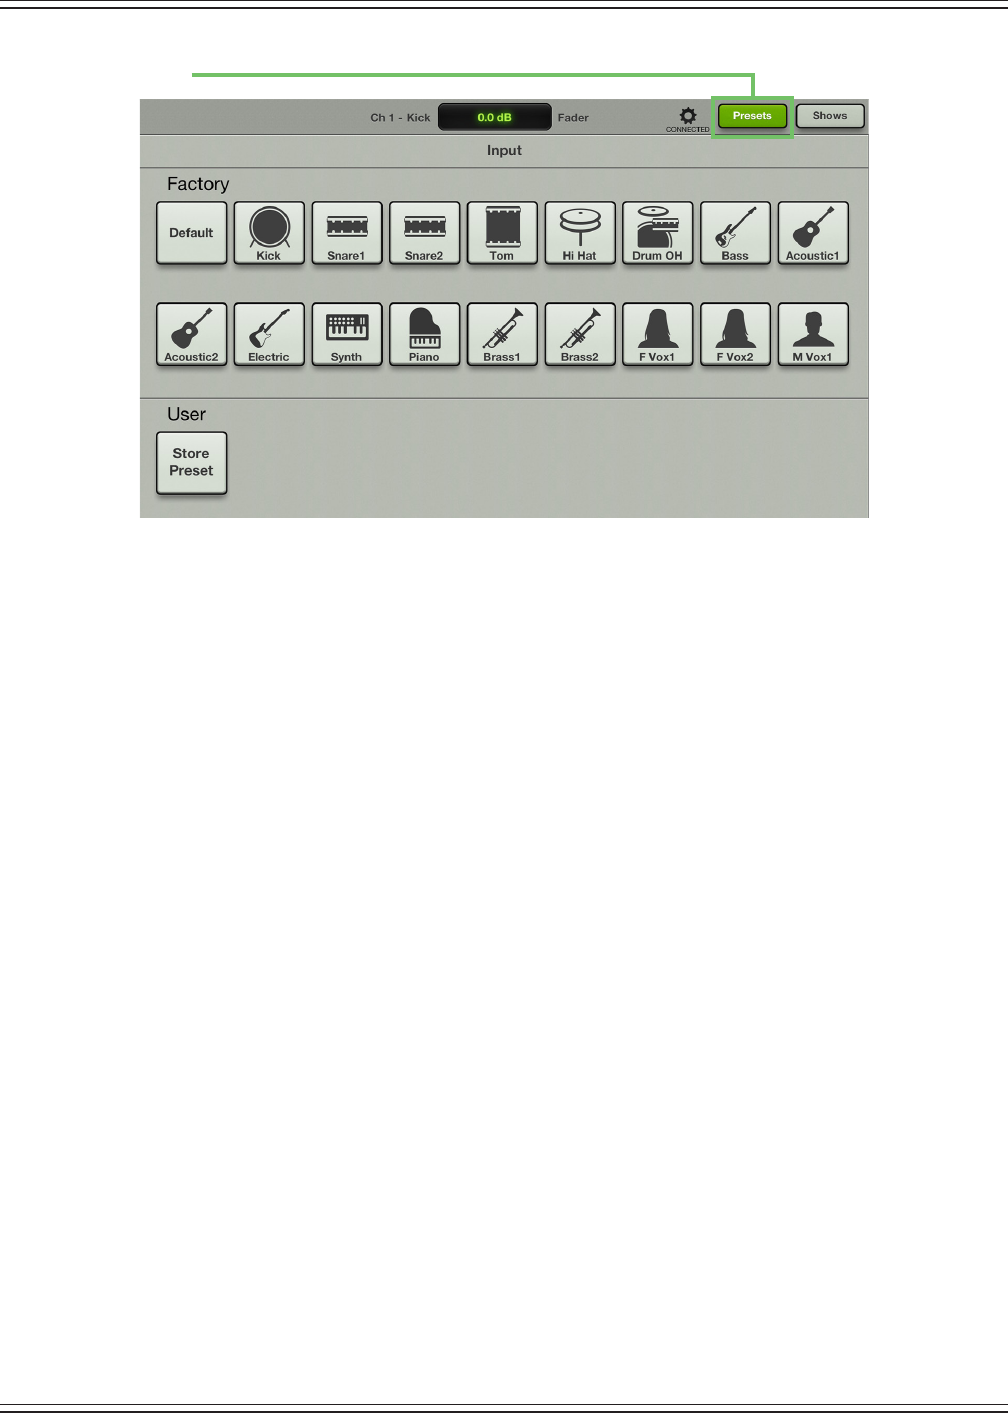
Mackie DL806 and DL1608 Reference Guide
125
Presets
PresetssaveparametersonindividualinputoroutputchannelsandonparticularDSPblockssuch
as EQ, dynamics, FX, graphic EQ, etc. For example, a favorite kick drum EQ setting may be saved
asapresetandrecalledasneeded.Presetsarenotassociatedwithaparticularshow,snapshot
or channel. In other words, a preset may be created while one show is active and recalled again
into a dierent show.
Themixercomeswithalibraryoffactorypresets.Amaximumof18factorypresetswillbedisplayed
at one time. Just scroll up to view the other factory presets, if available. There are also user presets.
These may be created for each preset type. The number of user presets available is limited only by the
availablespaceontheiPad.Presetsaregenerallysetaheadtime,notasaneventistakingplace.
PresetsarestoredontheiPad,notthemixer.
The following preset types are available:
•Inputchannel(asseenintheimageabove)
•Outputchannel
•Gate
•Compressor
•EQ
•GraphicEQ(userpresetsonly)
•Reverb
•Delay
The rst thing we will do is take a look at factory presets vs user presets. From there, channel presets
andDSPpresetsmaybeselected[factory]orcreated[user].

Mackie DL806 and DL1608 Reference Guide
126
Factory Presets vs User Presets
TherearefactorypresetsanduserpresetsonallchannelandDSPsettingsthatmaybesetahead
of time. Feel free to start with a factory preset, manipulate to your liking, then save as a user preset.
We will start with what each one looks like and how they work. The next section will discuss the
dierencesbetweenchannelpresetsandDSPpresets.
Atthebeginningofeachfactorypresetlistisabuttonlabeled“Default”.Defaultwillzerooutthe
current selection. For example, imagine how long it might take to reset each of the 31 bands on
the graphic EQ to ±0 dB. The factory default for graphic EQ will do that for you in three easy steps.
From the graphic EQ presets page: (1) tap the factory default button, (2) tap recall, and (3) tap the
yesbutton.Done!Factorypresetsmayonlyberecalled;theycannotbereplaced,renamedordeleted...
that’swhatuserpresetsarefor!
Beyond“Default”liesawidevarietyofotherfactorypresetstochoosefrom.Thesearegracedwith
an icon and name of said factory preset. Simply tap the preferred preset, recall and yes. This will
updatethecurrentselection.Forexample,selecting“Kick”fromthelistwillupdatetheEQ,gate
andcompressorsettingstostandardkicksettings.It’scertainlyeasiertomakeupdatesfroma
factory preset versus updating parameters from a zeroed out board!
Userpresetsareshownbelowthefactorypresetsandeachnameandimageisuser-editable.
Attheendoftheuserpresetlistisabuttonlabeled“StorePreset”.Tappingthisbuttonreveals
a keyboard. Simply type in a name you would like to call this preset. This stores the new preset
andaddsanother“StorePreset”buttontotheendoftheuserpresetlist.Thisissimilartoa“Store”
button on other consoles.
Touchingapresetbutton(otherthanafactorypresetorthe“StorePreset”button)willdisplay
a popover with the following options:
Recall—Pressingtherecallbuttonrecallspresets.Onrecall,allappropriateconsoleparameters
change to match the stored preset. Recall is the only available option with factory presets.
Aconrmationdialogwillappear.
Replace—Savesthecurrentpresetovertheselectedpreset.Aconrmationdialogwillappear.
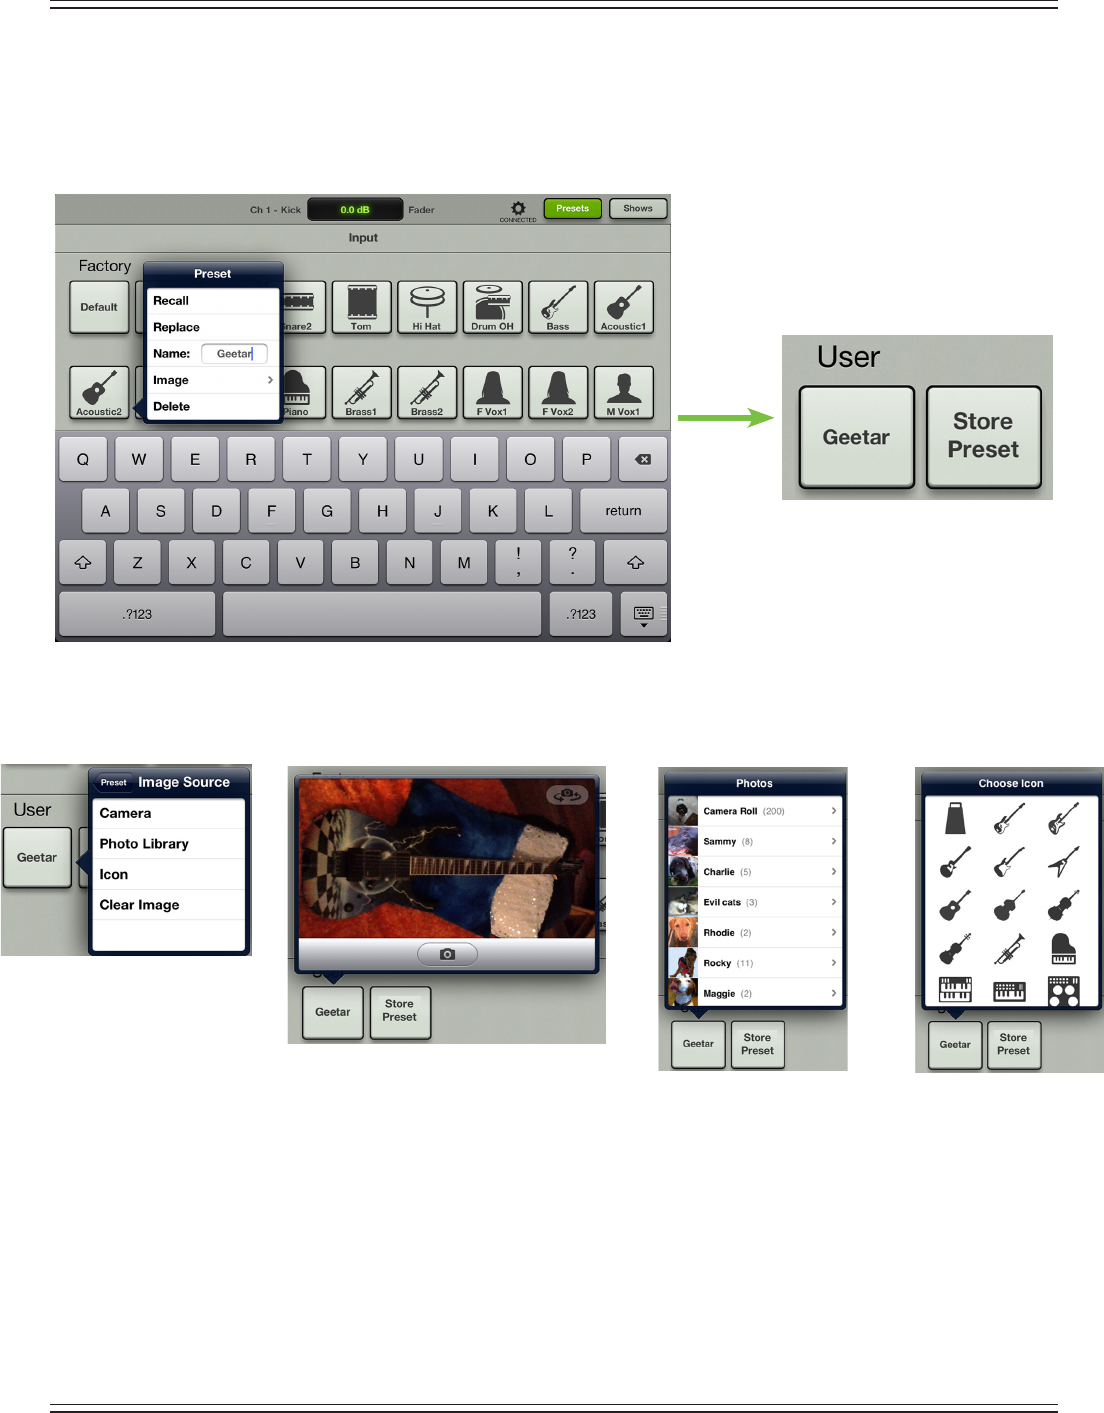
Mackie DL806 and DL1608 Reference Guide
127
Name — When the name button is pressed, use the onscreen keyboard to name the currently
selecteditem.Simplytypeanameintheboxandtapthe“return”keywhennished.Ifthename
is too long to t, the button scrolls, displaying the entire name.
Forfamiliarity,thisisthesamekeyboardthatisusedformessagingoremailingfromtheiPad.
Anopengrayboxwithonlythepreset’snameworks,butlet’sspiceitupwithanimage.
Thereareseveraloptionsinthisdepartment.Fromthepresetpopover,tap“Image”toreveal
anewpopoverasseenbelow[ImageSource].Youwillbepresentedwithfourchoices:
Camera — Ifyou’refamiliarwithhowthecameraontheiPadworks,thenyou’reinluck...thisone
works the exact same way! The encircled camera icon in the middle of the gray bar snaps the picture
andtheiconintheupper-rightcornerselectsbetweenthefrontandbackcameraontheiPad.
[CameraisunavailableontherstgenerationiPad].Apparentlythe‘80scalledandtheywanttheir
checkerboard mirror ball-with-lightning guitar back.
Photo Library — HereyoumayselectfromallthephotosthatcurrentlyresideonyouriPad.
Icon — Or select from a multitude of built-in icons at your disposal.
Clear Image — Believe it or not, tapping here will clear the image for that preset.
Image Source
Icon
Photo Library
Camera
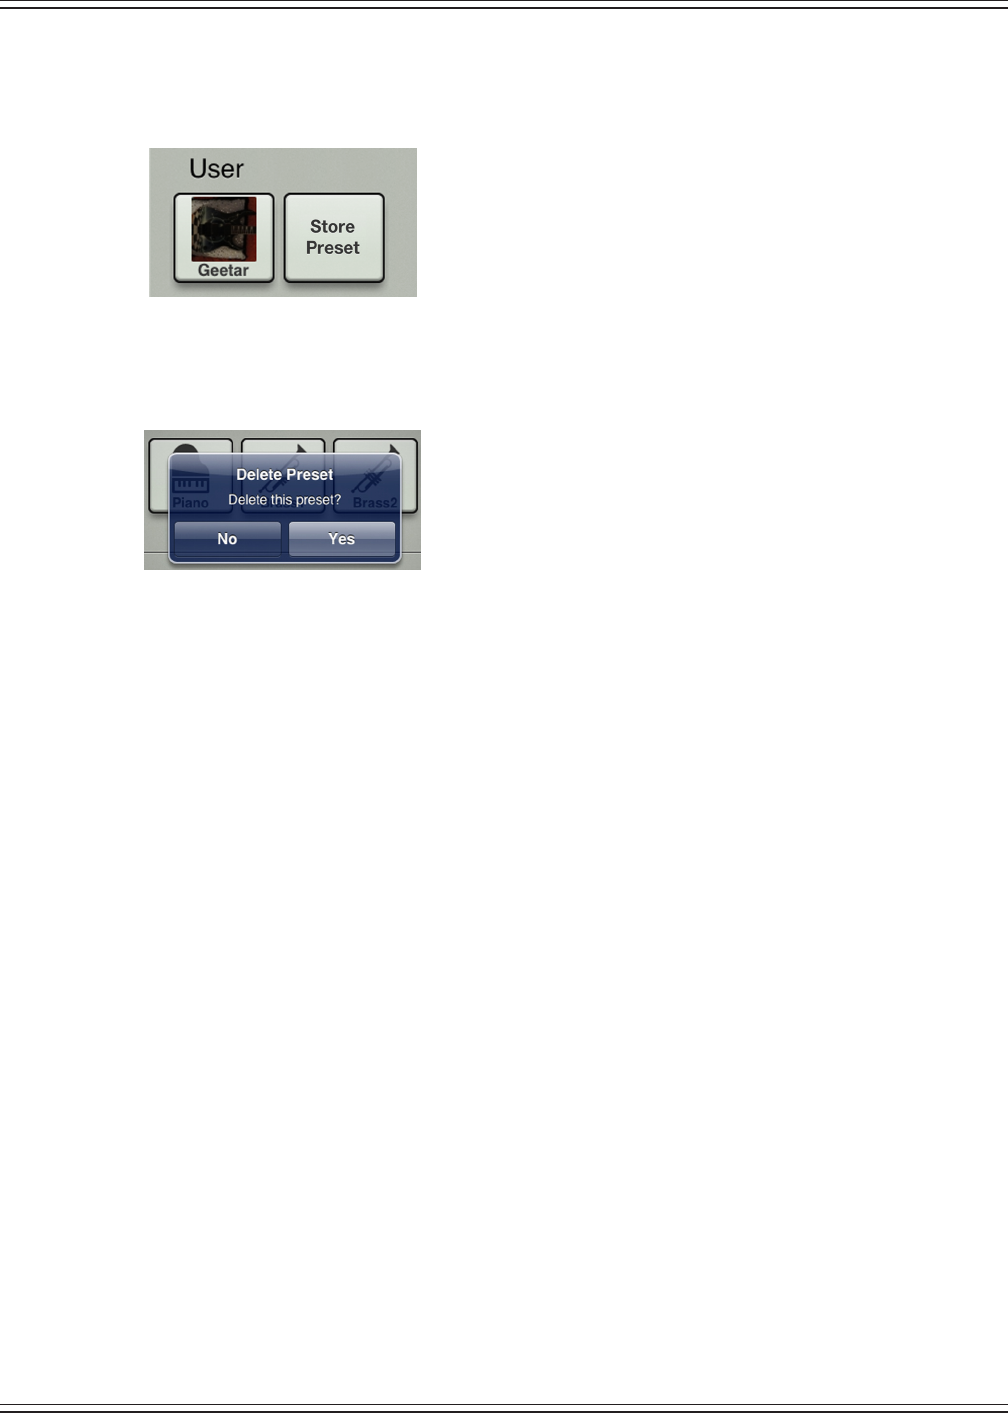
Mackie DL806 and DL1608 Reference Guide
128
Sincewealreadynamedthispresetgeetar,wemightaswellusethegeetarpicturetoboot,right?
Select the photo from the camera roll in select photo. This preset is set: name, image and most
importantly...settings.
Delete Preset — The delete button deletes the currently selected preset. This is a permanent deletion
with no undo, so a conrmation dialog helps prevent accidents.
Let’smoveonandtakealookatchannelpresetsversusDSPpresets.
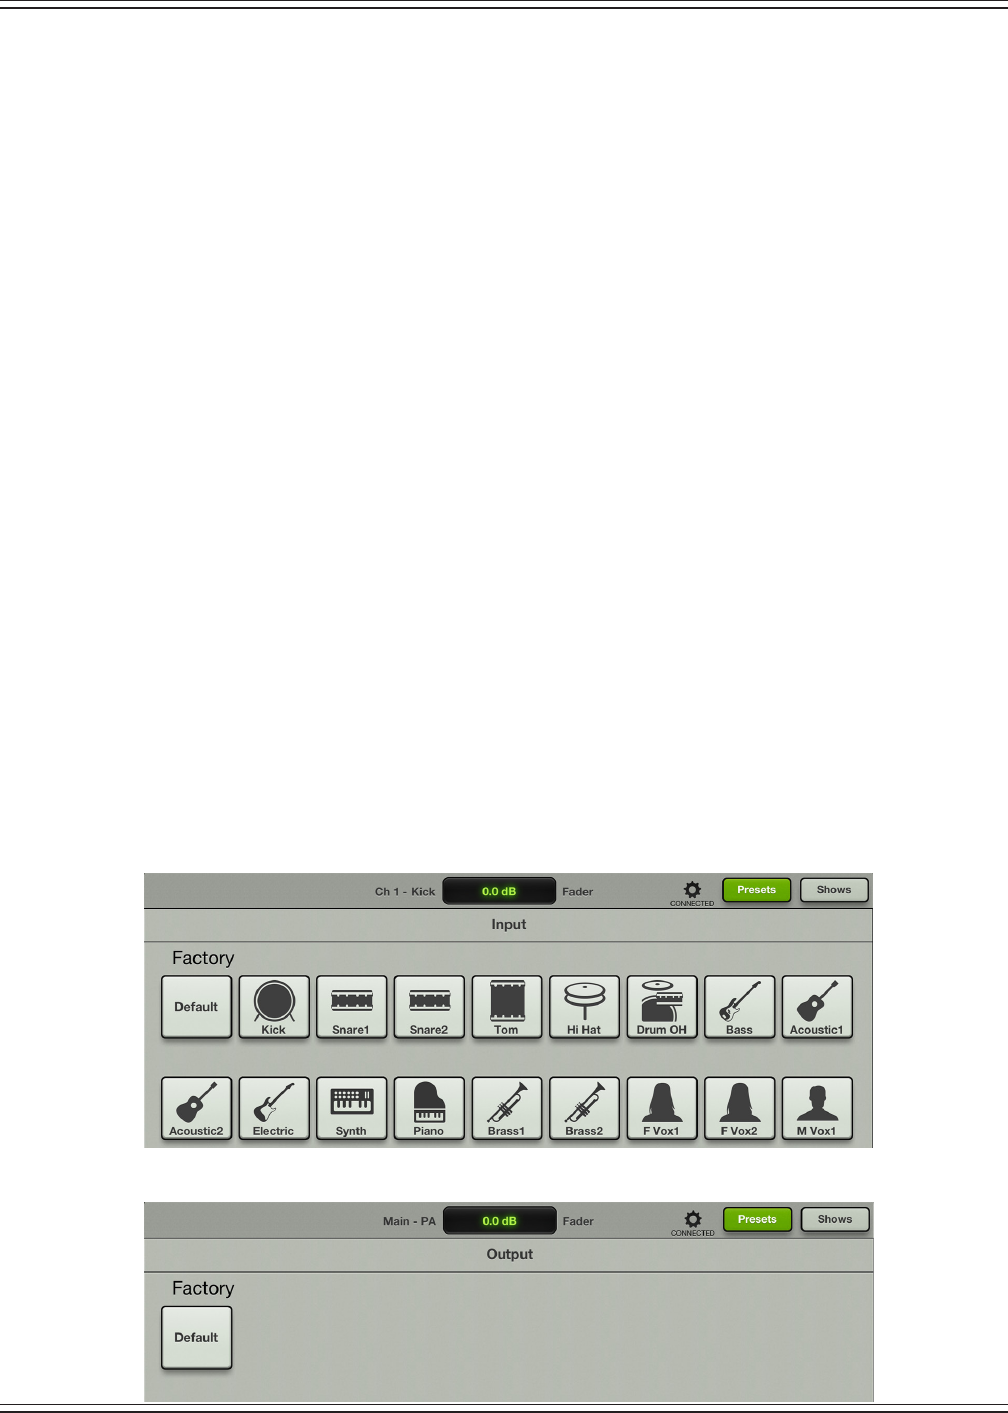
Mackie DL806 and DL1608 Reference Guide
129
Channel Presets vs DSP Presets
TherearechannelpresetsandDSPpresets.Also,therearefactorypresetsforbothoryoumay
createyourownuserpresetsforeach.Somanyoptions!Let’stakealookateach:
Input and Output Channel Presets—Channelpresetschangevirtuallyallcontrolsonthechannel.
There are both input and output channel presets. Input channel presets do NOT change pan, mute,
fader, solo, polarity or the linked state. Output channel presets do NOT change balance, level, the
aux/FX send conguration or the linked state. This allows you to easily audition presets on a channel
one after another.
Inputchannel,outputchannelandDSPpresetscanbestoredandrecalledtolinkedandunlinked
channels.ThelinkparameterisNOTstoredinthepreset.
Channelnamesandimagesarestoredinthepresetifpresentonthesamechannelwhencreatingthe
preset. When recalled – if a name or image is present – it will be updated on the destination channel.
DSP Presets—DSPpresetschangeonlyaportionofaninputoroutputchannel.ThisincludesEQ
andHPF,gate,compressor,andgraphicEQ.TheEQanddynamicspresetsalsorecallthetype[modern
orvintage].However,DSPpresetsdoNOT change the on / o state. This allows a user to audition
presets with the processor on or o, as desired.
Sohowdoyougettothesevariouspresettypes?Easy!Thepresetbuttonissmartandknows
what screen you are currently viewing by what is shown in the current parameter display.
In turn, it will display the correct preset window when the presets button is tapped. From the
mixer view, you may access the input or output channel presets depending on what is showing
in the current parameter display.
Below are two images. The rst displays the input channel presets and the second displays the output
channelpresets.Noticethattheoutputchannelpresetsonlydisplaysthefactorydefaultbutton.
Thatzeroesoutthesettingsoftheoutputchannel,themasterfader.Anysettingsthatyoumay
wantfortheoutputchannelcanbecreatedandstoredasauserpreset.Alsonotethecurrent
parameterdisplaywhenenteringtheworldofpresets;itmustshowthecurrentchannelsystem
name and current parameter name that you want to adjust, recall, etc.
INPUT
CHANNEL
PRESETS
OUTPUT
CHANNEL
PRESETS
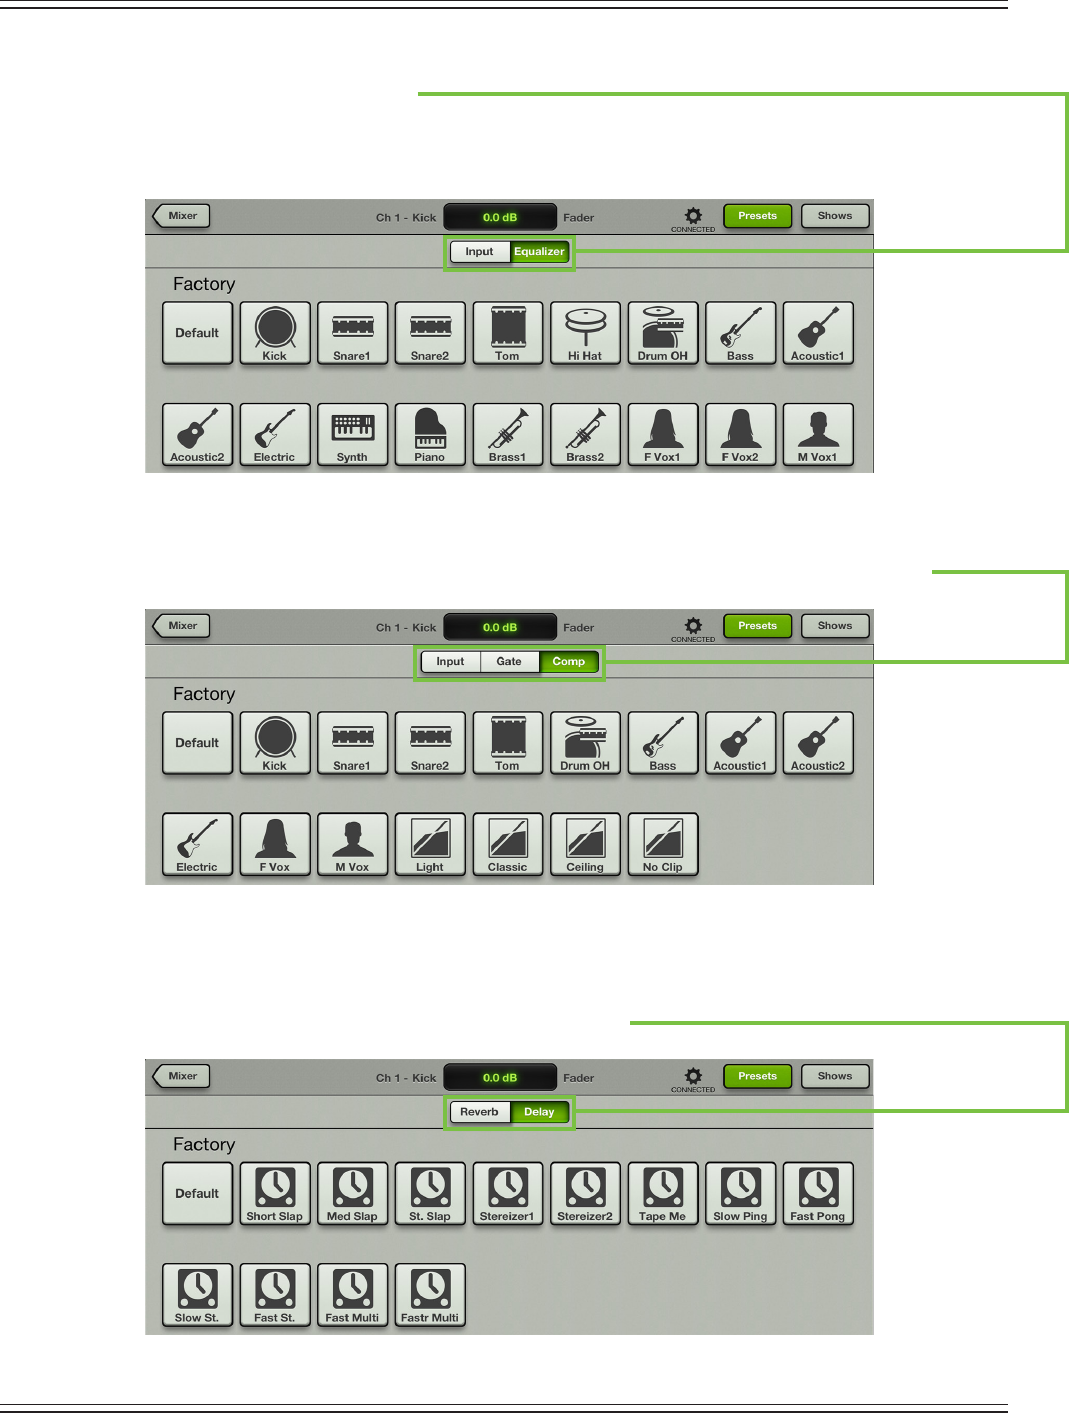
Mackie DL806 and DL1608 Reference Guide
130
From the EQ channel view you are able to choose between setting a preset for the entire input
channelorjustthechannel’sEQ.
Don’tforgettoscrolluptoaccessmorefactorypresets,ifgoingthatroute.EQpresetsdoNOT recall
eithertheHPFon/oortheEQon/o,buttheEQpresetsDOrecalltheEQtype[modernorvintage].
From the gate / compressor channel view there are three preset choices to choose from:
theentireinputchannel,justthechannel’sgateorjustthechannel’scompressor.
Thedynamicspresetsrecallthedynamicstype[modernorvintage].Tapwhichoneyouprefer.
From the reverb / delay channel view you are able to choose between setting a preset for the just
thechannel’sreverborjustthechannel’sdelay.Tapwhichoneyouprefer.Notethatthereverb
and delay presets do NOT change the send or return level.
EQ
PRESETS
GATE & COMP
PRESETS
FX
PRESETS
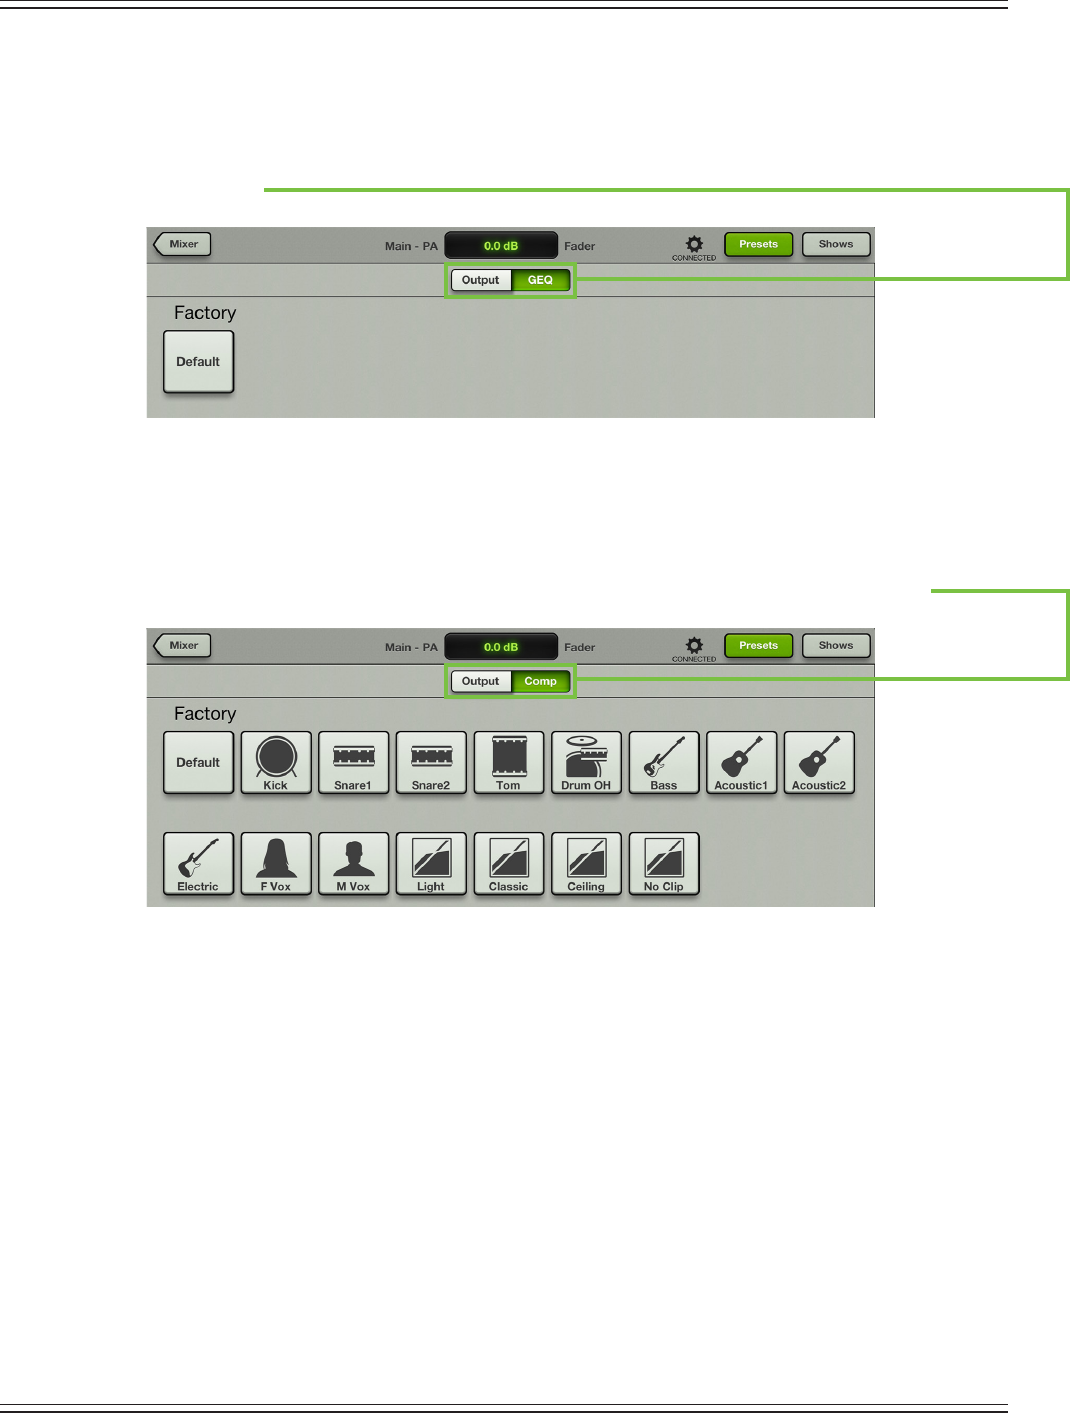
Mackie DL806 and DL1608 Reference Guide
131
From the graphic EQ channel view you are able to choose between setting a preset for the entire
output channel or just the graphic EQ. Tap which one you prefer.
Also,thisistheeasywaytoresetthegraphicEQto±0dB.Inthisview,(1)makesurethe“GEQ”button
(notthe“Output”button)isgreen,(2)tapthefactorydefaultbutton,(3)taprecall,and(4)taptheyes
button. Done!
Andfromthecompressor/limiterchannelviewyouareabletochoosebetweensettingapreset
for the entire output channel or just the output compressor / limiter. Tap which one you prefer.
GRAPHIC EQ
PRESETS
OUTPUT
COMP
PRESETS
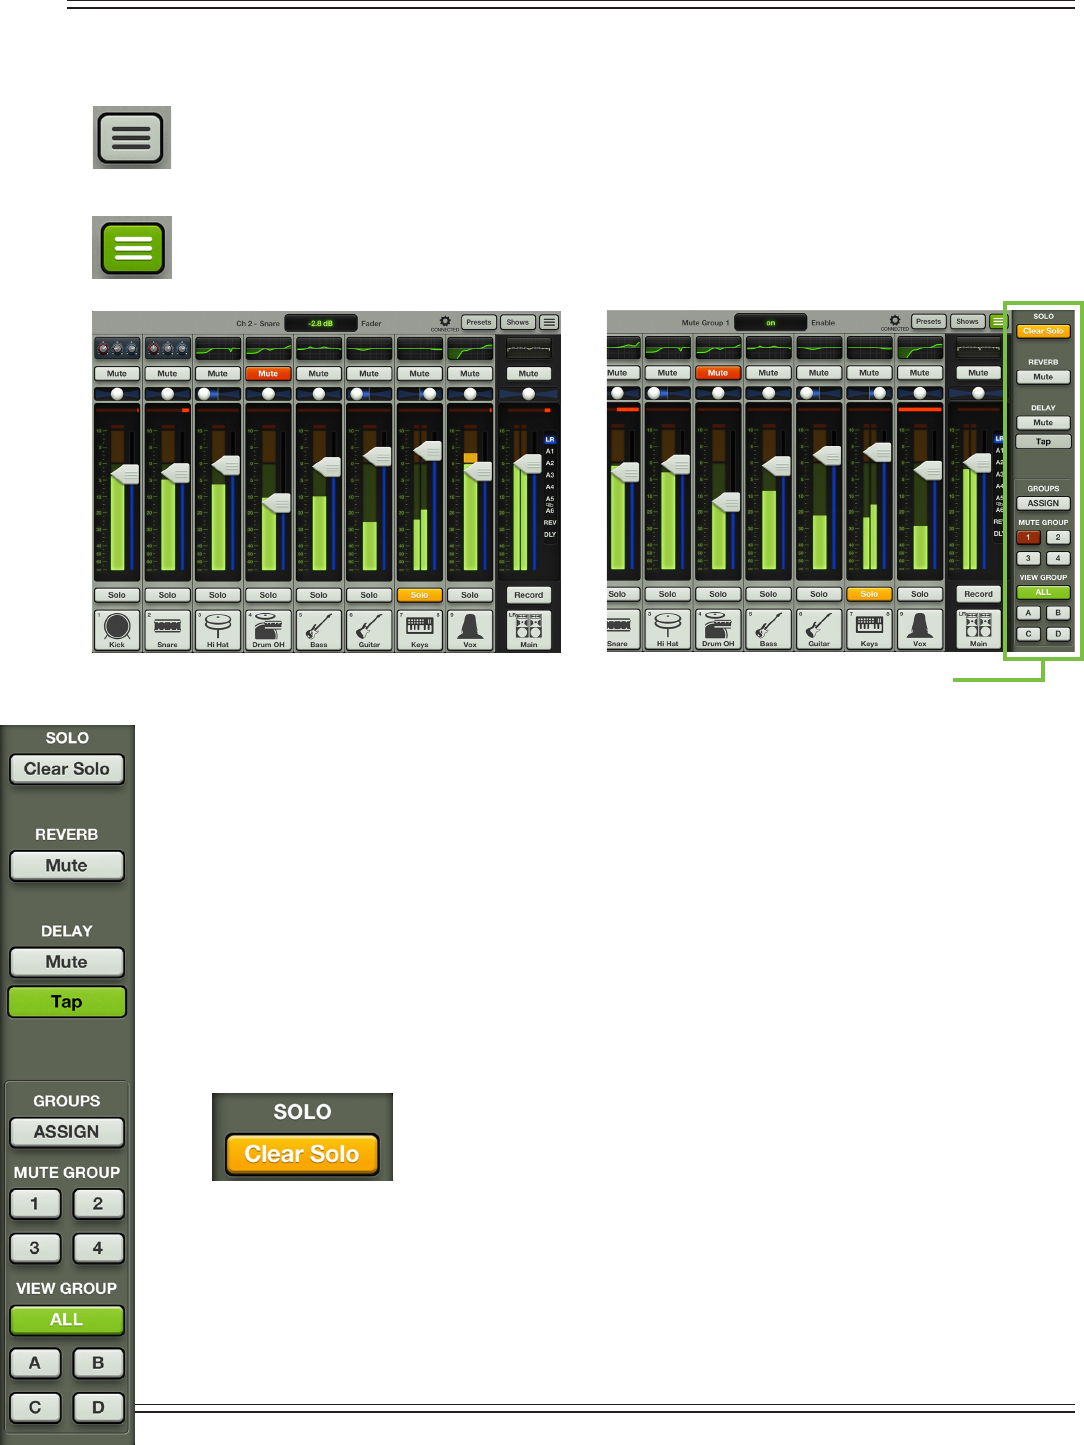
Mackie DL806 and DL1608 Reference Guide
132
Quick Access Panel
Residingonthefarright-handsideofthenavigationbaristhequickaccesspanel.It’sthesquarebuttonwith
threecenteredhorizontallines.Ifyou’rehungry,itmaylooklikeahamburger.Ifyou’renothungry,younow
noticethatitkinda,sortalookslikeahamburger,anyway.That’syourquickaccesspanel!Itallowsforfast
control over critical functions. It does not allow for fast access to hamburgers.
Tapping the quick access panel illuminates the button green and scooches the master fader and channel
faders to the left, making way for another strip of functions.
The following is a list of what resides in the quick access panel. We will go through each one in detail, but
here now is a super-short overview of each:
(1) Clear Solo [below] —
Easily clear all solos.
(2) Eects Controls [page 133] —
Globally mute the reverb and/or delay. Set tap delay.
(3) Mute Group Control [pages 134-138] —
Set channel assignment and on/o control per
mute group master.
(4) View Group Control [pages 139-141] —
Set channel assignment and view group select.
Tap the quick access panel button or anywhere else on the mixer view or channel view to exit out of the
quick access panel.
Clear Solo
Let’ssaythebandisjusttearingitup,playingtheabsolutebestshowoftheirlives.Rightinthemiddle
oftheirbestsong,theguitaristjustchokesonthememorable,hummableguitarsolo.Justtapthe‘Clear
Solo’buttonandallwillberightintheworldagain.
Yeah,wewishitwerethateasy,too.HereiswhattheClearSolobuttonreallydoes.Whenanyinput
or output is soloed this button illuminates orange, serving as a reminder that a soloed channel
exists somewhere. This is especially useful when an output is soloed and you switch to adjust
a dierent channel on a dierent output. Tapping this button will clear all solos on all inputs
andoutputs,includingtheonesyoucan’tsee.
Quick Access Panel Closed Quick Access Panel Open
Quick Access Panel
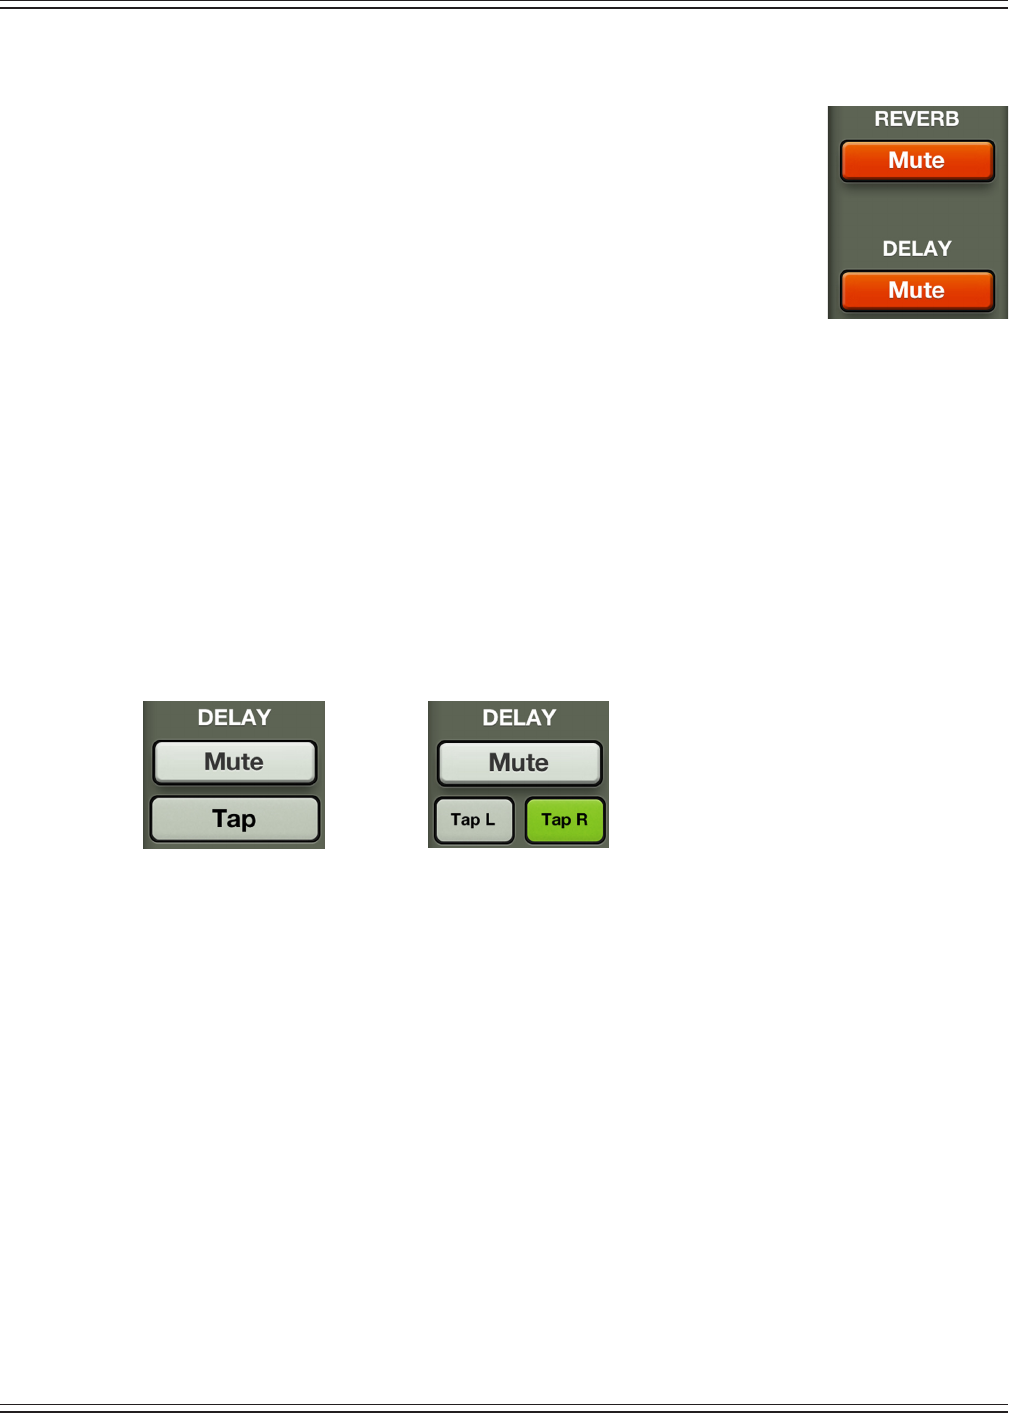
Mackie DL806 and DL1608 Reference Guide
133
Eects Controls
Mute Reverb/Delay —
Tapping the reverb and/or delay mute button in the
quick access panel is akin to tapping the LR mute button at the top of the
reverb and/or delay channel strip. However, with the quick access panel, you
now have easier access to the eects controls regardless of what view is open.
Forexample,let’ssayyou’readjustingtheEQonchannelthree.Oneoption
is to go back to the mixer view, swipe left until the eects channels are visible,
taptheeect’smutebuttons,swiperighttoheadbacktochannelthreeand
nally tap its EQ curve to continue where you left o......or simply leave the
channelthreeEQopen,tapthequickaccesspanel,taptheeect’smutebutton,
then continue to adjust the channel three EQ without missing a beat!
Liketheeect’schannelsmutebuttons,thequickaccesseect’smutebuttonsarealsoglobal.
Additionally,theyilluminatethesameredcolorwhenengagedandaregraywhendisengaged.
Tap Delay —
Tapping the tap delay button in the quick access panel is akin to tapping the tap delay
button in the FX view. However, with the quick access panel, you now have easier access to the tap
delay regardless of what view is open.
Forexample,let’ssayyou’readjustingthegateonchannelnine.Oneoptionistoswipeuptothe
FX view, tap the tap delay button to the desired setting, then swipe back down to the comp/gate view
to continue where you left o......or simply leave the channel nine comp/gate view open, tap the quick
access panel, tap the tap delay button to the desired setting, then continue to adjust the channel nine
gate without missing a beat!
Stereo Tap DelayMono Tap Delay
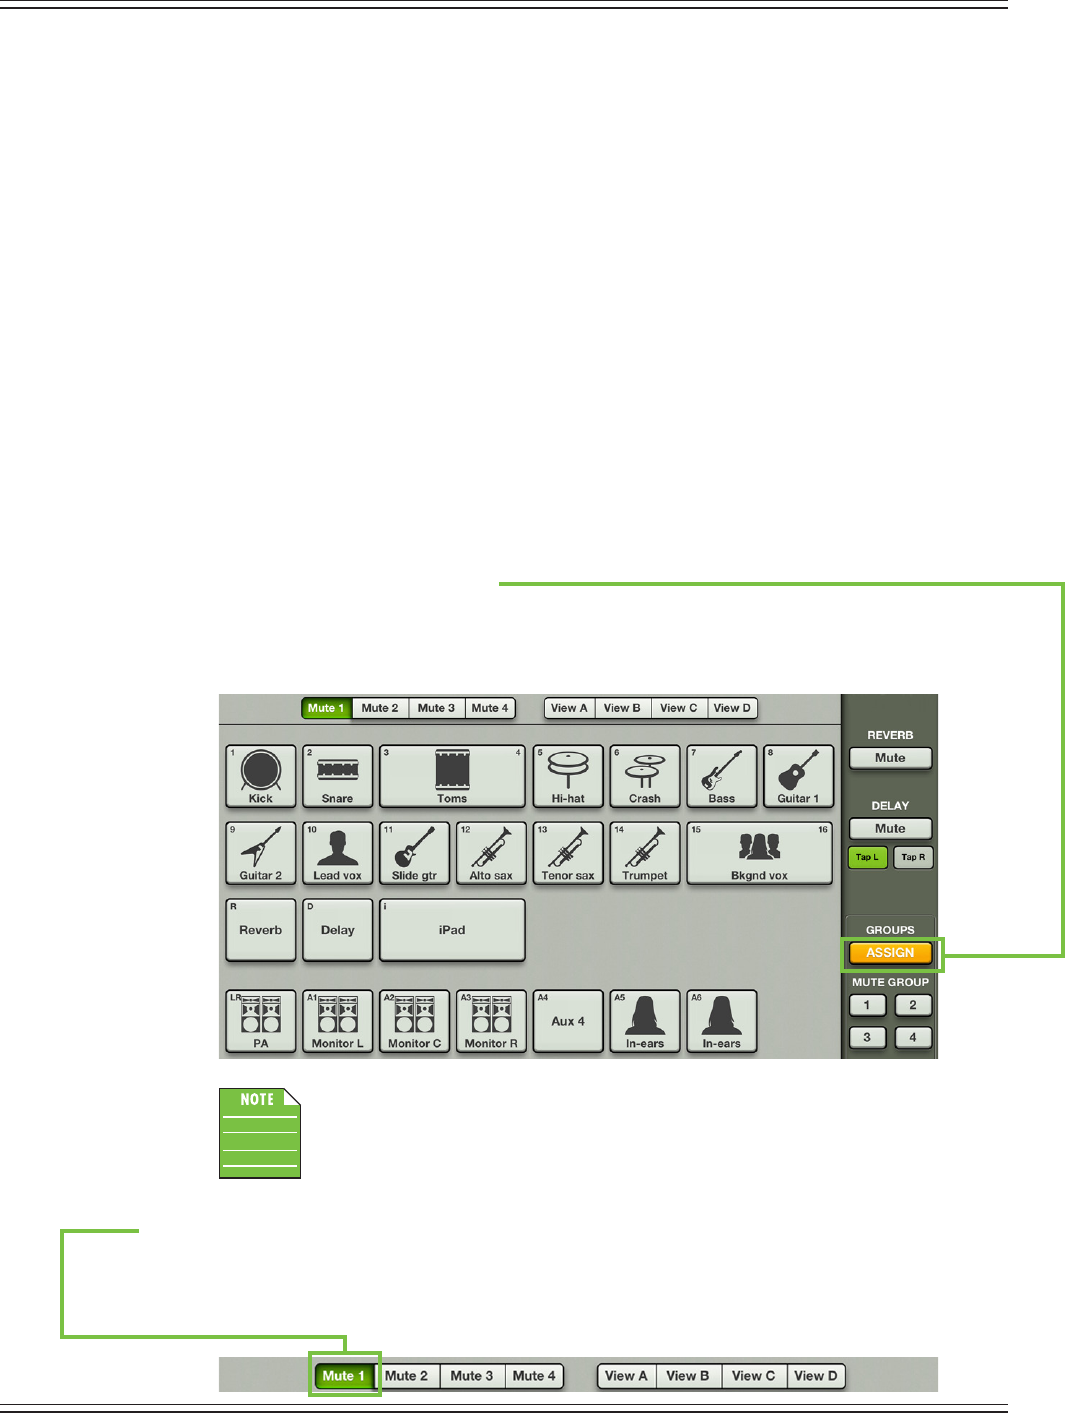
Mackie DL806 and DL1608 Reference Guide
134
Mute Group Control
Mute groups allow you to quickly mute (and unmute) multiple channels and/or outputs with a single
tap. There are a multitude of possibilities in which to assign and enable mute groups: productions
featuring a rotating cast of musicians, theater productions, a house of worship and more. It is also great
formutingallinputsduringsongbreaksorin-betweensets.Youmaycreateasmanyasfourseparate
mutegroupswithMasterFader.Let’stakeacloserlookatacoupleofexamples.
ExampleOne:Acoverbandplaysfoursetsinonenight.Eightofthetunesfeatureslideguitar,ahorn
section and background singers. One option is for the band to play all eight songs in a row, then mute
thechannelsoncecompleted...butthatisn’tverydiverse,isit?Rather,thebandwouldprefertopepper
the songs in throughout the night for variety. Simply assign those channels to a mute group and keep
that mute group master engaged until the songs featuring slide guitar, a horn section and background
singersareplayed.Here’show:
Step 1 — Open the quick access panel:
Assigningchannelstomutegroupsstartsinthequickaccesspanel,soyou’llneedtohead
here rst.
Step 2 — Tap the groups assign button:
The assignment panel slides into view when the groups assign button is tapped. The groups
assign view is where you assign which channels belong to which mute group. See the screen
shot below for an example.
Youmaynoticeintheimageabovethatthebuttonoflinkedchannels
(3-4,15-16,iPad)istwicethesizeofunlinkedchannels.
Step 3 — Tap the Mute A button:
TapthemuteAbuttonlocatedjustbelowthenavigationbar.Itwillilluminategreentoindicate
thatyouarenowassigningchannelstomutegroupA.Asmentionedabove,uptofourdierent
mute groups may be created.

Mackie DL806 and DL1608 Reference Guide
135
Step 4 — Tap the channels to assign:
Tapthechannelsyouwishtoassigntoamutegroup.Inthiscase,tapchannels11-16.Notice
in the screen shot below that each assigned channel button turns oxblood red when selected.
Conincidentally,theband’snameisOxbloodRedandtheyputonagreatshow!
Step 5 — Tap the groups assign button (again):
Closetheassignmentpanelbytappingthegroupsassignbuttonagain.
The quick access panel will remain open, as seen in the image below.
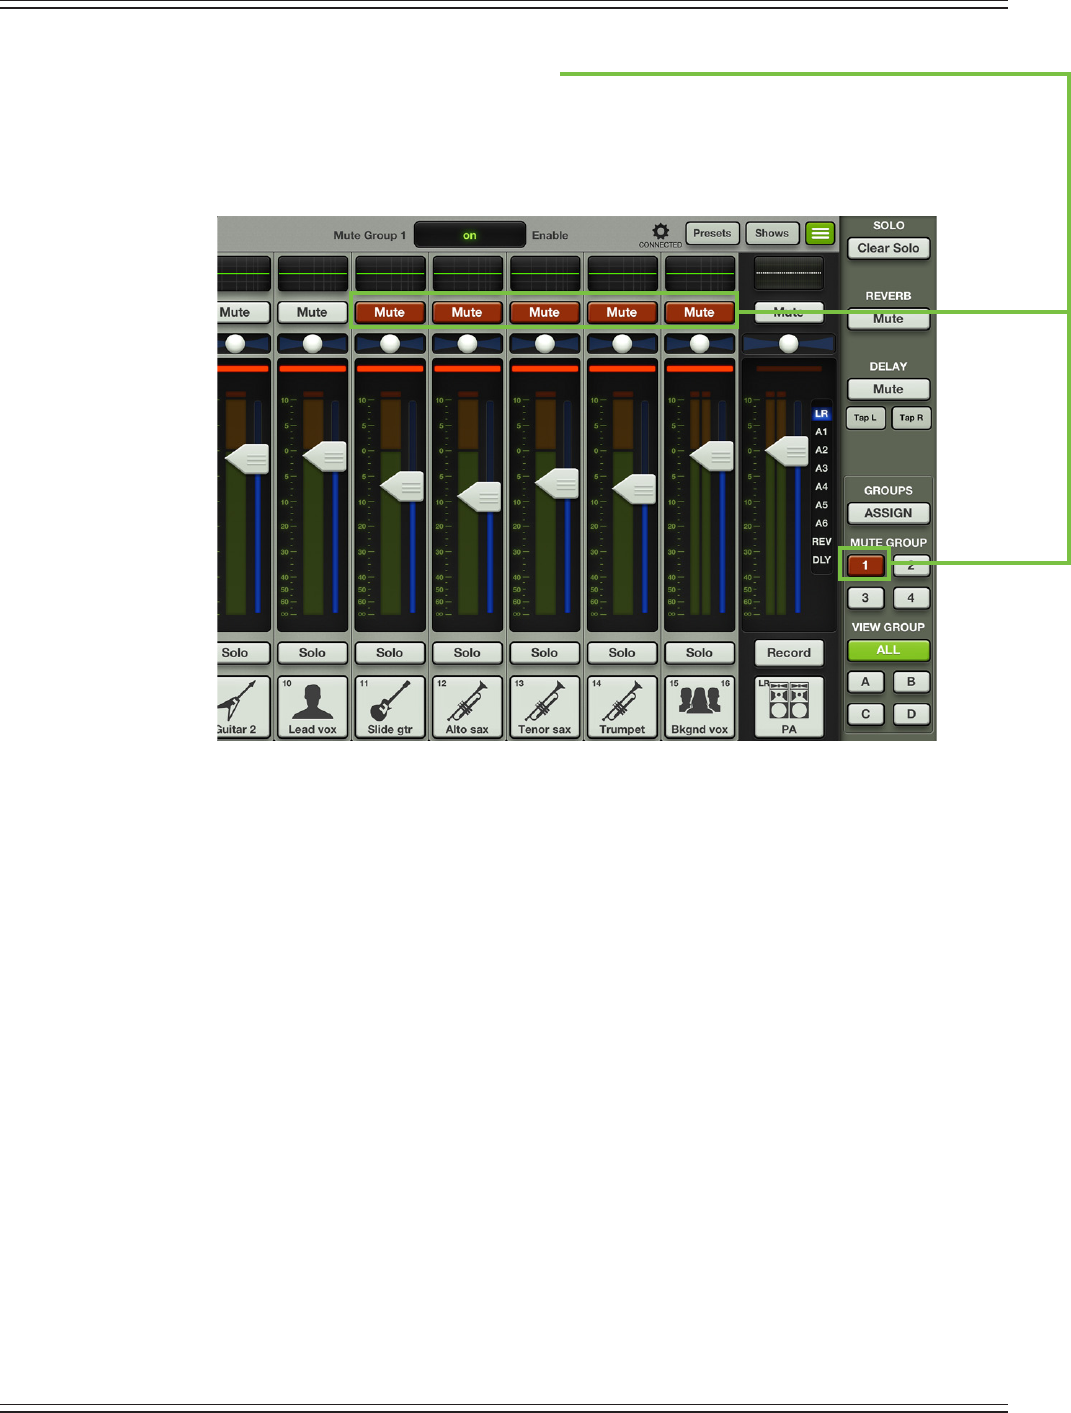
Mackie DL806 and DL1608 Reference Guide
136
Step 6 — Tap the mute group 1 master button:
Tapthemutegroup1masterbuttonlocatedonthequickaccesspanel.Noticeinthescreen
shotbelowthateachassignedchannel’smutebutton(channels11-16)andthemutegroup1
master button turn oxblood red when selected. This is the exact same screen shot as seen
on the previous page, but with the mute group 1 master button enabled.
Step 7 — Close the quick access panel until needed:
Excellentwork!Youassignedthechannelstomutegroup1andenabledmutegroup1
master (thereby muting channels 11-16), so simply tap the quick access panel button to exit.
Whenyou’rereadytounmutethechannels,simplyre-openthequickaccesspanelandtap
the mute group 1 master button. It will turn gray, as will each of the mute buttons on channels
11-16, indicating that the channels are no longer muted. Do this each time the slide guitar,
horn section and background singers are and are not needed. This is much easier than muting
and unmuting all ve channels every time!
Usingthissameexample,let’ssaythereareacoupleoftunesthatfeatureonlyacoustic
guitarandvocals.Youshouldfollowthesamesteps,except:
(1) be sure to assign them to a dierent mute group rst since mute group 1 is already
in use and...
(2) select all channels except channel 8 (Guitar 1) and channel 10 (Lead Vox).
Other than that, the process remains the same!
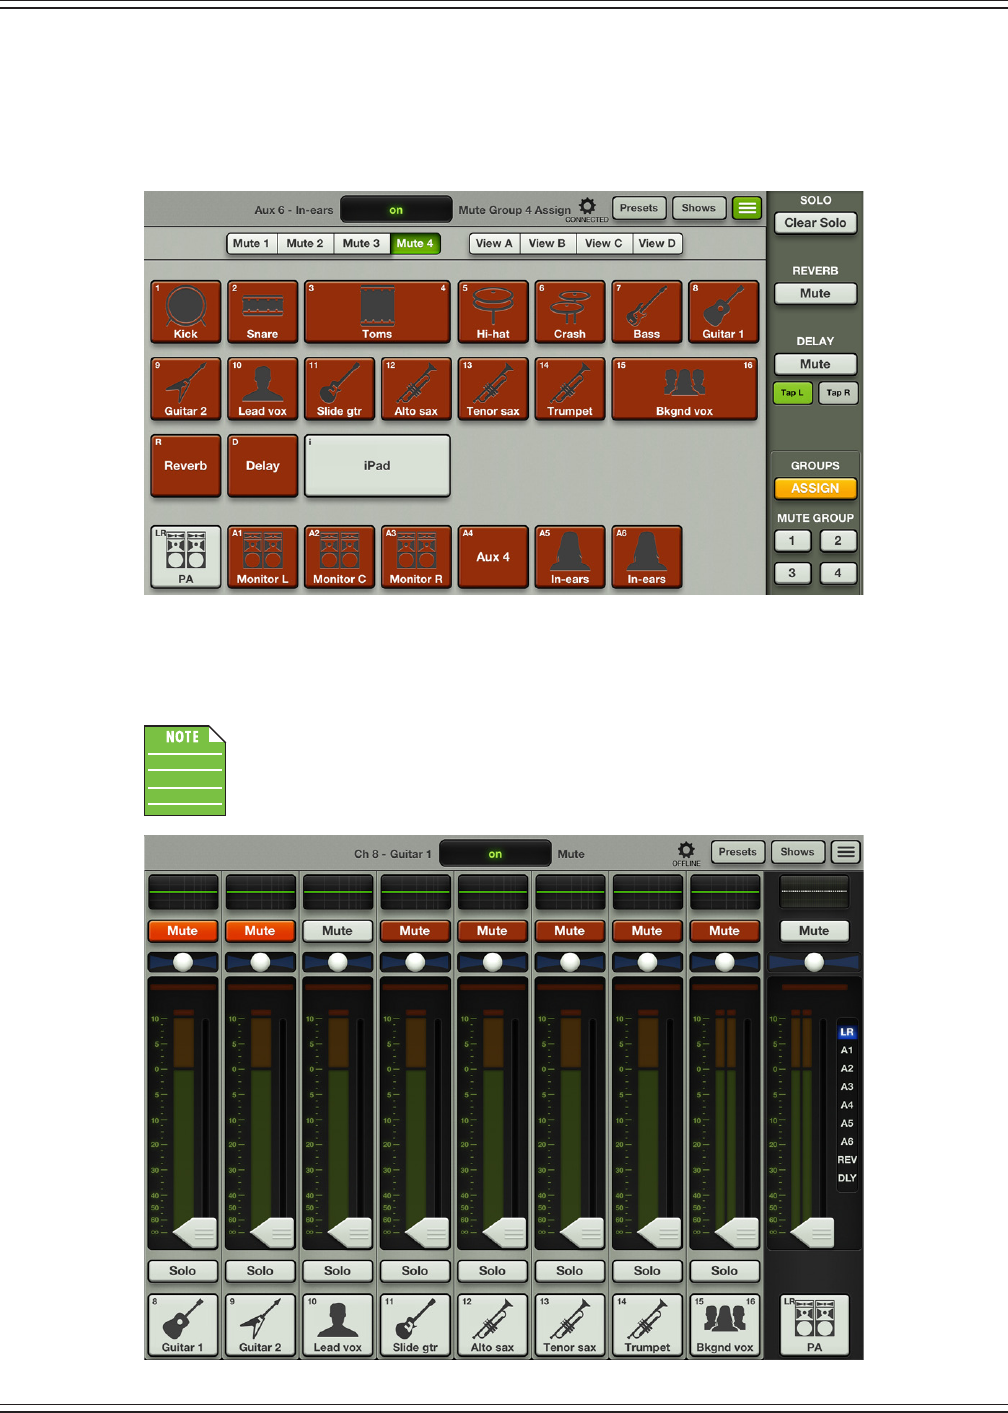
Mackie DL806 and DL1608 Reference Guide
137
Mute groups are also great for muting all inputs during song breaks or as a break switch in between sets.
In fact, this is similar to the iconic break switch found on many classic Mackie consoles...but with the
DLSeriesmixers,youcanactuallysetupthebreakswitchhowyouwant.Here’show:
Aclassicbreakswitchismutingallinputsandoutputs,excepttheiPadchannelandLR,asseenbelow.
When the mute group 4 button is engaged everything will be muted except for the house music over
thePA.Justunmutegroup4whenthenextband’sgearhasbeensetupandthey’rereadytorock!
Itisstillpossibletomutechannels,evenifmutegroupsareengaged.Notonlythat,
but the color diers, so you know which muted channels belong to a mute group
[oxbloodred]orjustaregular‘olmute[red].Seebelow.

Mackie DL806 and DL1608 Reference Guide
138
Multiple mute groups may be enabled simultaneously. This would be particularly helpful
inalargerproductionfeaturingarotatingensembleofmusiciansonstage.Youcould
also use mute groups for scenes in a theater production, a variety of services in a House
of Worship and more. The possibilities are endless!
Snapshots will save your mute group assignments, but not the mute group master enables!
In other words, you can enable/disable the mute group masters regardless of how they
were stored as a snapshot. If you need more than four dierent mute groups in the same
show, save the mute group assignments as snapshots and recall when needed!
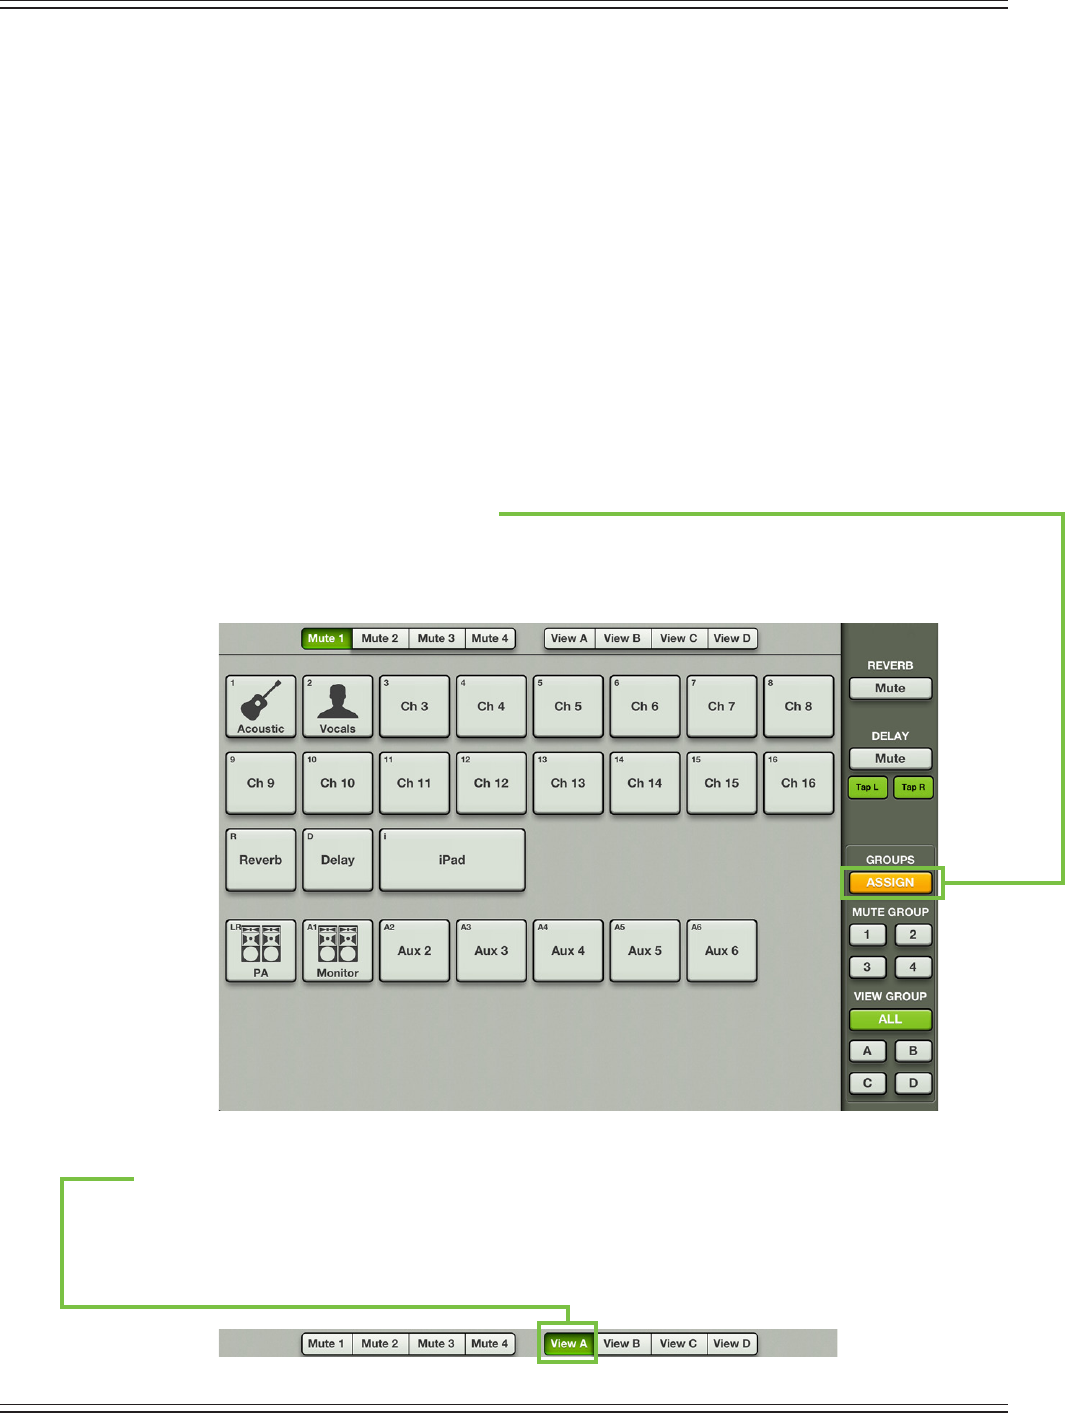
Mackie DL806 and DL1608 Reference Guide
139
View Group Control
View groups allow you to see only the channels that you want to view, hiding the rest. This improves
organizationandallowsforfasternavigation.Youmaycreateandassignasmanyasfourseparate
viewgroupswithMasterFader.Let’stakealookatacoupleofexamples.
ExampleOne:Asinger-songwriterisplayingatthelocalcoeeshop.Inalllikelihood,3-4inputs
areprobablythemaximumamountofchannelsneeded.Wouldn’titbegreattohidetheunused
channels,showingonlythechannelsinuse?Theanswerisaresounding“YES,ofcourseitwould!”
Plus,theFXreturnswouldbeinviewwiththeselectedchannelstrips...nomoreswipingbackand
forth!Simplyassignthosechannelstoaviewgroupandengagethatviewgroupbutton.Here’show:
Step 1 — Open the quick access panel:
Assigningchannelstoviewgroupsstartsinthequickaccesspanel,soyou’llneedtohead
here rst.
Step 2 — Tap the groups assign button:
The assignment panel slides into view when the groups assign button is tapped. The groups
assign view is where you assign which channels belong to which view group. See the screen
shot below for an example.
Step 3 — Tap the View A button:
TaptheViewAbuttonlocatedjustbelowthenavigationbar.Itwillilluminategreentoindicate
thatyouarenowassigningchannelstoviewgroupA.Asmentionedabove,uptofourdierent
view groups may be created.
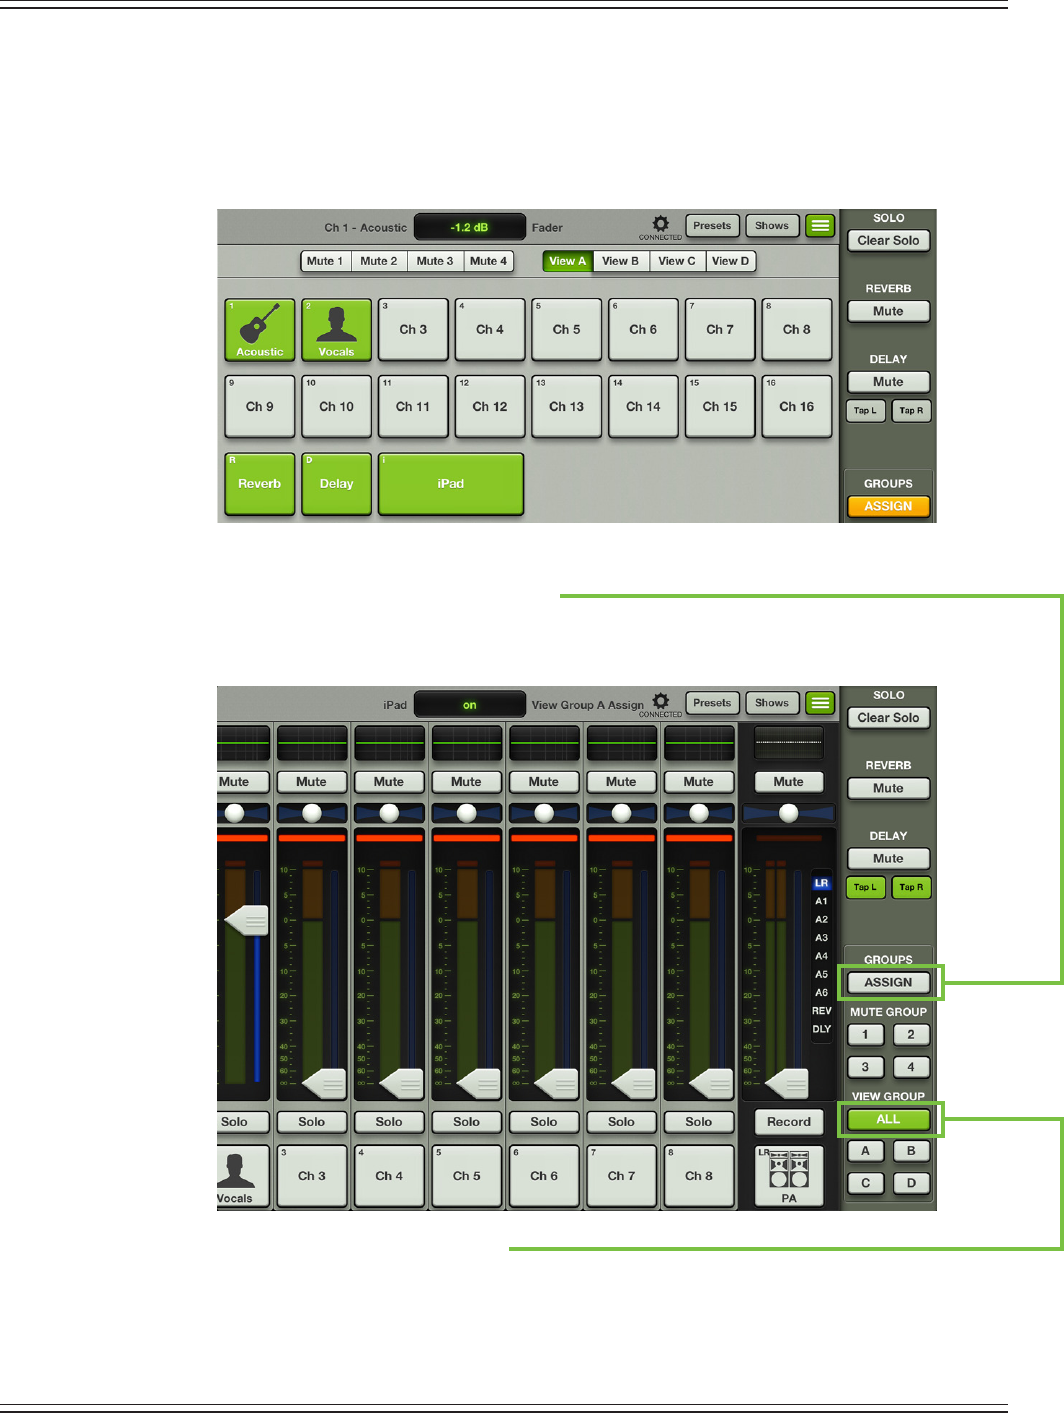
Mackie DL806 and DL1608 Reference Guide
140
Step 4 — Tap the channels to assign:
Tap the channels you wish to assign to the view group. In this case, tap channels 1 and 2.
FXandbackingtrackswillonlyenhancetheperformance,sotapthereverb,delayandiPad
channelbuttons,aswell.Noticeinthescreenshotbelowthateachassignedchannelbutton
turns green when selected.
Step 5 — Tap the groups assign button (again):
Closetheassignmentpanelbytappingthegroupsassignbuttonagain.
The quick access panel will remain open, as seen in the image below.
TakealookatthegreenAllbutton.
This informs you that you are currently viewing all channels (even if channels have been
assignedtoviewgroups).Anytimeyouwishtoviewallchannelsagain,taptheAllbutton.
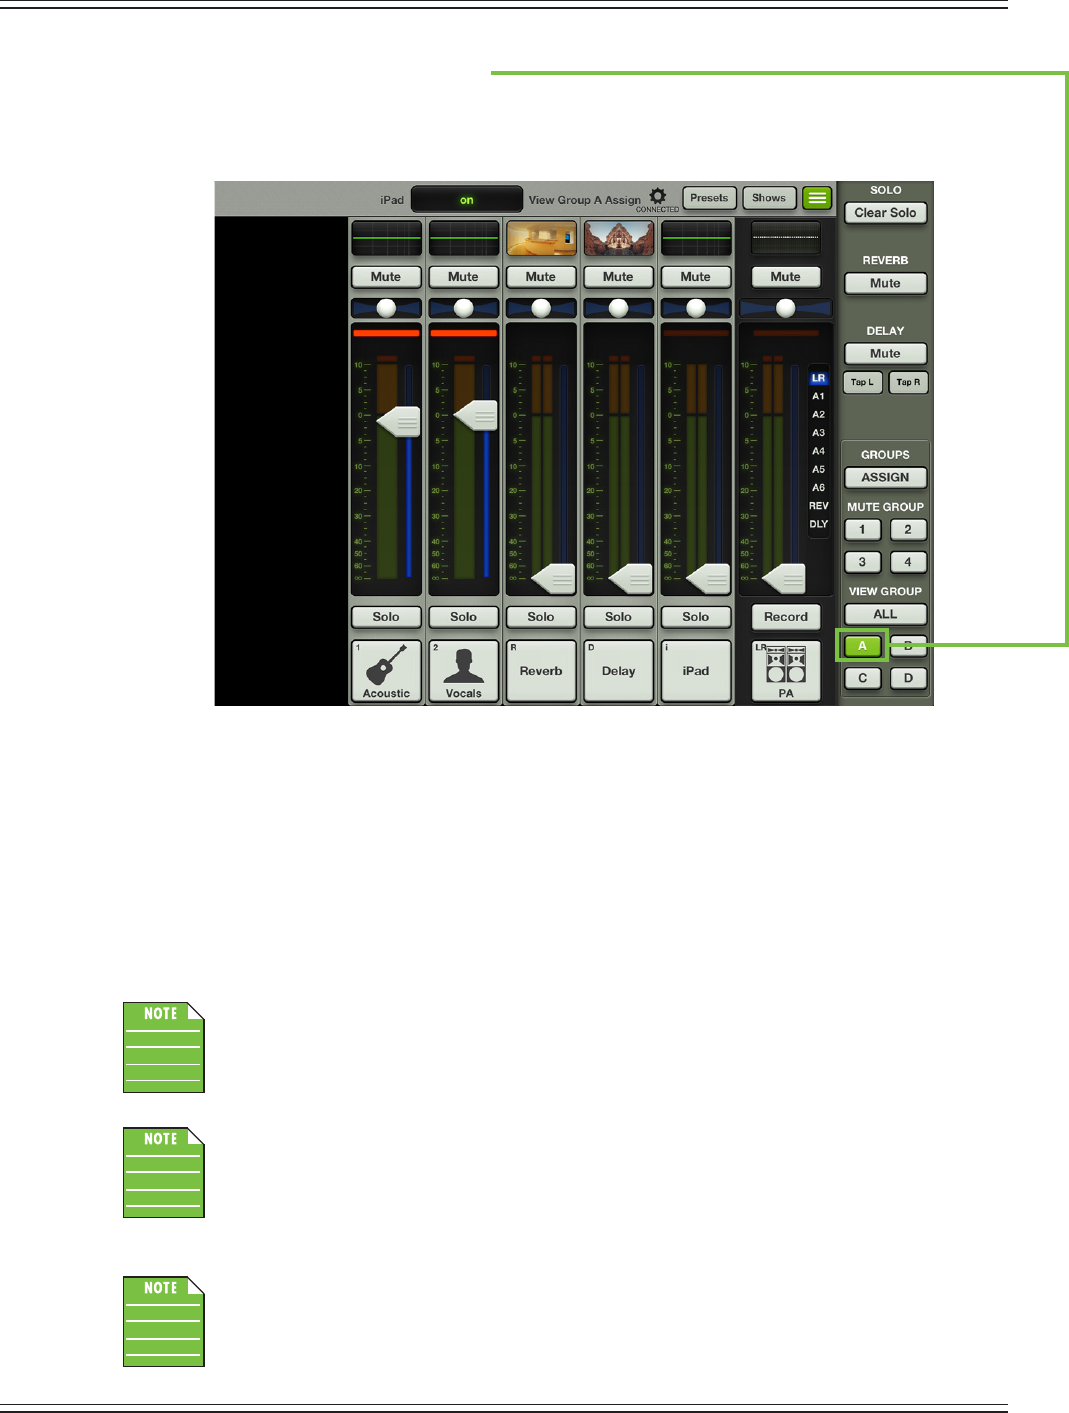
Mackie DL806 and DL1608 Reference Guide
141
Step 6 — Tap the view group A button:
TaptheviewgroupAbuttonlocatedonthequickaccesspanel.Noticeinthescreenshot
belowthattheviewgroupAbuttonilluminatesgreenwhenselected.
This is the exact same
screenshotasseenonthepreviouspage,butwiththeviewgroupAbuttonselected.
Excellentwork!Youassignedchannels1,2,theFXandiPadchannelstoviewgroupA
andengagedviewgroupA(therebyhidingallotherchannels).Noticethatonlychannels
1,2,reverb,delay,iPadandthemasterfaderchannelsarepresent....thechannelsyou
assigned to view!
Now,let’ssaythere’sanall-acoustichootenannytakingplaceatthemonthlyhoedown.
Afterthesinger-songwriter’ssessioniscompleted,thenextbandupcouldaddmandolin
and banjo to the mix. Simply assign those channels to a dierent view group following
the same steps.
Only one view group may be enabled at a time. Imagine your iOS device trying to view two or
more groups simultaneously...there would be a meltdown! If you want to view all channels
again,simplytaptheAllbuttononthequickaccesspanel.
Snapshots will save your view group assignments, but not the view group master enables!
In other words, you will need to engage/disengage the view group masters regardless
of how they were stored as a snapshot. If you need more than four dierent view groups
in the same show, save the view group assignments as snapshots and recall when needed!
Each user may decide what view group they want enabled for their iOS device. This is extremely
helpfulforabandonstagewantingtoviewonlythechannel(s)they’reusing.Thechannels
assigned to each view group are shared, but each user decides which view they want enabled,
includingAll.
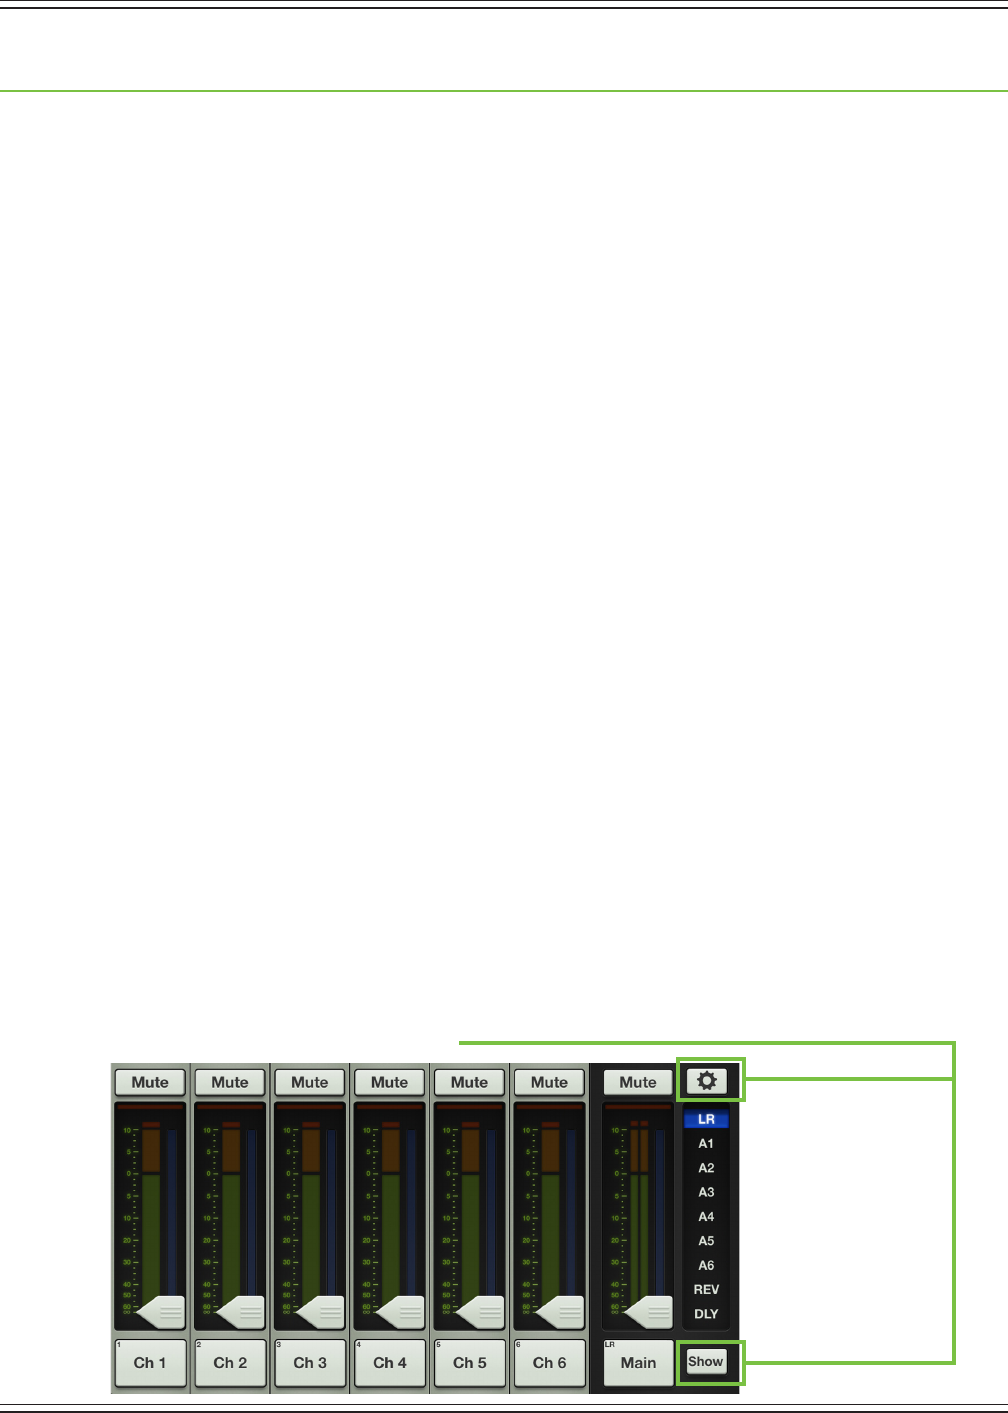
Mackie DL806 and DL1608 Reference Guide
142
Chapter 16: Mackie My Fader Software
Introduction
DoyouwanttocontrolthemixviaiPhoneoriPodtouch?OFcourseyoudo!Well,you’vecometotheright
place!Atthispoint,youmustbewell-versedin–oratleastsomewhat familiar with – the ins and outs of
Master Fader. My Fader looks and works similarly to that of Master Fader, but just on a much smaller scale.
It’sgreatforeasy,fastaccesstokeycontrolsneededduringashow.
MyFaderallowscontrolofDLSeriesmixersviaWi-FifromaniPhone4,4S,5,5S,5Cand/oriPodtouch(4th
and 5th generation). Version 2.1 features touch-friendly control over multiple input channels at once and
an output selector for quick access to any mix. The addition of channel muting, detailed channel ID
andmeteringandtheinclusionofamasterfaderprovideunmatchedcontrol.Plus,anaccesscontrolfeature
limits users to only control their assigned output, keeping them away from other outputs. This is great for
simpleon-stagecontrolofmonitormixes.Alsoincludedistheabilitytorecallanysnapshotsfromthe
current show on the DL Series mixer. This way, bands are able to control the whole mix from the stage.
Last, but not least, users have the ability to enable/disable mute groups and select view groups. Mute
groups are great for muting all inputs in-between sets (for just one example), while view groups displays
only the input channels you want, hiding the others. With My Fader, DL Series mixer users benet from the
full power of a digital mixer with an easy-to-use application that ts right in their hand.
Downloading, Installing and Updating the My Fader App
The steps it takes to download, install and update the My Fader app are nearly identical to that
oftheMasterFaderapp.JustfollowthesamestepsasoutlinedinChapter5,startingonpage29
(butreplace“MasterFader”with“MyFader”).
Using My Fader
MyFaderdoesn’thaveevery single feature of the Master Fader. Rather, My Fader contains the primary
featuresneededwhileashowisunderway.YouwillstillwanttouseMasterFadertosetupeverything
before-hand, then use My Fader to ne-tune levels and load shows during the set. There are three views
available on My Fader: mixer view, tools and shows.
Take a look at the mixer view of My Fader. Starting at the top and working your way down, the rst thing
youmightnoticeisthatthewholetopsectionofMasterFaderisnon-existentinMyFader;thisincludesthe
entirenavigationbar,channelEQcurvesandGEQ.Alsoofnotearethemissingchannelpans(andmaster
balance), as well as the solo and record buttons. Finally, whereas Master Fader displays nine faders at a time
(includingthemasterfader),MyFaderdisplaysseven(includingthemasterfader);trustme,youwouldn’t
want nine faders on My Fader...and I have skinny ngers!
The tools button is located above the output selector and shows may be accessed by touching the show
button located below the output selector.
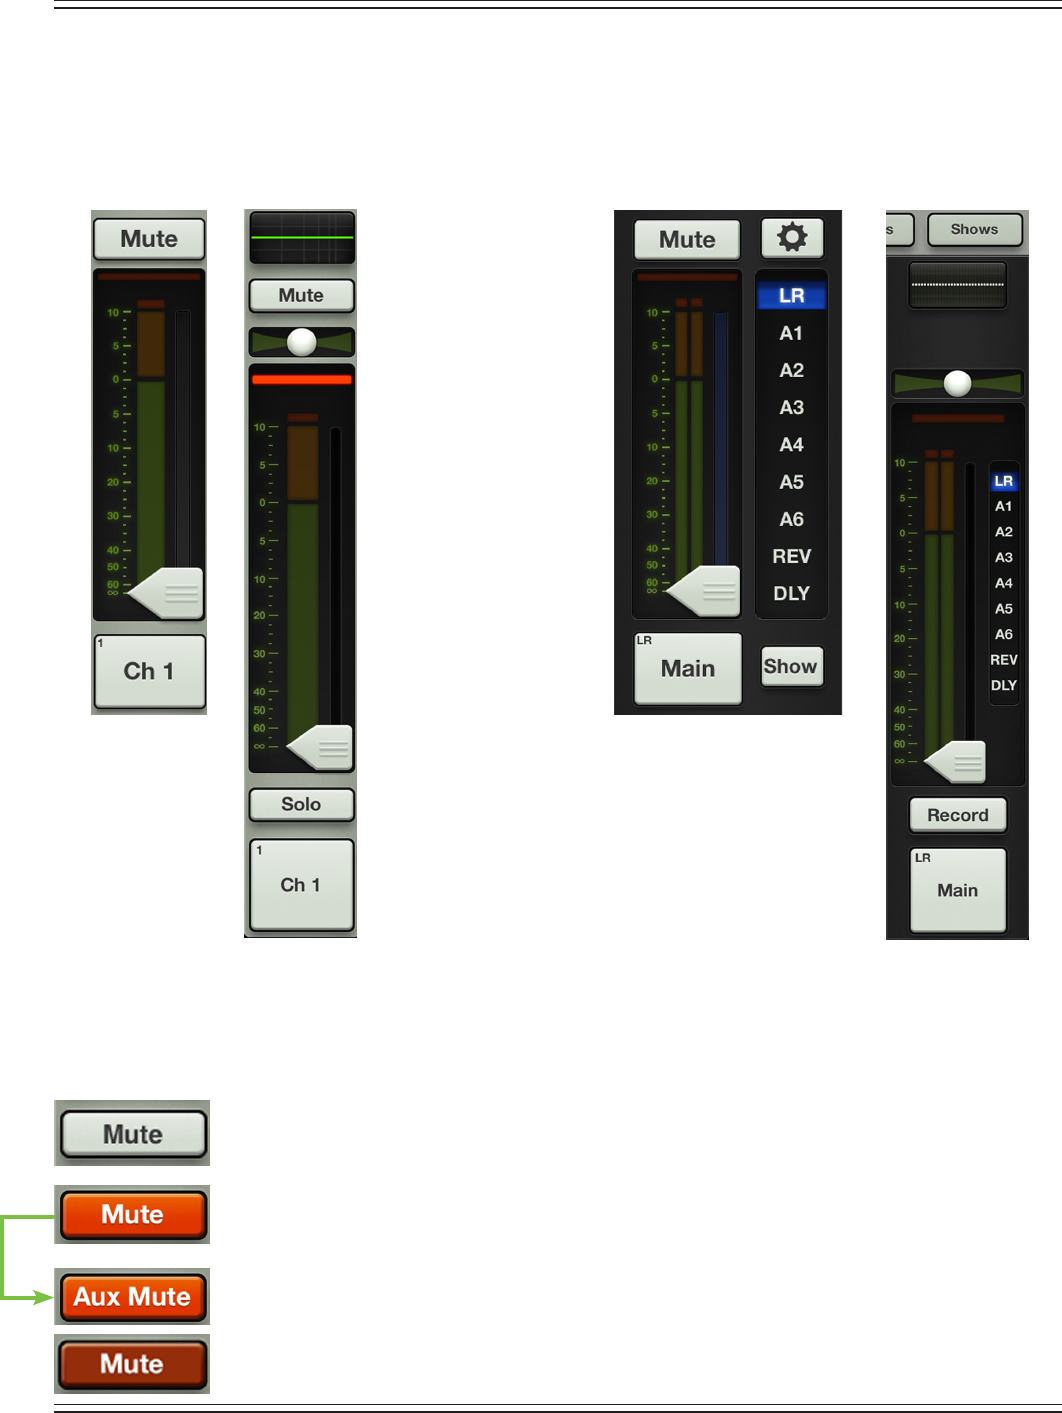
Mackie DL806 and DL1608 Reference Guide
143
My Fader vs Master Fader
The previous page displayed an image of what the entire mixer view of My Fader looks like and we just
discussedthedierencesbetweenMyFaderandMasterFader,butlet’stakeacloserlookatwhatwasjust
explained.We’llbreakdownthemixerviewbeforemovingontothetoolsandshowssections.
The images below show side-by-side comparisons (and dierences) between the My Fader and Master Fader
channel strips (left) and output strips (right).
WhileMyFaderdoesn’thaveeverysinglefeaturethatMasterFaderdoes,itdoesoerawide-selectionof
toolsnecessarytorunashow.Let’sbreakitdown.
Mute – Mute buttons do just what they sound like they do. They mute – turn o – the signal on the
channel(s).Engagingachannel’smuteswitchprovidesthesameresultsasslidingthechannel
fader all the way down.
Mute buttons illuminate red when engaged and are gray when disengaged.
Pleasenotethatmutingachannelmutesitallonalloutputs,notjusttheoutputthatiscurrently
shown...unlesstheuserde-selectsUseLRMuteforaparticularaux/FXsend,inwhichcaseaux
mutes (or FX mutes) and main mix mutes may be controlled independently for each channel.
MoreinformationaboutUseLRMutemaybefoundonpages48-49.
Inputs muted by mute groups will illuminate oxblood red. More information about mute groups
may be found on pages 134-138.
Master Fader
Output Strip
Master Fader
Channel Strip
My Fader
Channel Strip
My Fader
Output Strip
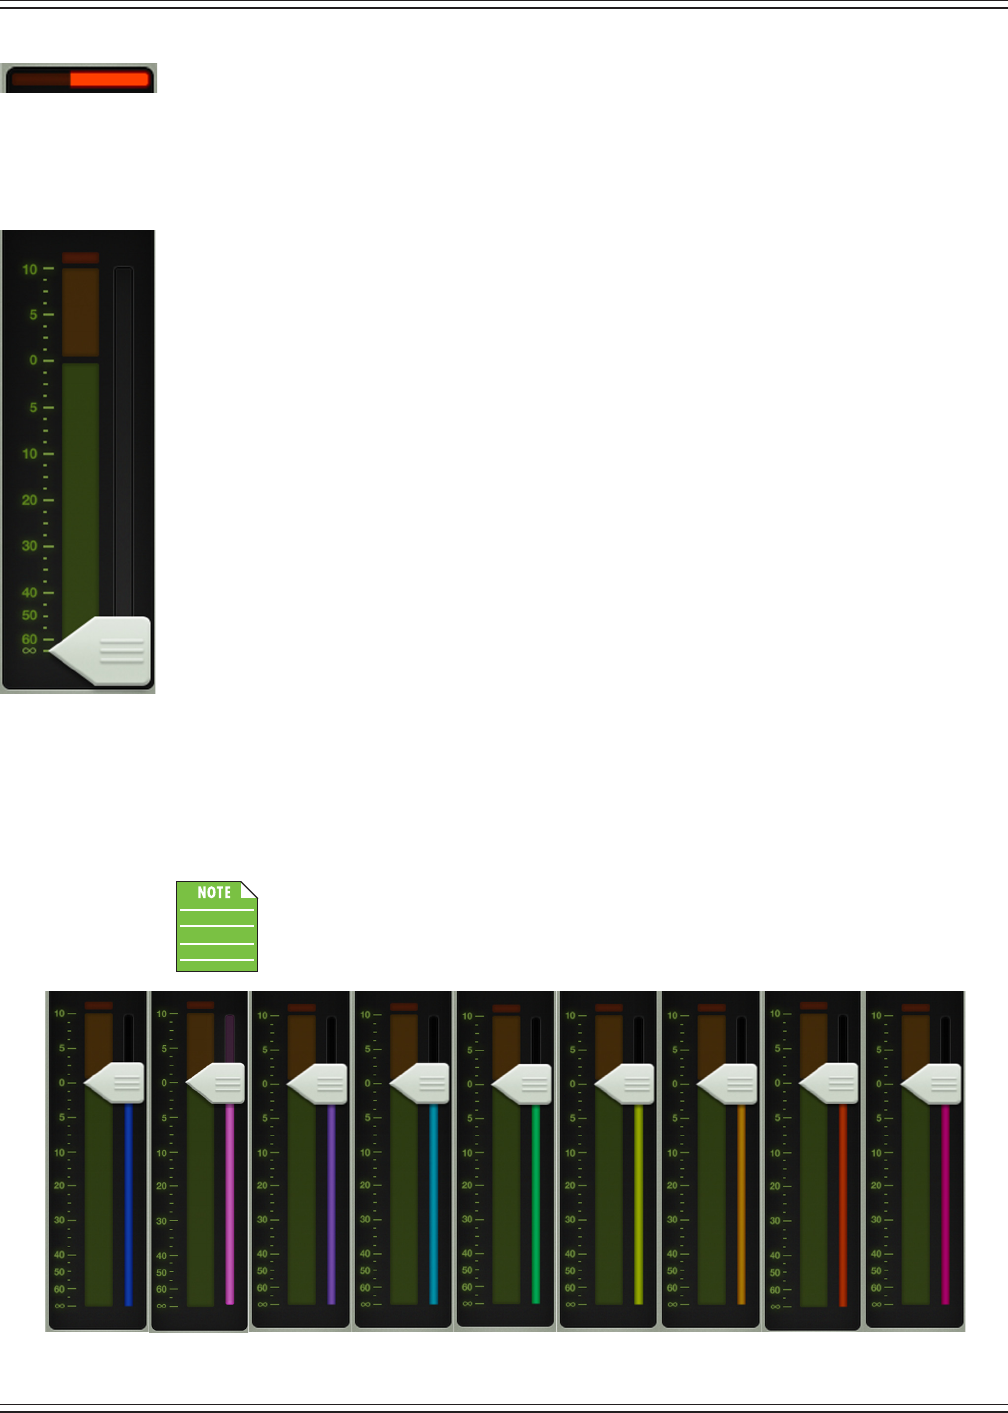
Mackie DL806 and DL1608 Reference Guide
144
Gain Reduction Meter – The gain reduction meter displays the input channel gain reduction
from the gate and compressor. The single meter shows the sum of the total reduction applied
by the gate and compressor.
It illuminates from right to left and is 20 dB when fully lit.
To learn more about dynamics, check out chapter 10 starting on page 68.
Channel Faders and Input Meters – The touch sensitive faders adjust the level of each channel
goingtotheselectedoutput.Adjustmentsaremadebytouchinganddraggingchannelfaders
upanddown.Touchedchannelfaderswill“grow&glow”toindicatethattheyarebeingadjusted.
Thefaderlevelrangesfrom–∞to+10dBasindicatedbythescaleontheleft.
The input meters (next to each channel fader) display the input signal level to the channel before all
channelprocessing.ChangesmadetotheEQ,muteandfaderdonotaectthesemeters.Thismeter
should remain green with the occasional bump into the yellow zone. Turn down the gain knob if the
inputmeterremainsconsistentlyyellow.Iftheinputistoohigh[overloading],aclipindicatoratthe
topofthemeterwillilluminatered.Ifclippingoccurs,reducethegain.Unlinkedchannelsdisplay
mono meters, while linked channels display stereo meters. How to link channels is discussed on
page 146.
Red[clipping]=–3dBFS
Green to yellow = –18 dBFS
Green[bottom]=–90dBFS
Selected Output Indicators – Directly to the right of each input meter (and underneath each fader
cap) are the selected output indicators. These vary by color for clear indication of which output type
is currently selected.
The output type is discussed in greater detail in the master fader section, starting on page 46.
There is no way you would ever see the image as shown below. It is just a point of
reference.Asmentionedabove,eachselectedoutputhasadierentcolorforclear
indication of which output type is currently selected. This is especially useful in the
mixer view.
LR AUX 1 AUX 2 AUX 3 AUX 4 AUX 5 AUX 6 REV DLY
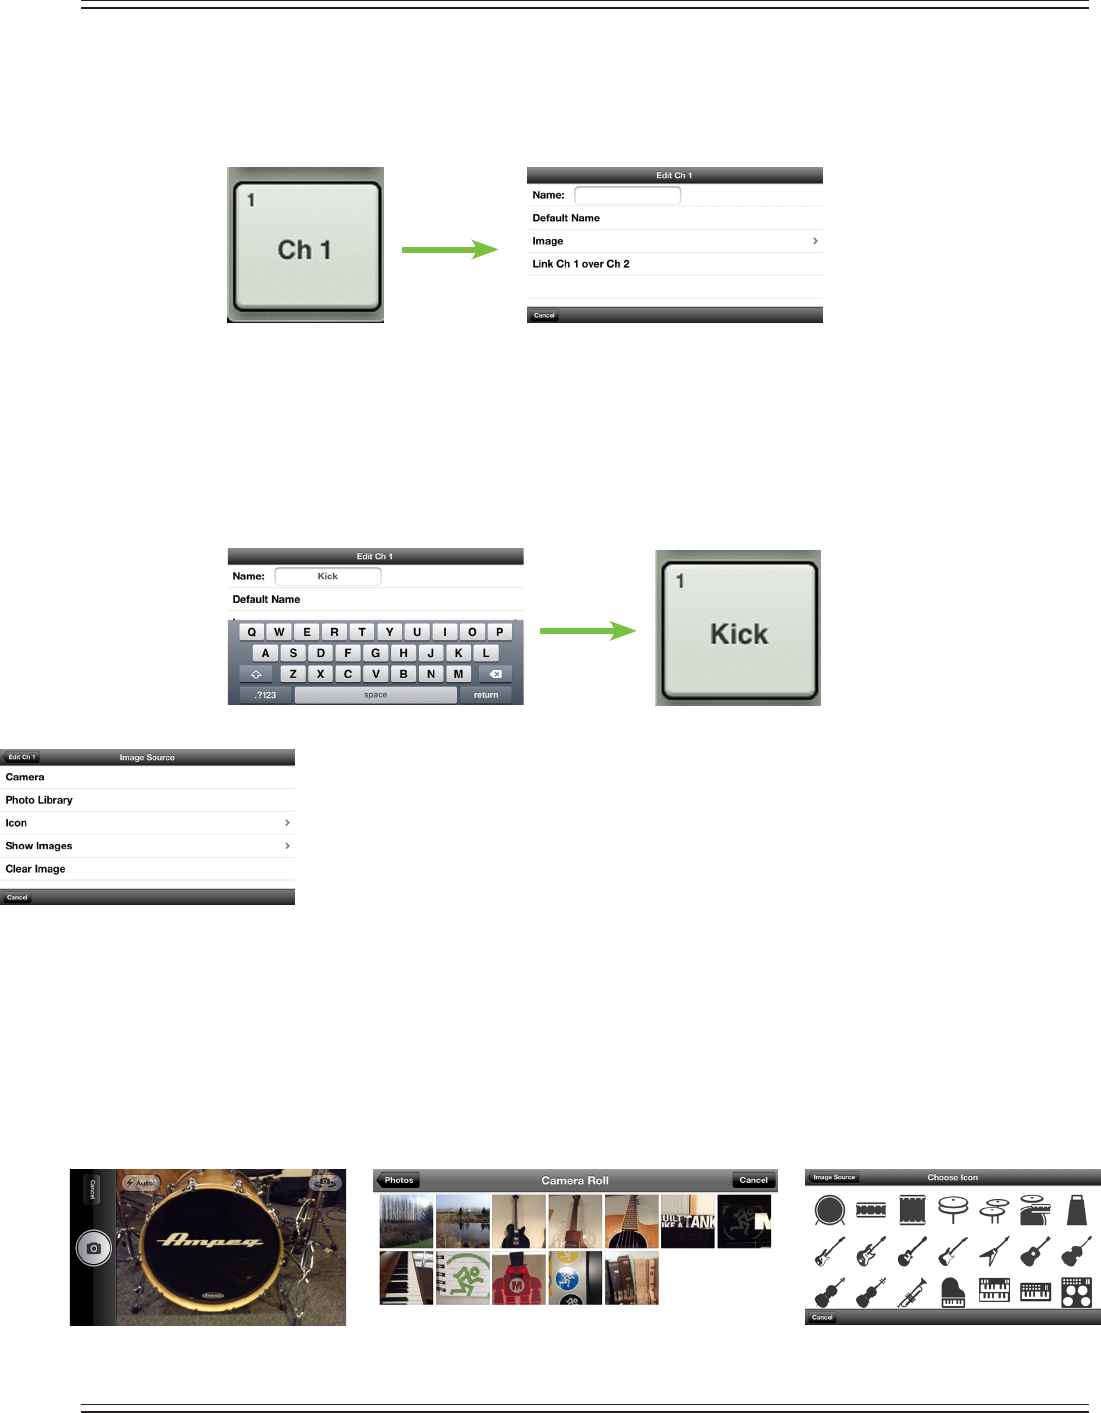
Mackie DL806 and DL1608 Reference Guide
145
Channel ID Button –EachchannelIDbuttonnameandimageisuser-editable.Additionally,usersmay
also link two adjoining channels together into a single channel strip. Simply tap the button at the very
bottom of the channel strip to reveal a popover that allows editing of the name and image and option
to link channels.
Let’sstartwiththename.Tapinthenameboxtobringuptheblinkingcursorandkeyboard(asseen
in the image below). Simply type in the name you want for that channel followed by a carriage return.
If the name is too long to t, the button scrolls, displaying the entire name.
Forfamiliarity,thisisthesamekeyboardthatisusedformessagingoremailingfromtheiPhoneand
iPodtouch.
Itgoeswithoutsayingthattapping“DefaultName”changesthatchannel’snamebacktoitsdefault
name.
Anopengrayboxwithonlythechannel’snameworks,butlet’sspiceitupwithanimage.
Show images are kept in sync which means that all connected devices will display the new
image once its been added, whether or not it was already on that device. There are several
waystochooseanimage.Fromthechannelpopover,tap“Image”torevealanewpopover
asseentotheleft[ImageSource].Youwillbepresentedwithvechoices:
Camera — Ifyou’refamiliarwithhowthecameraontheiPhoneandiPodtouchworks,
thenyou’reinluck...thisoneworkstheexactsameway!Theencircledcameraiconsnaps
the picture and the icon in the upper-right corner selects between the front and back
cameraontheiPhoneandiPodtouch.
Photo Library — Here you may select from all the photos that currently reside on your
iPhoneoriPodtouch.
Icon — Or select from a multitude of built-in icons at your disposal.
Image Source
Icon
Photo Library
Camera
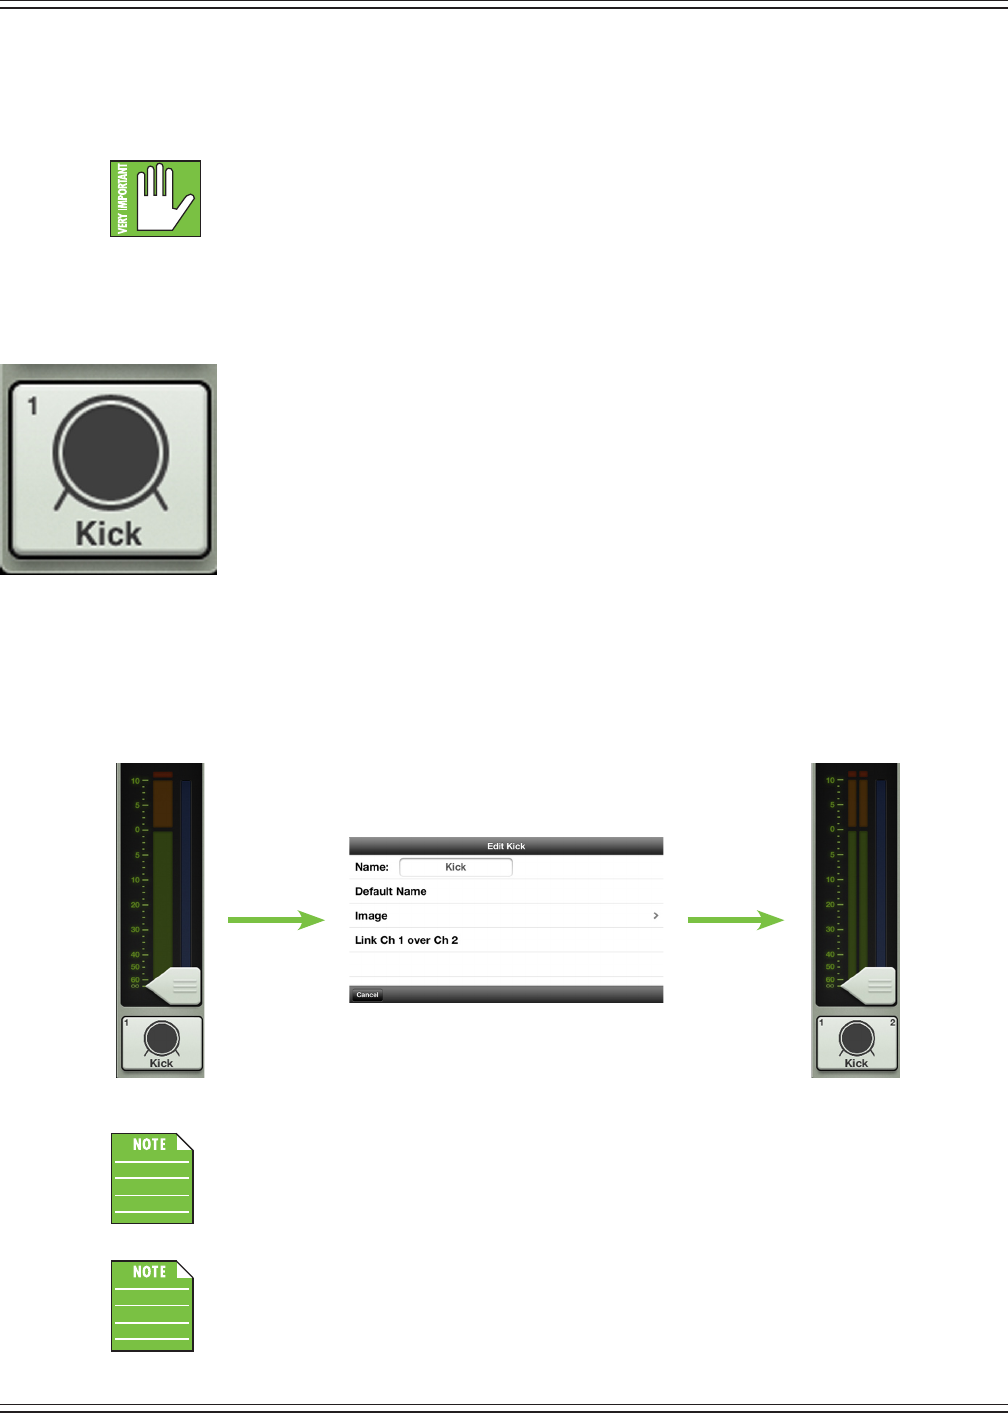
Mackie DL806 and DL1608 Reference Guide
146
Show Images — This allows you to select the channel image from photos that are currently
in use on the current show. The list will display all images currently in use. Tap the photo you
would like to use from this list.
Amaximumof64imagesmaybeusedpershow.However,ifthesameimageisused
on multiple channels, it only counts as one image (if the image has been selected from show
images and not multiple times from the photo library). Icons do not count toward the 64.
Moreinformationaboutthelesystem[shows,snapshots,etc.]beginsonpage115.
Clear Image — Believe it or not, tapping here will clear the image for that channel.
Thisremovestheimagefromthechanneland,ifitisn’tusedelsewhere,fromthe
CurrentShowandtheShowImageslist.
Since we already named channel 1 the kick drum, we might as well go with the
kickdrumicontoboot,right?Tapthekickdrumiconintheupper-leftcorner.
Channel1isset:nameandimage.
Asseeninalloftheseimages,asmallnumberresidesIntheupper-leftcorner
regardless of name and/or image. This number represents each channel and
itcannotbechangedorremoved.Trustus,it’sforthebest,asitisforeasy
identication of each mic pre.
Asmentionedpreviously,twoadjoiningmonoinputchannelsmaybelinkedtogetherintoasinglestereo
channel strip. This is ideal for stereo input sources such as keyboards, submixer outputs, vocal processors
and more. When linked, the level control, EQ, gate and compressor are adjusted with a single set of controls!
Linkingchannelsiseasy.AftertappingaChannelIDbutton,youwillseeanoptionto“LinkChXoverChX”.
Tapit!Apopoverwilldisplayaskingyoutoconrm.Avisualdierencebetweenunlinkedandlinked
channels is displayed below. Follow the same steps outlined above to unlink channels.
Odd-numberedchannelswilllinktothenext(even-numbered)channel[e.g.1-2,3-4,etc],
while even-numbered channels will link to the previous (odd-numbered) channel
[e.g.10-9,12-11,etc].
Thelinkedoverchannelwilltakeonalloftheattributes[EQsettings,gateandcompressor
settings,delayandreverbsettings,etc.]ofthetappedChannelIDbutton.Inotherwords,
if you link channel 1 over 2, the resulting stereo channel will take on all of the settings of
channel 1. However, if you link channel 2 over channel 1, the resulting stereo channel will
take on all of the settings of channel 2.
Unlinked Linked
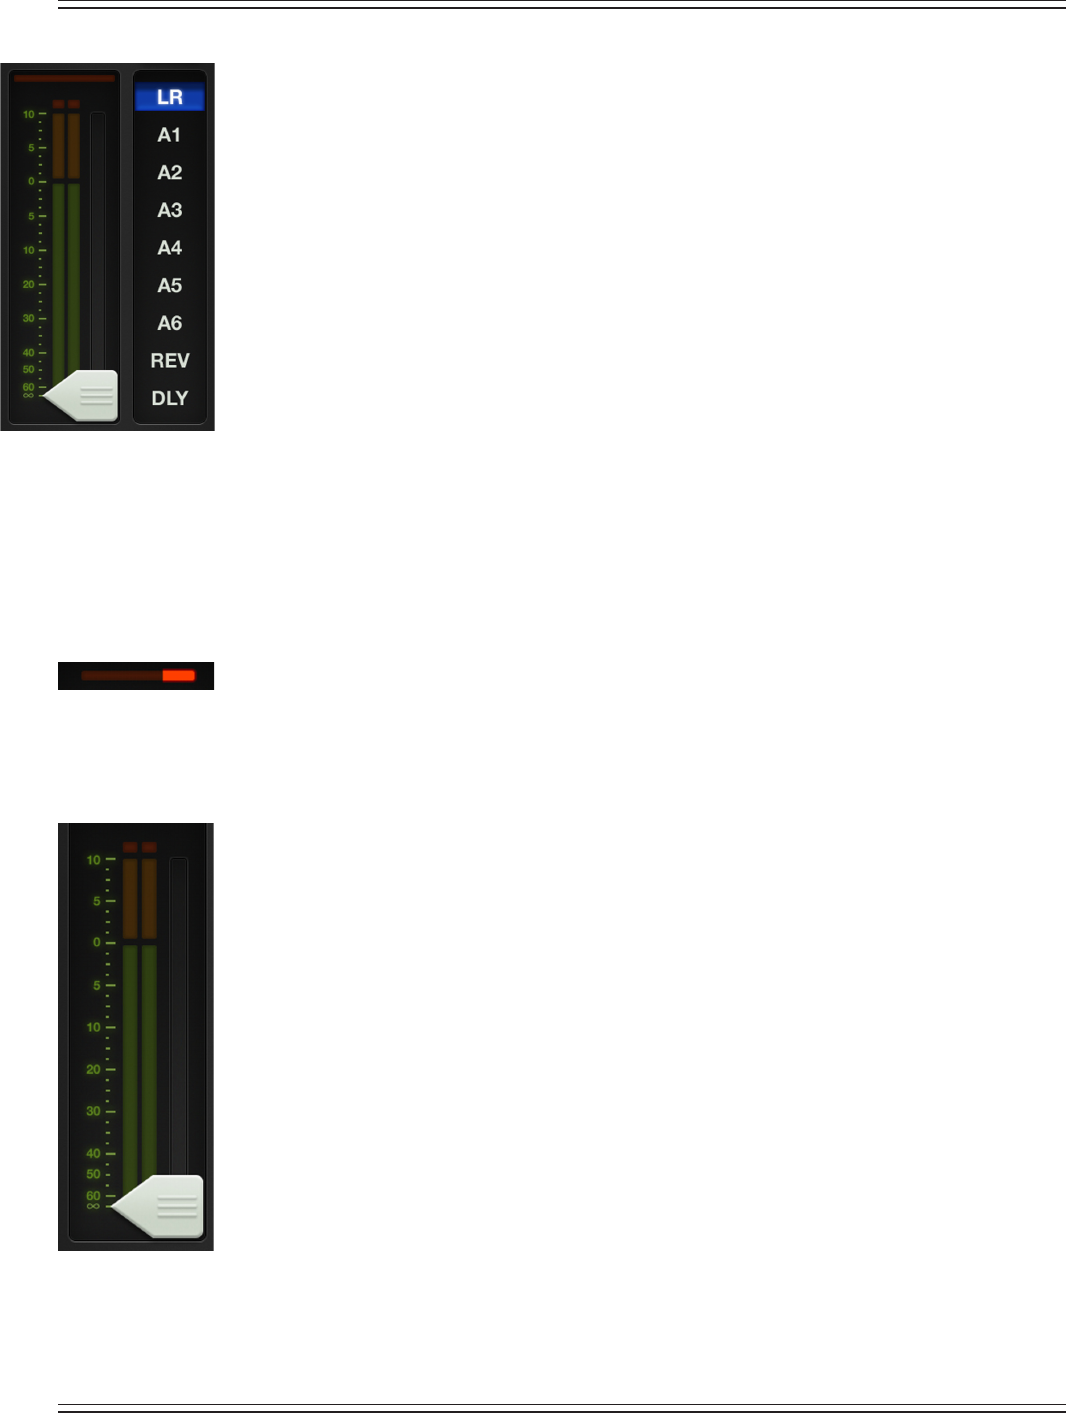
Mackie DL806 and DL1608 Reference Guide
147
Output Selector / Output Channels – The master fader is arguably the most important tool of the
mixerandtheoutputselectorhasthemostimportantrole,sowe’llstartthere.Afterthat,wewill
head back to the top of the master fader and work our way down.
The mixer view shows a fader for each channel. Initially, this fader controls the level to the LR output.
Buthowdoyoucontrolthelevelgoingtotheauxsends?Orhowabouttheauxmasterlevel?Simple.
Usetheoutputselectortoswitchbetweenoutputs.
Selectfromoneofthefollowingoutputs:LR,A1-A6,reverbanddelay[ontheDL1608;LR,A1-A4,
reverbanddelayontheDL806].
The currently selected output is illuminated, but changing the selected output is easy. Simply touch
the output selector and it will immediately grow & glow. Move your nger to the desired output and
release.Oryoucouldjusttaptheoutputyoudesireanditwillchangejustlikethat<snapsngers>.
Once a dierent output has been selected, the channel faders will change to show the level going
to the newly selected output. Similarly, the master fader will change to show the controls of the
newly selected output.
Here,themixerviewactslikeawindowwhereyoumayviewandchangeoneoutput’smixatatime.
Nomatterwhichoutputiscurrentlyselected,theothersarestillthere,astheywere.
The thin illuminated strip underneath the master fader cap also helps indicate which output type
iscurrentlyselected;thecolorvariesandisdependentontheselectedoutput.Thisisthesame
indicator that is also on display underneath the fader cap of each input fader.
Output Gain Reduction Meter – Like channel faders, the output gain reduction meter shows
the amount of gain reduction applied to the output by the compressor / limiter. Output channels
do not contain gates.
To learn more about the output compressor / limiter, check out chapter 13 starting on page 96.
Master Fader and Output Meters –Asdiscussed,themasterfaderadjuststheoutputlevelofthe
LR, the aux masters and the reverb and delay master sends, depending on which output is selected.
While one fader controls the output level of each output, each output is independent of the others.
Once the selected output has been chosen, touch and drag the master fader up and down to make
adjustments.
The output meter displays the output signal level. The output meter is presented in mono or stereo
dependingontheselectedoutput.ItisstereoforLRandlinkedauxesandFXsends.Unlinkedauxes
and FX sends are presented in mono.
Speaking of FX, if reverb or delay is selected, the fader controls the master send into the
corresponding FX processor.
This meter should remain green with the occasional bump into the yellow zone. The output meters
arepost-fader,soifthereistoomuchyellow(oranyredclipping),lowerthemasterfaderuntilit’s
gone and check the input channels, as well.
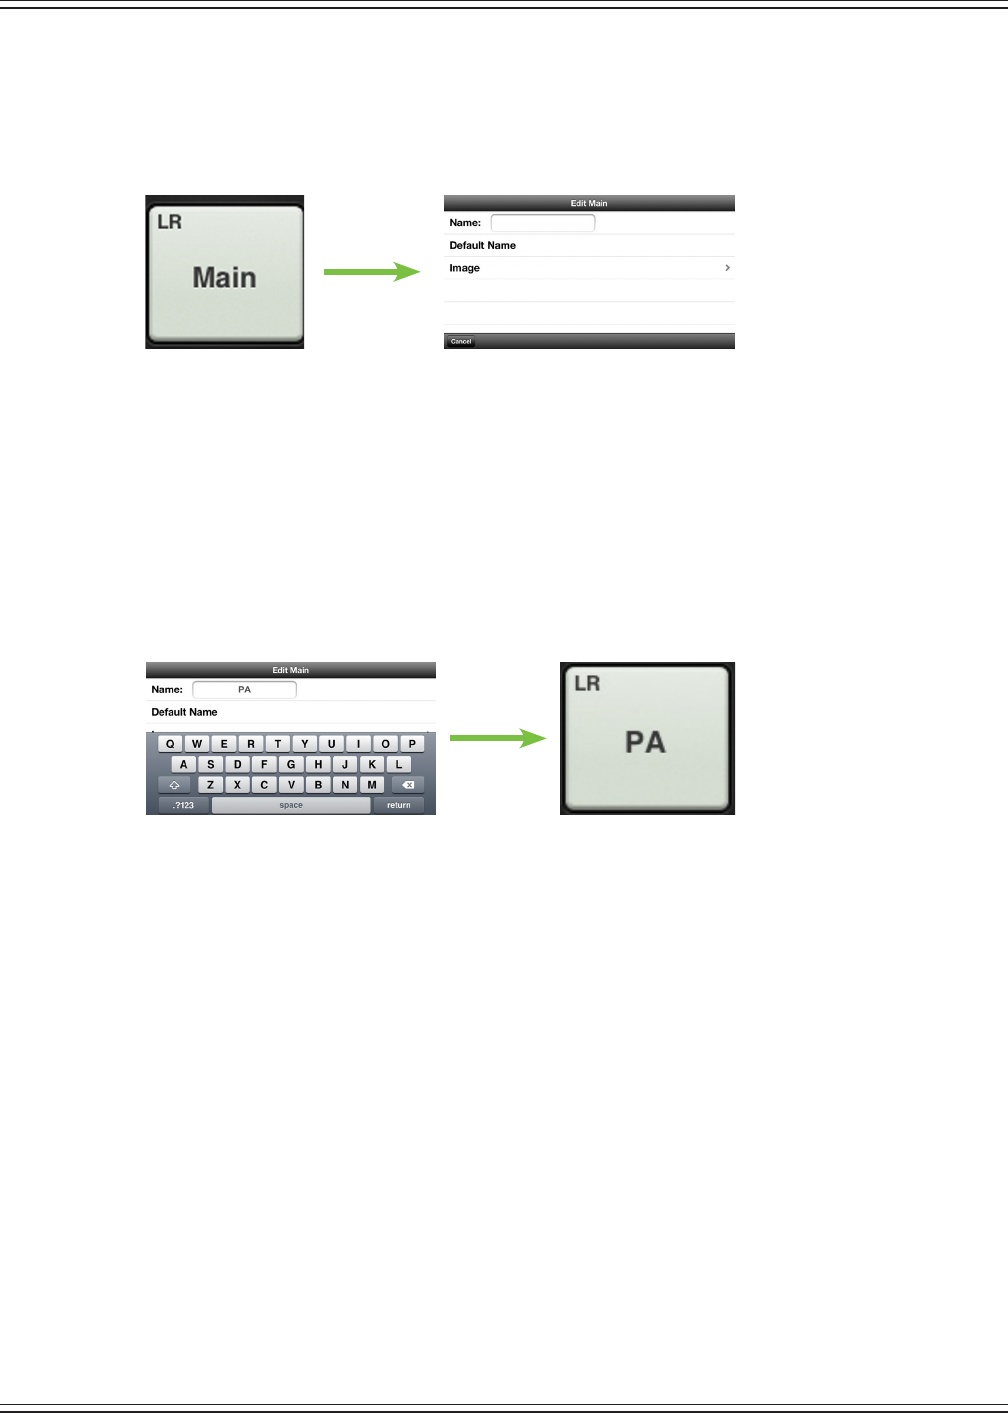
Mackie DL806 and DL1608 Reference Guide
148
Master ID Button –Themasterfader’snameandimageissimilartothatofachannelstrip’snameand
image.Likethechannelfaders,themasterfader’snameandimageisalsouser-editable.Additionally,
users may also link two adjoining auxes together. Simply tap the button at the bottom of the master
fader and a popover allows editing a name or selecting an image and option to link auxes.
Let’sstartwiththename.Tapinthenameboxtobringuptheblinkingcursorandkeyboard(asseen
intheimagebelow).Simplytypeinthenameyouwantfollowedbyacarriagereturn.Notethetext
changebetweenthebuttonshowntotheleft[“Main”]versustheoneasshownbelow[“PA”].
If the name is too long to t, the button scrolls, displaying the entire name.
Forfamiliarity,thisisthesamekeyboardthatisusedformessagingoremailingfromtheiPhone
andiPodtouch.
Itgoeswithoutsayingthattapping“DefaultName”changesthemasterfader’snamebacktoits
default name.
Asseeninalloftheseimages,asmallnameresidesintheupper-leftcornerofthemasterIDbutton
regardless of the name and/or image. This system name represents each output and it cannot be
changedorremoved.Trustus,it’sforthebest,asitisforeasyidenticationofeachoutput,evenafter
you rename it something goofy.
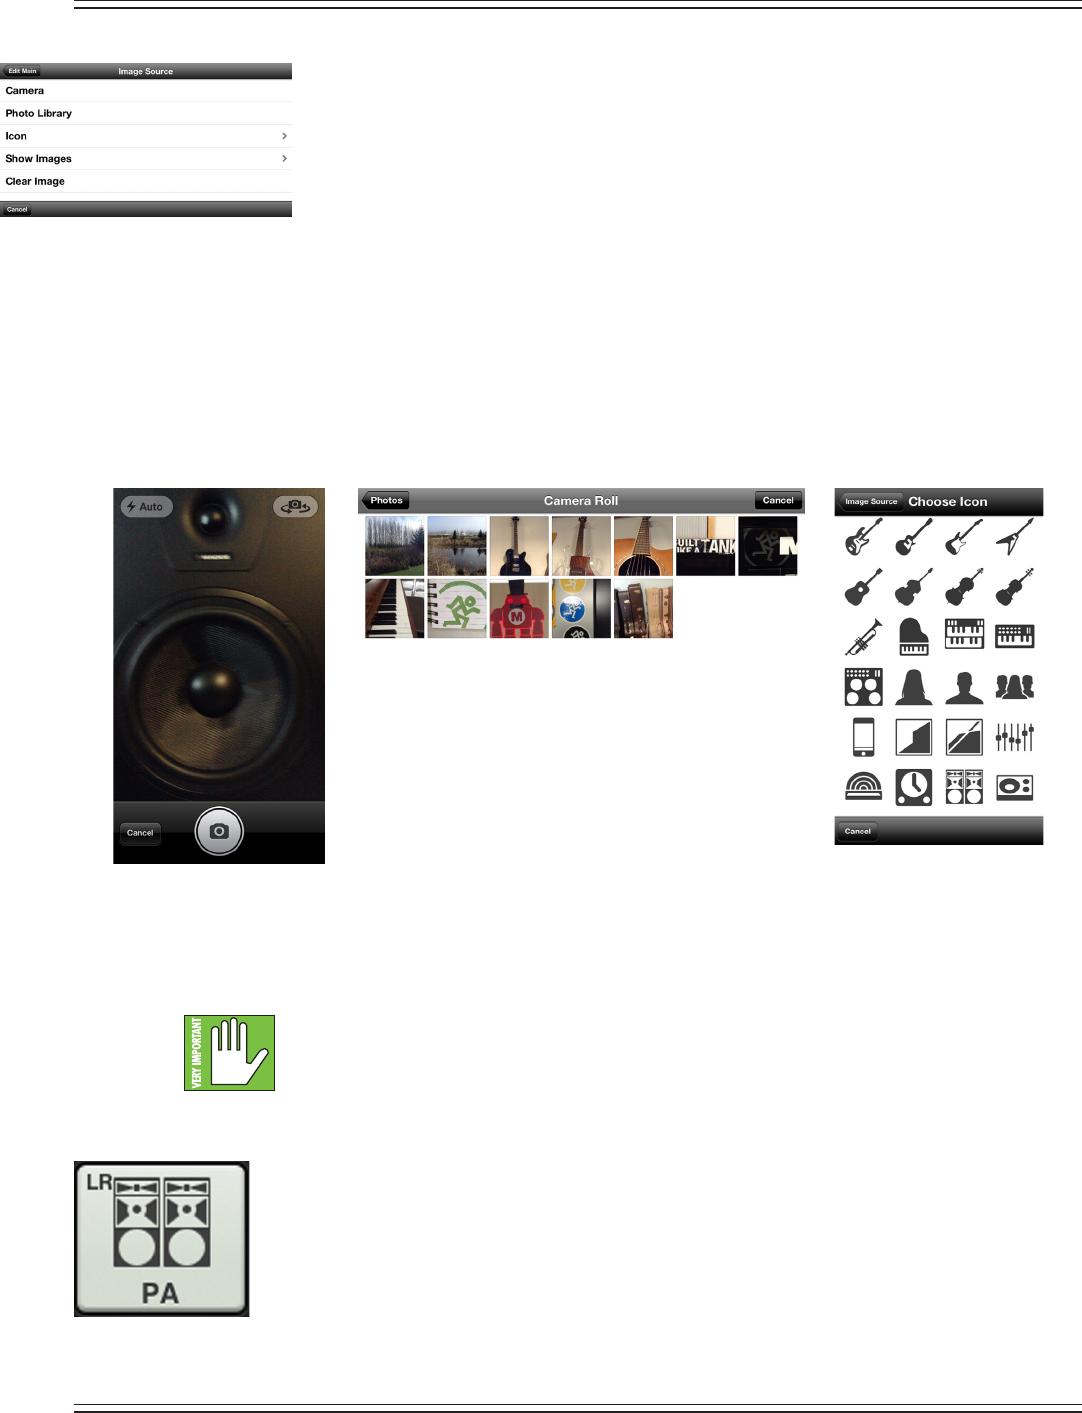
Mackie DL806 and DL1608 Reference Guide
149
Anopengrayboxwithonlythemasterfader’snameworks,butlet’sspiceitupwithanimage.
Show images are kept in sync which means that all connected devices will display the new
image once its been added, whether or not it was already on that device. There are several
waystochooseanimage.Fromthepopover,tap“Image”torevealanewpopoverasseen
totheleft[ImageSource].Youwillbepresentedwithvechoices:
Camera — Ifyou’refamiliarwithhowthecameraontheiPhoneoriPodtouchworks,then
you’reinluck...thisoneworkstheexactsameway!Theencircledcameraiconsnapsthepicture
and the icon in the upper-right corner selects between the front and back camera on the
iPhoneoriPodtouch.
Photo Library — HereyoumayselectfromallthephotosthatcurrentlyresideonyouriPhone
oriPodtouch.
Icon — Or select from a multitude of built-in icons at your disposal.
Show Images — This allows you to select the master fader image from photos that
are currently in use on the current show. The list will display all images currently in use.
Tap the photo you would like to use from this list.
Amaximumof64imagesmaybeusedpershow.However,Ifthesameimageisused
on multiple channels, it only counts as one image (if the image has been selected from show
images and not multiple times from the photo library). Icons do not count toward the 64.
Moreinformationaboutthelesystem[shows,snapshots,etc.]beginsonpage115.
Clear Image — Believe it or not, tapping here will clear the image for that channel.
SincewealreadynamedthemasterfaderthePA,wemightaswellgowiththePAicontoboot,
right?TapthePAiconinthelower-leftcorner.Themasterfaderisset:nameandimage.
Icon
Photo Library
Camera
Image Source
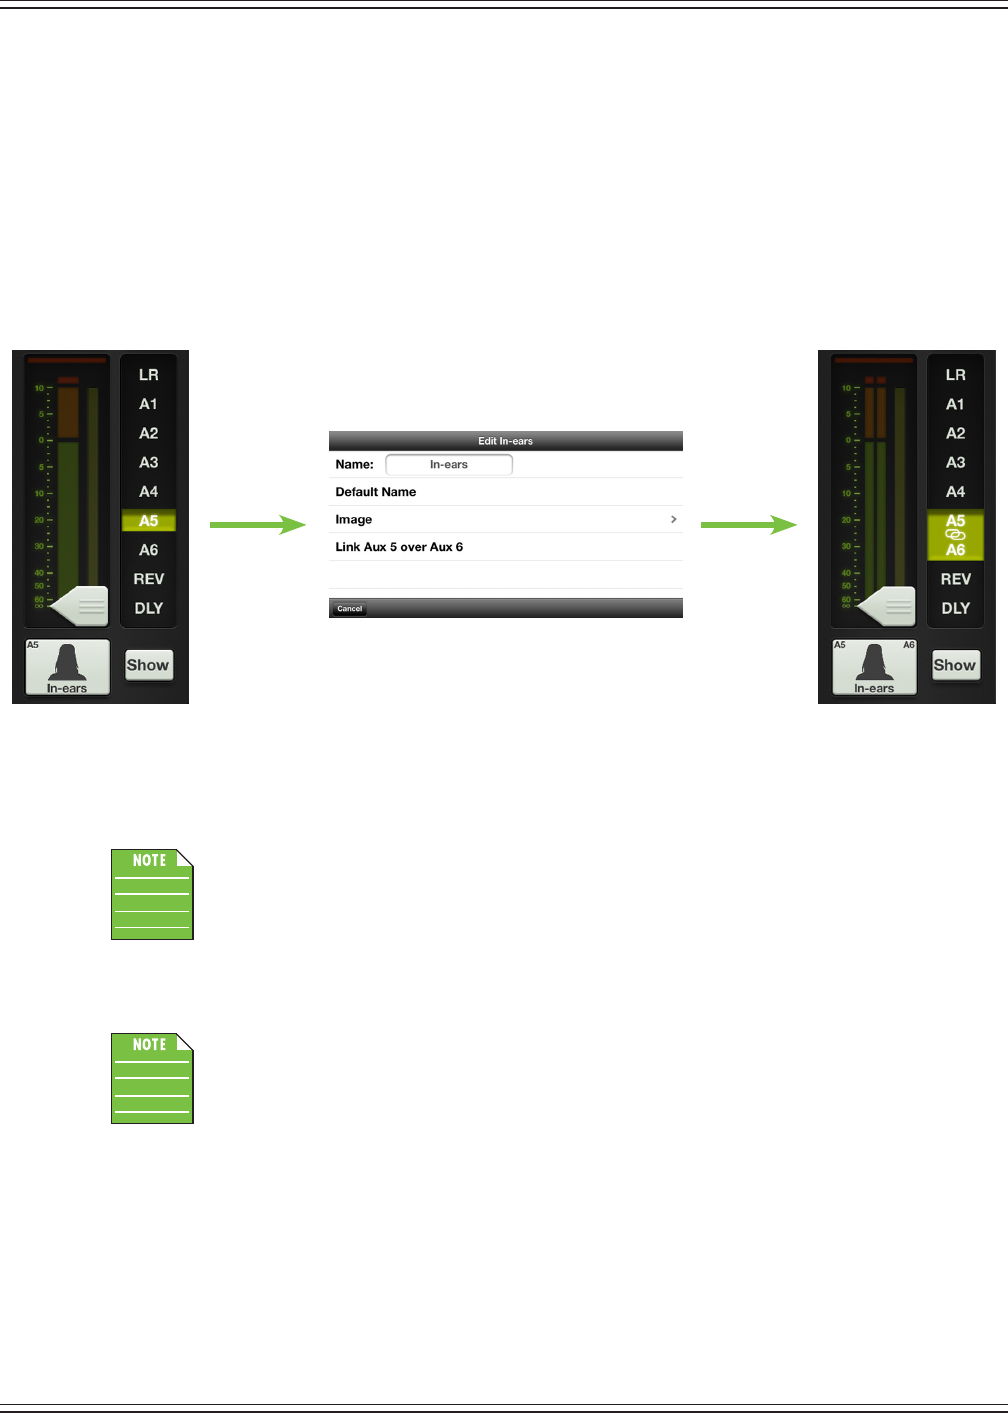
Mackie DL806 and DL1608 Reference Guide
150
Linking Auxes –Asmentionedpreviously,twoseparatemonoauxesmaybelinkedtogetherintoasingle
stereo aux. This is ideal for using in-ear monitors or other stereo output destinations such as broadcast feeds,
recording devices and more. When linked, the level control, graphic EQ and output compressor/limiter are
adjusted with a single set of controls!
Linkingauxesiseasy.Firstyouneedtoselecttheauxyouwanttolink.Nowtaptheaux’sMasterIDbutton;
youwillseeanoptionto“LinkAuxXoverAuxX”.Tapit!Apopoverwilldisplayaskingyoutoconrm.Avisual
of these steps is displayed below. Follow the same steps outlined above to unlink auxes.
Odd-numberedauxeswilllinktothenext(even-numbered)aux[1-2,3-4,5-6],while
even-numberedauxeswilllinktotheprevious(odd-numbered)aux[6-5,4-3,2-1].
Thelinkedoverauxwilltakeonalloftheattributes[graphicEQsettings,outputcompressor/
limitersettings,auxsendoutputrouting,etc.]ofthetappedMasterID(aux)button.Inother
words, if you link aux 1 over 2, the resulting stereo aux will take on all of the settings of aux 1.
However, if you link aux 2 over aux 1, the resulting stereo aux will take on all of the settings of
aux 2.
Unlinked Linked
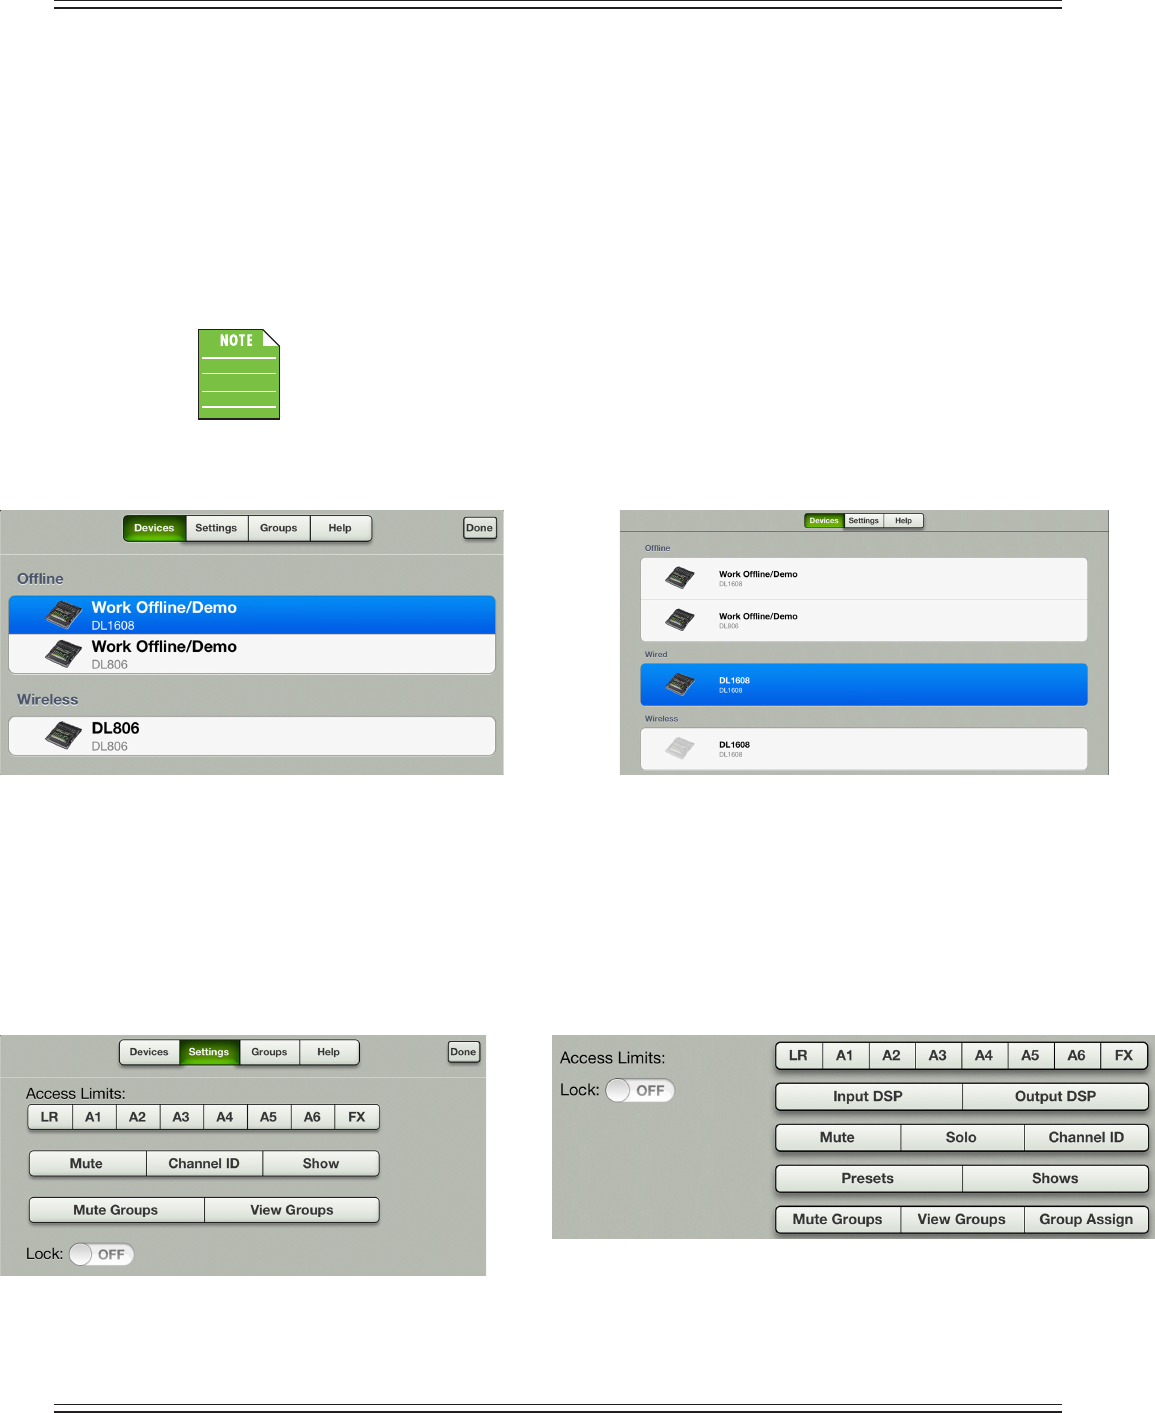
Mackie DL806 and DL1608 Reference Guide
151
Tools
Tapthebuttonwiththegearicononittoopenupthetoolsview.Noticethatithasanearlyidenticallayout
to that of the tools section of Master Fader. My Fader is divided into four sections: devices, settings, groups
and help. Below is a side-by-side comparison of each, with My Fader screen shots on the left and Master
Fader screen shots on the right.
Devices – Devices is where you select a DL Series mixer to control wirelessly from the My Fader app
onaniPhoneoriPodtouch.Oryoumaychoosetoworkoineforavarietyofreasons.Simplyselect
from a list of all discovered consoles available for control. The list of available devices to select from
is divided into two sections: Oine and Wireless.
DonottryconnectinganiPhoneoriPodtouchtothemixerdock;MyFaderonlyworks
wirelessly (or oine).
More information about devices may be found on pages 102-107.
Settings [Access Limits] – This set of buttons allows you to limit access to a variety of controls on each
iOS device. This is useful in multiple situations. For example, each member of a band with an iOS device
can access and change only the controls you choose.
Devices: My Fader Devices: Master Fader
Settings: My Fader Settings: Master Fader
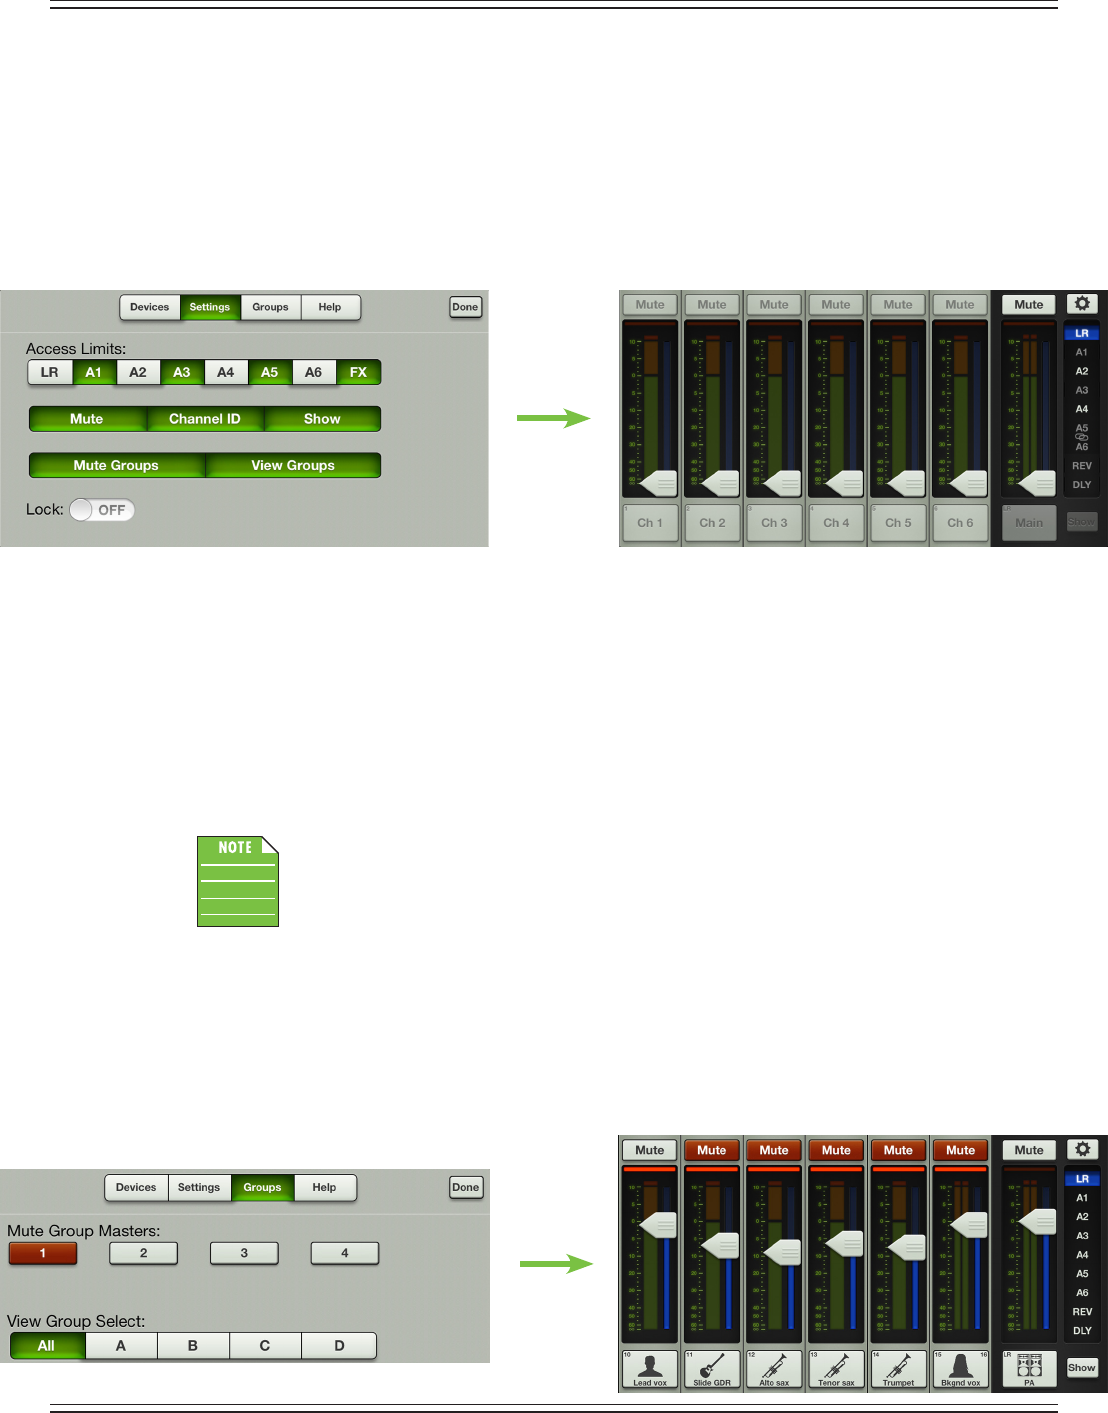
Mackie DL806 and DL1608 Reference Guide
152
Checkoutthetwoimagesbelow.Ontheleftside,wesetaccesslimitstoAuxes1,3,and5,aswellas
theFXoutputs,Mute,ChannelID,Shows,MuteGroupsandViewGroups.Weknowbecauseaswe’ve
seen throughout the reference guide, a green button means a function is engaged, while gray buttons
are disengaged items.
On the right hand side is an image of the mixer view with the above-mentioned access limits in place.
Noticethatthefunctionsarestillvisible,butshadedgray,indicatingthattheyarenotavailable
forupdate.TheLRoutputandauxes2,4and6werenotset;noticethedierenceincolorinthe
same mixer view image.
More information about settings (and access limits) may be found on pages 108-112.
Groups – Tapping the groups button accesses the mute group masters and view group select.
Mute groups allow you to quickly mute (and unmute) multiple channels and/or outputs with
a single tap. There are a multitude of possibilities in which to assign and enable mute groups:
productions featuring a rotating cast of musicians, theater productions, a house of worship
and more. It is also great for muting all inputs during song breaks or in-between sets.
View groups, on the other hand,
allow you to see only the channels that you want to view, hiding
the rest. This improves organization and allows for faster navigation.
This improves organization and
allows for faster navigation.
The mute group masters and view group masters may be enabled/disabled via Master Fader
or My Fader. However, channels may only be assigned to mute groups and view groups in
Master Fader.
The mute groups and view groups seen below are the same ones that were assigned in the mute
and view groups section of Master Fader (pages 134-141). These master group master and view
group select buttons are enabled via My Fader.
We’llstartwiththemutegroups.Checkouttheimagesbelow.Ontheleftside,weenabledmute
group master 1. On the right side is an image of the mixer view with mute group master 1 enabled.
Noticethatthechannelsthatwereaddedtomutegroup1arenowmuted.
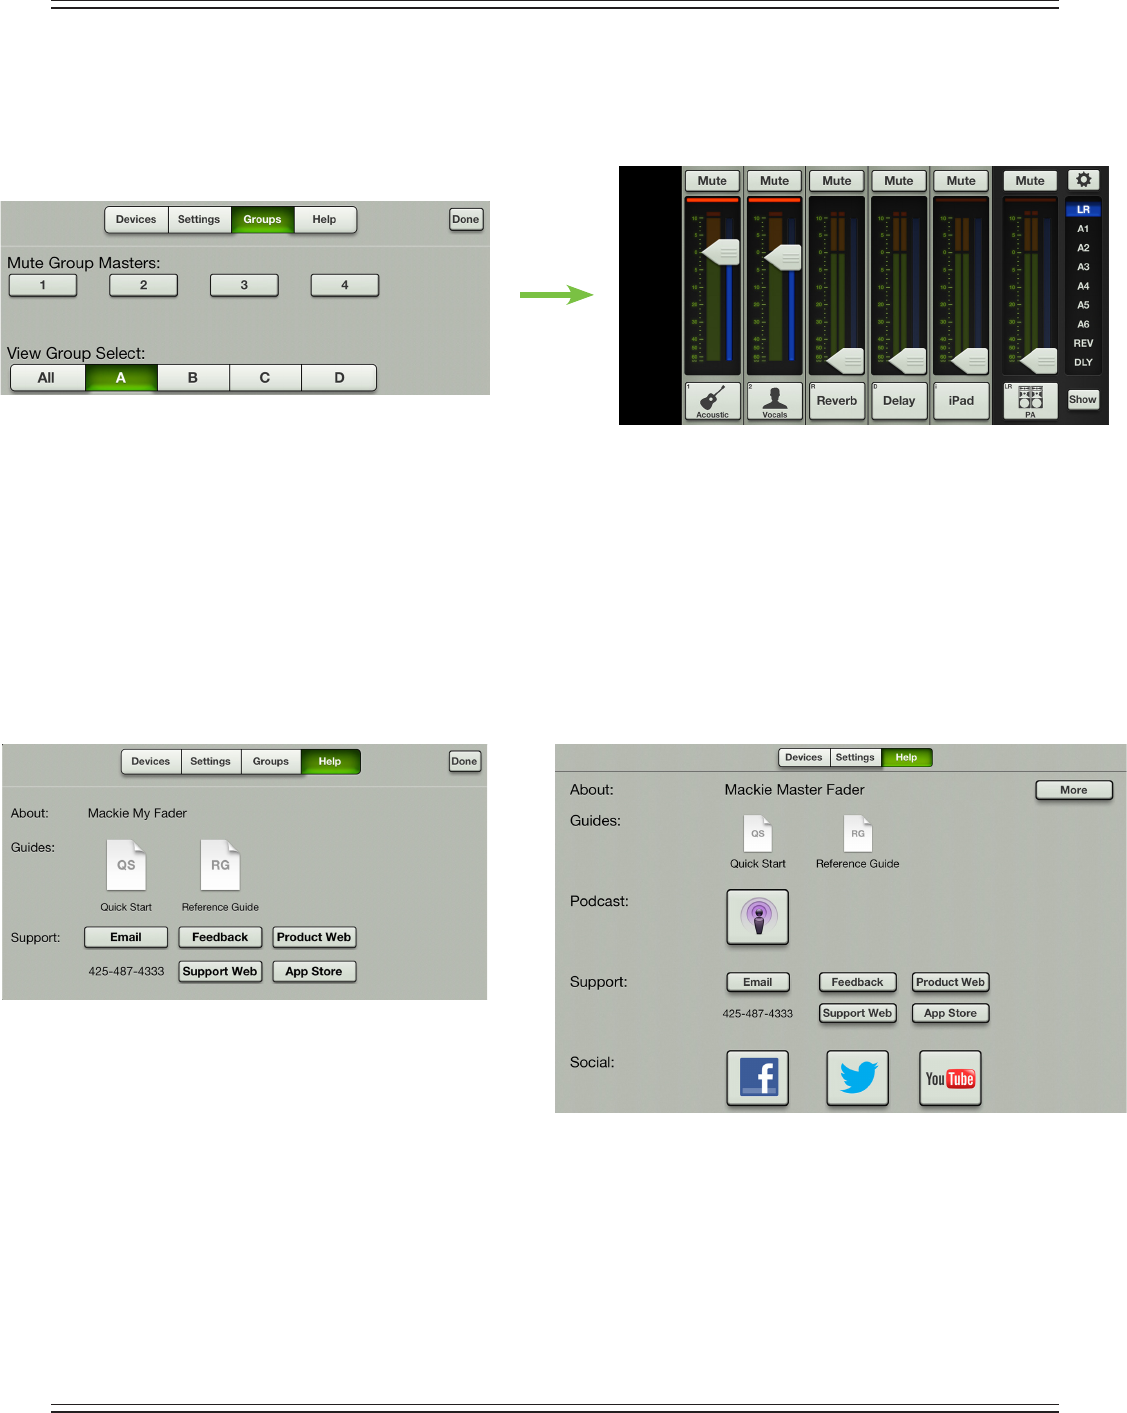
Mackie DL806 and DL1608 Reference Guide
153
NowforMyFaderviewgroups.Checkouttheimagesbelow.Ontheleftside,weenabledview
groupselectA.OntherightsideisanimageofthemixerviewwithviewgroupselectAenabled.
NoticethatthechannelsthatwereaddedtoviewgroupAaretheonlychannelsinview.
More information about mute groups and view groups may be found on pages 134-141.
Help – For the most part, the help section is pretty self-explanatory. Basically this is where to go if
you need further assistance or simply want to seek additional information about the DL Series mixers.
There is plenty enough to go around for everyone and we share nice. Below is a screen shot of the
helptabinMyFader(left)andMasterFader(right).Asyoucansee,theonlythingsnotavailable
intheMyFaderhelpsectionarethepodcastandsocialmedialinks.Noproblemo!Youcangather
that information from Master Fader or by clicking one or more of the following links right here:
Podcast, Facebook, Twitter, YouTube.
ThephonenumberlistedonthehelpscreenwillhaveabuttonassociatedwithitoniPhoneswith
MyFaderinstalled.Simplytapthebuttontomakethecall.Youcan’tmakephonecallsusinganiPod
touch, therefore no button!
Moreinformationabouthelpmaybefoundonpage114.Seemslikeanoxymoron,doesn’tit?
For more help about help go here, haha!
Help: My Fader
Help: Master Fader
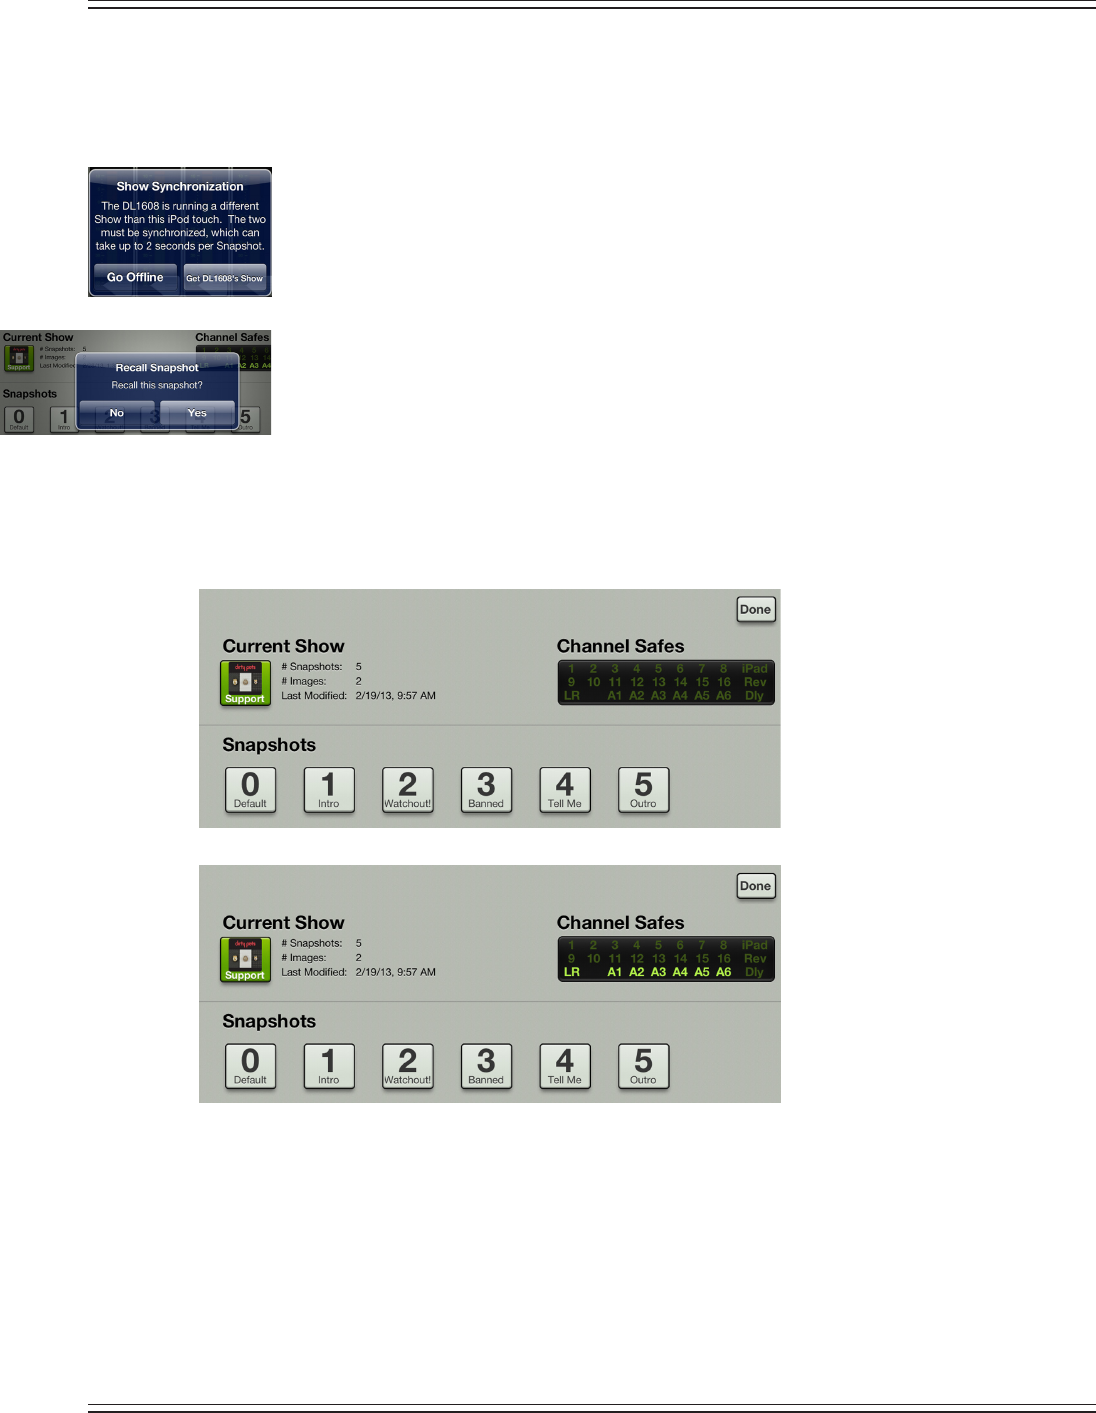
Mackie DL806 and DL1608 Reference Guide
154
Shows
Shows from My Fader works similarly to that of Master Fader except that you cannot create and save them.
Instead, My Fader pulls the current show from the DL Series mixer, allowing you to recall its snapshots.
Todothis,theshowontheiPhoneand/oriPodtouchmustbesync’dwithwhat’scurrently
loaded on Master Fader. If not, you will be asked whether to go oine or load the current
showsothey’resync’d.
Once the show is loaded, simply tap the snapshot button containing the settings you desire
to recall. On recall, all appropriate console parameters change to match the stored snapshot.
ARecallSnapshotconrmationdialogwillberevealed;taptheYesbuttontorecallthesnapshot.
There are two screen shots below, both displaying the shows view in My Fader. The one on top
has no channel safes set, while the one below it has channel safes on the main LR and all aux sends.
There is a lot more information about shows (and the le system in general: shows, snapshots,
channel safes and presets) on pages 115-131.
My Fader Wrap-Up
Asyousawwithintheselastfewpages,MyFaderisbasicallyanoutlinedversionofMasterFader.Itgives
you just the things needed during a show. They function quite similarly so the learning curve is kept to a
minimum. To reiterate, though: if you came straight here, it would behoove you to read and review all the
pages mentioned in this chapter so you have a rm grasp on how these features work.
If I told you a decade ago that you would be mixing a show from a phone in the near future,
you would laugh, point ngers and tell your engineer friends about a great joke you heard earlier
intheday...andIwouldn’tblameyou!Nowifyou’llexcuseme,IneedtogomakeacallonmyRAZR...
Shows: No Channel Safes Set
Shows: Channel Safes on LR, A1-A6

Mackie DL806 and DL1608 Reference Guide
155
Appendix A : Service Information
Troubleshooting
If you think your Mackie product has a problem, please check out the following troubleshooting tips and
do your best to conrm the problem. Visit the Support section of our website (www.mackie.com) to get
someideasorcontactourtechnicalsupportheroes.Youmayndtheanswertotheproblemwithout
having to send your Mackie product away.
Here are three useful tips that could correct any of the issues outlined below (or possibly any other issue
thatwehaven’tyetdiscovered):
(1)—RestarttheiPad.Don’tjustrestarttheMasterFaderapp.Restart the iPad!Completelypowerit
down, then power it back up.
(2) — Restart the mixer. This is especially useful after rmware and software updates where the mixer
andiPadaren’tquiteonthesamepage.Asimplerebootcansometimesworkgreatwonders.
(3)—Restarttherouter.Internetdisconnectivitygotyoudown?Unplugandre-plugtherouter.
This may resolve any connection issues.
(4) — Level setting procedure. If you are having any sound (or non-sound) issues, try following the level
settingprocedureasoutlinedinchapter8[pages56-57]toverifythatallofthevolumecontrolsinthe
system are properly adjusted.
There are no user serviceable parts.Ifnoneofthesetipswork,pleasereferto“Repair”onthenextpageto
nd out how to proceed.
No Power
• Ourfavoritequestion.Isitpluggedin?Makesurethatthefemaleendofthelinecordissecurely
seatedintheIECsocketofThePowerBlockandthemaleendpluggedallthewayintoalive
groundedACoutlet.MakesurethelockingbarrelconnectorattheendofthecordattachedtoThe
PowerBlockisattachedtothepowerconnectoronthemixerandsecurelytightened.AnLED
onThePowerBlockwillilluminategreentoindicatesuccess(whetherthemixerispoweredonornot).
• Oursecondfavoritequestion.IstherearpanelpowerswitchintheONposition?
• Areallthelightsoutintown?Ifso,contactthelocalpowercompanytogetpowerrestored.
No Sound
• Arealltheconnectionsgoodandsound?Makesurealloftheconnectingcablesworkandare
securely connected at both ends. Try the same source signal in another channel, set up exactly
like the suspect channel.
• Isthesignalsourcepoweredon?Isitworking(andmakingunionscale)?

Mackie DL806 and DL1608 Reference Guide
156
Noise / Hum
• Arealltheconnectionsgoodandsound?Makesurealloftheconnectingcablesworkandare
securely connected at both ends. Try the same source signal in another channel, set up exactly
like the suspect channel.
• Areyouusingunbalancedcables?Swapthemoutwithbalancedcablestoseeifthatxestheproblem.
• Turntheinputgainsdownone-by-one.Iftheoendingnoisedisappears,it’seitherthatinputor
whatever is plugged into it. If you unplug the whatever-is-plugged-into-it and turn the input gain
backupandthenoiseisgone,it’sfromyourwhatever.
• Isphantompowerrequiredforthemicrophone?
• SometimesithelpstoplugalltheaudioequipmentintothesameACcircuitsotheysharea
common ground. Make it so.
• Hasthebandbeentogetherlong?
No Interwebs
• Re-read“Chapter4:MixerHardware:WirelessSetup”[pages25-28].Thissectionisveryimportant
and reading it cover-to-cover is the best troubleshooting.
• IsyouriPadconnectedtothecorrectwirelessnetwork?GotoiPadSettings>Wi-Fiandensurethat
itdidn’thopontotoadierentwirelessnetwork.
• DidyouselectthewirelessDL806orDL1608fromthetools>devicesscreen?
• AreyourunningthelatestandgreatestmasterfaderandDLSeriesrmware?GototheAppStore
and check for an update as described on pages 30-31.
• DidyouconnecttheEthernetcabletothecorrectportontherouter?BesuretousetheLANport
andnottheWANport.
• DidyouconnectandthenpowerontheWi-FirouterBEFOREturningonthemixer?
• LeavetheMasterFaderandthenreturnbypressingtheHomebuttonontheiPad.
• ForcequittheMasterFaderapp.
• TryanotherEthernetcable.
• TryanotherWi-Firouter.
Repair
For warranty service, refer to the warranty information on page 210.
Non-warrantyserviceforMackieproductsisavailableatafactory-authorizedservicecenter.Tolocatethe
nearestservicecenter,visitwww.mackie.com,click“Support”andselect“LocateaServiceCenter.”Service
forMackieproductslivingoutsidetheUnitedStatescanbeobtainedthroughlocaldealersordistributors.
If you do not have access to our website, you can call our Tech Support department at 1-800-898-3211,
Monday-Fridayduringnormalbusinesshours,PacicTime,toexplaintheproblem.TechSupportwilltell
you where the nearest factory-authorized service center is located in your area.
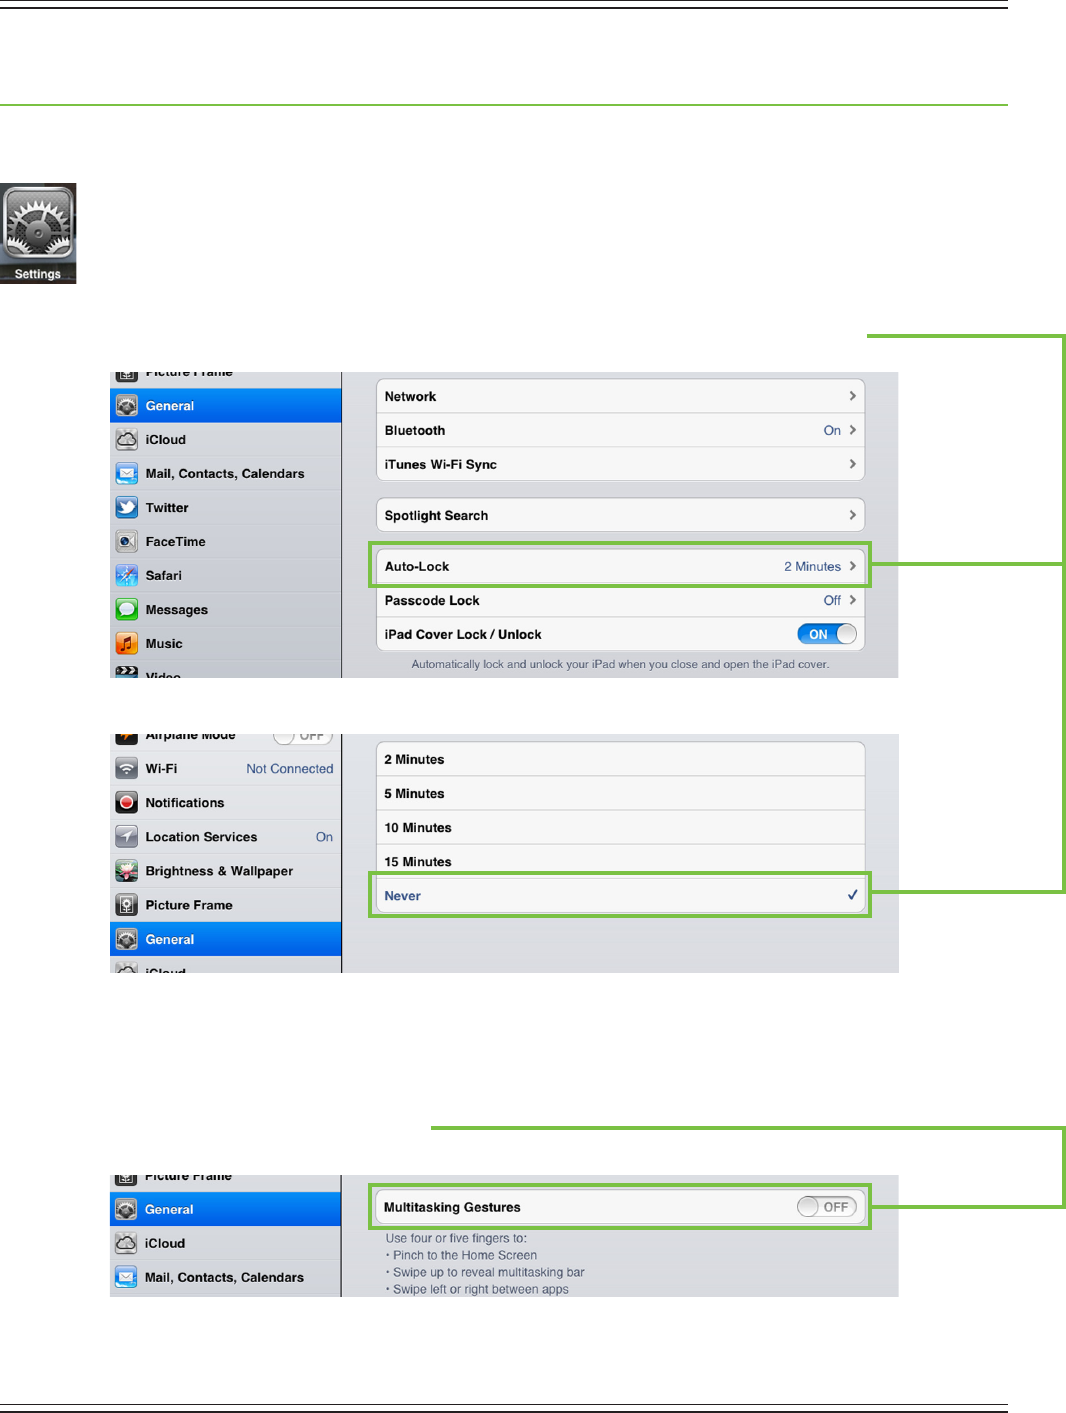
Mackie DL806 and DL1608 Reference Guide
157
Appendix B : iOS Optimizations
iPad Optimizations
BelowisalistofwaystotrickoutyouriPadtooptimizeitsusewithMasterFaderandyourDLSeries
mixer.Whenyouhavesomeadditionaltime,useyourfavoritesearchenginetosearch“trickoutyour
iPad”forotherwaystooptimizeyouriPad.Allofthefollowingtipsandtricksmaybefoundbygoing
toSettings>GeneralontheiPad.
iPad Optimization #1 :PreventtheiPadfromturningointhemiddleofashow.
SimplychangetheAuto-Lockfromitscurrentselectionto“Never”(or15minutes,atleast).
iPad Optimization #2 :Allowsyoutochangethelevelonmorethanthreefaderssimultaneously.
Simply turn Multitasking Gestures o.
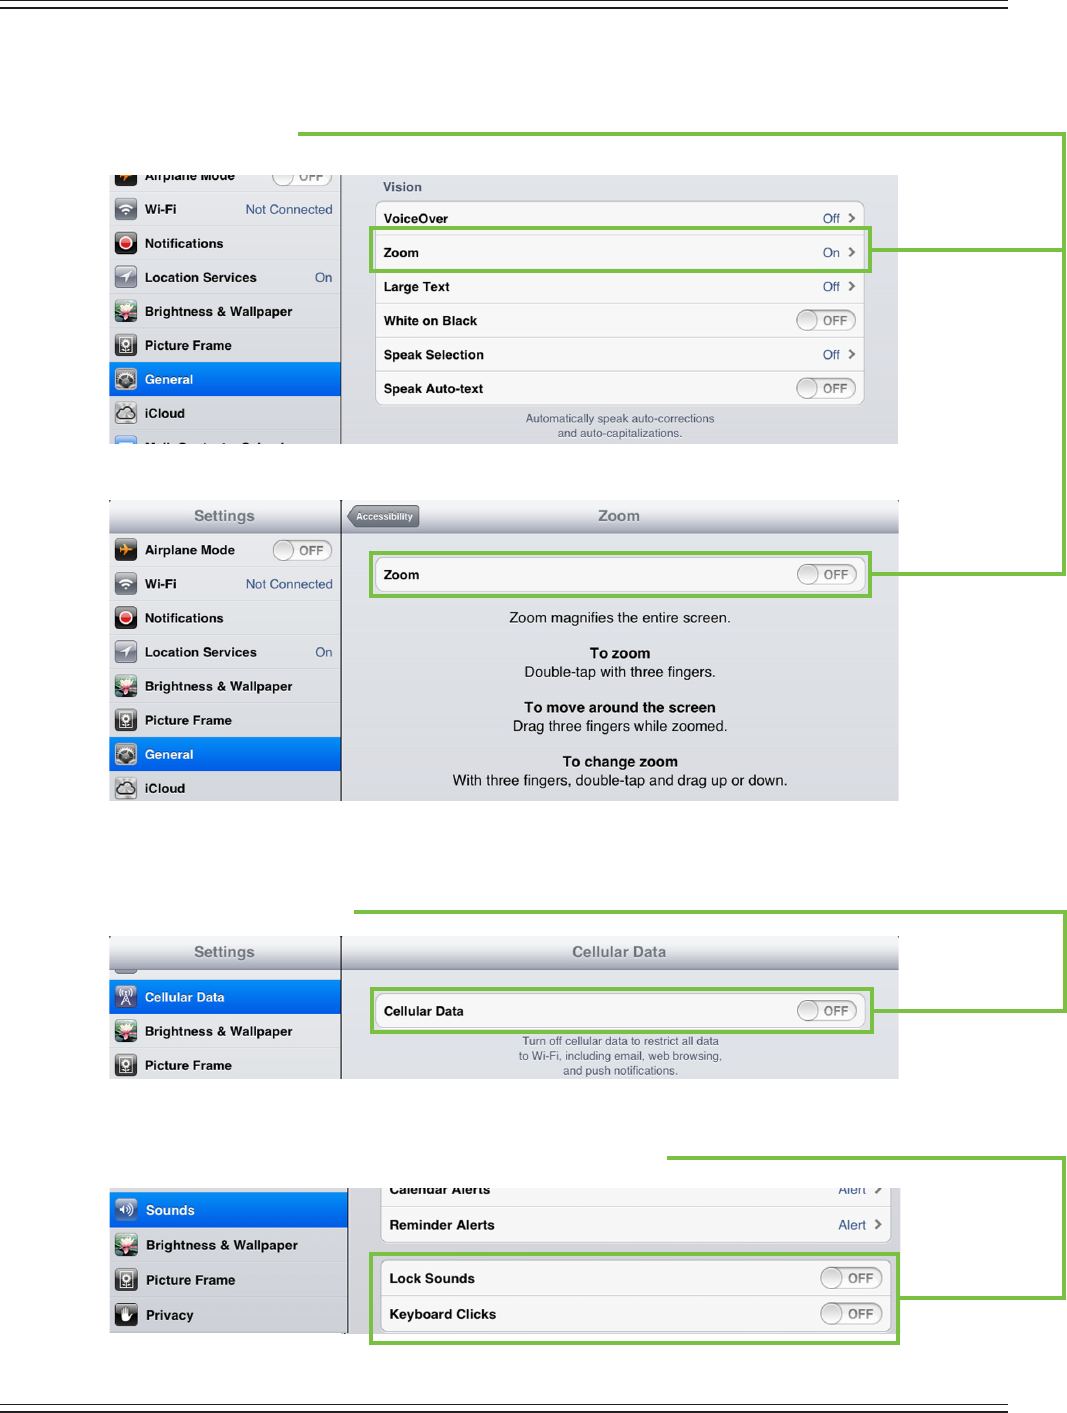
Mackie DL806 and DL1608 Reference Guide
158
iPad Optimization #3 :Allowsyoutopressthreefaderssimultaneously.
GotoSettings>General>Accessibility.
SimplyturnZoomo.
iPad Optimization #4 :Disable3GData[TDMA]sotheiPadisWi-Fionly.
SimplyturnCellularDatao.
iPad Optimization #5 :TurnoLockSoundsandKeyboardClicks.
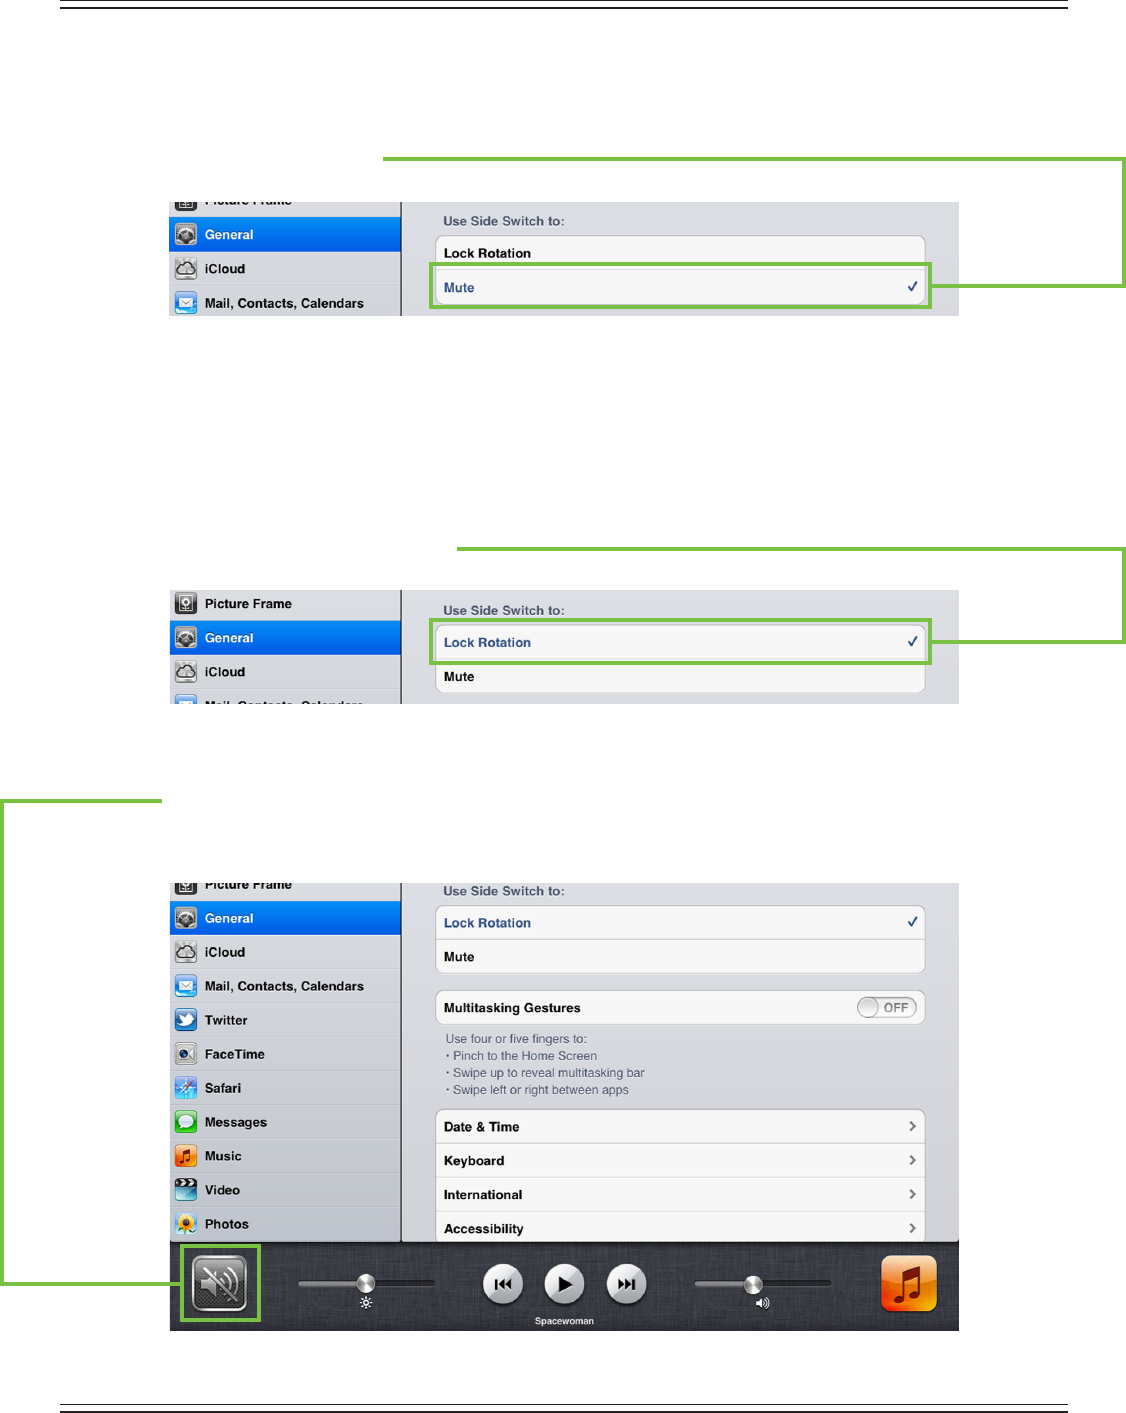
Mackie DL806 and DL1608 Reference Guide
159
iPad Optimization #6 : Mute sounds, including email alerts, calendar event warnings, alarms and other
extraneousiPadnoises(exceptmusicapps;thosewillcontinuetoplay).Therearetwomethodstooptimize
youriPadhere.It’sjustamatterofpreference.
UseSideSwitchto:Mute
NowipthesideswitchontheiPad(nexttothevolumeup/downswitch)sothattheorangedotisvisible.
ItindicatesthattheiPadisindeedmuted(exceptforthemusicapps).
OR
UseSideSwitchto:Lock Rotation
Double-tapthehomebuttonontheiPadtorevealthetoolbaratthebottomoftheiPad.
NowswipeitrighttorevealtheiPad’saudioplaybar.
On the far left is a mute/un-mute button. Mute it.
ThespeakerwillbecrossedouttoindicatethattheiPadisindeedmuted(exceptforthemusicapps).
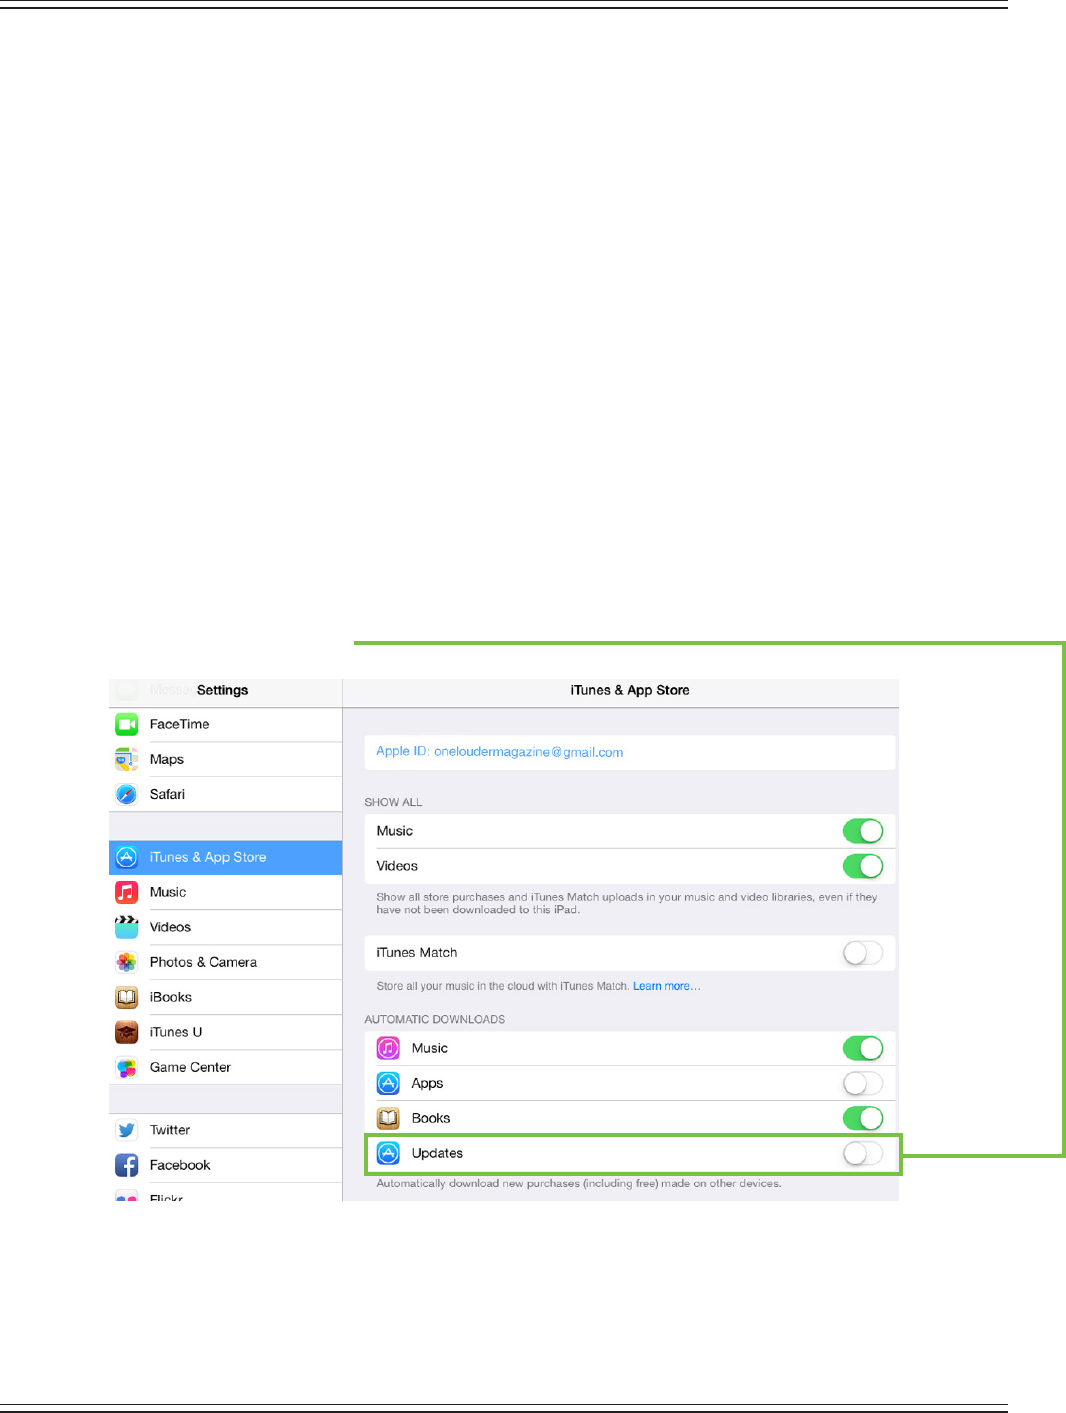
Mackie DL806 and DL1608 Reference Guide
160
iPad Optimization #7 :MasterFaderandAutoUpdatingAppsiniOS7
iOS7 adds an interesting new feature allowing apps to be updated in the background. This feature
is great for consumer apps like games, etc. However, you use apps like Master Fader professionally
and auto-updating your apps can cause problems at the gig if the process is not properly understood.
Beforeyouupdatethatapp,let’srstunderstandhowupdatesgenerallywork.
1.YouarenotiedofaMasterFaderorMyFaderupdatethroughtheiOSAppStore.
2.Youdownloadandinstalltheupdate.Boom.Theappisupdated.
3.Now,yourDLmixerneedsarmwareupdatetoworkwiththenewappversion.Thisisquiteeasy;
the app contains the rmware update. The next time you connect your device to the mixer, you will
be prompted to update the mixer. This process can take up to 15 minutes. We strongly recommend
youupdatethemixerimmediatelyafteranappupdate.YouDON’Twanttodothisduringsoundcheck.
But now with iOS7, the operating system can update an app in the background automatically. If Master
Fader (or My Fader) is automatically updated without you knowing, you could nd yourself at a show
needing to do an unexpected rmware update. Since this update can take up to 15 minutes, this may
cause serious problems delaying setup or the start of your show. Obviously this is not something you
want to happen.
Toavoidthis,westronglyrecommendyoudisableautomaticupdatesforAppsiniOS7.
Here’show:
GotoSettings>iTunes&AppStore.
SimplyturnAppUpdateso.
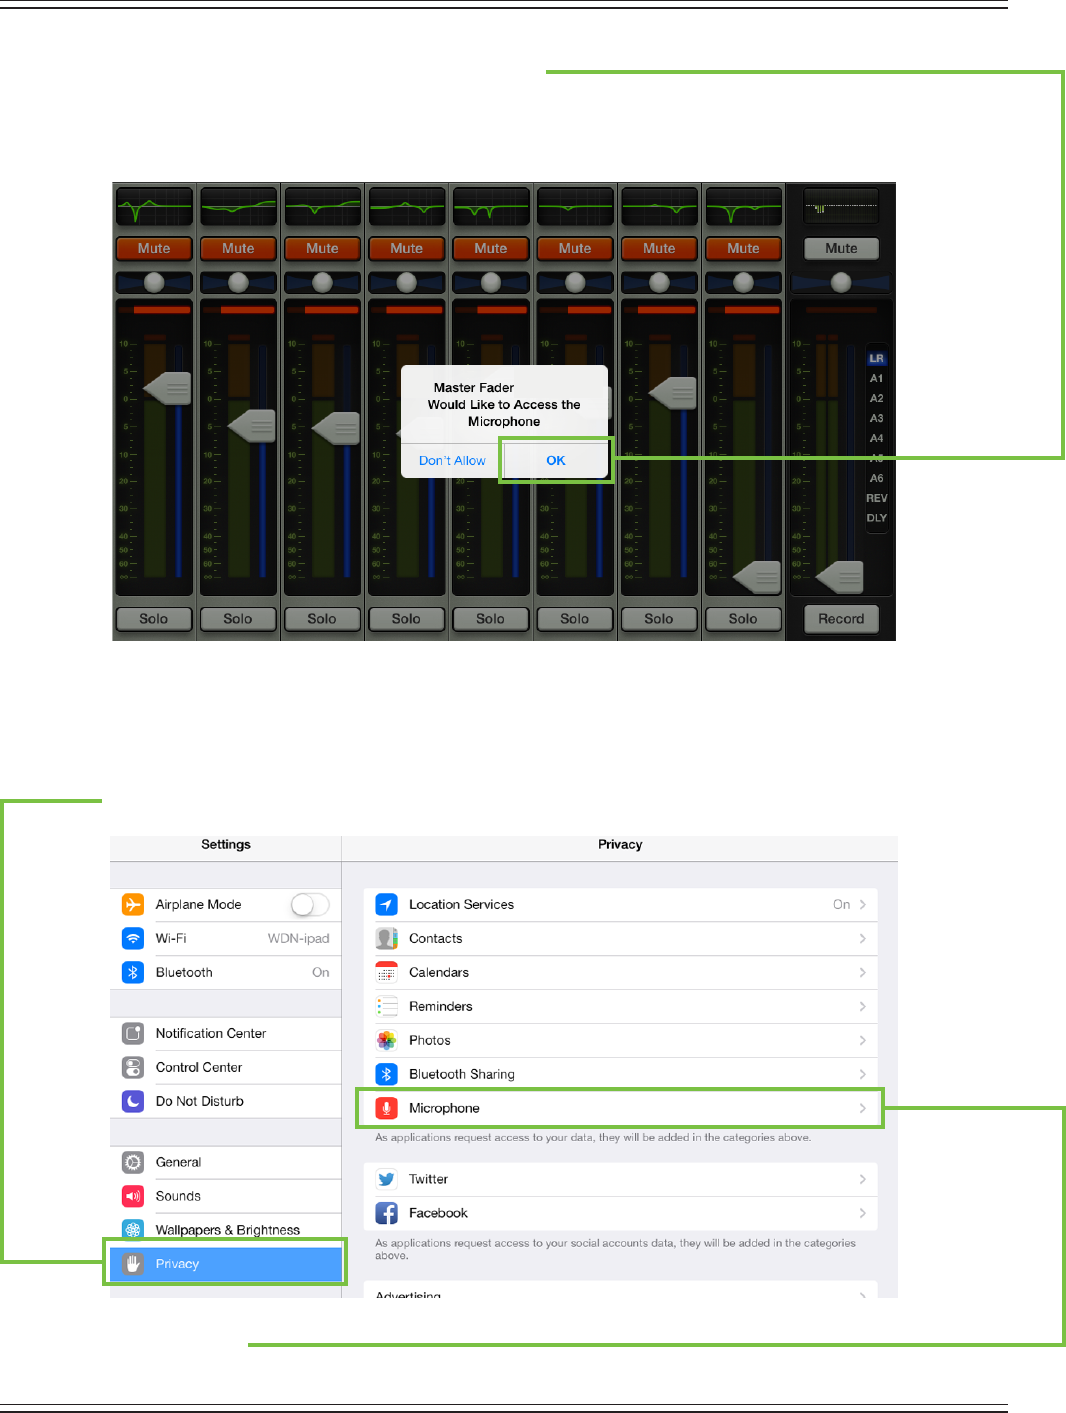
Mackie DL806 and DL1608 Reference Guide
161
iPad Optimization #8 : Turn microphone access on.
iOS7 adds a new security feature requiring apps that record via the microphone or dock connector,
to rst get approval from the user. So the rst time you launch Master Fader on iOS7 you will see
the following popup.
Even though master fader does not use the microphone to record, you need to approve this request in order
toallowittorecordoverthedockconnector.Ifyoudon’tallowaccess,MasterFaderwillrecordshort,empty
audio les.
If you had previously denied access, you can still change this setting later through the Settings app.
GotoSettings>Privacy
Tap Microphone
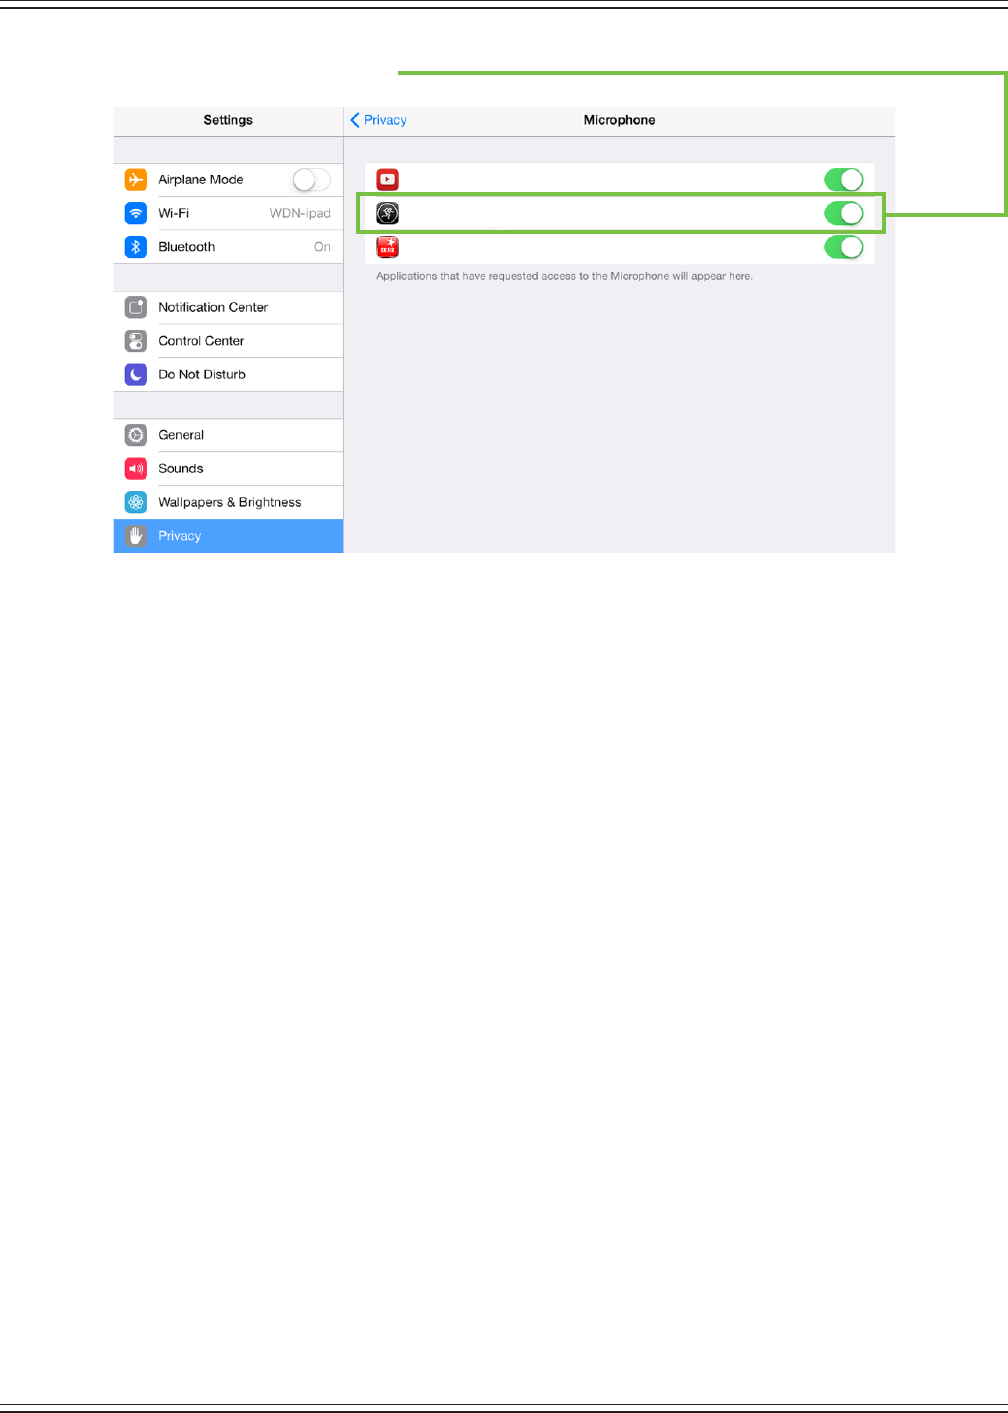
Mackie DL806 and DL1608 Reference Guide
162
Turn Master Fader microphone on.
Master Fader
YouTube
Spreaker DJ
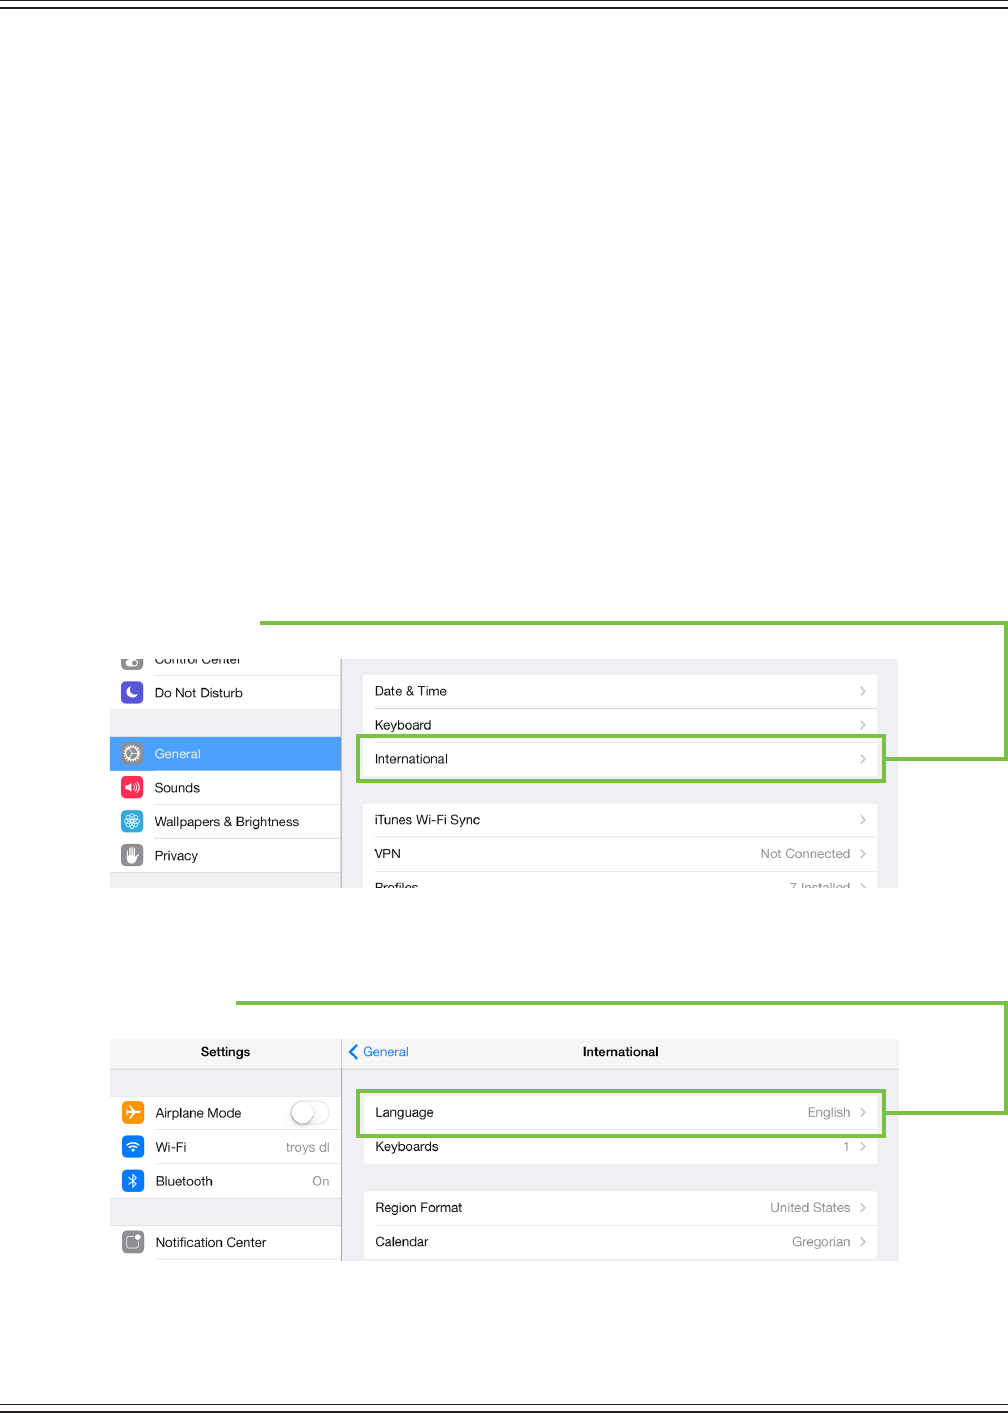
Mackie DL806 and DL1608 Reference Guide
163
iPad Optimization #9 : Localized text is available in ve languages, including English.
• English
• German
• Spanish
• French
• Mandarin(SimpliedChinese)
This is ideal for users who may not have a pro audio background to instantly know and understand these
pro audio terms in English. Even if a non-English speaking user is able to read and understand pro audio
terms in English, the language of advanced settings, critical warnings, rmware updates and complex
showmanagementcouldbediculttotranslate.Non-Englishspeakinguserswillbeabletodigindeeper
thaneverbeforebychangingtheiPadtotheirnativelanguage.
HereishowtoupdatetheiPadtoyournativelanguage.
GotoSettings>General.
Tap International.
Tap Language.

Mackie DL806 and DL1608 Reference Guide
164
Tap the preferred language.
Tap Done.
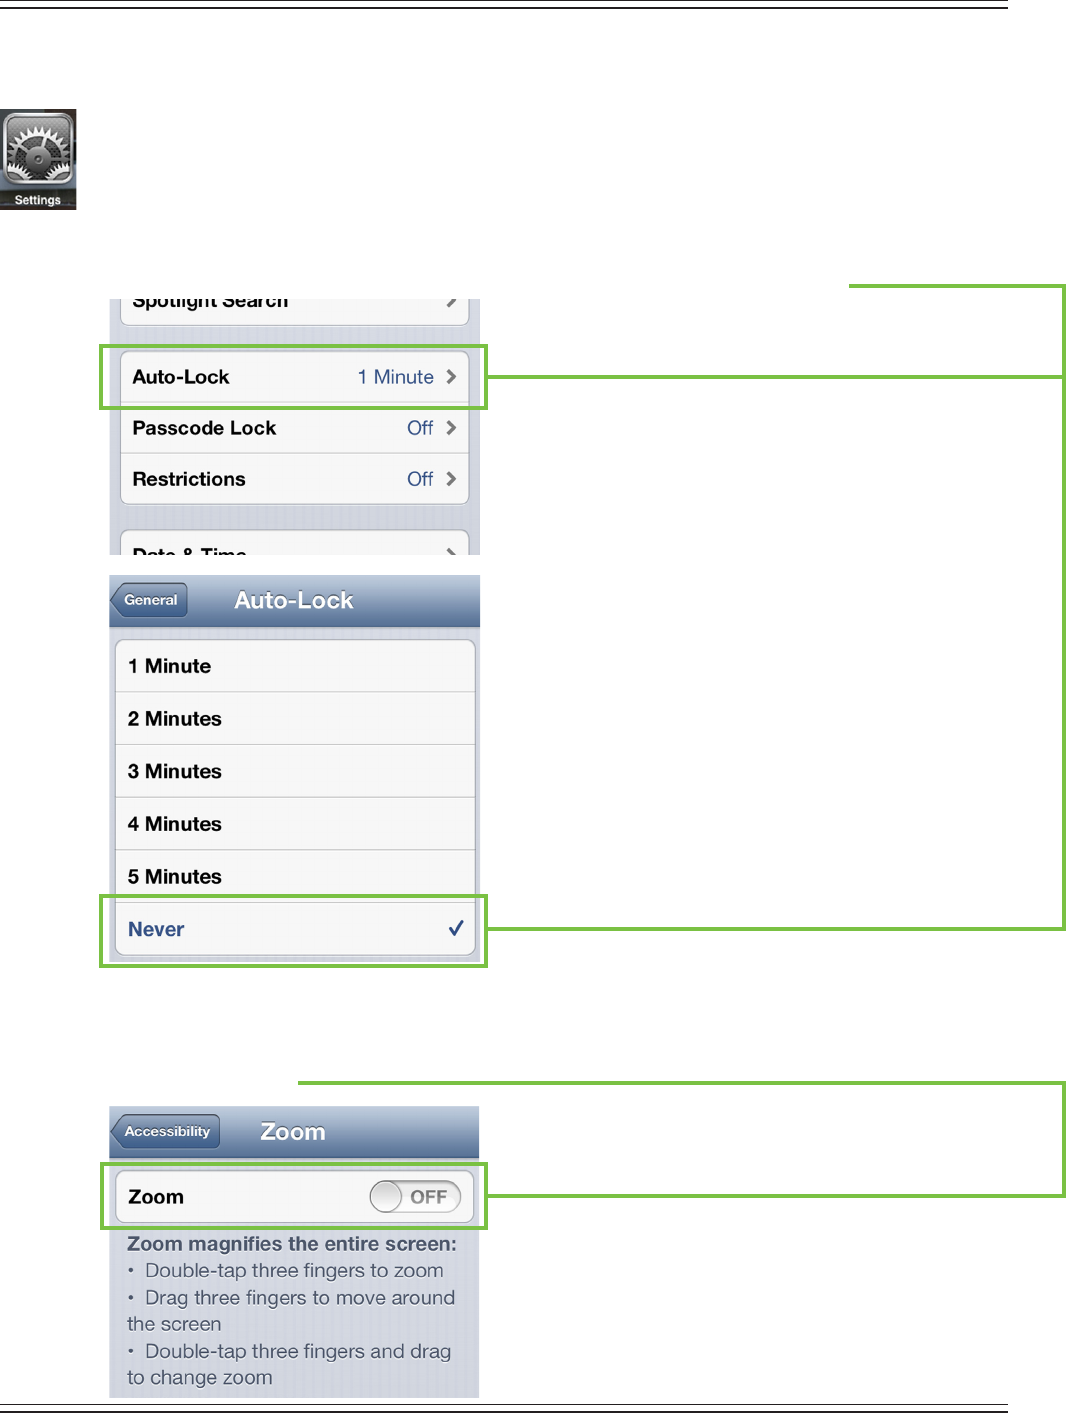
Mackie DL806 and DL1608 Reference Guide
165
iPhone / iPod touch Optimizations
BelowisalistofwaystotrickoutyouriPhone/iPodtouchtooptimizeitsusewithMyFaderandyour
DLSeriesmixer.Whenyouhavesomeadditionaltime,useyourfavoritesearchenginetosearch“trickout
youriPhone”(or“iPodtouch”)forotherwaystooptimizeyouriPhone/iPodtouch.Allofthefollowingtips
andtricksmaybefoundbygoingtoSettings>GeneralontheiPhone/iPodtouch.
iPhone / iPod touch Optimization #1 :PreventtheiPhone/iPodtouchfromturningointhemiddle
of a show.
SimplychangetheAuto-Lockfromitscurrentselectionto“Never”(or5minutes,atleast).
iPhone / iPod touch Optimization #2 :Allowsyoutopressthreefaderssimultaneously.
GotoSettings>General>Accessibility.
SimplyturnZoomo.
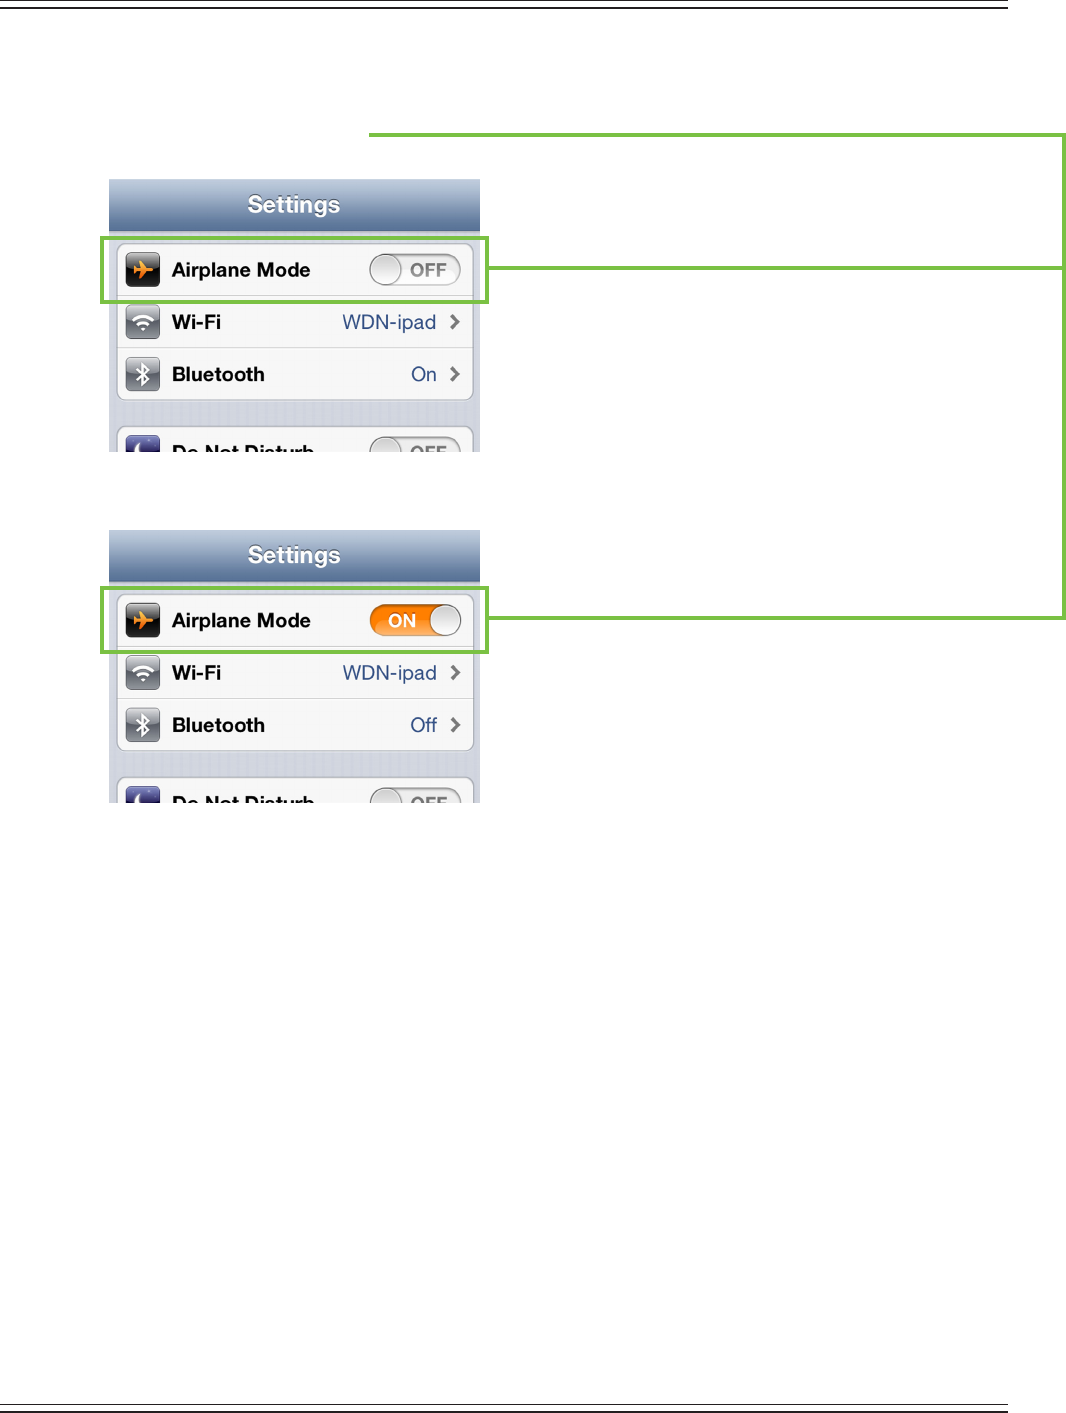
Mackie DL806 and DL1608 Reference Guide
166
iPhone / iPod touch Optimization #3 :Disable3GDatasotheiPhone/iPodtouchisWi-Fionlytoprevent
accidental interruptions such as phone calls, emails, text messages and more.
SimplyturnAirplaneModeon.
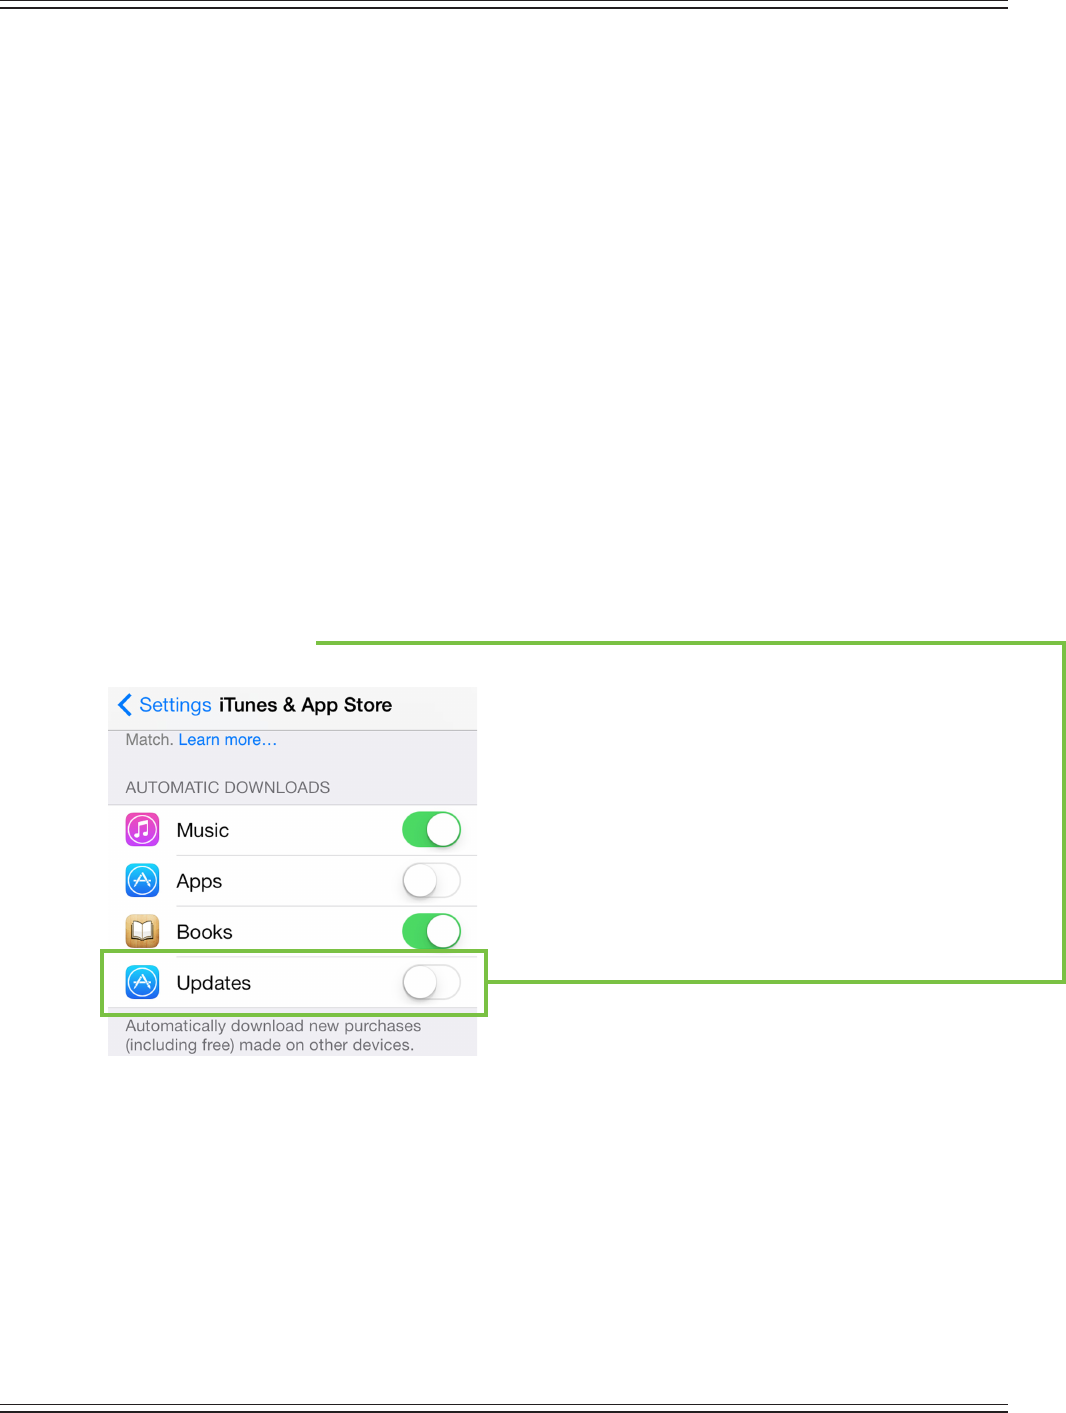
Mackie DL806 and DL1608 Reference Guide
167
iPhone / iPod touch Optimization #4 :MasterFaderandAutoUpdatingAppsiniOS7
iOS7 adds an interesting new feature allowing apps to be updated in the background. This feature
is great for consumer apps like games, etc. However, you use apps like Master Fader professionally
and auto-updating your apps can cause problems at the gig if the process is not properly understood.
Beforeyouupdatethatapp,let’srstunderstandhowupdatesgenerallywork.
1.YouarenotiedofaMasterFaderorMyFaderupdatethroughtheiOSAppStore.
2.Youdownloadandinstalltheupdate.Boom.Theappisupdated.
3.Now,yourDLmixerneedsarmwareupdatetoworkwiththenewappversion.Thisisquiteeasy;
the app contains the rmware update. The next time you connect your device to the mixer, you will
be prompted to update the mixer. This process can take up to 15 minutes. We strongly recommend
youupdatethemixerimmediatelyafteranappupdate.YouDON’Twanttodothisduringsoundcheck.
But now with iOS7, the operating system can update an app in the background automatically. If Master
Fader (or My Fader) is automatically updated without you knowing, you could nd yourself at a show
needing to do an unexpected rmware update. Since this update can take up to 15 minutes, this may
cause serious problems delaying setup or the start of your show. Obviously this is not something you
want to happen.
Toavoidthis,westronglyrecommendyoudisableautomaticupdatesforAppsiniOS7.
Here’show:
GotoSettings>iTunes&AppStore.
SimplyturnUpdateso.
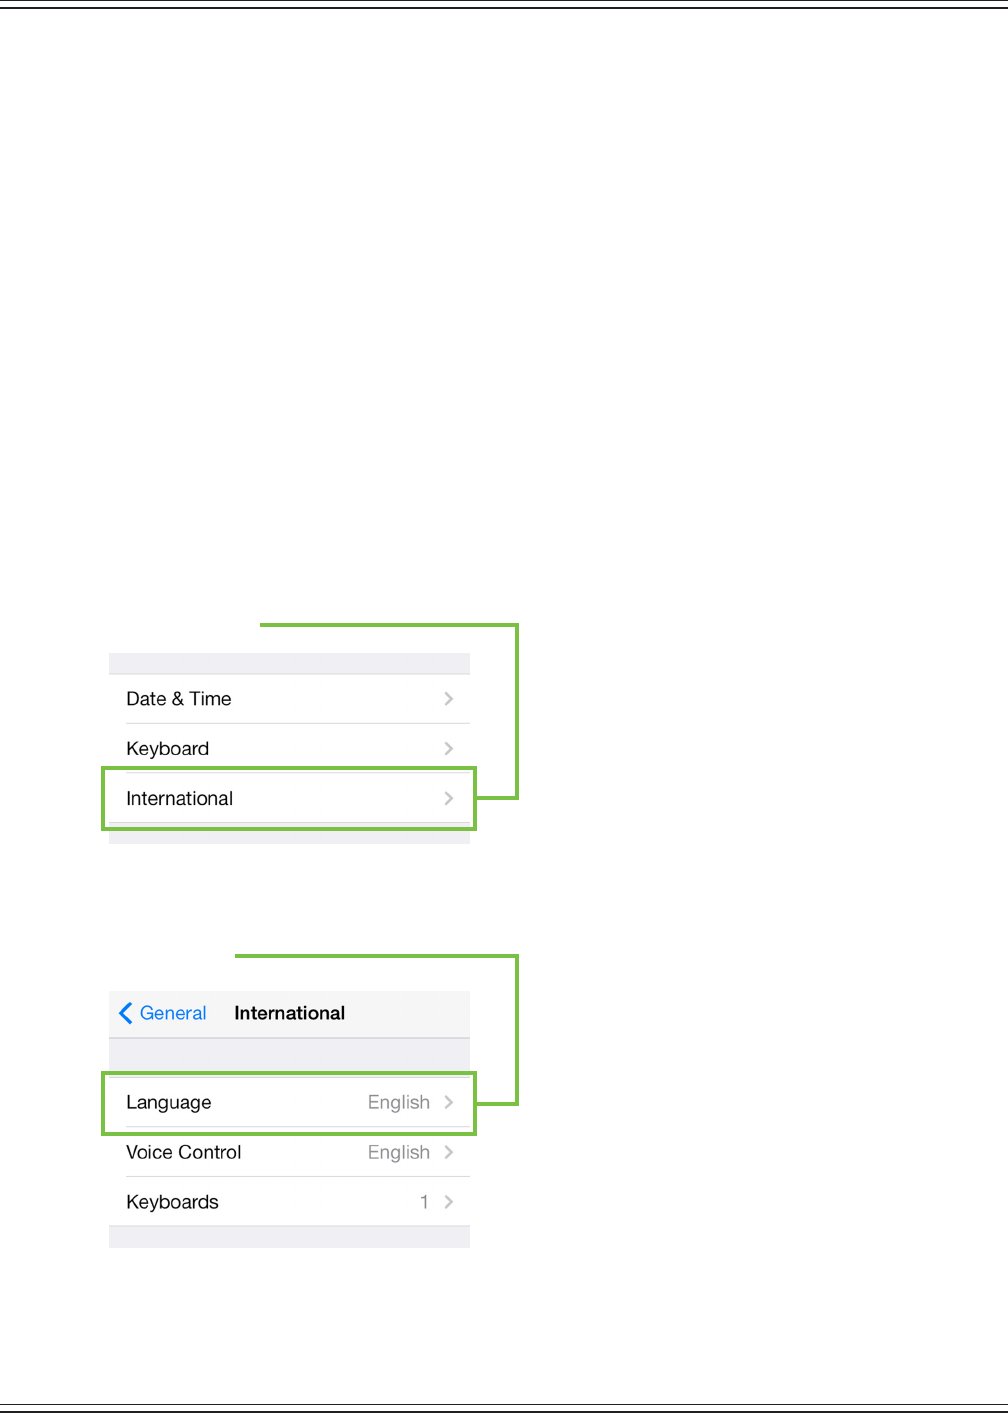
Mackie DL806 and DL1608 Reference Guide
168
iPhone / iPod touch Optimization #5 : Localized text is available in ve languages, including English.
• English
• German
• Spanish
• French
• Mandarin(SimpliedChinese)
This is ideal for users who may not have a pro audio background to instantly know and understand these
pro audio terms in English. Even if a non-English speaking user is able to read and understand pro audio
terms in English, the language of advanced settings, critical warnings, rmware updates and complex
showmanagementcouldbediculttotranslate.Non-Englishspeakinguserswillbeabletodigindeeper
thaneverbeforebychangingtheiPhone/iPodtouchtotheirnativelanguage.
HereishowtoupdatetheiPhone/iPodtouchtoyournativelanguage.
GotoSettings>General.
Tap International.
Tap Language.
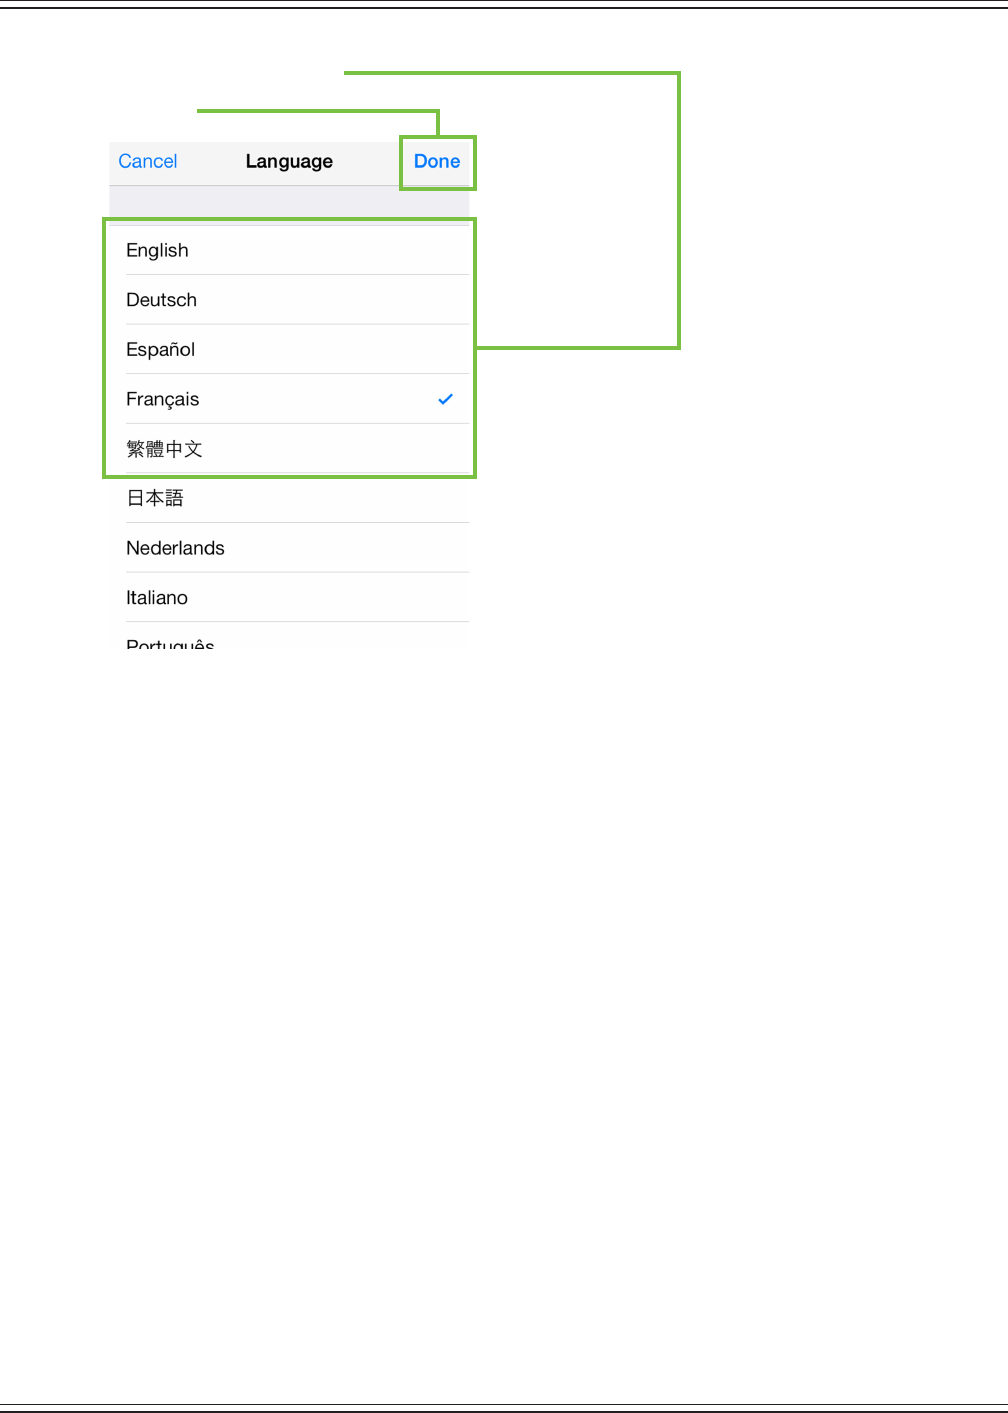
Mackie DL806 and DL1608 Reference Guide
169
Tap the preferred language.
Tap Done.
Mackie DL806 and DL1608 Reference Guide
170
Appendix C : Technical Information
Specications
General Digital
Sample Rate: .................................................................................................................................................................................................48 kHz
A/D/ABitDepth: .......................................................................................................................................................................................... 24-bit
System Latency: .......................................................................................................................................................................................... 1.5 ms
Frequency Response
Allinputstoalloutputs: .................................................................................................................................... ±0, –1 dB, 20 Hz to 20 kHz
Distortion
THD (mic input to main output, 1 kHz, –1 dBFS): ....................................................................................................................... <0.005%
Noise / Dynamic Range / Signal-to-Noise Ratio
EIN(150 termination): ..................................................................................................................................................................... –128 dBu
MicinputtoMainOutput(A–weighted)
Channelandmainfadersatunity: .......................................................................................................................................–79 dBu
Faders down: ................................................................................................................................................................................–90 dBu
Crosstalk(adjacentinputs): ............................................................................................................................................... <–120dB@1kHz
Crosstalk(outputs): .............................................................................................................................................................. <–105dB@1kHz
Phoneslevelpotfeedthrough@minimumtravel: .................................................................................................................... <–75dB
Signal-to-NoiseRatio(ref+4dBu,onechannelandmainfaderatunity,A–weighted): ....................................................92 dB
DynamicRange(Onechannelandmainfaderatunity,A–weighted): .................................................................................. 109 dB
CMRR: .................................................................................................................................................................... >70dB@1kHz(60dBgain)
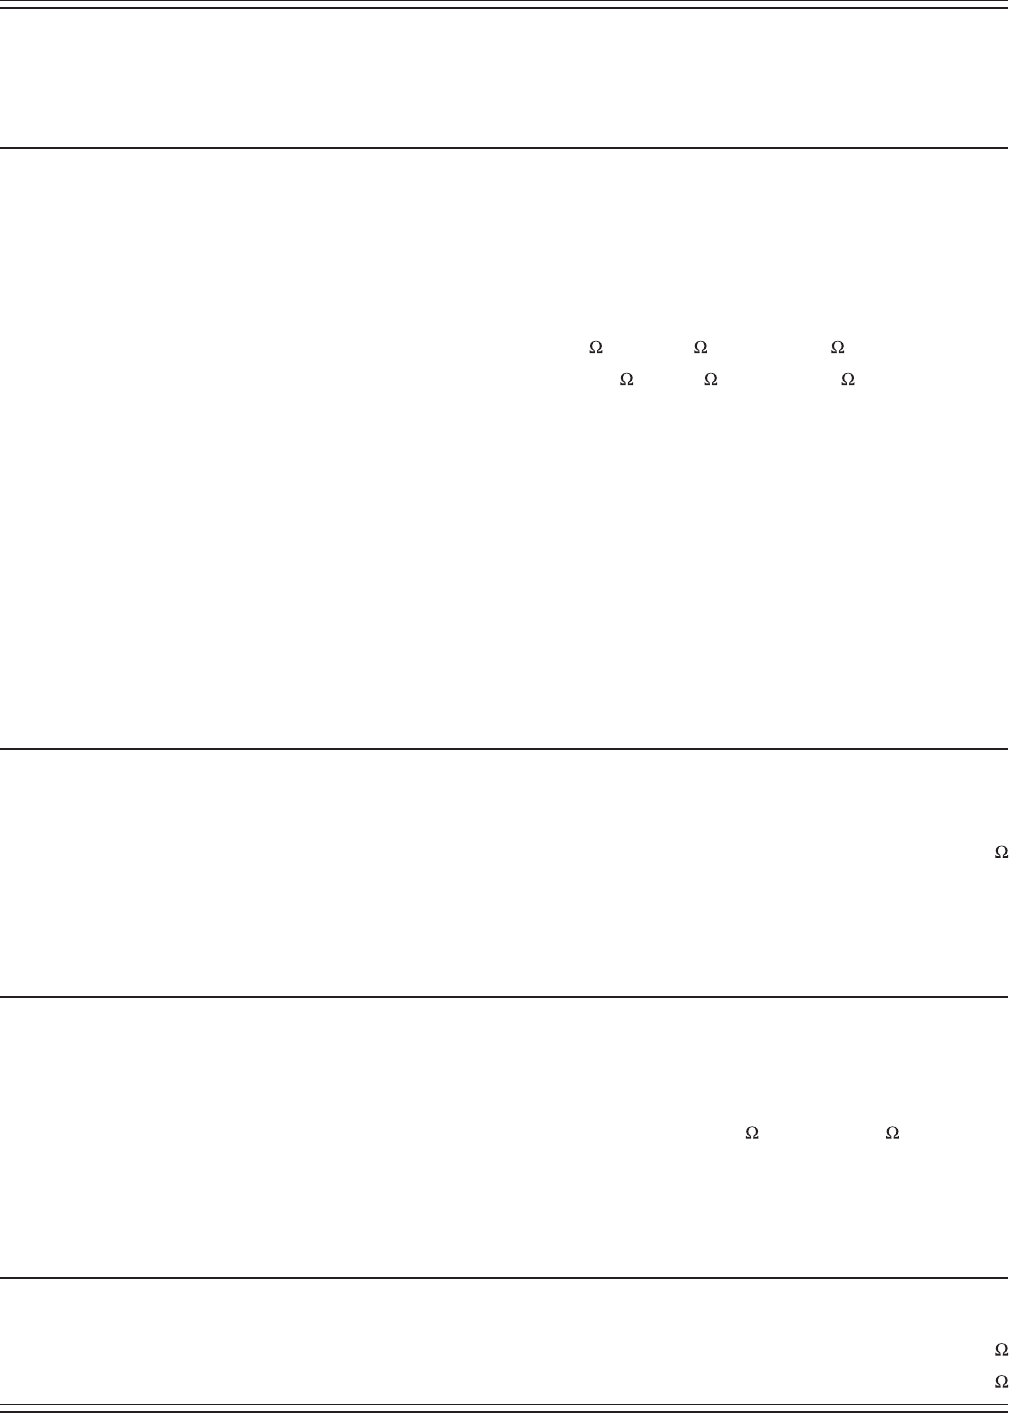
Mackie DL806 and DL1608 Reference Guide
171
Specications Continued...
Analog Inputs
Connectors: .................................................................................. 1-12:XLRBalanced,13-16:ComboXLR/TRSBalanced[DL1608]
1-4:XLRBalanced,5-8:ComboXLR/TRSBalanced[DL806]
XLRMicPre: .....................................................................................................................................................................................................Onyx
Input Impedance: ............................................................................... 1-12: 3k , 13-16: 3 k mic[XLR],30k line[1/4"][DL1608]
1-4: 3k , 5-8: 3 k mic[XLR],30k line[1/4"][DL806]
Max Input Level: .............................................................................................................................................................................XLR:+21dBu
1/4":+30dBu
Gain: ............................................................................................................................................................................................. XLR: 0 to 60 dB
1/4":–20to40dB
48VPhantomPower(XLR): ............................................. 48VDC,10mAmaxpermic,withuptoeightsimultaneously[both]
5mAmaxpermic,withupto16simultaneously[DL1608]
Analog Main Out L/R
Connectors: .....................................................................................................................................................................................XLR Balanced
Output Impedance: .....................................................................................................................................................................................600
Max Output Level: .................................................................................................................................................................................. +21dBu
Analog Aux Sends
Connectors: .................................................................................................................................................... 1/4"TRSImpedanceBalanced
(Supports balanced / unbalanced operation)
Output Impedance: ........................................................................................................................ 240 Balanced, 120 Unbalanced
Max Output Level: .................................................................................................................................................................................. +21dBu
Analog Headphone Out
Connector: ....................................................................................................................................................................................1/4"TRSStereo
Max Output Level: .........................................................................................................................................................+18.0dBuinto600
+19.5dBumaxinto100k

Mackie DL806 and DL1608 Reference Guide
172
Specications Continued...
Networking
Connector: .................................................................................................................................................................................100 MB Ethernet
Control: .................................................................................................................................................................................................... Complete
SimultaneousControl: ............................................................................................................................................................10iPadDevices
Supported Devices
Version Requirement: ..............................................................................................................................iOS5.1orhigher[MasterFader]
iOS6orhigher[MyFader]
DLSeriesmixerwithLightningConnector
WirediPad: ..........................................................................................................................................................iPad(4thgeneration),
iPadmini(requiresoptionaliPadminitrayaccessory)
WirelessiPad: ................................................................................................................................................................. AlliPadmodels
WirelessiPhone/iPodtouch: ........................................................................................iPodtouch(4thand5thgeneration),
iPhone4,iPhone4S,iPhone5
DLSeriesmixer30-pinConnector
WirediPad: .........................................................................................................OriginaliPad,iPad2andiPad(3rdgeneration)
WirelessiPad: ................................................................................................................................................................. AlliPadmodels
ControlApplication: ............................................................................................................................................ MackieMasterFaderApp1
MackieMyFaderApp2
DSP
InputChannelProcessing: ........................................................................................................................................... HPF,EQ,Comp,Gate
OutputChannelProcessing: ......................................................................................................................................... GEQ,Comp/Limiter
FX: ................................................................................................................................................................................................Reverb, Delay
Power
External Supply
PowerRequirements: ................................................................................................ 100-240VAC,50-60Hz,UniversalSupply
Output Voltage:..............................................................................................................................................................................12VDC
Current: ......................................................................................................................................................................................................4A
DCConnector: ............................................................................................................5.5 mm x 2.5 mm barrel with locking ring
LineCord: ........................................................................................................................................................................... User-replaceableIEC
PowerConsumption: ...........................................................................................................................................................................48 W max
1 https://itunes.apple.com/us/app/mackie-master-fader/id511500747?mt=8
2https://itunes.apple.com/us/app/mackie-my-fader/id599029732?mt=8

Mackie DL806 and DL1608 Reference Guide
173
Specications Continued...
Dimensions
Width: ..........................................................................................................................................................................................11.5 in / 291 mm
Height (Front): ...............................................................................................................................................................................1.6 in / 40 mm
Height (Rear): ................................................................................................................................................................................3.7 in / 95 mm
Depth: .........................................................................................................................................................................................15.4 in / 391 mm
Weight: .......................................................................................................................................................................... 7.9lb/3.6kg[DL1608]
6.9lb/3.1kg[DL806]
Rack: ........................................................................................................................................................................................ NineRackSpaces
[Needsanadditionalspaceortwoabovetoallowforconnections]
Environment
OperatingTemperature[extendedambienttemperature]:.................................................................................................. 32-104 ˚F
0-40˚C
Accessories
RackmountKit: ............................................................................................................................................................................. Part#2036840
Mixer Bag: ................................................................................................................................................................................Part#2036809-16
MixerCover: ............................................................................................................................................................................Part#2036809-17
About
Reference Guide Version: ............................................................................................................................................................................. V2.1
PartNumber,RevandDate: ........................................................................................................................SW0938, Rev F, January 2014
©2014LOUDTechnologiesInc.Allrightsreserved.Apple,iPad,iPhoneandiPodtoucharetrademarksofAppleInc.,registeredintheU.S.
andothercountries.AllothermarksareRegisteredTrademarks,orTrademarks,ofLOUDTechnologiesintheUnitedStatesandothercountries.
DL806andDL1608PatentPending.
“MadeforiPad”meansthatanelectronicaccessoryhasbeendesignedtoconnectspecicallytoiPadandhasbeencertiedbythedeveloperto
meetAppleperformancestandards.Appleisnotresponsiblefortheoperationofthisdeviceoritscompliancewithsafetyandregulatorystandards.
PleasenotethattheuseofthisaccessorywithiPadmayaectwirelessperformance.
LOUDTechnologiesInc.isalwaysstrivingtoimproveourproductsbyincorporatingnewandimprovedmaterials,components,andmanufacturing
methods. Therefore, we reserve the right to change these specications at any time without notice.
PleasecheckourwebsiteforanyupdatestothisReferenceGuide:www.mackie.com.
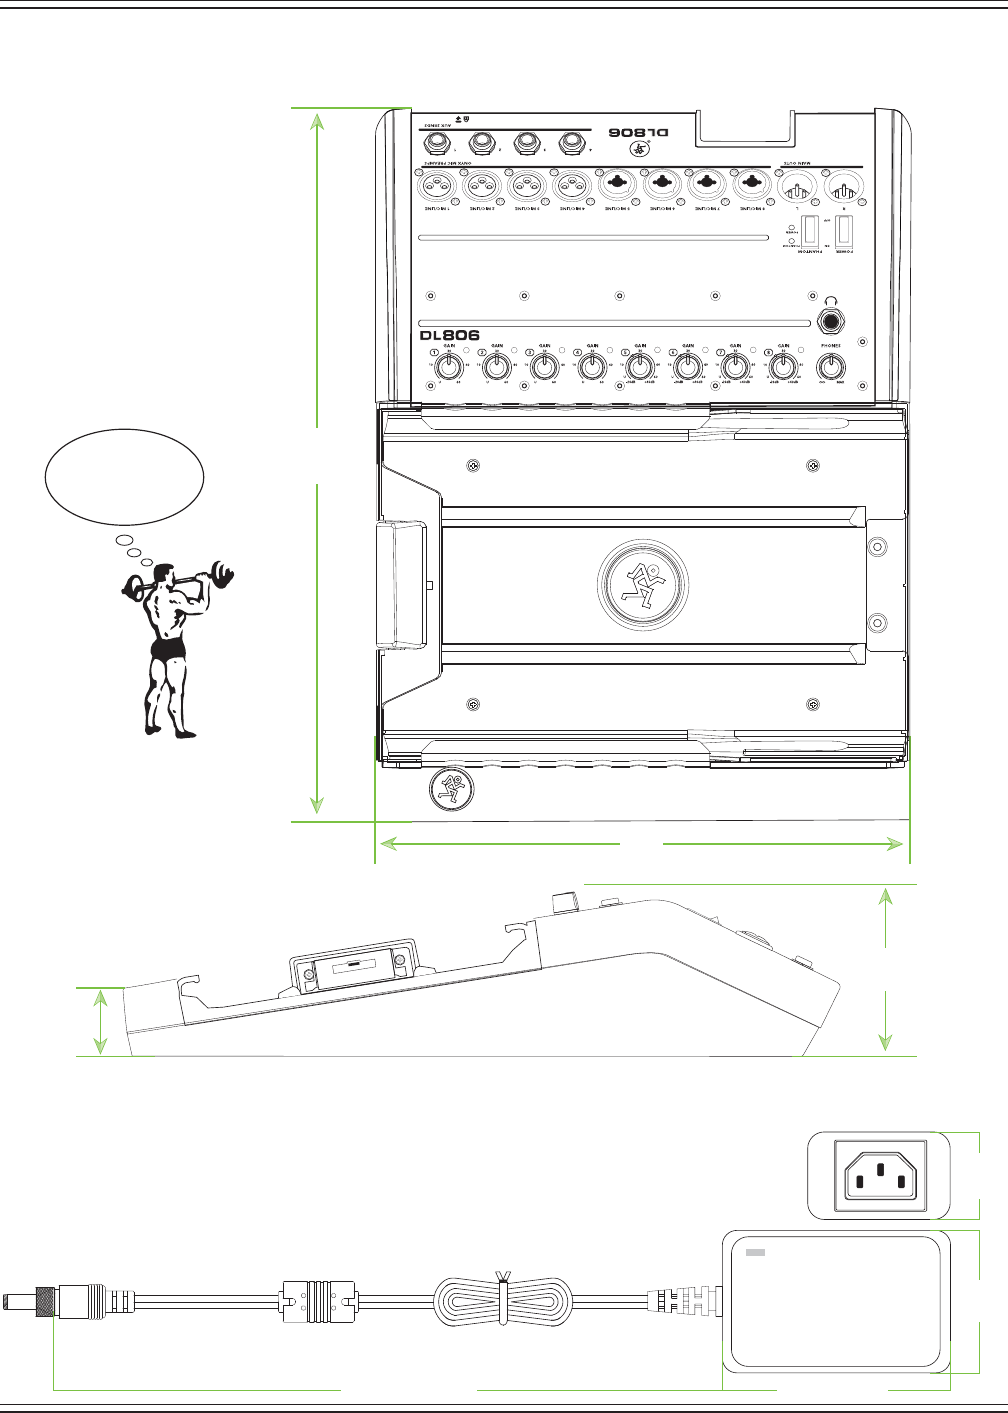
Mackie DL806 and DL1608 Reference Guide
174
11.5
[291]
15.4
[391]
3.7
[95]
1.6
[40]
Weight
6.9 lb / 3.1 kg
4.5 in / 115 mm59.1 in / 1500 mm
2.1 in /
53 mm
1.5 in /
38 mm
DL806 Lightning Dimensions
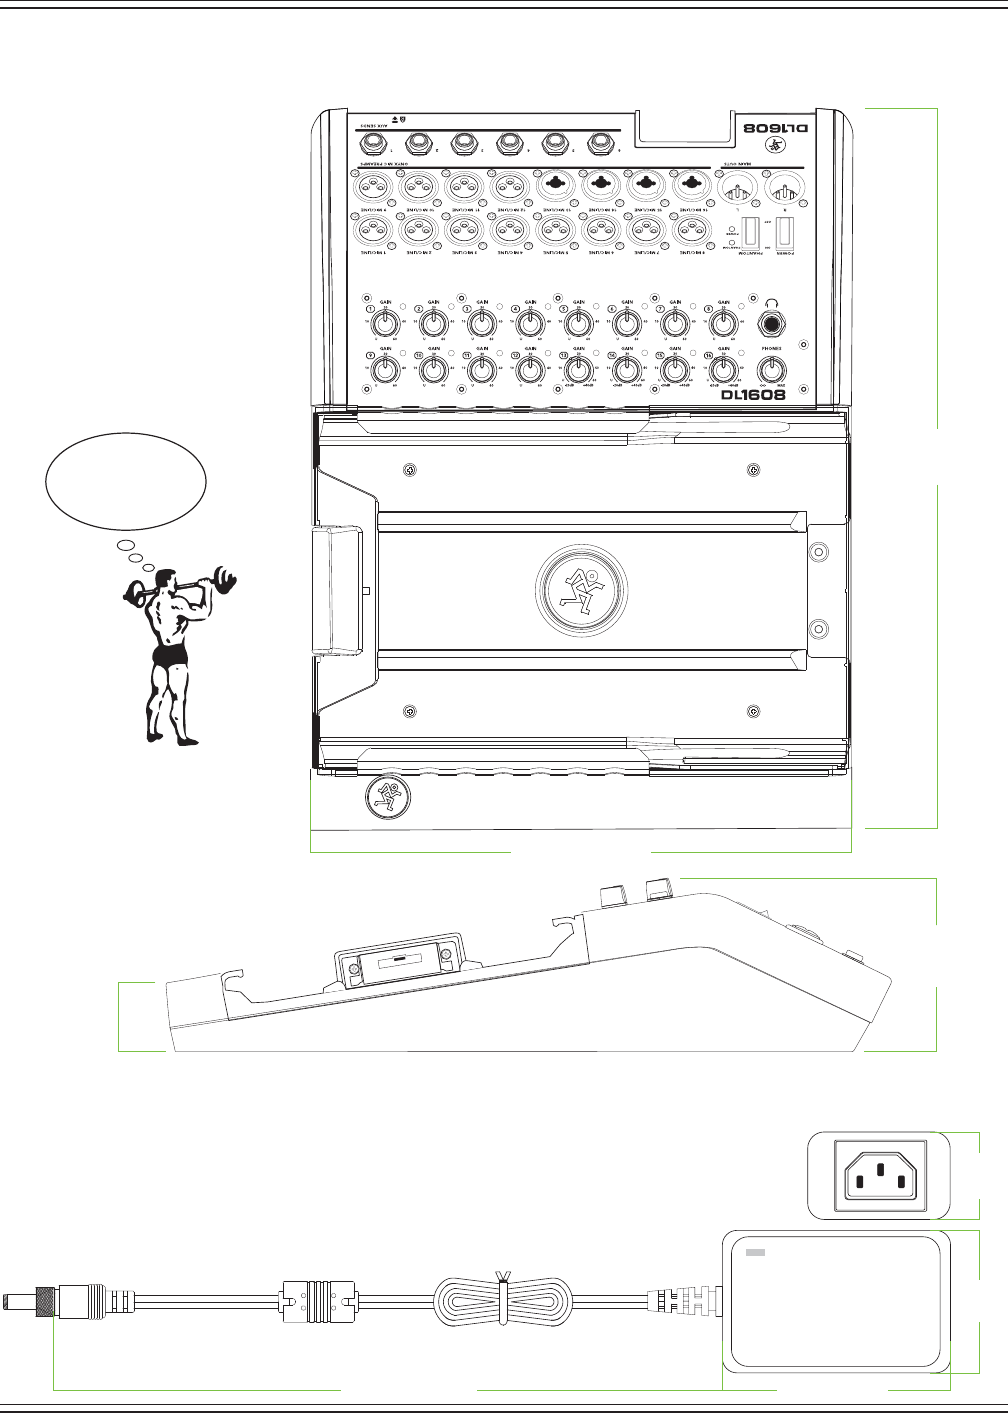
Mackie DL806 and DL1608 Reference Guide
175
DL1608 Lightning Dimensions
11.5 in / 291 mm
15.4 in / 391 mm
3.7 in /
95 mm
1.6 in /
40 mm
Weight
7.9 lb / 3.6 kg
4.5 in / 115 mm59.1 in / 1500 mm
2.1 in /
53 mm
1.5 in /
38 mm
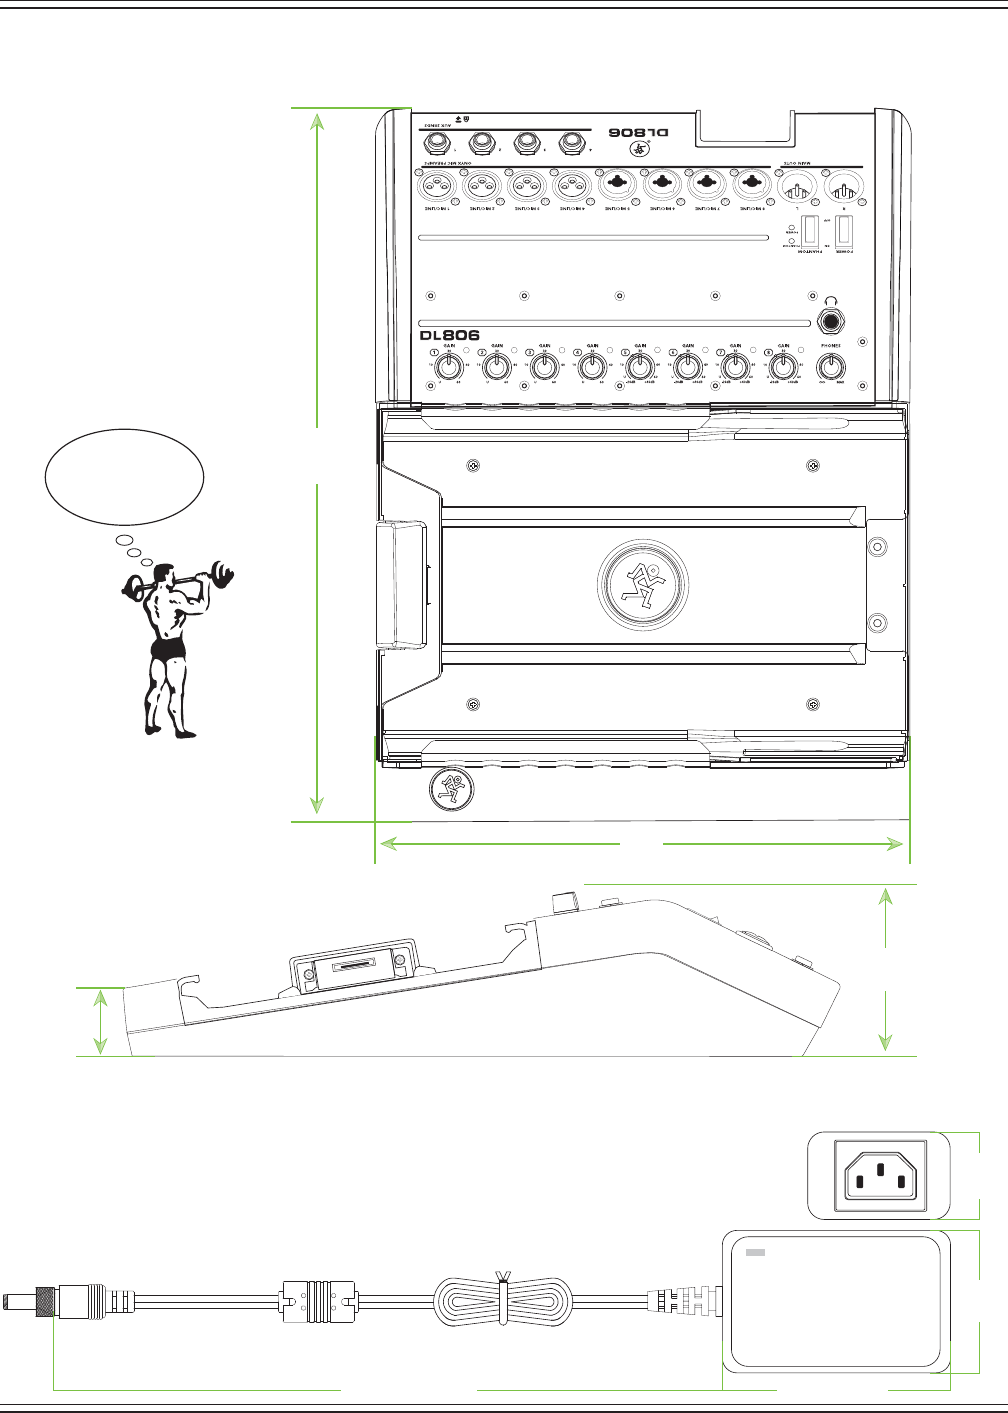
Mackie DL806 and DL1608 Reference Guide
176
11.5
[291]
15.4
[391]
3.7
[95]
1.6
[40]
Weight
6.9 lb / 3.1 kg
4.5 in / 115 mm59.1 in / 1500 mm
2.1 in /
53 mm
1.5 in /
38 mm
DL806 30-pin Dimensions

Mackie DL806 and DL1608 Reference Guide
177
DL1608 30-pin Dimensions
11.5 in / 291 mm
15.4 in / 391 mm
3.7 in /
95 mm
1.6 in /
40 mm
Weight
7.9 lb / 3.6 kg
4.5 in / 115 mm59.1 in / 1500 mm
2.1 in /
53 mm
1.5 in /
38 mm
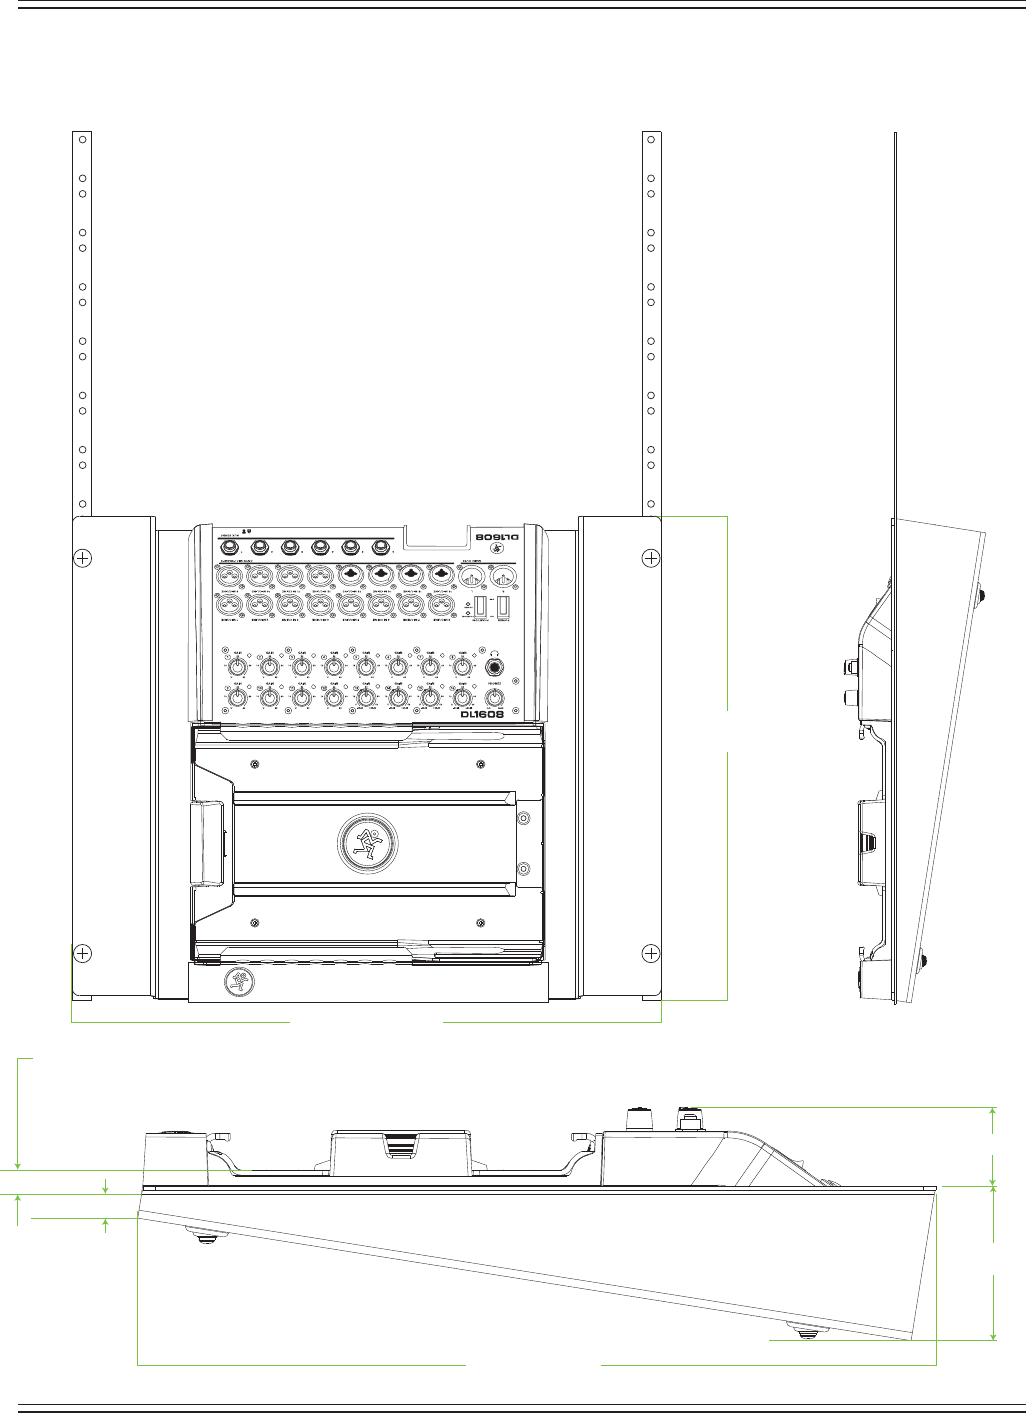
Mackie DL806 and DL1608 Reference Guide
178
DL806 and DL1608 Dimensions Continued...
19.0 in / 483 mm
Nine rack spaces
15.6 in / 395 mm
1.5 in / 39 mm
3.0 in / 77 mm
0.6 in / 16 mm
0.354 in / 9 mm [iPad 1 bottom]
0.520 in / 13.2 mm [iPad 2 bottom]
0.535 in / 13.6 mm [iPad 3 bottom]
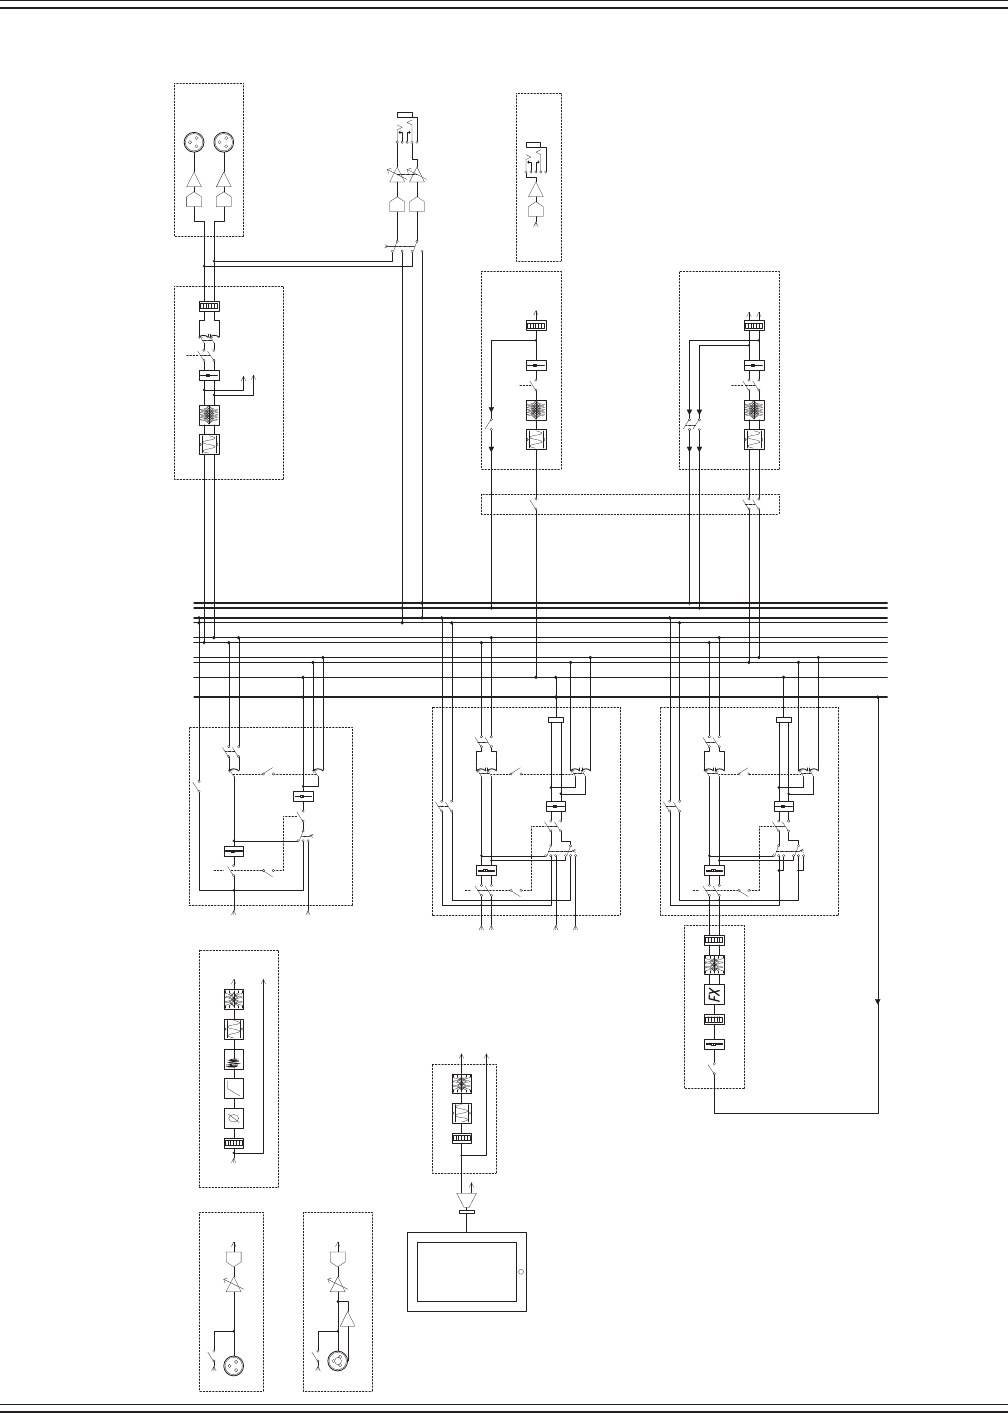
Mackie DL806 and DL1608 Reference Guide
179
Block Diagram
Polarity Gate 4-Band
Para EQ
High
Pass
Channel 1 Processing
(=Channel 2-8/2-16)
Optional Stereo Link in Pairs (1&2, 3&4, etc.)
All processing parameters linked, and true stereo gate/compression.
Main Out
L R
PFL Solo
AFL Solo
L R
Pan
Mute
Fader
Solo
Solo
Solo
Channel 1 Level, Pan, Assign & Sends
(=Channel 2-8/2-16, iPad)
DAC
PHONES
Solo
Control
Mute
Mute
DSP -
Level, Pan,
Assign &
Sends
Comp
Comp
Comp
Mono Aux 1 Processing
(=Aux 2-4/2-6)
Stereo Aux 1-2 Processing
(=other Aux pairs as stereo)
L R
Meter
RL
Meter
GEQ
GEQ
LR Assign
To Aux 1
Output
Meter
Main LR Processing
Comp GEQ
Phones
Level
AUX
1-4/1-6
DAC
Aux 1 Output
(=Aux 2-4/2-6)
From Aux
Processing
MAIN L
DAC
Main LR Outputs
Gain: 0 ~ +60dB
48V
To
Channel 5/13
Processing
From
Channel 1
Input
Channel 5/13 Input
(=Channel 6-8/14-16)
Balance
Aux 1/2 Stereo
(= Aux 3-4/3-6 Pairs)
Aux 1 Mono
(= Aux 2-4/2-6)
Fader
Fader
Fader
Fader
DAC
Mono
Aux
Stereo
Linked
Aux
Aux 1 Type
(=Aux 2-4/2-6)
FX A
(= FX B)
Mute
FX Stereo Return A Level, Pan, Assign & Sends
(= FX Stereo Return B)
LR Assign
Fader
Solo
Balance
FX 1 Processing
(= FX 2)
Effect 4-Band
Para EQ
ADC
Phantom Power
Aux 1
Level
(per Aux)
(per chan)
Gain: 0 ~ +60dB
48V
To
Channel 1
Processing
Channel 1 Input
(=Channel 2-4/2-12)
ADC
Phantom Power
iPad Processing L
(=iPad R)
4-Band
Para EQ
Meter Comp
To iPad
Meter
Meter
MAIN R
DAC
+
Fader
-20dB pad
TRS
XLR
MeterFader
Mute
Aux 1
Source
(per Aux)
Optional Stereo Link
All processing parameters linked, and true stereo
compression.
Mute Group
Control
Mute Group
Control
Mute Group
Control
Mute Group
Control
Mute
Mute Group
Control
When Channel not Stereo Linked
Aux 1
Level
(per Aux/FX)
(per chan)
Aux 1
Source
(per Aux/FX)
Aux 1-2 Pan
(per linked Aux)
(per chan)
Aux 1
Mute
(per Aux/FX)
(per chan)
Mute
Channel 1&2 Linked Level, Pan, Assign & Sends
(=other Channel pairs, iPad Linked)
LR Assign
Fader
Solo
Balance
Aux 1
Level
(per Aux/FX)
(per chan)
+
Fader
Aux 1
Source
(per Aux/FX)
Aux 1-2
Use LR Pan
(per linked Aux)
Mute Group
Control
Aux 1
Use LR Mute
(per Aux/FX)
When Channel Pair Stereo Linked (1&2, 3&4, etc.)
Aux 1
Mute
(per Aux/FX)
(per chan)
Aux 1
Mute
(per Aux)
(per chan)
Aux 1-2 Balance
(per linked Aux)
(per chan)
Aux 1-2 Balance
(per linked Aux)
(per chan)
Aux 1
Use LR Mute
(per Aux)
Aux 1
Use LR Pan
(per linked Aux)
Aux 1-2
Use LR Pan
(per linked Aux)
Aux 1
Use LR Mute
(per Aux/FX)
Ch 1 DSP -
Level, Pan,
Assign and
Sends
Ch 1 Pre-
DSP Send
Channel
DSP
Channel
Pre-DSP
Stereo
Linked
Channel
DSP
Stereo
Linked
Channel
Pre-DSP
To Aux 1-2
Outputs
Pre-DSP
Send
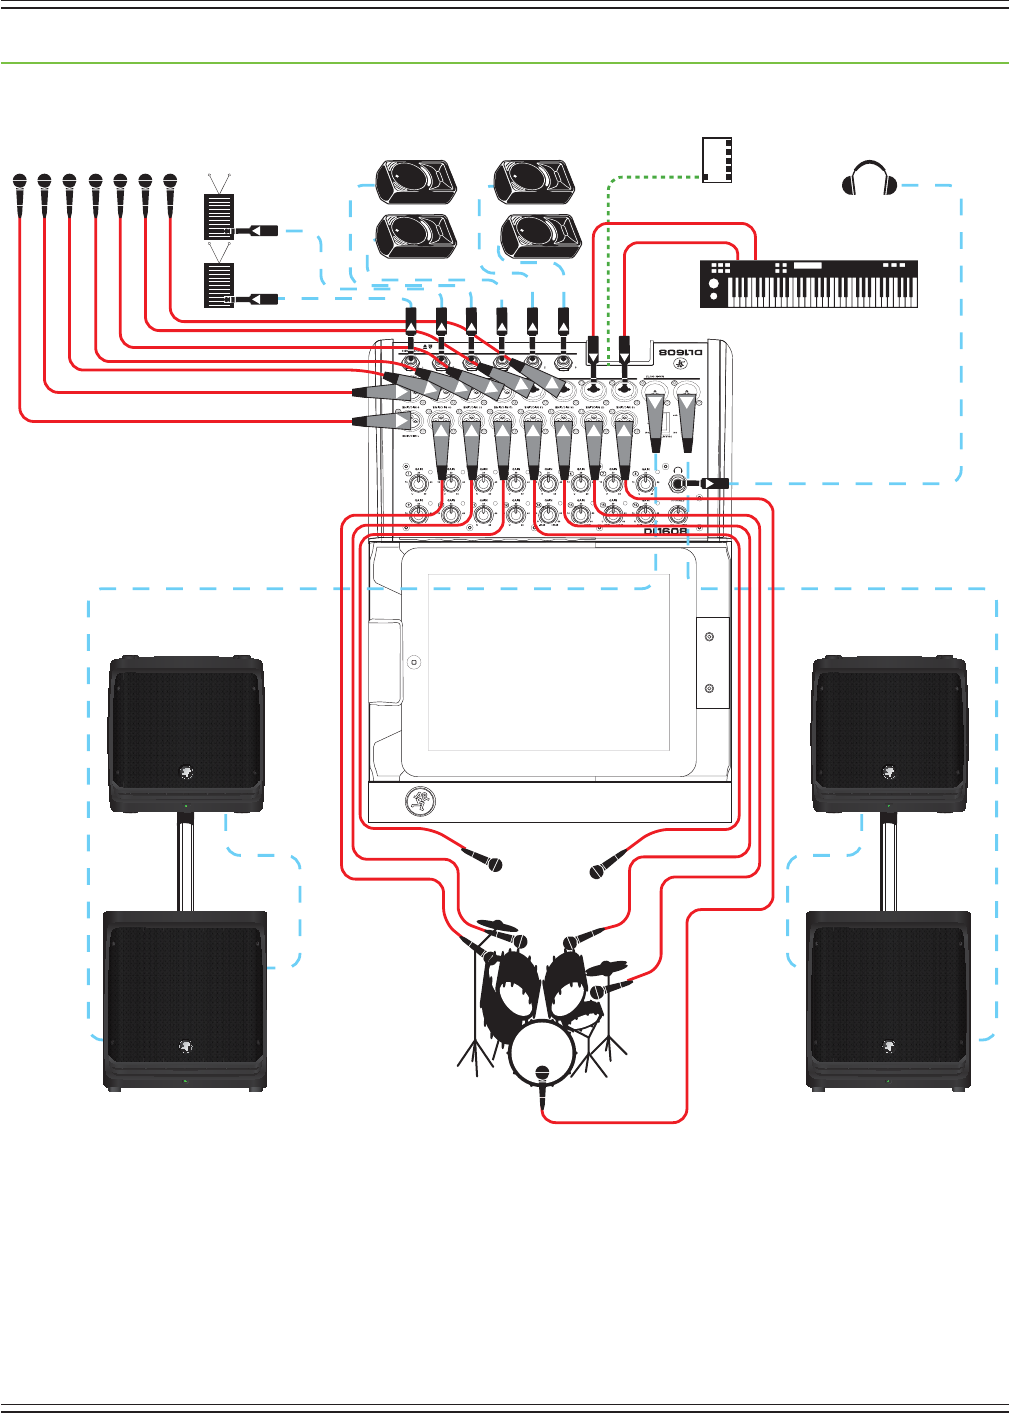
Mackie DL806 and DL1608 Reference Guide
180
Appendix D : Hookup Diagrams
Live Sound: House Engineer
Here’saprettycommonsetuputilizingtheDL1608.Drumsaremic’dupandsenttoinputchannels1-7.
Anadditionalsevenmicsareconnectedtoinputchannels8-14.Thesemaybeusedtomicguitarand
basscabinets,acousticguitar,leadandbackgroundvocals,ahornsection,etc.Akeyboardisconnected
tochannels15-16via1/4"inputjacks.
The L/R main outs of the DL1608 connect directly to a pair of Mackie DLM12S powered subwoofers
whichareconnectedtoapairofMackieDLM12poweredloudspeakers.Auxsends1-4aresenttofour
separateSRM450v2poweredloudspeakerssetupasmonitorsfortheband.Auxsends5-6aresentto
transmitters for in-ear monitors.
Thehouseengineer’siPadisconnected(butnotlocked)totheDL1608wherehe/shewillsettheLRmain
mix,aswellasgetthe2-trackrecordingoftheband’sliveshow.
Keyboard
Wireless
Router
(Wi-Fi)
Headphones
SRM450v2 Powered Monitors
Drums
Microphones
Transmitters
for in-ear
monitors
Mackie DLM12S
powered subwoofer
Mackie DLM12
powered loudspeaker
Mackie DLM12
powered loudspeaker
Mackie DLM12S
powered subwoofer
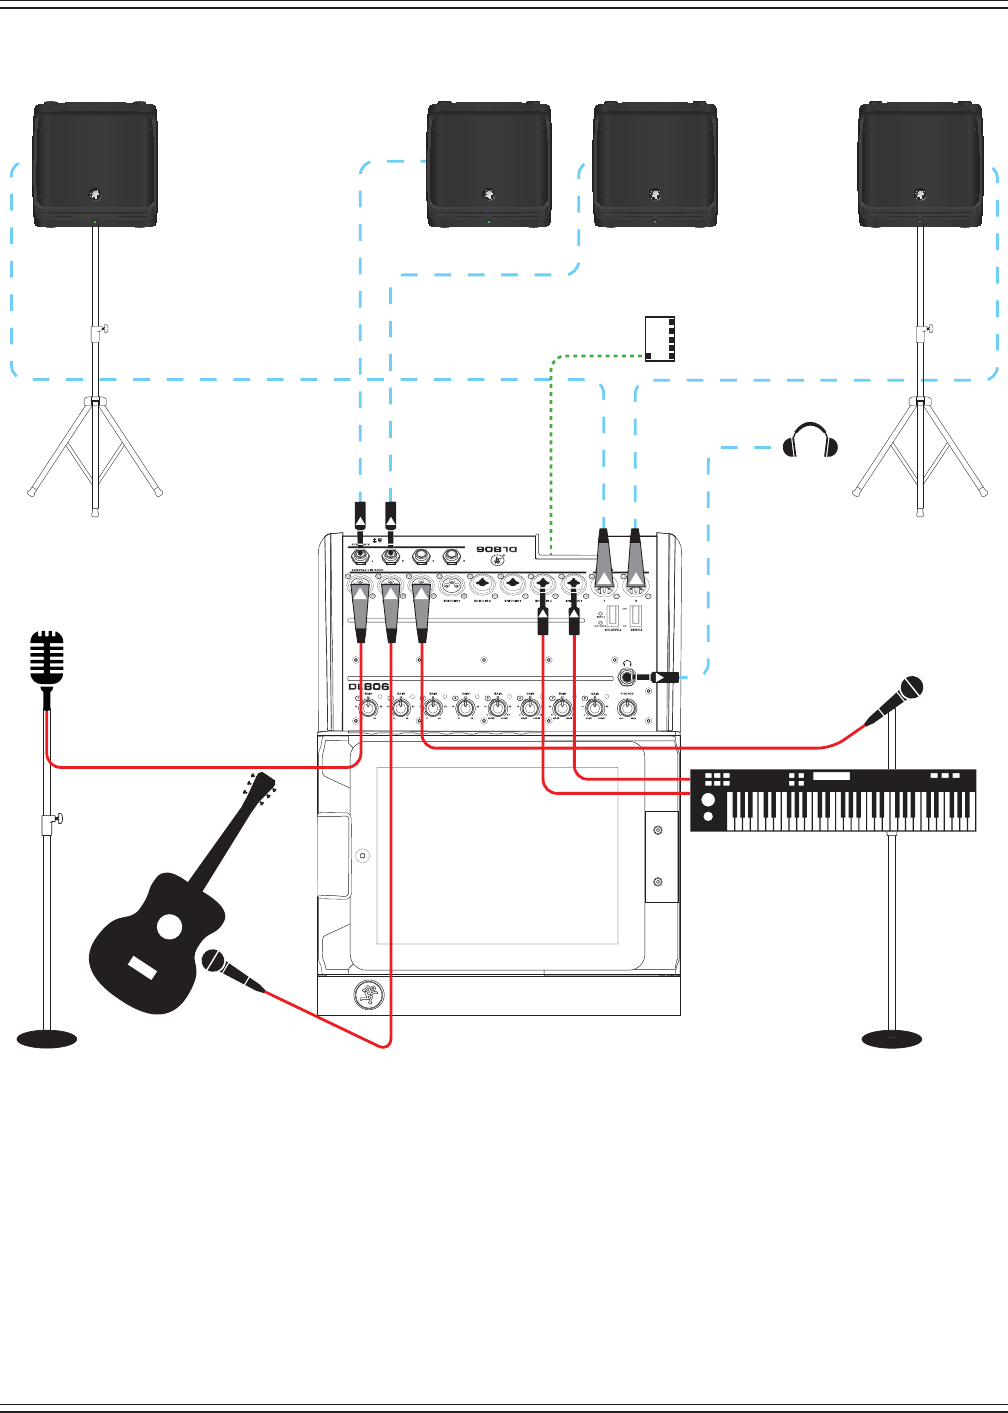
Mackie DL806 and DL1608 Reference Guide
181
Live Sound: Coee Shop
Nowthebandwantstoparedowntoplaythelocalcafe.Becausethevenuesizeismuchsmaller,thereisno
needtocrankupabigPA,nordoyouneedtomicthedrumset,basscabinetorguitarcabinets.Thoseare
loud enough on their own!
Whatwe’vegotlinedupinthisexampleistheleadvocalmicconnectedtothechanneloneinputandhis
acousticguitarismic’dupandconnectedtothechanneltwoinput.Thekeyboardplayersingsbackupvocals;
her vocal mic is connected to the channel three input and her keyboard is connected to channels 7-8 via
1/4"inputjacks.Channelsfour,veandsixareavailabletouseforadditionalbackupvocals,mic’inganother
acousticguitar,mic’ingahornsection,bongos,xylophone,oud,etc...unlimitedpossibilities!
The L/R main outs of the DL806 connect directly to a pair of Mackie DLM8 powered loudspeakers.
Auxsends1-2aresenttotwoseparateDLM8poweredloudspeakerssetupasmonitorsfortheband.
Or use one (or more) aux sends to send signal to transmitters for in-ear monitors.
Thehouseengineer’siPadisconnected(butnotlocked)totheDL806wherehe/shewillsettheLRmain
mix,aswellasgetthe2-trackrecordingoftheband’sliveshow.
Keyboard
Wireless
Router
(Wi-Fi)
Headphones
Mackie DLM8 Powered Monitors
Mackie DLM8
powered loudspeaker
Mackie DLM8
powered loudspeaker
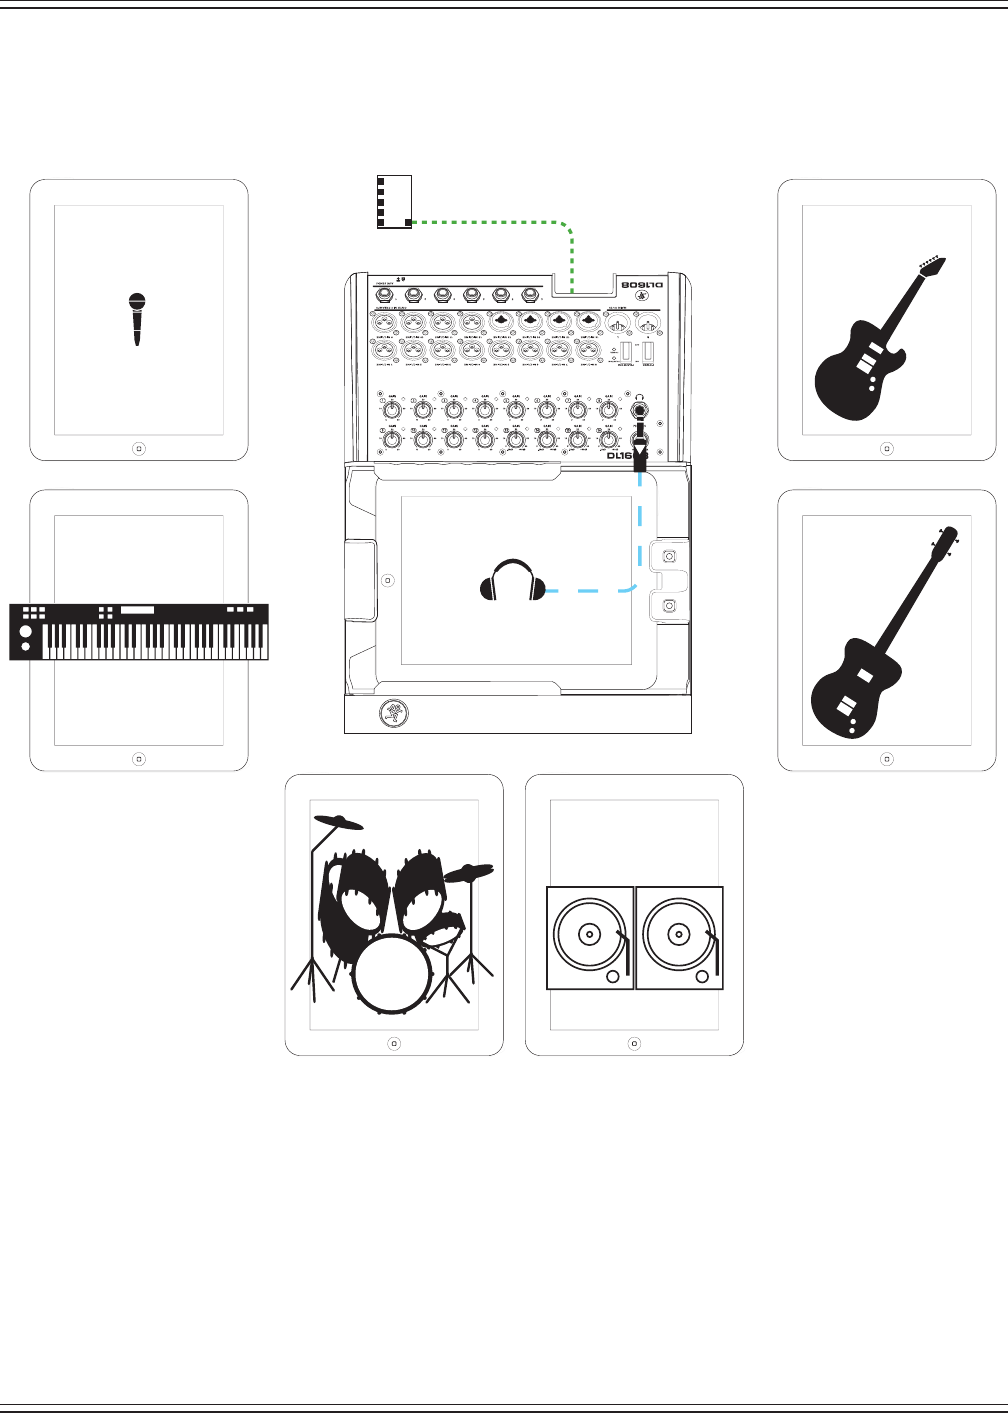
Mackie DL806 and DL1608 Reference Guide
182
Here’sasetupforallthemusiciansouttherewhowhinefor“moreme”inthemix.Setupandconnecteach
musician’sinstrument,thePAandmonitorsjustliketheywouldbeinanyotherlivesituation.
Thehouseengineer’siPadisconnectedandlockedtothemixerwherehe/shewillsettheLRmainmix,
aswellasgetthe2-trackrecordingoftheband’sliveshow.
Upto10iOSdevicesmaybeconnectedtotheDLSeriesmixerwirelessly.Assuch,eachbandmembermay
controltheirownmixfromtheirown“station”.Asseenintheillustrationabove,thevocalist,guitarist,bassist,
keyboardist,drummistandDJisteachhaveaniPad.Sixmusicians,sixiPads,sixauxes.Coincidence?Wethink
not. Whining problem solved!
Live Sound: Self-Engineered
Keyboardist Bassist
Vocalist Guitarist
Wireless
Router
(Wi-Fi)
Engineer’s
Headphones
Drummist DJist

Mackie DL806 and DL1608 Reference Guide
183
Live Sound: Two Mixers, One iPad
So you say you have a snake. We prefer dogs, cats or sh for pets, but snakes are cool, too.
Howaboutananalogsnake;doyouhaveoneofthoseinyourarsenal?Thesnakeisa
great tool for cutting down on cable spaghetti.
This setup is ideal for clubs utilizing one mixer for FOH and one mixer for monitors.
ConnectallinputsandoutputsfromtheFOHandmonitormixerstothesnake.
Next,connectallofthedrum,guitarcabinetandvocalmics,DIbox,etc,TOthesnake.
ThemainPAandmonitorsreceiveinputFROMthesnake.
AlsonoticethatthereisonlyoneiPadinthisillustration.ItonlytakesoneengineerandoneiPadtorun
both mains and monitors at this particular venue.
Thelastthingtonoticeisthecrowd...they’regoingcrazyforthisband!Thismustbesomeweird,
underground,cultclubsincenoonethere[bandorfans]hasanyfeetorhands,nottomentionhair,
facialfeatures,etc.Theremaybealotmissing,butwhat’snotmissingistheenergy...theplaceisrockin’!
Wireless
Router
(Wi-Fi)
Mackie DLM12
Loudspeaker
and DLM12S
Subwoofer
Mackie DLM12
Loudspeaker
and DLM12S
Subwoofer
FOH Mixer
Monitor Mixer
Headphones
Mackie HD1221 (for monitors)
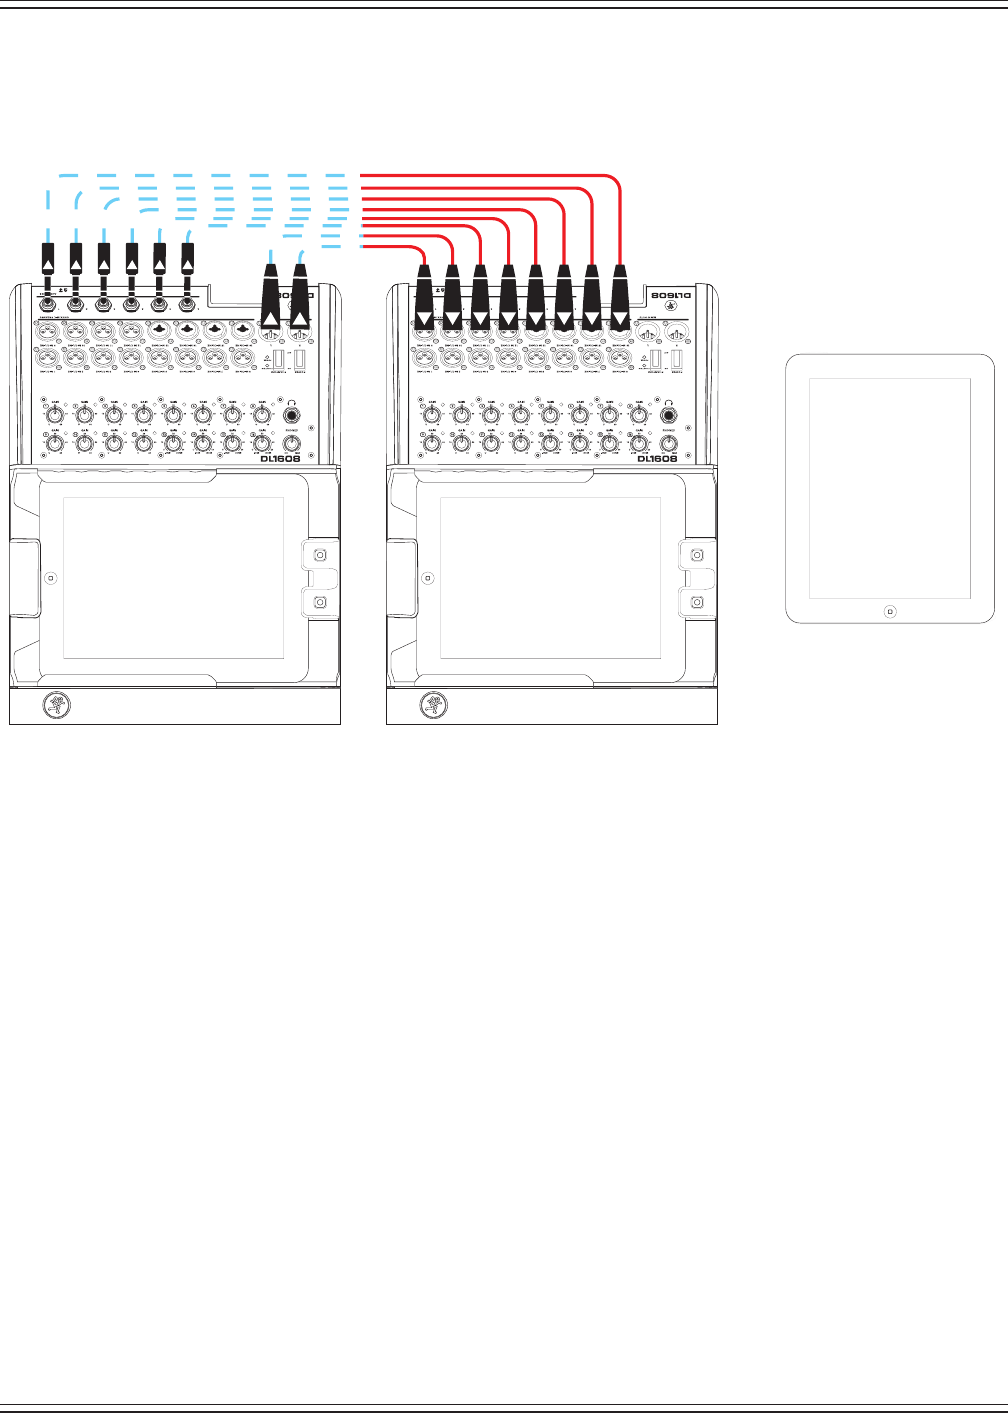
Mackie DL806 and DL1608 Reference Guide
184
Live Sound: Two Mixers Linked
SotheclubdownthestreetisrunningsoundthroughaDLSeriesmixerandyouwanttoone-upthem?
That’seasy!HowaboutrunningsoundthroughTWODLSeriesmixers?!No,itwon’tbetwiceasloud,
butyouwillhavenearlytwiceasmanyinputswhichmeansyou’llprobablyhavetwicethetalentplaying
at your venue in no time.
Startbysettingupandconnectingeachmusician’sinstrumentjustliketheywouldbeinanyother
live situation. When you run out of inputs on the rst mixer, start using inputs on the second mixer.
Allyouneedtodoisleaveeightinputsopenonthesecondmixer.Thenmaketheconnectionfrom
theoutputsandauxesofmixer#1totheinputsofmixer#2.Theoutputsofmixer#2arethensent
totheinputsofthePA.
AniPadisconnectedandlockedtoeachmixer,whileathird(wireless)iPadisavailableforwandering
the venue and creating an awesome mix.
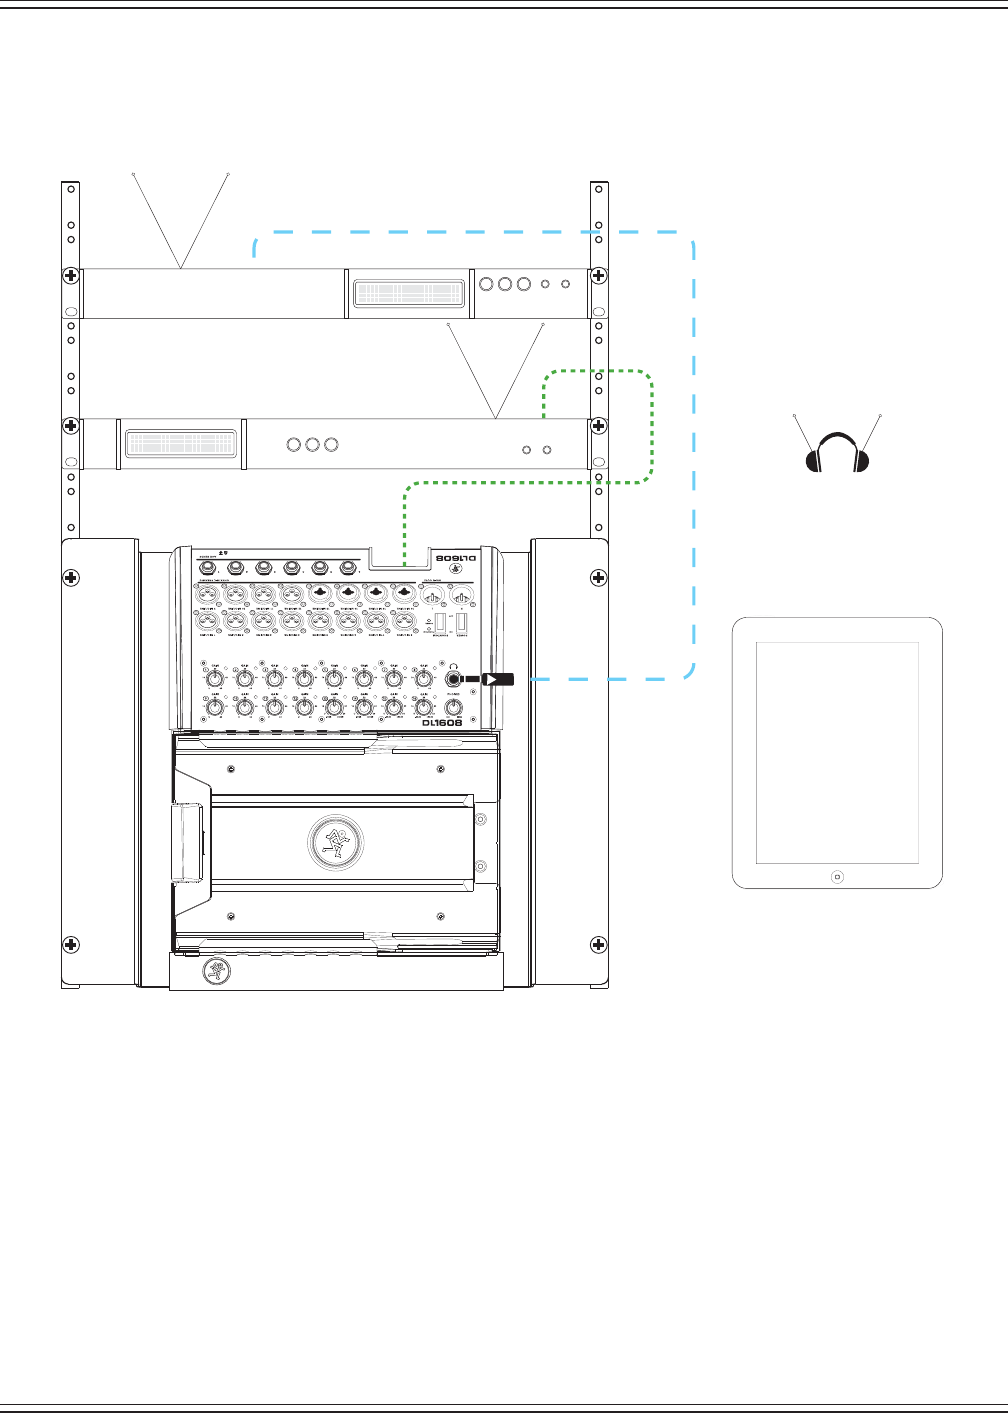
Mackie DL806 and DL1608 Reference Guide
185
Rack Mounted
Thishookupdiagramillustratesthatthemixerdoesn’tjusthavetoeatupdeskspace...rackmount
itinstead!Beforedoingso,though,itwouldbeagoodideatoreviewtheRackMountKitInstallation
InstructionsthatwereincludedwiththeRackMountKit.Thedogatethem,yousay?Likelystory,actually.
Youknowwhy?Themixershaveactuallybeenreadytobeunleashedtotheworldforeons,butmy
girlfriend’sdogskepteatingcopiesoftheReferenceGuide.Anyway,backtotheRackMountKitInstallation
Instructions.Clickhere to retrieve them.
Wireless
Headphones
Wireless Router
Wireless Headphones
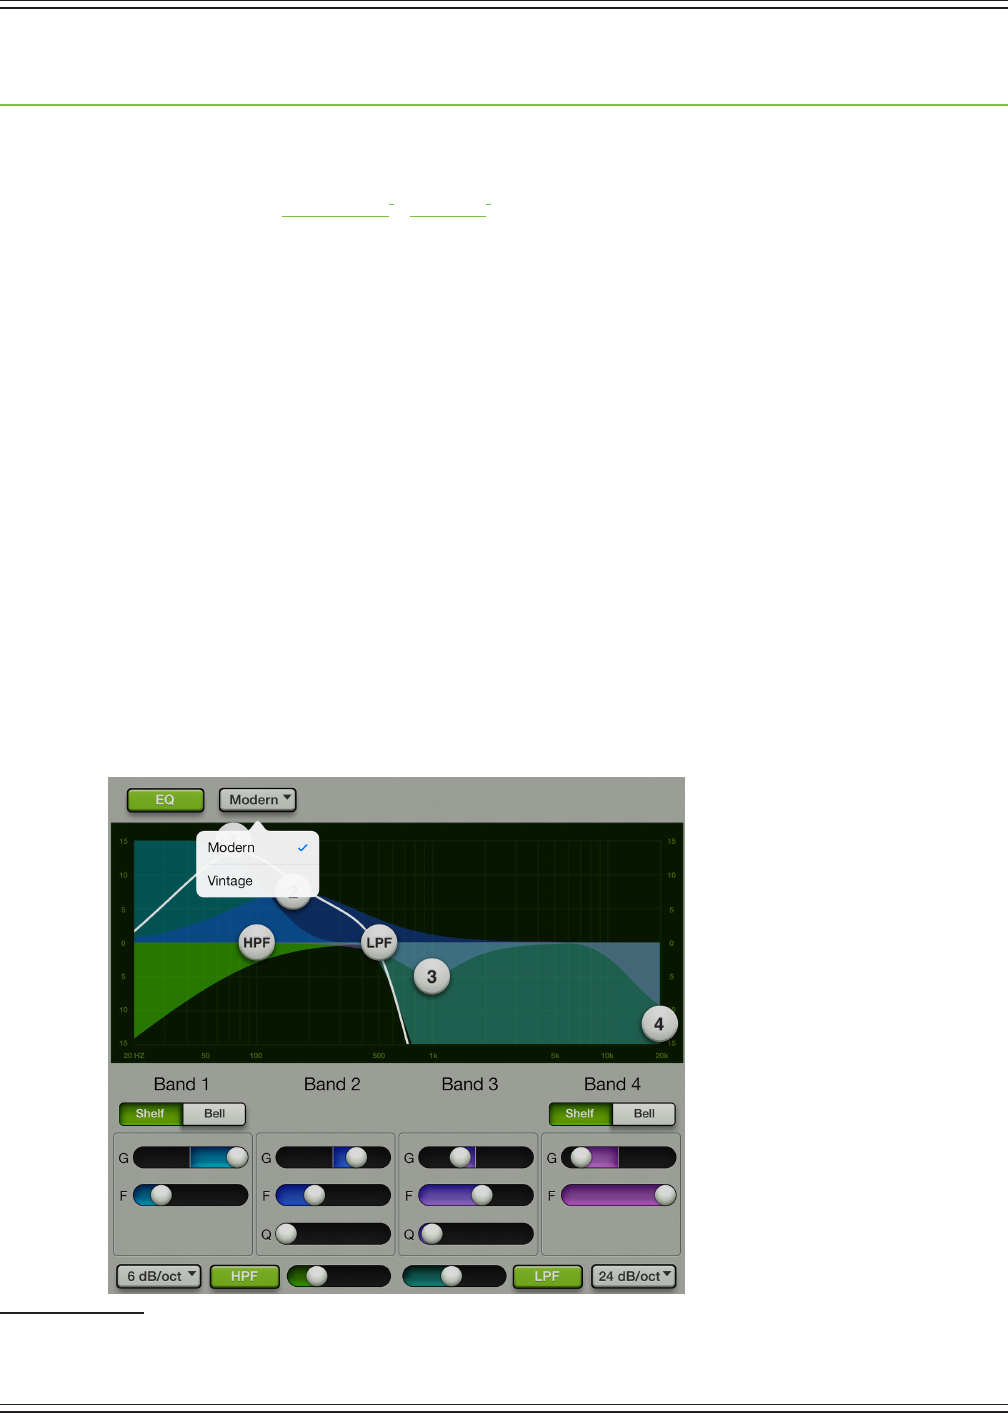
Mackie DL806 and DL1608 Reference Guide
186
Appendix E: Release Notes
Updating the App
NewappreleasesmaybedownloadedandinstalleddirectlyfromtheiOSdeviceviatheAppStoreorvia
iTunesonMacorPC:
Master Fader1 / My Fader2.
Ifyoudon’tknowtheversionyouarecurrentlyusing,gotoTools>Help>Aboutontheapp.Theversionis
listed near the top of the screen.
Youmaybepromptedtoupdatethermwarethersttimeyoulaunchtheupdatedappconnectedtothe
DL Series mixer. Simply follow the on-screen instructions. Refer to page 31 of the Reference Guide for more
information.
NOTE: iOS7 updates apps automatically. We strongly recommend you disable automatic updates for
apps in iOS7. Otherwise you run the risk of a long update occurring right in the middle of a show. Ouch!
SimplygotoSettings>iTunes&AppStore,thenturnUpdateso.Moredetailedinstructionsmaybe
foundinAppendixB:iOSOptimizations.
Version 2.1
The following is a list of items that have been added, changed or xed since Version 2.0.
1. Output Parametric EQ
[pages85-95oftheReferenceGuide]
Theparametricequalizerisagreattoolfordialinginthesoundyou’relookingforortosquelchfeedback
frommonitors.Alloutputchannels(LR,auxs1-4/6)haveupto4-bandEQwithhighshelving,high-mid
peaking,low-midpeakingandlowshelvingandahigh-passlter(HPF)andlow-passlter(LPF),both
with selectable slopes.
1
http://itunes.apple.com/us/app/mackie-master-fader/id511500747?mt=8
2
https://itunes.apple.com/us/app/mackie-my-fader/id599029732?mt=8
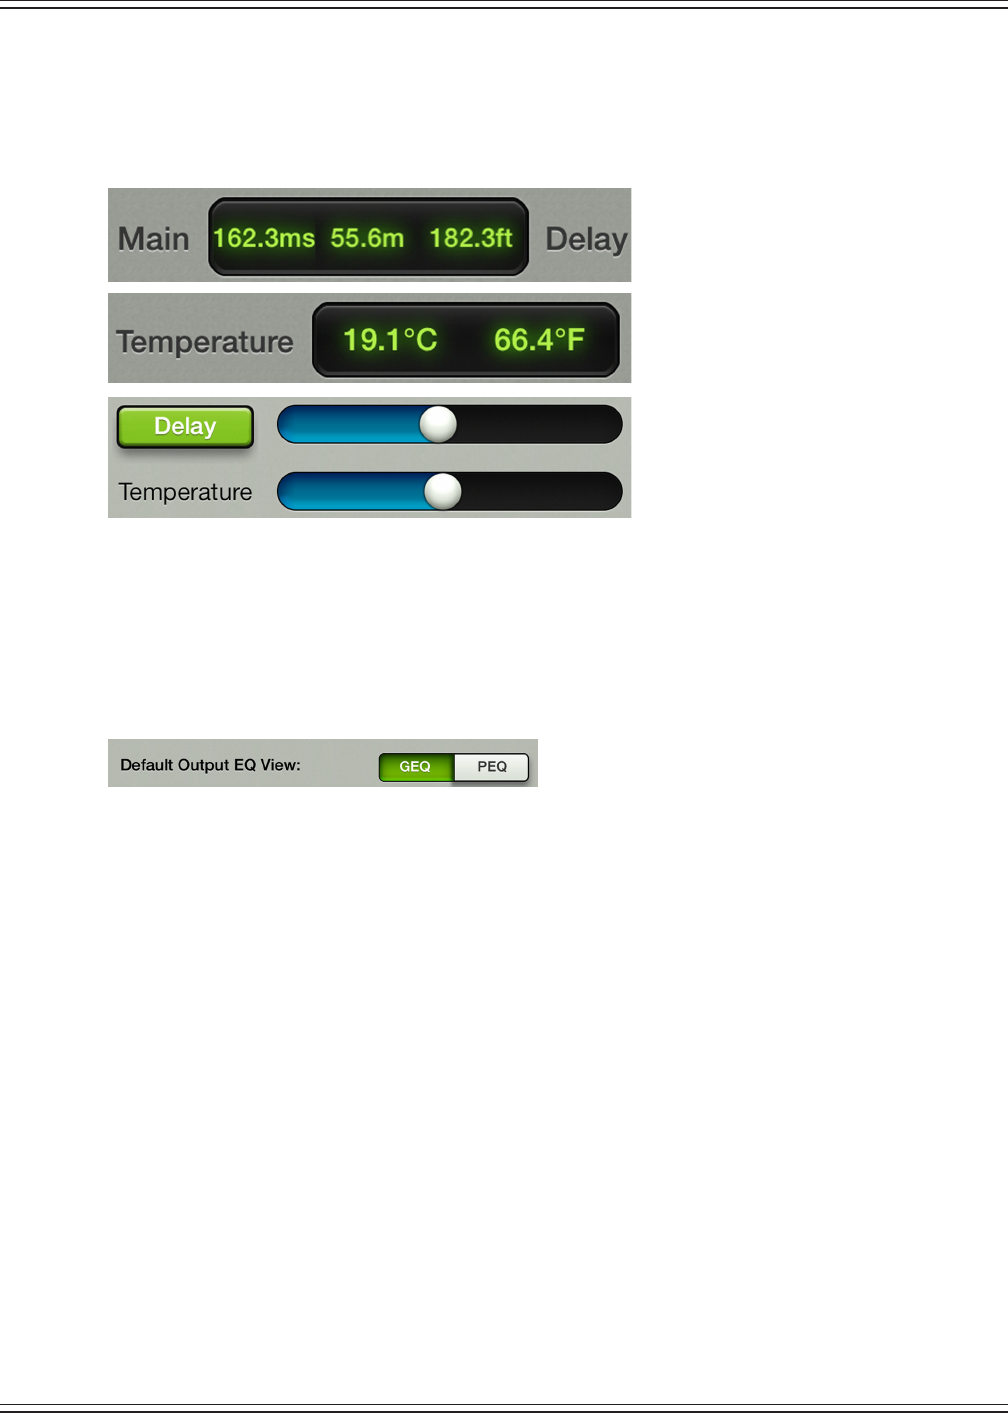
Mackie DL806 and DL1608 Reference Guide
187
2. Output Alignment Delay
[page97oftheReferenceGuide]
The main LR and all aux sends now feature a 350 ms delay with adjustable delay time, room temperature
adjustment and on/o functionality. It is accessible via the output compressor/limiter of each aux send
master.It’susedtotime-alignthesoundwhentherearespeakersthatarenotneareachother.
3. Default Output EQ View [page113oftheReferenceGuide]
YougettodecidewhetherthegraphicEQorparametricEQisthedefaultoutputEQview.
SimplygotoTools>Settings>DefaultOutputEQViewandtapwhichsettingyouprefer(GEQorPEQ).
The chosen setting will illuminate green when engaged, while the other option will be grayed out.
Whichever output EQ view is chosen, you can always swipe in the output view to get to the other.
4. Localized Text [pages163-164,168-169oftheReferenceGuide]
Localized text is available in ve languages, including English.
• English
• German
• Spanish
• French
• Mandarin(SimpliedChinese)
This is ideal for users who may not have a pro audio background to instantly know and understand these
pro audio terms in English. Even if a non-English speaking user is able to read and understand pro audio
terms in English, the language of advanced settings, critical warnings, rmware updates and complex
showmanagementcouldbediculttotranslate.Non-Englishspeakinguserswillbeabletodigindeeper
than ever before by changing their iOS device to their native language.

Mackie DL806 and DL1608 Reference Guide
188
5. Bug xes and stability improvements (including, but not limited to):
•ImprovedaccuracyofEQgraphicscode.
•FixedbugwhereMasterFadercouldstopregisteringtoucheswhilerecordingoniOS7.
•FixedcrashbugwhenattemptingtorenamethecurrentshowunderiOS6.
•Fixedcrashbugwhenpullingashowwithmaximumsnapshotsandimages.
•Fixedbugwherethedevicenamecouldberesetafteranupgrade.
•Fixedbugswithpresetrecallimmediatelyafterachannellink.
•FixedgraphicsissuewithoutputselectoronDL806.
•FixedbugwithVintageComp/Gatemetersettingsnotbeingstoredcorrectly.
•Fixedbugwherechannelsafesweren’tworkingproperlyoine.
•FixedbugwhenupdatingmixerwithmultipleiPadsconnected.
•Fixedbugwhereaccesslimitingwasn’tproperlypreventingaccessforlinkedoutputs.
•Fixedbugwhereaccesslimitingwasn’tproperlyindicatinglimitstateforoutputcompressor.
•FixedbugwherethePodcastbuttonwasn’tworkingproperly.
•Performedotherminorxesandstabilityimprovements.

Mackie DL806 and DL1608 Reference Guide
189
Version 2.0
The following is a list of items that have been added, changed or xed since Version 1.4.
1. Input Channel Linking
[pages42,44oftheReferenceGuide]
Two neighboring mono input channels may be linked together into a single stereo channel strip. This is ideal
for stereo input sources such as keyboards, submixer outputs, vocal processors and more. When linked, the
level control, EQ, gate and compressor are adjusted with a single set of controls.
Additionally,thesinglestereoiPadchannelmaybeunlinkedtomaketwo
separatemonoiPadchannels.Thisisidealforclicktracksandbackingtracks.
ChannelsmaybelinkedandunlinkedinMyFader,too.
Unlinked Linked
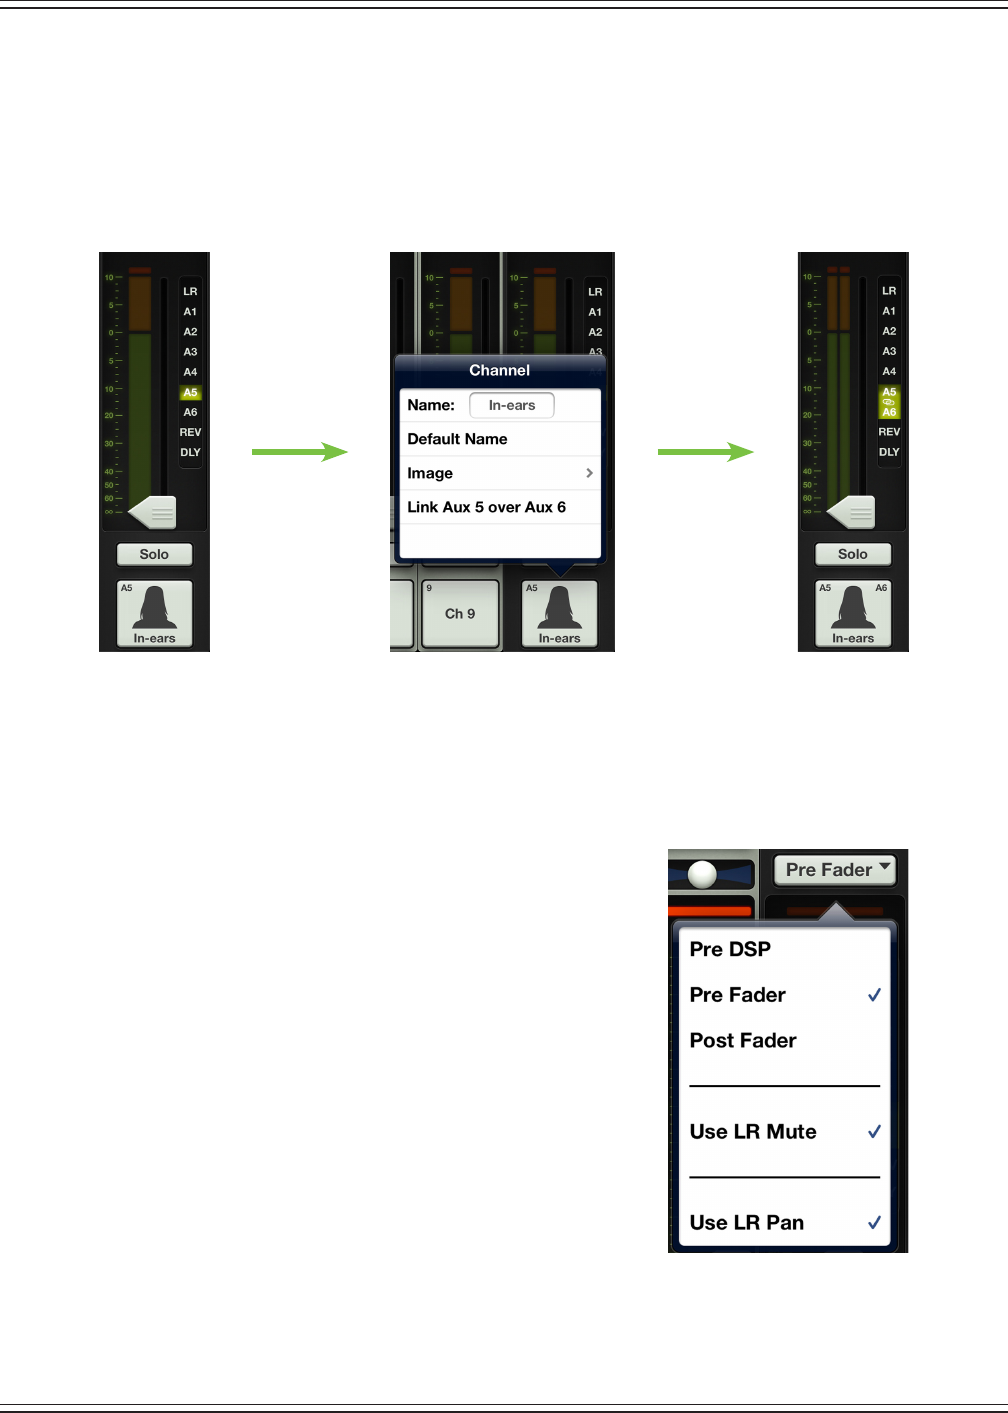
Mackie DL806 and DL1608 Reference Guide
190
2. Aux Send Linking
[page55oftheReferenceGuide]
Two neighboring mono aux sends may be linked together into a single stereo aux. This is ideal for using
in-ear monitors or other stereo output destinations such as broadcast feeds, recording devices and more.
When linked, the level control, graphic EQ and output compressor/limiter are adjusted with a single set
of controls.
AuxsendsmaybelinkedandunlinkedinMyFader,too.
3. Aux/FX Send Conguration Menu
[pages48-49oftheReferenceGuide]
There are three additions to the aux/FX send conguration menu:
Pre DSP —InadditiontoPreFaderandPostFader,usersmay
nowchoosePreDSPastheauxsendsource.PreDSPisideal
when using the auxes for monitor mixes and you want EQ, gate
andcompressioninthemainmix,butnotthemonitors.PreDSP
is available on all auxes, but not the FX sends.
Use LR Mute —WhenUseLRMuteisenabled,theauxsends
sharethesamemutesastheLRmainmix.WhenUseLRMute
is disabled, users can control aux mutes and main mix mutes
independentlyforeachchannel.UseLRMuteisavailableonall
auxes and FX.
Use LR Pan [Stereo Auxes only] —WhenUseLRPanisenabled,
the aux pans share the same pans as the LR main mix. When
UseLRPanisdisabled,userscancontrolauxpansandmainmix
pansindependentlyforeachchannel.UseLRPanisavailableon
stereo linked auxes, but not on FX.
Additionally,FXsendsmaynowbeconguredasPreFaderformoreadvancedFXneeds.
Unlinked Linked
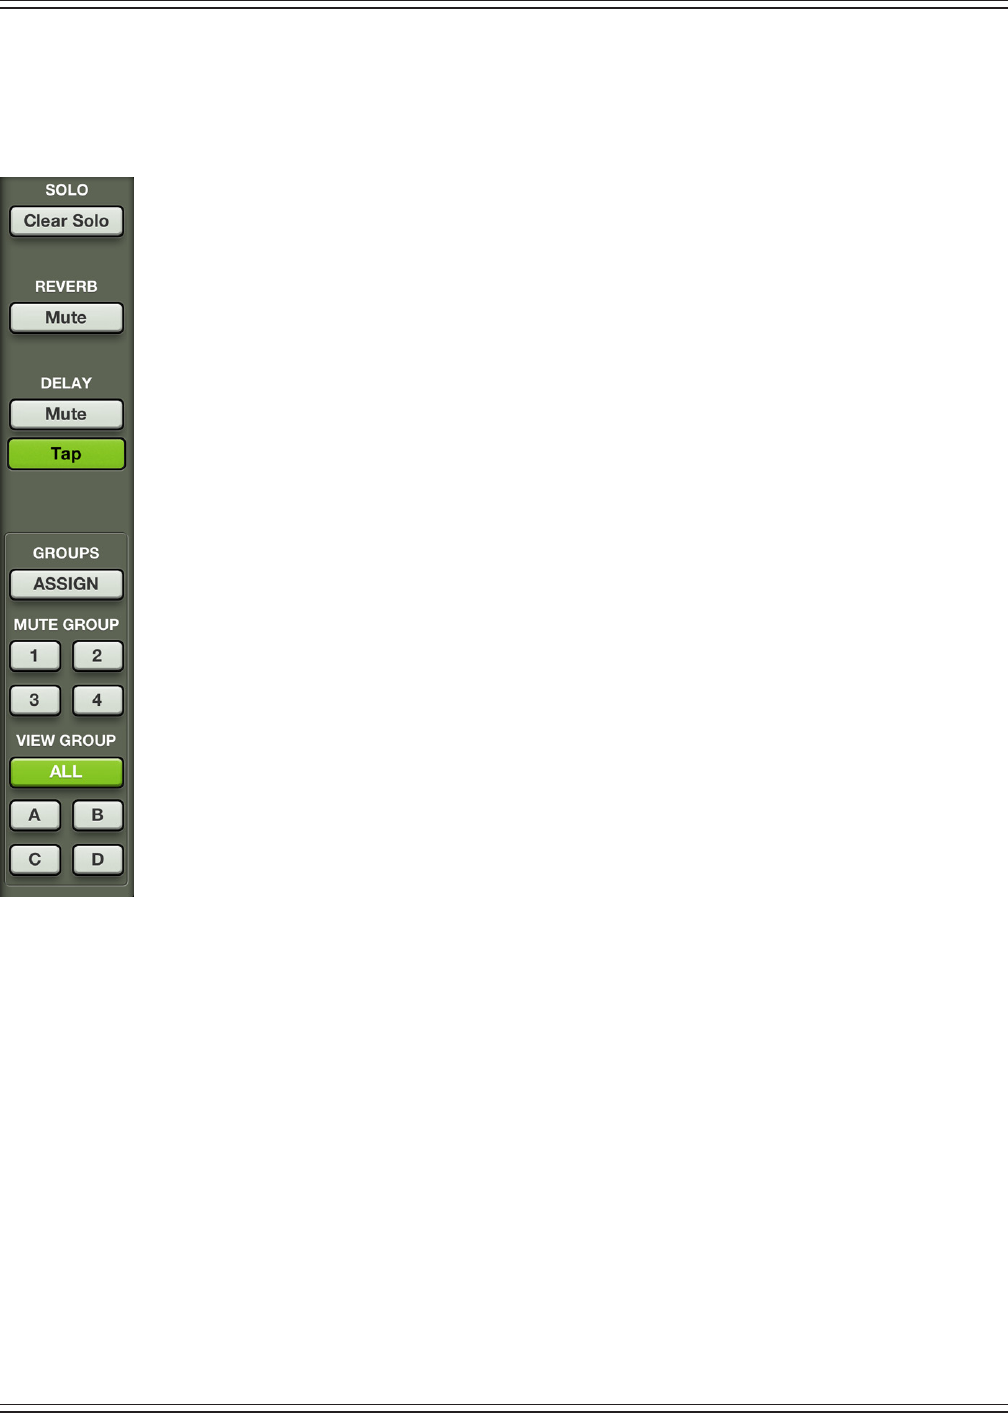
Mackie DL806 and DL1608 Reference Guide
191
4. Quick Access Panel
[pages132-141oftheReferenceGuide]
The quick access panel allows for fast control over critical functions, including:
(1)ClearSolo—Easilyclearallsolos.
(2)EectsControls—Globallymutethereverband/ordelay.Settapdelaytempo.
(3)MuteGroupControl—Setchannelassignmentandon/ocontrolpermutegroupmaster.
(4)ViewGroupControl—Setchannelassignmentandviewgroupselect.
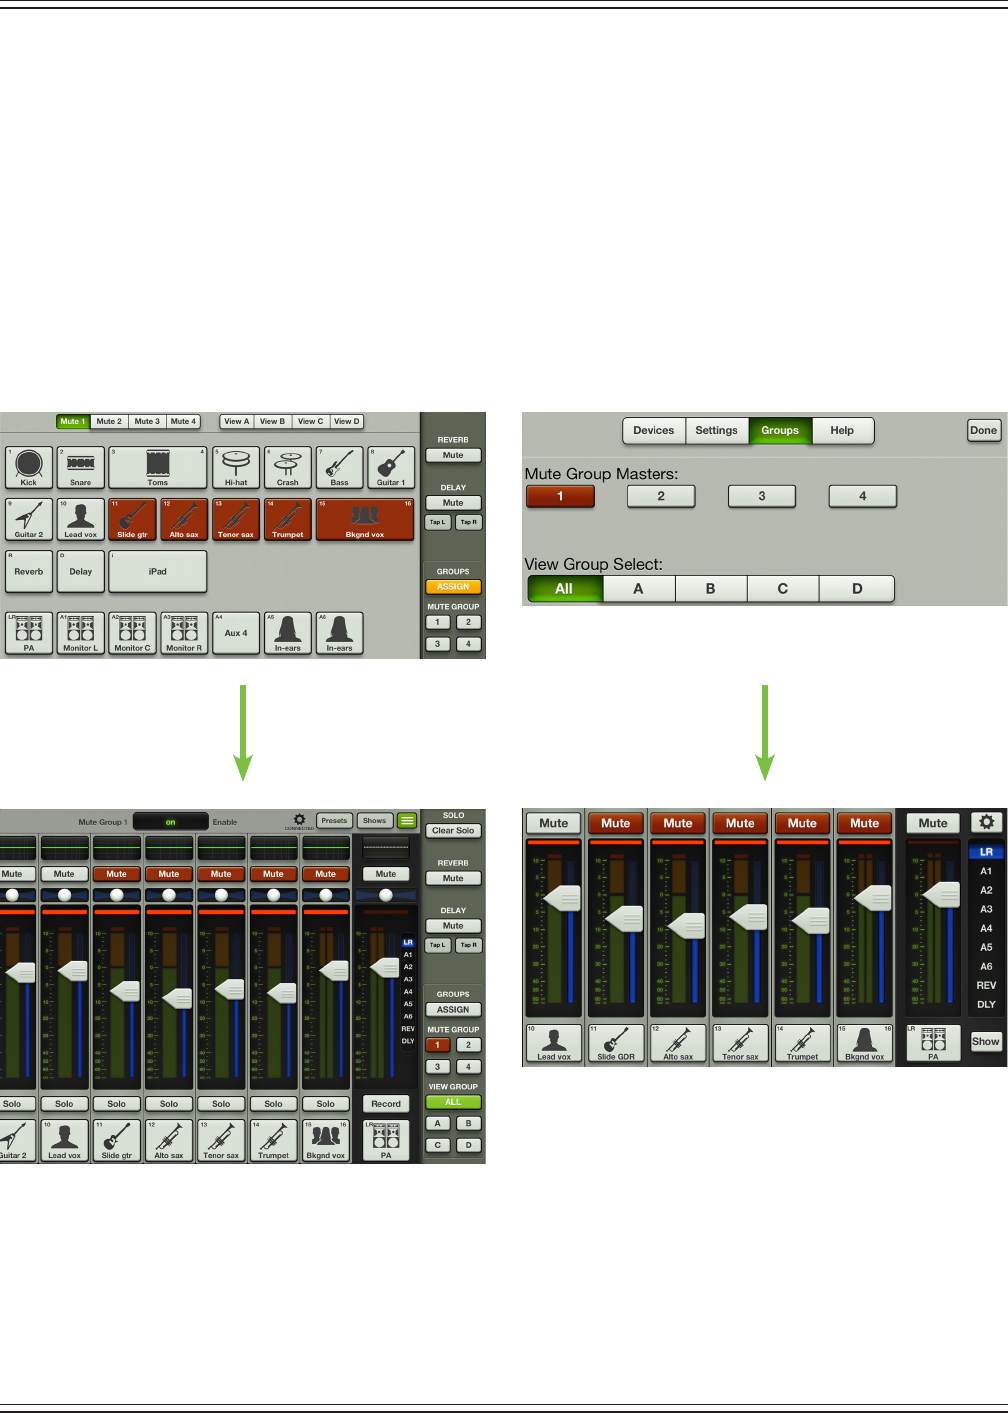
Mackie DL806 and DL1608 Reference Guide
192
5. Mute Group Control
[pages134-138oftheReferenceGuide]
Mute groups allow you to quickly mute (and unmute) multiple channels and/or outputs with a single tap.
There are a multitude of ways to congure and use mute groups: productions featuring a rotating cast
of musicians or theater productions with dierent scenes. It is also great for muting all inputs during
songbreaksorin-betweensets.Youmaycreateandassignasmanyasfourseparatemutegroups
with Master Fader.
The mute group masters may be enabled/disabled via Master Fader or My Fader. However, channels may
only be assigned to mute groups in Master Fader.
Master Fader
Mute Group Control
My Fader
Mute Group Control
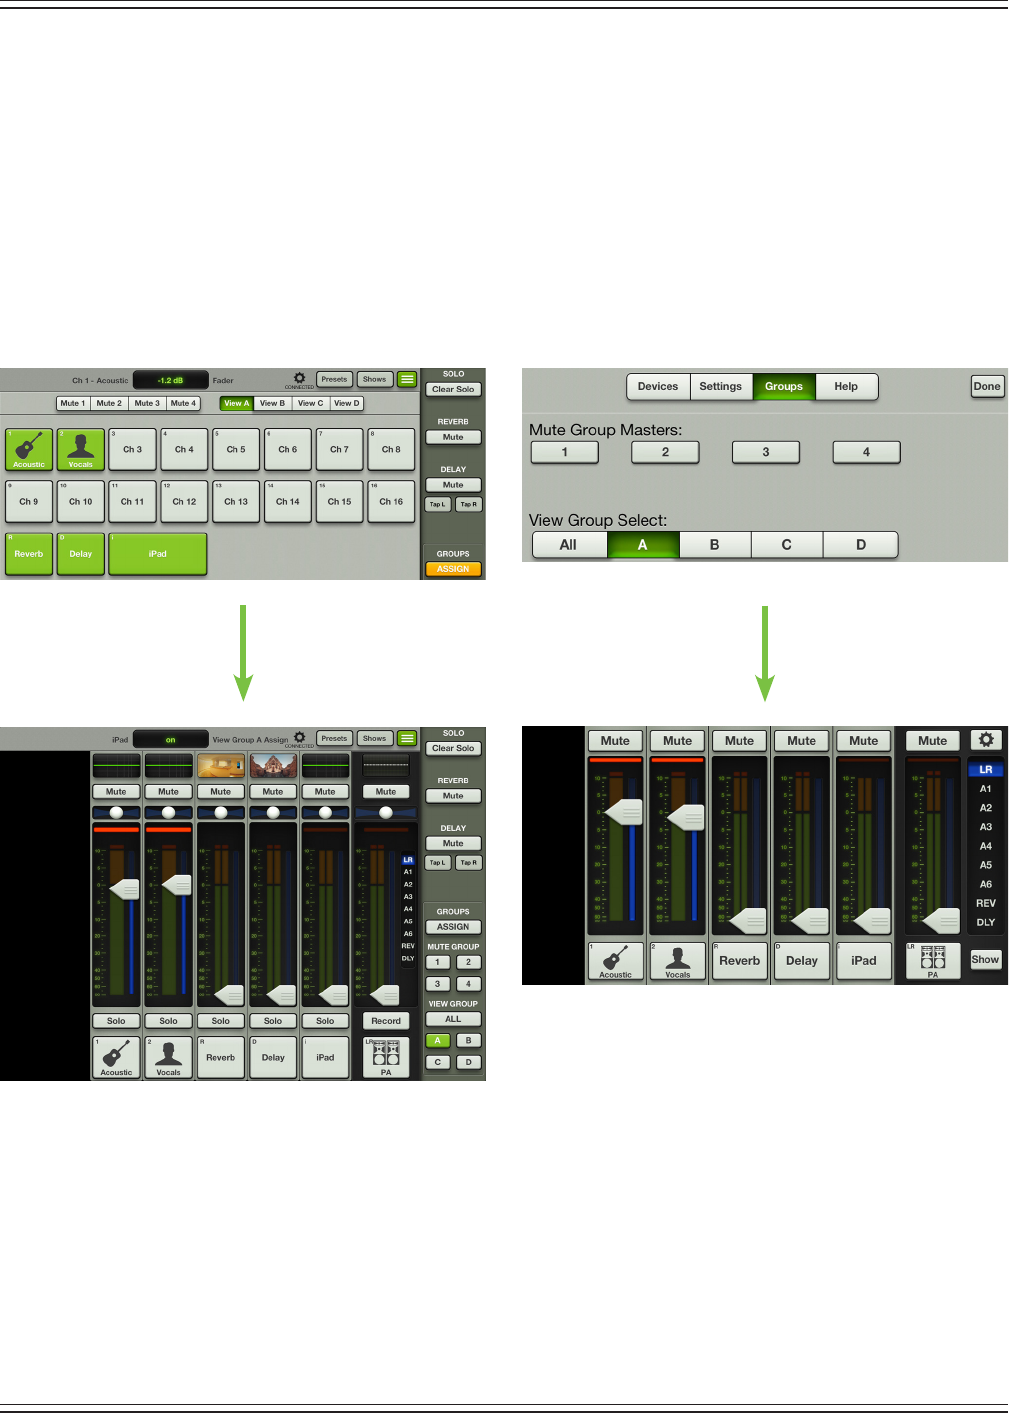
Mackie DL806 and DL1608 Reference Guide
193
6. View Group Control
[pages139-141oftheReferenceGuide]
View groups allow you to see only the channels that you want to view, hiding the rest. This improves
organizationandallowsforfasternavigation.Youmaycreateandassignasmanyasfourseparate
view groups with Master Fader.
The view group may be selected via Master Fader or My Fader. However, channels may only be assigned
to view groups in Master Fader.
Master Fader
View Group Select
My Fader
View Group Select
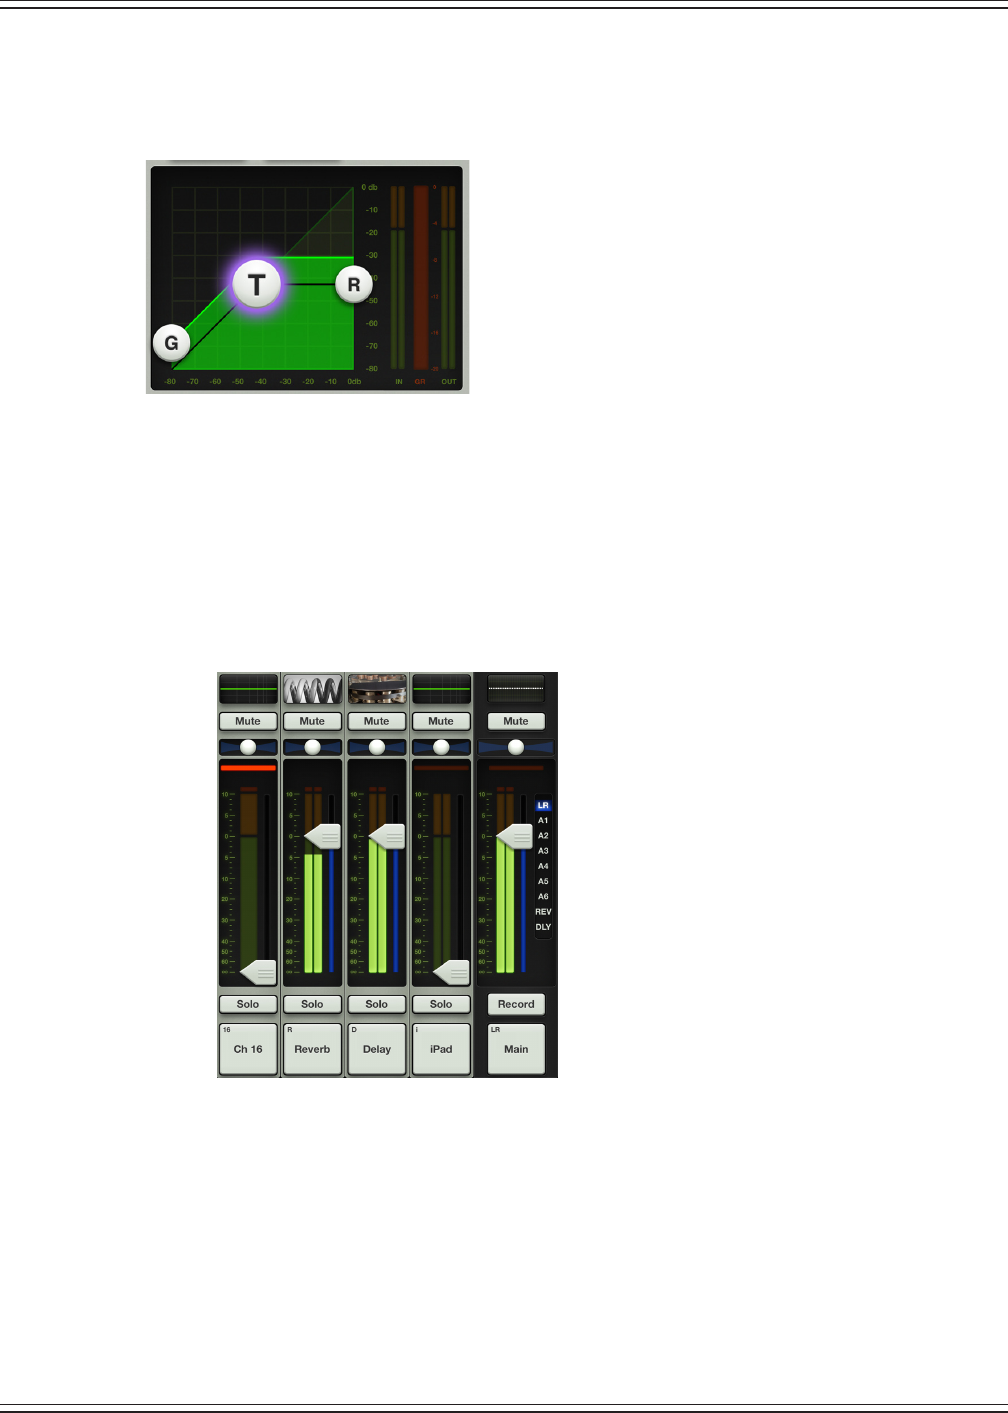
Mackie DL806 and DL1608 Reference Guide
194
7. Other changes
•Updatedgateandcompressor/limitergraphics.
[Pages69-70,72,96,98-99oftheReferenceGuide]
•AmutehasbeenaddedtothemainLR.[Page47oftheReferenceGuide]
•Navigationenhancements
• Eects Display — The EQ curve is replaced with an image of the currently selected reverb
anddelayeecttype.Simplytappingtheimagewilltakeyoustraighttothateect’scontrols.
[Page43oftheReferenceGuide]
• Fast access to dynamics — Tapping the gain reduction meter takes you straight
tothedynamicsview.[Pages38,50oftheReferenceGuide]
• Fast return from channel view — When in channel view, tapping the small
EQ curve at the top of the channel strip returns you back to the mixer view.
[Pages38,47oftheReferenceGuide]
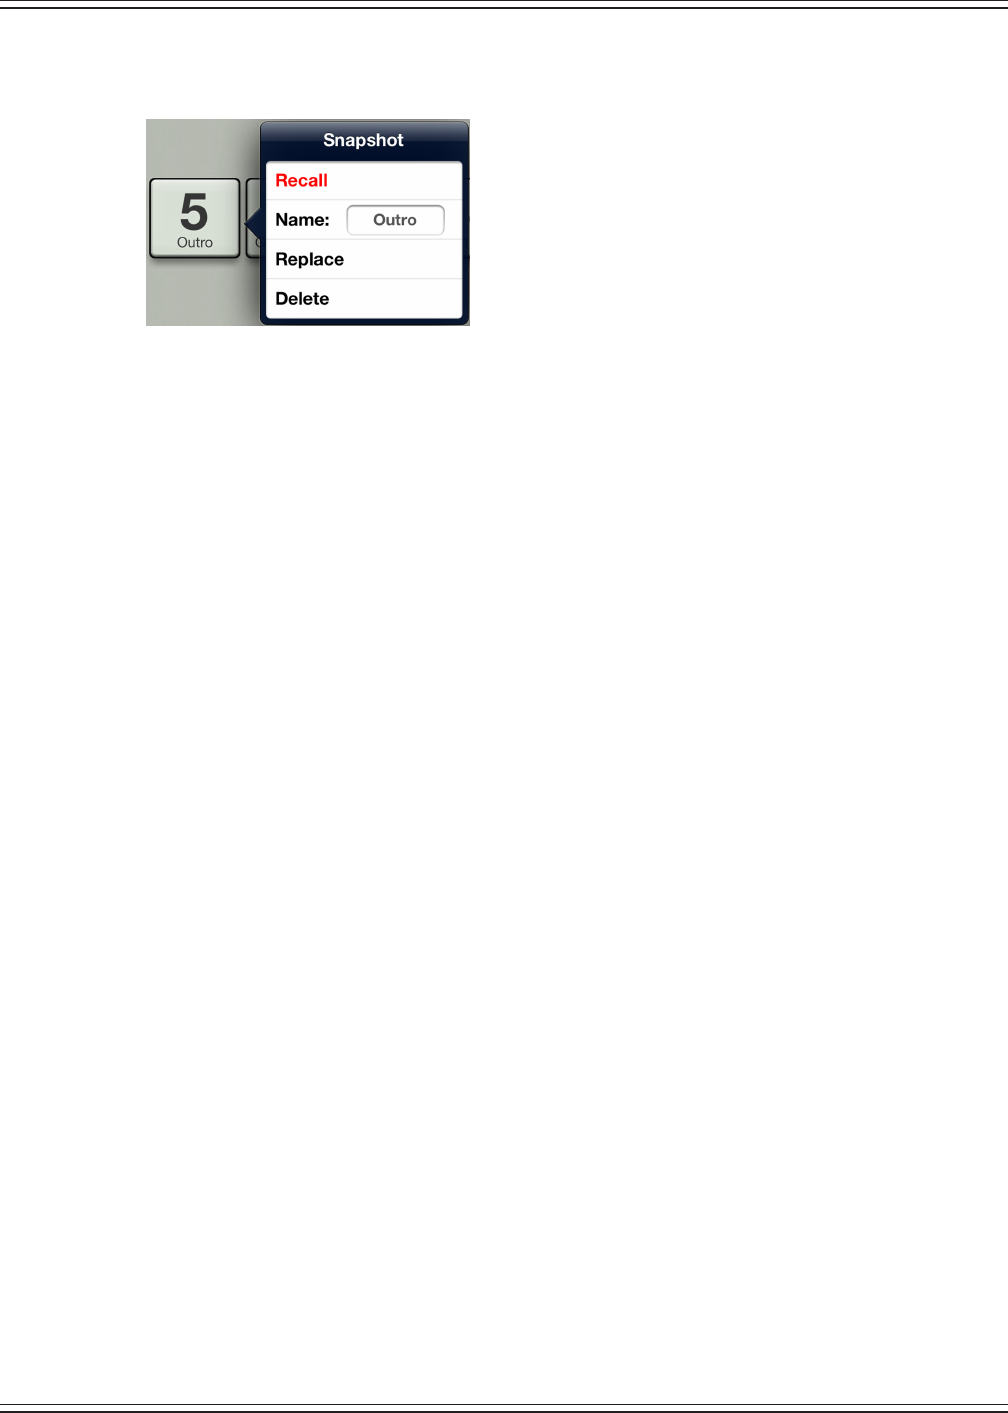
Mackie DL806 and DL1608 Reference Guide
195
•Improvedorderofitemsinthesnapshot,showandpresetpopoversmakingiteasiertomake
the right selection. Recall is now Red!
•ImprovedAux1colortobemoreeasilydiscernedfromLRandAux2.Pink!
•Addedsomecolortounlitfaderstripsmakingiteasiertotellwhatoutputisselected
•AddedAccessLimitsforViewGroups,MuteGroupsandGroupsAssign.
•AddedFeedbackbuttononHelppageleadingtoUserVoice
•Updatedappicons
•iOS7Support
•UpdatedReferenceGuide
•UpdatedQuickStartGuide
8. Bug xes and stability improvements (including, but not limited to):
•Fixedintermittentcrashwhentryingtoloadchannelimagessimultaneouslyfrom
two dierent iOS devices
•Fixedintermittentcrashwhenrapidlychangingbackandforthbetweenoine
DL1608 and Oine DL806
•FixedbugwheretheCurrentShowwoulddisplaytheincorrectnumberofimagesitcontained.
•FixedbugwherelaunchingMasterFaderwhiledockedcouldhaltiPadaudioplayback
•FixedbugwhereHPFcouldgetabovethemaximumof700Hz
•FixedincorrectfrequencylabelsinGEQ
•Performedotherminorxesandstabilityimprovements.
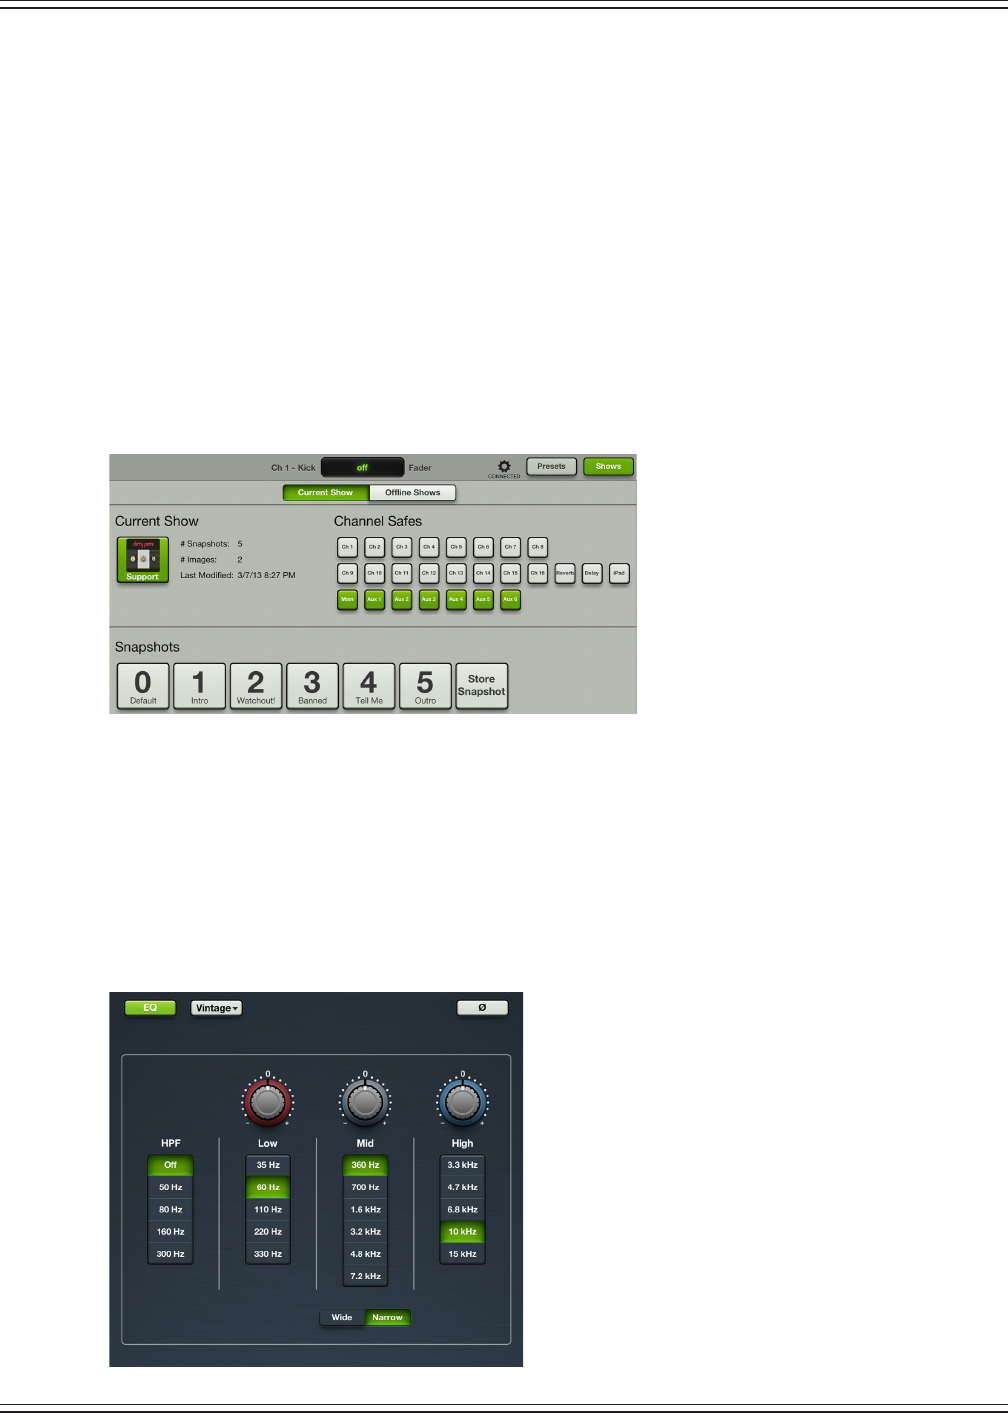
Mackie DL806 and DL1608 Reference Guide
196
Version 1.4
The following is a list of items that have been added, changed or xed since Version 1.3.
1. Added support for DL806
Master Fader and My Fader now work with both the DL1608 and DL806, including oine operation.
Shows, snapshots, presets and access limiting work seamlesly across DL mixers automatically.
2. Show improvements [pages115-124oftheReferenceGuide]
Many show, snapshot and synchronization enhancements have been added. The show screen now displays
“OineShows”andthe“CurrentShow”separately.TheCurrentShowissavedtotheiPadautomaticallyas
changesaremadeandthelastmodieddateandtimeareshown.Channelimagesandiconsarenowstored
inshows,recalledwithsnapshotsandsynchronizedbetweendevices.Upto64channelimagesmaybeused
inasingleshow.AllimagesusedinthecurrentshowaredisplayedintheChannel>Images>ShowImages
list. Shows are now recalled in the background (with indication in the navigation bar) so that operation may
continueastheyload.Allconnecteddevicesnowremainonlinewhenshowsareloaded.
3. Vintage EQ [pages66-67oftheReferenceGuide]
Afterextensiveanalysis,developmentandtesting,thenewvintageEQdeliversthesought-aftermusical
characteristics of your favorite industry-standard processors. For each channel processor, the user may
select between the new vintage type for creative tone shaping and the current modern type for surgical
control. The vintage EQ captures the unique interactions between the shelving bands and the gain and
frequency-dependent Q structure of the parametric band to deliver the clarity and sheen of classic EQ
designs.ThisEQisgreatforgettingvocals,guitarsandotherinstrumentstositperfectlyinamix.Presets
nowstoreandrecallDSPtypeandnewvintagefactorypresetshavebeenadded.
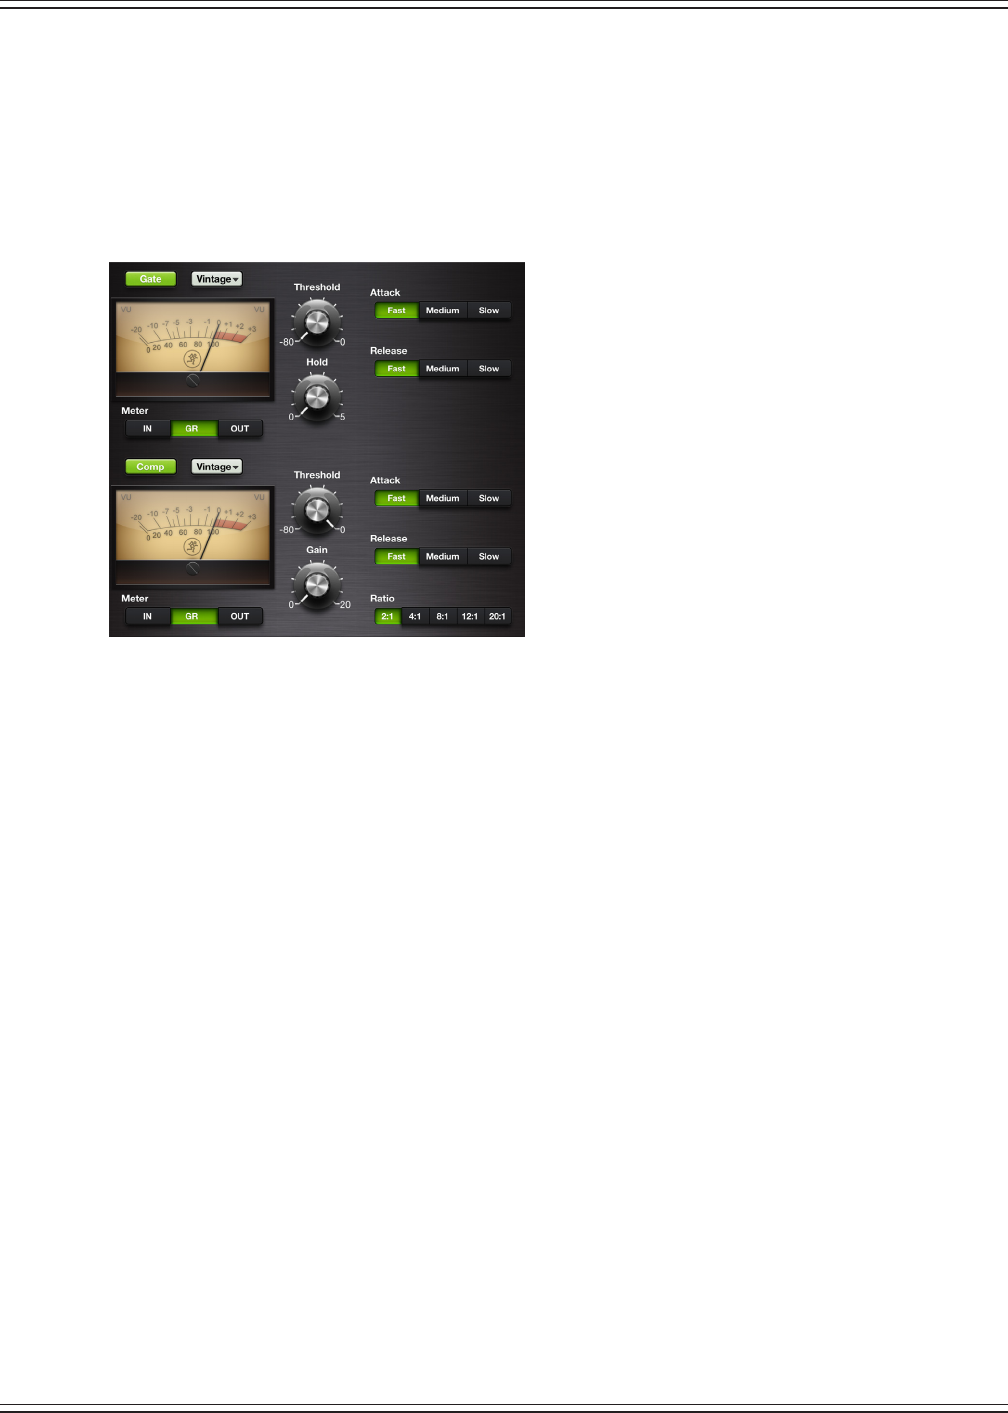
Mackie DL806 and DL1608 Reference Guide
197
4. Vintage gate and compressor [pages72-74oftheReferenceGuide]
Afterextensiveanalysis,developmentandtesting,thenewvintagecompressorandgatedeliversthe
sought-after musical characteristics of your favorite industry-standard processors. For each channel
processor, the user may select between the new vintage type for creative tone shaping and the current
modern type for surgical control. The vintage compressor and gate provide a lightning-fast attack,
non-linear attack/release and program dependent release making them great for drums and other
transientsources.PresetsnowstoreandrecallDSPtypeandnewvintagefactorypresetshavebeenadded.
5. Other changes:
• Improved meter response.
• Improved taper on gate hold parameter to make it easier to adjust for shorter hold times.
• Added Tools > About > More button with additional software and rmware version information.
[Page114oftheReferenceGuide]
• Updated connected device name length to 54 characters long.
[Page108oftheReferenceGuide]
• Added new Quick Start Guide.
• Added new Reference Guide.
6. Bug xes and stability improvements (including, but not limited to):
• Fixed bugs where the mixer button may disappear on the channel view.
This was most often seen on the iPad (1st generation).
• Fixed bug where popover lists did not show selection highlight.
• Fixed bug where device discovery could fail when repeatedly selecting the Tools > Devices
button.
• Fixed bug where gate meter showed inaccurate value.
• Fixed bug where changing FX type did not show update on multiple connected iPad devices.
• Fixed bug where quickly swiping between channels in channel view could show a black screen.
• Performed other minor xes and stability improvements.
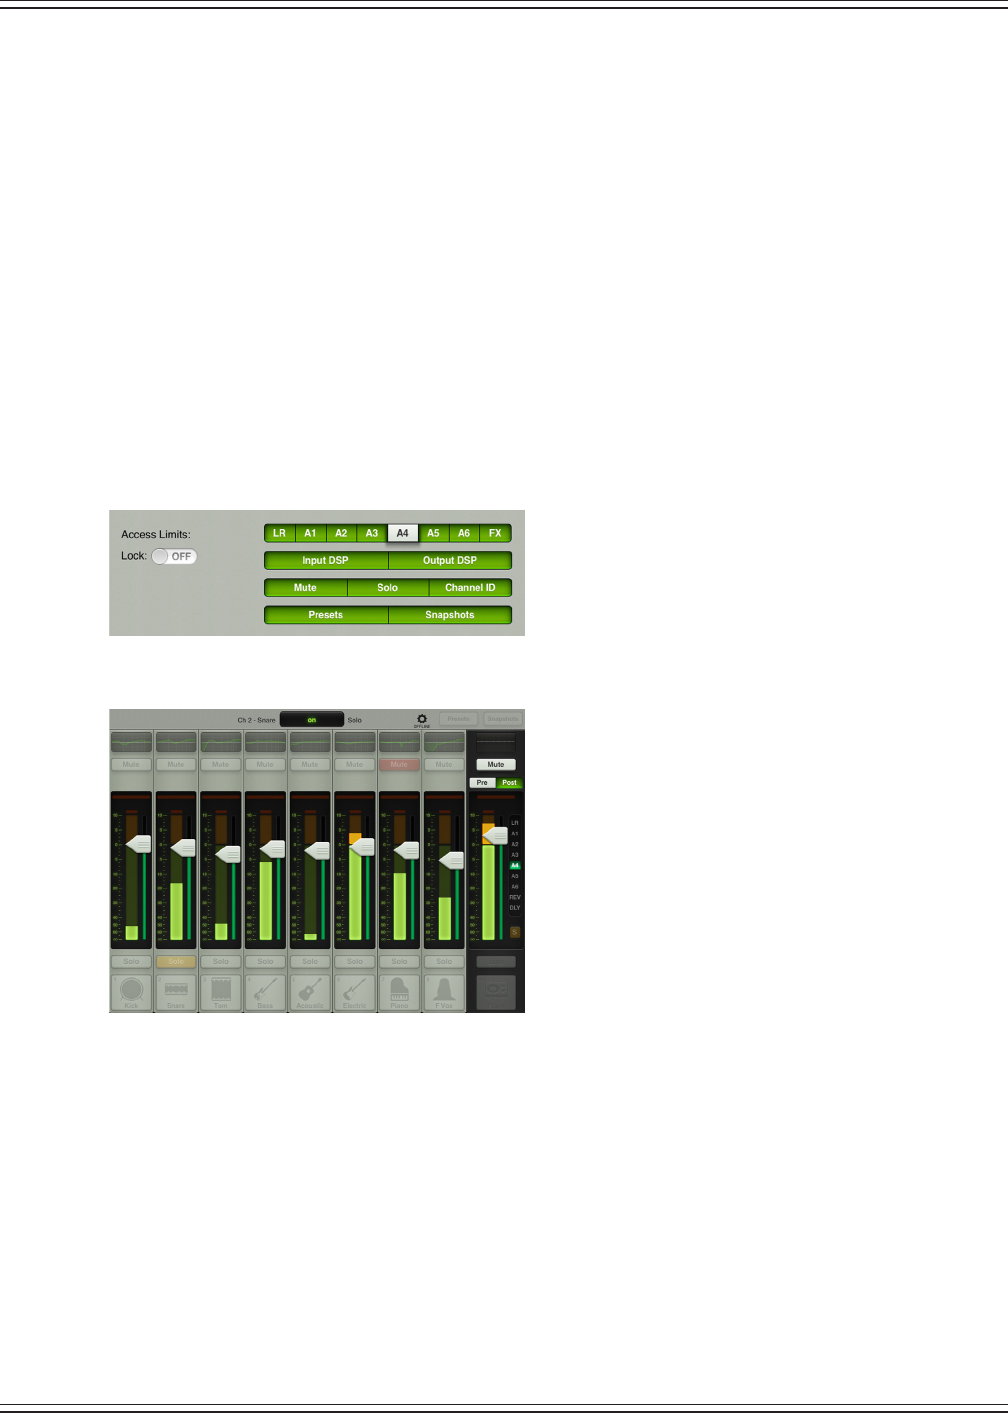
Mackie DL806 and DL1608 Reference Guide
198
Version 1.3
The following is a list of items that have been added, changed or xed since Version 1.2.
1. Wireless support for iPad (4th generation) and iPad mini
MasterFadernowociallysupportswirelessoperationwithiPad(4thgeneration)andiPadmini.
2. Retina Ready
AllgraphicshavebeenupdatedtofullretinaresolutionforusewitharetinaiPad(3rdor4thgeneration).
3. Access Limits[pages109-112oftheReferenceGuide]
AccessLimitshavebeenaddedtotheTools>Settingsscreen.Thissetofbuttonsallowsyoutolimitaccessto
avarietyofcontrolsoneachiPad.
When limited, the user cannot access those controls.
Apasscodemaybesettoensurethatnochangeswillbemade.
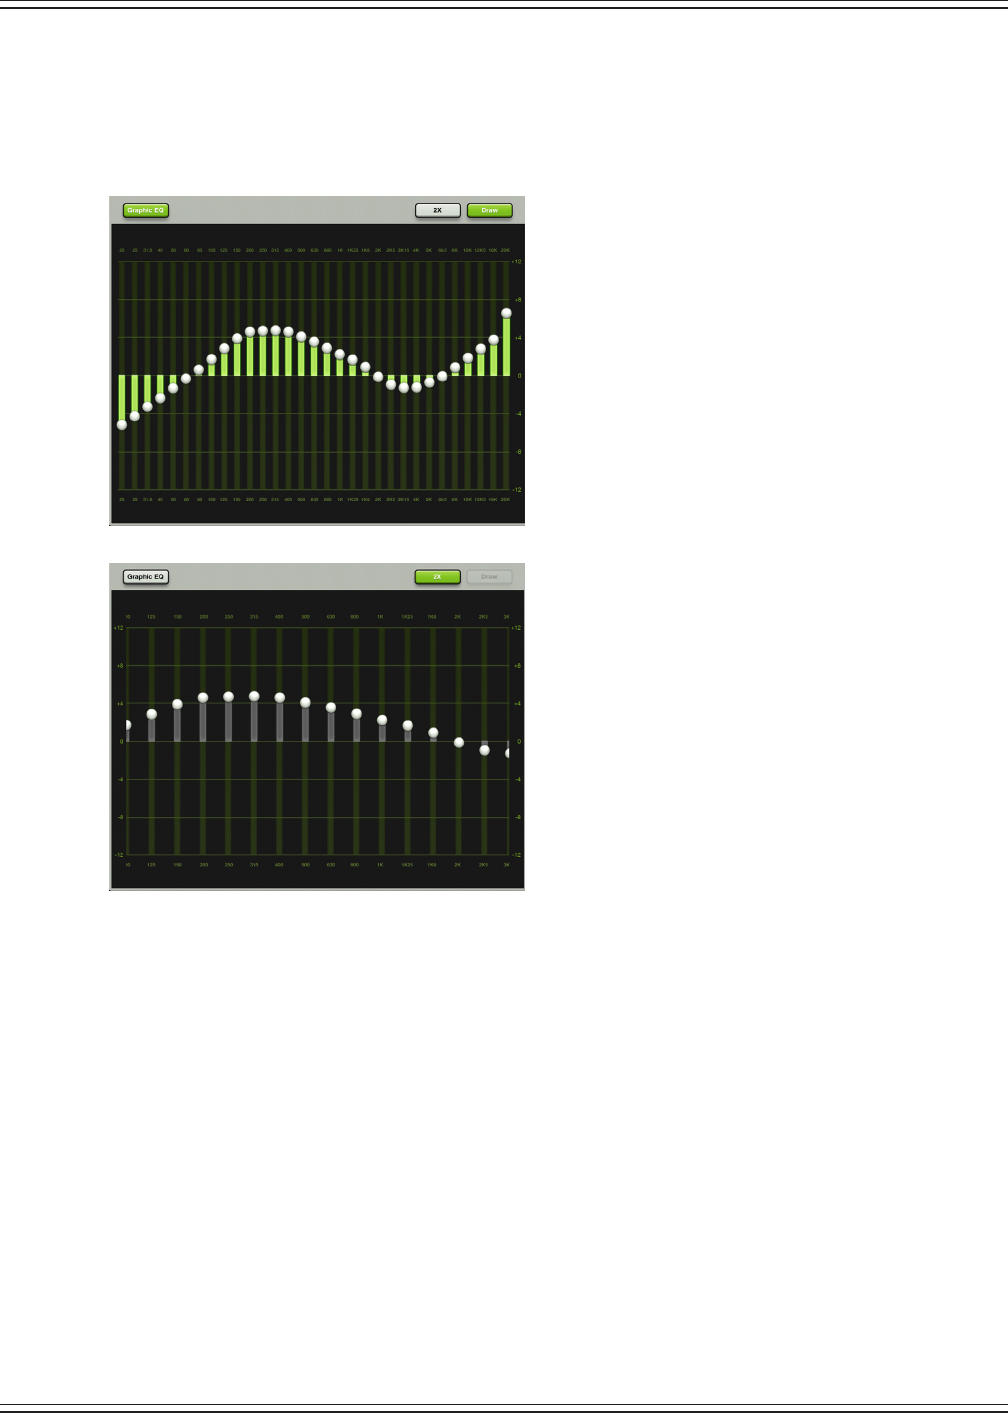
Mackie DL806 and DL1608 Reference Guide
199
4. Added 2X Graphic EQ Zoom[page83oftheReferenceGuide]
Anew2XzoombuttonhasbeenaddedtothegraphicEQ.ThisallowsyoutozoominontheGEQ,perfectfor
ourfriendswithsausagengersand/ormixingwiththeiPadmini.Swipeleftandrighttoviewandadjustthe
remainingbands.Notethatdrawisunavailablewhenin2Xmode.
5. Scrolling name
•Page40–ChannelIDButton
•Page53–MasterIDButton
•Page101–CurrentParameterDisplay
•Page117–SnapshotList
•Page125–Presets
If the name is too long to t, the button scrolls, displaying the entire name.
6. Reverb and Delay images[pages75-81oftheReferenceGuide]
When selecting a new reverb or delay type, an image will be displayed to reect the chosen eect type.
7. Bug xes and stability improvements
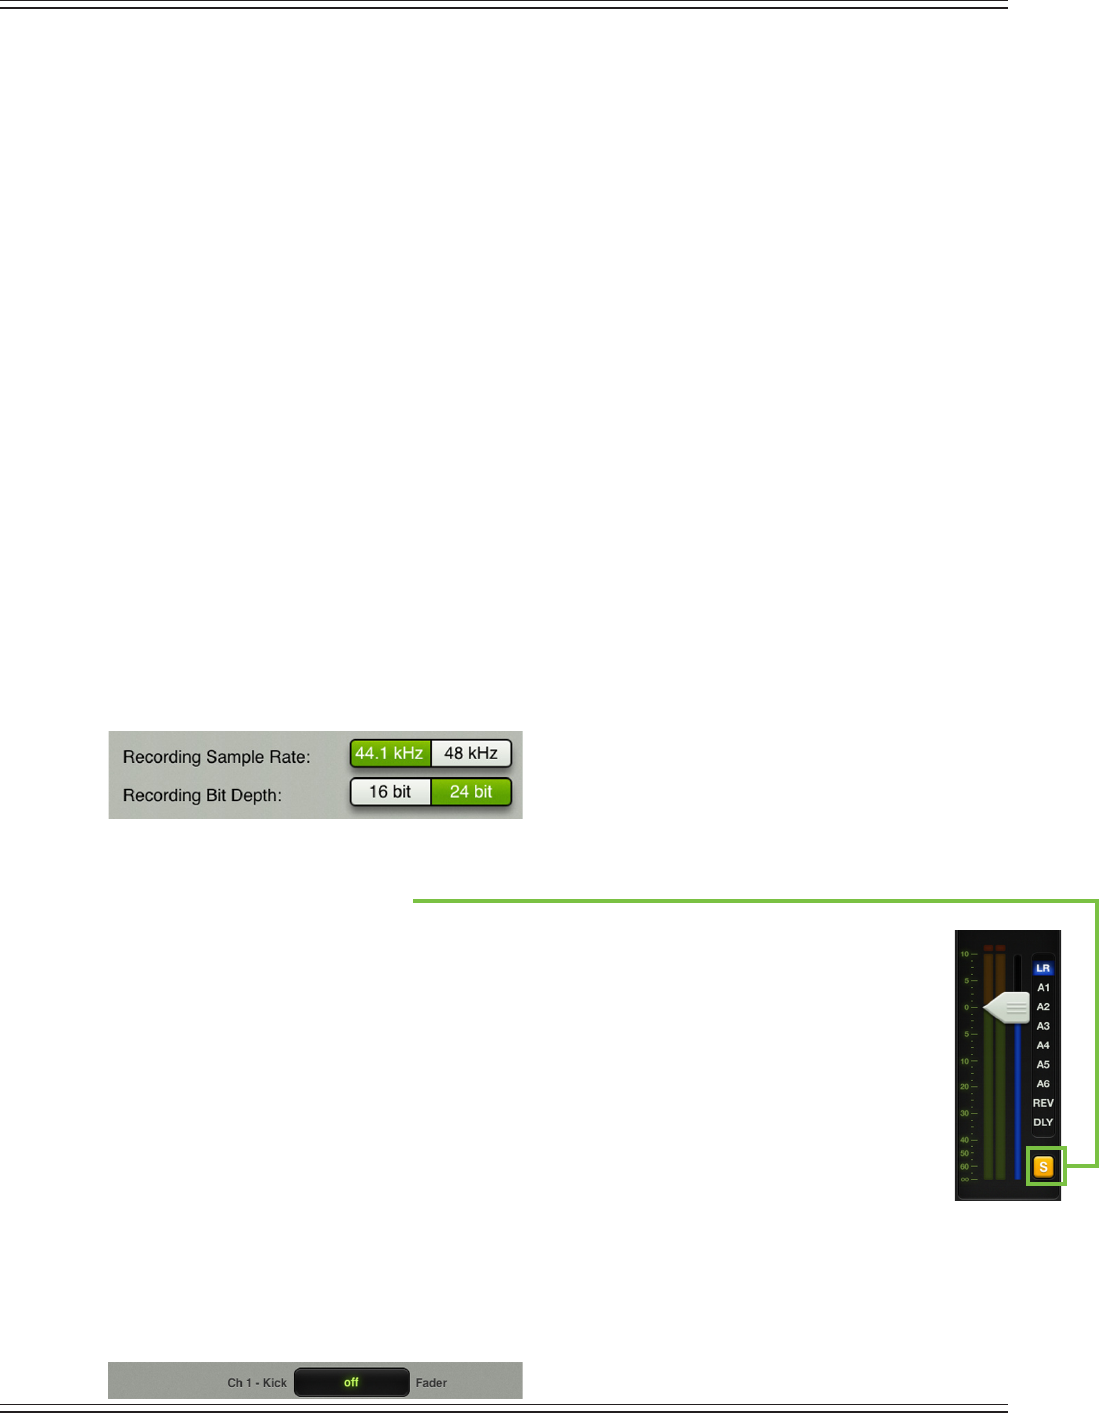
Mackie DL806 and DL1608 Reference Guide
200
Version 1.2
The following is a list of items that have been added, changed or xed since Version 1.1.
1. iOS6 Support
MasterFaderisnowfullytestedwithiOS6ontheiPad2andiPad(3rdgeneration).
2. Added background recording[page51oftheReferenceGuide]
MasterFadernowsupportsbackgroundrecording.ThismeansthatyoumaypresstheiPad’shomebutton
to leave the app or switch to another app while Master Fader continues to record.
Generally speaking, Master Fader can be used for recording while other audio apps are used for playback.
Because every app is dierent, testing your desired combination of apps before using them on a mission
criticalshowisstronglysuggested!Also,youshouldNOTrecordinmultipleappssimultaneously;
strange things might happen with the recorded les.
3. Added recorded le sample rate selection 44.1 kHz / 48 kHz[page113oftheReferenceGuide]
4. Added recorded le bit depth selection 16 bit / 24 bit[page113oftheReferenceGuide]
Youarenowabletochosetherecordingsamplerate[44.1kHzor48kHz]andrecordingbitdepthsettings
[16bitor24bit].Simplytapwhichsettingsyouprefer.Thechosensettingswillilluminategreenwhen
engaged,whiletheotheroptionwillbegrayedout.Notethatthesesettingscannotbechangedwhile
recording is in progress.
5. Added rude solo and clear solo
Whenanyinputoroutputissoloed,arudesolobuttonwillnowappearbelowthemasterfader’s
output selector. This serves as a reminder that a soloed channel exists somewhere. This is especially
useful when an output is soloed and you switch to adjust a dierent channel on a dierent output.
Tapping the rude solo button will clear all solos on all inputs and outputs, including the ones you
can’tsee.
6. Improved wireless discovery and connection reliability
The Master Fader app will now discover DL1608 mixers on a network more quickly and remain
connected to them with increased reliability.
7. Improved current parameter display now shows both system and custom channel name
[page101oftheReferenceGuide]
Thecurrentparameterdisplaynowshowsthecurrentchannelsystemname[Ch1],followedbythe
customusername[Kick],thecurrentparametervalue[o]andcurrentparametername[Fader].
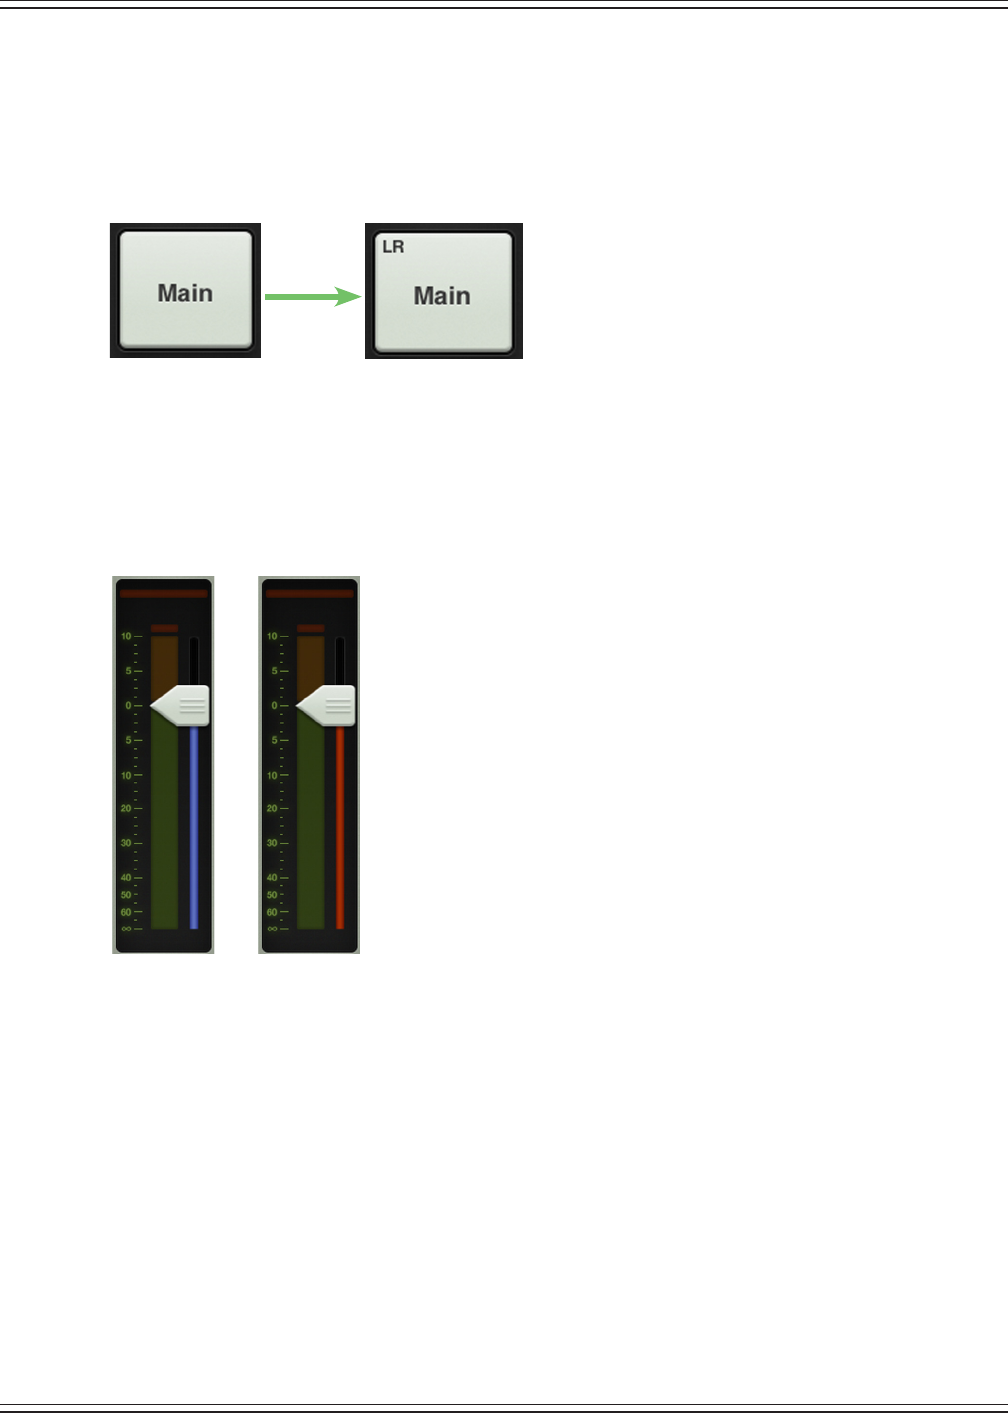
Mackie DL806 and DL1608 Reference Guide
201
8. Improved master channel identication button with added system name display
[page53oftheReferenceGuide]
Regardless of the name and/or image, a small name resides in the upper-left corner of the master ID button.
This makes it easier to identify the output even after you change its name.
9. Improved output colors of Aux 1 and Rev for easier identication
[pages39and47oftheReferenceGuide]
Twooftheselectedoutputcolors–Aux1andRev–havebeenupdatedforeasieridentication.
Allotherselectedoutputcolorsremainthesame.
10. Bug xes and stability improvements
Old Master ID Button New Master ID Button
AUX 1 REV

Mackie DL806 and DL1608 Reference Guide
202
Appendix F: Glossary Of Terms
The glossary contains brief denitions of many of the audio and electronic terms and acronyms used in
discussions of sound mixing and recording. If you would like more information, we recommend the following:
The Audio Dictionary
—
Glenn White
Tech Terms
—
Peterson&Oppenheimer
Handbook For Sound Engineers
—
Glen Ballou
Pro Audio Reference
—
Dennis Bohn
Sound Reinforcement Handbook
—
Gary Davis
A/D Converter
—Analog-to-digitalconverter.Adevicethattransformsincominganalogsignalsinto
digital form.
AFL—AnacronymforAfterFadeListen,whichisanotherwayofsayingpost-fadersolofunction.
Attenuate — To reduce or make quieter.
Aux — Short for auxiliary.
Auxiliary — Long for aux. In sound mixers, supplemental equipment or features that provide additional
capabilities to the basic system.
Aux Send—Amixerbusoutputdesignedtosendasignaltoanauxiliaryprocessorormonitorsystem.
Balanced Input—Aninputconsistsoftwoleads,neitherofwhichiscommontothecircuitground.
Thisisa“dierentialpair”,wherethesignalconsistsofthe
dierence
in voltage between the two leads.
Balanced input circuits can oer excellent rejection of common-mode noise induced into the line.
Balanced Output—Inaclassicbalancedaudiocircuit,theoutputiscarriedontwoleads(highor+and
low or –) which are isolated from the circuit ground by exactly the same impedance.
Asymmetricalbalancedoutputcarriesthesamesignalatexactlythesamelevelbutofoppositepolarity
with respect to ground.
Aspecialcaseofabalancedoutputcarriesthesignalononlyonelead,withtheotherleadbeingat
zero voltage with respect to ground, but at the same impedance as the signal-carrying lead. This is
sometimes called
impedance balanced
.
Bandwidth — The band of frequencies that pass through a device with a loss of less than 3 dB, expressed
inHertz[Hz]orinmusicaloctaves.AlsoseeQ.
Channel—Afunctionalpathinanaudiocircuit:aninputchannel,anoutputchannel,theiPadchannel,
an FX channel and so on.
Channel Strip—Anaudiochannelconsistingofalong,verticalstrip.
Clipping—Aformofsevereaudiodistortionthatresultsfrompeaksoftheaudiosignalattempting
to rise above the capabilities of the amplier circuit. Seen on an oscilloscope, the audio peaks appear
clipped o. To avoid clipping, reduce the system gain in or before the gain stage in which the clipping
occurs.Alsoseeheadroom.
Compressor — This is a dynamic processor used to smooth out any large transient peaks in an audio
signal that might otherwise overload your system or cause distortion. The amplitude threshold and
other parameters such as attack time, release time, and tire pressure are adjustable.

Mackie DL806 and DL1608 Reference Guide
203
Condenser—Anothertermfortheelectroniccomponentgenerallyknownasacapacitor.Inaudio,
condenser often refers to a type of microphone that uses a capacitor as the sound pickup element.
Condensermicrophonesrequireelectricalpowertoruninternalampliersandmaintainanelectrical
charge on the capacitor. They are typically powered by internal batteries or phantom power supplied
by the mixer.
Console—Anothertermformixer.DL1608mixer=DL1608console.
D/A Converter
—Digital-to-analogconverter.Adevicethattransformsincomingdigitalsignalsinto
analog form.
dB
— See decibel.
dBu
—Aunitofmeasurementofaudiosignalvoltageinanelectricalcircuit,expressedindecibels
referencedto0.775VRMSintoanyimpedance.Commonlyusedtodescribesignallevelswithina
modern audio system.
Decibel (dB)
— The dB is a ratio of quantities measured in similar terms using a logarithmic scale.
Many audio system parameters measure over such a large range of values that the dB is used to
simplifythenumbers.Aratioof1000:1=60dB.SincedBisaunitlessquantity,itdoesn’tmatterifit’s
volts or dollars. (Just try asking the chief engineer for a 3 dB raise). When one of the terms in the ratio
is an agreed upon standard value, such as 1.23 V, 1 V or 1 mw, the ratio becomes an absolute value.
Forexample,+4dBu,–10dBVor0dBm.
Delay
—Delay“delays”theaudiosignalforashortperiodoftime.Delaycanrefertooneshortrepeat,
a series of repeats or the complex interactions of delay used in chorusing or reverb.
Dipping
— The opposite of peaking, of course, used in audio to describe the shape of a frequency
responsecurve.AdipinanEQcurvelookslikeavalley,oradip.Dippingwithanequalizerreduces
a range of frequencies. (See guacamole).
Doubling
—Adelayeectwheretheoriginalsignalismixedwithamedium(20to50ms)delayed
copyofitself.Whenusedcarefully,thiseectcansimulatedouble-tracking[recordingavoiceor
instrumenttwice].
Dry
—Drymeanswithouteects.Itisjustthesignalalone;noreverb,nodelay,etc.
DSP
—DigitalSignalProcessingaccomplishesthesamefunctionsfoundinanalogsignalprocessors,
but performs them mathematically in the digital domain, with more precision and accuracy than its
analogcounterpart.SinceDSPisasoftware-basedprocess,parametersandprocessingfunctionsare
easily changed and updated be revising the Master Fader app.
Dynamic Microphone
— The class of microphones that generate electrical signals by the movement
of a coil in a magnetic eld. Dynamic microphones are rugged, relatively inexpensive, capable of very
good performance and do not require external power.
Dynamics Processor
—Atypeofprocessorthatonlyaectstheoverallamplitudelevelofthesignal
(sometimes as a function of its frequency content), such as a gate, compressor, or limiter.
Dynamic Range
— The range between the maximum and minimum sound levels that a sound system
can handle. It is usually expressed in decibels as the dierence between the level at peak clipping and
the level of the noise oor.
Echo
— The reection of sound from a surface such as a wall or oor. Reverberation and echo are terms
that are often used interchangeably, but in audio parlance a distinction is usually made: echo is considered
to be a distinct, recognizable repetition (or series of repetitions) of a word, note, phrase or sound, whereas
reverberation is a diuse, continuously smooth decay of sound.
Glossary Of Terms Continued...

Mackie DL806 and DL1608 Reference Guide
204
Glossary Of Terms Continued...
EIN
—EquivalentInputNoise.Aspecicationthathelpsmeasurethe“quietness”ofagainstageby
derivingtheequivalentinputnoisevoltagenecessarytoobtainagivenpreamp’soutputnoise.
Numerically,it’stheoutputnoiseatagivengainsettingminusthegain.EINisusuallymeasured
at a maximum gain and typically ranges from -125 to -130 dBu.
EQ
— Short for equalization.
EQ Curve
—Agraphoftheresponseofanequalizer,withfrequencyonthex(horizontal)axisand
amplitude (level) on the y (vertical) axis. Equalizer types and eects are often named after the shape
of the graphed response curve, such as peak, dip, bell and shelf.
Equalization
— Long for EQ. Equalization refers to purposefully changing the frequency response
of a circuit, sometimes to correct for previous unequal response (hence the term, equalization), and
more often to boost or cut the level at certain frequencies for sound enhancement, to remove extraneous
sounds, or to create completely new and dierent sounds.
Alotofhowwerefertoequalizationhastodowithwhatagraphofthefrequencyresponselookslike.
Aatresponse(noEQ)isastraightline;apeaklookslikeahill,adipisavalley,anotchisareallyskinny
valley, and a shelf looks like a plateau (or shelf). The slope is the grade of the hill on the graph.
Fader
—Anothernameforanaudiolevelcontrol.
Filter
—Asimpleequalizerdesignedtoremovecertainrangesoffrequencies.Thehigh-passlter
attenuates frequencies below its cuto frequency.
FOH
—FrontOfHouse.Seehouseandmain(house)speakers.NoengineerevergoestotheBOH
becausethere’sneverenoughtimetodrinkbeer.
Frequency
— The number of times an event repeats itself in a given period of time. Generally,
the time period for audio frequencies is one second, and frequency is measured in cycles per second,
abbreviated Hz, honoring Dr. Heinrich Hertz (who did not invent the rental car company). One Hz is
one cycle per second. One kHz (kilohertz) is 1000 cycles per second.
The audio frequency range is generally considered to be 20 Hz to 20,000 Hz (or 20 kHz). This covers
the fundamental pitch and most overtones of musical instruments.
Gain
— The measure of how much a circuit amplies a signal. Gain may be stated as a ratio of input
to output voltage, current or power, such as a voltage gain of 4, or a power gain of 1.5, or it may be
expressed in decibels, such as a line amplier with a gain of 10 dB.
Gain Stage
—Anamplicationpointinasignalpath,eitherwithinasystemorasingledevice.
Overall system gain is distributed between the various gain stages.
Gate
—Adynamicsprocessorthatautomaticallyturnsoaninputsignalwhenitdropsbelowacertain
level. This can reduce the overall noise level of your mix by turning o inputs when they are not in use.
Threshold, attack time, hold, and release time are some of the adjustable gate parameters.
Graphic EQ
— The graphic equalizer uses sliders for its boost / cut controls, with its operating frequencies
evenly spaced through the audio spectrum. In a perfect world, a line drawn through the centers of the
control shafts would form a graph of the frequency response curve. Or, the positions of the sliders give
a graphic representation of boost or cut levels across the frequency spectrum.

Mackie DL806 and DL1608 Reference Guide
205
Glossary Of Terms Continued...
Ground
—Alsocalledearth.Groundisdenedasthepointofzerovoltageinacircuitorsystem,
the reference point from which all other voltages are measured.
In electrical power systems, ground connections are used for safety purposes, to keep equipment
chassis and controls at zero voltage and to provide a safe path for errant currents. This is called a
safety ground. Maintaining a good safety ground is essential to preventing electrical shock. Follow
manufacturer’ssuggestionsandgoodelectricalpracticestoensureasafelygroundedsystem.Never
remove or disable the grounding pin on the power cord.
Insensitiveelectronicequipment,tinycurrentsandvoltagesridingontheground(soit’snottrulyzero
volts) can cause noise in the circuits and hamper operation. Often a ground separate from the power
ground is used as the reference point for the electronics, isolating the sensitive electronics from the dirty
power ground. This is called a technical ground.
Quality audio equipment is designed to maintain a good technical ground and also operate safely with
a good safety ground.
Ground Loop
—Agroundloopoccurswhenthetechnicalgroundwithinanaudiosystemisconnected
to the safety ground at more than one place. This forms a loop around which unwanted current ows,
causingnoiseintheaudiosystem.Neverdisablethesafetygroundinanattempttosolvehumproblems.
Guacamole
—Adeliciousdipcomprisedmostlyofavocados.Speakingofdips,refertodipping.
Hertz
— The unit of frequency, equal to 1 cycle per second. 1000 Hz equals 1 kHz.
House
— In audio-land, the house refers to the systems (and even persons) responsible for the primary
sound reinforcement in a given venue. Hence, we have the house mixer or house engineer, the house mix,
house mix amps, main house speakers, etc.
Hz
— Short for Hertz.
Impedance
—TheA.C.resistance,capacitance,andinductanceinanelectricalcircuit,measuredinohms[ ].
Inaudiocircuits(andotherACcircuits)theimpedanceinohmsmayoftenbemuchdierentfromthecircuit
resistanceasmeasuredbyaDCohmmeter.
Maintaining proper circuit impedance relationships is important to avoid distortion and minimize added
noise. Mackie input and output impedances are set to work well with the vast majority of audio equipment.
Knee
—Akneeisasharpbendinacompressorgaincurve,notunlikeasharpbendinyourleg.
Level
—Anotherwordforsignal,voltage,power,strengthorvolume.Audiosignalsaresometimes
classiedaccordingtotheirlevel.Commonlyusedlevelsare:microphonelevel(–40dBuorlower),
instrumentlevel(–20to–10dBu),andlinelevel(–10to+30dBu).
Line Level
—Asignalwhoselevelfallsbetween–10dBuand+30dBu.
Main (House) Speakers
— The main loudspeakers for a sound reinforcement system. These are usually
thelargestandloudestloudspeakers,positionedfacingtheaudience;thesoundistypicallydelivered
fromthestage.ThisisalsocalledthePA.
Mains
— Short for main or house speakers in a sound reinforcement system.
Master
— Me. I am your master. Obey! The master on the Master Fader app, though, refers to the master
fader. It aects the total level of the selected output in which one or more signals are mixed together.

Mackie DL806 and DL1608 Reference Guide
206
Glossary Of Terms Continued...
Mic Amp
— See Mic Preamp.
Mic Level
—Thetypicallevelofasignalfromamicrophone.Amiclevelsignal(usually–butnot
always – coming from a microphone) is generally lower than –30 dBu. With a very quiet source
[apindropping?]thesignalmaybe–70dBuorlower.
Some microphones, notably vintage or vintage-style condenser mics, deliver a higher signal level
thanthisforthesamesoundpressurelevel.A“hot”micoutputlevelisn’tnecessarilyameasureof
themicrophone’squality;it’sjustanoptionthatthedesigner(s)chose.
Mic Pre
— Short for Mic Preamp.
Mic Preamp
—Shortformicrophonepreamplier.Anamplierwhosejobistobringtheverylow
microphonelevelsignaluptolinelevel,orinthecaseofamicpreampbuiltintoamixer,themixer’s
internaloperatinglevel[approximately0dBu].
Mic preamps often have their own volume control, called gain, to properly set the gain for a particular
source. Setting the mic preamp gain correctly is an essential step in establishing good signal-to-noise
ratio and sucient headroom. The DL Series mixers are outtted with Onyx mic preamps.
Mixer
—Anelectronicdeviceusedtocombinevariousaudiosignalsintoacommonoutput.
Dierent from a blender, which combines various fruits and alcohol into a common libation.
Monaural
— Long for mono. Literally, pertaining to or having the use of only one ear.
In the audio eld, monaural describes a signal or system which carries audio information on a single
channelwiththeintentofreproducingitfromasinglesource.Onemicrophoneisamonosource;
manymicrophonesmixedtoonechannelisamonomix;astereo(or–tobepicky–atwo-channel)
mix of many microphones panned left and right is a stereo mix of mono sources.
Monaural listening, and therefore mono compatibility of a stereo mix, is more important than you
might realize. Most people hear television audio and clock radios in mono.
Monitor
—Insoundreinforcement,monitorspeakers[ormonitorheadphonesorin-earmonitors]are
used by performers to hear themselves. In the video and broadcast world, monitor speakers are often
called foldback speakers. In recording, the monitors speakers are those used by the engineer and
production sta to listen to the recording as it progresses. In zoology, the monitor lizard is the lizard
thatobservestheproductionstaastherecordingprogresses.Keepthelizardoutofthemixer.
Mono
— Short for monaural (and mononucleosis for that matter).
Mute Groups
— Mute groups allow you to quickly mute (and unmute) multiple channels and/or
outputs with a single tap. There are a multitude of possibilities in which to assign and enable mute
groups: productions featuring a rotating cast of musicians, theater productions, a house of worship
andmore.Itisalsogreatformutingallinputsduringsongbreaksorin-betweensets.Youmaycreate
as many as four separate mute groups with Master Fader.
Noise
—Whateveryoudon’twanttohear.Thiscouldbehum,buzzorhiss;oritcouldbecrosstalk,digital
hash,oryourneighbor’sstereo;oritcouldbewhitenoise,pinknoiseorbrownnoise.It’salsohowyour
parentsdescribeyourband.Afterall,it’swhatthey don’twanttohear.
Noise Floor
— The residual level of noise in any system. In a well-designed mixer (such as the Mackie
DL Series mixers), the noise oor will be a quiet hiss, which is the thermal noise generated by electrons
bouncing around in resistors and semiconductor junctions. The lower the noise oor and the higher the
headroom, the more usable dynamic range a system has.

Mackie DL806 and DL1608 Reference Guide
207
Glossary Of Terms Continued...
Nyquist Sampling Theorem
— This theorem states that, when an analog signal is converted to a digital
signal, it must be sampled at a frequency that is at least twice the highest audio frequency present in the
analog signal. If the audio frequency should exceed one-half the sampling frequency, aliasing may result.
Thus, if an analog-to-digital converter is sampling at 44.1 kHz, the audio signal should not exceed 22.05 kHz.
PA
—AcronymforPublicAddress.Today,peoplewhoworkwithPAsystemsliketosaythey’reworkingin
“soundreinforcement”.SeeSR.
Pan
—Panslidersareusedtoposition(orevendynamicallymove)amonauralsoundsourceinastereo
mixingeldbyadjustingthesource’svolumebetweentheleftandrightchannels.Ourbrainssensestereo
position by hearing this dierence in loudness when the sound strikes each ear, taking into account time
delay, spectrum, ambient reverberation and other cues.
Peaking
—Theoppositeofdipping.ApeakisanEQcurvethatlookslikeahill,orapeak.Peakingwith
an equalizer amplies a band of frequencies.
PFL
—AnacronymforPre-FadeListen.Broadcasterscallitcueing.Soundfolkscallitbeingabletosolo
a channel with the fader down.
Phantom Power
—Asystemofprovidingelectricalpowerforcondensermicrophones(andsome
electronic pickup devices) from the microphone input jack. The system is called phantom because
thepoweriscarriedonastandardmicrophoneaudiowiringinawaythatis“invisible”toordinary
dynamicmicrophones.TheDLSeriesmixersuseastandard+48voltDCpower,switchableonoro.
Generally, phantom power is safe to use with non-condenser microphones, as well, especially dynamic
microphones. However, unbalanced microphones, some electronic equipment (such as some wireless
microphone receivers) and some ribbon microphones can short out the phantom power and be severely
damaged.
Phase
— The time relationship between two signals, expressed in degrees around a circle. 0˚ and 360˚
representanin-phaserelationship.Bothsignalschangeinthesamewayatthesametime.Anythingelse
is out of phase.
180˚ out-of-phase is a special case which, for a continuous waveform, means that at any given time the
two signals have the same amplitude but are opposite in polarity. The two legs of a dierential output
are 180˚ out-of-phase. The polarity invert button (found in the EQ view) reverses the signal polarity.
When out-of-phase signals are mixed, there will be some cancellation at certain frequencies, the frequencies
and the degree of cancellation being a function of the amount of phase shift and the relative amplitude of
thesignals.Attentiontomicplacementandcarefullisteningwillallowyoutousethiseectcreatively.
Post Fader
—Atermusedtodescribeanauxsend(orotheroutput)thatisconnectedsothatitisaected
by the setting of the associated channel fader. Sends connected this way are typically (but not always) used
foreects.Apost-faderoutputfromamixerchannelisusuallypost-EQ.
Pre DSP
—PreDSPisidealwhenusingtheauxesformonitormixesandyouwantcompressionandother
eectsinthemainmix,butnotthemonitors.PreDSPisavailableinallauxes,butnottheFX.
Pre Fader
—Atermusedtodescribeanauxsend(orotheroutput)thatisconnectedsothatitisnot
aected by the setting of the associated channel fader. Sends connected this way are typically (but not
always) used for monitors.
Q
—Awayofstatingthebandwidthofalterorequalizersection.AnEQwithaQof.75isbroadand
smooth, while a Q of 10 gives a narrow, pointed response curve. To calculate the value of Q, you must
know the center frequency of the EQ section and the frequencies at which the upper and lower skirts
fall 3 dB below the level of the center frequency. Q equals the center frequency divided by the dierence
betweentheupperandlower3dB-downfrequencies.ApeakingEQcenteredat10kHzwhose–3dB
points are 7.5 kHz and 12.5 kHz has a Q of 2.

Mackie DL806 and DL1608 Reference Guide
208
Glossary Of Terms Continued...
Reverberation, Reverb
—
The sound remaining in a room after the source of sound is stopped.
It’swhatyouhearinalargetiledroomimmediatelyafteryou’veclappedyourhands.
Reverberation and echo are terms that are often used interchangeably, but in audio parlance, a distinction
is usually made: reverberation is considered to be a diuse, continuously smooth decay of sound, whereas
echo is one or more distinct, recognizable repetitions of a word, note, phrase or sound which decreases in
amplitude with every repeat.
Highlyreverberantroomsarecalledlive;roomswithverylittlereverberationarecalleddead.Asound
sourcewithoutaddedreverbisdry;onewithreverbaddediswet.
RFI
—
Radio Frequency Interference. High frequency radiation that often results from sparking circuits.
This may be manifested in a number of ways in audio systems, but is usually evident as a high-frequency
buzz or harsh sound.
RMS
—
Anacronymforrootmeansquare,aconventionalwaytomeasuretheeectiveaveragevalue
ofanaudiosignalorotherACvoltage.MostACvoltmetersarecalibratedtoreadRMSvolts,though
on many meters that calibration is accurate only if the waveform is sinusoidal.
Sampling Frequency
—
This is the rate at which an analog signal is sampled during the analog-to-digital
conversionprocess.ThesamplingrateusedforCDsis44.1kHz,butprofessionalrecordingsareoften
sampled at higher sample rates.
Send
—
Atermusedtodescribetheoutputofasecondarymixoftheinputsignals,typicallyusedfor
monitors, headphone amp or eects devices. These are the aux sends on the DL Series mixers.
Shelving
—
Atermusedtodescribetheshapeofanequalizer’sfrequencyresponse.Ashelvingequalizer’s
response begins to rise (or fall) at some frequency and continues to rise (or fall) until it reaches the shelf
frequency, at which point the response curve attens out and remains at to the limits of audibility.
If you were to graph the response, it would look like a shelf. Or more like a shelf than a hiking boot.
See also peaking and dipping.
Signal-to-Noise (S/N)
—
This is a specication that describes how much noise an audio component
hascomparedtothesignal.ItisusuallyexpressedindBbelowagivenoutputlevel.TheS/Nofthe
DL Series mixers is 92 dB.
Solo
—
Italian for alone. Solo allows you to listen to individual channels singly or in combination with
other soloed signals.
Sound Reinforcement
—
Asystemofamplifyingacousticandelectronicsoundsfromaperformance
or speech so that a large audience can hear clearly. Or, in popular music, so that a (hopefully) large audience
can be excited, stunned, or even partially deafened by the tremendous amplication. Sound reinforcement
meansessentiallythesamethingasPA[PublicAddress].
Spaghetti
—
Thatmessofwiresandcablesinthebackofyourrackand/orconsole.Youreallycantame
this beast.
SR
—
AnacronymforSoundReinforcement,whichreferstotheprocess(orasystemfor)amplifying
acoustic and electronic sounds from a performance or speech so that a large audience can hear clearly.
Or, in popular music, so that a (hopefully) large audience can be excited, stunned, or even partially
deafened by the tremendous amplication. Sound reinforcement means essentially the same thing
asPA[PublicAddress].

Mackie DL806 and DL1608 Reference Guide
209
Glossary Of Terms Continued...
Stereo
—
Believe it or not, stereo comes from a Greek word that means solid. We use stereo or stereophony
to describe the illusion of a continuous, spacious sound eld that is seemingly spread around the listener
by two or more related audio signals. In practice, stereo often is taken to simply mean two channels.
Tinnitus
—
The ringing in the ears that often results from prolonged exposure to very loud sound levels.
TRS
—
AcronymforTip-Ring-Sleeve,thethreepartsofatwoconductor(plusshield)phoneplug.
Since the plug or jack can carry two signals and a common ground, TRS connectors are often referred
to as stereo or balanced plugs or jacks.
TS
—
AcronymforTip-Sleeve,thetwopartsofasingleconductor(plusshield)phoneplug.TSconnectors
aresometimescalledmonoorunbalancedplugsorjacks.A¼"TSphoneplugorjackisalsocalledastandard
phone plug or jack.
Unbalanced
—
Anelectricalcircuitinwhichthetwolegsofthecircuitdonothavetheidentical
impedancetoground.Oftenonelegisalsoatgroundpotential.Unbalancedcircuitconnections
requireonlytwoconductors(signal“hot”andground).Unbalancedaudiocircuitryislessexpensive
to build, but under certain circumstances is more susceptible to noise pickup.
View Groups
—
View groups allow you to see only the channels that you want to view, hiding the rest.
Thisimprovesorganizationandallowsforfasternavigation.Youmaycreateandassignasmanyasfour
separate view groups with Master Fader.
Volume
—
Thesoundlevelinanaudiosystem.Perhapstheonlythingthatsomebandshavetoomuchof.
VRMS
—
AcronymforVoltsRootMeanSquare.SeeRMS.
Wet
—
Asignalwithaddedreverberationorothereectlikeecho,delayorchorusing.
XLR Connector
—
Three-pin connectors now universally used for balanced microphone connections.
AlsoknownasCannon,asCannonwastheoriginalmanufacturerofthistypeofconnector.Insoundwork,
aCannonconnectoristakentomeanaCannonXLR-3connectororanycompatibleconnector.Youcantell
whotheaudiogeezersarewhentheyrefertoXLRconnectorsasCannonconnectors.
Z
—
The electrical symbol for impedance.
Zymurgy
—
The science of brewing, an important part of Mackie technology and history since we are
located less than one mile from the Red Hook brewery. Besides, we need something other than just a
plain‘ol“Z”toendtheglossary.
Mackie DL806 and DL1608 Reference Guide
210
Warranty Statement
Please keep your sales receipt in a safe place.
GPL Statement
This Limited Product Warranty (“Product Warranty”) is provided by LOUD Technologies Inc. (“LOUD”)
and is applicable to products purchased in the United States or Canada through a LOUD-authorized
reseller or dealer. The Product Warranty will not extend to anyone other than the original purchaser of
the product (hereinafter, “Customer,” “you” or “your”).
For products purchased outside the U.S. or Canada, please visit www.mackie.com/warranty to find
contact information for your local distributor, and information on any warranty coverage provided by the
distributor in your local market.
LOUD warrants to Customer that the product will be free from defects in materials and workmanship
under normal use during the Warranty Period. If the product fails to conform to the warranty then LOUD
or its authorized service representative will at its option, either repair or replace any such nonconforming
product, provided that Customer gives notice of the noncompliance within the Warranty Period to the
Company at: www.mackie.com/support or by calling LOUD technical support at 1.800.898.3211
(toll-free in the U.S. and Canada) during normal business hours Pacific Time, excluding weekends or
LOUD holidays. Please retain the original dated sales receipt as evidence of the date of purchase. You will
need it to obtain any warranty service.
For full terms and conditions, as well as the specific duration of the Warranty for this product, please visit
www.mackie.com/warranty.
The Product Warranty, together with your invoice or receipt, and the terms and conditions located
at www.mackie.com/warranty constitutes the entire agreement, and supersedes any and all prior
agreements between LOUD and Customer related to the subject matter hereof. No amendment,
modification or waiver of any of the provisions of this Product Warranty will be valid unless set forth in a
written instrument signed by the party to be bound thereby.
This Mackie product includes software code developed by third parties, including software code subject
to the GNU General Public License (“GPL”) Version 2. Where such specific license terms entitle you to
the source code of such software, LOUD Technologies Inc. will provide upon written request via email
or traditional paper mail the applicable GPL source code files via CD-ROM for a nominal cost to cover
media, shipping and handling charges as allowed under the GPL.
The GPL code used in this product is distributed WITHOUT ANY WARRANTY and is subject to the
copyrights of one or more authors. For details, see the GPL code and the terms of the GPL. For a copy
of the GPL please write to the Free Software Foundation, Inc., 51 Franklin Street, Fifth Floor, Boston, MA
02110-1301, USA.
Please direct all GPL Source Requests to the following email/address.
Attn: GPL Source Request
LOUD Technologies Inc.
16220 Woodinville-Redmond Rd. N.E.
Woodinville, WA 98072
or
techmail@mackie.com

Mackie DL806 and DL1608 Reference Guide
211
Open Source Code
Master Fader uses the following open source code:
PAPasscode
Copyright (c) 2012, Denis Hennessy (Peer Assembly - http://peerassembly.com) All rights reserved.
Redistribution and use in source and binary forms, with or without modification, are permitted provided that the following
conditions are met:
* Redistributions of source code must retain the above copyright notice, this list of conditions and the following
disclaimer.
* Redistributions in binary form must reproduce the above copyright notice, this list of conditions and the following
disclaimer in the documentation and/or other materials provided with the distribution.
* Neither the name of Peer Assembly, Denis Hennessy nor the names of its contributors may be used to endorse or
promote products derived from this software without specific prior written permission.
THIS SOFTWARE IS PROVIDED BY THE COPYRIGHT HOLDERS AND CONTRIBUTORS "AS IS" AND ANY EXPRESS OR
IMPLIED WARRANTIES, INCLUDING, BUT NOT LIMITED TO, THE IMPLIED WARRANTIES OF MERCHANTABILITY
AND FITNESS FOR A PARTICULAR PURPOSE ARE DISCLAIMED. IN NO EVENT SHALL PEER ASSEMBLY OR DENIS
HENNESSY BE LIABLE FOR ANY DIRECT, INDIRECT, INCIDENTAL, SPECIAL, EXEMPLARY, OR CONSEQUENTIAL
DAMAGES (INCLUDING, BUT NOT LIMITED TO, PROCUREMENT OF SUBSTITUTE GOODS OR SERVICES; LOSS OF
USE, DATA, OR PROFITS; OR BUSINESS INTERRUPTION) HOWEVER CAUSED AND ON ANY THEORY OF LIABILITY,
WHETHER IN CONTRACT, STRICT LIABILITY, OR TORT (INCLUDING NEGLIGENCE OR OTHERWISE) ARISING IN ANY
WAY OUT OF THE USE OF THIS SOFTWARE, EVEN IF ADVISED OF THE POSSIBILITY OF SUCH DAMAGE.
Objective-Zip
Copyright (c) 2009-2012, Flying Dolphin Studio All rights reserved.
Redistribution and use in source and binary forms, with or without modification, are permitted provided that the following
conditions are met:
* Redistributions of source code must retain the above copyright notice, this list of conditions and the following
disclaimer.
* Redistributions in binary form must reproduce the above copyright notice, this list of conditions and the following
disclaimer in the documentation and/or other materials provided with the distribution.
* Neither the name of Flying Dolphin Studio nor the names of its contributors may be used to endorse or promote
products derived from this software without specific prior written permission.
THIS SOFTWARE IS PROVIDED BY THE COPYRIGHT HOLDERS AND CONTRIBUTORS “AS IS” AND ANY EXPRESS OR
IMPLIED WARRANTIES, INCLUDING, BUT NOT LIMITED TO, THE IMPLIED WARRANTIES OF MERCHANTABILITY
AND FITNESS FOR A PARTICULAR PURPOSE ARE DISCLAIMED. IN NO EVENT SHALL THE COPYRIGHT HOLDER OR
CONTRIBUTORS BE LIABLE FOR ANY DIRECT, INDIRECT, INCIDENTAL, SPECIAL, EXEMPLARY, OR CONSEQUENTIAL
DAMAGES (INCLUDING, BUT NOT LIMITED TO, PROCUREMENT OF SUBSTITUTE GOODS OR SERVICES; LOSS OF
USE, DATA, OR PROFITS; OR BUSINESS INTERRUPTION) HOWEVER CAUSED AND ON ANY THEORY OF LIABILITY,
WHETHER IN CONTRACT, STRICT LIABILITY, OR TORT (INCLUDING NEGLIGENCE OR OTHERWISE) ARISING IN ANY
WAY OUT OF THE USE OF THIS SOFTWARE, EVEN IF ADVISED OF THE POSSIBILITY OF SUCH DAMAGE.
Mackie DL806 and DL1608 Reference Guide
212
