Drm Plus Administrator Manual V6 9
User Manual: Pdf
Open the PDF directly: View PDF ![]() .
.
Page Count: 315 [warning: Documents this large are best viewed by clicking the View PDF Link!]

May 2018 DRM Plus Administrator Manual v6.9 1
Dental Record
Manager Plus
(DRM Plus)
Administrator Manual
Version 6.9 May 2018

May 2018 DRM Plus Administrator Manual v6.9 2
© 2018 Document Storage Systems, Inc. All rights
reserved.
Document Storage Systems (DSS) is a privately held
corporation and has been the premier provider of health
information and document imaging distribution and
storage
systems to Veterans Affairs facilities for over
seventeen
years. DSS is located at 12575 US Highway
One, Suite 200,
Juno Beach, Florida 33408.
World Wide Web: www.dssinc.com
Dental Record Manager Plus is a trademark of
Document
Storage Systems, Inc. Outlook, Internet
Explorer, and
Windows are trademarks of Microsoft
Corporation. VistA is
a trademark of the Department of
Veterans Affairs, Software
Services, and Computerized
Patient Record System.
No portion of this manual or software may be reproduced
without the prior written consent of Document Storage
Systems, Inc.
May 2018 DRM Plus Administrator Manual v6.9 3
Table of Contents
Introduction ............................................................................................................................................. 9
Document Storage Systems, Inc. ................................................................................................... 9
From the Department of Veterans Affairs ...................................................................................... 9
Introduction .................................................................................................................................. 9
Quality Improvement/Performance Measures and Benefits .......................................................... 10
Customer Support ....................................................................................................................... 10
Dental Record Manager Plus User and Administrator Requirements .................................................... 11
DRM Plus User Requirements .................................................................................................... 11
Administrator Option .................................................................................................................. 12
Accessing DRM Plus .............................................................................................................................. 13
Access ........................................................................................................................................ 13
Using the DRM Plus Drop-Down Menus ............................................................................................... 17
File ............................................................................................................................................. 17
Refresh Patient Chart ..................................................................................................... 17
File Administrative Time ................................................................................................ 17
File Fee Basis ................................................................................................................ 18
Print ............................................................................................................................... 19
Spell Check .................................................................................................................... 20
Save Unfiled Data .......................................................................................................... 21
Exit ................................................................................................................................ 22
Edit ............................................................................................................................................. 23
Copy .............................................................................................................................. 23
Cut ................................................................................................................................. 23
Paste .............................................................................................................................. 23
Select All ........................................................................................................................ 23
Dental Encounter Data ................................................................................................................ 24
Create New PCE Visit .................................................................................................... 24
View Scheduled Appointments and Historical Visits ........................................................ 25
Treatment & Exam...................................................................................................................... 28
Show Configuration ........................................................................................................ 29
Add/Edit Personal QuickList .......................................................................................... 40
Add Medical Codes to ADA Table .................................................................................. 41
Edit Code Information in the ADA Table ........................................................................ 43
Edit Procedure Costs ...................................................................................................... 44
Filter View ..................................................................................................................... 45
Clean Slate ..................................................................................................................... 46
Undo Clean Slate ........................................................................................................... 51
All Planned Care to Clipboard ....................................................................................... 52
Tools .......................................................................................................................................... 53
Windows Calculator ....................................................................................................... 53
Windows Explorer .......................................................................................................... 53
Windows Notepad ........................................................................................................... 53
User Inquiry ................................................................................................................... 54
User Options .................................................................................................................. 56
Administrative Toolbox ................................................................................................... 73
Panel Add/Edit ............................................................................................................... 87
Provider Add/Edit .......................................................................................................... 89
Ancillary Tool Functions – ADA Website ........................................................................ 91
Reports ....................................................................................................................................... 92
May 2018 DRM Plus Administrator Manual v6.9 4
Reports ........................................................................................................................... 92
Service Reports ............................................................................................................ 115
Data Warehouse Reports .............................................................................................. 117
Adverse Events Report .................................................................................................. 119
Device Tracking Report ................................................................................................ 122
Extract History File ...................................................................................................... 125
Queued Extract History File ......................................................................................... 127
Help .......................................................................................................................................... 130
Contents ....................................................................................................................... 130
Version Release Notes .................................................................................................. 131
Last Broker Call ........................................................................................................... 132
VA Intranet Website...................................................................................................... 132
Find your DRM Plus Administrators............................................................................. 132
Have a Question, Comment or Suggestion about DRM? ............................................... 132
About ........................................................................................................................... 133
DRM Plus Banner ............................................................................................................................... 135
Patient Information ................................................................................................................... 135
Visit Information ...................................................................................................................... 136
Dental Provider Information...................................................................................................... 137
Vitals Button............................................................................................................................. 138
Adverse Events Button .............................................................................................................. 138
To add an adverse event: .............................................................................................. 139
To edit a filed Active adverse event: .............................................................................. 140
To delete a filed adverse event: ..................................................................................... 140
Device Tracking Button ............................................................................................................ 142
To add completed procedure device identifiers: ............................................................ 144
To add non-transaction device identifiers: .................................................................... 145
To remove filed device identifiers for a transaction or non-transaction: ........................ 147
To delete the filed device identifiers for a transaction or non-transaction: .................... 148
Dental Class Information .......................................................................................................... 149
Clean Slate................................................................................................................................ 150
Icons ......................................................................................................................................... 150
General Coding Standards ........................................................................................... 150
Patient Flags ............................................................................................................................. 150
Clinical Reminders ....................................................................................................... 150
Consult ......................................................................................................................... 151
Exam Quality Indicator ................................................................................................ 151
Fluoride Quality Indicator ............................................................................................ 152
Alerts ........................................................................................................................... 153
Cover Page ........................................................................................................................................... 155
Dental Eligibility ...................................................................................................................... 156
Dental Class ................................................................................................................. 156
Service Connected Teeth/Service Trauma ..................................................................... 156
Adjunctive Medical Condition(s) .................................................................................. 157
Eligibility Expiration Date ............................................................................................ 158
Anticipated Rehab Date ................................................................................................ 158
Demographics ........................................................................................................................... 159
Case Management ..................................................................................................................... 159
Status ........................................................................................................................... 159
Suggested Recare Date ................................................................................................. 159
Recent Dental Activity .............................................................................................................. 160
May 2018 DRM Plus Administrator Manual v6.9 5
Fluoride Indicator Prescription Date .......................................................................................... 160
Dental Alerts............................................................................................................................. 161
Notes ........................................................................................................................................ 161
Filed Planned Care .................................................................................................................... 162
Clinical Record .................................................................................................................................... 163
Problems ................................................................................................................................... 165
Consultations ............................................................................................................................ 165
Notes ........................................................................................................................................ 166
Adding a New TIU Progress Note ................................................................................. 167
Adding a New TIU Progress Note Addendum ................................................................ 169
Dental History ...................................................................................................................................... 170
Viewing Dental Information by Tooth ....................................................................................... 171
Viewing Other Dental History Information................................................................................ 171
Viewing All Dental History Information ................................................................................... 171
Viewing Dental History Information by Episode of Care ........................................................... 172
Episode in Date Range .............................................................................................................. 172
Deleting an Encounter ............................................................................................................... 172
Chart/Treatment – Treatment & Exam ............................................................................................. 174
Diagnostic Findings .................................................................................................................. 176
Editing Diagnostic Finding Descriptions ...................................................................... 177
Deleting a Diagnostic Finding ...................................................................................... 177
Treatment Plan .......................................................................................................................... 178
Entering a Treatment Plan ........................................................................................... 178
Editing a Treatment Plan Description ........................................................................... 180
Deleting a Treatment Plan ............................................................................................ 181
Completing a Treatment Plan ....................................................................................... 181
Completed Care ........................................................................................................................ 182
Entering Completed Care ............................................................................................. 182
Editing Completed Care Description ............................................................................ 183
Deleting a Completed Care .......................................................................................... 183
Include “Completed”/Include “Findings and Completed”/Include “Findings” ............................ 184
Perio Buttons Icon .................................................................................................................... 185
Seq Plan/Sequencing Button ..................................................................................................... 186
Plan a Treatment Sequence .......................................................................................... 187
Complete a Planned Treatment in the Sequencing Screen ............................................. 187
Deleting a Planned Treatment in the Sequencing Screen ............................................... 188
Chart Hx (History) Button ......................................................................................................... 188
Summary Button ....................................................................................................................... 189
H&N Button ............................................................................................................................. 190
PSR Button ............................................................................................................................... 193
OHA (Oral Health Assessment) Button ..................................................................................... 194
TMJ Button .............................................................................................................................. 196
Occl (Occlusion) Button ........................................................................................................... 197
Habits (Parafunctional) Button .................................................................................................. 199
Social Hx (Social History) Button ............................................................................................. 200
Multiple Filings to Same Modal on Same Day .............................................................. 201
Chart/Treatment – Periodontal Chart ................................................................................................ 203
History and Compare Buttons ................................................................................................... 204
Summary Button ....................................................................................................................... 205
H&N Button ............................................................................................................................. 205
PSR Button ............................................................................................................................... 205
May 2018 DRM Plus Administrator Manual v6.9 6
Stats Button .............................................................................................................................. 206
OHA (Oral Health Assessment) Button ..................................................................................... 206
Notes Button ............................................................................................................................. 207
Entering Periodontal Information .............................................................................................. 208
Other Tools ............................................................................................................................... 209
Exam .................................................................................................................................................... 210
Exam Elements ......................................................................................................................... 212
Presentation/Chief Complaint Element ......................................................................... 212
Vitals Elements ............................................................................................................. 213
PMH (Past Medical History) and Medications Element ................................................ 214
Social History Element ................................................................................................. 215
H&N (Head and Neck) Findings Element ..................................................................... 216
Radiographic Findings Element.................................................................................... 217
Diagnostic Findings Element ........................................................................................ 218
Periodontal Assessment Element .................................................................................. 219
Parafunctional Habits Element ..................................................................................... 222
TMJ Findings Element.................................................................................................. 223
Occlusal Findings Element ........................................................................................... 224
Salivary Flow Element.................................................................................................. 225
Removable Prostheses Element ..................................................................................... 226
Assessment/Plan Element ............................................................................................. 227
Patient Education Element ........................................................................................... 228
Disposition Element ..................................................................................................... 229
Import Previously Filed Data Screen ............................................................................ 230
Completing the Encounter .................................................................................................................. 232
Potential Duplicate Transactions Screen .................................................................................... 236
File Data Option Screen ............................................................................................................ 237
File to PCE/DES with Code .......................................................................................... 237
File to DES-Only Data ................................................................................................. 238
Filing Options Screen................................................................................................................ 238
Filing Options .............................................................................................................. 238
Visit Date/Time ............................................................................................................ 238
Encounter Dental Class ................................................................................................ 239
Disposition ................................................................................................................... 239
Suggested Recare Date ................................................................................................. 239
Primary PCE Diagnosis & Send Dx to CPRS Problem List ........................................... 240
Service Connection ....................................................................................................... 240
Additional Providers/Additional Signers ....................................................................... 241
Station .......................................................................................................................... 242
Progress Note Screen ................................................................................................................ 242
Viewing/Importing DRM Object/Progress Note ............................................................ 243
Viewing/Importing CPRS Templates ............................................................................. 243
Importing VistA Medical Information ........................................................................... 243
Other Options in the Import Menu ................................................................................ 244
Accessing Dental CNTs ................................................................................................ 244
Electronic Signature ..................................................................................................... 244
Progress Note Addendum ............................................................................................. 245
CNT Navigator ......................................................................................................................... 246
Navigating Within CNTs ............................................................................................... 247
Consult Notes ........................................................................................................................... 249
Resident Filing as Cosigners or Distributed Providers ............................................................... 251
May 2018 DRM Plus Administrator Manual v6.9 7
Appendix A – Glossary of VA Terms ................................................................................................. 253
Appendix B – Common Application Functions .................................................................................. 257
Appendix C – Hints and Notes ............................................................................................................. 259
Save Unfiled Data ..................................................................................................................... 259
Dental Class Displayed on Banner ............................................................................................ 259
Diagnostic Findings .................................................................................................................. 259
Treatment Plan .......................................................................................................................... 259
Multi-Add Screen ..................................................................................................................... 260
Ranged Codes ........................................................................................................................... 260
Speed Codes ............................................................................................................................. 260
Tx Planning/Sequencing Screen ................................................................................................ 260
Completed Care ........................................................................................................................ 261
Periodontal Chart ...................................................................................................................... 261
Completing the Encounter ......................................................................................................... 262
Reports – Non-Clinical Time by Provider.................................................................................. 264
Code Boilerplates...................................................................................................................... 264
Last Broker Call ........................................................................................................................ 264
Recent Dental Activity .............................................................................................................. 264
Appendix D – Icon Definitions ............................................................................................................. 265
Diagnostic Findings .................................................................................................................. 265
Treatment Plan .......................................................................................................................... 268
Completed Care ........................................................................................................................ 270
Special Descriptions – Bridge Icon ............................................................................................ 272
Special Descriptions – Conn Bar Icon ....................................................................................... 273
Special Descriptions – Notes Icon ............................................................................................. 273
Appendix E – Create Reports in MS Excel and Access ....................................................................... 274
Developing Excel Reports ......................................................................................................... 274
Creating Custom Reports Using Excel ...................................................................................... 277
Deleting Columns or Rows ........................................................................................... 278
Expanding Columns or Rows ........................................................................................ 278
Field Formatting Options ............................................................................................. 278
Creating a Header for a Report .................................................................................... 281
Sorting Data ................................................................................................................. 283
Subtotaling Data .......................................................................................................... 284
Pull Down Options ....................................................................................................... 286
Importing the DRM Plus Extract Text File into an Access Report.............................................. 287
Importing the DRM Plus Extract Excel File into Access Database ............................................. 294
Appendix F – Using the Keyboard to Enter Periodontal Data ............................................................ 299
Overview .................................................................................................................................. 299
Navigating the Periodontal Screen ............................................................................... 299
Arch Views ................................................................................................................... 299
Cursor Movement ......................................................................................................... 299
Entering Data ............................................................................................................... 300
Special Buttons ............................................................................................................. 300
Other Functions ........................................................................................................... 300
Appendix G – Ranged Codes ............................................................................................................... 301
Appendix H – Active-Inactive Maintenance Control .......................................................................... 302
Appendix I – Option to Set Dental Patients to Inactive Status .............................................................. 304
Appendix J – How to Map Dental CNTs .............................................................................................. 305
Appendix K – Recommendations for Coding of Prosthetic Appliance ............................................... 307
Appendix L – Business Use of DRM Plus ............................................................................................ 309
May 2018 DRM Plus Administrator Manual v6.9 8
Local Policy and Practice .......................................................................................................... 309
National Policy and Practice Coding Standards ......................................................................... 309
Appendix M – Data Security ............................................................................................................... 310
Appendix N – madExcept Application................................................................................................ 312
Periodontal Keyboard Shortcuts Tear-Out.......................................................................................... 315

May 2018 DRM Plus Administrator Manual v6.9 9
Document Storage Systems, Inc.
DSS, Inc. specializes in the computerization of patient medical charts. Our core specialty within the medical
market is building Windows Graphical User Interface (GUI) applications; which insert, update and retrieve
patient data held in a MUMPS (M) data repository, or SQL database system. DSS offers an array of GUI
products, which allow for the electronic documentation of TIU progress notes and other significant parts of
medical records, scanning and viewing of clinical and administrative documents and automated medical
record coding through simple points and clicks.
From the Department of Veterans Affairs
Dental Record Manager Plus (DRM Plus) captures specific dentally-related information elements NOT
readily available in CPRS. These elements include: oral cavity/tooth related diagnostic findings, dental-
specific care plans and a superset of completed care information. DRM Plus aids the provider in the entry of
dental diagnostic information, coding and crediting dental procedures, completing TIU progress notes, and
planning and tracking dental patient care. DRM Plus is adjunctive to CPRS and is NOT designed to replace
CPRS for dental users. While some information from CPRS is available, and can be accessed in DRM plus,
providers should use all the available tools in the VistA suite of applications. These tools include: VistA
Imaging, I-Med Consent, and any clinical system applications specific to the local sites.
DRM Plus is a Dental Graphical User Interface front end for data input into the VistA Dental files, as well
as the Patient Care Encounter (PCE), Text Integration Utility (TIU) and CPRS Problem List packages.
Introduction
The DRM Plus program is designed to provide dental health care facilities with an intuitive, user-friendly
Windows interface for end-users to create encounter information, evaluate patient dental conditions, and
develop and maintain the treatment plan. The DRM Plus program is an application that uses RPC Broker
technology, which permits the facility users to store and retrieve clinical data within the VistA System.
DRM Plus supports the Veterans Health Administration, Office of Dentistry, continuous quality
improvement initiatives by providing added value to the clinical and administrative management of the
patient’s electronic dental record. The enhanced methods of data capture included in this application
continue to eliminate unnecessary paperwork and administrative functions through the automation of
clinical dental data.
The use of DRM Plus results in more accurate insurance billing for dental visits, consults and procedures.
This application supports the filing of Dental Encounter System (DES) within the guidelines established by
the Veterans Health Administration, Office of Dentistry.
Introduction

May 2018 DRM Plus Administrator Manual v6.9 10
Some features of DRM Plus are summarized in the following:
Entry of dental conditions, plans and completed procedures through the use of graphic icons with
extensive use of color schemes.
Upper/Lower/Full Views with full color coded graphics.
Sequencing of Treatment Plan procedures
Dental History with date-change capability
Quadrant or Tooth summaries
Head/Neck Findings availability
Periodontal charting
Full Mouth Plaque Index with definitions
ADA/Local/Quick Codes
Creation and maintenance of tooth-specific and general patient notes.
Quality Improvement/Performance Measures and Benefits
DRM Plus supports the VA Administration, Office of Dentistry’s continuous quality improvement
initiatives by providing added value to the clinical and administrative management of the patient’s electronic
dental record. The efficient data capture methods included in this product eliminates unnecessary paperwork
and administrative functions. Additional quality improvement benefits and sample performance measures
include:
Performances Measures
Reductions in operating cost and improved services through better integration of VHA resources
and data.
Supports high level job satisfaction by providing clinicians with feedback regarding quality of care
and promotes a culture that places a high value on individual and collective accountability through
reporting.
Promotes a VHA culture of ongoing quality improvement that is predicated on providing excellent
health care value.
Accuracy and usefulness of data increases based on the reduction of data entry points and
decreased potential for error.
Enhanced capability to measure quality of care consistent with the VA Dentistry GPRA
Performance Plan.
Customer Support
DRM Plus is supported in the same manner as any other nationally supported software product. Problems
should be reported to the local site ADPAC and/or Help Desk, who in turn utilize the Computer Associate’s
Service Desk Manager (CA SDM) system to log and track problems. Help desk support is provided from
8:00 AM to 7:00PM Eastern Standard Time, Monday through Friday. Documenting problems provides a
means to find and disseminate solutions to those involved in any area of DRM Plus or VistA.

May 2018 DRM Plus Administrator Manual v6.9 11
DRM Plus User Requirements
1.
DRM Plus users must have a valid Person Class in VistA file 200 (New Person File) to file data in
DRM Plus.
a. ALL residents and fellows must have one of the following Person Classes: V030300, V115500,
or V115600, and this requires the resident to select a distributive provider (attending) as the
primary provider when filing to DES and PCE.
b. DRM Plus users must have a Person Class (different than the three listed above) to file data in
DRM Plus. DRM Plus users that do NOT have a Person Class will receive an “!”-screen
(Informational) stating the user is required to have an active Person Class to file data in DRM
Plus. Please contact IT support for assignment of Person Class.
c. DRM Plus users without a Person Class assigned may file an unsigned encounter for another
provider or save unfiled data for another provider.
2.
Dental Residents and Fellows using DRM Plus must have a valid User Class in VistA TIU if they
require a cosigner. Please refer to the Authorization/Subscription Utility (ASU) User Manual to
insure that Dental Residents are prompted for cosignature on all Progress Notes and Consults. This
is typically done by a Clinical Coordinator, IT Staff, ADPAC or other manager using the Document
Parameter Edit option on the TIU Parameters Menu on the IRM Maintenance Menu. The USERS
REQUIRING COSIGNATURE field within the Document Parameter Edit option indicates which
groups of users (i.e., User Classes) require cosignature for the type of document in question.
3.
All DRM Plus users filing TIU progress notes must have an electronic signature in VistA file 200
(New Person File).
4.
All DRM Plus users must have a default division (station number) in VistA file 200 (New Person
File) for the station number to appear as the default (preselected) when filing an encounter.
5.
All DRM Plus users must have the secondary menu option DENTV DSS DRM GUI assigned to
access DRM Plus.
6.
All DRM Plus users filing encounters should have their initials defined in the new person file (200)
so that they will appear in the DRM Plus transaction tables.
7.
All DRM Plus users (except Cover Page Only users) must have an active 8-Digit Dental Provider
ID in the VistA Dental Provider File (220.5) to open DRM Plus and file data. DRM Plus users that
do NOT have an 8-Digit Dental Provider ID will receive a “Red X”-screen (Stop) stating that they
are required to have an active Dental Provider ID and will be denied access to DRM Plus. Note to
DRM Plus application administrators: Use the DRM Plus option Provider Add/Edit on the Tools
menu to enter this information. Select the New button if the user name does NOT display in the list.
8.
Dental Students should NOT be assigned a Person Class in VistA; they only need an 8-digit
Provider ID and require a User Class in VistA TIU (student). The User Class allows them to
access CPRS. The dental student may file data for another provider.
9.
DRM Plus users that have Cover Page Only access require the secondary menu option DENTV
DSS DRM GUI assigned and no other requirements to access DRM Plus. Cover Page Only access
must be granted by a DRM Plus application administrator.
Note: DRM Plus users must have permission to write and modify to-and-from the DOCSTORE folder.
Dental Record Manager Plus User and Administrator
Requirements

May 2018 DRM Plus Administrator Manual v6.9 12
Administrator Option
All DRM Plus application administrators must be DRM Plus users. Enter VistA in Programmer Mode by
typing D ^XUP at the VistA prompt and get to "Select Option".
1.
At Select Option Name, type: DENTV XPAR EDIT PARAMS.
2.
At the Select PARAMETER DEFINITION NAME, type: DENTV DRM ADMINISTRATOR.
3.
At the Select NEW PERSON NAME, type in the name of the person to be made a dental
administrator.
4.
Set the value to YES.
May 2018 DRM Plus Administrator Manual v6.9 13
Access
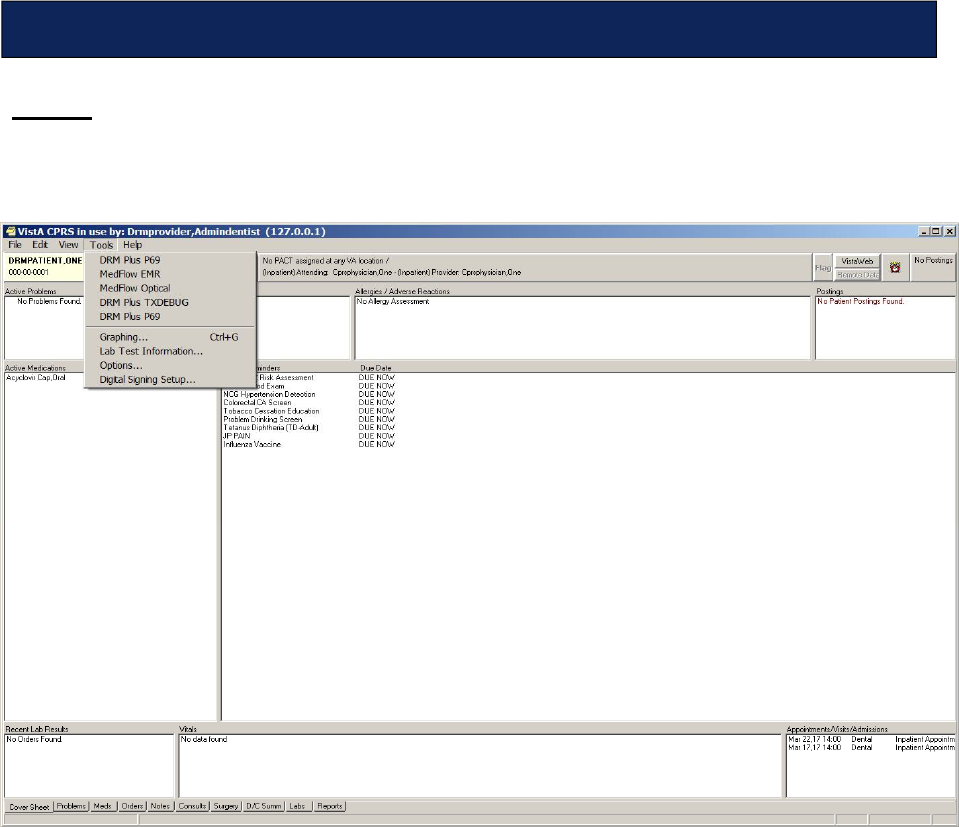
To access DRM Plus, first open CPRS and select the desired patient. Open the Tools menu in the CPRS tool
bar, and select DRM Plus submenu from the available submenus.
Figure 1: Access DRM Plus through CPRS
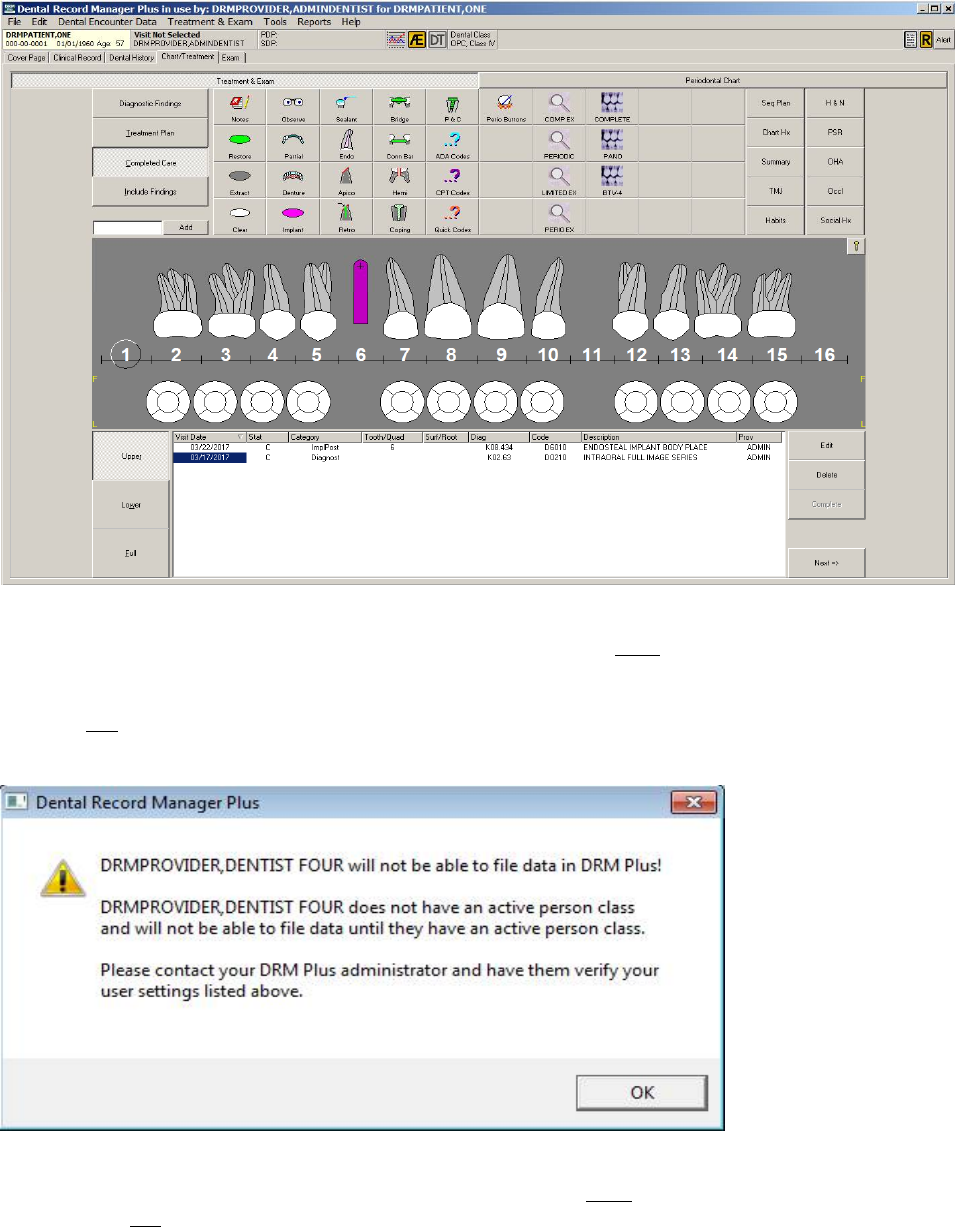
DRM Plus opens with the patient information loaded and, unless changed by the user, the
Chart/Treatment tab as the default opening screen.
Note: Users may be required to re-enter Access/Verify codes when opening DRM Plus. The default
opening settings of DRM Plus is the Treatment Plan screen on the Chart/Treatment tab, unless changed
by the user.
Note: The proper ways to close DRM Plus are listed:
1.
Selecting the [X] button in the upper right corner of the DRM Plus screen; or
2.
Selecting File menu Exit submenu; or
3.
Selecting Task Manager Application tab highlight Dental Record Manager Plus task
End Task button.
Accessing DRM Plus
May 2018 DRM Plus Administrator Manual v6.9 14
Figure 2: DRM Plus Chart/Treatment Tab
The “!”- screen (Informational) displays when a DRM Plus user does NOT have an active VistA Person
Class. This user will need to contact the local Help Desk and request an active VistA Person Class. One of
the requirements to file data in DRM Plus is to have an active VistA Person Class. However a DRM Plus
user with NO VistA Person Class may file an unsigned encounter for another provider or save unfiled data
for another provider.
Figure 3: “!”-screen (Informational)
The “Red X”- screen (Stop) displays when a DRM Plus user does NOT have an active 8-Digit Dental
Provider ID. NO access will be allowed to open DRM Plus by the user. A DRM Plus Administrator may
create an active 8-Digit Dental Provider ID from the Provider Add/Edit submenu from the Tools menu in
DRM Plus. One of the requirements to file data in DRM Plus is to have an active 8-Digit Dental Provider
ID.
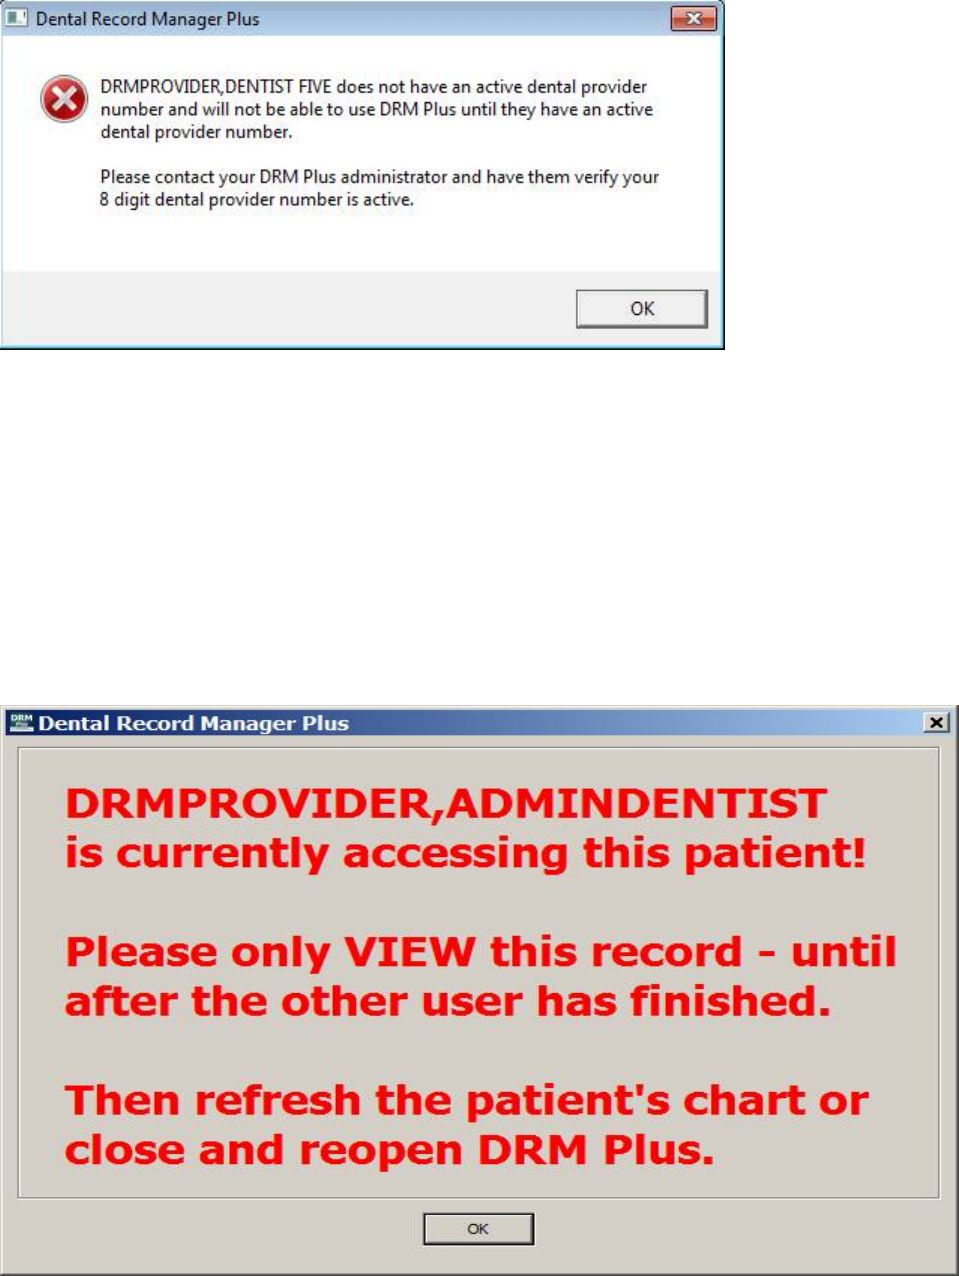
May 2018 DRM Plus Administrator Manual v6.9 15
Figure 4: “Red X” –screen (Stop)
Note: No informational warning screen displays to a user with Cover Page tab access only.
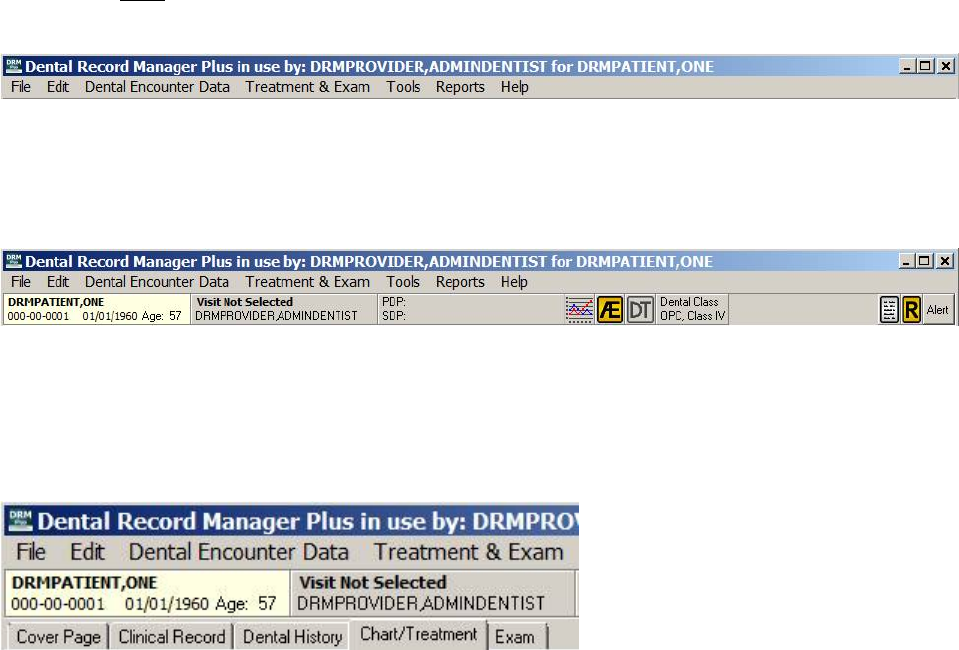
The following informational screen will display when someone opens a DRM Plus patient’s chart that
someone else has open. The informational screen displays the name of the user who first opened the
patient’s chart. The informational screen also asks the user to only view the chart until the first user
accessing the patient chart closes it, nothing should be entered, edited or deleted. The user receiving the
warnings should refresh the patient’s chart or close and reopen DRM Plus after the other user has
finished.
There can be issues in DRM Plus when filing entries such as unfiled data or patient’s TIU progress notes
when more than one person is accessing the same patient chart.
Figure 5: Warning Informational Screen
May 2018 DRM Plus Administrator Manual v6.9 16
In the following pages, the various parts of DRM Plus are highlighted and the functionality of the program
is explored. The main screen is broken into three distinct parts. The drop-down menus allow the user to
access various menus throughout the program, regardless of which tab is in use. Some drop-down menu
functions are NOT available with every different tab. In this case, the menu function is disabled when the
tab is open.
Figure 6: DRM Plus Drop-Down Menus
The banner contains patient, visit/location, provider/patient information and limited vitals entry. There are
also the adverse events button, device tracking button, dental class button, coding standards and alerts icons
on the banner.
Figure 7: DRM Plus Banner
The tabs are the heart of DRM Plus. They allow the user to create a new exam template, new treatment plan,
view the dental history of a patient, view clinical records, and create a text note or a text note addendum. All
providers may perform myriad tasks by simply clicking through each of the tabs and adding the pertinent
information that is allowed in the appropriate place.
Figure 8: DRM Plus Tabs
The following chapters explore the functionality of each of the areas of the program in detail.
May 2018 DRM Plus Administrator Manual v6.9 17
The DRM Plus drop-down menus consist of seven menus: File, Edit, Dental Encounter Data, Treatment
& Exam, Tools, Reports and Help.
Figure 9: DRM Plus Drop-Down Menus
File
The File menu contains seven submenus: Refresh Patient Chart, File Administrative Time, File Fee
Basis, Print, Spell Check, Save Unfiled Data and Exit. The Spell Check is only active in the note and
note addendum screens.
Figure 10: DRM Plus File Menu
Refresh Patient Chart
The Refresh Patient Chart submenu allows DRM Plus users to refresh the patient’s chart while working in
DRM Plus.
File Administrative Time
When the File Administrative Time submenu is selected from the File menu, the File Administrative
Time screen displays.
Using the DRM Plus Drop-Down Menus
May 2018 DRM Plus Administrator Manual v6.9 18
Figure 11: File Administrative Time Screen
1. Use the drop-down menu near the top of the screen to select the desired Station Number.
2. Click the appropriate radio button to select the type of administrative time.
3. Use the up and down arrows next to the hours and minutes text boxes to adjust how much time is
recorded. Note that the minutes can only be adjusted in 15 minute increments.
4. Click the OK button. The screen closes and files that administrative time for report usage.
Note: This filing of administrative time is for local use only and does NOT file to the VA-MCA Labor
Mapping Access Database Program.
File Fee Basis
When the File Fee Basis submenu is selected, the Dental Record Manager Fee Basis screen displays.
Figure 12: Dental Record Manager Fee Basis Screen
May 2018 DRM Plus Administrator Manual v6.9 19
1. Use the Report Date drop-down menu to select a date to edit/delete a previous fee basis entry.
2. Choose the station by clicking the appropriate radio button.
3. Click the Dental Category drop-down menu to choose a Dental Class.
4. Click the Date Authorized for Payment drop-down menu to display a calendar. The user may
toggle through this calendar to choose the authorized date for payment.
5. Enter the Total Cost in the text box.
6. Click the Finish button.
7. A screen displays stating that a Fee Basis record has been added. Click the OK button.
End-user criteria required to allow entering fee basis data within DRM Plus includes:
Does need to be in the Dental Provider file (8-digit provider ID).
Does NOT need a Person Class in VistA.
Does need access to CPRS.
Does need access to DRM Plus (DENTV DSS DRM GUI secondary menu option).
Does NOT need DRM Plus administrative access.
Note: DRM Plus Administrators can run all Fee Basis reports. Patient care provided by fee should be
entered in DRM Plus as Diagnostic Findings.
Note: Fee basis data entered in DRM Plus is only available for local reports created in DRM Plus.
Print
Select the Print button to view the Print screen.
Figure 13: Print Screen
Select the check boxes that correspond to what is to be printed.
May 2018 DRM Plus Administrator Manual v6.9 20
Spell Check
Select Spell Check to correct possible spelling errors. This feature is only active in note and note addendum
screens.
Figure 14: Spelling Screen
The program goes through the text and highlights words that may have been misspelled and suggests
possible correct spellings. Use the buttons to Ignore, Change or Add words. Click the Options button to
select various options, pick a language/dictionary or add a custom dictionary.
Figure 15: Spelling Options Screen
May 2018 DRM Plus Administrator Manual v6.9 21
Click the check boxes beside the desired options located on the Spelling tab. Select the language and
dictionaries from the Language tab and click the OK button. The Spelling Options screen closes.
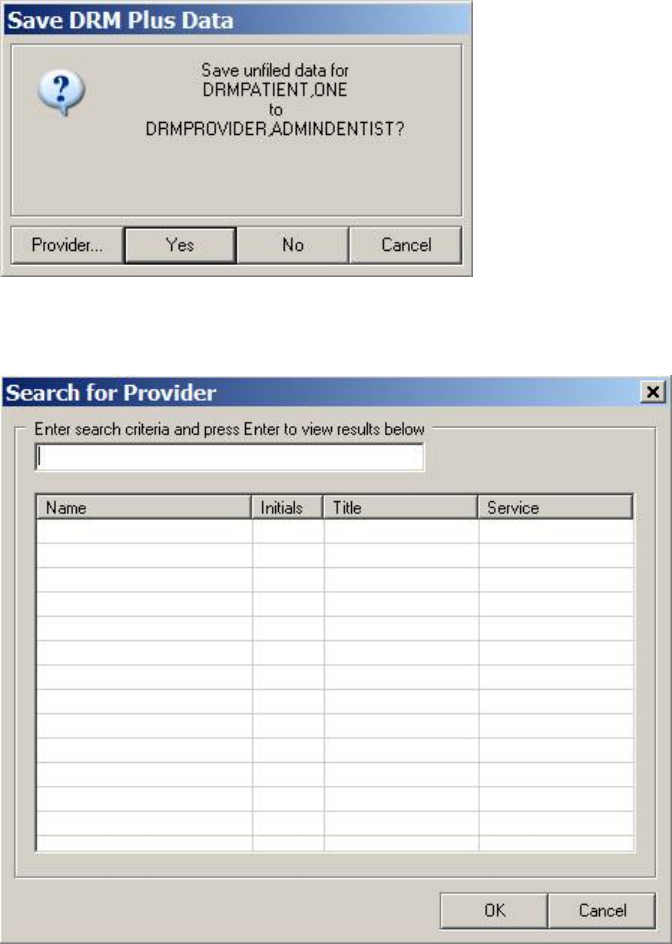
Save Unfiled Data
Select the Save Unfiled Data submenu. The Save DRM Plus Data screen displays. Click the Yes button to
save the unfiled data to the listed provider. A screen displays. Click the Yes button again to confirm.
Figure 16: Save DRM Plus Data Screen
To change the save unfiled data to another provider, click the Provider... button.
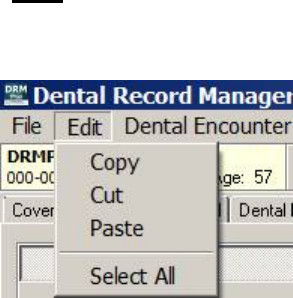
Figure 17: Search for Provider Screen
1. Enter the name or partial name of the desired provider in the search criteria text box.
2. Press the <Enter> key.
3. Click the needed provider from the list of results.

May 2018 DRM Plus Administrator Manual v6.9 22
4. Click the OK button to change the provider. The Save DRM Plus Data screen displays.
5. Click the Yes button to save the unfiled data to the new provider.
When a dental provider is saving unfiled data and assigning it to another dental provider for a selected
patient who has previously saved unfiled data that has NOT been filed, the following screen displays.
Figure 18: Provider Already Has Unfiled Data
If the user clicks the Yes button, previously saved unfiled data originally saved by another dental provider,
or this provider, is overwritten. Only one unfiled data entry may be maintained by a single provider, per
patient.
Exit
Exit the program by selecting the Exit submenu from the File menu. The CPRS main screen displays.
May 2018 DRM Plus Administrator Manual v6.9 23
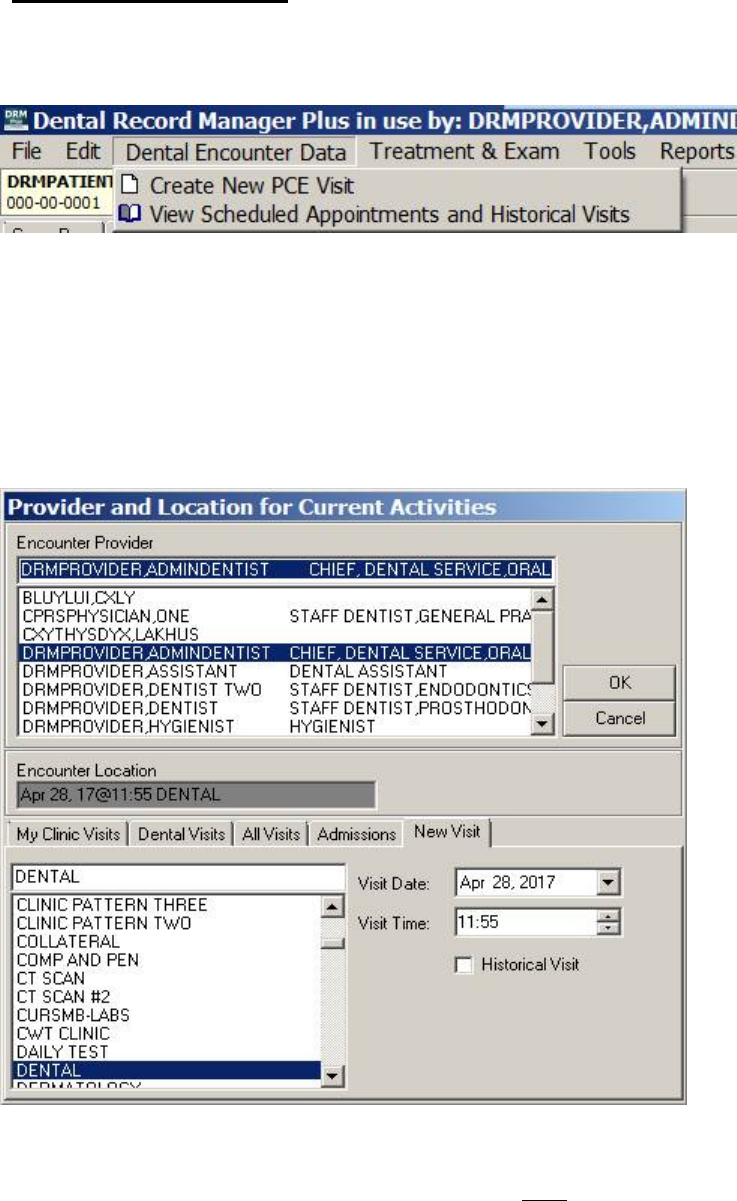
Edit
The Edit menu consists of four submenus: Copy, Cut, Paste and Select All.
Figure 19: Edit Menu
Copy
To copy, highlight the desired text and choose Copy.
Cut
To cut, highlight the desired text and choose Cut. The selected text is removed.
Paste
To paste, move the cursor to the area where the copy or cut text is to be replaced. Select the Paste submenu
to add the text to the chosen area.
Select All
Select All highlights all the text visible on the screen which can be copied and/or cut. Use the Copy or Cut
submenus to complete the desired task.
May 2018 DRM Plus Administrator Manual v6.9 24
Dental Encounter Data
The Dental Encounter Data menu has two submenus: Create New PCE Visit and View Scheduled
Appointments and Historical Visits.
Figure 20: Dental Encounter Data Menu
Create New PCE Visit
Select the Create New PCE Visit submenu to display the Provider and Location for Current Activities
screen.
Note: This submenu is only available if the DRM Plus Administrator allows new PCE visits to be created in
the DRM Plus application. The opening default tab is the New Visit tab.
Figure 21: Provider and Location for Current Activities Screen
The Encounter Provider field should default to the correct end-user that is signed into VistA. Select the
Encounter Location if the Default Location parameter is NOT set in advance. The Default Location
parameter is explained in the Treatment System section in the Using the DRM Plus Drop-Down Menus
chapter of this manual.
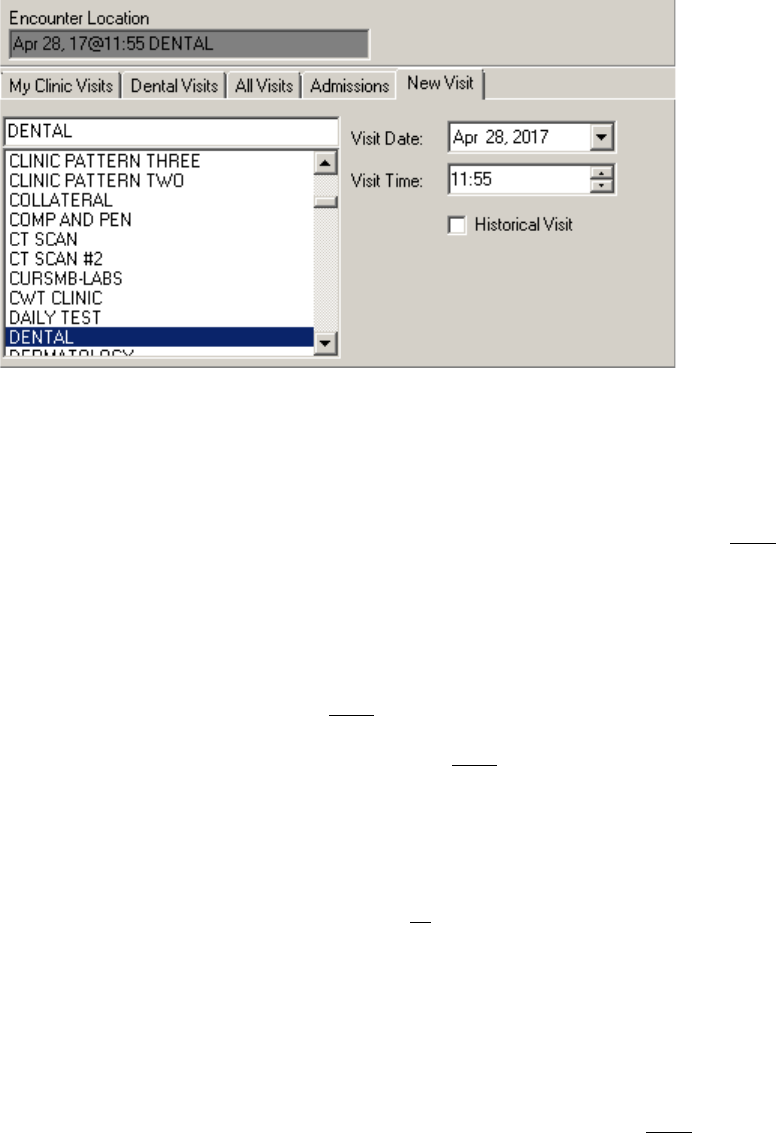
May 2018 DRM Plus Administrator Manual v6.9 25
Visit Date/Time defaults to the present date/time for a new visit in the New Visit tab. The date and time
may be changed if desired.
Figure 22: New Visit Tab
To record a new visit other than the present date/time:
1. DRM Plus defaults to the present provider; however, a different provider may be selected using the
Encounter Provider list.
2. Select the clinic location from the scroll menu if the Default Location is NOT set.
3. Use the drop-down arrow to toggle through the calendar screen and select a date.
4. Use the up and down arrows to adjust the Visit Time.
5. Check the Historical Visit check box, if applicable.
6. Click the OK button to create the new PCE visit.
Note: Future date appointments may NOT be created in DRM Plus.
Note: Creating a new PCE visit in DRM Plus does NOT update Appointment Manager in VistA.
View Scheduled Appointments and Historical Visits
The My Clinic Visits tab lists the patient visits for the selected clinic. This tab only displays if a default
Dental Location parameter is selected. When no default Dental Location parameter is selected, the Dental
Visits tab displays.
To record the scheduled appointment for the patient:
1. DRM Plus defaults to the present provider; however, another provider may be selected from the
Encounter Provider list.
2. If there is only one scheduled visit, it is automatically defaulted.
3. Select the correct scheduled visit in the bottom window, if it is NOT defaulted.
4. Click the OK button and the provider/location is set for the scheduled visit.
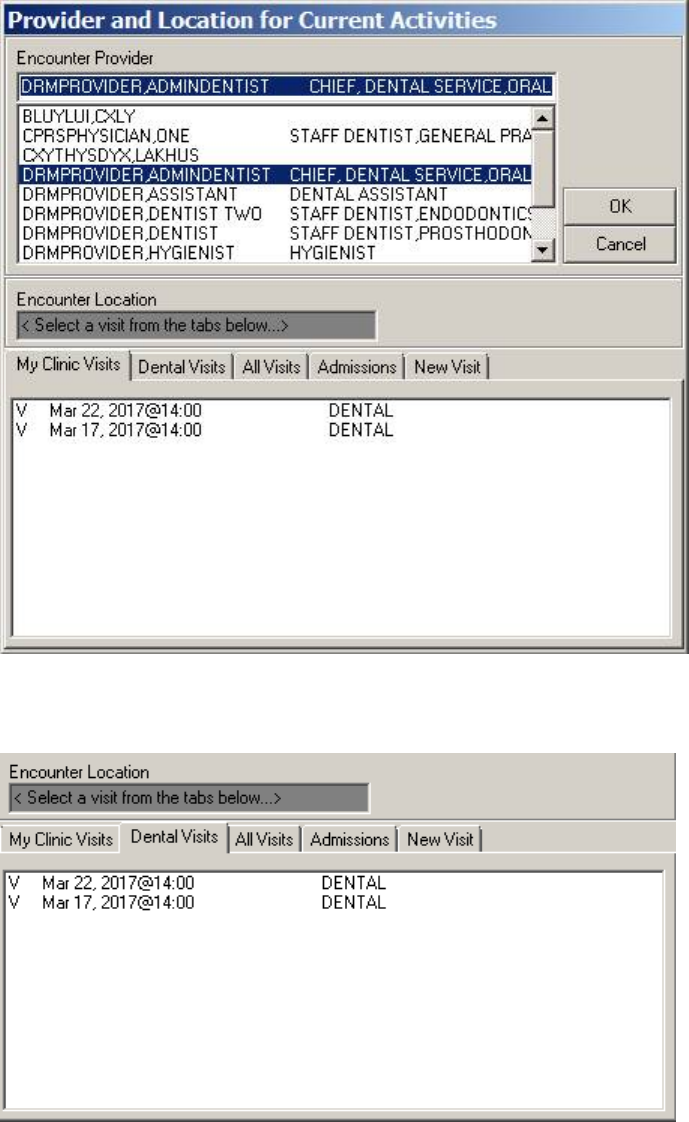
May 2018 DRM Plus Administrator Manual v6.9 26
Figure 23: My Clinic Visits Tab
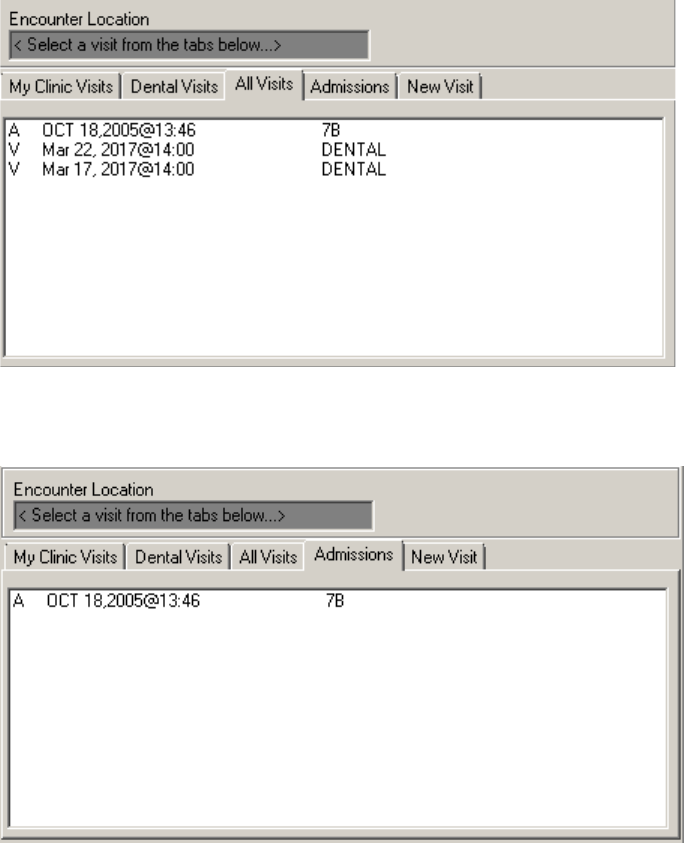
The Dental Visits tab lists all the dental clinic visits.
Figure 24: Dental Visits Tab
May 2018 DRM Plus Administrator Manual v6.9 27
The All Visits tab lists all dental visits and admission(s) if the selected patient is an inpatient.
Figure 25: All Visits Tab
The Admissions tab lists the admissions for the selected patient.
Figure 26: Admissions Tab
May 2018 DRM Plus Administrator Manual v6.9 28
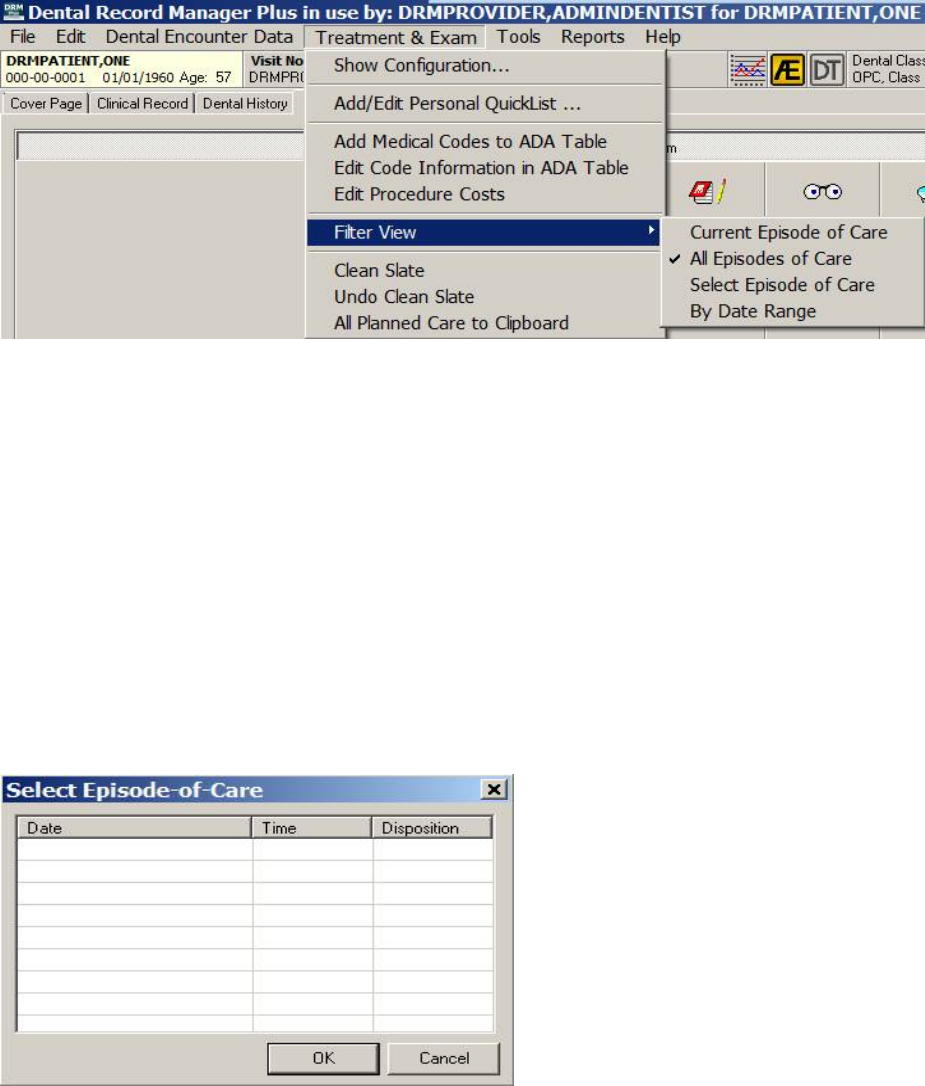
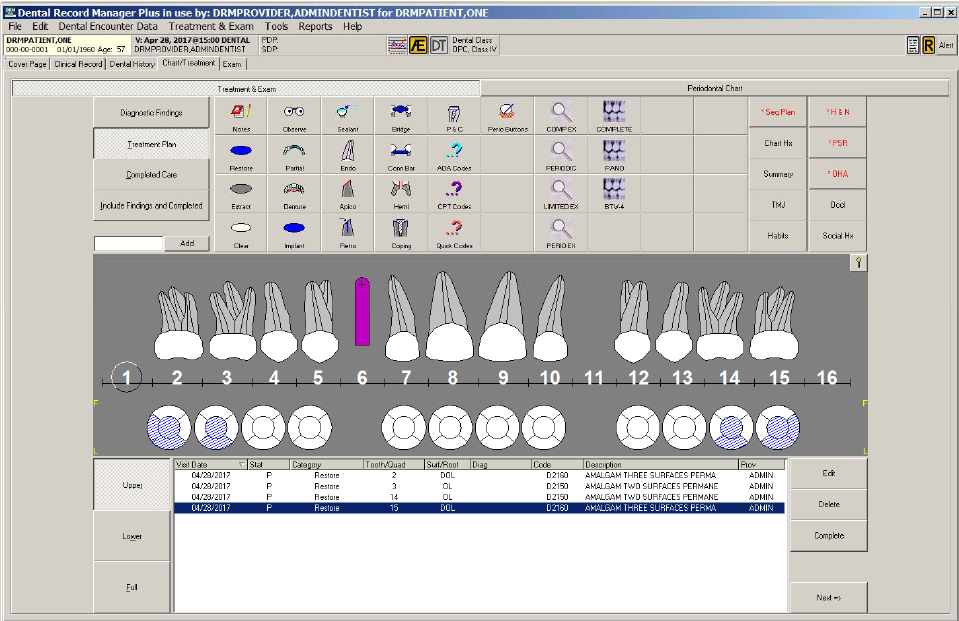
Treatment & Exam
The Treatment & Exam menu has nine submenus: Show Configuration, Add/Edit Personal QuickList,
Add Medical Codes to ADA Table, Edit Code Information in ADA Table, Edit Procedure Costs,
Filter View, Clean Slate, Undo Clean Slate and All Planned Care to Clipboard.
Note: The Add Medical Codes to ADA Table, Edit Code Information in ADA Table, Edit Procedure
Costs, Clean Slate and Undo Clean Slate are DRM Plus administrative submenus.
Figure 27: Treatment & Exam Menu
May 2018 DRM Plus Administrator Manual v6.9 29
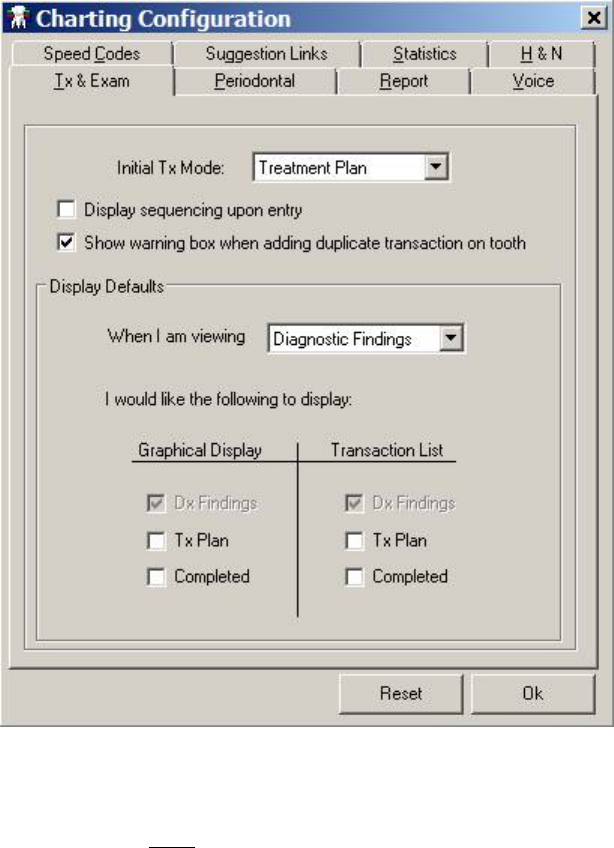
Show Configuration
Select the Show Configuration submenu to display the Charting Configuration screen.
Figure 28: Charting Configuration Screen
Use the various tabs to configure the chart. The tabs are: TX & Exam, Periodontal, Report, Voice, H&N,
Statistics, Suggestion Links and Speed Codes. The parameters on each tab are a user specific function;
changing it does NOT impact other users. When finished, click the OK button.
May 2018 DRM Plus Administrator Manual v6.9 30
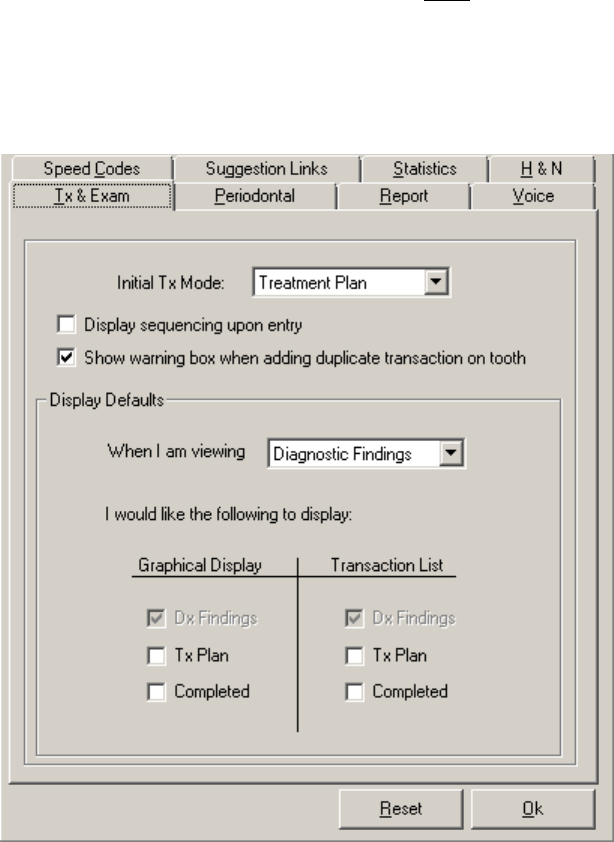
Tx & Exam
Use the Tx & Exam tab to change the default view screen that displays when DRM Plus is first opened. The
original default view screen is the Treatment Plan view.
The Sequencing screen displayed upon entry is NOT selected as a default parameter; however, showing a
warning box when adding duplicate transactions on a tooth for each view chart is a default parameter. Use
the check boxes to change these user specific parameter functions.
Use the functions on this tab to fine tune the Display Defaults; choose Graphical Displays or Transaction
Lists to display check boxes based on the screen being viewed.
Figure 29: Tx & Exam Tab
May 2018 DRM Plus Administrator Manual v6.9 31
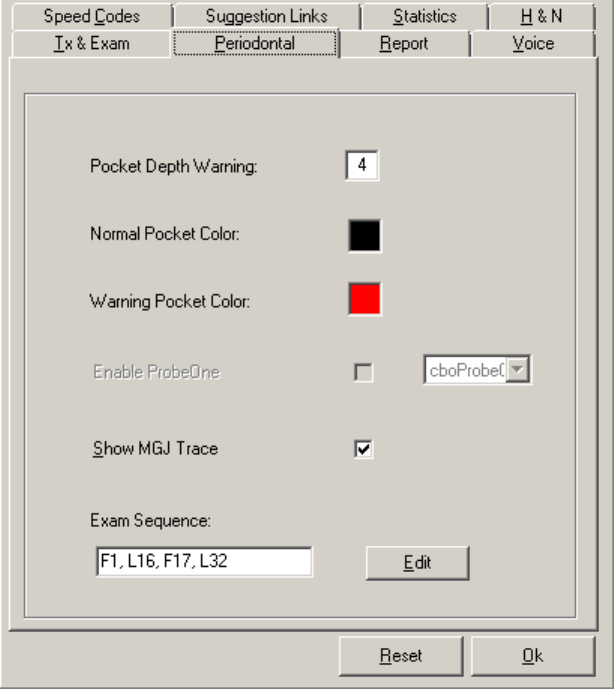
Periodontal
Choose the Periodontal tab to set pocket depth warning and choose the colors that display as pocket
warnings and normal pockets on the Periodontal Chart screen. Other submenus on this tab include Show
MGJ Trace and Exam Sequence.
Figure 30: Periodontal Tab
To change the exam sequence:
1. Click the Edit button.
2. The Edit Perio Sequence screen displays.
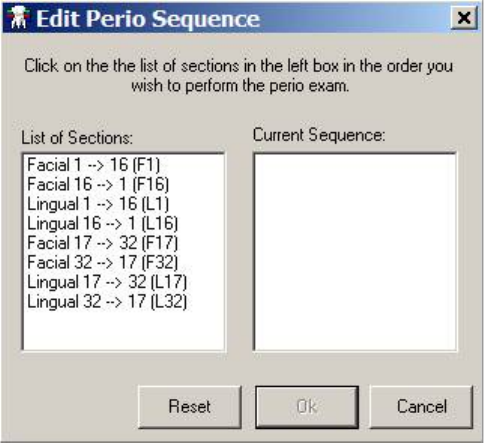
May 2018 DRM Plus Administrator Manual v6.9 32
Figure 31: Edit Perio Sequence Screen
3. Click each Section in the order in which the perio exam sequence should be performed.
4. Click the OK button to save the new exam sequence.
To go back to the original settings, which appeared when this screen was first displayed, click the Reset
button. Once the exam sequence has been changed and the user has clicked the OK button on the
Periodontal tab, this becomes the permanent default exam sequence.
May 2018 DRM Plus Administrator Manual v6.9 33
Report
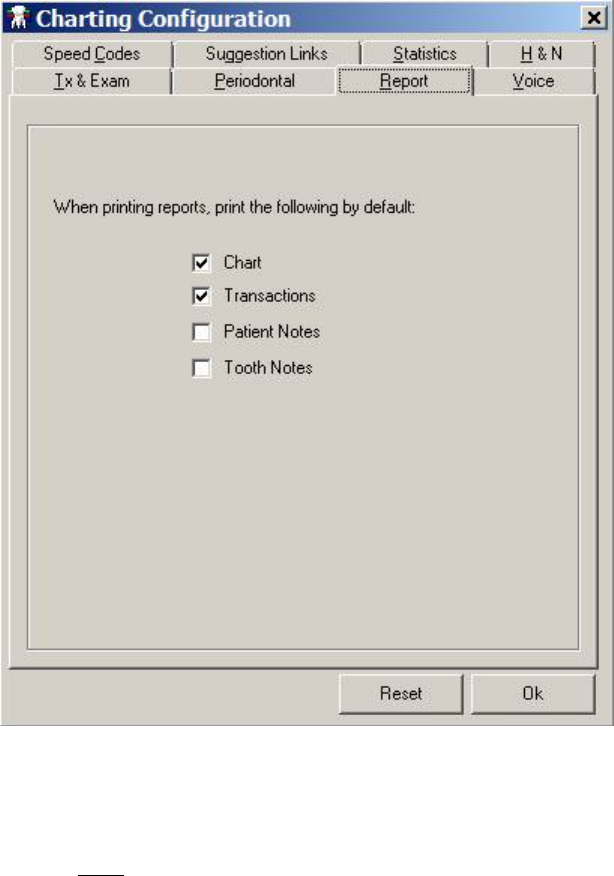
Use the functions on the Report tab to select certain pieces of information, which appears on individual
reports when using the Print option under the File menu. The Chart check box selection prints the graphic
chart, displayed on the last view screen of the Chart/Treatment tab, prior to the chosen Print submenu.
The Transactions check box selection prints the transaction table, displayed on the last view screen of the
Chart/ Treatment tab, prior to the chosen Print submenu. Patient Notes and Tooth Notes check box
selections print the entries entered using the Notes icon.
Figure 32: Report Tab
Voice
Voice is NOT enabled in DRM Plus.
May 2018 DRM Plus Administrator Manual v6.9 34
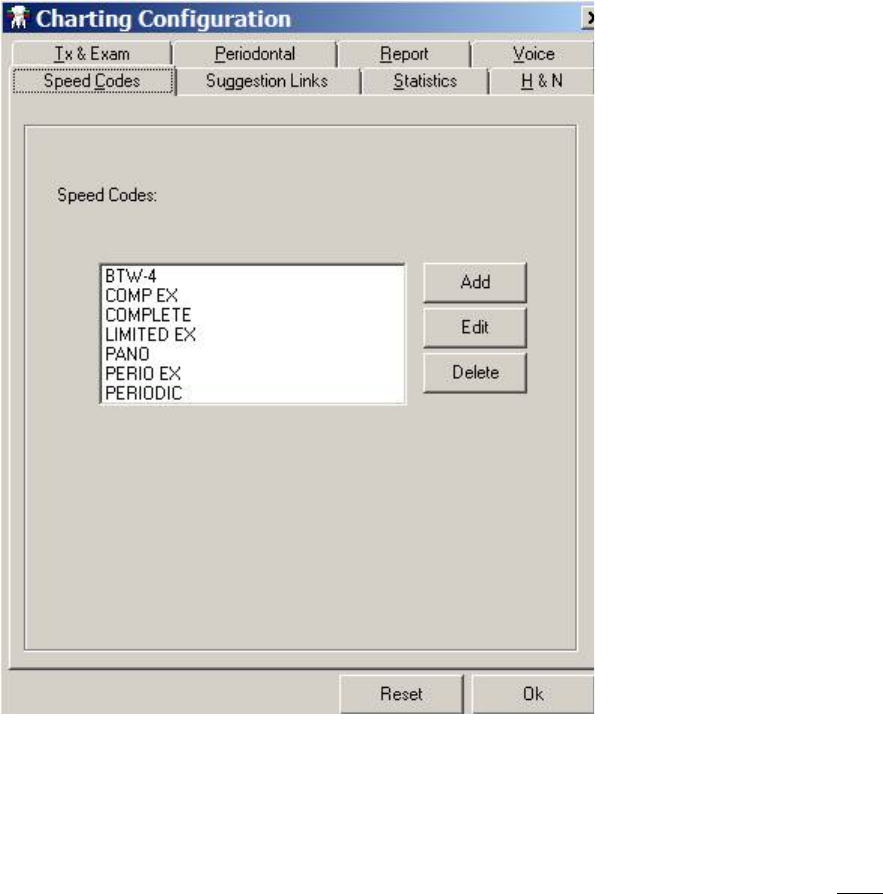
Speed Codes
Use the Speed Codes tab to set/create individual icons in DRM Plus for frequently used procedure codes
entered using the Treatment Plan or Completed Care viewing screens.
Figure 33: Speed Codes Tab
To add a Speed Code:
1. Click the Add button. The Edit Speed Code screen displays.
2. Add a new Name, which cannot exceed 10 characters.
3. Entering a description is optional. Two symbols; semicolon (;) and up-carrot (^) may NOT be
added or used in the description text.
4. Use the search function, ADA Codes, to look up a procedure code(s) and add it to the new speed
code.
5. Entering an icon is optional.
6. Click the OK button to begin finalization.
May 2018 DRM Plus Administrator Manual v6.9 35
Figure 34: Edit Speed Code Screen
To edit or delete the speed code, highlight the desired name in the Speed Codes tab and click the Edit or
Delete button. Provide appropriate entry in the subsequent screens; otherwise, click the OK button to
complete this part of the process.
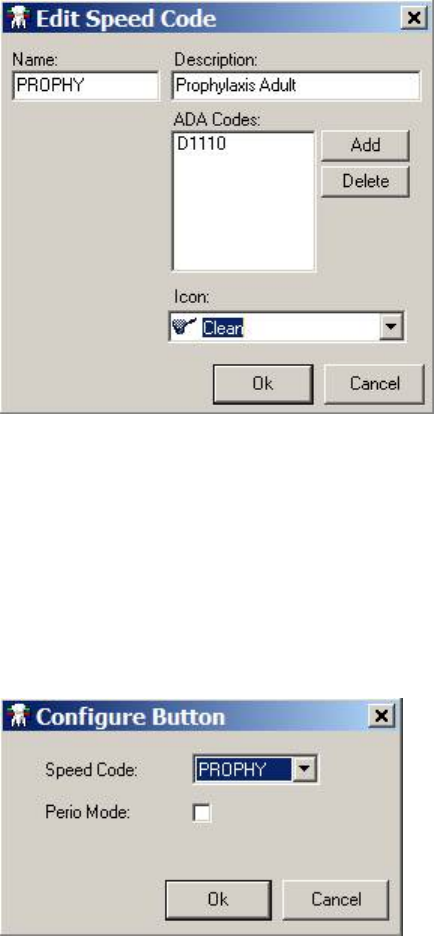
To complete the speed code process:
1. Move to the Completed Care or Treatment Plan view of the Treatment & Exam screen.
2. Click one of the undesignated icon squares. The Configure Button screen displays.
Figure 35: Configure Button Screen
3. Click the drop-down arrow, highlight and click the desired Speed Code name.
4. Click the OK button and the speed code is linked to that icon.
The Perio Mode check box on the Configure Button screen designates the viewing preference when the
Perio Buttons icon is clicked. The Perio Buttons icon is used as a toggle for displaying another 19
available icon buttons. Clicking the Perio Buttons icon displays any 19 Speed Code icons that have been
designated in the Perio Mode (check box clicked) while hiding any non-perio mode Speed Code icons from
the display. Clicking the Perio Buttons icon again reverses the display. This option allows for a total of 38
Speed Code icons to be created. The 19 non-perio mode speed codes are the default Speed Code icons
when DRM Plus is initially opened. Please see the Perio Buttons Icon section, in the Chart/Treatment –
Treatment & Exam chapter of this manual, for more information.
May 2018 DRM Plus Administrator Manual v6.9 36
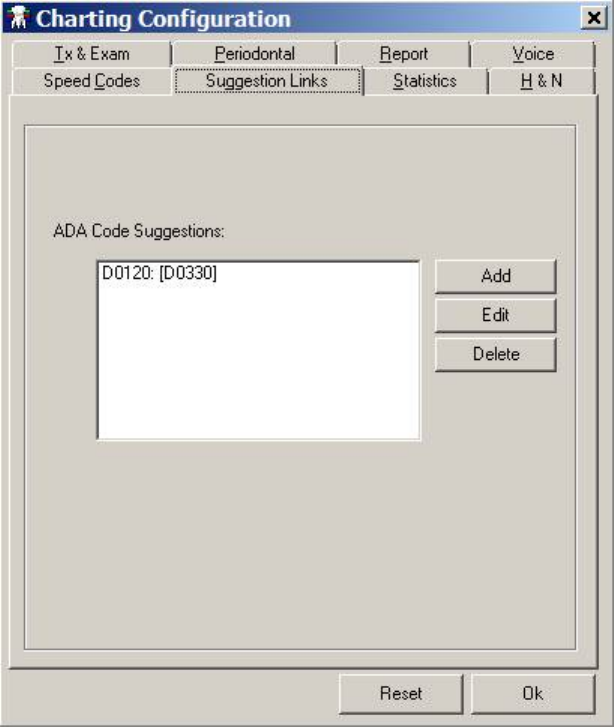
Suggestion Links
Use the Suggestion Links tab to enter code suggestions, when entering one procedure code which is linked
to another procedure code(s), without having to use an icon to find the other code. A screen displays asking
if other linked codes should be added providing an opportunity to decline the entry of suggested linked
codes.
Figure 36: Suggestion Links Tab
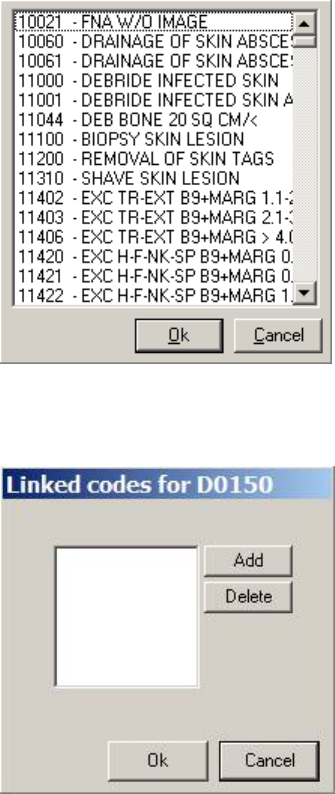
To add a suggestion link:
1. Click the Add button.
2. A screen displays featuring a list of all DRM Plus procedure codes. Click the desired primary
procedure code that other procedure codes are linked to, and then click the OK button.
May 2018 DRM Plus Administrator Manual v6.9 37
Figure 37: Suggestion Links Code List
3. A screen requesting the linked codes to the primary procedure code displays.
Figure 38: Linked Codes Screen
4. Click the Add button to add the first linked code. The list of all DRM Plus procedure codes
displays again.
5. Choose the second code to be linked with the primary procedure code and click the OK button.
6. Add as many linked codes to the primary procedure code as desired. To finish and return to the
tab, click the OK button.
Note: As many codes as necessary can be linked. Simply continue clicking the Add button on the Linked
codes screen and choosing more codes from the list.
To edit the suggestion link:
1. Select a suggestion link to be edited and click the Edit button. The Linked codes screen displays.
2. Click the Add button for another procedure code, and the list of procedure codes displays. Click
the OK button.
3. To remove a linked code entry, click the Delete button and then the OK button.
To delete the suggestion link, select the suggestion link and click the Delete button.
May 2018 DRM Plus Administrator Manual v6.9 38
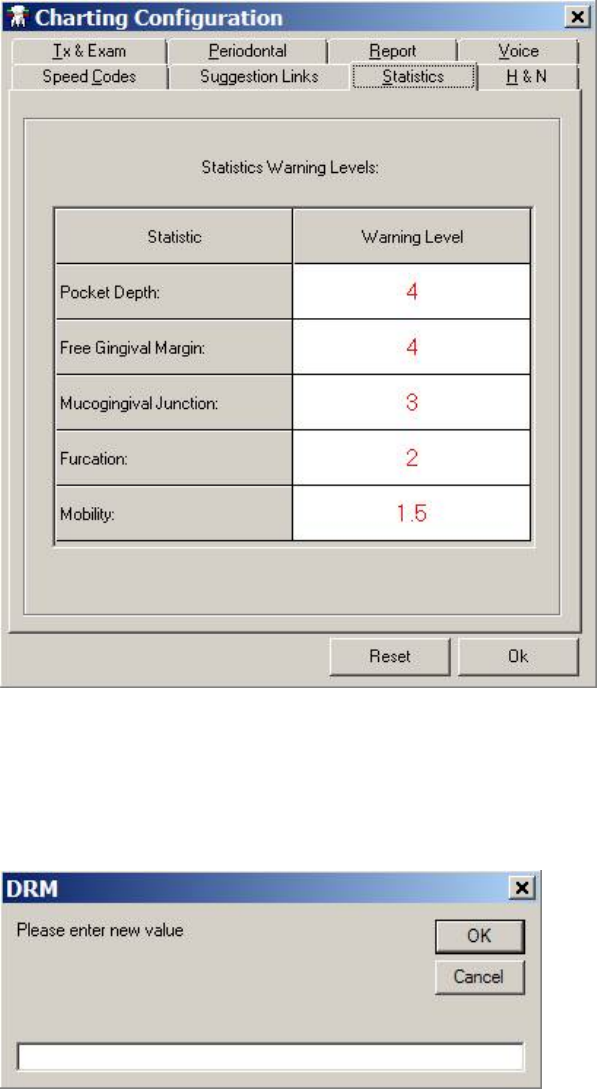
Statistics
Choose the Statistics tab to set the warning level for pocket depth, free gingival margin, mucogingival
junction, furcation and mobility found in the Stats screen on the Periodontal Chart.
Figure 39: Statistics Tab
To change the warning level:
1. Double-click the box containing the Warning Level to be changed.
2. A screen displays. Enter the new warning level in the text box and click the OK button.
Figure 40: Adjust the Warning Level
3. The Warning Level is changed on the tab.
May 2018 DRM Plus Administrator Manual v6.9 39
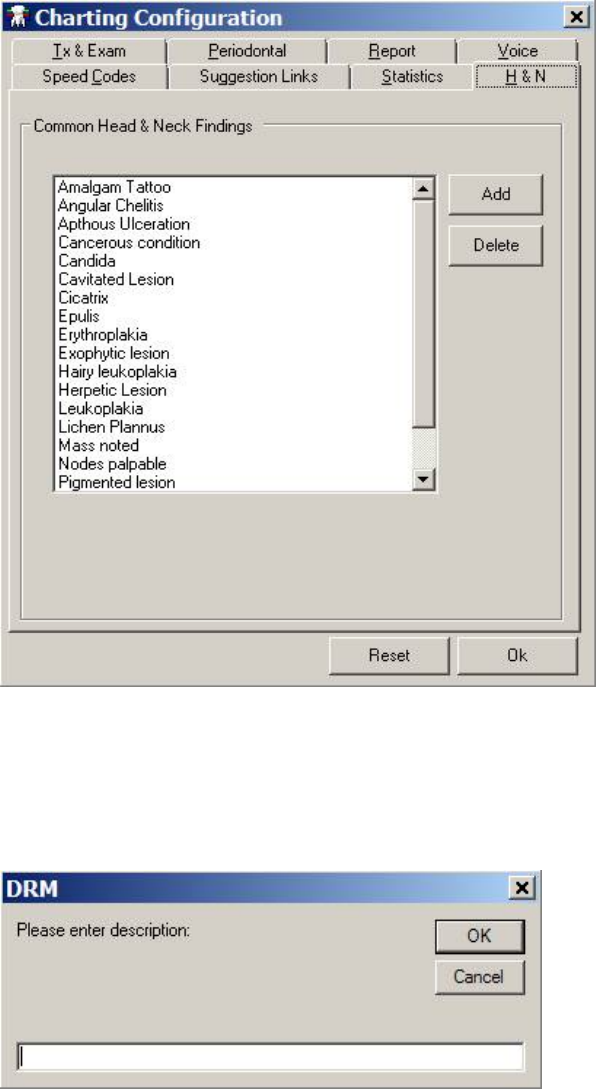
H&N
The H&N tab allows the provider to use the Add and Delete buttons to add/delete head and neck findings
listed on the H&N screen located on both the Treatment & Exam and Periodontal Chart screens.
Figure 41: H&N Tab
To add an H&N finding:
1. Click the Add button.
2. A DRM screen displays. Enter the finding in the text box.
Figure 42: DRM Description Screen
3. Click the OK button. The finding is added.
May 2018 DRM Plus Administrator Manual v6.9 40
To delete a finding, click the desired H&N finding in the list and then click the Delete button. The finding
is removed from the list.
Note: All administrative descriptions added or deleted for head and neck findings are permanent for all
users in the local DRM Plus server.
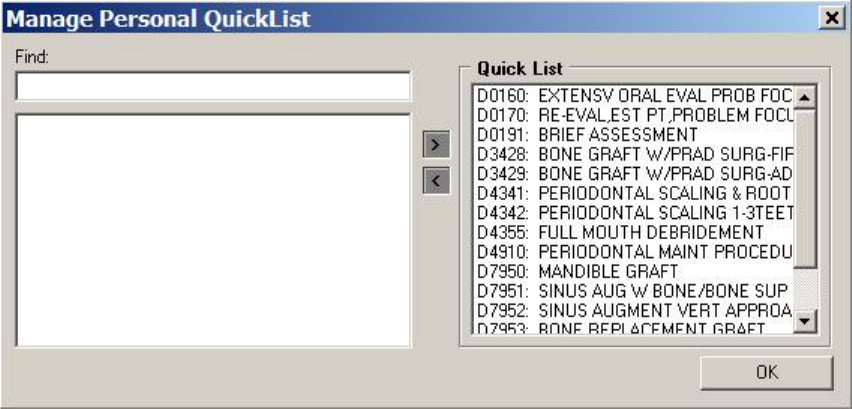
Add/Edit Personal QuickList
Select the Add/Edit Personal QuickList submenu to manage a Quick List of codes for personal use. For
additional convenience, enter frequently used procedure codes that have multi-add functionality associated
with the code, into the Quick List. The Manage Personal QuickList screen displays.
Figure 43: Manage Personal QuickList Screen
To add to the Quick List:
1. Type the search criteria into the Find text box. Search by words or numbers.
2. A matching list displays on the left side of the screen. Click one of them to select it.
3. Click the right arrow button to move the selected code to the Quick List.
4. Click the OK button to end and close the screen or repeat to add another code to the Quick List.
To remove from the Quick List:
1. Select an entry from the Quick List on the right side of the Manage Personal QuickList screen.
2. Click the left arrow button to remove it from the list. A screen displays confirming that the entry
is to be deleted. Click the Yes button to continue.
Note: Codes entered into a Quick List are accessed through the Quick Code icon.
May 2018 DRM Plus Administrator Manual v6.9 41
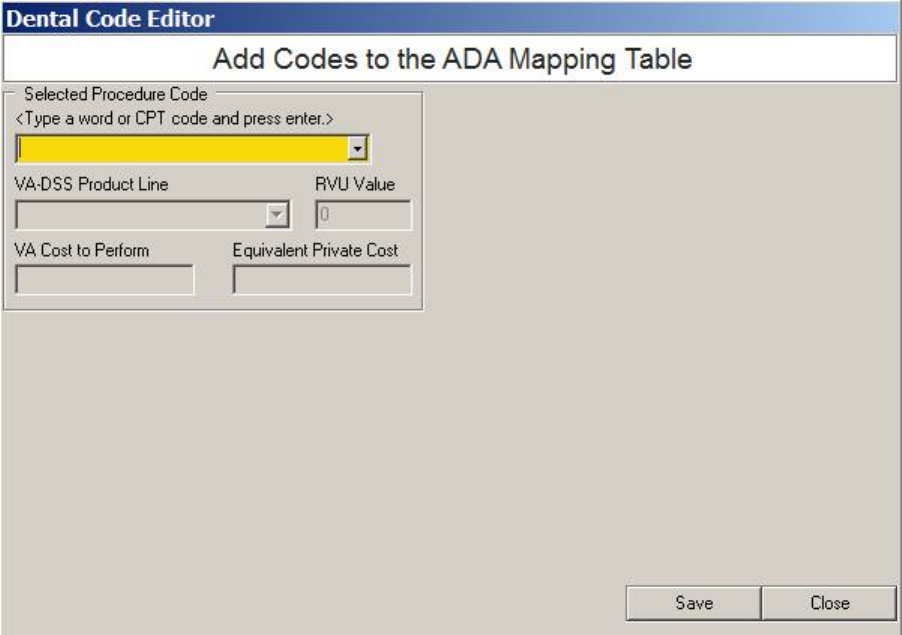
Add Medical Codes to ADA Table
A DRM Plus Administrator may select this submenu to add medical CPT procedure codes to the ADA
mapping table. Each medical CPT procedure code must have at least one designated diagnosis code entered
with it. Once a diagnosis code has been designated, it may be changed at any time. These changes apply
only to the local VistA system for specific facilities.
Figure 44: Dental Code Editor Screen
To add a medical procedure code to the ADA mapping table:
1. Type a word or medical CPT procedure code into the yellow drop-down box.
2. Press the <Enter> key.
3. Search results display in the drop-down menu. Select the correct result.
4. Once a new medical CPT procedure code is selected, several fields display on the Dental Code
Editor screen.
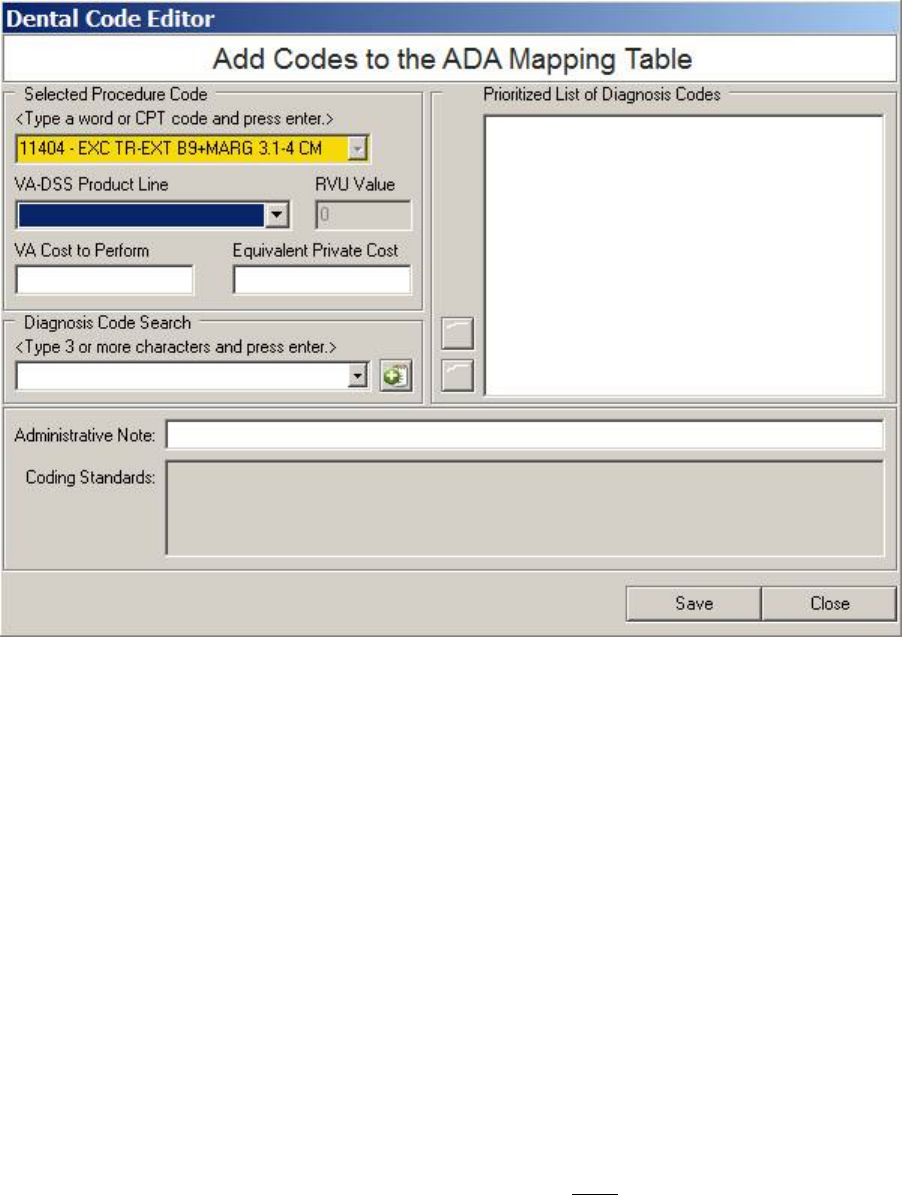
May 2018 DRM Plus Administrator Manual v6.9 42
Figure 45: Dental Code Editor Screen when Adding Procedure Code
5. Choose the VistA DES code from the VA-DSS Product Line drop-down menu. Enter the VA
Cost to perform and the Equivalent Private Cost information in the respective text boxes. The
VA-DSS Product Line field is required; the cost fields are optional.
6. The RVU Value in the text field is always zero for any local medical CPT procedure code added
to the ADA mapping table.
7. Add the diagnosis code using the Diagnosis Code Search, by typing into the corresponding text
box and pressing the <Enter> key.
8. Select the correct diagnosis code from the Diagnosis Code Search drop-down menu and click the
green icon [+] button. The diagnosis code is added to the Prioritized List of Diagnosis Codes.
Repeat this step until all necessary diagnosis codes are added.
9. To change the position of any diagnosis code on the list, first select the diagnosis code, and then
use the blue Up arrow to move the diagnosis code up. Repeat until all diagnosis codes are in the
correct order.
10. To remove a diagnosis code from the list, click the red [X] button.
11. Add an Administrative Note in the corresponding text box (optional).
12. When finished, click the OK button.
Note: Local DRM Plus Administrators can enter text freely in the Administrative Note text box to
complement the local medical CPT procedure code. This field is NOT mandatory to save a local medical
CPT procedure code.
Note: All locally-added medical CPT procedure codes are monitored nationally, and may be added in a
future DRM Plus patch, with an appropriate RVU value set.
May 2018 DRM Plus Administrator Manual v6.9 43
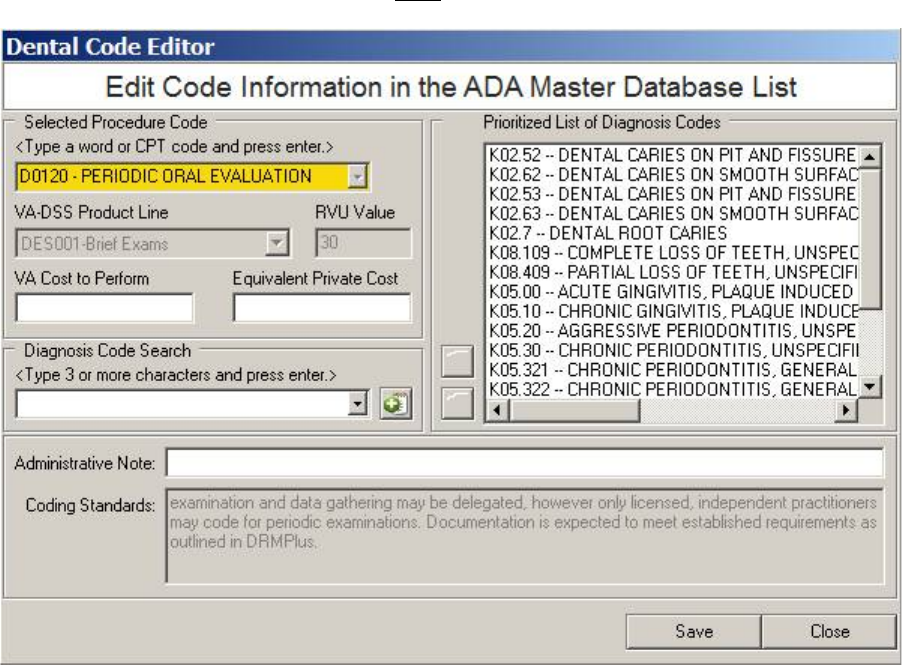
Edit Code Information in the ADA Table
Select this submenu to edit all CPT dental and medical procedure codes on the ADA mapping table from the
local server. Diagnosis codes may be added onto the existing national list of diagnosis codes; however, the
existing national list of diagnosis codes may NOT be edited.
Figure 46: Dental Code Editor Screen when Editing Procedure Code
To edit a code in the ADA Master Database List:
1. Type in the search term in the yellow drop-down box. Only those codes which are in the ADA
master database list display.
2. The VA-DSS Product Line, RVU Value and Coding Standards cannot be edited.
3. Type in the fields that are to be edited; the VA Cost to Perform, Equivalent Private Cost,
Prioritized List of Diagnosis Codes and the Administrative Note fields can be edited.
4. To add a list of local diagnosis codes, see the previous Add Medical Codes to ADA Table section
and follow steps (7-10).
5. When finished, click the OK button.
Note: When any diagnosis codes are added to a CPT procedure code, a line appears dividing the list into the
preset national list of diagnostic codes above the line, and the added local diagnostic codes below the line.
Note: The VA Cost to Perform, Equivalent Private Cost and Administrative Note text boxes are
optional.
May 2018 DRM Plus Administrator Manual v6.9 44
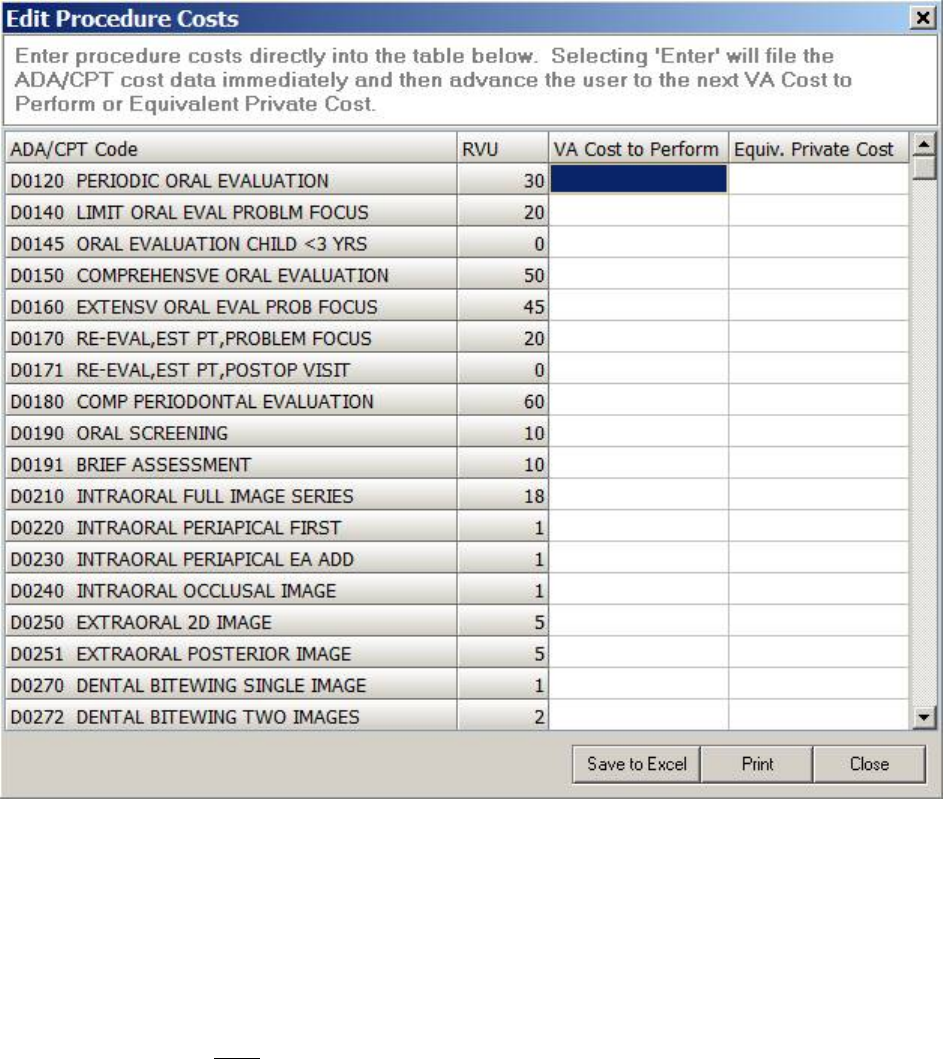
Edit Procedure Costs
Select this optional submenu to add or edit procedure code costs.
Figure 47: Edit Procedure Costs Screen
To add/edit a procedure code cost:
1. Scroll through the list to find the desired ADA/CPT procedure code.
2. Select the cost to be added or edited. Both VA Cost to Perform and Equivalent Private Cost can
be added or edited. RVU cannot be edited.
3. Type the cost value into the appropriate cell.
4. Press the <Enter> key or use the up/down arrow keys so that the new cost is saved. Left or right
arrow keys do NOT save the cost value.
5. Click either Save to Excel, to view in Microsoft Excel, Print or Close.
May 2018 DRM Plus Administrator Manual v6.9 45
Filter View
Use the Filter View submenu to choose which encounters display on the Chart/Treatment tab of DRM
Plus.
Figure 48: Filter View Submenus
Current Episode of Care
Select this filter to show only those treatments that have been completed for all visits during the current
disposition or patient status.
All Episodes of Care
Select this filter to show all treatments completed for all visits. This is the default setting.
Select Episode of Care
Select this filter to see all the treatments completed for all visits during a previous specific disposition or
patient status. When this submenu is selected, a screen listening all previous dispositions or patient statuses
associated with a given patient displays.
Figure 49: Select Episode of Care Screen
To select a previous disposition, click the desired one from the list and click the OK button.
May 2018 DRM Plus Administrator Manual v6.9 46
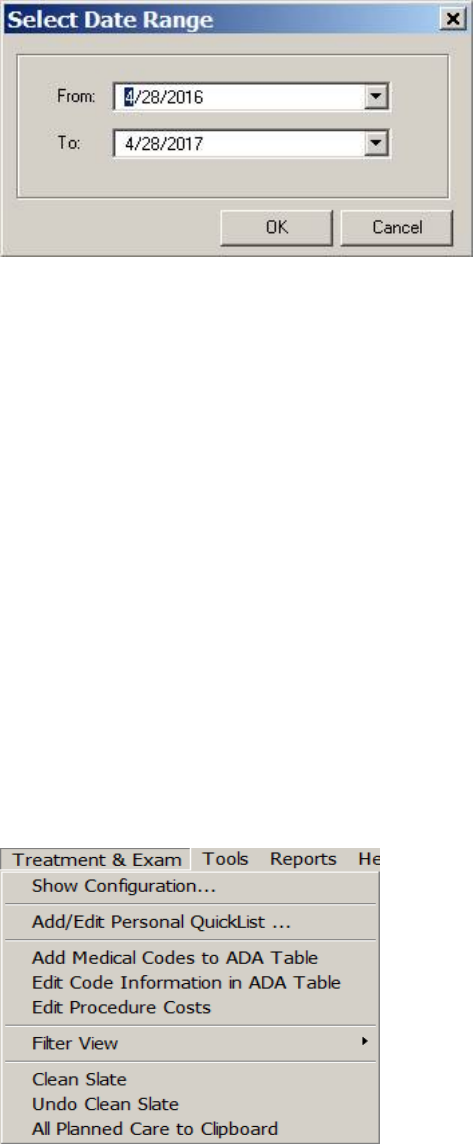
Date Range
Select this filter to show treatments that have been completed within a specified date range. When this filter
is selected, a screen displays. Use this screen to select a date range.
Figure 50: Select Date Range Screen
To filter by date range:
1. Use the drop-down menu to select the needed dates. Click the OK button.
2. The treatments completed in the entered date range display on the screen. If no entries were made
during the selected date range, DRM Plus displays as a clean slate.
Clean Slate
The Clean Slate submenu functionality clears the graphical portion of the Treatment & Exam screen, and
deletes all planned treatment for the selected patient. The new clean slate can be restored for this patient at
any time until a new encounter has been filed on this patient’s chart. The deleted planned treatment may
never be recovered, only re-entered and filed on the patient’s chart. Clean slate also inactivates all saved
unfiled data entered during this session and all previous unfiled data saved by all providers for this patient.
Clean slate removes all graphics on the three Treatment & Exam screens, but leaves the historical
transactions in both tables of the findings and completed screens.
The submenus of Clean Slate and Undo Clean Slate are found under the Treatment & Exam menu. Only
end-users who have the DRM Plus Administrative parameter option for clean slate are allowed to use this
function.
Figure 51: Clean Slate Submenu
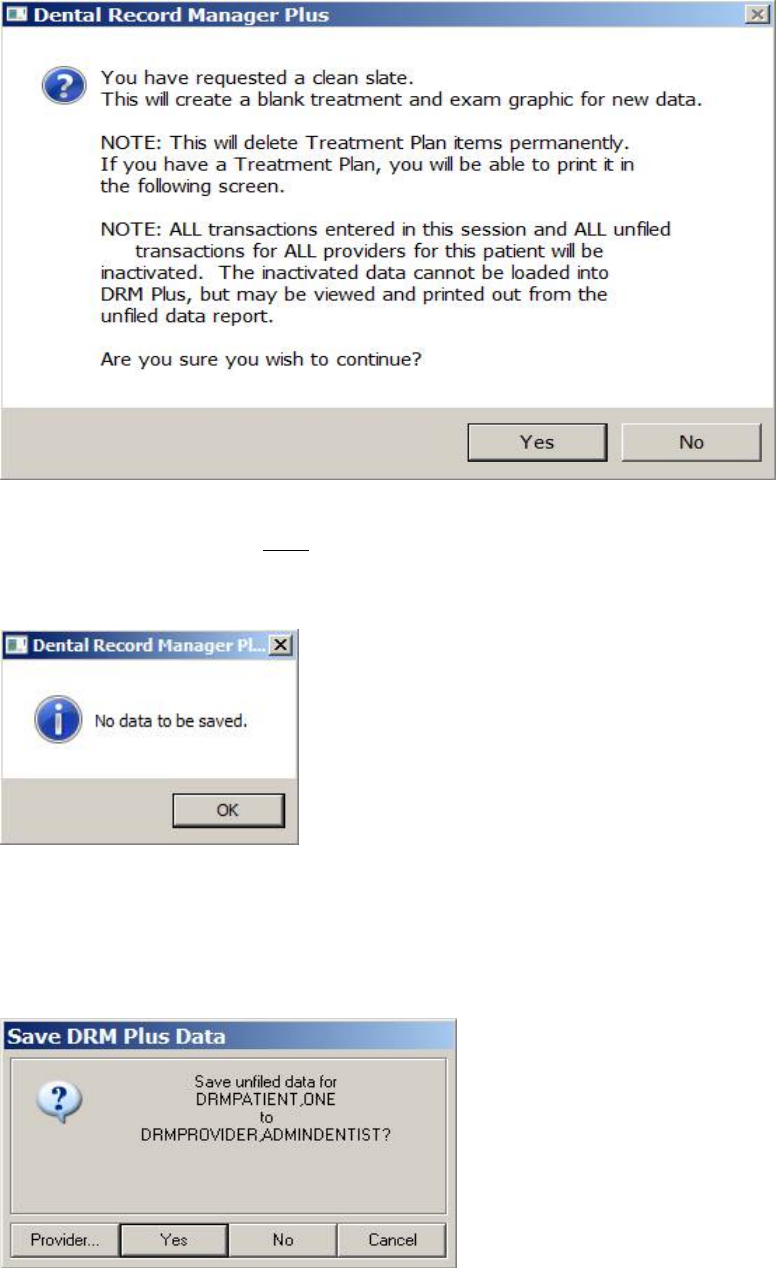
May 2018 DRM Plus Administrator Manual v6.9 47
The following dialog displays the planned treatment for the selected patient. This patient has extensive
findings and completed treatment which have been filed previously on the DRM Plus patient chart.
Figure 52: Patient Chart before Clean Slate
Selecting the Clean Slate submenu under the Treatment & Exam menu displays a screen informing the
DRM Plus Administrator that planned treatment is deleted permanently. All current graphics are removed
from the exam (findings) and completed treatment screens. All transactions entered during this session are
saved as inactivated unfiled data. All unfiled transactions from all providers saved on this patient are
inactivated.
May 2018 DRM Plus Administrator Manual v6.9 48
Figure 53: Clean Slate Information Screen
The next screens may or may NOT display to the DRM Plus Administrator. The first screen, Dental Record
Manager Plus, only displays if there was any unfiled data that was saved for this patient by any provider in
the past. The unfiled data is inactivated if a DRM Plus Administrator completes the clean slate.
Figure 54: No Data Saved
Otherwise, the Save DRM Plus Data screen displays, which allows the DRM Plus Administrator to save
new transactions as unfiled data. However, these transaction will be inactivated when completing the clean
slate. When the No button is selected on the Save DRM Plus Data screen, the user must again click the No
button on the same screen after clean slate has recycled.
Figure 55: Save DRM Plus Data
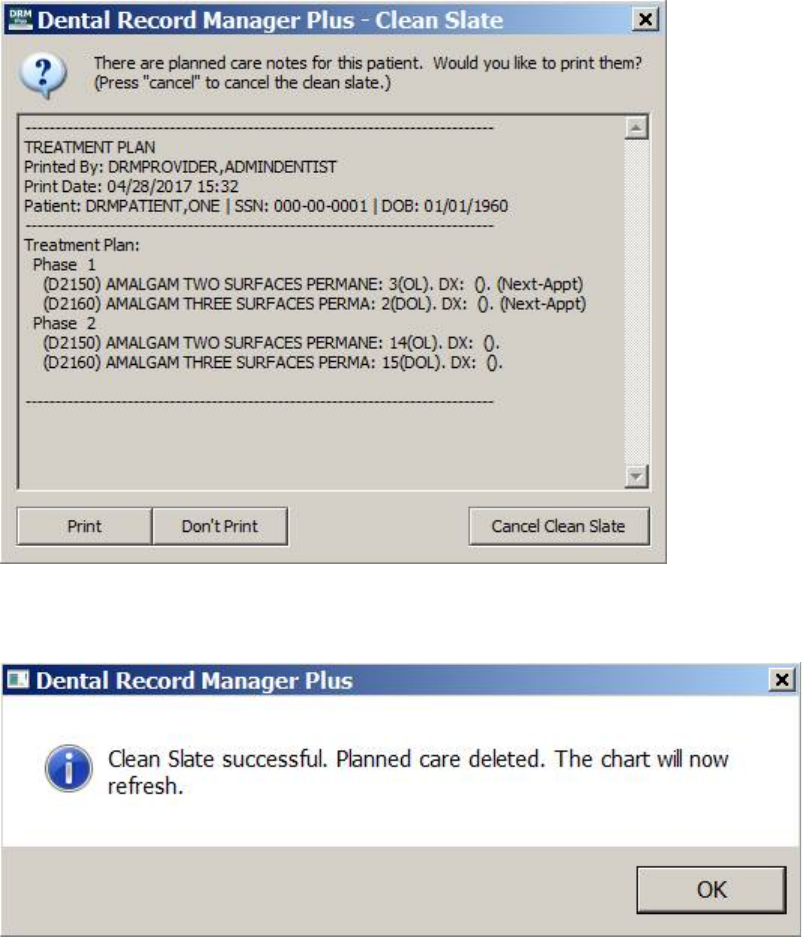
May 2018 DRM Plus Administrator Manual v6.9 49
The next screen, which always displays, has a message asking if the DRM Plus Administrator would like to
print the planned treatment. Select the Print button if concerned about re-entering the planned treatment,
because the planned treatment is deleted and cannot be recovered. When this is another provider’s treatment
plan, it should be printed and given to that provider to follow-up on the planned treatment for this patient.
That provider must re-enter and file the planned treatment on this patient’s chart.
Figure 56: Print Planned Care Notes
The following screen displays to inform that Clean Slate was successful, click the OK button.
Figure 57: Clean Slate Successful
The chart displays no graphics for completed treatment and exam findings. All the historical transactions in
the tables for both the completed treatment and exam findings are still present. The next dialog displayed
shows that the Seq Plan button is no longer active, because all planned treatment has been deleted; both
graphical and transactional.
May 2018 DRM Plus Administrator Manual v6.9 50
Figure 58: Patient Chart after Clean Slate
The following screen displays when a DRM Plus Administrator saved unfiled data during the clean slate
process. It also displays for any provider opening this patient’s chart after the clean slate has been
completed, and there was previously saved unfiled data for this patient by that provider. It informs the
provider that the patient now has inactive unfiled data. The provider may delete the unfiled data using the
screen by selecting the Delete button, or selecting the View button and then clicking either to View or
Delete the inactive unfiled data from the Unfiled Data report.
Figure 59: Load DRM Plus Data Screen
Clean slate displays an icon in the banner showing the last clean slate date performed on this patient’s chart.
This icon is permanently on this patient’s chart; however, it could be updated when another clean slate is
performed on this patient’s chart.
Figure 60: Clean Slate Banner Icon
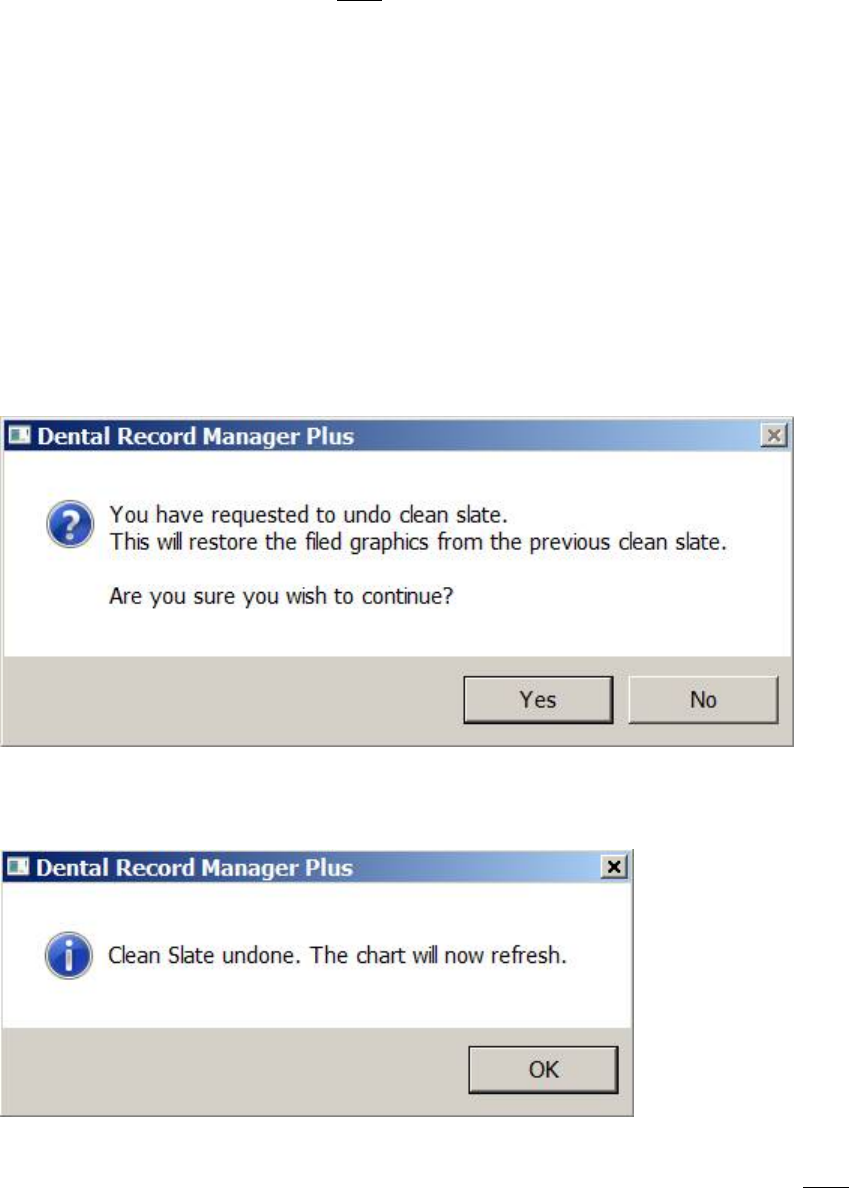
May 2018 DRM Plus Administrator Manual v6.9 51
Note: The Clean Slate submenu may NOT be used for any filed completed transaction corrections, or any
encounters filed incorrectly on a dental patient. These still have to be deleted by the DRM Plus
Administrator using the line item deletion function or the complete encounter deletion function.
Undo Clean Slate
The Undo Clean Slate submenu allows the DRM Plus Administrator to undo the last clean slate action
taken on a given patient. All historical graphics of completed treatment and findings are returned to the
chart, assuming only one clean slate has been performed. If it is the second time, it only returns the historical
graphics created following the first clean slate.
To utilize the undo clean slate function:
1. Select the Undo Clean Slate submenu from the Treatment & Exam drop-down menu. The
following screen displays.
Figure 61: Undo Clean Slate Message Screen
2. Click the Yes button to reveal another screen, which confirms that Clean Slate is undone.
Figure 62: Clean Slate Undone
While the DRM Plus patient’s chart is refreshing, if inactive unfiled data exists, which had NOT been
deleted, another screen displays. The options presented are the same that are provided when loading saved
unfiled data into the patient’s chart.
May 2018 DRM Plus Administrator Manual v6.9 52
Figure 63: Previously Saved Inactive Data Message
The correct date range of completed treatment and findings graphics imports into the patient’s chart, as
shown below.
Figure 64: Completed Treatment Graphics Recovered
Note: Saved unfiled data for a patient may be recovered if the DRM Plus Administrator performs a Clean
Slate for this patient and immediately uses the Undo Clean Slate submenu, before the inactive unfiled data
is deleted.
All Planned Care to Clipboard
All Planned Care to Clipboard is a submenu located as the last header on the Treatment & Exam menu.
This submenu when selected will allow the user to copy all planned data; filed and unfiled planned
treatment from the Seq Plan screen with extra planned details that occur on the cover page. This copy may
be pasted on any word document, text document or any application window if allowed.
Select the All Planned Care to Clipboard submenu and place your curser in the word document, text
document or any application window where you would like the planned data pasted.
May 2018 DRM Plus Administrator Manual v6.9 53
Tools
The Tools menu has 9 submenus: Windows Calculator, Windows Explorer, Windows Notepad, User
Inquiry, User Options, Administrative Toolbox, Panel Add/Edit, Provider Add/Edit and Vitals.
The ADA Website submenu is an ancillary application that the DRM Plus Administrator may customize for
all users. The DRM Plus Administrator may customize up to 10 ancillary application submenus.
Note: Administrative Toolbox, Panel Add/Edit and Provider Add/Edit are DRM Plus administrative
functions.
Figure 65: Tools Menu
Windows Calculator
Select this submenu to open Windows Calculator.
Windows Explorer
Select this submenu to open Windows Explorer.
Windows Notepad
Select this submenu to open Windows Notepad.
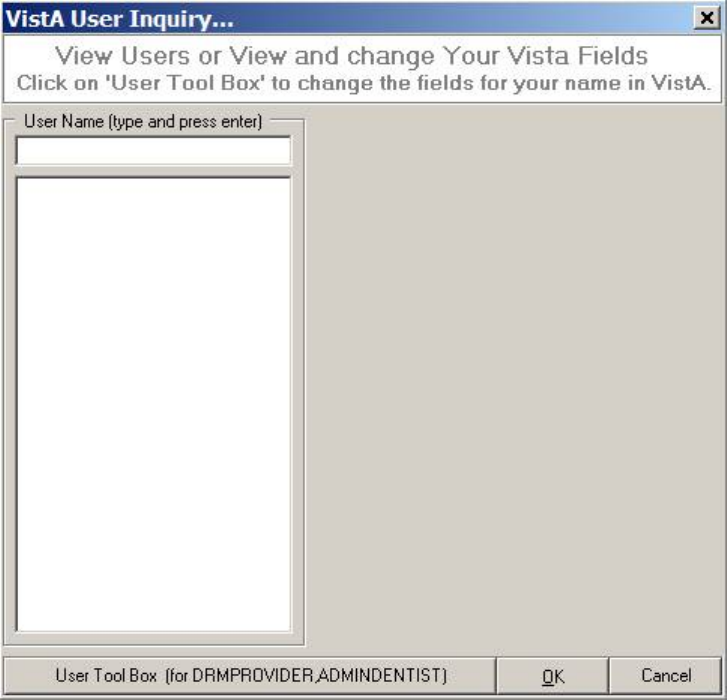
May 2018 DRM Plus Administrator Manual v6.9 54
User Inquiry
Select this submenu to view and change the VistA fields or to view the VistA fields of other users. The
VistA User Inquiry screen displays.
Figure 66: VistA User Inquiry Screen
1. Type the User Name into the input text box and press the <Enter> key.
2. The results display on the left side of the screen.
3. Select a User Name to view. The user’s information displays on the right side of the screen as
shown in the next figure.
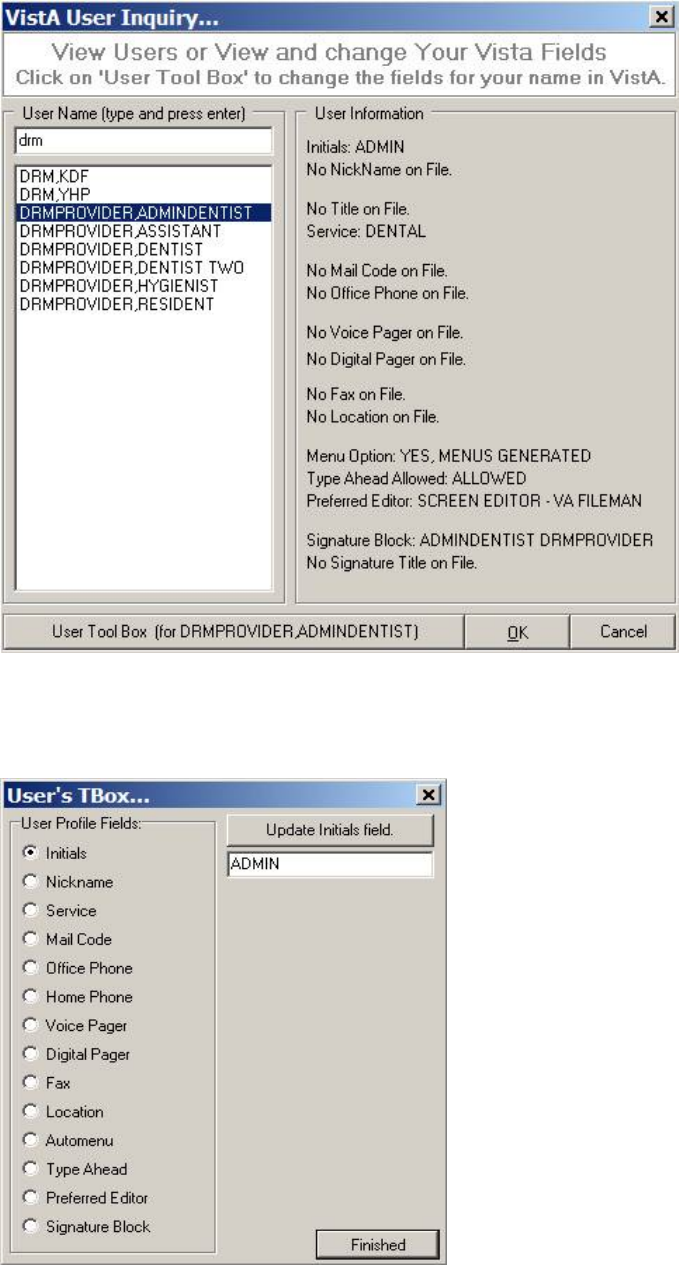
May 2018 DRM Plus Administrator Manual v6.9 55
Figure 67: VistA User Inquiry Screen with User Information Displayed
Select the User Tool Box button to change the personal fields in VistA. Click the User Tool Box button at
the bottom of the screen and the User’s TBox screen displays.
Figure 68: User’s TBox Screen
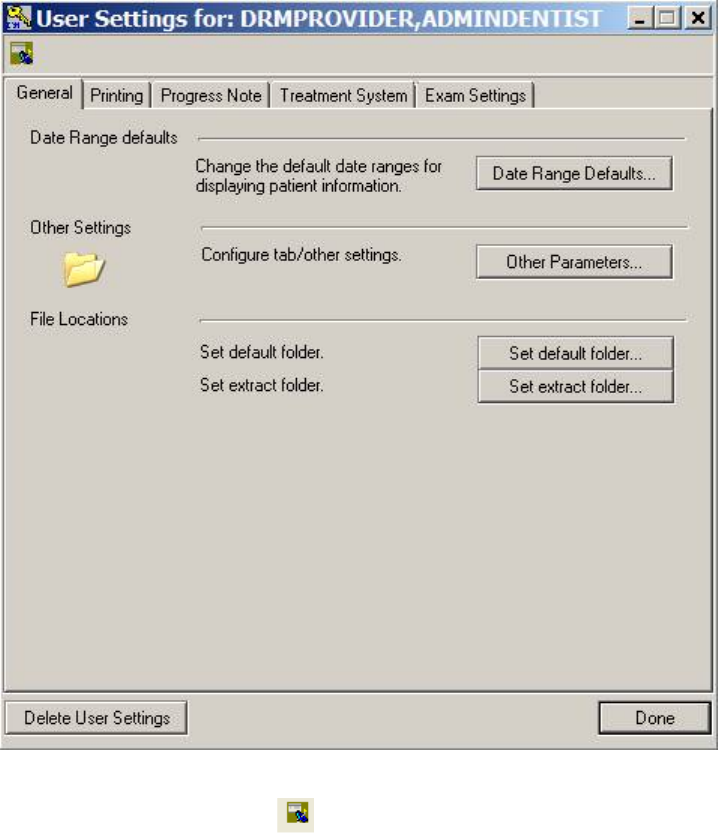
May 2018 DRM Plus Administrator Manual v6.9 56
4. Select the desired User Profile Fields by clicking the corresponding radio button.
5. Edit the new text in the text box.
6. Click the Update Field button.
7. Click the Finished button. The VistA User Inquiry screen displays again.
User Options
Adjust various user settings in this submenu. The screen contains five tabs: General, Printing, Progress
Note, Treatment System and Exam Settings.
Figure 69: User Settings Screen
The Broker Call History icon opens the broker calls screen. Please see the Last Broker Call section,
in the Using the DRM Plus Drop-Down Menus chapter of this manual, for more information.
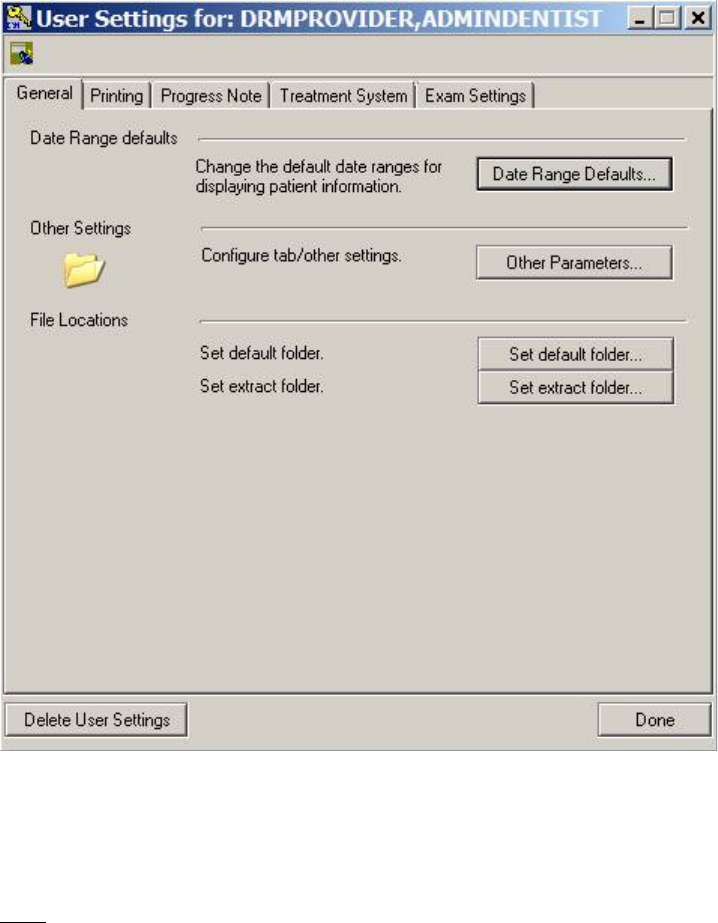
May 2018 DRM Plus Administrator Manual v6.9 57
General
The default General tab allows the provider to change Date Range defaults, Other Settings and File
Location folders.
Figure 70: General Tab
The Delete User Settings button located on the lower left corner of the screen displays in all the tabs. This
button allows the user to delete any new changes in this session before the parameter is saved.
Note: The Delete User Settings function only applies to the user that is currently logged in. Other users are
NOT affected if one chooses to delete user settings.
To change the default date ranges:
1. Click the Date Range Defaults button.
2. The Date Range screen displays.
May 2018 DRM Plus Administrator Manual v6.9 58
Figure 71: Date Range Screen
3. Use the up and down arrows to set the desired date range.
4. Click the OK button to return to the User Setting screen.
To change other parameter settings:
1. Click the Other Parameters button.
2. The Other Parameters screen displays.
Figure 72: Other Parameters Screen
3. Use the Tabs drop-down menu to set the initial tab and chart display in DRM Plus.
4. Use the Note Boilerplate check box to indicate whether the program should prompt for the
boilerplate insert associated with the VistA TIU progress note title selection.
May 2018 DRM Plus Administrator Manual v6.9 59
To change the file folder location:
1. Click the Set default folder button.
2. The Select Default Folder screen displays.
Figure 73: Select Default Folder Screen
3. Navigate to and click the desired folder.
4. Click the OK button to select it.
Note: This option allows the importing of information stored as a .txt file into the TIU progress note.
To set the extract folder location:
1. Click the Set extract folder button.
2. The Select Extract Folder screen displays.
May 2018 DRM Plus Administrator Manual v6.9 60
Figure 74: Select Extract Folder Screen
3. Navigate to the desired folder and click it.
4. Click the OK button to select the folder. A confirmation screen displays.
5. Click the OK button. Extract History reports are saved to this location.
May 2018 DRM Plus Administrator Manual v6.9 61
Printing
Use the Printing tab to set print margins, orientations, etc.
Figure 75: Printing Tab
To change the page configuration:
1. Click the Page Setup button.
2. The Page Setup screen displays.
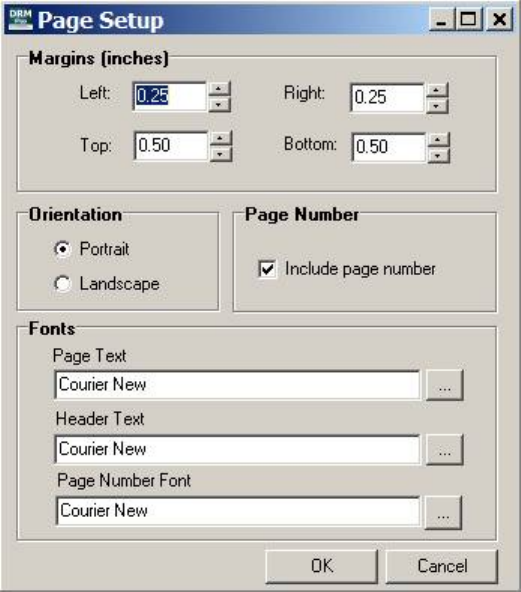
May 2018 DRM Plus Administrator Manual v6.9 62
Figure 76: Page Setup Screen
3. Use the up and down arrows to adjust the margins.
4. Use the Orientation radio buttons to change the orientation of the printed document.
5. Use the Page Number check box to indicate whether page numbers are to be included.
6. Use the Ellipsis buttons to choose fonts for the Page Text, Header Text and Page Number.
7. Click the OK button to return to the User Settings screen.
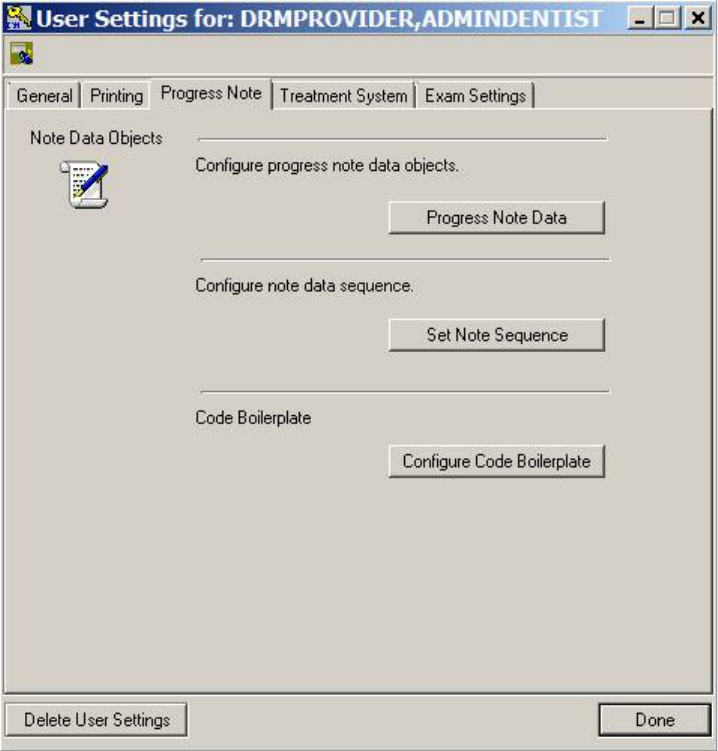
May 2018 DRM Plus Administrator Manual v6.9 63
Progress Note
Use the buttons in the Progress Note tab to configure progress note data objects, configure note data
sequence and configure code boilerplates.
Figure 77: Progress Note Tab
To configure progress note data objects:
1. Click the Progress Note Data button.
2. The Progress Note Data Objects screen displays.
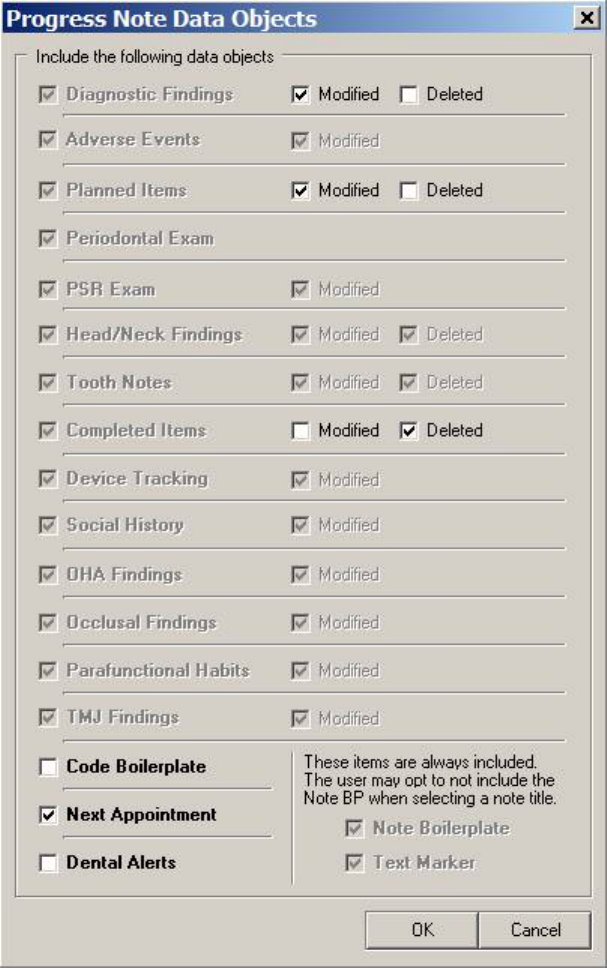
May 2018 DRM Plus Administrator Manual v6.9 64
Figure 78: Progress Note Data Objects Screen
3. Use the various check boxes to include or exclude desired progress note data objects.
4. Click the OK button to return to the User Settings screen.
Note: The Code Boilerplate check box activates the automatic importing into the TIU progress note of any
code boilerplate created in DRM Plus.
To configure the note data sequence:
1. Click the Set Note Sequence button.
2. The Note Object Sequence screen displays.
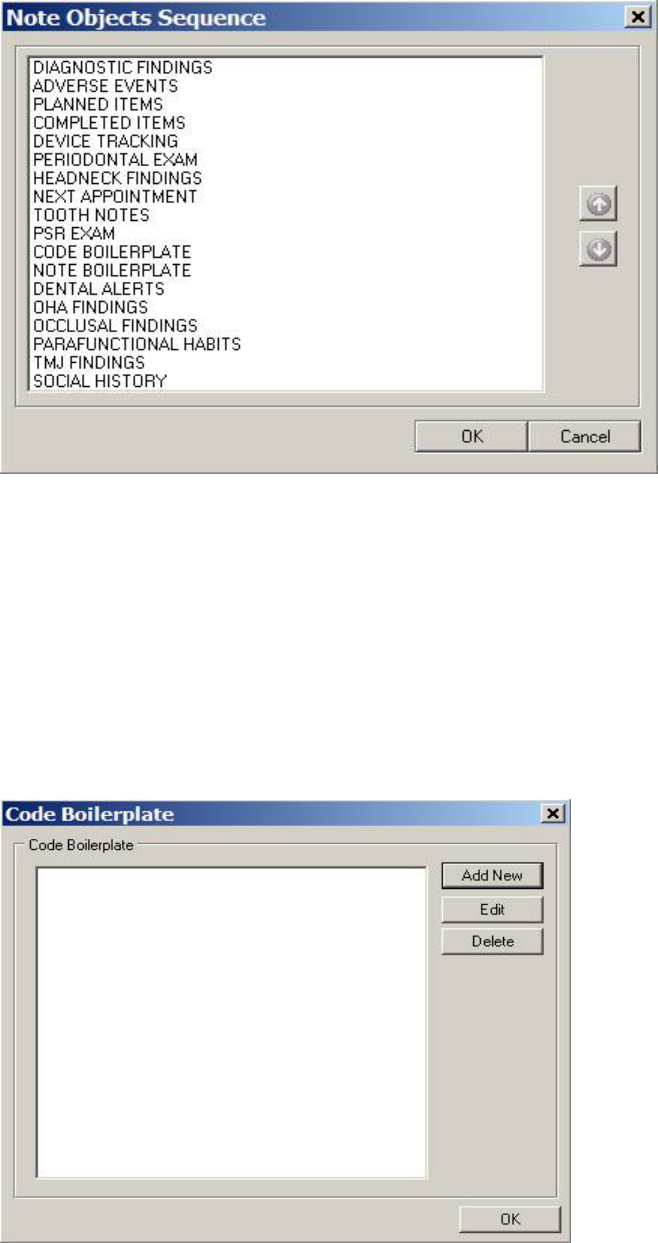
May 2018 DRM Plus Administrator Manual v6.9 65
Figure 79: Note Object Sequence Screen
3. Select the note object to be moved in the list.
4. Use the up and down arrows on the right side of the screen to change the sequence of the note
object on the list.
5. Click the OK button to return to the User Settings/Progress Note tab screen.
To configure the code boilerplate:
1. Click the Configure Code Boilerplate button.
2. The Code Boilerplate screen displays.
Figure 80: Code Boilerplate Screen
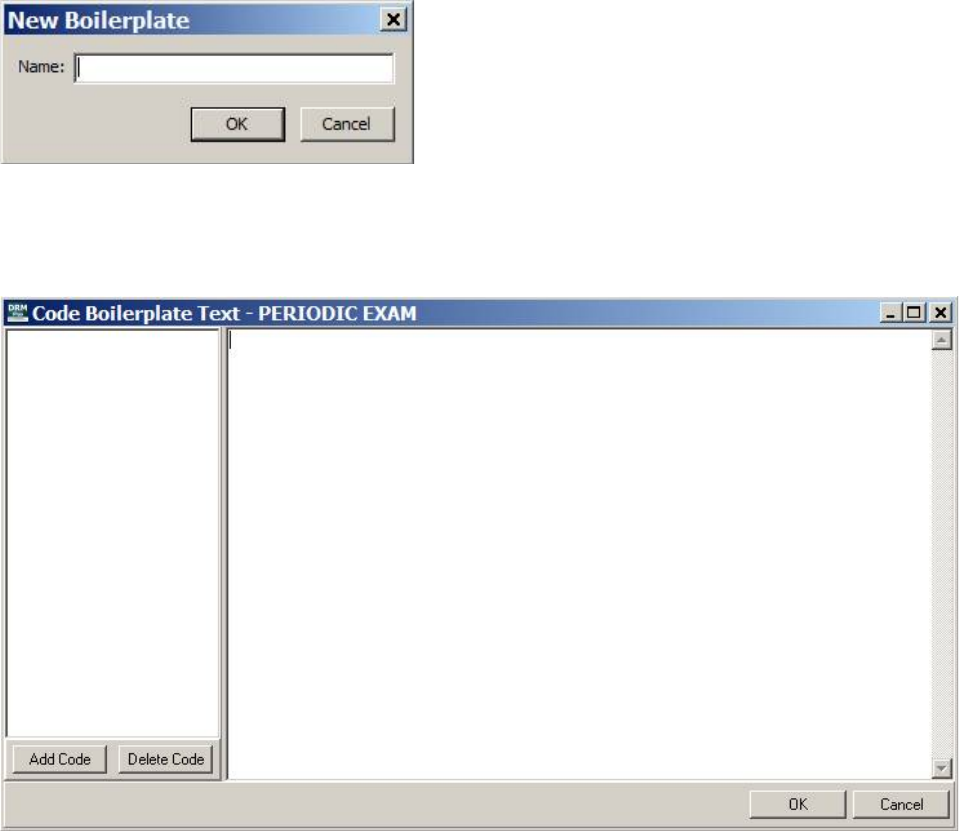
May 2018 DRM Plus Administrator Manual v6.9 66
To add a new code boilerplate:
1. Click the Add New button.
2. The New Boilerplate screen displays.
Figure 81: New Boilerplate Screen
3. Enter the name in the text box and click the OK button.
4. The Code Boilerplate Text screen displays.
Figure 82: Code Boilerplate Text Screen
5. Click the Add Code button to add a code to the boilerplate.
6. The Find CPT Code or CPT Description Text screen displays.
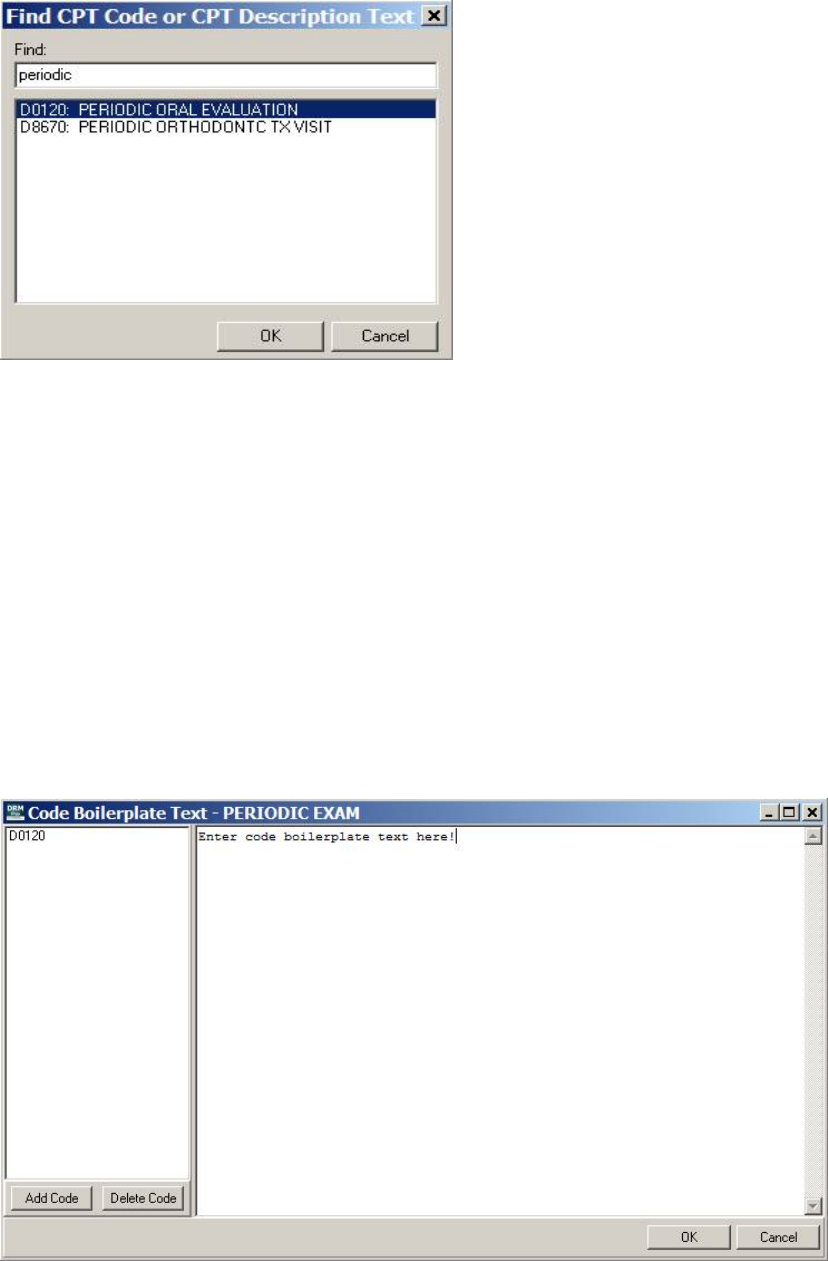
May 2018 DRM Plus Administrator Manual v6.9 67
Figure 83: Find CPT Code Screen
7. Type in the CPT code. A partial number is acceptable. Press the <Enter> key.
8. The search results display in the screen. Select one and click the OK button.
9. The selected code displays on the Code Boilerplate Text screen. The provider may add more than
one CPT code to this code boilerplate.
10. To delete that code, click the Delete Code button in the Code Boilerplate Text screen.
11. Type the desired associated text into the right side of the Code Boilerplate Text screen.
12. Click OK. A confirmation screen displays. Click OK to return to the Code Boilerplate screen.
To edit a code boilerplate:
1. Select the code boilerplate to be edited from the Code Boilerplate screen.
2. Click the Edit button.
3. The Code Boilerplate Text screen displays.
Figure 84: Code Boilerplate Text Screen
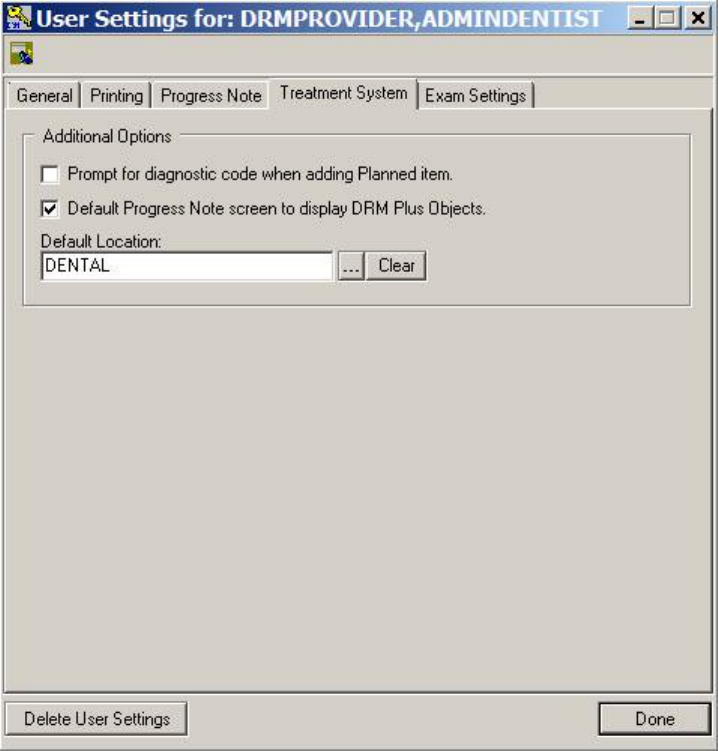
May 2018 DRM Plus Administrator Manual v6.9 68
4. From here, type in the right side of the screen to add or delete text from the boilerplate. Use the
Add Code and Delete Code buttons to add or delete codes form the boilerplate.
5. Click the OK button. An information screen displays. Click the OK button to return to the Code
Boilerplate screen.
To delete a code boilerplate:
1. Select a code boilerplate from the list on the Code Boilerplate screen.
2. Click the Delete button.
3. A confirmation screen displays. Click the Yes button to delete the boilerplate.
4. An information screen displays. Click the OK button to return to the Code Boilerplate screen.
Treatment System
The Treatment System tab allows access to additional options.
Figure 85: Treatment System Tab
Use the check boxes to choose whether to prompt for a diagnostic code when adding a planned item, or
select the default tree view to display DRM Plus note objects on the Progress Note screen.
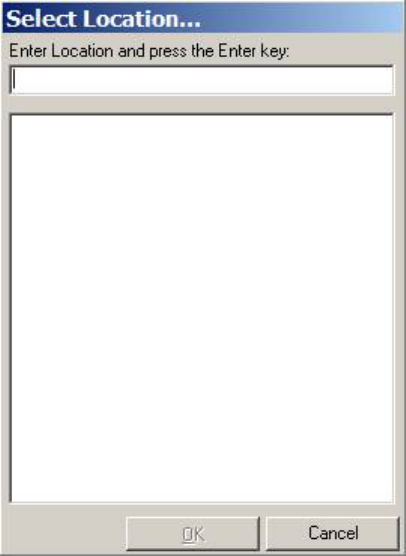
May 2018 DRM Plus Administrator Manual v6.9 69
To choose a default location:
1. Click the Ellipsis (...) button next to the Default Location text box.
2. The Select Location screen displays.
Figure 86: Select Location Screen
3. Type the location into the text box and press the <Enter> key.
4. Search results display on the Select Location screen.
5. Choose the desired location and click the OK button.
6. Select the OK button from the informational screen and the location is saved.
7. Use the Clear button if the location should be removed, then the OK button on the informational
screen.
8. The user may also change the default location by using the Select Location screen.
9. Always select the OK button from the informational screen to save any changes.
10. Select the Done button at the bottom of the screen to close the User Settings screen.
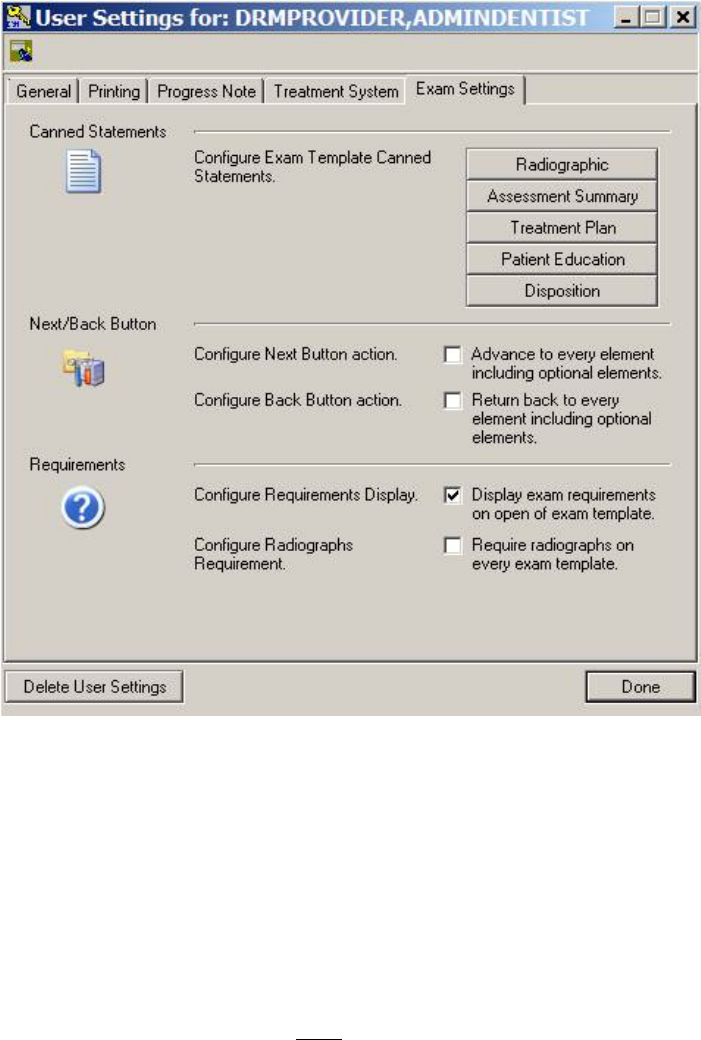
May 2018 DRM Plus Administrator Manual v6.9 70
Exam Settings
The Exam Settings tab provides the user with several options. These include: Canned Statements, Next/
Back Button and Requirements.
Figure 87: Exam Settings Tab
The Canned Statements parameter allows adding of additional pre-defined statements by the end-user to
four elements. All local providers are end-users when utilizing this function from the User Options
submenu, whether or not they are DRM Plus administrators. Any changes made from the User Settings
screen affect only the individual end user.
Pre-defined statements are broken into five categories: Radiographic, Assessment Summary and
Treatment Plan (located in the same element), Patient Education and Disposition. There is a maximum of
twelve pre-defined statements allowed per category.
The local DRM Plus Administrator has priority when entering these statements system-wide, utilizing the
administrator settings parameter (NOT displayed here).
When any of these element categories are maxed out with pre-defined statements, the DRM Plus
Administrator may add another. This can be done by utilizing the administrator settings parameter. This
hides the last pre-defined statement entered by any end-user, and only affects those end-users with twelve
entered and displayed in the given category.
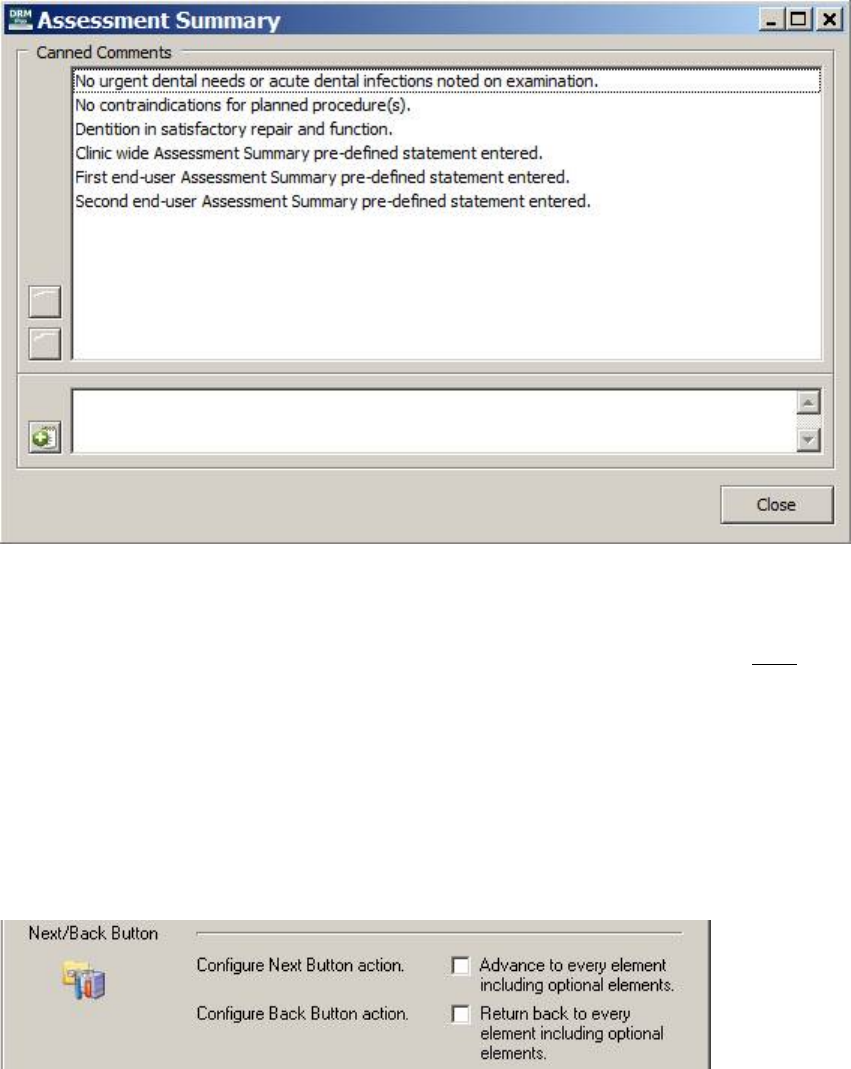
May 2018 DRM Plus Administrator Manual v6.9 71
To add a pre-defined statement (admin or non-admin) from the User Settings screen:
1. Select one of the five pre-defined statement buttons, such as Assessment Summary.
2. Type or copy/paste a pre-defined statement in the lower text box.
3. Click the green Add (+) button.
4. Click the OK button to confirm the new pre-defined statement addition.
Figure 88: Assessment Summary Screen
The end-user may highlight any of the pre-defined statements that were entered from their User Settings
screen and either delete that statement or move the statement’s position in the list. This deletion or
rearranging of the order only affects the end-user’s list of pre-defined statements and NOT any entered by
the DRM Plus Administrator or any national pre-defined comment that was kept by the DRM Plus
Administrator; these are listed at the top.
The Next/Back Button parameter setting allows end-users, when selecting the Next or Back buttons
located on any Exam tab element screen, to go directly to the next proceeding or previous required element
screen for that exam code and skip all optional element screens.
Note: There is no Back button on the first Presentation/Chief Complaint element screen and there is no
Next button on the last Disposition element screen.
Figure 89: Next/Back Button Parameters

May 2018 DRM Plus Administrator Manual v6.9 72
Both options are unchecked by default. When unchecked, the Next button skips any element that is optional
or has been completed from new data entered during this session and opens the next required element. When
checked, the Next button opens the very next element regardless of whether it is optional or completed
during this session.
The Back button when unchecked skips any element that is optional but opens all previous required
elements that are completed or NOT. When checked, the Back button opens the previous element regardless
of whether it is optional or required.
The user is required to complete any optional or required element when selecting the Next button when
trying to move forward. Selecting the Back button does NOT require the element to be completed to open a
previous element.
Note: When this parameter has been formatted in the User Settings screen, these selections only affect the
end-user’s profile and follows that end-user to any computer when loading DRM Plus with their VistA
access/verify codes.
The first requirements parameter, Configure Requirements Display, allows the end-user to keep the
requirements display open when selecting any element from the Exam tab or the definitions from the OHA
and Occlusal screens. The second requirements parameter, Configure Radiographs Requirement, allows
the end-user to require a Radiograph Finding entry with any exam/consult code entered as completed care
and requires data entered into the Exam tab.
Figure 90: Requirements Parameters
The Configure Requirements Display parameter is checked by default and displays the element’s
requirements whenever an element screen is open. When unchecked, the end-user must select the Done
button and then close/reopen DRM Plus to activate. This parameter change requires the end-user to open the
Element Requirements Panel manually.
The Element Requirements icon located in the upper right corner of the element screen when selected
displays the Element Requirements Panel.
Figure 91: Presentation/Chief Complaint Element Screen
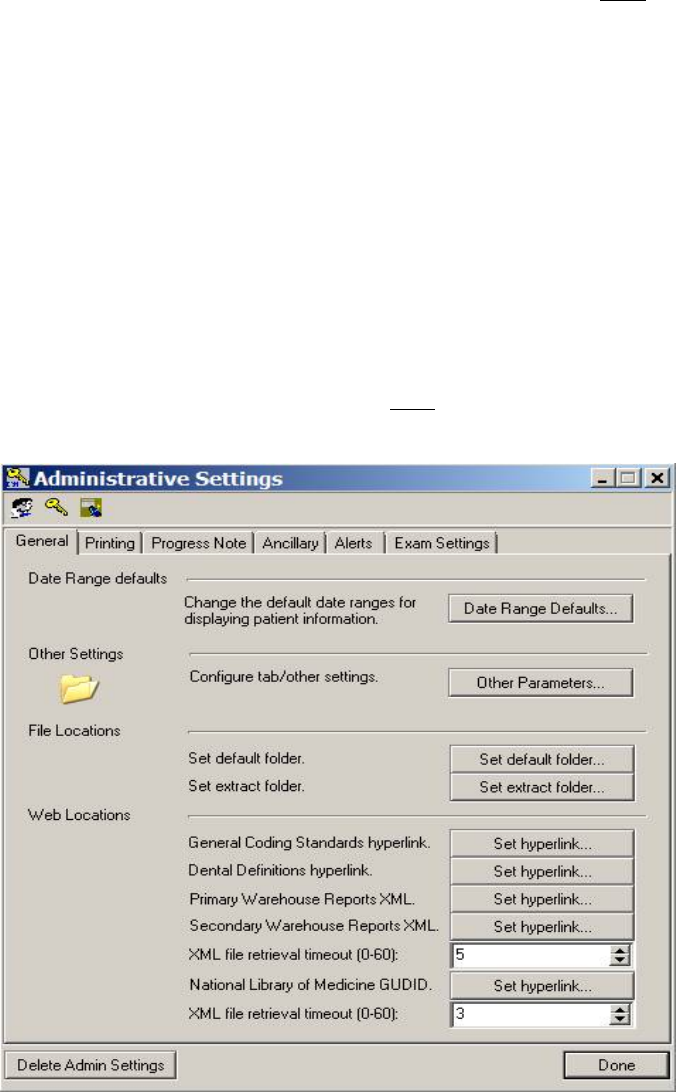
May 2018 DRM Plus Administrator Manual v6.9 73
The Configure Radiographs Requirement is unchecked by default and only requires radiographs for the
D0150 and D0180 exams. When checked, the end-user must select the Done button and then close/reopen
DRM Plus to activate. This parameter change requires the end-user to enter data from the Radiographic
Findings element with any exam/consult code entered as completed care and requires data entered into the
Exam tab.
Note: The ADA exam codes D0145, D0171, D0190 and D0191 are NOT included with the DRM Plus
Exam tab functionality when entered in DRM Plus by a provider.
Administrative Toolbox
The Administrative Toolbox submenu serves to change various administrative settings. It includes six tabs:
General, Printing, Progress Note, Ancillary, Alerts and Exam Settings. The Delete Admin Settings
button restores all default administrative settings present when DRM Plus was originally installed.
Changing the parameter settings for a non-DRM Plus Administrator in the clinic requires a DRM Plus
Administrator to select the Double Heads icon on the Administrative Settings screen. The DRM Plus
Administrator must enter and select the user’s name which opens the User Settings screen for the selected
user. A non-DRM Plus Administrator may overwrite any parameter change(s) entered by a DRM Plus
Administrator when setting parameters through their User Options submenu.
Note: A non-DRM Plus Administrator may NOT overwrite canned statements used with the Exam tab
elements entered by a DRM Plus Administrator.
Figure 93: Administrative Settings Screen
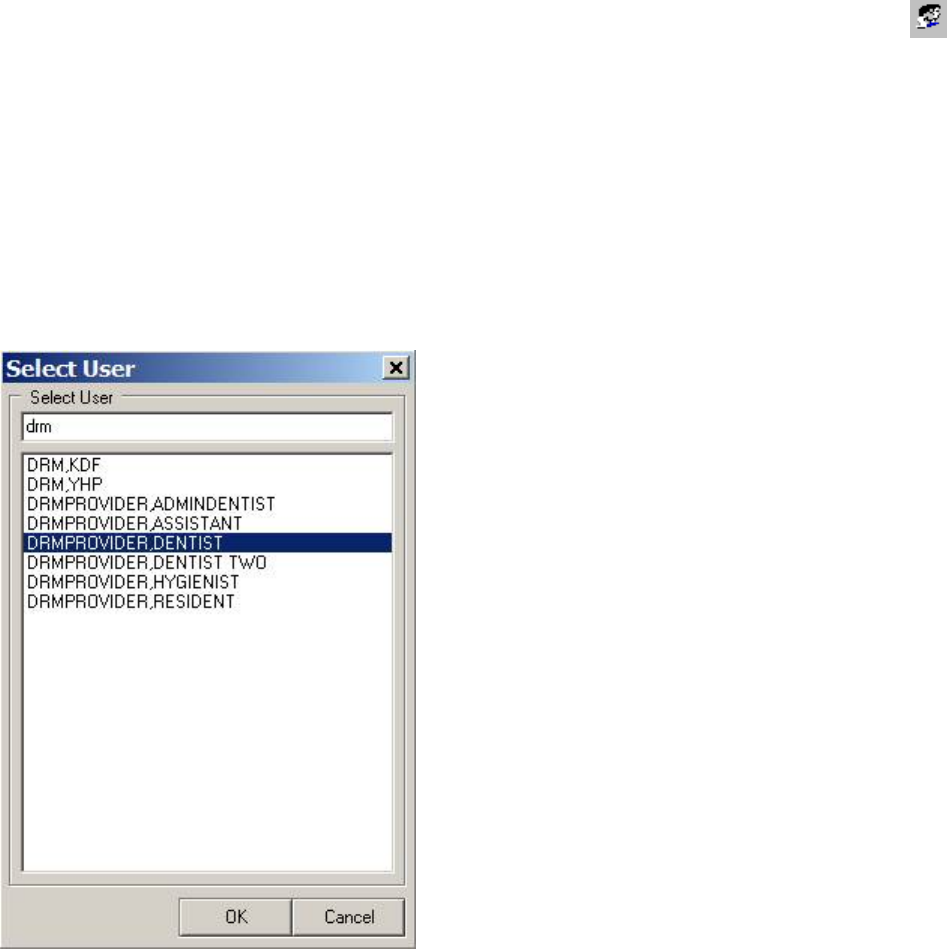
May 2018 DRM Plus Administrator Manual v6.9 74
The three icons found in the upper left corner allow access to other functions. Click the Double Heads
icon to select another end-user, allowing the DRM Plus Administrator to become that end-user. The admin
end-user screen displays the five tabs normally found with the user settings of this provider and a sixth
named Security tab.
The DRM Plus Administrator may also grant full or partial administrative privileges to the provider using
the Security tab. The other five tabs allow the administrator to change parameters for the end-user, which
supersedes current user options settings.
To change administrative privileges or parameters for another end-user:
1. Click the Double Heads icon. The Select User screen displays.
Figure 93: Select User Screen
2. Enter the search name for the provider in the text box.
3. Press the <Enter> key.
4. Select the desired user from the results.
5. Click the OK button.
6. The screen displayed then is the User Settings for: Provider’s Name screen.
7. Select the Security tab, click the appropriate check boxes to grant this provider any administrative
parameter(s) required.

May 2018 DRM Plus Administrator Manual v6.9 75
Figure 94: Security Tab with the Administrative Toolbox
8. Check the Grant full Administrator privilege check box to grant full administrative permission.
9. Check the Allow history extract (Excel) check box to allow the designated user to save Extract
History reports to be used in Excel/Access.
10. Check the Allow user to change Primary/Secondary Providers check box to allow the user to
change the patient’s primary and secondary provider.
11. Check the Allow user to edit Dental Eligibility (on the Cover Page) check box to allow the
designated user to edit the patient’s dental eligibility information.
12. Check the Allow user to clean slate dental graphics check box to allow the designated user to
clear all of the graphics in the three Treatment & Exam view screens.
13. Check the User has access to the Cover Page ONLY check box to allow the user to view/edit
only the Cover Page tab of DRM Plus.
14. The User TBox Access drop-down menu is provided to allow users the option to customize their
profiles.
a. The default for all users is E – Edits allowed, some VA facilities may prefer to deny this
permission.
b. The N – No Access Allowed option allows no editing of the user’s profile.
c. The D– Display Only setting allows the user to view their profile setting.
15. Check any other tab to change this provider’s User Settings parameters.
Click the Key icon to return back to the main Administrative Settings screen.
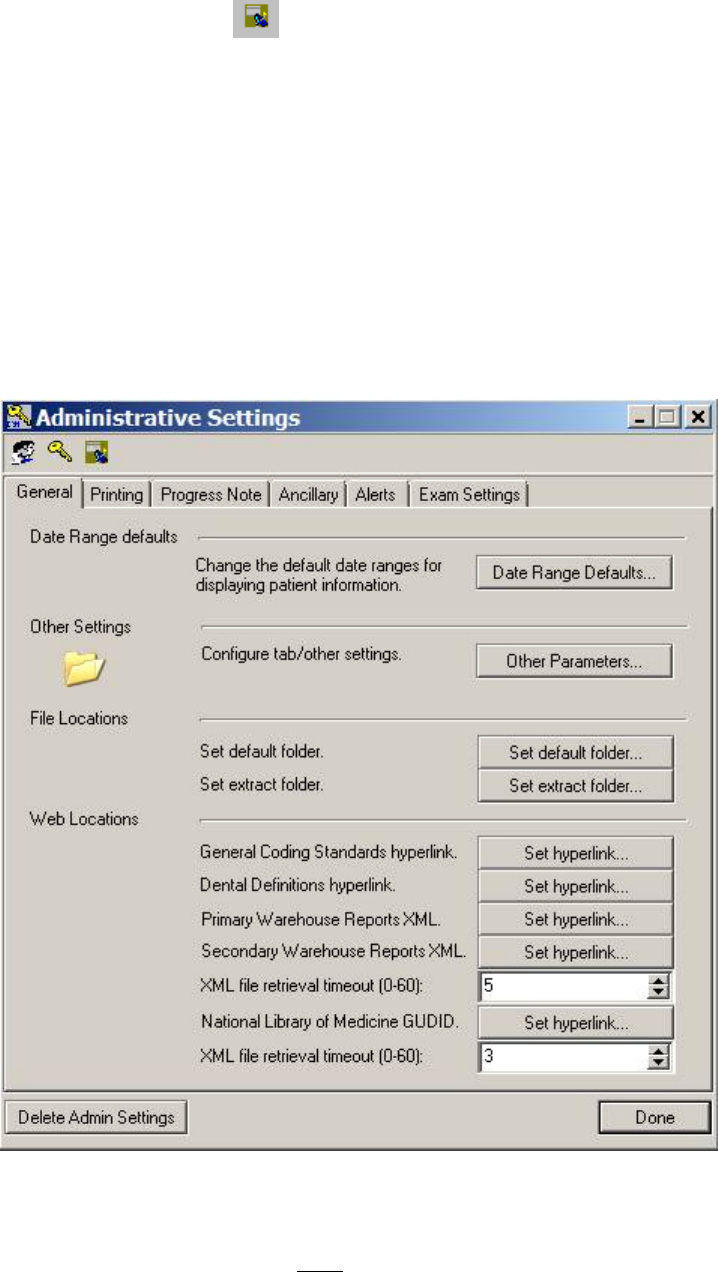
May 2018 DRM Plus Administrator Manual v6.9 76
The Broker Call History icon opens the broker calls screen. Please see the Last Broker Call section in
this chapter, for more information.
General
General tab parameters set by a DRM Plus Administrator can only be set for one user at a time. If a DRM
Plus Administrator is setting General tab parameter(s) for another DRM Plus user, then the DRM Plus
Administrator must select the Double Heads icon on the Administrative Settings screen. The DRM Plus
Administrator must enter, select the user’s name which opens the User Settings screen for the selected user
and enter the parameter setting(s) or change(s). This process needs to be repeated for each user requiring
General tab parameter setting(s) or change(s).
The General tab parameter settings entered by a DRM Plus Administrator will be the default settings until
that user resets or changes those parameter settings from their User Options submenu.
Figure 95: General Tab
To change the date range defaults, please see the User Options section of this chapter.
Note: Date range defaults should NOT be changed unless the DRM Plus Administrator first checks with
local IT support. Increasing these values can degrade overall network/systems performance.
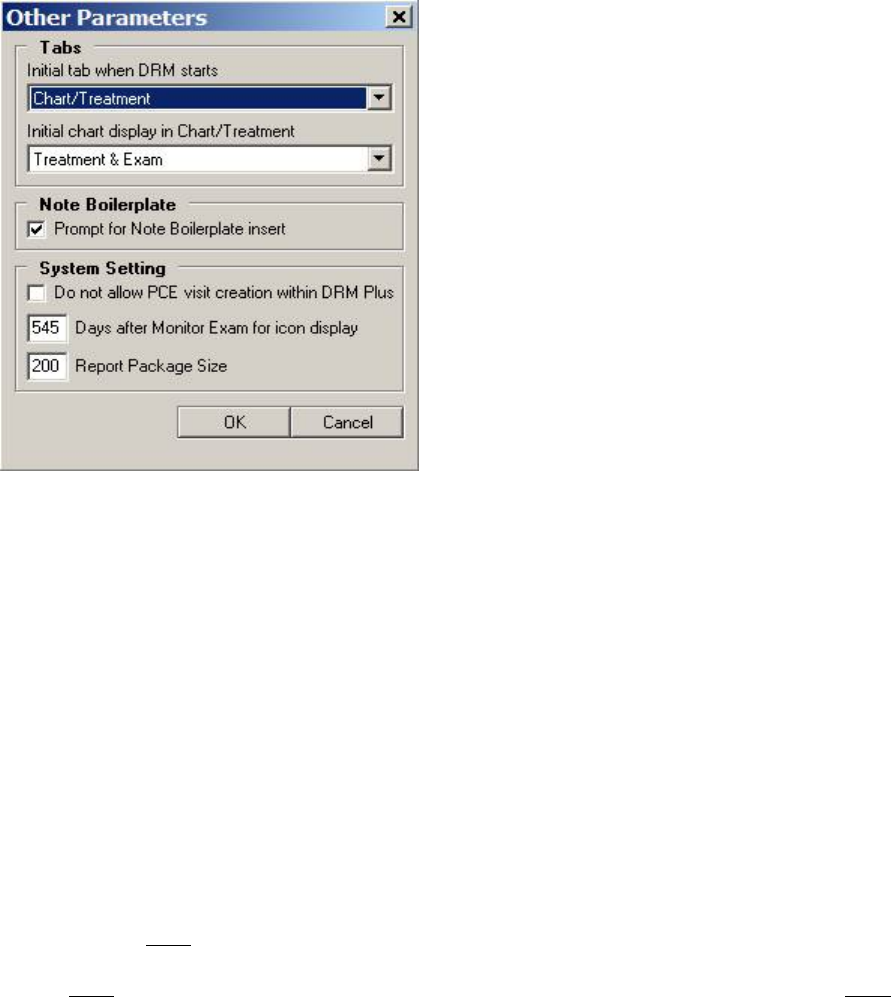
May 2018 DRM Plus Administrator Manual v6.9 77
To change other parameter settings:
1. Click the Other Parameters button. The Other Parameters screen displays.
Figure 96: Other Parameters Screen
2. Use the first Tabs drop-down menu to change the tab that displays when the program first opens.
Use the second drop-down menu to choose Treatment & Exam or Periodontal Chart for the
default view of the Chart/Treatment tab.
3. Click the Note Boilerplate check box, defaulted as checked, to choose whether to be prompted for
a TIU boilerplate insert. The TIU boilerplates reside in VistA and are tied to a TIU progress note
title. The parameter when selected displays a screen asking the user if they would like to import a
note boilerplate after they select a specific TIU progress note title.
4. Click the System Setting check box to determine if PCE visit creation within DRM Plus is
allowed in the local dental clinic.
5. The System Setting allows the number of days for the Exam Quality Indicator to display for the
entire local dental clinic. This option is unavailable in the User Options settings.
6. The System Setting also allows the Report Package Size value to be changed for Adverse
Events and Device Tracking reports. The number represents the returns per package of report data
retrieved from the VistA database.
Note: Please do NOT change the Report Package Size value unless you are having difficulty, errors or
connection loss, with retrieving either of the two reports. The time required to retrieve the report data is
usually NOT an issue with this setting and if the report package size is changed it will probably NOT
improve the time in retrieving the report.
To set the default file folder, please see the User Options section of this chapter for more information.
The Set Extract Folder allows the DRM Plus Administrator, or users with the administrative parameter
option for Extract History reports, to set the directory/file location where the extraction of the dental
history file is stored.
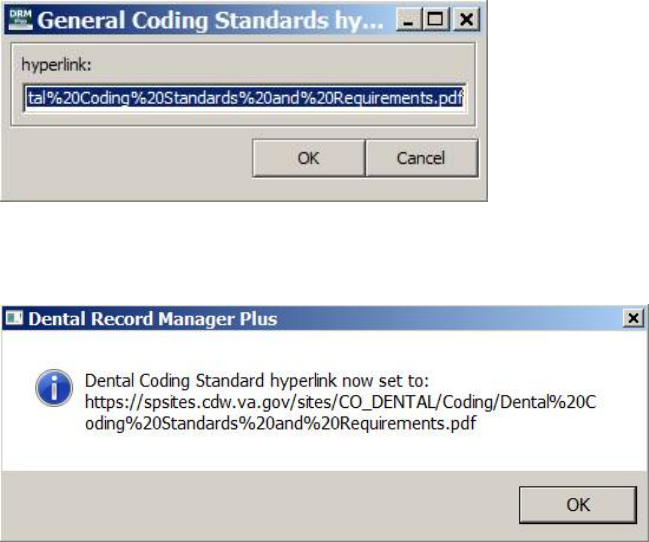
May 2018 DRM Plus Administrator Manual v6.9 78
To set the extract folder location:
1. Click the Set extract folder button.
2. Use the Select Extract Folder screen to navigate to the desired folder.
3. Click the OK button.
4. A confirmation screen displays with the new file location. Click the OK button.
To set the Web Locations, hyperlinks:
The General Coding Standards hyperlink located on the banner and on the Diagnosis Code selection
screen may be updated by a DRM Plus Administrator by changing the VA Office of Dentistry web address
if needed. The same functionality has been established for the Dental Definitions hyperlink which is located
in the OHA modal screen and the Occlusion modal screen. This hyperlink should be changed by the DRM
Plus Administrator when instructed to do so by the VA Dental Informatics and Analytics Director.
1. Click the General Coding Standards Set hyperlink button.
2. Copy and paste the correct web address in the field.
Figure 97: General Coding Standards hyperlink Screen
3. Click the OK button to save the new hyperlink default sent by the VA Office of Dentistry.
Figure 98: Confirmation Message
4. Click the OK button to close this informational screen.
The same process is used for the Dental Definitions hyperlink parameter.
1. Click the Dental Definitions Set hyperlink button.
2. Copy and paste the correct web address in the field.

May 2018 DRM Plus Administrator Manual v6.9 79
Figure 99: Dental Definitions hyperlink Screen
3. Clicking the OK button saves the new hyperlink default sent by the VA Office of Dentistry.
Figure 100: Confirmation Message
4. Click the OK button to close this informational screen.
The Primary/Secondary Warehouse Reports XML hyperlinks will connect to specific reports as
maintained by the Office of Dentistry. These hyperlinks should be changed by the DRM Plus Administrator
when instructed to do so by the VA Dental Informatics and Analytics Director.
The same process is used for the Primary Warehouse Reports XML and the Secondary Warehouse
Reports XML hyperlink parameters.
1. Click the Primary Warehouse Reports XML Set hyperlink button.
2. Copy and paste the correct web address in the field.
Figure 101: Primary Warehouse Reports HML File Hyperlink
3. Clicking the OK button saves the new hyperlink default sent by the VA Office of Dentistry.
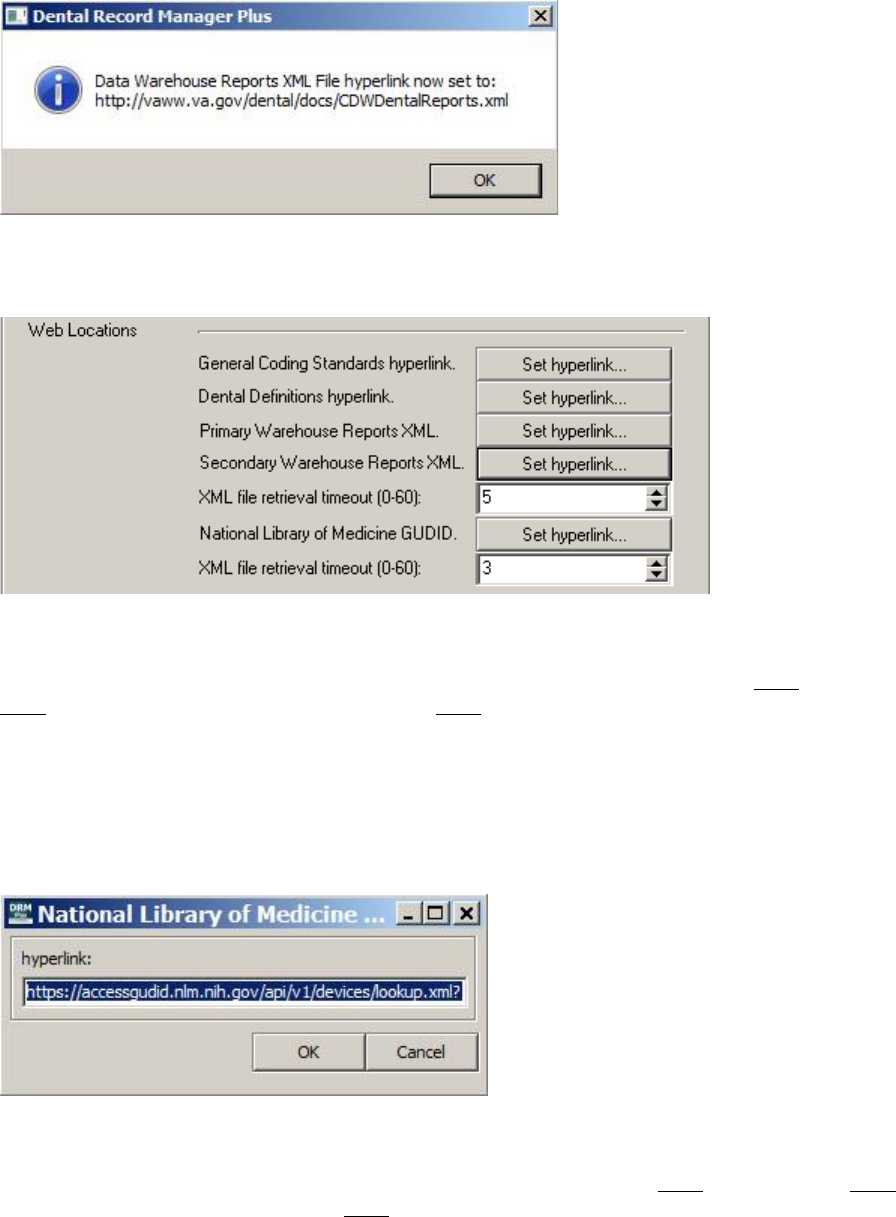
May 2018 DRM Plus Administrator Manual v6.9 80
Figure 102: Confirmation Message
4. Click the OK button to close this informational screen.
Figure 103: XML file retrieval timeout (0-60)
Adjusting the first XML file retrieval timeout (0-60) field allows the retrieval timeout to be adjusted by the
DRM Plus Administrator for Data Warehouse Reports. A setting of 0 seconds does NOT mean there will
NOT be a delay. Also a setting of 0 seconds may NOT allow your site time enough to connect and get the
submenu, so use with caution. A setting of 5 seconds is the default. This may need to be adjusted
(lengthened or shortened) based on your site’s internet/network connectivity.
The National Library of Medicine GUDID hyperlink will allow a connection and retrieval of a UDI
(unique device identification) value. The hyperlink should be changed by the DRM Plus Administrator
when instructed to do so by the VA Dental Informatics and Analytics Director.
Figure 104: National Library of Medicine GUDID hyperlink
Adjusting the second XML file retrieval timeout (0-60) field allows the retrieval timeout to be adjusted by
the DRM Plus Administrator for a UDI value. A setting of 0 seconds does NOT mean there will NOT be a
delay. Also a setting of 0 seconds may NOT allow your site time enough to connect and get the submenu, so
use with caution. A setting of 3 seconds is the default. This may need to be adjusted (lengthened or
shortened) based on your site’s internet/network connectivity.
May 2018 DRM Plus Administrator Manual v6.9 81
Printing
Printing tab parameters set by a DRM Plus Administrator can only be set for one user at a time. If a DRM
Plus Administrator is setting Printing tab parameter(s) for another DRM Plus user, then the DRM Plus
Administrator must select the Double Heads icon on the Administrative Settings screen. The DRM Plus
Administrator must enter, select the user’s name which results in the opening of the User Settings screen for
the selected user and enter the parameter setting(s) or change(s). This process needs to be repeated for each
user requiring Printing tab parameter setting(s) or change(s).
The Printing tab parameter settings entered by a DRM Plus Administrator is the default settings until that
user resets or changes those parameter settings from their User Options submenu.
Progress Note
Setting the parameters in the Progress Note tab cannot be changed using the Administrators Toolbox.
The DRM Plus Administrator may configure code boilerplates from the Progress Note tab located on the
Administrative Settings screen. Every end-user planning to access these code boilerplates must enter the
exact name of the code boilerplate created by the DRM Plus Administrator. After entering the exact name of
the code boilerplate in their User Settings screen and clicking the OK button, the administrative code
boilerplate automatically imports.
Treatment System
Treatment System tab parameters set by a DRM Plus Administrator can only be set for one provider at a
time. If a DRM Plus Administrator is setting Treatment System tab parameter(s) for another DRM Plus
provider, then the DRM Plus Administrator must select the Double Heads icon on the Administrative
Settings screen. The DRM Plus Administrator must enter, select the provider’s name which results in the
opening of the User Settings screen for the selected provider and enter the parameter setting(s) or
change(s). This process will need to be repeated for each provider requiring Treatment System tab
parameter setting(s) or change(s).
The Treatment System tab parameter settings entered by a DRM Plus Administrator will be the default
settings until that provider resets or changes those parameter settings from their User Options submenu.
Ancillary
Use the functions in the Ancillary tab to add options to the tool menu. Use the check box to enable
MiPACS. To add an application, type the name and website directly into the table, or use the browse
function. The location for these application executables may require IT assistance.
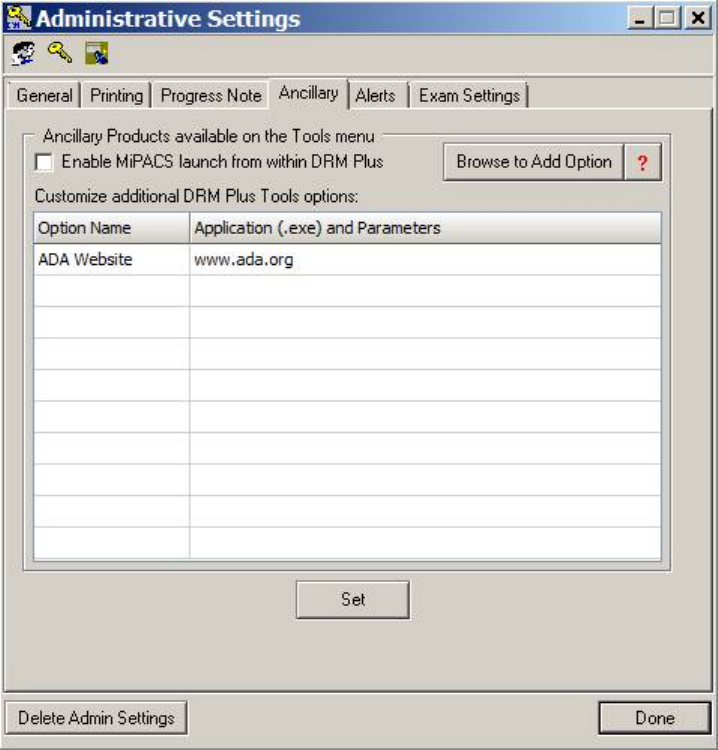
May 2018 DRM Plus Administrator Manual v6.9 82
Figure 105: Ancillary Tab
The DRM Plus Administrator may customize up to 10 ancillary applications or websites to launch from the
Tools menu.
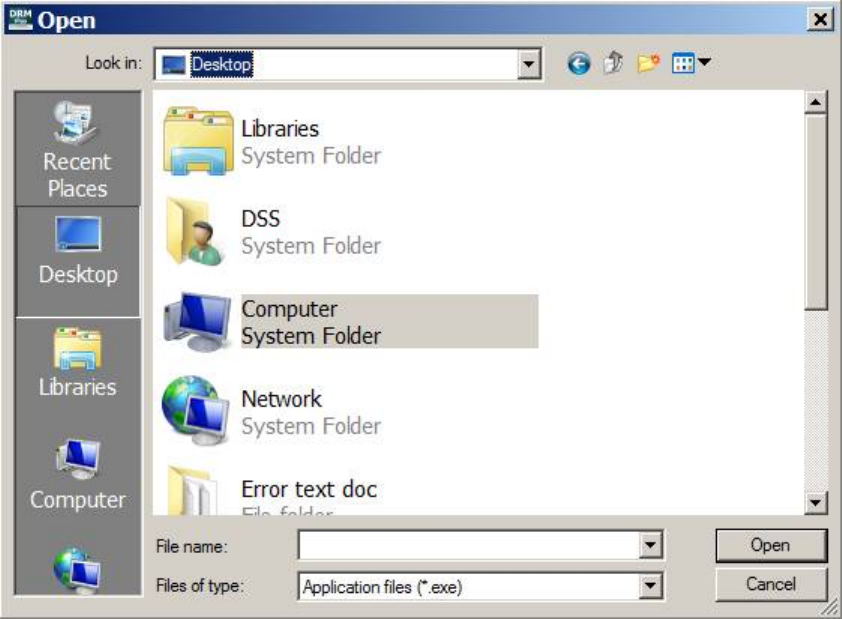
May 2018 DRM Plus Administrator Manual v6.9 83
To add an executable:
1. Click the Browse to Add Option button. The Microsoft Open browse screen displays.
Figure 106: Microsoft Open Browse Screen
2. Navigate to the desired executable file and click the Open button.
3. The .exe file appears on the list.
4. Name the option by typing in the corresponding Option Name field.
5. Click the Set button to confirm the changes.
6. A confirmation screen displays. Click the OK button.
7. The option now appears in the Tools menu.
To delete an executable:
1. Highlight the desired executable in the table.
2. Press the <Delete> key.
3. Highlight the desired option name.
4. Press the <Delete> key.
5. The option is removed from the Tools menu.
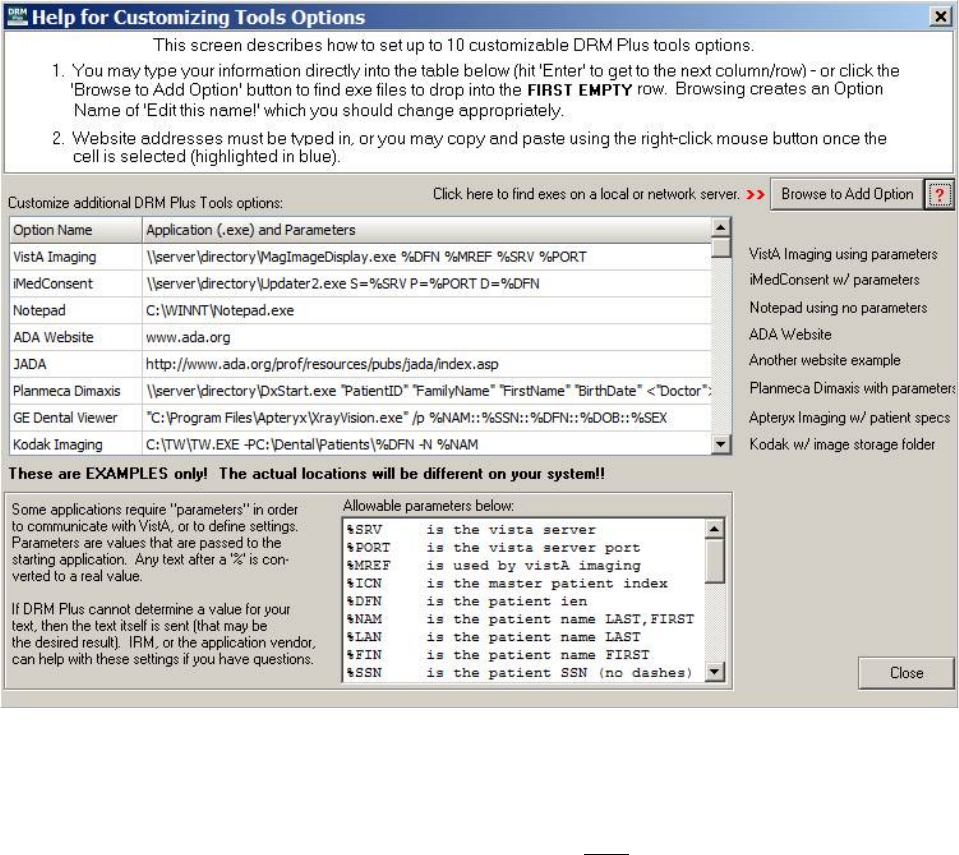
May 2018 DRM Plus Administrator Manual v6.9 84
Further guidance is available within the program. Click the red question mark [?] icon and the Help for
Customizing Tools Options screen displays. IT can help with parameter passing, since this is similar to
setting up CPRS Tools menu options.
Figure 107: Help for Customizing Tools Options Screen
This page contains examples and definitions of allowable parameters that DRM Plus understands and can
convert to real values.
Note: These are examples for illustration and some options might NOT be available at the user’s facility.
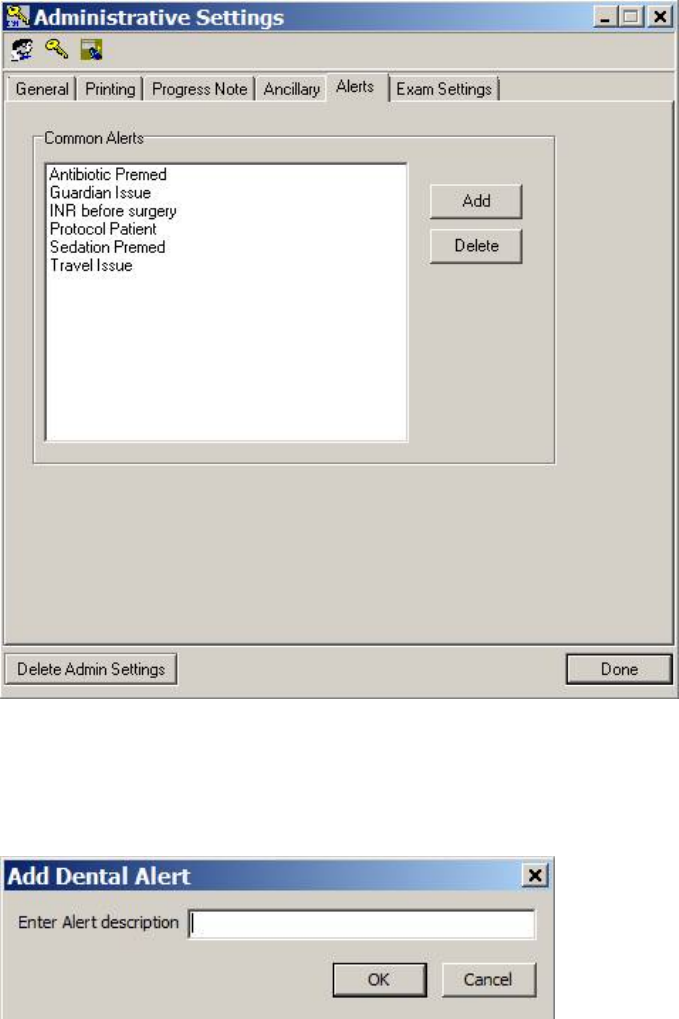
May 2018 DRM Plus Administrator Manual v6.9 85
Alerts
Use the functions on this tab to add or delete DRM Plus alerts. These alerts permanently saved by the DRM
Plus Administrator may be entered by any user with the Alert icon, located on the banner. When entered,
the alerts display on the Cover Page tab.
Figure 108: Alerts Tab
To add an alert:
1. Click the Add button. The Add Dental Alert screen displays.
Figure 109: Add Dental Alert Screen
2. Type the alert name into the text box.
3. Click the OK button. The alert appears on the list.

May 2018 DRM Plus Administrator Manual v6.9 86
To delete an alert:
1. Highlight the alert to be deleted.
2. Click the Delete button.
3. The alert is removed from the list.
Exam Settings
This Administrative Settings parameter allows the DRM Plus Administrator to add/delete, system wide, all
the national and local administrative pre-defined statements. This parameter may be accessed from the
Tools menu → Administrative Toolbox → Exam Settings tab, only by DRM Plus Administrators.
Figure 110: Exam Settings Tab
These parameters allow DRM Plus Administrators to create pre-defined statements that import to all end-
user accounts using the local VistA system. The five pre-defined statement buttons are Radiographic,
Assessment Summary, Treatment Plan, Patient Education and Disposition. There are two to four
national pre-defined statements pre-developed for these five categories.
There is a maximum of twelve pre-defined statements allowed per comment field by any end-user. The
DRM Plus Administrator has priority for entering pre-defined statements at any time and may add/delete a
national or local admin pre-defined statement by following the same steps described when entering with the
User Settings. The DRM Plus Administrator may only view the national pre-defined statements or those
entered by the DRM Plus Administrator with this parameter. The pre-defined statements entered by any end-
user’s User Settings parameter are NOT viewable in this screen, which includes DRM Plus Administrator
entries from their own User Settings parameter.
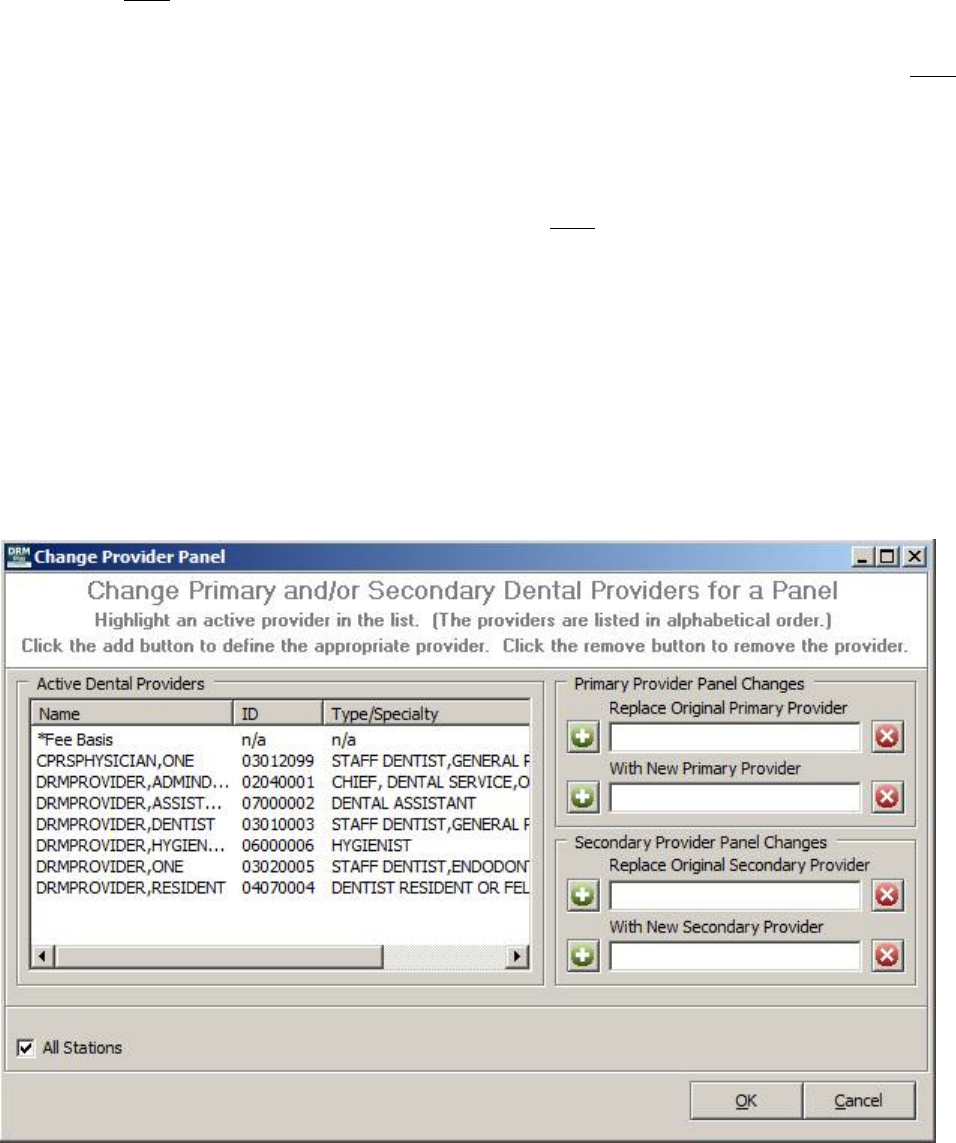
May 2018 DRM Plus Administrator Manual v6.9 87
The DRM Plus Administrator may delete or rearrange the sequencing of any national or administrator pre-
defined statements entered by this parameter. Highlight the pre-defined statement and use one of the two
buttons on the left side of the screen to delete or rearrange the sequence of this pre-defined statement. The
end-user may NOT delete or rearrange any of these admin pre-defined statements; they are always listed at
the top in every user’s list.
The Next/Back Button and the Requirements parameter from the Administrative Settings screen do NOT
affect the entire local VistA system or any other end-user functionality, but only result in changing the
admin end-user functionality. This action results in the same outcome when editing the User Settings
screen.
Note: DRM Plus Administrators must use either User Options or the Double Head icon (selecting
themselves) to enter end-user/personal pre-defined statements NOT intended for use by other providers in
the clinic.
Panel Add/Edit
Use this submenu to change the primary/secondary physician’s panel to a different provider. This
administrative panel changes all patients associated with the original primary provider to any new primary
provider for that block of patients. It works the same for any secondary providers completed together or
separate.
Selecting the Panel Add/Edit submenu displays the following screen.
Figure 111: Change Provider Panel Screen
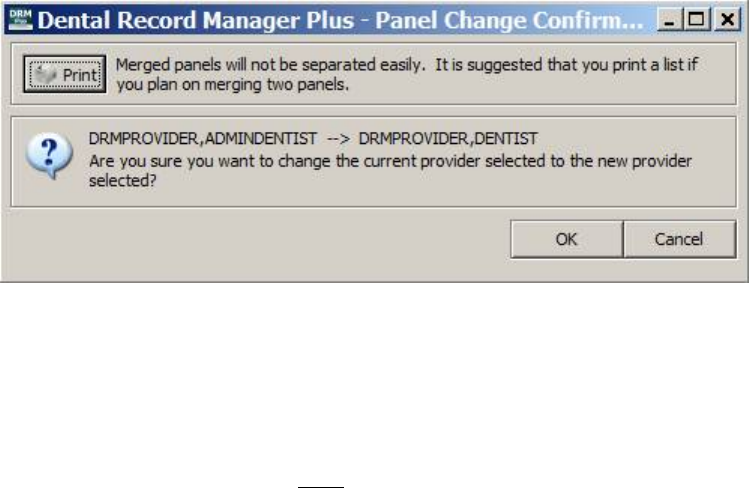
May 2018 DRM Plus Administrator Manual v6.9 88
1. Highlight the original PDP from the Active Dental Providers list and select the green [+] icon.
2. Highlight the new PDP from the Active Dental Providers list and select the green [+] icon.
3. Select the OK button.
Figure 112: Panel Change Confirmation Message
4. It is highly recommended that a list of patients be printed if the user is planning on merging two
panels.
5. Select the OK button if the panel of patients should be switched to a new provider.
Note: All patients listed on the print-out are changed to the new primary provider. If there are any patients
listed on the print-out that should NOT be changed to the new primary provider, then the DRM Plus
Administrator must make a decision to either change all patients listed to the new primary provider using
this batch-change functionality and manually change the ‘exception’ patients one at a time back to the
original provider after the batch change has been implemented, or change all patients listed on the print-out
manually. Manually changing providers one patient at a time requires the change to be made from the
Designated Dental Providers screen located in the DRM Plus banner in each patient’s chart.
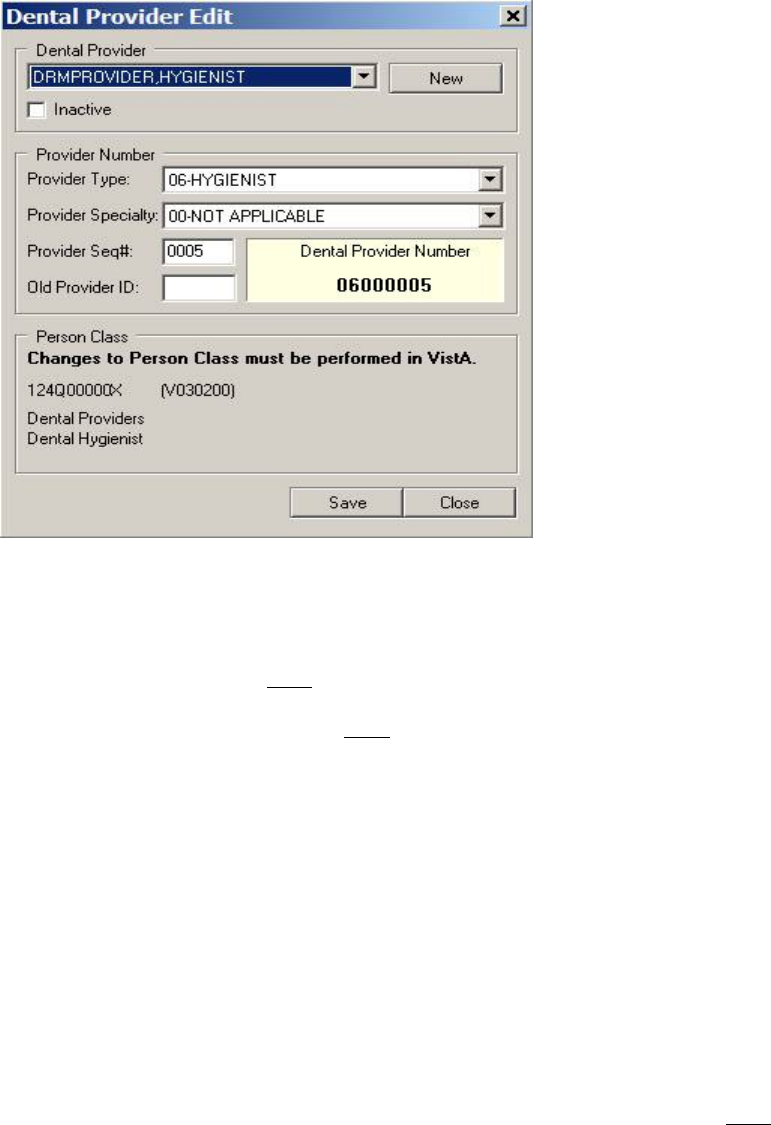
May 2018 DRM Plus Administrator Manual v6.9 89
Provider Add/Edit
Use this submenu to add a new provider, or to edit a provider’s 8-digit dental provider ID in DRM Plus.
Dental providers may also be inactivated using this function. Inactivated providers cannot be selected for
reports.
Figure 113: Dental Provider Edit Screen
Dental Provider Menu
This menu auto-fills with entries from the VistA dental provider file. Once a new provider is added to the
dental provider file; they may NOT be deleted by the DRM Plus Administrator.
Checking the Inactive check box does NOT allow the provider to be selected for any reports.
Provider Type Menu
This menu displays a list of provider types and includes a two-digit code used to build the new eight digit
dental provider ID.
Provider Specialty Menu
This menu displays a list of provider specialties and includes a two digit code used to build the new eight
digit dental provider ID.
Provider Seq #
This is the next available four digit sequenced number that is computer generated to build the new eight
digit dental provider ID. This number can be edited if desired; however, editing is NOT required.
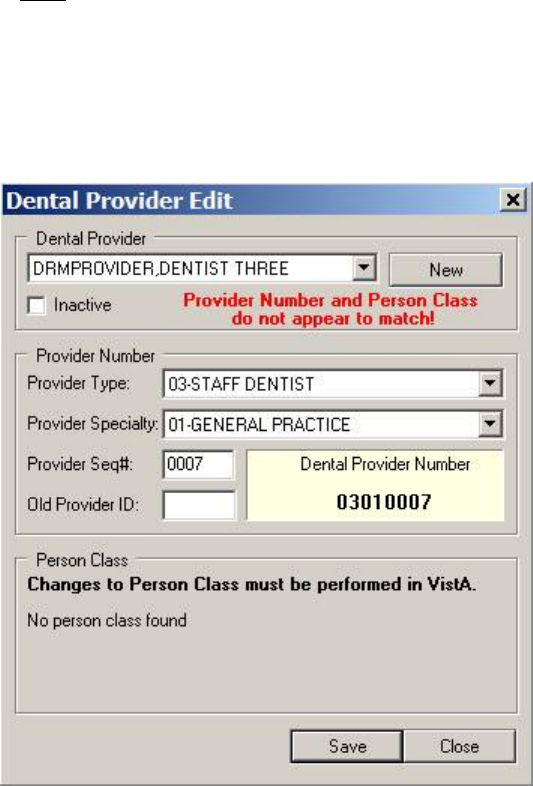
May 2018 DRM Plus Administrator Manual v6.9 90
Dental Provider Number
This displays the new 8-digit dental provider ID, which is a read only field. The first two digits are the two
digit code from Provider Type. The next two digits are the two digit code from Provider Specialty. The
last four digits are the Provider Seq # automatically generated or manually entered.
Old Provider ID
Old Provider IDs may be filed with old four digit IDs from previous provider numbers; however, this field
is NOT required for new DRM Plus users.
Person Class
The VistA Person Class displaying at the bottom of the screen will be view only and flagged if there is
some basic discrepancy between the 8-digit dental provider ID and the Person Class. The flag will be
displayed in a red typed message as in the following dialog.
Figure 114: Provider Number/Person Class Flag
Note: All dental providers must have an 8-digit dental provider ID to open and file data in DRM Plus.
To add a new provider:
1. Click the New button.
2. The Search for Provider screen displays.
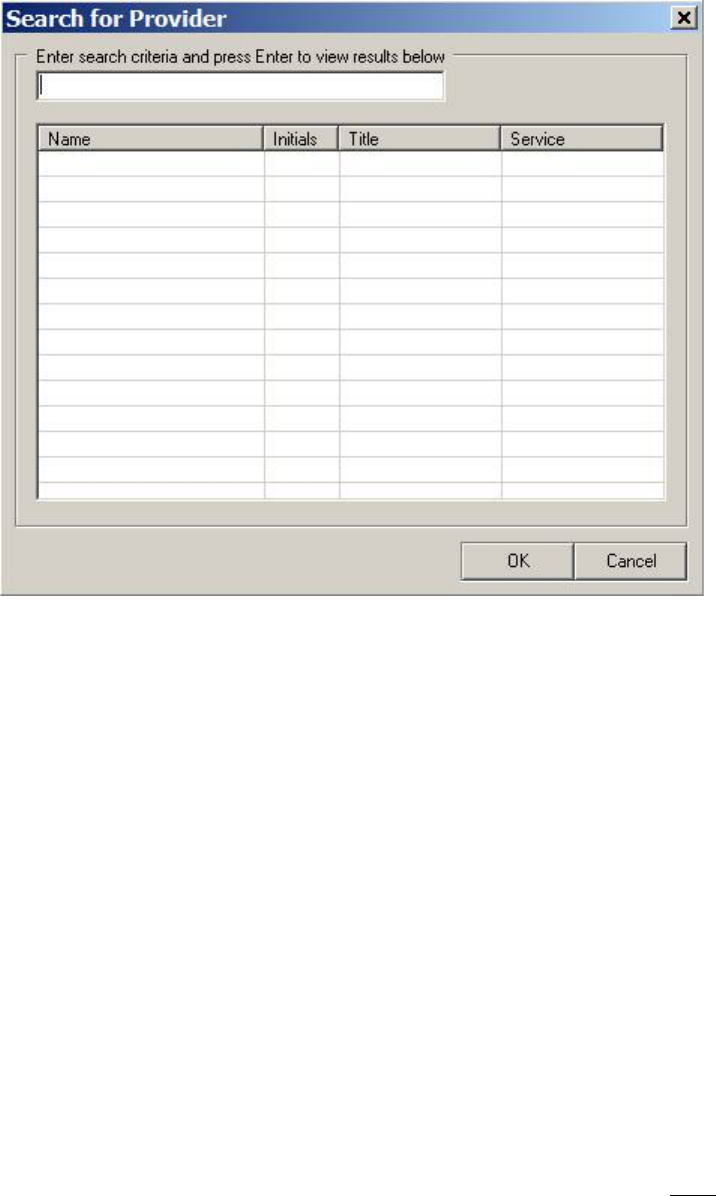
May 2018 DRM Plus Administrator Manual v6.9 91
Figure 115: Search for Provider Screen
3. Enter the search terms in the text box and press the <Enter> key. The search results display.
4. Select the desired provider and click the OK button.
5. The provider is added, and their name displays on the Dental Provider Edit screen.
To edit either a new or existing provider’s information:
1. Select the provider from the dental provider drop-down menu.
2. Select the Provider Type from the next drop-down menu.
3. Select the Provider Specialty from the next drop-down menu.
4. Enter the Provider Sequence number in the text box. (Populates automatically if new)
5. Select the Inactive check box, if appropriate.
6. The Dental Provider Number is listed.
7. Click the OK button.
8. A confirmation screen displays. Click the OK button.
Ancillary Tool Functions – ADA Website
This American Dental Association website is only available if the DRM Plus Administrator formats this in
the administrator’s Ancillary applications and parameters. Some users may NOT have permission to access
the internet or have to enter/re-enter a user name/passcode.
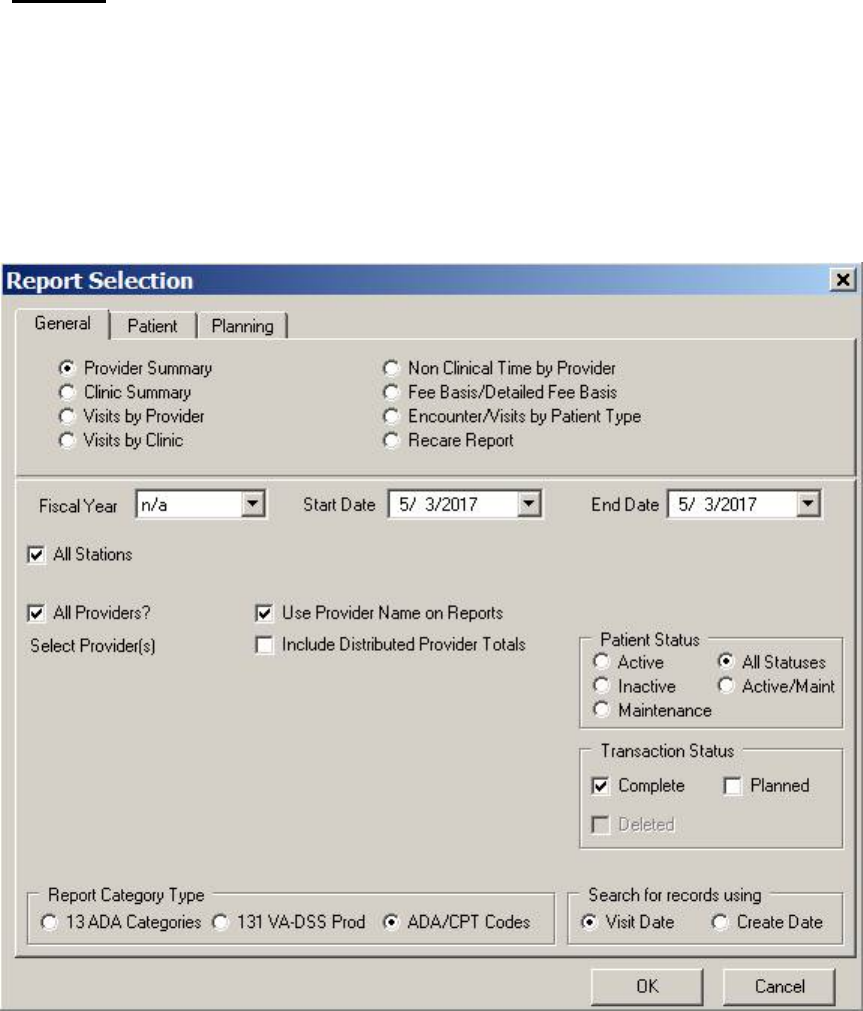
May 2018 DRM Plus Administrator Manual v6.9 92
Reports
The Reports menu has the seven following submenus: Reports (DRM canned reports), Service Reports
(old DAS reports), Data Warehouse Reports, Adverse Events, Device Tracking, Extract History File
(for small date range extract reports), and Queued Extract History File (for large date range extract
reports).
Reports
When this submenu is selected, the Report Selection screen displays.
Figure 116: Report Selection Screen
This screen has three tabs: General, Patient and Planning.
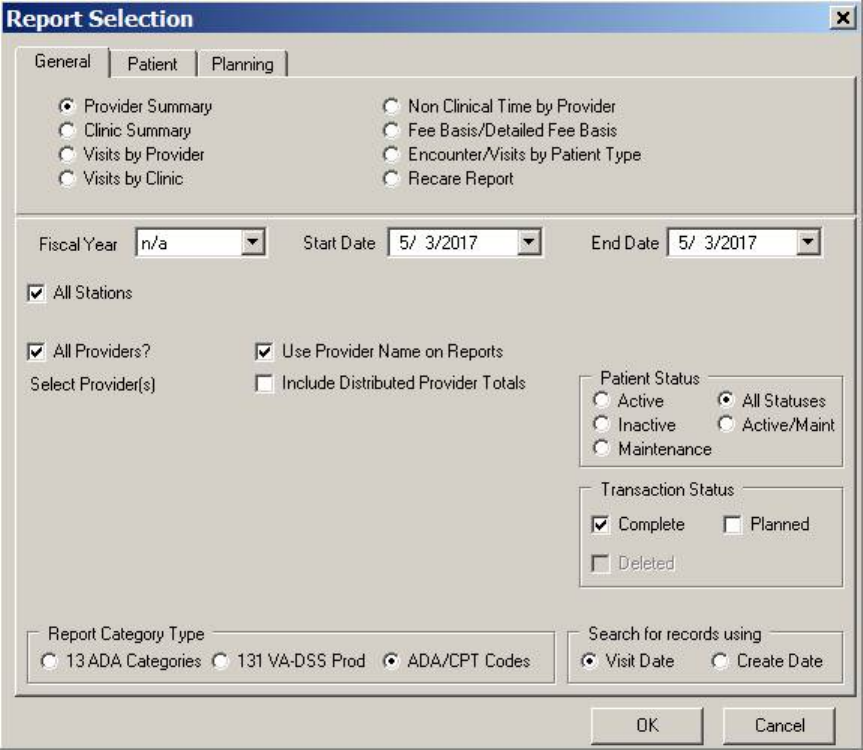
May 2018 DRM Plus Administrator Manual v6.9 93
General Tab
Figure 117: General Tab
To create a report:
1. Choose the desired report type radio button.
2. Select the Fiscal Year or the Start Date and End Date.
3. Use the check box to indicate whether the provider name and the distributed provider totals should
be included in the report.
4. Choose a Patient Status.
5. Indicate what the Transaction Status is.
6. Select the Report Category Type.
7. Choose the date type that is to be represented on the report.
8. Click the OK button to generate the report. The report screen displays.
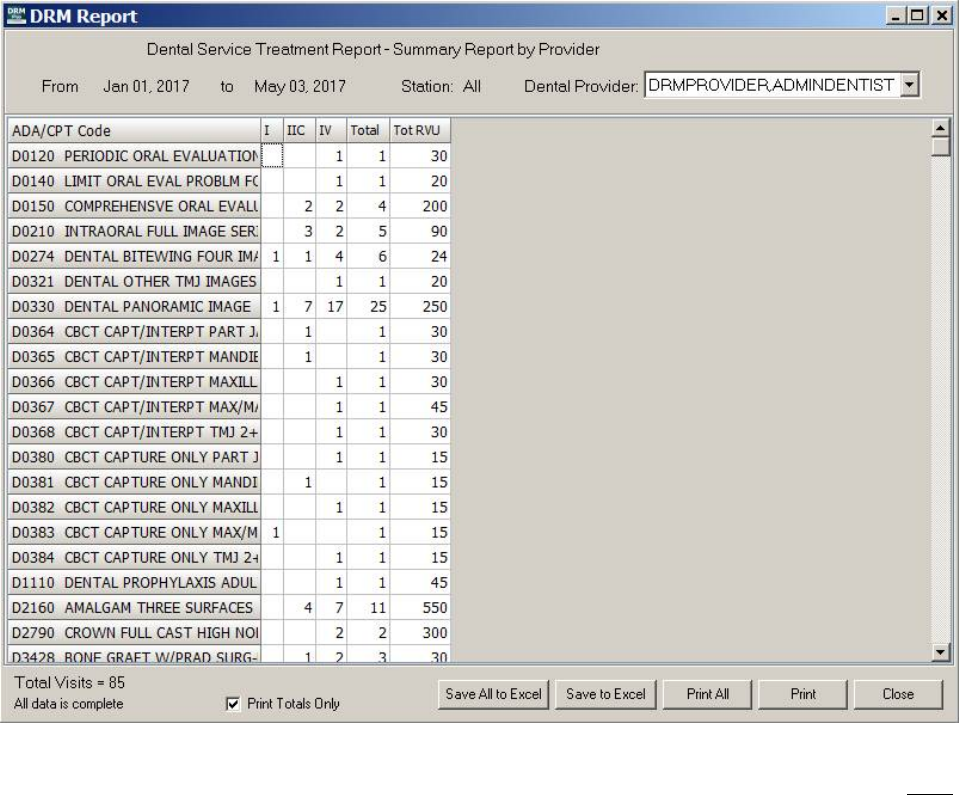
May 2018 DRM Plus Administrator Manual v6.9 94
Figure 118: DRM Report Screen
This screen has options to save an Excel file (Save to Excel button) or close. Some of the options may NOT
be available with every report type.
Eight report types are accessible through this tab:
Provider Summary: Summary counts of procedures by Station/Provider and Dental
Classification.
Clinic Summary: Summary counts of procedures by Station and Dental Classification.
Visits by Provider: Detailed listing of procedures by Station/Provider.
Visits by Clinic: Detailed listing of procedures by Station.
Non-Clinical Time by Provider: Total days by provider for time applied to Education,
Administration, Research and Fees.
Fee Basis/Detailed Fee Basis: Total amount authorized and number of cases by Dental
Classification (for local dental use only).
Encounters/Visits by Patient Type: Summary counts of encounters/visits by patient type.
Recare Report: List of patients with recare dates.

May 2018 DRM Plus Administrator Manual v6.9 95
Click the corresponding radio buttons to select the desired report types. Use the check boxes to customize
these reports.
There are seven check box options:
All Stations: This selection shows all stations of the parent facility.
All Providers: This selection shows the report for all providers using provider ID numbers.
Use Provider Name on Reports: This selection shows the report using provider names.
Include Distributed Provider Totals: This selection adds Distributed Provider workload totals to
the two provider reports.
Completed: This selection includes completed care in the report.
Planned: This selection includes planned procedures in the report.
Deleted: This selection includes deleted completed care procedures in the report.
Clinic Summary, Visits by Clinic and Fee Basis reports do NOT offer provider selection. Provider
Summary, Visits by Provider and Non Clinical Time by Provider do allow provider selection. De-
selecting the All Providers check box displays a list of providers to choose from. One or more is selectable
within the list for Provider Summary and Visits by Provider reports.
Start Date/End Date selections display a calendar on the drop-down. The dates default to the current date.
Future dates are NOT allowed in these fields. The Fiscal Year allows selection to auto-select the date range
for that fiscal year.
The station defaults to All Stations. This can be changed by selecting a single optioned station.
Patient Status allows the user to select either Active, Inactive, Maintenance, Active/Maintenance or All
Statuses.
Distributed provider workload may be viewed on the Provider Summary or Visits by Provider report.
When All Providers is checked for these provider reports, and Include Distributed Provider Totals is
checked, the distributed provider workload is included. The report may contain providers who are NOT in
the dental provider file. This could occur because the distributed provider is auto-defined when the resident
selects a cosigner for the note in DRM Plus. If the co-signer is NOT a dental provider, possibly from a
wrong selection, the report contains the name of the distributed provider enclosed in parentheses, i.e.,
(DOCTOR, ATTENDING).
Note: The report names Encounters by Provider and Encounters by Clinic have been changed to replace
the word Encounters with Visits. These reports (as well as the Summary reports) display the Total Visits
at the bottom. The number of encounters in DRM Plus is NOT truly indicative of the times the provider has
seen a patient.
Note: Selecting multiple reports from the General tab while the Report Selection screen is displayed
always requires the selection of the report radio button first, followed by the selection of the Fiscal Year,
even if the same fiscal year is desired for multiple reports.
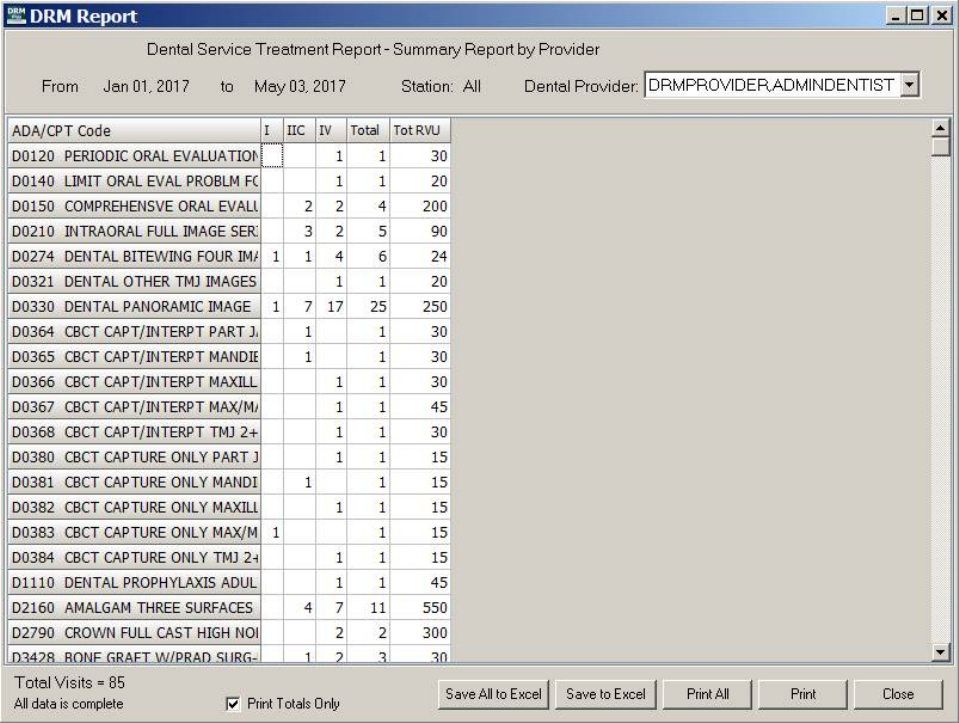
May 2018 DRM Plus Administrator Manual v6.9 96
Provider Summary
The Provider Summary report replaces the DENTREATPROV RPT in VistA. The optional third page
prompted in VistA report displays as total values at the end of the columns. ADA/CPT Codes, listed under
the date range, that are included in this report, come from the selection of either the Visit Date or the Create
Date designated on the General tab.
Figure 119: Provider Summary
When creating a Provider Summary report, select one or more providers by pressing and holding the
<Shift> and <Ctrl> keys, or select all providers by using the All Providers check box. Use the same
function to either show all rows/columns or to show just those rows/columns that contain data. The report
information may be saved to an Excel spreadsheet by clicking the Save All to Excel or Save to Excel
buttons. Print the selected information displayed for an individual provider, or select Print All to print for
all providers.
Note: Checking the Include Distributed Provider Totals check box adds distributed provider workload
totals, located at the bottom of each column in the two provider reports.
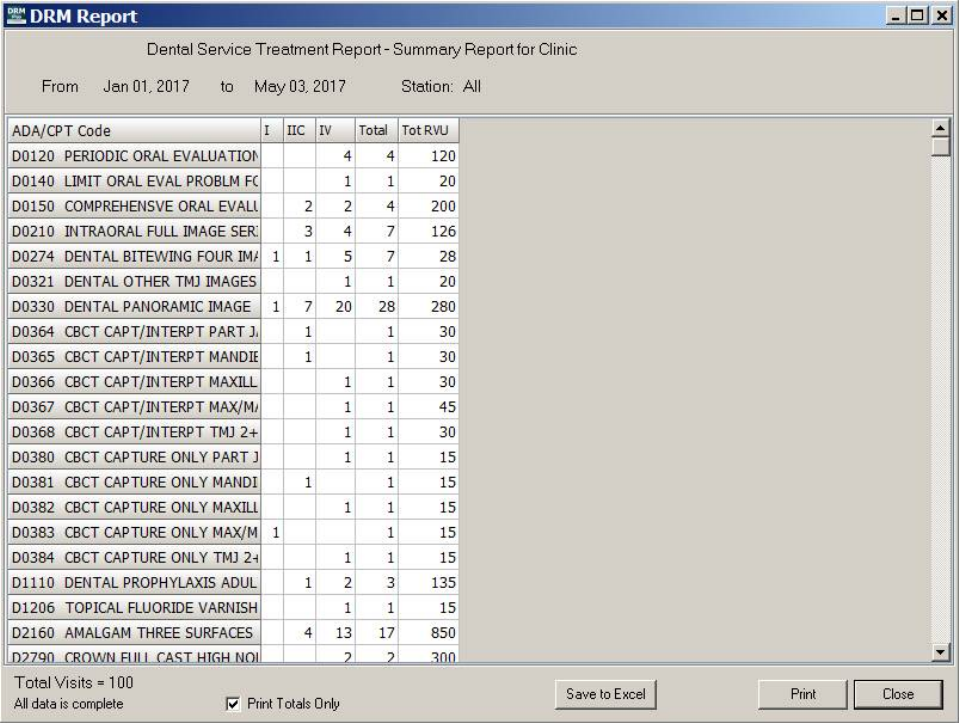
May 2018 DRM Plus Administrator Manual v6.9 97
Clinic Summary
The Clinic Summary report replaces the DENTREATCLINIC RPT in VistA. This report is essentially the
same as the Provider Summary report, except that the entire station is displayed (all providers). ADA/CPT
codes, listed under the date range, which are included in this report, come from the selection of either the
Visit Date or the Create Date designated on the General tab.
Figure 120: Clinic Summary
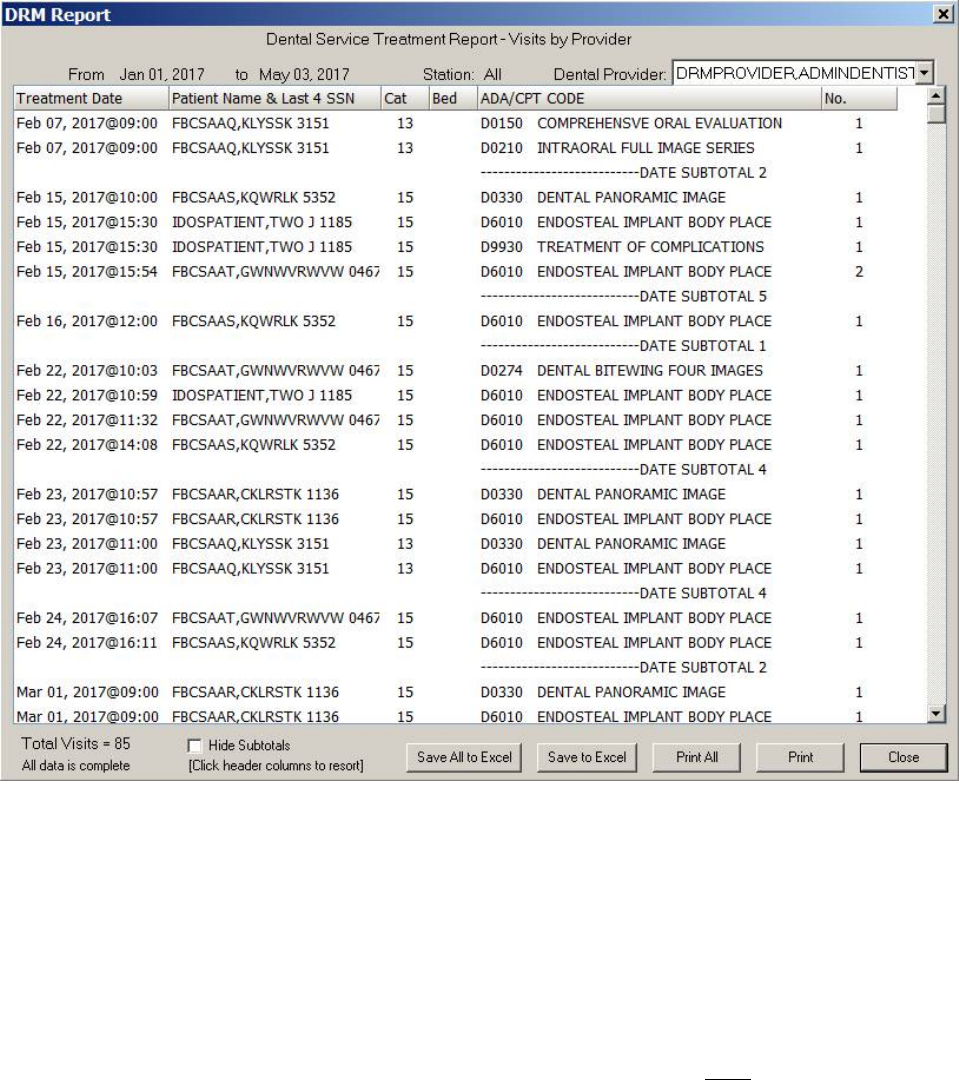
May 2018 DRM Plus Administrator Manual v6.9 98
Visits by Provider
The Visits by Provider report replaces the DENTTREATSITPROV RPT in VistA. Each transaction is
displayed, making this a potentially enormous report. Treatment dates included in this report come from the
selection of either the Visit Date or the Create Date, designated on the General tab. Data is displayed
chronologically.
Figure 121: Visits by Provider
To create a Visits by Provider report, select one or more providers by pressing the <Shift> and <Ctrl>
keys, or select all providers by checking the All Providers check box. Click the Save All to Excel or Save
to Excel buttons to save the current data to an Excel spreadsheet. The print options are the same as those for
the Provider Summary report.
On Visits by Provider reports, the items marked Distributed are those that were filed by a resident to this
attending provider. The unmarked entries are the items filed by the attending provider.
Note: Total sittings are equal to the number of history file entries for the selected date range. If the report is
large, and the number of rows displayed is greater than 65,000, the system does NOT allow a save to Excel.
A message displays prompting the user to change the date range.
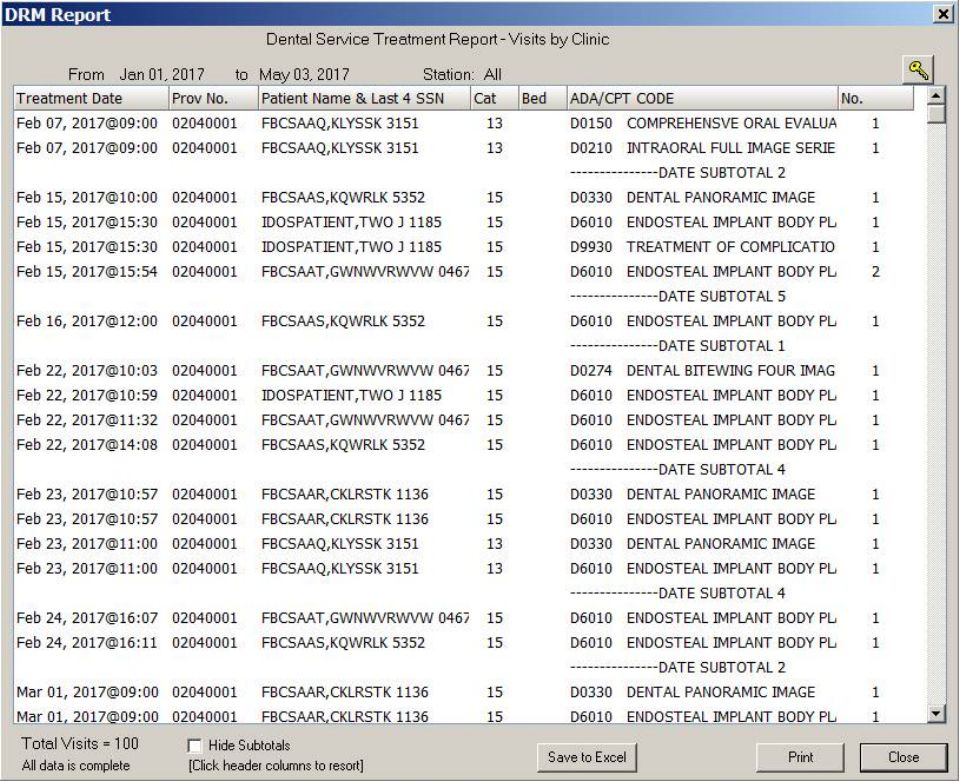
May 2018 DRM Plus Administrator Manual v6.9 99
Visits by Clinic
The Visits by Clinic report replaces the DENTTREATSIT RPT in VistA. This report is essentially the same
as the Visits by Provider report, except that the entire station is displayed (all providers). Treatment dates
included in this report come from the selection of either the Visit Date or the Create Date, designated on
the General tab.
Figure 122: Visits by Clinic
Note: This report may be very large and takes a considerable amount of time to process.
May 2018 DRM Plus Administrator Manual v6.9 100
Non-Clinical Time by Provider Report
The Non-Clinical Time by Provider report replaces the DENTNCLINTIME PROV in VistA. The data on
the Non-Clinical Time by Provider report only accounts for any non-clinical time entered in DRM Plus.
This option is for local use only.
Figure 123: Non-Clinical Time
The entry option allows the user to record Administrative, Fee Basis, Education and Training and
Research time in hours and minutes (15 minute increments) for local reporting only. The Non-Clinical
Time by Provider report displays an approximate numerical unit of days (1 day = 8 hours). The
accumulation of less than four hours results in rounding down to the nearest whole number day. The
columns for Research, Education, Fee and Admin are summed independently in total days. The Total
column includes the sum of all four categories combined together for its entry in total days.
Note: Filing non-clinical time in DRM Plus is for local DRM Plus reporting only. Workload credit for non-
clinical time should be entered in Labor Mapping, which is accessed through the Macro Cost Accounting
(VA-MCA) office. Contact the local VA-MCA office to obtain further information on Labor Mapping.
May 2018 DRM Plus Administrator Manual v6.9 101
Fee Basis/Detailed Fee Basis Report
The Dental Fee Basis (type 5) report replaces the Applications and Dental Fee (type 5) report DENTFEE
RPT in VistA. These two reports never have the same data, since they are from two different options (one in
VistA, the other in DRM) and two separate VistA files.
The Dental Fee Basis (type5) report displays data from the File Fee Basis submenu available from the File
drop-down menu.
Figure 124: Dental Fee Basis
Note: Fee basis data entered in DRM Plus is only available for local reports created in DRM Plus.
May 2018 DRM Plus Administrator Manual v6.9 102
Encounters/Visits by Patient Type Report
The Encounters/Visits by Patient Type report has been created to display data from DRM Plus in an easily
readable format of providers and patients by inpatient and outpatient categories.
Figure 125: Encounters/Visits by Patient Type
May 2018 DRM Plus Administrator Manual v6.9 103
Recare Report
The Recare report is available to list patients with recare dates in the selected date range. Patient demo-
graphic and recent dental activity data are displayed on the report. Maintenance and Active/Maintenance
were added as selectable statuses on various reports. Maintenance status is the default status on the Recare
report.
Note: The Recare report is accessible for all provider working at the dental clinic to run the report.
Figure 126: Recare Report
A list of elements in Recare reports include: Recare Date, Patient Class, Home Phone, Work Phone,
SSN, Patient Name, Address 1, Address 2, City, State, Zip, Sex, Last Visit, Last Provider, Primary
Provider, Secondary Provider, Dental Alerts, Next Appointment, Next Appointment Clinic, Last
Comp Exam, Last Brief Exam, Last Perio Exam, Last Pano X-ray, Last Full Mouth X-ray, Last BW
X-ray and Last Prophy.
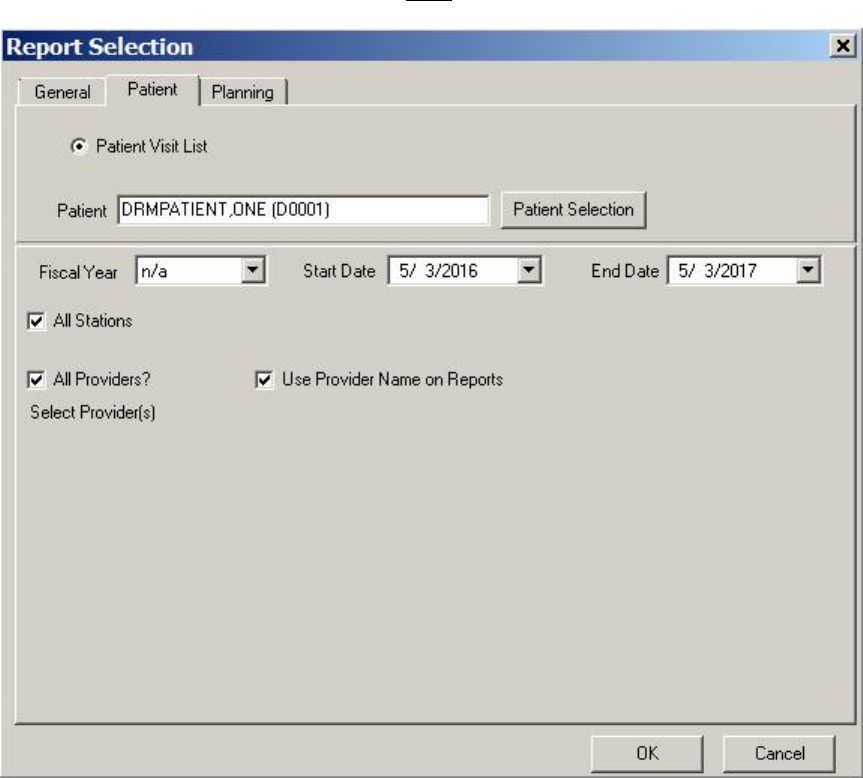
May 2018 DRM Plus Administrator Manual v6.9 104
Patient Tab
Use the Patient tab to run a report on any patient and view a list of visits. The patient is only used for report
generation; changing patients in DRM Plus is NOT allowed.
Figure 127: Patient Tab
1. Click the Patient Selection button to select a patient. The program automatically defaults to the
patient whose record is currently opened in DRM Plus.
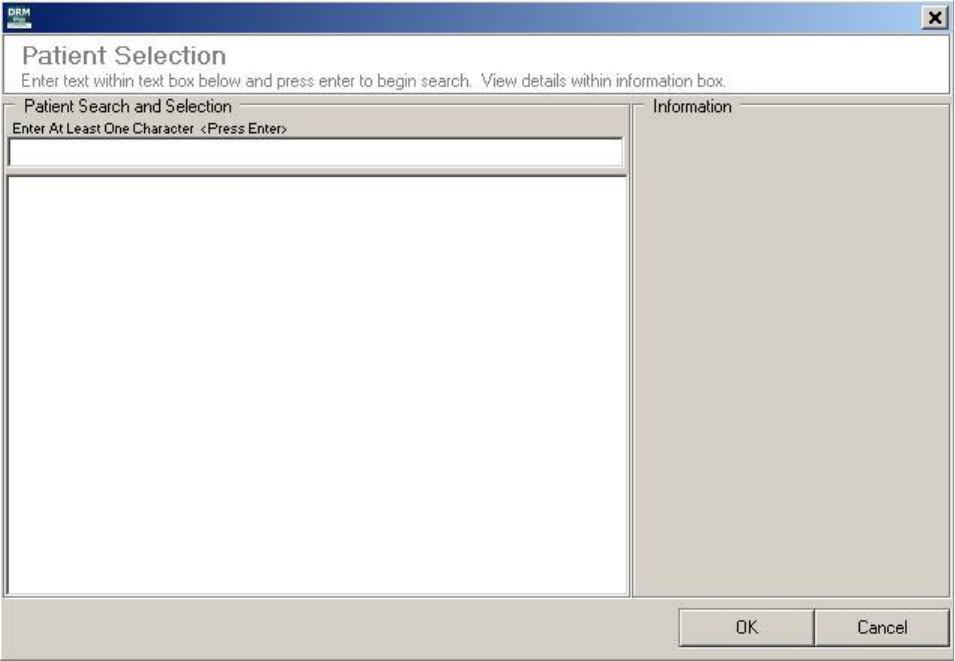
May 2018 DRM Plus Administrator Manual v6.9 105
2. The Patient Selection screen displays.
Figure 128: Patient Selection Screen
3. Type a patient name into the text box and press the <Enter> key. Partial names are acceptable.
4. Select the desired patient from the results box and click the OK button.
5. The selected patient’s name now displays on the Patient tab.
6. Choose the date and select other information to be included or excluded using the check boxes on
the Patient tab.
7. Click the OK button.
8. The DRM Report screen displays. Save to an Excel file, print or close.
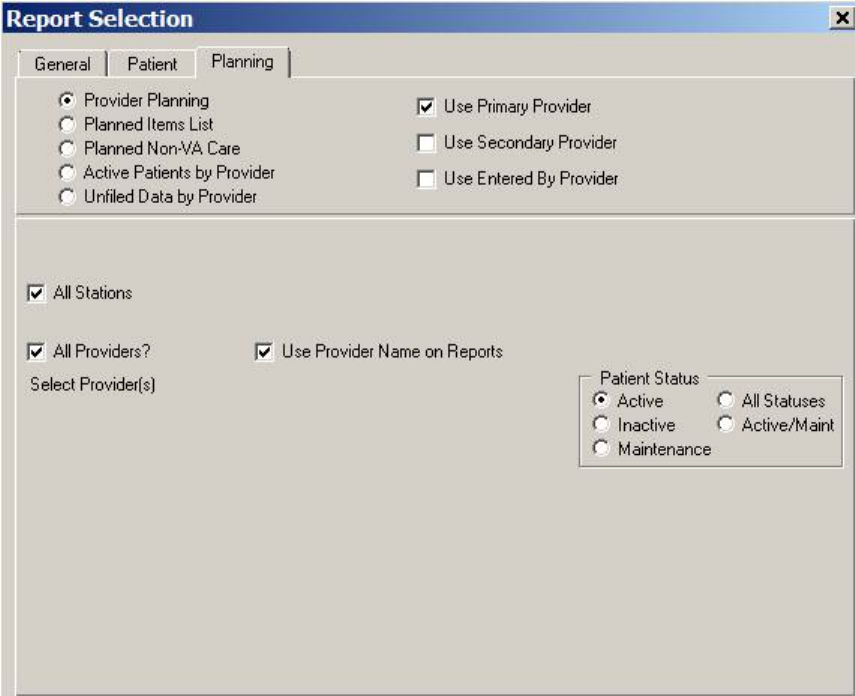
May 2018 DRM Plus Administrator Manual v6.9 106
Planning Tab
Use the options in the Planning tab to run planned reports, active patients by provider report or unfiled data
by provider report.
Figure 129: Planning Tab
1. Select the type of report from the five radio buttons.
2. Use the check boxes to indicate provider information.
3. Choose a Patient Status except for the Unfiled Data by Provider report.
4. Click the OK button.
5. The selected report screen will display. Print, close or save the results to Excel.
Note: The Primary/Secondary provider option is utilized for these reports: Provider Planning, Planned
Items List, Planned Non-VA Care and Active Patients by Provider.
The following reports are available from the Planning tab: Provider Planning, Planned Items List,
Planned Non-VA Care, Active Patients by Provider and Unfiled Data by Provider.

May 2018 DRM Plus Administrator Manual v6.9 107
Provider Planning
The Provider Planning report contains the Provider, Patient Name & Last 4 SSN, Patient Last Visit
and Patient Category, Planned Procedures, Next Appointment/Location and Qty/RVU/Cost data.
Figure 130: Primary Provider Planning
Note: The cost is included if it has previously been entered locally by a DRM Plus Administrator.
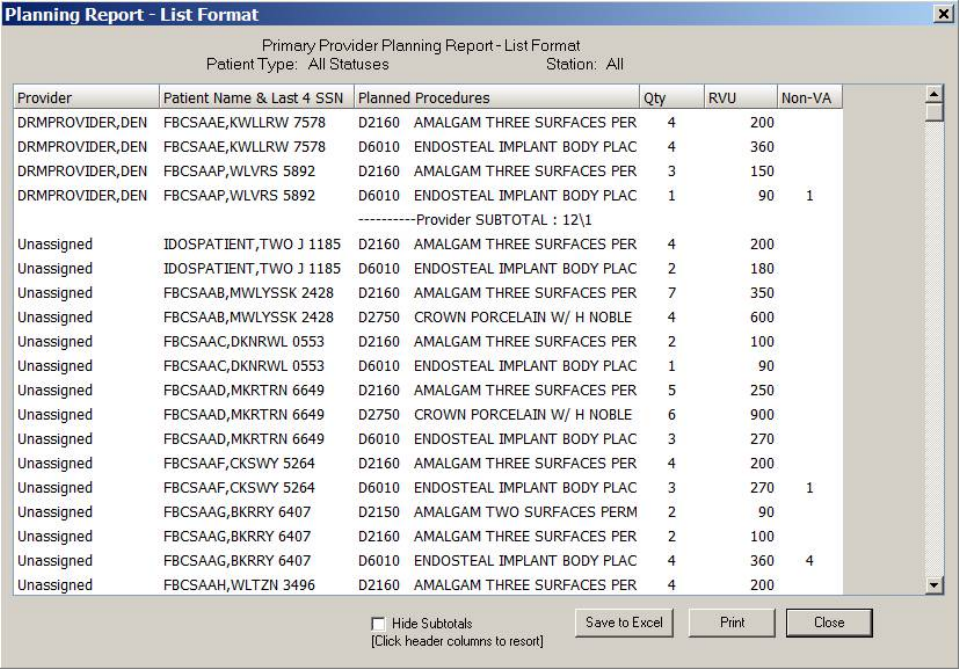
May 2018 DRM Plus Administrator Manual v6.9 108
Planned Items List
The Planned Items List report contains most of the same information as the existing Provider Planning
report. However this report is in a sortable list format. Clicking the first three headers Provider, Patient
Name & Last 4 SSN or Planned Procedures allows the provider to re-sort these columns.
The Provider Planning report contains the Provider, Patient Name & Last 4 SSN, Planned Procedures,
and Qty/RVU/Cost data. The Planned Items List report will also contain a column listing the planned
Non-VA care quantity procedures.
Figure 131: Planned Items List
Note: The cost is included if it has previously been entered locally by a DRM Plus Administrator.
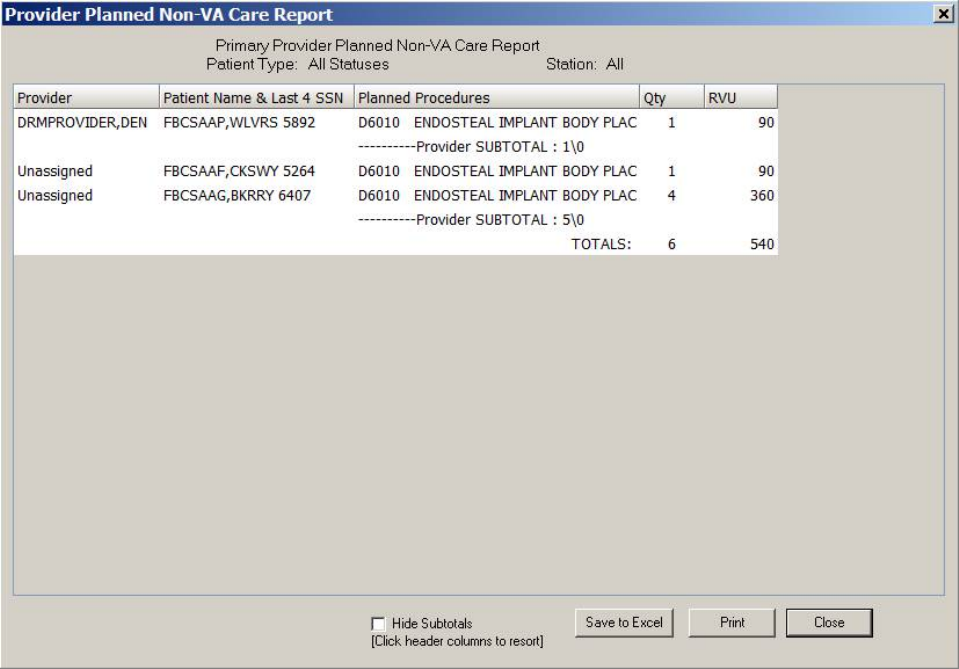
May 2018 DRM Plus Administrator Manual v6.9 109
Planned Non-VA Care Report
The Planned Non-VA Care report contains most of the same information as the existing Planned Items
List report with a sortable list format. Clicking the first three headers Provider, Patient Name & Last 4
SSN or Planned Procedures allows the provider to re-sort by these columns.
The Planned Non-VA Care report contains the Provider, Patient Name & Last 4 SSN, Planned
Procedures, and Qty/RVU/Cost data. However the report will only return planned Non-VA care
procedures that have been filed to the VistA server the local dental clinic is using.
Figure 132: Planned Non-VA Care
Note: The cost is included if it has previously been entered locally by a DRM Plus Administrator.

May 2018 DRM Plus Administrator Manual v6.9 110
Active Patients by Provider Report
The Active Patients by Provider report displays a list of patients with active dental encounters for
providers. It displays by Primary and/or Secondary provider. The report also only lists the patient one time
per provider.
This report may display many more patients than the provider truly has with an active status, due to the
default filing flag in DRM Plus. The default is Active, and most users do not change this. There are two
areas in DRM Plus to address this issue:
1. The most recent dental encounter may be updated by the user through the Case Management
Status field on the Cover Page.
2. Users are prompted to change the status of the patient when completing the encounter when they
click the Finish button. The provider is prompted because the patient no longer has any planned
items.
Figure 133: Active Patients by Provider
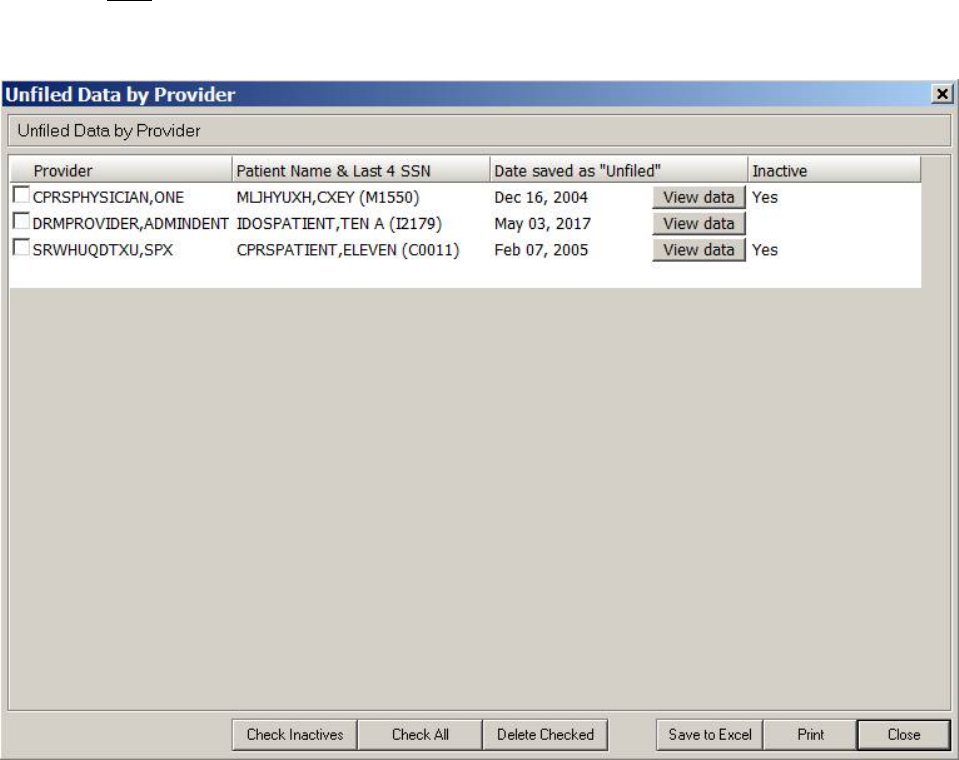
May 2018 DRM Plus Administrator Manual v6.9 111
Unfiled Data by Provider Report
The Unfiled Data by Provider report displays a list of patients who have unfiled data for providers. Unfiled
data is data that resides in a temporary scratch pad-type area, and is only visible by the provider the data is
saved to.
This data is NOT part of the patient’s chart record, and should be filed to completion in a timely manner.
Unfiled data becomes inactive after eight calendar days; the unfiled saved data is viewable but no longer
available to be filed.
Figure 134: Unfiled Data by Provider
After selecting an Unfiled Data by Provider report, the provider needs to select the View data button
which allows the user to display the data that was saved as unfiled data on that patient.
The TX Note Preview screen opens and displays the save unfiled data. This displays the unfiled data saved
by this provider or by some other provider who sent it to this provider on a specific patient.
The provider may print this unfiled data, especially if the data was made inactive either by the unfiled data
now saved over the 8-day limit, or if a DRM Plus Administrator used the Clean Slate submenu option on
this patient’s chart. An example of inactive unfiled data would have a Yes listed in the Inactive column.
Because DRM Plus is unable to reload this inactive data back into the patient’s chart, the provider is
required to re-enter the data manually with another encounter.

May 2018 DRM Plus Administrator Manual v6.9 112
The provider may delete any unfiled data by selecting the check box under the Provider column and then
selecting the Delete Checked button. The Check Inactives/Uncheck Inactives button allows the provider
to select/unselect all the inactive unfiled data reports. The Check All/Uncheck All button allows the
provider to select/unselect all the check boxes in the Unfiled Data by Provider report.
The following dialog is an example of unfiled data saved on a patient. The user may print the unfiled data by
selecting the Print button or close the screen by clicking the OK button.
Figure 135: TX Note Preview
Non-administrative end-users are able to delete, view and print the active/inactive unfiled data for all their
respective patients when accessing this report. The Unfiled Data by Provider report only allows a non-
administrative provider to view their own saved unfiled data and NOT of other providers.
The following dialog is the screen that allows the provider to Load, View (non-load) or Delete any unfiled
data when opening the DRM Plus chart for a patient. The Delete button allows the provider to delete unfiled
data before it is loaded into this patient’s chart. The provider is NOT able to view the unfiled data when they
select the Delete button from this screen.
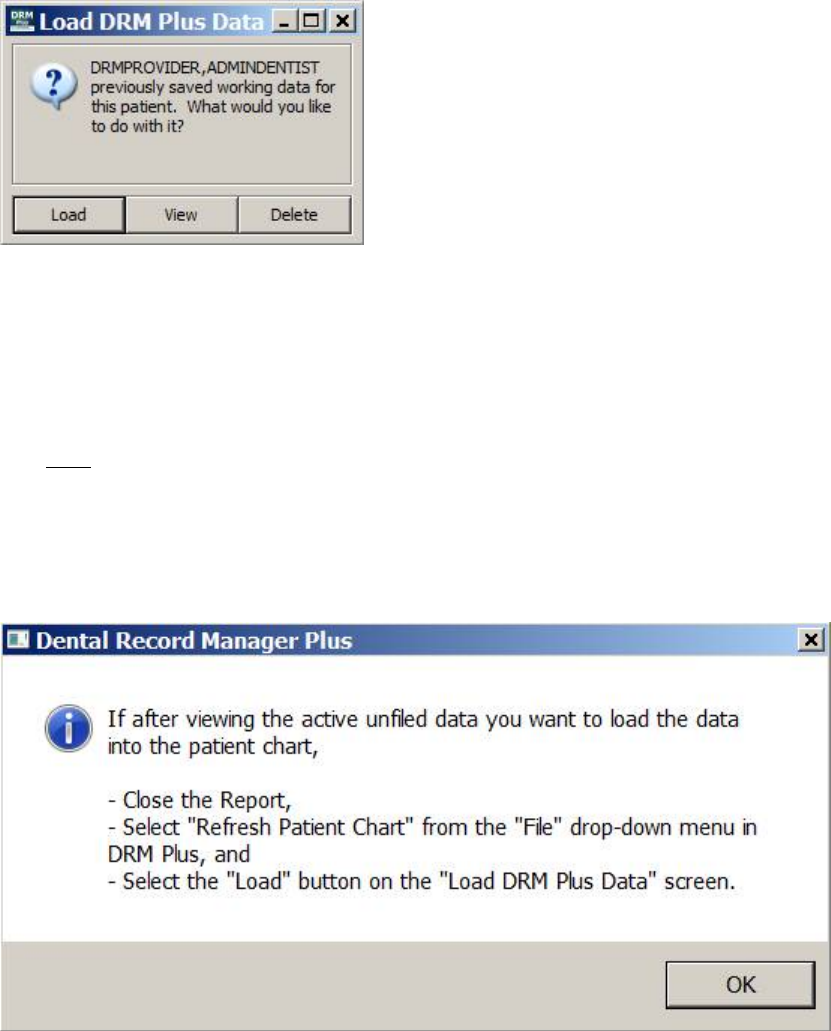
May 2018 DRM Plus Administrator Manual v6.9 113
The Load DRM Plus Data screen informs the provider the name of who saved the unfiled data to them.
The name listed at the beginning of the statement on the screen is the person who saved the unfiled data to
the user opening the patient’s chart.
Figure 136: Load DRM Plus Data Screen
There are two ways to view the unfiled data before the provider deletes this data. The first is to select the
Load option and go to the Unfiled Data by Provider report located on the Reports menu Reports
submenu Planning tab Unfiled Data by Provider report.
The second way to view unfiled data when the provider cannot remember exactly what was saved as unfiled
data is to select the View button. This option directs the user to the Unfiled Data by Provider report, but it
does NOT load the unfiled data. If the user wants the unfiled data loaded and filed, then they must close the
report and select the Refresh Patient Chart option under the File menu.
Selecting the View button displays a screen giving instructions to the end-user on how to load the data into
the patient’s chart. Selecting the Load button when the patient’s chart reopens after the refresh allows the
user to file the encounter. The following informational screen displays the steps to Load the unfiled data.
Figure 137: Instructional Steps to Load Unfiled Data
If Load or View were selected upon entry into the patient’s chart and the provider wants to delete the
unfiled data after viewing it, use the Delete Checked button in the Unfiled Data by Provider report. If the
Load button was selected, then the user also needs to select the Refresh Patient Chart submenu from the
File menu.
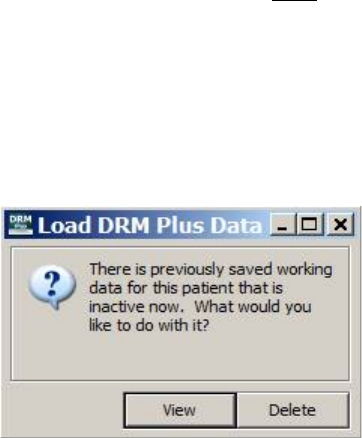
May 2018 DRM Plus Administrator Manual v6.9 114
Note: All data, including unfiled saved data or filed data for ‘test’ patients configured with the first three
digits of the SSN as zeros will NOT appear in any DRM Plus report.
Unfiled Data becomes inactive after eight calendar days. The end-user receives a screen message on the
ninth day after saving data whenever they enter the patient’s chart. This message provides two button
options to either View or Delete the inactive unfiled data.
The following screen displays when loading the patient’s chart which has inactive unfiled data by the
provider or from another provider.
Figure 138: Inactive Unfiled Saved Data
The View button takes the user directly to the Unfiled Data by Provider report, where they can view, print
or delete the inactive unfiled data. There is no way to load inactive unfiled data into the patient’s chart
except to re-enter all the data manually.
The Delete button deletes the patient’s inactive unfiled data from the VistA scratch pad.
May 2018 DRM Plus Administrator Manual v6.9 115
Service Reports
Use the Service Reports submenu from the Reports menu to select and create a service report.
Figure 139: Service Report Selection Screen
1. Choose the desired type of service report check box(s).
2. Set the Fiscal Year or date range, if applicable.
3. Change the All Station and All Providers options.
4. Select the date type that is to be represented on the report.
5. Click the OK button.
6. The Service Reports screen displays with the results.
May 2018 DRM Plus Administrator Manual v6.9 116
Figure 140: Service Reports
7. If more than one report, or all report options are checked on the Service Reports Selection screen,
the reports appear in tabs on the Service Reports screen.
8. Save the report to Excel or print.
May 2018 DRM Plus Administrator Manual v6.9 117
Data Warehouse Reports
The Data Warehouse Reports submenu will connect to specific reports as maintained by the Office of
Dentistry. The Office of Dentistry may change this submenu at any time. The submenu is dynamically
created based on settings of web addresses in the Administrative Toolbox settings in DRM Plus.
Figure 141: Reports Menu
The DRM Plus Administrator has the ability to maintain the web addresses for the Data Warehouse
Reports. The website addresses should end in ‘.xml’. These XML addresses/files build the structure for the
Data Warehouse Reports submenus.
When selecting the Reports menu there may be a few seconds delay. Once the submenu has been loaded,
there should no longer be a delay. If there is a failure to load the submenus, the website is down or you have
lost connection; the next time you try the Reports menu, it will try to load the submenus again.
This delay can be shortened by the retrieval timeout set by the DRM Plus Administrator (0-60 seconds). A
setting of 0 seconds does NOT mean there will NOT be a delay. It may take DNS a few seconds to resolve
the name of each website into an IP Address.
So in the case of a complete failure and a setting of 0 seconds on the timeout – you may still experience a
delay of 20 seconds or so when selecting the menu. The submenu would then display ‘currently unavailable
– try again later’ as the submenu. It is suggested that you wait and try later in the day or even possible the
next day. If the connection failure persists, please contact the local DRM Plus Administrator.
Figure 142: Data Warehouse Reports Submenu Failure
May 2018 DRM Plus Administrator Manual v6.9 118
Also a setting of 0 may NOT allow your site time enough to connect and get the submenu, so use with
caution. A setting of 5 seconds is the default. This may need to be adjusted (lengthened or shortened) based
on your sites Internet/network connectivity.
The first XML file retrieval timeout (0-60) field from the Administrative Settings screen is associated
with Data Warehouse Reports.
Figure 143: Administrative Toolbox Submenu - General Tab
May 2018 DRM Plus Administrator Manual v6.9 119
Adverse Events Report
The Adverse Events report may be opened from the Reports menu by selecting the Adverse Events
submenu which is displayed in the following dialog. The Adverse Events report submenu will only be
active for any full DRM Plus Administrator to create a report.
Figure 144: Reports Menu
When selecting the Adverse Events submenu the following Report Queue screen will display.
Figure 145: Report Queue
The Report and Parameters drop-down field allows for the selection of either the Adverse Events report
or the Device Tracking report to have a new scheduled report created.
The rest of the following functionality found on the Report Queue screen will allow the provider to
schedule a report, view a report, export a report to Excel, or delete a report.
May 2018 DRM Plus Administrator Manual v6.9 120
Status may be selected to customize the Adverse Events report. The default status is only the
Active check box selected however the provider may select any combination of Active, Resolved
or Deleted which would be included in the final report.
Date Range may be selected to customize the Adverse Events report. The default date range is set
to include the previous year from the creation date of the Adverse Events report.
Schedule Report button when selected will create a new Adverse Events queued report using the
Status and Date Range selections by the provider. The provider may change the schedule such as
the date and/or time so the report will get generated during a time when there is little or no effect
on the functionality of the workstation.
Refresh Queue button would be used when the Progress, last column in Queued Reports table,
is displaying any value less than 100% complete. Continue to select the Refresh Queue button
until the Progress is 100% complete. Then the recent queued report may be viewed by the
provider.
View Report button requires one of the Adverse Events report to be highlighted so the provider
may view the Adverse Events report.
Export to Excel button when selected with a queued report highlighted allows the provider to
export all the data from the queued report to an Excel document.
Delete Report button when selected with a queued report highlighted will delete that queued
report.
Close button when selected will close the Report Queue screen.
To create/schedule and view the Adverse Events report:
1. Select any combination or all the Status check boxes
2. Select the Date Range for the Adverse Events report
3. Select the Schedule Report button
4. Select the OK button on the informational Adverse Events pop-up screen
5. May need to select the Refresh Queue button multiple times until the Progress is 100%
6. Highlight the Adverse Events report in the Queued Reports table
7. Select the View Report button
May 2018 DRM Plus Administrator Manual v6.9 121
The following dialog displays an Adverse Events report with seven columns of the data displaying in the
dialog. There are actually eleven columns of data in all Adverse Events reports so four are NOT displayed
in the following dialog.
Figure 146: Adverse Events Report
Note: There are five columns containing dates in the Adverse Events report which are listed and explained
in greater detail.
2nd column VISIT – VISIT date selected for the encounter
6th column ENTRY DATE – real time date when encounter was filed
7th column RESOLVED DATE – real time date when adverse event was edited and filed
8th column VISIT DATE – VISIT date selected for the encounter
9th column LAST EDIT DATE – real time date when adverse event was edited/removed/deleted
and filed
Note: The Adverse Events report is only available for selection eight days when one is scheduled/created.
After the eighth day the report will be automatically deleted and a new report will have to be
scheduled/created.
Note: The Adverse Events report will contain test patient data if any has been filed in the VistA production
account. Adverse event Excel reports should have all test patient data removed after it has been saved.
May 2018 DRM Plus Administrator Manual v6.9 122
Device Tracking Report
The Device Tracking report may be opened from the Reports menu by selecting the Device Tracking
submenu which is displayed in the following dialog. The Device Tracking report submenu will only be
active for a full DRM Plus Administrator to create a report.
Figure 147: Reports Menu
When selecting the Device Tracking submenu the following Report Queue screen will display.
Figure 148: Report Queue
The Report and Parameters drop-down field allows the selection of either the Device Tracking report or
the Adverse Events report to have a new scheduled report created.

May 2018 DRM Plus Administrator Manual v6.9 123
The rest of the following functionality found on the Report Queue screen will allow the provider to
schedule a report, view a report, export report to Excel, or delete a report.
Status may be selected to customize the Device Tracking report. The default status is the Active
check box however the provider may select any combination of Active, Resolved or Deleted
which would be included in the final report.
Date Range may be selected to customize the Device Tracking report. The default date range is
set to include the previous year from the creation date of the Device Tracking report.
Schedule Report button when selected will create a new Device Tracking queued report using
the Status and Date Range selections by the provider. The provider may change the schedule such
as the date and/or time so the report will get generated during a time when there is little or no
effect on the functionality of the workstation.
Refresh Queue button would be used when the Progress, last column in Queued Reports table,
is displaying any value less than 100% complete. Continue to select the Refresh Queue button
until the Progress is 100% complete. Then the recent queued report may be viewed by the
provider.
View Report button requires one of the Device Tracking report to be highlighted so the provider
may view the Device Tracking report.
Export to Excel button when selected with a queued report highlighted allows the provider to
export all the data from the queued report to an Excel document.
Delete Report button when selected with a queued report highlighted will delete that queued
report.
Close button when selected will close the Report Queue screen.
To create/schedule and view the Device Tracking report:
1. Select any combination or all the Status check boxes
2. Select the Date Range for the Device Tracking report
3. Select the Schedule Report button
4. Select the OK button on the informational Device Tracking pop-up screen
5. May need to select the Refresh Queue button multiple times until the Progress is 100%
6. Highlight the Device Tracking report in the Queued Reports table
7. Select the View Report button
The following dialog displays a Device Tracking report with thirteen columns of the data displaying in the
dialog. There are actually twenty five columns of data in all Device Tracking reports so twelve are NOT
displayed in the following dialog.

May 2018 DRM Plus Administrator Manual v6.9 124
Figure 149: Dental Devices Report
The first two columns on the report, the DEVICE TRACKING IEN and the TRANSACTION, are
numbers that don’t represent any value to the provider viewing the report. However they are extremely
useful when an issue results with one of the device tracking entries and we need assistance from VA OI&T
to resolve the problem.
The Device Tracking report column of TRANSACTION contains the filed dental transaction IEN number
from VistA identifying that transaction internally.
The Device Tracking report column of DATE only will contain information from the filed non-transaction
device entry and no data from the filed transaction device entry.
The Device Tracking report column of TOOTH will display the tooth number for both the filed non-
transaction device entry if entered and the filed transaction device entry if the transaction had one.
Note: There are five columns possible containing dates in the first half of the Device Tracking report and
are listed below explaining the detailed date reference.
5th column DATE – date entered for a non-transaction device tracking entry
9th column ACTIVE DATE – real time date when encounter was filed
10th column REMOVED DATE – real time date when device tracking was edited and filed
12th column LAST EDIT DATE – real time date when adverse event was edited/removed/deleted
and filed
13th column VISIT DATE – VISIT date selected for the encounter when adding the device
tracking
Note: The Device Tracking report is only available for selection eight days when one is scheduled/created.
After the eighth day the report will be automatically deleted and a new report will have to be
scheduled/created.
Note: The Device Tracking report will contain test patient data if any has been filed in the VistA
production account. Adverse event Excel reports should have all test patient data removed after it has been
saved.
May 2018 DRM Plus Administrator Manual v6.9 125
Extract History File
The Extract History File submenu function is used to extract raw data and save it to a text (.txt) file, then
convert to Microsoft Access or Excel. Prior to extracting data, the DRM Plus Administrator should create a
folder on the hard drive or network. This folder can be designated in the User Options submenu, by clicking
the Set extract folder button. Please see the User Options section in this chapter for additional information.
Figure 150: Extract History File Data Screen
To extract data:
1. Use the drop-down menus to set the start and end dates.
2. The Output file selection requires the creation of a folder on the hard drive or network, as
previously explained. The directory should default if the Set extract folder parameter is used.
3. Select File to Replace from the right window, or add a new file to the directory by typing it
directly into the text box. Click in the text box, add a backslash <\>, then type the name of the file,
and then type .txt.
4. The All Stations check box is checked by default. This can be changed by selecting a single
optioned station.
5. Check the Optional Select Provider check box to retrieve information about a specific provider.
The Select Provider screen displays.
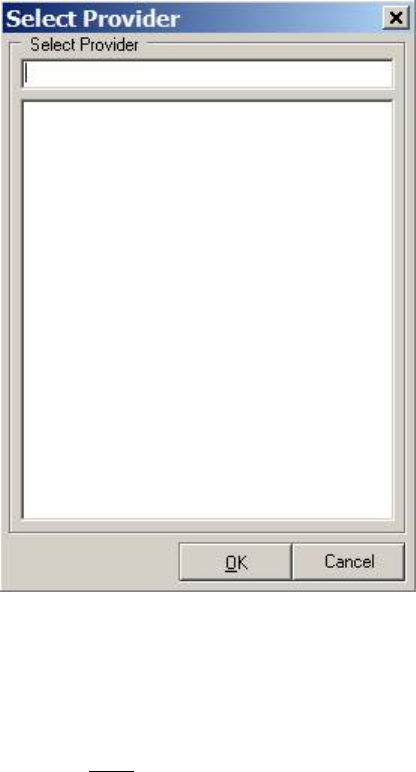
May 2018 DRM Plus Administrator Manual v6.9 126
Figure 151: Select Provider Screen
6. Enter the search term, press the <Enter> key. Highlight the desired result and click the OK button.
The provider name appears on the screen.
7. Click the OK button to complete the extract function and save the file to the designated folder.
Note: Do NOT use this extract function for long reports. The workstation screen displays an hourglass, and
no other applications can be run until the extract report finishes. When planning to run a long report, use the
Queued Extract History File function.
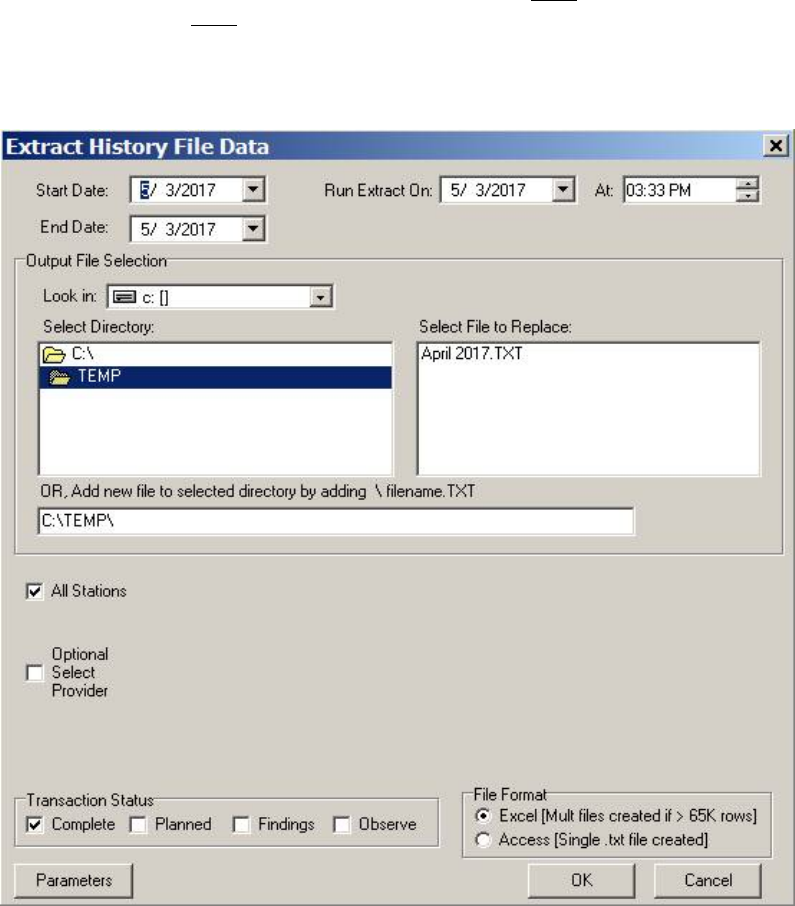
May 2018 DRM Plus Administrator Manual v6.9 127
Queued Extract History File
The Queued Extract History File submenu allows larger sites to setup an extract to run in the background
so that there is no effect on the functionality of the workstation. The Queued Extract History File submenu
is available in the Reports menu, and runs via a TCP/IP server on the user’s workstation, rather than
through the VistA RPC Broker on a local PC.
This provides at least two major benefits: the workstation is NOT tied up while the extract is running, and
the RPC Broker does NOT time out during long extracts.
Note: Obtain a valid Port # and IPaddress from the local IT department to use this function. The Port #
should be 15,000 or greater.
Figure 152: Extract History File Data Screen
This screen is similar to the Extract History File Data screen, with several key differences:
1. Use the drop-down menus to choose the Start Date and End Date for the date range the extract is
performed in. Use the Run Extract On drop-down menus to determine the date/time to perform
the extract.
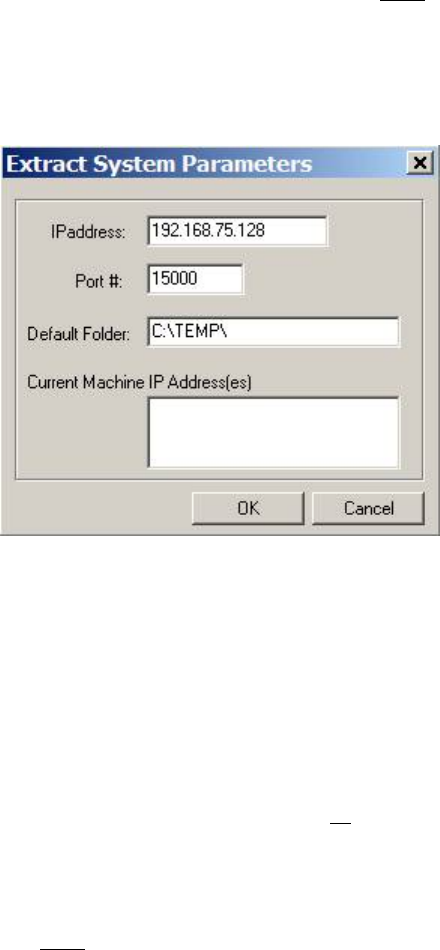
May 2018 DRM Plus Administrator Manual v6.9 128
2. The Output File Selection and the All Stations functions are identical to those found on the
Extract History File Data screen. See the previous section for further information.
3. Check the Optional Select Provider check box to gather information from a specific provider.
The Select Provider screen does NOT display; instead, a scroll menu displays on screen. Select
the provider by highlighting a specific name.
4. Check the desired Transaction Status check box.
5. Click the radio button corresponding to the desired File Format.
6. Click the Parameters button. The Extract System Parameters screen displays.
Figure 153: Extract System Parameters
7. Enter the IPaddress and Port # number. IT can provide this information.
8. Verify the Current Machine IP Address(es) is correct every time.
9. Once the parameter information is entered, click the OK button. This extracts the data to the
chosen directory folder location.
Considerations and Additional Information
Output from the extract is sent to the file location specified on the Extract History File Data screen. No
changes are made to the content, and no manipulations are part of the extract.
The extract application (DRMEXTSRV.exe) must reside in the same location as the DRM application
(typically \DOCTSTORE). If upon clicking the OK button on the Extract History File Data screen, the
user receives a message that reads “The specified file was not found,” this means the DRMEXTSRV.exe file
was NOT found.
Clicking the OK button starts the DRMEXTSRV application listening on the Port # defined on the
parameters screen. A DRM Extract icon appears in the system tray. It can be manually shut down by right-
clicking the icon, and selecting Shutdown from the right-click menu. The DRMEXTSRV application can
also be manually shut down by task manager from the Processes tab. If the DRM Extract process is
actively “talking” to VistA, placing the cursor over the icon displays the message, “Receiving Data.” Extract
successfully queued displays the following screen.
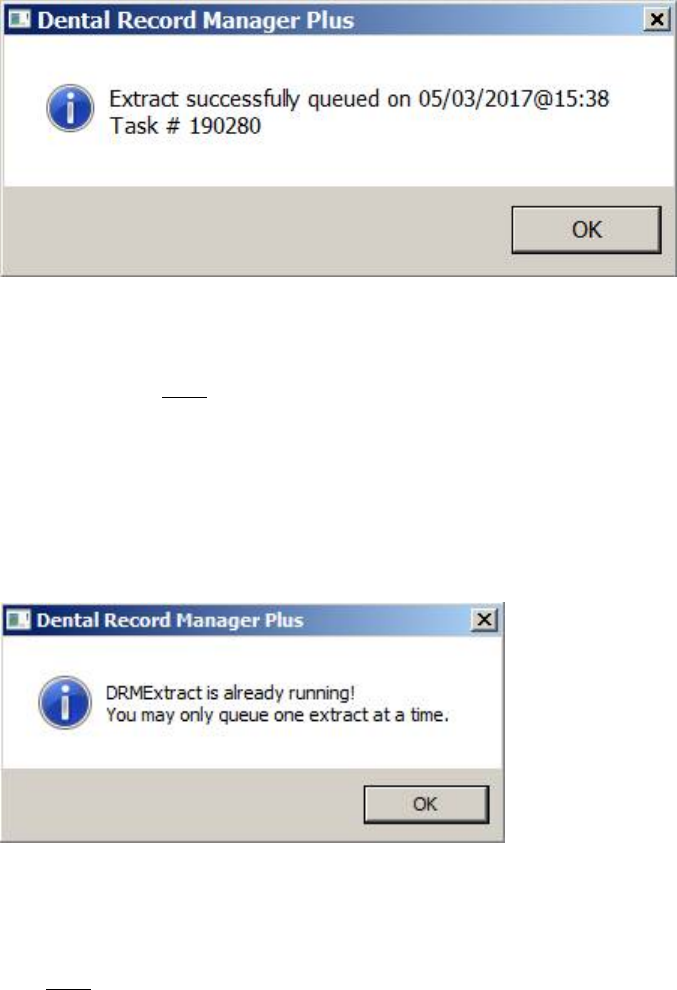
May 2018 DRM Plus Administrator Manual v6.9 129
Figure 154: Extract Successfully Queued
The Task # refers to the Taskman job number, and can be used by the local IT department to check if the
Taskman task is completed, or if an error has occurred. If an extract is queued on the VistA side, and
DRMEXTSRV is NOT running, the tasked job quits without outputting the .txt file.
Note: Since the extract is queued, there is no notification to the user that the IPaddress or Port # might be
wrong. It is critical that the IPaddress and Port # fields are confirmed correct.
Only one DRMEXTSRV application may run on a workstation at a time (specifically: only one may be
performed after work hours on the same machine). Trying to queue another extract results in the following
error message.
Figure 155: DRM Extract Already Running
When the extract is completed, the DRMEXTSRV application closes automatically, and another extract can
be queued. If multiple files are generated for the extract, they are numbered sequentially, i.e., Extract.txt is
the user selected name, followed by: Extract1.txt, Extract2.txt, etc. Since the extract is queued, and the user
does NOT know if it ran to completion, the last row in the .txt file is “END OF FILE”, denoting that all
rows were sent to the workstation TCP/IP process. If there are multiple files, all files except the last contain
the text END OF FILE (CONT...) to denote that additional extract data remains in other files.
Note: Multiple files are only output if the Excel format is selected from the extract screen, and there are
greater than 65K rows of text.
Once the tasked job is completed, and the file is created, the process for retrieving and creating Excel
worksheets is the same as discussed previously in the Extract History File Data section of this chapter.
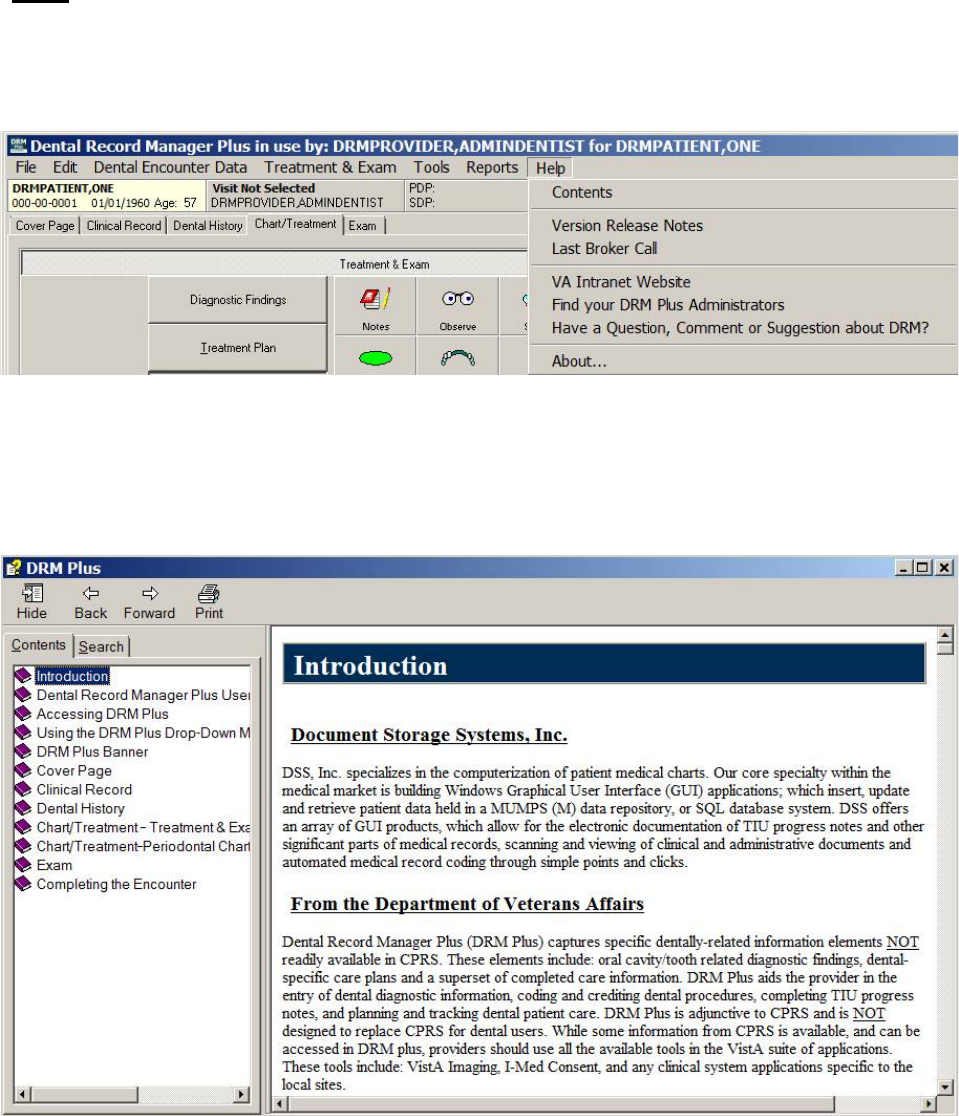
May 2018 DRM Plus Administrator Manual v6.9 130
Help
Use the Help menu to access more information on DRM Plus. There are seven submenus: Contents;
Version Release Notes; Last Broker Call; VA Intranet Website; Find your DRM Plus Administrators;
Have a Question, Comment or Suggestion about DRM?; and About.
Figure 156: Help Menu
Contents
Use the Contents to find information on using DRM Plus.
Figure 157: DRM Plus Contents Screen
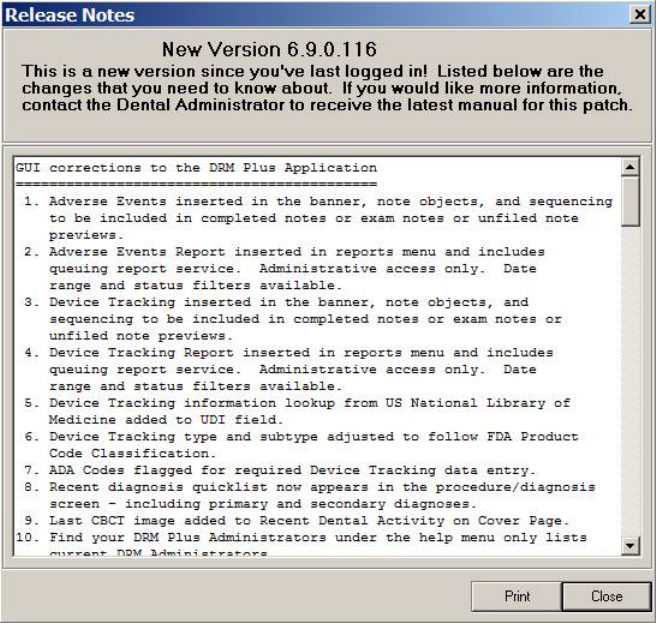
May 2018 DRM Plus Administrator Manual v6.9 131
Version Release Notes
Select the submenu to view what was introduced in the current version of DRM Plus.
Figure 158: Release Notes Screen
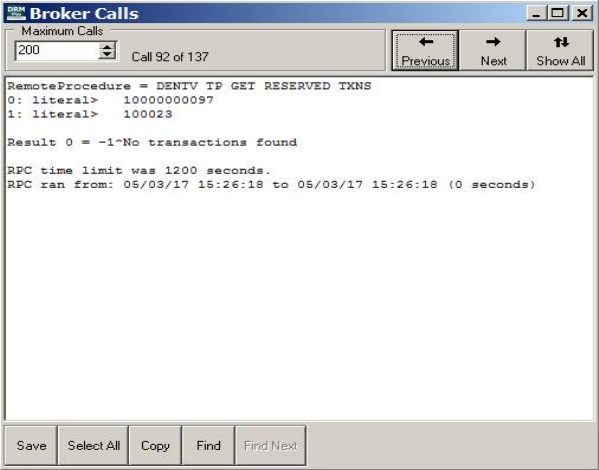
May 2018 DRM Plus Administrator Manual v6.9 132
Last Broker Call
Select the submenu to see the last broker call.
Figure 159: Broker Calls Screen
Use the up and down arrows next to the Maximum Calls text box to adjust how many broker calls are
retrieved. Use the previous and next arrows to scroll through the broker calls. Use the Show All button to
scroll through the list of broker calls.
VA Intranet Website
Select the submenu to access the VA Intranet website.
Note: Clicking this submenu connects the user to the VA Intranet website, where additional dental-related
information can be obtained. This includes the latest DRM Plus manuals.
Find your DRM Plus Administrators
Select the submenu to display a list of all the DRM Plus administrators that have full admin functionality.
The list of DRM Plus administrators may be from the local dental clinic or every dental clinic that shares the
same VistA server.
Have a Question, Comment or Suggestion about DRM?
Select the submenu and it will display a VA email screen with the VHA Dental Software Support group
pre-selected in the ‘To’ email field. The provider will receive a reply from the VHA Dental Software
Support group in response from the provider’s question, comment or suggestion when requested.
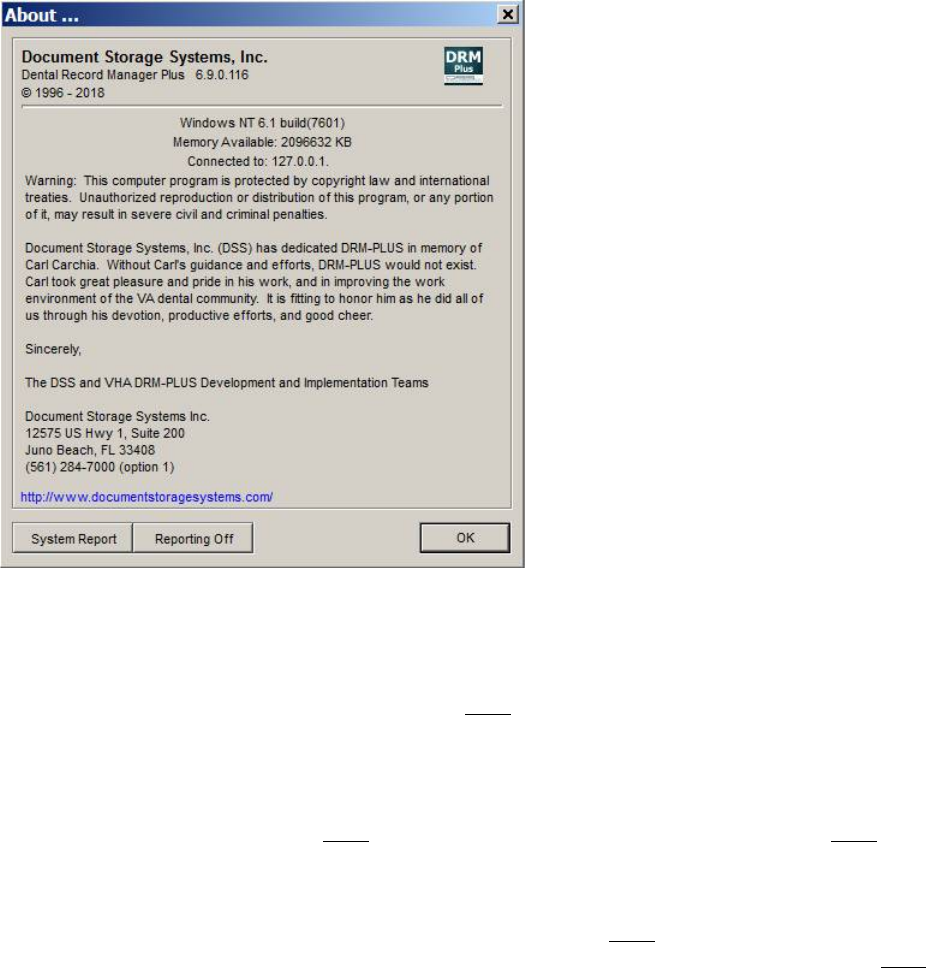
May 2018 DRM Plus Administrator Manual v6.9 133
About
The About screen contains information on the DRM Plus application currently in use at the facility,
including the version number of the executable.
Figure 160: DRM Plus About Screen
The System Report button and the Reporting Off button are located on the About screen.
Both buttons are useful for Document Storage Systems (DSS) in helping to evaluate any issue that may
have occurred in DRM Plus. It is strongly suggested NOT to select ether button except when working with a
DSS employee who will be helping the provider in finding details about the issue occurring in the DRM
Plus application.
The System Report button will cause the DRM Plus application to freeze. When selecting this button any
unfiled data entered this session and NOT saved as unfiled data will be lost. The provider will NOT be able
to recover the unsaved unfiled data and would have to re-enter all the data after restarting the DRM Plus
application.
Selecting the System Report button will give the provider an option NOT to continue if they desire. The
following informational screen will inform the provider to select the No button if they would prefer NOT to
lose any unsaved unfiled data recently entered this session.
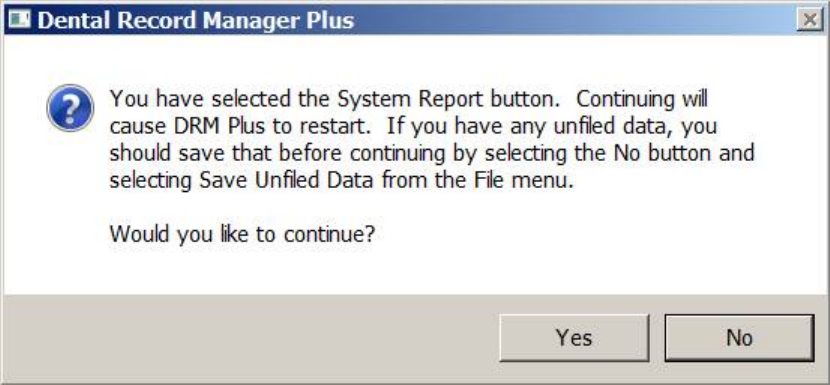
May 2018 DRM Plus Administrator Manual v6.9 134
Figure 161: System Report Informational Screen
Selecting the Yes button from the informational screen will freeze the DRM Plus application and give the
provider an error system report. All unsaved unfiled data at this point will be lost. The provider may select
the restart application button to re-launch DRM Plus and continue with their dental charting.
The default Reporting Off button will NOT affect the provider’s work process during this session unless
they experience an error using the application. The only visible change the provider may notice when the
button is selected will be changing the button’s name to Reporting On.
When the button displays Reporting On then the madExcept application, system report, will become
inactive. The madExcept system report is explained in detail when reading the madExcept Application
appendix from the DRM Plus manuals.
Note: The Reporting On button’s name will change back to the default Reporting Off button’s name each
time DRM Plus is closed and relaunched.
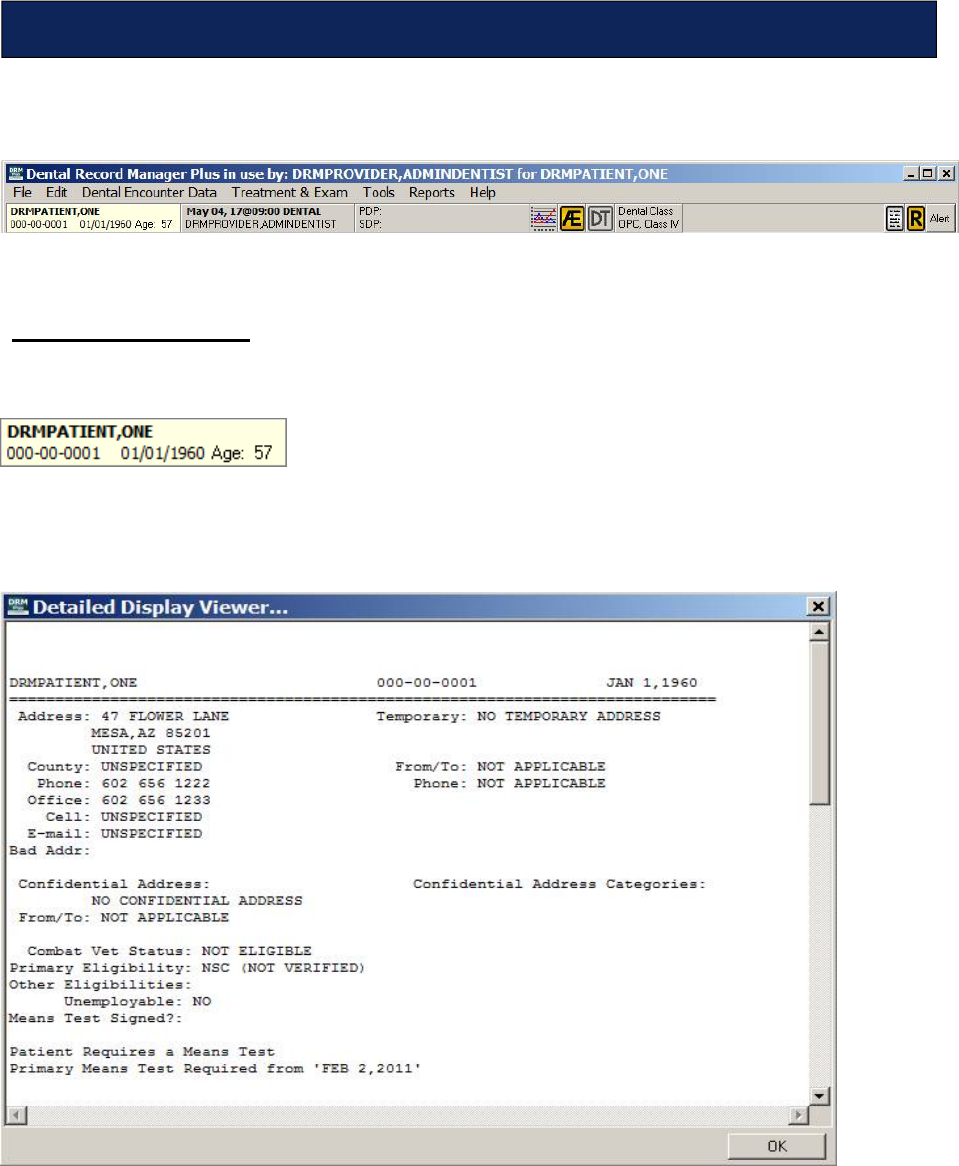
May 2018 DRM Plus Administrator Manual v6.9 135
The DRM Plus Banner contains vital information about the patient, providers, and also coding standards and
alerts.
Figure 162: DRM Plus Banner
Patient Information
Patient information displays on the far left side of the DRM Plus banner.
Figure 163: Patient Inquiry Button
The patient information area shows the patient’s first and last name, social security number, date of birth
and current age. Click the Patient Inquiry button of the banner to open the Patient Inquiry screen.
Figure 164: Patient Inquiry Screen
The Patient Inquiry screen contains more detailed information about the patient, including: address, phone
number, means test information, status, and admissions information.
DRM Plus Banner
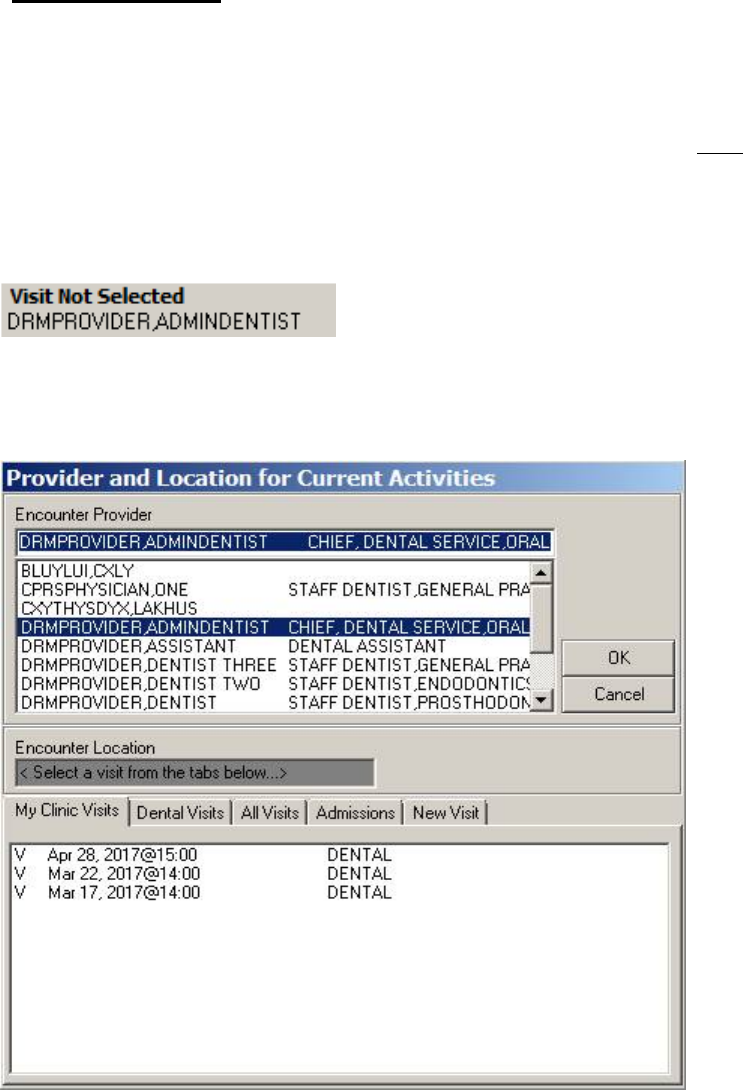
May 2018 DRM Plus Administrator Manual v6.9 136
Visit Information
Visit information is displayed on the banner in the second box from the left. It contains information on the
current encounter. A scheduled appointment automatically fills the field when the provider enters data into
DRM Plus on the same day of the appointment.
When no scheduled appointment automatically imports into banner or if one is NOT manually selected from
the banner after opening the dental chart then the following will result. After the first completed procedure
code has been selected during the current session results in the launch of the Provider and Location for
Current Activities screen. This will force the dental user to select a scheduled appointment before the first
diagnosis code can be selected for the completed transaction.
Figure 165: Provider/Visit Button
To change visit or provider information, click the Provider/Visit button of the banner. The Provider and
Location for Current Activities screen displays.
Figure 166: Provider and Location for Current Activities Screen
Select the provider in the top part of the screen and the correct appointment information in the bottom part
of the screen. The information in the banner changes to reflect the adjustments made on this screen. For
more information on navigating this screen, please see the Dental Encounter Data section in the Using the
DRM Plus Drop-Down Menus chapter of this manual.
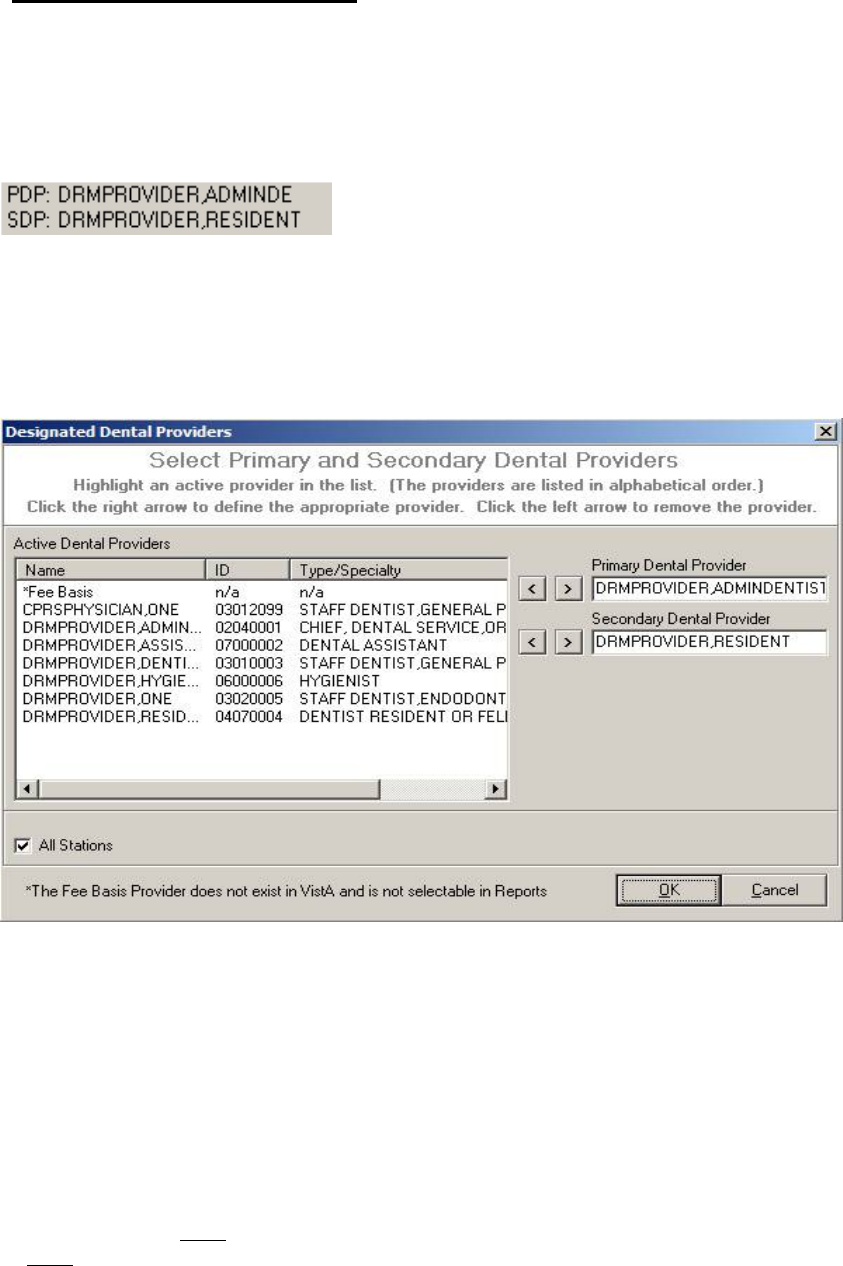
May 2018 DRM Plus Administrator Manual v6.9 137
Dental Provider Information
This section of the banner displays information on the primary and secondary dental providers. To assign a
primary and/or secondary dental provider for a patient requires an administrative parameter option, given by
the DRM Plus Administrator. Primary/Secondary providers are for planned care, and show who is
responsible for a given patient, and what is upcoming for the patient, regardless of who entered the
information.
Figure 167: Designate Dental Providers Button
To select a primary and/or secondary dental provider for a patient:
1. Click the Designate Dental Providers button of the banner.
2. The Designated Dental Providers screen displays.
Figure 168: Designated Dental Providers Screen
3. Select the provider from the list of active dental providers.
4. Click the right arrow associated with the Primary Dental Provider and/or Secondary Dental
Provider windows.
5. The provider’s name displays in the designated provider area. To remove the provider, click the
left arrow.
6. Click the OK button.
7. The provider information displays in the banner.
The primary dental provider or secondary dental provider can be set as Fee Basis in DRM Plus. The Fee
Basis provider does NOT exist in VistA. This is a “free-text” entry and therefore, most reports in DRM Plus
do NOT recognize the Fee Basis provider.
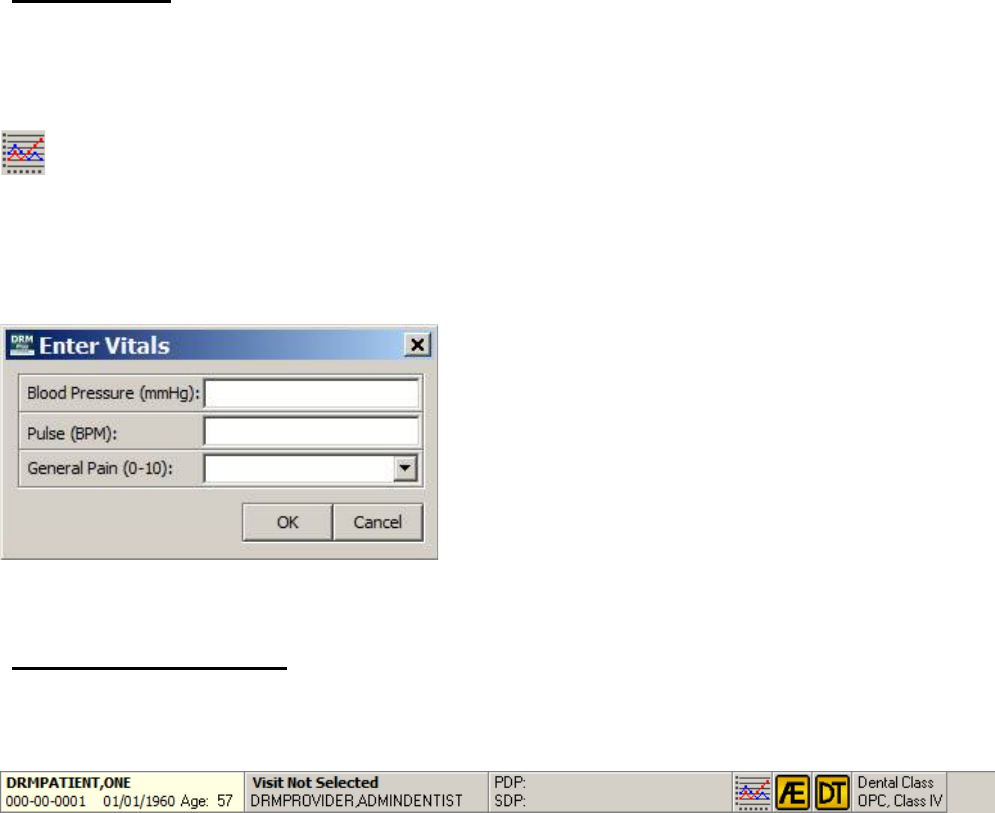
May 2018 DRM Plus Administrator Manual v6.9 138
Designating primary and/or secondary provider(s) is optional. Since the field is located in the DRM Plus
banner, it can be viewed from all DRM Plus screens.
Note: The Panel Add/Edit administrative option changes all patients assigned to the original primary
provider to the selected new primary provider for the entire block of patients.
Note: This option is utilized for these DES reports: Recare, Provider Planning, Planned Items List,
Planned Non-VA Care and Active Patients by Provider.
Vitals Button
This section of the banner contains a Vitals button to launch the Enter Vitals screen, which will add
specific vitals to the patient’s VistA database. Only the blood pressure, pulse and general pain maybe added
using the Enter Vitals screen.
Figure 169: Vitals Button
After selecting the Vitals button from the banner the Enter Vitals screen will display for the provider to
enter and save three specific vitals to the VistA database. After entering any of the three possible vitals
select the OK button to save to the VistA database.
Figure 170: Enter Vitals Screen
Adverse Events Button
The Adverse Events (AE) button in the banner when selected will launch a screen where an adverse event
may be entered and filed with an encounter for the selected patient’s chart.
Figure 171: Adverse Events Button on DRM Plus Banner
The AE button, displayed as a yellow button in the banner screen above, only results as a yellow icon when
at least one Active adverse event entry has been filed with the patient’s chart. Selecting the AE button will
open the following Adverse Events screen. When only filed Resolved entries are listed in the History
section of the Adverse Events screen then the AE button in the banner will remain the same background
color as the banner.
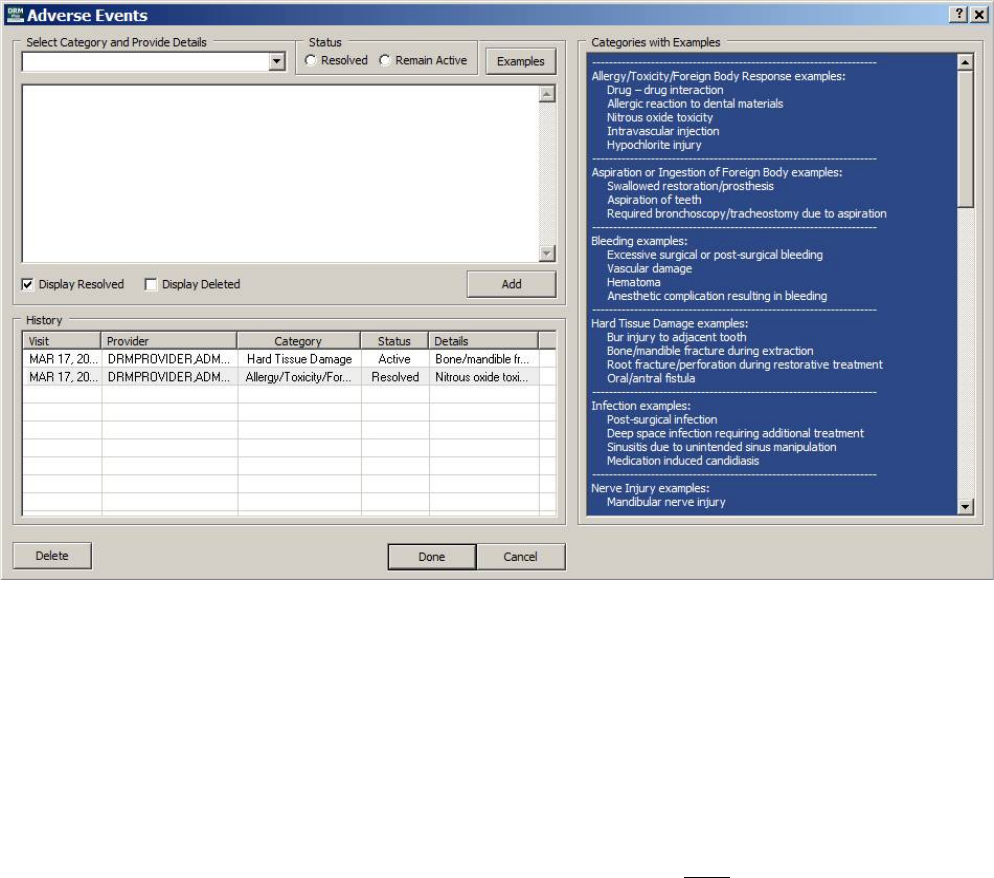
May 2018 DRM Plus Administrator Manual v6.9 139
To add an adverse event:
1. Select the drop-down arrow on the Select Category and Provider Details window
2. Select one of the twelve categories from the list
3. View the blue Categories with Examples window with the category listed at the top
4. Add or provide detailed text into the upper text window about the adverse event
5. Select the correct Status radio button (Resolved or Remain Active)
6. Select the Add button to temporary save the new adverse event
7. May add multiple adverse events this session if desired
8. When all adverse events have been added select the Done button to save as unfiled data
9. Filing an encounter is required when adding any adverse event during this session
Figure 172: Adverse Events Screen
Note: The Add button from the Select Category and Provide Details section will temporary save each
adverse event that may be entered this session. The name on the button will change to Save Changes when
a filed adverse event is selected from the History table and edited by the provider. After all the adverse
events have been added/edited/deleted during this session select the Done button to save all adverse events
as unfiled data.
Note: There is one trigger, completed procedure (D9930), which will automatically open the Adverse
Events screen when selected this session. The trigger occurs when the provider selects the Next button,
which will automatically open the Adverse Events screen. The completed procedure D9930 is only
suggested to include an adverse event associated with the procedure however NOT required for an adverse
event to be entered and filed. Selecting the Cancel button will allow the provider to complete the encounter
without adding an adverse event.
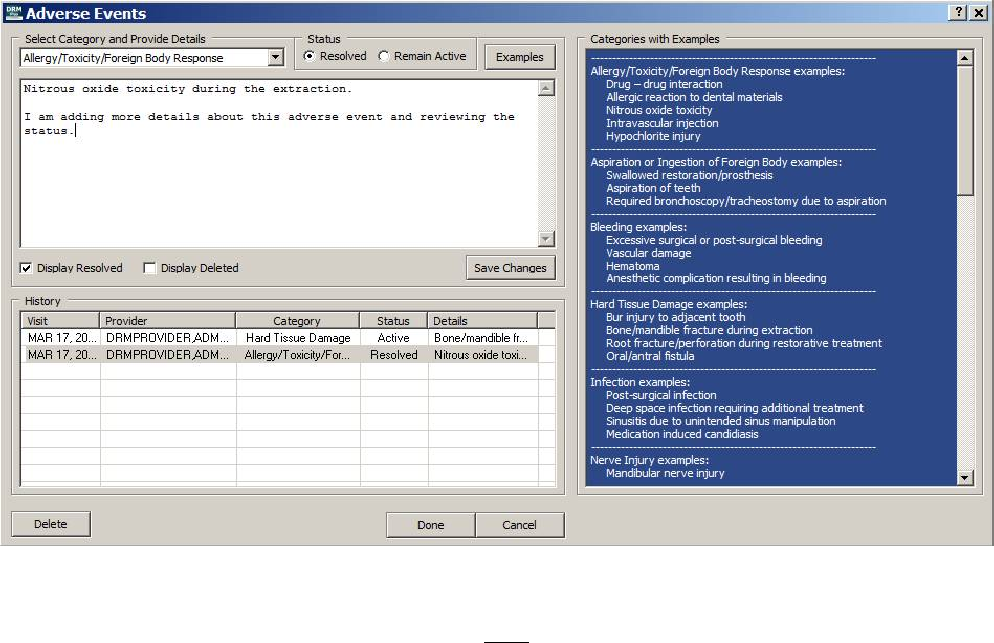
May 2018 DRM Plus Administrator Manual v6.9 140
To edit a filed Active adverse event:
1. Highlight the filed Active adverse event entry from the History table
2. May edit or add to the Provider Details in the upper text window
3. Or may change the Status radio button (to Resolved)
4. Select the Save Changes button to temporary save the edited adverse event
5. Select the OK button on the informational Adverse event edited screen
6. When all adverse events have been added select the Done button to save the unfiled data
7. Filing an encounter is required when editing any adverse event during this session
Figure 173: Adverse Events Screen
Note: Only a filed Active adverse event may be edited. When trying to edit a filed Resolved adverse event
the provider will get a screen informing them they can NOT edit any item that is not Active.
The Display Resolved check box is defaulted as checked when opening the Adverse Events screen. The
provider may uncheck the Display Resolved check box if the provider doesn’t want the History table to
display any resolved adverse events. The provider may select the Display Deleted check box to see if there
are any deleted adverse events filed for the patient’s chart. Any newly entered resolved and deleted adverse
event will be required to be filed with an encounter before that adverse event will be permanently viewable
with either of these check boxes.
To delete a filed adverse event:
1. Highlight the adverse event in the History table
2. Select the Delete button to temporary save the deleted adverse event
3. Select the OK button on the informational Adverse event deleted screen
4. When all adverse events have been entered select the Done button to save the unfiled data
5. Filing an encounter is required when deleting an adverse event this session
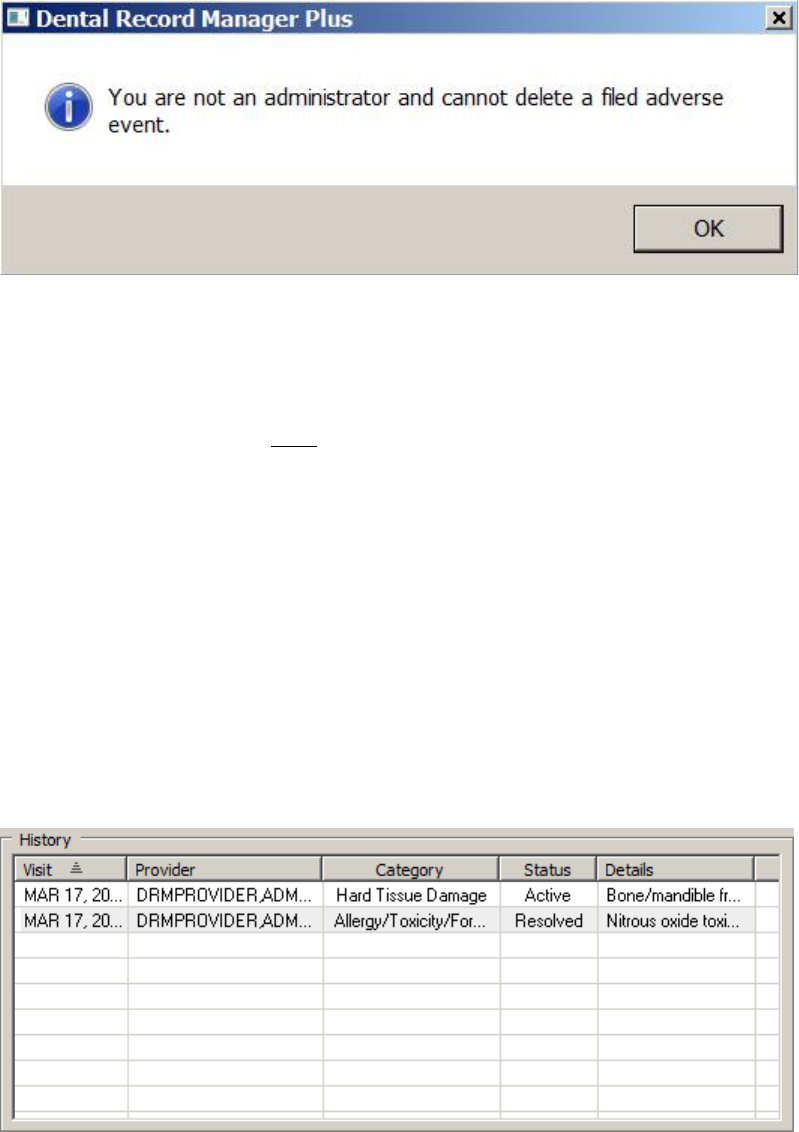
May 2018 DRM Plus Administrator Manual v6.9 141
The Delete button selection for any filed adverse event may only be completed by a full DRM Plus
Administrator. The deleted adverse event requires an encounter to be filed to complete the process. When
selecting the Delete button as a non-admin provider the following screen will display.
Figure 174: Not DRM Plus Administrator Informational Screen
Note: All deleted adverse events will display as a line through the entry in the History table when selected
by any DRM Plus provider that would want to view them.
When the Cancel button is selected before the Done button while the Adverse Events screen is open then
the add/edit/delete entries will NOT be saved. The Cancel button will undo any action taken with any new
entries by the provider when adding a new adverse event, modifying a filed adverse event, or deleting a filed
adverse event. All recent adverse event data entered while the Adverse Events screen was open will be lost
and will need to be re-entered again if the Cancel button is selected.
Note: When the Done button has been selected and any saved adverse events were entered in error during
this session follow one of the methods that follow to remove them. The only way to remove the adverse
event this session would be by selecting the Delete button from the Adverse Events screen and then the
Done button or refresh the patient’s chart and don’t save the unfiled data that has been entered up to this
time.
Each header on the History table is selectable for sequence reorder of the data listing in each column. When
the header is selected, a horizontal bar triangle displays and informs the provider the directional order of
data in that header column. In the next dialog the Visit column selected would display the oldest visit at the
top with the more recent visits following in sequence.
Figure 175: History Section on Adverse Events Screen
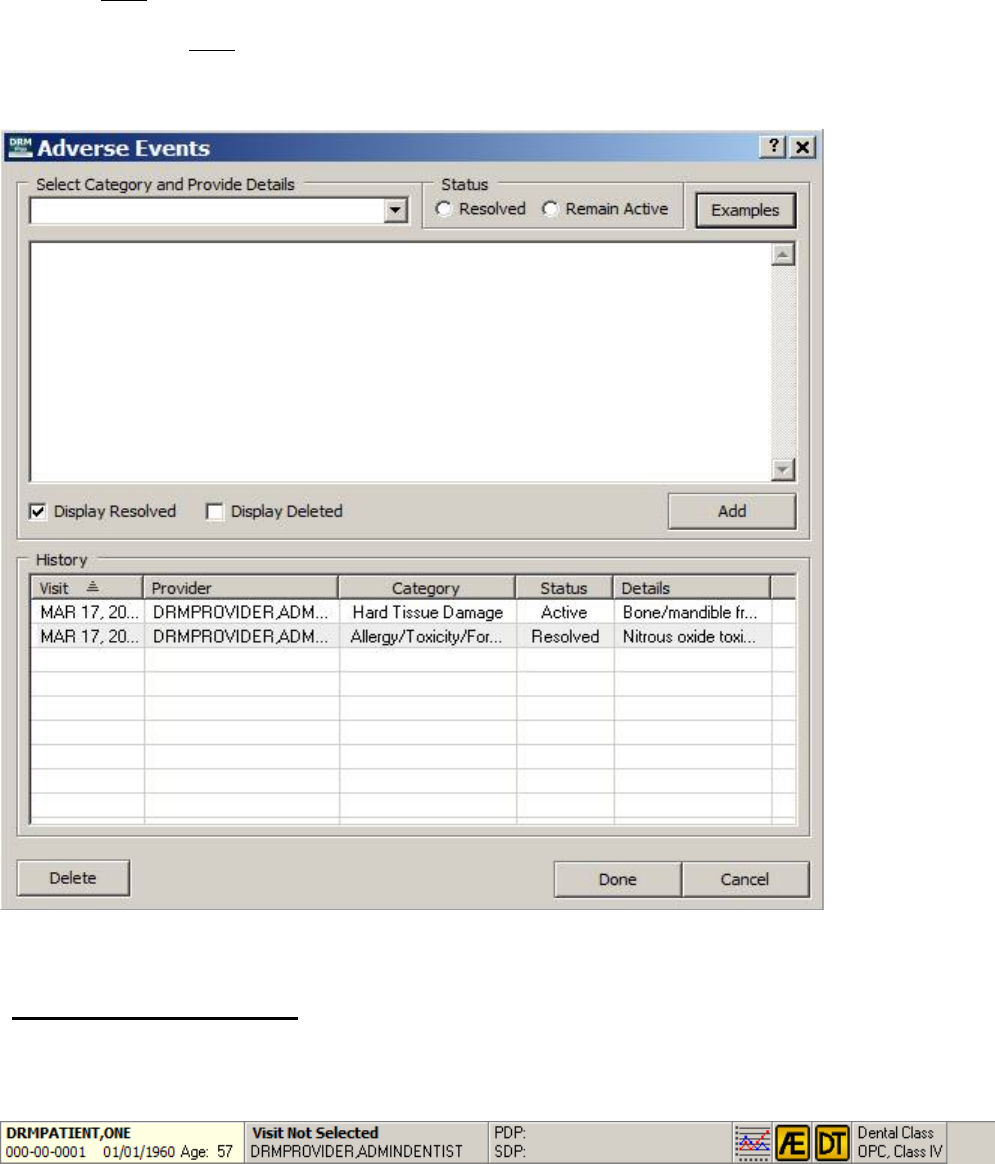
May 2018 DRM Plus Administrator Manual v6.9 142
The Examples button will open and close the right half of the screen labeled Categories with Examples in
the header. This blue view-only window allows the provider to view common examples associated with
each category that is listed as an adverse event. The common examples in the blue window that may be
viewed are NOT an exclusive list.
The next dialog does NOT display the blue Categories and Examples view-only window because the
Examples button was selected. Select the Examples button again and the blue view-only window will
display.
Figure 176: Adverse Events Screen without Categories and Examples
Device Tracking Button
The Device Tracking (DT) button in the banner when selected will launch a screen allowing device
tracking identifiers to be entered and then filed with an encounter for this patient’s chart.
Figure 177: Device Tracking Button on DRM Plus Banner
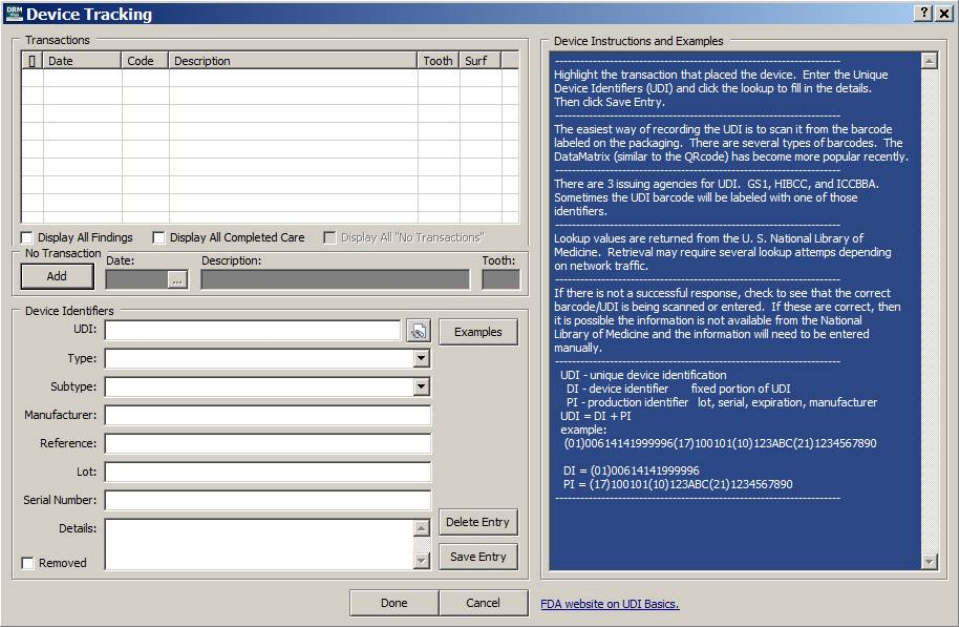
May 2018 DRM Plus Administrator Manual v6.9 143
Selecting the Device Tracking (DT) button, only results as a yellow button in the banner when at least one
device completed procedure has been filed without any device identifiers attached, will open the following
Device Tracking screen. When all filed device completed procedures have device identifiers filed to them
in the Device Tracking screen then the DT button in the banner will remain the same background color as
the banner.
Figure 178: Device Tracking Screen
From the Device Tracking screen, a provider may add device identifier(s) with a completed procedure
transaction, a diagnostic finding transaction, or a No Transaction by using the Save Entry button. The
previous dialog displays no current session device procedures entered. There are 26 different completed
procedures that may be displayed in this screen if entered this session or filed in the past on the patient’s
chart.
The device tracking Transactions table may display four different views. The other three views occur when
selecting the following check boxes; Display All Findings, Display All Completed Care, or Display All
“No Transactions”. The check box selections may be individual or accumulative. All four different views
may have device identifier(s) filed/attached to a specific procedure transaction or non-transaction.
The following options explain the details about the four views that may result when selecting a check box or
combination of check boxes.
No check boxes selected; which is the default selection when opening the Device Tracking
screen, will display all the unfiled/filed 26 trigger completed procedures suggested to have device
identifiers.
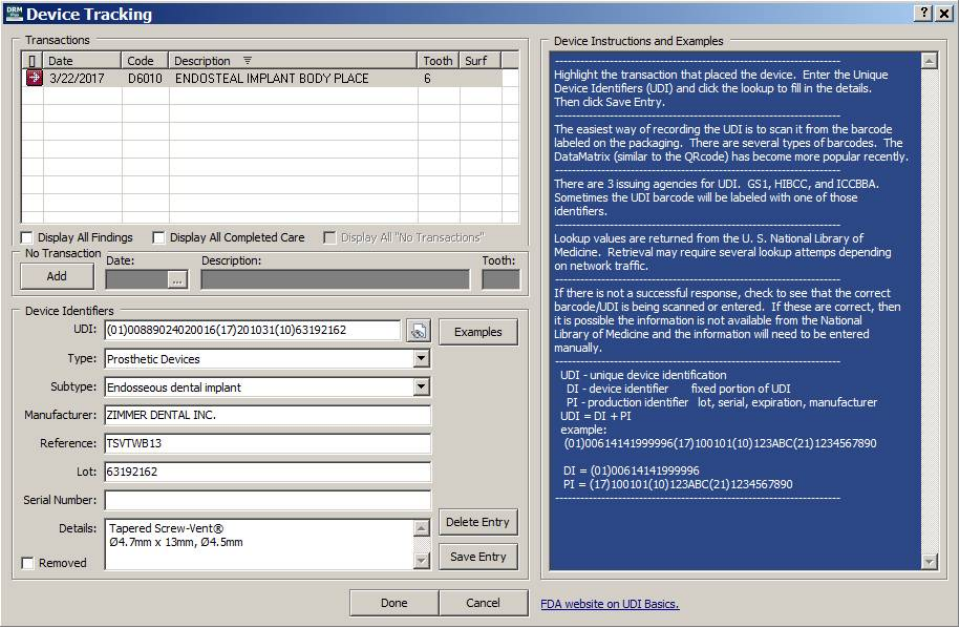
May 2018 DRM Plus Administrator Manual v6.9 144
Selecting the Display All Findings check box displays all the unfiled/filed diagnostic finding
transaction(s) for the patient’s chart.
Selecting the Display All Completed Care check box displays all the unfiled/filed completed care
transaction(s) for the patient’s chart.
Selecting the Display All “No Transactions” check box, inactive until the first no transaction
device has been added and filed, displays all the filed No Transactions for the patient’s chart.
Any combination of one or three check boxes selected would result in the Transactions table
displaying the accumulation of transactions/non-transactions from the check boxes that were
selected.
To add completed procedure device identifiers:
1. Enter one of the 26 trigger completed procedures from the Treatment & Exam screen this session
2. Select the DT button from the banner or select the Next button when completing the encounter
3. Highlight the completed procedure transaction in the Transactions table to add device identifiers
4. Required to enter at least one device identifier with this completed procedure transaction
5. Select the Save Entry button to save the new device identifiers to the completed procedure
transaction
6. Select the OK button on the informational Device identifiers saved screen
7. Select the Done button to save all the device identifier(s) during this session
8. Filing an encounter is required when adding device identifier(s) this session
Figure 179: Device Tracking Screen with Completed Transaction Entry

May 2018 DRM Plus Administrator Manual v6.9 145
Any unfiled/filed Diagnostic Finding transaction or any other unfiled/filed completed procedure transaction,
which is NOT one of the 26 trigger completed procedures, may have device identifier(s) added and filed
following the steps listed previously. Use the two check boxes at the bottom of the Transactions table;
Display All Findings and Display All Completed Care to display the transactions to be associated with
new Device Identifiers.
The easiest way for recording the UDI (unique device identification) is to scan it using the barcode labeled
on the packaging. There are several types of barcodes. The DataMatrix (similar to the QRcode) has become
more popular recently. There are three issuing agencies for UDI details; GSI, HIBCC, and ICCBBA.
Sometimes the UDI barcode will be labeled with one of those identifiers.
The UDI icon at the end of the UDI field in the Device Identifiers window allows importing of a few
or many Device Identifiers. After the UDI has been entered, the provider may select the Enter key or select
the UDI icon to import the field values found in the UDI. The imported field values come from the U.S.
National Library of Medicine. The retrieval may require several import attempts depending on the network
traffic.
Note: The drop-down field lists of (Types:) and (Sub-Types:) in the Device Identifiers section is
information obtained from the FDA.
When the Cancel button is selected before the Done button while the Device Tracking screen is open then
the add/edit/delete entries will NOT be saved. The Cancel button will undo any action taken with any new
entries from the provider when adding new device identifiers, modifying filed device identifiers, or deleting
filed device identifiers. Any recent device identifier data entered this session will be entirely lost and will
need to be re-entered again.
Under certain circumstances there may be a reason why device identifiers should NOT be filed with a dental
transaction. The No Transaction section, right below the Transactions section, which includes the Add
button on the Device Tracking screen will allow the following.
To add non-transaction device identifiers:
1. Select the DT button in the banner
2. Select the Add button from the No Transaction section
3. Data may be entered into Date, Description or Tooth fields
4. Description field is the only required data needed for entry
5. Required to enter at least one device identifier with the non-transaction entry
6. Select the Save Entry button to save the new device identifiers to the non-transaction entry
7. Select the OK button on the informational Device identifiers saved screen
8. Select the Done button to save all the device identifier(s) during this session
9. Filing an encounter is required when adding device identifier(s) this session
When adding a new No Transaction entry after selecting the Add button; the button will become a Cancel
button. Selecting the Cancel button will NOT save any data entered into No Transaction fields or device
identifier fields. Any No Transaction field data and device identifier data will need to be re-entered.
The next Device Tracking screen will display the No Transaction filed in the Display All “No
Transactions” view screen. Highlighting the non-transaction entry displays the device identifiers filed with
the non-transaction entry.
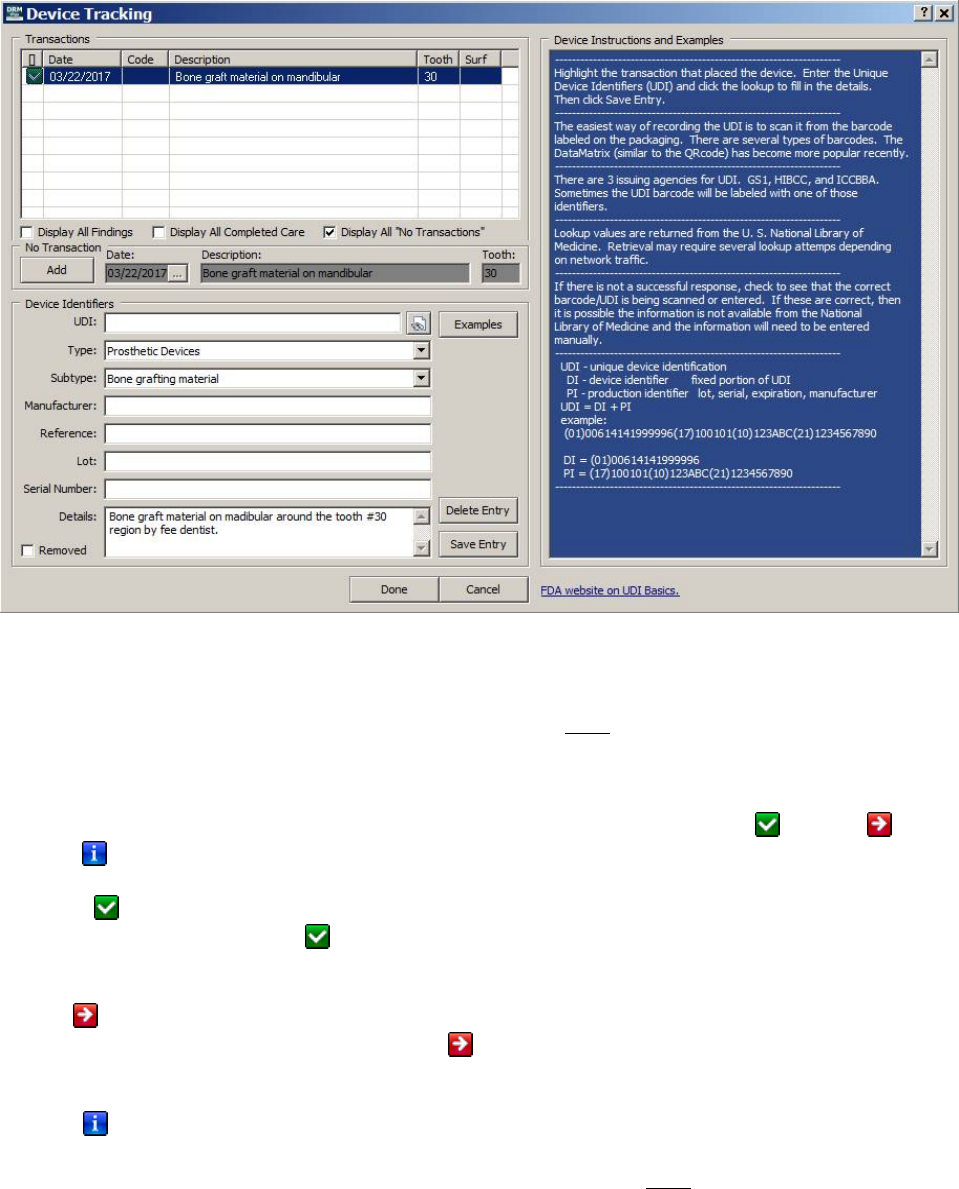
May 2018 DRM Plus Administrator Manual v6.9 146
The Transactions table displays a green (check-mark) icon in the first column, which identifies the non-
transaction entry having saved unfiled Device Identifiers.
Figure 180: Device Tracking Screen with No Transaction Entry
Note: The only way to delete any filed No Transaction entry has to be done in the Device Tracking screen.
The No Transaction may have been filed by mistake on a patient’s chart or filed to the wrong patient’s
chart. Deleting the encounter on the wrong patient’s record will NOT delete the No Transaction entry if
one was filed with that encounter.
The following explains the meaning of the icons found in the Device Tracking screen. The first column
icons from any of the multiple Transactions views may be displayed as either a green icon, red icon
or a blue icon.
The green icon represents unfiled/filed device identifier(s) filed with a transaction or non-transaction
found in all four views. The green icon also may represent a filed transaction or non-transaction as a
Removed device tracking entry.
The red icon represents any of the 26 trigger completed procedures having NO device identifier(s) filed
with the completed procedure transaction. The red icon will only be displayed in the default view or
when the Display All Completed Care check mark has been selected.
The blue icon represents all other unfiled/filed completed procedures or diagnostic findings. These
completed procedures/findings are left up to the provider if they would prefer to file a device identifier(s)
with the transaction. These completed procedure/finding transactions are NOT identified for any device
tracking entry by the VHA Office of Dentistry.
May 2018 DRM Plus Administrator Manual v6.9 147
Note: The red icon will display for any of the 26 unfiled/filed trigger completed procedures identified by
the VHA Office of Dentistry. When one of the 26 trigger completed procedures is entered during the current
session it will force the provider to the Device Tracking screen when the provider selects the Next button
when trying to complete the encounter. Then it will be up to the provider to decide if they want to save any
device identifiers to the unfiled completed transaction or NOT. The Cancel button on the Device Tracking
screen may be selected to complete the encounter by NOT entering any device identifiers to the trigger
completed procedure. The DT icon button in the banner will also display as a yellow icon informing the
provider at least one trigger completed procedure having no device identifiers associated with it is in the
Device Tracking screen.
Note: The 26 unfiled/filed trigger completed procedures identified by the VHA Office of Dentistry are
suggested to have device identifiers associated with them however they are NOT required to have device
identifiers.
Each header at the top of the Transactions table is selectable for sequence order of data listed in that
column. When the header is selected, a horizontal bar triangle displays and informs the provider the
directional order of data in that header column. In the next dialog the Icon column, first column, selected
displays the red icon, green icon and then blue icon from top to bottom.
Figure 181: Transaction Section on Device Tracking Screen
Here is how to Remove filed device identifiers for a transaction or non-transaction. The provider will be
required to highlight the filed completed procedure transaction, the filed diagnostic findings transaction, or
the filed non-transaction to label the device identifiers as removed.
To remove filed device identifiers for a transaction or non-transaction:
1. Find the filed transaction or non-transaction that should be marked as Removed
2. Highlight the filed transaction or non-transaction listed on the Transactions table
3. Select the Removed check box in lower left corner of the Device Tracking screen
4. Select the Save Entry button to save the transaction or non-transaction marked as Removed
5. Select the OK button on the informational Device identifiers edited screen
6. Select the Done button to save all the Device Tracking entries during this session
7. Filing an encounter is required when removal of a device tracking entry this session
Here is how to delete device identifiers that were filed to a transaction or non-transaction. The provider will
be required to highlight the filed completed procedure transaction, the filed diagnostic findings transaction,
or the filed non-transaction that should be deleted.

May 2018 DRM Plus Administrator Manual v6.9 148
To delete the filed device identifiers for a transaction or non-transaction:
1. Find the filed transaction or non-transaction where the device identifiers should be deleted
2. Highlight the filed transaction or non-transaction listed on the Transactions table
3. Select the Delete Entry button to save the deleted device identifiers for transaction or non-
transaction
4. Select the OK button on the informational Device identifiers deleted screen
5. Select the Done button to save all the Device Tracking entries during this session
6. Filing an encounter is required when deleting device identifiers this session
Only a full DRM Plus Administrator is able to delete device identifiers filed to a transaction or non-
transaction. When selecting the Delete button as a non-admin provider the following informational screen
will display.
Figure 182: Not DRM Plus Administrator Informational Screen
The Examples button will display and hid the right half of the screen labeled Device Instructions and
Examples as the header. This blue view-only window allows the provider to view device instructions and
examples of the UDI (unique device identification) information.
The next Device Tracking screen doesn’t display the blue Device Instructions and Examples view-only
window because the Examples button was selected. Select the Examples button again and the blue view-
only window will display.
May 2018 DRM Plus Administrator Manual v6.9 149
Figure 183: Device Tracking Screen without Device Instructions and Examples
Note: The FDA website on UDI Basics address found on the bottom of the Device Instructions and
Examples view-only window will launch the U.S. FOOD & DRUG ADMINSTRATION website that will
explain the UDI, unique device identifier, in greater detail.
Note: If there is not a successful response, check to see that the correct barcode/UDI is being scanned or
entered. If these are correct, then it is possible the information is not available from the National Library of
Medicine and the information will need to be entered manually.
Dental Class Information
This section of the banner contains information on the patient’s dental class.
Figure 184: Dental Class Button
Click the Dental Class button of the banner to go to the DRM Plus Cover Page tab. However, only a DRM
Plus Administrator or an end-user that has this administrative parameter option can change a patient’s dental
class. Please see the Cover Page chapter of this manual for more information.
May 2018 DRM Plus Administrator Manual v6.9 150
Clean Slate
This section, when present, is located between the Dental Class button and the icons on the far right of the
banner. Clean Slate is only a viewable window that displays the most recent date that a clean slate was
performed on the patient’s chart. Clean slate may only be performed by a DRM Plus Administrator, or an
end-user who has received the administrative parameter option.
Figure 185: Clean Slate Banner Notification
The clean slate functionality has been added to clear the graphical portion of the Treatment & Exam
screens in DRM Plus, and delete all planned treatment for the selected patient. The recent clean slate can be
restored for this patient at any time until a new encounter has been filed.
Icons
The icons located on the right side of the banner show patient flags, alerts and provide an easy way for the
user to view general coding standards.
Figure 186: DRM Plus Banner Icons
General Coding Standards
The first icon is the General Coding Standards icon. Clicking this icon takes the provider to the VA
Office of Dentistry website where current General Coding Standards may be viewed. This hyperlink
should be changed by the DRM Plus Administrator if requested to do so by the VA Dental Informatics and
Analytics Director.
Note: If NOT immediately directed to the website after clicking the icon please notify the Help Desk.
Patient Flags
There are four possible patient flags that can display in DRM Plus, including: Clinical Reminders,
Consult, Exam Quality Indicator and Fluoride Quality Indicator.
Clinical Reminders
The Clinical Reminders icon displays on the right side of the DRM Plus banner when there are clinical
reminders due for the selected patient. Providers must still process clinical reminders using CPRS.
May 2018 DRM Plus Administrator Manual v6.9 151
Clicking the Clinical Reminders icon displays an information screen, stating that the selected patient has
clinical reminders due.
Figure 187: Clinical Reminders Due
The Clinical Reminders icon should only display if the current end-user is responsible for, and may resolve
the clinical reminder(s) listed on the CPRS cover sheet. If clinical reminder(s) displaying in the list cannot
be resolved by the end-user, contact local IT for assistance.
Consult
The Consult icon displays when the patient has an incomplete consult in their chart. Click the icon. The
Clinical Record tab displays with consultations selected. For more information, see the Clinical Record
chapter of this manual.
Exam Quality Indicator
The Exam Quality Indicator icon displays when the patient is due for a follow-up exam. The icon
only displays if the patient meets certain class restrictions. Clicking this icon produces a screen, which
reveals when the patient last received a qualifying exam.
Figure 188: Exam Quality Indicator Screen
Click the OK button and the informational screen will close. For more information, see the Cover Page
chapter of this manual.
Note: The Exam Quality Indicator and Fluoride Quality Indicator only are active for VA dental care
under Class I, IIA, IIC or IV classification. These dental classes are eligible for any necessary dental care
to maintain or restore oral health and masticatory function, including repeat care.
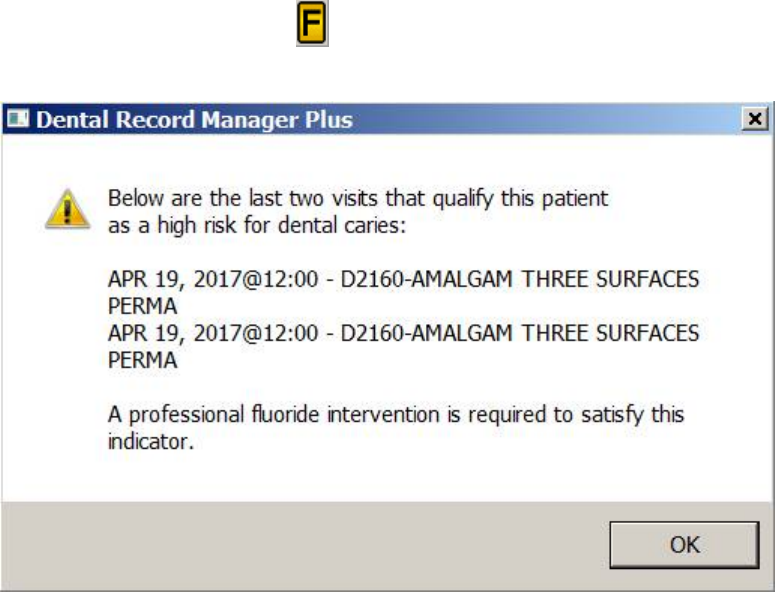
May 2018 DRM Plus Administrator Manual v6.9 152
Fluoride Quality Indicator
The Fluoride Quality Indicator icon displays when the patient is due for a fluoride intervention.
Clicking this icon displays an explanation of why the patient is at risk and needs intervention.
Figure 189: Fluoride Quality Indicator Screen
Click the OK button and the informational screen will close. After the patient’s chart has been loaded and
the Fluoride Quality Indicator icon is selected the DRM Plus Cover Page tab display after clicking the
OK button. For more information, see the Cover Page chapter of this manual.
Note: The Exam Quality Indicator and Fluoride Quality Indicator only are active for VA dental care
under Class I, IIA, IIC or IV classification. These dental classes are eligible for any necessary dental care
to maintain or restore oral health and masticatory function, including repeat care.
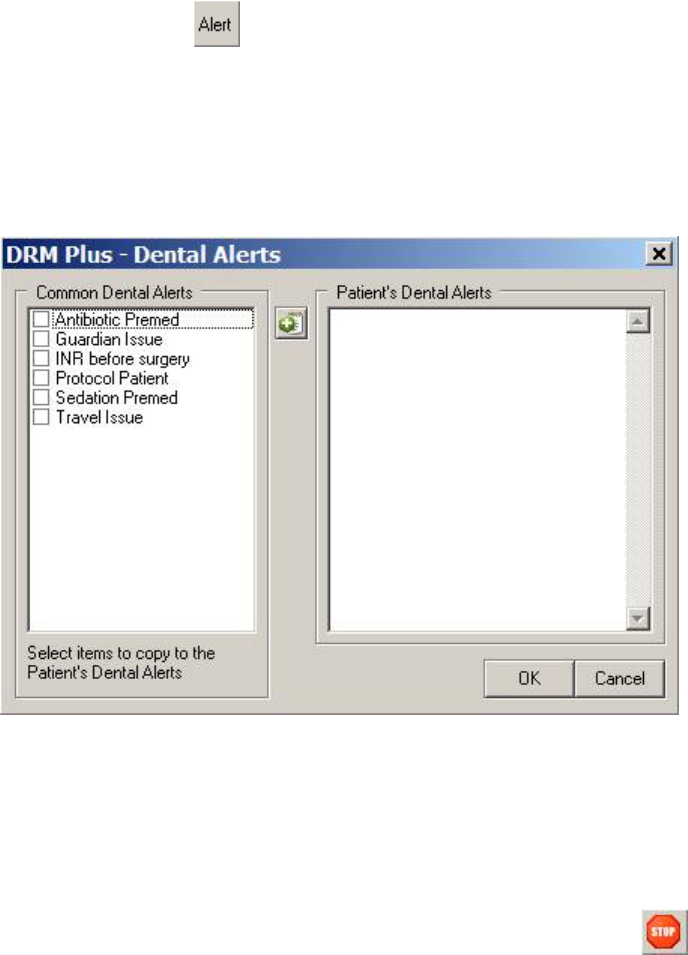
May 2018 DRM Plus Administrator Manual v6.9 153
Alerts
The DRM Plus Alert icon shows if the patient has any associated alerts. It can also be used to add
alerts to the patient’s chart in DRM Plus.
To add an alert:
1. Click the Alert icon.
2. The Dental Alert screen displays.
Figure 190: Dental Alerts Screen
3. Click the desired Common Dental Alerts check box on the left side of the screen.
4. Click the right arrow button.
5. The selected alert(s) display on the right side of the screen.
6. Alternatively, type the alert directly into the Patient’s Dental Alerts screen window.
7. Click the OK button.
The Alert icon changes when patient alerts are present and displays as a stop sign.
To view the alerts:
1. Click the Alert icon displaying a stop sign.
2. The Patient’s Dental Alerts screen displays.
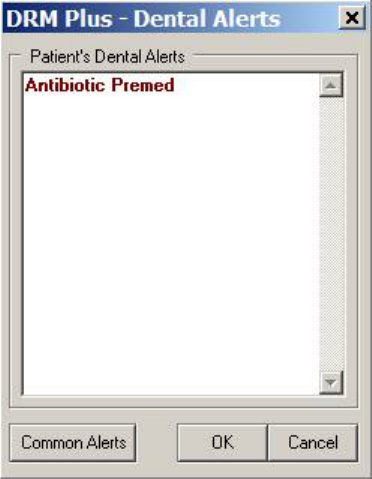
May 2018 DRM Plus Administrator Manual v6.9 154
Figure 191: Dental Alerts Screen without Common Dental Alerts
3. Click the Common Alerts button to include the Common Dental Alerts window.
4. The full Dental Alerts screen will display. From here, more dental alerts can be added, or the alert
can be removed by placing the cursor into the Patent’s Dental Alerts window and deleting the
text.
5. Click the OK button to finish.
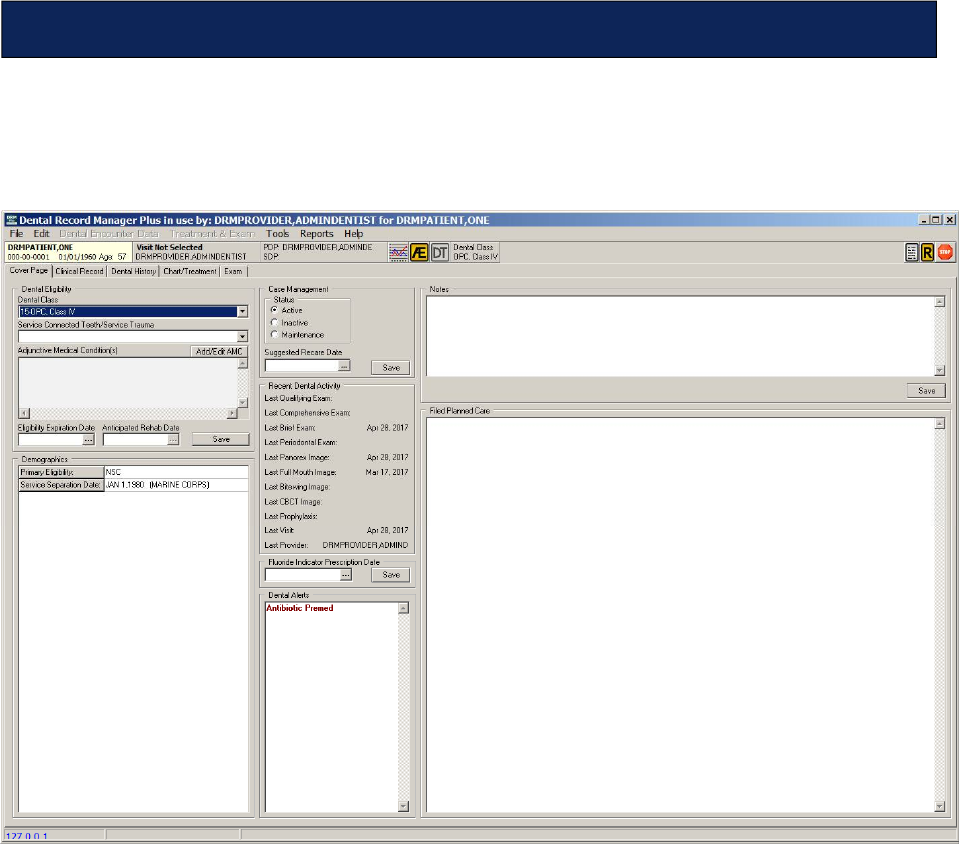
May 2018 DRM Plus Administrator Manual v6.9 155
The DRM Plus Cover Page tab displays important patient information. The tab has 8 major sections:
Dental Eligibility, Demographics, Case Management, Recent Dental Activity, Fluoride Indicator
Prescription Date, Dental Alerts, Notes and Filed Planned Care.
Figure 192: Cover Page Tab Screen
Cover Page

May 2018 DRM Plus Administrator Manual v6.9 156
Dental Eligibility
The patient’s dental class, service connected teeth/service trauma, adjunctive medical conditions, eligibility
expiration date, and anticipated rehab date are displayed in this section. Dental Eligibility can only be
changed by a DRM Plus Administrator, or an end-user who has received this administrative parameter
option.
Figure 193: Dental Eligibility Section
Dental Class
Use the drop-down menu to change the patient’s Dental Class. Selecting the top, empty field on this menu
allows the administrator to remove any dental classification saved/filed with the patient’s chart.
Service Connected Teeth/Service Trauma
The Service Connected Teeth/Service Trauma will be optional for any or all dental classes however a
Service Connected Teeth/Service Trauma will still be required for all Class IIA patients. The Class IIA
no longer requires trauma to a particular tooth, just some documentation of trauma to the oral cavity so the
Other check box has been added.
Figure 194: Service Connected Teeth/Service Trauma
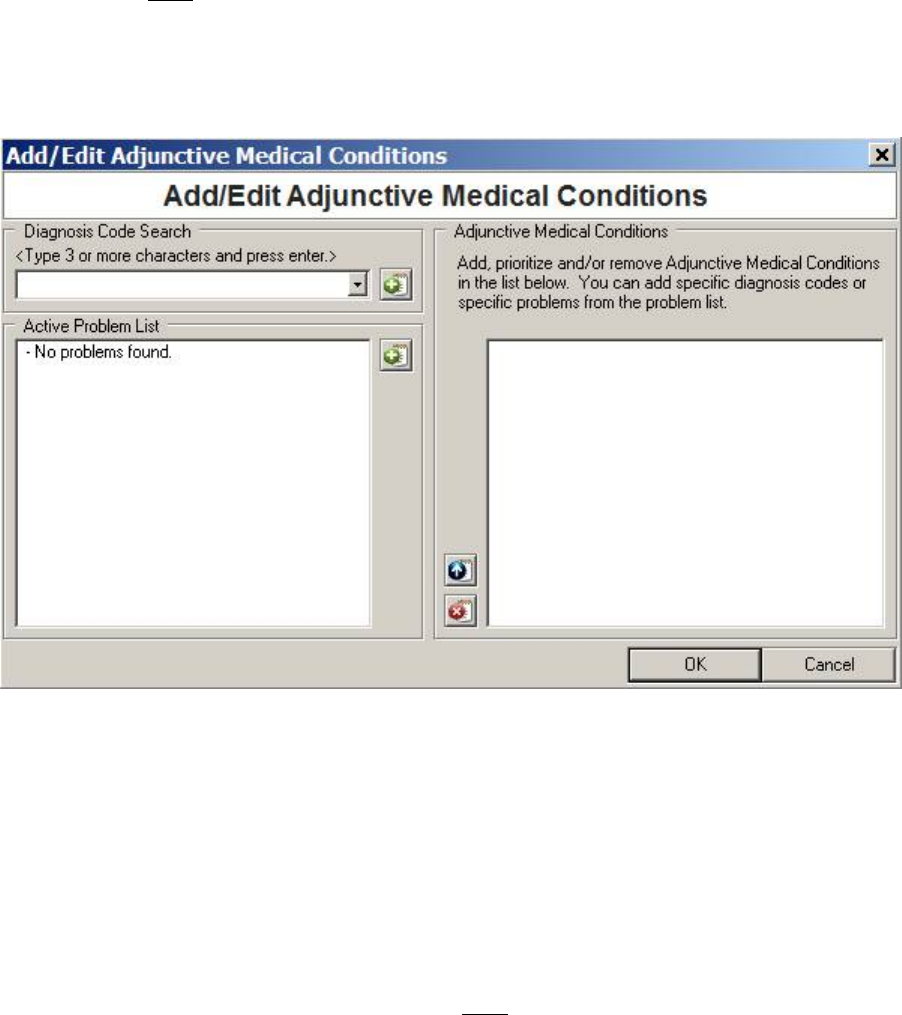
May 2018 DRM Plus Administrator Manual v6.9 157
Adjunctive Medical Condition(s)
The Adjunctive Medical Condition(s) field is still required for all Class III & Class VI patients but maybe
optional for all other dental classes if desired by the provider. Deletion of the Adjunctive Medical
Conditions will NOT be required when changing a patient’s dental class from Class III or Class VI to any
other dental class.
1. Click the Add/Edit AMC button.
2. The Add/Edit Adjunctive Medical Conditions screen displays.
Figure 195: Add/Edit Adjunctive Medical Conditions Screen
3. Add the diagnosis code. Type in the word or diagnosis code and press the <Enter> key.
4. Choose the desired result from the drop-down menu.
5. Click the green add button to add the diagnosis code to the adjunctive medical conditions list.
6. Active Problems, if present, can also be added to the adjunctive medical conditions list.
7. Use the blue up arrow button to move conditions within the list.
8. Use the red X button to delete items from the list.
9. Click the OK button. The condition displays on the Cover Page tab.
Note: The Diagnosis Code Search field on the Add/Edit Adjunctive Medical Conditions screen only
allows for CPT diagnosis code search and entry and NOT for SNOMED codes. Use the Active Problem
section in CPRS to search for SNOMED codes if desired. SNOMED codes may be added to the Active
Problem section in CPRS and then selectable in the Add/Edit Adjunctive Medical Conditions screen.
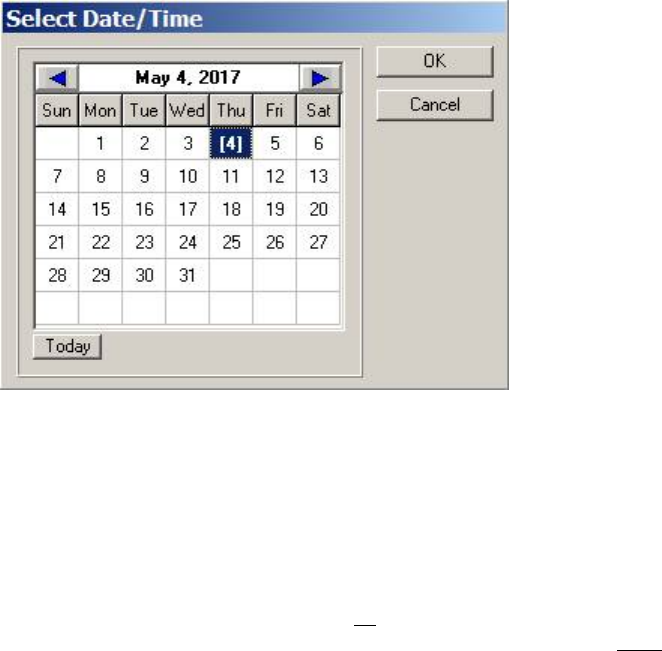
May 2018 DRM Plus Administrator Manual v6.9 158
Eligibility Expiration Date
The Eligibility Expiration Date field will be optional for all dental classes. A bubble pop-up informs the
provider if they really want to include an eligibility expiration date for any Class I, Class IIA, Class IIC
and Class IV since they rarely expire.
To change the eligibility expiration date:
1. Click the Eligibility Expiration Date Ellipsis (…) button.
2. The Select Date/Time screen displays.
Figure 196: Select Date/Time Screen
3. Select the desired date from the screen.
4. Click the OK button. The date is updated.
Anticipated Rehab Date
The Anticipated Rehab Date field had no updates to the Anticipated Rehab Date functionality. The
Anticipated Rehab Date is required for all Class V patients and will NOT be allowed for any other dental
classification.
Note: After entering any new dental eligibility, always click the Save button to update the VistA database.
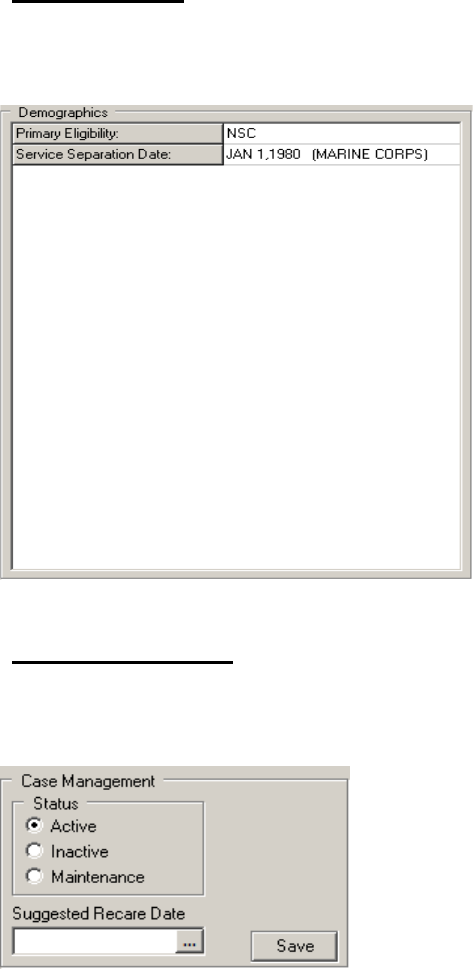
May 2018 DRM Plus Administrator Manual v6.9 159
Demographics
Patient demographic information is located here and is imported from VistA. The fields cannot be updated
or changed in DRM Plus.
Figure 197: Demographics Section
Case Management
Use the Case Management (Disposition) section to adjust the patient’s status and file suggested recare
dates. Click the Save button to update any new changes.
Figure 198: Case Management Section
Status
Change the Status of the patient by clicking the appropriate radio button.
Suggested Recare Date
1. Click the Ellipsis (...) button to display a calendar screen.
2. Select the desired date from the menu and click the OK button.
3. Click the Save button to file the data.
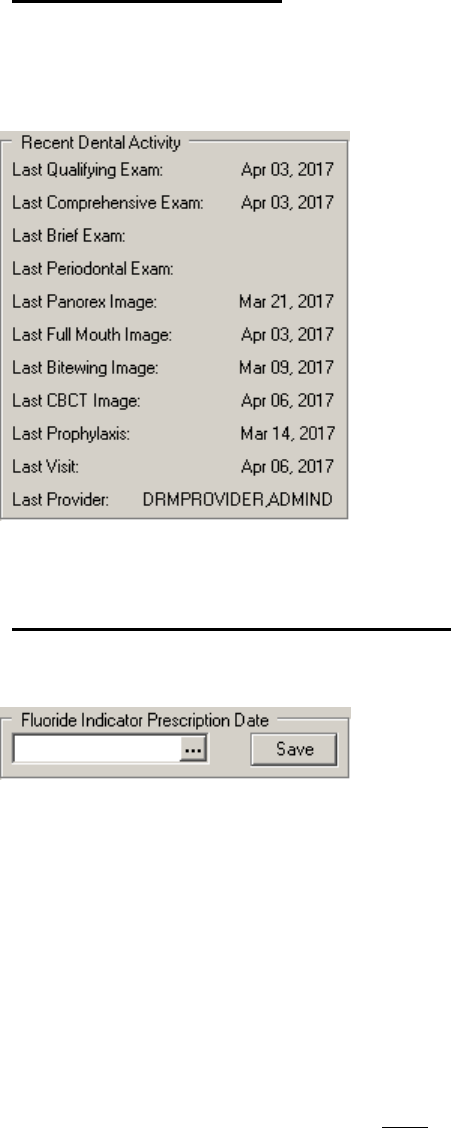
May 2018 DRM Plus Administrator Manual v6.9 160
Recent Dental Activity
This section displays visit dates, if applicable, when specific completed procedures were last performed on
the patient. Procedure codes that activate and display the visit date in this section may be viewed by
hovering the mouse cursor over the recent dental activity description.
Figure 199: Recent Dental Activity Section
Fluoride Indicator Prescription Date
Add a fluoride indicator prescription date here.
Figure 200: Fluoride Indicator Prescription Date Section
1. Click the Ellipsis (...) button.
2. Select a date from the calendar screen and click the OK button.
3. Click the Save button to file the date.
To delete the prescription date:
1. Click the date to place the cursor in the field.
2. Delete the date.
3. Click the Save button to file.
The field is active regardless of whether or NOT the patient has a fluoride quality indicator.
Note: No future dates are allowed for the fluoride indicator prescription date.
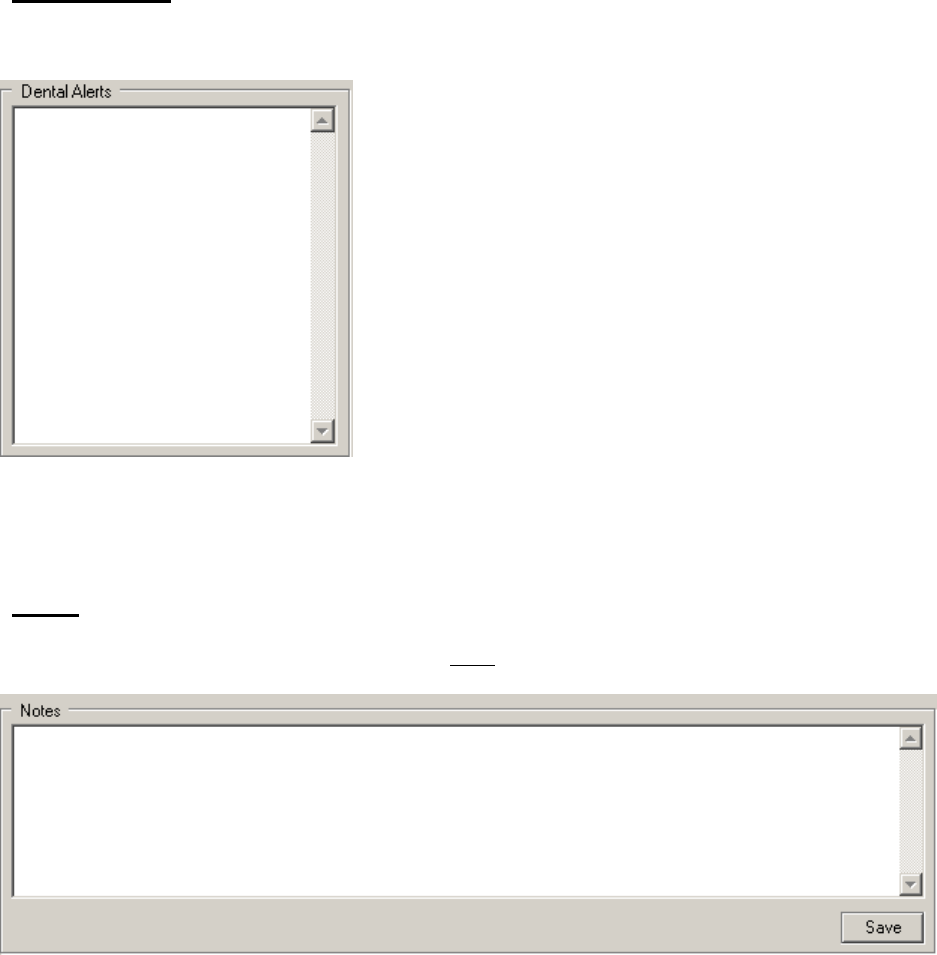
May 2018 DRM Plus Administrator Manual v6.9 161
Dental Alerts
The patient’s Dental Alerts, if any, are listed here.
Figure 201: Dental Alerts Section
Please see the Alerts section in the DRM Plus Banner chapter of this manual for more information.
Notes
Add general notes in this text box. These notes are NOT imported into the TIU progress note.
Figure 202: Notes Section
1. Place the cursor in the text box and begin typing.
2. Click the Save button to file the notes.
3. A screen will display showing that the information was saved. Click the OK button.
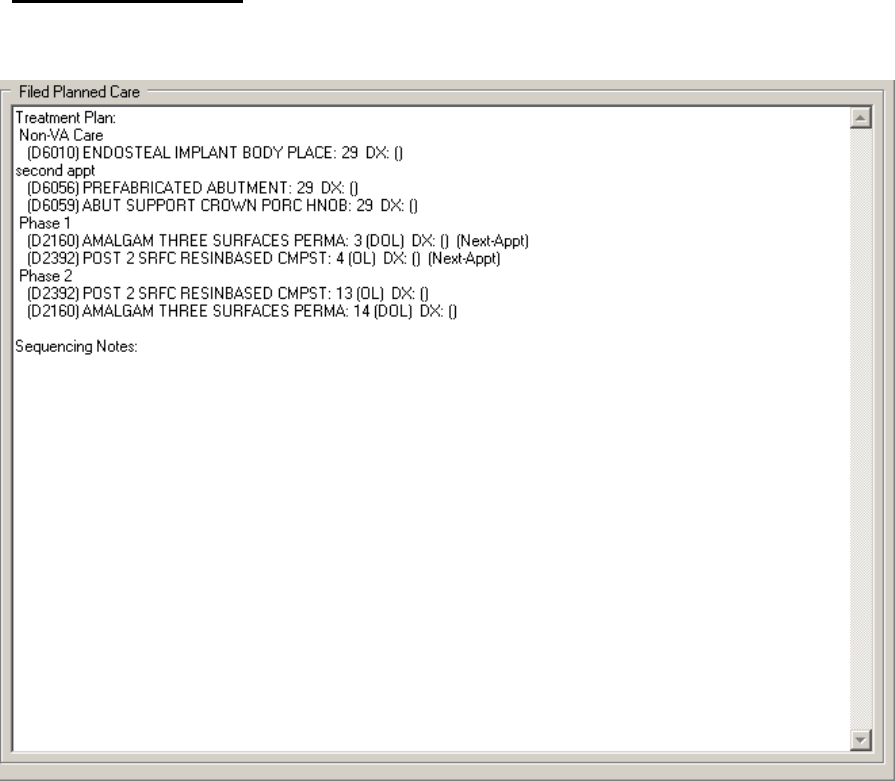
May 2018 DRM Plus Administrator Manual v6.9 162
Filed Planned Care
The filed planned treatment for the patient, if applicable, is displayed here. It cannot be edited on this page.
Figure 203: Filed Planned Care
Please see the Treatment Plan section in the Chart/Treatment -Treatment & Exam chapter of this manual for
more information.
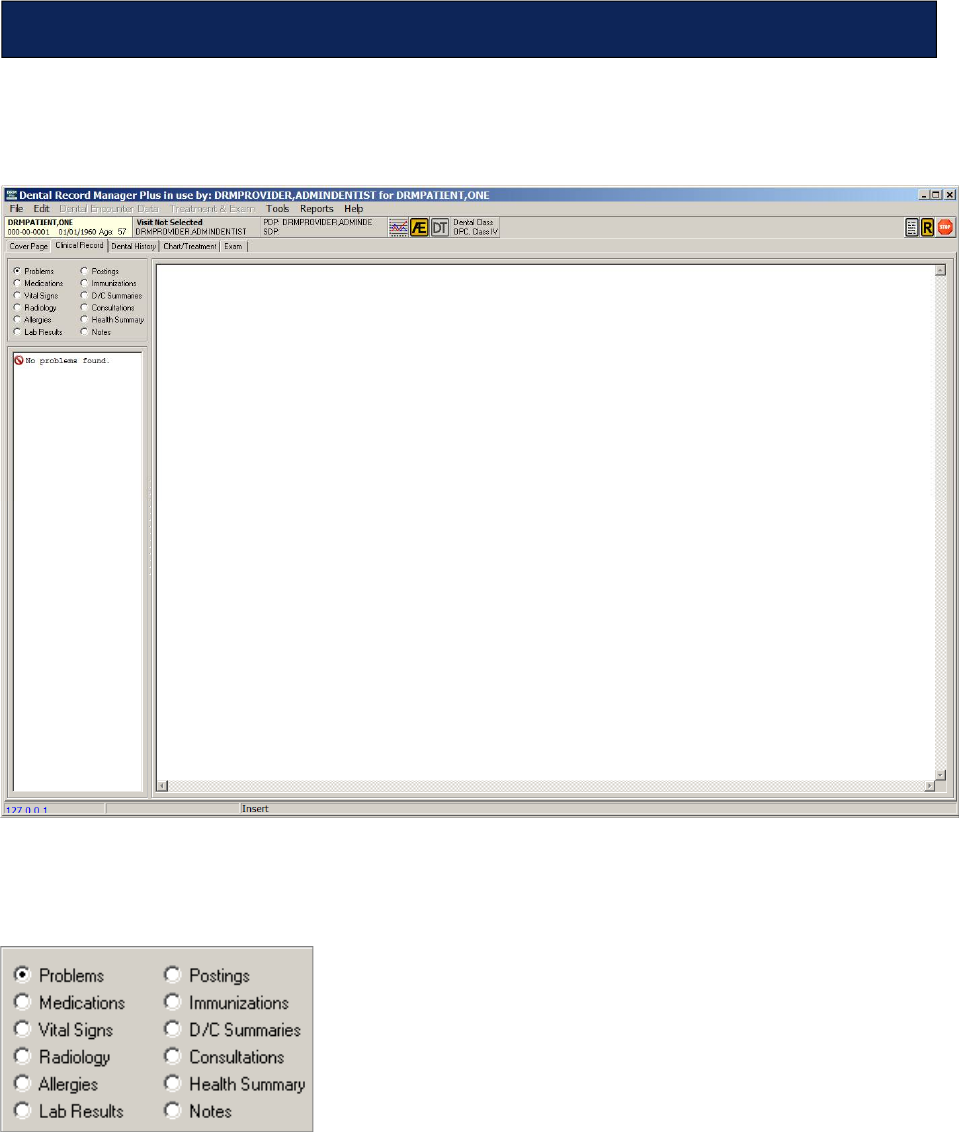
May 2018 DRM Plus Administrator Manual v6.9 163
The Clinical Record tab allows access to various areas of the patient’s record. From here, view Problems,
Medications, Vital Signs, Radiology, Allergies, Lab Results, Postings, Immunizations, D/C
Summaries, Consultations, Health Summary and Notes.
Figure 204: Clinical Record Tab
1. Click the radio button that corresponds to the type of clinical record to be viewed.
Figure 205: Clinical Record Radio Buttons
Clinical Record
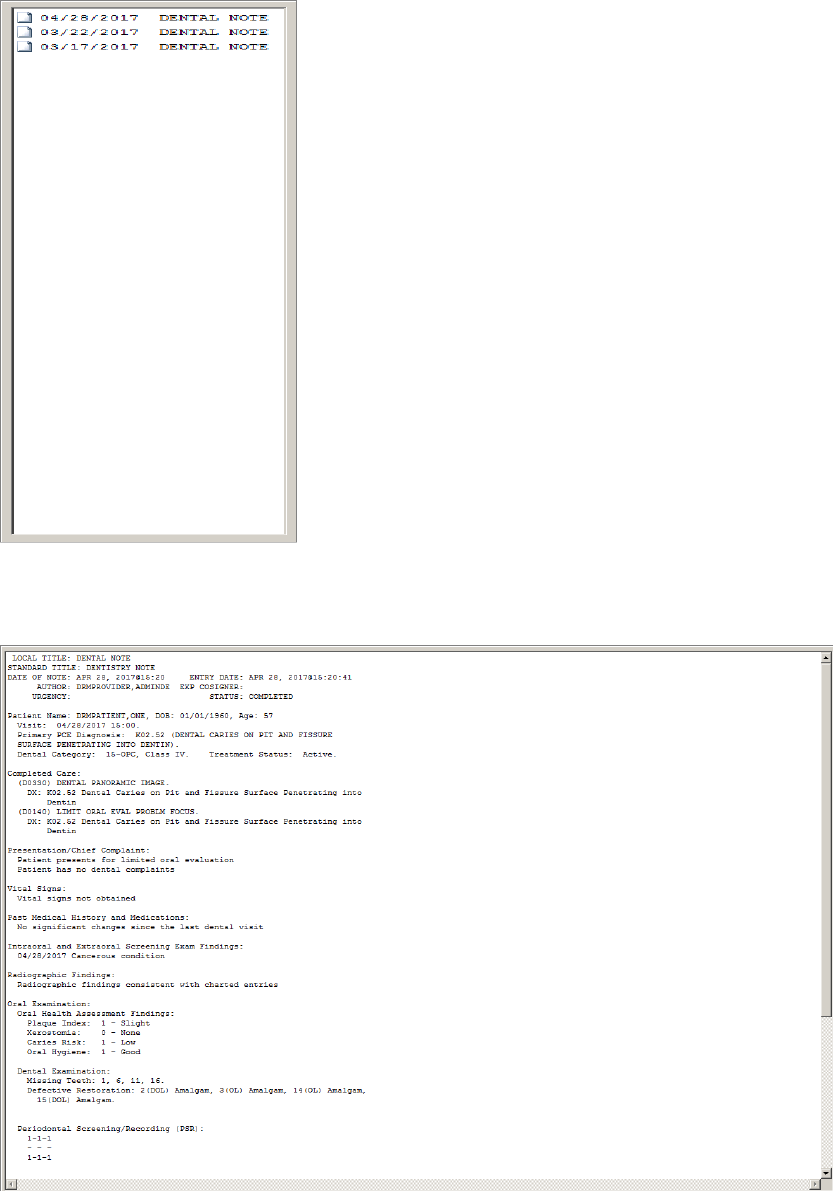
May 2018 DRM Plus Administrator Manual v6.9 164
2. A list of TIU note entries, corresponding to the selected Notes radio button, displays in the area
below the list of clinical record radio button section.
Figure 206: Clinical Record Selection Window
3. Select/highlight a TIU note entry. Details of the TIU note display on the right side of the screen.
Figure 207: Clinical Record TIU Note Window
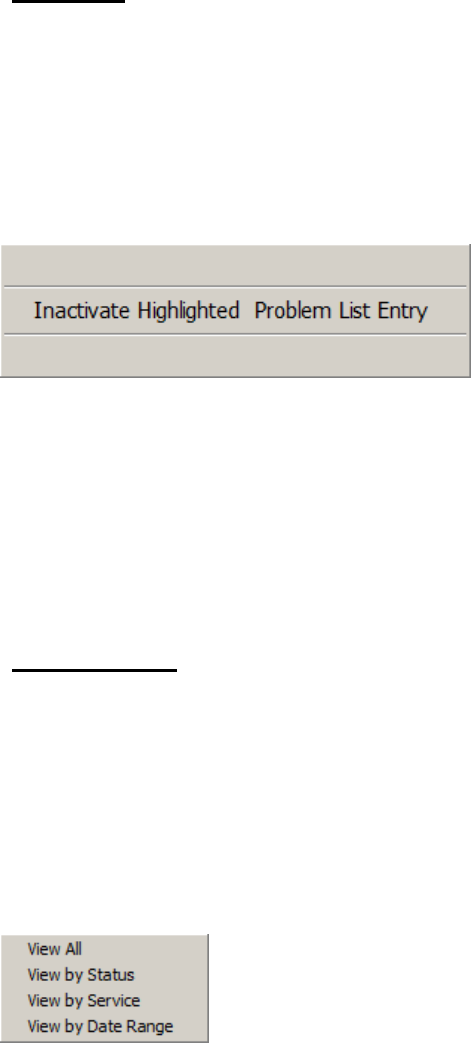
May 2018 DRM Plus Administrator Manual v6.9 165
Problems
Click the Problems radio button to view a list of active problems previously entered.
To inactivate a problem:
1. Select the problem from the list that should be inactivated.
2. Right-click on the problem selected.
3. The Inactive Highlighted Problem List Entry button displays.
Figure 208: Inactivate Highlighted Problem List Entry Button
4. Select the Inactive Highlighted Problem List Entry button to inactivate the problem.
5. Select Yes and a screen displays, confirming the inactivation. The problem is removed from the
list in DRM Plus and in CPRS the problem is listed as inactive.
Note: Use CPRS to reactivate the problem. Please see the File Data Option Screen section in the
Completing the Encounter chapter of this manual for more information to add a new problem.
Consultations
Selecting the Consultations radio button displays a complete list of consults. They appear with the
abbreviated notation of the consult status included in the listing. Consults can be filtered by status, service or
date range.
To filter consultations by status, service or date range:
1. Click the Consultations radio button. Consultations, if present, display in the entries area.
2. Right-click in the entries area. The filter menu displays.
Figure 209: Consultations Filter Menu
3. Select the desired filter from the menu.
4. Consults filtered by status, service or date range have a drop-down menu to filter the consults into
smaller sub-views.
5. The consultation sub-view list displays results in this consult on the right side of the Clinical
Record tab screen.
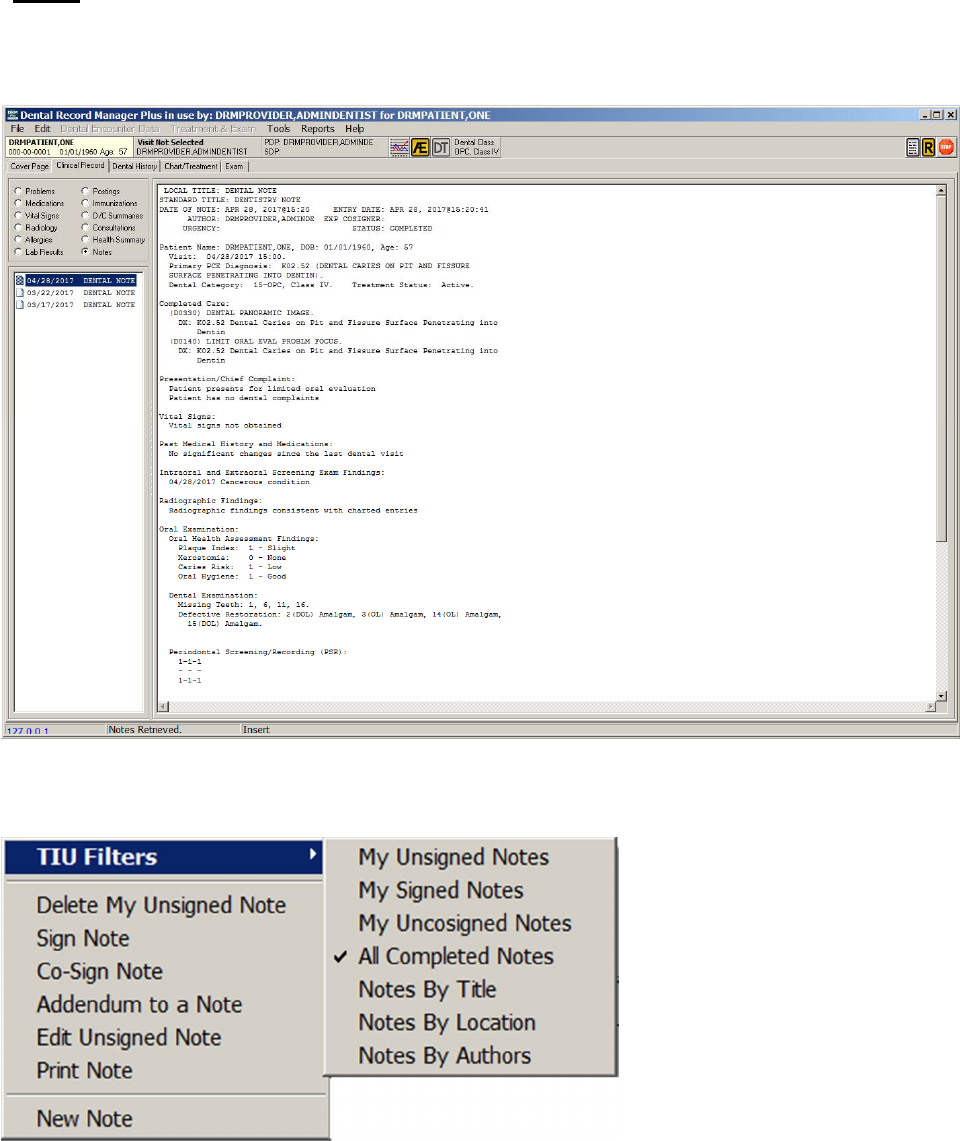
May 2018 DRM Plus Administrator Manual v6.9 166
Notes
Selecting the Notes radio button reveals a listing of all completed notes (the default listing). Right-clicking
the note window, where all notes are listed, brings up an option box.
Figure 210: All TIU Completed Notes List
Select the TIU Filters menu to filter the list of TIU progress notes by the listed criteria.
Figure 211: TIU Filters Submenus
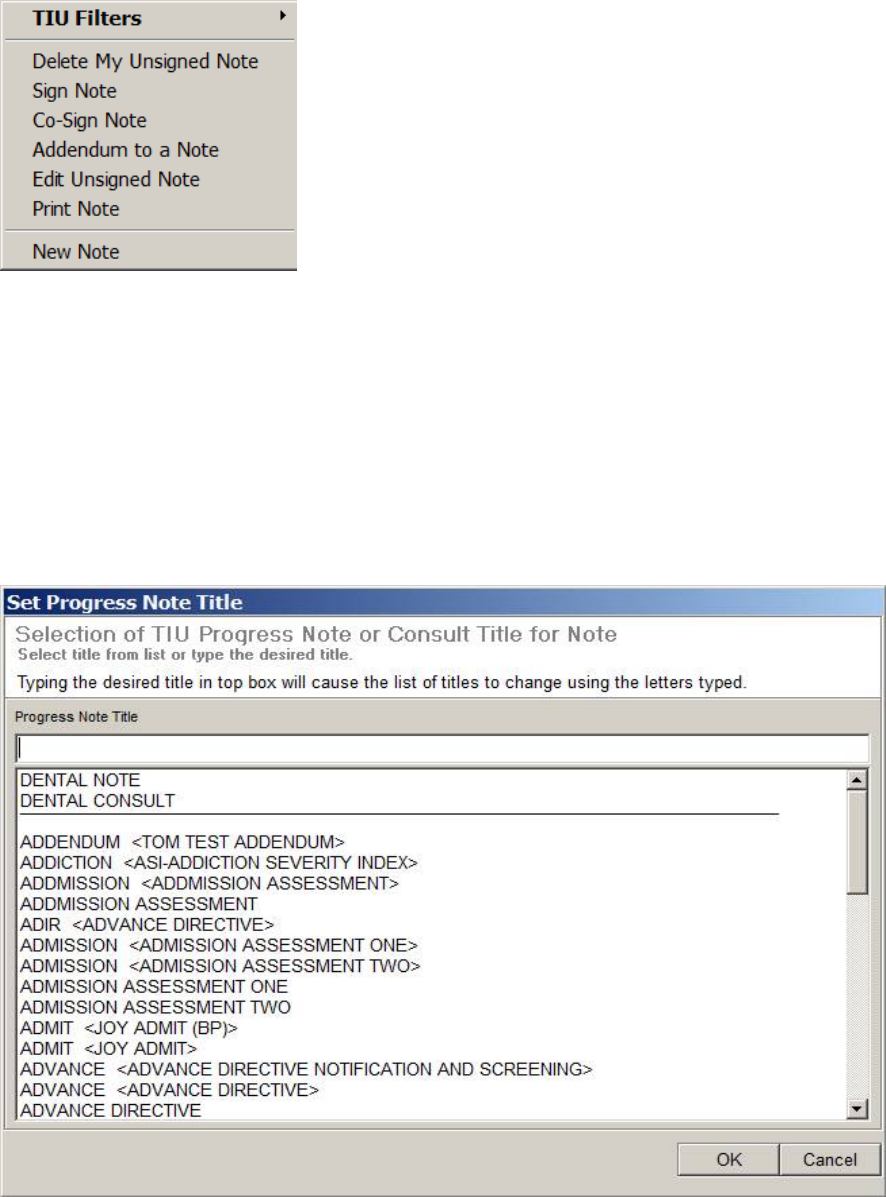
May 2018 DRM Plus Administrator Manual v6.9 167
Open the desired note. Right-click the list of notes again to view the functions available for the selected
note.
Figure 212: Note Functions Menu
The functions available coincide with the Action menu options, as seen on the Notes tab in CPRS, and
works similarly. The note functions can be selected with a left-click.
Adding a New TIU Progress Note
To add a new TIU progress note for informational purposes only, without an ADA procedure code:
1. Select the New Note option from the Note Functions menu.
2. The Set Progress Note Title screen displays.
Figure 213: Set Progress Note Title Screen

May 2018 DRM Plus Administrator Manual v6.9 168
3. Select the TIU progress note title from the list on the Set Progress Note Title screen. Note
information displays on the screen.
Figure 214: New TIU Progress Note without Any Procedures
4. Use the tools to create a historic visit or select a scheduled visit by using the drop-down menu.
5. Enter notation directly into the note.
6. Enter the Provider’s electronic signature and click the Finish button to complete the note.
Note: Historical notes may be entered using this option.
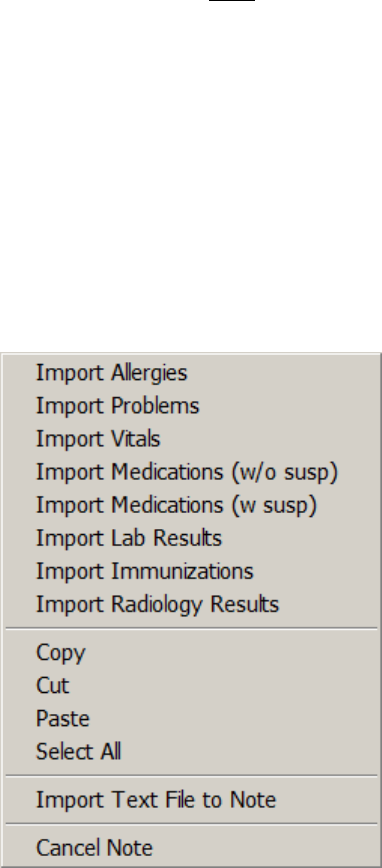
May 2018 DRM Plus Administrator Manual v6.9 169
Adding a New TIU Progress Note Addendum
Creating an addendum to a previously completed TIU progress note to provide additional information, or to
clarify any issues, does NOT require entering an ADA/CPT procedure code. This type of addendum can be
done from DRM Plus in the Clinical Record tab or in the CPRS GUI. An addendum that adds an
ADA/CPT procedure to a signed note requires passing information to VistA PCE/DES and requires entering
an ADA/CPT code through the Completed Care screen entry process.
To record a note addendum without an ADA/CPT procedure code:
1. Select the note to be appended from the list of notes.
2. The note displays in the viewer.
3. Right-click the area where the notes are listed to view the Note Functions menu.
4. Select Addendum to a Note from the menu. Only signed notes can have an addendum.
5. Type the note directly into the note viewer. Right-click on the note viewer to import menu
information or cancel the note.
Figure 215: Import Menu Information Screen
6. Enter the provider’s Electronic Signature and click the Finish button to add the addendum.
7. A confirmation screen displays. Click the OK button.
Note: If Addendum to a Note is selected in error, right-click the appended note and select the Cancel Note
submenu.
May 2018 DRM Plus Administrator Manual v6.9 170
The Dental History tab displays all dental completed care information for each tooth and non-tooth entry
filed in DRM Plus.
Figure 216: Dental History Tab
Dental History
May 2018 DRM Plus Administrator Manual v6.9 171
Viewing Dental Information by Tooth
To view dental information by tooth:
1. Click a tooth in the tab diagram. Teeth numbered in red with an asterisk have information
associated with them. When a tooth is selected, the tooth graphic is colored red in the diagram.
Figure 217: Dental History Teeth Diagram
2. Information about the selected tooth displays on the right side of the screen.
3. To de-select a tooth, click it again. The tooth graphic turns white and the information about the
tooth is removed from the right side of the screen.
Viewing Other Dental History Information
To see dental history that is NOT listed by tooth, select the Other check box. The information displays on
the right side of the screen.
Viewing All Dental History Information
To see all dental history associated with this patient, select the All check box. The information displays on
the right side of the screen.
May 2018 DRM Plus Administrator Manual v6.9 172
Viewing Dental History Information by Episode of Care
To view a patient’s dental history by episode of care:
1. Choose whether to view the Current Episode of Care or All Episodes of Care by selecting the
appropriate radio button.
Figure 218: Episode of Care Radio Buttons
2. Select the tooth or teeth to be viewed, or click the Other or All check boxes.
3. The information displays on the right side of the screen.
Episode in Date Range
To view a patient’s dental history information by date:
1. Click the Start and End drop-down arrows.
Figure 219: Episode in Date Range
2. Use the calendar screen to choose the desired start and end dates.
3. Click the Episode in Date Range button. The results display on the right side of the screen.
4. Select the tooth or teeth, or the Other or All check boxes to view the desired information.
Deleting an Encounter
An erroneous dental history encounter may be deleted directly from DRM Plus. Only DRM Plus
Administrators can delete filed dental history encounter data.
To delete an encounter:
1. Right-click in the large window on the tab. A pop-up button displays.
Figure 220: Delete History File Encounter/Visit Button
May 2018 DRM Plus Administrator Manual v6.9 173
2. Select Delete History File Encounter/Visit button from the pop-up.
3. The Delete Encounter/Visit Dental History screen displays.
Figure 221: Delete Encounter/Visit History Screen
4. Select the PCE Encounter Date/Time from the list.
5. Click the Delete button. A confirmation screen displays.
6. Click the OK button. The PCE encounter dental data is deleted if there are no multiple entries.
Completed care transactions can also be deleted via the Chart/Treatment – Treatment & Exam screen.
Please see the Deleting Completed Care Line Item(s) section, in the Chart/Treatment – Treatment & Exam
chapter of this manual, for more information.
Note: Deleting information from the Dental History tab removes the entire encounter from the chart. Once
an encounter is deleted, it cannot be recovered. DRM Plus automatically updates PCE encounter entries and
deletes data from the VistA PCE Encounter List. Multiple entries on a PCE Encounter List may require
manual deletion(s) in VistA via PCE.
Note: Local IT support follows local guidelines as to whether to append or hide the associated TIU (CPRS)
Note.
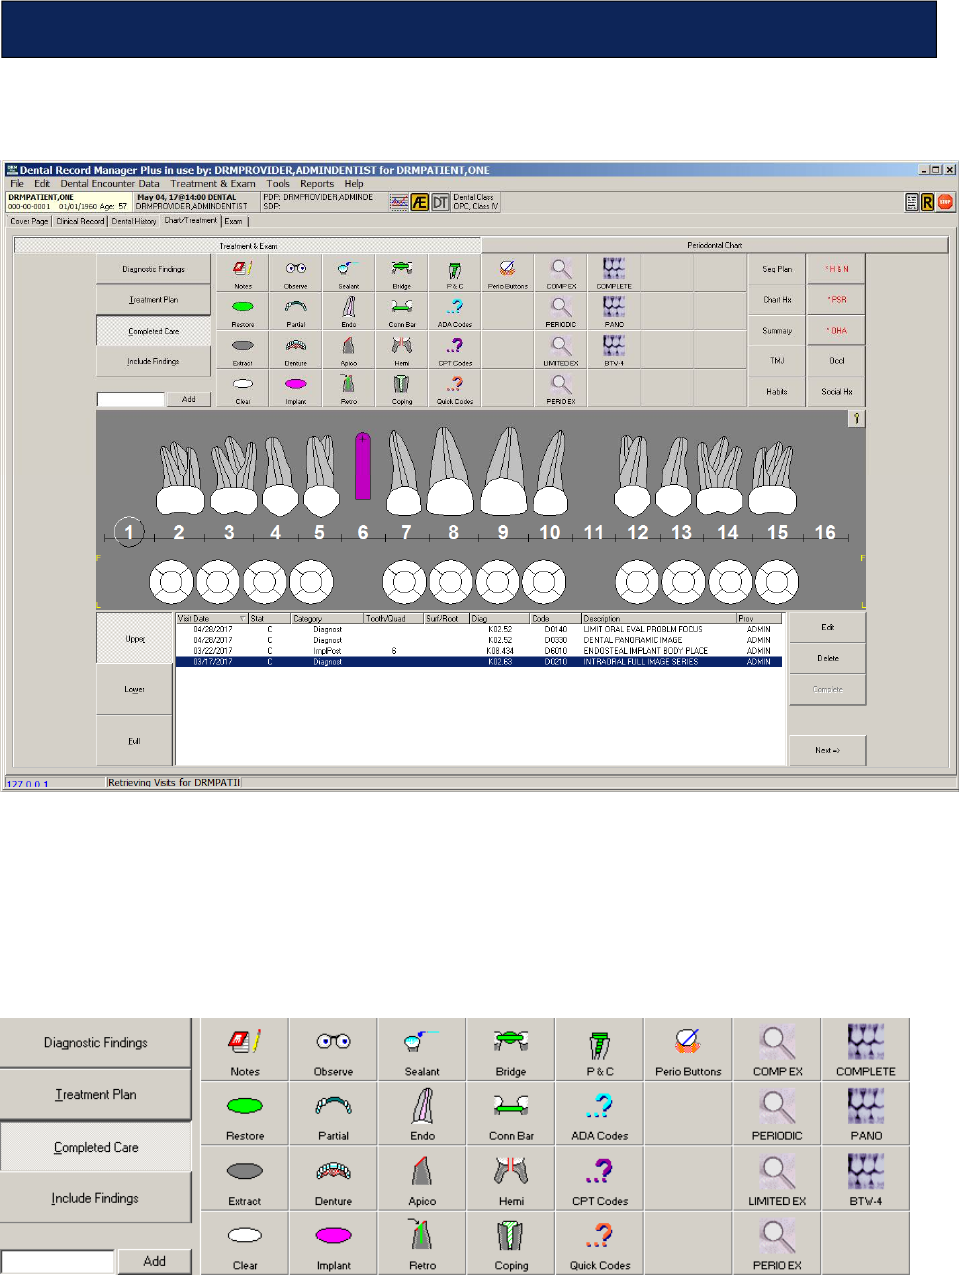
May 2018 DRM Plus Administrator Manual v6.9 174
There are two main sections to the Chart/Treatment tab: Treatment & Exam and Periodontal Chart.
Figure 222: Chart/Treatment Tab Displaying Treatment & Exam Screen
The Treatment & Exam screen has several important component views. On the upper left side of the
screen are the following functions: the Diagnostic Findings, Treatment Plan and Completed Care views,
with their corresponding buttons. These tools are used to enter information on diagnostic findings, create
treatment plans, view previously completed care, or enter dental procedures/diagnoses on today’s encounter.
The Include “...” button allows the user to view information from a combination of the aforementioned
views on one screen.
Figure 223: Diagnostic Findings, Treatment Plan, Completed Care and Include Buttons
Chart/Treatment – Treatment & Exam
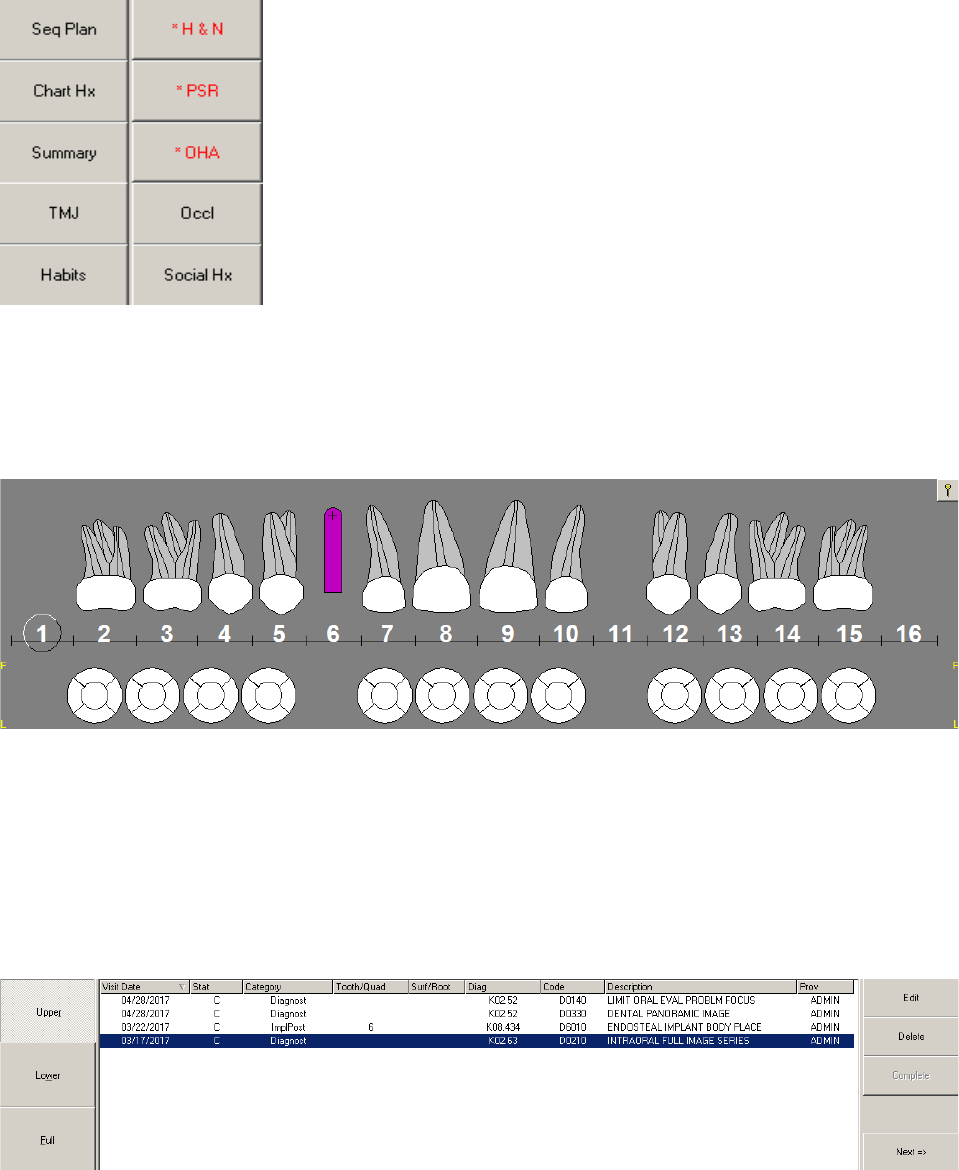
May 2018 DRM Plus Administrator Manual v6.9 175
The Seq Plan (Sequencing), Chart Hx (History), Summary, TMJ, Habits (Parafunctional), H&N, PSR,
OHA (Oral Health Assessment), Occl (Occlusion), and Social Hx (History) buttons are on the upper right
side of the screen.
Figure 224: Treatment & Exam Specialty Buttons
The center of the screen has a graphic display of all the teeth. Use the visual representation in combination
with the Diagnostic Findings, Treatment Plan and Completed Care buttons and icons to enter
information about the patient. There is also a Key button on the right side of the display that shows which
conditions the various colors, patterns and symbols represent.
Figure 225: Completed Care Graphic Display
The lower portion of the screen has buttons to change the view in the graphic display. Additionally, the
transaction table, which shows detailed information entered in the Diagnostic Findings, Treatment Plan
and the Completed Care view screens. There are tool buttons to the right of the transaction table, which
allow the user to Edit, Delete or Complete the planned treatment; the Next button moves on to completing
the encounter. Toggle between the teeth of the upper and lower arch by clicking the Upper and Lower
buttons to the left of the transaction table on the bottom section of the screen. The Full button allows the
user to view both arches.
Figure 226: Completed Care Transaction Table
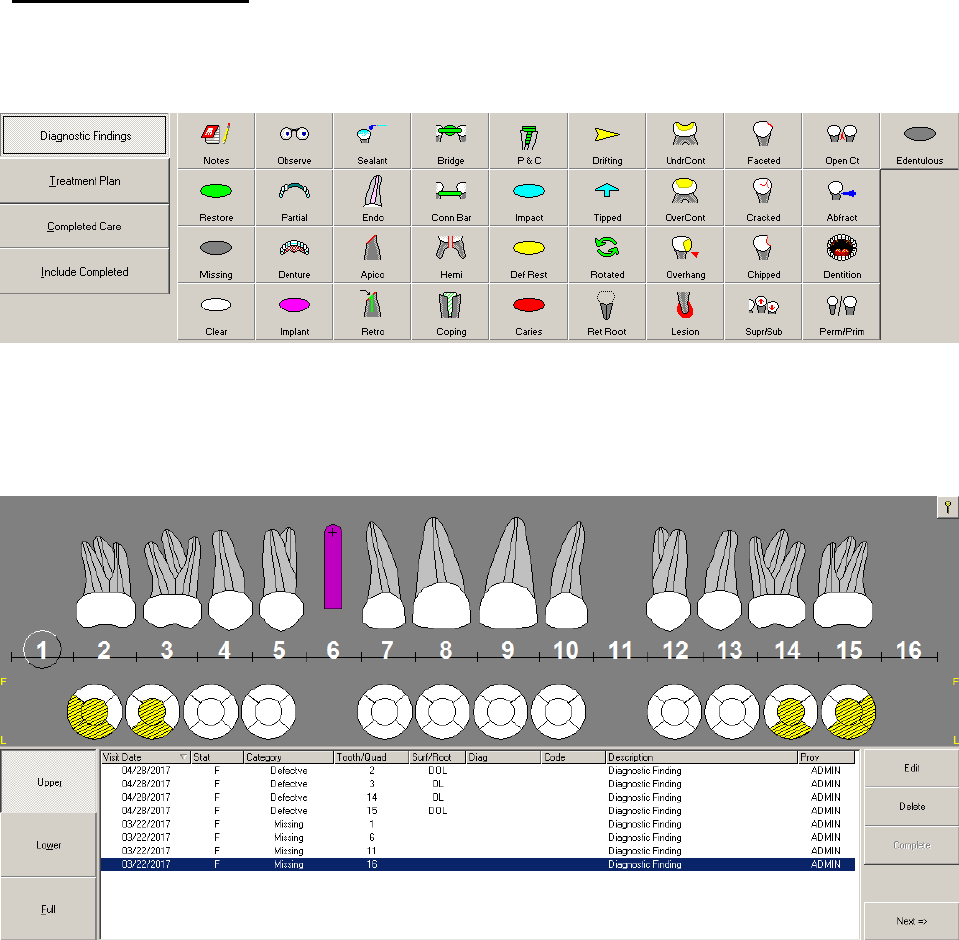
May 2018 DRM Plus Administrator Manual v6.9 176
Diagnostic Findings
1. Click the Diagnostic Findings button on the left side of the screen.
2. Select the desired finding from the icons to the right of the Diagnostic Findings button.
Figure 227: Diagnostic Findings Button with Icons
3. Click the tooth/area of the tooth in the graphic display. Use the Upper and Lower buttons on the
left side of the text display to view the arch and the previous diagnostic findings on the upper and
lower arches.
Figure 228: Diagnostic Findings Graphic Chart and Transaction Table
4. The finding appear in both the text and graphic display. Click the Key button in the upper right
corner of the graphic display to see how various findings are shown in the graphic.
5. Use the Clear icon to remove any finding entered during today’s encounter only. Click the Clear
icon and then click the desired finding on the graphic to remove the finding from both the graphic
and the transaction table.
Note: The Stats column in the transaction table displays an ‘F’ when the transaction is a finding.
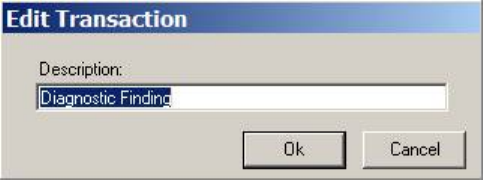
May 2018 DRM Plus Administrator Manual v6.9 177
Editing Diagnostic Finding Descriptions
Diagnostic Findings descriptions that have been entered, but for which no TIU progress note has yet been
filed, can be edited.
To edit a diagnostic finding description:
1. Select the finding by highlighting it in the transaction table.
2. Click the Edit button to the right of the transaction table.
3. The Edit Transaction screen displays.
Figure 229: Edit Transaction Screen
4. Enter the new description in the text box. Note that only the description can be edited. The other
information, such as Visit Date, Tooth/Quad or Category cannot be edited with this button.
5. Click the OK button. The edited information displays in the transaction table.
Deleting a Diagnostic Finding
Diagnostic Findings that have been entered, but for which no TIU progress note has yet been filed, can be
deleted.
To delete a diagnostic finding:
1. Select the finding by highlighting it in the transaction table.
2. Click the Delete button on the right side of the transaction table.
3. The finding is deleted.
Note: If the user attempts to delete a finding that has already been filed with an old encounter, the item is
removed from the graphic display, but remains in the transaction table with a line through it. The DRM Plus
Administrator may delete the finding from the graphic and the transaction table, unless the transaction has
previously been deleted by a DRM Plus non-Administrator.
Note: Clicking a transaction table column heading sorts the table. Generally in ascending order depending
on the current view. Clicking the column heading a second time returns the table to the original descending
view. This functionality works the same for all three Treatment & Exam transaction table views.
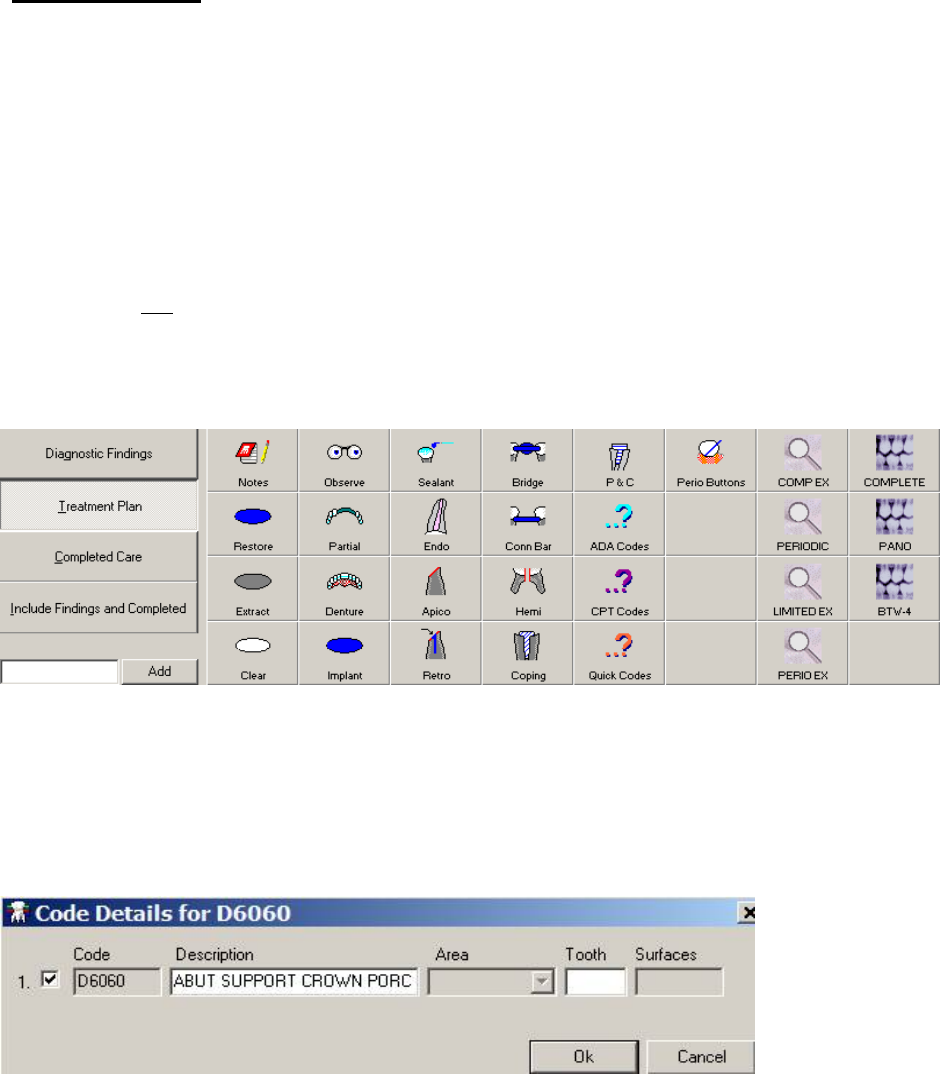
May 2018 DRM Plus Administrator Manual v6.9 178
Treatment Plan
Entering a Treatment Plan
There are multiple ways to enter a planned procedure code for a patient: by adding the code directly utilizing
the Add button with text box, or by selecting the icon that corresponds to the planned treatment and
choosing the tooth from the graphic display. Use the ADA Codes icon, CPT Codes icon, Quick Codes icon
or Personal Speed Code icon as additional ways to enter planned treatment for the patient.
Rules for entering a procedure code for a planned item in the Treatment Plan view include:
1. Always use a standard icon, first four columns and P&C, if one is available first.
2. When NO standard icon is available, use the ADA Codes, CPT Codes, Quick Codes or a Speed
Code icon.
3. The Add button with text box may be used interchangeably with rule 2.
4. Always enter transactions in the same order that they are performed on the patient.
Figure 230: Treatment Plan Button with Icons
To enter a planned treatment using the Add button and text box:
1. Click the Treatment Plan button. Notice that the Add button and text box are active.
2. Type a word or procedure code into the Add text box and click the Add button.
3. The Code Details screen displays if the procedure code is tooth or quadrant related.
Figure 231: Code Details Screen
Enter the Tooth number and, if applicable, the Area or Surfaces modifiers and click the OK button. The
graphic and the displays adjusts to reflect the addition.
Note: When surface modifiers are required for a procedure code, they must be entered using uppercase
letters (M, O, D, F, B, L, and I). When root modifiers are required for a procedure code, they must be
entered using lowercase letters (r, b, l, d, and m).
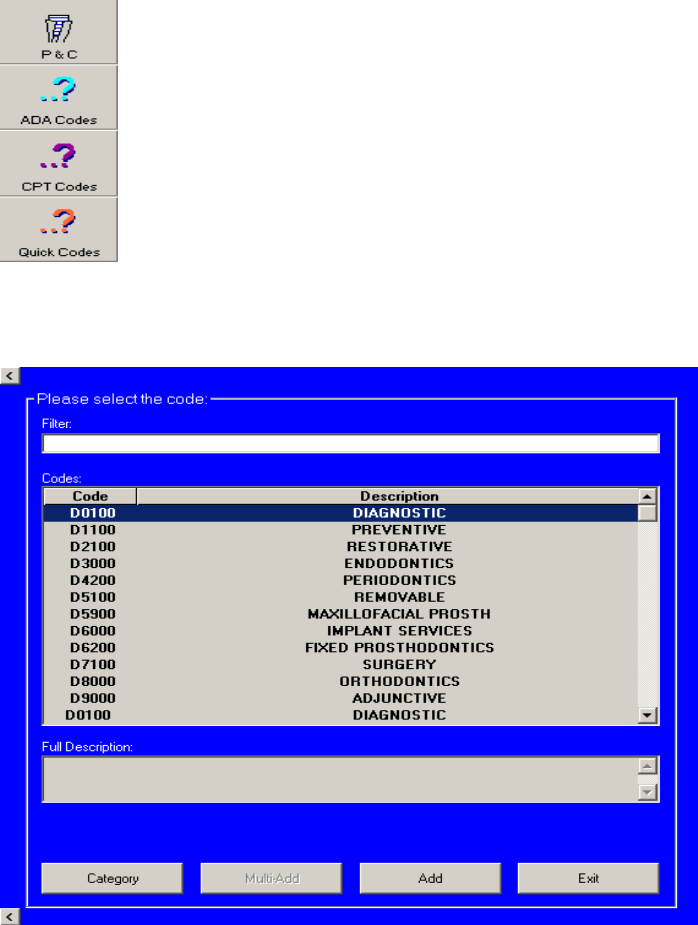
May 2018 DRM Plus Administrator Manual v6.9 179
To enter a planned treatment using the standard Treatment Plan icons:
1. Click the Treatment Plan button.
2. Click the icon to the right that corresponds to the desired planned treatment.
3. Click the appropriate tooth, area and/or surface.
4. As in diagnostic findings, toggle between the upper and lower arch by clicking the Upper or
Lower button on the left side of the display.
5. The graphic display and the transaction table display the new addition.
To enter a planned treatment using the ADA Codes icon or the CPT Codes icon:
1. Click the ADA Codes icon.
Figure 232: ADA, CPT and Quick Codes Icons
2. The Procedure Code Selection screen displays for the selection.
Figure 233: Procedure Code Selection Screen
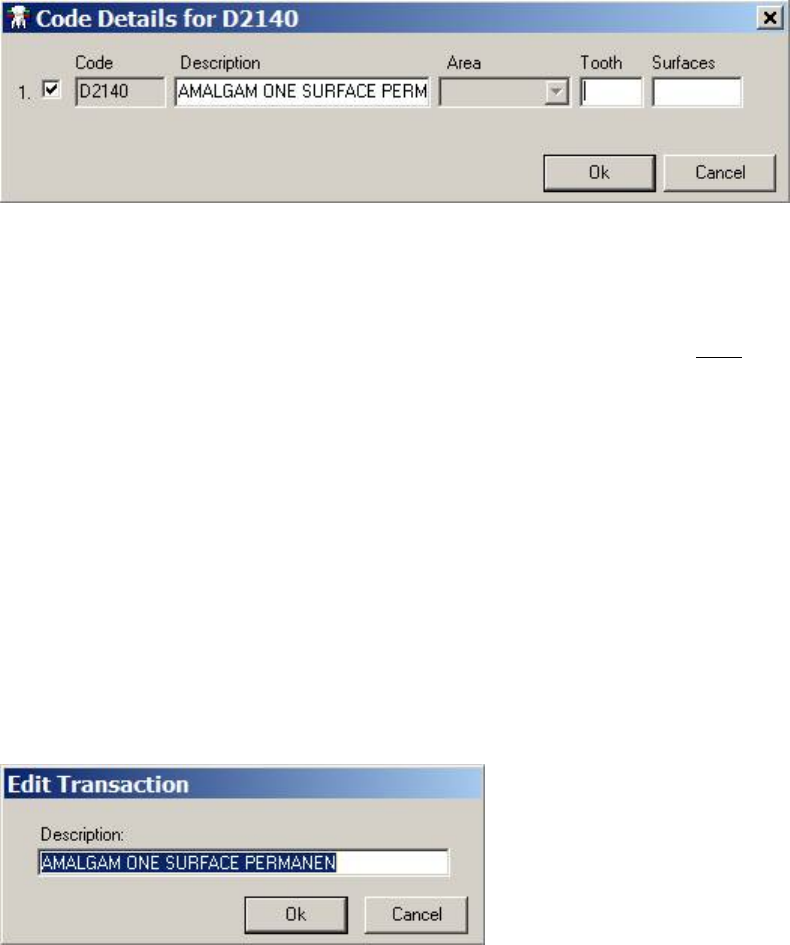
May 2018 DRM Plus Administrator Manual v6.9 180
3. Type the procedure code into the filter, or use the scroll bar to search for a code.
4. A description of the highlighted procedure code displays in the Full Description text box.
5. Click the Category button to return to the list of categories at the top of the scroll sheet. Click the
Multi-Add button to add multiple procedure codes on other teeth.
6. When the desired code is highlighted, click the Add button.
7. If the procedure code needs to be attached to a specific tooth and surface modifier, the Code
Details screen displays.
Figure 234: Code Details Screen
8. Fill in the fields with the requested information and click the OK button.
9. The Diagnosis Code screen displays if the parameter is activated.
10. Select the planned treatment procedure on the left side of the screen (default is all selected) and the
diagnosis code(s) on the right side. If the correct diagnosis code does NOT appear, use the
Additional Diagnosis Code Search to find a different diagnosis code.
11. Click the OK button. The information displays in the transaction table on the graphic chart.
12. To undo any graphical entry on today’s encounter, use the Clear icon as described in the
Diagnostic Findings section of this chapter.
Entering a planned treatment using the Quick Codes icon is similar to adding a planned treatment with the
ADA Code icon. To enter a planned treatment using the personal Speed Code icons, please see the Perio
Buttons section later in this chapter.
Editing a Treatment Plan Description
1. Select the desired planned entry in the transaction table.
2. Click the Edit button. The Edit Transaction screen displays.
Figure 235: Edit Transaction Screen
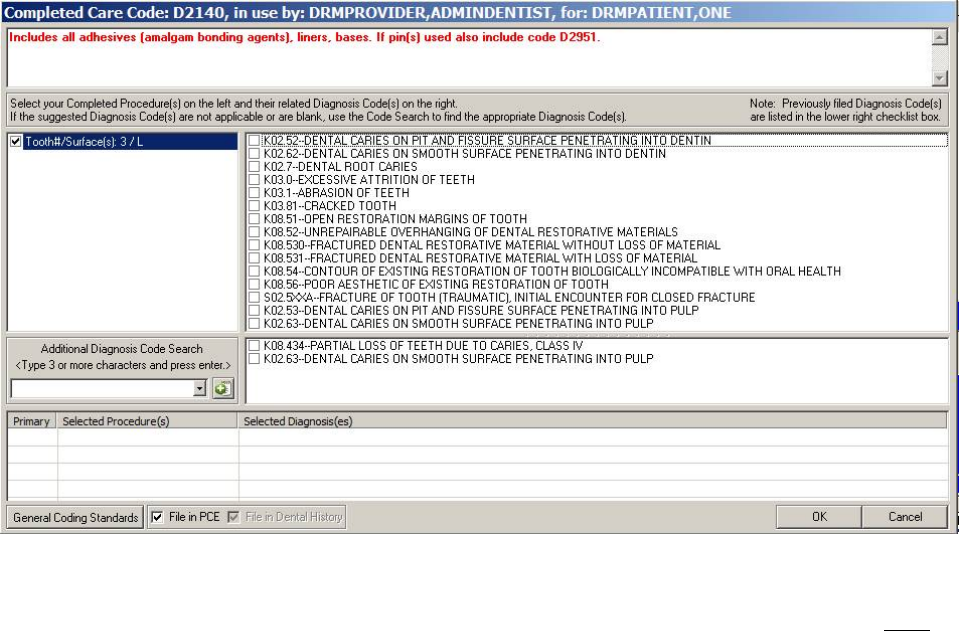
May 2018 DRM Plus Administrator Manual v6.9 181
3. Enter the new description in the text box.
4. Click the OK button.
5. The Description is changed in the transaction table. Note that the Code, Category and other
information cannot be changed with the Edit button.
Deleting a Treatment Plan
1. Select the desired planned entry in the transaction table.
2. Click the Delete button.
3. The planned treatment is removed from the graphic and the transaction table.
Every DRM Plus user is allowed to delete any planned item, regardless of who entered it. The planned entry
is removed from the graphic and transaction table in the Treatment Plan and Sequencing screens.
Completing a Treatment Plan
1. Select the planned procedure to be completed from the transaction table.
2. Click the Complete button.
3. The Diagnosis Code screen displays.
Figure 236: Diagnosis Code Screen
4. Select the planned treatment procedure on the left side of the screen (default is all selected) and the
diagnosis code(s) are mapped on the right side of the screen. If the correct diagnosis code is NOT
listed, use the Additional Diagnosis Code Search to find a different diagnosis code.
5. The diagnosis codes in the lower section comprise the diagnosis quicklist which have been filed
with every encounter for this patient’s chart during the past 24 months. This should help the
provider decrease the entry time for searching and locating past diagnoses that may still be relevant
for the patient’s visit.

May 2018 DRM Plus Administrator Manual v6.9 182
6. Notice the File in PCE check box. If the completed treatment is NOT to be filed in PCE, uncheck
this box.
7. Click the OK button.
8. The planned procedure is removed from the transaction table and is now part of Completed Care
transactions for the patient.
Note: When no diagnosis code(s) are mapped to (or listed with) a procedure code on the Diagnosis Code
screen the Additional Diagnosis Code Search must be used to find the appropriate diagnosis code(s) to be
filed with the selected procedure.
Note: The PCE check box option should only be used by advanced users. Changing this option effects the
data being sent to VistA PCE. Do NOT change this check box unless the user does NOT want the data to be
sent to VistA PCE.
Note: Planned procedure codes can be designated with or without a related diagnosis. The parameter change
for users to acquire this functionality is Tools menu User Options submenu Treatment System tab
select the top check box.
Completed Care
Click the Completed Care button to see all treatments that have been previously completed in the VA for
the patient, or entering any new completed treatment for today’s visit.
Figure 237: Completed Care Button Active with Icons
The rules for entering a procedure code for a completed treatment in the Completed Care view include:
1. Always use a standard icon, first four columns and P&C, if one is available first.
2. When NO standard icon is available use ADA, CPT, Quick Codes or a Speed Code icon.
3. The Add button and corresponding text box may be used interchangeably with rule 2.
4. Always enter transactions in the same order they are performed on a patient.
Entering Completed Care
There are several ways to enter completed treatment. Planned treatments, which are completed (see
Completing a Treatment Plan), display in the Completed Care transaction table. Completed treatment can
also be entered manually:
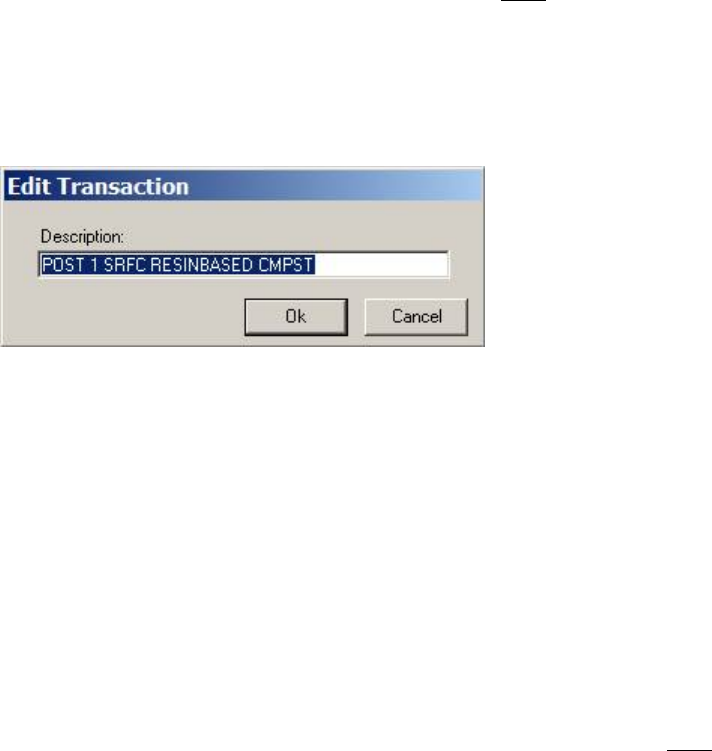
May 2018 DRM Plus Administrator Manual v6.9 183
1. Click the Completed Care button.
2. Select the desired associated standard icon.
3. Choose the appropriate tooth/area on the graphic display.
4. Complete the Diagnosis Code screen.
5. The entry displays in the graphical/transaction table.
6. To undo any graphical entry on today’s encounter, use the Clear icon as described in the
Diagnostic Findings section of this manual.
Completed treatment can also be entered through the Add button and text box; the ADA, CPT and Quick
Codes icons, as well as the Speed Code icons. Please see the Treatment Plan section of this manual for
further information on these functions.
Editing Completed Care Description
Completed Care description can only be edited if it has NOT yet been made a part of the TIU progress
note. To edit a completed care entry:
1. Choose a completed care entry from the transaction table.
2. Click the Edit button.
3. The Edit Transaction screen displays.
Figure 238: Edit Transaction Screen
4. Type the new description into the text box.
5. Click the OK button. Note that only the description can be edited.
Deleting a Completed Care
1. Click the desired completed entry in the transaction table.
2. Click the Delete button.
3. The completed treatment is removed from the graphic and transaction tables.
4. To finalize the deletion, the encounter with the patient must be completed and filed. See the
Completing the Encounter chapter of this manual for further information.
Only DRM Plus Administrators may delete line item entries, and this updates only DRM Plus charting,
VistA DES and VistA PCE. VistA TIU progress notes viewed in CPRS are NOT updated. If the deleted
completed transaction was associated with the Primary Diagnosis for the visit in which it was originally
entered, a new Primary Diagnosis for the encounter must be entered. The PCE Select Primary data screen
displays after the Electronic Signature is entered, so that a new Primary Diagnosis can be chosen. Click
the desired diagnosis (Dx) code/description check box, then click the OK button.
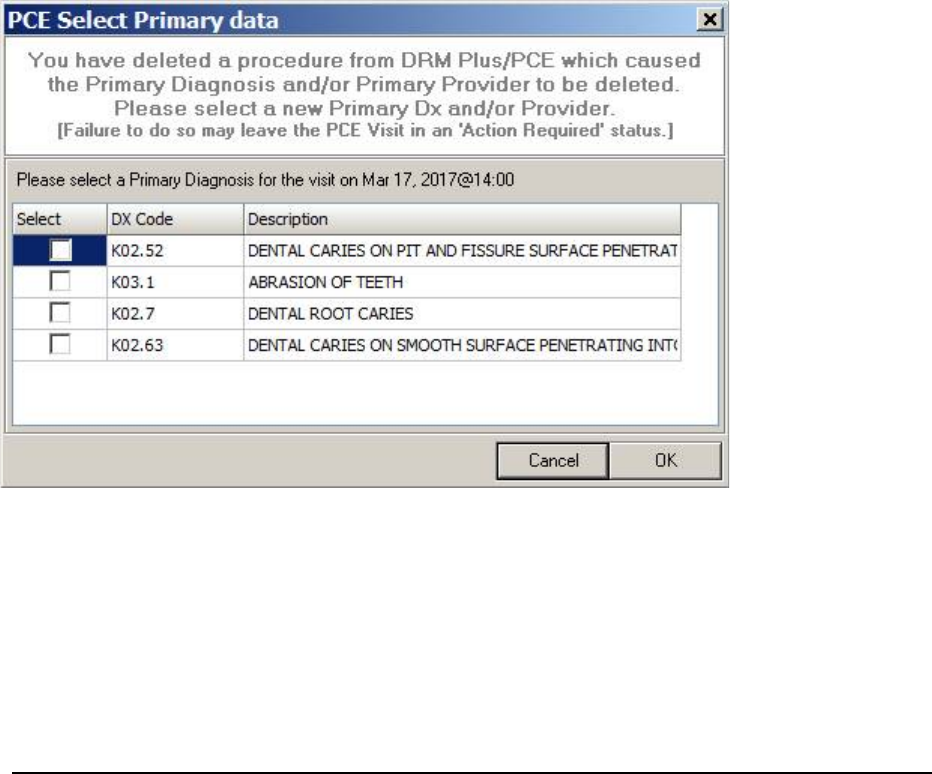
May 2018 DRM Plus Administrator Manual v6.9 184
Figure 239: PCE Select Primary Data Screen
Note: The DRM Plus Administrator should follow local guidelines as to whether they append the associated
TIU progress note, or have some other guideline option.
Note: To delete all entries from a dental encounter, never use the line item deletion in Completed Care
screen. Instead, delete the entire dental encounter in the Dental History tab. Please see the Deleting an
Encounter section in the Dental History chapter of this manual for further information.
Include “Completed”/Include “Findings and Completed”/Include “Findings”
This button can be used in conjunction with the other buttons to include more than one type of information
on the display. When the Diagnostic Findings button is active, and the associated information is displayed
in the graphic and transaction tables, clicking this button adds the Completed Care information to the
display. If the Treatment Plan button is active, and the associated information is displayed, clicking this
button adds the Diagnostic Findings and the Completed Care information to the graphic and transaction
tables. Finally, when the Completed Care button is active, and the associated information is displayed,
clicking this button adds the Diagnostic Findings.
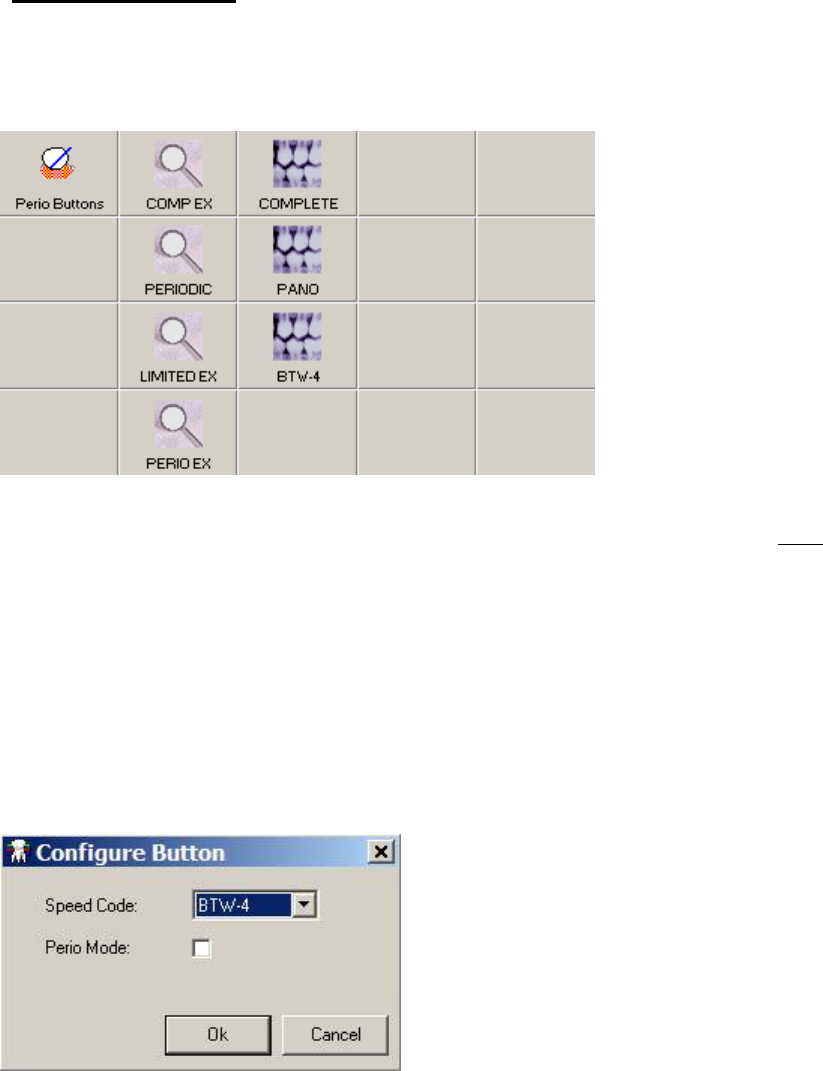
May 2018 DRM Plus Administrator Manual v6.9 185
Perio Buttons Icon
The icon table includes the Perio Buttons icon. Click this Perio Buttons icon to see the second set of speed
codes associated with perio mode, if entered by the user. Please see the Speed Codes section in the Using
the DRM Plus Drop-Down Menu chapter of this manual for further information.
Figure 240: Perio Buttons and Speed Code Icons
This option is only available while Treatment Plan or Completed Care are active, but NOT with
Diagnostic Findings.
Click the desired icon to add it to the planned treatment. If these buttons are clicked when Completed Care
screen is active, the Diagnosis Code screen displays, which allows the selection of diagnosis codes that are
mapped to that procedure code to be entered.
To change the location of the speed code icon:
1. Click one of the blank icons where the speed code icon is to be moved.
2. The Configure Button screen displays.
Figure 241: Configure Button Screen
3. Use the drop-down menu to assign the speed code.
4. Use the Perio Mode check box to link the speed code icon with the Perio Buttons icon.
5. Click the OK button. The old speed code icon location is cleared and the speed code icon is now in
the new assigned icon location.
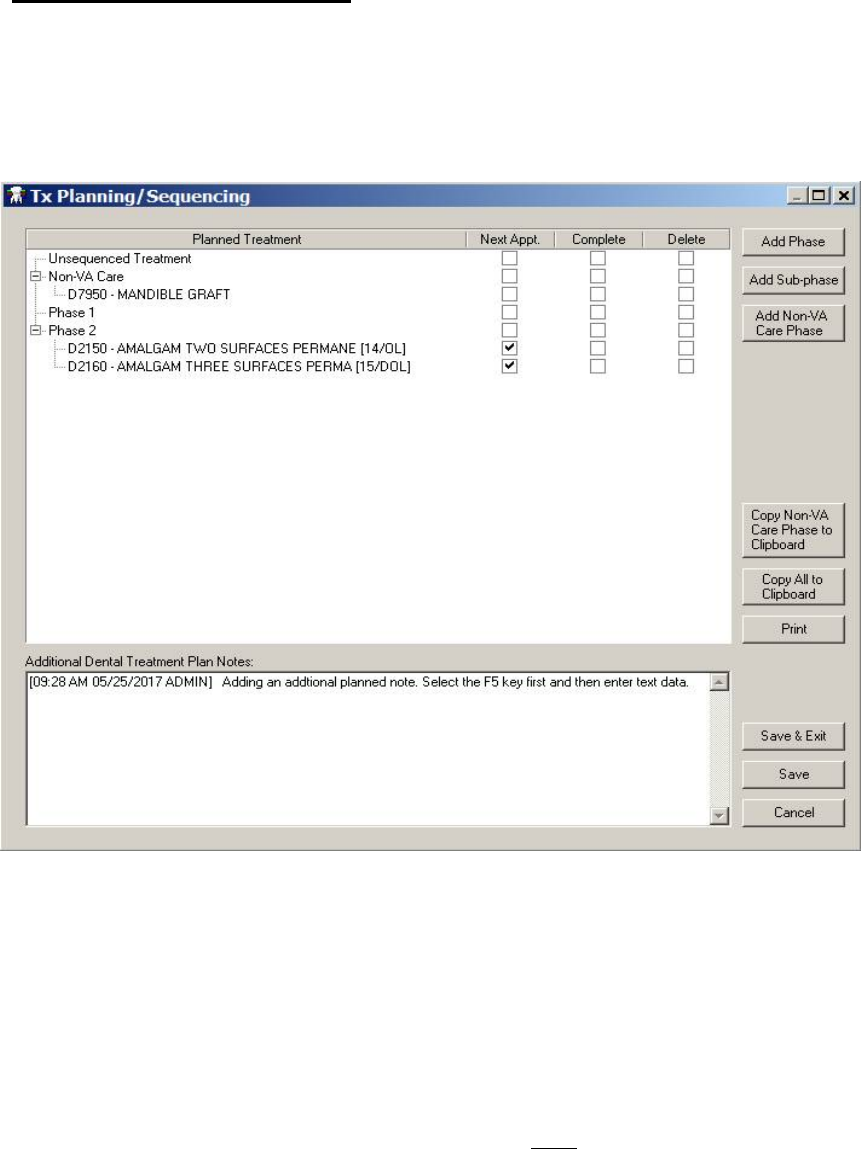
May 2018 DRM Plus Administrator Manual v6.9 186
Seq Plan/Sequencing Button
Use sequencing in combination with the Treatment Plan screen to organize when to perform specific
planned treatment. There are nine buttons on the Tx Planning/Sequencing screen. The nine buttons are
Add Phase, Add Sub-phase, Add Non-VA Care Phase, Copy Non-VA Care Phase to Clipboard, Copy
All to Clipboard, Print, Save & Exit, Save and Cancel. The Tx Planning/Sequencing screen has the nine
buttons positioned or grouped on the right side of the screen.
Figure 242: Tx Planning/Sequencing Screen
All planned transactions sequenced into a Phase 1, Phase 2, etc. and with all sub-phases associated with
numbered phases has full functionality of Next Appt., Complete and Delete check boxes.
The Add Non-VA Care Phase button allows only one Non-VA Care phase to be added. The Non-VA
Care phase will be listed below the Unsequenced Treatment and above Phase 1. Users may add an
unlimited number of sub-phases in a Non-VA Care phase. When trying to add a second Non-VA Care
phase a warning message appears stating that only one Non-VA Care phase may be added.
The Next Appt. and Complete check boxes for the Non-VA Care phase are inactive; if selected, an
informational screen appears stating these check boxes may NOT be used in the Non-VA Care phase. The
Delete check box remains active for the Non-VA Care phase and all of Non-VA Care sub-phases.
Note: The DRM Plus user should delete a planned Non-VA Care phase, sub-phases and transactions after
receiving verification from the Non-VA Care provider that the procedure(s) has/have been completed.

May 2018 DRM Plus Administrator Manual v6.9 187
The two buttons of Copy Non-VA Care Phase to Clipboard and the Copy All to Clipboard when
selected will allow the user to copy the planned transactions listed in the Tx Planning/Sequencing screen.
The copied data includes filed and unfiled planned treatment from only the Tx Planning/Sequencing screen
to paste on any word document, text document or any application window if allowed.
The end-user may use the <F5> key now in the Additional Dental Treatment Plan Notes to import a
date/time stamp identifier before or after the text entry if desired.
Plan a Treatment Sequence
1. Click the Seq Plan (Sequencing) button.
2. The Tx Planning/Sequencing screen displays.
3. Information from the Treatment Plan transaction table is shown on the screen. Use the Add
Phase, Add Sub-phase or Add Non-VA Care Phase buttons to add a new phase and/or sub-
phase. Highlight the desired phase listed in the screen to add the sub-phase under this phase.
4. Change the sequence of the planned treatments by dragging and dropping them into the correct
phase.
5. If the planned treatment is to be completed at the next appointment, click the corresponding check
box. Non-VA Care phase is NOT allowed a next appointment.
6. Add Additional Dental Treatment Plan Notes in the text box.
7. Click the Save & Exit button if only planned items have been added or sequenced for this patient.
This option requires that NO new data be entered as completed transactions, Perio, H&N or any
other modal at the same time for the option to work.
8. Click the Save button to save the progress in sequencing and keep working on this encounter.
Note: Always enter planned treatment in the same order they are performed on a patient.
Note: The Save & Exit button from the sequencing screen files any changes and minimize DRM Plus. Any
new planned entries added have the same Visit date as the latest TIU progress note filed on this patient. The
most recent dental encounter must have an Active status for this feature to work.
Complete a Planned Treatment in the Sequencing Screen
1. Click the Seq Plan (Sequencing) button.
2. The Tx Planning/Sequencing screen displays.
3. Choose the planned treatment that is to be completed by checking the corresponding check box in
the Complete column. Non-VA Care phase is NOT allowed to be completed in the Tx Planning/
Sequencing screen.
4. Click the Save button.
5. The Diagnosis Code screen displays. Please see the Completing a Treatment Plan portion in the
Treatment Plan section of this chapter for further information.
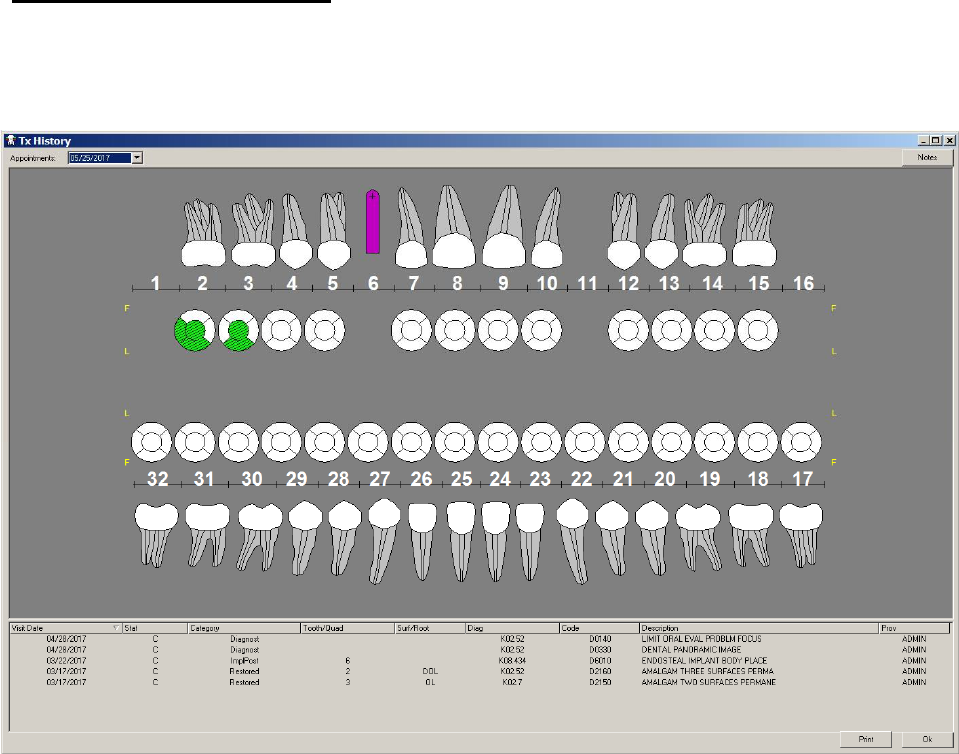
May 2018 DRM Plus Administrator Manual v6.9 188
Deleting a Planned Treatment in the Sequencing Screen
1. Click the Seq Plan (Sequencing) button.
2. The Tx Planning/Sequencing screen displays.
3. Choose the planned treatment that is to be deleted by checking the corresponding check box in the
Delete column. The DRM Plus user should delete a planned Non-VA Care phase, sub-phases and
transactions after receiving verification from the Non-VA Care provider that the procedure(s)
has/have been completed.
4. Click the Save button.
5. The planned treatment is deleted from the sequencing screen, the transaction table and the
graphical chart on the Treatment Plan screen.
Chart Hx (History) Button
Click the Chart Hx button to see a completed care chart of the patient’s dental history. The transaction table
includes the text details of the Visit Date, Stat, Category, Tooth/Quadrant, Surface/Root modifiers,
Codes, CPT Description and Provider initials.
Figure 243: Tx History Screen
Use the Appointments drop-down menu to see the patient’s history by different appointment dates. View
tooth notes on the patient’s file by clicking the Notes button tied to the note’s appointment date.
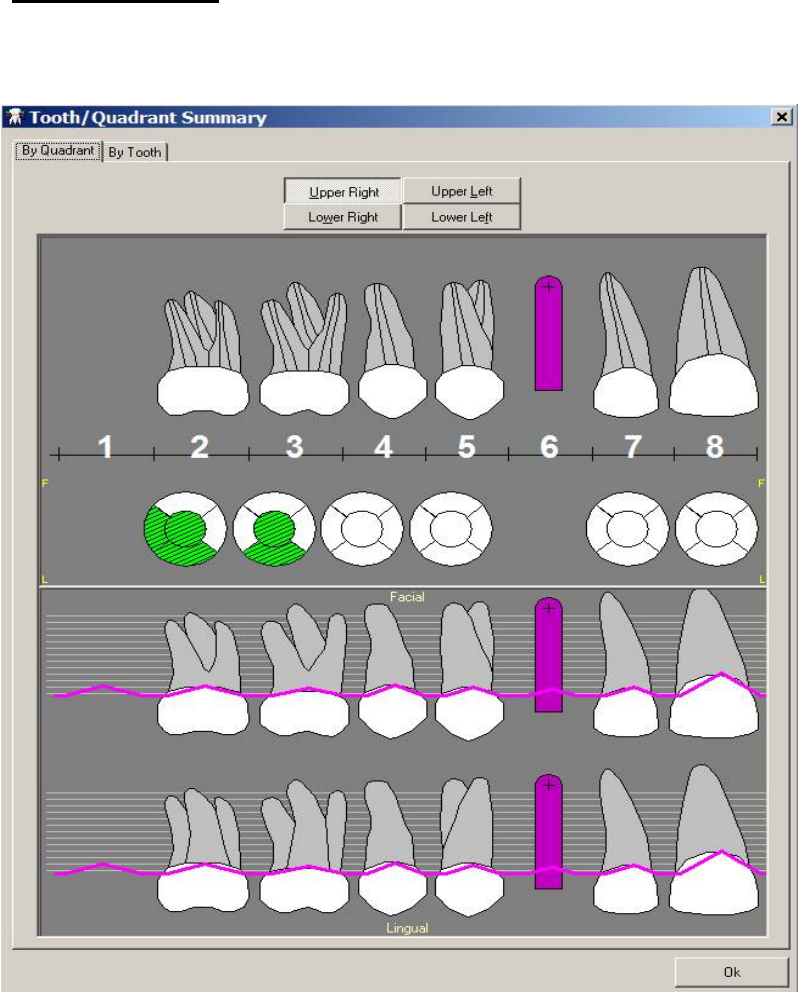
May 2018 DRM Plus Administrator Manual v6.9 189
Note: To display any past tooth-specific note, click the Chart Hx button. Continue by clicking the drop-
down arrow of the Appointment field, in the top left corner of the Tx History screen, and selecting the
appropriate date the tooth-specific note was entered. Once the date is selected, the tooth numbers in the
graph displays in yellow. Once the desired tooth is found, click the Notes button. Then use the drop-down
arrow to select the tooth-specific note of interest and view its contents.
Summary Button
Click the Summary button to view a summary of a patient’s chart. Periodontal information displays in the
summary as well.
Figure 244: Tooth/Quadrant Summary Screen
Use the tools on the screen to view the information by quadrant or by tooth.
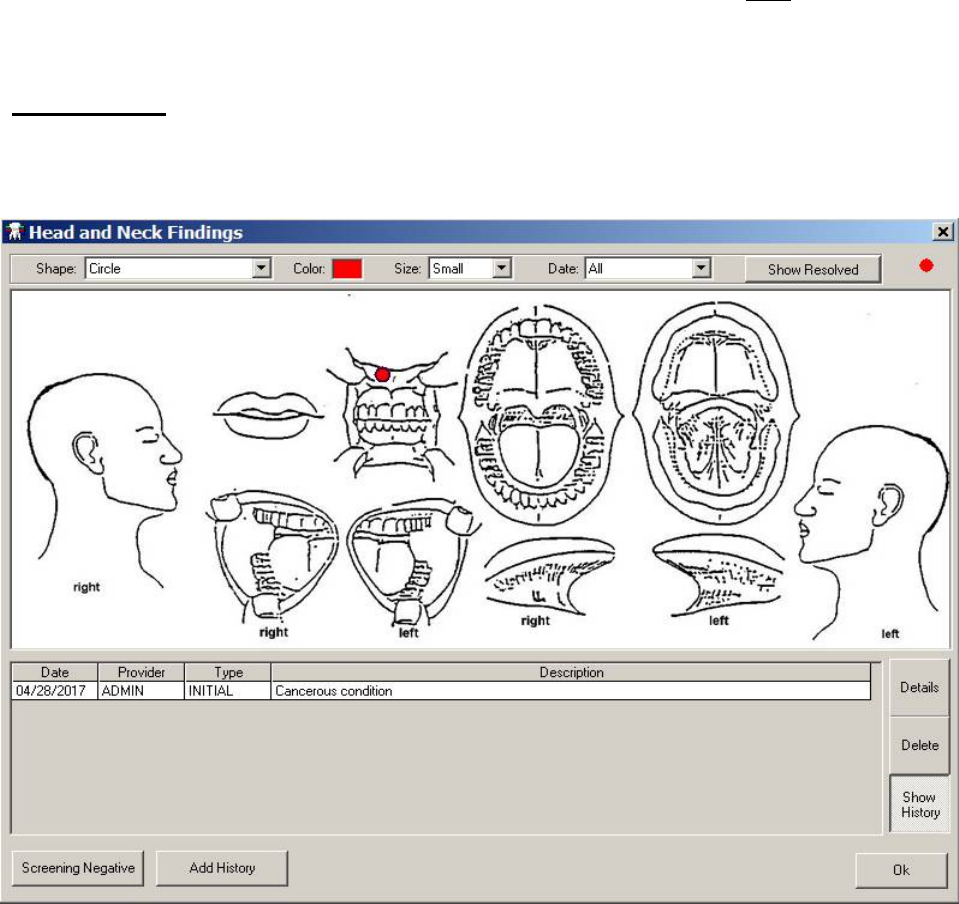
May 2018 DRM Plus Administrator Manual v6.9 190
Note: On the Treatment & Exam screen, with the following views: Diagnostic Findings, Treatment Plan
or Completed Care, clicking the Summary button displays the history of the selected primary view. The
upper half of the window shows the summary of the primary view that is active when the Summary button
is selected. Only the activated primary view, with all of its entries, displays in the restorative top window.
The lower half of the screen displays the periodontal summary, which includes the latest exam in
periodontal history with filed Diagnostic Findings and Completed Care; however, NOT including surfaces
or roots.
H&N Button
Use the functions in the H&N (Head and Neck) button to enter and view diagnostic information on the
patient’s head and neck.
Figure 245: Head and Neck Findings Screen
To enter an H&N finding:
1. Select the graphic shape that best represents the finding by using the Shape drop-down menu.
2. Select the contrasting color for the finding by clicking the Color box. A visual list of possible colors
displays.
3. Select the size of the graphic by using the Size drop-down menu.
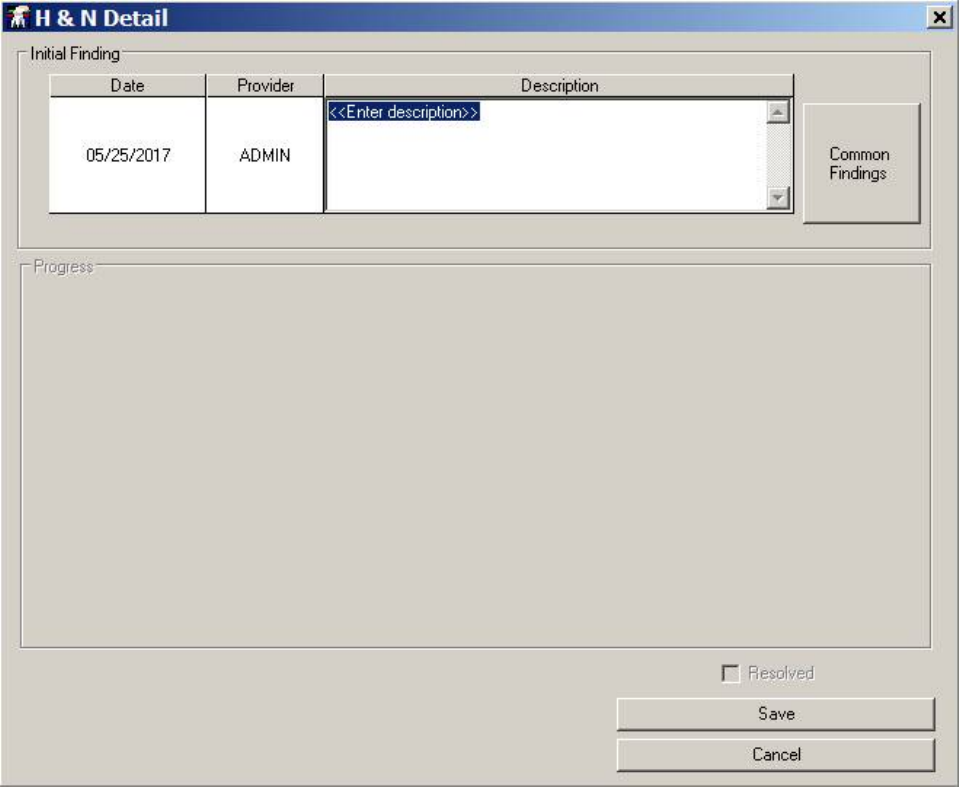
May 2018 DRM Plus Administrator Manual v6.9 191
4. The date box defaults to Today, which is required for new data entries. After the first filed TIU
progress note entry of H&N, the date box defaults to All. The user may click the drop-down arrow
and highlight a previous exam to view the entries on a previous date.
5. Click the graphic to show where the lesion is located on the patient.
6. The H&N Detail screen displays.
Figure 246: H&N Detail Screen
7. Enter the description of the lesion in the Description column, or click the Common Findings
button to see a list of commonly appearing lesions and add the description to the finding.
8. Click the Save button. The finding displays on the H&N Findings transaction table.

May 2018 DRM Plus Administrator Manual v6.9 192
To add new details of an H&N finding:
1. Click the desired finding in the H&N Findings transaction table and click the Details button.
2. The H&N Detail screen displays with progress information to be entered.
Figure 247: H&N Detail Screen with Progress Description
3. Enter information in the Description column of the Progress window.
4. Click the Save button to save the entered information and return to the H&N Findings screen.
To delete a lesion:
1. Highlight the finding entry on the H&N Findings transaction table.
2. Click the Delete button.
3. A screen confirming that the entry is to be deleted displays. Click the OK button. Note that this
screen only displays if the finding entry is made during this session.
4. The entry and the mark on the H&N Findings graphic is removed if entered this session.
Note: Clicking the Delete button deletes the highlighted finding entry(s) during the same session the H&N
Findings transaction was entered. Deleting any filed H&N Findings transaction by any DRM Plus end-user
results in a line through the entry, and it remains in the transaction table.
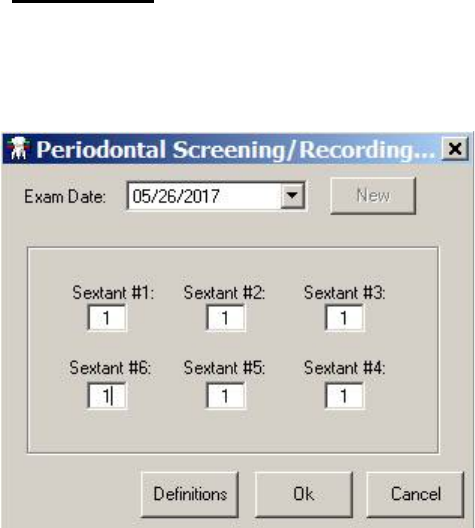
May 2018 DRM Plus Administrator Manual v6.9 193
PSR Button
Click the PSR button to view the Periodontal Screening/Recording (PSR) screen. Use this screen to view
previously entered PSR information if present, or to enter new PSR information.
Figure 248: Periodontal Screening/Recording (PSR) Screen
Use the Exam Date drop-down menu to view past periodontal screening information.
To enter new information:
1. Click the New button. All the Sextant text boxes will default to a 0 dental value.
2. Enter the desired national dental value in each Sextant text box. Entering an “*” requires a
number added with the symbol to be saved (i.e., “3*”).
3. Click the Definitions button to view PSR definitions of national dental values.
4. Click the OK button to complete.
Note: The PSR modal allows two providers to enter a PSR exam on the same day; however, it only displays
the last PSR exam that was filed on that day. The first entered/filed PSR exam is only viewable in the TIU
progress note of the provider that filed the encounter. The second provider’s filed note has a different
header, which includes the word ‘modified’ in the PSR exam of the TIU progress note.
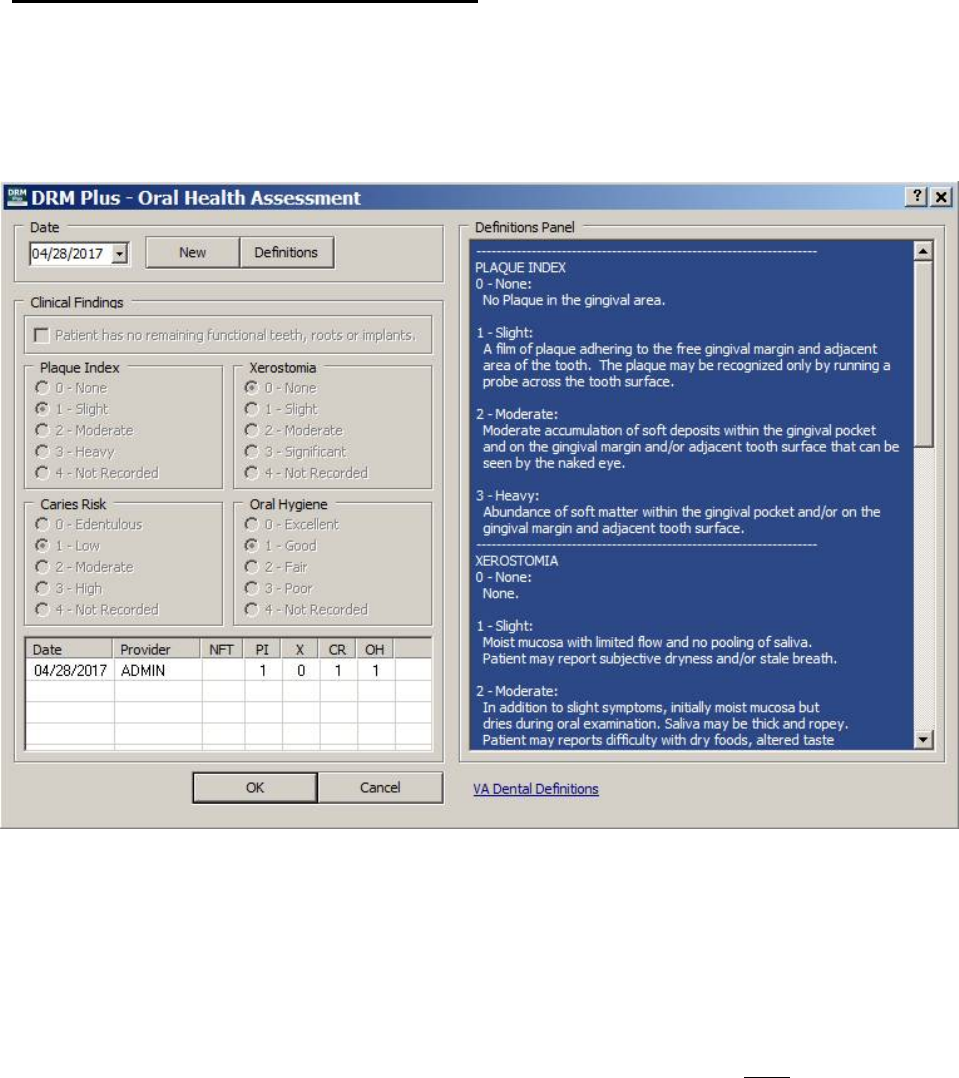
May 2018 DRM Plus Administrator Manual v6.9 194
OHA (Oral Health Assessment) Button
The specialty Plaque button was combined with Xerostomia, Caries Risk and Oral Hygiene to create the
OHA button. This also applies to the Plaque button on the Periodontal Chart screen.
To enter new data in the Oral Health Assessment (OHA) screen, click the New button. Today’s date is
imported into the Date field on the screen.
Figure 249: Oral Health Assessment (OHA) Screen
The NFT check box, Patient has no remaining functional teeth, roots or implants; may be selected in
the event the patient meets these criteria and no findings can be entered in the Diagnostic Findings chart.
Checking this box automatically completes the Diagnostic Findings element and the Periodontal
Assessment element when filing any exam/consult code during a dental encounter. It also automatically
selects the 0-Edentulous radio button in the Caries Risk section.
The radio buttons default to 4 – Not Recorded in all four fields. This selection does NOT import any
clinical finding into the TIU progress note, nor does it display in the transaction table of the OHA screen.
The provider has the option of selecting the appropriate radio button (0-3) for each of Plaque Index,
Xerostomia, Caries Risk and Oral Hygiene, or simply leaving the default setting.
The entry of date, provider’s initials and each field value entered is captured in the transaction table at the
bottom of the screen. The provider has to enter at least one value (between 0-3) in one of the four fields to
save and file an oral health assessment.
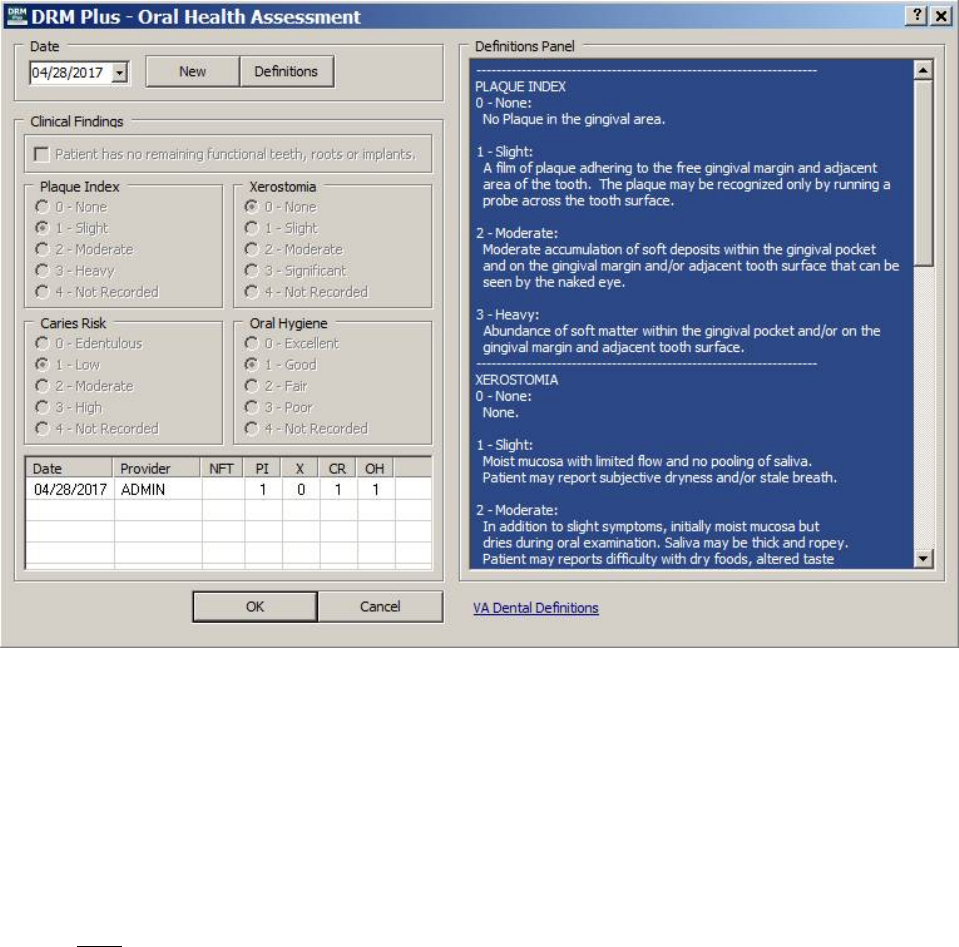
May 2018 DRM Plus Administrator Manual v6.9 195
The Definitions button has the American Dental Association definitions for field values when entering
Plaque Index, Xerostomia Risk and Caries Risk. The rest of the Xerostomia and Caries Risk definitions
may be viewed using the scroll bar on the right side of the screen.
Figure 250: OHA Definitions Displaying Plaque Index/Xerostomia
The OHA (Oral Health Assessment) Definitions Panel is displayed in the previous screen. The Definitions
Panel may be automatically expanded due to the parameter selection that is defaulted when first loaded. The
user may change this parameter by navigating to Tools menu User Options submenu Exam Settings
tab uncheck the Requirements.
At the bottom of the OHA definitions panel the VA Dental Definitions hyperlink takes the provider to the
VA dental website to view current OHA definitions. This hyperlink should be changed by the DRM Plus
Administrator when instructed to do so by the VA Dental Informatics and Analytics Director.
Note: If NOT immediately directed to the website when selecting the hyperlink, please notify the Help
Desk.
Note: The Plaque Index definitions have been reprogrammed and only allow whole number entries. Most
Plaque Index values filed before the loading of the exam template patch retain the decimal value, if entered
with one, and is located in the PI column of the OHA transaction table.
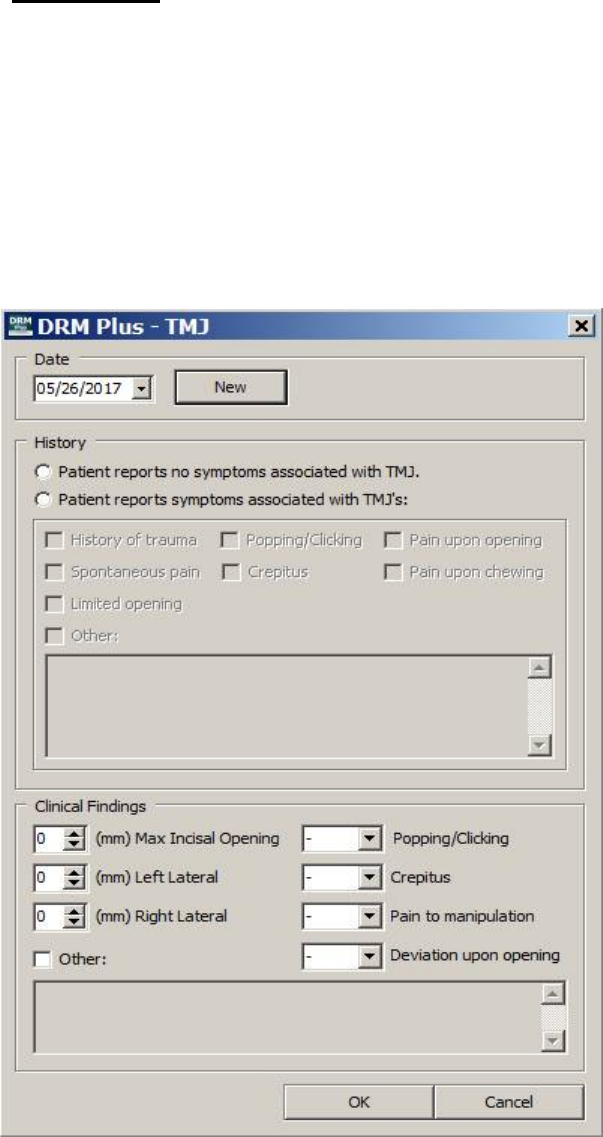
May 2018 DRM Plus Administrator Manual v6.9 196
TMJ Button
The TMJ modal functions similar to the OHA modal when entering a new exam. Click the New button and
today’s date imports into the Date field.
At least one entry in either the History or Clinical Findings sections from this TMJ screen requires data to
be selected in order to save. Selecting the second History radio button, Patient reports symptoms
associated with TMJ’s; allows multiple check box selections and at least one is required for this option to
save.
The text windows below the Other check box in History or Clinical Findings only opens if the check box
has been selected and each requires a text entry. The Other text boxes allow an unlimited text field.
Figure 251: TMJ Screen
The Clinical Findings section has three numerical fields to enter a millimeter value and four drop-down
menu options in selecting popping/clicking, crepitus, pain to manipulation, and deviation upon opening. The
Other check box allows an unlimited text field for additional text information if selected.
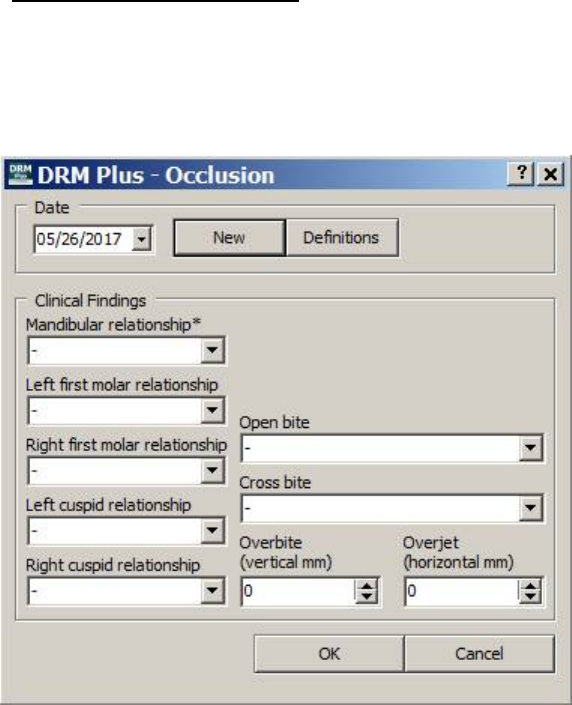
May 2018 DRM Plus Administrator Manual v6.9 197
The minimum requirement to enter a new TMJ finding is the selection of only one historical or clinical
finding from this screen.
Occl (Occlusion) Button
The Occl (Occlusion) button functions are different from the other modals when entering a new occlusion
finding. Click the New button and today’s date imports into the Date field. When there is previous filed data
present then all that filed data imports into the new exam. The user needs to add/delete any new occlusion
findings and click the OK button to save.
Figure 252: Occlusion Screen
The Clinical Findings drop-down menu option Mandibular relationship* is the only required (*) field on
this screen. The six other drop-down menu options and the two numerical box selections are optional
entries.
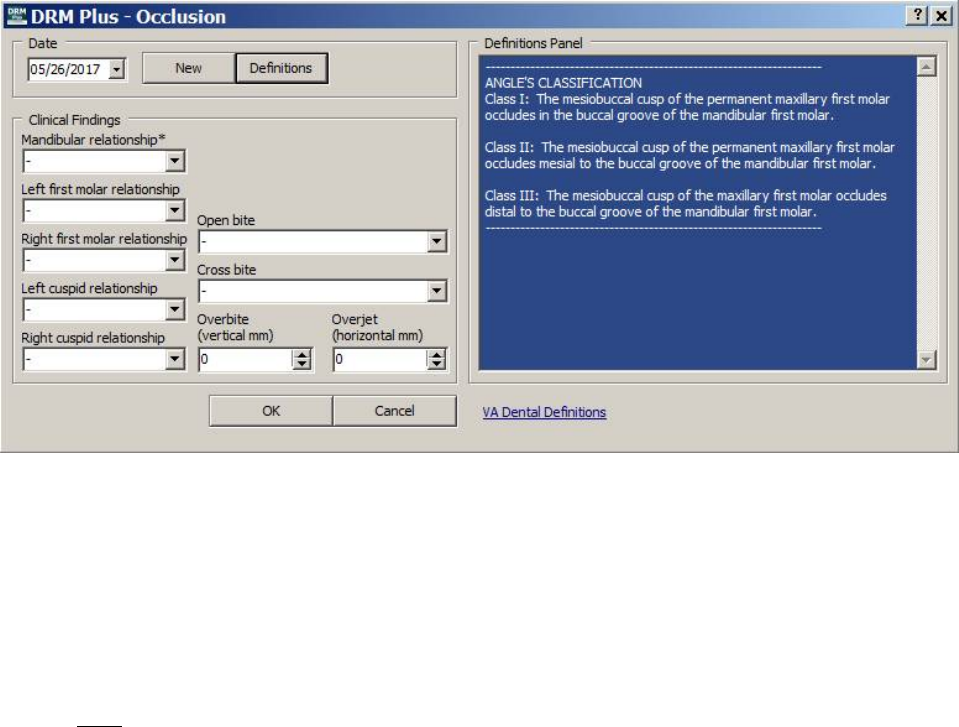
May 2018 DRM Plus Administrator Manual v6.9 198
The Definitions Panel displays the Angle’s Classification definitions. These angle’s classifications are for
the selections displayed in the left bottom four drop-down menus. The Definitions Panel maybe reduced to
display only the Occlusion screen by selecting the Definitions button.
Figure 253: Occlusion Angle’s Classification Definitions
The Definitions Panel may be expanded due to the parameter selection that is defaulted when first loaded.
The user may change this parameter by going to the Tools menu User Options submenu Exam
Settings tab uncheck the Requirements.
At the bottom of the occlusion Definitions Panel, the VA Dental Definitions hyperlink takes the provider
to the VA dental website to view current occlusion definitions. This hyperlink should be changed by the
DRM Plus Administrator when instructed to do so by the VA Dental Informatics and Analytics Director.
Note: If NOT immediately directed to the website when selecting the hyperlink, please notify the Help
Desk.
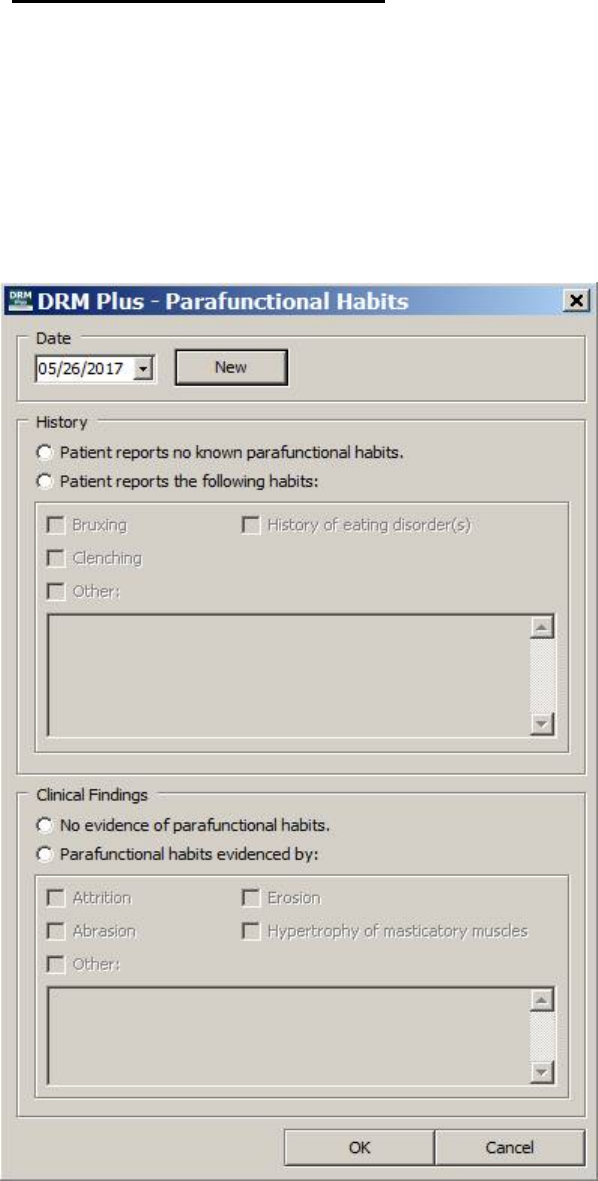
May 2018 DRM Plus Administrator Manual v6.9 199
Habits (Parafunctional) Button
The Habits (Parafunctional) modal functions similar to the OHA modal when entering a new exam. Click
the New button and today’s date imports into the Date field.
The History and Clinical Findings fields each have two radio buttons for selection. When the second radio
button is selected in each field, multiple options become active for selection. The Other check box allows
an unlimited text field for additional text information.
The minimum requirement to enter a new parafunctional habit finding is to select only one historical or
clinical finding from the Parafunctional Habits screen.
Figure 254: Parafunctional Habits Screen
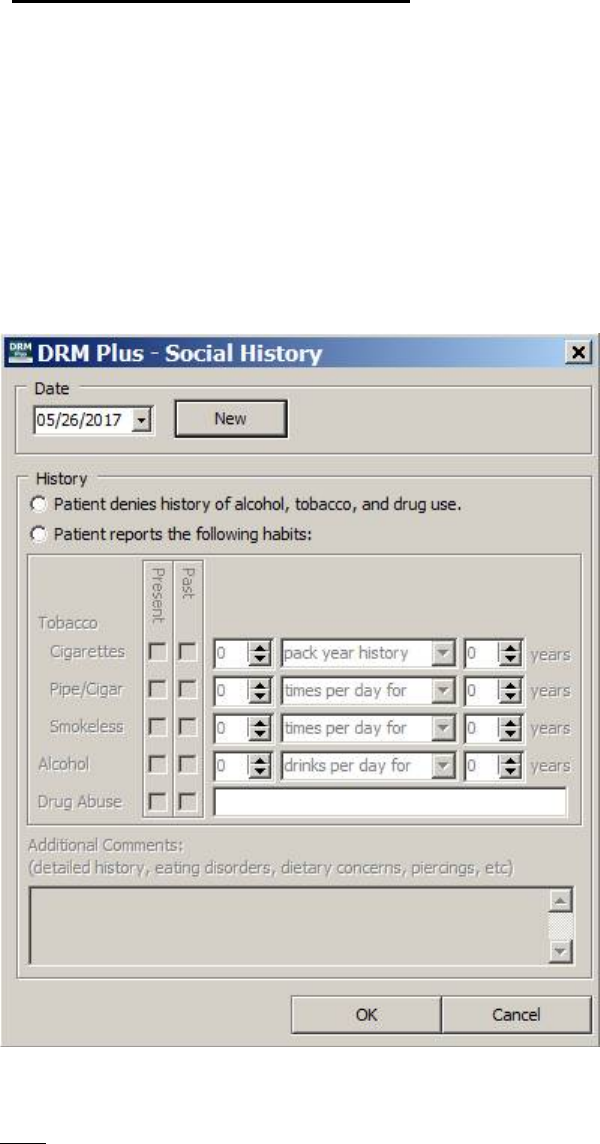
May 2018 DRM Plus Administrator Manual v6.9 200
Social Hx (Social History) Button
The Social History modal functions similar to the OHA modal when entering a new exam. Click the New
button and today’s date imports into the Date field.
The minimum requirement is the selection of one of the two History radio buttons. When selecting the
second radio button then at least one check box option is required to save the new historical data.
Any combination of check boxes maybe selected for Present/Past. The tobacco and alcohol drop-down
options are per day, per week, per month, and per year except for cigarettes. Cigarettes have only the drop-
down options of pack year history, per day, and per week. The text box with the Drug Abuse selection is
optional when one of the check boxes is selected. The bottom text box is optional and allows an unlimited
text field of formation if selected to enter data about eating disorders, dietary concerns, piercings, etc.
Figure 255: Social Hx (History) Screen
Note: All entries made into the Social History, OHA, Occlusion, Parafunctional Habits and TMJ modals
NOT filed are cleared by selecting the Cancel button.

May 2018 DRM Plus Administrator Manual v6.9 201
Multiple Filings to Same Modal on Same Day
The following occurs when any modal has multiple filed findings and/or history during the same day on the
same patient's chart; subsequent filings may be changed/edited or remain the same as the previous filing.
The last modal filing during one calendar day is the only record present from the date drop-down menu of
that modal screen. The TIU progress notes filed that day will have the record of the modal data entered that
session/encounter.
The first provider (HYG) may file findings in the OHA modal and that data displays in the screen for every
other user of DRM Plus to review.
Figure 256: Provider HYG Filed OHA Data First Today
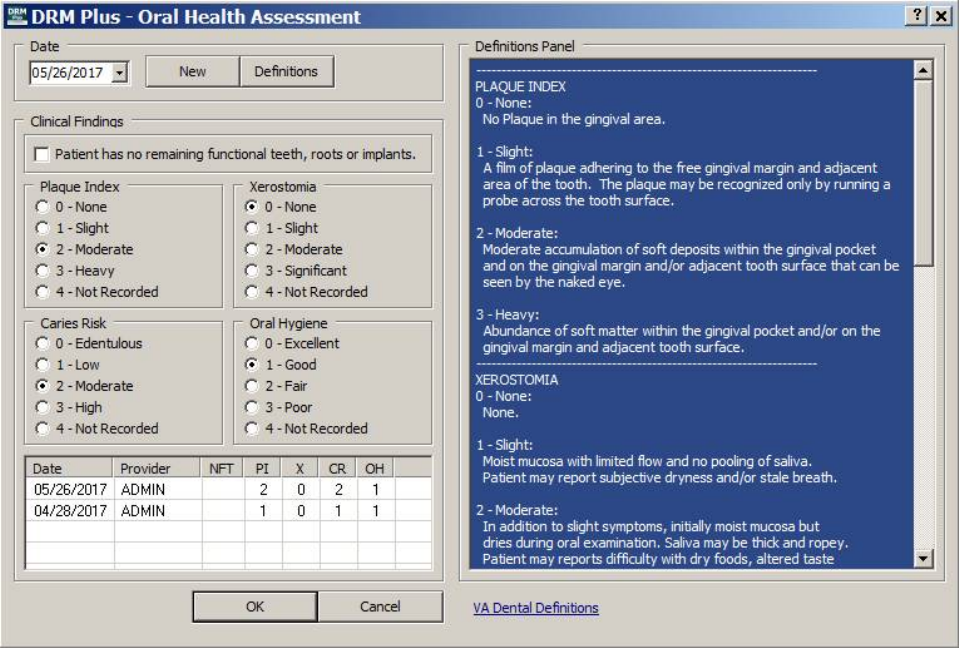
May 2018 DRM Plus Administrator Manual v6.9 202
If the second provider (ADMIN) changes/edits the filed OHA findings from the first provider (HYG) on the
same calendar day; modifies the findings in the OHA modal. The modified OHA findings filed by the
second provider will be the data viewed by the local clinical providers in the patient’s OHA screen.
Figure 257: Provider ADMIN Edited and Second Filed OHA Data Today
Note: The first provider’s OHA findings are only present in their filed TIU progress note.
Note: The OHA and H&N modals are the only screens that displays the date and the provider’s initials filed
with the findings and/or history data.
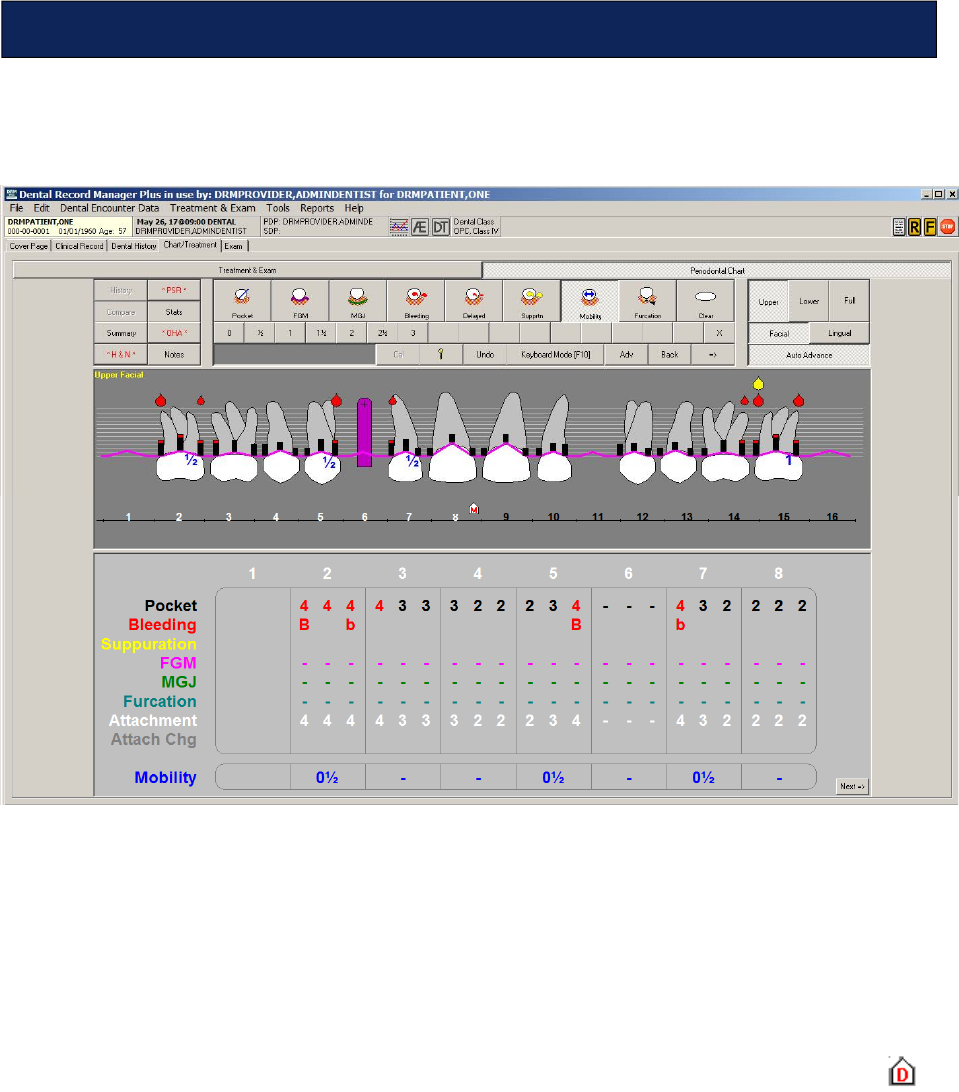
May 2018 DRM Plus Administrator Manual v6.9 203
Enter periodontal information on the patient from the Periodontal Chart screen, within the Chart/
Treatment tab.
Figure 258: Periodontal Chart Screen
The upper left side of the screen shows the History, Compare, Summary, H&N, PSR, Stats, OHA and
Notes buttons. The top center of the screen displays various periodontal condition-specific icons. Use these
to mark periodontal findings on the patient’s chart.
Use the options on the upper-right side of the screen to adjust the view of the tooth/arch graphic.
The center of the screen features the tooth/arch graphic. Clicking various areas in combination with the
condition-specific icons located in the top center of the screen enters information into the patient’s chart.
The bottom of the screen shows text (only a quadrant is viewable depending where the cursor shield is
located) of the periodontal information entered using the graphic and the condition-specific icons in the top
center of the screen.
Note: The Periodontal Chart screen allows two providers to enter perio data on the same day. However, it
only displays the last perio data that was filed on that day. The first entered perio data is only viewable in
the TIU progress note of the provider that filed the first encounter.
Chart/Treatment – Periodontal Chart
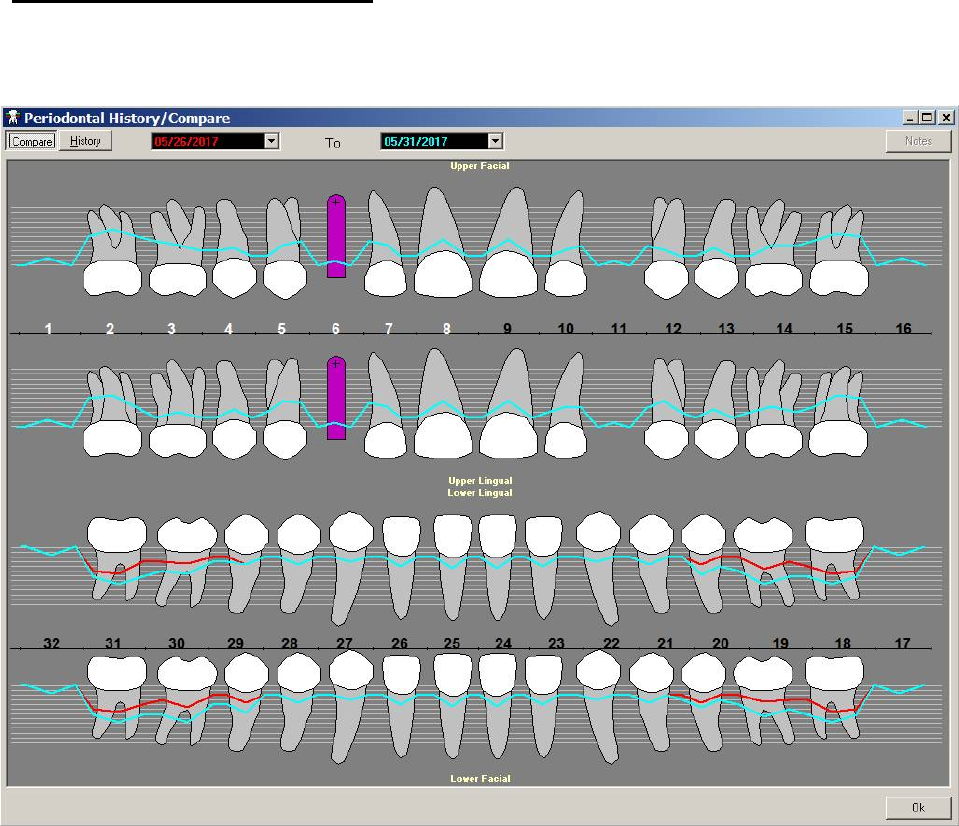
May 2018 DRM Plus Administrator Manual v6.9 204
History and Compare Buttons
Clicking the History or Compare buttons display similar perio screens. Use the Compare function to
compare two periodontal charts that have been filed previously to the patient’s chart.
Figure 259: Periodontal History/Compare Screen – Compare Viewable
The information is color-coded. The data from the earlier date is displayed in red, while the data from the
later date is displayed in blue. Use the drop-down menus to change the dates.
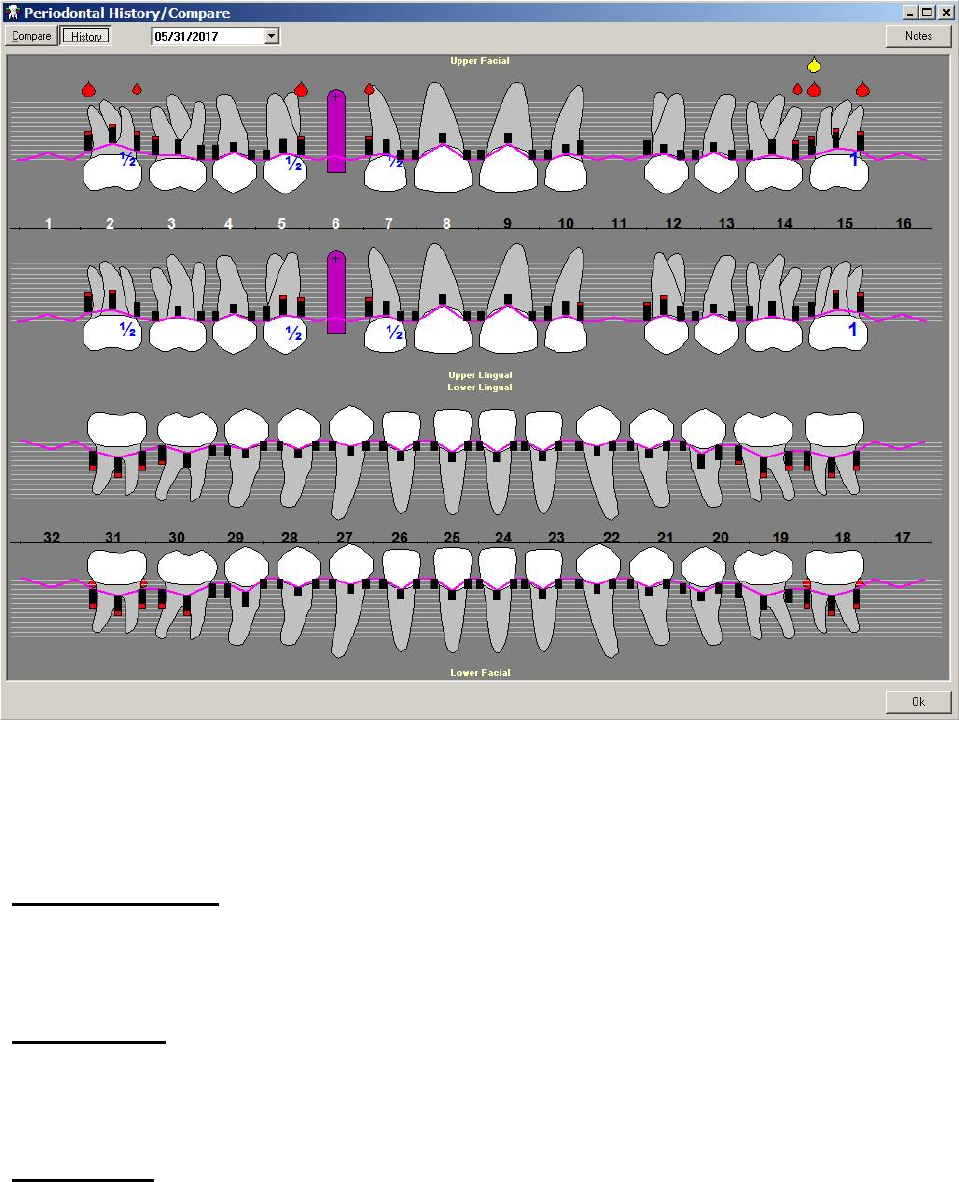
May 2018 DRM Plus Administrator Manual v6.9 205
Click the History button to view a graphic of the patient’s history.
Figure 260: Periodontal History/Compare Screen - History Viewable
Use the drop-down menu to change the date. Use the Notes button to view previously entered notes
concerning the patient’s periodontal history.
Summary Button
See the Summary Button section in the Chart/Treatment – Treatment & Exam chapter of this manual.
H&N Button
See the H&N Button section in the Chart/Treatment – Treatment & Exam chapter of this manual.
PSR Button
See the PSR Button section in the Chart/Treatment – Treatment & Exam chapter of this manual.
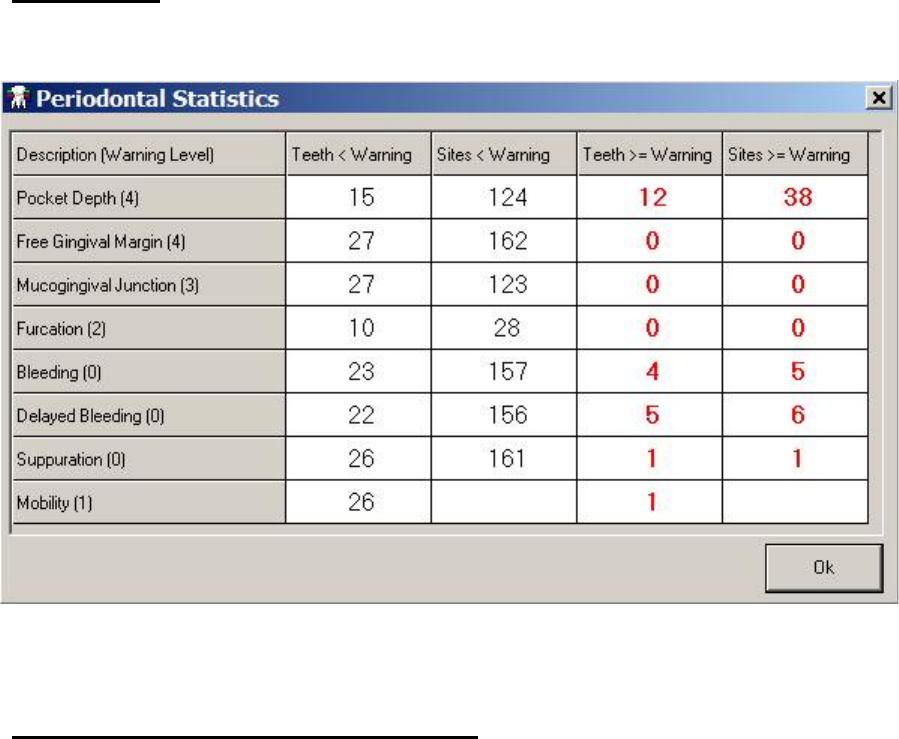
May 2018 DRM Plus Administrator Manual v6.9 206
Stats Button
Use the Stats function to view the patient’s total number of periodontal warning levels.
Figure 261: Periodontal Statistics Screen
OHA (Oral Health Assessment) Button
See the OHA Button section in the Chart/Treatment – Treatment & Exam chapter of this manual.
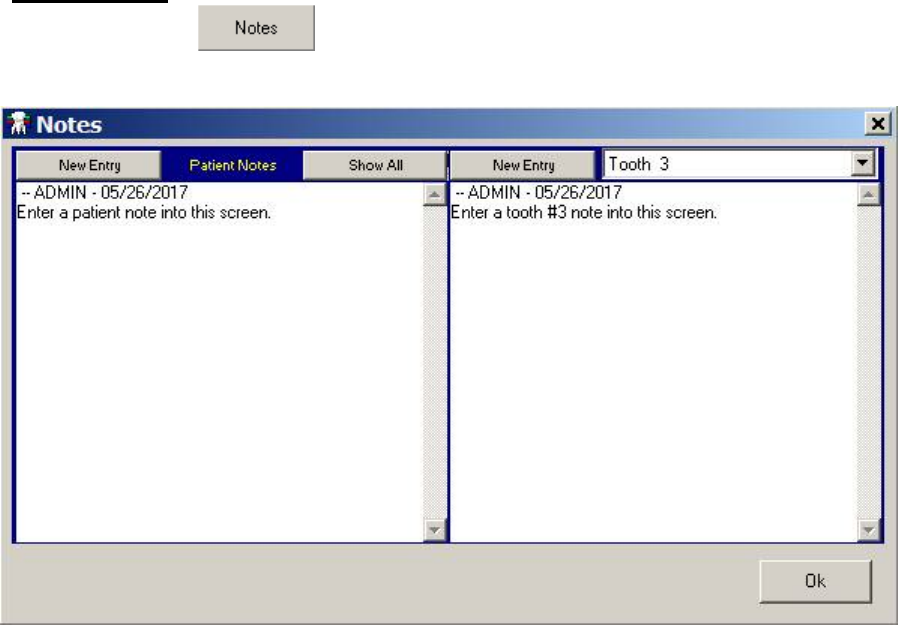
May 2018 DRM Plus Administrator Manual v6.9 207
Notes Button
Use the Notes button to enter general patient notes or tooth specific notes into the chart.
Figure 262: Notes Screen
Choose between creating a more general note on the patient by using the tools on the left side of the screen,
or a note about a specific tooth on the right side of the screen.
To create a new note, click the New Entry button.
To view all general patient notes in the patient’s chart, click the Show All button.
To make an entry about a specific tooth, use the drop-down menu on the right side of the screen to
select a tooth before making a new entry.
To view any tooth-specific note that has been entered during the past year into the patient’s chart, click the
History button. View the note by clicking the selected history’s Notes button, according to the appropriate
visit date. Note that this is the same screen that displays if the Notes icon is clicked on the Treatment &
Exam screen.
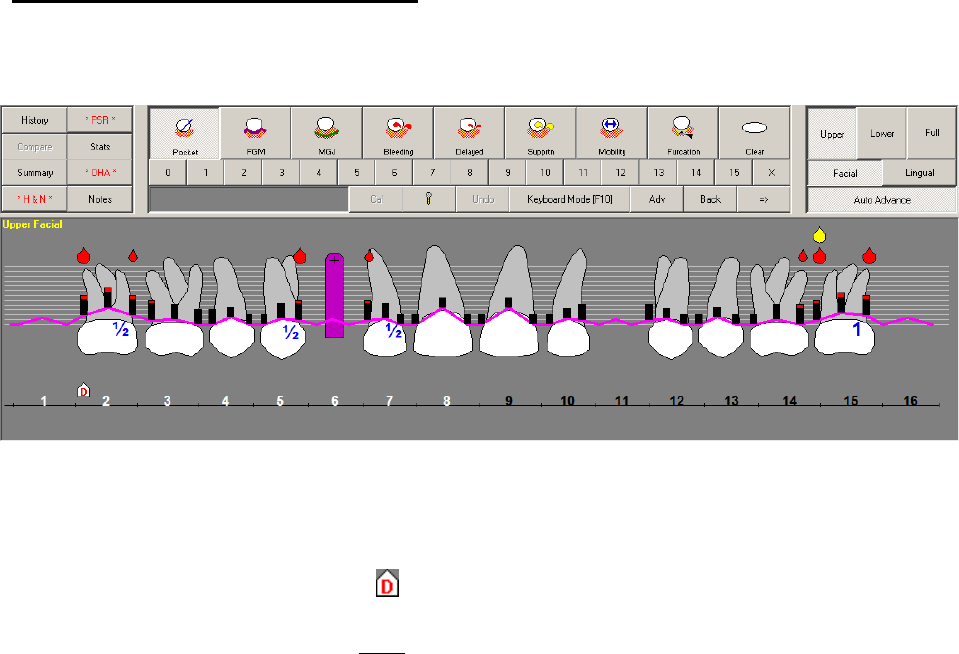
May 2018 DRM Plus Administrator Manual v6.9 208
Entering Periodontal Information
The condition-specific icons in the top center of the screen works in combination with the tooth/arch
graphic.
Figure 263: Periodontal Condition-Specific Icons and Periodontal Graphical Chart
To enter periodontal information:
1. Click the desired condition-specific icon (Pocket, FGM, Bleeding, Mobility, etc.).
2. On the graphic, the cursor shield is the graphical pocket location for perio data entry.
3. Click the desired number below the list of condition icons (if applicable). Bleeding, Delayed
Bleeding and Suppuration do NOT require any clicks on a number.
4. Use the buttons on the top right of the screen to view different areas of the tooth/arch, or to change
the view.
5. The condition and location displays on the graphic and on the transaction table below the graphic.
The transaction table only displays a quadrant of the upper/lower arch.
Note: Only one periodontal chart exam should be completed per day, per patient. When a second exam is
completed during the same day, the periodontal chart history only saves the second exam. TIU progress
notes in VistA still have all the data entered.
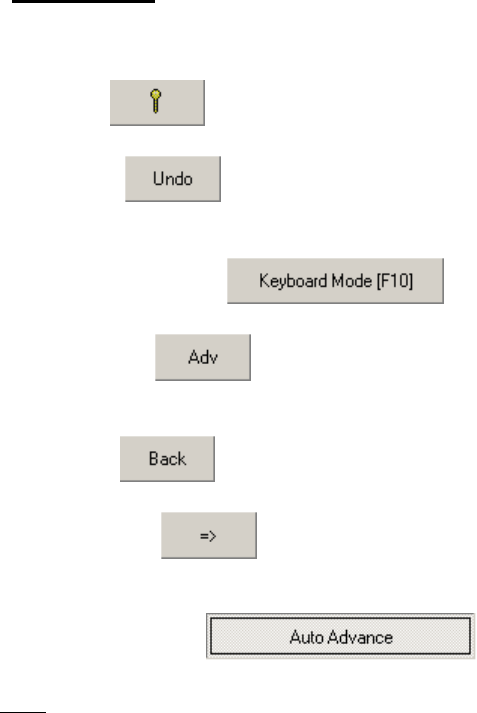
May 2018 DRM Plus Administrator Manual v6.9 209
Other Tools
The last line of buttons in the top center of the screen features several tools.
Key button displays keyboard shortcuts.
Undo button removes the last action performed on the screen. This action is limited to the last
nine actions performed.
Keyboard Mode button switches the program to keyboard mode.
Advance button moves the cursor shield on the graphic forward due to the direction of the
arrow.
Back button moves the cursor shield on the graphic back due to the direction of the arrow.
Direction button shows the direction the cursor shield moves on the graphic. The direction of
advancement depends on the orientation of this button.
Auto Advance button when the button is active, the cursor shield
automatically moves in the way designated for the perio exam entry of the condition-specific icons. It does
NOT allow Bleeding, Delayed Bleeding or Suppuration, to automatically move.
The auto exam sequence is a parameter adjustment that may be redesigned by each provider. For more
information, please see the Treatment & Exam/Show Configuration/Periodontal section of the Using the
DRM Plus Drop-Down Menus chapter of this manual.
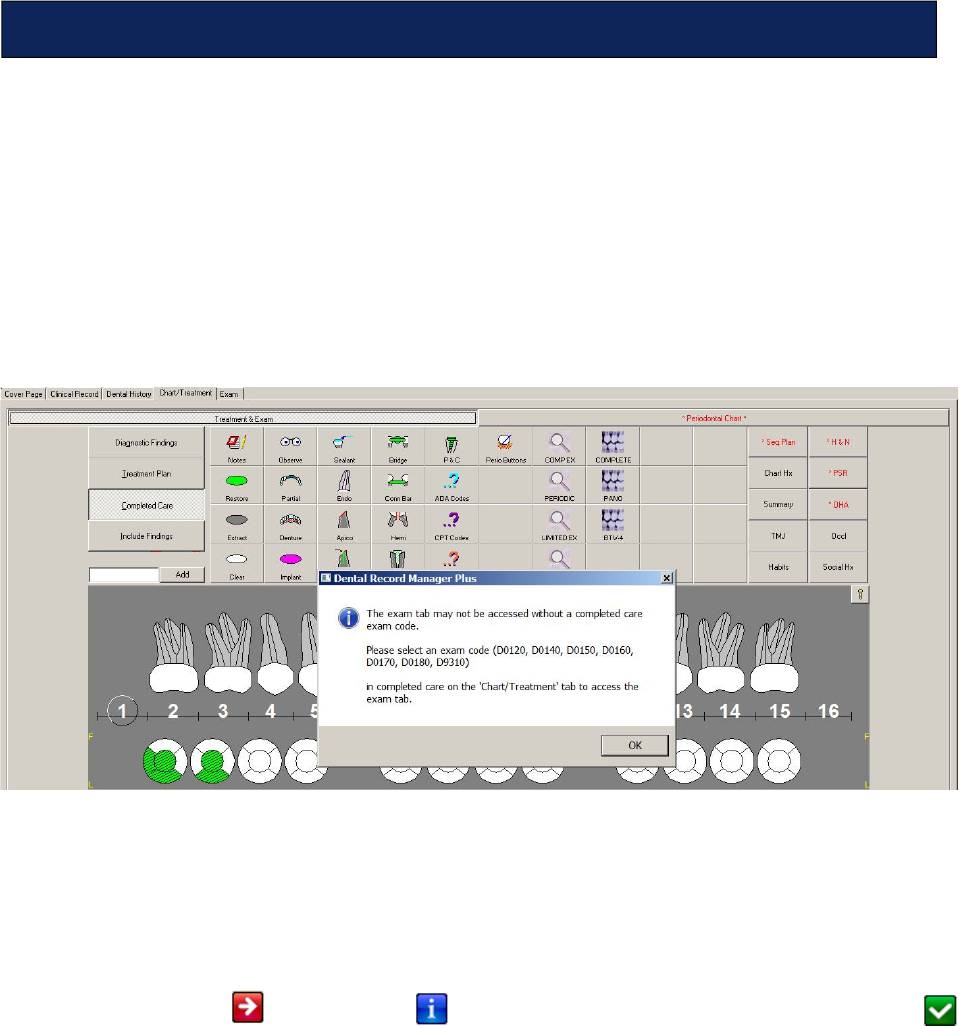
May 2018 DRM Plus Administrator Manual v6.9 210
Providers have the ability to file required data using a national standard exam style format for each exam/
consult code (D0120, D0140, D0150, D0160, D0170, D0180 and D9310) in conjunction with the Exam tab
in DRM Plus. Mandatory elements for each exam/consult code and requirements for each element are based
on the user’s exam/consult code selection. Initially, each element is marked with required or optional icon.
The Exam tab interfaces automatically with existing DRM Plus modals (i.e. Head & Neck) for easy data
entry. The Exam tab, when activated, generates a TIU progress note associated with a specific visit
containing the entire exam or consult’s required information, along with other DRM Plus note objects (i.e.
dental alerts, etc.).
To proceed to the Exam tab, the user is prompted to select one of the six exam or consult procedure codes
from the Chart/Treatment tab’s Completed Care screen.
Figure 264: Exam Tab Message
Entering the exam/consult procedure activates the Exam tab and displays the procedure in the Exam Type
drop-down menu. One way to change the exam/consult procedure after selecting it and determining it was
incorrect is to use the drop-down menu located on the Exam tab. Another way to change the exam/consult
procedure is by deleting the procedure from the Completed Care screen and entering a new one.
Selecting the exam/consult code from the Completed Care screen triggers all of the elements on the
Exam tab with a required icon or optional icon. When these elements are satisfied, a completed
icon displays. Some elements automatically pull data from the modals when entered from the Chart/
Treatment tab.
Note: Users may enter additional optional information in each element, if desired, for the selected exam/
consult code.
In the following example, the D0150, comprehensive exam, was selected from the Treatment & Exam/
Completed Care screen. Upon selecting the Exam tab, D0150 Comprehensive displays in the Exam Type
drop-down menu. Twelve of the sixteen elements require data entry by the provider when selecting the
D0150, comprehensive exam.
Exam
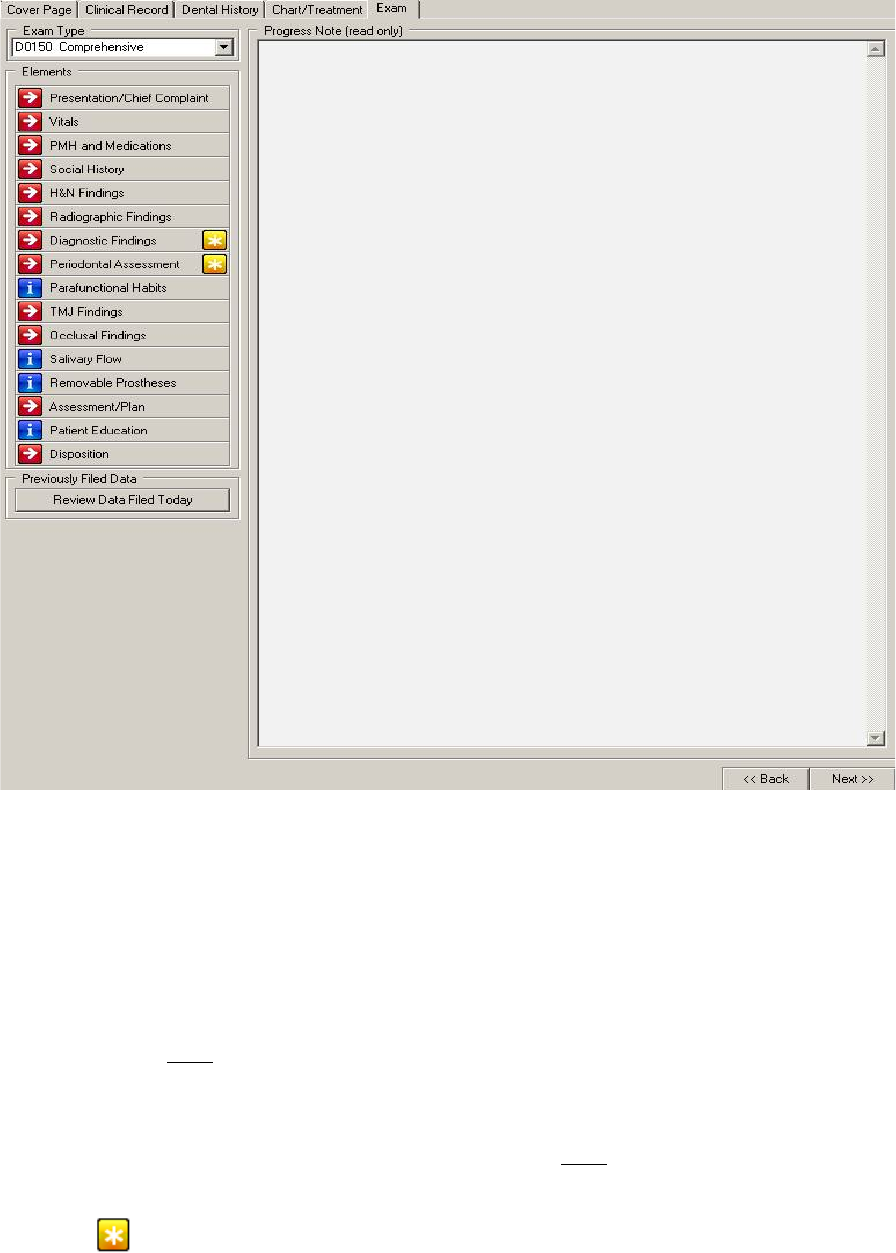
May 2018 DRM Plus Administrator Manual v6.9 211
Figure 265: Exam Tab
The seven exam/consult codes each have a different set of required and optional elements activated when
selecting a specific code. The dialogue found in each element section that follows are those that would
display if the user selected D0150, comprehensive exam, during a session.
The Back button located on the Exam tab screen returns the end-user to the Chart/Treatment tab.
The Next button located on the Exam tab allows the end-user to proceed to the Filing Options screen,
which is the next screen when completing the encounter. This Next button also opens any required element
if that element has NOT been completed.
The Back/Next buttons located on each element screen only move backward or forward to other element
screens. The buttons allow the provider to move to the next required element for this exam type depending
on the parameter the user selected. Usage of the Back button is NOT dependent on the element’s
completion.
Note: The icon on the right of the element button displays when there was previously filed data on the
same day and that data is associated with the element it is displayed on.

May 2018 DRM Plus Administrator Manual v6.9 212
Exam Elements
Presentation/Chief Complaint Element
The Presentation/Chief Complaint element is required for all seven exam/consult procedure codes and
defaults open when the Exam tab is selected. The presentation of the exam/consult code is automatically
imported and displayed at the top of the element. This element requires one of the two radio buttons to be
selected. The selection of the second radio button, Patient presents with dental complaint(s) opens two
text boxes which require a text entry only in the first text box intended for the dental complaint of the
patient. The second text box (optional text entry) allows data entry for the history of the patient’s present
illness.
Figure 266: Presentation/Chief Complaint Element Screen
The following information is the same with all sixteen elements except the Presentation/Chief Complaint
does NOT have a Back button, and Disposition does NOT have a Next button.
Additional Annotations is a free text window, which allows the provider to enter additional information
about the patient’s chief complaint. It offers right-click functionality for importing .txt files, if desired.
Annotations is view-only, and captures everything entered into this element. Select the OK button to save
all required information entered and close the element, or click the Next button to move to the next required
element, depending on the selected parameter.

May 2018 DRM Plus Administrator Manual v6.9 213
Vitals Elements
The Vitals element is required for all seven exam/consult procedures. This element requires one of the two
radio buttons to be selected. The second radio button, Vital signs obtained, defaults to vitals that have been
entered, using the Enter Vitals screen, during 24 hours of the visit date. The Visit/Date for this encounter
also must be entered in the banner for this feature to work. Entering the Visit/Date should be the first action
taken when opening any patient’s chart for a new encounter.
Figure 267: Vitals Element Screen
If no vitals have been entered using the Enter Vitals screen, the information can be entered manually;
however, no date is attached to these entries. Dental Pain is the only required vital sign.
To enter vitals, first select the scheduled appointment or visit and then select the Vitals button located
on the DRM Plus banner. The user can also click the Enter Vitals button in the lower left portion of the
Vitals element screen.
Specific vitals information can be entered into the Additional Annotations free text window. Right-click
this window to import text files, if desired. All information entered into the Vitals element appear in the
read-only Annotations window. Once the element is complete, click the Next button to move to the next
element, or the OK button to close the element. The Back button moves to the previous required element,
depending on the selected parameter, and is NOT dependent on the element’s completion.
Note: The only vital sign, Dental Pain, may be saved as unfiled data for this element.

May 2018 DRM Plus Administrator Manual v6.9 214
PMH (Past Medical History) and Medications Element
The PMH element is required for all seven exam/consult procedures. This element requires one of the three
radio buttons to be selected. The selection of the first radio button opens an optional text box to enter
additional information if the patient is new to the clinic. The selection of the third radio button opens a
required text box to enter any significant changes noted since the last dental visit.
The eight positive/negative check box conditions, one free text positive condition or the five Imports check
boxes are optional entries of patient information for this element. The user may select one import such as the
patient’s medications or use the Select ALL Imports button to import all four previously filed medical
histories about the patient which are being stored in a VistA database.
Figure 268: PMH and Medications Element Screen
Additional Annotations is a free text window, which allows the provider to enter additional information
about the patient’s past medical history. It offers right-click functionality of import text files, if desired.
Annotations is view-only, and captures everything entered into this element.
Once the element is complete, click the Next button to move to the next element, or the OK button to close
the element. The Back button moves to the previous required element, depending on the selected parameter,
and is NOT dependent on the element’s completion.
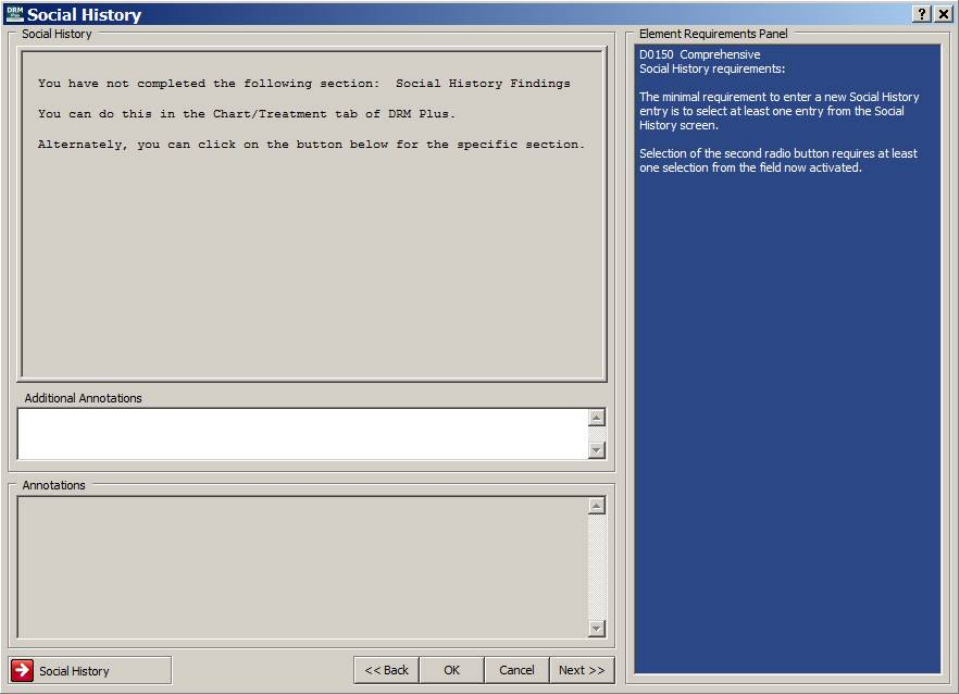
May 2018 DRM Plus Administrator Manual v6.9 215
Social History Element
The Social History element is required for the D0150 and D0180 exams. This element requires new social
history findings entered with the Social History screen when completing one of the two required exams.
The Social History screen may be opened with the specialty button located on the Chart/Treatment tab, or
by the Social History button located in the lower left corner of this screen. The minimum requirement to
enter a new social history entry is to select at least one historical finding from the Social History screen.
Figure 269: Social History Element Screen
Additional information regarding the patient can be entered into the Additional Annotations window.
Right-click in this window to import text files, if desired. All information added to this element displays in
the read-only Annotations window. Once this element is complete, click the Next button to move on to the
next element.
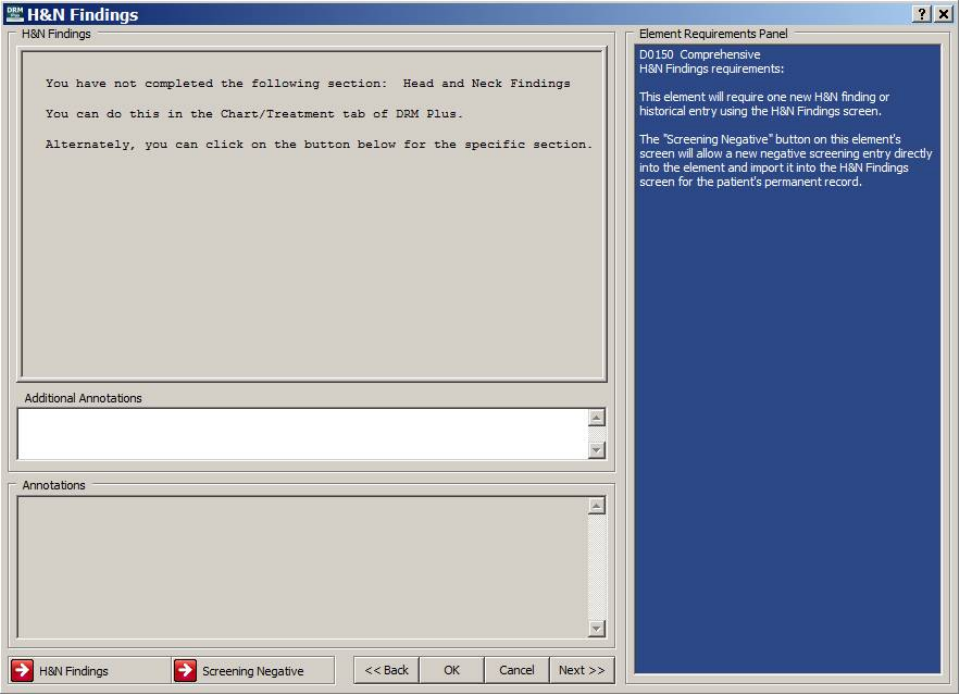
May 2018 DRM Plus Administrator Manual v6.9 216
H&N (Head and Neck) Findings Element
The H&N Findings element is required for the D0120, D0150 and D0180 exams. This element requires a
new H&N finding or historical entry using the H&N Findings screen. This element imports data entered
from the H&N Findings screen. The Screening Negative button on this element’s screen allows a new
screening negative entry directly into the element and import it into the H&N Findings screen for the
patient’s permanent record.
Figure 270: H&N Findings Element Screen
The H&N Findings screen can be accessed by either clicking the specialty button from the Chart/
Treatment tab, or clicking the H&N Findings button in the left bottom corner of this element. Once the
H&N findings are added to this element, additional information regarding the patient can be entered in the
Additional Annotations free text window. Right-click this window to import text files, if desired. All
information entered into this element displays in the read-only Annotations window. Once the element is
complete, click the Next button to move on to the next element.
May 2018 DRM Plus Administrator Manual v6.9 217
Radiographic Findings Element
The Radiographic Findings element is required for the D0150 and D0180 exams. The radiographic
element requires at least one selected check box from the top six options. The provider may select any
combination of the top six check boxes for the patient’s TIU progress note. The fourth check box down the
left column requires some data entry in the text box or at least one per-defined statement to satisfy the
requirements.
The Exams Settings tab located using the Tools menu User Options submenu Exam Settings tab
Configure Radiographs Requirement parameter that allows each user to require a radiographic finding for
all exam/consult codes with mandatory entries in the Exam tab.
Figure 271: Radiographic Findings Element Screen
Up to twelve pre-defined statements on radiographic findings can be selected from this screen. The check
boxes found in the pre-defined statements window have three national radiographic findings statements pre-
loaded; however, all twelve statements can be created locally.
The DRM Administrator has priority over all other users and may add or delete all twelve, if desired.
Additional information regarding the patient can be added in the Additional Annotations free text window.
The user can right-click to import a text file, if desired. All information entered into this element displays in
the Annotations read-only window. Once the element is complete, click the Next button to move on to the
next element.
May 2018 DRM Plus Administrator Manual v6.9 218
Diagnostic Findings Element
The Diagnostic Findings element is required for all seven exam/consult procedures. All exam/consult codes
are required as appropriate for new and updated findings. The second check box only displays after data is
entered from at least one Chart/Treatment findings screen that satisfies this option. Informational screens
advise the user of any missing requirements for a specific exam code.
The NFT, no functional teeth, check box when selected in the OHA screen, bypasses all requirements in
this element for all exam/consult procedures. The OHA screen may be opened from the Chart/Treatment
tab or by selecting the OHA button in the lower left area of this screen.
D0120: Requires a Plaque Index entry from the OHA screen. Also requires the selection of a
Mobility radio button, as it pertains to the patient.
D0150: Requires at least one entry from the Diagnostic Findings screen or the first check box of
no apparent pathology selected. Requires a Plaque Index entry from the OHA screen. Also
requires the selection of a Mobility radio button, as it pertains to the patient.
D0180: Requires an Oral Hygiene entry from the OHA screen.
Figure 272: Diagnostic Findings Element Screen
The user can enter any additional information regarding the patient into the Additional Annotations free
text window. Right-click this window to import a text file, if desired. All information entered into this
element displays in the read-only Annotations window. Once the element is complete, click the Next button
to move on to the next element.
May 2018 DRM Plus Administrator Manual v6.9 219
Periodontal Assessment Element
The Periodontal Assessment element is required for the D0120, D0150 and D0180 exams. The D0120 and
D0150 exams required at least one selection from the Periodontal General Assessment section. The
Detailed Assessment button allows the user to enter additional perio data; however, this is optional for the
D0120 and D0150 exam codes.
The Include Last Perio Chart check box defaults as unchecked if the provider wants to import the last filed
periodontal chart into this element. The Include Last Perio Chart check box, when selected, satisfies the
requirements for this Periodontal Assessment element for the D0140, D0160, D0170, and D9310
procedures. When any new perio data has been added to the perio chart during this session, that data imports
into this element and satisfies the same four exam/consult procedures as stated previously.
The NFT, no functional teeth, check box when selected in the OHA screen, bypasses all requirements for
the D0120, D0150 or D0180 exams in the periodontal element. The user may access the Periodontal Chart
screen, OHA screen or PSR screen using the buttons found on this Periodontal Assessment element
screen.
Figure 273: Periodontal Assessment Element Screen
The D0180 exam requires one selection from the Periodontal General Assessment section as well. The
Periodontal Detailed Assessment section is optional and has optional text boxes with each selection if
more descriptive detail is needed.
May 2018 DRM Plus Administrator Manual v6.9 220
The D0180 exam also requires the first four rows in the Additional Periodontal Detail section to have at
least one selection. The Additional Periodontal Comments text box is optional in this section. When the
Other check box is selected from the Past Periodontal Tx History options, data entry is required in the
Additional Periodontal Comments text box.
Figure 274: Periodontal Detailed Assessment Button Selected
Note: The D0180 exam code does NOT allow the user to select the Brief Assessment button from this
screen.
Additional information regarding the patient may be entered into the Additional Annotations free text
window. The user may right-click in this window to import a text file, if desired. All information entered
into this element appears in the read-only Annotations window. Once this element is complete, click the
Next button to move on to the next element.
The provider may open the OHA screen or the PSR screen using the buttons in the lower left area of this
screen or the Chart/Treatment tab to enter an OHA finding or a PSR exam. The Periodontal Chart button
on the middle right side of this screen allows access to that chart to enter any new findings for this session.
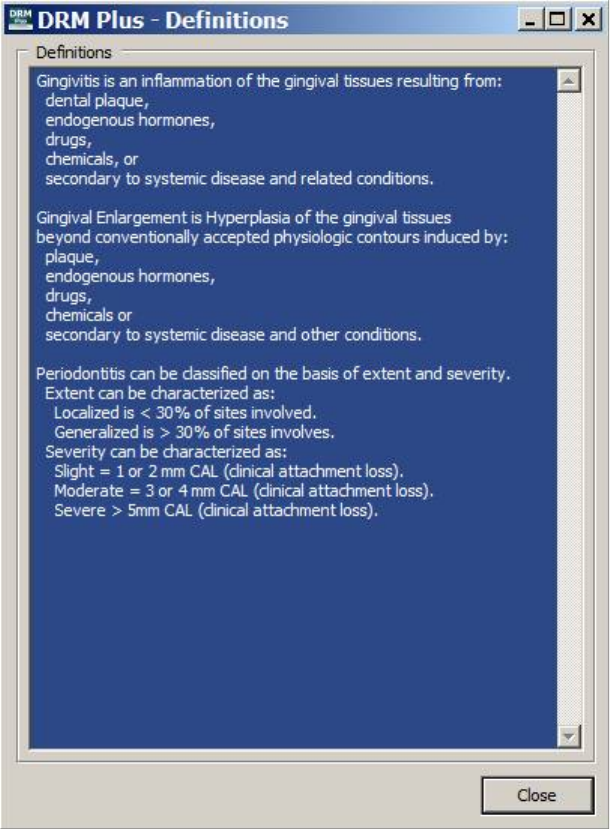
May 2018 DRM Plus Administrator Manual v6.9 221
The following dialog displays the VA Office of Dentistry perio definitions when selecting the Definitions
button.
Figure 275: VA Dentistry Periodontal Definitions
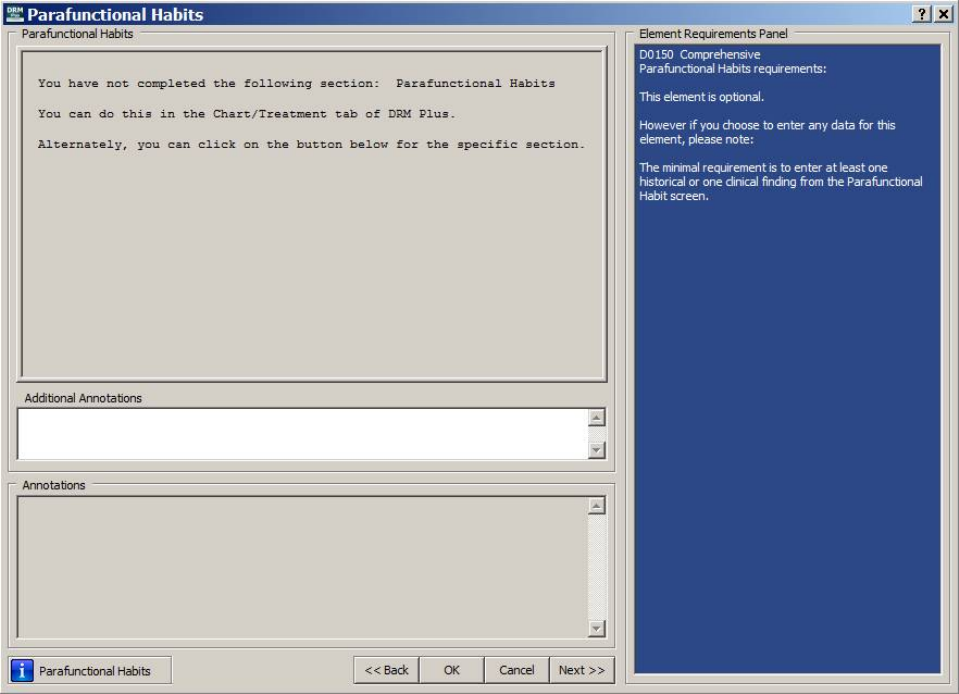
May 2018 DRM Plus Administrator Manual v6.9 222
Parafunctional Habits Element
This element is optional for all seven exam/consult types. It imports all data entered in this session from the
Parafunctional Habits screen, or simply is left blank. The Parafunctional Habits screen can be opened by
clicking the Habits (Parafunctional) button from the Chart/Treatment tab, or by clicking the
Parafunctional Habits button in the bottom left portion of this element.
The minimum requirement to enter a new parafunctional habit finding is to select at least one history or one
clinical finding from the Parafunctional Habits screen.
Figure 276: Parafunctional Habits Element Screen
Additional information regarding the patient may be entered into the Additional Annotations free text
window. The user can right-click in this window to import a text file, if desired. All information entered into
this element displays in the read-only Annotations window. Once this element is complete, click the Next
button to move on to the next element.
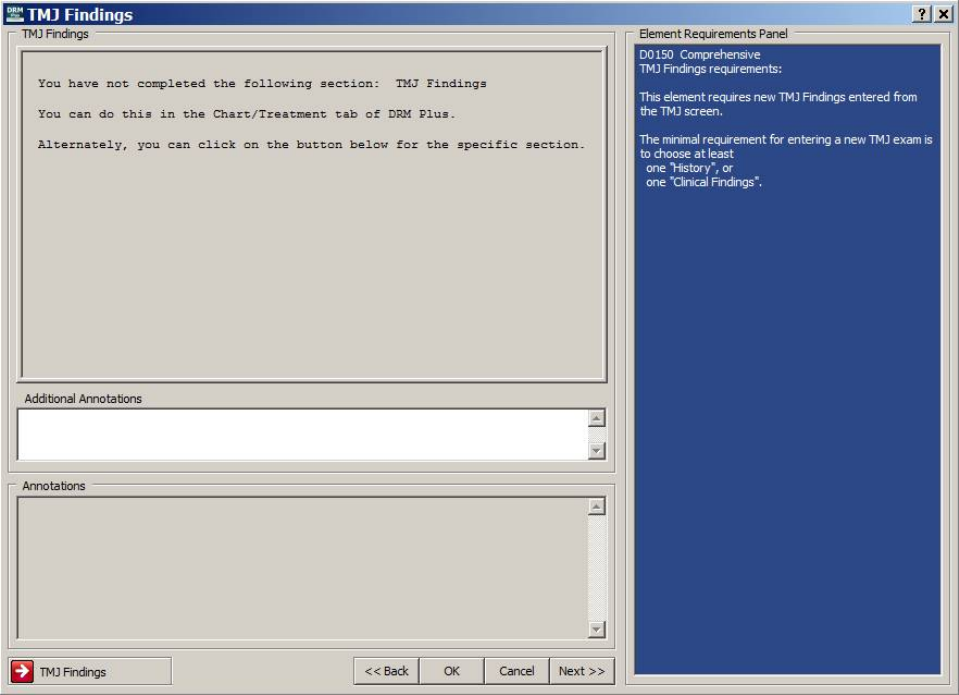
May 2018 DRM Plus Administrator Manual v6.9 223
TMJ Findings Element
This element is required for the D0120, D0150 and D0180 exams. It requires new TMJ findings entered
from the TMJ screen, which can be opened either by clicking the TMJ button from the Chart/ Treatment
tab, or the TMJ Findings button located in the bottom left portion of this element.
The minimum requirement to enter a new TMJ exam finding is to select at least one historical or clinical
finding from the TMJ screen. Additional information regarding the patient can be entered into the
Additional Annotations free text window. The user can right-click in this window to import a text file, if
desired.
Figure 277: TMJ Findings Element Screen
All information entered in this element appears in the read-only Annotations window. Once the element is
complete, click the Next button to move on to the next element.
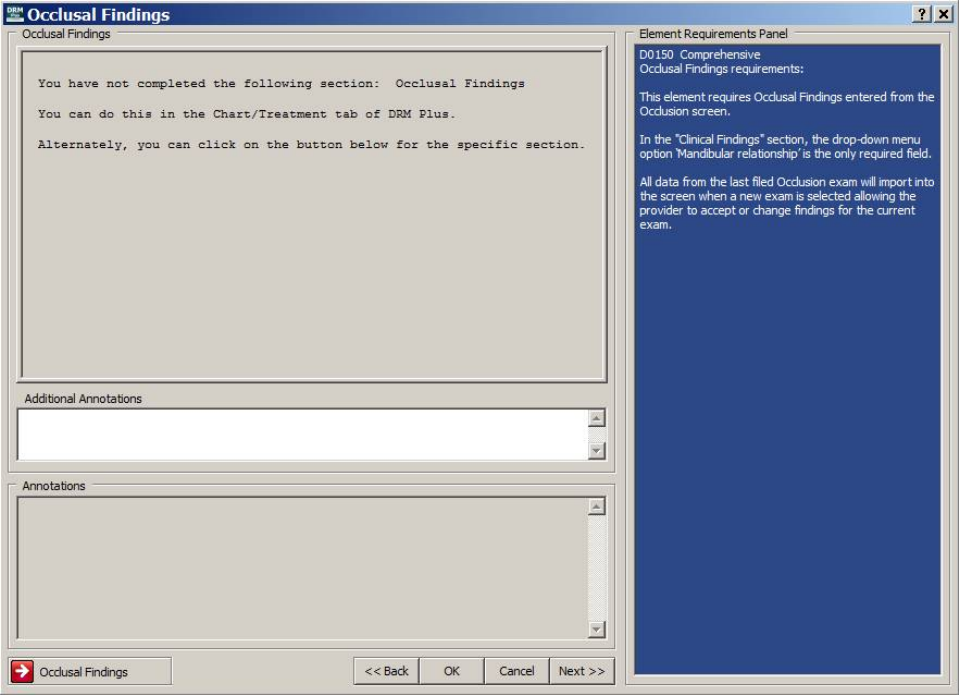
May 2018 DRM Plus Administrator Manual v6.9 224
Occlusal Findings Element
The Occlusal Findings element is required for every D0150 and D0180 exams. Occlusal findings must be
entered into, and imported from the Occlusion screen when completing one of these exams. The Occlusion
screen can either be opened by clicking the Occl (Occlusion) button from the Chart/Treatment tab, or by
clicking the Occlusal Findings button in the bottom left corner of this screen.
From the Clinical Findings section, the Mandibular relationship* is the only required field. All data from
the last filed occlusion exam imports into the screen with a new exam, which requires the provider to
remove and/or add correct data for the new exam.
Figure 278: Occlusal Findings Element Screen
Enter additional information regarding the patient in the Additional Annotations free-text window, which
offers right-click functionality to import text files, if desired. All information entered into this element
displays in the read-only Annotations window. When the element is complete, click the Next button to
move on to the next element.
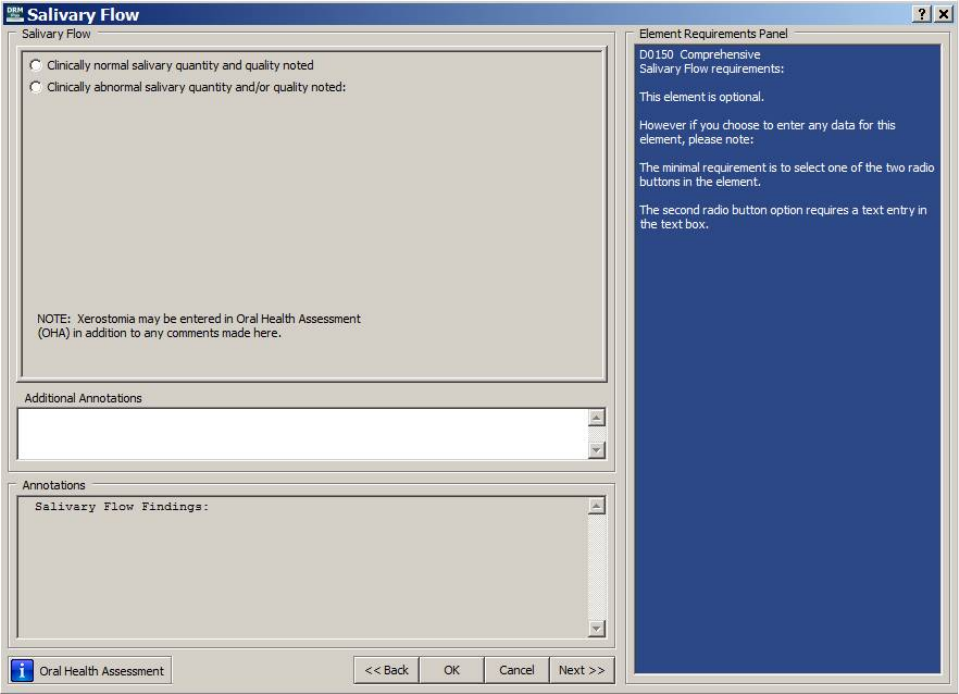
May 2018 DRM Plus Administrator Manual v6.9 225
Salivary Flow Element
The Salivary Flow element is optional for all seven exam/consult procedures. This element requires one of
the two radio buttons to be selected when entering data. The second radio button; Clinically abnormal
salivary quantity and/or quality noted, requires a statement to be entered in the text box.
The Xerostomia value and description imports for viewing on this Salivary Flow element screen if entered
from the OHA screen during this session.
Figure 279: Salivary Flow Element Screen
The user can enter additional information regarding the patient into the Additional Annotations free text
window. This window offers right-click functionality to import text files, if desired. All information entered
into the element displays in the read-only Annotations window. Once the element is complete, click the
Next button to move on to the next element.
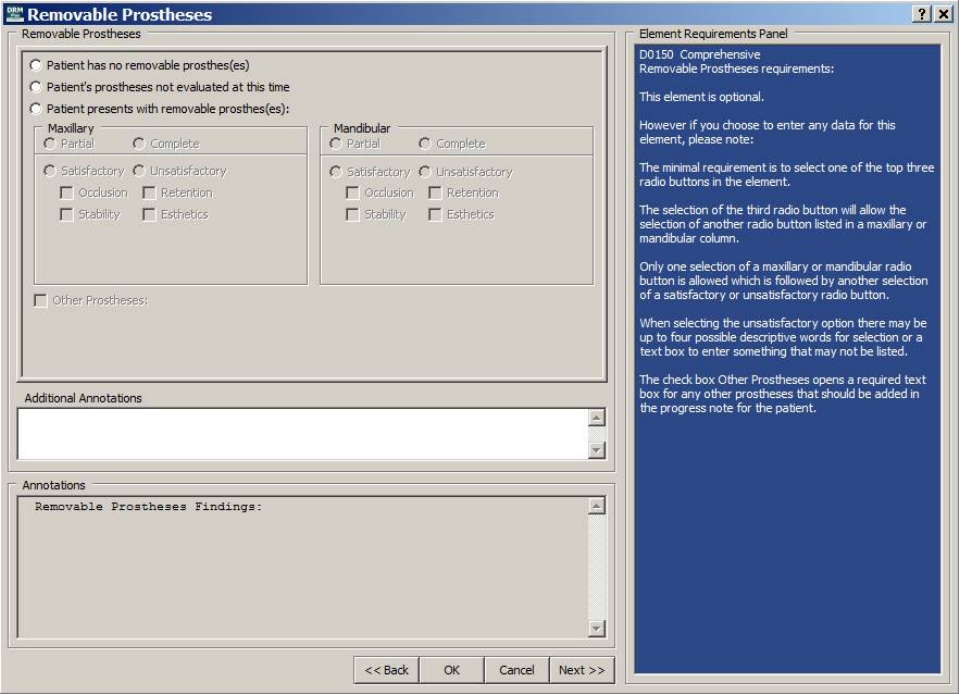
May 2018 DRM Plus Administrator Manual v6.9 226
Removable Prostheses Element
The Removable Prostheses element is optional for all seven exam/consult types. This element requires one
of the top three radio buttons to be selected when entering data. If the user selects the third radio button,
Patient presents with removable prosthes(es), the user must then select one of either the Maxillary or
Mandibular radio buttons: Partial or Complete. Only one is required and, once selected, it pens two more
radio buttons: Satisfactory or Unsatisfactory.
If the user selects Unsatisfactory, four check boxes (Occlusion, Retention, Stability and Esthetics) and a
text box become active. The user needs to check any box pertaining to the patient, and note any additional
prostheses in the text box.
The Other Prostheses check box opens a required text box for any other prostheses that should be added to
the TIU progress note for the patient.
Figure 280: Removable Prostheses Element Screen
The user may enter any additional information regarding the patient into the Additional Annotations text
window. This window offers right-click functionality to import text files, if desired. All information entered
into the element displays in the read-only Annotations window. Once the element is complete, click the
Next button to move on to the next element.
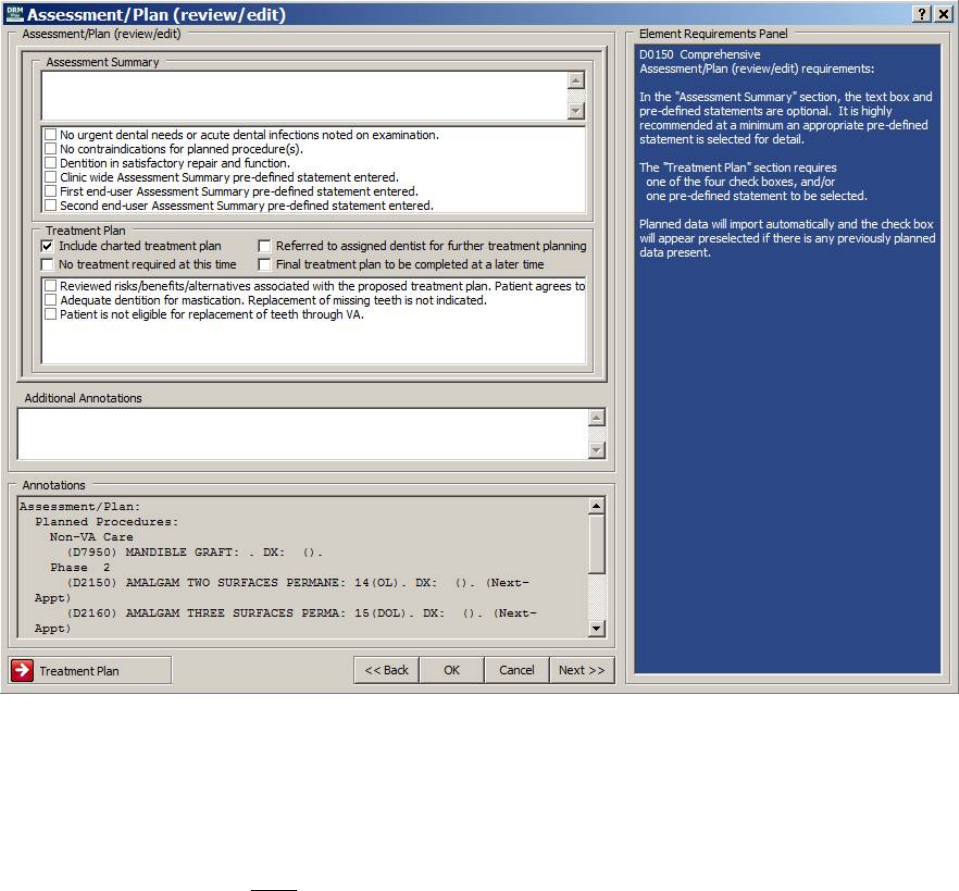
May 2018 DRM Plus Administrator Manual v6.9 227
Assessment/Plan Element
The Assessment/Plan element, comprised of an assessment and planned section, is required for all seven
exam/consult procedures. The top assessment section is optional for the completion of this element.
The Treatment Plan section requires one of the four check boxes or only one pre-defined statement to be
selected to complete the element. The first check box, Include charted treatment plan, loads automatically
and imports the patient’s newly entered and/or past planned treatment.
Up to twelve pre-defined statements for the Assessment Summary and twelve Treatment Plan statements
can be selected from this screen. The check boxes found in the pre-defined statement windows have three
national assessment and three national planned statements pre-loaded; however, all twelve statements from
either can be created locally. The DRM Administrator has priority over all other users and may add or delete
all twelve, if desired.
Figure 281: Assessment/Plan Element Screen
The user may enter additional information regarding the patient into the Additional Annotations free text
window. This window offers right-click functionality to import text files, if desired. All information entered
into this element appears in the read-only Annotations window. Once the element is complete, click the
Next button to move on to the next element.
Usage of the Back button is NOT dependent on the element’s completion.
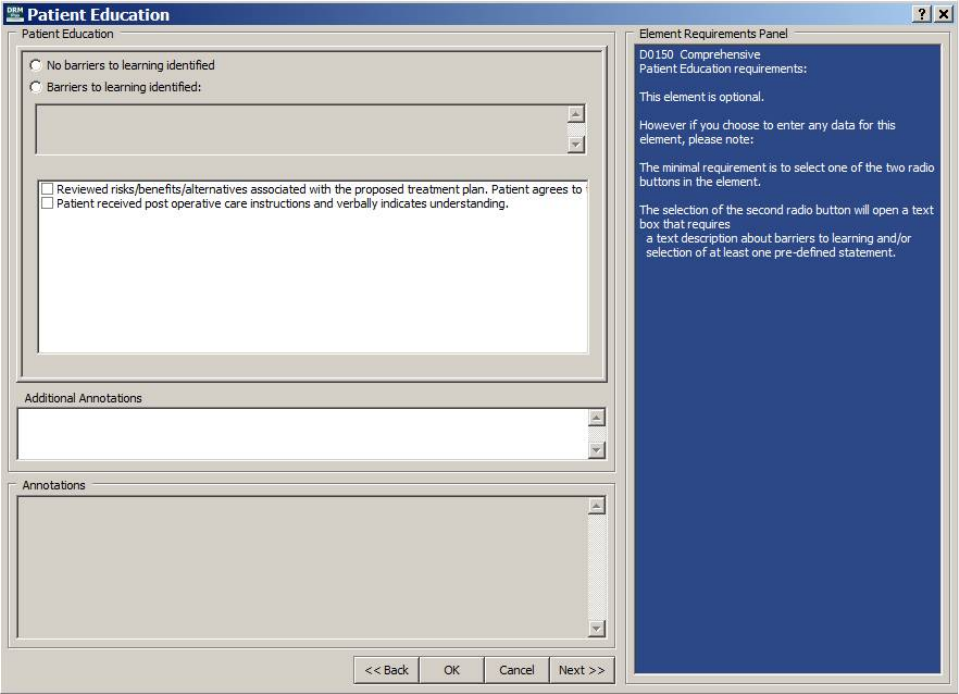
May 2018 DRM Plus Administrator Manual v6.9 228
Note: The Assessment/Plan element imports incomplete when it is saved as unfiled data and reloaded. The
provider is required to review/edit this element again at this time.
Patient Education Element
The Patient Education element is optional for all seven exam/consult procedures. This element requires
one of the two radio buttons to be selected when entering data. The selection of the second radio button
opens a text box that requires specific information regarding the patient or one pre-defined statement may be
selected.
Up to twelve pre-defined statements on patient education can be selected from this screen. The check boxes
found in the pre-defined statements window have two national patient education statements pre-loaded;
however, all twelve statements can be created locally. The DRM Administrator has priority over all other
users and may add or delete all twelve, if desired.
Figure 282: Patient Education Element Screen
The user may enter additional information regarding the patient into the Additional Annotations free text
window. This window offers right-click functionality to import text files, if desired. All information entered
into this element displays in the read-only Annotations window. Once the element is complete, click the
Next button to move on to the next element.
May 2018 DRM Plus Administrator Manual v6.9 229
Disposition Element
The Disposition element is required for all seven exam/consult procedures. This element requires one of the
two radio buttons to be selected when entering data. The selection of the second radio button, Next visit,
requires at least one of the following; one selection of the eight date ranges, a text description about the next
visit typed in the text box, or one selection from the pre-defined statements.
The Next Appointment check boxes, if selected in the Tx Planning/Sequencing screen, import
automatically into the Annotations view window of this element.
Up to twelve pre-defined statements on disposition can be selected from this screen. The check boxes found
in the pre-defined statements window have four national disposition statements pre-loaded; however, all
twelve statements can be created locally. The DRM Administrator has priority over all other users and may
add or delete all twelve, if desired.
Figure 283: Disposition Element Screen
The user may enter additional information regarding the patient into the Additional Annotations free text
window. This window offers right-click functionality to import text files, if desired. All information entered
into this element displays in the read-only Annotations window. Once the element is complete, click the
Next button to move on to the next element.
Usage of the Back button is NOT dependent on the element’s completion.
May 2018 DRM Plus Administrator Manual v6.9 230
Import Previously Filed Data Screen
When any provider has filed patient dental data previously that day in any of the following screens: Social
History, OHA, TMJ, Parafunctional Habits, Occlusion, Diagnostic Findings, Head and Neck
Findings, PSR or Periodontal Chart; then that data may be imported by a second provider entering an
exam encounter that same day. The second provider, after selecting an exam code and then selecting the
Exam tab, has the following Import Previously Filed Data screen display. This screen allows the provider
an option to import the data into his exam template to satisfy some possible requirement from the exam code
that they may have selected.
Selecting the check boxes of any or all previously filed data that day imports that data into their present
exam template session. There is a Check ALL the above check box at the bottom of the screen which
allows all that day’s filed data to be imported into this new TIU progress note. After selecting the desired
check boxes, the provider click the Import button to incorporate this data into the current exam template. If
none of the data should be imported into the current exam template, then select the Cancel button.
Figure 284: Import Previously Filed Data Screen
The icon on the right of the element button displays when there was previously filed data the same day
and that data is associated with the element. The Diagnostic Findings element informs the provider, by
displaying the icon, there is one or any combination of diagnostic findings and periodontal charting
filed earlier the same day by another provider.
May 2018 DRM Plus Administrator Manual v6.9 231
Below the element icons located on the left side of the Exam tab, there is a Review Data Filed Today
button. This button only displays when data was filed to the VistA database earlier that day by all providers
working with this patient. This button allows the provider to open the Import Previously Filed Data screen
to make edits or corrections by the present provider on what was filed previously that day.
Note: The yellow asterisk icon will always display when vitals have been entered for this patient during a
24 hours range from the Visit date and taken anywhere in the hospital for this patient.
May 2018 DRM Plus Administrator Manual v6.9 232
Click the Next button, located in the bottom right corner of both the Treatment & Exam and Periodontal
Chart screens, to begin completing the encounter for the patient’s chart. If there was no provider/visit/date
in the banner, imported or selected, when the patient’s chart was opened and NOT one completed
transaction selected; then clicking the Next button brings up the Provider and Location for Current
Activity screen to select/enter a visit. After selecting one procedure code the File Data Option screen
displays, which is explained later in this chapter. In addition, if the system finds possible duplicate
procedure codes in the planned and completed transactions, the Potential Duplicate Transaction screen
displays.
To complete the patient encounter with completed transactions:
1. Click the Next button on the bottom right corner of either the Treatment & Exam or Periodontal
Chart screens.
2. The Filing Options screen displays.
Figure 285: Filing Options Screen
3. Select the correct Filing Option. The information displayed in the Visit Date/Time and the
Disposition defaults can be changed. The Encounter Dental Class defaults if saved on the cover
page. Select the Suggested Recare Date if applicable to the patient.
4. Select the Primary PCE Diagnosis for the encounter, unless there is only one no matter how many
transactions there are which defaults checked.
5. Provider may select the diagnosis to be sent to the patient’s problem list.
Completing the Encounter
May 2018 DRM Plus Administrator Manual v6.9 233
6. Enter the locally required information for service connection.
7. Enter the optional information of Additional Providers or Additional Signers on this screen.
Please see the Additional Providers/Additional Signers section, found later in this chapter, for
more information.
8. Select the appropriate facility (station) by clicking the appropriate radio button.
9. Click the Next button.
10. The Dental Class Discrepancy screen may display, if the encounter dental class and cover page
dental class do NOT match. This does NOT stop the user from completing the encounter.
11. The Set Progress Note Title screen displays. Note that this screen does NOT display if the File
Data with a Note Addendum or File Data Without a Note options were selected from the filing
options.
Figure 286: Set Progress Note Title Screen
12. Search for the title using the Progress Note Title search box, or use the scroll bar to select the
desired title from the list. Default TIU progress note titles at the top of the list are set in the CPRS
Tools menu Options submenu Notes tab Document Titles button.
13. Click the OK button.
14. The progress note screen displays.
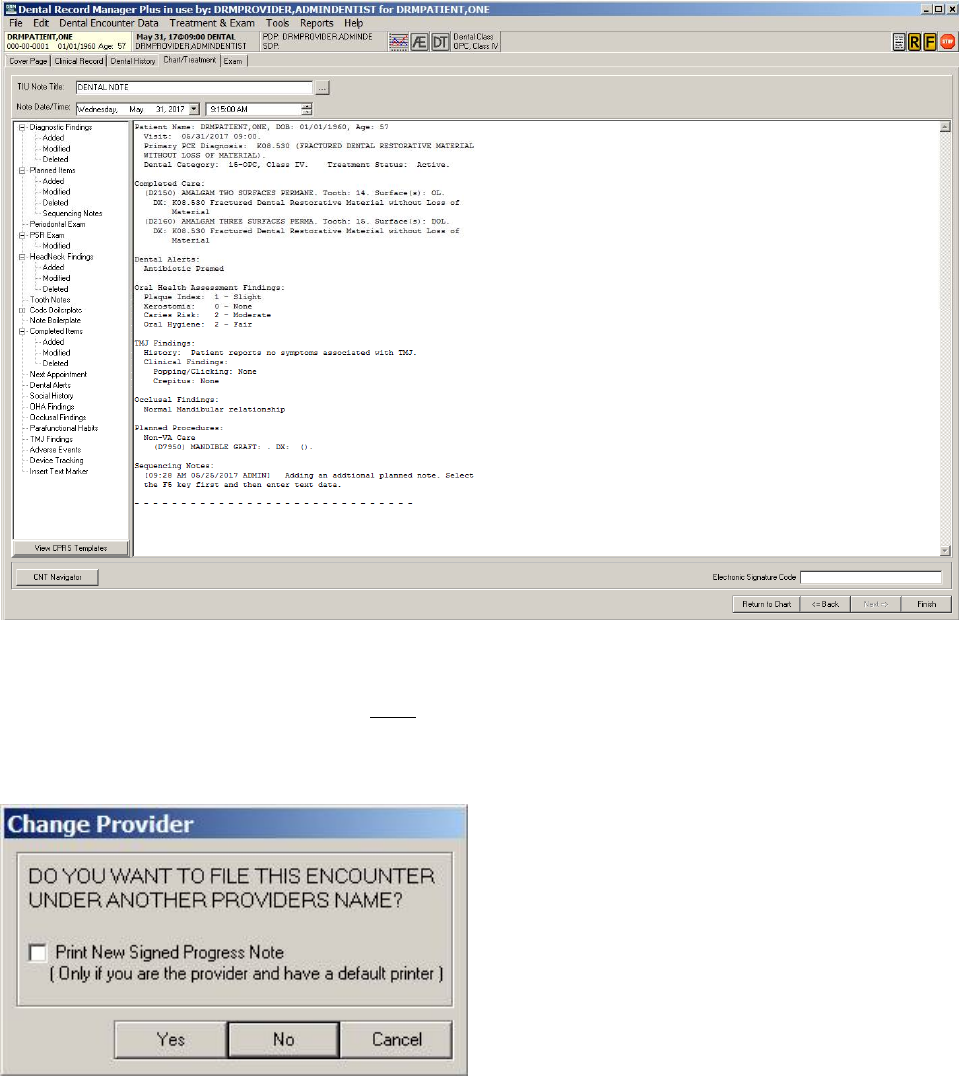
May 2018 DRM Plus Administrator Manual v6.9 234
Figure 287: Progress Note Screen
15. Ensure the information on the screen is correct. Enter the electronic signature and click the Finish
button. An electronic signature is NOT required to file the note as unsigned. Please see the
Electronic Signature section, found later in this chapter, for more information.
16. The Change Provider screen displays.
Figure 288: Change Provider Screen
17. Click the Yes button to change the provider. The Search for Provider screen displays. If No is
selected, a screen displays. Please see step 19.
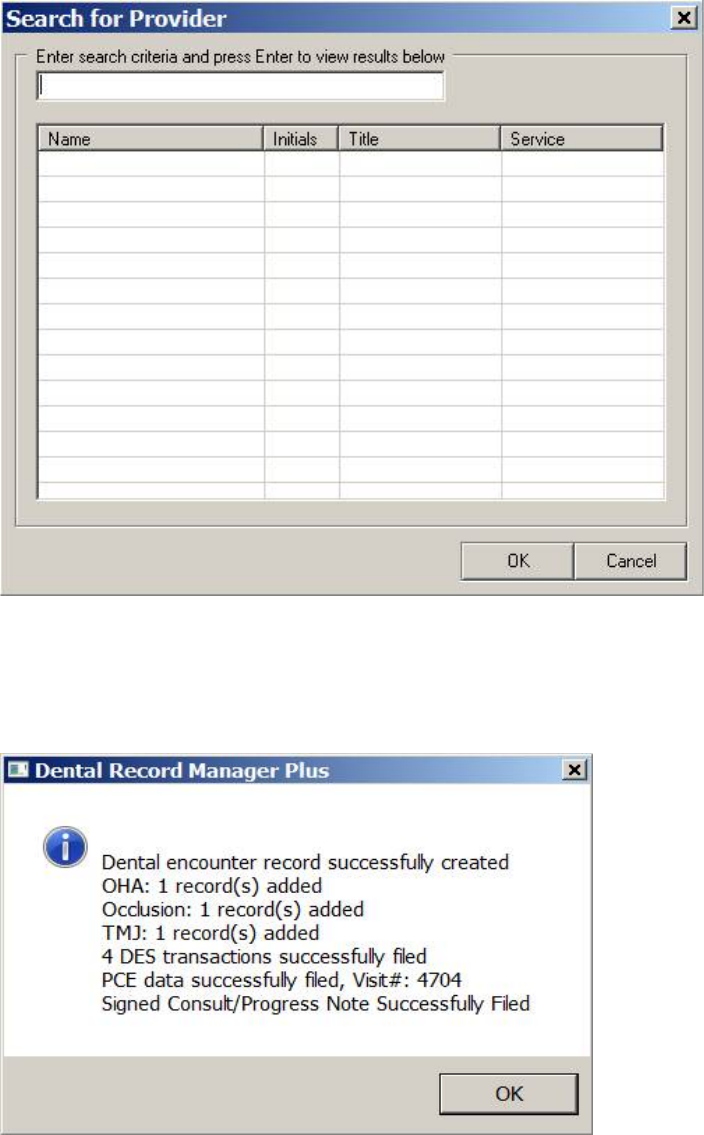
May 2018 DRM Plus Administrator Manual v6.9 235
Figure 289: Search for Provider Screen
18. Enter the search information and press the <Enter> key. Select the provider from the list and click
the OK button.
19. An informational screen displays stating that the encounter record has been created.
Figure 290: Dental Encounter Record Created
20. Click the OK button. The DRM Plus screen minimizes, and the CPRS main screen remains open,
unless it has timed out.
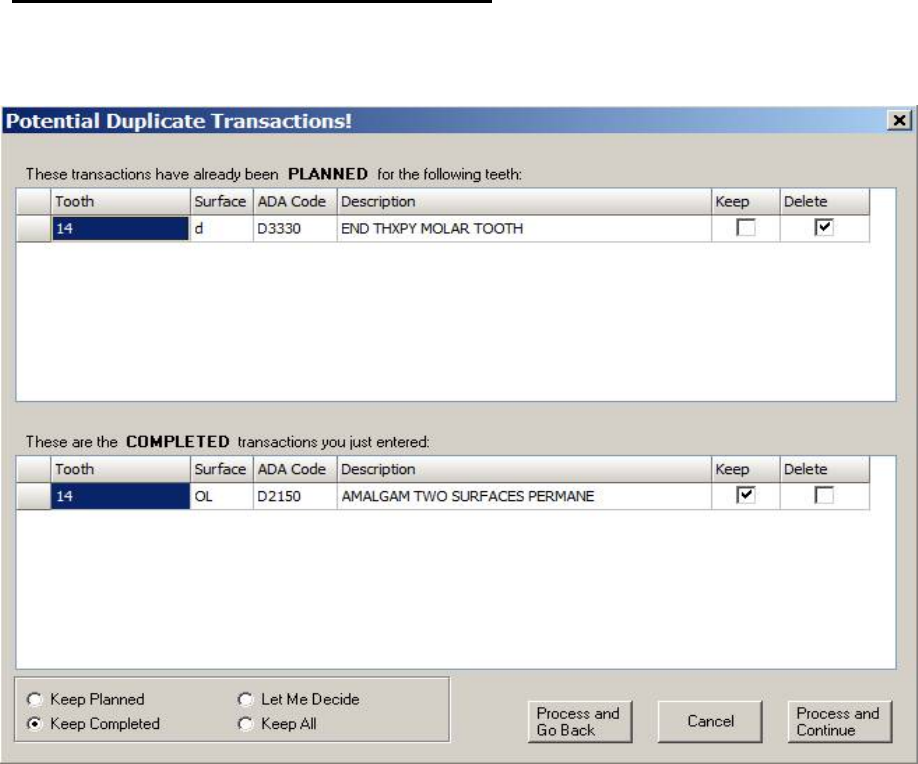
May 2018 DRM Plus Administrator Manual v6.9 236
Potential Duplicate Transactions Screen
If the system detects that a possible duplicate transaction exists, the Potential Duplicate Transactions
screen displays, when the Next button on the Treatment & Exam or Periodontal Chart screens is clicked.
Figure 291: Potential Duplicate Transactions! Screen
A list of planned transactions for a tooth, along with the procedure code and the description, are listed in the
top portion of the screen. Completed transactions taken during this encounter are listed in the bottom portion
of the screen, with elements that match other planned transactions for the same tooth.
The radio buttons on the lower left portion of the screen designate which information is kept or discarded.
The Keep Planned radio button keeps the planned transaction and deletes the conflicting completed trans-
action entered during the encounter. The Keep Completed radio button keeps the completed transaction
entered during this encounter and deletes the planned transaction. The Let Me Decide radio button clears all
check boxes and allows for picking and choosing among the planned and completed transactions. Keep All
allows all conflicting procedure codes that are planned and completed to be processed.
After clicking the desired radio button and selecting, if necessary, which transactions are kept and/or dis-
carded, click the Process and Go Back, Cancel or Process and Continue buttons to continue completing
the encounter. Process and Go Back processes the procedure codes and returns to the Treatment & Exam
or Periodontal Chart screen. Cancel displays the Periodontal Chart or Treatment & Exam screen
without processing any information. Process and Continue processes the procedure codes and continues
updating the TIU progress note. The Filing Options screen displays. Continue completing the encounter
from this point, as outlined previously in this chapter.
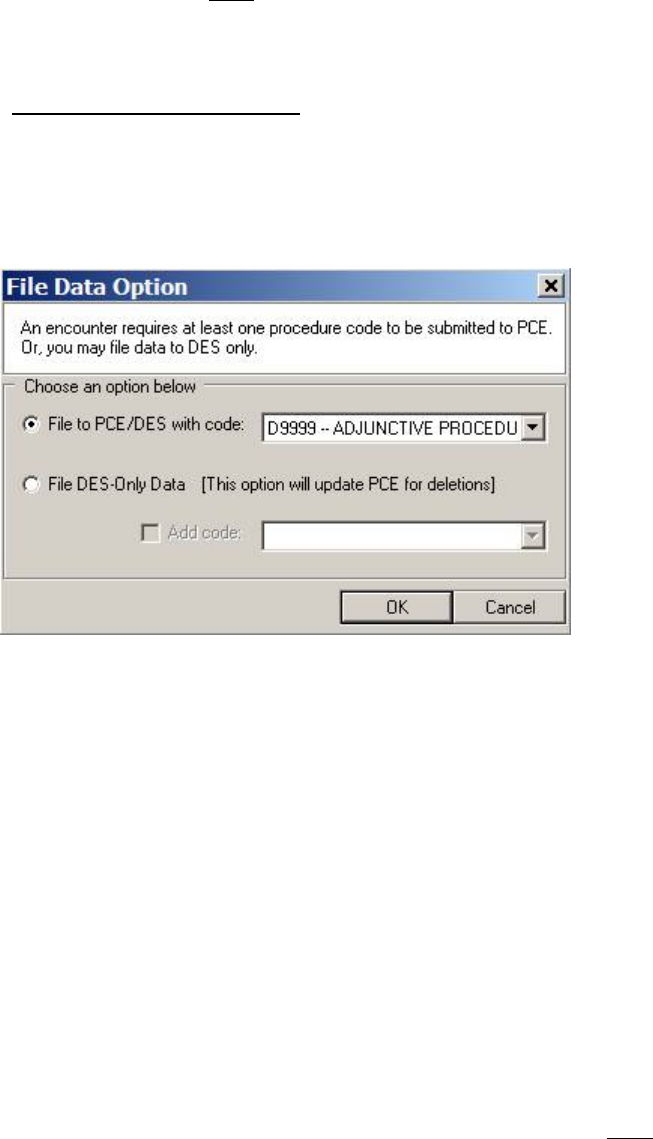
May 2018 DRM Plus Administrator Manual v6.9 237
Note: The system does NOT present a user with the Potential Duplicate Transactions screen when the
potential duplicate is a tooth-related radiographic procedure.
File Data Option Screen
If no procedure code has been entered as completed treatment on the Completed Care screen and the user
clicks the Next button, the Provider and Locations for Current Activities screen displays if no visit is
present in the banner. When the visit is present or after one has been selected then the File Data Option
screen displays.
Figure 292: File Data Option Screen
Click the appropriate radio button to designate whether the data is to be filed to PCE/DES with a procedure
code, or to file to DES-Only data.
File to PCE/DES with Code
To file data to PCE/DES with a procedure code:
1. The Provider and Location for Current Activities screen displays. Select the correct visit.
2. Click the File to PCE/DES with code radio button on the File Data Option screen.
3. The program defaults to D4999 if entering this screen from the Periodontal Chart, and D9999 if
entering from Treatment & Exam.
4. If the default procedure code is incorrect, click the code drop-down menu and select the desired
procedure code.
5. Click the OK button.
6. The Diagnosis Code screen displays.
7. Select the procedure code on the left side of the screen (default is all selected) and the diagnosis
code(s) on the right side. If the correct diagnosis code does NOT appear, use the Additional
Diagnosis Code Search to find a different diagnosis code.
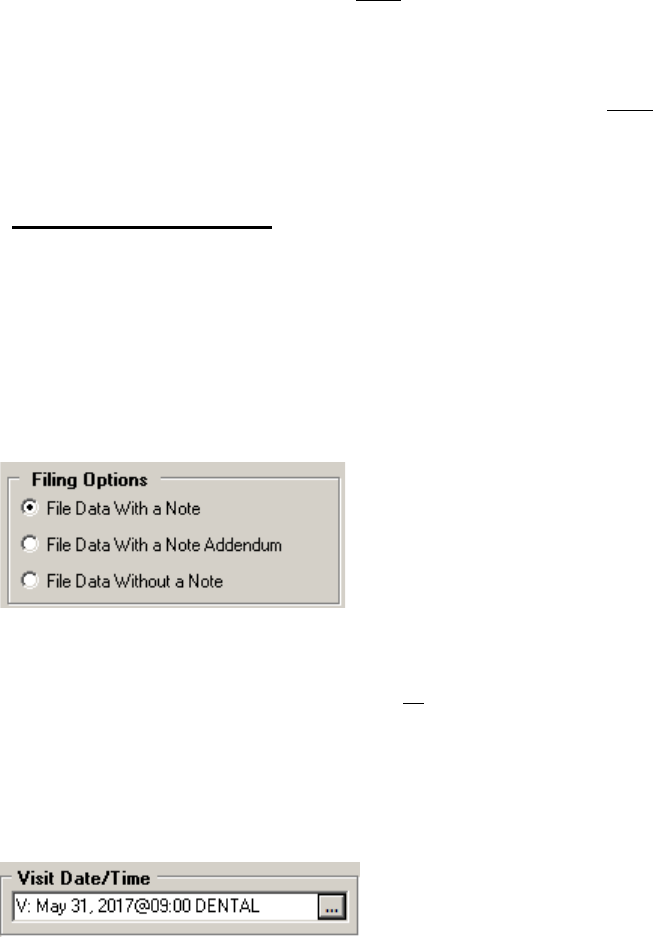
May 2018 DRM Plus Administrator Manual v6.9 238
File to DES-Only Data
To file to DES-Only data:
1. The Provider and Location for Current Activities screen displays. Select the correct visit.
2. Click the File to DES-Only Data radio button.
3. If a procedure code is desired (NOT required), check the Add code check box and use the drop-
down menu to select a procedure code.
4. The Diagnosis Code screen displays.
5. Select the procedure code on the left side of the screen (default is all selected) and the diagnosis
code(s) on the right side. If the correct diagnosis code does NOT appear, use the Additional
Diagnosis Code Search to find a different diagnosis code.
Filing Options Screen
The Filing Options screen is divided into ten main sections: Filing Options, Visit Date/Time, Encounter
Dental Class, Disposition, Suggested Recare Date, Primary PCE Diagnosis & Send DX to CPRS
Problem List, Service Connection, Additional Providers, Additional Signers and Station.
Filing Options
Use the Filing Options radio buttons to choose how the encounter is to be filed.
Figure 293: Filing Options
The options are: File to Data with a Note, File Data With a Note Addendum and File Data Without a
Note. The File Data Without a Note creates no TIU progress note.
Visit Date/Time
Adjust the Visit Date/Time using this function. The program defaults to whatever was entered on the
Provider and Location for Current Activities screen.
Figure 294: Visit Date/Time
To change the visit date and time:
1. Click the Ellipsis (...) button.
2. The Provider and Location for Current Activities screen displays.
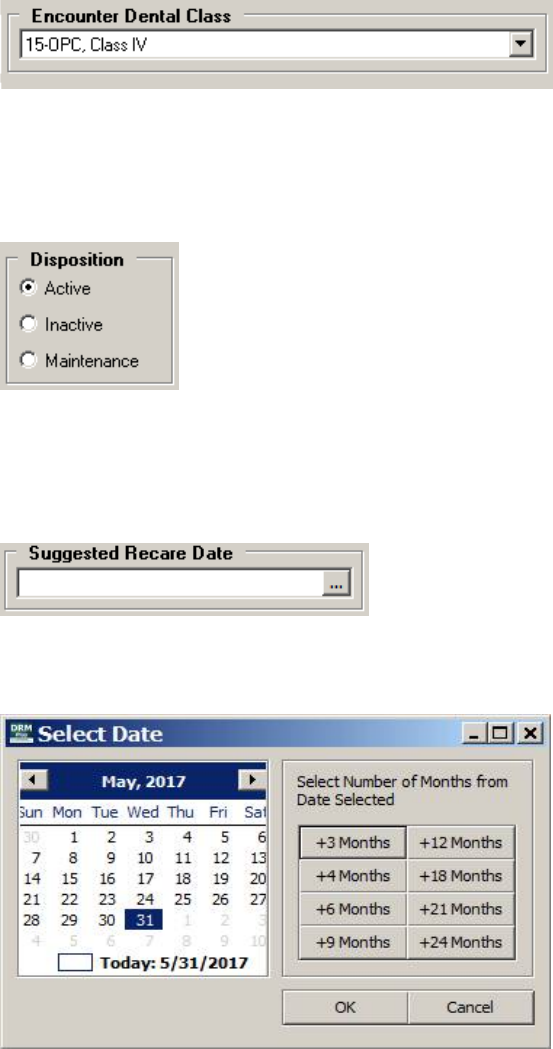
May 2018 DRM Plus Administrator Manual v6.9 239
3. Choose the correct provider and appointment from the Provider and Location for Current
Activities screen and click the OK button. Please see the Dental Encounter Data section in the
Using DRM Plus Drop-Down Menus chapter of this manual, for further information.
Encounter Dental Class
Use the drop-down menu to change the Encounter Dental Class for this encounter.
Figure 295: Encounter Dental Class
Disposition
Use the radio buttons to change the patient’s Disposition or case management status.
Figure 296: Disposition
Suggested Recare Date
Use the Ellipsis (...) button to add/change the suggested recare date.
Figure 297: Suggested Recare Date
Click the Ellipsis (...) button to open the Select Date screen.
Figure 298: Select Date Screen
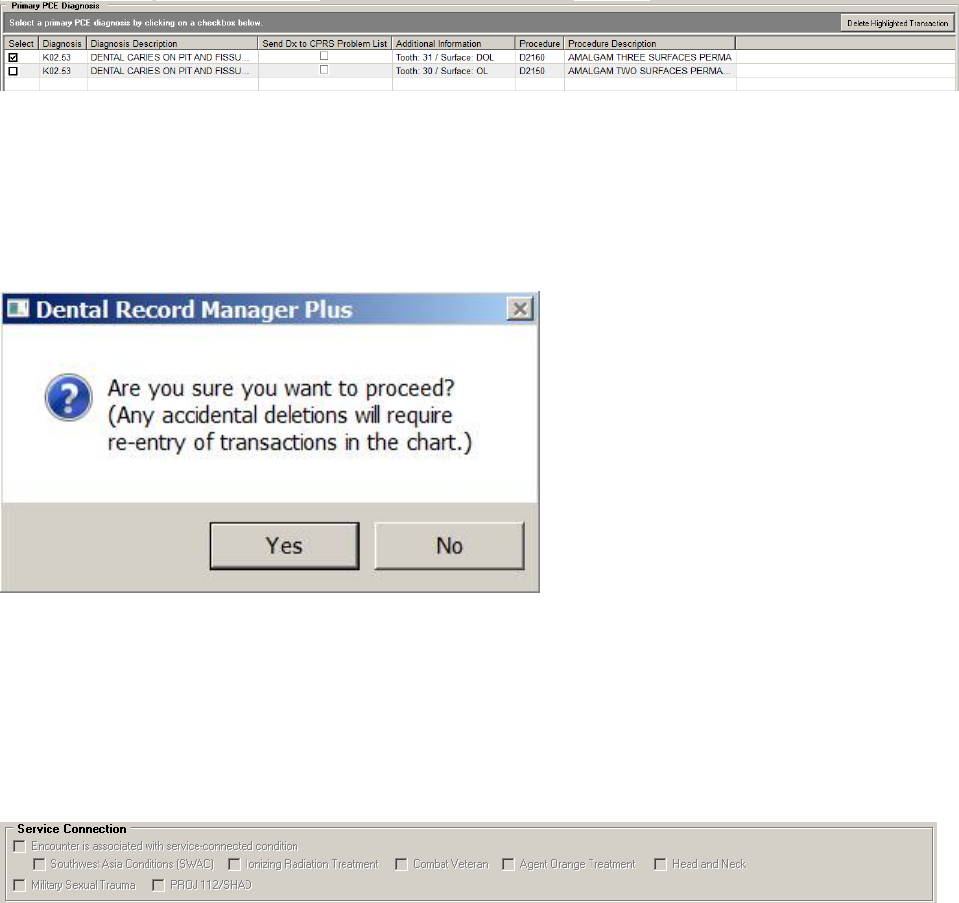
May 2018 DRM Plus Administrator Manual v6.9 240
Select the date from the calendar or select the number of additional months from the date selected first on
the calendar and then click the OK button.
Primary PCE Diagnosis & Send Dx to CPRS Problem List
This window features a list of the diagnosis codes with descriptions, selections to send diagnosis to CPRS
problem list, procedure codes with descriptions, and additional information.
Select the primary PCE diagnosis by clicking the check box under the Select column in the Primary PCE
Diagnosis window. If there is only one diagnosis, or several of the exact same diagnosis, the selection is
checked by default. All encounters require only one primary diagnosis filed to VistA PCE.
Select diagnoses to Send Dx to CPRS Problem List by clicking the check box in that column.
Figure 299: Primary PCE Diagnosis Window
The Primary PCE Diagnosis window allows one completed transaction at a time to be deleted when using
the Delete Highlighted Transaction button.
First highlight the completed transaction that should be deleted and then select the Delete Highlighted
Transaction button located in the upper right corner of the window.
Figure 300: Transaction Deletion Screen
The resulting pop-up will display asking are sure you want to proceed. Selecting the Yes button will delete
that completed transaction.
Service Connection
Use the check boxes to denote service connection, if applicable.
Figure 301: Service Connection
May 2018 DRM Plus Administrator Manual v6.9 241
Additional Providers/Additional Signers
Add or remove providers from this patient encounter by using the tools in this area.
Figure 302: Additional Providers/Additional Signers
To add a provider or signer:
1. Click the Add button.
2. The Search for Provider or the Search for Signer screen displays.
Figure 303: Search for Provider Screen
3. Enter the name into the text box and press <Enter>.
4. Select the correct name from the results and click the OK button.
5. The provider displays on the Additional Provider/Signer window. Repeat as necessary.
To remove a Provider/Signer:
1. Highlight the provider or signer name.
2. Click the Remove button.
3. A confirmation screen displays. Click the Yes button.
4. The name is removed from the Additional Provider/Signer window.
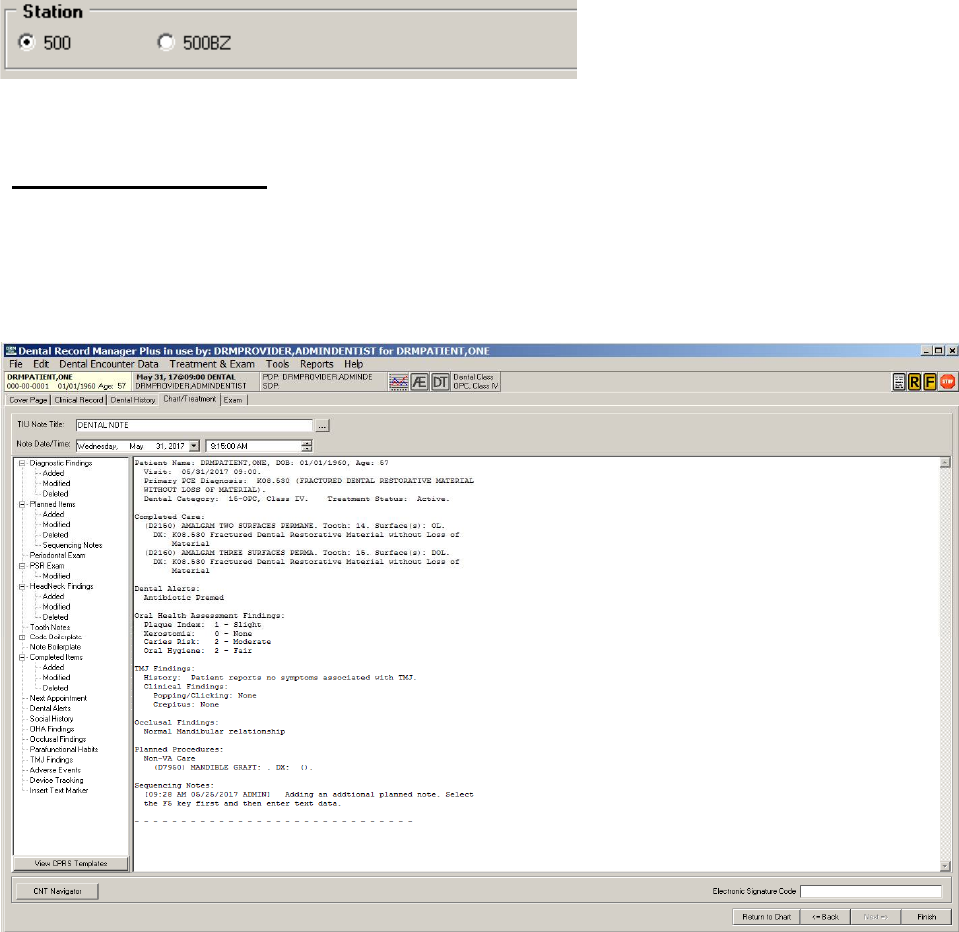
May 2018 DRM Plus Administrator Manual v6.9 242
Station
Select the appropriate Station (facility) by clicking the appropriate radio button, if applicable.
Figure 304: Station
Progress Note Screen
The Progress Note screen has several major areas and functions. This is the final screen in completing an
encounter with the patient, and has different incarnations depending on how the transaction is to be filed:
File Data With a Note, File Data With a Note Addendum or File Data Without a Note. The following
screen displays when the transaction is filed using the File Data With a Note option.
Figure 305: Progress Note Screen
Use the Ellipsis (...) button to change the TIU progress note title here if needed. Use the up and down
arrows to change the Note Date/Time if desired. From this screen, the user can also: view and/or import
DRM Plus objects, view and import CPRS templates, launch the CNT Navigator (DSS clinical note
templates), view the patient’s TIU progress note, import VistA medical information, and add an electronic
signature.
In addition to the imports that can be made into a TIU progress note, free-texting for narrative may also be
entered prior to filing the note by the user.
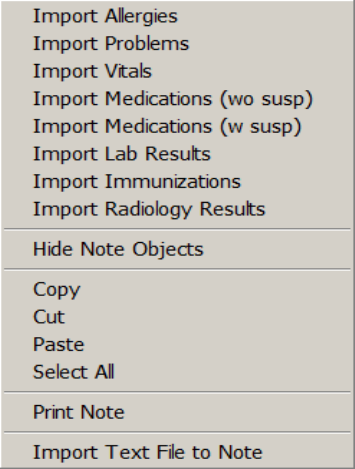
May 2018 DRM Plus Administrator Manual v6.9 243
Viewing/Importing DRM Object/Progress Note
To view/import DRM objects:
1. Click the View DRM Plus Objects button (defaulted) below the tree on the left side of the screen.
2. Double-click the DRM object and it displays in the viewer on the right side of the screen. The
DRM object imports where the cursor is positioned.
3. Information can be added or deleted by typing directly into the progress note on the right side of
the screen.
Viewing/Importing CPRS Templates
To view/import CPRS templates:
1. Click the View CPRS Template button below the tree on the left side of the screen.
2. The shared/personal templates tree, if expanded, displays on the left side of the screen. Most
functionality of CPRS templates in DRM Plus is the same as in CPRS.
3. Click the View DRM Plus Objects button to return to the DRM object tree.
Importing VistA Medical Information
To import VistA medical information into the patient’s TIU progress note:
1. Right-click in the progress note area.
2. The Import Menu displays.
Figure 306: Import Menu Screen
3. Choose the information that is to be imported from the top half of the menu.
4. The information displays in the progress note where the cursor was positioned.

May 2018 DRM Plus Administrator Manual v6.9 244
Other Options in the Import Menu
Hide Note Objects: Hides or closes the objects tree on the left side of the screen and enlarges the
progress note viewer.
View Note Objects: Undoes the hide note objects.
Copy: Copies selected text in the progress note.
Cut: Cuts selected information in the progress note.
Paste: Pastes information into the progress note.
Select All: Selects all text in the progress note.
Print Note: Prints the progress note.
Import Text File to Note: Navigates to a text file to import into a note. See the User Options
section in the Using DRM Plus Drop-Down Menus chapter of this manual for more information on
automatically setting the location for this text file.
Accessing Dental CNTs
Click the CNT Navigator button to access dental CNTs. These are DSS product clinical note templates. The
dental CNTs may NOT be mapped for DRM Plus at the user’s site; it would require IT assistance. Please see
the CNT Navigator section, further in this chapter.
Electronic Signature
Enter the Electronic Signature Code and click the Finish button to complete the TIU progress note.
Clicking the Finish button without entering an electronic signature leaves the patient TIU progress note
status as unsigned.
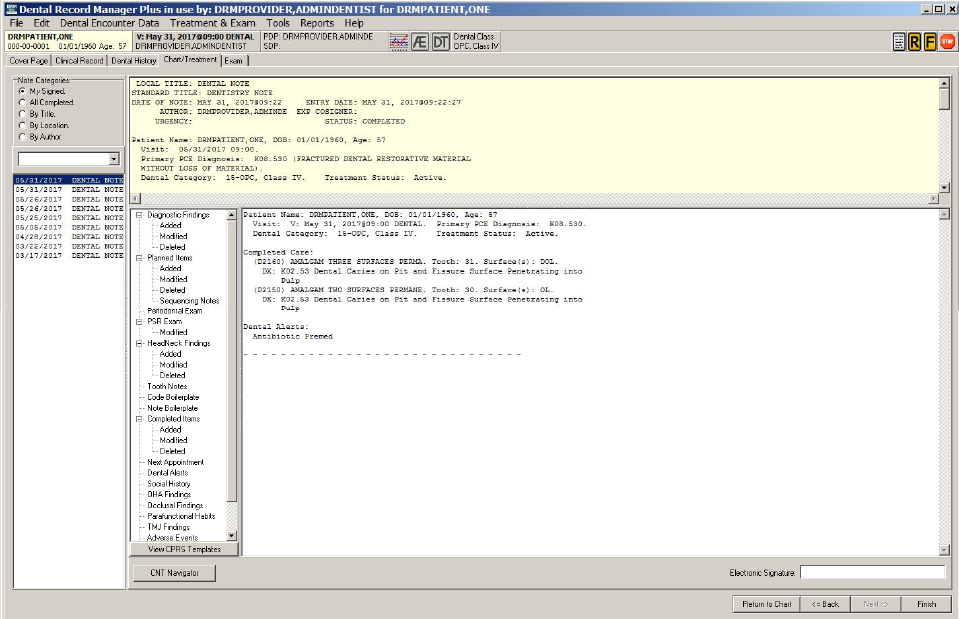
May 2018 DRM Plus Administrator Manual v6.9 245
Progress Note Addendum
When the File Data With Note Addendum option has been chosen, the Progress Note screen displays
slightly different. The functions are the same as in the previously shown progress note screen with the
additions of selecting the Note Categories radio button options and with the parent note displaying in the
upper right window.
Figure 307: Progress Note Addendum Screen
The notes associated with the selected Note Categories appear in the narrow window below the note
categories area. Use the drop-down menu below the note categories to filter the results. Click a parent note
to view details in the upper right window of the screen.
Finish the process of filing the encounter with a note addendum, which displays in the lower right window
of the screen.
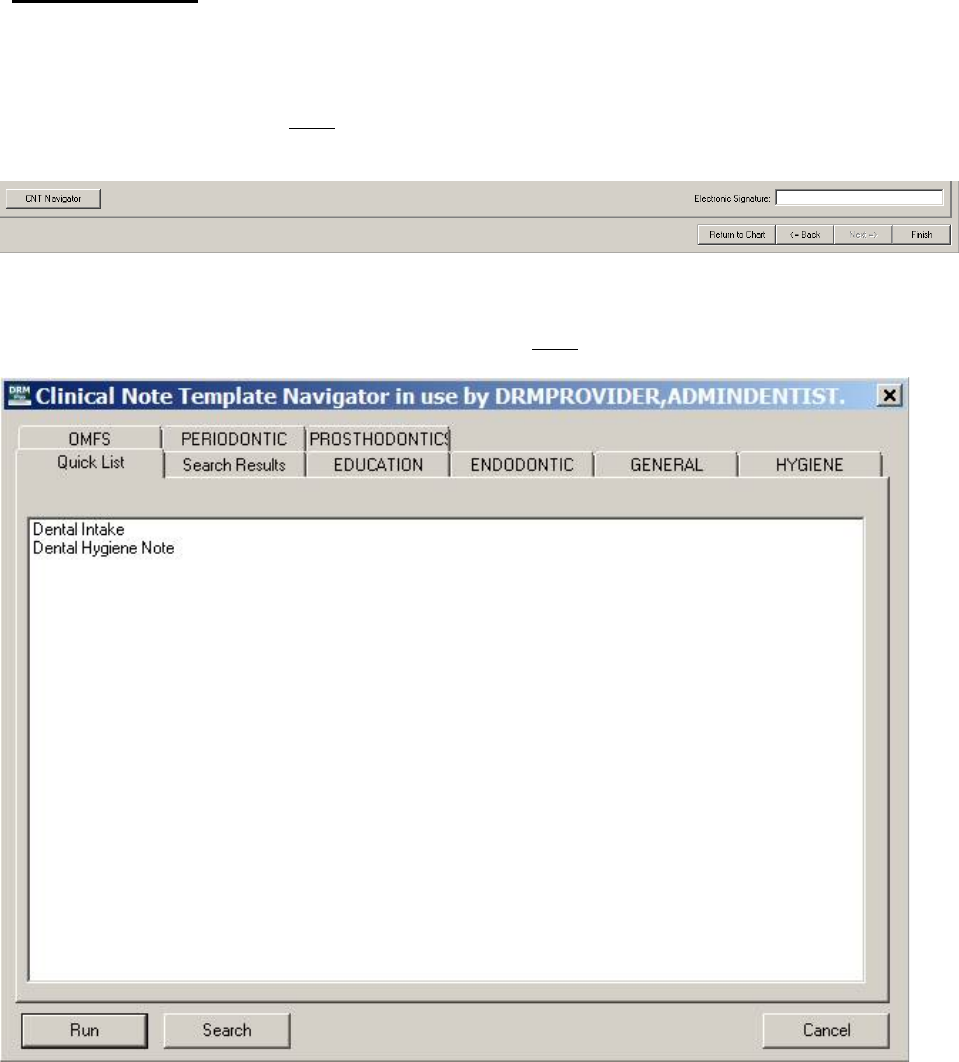
May 2018 DRM Plus Administrator Manual v6.9 246
CNT Navigator
Clicking the CNT Navigator button displays up a directory of clinical note templates in use, as a tool, to
assist the user in writing a note, or additional information to a note. The CNT Navigator button is located
on the bottom left side of the Progress Note screen. These are Document Storage Systems (DSS) product
clinical note templates, and may NOT function unless they are mapped correctly, which requires IT
assistance.
Figure 308: CNT Navigator Button
Using the mouse, point and click to select pre-determined text in the development of a note. Type the text
within the CNT if the pre-determined text or statement does NOT contain the necessary verbiage.
Figure 309: Clinical Note Template Navigator Screen
To access a CNT:
1. Click any of the tabs.
2. A listing of CNTs specific to the selected tab displays. Either double-click the desired template, or
click once to select it and then click the Run button.
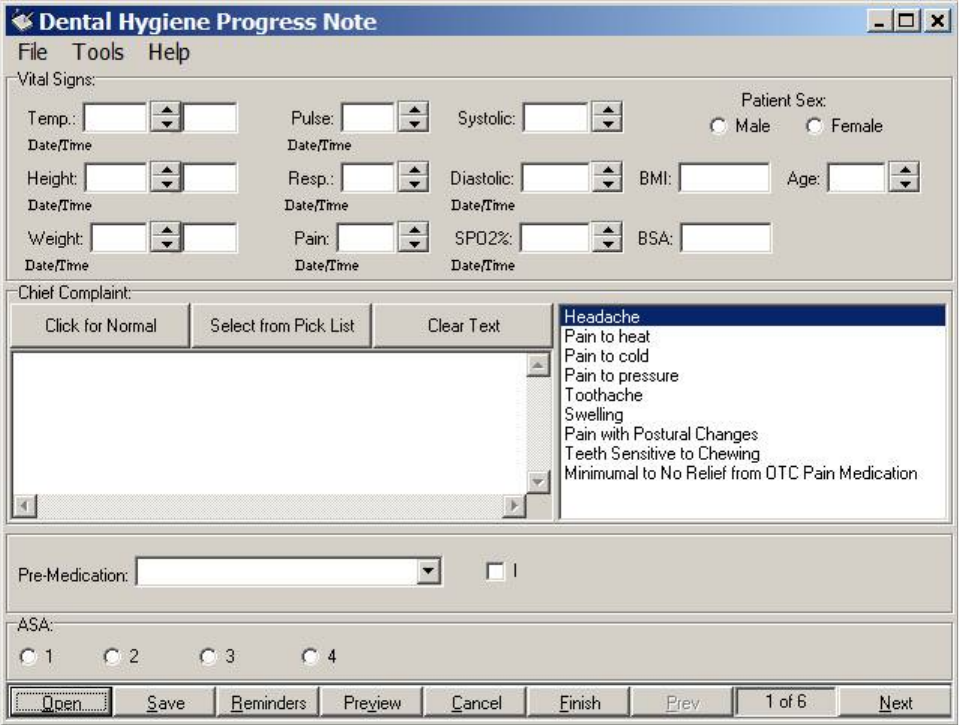
May 2018 DRM Plus Administrator Manual v6.9 247
Navigating Within CNTs
To navigate within a CNT:
1. Point and click within the windows, tabs, drop-down arrows, check boxes, and radio buttons. Each
navigational method provides the user with a different method of entering or selecting information.
Figure 310: Navigating Within CNT
2. Preview the note by clicking the Preview button.
3. Click the Return button to continue writing the note.
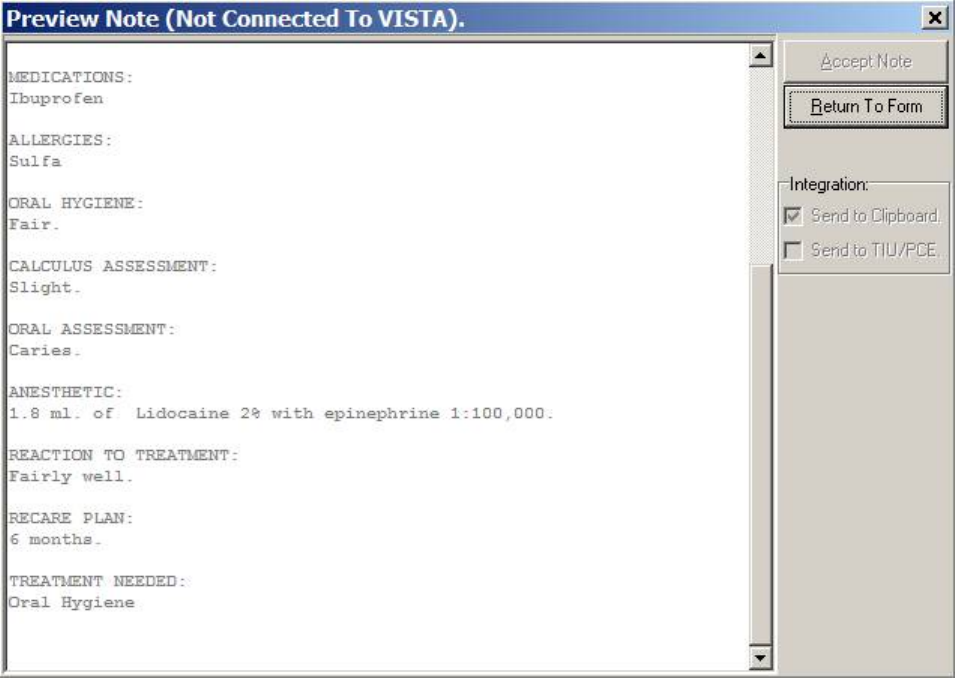
May 2018 DRM Plus Administrator Manual v6.9 248
Figure 311: Preview Note
When the note is complete, click the Finish button. Then click the Accept Note button.
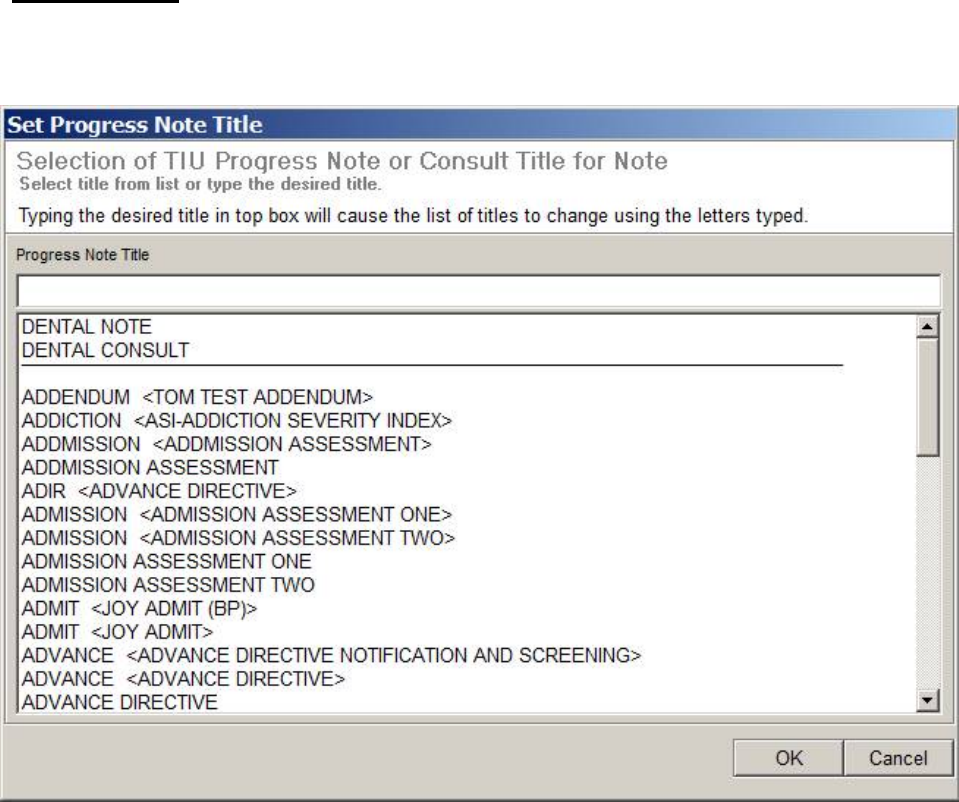
May 2018 DRM Plus Administrator Manual v6.9 249
Consult Notes
The option to complete a consult displays after the Filing Options screen, during the process of completing
a patient encounter, when the Set Progress Note Title screen displays.
Figure 312: Set Progress Note Title Screen
To complete the consult:
1. Choose the consult title from the Set Progress Note Title screen.
2. The patient’s pending consults display on the screen.
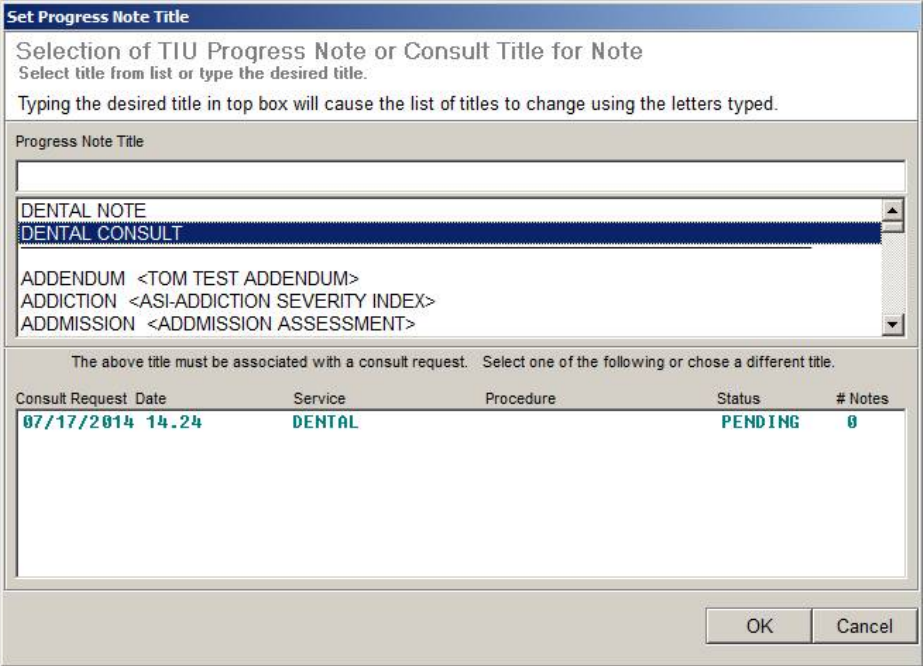
May 2018 DRM Plus Administrator Manual v6.9 250
Figure 313: Set Progress Note Title with Pending Consult
3. Select the consult from the list.
4. The consult is added to the progress note on the Progress Note screen. Once the electronic
signature is entered on the Progress Note screen, the consult is complete.
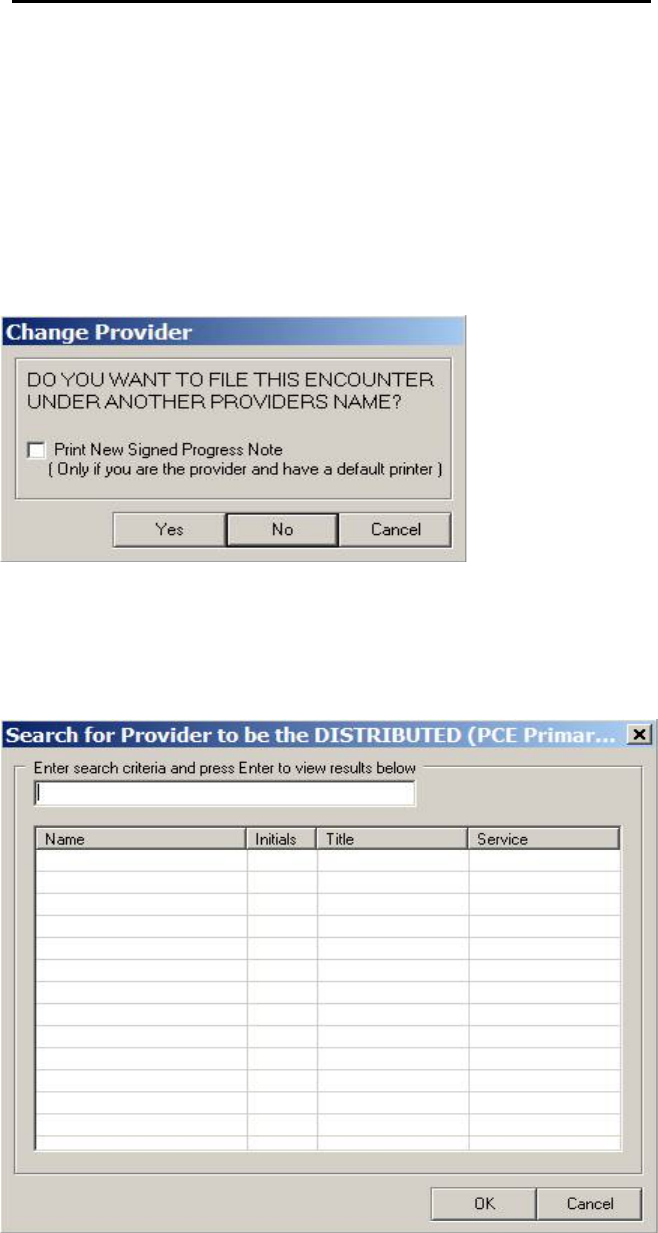
May 2018 DRM Plus Administrator Manual v6.9 251
Resident Filing as Cosigners or Distributed Providers
A 2006 VA Directive stated that residents are users with a VistA Person Class of V030300, V11550 or
V115600. All residents are required to have a distributed provider (attending) to complete the encounter
with the patient. Since most sites require residents to enter a cosigner for the note, the cosigner defaults as
the distributed provider in PCE. If there is no cosigner required for the resident, or the user filing data to a
resident, they must enter the distributed provider before filing.
To add a distributed provider:
1. Click the Finish button.
2. The Change Provider screen displays.
Figure 314: Change Provider Screen
3. Click the desired response. (Residents click the No button).
4. The Search for Cosigner Provider screen or the Search for Distributed (PCE Primary)
Provider screen displays.
Figure 315: Search for Distributed Provider Screen
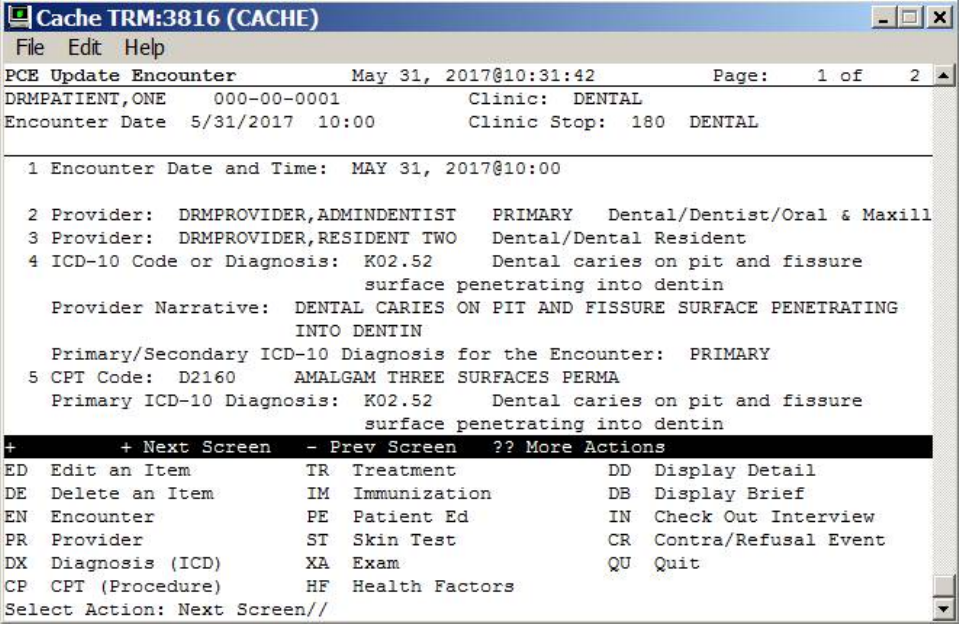
May 2018 DRM Plus Administrator Manual v6.9 252
5. Enter the search terms in the text box and press the <Enter> key.
6. Choose the provider from the search results and click the OK button.
7. An information screen displays confirming that the information was filed.
Note: VA dental gives credit/RVU time to the resident actually performing the procedures, all of which is
filed to DES; to meet the VA requirement that the attending (distributed) gains credit for the encounter, this
has to be filed in PCE.
When the encounter is filed to PCE, the resident becomes the secondary provider, and the distributed
provider becomes the primary provider for the PCE encounter. All procedures and diagnoses are assigned to
the distributed provider in VistA PCE.
Figure 316: PCE Encounter Information in VistA
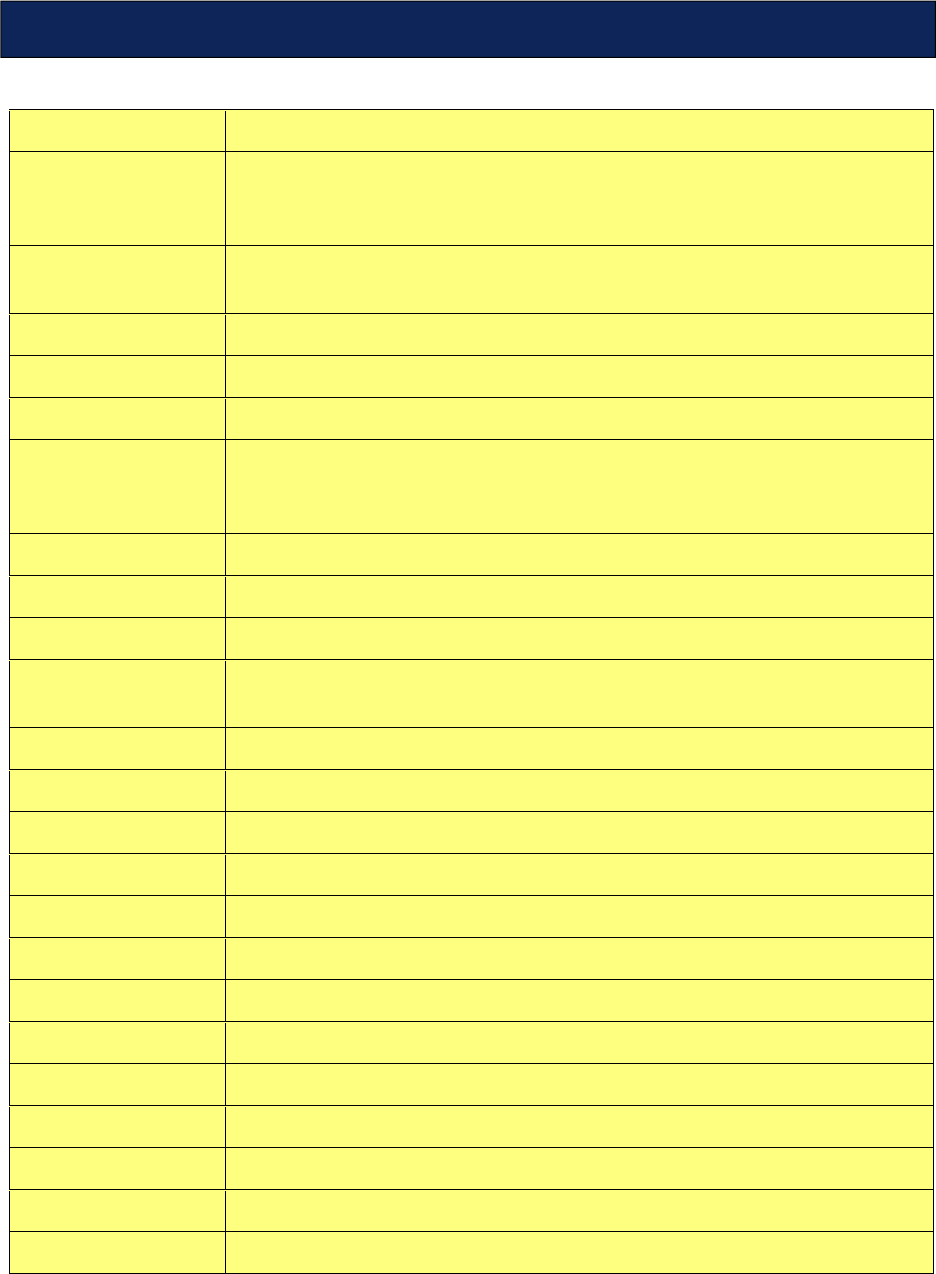
May 2018 DRM Plus Administrator Manual v6.9 253
ADPAC
Automated Data Processing Applications Coordinator
AICS
Automate
d Information Collection System;
formerly Integrated Billing, the
program that manages the definition, scanning and tracking of Encounter
Forms.
APPOINTMENT
A scheduled meeting with a provider at a clinic; an appointment can include
several encounters involving other providers, tests, procedures, etc.
CBOC
Community Based Outpatient Clinic
CC
Coordinating Committee
CFO
Chief Financial Officer
CHECKOUT
PROCESS
Part of the Medical Administration (PIMS) appointment processing. The
checkout process documents administrative and clinical data related to the
appointment.
CIO
Chief Information Officer
CIR
Corporate Information Repository
CIRN
Clinical Information Resource Network
CLINICIAN
A doctor or other provider in the medical center authorized to provide patient
care.
CNT
Clinical Not
e Template (Used to format TIU progress n
otes)
CPR
Cardiopulmonary Resuscitation
CPRS
Computerized
Patient Record System
CPT
Common Procedure Terminology
CQI
Continuous Quality Improvement
DAS
Dental Activity System (also called AMIS)
DES
Dental Encounter System (also called DES)
DHCP
Decentralized Hospital Computer Program (See: VistA)
DNR
Do Not
Resuscitate
DOD
Department of Defense
DRG
Diagnostic Related Group
DSS
Decision Support System
DSS
Document Storage Systems, Inc.
Appendix A – Glossary of VA Terms

May 2018 DRM Plus Administrator Manual v6.9 254
DVA
Department of
Veterans Affairs
EDI
Electronic Data Interchange
ELC
Executive Leadership Council
EMR
Electronic Medical Record
ENCOUNTER
A contact between a patient and a provider who has responsibility for assessing
and treating the patient at a given contact, exercising independent judgment. A
patient can have multiple encounters per visit.
ENCOUNTER FORM
A paper form used to display and collect data pertaining to an outpatient
encounter, developed by the AICS package.
EPISODE OF CARE
Many encounters for the
same problem constitute an episode of care. An
outpatient episode of care may be a single encounter, or can encompass
multiple encounters over a long period of time.
FEMA
Federal Emergency Management Agency
FIM
Federal Independence Measure
FRP
Federal
Response Plan
GAF
Global Assessment of Functioning
GPRA
Government Performance and Results Act
GUI
Graphic User Interface
HEALTH SUMMARY
A Health Summary is a clinically
-
oriented, structured report that extracts
multiple kinds of data from VistA and displays it in a standard format.
HR IGA
Human Resources
Office of Intergovernmental Affairs
INPATIENT VISIT
Inpatient encounters include the admission of a patient to a VAMC and any
clinically significant change related to treatment of that patient.
IOM
Institute of Medicine
ISDA
Intensity Severity Admission Discharge (criteria)
IT
Information Technology
JCAHO
Joint Commission on the Accreditation of Healthcare Organizations
LAN
Local Area Network
MV
V
Mission Vision Values
MAC
Management Assistance
Council
MCCR
Medical Care Cost Recovery
MDS
Minimum Data Set

May 2018 DRM Plus Administrator Manual v6.9 255
NHCU
Nursing Home Care Unit
OERR
Order Entry Results Reported
OSHA
Occupational Safety & Health Administration
OUTPATIENT
ENCOUNTER
Outpatient encounters include scheduled
appointments and walk
-
in
unscheduled visits
OUTPATIENT VISIT
The visit of an outpatient to one or more units or facilities located in or directed
by the provider maintaining the outpatient health care services (clinic,
physician’s office, hospital medical center) within one calendar day.
PACS
Picture Archiving and Communications System
PAI
Patient Assessment Instruction
PCE
Patient Care Encounter
PI
Prevention Index
PM
Performance Management
PROCEDURE
A test or action done for or to a patient that
can be coded with the CPT coding
process.
PROVIDER
The entity which furnishes health care to a consumer.
PSA
Patient Service Area
PTSD
Post Traumatic Stress Disorder
RM
Risk Management
RPM
Resource Planning Methodology
SD
Standard Deviation
SMI
Seriously Mentally Ill
SSC
Shared Service Center
TIU
Text Integrated Utility
TQI
Total Quality Management
UM
Utilization Management
UNC
Universal Naming Convention. Used in place of Drive letters.
VA
Department of Veteran Affairs
VAVS
Veterans
Administration Voluntary Service
VHA
Veterans Healthcare Administration
VISN
Veterans Integrated Service Network
VISIT
The visit of a patient to one or more units of a facility within one calendar day.

May 2018 DRM Plus Administrator Manual v6.9 256
VistA
Veterans Information System
Technology Architecture, the new name for
DHCP.
VSO
Veterans Service Organization

May 2018 DRM Plus Administrator Manual v6.9 257
Microsoft Windows tools are used in DRM Plus. Left-clicking, right-clicking, double-clicking, drop-down
arrows, radio buttons, check boxes, text boxes, highlighting and scroll bars are used throughout DRM Plus.
Certain buttons and clicking options are common to most screens and are discussed below.
OK: Clicking the OK button is used to finalize a selection or end a process. The open screen is closed, and
the user is moved to another screen.
Cancel: Clicking the Cancel button cancels the action taken on a screen and returns the user to the previous
screen.
Next: Clicking the Next button moves the user to the next screen.
Back: Clicking the Back button moves the user to the previous screen.
Add: Clicking the Add button adds a selected item to a function.
Edit: Clicking the Edit button allows the user to edit a selection.
Delete: Clicking the Delete button allows the user to delete a selection.
Reset: Clicking the Reset button resets changed settings to their original settings during this session.
Finish: Same as the OK button.
Browse Buttons: Clicking the Browse button moves the user to a previously-programmed selection screen.
Radio Buttons: Clicking a radio button displays a dot in the button, designating a specific option. Only
one radio button is allowed for a section in a group.
Check boxes: Clicking a check box works the same as a radio button, however multiple selections may be
added from one group.
Text Boxes: Clicking in a text box allows the user to type text into the box.
Drop-Down Arrows: Clicking these arrows displays a menu of selections.
Selection Arrows: Clicking these arrows allows a selected item to be moved from one dialogue box to
another.
Search Boxes: Typing selection criteria in a search box causes the criteria to be matched to a master file.
Matches are displayed, allowing the user to highlight the desired selection for further action. DRM Plus
requires the user to press the <Enter> key after entering the criteria.
Appendix B – Common Application Functions
May 2018 DRM Plus Administrator Manual v6.9 258
Sorting: Clicking a Transaction table column heading sorts the table, usually in ascending order, depending
on the current view. Clicking the column heading a second time returns the table to its original view.
Highlighting: Clicking an item results in its being highlighted, and selected for the next action to be
completed.
Shift Key: Generally, holding the <Shift> key down allows for selection of multiple consecutive items in
Windows applications.
Control Key: Generally, holding the <Ctrl> key down allows for selection of multiple items in Windows
applications.
Keyboard Use: When a letter or a button name is underlined (Add or Speed Code) the keyboard can be
used to activate the button. The action required is to press and hold the <Alt> key, then press the underlined
letter.

May 2018 DRM Plus Administrator Manual v6.9 259
Save Unfiled Data
If the user has entered any data and attempts to close DRM Plus, or switch to a different patient, DRM Plus
displays a screen prompting the user to save the current patient’s entries. Clicking the Yes button initiates
the save unfiled data function.
When the user has saved unfiled data and no longer needs this data for the patient, there are two options to
eliminate this saved, unfiled data. The first is to select the Delete button when opening the patient’s chart; a
dialogue screen asks the user if they want to load the saved data. The section option is to delete the saved
unfiled data from the Unfiled Data by Provider report.
Dental Class Displayed on Banner
The patient’s Dental Class displays in the banner area, only if the information was entered on the cover
page in the Dental Eligibility/Dental Class field by a DRM Plus Administrator. As soon as the Dental
Class is selected, it displays in both fields: the dental class field on the Cover Page tab screen, and the
Dental Class box in the DRM Plus banner.
Diagnostic Findings
Diagnostic Findings are NOT updated automatically from Completed Care entries for any encounter. Any
Completed Care entries that are filed need to be entered as Diagnostic Findings during a patient’s future
dental examination.
Always mark teeth missing in Diagnostic Findings before entering Partials, Dentures, Implants or Bridge
findings. DRM Plus works best when missing teeth or edentulous arch(es) are entered before any other
findings. Dentition is always entered first on a new patient before any dental data is entered in DRM Plus, if
the patient is a juvenile.
Diagnostic Findings may be deleted after the encounter has been filed by a user. If this happens after the
encounter has been filed, the deleted findings are removed from the graphic; however, the text entry remains
in the transaction table with a line through it. DRM Plus Administrators can completely remove any
Diagnostic Finding entry from the transaction table, unless the entry was already deleted by a user.
Treatment Plan
For implant procedures entered in the Treatment Plan screen, and if a related finding of Missing has NOT
been entered, DRM Plus does NOT allow this corrective planned treatment procedure to be entered.
It is recommended to use the Include Findings and Completed button to temporarily combine screens of
the planned treatment with the findings and NOT use the automatic Include parameter in DRM Plus. The
automatic Include parameter is the original default in DRM Plus when the user is viewing the Treatment
Plan screen. End-users may edit this parameter by accessing the Treatment & Exam menu Show
Configuration submenu Tx & Exam tab Display Defaults drop-down menu remove check marks
in check boxes.
Appendix C – Hints and Notes

May 2018 DRM Plus Administrator Manual v6.9 260
Multi-Add Screen
Small buttons [<] and [>] have been added to the Procedure Code selection screen to enable the user to
move the screen to the other half of the graphic chart. This may be necessary to see what is beneath,
especially when entering multi-add codes.
Missing teeth display as white text on a blue background. This can help the user visualize the mouth while
entering multi-add codes. The missing teeth are still selectable if needed for the procedures partial, denture,
implant or bridge.
Ranged Codes
Certain codes, designated as ranged codes, used for multiple teeth procedures, mostly in the prosthetics area,
have been restricted and can only be used with hard coded DRM Plus icons. These icons are Partial,
Bridge, Conn Bar and some Denture procedure codes. These icons are only found with the Treatment
Plan and Completed Care screens. When other options are utilized for selecting these CPT procedure
codes, when using the ADA Codes icon or Add box, the ranged codes are disabled and cannot be selected.
Speed Codes
Speed Codes do NOT have multi-add or suggestion links functionality. The multi-add and suggestion links
functionalities work with the Quick Codes icon, ADA Codes icon, CPT Codes icon, using the Add box to
select a procedure code. Some of the DRM Plus standard icons allow multi-add functionality. Speed codes
are only used with the Treatment Plan and Completed Care view screens for selecting a procedure code.
Speed Codes that include codes violating coding compliance rules need to be edited or deleted.
Tx Planning/Sequencing Screen
There is a maximum of nine phases which may be added to the sequenced planned treatment for one patient.
There are an unlimited number of sub-phases possible in each phase. There is only one Non-VA Care phase
that may be added however with an unlimited number of sub-phases.
Ranged codes, mostly prosthetics, move as a block when one code is highlighted, by left-clicking the item,
holding and dragging to the proper phase.
End-users are able to re-size and move the Tx Planning/Sequencing screen in all directions. DRM Plus
allows users to drag and drop multiple procedures at one time by pressing the <Shift> and <Ctrl> keys.
Users may add or modify the Treatment Plan and Tx Planning/Sequencing screen and file the changes
without having to click the Next button and create a TIU progress note as long as no new completed
transactions, perio, PSR or Head & Neck data are entered. In addition, the most recent dental encounter
must have an Active status for this feature to work. Clicking the Save & Exit button from the Tx
Planning/Sequencing screen files any changes made, and minimizes DRM Plus. Any new planned entries
added have the same visit date as the latest active TIU progress note filed for the patient.

May 2018 DRM Plus Administrator Manual v6.9 261
If the completed care screen is set as the display default in DRM Plus, transactions completed from the
sequencing screen may require a refresh for those transactions to display in the Completed Care screen.
Selecting the Diagnostic Findings button or the Treatment Plan button and then reselecting the
Completed Care button refreshes the application.
Completed Care
Completed procedures that have been filed can only be deleted by a DRM Plus Administrator. If an end-
user, who does NOT have this administrative parameter option, highlights an entry in the Completed Care
transaction table and clicks the Delete button, a screen stating that the transaction cannot be deleted
displays. When a DRM Plus Administrator deletes an entry from DRM Plus, appropriate procedures must be
followed to correct any associated entry filed in VistA TIU or possible VistA PCE.
In those rare cases where pre-existing charted care does NOT allow the user to click and select a procedure
code via the graphic chart, the user may enter the desired code via the ADA Codes icon.
If one or more of the procedures entered with multi-add functionality require an assignment of a different
diagnosis code, deselect the procedure code by clicking the check box of the procedure description located
on the upper left side of the Diagnosis Code screen. The deselected procedure code no longer appears
highlighted, and is removed from the table at the bottom of the screen, indicating that it does NOT associate
with the selected diagnosis code. Click the OK button at the bottom of the screen, and the remaining
unchecked procedure code(s) recycle and appear highlighted in the Diagnosis Code screen for the user to
assign a diagnosis code. This process of recycling continues until all procedure codes added with the multi-
add functionality have a diagnosis code assigned by the user.
Periodontal Chart
The History button maintains graphical entries from previous perio examinations; therefore, any prior perio
exam graph may be viewed with the History button, selected from the Periodontal Chart screen. The
Periodontal History/Compare screen may be vertically extended to view any data that is NOT visible.
To use the Furcation icon, the cursor shield must be positioned at the root location where an entry in the
graphics would be appropriate.
The X button located at the end of the pre-defined measurement scale results in a null entry in the
transaction table for Pocket, FGM, MGJ, Mobility and Furcation entries. This null entry only works when
the specific icon is active for Pocket, FGM, MGJ, Mobility and/or Furcation. The null entry remains as a
“-” mark in the transaction table, and there is no entry in the TIU progress note.
If the error is recognized immediately, the Undo button may be clicked. Otherwise, place the cursor shield
on the pocket where the incorrect value was entered. If the value is for Pocket, FGM, MGJ, Mobility or
Furcation; the incorrect value can be replaced by entering the correct value.
A zero entry results in no graphical view; however, it results in a zero entry in the transaction table and TIU
progress note, since it is a measurement. If no recording should be present for a given icon, a null entry can
be created by clicking the X button. If the incorrect entry is for Bleeding, Delayed Bleeding or
Suppuration; click the identical icon again to remove the graphic display and transaction table entry.

May 2018 DRM Plus Administrator Manual v6.9 262
When perio data is imported into the TIU progress note, it has each tooth displayed with each surface and
condition shown in the vertical column, under the tooth number. The key at the bottom of the perio data
explains certain symbols. There may be a statement at the bottom of the perio data, which informs other
providers that this TIU progress note contains perio data from the current exam, as well as data that has
NOT changed from at least one previous exam. If the Clear icon was used at the beginning of the perio
exam, then only data from this current exam is imported into the note.
Warning levels can be changed by the end-user and then displayed. The pocket depth warning level should
be the same for the perio chart graphics, and for the pocket depth warning level listed on the Statistics tab.
The pocket depth warning level on the Statistics tab must be the same as the pocket depth warning level in
the Periodontal tab. Both of these tabs are found by utilizing the Treatment & Exam menu Show
Configurations submenu.
Completing the Encounter
Selecting any Service Connection check box sends a flag to PCE for the encounter.
DRM Plus is now aligned with CPRS for patients who are Combat Veteran service connected. If
appropriate, the Combat Veteran option defaults to a check (Yes) in DRM Plus. To remove the check
(change to No), click the check box to the left of the Combat Veteran field. The check is removed.
VistA has co-signature functionality, and is checked by CPRS and DRM Plus. Both GUIs also have
additional signer functionality. Additional signers are NOT required, but may be added to a TIU progress
note by a provider. Do NOT confuse additional signers with co-signers. Co-signers are built into VistA by
facility management based on business rules. If the software detects that a co-signers is required, a screen
displays, requesting a co-signature. A provider may need a co-signer for one or all TIU progress notes.
Since most sites require residents to enter a co-signer, the co-signer defaults as the distributed provider in
PCE. If there is no co-signer (i.e., no note exists when using File Data Without a Note, or the resident is
NOT required to have a co-signer) then the resident, or user filing resident data, must enter the distributed
provider prior to filing. When the encounter is filed to VistA PCE, the resident becomes the secondary
provider and the distributed (attending) provider becomes the primary provider for the encounter. All
procedures and diagnoses are assigned to the distributed provider in VistA PCE.
VA Dental wants to give credit/RVU time, etc. to residents who actually perform the procedures, and all of
this is filed to VistA DES. However, to meet the VA requirement that gives credit for the encounter to the
attending (distributed), requires this to be filed in VistA PCE.
DRM Plus users may import a TIU Note Boilerplate into a patient’s TIU progress note. If the Note
Boilerplate parameter is set with a check mark, an informational screen displays when selecting a TIU
progress note or consult title, if that title has a note boilerplate associated with it. The informational screen
allows a user to select Yes or No to the question of importing the note boilerplate. If this parameter is NOT
set with a check mark then the note boilerplate imports into the patient’s TIU progress note without an
opportunity to decline this action. This parameter is located under the Tools menu User Options
submenu General tab Other Parameters button.

May 2018 DRM Plus Administrator Manual v6.9 263
CPRS templates automatically import into a patient’s TIU progress note if the TIU note/consult title selected
is associated with a CPRS template and there is no option for the user to decline this template import. When
the template displays or opens, complete or fill-in the appropriate information on the template and close or
finish it. The information entered on the template imports into the patient’s TIU progress note. Please note:
DRM Plus does NOT support Reminder Dialog or COM objects CPRS templates.
There are generally two types of TIU progress notes created using DRM Plus: 1) using the Exam tab or 2)
NOT using the Exam tab. A TIU progress note created using the Exam tab sequences DRM Plus objects in
the order designed and approved by the VA Dental Exam Committee. The sequencing of DRM Plus objects
in the Note Objects Sequence parameter screen is overwritten by the Exam tab sequence design when the
Exam tab is used. TIU progress notes created without using the Exam tab sequence DRM Plus objects in
the order set by the user in the Note Objects Sequence parameter screen. This parameter is located by
selecting the following: Tools menu User Options submenu Progress Note tab Set Note
Sequence button. The Note Boilerplate in the list of Note Objects Sequence parameter screen includes
both TIU Note Boilerplates and supported CPRS templates.
All DRM Plus data objects displayed in the left narrow window of the Progress Note screen may be
imported into the TIU progress note automatically. This depends on whether the parameters are activated by
the end-user. However, most of the data objects are NOT allowed to be de-selected by the end-user for the
automatic importing process. These parameters are located by selecting Tools menu User Options
submenu Progress Note tab Progress Note Data button.
DRM Plus Code Boilerplates are listed individually with the DRM Plus objects on the Progress Note
screen. DRM Plus users who have created code boilerplates can now import them into a TIU progress note
by clicking the desired Code Boilerplate object, listed with DRM Plus objects. Using the cursor, set the
object where it is sequenced in the TIU progress note, then double-click to import the object.
Text files may be created and saved in a preferred directory. Right-click in a Progress Note window and
click Import Text File option to navigate to and open the saved file. The file is then placed in the TIU
progress note as designated by the cursor placement.
Follow these steps to set up a file for importing:
1. Create a folder in an appropriate directory (usually a server drive).
2. From the Tools menu User Options submenu Set File Folder button, navigate to the folder
created in Step 1. Set the folder by double-clicking it.
3. Create a text file from the Tools menu Windows Notepad submenu and save it as a .txt file in
the designated folder from Step 1.
If the user clicks the Finish button before the provider’s electronic signature is entered, the dental data is
filed in VistA (PCE, DES and TIU) as an unsigned progress note, and may be viewed with CPRS. If the
electronic signature is entered before clicking the Finish button, the dental data is filed as a signed progress
note in VistA (PCE, DES and TIU).
When the user clicks the Finish button, a prompt may display if there are no planned items, and if the
patient status is Active. Correctly identifying the patient’s status is important for reporting. The user should
click the proper radio button (Active, Inactive or Maintenance) and then click the OK button.

May 2018 DRM Plus Administrator Manual v6.9 264
Reports – Non-Clinical Time by Provider
The Non-Clinical Time by Provider report displays an approximate numerical unit of days (1 day = 8
hours). Accumulation of less than 4 hours results in rounding down to the nearest whole number day, and
accumulation of 4 or greater hours round up to the nearest whole number day.
Code Boilerplates
Multiple boilerplates may be added for a single code, or multiple codes may be associated with the same
boilerplate. The user may establish as many boilerplates and related codes as necessary.
If a DRM Plus Administrator creates a code boilerplate in their Administrative Toolbox submenu, then
every user may use the code boilerplate by entering the name of that code boilerplate to their parameter.
Enter the name precisely as it was entered by the DRM Plus Administrator and click the OK button in the
end-user’s User Settings screen. This action imports the administrative code boilerplate to the end-user’s
code boilerplates.
Last Broker Call
The Last Broker Call submenu is used by the IT or ADPAC personnel to document problems. It is NOT
usually accessed by providers.
Recent Dental Activity
This section on the Cover Page tab displays the most recent visit date for selected types of procedure codes.
Hover the cursor over the heading to display all of the ADA procedure codes; the following list comprise the
procedure codes for each heading.
Last Qualifying Exam = D0120, D0150 or D0180
Last Comprehensive Exam = D0150 or D0160
Last Brief Exam = D0120, D0140 or D0170
Last Periodontal Exam = D0180
Last Panorex Image = D0330
Last Full Mouth Image = D0210
Last Bitewing Image = D0270, D0272, D0273, D0274 or D0277
Last CBCT Image = D0364, D0365, D0366, D0367, D0368, D0380, D0381, D0382, D0383,
D0384
Last Prophylaxis = D1110, D4341, D4342, D4346, D4355 or D4910
Last Visit = the last dental visit date the encounter was filed on.
Last Provider = the provider that filed the last encounter.
May 2018 DRM Plus Administrator Manual v6.9 265
Diagnostic Findings
The following table explains the actions required to enter a Diagnostic Finding:
ICON
CLICK
TOOTH
CLICK
SURFACE
CLICK ROOT
POP
-
UP
SCREEN
ADDITIONAL
COMMENTS
Restore
As many as
required
As many as
required
No
Material or
surfaces
Graphic in green
Missing
As many as
required
No
As many as
required
Selected Roots
Graphic for roots is
outlined
Observe
As
many as
required
No
As many as
required
Selected Roots
Tooth outlined in
red
Partial
As many as
required
No
No
Cancel or
Complete
Graphic allows root
condition graphics
to show. Graphic in
purple.
Denture
Any tooth
No
No
None
Graphic allows root
condition graphics
to show. Graphic in
purple.
Implant
As many as
required
No
No
None
Graphic in violet
Sealant
No
As many as
required
No
None
Graphic in green
Endo
No
No
Yes
Materials and
roots
Graphic color
denotes material
Apico
No
No
Yes
Select
roots
Graphic in red
Retro
No
No
Yes
Selected roots
and materials
Requires Apico to
be present.
Graphic denotes
material
Bridge
See special
instructions
Conn Bar
See Special
Instructions
Hemi
No
No
As many as
required
Selected roots
Graphic in
dark gray
Appendix D – Icon Definitions

May 2018 DRM Plus Administrator Manual v6.9 266
ICON
CLICK
TOOTH
CLICK
SURFACE
CLICK ROOT
POP
-
UP
SCREEN
ADDITIONAL
COMMENTS
Coping
Yes
No
No
None
Graphic in green
P&C
No
No
As many as
required
Selected roots
and materials
Graphic in green
and denotes material
Impact
As many
as
required
As many as
required
As many as
required
Selected
surfaces and
roots
Graphic in light
blue, roots in blue-
green
Def Rest
Yes
As many as
required
Yes
Selected
surfaces, roots
and materials
Graphic in yellow,
denotes material
Caries
Yes
As many
as
required
As many as
required
Selected
surfaces and
roots
Graphic in red, root
caries initiates
description box
Drifting
Yes
No
No
Direction
Graphic is yellow
arrow to the left of
tooth
Tipped
Yes
No
No
Direction
Graphic is light blue
arrow to left of tooth
Rotated
Yes
No
No
Direction
Graphic is green
arrow to left of tooth
Ret Root
No
No
As many as
required
None
Graphic removes
crown
UndrCont
No
As many as
required
No
Selected
surfaces
Graphic is red and
yellow
OverCont
No
As many as
required
No
Selected
surfaces
Graphic is red and
yellow
Overhang
No
As many as
required
No
Selected
surface
Graphic is red and
yellow
Lesion
No
No
As many root
surfaces as
required
Selected roots
Can also click
implant. Graphic is
a red circle.
Faceted
No
As many
as
required
No
Selected
surfaces
Graphic is red and
yellow

May 2018 DRM Plus Administrator Manual v6.9 267
ICON
CLICK
TOOTH
CLICK
SURFACE
CLICK ROOT
POP
-
UP
SCREEN
ADDITIONAL
COMMENTS
Cracked
No
As many as
required
As many as
required
Selected
surfaces and
roots
Graphic is red and
yellow
Chipped
No
As many as
required
No
Selected
surfaces
Graphic is red and
yellow
Supr/Sub
Yes
No
No
Direction
Graphic is red arrow
Open Ct
Yes
No
No
None
Graphic is red arrow
to right of tooth
Abfract
No
Facial or
lingual
No
None
Graphic is blue
arrows
Dentition
No
No
No
Dentition box
Converts graphic to
juvenile. Must be
done before other
entries
Perm/Prin
Yes
No
No
Dentition Box
Designate selected
tooth as primary or
permanent
E
dentulous
Any tooth
No
No
None
Graphic removes all
teeth and
roots in
arch
Note: Certain Diagnostic Findings or Completed Care procedures, once entered, display graphically on all
screen views. These items are, if entered from the Diagnostic Findings screen: missing, implant, impacted,
retained root, hemi section, dentition, and observe. If entered from the Completed Care screen: extract,
hemi section, implant and observe.

May 2018 DRM Plus Administrator Manual v6.9 268
Treatment Plan
ICON
CLICK
TOOTH
CLICK
SURFACE
CLICK ROOT
POP
-
U
P
SCREEN
ADDITIONAL
COMMENTS
Restore (2)
Yes
As many as
required
No
Code Selection
box
Graphic in Blue
Extract
Yes
No
Yes
Code Selection
Box
Graphic in shadow
Observe
As many as
required
No
No
None
Tooth outlined in red
Partial (1)
As many as
required
No
No
Cancel or
Complete
Graphic allows root
condition graphics to
show
Denture
Any tooth
No
No
Code Selection
box
Graphic allows root
condition graphics to
show.
Implant
Yes
No
No
Code Selection
Box
Graphic in violet,
Diagnostic Finding
must be Missing
Sealant
No
As many as
required
Yes
Code Selection
Box
Graphic in blue, no
root graphic
Endo
No
No
Yes
Code Selection
Box
Graphic in blue
Apico
No
No
Yes
Code Selection
Box
Graphic in red
Retro
No
No
Yes
Code Selection
Box
Requires Apico to be
present. Graphic in
blue.
Bridge (1)
Code Selection
Box
See special
instructions.
Conn Bar (1)
Code Selection
Box
See special instructions
May 2018 DRM Plus Administrator Manual v6.9 269
ICON
CLICK
TOOTH
CLICK
SURFACE
CLICK ROOT
POP
-
UP
SCREEN
ADDITIONAL
COMMENTS
Hemi
No
No
As many as
required
Code Selection
Box
Graphic in gray
Coping
Yes
No
No
Code Selec
tion
Box
Graphic in blue
P&C
No
No
As many as
required
Code Se
lec
tion
Box
Graphic in blue
Perio But
-
tons
No
No
No
None
No Graphic. See Speed
Code instructions.
Certain codes associated with these icons are defined as ranged codes. Ranged codes can only be entered by
clicking the proper icon button. The ADA Codes icon, CPT Codes icon, Quick Codes icon or Speed Code
icons are NOT allowed for entering ranged codes.
To designate a root restoration, click the Restore icon. Click the tooth surface that corresponds to the root
surface. Using a tooth note, or the description edit feature in the transaction table, explain the root
restoration.
Note: Certain Diagnostic Findings or Completed Care procedures, once entered, appear graphically on all
screen views. If these items are entered from the Diagnostic Findings screen, they are: missing, implant,
impacted, retained root, hemi section, dentition, and observe. If entered from the Completed Care screen,
they are: extract, hemi section, implant, and observe.

May 2018 DRM Plus Administrator Manual v6.9 270
Completed Care
ICON
CLICK
TOOTH
CLICK
SURFACE
CLICK ROOT
POP
-
UP
SCREEN
ADDITIONAL
COMMENTS
Restore (2)
Yes
As many as
required
No
Code Selection
Box
Graphic in Green
Extract
Yes
No
Yes
Code Selection
Box
Tooth disappears. Root
graphic in dark gray.
Observe
As many as
required
No
No
None
Tooth outlined in red
Partial (1)
As many as
required
No
No
Cancel or
Complete. Then
Code Selection
box.
Graphic
allows root
condition graphics to
show. Graphic in
purple.
Denture
Any tooth
No
No
Code Selection
Box
Graphic allows root
condition to show.
Graphic in blue-purple.
Implant
Yes
No
No
Code Selec
tion
Box
Graphic in violet,
Diagnostic Finding
must be Missing
Sealant
No
As many as
required
Yes
Code Selection
Box
Graphic in green. No
root graphic.
Endo
No
No
Yes
Code Selection
Box
Graphic in pink.
Apico
No
No
Yes
Code Selection
Box
Graphic in red.
Retro
No
No
Yes
Code Selec
tion
Box
Requires Apico to
be
present. Graphic in
green.
Bridge (1)
Code Selection
Box
See Special Instructions
May 2018 DRM Plus Administrator Manual v6.9 271
ICON
CLICK
TOOTH
CLICK
SURFACE
CLICK ROOT
POP
-
UP
SCREEN
ADDITIONAL
COMMENTS
Conn Bar (1)
Code Selection
Box
See Special Instructions
Hemi
No
No
As many as
required
Code Selection
Box
Graphic in gray
Coping
Yes
No
No
Code Selec
tion
Box
Graphic in green
P&C
No
No
As many as
required
Code Selec
tion
Box
Graphic in green
Perio But
-
tons
No
No
No
None
No Graphic. See Speed
Code instructions.
Certain codes associated with these icons are defined as ranged codes. Ranged codes can only be entered by
clicking the proper icon button. The ADA Codes icon, CPT Codes icon, Quick Codes icon or Speed Code
icons are NOT allowed for entering ranged codes.
To designate a root restoration, click the Restore icon. Click the tooth surface that corresponds to the root
surface. Using a tooth note, or the description edit feature in the transaction table, explain the root
restoration.
Note: Certain Diagnostic Findings or Completed Care procedures, once entered, appear graphically on all
screen views. If these items are entered from the Diagnostic Findings screen, they are: missing, implant,
impacted, retained root, hemi section, dentition, and observe. If entered from the Completed Care screen,
they are: extract, hemi section, implant, and observe.
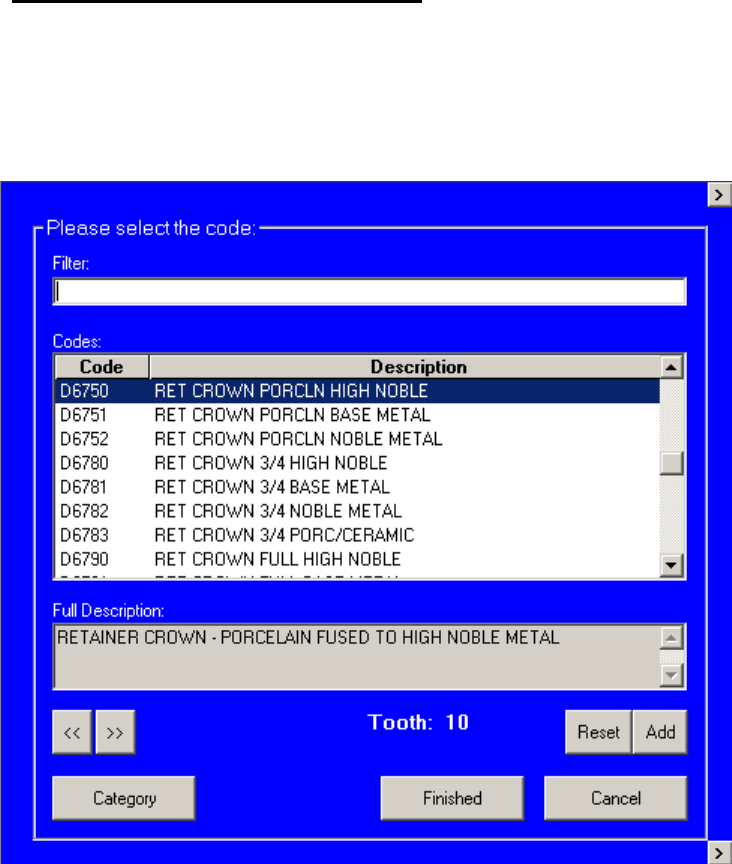
May 2018 DRM Plus Administrator Manual v6.9 272
Special Descriptions – Bridge Icon
Place the cursor on the first tooth included in the bridge and drag the cursor to the last tooth in the range of
teeth included in the bridge so that the ‘bar’ drawn for the bridge is one continuous line encompassing all
of the areas (teeth, whether missing or not) included in the bridge. The Code Selection screen displays, with
the lowest number tooth selected, as shown below.
Figure 317: Procedure Code Selection Screen
Select the appropriate code and click the Add button. The Procedure Code selection screen moves to the
first pontic tooth. Select the appropriate code and click the Add button again. Continue this process until all
required teeth and codes have been selected. Click the Finished button once the selection process is
complete.
Note: The << and >> buttons may be clicked to move backward or forward to different teeth for code
selection. The Reset button, when activated by using the << and >> buttons, clears all previously entered
codes for the selected tooth.

May 2018 DRM Plus Administrator Manual v6.9 273
Special Descriptions – Conn Bar Icon
This functionality works for all three view screens of Diagnostic Findings, Treatment Plan and
Completed Care. Place the cursor on the first tooth location and drag it to the final tooth location. When
entering a connector bar from the Treatment Plan screen or the Completed Care screens, the Procedure
Code selection screen displays, with no tooth selected. DRM Plus defaults to the correct connector
procedure code, depending on what conditions the connector bar was entered on. Click the OK button to
complete the connector bar entry.
Special Descriptions – Notes Icon
Please see the Notes section in the Chart/Treatment – Periodontal Chart chapter of this manual. This icon
works the same for all three Treatment & Exam screen views.
Items to consider on tooth notes:
Teeth designated as primary show in the tooth drop-down menu with the appropriate letter without
a number. A tooth designation for Supernumerary teeth is displayed after tooth #32 in the drop-
down menu.
When a tooth-specific note has been entered, the tooth number in the graphical chart on the
Diagnostic Findings, Treatment Plan, Completed Care and Periodontal Chart screens displays
in yellow.
Previously entered notes (tooth/patient note) appear disabled. The note appears disabled if it was
saved as unfiled data and DRM Plus is closed and reopened. It also becomes disabled when an
assistant saves unfiled data to a provider. When the provider re-opens DRM Plus to complete the
encounter, they may edit-delete the note (tooth/patient note) by clicking the New Entry button.
This activates the disabled entry so the provider is able to modify or delete the note before the
encounter is finished.
After entering any new dental data into Patient Notes or Tooth Notes windows select the Notes
icon to save and close the Notes screen. Closing the Notes screen before opening any other screen
in DRM Plus is the only action that saves the data entered into the Notes screen.
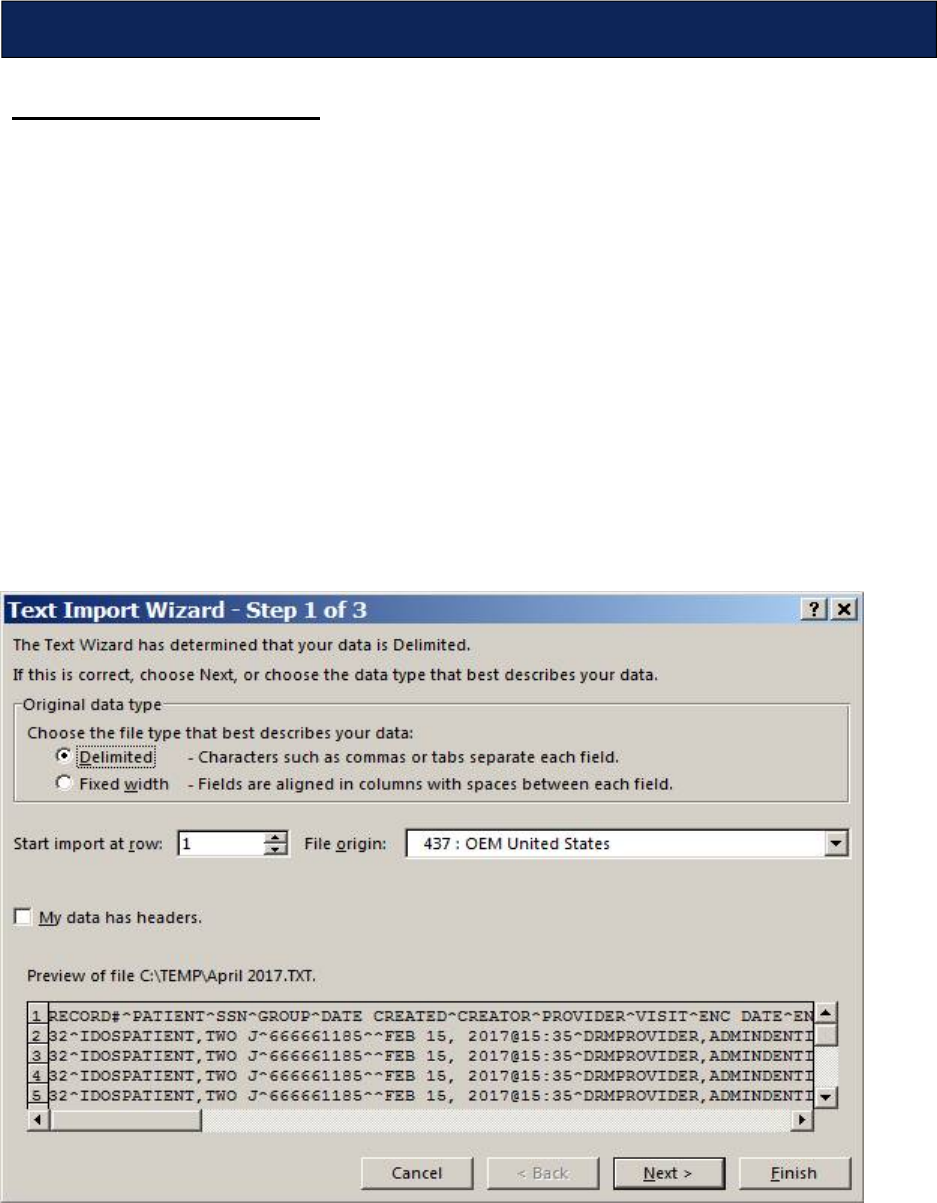
May 2018 DRM Plus Administrator Manual v6.9 274
Developing Excel Reports
To open Excel:
1. Click the Excel shortcut (if available) If unavailable;
2. Click the Start button.
3. Click the Programs button.
4. Click Microsoft Office.
5. Click Microsoft Excel. A blank Excel workbook opens.
To open a saved file:
1. Select the File menu from the top menu bar.
2. Click the Open option.
3. Navigate to the directory/network where the extract file is saved.
4. Navigate to the saved .txt file and click Open or double-click the file name.
5. A screen similar to the one below is displayed.
Figure 318: Developing Excel Spreadsheet Reports
6. Click the Delimited radio button.
Appendix E – Create Reports in MS Excel and Access
May 2018 DRM Plus Administrator Manual v6.9 275
7. Click the Next button. Another screen displays.
Figure 319: Delimiters Options
8. The Tab check box is checked by default.
9. Click the Other check box.
10. Type a ^ (<Shift> + <F6>) within the window beside Other. Then click the Next button.
11. Click the Next button. A similar screen displays.
May 2018 DRM Plus Administrator Manual v6.9 276
Figure 320: Text Import Wizard Final Screen
12. Click the Finish button. The extracted data displays in Excel.
May 2018 DRM Plus Administrator Manual v6.9 277
Figure 321: Report Preview
13. The text file can now be saved in an Excel format (.xls file). Select File from the top menu bar,
then choose the Save As option. Rename the file and save with the .xls suffix.
14. The Excel worksheet can now be modified to create any number of custom reports to meet specific
needs. The Excel tools are powerful, and numerous report types can be created depending on the
user’s level of Excel proficiency.
Examples of possible reports include:
All Procedures by Provider
All Procedures by Patient
All Procedures by Clinic
Reports by ADA Code
Specific ADA Codes by Provider
Reports by Diagnosis
Creating Custom Reports Using Excel
Reports can be customized using a variety of Excel functions including: deleting, expanding, formatting,
sorting and subtotaling fields. Data may also be copied to other Excel worksheets to create numerous
separate reports.
May 2018 DRM Plus Administrator Manual v6.9 278
Deleting Columns or Rows
Figure 322: Creating Custom Reports in Excel - Deleting Columns or Row
To delete a column or row:
1. Click the column or row header. This highlights the column or row for deletion.
2. Click the Home button.
3. Click the Delete button. This function can be initiated by right-clicking with the cursor in the
highlighted area.
Expanding Columns or Rows
Put the cursor on the line between the column heading letters. The cursor turns into a cross with two arrows.
Holding the left mouse button down and dragging right or left expands or contracts the column or row.
Double-clicking automatically expands or contracts the column or row to fit the contents.
Field Formatting Options
Click the Home menu. The following is displayed.

May 2018 DRM Plus Administrator Manual v6.9 279
Figure 323: Field Formatting Options
Click Format button and then the Format Cells submenu. The following screen displays.
Figure 324: Format Cells
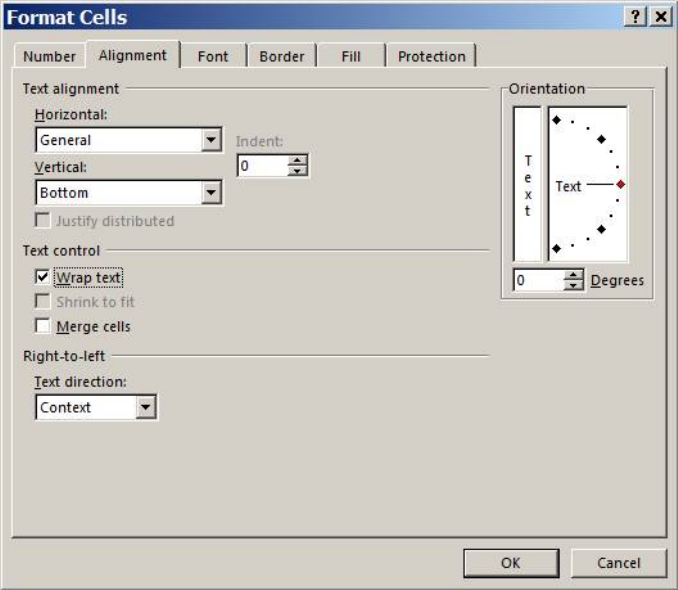
May 2018 DRM Plus Administrator Manual v6.9 280
Select the desired option, then enter the desired changes.
Set Horizontal/Vertical settings to make the report easier to read. Setting the text control to wrap text
automatically wraps the text within the space allotted for the cell. The height of the cells in a row or column
changes. Click the Alignment tab to display the following screen.
Figure 325: Text Alignment Options
Click the Wrap text check box. Click the OK button to complete the process.
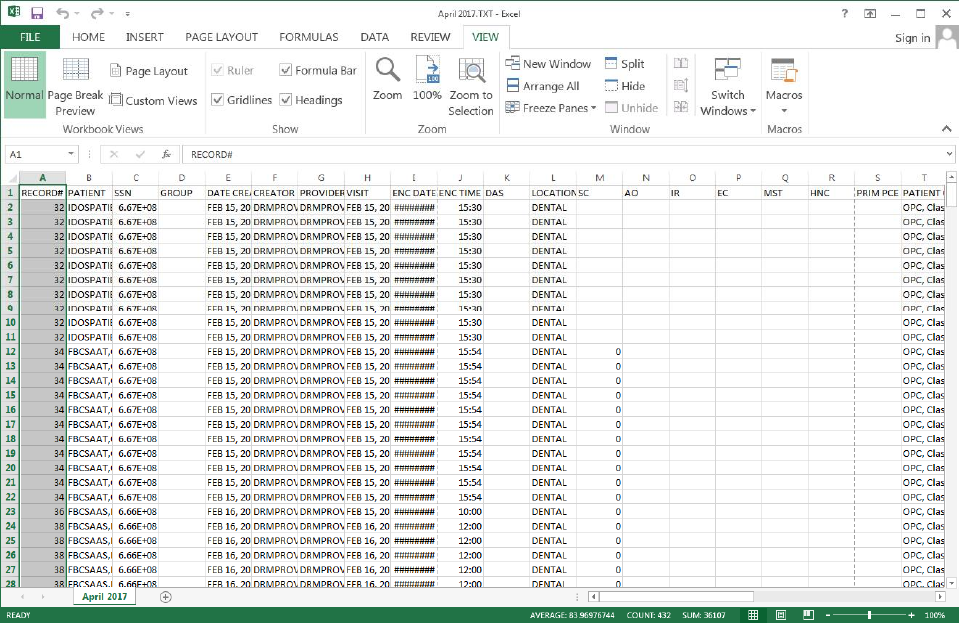
May 2018 DRM Plus Administrator Manual v6.9 281
Creating a Header for a Report
1. Click the View menu.
2. Click Page Layout button.
Figure 326: Header and Footer Option
Selecting the Page Layout button results in the following screen display.
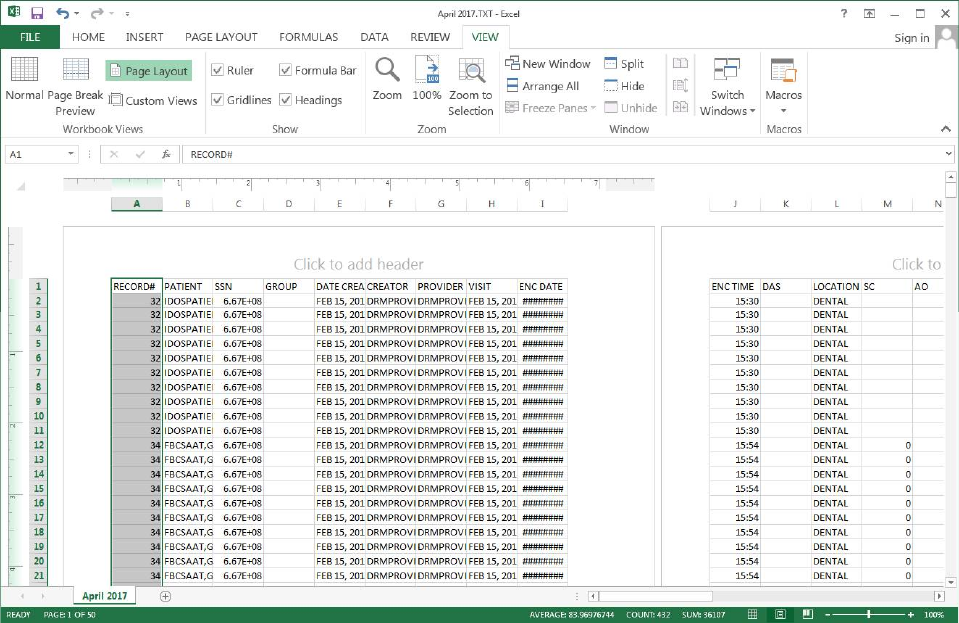
May 2018 DRM Plus Administrator Manual v6.9 282
Figure 327: Page Layout Screen
Click in the field labeled ‘Click to add header’ to enter a header or scroll to the field labeled ‘Click to add
footer’ to enter a footer.
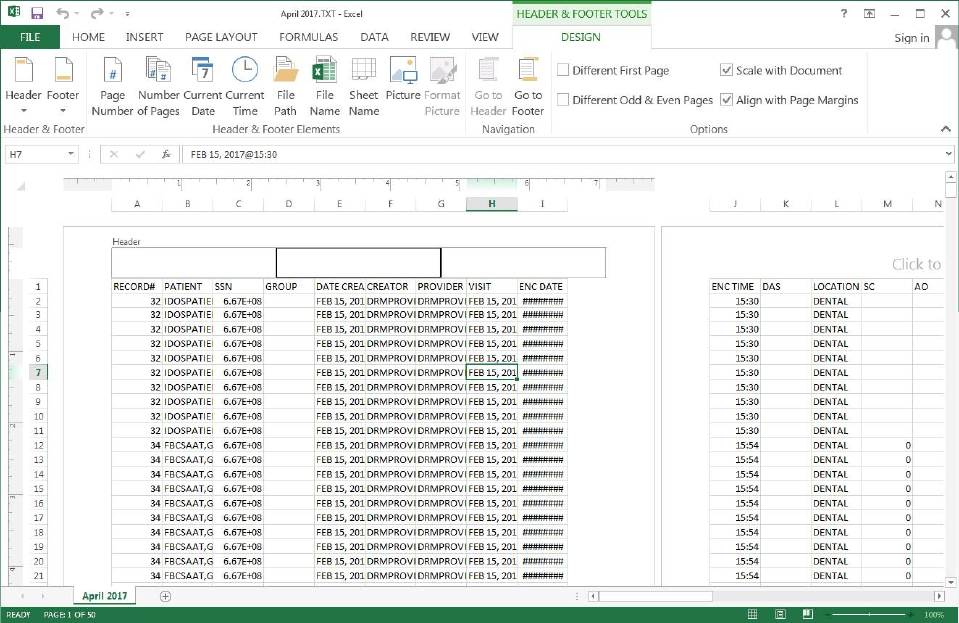
May 2018 DRM Plus Administrator Manual v6.9 283
Figure 328: Header & Footer Tools Screen
Sorting Data
To sort data:
1. Highlight the fields to include in the sort.
2. Click the Data menu.
3. Click the Sort button.
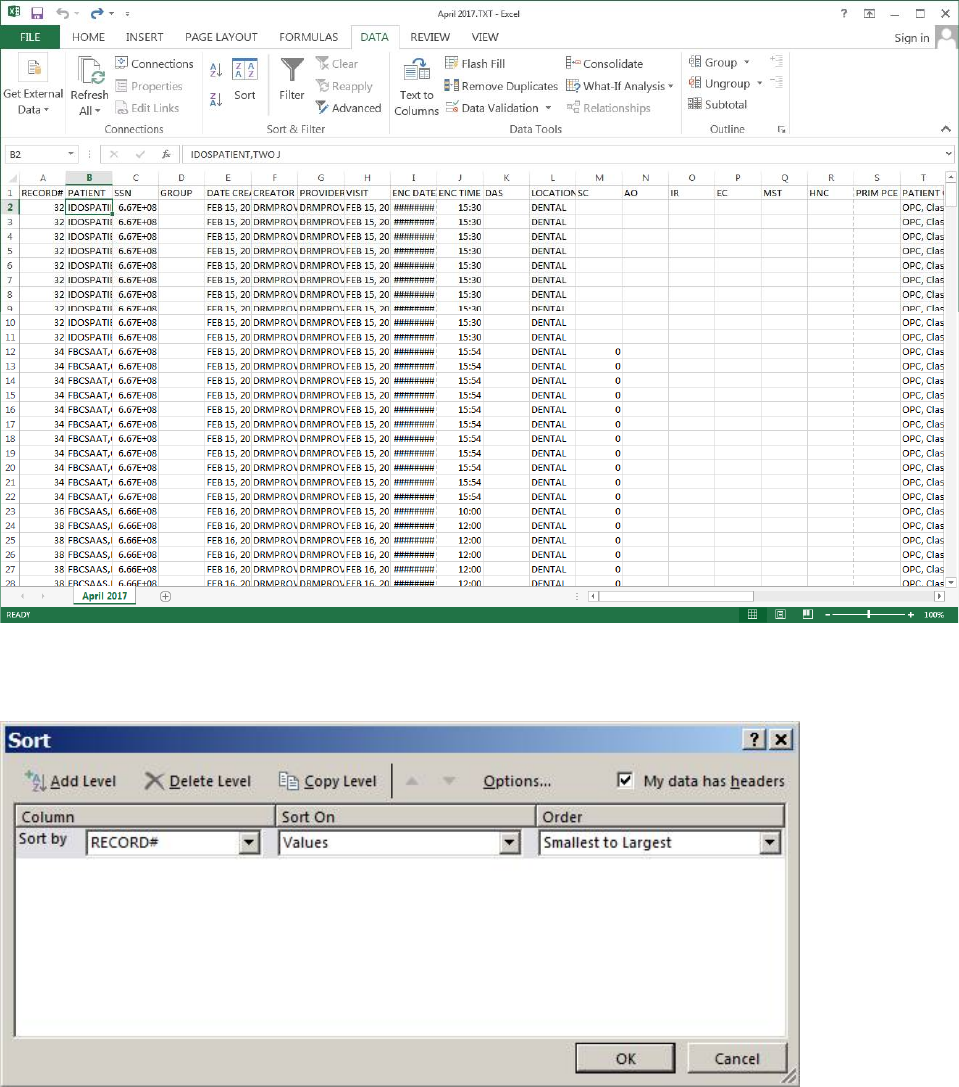
May 2018 DRM Plus Administrator Manual v6.9 284
Figure 329: Sorting Data
The Sort screen displays.
Figure 330: Data Sort Options
Choose the sorting options by clicking the drop-down menus and selecting the desired options.
Subtotaling Data
To subtotal data:
1. Highlight the fields to be included in the sub-total. Then click Data menu from the menu bar.
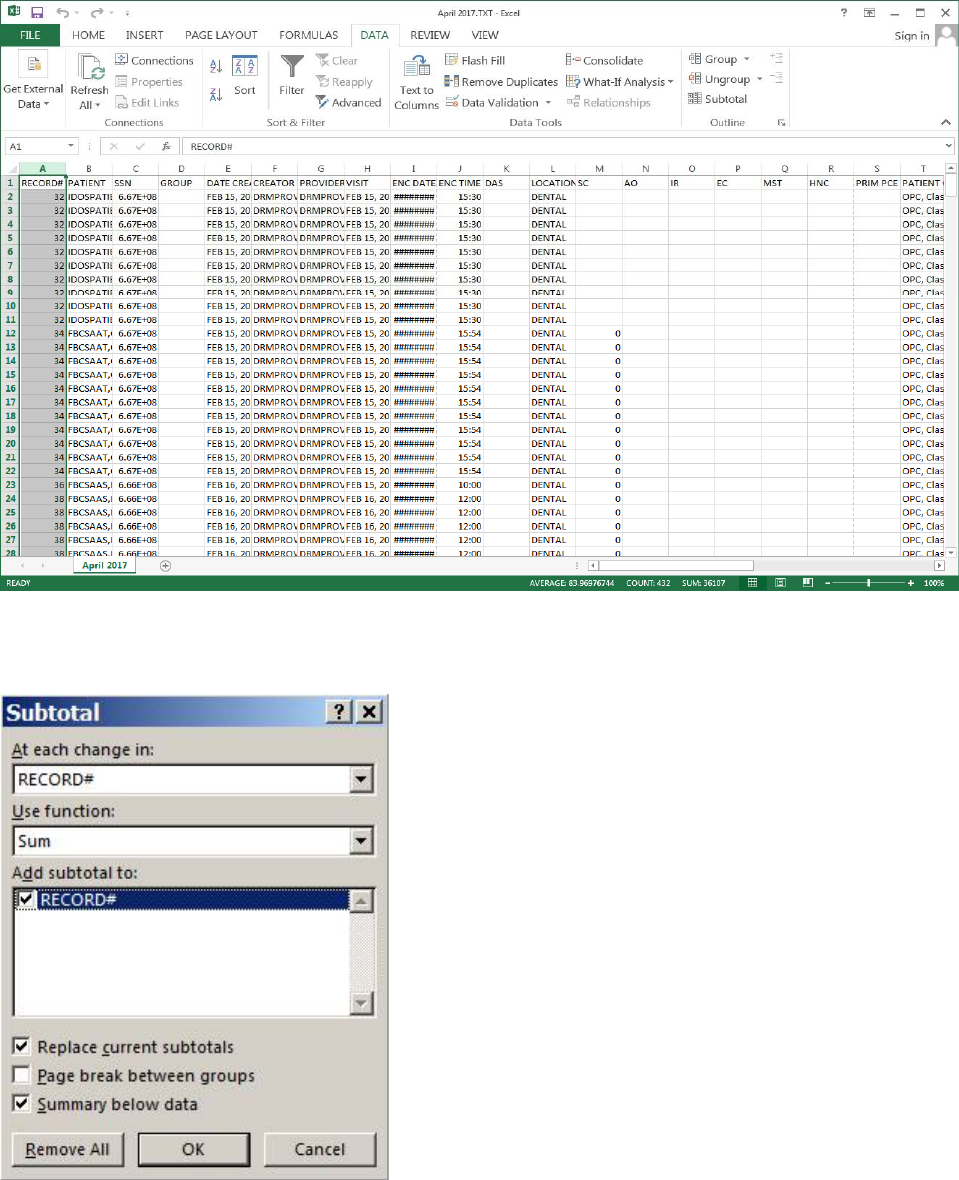
May 2018 DRM Plus Administrator Manual v6.9 285
Figure 331: Subtotaling Data
2. Click Subtotal button and the following screen displays.
Figure 332: Subtotal Options
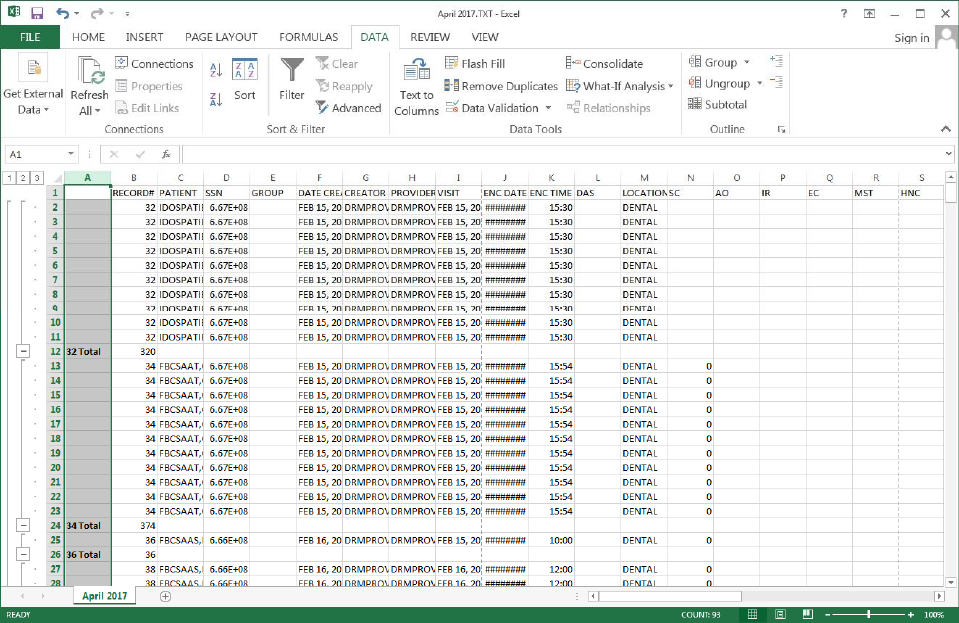
May 2018 DRM Plus Administrator Manual v6.9 286
Pull Down Options
At Each Change In: Select an item to perform subtotals when a change occurs. The example uses
Record #.
Use Function: This example counts the number of times a provider performs a CPT Procedure in
a given time frame.
Add Subtotal To: Location subtotals displays.
Below is a sample report:
Figure 333: Sample of History File
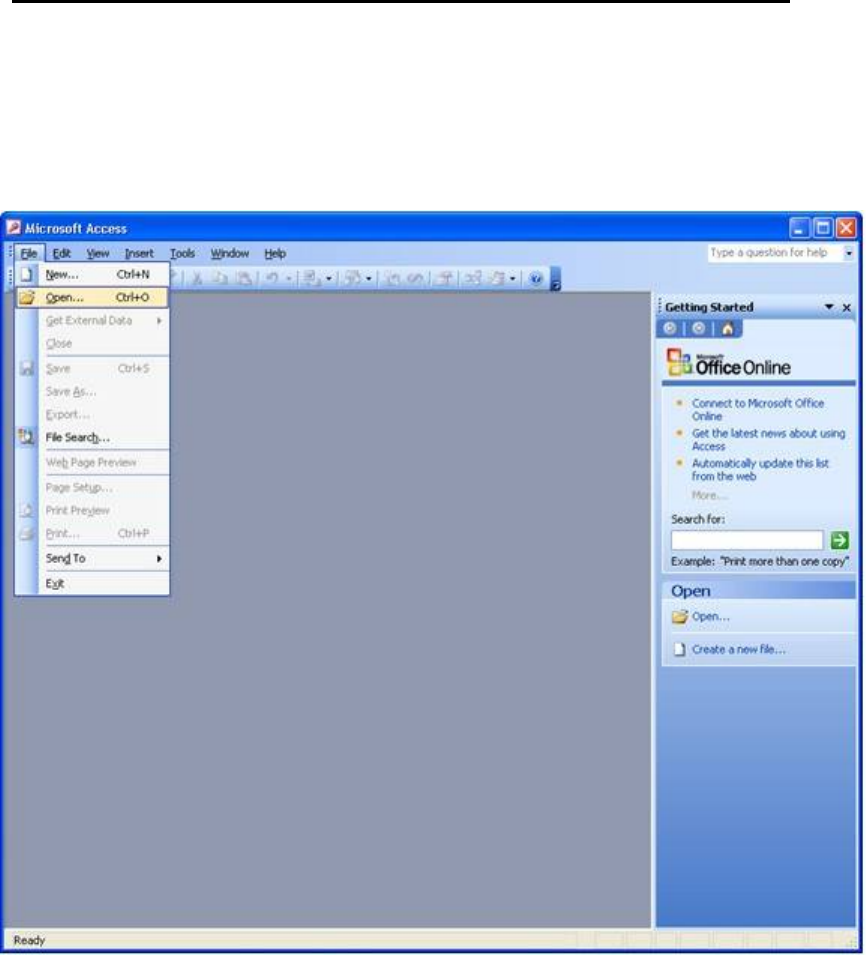
May 2018 DRM Plus Administrator Manual v6.9 287
Importing the DRM Plus Extract Text File into an Access Report
After creating a .txt file through the extract function, and saving this information in a preset folder, this
information can be placed in Microsoft Access for reporting purposes.
To import a DRM Plus extract file into Microsoft Access:
1. Open Microsoft Access. Click the File drop-down menu and choose the Open option.
Figure 334: Import Extract File into Microsoft Access
2. The Open window displays. Using the drop-down menu, search and highlight the area where the
preset extract folder is located. The preset extract folder contains the information previously
extracted from DRM Plus.

May 2018 DRM Plus Administrator Manual v6.9 288
Figure 335: Open File
3. Once the folder is located in the Open screen, click and highlight it.
4. Click the Files of type: drop-down menu and choose All Files (*.*) as the extension.
5. Click and highlight the .txt file extraction. To access the file, choose one of the following options:
double-click the .txt file; or, with the .txt file highlighted, click the Open button.
6. The following wizard screen displays, and the radio button preceding Delimited... must be
selected. Select the Next button to continue the process.
May 2018 DRM Plus Administrator Manual v6.9 289
Figure 336: Link Text Wizard
7. Click the Next button to continue the process.
May 2018 DRM Plus Administrator Manual v6.9 290
8. Within the Link Text Wizard screen, select the Other radio button and in the text area beside it,
type a ^ (<Shift> + <F6>).
Figure 337: Link Text Wizard
9. To continue, click the Finish button.
10. When the Finished linking table... screen displays, click the OK button.
11. The file displays in the Access Database screen.
May 2018 DRM Plus Administrator Manual v6.9 291
Figure 338: File in Access Database Screen
12. Click the Reports option, which displays on the remaining screen.
13. Highlight and double-click the Create report by using wizard feature.
Figure 339: Create Report By Using Wizard
May 2018 DRM Plus Administrator Manual v6.9 292
14. The Report Wizard window displays. Indicate the desired fields in the report by choosing by
highlighting the field and moving it to the selected fields area using the double arrow (>>) buttons
located in the center of the screen. Once all desired fields are selected, click the Next or Finish
button to continue (or finish).
Figure 340: Choose Desired Fields for Report
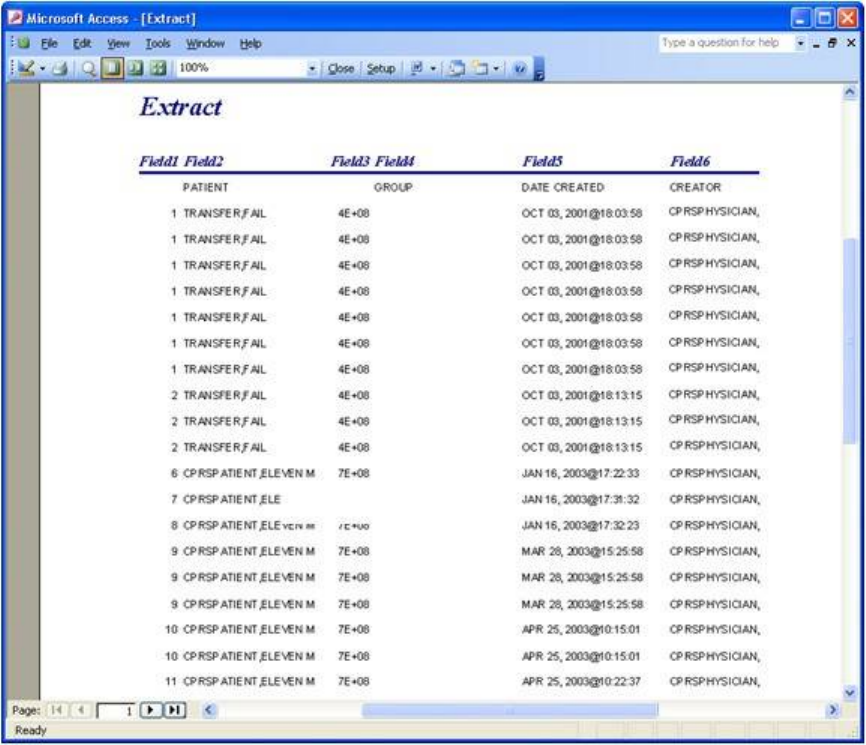
May 2018 DRM Plus Administrator Manual v6.9 293
15. Customized Microsoft Access reports display with the selected field information.
Figure 341: Customized Microsoft Access Report
The number of pages for any report depends on the number of fields selected. Total viewing of the Access
report may require the use of the Page arrow buttons, which display on the bottom left of the screen.
May 2018 DRM Plus Administrator Manual v6.9 294
Importing the DRM Plus Extract Excel File into Access Database
To import the DRM Plus extract file (Excel spreadsheet) into a new Microsoft Access database:
1. Open Microsoft Access.
2. Create a new database.
Figure 342: Import Excel File in Microsoft Access
3. Select Create a blank database.
4. Save the new database.
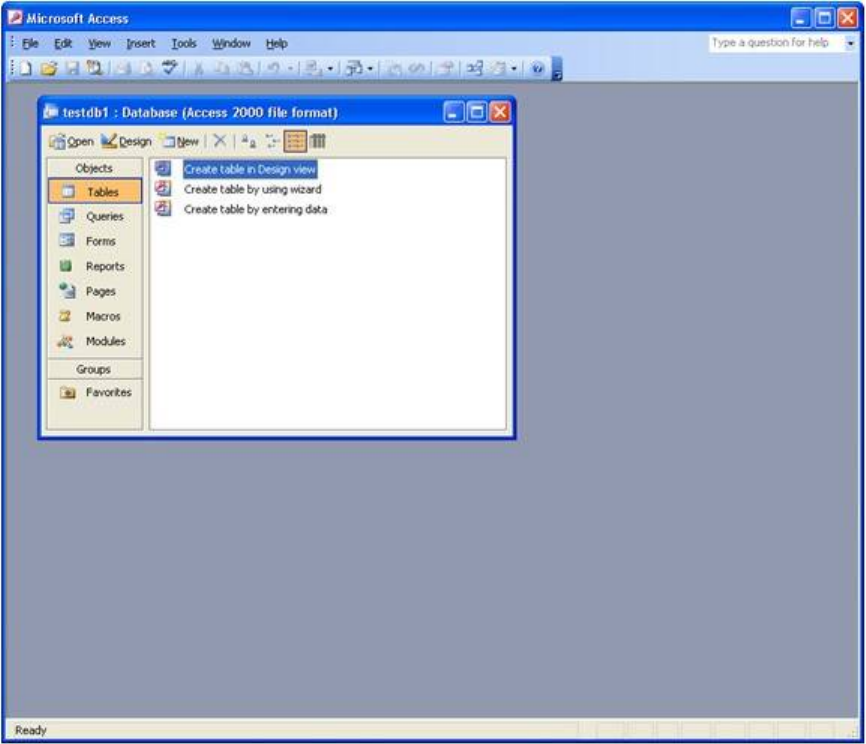
May 2018 DRM Plus Administrator Manual v6.9 295
Upon saving the database, the following screen displays.
Figure 343: Microsoft Access Tables Window
To import an extract Excel file:
1. Click the File drop-down menu.
2. Click the Get External Data option.
3. Click the Import option.
4. Select the desired Excel file to import.
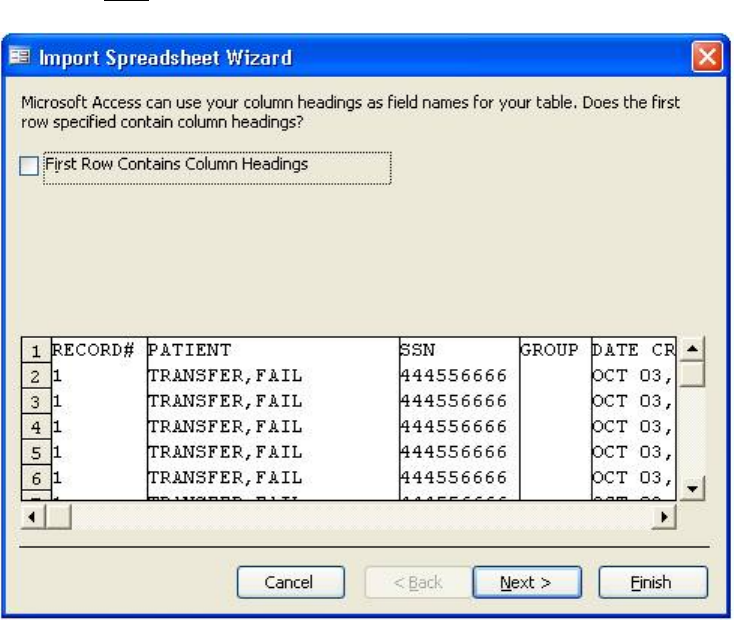
May 2018 DRM Plus Administrator Manual v6.9 296
5. Click the Import button, and the Import Spreadsheet wizard displays. In the event that this wizard
is NOT installed, contact local IT for additional support.
Figure 344: Import Spreadsheet Wizard
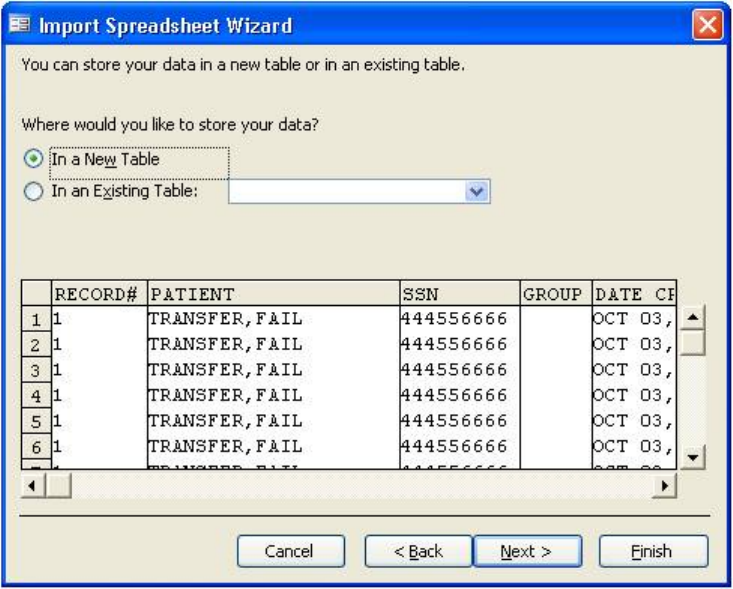
May 2018 DRM Plus Administrator Manual v6.9 297
6. Select the defaults, then click the Next button to continue.
Figure 345: Select Defaults for Storing Data
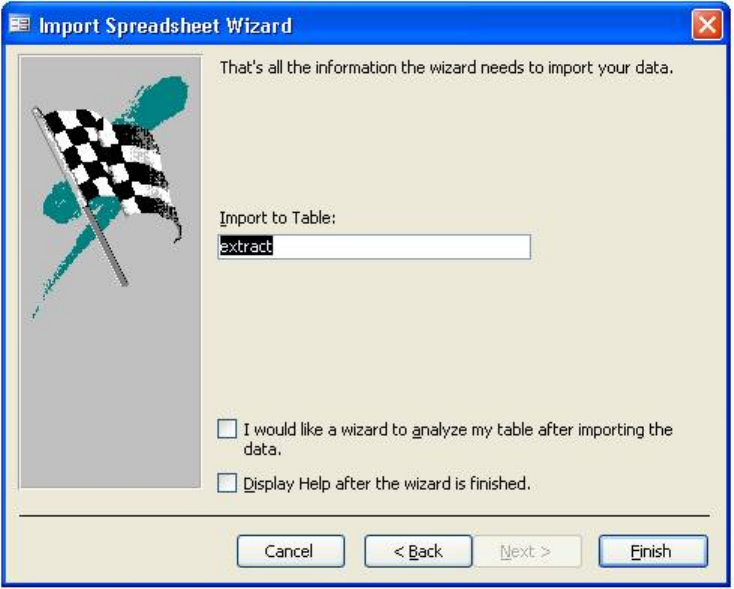
May 2018 DRM Plus Administrator Manual v6.9 298
7. Continue to select defaults until the following screen displays.
Figure 346: Import to Table
8. The extract spreadsheet is now in a Microsoft Access database.
Note: Microsoft Access training may be available. Contact local IT for further information.
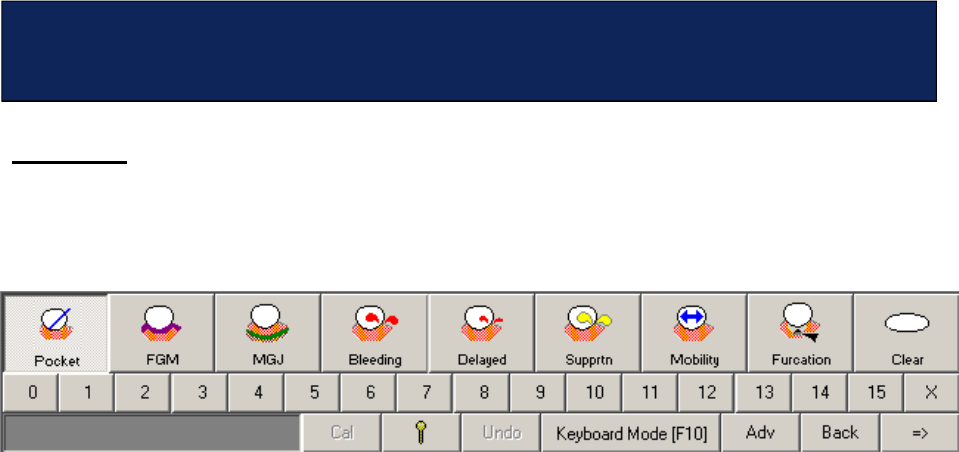
May 2018 DRM Plus Administrator Manual v6.9 299
Overview
The Periodontal screen is designed for data entry using the mouse. Data entry using the keyboard is also an
option. Clicking the Keyboard Mode key, <F10>, initiates keyboard navigation and data entry on this
screen.
Figure 347: Keyboard Mode Button on Periodontal Chart Screen
When this button is clicked, all of the icons are disabled and the keyboard is activated. The keyboard
functions are described in this section.
Navigating the Periodontal Screen
Use the following key strokes to change the screen views.
Arch Views
The screen moves from the existing view to any of the other views by using the following keys:
U = Upper
L = Lower
N = Lingual
F = Facial
F11 = Full (This screen must be closed by using the mouse.)
Cursor Movement
There are four options for moving the cursor to select a tooth/surface.
Enter: Moves the cursor one surface in the direction of the higher numbered tooth.
Backspace: Moves the cursor one surface in the direction of the lower numbered tooth.
“>” with or without the <Shift> key: Moves the cursor one surface in the direction of the higher numbered
tooth.
“<” with or without the <Shift> key: Moves the cursor one surface in the direction of the lower numbered
tooth.
Press the <A> key to toggle the Auto Advance function on or off.
Appendix F – Using the Keyboard to Enter
Periodontal Data
May 2018 DRM Plus Administrator Manual v6.9 300
Entering Data
Entering data from the keyboard requires the cursor to be placed on the desired tooth/surface. The user must
then select the desired condition and enter the data values in the appropriate manner.
Note: All numeric values must be entered with two digits (1= 01, 2 = 02 and 10 = 10). Entering FGM and
Mobility require the values to have a prefix (see below).
K = Pocket: Press the <K> key and with the cursor in the correct position, enter a two digit value. Then
move the cursor to the next surface.
G = FGM: Press the <G> key and with the cursor in the correct position, enter a plus sign (+) and a two
digit value, or just a two digit value. Then move the cursor to the next surface.
J = MGJ: Press the <J> key and with the cursor in the correct position, enter a two digit value. Then move
the cursor to the next surface.
B = Bleeding: Press the <B> key with the cursor in the correct position.
D = Delayed Bleeding: With the cursor in the correct position, press the <D> key.
S = Suppuration: With the cursor in the correct position, press the <S> key.
O = Mobility: Press the <O> key with the cursor in the correct position and enter a two digit value. For a
value of 1 1/2, 2 1/2, etc., enter the two digit value preceded by a plus sign “+”.
I = Furcation: Press the <I> key with the cursor in the correct position and enter a two digit value. Move
the cursor to the next surface.
R = Reset: Pressing the <R> key resets all values to zero (use this functionality with extreme caution).
Ctrl Z = Undo.
Special Buttons
Viewing the Special Buttons screen requires pressing the following keys:
H = History
C = Compare
M = Summary
E = Head & Neck
P = PSR
Q = Stats
Note: Displaying these screens using the keyboard turns off the keyboard function for these screens. The
mouse is required to navigate these screens.
Other Functions
Z = Cal and X = Lock
For convenience, a tear-out of the Periodontal Keyboard shortcut chart is available on the last page of this
manual.

May 2018 DRM Plus Administrator Manual v6.9 301
Using the graphic icon on the Treatment Plan and Completed Care screens is NOT only straightforward,
it minimizes the potential for errors. Certain codes, designated as ranged codes, used for multiple teeth
procedures, mostly in the prosthetics area, have been restricted to icon use only for procedure entry. These
codes are listed below.
Appendix G – Ranged Codes
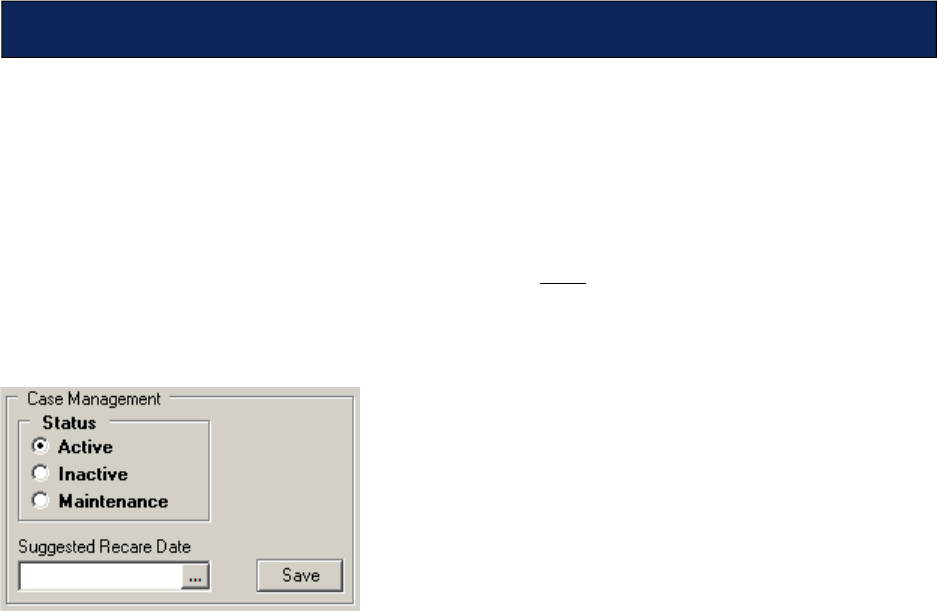
May 2018 DRM Plus Administrator Manual v6.9 302
With the introduction of DRM Plus, the direct entry of [Completed] or [Terminated] cases was removed
from the program. Instead, the concept of Patient Disposition was introduced. The provider can choose
between an [Active] and [Inactive] status, and if no planned items remain, the case records as [Completed].
If the provider changed the patient from [Active] to [Inactive] status, and planned items remained, the case
records as [Terminated]. The Current Episode of Care is defined as that interval from when the patient
was last updated from [Inactive] to [Active], then back to [Inactive].
A need has been recognized to account for patients who may NOT be active under care (i.e., have currently
planned dental procedures) but may be in a maintenance status, pending future diagnostic or preventive
dental care. Effective with Patch 47, DRM Plus now allow providers to choose the status of [Active],
[Inactive] or [Maintenance] for their patient.
Figure 348: Case Management Status
By design, whenever a new dental patient is created in the Dental Patient file that patient’s status is set to
[Active]. As before, if the provider changes the patient from an [Active] to [Inactive] status, and there are
no planned items remaining, the case is recorded as [Completed]. If the provider changes the patient from
an [Active] to [Inactive] status, and there were planned items remaining, the case is recorded as
[Terminated]. Now additionally, if the provider changes the patient’s status from [Active] to
[Maintenance], and there are no planned items remaining, the case is recorded as [Completed] and the
episode of care ends. If the provider changes the patient’s status from [Active] to [Maintenance], and there
are planned items remaining, the case remains ongoing with no changes to the episode of care. No matter
what the patient’s previous status, a patient’s status is set to [Active] if an entry is made for additional
planned care.
The provider also now has the option of entering a Recommended Recare Date for the patient, which
provides a date flag for reporting and re-evaluation purposes. (As CPRS re-engineering continues, this flag
eventually is used for setting a clinical reminder in CPRS).
Effective with Patch 47, the install routine traverses the Dental Patient file and cross reference the most
recent dental care for each patient. If there are no transactions on file for the patient in the last 24 months,
the patient’s status is set to [Inactive]. Then, on a monthly basis, a maintenance routine is set [Inactive]
those patients that have an [Active] status that have no transactions on file in the last 24 months and no
Recommended Recare Date set, or those patients with an [Active] or [Maintenance] status where 24
months have elapsed past their Recommended Recare Date.
Appendix H – Active-Inactive Maintenance Control
May 2018 DRM Plus Administrator Manual v6.9 303
Here are some likely scenarios and the recommended use of this control:
A newly enrolled Veteran is eligible for dental care and the patient is new to the dental clinic.
Their case is automatically set to [Active] without user intervention upon the first time opening the
patient in DRM Plus.
A Class II patient has had their post-discharge dental care episode finished. Upon completion of
care, their status is changed to [Inactive].
A Class I/IIC/IV patient has had all of their restorative and periodontal care complete. They
should be seen in four months for a periodontal checkup. Upon completion of the restorative and
periodontal care, their status is changed to [Maintenance] with the Recommended Recare Date
set four months from today. There is no statutory requirement for the VA to meet that
recommendation, but if the patient calls in for an appointment and an appointment cannot be
scheduled within the later of 30 days of that recommended date or the patient’s call, they should be
placed on the EWL.
A Class III/VI patient has had their adjunctive care completed. Upon completion of the adjunctive
care, their status is changed to [Inactive]. The provider can choose whether or not to recommend
and enter a re-care date; there is no statutory requirement for the VA to meet that recommendation.
A Class V patient has had their necessary dental care completed. Upon completion of care, their
status is changed to [Inactive]. The provider can choose whether or not to recommend and enter a
re-care date; there is no statutory requirement for the VA to meet that recommendation.
A newly enrolled Veteran is eligible for dental care. Limited capacity requires they be placed on
the EWL. Their dental eligibility information should be entered in DRM Plus and thus by opening
the patient in DRM Plus as a new patient their status is set to [Active]. Patients on the EWL should
always be recorded as [Active] until their care is complete. If it is likely the patient may have a
significant wait for care, it is suggested the Recommended Recare Date be set to the approximate
date the patient’s dental care is initiated to avoid automatic inactivation of the patient after 24
months.
A Class I/IIC/IV patient has failed to keep appointments and not followed through with their care.
The provider makes a progress note of the patient’s failure to adhere to medical recommendations
and change the patient’s status to [Inactive]. The provider can choose whether or not to
recommend and enter a re-care date; there is no statutory requirement for the VA to meet that
recommendation. The patient’s status is changed to [Active] upon a new application for care.
Necessary emergent care has been provided a patient with no other dental eligibility. Once all
clinically proper follow-up care is complete, the patient’s status is changed to [Inactive].
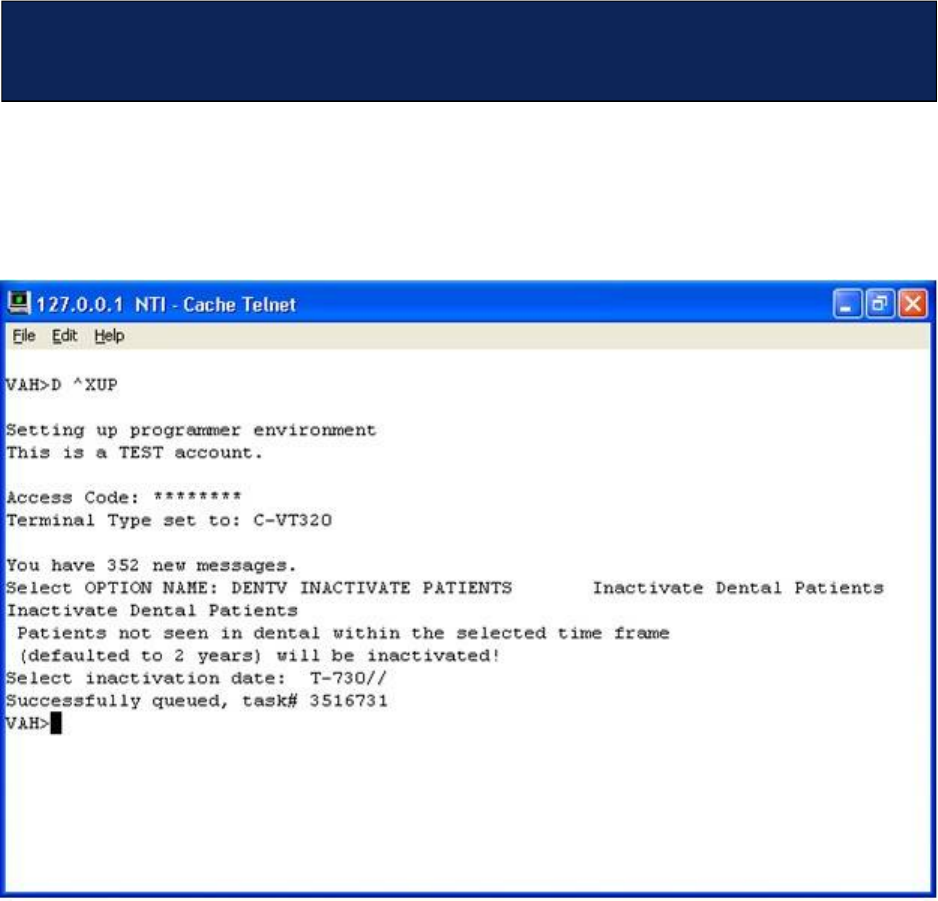
May 2018 DRM Plus Administrator Manual v6.9 304
A new option that IT may run (or may give as a secondary VistA option to DRM Plus users) allows the user
to check the system for patient activity, and set patients without current encounters to Inactive status.
Use the OPTION NAME: DENTV INACTIVE PATIENTS and then select an inactivate date (defaulted to
2 years).
Figure 349: VistA Option to Set an Inactivation Date
Appendix I – Option to Set Dental Patients to Inactive
Status
May 2018 DRM Plus Administrator Manual v6.9 305
Note: These procedures require IT assistance. The dental staff should provide these instructions to IT.
In order to confirm that the CNTs are mapped correctly:
1. Open the \DOCSTORE\Array\dntarray.txt file located on the server to confirm that within the
dntarray.txt file, the patch for each CNT is correct.
Figure 350: Map Dental CNTs from dntarrary.txt file
Appendix J – How to Map Dental CNTs
May 2018 DRM Plus Administrator Manual v6.9 306
2. Open one of the CNT .ini files within the \DOCSTORE\FORMS directory (i.e., \\vhaserver-
name\DOCSTORE\FORMS\160_DENT\04160001\DRMEval.ini)
Figure 351: DRMEval.ini File
3. Confirm that the VHAservername path matches what was in the \Array\dntarray.txt file and is
correct.
4. If the VHAservername within any of the \FORMS\160_DENT\########\ini files does NOT
match the directory shown above (in the ARRAY folder) then each .ini file within the FORMS
directory need to be opened and edited to reflect the correct path.

May 2018 DRM Plus Administrator Manual v6.9 307
Coding for prosthetic appliances is to be done at the time when the prostheses are delivered to the patient
and/or home care instructions are provided and documented.
Taking workload credit for the undeliverable prosthetic appliances should occur:
1. After death.
2. After 6 months and 3 attempted telephonic contacts. Attempts to reach patient should occur at a
timely interval (i.e., at least one week apart).
3. No response to a final letter to patient’s last known address.
4. CPRS documentation to insure no citation for patient abandonment.
To take workload credit with no associated patient visit (i.e., phone contact):
1. Follow local policies for documentation of telephonic contact. Codes for phone contacts in DRM
Plus are listed under the CPT codes (99441, 99442 and 99443).
To file workload credit:
1. Enter code(s) in the Completed Care screen.
2. Select the correct previously filed Visit Date/Time associated with this addendum.
3. Click the Next button and select the File Data With a Note Addendum radio button.
Appendix K – Recommendations for Coding of
Prosthetic Appliance
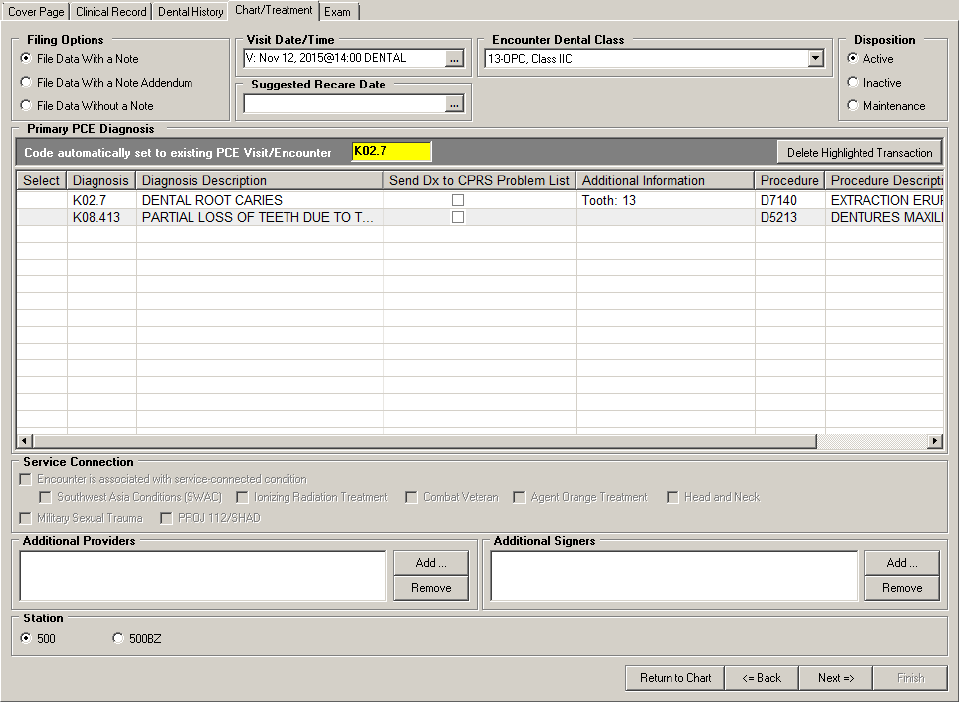
May 2018 DRM Plus Administrator Manual v6.9 308
Figure 352: Filing Options Setting and Visit Selection
4. Complete the encounter as a note addendum.

May 2018 DRM Plus Administrator Manual v6.9 309
As important as it is to know how to use DRM Plus, it is equally important to be aware of how to enter
codes, fees and similar DRM Plus business considerations.
Entering DRM Plus business information may be viewed in three different components:
Local policy and practice
National policy and practice
National business practice
Adhering to the following guidelines for each is essential and critical to the success of treating our Veterans.
Entering valid data can provide important information on the allocation of VA resources on a local and
national level, clarify current and future funding issues, and determine how to provide even better care to
patients.
Review this information carefully. If the user has any questions about this software or the accompanying
business policies, contact the local DRM Plus Subject Matter Expert on site. If this person cannot answer the
question, s/he knows who to contact to find the correct solution.
Local Policy and Practice
This includes the workflow process addressing the provider’s data entries for the following:
Diagnostic Findings
Observations
Approval for proposed Patient Treatment Plans are to be established by the local dental manager.
National Policy and Practice Coding Standards
All completed procedures on site must be entered into the DES through DRM Plus. This includes the
following:
Procedures by staff
Fee-basis on site
Sharing on site
Contract on site
Residents
Without compensation
Students
Hygienists
For example, if a surgeon goes to the OR and enters the procedure into PCE through the surgery package, or
through an encounter, that procedure must be entered into DES through DRM.
Coding standards should be followed in an attempt to calibrate providers, in the event that the same
encounters are observed at two separate clinics. This ensures that the encounters are coded the same.
Appendix L – Business Use of DRM Plus

May 2018 DRM Plus Administrator Manual v6.9 310
As a VA computer user, one of the best and most important ways to contribute to good computer security is
to know all data, its level of sensitivity, that it is virus-free, what would happen if it were unavailable, how
long it could be done-without, and the effect of another user changing it without approval.
Classifying data involves determining how sensitive and valuable it is, and what protection it needs.
Information is classified according to sensitivity, which is based on its need for:
Confidentiality: The information must be kept private as its owner instructs.
Integrity: The information must not be inappropriately changed or destroyed.
Availability: The information must be ready for use, as needed.
The amount of information and the context in which it is found can affect its value. Some information is
confidential only at certain times (i.e., contracting or economic forecast information, which is sensitive until
its publication or release date, after which it is made public). Current information is generally more valuable
than older information.
When protecting data, all employees and contractors have a responsibility to:
Be familiar with VA security policies, procedures, rules and regulations (i.e., know what to do,
how to do it and why).
The user should ask a supervisor or ISO any questions about these security responsibilities.
The user is responsible for:
Reporting known or suspected incidents immediately to the ISO.
Using VA computers only for lawful and authorized purposes.
Choosing good passwords and changing them every 90 days. Do not write down or share log-in
information with anyone, including Help Desk.
Complying with safeguards, policies and procedures to prevent unauthorized access to VA
computer systems.
Recognizing the accountability assigned to the user’s UserID and password. Each user must have a
unique ID to access the VA systems. Recognize that UserIDs are used to identify an individual’s
actions on VA systems and the Internet. Individual user activity is recorded, including sites and
files accessed on the Internet (recorded as the files go through the firewall).
Ensuring that data is backed up, tested and stored safely.
Not generating or sending offensive or inappropriate email messages, graphical images or sound
files. Limit distribution of email to only those who need to receive it. Realize that the user is
identified as a user of the VA computer systems when logged on to the Internet.
Using authorized virus scanning software on the workstation or PC and home computer. Know the
source before using discs or downloading files. Scan files for viruses before execution.
Complying with terms of software licenses and only using VA-licensed and authorized software.
Do not install single-license software on shared hard drives or servers.
Complying with terms of software licenses and using only VA-licensed and authorized software.
Do not install single-license software on shared hard drives or servers.
Appendix M – Data Security
May 2018 DRM Plus Administrator Manual v6.9 311
Knowing data and properly classifying and protecting it, as well as inputs and outputs, according
to their sensitivity and value. Label sensitive media, use a screen saver with a password, logoff
when leaving the work area, and secure that sensitive information is removed from hard disks sent
out for maintenance. Do not send sensitive information over the Internet unless it has been
encrypted.
Learning as much as possible about information security to assist the user’s ISO. Numbers alone
make users the most important security asset. Compared to one ISO for a system, users offer a
chance for numerous eyes and ears to remain alert to potential threats to information systems.
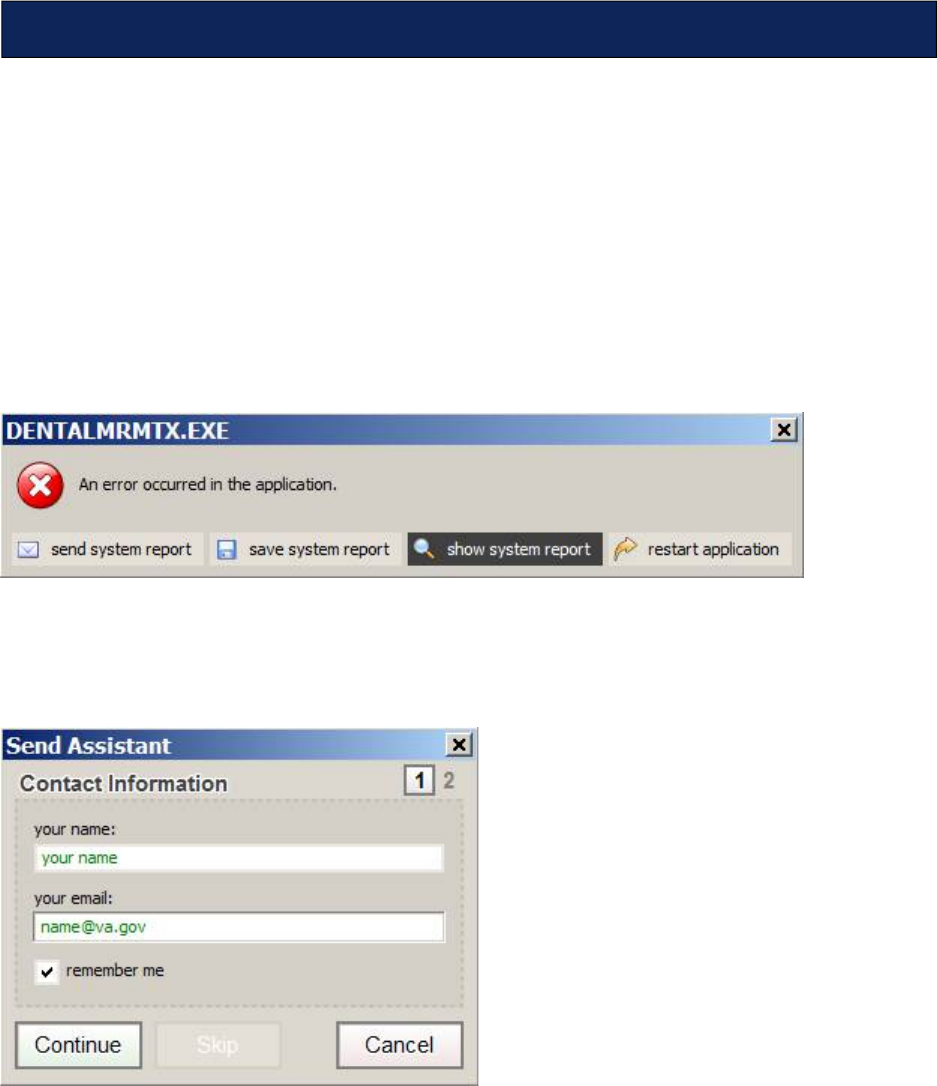
May 2018 DRM Plus Administrator Manual v6.9 312
The madExcept application is a tool that has been added to DRM Plus to assist with error reporting from
the field and implementing a fix in the application. In order to be prepared to use this tool if an error occurs
while using DRM Plus, please review the following directions:
Select all the OK buttons from any traditional error screen that may display in DRM Plus. There may be
more than one traditional error screen or there may be none, but no matter how many, select the OK button
on all. If any informational screen displays asking if the provider would like to view the last broker call,
select the No button from that screen and continue through this process.
As soon as the DENTALMRMTX.EXE error screen appears, select the ‘send system report’ button (first
button from the left) as displayed:
Figure 353: DENTALMRMTX.EXE screen
After selecting the ‘send system report’ button, the Contact Information screen will appear. The screen
asks for contact information so enter provider’s name and VA email address. Select the Continue button on
the Contact Information screen to move on to the next step.
Figure 354: Contact Information screen
The Error Details screen will immediately appear. Add information in the in the Error Details screen
providing as much information as possible. If known, list every click that occurred prior to the error
message. The more details listed; the easier it will be to reproduce the error and fix it.
Appendix N – madExcept Application
May 2018 DRM Plus Administrator Manual v6.9 313
Figure 355: Error Details Screen
Select the Continue button from the Error Details screen which will launch an email.
The following screen will open the provider’s email screen. The example used is MS Outlook. The email
address of both Vicky Byers and J.D. Carr will populate the ‘To’ field and the system report will be
attached.
Figure 356: Outlook Window

May 2018 DRM Plus Administrator Manual v6.9 314
Enter the name and location (include city and state) of the VA dental clinic where the error occurred. For
example, if the error occurred at the Daytona Beach Dental Clinic, enter Daytona Beach, Florida and please
do NOT enter Gainesville, Florida, even though Daytona Beach is a Gainesville satellite clinic. Also
include, if known, the person class or provider type/specialty and the phone number that may be used to
contact the person reporting the error. Enter all this data in the email address window.
The provider may add any other individuals as recipients (To and CC) in the email address fields as
appropriate. Additional information may be included by entering that information in the email address
window.
Click on the Send button from the email screen.
Select the ‘restart application’ button (bottom button on the right) from the DENTALMRMTX.EXE
screen. This will close the madExcept tool and restart DRM Plus.
Note: After an error occurs while using DRM Plus, please reboot the computer before continuing.
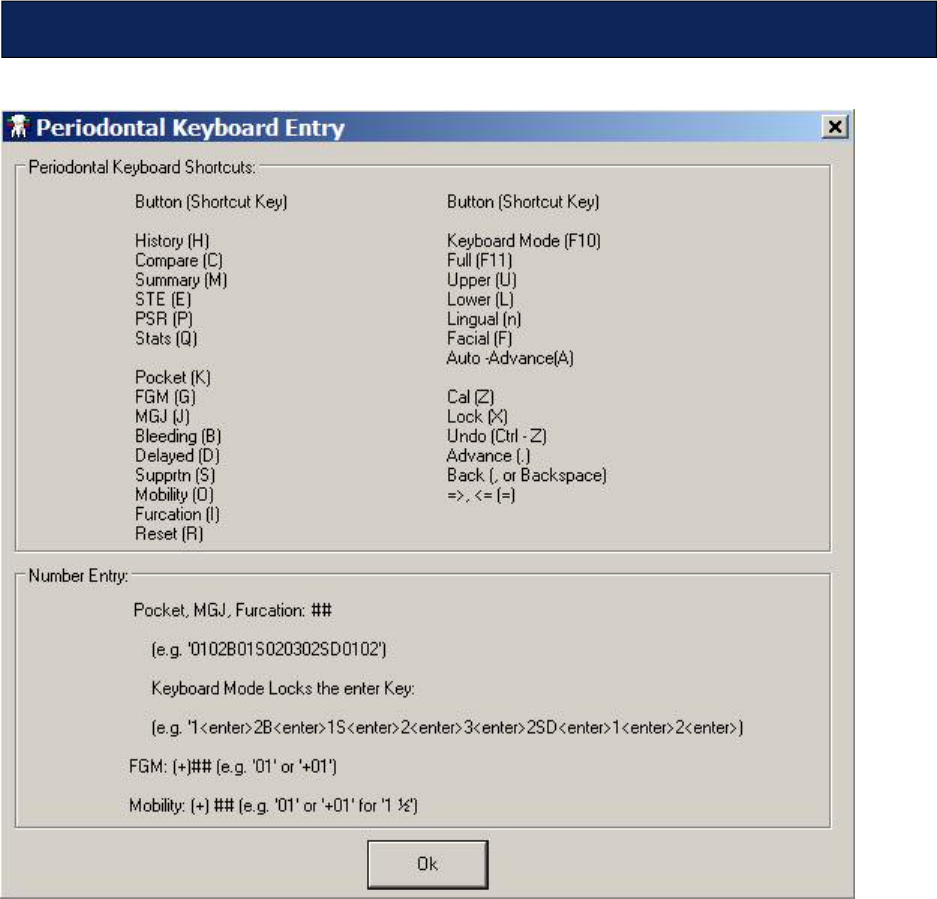
May 2018 DRM Plus Administrator Manual v6.9 315
Figure 357: Periodontal Keyboard Entry Screen
Periodontal Keyboard Shortcuts Tear-Out
