En.steval Bcnkt01v1 Quick Start Guide
User Manual: Pdf
Open the PDF directly: View PDF ![]() .
.
Page Count: 13
Quick Start Guide
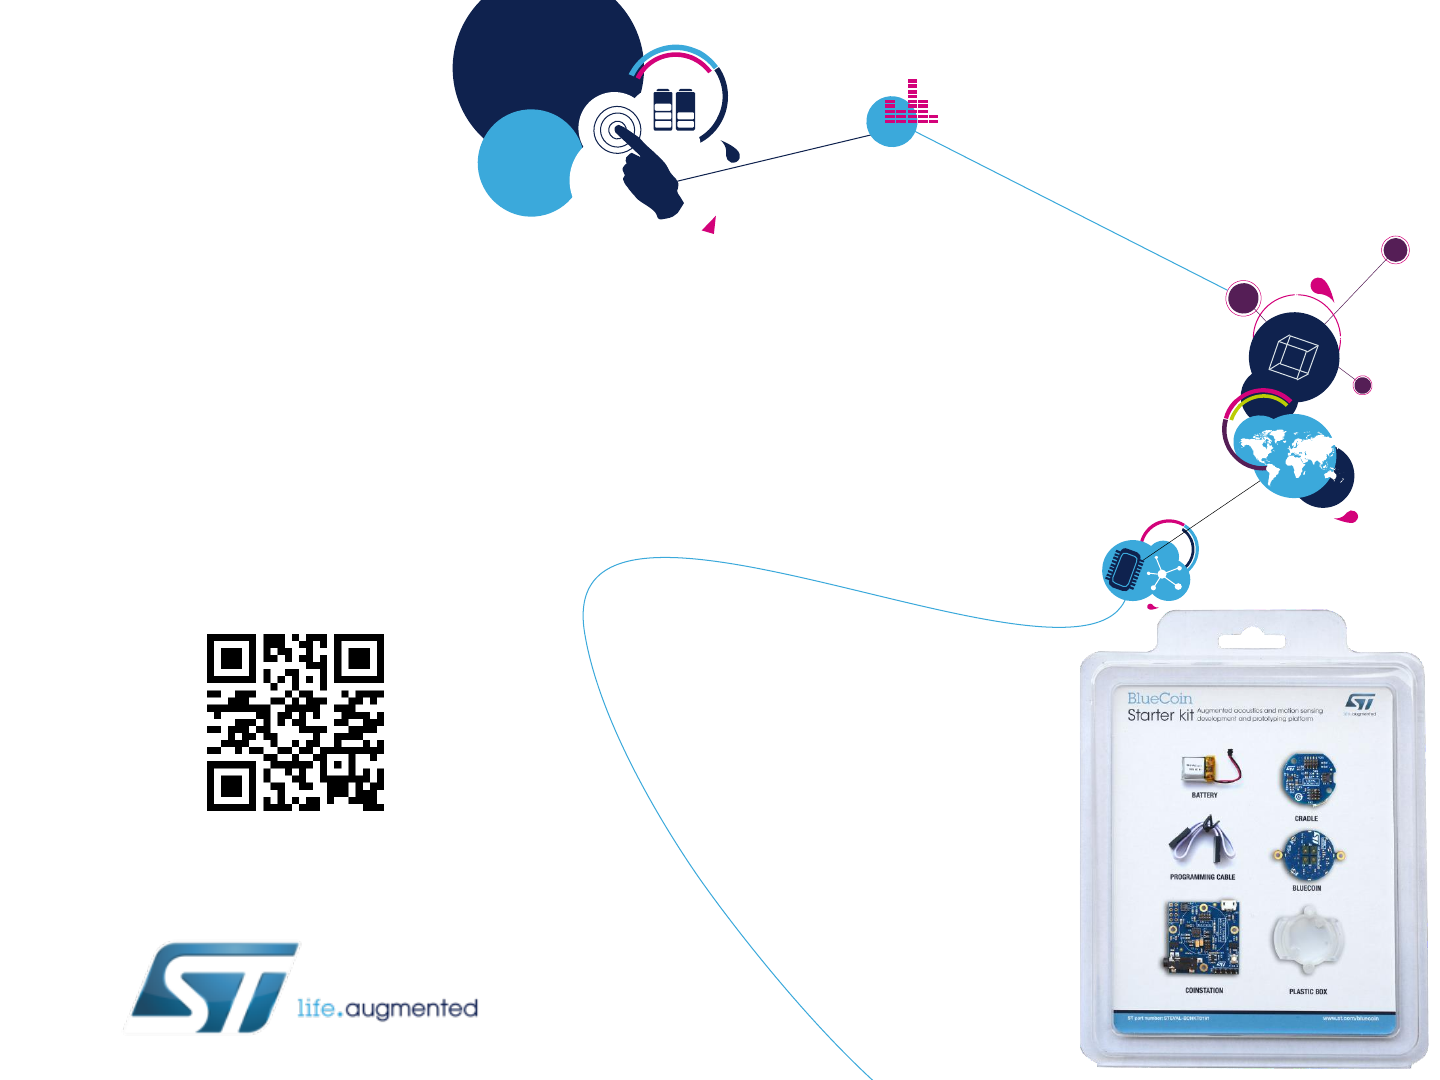
BlueCoin Starter Kit - STEVAL-BCNKT01V1
www.st.com/bluecoin
STEVAL-BCNKT01V1–BlueCoin Starter Kit
With the expanded capabilities of its starter kit, BlueCoin lets you explore advanced sensor
fusion and signal processing functions for robotics and automation applications with a 4
digital MEMS microphone array, a high-performance 9-axis inertial and environmental
sensor unit and time-of-flight ranging sensors.
2
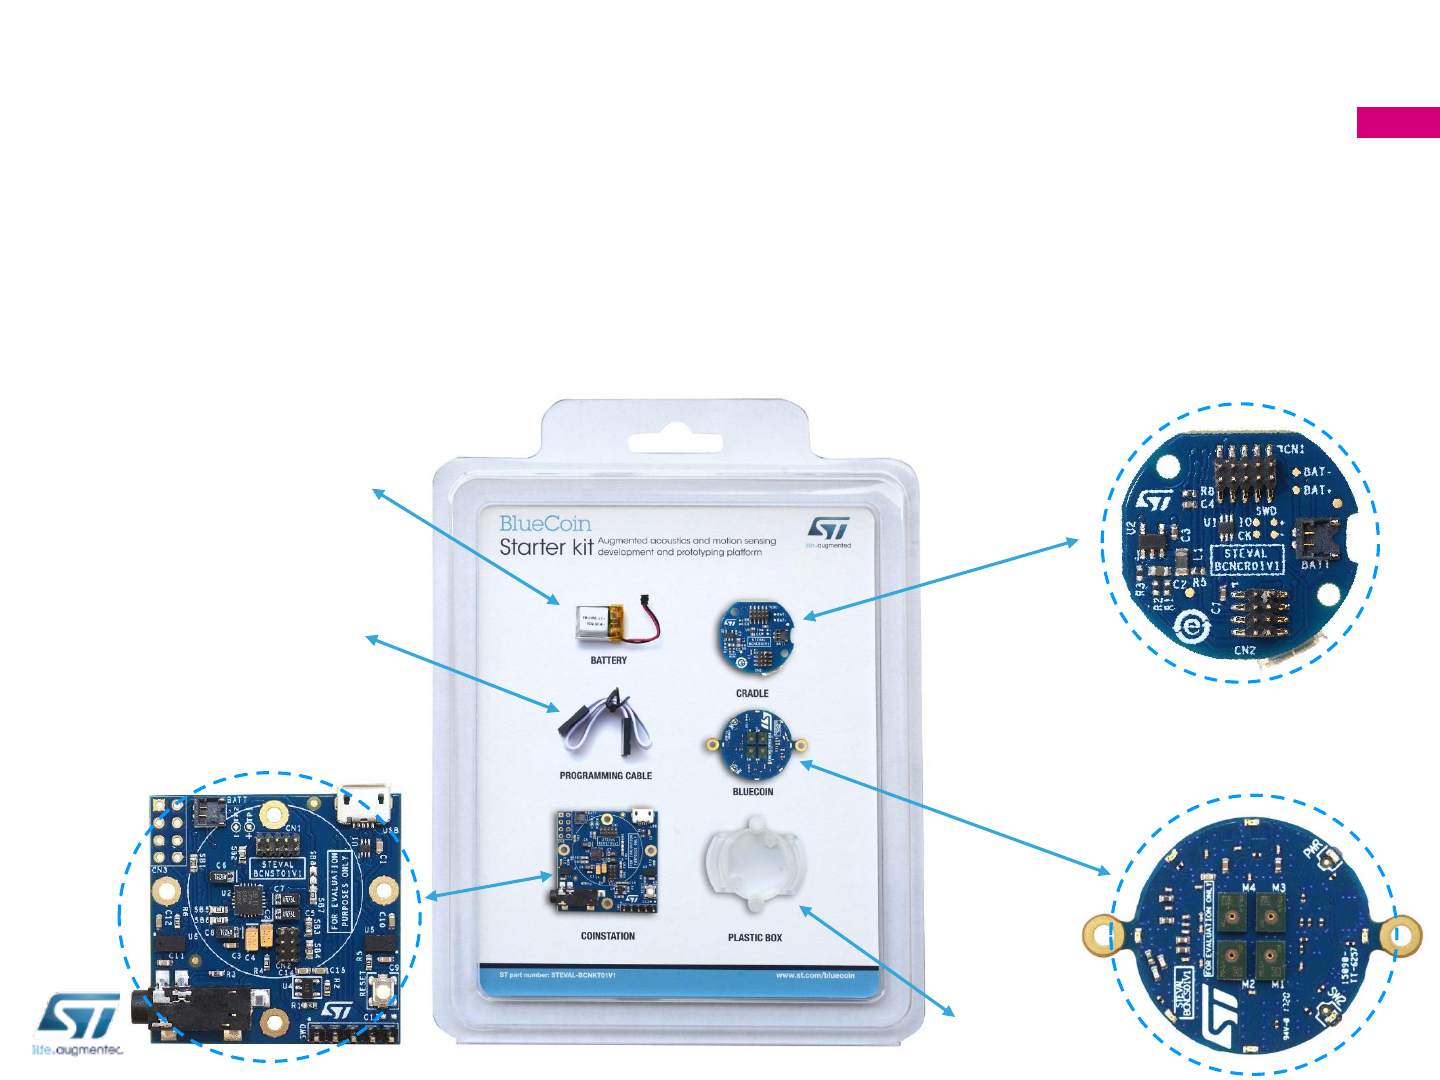
STEVAL-BCNST01V1
CoinStation
130mAh LiPo Battery
(UN38.3 Certified)
ST-Link SWD
Programming Cable
STEVAL-BCNCR01V1
Cradle
STEVAL-BCNCS01V1
Core System
Plastic Case
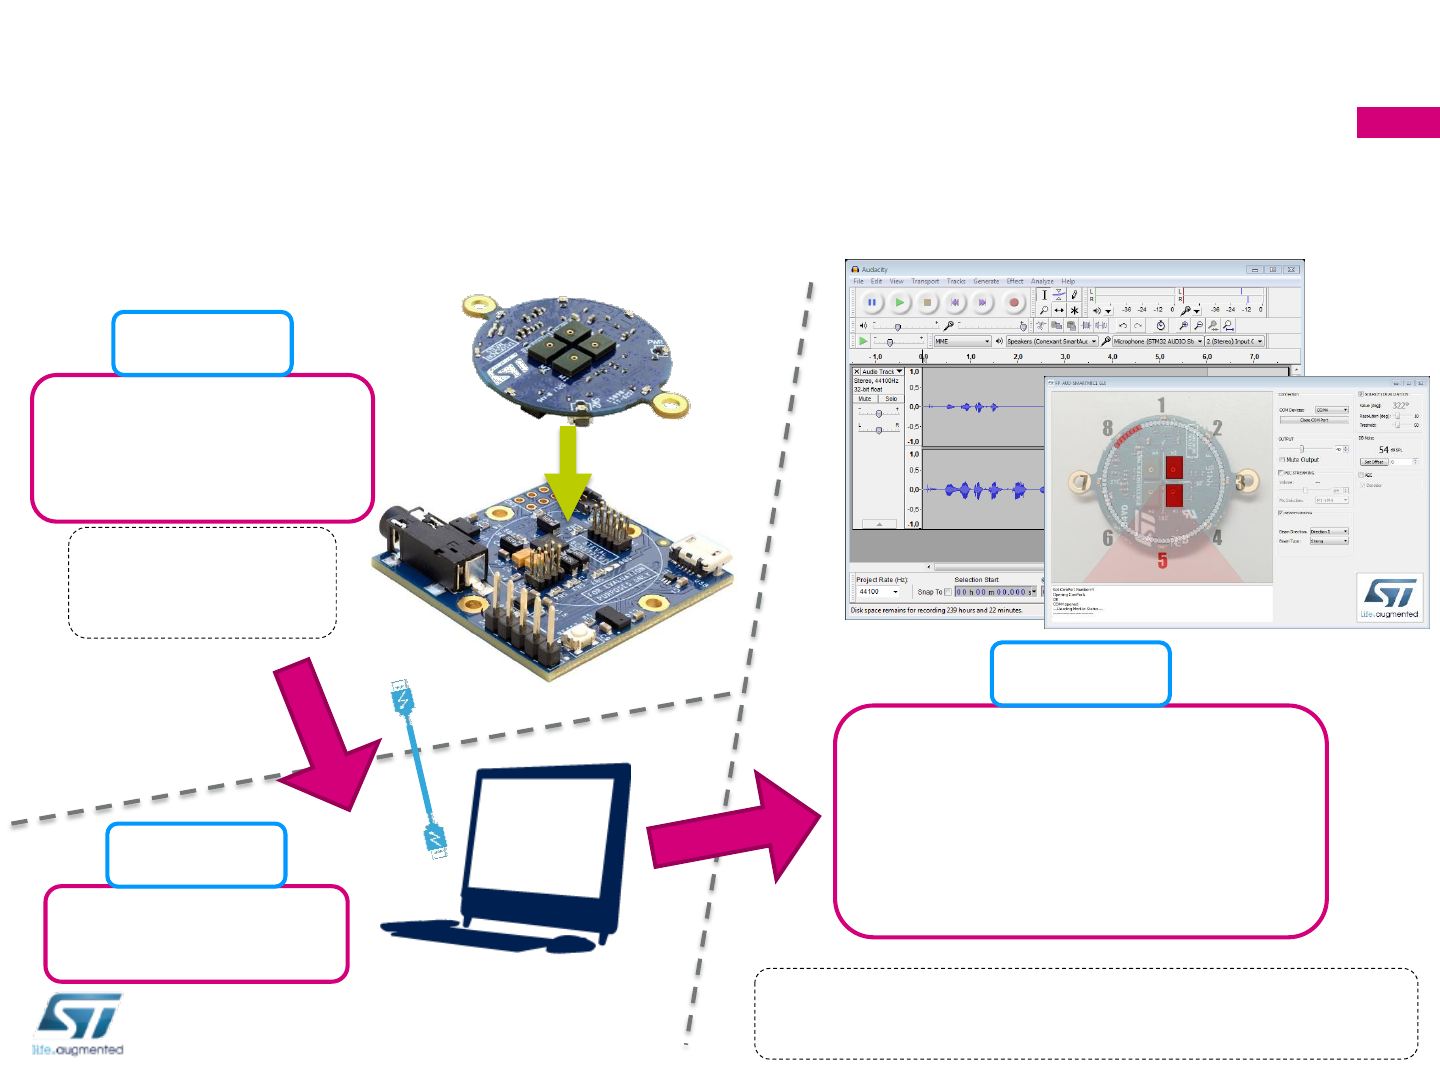
Run FP-AUD-SMARTMIC1
GUI, included in
FP-AUD-SMARTMIC1
function pack available on
www.st.com/bluecoin
First Setup –Run the preloaded Demo
The preloaded demo on BlueCoin Kit is the FP-AUD-SMARTMIC1
3
Step 3
Plug the BlueCoin
Core System on the
CoinStation.
Step 1
Connect it to the
PC via USB
Step 2
Please refer to function pack documentation for more
details about the software
Pay attention to the
alignment of the
BlueCoin connectors
4
Example projects in source code
STSW-BCNKT01
Starter Firmware
FP-AUD-SMARTMIC1
Advanced Audio
Function Pack for advanced audio
algorithms (Beamforming, SL, AEC)
Works with dedicated PC Software GUI
FP-SNS-ALLMEMS1
Algorithms and Connectivity
4 code examples for basic features:
DataLog, AudioLoop, GestureDetect,
BLESample_App
Function Pack for advanced sensing
algorithms and BLE connectivity
Works with dedicated Android or iOS app
FP-AUD-BVLINK1
Voice over BLE
Function Pack for Voice over Bluetooth
Low Energy
Works with dedicated Android or iOS app
5
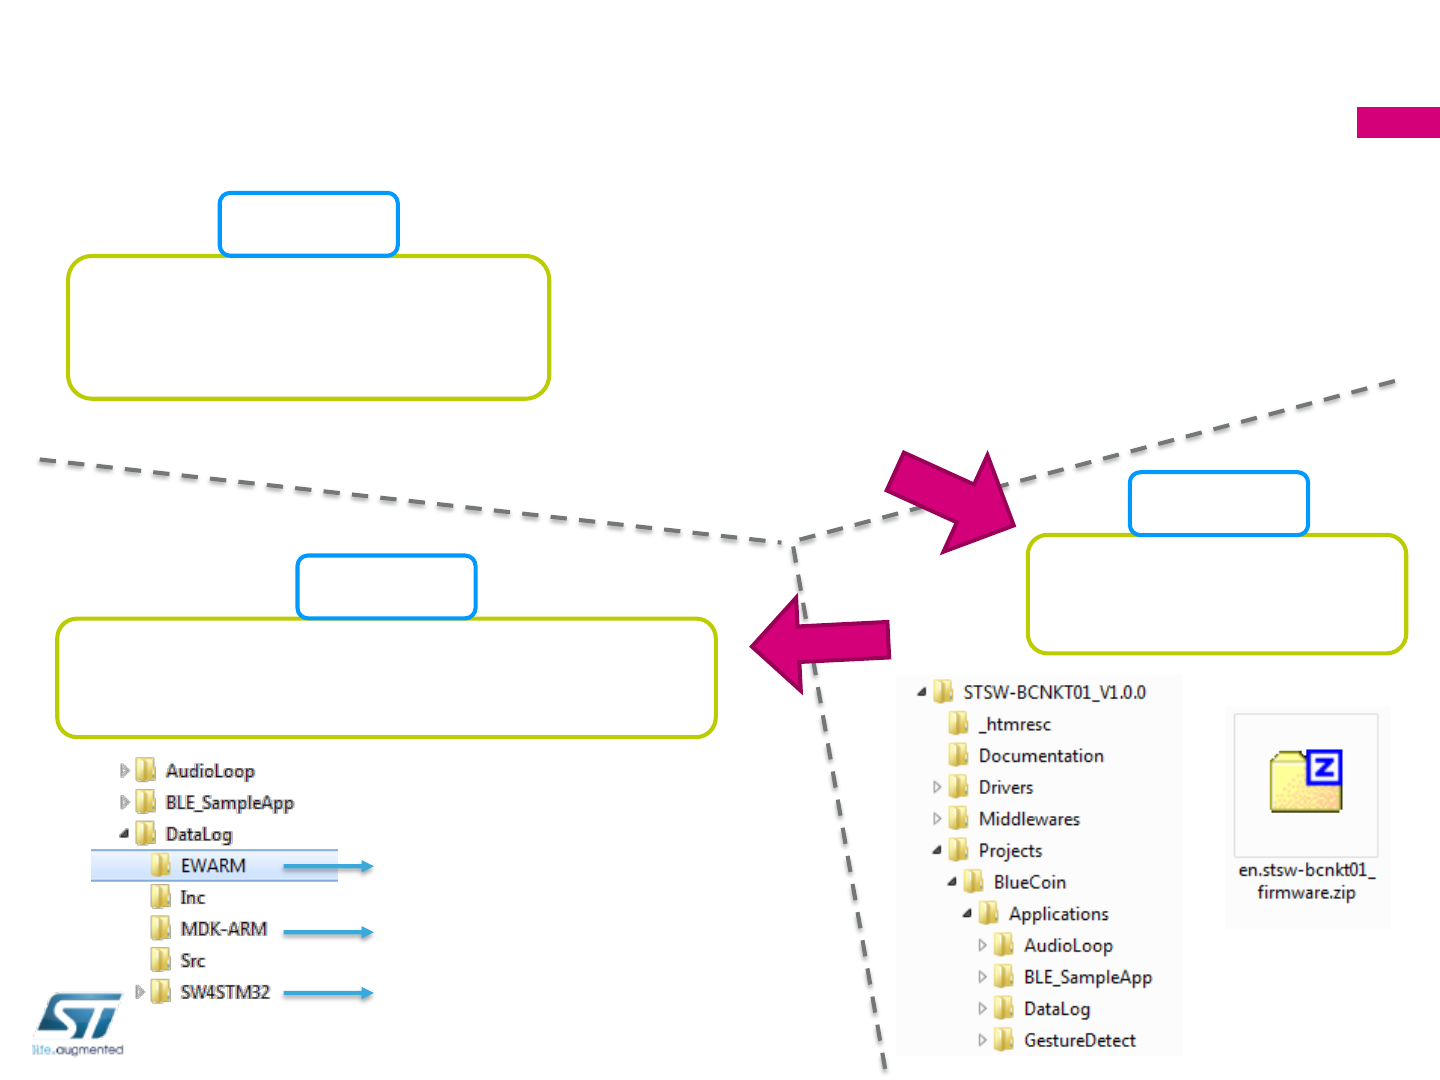
How to open the example projects
Download the chosen
project from
www.st.com/bluecoin
Step 1
Unzip the package
on your PC
Step 2
Open one of the projects
examples with your favorite IDE
Step 3
IAR Embedded Workbench
ARM KEIL µVision IDE
System Workbench for STM32
Figures below refer to STSW-BCNKT01,
same procedure can be applied to any of
the provided example projects
6
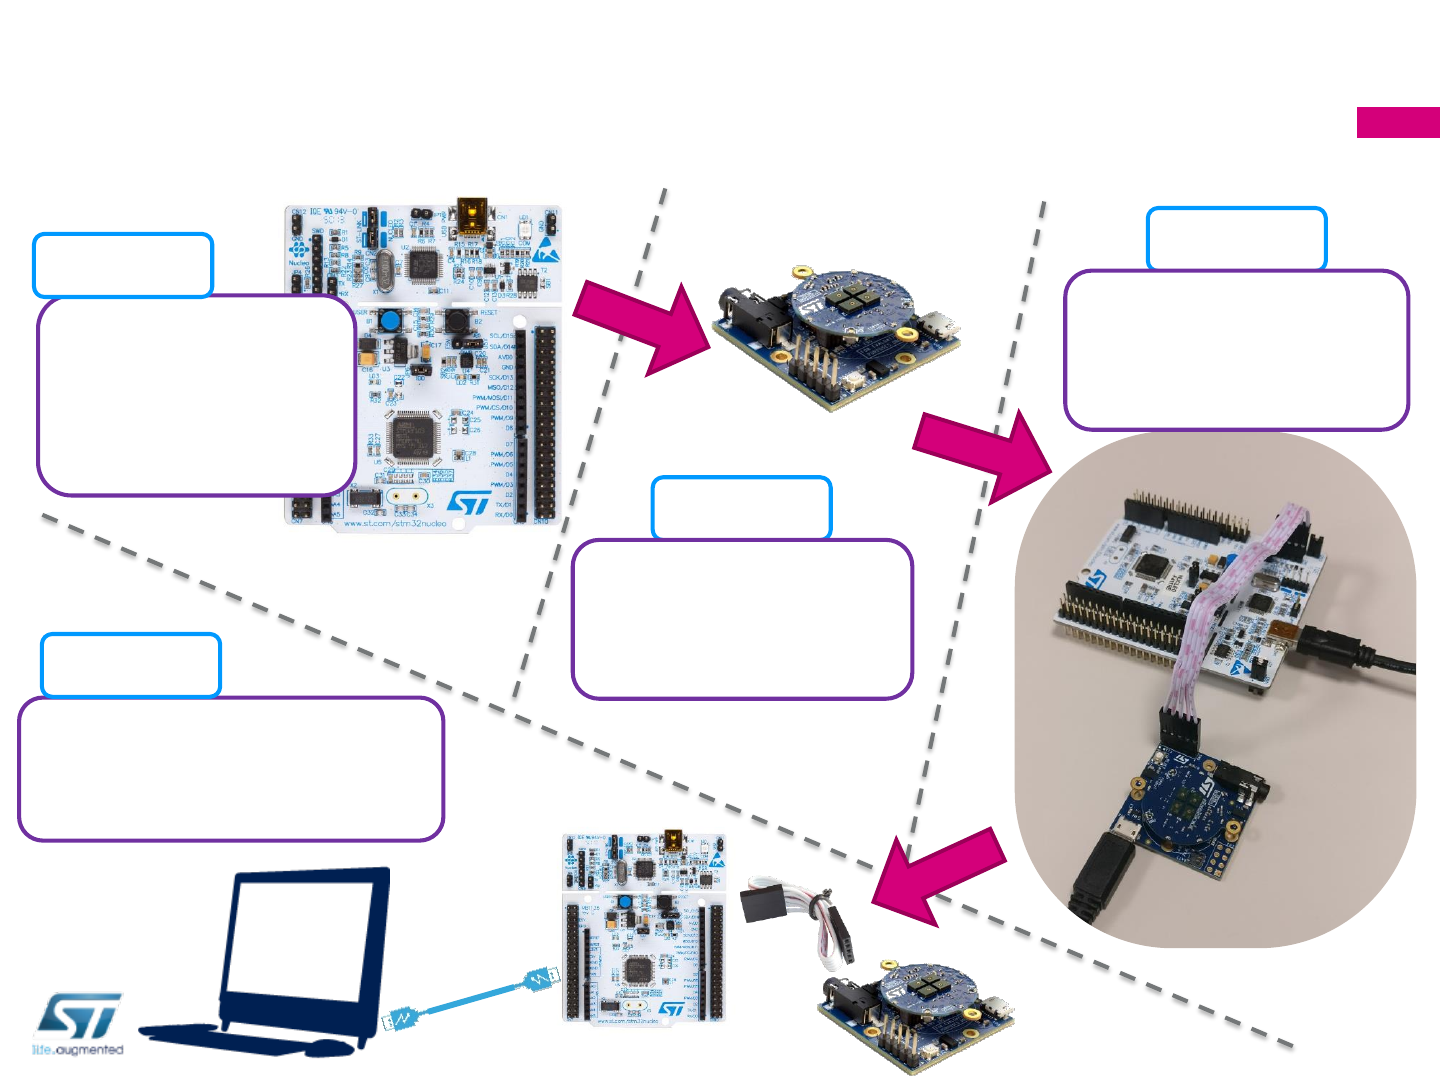
Hardware setup for board programming
Take an STM32
Nucleo board
And remove
CN2 jumpers
Step 1
Step 2
Connect to the PC and
download the firmware
with your IDE
Step 4
Plug the BlueCoin
on top of the
CoinStation
Step 3
Connect the two
boards with the
provided flat cable
More information
8
•STEVAL-BCNKT01V1 is the starter kit for the BlueCoin board (STEVAL-BCNCS01V1), ahighly
Integrated Development Platform with a broad range of functionalities aiming to improve system design
cycle and accelerate delivery of results
•Two host boards are also provided as part of the kit
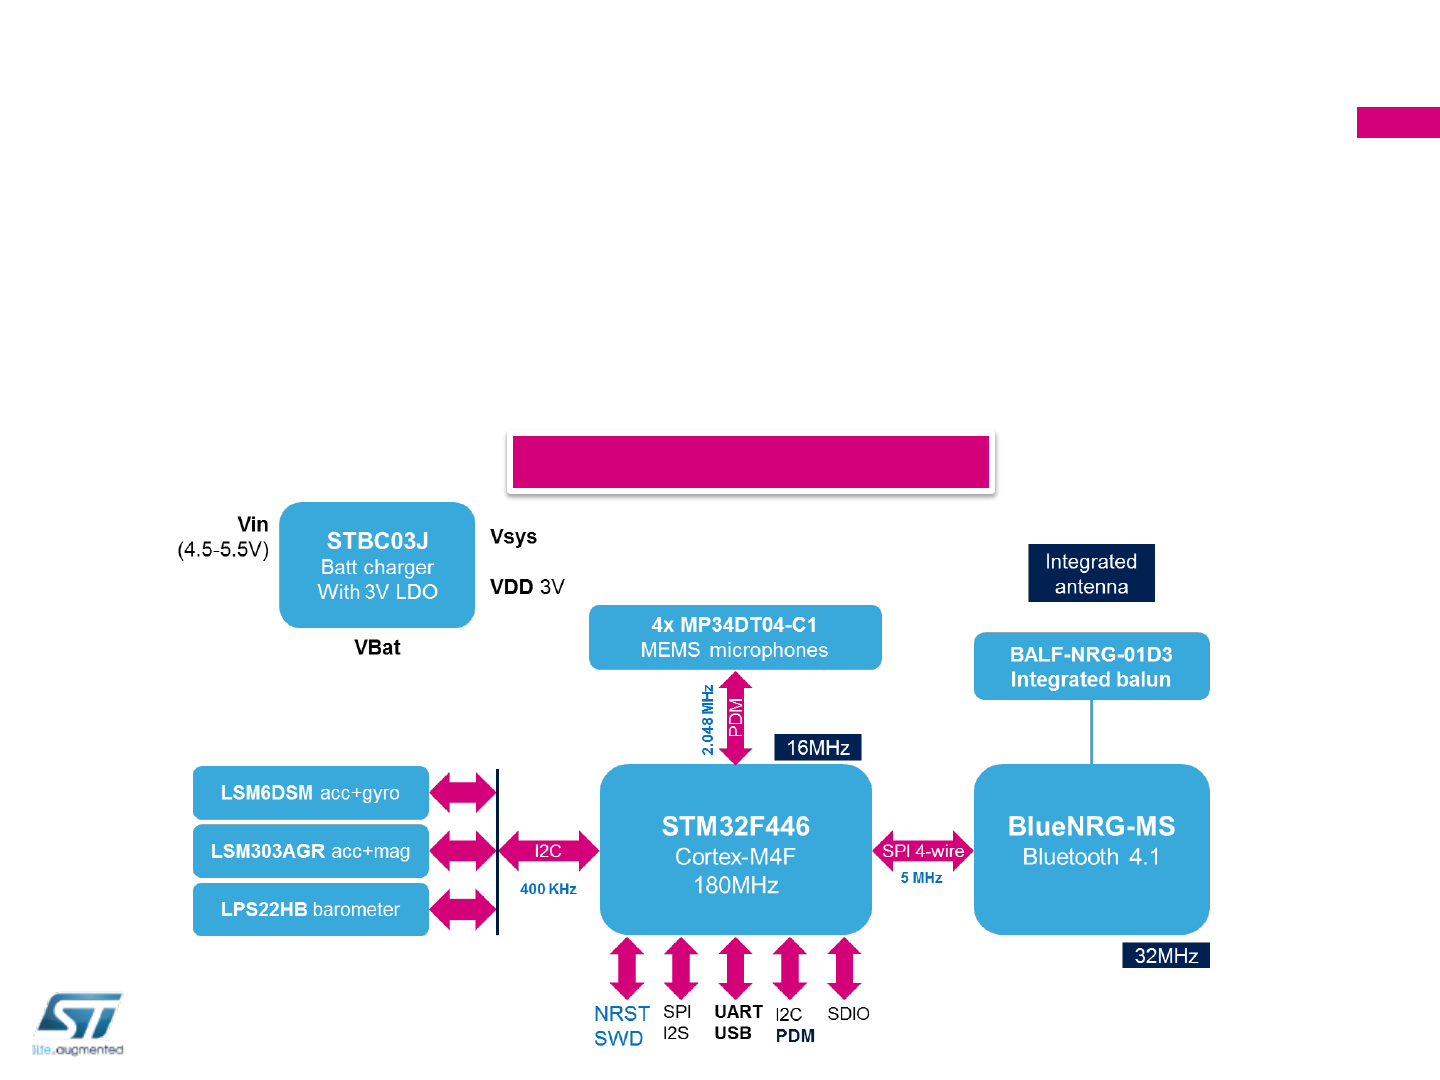
BlueCoin Block Diagram
BlueCoin Platform –Hardware overview
9
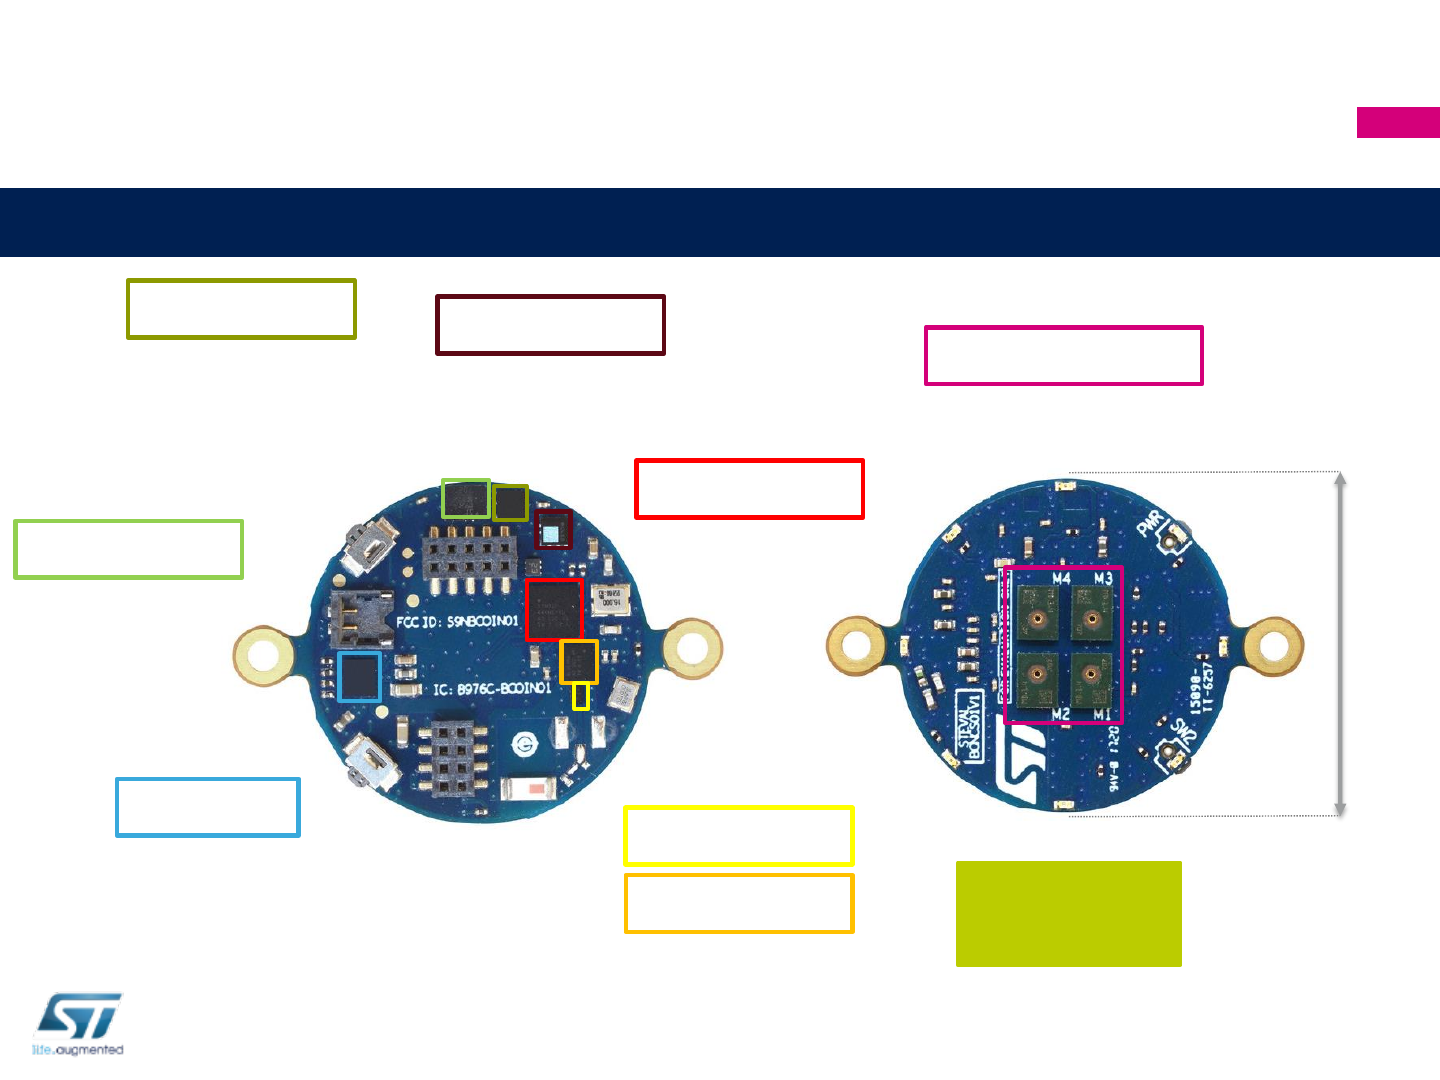
Core System: STEVAL-BCNCS01V1
BlueCoin - The Robotic Ear
8 LEDs
25 mm
Digital MEMS Microphones
64dB SNR, 120dBSPL
4x MP34DT04-C1
Cortex-M4
up to 180MHz
STM32F446
Bluetooth low-energy
Concurrent master/slave BT4.1
BlueNRG-MS
Balun Filter
Barometer
1-75Hz, 3-12μA @ 1Hz
3DAcc+3DMag
200μA @ 20 Hz (HR mode)
Accel/Mag independent
power down mode
3DAcc+3DGyro
0.65mA @ 1.6kHz
9μA @ 12.5Hz
LPS22HB
LSM303AGR
LSM6DSM
Li-Ion linear
battery charger
with LDO
STBC03
10
CoinStation: STEVAL-BCNST01V1
CoinStation
USBLC6-2P6
Battery
Connector
Stereo Audio DAC
and 3.5mm Jack
2x VL53L0X
LDK120M
2.8V LDO
BlueCoin
Connectors
Time-of-Flight
ranging sensors
Expansion
Connector
SWD
Connector
ESD protection
for USB
11
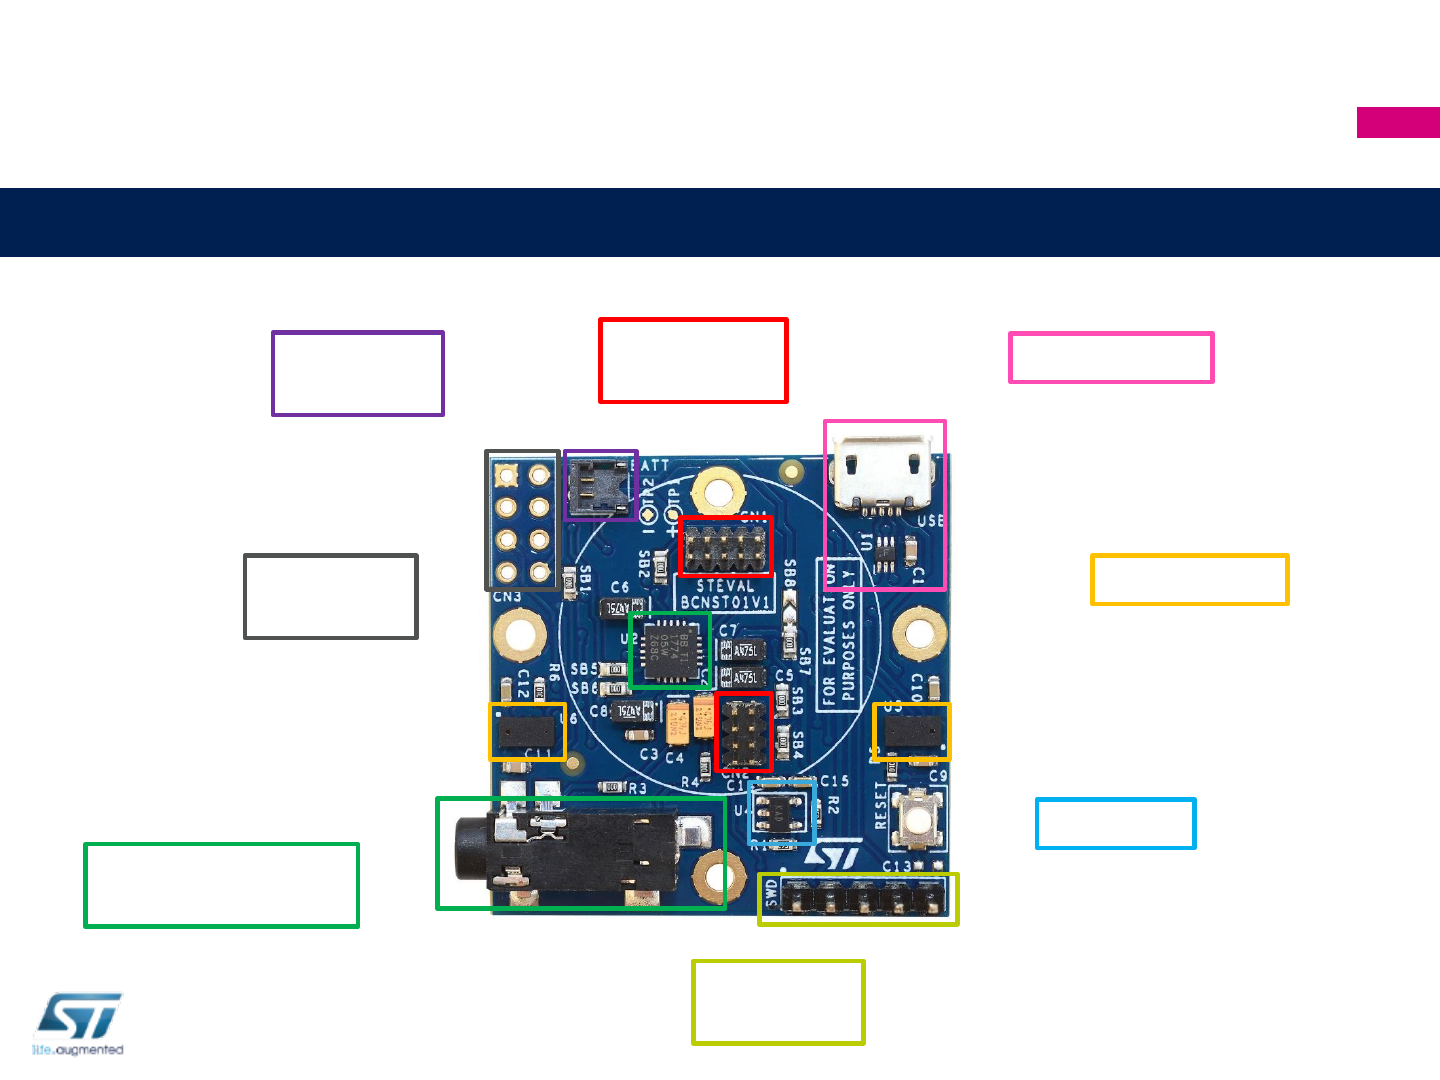
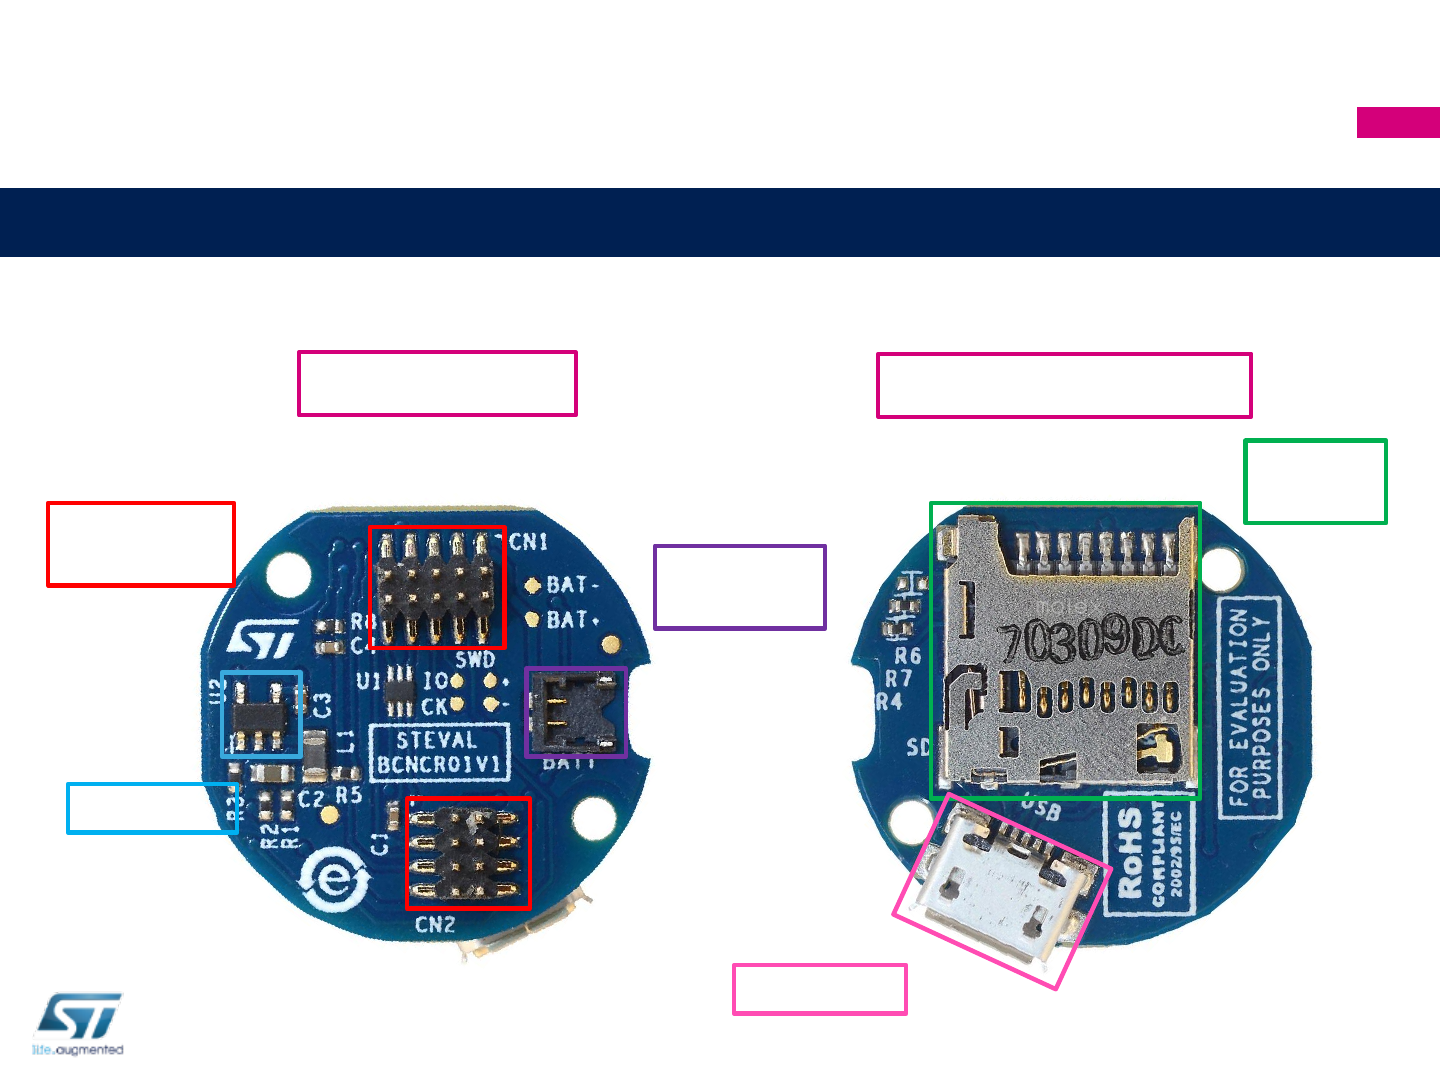
BlueCoin Cradle: STEVAL-BCNCR01V1
BlueCoin Cradle
BOTTOM VIEW
TOP VIEW
Micro USB
Battery
Connector
BlueCoin
Connectors
Micro
SD Card
ST1S12XX
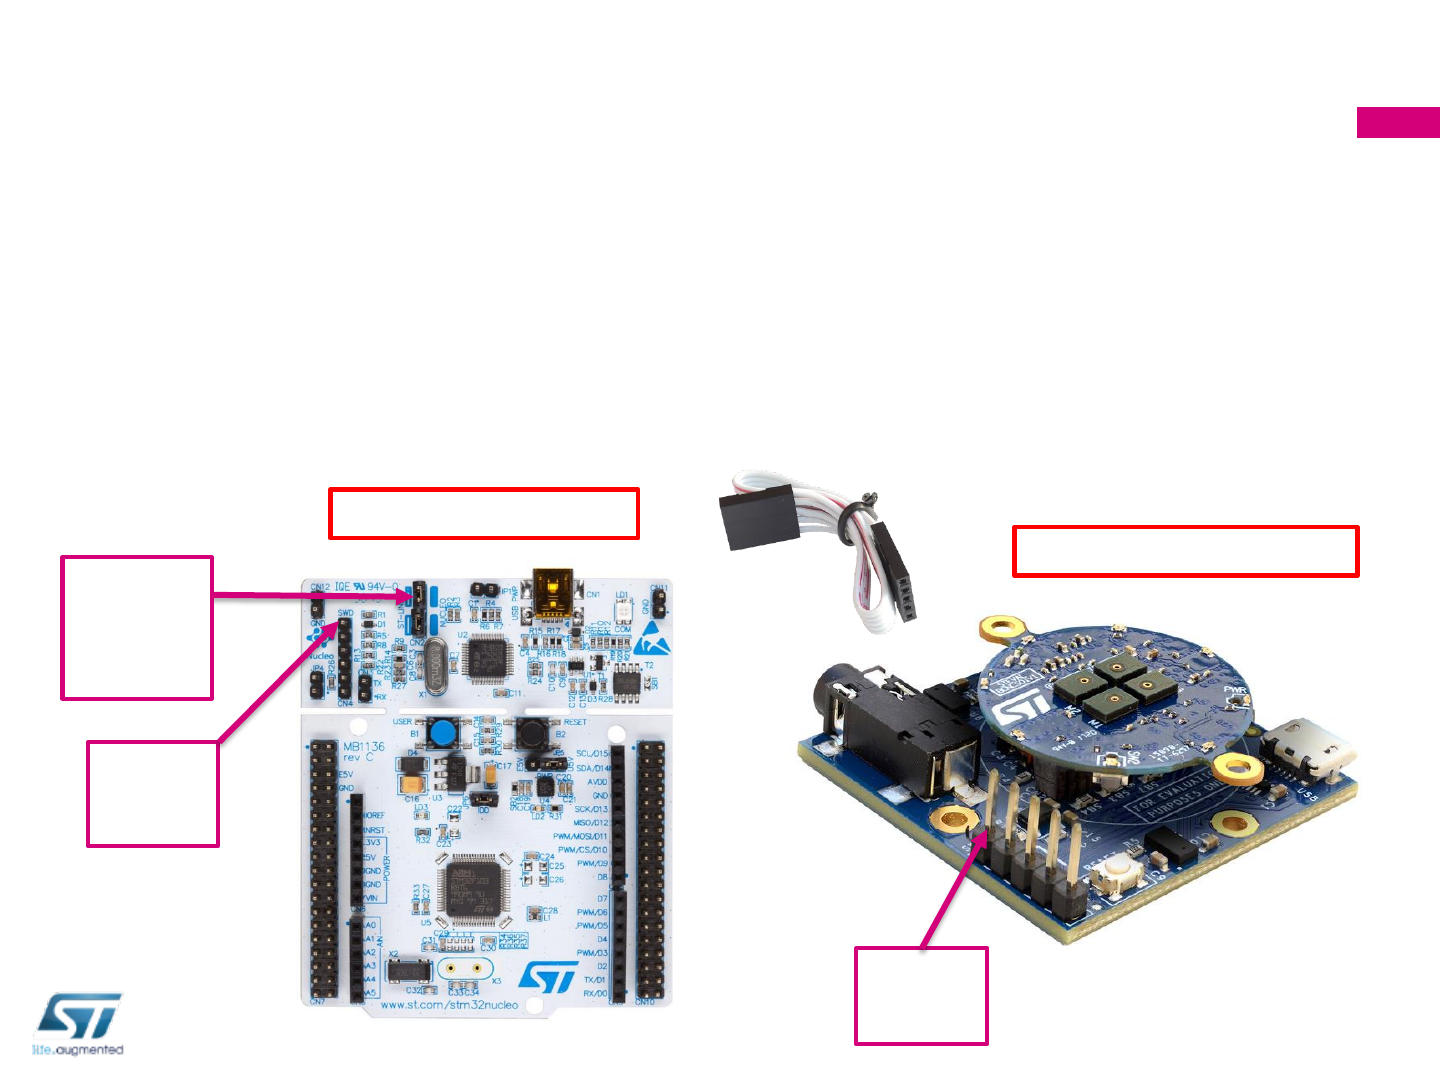
•Connect an external ST-Link to the cradles SWD connectors. A 5pin
flat cable is provided within the BlueCoin Starter Kit
•The easiest way is to get an STM32-Nucleo board which includes an ST-Link V2.1
•Remove CN2 Jumpers from the Nucleo Board
•Connect the SWD interfaces using the provided cable
12
SWD
(Pin1)
CN2
Remove
Jumpers
SWD
(Pin1)
BlueCoin Programming/Debugging
CoinStation + BlueCoin
STM32 Nucleo board
13
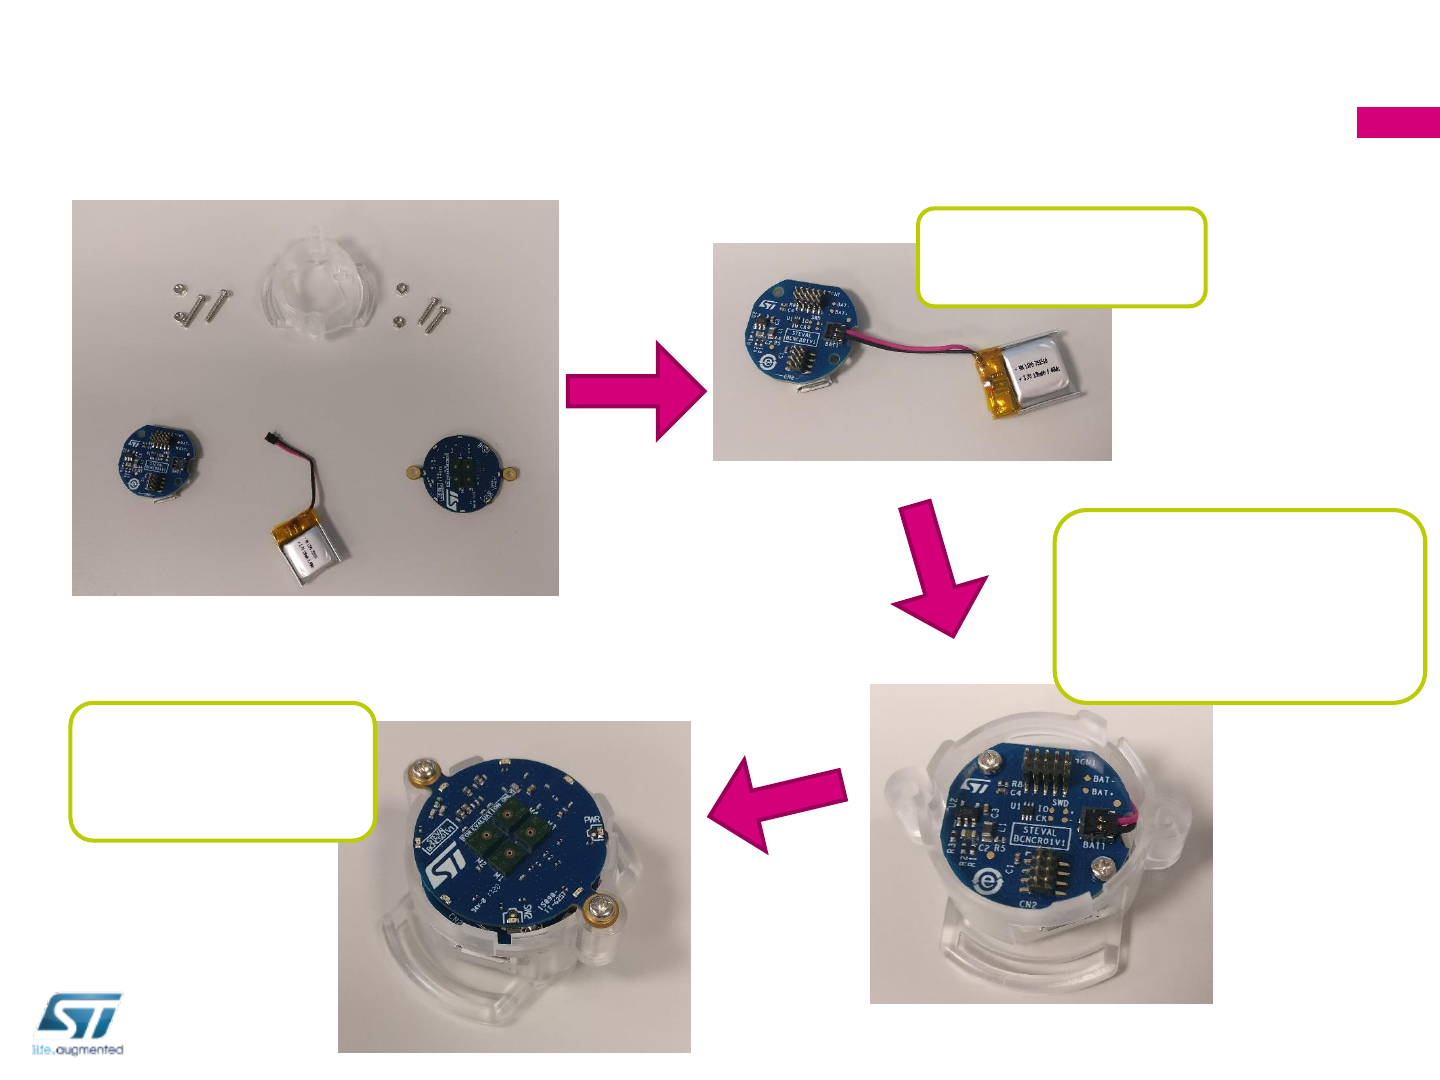
How to assemble the portable demo
Plug the battery
on the Cradle
Fold the Battery below
the cradle, insert in
the plastic case and
secure with the bolts
Plug the BlueCoin
and secure with
the bolts
