Heptio Kubernetes On The Aws Cloud Guide
User Manual: Pdf
Open the PDF directly: View PDF ![]() .
.
Page Count: 22

Amazon Web Services – Quick Start for Kubernetes by Heptio on the AWS Cloud April 2017
Page 2 of 22
Contents
About This Guide ................................................................................................................... 2
Quick Links ............................................................................................................................ 3
About Quick Starts ................................................................................................................. 3
Overview .................................................................................................................................... 3
Kubernetes on AWS ............................................................................................................... 4
Cost and Licenses ................................................................................................................... 5
AWS Services.......................................................................................................................... 5
Architecture ............................................................................................................................... 6
Best Practices .........................................................................................................................8
Planning the Deployment ......................................................................................................... 9
Deployment Options .............................................................................................................. 9
Deployment Steps ..................................................................................................................... 9
Step 1. Prepare Your AWS Account ..................................................................................... 10
Step 2. Launch the Quick Start ............................................................................................ 12
Step 3. (Optional) Test Your Kubernetes Cluster ................................................................ 17
Troubleshooting ...................................................................................................................... 19
Security ................................................................................................................................... 20
Additional Resources ............................................................................................................. 20
Send Us Feedback ................................................................................................................... 21
Document Revisions................................................................................................................ 21
About This Guide
This Quick Start deployment guide describes how to deploy a Kubernetes environment on
the Amazon Web Services (AWS) Cloud, using AWS CloudFormation templates that
automate the deployment.
The guide is for IT infrastructure architects, administrators, and DevOps professionals who
are planning to implement or extend their Kubernetes workloads on the AWS Cloud.
Amazon Web Services – Quick Start for Kubernetes by Heptio on the AWS Cloud April 2017
Page 3 of 22
Quick Links
The links in this section are for your convenience. Before you launch the Quick Start, please
review the architecture, configuration, network security, and other considerations discussed
in this guide.
If you have an AWS account, and you’re already familiar with AWS services and
Kubernetes, you can launch the Quick Start to build the architecture shown in Figure 1
in a new or existing virtual private cloud (VPC). The deployment takes approximately
ten minutes when you use the default Quick Start settings. If you’re new to AWS or to
Kubernetes, please review the implementation details and follow the step-by-step
instructions provided later in this guide.
If you want to take a look under the covers, you can view the AWS CloudFormation
templates that automate the deployment.
About Quick Starts
Quick Starts are automated reference deployments for key workloads on the AWS Cloud.
Each Quick Start launches, configures, and runs the AWS compute, network, storage, and
other services required to deploy a specific workload on AWS, using AWS best practices for
security and availability.
Overview
The Kubernetes Quick Start bootstraps your Kubernetes cluster with one master, two
additional nodes by default, and a load balancer for HTTPS access to the Kubernetes API.
This is a small cluster suitable for exploring Kubernetes networking, scaling, and
administration. By running this Quick Start configuration, you’ll be able to learn how
Kubernetes works at a manageable scale, with key parts in place for a full-scale deployment.
This is a step past the local or one-node deployment you might run to kick the tires.
View template
(for new VPC)
Launch
(for new VPC)
Launch
(for existing VPC)
View template
(for existing VPC)
Amazon Web Services – Quick Start for Kubernetes by Heptio on the AWS Cloud April 2017
Page 4 of 22
Ubuntu 16.04 LTS is the base image for all nodes. With kubeadm for cluster administration
and Calico or Weave for networking between pods, you’ll immediately be able to deploy
your own pods of networked container workloads on top of this architecture. Nodes have
full access to one another, but won’t be exposed over the public Internet. You can use
kubectl (a Kubernetes command-line tool) to expose workloads publicly.
Note This stack is appropriate for proof of concept (PoC), experimentation,
development, and small internal-facing projects. Consider this a test drive.
This stack does not currently support upgrades and must be rebuilt for new versions.
Kubernetes on AWS
Kubernetes is the popular orchestration software used for managing cloud workloads
through containers (like Docker). Kubernetes helps assign containers to machines in a
scalable way, keep them running in the face of failures and facilitating them talking to each
other.
The AWS Cloud provides the infrastructure services your containerized workloads run on,
while Kubernetes coordinates the containers in a flexible and fault-tolerant way.
Kubernetes handles many of the details of traditional system administration and decouples
workload deployment from infrastructure deployment. Kubernetes also integrates with
AWS to utilize Amazon Elastic Block Store (Amazon EBS) volumes and expose services
using Elastic Load Balancing. By deploying Kubernetes on the AWS Cloud, you can take
advantage of the functionality of Kubernetes along with the flexibility and security of AWS.
This guide provides infrastructure and configuration information for planning and
deploying a Kubernetes cluster on the AWS Cloud. It doesn’t cover general guidance and
best practices for Kubernetes. For general open-source reference, consult the Kubernetes
documentation. For more Kubernetes best practices and use cases, consult the Heptio
documentation.
A popular abbreviation for Kubernetes is k8s (“kates”), where the middle eight letters are
replaced with “8.”

Amazon Web Services – Quick Start for Kubernetes by Heptio on the AWS Cloud April 2017
Page 5 of 22
Cost and Licenses
You are responsible for the cost of the AWS services used while running this Quick Start
reference deployment. There is no additional cost for using the Quick Start.
The AWS CloudFormation templates for this Quick Start include configuration parameters
that you can customize. Some of these settings, such as instance type, will affect the cost of
deployment. By default, this will be three t2.medium instances for the cluster and a
t2.micro instance for a bastion host. For cost estimates, see the pricing pages for each AWS
service you will be using or the AWS Simple Monthly Calculator. Prices are subject to
change.
Kubernetes is free to deploy and uses the open-source Apache 2.0 license.
AWS Services
The core AWS components used by this Quick Start include the following services. (If you
are new to AWS, see the Getting Started section of the AWS documentation.)
Amazon VPC – The Amazon Virtual Private Cloud (Amazon VPC) service lets you
provision a private, isolated section of the AWS Cloud where you can launch AWS
services and other resources in a virtual network that you define. You have complete
control over your virtual networking environment, including selection of your own IP
address range, creation of subnets, and configuration of route tables and network
gateways.
Amazon EC2 – The Amazon Elastic Compute Cloud (Amazon EC2) service enables you
to launch virtual machine instances with a variety of operating systems. You can choose
from existing Amazon Machine Images (AMIs) or import your own virtual machine
images.
Elastic Load Balancing – Elastic Load Balancing automatically distributes incoming
application traffic across multiple Amazon EC2 instances. It enables you to achieve fault
tolerance in your applications, seamlessly providing the required amount of load
balancing capacity needed to route application traffic. You can provision load balancers
for your cluster workloads through Kubernetes, which will automatically handle setup
and configuration. See the Kubernetes article Creating an External Load Balancer for
details.
Amazon EBS – Amazon Elastic Block Store (Amazon EBS) provides persistent block-
level storage volumes for use with Amazon EC2 instances in the AWS Cloud. Each
Amazon EBS volume is automatically replicated within its Availability Zone to protect
you from component failure, offering high availability and durability. Amazon EBS

Amazon Web Services – Quick Start for Kubernetes by Heptio on the AWS Cloud April 2017
Page 6 of 22
volumes provide the consistent and low-latency performance needed to run your
workloads. Kubernetes can automatically attach/detach volumes and associate them
with a container, even if the container moves to a new node. See the Kubernetes article
on volumes for details.
Architecture
This Quick Start includes two templates. One automatically creates a VPC, subnets, and
bastion host, which is what Heptio recommends. The second template for more advanced
use cases deploys Kubernetes in a pre-existing VPC and subnet.
Deploying this Quick Start for a new VPC with default parameters builds the following
Kubernetes environment in the AWS Cloud.
Amazon Web Services – Quick Start for Kubernetes by Heptio on the AWS Cloud April 2017
Page 7 of 22
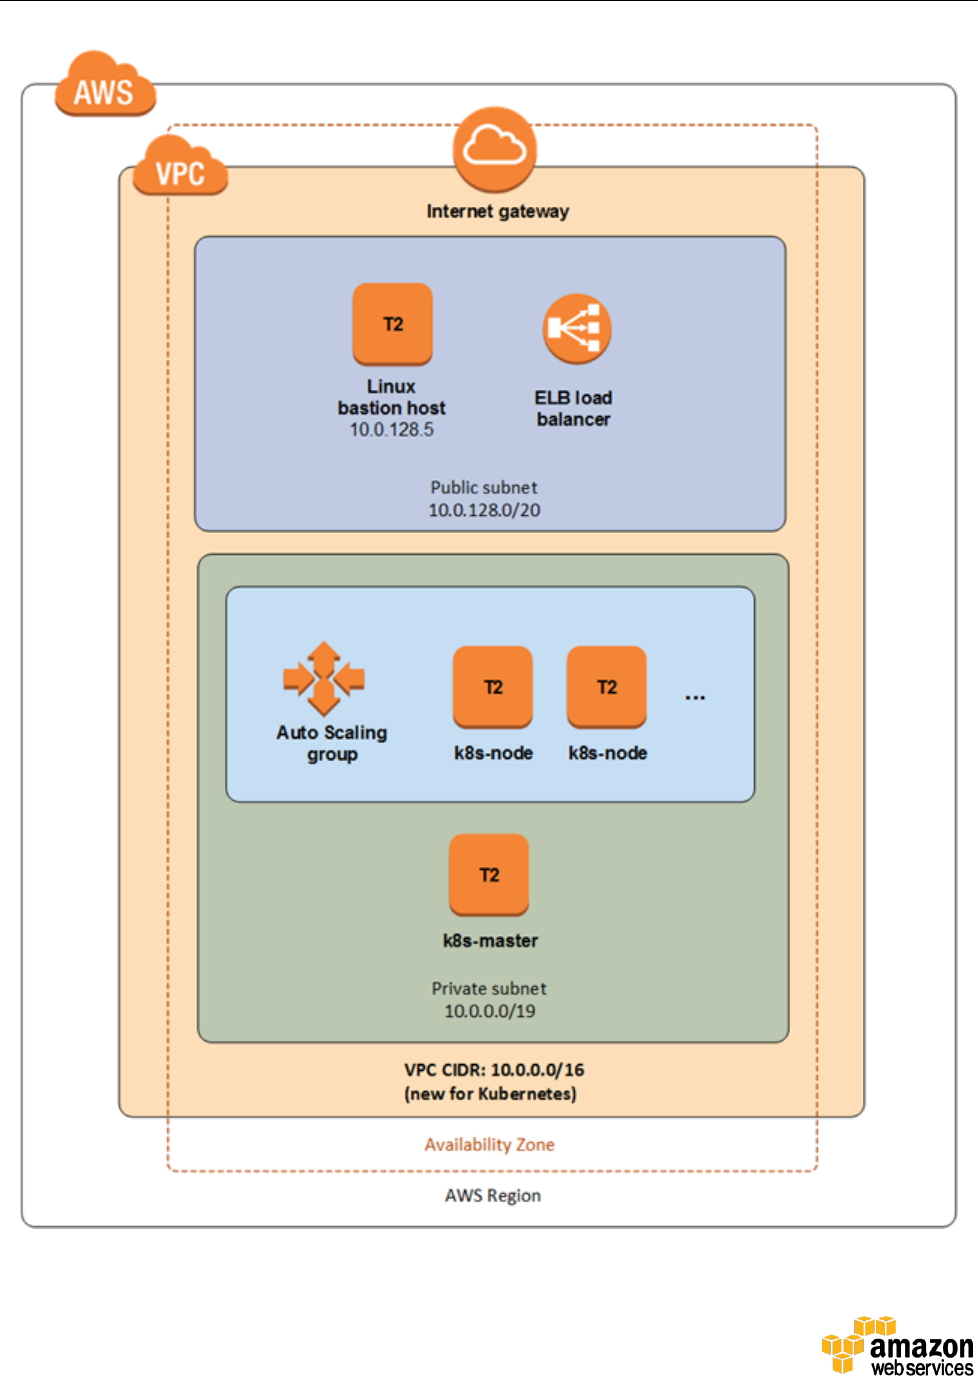
Figure 1: Kubernetes architecture on AWS

Amazon Web Services – Quick Start for Kubernetes by Heptio on the AWS Cloud April 2017
Page 8 of 22
The Quick Start sets up the following:
A VPC in a single Availability Zone*
Two subnets, one public and one private*
One EC2 instance acting as a bastion host in the public subnet*
One EC2 instance with automatic recovery for the master node in the private subnet
1-20 EC2 instances in an Auto Scaling group for additional nodes in the private subnet
One ELB load balancer for HTTPS access to the Kubernetes API
Ubuntu 16.04 LTS for all nodes
kubeadm for bootstrapping Kubernetes on Linux
Docker for the container runtime, which Kubernetes depends on
Calico or Weave for pod networking
One stack-only security group that allows port 22 for SSH access (to the bastion host or
directly to the stack, depending on configuration), port 6443 for HTTPS access to the
API, and inter-node connectivity on all ports
* The template that deploys the Quick Start into an existing VPC skips the tasks marked by
asterisks.
Best Practices
The architecture built by this Quick Start supports AWS best practices for security. This
setup can play a part in a Multi-AZ solution by deploying a Kubernetes cluster in each of
multiple zones, which is Heptio’s recommendation for high availability:
The master node uses simple automatic recovery with a 5-minute tolerance for failure.
Auto recovery brings the node up with the same IP address to preserve cluster
connectivity.
The other nodes are part of an Auto Scaling group to take advantage of high availability
on AWS.
The Kubernetes cluster is part of a private subnet with no connectivity allowed in from
the outside world except through a bastion host in the public subnet. Services are
exposed to the outside world by integrating with the AWS Elastic Load Balancing
service. Kubernetes can create and manage ELB load balancers. One way of provisioning
a load balancer from Kubernetes is by using kubectl, a Kubernetes command-line tool.
For details, see next steps at http://jump.heptio.com/aws-qs-next.
Amazon Web Services – Quick Start for Kubernetes by Heptio on the AWS Cloud April 2017
Page 9 of 22
The templates for this Quick Start create a single master node for Kubernetes and a set
of worker nodes. All of these nodes run in a single AWS Availability Zone. This is
appropriate for development clusters or for users who want to experiment with
Kubernetes to understand if it is suitable for their application.
While it is possible to create a single cluster that stretches across Availability Zones,
Heptio recommends achieving a multi-zone architecture by running one cluster per
zone. For details, see next steps at http://jump.heptio.com/aws-qs-multi-az.
Planning the Deployment
Deployment Options
This Quick Start provides two deployment options:
Deploy Kubernetes into a new VPC (end-to-end deployment) builds a new AWS
environment consisting of the VPC, subnets, security groups, bastion hosts, and other
infrastructure components, and then deploys Kubernetes into this new VPC. Heptio
recommends this deployment, since it configures the infrastructure in accordance
with AWS best practices.
Deploy Kubernetes into an existing VPC provisions Kubernetes in your existing
AWS infrastructure. If you use a public subnet you can connect directly to the master
node over SSH. If you use a private subnet, you will need a bastion host so you can
proxy to the master node over SSH.
The Quick Start also lets you configure additional settings such as CIDR blocks, instance
types, and Kubernetes settings, as discussed later in this guide.
Deployment Steps
Follow these steps to deploy Kubernetes on AWS. For detailed instructions, follow the links
for each step.
Step 1. Prepare Your AWS account
Sign up for an AWS account. Choose your region, create a key pair, and request increases
for account limits, if necessary.
Step 2. Launch the Quick Start
Launch the AWS CloudFormation template, specify parameter values, and create the stack.
The Quick Start provides a pair of templates for end-to-end deployment and a single
template for deploying into an existing VPC.
Amazon Web Services – Quick Start for Kubernetes by Heptio on the AWS Cloud April 2017
Page 10 of 22
Step 3. (Optional) Test Your Kubernetes Cluster
Use kubectl to test your cluster, and then view the Heptio documentation at
http://jump.heptio.com/aws-qs-next for an example application and next steps.
Step 1. Prepare Your AWS Account
If you already have an AWS account, skip to step 2.
1. Create your AWS account at https://aws.amazon.com by following the on-screen
instructions. Part of the sign-up process involves receiving a phone call and entering a
PIN using the phone keypad.
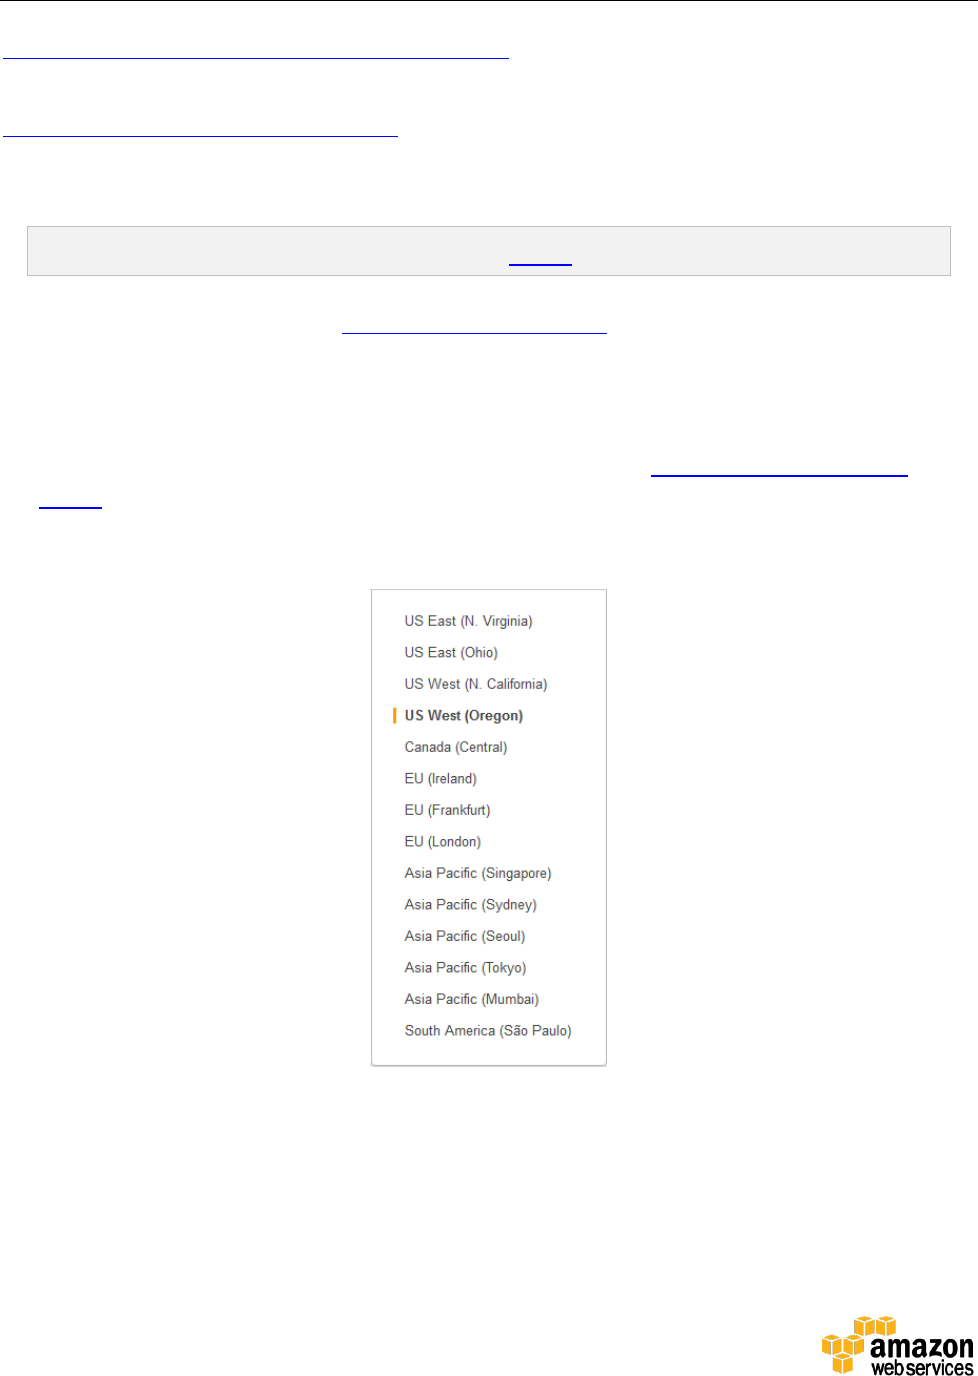
2. Use the region selector in the navigation bar to choose the AWS Region where you want
to deploy Kubernetes on AWS. For more information, see Regions and Availability
Zones. Regions are dispersed and located in separate geographic areas. Each Region
includes at least two Availability Zones that are isolated from one another but connected
through low-latency links.
Figure 2: Choosing an AWS Region
Consider choosing a region closest to your data center or corporate network to reduce
network latency between systems running on AWS and the systems and users on your
corporate network.

Amazon Web Services – Quick Start for Kubernetes by Heptio on the AWS Cloud April 2017
Page 11 of 22
3. Create a key pair in your preferred region. To do this, in the navigation pane of the
Amazon EC2 console, choose Key Pairs, Create Key Pair, type a name, and then
choose Create.
Figure 3: Creating a key pair
Amazon EC2 uses public-key cryptography to encrypt and decrypt login information. To
log in to your instances, you must create a key pair. On Linux, the key pair is used to
authenticate SSH login.
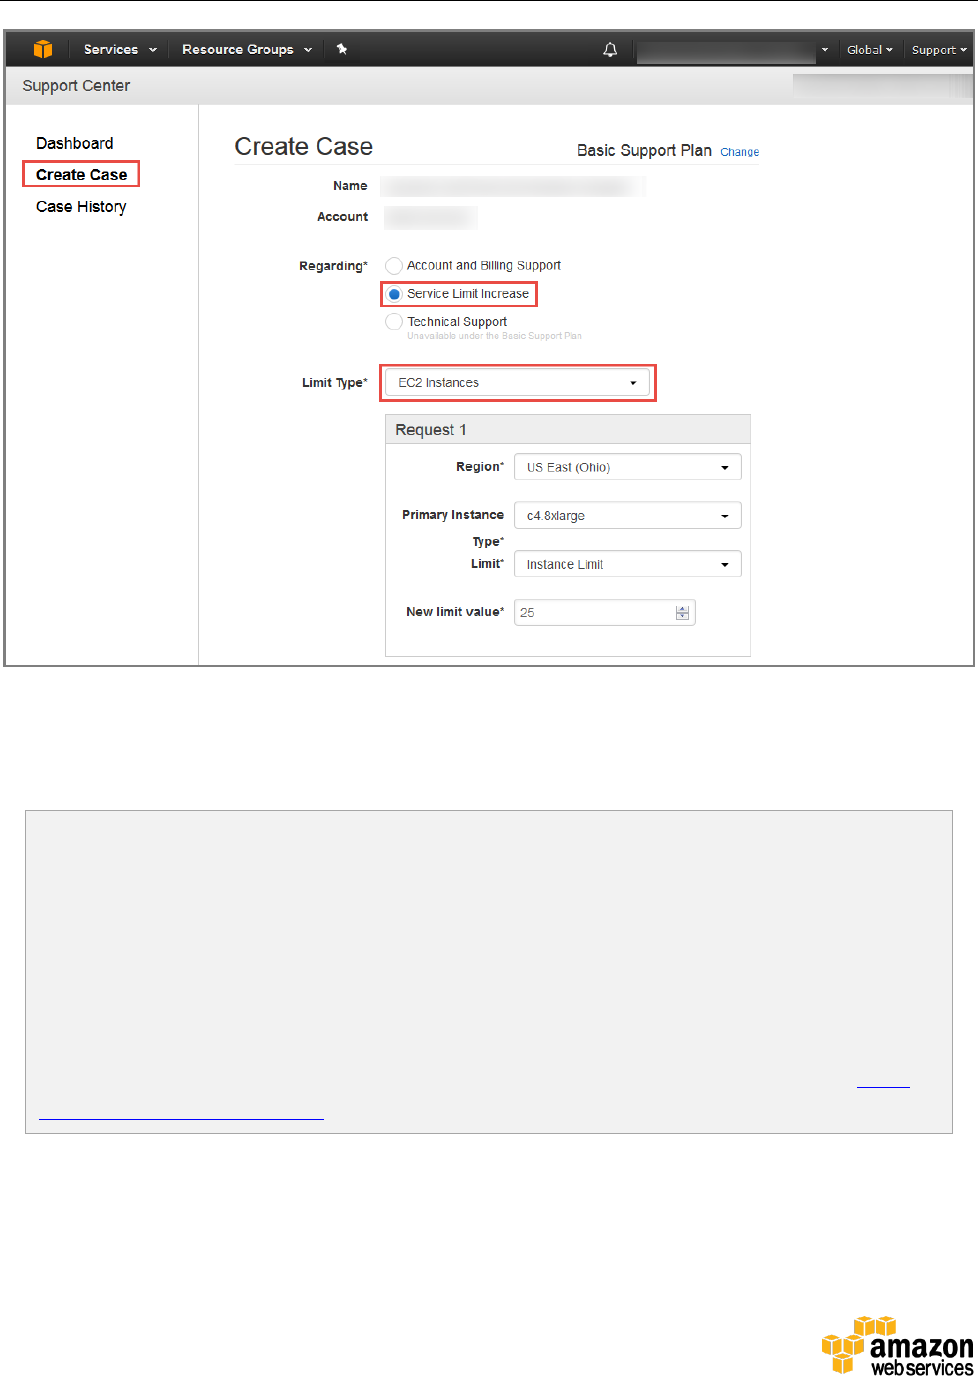
4. If necessary, request a service limit increase for the Amazon EC2 t2.medium instance
type (or the instance type you plan to use for the Kubernetes cluster). To do this, in the
AWS Support Center, choose Create Case, select the Service Limit Increase option,
select EC2 instances from the dropdown, and then complete the fields in the limit
increase form. The current default limit is 20 instances. To learn more about Amazon
EC2 limits, how to view your current limits, or how to request an increase, see Amazon
EC2 Service Limits in the AWS documentation.
You might need to request an increase if you already have an existing deployment that
uses this instance type, and you think you might exceed the default limit with this
Kubernetes deployment. It might take a few days for the new service limit to become
effective. For more information, see the Amazon EC2 User Guide.
Amazon Web Services – Quick Start for Kubernetes by Heptio on the AWS Cloud April 2017
Page 12 of 22
Figure 4: Requesting a service limit increase
Step 2. Launch the Quick Start
Note You are responsible for the cost of the AWS services used while running this
Quick Start reference deployment. There is no additional cost for using this Quick
Start.
The AWS CloudFormation template for this Quick Start includes configuration
parameters that you can customize. Some of these settings, such as instance type,
will affect the cost of deployment. By default, the Quick Start uses three t2.medium
instances for the cluster and a t2.micro instance for the bastion host. For cost
estimates, see the pricing pages for each AWS service you will be using or the AWS
Simple Monthly Calculator. Prices are subject to change.
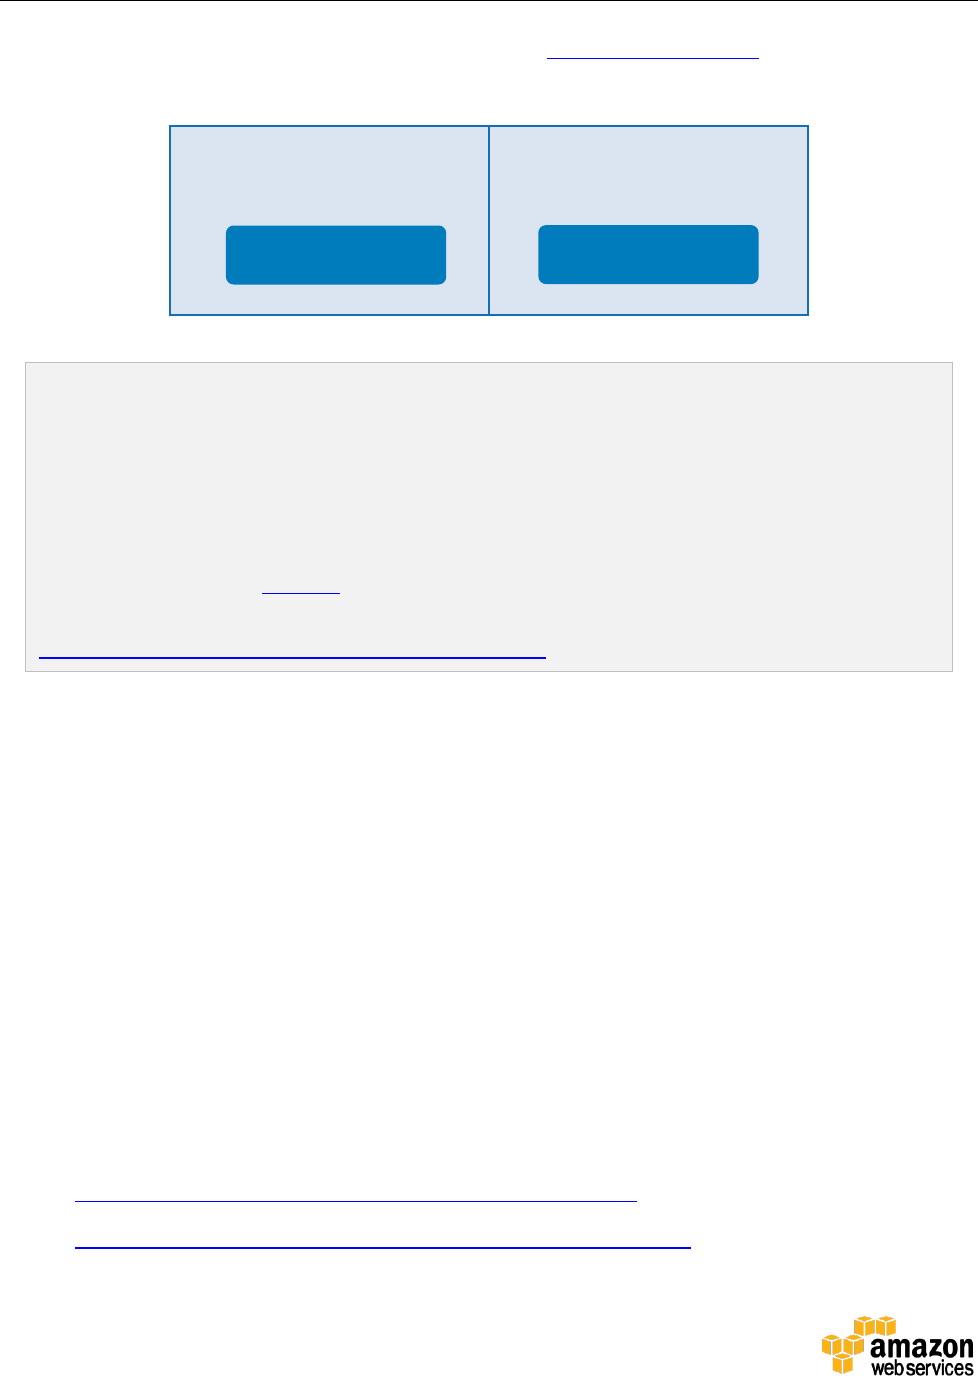
1. Choose one of the following options to launch the AWS CloudFormation template into
your AWS account. We recommend that you choose Option 1 to deploy Kubernetes
into a new VPC in your AWS account. If you already have a VPC and subnet where you
want to launch the cluster, you can use the Option 2 template and provide your
Amazon Web Services – Quick Start for Kubernetes by Heptio on the AWS Cloud April 2017
Page 13 of 22
identifiers. For help choosing an option, see the deployment options earlier in this
guide.
Option 1
Deploy Kubernetes into a
new VPC on AWS
Option 2
Deploy Kubernetes into an
existing VPC
Important There are no hard requirements for deploying Kubernetes into an
existing VPC. The cluster makes no assumptions about whether it is in a private or
public subnet. If you choose a public subnet, you will have to retrieve the master
node’s public IP or DNS information, and connect directly to it over SSH. If you
choose a private subnet, you must have a bastion host in that VPC so you can proxy
to the master node over SSH. In either case, we recommend making a one-time
connection to copy a kubectl configuration file from the master node, and using
kubectl for future connections. Both connection methods are discussed in the section
Step 3. (Optional) Test Your Kubernetes Cluster.
Each deployment takes about 10 minutes, but will take longer with the smaller instance
types (e.g., t2.nano).
2. Check the region that’s displayed in the upper-right corner of the navigation bar, and
change it if necessary. This is where the network infrastructure for Kubernetes will be
built. The template is launched in the US West (Oregon) Region by default.
3. On the Select Template page, keep the default setting for the template URL, and then
choose Next.
4. On the Specify Details page, change the stack name if needed. Review the parameters
for the template. Provide values where input is required. For all other parameters,
review the default settings and customize them as necessary. When all parameters are
set, choose Next.
In the following tables, parameters are listed by category and described separately for
the two deployment options:
– Parameters for deploying Kubernetes into a new VPC
– Parameters for deploying Kubernetes into an existing VPC
Launch
Launch
Amazon Web Services – Quick Start for Kubernetes by Heptio on the AWS Cloud April 2017
Page 14 of 22
Option 1: Parameters for deploying Kubernetes into a new VPC
View template
Required:
Parameter label
(name)
Default
Description
Availability Zone
(AvailabilityZone)
Requires input
The Availability Zone for this cluster. Generally, Heptio
recommends that you run one cluster per Availability Zone
and use tooling to coordinate across zones.
Admin Ingress
Location
(AdminIngressLocation)
Requires input
CIDR block (IP address range) to allow SSH access to the
bastion host and HTTPS access to the Kubernetes API. Use
0.0.0.0/0 to allow access from all locations.
SSH Key
(KeyName)
Requires input
The name of an existing Amazon EC2 key pair, to enable
SSH access to the instances. When you created an AWS
account, this is the key pair you created in your preferred
region.
Advanced:
Parameter label
(name)
Default
Description
Networking Provider
(NetworkingProvider)
calico
The networking provider to use for communication between
pods in the Kubernetes cluster. Supported configurations
are calico and weave.
Node Capacity
(K8sNodeCapacity)
2
The number of nodes that will run workloads (in addition to
the master node instance). You can choose 1-20 nodes for
deployment, and scale up your cluster later with more
nodes.
Instance Type
(InstanceType)
t2.medium
EC2 instance type for the cluster.
Disk Size (GiB)
(DiskSizeGb)
40
The size of the root disk for the EC2 instances for the
cluster, in GiB. You can specify a value between 8 and 1024.
Instance Type
(Bastion Host)
(BastionInstanceType)
t2.micro
EC2 instance type for the bastion host.
S3 Bucket
(QSS3BucketName)
heptio-aws-
quickstart-test
Change this setting only if you’ve set up assets, like
your own networking configuration, in an S3
bucket. This and the next parameter let you access scripts
from the scripts/ and templates/ directories of your own
fork of Heptio's Quick Start assets, uploaded to S3 and
stored at
${bucketname}.s3.amazonaws.com/${prefix}/scripts/some
file.txt. The Quick Start bucket name can include numbers,
Amazon Web Services – Quick Start for Kubernetes by Heptio on the AWS Cloud April 2017
Page 15 of 22
Parameter label
(name)
Default
Description
lowercase letters, uppercase letters, and hyphens (-). It
cannot start or end with a hyphen (-).
S3 Key Prefix
(QSS3KeyPrefix)
heptio/kubernetes/
latest
Change this setting only if you’ve set up assets, like
your own networking configuration, in an S3
bucket. This and the previous parameter let you access
scripts from the scripts/ and templates/ directories of your
own fork of Heptio's Quick Start assets, uploaded to S3 and
stored at
${bucketname}.s3.amazonaws.com/${prefix}/scripts/some
file.txt. The Quick Start key prefix can include numbers,
lowercase letters, uppercase letters, hyphens (-), and
forward slashes (/). It cannot start or end with a forward
slash (/), which is automatically added.
Option 2: Parameters for deploying Kubernetes into an existing VPC
View template
Amazon EC2 Configuration:
Parameter label
(name)
Default
Description
VPC
(VPCID)
Requires input
ID of an existing VPC in this region. Make sure that the
VPC corresponds to your desired Availability Zone
and subnet.
Availability Zone
(AvailabilityZone)
Requires input
The Availability Zone for this cluster. Generally, Heptio
recommends that you run one cluster per Availability Zone
and use tooling to coordinate across zones. Make sure that
the Availability Zone corresponds to your desired
VPC and subnet.
Instance Type
(InstanceType)
t2.medium
EC2 instance type for the cluster.
Disk Size (GiB)
(DiskSizeGb)
40
The size of the root disk for the EC2 instances for the
cluster, in GiB. You can specify a value between 8 and 1024.
Subnet
(ClusterSubnetId)
Requires input
The subnet for this cluster. Make sure that the subnet
corresponds to your desired VPC and Availability
Zone. A public subnet will work out of the box. A private
subnet will require a bastion host configured to work within
that VPC, for external SSH access.
Load Balancer Subnet
(LoadBalancerSubnetId)
Requires input
An existing subnet that you want to use for load balancing
HTTPS access to the Kubernetes API server. This must be a
public subnet and must belong to the Availability Zone you've
selected.
Amazon Web Services – Quick Start for Kubernetes by Heptio on the AWS Cloud April 2017
Page 16 of 22
Access Configuration:
Parameter label
(name)
Default
Description
SSH Ingress Location
(SSHLocation)
Requires input
CIDR block (IP address range) to allow SSH access to the
instances. Use 0.0.0.0/0 to allow access from all locations.
API Ingress Location
(ApiLbLocation)
Requires input
CIDR block (IP address range) to allow HTTPS access to the
Kubernetes API. Use 0.0.0.0/0 to allow access from all
locations.
SSH Key
(KeyName)
Requires input
The name of an existing Amazon EC2 key pair, to enable SSH
access to the instances. When you created an AWS account,
this is the key pair you created in your preferred region.
Kubernetes Configuration:
Parameter label
(name)
Default
Description
Node Capacity
(K8sNodeCapacity)
2
The number of nodes that will run workloads (in addition to
the master node instance). You can choose 1-20 nodes for
deployment, and scale up your cluster later with more nodes.
Networking Provider
(NetworkingProvider)
calico
The networking provider to use for communication between
pods in the Kubernetes cluster. Supported configurations are
calico and weave.
Advanced:
Parameter label
(name)
Default
Description
S3 Bucket
(QSS3BucketName)
heptio-aws-
quickstart-test
Change this setting only if you’ve set up assets, like
your own networking configuration, in an S3 bucket.
This and the next parameter let you access scripts from the
scripts/ and templates/ directories of your own fork of
Heptio's Quick Start assets, uploaded to S3 and stored at
${bucketname}.s3.amazonaws.com/${prefix}/scripts/somefi
le.txt. The Quick Start bucket name can include numbers,
lowercase letters, uppercase letters, and hyphens (-). It
cannot start or end with a hyphen (-).
S3 Key Prefix
(QSS3KeyPrefix)
heptio/kubernetes/
latest
Change this setting only if you’ve set up assets, like
your own networking configuration, in an S3 bucket.
This and the previous parameter let you access scripts from
the scripts/ and templates/ directories of your own fork of
Heptio's Quick Start assets, uploaded to S3 and stored at
${bucketname}.s3.amazonaws.com/${prefix}/scripts/somefi
le.txt. The Quick Start key prefix can include numbers,
lowercase letters, uppercase letters, hyphens (-), and forward

Amazon Web Services – Quick Start for Kubernetes by Heptio on the AWS Cloud April 2017
Page 17 of 22
Parameter label
(name)
Default
Description
slashes (/). It cannot start or end with a forward slash (/),
which is automatically added.
Cluster Association
(ClusterAssociation)
—
A string, unique within your AWS account, that associates
resources in this Kubernetes cluster with one another. This
adds a tag, which has the key KubernetesCluster and the
value of this parameter, to resources created as part of this
stack. Leave blank to use the Quick Start stack name.
5. On the Options page, you can specify tags (key-value pairs) for resources in your stack
and set advanced options. The template automatically names the nodes with k8s-
master or k8s-node as appropriate, and tags the EC2 instances and new security
group with the key of KubernetesCluster and the value of the stack name (or the
value of the Cluster Association parameter if you’re using the existing VPC
deployment option). This is required for the Kubernetes/AWS Cloud integration. When
you’re done, choose Next.
6. On the Review page, review and confirm the template settings. Under Capabilities,
select the check box to acknowledge that the template will create IAM resources.
7. Choose Create to deploy the stack(s). If you create a new VPC, two stacks are created.
The VPC has the name you specified, and the Kubernetes cluster has the same name
with -K8sStack- and a random string appended.
8. Monitor the status of the stack. When the status is CREATE_COMPLETE, the
Kubernetes cluster is ready.
9. Use the GetKubeConfigCommand in the Outputs tab for the VPC stack to configure
your local kubectl environment so you can connect to the resources that were created. If
you would rather connect to the cluster over SSH, see http://jump.heptio.com/aws-qs-
next.
Step 3. (Optional) Test Your Kubernetes Cluster
1. On your local machine, download and configure kubectl. (See step 3.4 to connect to the
cluster directly over SSH if you don’t want to use kubectl.)
2. From a machine with the appropriate key pair (the one you selected for the stack
deployment), run the scp command to download a configuration for your local kubectl
environment. kubectl is a command-line cluster management tool for Kubernetes. The
GetKubeConfigCommand is displayed in the Outputs tab for the VPC stack. This
command will securely copy a file called “kubeconfig” that was automatically generated
Amazon Web Services – Quick Start for Kubernetes by Heptio on the AWS Cloud April 2017
Page 18 of 22
on the master node and contains connection information and credentials for the cluster.
You will need to download the file so kubectl can use it to connect to this cluster you just
created. The command to download the file should look something like this:
SSH_KEY="<path/to/varMyKey.pem>"; scp -i $SSH_KEY -o
ProxyCommand="ssh -i \"${SSH_KEY}\" ubuntu@<BastionHostPublicIP> nc
%h %p" ubuntu@<MasterPrivateIP>:~/kubeconfig ./kubeconfig
If you deployed into an existing VPC, you should (a) modify the command to use
the IP address of a bastion host within that VPC, or (b) connect directly to the master
node’s public IP or public DNS name (learn how to describe the master instance and
obtain the IP or public DNS name). The second method works only if you’re using a
public subnet.
3. For ease of use, set this local environment variable so kubectl uses the downloaded file:
export KUBECONFIG=$(pwd)/kubeconfig
4. (Optional) To connect to the cluster directly over SSH — for example, if you don’t want
to configure kubectl locally — use the SSHProxyCommand shown in the Outputs
tab for the VPC stack. See http://jump.heptio.com/aws-qs-next for a more detailed
explanation. While logged into the master node, you can run kubectl commands
directly.
5. Run this command to list all Kubernetes nodes, either locally or from the master node
(proxied or otherwise):
kubectl get nodes
If you kept the default settings for the Quick Start, you should see one master node and
two additional nodes.
Name
Status
Age
ip-10-10-10-10
Ready,
master
1h
ip-172-172-172-172
Ready
1h
ip-192-192-192-192
Ready
1h
Now that you've seen the Kubernetes cluster working, you can take it for a test drive so
Kubernetes is doing something interesting! Visit http://jump.heptio.com/aws-qs-next for
some ideas on how to start using your cluster.
Amazon Web Services – Quick Start for Kubernetes by Heptio on the AWS Cloud April 2017
Page 19 of 22
Troubleshooting
For issues with Kubernetes, visit http://jump.heptio.com/aws-qs-help.
When you deploy the Quick Start, if you encounter a CREATE_FAILED error instead of the
CREATE_COMPLETE status code, we recommend that you relaunch the template with
Rollback on failure set to No. (This setting is under Advanced in the AWS
CloudFormation console, Options page.) With this setting, the stack’s state will be retained
and the instance will be left running, so you can troubleshoot the issue. (You’ll want to look
at the log files in %ProgramFiles%\Amazon\EC2ConfigService and in the C:\cfn\log
folder.)
Important When you set Rollback on failure to No, you’ll continue to
incur AWS charges for this stack. Please make sure to delete the stack when
you’ve finished troubleshooting.
The following table lists specific CREATE_FAILED error messages you might encounter.
Error message
Possible cause
What to do
We currently do not have
sufficient t2.medium capacity
in the AZ you requested
You have exceeded your
Amazon EC2 capacity
Switch to an instance type that supports higher
capacity, or complete the request form in the AWS
Support Center to increase the Amazon EC2 limit
for the instance type or region. Limit increases are
tied to the region they were requested for.
Instance ID did not stabilize
You have exceeded your
IOPS for the region
Request a limit increase by completing the request
form in the AWS Support Center.
K8sMasterInstance Value for
parameter availabilityZone is
invalid
The Availability Zone
and subnet don’t match
Check your settings for the Availability Zone
and Subnet parameters to make sure they match.
K8sMasterInstance Security
group and subnet belong to
different networks
The VPC and subnet
don’t match
Check your settings for the VPC and Subnet
parameters to make sure they match.
For additional information, see Troubleshooting AWS CloudFormation on the AWS
website. If the problem you encounter isn’t covered on that page or in the table, please visit
the AWS Support Center. If you’re filing a support ticket, please attach the install.log file
from the master instance (this is the log file that is located in the /root/install folder) to
the ticket.

Amazon Web Services – Quick Start for Kubernetes by Heptio on the AWS Cloud April 2017
Page 20 of 22
Security
This stack exposes port 22 on the bastion host and port 443 on the API ELB load balancer
to the IP address range(s) that you specify. All nodes within the stack can reach one another
on all ports.
To expose more ports, we recommend using Elastic Load Balancing. This will work
automatically with the Kubernetes/AWS Cloud integration. See
http://jump.heptio.com/aws-qs-next for details.
For general Kubernetes security considerations, please visit http://jump.heptio.com/aws-
qs-security.
For general AWS security considerations, please visit the AWS Security Center.
Additional Resources
AWS services
Amazon EC2 user guide for Linux
https://docs.aws.amazon.com/AWSEC2/latest/UserGuide/
AWS CloudFormation
https://aws.amazon.com/documentation/cloudformation/
Amazon VPC
https://aws.amazon.com/documentation/vpc/
Kubernetes documentation
Kubernetes Open-Source Documentation
https://kubernetes.io/docs/
kubeadm for Managing Kubernetes on Linux
https://kubernetes.io/docs/admin/kubeadm/
Calico Networking
http://docs.projectcalico.org/v2.0/getting-started/kubernetes/
Weave Networking
https://github.com/weaveworks/weave
Heptio AWS Quick Start Next Steps
http://jump.heptio.com/aws-qs-next

Amazon Web Services – Quick Start for Kubernetes by Heptio on the AWS Cloud April 2017
Page 21 of 22
Heptio Documentation for Kubernetes
http://docs.heptio.com/
Quick Start reference deployments
AWS Quick Start home page
https://aws.amazon.com/quickstart/
Send Us Feedback
We welcome your questions and comments. Please post your feedback on the AWS Quick
Start Discussion Forum.
You can visit the AWS GitHub repository to download the templates and scripts for this
public release of the Quick Start. Heptio will be updating this Quick Start on a regular basis;
you can find the latest development version hosted by Heptio at
https://github.com/heptio/aws-quickstart.
Document Revisions
Date Change In sections
April 2017 Kubernetes 1.6.2 release For information about this release, see
http://jump.heptio.com/aws-qs-1-6-changes
March 2017 Kubernetes 1.5.5 release Step 3
February 2017 Initial publication —

Amazon Web Services – Quick Start for Kubernetes by Heptio on the AWS Cloud April 2017
Page 22 of 22
© 2017, Amazon Web Services, Inc. or its affiliates, and Heptio. All rights reserved.
Notices
This document is provided for informational purposes only. It represents AWS’s current product offerings
and practices as of the date of issue of this document, which are subject to change without notice. Customers
are responsible for making their own independent assessment of the information in this document and any
use of AWS’s products or services, each of which is provided “as is” without warranty of any kind, whether
express or implied. This document does not create any warranties, representations, contractual
commitments, conditions or assurances from AWS, its affiliates, suppliers or licensors. The responsibilities
and liabilities of AWS to its customers are controlled by AWS agreements, and this document is not part of,
nor does it modify, any agreement between AWS and its customers.
The software included with this paper is licensed under the Apache License, Version 2.0 (the "License"). You
may not use this file except in compliance with the License. A copy of the License is located at
http://aws.amazon.com/apache2.0/ or in the "license" file accompanying this file. This code is distributed on
an "AS IS" BASIS, WITHOUT WARRANTIES OR CONDITIONS OF ANY KIND, either express or implied.
See the License for the specific language governing permissions and limitations under the License.
