Hmda Tools Instructions
HMDA-Tools-Instructions
User Manual: Pdf
Open the PDF directly: View PDF ![]() .
.
Page Count: 23

October 2017
0
HMDA Tools Instructions

1
Version log
The following is a version log that tracks the history of this document and its updates:
Date
Version
Changes
November 2017 1.1
Inclusion of Screenshots
Inclusion of instructions on the File Format Verification
Tool
January 2017 1.0 Original Document
2
Table of contents
Version log ................................................................................................................... 1
Table of contents......................................................................................................... 2
Paperwork Reduction Act ........................................................................................... 4
1. Introduction ........................................................................................................... 5
2. LAR Formatting Tool ............................................................................................ 6
2.1 What is the HMDA 2017 LAR Formatting Tool? .............................................. 6
2.2 Intended users of the HMDA 2017 LAR Formatting Tool ................................. 6
2.3 Instructions on the HMDA 2017 LAR Formatting Tool ..................................... 7
3. File Format Verification Tool ............................................................................. 15
3.1 What is the HMDA 2017 File Format Verification Tool? ................................. 15
3.2 Intended users of the HMDA 2017 File Format Verification Tool ................... 16
3.3 Instructions on the HMDA 2017 File Format Verification Tool ....................... 16
4. Additional information ....................................................................................... 19
4.1 Frequently Asked Questions ......................................................................... 19
4.2 HMDA Help ................................................................................................... 19
Appendix A: ............................................................................................................... 20
Enabling macros for Microsoft® Excel® 2002 and 2003 .......................................... 20
3
Appendix B: ............................................................................................................... 21
Transferring existing data from another workbook or Google Sheets™ web-based
spreadsheet program .................................................................................... 21
4
Paperwork Reduction Act
According to the Paperwork Reduction Act of 1995, an agency may not conduct or sponsor, and,
not withstanding any other provision of law, a person is not required to respond to a collection
of information unless it displays a valid OMB control number. The OMB control number for
this collection is 3170-0008. The time required to complete this information collection is
estimated to average between 7,700 hours and 77 hours per response depending on the size of
the institution, per response. The obligation to respond to this collection of information is
mandatory per the Home Mortgage Disclosure Act 12 U.S.C. 2801-2810 as implemented by
CFPB’S Regulation C 12 CFR part 1003. Comments regarding this collection of information,
including the estimated response time, suggestions for improving the usefulness of the
information, or suggestions for reducing the burden to respond to this collection should be
submitted to the Bureau at the Consumer Financial Protection Bureau (Attention: PRA Office),
1700 G Street NW, Washington, DC 20552, or by email to PRA@cfpb.gov. The other agencies
collecting information under this regulation maintain OMB Control numbers for their
collections as follows: Office of the Comptroller of the Currency (1557–0159), the Federal
Deposit Insurance Corporation (3064–0046), the Federal Reserve System (7100–0247), the
Department of Housing and Urban Development (HUD) (2502–0529), the National Credit
Union Administration (3133–0166).
5
1. Introduction
The HMDA Tools Instructions guide provides the instructions for the various tools developed by
the Bureau to assist you in getting your HMDA LAR ready for filing.
These tools include:
The 2017 HMDA LAR Formatting Tool
The 2017 HMDA LAR File Verification Tool
As more tools are developed, more instruction sections will be added, making this your one-
stop-shop for help in using the HMDA Tools.

6
2. LAR Formatting Tool
2.1 What is the HMDA 2017 LAR
Formatting Tool?
The HMDA 2017 LAR formatting tool is a Microsoft® Excel® workbook created by the Bureau
for HMDA filers, who do not have another means of doing so, to enter and format data into a
pipe delimited text file. A pipe delimited text file is the required format beginning for data
collected in 2017 for financial institutions to file their loan/application register (LAR) using the
HMDA Platform1.
2.2 Intended users of the HMDA 2017 LAR
Formatting Tool
This tool may be helpful for filers who:
Do not use vendor or other software to prepare their HMDA data for submission;
Previously entered each loan manually using the FFIEC’s Data Entry Software (DES),
and;
Typically file small volumes of covered loans and applications.
1 Please refer to the Filing Instructions Guide for HMDA data collected in 2017
http://www.consumerfinance.gov/hmda/static/for-filers/2017/2017-HMDA-FIG.pdf for the complete iling
requirements.

7
Filers who are able to format their LARs into the required pipe delimited format using other
software will not need to use the HMDA 2017 LAR Formatting Tool, and may submit their LARs
directly to the HMDA Platform to file their data.
2.3 Instructions on the HMDA 2017 LAR
Formatting Tool
Follow the instructions below to format your data into a pipe delimited text file.
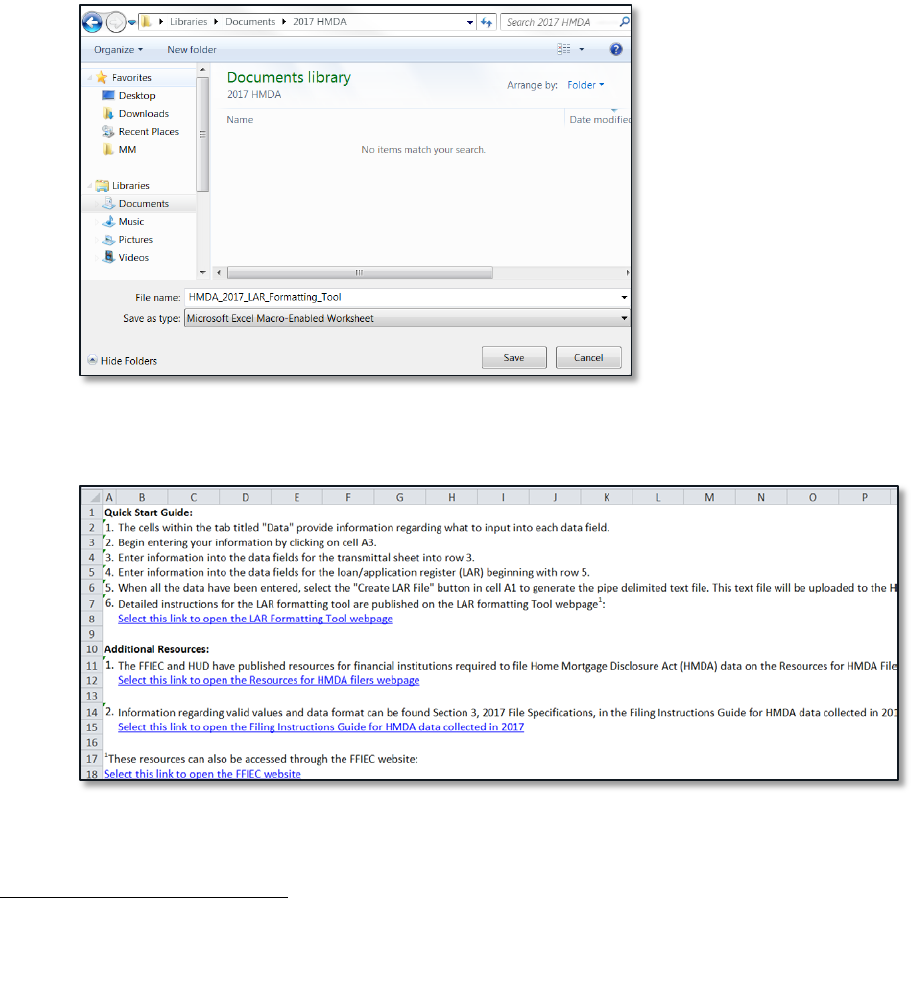
1. Using a PC, download the HMDA 2017 LAR Formatting Tool by selecting the
“Download the 2017 LAR Formatting Tool” link on the Loan/Application Register
(LAR) Formatting Tool webpage located at http://www.consumerfinance.gov/hmda/lar-
formatting-tool.
9
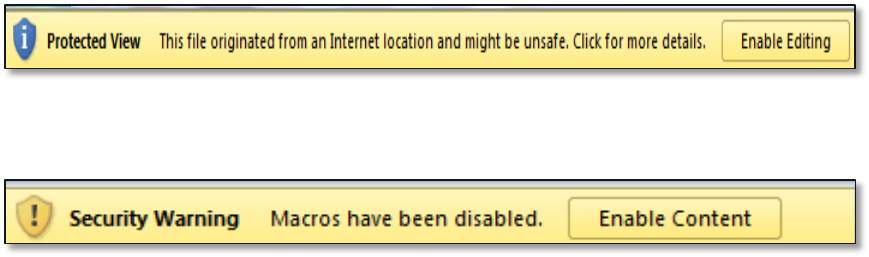
4. If the message “This file originated from an Internet location and might be unsafe”
appears, select the “Enable Editing” button.
5. If the message “Macros have been disabled” appears, select the “Enable Content” button.
6. The workbook contains two worksheets, Resources and Data:
a. The Resources Worksheet provides information including:
i. Quick Start Guide
ii. Additional Resources
1. The FFIEC and HUD have published resources for financial
institutions required to file HMDA data on the Resources for
HMDA Filers webpage located at
http://www.consumerfinance.gov/hmda/for-filers;
2. Information regarding valid values and data format can be found
in Section 3 of the Filing Instructions Guide for HMDA data
collected in 2017 located at
http://www.consumerfinance.gov/hmda/static/for-
filers/2017/2017-HMDA-FIG.pdf.
b. The Data Worksheet is where the data is entered under the appropriate
headings in row 4.
10
i. Certain cells in the Data Worksheet provide information regarding what
data to enter. Prompts will appear when you select a cell.
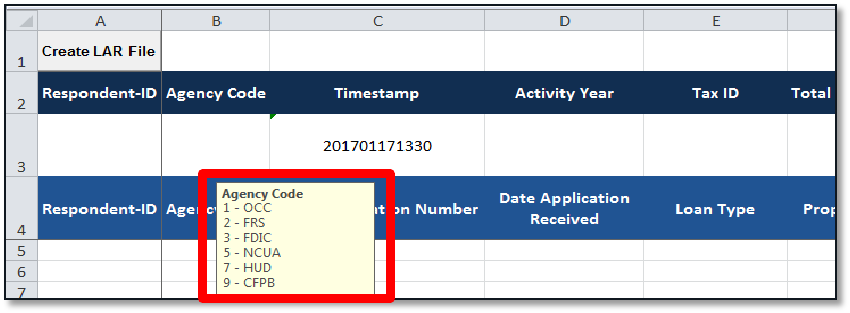
7. Enter the information from what is commonly known as the HMDA transmittal sheet
into the respective cells in row 3 of the Data Worksheet.
a. The “Timestamp” data field has been pre-populated in cell C3. This cell is a
placeholder and does not need to be updated.
b. Do not enter any commas “,” into any of the cells.
c. Verify that data fields with leading zeros, “0,” are intact. If the leading zero, “0,”
is missing, you must enter a single quotation mark as the first character in the
cell. For example, for the ZIP Code 00123, enter ‘00123 in cell K3.
d. All of the transmittal sheet information entered into row 3, from cell A3 to T3 will
be exported into a pipe delimited text file. Any information entered in row 3 after
T3 will not be exported.
e. The data fields have been formatted to wrap text in the cells, which means that
the data in each cell wraps to fit the column width. All the data entered into each
individual cell will be exported, even if part of the data is not visible.
11
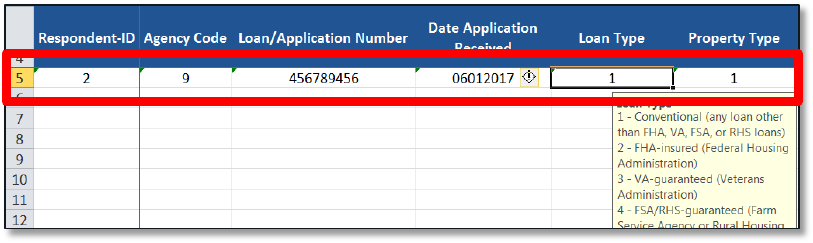
8. Enter loan level data beginning in row 5 of the Data Worksheet.
a. Enter the data consecutively by row. Do not skip any rows.
b. Each row should contain information regarding an individual loan.
c. Do not enter any commas “,” into any of the cells.
d. Verify that data fields with leading zeros, “0,” are intact. If the leading zero, “0,”
is missing, you must enter a single quotation mark as the first character in the
cell. For example, for the census tract 0109.02, enter ‘0109.02 into cell.
e. The format for data fields including a date, such as date application received or
date of action, is YYYYMMDD. For example, January 17, 2017 should be reported
as 20170117.
f. Beginning with row 5, all data entered from columns A to AL will be exported
into the pipe delimited text file. Any information entered after column AL will not
be exported.
g. The data fields have been formatted to wrap text in the cells, which means that
the data in each cell wraps to fit the column width. All the data entered into each
individual cell will be exported, even if part of the data is not visible.

12
9. When all the data have been entered, select the “Create LAR File” button located in
cell A1 of the Data Worksheet.
10. Enter a new filename and save the file type as “Text Files” in the prompt to save the
new file.
11. Select “Save” in the message confirming whether the changes to the file should be saved.
a. This will save the data into a separate pipe delimited text file.
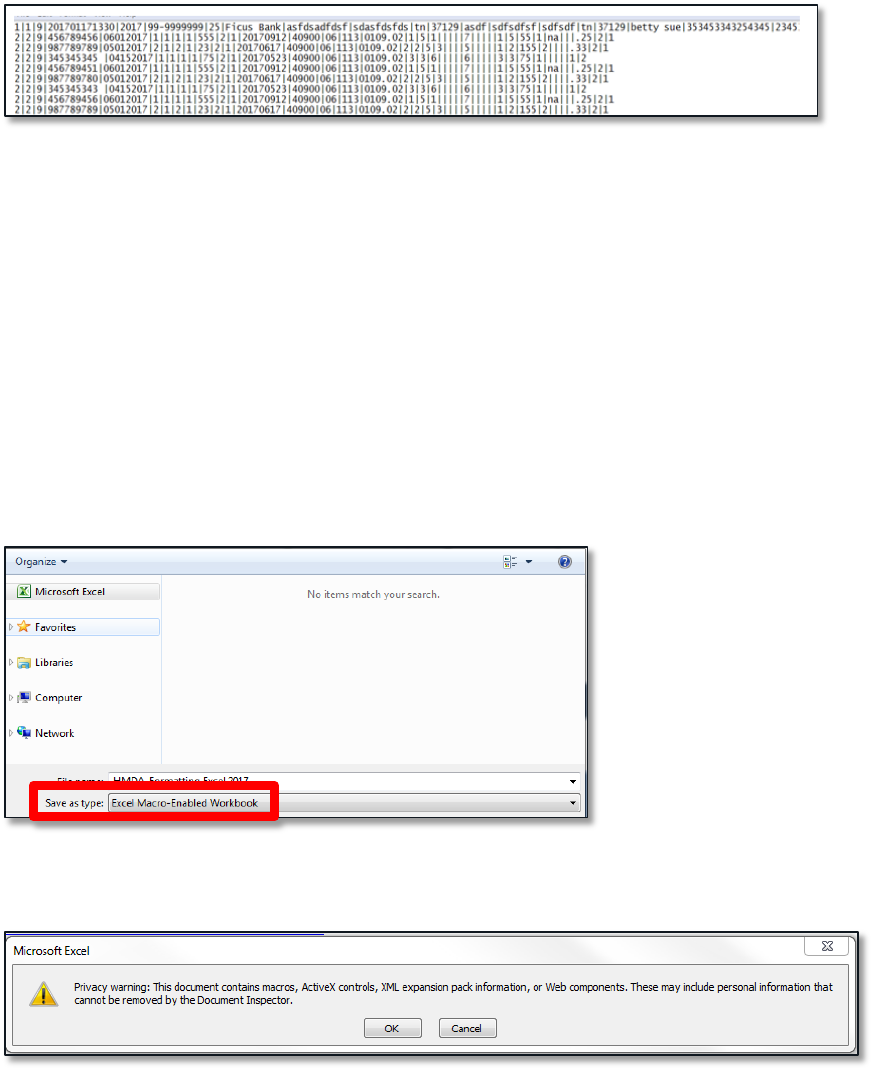
12. The data is now formatted into a pipe delimited text file (as shown below) and ready to
be submitted to the HMDA Platform. Prior to submission, the file format can be verified
by the 2017 File Format Verification Tool. Please refer to Section 3, below, or the
13
Resources for HMDA Filers webpage located at
http://www.consumerfinance.gov/hmda/for-filers for further information.
NOTE: The HMDA 2017 LAR Formatting Tool workbook in which the data was originally
entered will not be used during the filing process. This workbook can be saved for your
reference.
To save the data entered in the workbook for future reference:
Within the HMDA_2017_LAR_Formatting_Tool workbook, select “File”.
Select “Save As”.
Enter a new filename and save the file type as “Excel Macro-Enabled Workbook”
in the prompt to save the file.
Select “OK” in the privacy warning.
14
While the data is best viewed using a computer, the data can either be printed through
the Data Worksheet in the HMDA_2017_LAR_Formatting_Tool workbook, or
the text file (preferred).

15
3. File Format Verification Tool
3.1 What is the HMDA 2017 File Format
Verification Tool?
The File Format Verification Tool (FFVT) is a resource for testing whether your file, once
converted to pipe delimited format using the HMDA 2017 File Formatting Tool, meets certain
formatting requirements specified in the HMDA Filing Instructions Guide3. Specifically, it tests
to make sure that the file (1) is pipe-delimited; (2) has the proper number of data fields; and (3)
has data fields formatted as integers, where necessary. The FFVT does not allow you to submit
HMDA data. Additionally, the FFVT does not test for compliance with edits.
The FFVT uses “client-side testing” which runs on the user’s computer and does not transmit
any HMDA data over the internet. Thus, no Federal agency will receive or be able to view the
files you test using it. The FFVT was developed with no server logging technology, no login
functions, and does not log identifying information about you or your files. The FFVT simply
allows HMDA filers to test the formatting of their files.
The FFVT will run efficiently for most files, but it will run more slowly for larger files (e.g.,
containing more than 20,000 entries.)
3 Please refer to the Filing Instructions Guide for HMDA data collected in 2017
http://www.consumerfinance.gov/hmda/static/for-filers/2017/2017-HMDA-FIG.pdf for the complete iling
requirements.

16
This website essentially runs on the same software as the HMDA Platform. This means that if
your file passes all the checks on this website, then your file will be in the correct format
required to be uploaded to the HMDA Platform. The FFVT does not check for compliance with
HMDA edits.
3.2 Intended users of the HMDA 2017 File
Format Verification Tool
This tool may be helpful for filers who:
Do not use vendor or other software to prepare their HMDA data for submission;
Previously entered each loan manually using the FFIEC’s Data Entry Software (DES),
and;
Typically file small volumes of covered loans and applications.
3.3 Instructions on the HMDA 2017 File
Format Verification Tool
Follow the instructions below to verify that your pipe delimited text file is correctly formatted.
The 2017 File Format Verification Tool can now check the .txt file you just created for any
formatting issues.4
4 This tool only checks the formatting of your pipe delimited file; syntactical, validity, quality and macro edits will be
performed once the file is uploaded to the HMDA platform.
17
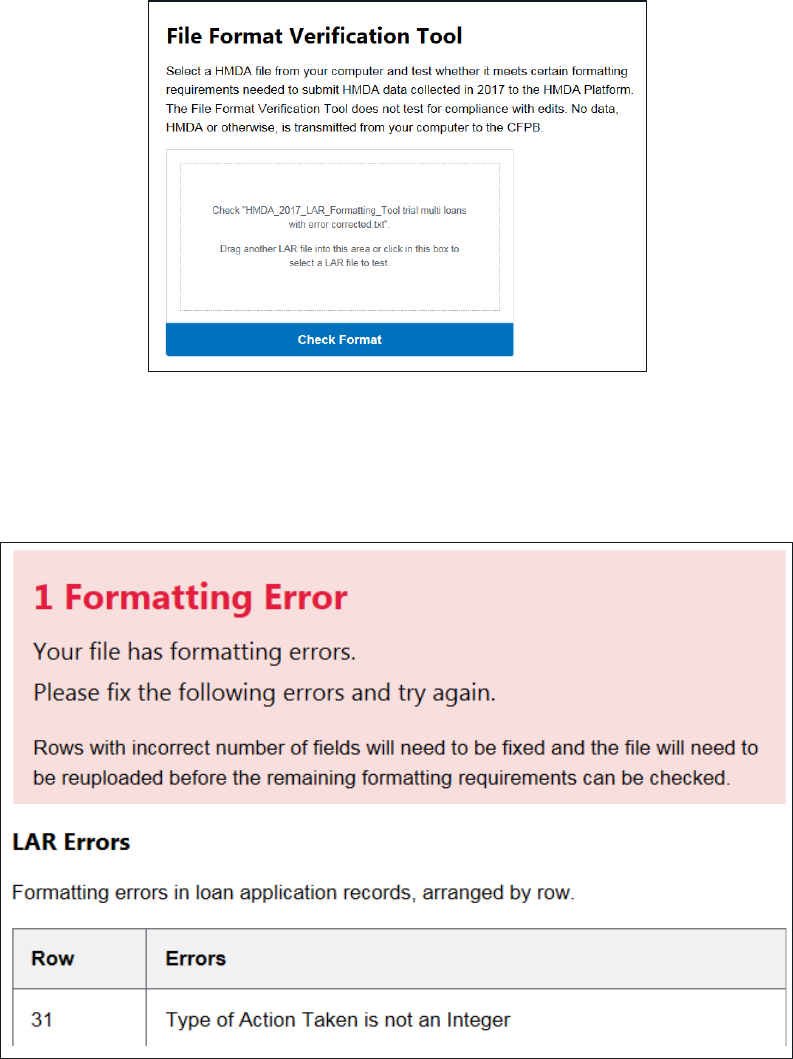
1. Upload or drag and drop the .txt file you just created using the CREATE LAR button on
the excel spread sheet and now saved in your financial institution’s HMDA file folder.
2. Once the file is uploaded, select “Check Format.” The tool will then review and notify
you of any formatting errors to be fixed by specifying the row in the excel sheet.
18
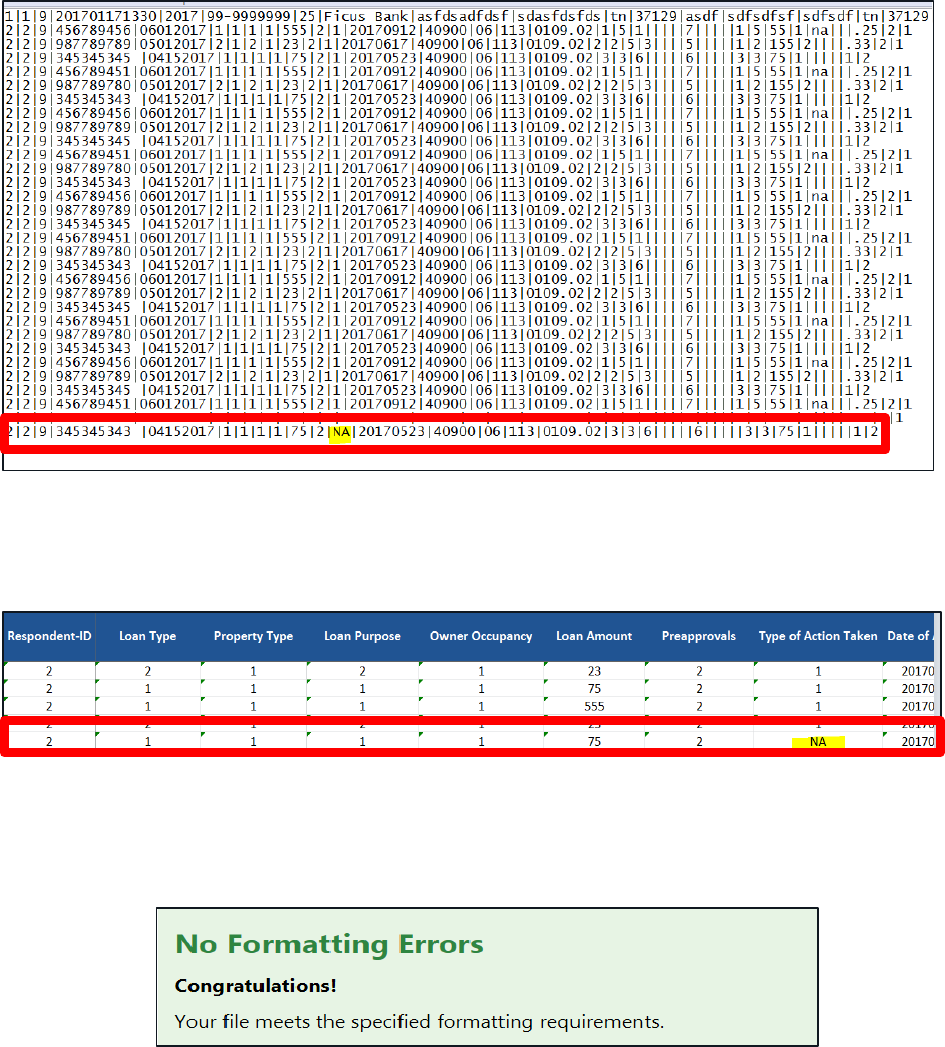
a. In this example, the error is identified below in the pipe delimited format:
b. The error can also be found in the Excel spreadsheet format:
3. Once the error has been corrected, resubmit the LAR .txt file to the format verification.
When a file is uploaded without any error messages, you’ll receive this message and be ready
to upload the file to the HMDA Platform:
19
4. Additional information
4.1 Frequently Asked Questions
The Frequently Asked Questions are available at http://www.consumerfinance.gov/hmda/for-
filers.
4.2 HMDA Help
Technical questions about reporting HMDA data collected in or after 2017 should be directed to
hmdahelp@cfpb.gov.
Technical questions about reporting HMDA data collected in or before 2016 should be directed
to hmdahelp@frb.gov.
20
APPENDIX A:
Enabling macros for Microsoft®
Excel® 2002 and 2003
If the message “The macro may not be available in this workbook or all macros may be disabled”
appears, then the macro settings must be updated.
Follow the instructions below to enable the HMDA 2017 LAR Formatting Tool macro.
1. Open the HMDA_2017_LAR_Formatting_Tool workbook.
2. Select Tools.
3. Select Options.
4. Within the Options dialog box, select the Security tab.
5. Select Macro Security.
6. In the Security dialog box, select the Medium option.
This will allow you to choose which macros to run.
7. Select OK to close the Security dialog box.
8. Select OK to close the Options dialog box.
9. Return to step 4 in Section 2, Instructions for the HMDA 2017 LAR Formatting Tool.

21
APPENDIX B:
Transferring existing data from
another workbook or Google
Sheets™ web-based
spreadsheet program
Data that is saved in another workbook or in Google Sheets™ web-based spreadsheet program
may be copied into the 2017 LAR Formatting Tool so that the data can be formatted into a pipe
delimited text file.
To copy data from external sources into the 2017 LAR Formatting Tool:
1. Open the workbook or the Google Sheets™ web-based spreadsheet program where the
data is stored.
2. Confirm that the data fields are displayed in the same order as required in Section 3, File
Specifications, of the 2017 FIG beginning with Data Field Number 2, Respondent-ID5, in
Table 2 and Table 3.
3. Open the HMDA_2017_LAR_Formatting_Tool workbook.
5 The 2017 LAR Formatting Tool will insert Data Field Number 1, Record Identifiers, into the pipe delimited text file.
Filers who use the 2017 LAR Formatting Tool can enter information beginning with Data Field Number 2,
Respondent-ID.
22
4. Copy and paste the information from the transmittal sheet into row 3 of the Data
Worksheet.
To preserve the format of the data, please use “Paste > Paste Special > Paste Values”
or “Paste > Paste Special > Text.”
The pasted data fields should align with the headers displayed in row 2.
5. Copy and paste the information from the LAR into the Data Worksheet beginning in
row 5.
To preserve the format of the data, please use “Paste > Paste Special > Paste Values”
or “Paste > Paste Special > Text.”
The pasted data fields should align with the headers in row 4.
