Developing Acrobat Applications Using JavaScript Js Developer Guide
js_developer_guide
User Manual: Pdf
Open the PDF directly: View PDF ![]() .
.
Page Count: 220 [warning: Documents this large are best viewed by clicking the View PDF Link!]
- Contents
- List of Examples
- Preface
- Introduction
- Tools
- JavaScript Contexts in Acrobat
- Creating and Modifying PDF Documents
- Print Production
- Using JavaScript in Forms
- Forms essentials
- Task-based topics
- Highlighting required form fields
- Making a form fillable
- Setting the hierarchy of form fields
- Creating forms
- Defining the tabbing order
- Defining form field calculation order
- Making PDF forms web-ready
- Importing and exporting form data
- Emailing completed forms
- Use date objects
- Date arithmetic
- Defining global variables in JavaScript
- Intercepting keystrokes in an Acrobat form
- Constructing custom colors
- Prompting the user for a response
- Fetching an URL from JavaScript
- Creating special rollover effects
- Introduction to XML forms architecture (XFA)
- Enabling dynamic layout and rendering
- Growable form fields
- Variable-size rows and tables
- Multiple customized forms within a form based on user input
- Handling image data
- Dynamic tooltips
- XFA-specific JavaScript methods
- JavaScript methods not enabled in XML Forms
- ADO support for Windows
- Detecting XML forms and earlier form types
- Saving form data as XML or XML Data Package (XDP)
- Global submit
- Making forms accessible
- Using JavaScript to secure forms
- Review, Markup, and Approval
- Working with comments using JavaScript
- Online collaboration essentials
- Managing comments
- Approving documents using stamps (Japanese workflows)
- Working with Digital Media in PDF Documents
- Modifying the User Interface
- Acrobat Templates
- Search and Index Essentials
- Security
- Security essentials
- Digitally signing PDF documents
- Adding security to PDF documents
- Digital IDs and certification methods
- Task based topics
- Rights-Enabled PDF Files
- Interacting with Databases
- SOAP and Web Services
- Using SOAP and web services
- Using a WSDL proxy to invoke a web service
- Synchronous and asynchronous information exchange
- Using document/literal encoding
- Exchanging file attachments and binary data
- Converting between string and readstream information
- Accessing SOAP version information
- Accessing SOAP header information
- Authentication
- Error handling
- DNS service discovery
- Managing XML-based information
- Workflow applications
- Using SOAP and web services
- Interfacing with 3D JavaScript
- Index

bbc
Developing Acrobat® Applications
Using JavaScript™
Adobe® Acrobat® SDK
November 2006 Version 8.0
© 2006 Adobe Systems Incorporated. All rights reserved.
Adobe® Acrobat® SDK 8.0 Developing Acrobat Applications Using JavaScript for Microsoft® Windows® and Mac OS®.
Edition 1.0, November 2006
If this guide is distributed with software that includes an end user agreement, this guide, as well as the software described in it, is furnished
under license and may be used or copied only in accordance with the terms of such license. Except as permitted by any such license, no part
of this guide may be reproduced, stored in a retrieval system, or transmitted, in any form or by any means, electronic, mechanical, recording,
or otherwise, without the prior written permission of Adobe Systems Incorporated. Please note that the content in this guide is protected
under copyright law even if it is not distributed with software that includes an end user license agreement.
The content of this guide is furnished for informational use only, is subject to change without notice, and should not be construed as a
commitment by Adobe Systems Incorporated. Adobe Systems Incorporated assumes no responsibility or liability for any errors or
inaccuracies that may appear in the informational content contained in this guide.
Please remember that existing artwork or images that you may want to include in your project may be protected under copyright law. The
unauthorized incorporation of such material into your new work could be a violation of the rights of the copyright owner. Please be sure to
obtain any permission required from the copyright owner.
Any references to company names and company logos in sample material are for demonstration purposes only and are not intended to refer
to any actual organization.
Adobe, the Adobe logo, Acrobat, After Effects, FrameMaker, Illustrator, LiveCycle, Photoshop, PostScript and Reader are either registered
trademarks or trademarks of Adobe Systems Incorporated in the United States and/or other countries.
Apple and Mac OS are trademarks of Apple Computer, Inc., registered in the United States and other countries.
JavaScript is a trademark or registered trademark of Sun Microsystems, Inc. in the United States and other countries.
Microsoft and Windows are either registered trademarks or trademarks of Microsoft Corporation in the United States and/or other countries.
All other trademarks are the property of their respective owners.
Adobe Systems Incorporated, 345 Park Avenue, San Jose, California 95110, USA.
Notice to U.S. Government End Users. The Software and Documentation are “Commercial Items,” as that term is defined at 48 C.F.R. §2.101,
consisting of “Commercial Computer Software” and “Commercial Computer Software Documentation,” as such terms are used in 48 C.F.R.
§12.212 or 48 C.F.R. §227.7202, as applicable. Consistent with 48 C.F.R. §12.212 or 48 C.F.R. §§227.7202-1 through 227.7202-4, as applicable,
the Commercial Computer Software and Commercial Computer Software Documentation are being licensed to U.S. Government end users
(a) only as Commercial Items and (b) with only those rights as are granted to all other end users pursuant to the terms and conditions herein.
Unpublished-rights reserved under the copyright laws of the United States. Adobe Systems Incorporated, 345 Park Avenue, San Jose, CA
95110-2704, USA. For U.S. Government End Users, Adobe agrees to comply with all applicable equal opportunity laws including, if
appropriate, the provisions of Executive Order 11246, as amended, Section 402 of the Vietnam Era Veterans Readjustment Assistance Act of
1974 (38 USC 4212), and Section 503 of the Rehabilitation Act of 1973, as amended, and the regulations at 41 CFR Parts 60-1 through 60-60,
60-250, and 60-741. The affirmative action clause and regulations contained in the preceding sentence shall be incorporated by reference.

3
Contents
Contents ....................................................................................................................................... 3
List of Examples ......................................................................................................................... 10
Preface........................................................................................................................................ 12
What’s in this guide? ...................................................................................................................................................................12
Who should read this guide? ...................................................................................................................................................12
About the sample scripts...........................................................................................................................................................12
Related documentation .............................................................................................................................................................13
1 Introduction ............................................................................................................................... 14
Overview..........................................................................................................................................................................................14
Reading the JavaScript for Acrobat API Reference ..........................................................................................................15
Object summary ...........................................................................................................................................................................16
app...............................................................................................................................................................................................16
Doc ..............................................................................................................................................................................................16
dbg ..............................................................................................................................................................................................17
console.......................................................................................................................................................................................17
global..........................................................................................................................................................................................17
util................................................................................................................................................................................................18
dialog..........................................................................................................................................................................................18
security.......................................................................................................................................................................................18
SOAP ...........................................................................................................................................................................................18
search .........................................................................................................................................................................................18
ADBC...........................................................................................................................................................................................19
event...........................................................................................................................................................................................19
JavaScript applications...............................................................................................................................................................19
2 Tools ........................................................................................................................................... 21
Using the JavaScript Debugger console..............................................................................................................................21
Opening the console ............................................................................................................................................................22
Executing JavaScript.............................................................................................................................................................22
Formatting code.....................................................................................................................................................................22
Enabling JavaScript ...............................................................................................................................................................22
Debugging with the JavaScript Console.......................................................................................................................24
Using a JavaScript editor ...........................................................................................................................................................24
Specifying the default JavaScript editor..............................................................................................................................25
Using an external editor.............................................................................................................................................................26
Additional editor capabilities ............................................................................................................................................26
Specifying additional capabilities to your editor .......................................................................................................26
Saving and closing a file with a syntax error................................................................................................................28
Using the Debugger with Adobe Reader ............................................................................................................................28
Enabling the JavaScript Debugger ........................................................................................................................................29

Adobe Acrobat SDK Contents
Developing Acrobat Applications Using JavaScript 4
2 Tools (Continued)
JavaScript Debugger...................................................................................................................................................................30
Main groups of controls.......................................................................................................................................................30
Debugger View windows....................................................................................................................................................31
Debugger buttons.................................................................................................................................................................32
Debugger Scripts window..................................................................................................................................................33
Call Stack list ............................................................................................................................................................................35
Inspect details window........................................................................................................................................................35
Coding styles and breakpoints ...................................................................................................................................37
Listing breakpoints .........................................................................................................................................................38
Using conditional breakpoints ...................................................................................................................................38
Starting the Debugger .........................................................................................................................................................38
Final notes ................................................................................................................................................................................39
3 JavaScript Contexts in Acrobat ................................................................................................ 40
The concept of a JavaScript event .........................................................................................................................................40
About contexts..............................................................................................................................................................................41
Folder level...............................................................................................................................................................................42
Document level ......................................................................................................................................................................43
Page level..................................................................................................................................................................................43
Field level ..................................................................................................................................................................................44
Batch level ................................................................................................................................................................................44
Privileged versus non-privileged context ...........................................................................................................................45
Executing privileged methods in a non-privileged context...................................................................................45
Executing privileged methods through the menu....................................................................................................47
Executing privileged methods in a certified document ..........................................................................................48
4 Creating and Modifying PDF Documents ................................................................................ 49
Creating and modifying PDF files...........................................................................................................................................49
Combining PDF documents...............................................................................................................................................51
Combining and extracting files.........................................................................................................................................51
Creating file attachments....................................................................................................................................................52
Cropping and rotating pages ............................................................................................................................................55
Cropping pages................................................................................................................................................................55
Rotating pages..................................................................................................................................................................56
Extracting, moving, deleting, replacing, and copying pages ................................................................................56
Adding watermarks and backgrounds...........................................................................................................................58
Converting PDF documents to XML format .......................................................................................................................59
5 Print Production ........................................................................................................................ 60
Setting print options...................................................................................................................................................................60
Printing PDF documents............................................................................................................................................................62
Silent printing..........................................................................................................................................................................63
Printing comments and forms ..........................................................................................................................................64
Booklet printing......................................................................................................................................................................64
Setting advanced print options........................................................................................................................................65
Specifying output settings...........................................................................................................................................65
Specifying marks and bleeds.......................................................................................................................................65
Setting PostScript options............................................................................................................................................65
Setting font options........................................................................................................................................................65

Adobe Acrobat SDK Contents
Developing Acrobat Applications Using JavaScript 5
6 Using JavaScript in Forms......................................................................................................... 67
Forms essentials............................................................................................................................................................................67
About PDF forms....................................................................................................................................................................67
Elements of Acrobat forms...........................................................................................................................................68
Guidelines for creating a new form...........................................................................................................................68
Creating Acrobat form fields..............................................................................................................................................69
Setting Acrobat form field properties ............................................................................................................................70
Field properties ................................................................................................................................................................71
Button fields ......................................................................................................................................................................72
Check box fields ...............................................................................................................................................................74
Combo box fields.............................................................................................................................................................75
List box fields.....................................................................................................................................................................79
Radio button fields..........................................................................................................................................................81
Signature fields.................................................................................................................................................................82
Text fields............................................................................................................................................................................83
Validation scripts..............................................................................................................................................................84
Calculation script .............................................................................................................................................................85
Task-based topics.........................................................................................................................................................................86
Highlighting required form fields ....................................................................................................................................86
Making a form fillable...........................................................................................................................................................87
Setting the hierarchy of form fields.................................................................................................................................87
Creating forms ........................................................................................................................................................................88
Positioning form fields...................................................................................................................................................88
Duplicating form fields ..................................................................................................................................................89
Creating multiple form fields ......................................................................................................................................90
Defining the tabbing order ................................................................................................................................................91
Defining form field calculation order .............................................................................................................................91
Making PDF forms web-ready...........................................................................................................................................91
Creating a submit button .............................................................................................................................................92
Creating a reset form button.......................................................................................................................................92
Defining CGI export values ..........................................................................................................................................92
Importing and exporting form data................................................................................................................................92
Emailing completed forms .................................................................................................................................................93
Use date objects .....................................................................................................................................................................93
Date arithmetic .......................................................................................................................................................................95
Defining global variables in JavaScript ..........................................................................................................................96
Enable the global object security policy .................................................................................................................96
Setting and getting a global variable.......................................................................................................................96
Deleting global variables..............................................................................................................................................97
Making global variables persistent ...........................................................................................................................97
Querying an Acrobat form field value in another open form..........................................................................97
Global object security policy .......................................................................................................................................98
Intercepting keystrokes in an Acrobat form.................................................................................................................98
Constructing custom colors...............................................................................................................................................99
Prompting the user for a response..................................................................................................................................99
Fetching an URL from JavaScript .....................................................................................................................................99
Creating special rollover effects .......................................................................................................................................99

Adobe Acrobat SDK Contents
Developing Acrobat Applications Using JavaScript 6
6 Using JavaScript in Forms (Continued)
Introduction to XML forms architecture (XFA) ..................................................................................................................99
Enabling dynamic layout and rendering.................................................................................................................... 100
Growable form fields ......................................................................................................................................................... 100
Variable-size rows and tables ......................................................................................................................................... 100
Multiple customized forms within a form based on user input......................................................................... 100
Handling image data ......................................................................................................................................................... 100
Dynamic tooltips................................................................................................................................................................. 100
XFA-specific JavaScript methods .................................................................................................................................. 101
JavaScript methods not enabled in XML Forms ...................................................................................................... 105
ADO support for Windows .............................................................................................................................................. 105
Detecting XML forms and earlier form types............................................................................................................ 105
Saving form data as XML or XML Data Package (XDP).......................................................................................... 106
Global submit ....................................................................................................................................................................... 106
Making forms accessible......................................................................................................................................................... 107
Text-to-speech ..................................................................................................................................................................... 107
Tagging annotations ......................................................................................................................................................... 108
Document metadata.......................................................................................................................................................... 109
Short description................................................................................................................................................................. 109
Setting tab order ................................................................................................................................................................. 109
Reading order....................................................................................................................................................................... 109
Using JavaScript to secure forms......................................................................................................................................... 110
7 Review, Markup, and Approval ..............................................................................................112
Working with comments using JavaScript....................................................................................................................... 112
Annotation types ................................................................................................................................................................ 112
Getting annotation data................................................................................................................................................... 113
Adding comments with JavaScript............................................................................................................................... 114
Setting comment properties .......................................................................................................................................... 114
Online collaboration essentials............................................................................................................................................ 115
Reviewing documents with additional usage rights ............................................................................................. 115
Emailing PDF documents................................................................................................................................................. 116
JavaScript-based collaboration driver......................................................................................................................... 116
Spell-checking in comments and forms ..................................................................................................................... 118
Setting spelling preferences..................................................................................................................................... 118
Adding words to a dictionary................................................................................................................................... 119
Approval................................................................................................................................................................................. 119
Managing comments............................................................................................................................................................... 119
Selecting, moving, and deleting comments............................................................................................................. 119
Using the comments list................................................................................................................................................... 120
Changing the status of comments......................................................................................................................... 120
Changing the appearance of comments ............................................................................................................. 120
Sorting comments .............................................................................................................................................................. 120
Showing and hiding comments.............................................................................................................................. 121
Exporting and importing comments ........................................................................................................................... 121
Aggregating comments for use in Excel .................................................................................................................... 121
Comparing comments in two PDF documents ....................................................................................................... 121
Extracting comments in a batch process ................................................................................................................... 122

Adobe Acrobat SDK Contents
Developing Acrobat Applications Using JavaScript 7
7 Review, Markup, and Approval (Continued)
Approving documents using stamps (Japanese workflows) .................................................................................... 122
Setting up a Hanko approval workflow ...................................................................................................................... 122
Participating in a Hanko approval workflow............................................................................................................. 122
Installing and customizing Hanko stamps .......................................................................................................... 123
Creating custom Inkan stamps................................................................................................................................ 123
Deleting custom stamps ............................................................................................................................................ 123
8 Working with Digital Media in PDF Documents....................................................................124
Media players: control, settings, renditions, and events............................................................................................. 124
Accessing a list of active players.................................................................................................................................... 125
Specifying playback settings .......................................................................................................................................... 125
Monitors........................................................................................................................................................................................ 127
Integrating media into documents .................................................................................................................................... 128
Controlling multimedia through a rendition action .............................................................................................. 130
Controlling multimedia with a Run a JavaScript action........................................................................................ 131
Adding and editing renditions....................................................................................................................................... 133
Setting multimedia preferences .......................................................................................................................................... 134
9 Modifying the User Interface..................................................................................................135
Adding toolbar buttons and menu items ........................................................................................................................ 135
Adding navigation to PDF documents.............................................................................................................................. 137
Thumbnails............................................................................................................................................................................ 138
Creating page thumbnails......................................................................................................................................... 138
Adding page actions with page thumbnails ...................................................................................................... 138
Bookmarks............................................................................................................................................................................. 139
Creating bookmarks .................................................................................................................................................... 139
Managing bookmarks ................................................................................................................................................. 140
Creating a bookmark hierarchy............................................................................................................................... 140
Links......................................................................................................................................................................................... 141
Adding and removing web links from text ......................................................................................................... 142
Adding and removing links....................................................................................................................................... 142
Defining the appearance of a link .......................................................................................................................... 143
Opening links ................................................................................................................................................................. 144
Opening file attachments.......................................................................................................................................... 144
Using destinations........................................................................................................................................................ 144
Using actions for special effects .................................................................................................................................... 145
Highlighting form fields and navigational components...................................................................................... 145
Setting up a presentation ................................................................................................................................................ 146
Defining the initial view in full screen view ........................................................................................................ 146
Defining an initial view............................................................................................................................................... 147
Numbering pages............................................................................................................................................................... 149
Creating buttons ................................................................................................................................................................. 150
Working with PDF layers......................................................................................................................................................... 150
Navigating with layers....................................................................................................................................................... 151
Editing the properties of PDF layers............................................................................................................................. 151
Reordering layers ................................................................................................................................................................ 152

Adobe Acrobat SDK Contents
Developing Acrobat Applications Using JavaScript 8
10 Acrobat Templates ..................................................................................................................153
The role of templates in PDF form architecture............................................................................................................. 153
Spawning templates ................................................................................................................................................................ 153
Dynamic form field generation...................................................................................................................................... 154
Dynamic page generation ............................................................................................................................................... 154
Template syntax and usage ............................................................................................................................................ 154
11 Search and Index Essentials....................................................................................................157
Searching for text in PDF documents ................................................................................................................................ 157
Finding words in an PDF document............................................................................................................................. 158
Using advanced search options .............................................................................................................................. 159
Searching across multiple PDF documents............................................................................................................... 159
Searching all PDF files in a specific location ....................................................................................................... 160
Using advanced search options for multiple document searches ............................................................. 160
Searching PDF index files........................................................................................................................................... 160
Using Boolean queries................................................................................................................................................ 160
Indexing multiple PDF documents..................................................................................................................................... 161
Creating, updating, or rebuilding indexes................................................................................................................. 161
Searching metadata ................................................................................................................................................................. 162
12 Security.....................................................................................................................................163
Security essentials..................................................................................................................................................................... 163
Methods for adding security to PDF documents .................................................................................................... 163
Passwords and restrictions........................................................................................................................................ 163
Certifying documents ................................................................................................................................................. 163
Encrypting files using certificates........................................................................................................................... 165
Security policies ............................................................................................................................................................ 166
Secure forms................................................................................................................................................................... 166
Digitally signing PDF documents........................................................................................................................................ 166
Signing a PDF document ................................................................................................................................................. 166
The security handler object............................................................................................................................................. 166
The SignatureInfo object ........................................................................................................................................... 167
Applying the signature............................................................................................................................................... 167
Clearing a digital signature from a signature field ........................................................................................... 168
Getting signature information from another user.................................................................................................. 168
Removing signatures......................................................................................................................................................... 168
Certifying a document ...................................................................................................................................................... 168
Validating signatures......................................................................................................................................................... 169
Setting digital signature properties with seed values........................................................................................... 169
Adding security to PDF documents.................................................................................................................................... 170
Adding passwords and setting security options ..................................................................................................... 170
Adding usage rights to a document ............................................................................................................................ 170
Encrypting PDF files for a list of recipients ................................................................................................................ 171
Encrypting PDF files using security policies.............................................................................................................. 173
Adding security to document attachments.............................................................................................................. 175

Adobe Acrobat SDK Contents
Developing Acrobat Applications Using JavaScript 9
12 Security (Continued)
Digital IDs and certification methods ................................................................................................................................ 175
Digital IDs............................................................................................................................................................................... 176
About digital ID providers ......................................................................................................................................... 176
Creating a digital ID (default certificate security) ............................................................................................. 177
Using digital IDs (default certificate security)..................................................................................................... 179
Managing digital IDs (Windows certificate security) ....................................................................................... 179
Managing digital ID certificates..................................................................................................................................... 180
Sharing digital ID certificates ................................................................................................................................... 180
Building a list of trusted identities.......................................................................................................................... 181
Checking information on certificates.................................................................................................................... 181
Task based topics ...................................................................................................................................................................... 182
Disallowing changes in scripts....................................................................................................................................... 182
Hiding scripts........................................................................................................................................................................ 182
13 Rights-Enabled PDF Files ........................................................................................................183
Additional usage rights........................................................................................................................................................... 183
LiveCycle Reader Extensions................................................................................................................................................. 184
Writing JavaScript for Adobe Reader................................................................................................................................. 184
Enabling collaboration............................................................................................................................................................ 186
14 Interacting with Databases.....................................................................................................188
About ADBC ................................................................................................................................................................................ 188
Establishing an ADBC connection....................................................................................................................................... 189
Executing SQL statements ..................................................................................................................................................... 191
15 SOAP and Web Services ..........................................................................................................193
Using SOAP and web services .............................................................................................................................................. 193
Using a WSDL proxy to invoke a web service ........................................................................................................... 194
Synchronous and asynchronous information exchange ..................................................................................... 195
Establishing a synchronous connection............................................................................................................... 196
Asynchronous web service calls.............................................................................................................................. 198
Using document/literal encoding................................................................................................................................. 199
Exchanging file attachments and binary data.......................................................................................................... 200
Converting between string and readstream information.................................................................................... 201
Accessing SOAP version information .......................................................................................................................... 201
Accessing SOAP header information........................................................................................................................... 201
Authentication..................................................................................................................................................................... 202
Error handling ...................................................................................................................................................................... 202
DNS service discovery.............................................................................................................................................................. 203
Managing XML-based information..................................................................................................................................... 205
Workflow applications............................................................................................................................................................. 206
16 Interfacing with 3D JavaScript ...............................................................................................207
Basic concepts ............................................................................................................................................................................ 207
Getting the Annot3D object of the 3D annotation....................................................................................................... 208
Annot3D properties ........................................................................................................................................................... 208
Acquiring the JavaScript 3D engine............................................................................................................................. 209
Using the default script of a 3D annotation .................................................................................................................... 210
Initializing upon activation.................................................................................................................................................... 211
Index .........................................................................................................................................213

10
List of Examples
Example 2.1 Test a regular expression in the JavaScript Debugger Console .....................................................................24
Example 3.1 Executing privileged methods....................................................................................................................................46
Example 4.1 Creating a document with content...........................................................................................................................50
Example 4.2 Creating a new document from two other documents ....................................................................................51
Example 4.3 Combining several PDF files ........................................................................................................................................51
Example 4.4 Combining several files of different formats .........................................................................................................52
Example 4.5 Extracting and saving pages........................................................................................................................................52
Example 4.6 Saving form data to and reading form data from an attachment .................................................................53
Example 4.7 Accessing an XML attachment using E4X...............................................................................................................54
Example 5.1 Set up booklet printing for right-side binding of text and print....................................................................64
Example 5.2 Print booklet in duplex mode, printing only the front pages .........................................................................64
Example 6.1 Custom script for a combo box ..................................................................................................................................78
Example 6.2 Accessing a list from another field ............................................................................................................................80
Example 6.3 Accessing individual radio button widgets ...........................................................................................................81
Example 6.4 Counting the number of widgets in a radio button field..................................................................................81
Example 6.5 Inputting numbers and checking the range in a text field...............................................................................84
Example 6.6 Calculating the average of several text fields........................................................................................................85
Example 6.7 Highlighting required fields.........................................................................................................................................86
Example 6.8 Inserting navigation buttons on each page ..........................................................................................................89
Example 6.9 Detecting and classifying XML forms in batch................................................................................................... 105
Example 8.1 Customizing the number of repetitions for playback..................................................................................... 127
Example 8.2 Running openPlayer with settings and events as a rendition action........................................................ 130
Example 8.3 Play a clip in full screen............................................................................................................................................... 131
Example 8.4 Playing a rendition in a screen annotation from a form button.................................................................. 132
Example 8.5 Playing a media clip from a URL.............................................................................................................................. 132
Example 8.6 Playing a media clip from a file................................................................................................................................ 133
Example 8.7 Playing a sound clip from a URL.............................................................................................................................. 133
Example 9.1 Adding a menu item.................................................................................................................................................... 135
Example 9.2 Installing and uninstalling a toolbar...................................................................................................................... 136
Example 9.3 Add navigation links to the document................................................................................................................. 142
Example 9.4 Setting full screen preferences and resetting them......................................................................................... 146
Example 9.5 Adding page transitions............................................................................................................................................. 147
Example 9.6 Creating a rollover effect ........................................................................................................................................... 150
Example 9.7 Toggling a PDF layer.................................................................................................................................................... 151
Example 10.1 Gathering personal data using templates........................................................................................................... 155
Example 12.1 Certification signature ................................................................................................................................................ 170

Adobe Acrobat SDK List of Examples
Developing Acrobat Applications Using JavaScript 11
Example 16.1 Assigning a name to a 3D annotation................................................................................................................... 208
Example 16.2 Rotating a named object in a 3D model .............................................................................................................. 209
Example 16.3 Setting the render mode of a 3D model .............................................................................................................. 210
Example 16.4 Setting the background color of the canvas on activation ........................................................................... 211

12
Preface
This guide shows how you can use JavaScript™ to develop and enhance standard Adobe® Acrobat®
workflows, such as:
●Printing and viewing
●Spell-checking
●Stamping and watermarking
●Managing document security and rights
●Accessing metadata
●Facilitating online collaboration
●Creating interactive forms
●Customizing interaction with web Services
●Interacting with databases
●Accessing the 3D JavaScript engine
What’s in this guide?
This guide contains detailed information about JavaScript for Acrobat, extensive examples which
demonstrate its capabilities, as well as descriptions of the use of the SDK tools.
Who should read this guide?
It is assumed that you are an Acrobat solution provider or power user, and that you possess basic
competency with JavaScript. If you would also like to take full advantage of Acrobat’s web-based features,
you will find it useful to understand XML, XSLT, SOAP, and web services. Finally, if you would like to use
Acrobat’s database capabilities, you will need a basic understanding of SQL.
This guide assumes that you are familiar with the non-scripting elements of the Acrobat 8 user interface
that are described in Acrobat’s accompanying online help documentation. To run the examples in this
guide, you will need to use Acrobat 8 Professional.
About the sample scripts
This guide includes examples that give you an opportunity to work directly with JavaScript for Acrobat. If
you plan to work with any of the examples, configure your computer as follows:
1. Install Acrobat Professional on your Microsoft® Windows® or Mac OS workstation.
2. Use the same directory for all the scripts, PDF documents and other files.
3. Extract the Zip files in the Acrobat SDK to a local directory.

Adobe Acrobat SDK Preface
Developing Acrobat Applications Using JavaScript Related documentation 13
Related documentation
This document refers to the following sources for additional information about JavaScript and related
technologies. The Acrobat documentation is available through the Acrobat Family Developer Center,
http://www.adobe.com/go/acrobat_developer.
For information about See
A guide to the documentation in the Acrobat SDK. Acrobat SDK Documentation Roadmap
Known issues and implementation details. Readme
Answers to frequently asked questions about the
Acrobat SDK.
Developer FAQ
New features in this Acrobat SDK release. What’s New
A general overview of the Acrobat SDK. Overview
A guide to the sections of the Acrobat SDK that pertain
to Adobe Reader.
Developing for Adobe Reader
A guide to the sample code included with the Acrobat SDK. Guide to SDK Samples
Configuring and administering a system for online
collaboration using comment repositories, Acrobat and
Adobe Reader.
Acrobat Online Collaboration:
Setup and Administration
Detailed descriptions of JavaScript APIs for adding
interactivity to 3D annotations within PDF documents.
JavaScript for Acrobat 3D Annotations
API Reference
Detailed descriptions of JavaScript APIs for developing and
enhancing workflows in Acrobat and Adobe Reader.
JavaScript for Acrobat API Reference
A description of how to convert JavaScript for Acrobat for
use in an Adobe® LiveCycle® Designer form.
Converting Acrobat JavaScript for Use
in LiveCycle Designer Forms
A detailed description of the PDF file format. PDF Reference
Using JavaScript to perform repetitive operations on a
collection of files.
Batch Sequences
A description of Acrobat's digital signature capabilities, which
document authors can use to create certified documents,
signable forms, and custom workflows and appearances.
Acrobat 8.0 Security User Guide

14
1Introduction
This chapter introduces the JavaScript for Acrobat scripting model and containment hierarchies (its
objects), as well as the primary Acrobat and PDF capabilities related to JavaScript usage.
Topic Description See
Overview A brief history of JavaScript, its origins in HTML, and its
relevance to Acrobat
page 14
Reading the JavaScript for Acrobat
API Reference
Discusses important features of the JavaScript for
Acrobat such as security restrictions on some of the
methods, safe paths and privileged methods.
page 15
Object summaryA listing and short description of some objects that
play an important role in JavaScript for Acrobat.
page 16
JavaScript applications A far-from-complete listing of suggested applications
to JavaScript.
page 19
Overview
JavaScript for Acrobat is an extension of core JavaScript, version 1.5 of ISO-16262, formerly known as
ECMAScript, an object-oriented scripting language developed by Netscape Communications. JavaScript
was created to offload web page processing from a server onto a client in web-based applications. Acrobat
extends the core language by adding new objects and their accompanying methods and properties, to
the JavaScript language. These Acrobat-specific objects enable a developer to manage document security,
communicate with a database, handle file attachments, manipulate a PDF file so that it behaves as an
interactive, web-enabled form, and so on. Because the Acrobat-specific objects are added on top of core
JavaScript, you still have access to its standard classes, including Math, String, Date, and RegExp.
PDF documents have great versatility since they can be displayed both within the Acrobat software as well
as a web browser. Therefore, it is important to be aware of the differences between JavaScript used in a
PDF file and JavaScript used in a web page:
●JavaScript in a PDF file does not have access to objects within an HTML page. Similarly, JavaScript in
a web page cannot access objects within a PDF file.
●In HTML, JavaScript is able to manipulate such objects as Window. JavaScript for Acrobat cannot
access this particular object but it can manipulate PDF-specific objects.
Most people know Acrobat as a medium for exchanging and viewing electronic documents easily and
reliably, independent of the environment in which they were created; however, Acrobat provides far more
capabilities than a simple document viewer.
You can enhance a PDF document so that it contains form fields to capture user-entered data as well as
buttons to initiate user actions. This type of PDF document can replace existing paper forms, allowing
employees within a company to fill out forms and submit them via PDF files, and connect their solutions to
enterprise workflows by virtue of their XML-based structure and the accompanying support for
SOAP-based web services.

Adobe Acrobat SDK Introduction
Developing Acrobat Applications Using JavaScript Reading the JavaScript for Acrobat API Reference 15
Acrobat also contains functionality to support online team review. Documents that are ready for review are
converted to PDF. When a reviewer views a PDF document in Acrobat and adds comments to it, those
comments (or annotations) constitute an additional layer of information on top of the base document.
Acrobat supports a wide variety of standard comment types, such as a note, graphic, sound, or movie. To
share comments on a document with others, such as the author and other reviewers, a reviewer can
export just the comment "layer" to a separate comment repository.
In either of these scenarios, as well as others that are not mentioned here, you can customize the behavior
of a particular PDF document, implement security policies, interact with databases and web services, and
dynamically alter the appearance of a PDF document by using JavaScript. You can tie JavaScript code to a
specific PDF document, a particular page within a PDF document, or a form field or button in a PDF file.
When an end user interacts with Acrobat or a PDF file displayed in Acrobat that contains JavaScript,
Acrobat monitors the interaction and executes the appropriate JavaScript code.
Not only can you customize the behavior of PDF documents in Acrobat, you can customize Acrobat itself.
In earlier versions of Acrobat (prior to Acrobat 5), this type of customization could only be done by writing
Acrobat plug-ins in a high-level language like C or C++. Now, much of that same functionality is available
through Acrobat extensions to JavaScript. You will find that using JavaScript to perform a task such as
adding a menu to Acrobat’s user interface is much easier than writing a plug-in.
Using Acrobat Professional, you can create batch sequences for processing multiple documents,
processing within a single document, processing for a given page, and processing for a single form field.
For batch processing, it is possible to execute JavaScript on a set of PDF files, which enables tasks such as
extracting comments from a comment repository, identifying spelling errors, and automatically printing
PDF files.
Reading the JavaScript for Acrobat API Reference
The companion document to Developing Acrobat Applications Using JavaScript is the JavaScript for Acrobat
API Reference. If you are seriously interested in developing JavaScript solutions for your PDF documents,
this document is of the highest importance to you. This being the case, it is vital to learn how to read the
reference, to be aware of the many security restrictions placed on some of the methods and to know the
standard ways of working with security-restricted methods.
These features are of particular importance:
●The quick bar: In the JavaScript for Acrobat API Reference, each object, property and method has a quick
bar, a one-row table of icons that provides a summary of the item’s availability and usage
recommendations. Many lost hours of time can be avoided by paying attention to this quick bar. Refer
to the JavaScript for Acrobat API Reference for details.
●Privileged context: This guide contains detailed information on executing JavaScript in a privileged
context, beyond that provided in JavaScript for Acrobat API Reference, see “Privileged versus
non-privileged context” on page 45.
●Safe path: Acrobat 6.0 introduced the concept of a safe path for JavaScript methods that write data to
the local hard drive based on a path passed to it by one of its parameters. Generally, when a path is
judged to be not safe, a NotAllowedError exception is thrown. See the JavaScript for Acrobat API
Reference for more information about safe paths.
Note: Many sample scripts presented in this guide reference the local file system. These scripts generally
use the path "/c/temp/", which is a safe path.

Adobe Acrobat SDK Introduction
Developing Acrobat Applications Using JavaScript Object summary 16
Object summary
The Acrobat extension to core JavaScript defines many objects that allow your code to interact with the
Acrobat application, a PDF document, or form fields within a PDF document. This section introduces you
to the primary objects used to access and control the application and document, the development
environment itself, and general-purpose JavaScript functionality.
Below is a short listing of some of the main objects used in the document and in the sample files. A brief
description of each of the objects follow the table.
Object Purpose
ADBCDatabase connections and queries
app Acrobat
console JavaScript Debugger
dbg Debugger
dialog Modal dialog boxes
Doc PDF document
event JavaScript events
global Persistent and cross-document information
search Searching and indexing
security Encryption and digital signatures
SOAP Web services
util JavaScript utility methods
app
The app object is a static object that represents the Acrobat application itself. It offers a number of
Acrobat-specific functions in addition to a variety of utility routines and convenience functions. By
interacting with the app object, you can open or create PDF and FDF documents, and customize the
Acrobat interface by setting its viewing modes, displaying popup menus, alerts, and thermometers,
displaying a modal dialog box, controlling time intervals, controlling whether calculations will be
performed, performing email operations, and modifying its collection of toolbar buttons, menus, and
menu items. You can also query app to determine which Adobe product and version the end user is using
(such as Adobe Reader 8 or Acrobat Professional 7.0), as well as which printer names and color spaces are
available.
Doc
The Doc object is the primary interface to the PDF document, and it can be used to access and manipulate
its content. The Doc object provides the interfaces between a PDF document open in the viewer and the
JavaScript interpreter. By interacting with the Doc object, you can get general information about the
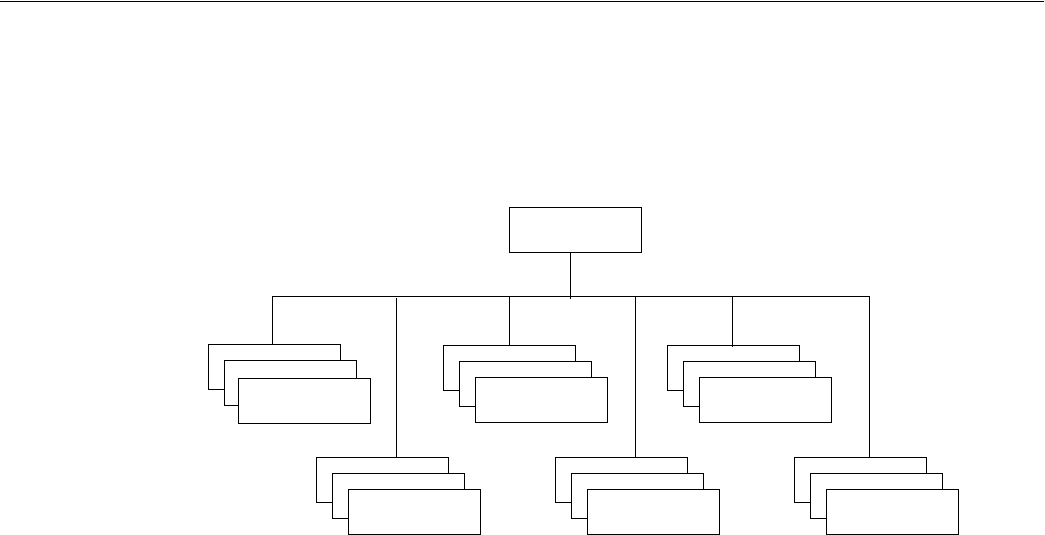
Adobe Acrobat SDK Introduction
Developing Acrobat Applications Using JavaScript dbg 17
document, navigate within the document, control its structure, behavior and format, create new content
within the document, and access objects contained within the document, including bookmarks, form
fields, templates, annotations, and sounds.
The following graphic represents the containment hierarchy of objects related to the Doc object.
Doc object containment hierarchy
doc
field sound
bookmark
annot
template data
Accessing the Doc object from JavaScript can be done in a variety of ways. The most common method is
using the this object, which is normally equivalent to the Doc object of the current underlying
document.
dbg
You can use the dbg object, available only in Acrobat Professional, to control the JavaScript Debugger
from a command line while the application is not executing a modal dialog box. The dbg object methods
offer the same functionality as the buttons in the JavaScript debugger dialog box toolbar, which permit
stepwise execution, setting, removing, and inspecting breakpoints, and quitting the debugger.
console
The console object is a static object that is used to access the JavaScript console for displaying debug
messages and executing JavaScript. It is useful as a debugging aid and as a means of interactively testing
code and is only available within Acrobat Professional.
global
The global object is used to store data that is persistent across invocations of Acrobat or shared by
multiple documents. Global data sharing and notification across multiple documents is done through a
subscription mechanism, which enables monitoring of global variables and reporting of their values to all
subscribing documents. In addition, global can be used to store information that pertains to a group of
documents, a situation that occurs when a batch sequence runs. For example, batch sequence code often
stores the total number of documents to be processed as a property of global. If information about the
documents needs to be stored in a Report object, it is assigned to a set of properties within global so it
is accessible to the Report object.

Adobe Acrobat SDK Introduction
Developing Acrobat Applications Using JavaScript util 18
util
The util object is a static JavaScript object that defines a number of utility methods and convenience
functions for number and date formatting and parsing. It can also be used to convert information between
rich content and XML representations.
dialog
The dialog object is an object literal used by the app object’s execDialog method to present a modal
dialog box identical in appearance and behavior to those used across all Adobe applications. The dialog
object literal consists of a set of event handlers and properties which determine the behavior and contents
of the dialog box, and may be comprised of the following elements: push buttons, check boxes, radio
buttons, list boxes, text boxes, popup controls, and containers and frames for sets of controls.
security
The security object is a static JavaScript object, available without restriction across all Acrobat
applications including Adobe Reader, that employs a token-based security model to facilitate the creation
and management of digital signatures and encryption in PDF documents, thus providing a means of user
authentication and directory management. Its methods and properties are accessible during batch,
console, menu, or application initialization events. The security object can be used to add passwords
and set security options, add usage rights to a document, encrypt PDF files for a list of recipients, apply
and assign security policies, create custom security policies, add security to document attachments, create
and manage digital IDs using certificates, build a list of trusted identities, and check information on
certificates.
SOAP
The SOAP object can be used to make remote procedure calls to a server and invoke web services
described by WSDL, and supports both SOAP 1.1 and 1.2 encoding. Its methods are available from
Acrobat Professional, Acrobat Standard, and for documents with form export rights open in Adobe Reader
6.0 or later. The SOAP object makes it possible to share comments remotely and to invoke web services in
form field events. It provides support for rich text responses and queries, HTTP authentication and
WS-Security, SOAP headers, error handling, sending or converting file attachments, exchanging
compressed binary data, document literal encoding, object serialization, XML streams, and applying DNS
service discovery to find collaborative repositories on an intranet. In addition the XMLData object can be
used to evaluate XPath expressions and perform XSLT conversions on XML documents.
search
The search object is a static object that can be used to perform simple and advanced searches for text in
one or more PDF documents or index files, create, update, rebuild, or purge indexes for one or more PDF
documents, and search through document-level and object-level metadata. The search object has
properties that can be used to fine-tune the query, such as a thesaurus, words with similar sounds,
case-sensitivity, and settings to search the text both in annotations and in EXIF metadata contained in
JPEG images.

Adobe Acrobat SDK Introduction
Developing Acrobat Applications Using JavaScript ADBC 19
ADBC
The ADBC object is used in conjunction with the connection and statement objects to interface with a
database. These objects constitute Acrobat Database Connectivity (ADBC), and provide a simplified means
of using ODBC calls to connect to a database and access its data. SQL statements are passed to the
statement object’s execute method in order to insert, update, retrieve, and delete data.
event
All JavaScript actions are executed when a particular event occurs. For each event, an event object is
created. When an event occurs, the event object can be used to obtain and manage any information
associated with the state of that particular event. An event object is created for each of the following type
of events: Acrobat initialization, batch sequences, mouse events on bookmarks, JavaScript console actions,
document print, save, open, or close actions, page open and close events, form field mouse, keystroke,
calculation, format, and validation events, and menu item selection events.
JavaScript applications
JavaScript for Acrobat enables you to do a wide variety of things within Acrobat and Adobe Reader, and
within PDF documents. The Acrobat extensions to JavaScript can help with the following workflows:
●Creating PDF documents
●Create new PDF files
●Control the appearance and behavior of PDF files
●Convert PDF files to XML format
●Create and spawn templates
●Attach files to PDF documents
●Creating Acrobat forms
●Create, modify, and fill in dynamically changing, interactive forms
●Import and export form, attachment, and image data
●Save form data in XML, XDP, or Microsoft Excel format
●Email completed forms
●Make forms accessible to visually impaired users
●Make forms web-ready
●Migrate legacy forms to dynamic XFA
●Secure forms
●Facilitating review, markup, and approval
●Set comment repository preferences
●Create and manage comments
●Approve documents using stamps
●Integrating digital media into documents
●Control and manage media players and monitors
●Add movie and sound clips
●Add and manage renditions
●Set multimedia preferences

Adobe Acrobat SDK Introduction
Developing Acrobat Applications Using JavaScript JavaScript applications 20
●Modifying the user interface
●Create dialog boxes
●Add navigation to PDF documents
●Manage PDF layers
●Manage print production
●Searching and indexing of documents and document metadata
●Perform searches for text in one or more documents
●Create, update, rebuild, and purge indexes
●Search document metadata
●Securing documents
●Create and manage digital signatures
●Add and manage passwords
●Add usage rights
●Encrypt files
●Manage digital certificates
●Managing usage rights
●Write JavaScript for Adobe Reader
●Enable collaboration
●Interacting with databases
●Establish an ADBC connection
●Execute SQL statements
●Support for ADO (Windows only)
●Interacting with web services
●Connection and method invocation
●HTTP authentication and WS-Security
●SOAP header support
●Error handling
●Handle file attachments
●Exchange compressed binary data
●Document literal encoding
●Serialize objects
●XML streams
●Apply DNS service discovery to find collaborative repositories on an intranet
●XML
●Perform XSLT conversions on XML documents
●Evaluate XPath expressions
21
2Tools
Acrobat provides an integrated development environment that offers several tools with which to develop
and test JavaScript functionality. These tools are the JavaScript Editor, Console, and Debugger. In addition,
Acrobat supports the use of third-party editors for code development.
Topic Description See
Using the JavaScript Debugger console Covers the following topics:
●Opening the Console
●Executing JavaScript
●Formatting code
●Enabling JavaScript
page 21
Using a JavaScript editor How to access and to use the JavaScript editor
built into Acrobat.
page 24
Specifying the default JavaScript editor How to set the default JavaScript editor to an
external text application.
page 25
Using an external editor The use of an external editor to write JavaScript
code.
page 26
Using the Debugger with Adobe Reader How to use the Debugger with Adobe Reader. page 28
Enabling the JavaScript Debugger Debugger preferences. page 29
JavaScript Debugger The Debugger controls and their use. page 30
Using the JavaScript Debugger console
The JavaScript console provides an interactive and convenient interface for testing portions of JavaScript
code and experimenting with object properties and methods. Because of its interactive nature, the
console behaves as an editor that permits the execution of single lines or blocks of code.
There are two ways to activate the JavaScript console: either through an Acrobat menu command or
through the use of the static console object within JavaScript code. In either case, it appears as a
component of the JavaScript Debugger, and the primary means of displaying values and results is through
the console.println method.

Adobe Acrobat SDK Tools
Developing Acrobat Applications Using JavaScript Opening the console 22
Opening the console
➤To open the JavaScript Debugger console:
1. Open the Debugger window using one of these methods:
●Select Advanced > Document Processing > JavaScript Debugger, or
●Type Ctrl+J (Windows) or Command+J (Mac OS)
2. Select either Console or Script and Console from the debugger View list.
To open and close the console with JavaScript code, use console.show() and console.hide()
methods, respectively.
Executing JavaScript
The JavaScript console allows you to evaluate single or multiple lines of code. There are three ways to
evaluate JavaScript code while using the interactive console:
●To evaluate a portion of a line of code, highlight the portion and press either the Enter key on the
numeric keypad or press Ctrl + Enter.
●To evaluate a single line of code, make sure the cursor is positioned on that line and press either the
Enter key on the numeric keypad or press Ctrl + Enter.
●To evaluate multiple lines of code, highlight those lines and press either the Enter key on the numeric
keypad or press Ctrl + Enter.
In all cases, the result of the most recent single JavaScript statement executed is displayed in the console.
Formatting code
To indent code in the JavaScript console, use the Tab key.
●To indent four spaces to the right, position the cursor at the beginning of a single line or highlight the
block of code, and press the Tab key.
●To indent four spaces to the left, position the cursor at the beginning of a single line or highlight a
block of code and press Shift + Tab.
Enabling JavaScript
In order to use JavaScript, you must first verify that JavaScript has been enabled. In order to execute code
from the console, you will also need to ensure that the JavaScript Debugger is enabled, since the Console
window is a component within the JavaScript Debugger interface.
➤To enable JavaScript, the Debugger and the Console:
1. Launch Acrobat.
2. Select Edit > Preferences to open the Preferences dialog box.
3. Select JavaScript from the list of options on the left side of the dialog box.
4. Select Enable Acrobat JavaScript if it is not already selected.
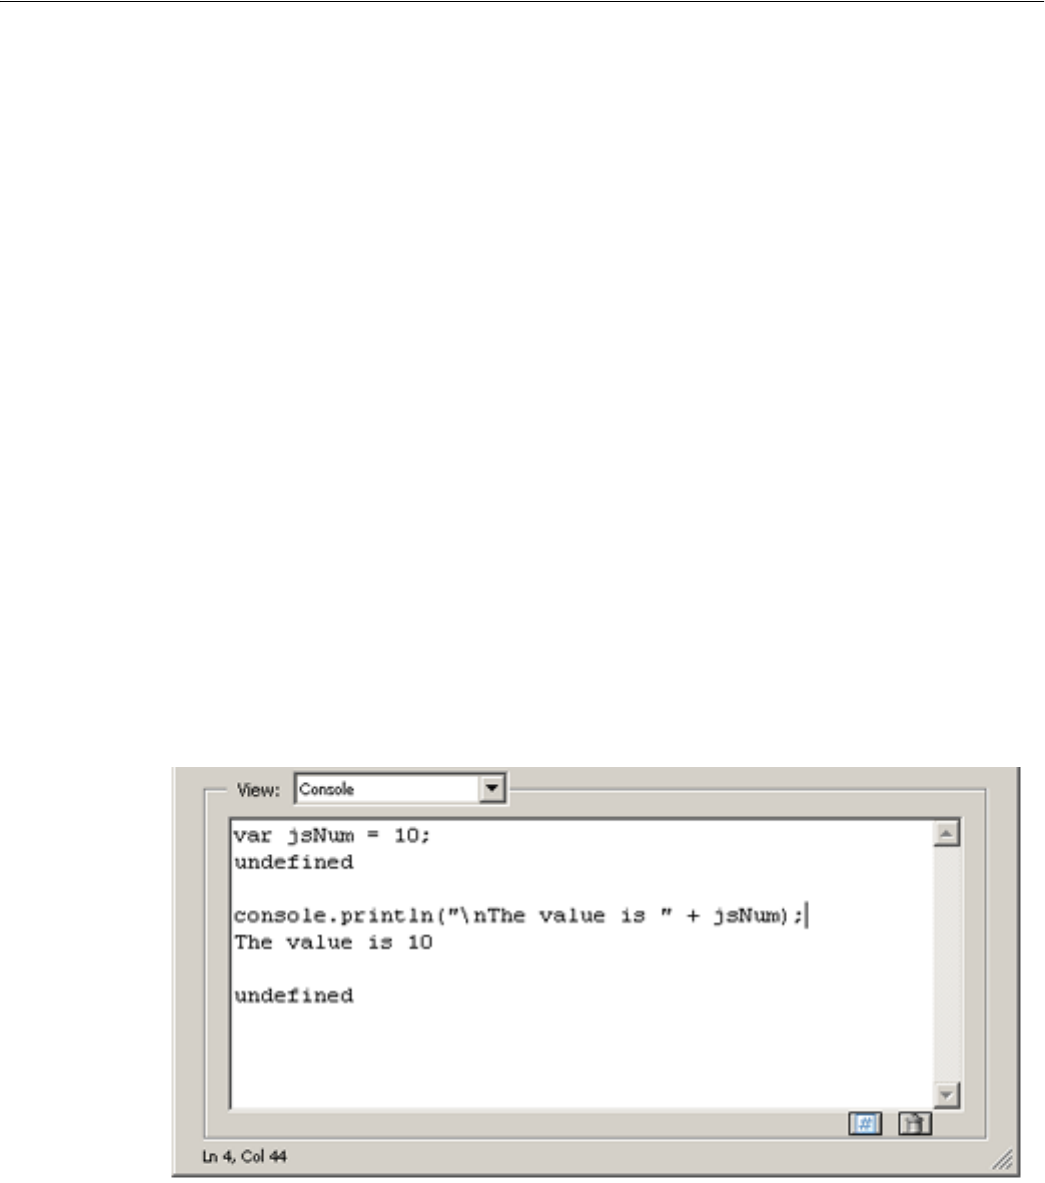
Adobe Acrobat SDK Tools
Developing Acrobat Applications Using JavaScript Enabling JavaScript 23
5. In the Preferences dialog box, select Enable JavaScript Debugger After Acrobat is Restarted from
the JavaScript Debugger options.
6. Select Enable Interactive Console. This option enables you to evaluate code that you write in the
console window.
7. Select Show Console on Errors and Messages. This ensures that whenever you make mistakes, the
console displays helpful information.
8. Click OK to close the Preferences dialog box.
9. Close and restart Acrobat.
➤To test the interactive Console:
1. Select Advanced > Document Processing > JavaScript Debugger to open the JavaScript Debugger.
2. In the debugger, select Console from the View window.
The Console window appears.
3. Click Clear (the trash can icon), located at the bottom right of the Console, to delete any contents that
appear in the window.
4. In the text window, type the following code:
var jsNum = 10;
5. With the mouse cursor positioned somewhere in this line of code, press Enter on the numeric keypad
or press Ctrl + Enter. The JavaScript variable is created and is assigned a value of 10. The results are
shown in the following graphic.
Evaluating the variable declaration
After each JavaScript statement executes, the console window prints out undefined, which is the
return value of the statement. Note that the result of a statement is not the same as the value of an
expression within the statement. In this case, the return value undefined does not mean that the
value of jsNum is undefined; it just means that the entire JavaScript statement’s value is undefined.
Note the use of the console.println() method to display the result in a more human-readable
format.

Adobe Acrobat SDK Tools
Developing Acrobat Applications Using JavaScript Debugging with the JavaScript Console 24
Debugging with the JavaScript Console
Though Acrobat Professional has a full-featured debugger, see “JavaScript Debugger” on page 30, for
simple scripts it is often easier to debug scripts by the following methods:
●testing and/or developing script snippets in the Console itself
●inserting console.println() commands to write information to the Console.
Example 2.1 Test a regular expression in the JavaScript Debugger Console
The following script, which can be created in the JavaScript Console, illustrates the use of
console.println().
The regular expression
var re = /(Professional|Pro)(\s+)(\d)/g
and the replacement function, myReplace(), are used to search the string, str, for the phrase
"Professional 7" or "Pro 7", and to replace the string "7" with the string "8". The script is executed
using the procedures described in “Executing JavaScript” on page 22.
After testing and debugging, the script can be copied and pasted to the target location.
Note the debugging loop inside the function myReplace() writes the arguments of the function to the
Console. This helps in the development phase: the arguments are seen in the Console where you can verify
that they are the ones expected. The loop can be deleted or commented out after testing.
function myReplace() {
var l = arguments.length;
for ( var i = 0; i < l; i++)
console.println("arg" + i + " = " + arguments[i])
return arguments[1] + arguments[2] + "8";
}
var str = "Acrobat Professional\n7 is a great application, "
+ "so I say on the 7th of May.\nOn a laptop Acrobat Pro 7.0 is on the go!"
var re = /(Professional|Pro)(\s+)(\d)/g;
var newStr = str.replace( re, myReplace);
console.println("\nnewStr = " + newStr);
Using a JavaScript editor
There are several ways to invoke the JavaScript Editor, depending on the context. To begin with, it is
possible to select JavaScripts from the Advanced > Document Processing menu and choose one of the
following options:
●Edit All JavaScripts
●Document JavaScripts
●Set Document Actions
A more basic approach, however, is to think of a script as an action associated with a part of the document,
such as a page, bookmark, or form field. As in the following example, you can select the object of interest
and edit its particular script.

Adobe Acrobat SDK Tools
Developing Acrobat Applications Using JavaScript Specifying the default JavaScript editor 25
➤To write a script for a document component:
1. Right-click a document component such as a bookmark. This triggers a context menu.
2. Select Properties and choose the Actions tab.
3. Select Run a JavaScript from the Select Action drop-down list.
4. Click Add to open the JavaScript editor.
5. In the editor window, write the JavaScript code to run when the event that activates the code is
created.
6. Click Close.
If there are errors in your code, the JavaScript editor highlights the code line in question and displays
an error message.
Note: JavaScript actions have a scope associated with various levels of objects in a PDF document, such as
a form field, a page, or the entire document. For example, a script at the document level would be
available from all other scriptable locations within the document.
Specifying the default JavaScript editor
You can choose whether to use the built-in JavaScript editor that comes with Acrobat, or an external
JavaScript editor of your choice.
➤To set the default editor:
1. Choose Edit > Preferences (Ctrl+K) to open the Preferences dialog box.
2. Select JavaScript from the list of options on the left side of the dialog box.
This brings up the Preferences dialog box.
3. In the JavaScript Editor section, select the editor you would like to use.
The Acrobat JavaScript Editor option sets the built-in JavaScript editor as the default.
The External JavaScript Editor option sets an external editor as the default.
Note: For some external editors, Acrobat provides extra command line options for invoking the editor. For
details, see “Additional editor capabilities” on page 26.
Like the JavaScript Console, the built-in JavaScript Editor can be used to evaluate portions of JavaScript
code. Select a line or block of code to be evaluated, and press the Enter key on the numeric keypad or
Ctrl + Enter on the regular keyboard.
When you execute script from within an JavaScript Editor window, results appear in the Console window.
The Console window should be open prior to opening any JavaScript Editor window.
The JavaScript Editor provides the same formatting options as those in the console window. For details,
see “Formatting code” on page 22.

Adobe Acrobat SDK Tools
Developing Acrobat Applications Using JavaScript Using an external editor 26
Using an external editor
If an external editor program has been specified as the default application for editing scripts in Acrobat,
Acrobat generates a temporary file and opens it in the external editor program. When editing a file in an
external editor, note the following restrictions:
●You must save the file in order for Acrobat to detect the changes.
●Acrobat is inaccessible while the external editor is in use.
●JavaScript code cannot be evaluated within the external editor.
Additional editor capabilities
Acrobat supports some additional command line editor capabilities for Windows-based applications, and
provides support for two parameters in particular: the file name (%f) and the target line number (%n).
Parameters for Mac OS-based editors are not supported.
Note that Acrobat launches a new instance of the editor for each new editing session. Some editors, if
already running, load new files into the same session and may close the other open files without saving
them. Thus, it is important to remember to take one of the following measures: save your changes before
beginning a new editing session, close the editor application before starting a new editing session, or
adjust its default preferences so that it always launches a new editor instance (this is the best course of
action, if available).
If you are able to set the editor preferences to launch a new instance for each editing session, and if the
editor requires a command line parameter in order to invoke a new editor instance, you can add that
parameter to the editor command line specified, as described in “Specifying additional capabilities to your
editor” on page 26.
If your editor accepts a starting line number on the command line, Acrobat can start the editor on a line
containing a syntax error by inserting the line number as a command line parameter (%n).
For your convenience, Acrobat provides predefined, command line templates for many current external
editors. The external editor settings are defined in Edit > Preferences > JavaScript. If you use the Browse
button to specify an external editor and it has a pre-defined command line template, the command line
parameters and options appear to the right of the pathname for the editor application, and you can edit
them. If no predefined template is available for your editor, you can still specify the appropriate command
line parameters.
Specifying additional capabilities to your editor
Acrobat provides internal support for both of the commands described above on a few editors such as
CodeWrite, Emacs, and SlickEdit (see the table “Supported external JavaScript editors with command line
templates” on page 27).
If your editor is not one that Acrobat currently supports, it will be necessary to check the editor’s
documentation. You will need to search for the following information:
●What are the command switches to tell the editor to always open a new instance?
Switches vary depending on the editor and include such parameters as /NI and +new followed by the
file name ("%f"). Note that the quotes are required, because the file name that Acrobat sends to the
editor may contain spaces.
Adobe Acrobat SDK Tools
Developing Acrobat Applications Using JavaScript Specifying additional capabilities to your editor 27
●Is there a way to instruct the editor to open a file and jump to a line number?
Some line number command switches are -#, -L, +, and -l, each followed by the line number (%n). For
most editors, the line number switch and %n should be enclosed in square brackets [...]. The text
inside the square brackets will be used only when Acrobat requires that the editor jump to a specific
line in order to correct a JavaScript syntax error. You can use an editor that does not support a line
number switch; in this case, you will need to scroll to the appropriate line in the event of a syntax error.
For example, Acrobat recognizes the Visual SlickEdit editor as vs.exe and automatically supplies this
command line template:
"C:\Program Files\vslick\win\vs.exe" "%f" +new [-#%n]
When Acrobat opens the default JavaScript editor, it makes the appropriate substitutions in the command
line and executes it with the operating system shell. In the above case, if the syntax error were on line 43,
the command line generated would appear as follows:
"C:\Program Files\vslick\win\vs.exe" "C:\Temp\jsedit.js" +new -#43
Note: To insert %, [, or ] as characters in the command line, precede each of them with the % escape
character, thus using %%, %[, or %] respectively.
Supported external JavaScript editors with command line templates
Editor Web site
Template command line
arguments
Boxer http://www.boxersoftware.com -G -2 "%f" [-L%n]
ConTEXT http://fixedsys.com/context "%f" [/g1:%n]
CodeWright http://www.codewright.com -M -N -NOSPLASH "%f" [-G%n]
Emacs http://www.gnu.org/software/emacs/emacs.html [+%n] "%f"
Epsilon http://www.lugaru.com [+%n] "%f"
Multi-Edit http://www.multiedit.com /NI /NS /NV [/L%n] "%f"
TextPad http://www.textpad.com -m -q "%f"
UltraEdit http://www.ultraedit.com "%f" [-l%n]
VEDIT http://www.vedit.com -s2 "%f" [-l %n]
Visual SlickEdit http://www.slickedit.com +new "%f" [-#%n]
➤To determine whether Acrobat can open your editor on a line number:
1. Open a script in your editor.
2. Add a syntax error.
3. Move the cursor to a line other than the one containing the syntax error.
4. Close and save the file.
If a dialog box automatically appears prompting you to fix the syntax error, check whether it correctly
specifies the line containing the error.

Adobe Acrobat SDK Tools
Developing Acrobat Applications Using JavaScript Saving and closing a file with a syntax error 28
Saving and closing a file with a syntax error
If you save and close a file containing a syntax error, Acrobat displays a dialog box with a message asking if
you would like to fix the error. For example, if there is an error on line 123, the following message appears:
There is a JavaScript error at line 123.
Do you want to fix the error?
Note: If you click No, Acrobat discards your file.
Always click Yes. Acrobat expands the path to the editor to include the line number in the specified syntax.
The editor opens and the cursor is placed on the appropriate line.
Using the Debugger with Adobe Reader
The JavaScript Debugger is a fully capable debugger that allows you to set breakpoints and inspect
variable values while stepping through code. While it is normally accessed from the Acrobat Professional
user interface, it can also be triggered to appear in Adobe Reader when an exception occurs.
Though fully supported JavaScript debugging is only available in Acrobat Professional, the following
instructions to make the complete Debugger functionality available in Adobe Reader on Windows and
Mac OS platforms are provided as a courtesy. For Windows, note that this procedure involves editing the
registry. Adobe Systems Incorporated does not provide support for editing the registry, which contains
critical system and application information. It is recommended that you back up the registry before
modifying it.
1. The file debugger.js, available at http://www.adobe.com/go/acrobat_developer or in the SDK
installation (Acrobat 8.0 SDK/JavaScriptSupport/Debugger/debugger.js), must be copied to the
Acrobat 8.0/Reader/JavaScripts folder.
2. Create key/value pairs in the registry settings, starting at the location
HKEY_CURRENT_USER\Software\Adobe\Acrobat Reader\8.0\JSPrefs\ on Windows as shown in the
table below, or in the property list file <user>:Library:Preferences:com.adobe.Reader8.0.plist on Mac
OS. For Mac OS, use an appropriate editor for the property list file, and add the following children under
JSPrefs, using Type : Array in each case: ConsoleOpen, ConsoleInput, EnableDebugger, and Exceptions.
Under each of these children, add the following children: 0 (number) and 1 (boolean).
3. Close and restart Adobe Reader. At this point the Debugger will be available.
Registry key/value pairs for Windows
bConsoleInput REG_DWORD 0x00000001
bEnableDebugger REG_DWORD 0x00000001
iExceptions REG_DWORD 0x00000002
(This will break into the Debugger when exceptions
occur.)
Note: Since Adobe Reader does not provide access to the Debugger through its menu items or the Ctrl + J
key sequence, the only ways to access the Debugger are to execute a JavaScript, cause an error, or
customize the user interface (for example, you could add a button that runs a JavaScript causing the
Debugger to appear).

Adobe Acrobat SDK Tools
Developing Acrobat Applications Using JavaScript Enabling the JavaScript Debugger 29
As you learned earlier when opening the JavaScript Console, which is integrated with the Debugger dialog
box, the Debugger may be opening in Acrobat Professional by selecting Advanced > Document
Processing > JavaScript Debugger. In addition, the Debugger automatically opens if a running script
throws an exception or encounters a previously set break point.
Note: The JavaScript Debugger cannot be used to analyze JavaScript stored in HTML pages viewed by
web browsers or any other kind of scripting languages.
Enabling the JavaScript Debugger
The JavaScript Debugger can be a powerful tool for debugging complex scripts; however, it is a tool for an
advanced user. For this reason, this section can be skipped at first reading. (Simple scripts can be
debugged by inserting console.println() statements to read out debugging information to the
console. For more information on this subject, see “Debugging with the JavaScript Console” on page 24.)
In order to make the Debugger available for use, you must enable both JavaScript and the Debugger. As
you did earlier, use the Preferences dialog box (Ctrl+K) to control the behavior of the JavaScript
development environment. Enabling JavaScript and the JavaScript editor are described in “Enabling
JavaScript” on page 22. To enable the Debugger, select JavaScript from the list on the left in the
Preferences dialog box and make sure the item Enable JavaScript Debugger after Acrobat is Restarted is
enabled. Note that you must restart Acrobat for this option to take effect.
The Debugger options are located in the JavaScript Debugger section of the Preferences dialog box, and
are explained in the following table.
JavaScript Debugger options
Option Meaning
Enable Javascript Debugger
after Acrobat is restarted
To enable the Debugger, check this option, which makes all Debugger
features available the next time Acrobat is launched.
Store breakpoints in PDF file This option enables you to store breakpoints so they are available the
next time you start Acrobat or open the PDF file. To remove the
breakpoints, do the following:
●Turn this option off.
●Select Advanced > Document Processing > Document JavaScripts
and delete the ACRO_Breakpoints script.
●Save the file.
When an exception is thrown This option provides three choices for actions when an exception is
thrown:
Ignore — ignores the exception
Trace — displays a stack trace
Break — stops execution and displays a message window that gives
you the option to start the debugger at the line where the exception
occurred.

Adobe Acrobat SDK Tools
Developing Acrobat Applications Using JavaScript JavaScript Debugger 30
JavaScript Debugger
You can open the JavaScript Debugger at any time by selecting the Acrobat menu item Advanced >
Document Processing > JavaScript Debugger. Familiarize yourself with the parts of the window and the
controls as described here before you attempt interactive debugging of a script.
For information on the types and locations of scripts that may be debugged, see “Accessing scripts in the
Scripts window” on page 33. The section “Starting the Debugger” on page 38 describes how to
automatically start the Debugger for a script.
Caution: In Windows, while the Debugger is open and a debugging session is in progress, Acrobat will be
unavailable.
Main groups of controls
The Debugger dialog box, see “Debugger dialog box” on page 31, consists of three main groups of
controls. The toolbar on the top left contains six button controls that provide basic debugging session
functionality.
Immediately below the toolbar, a Scripts window displays the names of scripts available for debugging.
These are organized in a tree hierarchy, such as the one shown below in the graphic Debugger dialog box,
and may be accompanied by the Scripts window below, which shows the code for a single script
corresponding to the one highlighted in the Scripts window.
The Call Stack and Inspect drop-down lists are located at the top right of the Debugger dialog box.
Selecting entries in these lists enables you to view the nesting order of function calls, and enables you to
inspect the details of variables, watches, and breakpoints in the Inspect Details window.
Enable interactive console This option allows you to enter JavaScript commands in the console
window. If this option is not checked and you click in the console
window, the following message appears:
The interactive console is not enabled. Would you like to enable it
now?
Click Yes to enable this option from within the Debugger. In
Preferences you will now see this option checked.
Show console on errors and
messages
This option opens the console window in the Debugger dialog box.
Regardless of whether the Debugger is enabled, this option causes the
Debugger dialog box to open when an error occurs and displays the
error message to the console window.
Option Meaning
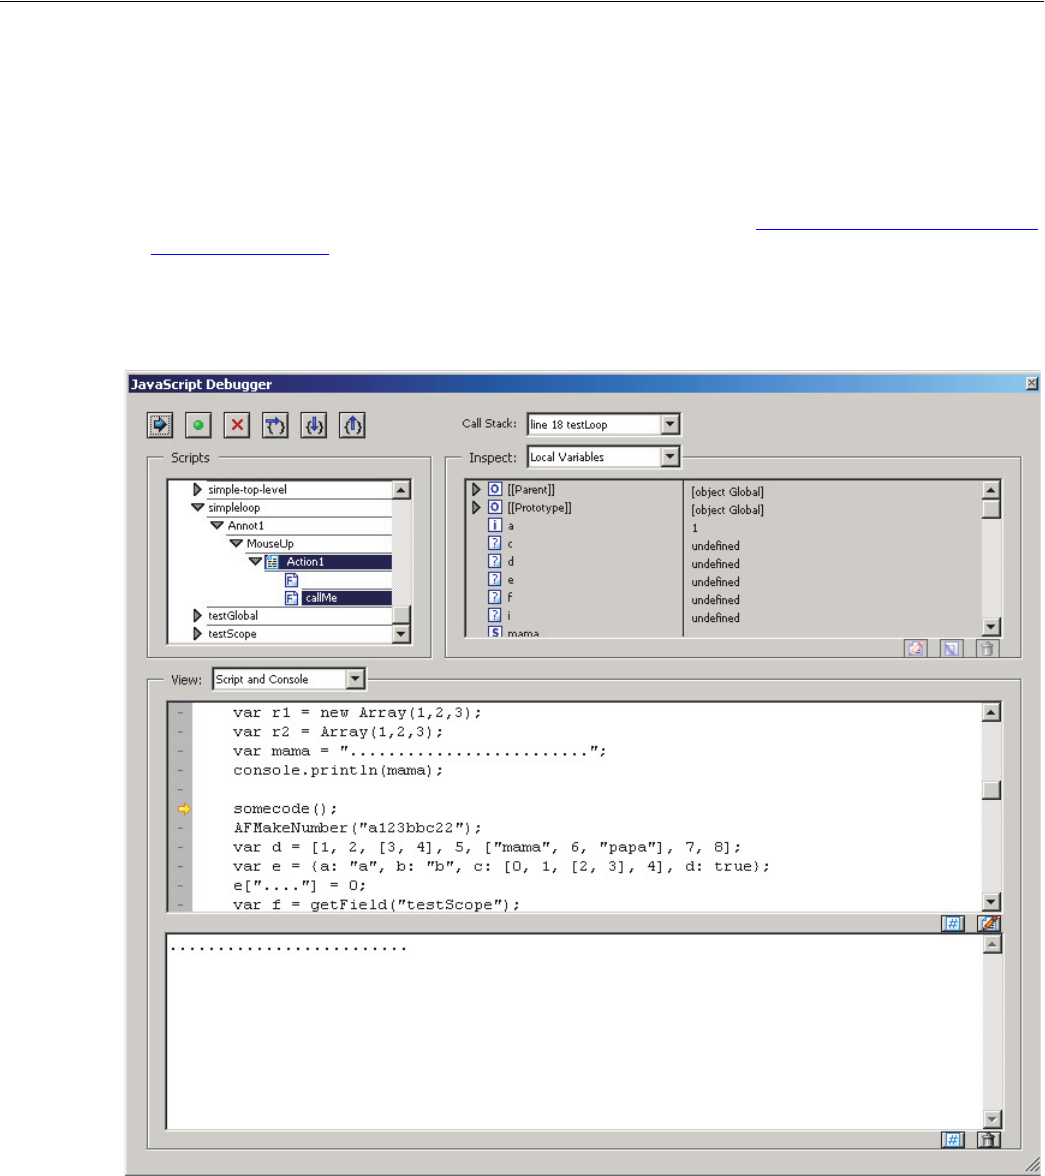
Adobe Acrobat SDK Tools
Developing Acrobat Applications Using JavaScript Debugger View windows 31
Debugger View windows
Below the main group of controls, the debugger provides a View drop-down list with the following
choices:
Script — view a single JavaScript script selected from the Scripts hierarchy window
Console — view the output of a selected script as it executes in the JavaScript Console window. The
Console may also be used to run scripts or individual commands. See “Using the JavaScript Debugger
console” on page 21.
Script and Console — view both the Console and Script windows at the same time. The Script window
displays above the console window, as shown in the following graphic.
Debugger dialog box
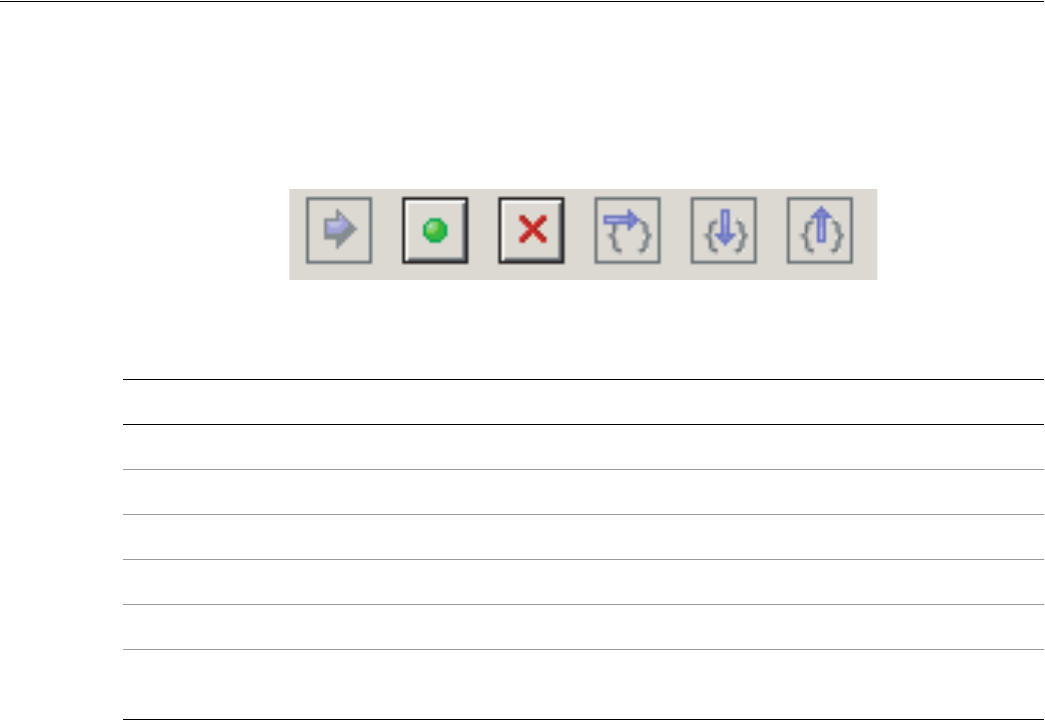
Adobe Acrobat SDK Tools
Developing Acrobat Applications Using JavaScript Debugger buttons 32
Debugger buttons
The following graphic shows the debugger buttons on the toolbar, and the table summarizes the
functionality of each button, followed by detailed descriptions below.
Debugger buttons
Resume Interrupt Quit Step over Step into Step out
Debugger buttons summary
Button Description
Resume Execution Runs a script stopped in the debugger.
Interrupt Halts execution.
Quit Closes the debugger and terminates script execution.
Step over Executes the next instruction, but does not enter a function call if encountered.
Step into Executes the next instruction, and enters a function call if encountered.
Step out Executes the remaining code in a function call, and stops at the next instruction
in the calling script.
Resume execution
When the script is stopped, the Resume Execution button cause the script to continue execution until it
reaches one of the following:
●The next script to be executed
●The next breakpoint encountered
●The next error encountered
●The end of the script
Interrupt
The Interrupt button halts execution of the current script. When clicked, it appears in red, which indicates
that it has been activated and causes execution to stop at the beginning of the next script that is run. If this
occurs, the Interrupt button is automatically deactivated and returns to its green color. It must be activated
again in order to interrupt another script.
Quit
The Quit button terminates the debugging session and closes the Debugger.
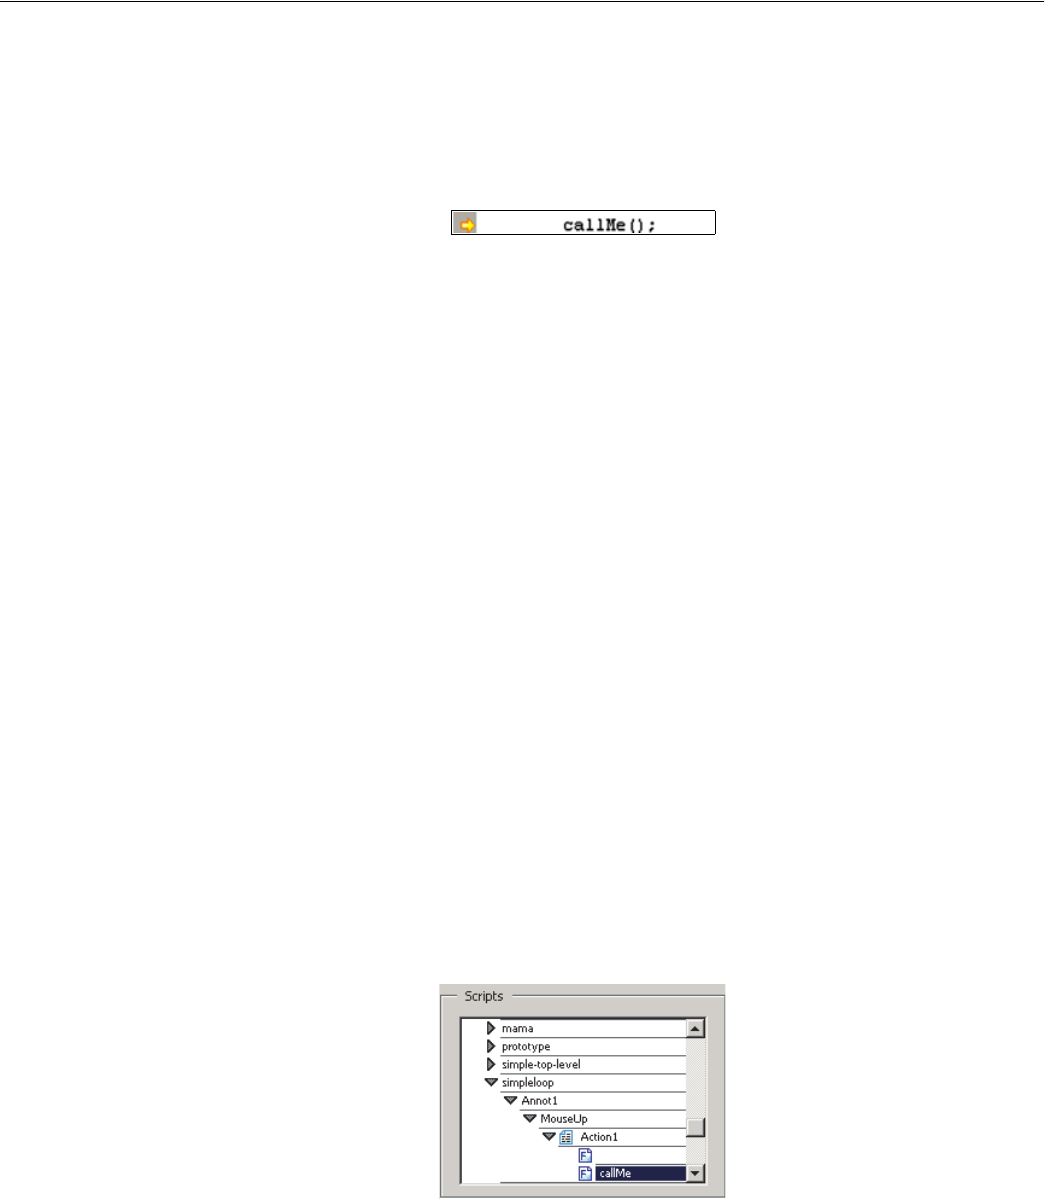
Adobe Acrobat SDK Tools
Developing Acrobat Applications Using JavaScript Debugger Scripts window 33
Step over
The Step Over button executes a single instruction, and if it is a function call, it executes the entire function
in a single step, rather than stepping into the function. For example, the position indicator (yellow arrow)
in the Debugger is to the left of a function call, as shown below.
Position indicator at a function call
Execution is currently halted before the call to callMe. Assuming that there are no errors or breakpoints in
callMe, clicking Step Over executes the entire callMe function, and advances the position indicator to
the next script instruction following the function call.
If the statement at the position indicator does not contain a function call, Step Over simply executes that
statement.
Step into
The Step Into button executes the next statement, and if it is a function call, it proceeds to the first
statement within the function.
Note: It is not possible to step into native functions, since they have no JavaScript implementation. This
applies to Acrobat native functions as well as core JavaScript functions.
Step out
The Step Out button executes the remaining code within the current function call and stops at the instruction
immediately following the call. This button provides a convenient means of eliminating cumbersome, stepwise
execution of functions that do not contain bugs. If you are not inside a function call and there are no errors, the
Step Out button continues executing code to the end of the current script or until a breakpoint is encountered.
Debugger Scripts window
All scripts associated with a PDF file are available in the Debugger dialog box. The Debugger displays these
in the Scripts window.
Scripts window
Accessing scripts in the Scripts window
To display the content of a script, click the triangle to its left in the Scripts window. Each triangle opens the
next level in the containment hierarchy. A script icon indicates the lowest level, which means that the code

Adobe Acrobat SDK Tools
Developing Acrobat Applications Using JavaScript Debugger Scripts window 34
for the given function is available. As shown above in the graphic Scripts window, a function has been
defined for a mouse-up action on a button named Button1. Click on the script icon to display its code.
JavaScript can be stored in several places, which may be either inside or outside PDF files. The following
sections describe their possible locations.
Scripts inside PDF files
The table below lists the types of scripts that can be placed in PDF files. These can be accessed from the
Scripts window within the Debugger dialog box. You can edit them from inside the Debugger, and set
breakpoints as described in “Breakpoints” on page 37.
Note: Changes to scripts do not take effect until the scripts are re-run; changes cannot be applied to a
running script.
Scripts inside PDF files
Location Access
Document level Advanced > Document Processing > Document JavaScripts
Document actions Advanced > Document Processing > Set Document Actions
Page actions Click the page on the Pages tab; right-click the thumbnail for the page and click
Page Properties.
Forms Double-click the form object in form editing mode (see below) to bring up the
properties dialog box for that form object.
Bookmarks Click the bookmark on the Bookmarks tab; right-click the bookmark and click on
Properties.
Links Double-click the link object in object editing mode (see below) to bring up the
Link Properties dialog box.
Form editing mode — To switch to form editing mode, select Forms > Edit Form in Acrobat.
Scripts outside PDF files
Scripts outside of Acrobat are also listed in the Scripts window and are available for debugging in Acrobat.
The following table lists these script types and how to access them.
Scripts outside PDF files
Location Access
Folder level Stored as JavaScript (.js) files in the App or User folder areas
Console Entered and evaluated in the console window
Batch Choose Advanced > Document Processing > Batch Processing
Folder-level scripts normally can be viewed and debugged but not edited in Acrobat. Console and batch
processing scripts are not visible to the Debugger until they are executed. For this reason, you cannot set
breakpoints prior to executing these scripts. You can access the scripts either using the Debug From Start
option or by using the debugger keyword. See “Starting the Debugger” on page 38 for details.
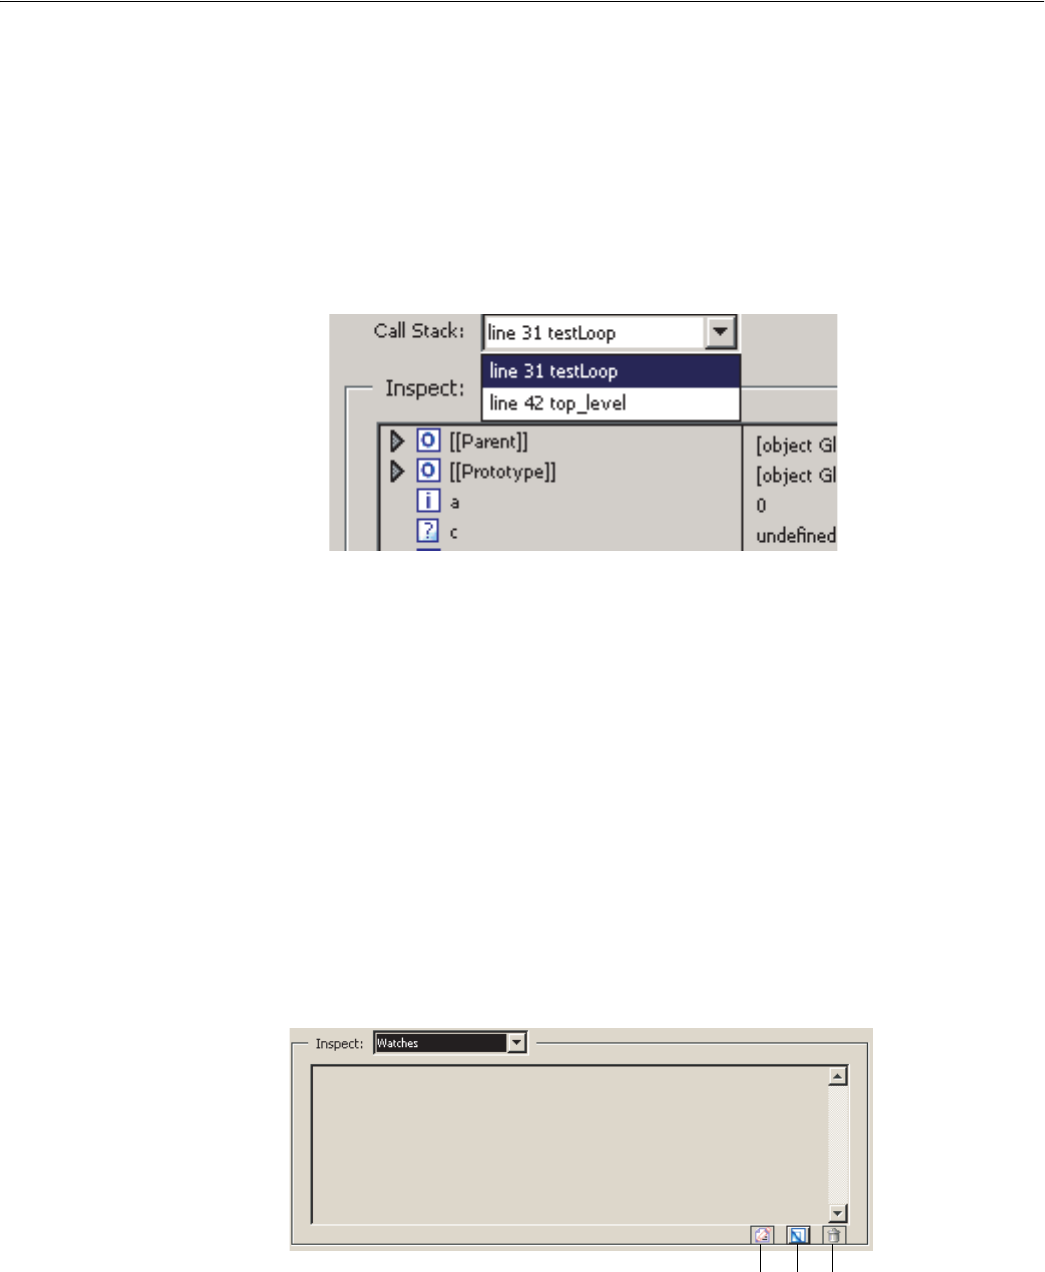
Adobe Acrobat SDK Tools
Developing Acrobat Applications Using JavaScript Call Stack list 35
Call Stack list
To the right of the Debugger control buttons is the Call Stack drop-down list which displays the currently
executing function and its associated state within the current set of nested calls. An example is shown in
the following graphic. When the Debugger has been used to suspend execution at a given statement, the
call stack displays text indicating the current function call (stack frame). Each entry shows the current line
number and function name. The most recent stack frame is displayed at the top of the Call Stack
drop-down list. To inspect the local variables of a particular frame in the stack, click that entry. They appear
in the Inspect details window immediately below the Call Stack list.
Call stack
You can select any function in the call stack. Doing so selects that stack frame, and its location is shown in
the Inspect details window. When Local Variables is selected in the Inspect drop-down list, the variables
specific to that active frame are displayed in the Inspect details window.
Inspect details window
The Inspect details window is located to the right of the Scripts window and below the Call Stack. Its
purpose is to help you inspect the values of variables, customize the way in which variables are inspected
(setting watches), and obtain detailed information about breakpoints.
Inspect details window controls
The three buttons at the bottom right of the Inspect details window, shown in the following graphic, can
be used to edit, create, or delete items. The Edit, New, and Delete buttons become active when items in
the Inspect drop-down list are selected.
Inspect details window button controls
Edit New Delete
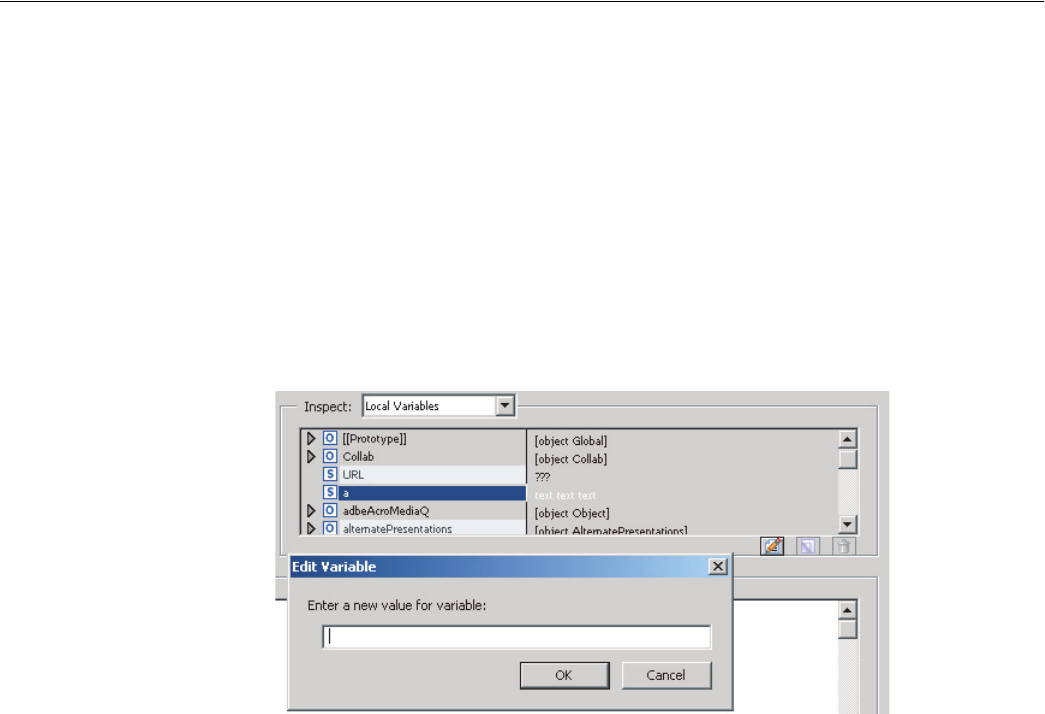
Adobe Acrobat SDK Tools
Developing Acrobat Applications Using JavaScript Inspect details window 36
Inspecting variables
The Inspect details window is a powerful tool that you can use to examine the current state of JavaScript
objects and variables. It enables you to inspect any objects and properties in a recursive manner within the
current stack frame in the debugging session.
To inspect a variable, select Local Variables from the Inspect drop-down list, which displays a list of variable
and value pairs in the Inspect details window. To place a value in a variable, highlight the variable in the
details window (this activates the Edit button). Click the Edit button. An Edit Variable dialog box appears,
allowing you to enter a new value for the variable as shown in the following graphic.
A triangle next to a name indicates that an object is available for inspection. If you would like to view its
properties, click the triangle to expand the object.
Local variable details
Watches
The Watches list enables you to customize how variables are inspected. Watches are JavaScript
expressions evaluated when the debugger encounters a breakpoint or a step in execution. The Watches
list provides you with the ability to edit, add, or delete watches using the three buttons just below the
Inspect details window. All results are displayed in the Inspect details window in the order in which they
were created.
➤To set a watch:
1. Select Watches from the Inspect drop-down list.
2. Click the New button. A dialog box prompts you for the JavaScript variable or expression to be
evaluated.
➤To change the value of a watch:
1. Select the watch from the list.
2. Click the Edit button, which displays a dialog box prompting you to specify a new expression for
evaluation.
➤To delete a watch:
1. Select the watch from the Inspect drop-down list.
2. Click the Delete button.
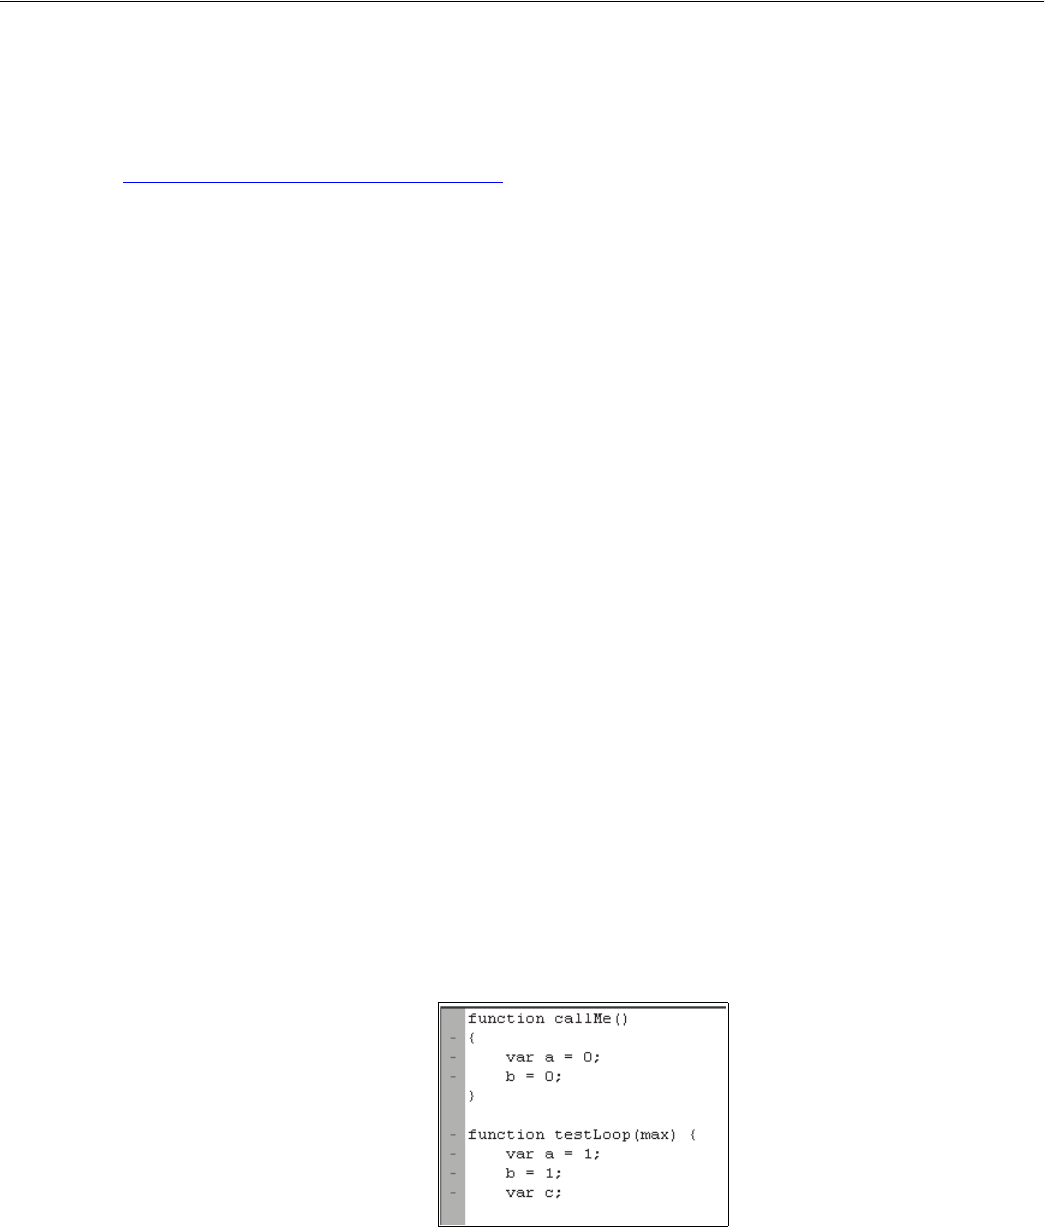
Adobe Acrobat SDK Tools
Developing Acrobat Applications Using JavaScript Inspect details window 37
Breakpoints
The Breakpoints option in the Inspect drop-down list enables you to manage program breakpoints, which
in turn make it possible to inspect the values of local variables once execution is halted. A breakpoint may
be defined so that execution halts at a given line of code, and conditions may be associated with them (see
“Using conditional breakpoints” on page 38).
When a breakpoint is reached, JavaScript execution halts and the debugger displays the current line of
code.
To add a breakpoint, click on the gray strip to the left of the code in the script view, which causes a red dot
to appear. The lines at which breakpoints are permitted have small horizontal lines immediately to their
left in the gray strip.
To remove the breakpoint, click on the red dot, which subsequently disappears.
Coding styles and breakpoints
Placement of the left curly brace ({) in a function definition is a matter of style.
Style 1: Place the left curly brace on the same line as the function name, for example,
function callMe() { // curly brace on same line as function name
var a = 0;
}
Style 2: Place the left curly brace on a separate line, for example
function callMe()
{ // curly brace is on a separate line
var a = 0;
}
If you would like to set a breakpoint at the function heading, use Style 1. Note that the JavaScript
Debugger does not set a breakpoint at the function heading for Style 2. It is only possible to set a
breakpoint from the line of code containing the left curly brace. This is illustrated in the graphic below. It is
possible to set the breakpoint on the line below the function heading for callMe and on the line
containing the function heading for testLoop. Setting a breakpoint at a function heading causes
execution to stop at the first statement within the function.
Setting a breakpoint at a function heading

Adobe Acrobat SDK Tools
Developing Acrobat Applications Using JavaScript Starting the Debugger 38
Listing breakpoints
To view the list of all breakpoints set for the debugging session, select the Breakpoints option from the
Inspect drop-down list. You can edit and delete breakpoints using the button controls just beneath the
Inspect details window, as shown in the graphic “Inspect details window button controls” on page 35.
Using conditional breakpoints
A conditional breakpoint causes the interpreter to stop the program and activate the Debugger only when
a specified condition is true. Conditional breakpoints are useful for stopping execution when conditions
warrant doing so, and streamline the debugging process by eliminating needless stepwise execution. For
example, if you are only interested in debugging after 100 iterations in a loop, you can set a breakpoint
that only becomes active when the looping index reaches the value of 100.
The condition is a JavaScript expression. If the expression evaluates to true, the interpreter stops the
program at the breakpoint. Otherwise, the interpreter does not stop the program. An unconditional
breakpoint, the default, always causes the interpreter to stop the program and to activate the Debugger
when it reaches the breakpoint, because its condition is always set to true.
➤To change a breakpoint condition:
1. Select Breakpoint from the Inspect drop-down list
2. Click Edit. A dialog box appears, prompting you to change the breakpoint condition
Starting the Debugger
There are four ways to invoke the JavaScript Debugger. Two of these ways begin the debugging session
from the start of execution, and the other two begin the session from a specified line of code.
Debugging from the start of execution
There are two ways to start the Debugger from the start of execution. In either case, use the Step Into
button, described on page 33, to proceed with the debugging session.
The first method is to choose Advanced > Document Processing and, if the option is not already checked,
click on Debug From Start.
This option causes the debugging session to begin at the start of execution of any new script.
Note: Debug From Start does not turn off automatically. Be sure to turn off this option when you have
finished debugging, otherwise it continues to stop on every new script you execute in Acrobat.
The second method uses the Interrupt button. Open the Debugger window and click the Interrupt button
(page 32), which displays in red. At this point, performing any action that runs a script causes execution to
stop at the beginning of the script.
Unlike Debug From Start, the Interrupt button is automatically deactivated after being used. To stop at the
beginning of a new script, you must reactivate it by clicking it again.

Adobe Acrobat SDK Tools
Developing Acrobat Applications Using JavaScript Final notes 39
Debugging from an arbitrary point in the script
To start debugging from a specific point in your script, you can set a breakpoint. For more information, see
“Breakpoints” on page 37.
An alternate approach is to insert the debugger keyword in any line of your code to stop execution and
enter the Debugger when that particular line is reached.
Note: Breakpoints created using the debugger keyword are not listed in the Inspect details window
when you select Breakpoints from the Inspect drop-down list.
Final notes
There are limitations to debugging scripts in Acrobat from inside a browser, because not all scripts
contained in a PDF file may be available if the PDF file has not been completely downloaded.
Debugging is not possible if a modal dialog box is running. This may occur when debugging a batch
sequence. If a modal dialog box is running during a debugging session and the program stops responding,
press the Esc key.
Debugging scripts with an event initiated by either the app.setInterval or app.setTimeOut
method may trigger the appearance of a series of recurring alert messages. If this occurs, press the Esc key
after the modal dialog box has exited.

40
3JavaScript Contexts in Acrobat
JavaScript for Acrobat can be placed in a variety of locations, both external to the document, and within
the document. This chapter discusses how to determine the appropriate location for a script, and how to
create and access the scripts.
Topic Description See
The concept of a JavaScript event A brief description of an event and how they are
triggered.
page 40
About contexts Discusses the placement of scripts at the folder,
document, page, field and batch levels.
page 41
Privileged versus non-privileged
context
A discussion of the execution of methods in a
privileged context, and how to work around these
security restrictions.
page 45
The concept of a JavaScript event
All scripts are executed in response to a particular event. There are several types of events:
●App
When the Viewer is started, the Application Initialization Event occurs. Script files, called Folder Level
JavaScripts, are read in from the application and user JavaScript folders. See “Folder level” on page 42
for additional details.
●Batch
A batch event occurs during the processing of each document of a batch sequence.
●Bookmark
This event occurs whenever a user clicks on a bookmark that executes a script.
●Console
A console event occurs whenever a user evaluates a script in the console. See “Executing JavaScript” on
page 22.
●Doc
This event is triggered whenever a document level event occurs. For more information, see “Document
level” on page 43.
●External
This event is the result of an external access, for example, through OLE, AppleScript, or loading an FDF
●field
This event is triggered when the user interacts with an Acrobat form, see “Field level” on page 44 for
more information.
●Link
This event is triggered when a link containing a JavaScript action is activated by the user.
●Menu
A menu event occurs whenever JavaScript that has been attached to a menu item is executed. In
Acrobat 5.0 and later, the user can add a menu item and associate JavaScript actions with it.

Adobe Acrobat SDK JavaScript Contexts in Acrobat
Developing Acrobat Applications Using JavaScript About contexts 41
●Page
This event is triggered when the user changes pages in the document. See “Page level” on page 43 for
more information.
●Screen
This event is triggered when the user interacts with a multimedia screen annotation.
These types of events may be initiated, or triggered, in a number of different ways, for example, in
response to a mouse up, a mouse down, a keystroke, on focus, or on blur. These are referred to by the
JavaScript for Acrobat API Reference as the event names. Event types and names appear in pairs. For
example, if an action is initiated by clicking a button, this would generate a Field type event, triggered by a
mouse up event; consequently, we refer to such an event as a field/mouse up event.
The table that follows lists all event type/name combinations.
Event type/name combinations
Event type Event names
App Init
Batch Exec
Bookmark Mouse Up
Console Exec
Doc DidPrint, DidSave, Open, WillClose, WillPrint, WillSave
External Exec
Field Blur, Calculate, Focus, Format, Keystroke, Mouse Down,
Mouse Enter, Mouse Exit, Mouse Up, Validate
Link Mouse Up
Menu Exec
Page Open, Close
Screen InView, OutView, Open, Close, Focus, Blur, Mouse Up,
Mouse Down, Mouse Enter, Mouse Exit
An event manifests itself in JavaScript as an Event object. Complete documentation for the different event
types of events and the ways in which they can be triggered can be found in the description of the Event
object in the JavaScript for Acrobat API Reference.
About contexts
JavaScript for Acrobat can be placed at a variety of levels:
●Folder level
Scripts placed here respond to App type events.
●Document level
Scripts placed here respond to Doc type events.
●Page level
Scripts placed here respond to Page type events.

Adobe Acrobat SDK JavaScript Contexts in Acrobat
Developing Acrobat Applications Using JavaScript Folder level 42
●Field level
Scripts placed here respond to Field type events.
●Batch level
Scripts are placed here respond to Batch type events.
Each of these levels represents a context, or location, in which processing occurs. The list above is by no
means a complete list of locations at which scripts can be placed.
The placement of a script at a given level determines its reusability. Folder level scripts are available within
all documents, document level scripts are available to all form fields within a given document, field level
scripts are visible to the form fields with which they are associated.
Note: For instructions on how to disallow changes to scripts or hide scripts, see “Disallowing changes in
scripts” on page 182 and “Hiding scripts” on page 182.
Folder level
Folder level scripts contain variable declarations and function definitions that may be generally useful to
Acrobat, and are visible from all documents. Top level scripts, ones that are not contained in a function
definition, are executed when the application is initialized.
There are two kinds of folder level scripts: App and User. For example, if you would like to add specialized
menus and menu items to be available to all documents opened in Acrobat, you can store the code at the
folder level.
Folder level scripts are placed in separate files that have the .js extension. App folder level scripts are
stored in the Acrobat application’s JavaScripts folder, and user folder level scripts are stored in the
user’s JavaScripts folder. These scripts are loaded when Acrobat starts execution, and are associated
with the event object’s Application Initialization (App/Init) event.
Note: The locations of these folders can be found by executing the following lines in the JavaScript
Debugger Console:
// for App folder scripts
app.getPath("app", "javascript");
// for User folder scripts
app.getPath("user", "javascript");
When Acrobat is installed on your machine, it provides you with several standard folder level JavaScript
files, including JSByteCodeWin.bin (this file is a pre-compiled script that supports the forms and
annotation plug-ins) and debugger.js; these are in the App folder. Other JavaScript files in the App
folder may be installed by third-party Acrobat plug-in developers.
The user folder may contain the files glob.js and config.js. The glob.js file is programmatically
generated and contains cross-session global variables set using the global object’s setPersistent
method. The config.js file is used to set user preferences or to customize the viewer UI by adding
toolbar buttons or menu items. (See “Adding toolbar buttons and menu items” on page 135 for more
information on this topic.) Any file with an extension of .js found in the user folder is also loaded by
Acrobat during initialization, after it has loaded the files found in the App folder, and after it has loaded the
config.js and global.js files.
To create folder level scripts, use an external editor running in parallel to Acrobat. Note that the external
editor cannot be invoked from Acrobat for folder level scripts.

Adobe Acrobat SDK JavaScript Contexts in Acrobat
Developing Acrobat Applications Using JavaScript Document level 43
Document level
Document level scripts are variable and function definitions that are generally useful to a given document,
but are not applicable outside the document.
●Variable definitions: Define variables at the document level to make them visible to any executing
script. For example,
var defaultUserColor = "red";
The variable defined above, which has an initial value of "red", may be changed as the user
interacts with the document.
●Function definitions: Define functions at the document level that support the user interaction with
the document. These functions may be utility functions for handling common tasks for string or
number manipulation, or functions that execute lengthy scripts called by actions initiated by a user
interacting with Acrobat form fields, bookmarks, page changes, and so on.
To create or access document level scripts in Acrobat, select Advanced > Document Processing >
Document JavaScript, which enables you to add, modify, or delete document level scripts. Document level
scripts are executed after the document has opened, but before the first Page Open event (See “Page
level” on page 43). They are stored within the PDF document.
You can also create Doc level scripts programmatically using the addScript method of the Doc object.
In addition to document level scripts, there are document action scripts that execute when certain
document events occur. Such document events are
●Document Will Close
This event is triggered before the document is closed.
●Document Will Save
This event is triggered before the document is saved.
●Document Did Save
This event is triggered after the document is saved.
●Document Will Print
This event is triggered, before the document is printed.
●Document Did Print
This event is triggered after the document is closed.
To access the JavaScript Editor for each of these document actions, select Advanced > Document
Processing > Set Document Action.
You can also create the document actions just described programmatically using the setAction method
of the Doc object.
Page level
Page level scripts are scripts that are executed when a particular page is either closed or opened.
●Page Open
This event is triggered whenever a new page is viewed and after the drawing of the page has occurred.
●Page Close
This event is triggered whenever the page being viewed is no longer the current page; that is, the user
switched to a new page or closed the document. Page Close will occur before the Document Will Close
event.

Adobe Acrobat SDK JavaScript Contexts in Acrobat
Developing Acrobat Applications Using JavaScript Field level 44
➤To create a page level script:
1. Click the Pages tab.
2. Right-click a thumbnail and select Page Properties.
3. Select the Actions tab from the Page Properties dialog box.
4. In the Select Trigger list, choose either Page Open or Page Close.
5. In the Select Action list, choose Run a JavaScript.
6. Click Add to open the JavaScript editor.
➤To access or delete a page level script:
1. Click the Pages tab.
2. Select the page by clicking the page thumbnail.
3. Right-click a thumbnail and select Page Properties.
4. Select the Actions tab from the Page Properties dialog box.
5. Select any of the actions listed in the Actions list.
6. Click Edit or Delete.
Other actions, as listed in the Select Action Menu of the Page Properties dialog box, can be created,
accessed and deleted in the same way.
Page level scripts can also be created programmatically using the setPageAction method of the Doc
object.
Field level
Field level scripts are associated or attached to an Acrobat form field. Field events occur as the user
interacts with the field, either directly or indirectly. Field scripts are typically executed to validate, format,
or calculate form field values. Like document level scripts, field level scripts are stored within the PDF
document.
There are several ways to create or edit field level scripts. The most straightforward manner is to right-click
the form field, select the Properties context menu item and choose the Actions tab. Choose Run a
JavaScript for Select Action and choose how to trigger the script from the Select Trigger Menu.
Field level scripts can also be created programmatically using the setAction method of the Field object.
Batch level
A batch level script is a script that can be applied to a collection of documents, and operates at the
application level. For example, you can define a batch script to print a series of documents or apply
security restrictions to them.
To create or edit a batch level script in Acrobat, select Advanced > Document Processing > Batch
Processing. The document Batch Sequences, available from the Acrobat Family Developer Center, is a
complete tutorial on how to write batch sequences using JavaScript.

Adobe Acrobat SDK JavaScript Contexts in Acrobat
Developing Acrobat Applications Using JavaScript Privileged versus non-privileged context 45
Privileged versus non-privileged context
Some JavaScript methods have security restrictions. These methods can be executed only in a privileged
context, which includes console, batch, and application initialization events. All other events (for example,
page open and mouse-up events) are considered non-privileged. In the JavaScript for Acrobat API Reference,
methods with security restrictions are marked by an
S
in the third column of the quick bar.
The description of each security-restricted method indicates the events during which the method can be
executed.
Beginning with Acrobat 6.0, security-restricted methods can execute in a non-privileged context if the
document is certified by the document author for embedded JavaScript.
Security-restricted methods can also execute in a non-privileged context through the use of a trusted
function (introduced in Acrobat 7.0).
In Acrobat versions earlier than 7.0, menu events were considered privileged contexts. Beginning with
Acrobat 7.0, execution of JavaScript through a menu event is no longer privileged. You can execute
security-restricted methods through menu events in one of the following ways:
●By enabling the preferences item named Enable Menu Items JavaScript Execution Privileges.
●By executing a specific method through a trusted function (introduced in Acrobat 7.0). Trusted
functions allow privileged code—code that normally requires a privileged context to execute—to
execute in a non-privileged context. For details and examples, see documentation of the
app.trustedFunction method in the JavaScript for Acrobat API Reference.
Executing privileged methods in a non-privileged context
To illustrate the techniques required, let’s work with a specific method, app.browseForFile. According
to the JavaScript for Acrobat API Reference, this method can only be executed during batch or console
events. This means that we are free to executed this method in the console, or to use it as a part of a batch
sequence. (See the Batch Sequences document, available from the Acrobat Family Developer Center, for a
detailed discussion of the Execute JavaScript command option.)
What happens when we execute this method in a non-privileged context? Create an Acrobat form button,
and attach the following script as a mouse up JavaScript action.
var oRetn = app.browseForDoc({bSave: true});
After clicking the button, an exception is thrown; the console displays the following message:
NotAllowedError: Security settings prevent access to this property or method.
app.browseForDoc:1:Field Button1:Mouse Up
This shows that we have violated the documented security restriction.
If we really want this method in our workflow what do we need to do? We need to move this method to
folder JavaScript and declare it as a trusted function. Why move it to the folder context? Because you can
only declare a function trusted from a folder (console or batch) context.

Adobe Acrobat SDK JavaScript Contexts in Acrobat
Developing Acrobat Applications Using JavaScript Executing privileged methods in a non-privileged context 46
Navigate to the user JavaScript folder and open the file config.js in your text editor. Paste the following
script into config.js:
myTrustedBrowseForDoc = app.trustedFunction( function ( oArgs )
{
app.beginPriv();
var myTrustedRetn = app.browseForDoc( oArgs );
app.endPriv();
return myTrustedRetn;
});
For the syntax details of app.trustedFunction, see the JavaScript for Acrobat API Reference. Note that
the privileged script must be enclosed by the app.beginPriv and app.endPriv pair.
Save the file and restart Acrobat (folder JavaScript is read only at startup).
Now create a PDF with a single button on it. The script for that button is
try {
var oRetn = myTrustedBrowseForDoc({bSave: true});
console.println(oRetn.toSource());
} catch(e) {
console.println("User cancelled Save As dialog box");
}
Clicking the button now executes the app.browseForDoc method without throwing the security
exception.
Here is another, more complex, example.
Example 3.1 Executing privileged methods
In this example, we use the app.browseForDoc and the Doc.saveAs methods, both of which have
security restrictions.
In config.js, paste both the myTrustedBrowseForDoc script listed above, and paste this script:
myTrustedSaveAs = app.trustedFunction( function ( doc, oArgs )
{
app.beginPriv();
var myTrustedRetn = doc.saveAs( oArgs );
app.endPriv();
return myTrustedRetn;
});
Note that the Doc object is passed to this trusted function. Now, revise the button described above to read
as follows:
try {
var oRetn = myTrustedBrowseForDoc({bSave: true});
try {
myTrustedSaveAs(this, { cPath: oRetn.cPath, cFS:oRetn.cFS });
} catch(e) { console.println("Save not allowed, perhaps readonly."); }
} catch(e) { console.println("User cancelled Save As dialog box");}
Now, the PDF document, through a mouse up button action, can open a Save As dialog box and save the
current document.

Adobe Acrobat SDK JavaScript Contexts in Acrobat
Developing Acrobat Applications Using JavaScript Executing privileged methods through the menu 47
Executing privileged methods through the menu
In versions of Acrobat previous to 7.0, executing JavaScript through a menu was non-privileged. This is no
longer the case. To execute privileged JavaScript through a menu event there are now two choices:
1. Ask the user to enable the Enable Menu Items JavaScript Execution Privileges option, in the JavaScript
section of the Preferences.
2. Use the trusted function approach discussed above.
In this section we discuss the first alternative.
Open config.js, found in the user’s JavaScript folder, and paste the following script:
app.addSubMenu({ cName: "New", cParent: "File", nPos: 0 })
app.addMenuItem({ cName: "Letter", cParent: "New", cExec: "app.newDoc();"});
app.addMenuItem({ cName: "A4", cParent: "New", cExec: "app.newDoc(420,595)"});
As usual, restart Acrobat so that the config.js file is read. Under the File menu, there is now a menu item
named New, with a sub menu with two items, Letter and A4.
With the Enable Menu Items JavaScript Execution Privileges option not enabled, upon the execution of
one of these menu items, either File > New > Letter or File > New > A4 are executed, an alert box appears
declaring that “An internal error occurred”, and the console shows the following error message:
1:Menu Letter:Exec
NotAllowedError: Security settings prevent access to this property or method.
app.newDoc:1:Menu Letter:Exec
The problem is app.newDoc, a method that has a security restriction.
Now enable the Enable Menu Items JavaScript Execution Privileges option and execute the same menu
item again, a new document is created, the menu operates as designed.
The above discussion shows what happens when you try to executed a privileged method through the
menu system and how to work around the restrictions on privileged methods by enabling the Enable
Menu Items JavaScript Execution Privileges option of the JavaScript section of the Preferences.
A note of caution. An Acrobat developer, cannot assume the user has enabled the JavaScript execution
privileges options; indeed, in a corporate setting, enabling this option may not be allowed for security
reasons. An Acrobat developer using JavaScript should perhaps use the trusted function approach, as
discussed in “Executing privileged methods in a non-privileged context” on page 45, which necessarily
implies the installation of folder JavaScript on the user’s system.

Adobe Acrobat SDK JavaScript Contexts in Acrobat
Developing Acrobat Applications Using JavaScript Executing privileged methods in a certified document 48
Executing privileged methods in a certified document
Many of the JavaScript methods in Acrobat are restricted for security reasons, and their execution is only
allowed during batch, console or menu events. This restriction is a limitation when enterprise customers
try to develop solutions that require these methods and know that their environment is secure.
Three requirements must be met to make restricted JavaScript methods available to users.
●You must obtain a digital ID.
●You must sign the PDF document containing the restricted JavaScript methods using the digital ID.
For details on where you can obtain digital IDs and the procedures for using them to sign documents,
see Acrobat Help.
●The recipient should trust the signer for certified documents and JavaScript.
For details, see Acrobat Help.
All trusted certificates can be accessed by selecting Certificates from Advanced > Manage Trusted
Identities in the Acrobat main menu.
49
4Creating and Modifying PDF Documents
This chapter provides a detailed overview of how to apply JavaScript in order to dynamically create PDF
files, modify them, and convert PDF files to XML format.
Topic Description See
Creating and modifying PDF files Discusses methods for reading a document using
JavaScript and surveys methods for modifying the
document, by adding fields, links and even
content.
page 49
Combining PDF documents Combine multiple PDF documents. page 51
Combining and extracting files Combine multiple documents that are not
necessarily PDF files.
page 51
Creating file attachments Programmatically attach a file to a PDF document.
This includes examples of communicating with
the attachments, and extracting data from and
writing to the attachments.
page 52
Cropping and rotating pages Covers methods for cropping and rotating pages. page 55
Extracting, moving, deleting, replacing,
and copying pages
Techniques and methods for manipulating pages. page 56
Adding watermarks and backgrounds Applying watermarks and backgounds using
JavaScript methods.
page 58
Converting PDF documents to XML
format
Use the saveAs method of the Doc object to
convert a document to XML format.
page 59
Creating and modifying PDF files
The Acrobat extensions to JavaScript provide support for dynamic PDF file creation and content
generation. This means that it is possible to dynamically create a new PDF file and modify its contents in an
automated fashion. This can help make a document responsive to user input and can enhance the
workflow.
To create a new PDF file, invoke the newDoc method of the app object, as shown in the example below:
var myDoc = app.newDoc();
This statement creates a blank PDF document and is used primarily for testing purposes.

Adobe Acrobat SDK Creating and Modifying PDF Documents
Developing Acrobat Applications Using JavaScript Creating and modifying PDF files 50
Once this statement has been executed from the console, you can manipulate the page by invoking
methods contained within the Doc object, as indicated in the following table. Details of these methods are
found in the JavaScript for Acrobat API Reference.
JavaScript for manipulating a PDF document
Content Object Methods
page Doc newPage, insertPages, replacePages
page template spawn
annot Doc addAnnot
field Doc addField
icon Doc addIcon
link Doc addLink
document-level
JavaScript
Doc addScript
thumbnails Doc addThumbnails
bookmark Doc.bookmarkRoot createChild, insertChild
web link Doc addWebLinks
template Doc createTemplate
The Doc.newDoc() method cannot write text content to the newly created document. To do that, you
need to use the Report object.
Example 4.1 Creating a document with content
The following example creates a PDF document, sets the font size, sets the color to blue, and writes a
standard string to the document using the writeText method of the Report object. Finally, it opens the
document in the viewer. See the JavaScript for Acrobat API Reference for details of this object, its properties
and methods and for additional examples.
var rep = new Report();
rep.size = 1.2;
rep.color = color.blue;
rep.writeText("Hello World!");
rep.open("My Report");
The Report object has many useful applications. With it, for example, you can create a document that
reports back a list of all form fields in the document, along with their types and values; another application
is to summarize all comments in a document. The JavaScript for Acrobat API Reference has an example of
the latter application in the Report object section.

Adobe Acrobat SDK Creating and Modifying PDF Documents
Developing Acrobat Applications Using JavaScript Combining PDF documents 51
Combining PDF documents
You can customize and automate the process of combining PDF documents.
If you would like to combine multiple PDF files into a single PDF document, you can do so through a series
of calls to the Doc object’s insertPages method.
Example 4.2 Creating a new document from two other documents
// Create a new PDF document:
var newDoc = app.newDoc();
// Insert doc1.pdf:
newDoc.insertPages({
nPage: -1,
cPath: "/c/temp/doc1.pdf",
});
// Insert doc2.pdf:
newDoc.insertPages({
nPage: newDoc.numPages-1,
cPath: "/c/temp/doc2.pdf",
});
// Save the new document:
newDoc.saveAs({
cPath: "/c/temp/myNewDoc.pdf";
});
// Close the new document without notifying the user:
newDoc.closeDoc(true);
Combining and extracting files
It is possible to combine several PDF files using the Doc.insertPages() method.
Example 4.3 Combining several PDF files
In this example, a document is opened with an absolute path reference, then other PDF files in the same
folder are appended to the end of the document. For convenience, the files that are appended are placed
in an array for easy execution and generalization.
var doc = app.openDoc({
cPath: "/C/temp/doc1.pdf"
})
aFiles = new Array("doc2.pdf","doc3.pdf");
for ( var i=0; i < aFiles.length; i++) {
doc.insertPages ({
nPage: doc.numPages-1,
cPath: aFiles[i],
nStart: 0
});
}

Adobe Acrobat SDK Creating and Modifying PDF Documents
Developing Acrobat Applications Using JavaScript Creating file attachments 52
Another problem is to combine several files of possibly different file types. In recent versions of Acrobat,
the notion of a binder was introduced. There is a nice UI for combining files of different formats. How do
you do it programmatically?
Example 4.4 Combining several files of different formats
In this example, an initial PDF file is opened, and all other files are appended to it.
doc = app.openDoc({ cPath: "/C/temp/doc1.pdf" })
// List of files of different extensions
aFiles = new Array( "doc2.eps", "doc3.jpg", "doc4.pdf");
for ( var i=0; i < aFiles.length; i++) {
// Open and convert the document
newDoc = app.openDoc({
oDoc: doc,
cPath: aFiles[i],
bUseConv: true
})
// Save the new PDF file to a temp folder
newDoc.saveAs({ cPath: "/c/temp/tmpDoc.pdf" });
// Close it without notice
newDoc.closeDoc(true);
// Now insert that PDF file just saved to the end of the first document
doc.insertPages ({
nPage: doc.numPages-1,
cPath: "/c/temp/tmpDoc.pdf",
nStart: 0
});
}
You can also programmatically extract pages and save them to a folder.
Example 4.5 Extracting and saving pages
Suppose the current document consists of a sequence of invoices, each of which occupies one page. The
following code creates separate PDF files, one for each invoice:
var filename = "invoice";
for (var i = 0; i < this.numPages; i++)
this.extractPages({
nStart: i,
cPath : filename + i + ".pdf"
});
Creating file attachments
Another way you can “combine files” is by attaching one or more files to your PDF document. This is useful
for packaging a collection of documents and send them together by emailing the PDF file. This section
describes the basic object, properties and methods of attaching and manipulating attachments.

Adobe Acrobat SDK Creating and Modifying PDF Documents
Developing Acrobat Applications Using JavaScript Creating file attachments 53
These are the objects, properties and methods relevant to file attachments.
Name Description
Doc.createDataObject() Creates a file attachment.
Doc.dataObjects Returns an array of Data objects
representing all files attached to the
document.
Doc.exportDataObject() Saves the file attachment to the local file
system
Doc.getDataObject() Acquires the Data object of a particular
attachment.
Doc.importDataObject() Attaches a file to the document.
Doc.removeDataObject() Removes a file attachment from the
document.
Doc.openDataObject() Returns the Doc object for an attached
PDF file.
Doc.getDataObjectContents() Allows access to the contents of the file
attachment associated with a Data
object.
Doc.setDataObjectContents() Rights to the file attachment.
util.streamFromString() Converts a stream from a string
util.stringFromStream() Converts a string from a stream.
Example 4.6 Saving form data to and reading form data from an attachment
This example takes the response given in a text field of this document and appends it to an attached
document. (Perhaps this document is circulating by email, and the user can add in their comments
through a multiline text field.) This example uses four of the methods listed above.
var v = this.getField("myTextField").value;
// Get the contents of the file attachment with the name "MyNotes.txt"
var oFile = this.getDataObjectContents("MyNotes.txt");
// Convert the returned stream to a string
var cFile = util.stringFromStream(oFile, "utf-8");
// Append new data at the end of the string
cFile += "\r\n" + v;
// Convert back to a stream
oFile = util.streamFromString( cFile, "utf-8");
// Overwrite the old attachment
this.setDataObjectContents("MyNotes.txt", oFile);
// Read the contents of the file attachment to a multiline text field
var oFile = this.getDataObjectContents("MyNotes.txt");
var cFile = util.stringFromStream(oFile, "utf-8");
this.getField("myTextField").value = cFile;

Adobe Acrobat SDK Creating and Modifying PDF Documents
Developing Acrobat Applications Using JavaScript Creating file attachments 54
Beginning with Acrobat 8, the JavaScript interpreter includes E4X, the ECMA-357 Standard that provides
native support of XML in JavaScript. See the document ECMAScript for XML (E4X) Specification for the
complete specification of E4X. The next example illustrates the use of E4X and file attachments.
Example 4.7 Accessing an XML attachment using E4X
The following script describes a simple database system. The database is an XML document attached to
the PDF file. The user enters the employee ID into a text field, the JavaScript accesses the attachment, finds
the employee’s record and displays the contents of the retrieved record in form fields.
We have a PDF file, employee.pdf, with three form fields, whose names are employee.id,
employee.name.first and employee.name.last. Attached to the PDF file is an XML document
created by the following script:
// Some E4X code to create a database of info
x = <employees/>;
function popXML(x,id,fname,lname)
{
y = <a/>;
y.employee.@id = id;
y.employee.name.first = fname;
y.employee.name.last = lname;
x.employee += y.employee;
}
popXML(x,"334234", "John", "Public");
popXML(x,"324234", "Jane", "Doe");
popXML(x,"452342", "Davey", "Jones");
popXML(x,"634583", "Tom", "Jefferson");
Copy and paste this code into the console and execute it. You’ll see the XML document as the output of
this script. The output was copied and pasted into a document named employee.xml, and saved to the
same folder as employee.pdf.
You can attach employee.xml using the UI, but the script for doing so is as follows:
var thisPath = this.path.replace(/\.pdf$/, ".xml");
try { this.importDataObject("employees", thisPath); }
catch(e) { console.println(e) };
Of the three form fields in the document employee.pdf, only employee.id has any script. The
following is a custom keystroke script:
if (event.willCommit) {
try {
// Get the data contents of the "employees" attachment
var oDB = this.getDataObjectContents("employees");
// Convert to a string
var cDB = util.stringFromStream(oDB);
// Use the eval method to evaluate the string, you get an XML variable
var employees = eval(cDB);
// Retrieve record with the id input in the employee.id field
var record = employees.employee.(@id == event.value);
// If the record is an empty string, or there was nothing entered...
if ( event.value != "" && record.toString() == "" ) {
app.alert("Record not found");
event.rc = false;
}

Adobe Acrobat SDK Creating and Modifying PDF Documents
Developing Acrobat Applications Using JavaScript Cropping and rotating pages 55
// Populate the two other fields
this.getField("employee.name.first").value = record.name.first;
this.getField("employee.name.last").value = record.name.last;
} catch(e) {
app.alert("The DB is not attached to this document!");
event.rc = false;
}
}
Cropping and rotating pages
In this section we discuss the JavaScript API for cropping and rotating a page.
Cropping pages
The Doc object provides methods for setting and retrieving the page layout dimensions. These are the
setPageBoxes and getPageBox methods. There are five types of boxes available:
●Art
●Bleed
●Crop
●Media
●Trim
See Section 10.10.1 of the PDF Reference version 1.7 for a discussion of these types of boxes.
The setPageBoxes method accepts the following parameters:
cBox — the type of box
nStart — the zero-based index of the beginning page
nEnd — the zero-based index of the last page
rBox — the rectangle in rotated user space
For example, the following code crops pages 2-5 of the document to a 400 by 500 pixel area:
this.setPageBoxes({
cBox: "Crop",
nStart: 2,
nEnd: 5,
rBox: [100,100,500,600]
});
The getPageBox method accepts the following parameters:
cBox — the type of box
nPage — the zero-based index of the page
For example, the following code retrieves the crop box for page 3:
var rect = this.getPageBox("Crop", 3);

Adobe Acrobat SDK Creating and Modifying PDF Documents
Developing Acrobat Applications Using JavaScript Extracting, moving, deleting, replacing, and copying pages 56
Rotating pages
You can use JavaScript to rotate pages in 90-degree increments in the clockwise direction relative to the
normal position. This means that if you specify a 90-degree rotation, no matter what the current
orientation is, the upper portion of the page is placed on the right side of your screen.
The Doc object’s setPageRotations and getPageRotation methods are used to set and retrieve
page rotations.
The setPageRotations method accepts three parameters:
nStart — the zero-based index of the beginning page
nEnd — the zero-based index of the last page
nRotate — 0, 90, 180, or 270 are the possible values for the clockwise rotation
In the following example, pages 2 and 5 are rotated 90 degrees in the clockwise direction:
this.setPageRotations(2,5,90);
To retrieve the rotation for a given page, invoke the Doc object getPageRotation method, which
requires only the page number as a parameter. The following code retrieves and displays the rotation in
degrees for page 3 of the document:
var rotation = this.getPageRotation(3);
console.println("Page 3 is rotated " + rotation + " degrees.");
Extracting, moving, deleting, replacing, and copying pages
The Doc object, in combination with the app object, can be used to extract pages from one document and
place them in another, and moving or copying pages within or between documents.
The app object an be used to create or open any document. To create a new document, invoke its newDoc
method, and to open an existing document, invoke its openDoc method.
The Doc object offers three useful methods for handling pages:
insertPages — Inserts pages from the source document into the current document
deletePages — Deletes pages from the document
replacePages — Replaces pages in the current document with pages from the source document.
These methods enable you to customize the page content within and between documents.
Suppose you would like to remove pages within a document. Invoke the Doc object’s deletePages
method, which accepts two parameters:
nStart — the zero-based index of the beginning page
nEnd — the zero-based index of the last page
For example, the following code deletes pages 2 through 5 of the current document:
this.deletePages({nStart: 2, nEnd: 5});

Adobe Acrobat SDK Creating and Modifying PDF Documents
Developing Acrobat Applications Using JavaScript Extracting, moving, deleting, replacing, and copying pages 57
Suppose you would like to copy pages from one document to another. Invoke the Doc object
insertPages method, which accepts four parameters:
nPage — the zero-based index of the page after which to insert the new pages
cPath — the device-independent path of the source file
nStart — the zero-based index of the beginning page
nEnd — the zero-based index of the last page
For example, the following code inserts pages 2 through 5 from mySource.pdf at the beginning of the
current document:
this.insertPages({
nPage: -1,
cPath: "/C/temp/mySource.pdf",
nStart: 2,
nEnd: 5
});
You can combine these operations to extract pages from one document and move them to another (they
will be deleted from the first document). The following code will extract pages 2 through 5 in
mySource.pdf and move them into myTarget.pdf:
// The operator, this, represents myTarget.pdf
// First copy the pages from the source to the target document
this.insertPages({
nPage: -1,
cPath: "/C/temp/mySource.pdf",
nStart: 2,
nEnd: 5
});
// Now delete the pages from the source document
var source = app.openDoc({cPath:"/C/temp/mySource.pdf"});
source.deletePages({nStart: 2, nEnd: 5});
To replace pages in one document with pages from another document, invoke the target document’s
replacePages method, which accepts four parameters:
nPage — The zero-based index of the page at which to start replacing pages
cPath — The device-independent pathname of the source file
nStart — The zero-based index of the beginning page
nEnd — The zero-based index of the last page
In the following example, pages 2 through 5 from mySource.pdf replace pages 30 through 33 of
myTarget.pdf:
// This represents myTarget.pdf
this.replacePages({
nPage: 30,
cPath: "/C/temp/mySource.pdf",
nStart: 2,
nEnd: 5
});

Adobe Acrobat SDK Creating and Modifying PDF Documents
Developing Acrobat Applications Using JavaScript Adding watermarks and backgrounds 58
To safely move pages within the same document, it is advisable to perform the following sequence:
1. Copy the source pages to a temporary file.
2. Insert the pages in the temporary file at the new location in the original document.
3. Delete the source pages from the original document.
The following example moves pages 2 through 5 to follow page 30 in the document:
// First create the temporary document:
var tempDoc = app.newDoc("/C/temp/temp.pdf");
// Copy pages 2 to 5 into the temporary file
tempDoc.insertPages({
cPath: "/C/temp/mySource.pdf",
nStart: 2,
nEnd: 5
});
// Copy all of the temporary file pages back into the original:
this.insertPages({
nPage: 30,
cPath: "/C/temp/temp.pdf"
});
// Now delete pages 2 to 5 from the source document
this.deletePages({nStart: 2, nEnd: 5});
Adding watermarks and backgrounds
The Doc object addWatermarkFromText and addWatermarkFromFile methods create watermarks
within a document, and place them in optional content groups (OCGs).
The addWatermarkFromFile method adds a page as a watermark to the specified pages in the
document. The example below adds the first page of watermark.pdf as a watermark to the center of all
pages within the current document:
this.addWatermarkFromFile("/C/temp/watermark.pdf");
In the next example, the addWatermarkFromFile method is used to add the second page of
watermark.pdf as a watermark to the first 10 pages of the current document. It is rotated
counterclockwise by 45 degrees, and positioned one inch down and two inches over from the top left
corner of each page:
this.addWatermarkFromFile({
cDIPath: "/C/temp/watermark.pdf",
nSourcePage: 1,
nEnd: 9,
nHorizAlign: 0,
nVertAlign: 0,
nHorizValue: 144,
nVertValue: -72,
nRotation: 45
});

Adobe Acrobat SDK Creating and Modifying PDF Documents
Developing Acrobat Applications Using JavaScript Converting PDF documents to XML format 59
It is also possible to use the addWatermarkFromText method to create watermarks. In this next
example, the word Confidential is placed in the center of all the pages of the document, and its font
helps it stand out:
this.addWatermarkFromText(
"Confidential",
0,
font.Helv,
24,
color.red
);
Converting PDF documents to XML format
Since XML is often the basis for information exchange within web services and enterprise infrastructures, it
may often be useful to convert your PDF documents into XML format.
It is a straightforward process to do this using the Doc object saveAs method, which not only performs
the conversion to XML, but also to a number of other formats.
In order to convert your PDF document to a given format, you will need to determine the
device-independent path to which you will save your file, and the conversion ID used to save in the desired
format. A list of conversion IDs for all formats is provided in the JavaScript for Acrobat API Reference found at
the Acrobat Family Developer Center. For XML, the conversion ID is com.adobe.acrobat.xml-1-00.
The following code converts the current PDF file to XML and saves it at C:\temp\test.xml:
this.saveAs("/c/temp/test.xml", "com.adobe.acrobat.xml-1-00");

60
5Print Production
This chapter will provide you with an in-depth understanding of the ways in which you can manage print
production workflows for PDF documents.
Topic Description See
Setting print options Gives brief descriptions of the printParams object, used to
set print options.
page 60
Printing PDF documents Discusses printing a document using the print method
of the Doc object.
page 62
Silent printing Print document with little user interaction. page 63
Printing comments and forms Setting the print job to print just forms. page 64
Booklet printing Use the print method to create a booklet. Various
options for doing this are discussed.
page 64
Setting advanced print options Discusses how to set the print job to some of the advanced
print options: marks and bleeds, PostScript® printing,
setting output and font options.
page 65
Setting print options
Since printing involves sending pages to an output device, there are many options that can affect print
quality. JavaScript can be used to enhance and automate the use of these options in print production
workflows, primarily through the use of the printParams object, whose properties and methods are
described in the following table.
PrintParams properties
Property Description
binaryOK Binary printer channel is supported.
bitmapDPI DPI used for bitmaps or rasterizing transparency.
booklet An object used to set properties of booklet printing.
colorOverride Uses color override settings.
colorProfile Color profile based on available color spaces.
constants Wrapper object for printParams constants.
downloadFarEastFonts Sends Far East fonts to the printer.
fileName fileName is used when printing to a file instead of a printer.

Adobe Acrobat SDK Print Production
Developing Acrobat Applications Using JavaScript Setting print options 61
firstPage The first zero-based page to be printed.
flags A bit field of flags to control printing options.
fontPolicy Used to determine when fonts are emitted.
gradientDPI The DPI used for rasterizing gradients.
interactive Sets the level of interaction for the user.
lastPage The last zero-based page to be printed.
nUpAutoRotate Auto rotate pages during multiple pages per sheet printing.
nUpNumPagesH Number of pages to lay out horizontally during multiple pages per
sheet printing.
nUpNumPagesV Number of pages to lay out vertically during multiple pages per sheet
printing.
nUpPageBorder Determines whether a page boundary is drawn and printed during
multiple pages per sheet printing.
nUpPageOrder Determines how the multiple pages are laid out on the sheet for
multiple pages per sheet printing.
pageHandling How pages will be handled (fit, shrink, or tiled).
pageSubset Even, odd, or all pages are printed.
printAsImage Sends pages as large bitmaps.
printContent Determines whether form fields and comments will be printed.
printerName The name of the destination printer.
psLevel The level of PostScript emitted to the printer.
rasterFlags A bit field of flags for outlines, clips, and overprint.
reversePages Prints pages in reverse order.
tileLabel Labels each page of tiled output.
tileMark Output marks to cut the page and where overlap occurs.
tileOverlap The number of points that tiled pages have in common.
tileScale The amount that tiled pages are scaled.
transparencyLevel The degree to which high level drawing operators are preserved.
userPrinterCRD Determines whether the printer Color Rendering Dictionary is used.
useT1Conversion Determines whether Type 1 fonts will be converted.
Property Description

Adobe Acrobat SDK Print Production
Developing Acrobat Applications Using JavaScript Printing PDF documents 62
In addition to the properties of the printParams object, the app object’s printColorProfiles and
printerNames properties provide a list of available color spaces and printer names, respectively.
When printing a document, any comments and form fields of the document may or may not print,
depending on the settings of the individual annotations. The print property of the Annotation and Field
objects is used to set whether an individual annotation is printed.
Printing PDF documents
It is possible to use JavaScript to specify whether a PDF document is sent to a printer or to a PostScript file.
In either case, to print a PDF document, invoke the Doc object print method. Its parameters are
described in the following table.
Print method parameters
Parameter Description
bAnnotations Determines whether to print annotations.
bPrintAsImage Determines whether to print each page as an image.
bReverse Determines whether to print in reverse page order.
bShrinkToFit Determines whether the page is shrunk to fit the imageable area of the
printed page.
bSilent Suppresses the Cancel dialog box while the document is printed.
bUI Determines whether to present a user interface to the user.
nEnd The zero-based index of the last page.
nStart The zero-based index of the beginning page.
printParams The printParams object containing the printing settings.
Note: The printParams parameter is available in Acrobat 6.0 or later. If this
parameter is passed, any other parameters are ignored.
In the first example below, pages 1-10 of the document are sent to the default printer, printed silently
without user interaction, and are shrunk to fit the imageable area of the pages:
this.print({
bUI: false,
bSilent: true,
bShrinkToFit: true,
nStart: 1,
nEnd: 10
});
The syntax above is used for versions of Acrobat previous to 6.0.
For Acrobat 6.0 or later, the recommend method is to pass a printParams object to the Doc.print
method. All the subsequent examples use this method.

Adobe Acrobat SDK Print Production
Developing Acrobat Applications Using JavaScript Silent printing 63
To print the document to a PostScript file, obtain the printParams object by invoking the Doc object
getPrintParams method. Set its printerName property to the empty string, and set its fileName
property to a string containing the device-independent path of the PostScript file to which it will be
printed, as shown in the following example:
var pp = this.getPrintParams();
pp.printerName = "";
// File name must be a safe path
pp.fileName = "/C/temp/myPSDoc.ps";
this.print(pp);
If you would like send the file to a particular printer, you can specify the printer by setting the
printerName property of the printParams object, as shown in the following example:
var pp = this.getPrintParams();
pp.interactive = pp.constants.interactionLevel.automatic;
pp.printerName = "Our office printer";
this.print(pp);
Silent printing
There are various ways to print a document without requiring user interaction. One way is to use the Doc
object print method and set the bSilent attribute to true, as the following example shows.
this.print({bUI: false, bSilent: true, bShrinkToFit: true});
Beginning with version 7.0, non-interactive printing can only be done in batch and console events. Using
the printParams object, this is the script for printing silently:
var pp = this.getPrintParams();
pp.interactive = pp.constants.interactionLevel.silent;
this.print(pp);
If you would like to print without requiring user interaction, and would like the progress monitor and
Cancel dialog box to be removed when printing is complete, use the interactive property as shown in
the following example:
var pp = this.getPrintParams();
pp.interactive = pp.constants.interactionLevel.automatic;
There are many options you can choose without requiring user interaction. For example, you can select
the paper tray:
var fv = pp.constants.flagValues;
pp.flags |= fv.setPageSize;
These coding approaches may be used in menus or buttons within a PDF file, may exist at the folder or
batch levels, and are available through Acrobat or Adobe Reader 6.0 or later. For more information, see the
JavaScript for Acrobat API Reference, as well as the Acrobat SDK samples SDKSilentPrint.js and
SDKJSSnippet1.pdf.

Adobe Acrobat SDK Print Production
Developing Acrobat Applications Using JavaScript Printing comments and forms 64
Printing comments and forms
The printContent property of the printParams object can be used to control whether document
content, form fields, and comments will be printed. In the following example, only the form field contents
will be printed (this is useful when sending data to preprinted forms):
var pp = this.getPrintParams();
pp.interactive = pp.constants.interactionLevel.silent;
pp.printContent = pp.constants.printContent.formFieldsOnly;
this.print(pp);
Booklet printing
Beginning with Acrobat 8.0, you can print booklets. To do so, begin by getting the printParams object:
var pp = this.getPrintParams();
Then set the pageHandling property to booklet:
pp.pageHandling = pp.constants.handling.booklet;
Use the booklet property of printParams to set the specialized printing parameters for booklet printing.
pp.booklet is an object with properties:
binding — determines the paper binding direction and the page arrange order
duplexMode — determines the duplex printing mode
subsetFrom — determines the first booklet sheet to be printed. Independently from the general
page range selection
subsetTo — determines the last booklet sheet to be printed
All the properties above take integers for their values.
The value for binding is set through the properties of the constants.bookletBindings object of
printParams, as illustrated in the following example.
Example 5.1 Set up booklet printing for right-side binding of text and print
var pp = this.getPrintParams();
pp.pageHandling = pp.constants.handling.booklet;
pp.booklet.binding = pp.constants.bookletBindings.Right;
this.print(pp);
The constants.bookBindings object has four properties: Left (the default), Right, LeftTall and
RightTall.
The value for duplexMode is set through the properties of the constants.bookletDuplexModes
object of printParams
Example 5.2 Print booklet in duplex mode, printing only the front pages
pp.pageHandling = pp.constants.handling.booklet;
pp.booklet.duplexMode = pp.constants.bookletDuplexModes.FrontSideOnly;
this.print(pp);
constants.bookletDuplexModes has three properties: BothSides, FrontSideOnly and
BackSideOnly. For printers that print only on one side, use FrontSideOnly first then reinsert the
printed pages and print again with BacksideOnly to complete a manual duplex printing.

Adobe Acrobat SDK Print Production
Developing Acrobat Applications Using JavaScript Setting advanced print options 65
Setting advanced print options
You can set the properties of the printParams object to specify advanced options including output, marks
and bleeds, transparency flattening, PostScript options, and font options.
Specifying output settings
You can obtain a listing of printer color spaces available by invoking the app object
printColorProfiles method. You can then assign one of these values to the printParams object
colorProfile property.
In addition, you can set the flags property of the printParams object to specify advanced output
settings, such as applying proof settings, shown in the example below:
var pp = this.getPrintParams();
var fv = pp.constants.flagValues;
pp.flags |= fv.applySoftProofSettings;
this.print(pp);
Specifying marks and bleeds
You can specify the types of tile marks and where overlap occurs by setting the tileMark property of the
printParams object. For example, in the following code, Western style tile marks are printed:
var pp = this.getPrintParams();
pp.tileMark = pp.constants.tileMarks.west;
this.print(pp);
Setting PostScript options
You can set the flags property of the printParams object to specify advanced PostScript settings, such as
emitting undercolor removal/black generation, shown in the example below:
var pp = this.getPrintParams();
var fv = pp.constants.flagValues;
pp.flags &= ~(fv.suppressBG | fv.suppressUCR);
this.print(pp);
In addition, you can set the psLevel property of the printParams object to specify the level of PostScript
emitted to PostScript printers. If the printer only supports PostScript level 1, set the printParams
object’s printAsImage property to true.
Setting font options
You can control the font policy by setting the fontPolicy property of the printParams object. There are
three values that may be used:
everyPage — emit needed fonts for every page, freeing fonts from the previous page. This is useful
for printers having a small amount of memory.
jobStart — emit all fonts at the beginning of the print job, free them at the end of the print job. This
is useful for printers having a large amount of memory.
pageRange — emit the fonts needed for a given range of pages, free them once those pages are
printed. This can be used to optimize the balance between memory and speed constraints.

Adobe Acrobat SDK Print Production
Developing Acrobat Applications Using JavaScript Setting advanced print options 66
In the following example, all the fonts are emitted at the beginning of the print job, and freed once the job
is finished:
var pp = this.getPrintParams();
pp.fontPolicy = pp.constants.fontPolicy.jobStart;
this.print(pp);
You can also control whether Type 1 fonts will be converted to alternative font representations, by setting
the useT1Conversion property of the printParams object. There are three values that can be used:
auto — let Acrobat decide whether to disable the conversion, based on its internal list of printers that
have problems with these fonts.
use — allow conversion of Type 1 fonts.
noUse — do not allow conversion of Type 1 fonts.
In the following example, conversion of Type 1 fonts is set to automatic:
var pp = this.getPrintParams();
pp.useT1Conversion = pp.usages.useT1Conversion.auto;
this.print(pp);
Finally, it is possible to send Far East fonts to the printer by setting the printParams object’s
downloadFarEastFonts property to true.

67
6Using JavaScript in Forms
In this chapter you will learn how to extend the functionality of Acrobat forms through the application of
JavaScript. You will learn how to generate, modify, and enhance all types of PDF forms and the elements
they contain, and ensure the proper collection and export of information in various formats relevant to
your workflow needs. In addition, you will understand how to leverage the XML Forms Architecture (XFA)
so that your presentation format will be not only responsive to user input, but will also ensure that the
information can be exchanged with web services and enterprise infrastructures.
Topic Description See
Forms essentials Discusses the various properties and methods of Acrobat
forms, and how to process user interaction.
page 67
Task-based topics Includes such tasks as highlighting required fields,
setting a field with a hierarchal naming scheme, setting
tab and calculation order.
page 86
Introduction to XML forms
architecture (XFA)
Gives on overview of XML forms and discusses the use of
JavaScript for Acrobat in an XML context.
page 99
Making forms accessible Guidelines for making an Acrobat form accessible. page 107
Using JavaScript to secure forms Discusses techniques for encrypting a document for a list
of recipients.
page 110
Forms essentials
You can extend the capability of your forms by using JavaScript to automate formatting, calculations, and
data validation. In addition, you can develop customized actions assigned to user events. Finally, it is
possible for your forms to interact with databases and web services.
About PDF forms
There are two types of PDF forms: Acrobat forms and Adobe LiveCycle Designer forms (XML form object
model).
Acrobat forms present information using form fields. They are useful for providing the user with a
structured format within which to view or print information. Forms permit the user to fill in information,
select choices, and digitally sign the document. Once the user has entered data, the information within the
PDF form can be sent to the next step in the workflow for extraction or, in the case of browser-based forms,
immediately transferred to a database. If you are creating a new form, the recommended type is LiveCycle
Designer forms since its format readily allows for web service interactions and compatibility with
document processing needs within enterprise-wide infrastructures.
The XML form object model uses a document object model (DOM) architecture to manage the
components that comprise a form. These include the base template, the form itself, and the data

Adobe Acrobat SDK Using JavaScript in Forms
Developing Acrobat Applications Using JavaScript About PDF forms 68
contained within the form fields. In addition, all calculations, validations, and formatting are specified and
managed within the DOM and XML processes.
Static XML forms were supported in Acrobat 6.0, and dynamic XML forms are now supported in Acrobat 7.0.
Both types are created using LiveCycle Designer. A static XML form presents a fixed set of text, graphics,
and field areas at all times. Dynamic XML forms are created by dividing a form into a series of subforms and
repeating subforms. They support dynamically changing fields that can grow or shrink based on content,
variable-size rows and tables, and intelligent data import/export features.
Elements of Acrobat forms
The form fields used in Acrobat forms are the basis of interaction with the user. They include buttons,
check boxes, combo boxes, list boxes, radio buttons, text fields, and digital signature fields. In addition, you
can enhance the appearance and value of your forms through the use of tables, templates, watermarks,
and other user interface elements such as bookmarks, thumbnails, and dialog boxes. Finally, the JavaScript
methods you define in response to events will help customize the utility and behavior of the form within
the context of its workflow.
Text fields can be useful for either presenting information or collecting data entered by the user, such as an
address or telephone number.
Digital signature fields can be used to ensure the security of a document.
When presenting the user with decisions or choices, you can use check boxes and radio buttons for a
relatively small set of choices, or list boxes and combo boxes for a larger set of dynamically changing
choices.
Guidelines for creating a new form
When designing a PDF form, consider first its purpose and the data it must manage. It may be that the
same page is used in multiple contexts, depending on user interactions and decisions. In this case, there
may be multiple sets of form fields. When this occurs, treat each set of form fields as a different problem, as
though each set had its own page. This will also require extra logic applied to visibility settings. Your form
design may have dynamically changing features such as the current date, as well as convenience options
such as automatic generation of email messages. It may even have a dynamically changing appearance
and layout which is responsive to user interactions.
Usability is a major factor in the design of forms since they are essentially graphical user interfaces, so
layout and clarity will be a major consideration. Finally, consider the medium in which the form will be
presented: screens with limited resolution may affect your decisions, and printing characteristics may also
be relevant.
When creating forms programmatically, consider the form elements that will be needed for a given area.
Declare those variables associated with the form elements, and apply logical groupings to those elements
that belong to the same collections, such as radio buttons or check boxes. This will simplify the task of
assigning properties, formatting options, validation scripts, calculation scripts, and tabbing order to each
of the individual form elements.

Adobe Acrobat SDK Using JavaScript in Forms
Developing Acrobat Applications Using JavaScript Creating Acrobat form fields 69
The creation of a new form, whether done through the Acrobat layout tools or LiveCycle Designer, or
programmatically through JavaScript, will require that you consider the following:
●How the form fields will be positioned.
●Which form fields will be associated in collections so that their properties can be set with consistency
and efficiency.
●How size, alignment, and distribution of form fields within the document will be determined.
●When and how to set up duplicate form fields so that when the user types information into one form
field, that information automatically appears in the duplicate form fields.
●When to create multiple form fields for array-based access and algorithms.
●The tab order of form fields.
Creating Acrobat form fields
There are seven types of Acrobat form fields, each associated with a field type value as shown in the
following table.
Acrobat form field types
Form field Field type value
Button button
Check box checkbox
Combo box combobox
List box listbox
Radio button radiobutton
Text field text
Digital signature signature
You can use JavaScript to create a form field by invoking the addField method of the Doc object, which
returns a Field object. This method permits you to specify the following information:
●The field name. This may include hierarchical syntax in order to facilitate logical groupings. For
example, the name myGroup.firstField implies that the form field firstField belongs to a
group of fields called myGroup. The advantage of creating logical hierarchies is that you can enforce
consistency among the properties of related form fields by setting the properties of the group, which
automatically propagate to all form fields within the group.
●One of the seven field type values listed above, surrounded by quotes.
●The page number where the form field is placed, which corresponds to a zero-based indexing scheme.
Thus, the first page is considered to be page 0.
●The location, specified in rotated user space (the origin is located at the bottom left corner of the page),
on the page where the form field is placed. The location is specified through the use of an array of four
values. The first two values represent the coordinates of the upper left corner, and the second two
values represent the coordinates of the lower right corner: [upper-left x, upper-left y,
lower-right x, lower-right y].
Adobe Acrobat SDK Using JavaScript in Forms
Developing Acrobat Applications Using JavaScript Setting Acrobat form field properties 70
For example, suppose you would like to place a button named myButton on the first page of the
document. Assume that the button is one inch wide, one inch tall, and located 100 points in from the left
side of the page and 400 points up from the bottom of the page (there are 72 points in 1 inch). The code
for creating this button would appear as follows:
var name = "myButton";
var type = "button";
var page = 0;
var location = [100, 472, 172, 400];
var myField = this.addField(name, type, page, location);
This approach to creating form fields is applicable to all fields, but it should be noted that radio buttons
require special treatment. Since a set of radio buttons represents a set of mutually exclusive choices, they
belong to the same group. Because of this, the names of all radio buttons in the same group must be
identical. In addition, the export values of the set of radio buttons must be set with a single statement, in
which an array of values are assigned by the exportValues property of the Field object.
For example, suppose we would like to create a set of three radio buttons, each 12 points wide and 12
points high, all named myRadio. We will place them on page 5 of the document, and their export values
will be Yes, No, and Cancel. They can be created as shown in the code given below:
var name = "myRadio";
var type = "radiobutton";
var page = 5;
var rb = this.addField(name, type, page, [400, 442, 412, 430]);
this.addField(name, type, page, [400, 427, 412, 415]);
this.addField(name, type, page, [400, 412, 412, 400]);
rb.exportValues=["Yes", "No", "Cancel"];
Setting Acrobat form field properties
Javascript provides a large number of properties and methods for determining the appearance and
associated actions of form fields. In this section you will learn what properties and methods are available,
and how to write scripts that control the appearance and behavior of form fields.
The list of topics in this section is given in the table below.
Form topics Page
Field properties page 71
Button fields page 72
Check box fields page 74
Combo box fields page 75
List box fields page 79
Radio button fields page 81
Signature fields page 82
Text fields page 83
Validation scripts page 84
Calculation script page 85

Adobe Acrobat SDK Using JavaScript in Forms
Developing Acrobat Applications Using JavaScript Setting Acrobat form field properties 71
Field properties
A form field has certain properties that determines its appearance, printability, orientation, and the actions
performed when the user interacts with it. Some properties are common to all form fields, while others are
particular to certain types of fields. The properties of a field can be set not only through the UI, but also
programmatically with JavaScript.
The most basic property of every form field is its name, which provides the reference necessary for
subsequent access and modification. The key to setting the properties of a field is to first acquire the Field
object of that field using its name; this is done using the getField method of the Doc object:
var f = this.getField("myField");
The getField method takes as its argument the field name of the target field. The Field object can be
obtained using other methods as well, for example, the addField method returns the Field object of the
field it just created.
General properties that apply to all form fields include the display rectangle, border style, border line
thickness, stroke color, orientation, background color, and tooltip. In addition, you can choose whether it
should be read only, have the ability to scroll, and be visible on screen or in print.
There are also specific settings you can apply to text characteristics, button and icon size and position
relationships, button appearance when pushed, check box and radio button glyph appearance, and the
number and selection options for combo box and list box items.
All formatting options are listed and described in the following table.
Field properties
Property Description Field properties
display rectangle Position and size of field on page. rect
border style Rectangle border appearance. borderStyle
stroke color Color of bounding rectangle. strokeColor
border thickness Width of the edge of the surrounding rectangle. lineWidth
orientation Rotation of field in 90-degree increments. rotation
background color Background color of field (gray, transparent,
RGB, or CMYK).
fillColor
tooltip Short description of field that appears on
mouse-over.
userName
read only Whether the user may change the field
contents.
readonly
scrolling Whether text fields may scroll. doNotScroll
display Whether visible or hidden on screen or in print. display

Adobe Acrobat SDK Using JavaScript in Forms
Developing Acrobat Applications Using JavaScript Setting Acrobat form field properties 72
Button fields
We will begin by creating a button named myButton:
var f = this.addField("myButton", "button", 0, [200, 250, 250, 400]);
In most cases, however, a form field, such as this button, is created through the UI.
If the field already exists, get the Field object as follows:
var f = this.getField("myButton");
To create a blue border along the edges of its surrounding rectangle, we will set its strokeColor
property:
f.strokeColor = color.blue;
In addition, you can select from one of the following choices to specify its border style: solid (border.s),
beveled (border.b), dashed (border.d), inset (border.i), or underline (border.u). In this case we
will make the border appear beveled by setting its borderStyle property:
f.borderStyle = border.b;
To set the line thickness (in points) of the border, set its lineWidth property:
f.lineWidth = 1;
To set its background color to yellow, we will set its fillColor property:
f.fillColor = color.yellow;
text Font, color, size, rich text, comb format,
multiline, limit to number of characters, file
selection format, or password format.
textFont, textColor,
textSize, richText,
richValue, comb,
multiline, charLimit,
fileSelect, password
text alignment Text layout in text fields. alignment
button alignment Alignment of icon on button face. buttonAlignX,
buttonAlignY
button icon scaling Relative scaling of an icon to fit inside a button
face.
buttonFitBounds,
buttonScaleHow,
buttonScaleWhen
highlight mode Appearance of a button when pushed. highlight
glyph style Glyph style for checkbox and radio buttons. style
number of items Number of items in a combo box or list box. numItems
editable Whether the user can type in a combo box. editable
multiple selection Whether multiple list box items may be
selected.
multipleSelection
Property Description Field properties

Adobe Acrobat SDK Using JavaScript in Forms
Developing Acrobat Applications Using JavaScript Setting Acrobat form field properties 73
To specify the text that appears on the button, invoke its buttonSetCaption method:
f.buttonSetCaption("Click Here");
You can set the text size, color, and font:
f.textSize = 16;
f.textColor = color.red;
f.textFont = font.Times;
To create a tooltip that appears when the mouse hovers over the button, set its userName property:
f.userName = "This is a button tooltip for myButton.";
In addition to the text, it is also possible to specify the relative positioning of the icon and text on the
button’s face. In this case, we will set the layout so that the icon appears to the left of the text:
f.buttonPosition = position.iconTextH;
To specify whether the button should be visible either on screen or when printing, set its display
property:
f.display = display.visible;
To set the button’s appearance in response to user interaction, set its highlight property to one of the
following values: none (highlight.n), invert (highlight.i), push (highlight.p), or outline
(highlight.o). In this example, we will specify that the button appears to be pushed:
f.highlight = highlight.p;
It is possible to specify the scaling characteristics of the icon within the button face. You can determine
when scaling takes place by setting the button’s buttonScaleWhen property to one of the following
values: always (scaleWhen.always), never (scaleWhen.never), if the icon is too big
(scaleWhen.tooBig), or if the icon is too small (scaleWhen.tooSmall). In this case, we will specify
that the button always scales:
f.buttonScaleWhen = scaleWhen.always;
You can also determine whether the scaling will be proportional by setting the buttonScaleHow
property to one of the following values: buttonScaleHow.proportional or
buttonScaleHow.anamorphic. In this case, we will specify that the button scales proportionally:
f.buttonScaleHow = buttonScaleHow.proportional;
To guarantee that the icon scales within the bounds of the rectangular region for the button, set the
buttonFitBounds property:
f.buttonFitBounds = true;
You can specify the alignment characteristics of the icon by setting its buttonAlignX and
buttonAlignY properties. This is done by specifying the percentage of the unused horizontal space
from the left or the vertical space from the bottom that is distributed. A value of 50 would mean that 50
percent of the unused space would be distributed to the left or bottom of the icon (centered). We will
center our icon in both dimensions:
f.buttonAlignX = 50;
f.buttonAlignY = 50;

Adobe Acrobat SDK Using JavaScript in Forms
Developing Acrobat Applications Using JavaScript Setting Acrobat form field properties 74
Now that you have prepared the space within the button for the icon, you can import an icon into the
document and place it within the button’s area. There are two methods for importing an icon for a button
face and associating it with a button
●Use the buttonImportIcon method of the Field object, this imports and associates in one step:
var retn = f.buttonImportIcon("/C/temp/myIcon.pdf");
if ( retn != 0 ) app.alert("Icon not imported");
If the argument of buttonImportIcon is empty, the user is prompted to choose an icon. This
approach works for Adobe Reader.
●Import the icon using the importIcon method of the Doc object, then associate the icon with the
button using the buttonSetIcon method of the Field object.
this.importIcon({
cName: "myIconName", cDIPath: "/C/temp/myIcon.pdf", nPage: 0});
var myIcon = this.getIcon("myIconName");
f.buttonSetIcon(myIcon);
If the cDIPath parameter is specified, which is the case in this example, the importIcon method can
only be executed in batch and console events; however, this restrictions can be bypassed using the
techniques discussed in “Executing privileged methods in a non-privileged context” on page 45. When
cDIPath is not specified, the script works for Adobe Reader.
To rotate the button counterclockwise, set its rotation property:
f.rotation = 90;
Finally, you will undoubtedly wish to associate an action to be executed when the button is clicked. You
can do this by invoking the setAction method of the Field object, which requires a trigger (an indication
of the type of mouse event) and an associated script. The possible triggers are MouseUp, MouseDown,
MouseEnter, MouseExit, OnFocus, and OnBlur. The following code displays a greeting when the
button is clicked:
f.setAction("MouseUp", "app.alert('Hello');" );
Check box fields
The check box field supports many of the same properties as the button, and actions are handled in the
same manner. The properties common to both form fields are:
●userName
●readonly
●display
●rotation
●strokeColor
●fillColor
●lineWidth
●borderStyle
●textSize
●textColor
In the case of textFont, however, the font is always set to Adobe Pi.

Adobe Acrobat SDK Using JavaScript in Forms
Developing Acrobat Applications Using JavaScript Setting Acrobat form field properties 75
The style property of the Field object is used to set the appearance of the check symbol that appears
when the user clicks in the check box. Permissible values of the style property are check (style.ch),
cross (style.cr), diamond (style.di), circle (style.ci), star (style.st), and square (style.sq).
For example, the following code causes a check to appear when the user clicks in the check box:
f.style = style.ch;
The export value of the check box can be set using the exportValues property of the Field object. For
example, the code below associates the export value "buy" with the check box:
var f = this.getField("myCheckBox");
f.exportValues=["buy"];
If there are several check box fields, you can indicate that one particular form field is always checked by
default. To do this, you must do two things:
●Invoke the defaultIsChecked method of the Field object. Note that since there may be several
check boxes that belong to the same group, the method requires that you specify the zero-based index
of the particular check box.
●Reset the field to ensure that the default is applied by invoking the resetForm method of the Doc
object.
This process is shown in the following code:
var f = this.getField("myCheckBox");
f.defaultIsChecked(0); // 0 means that check box #0 is checked
this.resetForm([f.name]);
Other useful Field methods are
●checkThisBox — used to check a box
●isBoxChecked — used test whether a check box is checked
●isDefaultChecked — use to test whether the default setting is the one selected by user
Combo box fields
The combo box has the same properties as the button and check box fields. Its primary differences lie in its
nature. Since the combo box maintains an item list in which the user may be allowed to enter custom text,
it offers several properties that support its formatting options.
If you would like the user to be permitted to enter custom text, set the editable property of the Field
object, as shown in the following code:
var f = this.getField("myComboBox");
f.editable = true;
You can specify whether the user’s custom text will be checked for spelling by setting its
doNotSpellCheck property. The following code indicates that the spelling is not checked:
f.doNotSpellCheck = true;
A combo box can interact with the user in one of two ways: either a selection automatically results in a
response, or the user first makes their selection and then takes a subsequent action, such as clicking a
Submit button.

Adobe Acrobat SDK Using JavaScript in Forms
Developing Acrobat Applications Using JavaScript Setting Acrobat form field properties 76
In the first case, as soon as the user clicks on an item in the combo box, an action can automatically be
triggered. If you would like to design your combo box this way, then set its commitOnSelChange
property to true. Otherwise, set the value to false. The following code commits the selected value
immediately:
f.commitOnSelChange = true;
To set the export values for the combo box items, invoke its setItems method, which can be used to set
both the face and export values. In this case, the face (or appearance) value (the value that appears in the
combo box) is the first value in every pair, and the export value is the second. The following code results in
the full state names appearing in the combo box (as the face or appearance values), and abbreviated state
names as their corresponding export values:
f.setItems( ["Ohio", "OH"], ["Oregon", "OR"], ["Arizona", "AZ"] );
In many cases, it is desirable to maintain a sorted collection of values in a combo box. In order to do this,
you will need to write your own sorting script. Recall that the JavaScript Array object has a sort method
that takes an optional argument which may be a comparison function.
This means that you must first define a compare function that accepts two parameters. The function must
return a negative value when the first parameter is less than the second, 0 if the two parameters are
equivalent, and a positive value if the first parameter is greater.
In the following example, we define a compare function that accepts two parameters, both of which are
user/export value pairs, and compares their user values. For example, if the first parameter is ["Ohio",
"OH"] and the second parameter is ["Arizona", "AZ"], the compare function returns 1, since
"Ohio" is greater than "Arizona":
function compare (a,b)
{
if (a[0] < b[0]) return -1; // index 0 means user value
if (a[0] > b[0]) return 1;
return 0;
}
Create a temporary array of values and populate it with the user/export value pairs in your combo box
field. The following code creates the array, iterates through the combo box items, and copies them into the
array:
var arr = new Array();
var f = this.getField("myCombobox");
for (var i = 0; i < f.numItems; i++)
arr[i] = [f.getItemAt(i,false), f.getItemAt(i)];
At this point you can invoke the sort method of the Array object and replace the items in the combo
box field:
arr.sort(compare); // Sort the array using your compare method
f.setItems(arr);
Responding to combo box changes
The Format tab of the Combo Box properties lists categories of formats available to combo box text. They
are None, Number, Percentage, Date, Time, Special and Custom. For all formatting categories, except None
and Custom, the JavaScript interpreter uses special formatting functions to properly process the text of a
combo box; these functions are undocumented now, so comments here are focused on the None and
Custom category.

Adobe Acrobat SDK Using JavaScript in Forms
Developing Acrobat Applications Using JavaScript Setting Acrobat form field properties 77
If the formatting category is set to None, then processing the combo box is easy. Whereas the combo box
does not process its own change in value, another form element can easily read the current setting of the
combo box. For example, if the name of the combo box is myComboBox, then the following code gets the
current value:
var f = this.getField("myComboBox");
var valueCombo = f.value;
The variable valueCombo contains the export value of the combo box. You cannot, by the way, get the
face value, if the export value is different from the face value.
When the formatting category is set to Custom, there are two types of formatting scripts, Custom
Keystroke Script and Custom Format Script.
The Custom Keystroke Script has the following general form:
if (event.willCommit) {
// Script that is executed when the choice is committed
} else {
// Script that is executed when the choice changes, or, if the
// combox box is editable, when text is typed in.
}
With regard to the Custom Keystroke Script, there are three event properties that can be read: value,
change and changeEx. To illustrate these event properties, let’s use the state combo box, defined above.
Here is the Custom Keystroke Script:
if (event.willCommit) {
console.println("Keystroke: willCommit")
console.println("event.value = " + event.value);
console.println("event.change = " + event.change);
console.println("event.changeEx = " + event.changeEx);
} else {
console.println("Keystroke: not Committed")
console.println("event.value = " + event.value);
console.println("event.change = " + event.change);
console.println("event.changeEx = " + event.changeEx);
}
The results of this script are listed below. Assume the combo box is set on a face value of "Arizona" and
you change the combo box to read "Ohio". Additional comments are inserted.
// Select Ohio, but not committed. Note that the value of event.value is still
// set to "Arizona", but event.change is now set to the face value of the new
// choice, and event.changeEx is set to the export value of the new selection.
Keystroke: not Committed
event.value = Arizona
event.change = Ohio
event.changeEx = OH
// The choice is committed. Note that the value of event.value is now "Ohio"
// and that event.change and event.changeEx are empty.
Keystroke: willCommit
event.value = Ohio
event.change =
event.changeEx =

Adobe Acrobat SDK Using JavaScript in Forms
Developing Acrobat Applications Using JavaScript Setting Acrobat form field properties 78
The only difference between the above sequence of events when f.commitOnSelChange=false
versus f.commitOnSelChange=true is that in the first case, after the user makes a (new) choice from
the combo box (and the “not committed” script is executed), the user must press the Enter key or click on a
white area outside the field to commit the change, at this point, the "willCommit" script will execute. When
f.commitOnSelChange=true, these two blocks of code will execute one after the other, with the “not
committed” code executing first.
A combo box can also be editable. An editable combo box is one where the user is allowed to type in, or
paste in, a selection. A combo box can be made editable by checking Allow User to Enter Custom Text in
the Options tab of the Combo Box Properties dialog box. For JavaScript, the editable field property is
used, as in the following example.
var f = this.getField("myComboBox");
f.editable = true;
The above output was captured in the console from a combo box that was not editable. The output is the
same when the user selects one of the items in the combo box; when the user types in a selection, the
output looks like this, assuming the user has already typed in the string "Te"and is now typing in "x":
/*
Note that when the selection is not committed, event.changeEx is empty. You
can test whether the user is typing in by using the conditional test
if ( event.changeEx == "" ) {<type/paste in>} else {<select from list>}
Note also that the value of event.value is "Te" and the value of
event.change is "x"; the previous keystrokes and the current keystroke,
respectively. When the user pastes text into the combo box, the length of
event.change will be larger than one,
if(event.change.length > 1 ) {<pasted text>} else {<typed text>}
*/
Keystroke: not Committed
event.value = Te
event.change = x
event.changeEx =
// ...Additional keystrokes to spell "Texas"
// Once committed, this output is the same as when the combo box is not
// editable.
Keystroke: willCommit
event.value = Texas
event.change =
event.changeEx =
Example 6.1 Custom script for a combo box
Suppose now you want to make the combo box editable, and ask to user to pick a state from the pop-up
combo box, or to type in a state. You want to format the state entered by the user so that the first letter is
capitalized, and the rest are lower case.
The following script is used for the Custom Keystroke Script of the combo box:
if (event.willCommit) {
// Test to be sure there something more than white spaces.
if ( event.rc = !( event.value.replace(/\s/g,"") == "" )) {
// On commit, split event.value into an array, convert to lower case
// and upper case for the first letter.
var aStr = event.value.split(" ");
for ( var i=0; i<aStr.length; i++){

Adobe Acrobat SDK Using JavaScript in Forms
Developing Acrobat Applications Using JavaScript Setting Acrobat form field properties 79
aStr[i] = aStr[i].charAt(0).toUpperCase()
+aStr[i].substring(1,aStr[i].length).toLowerCase();
}
// Join the separate words together, and return as the new value.
event.value = aStr.join(" ");
}
} else {
// User is typing in something, make sure it is a letter or space
var ch = event.change;
if ( ch.length==1 )
event.rc = (ch==" ") || (ch>="a" && ch<="z") || (ch>="A" && ch<="Z");
}
Format the combo box so that is reads "State of Ohio", for example.
Custom format script:
event.value = "State of " + event.value;
If the user has pasted into the editable combo box, you can catch any non-letters or spaces with the
validation script. A regular expression is used to see if there is something different from a letter or space.
Custom validation script:
event.rc = !/[^a-zA-Z ]+/.test(event.value);
These various events, Keystroke, Format and Validate, define the rc property of the event object. In the
above code, the event.rc is used to signal that the input is acceptable (true) or not acceptable (false).
In this way, the input can be checked, validated, and formatted, or, at some stage, can be canceled by
setting event.rc = false.
Full documentation of the objects used in the above sample script can be found in the JavaScript for
Acrobat API Reference.
List box fields
A list box has many of the same properties as buttons and combo boxes, except for the fact that the user
cannot enter custom text and, consequently, that spellchecking is not available.
However, the user can select multiple entries. To enable this feature, set its multipleSelection
property to true, as shown in the code below:
var f = this.getField("myListBox");
f.multipleSelection = true;
The List Box Properties dialog box has a Selection Change tab, this corresponds to the "Keystroke"
trigger of the combo box or text field. To enter script to process a change in the status of the list box, you
can either use the UI, or you can install your script, like so,
f.setAction( "Keystroke", "myListboxJavascript();" );
In the above, the action is to simply call a JavaScript function, defined, perhaps, as document JavaScript.

Adobe Acrobat SDK Using JavaScript in Forms
Developing Acrobat Applications Using JavaScript Setting Acrobat form field properties 80
The manner in which you process a selection change is the same as the combo box, with one exception.
// Note that unlike the combo box, the value of event.value is the export value
// of the field, not the face value as it is with the combo box.
Keystroke: not committed
event.value = FL
event.change = Arizona
event.changeEx = AZ
// When we commit, the value of event.value is the face value, not the export
// value.
Keystroke: willCommit
event.value = Arizona
event.change =
event.changeEx =
You can allow the user to make multiple selections from a list box by checking the Multiple Selection check
box in the Options tab of the List Box Properties dialog box, or you can make this selection using
JavaScript:
var f = this.getField("myListBox");
f.multipleSelection=true;
It is not possible to detect multiple selection using a Selection Change script; however, multiple selection
can be detected from another form field, such as a button. To get and set multiple values of the list box,
use the currentValueIndices property of the Field object. The following example illustrates the
techniques.
Example 6.2 Accessing a list from another field
This example accesses the list box which allows multiple selections. It simply reads the current value and
reports to the console. When the current value of the list box is a single selection,
currentValueIndices returns a number type (the index of the item selected); when there are multiple
selections, currentValueIndices returns an array of indices.
var f = this.getField("myListBox");
var a = f.currentValueIndices;
if (typeof a == "number") // A single selection
console.println("Selection: " + f.getItemAt(a, false));
else {// Multiple selections
console.println("Selection:");
for (var i = 0; i < a.length; i ++)
console.println(" " + f.getItemAt(a[i], false));
}
The field method getItemAt is used to get the face values of the list, using the index value returned by
currentValueIndices.
Other relevant field properties and methods not mentioned in this section are numItems,
insertItemAt, deleteItemAt and setItems. The JavaScript for Acrobat API Reference documents all
these methods and supplies many informative examples.

Adobe Acrobat SDK Using JavaScript in Forms
Developing Acrobat Applications Using JavaScript Setting Acrobat form field properties 81
Radio button fields
The unique nature of radio buttons is that they are always created in sets, and represent a collection of
mutually exclusive choices. This means that when you create a set of radio buttons, you must give all of
them identical names with possibly different export values.
The behavior of the radio buttons depends on several factors, whether or not there are two or more
members of the same radio set that have the same export value, and whether or not the item Buttons With
the Same Name and Value are Selected in Unison is checked in the Options tab of the Radio Button
Properties dialog box. (The latter can be set by JavaScript using the radiosInUnison field property.) The
differences are illustrated in the discussion below.
You have four radio buttons all in the same group (all having the same name of "myRadio"):
var f = this.getField("myRadio");
Suppose the export values are export0, export1, export2, and export3. This is the simplest case, all
choices are mutually exclusive; the behavior does not depend on whether Buttons With the Same Name
and Value are Selected in Unison is checked.
Now suppose the export values of the four radio buttons are export0, export1, export2, and
export2. If f.radiosInUnison=false, the four buttons behave as in the simplest case above. If
f.radiosInUnison=true, then there are only three mutually exclusive buttons; clicking either of the
two radios with export value export2 will select both of them, while clicking the radio button with
export value of export0 will select only that button.
Example 6.3 Accessing individual radio button widgets
This example illustrates how you can programmatically access the individual radio buttons in the same
radio group (all having the same name). Assume the command name is myRadio and there are four
widgets in the field.
var f = this.getField("myRadio");
// Get the second widget, change its appearance and add an action
var g = this.getField(f.name+".1");
g.strokeColor = color.red;
g.setAction("MouseUp",
"app.alert('Export value is ' + this.getField('myRadio').value)");
Some properties of the Field object, such as value, apply to all widgets that are children of that field.
Other properties, such as strokeColor and setAction, are specific to individual widgets. See the
section on the Field object in the JavaScript for Acrobat API Reference for a complete list of Field properties
accessible at the widget level.
Example 6.4 Counting the number of widgets in a radio button field
Sometimes the number of widgets in a radio button field is unknown. The code below counts the number
of widgets.
var f = this.getField("myRadio")
var nWidgets=0;
while(true) {
if ( this.getField(f.name + "." + nWidgets) == null ) break;
nWidgets++;
}
console.println("There are " + nWidgets + " widgets in this radio field");

Adobe Acrobat SDK Using JavaScript in Forms
Developing Acrobat Applications Using JavaScript Setting Acrobat form field properties 82
Signature fields
Signature fields have the usual properties, as listed under the General and Appearance tabs of the Digital
Signature Properties dialog box. These can be set in the standard way, by the UI or through JavaScript, as
in this example:
var f = this.getField("Signature1”);
f.strokeColor = color.black;
When the signature field is signed, you may want to execute some script in response to this event. The
script can be entered through the Signed tab of the Digital Signature Properties dialog box, or through the
setAction method of the Field object.
You can set the action of a signature field by invoking its setAction method and passing in the Format
trigger name as the first parameter. When the user signs the form, you can reformat other form fields with
the script you pass in to the setAction method.
Once a document is signed, you may wish to lock certain form fields within the document. You can do so
by creating a script containing a call to the signature field’s setLock method and passing that script as
the second parameter to the signature field’s setAction method.
The setLock method requires a Lock object, which you will obtain by invoking the form field’s getLock
method. Once you obtain the Lock object, set its action and fields properties. The action property
can be set to one of 3 values: "All" (lock all fields), "Exclude" (lock all fields except for these), or
"Include" (lock only these fields). The fields property is an array of fields.
For example, suppose you created a signature and would like to lock the form field whose name is
myField after the user signs the document. The following code would lock myField:
var f = this.getField("Signature1");
var oLock = f.getLock();
oLock.action = "Include";
oLock.fields = new Array("myField");
f.setLock(oLock);
To actually sign a document, you must do two things: choose a security handler, and then invoke the
signature field’s signatureSign method. The following code is an example of how to choose a handler
and actually sign the document:
var f = this.getField("Signature1");
var ppklite = security.getHandler("Adobe.PPKLite");
var oParams = {
cPassword: "myPassword",
cDIPath: "/C/signatures/myName.pfx" // Digital signature profile
};
ppklite.login(oParams);
f.signatureSign(ppklite,
{
password: "myPassword",
location: "San Jose, CA",
reason: "I am approving this document",
contactInfo: "userName@adobe.com",
appearance: "Fancy"
}
); //End of signature
ppklite.logout()

Adobe Acrobat SDK Using JavaScript in Forms
Developing Acrobat Applications Using JavaScript Setting Acrobat form field properties 83
Text fields
The text field has many of the same properties as buttons and combo boxes. In addition, it offers the
following specialized properties shown in the following table. (The table assumes that f is the field object
of a text field.)
Text field properties
Property Description Example
alignment Justify text f.alignment = "center";
charLimit Limit on number of characters in area f.charLimit = 40;
comb Comb of characters subject to limitation
set by charLimit
f.comb = true;
defaultValue Set a default text string f.defaultValue = "Name: ";
doNotScroll Permit scrolling of long text f.doNotScroll = true;
doNotSpellCheck Set spell checking f.doNotSpellCheck = true;
fileSelect Format field as a file path f.fileSelect = true;
multiline Allow multiple lines in the area f.multiline = true;
password Use special formatting to protect the
user’s password
f.password = true;
richText Set rich text formatting f.richText = true;
When the user enters data into a text field, the usual event object can be queried to process the
keystrokes, the behavior is similar to the combo box. In the output below, assume the user has already
typed in the "Te" and types in the letter "x":
// The value of event.value is the current text in text field, event.change has
// the current keystroke. Note that event.changeEx is always empty, and is not
// relevant to the text field.
Keystroke: not Committed
event.value = Te
event.change = x
event.changeEx =
Keystroke: willCommit
event.value = Texas
event.change =
event.changeEx =
Use the Custom Keystroke Script to intercept user keystrokes and process them. For example, the
following script changes all input to upper case:
Custom Keystroke Script:
if (!event.willCommit) event.change = event.change.toUpperCase();

Adobe Acrobat SDK Using JavaScript in Forms
Developing Acrobat Applications Using JavaScript Setting Acrobat form field properties 84
Validation scripts
You can enforce valid ranges, values, or characters entered in form fields. The main reason to use validation
is to ensure that users are only permitted to enter valid data into a form field. Validation is used whenever
the user enters text into a form field, for text fields and for editable combo boxes.
Enter the validation script through the Validation tab of the Text Field Properties dialog box, or through
the setAction method of the Field object. In the latter case, pass Validate as the first parameter, as
follows:
var f = this.getField("myText");
f.setAction("Validate", "myValidateRange(true, -1, true, 5)");
Normally, however, such a script is entered through the UI.
Example 6.5 Inputting numbers and checking the range in a text field
This is a simple example of a Custom Keystroke Script for inputting a number, and a simple validation
script for checking the range of the number.
Custom Keyboard Script:
if ( event.willCommit ) {
var value = ""+event.value.replace(/\s*/g,"");
if ( value != "" ) {
if (!isFinite(value)) {
app.beep(0);
event.rc = false;
}
}
} else
if ( event.change == " " ) event.change = "";
A representative Custom Validation Script is
myValidateRange(true, -1, true, 5);
which checks whether the value entered is strictly between -1 and 5. The validation script calls the
following document JavaScript:
function myRangeCheck(bGreater, nGreater, bLess, nLess)
{
value = event.value;
if ( bGreater && ( value <= nGreater ) ) {
app.alert("Value must be greater than " + nGreater);
app.beep();
event.rc = false;
return;
}
if ( bLess && ( value >= nLess ) ) {
app.alert("Value must be less than " + nLess);
app.beep();
event.rc = false;
return;
}
}

Adobe Acrobat SDK Using JavaScript in Forms
Developing Acrobat Applications Using JavaScript Setting Acrobat form field properties 85
Calculation script
Calculation options make it possible to automate mathematical calculations associated with form fields. To
apply a calculation to a form field action, enter the script through the Calculate tab of the Text Field
Properties dialog box. On this tab there are three options:
1. The value is the sum(+)/product(x), average/minimum/maximum of a specified collection of fields.
2. The value is the result of simplified field notation.
3. The value is the result of a Custom Calculation Script.
Options (1) and (2) are entered through the UI, option (3) is entered through the UI or through the
setAction method of the Field object. If you use the setAction method, pass "Calculate" as the
first parameter, and pass a script containing a call to a calculation script as the second parameter.
The calculation script makes all necessary calculations, perhaps drawing values from other text fields, then
reports the calculated value to the field by setting event.value.
Example 6.6 Calculating the average of several text fields
The script presented here calculates the average of several text fields. If one of the fields has no value, it is
not figured into the average. The example assumes all fields require a number for their value.
The following script is entered as a custom calculation script:
var aNumFields = new Array("Text1.0", "Text1.1", "Text1.2","Text1.3",
"Text1.4");
myAverageFunction(aNumFields);
The script above simply calls the myAverageFunction, it is this function that calculates the average of
the array of fields passed as its argument, and sets event.value. The function is placed in the document
as document JavaScript.
function myAverageFunction(aNumFields)
{
// n = number of fields that have a numerical value
var n=0, sum = 0;
for ( var i=0; i<aNumFields.length; i++) {
var v = this.getField(aNumFields[i]).value;
if ( v != "" ) {
n++;
sum += v;
}
}
if ( n == 0 ) event.value = "";
else event.value = sum/n;
}

Adobe Acrobat SDK Using JavaScript in Forms
Developing Acrobat Applications Using JavaScript Task-based topics 86
Task-based topics
In this section, common problems/tasks are presented, including such topics as highlighting required
fields, positioning form fields, duplicating form fields, importing and exporting form data and global
variables.
Highlighting required form fields
You can require that some text fields on a form are not left blank: these are called required form fields. It is
helpful to the user to highlight them so that they can be easily recognized. The following example
demonstrates one approach to the problem.
Example 6.7 Highlighting required fields
Create two buttons in a document containing form fields. One button has the JavaScript mouse up action
showRequired();
that will highlight all required fields, the other button has the following mouse up action
restoreRequired();
that restores the fields to the appearance state they were in before the showRequired() function
executed.
The script that follows is a document-level JavaScript that defines the functions called by the two buttons.
var oFieldNames = new Object(); // used to save the appearance of the fields
function showRequired() {
// Search through all fields for those that are set to required, excluding
// any button fields.
for ( var i=0; i < this.numFields; i++) {
var fname = this.getNthFieldName(i);
var f = this.getField(fname);
if ( (f.type != "button") && f.required) {
// Save appearance data in oFieldNames
oFieldNames[fname]={ strokeColor: f.strokeColor,
fillColor: f.fillColor};
// Assign a red boundary color, and fill color
f.strokeColor=color.red;
f.fillColor=app.runtimeHighlightColor;
}
}
}
// Now restore the fields.
function restoreRequired() {
if ( typeof oFieldNames == "object") {
for ( var o in oFieldNames ) {
var f = this.getField(o);
f.strokeColor=oFieldNames[o].strokeColor;
f.fillColor=oFieldNames[o].fillColor;
}
}
oFieldNames = new Object();
}

Adobe Acrobat SDK Using JavaScript in Forms
Developing Acrobat Applications Using JavaScript Making a form fillable 87
Making a form fillable
In order for a form to be fillable, its text fields or combo boxes must be formatted so that the user can edit
them.
If you would like a text area to be enabled for typing, set its readonly property to false, as shown in the
following code:
f.readonly = false;
If you would like a combo box to be enabled for typing, set its editable property to true, as shown in
the following code:
f.editable = true;
Setting the hierarchy of form fields
Fields can be arranged hierarchically within a document. For example, form fields with names like
"FirstName" and "LastName" are called flat names and there is no association between them. To
change an attribute of these fields requires you to change the attribute for each field:
var f = this.getField("FirstName");
f.textColor = color.red;
var f = this.getField("LastName");
f.textColor = color.red;
The above code changes the text color of each of the two fields to red.
By changing the field names, a hierarchy of fields within the document can be created. For example,
"Name.First" and "Name.Last" forms a tree of fields. The period (.) separator in Acrobat forms denotes
a hierarchy shift. "Name" in these fields is the parent; "First" and "Last" are the children. Also, the field
"Name" is an internal field because it has no visible appearance. "First" and "Last" are terminal fields
that appear on the page.
Acrobat form fields that share the same name also share the same value. Terminal fields can have different
presentations of that data. For example, they can appear on different pages, be rotated differently, or have
a different font or background color, but they have the same value. Therefore, if the value of one
presentation of a terminal field is modified, all others with the same name are updated automatically.
To repeat the above example using the naming scheme of "Name.First" and "Name.First", th e c o de is
var f = this.getField("Name");
f.textColor=color.red;
This changes the text color of both fields to red.
Of course, if you with to give the two fields different text colors, then you reference each field individually,
var f = this.getField("Name.First");
f.textColor = color.red;
var f = this.getField("Name.Last");
f.textColor = color.blue;
Each presentation of a terminal field is referred to as a widget. An individual widget does not have a name
but is identified by index (0-based) within its terminal field. The index is determined by the order in which
the individual widgets of this field were created (and is unaffected by tab-order).

Adobe Acrobat SDK Using JavaScript in Forms
Developing Acrobat Applications Using JavaScript Creating forms 88
You can determine the index for a specific widget by using the Fields navigation tab in Acrobat. The index
is the number that follows the ‘#’ sign in the field name shown. (In Acrobat 6.0 or later, the widget index is
displayed only if the field has more than one widget.) You can double-click an entry in the Fields panel to
go to the corresponding widget in the document. Alternatively, if you select a field in the document, the
corresponding entry in the Fields panel is highlighted.
Beginning with Acrobat 6.0, getField can be used to retrieve the Field object of one individual widget of
a field. This notation consists of appending a period (.) followed by the widget index to the field name
passed. When this approach is used, the Field object returned by getField encapsulates only one
individual widget. You can use the Field objects returned this way anywhere you would use a Field object
returned by passing the unaltered field name.
For example, suppose you have four text fields all with the same name of "myTextField". Executing the
following code changes the text color of all four fields to red.
this.getField("myTextField").textColor=color.red;
To change the text color of an individual field, you would execute the following code:
this.getField("myTextField.1").textColor=color.blue;
This code changes the text color of the text in the second field, the one labeled as "myTextField#1" in
the Fields navigation tab, to blue.
The technique of referencing individual widgets is especially useful with radio button fields, see “Radio
button fields” on page 81 for additional discussion and examples.
Some properties of the Field object, such as value, apply to all widgets that are children of that field.
Other properties, such as textColor and setAction, are specific to individual widgets. See the section
on the Field object in the JavaScript for Acrobat API Reference for a complete list of Field properties
accessible at the widget level.
Creating forms
In this section you learn how to create a form field using the Doc object addField method. Topics
include:
Topics Page
Positioning form fields page 88
Duplicating form fields page 89
Creating multiple form fields page 90
Positioning form fields
Remember that form field positioning takes place in Rotated User Space, in which the origin of a page is
located at the bottom left corner.
If you are accustomed to calculating the positions of form fields from the top left corner of a page, the
following example will serve as a template for obtaining the correct position.

Adobe Acrobat SDK Using JavaScript in Forms
Developing Acrobat Applications Using JavaScript Creating forms 89
In this example, we will position a 1 inch by 2 inch form field 0.5 inches from the top of the page and 1 inch
from the left side:
// 1 inch = 72 points
var inch = 72;
// Obtain the page coordinates in Rotated User Space
var aRect = this.getPageBox({nPage: 2});
// Position the top left corner 1 inch from the left side
aRect[0] += 1 * inch;
// Make the rectangle 1 inch wide
aRect[2] = aRect[0] + 1*inch;
// The top left corner is 0.5 inch down from the top of the page
aRect[1] -= 0.5*inch;
// Make the rectangle 2 inches tall
aRect[3] = aRect[1] - 2*inch;
// Draw the button
var f = this.addField("myButton", "button", 2, aRect);
Normally, when you create a form field, you do so using the UI; creating a form field using the addField
has limited applications because the exact positioning of the field on the page (and relative to its content)
is usually not known. The addField method is useful in situations when you either know the positioning
of the field, or you can acquire that information from another method; Example 6.8 on page 89 illustrates
the use of addField when the positioning of the fields are known in advance.
Duplicating form fields
It may sometimes be useful to duplicate a form field in other pages of the document. For example, you
may wish to insert navigation form buttons at the bottom of your document to help the user navigate.
Example 6.8 Inserting navigation buttons on each page
The script that follows can be executed in the console, or it can be used as batch sequence JavaScript.
Additional customizations are possible.
var aPage = this.getPageBox();
var w = 45; // Width of each button
var h = 12 // Height of each button
var nNavi = 4; // Number of buttons to be placed
var g = 6; // Gap between buttons
var totalWidth = nNavi * w + (nNavi - 1) * g; // total width of navi bar
var widthPage = aPage[2] - aPage[0];
// Horizontal offset to center navi bar
var hoffset = (widthPage - totalWidth) / 2;
var voffset = 12; // vertical offset from bottom

Adobe Acrobat SDK Using JavaScript in Forms
Developing Acrobat Applications Using JavaScript Creating forms 90
for (var nPage = 0; nPage < this.numPages; nPage++) {
// Create the fields
var pp = this.addField("PrevPage", "button", nPage,
[ hoffset, voffset, hoffset + w, voffset + h ] );
pp.buttonSetCaption(pp.name);
pp.fillColor=color.ltGray;
pp.setAction("MouseUp", "this.pageNum--");
var np = this.addField("NextPage", "button", nPage,
[ hoffset + w + g, voffset, hoffset + 2*w + g, voffset + h ] );
np.buttonSetCaption(np.name);
np.fillColor=color.ltGray;
np.setAction("MouseUp", "this.pageNum++");
var pv = this.addField("PrevView", "button", nPage,
[ hoffset + 2*w + 2*g, voffset, hoffset + 3*w + 2*g, voffset + h ] );
pv.buttonSetCaption(pv.name);
pv.fillColor=color.ltGray;
pv.setAction("MouseUp", "app.goBack()");
var nv = this.addField("NextView", "button", nPage,
[ hoffset + 3*w + 3*g, voffset, hoffset + 4*w + 3*g, voffset + h ] );
nv.buttonSetCaption(nv.name);
nv.fillColor=color.ltGray;
nv.setAction("MouseUp", "app.goForward()");
}
Creating multiple form fields
The best approach to creating a row, column, or grid of form fields is to use array notation in combination
with hierarchical naming.
For example, the following code creates a column of three text fields:
var myColumn = new Array();
myColumn[0] = "myFieldCol.name";
myColumn[1] = "myFieldCol.birthday";
myColumn[2] = "myFieldCol.ssn";
var initialPosition = [ 36, 36 ];
var w = 2*72;
var h = 12;
var vGap = 6;
var aRect = [initialPosition[0], initialPosition[1]-(h+vGap),
initialPosition[0]+w, initialPosition[1]-h-(h+vGap)];
for (var i=0; i<myColumn.length; i++)
{
aRect[1] += (h+vGap); // move the next field down 100 points
aRect[3] += (h+vGap); // move the next field down 100 points
var f = this.addField(myColumn[i], "text", 0, aRect);
}
f = this.getField("myFieldCol");
f.strokeColor = color.black; // set some common properties

Adobe Acrobat SDK Using JavaScript in Forms
Developing Acrobat Applications Using JavaScript Defining the tabbing order 91
Defining the tabbing order
You can specify the tabbing order on a given page by invoking the setPageTabOrder method of the
Doc object, which requires two parameters: the page number and the order to be used.
There are three options for tabbing order: you can specify tabbing by rows ("rows"), columns
("columns"), or document structure ("structure").
For example, the following code sets up tabbing by rows for page 2 of the document:
this.setPageTabOrder(2, "rows");
To set the tab order on each page of the document, you would execute a script like this:
for (var i = 0; i < this.numPages; i++)
this.setPageTabOrder(i, "rows");
Defining form field calculation order
When you add a text field or combo box that has a calculation script to a document, the new form field’s
name is appended to the calculation order array. When a calculation event occurs, the calculation script for
each of the form fields in the array runs, beginning with the first element in the array (array index 0) and
continuing in sequence to the end of the array.
If you would like one form field to have calculation precedence over another, you can change its
calculation index, accessed through the Field object’s calcOrderIndex property. A form field script with
a lower calculation index executes first. The following code guarantees that the calculation script for form
field subtotal will run before the one for form field total:
var subtotal = this.getField("subtotal");
var total = this.getField("total");
total.calcOrderIndex = subtotal.calcOrderIndex + 1;
Making PDF forms web-ready
PDF forms can be used in workflows that require the exchange of information over the web. You can create
forms that run in web browsers, and can submit and retrieve information between the client and server by
making a Submit button available in the form. The button can perform similar tasks to those of HTML
scripts.
You will need a CGI application on the web server that can facilitate the exchange of your form’s
information with a database. The CGI application must be able to retrieve information from forms in HTML,
FDF, or XML formats.
In order to enable your PDF forms for data exchange over the web, be sure to name your form fields so that
they match those in the CGI application. In addition, be sure to specify the export values for radio buttons
and check boxes.
The client side form data may be posted to the server using the HTML, FDF, XFDF, or PDF formats. Note that
the use of XFDF format results in the submission of XML-formatted data to the server, which will need an
XML parser or library to read the XFDF data.

Adobe Acrobat SDK Using JavaScript in Forms
Developing Acrobat Applications Using JavaScript Importing and exporting form data 92
The equivalent MIME types for all posted form data are shown in the following table.
MIME types for data formats
Data format MIME type
HTML application/x-www-form-urlencoded
FDF application/vnd.fdf
XFDF application/vnd.adobe.xfdf
PDF application/pdf
XML application/xml
Creating a submit button
To create a submit button, begin by showing the Forms toolbar (Tools > Forms > Show Forms Toolbar).
From the toolbar, select the Button tool. Once selected, you can either double-click the page, or drag a
rectangle. On the Actions tab of the Button Properties dialog box, use the Mouse Up trigger and select
Submit a Form action. You can specify which data format is used when you select the Export Format
option. If it is necessary for the server to be able to recognize and reconstruct a digital signature, it is
advisable that you choose the Incremental Changes to the PDF option.
Creating a reset form button
Create a button using the Button tool as described in Creating a submit button, above. On the Actions tab
of the Button Properties dialog box, use the Mouse Up trigger and select the Reset a Form action. Click the
Add button to select which fields you want to reset to their default values.
Defining CGI export values
The face value of a form is not necessarily the same as its export value. When a form is submitted, the
export value of each form field is the value that is used. For text fields, the face and export value is the
same; for combo boxes, list boxes, radio buttons and check boxes, the face value is not the same as the
export value. You need to check all the export values of your form to be sure they are values that your
server-side application recognizes and accepts. The values may represent identifying information that the
server-side application uses to process the incoming data.
Importing and exporting form data
Form data can be exported to a separate file, which can then be sent using email or over the web. When
doing this, save either to Forms Data Format (FDF) or XML-based FDF (XFDF). This creates an export file
much smaller than the original PDF file. To programmatically save your data in one of these formats use
the Doc object methods exportAsFDF and exportAsXFDF.
On the server-side, use the FDF Toolkit to read the FDF data, or use a XML parser or library to read the XFDF
data
Note that Acrobat forms support the FDF, XFDF, tab-delimited text, and XML formats, and that XML forms
support XML and XDP formats.

Adobe Acrobat SDK Using JavaScript in Forms
Developing Acrobat Applications Using JavaScript Emailing completed forms 93
Emailing completed forms
Recent versions of Acrobat have offered an entire workflow around email submittal of form data. To email
a completed form in FDF format, invoke the mailForm method of the Doc object, which exports the data
to FDF and sends it via email.
To make an interactive email session, pass true to the first parameter, which specifies whether a user
interface should be used, as shown in the code below:
this.mailForm(true);
To send the exported FDF data automatically, pass false to the first parameter, and specify the cTO, cCc,
cBcc, cSubject, and cMsg fields (all of which are optional), as shown in the code below:
this.mailForm(false, );
this.mailForm({
bUI: false,
cTo: "recipient@example.com",
cSubject: "You are receiving mail",
cMsg: "A client filled in your online form and "
+ "submitted the attached data."
})
Unless this command is executed in a privileged context, see “Privileged versus non-privileged context” on
page 45, the mail client will appear to the user.
Use date objects
This section discusses the use of Date objects within Acrobat. The reader should be familiar with the
JavaScript Date object and the util methods that process dates. JavaScript Date objects actually
contain both a date and a time. All references to Date in this section refer to the date-time combination.
Note: All date manipulations in JavaScript, including those methods that have been documented in this
specification are Year 2000 (Y2K) compliant.
Note: When using the Date object, do not use the getYear method, which returns the current year
minus 1900. Instead use the getFullYear method which always returns a four digit year. For
example,
var d = new Date()
d.getFullYear();
Converting from a date to a string
Acrobat provides several date-related methods in addition to the ones provided by the JavaScript Date
object. These are the preferred methods of converting between Date objects and strings. Because of
Acrobat’s ability to handle dates in many formats, the Date object does not always handle these
conversions correctly.

Adobe Acrobat SDK Using JavaScript in Forms
Developing Acrobat Applications Using JavaScript Use date objects 94
To convert a Date object into a string, the printd method of the util object is used. Unlike the built-in
conversion of the Date object to a string, printd allows an exact specification of how the date should be
formatted.
/* Example of util.printd */
var d = new Date(); // Create a Date object containing the current date
/* Create some strings from the Date object with various formats with
** util.printd */
var s = [ "mm/dd/yy", "yy/m/d", "mmmm dd, yyyy", "dd-mmm-yyyy" ];
for (var i = 0; i < s.length; i++) {
/* Print these strings to the console */
console.println("Format " + s[i] + " looks like: "
+ util.printd(s[i], d));
}
The output of this script would look like:
Format mm/dd/yy looks like: 01/15/05
Format yy/mm/dd looks like: 05/1/15
Format mmmm dd, yyyy looks like: January 15, 2005
Format dd-mmm-yyyy looks like: 15-Jan-2005
Note: You should output dates with a four digit year to avoid ambiguity.
Converting from a string to a date
To convert a string to a Date object, use the util object’s scand method. It accepts a format string that it
uses as a hint as to the order of the year, month, and day in the input string.
/* Example of util.scand */
/* Create some strings containing the same date in differing formats. */
var s1 = "03/12/97";
var s2 = "80/06/01";
var s3 = "December 6, 1948";
var s4 = "Saturday 04/11/76";
var s5 = "Tue. 02/01/30";
var s6 = "Friday, Jan. the 15th, 1999";
/* Convert the strings into Date objects using util.scand */
var d1 = util.scand("mm/dd/yy", s1);
var d2 = util.scand("yy/mm/dd", s2);
var d3 = util.scand("mmmm dd, yyyy", s3);
var d4 = util.scand("mm/dd/yy", s4);
var d5 = util.scand("yy/mm/dd", s5);
var d6 = util.scand("mmmm dd, yyyy", s6);
/* Print the dates to the console using util.printd */
console.println(util.printd("mm/dd/yyyy", d1));
console.println(util.printd("mm/dd/yyyy", d2));
console.println(util.printd("mm/dd/yyyy", d3));
console.println(util.printd("mm/dd/yyyy", d4));
console.println(util.printd("mm/dd/yyyy", d5));
console.println(util.printd("mm/dd/yyyy", d6));

Adobe Acrobat SDK Using JavaScript in Forms
Developing Acrobat Applications Using JavaScript Date arithmetic 95
The output of this script would look like this:
03/12/1997
06/01/1980
12/06/1948
04/11/1976
01/30/2002
01/15/1999
Unlike the date constructor (new Date(...)), scand is rather forgiving in terms of the string passed to
it.
Note: Given a two digit year for input, scand resolves the ambiguity as follows: if the year is less than 50
then it is assumed to be in the 21st century (i.e. add 2000), if it is greater than or equal to 50 then it is
in the 20th century (add 1900). This heuristic is often known as the Date Horizon.
Date arithmetic
It is often useful to do arithmetic on dates to determine things like the time interval between two dates or
what the date will be several days or weeks in the future. The JavaScript Date object provides several ways
to do this. The simplest and possibly most easily understood method is by manipulating dates in terms of
their numeric representation. Internally, JavaScript dates are stored as the number of milliseconds (one
thousand milliseconds is one whole second) since a fixed date and time. This number can be retrieved
through the valueOf method of the Date object. The Date constructor allows the construction of a new
date from this number.
/* Example of date arithmetic. */
/* Create a Date object with a definite date. */
var d1 = util.scand("mm/dd/yy", "4/11/76");
/* Create a date object containing the current date. */
var d2 = new Date();
/* Number of seconds difference. */
var diff = (d2.valueOf() - d1.valueOf()) / 1000;
/* Print some interesting stuff to the console. */
console.println("It has been "
+ diff + " seconds since 4/11/1976");
console.println("It has been "
+ diff / 60 + " minutes since 4/11/1976");
console.println("It has been "
+ (diff / 60) / 60 + " hours since 4/11/1976");
console.println("It has been "
+ ((diff / 60) / 60) / 24 + " days since 4/11/1976");
console.println("It has been "
+ (((diff / 60) / 60) / 24) / 365 + " years since 4/11/1976");
The output of this script would look something like this:
It has been 718329600 seconds since 4/11/1976
It has been 11972160 minutes since 4/11/1976
It has been 199536 hours since 4/11/1976
It has been 8314 days since 4/11/1976
It has been 22.7780821917808 years since 4/11/1976

Adobe Acrobat SDK Using JavaScript in Forms
Developing Acrobat Applications Using JavaScript Defining global variables in JavaScript 96
The following example shows the addition of dates.
/* Example of date arithmetic. */
/* Create a date object containing the current date. */
var d1 = new Date();
/* num contains the numeric representation of the current date. */
var num = d1.valueOf();
/* Add thirteen days to today’s date, in milliseconds. */
/* 1000 ms/sec, 60 sec/min, 60 min/hour, 24 hours/day, 13 days */
num += 1000 * 60 * 60 * 24 * 13;
/* Create our new date, 13 days ahead of the current date. */
var d2 = new Date(num);
/* Print out the current date and our new date using util.printd */
console.println("It is currently: "
+ util.printd("mm/dd/yyyy", d1));
console.println("In 13 days, it will be: "
+ util.printd("mm/dd/yyyy", d2));
The output of this script would look something like this:
It is currently: 01/15/1999
In 13 days, it will be: 01/28/1999
Defining global variables in JavaScript
In this section we discuss how to define, set, get and manage global variables.
Enable the global object security policy
Beginning with version 8, the access to global variables has changed somewhat. The JavaScript category
in the Preferences dialog box (Ctrl+K) has a new security check box, Enable Global Object Security Policy.
●When checked, the default, each time a global variable is written to, the origin which set it is
remembered. Only origins that match can then access the variable.
●For files, this means only the file that set it, having the same path it had when the variable was set,
can access the variable.
●For documents from URLs it means only the host which set it can access the variable.
There is an important exception to the restrictions described above, global variables can be defined
and accessed in a privileged context, in the console, in a batch sequence and in folder JavaScript. A
global variable set at the folder level can be accessed at the folder level, or from within the console.
●When not checked, documents from different origins are permitted to access the variable; this is the
behavior previous to version 8.0.
Additional discussion and examples, see “Global object security policy” on page 98.
Setting and getting a global variable
The Acrobat extensions to JavaScript define a global object to which you can attach global variables as
properties. To define a new global variable called myVariable and set it equal to the number 1, you
would type:
global.myVariable = 1;

Adobe Acrobat SDK Using JavaScript in Forms
Developing Acrobat Applications Using JavaScript Defining global variables in JavaScript 97
A global variable can be read in the usual way,
console.println("The value of global.myVariable is " + global.myVariable);
The life of this variable ends when the application is closed.
In versions of Acrobat previous to 8.0, any document open in Acrobat (or Adobe Reader) had access to any
global variable and its value. This same behavior can be maintained in version 8 provided the item Enable
Global Object Security Policy, found in the JavaScript section of the Preference, is unchecked. When
checked, however, which is the default, a global variable is restricted to only that document that created
the global variable in the case of viewing PDF files in Acrobat or Adobe Reader, or to only those
documents that come from the same web host where the global variable was set. See the JavaScript for
Acrobat API Reference for a more detailed description of this policy.
Deleting global variables
Once you have finished using a global variable, it can be deleted with the delete operator.
global.myVariable = 1;
delete global.myVariable;
Making global variables persistent
Global data does not persist across user sessions unless you specifically make your global variables
persistent. The predefined global object has a method designed to do this. To make a variable named
myVariable persist across sessions, use the following syntax:
global.setPersistent("myVariable",true);
In future sessions, the variable will still exist with its previous value intact.
Beginning with Acrobat version 8, there is a new security policy for global variables that applies to global
persistent variables as well. See the description above of this policy for more details.
Querying an Acrobat form field value in another open form
Use the global object subscribe method to make the field(s) of interest available to others at runtime.
For example, a document (Document A) may contain a document script (invoked when that document is
first opened) that defines a global field value of interest:
global.xyz_value = some value;
Then, when your document (Document B) wants to access the value of interest from the other form
(Document A), it can subscribe to the variable in question:
global.subscribe("xyz_value", ValueUpdate);
In this case, ValueUpdate refers to a user-defined function that is called automatically whenever
xyz_value changes. If you were using xyz_value in Document B as part of a field called MyField, you
might define the callback function this way:
function ValueUpdate( newValue ) {
this.getField("MyField").value = newValue;}
Beginning with version 8.0 of Acrobat, there is a new security policy for global variables that applies to
global variables. For the above solution to work, the Enable Global Object Security Policy, found in the
JavaScript section of the Preferences, is unchecked, or both documents must be served from the same
web host. See the previous description of this policy for more details.

Adobe Acrobat SDK Using JavaScript in Forms
Developing Acrobat Applications Using JavaScript Intercepting keystrokes in an Acrobat form 98
Global object security policy
The new global security policy places restrictions on document access to global variables. For more
information and exceptions, see “Enable the global object security policy” on page 96.
In a document, named docA.pdf, execute the following script in a non-privileged context (mouse-up
button):
global.x = 1
global.setPersistent("x", true);
The path for docA.pdf is the origin saved with the global.x variable; consequently, docA.pdf can
access this variable:
console.println("global.x = " + global.x);
To set this global from docA.pdf, we execute global.x = 3, for example, in any context.
To have a document with a different path get and set this global variable, the getting and setting must
occur in a trusted context, with a raised level of privilege. The following scripts are folder JavaScript.
myTrustedGetGlobal = app.trustedFunction ( function()
{
app.beginPriv();
var y = global.x;
return y
app.endPriv();
});
myTrustedSetGlobal = app.trustedFunction ( function(value)
{
app.beginPriv();
global.x=value;
app.endPriv();
});
Another document, docB.pdf can access the global.x variable through the above trusted functions:
// Mouse up button action from doc B
console.println("The value of global.x is " + myTrustedGetGlobal());
The global can also be set from docB.pdf:
// Set global.x from docB.pdf
myTrustedSetGlobal(2);
Once global.x has been set from docB.pdf, the origin is changed; docA.pdf cannot access
global.x directly unless it is through a trusted function:
// Execute a mouse up button action from docA.pdf
console.println("The value of global.x is " + myTrustedGetGlobal());
Intercepting keystrokes in an Acrobat form
Create a custom keystroke script (see the Format tab in the Properties dialog box for any text field or
combo box) in which you examine the value of event.change. By altering this value, you can alter the
user's input as it takes place. See the discussion of the Text fields, page 83.

Adobe Acrobat SDK Using JavaScript in Forms
Developing Acrobat Applications Using JavaScript Constructing custom colors 99
Constructing custom colors
Colors are Array objects in which the first item in the array is a string describing the color space ("T" for
transparent, "G" for grayscale, "RGB" for RGB, "CMYK" for CMYK) and the following items are numeric
values for the respective components of the color space. Hence:
color.blue = new Array("RGB", 0, 0, 1);
color.cyan = new Array("CMYK", 1, 0, 0, 0);
To make a custom color, just declare an array containing the color-space type and channel values you want
to use.
Prompting the user for a response
Use the response defined in the app object. This method displays a dialog box containing a question
and an entry field for the user to reply to the question. (Optionally, the dialog box can have a title or a
default value for the answer to the question.) The return value is a string containing the user’s response. If
the user clicks Cancel, the response is the null object.
var dialogTitle = "Please Confirm";
var defaultAnswer = "No.";
var reply = app.response("Did you really mean to type that?",
dialogTitle, defaultAnswer);
Fetching an URL from JavaScript
Use the getURL method of the Doc object. This method retrieves the specified URL over the Internet
using a GET. If the current document is being viewed inside the browser or Acrobat Web Capture is not
available, it uses the Weblink plug-in to retrieve the requested URL.
Creating special rollover effects
You can create special rollover effects using buttons. Create a button with the border and fill colors set to
transparent, and place it where you want to detect mouse entry or exit. Then attach scripts to the
mouse-enter and/or mouse-exit actions of the field. When the user enters or exists the button region, the
JavaScript you created will execute. For example, the following is a mouse enter JavaScript action:
console.println("You have entered my secret area");
Introduction to XML forms architecture (XFA)
The XML forms architecture (XFA) is an XML-based architecture which supports the production of business
form documents through the use of templates based on the XML language. Its features address a variety
of workflow needs including dynamic reflow, dynamic actions based on user interaction or automated
server events, headers, footers, and complex representations of forms capable of large-scale data
processing.
XFA can be understood in terms of two major components: templates and content. The templates define
presentation, calculation, and interaction rules, and are based on XML. Content is the static or dynamic
data, stored in the document, that is bound to the templates.

Adobe Acrobat SDK Using JavaScript in Forms
Developing Acrobat Applications Using JavaScript Enabling dynamic layout and rendering 100
Dynamic XFA indicates that the content will be defined later after binding to a template. This also means
that the following is possible:
●Form fields may be moved or resized.
●Form fields automatically grow or shrink according to the amount of text added or removed.
●As a form field grows, it can span multiple pages.
●Repeating subforms may be spawned as needed, and page contents shifted accordingly.
●Elements on the page are shown or hidden as needed.
To take advantage of the rich forms functionality offered by the XFA plug-in, use Adobe LiveCycle Designer
to create or edit the templates, and save your forms in the XML Data Package format (XDP) or as a PDF
document. Use XDP if the data is processed by server applications, and PDF if the data is processed by
Acrobat.
Enabling dynamic layout and rendering
In order to enable dynamic layout and rendering for a form, save it from LiveCycle Designer as a dynamic
PDF form file.
Growable form fields
The elements, which include Fields, Subforms, Areas, Content Areas, and Exclusion Groups, expand to fit
the data they contain. They may relocate in response to changes in the location or extent of their
containing elements, or if they flow together with other elements in the same container.
If the element reaches the nominal content region of the containing page, then it splits so that it may be
contained across both pages.
Variable-size rows and tables
Subforms may repeat to accommodate incoming data. For example, when importing a variable number of
subforms containing entries for name, address, and telephone number, form fields need to be added or
removed based on the volume of data. This means that the number of rows in a table may increase.
Multiple customized forms within a form based on user input
Subforms may also be subject to conditions. For example, form fields for dependent children would
become visible if the user checks a box indicating that there are dependent children. In addition, XFA
allows multiple form fields with the same name and multiple copies of the same form.
Handling image data
Images are handled as data and are considered to have their own field type. There is automatic support for
browsing images in all standard raster image formats (including PNG, GIF, TIFF, and JPEG).
Dynamic tooltips
XFA forms support dynamic tooltips, including support for individual radio buttons in a group.

Adobe Acrobat SDK Using JavaScript in Forms
Developing Acrobat Applications Using JavaScript XFA-specific JavaScript methods 101
XFA-specific JavaScript methods
JavaScript for Acrobat provides access to the XFA appModel container, which provides the properties and
methods indicated in the following two tables.
XFA appModel properties
appModel property Description
aliasNode Returns the node represented by the alias for this model.
all Returns all nodes with the same name or class.
appModelName Returns xfa.
classAll Returns all nodes with the same class name.
classIndex Returns the position of this node in the collection of nodes having the
same class name.
className Returns the class name of the object.
context Returns the current node (needed for resolveNode and resolveNodes).
id Returns the ID of the current node.
index Returns the position of this node in the collection of nodes having the
same name.
isContainer Returns true if this is a container object.
isNull Returns true if the node has a null value.
model Returns the XFA model for this node.
name Returns the name of this node.
nodes Returns a list of child nodes for this node.
ns Returns the namespace for this node (or XFAModel).
oneOfChild Retrieves or sets the child that has the XFA::oneOfChild relationship to
its parent.
parent Retrieves the parent of this node.
somExpression Retrieves the SOM expression for this node.
this Retrieves the current node (starting node for resolveNode and
resolveNodes).

Adobe Acrobat SDK Using JavaScript in Forms
Developing Acrobat Applications Using JavaScript XFA-specific JavaScript methods 102
XFA appModel methods
appModel method Description
applyXSL Performs an XSL transformation of the current node
assignNode Sets the value of the node, and creates one if necessary
clearErrorList Clears the current list of errors
clone Clones a node (and its subtree if specified)
createNode Creates a new XFA node based on a valid classname
getAttribute Retrieves a specified attribute value
getElement Retrieves a specified property element
isCompatibleNS Determines if two namespaces are equivalent
isPropertySpecified Checks if a specific property has been defined for the node
loadXML Loads and appends the current XML document to the node
resolveNode Obtains the node corresponding to the SOM expression
resolveNodes Obtains the XFATreeList corresponding to the SOM expression
saveXML Saves the current node to a string
setAttribute Sets a specified attribute value
setElement Sets a specified property element
The XFA DOM model contains a root object that consists of either a treeList or a Tree. A treeList
consists of a list of nodes (which is why it is sometimes called a NodeList). A Tree consists of a hierarchical
structure of nodes, each of which may contain content, a model, or a textNode.
The following properties and methods are available in a treeList object:
Properties:
length
Methods:
append, insert, item, namedItem, remove
The following properties and methods are available in a Tree object:
Properties:
all, classAll, classIndex, index, name, nodes, parent, somExpression
Methods:
resolveNode, resolveNodes

Adobe Acrobat SDK Using JavaScript in Forms
Developing Acrobat Applications Using JavaScript XFA-specific JavaScript methods 103
Each Node element represents an element and its children in the XML DOM. To obtain a string
representation of the node, invoke its saveXML method. To apply an XSL transform (XSLT) to the node and
its children, invoke its applyXSL method. The following properties and methods are available in a Node
object:
Properties:
id, isContainer, isNull, model, ns, oneOfChild
Methods:
applyXSL, assignNode, clone, getAttribute, getElement,
isPropertySpecified, loadXML, saveXML, setAttribute, setElement
There are two approaches to accessing content in an XML stream. In the first approach, XFA syntax may be
used to manipulate the XML DOM. In the second approach, you can use standard XPath syntax.
The XMLData object provides two methods useful for manipulating XML documents: applyXPath and
parse.
The applyXPath permits the manipulation of an XML document via an XPath, and the parse method
creates an object representing an XML document tree. Both of these return an XFA object.
The first approach involves the usage of the parse method of the XFAData object for accessing and
manipulating XML streams. The second approach involves the usage of the applyXPath method of the
XFAData object.
Both approaches are illustrated below.
In this first example, the usage of the parse method is illustrated below. We create our XML data using an
Acrobat 8.0 specific feature, E4X (ECMA-357).
// Create the XML stream using E4X
var myXML = <purchase>
<product>
<price>300</price>
<name>Media Player</name>
</product>
<product>
<price>49.95</price>
<name>case</name>
</product>
</purchase>
// Now convert to a string so we can use XMLData.parse()
var parseString = myXML.toXMLString()
// Now create the DOM
var x = XMLData.parse(parseString);
List our data in a human readable form:
console.println("----------------------");
for ( var i=0; i<x.nodes.length; i++) {
y = x.nodes.item(i);
console.println("Name: " + y.name.value);
console.println("Price: " + y.price.value);
console.println("----------------------");
}

Adobe Acrobat SDK Using JavaScript in Forms
Developing Acrobat Applications Using JavaScript XFA-specific JavaScript methods 104
This is the output to the console:
----------------------
Name: Media Player
Price: 299.00
----------------------
Name: case
Price: 49.95
----------------------
// Change the price of the Media Player
x.nodes.item(0).price.value = "400";
Now verify the price has changed by executing the loop listed above. This is the output to the console:
----------------------
Name: Media Player
Price: 400
----------------------
Name: case
Price: 49.95
----------------------
This next example accomplishes the same task through the applyXPath method:
// Create the XML stream using E4X
var myXML = <purchase>
<product>
<price>300</price>
<name>Media Player</name>
</product>
<product>
<price>49.95</price>
<name>case</name>
</product>
</purchase>
// Now convert to a string so we can use XMLData.parse()
var parseString = myXML.toXMLString()
// Now create the DOM
var x = XMLData.parse(parseString,false);
// Set up the XPath expression
var xPathExpr = "//purchase/product[name='iPod']/price";
// Now get the media player price
var price = XMLData.applyXPath(x, xPathExpr);
// Give the media player price a new price
price.value = "400";

Adobe Acrobat SDK Using JavaScript in Forms
Developing Acrobat Applications Using JavaScript JavaScript methods not enabled in XML Forms 105
JavaScript methods not enabled in XML Forms
The following methods are not available from an XML form:
●getField
●getNthFieldName
●addNewField
●addField
●removeField
●setPageTabOrder
For additional details on the use of JavaScript within XML forms created by LiveCycle Designer, see the
document Converting Acrobat JavaScript for Use in LiveCycle Designer Forms, available through the Acrobat
Family Developer Center.
ADO support for Windows
You can access both individual and multiple records. Forms can be enabled with ADO support for more
direct database interaction.
Detecting XML forms and earlier form types
To determine whether a PDF document is an XML form (static or dynamic) or an Acrobat form, test for the
presence of the xfa object, then further subclassify using the dynamicXFAForm and XFAForeground
properties of the Doc object.
Example 6.9 Detecting and classifying XML forms in batch
The following script can be used as a batch sequence to find all PDF documents, from a given collection,
that are XML forms documents (created by LiveCycle Designer). The script reports the file name to the
console along with its classification as a dynamic or static XML form, or an Acrobat form.
// This script assumes you are using Acrobat 8.0.
console.println("Document name: " + this.documentFileName);
// The xfa object is undefined in an Acrobat form.
if ( typeof xfa == "object" ) {
if ( this.dynamicXFAForm )
console.println(" This is a dynamic XML form.");
else
console.println(" This is a static XML form.");
if ( this.XFAForeground )
console.println(" This document has imported artwork");
}
else console.println(" This is an Acrobat Form.");

Adobe Acrobat SDK Using JavaScript in Forms
Developing Acrobat Applications Using JavaScript Saving form data as XML or XML Data Package (XDP) 106
Saving form data as XML or XML Data Package (XDP)
To save your form data in XML format, invoke the saveAs method of the Doc object using the conversion
ID for XML, as shown in the code below:
this.saveAs("myDoc.xml", "com.adobe.acrobat.xml-1-00");
To take advantage of XFA functionality, you can save your forms in the XML Data Package format (XDP).
This simply requires the usage of the conversion ID for XDP, as shown in the code below:
this.saveAs("myDoc.xml", "com.adobe.acrobat.xdp");
Global submit
Suppose you have a document that contains multiple attachments, from which you would like to compile
information for submission to a server in XML format. You can create a global submit button whose mouse
up action contains a script that collects the data from each of the attachments and creates a unified
collection in XML format.
To do this, you will need to invoke the Doc object openDataObject method in order to open the
attachments, followed by its submitForm method to upload the combined XML data to the server.
The following example merges the data from several XML form attachments and submits it to a server:
var oParent = event.target;
// Get the list of attachments:
var oDataObjects = oParent.dataObjects;
if (oDataObjects == null)
app.alert("This form has no attachments!");
else {
// Create the root node for the global submit:
var oSubmitData = oParent.xfa.dataSets.createNode(
"dataGroup",
"globalSubmitRootNode"
);
// Iterate through all the attachments:
var nChildren = oDataObjects.length;
for (var iChild = 0; iChild < nChildren; i++) {
// Open the next attachment:
var oNextChild = oParent.openDataObject(
oDataObjects[iChild].name
);
// Transfer its data to the XML collection:
oSubmitData.nodes.append(
oNextChild.xfa.data.nodes.item(0)
);
close the attachment//
oNextChild.closeDoc();
}

Adobe Acrobat SDK Using JavaScript in Forms
Developing Acrobat Applications Using JavaScript Making forms accessible 107
// Submit the XML data collection to the server
oParent.submitForm({
cURL: "http://theserver.com/cgi-bin/thescript.cgi",
cSubmitAs: "XML",
oXML: oSubmitData
});
}
Making forms accessible
The accessibility of electronic information is an increasingly important issue. Creating forms that adhere to
the accessibility tips below will make your forms usable by all users.
Making a PDF form accessible to users who have impaired motor or visual ability requires that the
document be structured, which means that PDF tags present in the document ensure that the content is
organized according to a logical structure tree. This means that you will have added tags to the document.
Once you do this, you can specify alternative text within the tags.
You can make forms accessible through the use of text-to-speech engines and tagged annotations
containing alternative text.
Text-to-speech engines can translate structured text in a PDF document into audible sound, and tagged
annotations containing alternative text can provide substitute content for graphical representations,
which cannot be read by a screen reader. It is useful to consider embedding alternative text in links and
bookmarks, as well as specifying the language of the document.
Text-to-speech
In order for text-to-speech engines to be able to work with your document, it must be structured. You can
create structured documents using Adobe FrameMaker® 7.0 or Adobe FrameMaker SGML 6.0 running in
structured mode.
To access the text-to-speech engine with JavaScript, use the TTS object, which has methods to render text
as digital audio and present it in spoken form to the user.
For example, the following code displays a message stating whether the TTS engine is available:
console.println("TTS available: " + tts.available);
The next code sample illustrates how to enumerate through all available speakers, queue a greeting into
the TTS object for each one, and present the digital audio version of it to the user:
for (var i=0; i < tts.numSpeakers; i++) {
var cSpeaker = tts.getNthSpeakerName(i);
console.println("Speaker[" + i + "] = " + cSpeaker);
tts.speaker = cSpeaker;
tts.qText("Hello");
tts.talk();
}

Adobe Acrobat SDK Using JavaScript in Forms
Developing Acrobat Applications Using JavaScript Tagging annotations 108
The properties and methods of the TTS object are summarized in the following two tables, TTS properties
and TTS methods, see JavaScript for Acrobat API Reference for more details.
TTS properties
Property Description
available Returns true if the text-to-speech engine is available.
numSpeakers Returns the number of speakers in the engine.
pitch The baseline pitch between 0 and 10.
speaker A speaker with desired tone quality.
speechRate The rate in words per minute.
volume The volume between 0 and 10.
TTS methods
Method Description
getNthSpeakerName Retrieves the Nth speaker in the current text-to-speech engine.
pause Pauses the audio output.
qSilence Queues a period of silence into the text.
qSound Inserts a sound cue using a .wav file.
qText Inserts text into the queue.
reset Stops playback, flushes the queue, and resets all text-to-speech properties.
resume Resumes playback on a paused TTS object.
stop Stops playback and flushes the queue.
talk Sends queue contents to a text-to-speech engine.
Tagging annotations
Tagged files provide the greatest degree of accessibility, and are associated with a logical structure tree
that supports the content. Annotations can be dynamically associated with a new structure tree that is
separate from the original content of the document, thus supporting accessibility without modifying the
original content. The annotation types supported for accessibility are:
Text, FreeText, Line, Square, Circle, Polygon, Polyline, Highlight,
Underline, Squiggly, Strikeout, Stamp, Caret, Ink, Popup, FileAttachment,
Sound
To add an accessible tag, select Advanced > Accessibility and choose Add Tags to Document.

Adobe Acrobat SDK Using JavaScript in Forms
Developing Acrobat Applications Using JavaScript Document metadata 109
Document metadata
The metadata for a document can be specified using File > Properties > Description.
When a document is opened, saved, printed, or closed by a screen reader, the document title is spoken to
the user. If the title has not been specified in the document metadata, then the file name is used. Often, file
names are abbreviated or changed, so it is advised that the document author specify a title. For example, if
a document has a file name of IRS1040.pdf, a good document title would be Form 1040: U.S. Individual
Income Tax Return for 2006.
In addition, third-party screen readers usually read the title in the window title bar. You can specify what
appears in the window title bar by using File > Properties > Initial View and in the Window Options, choose
to Show either the file name or document title.
Providing all of the additional metadata associated with a document (Author, Subject, Keywords) also
makes it more easily searchable using Acrobat Search and Internet search engines.
Short description
Every field that is not hidden must contain a user-friendly name (tooltip). The tooltip is accessible through
the UI or through the Field object userName property.
The tooltip name is spoken when a user acquires the focus to that field and should give an indication of
the field’s purpose. For example, if a field is named name.first, a good short description would be
First Name. The name should not depend on the surrounding context. For instance, if both the main
section and spouse section of a document contain a First Name field, the field in the spouse section
might be named Spouse's First Name. This description is also displayed as a tooltip when the user
positions the mouse over the field.
Setting tab order
In order to traverse the document in a reasonable manner, the tab order for the fields must be set in a
logical way. This is important as most users use the tab key to move through the document. For visually
impaired users, this is a necessity as they cannot rely on mouse movements or visual cues.
Pressing the tab (shift-tab) key when there is no form field that has the keyboard focus will cause the first
(last) field in the tab order on the current page to become active. If there are no form fields on the page
then Acrobat will inform the user of this via a speech cue.
Using tab (shift-tab) while a field has the focus tabs forward (backward) in the tab order to the next
(previous) field. If the field is the last (first) field on the page and the tab (shift-tab) key is pressed, the focus
is set to the first (last) field on the next (previous) page if one exists. If such a field does not exist, then the
focus "loops" to the first (last) field on the current page.
Reading order
The reading order of a document is determined by the Tags tree. In order for a form to be used effectively
by a visually impaired user, the content and fields of a page must be included in the Tags tree. The Tags
tree can also indicate the tab order for the fields on a page.

Adobe Acrobat SDK Using JavaScript in Forms
Developing Acrobat Applications Using JavaScript Using JavaScript to secure forms 110
Using JavaScript to secure forms
As you learned earlier in Signature fields on page 82 you can lock any form fields you deem appropriate
once a document has been signed. In addition, you can also encrypt a document.
JavaScript provides a number of objects that support security. These are managed by the security and
securityHandler objects for building certificates and signatures, as well as the certificate,
directory, SignatureInfo, and dirConnection objects which are used to access the user
certificates. (The certificate object provides read-only access to an X.509 public key certificate).
These objects, in combination, provide you with the means to digitally sign or encrypt a document. Once
you have built a list of authorized recipients, you can then encrypt the document using the
encryptForRecipients method of the Doc object, save the document to commit the encryption, and
email it to them.
For example, you can obtain a list of recipients for which the encrypted document is available, and then
encrypt the document:
// Invoke the recipients dialog box to select which recipients
// will be authorized to view the encrypted document:
var oOptions = {
bAllowPermGroups: false,
cNote: "Recipients with email and certificates",
bRequireEmail: true,
bUserCert: true
};
var oGroups = security.chooseRecipientsDialog(oOptions);
// Build the mailing list
var numCerts = oGroups[0].userEntities.length;
var cMsg = "Encrypted for these recipients:\n";
var mailList = new Array;
for (var i=0; i<numCerts; i++) {
var ue = oGroups[0].userEntities[i];
var oCert = ue.defaultEncryptCert;
if (oCert == null) oCert = ue.certificates[0];
cMsg += oCert.subjectCN + ", " + ue.email + "\n";
var oRDN = oCert.subjectDN;
if (ue.email) mailList[i] = ue.email;
else if (oRDN.e) mailList[i] = oRDN.e;
}
// Now encrypt the document
this.encryptForRecipients(oGroups);
// Mail the document.
this.mailDoc({
cTo: mailList.toString(),
cSubject: "For your review",
cMsg: "Please read this before the meeting on Monday."
})

Adobe Acrobat SDK Using JavaScript in Forms
Developing Acrobat Applications Using JavaScript Using JavaScript to secure forms 111
The properties and methods of the security object are described in the following two tables.
Security properties
Property Description
handlers Returns an array of security handler names
validateSignaturesOnOpen User preference to be automatically validated when document
opens
Security methods
Method Description
chooseRecipientsDialog Opens a dialog box to choose a list of recipients
chooseSecurityPolicy Displays a dialog box to allow a user to choose from a list of
security policies, filtered according to the options.
exportToFile Saves a Certificate object to a local disk
getHandler Obtains a security handler object
getSecurityPolicies Returns the list of security policies currently available, filtered
according to the options specified.
importFromFile Reads in a Certificate object from a local disk
See the JavaScript for Acrobat API Reference for documentation on these properties and methods.

112
7Review, Markup, and Approval
In this chapter you will learn how to make use of Acrobat’s ability to facilitate online collaborative reviews
for many types of content. At the heart of this process is the set of commenting, markup, and approval
tools available to the reviewers, and the tools available to the initiator for managing the review.
You can use JavaScript to customize the review process and how comments are handled, to add additional
annotations, and to configure a SOAP-based online repository.
For more information about online collaboration, see Acrobat Online Collaboration: Setup and
Administration.
Topics Description Page
Working with comments using
JavaScript
Topics in this section include a discussion of the
relationship between the UI name of a comment and its
JavaScript counterpart, methods of gathering all
comments in a document, and techniques of setting the
properties of a comment.
page 112
Online collaboration essentials Discusses encrypting a document for a list of recipients
for review, emailing the document for review and
customizing the reviewing state model.
page 115
Managing comments Methods of managing comments: gathering and sorting,
importing and exporting, and saving to an Excel
spreadsheet.
page 119
Approving documents using
stamps (Japanese workflows)
Describes the Hanko approval workflow, used for
Japanese document workflow.
page 122
Working with comments using JavaScript
The Commenting toolbar provides reviewers with the tools necessary to create comments, which may be
placed in the document in the form of notes, highlighting, and other markup. In this section, you are
introduced to the various annotation types from the JavaScript point of view, on page 113, you will learn how
to extract content from comments and later, on page 114, you will learn to set the properties of a comment.
Annotation types
Each annotation has a JavaScript type. In the paragraphs that follow, the relation between each UI name
and its corresponding type is delineated.
UI tool name Type
Sticky Note tool Text
Text Box tool FreeText
Highlight Text tool HighLight

Adobe Acrobat SDK Review, Markup, and Approval
Developing Acrobat Applications Using JavaScript Getting annotation data 113
Getting annotation data
There are two methods for getting annotation information present in a document, or a collection of
documents. These methods are getAnnot and getAnnots of the Doc object.
The getAnnot method returns an Annotation object, an object that holds all data of the annotation. This
method takes two parameters, nPage (page number) and cName (the name of the annot). For example,
var a = this.getAnnot({ nPage: 2, cName: "myAnnot" });
if ( a != null ) {
console.println("This annot has type " + a.type);
if ( (a.type != "FileAttachment") || (a.type != "Sound") )
console.println("The comment of this annot is " + a.contents);
}
When the user makes a comment using the UI, the name of the comment is randomly assigned. As a
consequence, unless the annotation is created with the addAnnot method, in which the name of the
annot can be assigned at the time of creation, the name is not typically known to the developer.
In normal workflows, the problem is to gather all comments in a document and process them in some way.
The tool for doing this is getAnnots. The method returns an array of Annotation objects based on the
search parameters, all of which are optional:
nPage - The page number to search for annotations, if not provided, the whole document is searched.
nSortBy - The method used to sort the search results, these include page, author, and modification
date.
bReverse - If true, the array is reverse-sorted.
nFilterBy - Get anntotations satisfying certain criteria, such as getting only those annotations that
can be printed, that can be viewed, or that can be edited.
Additional discussion can be found in “Sorting comments” on page 120. See the JavaScript for Acrobat API
Reference for full descriptions of these parameters.
Cross-Out Text tool StrikeOut
Underline Text tool Underline
Stamp tool Stamp
Cloud tool. Polygon tool Polygon
Arrow tool Line
Rectangle tool Square
Pencil Tool Ink
Oval Tool Circle
Attach a File as a Comment tool FileAttachment
Record Audio Comment tool Sound
Polygon Line tool PolyLine
UI tool name Type

Adobe Acrobat SDK Review, Markup, and Approval
Developing Acrobat Applications Using JavaScript Adding comments with JavaScript 114
The following code retrieves all annotations in the document, and sorts them by author name:
var annots = this.getAnnots({
nSortBy: ANSB_Author
});
console.println("\nAnnot Report for document: " + this.documentFileName);
if ( annots != null ) {
console.show();
console.println("Number of Annotations: " + annots.length);
var msg = " %s in a %s annot said: \"%s\"";
for (var i = 0; i < annots.length; i++)
console.println(util.printf(msg, annots[i].author, annots[i].type,
annots[i].contents));
} else
console.println(" No annotations in this document.");
Adding comments with JavaScript
You can include a text box comment in a document and control its border, background color, alignment,
font, and size characteristic. To create a Square type annotation, such as one created by the Rectangle
tool in the UI, use the Document method addAnnot as follows:
this.addAnnot({
page: 0,
type: "Square",
rect: [0,0,100,100],
name: "OnMarketShare",
author: "A.C. Robat",
contents: "This section needs revision"
});
Refer to the JavaScript for Acrobat API Reference for full descriptions of the properties specified above.
All annotations can be constructed in this way, in the case of sound and file attachment annotations, there
is no JavaScript method for associating a recording with a sound annotation or a file with a file
attachment.
Setting comment properties
To set the properties of a comment, create an object literal containing the properties to be applied to your
comment. Then apply the properties to your annotation:
// Create the common properties in an object literal:
var myProps = {
strokeColor: color.red,
popupOpen: true,
arrowBegin: "Diamond",
arrowEnd: "OpenArrow"
};
// Assign the common properties to a previously created annot:
myAnnot.setProps(myProps);
The object literal, myProps, can be used again to change the properties of a collection of annotations,
perhaps ones returned by the getAnnots, as discussed in “Getting annotation data” on page 113.

Adobe Acrobat SDK Review, Markup, and Approval
Developing Acrobat Applications Using JavaScript Online collaboration essentials 115
Online collaboration essentials
You can initiate several types of review workflows for PDF documents:
●Email the document to all reviewers, and import the returned comments into the original document.
●Set up an automated email-based review.
●Set up an automated browser-based review through the use of a shared server.
●Initiate an email-based approval workflow.
●Initiate an JavaScript-based review.
Online collaboration essentials topics Page
Reviewing documents with additional
usage rights
page 115
Emailing PDF documents page 116
JavaScript-based collaboration driver page 116
Spell-checking in comments and forms page 118
Approval page 119
Reviewing documents with additional usage rights
For email-based reviews, the specification of additional usage rights within a document enables extra
capabilities within Adobe Reader. This enables the reviewer to add comments, import and export
form-related content, save the document, or apply a digital signature.
For example, when using the Doc object encryptForRecipients method, you can specify the
following permissions for reviewers:
allowAll — Permits full and unrestricted access to the entire document.
allowAccessibility — Permits content accessed for readers with visual or motor impairments.
allowContentExtraction — Permits content copying and extraction.
allowChanges — Permits either no changes, or changes to part or all of the document assembly,
content, forms, signatures, and notes.
allowPrinting — Permits no printing, low-quality printing, or high-quality printing.
The following code allows full and unrestricted access to the entire document for one set of users
(importantUsers), and allows high quality printing for another set of users (otherUsers):
var sh = security.getHandler("Adobe.PPKMS");
var dir = sh.directories[0];
var dc = dir.connect();
dc.setOutputFields({oFields:["certificates","email"]});
var importantUsers = dc.search({oParams:{lastName:"Smith"}});
var otherUsers = dc.search({oParams:{lastName:"Jones"}});
this.encryptForRecipients({
oGroups:[
{
userEntities: importantUsers,

Adobe Acrobat SDK Review, Markup, and Approval
Developing Acrobat Applications Using JavaScript Emailing PDF documents 116
permissions: { allowAll: true }
},
{
userEntities: otherUsers,
permissions: { allowPrinting: "highQuality" }
}
],
bMetaData: true
});
eMailList = "";
for ( var i=0; i < importantUsers.length; i++)
eMailList += (importantUsers[i].email + ",");
for ( var i=0; i<otherUsers.length; i++)
eMailList += (otherUsers[i].email + ",");
// Now email the secured document.
this.mailDoc({
cTo: eMailList,
cSubject: "For your eyes only",
cMsg: "Please review for the meeting on Friday."
})
Emailing PDF documents
In addition to the email options available in the Acrobat menu and toolbar, it is also possible to use
JavaScript to set up an automated email review workflow. This may be done through the Doc object
mailDoc method. In the code shown below, the document is automatically sent to
recipient@example.com:
this.mailDoc({
bUI: false,
cTo: "recipient@example.com",
cSubject: "Review",
cMsg: "Please review this document and return. Thank you."
});
Note: For Windows systems, the default mail program must be MAPI-enabled.
JavaScript-based collaboration driver
JavaScript can be used to describe the workflow for a given document review, and can be used in review
management. This is done by specifying a state model for the types of annotations a reviewer may use and
creating an annotation store on the server for customized comment and review within browser-based
workflows. The Collab object provides you with control over the possible states annotation objects may
have, and may be used in conjunction with the SOAP object to create an annotation store.
There are several methods available within the Collab object that enable you to describe the state model
for the review: these include addStateModel, getStateInModel, transitionToState, and
removeStateModel.

Adobe Acrobat SDK Review, Markup, and Approval
Developing Acrobat Applications Using JavaScript JavaScript-based collaboration driver 117
The addStateModel method is used to add a new state model to Acrobat describing the possible states
for an annot object using the model, and the removeStateModel method removes the model, though
it does not affect previously created annot objects. Their usage is shown in the code below:
// Add a state model, this script can be placed at the folder level to
// install a custom state model for enterprise users, for example.
try{
var myStates = new Object;
myStates["initial"] = {cUIName: "Haven’t reviewed it"};
myStates["approved"] = {cUIName: "I approve"};
myStates["rejected"] = {cUIName: "Forget it"};
myStates["resubmit"] = {cUIName: "Make some changes"};
Collab.addStateModel({
cName: "ReviewStates",
cUIName: "My Review",
oStates: myStates,
cDefault: "initial"
});
}
catch(e){console.println(e);}
// Now transition all annots to the "rejected" state.
var myAnnots = this.getAnnots();
for ( var i=0; i<myAnnots.length; i++ )
myAnnots[i].transitionToState("ReviewStates", "rejected");
// Now remove the state model.
try {Collab.removeStateModel("ReviewStates");}
catch(e){console.println(e);}
You can also use the SOAP object’s connect, request, and response methods to create customized
commenting and review within browser-based workflows. You can do this by setting up a SOAP-based
annotation store on the server using the Collab object’s addAnnotStore and setStoreSettings
methods.
The Collab object’s addAnnotStore method requires three parameters:
cIntName — The internal name for the annotation store.
cDispName — The display name for the annotation store.
cStore — The definition for the new Collab store class.
The new Collab store class must contain the following definitions for the functions used to add, delete,
update, and enumerate through the array of annotations:
enumerate — Communicates with the web service to request the array of annotations stored on the
server. It is used when the PDF document is loaded for online review, or when the user clicks Upload or
Send on the Commenting toolbar.
complete — Passes the annotation data to the collaboration server so that it can be updated.
update — Uploads new and modified annotations to the server.
The class SDKSampleSOAPAnnotStore, as shown in the sample code below, is defined in
sdkSOAPCollabSample.js in the Acrobat SDK, and contains complete definitions of the three
functions described above.

Adobe Acrobat SDK Review, Markup, and Approval
Developing Acrobat Applications Using JavaScript Spell-checking in comments and forms 118
The sample code below provides a standard example of how to use the SOAP and Collab objects to
customize your online collaborative review. Note that all of the reviewers must have a copy of the
JavaScript collaboration store code. In Acrobat 7.0 and later, the Custom collaboration store type allows
you to put the JavaScript on the server. The store type used is CUSTOM, and the setting is a URL to the
JavaScript file:
// Here is the URL for a SOAP HTTP service:
var mySetting = "http://sampleSite/comments.asmx?WSDL";
// Here is the internal name for the collaborative store:
var myType = "mySOAPCollabSample";
// Set the connection settings for the SOAP collab store:
Collab.setStoreSettings(mySetting, myType);
// Set the default collab store:
Collab.defaultStore = myType;
// Add the collab store to the Acrobat Collab servers:
if (typeof SOAPFileSys == "undefined")
Collab.addAnnotStore(
myType,
"SOAP Sample",
{
// Annot store instantiation function is required:
create: function(doc, user, settings)
{
if (settings && settings != "")
return new SDKSampleSOAPAnnotStore(
doc, user, settings
);
else
return null;
}
}
);
Spell-checking in comments and forms
You can check the spelling of any word using the spell object’ checkWord method. This can be applied
to any form field or annotation. First retrieve the contents, and submit each word to the method.
Setting spelling preferences
To set the dictionary order, first retrieve the array of dictionaries using the Doc object’s
spellDictionaryOrder property. Then modify the order of the array entries, and assign the array to
the same property. An array of currently available dictionaries can be obtained using the spell object’s
dictionaryNames property.
To set the language order, perform a similar algorithm using the Doc object’s spellLanguageOrder
property. An array of currently available dictionaries can be obtained using the spell object’s
languages property.

Adobe Acrobat SDK Review, Markup, and Approval
Developing Acrobat Applications Using JavaScript Approval 119
Adding words to a dictionary
You can add words to a dictionary by invoking the spell object’s addWord method, as shown in the code
sample below:
spell.addWord(myDictionary, "myNewWord");
Approval
Approval workflows may include an automated process in which a PDF document is automatically sent via
email to a recipient for their approval. For example, this may be accomplished through the usage of the
Doc object’s mailDoc method. The user may then use a standard approval stamp, use a custom stamp, or
use a Hanko stamp to create a secure digital signature.
Managing comments
In this section, you will look in a more detailed way at the method of managing the comments in a
document. Topics covered as listed below:
Topics Page
Selecting, moving, and deleting comments page 119
Using the comments list page 120
Exporting and importing comments page 121
Comparing comments in two PDF documents page 121
Aggregating comments for use in Excel page 121
Extracting comments in a batch process page 122
Selecting, moving, and deleting comments
Just as you can access the Comments List in the Acrobat user interface, you can likewise do so through
using the syncAnnotScan and getAnnots methods of the Doc object. The syncAnnotScan method
guarantees that all annotations in the document are scanned, and the getAnnots method returns a list of
annotations satisfying specified criteria.
For example, the following code scans all the annotations on page 2 of the document and captures them
all in the variable myAnnotList:
this.syncAnnotScan();
var myAnnotList = this.getAnnots({nPage: 1}); // Zero-based page number
To move a comment, use the corresponding setProps method of the Annotation object to specify a new
location or page. To delete the comment, invoke the corresponding destroy method of the Annotation
object. In the code sample below, all the free text comments on page 2 of the document are deleted:
for (var i=0; i<myAnnotList.length; i++)
if (myAnnotList[i].type == "FreeText")
myAnnotList[i].destroy();

Adobe Acrobat SDK Review, Markup, and Approval
Developing Acrobat Applications Using JavaScript Using the comments list 120
Using the comments list
Once you have acquired the comments list through the syncAnnotScan and getAnnots methods of
the Doc object, you can change their status, appearance, order, and visibility. In addition, you will be able
to search for comments having certain characteristics.
Changing the status of comments
To change the status of a comment, invoke the corresponding transitionToState method of the
Annotation object, as shown in the code below:
// Transition myAnnot to the "approved" state:
myAnnot.transitionToState("ReviewStates", "approved");
The code above assumes myAnnot is an Annotation object of the document.
Changing the appearance of comments
You can change the appearance of a comment in a variety of ways. In general, the appearance of any
comment may be changed by invoking the setProps method of the Annotation object, as shown in the
code below:
myAnnot.setProps({
page: 0,
points: [[10,40], [200,200]],
strokeColor: color.red,
popupOpen: true,
popupRect: [200,100,400,200],
arrowBegin: "Diamond",
arrowEnd: "OpenArrow"
});
Sorting comments
To sort comments, use getAnnots method of the Doc object and specify a value for the nSortBy
parameter. Permissible values of nSortBy are
ANSB_None — Do not sort.
ANSB_Page — Sort by page number.
ANSB_Author — Sort by author.
ANSB_ModDate — Sort by modification date.
ANSB_Type — Sort by annotation type.
In addition, you can specify that the sorting be performed in reverse order by submitting the optional
bReverse parameter to the method.
The code sample given below shows how to obtain a list of comments from page 2 of the document,
sorted in reverse order by author:
this.syncAnnotScan();
var myAnnotList = this.getAnnots({
nPage: 2,
nSortBy: ANSB_Author,
bReverse: true
});

Adobe Acrobat SDK Review, Markup, and Approval
Developing Acrobat Applications Using JavaScript Exporting and importing comments 121
Showing and hiding comments
To show or hide a comment, set its corresponding hidden property of the Annotation object. For
example, the following code hides myAnnot:
myAnnot.hidden = true;
Exporting and importing comments
To export all the comments in a file, invoke the exportAsFDF or exportAsXFDF methods of the Doc
object. In both cases, set the bAnnotations parameter to true, as shown in the code sample below,
which exports only the comments and nothing else:
this.exportAsFDF({bAnnotations: true});
To import comments from an FDF or XFDF into a file, invoke the importAnFDF or importAnXFDF
methods of the Doc object.
Aggregating comments for use in Excel
The createDataObject method of the Doc object may be used to create a tab-delimited text file, which
can then be used in Excel. To aggregate comments for use in Excel, collect all the comments using the
getAnnots method, iterate through them and store them into a tab-delimited string, create a text file
attachment object using the createDataObject method of the Doc object, pass the string to the
cValue parameter in the createDataObject method, and optionally, save the attachment to the local
hard drive using exportDataObject. Below is a sample script which follows the above outline:
var annots = this.getAnnots();
var cMyC = "Name\tPage\tComment";
for ( var i=0; i<annots.length; i++ )
cMyC += ("\n"+annots[i].author + "\t" + annots[i].page + "\t\""
+ annots[i].contents+"\"");
this.createDataObject({cName: "myCommentList.xls", cValue: cMyC});
this.exportDataObject({cName: "myCommentList.xls", nLaunch: 1});
Comparing comments in two PDF documents
While the Acrobat user interface provides you with a menu choice for comparing two documents, it is
possible to customize your comparisons using JavaScript. To gain access to multiple documents, invoke
the app object’s openDoc method for each document you would like to analyze. Each Doc object exposes
the contents of each document, such as an array of annotations. You can then compare and report any
information using customized algorithms. For example, the code below reports how many annotations
exist in the two documents:
var doc2 = app.openDoc("/C/secondDoc.pdf");
var annotsDoc1 = this.getAnnots();
var annotsDoc2 = doc2.getAnnots();
console.println("Doc 1: " + annotsDoc1.length + " annots.");
console.println("Doc 2: " + annotsDoc2.length + " annots.");
The above code will work if executed in the console. If executed from a non-privileged context, the
secondDoc.pdf must be disclosed for app.openDoc to return its Doc object. Disclosed means that the
code this.disclosed=true is executed when the document is opened, either as an open page action,
or as part of a top level execution of document scripts. See the documentation of app.openDoc in the
JavaScript for Acrobat API Reference for details.

Adobe Acrobat SDK Review, Markup, and Approval
Developing Acrobat Applications Using JavaScript Extracting comments in a batch process 122
Extracting comments in a batch process
In a batch process, you can open any number of Doc objects using the app object openDoc method. For
each open document, you can invoke its corresponding Doc object getAnnots method to collect the
comments in that file. If you would like to put all the comments together in one file, you can do so by
creating a new document and saving the various arrays of comments into that new file.
The Batch Sequences document, available from the Acrobat Family Developer Center, includes a sequence
called Comments to Tab-Delimited File. This sequence uses the techniques described in the previous
paragraph.
Approving documents using stamps (Japanese workflows)
Approval workflows are similar to other email-based collaborative reviews, and provide you with the
ability to set the order in which participants are contacted. This means that, based on the approval issued
by a participant, the document can be mailed to the next participant, and an email can be sent to the
initiator.
Setting up a Hanko approval workflow
A registered Hanko is a stamp used in Japanese document workflows, and can be used to sign official
contracts. Every registered hanko is unique and is considered a legal form of identification.
A personal Hanko is not registered, and is used for more common types of signatures, such as those used
in meeting notes or budget proposals. Everyone in an organization who is involved in a document review
must add their Hanko to the document in order for it to gain final approval.
Acrobat provides an assistant to help you set up an approval workflow. You can customize your workflow
as well, by adding form fields to the document containing recipient lists to be chosen by the participant.
This way, in case there are multiple directions for a given branch in the workflow, the participant may
invoke automated functions that send the document to the correct participants, as well as an email to the
initiator containing a record of activity.
You can use JavaScript to automate various steps within the workflow by sending the document and other
information by email using the Doc.mailDoc method.
Participating in a Hanko approval workflow
A participant receives an email with instructions for opening the document and completing their portion
of the approval process. As noted above, this can be customized and automated through the use of form
fields if the workflow is complex.
A Hanko stamp is a commenting tool used in approval workflows, and an Inkan stamp is a unique image
that can represent an individual’s identity and can be used in place of a signature. Both are created,
customized, and managed through the Acrobat user interface.
In order to use a Hanko or Inkan stamp, you will need to create a custom stamp and add digital signature
information. Once the stamp has been created, you can apply it in your workflows.

Adobe Acrobat SDK Review, Markup, and Approval
Developing Acrobat Applications Using JavaScript Participating in a Hanko approval workflow 123
Installing and customizing Hanko stamps
Creating custom Hanko stamp information involves the combination of user information and a digital
signature. Once you have set this up, it can be saved in a PDF file which is stored in the Stamps folder.
Creating custom Inkan stamps
To create an Inkan stamp, add your name, title, department, and company, choose a layout, and provide a
name to use for the stamp. You can also import a PDF form to add customized features and additional
fields containing personal information. In addition, it is possible to add secure digital signature
information to an Inkan stamp.
Deleting custom stamps
You can delete any Hanko and Inkan stamps that you created, though it is not possible to delete any of the
predefined stamps in the Stamps palette.

124
8Working with Digital Media in PDF Documents
In this chapter you will learn how to use JavaScript to extend Acrobat’s ability to integrate digital media
into PDF documents. You will learn how to set up, control, and customize properties and preferences for
media players and monitors, how to integrate movie and sound clips into your documents, and how to
add, edit, and control the settings for their renditions.
Topics Description Page
Media players: control, settings,
renditions, and events
Lists the basic objects used in creating a multimedia
document.
page 124
Monitors For systems with multiple monitors, this section
describes how to select which monitor is best suited
for the media event.
page 127
Integrating media into documents The techniques use to play media clips, in a screen
annotation, as a floating window, or in full screen.
page 128
Setting multimedia preferences A brief discussion of multimedia preferences. page 134
Media players: control, settings, renditions, and events
There are several objects that provide you with the means to customize the control, settings, renditions,
and events related to media players. These are shown in the following table.
Media player objects
Object Description
app.media Primary object for media control, settings, and renditions.
MediaOffset Time or frame position within a media clip.
Event A multimedia event fired by a Rendition object.
Events A collection of multimedia event objects.
MediaPlayer An instance of a multimedia player.
Marker A location representing a frame or time value in a media clip.
Markers All the markers in the currently loaded media clip.
MediaReject Error information when a Rendition object is rejected.
MediaSelection A media selection object used to create the MediaSettings object.
MediaSettings An object containing settings used to create a MediaPlayer object.
Monitor A display monitor used for playback.

Adobe Acrobat SDK Working with Digital Media in PDF Documents
Developing Acrobat Applications Using JavaScript Accessing a list of active players 125
Accessing a list of active players
To obtain a list of available players, call the getPlayers method of the app.media object, which accepts
an optional parameter specifying the MIME type and returns a PlayerInfoList object. The
PlayerInfoList object is an array of PlayerInfo objects that can be filtered using its select
method.
The following code sample shows how to obtain a list of all available players:
var mp = app.media.getPlayers();
The following code sample shows how to obtain a list of all available MP3 players and print them to the
console:
var mp = app.media.getPlayers("audio/MP3");
for (var i = 0; i < mp.length; i++) {
console.println("\nmp[" + i + "] Properties");
for (var p in mp[i])
console.println(p + ": " + mp[i][p]);
}
To filter the list of players using the select method of the PlayerInfoList object, you can supply an
optional object parameter which can contain any combination of id, name, and version properties,
each of which may be either a string or a regular expression. For example, the following code obtains the
QuickTime media player:
var mp = app.media.getPlayers().select({id: /quicktime/i});
In addition, the getOpenPlayers method of the doc.media object returns an array of all currently
open MediaPlayer objects. With this array, you can stop or close all players, and manipulate any subset
of the open players. The following example stops all running players in the document:
var players = doc.media.getOpenPlayers(oDoc);
for (var i in players) players[i].stop();
Specifying playback settings
You can obtain and adjust the media settings offered by a player. To do this, invoke the
getPlaySettings method of the Rendition object, which returns a MediaSettings object, as
shown in the code below:
var settings = myRendition.getPlaySettings();
Monitors An array of display monitors connected to the user’s system.
PlayerInfo An available media player.
PlayerInfoList An array of PlayerInfo objects.
Rendition Information needed to play a media clip.
ScreenAnnot A display area used for media playback.
Object Description

Adobe Acrobat SDK Working with Digital Media in PDF Documents
Developing Acrobat Applications Using JavaScript Specifying playback settings 126
In addition to the app.media properties and methods, a MediaSettings object, which is used to create
a MediaPlayer object, contains many properties related to the functional capabilities of players. These
are described in the following table.
MediaSettings object properties
Property Description
autoPlay Determines whether to play the media clip automatically when the player is
opened.
baseURL Resolves any relative URLs used in the media clip.
bgColor Specifies the background color for the media player window.
bgOpacity Specifies the background opacity for the media player window.
endAt Defines the ending time or frame for playback.
data The contents of the media clip (MediaData object).
duration The number of seconds required for playback.
floating An object containing the location and size properties of a floating window used
for playback.
layout A value indicating whether and how the content should be resized to fit the
window.
monitor Defines the rectangle containing the display monitor used for playback.
monitorType The category of display monitor used for playback (such as primary, secondary,
best color depth, etc.)
page The document page number used in case a docked media player is used.
palindrome Indicates that the media can play from beginning to end, and then in reverse from
the end to the beginning.
players The list of available players for this rendition.
rate The playback speed.
repeat The number of times the playback repeats.
showUI Indicates whether the media player controls will be visible.
startAt Defines the starting time or frame for playback.
visible Indicates whether the media player will be visible.
volume The playback volume.
windowType An enumeration obtained from App.media.WindowType indicating whether
the media player window will be docked or floating.

Adobe Acrobat SDK Working with Digital Media in PDF Documents
Developing Acrobat Applications Using JavaScript Monitors 127
The example that follows illustrates the use of these properties to control how the media file is played.
Other examples can be found in “Integrating media into documents” on page 128, as well as in the
JavaScript for Acrobat API Reference.
Example 8.1 Customizing the number of repetitions for playback
This minimal example is a custom script from the Actions tab in the Multimedia Properties panel of a
screen annotation. To override the parameters specified by the UI of the screen annotation, the args
parameter is passed.
// Obtain the MediaSettings object, and store its repeat value
var nRepeat = event.action.rendition.getPlaySettings().repeat;
nRepeat =(nRepeat == 1) ? 2 : 1;
// Set the new repeat value when opening the media player
var args = { settings: {repeat: nRepeat} };
app.media.openPlayer(args);
Monitors
The Monitors object is a read-only array of Monitor objects, each of which represents a display monitor
connected to the user’s system. It is available as a property of the app object, and you can write
customized JavaScript code to iterate through this array to obtain information about the available
monitors and select one for a full-screen or popup media player.
It is possible to apply filtering criteria to select a monitor. For example, you can select the monitor with the
best color, or if there are multiple instances, additionally select the monitor with the greatest color depth.
These criteria are methods of the Monitor object, and are listed in the following table.
Monitors filter criteria methods
Method Description
bestColor Returns the monitors with the greatest color depth.
bestFit Returns the smallest monitors with minimum specified dimensions.
desktop Creates a new monitor representing the entire virtual desktop.
document Returns the monitors containing the greatest amount of the document.
filter Returns the monitors having the highest rank according to a ranking function
supplied as a parameter.
largest Returns the monitors with the greatest area in pixels.
leastOverlap Returns the monitors overlapping the least with a given rectangle.
mostOverlap Returns the monitors overlapping the most with a given rectangle.
nonDocument Returns the monitors displaying the least amount (or none) of the document.
primary Returns the primary monitor.
secondary Returns all monitors except for the primary one.

Adobe Acrobat SDK Working with Digital Media in PDF Documents
Developing Acrobat Applications Using JavaScript Integrating media into documents 128
In addition to the capabilities within the Monitors object, the Monitor object provides the properties
shown in the following table.
Monitor object properties
Property Description
colorDepth The color depth of the monitor in bits per pixel.
isPrimary Returns true if the monitor is the primary one.
rect The boundaries of the monitor in virtual desktop coordinates.
workRect The monitor’s workspace boundaries in virtual desktop coordinates.
The example below illustrates how to obtain the primary monitor and check its color depth:
var monitors = app.monitors.primary();
if (monitors.length > 0)
console.println("Color depth: " + monitors[0].colorDepth);
The next example illustrates how to obtain the monitor with the greatest color depth, with a minimum
specified depth of 24:
var monitors = app.monitors.bestColor(24);
if (monitors.length > 0)
console.println("Found the best color depth over 24!");
The next example illustrates how to obtain the monitor with the greatest width in pixels, and determines
whether it is the primary monitor:
var monitors = app.monitors.widest();
var isIsNot = (monitors[0].isPrimary) ? " is " : " is not ";
console.println("Widest monitor" + isIsNot + "the primary.");
Integrating media into documents
You can integrate media into documents, which can be played in either a screen annotation, a floating
window, or in full screen mode. Media can be embedded in the document itself through the UI, played
from the local hard drive, or played from an external URL. There are no JavaScript methods for embedding
a movie or sound clip into the document.
When a movie or sound clip is played, there is a default behavior. For a movie, the user clicks on a screen
annotation to start the movie. A customized behavior can be developed for when the user clicks the
screen annotation or a form button. (The mechanism for activating a clip is not restricted to clicking the
screen annotation or a button, for example such events can be activated from a bookmark action or a page
open action.)
select Returns monitors filtered by monitor type.
tallest Returns the monitors with the greatest height in pixels.
widest Returns the monitors with the greatest width in pixels.
Method Description

Adobe Acrobat SDK Working with Digital Media in PDF Documents
Developing Acrobat Applications Using JavaScript Integrating media into documents 129
➤To embed a movie or sound file in a document
1. Open a document and change to the page on which you wish to place a screen annotation.
2. Display the Editing toolbar by selecting View > Toolbars > Advanced Editing.
3. Select either the Movie tool or the Sound tool from the Advanced Editing toolbar, as appropriate.
4. Marquee-select the desired movie screen area for your sound.
5. In the Add Movie or Add Sound dialog box, click the Browse button and browse for your media file.
6. From the toolbar, select the Hand tool, and click the screen annotation. The media file will play. This is
the default behavior of a new screen annotation.
Select the Object tool on the Editing toolbar and double click on your screen annotation to bring up the
Multimedia Properties dialog box. The dialog box has three tabs, Settings, Appearance and Actions. See
Acrobat help for detailed descriptions of these tabs.
The Actions tab of the Multimedia Properties dialog box is the same as that for any Acrobat form field. Of
particular interest are the Play Media (Acrobat 6 or Later Compatible) and the Run a JavaScript actions.
These are extensively discussed below.
Select the Object tool from the Editing tool bar and double click on the screen annotation to bring up the
Multimedia Properties dialog box again, and choose the Actions tab. Note that in the Actions window, a
Mouse Up trigger is listed, and the action is “Play Media (Acrobat 6 or Later Compatible)”. Highlight the
Action, click the Edit button below. You now see the “Play Media (Acrobat 6 or Later Compatible)” dialog
box. At the top of this dialog box there is a menu “Operation to Perform”. The operations are
●Play
●Stop
●Pause
●Resume
●Play from beginning
●Custom JavaScript
The operation should be set to Play from Beginning, the default operation for a new screen annotation.
The other operations of Play, Stop, Pause, and Resume can be used with buttons so that the user can pause
and resume the media clip.
In this chapter, however, we are most interested in the Custom JavaScript option, and you will learn how to
play a media clip and to add event listeners.
When using a button to play a media clip, there are two possible actions to be selected from the Button
Properties dialog box.
●Play Media (Acrobat 6 or Later Compatible)
●Run a JavaScript
In the first case, a media clip can be played by setting the UI to play the selected clip, or by executing a
custom JavaScript the rendition to be used. In second case, that of Run a JavaScript, is used when setting
the action of a form field, such as a button. Both these cases are discussed in the paragraphs that follow.

Adobe Acrobat SDK Working with Digital Media in PDF Documents
Developing Acrobat Applications Using JavaScript Controlling multimedia through a rendition action 130
Controlling multimedia through a rendition action
In this section, you will learn how to write JavaScript to play a media clip from a screen annotation in the
context of a rendition action.
➤To control the Play Media option using a JavaScript rendition action
1. Create a screen annotation by embedding a movie into your document, as described on page 129.
2. In the Actions tab of the Multimedia Properties dialog box, click Play Media (Acrobat 6 or Later
Compatible) for a mouse up trigger, and click the Edit button.
3. In the Play Media (Acrobat 6 or Later Compatible) dialog box, select Custom JavaScript from the
Operations to Perform menu, and click the Specify JavaScript button.
4. In the Select Rendition dialog box, choose the rendition you want to control, and click Next. The
JavaScript editor appears with the following text:
/* var player = */ app.media.openPlayer({
/* events, settings, etc. */
});
This is a rough template for starting your clip, the text suggests that you can define events and settings.
Custom JavaScript like this is referred to as a rendition action.
A minimal example for playing the clip is
app.media.openPlayer();
Close all dialog boxes and select the Hand tool. The movie plays when you click the screen annotation.
Additional examples follow.
Example 8.2 Running openPlayer with settings and events as a rendition action
For a rendition action, the event object carries certain multimedia specific information, for example,
event.action.annot is the annotation object to be used to play the media, and
event.action.rendition is the rendition to be played. In this example, we set the number of times
this media is to play to three, and we install some event listeners.
// Get the rendition.
var rendition = event.action.rendition;
// Get the play settings for this rendition
var settings = rendition.getPlaySettings();
// Change the repeat property to 3.
settings.repeat = 3;
// Create some event listeners for this action.
var events = new app.media.Events(
{
onPlay: function() { console.println( "Playing..." ); },
onClose: function() { console.println( "Closing..." ); },
});
// Set these into an args object, with property names expected by
// openPlayer.
args = { events: events, settings: settings };
// Play the media with specified argument.
app.media.openPlayer(args);

Adobe Acrobat SDK Working with Digital Media in PDF Documents
Developing Acrobat Applications Using JavaScript Controlling multimedia with a Run a JavaScript action 131
The app.media.openPlayer method calls app.media.createPlayer, then calls the method
MediaPlayer.open, which, by default, begins playback of the media. In the next example, the
createPlayer method is used, and playback is delayed to add in some listener events. Compare the
techniques of the previous example with the next.
Example 8.3 Play a clip in full screen
The script below is for a rendition action. The movie clip is played in full screen with the UI controls visible.
An event listener is added that causes an alert box to appear when the clip is closed.
// Get the rendition chosen in a Select Rendition dialog box.
// We need the rendition to change its settings.
var rendition = event.action.rendition;
// Get the play settings for this rendition
var settings = rendition.getPlaySettings();
// Make the window type to be full screen.
settings.windowType=app.media.windowType.fullScreen;
// Play the clip only once.
settings.repeat = 1;
// Show the UI of the player
settings.showUI = true;
// Form an args object to pass to createPlayer.
var args = { settings: settings };
// Get the returned MediaPlayer object
var player = app.media.createPlayer(args);
// Use the MediaPlayer object to add an onClose event.
player.events.add({ onClose: function() {
app.alert("That's the end of the clip. Any questions?")
} });
// Now, open the player, which begins playback, provided
// player.settings.autoPlay is true (the default). If
// player.settings.autoPlay is false, we would have to
// use player.play();
player.open()
Controlling multimedia with a Run a JavaScript action
Controlling a multimedia clip with a Run a JavaScript action is similar to a rendition action, except the
multimedia events, event.action.rendition and event.action.annot, are not defined. The
rendition and screen annotation need to be specified, and passed as part of the argument to the
openPlayer or createPlayer method.
When working with a Run a JavaScript action, the methods app.media.getAnnot and
app.media.getAnnots are fundamental for acquiring a particular screen annotation or an array of
screen annotations; the method app.media.getRendition is used to get the rendition of the selected
clip. Some of these methods are illustrated by the following example.

Adobe Acrobat SDK Working with Digital Media in PDF Documents
Developing Acrobat Applications Using JavaScript Controlling multimedia with a Run a JavaScript action 132
Example 8.4 Playing a rendition in a screen annotation from a form button
This script is for a Run a JavaScript action of a form button. It gets a media clip and plays it in a screen
annotation.
// Get the screen annotation with a title of myScreen
var annot= this.media.getAnnot
({ nPage: 0,cAnnotTitle: "myScreen" });
// Get the rendition present in this document with a rendition name of
// myClip
var rendition = this.media.getRendition("myClip");
// Get the set of default settings for this rendition.
var settings = rendition.getPlaySettings();
// Play the clip in a docked window.
settings.windowType=app.media.windowType.docked;
// Set the arguments to be passed to openPlayer, the rendition, the
//annotation and the settings.
var args = {
rendition: rendition,
annot: annot,
settings: settings
};
// Open the the media player and play.
app.media.openPlayer( args );
The above example assumes that myClip is embedded in the document. In the next two examples,
techniques for playing media from the local hard drive and from a URL are illustrated.
Example 8.5 Playing a media clip from a URL
This example references a media clip on the Internet and plays it in a floating window.
var myURLClip = "http://www.example.com/myClips/myClip.mpg";
var args = {
URL: myURLClip,
mimeType: "video/x-mpg",
doc: this,
settings:
{
players: app.media.getPlayers("video/x-mpg"),
windowType: app.media.windowType.floating,
data: app.media.getURLData( myURLClip,"video/x-mpg" ),
floating: { height: 400, width: 600 }
}
}
var settings = app.media.getURLSettings(args)
args.settings = settings;
app.media.openPlayer(args);
Here is the same example with the media on the local hard drive.

Adobe Acrobat SDK Working with Digital Media in PDF Documents
Developing Acrobat Applications Using JavaScript Adding and editing renditions 133
Example 8.6 Playing a media clip from a file
The problem with playing a file from the local hard drive is locating it. This example assumes the media clip
is in the same folder as the document.
// Get the path to the current folder.
var folderPath = /.*\//i.exec(this.URL);
// Form the path to the clip.
var myURLClip = folderPath+"/myClip.mpg";
var args = {
URL: myURLClip,
mimeType: "video/x-mpg",
doc: this,
settings:
{
players: app.media.getPlayers("video/x-mpg"),
windowType: app.media.windowType.floating,
data: app.media.getURLData( myURLClip,"video/x-mpg" ),
floating: { height: 400, width: 600 }
}
}
var settings = app.media.getURLSettings(args)
args.settings = settings;
app.media.openPlayer(args);
Playing sound clips is handled in the same way, as the following example shows.
Example 8.7 Playing a sound clip from a URL.
var myURLClip = "http://www.example.com/myClips/dream.mp3";
var args = {
URL: myURLClip,
mimeType: "audio/mp3",
doc: this,
settings: {
players: app.media.getPlayers("audio/mp3"),
windowType: app.media.windowType.floating,
floating: {height: 72, width: 128},
data: app.media.getURLData(myURLClip, "audio/mp3"),
showUI: true
},
};
var settings = app.media.getURLSettings(args);
args.settings = settings;
app.media.openPlayer(args);
Adding and editing renditions
A rendition object contains information needed to play a media clip, including embedded media data
(or a URL), and playback settings, and corresponds to the rendition in the Acrobat user interface. When you
add a movie or sound clip to your document, a default rendition is listed in the Multimedia Properties
dialog box and is assigned to a Mouse Up action. In case the rendition cannot be played, you can add other
renditions or edit the existing ones.

Adobe Acrobat SDK Working with Digital Media in PDF Documents
Developing Acrobat Applications Using JavaScript Setting multimedia preferences 134
If you add alternate versions of the media clip, these become new renditions that can serve as alternates in
case the default choice cannot be played. It is then possible to invoke the rendition object’s select
method to obtain the available media players for each rendition.
There are several types of settings that can be specified for a given rendition: media settings, playback
settings, playback location, system requirements, and playback requirements. You can use JavaScript to
customize some of these settings through the rendition object. There are several properties to which
you have read-only access when editing a rendition. These are listed in the following table.
Rendition object properties
Property Description
altText The alternate text string for the rendition.
doc The document that contains the rendition.
fileName Returns the file name or URL of an external media clip.
type A MediaRendition object or a rendition list.
uiName The name of the rendition.
In addition to these properties, you can invoke the rendition object’s getPlaySettings method,
which returns a MediaSettings object. As you learned earlier in Specifying playback settings, you can
adjust the settings through this object. You can also invoke its testCriteria method, with which you
can test the rendition against any criteria specified in the PDF file, such as minimum bandwidth.
Setting multimedia preferences
In general, you can choose which media player should be used to play a given clip, determine whether the
Player Finder dialog box is displayed, and set accessibility options for impaired users (these include
subtitles, dubbed audio, or supplemental text captions).
In addition, you can use JavaScript to access or customize multimedia preferences. For example, the
doc.media object’s canPlay property may be used to indicate whether multimedia playback is allowed
for the document. The MediaSettings object’s bgColor property can be used to specify the
background color for the media player window. Examples of each are given below:
var canPlay = doc.media.canPlay;
if (canPlay.no) {
// Determine whether security settings prohibit playback:
if (canPlay.no.security) {
if (canPlay.canShowUI)
app.alert("Security prohibits playback.");
else
console.println("Security prohibits playback.");
}
}
// Set the background color to red:
settings.bgColor = ["RGB", 1, 0, 0];

135
9Modifying the User Interface
This chapter will provide you with an understanding of the ways in which you can present and modify the
user interface. You will learn how to use JavaScript to add menu items and toolbars, customize navigation
in PDF documents and customize PDF layers.
Topics Description Page
Adding toolbar buttons and
menu items
Discusses the techniques and methods of creating toolbar
buttons and menu items.
page 135
Adding navigation to PDF
documents
Discusses how to aid the user to navigate through a PDF
document with thumbnails, bookmarks and links. Also
discussed are using actions for special effects, highlighting
form fields, numbering pages and creating buttons.
page 137
Working with PDF layers The fundamental methods of working with layers of content
(Optional Content Groups).
page 150
Adding toolbar buttons and menu items
You can add menu items and toolbar buttons to help the user navigate through your application, or to
help the user perform designated tasks.
Use app.addSubMenu and/or app.addMenuItem to add a menu item. The following example uses only
app.addMenuItem.
Example 9.1 Adding a menu item
The intention of this menu is to add a button set to the toolbar; the button set will only appear on the
toolbar if there is no document open in the window. Once the button set is installed on the toolbar, the
menu item is only enabled if there is a document open in the window.
This code is placed in the user JavaScript folder and uses a variable atbtoolbuttons to detect if this
menu item should be marked. It is set to marked if atbtoolbuttons is defined and is false.
var atbtoolbuttons;
app.addMenuItem({
cName: "atbToolButtonSet",
cUser: "My Menu",
cParent: "Tools",
cMarked: "event.rc = ( (typeof atbtoolbuttons != 'undefined')
&& !atbtoolbuttons )",
cEnable: "event.rc = (event.target == null);",
cExec: "loadATBToolButton();", nPos: 0
});
There is brief example of app.addSubMenu and app.addMenuItem, see “Executing privileged methods
through the menu” on page 47.

Adobe Acrobat SDK Modifying the User Interface
Developing Acrobat Applications Using JavaScript Adding toolbar buttons and menu items 136
Example 9.1 installs a menu item under the main Tools menu. When executed, the menu calls the function
loadATBToolButton(). This function loads the custom toolbar set, the definition of which follows.
Example 9.2 Installing and uninstalling a toolbar
If this function is called with atbtoolbuttons set to false, it means the toolbar is already installed, and
the function uninstalls the toolbar set; otherwise, the toolbar set is installed.
The method app.addToolButton is used to add a toolbar button, and app.removeToolButton is
used to remove a toolbar button.
For Acrobat 8, this script assumes that the Enable Global Object Security Policy is enabled in the JavaScript
section of the Preferences, see the discussion in “Enable the global object security policy” on page 96.
The function loadATBToolButton is a trusted function because it executes privileged methods, such as
app.getPath and app.openDoc.
The icons for the toolbar buttons are contained in icon_toolbar.pdf, which resides in the same folder
as this script. The document contains two named icons with the names of myIcon1 and myIcon2. Note
that according to the JavaScript for Acrobat API Reference, the icon size is restricted to 20 by 20 pixels. If an
icon of larger dimensions is used, an exception is thrown.
var loadATBToolButton = app.trustedFunction( function ()
{
if ( typeof atbtoolbuttons == "undefined" )
atbtoolbuttons = true;
else {
if (!atbtoolbuttons) {
app.removeToolButton("atbToolButton1");
app.removeToolButton("atbToolButton2");
atbtoolbuttons = true;
return;
}
}
if ( atbtoolbuttons ) {
app.beginPriv();
// Get the path to the user JavaScript folder
var atbPath=app.getPath({cCategory: "user", cFolder: "javascript"});
try {
// Try opening the icon doc as in hidden mode, and retrieve its doc
// object.
var doc=app.openDoc({
cPath: atbPath+"/icon_toolbar.pdf", bHidden: true});
} catch (e) { console.println("Could not open icon file"); return;}
// Get the icon stream for myIcon1 from the hidden doc
var oIcon = util.iconStreamFromIcon(doc.getIcon("myIcon1"));
// Add a tool button using this icon
app.addToolButton({
cName: "atbToolButton1",
oIcon: oIcon,
cExec: "atbTask1();",
cTooltext: "My toolbar button 1",
nPos: 0
});
Adobe Acrobat SDK Modifying the User Interface
Developing Acrobat Applications Using JavaScript Adding navigation to PDF documents 137
// Now get myIcon2 from the hidden document.
oIcon = util.iconStreamFromIcon(doc.getIcon("myIcon2"));
// and install this toolbar button as well
app.addToolButton({
cName: "atbToolButton2",
oIcon: oIcon,
cExec: "atbTask2()",
cTooltext: "My toolbar button 2",
nPos: 0
});
// Close our hidden document containing the icons.
doc.closeDoc();
app.endPriv();
// Set this variable to signal that the toolbars are installed.
atbtoolbuttons = false;
}
})
Adding navigation to PDF documents
JavaScript for Acrobat provides a number of constructs that enable you to add and customize navigation
features within PDF documents. These features make it convenient for the user to see and visit areas of
interest within the document, and you can associate a variety of actions with navigation events. In
addition, you can customize the appearance of your form fields and pages, manipulate multiple
documents, add and delete pages, and add headers, footers, watermarks, backgrounds, and buttons.
Topics Page
Thumbnails page 138
Bookmarks page 139
Links page 141
Using actions for special effects page 145
Highlighting form fields and navigational components page 145
Setting up a presentation page 146
Numbering pages page 149
Creating buttons page 150

Adobe Acrobat SDK Modifying the User Interface
Developing Acrobat Applications Using JavaScript Thumbnails 138
Thumbnails
This section discusses how to embed thumbnail images in a PDF document and how to add page actions.
Creating page thumbnails
Acrobat renders thumbnail images of each page on the fly. Should you want to store the images as part of
the PDF document, there are methods for adding and removing thumbnails in a document. To add a set of
thumbnails, invoke the Doc object addThumbnails method, which creates thumbnails for a specified set
of pages in the document. It accepts two optional parameters: nStart and nEnd represent the beginning
and end of an inclusive range of page numbers.
For example, to add thumbnails for pages 2 through 5, use the following command:
this.addThumbnails({nStart: 2, nEnd: 5});
To add a thumbnail for just one page, just provide a value for nStart. The following example adds a
thumbnail for page 7:
this.addThumbnails({nStart: 7});
To add thumbnails from page 0 to a specified page, just provide a value for nEnd. The following example
adds thumbnails for pages 0-7:
this.addThumbnails({nEnd: 7});
To add thumbnails for all the pages in the document, omit both parameters:
this.addThumbnails();
To remove a set of thumbnails, invoke the Doc object’s removeThumbnails method, which accepts the
same parameters as the addThumbnails method. For example, to remove the thumbnails for pages 2 to
5, use the following code:
this.removeThumbnails({nStart: 2, nEnd: 5});
Adding page actions with page thumbnails
You can associate a Page Open event with a page thumbnail. The most straightforward way of doing this
is to specify a Page Open or Page Close action in the Page Properties dialog box.
To customize a page action using JavaScript, invoke the Doc object setPageAction method for the
page to be opened. In the following example, a greeting is displayed when the user clicks on the
thumbnail for page 2:
this.setPageAction({ nPage: 2, cTrigger: "Open",
cScript: "app.alert('Hello');"}
);
The advantage of this approach is that you can dynamically build JavaScript strings to be used in the
method call.

Adobe Acrobat SDK Modifying the User Interface
Developing Acrobat Applications Using JavaScript Bookmarks 139
Bookmarks
You can use JavaScript to customize the appearance and behavior of the bookmarks that appear in the
Bookmarks navigation panel. Every PDF document has an object known as the bookmarkRoot, which is
the root of the bookmark tree for the document. It is possible to recursively add and modify levels of
bookmarks underneath the root. Each node is a bookmark object which can have any number of children.
Acrobat makes the bookmarkRoot object available as a property of the Doc object. This root node
contains a property called children, which is an array of bookmark objects. The bookmark object has
the properties shown in the table Bookmark properties below, and the methods shown in the table
Bookmark methods on page 139.
Bookmark properties
Property Description
children Returns the array of child objects for the current node.
color Specifies the color for the bookmark.
doc The Doc object for the bookmark.
name The text string appearing in the navigational panel.
open Determines if children are shown.
parent The parent bookmark.
style Font style.
Bookmark methods
Method Description
createChild Creates a new child bookmark.
execute Executes the Mouse Up action for the bookmark.
insertChild Inserts a bookmark as a new child for this bookmark (this may be used to move
existing bookmarks).
remove Removes the bookmark and all its children.
setAction Sets a Mouse Up action for the bookmark.
Creating bookmarks
To create a bookmark, it is necessary to navigate through the bookmark tree and identify the parent of the
new node. Begin by accessing the bookmarkRoot, which is a property of the current document
representing the top node in the bookmark tree:
var myRoot = this.bookmarkRoot;
Assume there are no bookmarks in the document. To create a new bookmark, invoke the Bookmark object
createChild method to which you can submit the following parameters: cName (the name to appear in

Adobe Acrobat SDK Modifying the User Interface
Developing Acrobat Applications Using JavaScript Bookmarks 140
the navigation panel), cExpr (an optional JavaScript to be executed when the bookmark is clicked), and
nIndex (an optional zero-based index into the children array).
The following code creates a bookmark that displays a greeting when clicked. Note that the omission of
the nIndex value means that it is placed at position 0 in the children array:
myRoot.createChild("myBookmark", "app.alert('Hello!');");
The following code adds a bookmark called grandChild as a child of myBookmark:
var current = myRoot.children[0];
current.createChild("grandChild");
To move grandChild so that it becomes a child of the root, invoke the Bookmark object insertChild
method, and provide a reference to grandChild as a parameter:
var grandChild = myRoot.children[0].children[0];
myRoot.insertChild(grandChild, 1);
Managing bookmarks
You can use JavaScript to change the name, color, and style properties of a bookmark. Note that the
style property is an integer: 0 means normal, 1 means italic, 2 means bold, and 3 means bold-italic. The
code below changes the name to New Name, the color to red, and the font style to bold:
var myRoot = this.bookmarkRoot;
var myChild = myRoot.children[0];
myChild.name = "New Name";
myChild.color = color.red;
myChild.style = 2;
In addition to adding new or existing bookmarks as you learned in Creating bookmarks, you can also
delete a bookmark and its children by invoking its remove method. The following line of code removes all
bookmarks from the document:
this.bookmarkRoot.remove();
Creating a bookmark hierarchy
Because of the tree structure associated with bookmarks, it is possible to construct a hierarchy of
bookmarks; a child of a bookmark represents a subsection of the section represented by that bookmark.
To create a hierarchy, first add bookmarks to the root, then to the children of the root, and recursively to
their children.
The following code creates bookmarks A, B, C. Each section has 3 children. Child A has children A0, A1, and
A2. Child B has children B0, B1, and B2. Child C has children C0, C1, and C2:
var myRoot = this.bookmarkRoot;
myRoot.createChild("A");
myRoot.createChild({cName: "B", nIndex: 1});
myRoot.createChild({cName: "C", nIndex: 2});
for (var i = 0; i < myRoot.children.length; i++) {
var child = myRoot.children[i];
for (var j = 0; j < 3; j++) {
var name = child.name + j;
child.createChild({cName: name, nIndex: j});
}
}

Adobe Acrobat SDK Modifying the User Interface
Developing Acrobat Applications Using JavaScript Links 141
To print out the hierarchy to the console, you can keep track of levels as shown in the following code. Note
its recursive nature:
function DumpBookmark(bm, nLevel){
// Build indents to illustrate the level
var s = "";
for (var i = 0; i < nLevel; i++) s += " ";
// Print out the bookmark’s name:
console.println(s + "+-" + bm.name);
// Recursively print out the bookmark’s children:
if (bm.children != null)
for (var i = 0; i < bm.children.length; i++)
DumpBookmark(bm.children[i], nLevel+1);
}
// Open the console to begin:
console.clear(); console.show();
// Recursively print out the bookmark tree
DumpBookmark(this.bookmarkRoot, 0);
Links
JavaScript provides support for the addition, customization, or removal of links within PDF documents.
These links may be used to access URLs, file attachments, or destinations within the document.
The Doc object contains methods for adding, retrieving, and removing links. These include the methods
listed in the table Doc object link methods. This is used in conjunction with the link object, which
contains properties as well as a setAction method for customizing the appearance and behavior of a
given link. Its properties are listed in the table Link properties.
In addition, the app object contains a property called openInPlace, which can be used to specify
whether cross-document links are opened in the same window or in a new one.
Doc object link methods
Method Description
addLink Adds a new link to a page.
addWeblinks Converts text instances to web links with URL actions.
getLinks Retrieves the links within a specified area on a page.
getURL Opens a web page.
gotoNamedDest Goes to a named destination within the document.
removeLinks Removes the links within a specified area on a page.
removeWeblinks Removes web links created with the Acrobat user interface.

Adobe Acrobat SDK Modifying the User Interface
Developing Acrobat Applications Using JavaScript Links 142
Link properties
Property Description
borderColor The border color of the bounding rectangle.
borderWidth The border width of the surrounding rectangle.
highlightMode The visual effect when the user clicks the link.
rect The rotated user space coordinates of the link.
Adding and removing web links from text
If a PDF document contains text beginning with http://, such as http://www.example.com, you can convert
all such instances to links with URL actions by invoking the Doc object addWeblinks method. The
method returns an integer representing the number of text instances converted, as shown in the code
below:
var numberOfLinks = this.addWeblinks();
console.println("Converted " + numberOfLinks + " links.");
To remove web links that were authored in Acrobat, invoke the Doc object removeWeblinks method. It
accepts two optional parameters: nStart and nEnd represent the beginning and end of an inclusive
range of page numbers. The following examples illustrate how to remove web links from different page
ranges in the document:
// Remove the web links from pages 2 through 5:
this.removeWeblinks({nStart: 2, nEnd: 5});
// Remove the web links from page 7
this.removeWeblinks({nStart: 7});
// Remove the web links from pages 0 through 7:
this.removeWeblinks({nEnd: 7});
// Remove all the web links in the document:
this.removeWeblinks();
Adding and removing links
To add a single link to a PDF document, first invoke the Doc object addLink method, and then customize
the returned link object properties. The addLink method requires two parameters: the page number
and the coordinates, in rotated user space, of the bounding rectangle. The next example illustrates the use
of addLink.
Example 9.3 Add navigation links to the document
In this example, navigational links are added to the lower left and right corners of each page in the
document. The left link opens the previous page, and the right link opens the next page:
var linkWidth = 36, linkHeight = 18;
for (var i = 0; i < this.numPages; i++)
{
// Create the coordinates for the left link:

Adobe Acrobat SDK Modifying the User Interface
Developing Acrobat Applications Using JavaScript Links 143
var lRect = [0, linkHeight, linkWidth, 0];
// Create the coordinates for the right link:
var cropBox = this.getPageBox("Crop", i);
var offset = cropBox[2] - cropBox[0] - linkWidth;
var rRect = [offset, linkHeight, linkWidth + offset, 0];
// Create the Link objects:
var leftLink = this.addLink(i, lRect);
var rightLink = this.addLink(i, rRect);
// Calculate the previous and next page numbers:
var nextPage = (i + 1) % this.numPages;
var prevPage = i - 1;
if (prevPage < 0) prevPage = this.numPages - 1;
// Set the link actions to go to the pages:
leftLink.setAction("this.pageNum = " + prevPage);
rightLink.setAction("this.pageNum = " + nextPage);
// Customize the link appearance:
leftLink.borderColor = color.red;
leftLink.borderWidth = 1;
rightLink.borderColor = color.red;
rightLink.borderWidth = 1;
}
To remove a known link object from a given page, retrieve its bounding rectangle coordinates and invoke
the Doc object removeLinks method. In the following example, myLink is removed from page 2 of the
document. In the script below, it is assumed that myLink is a Link object:
var linkRect = myLink.rect;
this.removeLinks(2, linkRect);
To remove all links from the document, simply use the crop box for each page, as shown in the code
below:
for (var page = 0; page < this.numPages; page++)
{
var box = this.getPageBox("Crop", page);
this.removeLinks(page, box);
}
Defining the appearance of a link
Example 9.3, on page 142, contains a script that sets the appearance of the bounding rectangle for the
links through their borderColor and borderWidth properties. You can also specify how the link will
appear when it is clicked by setting its highlightMode property to one of four values: None, Outline,
Invert (the default), or Push.
For example, the following code sets the border color to blue, the border thickness to 2, and the highlight
mode to Outline for myLink:
myLink.borderColor = color.blue;
myLink.borderWidth = 2;
myLink.highlightMode = "Outline";

Adobe Acrobat SDK Modifying the User Interface
Developing Acrobat Applications Using JavaScript Links 144
Opening links
To open a web page for a given link, invoke the Link object setAction method, and pass in a script
containing a call to the Doc object getURL method.
For example, suppose you have created a Link object named myLink. The following code opens
http://www.example.com:
myLink.setAction("this.getURL('http://www.example.com')");
To open a file that resides in a known location on your local hard drive, use the app object openDoc
method.
The following example opens myDoc.pdf when myLink is clicked:
myLink.setAction("app.openDoc('/C/temp/myDoc.pdf');");
Opening file attachments
To open a file that is an attachment of the document, use the Doc object exportDataObject method.
The method takes up to three parameters: cName, the name of the data object to extract; bAllowAuth, a
Boolean value which, if true, uses a dialog box to obtain user authorization; nLaunch, a number that
controls how the attachment is launched, permissible values are 0 (user is prompted to save, file not
launched), 1 (user is prompted to save, and the file is launched), and 2 (file is saved to a temporary file and
launched, file will be deleted by Acrobat upon application shutdown).
this.exportDataObject({ cName: "myDoc.pdf", nLaunch: 2 });
The file myDoc.pdf can be attached to a PDF document by executing the following script in the console:
var thisPath = "/c/temp/myDoc.pdf";
this.importDataObject({cName:"myDoc.pdf", cDIPath: thisPath })
Using destinations
To go to a named destination within a document, embed a script in the call to the Link object setAction
method. The script contains a call to the Doc object gotoNamedDest method.
The following example goes to the destination named as myDest in the current document when myLink
is clicked:
myLink.setAction("this.gotoNamedDest('myDest');");
The following example opens a document, then goes to a named destination within that document. The
example assumes the document being opened by openDoc is disclosed and can be used for a link
action.
// Open a new document
var myDoc = app.openDoc("/c/temp/myDoc.pdf");
// Go to a destination in this new doc
myDoc.gotoNamedDest("myDest");
// Close the old document
this.closeDoc();
Beginning with Acrobat 8, there is an additional parameter, cDest, for the app.openDoc method to set
the destination. With this parameter, the target document need not be disclosed. For example,
app.openDoc({ cPath: "/c/temp/myDoc.pdf", cDest: "myDest" });
this.closeDoc();

Adobe Acrobat SDK Modifying the User Interface
Developing Acrobat Applications Using JavaScript Using actions for special effects 145
Using actions for special effects
Thumbnails, bookmarks, links, and other objects have actions associated with them, and you can use
JavaScript to customize these actions. For example, you can display messages, jump to destinations in the
same document or any other, open attachments, open web pages, execute menu commands, or perform a
variety of other tasks.
As you learned earlier, you can associate a thumbnail with a Page Open event, and associate bookmarks
and links with Mouse Up events.
You can use JavaScript to customize the actions associated with a thumbnail by invoking the Doc object
setPageAction method. To customize the actions associated with bookmarks and links, create a string
containing script and pass it to the object’s setAction method. In the examples shown below, a greeting
is displayed when a thumbnail, bookmark, and link are clicked:
// Open action for thumbnail:
this.setPageAction(2, "Open", "app.alert('Hello!');");
// MouseUp actions for bookmark and link:
myBookmark.setAction("app.alert('Hello!');");
myLink.setAction("app.alert('Hello!');");
Highlighting form fields and navigational components
You can use JavaScript to customize the actions associated with buttons, links, and bookmarks so that they
change their appearance after the user has clicked them.
For a button, which is a field, you can invoke its highlight property, which allows you to specify how the
button appears once it has been clicked. There are four choices, as shown in the following table.
Button appearance
Type Keyword
none highlight.n
invert highlight.i
push highlight.p
outline highlight.o
For example, the following code makes the button appear pushed when clicked:
// Set the highlight mode to push
var f = this.getField("myButton");
f.highlight = highlight.p;
As you learned earlier, the link object also has a highlight property.
There are other ways in which you can creatively address the issue of highlighting. For example, you can
change the background color of the button when clicked, by including a line of code in the script passed
into its setAction method.

Adobe Acrobat SDK Modifying the User Interface
Developing Acrobat Applications Using JavaScript Setting up a presentation 146
In the following example, the button displays a greeting and changes its background color to blue when
the mouse enters its area:
var script = "app.alert('Hello!');";
script += "var myButton = this.getField('myButton');";
script += "myButton.fillColor = color.blue;";
f.setAction("MouseEnter", script);
The above script can also be entered through the UI as well.
This idea can be applied to the bookMark object’s color property, as well as the link object’s
borderColor property. In both cases, similar code to that shown in the example above can be used in
the scripts passed into their setAction methods.
For bookMark objects, you can change the text or font style through its name and style properties. For
example, the following code adds the word VISITED to myBookmark and changes the font style to bold:
myBookmark.name += " - VISITED");
myBookmark.style = 2;
Setting up a presentation
There are two viewing modes for Acrobat and Adobe Reader: full screen mode and regular viewing mode.
Full screen mode is often appropriate for presentations, since PDF pages can fill the entire screen with the
menu bar, toolbar, and window controls hidden.
You can use JavaScript to customize the viewing mode when setting up presentations. The app object fs
property may be used to set the viewing mode. (Media clips can also be played in full screen, see Example
8.3 on page 131.)
Defining the initial view in full screen view
To cause Acrobat and Adobe Reader to display in full screen mode, include the following statement in a
document JavaScript triggered when the document is opened.
app.fs.isFullScreen=true;
app.fs is the FullScreen object, which can be used to set your full screen preferences.
Example 9.4 Setting full screen preferences and resetting them
You want the document to be viewed in full screen, but as a courtesy, you want to restore the screen
preferences of the user back to the original settings. Place the following script as document JavaScript, it
will be executed once and only once upon loading the document.
// Save the settings we plan to change.
var _clickAdvances = app.fs.clickAdvances;
var _defaultTransition = app.fs.defaultTransition;
var _escapeExits = app.fs.escapeExits;
// Change these settings now.
app.fs.clickAdvances=true;
app.fs.defaultTransition = "UncoverLeft";
app.fs.escapeExits=true;
// Now, go into full screen.
app.fs.isFullScreen=true;

Adobe Acrobat SDK Modifying the User Interface
Developing Acrobat Applications Using JavaScript Setting up a presentation 147
To restore the settings, place the following code in the Will Close section of the Document JavaScripts,
located at Advanced > Document Processing > Set Document Actions.
// Restore the full screen preferences that we changed.
app.fs.clickAdvances = _clickAdvances;
app.fs.defaultTransition = _defaultTransition;
app.fs.escapeExits = _escapeExits;
You can use JavaScript to customize how page transitions occur for any pages within a document. This is
accomplished through the Doc object’s setPageTransitions and getPageTransitions methods.
The setPageTransitions method accepts three parameters:
nStart — the zero-based index of the beginning page
nEnd — the zero-based index of the last page
aTrans — a page transition array containing three values:
nDuration — the time a page is displayed before automatically changing
cTransition — the name of the transition to be applied
nTransDuration — the duration in seconds of the transition effect
The name of the transition to be applied can be chosen from a comprehensive list made available through
the FullScreen object transitions property. To obtain the list, type the following code into the console:
console.println("[" + app.fs.transitions + "]");
In addition, you can set up a default page transition through the FullScreen object defaultTransition
property, as Example 9.4 on page 146 demonstrates.
Example 9.5 Adding page transitions
In the following example, page transitions are applied to pages 2 through 5. Each page displays for 10
seconds, and then an automatic transition occurs for one second:
this.setPageTransitions({
nStart: 2,
nEnd: 5,
aTrans: {
nDuration: 10,
cTransition: "WipeLeft",
nTransDuration: 1
}
});
// Set the viewing mode to full screen
app.fs.isFullScreen = true;
Defining an initial view
In addition to specifying whether the full screen or regular viewing mode will be used, you can also use
JavaScript to set up the document view. You can customize the initial view in terms of magnification, page
layout, application and document viewing dimensions, the initial page to which the document opens, and
whether parts of the user interface will be visible.

Adobe Acrobat SDK Modifying the User Interface
Developing Acrobat Applications Using JavaScript Setting up a presentation 148
The Doc object layout property allows you to specify page layout by assigning one of the following
values:
●SinglePage
●OneColumn
●TwoColumnLeft
●TwoColumnRight
●TwoPageLeft
●TwoPageRight
For example, the script this.layout = "SinglePage" puts the document into single page viewing.
To set up the magnification, assign a value to the Doc object zoom property. For example, the following
code sets up a magnification of 125%:
this.zoom = 125;
You can also set the zoom type by assigning one of the settings, shown in the following table, to the Doc
object’s zoomtype property:
ZoomType settings
Zoom type Property value
NoVary zoomtype.none
FitPage zoomtype.fitP
FitWidth zoomtype.fitW
FitHeight zoomtype.fitH
FitVisibleWidth zoomtype.fitV
Preferred zoomtype.pref
ReflowWidth zoomtype.refW
The following example sets the zoom type of the document to fit the width:
this.zoomType = zoomtype.fitW;
To specify the page to which the document initially opens (or to simply change the page), set the Doc
object pageNum property. If the following code is included in the script used in the document Open event,
the document automatically opens to page 30:
this.pageNum = 30;
Finally, you can choose whether menu items and toolbar buttons will be visible by invoking the following
methods of the app object:
hideMenuItem — Removes a specific menu item
hideToolbarButton — Removes a specific toolbar button
For example, if the following code is placed in a folder-level script, the Hand toolbar button is removed
when Acrobat or Adobe Reader is started:
app.hideToolbarButton("Hand");

Adobe Acrobat SDK Modifying the User Interface
Developing Acrobat Applications Using JavaScript Numbering pages 149
Numbering pages
You can customize the page numbering schemes used throughout a document. There are three
numbering formats:
●decimal (often used for normal page ranges)
●roman (often used for front matter such as a preface)
●alphabetic (often used for back matter such as appendices)
The Doc object getPageLabel and setPageLabels methods can be used to control and customize the
appearance of numbering schemes within a PDF document.
The getPageLabel method accepts the zero-based page index and returns a string containing the label
for a given page.
The setPageLabels method accepts two parameters: nPage is the zero-based index for the page to be
labeled, and aLabel is an array of three values representing the numbering scheme. If aLabel is not
supplied, the method removes page numbering for the specified page and any others up to the next
specified label.
The aLabel array contains three required values:
cStyle — the style of page numbering as shown in the following table
cPrefix — the string used to prefix the numeric portion of the page label
nStart — the ordinal with which to start numbering the pages
Page numbering style values
cStyle value Description
DDecimal numbering
RUpper case Roman numbering
rLower case Roman numbering
AUpper case alphabetic numbering
aLower case alphabetic numbering
For example, the code shown below labels 10 pages within a document using the following scheme: i, ii,
iii, 1, 2, 3, 4, 5, Appendix-A, Appendix-B:
// Pages 0-2 will have lower case roman numerals i, ii, iii:
this.setPageLabels(0, ["r", "", 1]);
// Pages 3-7 will have decimal numbering 1-5:
this.setPageLabels(3, ["D", "", 1]);
// Pages 8-9 will have alphabetic numbering:
this.setPageLabels(8, ["A", "Appendix-", 1]);
// The page labels will be printed to the console:
var labels = this.getPageLabel(0);
for (var i=1; i<this.numPages; i++)
labels += ", " + this.getPageLabel(i);
console.println(labels);

Adobe Acrobat SDK Modifying the User Interface
Developing Acrobat Applications Using JavaScript Creating buttons 150
It is also possible to remove a page label by omitting the aLabel parameter, as shown in the code below
(which assumes the existence of the labels in the previous example:
// The labels for pages 3-7 will be removed:
this.setPageLabels(3);
Creating buttons
Though buttons are normally considered form fields, you can add them to any document. A button may
be used for a variety of purposes, such as opening files, playing sound or movie clips, or submitting data to
a web server. As you learned earlier, you can place text and images on a button, making it a user-friendly
interactive portion of your document. To show or hide portions of graphic buttons, use the Mouse Enter
and Mouse Exit events or other types of control mechanisms to manage the usage of the Field object
buttonSetIcon method.
Example 9.6 Creating a rollover effect
The following code shows one icon when the mouse enters the button field, and a different icon when the
mouse exits:
// Mouse enter script.
var f = event.target;
f.buttonSetIcon(this.getIcon('oneIcon'));
// Mouse exit script.
var f = event.target;
f.buttonSetIcon(this.getIcon('otherIcon'));
Working with PDF layers
PDF layers (called Optional Content Groups in Section 4.10 of the PDF Reference version 1.7) are sections of
content that can be selectively viewed or hidden by document authors or consumers. Multiple
components may be visible or hidden depending on their settings, and may be used to support the
display, navigation, and printing of layered PDF content by various applications. It is possible to edit the
properties of layers, to lock layers, to add navigation to them, to merge or flatten layers, and to combine
PDF layered documents. Properties and methods for handling PDF layers are accessed through the OCG
object.
To obtain an array of the OCG objects for a given page in the document, invoke the Doc object getOCGs
method. The following code obtains the array of OCG objects contained on page 3 of the document:
var ocgArray = this.getOCGs(3);
The getOCGs method returns an array of OCG objects or null, if there are none; consequently, in
situations in which it is uncertain if there are any OCGs on the page, you need to test the return value for
null:
var ocgArray = this.getOCGs(3);
if ( ocgArray != null ) {
<some action script>
}

Adobe Acrobat SDK Modifying the User Interface
Developing Acrobat Applications Using JavaScript Navigating with layers 151
Navigating with layers
Since information can be stored in different layers of a PDF document, navigational controls can be
customized within different layers, whose visibility settings may be dynamically customized so that they
are tied to context and user interaction. For example, if the user selects a given option, a set of navigational
links belonging to a corresponding optional content group may be shown.
Example 9.7 Toggling a PDF layer
This example is a Mouse Up action for a button. The action is to toggle the visibility of a particular layer.
The methodology is to get the array of OCGs on the page, search through them to find the particular layer
of interest, and finally, to toggle its state property, which determines the visibility of the layer, see “OCG
properties” on page 151.
var ocgLayerName = "myLayer";
var ocgArray = this.getOCGs(this.pageNum);
for ( var i=0; i < ocgArray.length; i++) {
if ( ocgArray[i].name == ocgLayerName ) {
ocgArray[i].state = !ocgArray[i].state;
break;
}
}
Editing the properties of PDF layers
The OCG object provides properties that can be used to determine whether the object’s default state
should be on or off, whether its intent should be for viewing or design purposes, whether it should be
locked, the text string seen in the user interface, and the current state. The properties are shown in the
following table.
OCG properties
Property Description
initState Determines whether the OCG object is on or off by default
intent The intent of the OCG object (View or Design)
locked Whether the on/off state can be toggled through the user interface
name The text string seen in the user interface for the OCG object
state The current on/off state of the OCG object
The initState property can be used to set the default state for an optional content group. In the
following example, myLayer is set to on by default:
myLayer.initState = true;
The intent property, which is an array of values, can be used to define the intent of a particular optional
content group. There are two possible values used in the array: View and Design. A Design layer is
created for informational purposes only, and does not affect the visibility of content. Its purpose is to
represent a document designer’s structural organization of artwork. The View layer is intended for
interactive use by document consumers. If View is used, the visibility of the layer is affected.

Adobe Acrobat SDK Modifying the User Interface
Developing Acrobat Applications Using JavaScript Reordering layers 152
In the following example, the intent of all the OCG objects in the document is set to both values:
var ocgs = this.getOCGs();
for (var i=0; i<ocgs.length; i++)
ocgs[i].intent = ["View", "Design"];
The locked property is used to determine whether a given layer can be toggled through the user
interface. In the following example, myLayer is locked, meaning that it cannot be toggled through the
user interface:
myLayer.locked = true;
The state property represents the current on/off state for a given OCG. In the following example, all the
OCGs are turned on:
var ocgs = this.getOCGs();
for (var i=0; i<ocgs.length; i++)
ocgs[i].state = true;
The name property represents the text string seen in the user interface that is used to identify layers. In the
following example, the Watermark OCG is toggled:
var ocgs = this.getOCGs();
for (var i=0; i<ocgs.length; i++)
if (ocgs[i].name == "Watermark")
ocgs[i].state = !ocgs[i].state;
Reordering layers
It is possible to determine the order in which layers are displayed in the user interface by invoking the Doc
object getOCGOrder and setOCGOrder methods. In the following example, the display order of all the
layers is reversed:
var ocgOrder = this.getOCGOrder();
var newOrder = new Array();
for (var i=0; i<ocgOrder.length; i++)
newOrder[i] = ocgOrder[ocgOrder.length - i - 1];
this.setOCGOrder(newOrder);

153
10 Acrobat Templates
This chapter will help you understand the role of templates in PDF form structures, and the options and
implications related to their use. You will also learn about the parameters for the template object
methods.
Topics Description Page
The role of templates in PDF form
architecture
Discusses templates as a way of dynamically creating
additional pages to hold form data.
page 153
Spawning templates Methods and techniques of working with templates. page 153
The role of templates in PDF form architecture
The Acrobat extension of JavaScript defines a template object that supports interactive form architectures.
In this context, a template is a named page within a PDF document that provides a convenient format
within which to automatically generate and manipulate a large number of form fields. These pages
contain visibility settings, and can be used to spawn new pages containing identical sets of form controls
to those defined within the template.
As you learned earlier, it is possible to use templates to dynamically generate new content within a
document. Templates help to create reusable content, and can be used for replicating logic.
A template is used to reproduce the logic on a given page at any new location in the document. This logic
may include form fields such as text fields and buttons, digital signatures, and embedded logic such as
scripts that email form data to another user. To create a template based on a page, invoke the Doc object
createTemplate method, in which you will name your template and specify the page from which it will
be created. The code below creates a template called myTemplate based on page 5 of the current
document:
this.createTemplate({cName: "myTemplate", nPage: 5});
There are two steps required to generate pages based on a template contained in the document:
1. Select a template from the Doc object templates property, which is an array of template objects.
2. Spawn a page invoking the template object spawn method.
The following code adds a new page at the end of the current document that is based on the first template
contained in the document:
var myTemplateArray = this.templates;
var myTemplate = myTemplateArray[0];
myTemplate.spawn(this.numPages, false, false);
Spawning templates
In this section you will learn how to spawn a page and about the naming convention for any form fields
residing on a template page. Finally, a detailed example is presented.

Adobe Acrobat SDK Acrobat Templates
Developing Acrobat Applications Using JavaScript Dynamic form field generation 154
Dynamic form field generation
When spawning templates, you an specify whether the form fields are renamed on the new page or retain
the same names as those specified in the template. This is done through the optional bRename parameter.
If you set the parameter’s value to true, the form fields on each spawned page have unique names, and
values entered into any of those fields do not affect values in their counterparts on other pages. This
would be useful, for example, in forms containing expense report items. If you set the parameter’s value to
false, the form fields on each spawned page have the same name as their counterparts on all the other
spawned pages. This might be useful if you would like, for example, to duplicate a button or display the
date on every page, since entering it once results in its duplication throughout all the spawned pages.
Suppose the bRename parameter is true and the field name on the template is myField. If the template
is named myTemplate and is spawned onto page 4, the new corresponding field name is
P4.myTemplate.myField. The page number embedded in the new field guarantees its uniqueness.
Dynamic page generation
When templates are used to spawn new pages, those pages contain an identical set of form fields to those
defined in the template. Depending on the parameters used, this process may result in a file size inflation
problem. This is because there are two ways to specify page generation: one option is to repeatedly spawn
the same page which results in the duplication of
XObject
objects (external graphics objects), and the other
is to generate page contents as
XObject
objects, which only requires that those objects be repositioned.
The nPage parameter is used to specify the zero-based index of the page number used to create the page.
If the bOverlay value is set to true, the new page overlays on to the page number specified in the
nPage parameter. If the bOverlay value is set to false, the new page is inserted as a new page before
the specified page. To append a page at the end of the document, set the bOverlay value to false and the
nPage parameter to the total number of pages in the document.
Template syntax and usage
In this first example, all the templates will be spawned once, the field names will not be unique in each
resultant page (bRename will be false), and the resultant pages will be appended to the end of the
document (bOverlay will be false). The oXObject parameter will be used to prevent file size inflation:
// Obtain the collection of templates:
var t = this.templates;
// Spawn each template once as a page appended at the end:
for (var i = 0; i < t.length; i++)
t[i].spawn(this.numPages, false, false);
In this next example, the same template will be spawned 10 times, will overlay on to pages 0 through 9
(bOverlay will be true), and the field names will be unique on each page (bRename will be true):
// Obtain the template:
var t = this.templates;
var T = t[0];
// Prevent file size inflation by using the XObject. Do this by
// spawning once, saving the result (an XObject), and passing
// the resultant XObject to the oXObject parameter in
// the subsequent calls to the spawn method:
var XO = T.spawn(0, true, true);
for (var i = 1; i < 10; i++)
T.spawn(i, true, true, XO);

Adobe Acrobat SDK Acrobat Templates
Developing Acrobat Applications Using JavaScript Template syntax and usage 155
In this next example, we will retrieve the template named myTemplate, overlay it onto pages 5 through
10 (bOverlay will be true), and use the same field names on each page (bRename will be false):
// Obtain the template name "myTemplate":
var t = this.getTemplate("myTemplate");
// Prevent file size inflation:
var XO = t.spawn(5, true, false);
// Spawn the remaining pages:
for (var i = 6; i <= 10; i++)
t.spawn(i, true, false, XO);
Example 10.1 Gathering personal data using templates
In this example, we have a two page document and one hidden template page named datapage. On the
first page of the document, the head of household fills in his/her name, as well as the names of the
dependents, the spouse and children. After doing this, a button is clicked. The button action spawns the
hidden template, datapage, for a number of instances equal to the number of people in the household.
The names of each member of the household are pre-populated into each of the templates. On each of
these template pages, the head of household fills in personal data of each household member: name
(pre-populated), age, gender (combo box, Male or Female), and income.
The button action on the first page looks like this:
// Define an array of field names for the first page, up to five children
var aFamily = ["family.head","family.spouse", "family.child1",
"family.child2", "family.child3", "family.child4", "family.child5" ]
// Get the template object of the template datapage.
var T = this.getTemplate("datapage");
var fName = "P1.datapage.name";
// Put this just before the last page.
var XO = T.spawn(this.numPages-1, true, false);
var f = this.getField(aFamily[0]);
var g = this.getField(fName);
// Populate this name field of the first template with the name of
//the head of household
g.value = f.value;
// Now, go through the other fields, extracting names, and spawning
// templates
for ( var i=1; i < aFamily.length; i++ ) {
var f = this.getField(aFamily[i]);
if ( f.value != "" ) {
// Insert a new template just before the last page.
var fName = "P"+(this.numPages-1)+".datapage.name";
T.spawn(this.numPages-1, true, false, XO);
console.println("fName = " + fName);
g.value = f.value;
} else break;
}

Adobe Acrobat SDK Acrobat Templates
Developing Acrobat Applications Using JavaScript Template syntax and usage 156
Now for the last page. On this page we have a series of four fields that summarizes the information entered
in the template pages. These fields give the total number of dependents; the spouse’s name, age, and
gender; and each of the children’s names, genders and ages. The following script is placed as a Page Open
event for the last page, the one that contains the summary information.
if ( this.pageNum != 1 ) {
// Number of dependents = number of pages - 3
var numDependents = this.numPages - 3
this.getField("dependents").value = numDependents;
var totalincome = 0;
// Get the head of household's income
var income = this.getField("P1.datapage.income").value;
totalincome += income;
// Spouse's name and gender is on P2
if ( numDependents > 0 ) {
var gender = this.getField("P2.datapage.gender").value;
var age = this.getField("P2.datapage.age").value;
var spouseStr = this.getField("P2.datapage.name").value
+" (" + gender +", " + age + ")";
this.getField("spouse").value = spouseStr
income = this.getField("P2.datapage.income").value;
totalincome += income;
}
if ( numDependents > 1 ) {
var nChildren = numDependents - 1;
var l = nChildren + 3;
var childStr = "";
for ( var i=3; i < l; i++) {
var childName = this.getField("P"+i+".datapage.name").value;
var gender = this.getField("P"+i+".datapage.gender").value;
var age = this.getField("P"+i+".datapage.age").value;
childStr += (childName + " (" + gender +", "+ age +"); ");
var income = this.getField("P"+i+".datapage.income").value;
totalincome += income;
}
this.getField("children").value = childStr;
}
this.getField("totalincome").value = totalincome;
}
In the script above, the field names of the spawned templates have been renamed. To extract the
information contained in these template pages, the field names have to be built. Knowledge of the
naming convention used by templates, as well as the structure of the document and the placement of the
templates in the document is essential.

157
11 Search and Index Essentials
This chapter will enable you to customize and extend searching operations for PDF document content and
metadata, as well as indexing operations. The principal JavaScript objects used in searching and indexing
are the search, catalog, and index objects. In this chapter we shall see how to use these objects.
Topics Description Page
Searching for text in PDF
documents
A survey of the methods for conducing a search of a document,
multiple documents, or an index collection of files.
page 157
Indexing multiple PDF
documents
Methods of rebuilding and updating an index. page 161
Searching metadata A brief indication of how to search a document’s XMP metadata. page 162
Searching for text in PDF documents
JavaScript provides a static search object, which provides powerful searching capabilities that may be
applied to PDF documents and indexes. Its properties and methods are described in the following tables.
Search properties
Property Description
attachments Searches PDF attachments along with the base document.
available Determines if searching is possible.
docInfo Searches document metadata information.
docText Searches document text.
docXMP Searches document XMP metadata.
bookmarks Searches document bookmarks.
ignoreAccents Ignores accents and diactrics in search.
ignoreAsianCharacterWidth Matches Kana characters in query.
indexes Obtains all accessible index objects.
jpegExif Searches EXIF data in associated JPEG images.
markup Searches annotations.
matchCase Determines whether query is case-sensitive.

Adobe Acrobat SDK Search and Index Essentials
Developing Acrobat Applications Using JavaScript Finding words in an PDF document 158
Search methods
Method Description
addIndex Adds an index to the list of searchable indexes.
getIndexForPath Searches the index list according to a specified path.
query Searches the document or index for specified text.
removeIndex Removes an index from the list of searchable indexes.
Finding words in an PDF document
The search object query method is used to search for text within a PDF document. It accepts three
parameters:
cQuery — the search text
cWhere — where to search:
ActiveDoc — within the active document
Folder — within a specified folder
Index — within a specified index
ActiveIndexes — within the active set of available indexes (the default)
cDIPath — the path to a folder or index used in the search
The simplest type of search is applied to the text within the PDF document. For example, the following
code performs a case-insensitive search for the word Acrobat within the current document:
search.query("Acrobat", "ActiveDoc");
matchWholeWord Finds only occurrences of complete words.
maxDocs Specifies the maximum number of documents returned.
proximity Uses proximity in results ranking for AND clauses.
proximityRange Specifies the range of proximity search in number of words.
refine Uses previous results in query.
stem Uses word stemming in searches.
wordMatching Determines how words will be matched (phrase, all words, any
words, Boolean query).
Property Description

Adobe Acrobat SDK Search and Index Essentials
Developing Acrobat Applications Using JavaScript Searching across multiple PDF documents 159
Using advanced search options
You can set the search object properties to use advanced searching options, which can be used to
determine how to match search strings, and whether to use proximity or stemming.
To determine how the words in the search string will be matched, set the search object wordMatching
property to one of the following values:
MatchPhrase — match the exact phrase
MatchAllWords — match all the words without regard to the order in which they appear
MatchAnyWord — match any of the words in the search string
BooleanQuery — perform a Boolean query for multiple-document searches (the default)
For example, the following code matches the phrases “My Search” or “Search My”:
search.wordMatching = "MatchAllWords";
search.query("My Search");
To determine whether proximity is used in searches involving multiple documents or index definition files,
set the search object wordMatching property to MatchAllWords and set its proximity property to
true. In the example below, all instances of the words My and Search that are not separated by more
than 900 words will be listed in the search:
search.wordMatching = "MatchAllWords";
search.proximity = true;
search.query("My Search");
To use stemming in the search, set the search object stem property to true. For example, the following
search lists words that begin with “run”, such as “running” or “runs”:
search.stem = true;
search.query("run");
To specify that the search should only identify occurrences of complete words, set the search object
matchWholeWord property to true. For example, the following code matches “nail”, but not “thumbnail”
or “nails”:
search.matchWholeWord = true;
search.query("nail");
To set the maximum number of documents to be returned as part of a query, set the search object
maxDocs property to the desired number (the default is 100). For example, the following code limits the
number of documents to be searched to 5:
search.maxDocs = 5;
To refine the results of the previous query, set the search object refine property to true, as shown in
the following code:
search.refine = true;
Searching across multiple PDF documents
This section discusses searches involving more than one PDF document.

Adobe Acrobat SDK Search and Index Essentials
Developing Acrobat Applications Using JavaScript Searching across multiple PDF documents 160
Searching all PDF files in a specific location
To search all the PDF files within a folder, set the cWhere parameter in the search object query method
to Folder. In the following example, all documents in /C/MyFolder will be searched for the word
“Acrobat”:
search.query("Acrobat", "Folder", "/C/MyFolder");
Using advanced search options for multiple document searches
In addition to the advanced options for matching phrases, using stemming, and using proximity, it is also
possible to specify whether the search should be case-sensitive, whether to match whole words, to set the
maximum number of documents to be returned as part of a query, and whether to refine the results of the
previous query.
To specify that a search should be case sensitive, set the search object matchCase property to true. For
example, the following code matches “Acrobat” but not “acrobat”:
search.matchCase = true;
search.query("Acrobat", "Folder", "/C/MyFolder");
Searching PDF index files
A PDF index file often covers multiple PDF files, and the time required to search an index is much less than
that required to search each of the corresponding individual PDF files.
To search a PDF index, set the cWhere parameter in the search object’s query method to Index. In the
following example, myIndex is searched for the word “Acrobat”:
search.query("Acrobat", "Index", "/C/MyIndex.pdx");
Using Boolean queries
You can perform a Boolean query when searching multiple document or index files. Boolean queries use
the following operations as logical connectors:
●AND
●OR
●^ (exclusive or)
●NOT
For example, the phrase "Paris AND France" used in a search would return all documents containing
both the words Paris and France.
The phrase "Paris OR France" used in a search would return all documents containing one or both of
the words Paris and France.
The phrase "Paris ^ France" used in a search would return all documents containing exactly one (not
both) of the words Paris and France.
The phrase "Paris NOT France" used in a search would return all documents containing Paris that
do not contain the word France.

Adobe Acrobat SDK Search and Index Essentials
Developing Acrobat Applications Using JavaScript Indexing multiple PDF documents 161
In addition, parentheses may be used. For example, the phrase "Acrobat AND (Standard OR
Professional OR Pro)". The result of this query would return all documents that contain the word
“Acrobat” and either “Standard”, “Professional” or “Pro” in it.
search.wordMatching="BooleanQuery";
search.query("Acrobat AND (Standard OR Professional OR Pro)", "Folder",
"/C/MyFolder");
To specify that a Boolean query will be used, be sure that the search object wordMatching property is
set to BooleanQuery (which is the default).
Indexing multiple PDF documents
It is possible to extend and customize indexes for multiple PDF documents using the JavaScript catalog,
catalogJob, and index objects. These objects may be used to build, retrieve, or remove indexes. The
index object represents a catalog-generated index, contains a build method that is used to create an
index (and returns a catalogJob object containing information about the index), and has the properties
shown below the following table.
Index properties
Property Description
available Indicates whether an index is available
name The name of the index
path The device-independent path of the index
selected Indicates whether the index will participate in the search
The catalog object may be used to manage indexing jobs and retrieve indexes. It contains a getIndex
method for retrieving an index, a remove method for removing a pending indexing job, and properties
containing information about indexing jobs.
Creating, updating, or rebuilding indexes
To determine which indexes are available, use the search object indexes property, which contains an
array of index objects. For each object in the array, you can determine its name by using its name
property. In the code below, the names and paths of all available selected indexes are printed to the
console:
var arr = search.indexes;
for (var i=0; i<arr.length; i++)
{
if (arr[i].selected)
{
var str = "Index[" + i + "] = " + arr[i].name;
str += "\nPath = " + arr[i].path;
console.println(str);
}
}

Adobe Acrobat SDK Search and Index Essentials
Developing Acrobat Applications Using JavaScript Searching metadata 162
To build an index, first invoke the catalog object getIndex method to retrieve the index object. This
method accepts a parameter containing the path of the index object. Then invoke the index object
build method, which returns a catalogJob object. The method accepts two parameters:
cExpr — a JavaScript expression executed once the build operation is complete
bRebuildAll — indicates whether to perform a clean build in which the existing index is first deleted
and then completely built
Finally, the returned catalogJob object contains three properties providing useful information about
the indexing job:
path — the device-independent path of the index
type — the type of indexing operation (Build, Rebuild, or Delete)
status — the status of the indexing operation (Pending, Processing, Completed, or
CompletedWithErrors)
In the code shown below, the index myIndex is completely rebuilt, after which its status is reported:
// Retrieve the Index object
var idx = catalog.getIndex("/C/myIndex.pdx");
// Build the index
var job = idx.build("app.alert('Index build');", true);
// Confirm the path of the rebuilt index:
console.println("Path of rebuilt index: " + job.path);
// Confirm that the index was rebuilt:
console.println("Type of operation: " + job.type);
// Report the job status
console.println("Status: " + job.status);
Searching metadata
PDF documents contain document metadata in XML format, which includes information such as the
document title, subject, author’s name, keywords, copyright information, date modified, file size, and file
name and location path.
To use JavaScript to search a document’s XMP metadata, set the search object’s docXMP property to
true, as shown in the following code:
search.docXMP = true;

163
12 Security
This chapter will introduce you to the various security options available through JavaScript for Acrobat.
You will understand how to customize security in PDF documents by applying passwords and digital
signatures, certifying documents, encrypting files, adding security to attachments, managing digital IDs
and certificates, and customizing security policies.
Topics Description Page
Security essentials Overview for securing a document: encryption and certification. page 163
Digitally signing PDF
documents
Methods of signing a signature field using JavaScript. page 166
Adding security to PDF
documents
A more detailed look at encryption using certificates and security
policies.
page 170
Digital IDs and
certification methods
Discussed are how to customize and extend the management
and usage of digital IDs using JavaScript, to share digital ID
certificates, to build a list of trusted identities, and to analyze the
information contained within certificates.
page 175
Security essentials
JavaScript for Acrobat provides a number of objects that support security. These are managed by the
security, securityPolicy, and securityHandler objects for managing certificates, security policies, and
signatures. The certificate, directory, signatureInfo, and dirConnection objects are used to manage digital
signatures and access the user certificates.
Methods for adding security to PDF documents
The general procedures for applying various types of security to a PDF document are described below.
Details and examples are provided in the later sections of this chapter.
Passwords and restrictions
The basic way to protect a document from unauthorized access is to encrypt it for a list of authorized
recipients using the Doc object encryptForRecipients method. This essentially requires that the
authorized recipients use a private key or credential to gain access to it. Restrictions may be applied so that
the recipients’ access to the document may be controlled.
Certifying documents
The certification signature for a document makes modification detection and prevention (mdp) possible.
When this type of signature is applied, it is possible to certify the document, and thereby specify
information about its contents and the types of changes that are allowed in order for the document to
remain certified.

Adobe Acrobat SDK Security
Developing Acrobat Applications Using JavaScript Methods for adding security to PDF documents 164
To apply an author signature to a document, create an certification signature field using the Doc object
addField method. Then sign the field using the Field object signatureSign method, in which you will
provide parameters containing the security handler, a signatureInfo object containing an mdp property
value other than allowAll, and a legal attestation explaining why certain legal warnings are embedded
in the document. The SignatureInfo object has properties common to all security handlers. These
properties are described below in the following table.
SignatureInfo properties
Property Description
buildInfo Software build and version for the signature.
date Date and time of the signature.
dateTrusted A Boolean value, which if true, specifies that the date is to be trusted.
handlerName Security handler name specified in the Filter attribute in the
signature dictionary.
handlerUserName Security handler name specified by handlerName.
handlerUIName Security handler name specified by handlerName.
location Physical location or hostname.
mdp Modification detection and prevention setting (allowNone,
allowAll, default, defaultAndComments).
name Name of the user.
numFieldsAltered Number of fields altered since the previous signature.
numFieldsFilledIn Number of fields filled in since the previous signature.
numPagesAltered Number of pages altered since the previous signature.
numRevisions The number of revisions in the document.
reason Reason for signing.
revision Signature revision.
sigValue Raw bytes of the signature, as a hex-encoded string.
status Validity status (4 represents a completely valid signature).
statusText String representation of signature status.
subFilter Formats used for public key signatures.
timeStamp The URL of the server for time-stamping the signature.
verifyDate The date and time that the signature was verified.
verifyHandlerName Security handler used to validate signature.
verifyHandlerUIName Handler specified by verifyHandlerName.

Adobe Acrobat SDK Security
Developing Acrobat Applications Using JavaScript Methods for adding security to PDF documents 165
Encrypting files using certificates
When you invoke the Doc object encryptForRecipients method, it encrypts the document using the
public key certificates of each recipient. The groups of recipients are specified in the oGroups parameter,
which is an array of Group objects, each of which contains two properties: permissions and
userEntities. The userEntities property is an array of UserEntity objects (described below in
the UserEntity object properties table), each of which describes a user and their associated certificates, and
is returned by a call to the DirConnection object search method. The associated certificates are
represented in a property containing an array of Certificate objects (described below in Certificate object
properties table), each of which contains read-only access to the properties of an X.509 public key
certificate.
To obtain a group of recipients (the oGroups parameter mentioned above), you can invoke the
security object chooseRecipientsDialog method, that opens a dialog box prompting the user to
choose a list of recipients.
UserEntity object properties
Property Description
firstName The first name of the user.
lastName The last name of the user.
fullName The full name of the user.
certificates Array of certificate objects for the user.
defaultEncryptCert An array of preferred certificate objects.
Certificate object properties
Property Description
binary The raw bytes of the certificate.
issuerDN The distinguished name of the user.
keyUsage The value of the certificate key usage extension.
MD5Hash The MD5 digest of the certificate.
SHA1Hash The SHA1 digest of the certificate.
serialNumber A unique identifier for the certificate.
subjectCN The common name of the signer.
subjectDN The distinguished name of the signer.
usage The purposes for which the certification may be used: end-user signing
or encryption.
ubrights An application Rights object.

Adobe Acrobat SDK Security
Developing Acrobat Applications Using JavaScript Digitally signing PDF documents 166
Security policies
Security policies are groups of reusable security settings that may include the type of encryption, the
permission settings, and the password or public key to be used. You can create folder-level scripts
containing objects that reflect these policies. Security policies may be customized through the use of
securityPolicy objects, which can be accessed and managed by the security object
getSecurityPolicies and chooseSecurityPolicy methods as well as the Doc object
encryptUsingPolicy method.
Secure forms
You can lock form fields by creating a script containing a call to the Field object setLock method, and
passing that script as the second parameter to the signature field setAction method.
In addition, you can sign an embedded FDF data object by invoking its signatureSign method, and
subsequently validate the signature by invoking its signatureValidate method.
Digitally signing PDF documents
A certification signature contains identifying information about the person signing the document. When
applying an certification signature, which must be the first signature in the document, it is also possible to
certify the document. This involves providing a legal attestation as to the document’s contents and
specifying the types of changes allowed for the document in order for it to remain certified.
Signing a PDF document
To sign a document, create a signature field, choose a security handler, and invoke the field object
signatureSign method. The signatureSign method accepts the following parameters:
oSig — the security handler object
oInfo — a signatureInfo object
cDIPath — the device-independent path to which the file will subsequently be saved
bUI — whether the security handler will display a user interface when signing
cLegalAttest — a string that describes content or feature and explains why it is present (for
certification signatures only)
The creation and usage of these parameters are explained below in the following sections: The security
handler object, The SignatureInfo object, and Applying the signature.
The security handler object
To obtain a security handler (the oSig parameter), invoke the security object getHandler method.
The method, which returns a security handler object, takes the following parameters:
cName — The name of the security handler (contained in the security object’s handlers property)
bUIEngine — If true, the method returns the existing engine associated with the Acrobat user
interface; if false, the default, it returns a new engine.

Adobe Acrobat SDK Security
Developing Acrobat Applications Using JavaScript The security handler object 167
The following code illustrates how to set up signature validation whenever the document is opened, lists
all available security handlers, and selects the Adobe.PPKLite engine associated with the Acrobat user
interface:
// Validate signatures when the document is opened:
security.validateSignaturesOnOpen = true;
// List all the available signature handlers
for (var i=0; i<security.handlers.length; i++)
console.println(security.handlers[i]);
// Select the Adobe.PPKLite engine with the Acrobat user interface:
var ppklite = security.getHandler(security.PPKLiteHandler, true);
After obtaining the security handler, invoke the securityHandler object login method, which makes it
possible to access and select your digital ID as shown in the following code:
var oParams = {
cPassword: "myPassword",
cDIPath: "/C/signatures/myName.pfx" // Digital signature profile
};
ppklite.login(oParams);
The SignatureInfo object
To create the oInfo parameter for the signature field’s signatureSign method, create a generic object
containing the properties as described in the table SignatureInfo properties:
var myInfo = {
password: "myPassword",
location: "San Jose, CA",
reason: "I am approving this document",
contactInfo: "userName@adobe.com",
appearance: "Fancy",
mdp: "allowNone" // An mdp value is needed for certification signatures
};
Applying the signature
Now that the security handler and signature information have been created, you can invoke the signature
field’s signatureSign method, as shown in the code below:
// Obtain the signature field object:
var f = this.getField("Signature1");
// Sign the field:
f.signatureSign({
oSig: ppklite,
oInfo: myInfo,
cDIPath: "/C/temp/mySignedFile.pdf",
cLegalAttest: "Fonts are not embedded to reduce file size"
}); //End of signature
See also the discussion of “Signature fields” on page 82.

Adobe Acrobat SDK Security
Developing Acrobat Applications Using JavaScript Getting signature information from another user 168
Clearing a digital signature from a signature field
To clear a signature, invoke the Doc object resetForm method. In the example below, Signature1 is
cleared:
this.resetForm(["Signature1"]);
Getting signature information from another user
You can maintain a list of trusted user identities by adding the certificates contained within FDF files sent
to you by other users. You can also obtain signature information from an FDF file by invoking the FDF
object signatureValidate method, which returns a signatureInfo object, as shown in the example
below:
// Open the FDF file sent to you by the other user:
var fdf = app.openFDF("/C/temp/myDoc.fdf");
// Obtain the security handler:
var engine = security.getHandler("Adobe.PPKLite");
// Check to see if the FDF has been signed:
if (fdf.isSigned)
{
// Obtain the other user’s signature info:
sigInfo = fdf.signatureValidate({
oSig: engine,
bUI: true
});
// Display the signature status and description:
console.println("Signature Status: " + sigInfo.status);
console.println("Description: " + sigInfo.statusText);
}
else
console.println("This FDF was not signed.");
Removing signatures
To remove a signature field, invoke the Doc object removeField method. In the example below,
Signature1 is removed:
var sigFieldName = "Signature1"
this.resetForm([sigFieldName]); // clear the signature
this.removeField(sigFieldName); // remove the field
Certifying a document
When applying a signature to certify a document, check the trustFlags property of the
signatureInfo object. If its value is 2, the signer is trusted for certifying documents.

Adobe Acrobat SDK Security
Developing Acrobat Applications Using JavaScript Validating signatures 169
Validating signatures
To validate a signature, invoke the signature field’s signatureValidate method. It returns one of the
following integer validity status values:
-1 — not a signature field
0 — signature is blank
1 — unknown status
2 — signature is invalid
3 — signature is valid, identity of signer could not be verified
4 — signature and identity of signer are both valid
The method accepts two parameters:
oSig — the security handler used to validate the signature (a securityHandler or
SignatureParameters object)
bUI — determines whether the user interface is shown when validating the data file
A SignatureParameters object contains two properties:
oSecHdlr — the security handler object
bAltSecHdlr — determines whether an alternate security handler may be used
In the following example, mySignatureField is analyzed for validity:
// Obtain the signature field:
var f = this.getField("mySignatureField");
// Validate the signature field:
var status = f.signatureValidate();
// Obtain the signature information
var sigInfo = f.signatureInfo();
// Check the status returned from the validation:
if (status < 3)
var msg = "Signature is not valid: " + sigInfo.statusText;
else
var msg = "Signature is valid: " + sigInfo.statusText;
// Display the status message:
app.alert(msg);
Setting digital signature properties with seed values
Sometimes form authors need to limit the choices a user can make when signing a particular signature
field. In enterprise settings, document authors can craft documents with behaviors and features that meet
specific business needs, thereby enabling administrative control of signature properties such as
appearance, signing reasons, and so on.
Such customizations are possible by using signature field seed values. A seed value specifies an attribute
and attribute value. The author can make the seed value a preference or a requirement.

Adobe Acrobat SDK Security
Developing Acrobat Applications Using JavaScript Adding security to PDF documents 170
The Field method signatureSetSeedValue sets the properties that are used when signing signature
fields. The properties are stored in the signature field and are not altered when the field is signed, the
signature is cleared, or when resetForm is called.
Refer to the Acrobat 8.0 Security User Guide to obtain a deeper understanding of the use of signature seed
values.
Example 12.1 Certification signature
The following script sets the seed values for the certification signature, and forces a certifying signature.
Certified signatures are always associated with modification detection and prevention (MDP) settings that
control which changes are allowed to be made to a document before the signature becomes invalid.
Changes are stored in the document as incremental saves beyond the original version of the document
that was covered by the certifying signature.
// Obtain the signature field object:
var f = this.getField("theAuthorSignature");
f.signatureSetSeedValue({
mdp: "defaultAndComments",
legalAttestations: ["Trust me and be at ease.",
"You can surely trust the author."],
reasons: ["This is a reason", "This is a better reason"],
flags: 8
});
Adding security to PDF documents
This section discusses various aspects of security: adding security, including encrypting files for a list of
recipients, encrypting files using security policies and adding security to document attachments.
Adding passwords and setting security options
Since the Standard security handler, used for password encryption of documents, is not
JavaScript-enabled, the most direct way to add passwords is through the creation of user or master
passwords in the Acrobat user interface.
As described in Encrypting files using certificates on page 165, you can encrypt a document for a number
of recipients using certificates, and can set security policies through the application of a certification
signature accompanied by the desired modification, detection, and prevention settings shown in the table
SignatureInfo properties, page 164.
Adding usage rights to a document
You can decide which usage rights will be permitted for a set of users. You can specify either full,
unrestricted access to the document, or rights that address accessibility, content extraction, allowing
changes, and printing. You can use JavaScript to customize these rights when encrypting a document for a
list of recipients. For more information, see “Rights-Enabled PDF Files” on page 183.

Adobe Acrobat SDK Security
Developing Acrobat Applications Using JavaScript Encrypting PDF files for a list of recipients 171
Encrypting PDF files for a list of recipients
The Doc object encryptForRecipients method is the primary means of encrypting PDF files for a list
of recipients using JavaScript. In “Reviewing documents with additional usage rights” on page 115, the
certificates used were gathered by connecting to a directory, which is a repository of user information. The
directory object contains an info property with which it is possible to create and activate a new directory.
It is accessible either through the directories property or the newDirectory method of the
securityHandler object.
The value of the info property is a DirectoryInformation object, that may contain standard properties
related to the name of the directory as well as additional properties specific to a particular directory
handler (these may include server and port information).
To create a new directory, create a DirectoryInformation object, obtain a SecurityHandler object and
invoke its newDirectory method, and assign the DirectoryInformation object to the new directory’s
info property.
// Create and activate a new directory:
var newDirInfo = {
dirStdEntryID: "dir0",
dirStdEntryName: "Employee LDAP Directory",
dirStdEntryPrefDirHandlerID: "Adobe.PPKMS.ADSI",
dirStdEntryDirType: "LDAP",
server: "ldap0.acme.com",
port: 389
};
// Obtain the security handler:
var sh = security.getHandler("Adobe.PPKMS");
// Create the new directory object:
var newDir = sh.newDirectory();
// Store the directory information in the new directory:
newDir.info = newDirInfo;
In order to obtain certificates from a directory, you must first connect to it using the Directory object
connect method, and return a DirConnection object. An example is given below:
// Obtain the security handler:
var sh = security.getHandler("Adobe.PPKMS");
var dc = sh.directories[0].connect();
It is then possible to use the DirConnection object to search for certificates. You can specify the list of
attributes to be used for the search by invoking the DirConnection object setOutputFields method,
that accepts two parameters:
oFields — an array of attributes to be used in the search
bCustom — whether the attributes are standard output attribute names
For example, the following code specifies standard output attributes (certificates and email):
dc.setOutputFields({oFields: ["certificates", "email"]});

Adobe Acrobat SDK Security
Developing Acrobat Applications Using JavaScript Encrypting PDF files for a list of recipients 172
To perform the search, invoke the DirConnection object search method. It takes the following
parameters:
oParams — an array of key-value pairs consisting of search attribute names and their corresponding
strings
cGroupName — the name of the group to which to restrict the search
bCustom — whether oParams contains standard attribute names
bUI — whether a user interface is used to collect the search parameters
In the following example, the directory is searched for certificates for the user whose last name is "Smith",
and displays the user’s email address:
var retval = dc.search({oParams: {lastName: "Smith"}});
if (retval.length > 0) console.println(retval[0].email);
When you invoke the Doc object encryptForRecipients method, the oGroups parameter is an array
of Group objects, each of which contains a permissions property. The permissions property is an
object containing the properties described in the following table.
Permissions object
Property Description
allowAll Full, unrestricted access.
allowAccessibility Content access for the visually impaired.
allowContentExtraction Content copying and extraction.
allowChanges Allowed changes (none, documentAssembly, fillAndSign,
editNotesFillAndSign, all).
allowPrinting Printing security level (none, lowQuality, highQuality).
The following code allows full and unrestricted access to the entire document for one set of users
(importantUsers), and allows high quality printing for another set of users (otherUsers):
// Obtain the security handler:
var sh = security.getHandler("Adobe.PPKMS");
// Connect to the directory containing the user certificates:
var dir = sh.directories[0];
var dc = dir.connect();
// Search the directory for certificates:
dc.setOutputFields({oFields:["certificates"]});
var importantUsers = dc.search({oParams:{lastName:"Smith"}});
var otherUsers = dc.search({oParams:{lastName:"Jones"}});
// Allow important users full, unrestricted access:
var importantGroup = {
userEntities: importantUsers,
permissions: {allowAll: true}
};

Adobe Acrobat SDK Security
Developing Acrobat Applications Using JavaScript Encrypting PDF files using security policies 173
// Allow other users high quality printing:
var otherGroup = {
userEntities: otherUsers,
permissions: {allowPrinting: "highQuality"}
};
// Encrypt the document for the intended recipients:
this.encryptForRecipients({
oGroups:[importantGroup, otherGroup],
bMetaData: true
});
See a related example in the section See “Reviewing documents with additional usage rights” on
page 115.
Encrypting PDF files using security policies
It is possible to define a security policy for a PDF document. The policy can contain a list of people who can
open the document, restrictions limiting their ability to modify, print, or copy the document, and an
expiration date for the document after which it cannot be opened.
There are two kinds of security policies: a personal policy is one created by a user and is stored on a local
computer, and a organizational policy is developed by an administrator and stored on a policy server such
as Adobe LiveCycle® Policy Server.
There are three types of custom policies. You can create policies for password security, certificate security,
and policies used on Policy Server.
JavaScript for Acrobat defines a securityPolicy object that contains the following properties:
policyID — a machine-readable policy ID string
name — the policy name
description — the policy description
lastModified — the date when the policy was last modified
handler — the handler that implements the policy (Adobe.APS, Adobe.PubSec, and
Adobe.Standard)
target — the target data covered by the policy (document or attachments)
To obtain a list of the security policies currently available, invoke the security object
getSecurityPolicies method. The method accepts two parameters:
oOptions — a SecurityPolicyOptions object containing parameters used to filter the list
bUI — determines whether the user interface will be displayed (affects bCheckOnline in the
oOptions parameter)
The SecurityPolicyOptions object is a generic object used to filter the list of security policies that will be
returned by the method, and contains the following properties:
bFavorites — determines whether to return policies are favorites or not
cFilter — returns policies using the specified security filter (Adobe.APS, Adobe.PubSec, and
Adobe.Standard)
cTarget — returns policies using the specified target (document or attachments)

Adobe Acrobat SDK Security
Developing Acrobat Applications Using JavaScript Encrypting PDF files using security policies 174
The following example illustrates how to request and display a list of favorite security policies:
// Set up the filtering options (SecurityOptionsPolicy object):
var options = {
bFavorites: true,
cFilter: "Adobe.PubSec"
};
// Obtain the filtered list of security policies:
var policyArray = security.getSecurityPolicies(options);
// Display the list of security policies by name:
for (var i=0; i<policyArray.length; i++)
console.println(policyArray[i].name);
To encrypt a PDF file using a security policy, you must first choose a security policy by invoking the
security object chooseSecurityPolicy method and then encrypt the file by invoking the Doc
object’s encryptUsingPolicy method.
The security object chooseSecurityPolicy method opens a dialog box that permits the user to
choose from a list of security policies filtered according to a SecurityPolicyOptions object.
The Doc object encryptUsingPolicy method accepts three parameters:
oPolicy — the policy object to use when encrypting the document
oGroups — an array of Group objects that the handler should use when applying the policy
oHandler — the SecurityHandler object to be used for encryption
bUI — whether the UI is displayed
In the following example, a newly created document is encrypted for a list of recipients, using the
encryptUsingPolicy method, by choosing and applying a security policy. A Policy Server must be
configured for publishing before running this example.
// Create the new document
var myDoc = app.newDoc();
// Choose the list of recipients
var recipients = [{
userEntities: [
{email: "user1@adobe.com"},
{email: "user2@adobe.com"},
{email: "user3@adobe.com"}
]
}];
// Encrypt the document using the security policy:
var results = myDoc.encryptUsingPolicy({
oPolicy: "adobe_secure_for_recipients",
oGroups: recipients
});
if ( results.errorCode == 0)
console.println("The policy applied was: " + results.policyApplied.name);

Adobe Acrobat SDK Security
Developing Acrobat Applications Using JavaScript Adding security to document attachments 175
Adding security to document attachments
You can add security to a document by encrypting its attachments and enclosing them in an eEnvelope. To
do this with JavaScript, invoke the Doc object addRecipientListCryptFilter method, which is used
to encrypt data objects and accepts two parameters:
oCryptFilter — the name of the encryption filter
oGroup — an array of Group objects representing the intended recipients
Note: For Acrobat 7.0, the value of cCryptFilter must be the string DefEmbeddedFile, beginning
with Acrobat 8, the value of cCryptFilter can be any string.
Thus, an eEnvelope is a PDF file that contains encrypted attachments. The name of the crypt filter, which
represents the recipient list, is defined and used when importing the attachment. An example is given
below:
// Create instructions to be used in the recipient dialog box:
var note = "Select the recipients. Each must have ";
note += "an email address and a certificate.";
// Specify the remaining options used in the recipient dialog box:
var options = {
bAllowPermGroups: false,
cNote: note,
bRequireEmail: true
};
// Obtain the intended recipient Group objects:
var groupArray = security.chooseRecipientsDialog(options);
// Open the eEnvelope document:
var env = app.openDoc("/C/eEnvelopes/myeEnvelope.pdf");
// Set up the crypt filter:
env.addRecipientListCryptFilter("myFilter", groupArray);
// Attach the current document to the eEnvelope:
env.importDataObject("secureMail0", this.path, "myFilter");
// Save the eEnvelope:
env.saveAs("/C/output/outmail.pdf");
Digital IDs and certification methods
It is possible to customize and extend the management and usage of digital IDs using JavaScript. In
addition, it is possible to share digital ID certificates, build a list of trusted identities, and analyze the
information contained within certificates.

Adobe Acrobat SDK Security
Developing Acrobat Applications Using JavaScript Digital IDs 176
Digital IDs
A digital ID is represented with a SignatureInfo object, which contains properties of the digital signature
common to all handlers, in addition to other properties defined by public key security handlers. These
additional properties are described in the following table.
SignatureInfo public key security handler properties
Property Description
appearance User-configured appearance name.
certificates Chain of certificates from signer to certificate authority.
contactInfo User-specified contact information for determining trust.
byteRange Bytes covered by this signature.
docValidity Validity status of the document byte range digest.
idPrivValidity Validity of the identity of the signer.
idValidity Numerical validity of the identity of the signer.
objValidity Validity status of the object digest.
trustFlags What the signer is trusted for.
password Password used to access the private key for signing.
About digital ID providers
A digital ID provider is a trusted 3rd party, or certificate authority, that verifies the digital ID owner’s identity,
and issues the certificate or private key. The certificates property of the SignatureInfo object contains
an array of certificates that reflects the certificate chain leading from the signer’s certificate to that issued
by the certificate authority. Thus, you can inspect the details of the certificate issued by the digital ID
provider (such as its usage property).
For example, the following code encrypts the current document for everyone in the address book. It does
this by creating a collection of certificates suitable for encrypting documents, that are filtered from the
overall collection. This is accomplished by examining all the certificates in the address book and excluding
those entries containing sign-only certificates, CA certificates, no certificates, or certificates otherwise
unsuitable for encryption:
// Obtain the security handler:
var eng = security.getHandler("Adobe.AAB");
// Connect to the directory containing the certificates:
var dc = eng.directories[0].connect();
// Obtain the list of all recipients in the directory:
var rcp = dc.search();
// Create the filtered recipient list:
var fRcp = new Array();

Adobe Acrobat SDK Security
Developing Acrobat Applications Using JavaScript Digital IDs 177
// Populate the filtered recipient list:
for (var i=0; i<rcp.length; i++) {
if (rcp[i].defaultEncryptCert &&
rcp[i].defaultEncryptCert.usage.endUserEncryption)
fRcp[fRcp.length] = rcp[i];
if (rcp[i].certificates) {
for (var j=0; j<rcp[i].certificates.length; j++)
if (rcp[i].certificates[j].usage.endUserEncryption)
fRcp[fRcp.length] = rcp[i];
}
}
// Now encrypt for the filtered recipient list:
this.encryptForRecipients({ oGroups:[{userEntities: fRcp}] });
Creating a digital ID (default certificate security)
If you would like to create a certificate for a new user, invoke the securityHandler object newUser
method, which supports enrollment with the Adobe.PPKLite and Adobe.PPKMS security handlers by
creating a new self-sign digital ID, and prevents the user from overwriting the file. It accepts the following
parameters:
cPassword — the password needed to access the digital ID file
cDIPath — the location of the digital ID file
oRDN — the relative distinguished name (represented as an RDN object) containing the issuer or subject
name for the certificate
oCPS — the certificate policy information, which is a generic object containing the following
properties:
oid — the certificate policy object identifier
url — URL pointing to detailed policy information
notice — shortened version of detailed policy information
bUI — determines whether to use the user interface to enroll the new user
The relative distinguished name is a generic object containing the properties shown in the following table.
RDN object
Property Description
cCountry or region
cn Common name
oOrganization name
ou Organization unit
eEmail address

Adobe Acrobat SDK Security
Developing Acrobat Applications Using JavaScript Digital IDs 178
An example is given below:
// Obtain the security handler:
var ppklite = security.getHandler("Adobe.PPKLite");
// Create the relative distinguished name:
var newRDN = {
cn: "newUser",
c: "US"
};
// Create the certificate policy information:
var newCPS = {
oid: "1.2.3.4.5",
url: "http://newca.com/newCPS.html",
notice: "This is a self-generated certificate"
};
// Create the new user’s certificate:
security.newUser({
cPassword: "newUserPassword",
cDIPath: "/C/temp/newUser.pfx",
oRDN: newRDN,
oCPS: newCPS,
bUI: false
});
The securityHandler object has a DigitalIDs property that contains the certificates associated with
the currently selected digital IDs for the security handler. The DigitalIDs property is a generic object
containing the following properties:
oEndUserSignCert — the certificate used when signing
oEndUserCryptCert — the certificate used when encrypting
certs — an array of certificates corresponding to all the digital IDs
stores — an array of strings (one for every certificate object) indicating where the digital IDs are
stored
You can use the security object exportToFile method to save a certificate file to disk. In the
following example, the signing certificate is written to disk:
// Obtain the security handler:
var sh = security.getHandler("Adobe.PPKMS");
// Obtain the certificates:
var ids = sh.DigitalIDs;
// Write the signing certificate to disk:
security.exportToFile(ids.oEndUserSignCert, "/C/mySignCert.cer");

Adobe Acrobat SDK Security
Developing Acrobat Applications Using JavaScript Digital IDs 179
Using digital IDs (default certificate security)
As you learned earlier, you can obtain signature information from a signature field by invoking its
signatureInfo method. In addition to this, you can also use an existing certificate to create a digital ID.
To do this, obtain the certificate from an existing, signed field and create the relative distinguished name
using the information it contains:
// Obtain the security handler:
var ppklite = security.getHandler("Adobe.PPKLite");
// Obtain the signature field:
var f = this.getField("existingSignature");
// Validate the signature:
f.signatureValidate();
// Obtain the signature information:
var sigInfo = f.signatureInfo();
// Obtain the certificates and distinguished name information
var certs = sigInfo.certificates;
var rdn = certs[0].subjectDN;
// Now create the digital signature:
ppklite.newUser({
cPassword: "newUserPassword",
cDIPath: "/C/temp/newUser.pfx",
oRDN: rdn,
});
Managing digital IDs (Windows certificate security)
A Directory object is a repository of user information, including public key certificates. On Windows, the
Adobe.PPKMS security handler provides access to the directories created by the user through the
Microsoft Active Directory Script Interface (ADSI). These are created sequentially with the names
Adobe.PPKMS.ADSI.dir0, Adobe.PPKMS.ADSI.dir1, etc. In this case, the Adobe.PPKMS.ADSI
directory handler includes the directory information object properties shown in the following table.
Adobe.PPKMS.ADSI directory handler object properties
Property Description
server The server hosting the data
port The port number (standard LDAP port is 389)
searchBase Used to narrow the search to a section of the directory
maxNumEntries Maximum number of entries retrieved from search
timeout Maximum time allowed for search

Adobe Acrobat SDK Security
Developing Acrobat Applications Using JavaScript Managing digital ID certificates 180
For example, the following code displays information for an existing directory:
// Obtain the security handler:
var ppkms = security.getHandler("Adobe.PPKMS");
// Obtain the directory information object:
var info = ppkms.directories[0].info;
// Display some of the directory information:
console.println("Directory: " + info.dirStdEntryName);
console.println("Address: " + info.server + ":" + info.port);
Managing digital ID certificates
This section contains a brief discussion on sharing digital ID certificates and extracting information from
the certificate of a digital ID.
Sharing digital ID certificates
You can share a self-signed digital ID certificate by exporting it as an FDF file. To do this, sign the FDF file by
invoking the FDF object signatureSign method. The signatureSign method works similarly to that
of the Doc object:
// Obtain the security handler:
var eng = security.getHandler("Adobe.PPKLite");
// Access the digital ID:
eng.login("myPassword", "/C/temp/myID.pfx");
// Open the FDF:
var myFDF = app.openFDF("/C/temp/myFDF.fdf");
// Sign the FDF:
if (!myFDF.isSigned) {
// Sign the FDF
myFDF.signatureSign({
oSig: eng,
nUI: 1,
cUISignTitle: "Sign Embedded File FDF",
cUISelectMsg: "Please select a digital ID"
});
// Save the FDF
myFDF.save("/C/temp/myFDF.fdf");
}

Adobe Acrobat SDK Security
Developing Acrobat Applications Using JavaScript Managing digital ID certificates 181
Building a list of trusted identities
The trust level associated with a digital ID is stored in the trustFlags property defined in the
signatureInfo object’s public key security handler properties. The bits in this number indicate the level
of trust associated with the signer and are valid only when the status property has a value of 4. These
trust settings are derived from those in the recipient’s trust database, such as the Acrobat Address Book
(Adobe.AAB). The following bit assignments are described below:
1 — trusted for signatures
2 — trusted for certifying documents
3 — trusted for dynamic content such as multimedia
4 — Adobe internal use
5 — the JavaScript in the PDF file is trusted to operate outside the normal PDF restrictions
Checking information on certificates
You can obtain a certificates through the certificates property of a SignatureInfo object, that is
returned by a call to the signature field’s signatureInfo method. The certificate properties are
described in the table Certificate object properties and the relative distinguished name properties are
defined in the table RDN object.
In the following example, the signer’s common name, the certificate’s serial number, and the distinguished
name information are displayed:
// Obtain the signature field:
var f = this.getField("mySignatureField");
// Validate the signature field:
var status = f.signatureValidate();
// Obtain the signature information
var sigInfo = f.signatureInfo();
// Obtain the certificate:
var cert = sigInfo.certificates[0];
console.println("signer’s common name: " + cert.subjectCN);
console.println("serial number: " + cert.serialNumber);
// Distinguished name information:
console.println("distinguished common name: " + cert.subjectDN.cn);
console.println("distinguished organization: " + cert.subjectDN.o);

Adobe Acrobat SDK Security
Developing Acrobat Applications Using JavaScript Task based topics 182
Task based topics
This section contains a discussion of a few security-oriented tasks.
Disallowing changes in scripts
Go to File > Properties and select the Security tab. Set up either password or certificate security for the
document by clicking Security Method and choosing either Password Security or Certificate Security. In
the Permissions area of the dialog box that pops up, click Changes Allowed and select any of the options
except Any Except Extracting Pages. You can verify that changes to scripts have been disabled by returning
to the Security tab. In the Document Restrictions Summary portion, Changing the Document should be
set to Not Allowed.
Hiding scripts
Go to File > Properties and select the Security tab. Set up either password or certificate security for the
document by clicking Security Method and choosing either Password Security or Certificate Security. In
the Permissions area of the dialog box that pops up, ensure that Enable Copying of Text, Images, and
Other Content is unchecked. You can verify that changes to scripts have been disabled by returning to the
Security tab. In the Document Restrictions Summary portion, Changing the Document should be set to
Not Allowed.
183
13 Rights-Enabled PDF Files
When creating a PDF document, it is possible to create certified documents by assigning special rights to it
that enable users of Adobe Reader to fill in forms, participate in online reviews, and attach files. Adobe
LiveCycle® Reader Extensions may be used to activate additional functionality within Adobe Reader for a
particular document, thereby enabling the user to perform such operations as save, fill in, annotate, sign,
certify, authenticate, and submit the document, thus streamlining collaboration for document reviews and
automating data capture with electronic forms. In addition, users of Acrobat Professional can
Reader-enable collaboration.
Topics Description Page
Additional usage rights Describes usage rights set by LiveCycle Reader Extensions. page 183
LiveCycle Reader Extensions A brief description of LiveCycle Reader Extensions is
presented.
page 184
Writing JavaScript for Adobe
Reader
Discusses how usage rights in Adobe Reader affects
JavaScript for Acrobat API.
page 184
Enabling collaboration Discusses the API that is enabled when collaboration is
enabled through LiveCycle Reader Extensions.
page 186
Additional usage rights
LiveCycle Reader Extensions sets permissions within a PDF document that would otherwise be disabled
through the usage of a certificate issued by the Adobe Reader Extension Root Certificate Authority.
Permissions for Reader-enabled PDF files are determined by the combination of the user rights settings in
the PDF file and a special Object Identifier (OID), embedded within the certificate, specifying the
additional permissions to be made available. The permissions are listed below:
Form: fill-in and document full-save
Form: import and export
Form: add and delete
Form: submit standalone
Form: spawn template, spawn page from template, and delete spawned pages.
Note: Changing page visibility using template.hidden is not allowed through JavaScript.
Signature: modify
Annotation: create, delete, modify, and copy

Adobe Acrobat SDK Rights-Enabled PDF Files
Developing Acrobat Applications Using JavaScript LiveCycle Reader Extensions 184
Annotation: import and export
Form: barcode plain text
Annotation: online
Form: online
Note: JavaScript allows SOAP access in forms. For Adobe Reader 6.0, SOAP access is allowed in Acrobat
forms. For Adobe Reader 6.02, OleDb database access is allowed in Windows for static XML
forms. For Adobe Reader 7.0.5, SOAP access is allowed for static and dynamic XML forms.
Embedded File: create, delete, modify, copy, and import.
Note: The ability to manipulate embedded data objects is available in Adobe Reader 6.0 and later.
LiveCycle Reader Extensions
During the design process, a PDF document may be generated by LiveCycle or other products. The
document creator may then assign appropriate usage rights using the LiveCycle Reader Extensions. The
PDF document is made available on the web, and users may complete the form on the web site, or save it
locally and subsequently complete and annotate it, digitally sign it, add attachments, and return it.
In effect, LiveCycle Reader Extensions will enable functionality within Adobe Reader for a given document
that is not normally available. After the user has finished working with the document, those functions will
be disabled until the user receives another rights-enabled PDF file.
One major advantage of LiveCycle Reader Extensions is that the client application (Adobe Reader) is on
the user’s desktop, which means that there is no cost to the end user.
Writing JavaScript for Adobe Reader
It is possible to access or assign additional usage rights within a PDF file by using the LiveCycle Reader
Extensions API or its web user interface.
Note: For rights-enabled documents, certain editing features normally available within the
Acrobat Standard and Acrobat Professional products will be disabled. This will ensure that the user
does not inadvertently invalidate the additional usage rights in a document under managed review
before passing the document on to an Adobe Reader user for further commenting.
The methods shown in the following table are disabled in Acrobat Standard and Acrobat Professional by
LiveCycle Reader Extensions.
Features disabled by LiveCycle Reader Extensions
Features Methods
delete, add, replace, and
move pages
Doc.deletePages, Doc.newPage, Doc.replacePages,
Doc.movePage, Doc.insertPages, Doc.spawnPageFromTemplate
modify page content Doc.addWatermarkFromText, Doc.addWatermarkFromFile,
Doc.flattenPages, Doc.deleteSound

Adobe Acrobat SDK Rights-Enabled PDF Files
Developing Acrobat Applications Using JavaScript Writing JavaScript for Adobe Reader 185
In Acrobat Standard and Acrobat Professional, the following controls are disabled for rights-enabled
documents:
●Menu items that allow the addition or modification of scripts (except for the Debugger).
●Menu items that allow the creation, modification, or deletion of form fields (except the Import and
Export menu items).
●Certain operations within the Security Panel marked as Not Allowed.
In addition, since the following menu operations will be affected in Acrobat Standard and
Acrobat Professional, so will their corresponding JavaScript methods, indicated in the following table.
Controls affected by LiveCycle Reader Extensions in Acrobat Standard and Professional
Menu operation Equivalent JavaScript method
Insert Pages Doc.insertPage
Replace Pages Doc.replacePages
Delete Pages Doc.deletePages
Crop Pages Doc.setPageBoxes
Rotate Pages Doc.setPageRotations
Set Page Transitions app.defaultTransitions (read-only),
Doc.setPageTransitions
Number Pages Doc.setPageLabels
Add Watermark & Background Doc.addWatermarkFromText, Doc.addWatermarkFromFile
Add Bookmark Bookmark.createChild
If a document is rights-enabled but commenting is not allowed, then the JavaScript methods shown in the
following table will be disabled.
When commenting is not allowed in Reader-enabled documents
Feature Method
Add a comment Doc.addAnnot
Import comments Doc.importAnFDF
Export comments Doc.exportAsFDF (when bAnnotations is set to true)
add or modify JavaScripts Doc.setAction, Doc.setPageAction, Field.setAction,
Link.setAction, Ocg.setAction, Bookmark.setAction,
Doc.importAnFDF
invoke web services SOAP.connect, SOAP.request, SOAP.response
Features Methods

Adobe Acrobat SDK Rights-Enabled PDF Files
Developing Acrobat Applications Using JavaScript Enabling collaboration 186
If a document is rights-enabled but file attachments are not allowed, then the following JavaScript
methods will be disabled:
●Doc.createDataObject
●Doc.importDataObject
●Doc.setDataObjectContents
●Doc.removeDataObject
If a document is rights-enabled but digital signatures are not allowed, then the following JavaScript
methods will be disabled:
●Doc.getField (for signature fields)
●Doc.addField (when cFieldType = "signature")
●Field.removeField (when cFieldType = "signature")
●Field.signatureSign
For more information on developing JavaScript solutions for Adobe Reader see Developing for Adobe
Reader.
Enabling collaboration
By using RSS, collaboration servers can provide customized XML-based user interfaces directly inside of
Acrobat itself, thus providing a more dynamic and personalized tool, and providing JavaScript developers
a means to extend collaboration, including full user interfaces.
In addition, it is now straightforward to migrate comments from one document to another, carry
comments across multiple versions of a document, and anchor comments to content so that the
annotations remain in the right place even if the content changes.
The advantages of this are that it is possible to automate discovery of collaboration servers, initiation
workflows, and RSS feeds which may be used to populate content inside Adobe Reader.
It is significant to note that users of Acrobat Professional can enable both file-based and online
collaboration, thus enabling them to invite users of Adobe Reader to participate in the review process.
The following JavaScript methods will be enabled in Adobe Reader when collaboration is enabled:
●Doc.addAnnot
●Doc.importAnFDF
●Doc.exportAnFDF
When collaboration is not enabled, it is still possible for annotations to appear in a browser by embedding
the following statement in the FDF file:
Collab.showAnnotToolsWhenNoCollab = true;

Adobe Acrobat SDK Rights-Enabled PDF Files
Developing Acrobat Applications Using JavaScript Enabling collaboration 187
A complete example of an FDF file that makes it possible for annotations to appear in a browser is shown
below:
%FDF-1.2
%âãÏÓ
1 0 obj
<<
/FDF
<<
/F (file:///C:/ReaderAnnots/seafood_wallet_re.pdf)
/JavaScript
<<
/AfterPermsReady 2 0 R
>>
>>
>>
endobj
2 0 obj
<<
>>
stream
app.alert("DocumentOpen Script Start");
Collab.showAnnotToolsWhenNoCollab = true;
endstream
endobj
trailer
<<
/Root 1 0 R
>>%%EOF
188
14 Interacting with Databases
It is possible to use JavaScript for Acrobat to interact with Windows databases through an ODBC
connection. This means that you can use JavaScript objects to connect to a database, retrieve tables, and
execute queries. The object model associated with database interaction is centered on the ADBC object,
which provides an interface to the ODBC connection. The ADBC object interacts with other objects to
facilitate database connectivity and interaction DataSourceInfo, connection, statement, Column,
ColumnInfo, row, and TableInfo. These objects can be used in document-level scripts to execute
database queries.
Topics Description Page
About ADBC A brief overview of ADBC as a Windows only interface to
ODBC.
page 188
Establishing an ADBC
connection
Discusses how to made a connection with a database and
how to extract data.
page 189
Executing SQL statements Show how to use SQL statements to filter the type of data
brought back from the database.
page 191
About ADBC
The Acrobat extensions to JavaScript provides an ODBC-compliant object model called Acrobat Database
Connectivity (ADBC), which can be used in document-level scripts to connect to a database for the
purposes of inserting new information, updating existing information, and deleting database entries.
ADBC provides a simplified interface to ODBC, which it uses to establish a connection to a database and
access its data, and supports the usage of SQL statements for data access, update, deletion, and retrieval.
Thus, a necessary requirement to the usage of ADBC is that ODBC must be installed on a client machine
running a Microsoft Windows operating system. In addition, ADBC does not provide security measures
with respect to database access; it is assumed that the database administrator will establish and maintain
the security of all data.
The ADBC object provides methods through which you can obtain a list of accessible databases and form a
connection with one of them. These methods are called getDataSourceList and newConnection. In
addition, the ADBC object provides a number of properties corresponding to all supported SQL and
JavaScript data types, which include representations of numeric, character, time, and date formats.
Note: To activate ADBC, create a registry key of type DWORD with the name “bJSEnable” and a value of
“true” (1) in the following location:
HKEY_CURRENT_USER\SOFTWARE\Adobe\Adobe Acrobat\8.0\ADBC
This activates ADBC in Acrobat 8.0. In previous releases of Acrobat, ADBC was active by default. In
Acrobat 8.0, this setting has been changed to require user intervention to activate ADBC because
most users do not want to have ADBC accessible from PDF.

Adobe Acrobat SDK Interacting with Databases
Developing Acrobat Applications Using JavaScript Establishing an ADBC connection 189
Establishing an ADBC connection
There are normally two steps required to establish an ADBC connection. First, obtain a list of accessible
databases by invoking the ADBC object’s getDataSourceList method. Then establish the connection
by passing the Data Source Name (DSN) of one of the databases in the list to the ADBC object’s
newConnection method.
The getDataSourceList method returns an array of DataSourceInfo generic objects, each of which
contains the following properties:
name — a string identifying the database
description — a description containing specific information about the database
In the following example, a list of all available databases is retrieved, and the DSN of the
DataSourceInfo object representing Q32000Data is identified and stored in the variable DB:
// Obtain a list of accessible databases:
var databaseList = ADBC.getDataSourceList();
// Search the DataSourceInfo objects for the “Q32000Data” database:
if (databaseList != null) {
var DB = "";
for (var i=0; i<databaseList.length; i++)
if (databaseList[i].name == "Q32000Data") {
DB = databaseList[i].name;
break;
}
}
To establish the database connection, invoke the ADBC object’s newConnection method, which accepts
the following parameters:
cDSN — the Data Source Name (DSN) of the database
cUID — the user ID
cPWD — the password
The newConnection method returns a connection object, which encapsulates the connection by
providing methods which allow you to create a statement object, obtain information about the list of
tables in the database or columns within a table, and close the connection.
In the following example, a connection is established with the Q32000Data database:
if (DB != "") {
// Connect to the database and obtain a Connection object:
var myConnection = ADBC.newConnection(DB.name);
}
Normally, the DSN is known on the system, so searching for it is not necessary. You can connect in a more
direct way:
var myConnection = ADBC.newConnection("Q32000Data");

Adobe Acrobat SDK Interacting with Databases
Developing Acrobat Applications Using JavaScript Establishing an ADBC connection 190
The connection object provides the methods shown in the following table.
Connection object
Method Description
close Closes the database connection.
newStatement Creates a statement object used to execute SQL statements.
getTableList Retrieves information about the tables within the database.
getColumnList Retrieves information about the various columns within a table.
The connection object’s getTableList method returns an array of TableInfo generic objects, each of
which corresponds to a table within the database and contains the following properties:
name — the table name
description — a description of database-dependent information about the table
In the following example, the name and description of every table in the database is printed to the
console:
// Obtain the array of TableInfo objects representing the database tables:
var tableArray = myConnection.getTableList();
// Print the name and description of each table to the console:
for (var i=0; i<tableArray.length; i++) {
console.println("Table Name: " + tableArray[i].name);
console.println("Table Description: " + tableArray[i].description);
}
The connection object’s getColumnList method accepts a parameter containing the name of one of the
database tables, and returns an array of ColumnInfo generic objects, each of which corresponds to a
column within the table and contains the following properties:
name — the name of the column
description — a description of database-dependent information about the column
type — a numeric identifier representing an ADBC SQL type
typeName — a database-dependent string representing the data type
In the following example, a complete description of every column in the Q32000Data database table
called Sales is printed to the console:
// Obtain the array of ColumnInfo objects representing the Sales table:
var columnArray = myConnection.getColumnList("Sales");
// Print a complete description of each column to the console:
for (var i=0; i<columnArray.length; i++) {
console.println("Column Name: " + columnArray[i].name);
console.println("Column Description: " + columnArray[i].description);
console.println("Column SQL Type: " + columnArray[i].type);
console.println("Column Type Name: " + columnArray[i].typeName);
}

Adobe Acrobat SDK Interacting with Databases
Developing Acrobat Applications Using JavaScript Executing SQL statements 191
Executing SQL statements
To execute SQL statements, first create a statement object by invoking the connection object
newStatement method. The newly created statement object can be used to access any row or column
within the database table and execute SQL commands.
In the following example, a statement object is created for the Q32000Data database created in the
previous sections:
myStatement = myConnection.newStatement();
The statement object provides the methods shown the following table.
Statement object
Method Description
execute Executes an SQL statement.
getColumn Obtains a column within the table.
getColumnArray Obtains an array of columns within the table.
getRow Obtains the current row in the table.
nextRow Iterates to the next row in the table.
In addition to the methods shown above, the statement object provides two useful properties:
columnCount — the number of columns in each row of results returned by a query
rowCount — the number of rows affected by an update
To execute an SQL statement, invoke the statement object execute method, which accepts a string
parameter containing the SQL statement. Note that any names containing spaces must be surrounded by
escaped quotation marks, as shown in the following example:
// Create the SQL statement:
var SQLStatement = 'Select * from \"Client Data\"';
// Execute the SQL statement:
myStatement.execute(SQLStatement);
There are two steps required to obtain a row of data. First, invoke the statement object nextRow method;
this makes it possible to retrieve the row’s information. Then, invoke the statement object getRow
method, which returns a Row generic object representing the current row.
In the example shown below, the first row of information will be displayed in the console. Note that the
syntax is simplified in this case because there are no spaces in the column names:
// Create the SQL statement:
var st = 'Select firstName, lastName, ssn from \"Employee Info\"';
// Execute the SQL statement:
myStatement.execute(st);

Adobe Acrobat SDK Interacting with Databases
Developing Acrobat Applications Using JavaScript Executing SQL statements 192
// Make the next row (the first row in this case) available:
myStatement.nextRow();
// Obtain the information contained in the first row (a Row object):
var firstRow = myStatement.getRow();
// Display the information retrieved:
console.println("First name: " + firstRow.firstName.value);
console.println("Last name: " + firstRow.lastName.value);
console.println("Social Security Number: " + firstRow.ssn.value);
If the column names contain spaces, the syntax can be modified as shown below:
// Create the SQL statement:
var st = 'Select \"First Name\", \"Last Name\" from \"Employee Info\"';
// Execute the SQL statement:
myStatement.execute(st);
// Make the next row (the first row in this case) available:
myStatement.nextRow();
// Obtain the information contained in the first row (a Row object):
var firstRow = myStatement.getRow();
// Display the information retrieved:
console.println("First name: " + firstRow["First Name"].value);
console.println("Last name: " + firstRow["Last Name"].value);

193
15 SOAP and Web Services
Acrobat 7.0 and later provides support for the SOAP 1.1 and 1.2 standards in order to enable PDF forms to
communicate with web services. This support has made it possible to include both SOAP header and body
information, send binary data more efficiently, use document/literal encoding, and facilitate authenticated
or encrypted communications. In addition, it provides the ability to locate network services using DNS
Service Discovery. All of this makes it possible to integrate PDF files into existing workflows by binding
XML forms to schemas, databases, and web services. These workflows include the ability to share
comments remotely or invoke web services through form field actions.
Topics Description Page
Using SOAP and web
services
Describes the major methods and properties of the SOAP object;
also discusses such topics as synchronous and asynchronous
information exchange, exchanging file attachments and binary
data, accessing SOAP header information and authentication.
page 193
DNS service discovery How to the queryServices and resolveService methods
to locate the service on the network and bind to it for
communications.
page 203
Managing XML-based
information
How to use XPath to extract XML data. page 205
Workflow applications Discusses how a SOAP-based collaboration server can be used to
share comments remotely via a web-based comment repository.
page 206
Note: Beginning with version 8, the SOAP object is deprecated, though support will continue. Use the
Net.SOAP when developing any new web services. See the documentation of the Net object in
the JavaScript for Acrobat API Reference for details.
Using SOAP and web services
JavaScript for Acrobat provides a SOAP object that encapsulates the support for web services and service
discovery. Through the usage of this object, you can extend and customize your workflows by engaging in
XML-based communication with remote servers.
The SOAP object has a wireDump property that sends all XML requests and responses to the JavaScript
Console for debugging purposes. In addition, the SOAP object provides the methods described in the
following table.
SOAP object
Method Description
connect Obtains a WSDL proxy object used to invoke a web service.
queryServices Locates network services using DNS Service Discovery.

Adobe Acrobat SDK SOAP and Web Services
Developing Acrobat Applications Using JavaScript Using a WSDL proxy to invoke a web service 194
Using a WSDL proxy to invoke a web service
When connecting to a web service, your JavaScript code may use a WSDL proxy object to generate a SOAP
envelope. The envelope contains a request for the server to run a web method on behalf of the client. To
obtain the WSDL proxy object, invoke the SOAP object’s connect method, which accepts a single
parameter containing the HTTP or HTTPS URL of the WSDL document.
The returned proxy object contains the web methods available in the web service described by the WSDL
document. If the web service uses SOAP/RPC encoding, the parameters in the proxy object’s methods will
match the order specified in the WSDL document. If the web service uses document/literal encoding, the
methods will accept a single parameter describing the request message.
resolveService Binds a service name to a network address and port.
request The principal method used to invoke a web service.
response A callback method used in asynchronous web method calls.
streamDecode Decodes a Base64 or Hex stream object.
streamEncode Applies Base64 or Hex encoding to a stream object.
streamFromString Converts a string to a stream object.
stringFromStream Converts a stream object to a string.
SOAP and web services topics Page
Using a WSDL proxy to invoke a web service page 194
Synchronous and asynchronous information
exchange
page 195
Using document/literal encoding page 199
Exchanging file attachments and binary data page 200
Converting between string and readstream
information
page 201
Accessing SOAP version information page 201
Accessing SOAP header information page 201
Authentication page 202
Error handling page 202
Method Description

Adobe Acrobat SDK SOAP and Web Services
Developing Acrobat Applications Using JavaScript Synchronous and asynchronous information exchange 195
In the example shown below, a connection to a web service will be established, and its RPC-encoded web
methods will be invoked. Assume that myURL contains the address of the WSDL document:
// Obtain the WSDL proxy object:
var myProxy = SOAP.connect(myURL);
// Invoke the echoString web service, which requires a string parameter:
var testString = "This is a test string.";
var result = myProxy.echoString(testString);
// Display the response in the console:
console.println("Result is " + result);
// Invoke the echoInteger web service, which requires an integer parameter:
// Since JavaScript does not support XSD-compliant integer values,
// we will create an integer object compliant with the XSD standard:
var myIntegerObject = {
soapType: "xsd:int",
soapValue: "10"
};
var result = myProxy.echoInteger(myIntegerObject);
// Display the response in the console:
console.println("Result is " + result);
Note that each call to a web method generates a SOAP envelope that is delivered to the web service, and
that the return value is extracted from the corresponding envelope returned by the web service. Also,
since XML relies on text, there is no problem sending a string to the web service. In the case of integers,
however, it is necessary to create an XSD-compliant object to represent the integer value. JavaScript for
Acrobat does support some of the standard data types specified in the XSD. These are shown in the
following table.
XSD-compliant data types supported in JavaScript
JavaScript type Equivalent XSD-compliant type
String xsd:string
Number xsd:float
Date xsd:dateTime
Boolean xsd:boolean
ReadStream SOAP-ENC:base64
Array SOAP-ENC:Array
Synchronous and asynchronous information exchange
The SOAP object request method may be used to establish either synchronous or asynchronous
communication with a web service, and provides extensive support for SOAP header information, firewall
support, the type of encoding used, namespace qualified names, compressed or uncompressed
attachments, the SOAP protocol version to be used, authentication schemes, response style, and
exception handling.

Adobe Acrobat SDK SOAP and Web Services
Developing Acrobat Applications Using JavaScript Synchronous and asynchronous information exchange 196
The request method accepts the parameters shown in the following table.
Request method
Parameter Description
cURL URL for SOAP HTTP endpoint.
oRequest Object containing RPC information.
oAsync Object used for asynchronous method invocation.
cAction SOAPAction header used by firewalls and servers to filter requests.
bEncoded Indicates whether SOAP encoding is used.
cNamespace Message schema namespace when SOAP encoding is not used.
oReqHeader SOAP header to be included with request.
oRespHeader SOAP header to be included with response.
cVersion SOAP protocol version to be used (1.1 or 1.2).
oAuthenticate Authentication scheme.
cResponseStyle The type and structure of the response information (JS, XML, Message).
cRequestStyle Indicates how oRequest is interpreted.
cContentType Specifies the HTTP content-type header.
Establishing a synchronous connection
The SOAP object request method may be used to establish a synchronous connection with a web
service. To establish the connection and invoke the web methods, it is necessary to provide the cURL,
oRequest, and cAction parameters. The example below demonstrates how to invoke the same web
services used in the previous example.
Similar to the parameter used in the connect method, the cURL parameter contains the URL for the
WSDL document. For the purposes of our example, assume that myURL represents the WSDL document
location.
The oRequest parameter is a fully qualified object literal specifying both the web method name and its
parameters, in which the namespace is separated from the method name by a colon. It may also contain
the following properties:
soapType — the SOAP type used for the value
soapValue — the SOAP value used when generating the message
soapName — the element name used when generating the SOAP message
soapAttributes — an object containing the XML attributes in the request node
soapQName — the namespace-qualified name of the request node
soapAttachment — determines whether soapValue is encoded as an attachment according to the
SwA/MTOM specification. In this case, soapValue will be a stream.

Adobe Acrobat SDK SOAP and Web Services
Developing Acrobat Applications Using JavaScript Synchronous and asynchronous information exchange 197
Assume that the namespace is http://www.example.com/methods, the method name is echoString,
and it accepts a string parameter called inputString. The following code represents the oRequest
parameter:
var echoStringRequest = {
"http://www.example.com/methods:echoString {
inputString: "This is a test."
}
};
The cAction parameter contains header information described by the WSDL document that is used by
firewalls to filter SOAP requests. In our example, we will supply the location of the WSDL document:
var mySOAPAction = "http://www.example.com/methods";
We may now invoke the echoString web method:
var response = SOAP.request ({
cURL: myURL,
oRequest: echoStringRequest,
cAction: mySOAPAction
});
In the case of synchronous requests such as this one, the value returned by the request method
(response in this example) is an object containing the result of the web method, which will be one of the
JavaScript types corresponding to XSD types. The default format for the response value is an object
describing the SOAP body (or header) of the returned message.
Note: In the case of base64 or hex encoding of binary information, the type returned will be a
readStream object.
We may now obtain the returned value by using syntax that corresponds to the SOAP body sent back by
the web method:
var responseString = "http://www.example.com/methods:echoStringResponse";
var result = response[responseString]["return"];
// Display the response in the console:
console.println("Result is " + result);
Similarly, we can invoke the echoInteger method. To do this, we will use the same value for the cURL
and cAction parameters, and develop an oRequest parameter like the one we used for the
echoString method. In this case, however, we must supply an XSD-compliant object to represent the
integer value:
var myIntegerObject = {
soapType: "xsd:int",
soapValue: "10"
};
var echoIntegerRequest = {
"http://www.example.com/methods:echoInteger {
inputInteger: myIntegerObject
}
};

Adobe Acrobat SDK SOAP and Web Services
Developing Acrobat Applications Using JavaScript Synchronous and asynchronous information exchange 198
Now we may invoke the echoInteger web method and display its results:
var response = SOAP.request ({
cURL: myURL,
oRequest: echoIntegerRequest,
cAction: mySOAPAction
});
var responseString = "http://www.example.com/methods:echoIntegerResponse";
var result = response[responseString]["return"];
// Display the response in the console:
console.println("Result is " + result);
Asynchronous web service calls
The SOAP object request method may be used in conjunction with the response method to establish
asynchronous communication with a web service. In this case, the request method calls a method on the
notification object, and does not return a value.
Asynchronous communication is made possible by assigning a value to the request method’s aSync
parameter, which is an object literal that must contain a function called response that accepts two
parameters: oResult (the result object) and cURI (the URI of the requested HTTP endpoint).
In the example below, the aSync parameter named mySync contains an attribute called isDone, which is
used to monitor the status of the web service call, and an attribute called val which will contain the result
of the web service call. When the response function is called by the web service, it sets isDone to true
indicating that the asynchronous call has been completed:
// Create the aSync parameter:
var mySync = {
isDone: false,
val: null,
// Generates the result of the web method:
result: function(cMethod)
{
this.isDone = false;
var name = "http://www.example.com/methods/:" + cMethod + "Response";
if (typeof this.val[name] == "undefined")
return null;
else
return this.val[name]["return"];
},
// The method called by the web service after completion:
response: function(oResult, cURI)
{
this.val = oResult;
this.isDone = true;
},
// While the web service is not done, do something else:
wait: function()
{

Adobe Acrobat SDK SOAP and Web Services
Developing Acrobat Applications Using JavaScript Using document/literal encoding 199
while (!this.isDone) doSomethingElse();
}
};
// Invoke the web service:
SOAP.request({
cURL: myURL,
oRequest: echoIntegerRequest,
oAsync: mySync,
cAction: mySOAPAction
});
// The response callback function could contain the following code:
// Handle the asynchronous response:
var result = mySync.result("echoInteger");
// Display the response in the console:
console.println("Result is " + result);
Using document/literal encoding
You can use document/literal encoding in your SOAP messages by assigning values to the following
parameters of the request method:
bEncoded — Assign a value of false to this parameter.
cNamespace — Specify a namespace for the message schema.
cResponseStyle — Assign SOAPMessageStyle.JS, SOAPMessageStyle.XML, or
SOAPMessageStyle.Message value to this parameter.
Once this is done, fill the oRequest parameter with an object literal containing the data. An example is
given below:
// Set up two integer values to be added in a web method call:
var aInt = {soapType: "xsd:int", soapValue: "10"};
var bInt = {soapType: "xsd:int", soapValue: "4"};
// Set up the document literal:
var req = {};
req["Add"] = {a: aInt, b: bInt};
// Invoke the web service:
var response = SOAP.request({
cURL: myURL,
oRequest: req,
cAction: mySOAPAction,
bEncoded: false,
cNamespace: myNamespace,
cResponseStyle: SOAPMessageStyle.Message
});
// Display the response to the console:
var value = response[0].soapValue[0].soapValue;
console.println("ADD(10 + 4) = " + value);

Adobe Acrobat SDK SOAP and Web Services
Developing Acrobat Applications Using JavaScript Exchanging file attachments and binary data 200
Exchanging file attachments and binary data
As you learned earlier, the oRequest parameter provides alternative options for sending binary-encoded
data. This may be useful for sending information such as serialized object data or embedded images. You
can embed binary information in text-based format in the SOAP envelope by using base64 encoding, or
take advantage of the Soap With Attachments (SwA) standard or the Message Transmission Optimization
Mechanism (MTOM) to send the binary data in a more efficient format. Both SwA and MTOM can
significantly reduce network transmission time, file size, and XML parsing time.
SwA can be used by setting the oRequest parameter soapAttachment value to true, as shown in the
example below. Assume myStream is a readStream object containing binary data:
// Use the SwA standard:
var SwARequest = {
"http://www.example.com/methods:echoAttachment": {
dh:
{
soapAttachment: true,
soapValue: myStream
}
}
};
var response = SOAP.request ({
cURL: myURL,
oRequest: SwARequest
});
var responseString =
"http://www.example.com/methods:echoAttachmentResponse";
var result = response[responseString]["return"];
MTOM is used by additionally setting the request method’s bEncoded parameter to false and the
cNamespace parameter to an appropriate value. This is illustrated in the following code, which creates an
oRequest object:
// Use the MTOM standard:
var MTOMRequest = {
"echoAttachmentDL": {
dh:
{
inclusion:
{
soapAttachment: true,
soapValue: myStream
}
}
}
};
var response = SOAP.request({
cURL: myURL,
oRequest: MTOMRequest,
bEncoded: false,
cNamespace: myNamespace
});

Adobe Acrobat SDK SOAP and Web Services
Developing Acrobat Applications Using JavaScript Converting between string and readstream information 201
Converting between string and readstream information
The SOAP object streamFromString and stringFromStream methods are useful for converting
between formats. The streamFromString method is useful for submitting data in a web service call,
and the stringFromStream method is useful for examining the contents of a response returned by a
web service call. An example is shown below:
// Create a ReadStream object from an XML string:
var myStream = streamFromString("<mom name = 'Mary'></mom>");
// Place the information in an attachment:
this.setDataObjectContents("org.xml", myStream);
// Convert the ReadStream object back to a string and display in console:
console.println(stringFromStream(myStream));
Accessing SOAP version information
Acrobat 7.0 provides improved support for SOAP Version 1.1 and support for Version 1.2. To encode the
message using a specific version, assign one of the following values to the request method’s cVersion
parameter: SOAPVersion.version_1_1 (SOAP Version 1.1) or SOAPVersion.version_1_2 (SOAP
Version 1.2). Its usage is shown in the following example:
var response = SOAP.request ({
cURL: myURL,
oRequest: myRequest,
cVersion: SOAPVersion.version_1_2
});
Accessing SOAP header information
You can send SOAP header information to the web service using the request method’s oReqHeader
parameter, and access the returned header information using the oRespHeader parameter. The
oReqHeader is identical to the oRequest object, with the addition of two attributes:
soapActor — the SOAP actor that should interpret the header
soapMustUnderstand — determines whether the SOAP actor must understand the header contents
Their usage is shown in the following example:
// Set up the namespace to be used:
var myNamespace = "http://www.example.com/methods/:";
// Create the oReqHeader parameter:
var sendHeader = {};
sendHeader[myNamespace + "testSession"] = {
soapType: "xsd:string",
soapValue: "Header Test String"
};
// Create the intially empty oRespHeader parameter:
var responseHeader = {};
responseHeader[myNamespace + "echoHeader"] = {};

Adobe Acrobat SDK SOAP and Web Services
Developing Acrobat Applications Using JavaScript Authentication 202
// Exchange header information with the web service:
var response = SOAP.request({
cURL: myURL,
oRequest: {},
cAction: "http://www.example.com/methods",
oReqHeader: sendHeader,
oRespHeader: responseHeader
});
Authentication
You can use the request method’s oAuthenticate parameter to specify how to handle HTTP
authentication or provide credentials used in Web Service Security (WS-Security). Normally, if
authentication is required, an interface will handle HTTP authentication challenges for BASIC and DIGEST
authentication using the SOAP header, thus making it possible to engage in encrypted or authenticated
communication with the web service. This parameter helps to automate the authentication process.
The oAuthenticate parameter contains two properties:
Username — A string containing the username
Password — A string containing the authentication credential
Its usage is shown in the following example:
// Create the oAuthenticate object:
var myAuthentication = {
Username: "myUsername",
Password: "myPassword"
};
// Invoke the web service using the username and password:
var response = SOAP.request ({
cURL: myURL,
oRequest: echoStringRequest,
cAction: mySOAPAction
oAuthenticate: myAuthentication
});
Error handling
The SOAP object provides extensive error handling capabilities within its methods. In addition to the
standard JavaScript for Acrobat exceptions, the SOAP object also provides SOAPError and
NetworkError exceptions.
A SOAPError exception is thrown when the SOAP endpoint returns a SOAPFault. The SOAPError
exception object will include information about the SOAP Fault code, the SOAP Actor, and the details
associated with the fault. The SOAP object’s connect and request methods support this exception type.
A NetworkError exception is thrown when there is a problem with the underlying HTTP transport layer
or in obtaining a network connection. The NetworkError exception object will contain a status code
indicating the nature of the problem. The SOAP object’s connect, request, and response methods
support this exception type.

Adobe Acrobat SDK SOAP and Web Services
Developing Acrobat Applications Using JavaScript DNS service discovery 203
DNS service discovery
Suppose the exact URL for a given service is not known, but that it is available locally because it has been
published using DNS Service Discovery (DNS-SD). You can use the SOAP object queryServices and
resolveService methods to locate the service on the network and bind to it for communications.
The queryServices method can locate services that have been registered using Multicast DNS (mDNS)
for location on a local network link, or through unicast DNS for location within an enterprise. The method
performs an asynchronous search, and the resultant service names can be subsequently bound to a
network location or URL through the SOAP object resolveService method.
The queryServices method accepts the following parameters:
cType — The DNS SRV service name (such as “http” or “ftp”)
oAsync — A notification object used when services are located or removed (implements
addServices and removeServices methods). The notification methods accept a parameter
containing the following properties:
name — the Unicode display name of the service
domain — the DNS domain for the service
type — the DNS SRV service name (identical to cType)
aDomains — An array of domains for the query. The valid domains are ServiceDiscovery.local
(searches the local networking link using mDNS) and ServiceDiscovery.DNS (searches the default
DNS domain using unicast DNS).
An example of its usage is shown below:
// Create the oAsync notification object:
var myNotifications = {
// This method is called whenever a service is added:
addServices: function(services)
{
for (var i=0; i<services.length; i++) {
var str = "ADD: ";
str += services[i].name;
str += " in domain ";
str += services[i].domain;
console.println(str);
}
},
// This method is called whenever a service is removed:
removeServices: function(servces)
{
var str = "DEL: ";
str += services[i].name;
str += " in domain ";
str += services[i].domain;
console.println(str);
}
};

Adobe Acrobat SDK SOAP and Web Services
Developing Acrobat Applications Using JavaScript DNS service discovery 204
// Perform the service discovery:
SOAP.queryServices({
cType: "http",
oAsync: myNotifications,
aDomains: [ServiceDiscovery.local, ServiceDiscovery.DNS]
});
Once a service has been discovered, it can be bound through the SOAP object resolveService method
to a network address and port so that a connection can be established. The resolveService method
accepts the following parameters:
cType — the DNS SRV service name (such as “http” or “ftp”).
cDomain — the domain in which the service is located.
cService — the service name to be resolved.
oResult — a notification object used when the service is resolved. It implements a resolve method
that accepts parameters nStatus (0 if successful) and oInfo (used if successful, contains a
serviceInfo object). The serviceInfo object contains the following properties:
target — the IP address or DNS name of the machine providing the service.
port — the port on the machine.
info — an object with name/value pairs supplied by the service.
Its usage is illustrated in the following example:
// Create the oAsync notification object:
var myNotification = {
// This method is called when the service is bound:
resolve: function(nStatus, oInfo)
{
// Print the location if the service was bound:
if (nStatus == 0){
var str = "RESOLVE: http://";
str += oInfo.target;
str += ":";
str += oInfo.port;
str += "/";
str += oInfo.info.path;
console.println(str);
}
// Display the error code if the service was not bound:
else
console.println("ERROR: " + nStatus);
}
};
// Attempt to bind to the service:
SOAP.resolveService({
cType: "http",
cDomain: "local.",
cService: "My Web Server",
oResult: myNotification
});

Adobe Acrobat SDK SOAP and Web Services
Developing Acrobat Applications Using JavaScript Managing XML-based information 205
Managing XML-based information
JavaScript for Acrobat provides support for XML-based information generated within your workflows by
providing an XMLData object, which represents an XML document tree that may be manipulated via the
XFA Data DOM. (For example, it is possible to apply an XSL transformation (XSLT) to a node and its children
using the XFA object). The XMLData object provides two methods for manipulating XML documents:
parse — Creates an object representing an XML document tree.
applyXPath — Permits the manipulation and query of an XML document via XPath expressions.
You can convert a string containing XML information into a document tree using the XMLData object
parse method, and then manipulate and query the tree using its applyXPath method.
The XMLData object’s parse method accepts two parameters:
param1 — A string containing the text in the XML document.
param2 — A Boolean value that determines whether the root node should be ignored.
Its usage is illustrated below:
// XML string to be converted into a document tree:
myXML = "<family name = 'Robat'>\
<mom id = 'm1' name = 'Mary' gender = 'F'>\
<child> m2 </child>\
<personal>\
<income>75000</income>\
</personal>\
</mom>\
<son id = 'm2' name = 'Bob' gender = 'M'>\
<parent> m1 </parent>\
<personal>\
<income>35000</income>\
</personal>\
</son>\
</family>";
// Generate the document tree:
var myTree = XMLData.parse(myXML, false);
// Print mom’s name:
console.println("Mom: " + myXML.family.mom.value);
// Change son’s income:
myXML.family.son.personal.income.value = 40000;
The XMLData object applyXPath method accepts two parameters:
oXML — An object representing the XML document tree.
cXPath — A string containing an XPath query to be performed on the document tree.

Adobe Acrobat SDK SOAP and Web Services
Developing Acrobat Applications Using JavaScript Workflow applications 206
In the following example, assume that myXML is the document tree obtained in the previous example:
// Obtain mom’s information:
var momInfo = XMLData.applyXPath(myXML, "//family/mom");
// Save the information to a string:
momInfo.saveXML('pretty');
// Give mom a raise:
momInfo.personal.income.value = "80000";
Workflow applications
Support for SOAP in JavaScript for Acrobat has a major impact on collaboration workflows. A SOAP-based
collaboration server can be used to share comments remotely via a web-based comment repository.
Through the DNS Service Discovery support, it is possible to enable dynamic discovery of collaboration
servers, initiation workflows, and RSS feeds that can provide customized user interfaces, via XML, directly
inside of Acrobat 7.0 or later.
In addition, it is possible to deploy web-based scripts that always maintain the most updated information
and processes, and to connect to those scripts via form field actions that invoke web services.
In the following example, a form is submitted to a server using a SOAP-based invocation:
// Populate the content object with form and SOAP information:
var location = "http://adobe.com/Acrobat/Form/submit/"
var formtype = location + "encodedTypes:FormData";
var content = new Array();
for(var i = 0; i < document.numFields; i++) {
var name = document.getNthFieldName(i);
var field = document.getField(name);
content[i] = new Object();
content[i].soapType = formtype;
content[i].name = field.name;
content[i].val = field.value;
}
// Send the form to the server:
SOAP.request({
cURL: cURL,
oRequest: {
location + ":submitForm":
{
content: content
}
},
cAction: location + "submitForm"
}

207
16 Interfacing with 3D JavaScript
In this chapter, you will learn about how to connect the JavaScript engine for Acrobat with the JavaScript
engine used for 3D annotations, giving you access to the entire 3D JavaScript API. Though this chapter is
not a tutorial on the 3D JavaScript API, some of the APIs will be demonstrated through the examples.
Topics Description Page
Basic concepts Overview of the 3D JavaScript engine and how to access it using
the JavaScript engine for Acrobat.
page 207
Getting the Annot3D object
of the 3D annotation
Discusses how to get a Annot3D object and how it is used to
access the JavaScript 3D engine.
page 208
Using the default script of a
3D annotation
The default script of a 3D annotation is executed by the
JavaScript 3D engine, here, techniques for calling functions
defined as default script form the JavaScript engine for Acrobat.
page 210
Initializing upon activation Techniques for initializing variables defined in the default script
of a 3D annotation, when that annotation is activated.
page 211
Basic concepts
To create 3D annotations and attach scripts to them using the JavaScript for 3D API you need
Acrobat Professional or Acrobat 3D. Those scripts can run on Acrobat 3D, Acrobat Professional,
Acrobat Standard, and Adobe Reader for Windows and Mac OS platforms. Unless otherwise noted, all
JavaScript objects, properties, and methods have support starting in version 7.0.
When you create a 3D annotation, it has certain default behaviors that allow the user to interact with the
3D model. These behaviors, which are accessed through the 3D Annotation’s toolbar, are Rotate, Spin, Pan,
Zoom, Measurement, Play/Pause Animation, Use Perspective/Orthographic Projection, Model Render
Mode, Lighting Scheme, Background Color and Toggle Cross Section.
If you wish to enhance the user’s 3D experience beyond the default behaviors, you must use the JavaScript
API for 3D annotations. With the 3D JavaScript engine, you can specify the render modes and 3D matrix
transformations of any of the individual meshes; set camera position, target, and field of view; detect
mouse and keyboard events; control animations, and many more behaviors. The document JavaScript for
Acrobat 3D Annotations API Reference is the complete reference for the JavaScript API for 3D annotations.
The 3D JavaScript engine, which is distinct from the JavaScript engine for Acrobat, can be accessed in one
of two ways:
●The primary way is by attaching a default script to the 3D annotation. This can be accomplished while
placing a 3D annotation using the 3D Tool or on an existing 3D annotation by accessing its properties
dialog box using the Select Object tool. This script will be run directly by the 3D JavaScript engine.
●
Acrobat provides a mechanism to directly access the entire 3D JavaScript engine API from within Acrobat’s
own scripting engine by means of the JavaScript
Annot3D.context3D
property. This allows the author
to wire up elements on the PDF page, such as buttons and links, to manipulate the 3D content.
The second method is the primary focus of this chapter, but we must necessarily address the default script
of the 3D annotation.

Adobe Acrobat SDK Interfacing with 3D JavaScript
Developing Acrobat Applications Using JavaScript Getting the Annot3D object of the 3D annotation 208
Getting the Annot3D object of the 3D annotation
To get access to the JavaScript 3D API engine from an Acrobat form or link, you must first get the Annot3D
object of the annotation. There are two methods for doing this:
Doc.getAnnot3D
and
Doc.getAnnots3D
.
The Doc method getAnnot3D takes two parameters:
nPage — The 0-based page number that contains the 3D annotation
cName — The name of the 3D annotation
A 3D annotation is not required to have a name, and there is no UI for entering the name of the
annotation, so this method may not be useful unless you’ve already programmatically assigned a name to
the 3D annotation, see Example 16.1. For a 3D annotation on page 1 of the document with a name of
my3DAnnot, we can acquire the Annot3D object as follows:
var oMy3DAnnot = this.getAnnot3D(0, "my3DAnnot");
Note that the first argument has a value of 0 because the index of the page is one less than the page number.
The Doc method getAnnots3D returns the array of all Annot3D objects on a specified page. This method
takes only a parameter of nPage, the 0-based page number,
var aMy3DAnnots = this.getAnnots3D(0);
The variable aMy3DAnnots is either undefined, or is an array of Annot3D objects.
Example 16.1 Assigning a name to a 3D annotation
Suppose your target annotation is the first annotation on page 0 of the document. The following script is
executed from the JavaScript console.
var aMy3DAnnots = this.getAnnots3D(0);
aMy3DAnnots[0].name = "my3DAnnot";
Annot3D properties
The Annot3D has a number of properties, as summarized in the table below.
Property Description
activated A Boolean value, which if true, indicates that the 3D model is activated.
context3D If activated is true, this property returns the context of the 3D annotation, a
global object containing the 3D scene.
innerRect An array of four numbers specifying the lower-left x, lower-left y, upper-right x and
upper-right y coordinates, in the coordinate system of the annotation (lower-left is [0,
0], top right is [width, height]), of the 3D annotation’s 3D bounding box, where the 3D
artwork is rendered.
name The name of the annotation.
page The 0-based page number of the page containing the annotation.
rect Returns an array of four numbers specifying the lower-left x, lower-left y, upper-right x
and upper-right y coordinates, in default user space, of the rectangle defining the
location of the annotation on the page.
Of particular importance is the context3D property. The object returned is, in fact, the handle to the
JavaScript 3D engine.

Adobe Acrobat SDK Interfacing with 3D JavaScript
Developing Acrobat Applications Using JavaScript Acquiring the JavaScript 3D engine 209
Acquiring the JavaScript 3D engine
Having acquired the Annot3D object of your 3D annotation, as described above, the next step is to get the
object that gives you access to the JavaScript 3D engine. This is done through the context3D property of
the Annot3D object. In the script below, we get the Annot3D object of the first annotation on page 0 of
the document, then we get the object that gives us access to the 3D engine.
var aMy3DAnnots = this.getAnnots3D(0);
var c3d = aMy3DAnnots[0].context3D;
Alternatively, we can use a single line of code.
var c3d = this.getAnnots3D(0)[0].context3D;
The context3D will be undefined until the corresponding annotation is activated. You may need to check
in your script for this condition before attempting to execute script commands on the 3D annotation.
var c3d = this.getAnnots3D(0)[0].context3D;
if ( typeof c3d != "undefined" ) {
// 3D annotation activated
....
} else {
// 3D annotation not activated
...
}
The example below demonstrates how to acquire the JavaScript 3D engine, and to use it to rotate a
component of the 3D content.
Example 16.2 Rotating a named object in a 3D model
Suppose that you have a 3D annotation and that you wish to create a button or link to rotate a U3D object.
Suppose that the object you wish to rotate is named "Axes". The following script is a mouse-up button
action, or perhaps, a link action, that does the job.
// Get index of the page containing the Annot3D object (count starts at 0).
pageIndex = this.pageNum;
// Index of the Annot3D (count starts at 0).
annotIndex = 0;
// Get a reference to the Annot3D script context.
var c3d = this.getAnnots3D( pageIndex )[ annotIndex ].context3D;
if ( typeof c3d != "undefined" ) {
// Get a reference to the node in the scene named "Axes".
axes = c3d.scene.nodes.getByName( "Axes" );
// Rotate the object about the X-Axis PI/6 radians (30 degrees).
axes.transform.rotateAboutXInPlace( Math.PI / 6 );
}

Adobe Acrobat SDK Interfacing with 3D JavaScript
Developing Acrobat Applications Using JavaScript Using the default script of a 3D annotation 210
Using the default script of a 3D annotation
The rotation problem of Example 16.2 was simple enough that it was not necessary to use the default
script of the 3D annotation. In this section, we present several examples illustrating the use of the default
script.
Unlike JavaScript for Acrobat, which has a build-in Acrobat editor, the default script of a 3D annotation
must be written using an external text editor and imported into the 3D annotation via the UI. The script is
saved with a .js extension.
➤To import a script into a 3D annotation
1. If not already showing, display the Advanced Editing toolbar, by selecting Tools > Advanced Editing >
Show Advanced Editing Toolbar.
2. On the page containing your 3D annotation, select the Select Object tool from the Advanced Editing
toolbar.
3. Double-click the 3D annotation to view the 3D Properties dialog box.
4. Click the Edit Content button.
5. In the Add 3D Content dialog box, click the Browse button corresponding to the Default Script, and
browse for your .js file.
6. Once located, click Open to import the file as the default script of the 3D annotation.
7. Click OK to exit the Add 3D Content dialog box, then click OK to exit the 3D Properties dialog box.
8. Click the Hand tool to exit Select Object mode.
Note: The default script for a 3D annotation is executed directly by the JavaScript 3D engine.
Example 16.3 Setting the render mode of a 3D model
Create a button that changes the render mode of a 3D annotation to "transparent".
The default script of the 3D annotation defines a function setRenderMode, which goes through all the
meshes of the scene and changes the render mode of that mesh to the mode passed to the function.
function setRenderMode( renderModeName ) {
for (var i=0; i < scene.meshes.count; i++) {
scene.meshes.getByIndex(i).renderMode = renderModeName;
}
}
Now to call the function setRenderMode from a button or link using the JavaScript engine for Acrobat,
you would have script as follows:
// Get the Annot3D script context of the targeted annot.
var c3D = getAnnots3D(0)[0].context3D;
// Call the JavaScript function setRenderMode() defined in the default
// script of the referenced 3D annotation.
c3D.setRenderMode("transparent");

Adobe Acrobat SDK Interfacing with 3D JavaScript
Developing Acrobat Applications Using JavaScript Initializing upon activation 211
Initializing upon activation
When you have developed a general “library” of JavaScript functions to manipulate 3D content, you might
want to set the values of certain parameters of one or more of these functions when the 3D annotation is
activated without having to edit the default script itself. One approach for this is to insert a script at the
document level to make the initialization. Below is a template for an initialization function:
function initialize()
{
console.println( "\nchecking for 3D Annotation activation..." );
if ( waitingFor3DActivated )
{
var a3d = getAnnots3D(0)[0];
if ( a3d.activated )
{
waitingFor3DActivated = false;
console.println( "...3D Annotation is activated." );
app.clearInterval( timeout );
c3D = a3d.context3D;
// 3D annotation has been activated, do any initializations here
}
if ( timeout.count >= 10 ) // Set to 10 seconds
{
console.println( "The 3D annotation is still not activated" );
console.println( "Time limit exceeded, terminating initialization");
app.clearInterval( timeout );
}
}
timeout.count++;
}
// Check for activation every second
timeout = app.setInterval( "initialize()", 1000 );
timeout.count = 0;
var waitingFor3DActivated = true;
See the example that follows.
Example 16.4 Setting the background color of the canvas on activation
A simple example of this initialization is to set the background color when the 3D annotation becomes
activated.
The following script is executed as a document level script.
function initialize()
{
console.println( "\nchecking for 3D Annotation activation..." );
if ( waitingFor3DActivated )
{
var a3d = getAnnots3D(0)[0];

Adobe Acrobat SDK Interfacing with 3D JavaScript
Developing Acrobat Applications Using JavaScript Initializing upon activation 212
if ( a3d.activated )
{
waitingFor3DActivated = false;
console.println( "...3D Annotation is activated." );
app.clearInterval( timeout );
c3D = a3d.context3D;
// The function setBackgroundColor is defined as part of the
// default script, so it must be executed using the 3D JS engine
// Here, we set the background color of the canvas to dark green.
c3D.setBackgroundColor( 0, 0.6, 0 );
}
if ( timeout.count >= 10 ) // set to 10 seconds
{
console.println( "The 3D Annotation is still not activated" );
console.println( "Time limit exceeded, terminating initialization");
app.clearInterval( timeout );
}
}
timeout.count++;
}
// Check for activation every second
timeout = app.setInterval( "initialize()", 1000 );
timeout.count = 0;
var waitingFor3DActivated = true;
The default script of the 3D annotation contains the following script:
// The variable theBackground is initially set to null. When the
// renderEventHandler is set to canvas background just before the runtime
// engine renders the 3D model.
var theBackground = null;
function setBackgroundColor( r, g, b )
{
theBackground.setColor(new Color( r, g, b ));
}
// Create a new render event handler
renderEventHandler = new RenderEventHandler();
// Define the onEvent property that will handle things when the 3D is
// rendered
renderEventHandler.onEvent = function( event )
{
// Remove this handler after it has executed once.
runtime.removeEventHandler( this );
// Set theBackground to point to the background of the canvas.
theBackground = event.canvas.background;
}
// Add our new handler using the addEventHandler method of the runtime
// object.
runtime.addEventHandler( renderEventHandler );

213
Index
A
accessibility
document metadata 109
reading order 109
tab order 109
tagging annotations 108
text-to-speech 107
tooltip 109
accessing
3D annotations 208
form field 71
accessing data
execute a SQL statement 191
get a row of data 191
getting the next row of data 191
statement object, see statement object methods
Acrobat Address Book 181
Acrobat Database Connectivity
about 19, 188
accessing data, see accessing data
connection, see connection
establishing connections 189
supports SQL statements 188
Acrobat Family Developer Center 44, 45, 59, 105, 122
Acrobat forms
about 67
accessible 107
email 93
field types 69
guidelines for creating 68
importing and exporting data 92
properties 71
securing 166
web-ready 91
Acrobat Web Capture 99
Active Directory 179
ADBC, see Acrobat Database Connectivity
addAnnotStore method 117
adding security to attachments 175
adding words to dictionary 119
additional usage rights 115, 184
addStateModel method 117
ADO support for Windows (XML forms) 105
Adobe LiveCycle Designer
Reader Extensions 183, 184
Reader Extensions, features disabled 184
Adobe LiveCycle Policy Server 173
Adobe Reader additional usage rights 183
Adobe Reader Extension Root Certificate Authority 183
ADSI, see Active Directory
Annot3D object
context3D 207
properties 208
annotation object
hidden 121
setProps 114, 119, 120
transitionToState 120
annotation, see comments
app object
about 16
addMenuItemu 135
addSubMenu 135
addToolButton 136
beginPriv 46
endPriv 46
execDialog 18
fs 146
fullscreen 146
getPath 136
hideMenuItem 148
hideToolbarButton 148
newDoc 47, 49, 56
openDoc 56, 121, 136, 144
openInPlace 141
printColorProfiles 62, 65
printerNames 62
removeToolButton 136
response 99
setInterval 39
setTimeOut 39
trustedFunction 45, 46
app.media
createPlayer 131
getAnnot 131
getPlayers 125
getRendition 131
openPlayer 130
application initialization 42
application/pdf MIME type 92
application/vnd.adobe.xfdf MIME type 92
application/vnd.fdf MIME type 92
application/xml MIME type 92
application/x-www-form-urlencoded MIME type 92
array, sort and compare elements 76
asynchronous communication 198
B
batch sequences
about 15
Batch Sequences documentation 44
batch-level script 44
collecting comments 122
binder 52

Adobe Acrobat SDK Index
Developing Acrobat Applications Using JavaScript 214
bookmarks
children 139
color 146
creating 139
hierarchy 140
inserting 140
methods 139
properties 139
removing 140
root 139
Boolean queries 160
breakpoints
conditional 38
define 39
buttons
adding an action 145
appearance 145
buttonAlignX 73
buttonAlignY 73
buttonScaleHow 73
buttonScaleWhen 73
creating 72
highlight 73, 145
rollover effects 99
set icon appearance 150
setIcon 74
setting a caption 73
uses 150
C
calculation order array 91
call stack 35
catalog object
getIndex 162
catalogJob object 161
certificates
authority 176
certificates object properties 165
default security 177, 179
getting information 181
public key 179
certification signature 166
certifying a document 168
CGI application 91
check boxes 74
Collab 117
Collab object
about 116
addAnnotStore 117
addStateModel 117
getStateInModel 116
removeStateModel 116
setStoreSettings 117
transitionToState 116
collaborative review 112
color spaces 99
colors, creating custom 99
combining PDF documents 51
combo boxes
about 75
custom validation script 79
editable 75, 78
processing keystrokes 76
setting items 76
spell checking 75
comment preferences 114
comment repository 15
Commenting toolbar 112
comments
adding 113
adding model states 117
changing appearance 120
changing status 120
collecting for Excel 121
collecting with SOAP 117
comparing 121
emailing 116
extracting data 113
importing and exporting 121
list 120
selecting, moving, and deleting 119
showing or hiding 121
sorting 120
stamps (Japanese workflows) 122
concept of a JavaScript event 40
config.js 42
connecting to databases
getting a column list 190
getting a list of tables 190
methods 190
newStatement 191
connection object 189
console
about 17
debugging with 24
formatting script 22
converting
date to string 94
stream to string 201
string to date 94
string to stream 201
core JavaScript 14
creating a digital ID 177
cropping a page 55
custom calculation script 85
custom keystroke script 83
D
Data Source Name (DSN) 189
date arithmetic 95
date conversion
date to string 93
string to date 94
date horizon 95
Date object
getFullYear 93
use 93

Adobe Acrobat SDK Index
Developing Acrobat Applications Using JavaScript 215
Debug From Start 38
debugger
breakpoints 37
buttons 32
call stack 35
conditional breakpoints 38
control button descriptions 32
controls 21, 30
debug from start 38
debugger.js 42
enabling 29
inspect details window 35, 36
opening 29
preferences 21
stopping execution 39
watches list 36
debugger.js 28
debugging
See also debugger
about 17
dbg object 17
folder-level script 34
in Adobe Reader 28
JavaScript debugger 17
limitations 39
modal dialog box 39
using the console 24
dialog boxes
about 18
dialog object 18
dictionary, adding words 119
digital IDs
certificate sharing 180
creating 177
for certifying a document 48
managing 179
provider 176
representing 176
self-sign credential 177
using 179
digital signatures
clear signature fields 168
preferences 169
DirConnection
search 172
setOutputFields 171
directories, connecting to 171
Directory object 179
DirectoryInformation object 171
disclosed property 121
DNS
and SOAP 18
Multicast 203
service discovery 193, 203
unicast 203
Doc object
about 16
addAnnot 113
Doc object (Continued)
addField 69, 71
addLink 142
addThumbnails 138
addWatermarkFromFile 58
addWatermarkFromText 58
addWeblinks 142
bookmark 139
bookmarkRoot 139
createDataObject 121
createTemplate 153
deletePages 56
disclosed 121, 144
dynamicXFAForm 105
encryptForRecipients 110, 115, 163, 165, 171
encryptUsingPolicy 174
exportAsFDF 121
exportAsXFDF 121
exportDataObject 144
extractPages 52
getAnnot 113
getAnnot3D 208
getAnnots 113, 119, 120, 121
getAnnots3D 208
getField 71
getOCGOrder 152
getOCGs 150
getPageBox 55
getPageLabel 149
getPageRotation 56
getPageTransitions 147
getPrintParams 63
getURL 99, 144
gotoNamedDest 144
importAnFDF 121
importAnXFDF 121
importIcon 74
insertPages 51, 56
layout 148
mailDoc 116, 119, 122
mailForm 93
newDoc 50
openDataObject 106
pageNum 148
print 62
removeField 168
removeLinks 143
removeThumbnails 138
removeWeblinks 142
replacePages 56
resetForm 75, 168, 170
saveAs 59, 106
setOCGOrder 152
setPageAction 138, 145
setPageBoxes 55
setPageLabels 149
setPageRotations 56
setPageTabOrder 91
setPageTransitions 147

Adobe Acrobat SDK Index
Developing Acrobat Applications Using JavaScript 216
Doc object (Continued)
spellDictionaryOrder 118
spellLanguageOrder 118
syncAnnotScan 119
templates 153
XFAForeground 105
zoom 148
zoomType 148
Doc.media
canPlay 134
getOpenPlayers 125
document level script
about 43
availability 42
placement 41
documents
adding a background 58
adding a watermark 58
certifying 168
combining 51
combining several PDF files 51
convert to XML format 59
creating 47, 49, 56
customization 15
Doc object 16
encryption 165
file attachments 53
indexing 161
initial view 147
metadata 109
opening 56, 144
page layout 148
writing content 50
dynamic data (XML forms) 99
E
E4X 54, 103
ECMA-357 Standard, see E4X
ECMAScript 14
eEnvelope 175
Enable Global Object Security Policy 96, 97, 136
enabling JavaScript 22
encrypting
documents 165, 170
for a list of recipients 163, 171
event object
about 19
change 77
changeEx 77
value 77
events 40, 41
exceptions 45
execute JavaScript
after document is printed 43
when document is printed 43
executing JavaScript with printing and saving 43
executing privileged methods 46, 48
export value of a field 70
external editor 26
F
FDF Toolkit 92
FDF, see Forms Data Format
fetching an URL from JavaScript 99
Field object
addField 88
borderStyle 72
buttonPosition 73
buttonSetCaption 73
currentValueIndices 80
deleteItemAt 80
display 73
exportValues 70, 75
fillColor 72
getField 88
getItemAt 80
insertItemAt 80
lineWidth 72
name 71
numItems 80
radiosInUnison 81
readonly 87
rotation 74
setAction 74, 81, 84, 145
setItems 80
signatureInfo 179
signatureSetSeedValue 170
signatureSign 164, 166
signatureValidate 169
strokeColor 72, 81
userName 73, 109
value 81, 88
fields
See also Acrobat forms
accessing 71
border style 72
buttons 72
creating 69, 88
getting the number of 80
making read only 87
naming conventions 87
properties 71
setting calculation order 91
setting tab order 91
value 88
widgets 87
Fields navigation tab 88
file attachments
accessing XML attachments 54
adding security 175
encrypting 165
methods 53
opening 144
files, creating 49
folder level scripts
App and User 42
locating 42
provided files 42
font options 65
form, see Acrobat form

Adobe Acrobat SDK Index
Developing Acrobat Applications Using JavaScript 217
formats for posting to the server 91
formatting code in console 22
Forms Data Format 92
Forms toolbar 92
fullScreen
defaultTransition 147
transitions 147
G
getStateInModel method 116
getting the Field object 71
glob.js 42
global object security policy 96, 98
global variables 17, 96, 97
global.setPersistent 97
global.subscribe 97
H
Hanko stamps 122
highlighting required fields 86
HTML, JavaScript in 14
HTTP authentication 18, 202
HTTPS 194
I
importing icons 74
indexes
catalog 157
file 160
search 157
Inkan stamp 122
Intercepting keystrokes in an Acrobat form 98
J
JavaScript
core 14
debugger options 29
enabling 22
formatting 22
objects, summary 16
scope of actions 25
tools 21
L
language order 118
layers, see Optional Content Groups
link object
methods 141
properties 142
setAction 141
links
adding and removing 142
appearance 143
jump to a named destination 144
opening a URL 144
properties 142
removing a web link 142
links (Continued)
setting an action 144
setting the border color 146
list boxes
getting, setting and inserting items 80
making multiple selections 80
processing multiple selections 80
LiveCycle, see Adobe LiveCycle Designer
M
mDNS, see Multicast DNS
mdp 163, 170
media players
controlling 124
listing of open players 125
opening and playing 130
specifying settings 125
media playing modes 128
menu items
adding 47, 135
hiding 148
Message Transmission Optimization Mechanism 200
metadata
EXIF 18
UI location 109
MIME types for data formats 92
modification detection and prevention, see mdp
monitor 127, 128
MTOM, see Message Transmission Optimization Mechanism
multimedia preferences 134
multimedia presentation
floating window 128
full screen 128, 131
screen annotation 128, 132
multimedia screen annotation, see screen annotation
multiple selection list box 80
N
named destination 144
navigation
adding to PDF documents 137
with layers 151
non-privileged methods 45
O
Object Identifier, see OID
OCG, see Optional Content Groups
ODBC 19, 188
OID 183
online
collaborative review 112
team review 15
Optional Content Groups
about 150
getting layers (OCG objects) 150
layer properties 151
locking layers 152
navigating 151

Adobe Acrobat SDK Index
Developing Acrobat Applications Using JavaScript 218
Optional Content Groups (Continued)
reordering layers 152
setting the default state 151
showing and hiding a layer 152
watermarks 58
P
pages
action 138
add a field 71
cropping 55
deleting 56
execute JavaScript 43
extracting 52, 56
getting and setting page box 55
getting number of 148
inserting 56
inserting pages 51
labeling 149
layout 148
magnifying 148
numbering 149
replacing 56
rotating 55, 56
setting page action 145
transitions 147, 149
parsing XML data 205
passwords 170
PDF documents, See documents
PDF forms, see Acrobat forms
PDF layers, see Optional Content Groups
permissions object 172
placement of scripts
batch level 42
document level 41
field level 42
folder level 41, 42
page level 41
playback settings 125
playing media
full screen 131
screen annotation 132
plug-ins 15
PostScript options 65
printing
advanced output settings 65
booklet 64
documents 62
font options 65
forms only 64
getting list of printers 62
setting PostScript level 65
setting print parameters 60
tile marks 65
to PostScript file 63
using print method 62
printParams object 60, 63
booklet 64
colorProfile 65
downloadFarEastFonts 66
flags 65
fontPolicy 65
interactive 63
pageHandling 64
printContent 64
printerName 63
properties 60
psLevel 65
tileMark 65
useT1Conversion 66
privileged context 15, 45, 93
privileged methods 47
prompting the user 99
public key encryption 110
Q
quick bar 15
R
radio buttons
accessing individual widgets 81
behavior 81
creating 70
exporting values 81
setting an action 81
regular expressions 79
relative distinguished name 177
removeStateModel method 116
rendition
about 133
getting player settings 134
selecting 134
rendition action 130
Report object 50
required form fields 86
review, markup, and approval 112
rollover effect 99
rotated user space 69, 88
rotating
fields 74
pages 55
rotating pages 56
RSS 186
S
safe paths 15
screen annotation, getting 131
scripts
batch-level 44
Document Did Print 43
Document Did Save 43
Document Will Close 43

Adobe Acrobat SDK Index
Developing Acrobat Applications Using JavaScript 219
scripts (Continued)
Document Will Print 43
Document Will Save 43
document-level 43
field-level 44
folder-level 42
for PDF forms 67
page level 43
Scripts window 30, 33
search object 157
about 18
methods 158
properties 157
query 158
wordMatching 159
searching
advanced options 159
Boolean queries 160
files 160
index files 160
matching criterion 159
matching words 159
multiple documents 160
queries 158
setting scope 157
XMP metadata 157, 162
security
chooseRecipientsDialog 165
getting security engine 166
handlers 166, 167, 177, 179
logging into handler 167
objects in support of 163
policies 166, 173, 174
restrictions on JavaScript 45
trusted user identities 168
security object
about 18
methods 111
properties 111
securityHandler
DigitalIDs 178
login 167
newUser 177
securityPolicy object 163, 166
setStoreSettings method 117
setting icon appearance 74
setting JavaScript action button 74
sharing digital IDs certificates 180
SignatureInfo object
common properties 164
public key security handler properties 176
signing
about 82, 164, 166
locking after signing 82, 166
preferences 169
removing 168
setting an action 82
signature fields 82
validating 168, 169
SOAP
about 18
collaboration 116
collaboration server 206
connecting 117, 194, 196
converting between string and stream 201
envelope 194
error handling 202
establishing communication with web service 198
exchanging file attachments and binary data 200
header 195
query services 203
request 117, 195, 199
response 117
sending header information 201
Soap With Attachments standard 200
spelling
adding a word 119
getting dictionary names 118
languages 118
setting dictionary order 118
statement object 189, 191
statement object methods 191
static data (XML forms) 99
SwA, see Soap With Attachments
synchronous connections 196
T
tab order 91
template object 153
templates 153
terminal field 87
text field
calculating 85
processing keystrokes 83
properties 83
setting an action 84
text-to-speech 107
3D annotations
default script 207, 210
render mode 210
accessing 208
activation 211
3D JavaScript engine
about 207
accessing 207, 208
throwing an exception 45
thumbnails 138
thumbnails, adding and removing 138
tile marks 65
tool buttons
adding 136
hiding 148
transitions 147
transitionToState method 116
triggering a form field action 41
trust level 181
trusted certificates 48
trusted function 45
trusted user identities 168

Adobe Acrobat SDK Index
Developing Acrobat Applications Using JavaScript 220
U
usage rights 20, 170
user certificates 163
UserEntity properties 165
util object
about 18
printd 94
scand 94
V
validation script 84
View windows in the debugger 31
viewing modes 146
full screen 146
putting into full screen 146
regular 146
W
watches list 36
watermarks 58
web links, adding and removing 142
Web Service Security 202
web services 59, 193
widgets 81, 87, 88
Windows certificate security 179
workflows
approvals 119
creating Acrobat forms 19
creating PDF documents 19
interacting with databases 20
interacting with web services 20
workflows (Continued)
managing usage rights 20
review, markup, and approval 19
WSDL
document 18, 194, 196
proxy 194
WS-Security, see Web Service Security
X
X.509 public key certificate 110
XFA, see XML forms
XFDF, see XML-based FDF
XML forms
dynamic forms 68
global submit 106
save 106
static forms 68
XFA-specific JavaScript methods 101
XML streams 18
XML-based FDF 91, 92
XMLData object
applyXPath 103, 205
parse 103, 205
XObject objects 154
XPath
expressions 18
parsing XML data 103
XSL transformation (XSLT) 103, 205
Z
zoom type 148
