Mininet Wifi Manual
User Manual: Pdf
Open the PDF directly: View PDF ![]() .
.
Page Count: 68
- About Mininet-WiFi
- Mobility Models
- Propagation Models
- Tutorial
- Introduction
- First ideas
- Mininet-WiFi Tutorial #1: One access point
- Mininet-WiFi Tutorial #2: Multiple access points
- Mininet-WiFi Tutorial #3: Python API and scripts
- The Mininet-WiFi Python API
- Basic station and access point methods
- Classic Mininet API
- Example
- Working at runtime
- Mininet-WiFi CLI
- Position
- Distance
- Mininet-WiFi Python runtime interpreter
- Getting network information
- Changing the network during runtime
- Running commands in nodes
- Mininet-WiFi and shell commands
- Stop the tutorial
- Mininet-WiFi Tutorial #4: Mobility
- Mininet-WiFi Tutorial #5: VANETs (Veicular Ad Hoc Networks)
- Mininet-WiFi example scripts
- Conclusion
- Guided exercises/demo
- Reproducible Research
- SwitchOn 2015
- SBRC 2016
- SIGCOMM 2016
- From Theory to Experimental Evaluation: Resource Management in Software-Defined Vehicular Networks 2017
- The Computer Journal - How far can we go? Towards Realistic Software-Defined Wireless Networking Experiments 2017
- Wireless n-Casting
- Multipath TCP
- Hybrid Physical-Virtual Environment
- SSID-based Flow Abstraction
- EXPERIMENTAL VALIDATION: Propagation Model
- EXPERIMENTAL VALIDATION: Simple File Transfer
- EXPERIMENTAL VALIDATION: Replaying Network Conditions
- On the Krack Attack: Reproducing Vulnerability and a Software-Defined Mitigation Approach WCNC 2018
- Publications
- Acknowledgment
- Appendix

The User Manual

2
Ramon dos Reis Fontes and Christian Esteve Rothenberg
INFORMATION & NETWORKING TECHNOLOGIES RESEARCH & INNOVATION GROUP (INTRIG)
DEPARTMENT OF COMPUTER ENGINEERING AND INDUSTRIAL AUTOMATION (DCA)
SCHOOL OF ELECTRICAL AND COMPUTER ENGINEERING (FEEC)
UNIVERSITY OF CAMPINAS(UNICAMP) - BRAZIL
GITHUB.COM/INTRIG-UNICAMP/MININET-WIFI
Mininet-WiFi is being developed as a clean extension of the high-fidelity Mininet emulator by adding
the new abstractions and classes to support wireless NICs and emulated links while conserving all
native lightweight virtualization and OpenFlow/SDN features.
February 2018

Contents
1About Mininet-WiFi .............................................. 9
1.1 Requirements 9
1.2 Installing Mininet-WiFi 9
1.2.1 GitHub .......................................................... 9
1.2.2 Docker ......................................................... 10
1.3 Limitations 10
1.4 Architecture and Components 10
1.4.1 Files ........................................................... 11
1.4.2 Classes ......................................................... 12
1.5 Wireless medium emulation 12
1.5.1 TrafficControl(TC) ................................................ 12
1.5.2 Wmediumd ..................................................... 13
1.6 Usability 14
1.6.1 Changing Topology Size and Type . . . . . . . . . . . . . . . . . . . . . . . . . . . . . . . . . . . 14
1.6.2 Examples ....................................................... 15
1.6.3 Gettinginformation ............................................... 15
1.6.4 Changesatruntime............................................... 16
1.7 Supported Features 16
1.7.1 Bgscan(Backgroundscanning) ..................................... 16
1.7.2 Encryption ...................................................... 17
1.7.3 Hybrid Physical-Virtual Environment . . . . . . . . . . . . . . . . . . . . . . . . . . . . . . . . . . . 17
1.7.4 IEEE8021x....................................................... 17
1.7.5 IEEE802.11r...................................................... 17
1.7.6 Interference ..................................................... 17
1.7.7 MultipleSSIDsoverasingleAP....................................... 18
1.7.8 SupporttoVirtualInterfaces ........................................ 18
1.7.9 4-address for AP and client mode . . . . . . . . . . . . . . . . . . . . . . . . . . . . . . . . . . . . 18
1.7.10 ReplayingTraces ................................................. 19
1.8 Supported 802.11 Protocols 19
1.9 Videos 19
1.10 Contact Us 19
1.11 FAQ 20
2Mobility Models ............................................... 21
2.1 Mobility Models Supported 21
2.2 How to setup Mobility? 21
3Propagation Models ........................................... 23
3.1 Propagation Models Supported 23
3.2 How to add specific Propagation Model? 23
4Tutorial ........................................................ 25
4.1 Introduction 25
4.2 First ideas 25
4.2.1 Howtoreadthispost.............................................. 25
4.2.2 Mininet-WiFi compared to Mininet . . . . . . . . . . . . . . . . . . . . . . . . . . . . . . . . . . . 26
4.2.3 Mininet-WiFiandMobility........................................... 26
4.2.4 802.11WirelessLANEmulation ....................................... 27
4.2.5 Mininet-WiFidisplaygraph.......................................... 27
4.2.6 Install Mininet-WiFi on a Virtual Machine . . . . . . . . . . . . . . . . . . . . . . . . . . . . . . . 27
4.2.7 SetupanewUbuntuServerVM ..................................... 27
4.2.8 SetuptheMininet-WiFiVM ......................................... 28
4.3 Mininet-WiFi Tutorial #1: One access point 28
4.3.1 Capturing Wireless control traffic in Mininet-WiFi . . . . . . . . . . . . . . . . . . . . . . . . . 28
4.3.2 Wireless Access Points and OpenFlow . . . . . . . . . . . . . . . . . . . . . . . . . . . . . . . . . 29
4.3.3 Stopthetutorial .................................................. 30
4.4 Mininet-WiFi Tutorial #2: Multiple access points 31
4.4.1 Asimplemobilityscenario .......................................... 33
4.4.2 OpenFlow flows in a mobility scenario . . . . . . . . . . . . . . . . . . . . . . . . . . . . . . . . . 33
4.4.3 Stopthetutorial .................................................. 39
4.5 Mininet-WiFi Tutorial #3: Python API and scripts 39
4.5.1 TheMininet-WiFiPythonAPI ......................................... 39
4.5.2 Basic station and access point methods . . . . . . . . . . . . . . . . . . . . . . . . . . . . . . . 39
4.5.3 ClassicMininetAPI................................................ 40
4.5.4 Example ....................................................... 41
4.5.5 Workingatruntime ............................................... 42
4.5.6 Mininet-WiFiCLI .................................................. 42
4.5.7 Position......................................................... 43
4.5.8 Distance........................................................ 43
4.5.9 Mininet-WiFi Python runtime interpreter . . . . . . . . . . . . . . . . . . . . . . . . . . . . . . . . 43
4.5.10 Gettingnetworkinformation ........................................ 43
4.5.11 Changing the network during runtime . . . . . . . . . . . . . . . . . . . . . . . . . . . . . . . . 44
4.5.12 Runningcommandsinnodes ....................................... 44
4.5.13 Mininet-WiFi and shell commands . . . . . . . . . . . . . . . . . . . . . . . . . . . . . . . . . . . . 45
4.5.14 Stopthetutorial .................................................. 45
4.6 Mininet-WiFi Tutorial #4: Mobility 45
4.6.1 PythonAPIandmobility............................................ 46
4.6.2 Moving a station in virtual space . . . . . . . . . . . . . . . . . . . . . . . . . . . . . . . . . . . . . 47
4.6.3 Re-startingthescenario............................................ 48
4.6.4 MorePythonfunctions............................................. 49
4.6.5 Testwithiperf .................................................... 49
4.6.6 Stopthetutorial .................................................. 49
4.7 Mininet-WiFi Tutorial #5: VANETs (Veicular Ad Hoc Networks) 49
4.7.1 PythonAPI ...................................................... 49
4.7.2 NodeCarArchitecture ............................................ 50
4.7.3 Integration with SUMO (Simulation of Urban Mobility) . . . . . . . . . . . . . . . . . . . . . 51
4.8 Mininet-WiFi example scripts 51
4.9 Conclusion 51
5Guided exercises/demo ....................................... 53
5.1 Guided exercises/demo 53
5.1.1 Activity1:Warmingup ............................................ 53
5.1.2 Activity 2: Loading Network Topologies . . . . . . . . . . . . . . . . . . . . . . . . . . . . . . . . 54
5.1.3 Activity 3: Customizing the Wireless Channel . . . . . . . . . . . . . . . . . . . . . . . . . . . 55
5.2 Further hands-on 55
5.2.1 Activity4:Mobility ................................................ 55
5.2.2 Activity 5: Received Signal Strength . . . . . . . . . . . . . . . . . . . . . . . . . . . . . . . . . . 55
5.3 OpenFlow 56
5.3.1 Activity 6: Mobility and OpenFlow . . . . . . . . . . . . . . . . . . . . . . . . . . . . . . . . . . . . 56
6Reproducible Research ........................................ 57
6.1 SwitchOn 2015 57
6.2 SBRC 2016 57
6.2.1 Case1-Simpletest ............................................... 58
6.2.2 Case 2 (1/2) - Communication among stations and hosts/Verifying flow table . 58
6.2.3 Case 2 (2/2) - Changing the controller (from reference to external controller) . 58

8
6.2.4 Case3-Handover................................................ 58
6.2.5 Case4-Changesatruntime ....................................... 58
6.2.6 Case 5 - Bridging physical and virtual emulated environments . . . . . . . . . . . . . 59
6.3 SIGCOMM 2016 59
6.4 From Theory to Experimental Evaluation: Resource Management in Software-
Defined Vehicular Networks 2017 60
6.5 The Computer Journal - How far can we go? Towards Realistic Software-
Defined Wireless Networking Experiments 2017 60
6.5.1 Wireless n-Casting ................................................ 60
6.5.2 Multipath TCP ................................................... 61
6.5.3 Hybrid Physical-Virtual Environment .................................. 61
6.5.4 SSID-based Flow Abstraction ........................................ 61
6.5.5 EXPERIMENTAL VALIDATION: Propagation Model ......................... 61
6.5.6 EXPERIMENTAL VALIDATION: Simple File Transfer ......................... 61
6.5.7 EXPERIMENTAL VALIDATION: Replaying Network Conditions ................ 61
6.5.8
On the Krack Attack: Reproducing Vulnerability and a Software-Defined Mitigation
ApproachWCNC2018 ............................................ 62
7Publications ................................................... 63
7.1 SDN For Wireless 2015 63
7.2 CNSM 2015 - Best Paper Award! 63
7.3 SwitchOn 2015 63
7.4 SBRC 2016 63
7.5 SIGCOMM 2016 64
7.6 Institute of Electrical and Electronics Engineers - IEEE 2017 64
7.7 The Computer Journal 2017 64
7.8 WCNC 2018 64
8Acknowledgment ............................................. 65
9Appendix ..................................................... 67
9.1 handover.py 67

1. About Mininet-WiFi
Mininet-WiFi is a fork of the Mininet SDN network emulator and extended the functionality of
Mininet by adding virtualized WiFi stations and access points based on the standard Linux wireless
drivers and the 80211_hwsim wireless simulation driver. We added classes to support the addition of
these wireless devices in a Mininet network scenario and to emulate the attributes of a mobile station
such as position and movement relative to the access points.
The Mininet-WiFi extended the base Mininet code by adding or modifying classes and scripts.
So, Mininet-WiFi adds new functionality and still supports all the normal SDN emulation capabilities
of the standard Mininet network emulator.
1.1 Requirements
Mininet-WiFi should work fine in any Ubuntu Distribution from 14.04.
1.2 Installing Mininet-WiFi
1.2.1 GitHub
You have to follow only for 4 steps to install Mininet-WiFi:
• sudo apt-get install git
• git clone https://github.com/intrig-unicamp/mininet-wifi
• cd mininet-wifi
• sudo util/install.sh -Wlnfv
Mininet WiFi is installed by a script. Run the script with the
-h help
option to see all the
options available.
wifi:~$ util/install.sh -h
10 Chapter 1. About Mininet-WiFi
cfg80211
nl80211
Kernel Space
User Space
mac80211_hwsim
station sta1
namespace
sta1-wlan0
station sta2
namespace
sta2-wlan0
mac80211
root ap1
namespace
Mininet-WiFi
ap1-wlan0
Provides MLME management services with which
drivers can be developed to support softMAC
Creates Virtual WiFi Interfaces
Configuration management
for wireless devices
wlan1 wlan2 wlan3
TC tool and
MLME
station mode
MLME
AP mode
Hostapd
iwconfig
iw
wpa_supplicant
ofdatapath ofprotocol controller
Mobility Models
Propagation ModelsPropagation Models
Configuration management
for wireless devices
Wmediumd
Figure 1.1: Mininet-WiFi Components.
1.2.2 Docker
Mininet-WiFi is available on Docker1.
1.3 Limitations
Mininet-WiFi inherits all limitations of Mininet, including:
•
You cannot handle with packets that go out to the incoming port with the OpenFlow protocol.
1.4 Architecture and Components
The main components that make part of the development of Mininet-WiFi are illustrated in Figure 1.1.
In the kernel-space the module mac80211_hwsim is responsible for creating virtual Wi-Fi interfaces,
important for stations and access points. Continuing in the kernel-space, MLME (Media Access
Control Sublayer Management Entity)
2
is realized in the stations side, while in the user-space the
hostapd is responsible for this task in the AP side.
Mininet-WiFi also uses a couple utilities such as iw,iwconfig e o wpa_supplicant. The first
two are used for interface configuration and for getting information from wireless interfaces and
the last one is used with Hostapd, in order to support WPA (Wi-Fi Protected Access), among other
things. Besides them, another fundamental utility is TC (Traffic Control). The TC is an user-space
utility program used to configure the Linux kernel packet scheduler, responsible for controlling
the rate, delay, latency and loss, applying these attributes in virtual interfaces of stations and APs,
representing with higher fidelity the behavior of the real world.
Figure 1.2 depicts the components and connections in a simple topology with two stations (or
hosts) created with Mininet-WiFi, where the newly implemented components (highlighted in gray)
are presented along the original Mininet building blocks. Although stations are equipped with a
wireless interface by default they are able to connect with access points through wired links (veth
pairs) as well.
More specifically, we added WiFi interfaces on stations that now are able to connect to an access
point through its (
wlanX
) interface that is bridged to an OpenFlow switch with AP capabilities
1https://registry.hub.docker.com/u/ramonfontes/mininet-wifi/
2some of the functions performed by MLME are authentication, association, sending and receiving beacons, etc.
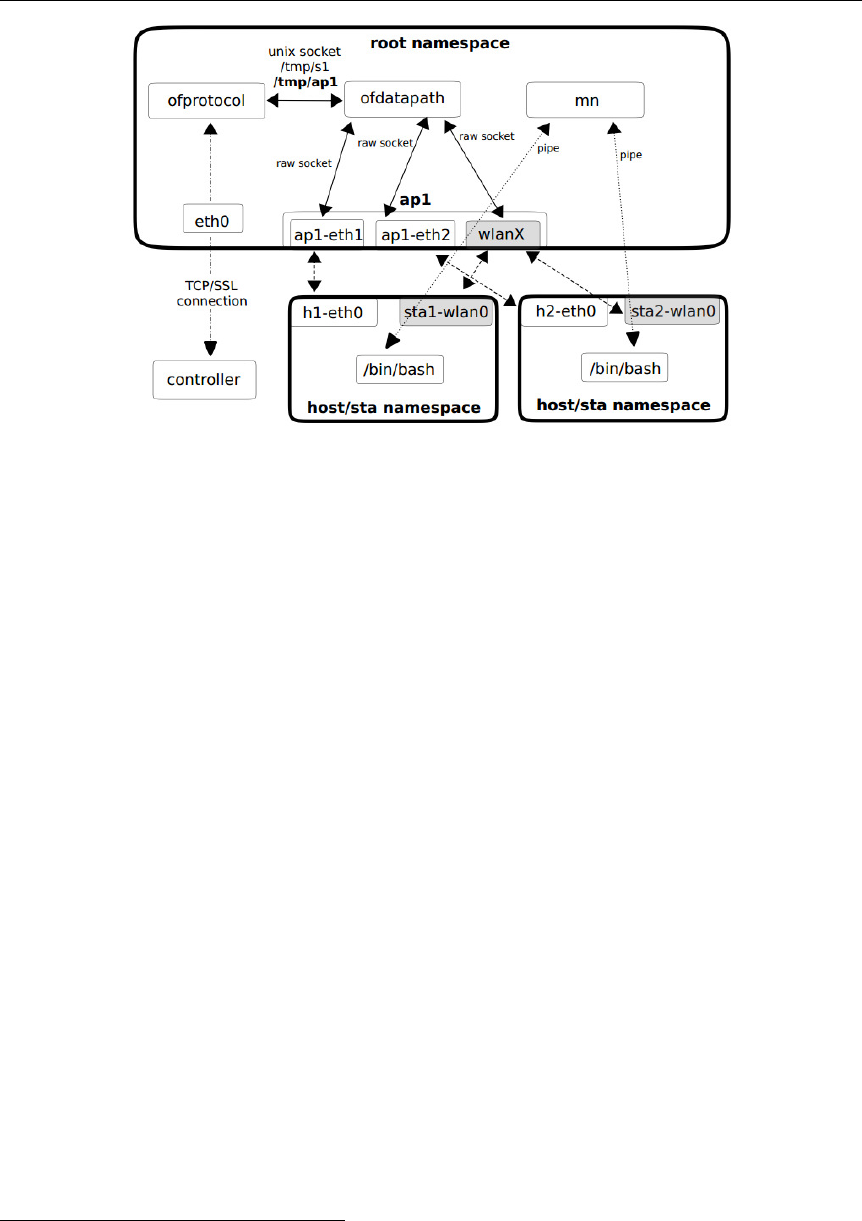
1.4 Architecture and Components 11
Figure 1.2: Components and connections in a two-host network created with Mininet-WiFi.
represented by (
ap1
). Similar to Mininet, the virtual network is created by placing host processes in
Linux OS network namespaces interconnected through virtual Ethernet (veth) pairs. The wireless
interfaces to virtualize WiFi devices work on master mode for access points and managed mode for
stations.
Stations:
Are devices that connect to an access point through authentication and association. In our
implementation, each station has one wireless card (
staX-wlan0
- where X shall be replaced by
the number of each station). Since the traditional Mininet hosts are connected to an access point,
stations are able to communicate with those hosts.
Access Points:
Are devices that manage associated stations. Virtualized through
hostapd3
daemon
and use virtual wireless interfaces for access point and authentication servers. While virtualized
access points do not have (yet) APIs allowing users to configure several parameters in the same
fashion of a real one, the current implementation covers the most important features, for example
ssid, channel, mode, password, cryptography, etc.
Both stations and access points use
cfg80211
to communicate with the wireless device driver, a
Linux 802.11 configuration API that provides communication between stations and
mac80211
. This
framework in turn communicates directly with the WiFi device driver through a
netlink
socket (or
more specifically
nl80211
) that is used to configure the
cfg80211
device and for kernel-user-space
communication as well.
1.4.1 Files
• mininet/wifiAssociationControl.py - association Control techniques
• mininet/wifiLink.py - link details
• mininet/wifiDevices.py - specification of real devices
• mininet/wifiMobility.py - mobility parameters
• mininet/wifiModule.py - module
3
Hostapd (
H
ost
A
ccess
P
oint
D
aemon) user space software capable of turning normal wireless network interface cards
into access points and authentication servers

12 Chapter 1. About Mininet-WiFi
• mininet/wifiPlot.py - graphs
• mininet/wifiPropagationModels.py - propagation models
• mininet/wifiReplaying.py - replaying captured traces
• mininet/vanet.py - VANET networks
1.4.2 Classes
•UserAP(): User-space AP
•OVSAP(): Open vSwitch AP
•addHost(): adds a host to a topology and returns the host name
•addAccessPoint(): adds an access point to a topology and returns the access point name
•addCar(): adds a car to a topology and returns the car name
•
addPhysicalBaseStation(): attach a physical usb interface to a virtual base station to a topology
and returns the physical base station name
•addStation(): adds a station to a topology and returns the station name
•addSwitch(): adds a switch to a topology and returns the switch name
•
addLink(): adds a bidirectional link to a topology (and returns a link key, but this is not
important). Links in Mininet-WiFi are bidirectional unless noted otherwise.
•plotGraph(): use this class if you want to plot graph.
•startMobility: useful when you want to use a mobility model.
1.5 Wireless medium emulation
Mininet-WiFi relies on two approaches for simulating the wireless medium: tc and wmediumd.
1.5.1 Traffic Control (TC)
Tc (traffic control) is the user-space utility program used to configure the Linux kernel packet
scheduler. Used to configure Traffic Control in the Linux kernel, Traffic Control consists of the
following:
•Shaping:
When traffic is shaped, its rate of transmission is under control. Shaping may be
more than lowering the available bandwidth - it is also used to smooth out bursts in traffic for
better network behaviour. Shaping occurs on egress.
•Scheduling:
By scheduling the transmission of packets it is possible to improve interactivity
for traffic that needs it while still guaranteeing bandwidth to bulk transfers. Reordering is also
called prioritizing, and happens only on egress.
•Policing:
Where shaping deals with transmission of traffic, policing pertains to traffic arriving.
Policing thus occurs on ingress.
•Dropping:
Traffic exceeding a set bandwidth may also be dropped forthwith, both on ingress
and on egress.
The aforementioned properties have been used to apply values for bandwidth, loss, latency and
delay in Mininet-WiFi. Tc was the first approach adopted in Mininet-WiFi for simulating the wireless
medium.
Intermediate Functional Block (IFB) Devices
There are two modes of traffic shaping:
ingress
and
egress
. Ingress handles incoming traffic
and egress outgoing traffic. Linux does not support shaping/queuing on ingress, but only policing.

1.5 Wireless medium emulation 13
Therefore IFB exists, which we can attach to the ingress queue while we can add any normal queuing
like as egress queue on the IFB device.
Intermediate Functional Block (IFB) is an alternative to tc filters for handling ingress traffic,
by redirecting it to a virtual interface and treat is as egress traffic. IFB is supported by calling
net.useIFB() just after adding all nodes and before calling net.configureWifiNodes(). Further
information about IFB is available at http://shorewall.net/traffic_shaping.htm#IFB.
Customizing Equations
When a node is in motion different values for bandwidth, latency, loss and delay are applied based
on equations. Those equations can be customized by calling setChannelEquation(), for instance (it
won’t work for mesh/adhoc):
#dist = distance between receiver and transmitter
#custombw = is a default value for bw which takes into account the RSSI
net.setChannelEquation(bw='value.rate * (1.1 ** -dist)',loss='(dist * 2) /
100',delay='(dist / 10) + 1',latency='2 + dist'),→
1.5.2 Wmediumd
The kernel module mac80211_hwsim uses the same virtual medium for all wireless nodes. This
means all nodes are internally in range of each other and they can be discovered in a wireless scan on
the virtual interfaces. Mininet-WiFi simulates their position and wireless ranges by assigning stations
to other stations or access points and revoking these wireless associations. If wireless interfaces
should be isolated from each other (e.g. in adhoc or mesh networks) a solution like
wmediumd4
is
required. It uses a kind of a dispatcher to permit or deny the transfer of packets from one interface to
another.
A small helper to support wmediumd was initially developed by Patrick Große
5
and it was
included in Mininet-WiFi. At the first release It supported two modes: dynamic and static mode.
Dynamic mode
This mode should be the best choice in most use cases. It requires the input of Mininet-WiFi
interfaces as Python objects and retrieves the MAC addresses which are required for wmediumd
automatically from the Mininet API.
Static mode
The static mode uses the MAC addresses that have been provided. In most cases the dynamic mode
is the one to use. The advantage of the static mode is that no station objects are required and the data
could be provided prior to the start of Mininet-WiFi.
Afterwards, support to interference was added. The support to interference improved the helper in
such way that wmediumd is able to capture the position of nodes from Mininet-WiFi and it calculates
the signal level based on the distance between source and destination by relying on the log distance
propagation model. The interference model provided by wmediumd relies on the clear channel
assessment (CCA) threshold, which defines a parameter causing interference.
4https://github.com/bcopeland/wmediumd
5https://github.com/patgrosse/wmediumd

14 Chapter 1. About Mininet-WiFi
The initial idea behind both dynamic and static modes is now discarded since wmediumd can
be used when you set enable_wmediumd=True.
Installation of wmediumd
It is required that wmediumd can be called using the command
wmediumd
. That means it should be
located in /usr/bin or any other path that is available through the PATH enviroment variable.
wmediumd can be automatically installed using the
-l
option on
util/install.sh
. This will copy
the binary to /usr/bin/wmediumd.
Installing wmediumd in Mininet-WiFi: sudo util/install.sh -W
Traffic control versus Wmediumd
Wmediumd has been shown to be the best approach for the simulation of the wireless medium. Some
advantages include:
• It isolates the wireless interfaces from each other
• wmediumd implements backoff algorithm. TC relies only in FIFO queue discipline.
• It decides when the association has to be evoked based on the signal level
•
Values for bandwidth, loss, latency and delay are applied relying in a matrix. This matrix
implements an option to determine PER (packet error rate) with outer matrix defined in
IEEE 802.11ax. The matrix is defined in Appendix 3 of 11-14-0571-12 TGax Evaluation
Methodology6.
• We highly recommend wmediumd for both adhoc and wireless mesh networks.
1.6 Usability
You can create a simple network (2 stations and 1 access point) with the following command:
sudo mn --wifi
The command above can be used with other parameters, like in:
sudo mn --wifi --ssid=new_ssid --mode=g --channel=1
and also,
sudo mn --wifi --position --wmediumd --plot
position parameter automatically defines the position of the nodes, whereas wmediumd enables
wmediumd (you can find more information about wmediumd along this manual). plot plots a graph.
You can also use just mn if you want to work only with Mininet instead of Mininet-WiFi.
1.6.1 Changing Topology Size and Type
The default topology is a single Access Point connected to two Stations. You could change this to a
different topo with –topo and pass parameters for that topology’s creation. For example, to verify
all-pairs ping connectivity with one Access Point and five Stations:
sudo mn --wifi --test pingall --topo single,5
6https://mentor.ieee.org/802.11/dcn/14/11-14-0571-12-00ax-evaluation-methodology.docx

1.6 Usability 15
Another example, with a linear topology (where each Access Point has one station, and all Access
Points connect in a line via wired media):
sudo mn --wifi --test pingall --topo linear,5
1.6.2 Examples
If you are just beginning to write scripts for Mininet-WiFi, you can use the example scripts as a
starting point. We created example scripts in the
/mininet-wifi/examples
directory that show
how to use most of the features in Mininet-WiFi.
1.6.3 Getting information
getting the position:
mininet-wifi>py sta1.params['position']
getting AP that a specific station is associated:
mininet-wifi>py sta1.params['associatedTo']
getting APs in range:
mininet-wifi>py sta1.params['apsInRange']
getting the channel:
mininet-wifi>py sta1.params['channel']
getting the frequency:
mininet-wifi>py sta1.params['frequency']
getting the mode:
mininet-wifi>py sta1.params['mode']
getting the rssi:
#not available when wmediumd and interference are enabled. Use iw/iwconfig instead.
mininet-wifi>py sta1.params['rssi']
getting the Tx Power:
mininet-wifi>py sta1.params['txpower']
getting associated stations to ap1:
mininet-wifi>py ap1.params['associatedStations']

16 Chapter 1. About Mininet-WiFi
1.6.4 Changes at runtime
setting the position (coord x, y, z):
mininet-wifi>py sta1.setPosition('40,20,40')
setting up the antenna gain (dBm):
mininet-wifi>py sta1.setAntennaGain(5, intf='sta1-wlan0')
setting the signal range (meters):
mininet-wifi>py sta.setRange(100)
mininet-wifi>py sta.setRange(100, intf='sta1-wlan0')
setting Tx Power (dBm):
mininet-wifi>py sta1.setTxPower(10, intf='sta1-wlan0')
setting channel:
mininet-wifi>py sta1.setChannel(10, intf='sta1-wlan0')
changing association to ap1:
mininet-wifi>py sta1.moveAssociationTo(ap1, intf='sta1-wlan0')
make interface work as adhoc mode:
mininet-wifi>py sta1.setAdhocIface('sta1-wlan0',ssid='my-ssid')
make interface work as mesh mode:
mininet-wifi>py sta1.setMeshIface('sta1-wlan0',ssid='my-ssid')
1.7 Supported Features
1.7.1 Bgscan (Background scanning)
wpa_supplicant
behavior for background scanning can be specified by configuring a bgscan
module. This module is responsible for requesting background scans for the purpose of roaming
within an ESS (i.e., within a single network block with all the APs using the same SSID). You can
enable bgscan calling setBgscan(), for example:
net.setBgscan()
or
net.setBgscan(module="$module_name",s_inverval=$value,signal=$value,
l_interval=$value,database=$dir),→
s_interval: short bgscan interval in seconds
signal: signal strength threshold
l_interval: long interval
database: <database file name>
source: https://w1.fi/cgit/hostap/plain/wpa_supplicant/wpa_supplicant.conf

1.7 Supported Features 17
1.7.2 Encryption
Mininet-WiFi supports all the common wireless security protocols, such as WEP (Wired Equivalent
Privacy), WPA (Wi-Fi Protected Access) and WPA2.
On both station/ap side the password and encryption type can be set as below:
sta1 =net.addStation('sta1',passwd='123456789a',encrypt='wpa2')
ap1 =net.addAccessPoint('ap1',ssid="ssid1",mode="g",channel="1",
passwd='123456789a',encrypt='wpa2'),→
Attention! OVS does not support WPA/WPA2 authentication.
1.7.3 Hybrid Physical-Virtual Environment
This feature was first presented in section 6.3 and features a hybrid physical-virtual environment
where real users connect their 802.11-enabled smartphones to interact with the virtualized infrastruc-
ture, including nodes forming a mesh subnetwork, and access the global Internet after having its
traffic processed through a multi-hop OpenFlow network.
1.7.4 IEEE 8021x
The example below enables 8021x.
ap1 =net.addAccessPoint('ap1', ... authmode='8021x',encrypt='wpa2',
...),→
Further configuration includes radius_server and shared_secret:
ap1 =net.addAccessPoint('ap1', ... mode='8021x',encrypt='wpa2',
enable_radius='yes',radius_server='127.0.0.1',
shared_secret='secret'...)
,→
,→
1.7.5 IEEE 802.11r
The example below enables 802.11r.
ap1 =net.addAccessPoint('ap1', ... passwd='123456789a',
encrypt='wpa2',ieee80211r='yes',mobility_domain='a1b2',→
1.7.6 Interference
Mininet-WiFi supports the interference model provided by wmediumd. An example about how to
enable interference is given below.
net =Mininet(... link=wmediumd, enable_interference=True )
The interference model implemented in wmediumd relies on CCA THRESHOLD (Clear Chan-
nel Assessment). The CCA is used by the MAC layer to determine (i) if the channel is clear for
transmitting data, and (ii) for determining when there is incoming data. Evaluation of CCA is
made by the PHY layer and the resulting assessment is communicated to the MAC layer via the
PHY-CCA.indicate service primitive. This primitive can either be set to IDLE, when the channel is
assessed to be clear, or BUSY when the channel is assessed to be in use.
Optionally, a fadding coefficient is also supported by Mininet-WiFi when wmediumd is enabled:

18 Chapter 1. About Mininet-WiFi
net =Mininet(... link=wmediumd, enable_interference=True,
fading_coefficient=1 ),→
Further details about the interference model implemented in wmediumd can be found at the
mater thesis titled Medium and mobility behaviour insertion for 802.11 emulated networks.
1.7.7 Multiple SSIDs over a single AP
It is very common for an organization to have multiple SSIDs in their wireless network for various
purposes, including: (i) to provide different security mechanisms such as WPA2-Enterprise for
your employees and an “open” network with a captive portal for guests; (ii) to split bandwidth
among different types of service; or (iii) to reduce costs by reducing the amount of physical access
points. In Mininet-WiFi, an unique AP supports up to 8 different SSIDs (limitation imposed by
mac80211_hwsim). Multiple SSIDs can be configured as below:
ap1 =net.addAccessPoint('ap1',ssid="ssid1,ssid2,ssid3",mode="g",
channel="1" ),→
1.7.8 Support to Virtual Interfaces
The mac80211 subsystem in the linux kernel supports multiple wireless interfaces to be created with
one physical wireless card. To do so you have to set the number of virtual interfaces to be created
(nvif), as illustrated below.
sta1 =net.addStation('sta1',nvif=2 )
1.7.9 4-address for AP and client mode
IEEE 802.11 (WLAN) frames have four address fields in their headers. In order to transport ethernet
packets transparently over a Wireless Distribution System (WDS) link, the IEEE 802.3 (Ethernet)
frame gets encapsulated in a IEEE 802.11 (WLAN) frame. In this case all of the four address fields
are used, for:
• sender of the ethernet frame
• receiver of the ethernet frame
• sender of the WLAN frame
• receiver of the WLAN frame
Sender and receiver of the ethernet frame are simply copied from the transported ethernet frame.
The remaining fields allow the receiver to recognize that the frame is meant for him, and allow it
to acknowledge the reception of the frame to the (WLAN) sender. However, usually only three of
the four fields are needed, so most drivers don’t know about how to handle frames which make use
of all four address fields. In other words: the most important ingredient for WDS is support for
4-address-headers.
Worth to mention that the 4-address frame format does not itself constitute a wireless distribution
system or a wireless DS, it is simply a frame addressing mechanism that allows creation of a
multitude of specialized implementations, one of which could be a wireless distribution system. The
advantage of this mode compared to regular WDS mode is that it’s easier to configure and does not
require a static list of peer MAC addresses on any side.
A sample file for 4-address is available at /examples/4address.py. In general, the user must set
AP/Client with the param _4addr, for example:

1.8 Supported 802.11 Protocols 19
ap1 =net.addAccessPoint('ap1',_4addr="ap",ssid="ssid1" ... )
ap2 =net.addAccessPoint('ap2',_4addr="client",ssid="ssid2" ... )
and then a 4-address link must be created as below:
net.addLink(ap1, ap2, link='4addr')
1.7.10 Replaying Traces
Being able to replay real networking conditions based on traffic observations in real environments is
useful to predict network performance under certain conditions, reason about the observed network
behavior, and perform fair comparisons between alternative algorithms’ implementations subject to
the mirrors of the physical network. Mininet-WiFi is able to replay network conditions, bandwidth,
mobility and rssi.
Replaying Network Conditions
Please refer to examples/replaying/replayingNetworkConditions.py
Replaying Bandwidth
Please refer to examples/replaying/replayingBandwidth.py
Replaying Mobility
Please refer to examples/replaying/replayingMobility.py
Replaying RSSI
Please refer to examples/replaying/replayingRSSI.py
1.8 Supported 802.11 Protocols
Mininet-WiFi already supports: IEEE 802.11a, IEEE 802.11b, IEEE 802.11g, IEEE 802.11h, IEEE
802.11i, IEEE 802.11n, IEEE 802.11q, IEEE 802.11s, IEEE 802.11r, IEEE 802.11x, IEEE 802.11ac,
IEEE 802.11ax.
Info:
mac80211_hwsim can be extended in order to support all protocols supported by mac80211!
1.9 Videos
You can find many videos about Mininet-WiFi in a channel on youtube7.
1.10 Contact Us
You are invited to participate of our mailing list8.
7https://www.youtube.com/playlist?list=PLccoFREVAt_4nEtrkl59mjjf5ZzRX8DZA
8https://groups.google.com/forum/#!forum/mininet-wifi-discuss

20 Chapter 1. About Mininet-WiFi
1.11 FAQ
•
Question: I am getting the following Error message:
IndexError: list index out of range
.
How to solve it?
Answer:
sudo mn -c
•Question: Is it possible to create a wired link between station and ap?
Answer: Yes. When you add a link between station and ap you have to add the parameter
link=’wired’ (e.g. net.addLink(sta1, ap2, link=’wired’)
•May I customize the Access Point and Station configuration file?
Answer: Since the Access Point is based on Hostapd you may customize the configuration file
generated by Mininet-WiFi adding the parameter
config
when you create the access point,
for example:
ap1 =net.addAccessPoint('ap1',
config='ctrl_interface=/var/run/hostapd/,ctrl_interface_group=0'
)
,→
,→
The code above will create the file ap1-wlan1.apconf.
The same can be done for stations when wpa_supplicant is used, for example:
sta1 =net.addStation('sta1',config='eap=PEAP,identity="bob"')
•
Is it possible to plot hosts in graph? Yes, it is possible. You have to call the method below
before calling net.addLink():
h1.plot(position='10,10,0')
•
The mode N supports booth 2.4 and 5Ghz. How can I make a choice between 2.4 or 5Ghz?
Answer: You have to set band=2.4 or band=5 when you add an AP.
•How to uninstall Mininet-WiFi?
sudo rm -rf /usr/local/bin/mn /usr/local/bin/mnexec /usr/local/lib/python*/*/*mininet* /usr/local/bin/ovs-
* /usr/local/sbin/ovs-*
2. Mobility Models
2.1 Mobility Models Supported
Mininet-WiFi supports the following mobility models:
RandomWalk
,
TruncatedLevyWalk
,
RandomDirection
,
RandomWayPoint,GaussMarkov,ReferencePoint and TimeVariantCommunity.
2.2 How to setup Mobility?
To use those mobility models you have to call the method net.startMobility() like in examples/mobili-
tyModel.py. You may also have to consider the use of examples/mobility.py if you want a different
type of mobility. Another alternative is to consider some parameters for specifics mobility models
(not mandatory), for example:
RandomWalk
sta1 =net.addStation(..., min_x=10, max_x=20, min_y=10, max_y=20,
constantDistance=1, constantVelocity=1 ),→
min_x =Minimum X position
max_x =Maximum X position
min_y =Minimum Y position
max_y =Maximum Y position
constantDistance =the value for the constant distance traveled in each step.
Default is 1.0.,→
constantVelocity =the value for the constant node velocity. Default is 1.0
In the current implementation each step is 1 second. It is not possible to have a velocity larger than
the distance.

22 Chapter 2. Mobility Models
RandomDirection
sta1 =net.addStation(..., min_x=10, max_x=20, min_y=10, max_y=20, min_v=1,
max_v=2 ),→
min_x =Minimum X position
max_x =Maximum X position
min_y =Minimum Y position
max_y =Maximum Y position
min_v =Minimum value for node velocity
max_v =Maximum value for node velocity
RandomWayPoint
sta1 =net.addStation(..., min_x=10, max_x=20, min_y=10, max_y=20, min_v=1,
max_v=2 ),→
//min_v and max_v must have different values
min_x =Minimum X position
max_x =Maximum X position
min_y =Minimum Y position
max_y =Maximum Y position
min_v =Minimum value for node velocity
max_v =Maximum value for node velocity
GaussMarkov
sta1 =net.addStation(..., min_x=10, max_x=20, min_y=10, max_y=20 )
min_x =Minimum X position
max_x =Maximum X position
min_y =Minimum Y position
max_y =Maximum Y position

3. Propagation Models
3.1 Propagation Models Supported
Mininet-WiFi supports the following propagation models:
Friis Propagation Loss Model
,
Log-Distance Propagation Loss Model
(DEFAULT ONE),
Log-Normal Shadowing Propagation
Loss Model
,
International Telecommunication Union (ITU) Propagation Loss Model
and Two-Ray Ground Propagation Loss Model.
3.2 How to add specific Propagation Model?
You have to call the method
net.propagationModel()
like in examples/propagationModel.py.
You might have to consider some parameters for specifics propagation models (not mandatory), for
example:
Friis Propagation Loss Model
net.propagationModel(model="friis",sL =$int)
sL =system loss
Log-Distance Propagation Loss Model
net.propagationModel(model="logDistance",sL =$int,exp =$int)
sL =system loss
exp =exponent
Log-Normal Shadowing Propagation Loss Model
net.propagationModel(model="logNormalShadowing",sL =$int,exp =$int,
variance =$int),→
sL =system loss
exp =exponent
variance =gaussian variance

24 Chapter 3. Propagation Models
International Telecommunication Union (ITU) Propagation Loss Model
net.propagationModel(model="ITU",lF =$int,nFloors =$int,pL =$int)
lF =floor penetration loss factor
nFloors =number of floors
pL =power loss coefficient
Two-Ray Ground Propagation Loss Model
Attention: It does not give a good result for a short distance
net.propagationModel(model="twoRayGround")
4. Tutorial
4.1 Introduction
This tutorial has been developed by Brian Linkletter (http://www.brianlinkletter.com/mininet-wifi-
software-defined-network-emulator-supports-wifi-networks). We thank Brian for his time and this
helpful tutorial.
4.2 First ideas
In this post, I describe the unique functions available in the Mininet-WiFi network emulator and
work through a few tutorials exploring its features.
4.2.1 How to read this post
In this post, I present the basic functionality of Mininet-WiFi by working through a series of tutorials,
each of which works through Mininet-WiFi features, while building on the knowledge presented in
the previous tutorial. I suggest new users work through each tutorial in order.
I do not attempt to cover every feature in Mininet-WiFi. Once you work through the tutorials
in this post, you will be well equipped to discover all the features in Mininet-WiFi by work-
ing through the
Mininet-WiFi example scripts
- https://github.com/intrig-unicamp/mininet-
wifi/tree/master/examples, and reading the Mininet-WiFi wiki1and mailing list2.
I assume the reader is already familiar with the [Mininet network emulator](http://mininet.org/)
so I cover only the new WiFi features added by Mininet-WiFi. If you are not familiar with Mininet,
please read my
Mininet network simulator review3
before proceeding. I have also written
many other posts about Mininet4.
1https://github.com/intrig-unicamp/mininet-wifi/wiki
2https://groups.google.com/forum/#!forum/mininet-wifi-discuss
3http://www.brianlinkletter.com/mininet-test-drive/
4http://www.brianlinkletter.com/tag/mininet/

26 Chapter 4. Tutorial
I start by discussing the functionality that Mininet-WiFi adds to Mininet: Mobility functions
and WiFi interfaces. Then I show how to install Mininet-WiFi and work through the tutorials listed
below:
Tutorial #1: One access point shows how to run the simplest Mininet-WiFi scenario, shows how
to capture wireless traffic in a Mininet-Wifi network, and discusses the issues with OpenFlow and
wireless LANs.
Tutorial #2: Multiple access points shows how to create a more complex network topology so we
can experiment with a very basic mobility scenario. It discusses more about OpenFlow and shows
how the Mininet reference controller works in Mininet-WiFi.
Tutorial #3: Python API and scripts shows how to create more complex network topologies
using the Mininet-WiFi Python API to define node positions in space and other node attributes. It
also discusses how to interact with nodes running in a scenario with the Mininet-WiFi CLI, the
Mininet-WiFi Python interpreter, and by running commands in a node’s shell.
Tutorial #4: Mobility shows how to create a network mobility scenario in which stations move
through space and may move in and out of range of access points. It also discusses the available
functions that may be used to implement different mobility models using the Mininet-WiFi Python
API.
4.2.2 Mininet-WiFi compared to Mininet
Mininet-WiFi is an extension of the Mininet software defined network emulator. The Mininet-WiFi
developer did not modify any existing Mininet functionality, but added new functionality.
4.2.3 Mininet-WiFi and Mobility
Broadly defined, mobility in the context of data networking refers to the ability of a network to
accommodate hosts moving from one part of the network to another. For example: a cell phone user
may switch to a wifi access point when she walks into a coffee shop; or a laptop user may walk from
her office in one part of a building to a meeting room in another part of the building and still being
able to connect to the network via the nearest WiFi access point.
While the standard Mininet network emulator may be used to test mobility (In the Mininet
examples folder, we find a
mobility.py
script that demonstrates methods that may be used to create
a scenario where a host connected to one switch moves its connection to another switch), Mininet-
WiFi offers more options to emulate complex scenarios where many hosts will be changing the
switches to which they are connected. Mininet-WiFi adds new classes that simplify the programming
work required by researchers to create Mobility scenarios.
Mininet-WiFi does not modify the reference SDN controller provided by standard Mininet so
the reference controller cannot manage the mobility of users in the wireless network. Researchers
must use a remote controller that supports the CAPWAP protocol (NOTE: I’ve not tried this and I do
not know if it will work without modifications or additional programming), or manually add and
delete flows in the access points and switches.

4.2 First ideas 27
4.2.4 802.11 Wireless LAN Emulation
Mininet-wifi incorporates the Linux 802.11 SoftMAC
5
wireless drivers, the cfg80211
6
wireless
configuration interface and the mac80211_hwsim7wireless simulation drivers in its access points.
The
mac80211_hwsim
driver is a software simulator for Wi-Fi radios. It can be used to
create virtual wi-fi interfaces8
that use the
802.11 SoftMAC wireless LAN driver9
.
Using this tool, researchers may
emulate a Wi-Fi link between virtual machines10
- some
mac80211_hwsim practical examples and supporting information are at the following links:
lab11
,
thesis12
,
hostapd13
,
wpa-supplicant14
,
docs-115
, and
docs-216
. The 80211_hwsim driver
enables researchers to emulate the wifi protocol control messages passing between virtual wireless
access points and virtual mobile stations in a network emulation scenario. By default, 80211_hwsim
simulates perfect conditions, which means there is no packet loss or corruption.
4.2.5 Mininet-WiFi display graph
Since locations of nodes in space is an important aspect of WiFi networks, Mininet WiFi provides a
graphical display (figure 4.1) showing locations of WiFi nodes in a graph. The graph may be created
by calling its method in the Mininet-WiFi Python API (see examples in the tutorials below).
The graph will show wireless access points and stations, their positions in space and will display
the affects of the range parameter for each node. The graph will not show any "wired" network
elements such as standard Mininet hosts or switches, Ethernet connections between access points,
hosts, or switches.
4.2.6 Install Mininet-WiFi on a Virtual Machine
First, we need to create a virtual machine that will run the Mininet-WiFi network emulator. In the
example below, we will use the VirtualBox virtual machine manager because it is open-source and
runs on Windows, Mac OS, and Linux.
4.2.7 Set up a new Ubuntu Server VM
Install Ubuntu Server in a new VM. Download an Ubuntu Server ISO image from the Ubuntu web
site. See my post about
installing Debian Linux in a VM17
. Follow the same steps to install
Ubuntu.
In this example, we will name the VM Mininet-WiFi.
5https://wireless.wiki.kernel.org/en/developers/documentation/glossary#softmac
6http://www.linuxwireless.org/en/developers/Documentation/cfg80211
7https://wireless.wiki.kernel.org/en/users/drivers/mac80211_hwsim
8http://stackoverflow.com/questions/33091895/virtual-wifi-802-11-interface-similar-to-veth-on-linux
9http://linuxwireless.org/en/developers/Documentation/mac80211/__v49.html
10https://w1.fi/cgit/hostap/plain/tests/hwsim/example-setup.txt
11http://www2.cs.siu.edu/˜
sharvey/code/cs441/cs441_lab.pdf
12http://upcommons.upc.edu/bitstream/handle/2099.1/19202/memoria.pdf?sequence=4
13https://nims11.wordpress.com/2012/04/27/hostapd-the-linux-way-to-create-virtual-wifi-access-point/
14https://wiki.debian.org/WiFi/HowToUse#wpa_supplicant
15https://www.kernel.org/doc/readme/Documentation-networking-mac80211_hwsim-README
16https://github.com/penberg/linux-kvm/tree/master/Documentation/networking/mac80211_hwsim))
17http://www.brianlinkletter.com/installing-debian-linux-in-a-virtualbox-virtual-machine/

28 Chapter 4. Tutorial
Figure 4.1: Mininet-WiFi Graph
4.2.8 Set up the Mininet-WiFi VM
To ensure that the VM can display X applications such as Wireshark on your host computer’s desktop,
read through my post about
setting up the standard Mininet VM18
and set up the host-only
network adapter, the X windows server, and your SSH software.
Now you can connect to the VM via SSH with X Forwarding enabled. In the example below,
my host computer is t420 and the Mininet WiFi VM is named wifi.
t420:~$ ssh -X 192.168.52.101
wifi:~$
4.3 Mininet-WiFi Tutorial #1: One access point
The simplest network is the default topology, which consists of a wireless access point with two
wireless stations. The access point is a switch connected to a controller. The stations are hosts.
This simple lab will allow us to demonstrate how to capture wireless control traffic and will
demonstrate the way an OpenFlow-enabled access point handles WiFi traffic on the
wlan
interface.
4.3.1 Capturing Wireless control traffic in Mininet-WiFi
To view wireless control traffic we must first start Wireshark:
wifi:~$ wireshark &
18http://www.brianlinkletter.com/set-up-mininet/
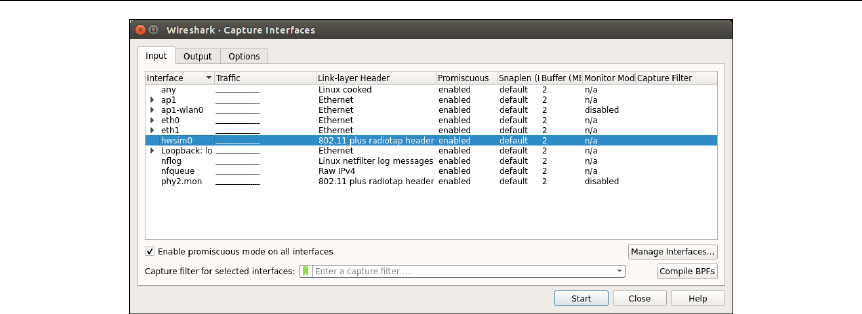
4.3 Mininet-WiFi Tutorial #1: One access point 29
Figure 4.2: Start capture on hwsim0 interface
Then, start Mininet-WiFi with the default network scenario using the command below:
wifi:~$ sudo mn --wifi
Next, enable the
hwsim0
interface. The
hwsim0
interface is the software interface created by Mininet-
WiFi that copies all wireless traffic to all the virtual wireless interfaces in the network scenario. It is
the easiest way to monitor the wireless packets in Mininet-WiFi.
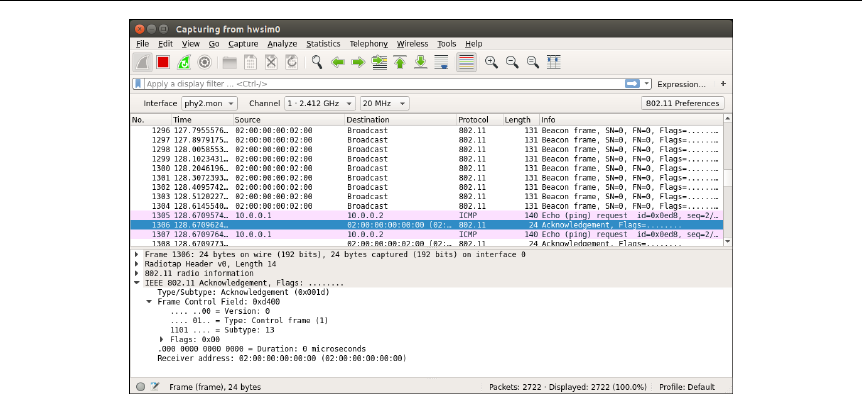
mininet-wifi> sh ifconfig hwsim0 up
Now, in Wireshark (figure 4.2, refresh the interfaces and then start capturing packets on the *hwsim0*
interface. You should see wireless control traffic. Next, run a ping command:
mininet-wifi> sta1 ping sta2
In Wireshark (figure 4.3), see the wireless frames and the ICMP packets encapsulated in Wireless
frames passing through the
hwsim0
interface. Stop the ping command by pressing
Ctrl-C
. In this
default setup, any flows created in the access point (that’s if they’re created – see below for more on
this issue) will expire in 60 seconds.
4.3.2 Wireless Access Points and OpenFlow
In this simple scenario, the access point has only one interface,
ap1-wlan0
. By default, stations
associated with an access point connect in
infrastructure mode
so wireless traffic between
stations must pass through the access point. If the access point works similarly to a switch in
standard Mininet, we expect to see OpenFlow messages exchanged between the access point and the
controller whenever the access point sees traffic for which it does not already have flows established.
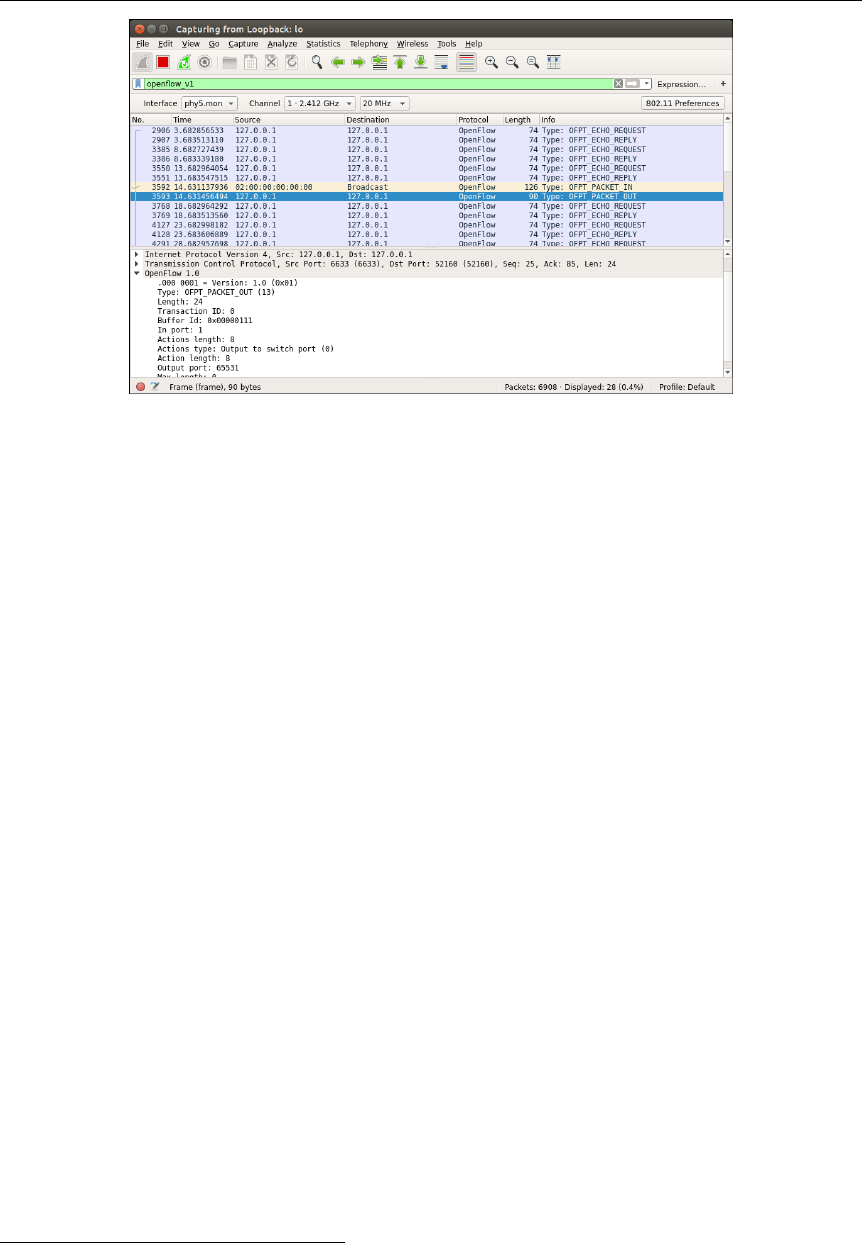
To view OpenFlow packets, stop the Wireshark capture and switch to the
loopback
interface.
Start capturing again on the
loopback interface
. Use the
OpenFlow_1.0
filter to view only
OpenFlow messages.
Then, start some traffic running with the
ping
command and look at the OpenFlow messages
captured in Wireshark.
30 Chapter 4. Tutorial
Figure 4.3: Wireshark capturing WiFi control traffic
mininet-wifi> sta1 ping sta2
I was expecting that the first ICMP packet generated by the
ping
command should be flooded to
the controller, and the controller would set up a flows on the access point so the two stations could
exchange packets. Instead, I found that the two stations were able to exchange packets immediately
and the access point did not flood the ICMP packets to the controller. Only an ARP packet, which is
in a broadcast frame, gets flooded to the controller and is ignored (figure 4.4.
Check to see if flows have been created in the access point:
mininet-wifi> dpctl dump-flows
*** ap1 ------------------------------------------
NXST_FLOW reply (xid=0x4):
We see that no flows have been created on the access point. How do the two access points
communicate with each other?
I do not know the answer but I have an idea. My research indicates that OpenFlow-enabled
switches (using OpenFlow 1.0 or 1.3) will reject "hairpin connections", which are flows that cause
traffic to be sent out the same port in which it was received. A wireless access point, by design,
receives and sends packets on the same wireless interface. Stations connected to the same wireless
access point would require a "hairpin connection" on the access point to communicate with each
other. I surmise that, to handle this issue, Linux treats the WLAN interface in each access point like
the radio network sta1-ap1-sta2 as if it is a "hub", where
ap1-wlan0
provides the "hub" functionality
for data passing between sta1 and sta2.
ap1-wlan0
switches packets in the wireless domain and will
not bring a packet into the "Ethernet switch" part of access point
ap1
unless it must be switched to
another interface on ap1 other than back out ap1-wlan0.
4.3.3 Stop the tutorial
Stop the Mininet ping command by pressing Ctrl-C.
4.4 Mininet-WiFi Tutorial #2: Multiple access points 31
Figure 4.4: No OpenFlow messages passing to the controller
In the Wireshark window, stop capturing and quit Wireshark.
Stop Mininet-Wifi and clean up the system with the following commands:
mininet-wifi> exit
wifi:~$ sudo mn -c
4.4 Mininet-WiFi Tutorial #2: Multiple access points
When we create a network scenario with two or more wireless access points, we can show more of
the functions available in Mininet-WiFi.
In this tutorial, we will create a linear topology with three access points, where one station is
connected to each access point. Remember, you need to already know
basic Mininet commands19
to appreciate how we create topologies using the Mininet command line.
Run Mininet-Wifi and create a linear topology with three access points:
sudo mn --wifi --topo linear,3
From the output of the command, we can see how the network is set up and which stations are
associated with which access points.
*** Creating network
*** Adding controller
*** Adding hosts and stations:
sta1 sta2 sta3
*** Adding switches and access point(s):
ap1 ap2 ap3
*** Adding links and associating station(s):
(ap2, ap1) (ap3, ap2) (sta1, ap1) (sta2, ap2) (sta3, ap3)
19http://mininet.org/walkthrough/

32 Chapter 4. Tutorial
*** Starting controller(s)
c0
*** Starting switches and access points
ap1 ap2 ap3 ...
*** Starting CLI:
mininet-wifi>
We can also verify the configuration using the Mininet CLI commands
net
and
dump
. For
example, we can run the net command to see the connections between nodes:
mininet-wifi> net
sta1 sta1-wlan0:None
sta2 sta2-wlan0:None
sta3 sta3-wlan0:None
ap1 lo: ap1-eth1:ap2-eth1
ap2 lo: ap2-eth1:ap1-eth1 ap2-eth2:ap3-eth1
ap3 lo: ap3-eth1:ap2-eth2
c0
From the
net
command above, we see that ap1, ap2, and ap3 are connected together in a linear
fashion by Ethernet links. But, we do not see any information about to which access point each
station is connect. This is because they are connected over a "radio" interface so we need to run the
iw command at each station to observe to which access point each is associated.
To check which access points are "visible" to each station, use the iw scan command:
mininet-wifi> sta1 iw dev sta1-wlan0 scan | grep ssid
SSID: ssid_ap1
SSID: ssid_ap2
SSID: ssid_ap3
Verify the access point to which each station is currently connected with the
iw link
command.
For example, to see the access point to which station
sta1
is connected, use the following command:
mininet-wifi> sta1 iw dev sta1-wlan0 link
Connected to 02:00:00:00:03:00 (on sta1-wlan0)
SSID: ssid_ap1
freq: 2412
RX: 1853238 bytes (33672 packets)
TX: 7871 bytes (174 packets)
signal: -30 dBm
tx bitrate: 54.0 MBit/s
bss flags: short-slot-time
dtim period: 2
beacon int: 100
mininet-wifi>

4.4 Mininet-WiFi Tutorial #2: Multiple access points 33
4.4.1 A simple mobility scenario
In this example, each station is connected to a different wireless access point. We can use the
iw
command to change which access point to which each station is connected.
Note: The
iw
commands may be used in static scenarios like this but should not be used when
Mininet-WiFi automatically assigns associations in more realistic mobility scenarios. We’ll discuss
how Mininet-WiFi handles real mobility and how to use
iw
commands with Mininet-WiFi later in
this post.
Let’s decide we want
sta1
, which is currently associated with
ap1
, to change its association to
ap2
. Manually switch the
sta1
association from
ap1
(which is ssid_ap1) to
ap2
(which is ssid_ap2)
using the following commands:
mininet-wifi> sta1 iw dev sta1-wlan0 disconnect
mininet-wifi> sta1 iw dev sta1-wlan0 connect ssid_ap2
Verify the change with the iw link command:
mininet-wifi> sta1 iw dev sta1-wlan0 link
Connected to 02:00:00:00:04:00 (on sta1-wlan0)
SSID: ssid_ap2
freq: 2412
RX: 112 bytes (4 packets)
TX: 103 bytes (2 packets)
signal: -30 dBm
tx bitrate: 1.0 MBit/s
bss flags: short-slot-time
dtim period: 2
beacon int: 100
mininet-wifi>
We see that
sta1
is now associated with
ap2
. So we’ve demonstrated a basic way to make
stations mobile, where they switch their association from one access point to another.
4.4.2 OpenFlow flows in a mobility scenario
Now let’s see how the Mininet reference controller handles this simple mobility scenario. We need
to get some traffic running from
sta1
to
sta3
in a way that allows us to access the Mininet-WiFi
command line. We’ll run the ping command in an xterm window on sta3.
First, check the IP addresses on
sta1
and
sta3
so we know which parameters to use in our test.
The easiest way to see all IP addresses is to run the dump command:
mininet-wifi> dump
<Host sta1: sta1-wlan0:10.0.0.1 pid=7091>
<Host sta2: sta2-wlan0:10.0.0.2 pid=7094>
<Host sta3: sta3-wlan0:10.0.0.3 pid=7097>
<OVSSwitch ap1: lo:127.0.0.1,ap1-eth1:None pid=7106>
<OVSSwitch ap2: lo:127.0.0.1,ap2-eth1:None,ap2-eth2:None pid=7110>
34 Chapter 4. Tutorial
Figure 4.5: xterm window on sta3
<OVSSwitch ap3: lo:127.0.0.1,ap3-eth1:None pid=7114>
<Controller c0: 127.0.0.1:6633 pid=7080>
mininet-wifi>
So we see that
sta1
has IP address 10.0.0.1 and
sta3
has IP address 10.0.0.3. Next, start an
xterm window on sta3:
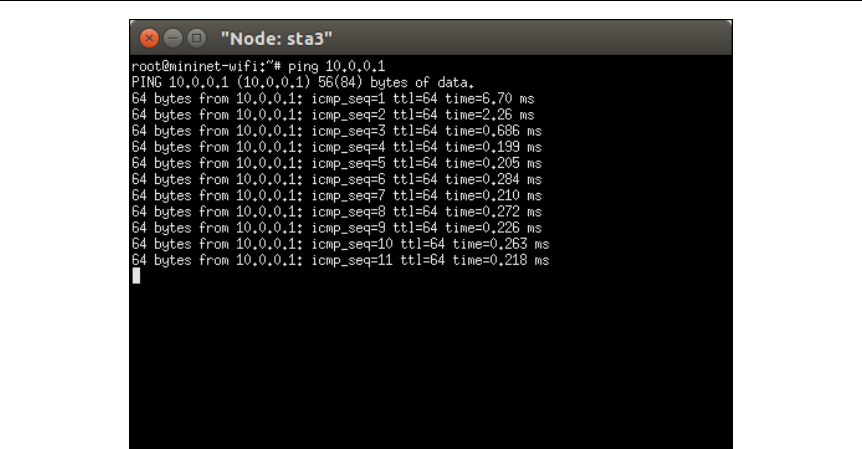
mininet-wifi> xterm sta3
This opens an xterm window (figure 4.5 from sta3.
In that window, run the following command to send ICMP messages from sta3 to sta1:
root@mininet-wifi:~# ping 10.0.0.1
Since these packets will be forwarded by the associated access points out a port other then the port
on which the packets were received, the access points will operate like normal OpenFlow-enabled
switches. Each access point will forward the first ping packet it receives in each direction to the
Mininet reference controller. The controller will set up flows on the access points to establish a
connection between the stations sta1 and sta3.
If we run Wireshark (figure 4.6 and enable packet capture on the
Loopback
interface, then
filter using with
of
(for Ubuntu 14.04) or
openflow_v1
(for Ubuntu 15.10 and later), we will see
OpenFlow messages passing to and from the controller. Now, in the Mininet CLI, check the flows on
each switch with the dpctl dump-flows command.
mininet-wifi> dpctl dump-flows
*** ap1 -----------------------------------------------
NXST_FLOW reply (xid=0x4):
*** ap2 -----------------------------------------------
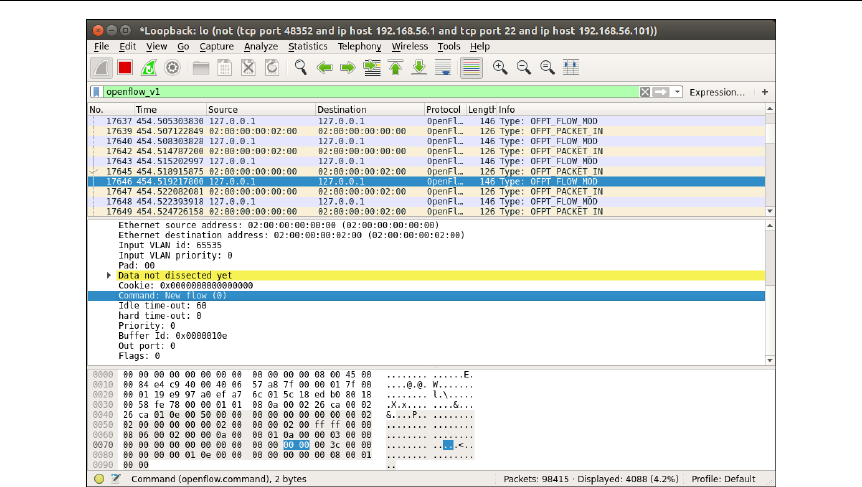
4.4 Mininet-WiFi Tutorial #2: Multiple access points 35
Figure 4.6: Wireshark capturing OpenFlow messages
NXST_FLOW reply (xid=0x4):
idle_timeout=60, idle_age=0,
priority=65535,arp,in_port=2,vlan_tci=0x0000,dl_src=02:00:00:00:02:00,
dl_dst=02:00:00:00:00:00,arp_spa=10.0.0.3,arp_tpa=10.0.0.1,arp_op=2
actions=output:3
,→
,→
,→
cookie=0x0, duration=1068.17s, table=0, n_packets=35, n_bytes=1470,
idle_timeout=60, idle_age=0,
priority=65535,arp,in_port=3,vlan_tci=0x0000,dl_src=02:00:00:00:00:00,
dl_dst=02:00:00:00:02:00,arp_spa=10.0.0.1,arp_tpa=10.0.0.3,arp_op=1
actions=output:2
,→
,→
,→
,→
cookie=0x0, duration=1073.174s, table=0, n_packets=1073,
n_bytes=105154, idle_timeout=60, idle_age=0,
priority=65535,icmp,in_port=3,vlan_tci=0x0000,dl_src=02:00:00:00:00:00,
dl_dst=02:00:00:00:02:00,nw_src=10.0.0.1,nw_dst=10.0.0.3,nw_tos=0,
icmp_type=0,icmp_code=0 actions=output:2
,→
,→
,→
,→
cookie=0x0, duration=1073.175s, table=0, n_packets=1073,
n_bytes=105154, idle_timeout=60, idle_age=0,
priority=65535,icmp,in_port=2,vlan_tci=0x0000,dl_src=02:00:00:00:02:00,
dl_dst=02:00:00:00:00:00,nw_src=10.0.0.3,nw_dst=10.0.0.1,nw_tos=0,
icmp_type=8,icmp_code=0 actions=output:3
,→
,→
,→
,→
*** ap3 -----------------------------------------------
NXST_FLOW reply (xid=0x4):

36 Chapter 4. Tutorial
cookie=0x0, duration=1068.176s, table=0, n_packets=35, n_bytes=1470,
idle_timeout=60, idle_age=0,
priority=65535,arp,in_port=2,vlan_tci=0x0000,dl_src=02:00:00:00:02:00,
dl_dst=02:00:00:00:00:00,arp_spa=10.0.0.3,arp_tpa=10.0.0.1,arp_op=2
actions=output:1
,→
,→
,→
,→
idle_timeout=60, idle_age=0,
priority=65535,arp,in_port=1,vlan_tci=0x0000,dl_src=02:00:00:00:00:00,
dl_dst=02:00:00:00:02:00,arp_spa=10.0.0.1,arp_tpa=10.0.0.3,arp_op=1
actions=output:2
,→
,→
,→
cookie=0x0, duration=1073.182s, table=0, n_packets=1073,
n_bytes=105154, idle_timeout=60, idle_age=0,
priority=65535,icmp,in_port=1,vlan_tci=0x0000,dl_src=02:00:00:00:00:00,
dl_dst=02:00:00:00:02:00,nw_src=10.0.0.1,nw_dst=10.0.0.3,nw_tos=0,
icmp_type=0,icmp_code=0 actions=output:2
,→
,→
,→
,→
cookie=0x0, duration=1073.185s, table=0, n_packets=1073,
n_bytes=105154, idle_timeout=60, idle_age=0,
priority=65535,icmp,in_port=2,vlan_tci=0x0000,dl_src=02:00:00:00:02:00,
dl_dst=02:00:00:00:00:00,nw_src=10.0.0.3,nw_dst=10.0.0.1,nw_tos=0,
icmp_type=8,icmp_code=0 actions=output:1
,→
,→
,→
,→
mininet-wifi>
We see flows set up on
ap2
and
ap3
, but not on
ap1
. This is because
sta1
is connected to
ap2
and
sta3
is connected to
ap3
so all traffic is passing through only
ap2
and
ap3
. What will happen if
sta1 moves back to ap1? Move sta1 back to access point ap1 with the following commands:
mininet-wifi> sta1 iw dev sta1-wlan0 disconnect
mininet-wifi> sta1 iw dev sta1-wlan0 connect ssid_ap1
The ping command running on sta3 stops working. We see no more pings completed.
In this case, access points
ap2
and
ap3
already have flows for ICMP messages coming from
sta3
so they just keep sending packets towards the
ap2-wlan0
interface to reach where they think
sta1
is connected. Since ping messages never get to
sta1
in its new location, the access point
ap1
never sees any ICMP traffic so does not request any flow updates from the controller.
Check the flow tables in the access points again:
mininet-wifi> dpctl dump-flows
*** ap1 -----------------------------------------------
NXST_FLOW reply (xid=0x4):
cookie=0x0, duration=40.959s, table=0, n_packets=1, n_bytes=42,
idle_timeout=60, idle_age=40,
priority=65535,arp,in_port=1,vlan_tci=0x0000,dl_src=02:00:00:00:02:00,
dl_dst=02:00:00:00:00:00,arp_spa=10.0.0.3,arp_tpa=10.0.0.1,arp_op=1
actions=output:2
,→
,→
,→
,→
cookie=0x0, duration=40.958s, table=0, n_packets=1, n_bytes=42,
idle_timeout=60, idle_age=40,
priority=65535,arp,in_port=2,vlan_tci=0x0000,dl_src=02:00:00:00:00:00,
dl_dst=02:00:00:00:02:00,arp_spa=10.0.0.1,arp_tpa=10.0.0.3,arp_op=2
actions=output:1
,→
,→
,→
,→

4.4 Mininet-WiFi Tutorial #2: Multiple access points 37
*** ap2 -----------------------------------------------
NXST_FLOW reply (xid=0x4):
cookie=0x0, duration=40.968s, table=0, n_packets=1, n_bytes=42,
idle_timeout=60, idle_age=40,
priority=65535,arp,in_port=2,vlan_tci=0x0000,dl_src=02:00:00:00:02:00,
dl_dst=02:00:00:00:00:00,arp_spa=10.0.0.3,arp_tpa=10.0.0.1,arp_op=1
actions=output:1
,→
,→
,→
,→
cookie=0x0, duration=40.964s, table=0, n_packets=1, n_bytes=42,
idle_timeout=60, idle_age=40,
priority=65535,arp,in_port=1,vlan_tci=0x0000,dl_src=02:00:00:00:00:00,
dl_dst=02:00:00:00:02:00,arp_spa=10.0.0.1,arp_tpa=10.0.0.3,arp_op=2
actions=output:2
,→
,→
,→
,→
cookie=0x0, duration=1214.279s, table=0, n_packets=1214,
n_bytes=118972, idle_timeout=60, idle_age=0,
priority=65535,icmp,in_port=2,vlan_tci=0x0000,dl_src=02:00:00:00:02:00,
dl_dst=02:00:00:00:00:00,nw_src=10.0.0.3,nw_dst=10.0.0.1,nw_tos=0,
icmp_type=8,icmp_code=0 actions=output:3
,→
,→
,→
,→
*** ap3 -----------------------------------------------
NXST_FLOW reply (xid=0x4):
cookie=0x0, duration=40.978s, table=0, n_packets=1, n_bytes=42,
idle_timeout=60, idle_age=40,
priority=65535,arp,in_port=2,vlan_tci=0x0000,dl_src=02:00:00:00:02:00,
dl_dst=02:00:00:00:00:00,arp_spa=10.0.0.3,arp_tpa=10.0.0.1,arp_op=1
actions=output:1
,→
,→
,→
,→
cookie=0x0, duration=40.971s, table=0, n_packets=1, n_bytes=42,
idle_timeout=60, idle_age=40,
priority=65535,arp,in_port=1,vlan_tci=0x0000,dl_src=02:00:00:00:00:00,
dl_dst=02:00:00:00:02:00,arp_spa=10.0.0.1,arp_tpa=10.0.0.3,arp_op=2
actions=output:2
,→
,→
,→
,→
cookie=0x0, duration=1214.288s, table=0, n_packets=1214,
n_bytes=118972, idle_timeout=60, idle_age=0,
priority=65535,icmp,in_port=2,vlan_tci=0x0000,dl_src=02:00:00:00:02:00,
dl_dst=02:00:00:00:00:00,nw_src=10.0.0.3,nw_dst=10.0.0.1,nw_tos=0,
icmp_type=8,icmp_code=0 actions=output:1
,→
,→
,→
,→
mininet-wifi>
The controller sees some LLC messages from
sta1
but does recognize that
sta1
has moved to a
new access point, so it does nothing. Since the controller does not modify any flows in the access
points, none of the ICMP packets still being generated by
sta3
will reach
sta1
so it cannot reply.
This situation will remain as long as the access points
ap2
and
ap3
continue to see ICMP packets
from sta3, which keeps the old flow information alive in their flow tables.
One "brute force" way to resolve this situation is to delete the flows on the switches. In this
simple example, it’s easier to just delete all flows. Delete the flows in the access points using the
command below:
mininet-wifi> dpctl del-flows

38 Chapter 4. Tutorial
Now the ping command running in the xterm window on
sta3
should show that pings are being
completed again.
Once all flows were deleted, ICMP messages received by the access points do not match any
existing flows so the access points communicate with the controller to set up new flows. If we dump
the flows we see that the ICMP packets passing between
sta3
and
sta1
are now traversing across
all three acces points.
mininet-wifi> dpctl dump-flows
*** ap1 -----------------------------------------------
NXST_FLOW reply (xid=0x4):
cookie=0x0, duration=10.41s, table=0, n_packets=11, n_bytes=1078,
idle_timeout=60, idle_age=0,
priority=65535,icmp,in_port=2,vlan_tci=0x0000,dl_src=02:00:00:00:00:00,
dl_dst=02:00:00:00:02:00,nw_src=10.0.0.1,nw_dst=10.0.0.3,nw_tos=0,
icmp_type=0,icmp_code=0 actions=output:1
,→
,→
,→
,→
cookie=0x0, duration=9.41s, table=0, n_packets=10, n_bytes=980,
idle_timeout=60, idle_age=0,
priority=65535,icmp,in_port=1,vlan_tci=0x0000,dl_src=02:00:00:00:02:00,
dl_dst=02:00:00:00:00:00,nw_src=10.0.0.3,nw_dst=10.0.0.1,nw_tos=0,
icmp_type=8,icmp_code=0 actions=output:2
,→
,→
,→
,→
*** ap2 -----------------------------------------------
NXST_FLOW reply (xid=0x4):
cookie=0x0, duration=10.414s, table=0, n_packets=11, n_bytes=1078,
idle_timeout=60, idle_age=0,
priority=65535,icmp,in_port=1,vlan_tci=0x0000,dl_src=02:00:00:00:00:00,
dl_dst=02:00:00:00:02:00,nw_src=10.0.0.1,nw_dst=10.0.0.3,nw_tos=0,
icmp_type=0,icmp_code=0 actions=output:2
,→
,→
,→
,→
cookie=0x0, duration=9.417s, table=0, n_packets=10, n_bytes=980,
idle_timeout=60, idle_age=0,
priority=65535,icmp,in_port=2,vlan_tci=0x0000,dl_src=02:00:00:00:02:00,
dl_dst=02:00:00:00:00:00,nw_src=10.0.0.3,nw_dst=10.0.0.1,nw_tos=0,
icmp_type=8,icmp_code=0 actions=output:1
,→
,→
,→
,→
*** ap3 -----------------------------------------------
NXST_FLOW reply (xid=0x4):
cookie=0x0, duration=10.421s, table=0, n_packets=11, n_bytes=1078,
idle_timeout=60, idle_age=0,
priority=65535,icmp,in_port=1,vlan_tci=0x0000,dl_src=02:00:00:00:00:00,
dl_dst=02:00:00:00:02:00,nw_src=10.0.0.1,nw_dst=10.0.0.3,nw_tos=0,
icmp_type=0,icmp_code=0 actions=output:2
,→
,→
,→
,→
cookie=0x0, duration=9.427s, table=0, n_packets=10, n_bytes=980,
idle_timeout=60, idl_age=0,
priority=65535,icmp,in_port=2,vlan_tci=0x0000,dl_src=02:00:00:00:02:00,
dl_dst=02:00:00:00:00:00,nw_src=10.0.0.3,nw_dst=10.0.0.1,nw_tos=0,
icmp_type=8,icmp_code=0 actions=output:1
,→
,→
,→
,→
mininet-wifi>
We have shown how the Mininet reference controller works in Mininet-WiFi. The Mininet

4.5 Mininet-WiFi Tutorial #3: Python API and scripts 39
reference controller does not have the ability to detect when a station moves from one access point to
another. When this happens, we must delete the existing flows so that new flows can be created. We
will need to us a more advanced remote controller, such as OpenDaylight, to enable station mobility
but that is a topic outside the scope of this post.
4.4.3 Stop the tutorial
Stop the Mininet
ping
command by pressing
Ctrl-C
. In the Wireshark window, stop capturing and
quit Wireshark. Stop Mininet-Wifi and clean up the system with the following commands:
mininet-wifi> exit
wifi:~$ sudo mn -c
4.5 Mininet-WiFi Tutorial #3: Python API and scripts
Mininet provides a Python API so users can create simple Python scripts that will set up custom
topologies. Mininet-WiFi extends this API to support a wireless environment.
When you use the normal Mininet
mn
command with the
–wifi
option to create Mininet-WiFi
topologies, you do not have access to most of the extended functionality provided in Mininet-WiFi.
To access features that allow you to emulate the behavior of nodes in a wireless LAN, you need to
use the Mininet-Wifi extensions to the Mininet Python API.
4.5.1 The Mininet-WiFi Python API
The Mininet-WiFi developers added new classes to Mininet to support emulation of nodes in a
wireless environment. Mininet-WiFi adds
addStation
and
addAccessPoint
methods, and a
modified addLink method to define the wireless environment.
If you are just beginning to write scripts for Mininet-WiFi, you can use the example scripts as a
starting point. The Mininet-WiFi developers created example scripts that show how to use most of
the features in Mininet-WiFi. In all of the tutorials I show below, I started with an example script
and modified it.
Mininet-Wifi example scripts are in the /mininet-wifi/examples directory.
4.5.2 Basic station and access point methods
In a simple scenario, you may add a station and an access point with the following methods in a
Mininet-WiFi Python script:
Add a new station named sta1, with all parameters set to default values:
net.addStation('sta1')
Add a new access point named
ap1
, with SSID
ap1-ssid
, and all other parameters set to default
values:
net.addAccessPoint('ap1',ssid='new_ssid')
Add a wireless association between station and access point, with default values for link attributes:
net.addLink(ap1, sta1 )

40 Chapter 4. Tutorial
For more complex scenarios, more parameters are available for each method. You may specify the
MAC address, IP address, location in three dimensional space, radio range, and more. For example,
the following code defines an access point and a station, and creates an association (a wireless
connection) between the two nodes and applies some traffic control parameters to the connection to
make it more like a realistic radio environment, adding badwidth restrictions, an error rate, and a
propagation delay:
Add a station and specify the wireless encryption method, the station MAC address, IP address, and
position in virtual space:
net.addStation('sta1',passwd='123456789a',encrypt='wpa2',
mac='00:00:00:00:00:02',ip='10.0.0.2/8',position='50,30,0'),→
Add an access point and specify the wireless encryption method, SSID, wireless mode, channel,
position, and radio range:
net.addAccessPoint('ap1',passwd='123456789a',encrypt='wpa2',ssid=
'ap1-ssid',mode='g',channel='1',position='30,30,0',range=30 ),→
To activate association control in a static network, you may use the *associationControl* method,
which makes Mininet-WiFi automatically choose which access point a station will connect to based
on the range between stations and access points. For example, use the following method to use the
*strongest signal first* when determining connections between station and access points:
net.associationControl('ssf')
4.5.3 Classic Mininet API
The Mininet WiFi Python API still supports the standard Mininet node types – switches, hosts, and
controllers. For example:
Add a host. Note that the station discussed above is a type of host nodem with a wireless interface
instead of an Ehternet interface.
net.addHost('h1')
Add a switch. Note that the access point discussed above is a type of switch that has one wireless
interface (*wlan0*) and any number of Ethernet interfaces (up to the maximum supported by your
installed version of Open vSwitch).
net.addSwitch('s1')
Add an Ethernet link between two nodes. Note that if you use *addLink* to connect two access
points together (and are using the default Infrastructure mode), Mininet-WiFi creates an Ethernet
link between them.
net.addLink(s1, h1 )
Add a controller:
net.addController('c0')
Using the Python API, you may build a topology that includes hosts, switches, stations, access points,
and multiple controllers.

4.5 Mininet-WiFi Tutorial #3: Python API and scripts 41
4.5.4 Example
In the example below, I created a Python program that will set up two stations connected to two
access points, and set node positions and radio range so that we can see how these properties affect
the emulated network.
1# ! / u s r / b i n / p y t h o n
2
3from m i n i n e t . node i m p o r t Controller
4from mininet . log i m p o r t s e t L o g L e v e l
5from m i n i n e t . w i f i . n e t i m p o r t Mininet_wifi
6from m i n i n e t . w i f i . node i m p o r t OVSKernelAP
7from m i n i n e t . w i f i . c l i i m p o r t CLI_wifi
8
9
10 def t o p o l o g y ( ) :
11
12 n e t = M i n i n e t _ w i f i ( c o n t r o l l e r = C o n t r o l l e r , a c c e s s P o i n t =OVSKernelAP )
13
14 print "*** C r e a t i n g no de s "
15 ap1 = n e t . a d d A c c e s s P o i n t ( ' ap1 ' , s s i d = ' s s i d −ap1 ' , mode= ' g ' , c h a n n e l = ' 1 ' ,
position= ' 1 0 , 3 0 , 0 ' ,range=' 20 ' )
16 ap2 = n e t . a d d A c c e s s P o i n t ( ' ap2 ' , s s i d = ' s s i d −ap2 ' , mode= ' g ' , c h a n n e l = ' 6 ' ,
position= ' 5 0 , 3 0 , 0 ' ,range=' 20 ' )
17 s t a 1 = n e t . a d d S t a t i o n ( ' s t a 1 ' , mac= ' 00:00:00:00:00:01 ' , i p = ' 10.0.0.1/8 ' ,
position= ' 1 0 , 2 0 , 0 ' )
18 s t a 2 = n e t . a d d S t a t i o n ( ' s t a 2 ' , mac= ' 00:00:00:00:00:02 ' , i p = ' 10.0.0.2/8 ' ,
position= ' 5 0 , 2 0 , 0 ' )
19 c1 = n e t . a d d C o n t r o l l e r ( ' c 1 ' , c o n t r o l l e r = C o n t r o l l e r )
20
21 print "*** C o n f i g u r i n g w i f i nod es "
22 net . configureWifiNodes ()
23
24 " " " p l o t g r ap h " " "
25 n e t . p l o t G r a p h ( max_x = 60 , max_y = 60)
26
27 # Comment o u t t h e f o l l o w i n g two l i n e s t o d i s a b l e AP
28 print "*** E n a b l i n g a s s o c i a t i o n c o n t r o l ( AP ) "
29 net . associationControl ( ' s s f ' )
30
31 print "*** C r e a t i n g l i n k s and a s s o c i a t i o n s "
32 n e t . a ddL ink ( ap1 , ap2 )
33 n e t . a dd Li nk ( ap1 , s t a 1 )
34 n e t . a dd Li nk ( ap2 , s t a 2 )
35
36 print "*** S t a r t i n g n e t w o r k "
37 n e t . b u i l d ( )
38 c1 . s t a r t ( )
39 ap1 . s t a r t ( [ c1 ] )
40 ap2 . s t a r t ( [ c1 ] )
41
42 print "*** Running CLI "
43 C L I _ w i f i ( n e t )
44
45 print "*** S t o p p i n g n e t wo rk "
46 n e t . s t o p ( )
47

42 Chapter 4. Tutorial
Figure 4.7: The position-test.py script running
48 i f __name__ == ' __main__ ' :
49 s e t L o g L e v e l ( ' i n f o ' )
50 t o p o l o g y ( )
codes/position–test.py
I saved the file with the name position-test.py and made it executable.
4.5.5 Working at runtime
Mininet-WiFi python scripts may be run from the command line by running the script directly, or by
calling it as part of a Python command. The only difference is how the path is stated. For example:
wifi:~/scripts $ sudo ./position-test.py
or,
wifi:~$ sudo python position-test.py
The
position-test.py
script will set open the Mininet-WiFi graph window and show the
locations of each wireless node in space (figure 4.7, and the range attribute of each node.
While the scenario is running, we can query information about the network from either the
Mininet-WiFi command line or from the Python interpreter and we can log into running nodes to
gather information or make configuration changes.
4.5.6 Mininet-WiFi CLI
The Python script
position-test.py
places nodes in specific positions. When the scenario is
running, we can use the Mininet-WiFi command line interface (CLI) commands to can check the
geometric relationship between nodes in space, and information about each node.

4.5 Mininet-WiFi Tutorial #3: Python API and scripts 43
4.5.7 Position
The
position
CLI command outputs the location of a node in virtual space as measured by three
values, one for each of the vertices X, Y, and Z.
Suppose we want to know the position of the access point
ap1
in the network scenario’s virtual
space. We may use the position CLI command to view a node’s position:
mininet-wifi> py ap1.params['position']
We may also check the position of the station sta2:
mininet-wifi> py sta.params['position']
4.5.8 Distance
The
distance
CLI command tells us the distance between two nodes. For example, we may check
how far apart access point
ap1
and station
sta2
are from each other using the
distance
CLI
command:
mininet-wifi> distance ap1 sta2
The distance between ap1 and sta2 is 41.23 meters
4.5.9 Mininet-WiFi Python runtime interpreter
In addition to the CLI, Mininet-WiFi supports running Python code directly at the command line
using the
py
command. Simple, Python functions may be called to get additional information about
the network, or to make simple changes while the scenario is running.
4.5.10 Getting network information
The examples I show below are useful for gathering information about stations and access points.
To see the range of an access point or station, call the
range
function. Call it using the name of
the node followed by the function as shown below for access point ap1:
mininet-wifi> py ap1.params['range']
20
To see which station is associated with an access point (in this example
ap1
) call the
associatedStations
function:
mininet-wifi> py ap1.params['associatedStations']
[<Host sta1: sta1-wlan0:10.0.0.1 pid=3845> ]
To see which access point is associated with a station (in this example
sta1
) call the
associatedTo
key:
mininet-wifi>py sta1.params['associatedTo']
[<OVSSwitch ap1: lo:127.0.0.1,ap1-eth1:None pid=3862>]

44 Chapter 4. Tutorial
You may also query the received signal strength indicator (
rssi
), transmitted power (
txpower
),
service set indicator (
ssid
),
channel
, and
frequency
of each wireless node using the Python
interpreter.
As we can see, the output of Python functions is formatted as strings and numbers that may sometimes
be hard to read. This is because these functions are built to support the program, not to be read by
humans. However, if you which functions are available to be called at the Mininet-WiFi command
line you will be able to get information you cannot get through the standard Mininet-WiFi CLI.
4.5.11 Changing the network during runtime
Mininet-WiFi provides Python functions that can be used during runtime to make changes to node
positions and associations. These functions are useful when we have a static setup and want to make
arbitrary changes on demand. This makes it possible to do testing or demonstrations with carefully
controlled scenarios.
To change the access point to which a station is associated (provided the access point is within
range):
mininet-wifi> py sta1.moveAssociationTo('sta1-wlan0', ap1)
To move a station or access point in space to another coordinate position:
mininet-wifi> py sta1.setPosition('40,20,40')
To change the range of a station or access point:
mininet-wifi> py sta1.setRange(100)
The commands above will all impact which access points and which stations associate with each
other. The behavior of the network will be different depending on whether association control is
enabled or disabled in the position-test.py script.
4.5.12 Running commands in nodes
When running a scenario, users may make configuration changes on nodes to implement some addi-
tional functionality. This can be done from the Mininet-WiFi command line by sending commands
to the node’s command shell. Start the command with the name of the node followed by a space,
then enter the command to run on that node.
For example, to see information about the WLAN interface on a station named
sta1
, run the
command:
mininet-wifi> sta1 iw dev sta1-wlan0 link
Another way to run commands on nodes is to open an
xterm
window on that node and enter
commands in the xterm window. For example, to open an xterm window on station *sta1*, run the
command:
mininet-wifi> xterm sta1

4.6 Mininet-WiFi Tutorial #4: Mobility 45
Running commands on nodes is standard Mininet feature but it is also an advanced topic. See
the
Mininet documentation20
for more details. You can run simple commands such as
ping
or
iwconfig
but more advance commands may require you to mount
private directories21
for
configuration or log files.
4.5.13 Mininet-WiFi and shell commands
Mininet-WiFi manages the affect of range using code that calculates the ability of each node to
connect with other nodes. However, Mininet-WiFi does not change the way networking works at the
operating system level. So
iw
commands executed on nodes will override Mininet-WiFi and do not
gather information generated by Mininet-WiFi about the network.
I suggest you do not rely on
iw
commands. For example, the
iw scan
command will still show
that
sta1
can detect the SSIDs of all access points, even the access point
ap2
which should be out of
range. The iw link command will show the same signal strength regardless of how far the station
is from the access point, while the Mininet-WiFi *info* command will show the calculated signal
strength based on the propagation model and distance between nodes.
For example, the
iw
command run on
sta1
shows received signal strength is -30 dBm. This
never changes no matter how far the station is from the access point.
mininet-wifi> sta1 iw dev sta1-wlan0 link
Connected to 02:00:00:00:00:00 (on sta1-wlan0)
SSID: ssid-ap1
freq: 2412
RX: 164628 bytes (2993 packets)
TX: 775 bytes (10 packets)
signal: -30 dBm
tx bitrate: 6.0 MBit/s
bss flags: short-slot-time
dtim period: 2
beacon int: 100
The
info
command shows Mininet-WiFi’s calculated signal strength received by the station is
-43.11 dBm. This value will change if you reposition the station.
4.5.14 Stop the tutorial
Stop Mininet-Wifi and clean up the system with the following commands:
mininet-wifi> exit
wifi:~$ sudo mn -c
4.6 Mininet-WiFi Tutorial #4: Mobility
The more interesting features provided by Mininet-WiFi support mobile stations moving around
in virtual space. Mininet-Wifi provides new methods in its Python API, such as
startMobility
20https://github.com/mininet/mininet/wiki/Documentation
21https://github.com/mininet/mininet/wiki/Introduction-to-Mininet#important-shared-filesystem

46 Chapter 4. Tutorial
and
Mobility
, with which we may specify a wide variety of wireless LAN scenarios by controlling
station movement, access point range, radio propagation models, and more.
In this tutorial, we will create a scenario where one station moves about in space, and where it
changes which access point it connects to, based on which access point is the closest.
4.6.1 Python API and mobility
The Mininet-WiFi Python API adds new methods that allow the user to create stations that move
around in virtual space when an emulation scenario is running.
To move a station in a straight line, use the
net.startMobility
and
net.mobility
methods.
See the example script
wifiMobilty.py
. For example, to move a station from one position to
another over a period of 60 seconds, add the following lines to your script:
net.startMobility(time=0 )
net.mobility(sta1, 'start',time=1, position='10,20,0')
net.mobility(sta1, 'stop',time=59, position='30,50,0')
net.stopMobility(time=60 )
Mininet-WiFi can also automatically move stations around based on predefined mobility mod-
els. See the example script
mobilityModel.py
. Available mobility models are:
RandomWalk
,
TruncatedLevyWalk
,
RandomDirection
,
RandomWayPoint
,
GaussMarkov
,
ReferencePoint
,
and
TimeVariantCommunity
. For example, to move a station around in an area 60 meters by 60
meters with a minimum velocity of 0.1 meters per second and a maximum velocity of 0.2 meters per
second, add the following line to your script:
net.startMobility(time=0, model='RandomDirection',max_x=60, max_y=60,
min_v=0.1, max_v=0.2),→
Mininet-WiFi will automatically connect and disconnect stations to and from access points based
on either calculated signal strength or load level. See the example script
associationControl.py
.
To use association control, add the
AC
parameter to the
net.startMobility
call. For example, to
switch access points based on the “least loaded first” criteria, add the following line to your script:
net.startMobility(time=0, model='RandomWayPoint',max_x=140, max_y=140,
min_v=0.7, max_v=0.9, AC='llf'),→
The valid values for the AC parameter are:
• llf (Least-Loaded-First)
• ssf (Strongest-Signal-First)
When creating a scenario where stations will be mobile, we may set the range of the access
points. In an example where we use “strongest signal first” as the Association Control method, the
range of each access point will determine where handoffs occur between access points and which
stations may connect to which access points. If you do not define the range, Mininet-WiFi assigns a
default value.
Mininet-WiFi supports more methods than mentioned above. See the example scripts (mentioned
further below) for examples of using other methods.

4.6 Mininet-WiFi Tutorial #4: Mobility 47
4.6.2 Moving a station in virtual space
A simple way to demonstrate how Mininet-WiFi implements scenarios with mobile stations that
hand off between access points is to create a script that moves one station across a path that passes
by three access points.
The example below will create three access points –
ap1
,
ap2
, and
ap3
– arranged in a line at
differing distances from each other. It also creates a host
h1
to serve as a test server and a mobile
station sta1 and moves sta1 across space past all three access points.
1# ! / u s r / b i n / p y t h o n
2
3from m i n i n e t . node i m p o r t Controller
4from mininet . log i m p o r t s e t L o g L e v e l
5from m i n i n e t . w i f i . n e t i m p o r t Mininet_wifi
6from m i n i n e t . w i f i . node i m p o r t OVSKernelAP
7from m i n i n e t . w i f i . c l i i m p o r t CLI_wifi
8
9
10 def t o p o l o g y ( ) :
11
12 n e t = M i n i n e t _ w i f i ( c o n t r o l l e r = C o n t r o l l e r , a c c e s s P o i n t =OVSKernelAP )
13
14 print "*** C r e a t i n g n o de s "
15 h1 = n e t . ad dHo st ( ' h1 ' , mac= ' 00:00:00:00:00:01 ' , i p = ' 10.0.0.1/8 ' )
16 s t a 1 = n e t . a d d S t a t i o n ( ' s t a 1 ' , mac= ' 00:00:00:00:00:02 ' , i p = ' 10.0.0.2/8 ' ,
range=' 20 ' )
17 ap1 = n e t . a d d A c c e s s P o i n t ( ' ap1 ' , s s i d = ' ap1−s s i d ' , mode= ' g ' , channel= ' 1 ' ,
position= ' 3 0 , 5 0 , 0 ' ,range=' 30 ' )
18 ap2 = n e t . a d d A c c e s s P o i n t ( ' ap2 ' , s s i d = ' ap2−s s i d ' , mode= ' g ' , channel= ' 1 ' ,
position= ' 9 0 , 5 0 , 0 ' ,range=' 30 ' )
19 ap3 = n e t . a d d A c c e s s P o i n t ( ' ap3 ' , s s i d = ' ap3−s s i d ' , mode= ' g ' , channel= ' 1 ' ,
position= ' 1 3 0 , 5 0 , 0 ' ,range=' 30 ' )
20 c1 = n e t . a d d C o n t r o l l e r ( ' c 1 ' , c o n t r o l l e r = C o n t r o l l e r )
21
22 print "*** C o n f i g u r i n g w i f i n od es "
23 net . configureWifiNodes ()
24
25 print "*** A s s o c i a t i n g and C r e a t i n g l i n k s "
26 n e t . a ddL ink ( ap1 , h1 )
27 n e t . a ddL ink ( ap1 , ap2 )
28 n e t . a ddL ink ( ap2 , ap3 )
29
30 n e t . p l o t G r a p h ( max_x = 16 0 , max_y = 16 0)
31
32 n e t . s t a r t M o b i l i t y ( t i m e = 0 , AC= ' s s f ' )
33 n e t . m o b i l i t y ( s ta 1 , ' start ' , t i m e =20 , p o s i t i o n = ' 1 , 5 0 , 0 ' )
34 n e t . m o b i l i t y ( s ta 1 , ' s t o p ' , t i m e =79 , p o s i t i o n = ' 1 5 9 , 5 0 , 0 ' )
35 n e t . s t o p M o b i l i t y ( t im e = 8 0)
36
37 print "*** S t a r t i n g n e t w o r k "
38 n e t . b u i l d ( )
39 c1 . s t a r t ( )
40 ap1 . s t a r t ( [ c1 ] )
41 ap2 . s t a r t ( [ c1 ] )
42 ap3 . s t a r t ( [ c1 ] )
43
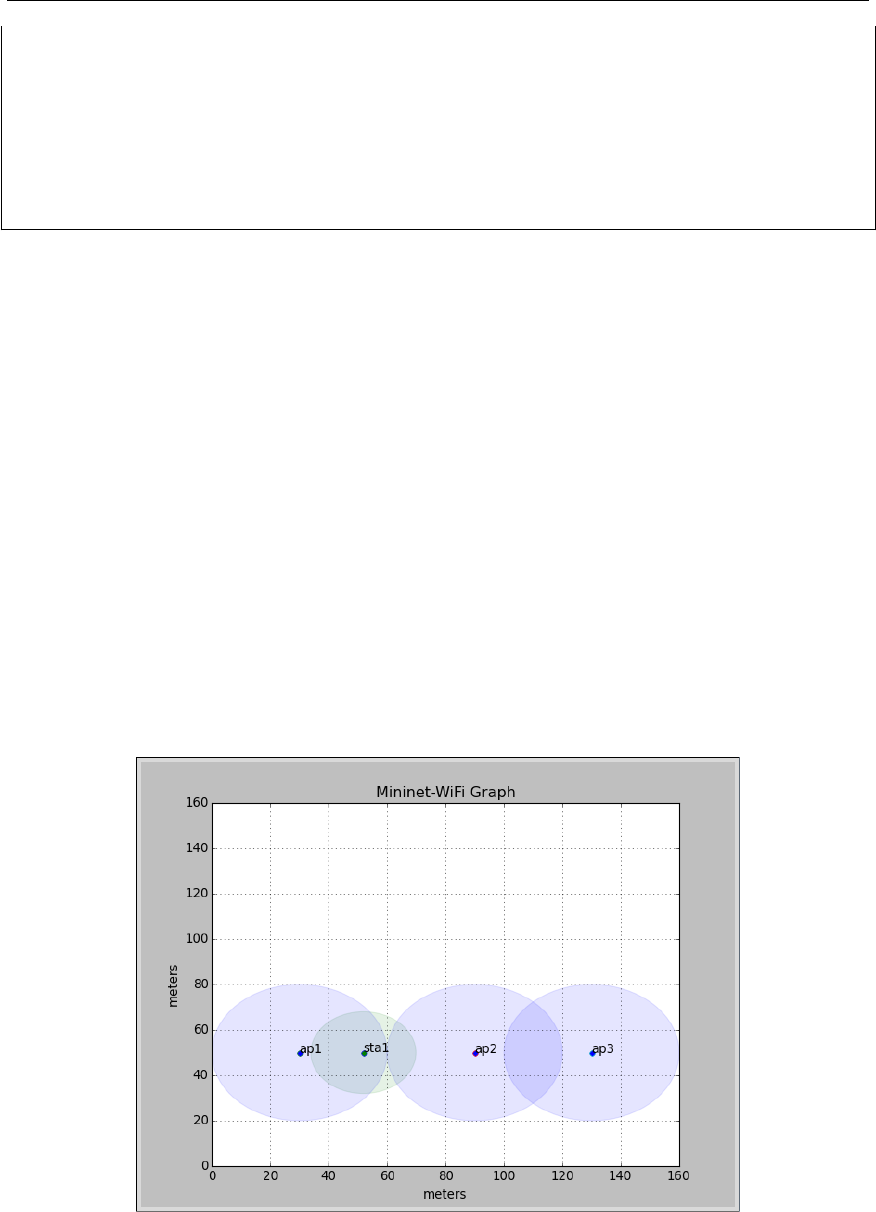
48 Chapter 4. Tutorial
44 print "*** Running CLI "
45 C L I _ w i f i ( n e t )
46
47 print "*** S t o p p i n g n e t wo rk "
48 n e t . s t o p ( )
49
50 i f __name__ == ' __main__ ' :
51 s e t L o g L e v e l ( ' i n f o ' )
52 t o p o l o g y ( )
codes/line.py
Save the script and call in line.py. Make it executable, then run the command:
wifi:~$ sudo ./line.py
The Mininet-Wifi graph will appear (figure 4.8), showing the station and the access points.
The station
sta1
will sit still for 20 seconds, and then start to move across the graph from left to
right for 60 seconds until it gets to the far side of the graph. The host
h1
and the virtual Ethernet
connections between h1,ap1 and between the three access points are not visible.
4.6.3 Re-starting the scenario
This simple scenario has a discreet start and stop time so, if you wish to run it again, you need to
quit Mininet-WiFi, and start the script again.
For example, suppose the scenario is at its end, where the station is now at the far right of the
graph window. To stop and start it again, enter the following commands:
mininet-wifi> exit
wifi:~$ sudo mn -c
wifi:~$ sudo ./line.py
Figure 4.8: The line.py script running

4.7 Mininet-WiFi Tutorial #5: VANETs (Veicular Ad Hoc Networks) 49
4.6.4 More Python functions
When running a scenario with the mobility methods in the Python API, we have access to more
information from Mininet-WiFi’s Python functions. To see all access points that are within range of
a station such as sta1 at any time while the scenario is running, call the apsInRange function:
mininet-wifi> py sta1.params['apsInRange']
[<OVSSwitch ap1: lo:127.0.0.1,ap1-eth1:None pid=3862>]
4.6.5 Test with iperf
To see how the system responds to traffic, run some data between host
h1
and station
sta1
when the
scenario is started.
We have seen in previous examples how to use the
ping
program to create traffic. In this example,
we will use the
iperf
program. First, start the
line.py
script again. Then start an iperf server on
the station
mininet-wifi> sta1 iperf --server
Then open an xterm window on the host h1.
mininet-wifi> xterm h1
From the xterm window, we will start the iperf client command and create a stream of data between
h1 and sta1. On the h1 xterm, run the command:
iperf --client 10.0.0.2 --time 60 --interval 2
Watch the iperf output as the station moves through the graph. When it passes from one access point
to the next, the traffic will stop. To get the traffic running again, clear the flow tables in the access
points. In the Mininet-WiFi CLI, run the command shown below:
mininet-wifi> dpctl del-flows
Traffic should start running again. As stated in Tutorial #2 above, we must clear flows after a hand
off because the Mininet reference controller cannot respond correctly in a mobility scenario. The
topic of configuring a remote controller to support a mobility scenario is outside the scope of this
post. Clear the flows every time the station switches to the next access point.
4.6.6 Stop the tutorial
Stop Mininet-Wifi and clean up the system with the following commands:
mininet-wifi> exit
wifi:~$ sudo mn -c
4.7 Mininet-WiFi Tutorial #5: VANETs (Veicular Ad Hoc Networks)
4.7.1 Python API
The Mininet-WiFi python API add a new node that allow the user to create cars that move around in
virtual space when an emulation scenario is running. The function addCar() defines this new node
and you can see an example in the file vanet.py into /examples.
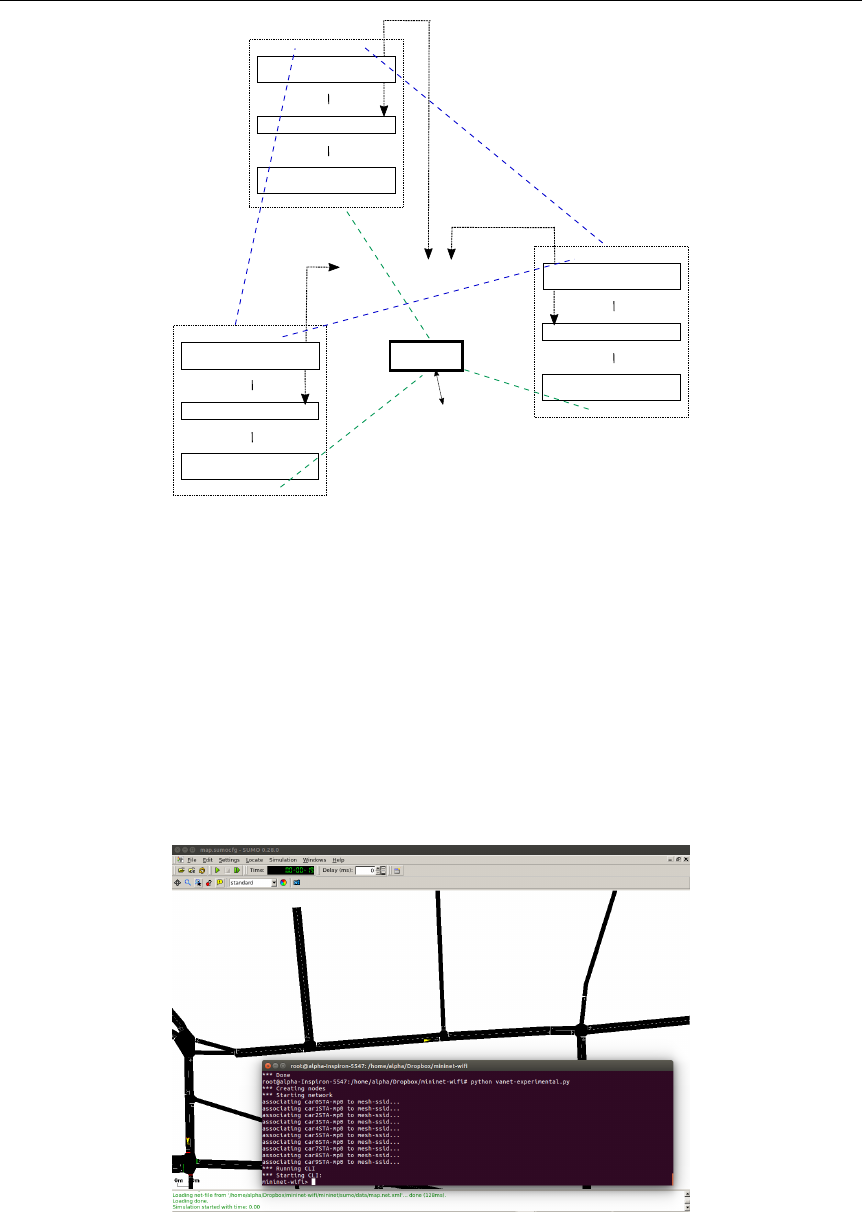
50 Chapter 4. Tutorial
v1STA-mp0
Vehicle1
Vehicle1SW
Vehicle1STA
v1STA-eth0
v1SW-eth1
v1SW-eth2
v1-eth0
v2STA-mp0
Vehicle2
Vehicle2SW
Vehicle2STA
v2STA-eth0
v2SW-eth1
v2SW-eth2
v2-eth0
v3STA-mp0
Vehicle3
Vehicle3SW
Vehicle3STA
v3STA-eth0
v3SW-eth1
v3SW-eth2
v3-eth0
mesh controller
(in-band)
v3-wlan1
v1-wlan1
v2-wlan1
RSU
RSU controller
(out-of-band)
Car1
Car2
Car3
mesh
infra
mesh
mesh
infra
infra
Figure 4.9: Node Car Architecture
4.7.2 Node Car Architecture
The architecture of the node
car
is depicted in Figure 4.9. In order to allow OpenFlow controllers to
control simple nodes, like a car, it was necessary to create an architecture with a switch. Thus, every
packet that comes from VehicleX needs to pass-trough VehicleXSW if the destination is a node in
the wireless mesh network (like a Vehicle-to-Vehicle communication). The communication between
cars and RSUs (Vehicle-to-Infrastructure), in turn, is done directly between VehicleX and the RSU.
Figure 4.10: Integration with SUMO

4.8 Mininet-WiFi example scripts 51
4.7.3 Integration with SUMO (Simulation of Urban Mobility)
Mininet-WiFi already has some integration with SUMO. An example can be found in /examples/sumo-
experimental.py.
4.8 Mininet-WiFi example scripts
The Mininet-WiFi developers created many example scripts that show examples of most of the API ex-
tensions they added to Mininet. They placed these example scripts in the folder
mininet-wifi/examples/
.
Try running these scripts to see what they do and look at the code to understand how each feature is
implemented using the Python API. Some interesting Mininet-WiFi example scripts are:
adhoc
shows how to set up experiments with adhoc mode, where stations connect to each other
without passing through an access point.
simplewifitopology
show the Python code that create
the same topology as the default topology created my the
mn –wifi
command (two stations and
one access point).
position.py
shows how to create a network where stations and access points
are places in specific locations in virtual space.
mobility
and
mobilityModel
show how to move
stations and how mobility models can be incorporated into scripts.
associationControl
shows
how the different values of the AC parameter affect station handoffs to access points.
mesh.py
shows
how to set up a mesh network of stations.
handover.py
shows how to create a simple mobility
scenario where a station moves past two access points, causing the station to hand off from one to the
other.
multipleWlan.py
shows how to create a station with more than one wireless LAN interface.
propagationModel.py
shows how to use propagation models that impact how stations and access
points can communicate with each other over distance.
authentication.py
shows how to set up
WiFi encryption and passwords on access points and stations.
4.9 Conclusion
The tutorials presented above work demonstrate many of the unique functions offered by Mininet-
WiFi. Each tutorial revealed more functionality and we stopped at the point where we were able to
emulate mobility scenario featuring a WiFi station moving in a straight line past several wireless
access points.
RThank you Brian Linkletter for this helpful tutorial.

5. Guided exercises/demo
5.1 Guided exercises/demo
In general, you will learn in this chapter how the Mininet-WiFi wireless network emulator works.
Guided exercises will be explored and pointers to source code for those interested in delving deeper
into the system architecture will be also provided. The pointers include stretches of the code where
the link (including the latency) can be customized.
5.1.1 Activity 1: Warming up
First of all, you have to stop the network-manager:
sudo service network-manager stop
Then, create a simple topology with the command below:
sudo mn --wifi
The command above will start Mininet-WiFi and configure a small network with two stations, and
one access point. Use the option --topo of mn command, and discover further the topology options.
In Mininet-WiFi terminal (mininet-wifi>), execute the command nodes to observe the created
network. Then, execute iwconfig to verify the association between the stations and ap1.
mininet-wifi>sta1 iwconfig
mininet-wifi>sta2 iwconfig
mininet-wifi>sta1 ping sta2
Then, disconnect sta1 and confirm the disconnection:
mininet-wifi>sta1 iw dev sta1-wlan0 disconnect
mininet-wifi>sta1 iwconfig
mininet-wifi>sta1 ping sta2

54 Chapter 5. Guided exercises/demo
Now, connect sta1 again:
mininet-wifi>sta1 iw dev sta1-wlan0 connect my-ssid
mininet-wifi>sta1 iwconfig
mininet-wifi>sta1 ping sta2
5.1.2 Activity 2: Loading Network Topologies
Running an example with the command below:
sudo python examples/position.py
Now, observe the position of sta1, sta2 and ap1:
mininet-wifi>py sta1.params['position']
mininet-wifi>py sta2.params['position']
mininet-wifi>py ap1.params['position']
Observe the signal power as well:
mininet-wifi>py sta1.params['rssi']
mininet-wifi>py sta2.params['rssi']
If you prefer, you can see the distance between two nodes with the following command:
mininet-wifi>distance sta1 ap1
mininet-wifi>distance sta1 sta2
∗Question 2.1: What is the observed bandwidth between sta1 and sta2?
Tip: try iperf sta1 sta2
Now, move sta1 to another position:
mininet-wifi>py sta1.setPosition('70,40,0')
∗Question 2.2: What happened with the association between sta1 and ap1?
Tip: try sta1 iwconfig
Finally, increase the signal range of ap1:
mininet-wifi>py ap1.setRange(60)
∗Question 2.3: What happened with the association between sta1 and ap1 now?
∗Question 2.4: Now, observe the bandwidth between sta1 and sta2 again. What can we
conclude?

5.2 Further hands-on 55
5.1.3 Activity 3: Customizing the Wireless Channel
Mininet-WiFi relies on the configuration of Linux TC (by default) to control the wireless chan-
nel properties, such as bandwidth,packet loss,delay and latency. Please see the equations in
mininet/wifiLink.py (refer to equationBW, equationLoss, equationDelay and equationLatency. Those
equations can be customized by calling setChannelEquation(), for example:
net.setChannelEquation(bw='value.rate * (1.1 ** -dist)',loss='(dist *
2)/100',delay='(dist / 10) + 1',latency='2 + dist'),→
Alternatively, a new approach called wmediumd has been implemented, a wireless medium
simulation tool for Linux, based on the netlink API implemented in the mac80211_hwsim kernel
driver. A couple of sample files that use wmediumd are available at /examples.
∗Question 3.1: Run position.py again and try sta1 tc qdisc before and after moving sta1 to the
new position. What do you can conclude about the configuration applied by tc?
5.2 Further hands-on
(Further hands-on exercises proposed to be carried by the attendees on their own and at their pace. A
number practical exercises will be proposed where mobility and/or distance (or poor signal) among
mobile nodes may impact latency and bandwidth, consequently the communication between two
nodes.)
5.2.1 Activity 4: Mobility
Open examples/mobilityModel.py with any text editor and change the velocity of stations as below:
from: net.startMobility(time=0, model='RandomDirection',max_x=100,
max_y=100, min_v=0.5, max_v=0.8),→
to: net.startMobility(time=0, model='RandomDirection',max_x=100,
max_y=100, min_v=0.1, max_v=0.1),→
Run examples/mobilityModel.py and change the signal range of ap1:
python examples/mobilityModel.py
mininet-wifi>py ap1.setRange(60)
Then, ping sta1 and sta2:
mininet-wifi>sta1 ping sta2
∗Question 4.1: What can you conclude about the latency?
Tip: you can issue sta1 tc qdisc, repeatedly, to see the values applied by tc.
5.2.2 Activity 5: Received Signal Strength
Open examples/position.py with any text editor and add sta3 at position=’10,10,10’ and set max_z=100
in order to plot a 3d graph. Then, run examples/position.py.

56 Chapter 5. Guided exercises/demo
∗Question 5.1: What is the received signal strength indicator (RSSI) observed from sta3?
∗Question 5.2: What is the average ping response time between sta2 and sta1? And sta3
and sta1? Note: define the number of packets to 10 (ping -c10).
5.3 OpenFlow
You will learn with this activity some basic concepts of the OpenFlow protocol, such as idle/hard
timeout and identify the impact of the mobility in the communication.
5.3.1 Activity 6: Mobility and OpenFlow
First of all you have to get the code from
https://github.com/ramonfontes/reproducible-research/
blob/master/mininet-wifi/ACROSS-Sweden-2017/handover.py
and then run it with the com-
mand below (the content of handover.py is also available in Code 9.1):
sudo python handover.py
Now, keep h1 pinging to sta1
mininet-wifi>h1 ping sta1
∗Question 6.1: As you can see, h1 cannot reach sta1 when sta1 goes to ap2. Why? Two
important commands should help you to answer this question:
mininet-wifi>links
mininet-wifi>sh ovs-ofctl dump-flows s3
Tip: Observe both idle_timeout and idle_age.
∗Question 6.2: Now you know the answer to Question 6.1, how could sta1 be reached by h1?

6. Reproducible Research
The code and instructions used in this section can be found at
https://github.com/ramonfontes/
reproducible-research
6.1 SwitchOn 2015
Extended abstract - Towards an Emulator for Software Defined Wireless Networks
Firstly, you have to get the code at
https://github.com/ramonfontes/reproducible-research/
blob/master/mininet-wifi/SWITCHON-2015, then execute it:
sudo python allWirelessNetworksAroundUs.py
mininet-wifi> xterm sta1 h1
On sta1:
cvlc -vvv v4l2:///dev/video0 --input-slave=alsa://hw:1,0 --mtu 1000
--sout'#transcode{vcodec=mp4v,vb=800,scale=1,acodec=mpga,ab=128,channels=1}:
duplicate{dst=display,dst=rtp{sdp=rtsp://10.0.0.10:8080/helmet.sdp}'
,→
,→
On h1:
cvlc rtsp://10.0.0.10:8080/helmet.sdp
6.2 SBRC 2016
DEMO - Mininet-WiFi: Emulação de Redes Sem Fio Definidas por Software com suporte a Mobili-
dade
Codes necessary to reproduce this paper are available at
https://github.com/ramonfontes/
reproducible-research/tree/master/mininet-wifi/SBRC-2016
and
https://github.com/
ramonfontes/reproducible-research/blob/master/mininet-wifi/SBRC-2016/wifiStationsAndHosts.
py.

58 Chapter 6. Reproducible Research
6.2.1 Case 1 - Simple test
sudo mn --wifi
mininet-wifi>sta1 ping sta2
mininet-wifi>sta1 iwconfig
mininet-wifi>sta2 iwconfig
6.2.2 Case 2 (1/2) - Communication among stations and hosts/Verifying flow table
sudo python examples/wifiStationsAndHosts.py
mininet-wifi>nodes
mininet-wifi>sh ovs-ofctl dump-flows ap1
mininet-wifi>sta1 ping h3
mininet-wifi>sh ovs-ofctl dump-flows ap1
6.2.3 Case 2 (2/2) - Changing the controller (from reference to external controller)
Open the code examples/wifiStationsAndHosts.py and make the following changes:
from: net =Mininet(controller=Controller, link=TCLink,
switch=OVSKernelSwitch ),→
to: net =Mininet(controller=RemoteController, link=TCLink,
switch=OVSKernelSwitch ),→
from: c0 =net.addController('c0',controller=Controller, ip='127.0.0.1')
to: c0 =net.addController('c0',controller=RemoteController, ip='127.0.0.1'
),→
sudo python examples/wifiStationsAndHosts.py
mininet-wifi>sta1 ping h3 #Why there is no communication?
6.2.4 Case 3 - Handover
sudo python examples/handover.py
mininet-wifi>sta1 iwconfig
mininet-wifi>sta1 ping sta2 #here I suggest you wait sta1 reaches ap2
before going to the next step,→
mininet-wifi>sta1 iwconfig
6.2.5 Case 4 - Changes at runtime
sudo python examples/position.py
mininet-wifi>sta1 iwconfig
mininet-wifi>sta1 ping sta2
mininet-wifi>py sta1.setPosition('70,40,0')
mininet-wifi>sta1 iwconfig
mininet-wifi>sta1 ping sta2
mininet-wifi>py ap1.setRange(60)
mininet-wifi>sta1 iwconfig
mininet-wifi>sta1 ping sta2

6.3 SIGCOMM 2016 59
6.2.6 Case 5 - Bridging physical and virtual emulated environments
sudo systemctl stop network-manager
Edit sbrc.py:
from: phyap1 =net.addPhysicalBaseStation('phyap1',ssid=
'SBRC16-MininetWiFi',mode='g',channel='1',position='50,115,0',
wlan='wlan11')
,→
,→
to: wlan11 to your usb wlan interface.
Then,
sudo python sbrc.py
At this moment users attending the conference will be invited to connect their mobile devices
into the physical/emulated environment.
6.3 SIGCOMM 2016
Demo: Mininet-WiFi: A Platform for Hybrid Physical-Virtual Software-Defined Wireless Networking
Research
Requirements to reproduce:
• WiFi interface + (other WiFi or ethernet interface)
• Floodlight OpenFlow controller
•
ofsoftswitch13 (you may install it with util/install.sh -3f ) - https://github.com/CPqD/ofsoftswitch13
• Speedtest-cli
•
Codes are available at
https://github.com/ramonfontes/reproducible-research/
tree/master/mininet-wifi/SIGCOMM-2016
Important (changes in code - You have to set both Internet and wlan interfaces):
internetIface ='eth0'# wired/wireless card.
usbDongleIface ='wlan0'# wifi interface.
Next, executing the Floodlight OpenFlow controller:
sudo java -jar target/floodlight.jar
Then,
sudo py hybridVirtualPhysical.py
mininet-wifi> sh ./rule.hybridVirtualPhysical
Despite the content of rule.hybridVirtualPhysical is included in hybridVirtualPhysical.py, we
have faced some troubles in floodlight controller. Thus, probably you have to execute rule.hybridVirtualPhysical
after executing hybridVirtualPhysical.py.
Now, stations should be able to communicate with each other and with the Internet. You may
use any station connected to any Access Point and try it out:
mininet-wifi>xterm $station
$station>speedtest-cli

60 Chapter 6. Reproducible Research
Using speedtest-cli you can test both Download and Upload speed of your Internet connection. The
available bandwidth is controlled by OpenFlow meter entries.
There is a web server accessible at 10.0.0.111 and according rules applied in rule.hybridVirtualPhysical,
if you access 10.0.0.109 the traffic will be redirect to 10.0.0.111.
Useful commands:
sta1 iw dev sta1-wlan0 mpath dump #verify mesh routing information
sh dpctl unix:/tmp/ap3 stats-flow
sh dpctl unix:/tmp/ap3 stats-meter
sh dpctl unix:/tmp/ap3 meter-config
6.4 From Theory to Experimental Evaluation: Resource Management in Software-
Defined Vehicular Networks 2017
Firstly, you have to get vanet.py at
https://github.com/ramonfontes/reproducible-research/
blob/master/mininet-wifi/IEEE-Access-2017/vanet.py
sudo python vanet.py
Please consider to watch: https://www.youtube.com/watch?v=kO3O9EwrP_s
6.5 The Computer Journal - How far can we go? Towards Realistic Software-
Defined Wireless Networking Experiments 2017
Codes necessary to reproduce this paper are available at
https://github.com/ramonfontes/
reproducible-research/tree/master/mininet-wifi/The-Computer-Journal-2017
6.5.1 Wireless n-Casting
Requirements:
Floodlight controller.
In order to reproduce this case, please follow the instructions below:
First, run the controller:
sudo java -jar target/floodlight.jar
start the topology:
sudo python ncasting.py
and finally install the rules:
sudo python ncasting-controller.py

6.5 The Computer Journal - How far can we go? Towards Realistic
Software-Defined Wireless Networking Experiments 2017 61
6.5.2 Multipath TCP
Requirements:
You have to install mptcp and ifstat to reproduce this use case.
In order to allow the communication we use pox controller with spanning tree enabled. This
command can be used to enable spanning tree:
./pox.py forwarding.l2_learning openflow.spanning_tree --hold-down log.level
--DEBUG samples.pretty_log openflow.discovery host_tracker
info.packet_dump
,→
,→
Then, start the environment in a new terminal and run some commands with xterm:
sudo python mptcp.py
mininet-wifi>xterm sta1 sta1 h10 h10
Node: h10 (terminal1)$ifstat
Node: sta1 (terminal1)$ifstat
Node: h10 (terminal2)$iperf -s
Node: sta1 (terminal2)$iperf -c 192.168.1.254
6.5.3 Hybrid Physical-Virtual Environment
See Section 6.3.
6.5.4 SSID-based Flow Abstraction
Requirements:
ofsoftswitch13
In order reproduce this case you have to run the following code:
sudo python forwardingBySSID.py
Then, you may run any application (e.g., Iperf) to test the available bandwidth for any SSID.
Alternatively, you might run dpctl to verify meter table configuration.
mininet-wifi> sh dpctl unix:/tmp/ap1 meter-config
6.5.5 EXPERIMENTAL VALIDATION: Propagation Model
Consider to use the file propagationModelCase.py if you want to reproduce the results.
6.5.6 EXPERIMENTAL VALIDATION: Simple File Transfer
Consider to use the files fileTransferring.py and fileTransferring.cc if you want to reproduce the
results.
6.5.7 EXPERIMENTAL VALIDATION: Replaying Network Conditions
Consider to use files into the directory replayingNetwork/ if you want to reproduce the results.

62 Chapter 6. Reproducible Research
6.5.8 On the Krack Attack: Reproducing Vulnerability and a Software-Defined Mitigation
Approach WCNC 2018
Please refer to https://github.com/ramonfontes/reproducible-research/tree/master/mininet-wifi/WCNC-
2018

7. Publications
7.1 SDN For Wireless 2015
Exhibit
Fontes, R. R., Afzal, S., Brito, S. H. B., Santos, M., Rothenberg, C. E. “Towards an Emulator
for Software Defined Wireless Networks“. In EAI International Conference on Software Defined
Wireless Networks and Cognitive Technologies for IoT. Rome, Italy, Oct 2015.
7.2 CNSM 2015 - Best Paper Award!
This paper explains the basic Mininet-WiFi design and useful Case Studies.
Fontes, R. R., Afzal, S., Brito, S. H. B., Santos, M., Rothenberg, C. E. “Mininet-WiFi: Emulating
Software-Defined Wireless Networks“. In 2nd International Workshop on Management of SDN and
NFV Systems 2015. Barcelona, Spain, Nov 2015.
7.3 SwitchOn 2015
This paper presents a demo use case in a mobile video streaming scenario to showcase the ability
of Mininet-WiFi to emulate the wireless channel in terms of bandwidth, packet loss, and delay
variations as a function of the distance between the communicating parties.
Fontes, R. R., Rothenberg, C. E. Towards an Emulator for Software-Defined Wireless Networks. In:
SwitchOn 2015, São Paulo – SP – Brazil.
7.4 SBRC 2016
DEMO
Ramon dos Reis Fontes and Christian Esteve Rothenberg. Mininet-WiFi: Emulação de Redes
Sem Fio Definidas por Software com suporte a Mobilidade. In Simpósio Brasileiro de Redes de
Computadores e Sistemas Distribuídos (SBRC 2016) - Salão de Ferramentas, 2016, Salvador - BA -
Brazil.

64 Chapter 7. Publications
7.5 SIGCOMM 2016
DEMO
Ramon dos Reis Fontes and Christian Esteve Rothenberg. Mininet-WiFi: A Platform for Hy-
brid Physical-Virtual Software-Defined Wireless Networking Research (SIGCOMM 2016) - 2016,
Florianopolis - ES - Brazil.
7.6 Institute of Electrical and Electronics Engineers - IEEE 2017
In this paper, we enumerate the potentials of software-defined vehicular networks, analyse the need
of rethinking the traditional SDN approach from theoretical and practical standpoints when applied
in this application context, and present an emulation approach based on the proposed node car
architecture in Mininet- WiFi to showcase the applicability and some expected benefits of SDN in a
selected use case scenario.
Ramon dos Reis Fontes and Claudia Campolo and Christian E. Rothenberg and Antonella Molinaro.
From Theory to Experimental Evaluation: Resource Management in Software-Defined Vehicular
Networks (IEEE Access 2017), DOI: 10.1109/access.2017.2671030.
7.7 The Computer Journal 2017
Ramon dos Reis Fontes and Mohamed Mahfoudi and Walid Dabbous and Thierry Turletti and Chris-
tian Rothenberg. How Far Can We Go? Towards Realistic Software-Defined Wireless Networking
Experiments, Oxford University Press (OUP), DOI: 10.1093/comjnl/bxx023.
7.8 WCNC 2018
Ramon dos Reis Fontes and Christian Esteve Rothenberg. On the Krack Attack: Reproducing
Vulnerability and a Software-Defined Mitigation Approach - Poster Session. WCNC 2018.
8. Acknowledgment
•
This project is partially supported by
INRIA - Institut National de Recherche en Informa-
tique et en Automatique
, in Sophia Antipolis, France and
FAPESP - Fundação de Amparo
à Pesquisa do Estado de São Paulo, in Sao Paulo, Brazil.
•
We thank
Dr. Chih-Heng Ke
, from Department of Computer Science and Information
Engineering, National Quemoy University, Kinmen, Taiwan, for all our discussion at the
beginning of this work.
• We thank Brian Linkletter - brianlinkletter.com for the tutorial presented at the chapter 4.
•
We thank
Patrick Große
, member of
http://www.uni-muenster.de/Comsys/en/
for integrating
Mininet-WiFi with wmediumd (section 1.5.2).
•
We thank
all users who participate of our mailing
list for collaborating in the development
of this work.
9. Appendix
9.1 handover.py
1# ! / u s r / b i n / p y t h o n
2
3' E xam ple f o r h a n d o v e r '
4
5from m i n i n e t . node i m p o r t C o n t r o l l e r , OVSKern e l Swit c h
6from mininet . log i m p o r t s e t L o g L e v e l
7from m i n i n e t . w i f i . n e t i m p o r t Mininet_wifi
8from m i n i n e t . w i f i . node i m p o r t OVSKernelAP
9from m i n i n e t . w i f i . c l i i m p o r t CLI_wifi
10
11
12 def t o p o l o g y ( ) :
13
14 " C r e a t e a n e t w o r k . "
15 n e t = M i n i n e t _ w i f i ( c o n t r o l l e r = C o n t r o l l e r , s w i t c h =OVSKernel S witch ,
a c c e s s P o i n t =OVSKernelAP )
16
17 print "*** C r e a t i n g n o de s "
18 s t a 1 = n e t . a d d S t a t i o n ( ' s t a 1 ' , mac= ' 00:00:00:00:00:01 ' , i p = ' 10.0.0.1/8 ')
19 ap1 = n e t . a d d A c c e s s P o i n t ( ' ap1 ' , s s i d = ' new−s s i d 1 ' , mode= ' g ' , c h a n n e l = ' 1 ' ,
position= ' 1 5 , 3 0 , 0 ' )
20 ap2 = n e t . a d d A c c e s s P o i n t ( ' ap2 ' , s s i d = ' new−s s i d 1 ' , mode= ' g ' , c h a n n e l = ' 6 ' ,
position= ' 5 5 , 3 0 , 0 ' )
21 s 3 = n e t . a d d S w i t c h ( ' s3 ' )
22 h1 = n e t . ad dHo st ( ' h1 ' , mac= ' 00:00:00:00:00:02 ' , i p = ' 10.0.0.2/8 ')
23 c1 = n e t . a d d C o n t r o l l e r ( ' c1 ' , c o n t r o l l e r = C o n t r o l l e r , p o r t = 6 65 3)
24
25 print "*** C o n f i g u r i n g WiFi Nodes "
26 net . configureWifiNodes ()
27
28 h1 . p l o t ( p o s i t i o n = ' 3 5 , 9 0 , 0 ' )
29 s3 . p l o t ( p o s i t i o n = ' 3 5 , 8 0 , 0 ' )

68 Chapter 9. Appendix
30
31 print "*** C r e a t i n g l i n k s "
32 n e t . a ddL ink ( ap1 , s 3 )
33 n e t . a ddL ink ( ap2 , s 3 )
34 n e t . a ddL ink ( h1 , s3 )
35
36 " " " p l o t t i n g g ra ph " " "
37 n e t . p l o t G r a p h ( max_x = 10 0 , max_y = 10 0)
38
39 n e t . s t a r t M o b i l i t y ( t i m e = 0)
40 n e t . m o b i l i t y ( s ta 1 , ' start ' , t i m e =1 , p o s i t i o n = ' 1 0 , 3 0 , 0 ' )
41 n e t . m o b i l i t y ( s ta 1 , ' s t o p ' , t i m e =80 , p o s i t i o n = ' 6 0 , 3 0 , 0 ' )
42 n e t . s t o p M o b i l i t y ( t im e = 8 0)
43
44 print "*** S t a r t i n g n e t w o r k "
45 n e t . b u i l d ( )
46 c1 . s t a r t ( )
47 ap1 . s t a r t ( [ c1 ] )
48 ap2 . s t a r t ( [ c1 ] )
49 s3 . s t a r t ( [ c1 ] )
50
51 print "*** Running CLI "
52 C L I _ w i f i ( n e t )
53
54 print "*** S t o p p i n g n e t wo rk "
55 n e t . s t o p ( )
56
57 i f __name__ == ' __main__ ' :
58 s e t L o g L e v e l ( ' i n f o ' )
59 t o p o l o g y ( )
Code 9.1: handover.py
