NRF Connect Bluetooth Low Energy N RFConnect BLE User Guide V2.0
User Manual: Pdf
Open the PDF directly: View PDF ![]() .
.
Page Count: 23
- Contents
- Revision history
- nRF Connect Bluetooth® low energy
- Installing nRF Connect Bluetooth® low energy
- Establishing serial port connection to a local device
- Establishing Bluetooth® low energy connections
- Viewing service details
- Updating connection parameters
- Pairing devices
- Configuring server setup
- Setting up advertising
- Updating firmware over the air
- Adding UUID definitions
- Troubleshooting
- Legal notices

Doc. ID 4399_003 v2.0 2017-07-06
nRF Connect Bluetooth® low energy
User Guide
v2.0

Contents
Doc. ID 4399_003 v2.0 Page 2
Contents
Revision history.................................................................................................................... 3
Chapter1:nRF Connect Bluetooth® low energy............................................4
Chapter2:Installing nRF Connect Bluetooth® low energy...........................5
Chapter3:Establishing serial port connection to a local device.................6
Chapter4:Establishing Bluetooth® low energy connections.......................8
Chapter5:Viewing service details...............................................................10
Chapter6:Updating connection parameters............................................. 11
Chapter7:Pairing devices............................................................................ 12
Chapter8:Configuring server setup........................................................... 14
Chapter9:Setting up advertising................................................................16
Chapter10:Updating firmware over the air...............................................17
Chapter11:Adding UUID definitions.......................................................... 20
Chapter12:Troubleshooting........................................................................21
Legal notices.......................................................................................................................22
Doc. ID 4399_003 v2.0 Page 3
Revision history
Date Version Description
July 2017 2.0 • Application ported to new framework
• Added support for multiple custom properties in advertisement
data
• Added support for Buttonless DFU Service
January 2017 1.1 • Added Secure DFU
• Added support for nRF52 Development Kit PCA10056
July 2016 1.0 First release

Doc. ID 4399_003 v2.0 Page 4
Chapter 1
nRF Connect Bluetooth® low energy
nRF Connect Bluetooth® low energy is an app for the nRF Connect desktop application for getting familiar
with, developing, and testing Bluetooth® low energy devices. It allows you to set up a local device,
connect it to advertising devices and discover their services, maintain the connection and the connection
parameters, pair the devices, and change the server setup for your local device. It also offers a detailed log for
troubleshooting purposes.
Supported devices • PCA10028 nRF51 Development Kit
• PCA10040 nRF52 Development Kit
• PCA10056 nRF52 Development Kit
• PCA10031 nRF51 Dongle
Supported operating systems • Microsoft Windows 7, 8, and 10
• OS X 10.10 and above
• Ubuntu Linux 14.04 and 16.04
Doc. ID 4399_003 v2.0 Page 5
Chapter 2
Installing nRF Connect Bluetooth®
low energy
This section describes the installation procedure for the nRF Connect Bluetooth® low energy app.
To install the app, you need to have the nRF Connect desktop application installed.
After installing nRF Connect, you can install the nRF Connect Bluetooth® low energy app:
1. Open nRF Connect.
2. Click Add/remove apps.
3. Click Install next to Bluetooth low energy.
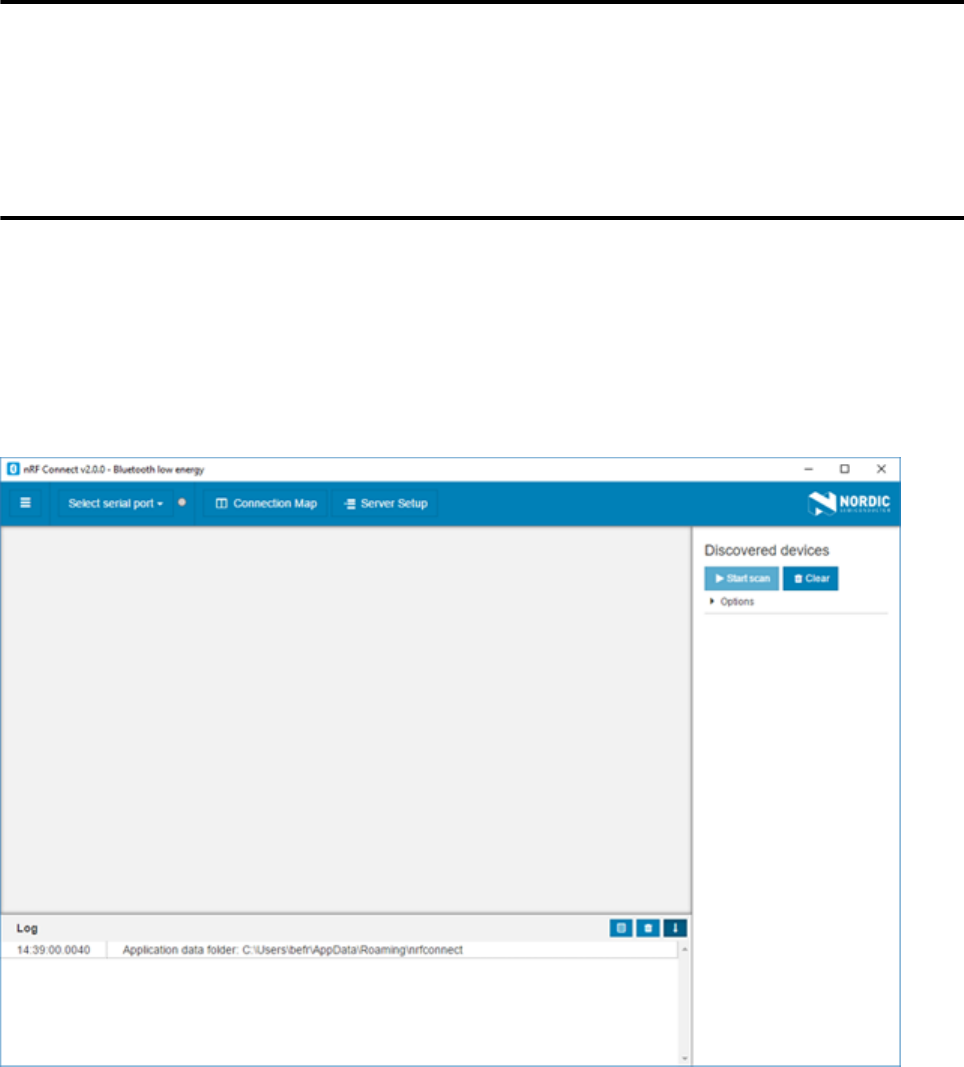
Figure 1: Application window
After starting the nRF Connect Bluetooth® low energy app, a window consisting of the following main
elements is displayed:
• Main view in the center: Initially empty, but will be populated with local and remote Bluetooth® low energy
devices
• Navigation bar at the top: Selecting serial port and application screen
• Three-dash button on the top-left corner of the navigation bar: Opening the nRF Connect app manager
• Discovered devices view on the right side: Starting scan and viewing discovered devices
• Log view at the bottom: Viewing the most important log events tagged with a timestamp
Doc. ID 4399_003 v2.0 Page 6
Chapter 3
Establishing serial port connection
to a local device
The nRF Connect Bluetooth® low energy app requires a serial port connection to a local development kit or
dongle. The nRF SoC (System on Chip) on the development kit or dongle is controlled by the app which sends
serialized commands to it over a serial port.
To set up a local device, complete the following steps:
1. Connect a development kit or dongle to the computer with USB.
2. In the navigation bar, click on the Select serial port menu.
3. Select a serial port for the device.
When the serial port is selected, the Select serial port menu shows the name of the selected port.
If the development kit or dongle has not been used with the nRF Connect Bluetooth® low energy app before,
you may be asked to update the J-Link firmware and connectivity firmware for the device. You need to have
the correct connectivity firmware on the nRF SoC to proceed. When the nRF SoC has been programmed with
the correct firmware, the nRF Connect Bluetooth® low energy app proceeds to connect to it over UART. When
the connection is established, the device appears in the main view.
Important: When using OS X, an issue with the SEGGER J-Link OB firmware leads to the corruption of
long packets over UART. See www.nordicsemi.com/nRFConnectOSXfix for more information.
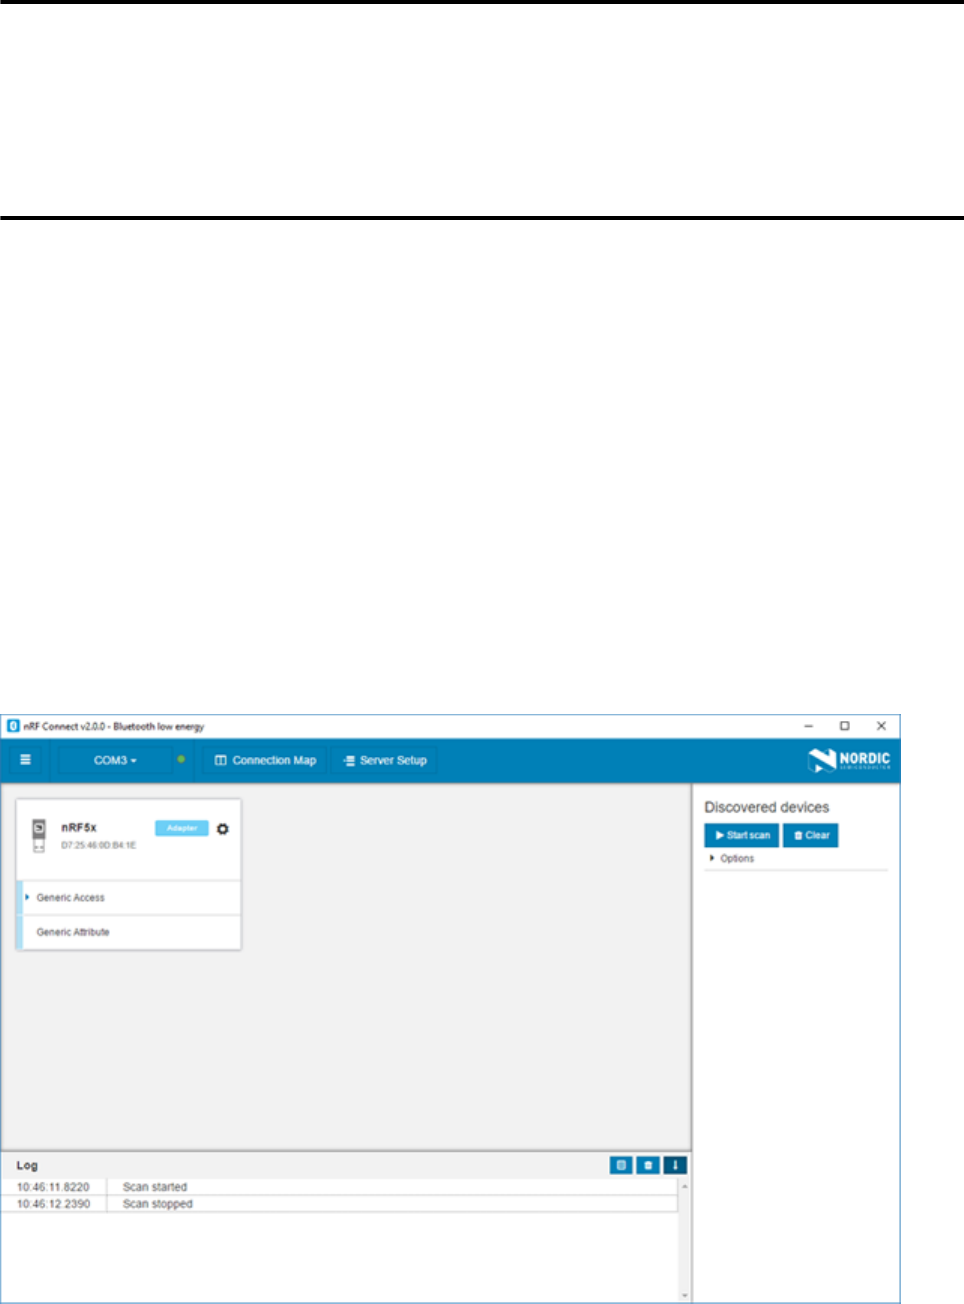
Figure 2: Local device view
3 Establishing serial port connection to a local device
Doc. ID 4399_003 v2.0 Page 7
The local device is labeled adapter to signal that it is connected locally to the computer. The device name and
Bluetooth® device address are shown at the top. The attribute table of the device is shown below them.
To expand a menu that shows actions and configurations available for the local device, click the Device
options icon .
Doc. ID 4399_003 v2.0 Page 8
Chapter 4
Establishing Bluetooth® low energy
connections
The nRF Connect Bluetooth® low energy app can establish and maintain up to eight simultaneous Bluetooth®
low energy connections.
To connect to devices, complete the following steps:
1. To scan for nearby Bluetooth® devices, click the Start scan button in the Discovered devices view.
The advertising devices start to appear in a list in the Discovered devices view. Each entry in the list
shows the name, address, and RSSI of the received advertising packet. For information on how to set up
advertising for a device, see Setting up advertising on page 16.
2. To view the advertising type and data fields of a packet, select the packet entry in the list.
3. To sort the list according to signal strength and thus according to which device is closest, click Options and
select Sort by signal strength.
4. To establish a Bluetooth® connection with a peer device, click the Connect button associated with the
device.
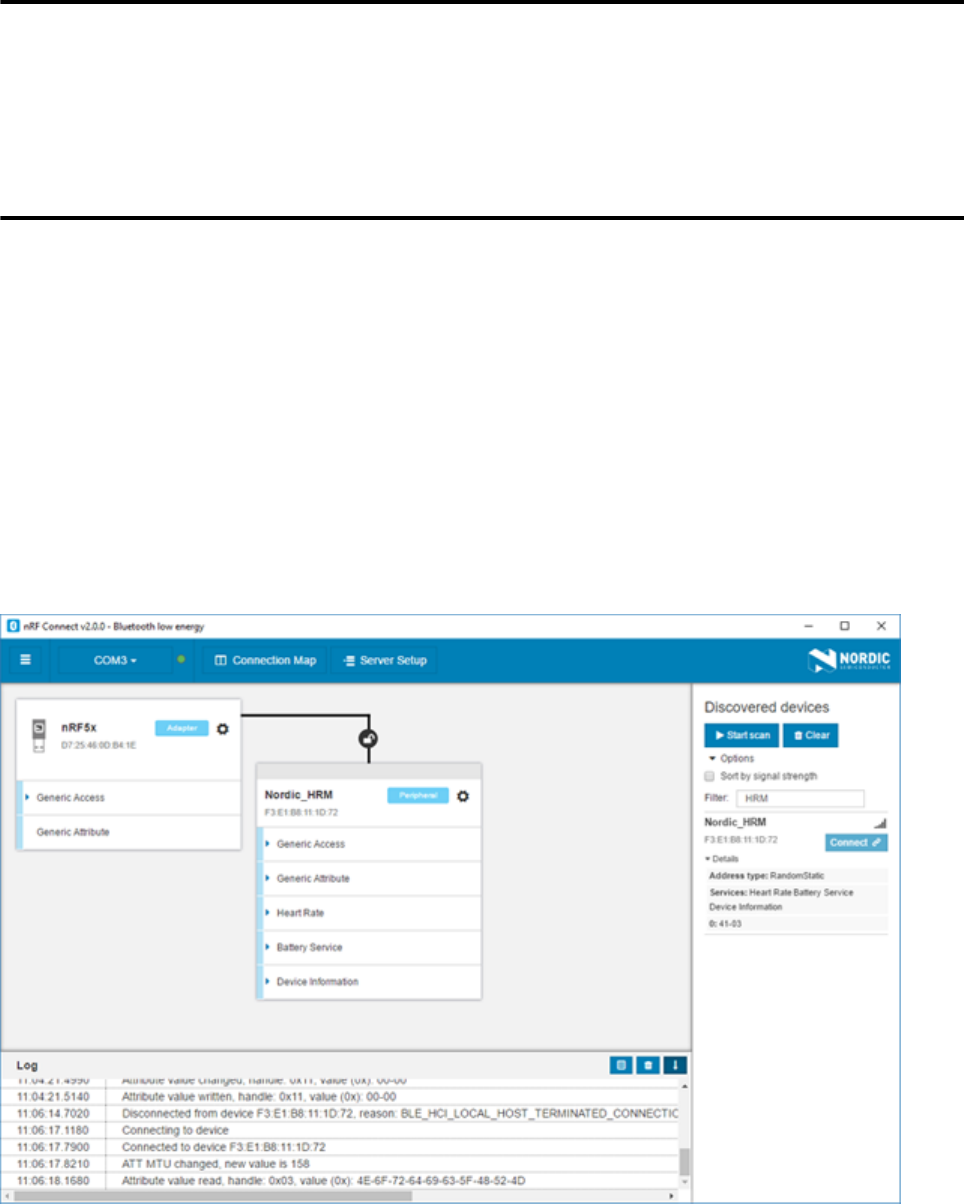
Figure 3: Discovered services
When the connection has been established, a new device appears in the main view to the right of the local
device. The nRF Connect Bluetooth® low energy app automatically performs an initial service discovery. The
discovered services are listed below the connected device. Attributes that are known to the application
are shown by their name. Attributes that are unknown to the application are shown by their UUID only. For
information on how to add UUID definitions, see Adding UUID definitions on page 20.
4 Establishing Bluetooth® low energy connections
Doc. ID 4399_003 v2.0 Page 9
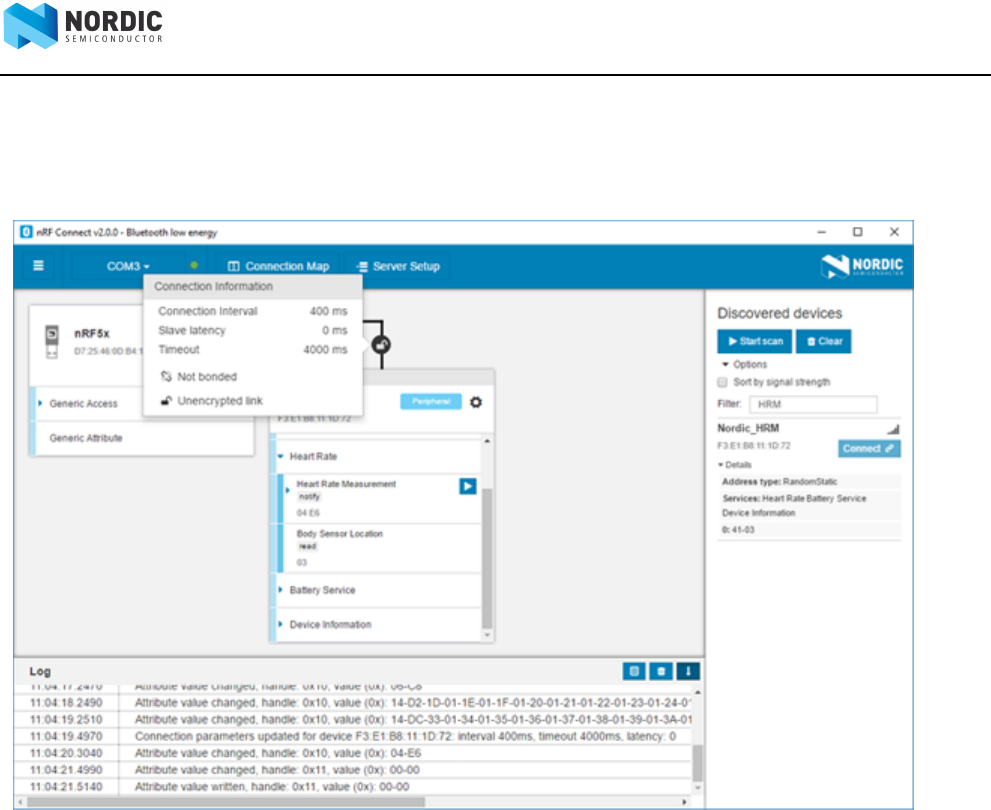
A line connects the local and remote device to signal that they are connected over Bluetooth®. Move the
mouse pointer over the padlock icon on the line to open a connection info dialog that shows the parameters
of the connection as well as the encryption and bond state.
Figure 4: Hovering over the padlock icon
Doc. ID 4399_003 v2.0 Page 10
Chapter 5
Viewing service details
The nRF Connect Bluetooth® low energy app can discover and display services, characteristics, and descriptors
of a connected peer device's attribute table.
• To view the handle and UUID of an attribute, move the mouse pointer over the attribute name.
A hover text is displayed.
•To view the characteristics of a service, click the Expand/collapse icon .
The characteristics have different buttons available depending on the associated properties. Read, write,
and notify actions are available if the corresponding properties are available for the characteristic.
• To view descriptors, expand the characteristics.
• To configure the peer device to start sending notifications, click the Toggle notifications icon .
If a notification has been received on a device, it is displayed with a highlight color on the corresponding
attribute and its value is updated.
If a service or characteristic does not have any child attributes, the list is empty when you click the Expand/
collapse icon .
Doc. ID 4399_003 v2.0 Page 11
Chapter 6
Updating connection parameters
In a connection, you can request new connection parameters and respond to an incoming connection
parameter update request.
To define connection parameters, complete the following steps:
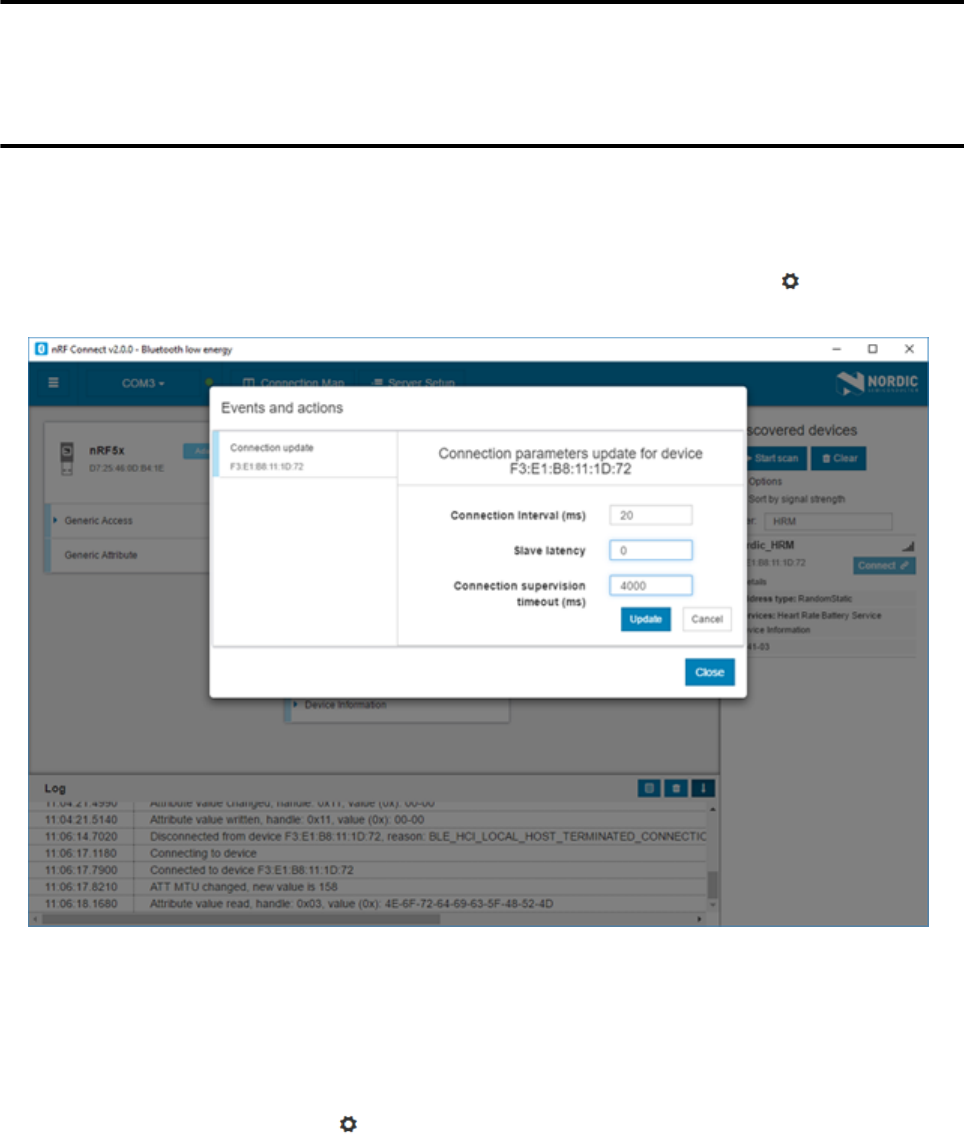
1. To expand the device options for the connected device, click the Device options icon .
2. To open the Connection update dialog, click Update connection....
3. Set the desired parameters in the dialog, then click Update.
4. To close the Connection update dialog, click Close.
There are two main options for responding to update requests: Letting the nRF Connect Bluetooth® low
energy app accept the request automatically (default) or responding to the request manually.
To select the responding option, complete the following steps:
1. Click the local Device options icon .
2. Select or deselect Auto accept update requests.
Doc. ID 4399_003 v2.0 Page 12
Chapter 7
Pairing devices
Pairing is the process of exchanging security keys and establishing an encrypted link. The level of security is
configurable, and it ranges from an unencrypted link with no security to an encrypted link with authentication
and protection against man-in-the-middle attacks.
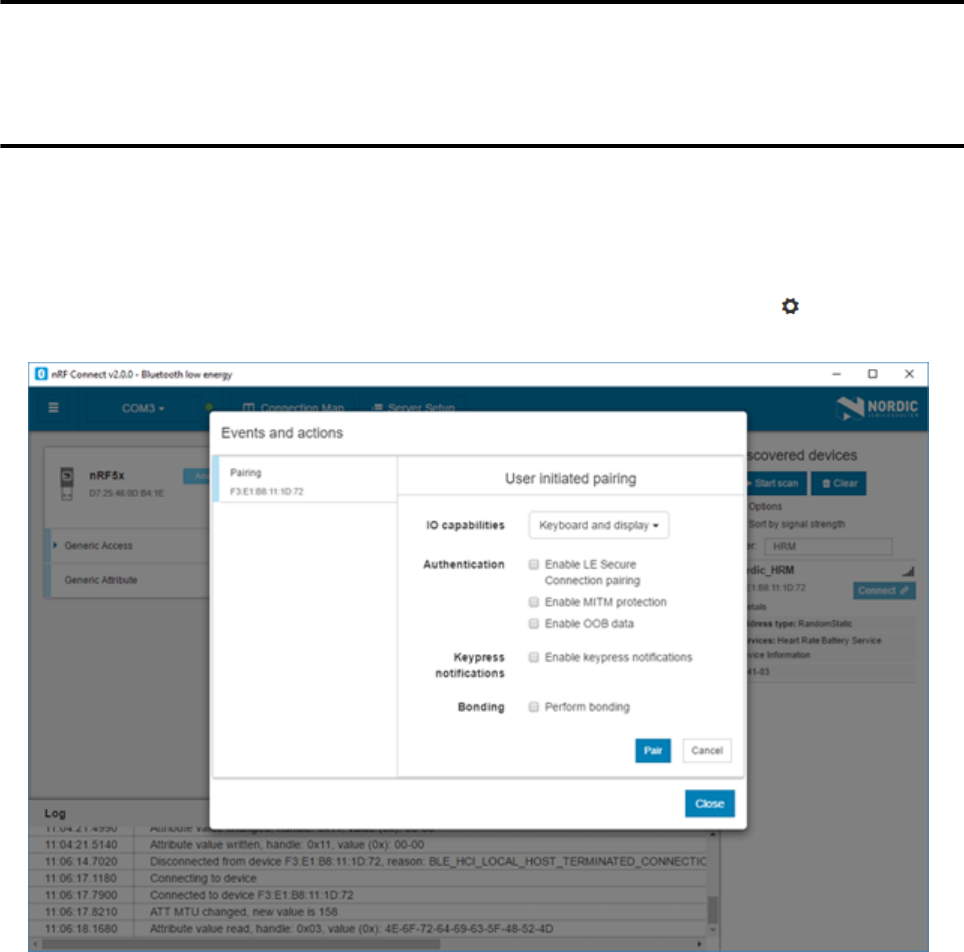
To pair with a connected device, complete the following steps:
1. To expand the device options for the connected device, click the Device options icon .
2. To open the Pairing dialog, click Pair....
3. Set the desired parameters in the dialog, then click Pair.
Depending on the chosen security parameters, an additional dialog may be shown for passkey, out-of-
band data, or numerical comparison input.
4. To close the Pairing dialog, click Close.
When the pairing procedure has been completed, the following changes are displayed:
• A log entry shows the new security level of the connection.
• The connection info padlock changes to locked if the connection is encrypted.
• The event view text turns green to indicate success.
Bonding can also be established, which means creating and exchanging long-term keys that are used for
reestablishing an encrypted link without having to go through the pairing process.
Incoming pairing requests can be replied to automatically by the nRF Connect Bluetooth® low energy app
(default), or they can be handled by the user.
To select the replying option for pairing requests, complete the following steps:
7 Pairing devices
Doc. ID 4399_003 v2.0 Page 13
1. Click the local Device options icon .
2. Select or deselect Auto reply security requests.
When Auto reply security requests is selected, the nRF Connect Bluetooth® low energy app uses the
settings specified in Security parameters when automatically replying to the request.
To edit security parameters, complete the following steps:
1. Click the local Device options icon .
2. To open the Security parameters dialog, click Security parameters.
3. Click Apply when done.
Important:
• Bonding is supported, but the keys are not retained across application restarts.
• Address resolving is currently not supported. Therefore, using keys from a bond after the device has
changed address will most likely fail.

Doc. ID 4399_003 v2.0 Page 14
Chapter 8
Configuring server setup
The nRF Connect Bluetooth® low energy app supports the configuration of the local device's GATT (Generic
Attribute profile) attribute table, also known as server setup. Adding attributes to the server setup allows the
local device to exchange data with a connected peer device.
The default server setup consists of two mandatory services: GATT and GAP (Generic Access Profile). These
services can be modified, but they cannot be removed, and you cannot extend them with more characteristics
or descriptors.
To add new attributes to the server setup, complete the following steps:
1. In the navigation bar, click the Server setup button.
Initially, the default server setup that is displayed contains only GAP and GATT services.
2. Click New service.
3. Select the added service.
A form is displayed.
4. Define the attribute values, then click Save.
5. To add a new characteristic, expand the added New Service, then click New characteristic.
6. Select the added characteristic.
A form is displayed.
7. Define the attribute values, then click Save.
Important: When adding a notify or indicate property on a characteristic, you need to add a Client
Characteristic Configuration Descriptor (CCCD) for that characteristic.
8. To add a new descriptor, expand the added New Characteristic, then click New descriptor.
9. Select the added descriptor.
A form is displayed.
10.Define the attribute values, then click Save.
11.When you have completed the server setup, click Apply to device to upload the setup to the local device.

8 Configuring server setup
Doc. ID 4399_003 v2.0 Page 15
Figure 5: Server setup
To save a server setup to file for later use, complete the following steps:
1. Click the local Device options icon .
2. Click Save setup....
3. Choose a directory and type a file name, then click Save.
To load a previously saved server setup from file, complete the following steps:
1. Click the local Device options icon .
2. Click Load setup....
3. Navigate to the right directory and select the file, then click Open.
Important: You cannot remove or overwrite a setup from the device. To enable the uploading of a
new server setup, hit the Reset button on the development kit. This updates the application state
appropriately. Alternatively, close and open the serial port in the device selector.
After the setup has been applied to the device, you can view the resulting setup by clicking the Connection
map button in the navigation bar. The new setup is reflected in the local device.
Doc. ID 4399_003 v2.0 Page 16
Chapter 9
Setting up advertising
The nRF Connect Bluetooth® low energy app can make the local device operate as a peripheral and start
sending connectable advertising packets. The contents of the advertising packets can be configured in the
advertising setup.
To start sending advertising packets, complete the following steps:
1. Click the local Device options icon .
2. To start advertising the device, click Start advertising.
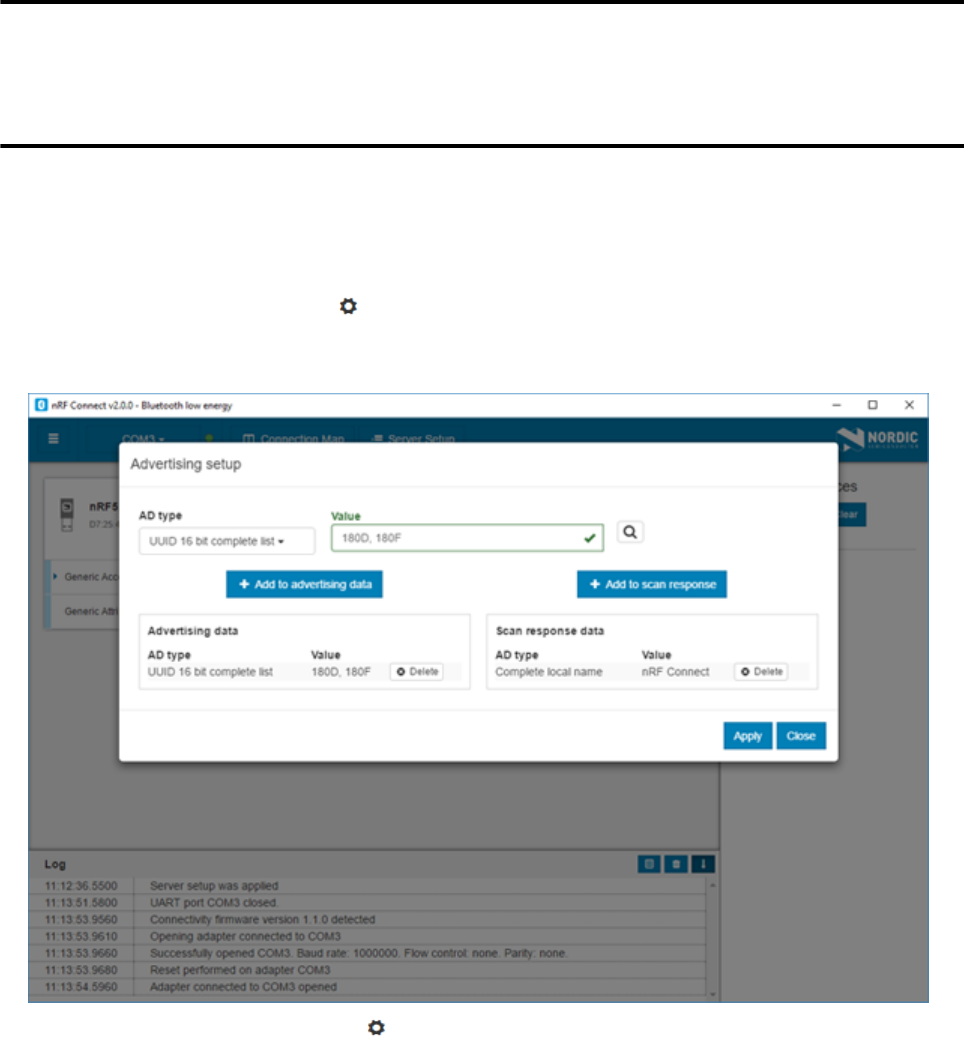
3. Specify the contents of the advertising packets:
a) Click the local Device options icon .
b) To display the Advertising setup dialog, click Advertising setup.
c) From the AD type drop-down menu, select an AD type.
d) In the Value field, add a data value.
e) Select Add to advertising data or Add to scan response.
f) Repeat until all wanted fields are present.
g) Click Apply, then click Close.
Doc. ID 4399_003 v2.0 Page 17
Chapter 10
Updating firmware over the air
If the connected device has Nordic Device Firmware Update (DFU) Service, you can update the firmware on
the device.
For more information on the DFU process, see Device Firmware Update process. For DFU bootloader
examples, see DFU bootloader examples.
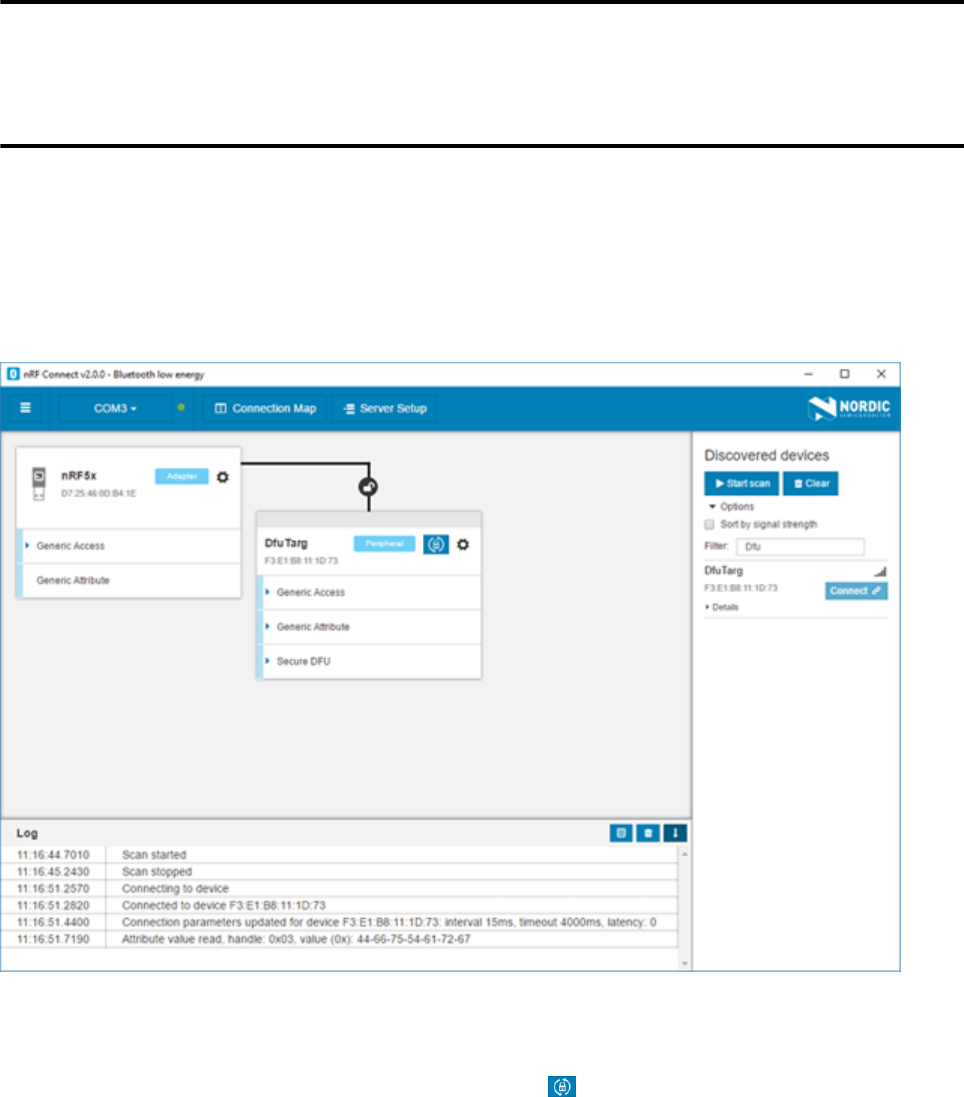
For a device that has DFU Service, Secure DFU appears in the device's list of discovered services and the Start
Secure DFU button appears in the list header.
Figure 6: Secure DFU in the list of discovered services
To update the firmware, complete the following steps:
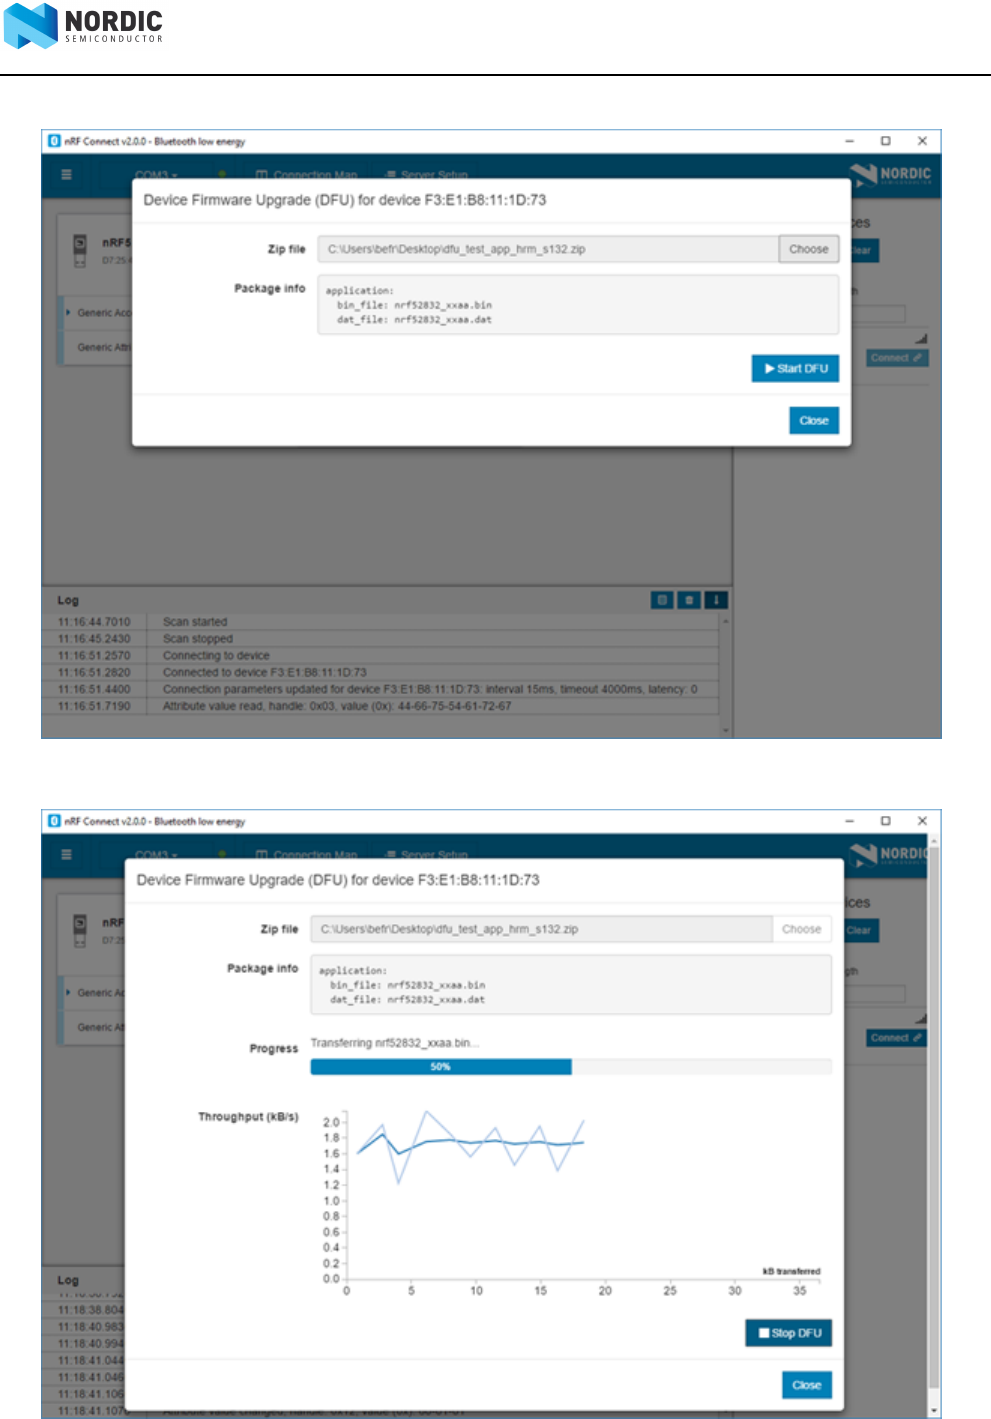
1. To open the DFU dialog, click the Start Secure DFU button .
2. Browse and select a DFU zip package file on your computer.
Important: To create the DFU zip package file, use the nrfutil tool. See the nrfutil documentation
for more information.
Information on the content of the DFU zip package is displayed in the Package info field.
10 Updating firmware over the air
Doc. ID 4399_003 v2.0 Page 18
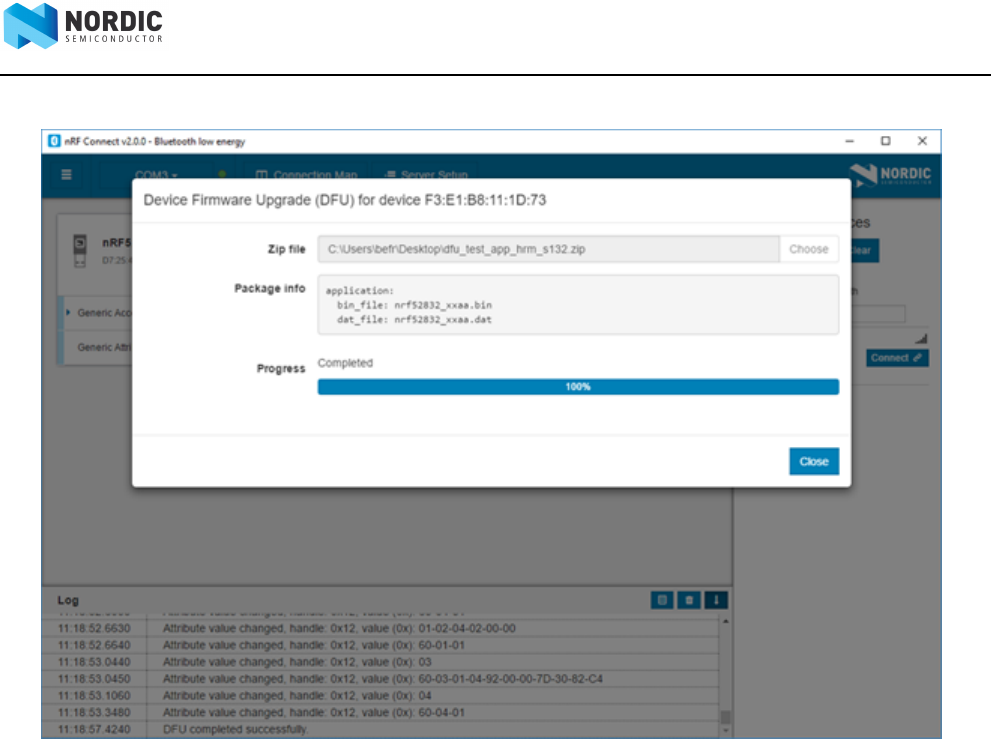
3. To start the transfer of the DFU package to the connected peer device, click Start DFU.
The progress bar shows the progress of the transfer.
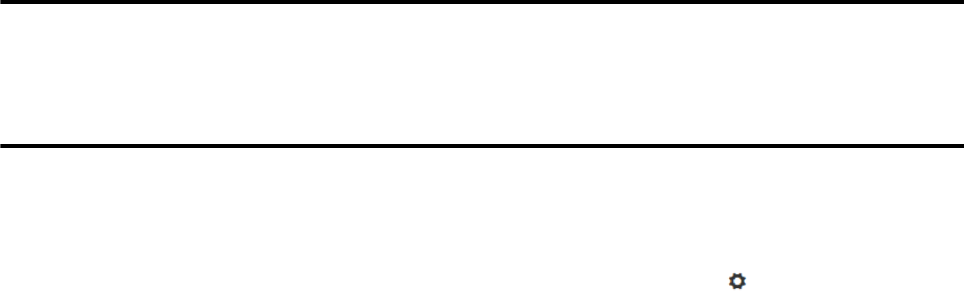
4. When the progress bar has reached 100%, click Close.
10 Updating firmware over the air
Doc. ID 4399_003 v2.0 Page 19
To stop the transfer, click Stop DFU. The transfer continues from where it was stopped when you click Start
DFU again.
If you click Close before the DFU transfer has completed, a confirmation dialog appears. If you click OK in the
confirmation dialog, the transfer is canceled.
Doc. ID 4399_003 v2.0 Page 20
Chapter 11
Adding UUID definitions
The nRF Connect Bluetooth® low energy app comes with a list of predefined names and UUIDs for some well-
known profiles. You can extend this list with custom definitions.
To extend the list of known UUIDs, complete the following steps:
1. To expand the device options for the local device, click the Device options icon .
2. Click Open UUID definitions file.
The definitions file is opened in your default application for .json files.
3. Following the examples in the file, add your UUIDs, then save the file.
4. To load the changes, reconnect to the adapter or reload the application (CTRL + r).

Doc. ID 4399_003 v2.0 Page 21
Chapter 12
Troubleshooting
For troubleshooting, the nRF Connect Bluetooth® low energy app has a more detailed log file than the one
shown in the log view. To open the detailed log file, click the Open log file button in the log view.
Firmware programming If you receive the error Could not connect to debug
probe, verify that J-Link software is properly installed
on the system.
If the device has been programmed with memory
protection, the nRF Connect Bluetooth® low energy
app cannot program the firmware. To erase the
device, download nRF Command Line Tools from
Nordic Semiconductor and issue the following
command from the command line:
nrfjprog -e -f <nrf51 or nrf52>
In Windows: If you receive the error Could not load
nrfjprog DLL, verify that nRF Command Line Tools
are installed.
OS X J-Link issue In OS X: An issue with the SEGGER J-Link OB firmware
leads to the corruption of long packets over UART.
See www.nordicsemi.com/nRFConnectOSXfix for
more information.
Serial port access permissions on Ubuntu Linux If you receive errors when trying to open the serial
port in the nRF Connect Bluetooth® low energy app
on Ubuntu Linux, you may need to grant serial port
access permissions to your user. To do this, run the
following command:
sudo usermod -a -G dialout <username>
Doc. ID 4399_003 v2.0 Page 22
Legal notices
By using this documentation you agree to our terms and conditions of use. Nordic Semiconductor may
change these terms and conditions at any time without notice.
Liability disclaimer
Nordic Semiconductor ASA reserves the right to make changes without further notice to the product to
improve reliability, function or design. Nordic Semiconductor ASA does not assume any liability arising out of
the application or use of any product or circuits described herein.
All information contained in this document represents information on the product at the time of publication.
Nordic Semiconductor ASA reserves the right to make corrections, enhancements, and other changes to
this document without notice. While Nordic Semiconductor ASA has used reasonable care in preparing
the information included in this document, it may contain technical or other inaccuracies, omissions and
typographical errors. Nordic Semiconductor ASA assumes no liability whatsoever for any damages incurred by
you resulting from errors in or omissions from the information included herein.
Life support applications
Nordic Semiconductor products are not designed for use in life support appliances, devices, or systems where
malfunction of these products can reasonably be expected to result in personal injury.
Nordic Semiconductor ASA customers using or selling these products for use in such applications do so at
their own risk and agree to fully indemnify Nordic Semiconductor ASA for any damages resulting from such
improper use or sale.
RoHS and REACH statement
Nordic Semiconductor products meet the requirements of Directive 2002/95/EC of the European Parliament
and of the Council on the Restriction of Hazardous Substances (RoHS) and the requirements of the REACH
regulation (EC 1907/2006) on Registration, Evaluation, Authorization and Restriction of Chemicals.
The SVHC (Substances of Very High Concern) candidate list is continually being updated. Complete hazardous
substance reports, material composition reports and latest version of Nordic's REACH statement can be found
on our website www.nordicsemi.com.
Trademarks
All trademarks, service marks, trade names, product names and logos appearing in this documentation are the
property of their respective owners.
Copyright notice
© 2017 Nordic Semiconductor ASA. All rights are reserved. Reproduction in whole or in part is prohibited
without the prior written permission of the copyright holder.
All rights reserved.
Reproduction in whole or in part is prohibited without the prior written permission of the copyright holder.
