Beginnerʼs Guide Open Build Service Obs Beginners
User Manual: Pdf
Open the PDF directly: View PDF ![]() .
.
Page Count: 19
- Beginnerʼs Guide
- Contents
- 1. Target Audience
- 2. Conceptual Overview
- 3. Requirements for Working with the osc Command-Line Tool
- 4. Configuring Your System for OBS
- 5. Covered Scenarios
- 6. Setting Up Your Home Project for the First Time
- 7. Creating a New Project
- 8. Patching Source Code
- 9. Branching a Package
- 10. Installing Packages from OBS
- 11. Other Useful osc Commands

Beginnerʼs Guide
Open Build Service
Open Build Service
This guide describes basic workflows for working with packages on Open
Build Service. This includes checking out a package from an upstream
project, creating patches, branching a repository, and more.
Publication Date: 01/29/2018
Contents
1 Target Audience 2
2 Conceptual Overview 2
3 Requirements for Working with the osc Command-Line Tool 4
4 Configuring Your System for OBS 5
5 Covered Scenarios 6
6 Setting Up Your Home Project for the First Time 8
7 Creating a New Project 8
8 Patching Source Code 12
9 Branching a Package 15
10 Installing Packages from OBS 17
11 Other Useful osc Commands 18
1Open Build Service

1Target Audience
This document is intended for users and developers interested in building packages from source
code for different platforms and Linux distributions. Basic knowledge of Linux and the command
line usage is recommended.
2Conceptual Overview
Created in 2005, the Open Build Service (OBS) is a generic system for building and distributing
packages or images from source code in an automatic, consistent, and reproducible way. OBS
can create images and installable packages for a wide range of operating systems (SUSE, Debian,
Ubuntu, Red Hat, Windows, etc.) and hardware architectures (x86, AMD64, zSystems, POWER
etc.).
2.1 Build Recipe
To create a package in OBS, you need a build recipe which contains the following information:
Metadata. The package name and the description are mandatory. Other data such as the
version, the license, the upstream URL is optional.
Requirements. Packages depend on other packages to function properly. There are two
types of requirements: build requirements and installation requirements.
Build requirements are dependencies which are needed during the build process in OBS.
For example, a C++ program needs a C++ compiler.
Installation requirements are dependencies which are needed when installing the final
package.
A Package List. To successfully install and remove a package and all its contents, the
package manager needs to know which les and directories belong to which package.
For RPM-based operating systems such as openSUSE, SUSE Linux Enterprise, or Red Hat Enter-
prise Linux, all the information above is included in a le with the le extension .spec .
2Target Audience Open Build Service
2.2 Build Hosts and Packages
The OBS server provides a Web interface and an API. The API is used by the osc command-line
tool.
To build the package, the back end creates a sandbox with the respective distribution. This
sandbox is isolated from the rest of the host system. Depending on the build recipe (on RPM-
based systems, this is a spec le), other packages are downloaded and installed prior to building.
The build process executes all the instructions that it nds in the build recipe. If the build is
successful, the les which belong to the package are installed into the sandbox. From those
sandboxed les, the final RPM package is created and moved into a download area, the download
repository.
End users can install the package using their preferred package management tools. On a SUSE-
based system, you can use YaST or Zypper command-line tool to install an RPM version of the
package.
Other OBS-related services (like the notification server, mirror interface, etc.) perform very
specific tasks and therefore beyond the scope of this guide.
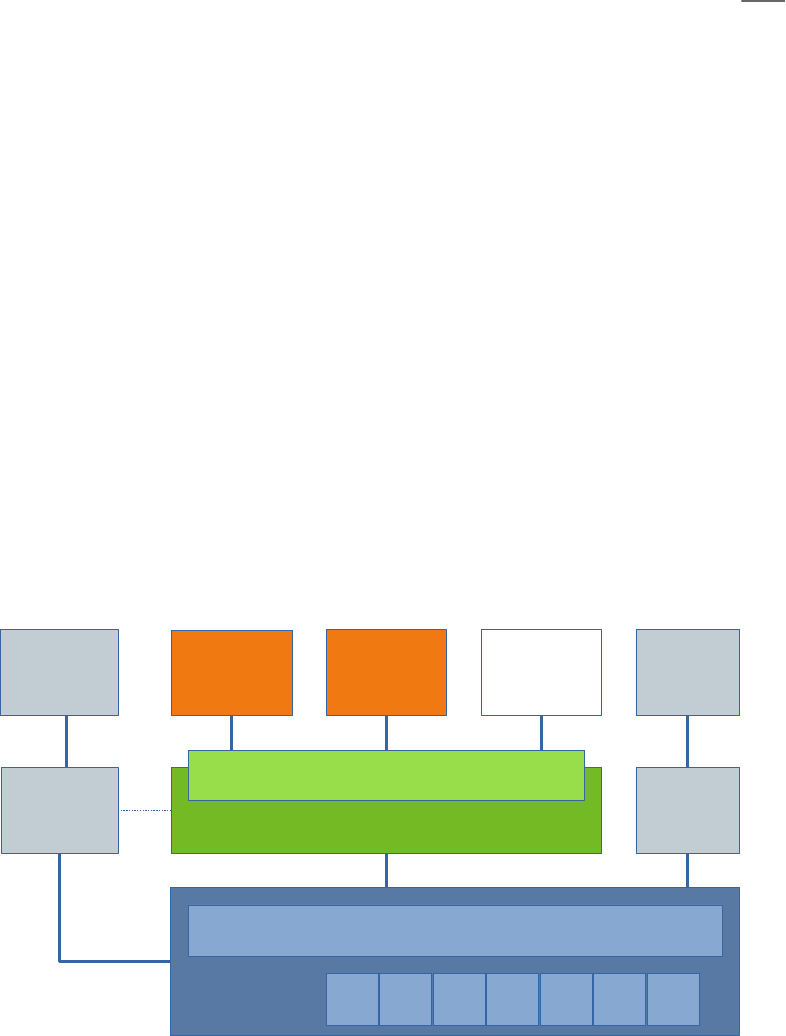
The schematic in Figure1, “Conceptual Overview of Open Build Service” shows the components in
context.
Web UI
Command
Line
Client
Installer
(YaST,etc.)
OBS API (api.opensuse.org)
User controller, Database, Search, ...
Storage
Build
Host
Your Client
Mirror
Interface
Backend
Hermes
Web UI
Notification
Server
Build
Host
Build
Host
Build
Host
Build
Host
Build
Host
Build
Host
FIGURE1:CONCEPTUAL OVERVIEW OF OPEN BUILD SERVICE
3Build Hosts and Packages Open Build Service

2.3 Projects and Packages
In OBS, packages are organized in projects. A single project can contain several packages, and
it usually serves a specific organizational purpose. Generic access control, related repositories,
and build targets (operating systems and architectures) are all defined on the project level.
Projects can also have other projects (subprojects) to structure work. They are isolated from
their parent project and can be configured individually.
Each project name is separated by colon. For example, in the openSUSE Build Service, packages
for fonts are collected in the project M17N:fonts which is a subproject of M17N . Packages
for the Python programming language are available in the devel:languages:python project
which is a subproject of devel:languages which itself is a subproject of devel .
As a user, you will normally build packages in your home project, available in OBS as home:USER-
NAME . Home projects serve as a personal working area in OBS to define build targets, upload,
build, and download packages. Users are also permitted to create subprojects for temporary
subprojects to work on other people's packages.
Sometimes, you will see the obs://DOMAIN/PROJECT notation. The obs:// schema is a short-
hand to abbreviate the long URL and needs to be replaced by the real OBS instance URL.
3Requirements for Working with the osc Command-
Line Tool
Before you start working with Open Build Service, make sure that the following requirements
are met.
Software Requirements
Install the osc command line tool from your preferred distributions or from the OBS
project openSUSE:Tools :
For SUSE related systems, install the osc package with the zypper command (re-
place DISTRIBUTION with your distribution):
root # zypper ar https://download.opensuse.org/repositories/openSUSE:/
Tools/DISTRIBUTION/openSUSE:Tools.repo
4Projects and Packages Open Build Service

root # zypper install osc
For other systems, use your preferred package manager.
As an alternative, you can use the AppImage le . An AppImage le is a packaged ap-
plication which can run on many distributions. Download the le from https://down-
load.opensuse.org/repositories/openSUSE:/Tools/AppImage/ , save it in your ~/bin
directory, and make the le executable.
Hardware Requirements
Make sure you have a minimum of 1 GB of free disk space. The osc command builds all
packages locally under /var/tmp/oscbuild and caches downloaded packages under /
var/tmp/osbuild-packagecache .
4Configuring Your System for OBS
While it is possible to use the osc tool without any configuration, it is recommended to set up
your system as described below.
After all dependencies are downloaded and before the actual build process can start, you need
to enter the root password. This can be inconvenient when you rebuild packages frequently.
The configuration below modifies the sudo configuration to allow building packages without
entering the root password. To maximize security, only specific users can have root privileges.
Follow the steps below to customize sudo .
PROCEDURE1:CONFIGURING sudo
To allow all users in the osc group to build packages without entering the root password,
do as follows.
1. Log in as root and create a new group osc . This group will contain all users which are
allowed to build packages:
root # groupadd osc
2. Add users to your newly created group osc which are allowed to build packages:
root # usermod -a -G osc geeko
Repeat this step to add other users, if necessary.
5Configuring Your System for OBS Open Build Service

3. Run visudo to create the sudoers le /etc/sudoers.d/osc :
root # visudo -f /etc/sudoers.d/osc
4. Add the following lines to create a command alias that can be executed only by the osc
group:
# sudoers file "/etc/sudoers.d/osc" for the osc group
Cmnd_Alias OSC_CMD = /usr/bin/osc, /usr/bin/build
%osc ALL = (ALL) NOPASSWD:OSC_CMD
5. Log out of your system and log in again to apply the changes.
6. Create a new OBS configuration le:
geeko > osc ls home:obsgeeko
If you run the command for the rst time, you will be prompted to enter your OBS user
name and OBS password.
Note: Alternative Directory Structure
If you prefer to separate projects and subprojects in directories and subdirectories, change
the following line in your configuration le ~/.oscrc :
checkout_no_colon = 1
This will use an alternate layout when checking out a project. For example, setting the
option above and checking out the home project will generate the home/obsgeeko di-
rectory structure instead of the single home:obsgeeko directory.
However, this guide uses the default configuration with colons.
5Covered Scenarios
This guide is based on the following assumptions.
6Covered Scenarios Open Build Service

Since Git is used throughout this guide, and many OBS concepts are modeled after their
Subversion (SVN) equivalents, you have a working knowledge of version control systems
such as Git and Subversion (SVN).
You are using the openSUSE Build Service at https://build.opensuse.org . If you are using
another OBS instance, some commands may differ.
You have an account on an Open Build Service instance.
You are running an RPM-based operating system like openSUSE or SUSE Linux Enterprise.
You are using a customized system as shown in Section4, “Configuring Your System for OBS”.
All examples use the following elements.
A user on a local machine (you) called geeko . This user builds packages on their own
machine.
An OBS user called obsgeeko with home home:obsgeeko on the Open Build Service. This
user is the same as the system user geeko , that is, you.
An OBS user obstux and their home home:obstux on Open Build Service. This user acts
as a collaborator.
An example upstream open source project available at https://github.com/obs-example/my-
first-obs-package . This project contains source code in the C++ programming language.
This guide describes the following common tasks:
Section6, “Setting Up Your Home Project for the First Time”
Setting up a home project using the OBS Web UI.
Section7, “Creating a New Project”
Creating packages from a basic project hosted on GitHub.
Section8, “Patching Source Code”
Patching source code without touching the original source.
Section9, “Branching a Package”
Branching a project, making changes, and submitting back the changes to the original
project.
Section10, “Installing Packages from OBS”
Integrating the download repository into your system and installing your built package.
7Covered Scenarios Open Build Service

6Setting Up Your Home Project for the First Time
This section shows how to set up your home project after creating an openSUSE account.
When you log in to your home project for the rst time, it will be empty. To build packages, you
need to select build targets (operating systems and architectures) rst. Build targets are defined
project-wide and every package in a project is built for each build target. However, you can
disable build targets for a specific package.
Setting up a home project is done as shown below.
PROCEDURE2:ADDING GLOBAL BUILD TARGETS TO YOUR HOME PROJECT
1. Log in to the Open Build Service instance.
2. Click the Home Project link in the upper-right corner.
3. Click the Repositories tab, then the Add Repositories link.
4. Select the distributions you want to build for.
OBS shows several Linux distributions. For SUSE distributions, it is recommended to ac-
tivate at least openSUSE Tumbleweed and the latest openSUSE Leap release. To enable
package builds for SUSE Linux Enterprise, mark one of the openSUSE Backports for SLE 12.
When you select a distribution, OBS shows a message that the distribution has been suc-
cessfully added it to your home project.
5. Click the Overview tab to see the available build targets on the right side.
To add more build targets, repeat the procedure above.
To ne tune your build targets, click the Repositories tab, nd the respective build target, and
click the Edit repository link. This shows the available architectures and additional package repos-
itories you can add.
7Creating a New Project
This section demonstrates how to create packages from a simple C++ project hosted on GitHub
(the “upstream project”). We assume that this project contains source code which you want to
package for different SUSE distributions.
Note: Check the License First
Before building, go to the homepage of the upstream project and check the license.
8Setting Up Your Home Project for the First Time Open Build Service
For example, in the openSUSE Build Service, you must only redistribute packages which
are available under an open source license. If you are submitting a package to openSUSE,
its source code will be checked for license compliance. If your package is not released
under an open source license, it will be rejected.
You can nd a list of already used licenses in OBS at https://license.opensuse.org . For
more details and a comparison of open source licenses in general, see https://en.wikipedi-
a.org/wiki/Comparison_of_free_and_open-source_software_licenses .
To create a package from the upstream project, follow the steps below.
1. Set up your project as shown in Section6, “Setting Up Your Home Project for the First Time”.
2. In the terminal, choose or create a directory on a local partition that has enough space
to hold the package sources.
3. Check out your home project:
geeko > osc checkout home:obsgeeko
This creates an empty home:obsgeeko directory in the current directory.
4. Create a new package in your local working directory:
geeko > cd home:obsgeeko
geeko > osc mkpac example-osc
5. Get the source code of the upstream project and save it in home:obsgeeko/my-first-
obs-package .
Download a TAR archive of the sources.
In our example, the project is hosted on GitHub and you can use the following URL: https://
github.com/obs-example/my-first-obs-package/releases . If there is no published release
of a project, click the Clone or download button and download the latest sources using the
Download ZIP link.
6. Create the build recipe. This le contains metadata and build instructions.
In this example, we are building an RPM for openSUSE. For RPM-based distributions, we
create a spec le. The skeleton of such a spec le looks like this:
EXAMPLE1:SKELETON OF A SPEC FILE
#
9Creating a New Project Open Build Service
# spec file for package my-first-obs-package
#
# -- Copyright omitted --
Name: my-first-obs-package 1
Version: 0.1.0 1
Release: 0 1
License: GPL-3.0 1
Group: Documentation 1
Summary: Frobnication Tool 1
Url: https://github.com/obs-example/my-first-obs-package 1
Source: my-first-obs-package-%{version}.tar.gz 1
BuildRequires: gcc 2
BuildRequires: cmake 2
BuildRoot: %{_tmppath}/%{name}-%{version}-build
%description 3
This tool frobnicates the bar with the foo when choosing the baz.
%prep 4
%setup -q -n %{name}-%{version}
%build 5
%install 6
%files 7
%defattr(-,root,root,-)
%doc README LICENSE *.txt
%{_bindir}/*
%changelog 8
1The Header. Metadata like package name, version, release, license, the RPM group,
a brief summary, the upstream URL, and the name of the source le.
2Build Requirements. Lists package dependencies that are required for building. The
listed packages are downloaded and installed before building the package.
3The Description Section. Describes the purpose of the package and gives a compre-
hensive explanation.
4The Preparation Section. Prepares the sources for building. This usually includes
unpacking them with the %setup macro and patching them using the %patch macro.
(For more information about patching, see Section8, “Patching Source Code”.)
5The Build Section. Contains commands or RPM macros for building the package.
10 Creating a New Project Open Build Service

6The Install Section. Contains commands or RPM macros which create directories or
copy les to the installation location.
7The Files Section. Lists all les and directories which belong to the package. Docu-
mentation-related les are marked with %doc , and they are automatically installed
in the default documentation directory.
8The Changelog Section. This section is usually empty. Instead, OBS searches for a
le with the extension .changes . If such a le exists in the project directory, it will
be automatically included as a changelog. The changelog le itself contains a high
level overview of the history of the package.
For the complete spec le, see https://github.com/obs-example/my-first-obs-package .
7. Create a changelog le:
geeko > osc vc
This command opens a text le with the following content in the default editor:
-------------------------------------------------------------------
Fri Aug 23 12:31:41 UTC 2017 - geeko@example.com
Add a short summary of your changes. Usually, a changelog entry contains a high-level
overview such as the version of the software in the package, which patches you applied,
and other changes in your project.
Save the le and leave the editor. osc then creates the le my-first-obs-pack-
age.changes .
8. Add all the les to your working directory:
geeko > osc add *.spec *.changes *.tar.gz
9. Build the package for the default build target:
geeko > osc build --local-package
The option --local-package is used here, because the package is not yet submitted to
OBS.
The default build target is set in the osc configuration le ~/.oscrc using the variable
build_repository . On openSUSE Build Service this is usually openSUSE Tumbleweed.
11 Creating a New Project Open Build Service
To build the package for another build target, use the following command:
geeko > osc build --local-package openSUSE_Tumbleweed x86_64 *.spec
10. Check whether your build was successful. If everything was ne, commit the les to your
package to your home project on OBS:
geeko > osc commit
If you encounter build errors, use the osc buildlog command to review them, as de-
scribed below.
To watch the current build of a specific build target, use the buildlog (alias bl ) subcommand
inside your working directory:
geeko > osc buildlog openSUSE_Tumbleweed x86_64
8Patching Source Code
This section describes how to patch an upstream project. We use the same project as shown in
Section7, “Creating a New Project”.
There are different reasons for patching a package.
You Do Not Have Permission to Commit Upstream. Often, you cannot commit changes
directly to the upstream project. If you send changes to the upstream project, they may
be integrated late or even be rejected.
Patch les allow making changes while keeping source code clean and also allow indepen-
dence from an upstream project's release cycle, coding style, and internal workings.
Apply Security and Bug Fixes or Distribution-Specific Fixes.
Change the Source Code, So It Builds on OBS.
Improve Security and Traceability. Untouched source code in OBS is easier to check for
changes than a modified one. The check is usually done with a checksum (MD5 or SHA).
Improve Structure and Consistency. From an organizational point of view, it is better
when changes are separated from the source code. With the changes inside the patch le,
everybody can see what was changed and which les changes were applied to.
12 Patching Source Code Open Build Service

We assume that you already have a project as described in Section7, “Creating a New Project”. The
project directory should look similar to this:
project directory
├── my-first-obs-package-0.1.0.tar.gz
├── my-first-obs-package.changes
└── my-first-obs-package.spec
In our case, we want to modify the source code under src/main.cpp to change the greeting
message.
PROCEDURE3:PATCHING
1. In the terminal, switch to your working directory.
2. Prepare a patch le:
a. Unpack the source code:
geeko > tar xvf my-first-obs-package-*.tar.gz
If you have downloaded the archive from GitHub, the archive contains a directory
in the form NAME-VERSION . In our case, unpacking the downloaded archive results
in the my-first-obs-package-0.1.0/ directory.
b. Switch to the directory my-first-obs-package-0.1.0/ and make a copy of the
original C++ source le:
geeko > cd my-first-obs-package-0.1.0/
geeko > cp src/main.cpp src/main.cpp.orig
c. Make your changes in src/main.cpp .
d. Create a di and carefully inspect your changes:
geeko > diff -u src/main.cpp.orig src/main.cpp
The output should look like this:
--- src/main.cpp.orig 2017-08-09 16:28:31.407449707 +0200
+++ src/main.cpp 2017-08-09 16:28:49.131541230 +0200
@@ -2,7 +2,7 @@
int main()
13 Patching Source Code Open Build Service

{
- std::cout<<"Hello OBS!\n";
+ std::cout<<"Hello Alice!\n";
return 0;
}
e. Redirect the di into a le:
geeko > diff -u src/main.cpp.orig src/main.cpp \
> ../my-first-obs-package_main.diff
You can use an arbitrary name for the patch le. However, we recommend giving
the le a descriptive name and adding the name of the upstream project. If there is
a bug or issue number associated with the patch, add it to the le name as well. You
can either use .diff or .patch as the le extension.
f. You can now remove the directory my-first-obs-package-0.1.0/ , as it is not
needed anymore.
3. Open your spec le and add the following line in the header under the Source line like
this:
Source: my-first-obs-package-%{version}.tar.gz
Patch0: my-first-obs-package_main.diff
4. In the %prep section, add the %patch macro:
%prep
%setup -q -n %{name}-%{version}
%patch0
5. Add your patch le to the local repository:
geeko > osc add my-first-obs-package_main.diff
6. Rebuild your package:
geeko > osc build
7. If everything was successful, commit your changes:
geeko > osc commit
14 Patching Source Code Open Build Service

When prompted, specify and save a commit message.
If you are dealing with a lot of patches, you might nd the quilt tool useful. For more infor-
mation about quilt , see https://savannah.nongnu.org/projects/quilt .
9Branching a Package
This section describes how to collaborate between projects. You can branch any package in OBS
into any project that you have write permission for. By default, new branches are created as a
subproject of your home project. These default branches have names beginning with home:ob-
sgeeko:branches .
There are different reasons to branch a package:
To modify the source code, building it, trying the effect of the changes, and submitting
back changes to the original project. Usually, you use this workflow when you do not have
write permissions for a project.
To make changes without affecting the original project.
To apply temporary changes to try out a different path of development.
We assume that you have checked out the project home:obsgeeko/my-first-obs-package on
OBS and the user obstux wants to change the code to change the welcome message. The code
should then be submitted to the original project.
User obstux has to perform the following steps.
PROCEDURE4:BRANCHING FROM A PROJECT
1. In the terminal, choose or create a directory on a local partition with enough free space.
2. Create a branch from geeko's home project:
tux > osc branchco home:obsgeeko my-first-obs-package
This creates a branched package in OBS at home:obstux:branches/my-first-
obs-package and checks out a directory home:obstux:branches:home:obs-
geeko:my-first-obs-package .
3. Change the working directory to your checked-out branch:
tux > cd home:obstux/branches/home/obsgeeko/my-first-obs-package
15 Branching a Package Open Build Service

4. Make changes as shown in Section8, “Patching Source Code”.
5. Build the package for the default build target:
geeko > osc build
6. Review the build log:
geeko > osc buildlog openSUSE_Tumbleweed x86_64
7. Make sure all included and removed les are added to the OBS repository:
tux > osc addremove
8. If everything was successful, commit your changes:
geeko > osc commit
When prompted, specify and save a commit message.
9. Create a submit request and finish it by adding a comment:
tux > osc submitreq
Used without any options, the submitreq command submits back to the package where
you branched from. Note that with the submit request, you submit a specific version of
the source. Later changes do not get automatically fetched by default.
If there are multiple packages in a branch, all packages will be submitted together. To
avoid that, specify the names of the source and destination projects and the package name:
tux > osc submitreq home:obstux:branches:home:obsgeeko my-first-obs-package
home:obsgeeko
User obstux has finished the task now and the submit request is assigned to obsgeeko . User
obsgeeko can now either accept or decline the submit request.
Accept the Submit Request. The changes from user obstux will be integrated into the
home:obsgeeko project. The accepted submit request will be closed. To make further
changes, obstux needs to create a new submit request.
Decline the Submit Request. The changes from user obstux are not integrated into the
home:obsgeeko project.
16 Branching a Package Open Build Service

Reasons for declining a submit requires can be build errors or style issues. The reviewer
usually gives a reason when declining the submit request. User obstux can then 1) correct
their submission using a new submit request that supersedes the previous one, 2) disagree
and reopen the request, or 3) accept the decline and revoke the request.
User obsgeeko is responsible for the following.
PROCEDURE5:DEALING WITH SUBMIT REQUESTS
1. Show all submit requests that belong to your home project
geeko > osc request list -s new -P home:obsgeeko
2. Find the correct submit request. If you know the correct number you can use:
geeko > osc request show 246
3. Review the request and decide:
• Accept the submit request:
geeko > osc request accept 246 --message="Reviewed OK."
• Decline the request and give a reason:
geeko > osc request decline 256 --message="Declined, because of missing
semicolon."
If the submit request has been accepted, the changes will be integrated into the home project
home:obsgeeko .
If the submit request has been declined, you can x the issues and resubmit the package. When
creating a new submit request, osc will prompt to supersede the previous request.
10 Installing Packages from OBS
OBS provides a place containing all the distribution-specific and architecture-specific versions of
successfully built packages. When you create a package in your OBS home project, all successful-
ly built packages appear under the https://download.opensuse.org/repositories/home:/
obsgeeko URL.
17 Installing Packages from OBS Open Build Service

However, this is only true for the home project itself and manually created subprojects, but not
for subprojects created as a result of branching a package. Branched projects are not published by
default. If you need the build results, download the binaries manually with osc getbinaries .
For example, if you have enabled the openSUSE Tumbleweed distribution, all packages for
openSUSE Tumbleweed will be published at https://download.opensuse.org/reposito-
ries/home:/obsgeeko/openSUSE_Tumbleweed . This download repository is used as an installa-
tion source for Zypper or YaST.
To install the my-first-obs-package package from your home project, use the following steps:
1. Inside your working directory, determine the download repository URLs:
geeko > osc repourls
https://download.opensuse.org/repositories/home:/obsgeeko/openSUSE_Tumbleweed/
home:obsgeeko.repo
https://download.opensuse.org/repositories/home:/obsgeeko/openSUSE_42.2/
home:obsgeeko.repo
2. Copy the desired URL of your preferred distribution. In our case, that is the line containing
openSUSE_Tumbleweed .
3. Use zypper and add the copied URL:
root # zypper addrepo https://download.opensuse.org/repositories/home:/obsgeeko/
openSUSE_Tumbleweed/home:obsgeeko.repo
When prompted, accept the GPG key of the download repository.
4. Install the package:
root # zypper install my-first-obs-package
To update the package again, run Step 4. You do not need to execute Step 1, as the repository
is already configured in your system.
11 Other Useful osc Commands
The following list gives you a short overview of frequently used osc subcommands that were
not mentioned in this guide. For an overview of their syntax, use osc SUBCOMMAND --help .
18 Other Useful osc Commands Open Build Service

osc diff
Generates a di, comparing local changes against the remote OBS project.
osc list
Shows source or binaries on an OBS server.
osc prjresults
Shows project-wide build results.
osc status
Shows the status of les in your working directory
19 Other Useful osc Commands Open Build Service
