OpenTCS: Developer’s Guide Opentcs Developers
opentcs-developers-guide
opentcs-developers-guide
opentcs-developers-guide
User Manual: Pdf
Open the PDF directly: View PDF ![]() .
.
Page Count: 26
- openTCS: Developer’s Guide
- Table of Contents
- Chapter 1. Development with openTCS in general
- Chapter 2. Using the kernel API
- 2.1. Working with transport orders
- 2.1.1. A transport order’s life cycle
- 2.1.2. Structure and processing of transport orders
- 2.1.3. How to create a new transport order
- 2.1.4. How to create a transport order that sends a vehicle to a point instead of a location
- 2.1.5. Using order sequences
- 2.1.6. How to withdraw a transport order that is currently being processed
- 2.1.7. How to withdraw a transport order via a reference on the vehicle processing it
- 2.1. Working with transport orders
- Chapter 3. TCP/IP-based interfaces to other systems
- Chapter 4. Customizing and extending the kernel application
- Chapter 5. Customizing and extending the plant overview application
openTCS
Developer’s Guide
The openTCS developers
openTCS 4.7.0-SNAPSHOT
Table of Contents
1. Development with openTCS in general . . . . . . . . . . . . . . . . . . . . . . . . . . . . . . . . . . . . . . . . . . . . . . . . . . . . . Ê1
1.1. System requirements . . . . . . . . . . . . . . . . . . . . . . . . . . . . . . . . . . . . . . . . . . . . . . . . . . . . . . . . . . . . . . . . . Ê1
1.2. Available artifacts and API compatibility. . . . . . . . . . . . . . . . . . . . . . . . . . . . . . . . . . . . . . . . . . . . . . . . Ê1
1.3. Third-party dependencies . . . . . . . . . . . . . . . . . . . . . . . . . . . . . . . . . . . . . . . . . . . . . . . . . . . . . . . . . . . . . Ê2
1.4. Modularity and extensibility . . . . . . . . . . . . . . . . . . . . . . . . . . . . . . . . . . . . . . . . . . . . . . . . . . . . . . . . . . . Ê3
1.5. Logging . . . . . . . . . . . . . . . . . . . . . . . . . . . . . . . . . . . . . . . . . . . . . . . . . . . . . . . . . . . . . . . . . . . . . . . . . . . . . . Ê3
1.6. Working with the openTCS source code . . . . . . . . . . . . . . . . . . . . . . . . . . . . . . . . . . . . . . . . . . . . . . . . . Ê3
2. Using the kernel API . . . . . . . . . . . . . . . . . . . . . . . . . . . . . . . . . . . . . . . . . . . . . . . . . . . . . . . . . . . . . . . . . . . . . . Ê4
2.1. Working with transport orders . . . . . . . . . . . . . . . . . . . . . . . . . . . . . . . . . . . . . . . . . . . . . . . . . . . . . . . . Ê4
2.1.1. A transport order’s life cycle . . . . . . . . . . . . . . . . . . . . . . . . . . . . . . . . . . . . . . . . . . . . . . . . . . . . . . . Ê4
2.1.2. Structure and processing of transport orders . . . . . . . . . . . . . . . . . . . . . . . . . . . . . . . . . . . . . . . . Ê6
2.1.3. How to create a new transport order . . . . . . . . . . . . . . . . . . . . . . . . . . . . . . . . . . . . . . . . . . . . . . . Ê7
2.1.4. How to create a transport order that sends a vehicle to a point instead of a location . . . . Ê8
2.1.5. Using order sequences . . . . . . . . . . . . . . . . . . . . . . . . . . . . . . . . . . . . . . . . . . . . . . . . . . . . . . . . . . . . Ê9
2.1.6. How to withdraw a transport order that is currently being processed . . . . . . . . . . . . . . . . Ê10
2.1.7. How to withdraw a transport order via a reference on the vehicle processing it . . . . . . . Ê11
3. TCP/IP-based interfaces to other systems . . . . . . . . . . . . . . . . . . . . . . . . . . . . . . . . . . . . . . . . . . . . . . . . . . Ê12
3.1. Creating orders via TCP/IP . . . . . . . . . . . . . . . . . . . . . . . . . . . . . . . . . . . . . . . . . . . . . . . . . . . . . . . . . . . . Ê12
3.1.1. XML telegrams for creating orders . . . . . . . . . . . . . . . . . . . . . . . . . . . . . . . . . . . . . . . . . . . . . . . . Ê12
3.1.2. XML telegrams referencing order batches. . . . . . . . . . . . . . . . . . . . . . . . . . . . . . . . . . . . . . . . . . Ê13
3.1.3. Receipts for created orders . . . . . . . . . . . . . . . . . . . . . . . . . . . . . . . . . . . . . . . . . . . . . . . . . . . . . . . Ê14
3.1.4. Receipts for order batches . . . . . . . . . . . . . . . . . . . . . . . . . . . . . . . . . . . . . . . . . . . . . . . . . . . . . . . . Ê14
3.2. Status messages via TCP/IP . . . . . . . . . . . . . . . . . . . . . . . . . . . . . . . . . . . . . . . . . . . . . . . . . . . . . . . . . . . Ê15
3.3. XML Schema definitions for telegrams and scripts . . . . . . . . . . . . . . . . . . . . . . . . . . . . . . . . . . . . . . Ê16
4. Customizing and extending the kernel application. . . . . . . . . . . . . . . . . . . . . . . . . . . . . . . . . . . . . . . . . . Ê17
4.1. Guice modules. . . . . . . . . . . . . . . . . . . . . . . . . . . . . . . . . . . . . . . . . . . . . . . . . . . . . . . . . . . . . . . . . . . . . . . Ê17
4.2. Replacing default kernel components . . . . . . . . . . . . . . . . . . . . . . . . . . . . . . . . . . . . . . . . . . . . . . . . . Ê17
4.3. Developing vehicle drivers . . . . . . . . . . . . . . . . . . . . . . . . . . . . . . . . . . . . . . . . . . . . . . . . . . . . . . . . . . . Ê18
4.3.1. Classes and interfaces of a driver implementation . . . . . . . . . . . . . . . . . . . . . . . . . . . . . . . . . . Ê18
4.3.2. Steps to create a new vehicle driver . . . . . . . . . . . . . . . . . . . . . . . . . . . . . . . . . . . . . . . . . . . . . . . Ê20
4.3.3. Requirements for a vehicle driver to be found at runtime . . . . . . . . . . . . . . . . . . . . . . . . . . . Ê20
4.4. Sending messages to communication adapters . . . . . . . . . . . . . . . . . . . . . . . . . . . . . . . . . . . . . . . . . Ê21
4.5. Acquiring data from communication adapters . . . . . . . . . . . . . . . . . . . . . . . . . . . . . . . . . . . . . . . . . Ê21
5. Customizing and extending the plant overview application . . . . . . . . . . . . . . . . . . . . . . . . . . . . . . . . . Ê23
5.1. Guice modules. . . . . . . . . . . . . . . . . . . . . . . . . . . . . . . . . . . . . . . . . . . . . . . . . . . . . . . . . . . . . . . . . . . . . . . Ê23
5.2. How to create a plugin panel for the plant overview client . . . . . . . . . . . . . . . . . . . . . . . . . . . . . . Ê23
5.3. How to create a location/vehicle theme for openTCS . . . . . . . . . . . . . . . . . . . . . . . . . . . . . . . . . . . . Ê24
Chapter 1. Development with openTCS in
general
1.1. System requirements
The openTCS source code is written in Java. To compile it, you need a Java Development Kit (JDK)
1.8 or later. To run the resulting binaries, you need a Java Runtime Environment (JRE) 1.8 or later.
All other required libraries are included in the openTCS distribution or will be downloaded
automatically when building it from source code.
1.2. Available artifacts and API compatibility
The openTCS project publishes artifacts for releases via JCenter, so you can easily integrate them
with build systems such as Gradle or Maven. In Gradle build scripts, for example, use something
like the following to integrate an openTCS library:
repositories {
Ê jcenter()
}
dependencies {
Ê compile group: 'org.opentcs', name: '${ARTIFACT}', version: '4.7.0-SNAPSHOT'
}
Set the version number of the openTCS release you actually want to work with, and select the
appropriate ${ARTIFACT} name from the following table:
Table 1. Artifacts published by the openTCS project
Artifact name API compatibility
between minor
releases
Content
opentcs-api-base Yes Contains the base API for clients and extensions.
This is what most developer’s probably want to
use.
opentcs-api-injection Yes Contains API interfaces and classes used for
dependency injection within the kernel and
plant overview applications. This is required in
integration projects customizing these
applications, e.g. adding components like vehicle
driver implementations.
opentcs-common No Contains a collection of utility classes used by
openTCS components.
1

Artifact name API compatibility
between minor
releases
Content
opentcs-commadapter-
loopback No Contains a very basic vehicle driver simulating a
virtual vehicle.
opentcs-strategies-
default No Contains the default implementations of
strategies that are used by the kernel
application.
opentcs-kernel No Contains the kernel application.
opentcs-plantoverview No Contains the plant overview application.
Note that only the basic API libraries provide a documented API that the openTCS developers try to
keep compatible between releases. All other artifacts' contents can and will change regardless of
any compatibility concerns, so if you use these and switch to a different version of openTCS, you
may have to adjust and recompile your code.
1.3. Third-party dependencies
Both the kernel and the plant overview application depend on the following external frameworks
and libraries:
•SLF4J (https://www.slf4j.org/): A simple logging facade to keep the actual logging
implementation replaceable.
•Google Guice (https://github.com/google/guice): A light-weight dependency injection framework.
•Cfg4j (http://www.cfg4j.org/): A configuration library supporting binding interfaces.
•Google Guava (https://github.com/google/guava): A collection of small helper classes and
methods.
•MBassador (https://github.com/bennidi/mbassador): A light-weight event bus implementation.
•JUnit (http://junit.org/junit4/): A simple unit-testing framework.
•Mockito (http://mockito.org/): A mocking framework for unit tests.
The kernel application also depends on the following libraries:
•JDOM (http://www.jdom.org/): A library for reading and writing XML data.
•JGraphT (http://jgrapht.org/): A library for working with graphs and using algorithms on them.
The plant overview application has the following additional dependencies:
•JHotDraw (http://www.jhotdraw.org/): A framework for drawing graph structures (like driving
course models).
•Docking Frames (http://www.docking-frames.org/): A framework for docking and undocking of
GUI panels
The artifacts for these dependencies are downloaded automatically when building the applications.
2

1.4. Modularity and extensibility
The openTCS project heavily relies on Guice for dependency injection and wiring of components as
well as for providing plugin-like extension mechanisms. In the injection API, relevant classes can be
found in the package org.opentcs.customizations. For examples, see Customizing and extending the
kernel application and Customizing and extending the plant overview application.
1.5. Logging
The code in the official openTCS distribution uses SLF4J for logging. Thus, the actual logging
implementation is easily interchangeable by replacing the SLF4J binding in the respective
application’s classpath. The kernel and plant overview client applications come with SLF4J’s
bindings for java.util.logging by default. For more information on how to change the actual
logging implementation, e.g. to use log4j, please see the SLF4J documentation.
1.6. Working with the openTCS source code
The openTCS project itself uses Gradle as its build management tool. To build openTCS from source
code, just run gradlew build from the source distribution’s main directory. For details on how to
work with Gradle, please see its documentation.
These are the main Gradle tasks of the root project you need to know to get started:
•build: Compiles the source code of all subprojects.
•release: Builds and packages all system components to a distribution in build/.
•clean: Cleans up everything produced by the other tasks.
To work with the source code in your IDE, see the IDE’s documentation for Gradle integration.
There is no general recommendation for any specific IDE. Note, however, that the openTCS source
code contains GUI components that have been created with the NetBeans GUI builder. If you want
to edit these, you may want to use the NetBeans IDE.
In case you use NetBeans, install the Gradle Support plugin from the NetBeans plugin portal. You
should then be able to open the source distribution’s root directory as a Gradle project and compile
and run the components from within NetBeans.
3

Chapter 2. Using the kernel API
The interfaces and classes required to use the kernel API are part of the opentcs-api-base JAR file,
so you should add that to your classpath/declare a dependency on it. (See Available artifacts and
API compatibility.) The central interface that is usually interacted with is the Kernel interface.
To use the kernel API in code running inside the kernel JVM, e.g. a vehicle driver, simply request an
instance of Kernel to be provided via dependency injection. You may also work with an instance of
LocalKernel here, which provides additional methods available only to kernel application
components.
To access the kernel API from another JVM, e.g. in a client that is supposed to create transport
orders or to receive status updates for transport orders or vehicles, you need to connect to the
kernel via Remote Method Invocation (RMI). The easiest way to do this is by creating an instance of
the KernelProxyBuilder class and letting it build a KernelProxy instance for you. (For now, there isn’t
much support for user management, so it is recommended to ignore the methods that require user
credentials.) See also the class documentation for KernelProxyBuilder in the base API’s JavaDoc
documentation.
2.1. Working with transport orders
A transport order, represented by an instance of the class TransportOrder, describes a process to be
executed by a vehicle. Usually, this process is an actual transport of goods from one location to
another. A TransportOrder may, however, also just describe a vehicle’s movement to a destination
position and an optional vehicle operation to be performed.
All of the following are examples for "transport orders" in openTCS, even if nothing is actually
being transported:
•A classic order for transporting goods from somewhere to somewhere else:
a. Move to location "A" and perform operation "Load cargo" there.
b. Move to location "B" and perform operation "Unload cargo" there.
•Manipulation of transported or stationary goods:
a. Move to location "A" and perform operation "Drill" there.
b. Move to location "B" and perform operation "Hammer" there.
•An order to move the vehicle to a parking position:
a. Move to point "Park 01" (without performing any specific operation).
•An order to recharge the vehicle’s battery:
a. Move to location "Recharge station" and perform operation "Charge battery" there.
2.1.1. A transport order’s life cycle
1. When a transport order is created, its initial state is RAW.
4

2. A user/client sets parameters for the transport order that are supposed to influence the
transport process. These parameters may be e.g. the transport order’s deadline, the vehicle
supposed to process the transport order or a set of generic, usually project-specific properties.
3. The transport order is activated. Its state is set to ACTIVE.
4. The kernel’s router checks whether routing between the transport order’s destinations is
possible at all. If yes, its state is changed to DISPATCHABLE. If routing is not possible, the transport
order is marked as UNROUTABLE and not processed any further.
5. The kernel’s dispatcher checks whether all requirements for executing the transport order are
fulfilled and a vehicle is available for processing it. As long as there are any requirements not
yet fulfilled or no vehicle can execute it, the transport order is left waiting.
6. The kernel’s dispatcher assigns the transport order to a vehicle for processing. Its state is
changed to BEING_PROCESSED.
•If a transport order that is being processed is withdrawn (by a client/user), its state first
changes to WITHDRAWN, then to FAILED. It is not processed any further.
•If processing of the transport order fails for any reason, it is marked as FAILED and not
processed any further.
•If the vehicle successfully processes the transport order, it is marked as FINISHED.
7. Eventually — after a longer while or when too many transport orders in a final state have
accumulated in the kernel’s order pool — the kernel removes the transport order.
The following state machine visualizes this life cycle:
5
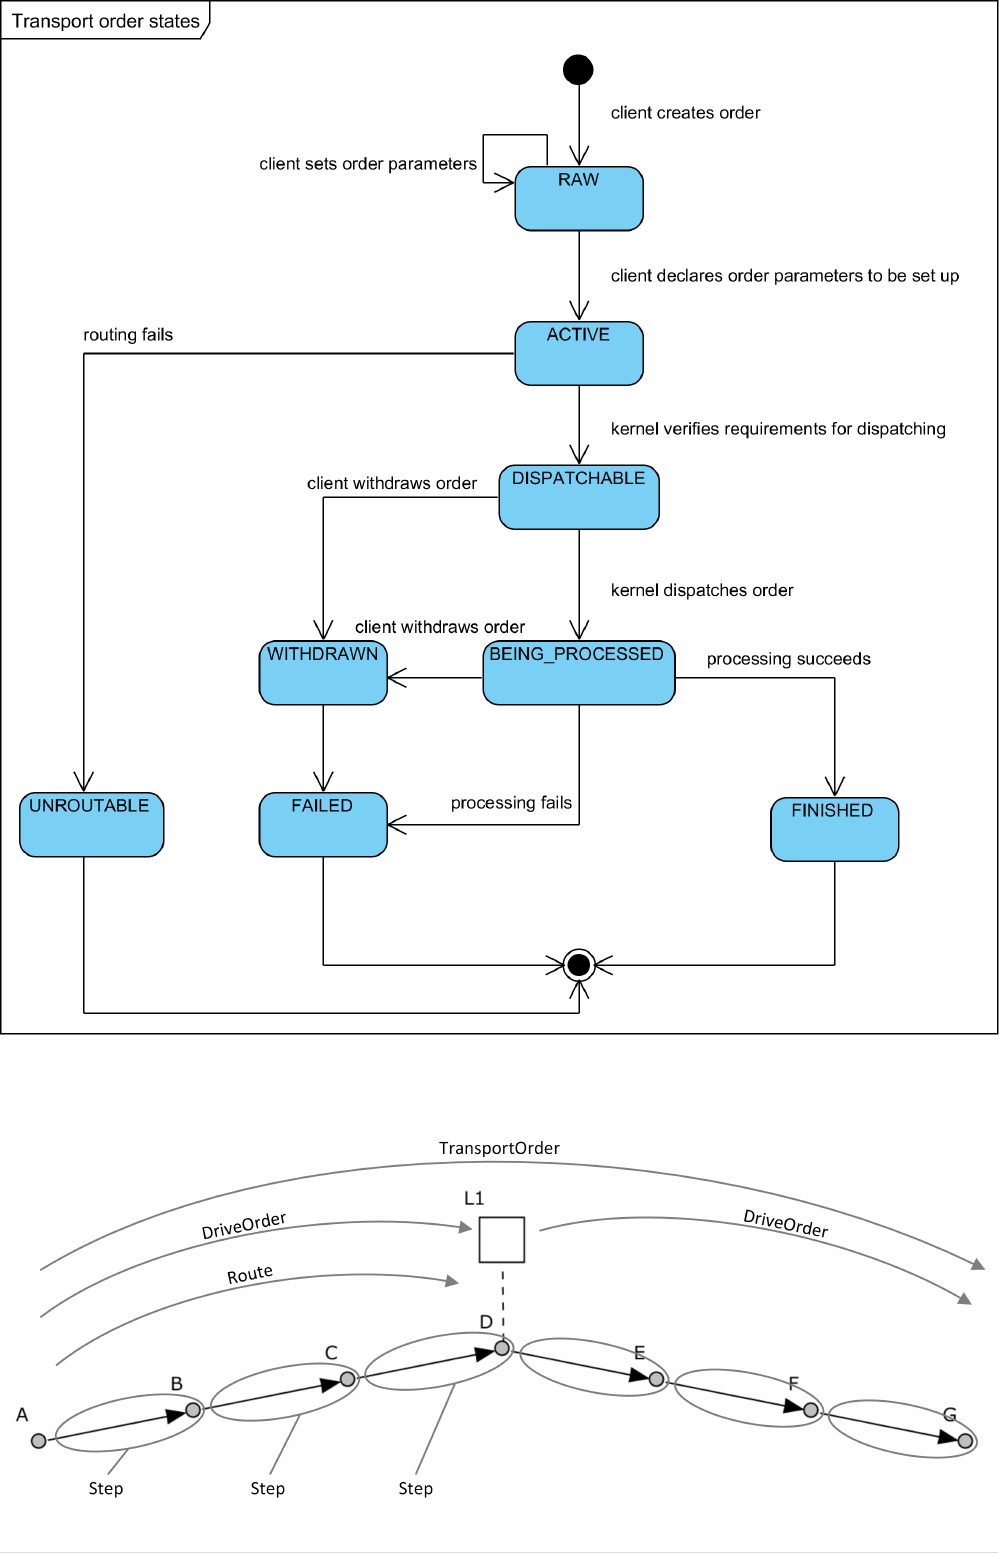
2.1.2. Structure and processing of transport orders
6
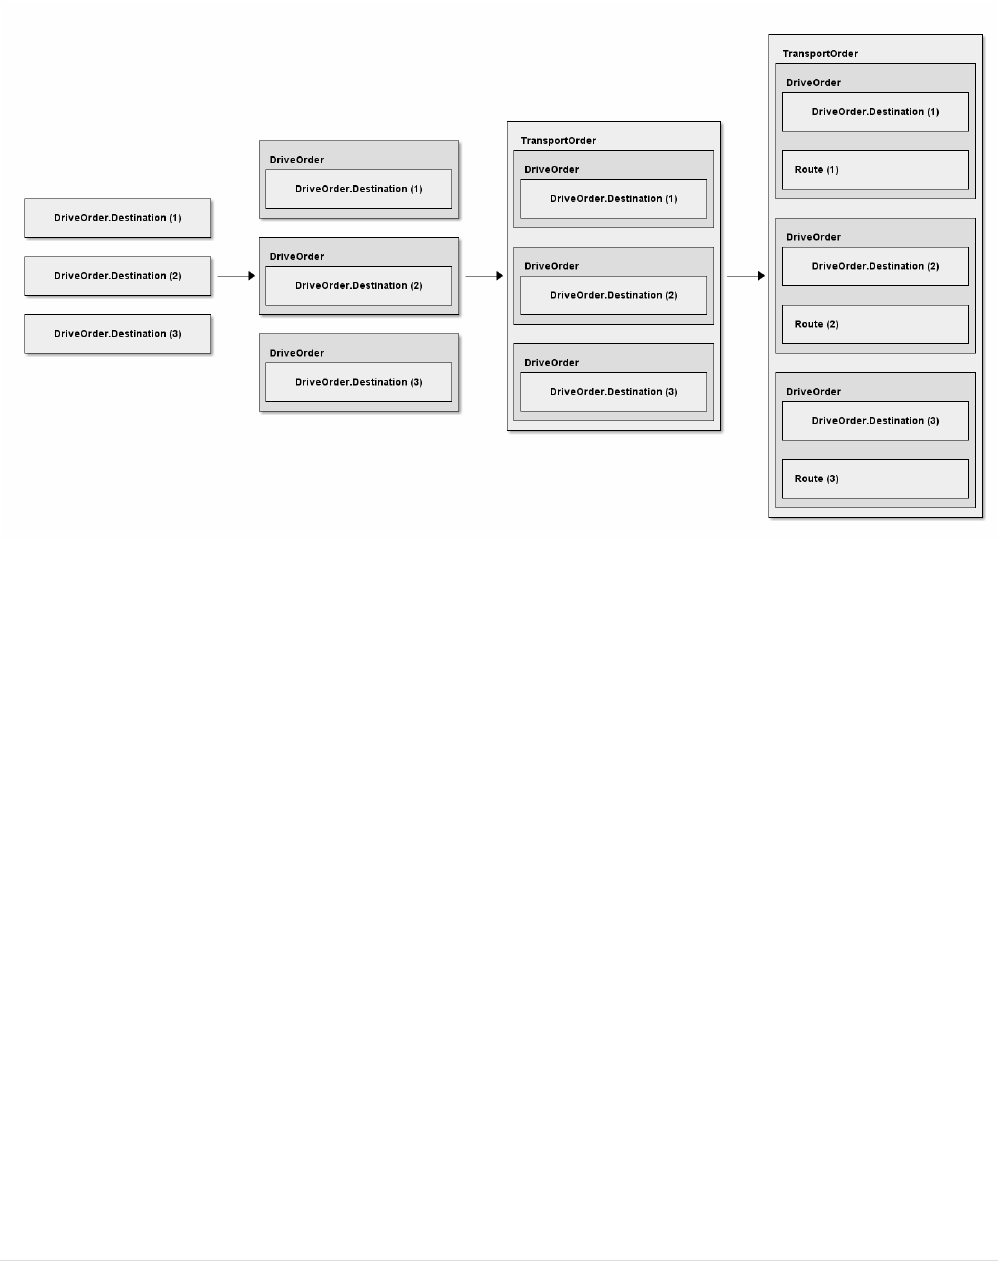
1. A TransportOrder is created by passing a list of DriveOrder.Destination instances to the Kernel
instance’s createTransportOrder() method.
a. The Kernel wraps each Destination in a newly-created DriveOrder instance.
b. These DriveOrders are themselves wrapped by the kernel in a single, newly-created
TransportOrder instance in their given order (see figure below).
2. Once a TransportOrder is being assigned to a vehicle by the Dispatcher, a Route is computed for
each of its DriveOrders. These Routes are then stored in the corresponding DriveOrders.
3. As soon as a vehicle (driver) is able to process a DriveOrder, the single Steps of its Route are
mapped to MovementCommands. These MovementCommands contain all information the vehicle driver
needs to reach the final destination and to perform the desired operation there.
4. The MovementCommands for the partial routes to be travelled are sent to the vehicle driver bit by
bit. The kernel only sends as many MovementCommandss in advance as is required for the vehicle
driver to function properly; it does this to maintain fine-grained control over the
paths/resources used by all vehicles. A vehicle driver may set the maximum number of
MovementCommands it gets in advance by adjusting its command queue capacity.
5. As soon as a DriveOrder is finished, the Route of the next DriveOrder is mapped to
MovementCommands.
6. Once the last DriveOrder of a TransportOrder is finished, the whole TransportOrder is finished, as
well.
2.1.3. How to create a new transport order
7

Ê // The Kernel instance we're working with
Ê Kernel kernel = getAKernelReference();
Ê // A list of destinations the transport order the vehicle is supposed
Ê // to travel to:
Ê List<DestinationCreationTO> destinations = new LinkedList<>();
Ê // Create a new destination description and add it to the list.
Ê // Every destination is described by the name of the destination
Ê // location in the plant model and an operation the vehicle is supposed
Ê // to perform there:
Ê destinations.add(new DestinationCreationTO("Some location name",
Ê "Some operation"));
Ê // Add as many destinations to the list like this as necessary. Then
Ê // create a transport order description with a name for the new transport
Ê // order and the list of destinations.
Ê // Note that the given name needs to be unique.
Ê TransportOrderCreationTO orderTO
Ê = new TransportOrderCreationTO("MyTransportOrder-" + UUID.randomUUID(),
Ê destinations);
Ê // Optionally, assign a specific vehicle to the transport order:
Ê orderTO.setIntendedVehicleName("Some vehicle name");
Ê // Optionally, set a deadline for the transport order:
Ê orderTO.setDeadline(ZonedDateTime.of(2099, 12, 31, 23, 59, 59, 0, ZoneId.of(
"Europe/Berlin")));
Ê // Create a new transport order for the given description:
Ê TransportOrder newOrder = kernel.createTransportOrder(orderTO);
Ê // And at last activate the transport order
Ê kernel.activateTransportOrder(newOrder.getReference());
Ê // Once a vehicle is available and able to process the transport order,
Ê // the kernel will assign it.
2.1.4. How to create a transport order that sends a vehicle to a point instead
of a location
8

Ê // The Kernel instance we're working with
Ê Kernel kernel = getAKernelReference();
Ê // Create a list containing a single destination to a point.
Ê // Use Destination.OP_MOVE as the operation to be executed:
Ê List<DestinationCreationTO> destinations = new LinkedList<>();
Ê destinations.add(new DestinationCreationTO("Some point name",
Ê Destination.OP_MOVE));
Ê // Create a transport order description with the destination and a
Ê // unique name and assign it to a specific vehicle:
Ê TransportOrderCreationTO orderTO
Ê = new TransportOrderCreationTO("MyTransportOrder-" + UUID.randomUUID(),
Ê destinations)
Ê .setIntendedVehicleName("Some vehicle name");
Ê // Create a transport order using the description:
Ê TransportOrder dummyOrder = kernel.createTransportOrder(orderTO);
Ê // Activate the new transport order:
Ê kernel.activateTransportOrder(dummyOrder.getReference());
2.1.5. Using order sequences
An order sequence can be used to force a single vehicle to process multiple transport orders in a
given order. Some rules for using order sequences are described in the API documentation for
OrderSequence, but here is what you would do in general:
9

Ê // The Kernel instance we're working with
Ê Kernel kernel = getAKernelReference();
Ê // Create an order sequence description with a unique name:
Ê OrderSequenceCreationTO sequenceTO
Ê = new OrderSequenceCreationTO("MyOrderSequence-" + UUID.randomUUID());
Ê // Optionally, set the sequence's failure-fatal flag:
Ê sequenceTO.setFailureFatal(true);
Ê // Create the order sequence:
Ê OrderSequence orderSequence = kernel.createOrderSequence(sequenceTO);
Ê // Set up the transport order as usual:
Ê List<DestinationCreationTO> destinations = new ArrayList<>();
Ê destinations.add(new DestinationCreationTO("Some location name",
Ê "Some operation"));
Ê TransportOrderCreationTO orderTO
Ê = new TransportOrderCreationTO("MyOrder-" + UUID.randomUUID(),
Ê destinations);
Ê // Set the name of the wrapping order sequence:
Ê orderTO.setWrappingSequence(orderSequence.getName());
Ê // Create the transport order and activate it for processing:
Ê TransportOrder order = kernel.createTransportOrder(orderTO);
Ê // Activate the order when it may be processed by a vehicle.
Ê kernel.activateTransportOrder(order.getReference());
Ê // Create, add and activate more orders as necessary.
Ê // Eventually, set the order sequence's complete flag to indicate that more
Ê // transport orders will not be added to it.
Ê kernel.setOrderSequenceComplete(orderSequence.getReference());
As long as the sequence has not been marked as complete and finished completely, the vehicle
selected for its first order will be tied to this sequence. It will not process any orders not belonging
to the same sequence until the whole sequence has been finished.
Once the complete flag of the sequence has been set and all transport orders belonging to it have
been processed, its finished flag will be set by the kernel.
2.1.6. How to withdraw a transport order that is currently being processed
10

Ê // The Kernel instance we're working with
Ê Kernel kernel = getKernelFromSomewhere();
Ê // Get the transport order to be withdrawn.
Ê TransportOrder curOrder = getTransportOrderToWithdraw();
Ê // Withdraw the order.
Ê // The second argument indicates if the vehicle should finish the movements
Ê // it is already assigned to (false) or abort immediately (true).
Ê // The third argument indicates whether the vehicle's processing state should
Ê // be changed to UNAVAILABLE so it cannot be assigned another transport order
Ê // right after the withdrawal.
Ê kernel.withdrawTransportOrder(curOrder.getReference(), true, false);
2.1.7. How to withdraw a transport order via a reference on the vehicle
processing it
Ê // The Kernel instance we're working with
Ê Kernel kernel = getKernelFromSomewhere();
Ê // Get the vehicle from which the transport order shall be withdrawn
Ê Vehicle curVehicle = kernel.getTCSObject(Vehicle.class,
Ê getSampleVehicle());
Ê // Withdraw the order.
Ê // The second argument indicates if the vehicle should finish the movements
Ê // it is already assigned to (false) or abort immediately (true).
Ê // The third argument indicates whether the vehicle's processing state should
Ê // be changed to UNAVAILABLE so it cannot be assigned another transport order
Ê // right after the withdrawal.
Ê kernel.withdrawTransportOrderByVehicle(curVehicle.getReference(), true, false);
11

Chapter 3. TCP/IP-based interfaces to other
systems
In addition to the Java-specific kernel interface, openTCS offers the following interfaces for
communication with other systems:
•A bidirectional interface via a TCP/IP connection for the creation of transport orders
•An unidirectional interface via a TCP/IP connection for receiving status messages, e.g. about
transport orders being processed
The TCP/IP interfaces are described in the following sections.
3.1. Creating orders via TCP/IP
For creating transport orders, the openTCS kernel accepts connections to a TCP port (default: port
55555). The communication between openTCS and the host works as follows:
1. The host establishes a new TCP/IP connection to openTCS.
2. The host sends a single XML telegram (described in detail in XML telegrams for creating orders
and XML telegrams referencing order batches) which either describes the transport orders to be
created or identifies batch files that are available with the kernel and that contain the transport
order descriptions.
3. The host closes its output stream of the TCP/IP connection or sends two consecutive line breaks
(i.e. "\r\n\r\n"), letting the kernel know that no further data will follow.
4. openTCS interprets the telegram sent by the host, creates the corresponding transport orders
and activates them.
5. openTCS sends an XML telegram (described in detail in Receipts for created orders) to confirm
processing of the telegram.
6. openTCS closes the TCP/IP connection.
The following points should be respected:
•Multiple sets of transport orders are not intended to be transferred via the same TCP
connection. After processing a set and sending the response, openTCS closes the connection. To
transfer further sets new TCP/IP connections need to be established by the peer system.
•openTCS only waits a limited amount of time (default: ten seconds) for incoming data. If there is
no incoming data from the peer system over a longer period of time, the connection will be
closed by openTCS without any transport orders being created.
•The maximum length of a single XML telegram is limited to 100 kilobytes by default. If more
data is transferred, the connection will be closed without any transport orders being created.
3.1.1. XML telegrams for creating orders
Every XML telegram sent to openTCS via the interface described above can describe multiple
12
transport orders to be created. Every order element must contain the following data:
•A string identifying the order element. This string is required for unambiguous matching of
receipts (see Receipts for created orders) and orders.
•A sequence of destinations and destination operations defining the actual order.
Furthermore, each order element may contain the following data:
•A deadline/point of time at which the order should be finished.
•The name of a vehicle in the system that the order should be assigned to. If this information is
omitted, any vehicle in the system may process the order.
•A set of names of existing transport orders that have to be finished before the new order may be
assigned to a vehicle.
The following example shows how an XML telegram for the creation of two transport orders could
look like.
Example 1: XML telegram for the creation of two transport orders
<?xml version="1.0" encoding="UTF-8" standalone="yes"?>
<tcsOrderSet>
Ê <order xsi:type="transport" deadline="2018-01-13T21:39:18.502+05:30"
intendedVehicle="Vehicle-01" id="TransportOrder-01" xmlns:xsi=
"http://www.w3.org/2001/XMLSchema-instance">
Ê <destination locationName="Storage 01" operation="Load cargo"/>
Ê <destination locationName="Storage 02" operation="Unoad cargo"/>
Ê <property key="waitBefore" value="Unload"/>
Ê </order>
Ê <order xsi:type="transport" id="TransportOrder-02" xmlns:xsi=
"http://www.w3.org/2001/XMLSchema-instance">
Ê <destination locationName="Working station 01" operation="Drill">
Ê <property key="drillSize" value="3"/>
Ê </destination>
Ê <destination locationName="Working station 02" operation="Drill">
Ê <property key="drillSize" value="8"/>
Ê </destination>
Ê <destination locationName="Working station 03" operation="Cut"/>
Ê </order>
</tcsOrderSet>
3.1.2. XML telegrams referencing order batches
Alternatively, an XML telegram may also reference order batches which are kept in files on the
openTCS system. The (parameters of the) transport orders to be created will then be read from the
referenced batch files. A batch file may contain/create an arbitrary number of transport orders and
needs to be placed in the kernel application’s subdirectory scripts. In the openTCS distribution, this
directory already contains a couple of templates for batch files (template.tcs and test.tcs).
The following example shows how an XML telegram referencing a batch file could look like.
13

Example 2: XML telegram referencing a batch file
<?xml version="1.0" encoding="UTF-8" standalone="yes"?>
<tcsOrderSet>
Ê <order xsi:type="transportScript" fileName="test.tcs" id="test.tcs" xmlns:xsi=
"http://www.w3.org/2001/XMLSchema-instance"/>
</tcsOrderSet>
3.1.3. Receipts for created orders
In response to an XML telegram for the creation of transport orders, an XML telegram will be sent
back to the peer, reporting the operation’s outcome. In the response telegram, every order element
of the original telegram will be referenced by a response element with the same ID. Furthermore,
every response element contains:
•A flag reflecting the success of creating the respective order
•The name that openTCS internally assigned to the created order. (This name is relevant for
interpreting the messages on the status channel - see Status messages via TCP/IP.)
The following example shows how a response to the telegram in Example 1 could look like.
Example 3: XML telegram with receipts for created orders
<?xml version="1.0" encoding="UTF-8" standalone="yes"?>
<tcsResponseSet>
Ê <response xsi:type="transportResponse" executionSuccessful="true" orderName=
"TOrder-0001" id="TransportOrder-01" xmlns:xsi="http://www.w3.org/2001/XMLSchema-
instance"/>
Ê <response xsi:type="transportResponse" executionSuccessful="true" orderName=
"TOrder-0002" id="TransportOrder-02" xmlns:xsi="http://www.w3.org/2001/XMLSchema-
instance"/>
</tcsResponseSet>
3.1.4. Receipts for order batches
For referenced order batches, receipts will be sent back to the peer, too. The response contains an
element for every batch file referenced by the peer. If the batch file was successfully read and
processed, a response for every single order definition it contains will be included.
The following example shows a possible response to the batch file reference in Example 2. In this
case, the batch file contains two transport order definitions which have been processed
successfully.
14

Example 4: XML telegram with receipts for orders in batch file
<?xml version="1.0" encoding="UTF-8" standalone="yes"?>
<tcsResponseSet>
Ê <response xsi:type="scriptResponse" parsingSuccessful="true" id="test.tcs"
xmlns:xsi="http://www.w3.org/2001/XMLSchema-instance">
Ê <transport executionSuccessful="true" orderName="TOrder-0003" id="test.tcs"/>
Ê <transport executionSuccessful="true" orderName="TOrder-0004" id="test.tcs"/>
Ê </response>
</tcsResponseSet>
3.2. Status messages via TCP/IP
To receive status messages for transport orders in the system, connections to another TCP port
(default: port 44444) may be established. Whenever the state of a transport order changes, an XML
telegram will be sent to each connnected client, describing the new state of the order. Each of these
telegrams is followed by a string that does not appear in the telegrams themselves (by default, a
single pipe symbol: "|"), marking the end of the respective telegram. Status messages will be sent
until the peer closes the TCP connection.
The following points should be respected:
•From the peer’s point of view, connections to this status channel are purely passive, i.e. openTCS
does not expect any messages from the peer and will not process any data received via this
connection.
•A peer needs to filter the received telegrams for relevant data itself. The openTCS kernel does
not provide any filtering of status messages for clients.
•Due to concurrent processes within openTCS, it is possible that the creation and activation of a
transport order and its assignment to a vehicle is reported via the status channel before the
peer that created the order receives the corresponding receipt.
The following example shows a status message as it would be sent via the status channel after the
first of the two transport orders defined in Example 1 has been created and activated.
15

Example 5: Status message for the generated order
<?xml version="1.0" encoding="UTF-8" standalone="yes"?>
<tcsStatusMessageSet timeStamp="2018-01-13T21:39:19.191+05:30">
Ê <statusMessage xsi:type="orderStatusMessage" orderName="TOrder-0001" orderState=
"ACTIVE" processingVehicleName="Vehicle-0001" xmlns:xsi=
"http://www.w3.org/2001/XMLSchema-instance">
Ê <destination locationName="Storage 01" operation="Load cargo" state="PRISTINE
"/>
Ê <destination locationName="Storage 02" operation="Unload cargo" state=
"PRISTINE"/>
Ê <property key="waitBefore" value="Unload"/>
Ê </statusMessage>
</tcsStatusMessageSet>
The following example shows a status message as it would be sent via the status channel for a
vehicle state update.
Example 6: Status message for vehicle update
<?xml version="1.0" encoding="UTF-8" standalone="yes"?>
<tcsStatusMessageSet timeStamp="2018-01-13T21:39:20.630+05:30">
Ê <statusMessage xsi:type="vehicleStatusMessage" position="Point-000"
processingState="PROCESSING_ORDER" state="EXECUTING" transportOrderName=
"TransportOrder-001" vehicleName="Vehicle-000" xmlns:xsi=
"http://www.w3.org/2001/XMLSchema-instance">
Ê <precisePosition x="100" y="110" z="120"/>
Ê </statusMessage>
</tcsStatusMessageSet>
3.3. XML Schema definitions for telegrams and scripts
XML schemas describing the expected structure of XML order telegrams and order batch files as
well as the structure of receipt telegrams as sent by openTCS are part of the openTCS distribution
and can be found in the directory containing the developer documentation.
16

Chapter 4. Customizing and extending the
kernel application
4.1. Guice modules
The openTCS kernel application uses Guice to configure its components. To modify the wiring of
components within the application and to add your own components, you can register custom
Guice modules. Modules are found and registered automatically via java.util.ServiceLoader.
Basically, the following steps are required for customizing the application:
1. Build a JAR file for your custom injection module with the following content:
a. A subclass of org.opentcs.customizations.kernel.KernelInjectionModule, which can be found
in the base library, must be contained. Configure your custom components or adjust the
application’s default wiring in this module. KernelInjectionModule provides a few supporting
methods you can use.
b. A plain text file named META-
INF/services/org.opentcs.customizations.kernel.KernelInjectionModule must also be
contained. This file should contain a single line of text with the fully qualified class name of
your module.
2. Ensure that the JAR file(s) containing your Guice modules and the implementation of your
custom component(s) are part of the class path when you start the kernel application.
For more information on how the automatic registration works, see the documentation of
java.util.ServiceLoader in the Java class library. For more information on how Guice works, see
the Guice documentation.
4.2. Replacing default kernel components
The kernel application comes with default implementations for the component interfaces in
org.opentcs.components.kernel. These default implementations allow the kernel to fulfil all of its
responsibilities, but the default components might not be optimal for a specific use case. They can
be replaced with a custom Guice configuration, which could look similar to the default
configuration the kernel application uses:
17
Ê @Override
Ê protected void configure() {
Ê configureSchedulerDependencies();
Ê configureRouterDependencies();
Ê configureDispatcherDependencies();
Ê configureRecoveryEvaluatorDependencies();
Ê bindScheduler(DefaultScheduler.class);
Ê bindRouter(DefaultRouter.class);
Ê bindDispatcher(DefaultDispatcher.class);
Ê bindRecoveryEvaluator(DefaultRecoveryEvaluator.class);
Ê }
For every component, KernelInjectionModule provides a convenience method for (re)binding the
implementation. To replace e.g. the default Dispatcher implementation, simply register a Guice
module in which you call bindDispatcher(). The module’s implementation could look like this:
@Override
protected void configure() {
Ê configureSomeDispatcherDependencies();
Ê bindDispatcher(CustomDispatcher.class);
}
Note that all component implementations are bound as singletons. This is
important for the following reason: Components may be injected and used at
multiple places within the kernel application; at the same time, every component
may also have to keep an internal state to do its work. If they were not bound as
singletons, a new instance would be created for every injection, each of them
with their own, separate internal state. Build custom components with that in
mind, and implement their initialize() and terminate() methods appropriately!
4.3. Developing vehicle drivers
openTCS supports dynamic integration of vehicle drivers that implement vehicle-specific
communication protocols and thus mediate between the kernel and the vehicle. Due to its function,
a vehicle driver is also called a communication adapter. The following sections describe which
requirements must be met by a driver and which steps are necessary to create and use it.
4.3.1. Classes and interfaces of a driver implementation
18
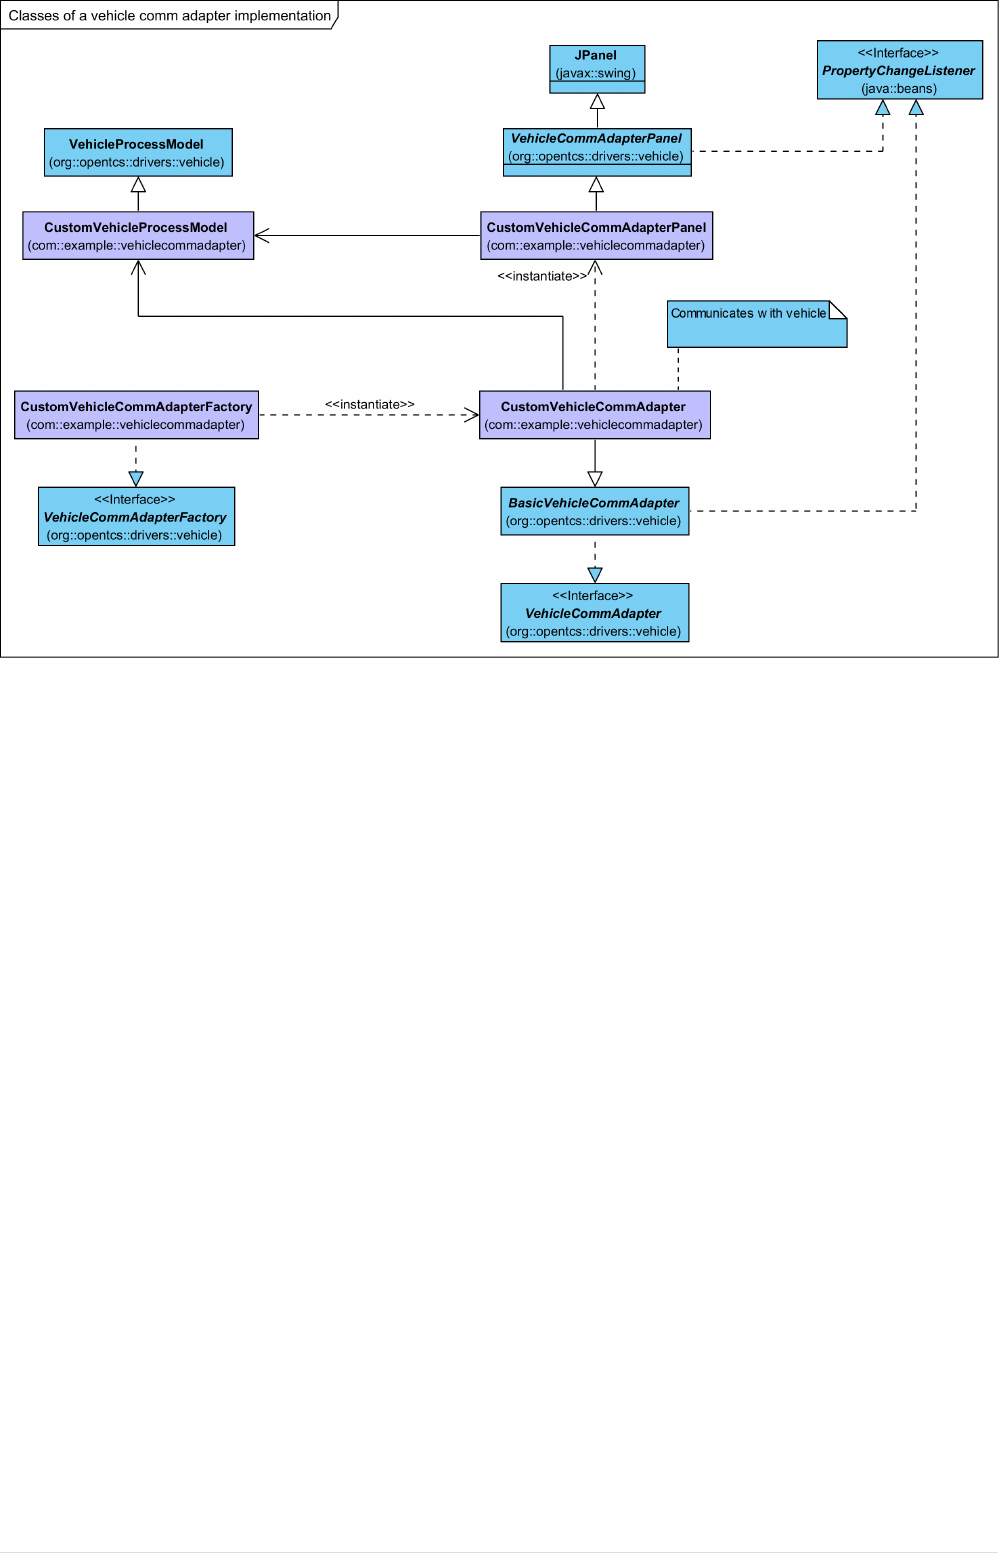
Figure 1. Classes of a vehicle comm adapter implementation
When developing a vehicle driver, the most important classes and interfaces in the base library are
the following:
•VehicleCommAdapter declares methods that every comm adapter must implement. These methods
are called by components within the kernel, for instance to tell a vehicle that it is supposed to
move to the next position in the driving course. Classes implementing this interface are
expected to realize the actual communication with a vehicle, e.g. via TCP, UDP or some field bus.
•BasicVehicleCommAdapter may be used as a base class for implementing a VehicleCommAdapter. It
primarily provides some basic command queueing.
•VehicleCommAdapterFactory describes a factory for VehicleCommAdapter instances. The kernel
instantiates and uses one such factory per vehicle type/driver to create instances of the
respective VehicleCommAdapter on demand.
•VehicleCommAdapterPanel instances may be created by a VehicleCommAdapter e.g. to display
information about the associated vehicle or send low-level messages to it.
•A single VehicleProcessModel instance should be provided by every VehicleCommAdapter instance
in which it keeps the relevant state of both the vehicle and the comm adapter. This model
instance is supposed to be shared by a VehicleCommAdapter and all of its VehicleCommAdapterPanel
instances for mutual updates, and should be updated to notify the kernel about relevant
changes. The comm adapter implementation should e.g. update the vehicle’s current position in
the model when it receives that information to allow panels to display it. Likewise, panels may
set values that influence the comm adapter’s behaviour in the model, e.g. an interval for
periodic messages the comm adapter sends to the vehicle. VehicleProcessModel may be used as it
is, as it contains members for all the information the openTCS kernel itself needs. However,
19

developers may use driver-specific subclasses of VehicleProcessModel to have comm adapter and
panels exchange more than the default set of attributes.
In the class diagram above, the following exemplary classes could have been created by a
developer:
•CustomVehicleCommAdapter realizes the communication with the actual vehicle and updates the
VehicleProcessModel when necessary.
•CustomVehicleCommAdapterFactory produces instances of CustomVehicleCommAdapter on demand.
•Optional: CustomVehicleCommAdapterPanel visualizes the vehicle’s and/or comm adapter’s current
state and provides some low-level interaction with the vehicle.
•Optional: CustomVehicleProcessModel contains vehicle-specific state information.
4.3.2. Steps to create a new vehicle driver
1. Create an implementation of VehicleCommAdapter:
a. Subclass BasicVehicleCommAdapter unless you have a reason not to. You don’t have to, but if
you don’t, you also need to implement command queue management yourself.
b. Implement the abstract methods of BasicVehicleCommAdapter in the derived class to realize
communication with the vehicle and to provide driver-specific visualization panels, if any.
c. In situations in which the state of the vehicle changes in a way that is relevant for the kernel
or the comm adapter’s custom panels, the comm adapter should call the respective methods
on the model. Most importantly, call setVehiclePosition() and commandExecuted() on the
comm adapter’s model when the controlled vehicle’s reported state indicates that it has
moved to a different position or that it has finished an order.
2. Create an implementation of VehicleCommAdapterFactory that provides instances of your
VehicleCommAdapter for given Vehicle objects.
3. Optional: Create any number of implementations of VehicleCommAdapterPanel that the kernel GUI
should display for the comm adapter. Create and return instances of these panels in the
getAdapterPanels() method of your comm adapter implementation.
See the API documentation for more details. For an example, refer to the implementation of the
loopback comm adapter for virtual vehicles in the openTCS source distribution.
4.3.3. Requirements for a vehicle driver to be found at runtime
1. Create a Guice module for your vehicle driver by creating a subclass of KernelInjectionModule.
Implement the configure() method and register a binding to your VehicleCommAdapterFactory.
The following example demonstrates how this module’s configure() method looks like for the
loopback driver that is part of the openTCS distribution:
20

Ê @Override
Ê protected void configure() {
Ê configureLoopbackAdapterDependencies();
Ê vehicleCommAdaptersBinder().addBinding().to(
LoopbackCommunicationAdapterFactory.class);
Ê }
2. In the JAR file containing your driver, ensure that there exists a folder named META-
INF/services/ with a file named org.opentcs.customizations.kernel.KernelInjectionModule. This
file should consist of a single line of text holding simply the name of the Guice module class, e.g.:
org.opentcs.kernel.LoopbackCommAdapterModule
Background: openTCS uses java.util.ServiceLoader to automatically find
Guice modules on startup, which depends on this file (with this name) being
present. See the JDK’s API documentation for more information about how
this mechanism works.
3. Place the JAR file of your driver including all neccessary resources in the subdirectory
lib/openTCS-extensions/ of the openTCS kernel application’s installation directory before the
kernel is started. (The openTCS start scripts include all JAR files in that directory in the
application’s classpath.)
Drivers meeting these requirements are found automatically when you start the kernel.
4.4. Sending messages to communication adapters
Sometimes it is required to have some influence on the behaviour of a communication adapter (and
thus the vehicle it is associated with) directly from a kernel client - to send a special telegram to the
vehicle, for instance. For these cases, Kernel.sendCommAdapterMessage(TCSObjectReference<Vehicle>,
Object) provides a one-way communication channel for a client to send a message object to a
communication adapter currently associated with a vehicle. A comm adapter implementing
processMessage() may interpret message objects sent to it and react in an appropriate way. Note that
the client sending the message may not know which communication adapter implementation is
currently associated with the vehicle, so the adapter may or may not be able to understand the
message.
4.5. Acquiring data from communication adapters
For getting information from a communication adapter to a kernel client, there are the following
ways:
Communication adapters may call publish events via their VehicleProcessModel instance to emit
information encapsulated in an event for any listeners registered with the kernel. Apparently,
listeners must already be registered before such an event is emitted by the communication adapter,
or they will miss it. To register a client as a listener, use Kernel.addEventListener().
21

Alternatively, communication adapters may use their VehicleProcessModel to set properties in the
corresponding Vehicle object. Kernel clients may then retrieve the information from it:
Ê // The Kernel instance we're working with
Ê Kernel kernel = getKernelFromSomewhere();
Ê // Get the vehicle from which information shall be retrieved
Ê Vehicle vehicle = kernel.getTCSObject(Vehicle.class, getTheVehicleName());
Ê // Get the actual property you're looking for
Ê String property = vehicle.getProperty("someKey");
Communication adapters may also use their VehicleProcessModel to set properties in the
corresponding TransportOrder object a vehicle is currently processing. This basically works the
same way as with the Vehicle object:
Ê // The Kernel instance we're working with
Ê Kernel kernel = getKernelFromSomewhere();
Ê // Get the tansport order from which information shall be retrieved
Ê TransportOrder transportOrder = kernel.getTCSObject(TransportOrder.class,
Ê getTheTransportOrderName());
Ê // Get the actual property you're looking for
Ê String property = transportOrder.getProperty("someKey");
Unlike information published via events, data stored as properties in Vehicle or TransportOrder
objects can be retrieved at any time.
22

Chapter 5. Customizing and extending the
plant overview application
5.1. Guice modules
Analogous to the kernel application, the plant overview application uses Guice to configure its
components. To modify the wiring of components within the application and to add your own
components, you can register custom Guice modules. Modules are found and registered
automatically via java.util.ServiceLoader.
Basically, the following steps are required for customizing the application:
1. Build a JAR file for your custom injection module with the following content:
a. A subclass of PlantOverviewInjectionModule, which can be found in the base library, must be
contained. Configure your custom components or adjust the application’s default wiring in
this module. PlantOverviewInjectionModule provides a few supporting methods you can use.
b. A plain text file named META-
INF/services/org.opentcs.customizations.plantoverview.PlantOverviewInjectionModule must
also be contained. This file should contain a single line of text with the fully qualified class
name of your module.
2. Ensure that the JAR file(s) containing your Guice modules and the implementation of your
custom component(s) are part of the class path when you start the plant overview application.
For more information on how the automatic registration works, see the documentation of
java.util.ServiceLoader in the Java class library. For more information on how Guice works, see
the Guice documentation.
5.2. How to create a plugin panel for the plant
overview client
The plant overview client offers to integrate custom panels providing project-specific functionality.
1. Implement a subclass of PluggablePanel.
2. Implement a PluggablePanelFactory that produces instances of your PluggablePanel.
3. Create a Guice module for your PluggablePanelFactory by subclassing
PlantOverviewInjectionModule. Implement the configure() method and add a binding to your
PluggablePanelFactory using pluggablePanelFactoryBinder(). The following example
demonstrates how this module looks like for the panels that are part of the openTCS
distribution:
23
public class DefaultPluginPanelsModule
Ê extends PlantOverviewInjectionModule {
Ê @Override
Ê protected void configure() {
Ê pluggablePanelFactoryBinder().addBinding().to(ContinuousLoadPanelFactory.class
);
Ê pluggablePanelFactoryBinder().addBinding().to(StatisticsPanelFactory.class);
Ê pluggablePanelFactoryBinder().addBinding().to(ResourceAllocationPanelFactory
.class);
Ê }
}
4. Build and package the PluggablePanel, PluggablePanelFactory and Guice module into a JAR file.
5. In the JAR file, register the Guice module class as a service of type PlantOverviewInjectionModule.
To do that, ensure that the JAR file contains a folder named META-INF/services/ with a file
named org.opentcs.customizations.plantoverview.PlantOverviewInjectionModule. This file
should consist of a single line of text holding simply the name of the guice module class, e.g.:
org.opentcs.guing.DefaultPluginPanelsModule
6. Place the JAR file in the Plant Overview application’s class path (subdirectory lib/openTCS-
extensions/ of the application’s installation directory) and start the application.
5.3. How to create a location/vehicle theme for
openTCS
Locations and vehicles are visualized in the plant overview client using configurable themes. To
customize the appearance of locations and vehicles, new theme implementations can be created
and integrated into the plant overview client.
1. Create a new class which implements LocationTheme or VehicleTheme.
2. Place the JAR file of your theme, containing all required resources, in the subdirectory
lib/openTCS-extensions/ of the openTCS plant overview application’s installation directory
before the application is started. (The openTCS start scripts include all JAR files in that directory
in the application’s classpath.)
3. Set the locationThemeClass or vehicleThemeClass in the Plant Overview application’s
configuration file (config/opentcs-plantoverview.properties).
Vehicles or locations in plant models are then rendered using your custom theme.
24
