Pdi User Guide
pdi_user_guide
User Manual: Pdf
Open the PDF directly: View PDF ![]() .
.
Page Count: 262 [warning: Documents this large are best viewed by clicking the View PDF Link!]
- Contents
- Introduction
- Pentaho Data Integration Architecture
- Use Pentaho Data Integration
- Interface Perspectives
- Terminology and Basic Concepts
- Create Transformations
- Executing Transformations
- Working with the DI Repository
- Reusing Transformation Flows with Mapping Steps
- Arguments, Parameters, and Variables
- Rapid Analysis Schema Prototyping
- Using the SQL Editor
- Using the Database Explorer
- Unsupported Databases
- Performance Monitoring and Logging
- Working with Big Data and Hadoop in PDI
- Pentaho MapReduce Workflow
- PDI Hadoop Job Workflow
- Hadoop to PDI Data Type Conversion
- Hadoop Hive-Specific SQL Limitations
- Big Data Tutorials
- Implement Data Services with the Thin Kettle JDBC Driver
- Transactional Databases and Job Rollback
- Interacting With Web Services
- Scheduling and Scripting PDI Content
- Transformation Step Reference
- Big Data
- Input
- Cassandra Input
- CSV File Input
- Data Grid
- De-serialize From File
- Email Messages Input
- ESRI Shapefile Reader
- Fixed File Input
- Generate Random Credit Card Numbers
- Generate Random Value
- Generate Rows
- Get Data From XML
- Get File Names
- Get Files Rows Count
- Get Repository Names
- Get Subfolder Names
- Get System Info
- Get Table Names
- Google Analytics Input
- Google Docs Input
- GZIP CSV Input
- HBase Input
- HL7 Input
- JMS Consumer
- JSON Input
- LDAP Input
- LDIF Input
- Load File Content In Memory
- Microsoft Access Input
- Microsoft Excel Input
- Mondrian Input
- MongoDB Input
- OLAP Input
- OpenERP Object Input
- Palo Cell Input
- Palo Dim Input
- Property Input
- Splunk Input
- RSS Input
- S3 CSV Input
- Salesforce Input
- SAP Input
- SAS Input
- Table Input
- Text File Input
- XBase Input
- XML Input Stream (StAX)
- YAML Input
- Output
- Automatic Documentation Output
- Cassandra Output
- Delete
- HBase Output
- Insert/Update
- JMS Producer
- JSON Output
- LDAP Output
- Microsoft Access Output
- Microsoft Excel Output
- Microsoft Excel Writer
- MongoDB Output
- OpenERP Object Input
- Palo Cell Output
- Palo Dim Output
- Pentaho Reporting Output
- Properties Output
- RSS Output
- S3 File Output
- Salesforce Delete
- Salesforce Insert
- Salesforce Update
- Salesforce Upsert
- Serialize to File
- Splunk Output
- SQL File Output
- Synchronize After Merge
- Table Output
- Text File Output
- Update
- XML Output
- Transform
- Add a Checksum
- Add Constants
- Add Sequence
- Add Value Fields Changing Sequence
- Add XML
- Calculator
- Closure Generator
- Example Plugin
- Get ID From Slave Server
- Number Range
- Replace in String
- Row Denormalizer
- Row Flattener
- Row Normalizer
- Select Values
- Set Field Value
- Set Field Value to a Constant
- Sort Rows
- Split Field to Rows
- Split Fields
- String Operations
- Strings Cut
- Unique Rows
- Unique Rows (HashSet)
- Value Mapper
- XSL Transformation
- Utility
- Flow
- Scripting
- Lookup
- Joins
- Data Warehouse
- Validation
- Statistics
- Palo
- Job
- Mapping
- Bulk Loading
- Inline
- Data Mining Steps
- Job Entry Reference
- About PDI Marketplace
- Troubleshooting
- Changing the Pentaho Data Integration Home Directory Location (.kettle folder)
- Kitchen can't read KJBs from a Zip export
- Generating a DI Repository Configuration Without Running Spoon
- Unable to Get List of Repositories Exception
- Database Locks When Reading and Updating From A Single Table
- Force PDI to use DATE instead of TIMESTAMP in Parameterized SQL Queries
- PDI Does Not Recognize Changes Made To a Table
- Using ODBC
- Sqoop Import into Hive Fails

Create DI Solutions

This document supports Pentaho Business Analytics Suite 5.0 GA and Pentaho Data Integration 5.0 GA,
documentation revision February 3, 2014, copyright © 2014 Pentaho Corporation. No part may be reprinted without
written permission from Pentaho Corporation. All trademarks are the property of their respective owners.
Help and Support Resources
If you do not find answers to your quesions here, please contact your Pentaho technical support representative.
Support-related questions should be submitted through the Pentaho Customer Support Portal at
http://support.pentaho.com.
For information about how to purchase support or enable an additional named support contact, please contact your
sales representative, or send an email to sales@pentaho.com.
For information about instructor-led training, visit
http://www.pentaho.com/training.
Liability Limits and Warranty Disclaimer
The author(s) of this document have used their best efforts in preparing the content and the programs contained
in it. These efforts include the development, research, and testing of the theories and programs to determine their
effectiveness. The author and publisher make no warranty of any kind, express or implied, with regard to these
programs or the documentation contained in this book.
The author(s) and Pentaho shall not be liable in the event of incidental or consequential damages in connection
with, or arising out of, the furnishing, performance, or use of the programs, associated instructions, and/or claims.
Trademarks
Pentaho (TM) and the Pentaho logo are registered trademarks of Pentaho Corporation. All other trademarks are the
property of their respective owners. Trademarked names may appear throughout this document. Rather than list
the names and entities that own the trademarks or insert a trademark symbol with each mention of the trademarked
name, Pentaho states that it is using the names for editorial purposes only and to the benefit of the trademark
owner, with no intention of infringing upon that trademark.
Third-Party Open Source Software
For a listing of open source software used by each Pentaho component, navigate to the folder that contains the
Pentaho component. Within that folder, locate a folder named licenses. The licenses folder contains HTML.files that
list the names of open source software, their licenses, and required attributions.
Contact Us
Global Headquarters Pentaho Corporation
Citadel International, Suite 340
5950 Hazeltine National Drive
Orlando, FL 32822
Phone: +1 407 812-OPEN (6736)
Fax: +1 407 517-4575
http://www.pentaho.com
Sales Inquiries: sales@pentaho.com
| TOC | 3
Contents
Introduction..............................................................................................................................11
Pentaho Data Integration Architecture.....................................................................................12
Use Pentaho Data Integration................................................................................................. 13
Create a Connection to the DI Repository..................................................................................................13
Interface Perspectives............................................................................................................. 14
Use Perspectives Within Spoon................................................................................................................. 14
Tour Spoon.................................................................................................................................................15
VFS File Dialogues in Spoon...........................................................................................................17
Model Perspective...................................................................................................................................... 17
Visualization Perspective............................................................................................................................18
Instaview Perspective.................................................................................................................................19
Customizing the Spoon Interface................................................................................................................21
Terminology and Basic Concepts............................................................................................24
Transformations, Steps, and Hops............................................................................................................. 24
Jobs............................................................................................................................................................ 25
More About Hops........................................................................................................................................25
Create Transformations...........................................................................................................28
Get Started................................................................................................................................................. 28
Save Your Transformation..........................................................................................................................29
Run Your Transformation Locally............................................................................................................... 29
Build a Job..................................................................................................................................................30
Executing Transformations......................................................................................................31
Initialize Slave Servers in Spoon................................................................................................................ 31
Executing Jobs and Transformations from the Repository on the Carte Server.........................................32
Impact Analysis...........................................................................................................................................32
Working with the DI Repository............................................................................................... 33
Deleting a Repository................................................................................................................................. 33
Managing Content in the DI Repository......................................................................................................33
Setting Folder-Level Permissions.................................................................................................... 34
Exporting Content from Solutions Repositories with Command-Line Tools.................................... 35
Working with Version Control..................................................................................................................... 36
Examining Version History...............................................................................................................36
Restoring a Previously Saved Version of a Job or Transformation................................................. 36
Reusing Transformation Flows with Mapping Steps................................................................37
Arguments, Parameters, and Variables...................................................................................39
Arguments.................................................................................................................................................. 39
Parameters................................................................................................................................................. 39
VFS Properties.................................................................................................................................39
Variables.....................................................................................................................................................40
Variable Scope.................................................................................................................................41
Internal Variables.............................................................................................................................41
Rapid Analysis Schema Prototyping........................................................................................43
Creating a Prototype Schema With a Non-PDI Data Source......................................................................43
Creating a Prototype Schema With a PDI Data Source............................................................................. 43
Testing With Pentaho Analyzer and Report Wizard................................................................................... 44
Prototypes in Production.............................................................................................................................44
Using the SQL Editor...............................................................................................................45
Using the Database Explorer...................................................................................................46
Unsupported Databases..........................................................................................................47
Performance Monitoring and Logging......................................................................................48
Monitoring Step Performance.....................................................................................................................48
Using Performance Graphs............................................................................................................. 48
Logging Steps.............................................................................................................................................49
| TOC | 4
Logging Transformations............................................................................................................................50
Pentaho Data Integration Performance Tuning Tips.................................................................................. 52
Working with Big Data and Hadoop in PDI..............................................................................54
Pentaho MapReduce Workflow.................................................................................................................. 54
PDI Hadoop Job Workflow..........................................................................................................................56
Hadoop to PDI Data Type Conversion....................................................................................................... 57
Hadoop Hive-Specific SQL Limitations.......................................................................................................58
Big Data Tutorials....................................................................................................................................... 58
Hadoop Tutorials..............................................................................................................................58
MapR Tutorials.................................................................................................................................66
Cassandra Tutorials.........................................................................................................................67
MongoDB Tutorials.......................................................................................................................... 67
Implement Data Services with the Thin Kettle JDBC Driver....................................................69
Transactional Databases and Job Rollback............................................................................ 70
Make a Transformation Database Transactional........................................................................................70
Make a Job Database Transactional.......................................................................................................... 70
Interacting With Web Services.................................................................................................71
Scheduling and Scripting PDI Content.................................................................................... 72
Scheduling Transformations and Jobs From Spoon...................................................................................72
Command-Line Scripting Through Pan and Kitchen.................................................................................. 73
Pan Options and Syntax.................................................................................................................. 73
Kitchen Options and Syntax.............................................................................................................74
Importing KJB or KTR Files From a Zip Archive..............................................................................76
Connecting to a DI Solution Repositories with Command-Line Tools............................................. 76
Exporting Content from Solutions Repositories with Command-Line Tools.................................... 77
Transformation Step Reference...............................................................................................79
Big Data......................................................................................................................................................79
Avro Input.........................................................................................................................................79
Cassandra Input...............................................................................................................................80
Cassandra Output............................................................................................................................82
CouchDB Input.................................................................................................................................83
Hadoop File Input.............................................................................................................................84
Hadoop File Output..........................................................................................................................89
HBase Input..................................................................................................................................... 91
HBase Output.................................................................................................................................. 93
HBase Row Decoder....................................................................................................................... 95
MapReduce Input.............................................................................................................................96
MapReduce Output..........................................................................................................................96
MongoDB Input................................................................................................................................97
MongoDB Output........................................................................................................................... 102
Splunk Input...................................................................................................................................105
Splunk Output................................................................................................................................ 107
SSTable Output............................................................................................................................. 108
Input..........................................................................................................................................................108
Cassandra Input.............................................................................................................................108
CSV File Input................................................................................................................................109
Data Grid........................................................................................................................................111
De-serialize From File....................................................................................................................111
Email Messages Input....................................................................................................................111
ESRI Shapefile Reader..................................................................................................................112
Fixed File Input.............................................................................................................................. 112
Generate Random Credit Card Numbers...................................................................................... 113
Generate Random Value............................................................................................................... 113
Generate Rows..............................................................................................................................113
Get Data From XML.......................................................................................................................114
Get File Names..............................................................................................................................114
Get Files Rows Count....................................................................................................................114
Get Repository Names...................................................................................................................115
Get Subfolder Names.................................................................................................................... 115
Get System Info............................................................................................................................. 115
| TOC | 5
Get Table Names...........................................................................................................................115
Google Analytics Input...................................................................................................................115
Google Docs Input......................................................................................................................... 117
GZIP CSV Input............................................................................................................................. 118
HBase Input................................................................................................................................... 118
HL7 Input....................................................................................................................................... 121
JMS Consumer.............................................................................................................................. 122
JSON Input.................................................................................................................................... 122
LDAP Input.....................................................................................................................................124
LDIF Input...................................................................................................................................... 124
Load File Content In Memory.........................................................................................................124
Microsoft Access Input...................................................................................................................124
Microsoft Excel Input......................................................................................................................124
Mondrian Input...............................................................................................................................127
MongoDB Input..............................................................................................................................127
OLAP Input.................................................................................................................................... 132
OpenERP Object Input.................................................................................................................. 132
Palo Cell Input................................................................................................................................132
Palo Dim Input............................................................................................................................... 132
Property Input................................................................................................................................ 132
Splunk Input...................................................................................................................................133
RSS Input.......................................................................................................................................134
S3 CSV Input................................................................................................................................. 135
Salesforce Input.............................................................................................................................136
SAP Input.......................................................................................................................................136
SAS Input.......................................................................................................................................136
Table Input.....................................................................................................................................136
Text File Input................................................................................................................................ 137
XBase Input................................................................................................................................... 143
XML Input Stream (StAX).............................................................................................................. 143
YAML Input.................................................................................................................................... 143
Output.......................................................................................................................................................144
Automatic Documentation Output..................................................................................................144
Cassandra Output..........................................................................................................................145
Delete.............................................................................................................................................146
HBase Output................................................................................................................................ 146
Insert/Update................................................................................................................................. 148
JMS Producer................................................................................................................................ 148
JSON Output..................................................................................................................................149
LDAP Output..................................................................................................................................150
Microsoft Access Output................................................................................................................150
Microsoft Excel Output...................................................................................................................150
Microsoft Excel Writer....................................................................................................................151
MongoDB Output........................................................................................................................... 152
OpenERP Object Input.................................................................................................................. 155
Palo Cell Output.............................................................................................................................155
Palo Dim Output.............................................................................................................................156
Pentaho Reporting Output............................................................................................................. 156
Properties Output...........................................................................................................................156
RSS Output....................................................................................................................................157
S3 File Output................................................................................................................................157
Salesforce Delete...........................................................................................................................159
Salesforce Insert............................................................................................................................159
Salesforce Update......................................................................................................................... 159
Salesforce Upsert.......................................................................................................................... 159
Serialize to File.............................................................................................................................. 160
Splunk Output................................................................................................................................ 160
SQL File Output............................................................................................................................. 161
Synchronize After Merge............................................................................................................... 161
Table Output.................................................................................................................................. 161
Text File Output............................................................................................................................. 163
| TOC | 6
Update........................................................................................................................................... 165
XML Output....................................................................................................................................165
Transform................................................................................................................................................. 165
Add a Checksum............................................................................................................................165
Add Constants............................................................................................................................... 166
Add Sequence............................................................................................................................... 166
Add Value Fields Changing Sequence.......................................................................................... 167
Add XML........................................................................................................................................ 167
Calculator.......................................................................................................................................168
Closure Generator......................................................................................................................... 171
Example Plugin..............................................................................................................................171
Get ID From Slave Server..............................................................................................................171
Number Range...............................................................................................................................173
Replace in String............................................................................................................................174
Row Denormalizer......................................................................................................................... 174
Row Flattener.................................................................................................................................174
Row Normalizer............................................................................................................................. 174
Select Values.................................................................................................................................174
Set Field Value...............................................................................................................................176
Set Field Value to a Constant........................................................................................................ 176
Sort Rows...................................................................................................................................... 177
Split Field to Rows......................................................................................................................... 177
Split Fields..................................................................................................................................... 177
String Operations...........................................................................................................................177
Strings Cut..................................................................................................................................... 178
Unique Rows..................................................................................................................................178
Unique Rows (HashSet)................................................................................................................ 178
Value Mapper.................................................................................................................................179
XSL Transformation.......................................................................................................................179
Utility.........................................................................................................................................................179
Change File Encoding....................................................................................................................179
Clone Row..................................................................................................................................... 179
Delay Row......................................................................................................................................179
Edit to XML.................................................................................................................................... 179
Execute a Process.........................................................................................................................180
If Field Value is Null....................................................................................................................... 180
Mail................................................................................................................................................ 180
Metadata Structure of Stream........................................................................................................182
Null if..............................................................................................................................................183
Process Files................................................................................................................................. 183
Run SSH Commands.....................................................................................................................183
Send Message to Syslog............................................................................................................... 184
Write to Log....................................................................................................................................184
Flow.......................................................................................................................................................... 184
Abort.............................................................................................................................................. 184
Append Streams............................................................................................................................ 185
Block This Step Until Steps Finish.................................................................................................185
Blocking Step.................................................................................................................................185
Detect Empty Stream.....................................................................................................................186
Dummy (do nothing)...................................................................................................................... 186
ETL Metadata Injection..................................................................................................................186
Filter Rows.....................................................................................................................................186
Identify Last Row in a Stream........................................................................................................187
Java Filter...................................................................................................................................... 187
Prioritize Streams...........................................................................................................................188
Single Threader............................................................................................................................. 188
Switch / Case.................................................................................................................................188
Scripting....................................................................................................................................................188
Execute Row SQL Script............................................................................................................... 188
Execute SQL Script........................................................................................................................188
Formula..........................................................................................................................................189
| TOC | 7
Modified JavaScript Value............................................................................................................. 189
Regex Evaluation...........................................................................................................................190
User Defined Java Class............................................................................................................... 190
User Defined Java Expression.......................................................................................................190
Lookup......................................................................................................................................................190
Call DB Procedure......................................................................................................................... 190
Check if a Column Exists...............................................................................................................191
Check if File is Locked...................................................................................................................191
Check if Webservice is Available...................................................................................................191
Database Join................................................................................................................................191
Database Lookup...........................................................................................................................191
Dynamic SQL Row.........................................................................................................................192
File Exists.......................................................................................................................................192
Fuzzy Match...................................................................................................................................192
HTTP Client................................................................................................................................... 194
HTTP Post..................................................................................................................................... 194
MaxMind GeoIP Lookup................................................................................................................ 195
RESTClient.................................................................................................................................... 195
Stream Lookup...............................................................................................................................197
Table Exists................................................................................................................................... 198
Web Services Lookup....................................................................................................................198
Joins......................................................................................................................................................... 199
Join Rows (Cartesian Product)...................................................................................................... 199
Merge Join..................................................................................................................................... 199
Merge Rows (diff)...........................................................................................................................200
Sorted Merge................................................................................................................................. 200
XML Join........................................................................................................................................200
Data Warehouse.......................................................................................................................................200
Combination Lookup/Update......................................................................................................... 201
Dimension Lookup/Update.............................................................................................................203
Validation..................................................................................................................................................206
Credit Card Validator..................................................................................................................... 206
Data Validator................................................................................................................................ 207
Mail Validator................................................................................................................................. 207
XSD Validator................................................................................................................................ 207
Statistics................................................................................................................................................... 207
Analytic Query................................................................................................................................207
Group By........................................................................................................................................208
Memory Group By..........................................................................................................................209
Output Steps Metrics..................................................................................................................... 209
Reservoir Sampling........................................................................................................................209
Sample Rows.................................................................................................................................210
Univariate Statistics....................................................................................................................... 210
Palo...........................................................................................................................................................210
Palo Cell Input................................................................................................................................210
Palo Cell Output.............................................................................................................................210
Palo Dim Input............................................................................................................................... 210
Palo Dim Output.............................................................................................................................211
Job............................................................................................................................................................211
Copy Rows to Result..................................................................................................................... 211
Get Files From Result....................................................................................................................211
Get Rows From Result...................................................................................................................211
Get Variables................................................................................................................................. 212
Set Files in Result..........................................................................................................................212
Set Variables..................................................................................................................................213
Mapping....................................................................................................................................................213
Mapping (sub-transformation)........................................................................................................213
Mapping Input Specification...........................................................................................................213
Mapping Output Specification........................................................................................................213
Bulk Loading.............................................................................................................................................213
ElasticSearch Bulk Insert...............................................................................................................213
| TOC | 8
Greenplum Bulk Loader.................................................................................................................214
Greenplum Load............................................................................................................................ 214
Infobright Loader............................................................................................................................214
Ingres VectorWise Bulk Loader..................................................................................................... 215
LucidDB Streaming Loader............................................................................................................215
MonetDB Bulk Loader....................................................................................................................215
MySQL Bulk Loader.......................................................................................................................215
Oracle Bulk Loader........................................................................................................................ 215
PostgreSQL Bulk Loader............................................................................................................... 215
Teradata Fastload Bulk Loader......................................................................................................216
Inline......................................................................................................................................................... 216
Injector........................................................................................................................................... 216
Socket Reader............................................................................................................................... 216
Socket Writer................................................................................................................................. 216
Data Mining Steps.................................................................................................................................... 216
Weka Scoring.................................................................................................................................217
Reservoir Sampling........................................................................................................................217
ARFF Output..................................................................................................................................217
Univariate Statistics....................................................................................................................... 217
Knowledge Flow.............................................................................................................................217
Univariate Statistics....................................................................................................................... 217
Weka Forecasting..........................................................................................................................217
Job Entry Reference..............................................................................................................219
File Encryption..........................................................................................................................................219
Decrypt Files With PGP................................................................................................................. 219
Encrypt Files With PGP................................................................................................................. 219
Verify File Signature With PGP......................................................................................................219
Big Data....................................................................................................................................................219
Amazon EMR Job Executor...........................................................................................................219
Amazon Hive Job Executor............................................................................................................220
Hadoop Copy Files........................................................................................................................ 221
Hadoop Job Executor.................................................................................................................... 222
Oozie Job Executor........................................................................................................................223
Pentaho MapReduce..................................................................................................................... 224
Pig Script Executor........................................................................................................................ 227
Sqoop Export................................................................................................................................. 228
Sqoop Import................................................................................................................................. 228
General.....................................................................................................................................................229
Start............................................................................................................................................... 229
Dummy...........................................................................................................................................229
Example Plugin..............................................................................................................................229
Job................................................................................................................................................. 230
Set Variables..................................................................................................................................231
Success......................................................................................................................................... 231
Transformation...............................................................................................................................231
Mail........................................................................................................................................................... 233
Get Mails (POP3/IMAP).................................................................................................................233
Mail................................................................................................................................................ 233
Mail Validator................................................................................................................................. 235
File Management......................................................................................................................................235
Add Filenames to Result................................................................................................................235
Compare Folders........................................................................................................................... 235
Convert File Between DOS and Unix.............................................................................................236
Copy Files......................................................................................................................................236
Copy or Remove Result Filenames............................................................................................... 237
Create a Folder..............................................................................................................................237
Create File..................................................................................................................................... 237
Delete File......................................................................................................................................237
Delete Filenames From Result...................................................................................................... 237
Delete Files....................................................................................................................................238
Delete Folders................................................................................................................................238
| TOC | 9
File Compare................................................................................................................................. 238
HTTP..............................................................................................................................................238
Move Files......................................................................................................................................239
Unzip File.......................................................................................................................................239
Wait For File...................................................................................................................................241
Write to File....................................................................................................................................241
Zip File........................................................................................................................................... 241
Conditions.................................................................................................................................................242
Check DB Connections..................................................................................................................242
Check Files Locked........................................................................................................................242
Check If a Folder is Empty.............................................................................................................243
Check Webservice Availability.......................................................................................................243
Checks If Files Exist.......................................................................................................................243
Columns Exist in a Table............................................................................................................... 243
Evaluate Files Metrics....................................................................................................................244
Evaluate Rows Number in a Table................................................................................................ 244
File Exists.......................................................................................................................................244
Simple Evaluation.......................................................................................................................... 244
Table Exists................................................................................................................................... 245
Wait For......................................................................................................................................... 245
Scripting....................................................................................................................................................245
JavaScript...................................................................................................................................... 245
Shell...............................................................................................................................................246
SQL................................................................................................................................................247
Bulk Loading.............................................................................................................................................247
Bulkload From MySQL Into File.....................................................................................................247
Bulkload Into MSSQL.....................................................................................................................247
Bulkload Into MySQL..................................................................................................................... 248
MS Access Bulk Load....................................................................................................................248
XML.......................................................................................................................................................... 248
Check if XML FIle is Well-Formed................................................................................................. 248
DTD Validator................................................................................................................................ 249
XSD Validator................................................................................................................................ 249
XSL Transformation.......................................................................................................................249
Utility.........................................................................................................................................................249
Abort Job........................................................................................................................................250
Display Msgbox Info.......................................................................................................................250
HL7 MLLP Acknowledge................................................................................................................250
HL7 MLLP Input.............................................................................................................................250
Ping a Host.................................................................................................................................... 250
Send Information Using Syslog......................................................................................................250
Send SNMP Trap...........................................................................................................................251
Talend Job Execution.................................................................................................................... 251
Truncate Tables.............................................................................................................................251
Wait for SQL.................................................................................................................................. 251
Write to Log....................................................................................................................................252
Repository.................................................................................................................................................252
Check if Connected to Repository................................................................................................. 252
Export Repository to XML File....................................................................................................... 252
File Transfer..............................................................................................................................................252
FTP Delete.....................................................................................................................................252
Get a File with FTP........................................................................................................................ 252
Get a File With FTPS.....................................................................................................................254
Get a file with SFTP.......................................................................................................................254
Put a File With FTP........................................................................................................................255
Put a File With SFTP..................................................................................................................... 255
SSH2 Get.......................................................................................................................................255
SSH2 Put....................................................................................................................................... 255
Upload Files to FTPS.....................................................................................................................255
Palo...........................................................................................................................................................256
Palo Cube Create.......................................................................................................................... 256
| TOC | 10
Palo Cube Delete...........................................................................................................................256
About PDI Marketplace..........................................................................................................257
Troubleshooting.....................................................................................................................258
Changing the Pentaho Data Integration Home Directory Location (.kettle folder)....................................258
Changing the Kettle Home Directory within the Pentaho BI Platform............................................ 259
Kitchen can't read KJBs from a Zip export............................................................................................... 260
Generating a DI Repository Configuration Without Running Spoon.........................................................260
Connecting to a DI Solution Repositories with Command-Line Tools........................................... 260
Unable to Get List of Repositories Exception........................................................................................... 261
Executing Jobs and Transformations from the Repository on the Carte Server............................261
Database Locks When Reading and Updating From A Single Table.......................................................261
Reading and Updating Table Rows Within a Transformation........................................................261
Force PDI to use DATE instead of TIMESTAMP in Parameterized SQL Queries....................................262
PDI Does Not Recognize Changes Made To a Table.............................................................................. 262
Using ODBC............................................................................................................................................. 262
Sqoop Import into Hive Fails.....................................................................................................................262

| Introduction | 11
Introduction
Pentaho Data Integration (PDI) is a flexible tool that allows you to collect data from disparate sources such as
databases, files, and applications, and turn the data into a unified format that is accessible and relevant to end users.
PDI provides the Extraction, Transformation, and Loading (ETL) engine that facilitates the process of capturing the right
data, cleansing the data, and storing the data using a uniform and consistent format.
PDI provides support for slowly changing dimensions, and surrogate key for data warehousing, allows data migration
between databases and application, is flexible enough to load giant datasets, and can take full advantage of cloud,
clustered, and massively parallel processing environments. You can cleanse your data using transformation steps that
range from very simple to very complex. Finally, you can leverage ETL as the data source for Pentaho Reporting.
Note: Dimension is a data warehousing term that refers to logical groupings of data such as product, customer,
or geographical information. Slowly Changing Dimensions (SCD) are dimensions that contain data that
changes slowly over time. For example, in most instances, employee job titles change slowly over time.
Common Uses of Pentaho Data Integration Include:
• Data migration between different databases and applications
• Loading huge data sets into databases taking full advantage of cloud, clustered and massively parallel processing
environments
• Data Cleansing with steps ranging from very simple to very complex transformations
• Data Integration including the ability to leverage real-time ETL as a data source for Pentaho Reporting
• Data warehouse population with built-in support for slowly changing dimensions and surrogate key creation (as
described above)
Audience and Assumptions
This section is written for IT managers, database administrators, and Business Intelligence solution architects who have
intermediate to advanced knowledge of ETL and Pentaho Data Integration Enterprise Edition features and functions.
You must have installed Pentaho Data Integration to examine some of the step-related information included in this
document.
If you are novice user, Pentaho recommends that you start by following the exercises in Getting Started with Pentaho
Data Integration available in the Pentaho InfoCenter. You can return to this document when you have mastered some of
the basic skills required to work with Pentaho Data Integration.
What this Section Covers
This document provides you with information about the most commonly used steps. For more information about steps,
see Matt Caster's blog and the Pentaho Data Integration wiki.
Refer to Administer DI Server for information about administering PDI and configuring security.

| Pentaho Data Integration Architecture | 12
Pentaho Data Integration Architecture
Spoon is the design interface for building ETL jobs and transformations. Spoon provides a drag-and-drop interface that
allows you to graphically describe what you want to take place in your transformations. Transformations can then be
executed locally within Spoon, on a dedicated Data Integration Server, or a cluster of servers.
The Data Integration Server is a dedicated ETL server whose primary functions are:
Execution Executes ETL jobs and transformations using the Pentaho
Data Integration engine
Security Allows you to manage users and roles (default security) or
integrate security to your existing security provider such
as LDAP or Active Directory
Content Management Provides a centralized repository that allows you to
manage your ETL jobs and transformations. This includes
full revision history on content and features such as
sharing and locking for collaborative development
environments.
Scheduling Provides the services allowing you to schedule and
monitor activities on the Data Integration Server from
within the Spoon design environment.
Pentaho Data Integration is composed of the following primary components:
•Spoon. Introduced earlier, Spoon is a desktop application that uses a graphical interface and editor for
transformations and jobs. Spoon provides a way for you to create complex ETL jobs without having to read or
write code. When you think of Pentaho Data Integration as a product, Spoon is what comes to mind because, as a
database developer, this is the application on which you will spend most of your time. Any time you author, edit, run
or debug a transformation or job, you will be using Spoon.
•Pan. A standalone command line process that can be used to execute transformations and jobs you created in
Spoon. The data transformation engine Pan reads data from and writes data to various data sources. Pan also
allows you to manipulate data.
•Kitchen. A standalone command line process that can be used to execute jobs. The program that executes the jobs
designed in the Spoon graphical interface, either in XML or in a database repository. Jobs are usually scheduled to
run in batch mode at regular intervals.
•Carte. Carte is a lightweight Web container that allows you to set up a dedicated, remote ETL server. This provides
similar remote execution capabilities as the Data Integration Server, but does not provide scheduling, security
integration, and a content management system.
What's with all the Culinary Terms?
If you are new to Pentaho, you may sometimes see or hear Pentaho Data Integration referred to as, "Kettle." To avoid
confusion, all you must know is that Pentaho Data Integration began as an open source project called. "Kettle." The
term, K.E.T.T.L.E is a recursive that stands for Kettle Extraction Transformation Transport Load Environment. When
Pentaho acquired Kettle, the name was changed to Pentaho Data Integration. Other PDI components such as Spoon,
Pan, and Kitchen, have names that were originally meant to support a "restaurant" metaphor of ETL offerings.

| Use Pentaho Data Integration | 13
Use Pentaho Data Integration
There are several tasks that must be done first before following these tutorials. These are the tasks that must be done
first.
• Your administrator must have installed Pentaho Data Integration and configured the DI server and its client tools as
described in Configure the DI Server and Configure the PDI Tools and Utilities.
• You must also start the DI server and login to Spoon.
Create a Connection to the DI Repository
You need a place to store your work. We call this place the DI Repository. Your administrator may have created a
connection to the DI repository during the configuration process. If you need to make another repository connection or if
your administrator did not create a connection to the DI repository, you can create the connection.
1. Click on Tools > Repository > Connect.
The Repository Connection dialog box appears.
2. In the Repository Connection dialog box, click the add button (+).
3. Select DI Repository:DI Repository and click OK.
The Repository Configuration dialog box appears.
4. Enter the URL associated with your repository. Enter an ID and name for your repository.
5. Click Test to ensure your connection is properly configured. If you see an error message, make sure you started
your DI server is started and that the Repository URL is correct.
6. Click OK to exit the Success dialog box.
7. Click OK to exit the Repository Configuration dialog box.
Your new connection appears in the list of available repositories.
8. Select the repository, type your user name and password, and click OK.

| Interface Perspectives | 14
Interface Perspectives
The Welcome page contains useful links to documentation, community links for getting involved in the Pentaho Data
Integration project, and links to blogs from some of the top contributors to the Pentaho Data Integration project.
Close the Welcome Page to proceed to Spoon.
Use Perspectives Within Spoon
Pentaho Data Integration (PDI) provides you with tools that include ETL, modeling, and visualization in one unified
environment — the Spoon interface. This integrated environment allows you to work in close cooperation with business
users to build business intelligence solutions more quickly and efficiently.
When you are working in Spoon you can change perspectives, or switch from designing ETL jobs and transformations
to modeling your data, and visualizing it. As users provide you with feedback about how the data is presented to them,
you can quickly make iterative changes to your data directly in Spoon by changing perspectives. The ability to quickly
respond to feedback and to collaborate with business users is part of the Pentaho Agile BI initiative.
From within Spoon you can change perspectives using the Perspective toolbar located in the upper-right corner.
The perspectives in PDI enable you to focus how you work with different aspects of data.
•Data Integration perspective—Connect to data sources and extract, transform, and load your data
•Model perspective—Create a metadata model to identify the relationships within your data structure
•Forecast perspective—Identify trends within facets of your data
•Visualize perspective—Create charts, maps, and diagrams based on your data
•Instaview perspective—Create a data connection, a metadata model, and analysis reports all at once with a dialog-
guided, template-based reporting tool
•Schedule perspective—Plan when to run data integration jobs and set timed intervals to automatically send the
output to your preferred destinations
•*ScatterPlot3D perspective—Visualize your data as a Java 3D scatter plot visualization or histogram matrix
overview (*separate installation required)

| Interface Perspectives | 15
Tour Spoon
Component Name Name Function
Toolbar Single-click access to common
actions such as create a new file,
opening existing documents, save
and save as.
Perspectives Toolbar Switch between the different
perspectives.
•Data Integration — Create ETL
transformations and jobs
•Instaview — Use pre-made
templates to create visualizations
from PDI transformations
•Visualize — Test reporting and
OLAP metadata models created
in the Model perspective using
the Report Design Wizard and
Analyzer clients
•Model Editor — Design reporting
and OLAP metadata models which
can be tested right from within
the Visualization perspective or
published to the Pentaho BA
Server
•Schedule — Manage scheduled
ETL activities on the Data
Integration Server
Sub-toolbar Provides buttons for quick access
to common actions specific to the
transformation or job such as Run,
Preview, and Debug.
Design and View Tabs The Design tab of the Explore
pane provides an organized list of
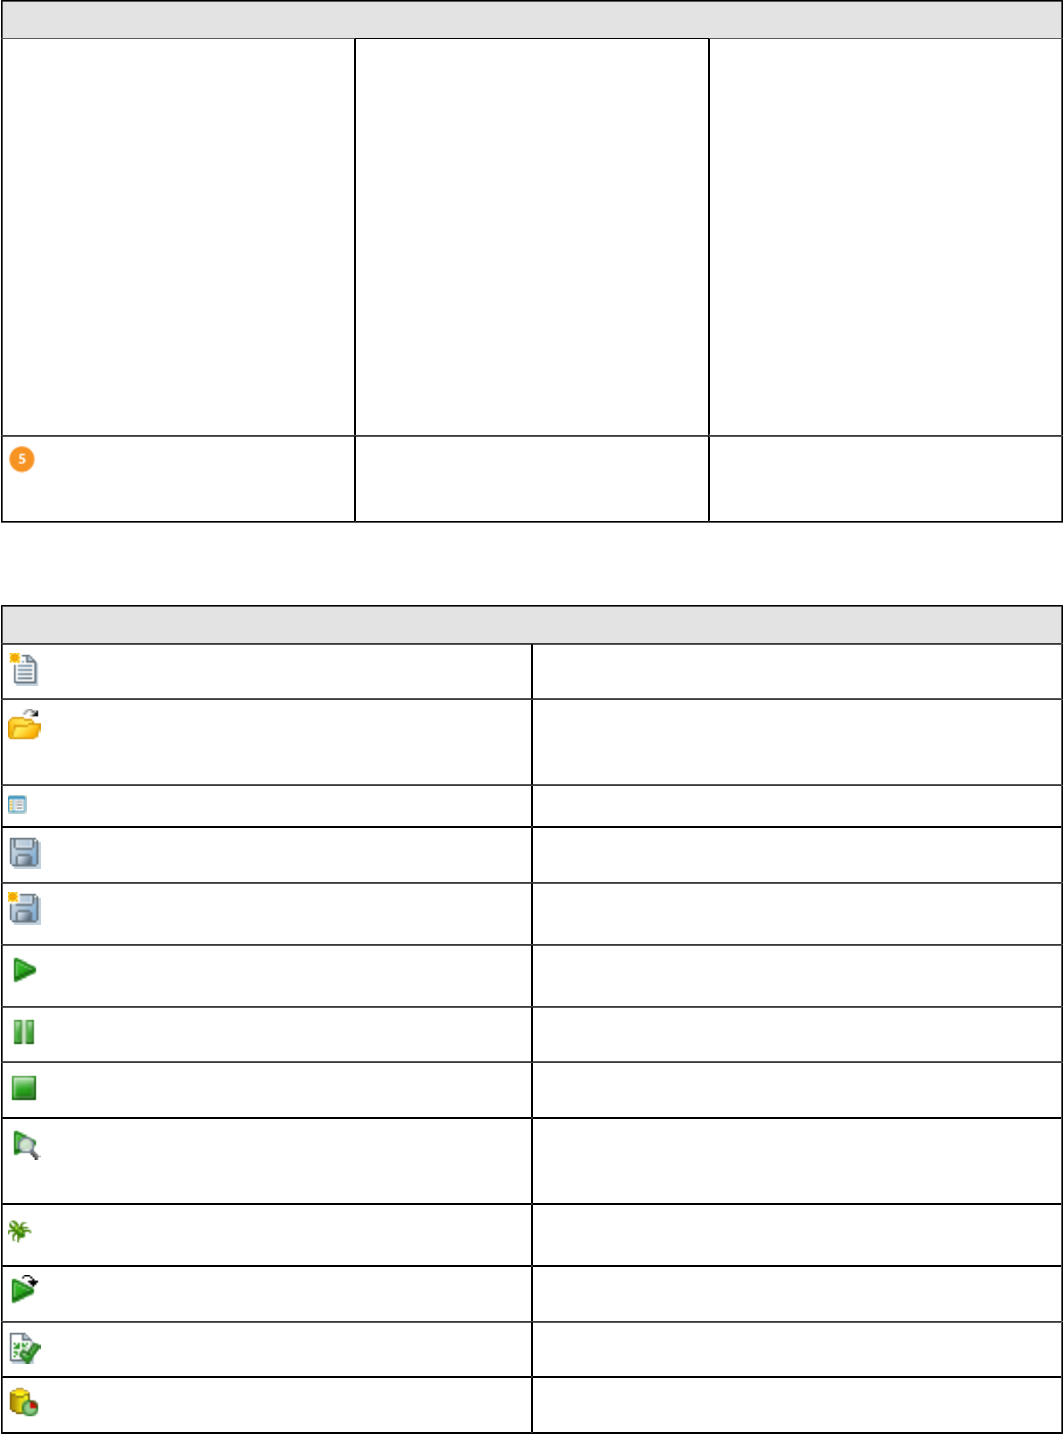
| Interface Perspectives | 16
Component Name Name Function
transformation steps or job entries
used to build transformations and
jobs. Transformations are created by
simply dragging transformation steps
from the Design tab onto the canvas
and connecting them with hops to
describe the flow of data.
The View tab of the Explore pane
shows information for each job
or transformation. This includes
information such as available
database connections and which
steps and hops are used.
In the image, the Design tab is
selected.
Canvas Main design area for building
transformations and jobs describing
the ETL activities you want to perform
Table 1: Spoon Icon Descriptions
Icon Description
Create a new job or transformation
Open transformation/job from file if you are not connected
to a repository or from the repository if you are connected
to one
Explore the repository
Save the transformation/job to a file or to the repository
Save the transformation/job under a different name or file
name (Save as)
Run transformation/job; runs the current transformation
from XML file or repository
Pause transformation
Stop transformation
Preview transformation: runs the current transformation
from memory. You can preview the rows that are
produced by selected steps.
Run the transformation in debug mode; allows you to
troubleshoot execution errors
Replay the processing of a transformation
Verify transformation
Run an impact analysis on the database

| Interface Perspectives | 17
Icon Description
Generate the SQL that is needed to run the loaded
transformation.
Launch the database explorer allowing you to preview
data, run SQL queries, generate DDL and more
Hide execution results pane
Lock transformation
VFS File Dialogues in Spoon
Some job and transformation steps have virtual filesystem (VFS) dialogues in place of the traditional local filesystem
windows. VFS file dialogues enable you to specify a VFS URL in lieu of a typical local path. The following PDI and PDI
plugin steps have such dialogues:
• File Exists
• Mapping (sub-transformation)
• ETL Meta Injection
• Hadoop Copy Files
• Hadoop File Input
• Hadoop File Output
Note: VFS dialogues are configured through certain transformation parameters. Refer to Configure SFTP VFS
on page 40 for more information on configuring options for SFTP.
Model Perspective
The Model perspective is used for designing reporting and OLAP metadata models that can be tested from within the
Visualize perspective or published to the Pentaho BA Server.
Component Name Description
1-Menubar The Menubar provides access to common features such
as properties, actions and tools.
2-Main Toolbar The Main Toolbar provides single-click access to common
actions such as create a new file, opening existing
documents, save and save as. The right side of the

| Interface Perspectives | 18
Component Name Description
main toolbar is also where you can switch between
perspectives.
3-Data Panel Contains a list of available fields from your data source
that can be used either as measure or dimension levels
(attributes) within your OLAP dimensional model.
4- Model Panel Used to create measures and dimensions of your Analysis
Cubes from the fields in the data panel. Create a new
measure or dimension by dragging a field from the data
panel over onto the Measures or Dimension folder in the
Model tree.
5-Properties Panel Used to modify the properties associated with the
selection in the Model Panel tree.
Visualization Perspective
The Visualize perspective allows you to test reporting and OLAP metadata models created in the Model perspective
using the Report Design Wizard and Analyzer clients respectively.
Component Name Description
1-Menubar The Menubar provides access to common features such
as properties, actions, and tools.
2-Main Toolbar The Main Toolbar provides single-click access to common
actions such as create a new file, opening existing
documents, save and save as. The right side of the
main toolbar is also where you can switch between
perspectives.
3-Field List Contains the list of measures and attributes as defined in
your model. These fields can be dragged into the Report
Area to build your query.
4-Layout Allows you to drag Measures and Levels into the Row,
Column, and Measures area so you can control how it
appears in the workspace.
5-Canvas Drag fields from the field list into the Report Area to build
your query. Right click on a measure or level to further
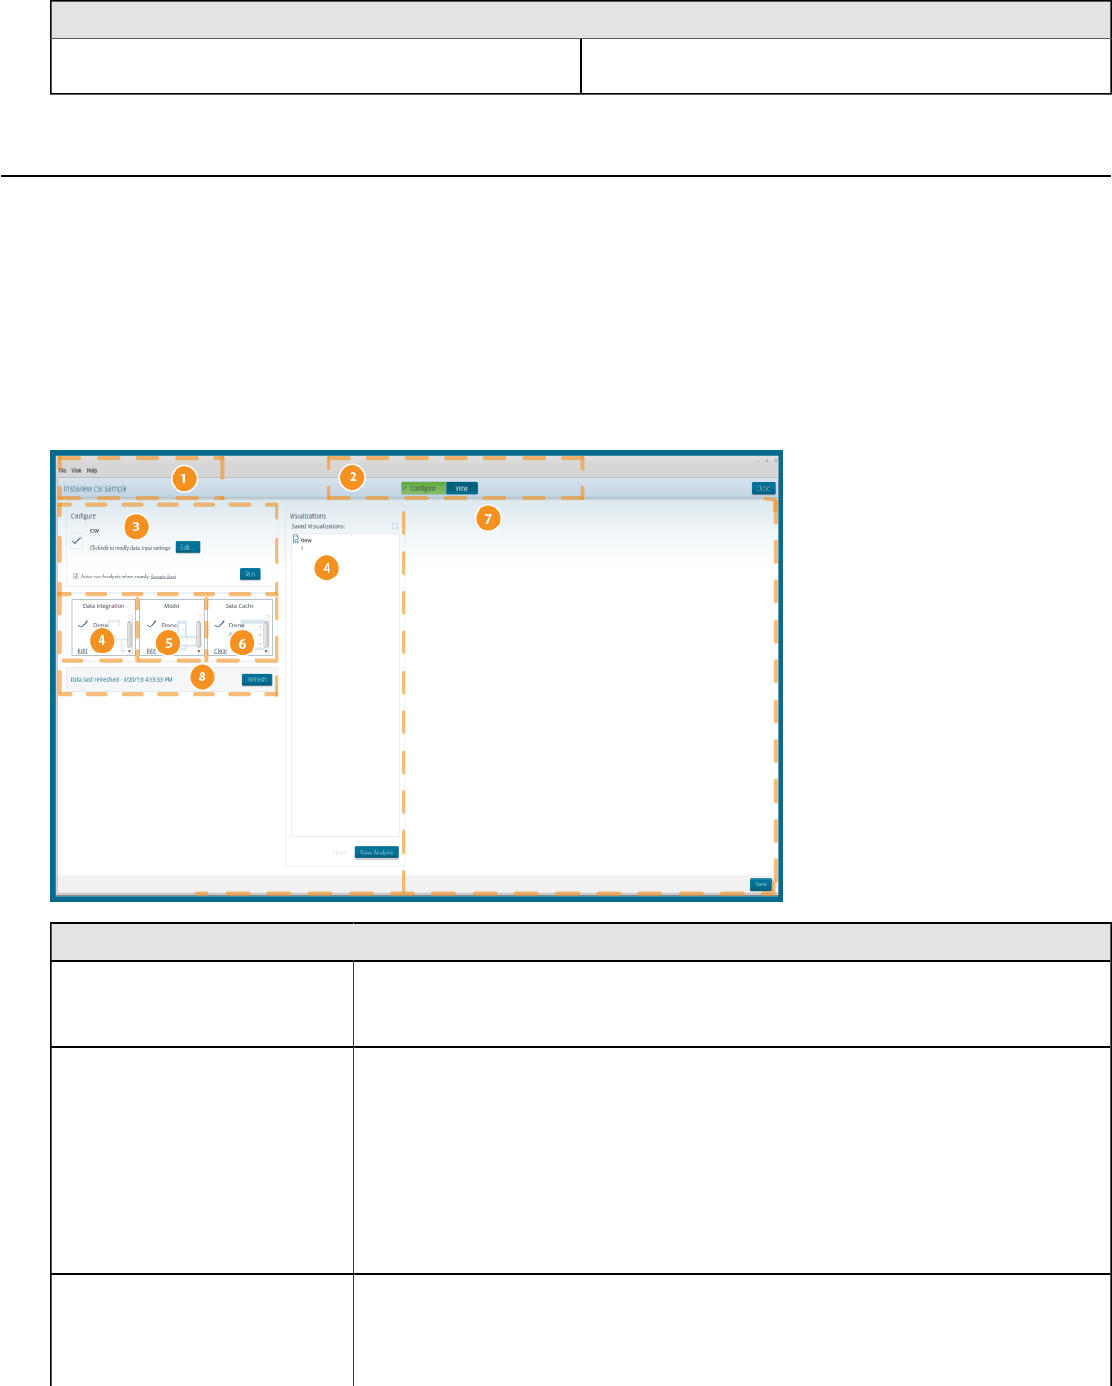
| Interface Perspectives | 19
Component Name Description
customize your report with sub-totals, formatting, and
more.
Instaview Perspective
With Instaview, you can access, transform, analyze, and visualize data without having extensive experience designing
business analytics solutions or staging databases. Instaview gives you immediate access to your data so you can
quickly explore different ways to structure and present your data as a complete business analytics solution. In addition
to extracting and loading the data, Instaview gives you the ability to manipulate the data to make it fit your specific
needs from within one simple tool.
When you create an Instaview you
• Create a new data source from which to extract and transform your data.
• Create a data model to define how columns and fields relate to one-another.
• Create an Analyzer Report with tables and charts from your transformed data.
Component Description
1 - Instaview A combination of a valid data connection, a data integration transformation, a
metadata data source template, and one or more Analyzer reports. You can only
have one Instaview at a time.
2 - Configure View The Configure/View mode toggle allows you to switch between Cofigure mode and
View mode.
• Configure mode enables you edit a data connection, data integration
transformation, metadata data source template, and Analyzer report. It also
provides the means to clear the Data Cache.
• View mode enables you to create reports and visualizations from a valid
Instaview data source. From within this view you can drag and drop fields from
(measurements or dimensions) your data onto the Reporting canvas.
3 - Configure data source panel • The Edit button takes you to the data connection dialog and allows you to edit
the data connection settings for the current Instaview.
• The Auto run Analysis when ready option, if checked, will automatically create a
new Analyzer report after pressing Run.

| Interface Perspectives | 20
Component Description
• The Run button lets you manually start the Instaview data transformation.
Pressing Run will modify the data integration transformation or metadata model
if changes were made within the Configure panel, if necessary.
4 - Data Integration panel Provides the means to access and edit the data integration transformation for the
current Instaview. Editing will open the Data Integration perspective in PDI.
5 - Model panel Enables you to edit the metadata model for the current Instaview. Editing will open
the Model perspective in PDI.
6 - Data Cache panel Provides the means to clear the data cache.
7 - Visualizations panel Displays existing Views and provides the means to open existing, create new, and
delete Instaviews. You can also rename an existing visualization by right-clicking an
item within this panel.
8 - Refresh display Displays when the current Instaview was last run. If your data is connected to a live
data source this displays the last time the data was accessed by Instaview.
The Refresh button provides the means to manually refresh the current Instaview.
Item Name Function
Opened view Displays quick access buttons across the top to create and save new
Analysis reports, Interactive reports, and Dashboards. Opened reports and
files show as a series of tabs across the page.
Available Fields and Layout
panels Use the Available Fields and Layout panels to drag levels and measures
into a report.
Your report displays changes in the Report Canvas as you drag items onto
the Layout panel.
Delete a level or measure from your report by dragging it from the Layout
panel to the trashcan that appears in the lower right corner of the Report
Canvas.
Report Canvas Shows a dynamic view of your report as you work to build it. The look of your
report changes constantly as you work with Available Fields and Layout
panels to refine it.
The Report Canvas shows different fields based on the chart type selected.

| Interface Perspectives | 21
Item Name Function
Analyzer Toolbar and Filters Use the Analyzer Toolbar functions to undo or redo actions, hide lists of
fields, add or hide filters, disable the auto-refresh function, adjust settings,
and change the view of your report.
Use the Filters panel to display a list of filters applied to the active report, or
edit or delete filters.
Customize the Spoon Interface
Kettle Options allow you to customize properties associated with the behavior and look and feel of the Spoon interface.
Examples include startup options such as whether or not to display tips and the Welcome page, and user interface
options such as fonts and colors. To access the options, in the menu bar, go to Tools > Options...
The tables below contain descriptions for options under the General and Look & Feel tabs, respectively. You may want
to keep the default options enabled initially. As you become more comfortable using Pentaho Data Integration, you can
set the options to better suit your needs.
General
Option Description
Default number of lines in preview dialog Sets the default number of lines that are displayed in the
preview dialog box in Spoon
Maximum nr of lines in the logging windows Specifies the maximum limit of rows to display in the
logging window
Central log line store timeout in minutes no def given
Max number of lines in the log history views Specifies the maximum limit of line to display in the log
history views
Show tips at startup? Sets the display of tips at startup
Show welcome page at startup? Controls whether or not to display the Welcome page
when launching Spoon
Use database cache? Spoon caches information that is stored on the source
and target databases. In some instances, caching causes
incorrect results when you are making database changes.
To prevent errors you can disable the cache altogether
instead of clearing the cache every time.
Open last file at startup? Loads the last transformation you used (opened or saved)
from XML or repository automatically
Auto save changed files? Automatically saves a changed transformation before
running
Only show the active file in the main tree? Reduces the number of transformation and job items in
the main tree on the left by only showing the currently
active file
Only save used connections to XML? Limits the XML export of a transformation to the used
connections in that transformation. This is helpful while
exchanging sample transformations to avoid having all
defined connections to be included.
Ask about replacing existing connections on open/
import? Requests permission before replacing existing database
connections during import
Replace existing connections on open/import? This is the action that takes place when there is no dialog
box shown, (see previous option)

| Interface Perspectives | 22
Option Description
Show Save dialog? Allows you to turn off the confirmation dialogs you receive
when a transformation has been changed
Automatically split hops? Disables the confirmation messages that launch when you
want to split a hop
Show copy or distribute dialog? Disables the warning message that appears when you
link a step to multiple outputs. This warning message
describes the two options for handling multiple outputs:
1. Distribute rows - destination steps receive the rows in
turns (round robin) 2. Copy rows - all rows are sent to all
destinations
Show repository dialog at startup? Controls whether or not the Repository dialog box
appears at startup
Ask user when exiting? Controls whether or not to display the confirmation dialog
when a user chooses to exit the application
Clear custom parameters (steps/plug-ins) Clears all parameters and flags that were set in the plug-
in or step dialog boxes.
Display tool tips? Controls whether or not to display tool tips for the buttons
on the main tool bar.
Look & Feel
Option Description
Fixed width font This option customizes the font that is used in the dialog
boxes, trees, input fields, and more; click Edit to edit the
font or Delete to return the font to its default value.
Font on workspace This option customizes font that is used in the Spoon
interface; click Edit to edit the font or Delete to return the
font to its default value.
Font for notes This option customizes the font used in notes that are
displayed in Spoon; click Edit to edit the font or Delete to
return the font to its default value.
Background color This option sets the background color in Spoon and
affects all dialog boxes; click Edit to edit the color or
Delete to return the background color to its default value.
Workspace background color This option sets the background color in the graphical
view of Spoon; click Edit to edit the background color or
Delete to return the background color to its default value.
Tab color This option customizes the color that is being used to
indicate tabs that are active/selected; click Edit to edit the
tab color or Delete to return the color to its default value.
Icon size in workspace Affects the size of the icons in the graph window. The
original size of an icon is 32x32 pixels. The best results
(graphically) are probably at sizes 16,24,32,48,64 and
other multiples of 32.
Line width on workspace Affects the line width of the hops in the Spoon graphical
view and the border around the step.
Shadow size on workspace If this size is larger then 0, a shadow of the steps, hops,
and notes is drawn on the canvas, making it look like the
transformation floats above the canvas.

| Interface Perspectives | 23
Option Description
Dialog middle percentage By default, a parameter is drawn at 35% of the width of
the dialog box, counted from the left. You can change
using this option in instances where you use unusually
large fonts.
Canvas anti-aliasing? Some platforms like Windows, OSX and Linux support
anti-aliasing through GDI, Carbon or Cairo. Enable this
option for smoother lines and icons in your graph view.
If you enable the option and your environment does not
work, change the value for option "EnableAntiAliasing"
to "N" in file $HOME/.kettle/.spoonrc (C:\Documents and
Settings\<user>\.kettle\.spoonrc on Windows)
Use look of OS? Enabling this option on Windows allows you to use the
default system settings for fonts and colors in Spoon. On
other platforms, the default is always enabled.
Show branding graphics Enabling this option will draw Pentaho Data Integration
branding graphics on the canvas and in the left hand side
"expand bar."
Preferred Language Specifies the preferred language setting.
Alternative Language Specifies the alternative language setting. Because the
original language in which Pentaho Data Integration was
written is English, it is best to set this locale to English.

| Terminology and Basic Concepts | 24
Terminology and Basic Concepts
Before you can start designing transformations and jobs, you must have a basic understanding of the terminology
associated with Pentaho Data Integration.
Transformations, Steps, and Hops
A transformation is a network of logical tasks called steps. Transformations are essentially data flows. In the example
below, the database developer has created a transformation that reads a flat file, filters it, sorts it, and loads it to a
relational database table. Suppose the database developer detects an error condition and instead of sending the data
to a Dummy step, (which does nothing), the data is logged back to a table. The transformation is, in essence, a directed
graph of a logical set of data transformation configurations. Transformation file names have a .ktr extension.
The two main components associated with transformations are steps and hops:
Steps are the building blocks of a transformation, for example a text file input or a table output. There are over 140
steps available in Pentaho Data Integration and they are grouped according to function; for example, input, output,
scripting, and so on. Each step in a transformation is designed to perform a specific task, such as reading data from a
flat file, filtering rows, and logging to a database as shown in the example above. Steps can be configured to perform
the tasks you require.
Hops are data pathways that connect steps together and allow schema metadata to pass from one step to another. In
the image above, it seems like there is a sequential execution occurring; however, that is not true. Hops determine the
flow of data through the steps not necessarily the sequence in which they run. When you run a transformation, each
step starts up in its own thread and pushes and passes data.
Note: All steps are started and run in parallel so the initialization sequence is not predictable. That is why you
cannot, for example, set a variable in a first step and attempt to use that variable in a subsequent step.
You can connect steps together, edit steps, and open the step contextual menu by clicking to edit a step. Click the
down arrow to open the contextual menu. For information about connecting steps with hop, see More About Hops.
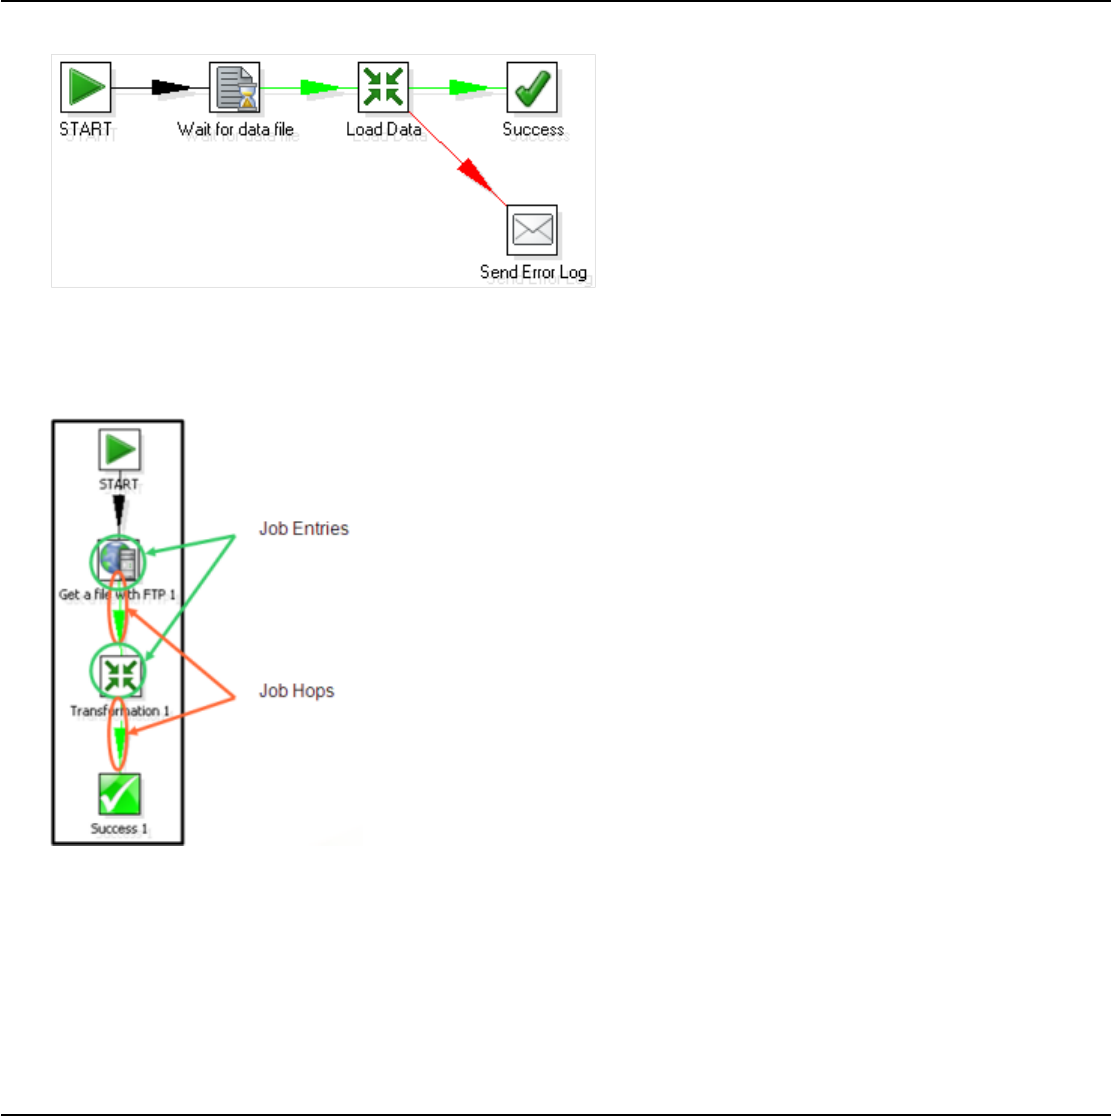
| Terminology and Basic Concepts | 25
A step can have many connections — some join two steps together, some only serve as an input or output for a step.
The data stream flows through steps to the various steps in a transformation. Hops are represented in Spoon as arrows.
Hops allow data to be passed from step to step, and also determine the direction and flow of data through the steps. If a
step sends outputs to more than one step, the data can either be copied to each step or distributed among them.
Jobs
Jobs are workflow-like models for coordinating resources, execution, and dependencies of ETL activities.
Jobs aggregate up individual pieces of functionality to implement an entire process. Examples of common tasks
performed in a job include getting FTP files, checking conditions such as existence of a necessary target database
table, running a transformation that populates that table, and e-mailing an error log if a transformation fails. The final job
outcome might be a nightly warehouse update, for example.
Jobs are composed of job hops, job entries, and job settings. Hops behave differently when used in a job, see More
About Hops. Job entries are the individual configured pieces as shown in the example above; they are the primary
building blocks of a job. In data transformations these individual pieces are called steps. Job entries can provide you
with a wide range of functionality ranging from executing transformations to getting files from a Web server. A single job
entry can be placed multiple times on the canvas; for example, you can take a single job entry such as a transformation
run and place it on the canvas multiple times using different configurations. Job settings are the options that control the
behavior of a job and the method of logging a job’s actions. Job file names have a .kjb extension.
More About Hops
A hop connects one transformation step or job entry with another. The direction of the data flow is indicated by an
arrow. To create the hop, click the source step, then press the <SHIFT> key down and draw a line to the target step.
Alternatively, you can draw hops by hovering over a step until the hover menu appears. Drag the hop painter icon from
the source step to your target step.

| Terminology and Basic Concepts | 26
Additional methods for creating hops include:
• Click on the source step, hold down the middle mouse button, and drag the hop to the target step.
• Select two steps, then choose New Hop from the right-click menu.
• Use <CTRL + left-click> to select two steps the right-click on the step and choose New Hop.
To split a hop, insert a new step into the hop between two steps by dragging the step over a hop. Confirm that you
want to split the hop. This feature works with steps that have not yet been connected to another step only.
Loops are not allowed in transformations because Spoon depends heavily on the previous steps to determine the field
values that are passed from one step to another. Allowing loops in transformations may result in endless loops and
other problems. Loops are allowed in jobs because Spoon executes job entries sequentially; however, make sure you
do not create endless loops.
Mixing rows that have a different layout is not allowed in a transformation; for example, if you have two table input
steps that use a varying number of fields. Mixing row layouts causes steps to fail because fields cannot be found
where expected or the data type changes unexpectedly. The trap detector displays warnings at design time if a step is
receiving mixed layouts.
You can specify if data can either be copied, distributed, or load balanced between multiple hops leaving a step.
Select the step, right-click and choose Data Movement.
A hop can be enabled or disabled (for testing purposes for example). Right-click on the hop to display the options menu.

| Terminology and Basic Concepts | 27
Job Hops
Besides the execution order, a hop also specifies the condition on which the next job entry will be executed. You can
specify the Evaluation mode by right clicking on the job hop. A job hop is just a flow of control. Hops link to job entries
and, based on the results of the previous job entry, determine what happens next.
Option Description
Unconditional Specifies that the next job entry will be executed
regardless of the result of the originating job entry
Follow when result is true Specifies that the next job entry will be executed only
when the result of the originating job entry is true; this
means a successful execution such as, file found, table
found, without error, and so on
Follow when result is false Specifies that the next job entry will only be executed
when the result of the originating job entry was false,
meaning unsuccessful execution, file not found, table not
found, error(s) occurred, and so on

| Create Transformations | 28
Create Transformations
This exercise is designed to help you learn basic skills associated with handling steps and hops, running and
previewing transformations. See Get Started with DI for a comprehensive, "real world" exercise for creating, running,
and scheduling transformations.
Get Started
Follow these instructions to begin creating your transformation.
1. Click File > New > Transformation.
2. Under the Design tab, expand the Input node, then select and drag a Generate Rows step onto the canvas.
Note: If you don't know where to find a step, there is a search function in the left corner of Spoon. Type
the name of the step in the search box. Possible matches appear under their associated nodes. Clear your
search criteria when you are done searching.
3. Expand the Flow node; click and drag a Dummy (do nothing) step onto the canvas.
4. To connect the steps to each other, you must add a hop. Hops describe the flow of data between steps in your
transformation. To create the hop, click the Generate Rows step, then press and hold the <SHIFT> key and draw a
line to the Dummy (do nothing) step.
Note: Alternatively, you can draw hops by hovering over a step until the hover menu appears. Drag the hop
painter icon from the source step to your target step.
5. Double click the Generate Rows step to open its edit properties dialog box.
6. In the Limit field, type 100000.
This limits the number of generated rows to 100,000.
7. Under Name, type FirstCol in the Name field.
8. Under Type, type String.
9. Under Length, type 150.
10.Under Value, type My First Step. Your entries should look like the image below. Click OK to exit the Generate
Rows edit properties dialog box.

| Create Transformations | 29
11.Now, save your transformation. See Save Your Transformation.
Save Your Transformation
Follow the instructions below to save your transformation.
1. In Spoon, click File > Save As.
The Transformation Properties dialog box appears.
2. In the Transformation Name field, type First Transformation.
3. In the Directory field, click the Folder Icon to select a repository folder where you will save your transformation.
4. Expand the Home directory and double-click the admin folder.
Your transformation will be saved in the admin folder in the DI Repository.
5. Click OK to exit the Transformation Properties dialog box.
The Enter Comment dialog box appears.
6. Click in the Enter Comment dialog box and press <Delete> to remove the default text string. Type a meaningful
comment about your transformation.
The comment and your transformation are tracked for version control purposes in the DI Repository.
7. Click OK to exit the Enter Comment dialog box and save your transformation.
Run Your Transformation Locally
In Get Started, you created a simple transformation. Now, you are going to run your transformation locally, which is
a local execution. Local execution allows you to execute a transformation or job from within the Spoon on your local
device. This is ideal for designing and testing transformations or lightweight ETL activities.
1. In Spoon, go to File > Open.
The contents of the repository appear.
2. Navigate to the folder that contains your transformation.
If you are a user with administrative rights, you may see the folders of other users.
3. Double-click on your transformation to open it in the Spoon workspace.
Note: If you followed the exercise instructions, the name of the transformation is First Transformation.
4. In the upper left corner of the workspace, click Run.
The Execute a Transformation dialog box appears. Notice that Local Execution is enabled by default.
5. Click Launch.
The Execution Results appear in the lower pane.
6. Examine the contents under Step Metrics. The Step Metrics tab provides statistics for each step in your
transformation such as how many records were read, written, caused an error, processing speed (rows per second)
and more. If any of the steps caused the transformation to fail, they are highlighted in red.

| Create Transformations | 30
Note: Other tabs associated with Execution Results require additional set up. See Performance Monitoring
and Logging.
Build a Job
You created, saved, and ran your first transformation. Now, you will build a simple job. Use jobs to execute one or
more transformations, retrieve files from a Web server, place files in a target directory, and more. Additionally, you
can schedule jobs to run on specified dates and times. The section called Get Started with DI contains a "real world"
exercise for building jobs.
1. In the Spoon menubar, go to File > New > Job. Alternatively click (New) in the toolbar.
2. Click the Design tab.
The nodes that contain job entries appear.
3. Expand the General node and select the Start job entry.
4. Drag the Start job entry to the workspace (canvas) on the right.
The Start job entry defines where the execution will begin.
5. Expand the General node, select and drag a Transformation job entry on to the workspace.
6. Use a hop to connect the Start job entry to the Transformation job entry.
7. Double-click on the Transformation job entry to open its properties dialog box.
8. Under Transformation specification, click Specify by name and directory.
9. Click (Browse) to locate your transformation in the solution repository.
10.In the Select repository object view, expand the directories. Locate First Transformation and click OK.
The name of the transformation and its location appear next to the Specify by name and directory option.
11.Under Transformation specification, click OK.
12.Save your job; call it First Job. Steps used to save a job are nearly identical to saving a transformation. Provide a
meaningful comment when saving your job. See Saving Your Transformation.
13.Click (Run Job) in the toolbar. When the Execute a Job dialog box appears, choose Local Execution and click
Launch.
The Execution Results panel opens displaying the job metrics and log information for the job execution.

| Executing Transformations | 31
Executing Transformations
When you are done modifying a transformation or job, you can run it by clicking (Run) from the main menu toolbar,
or by pressing F9. There are three options that allow you to decide where you want your transformation to be executed:
•Local Execution — The transformation or job executes on the machine you are currently using.
•Execute remotely — Allows you to specify a remote server where you want the execution to take place. This
feature requires that you have the Data Integration Server running or Data Integration installed on a remote machine
and running the Carte service. To use remote execution you first must set up a slave server (see Setting Up a Slave
Server) .
•Execute clustered — Allows you to execute a transformation in a clustered environment.
Initialize Slave Servers in Spoon
Follow the instructions below to configure PDI to work with Carte slave servers.
1. Open a transformation.
2. In the Explorer View in Spoon, select Slave Server.
3. Right-click and select New.
The Slave Server dialog box appears.
4. In the Slave Server dialog box, enter the appropriate connection information for the Data Integration (or Carte) slave
server. The image below displays a connection to the Data Integration slave server.
Option Description
Server name The name of the slave server
Hostname or IP address The address of the device to be used as a slave
Port Defines the port you are for communicating with the
remote server
Web App Name Used for connecting to the DI server and set to pentaho-
di by default
User name Enter the user name for accessing the remote server
Password Enter the password for accessing the remote server
| Executing Transformations | 32
Option Description
Is the master Enables this server as the master server in any
clustered executions of the transformation
Note: When executing a transformation or job in a clustered environment, you should have one server set up
as the master and all remaining servers in the cluster as slaves.
Below are the proxy tab options:
Option Description
Proxy server hostname Sets the host name for the Proxy server you are using
The proxy server port Sets the port number used for communicating with the
proxy
Ignore proxy for hosts: regexp|separated Specify the server(s) for which the proxy should not be
active. This option supports specifying multiple servers
using regular expressions. You can also add multiple
servers and expressions separated by the ' | ' character.
5. Click OK to exit the dialog box. Notice that a plus sign (+) appears next to Slave Server in the Explorer View.
Executing Jobs and Transformations from the Repository on the Carte Server
To execute a job or transformation remotely on a Carte server, you first need to copy the local repositories.xml
from the user's .kettle directory to the Carte server's $HOME/.kettle directory. The Carte service also looks for the
repositories.xml file in the directory from which Carte was started.
For more information about locating or changing the .kettle home directory, see Changing the Pentaho Data
Integration Home Directory Location (.kettle folder).
Impact Analysis
To see what effect your transformation will have on the data sources it includes, go to the Action menu and click on
Impact. PDI will perform an impact analysis to determine how your data sources will be affected by the transformation if
it is completed successfully.

| Working with the DI Repository | 33
Working with the DI Repository
In addition to storing and managing your jobs and transformations, the DI repository provides full revision history for
documents allowing you to track changes, compare revisions and revert to previous versions when necessary. This, in
combination with other feature such as enterprise security and content locking make the DI repository an ideal platform
for providing a collaborative ETL environment.
Note: If you prefer to manage your documents as loose files on the file system, click Cancel in the Repository
Connection dialog box. You can also stop the Repository Connection dialog box from appearing at startup by
disabling the Show this dialog at startup option.
Deleting a Repository
When necessary, you can delete a DI repository or Kettle Database repository. Follow these instructions
1. In the Repository Connection dialog box, select the repository you want to delete from the list of available
repositories.
2. Click Delete.
A confirmation dialog appears.
3. Click Yes to delete the repository.
Managing Content in the DI Repository
When you are in the Repository Explorer view (Tools > Repository > Explore) use the right-click menu to perform
common tasks such as those listed below:
• Exploring repository contents
• Sharing content with other repository users
• Creating a new folder in the repository
• Opening a folder, job, or transformation
• Renaming a folder, job or transformation
• Deleting a folder, job, or transformation
• Locking a job or transformation
Note: Permissions set by your administrator determine what you are able to view and tasks you are able to
perform in the repository.
To move objects, such as folders, jobs, or transformations, in the repository, select the object, then click-and-drag it to
the desired location in the navigation pane on the left. You can move an object in your folder to the folder of another
repository user.
To restore an object you deleted, double-click (Trash). The object(s) you deleted appear in the right pane. Right-click
on the object you want restored, and select Restore from the menu.
To lock a job or transformation from being edited by other users, select the job or transformation, right-click, and
choose Lock. Enter a meaningful comment in the notes box that appears. A padlock icon appears next to jobs and

| Working with the DI Repository | 34
transformation that have been locked. Locking and unlocking objects in the repository works like a toggle switch. When
you release a lock on an object, the check-mark next to the Lock option disappears.
Note: The lock status icons are updated on each PDI client only when the Repository Explorer is launched. If
you want to refresh lock status in the Repository Explorer, exit and re-launch it.
In addition to managing content such as jobs and transformations, click the Connections tab to manage (create, edit,
and delete) your database connections in the DI Repository. See Managing Connections for more information about
connecting to a database.
Click the Security tab to manage users and roles. Pentaho Data Integration comes with a default security provider. If
you do not have an existing security such as LDAP or MSAD, you can use Pentaho Security to define users and roles.
You must have administrative privileges to manage security. For more information, see the section called Administer the
DI Server.
You can manage your slave servers (Data Integration and Carte instances) by clicking the Slaves tab. See Setting Up a
Slave Server for instructions.
Click the Partitions and Cluster tabs to manage partitions and clusters. See Creating a Cluster Schemafor more
information.
Setting Folder-Level Permissions
You can assign specific permissions to content files and folders stored in the DI Repository. Setting permissions
manually will override inherited permissions if the access control flags allow. Follow the instructions below to set folder-
level permissions.
1. Open the Repository Explorer (Tools > Repository > Explore).
2. Navigate to the folder to which you want permissions set and click to select it.
The folder must appear in the right pane before you can set permissions.
3. In the lower pane, under the Permissions tab, disable Inherit security settings from parent.
4. Click Add to open the Select User or Role dialog box.
5. Select a user or role to add to the permission list. Use the yellow arrows to move the user or role in or out of the
permissions list. Click OK when you are done.

| Working with the DI Repository | 35
6. In the lower pane, under the Access Control tab, enable the appropriate Permissions granted to your selected
user or role.
If you change your mind, use Delete to remove users or roles from the list.
7. Click Apply to apply permissions.
Access Control List (ACL) Permissions
These are the permissions settings for DI Repository content and folders.
Note: You must assign both Write and Manage Access Control to a directory in order to enable the selected
user to create subfolders and save files within the folder.
Read If set, the content of the file or contents of the directory will
be accessible. Allows execution.
Manage Access Control If set, access controls can be changed for this object.
Write If set, enables read and write access to the selected
content.
Delete If set, the content of the file or directory can be deleted.
Exporting Content from Solutions Repositories with Command-Line Tools
To export repository objects into XML format, using command-line tools instead of exporting repository configurations
from within Spoon, use named parameters and command-line options when calling Kitchen or Pan from a command-
line prompt.
The following is an example command-line entry to execute an export job using Kitchen:
call kitchen.bat /file:C:\Pentaho_samples\repository\repository_export.kjb
"/param:rep_name=PDI2000" "/param:rep_user=admin" "/param:rep_password=password"
"/param:rep_folder=/public/dev"
"/param:target_filename=C:\Pentaho_samples\repository\export\dev.xml"
Parameter Description
rep_folder Repository Folder
rep_name Repository Name
rep_password Repository Password
rep_user Repository Username
target_filename Target Filename
It is also possible to use obfuscated passwords with Encr, the command line tool for encrypting strings for storage/use
by PDI. The following is an example command-line entry to execute a complete command-line call for the export in
addition to checking for errors:
@echo off
ECHO This an example of a batch file calling the repository_export.kjb

| Working with the DI Repository | 36
cd C:\Pentaho\pdi-ee-<ph conref="../reuse_files/
reference_reusable.xml#reference_instaview_view_panel/PDIvernum3"/>\data-integration
call kitchen.bat /file:C:\Pentaho_samples\repository\repository_export.kjb "/
param:rep_name=PDI2000"
"/param:rep_user=admin" "/param:rep_password=password" "/param:rep_folder=/public/
dev"
"/param:target_filename=C:\Pentaho_samples\repository\export\dev.xml"
if errorlevel 1 goto error
echo Export finished successful.
goto finished
:error
echo ERROR: An error occurred during repository export.
:finished
REM Allow the user to read the message when testing, so having a pause
pause
Working with Version Control
Whenever you save a job or transformation in the DI Repository, you are prompted to provide a comment. Your
comments are saved along with your job or transformation so that you can keep track of changes you make. If you have
made a change to a transformation or job that you do not like, you can choose to restore a specific version of that job
or transformation. It is important to provide descriptive version control comments, so that you can make good decisions
when reverting to a version of a job or transformation.
Examining Revision History
To examine revision history for a job or transformation...
1. In Spoon menubar, go to Tools > Repository > Explore.
The Repository Explorer window opens.
2. In the navigation pane on the left, locate and double-click the folder that contains your job or transformation.
3. Click on a transformation or job from the list to select it. The Version History associated with transformation or job
appears in the lower pane.
Administrative users see the home folders of all users on the system. If you are not logged in as an administrator,
you see your home and public folders. Your home folder is where you manage private content, such as
transformations and jobs that are in progress. The public folder is where you store content that you want to share
with others.
Right-click on the line under Version History that contains the transformation or job you want to examine. Choose
Open to open the transformation or job in Spoon.
Restoring a Previously Saved Version of a Job or Transformation
To restore a version of a job or transformation...
1. In Spoon menubar, go to Tools > Repository > Explore.
The Repository Explorer window opens.
2. Browse through the folders to locate the transformation or job that has multiple versions associated with it.
3. Right-click on a transformation or job from the list to select it.
4. Select Restore.
5. Write a meaningful comment in the Commit Comment dialog box and click OK. The version is restored. Next time
you open the transformation or job, the restored version is what you will see.
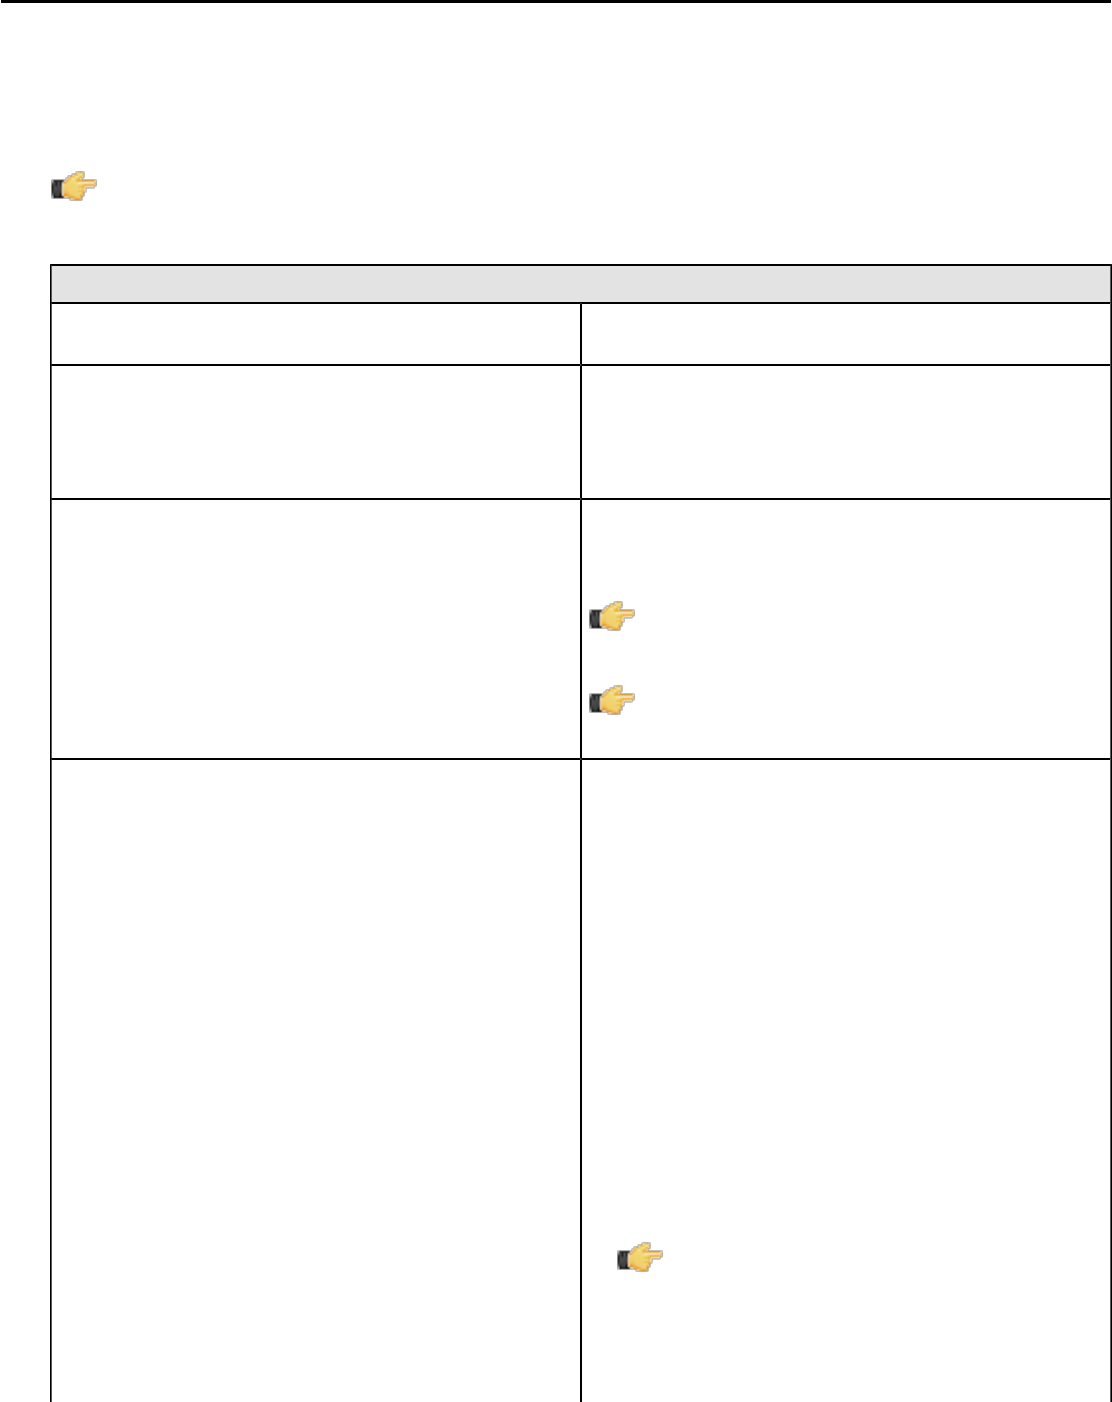
| Reusing Transformation Flows with Mapping Steps | 37
Reusing Transformation Flows with Mapping Steps
When you want to reuse a specific sequence of steps, you can turn the repetitive part into a mapping. A mapping is a
standard transformation except that you can define mapping input and output steps as placeholders.
• Mapping Input Specification — the placeholder used for input from the parent transformation
• Mapping Output Specification — the placeholder from which the parent transformation reads data
Note: Pentaho Data Integration samples that demonstrate the use of mapping steps are located at
...samples\mapping\Mapping.
Below is the reference for the Mapping (sub-transformation) step:
Option Description
Step name Optionally, you can change the name of this step to fit
your needs.
Mapping transformation Specify the name of the mapping transformation file to
execute at runtime. You can specify either a filename
(XML/.ktr) or a transformation from the repository. The
Edit button opens the specified transformation under a
separate step in the Spoon Designer.
Parameters Options under the Parameters tab allow you to define or
pass PDI variables down to the mapping. This provides
you with a high degree of customization.
Note: It is possible to include variable
expressions in the string values for the variable
names.
Note: Important! Only those variables/values
that are specified are passed down to the sub-
transformation.
Input Tabs Each of the Input tabs (may be missing) correspond to
one Mapping Input Specification step in the mapping
or sub-transformation. This means you can have multiple
Input tabs in a single Mapping step. To add an Input tab,
click Add Input.
•Input source step name— The name of the step
in the parent transformation (not the mapping) from
which to read
•Mapping target step name — The name of the step
in the mapping (sub-transformation) to send the rows
of data from the input source step
•Is this the main data path? — Enable if you only
have one input mapping ; you can leave the Mapping
source step name and Output target step name
fields blank
•Ask these values to be renamed back on output?
— Fields get renamed before they are transferred to
the mapping transformation
Note: Enabling this option renames the values
back to their original names once they move
to the Mapping output step. This option makes
your sub-transformations more transparent and
reusable.
•Step mapping description — Add a description of the
mapping step

| Reusing Transformation Flows with Mapping Steps | 38
Option Description
•Source - mapping transformation mapping Enter
the required field name changes
Output Tabs Each of the Output tabs (may be missing) correspond to
one Mapping Output Specification step in the mapping
or sub-transformation. This means you can have multiple
Output tabs in a single Mapping step. To add an Output
tab, click Add Output.
•Mapping source step — the name of the step in the
mapping transformation (sub-transformation) where
that will be read
•Output target step name — the name of the step in
the current transformation (parent) to send the data
from the mapping transformation step to.
•Is this the main data path? — Enable if you only
have one output mapping and you can leave the
Mapping source step and Output target step name
fields above blank.
•Step mapping description — Add a description to the
output step mapping
•Mapping transformation - target step field mapping
— Enter the required field name changes
Add input / Add output Add an input or output mapping for the specified sub-
transformation

| Arguments, Parameters, and Variables | 39
Arguments, Parameters, and Variables
PDI has three paradigms for storing user input: arguments, parameters, and variables. Each is defined below, along
with specific tips and configuration information.
Arguments
A PDI argument is a named, user-supplied, single-value input given as a command line argument (running a
transformation or job manually from Pan or Kitchen, or as part of a script). Each transformation or job can have a
maximum of 10 arguments. Each argument is declared as space-separated values given after the rest of the Pan or
Kitchen line:
sh pan.sh -file:/example_transformations/example.ktr argOne argTwo argThree
In the above example, the values argOne, argTwo, and argThree are passed into the transformation, where they will
be handled according to the way the transformation is designed. If it was not designed to handle arguments, nothing
will happen. Typically these values would be numbers, words (strings), or variables (system or script variables, not PDI
variables).
In Spoon, you can test argument handling by defining a set of arguments when you run a transformation or job. This
is accomplished by typing in values in the Arguments fields in the Execute a Job or Execute a Transformation
dialogue.
Parameters
Parameters are like local variables; they are reusable inputs that apply only to the specific transformation that they are
defined in. When defining a parameter, you can assign it a default value to use in the event that one is not fetched for it.
This feature makes it unique among dynamic input types in PDI.
Note: If there is a name collision between a parameter and a variable, the parameter will take precedence.
To define a parameter, right-click on the transformation workspace and select Transformation settings from the
context menu (or just press Ctrl-T), then click on the Parameters tab.
VFS Properties
vfs . scheme . property . host
The vfs subpart is required to identify this as a virtual filesystem configuration property. The scheme subpart
represents the VFS driver's scheme (or VFS type), such as http, sftp, or zip. The property subpart is the name of
a VFS driver's ConfigBuilder's setter (the specific VFS element that you want to set). The host optionally defines a
specific IP address or hostname that this setting applies to.
You must consult each scheme's API reference to determine which properties you can create variables for.
Apache provides VFS scheme documentation at http://commons.apache.org/vfs/apidocs/index.html. The
org.apache.commons.vfs.provider package lists each of the configurable VFS providers (ftp, http, sftp, etc.). Each
provider has a FileSystemConfigBuilder class that in turn has set*(FileSystemOptions, Object) methods. If a
method's second parameter is a String or a number (Integer, Long, etc.) then you can create a PDI variable to set the
value for VFS dialogues.
The table below explains VFS properties for the SFTP scheme. Each property must be declared as a PDI variable and
preceded by the vfs.sftp prefix as defined above.
Note: All of these properties are optional.
SFTP VFS Property Purpose
compression Specifies whether zlib compression is used for the
destination files. Possible values are zlib and none.

| Arguments, Parameters, and Variables | 40
SFTP VFS Property Purpose
identity The private key file (fully qualified local or remote path
and filename) to use for host authentication.
authkeypassphrase The passphrase for the private key specified by the
identity property.
StrictHostKeyChecking If this is set to no, the certificate of any remote host will be
accepted. If set to yes, the remote host must exist in the
known hosts file (~/.ssh/known_hosts).
Configure SFTP VFS
To configure the connection settings for SFTP dialogues in PDI, you must create either variables or parameters for each
relevant value. Possible values are determined by the VFS driver you are using.
You can also use parameters to substitute VFS connection details, then use them in the VFS dialogue where
appropriate. For instance, these would be relevant credentials, assuming the parameters have been set:
sftp://${username}@${host}/${path}
This technique enables you to hide sensitive connection details, such as usernames and passwords.
See VFS Properties on page 39 for more information on VFS options. You can also see all of these techniques
in practice in the VFS Configuration Sample sample transformation in the /data-integration/samples/
transformations/ directory.
Variables
A variable in PDI is a piece of user-supplied information that can be used dynamically and programmatically in a variety
of different scopes. A variable can be local to a single step, or be available to the entire JVM that PDI is running in.
PDI variables can be used in steps in both jobs and transformations. You define variables with the Set Variable step in
a transformation, by hand through the kettle.properties file, or through the Set Environment Variables dialogue in the
Edit menu.
TheGet Variable step can explicitly retrieve a value from a variable, or you can use it in any PDI text field that has the
diamond dollar sign icon next to it by using a metadata string in either the Unix or Windows formats:
•${VARIABLE}
•%%VARIABLE%%
Both formats can be used and even mixed. In fact, you can create variable recursion by alternating between the Unix
and Windows syntaxes. For example, if you wanted to resolve a variable that depends on another variable, then you
could use this example: ${%%inner_var%%}.
Note: If there is a name collision with a parameter or argument, variables will defer.
You can also use ASCII or hexidecimal character codes in place of variables, using the same format: $[hex value]. This
makes it possible to escape the variable syntax in instances where you need to put variable-like text into a variable. For
instance if you wanted to use ${foobar} in your data stream, then you can escape it like this: $[24]{foobar}. PDI will
replace $[24] with a $ without resolving it as a variable.

| Arguments, Parameters, and Variables | 41
Variable Scope
The scope of a variable is defined by the location of its definition. There are two types of variables: global environment
variables, and Kettle variables. Both are defined below.
Environment Variables
This is the traditional variable type in PDI. You define an environment variable through the Set Environment Variables
dialogue in the Edit menu, or by hand by passing it as an option to the Java Virtual Machine (JVM) with the -D flag.
Environment variables are an easy way to specify the location of temporary files in a platform-independent way;
for example, the ${java.io.tmpdir} variable points to the /tmp/ directory on Unix/Linux/OS X and to the C:
\Documents and Settings\<username\Local Settings\Temp\ directory on Windows.
The only problem with using environment variables is that they cannot be used dynamically. For example, if you run two
or more transformations or jobs at the same time on the same application server, you may get conflicts. Changes to the
environment variables are visible to all software running on the virtual machine.
Kettle Variables
Kettle variables provide a way to store small pieces of information dynamically in a narrower scope than environment
variables. A Kettle variable is local to Kettle, and can be scoped down to the job or transformation in which it is set, or
up to a related job. The Set Variable step in a transformation allows you to specify the related job that you want to limit
the scope to; for example, the parent job, grandparent job, or the root job.
Internal Variables
The following variables are always defined:
Variable Name Sample Value
Internal.Kettle.Build.Date 2010/05/22 18:01:39
Internal.Kettle.Build.Version 2045
Internal.Kettle.Version 4.3
These variables are defined in a transformation:
Variable Name Sample Value
Internal.Transformation.Filename.Directory D:\Kettle\samples
Internal.Transformation.Filename.Name Denormaliser - 2 series of key-value pairs.ktr
Internal.Transformation.Name Denormaliser - 2 series of key-value pairs sample
Internal.Transformation.Repository.Directory /
These are the internal variables that are defined in a job:
Variable Name Sample Value
Internal.Job.Filename.Directory file:///home/matt/jobs
Internal.Job.Filename.Name Nested jobs.kjb
Internal.Job.Name Nested job test case
Internal.Job.Repository.Directory /
These variables are defined in a transformation running on a slave server, executed in clustered mode:
Variable Name Sample Value
Internal.Slave.Transformation.Number 0..<cluster size-1> (0,1,2,3 or 4)
Internal.Cluster.Size <cluster size> (5)

| Arguments, Parameters, and Variables | 42
Note: In addition to the above, there are also System parameters, including command line arguments. These
can be accessed using the Get System Info step in a transformation.
Note: Additionally, you can specify values for variables in the Execute a transformation dialog box. If you
include the variable names in your transformation they will appear in this dialog box.

| Prototype With Data Integration | 43
Prototype With Data Integration
Data Integration offers rapid prototyping of analysis schemas through a mix of processes and tools known as Agile BI.
The Agile BI functions of Pentaho Data Integration are explained in this section, but there is no further instruction here
regarding PDI installation, configuration, or use beyond OLAP schema creation. If you need information related to PDI
in general, consult the section on installing PDI and/or the section on working with PDI in the Pentaho InfoCenter.
Note: Agile BI is for prototyping only. It is extremely useful as an aid in developing OLAP schemas that
meet the needs of BI developers, business users, and database administrators. However, it should not be
used for production. Once your Agile BI schema has been refined, you will have to either hand-edit it in
Schema Workbench to optimize it for performance, or completely re-implement the entire model with Schema
Workbench.
Creating a Prototype Schema With a Non-PDI Data Source
Your data sources must be configured, running, and available before you can proceed with this step.
Follow the below procedure to create a OLAP schema prototype from an existing database, file, or data warehouse.
Note: If you are already using PDI to create your data source, skip these instructions and refer to Creating a
Prototype Schema With a PDI Data Source on page 43 instead.
1. Start Spoon and connect to your repository, if you are using one.
cd ~/pentaho/design-tools/data-integration/ && ./spoon.sh
2. Go to the File menu, then select the New sub-menu, then click on Model.
The interface will switch over to the Model perspective.
3. In the Properties pane on the right, click Select.
A data source selection window will appear.
4. Click the round green + icon in the upper right corner of the window.
The Database Connection dialogue will appear.
5. Enter in and select the connection details for your data source, then click Test to ensure that everything is correct.
Click OK when you're done.
6. Select your newly-added data source, then click OK.
The Database Explorer will appear.
7. Traverse the database hierarchy until you get to the table you want to create a model for. Right-click the table, then
select Model from the context menu.
The Database Explorer will close and bring you back to the Model perspective.
8. Drag items from the Data pane on the left and drop them into either the Measures or Dimensions groups in the
Model pane in the center.
The Measures and Dimensions groups will expand to include the items you drag into them.
9. Select each new measure and dimension item, and modify its details accordingly in the Properties pane on the
right.
10.Save your model through the File menu, or publish it to the BA Server using the Publish icon above the Model
pane.
You now have a basic OLAP schema. You should test it yourself before putting it into production. To do this, continue
on to Testing With Pentaho Analyzer and Report Wizard on page 44.
Creating a Prototype Schema With a PDI Data Source
1. Start Spoon and connect to your repository, if you are using one.
cd ~/pentaho/design-tools/data-integration/ && ./spoon.sh
2. Open the transformation that produces the data source you want to create a OLAP schema for.

| Prototype With Data Integration | 44
3. Right-click your output step, then select Model from the context menu.
4. Drag items from the Data pane on the left and drop them into either the Measures or Dimensions groups in the
Model pane in the center.
The Measures and Dimensions groups will expand to include the items you drag into them.
5. Select each new measure and dimension item, and modify its details accordingly in the Properties pane on the
right.
6. Save your model through the File menu, or publish it to the BA Server using the Publish icon above the Model
pane.
You now have a basic OLAP schema. You should test it yourself before putting it into production. To do this, continue
on to Testing With Pentaho Analyzer and Report Wizard on page 44.
Testing With Pentaho Analyzer and Report Wizard
You must have an analysis schema with at least one measure and one dimension, and it must be currently open and
focused on the Model perfective in Spoon.
This section explains how to use the embedded Analyzer and Report Design Wizard to test a prototype analysis
schema.
1. While in the Model perspective, select your visualization method from the drop-down box above the Data pane (it
has a New: to its left), then click Go.
The two possible choices are: Pentaho Analyzer and Report Wizard. You do not need to have license keys for
Pentaho Analysis or Pentaho Reporting in order to use these preview tools.
2. Either the Report Design Wizard will launch in a new sub-window, or Pentaho Analyzer will launch in a new tab. Use
it as you would in Report Designer or the Pentaho User Console.
3. When you have explored your new schema, return to the Model perspective by clicking Model in the upper right
corner of the Spoon toolbar, where all of the perspective buttons are.
Do not close the tab; this will close the file, and you will have to reopen it in order to adjust your schema.
4. If you continue to refine your schema in the Model perspective, you must click the Go button again each time you
want to view it in Analyzer or Report Wizard; the Visualize perspective does not automatically update according to
the changes you make within the Model perspective.
You now have a preview of what your model will look like in production. Continue to refine it through the Model
perspective, and test it through the Visualize perspective, until you meet your initial requirements.
Prototypes in Production
Once you're ready to test your OLAP schema on a wider scale, use the Publish button above the Model pane in the
Model perspective, and use it to connect to your test or development BA Server.
You can continue to refine your schema if you like, but it must be republished each time you want to redeploy it.
Note: Agile BI is for prototyping only. It is extremely useful for developing OLAP schemas that meet the needs
of business analytics developers, business users, and database administrators. However, it should not be
used for production. Rather, once your Agile BI schema has been refined, you will have to either hand-edit it
in Schema Workbench to optimize it for performance, or completely re-implement the entire model with Schema
Workbench.

| Using the SQL Editor | 45
Using the SQL Editor
The SQL Editor is good tool to use when you must execute standard SQL commands for tasks such as creating tables,
dropping indexes and modifying fields. The SQL Editor is used to preview and execute DDL (Data Definition Language)
generated by Spoon such as "create/alter table, "create index," and "create sequence" SQL commands. For example,
if you add a Table Output step to a transformation and click the SQL button at the bottom of the Table Input dialog box,
Spoon automatically generates the necessary DDL for the output step to function properly and presents it to the end
user through the SQL Editor.
Below are some points to consider:
• Multiple SQL Statements must be separated by semi-colons.
• Before SQL Statements are sent to the database to be executed, Spoon removes returns, line-feeds, and separating
semi-colons.
• Pentaho Data Integration clears the database cache for the database connection on which you launch DDL
statements.
The SQL Editor does not recognize the dialects of all supported databases. That means that creating stored
procedures, triggers, and other database-specific objects may pose problems. Consider using the tools that came with
the database in these instances.

| Using the Database Explorer | 46
Using the Database Explorer
The Database Explorer allow you to explore configured database connections. The Database Explorer also supports
tables, views, and synonyms along with the catalog, schema, or both to which the table belongs.
A right-click on the selected table provides quick access to the following features:
Feature Description
Preview first 100 Returns the first 100 rows from the selected table
Preview x Rows Prompts you for the number of rows to return from the
selected table
Row Count Specifies the total number of rows in the selected table
Show Layout Displays a list of column names, data types, and so on
from the selected table
DDL Generates the DDL to create the selected table based on
the current connection type; the drop-down
View SQL Launches the Simple SQL Editor for the selected table
Truncate Table Generates a TRUNCATE table statement for the current
table
Note: The statement is commented out by default
to prevent users from accidentally deleting the
table data
Model Switches to the Model perspective for the selected table
Visualize Switches to the Visualize perspective for the selected
table

| Unsupported Databases | 47
Unsupported Databases
It may be possible to read from unsupported databases by using the generic database driver through an ODBC or
JDBC connection. Contact Pentaho if you want to access a database type that is not yet in our list of supported
components.
You can add or replace a database driver files in the libext directory located under ...\design-tools\data-
integration.
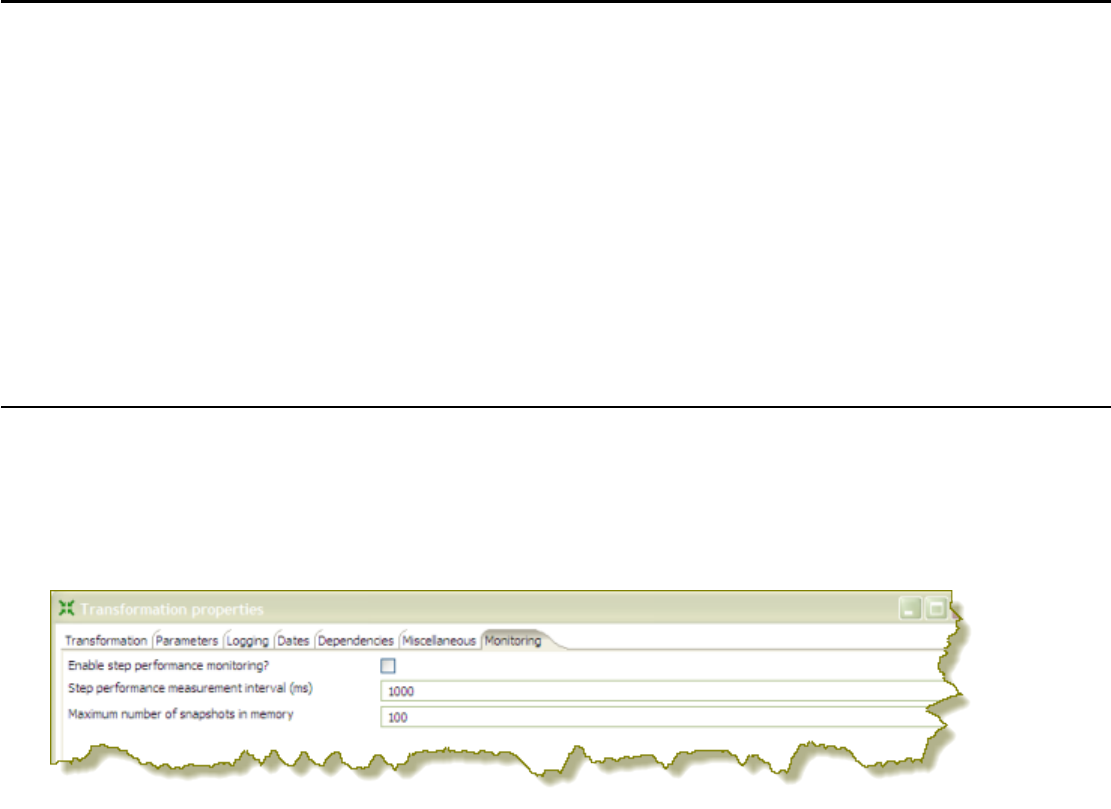
| Performance Monitoring and Logging | 48
Performance Monitoring and Logging
Pentaho Data Integration provides you with several methods in which to monitor the performance of jobs and
transformations. Logging offers you summarized information regarding a job or transformation such as the number of
records inserted and the total elapsed time spent in a transformation. In addition, logging provides detailed information
about exceptions, errors, and debugging details.
Reasons you may want to enable logging and step performance monitoring include: determining if a job completed with
errors or to review errors that were encountered during processing. In headless environments, most ETL in production
is not run from the graphical user interface and you need a place to watch initiated job results. Finally, performance
monitoring provides you with useful information for both current performance problems and capacity planning.
If you are an administrative user and want to monitor jobs and transformations, you must first set up logging and
performance monitoring in Spoon. For more information about monitoring jobs and transformations, see the section
Administer the DI Server.
Monitoring Step Performance
Pentaho Data Integration provides you with a tool for tracking the performance of individual steps in a transformation.
By helping you identify the slowest step in the transformation, you can fine-tune and enhance the performance of your
transformations.
You enable the step performance monitoring in the Transformation Properties dialog box. To access the dialog box
right-click in the workspace that is displaying your transformation and choose, Transformation Settings. You can also
access this dialog box, by pressing <CTRL + T>.
As shown in the sample screen capture above, the option to track performance (Enable step performance
monitoring?) is not selected by default. Step performance monitoring may cause memory consumption problems in
long-running transformations. By default, a performance snapshot is taken for all the running steps every second. This
is not a CPU-intensive operation and, in most instances, does not negatively impact performance unless you have
many steps in a transformation or you take a lot of snapshots (several per second, for example). You can control the
number of snapshots in memory by changing the default value next to Maximum number of snapshots in memory.
In addition, if you run in Spoon locally you may consume a fair amount of CPU power when you update the JFreeChart
graphics under the Performance tab. Running in "headless" mode (Kitchen, Pan, DI Server (slave server), Carte,
Pentaho BI platform, and so on) does not have this drawback and should provide you with accurate performance
statistics.
Using Performance Graphs
If you configured step performance monitoring, with database logging (optional), you can view the performance
evolution graphs. Performance graphs provide you with a visual interpretation of how your transformation is processing.
To enable database logging, enable the option Enable step performance monitoring within the Transformation
Properties / Monitoring dialog box.

| Performance Monitoring and Logging | 49
Follow the instructions below to set up a performance graph history for your transformation.
1. Right-click in the workspace (canvas) where you have an open transformation. Alternatively, press <CTRL
+T>. To enable the logging, you also need to enable the option Enable step performance monitoring in the
Transformation Properties/Monitoring in the dialog.
The Transformation Properties dialog box appears.
2. In the Transformation Properties dialog box, click the Logging tab. Make sure Performance is selected in the
navigation pane on the left.
3. Under Logging enter the following information:
Option Description
Log Connection Specifies the database connection you are using for
logging; you can configure a new connection by clicking
New.
Log Table Schema Specifies the schema name, if supported by your
database
Log Table Name Specifies the name of the log table (for example L_ETL)
Logging interval (seconds) Specifies the interval in which logs are written to the
table
Log record timeout (in days) Specifies the number of days old log entries in the table
will be kept before they are deleted
4. Enable the fields you want to log or keep the defaults.
5. Click SQL to create your log table.
The Simple SQL Editor appears.
6. Click Execute to execute the SQL code for your log table, then click OK to exit the Results dialog box.
Note: You must execute the SQL code to create the log table.
7. Click Close to exit the Simple SQL Editor.
8. Click OK to exit the Transformation Properties dialog box.
Logging Steps
Follow the instructions below to create a log table that keeps history of step-related information associated with your
transformation.
1. Right-click in the workspace (canvas) where you have an open transformation. Alternatively, press <CTRL +T>.
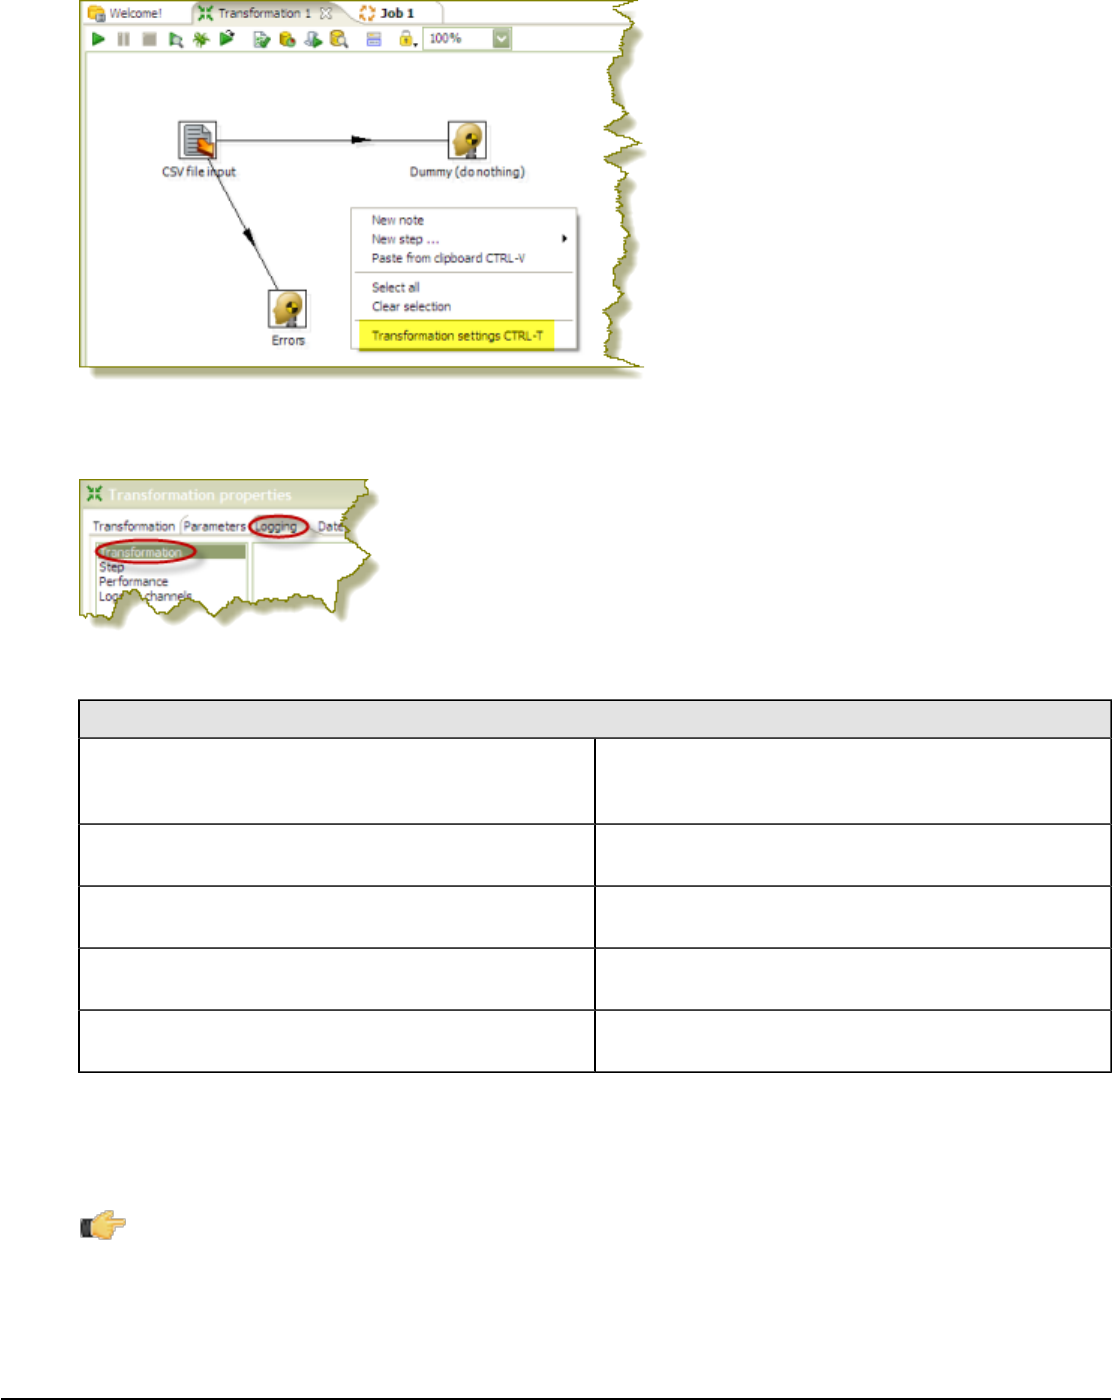
| Performance Monitoring and Logging | 50
The Transformation Properties dialog box appears.
2. In the Transformation Properties dialog box, click the Logging tab. Make sure Step is selected in the navigation
pane on the left.
3. Under Logging enter the following information:
Option Description
Log Connection Specifies the database connection you are using for
logging; you can configure a new connection by clicking
New.
Log Table Schema Specifies the schema name, if supported by your
database
Log Table Name Specifies the name of the log table (for example
L_STEP)
Logging interval (seconds) Specifies the interval in which logs are written to the
table
Log record timeout (in days) Specifies the number of days old log entries in the table
will be kept before they are deleted
4. Enable the fields you want to log or keep the defaults.
5. Click SQL to create your log table.
The Simple SQL Editor appears.
6. Click Execute to execute the SQL code for your log table, then click OK to exit the Results dialog box.
Note: You must execute the SQL code to create the log table.
7. Click Close to exit the Simple SQL Editor.
8. Click OK to exit the Transformation Properties dialog box.
Logging Transformations
Follow the instructions below to create a log table for transformation-related processes:
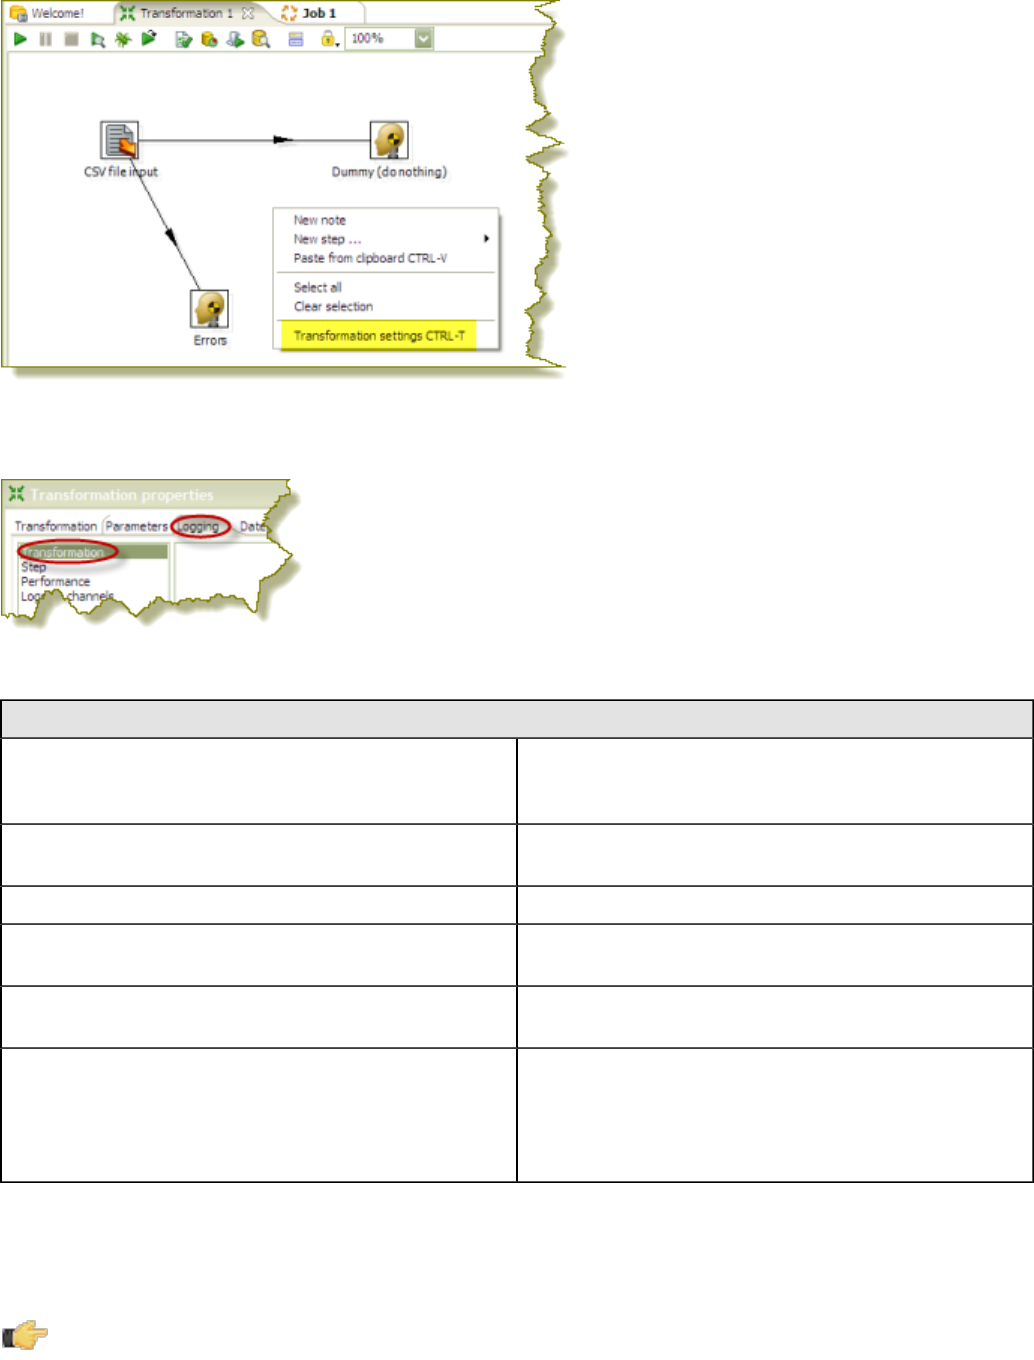
| Performance Monitoring and Logging | 51
1. Right-click in the workspace (canvas) where you have an open transformation. Alternatively, press <CTRL +T>.
The Transformation Properties dialog box appears.
2. In the Transformation Properties dialog box, click the Logging tab. Make sure Transformation is selected in the
navigation pane on the left.
3. Under Logging enter the following information:
Option Description
Log Connection Specifies the database connection you are using for
logging; you can configure a new connection by clicking
New.
Log Table Schema Specifies the schema name, if supported by your
database
Log Table Name Specifies the name of the log table (for example L_ETL)
Logging interval (seconds) Specifies the interval in which logs are written to the
table
Log record timeout (in days) Specifies the number of days old log entries in the table
will be kept before they are deleted
Log size limit in lines Limits the number of lines that are stored in the
LOG_FIELD (when selected under Fields to Log); when
the LOG_FIELD is enabled Pentaho Data Integration
will store logging associated with the transformation in a
long text field (CLOB)
4. Enable the fields you want to log or keep the defaults.
5. Click SQL to create your log table.
The Simple SQL Editor appears.
6. Click Execute to execute the SQL code for your log table, then click OK to exit the Results dialog box.
Note: You must execute the SQL code to create the log table.
7. Click Close to exit the Simple SQL Editor.
8. Click OK to exit the Transformation Properties dialog box.

| Performance Monitoring and Logging | 52
The next time you run your transformation, logging information will be displayed under the Execution History tab.
Pentaho Data Integration Performance Tuning Tips
The tips described here may help you to identify and correct performance-related issues associated with PDI
transformations.
Step Tip Description
JS Turn off compatibility
mode Rewriting JavaScript to use a format that is not compatible with previous
versions is, in most instances, easy to do and makes scripts easier to work with
and to read. By default, old JavaScript programs run in compatibility mode.
That means that the step will process like it did in a previous version. You
may see a small performance drop because of the overload associated with
forcing compatibility. If you want make use of the new architecture, disable
compatibility mode and change the code as shown below:
•intField.getInteger() > intField
•numberField.getNumber() > numberField
•dateField.getDate() > dateField
•bigNumberField.getBigNumber() > bigNumberField
• and so on...
Instead of Java methods, use the built-in library. Notice that the resulting
program code is more intuitive. For example :
• checking for null is now: field.isNull() > field==null
• Converting string to date: field.Clone().str2dat() >
str2date(field)
• and so on...
If you convert your code as shown above, you may get significant performance
benefits.
Note: It is no longer possible to modify data in-place using the value
methods. This was a design decision to ensure that no data with the
wrong type would end up in the output rows of the step. Instead of
modifying fields in-place, create new fields using the table at the bottom
of the Modified JavaScript transformation.
JS Combine steps One large JavaScript step runs faster than three consecutive smaller steps.
Combining processes in one larger step helps to reduce overhead.
JS Avoid the JavaScript
step or write a custom
plug in
Remember that while JavaScript is the fastest scripting language for Java, it is
still a scripting language. If you do the same amount of work in a native step
or plugin, you avoid the overhead of the JS scripting engine. This has been
known to result in significant performance gains. It is also the primary reason
why the Calculator step was created — to avoid the use of JavaScript for simple
calculations.
JS Create a copy of a field No JavaScript is required for this; a "Select Values" step does the trick. You
can specify the same field twice. Once without a rename, once (or more) with
a rename. Another trick is to use B=NVL(A,A) in a Calculator step where B
is forced to be a copy of A. In version 3.1, an explicit "create copy of field A"
function was added to the Calculator.
JS Data conversion Consider performing conversions between data types (dates, numeric data, and
so on) in a "Select Values" step (version 3.0.2 or higher). You can do this in the
Metadata tab of the step.
JS Variable creation If you have variables that can be declared once at the beginning of the
transformation, make sure you put them in a separate script and mark that
script as a startup script (right click on the script name in the tab). JavaScript
object creation is time consuming so if you can avoid creating a new object for

| Performance Monitoring and Logging | 53
Step Tip Description
every row you are transforming, this will translate to a performance boost for the
step.
N/A Launch several copies
of a step There are two important reasons why launching multiple copies of a step may
result in better performance:
1. The step uses a lot of CPU resources and you have multiple processor
cores in your computer. Example: a JavaScript step
2. Network latencies and launching multiple copies of a step can reduce
average latency. If you have a low network latency of say 5ms and you need
to do a round trip to the database, the maximum performance you get is 200
(x5) rows per second, even if the database is running smoothly. You can try
to reduce the round trips with caching, but if not, you can try to run multiple
copies. Example: a database lookup or table output
N/A Manage thread
priorities In versions 3.0.2 and higher, this feature that is found in the "Transformation
Settings" dialog box under the (Misc tab) improves performance by reducing the
locking overhead in certain situations. This feature is enabled by default for new
transformations that are created in recent versions, but for older transformations
this can be different.
Select
Value If possible, don't
remove fields in Select
Value
Don't remove fields in Select Value unless you must. It's a CPU-intensive task
as the engine needs to reconstruct the complete row. It is almost always faster
to add fields to a row rather than delete fields from a row.
Get
Variables Watch your use of Get
Variables May cause bottlenecks if you use it in a high-volume stream (accepting input).
To solve the problem, take the "Get Variables" step out of the transformation
(right click, detach)then insert it in with a "Join Rows (cart prod)" step. Make
sure to specify the main step from which to read in the "Join Rows" step. Set it
to the step that originally provided the "Get Variables" step with data.
N/A Use new text file input The new "CSV Input" or "Fixed Input" steps provide optimal performance. If
you have a fixed width (field/row) input file, you can even read data in parallel.
(multiple copies) These new steps have been rewritten using Non-blocking I/O
(NIO) features. Typically, the larger the NIO buffer you specify in the step, the
better your read performance will be.
N/A When appropriate, use
lazy conversion In instances in which you are reading data from a text file and you write the
data back to a text file, use Lazy conversion to speed up the process. The
principle behind lazy conversion that it delays data conversion in hopes that it
isn't necessary (reading from a file and writing it back comes to mind). Beyond
helping with data conversion, lazy conversion also helps to keep the data in
"binary" storage form. This, in turn, helps the internal Kettle engine to perform
faster data serialization (sort, clustering, and so on). The Lazy Conversion
option is available in the "CSV Input" and "Fixed input" text file reading steps.
Join Rows Use Join Rows You need to specify the main step from which to read. This prevents the step
from performing any unnecessary spooling to disk. If you are joining with a set
of data that can fit into memory, make sure that the cache size (in rows of data)
is large enough. This prevents (slow) spooling to disk.
N/A Review the big picture:
database, commit size,
row set size and other
factors
Consider how the whole environment influences performance. There can be
limiting factors in the transformation itself and limiting factors that result from
other applications and PDI. Performance depends on your database, your
tables, indexes, the JDBC driver, your hardware, speed of the LAN connection
to the database, the row size of data and your transformation itself. Test
performance using different commit sizes and changing the number of rows
in row sets in your transformation settings. Change buffer sizes in your JDBC
drivers or database.
N/A Step Performance
Monitoring Step Performance Monitoring is an important tool that allows you identify the
slowest step in your transformation.

| Working with Big Data and Hadoop in PDI | 54
Working with Big Data and Hadoop in PDI
Pentaho Data Integration (PDI) can operate in two distinct modes, job orchestration and data transformation. Within PDI
they are referred to as jobs and transformations.
PDI jobs sequence a set of entries that encapsulate actions. An example of a PDI big data job would be to check for
existence of new log files, copy the new files to HDFS, execute a MapReduce task to aggregate the weblog into a click
stream and stage that clickstream data in an analytic database.
PDI transformations consist of a set of steps that execute in parallel and operate on a stream of data columns. The
columns usually flow from one system, through the PDI engine, where new columns can be calculated or values can
be looked up and added to the stream. The data stream is then sent to a receiving system like a Hadoop cluster, a
database, or even the Pentaho Reporting Engine.
The tutorials within this section illustrate how to use PDI jobs and transforms in typical big data scenarios. PDI job
entries and transformation steps are described in the Transformation Step Reference and Job Entry Reference sections
of Administer the DI Server.
PDI's Big Data Plugin
The Pentaho Big Data plugin contains all of the job entries and transformation steps required for working with Hadoop,
Cassandra, and MongoDB.
By default, PDI is pre-configured to work with Apache Hadoop 0.20.X. But PDI can be configured to communicate with
most popular Hadoop distributions. Instructions for changing Hadoop configurations are covered in the Configure Your
Big Data Environment section.
For a list of supported big data technology, including which configurations of Hadoop are currently supported, see the
section on Supported Components.
Using PDI Outside and Inside the Hadoop Cluster
PDI is unique in that it can execute both outside of a Hadoop cluster and within the nodes of a hadoop cluster. From
outside a Hadoop cluster, PDI can extract data from or load data into Hadoop HDFS, Hive and HBase. When executed
within the Hadoop cluster, PDI transformations can be used as Mapper and/or Reducer tasks, allowing PDI with
Pentaho MapReduce to be used as visual programming tool for MapReduce.
These videos demonstrate using PDI to work with Hadoop from both inside and outside a Hadoop cluster.
• Loading Data into Hadoop from outside the Hadoop cluster is a 5-minute video that demonstrates moving data using
a PDI job and transformation: http://www.youtube.com/watch?v=Ylekzmd6TAc
• Use Pentaho MapReduce to interactively design a data flow for a MapReduce job without writing scripts or
code. Here is a 12 minute video that provides an overview of the process: http://www.youtube.com/watch?
v=KZe1UugxXcs.
Pentaho MapReduce Workflow
PDI and Pentaho MapReduce enables you to pull data from a Hadoop cluster, transform it, and pass it back to the
cluster. Here is how you would approach doing this.
PDI Transformation
Start by deciding what you want to do with your data, open a PDI transformation, and drag the appropriate steps onto
the canvas, configuring the steps to meet your data requirements. Drag the specifically-designed Hadoop MapReduce
Input and Hadoop MapReduce Output steps onto the canvas. PDI provides these steps to completely avoid the need
to write Java classes for this functionality. Configure both of these steps as needed. Once you have configured all the
steps, add hops to sequence the steps as a transformation. Follow the workflow as shown in this sample transformation
in order to properly communicate with Hadoop. Name this transformation Mapper.

| Working with Big Data and Hadoop in PDI | 55
Hadoop communicates in key/value pairs. PDI uses the MapReduce Input step to define how key/value pairs from
Hadoop are interpreted by PDI. The MapReduce Input dialog box enables you to configure the MapReduce Input
step.
PDI uses a MapReduce Output step to pass the output back to Hadoop. The MapReduce Output dialog box enables
you to configure the MapReduce Output step.
What happens in the middle is entirely up to you. Pentaho provides many sample steps you can alter to create the
functionality you need.
PDI Job
Once you have created the Mapper transformation, you are ready to include it in a Pentaho MapReduce job entry and
build a MapReduce job. Open a PDI job and drag the specifically-designed Pentaho MapReduce job entry onto the
canvas. In addition to ordinary transformation work, this entry is designed to execute mapper/reducer functions within
PDI. Again, no need to provide a Java class to achieve this.
Configure the Pentaho MapReduce entry to use the transformation as a mapper. Drag and drop a Start job entry, other
job entries as needed, and result jobentries to handle the output onto the canvas. Add hops to sequence the entries into
a job that you execute in PDI.
The workflow for the job should look something like this.

| Working with Big Data and Hadoop in PDI | 56
The Pentaho MapReduce dialog box enables you to configure the Pentaho MapReduce entry.
PDI Hadoop Job Workflow
PDI enables you to execute a Java class from within a PDI/Spoon job to perform operations on Hadoop data. The
way you approach doing this is similar to the way would for any other PDI job. The specifically-designed job entry that
handles the Java class is Hadoop Job Executor. In this illustration it is used in the WordCount - Advanced entry.
The Hadoop Job Executor dialog box enables you to configure the entry with a jar file that contains the Java class.

| Working with Big Data and Hadoop in PDI | 57
If you are using the Amazon Elastic MapReduce (EMR) service, you can Amazon EMR Job Executor. job entry to
execute the Java class This differs from the standard Hadoop Job Executor in that it contains connection information for
Amazon S3 and configuration options for EMR.
Hadoop to PDI Data Type Conversion
The Hadoop Job Executor and Pentaho MapReduce steps have an advanced configuration mode that enables you
to specify data types for the job's input and output. PDI is unable to detect foreign data types on its own; therefore you
must specify the input and output data types in the Job Setup tab. This table explains the relationship between Hadoop
data types and their PDI equivalents.
PDI (Kettle) Data Type Apache Hadoop Data Type
java.lang.Integer org.apache.hadoop.io.IntWritable
java.lang.Long org.apache.hadoop.io.IntWritable
| Working with Big Data and Hadoop in PDI | 58
PDI (Kettle) Data Type Apache Hadoop Data Type
java.lang.Long org.apache.hadoop.io.LongWritable
org.apache.hadoop.io.IntWritable java.lang.Long
java.lang.String org.apache.hadoop.io.Text
java.lang.String org.apache.hadoop.io.IntWritable
org.apache.hadoop.io.LongWritable org.apache.hadoop.io.Text
org.apache.hadoop.io.LongWritable java.lang.Long
For more information on configuring Pentaho MapReduce to convert to additional data types, see http://
wiki.pentaho.com/display/BAD/Pentaho+MapReduce.
Hadoop Hive-Specific SQL Limitations
There are a few key limitations in Hive that prevent some regular Metadata Editor features from working as intended,
and limit the structure of your SQL queries in Report Designer:
•Outer joins are not supported.
•Each column can only be used once in a SELECT clause. Duplicate columns in SELECT statements cause
errors.
•Conditional joins can only use the = conditional unless you use a WHERE clause. Any non-equal conditional
in a FROM statement forces the Metadata Editor to use a cartesian join and a WHERE clause conditional to limit it.
This is not much of a limitation, but it may seem unusual to experienced Metadata Editor users who are accustomed
to working with SQL databases.
Big Data Tutorials
These sections contain guidance and instructions about using Pentaho technology as part of your overall big data
strategy. Each section is a series of scenario-based tutorials that demonstrate the integration between Pentaho and
Hadoop using a sample data set.
Hadoop Tutorials
These tutorials are organized by topic and each set explains various techniques for loading, transforming, extracting
and reporting on data within a Hadoop cluster. You are encouraged to perform the tutorials in order as the output of
one is sometimes used as the input of another. However, if you would like to jump to a tutorial in the middle of the flow,
instructions for preparing input data are provided.
Loading Data into a Hadoop Cluster
These scenario-based tutorials contain guidance and instructions on loading data into HDFS (Hadoop's Distributed File
System), Hive and HBase using Pentaho Data Integration (PDI)
Prerequisites
To perform the tutorials in this section you must have these components installed.
PDI—The primary development environment for the tutorials. See the Data Integration Installation Options if you have
not already installed PDI.
Apache Hadoop 0.20.X—A single-node local cluster is sufficient for these exercises, but a larger and/or remote
configuration also works. If you are using a different distribution of Hadoop see Configure Your Big Data Environment.
You need to know the addresses and ports for your Hadoop installation.
*Hive—A supported version of Hive. Hive is a Map/Reduce abstraction layer that provides SQL-like access to Hadoop
data. For instructions on installing or using Hive, see the Hive Getting Started Guide.
*HBase—A supported version of HBase. HBase is an open source, non-relational, distributed database that runs on top
of HDFS. For instructions on installing or using HBase, see the Getting Started section of the Apache HBase Reference
Guide.

| Working with Big Data and Hadoop in PDI | 59
*Component only required for corresponding tutorial.
Sample Data
The tutorials in this section were created with this sample weblog data.
Tutorial File Name Content
Using a Job Entry to Load Data into
Hadoop's Distributed File System
(HDFS)
weblogs_rebuild.txt.zip Unparsed, raw weblog data
Using a Job Entry to Load Data into
Hive weblogs_parse.txt.zip Tab-delimited, parsed weblog data
Using a Transformation Step to Load
Data into HBase weblogs_hbase.txt.zip Prepared data for HBase load
Using a Job Entry to Load Data into Hadoop's Distributed File System (HDFS)
In order to follow along with this tutorial, you will need
• Hadoop
• Pentaho Data Integration
You can use PDI jobs to put files into HDFS from many different sources. This tutorial describes how to create a PDI job
to move a sample file into HDFS.
If not already running, start Hadoop and PDI. Unzip the sample data files and put them in a convenient location:
weblogs_rebuild.txt.zip.
1. Create a new Job by selecting File > New > Job.
2. Add a Start job entry to the canvas. From the Design palette on the left, under the General folder, drag a Start job
entry onto the canvas.
3. Add a Hadoop Copy Files job entry to the canvas. From the Design palette, under the Big Data folder, drag a
Hadoop Copy Files job entry onto the canvas.
4.
Connect the two job entries by hovering over the Start entry and selecting the output connector , then drag
the connector arrow to the Hadoop Copy Files entry.

| Working with Big Data and Hadoop in PDI | 60
5. Enter the source and destination information within the properties of the Hadoop Copy Files entry by double-
clicking it.
a) For File/Folder source(s), click Browse and navigate to the folder containing the downloaded sample file
weblogs_rebuild.txt.
b) For File/Folder destination(s), enter hdfs://<NAMENODE>:<PORT>/user/pdi/weblogs/raw, where
NAMENODE and PORT reflect your Hadoop destination.
c) For Wildcard (RegExp), enter ^.*\.txt.
d) Click Add to include the entries to the list of files to copy.
e) Check the Create destination folder option to ensure that the weblogs folder is created in HDFS the first time
this job is executed.
When you are done your window should look like this (your file paths may be different).
Click OK to close the window.
6. Save the job by selecting Save as from the File menu. Enter load_hdfs.kjb as the file name within a folder of
your choice.
7. Run the job by clicking the green Run button on the job toolbar , or by selecting Action > Run from the
menu. The Execute a job window opens. Click Launch.
An Execution Results panel opens at the bottom of the Spoon interface and displays the progress of the job as it
runs. After a few seconds the job finishes successfully.
If any errors occurred the job entry that failed will be highlighted in red and you can use the Logging tab to view
error messages.
8. Verify the data was loaded by querying Hadoop.
a) From the command line, query Hadoop by entering this command.
hadoop fs -ls /user/pdi/weblogs/raw

| Working with Big Data and Hadoop in PDI | 61
This statement is returned
-rwxrwxrwx 3 demo demo 77908174 2011-12-28 07:16 /user/pdi/weblogs/raw/weblog_raw.txt
Using a Job Entry to Load Data into Hive
In order to follow along with this tutorial, you will need
• Hadoop
• Pentaho Data Integration
• Hive
PDI jobs can be used to put files into Hive from many different sources. This tutorial instructs you how to use a PDI job
to load a sample data file into a Hive table.
Note: Hive could be defined with external data. Using the external option, you could define a Hive table that
uses the HDFS directory that contains the parsed file. For this tutorial, we chose not to use the external option to
demonstrate the ease with which files can be added to non-external Hive tables.
If not already running, start Hadoop, PDI, and the Hive server. Unzip the sample data files and put them in a convenient
location: weblogs_parse.txt.zip.
This file should be placed in the /user/pdi/weblogs/parse directory of HDFS using these three commands.
hadoop fs -mkdir /user/pdi/weblogs
hadoop fs -mkdir /user/pdi/weblogs/parse
hadoop fs -put weblogs_parse.txt /user/pdi/weblogs/parse/part-00000
If you previously completed the Using Pentaho MapReduce to Parse Weblog Datatutorial, the necessary files will
already be in the proper directory.
1. Create a Hive Table.
a) Open the Hive shell by entering 'hive' at the command line.
b) Create a table in Hive for the sample data by entering
create table weblogs (
client_ip string,
full_request_date string,
day string,
month string,
month_num int,
year string,
hour string,
minute string,
second string,
timezone string,
http_verb string,
uri string,
http_status_code string,
bytes_returned string,
referrer string,
user_agent string)
row format delimited
fields terminated by '\t';
c) Close the Hive shell by entering 'quit'.
2. Create a new Job to load the sample data into a Hive table by selecting File > New > Job.
3. Add a Start job entry to the canvas. From the Design palette on the left, under the General folder, drag a Start job
entry onto the canvas.

| Working with Big Data and Hadoop in PDI | 62
4. Add a Hadoop Copy Files job entry to the canvas. From the Design palette, under the Big Data folder, drag a
Hadoop Copy Files job entry onto the canvas.
5.
Connect the two job entries by hovering over the Start entry and selecting the output connector , then drag
the connector arrow to the Hadoop Copy Files entry.
6. Enter the source and destination information within the properties of the Hadoop Copy Files entry by double-
clicking it.
a) For File/Folder source(s), enter hdfs://<NAMENODE>:<PORT>/user/pdi/weblogs/parse, where
NAMENODE and PORT reflect your Hadoop destination.
b) For File/Folder destination(s), enter hdfs://<NAMENODE>:<PORT>/user/hive/warehouse/weblogs.
c) For Wildcard (RegExp), enter part-.*.
d) Click the Add button to add the entries to the list of files to copy.
When you are done your window should look like this (your file paths may be different)
Click OK to close the window.
7. Save the job by selecting Save as from the File menu. Enter load_hive.kjb as the file name within a folder of
your choice.
8. Run the job by clicking the green Run button on the job toolbar , or by selecting Action > Run from the
menu. The Execute a job window opens. Click Launch.

| Working with Big Data and Hadoop in PDI | 63
An Execution Results panel opens at the bottom of the Spoon interface and displays the progress of the job as it
runs. After a few seconds the job finishes successfully.
If any errors occurred the job entry that failed will be highlighted in red and you can use the Logging tab to view
error messages.
9. Verify the data was loaded by querying Hive.
a) Open the Hive shell from the command line by entering hive.
b) Enter this query to very the data was loaded correctly into Hive.
select * from weblogs limit 10;
Ten rows of data are returned.
Using a Transformation Step to Load Data into HBase
In order to follow along with this tutorial, you will need
• Hadoop
• Pentaho Data Integration
• HBase
This tutorial describes how to use data from a sample flat file to create a HBase table using a PDI transformation. For
the sake of brevity, you will use a prepared sample dataset and a simple transformation to prepare and transform your
data for HBase loads.
If not already running, start Hadoop, PDI, and HBase. Unzip the sample data files and put them in a convenient
location: weblogs_hbase.txt.zip
1. Create a HBase Table.
a) Open the HBase shell by entering hbase shell at the command line.
b) Create the table in HBase by entering create 'weblogs', 'pageviews' in the HBase shell.
This creates a table named weblogs with a single column family named pageviews.
c) Close the HBase shell by entering quit.
2. From within the Spoon, create a new transformation by selecting File > New > Transformation.
3. Identify the source where the transformation will get data from.
For this tutorial your source is a text file (.txt). From the Input folder of the Design palette on the left, add a Text
File Input step to the transformation by dragging it onto the canvas.
4. Edit the properties of the Text file input step by double-clicking the icon.
The Text file input dialog box appears.
5. From the File tab, in the File or Directory field, click Browse and navigate to the weblog_hbase.txt file. Click
Add.
The file appears in the Selected files pane.

| Working with Big Data and Hadoop in PDI | 64
6. Configure the contents of the file by switching to the Content tab.
a) For Separator, clear the contents and click Insert TAB.
b) Check the Header checkbox.
c) For Format, Select Unix from the drop-down menu.
7. Configure the input fields.
a) From the Fields tab, select Get Fields to populate the list the available fields.
b) A dialog box appears asking for Number of sample lines. Enter 100 and click OK.
c) Change the Type of the field named key to String and set the Length to 20.
Click OK to close the window.

| Working with Big Data and Hadoop in PDI | 65
8. On the Design palette, under Big Data, drag the HBase Output to the canvas. Create a hop to connect your input
and HBase Output step by hovering over the input step and clicking the output connector , then drag the
connector arrow to the HBase Output step.
9. Edit the HBase Output step by double-clicking it. You must now enter your Zookeeper host(s) and port number.
a) For the Zookeeper hosts(s) field, enter a comma separated list of your HBase Zookeeper Hosts. For local single
node clusters use localhost.
b) For Zookeeper port, enter the port for your Zookeeper hosts. By default this is 2181.
10.Create a HBase mapping to tell Pentaho how to store the data in HBase by switching to the Create/Edit mappings
tab and changing these options.
a) For HBase table name, select weblogs.
b) For Mapping name, enter pageviews.
c) Click Get incoming fields.
d) For the alias key change the Key column to Y, clear the Column family and Column name fields, and set the
Type field to String. Click Save mapping.
11.Configure the HBase out to use the mapping you just created.
a) Go back to the Configure connection tab and click Get table names.
b) For HBase table name, enter weblogs.
c) Click Get mappings for the specified table.
d) For Mapping name, select pageviews. Click OK to close the window.
Save the transformation by selecting Save as from the File menu. Enter load_hbase.ktr as the file name within a
folder of your choice.
12.Run the transformation by clicking the green Run button on the transformation toolbar , or by
choosing Action > Run from the menu. The Execute a transformation window opens. Click Launch.
An Execution Results panel opens at the bottom of the Spoon interface and displays the progress of the
transformation as it runs. After a few seconds the transformation finishes successfully.
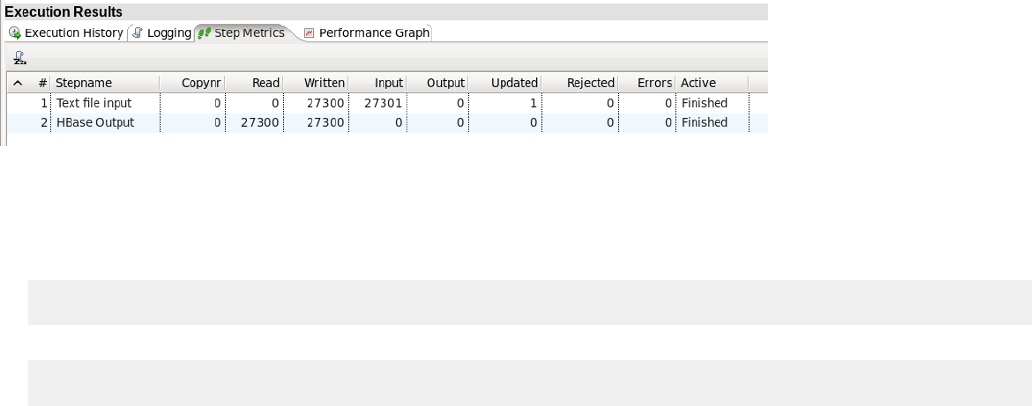
| Working with Big Data and Hadoop in PDI | 66
If any errors occurred the transformation step that failed will be highlighted in red and you can use the Logging tab
to view error messages.
13.Verify the data was loaded by querying HBase.
a) From the command line, open the HBase shell by entering this command.
hbase shell
b) Query HBase by entering this command.
scan 'weblogs', {LIMIT => 10}
Ten rows of data are returned.
Transforming Data within a Hadoop Cluster
These tutorials contain guidance and instructions on transforming data within the Hadoop cluster using Pentaho
MapReduce, Hive, and Pig.
•Using Pentaho MapReduce to Parse Weblog Data—How to use Pentaho MapReduce to convert raw weblog data
into parsed, delimited records.
•Using Pentaho MapReduce to Generate an Aggregate Dataset—How to use Pentaho MapReduce to transform and
summarize detailed data into an aggregate dataset.
•Transforming Data within Hive—How to read data from a Hive table, transform it, and write it to a Hive table within
the workflow of a PDI job.
•Transforming Data with Pig—How to invoke a Pig script from a PDI job.
Extracting Data from a Hadoop Cluster
These tutorials contain guidance and instructions on extracting data from Hadoop using HDFS, Hive, and HBase.
•Extracting Data from HDFS to Load an RDBMS—How to use a PDI transformation to extract data from HDFS and
load it into a RDBMS table.
•Extracting Data from Hive to Load an RDBMS—How to use a PDI transformation to extract data from Hive and load
it into a RDBMS table.
•Extracting Data from HBase to Load an RDBMS—How to use a PDI transformation to extract data from HBase and
load it into a RDBMS table.
•Extracting Data from Snappy Compressed Files—How to configure client-side PDI so that files compressed using
the Snappy codec can be decompressed using the Hadoop file input or Text file input step.
Reporting on Data within a Hadoop Cluster
These tutorials contain guidance and instructions about reporting on data within a Hadoop cluster.
•Reporting on HDFS File Data—How to create a report that sources data from a HDFS file.
•Reporting on HBase Data—How to create a report that sources data from HBase.
•Reporting on Hive Data—How to create a report that sources data from Hive.
MapR Tutorials
These tutorials are organized by topic and each set explains various techniques for loading, transforming, extracting
and reporting on data within a MapR cluster. You are encouraged to perform the tutorials in order as the output of one
is sometimes used as the input of another. However, if you would like to jump to a tutorial in the middle of the flow,
instructions for preparing input data are provided.
| Working with Big Data and Hadoop in PDI | 67
Loading Data into a MapR Cluster
These tutorials contain guidance and instructions on loading data into CLDB (MapR’s distributed file system), Hive, and
HBase.
•Loading Data into CLDB—How to use a PDI job to move a file into CLDB.
•Loading Data into MapR Hive—How to use a PDI job to load a data file into a Hive table.
•Loading Data into MapR HBase—How to use a PDI transformation that sources data from a flat file and writes to an
HBase table.
Transforming Data within a MapR Cluster
These tutorials contain guidance and instructions on leveraging the massively parallel, fault tolerant MapR processing
engine to transform resident cluster data.
•Using Pentaho MapReduce to Parse Weblog Data in MapR—How to use Pentaho MapReduce to convert raw
weblog data into parsed, delimited records.
•Using Pentaho MapReduce to Generate an Aggregate Dataset in MapR—How to use Pentaho MapReduce to
transform and summarize detailed data into an aggregate dataset.
•Transforming Data within Hive in MapR—How to read data from a Hive table, transform it, and write it to a Hive table
within the workflow of a PDI job.
•Transforming Data with Pig in MapR—How to invoke a Pig script from a PDI job.
Extracting Data from a MapR Cluster
These tutorials contain guidance and instructions on extracting data from a MapR cluster and loading it into an RDBMS
table.
•Extracting Data from CLDB to Load an RDBMS—How to use a PDI transformation to extract data from MapR CLDB
and load it into a RDBMS table.
•Extracting Data from Hive to Load an RDBMS in MapR—How to use a PDI transformation to extract data from Hive
and load it into a RDBMS table.
•Extracting Data from HBase to Load an RDBMS in MapR—How to use a PDI transformation to extract data from
HBase and load it into a RDBMS table.
Reporting on Data within a MapR Cluster
These tutorials contain guidance and instructions about reporting on data within a MapR cluster.
•Reporting on CLDB File Data —How to create a report that sources data from a MapR CLDB file.
•Reporting on HBase Data in MapR—How to create a report that sources data from HBase.
•Reporting on Hive Data in MapR—How to create a report that sources data from Hive.
Cassandra Tutorials
These tutorials demonstrate the integration between Pentaho and the Cassandra NoSQL Database, specifically
techniques about writing data to and reading data from Cassandra using graphical tools. These tutorials also include
instructions on how to sort and group data, create reports, and combine data from Cassandra with data from other
sources.
•Write Data To Cassandra—How to read data from a data source (flat file) and write it to a column family in
Cassandra using a graphic tool.
•How To Read Data From Cassandra—How to read data from a column family in Cassandra using a graphic tool.
•How To Create a Report with Cassandra—How to create a report that uses data from a column family in Cassandra
using graphic tools.
MongoDB Tutorials
These tutorials demonstrate the integration between Pentaho and the MongoDB NoSQL Database, specifically how to
write data to, read data from, MongoDB using graphical tools. These tutorials also include instructions on sorting and
grouping data, creating reports, and combining data from Mongo with data from other sources.
•Write Data To MongoDB—How to read data from a data source (flat file) and write it to a collection in MongoDB
•Read Data From MongoDB—How to read data from a collection in MongoDB.

| Implement Data Services with the Thin Kettle JDBC Driver | 69
Implement Data Services with the Thin Kettle JDBC Driver
The Thin Kettle JDBC Driver provides a means for a Java-based client to query the results of a transformation.
Any Java-based, JDBC-compliant tool, including third-party reporting systems, can use this driver to query a Kettle
transformation by using a SQL string via JDBC. With the Thin Kettle JDBC Driver, you can blend, enrich, clean, and
transform data from multiple sources to create a single data federation source. You can also seamlessly integrate with
Enterprise Service Buses (ESB).
Details on how to use the Thin Kettle JDBC Driver appear on the wiki.
•Configuration of the Kettle JDBC Driver
•Example of How to Use the Kettle JDBC Driver
•JDBC Driver and SQL Reference

| Transactional Databases and Job Rollback | 70
Transactional Databases and Job Rollback
By default, when you run a job or transformation that makes changes to a database table, changes are committed as
the transformation or job executes. Sometimes, this can cause an issue if a job or transformation fails. For example, if
you run a job that updates then syncs two tables, but the job fails before you can write to the second table, the first table
might be updated and the other might not, rendering them both out of sync. If this is a concern, consider implementing
job rollback by making the transformation or job databases (or both) transactional. When you do this, changes to a data
source occur only if a transformation or job completes successfully. Otherwise, the information in both data sources
remain unchanged.
The following links provide general information on how to make databases transactional. The wiki provides more detail.
•Make a Transformation Database Transactional
•Make a Job Database Transactional
Make a Transformation Database Transactional
To make a transformation database transactional, complete these steps.
1. In Spoon, open a transformation.
2. Right-click an empty space in the transformation's tab and select Transformation Settings from the menu that
appears.
3. Click the Miscellaneous tab.
4. Enable the Make the transformation database transactional checkbox.
5. Click OK to close the window.
Make a Job Database Transactional
To make a job database transactional, complete these steps.
1. In Spoon, open a job.
2. Right-click in an empty space in the job’s tab. Select Job Settings from the menu that appears.
3. Click the Transactions tab.
4. Enable the Make the job database transactional checkbox.
5. Click OK to close the window.

| Interacting With Web Services | 71
Interacting With Web Services
PDI jobs and transformations can interact with a variety of Web services through specialized steps. How you use these
steps, and which ones you use, is largely determined by your definition of "Web services." The most commonly used
Web services steps are:
•Web Service Lookup
•Modified Java Script Value
•RSS Input
•HTTP Post
The Web Service Lookup Step is useful for selecting and setting input and output parameters via WSDL, but only if you
do not need to modify the SOAP request. You can see this step in action in the Web Services - NOAA Latitude and
Longitude.ktr sample transformation included with PDI in the /data-integration/samples/transformations/
directory.
There are times when the SOAP message generated by the Web Services Lookup step is insufficient. Many Web
services require the security credentials be placed in the SOAP request headers. There may also be a need to parse
the response XML to get more information than the response values provide (such as namespaces). In cases like
these, you can use the Modified Java Script Value step to create whatever SOAP envelope you need. You would then
hop to an HTTP Post step to accept the SOAP request through the input stream and post it to the Web service, then
hop to another Modified Java Script Value to parse the response. The General - Annotated SOAP Web Service
call.ktr sample in the /data-integration/samples/transformations/ directory shows this theory in practice.
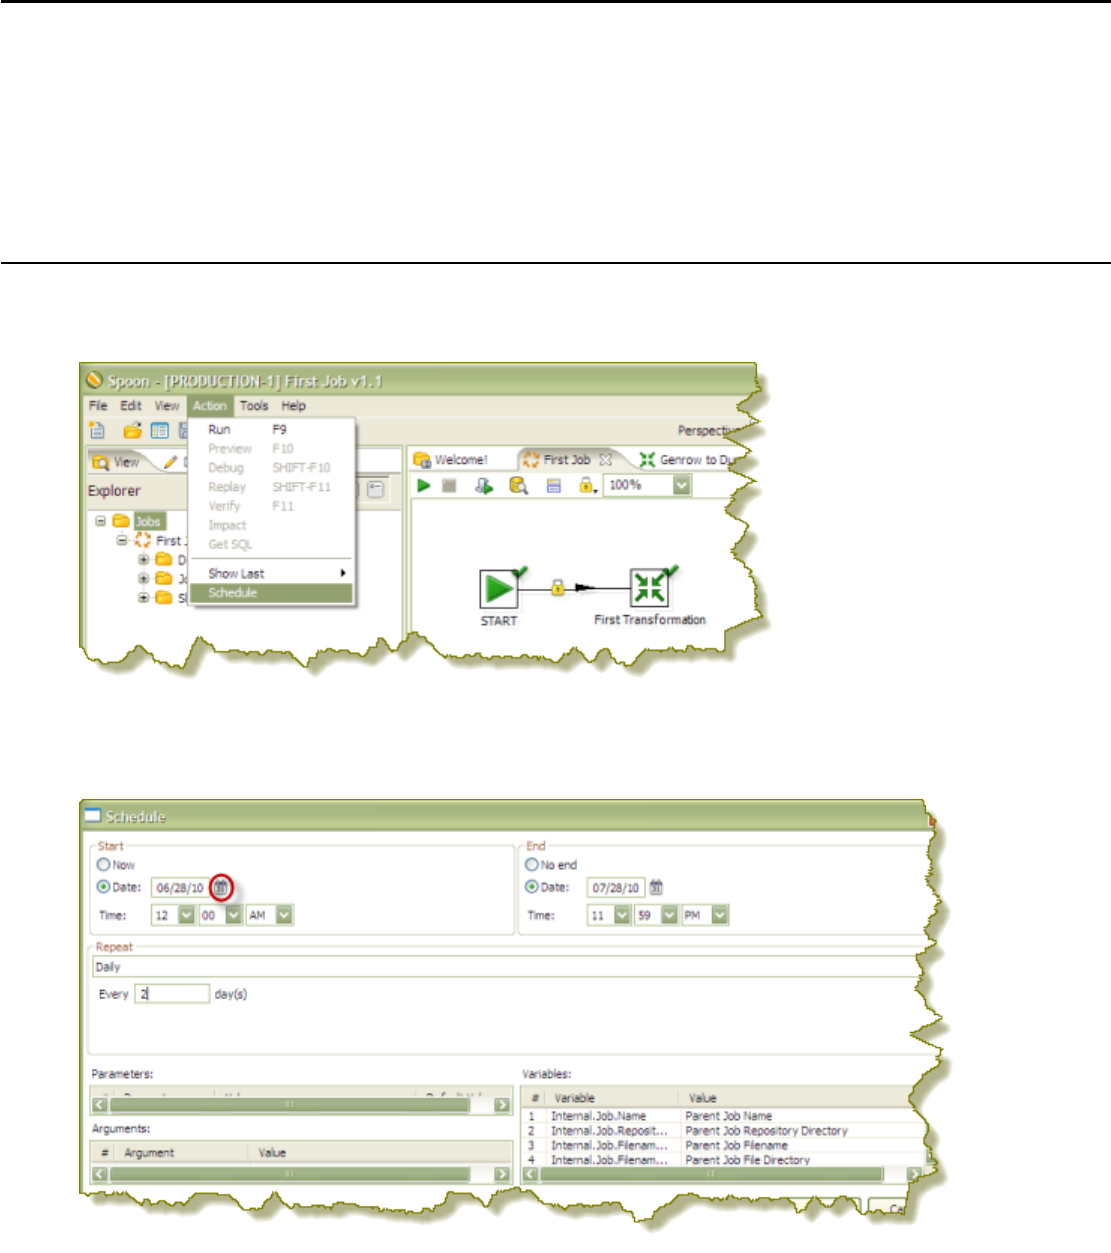
| Scheduling and Scripting PDI Content | 72
Scheduling and Scripting PDI Content
Once you're finished designing your PDI jobs and transformations, you can arrange to run them at certain time intervals
through the DI Server, or through your own scheduling mechanism (such as cron on Linux, and the Task Scheduler or
the at command on Windows). The methods of operation for scheduling and scripting are different; scheduling through
the DI Server is done through the Spoon graphical interface, whereas scripting using your own scheduler or executor is
done by calling the pan or kitchen commands. This section explains all of the details for scripting and scheduling PDI
content.
Scheduling Transformations and Jobs From Spoon
You can schedule jobs and transformations to execute automatically on a recurring basis by following the directions
below.
1. Open a job or transformation, then go to the Action menu and select Schedule.
2. In the Schedule a Transformation dialog box, enter the date and time that you want the schedule to begin in the
Start area, or click the calendar icon (circled in red) to display the calendar. To run the transformation immediately,
enable the Now radio button.
3. Set up the End date and time. If applicable, enable the No end radio button or click on the calendar and input the
date and time to end the transformation.
4. If applicable, set up a recurrence under Repeat.
End date and time are disabled unless you select a recurrence. From the list of schedule options select the choice
that is most appropriate: Run Once, Seconds, Minutes, Hourly, Daily, Weekly, Monthly, Yearly.
5. Make sure you set parameters, arguments and variables, if available. Click OK.

| Scheduling and Scripting PDI Content | 73
6. In the Spoon button bar, click the Schedule perspective.
From the Schedule perspective, you can refresh, start, pause, stop and delete a transformation or job using the
buttons on the upper left corner of the page.
Command-Line Scripting Through Pan and Kitchen
You can use PDI's command line tools to execute PDI content from outside of Spoon. Typically you would use these
tools in the context of creating a script or a cron job to run the job or transformation based on some condition outside of
the realm of Pentaho software.
Pan is the PDI command line tool for executing transformations.
Kitchen is the PDI command line tool for executing jobs.
Both of these programs are explained in detail below.
Pan Options and Syntax
Pan runs transformations, either from a PDI repository (database or enterprise), or from a local file. The syntax for the
batch file and shell script are shown below. All Pan options are the same for both.
pan.sh - option = value arg1 arg2
pan.bat / option : value arg1 arg2
Switch Purpose
rep Enterprise or database repository name, if you are using one
user Repository username
pass Repository password
trans The name of the transformation (as it appears in the repository) to launch
dir The repository directory that contains the transformation, including the leading slash
file If you are calling a local KTR file, this is the filename, including the path if it is not in the local
directory
level The logging level (Basic, Detailed, Debug, Rowlevel, Error, Nothing)
logfile A local filename to write log output to
listdir Lists the directories in the specified repository
listtrans Lists the transformations in the specified repository directory
listrep Lists the available repositories
exprep Exports all repository objects to one XML file
norep Prevents Pan from logging into a repository. If you have set the KETTLE_REPOSITORY,
KETTLE_USER, and KETTLE_PASSWORD environment variables, then this option will enable
you to prevent Pan from logging into the specified repository, assuming you would like to
execute a local KTR file instead.

| Scheduling and Scripting PDI Content | 74
Switch Purpose
safemode Runs in safe mode, which enables extra checking
version Shows the version, revision, and build date
param Set a named parameter in a name=value format. For example: -param:FOO=bar
listparam List information about the defined named parameters in the specified transformation.
maxloglines The maximum number of log lines that are kept internally by PDI. Set to 0 to keep all rows
(default)
maxlogtimeout The maximum age (in minutes) of a log line while being kept internally by PDI. Set to 0 to keep
all rows indefinitely (default)
sh pan.sh -rep=initech_pdi_repo -user=pgibbons -pass=lumburghsux -
trans=TPS_reports_2011
pan.bat /rep:initech_pdi_repo /user:pgibbons /pass:lumburghsux /
trans:TPS_reports_2011
Pan Status Codes
When you run Pan, there are seven possible return codes that indicate the result of the operation. All of them are
defined below.
Status code Definition
0 The transformation ran without a problem.
1 Errors occurred during processing
2 An unexpected error occurred during loading / running of
the transformation
3 Unable to prepare and initialize this transformation
7 The transformation couldn't be loaded from XML or the
Repository
8 Error loading steps or plugins (error in loading one of the
plugins mostly)
9 Command line usage printing
Kitchen Options and Syntax
Kitchen runs jobs, either from a PDI repository (database or enterprise), or from a local file. The syntax for the batch file
and shell script are shown below. All Kitchen options are the same for both.
kitchen.sh - option = value arg1 arg2
kitchen.bat / option : value arg1 arg2
Switch Purpose
rep Enterprise or database repository name, if you are using
one
user Repository username
pass Repository password

| Scheduling and Scripting PDI Content | 75
Switch Purpose
job The name of the job (as it appears in the repository) to
launch
dir The repository directory that contains the job, including
the leading slash
file If you are calling a local KJB file, this is the filename,
including the path if it is not in the local directory
level The logging level (Basic, Detailed, Debug, Rowlevel,
Error, Nothing)
logfile A local filename to write log output to
listdir Lists the directories in the specified repository
listjob Lists the jobs in the specified repository directory
listrep Lists the available repositories
export Exports all linked resources of the specified job. The
argument is the name of a ZIP file.
norep Prevents Kitchen from logging into a repository. If you
have set the KETTLE_REPOSITORY, KETTLE_USER,
and KETTLE_PASSWORD environment variables, then
this option will enable you to prevent Kitchen from logging
into the specified repository, assuming you would like to
execute a local KTR file instead.
version Shows the version, revision, and build date
param Set a named parameter in a name=value format. For
example: -param:FOO=bar
listparam List information about the defined named parameters in
the specified job.
maxloglines The maximum number of log lines that are kept internally
by PDI. Set to 0 to keep all rows (default)
maxlogtimeout The maximum age (in minutes) of a log line while being
kept internally by PDI. Set to 0 to keep all rows indefinitely
(default)
sh kitchen.sh -rep=initech_pdi_repo -user=pgibbons -pass=lumburghsux -
job=TPS_reports_2011
kitchen.bat /rep:initech_pdi_repo /user:pgibbons /pass:lumburghsux /
job:TPS_reports_2011
Kitchen Status Codes
When you run Kitchen, there are seven possible return codes that indicate the result of the operation. All of them are
defined below.
Status code Definition
0 The job ran without a problem.
1 Errors occurred during processing

| Scheduling and Scripting PDI Content | 76
Status code Definition
2 An unexpected error occurred during loading or running of
the job
7 The job couldn't be loaded from XML or the Repository
8 Error loading steps or plugins (error in loading one of the
plugins mostly)
9 Command line usage printing
Importing KJB or KTR Files From a Zip Archive
Both Pan and Kitchen can pull PDI content files from out of Zip files. To do this, use the ! switch, as in this example:
Kitchen.bat /file:"zip:file:///C:/Pentaho/PDI Examples/Sandbox/
linked_executable_job_and_transform.zip!Hourly_Stats_Job_Unix.kjb"
If you are using Linux or Solaris, the ! must be escaped:
./kitchen.sh -file:"zip:file:////home/user/pentaho/pdi-ee/my_package/
linked_executable_job_and_transform.zip\!Hourly_Stats_Job_Unix.kjb"
Connecting to a DI Solution Repositories with Command-Line Tools
To export repository objects into XML format using command-line tools instead of exporting repository configurations
from within Spoon, use named parameters and command-line options when calling Kitchen or Pan from a command-
line prompt.
The following is an example command-line entry to execute an export job using Kitchen:
call kitchen.bat /file:C:\Pentaho_samples\repository\repository_export.kjb
"/param:rep_name=PDI2000" "/param:rep_user=admin" "/param:rep_password=password"
"/param:rep_folder=/public/dev"
"/param:target_filename=C:\Pentaho_samples\repository\export\dev.xml"
Parameter Description
rep_folder Repository Folder
rep_name Repository Name
rep_password Repository Password
rep_user Repository Username
target_filename Target Filename
Note: It is also possible to use obfuscated passwords with Encr a command line tool for encrypting strings for
storage or use by PDI.
The following is an example command-line entry to execute a complete command-line call for the export in addition to
checking for errors:
@echo off
ECHO This an example of a batch file calling the repository_export.kjb
cd C:\Pentaho\pdi-ee-<ph conref="../reuse_files/
reference_reusable.xml#reference_instaview_view_panel/PDIvernum3"/>\data-integration
call kitchen.bat /file:C:\Pentaho_samples\repository\repository_export.kjb "/
param:rep_name=PDI2000"

| Scheduling and Scripting PDI Content | 77
"/param:rep_user=admin" "/param:rep_password=password" "/param:rep_folder=/public/
dev"
"/param:target_filename=C:\Pentaho_samples\repository\export\dev.xml"
if errorlevel 1 goto error
echo Export finished successfull.
goto finished
:error
echo ERROR: An error occured during repository export.
:finished
REM Allow the user to read the message when testing, so having a pause
pause
Exporting Content from Solutions Repositories with Command-Line Tools
To export repository objects into XML format, using command-line tools instead of exporting repository configurations
from within Spoon, use named parameters and command-line options when calling Kitchen or Pan from a command-
line prompt.
The following is an example command-line entry to execute an export job using Kitchen:
call kitchen.bat /file:C:\Pentaho_samples\repository\repository_export.kjb
"/param:rep_name=PDI2000" "/param:rep_user=admin" "/param:rep_password=password"
"/param:rep_folder=/public/dev"
"/param:target_filename=C:\Pentaho_samples\repository\export\dev.xml"
Parameter Description
rep_folder Repository Folder
rep_name Repository Name
rep_password Repository Password
rep_user Repository Username
target_filename Target Filename
It is also possible to use obfuscated passwords with Encr, the command line tool for encrypting strings for storage/use
by PDI. The following is an example command-line entry to execute a complete command-line call for the export in
addition to checking for errors:
@echo off
ECHO This an example of a batch file calling the repository_export.kjb
cd C:\Pentaho\pdi-ee-<ph conref="../reuse_files/
reference_reusable.xml#reference_instaview_view_panel/PDIvernum3"/>\data-integration
call kitchen.bat /file:C:\Pentaho_samples\repository\repository_export.kjb "/
param:rep_name=PDI2000"
"/param:rep_user=admin" "/param:rep_password=password" "/param:rep_folder=/public/
dev"
"/param:target_filename=C:\Pentaho_samples\repository\export\dev.xml"
if errorlevel 1 goto error
echo Export finished successful.
goto finished
:error
echo ERROR: An error occurred during repository export.
:finished
REM Allow the user to read the message when testing, so having a pause

| Scheduling and Scripting PDI Content | 78
pause
| Transformation Step Reference | 79
Transformation Step Reference
This section contains reference documentation for transformation steps.
Note: Many steps are not completely documented in this section, but have rough definitions in the Pentaho
Wiki: http://wiki.pentaho.com/display/EAI/Pentaho+Data+Integration+Steps.
Big Data
The PDI transformation steps in this section pertain to Big Data operations.
Note: PDI is configured by default to use the Apache Hadoop distribution. If you are working with a Cloudera
or MapR distribution instead, you must install the appropriate patch before using any Hadoop functions in PDI.
Patch installation is covered in Select DI Installation Options and Getting Started with PDI and Hadoop.
•Avro Input
•Cassandra Input
•Cassandra Output
•CouchDB
•Hadoop File Input
•Hadoop File Output
•HBase Input
•HBase Output
•HBase Row Decoder
•MapReduce Input
•MapReduce Output
•MongoDB Input
•MongoDB Output
•Splunk Input
•Splunk Output
•SSTable Output
Avro Input
The Avro Input step decodes binary or JSON Avro data and extracts fields from the structure it defines, either from flat
files or incoming fields.
Source tab
Option Definition
Avro source is in file Indicates the source data comes from a file.
Avro source is defined in a field Indicates the source data comes from a field, and you can
select an incoming field to decode from the Avro field to
decode from drop-down box. In this mode of operation, a
schema file must be specified in the Schema file field.
Avro file Specifies the file to decode.
Avro field to decode from Specifies the incoming field containing Avro data to
decode.
JSON encoded Indicates the Avro data has been encoded in JSON.
Schema tab
Option Definition
Schema file Indicates an Avro schema file.

| Transformation Step Reference | 80
Option Definition
Schema is defined in a field Indicates the schema specified to use for decoding
an incoming Avro object is found within a field. When
checked, this option enables the Schema in field is a
path and Cache schemas options. This also changes the
Schema file label to Default schema file, which the user
can specify if an incoming schema is missing.
Schema in field is a path Indicates that the incoming schema specifies a path to
a schema file. If left unchecked, the step assumes the
incoming schema is the actual schema definition in JSON
format.
Cache schemas in memory Enables the step to retain all schemas seen in memory
and uses this before loading or parsing an incoming
schema.
Field containing schema Indicates which field contains the Avro schema.
Avro fields tab
Option Definition
Do not complain about fields not present in the
schema Disables issuing an exception when specified paths or
fields are not present in the active Avro schema. Instead a
null value is returned. OR Instead the system returns a
null value.
Preview Displays a review of the fields or data from the designated
source file.
Get fields Populates the fields available from the designated source
file or schema and gives each extracted field a name that
reflects the path used to extract it.
Lookup fields tab
Option Definition
Get incoming fields Populates the Name column of the table with the names
of incoming Kettle fields. The Variable column of the table
allows you to assign the values of these incoming fields
to variable. A default value (to use in case the incoming
field value is null) can be supplied in the Default value
column. These variables can then be used anywhere in
the Avro paths defined in the Avro fields tab.
Cassandra Input
Configure Cassandra Input
Cassandra Input is an input step that enables data to be read from a Cassandra column family (table) as part of an ETL
transformation.
Option Definition
Step name The name of this step as it appears in the transformation
workspace.
Cassandra host Connection host name input field.
Cassandra port Connection host port number input field.

| Transformation Step Reference | 81
Option Definition
Username Input field for target keyspace and/or family (table)
authentication details.
Password Input field for target keyspace and/or family (table)
authentication details.
Keyspace Input field for the keyspace (database) name.
Use query compression If checked, tells the step whether or not to compress the
text of the CQL query before sending it to the server.
Show schema Opens a dialog that shows metadata for the column family
named in the CQL SELECT query.
CQL SELECT Query
The large text box at the bottom of the dialog enables you to enter a CQL SELECT statement to be executed. Only a
single SELECT query is accepted by the step.
SELECT [FIRST N] [REVERSED] <SELECT EXPR>
FROM <COLUMN FAMILY> [USING <CONSISTENCY>] [WHERE <CLAUSE>] [LIMIT N];
Important: Cassandra Input does not support the CQL range notation, for instance name1..nameN, for
specifying columns in a SELECT query.
Select queries may name columns explicitly (in a comma separated list) or use the * wildcard. If the wildcard is used
then only those columns defined in the metadata for the column family in question are returned. If columns are selected
explicitly, then the name of each column must be enclosed in single quotation marks. Because Cassandra is a sparse
column oriented database, as is the case with HBase, it is possible for rows to contain varying numbers of columns
which might or might not be defined in the metadata for the column family. The Cassandra Input step can emit columns
that are not defined in the metadata for the column family in question if they are explicitly named in the SELECT clause.
Cassandra Input uses type information present in the metadata for a column family. This, at a minimum, includes a
default type (column validator) for the column family. If there is explicit metadata for individual columns available, then
this is used for type information, otherwise the default validator is used.
Option Definition
LIMIT If omitted, Cassandra assumes a default limit of 10,000
rows to be returned by the query. If the query is expected
to return more than 10,000 rows an explicit LIMIT clause
must be added to the query.
FIRST N Returns the first N [where N is determined by the column
sorting strategy used for the column family in question]
column values from each row, if the column family in
question is sparse then this may result in a different N
(or less) column values appearing from one row to the
next. Because PDI deals with a constant number of fields
between steps in a transformation, Cassandra rows that
do not contain particular columns are output as rows with
null field values for non-existent columns. Cassandra's
default for FIRST (if omitted from the query) is 10,000
columns. If a query is expected to return more than
10,000 columns, then an explicit FIRST must be added to
the query.
REVERSED Option causes the sort order of the columns returned by
Cassandra for each row to be reversed. This may affect
which values result from a FIRST N option, but does not
affect the order of the columns output by Cassandra Input.

| Transformation Step Reference | 82
Option Definition
WHERE clause Clause provides for filtering the rows that appear in
results. The clause can filter on a key name, or range
of keys, and in the case of indexed columns, on column
values. Key filters are specified using the KEY keyword, a
relational operator (one of =, >, >=, <, and <=) and a term
value.
Cassandra Output
Configure Cassandra Output
Cassandra Output is an output step that enables data to be written to a Cassandra column family (table) as part of an
ETL transformation.
Option Definition
Step name The name of this step as it appears in the transformation
workspace.
Cassandra host Connection host name input field.
Cassandra port Connection host port number input field.
Username Target keyspace and/or family (table) authentication
details input field.
Password Target keyspace and/or family (table) authentication
details input field.
Keyspace Input field for the keyspace (database) name.
Show schema Opens a dialog box that shows metadata for the specified
column family.
Configure Column Family and Consistency Level
This tab contains connection details and basic query information, in particular, how to connect to Cassandra and
execute a CQL (Cassandra query language) query to retrieve rows from a column family (table).
Important: Note that Cassandra Output does not check the types of incoming columns against matching
columns in the Cassandra metadata. Incoming values are formatted into appropriate string values for use in a
textual CQL INSERT statement according to PDI's field metadata. If resulting values cannot be parsed by the
Cassandra column validator for a particular column then an error results.
Note: Cassandra Output converts PDI's dense row format into sparse data by ignoring incoming field values
that are null.
Option Definition
Column family (table) Input field to specify the column family, to which the
incoming rows should be written.
Get column family names button Populates the drop-down box with names of all the
column families that exist in the specified keyspace.
Consistency level Input field enables an explicit write consistency to be
specified. Valid values are: ZERO, ONE, ANY, QUORUM
and ALL. The Cassandra default is ONE.
Create column family If checked, enables the step to create the named column
family if it does not already exist.

| Transformation Step Reference | 83
Option Definition
Truncate column family If checked, specifies whether any existing data should be
deleted from the named column family before inserting
incoming rows.
Update column family metadata If checked, updates the column family metadata with
information on incoming fields not already present, when
option is selected. If this option is not selected, then any
unknown incoming fields are ignored unless the Insert
fields not in column metadata option is enabled.
Insert fields not in column metadata If checked, inserts the column family metadata in any
incoming fields not present, with respect to the default
column family validator. This option has no effect if
Update column family metadata is selected.
Commit batch size Allows you to specify how many rows to buffer before
executing a BATCH INSERT CQL statement.
Use compression Option compresses (gzip) the text of each BATCH
INSERT statement before transmitting it to the node.
Pre-insert CQL
Cassandra Output gives you the option of executing an arbitrary set of CQL statements prior to inserting the first
incoming PDI row. This is useful for creating or dropping secondary indexes on columns.
Note: Pre-insert CQL statements are executed after any column family metadata updates for new incoming
fields, and before the first row is inserted. This enables indexes to be created for columns corresponding new to
incoming fields.
Option Definition
CQL to execute before inserting first row Opens the CQL editor, where you can enter one or more
semicolon-separated CQL statements to execute before
data is inserted into the first row.
CouchDB Input
The CouchDB Input step retrieves all documents from a given view in a given design document from a given database.
The resulting output is a single String field named JSON, one row for each received document. For information about
CouchDB, design documents, or views, see http://guide.couchdb.org.
Option Definition
Step Name The name of this step as it appears in the transformation
workspace.
Host name or IP Connection host name input field.
Port Connection host port number input field.
Database Name of the incoming database.
Design document Identify the source design document. Design
documents are a special type of CouchDB document that
contains application code. See http://guide.couchdb.org
for more information about design documents in
CouchDB.
View name Identify the source CouchDB view. For more on views
in CouchDB, see http://guide.couchdb.org/editions/1/en/
views.html#views.
Authentication user The username required to access the database.

| Transformation Step Reference | 84
Option Definition
Authentication password The password required to access the database.
Hadoop File Input
The Hadoop File Input step is used to read data from a variety of different text-file types stored on a Hadoop cluster.
The most commonly used formats include comma separated values (CSV files) generated by spreadsheets and fixed
width flat files.
This step enables you to specify a list of files to read, or a list of directories with wild cards in the form of regular
expressions. In addition, you can accept file names from a previous step.
These tables describe all available Hadoop File Input options.
File Tab Options
Option Description
Step Name Optionally, you can change the name of this step to fit
your needs. Every step in a transformation must have a
unique name.
File or Directory Specifies the location and/or name of the text file to read.
Click Browse to navigate to the file, select Hadoop in the
file dialog to enter in your Hadoop credentials, and click
Add to add the file/directory/wildcard combination to the
list of selected files (grid).
Regular expression Specify the regular expression you want to use to select
the files in the directory specified in the previous option.
For example, you want to process all files that have
a .txt output.
Selected Files Contains a list of selected files (or wild card selections)
along with a property specifying if a file is required or not.
If a file is required and it isn't found, an error is generated.
Otherwise, the file name is skipped.
Show filenames(s)... Displays a list of all files that are loaded based on the
current selected file definitions.
Show file content Displays the raw content of the selected file.
Show content from first data line Displays the content from the first data line for the
selected file.
Selecting file using Regular Expressions... The Text File Input step can search for files by wildcard in the form of a
regular expression. Regular expressions are more sophisticated than using '*' and '?' wildcards. This table describes a
few examples of regular expressions.
File Name Regular Expression Files selected
/dirA/ .userdata.\.txt Find all files in /dirA/ with names
containing user data and ending
with .txt
/dirB/ AAA.* Find all files in /dirB/ with names
that start with AAA
/dirC/ [ENG:A-Z][ENG:0-9].* Find all files in /dirC/ with names
that start with a capital and followed
by a digit (A0-Z9)

| Transformation Step Reference | 85
Accepting file names from a previous step... This option allows even more flexibility in combination with other steps,
such as Get File Names. You can specify your file name and pass it to this step. This way the file name can come from
any source; a text file, database table, and so on.
Option Description
Accept file names from previous steps Enables the option to get file names from previous steps
Step to read file names from Step from which to read the file names
Field in the input to use as file name Text File Input looks in this step to determine which
filenames to use
Content Tab
Options under the Content tab allow you to specify the format of the text files that are being read. This table is a list of
the options associated with this tab.
Option Description
File type Can be either CSV or Fixed length. Based on this
selection, Spoon launches a different helper GUI when
you click Get Fields in the Fields tab.
Separator One or more characters that separate the fields in a single
line of text. Typically this is a semicolon ( ; ) or a tab.
Enclosure Some fields can be enclosed by a pair of strings to allow
separator characters in fields. The enclosure string is
optional. If you use repeat an enclosures allow text line
'Not the nine o''clock news.'. With ' the enclosure string,
this gets parsed as Not the nine o'clock news.
Allow breaks in enclosed fields? Not implemented
Escape Specify an escape character (or characters) if you have
these types of characters in your data. If you have a
backslash ( / ) as an escape character, the text 'Not
the nine o\'clock news' (with a single quote [ ' ] as the
enclosure) gets parsed as Not the nine o'clock news.
Header & number of header lines Enable if your text file has a header row (first lines in the
file). You can specify the number of times the header lines
appears.
Footer & number of footer lines Enable if your text file has a footer row (last lines in the
file). You can specify the number of times the footer row
appears.
Wrapped lines and number of wraps Use if you deal with data lines that have wrapped beyond
a specific page limit. Headers and footers are never
considered wrapped.
Paged layout and page size and doc header Use these options as a last resort when dealing with texts
meant for printing on a line printer. Use the number of
document header lines to skip introductory texts and the
number of lines per page to position the data lines
Compression Enable if your text file is in a Zip or GZip archive. Only the
first file in the archive is read.
No empty rows Do not send empty rows to the next steps.
Include file name in output Enable if you want the file name to be part of the output
File name field name Name of the field that contains the file name
Rownum in output? Enable if you want the row number to be part of the output

| Transformation Step Reference | 86
Option Description
Row number field name Name of the field that contains the row number
Format Can be either DOS, UNIX, or mixed. UNIX files have
lines that are terminated by line feeds. DOS files have
lines separated by carriage returns and line feeds. If you
specify mixed, no verification is done.
Encoding Specify the text file encoding to use. Leave blank to use
the default encoding on your system. To use Unicode,
specify UTF-8 or UTF-16. On first use, Spoon searches
your system for available encodings.
Be lenient when parsing dates? Disable if you want strict parsing of data fields. If case-
lenient parsing is enabled dates like Jan 32nd become
Feb 1st.
The date format Locale This locale is used to parse dates that have been written
in full such as "February 2nd, 2006." Parsing this date on
a system running in the French (fr_FR) locale would not
work because February is called Février in that locale.
Add filenames to result Adds filenames to result filenames list.
Error Handling Tab
Options under the Error Handling tab allow you to specify how the step reacts when errors occur, such as, malformed
records, bad enclosure strings, wrong number of fields, premature line ends. This describes the options available for
Error handling.
Option Description
Ignore errors? Enable if you want to ignore errors during parsing
Skip error lines Enable if you want to skip those lines that contain errors. You can generate an extra file that
contains the line numbers on which the errors occur. Lines with errors are not skipped. The
fields that have parsing errors are empty (null).
Error count field name Add a field to the output stream rows. This field contains the number of errors on the line.
Error fields field name Add a field to the output stream rows; this field contains the field names on which an error
occurred.
Error text field name Add a field to the output stream rows; this field contains the descriptions of the parsing
errors that have occurred.
Warnings file
directory When warnings are generated, they are placed in this directory. The name of that file is
<warning dir>/filename.<date_time>.<warning extension>
Error files directory When errors occur, they are placed in this directory. The name of the file is
<errorfile_dir>/filename.<date_time>.<errorfile_extension>
Failing line numbers
files directory When a parsing error occurs on a line, the line number is placed in this directory. The name
of that file is <errorline dir>/filename.<date_time>.<errorline extension>
Filters Tab
Options under the Filters tab enables you to specify the lines you want to skip in the text file. This table describes the
available options for defining filters.
Option Description
Filter string The string for which to search.
Filter position The position where the filter string must be placed in the
line. Zero (0) is the first position in the line. If you specify a

| Transformation Step Reference | 87
Option Description
value below zero (0), the filter string is searched for in the
entire string.
Stop on filter Specify Y here if you want to stop processing the current
text file when the filter string is encountered.
Positive match Turns filters into positive mode when turned on. Only lines
that match this filter will be passed. Negative filters take
precedence and are immediately discarded.
Fields Tab
The options under the Fields tab allow you to specify the information about the name and format of the fields being
read from the text file. Available options include:
Option Description
Name Name of the field.
Type Type of the field can be either String, Date or Number.
Format See Number Formats for a complete description of format
symbols.
Length For Number: Total number of significant figures in a
number. For String: total length of string. For Date: length
of printed output of the string, for instance, 4 only gives
back the year.
Precision For Number: Number of floating point digits. For String,
Date, Boolean: unused.
Currency Used to interpret numbers like $10,000.00 or E5.000,00.
Decimal A decimal point can be a "." (10;000.00) or "," (5.000,00).
Grouping A grouping can be a dot "," (10;000.00) or "." (5.000,00).
Null if Treat this value as null.
Default Default value in case the field in the text file was not
specified (empty).
Trim Type trim this field, left, right, both, before processing.
Repeat If the corresponding value in this row is empty, repeat the
one from the last time it was not empty (Y/N).
Number formats... The information about number formats was taken from the Sun Java API documentation, Decimal
Formats.
Symbol Location Localized Meaning
0 Number Yes Digit
# Number Yes Digit, zero shows as absent
. Number Yes Decimal separator or
monetary decimal separator
- Number Yes Minus sign
, Number Yes Grouping separator
E Number Yes Separates mantissa and
exponent in scientific

| Transformation Step Reference | 88
Symbol Location Localized Meaning
notation. Need not be
quoted in prefix or suffix.
; Sub pattern boundary Yes Separates positive and
negative sub patterns
% Prefix or suffix Yes Multiply by 100 and show
as percentage
\u2030 Prefix or suffix Yes Multiply by 1000 and show
as per mille
(\u00A4) Prefix or suffix No Currency sign, replaced by
currency symbol. If doubled,
replaced by international
currency symbol. If present
in a pattern, the monetary
decimal separator is used
instead of the decimal
separator.
' Prefix or suffix No Used to quote special
characters in a prefix or
suffix, for example, "'#'#"
formats 123 to "#123".
To create a single quote
itself, use two in a row: "#
o''clock".
Scientific Notation... In a pattern, the exponent character immediately followed by one or more digit characters
indicates scientific notation, for example "0.###E0" formats the number 1234 as "1.234E3".
Date formats... The information about Date formats was taken from the Sun Java API documentation, Date Formats.
Letter Date or Time Component Presentation Examples
G Era designator Text AD
y Year Year 1996 or 96
M Month in year Month July, Jul, or 07
w Week in year Number 27
W Week in month Number 2
D Day in year Number 189
d Day in month Number 10
F Day of week in month Number 2
E Day in week Text Tuesday or Tue
a Am/pm marker Text PM
H Hour in day (0-23) Number 0 n/a
k Hour in day (1-24) Number 24 n/a
K Hour in am/pm (0-11) Number 0 n/a
h Hour in am/pm (1-12) Number 12 n/a
m Minute in hour Number 30 n/a
s Second in minute Number 55 n/a
S Millisecond Number 978 n/a

| Transformation Step Reference | 89
Letter Date or Time Component Presentation Examples
z Time zone General time zone Pacific Standard Time,
PST, or GMT-08:00
Z Time zone RFC 822 time zone -0800
Hadoop File Output
The Hadoop File Output step is used to export data to text files stored on a Hadoop cluster. This is commonly used
to generate comma separated values (CSV files) that can be read by spreadsheet applications. It is also possible to
generate fixed width files by setting lengths on the fields in the fields tab.
These tables describe all available Hadoop File Output options.
File Tab
The options under the File tab is where you define basic properties about the file being created.
Option Description
Step name Optionally, you can change the name of this step to fit
your needs. Every step in a transformation must have a
unique name.
Filename Specifies the location and/or name of the text file to
which to write. Click Browse to navigate to the file. Select
Hadoop in the file dialogue to enter in your Hadoop
credentials.
Extension Adds a point and the extension to the end of the file name
(.txt).
Accept file name from field? Enables you to specify the file name(s) in a field in the
input stream.
File name field When the previous option is enabled, you can specify the
field that contains the filename(s) at runtime.
Include stepnr in filename If you run the step in multiple copies (Launching several
copies of a step), the copy number is included in the file
name before the extension. (_0).
Include partition nr in file name? Includes the data partition number in the file name.
Include date in file name Includes the system date in the filename (_20101231)
Include time in file name Includes the system time in the filename (_235959)
Specify Date time format Allows you to specify the date time format from the list
within the Date time format dropdown list..
Date time format Dropdown list of date format options.
Show file name(s) Displays a list of the files that are generated. This is a
simulation and depends on the number of rows that go
into each file.
Content tab
The Content tab contains these options for describing the content being read.
Option Description
Append Enables to append lines to the end of the specified file.
Separator Specifies the character that separates the fields in a
single line of text. Typically this is semicolon ( ; ) or a tab.

| Transformation Step Reference | 90
Option Description
Enclosure A pair of strings can enclose some fields. This allows
separator characters in fields. The enclosure string is
optional. Enable if you want the text file to have a header
row (first line in the file).
Force the enclosure around fields? Forces all field names to be enclosed with the character
specified in the Enclosure property above
Header Enable this option if you want the text file to have a
header row (first line in the file)
Footer Enable this option if you want the text file to have a footer
row (last line in the file)
Format Can be either DOS or UNIX; UNIX files have lines are
separated by line feeds, DOS files have lines separated
by carriage returns and line feeds
Encoding Specify the text file encoding to use. Leave blank to use
the default encoding on your system. To use Unicode,
specify UTF-8 or UTF-16. On first use, Spoon searches
your system for available encodings.
Compression Specify the type of compression, .zip or .gzip to use when
compressing the output.
Note: Only one file is placed in a single archive.
Fast data dump (no formatting) Improves the performance when dumping large amounts
of data to a text file by not including any formatting
information.
Split every ... rows If the number N is larger than zero, split the resulting text-
file into multiple parts of N rows.
Add Ending line of file Allows you to specify an alternate ending row to the
output file.
Fields tab
The fields tab is where you define properties for the fields being exported. The table below describes each of the
options for configuring the field properties:
Option Description
Name The name of the field
Type Type of the field can be either String, Date or Number.
Format The format mask to convert with. See Number Formats for
a complete description of format symbols.
Length The length option depends on the field type follows:
• Number - Total number of significant figures in a
number
• String - total length of string
• Date - length of printed output of the string (for exampl,
4 returns year)
Precision The precision option depends on the field type as follows:
• Number - Number of floating point digits
• String - unused

| Transformation Step Reference | 91
Option Description
• Date - unused
Currency Symbol used to represent currencies like $10,000.00 or
E5.000,00
Decimal A decimal point can be a "." (10,000.00) or "," (5.000,00)
Group A grouping can be a "," (10,000.00) or "." (5.000,00)
Trim type The trimming method to apply on the string
Note: Trimming works when there is no field
length given only.
Null If the value of the field is null, insert this string into the text
file
Get Click to retrieve the list of fields from the input fields
stream(s)
Minimal width Change the options in the Fields tab in such a way that
the resulting width of lines in the text file is minimal. So
instead of save 0000001, you write 1, and so on. String
fields will no longer be padded to their specified length.
HBase Input
This step reads data from an HBase table according to user-defined column metadata.
Configure Query
This tab contains connection details and basic query information. You can configure a connection in one of two ways:
either via a comma-separated list of hostnames where the zookeeper quorum reside, or via an hbase-site.xml (and,
optionally, hbase-default.xml) configuration file. If both zookeeper and HBase XML configuration options are supplied,
then the zookeeper takes precedence.
Option Definition
Step name The name of this step as it appears in the transformation
workspace.
Zookeeper host(s) Comma-separated list of hostnames for the zookeeper
quorum.
URL to hbase-site.xml Address of the hbase-site.xml file.
URL to hbase-default.xml Address of the hbase-default.xml file.
HBase table name The source HBase table to read from. Click Get Mapped
Table Names to populate the drop-down list of possible
table names.
Mapping name A mapping to decode and interpret column values. Click
Get Mappings For the Specified Table to populate the
drop-down list of available mappings.
Start key value (inclusive) for table scan A starting key value to retrieve rows from. This is inclusive
of the value entered.
Stop key value (exclusive) for table scan A stopping key value for the scan. This is exclusive of the
value entered. Both fields or the stop key field may be left
blank. If the stop key field is left blank, then all rows from
(and including) the start key will be returned.
Scanner row cache size The number of rows that should be cached each time a
fetch request is made to HBase. Leaving this blank uses

| Transformation Step Reference | 92
Option Definition
the default, which is to perform no caching; one row would
be returned per fetch request. Setting a value in this field
will increase performance (faster scans) at the expense of
memory consumption.
#The order of query limitation fields.
Alias The name that the field will be given in the output stream.
Key Indicates whether the field is the table's key field or not.
Column family The column family in the HBase source table that the field
belongs to.
Column name The name of the column in the HBase table (family +
column name uniquely identifies a column in the HBase
table).
Type The PDI data type for the field.
Format A formatting mask to apply to the field.
Indexed values Indicates whether the field has a predefined set of values
that it can assume.
Get Key/Fields Info Assuming the connection information is complete and
valid, this button will populate the field list and display the
name of the key.
Create/Edit Mappings
This tab creates or edits a mapping for a given HBase table. A mapping simply defines metadata about the values that
are stored in the table. Since most information is stored as raw bytes in HBase, this enables PDI to decode values and
execute meaningful comparisons for column-based result set filtering.
Option Definition
HBase table name Displays a list of table names. Connection information in
the previous tab must be valid and complete in order for
this drop-down list to populate.
Mapping name Names of any mappings that exist for the table. This box
will be empty if there are no mappings defined for the
selected table, in which case you can enter the name of a
new mapping.
#The order of the mapping operation.
Alias The name you want to assign to the HBase table key. This
is required for the table key column, but optional for non-
key columns.
Key Indicates whether or not the field is the table's key.
Column family The column family in the HBase source table that the
field belongs to. Non-key columns must specify a column
family and column name.
Column name The name of the column in the HBase table.
Type Data type of the column. Key columns can be of type:
String Integer Unsigned integer (positive only) Long
Unsigned long (positive only) Date Unsigned date. Non-
key columns can be of type: String, Integer, Long, Float,
Double, Boolean, Date, BigNumber, Serializable, Binary.

| Transformation Step Reference | 93
Option Definition
Indexed values String columns may optionally have a set of legal values
defined for them by entering comma-separated data into
this field.
Filter Result Set
This tab provides two fields that limit the range of key values returned by a table scan. Leaving both fields blank will
result in all rows being retrieved from the source table.
Option Definition
Match all / Match any When multiple column filters have been defined, you have
the option returning only those rows that match all filters,
or any single filter. Bounded ranges on a single numeric
column can be defined by defining two filters (upper and
lower bounds) and selecting Match all; similarly, open-
ended ranges can be defined by selecting Match any.
#The order of the filter operation.
Alias A drop-down box of column alias names from the
mapping.
Type Data type of the column. This is automatically populated
when you select a field after choosing the alias.
Operator A drop-down box that contains either equality/inequality
operators for numeric, date, and boolean fields; or
substring and regular expression operators for string
fields.
Comparison value A comparison constant to use in conjunction with the
operator.
Format A formatting mask to apply to the field.
Signed comparison Specifies whether or not the comparison constant and/
or field values involve negative numbers (for non-string
fields only). If field values and comparison constants
are only positive for a given filter, then HBase's native
lexicographical byte-based comparisons are sufficient. If
this is not the case, then it is necessary for column values
to be deserialized from bytes to actual numbers before
performing the comparison.
Performance Considerations
Specifying fields in the Configure query tab will result in scans that return just those columns. Since HBase is a sparse
column-oriented database, this requires that HBase check to see whether each row contains a specific column. More
lookups equate to reduced speed, although the use of Bloom filters (if enabled on the table in question) mitigates this
to a certain extent. If, on the other hand, the fields table in the Configure query tab is left blank, it results in a scan that
returns rows that contain all columns that exist in each row (not only those that have been defined in the mapping).
However, the HBase Input step will only emit those columns that are defined in the mapping being used. Because
all columns are returned, HBase does not have to do any lookups. However, if the table in question contains many
columns and is dense, then this will result in more data being transferred over the network.
HBase Output
This step writes data to an HBase table according to user-defined column metadata.

| Transformation Step Reference | 94
Configure Connection
This tab contains HBase connection information. You can configure a connection in one of two ways: either via a
comma-separated list of hostnames where the zookeeper quorum reside, or via an hbase-site.xml (and, optionally,
hbase-default.xml) configuration file. If both zookeeper and HBase XML configuration options are supplied, then the
zookeeper takes precedence.
Option Definition
Step name The name of this step as it appears in the transformation
workspace.
Zookeeper host(s) Comma-separated list of hostnames for the zookeeper
quorum.
URL to hbase-site.xml Address of the hbase-site.xml file.
URL to hbase-default.xml Address of the hbase-default.xml file.
HBase table name The HBase table to write to. Click Get Mapped Table
Names to populate the drop-down list of possible table
names.
Mapping name A mapping to decode and interpret column values. Click
Get Mappings For the Specified Table to populate the
drop-down list of available mappings.
Disable write to WAL Disables writing to the Write Ahead Log (WAL). The WAL
is used as a lifeline to restore the status quo if the server
goes down while data is being inserted. Disabling WAL
will increase performance.
Size of write buffer (bytes) The size of the write buffer used to transfer data to
HBase. A larger buffer consumes more memory (on
both the client and server), but results in fewer remote
procedure calls. The default (in the hbase-default.xml) is
2MB (2097152 bytes), which is the value that will be used
if the field is left blank.
Create/Edit Mappings
This tab creates or edits a mapping for a given HBase table. A mapping simply defines metadata about the values
that are stored in the table. Since just about all information is stored as raw bytes in HBase, this allows PDI to decode
values and execute meaningful comparisons for column-based result set filtering.
Note: The names of fields entering the step are expected to match the aliases of fields defined in the mapping.
All incoming fields must have a matching counterpart in the mapping. There may be fewer incoming fields than
defined in the mapping, but if there are more incoming fields then an error will occur. Furthermore, one of the
incoming fields must match the key defined in the mapping.
Option Definition
HBase table name Displays a list of table names. Connection information in
the previous tab must be valid and complete in order for
this drop-down list to populate.
Mapping name Names of any mappings that exist for the table. This box
will be empty if there are no mappings defined for the
selected table, in which case you can enter the name of a
new mapping.
#The order of the mapping operation.
Alias The name you want to assign to the HBase table key. This
is required for the table key column, but optional for non-
key columns.

| Transformation Step Reference | 95
Option Definition
Key Indicates whether or not the field is the table's key.
Column family The column family in the HBase source table that the
field belongs to. Non-key columns must specify a column
family and column name.
Column name The name of the column in the HBase table.
Type Data type of the column. Key columns can be of type:
String Integer Unsigned integer (positive only) Long
Unsigned long (positive only) Date Unsigned date. Non-
key columns can be of type: String, Integer, Long, Float,
Double, Boolean, Date, BigNumber, Serializable, Binary.
Indexed values String columns may optionally have a set of legal values
defined for them by entering comma-separated data into
this field.
Get incoming fields Retrieves a field list using the given HBase table and
mapping names.
Performance Considerations
The Configure connection tab provides a field for setting the size of the write buffer used to transfer data to HBase. A
larger buffer consumes more memory (on both the client and server), but results in fewer remote procedure calls. The
default (defined in the hbase-default.xml file) is 2MB. When left blank, the buffer is 2MB, auto flush is enabled, and Put
operations are executed immediately. This means that each row will be transmitted to HBase as soon as it arrives at the
step. Entering a number (even if it is the same as the default) for the size of the write buffer will disable auto flush and
will result in incoming rows only being transferred once the buffer is full.
There is also a checkbox for disabling writing to the Write Ahead Log (WAL). The WAL is used as a lifeline to restore
the status quo if the server goes down while data is being inserted. However, the tradeoff for error-recovery is speed.
The Create/edit mappings tab has options for creating new tables. In the HBase table name field, you can suffix the
name of the new table with parameters for specifying what kind of compression to use, and whether or not to use Bloom
filters to speed up lookups. The options for compression are: NONE, GZ and LZO; the options for Bloom filters are:
NONE, ROW, ROWCOL. If nothing is selected (or only the name of the new table is defined), then the default of NONE
is used for both compression and Bloom filters. For example, the following string entered in the HBase table name field
specifies that a new table called "NewTable" should be created with GZ compression and ROWCOL Bloom filters:
NewTable@GZ@ROWCOL
Note: Due to licensing constraints, HBase does not ship with LZO compression libraries. These must be
manually installed on each node if you want to use LZO compression.
HBase Row Decoder
The HBase Row Decoder step decodes an incoming key and HBase result object according to a mapping.
Option Definition
Step Name The name the step as it appears in the transformation
workspace.
Configure fields tab
Option Definition
Key field Input key field.
HBase result field Field containing the serialized HBase result.

| Transformation Step Reference | 96
Create/Edit mappings tab
Option Definition
Zookeeper host Hostname for the zookeeper quorum.
Zookeeper port Database entry port for the zookeeper quorum.
HBase table name Displays a list of table names which have mappings
defined for them.
Mapping name Names of any mappings that exist for the table. This box
will be empty if there are no mappings defined for the
selected table. You can define a mapping from scratch or
use the connection fields to access any mappings already
saved into HBase.
Save mapping Saves the mapping in HBase as long as valid connection
details were provided and the mapping was named. If the
mapping was only needed locally then connection details
and mapping name are not needed, the mapping will be
serialized into the transformation metadata automatically.
Delete mapping Deletes the mapping.
Create a tuple template Partially populates the table with special fields that define
a tuple mapping for use in the tuple output mode. Tuple
output mode allows the step to output all the data in
wide HBase rows where the number of columns may
vary from row to row. It assumes that all column values
are of the same type. A tuple mapping consists of the
following output fields: KEY, Family, Column, Value and
Timestamp. The type for “Family” and “Timestamp” is
preconfigured to “String” and “Long” respectively. You
must provide the types for “KEY”, “Column” (column
name) and “Value” (column value). The default behavior is
to output all column values in all column families.
MapReduce Input
This step defines the key/value pairs for Hadoop input. The output of this step is appropriate for whatever data
integration transformation tasks you need to perform.
Option Definition
Step name The name of this step as it appears in the transformation
workspace.
Key field The Hadoop input field and data type that represents the
key in MapReduce terms.
Value field The Hadoop input field and data type that represents the
value in MapReduce terms.
MapReduce Output
This step defines the key/value pairs for Hadoop output. The output of this step will become the output to Hadoop,
which changes depending on what the transformation is used for.
If this step is included in a transformation used a as mapper and there is a combiner and/or reducer configured, the
output will become the input pairs for the combiner and/or reducer. If there are no combiner or reducers configured the
output is passed to the format configured for the job it was executed with.
If this step is included in a transformation used as a combiner and there is a reducer configured, the output will become
the input pairs for the reducer. If no reducer configured, the output is passed to the format configured for the job it was
executed with.

| Transformation Step Reference | 97
If this step is included in a transformation used as a reducer, then the output is passed to the format configured for the
job it was executed with.
Note: You are not able to define the data type for the key or value here; it is defined earlier in your
transformation. However, a reducer or combiner that takes this output as its input will have to know what the key
and value data types are, so you may need to make note of them somehow.
Option Definition
Step name The name of this step as it appears in the transformation
workspace.
Key field The Hadoop output field that represents the key in
MapReduce terms.
Value field The Hadoop output field that represents the value in
MapReduce terms.
MongoDB Input
The MongoDB Input transformation step enables you to retrieve documents or records from a collection within
MongoDB. For additional information about MongoDB, see the MongoDB documentation.
Configure Connection Tab
The Configure connection tab enables you to specify the database and collection to query.
Option Definition
Step name Name of the step as it appears in the transformation
workspace.
Host name(s) or IP address(es) Indicates the network name or address of the MongoDB
instance or instances. You can input multiple host
names or IP addresses, separated by a comma. You
can also specify a different port number for each
host name by separating the host name and port
number with a colon, and separating each combination
of host name and port number with a comma. For
example, to include the host name and port number
for two different MongoDB instances, you would input
localhost1:27017,localhost2:27018 and leave
the Port field empty.
Use all replica set members/mongos Differentiates between a replica set containing one node
and a stand-alone single Mongo host. If there is a replica
set, and it contains more than one host, then the Java
driver discovers all hosts automatically. It is good practice
to list more than one replica set host in the hosts field
so that the driver has a better chance of connecting
successfully if one is down.
Port Indicates the port number of the MongoDB instance or
instances. Specify a default port to use if no port numbers
are specified in the Host name(s) or IP address(es) field.
Username Indicates the username required to access the database.
If you want to use Kerberos authentication, enter the
Kerberos principal in this field. If you do not know
the principal, contact your system administrator. The
principal is the unique identity to which Kerberos
assigns tickets. When you enter the principal as the
username, it should be formatted like this: <primary>/
<instance>@<KERBEROS_REALM> is typically the
name of the user. If the primary is a host, the primary

| Transformation Step Reference | 98
Option Definition
is typically the word host. <instance> qualifies
the primary. Sometimes if the primary is a user, the
instance is the username of the database administrator.
<KERBEROS_REALM> is the Kerberos realm (domain
name). Note that the <KERBEROS_REALM> is
case sensitive. Here is an example of a correctly-
formatted Kerberos principal username: <joe/
admin@CORPORATION.COM>.
Password Indicates the password associated with the provided
Username. If you are using Kerberos authentication, you
do not need to enter the password.
Authenticate using Kerberos Indicates whether to use the Kerberos service to manage
the authentication process. If you check this, make sure
that you enter the Kerberos principal as the Username. If
you choose this option, read Use Kerberos Authentication
to Provide Spoon Users Access to MongoDB for
configuration information.
Connection timeout Designates how long to wait for a connection to a
database (in milliseconds) before terminating the
connection attempt. Leave blank to never terminate the
connection.
Socket timeout Designates how long to wait for a write operation (in
milliseconds) before terminating the operation. Leave
blank to never terminate the operation.
Preview Displays a first look of the data. Clicking Preview causes
the Enter preview size window to appear. Enter the
maximum number of records that you want to preview,
then click OK. The preview data appears in the Examine
preview data window.
Input Options Tab
The Input Options tab enables you to specify which database and collection you want to retrieve information from. You
can also indicate the read preferences and tag sets in this tab. See Tag Sets for more information.
Option Definition
Database Name of the database to retrieve data from. Click Get
DBs to populate the drop-down menu with a list of
databases on the server.
Collection Name of the collection to retrieve data from. Click Get
collections to populate the drop-down menu with a list of
collections within the database.
Read preference Indicates which node to read first—Primary, Primary
preferred, Secondary, Secondary preferred, or
Nearest.
Tag set specification/#/Tag Set Tags allow you to customize write concerns and read
preferences for a replica set. The Tag set specification
section of the window allows you to specify criteria for
selecting replica set members. When you click Get tags,
the Tag set specification populates with the tag sets
that are available on the database, in order of execution.
You can join, delete, copy, or paste tag sets, then click
Test tag set to see which replica set members match
the Tag set specification criteria you specified. The #

| Transformation Step Reference | 99
Option Definition
field indicates the number of the tag set. The Tag set field
displays the tag set criteria.
Get Tags Retrieves a list of the tag sets that are in the database
indicated in the Database field.
Join tags Appends selected tag sets so that nodes that match the
criteria are queried or written to simultaneously. If you
select individual tag sets, then click Join tags, the tag
sets are combined to create one tag set. Note that this
change only occurs in the MongoDB Input window, not
on the database.
Test tag set Displays the set members that match the tags indicated
in the tag set specification. Clicking Test tag set displays
the id, host name, priority, and tags for each replica set
member that matches the tag set specification criteria.
Query Tab
The Query tab enables you to refine your read request. This tab operates in two different modes. You can create a
query using JSON Query expression or using the Aggregation Framework. By default, the Query tab is in JSON Query
expression mode. You can enter a JSON Query expression when the Query is aggregation pipeline checkbox is
deselected. MongoDB queries use a JSON-like query language that includes a variety of query operators. To place
the Aggregation Framework mode Query is aggregation pipeline checkbox. You can then enter a query, using the
Aggregation Framework, in the Aggregation pipeline specification field that appears. See MongoDB's Aggregation
Framework for additional information, including code examples.
Option Definition
Query expression (JSON)(Field is visible if Query is
aggregation pipeline checkbox is not selected.) JSON expression to limit the output. See the sub-section
Query Examples (JSON Query Expressions) for additional
details.
Aggregation pipeline specification (JSON)(Field is
visible if Query is aggregation pipeline checkbox is
selected.)
Use this field if you want to use the MongoDB Aggregation
Framework to perform a simple or complex aggregations
or selections such as totalling or averaging field values.
Note that the method name (which includes the collection
name of the database you selected in the Input
Options tab), appears after the Aggregation pipeline
specification (JSON) label for this field. See the sub-
section Query Examples (JSON Aggregate Pipeline) for
additional details.
Query is aggregation pipeline Pipes multiple JSON expressions together to execute
at once. An aggregation pipeline strings several JSON
expressions together, with the output of the previous
expression becoming the input for the next. When
selected, the Aggregation pipeline specification
(JSON) field appears. When deselected, the Query
expression (JSON) field appears.
Execute for each row Perform the query on each row of data.
Fields expression (JSON)(Field is visible if Query is
aggregation pipeline check box is not selected.) This field becomes active only if Query is aggregation
pipeline is not selected. Controls the fields to return,
or in MongoDB terms, the projection. If empty, all fields
are returned. Enter true or false after the fields to
indicate selected or not, respectively. See the MongoDB
documentation [http://docs.mongodb.org/manual/
reference/method/db.collection.find/ ] for more information
about projections.

| Transformation Step Reference | 100
Fields Tab
The Fields tab enables you to define properties for the exported fields. The Fields tab operates in two different modes
that impact how query results are formatted. You can indicate that you want the query result to be stored in a single
JSON field. To do this, click the Output single JSON field check box. If you decide to do this and you want to parse
the results of the field, you can apply a transformation step later in the process. Or, you can uncheck the Output single
JSON field check box and instead, click the Get Fields button to apply Pentaho's Schema on Read functionality. This
functionality parses fields, paths, and data types and displays them. You can then review and adjust this information, as
needed.
Option Definition
Output single JSON field Indicates whether the JSON result of the query should
be outputted to a single field that has the String data
type. You can parse this JSON using the JSON Input
transformation step, eval("{"+jsonString+"}") in
JavaScript, or using a User Defined Java Class step.
Name of JSON output field(Field is active if Output
single JSON field check box is selected.) Designates the name of the field that contains the JSON
output from the server.
Get fields(Field is active if Output single JSON field
check box is not selected.) Creates a sample set of documents, then displays the
name and field for each record. Pentaho's Schema on
Read functionality determines the field names, paths, and
the data type for each field in the sample.
# (Field is active if Output single JSON field check box
is not selected.) The order of this entry in the list.
Name(Field is active if Output single JSON field check
box is not selected.) Displays a user-friendly name of the field that is based
on the value in the Path field. The name that appears
here maps the name of the field as it appears in the PDI
transformation with the field that appears in the MongoDB
database. You can edit the name as desired.
Path(Field is active if Output single JSON field check
box is not selected.) Indicates the JSON path of the field in MongoDB. If
the path shown is an array, you can specify a specific
element in the array by passing it the key value, which
is contained in the bracketed part of the array. For
example $.emails[0] indicates that you want the result
to display the first value in the array. $.emails[1]
indicates that you want the result to display the second
value in the array and so forth. If you want to display
all array values, use the asterisk as the key, like this
$.email[*]. If the array contains records, and not
just strings, you can specify that you want to display the
record like this: $.emails[*].sender.
Type(Field is active if Output single JSON field check
box is not selected.) Indicates the data type.
Indexed Values(Field is active if Output single JSON
field check box is not selected.) Allows you to enter a comma-separated list of legal values
for String fields. If you specify values in this field, the
Kettle indexed data type is applied to the data. If not, the
String data type is applied. Usually, you will only need
to modify this field if you are using Weka metadata for
nominal fields.
Sample: array min: max index(Field is active if Output
single JSON field check box is not selected.) Indicates minimum and maximum values for the index
seen in the sampled documents.
Sample: #occur/#docs(Field is active if Output single
JSON field check box is not selected.) Indicates how often the field occurs as well as the number
of documents processed.
Sample: disparate types(Field is active if Output single
JSON field check box is not selected.) If several documents are sampled, but the same field
contain different data types, the Sample: disparate types

| Transformation Step Reference | 101
Option Definition
field is populated with a "Y." The Type field displays the
String data type. In this instance, the Kettle type for the
field in question is set to the String data type, so it is able
to output values of differing types.
Query Examples (JSON Query Expressions)
MongoDB has a rich query system that allows you to select and filter documents in a collection along specific fields and
values. The MogoDB Extended JASON page in the MongoDB wiki space details how to use queries. Pentaho supports
only the features discussed on this page. This table displays some examples of the syntax and structure of the queries
you can use to request data from MongoDB.
Query expression Description
{ name : "MongoDB" } Queries all values where the name field has a value equal
to MongoDB
{ name : { '$regex' : "m.*", '$options' :
"i" } }
Uses a regular expression to find name fields starting with
m, case insensitive
{ name : { '$gt' : "M" } } Searches all strings greater than M
{ name : { '$lte' : "T" } } Searches all strings less than or equal to T
{ name : { '$in' : [ "MongoDB",
"MySQL" ] } }
Finds all names that are either MongoDB or MySQL
{ name : { '$nin' : [ "MongoDB",
"MySQL" ] } }
Finds all names that are either MongoDB or MySQL
{ $where : "this.count == 1" } Uses JavaScript to evaluate a condition
{ $query: {}, $orderby: { age : -1 } } Returns all documents in the collection named collection
sorted by the age field in descending order.
Query Examples (JSON Aggregate Pipeline)
MongoDB has a rich query system that allows you to select and filter documents using the aggregation pipeline
framework. The Aggregation Framework Examples page in the MongoDB wiki provides additional examples of function
calls. This table displays some examples of the syntax and structure of the queries you can use to request data from
MongoDB.
Query expression Description
{ $match : {state : "FL", city :
"ORLANDO" } }, {$sort : {pop : -1 } }
Returns all fields from all documents where the state
field has a value of FL and the city field has a value of
ORLANDO. The documents will be returned sorted by the
pop field in descending order.
{ $group : { _id: "$state"} }, { $sort :
{ _id : 1 } }
Returns one field named _id containing the distinct
values for state in ascending order. Similar to the
SQL: SELECT DISTINCT state AS _id FROM
collection ORDER BY state ASC.
{ $match : {state : "FL" } }, { $group:
{_id: "$city" , pop: { $sum: "$pop" } }
}, { $sort: { pop: -1 } }, { $project:
{_id : 0, city : "$_id" } }
Gets all documents where thestate field has a value of
FL, aggregates all values of pop for each city, sorts by
population descending and returns one field named city.
{ $unwind : "$result" }</p> Peels off the elements of an array individually, and returns
one document for each element of the array.

| Transformation Step Reference | 102
MongoDB Output
The MongoDB Output step enables you to insert data to a MongoDB collection and specify a number of options that
control what and how data is written. These tables describe the available options within the MongoDB Output step.
Configure Connection Tab
The Configure connection tab is where you enter basic connection details. Click Get DBs and Get collections to
retrieve the names of existing databases and collections within the connected database.
Option Definition
Step name Name of this step as it appears in the transformation
workspace
Host name(s) or IP address(es) Indicates the network name or address of the MongoDB
instance or instances. You can input multiple host
names or IP addresses, separated by a comma. You
can also specify a different port number for each
host name by separating the host name and port
number with a colon, and separating each combination
of host name and port number with a comma. For
example, to include the host name and port number
for two different MongoDB instances, you would input
localhost1:27017,localhost2:27018 and leave
the Port field empty.
Port Indicates the port number of the MongoDB instance or
instances. Use this to specify a default port if no ports
are given as part of the Host name(s) or IP address(es)
field.
Use all replica set members/mongos Differentiates between a replica set containing one node
and a stand-alone single Mongo host. If there is a replica
set, and it contains more than one host, then the Java
driver discovers all hosts automatically. It is good practice
to list more than one replica set host in the hosts field
so that the driver has a better chance of connecting
successfully if one is down.
Username Indicates the user name required to access the database.
If you want to use Kerberos authentication, enter the
Kerberos principal in this field. If you do not know
the principal, contact your system administrator. The
principal is the unique identity to which Kerberos
assigns tickets. When you enter the principal as the
username, it should be formatted like this: <primary>/
<instance>@<KERBEROS_REALM> is typically the
name of the user. If the primary is a host, the primary
is typically the word host. <instance> qualifies
the primary. Sometimes if the primary is a user, the
instance is the username of the database administrator.
<KERBEROS_REALM> is the Kerberos realm (domain
name). Note that the <KERBEROS_REALM> is
case sensitive. Here is an example of a correctly-
formatted Kerberos principal username: <joe/
admin@CORPORATION.COM>.
Password Indicates the password associated with the provided
Username. If you are using Kerberos authentication, you
do not need to enter the password.

| Transformation Step Reference | 103
Option Definition
Authenticate using Kerberos Indicates whether to use the Kerberos service to manage
the authentication process. If you choose this option, read
Use Kerberos Authentication to Provide Spoon Users
Access to MongoDB for configuration information.
Connection timeout Designates how long to wait for a connection to a
database (in milliseconds) before terminating the
connection attempt. Leave blank to never terminate the
connection.
Socket timeout Designates how long to wait for a write operation (in
milliseconds) before terminating the operation. Leave
blank to never terminate the operation.
Output Options Tab
The Output options tab provides additional controls for inserting data into a MongoDB collection. If the specified
collection does not exist, it is created before a document is inserted.
Option Definition
Database Name of the database to write data to. Click Get DBs to
populate the drop-down menu with a list of databases on
the server.
Collection Name of the collection to write data to. Click Get
collections to populate the drop-down menu with a list of
collections within the database.
Batch insert size Sets the batch size for fast bulk insert operations. If left
blank, the default size is 100 rows.
Truncate collection Deletes any existing data in the target collection before
inserting begins.
Upsert Changes the write mode from insert to upsert, which
either updates the first document matched in the target
collection or, if no document matches, inserts a new
document into the target collection according to the
incoming fields specified in the Mongo document fields
tab.
Multi-update Updates all matching documents, rather than just the first.
Modifier update Enables modifier operators to be used to modify individual
fields within matching documents. To set the Modifier
operation see the Mongo document fields tab.
Write concern (w option) http://docs.mongodb.org/manual/reference/glossary/
#term-write-concern specifies the minimum number of
servers that must succeed for a write operation. A value
of -1 disables all acknowledgement of write operation
errors. Zero (0) disables basic acknowledgment of write
operations, but returns information about socket excepts
and networking errors. 1 provides acknowledgment
of write operations on the primary node. >1 waits for
successful write operations to the specified number of
slaves, including the primary.
w Time out Designates how long to wait for a response to write
operations (in milliseconds) before terminating the
operation. Leave blank to never terminate.

| Transformation Step Reference | 104
Option Definition
Journaled writes Writes the operation to the journal first, and after to the
core data files. This confirms the write operation can
survive a shutdown and ensures the write operation is
durable.
Read preference Indicates which node to read first—Primary, Primary
preferred, Secondary, Secondary preferred, or Nearest
Number of retries for write operations Indicates the number of times that a write operation is
attempted.
Delay, in seconds, between retry attempts Indicates the number of seconds between write operation
retry attempts.
Mongo Document Fields Tab
The Mongo document fields tab enables you to define how field values which are coming into the step get written to
a Mongo document. Configure the Modifier policy column in the Mongo document fields tab for control over when
execution of a modifier operation affects a particular field. This can be particularly useful when the data for one Mongo
document is split over several incoming PDI rows and in situations where it is not possible to execute different modifier
operations that affect the same field simultaneously. The Modifier policy can be set to these values: Insert&Update,
Insert, and Update. Only these modifier operations are supported: $set, $inc, and $push. You can set the
Modifier policy to these values.
Option Definition
#The order of this entry in the list.
Name The name of this field, descriptive of its content.
Mongo document path Defines the hierarchical path to each field
Use field name Specifies whether the incoming field name is used as the
final entry in the path. When this is set to Y for a field, a
preceding . (dot) is assumed.
JSON Indicates if a field is in JSON format
Match field for upsert Specifies which of the fields should be used for matching
when performing an upsert operation. The first document
in the collection that matches all fields tagged as Y in this
column is replaced with the new document constructed
with incoming values for all of the defined field paths. If a
matching document does not exist, then a new document
is inserted into the collection. Insert&Update: The
operation gets executed whether or not a match exists in
the collection according to the match conditions. Insert:
The operation is executed on an insert only, for instance
if a matching document does not exist. Update: Update
only, for instance if the record exists.
Modifier operation In-place modifications of existing document fields. Update
more than one matching document by selecting the
Modifier update option in conjunction with the Upsert
option. Selecting the Multi-update option also enables
each update to apply to all matching documents, rather
than just the first. $set—Sets the value of a field. Used
to create the bulk of initial document structure for a new
document.$inc—If the field does not exist, sets the value
of a field. If the field exists, increases (or decreases,
with a negative value) the value of a field.$push—If the
field does not exist, sets the value of a field. If the field

| Transformation Step Reference | 105
Option Definition
exists, appends the value of a field. Used for appending to
existing arrays in documents.
Modifier policy Controls when execution of a modifier operation affects a
particular field
Get fields Populates the left-hand column of the table with the
names of the incoming fields
Preview document structure Displays the structure to be written to MongoDB in JSON
format
Create/Drop Indexes Tab
The Create/drop indexes tab enables you to specify which indexes to create or remove. An index is a data structure
that allows you to quickly locate documents based on the values stored in the specified fields. Fundamentally, indexes
in MongoDB are similar to indexes in other database systems. MongoDB supports indexes on any field or sub-field
contained in documents within a MongoDB collection.
Each row in the table can be used to create a single index (using one field) or a compound index (using multiple fields).
The dot ( . ) notation is used to specify a path to a field to use in the index. This path can be optionally postfixed by a
direction indicator. Compound indexes are specified by a comma-separated list of paths.
Option Definition
#The order of this field in the list.
Index fields Specifies a single index (using one field) or a compound
index (using multiple fields). The . (dot) notation is used
to specify a path to a field to use in the index. This path
can be optionally postfixed by a direction indicator, :1 for
ascending or :-1 for descending. Compound indexes are
specified by a comma-separated list of paths.
Index opp Specifies whether the index is created or dropped.
Unique Indicates whether to display entries for documents that
have a duplicate value for the indexed field.
Sparse Indicates whether the index should contain only entries fro
those documents that have a value in the indexed field.
Show indexes Displays the index information available.
Further Reading
See the Big Data MongoDB Tutorials, or MongoDB Output section of the Pentaho Wiki for scenario-based examples of
working with MongoDB and Pentaho.
Splunk Input
The Splunk Input transformation step enables you to connect to a Splunk server, enter a Splunk query, and get results
back for use within a PDI Transformation. Once you have completed those steps, you can stream data from Splunk into
your transformation. Make sure that you have read access to a Splunk server before you use the Splunk Input step. To
learn more about Splunk see their online documentation.
Configure connection tab
The Configure connection tab enables you to specify the database and collection to query.
Option Definition
Step name Name of the step as it appears in the transformation
workspace.

| Transformation Step Reference | 106
Option Definition
Host name(s) or IP address(es) Indicates the network name or address of the Splunk
instance or instances.
Port Indicates the port number of the Splunk (splunkd) server.
The default value is 8089.
Username Indicates the username required to access the Splunk
server.
Password Indicates the password associated with the provided
Username.
Execute for each row If checked, a new query is issued for each row of data
coming into the step. You can reference incoming fields of
data using the ?{<Field>} syntax. For instance, if you
want to use the incoming field Size to drive the limit of
results coming in, type this: search *head ?{Size}.
Splunk Query Expression This is the definition of the splunk query. Note that unlike
the queries defined in the Splunk user interface, you
must start the query with the term search. Here is an
example: search * | head 100. One capability of
Splunk search is field selection. This allows you to get
access to Splunk-parsed fields within the _raw column.
To select specific fields, use this syntax at the end of your
defined search query: ... | field index source
OpCode.
Preview Provides a first look at the data. Clicking Preview causes
the Enter preview size window to appear. Enter the
maximum number of records that you want to preview,
then click OK. The preview data appears in the Examine
preview data window.
Fields Tab
The Fields tab enables you to define properties for the exported fields.
Option Definition
# Number of the record returned.
Name Name of the field.
Splunk name Indicates the Splunk name for the field.
Type Specifies the data type of the field.
Length Indicates the length of the field.
Format Specifies the format of the field.
Get Fields Displays the field metadata and displays it in the Fields
tab. After you have detected the field metadata using the
Get Fields button on the Fields tab, you may choose
to delete metadata fields that are not relevant to your
specific query. Since each field must be translated to
its mapped data type, removing unused fields should
increase performance.
Raw Field Parsing
The input step automatically attempts to parse the raw field into a number of child fields denoted by _raw.<Field
Name>. It parses the raw field assuming that the field if formatted with name value pairs separated by a newline

| Transformation Step Reference | 107
character, like this: <Name1>=<Value1>\n <Name2>=<Value2>\n . If raw field data is not formatted like this, you
must post-process those fields with other steps in the transformation flow. Note that your secondary steps may include
String variables.
Date Handling
Kettle does not support the parsing of ISO-8601 date formats, which is Splunk's format for passing date objects through
web services. However, you can edit the date string returned from Splunk using the Modified Java Script Value step.
Use this script to parse the date.
var dateobj = str2date((substr(_time, 0, 23) + "GMT" + substr(_time, 23)).trim(),
"yyyy-MM-dd'T'HH:mm:ss.SSSz");
Splunk Output
The Splunk Output transformation step enables you to connect to a Splunk server and write events to a Splunk index.
By default, the step writes events as name value pairs separated by newline characters, but can also write arbitrary
formats by customizing event data. You must have write access to a Splunk server before you use the Splunk Output
step. To learn more about Splunk see their online documentation.
Option Definition
Step name Name of the step as it appears in the transformation
workspace.
Host name(s) or IP address(es) Specifies the network name or address of the Splunk
instance or instances.
Port Indicates the port number of the Splunk (splunkd) server.
The default value is 8089, but your administrator may
have changed the port number.
Username Specifies the username required to access the Splunk
server.
Password Indicates the password associated with the Username.
Index to write to Specifies the Splunk index where the events are stored.
Usually, this is the main index. Check your Splunk
server for a list of available indices. This field can be
parameterized with incoming fields (?{<Field>}) or
transformation parameters (${Parameter}).
Event host Indicates the hostname of the original event host. If
you want to gather data from a router and write it to
Splunk, use the router's host name. This field can be
parameterized with incoming fields (?{<Field>}) or
transformation parameters (${Parameter}).
Event source type Indicates the format type of the event data. The list of
known source types appears here. To define a new
format, follow these instructions.
Event source Indicates the source of the event data. See Splunk
documentation for more details.
Customize Splunk event If checked, enables the Splunk Event Data option and
allows you to customize the data coming into Splunk. This
is useful if you want to write a different format than the
default, which is name value pairs separated by newline
characters.
Splunk event data Allows you to specify customized event text. This field can
be parameterized with incoming fields (?{<Field>}) or
transformation parameters (${Parameter}).

| Transformation Step Reference | 108
SSTable Output
The SSTable Output step writes to a filesystem directory as a Cassandra SSTable.
Option Definition
Step name The name of this step as it appears in the transformation
workspace.
Cassandra yaml file Location of yaml file. A cassandra.yaml file is the main
configuration file for Cassandra and defines node and
cluster configuration details.
Directory Location to write the output to. This directory points to the
target table to load to and must match the Keyspace field.
Keyspace Name of the keyspace of the target table to load to. This
name must match the Directory field.
Column family (table) Name of the table to upload to. This assumes the
metadata for this table was previously defined in
Cassandra.
Incoming field to use as the row key Allows you to select which incoming row to use as the row
key. This drop-down box will be populated with the names
of incoming transformation fields.
Buffer (MB) The buffer size to use. A new table file is written every
time the buffer is full.
Input
The PDI transformation steps in this section pertain to various methods of data input.
Cassandra Input
Configure Cassandra Input
Cassandra Input is an input step that enables data to be read from a Cassandra column family (table) as part of an ETL
transformation.
Option Definition
Step name The name of this step as it appears in the transformation
workspace.
Cassandra host Connection host name input field.
Cassandra port Connection host port number input field.
Username Input field for target keyspace and/or family (table)
authentication details.
Password Input field for target keyspace and/or family (table)
authentication details.
Keyspace Input field for the keyspace (database) name.
Use query compression If checked, tells the step whether or not to compress the
text of the CQL query before sending it to the server.
Show schema Opens a dialog that shows metadata for the column family
named in the CQL SELECT query.

| Transformation Step Reference | 109
CQL SELECT Query
The large text box at the bottom of the dialog enables you to enter a CQL SELECT statement to be executed. Only a
single SELECT query is accepted by the step.
SELECT [FIRST N] [REVERSED] <SELECT EXPR>
FROM <COLUMN FAMILY> [USING <CONSISTENCY>] [WHERE <CLAUSE>] [LIMIT N];
Important: Cassandra Input does not support the CQL range notation, for instance name1..nameN, for
specifying columns in a SELECT query.
Select queries may name columns explicitly (in a comma separated list) or use the * wildcard. If the wildcard is used
then only those columns defined in the metadata for the column family in question are returned. If columns are selected
explicitly, then the name of each column must be enclosed in single quotation marks. Because Cassandra is a sparse
column oriented database, as is the case with HBase, it is possible for rows to contain varying numbers of columns
which might or might not be defined in the metadata for the column family. The Cassandra Input step can emit columns
that are not defined in the metadata for the column family in question if they are explicitly named in the SELECT clause.
Cassandra Input uses type information present in the metadata for a column family. This, at a minimum, includes a
default type (column validator) for the column family. If there is explicit metadata for individual columns available, then
this is used for type information, otherwise the default validator is used.
Option Definition
LIMIT If omitted, Cassandra assumes a default limit of 10,000
rows to be returned by the query. If the query is expected
to return more than 10,000 rows an explicit LIMIT clause
must be added to the query.
FIRST N Returns the first N [where N is determined by the column
sorting strategy used for the column family in question]
column values from each row, if the column family in
question is sparse then this may result in a different N
(or less) column values appearing from one row to the
next. Because PDI deals with a constant number of fields
between steps in a transformation, Cassandra rows that
do not contain particular columns are output as rows with
null field values for non-existent columns. Cassandra's
default for FIRST (if omitted from the query) is 10,000
columns. If a query is expected to return more than
10,000 columns, then an explicit FIRST must be added to
the query.
REVERSED Option causes the sort order of the columns returned by
Cassandra for each row to be reversed. This may affect
which values result from a FIRST N option, but does not
affect the order of the columns output by Cassandra Input.
WHERE clause Clause provides for filtering the rows that appear in
results. The clause can filter on a key name, or range
of keys, and in the case of indexed columns, on column
values. Key filters are specified using the KEY keyword, a
relational operator (one of =, >, >=, <, and <=) and a term
value.
CSV File Input
The CSV File Input step reads a delimited file format. The CSV label for this step is a misnomer because you can define
whatever separator you want to use, such as pipes, tabs, and semicolons; you are not constrained to using commas.
Internal processing allows this step to process data quickly. Options for this step are a subset of the Text File Input
step. An example of a simple CSV Input transformation can be found under ...\samples\transformations\CSV
Input - Reading customer data.ktr.

| Transformation Step Reference | 110
CSV File Input Options
The table below describes the options available for the CSV Input step:
Option Description
Step name Optionally, you can change the name of this step to fit
your needs.
File Name Specify the name of the CSV file from which to read or
select the field name that will contain the file name(s) from
which to read. If your CSV Input step receives data from a
previous step, this option is enabled as well as the option
to include the file name in the output.
Delimiter Specify the file delimiter or separator used in the target
file. This includes pipes, tabs, semicolons and so on. In
the sample image, the delimiter is a semicolon.
Enclosure Specify the enclosure character used in the target file. It's
possible that your strings contain semicolons or commas
as delimiters, so the enclosures specify that a textual
string inside an enclosure, such as a "quotation mark" is
not to be parsed until the "end" enclosure. In the sample
image, the enclosure is a quotation mark.
NIO buffer size The size of the read buffer. It represents the number of
bytes that is read at one time from disk.
Lazy conversion Lazy conversion delays conversion of data as long as
possible. In some instances, data conversion is prevented
altogether. This can result in significant performance
improvements when possible. The typical example that
comes to mind is reading from a text file and writing back
to a text file.
Header row present? Enable this option if the target file contains a header row
containing column names. Header rows are skipped.
Add file name to result Adds the CSV filename(s) read to the result of this
transformation. A unique list is being kept in memory that

| Transformation Step Reference | 111
Option Description
can be used in the next job entry in a job, for example in
another transformation.
The row number field name (optional) The name of the Integer field that will contain the row
number in the output of this step.
Running in parallel? Enable if you will have multiple instances of this step
running (step copies) and if you want each instance to
read a separate part of the CSV file(s).
When reading multiple files, the total size of all files is
taken into consideration to split the workload. In that
specific case, make sure that ALL step copies receive all
files that need to be read, otherwise, the parallel algorithm
will not work correctly (for obvious reasons).
Note: For technical reasons, parallel reading of
CSV files is supported only for files that do not
include fields with line breaks or carriage returns.
File Encoding Specify the encoding of the file being read.
Fields Table This table contains an ordered list of fields to be read from
the target file.
Preview Click to preview the data coming from the target file.
Get Fields Click to return a list of fields from the target file based on
the current settings (for example, Delimiter, Enclosure,
and so on.). All fields identified will be added to the Fields
Table.
Data Grid
This step is not yet documented here. However, there may be a rough definition available in the Pentaho Wiki: http://
wiki.pentaho.com/display/EAI/Pentaho+Data+Integration+Steps.
Option Definition
Step name The name of this step as it appears in the transformation
workspace.
De-serialize From File
This step is not yet documented here. However, there may be a rough definition available in the Pentaho Wiki: http://
wiki.pentaho.com/display/EAI/Pentaho+Data+Integration+Steps.
Option Definition
Step name The name of this step as it appears in the transformation
workspace.
Email Messages Input
This step is not yet documented here. However, there may be a rough definition available in the Pentaho Wiki: http://
wiki.pentaho.com/display/EAI/Pentaho+Data+Integration+Steps.
Option Definition
Step name The name of this step as it appears in the transformation
workspace.

| Transformation Step Reference | 112
ESRI Shapefile Reader
This step is not yet documented here. However, there may be a rough definition available in the Pentaho Wiki: http://
wiki.pentaho.com/display/EAI/Pentaho+Data+Integration+Steps.
Option Definition
Step name The name of this step as it appears in the transformation
workspace.
Fixed File Input Step
This step is used to read data from a fixed-width text file, exclusively. In fixed-width files, the format is specified by
column widths, padding, and alignment. Column widths are measured in units of characters. For example, the data
in the file contains a first column that has exactly 12 characters, and the second column has exactly 10, the third has
exactly 7, and so on. Each row contains one record of information; each record can contain multiple pieces of data
(fields), each data field (column) has a specific number of characters. When the data does not use all the characters
alloted to it, the data is padded with spaces (or other character). In addition, each data element may be left or right
justified, which means that characters can be padded on either side.
A sample Fixed File Input transformation is located at ...\samples\transformations\Fixed Input - fixed
length reading .ktr
The table below describes the options available for the Fixed File Input step:
Fixed File Options
Option Description
Step name Optionally, you can change the name of this step to fit your needs.
File name Specify the CSV file from which to read.
Line feeds present? Enable if the target file contains line feed characters; line width in bytes (excluding carriage
returns) — defines the width of each line in the input file
NIO buffer size The size of the read buffer — represents the number of bytes that is read at one time from
disk

| Transformation Step Reference | 113
Option Description
Lazy conversion The lazy conversion algorithm will try to avoid unnecessary data type conversions and can
result in a significant performance improvements if this is possible. The typical example that
comes to mind is reading from a text file and writing back to a text file.
Header row present? Enable if the target file contains a header row containing column names.
Running in parallel? Enable if you will have multiple instances of this step running (step copies) and if you want
each instance to read a separate part of the file.
File Encoding Specify the encoding of the file being read.
Add file name to result Adds the file name(s) read to the result of this transformation. A unique list is kept in
memory so that it can be used in the next job entry in a job, for example in another
transformation.
Fields Table Contains an ordered list of fields to be read from the target file.
Preview Click to preview the data coming from the target file.
Get Fields Click to return a list of fields from the target file based on the current settings;for example,
Delimiter, Enclosure, and so on. All fields identified will be added to the Fields Table.
Generate Random Credit Card Numbers
This step generates random credit card numbers with a valid LUHN checksum.
Option Definition
Step name The name of this step as it appears in the transformation
workspace.
Card number Credit card number.
Card type Specify the type of credit card.
Card length Specify the length of the credit card numbers.
Generate numbers for cards: Card type Specify the card type, for example "VISA."
Generate numbers for cards: Length Specify the desired length of the number.
Generate numbers for cards: How many? Specify how many random numbers per card type.
Generate Random Value
This step creates a large random compilation of letters and numbers.
Option Definition
Step name The name of this step as it appears in the transformation
workspace.
Name Specify the name of the new field that will contain the
random value.
Type Specify the type of data to generate.
Generate Rows
Generate rows outputs a specified number of rows. By default, the rows are empty; however they can contain a number
of static fields. This step is used primarily for testing purposes. It may be useful for generating a fixed number of rows,
for example, you want exactly 12 rows for 12 months. Sometimes you may use Generate Rows to generate one row
that is an initiating point for your transformation. For example, you might generate one row that contains two or three
field values that you might use to parameterize your SQL and then generate the real rows.

| Transformation Step Reference | 114
Generate Rows Options
Option Description
Step Name Optionally, you can change the name of this step to fit
your needs
Limit Specifies the number of rows to output
Fields This table is where you configure the structure and values
of the rows you are generating (optional). This may be
used to generate constants.
Get Data From XML
This step is not yet documented here. However, there may be a rough definition available in the Pentaho Wiki: http://
wiki.pentaho.com/display/EAI/Pentaho+Data+Integration+Steps.
Option Definition
Step name The name of this step as it appears in the transformation
workspace.
Get File Names
This step is not yet documented here. However, there may be a rough definition available in the Pentaho Wiki: http://
wiki.pentaho.com/display/EAI/Pentaho+Data+Integration+Steps.
Option Definition
Step name The name of this step as it appears in the transformation
workspace.
Get Files Rows Count
This step is not yet documented here. However, there may be a rough definition available in the Pentaho Wiki: http://
wiki.pentaho.com/display/EAI/Pentaho+Data+Integration+Steps.
Note: This step can only work with plain text files.
File
Option Definition
Step name The name of this step as it appears in the transformation
workspace.
Get filename from field
Filename from field
File or directory
Regular expression
Exclude regular expression
Selected files
Content
Option Definition
Rows count fieldname
Rows separator type
| Transformation Step Reference | 115
Option Definition
Row separator
Include files count in output?
Files count field name
Add filename to result
Get Repository Names
This step is not yet documented here. However, there may be a rough definition available in the Pentaho Wiki: http://
wiki.pentaho.com/display/EAI/Pentaho+Data+Integration+Steps.
Option Definition
Step name The name of this step as it appears in the transformation
workspace.
Get Subfolder Names
This step reads a parent folder and returns all subfolders.
Option Definition
Step name The name of this step as it appears in the transformation
workspace.
Get System Info
This step retrieves information from the Kettle environment. It generates a single row with the fields containing the
requested information.
Option Definition
Step name The name of this step as it appears in the transformation
workspace.
Name Specify the name for the information to retrieve.
Type Select the information type to retrieve. A menu appears
with a list of available information to retrieve.
Get Table Names
This step is not yet documented here. However, there may be a rough definition available in the Pentaho Wiki: http://
wiki.pentaho.com/display/EAI/Pentaho+Data+Integration+Steps.
Option Definition
Step name The name of this step as it appears in the transformation
workspace.
Google Analytics Input Step
The Google Analytics step allow you to access your Google analytics data to generate reports or populate your BI data
warehouse. To make querying easier, a link provides you with quick access to the Google Analytics API documentation.
Note: This step was deprecated in favor of the Google Analytics step.

| Transformation Step Reference | 116
Authorization
Option Description
Username Google Analytics account user name
Password Google Analytics account password
Query
Option Description
Domain Table ID Specifies the domain associated with Google Analytics
that must be queried. Click Lookup to display the list of
available domains.
Start Date Specifies the start date associated with the query - date
must be entered in the following format: year, month, and
date (for example, 2010-03-01)
End Date Specifies the end date associated with the query - date
must be entered in the following format: year, month, and
date (for example, 2010-03-31)
Dimensions Specifies the dimension fields for which you want to query
- the Google Analytics API documentation provides you
with a list of valid inputs and metrics that can be combined
Metrics Specifies the metrics fields you want returned
Filters Specifies the filter (described in the Google Analytics API
documentation) for example, 'ga:country==Algeria'
Sort Specifies a field on which to sort, for example, 'ga:city'
Fields
Click Get Fields to retrieve a list of possible fields based on the query you defined on the Query tab.
Click Preview Rows to preview data based on the defined query.
Setting Up Google Analytics API
The Google Analytics API requires an API key. The upgraded Pentaho Google Analytics EE plugin provides a field in
the step dialog for entering this key.
To set up your Google project:
1. Navigate to http://developers.google.com and click on API Console under Developer Tools.
2. Sign in with your credentials.
3. From the Services page, turn on Analytics API. Here you find the API key. This is the key that is to be entered
in the new field within the Google Analytics EE step.
Google Analytics Plugin Installation
This procedure describes how to install the Google Analytics plugin for Google 2.4 APIs:
1. From within the data-integration/plugins/steps folder, delete the plugin folder named google-
analytics-input-step.
2. Copy the gdata-analytics-2.3.0.jar file from data-integration/plugins/steps/google-
analytics-input-step/gdata-analytics to two locations:
•data-integration/libext/google
•data-integration-server/tomcat/webapps/pentaho-di/WEB-INF/lib
3. Delete the gdata-analytics-2.1.jar from the following two locations:
•data-integration/libext/google.
•data-integration-server/tomcat/webapps/pentaho-di/WEB-INF/lib.

| Transformation Step Reference | 117
Google Analytics is now configured for input into Kettle and will work with Google 2.4 APIs.
Google Docs Input
The Google Docs Input step provides you with the ability to read data from one or more Google Docs spreadsheets.
The following sections describe each of the available features for configuring the Google Docs Input step. If necessary,
you refer to the Google Dimensions and Metrics Reference.
Files
The Files tab is where you define the location of the Google Docs files that you want read. The table below contains
options associated with the Files tab:
Option Description
Step Name Optionally, you can change the name of this step to fit
your needs.
Username Google Docs account user name
Password Google Docs account password
Google Docs Object ID Key to the Google document from which you want to read
data - Note: The key is included in the URL associated
with the document; your entry must be in the following
format spreadsheet%pBb5yoxtYzKEyXDB9eqsNVG. Click
Lookup to display the list of available keys.
Sheets
The options in the Sheets tab allow you to specify the names of the sheets in the Google Docs workbook to read. For
each of the sheet names, you can specify the row and column to start at. The row and column numbers are zero (0)
based; start number is 0.
Content
The content tab allows you to configure the following properties:
Option Description
Header Enable if the sheets specified contain a header row to skip
No empty rows Enable if you don't want empty rows in the output of this
step
Stop on empty row Makes the step stop reading the current sheet of a file
when a empty line is encountered
Filename field Specifies a field name to include the file name in the
output of this step
Sheetname field Specifies a field name to include the sheet name in the
output of this step
Sheet row nr field Specifies a field name to include the sheet row number in
the output of the step; the sheet row number is the actual
row number in the Google Docs sheet
Row nrwritten field Specifies a field name to include the row number in the
output of the step; "Row number written" is the number of
rows processed, starting at 1 and counting indefinitely
Limit Limits the number of rows to this number (zero (0) means
all rows).
Encoding Specifies the character encoding (such as UTF-8, ASCII)

| Transformation Step Reference | 118
Error Handling
The Error handling tab allows you to configure the following properties:
Option Description
Strict types? Certain columns in the Google Docs input step can be
flagged as numbers, strings, dates, and so on. Once
flagged, if a column does not contain the right data type;
for example, the column was flagged as numeric but
contains a string input, an error occurs.
Ignore errors? Enable if you want to ignore errors during parsing
Skip error lines? Enable if you want to skip the lines that contain errors.
Note: you can generate an extra file that will contain the
line numbers on which the errors occurred. If lines with
errors are not skipped, the fields that did have parsing
errors, will be empty (null).
Warnings file directory When warnings are generated, they are placed in this
directory. The name of that file is <warning dir>/
filename. <date_time>.<warning extension>
Error files directory When errors occur, they are placed in
this directory. The name of that file is
<errorfile_dir>/filename .<date_time>.
<errorfile_extension>
Failing line numbers files directory When a parsing error occurs on a line, the
line number is placed in this directory. The
name of that file is <errorline dir> /
filename.<date_time>.<errorline extension>
Fields
The fields tab is for specifying the fields that must be read from the Google Docs files. Use Get fields from header row
to fill in the available fields if the sheets have a header row automatically. The Type column performs type conversions
for a given field. For example, if you want to read a date and you have a String value in the Google Docs file, specify the
conversion mask.
Note: In the case of Number to Date conversion (for example, 20101028 > October 28th, 2010) specify the
conversion mask yyyyMMdd because there will be an implicit Number to String conversion taking place before
doing the String to Date conversion.
GZIP CSV Input
This step is not yet documented here. However, there may be a rough definition available in the Pentaho Wiki: http://
wiki.pentaho.com/display/EAI/Pentaho+Data+Integration+Steps.
Option Definition
Step name The name of this step as it appears in the transformation
workspace.
HBase Input
This step reads data from an HBase table according to user-defined column metadata.
Configure Query
This tab contains connection details and basic query information. You can configure a connection in one of two ways:
either via a comma-separated list of hostnames where the zookeeper quorum reside, or via an hbase-site.xml (and,
optionally, hbase-default.xml) configuration file. If both zookeeper and HBase XML configuration options are supplied,
then the zookeeper takes precedence.

| Transformation Step Reference | 119
Option Definition
Step name The name of this step as it appears in the transformation
workspace.
Zookeeper host(s) Comma-separated list of hostnames for the zookeeper
quorum.
URL to hbase-site.xml Address of the hbase-site.xml file.
URL to hbase-default.xml Address of the hbase-default.xml file.
HBase table name The source HBase table to read from. Click Get Mapped
Table Names to populate the drop-down list of possible
table names.
Mapping name A mapping to decode and interpret column values. Click
Get Mappings For the Specified Table to populate the
drop-down list of available mappings.
Start key value (inclusive) for table scan A starting key value to retrieve rows from. This is inclusive
of the value entered.
Stop key value (exclusive) for table scan A stopping key value for the scan. This is exclusive of the
value entered. Both fields or the stop key field may be left
blank. If the stop key field is left blank, then all rows from
(and including) the start key will be returned.
Scanner row cache size The number of rows that should be cached each time a
fetch request is made to HBase. Leaving this blank uses
the default, which is to perform no caching; one row would
be returned per fetch request. Setting a value in this field
will increase performance (faster scans) at the expense of
memory consumption.
#The order of query limitation fields.
Alias The name that the field will be given in the output stream.
Key Indicates whether the field is the table's key field or not.
Column family The column family in the HBase source table that the field
belongs to.
Column name The name of the column in the HBase table (family +
column name uniquely identifies a column in the HBase
table).
Type The PDI data type for the field.
Format A formatting mask to apply to the field.
Indexed values Indicates whether the field has a predefined set of values
that it can assume.
Get Key/Fields Info Assuming the connection information is complete and
valid, this button will populate the field list and display the
name of the key.
Create/Edit Mappings
This tab creates or edits a mapping for a given HBase table. A mapping simply defines metadata about the values that
are stored in the table. Since most information is stored as raw bytes in HBase, this enables PDI to decode values and
execute meaningful comparisons for column-based result set filtering.

| Transformation Step Reference | 120
Option Definition
HBase table name Displays a list of table names. Connection information in
the previous tab must be valid and complete in order for
this drop-down list to populate.
Mapping name Names of any mappings that exist for the table. This box
will be empty if there are no mappings defined for the
selected table, in which case you can enter the name of a
new mapping.
#The order of the mapping operation.
Alias The name you want to assign to the HBase table key. This
is required for the table key column, but optional for non-
key columns.
Key Indicates whether or not the field is the table's key.
Column family The column family in the HBase source table that the
field belongs to. Non-key columns must specify a column
family and column name.
Column name The name of the column in the HBase table.
Type Data type of the column. Key columns can be of type:
String Integer Unsigned integer (positive only) Long
Unsigned long (positive only) Date Unsigned date. Non-
key columns can be of type: String, Integer, Long, Float,
Double, Boolean, Date, BigNumber, Serializable, Binary.
Indexed values String columns may optionally have a set of legal values
defined for them by entering comma-separated data into
this field.
Filter Result Set
This tab provides two fields that limit the range of key values returned by a table scan. Leaving both fields blank will
result in all rows being retrieved from the source table.
Option Definition
Match all / Match any When multiple column filters have been defined, you have
the option returning only those rows that match all filters,
or any single filter. Bounded ranges on a single numeric
column can be defined by defining two filters (upper and
lower bounds) and selecting Match all; similarly, open-
ended ranges can be defined by selecting Match any.
#The order of the filter operation.
Alias A drop-down box of column alias names from the
mapping.
Type Data type of the column. This is automatically populated
when you select a field after choosing the alias.
Operator A drop-down box that contains either equality/inequality
operators for numeric, date, and boolean fields; or
substring and regular expression operators for string
fields.
Comparison value A comparison constant to use in conjunction with the
operator.
Format A formatting mask to apply to the field.

| Transformation Step Reference | 121
Option Definition
Signed comparison Specifies whether or not the comparison constant and/
or field values involve negative numbers (for non-string
fields only). If field values and comparison constants
are only positive for a given filter, then HBase's native
lexicographical byte-based comparisons are sufficient. If
this is not the case, then it is necessary for column values
to be deserialized from bytes to actual numbers before
performing the comparison.
Performance Considerations
Specifying fields in the Configure query tab will result in scans that return just those columns. Since HBase is a sparse
column-oriented database, this requires that HBase check to see whether each row contains a specific column. More
lookups equate to reduced speed, although the use of Bloom filters (if enabled on the table in question) mitigates this
to a certain extent. If, on the other hand, the fields table in the Configure query tab is left blank, it results in a scan that
returns rows that contain all columns that exist in each row (not only those that have been defined in the mapping).
However, the HBase Input step will only emit those columns that are defined in the mapping being used. Because
all columns are returned, HBase does not have to do any lookups. However, if the table in question contains many
columns and is dense, then this will result in more data being transferred over the network.
HL7 Input
This step provides the ability to read data from HL7 data streams within a transformation. Combined with the job entry
HL7 MLLP Input on page 250, messages can be read from a remote server, processed by a transformation and then
acknowledged by the HL7 MLLP Acknowledge on page 250 job entry.
Options
Option Definition
Step name The name of this step as it appears in the transformation
workspace.
Message field Specifies the field name in the data stream that gets
parsed.
Output Fields
All output fields have fixed names and are String value types.
Fieldname Description
ParentGroup This is the name of the root group.
Group Name of the Group.
HL7Version HL7 version of the data stream.
StructureName Name of the HL7 structure.
StructureNumber Child number within structure (level)
FieldName Field Description according to HL7
Coordinates Level within each Segment:
Segment.Terser.Component.SubComponent
HL7DataType Data Types according to the HL7 specification. Note:
These data types do not get mapped to Kettle data types.
FieldDescription Field Description according to HL.
Value The value of the field. Note: All values are of String type.
| Transformation Step Reference | 122
JMS Consumer
The Java Messaging Service (JMS) Consumer step allows Pentaho Data Integration to receive text messages from any
JMS server. For example, you could use JMS Consumer step to define a long running transformation that updates a
data warehouse every time a JMS message is received.
You must be familiar with JMS messaging to use this step. Additionally, you must have a message broker like Apache
ActiveMQ available before you configure this step. If you are using the Java Naming and Directory Interface (JNDI) to
connect to JMS, you must have the appropriate connection information.
JMS Consumer Options
Option Description
Step Name Optionally, you can change the name of this step to fit your needs.
ActiveMQ
Connection Enable ActiveMQ Connection you are using ActiveMQ as your message broker.
JMS URL Enter the appropriate broker URL.
Username Enter the ActiveMQ user name.
Password Enter the ActiveMQ password.
Jndi Connection Enable JNDI Connection if you are using the Java Naming and Directory Interface (JNDI) to
connect to JMS
Jndi URL The URL for the JNDI connection
Topic/Queue Select Topic or Queue from the drop down list to specify whether you want to use a Topic or
Queue delivery model.
Topic uses a publish/subscribe delivery model meaning that a one message can be delivered
to multiple consumers. Messages are delivered to the topic destination, and ultimately to all
active consumers who are subscribers of the topic. Also, any number of producers can send
messages to a topic destination; each message can be delivered to any number of subscribers.
If there are no registered consumers, the topic destination does not hold messages unless it
has durable subscription for inactive consumers. A durable subscription represents a consumer
registered with the topic destination that can be inactive at the time the messages are sent to
the topic.
Queue uses a point-to-point delivery model. In this model, a message is delivered from a single
producer to a single consumer. The messages are delivered to the destination, which is a
queue, and then delivered to one of the consumers registered for the queue. While any number
of producers can send messages to the queue, each message is guaranteed to be delivered,
and consumed by one consumer. If no consumers are registered to consume the messages, the
queue holds them until a consumer registers to consume them.
Destination Specify the queue or topic name.
Receive Timeout Specify the time to wait for incoming messages in milliseconds.
Note: A timeout setting of zero never expires.
Field Name Specify the field name that contains the contents of the message.
JSON Input
The JSON Input step extracts relevant portions out of JSON structures, files or incoming fields, and outputs rows.
File Tab
The File tab is where you enter basic connection information for accessing a resource.

| Transformation Step Reference | 123
Option Definition
Step name Name of this step as it appears in the transformation
workspace
Source is defined in a field Retrieves the source from a previously defined field
Source is a filename Indicates source is a filename
Read source as URL Indicates a source should be accessed as a URL
Get source from field Indicates the field to retrieve a source from
File or directory Indicates the location of the source if the source is not
defined in a field
Regular expression All filenames that match this regular expression are
selected if a directory is specified
Exclude regular expression All filenames that match this regular expression are
excluded if a directory is specified
Show filename Displays the file names of the connected source
Content Tab
The Content tab enables you to configure which data to collect.
Option Definition
Ignore empty file When checked, indicates to skip empty files—when
unchecked, instances of empty files causes the process
fail and stop
Do not raise an error if no files When unchecked, causes the transformation to fail when
there is no file to process—then checked, avoids failure
when there is no file to process
Ignore missing path When unchecked, causes the transformation to fail when
the JSON path is missing—then checked, avoids failure
when there is no JSON path
Limit Sets a limit on the number of records generated from the
step when set greater than zero
Include filename in output Adds a string field with the filename in the result
Rownum in output Adds an integer field with the row number in the result
Add files to result filesname If checked, adds processed files to the result file list
Fields Tab
The Fields tab displays field definitions to extract values from the JSON structure. This step uses JSONPath to extract
fields from JSON structures.
Additional Output Fields Tab
The Additional output fields tab enables you to provide additional information about the file to process.
Sample Transformations
Pentaho Data Integration ships with sample transformations you can run to demonstrate step functionality. To open
a sample transformation, from within the Spoon interface, go to the File menu and select Open. Browse to pentaho
\design-tools\data-integration\samples\transformations, then select the sample transformation you
want to run. Within this directory are several sample transformations to demonstrate the functionality of this step.
•JsonInput - read a dynamic file.ktr

| Transformation Step Reference | 124
•JsonInput - read a file.ktr
•JsonInput - read incoming stream.ktr
LDAP Input
This step is not yet documented here. However, there may be a rough definition available in the Pentaho Wiki: http://
wiki.pentaho.com/display/EAI/Pentaho+Data+Integration+Steps.
Option Definition
Step name The name of this step as it appears in the transformation
workspace.
LDIF Input
This step is not yet documented here. However, there may be a rough definition available in the Pentaho Wiki: http://
wiki.pentaho.com/display/EAI/Pentaho+Data+Integration+Steps.
Option Definition
Step name The name of this step as it appears in the transformation
workspace.
Load File Content In Memory
This step is not yet documented here. However, there may be a rough definition available in the Pentaho Wiki: http://
wiki.pentaho.com/display/EAI/Pentaho+Data+Integration+Steps.
Option Definition
Step name The name of this step as it appears in the transformation
workspace.
Microsoft Access Input
This step is not yet documented here. However, there may be a rough definition available in the Pentaho Wiki: http://
wiki.pentaho.com/display/EAI/Pentaho+Data+Integration+Steps.
Option Definition
Step name The name of this step as it appears in the transformation
workspace.
Microsoft Excel Input
This step imports data from a Microsoft Excel (2003 or 2007) or OpenOffice.org Calc spreadsheet file.
Note: The Files, Sheets, and Fields tabs are required for proper step configuration.
Files Tab
The Files tab defines basic file properties for this step's output.
Option Description
Step name The name of this step in the transformation workspace.
File or directory The name of the spreadsheet file or directory of files that
you are reading from.
Regular Expression Includes all files (in a given location) that meet the criteria
specified by this regular expression.

| Transformation Step Reference | 125
Option Description
Exclude Regular Expression Excludes all files (in a given location) that meet the criteria
specified by this regular expression.
Selected files A list of files that will be used in this step, according to the
criteria specified in the previous fields.
Accept filenames from previous step If checked, will retrieve a list of filenames from the
previous step in this transformation. You must also specify
which step you are importing from, and the input field in
that step from which you will retrieve the filename data. If
you choose this option, the Show filename(s) option will
show a preview of the list of filenames.
Sheets Tab
The Sheets tab specifies which worksheets you want to use in the specified files. A spreadsheet document can contain
several worksheets.
Option Description
List of sheets to read A list of worksheets that you want to use. If this remains
empty, all worksheets in all specified files will be selected.
Rows and columns are numbered, starting with 0.
Get sheetname(s) This button will retrieve a list of worksheets from all of the
specified files and give you the option to select some or all
of them for this step.
Content Tab
The content tab contains options for describing the file's content.
Option Description
Header Enable this option if there is a header row to skip in the
selected worksheets.
No empty rows If checked, removes empty rows from the output.
Stop on empty row If checked, stops reading from the current worksheet
when an empty row is read.
Limit Sets a static number of rows to read. If set to 0, there is
no set limit.
Encoding Specifies the text file encoding to use. Leave blank to use
the default encoding on your system. To use Unicode,
specify UTF-8 or UTF-16. On first use, Spoon searches
your system for available encodings.
Spreadsheet type (engine) Specifies which spreadsheet format to expect from the
file, regardless of its extension.
Add filenames to result If checked, passes the input filenames to the output.
Error Handling tab
This tab sets options for recording and reporting various error conditions.
Option Description
Strict types? If checked, PDI will report data type errors in the input.
Ignore errors? If checked, no errors will be reported during input parsing.

| Transformation Step Reference | 126
Option Description
Skip error lines? If checked, PDI will skip lines that contain errors. These
lines can be dumped to a separate file by specifying a
path in the Failing line numbers files directory field
below. If this is not checked, lines with errors will appear
as NULL values in the output.
Warning files directory Directory in which to create files that contain warning
messages regarding input values for each spreadsheet
file read. These files will have the extension you specify
here.
Error files directory Directory in which to create files that contain error
messages regarding input values for each spreadsheet
file read. These files will have the extension you specify
here.
Failing line numbers files directory Directory in which to create files that contain the lines that
failed error checks during input validation. These files will
have the extension you specify here.
Fields tab
The Fields tab defines properties for the exported fields.
Option Description
Name The name of the field.
Type The field's data type; String, Date or Number.
Length The length option depends on the field type. Number:
total number of significant figures in a number; String:
total length of a string; Date: determines how much of the
date string is printed or recorded.
Precision The precision option depends on the field type, but only
Number is supported; it returns the number of floating
point digits.
Trim type Truncates the field (left, right, both) before processing.
Useful for fields that have no static length.
Repeat If set to Y, will repeat this value if the next field is empty.
Format The format mask (number type).
Currency Symbol used to represent currencies.
Decimal A decimal point; this is either a dot or a comma.
Grouping A method of separating units of thousands in numbers of
four digits or larger. This is either a dot or a comma.
Additional output fields tab
This tab retrieves custom metadata fields to add to the step's output. The purpose of each field is defined in its name,
but you can use these fields for whatever you want. Each item defines an output field that will contain the following
information. Some of these are missing.
Option Description
Full filename field The full file name plus the extension.
Sheetname field The worksheet name you're using.

| Transformation Step Reference | 127
Option Description
Sheet row nr field The current sheet row number.
Row nr written field Number of rows written
Short filename field
Extension field The three- or four-letter file type extension.
Path field
Size field
Is hidden field
Last modification field
URI field
Root URI field
Mondrian Input
This step is not yet documented here. However, there may be a rough definition available in the Pentaho Wiki: http://
wiki.pentaho.com/display/EAI/Pentaho+Data+Integration+Steps.
Option Definition
Step name The name of this step as it appears in the transformation
workspace.
MongoDB Input
The MongoDB Input transformation step enables you to retrieve documents or records from a collection within
MongoDB. For additional information about MongoDB, see the MongoDB documentation.
Configure Connection Tab
The Configure connection tab enables you to specify the database and collection to query.
Option Definition
Step name Name of the step as it appears in the transformation
workspace.
Host name(s) or IP address(es) Indicates the network name or address of the MongoDB
instance or instances. You can input multiple host
names or IP addresses, separated by a comma. You
can also specify a different port number for each
host name by separating the host name and port
number with a colon, and separating each combination
of host name and port number with a comma. For
example, to include the host name and port number
for two different MongoDB instances, you would input
localhost1:27017,localhost2:27018 and leave
the Port field empty.
Use all replica set members/mongos Differentiates between a replica set containing one node
and a stand-alone single Mongo host. If there is a replica
set, and it contains more than one host, then the Java
driver discovers all hosts automatically. It is good practice
to list more than one replica set host in the hosts field
so that the driver has a better chance of connecting
successfully if one is down.

| Transformation Step Reference | 128
Option Definition
Port Indicates the port number of the MongoDB instance or
instances. Specify a default port to use if no port numbers
are specified in the Host name(s) or IP address(es) field.
Username Indicates the username required to access the database.
If you want to use Kerberos authentication, enter the
Kerberos principal in this field. If you do not know
the principal, contact your system administrator. The
principal is the unique identity to which Kerberos
assigns tickets. When you enter the principal as the
username, it should be formatted like this: <primary>/
<instance>@<KERBEROS_REALM> is typically the
name of the user. If the primary is a host, the primary
is typically the word host. <instance> qualifies
the primary. Sometimes if the primary is a user, the
instance is the username of the database administrator.
<KERBEROS_REALM> is the Kerberos realm (domain
name). Note that the <KERBEROS_REALM> is
case sensitive. Here is an example of a correctly-
formatted Kerberos principal username: <joe/
admin@CORPORATION.COM>.
Password Indicates the password associated with the provided
Username. If you are using Kerberos authentication, you
do not need to enter the password.
Authenticate using Kerberos Indicates whether to use the Kerberos service to manage
the authentication process. If you check this, make sure
that you enter the Kerberos principal as the Username. If
you choose this option, read Use Kerberos Authentication
to Provide Spoon Users Access to MongoDB for
configuration information.
Connection timeout Designates how long to wait for a connection to a
database (in milliseconds) before terminating the
connection attempt. Leave blank to never terminate the
connection.
Socket timeout Designates how long to wait for a write operation (in
milliseconds) before terminating the operation. Leave
blank to never terminate the operation.
Preview Displays a first look of the data. Clicking Preview causes
the Enter preview size window to appear. Enter the
maximum number of records that you want to preview,
then click OK. The preview data appears in the Examine
preview data window.
Input Options Tab
The Input Options tab enables you to specify which database and collection you want to retrieve information from. You
can also indicate the read preferences and tag sets in this tab. See Tag Sets for more information.
Option Definition
Database Name of the database to retrieve data from. Click Get
DBs to populate the drop-down menu with a list of
databases on the server.
Collection Name of the collection to retrieve data from. Click Get
collections to populate the drop-down menu with a list of
collections within the database.

| Transformation Step Reference | 129
Option Definition
Read preference Indicates which node to read first—Primary, Primary
preferred, Secondary, Secondary preferred, or
Nearest.
Tag set specification/#/Tag Set Tags allow you to customize write concerns and read
preferences for a replica set. The Tag set specification
section of the window allows you to specify criteria for
selecting replica set members. When you click Get tags,
the Tag set specification populates with the tag sets
that are available on the database, in order of execution.
You can join, delete, copy, or paste tag sets, then click
Test tag set to see which replica set members match
the Tag set specification criteria you specified. The #
field indicates the number of the tag set. The Tag set field
displays the tag set criteria.
Get Tags Retrieves a list of the tag sets that are in the database
indicated in the Database field.
Join tags Appends selected tag sets so that nodes that match the
criteria are queried or written to simultaneously. If you
select individual tag sets, then click Join tags, the tag
sets are combined to create one tag set. Note that this
change only occurs in the MongoDB Input window, not
on the database.
Test tag set Displays the set members that match the tags indicated
in the tag set specification. Clicking Test tag set displays
the id, host name, priority, and tags for each replica set
member that matches the tag set specification criteria.
Query Tab
The Query tab enables you to refine your read request. This tab operates in two different modes. You can create a
query using JSON Query expression or using the Aggregation Framework. By default, the Query tab is in JSON Query
expression mode. You can enter a JSON Query expression when the Query is aggregation pipeline checkbox is
deselected. MongoDB queries use a JSON-like query language that includes a variety of query operators. To place
the Aggregation Framework mode Query is aggregation pipeline checkbox. You can then enter a query, using the
Aggregation Framework, in the Aggregation pipeline specification field that appears. See MongoDB's Aggregation
Framework for additional information, including code examples.
Option Definition
Query expression (JSON)(Field is visible if Query is
aggregation pipeline checkbox is not selected.) JSON expression to limit the output. See the sub-section
Query Examples (JSON Query Expressions) for additional
details.
Aggregation pipeline specification (JSON)(Field is
visible if Query is aggregation pipeline checkbox is
selected.)
Use this field if you want to use the MongoDB Aggregation
Framework to perform a simple or complex aggregations
or selections such as totalling or averaging field values.
Note that the method name (which includes the collection
name of the database you selected in the Input
Options tab), appears after the Aggregation pipeline
specification (JSON) label for this field. See the sub-
section Query Examples (JSON Aggregate Pipeline) for
additional details.
Query is aggregation pipeline Pipes multiple JSON expressions together to execute
at once. An aggregation pipeline strings several JSON
expressions together, with the output of the previous
expression becoming the input for the next. When
selected, the Aggregation pipeline specification

| Transformation Step Reference | 130
Option Definition
(JSON) field appears. When deselected, the Query
expression (JSON) field appears.
Execute for each row Perform the query on each row of data.
Fields expression (JSON)(Field is visible if Query is
aggregation pipeline check box is not selected.) This field becomes active only if Query is aggregation
pipeline is not selected. Controls the fields to return,
or in MongoDB terms, the projection. If empty, all fields
are returned. Enter true or false after the fields to
indicate selected or not, respectively. See the MongoDB
documentation [http://docs.mongodb.org/manual/
reference/method/db.collection.find/ ] for more information
about projections.
Fields Tab
The Fields tab enables you to define properties for the exported fields. The Fields tab operates in two different modes
that impact how query results are formatted. You can indicate that you want the query result to be stored in a single
JSON field. To do this, click the Output single JSON field check box. If you decide to do this and you want to parse
the results of the field, you can apply a transformation step later in the process. Or, you can uncheck the Output single
JSON field check box and instead, click the Get Fields button to apply Pentaho's Schema on Read functionality. This
functionality parses fields, paths, and data types and displays them. You can then review and adjust this information, as
needed.
Option Definition
Output single JSON field Indicates whether the JSON result of the query should
be outputted to a single field that has the String data
type. You can parse this JSON using the JSON Input
transformation step, eval("{"+jsonString+"}") in
JavaScript, or using a User Defined Java Class step.
Name of JSON output field(Field is active if Output
single JSON field check box is selected.) Designates the name of the field that contains the JSON
output from the server.
Get fields(Field is active if Output single JSON field
check box is not selected.) Creates a sample set of documents, then displays the
name and field for each record. Pentaho's Schema on
Read functionality determines the field names, paths, and
the data type for each field in the sample.
# (Field is active if Output single JSON field check box
is not selected.) The order of this entry in the list.
Name(Field is active if Output single JSON field check
box is not selected.) Displays a user-friendly name of the field that is based
on the value in the Path field. The name that appears
here maps the name of the field as it appears in the PDI
transformation with the field that appears in the MongoDB
database. You can edit the name as desired.
Path(Field is active if Output single JSON field check
box is not selected.) Indicates the JSON path of the field in MongoDB. If
the path shown is an array, you can specify a specific
element in the array by passing it the key value, which
is contained in the bracketed part of the array. For
example $.emails[0] indicates that you want the result
to display the first value in the array. $.emails[1]
indicates that you want the result to display the second
value in the array and so forth. If you want to display
all array values, use the asterisk as the key, like this
$.email[*]. If the array contains records, and not
just strings, you can specify that you want to display the
record like this: $.emails[*].sender.

| Transformation Step Reference | 131
Option Definition
Type(Field is active if Output single JSON field check
box is not selected.) Indicates the data type.
Indexed Values(Field is active if Output single JSON
field check box is not selected.) Allows you to enter a comma-separated list of legal values
for String fields. If you specify values in this field, the
Kettle indexed data type is applied to the data. If not, the
String data type is applied. Usually, you will only need
to modify this field if you are using Weka metadata for
nominal fields.
Sample: array min: max index(Field is active if Output
single JSON field check box is not selected.) Indicates minimum and maximum values for the index
seen in the sampled documents.
Sample: #occur/#docs(Field is active if Output single
JSON field check box is not selected.) Indicates how often the field occurs as well as the number
of documents processed.
Sample: disparate types(Field is active if Output single
JSON field check box is not selected.) If several documents are sampled, but the same field
contain different data types, the Sample: disparate types
field is populated with a "Y." The Type field displays the
String data type. In this instance, the Kettle type for the
field in question is set to the String data type, so it is able
to output values of differing types.
Query Examples (JSON Query Expressions)
MongoDB has a rich query system that allows you to select and filter documents in a collection along specific fields and
values. The MogoDB Extended JASON page in the MongoDB wiki space details how to use queries. Pentaho supports
only the features discussed on this page. This table displays some examples of the syntax and structure of the queries
you can use to request data from MongoDB.
Query expression Description
{ name : "MongoDB" } Queries all values where the name field has a value equal
to MongoDB
{ name : { '$regex' : "m.*", '$options' :
"i" } }
Uses a regular expression to find name fields starting with
m, case insensitive
{ name : { '$gt' : "M" } } Searches all strings greater than M
{ name : { '$lte' : "T" } } Searches all strings less than or equal to T
{ name : { '$in' : [ "MongoDB",
"MySQL" ] } }
Finds all names that are either MongoDB or MySQL
{ name : { '$nin' : [ "MongoDB",
"MySQL" ] } }
Finds all names that are either MongoDB or MySQL
{ $where : "this.count == 1" } Uses JavaScript to evaluate a condition
{ $query: {}, $orderby: { age : -1 } } Returns all documents in the collection named collection
sorted by the age field in descending order.
Query Examples (JSON Aggregate Pipeline)
MongoDB has a rich query system that allows you to select and filter documents using the aggregation pipeline
framework. The Aggregation Framework Examples page in the MongoDB wiki provides additional examples of function
calls. This table displays some examples of the syntax and structure of the queries you can use to request data from
MongoDB.
Query expression Description
{ $match : {state : "FL", city :
"ORLANDO" } }, {$sort : {pop : -1 } }
Returns all fields from all documents where the state
field has a value of FL and the city field has a value of

| Transformation Step Reference | 132
Query expression Description
ORLANDO. The documents will be returned sorted by the
pop field in descending order.
{ $group : { _id: "$state"} }, { $sort :
{ _id : 1 } }
Returns one field named _id containing the distinct
values for state in ascending order. Similar to the
SQL: SELECT DISTINCT state AS _id FROM
collection ORDER BY state ASC.
{ $match : {state : "FL" } }, { $group:
{_id: "$city" , pop: { $sum: "$pop" } }
}, { $sort: { pop: -1 } }, { $project:
{_id : 0, city : "$_id" } }
Gets all documents where thestate field has a value of
FL, aggregates all values of pop for each city, sorts by
population descending and returns one field named city.
{ $unwind : "$result" }</p> Peels off the elements of an array individually, and returns
one document for each element of the array.
OLAP Input
This step is not yet documented here. However, there may be a rough definition available in the Pentaho Wiki: http://
wiki.pentaho.com/display/EAI/Pentaho+Data+Integration+Steps.
Option Definition
Step name The name of this step as it appears in the transformation
workspace.
OpenERP Object Input
This step is not yet documented here. However, there may be a rough definition available in the Pentaho Wiki: http://
wiki.pentaho.com/display/EAI/OpenERP+Object+Input.
Option Definition
Step name The name of this step as it appears in the transformation
workspace.
Palo Cell Input
This step is not yet documented here. However, there may be a rough definition available in the Pentaho Wiki: http://
wiki.pentaho.com/display/EAI/Pentaho+Data+Integration+Steps.
Option Definition
Step name The name of this step as it appears in the transformation
workspace.
Palo Dim Input
This step is not yet documented here. However, there may be a rough definition available in the Pentaho Wiki: http://
wiki.pentaho.com/display/EAI/Pentaho+Data+Integration+Steps.
Option Definition
Step name The name of this step as it appears in the transformation
workspace.
Property Input
This step is not yet documented here. However, there may be a rough definition available in the Pentaho Wiki: http://
wiki.pentaho.com/display/EAI/Pentaho+Data+Integration+Steps.

| Transformation Step Reference | 133
Option Definition
Step name The name of this step as it appears in the transformation
workspace.
Splunk Input
The Splunk Input transformation step enables you to connect to a Splunk server, enter a Splunk query, and get results
back for use within a PDI Transformation. Once you have completed those steps, you can stream data from Splunk into
your transformation. Make sure that you have read access to a Splunk server before you use the Splunk Input step. To
learn more about Splunk see their online documentation.
Configure connection tab
The Configure connection tab enables you to specify the database and collection to query.
Option Definition
Step name Name of the step as it appears in the transformation
workspace.
Host name(s) or IP address(es) Indicates the network name or address of the Splunk
instance or instances.
Port Indicates the port number of the Splunk (splunkd) server.
The default value is 8089.
Username Indicates the username required to access the Splunk
server.
Password Indicates the password associated with the provided
Username.
Execute for each row If checked, a new query is issued for each row of data
coming into the step. You can reference incoming fields of
data using the ?{<Field>} syntax. For instance, if you
want to use the incoming field Size to drive the limit of
results coming in, type this: search *head ?{Size}.
Splunk Query Expression This is the definition of the splunk query. Note that unlike
the queries defined in the Splunk user interface, you
must start the query with the term search. Here is an
example: search * | head 100. One capability of
Splunk search is field selection. This allows you to get
access to Splunk-parsed fields within the _raw column.
To select specific fields, use this syntax at the end of your
defined search query: ... | field index source
OpCode.
Preview Provides a first look at the data. Clicking Preview causes
the Enter preview size window to appear. Enter the
maximum number of records that you want to preview,
then click OK. The preview data appears in the Examine
preview data window.
Fields Tab
The Fields tab enables you to define properties for the exported fields.
Option Definition
# Number of the record returned.
Name Name of the field.

| Transformation Step Reference | 134
Option Definition
Splunk name Indicates the Splunk name for the field.
Type Specifies the data type of the field.
Length Indicates the length of the field.
Format Specifies the format of the field.
Get Fields Displays the field metadata and displays it in the Fields
tab. After you have detected the field metadata using the
Get Fields button on the Fields tab, you may choose
to delete metadata fields that are not relevant to your
specific query. Since each field must be translated to
its mapped data type, removing unused fields should
increase performance.
Raw Field Parsing
The input step automatically attempts to parse the raw field into a number of child fields denoted by _raw.<Field
Name>. It parses the raw field assuming that the field if formatted with name value pairs separated by a newline
character, like this: <Name1>=<Value1>\n <Name2>=<Value2>\n . If raw field data is not formatted like this, you
must post-process those fields with other steps in the transformation flow. Note that your secondary steps may include
String variables.
Date Handling
Kettle does not support the parsing of ISO-8601 date formats, which is Splunk's format for passing date objects through
web services. However, you can edit the date string returned from Splunk using the Modified Java Script Value step.
Use this script to parse the date.
var dateobj = str2date((substr(_time, 0, 23) + "GMT" + substr(_time, 23)).trim(),
"yyyy-MM-dd'T'HH:mm:ss.SSSz");
RSS Input
This step imports data from an RSS or Atom feed. RSS versions 0.91, 0.92, 1.0, 2.0, and Atom versions 0.3 and 1.0 are
supported.
General Tab
The General tab defines which RSS/Atom URLs you want to use, and optionally which fields contain the URLs.
Option Description
Step name The name of this step in the transformation workspace.
URL is defined in a field If checked, you must specify which field to retrieve the
URL from.
URL Field If the previous option is checked, this is where you specify
the URL field.
URL list A list of RSS/Atom URLs you want to pull article data
from.
Content tab
The content tab contains options for limiting input and changing output.
Option Description
Read articles from Specifies a date in yyyy-MM-dd HH:mm:ss format. Only
articles published after this date will be read.

| Transformation Step Reference | 135
Option Description
Max number of articles Specifies a static number of articles to retrieve, starting at
the oldest.
Include URL in output? If checked, specify a field name to pass the URL to.
Include rownum in output? If checked, specify a field name to pass the row number
to.
Fields tab
The Fields tab defines properties for the exported fields.
Option Description
Name The name of the field.
Type The field's data type; String, Date or Number.
Length The length option depends on the field type. Number:
total number of significant figures in a number; String:
total length of a string; Date: determines how much of the
date string is printed or recorded.
Precision The precision option depends on the field type, but only
Number is supported; it returns the number of floating
point digits.
Trim type Truncates the field (left, right, both) before processing.
Useful for fields that have no static length.
Repeat If set to Y, will repeat this value if the next field is empty.
Format The format mask (number type).
Currency Symbol used to represent currencies.
Decimal A decimal point; this is either a dot or a comma.
Grouping A method of separating units of thousands in numbers of
four digits or larger. This is either a dot or a comma.
Notes on Error Handling
When error handling is turned on for the transformation that includes this step, the full exception message, the field
number on which the error occurred, and one or more of the following codes will be sent in an error row to the error
stream:
•UnknownError: an unexpected error. Check the "Error description" field for more details.
•XMLError: typically this means that the specified file is not XML.
•FileNotFound: an HTTP 404 error.
•UnknownHost: means that the domain name cannot be resolved; may be caused by network outage.
•TransferError: any non-404 HTTP server error code (401, 403, 500, 502, etc.) can cause this.
•BadURL: means that the URL cannot be understood. It may be missing a protocol or use an unrecognized protocol.
•BadRSSFormat: typically means that the file is valid XML, but is not a supported RSS or Atom doc type.
Note: To see the full stack trace from a handled error, turn on detailed logging.
S3 CSV Input
This step is not yet documented here. However, there may be a rough definition available in the Pentaho Wiki: http://
wiki.pentaho.com/display/EAI/Pentaho+Data+Integration+Steps.

| Transformation Step Reference | 136
Option Definition
Step name The name of this step as it appears in the transformation
workspace.
Salesforce Input
This step is not yet documented here. However, there may be a rough definition available in the Pentaho Wiki: http://
wiki.pentaho.com/display/EAI/Pentaho+Data+Integration+Steps.
Option Definition
Step name The name of this step as it appears in the transformation
workspace.
SAP Input
This step is not yet documented here. However, there may be a rough definition available in the Pentaho Wiki: http://
wiki.pentaho.com/display/EAI/Pentaho+Data+Integration+Steps.
Option Definition
Step name The name of this step as it appears in the transformation
workspace.
SAS Input
This step is not yet documented here. However, there may be a rough definition available in the Pentaho Wiki: http://
wiki.pentaho.com/display/EAI/SAS+Input.
Option Definition
Step name The name of this step as it appears in the transformation
workspace.
Table Input
This step is used to read information from a database, using a connection and SQL. Basic SQL statements can be
generated automatically by clicking Get SQL select statement.
Table Input Options
Option Description
Step name Optionally, you can change the name of this step to fit
your needs.
Connection The database connection from which to read data; see
Managing Connections for more information.
SQL The SQL statement used to read information from the
database connection. You can also click Get SQL select
statement... to browse tables and automatically generate
a basic select statement.
Enable lazy conversion When enables, lazy conversion avoids unnecessary
data type conversions and can result in a significant
performance improvements.
Replace variables in script? Enable to replace variables in the script; this feature was
provided to allow you to test with or without performing
variable substitutions.
Insert data from step Specify the input step name where Pentaho? an expect
information to come from. This information can then be
| Transformation Step Reference | 137
Option Description
inserted into the SQL statement. The locators where
Pentaho? inserts information is indicated by ? (question
marks).
Execute for each row? Enable to perform the data insert for each individual row.
Limit size Sets the number of lines that is read from the database;
zero (0) means read all lines.
Example... Below is a sample SQL statement::
SELECT * FROM customers WHERE changed_date BETWEEN ? AND ?
This statement requires two dates that are read on the Insert data from the step.
Note: The dates can be provided using the Get System Info step. For example, if you want to read all
customers that have had their data changed yesterday, you may get the range for yesterday and read the
customer data
Preview... Preview allows you to preview the step. This is accomplished by preview of a new transformation with two
steps: this one and a Dummy step. To see a detailed log of the execution, click Logs in the Preview window.
For additional information, see Table Input
Text File Input
The Text File Input step is used to read data from a variety of different text-file types. The most commonly used
formats include Comma Separated Values (CSV files) generated by spreadsheets and fixed width flat files.
The Text File Input step provides you with the ability to specify a list of files to read, or a list of directories with wild
cards in the form of regular expressions. In addition, you can accept file names from a previous step making file name
handling more even more generic.
The following sections describe the available options for configuring the Text file input step. You can find an example
of a simple Text File Input transformation at ...\samples\transformations\Text File Output - Number
formatting.ktr.
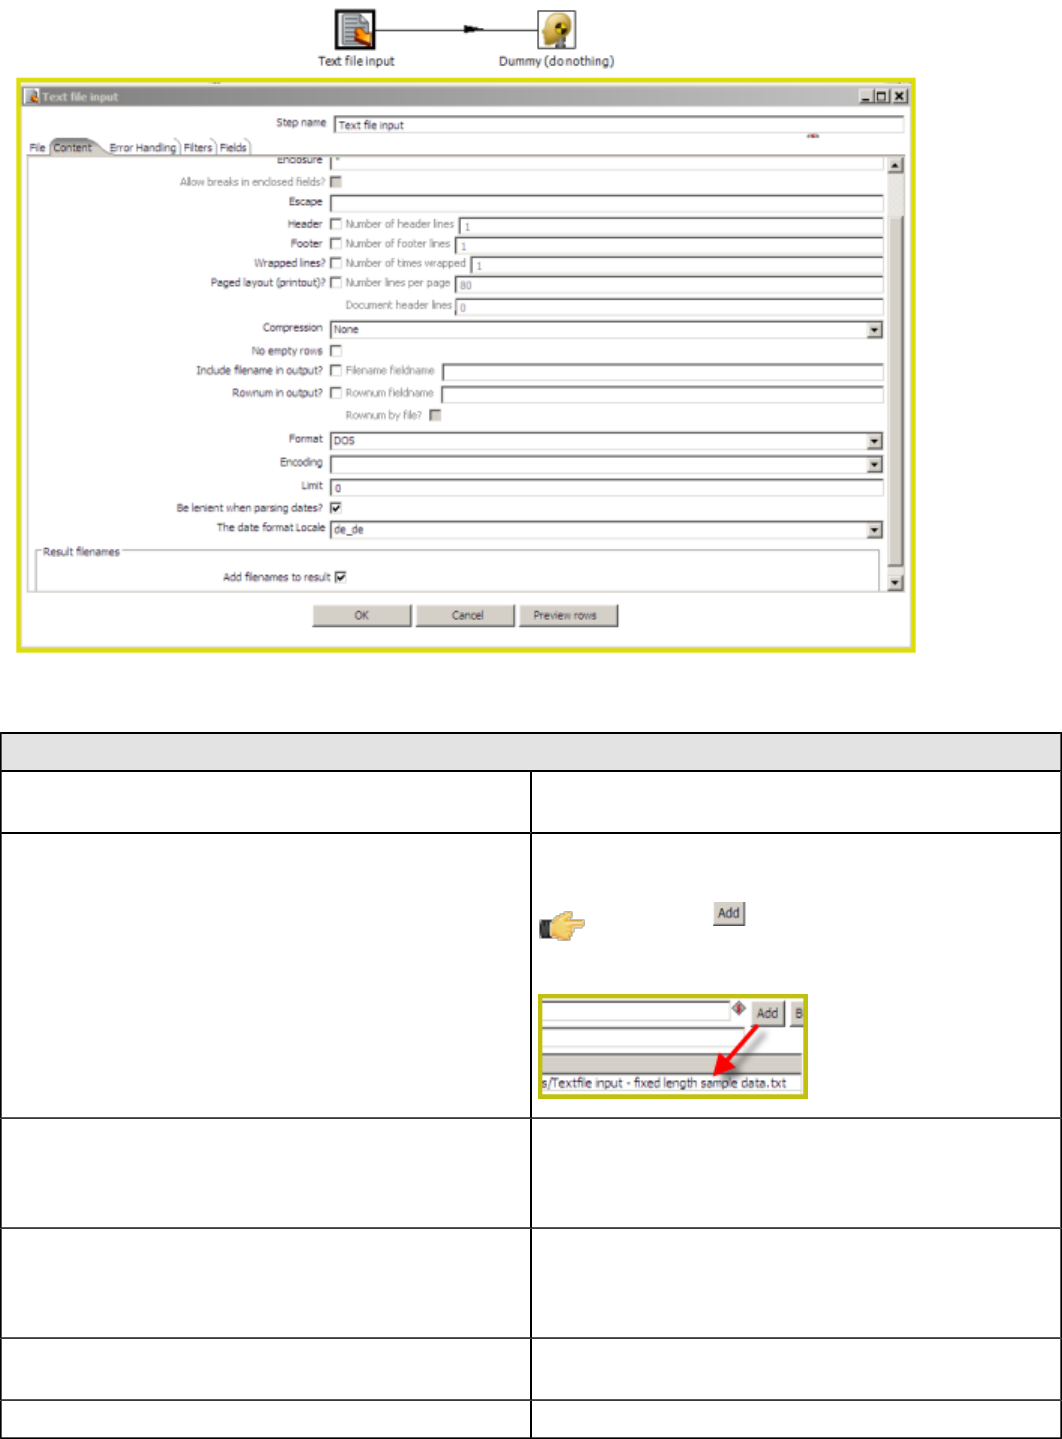
| Transformation Step Reference | 138
File Tab Options
Option Description
Step Name Optionally, you can change the name of this step to fit
your needs.
File or Directory Specifies the location and/or name of the input text file (s)
to be read. .
Note: Click (Add) to add the file/directory/
wildcard combination to the list of selected files
(grid) below.
Regular expression Specify the regular expression you want to use to select
the files in the directory specified in the previous option.
For example, you want to process all files that have a .txt
extension. (See below)
Selected Files This table contains a list of selected files (or wild card
selections) along with a property specifying if file is
required or not. If a file is required and it isn't found, an
error is generated. Otherwise, the file name is skipped.
Show filenames(s)... Displays a list of all files that will be loaded based on the
current selected file definitions.
Show file content Displays the raw content of the selected file.

| Transformation Step Reference | 139
Option Description
Show content from first data line Displays the content from the first data line only for the
selected file.
Note:
Selecting file using Regular Expressions The Text File Input step can search for files by wildcard in the form
of a regular expression. Regular expressions are more sophisticated than using '*' and '?' wildcards. Below are a
few examples of regular expressions:
File Name Regular Expression Files selected
/dirA/ .userdata.\.txt Find all files in /dirA/ with names
containing userdata and ending
with .txt
/dirB/ AAA.* Find all files in /dirB/ with names that
start with AAA
/dirC/ [ENG:A-Z][ENG:0-9].* Find all files in /dirC/ with names that
start with a capital and followed by a
digit (A0-Z9)
Note: Accepting file names from a previous step This option allows even more flexibility in combination with
other steps such as "Get File Names". You can create your file name and pass it to this step. This way the file
name can come from any source; a text file, database table, and so on.
Option Description
Accept file names from previous steps Enables the option to get file names from previous steps
Step to read file names from Step from which to read the file names
Field in the input to use as file name Text File Input looks in this step to determine which
filenames to use
Content Tab
Options under the Content tab allow you to specify the format of the text files that are being read. Below is a list of the
options associated with this tab:
Option Description
File type Can be either CSV or Fixed length. Based on this
selection, Spoon will launch a different helper GUI when
you click Get Fields in the Fields tab.
Separator One or more characters that separate the fields in a single
line of text. Typically this is ; or a tab.
Enclosure Some fields can be enclosed by a pair of strings to allow
separator characters in fields. The enclosure string is
optional. If you use repeat an enclosures allow text line
'Not the nine o''clock news.'. With ' the enclosure string,
this gets parsed as Not the nine o'clock news.
Allow breaks in enclosed fields? Not implemented
Escape Specify an escape character (or characters) if you have
these types of characters in your data. If you have \
as an escape character, the text 'Not the nine o\'clock
news' (with ' the enclosure) gets parsed as Not the nine
o'clock news.

| Transformation Step Reference | 140
Option Description
Header & number of header lines Enable if your text file has a header row (first lines in the
file); you can specify the number of times the header lines
appears.
Footer & number of footer lines Enable if your text file has a footer row (last lines in the
file); you can specify the number of times the footer row
appears.
Wrapped lines and number of wraps Use if you deal with data lines that have wrapped beyond
a specific page limit; note that headers and footers are
never considered wrapped
Paged layout and page size and doc header Use these options as a last resort when dealing with texts
meant for printing on a line printer; use the number of
document header lines to skip introductory texts and the
number of lines per page to position the data lines
Compression Enable if your text file is in a Zip or GZip archive.
No empty rows Do not send empty rows to the next steps.
Include file name in output Enable if you want the file name to be part of the output
File name field name Name of the field that contains the file name
Rownum in output? Enable if you want the row number to be part of the output
Row number field name Name of the field that contains the row number
Format Can be either DOS, UNIX, or mixed. UNIX files have
lines that are terminated by line feeds. DOS files have
lines separated by carriage returns and line feeds. If you
specify mixed, no verification is done.
Encoding Specify the text file encoding to use; leave blank to use
the default encoding on your system. To use Unicode,
specify UTF-8 or UTF-16. On first use, Spoon searches
your system for available encodings.
Limit The maximum number of rows that will be read from the
file
Be lenient when parsing dates? Disable if you want strict parsing of data fields; if case-
lenient parsing is enabled, dates like Jan 32nd will
become Feb 1st.
The date format Locale This locale is used to parse dates that have been written
in full such as "February 2nd, 2010;" parsing this date on
a system running in the French (fr_FR) locale would not
work because February is called Février in that locale.
Add filenames to result Enable so that output file names are added as a field in
the results
Error Handling Tab
Options under the Error Handling tab allow you to specify how the step reacts when errors (such as, malformed records,
bad enclosure strings, wrong number of fields, premature line ends), occur. The table below describes the options
available for Error handling:
Option Description
Ignore errors? Enable if you want to ignore errors during parsing

| Transformation Step Reference | 141
Option Description
Skip error lines Enable if you want to skip those lines that contain errors. You can generate an extra file
that contains the line numbers on which the errors occurred. When lines with errors are not
skipped, the fields that have parsing errors, will be empty (null)
Error count field name Add a field to the output stream rows; this field contains the number of errors on the line
Error fields field name Add a field to the output stream rows; this field contains the field names on which an error
occurred
Error text field name Add a field to the output stream rows; this field contains the descriptions of the parsing
errors that have occurred
Warnings file
directory When warnings are generated, they are placed in this directory. The name of that file is
<warning dir>/filename.<date_time>.<warning extension>
Error files directory When errors occur, they are placed in this directory. The name of the file is <errorfile_dir>/
filename.<date_time>.<errorfile_extension>
Failing line numbers
files directory When a parsing error occurs on a line, the line number is placed in this directory. The name
of that file is <errorline dir>/filename.<date_time>.<errorline extension>
Filters Tab
Options under the Filters tab allow you to specify the lines you want to skip in the text file. The table below describes the
available options for defining filters:
Option Description
Filter string The string for which to search
Filter position The position where the filter string has to be at in the line.
Zero (0) is the first position in the line. If you specify a
value below zero (0) here, the filter string is searched for
in the entire string.
Stop on filter Specify Y here to stop processing the current text file
when the filter string is encountered.
Positive Match Includes the rows where the filter condition is found
(include). The alternative is that those rows are avoided
(exclude).
Fields Tab
The options under the Fields tab allow you to specify the information about the name and format of the fields being read
from the text file. Available options include:
Option Description
Name Name of the field
Type Type of the field can be either String, Date or Number
Format See Number Formats below for a complete description of
format symbols.
Length For Number: Total number of significant figures in a
number; For String: total length of string; For Date: length
of printed output of the string (e.g. 4 only gives back the
year).
Precision For Number: Number of floating point digits; For String,
Date, Boolean: unused;
Currency Used to interpret numbers like $10,000.00 or E5.000,00

| Transformation Step Reference | 142
Option Description
Decimal A decimal point can be a "." (10,000.00) or "," (5.000,00)
Grouping A grouping can be a dot "," (10;000.00) or "." (5.000,00)
Null if Treat this value as NULL
Default Default value in case the field in the text file was not
specified (empty)
Trim Type Type trim this field (left, right, both) before processing
Repeat If the corresponding value in this row is empty, repeat the
one from the last time it was not empty (Y/N)
Note: Number formats The information about Number formats was taken from the Sun Java API
documentation, Decimal Formats.
Symbol Location Localized Meaning
0Number Yes Digit
#Number Yes Digit, zero shows as absent
.Number Yes Decimal separator or
monetary decimal separator
-Number Yes Minus sign
,Number Yes Grouping separator
ENumber Yes Separates mantissa and
exponent in scientific
notation; need not be
quoted in prefix or suffix
;Sub pattern boundary Yes Separates positive and
negative sub patterns
%Prefix or suffix Yes Multiply by 100 and show
as percentage
\u2030 Prefix or suffix Yes Multiply by 1000 and show
as per mille
(\u00A4) Prefix or suffix No Currency sign, replaced by
currency symbol. If doubled,
replaced by international
currency symbol. If present
in a pattern, the monetary
decimal separator is used
instead of the decimal
separator.
'Prefix or suffix No Used to quote special
characters in a prefix or
suffix, for example, "'#'#"
formats 123 to "#123".
To create a single quote
itself, use two in a row: "#
o''clock".
Note: Scientific Notation In a pattern, the exponent character immediately followed by one or more digit
characters indicates scientific notation (for example, "0.###E0" formats the number 1234 as "1.234E3".

| Transformation Step Reference | 143
Note: Date formats The information about Date formats was taken from the Sun Java API documentation, Date
Formats.
Letter Date or Time Component Presentation Examples
G Era designator Text AD
y Year Year 1996; 96
M Month in year Month July; Jul; 07
w Week in year Number 27
W Week in month Number 2
D Day in year Number 189
d Day in month Number 10
F Day of week in month Number 2
E Day in week Text Tuesday; Tue
a Am/pm marker Text PM
H Hour in day (0-23) Number 0 n/a
k Hour in day (1-24) Number 24 n/a
K Hour in am/pm (0-11) Number 0 n/a
h Hour in am/pm (1-12) Number 12 n/a
m Minute in hour Number 30 n/a
s Second in minute Number 55 n/a
S Millisecond Number 978 n/a
z Time zone General time zone Pacific Standard Time;
PST; GMT-08:00
Z Time zone RFC 822 time zone -0800
XBase Input
This step is not yet documented here. However, there may be a rough definition available in the Pentaho Wiki: http://
wiki.pentaho.com/display/EAI/Pentaho+Data+Integration+Steps.
Option Definition
Step name The name of this step as it appears in the transformation
workspace.
XML Input Stream (StAX)
This step is not yet documented here. However, there may be a rough definition available in the Pentaho Wiki: http://
wiki.pentaho.com/display/EAI/Pentaho+Data+Integration+Steps.
Option Definition
Step name The name of this step as it appears in the transformation
workspace.
YAML Input
This step is not yet documented here. However, there may be a rough definition available in the Pentaho Wiki: http://
wiki.pentaho.com/display/EAI/Pentaho+Data+Integration+Steps.

| Transformation Step Reference | 144
Option Definition
Step name The name of this step as it appears in the transformation
workspace.
Output
The PDI transformation steps in this section pertain to various methods of data output.
Automatic Documentation Output
This step is used to generate descriptive documentation for one or more transformations or jobs. This can be used as
a way to automatically generate documentation about the purpose of jobs and transformations or as a way to archive
their behavior as they change over time. It takes as input a list of file names types (transformation or job) and generates
a corresponding set of documentation files containing various details about them.
Option Definition
Step name The name of this step as it appears in the transformation
workspace.
File name field The input field containing the name of the file you are
generating documentation for.
File type field The input field containing the type of file (transformation or
job).
Target filename The target location and filename for the generated
documentation.
Output type The output type for the generated documentation (PDF,
HTML, DOC, Excel, CSV, or METADATA).
Include the name? If checked, the filename will be included in the generated
documentation.
Include the description? If checked, includes the description in the generated
documentation (the description is configured in the
transformation settings).
Include the extended description? If checked, includes the extended description in the
generated documentation (the extended description is
configured in the transformation settings).
Include the creation date and user? If checked, includes the creation date and username for
the creator in the generated documentation.
Include the modification date and user? If checked, includes the date of the last modification made
to the file and user who modified it.
Include the image? If checked, includes the job or transformation graph in the
generated documentation.
Include logging configuration details? If checked, includes a summary of the connections used
for logging in the transformation or job.
Include the last execution result? If checked, includes a summary of the last execution
results, such as whether it completed successfully or
ended in failure.
There is a sample distributed with PDI that shows this step in action. It's called Automatic
Documentation Output - Generate Kettle HTML Documentation, and it is included in the /data-
integration/samples/transformations/ directory.

| Transformation Step Reference | 145
Cassandra Output
Configure Cassandra Output
Cassandra Output is an output step that enables data to be written to a Cassandra column family (table) as part of an
ETL transformation.
Option Definition
Step name The name of this step as it appears in the transformation
workspace.
Cassandra host Connection host name input field.
Cassandra port Connection host port number input field.
Username Target keyspace and/or family (table) authentication
details input field.
Password Target keyspace and/or family (table) authentication
details input field.
Keyspace Input field for the keyspace (database) name.
Show schema Opens a dialog box that shows metadata for the specified
column family.
Configure Column Family and Consistency Level
This tab contains connection details and basic query information, in particular, how to connect to Cassandra and
execute a CQL (Cassandra query language) query to retrieve rows from a column family (table).
Important: Note that Cassandra Output does not check the types of incoming columns against matching
columns in the Cassandra metadata. Incoming values are formatted into appropriate string values for use in a
textual CQL INSERT statement according to PDI's field metadata. If resulting values cannot be parsed by the
Cassandra column validator for a particular column then an error results.
Note: Cassandra Output converts PDI's dense row format into sparse data by ignoring incoming field values
that are null.
Option Definition
Column family (table) Input field to specify the column family, to which the
incoming rows should be written.
Get column family names button Populates the drop-down box with names of all the
column families that exist in the specified keyspace.
Consistency level Input field enables an explicit write consistency to be
specified. Valid values are: ZERO, ONE, ANY, QUORUM
and ALL. The Cassandra default is ONE.

| Transformation Step Reference | 146
Option Definition
Create column family If checked, enables the step to create the named column
family if it does not already exist.
Truncate column family If checked, specifies whether any existing data should be
deleted from the named column family before inserting
incoming rows.
Update column family metadata If checked, updates the column family metadata with
information on incoming fields not already present, when
option is selected. If this option is not selected, then any
unknown incoming fields are ignored unless the Insert
fields not in column metadata option is enabled.
Insert fields not in column metadata If checked, inserts the column family metadata in any
incoming fields not present, with respect to the default
column family validator. This option has no effect if
Update column family metadata is selected.
Commit batch size Allows you to specify how many rows to buffer before
executing a BATCH INSERT CQL statement.
Use compression Option compresses (gzip) the text of each BATCH
INSERT statement before transmitting it to the node.
Pre-insert CQL
Cassandra Output gives you the option of executing an arbitrary set of CQL statements prior to inserting the first
incoming PDI row. This is useful for creating or dropping secondary indexes on columns.
Note: Pre-insert CQL statements are executed after any column family metadata updates for new incoming
fields, and before the first row is inserted. This enables indexes to be created for columns corresponding new to
incoming fields.
Option Definition
CQL to execute before inserting first row Opens the CQL editor, where you can enter one or more
semicolon-separated CQL statements to execute before
data is inserted into the first row.
Delete
This step is not yet documented here. However, there may be a rough definition available in the Pentaho Wiki: http://
wiki.pentaho.com/display/EAI/Pentaho+Data+Integration+Steps.
Option Definition
Step name The name of this step as it appears in the transformation
workspace.
HBase Output
This step writes data to an HBase table according to user-defined column metadata.
Configure Connection
This tab contains HBase connection information. You can configure a connection in one of two ways: either via a
comma-separated list of hostnames where the zookeeper quorum reside, or via an hbase-site.xml (and, optionally,
hbase-default.xml) configuration file. If both zookeeper and HBase XML configuration options are supplied, then the
zookeeper takes precedence.

| Transformation Step Reference | 147
Option Definition
Step name The name of this step as it appears in the transformation
workspace.
Zookeeper host(s) Comma-separated list of hostnames for the zookeeper
quorum.
URL to hbase-site.xml Address of the hbase-site.xml file.
URL to hbase-default.xml Address of the hbase-default.xml file.
HBase table name The HBase table to write to. Click Get Mapped Table
Names to populate the drop-down list of possible table
names.
Mapping name A mapping to decode and interpret column values. Click
Get Mappings For the Specified Table to populate the
drop-down list of available mappings.
Disable write to WAL Disables writing to the Write Ahead Log (WAL). The WAL
is used as a lifeline to restore the status quo if the server
goes down while data is being inserted. Disabling WAL
will increase performance.
Size of write buffer (bytes) The size of the write buffer used to transfer data to
HBase. A larger buffer consumes more memory (on
both the client and server), but results in fewer remote
procedure calls. The default (in the hbase-default.xml) is
2MB (2097152 bytes), which is the value that will be used
if the field is left blank.
Create/Edit Mappings
This tab creates or edits a mapping for a given HBase table. A mapping simply defines metadata about the values
that are stored in the table. Since just about all information is stored as raw bytes in HBase, this allows PDI to decode
values and execute meaningful comparisons for column-based result set filtering.
Note: The names of fields entering the step are expected to match the aliases of fields defined in the mapping.
All incoming fields must have a matching counterpart in the mapping. There may be fewer incoming fields than
defined in the mapping, but if there are more incoming fields then an error will occur. Furthermore, one of the
incoming fields must match the key defined in the mapping.
Option Definition
HBase table name Displays a list of table names. Connection information in
the previous tab must be valid and complete in order for
this drop-down list to populate.
Mapping name Names of any mappings that exist for the table. This box
will be empty if there are no mappings defined for the
selected table, in which case you can enter the name of a
new mapping.
#The order of the mapping operation.
Alias The name you want to assign to the HBase table key. This
is required for the table key column, but optional for non-
key columns.
Key Indicates whether or not the field is the table's key.
Column family The column family in the HBase source table that the
field belongs to. Non-key columns must specify a column
family and column name.
Column name The name of the column in the HBase table.
| Transformation Step Reference | 148
Option Definition
Type Data type of the column. Key columns can be of type:
String Integer Unsigned integer (positive only) Long
Unsigned long (positive only) Date Unsigned date. Non-
key columns can be of type: String, Integer, Long, Float,
Double, Boolean, Date, BigNumber, Serializable, Binary.
Indexed values String columns may optionally have a set of legal values
defined for them by entering comma-separated data into
this field.
Get incoming fields Retrieves a field list using the given HBase table and
mapping names.
Performance Considerations
The Configure connection tab provides a field for setting the size of the write buffer used to transfer data to HBase. A
larger buffer consumes more memory (on both the client and server), but results in fewer remote procedure calls. The
default (defined in the hbase-default.xml file) is 2MB. When left blank, the buffer is 2MB, auto flush is enabled, and Put
operations are executed immediately. This means that each row will be transmitted to HBase as soon as it arrives at the
step. Entering a number (even if it is the same as the default) for the size of the write buffer will disable auto flush and
will result in incoming rows only being transferred once the buffer is full.
There is also a checkbox for disabling writing to the Write Ahead Log (WAL). The WAL is used as a lifeline to restore
the status quo if the server goes down while data is being inserted. However, the tradeoff for error-recovery is speed.
The Create/edit mappings tab has options for creating new tables. In the HBase table name field, you can suffix the
name of the new table with parameters for specifying what kind of compression to use, and whether or not to use Bloom
filters to speed up lookups. The options for compression are: NONE, GZ and LZO; the options for Bloom filters are:
NONE, ROW, ROWCOL. If nothing is selected (or only the name of the new table is defined), then the default of NONE
is used for both compression and Bloom filters. For example, the following string entered in the HBase table name field
specifies that a new table called "NewTable" should be created with GZ compression and ROWCOL Bloom filters:
NewTable@GZ@ROWCOL
Note: Due to licensing constraints, HBase does not ship with LZO compression libraries. These must be
manually installed on each node if you want to use LZO compression.
Insert/Update
This step is not yet documented here. However, there may be a rough definition available in the Pentaho Wiki: http://
wiki.pentaho.com/display/EAI/Pentaho+Data+Integration+Steps.
Option Definition
Step name The name of this step as it appears in the transformation
workspace.
JMS Producer
The Java Messaging Service (JMS) Producer step allows Pentaho Data Integration to send text messages to any
JMS server. For example, you could use the JMS Producer step to define a transformation that for every update of a
warehouse, posts to a JMS queue that could launch another job that flushes an application cache.
You must be familiar with JMS messaging to use this step. Additionally, you must have a message broker like Apache
ActiveMQ available before you configure this step. If you are using the Java Naming and Directory Interface (JNDI) to
connect to JMS, you must have the appropriate connection information.
Note: Place JMS Library jars for the ConnectionFactory and other supporting classes in the .../data-
integration/plugins/pdi-jms-plugin/lib directory.

| Transformation Step Reference | 149
JMS Producer Options
Option Description
Step Name Optionally, you can change the name of this step to fit
your needs.
ActiveMQ Connection Enable ActiveMQ Connection you are using the message
broker.
JMS URL Enter the appropriate broker URL.
Username Enter the ActiveMQ user name
Password Enter the ActiveMQ password
JNDI Connection Enable JNDI Connection if you are using the Java Naming
and Directory Interface (JNDI) to connect to JMS
Jndi URL The URL for the JNDI connection
Topic/Queue Select Topic or Queue from the drop down list to specify
whether you want to use a Topic or Queue delivery
model.
Topic uses a publish/subscribe delivery model meaning
that a one message can be delivered to multiple
consumers. Messages are delivered to the topic
destination, and ultimately to all active consumers
who are subscribers of the topic. Also, any number of
producers can send messages to a topic destination;
each message can be delivered to any number of
subscribers. If there are no registered consumers, the
topic destination does not hold messages unless it has
durable subscription for inactive consumers. A durable
subscription represents a consumer registered with the
topic destination that can be inactive at the time the
messages are sent to the topic.
Queue uses a point-to-point delivery model. In this model,
a message is delivered from a single producer to a single
consumer. The messages are delivered to the destination,
which is a queue, and then delivered to one of the
consumers registered for the queue. While any number
of producers can send messages to the queue, each
message is guaranteed to be delivered, and consumed by
a single consumer. If there are no consumers registered
to consume the messages, the messages are held in the
queue until a consumer registers to consume them.
Destination Specify the queue or topic name.
Header Properties If the header properties file is specified, then the name/
value pairs are submitted with the message text as JMS
string properties.
Is field a filename? Enable if the message is based on a field name. In this
instance, the contents of the file, (not the field name), are
sent.
Field Name If applicable, select the name of the field from the list.
JSON Output
This step is not yet documented here. However, there may be a rough definition available in the Pentaho Wiki: http://
wiki.pentaho.com/display/EAI/Pentaho+Data+Integration+Steps.

| Transformation Step Reference | 150
Option Definition
Step name The name of this step as it appears in the transformation
workspace.
LDAP Output
This step is not yet documented here. However, there may be a rough definition available in the Pentaho Wiki: http://
wiki.pentaho.com/display/EAI/Pentaho+Data+Integration+Steps.
Option Definition
Step name The name of this step as it appears in the transformation
workspace.
Microsoft Access Output
This step is not yet documented here. However, there may be a rough definition available in the Pentaho Wiki: http://
wiki.pentaho.com/display/EAI/Pentaho+Data+Integration+Steps.
Option Definition
Step name The name of this step as it appears in the transformation
workspace.
Microsoft Excel Output
This step exports data to a Microsoft Excel 2003 spreadsheet file.
File Tab
The File tab defines basic file properties for this step's output.
Option Description
Step name The name of this step in the transformation workspace.
Filename The name of the spreadsheet file you are reading from.
Do not create file at start If checked, does not create the file until the end of the
step.
Extension The three-letter file extension to append to the file name.
Include stepnr in filename If you run the step in multiple copies (launching several
copies of a step), the copy number is included in the file
name, before the extension. (_0).
Include date in file name Includes the system date in the filename (_20101231).
Include time in file name Includes the system time (24-hour format) in the filename
(_235959).
Specify Date time format If checked, the filename will include a date and time
stamp that follows the selection you choose from the drop-
down box. Selecting this option disables the previous two
options.
Show file name(s) Displays a list of the files that will be generated. This is a
simulation and depends on the number of rows that will go
into each file.
Add filenames to result Uses the Filename field in constructing the result
filename. If un-checked, the Filename field is ignored.

| Transformation Step Reference | 151
Content Tab
The content tab contains options for describing the file's content.
Option Description
Append When checked, appends lines to the end of the specified
file. If the file does not exist, a new one will be created.
Header Enable this option if you want a header to appear before
the spreadsheet grid data.
Footer Enable this option if you want a footer to appear after the
spreadsheet grid data.
Encoding Specifies the text file encoding to use. Leave blank to use
the default encoding on your system. To use Unicode,
specify UTF-8 or UTF-16. On first use, Spoon searches
your system for available encodings and populates this list
accordingly.
Split every ... rows After this many rows, start a new spreadsheet file to
continue data output.
Sheet name Specifies the name of the worksheet within the
spreadsheet file.
Protect sheet? If checked, enables password protection on the
worksheet. You must also specify a password in the
Password field.
Auto size columns If checked, automatically sizes the worksheet columns to
the largest value.
Retain NULL values If checked, NULL values are preserved in the output. If
un-checked, NULLs are replaced with empty strings.
Use Template If checked, PDI will use the specified Excel template to
create the output file. The template must be specified in
the Excel template field.
Append to Excel Template Appends output to the specified Excel template.
Fields tab
The Fields tab defines properties for the exported fields. The Get Fields button will automatically retrieve a list of fields
from the inputstream and populate the list. The Minimal width button removes any padding from the output.
Option Description
Name The name of the field.
Type The field's data type; String, Date or Number.
Format The format mask (number type).
Microsoft Excel Writer
This step is not yet documented here. However, there may be a rough definition available in the Pentaho Wiki: http://
wiki.pentaho.com/display/EAI/Pentaho+Data+Integration+Steps.
Option Definition
Step name The name of this step as it appears in the transformation
workspace.

| Transformation Step Reference | 152
MongoDB Output
The MongoDB Output step enables you to insert data to a MongoDB collection and specify a number of options that
control what and how data is written. These tables describe the available options within the MongoDB Output step.
Configure Connection Tab
The Configure connection tab is where you enter basic connection details. Click Get DBs and Get collections to
retrieve the names of existing databases and collections within the connected database.
Option Definition
Step name Name of this step as it appears in the transformation
workspace
Host name(s) or IP address(es) Indicates the network name or address of the MongoDB
instance or instances. You can input multiple host
names or IP addresses, separated by a comma. You
can also specify a different port number for each
host name by separating the host name and port
number with a colon, and separating each combination
of host name and port number with a comma. For
example, to include the host name and port number
for two different MongoDB instances, you would input
localhost1:27017,localhost2:27018 and leave
the Port field empty.
Port Indicates the port number of the MongoDB instance or
instances. Use this to specify a default port if no ports
are given as part of the Host name(s) or IP address(es)
field.
Use all replica set members/mongos Differentiates between a replica set containing one node
and a stand-alone single Mongo host. If there is a replica
set, and it contains more than one host, then the Java
driver discovers all hosts automatically. It is good practice
to list more than one replica set host in the hosts field
so that the driver has a better chance of connecting
successfully if one is down.
Username Indicates the user name required to access the database.
If you want to use Kerberos authentication, enter the
Kerberos principal in this field. If you do not know
the principal, contact your system administrator. The
principal is the unique identity to which Kerberos
assigns tickets. When you enter the principal as the
username, it should be formatted like this: <primary>/
<instance>@<KERBEROS_REALM> is typically the
name of the user. If the primary is a host, the primary
is typically the word host. <instance> qualifies
the primary. Sometimes if the primary is a user, the
instance is the username of the database administrator.
<KERBEROS_REALM> is the Kerberos realm (domain
name). Note that the <KERBEROS_REALM> is
case sensitive. Here is an example of a correctly-
formatted Kerberos principal username: <joe/
admin@CORPORATION.COM>.
Password Indicates the password associated with the provided
Username. If you are using Kerberos authentication, you
do not need to enter the password.

| Transformation Step Reference | 153
Option Definition
Authenticate using Kerberos Indicates whether to use the Kerberos service to manage
the authentication process. If you choose this option, read
Use Kerberos Authentication to Provide Spoon Users
Access to MongoDB for configuration information.
Connection timeout Designates how long to wait for a connection to a
database (in milliseconds) before terminating the
connection attempt. Leave blank to never terminate the
connection.
Socket timeout Designates how long to wait for a write operation (in
milliseconds) before terminating the operation. Leave
blank to never terminate the operation.
Output Options Tab
The Output options tab provides additional controls for inserting data into a MongoDB collection. If the specified
collection does not exist, it is created before a document is inserted.
Option Definition
Database Name of the database to write data to. Click Get DBs to
populate the drop-down menu with a list of databases on
the server.
Collection Name of the collection to write data to. Click Get
collections to populate the drop-down menu with a list of
collections within the database.
Batch insert size Sets the batch size for fast bulk insert operations. If left
blank, the default size is 100 rows.
Truncate collection Deletes any existing data in the target collection before
inserting begins.
Upsert Changes the write mode from insert to upsert, which
either updates the first document matched in the target
collection or, if no document matches, inserts a new
document into the target collection according to the
incoming fields specified in the Mongo document fields
tab.
Multi-update Updates all matching documents, rather than just the first.
Modifier update Enables modifier operators to be used to modify individual
fields within matching documents. To set the Modifier
operation see the Mongo document fields tab.
Write concern (w option) http://docs.mongodb.org/manual/reference/glossary/
#term-write-concern specifies the minimum number of
servers that must succeed for a write operation. A value
of -1 disables all acknowledgement of write operation
errors. Zero (0) disables basic acknowledgment of write
operations, but returns information about socket excepts
and networking errors. 1 provides acknowledgment
of write operations on the primary node. >1 waits for
successful write operations to the specified number of
slaves, including the primary.
w Time out Designates how long to wait for a response to write
operations (in milliseconds) before terminating the
operation. Leave blank to never terminate.

| Transformation Step Reference | 154
Option Definition
Journaled writes Writes the operation to the journal first, and after to the
core data files. This confirms the write operation can
survive a shutdown and ensures the write operation is
durable.
Read preference Indicates which node to read first—Primary, Primary
preferred, Secondary, Secondary preferred, or Nearest
Number of retries for write operations Indicates the number of times that a write operation is
attempted.
Delay, in seconds, between retry attempts Indicates the number of seconds between write operation
retry attempts.
Mongo Document Fields Tab
The Mongo document fields tab enables you to define how field values which are coming into the step get written to
a Mongo document. Configure the Modifier policy column in the Mongo document fields tab for control over when
execution of a modifier operation affects a particular field. This can be particularly useful when the data for one Mongo
document is split over several incoming PDI rows and in situations where it is not possible to execute different modifier
operations that affect the same field simultaneously. The Modifier policy can be set to these values: Insert&Update,
Insert, and Update. Only these modifier operations are supported: $set, $inc, and $push. You can set the
Modifier policy to these values.
Option Definition
#The order of this entry in the list.
Name The name of this field, descriptive of its content.
Mongo document path Defines the hierarchical path to each field
Use field name Specifies whether the incoming field name is used as the
final entry in the path. When this is set to Y for a field, a
preceding . (dot) is assumed.
JSON Indicates if a field is in JSON format
Match field for upsert Specifies which of the fields should be used for matching
when performing an upsert operation. The first document
in the collection that matches all fields tagged as Y in this
column is replaced with the new document constructed
with incoming values for all of the defined field paths. If a
matching document does not exist, then a new document
is inserted into the collection. Insert&Update: The
operation gets executed whether or not a match exists in
the collection according to the match conditions. Insert:
The operation is executed on an insert only, for instance
if a matching document does not exist. Update: Update
only, for instance if the record exists.
Modifier operation In-place modifications of existing document fields. Update
more than one matching document by selecting the
Modifier update option in conjunction with the Upsert
option. Selecting the Multi-update option also enables
each update to apply to all matching documents, rather
than just the first. $set—Sets the value of a field. Used
to create the bulk of initial document structure for a new
document.$inc—If the field does not exist, sets the value
of a field. If the field exists, increases (or decreases,
with a negative value) the value of a field.$push—If the
field does not exist, sets the value of a field. If the field

| Transformation Step Reference | 155
Option Definition
exists, appends the value of a field. Used for appending to
existing arrays in documents.
Modifier policy Controls when execution of a modifier operation affects a
particular field
Get fields Populates the left-hand column of the table with the
names of the incoming fields
Preview document structure Displays the structure to be written to MongoDB in JSON
format
Create/Drop Indexes Tab
The Create/drop indexes tab enables you to specify which indexes to create or remove. An index is a data structure
that allows you to quickly locate documents based on the values stored in the specified fields. Fundamentally, indexes
in MongoDB are similar to indexes in other database systems. MongoDB supports indexes on any field or sub-field
contained in documents within a MongoDB collection.
Each row in the table can be used to create a single index (using one field) or a compound index (using multiple fields).
The dot ( . ) notation is used to specify a path to a field to use in the index. This path can be optionally postfixed by a
direction indicator. Compound indexes are specified by a comma-separated list of paths.
Option Definition
#The order of this field in the list.
Index fields Specifies a single index (using one field) or a compound
index (using multiple fields). The . (dot) notation is used
to specify a path to a field to use in the index. This path
can be optionally postfixed by a direction indicator, :1 for
ascending or :-1 for descending. Compound indexes are
specified by a comma-separated list of paths.
Index opp Specifies whether the index is created or dropped.
Unique Indicates whether to display entries for documents that
have a duplicate value for the indexed field.
Sparse Indicates whether the index should contain only entries fro
those documents that have a value in the indexed field.
Show indexes Displays the index information available.
Further Reading
See the Big Data MongoDB Tutorials, or MongoDB Output section of the Pentaho Wiki for scenario-based examples of
working with MongoDB and Pentaho.
OpenERP Object Input
This step is not yet documented here. However, there may be a rough definition available in the Pentaho Wiki: http://
wiki.pentaho.com/display/EAI/OpenERP+Object+Output.
Option Definition
Step name The name of this step as it appears in the transformation
workspace.
Palo Cell Output
This step is not yet documented here. However, there may be a rough definition available in the Pentaho Wiki: http://
wiki.pentaho.com/display/EAI/Pentaho+Data+Integration+Steps.

| Transformation Step Reference | 156
Option Definition
Step name The name of this step as it appears in the transformation
workspace.
Palo Dim Output
This step is not yet documented here. However, there may be a rough definition available in the Pentaho Wiki: http://
wiki.pentaho.com/display/EAI/Pentaho+Data+Integration+Steps.
Option Definition
Step name The name of this step as it appears in the transformation
workspace.
Pentaho Reporting Output
This step is not yet documented here. However, there may be a rough definition available in the Pentaho Wiki: http://
wiki.pentaho.com/display/EAI/Pentaho+Data+Integration+Steps.
Option Definition
Step name The name of this step as it appears in the transformation
workspace.
Properties Output
This step outputs a set of rows of data to a Java properties files. For more information on this file format, read this:
http://en.wikipedia.org/wiki/.properties.
The data needs to be structured in a key/value format to be usable for a properties file.
See also: Property Input and the Row Normalizer steps.
General tab
Option Definition
Step name The name of this step as it appears in the transformation
workspace.
Key field The input field name that will contain the key part to be
written to the properties file.
Value field The input field name that will contain the value part to be
written to the properties file.
Comment Short comment that is going to be copied into the
properties file (at the top).NOTE: Only the first line is
commented out. The next ones need to be commented by
the user.
Content
Option Definition
Filename The filename without the file extension.
Append Check this option to update an existing property file.
Properties in the file that are not processed by the step
will remain unchanged.
Create parent folder Check this option if you want to automatically create the
parent folder.

| Transformation Step Reference | 157
Option Definition
Accept file name from field? Check this option if the file name is specified in an input
stream field.
File name field Specifies the field that contains the name of the file to
write to.
Extension Specify the file extension. Usually this is "properties".
Include stepnr in filename Includes the step number (when running in multiple
copies) in the output filename.
Include date in filename Includes the date in the output filename with format
yyyyMMdd (20081231).
Include time in filename Includes the date in the output filename with format
HHmmss (235959).
Show filenames(s)... Displays the path of the file to be written to.
Result filename Add files to result filename : Adds the generated filenames
read to the result of this transformation. A unique list is
being kept in memory that can be used in the next job
entry in a job, for example in another transformation.
RSS Output
This step is not yet documented here. However, there may be a rough definition available in the Pentaho Wiki: http://
wiki.pentaho.com/display/EAI/Pentaho+Data+Integration+Steps.
Option Definition
Step name The name of this step as it appears in the transformation
workspace.
S3 File Output
This step exports data to a text file on an Amazon Simple Storage Service (S3) account.
File Tab
The File tab defines basic file properties for this step's output.
Option Description
Step name The name of this step in the transformation workspace.
Filename The name of the output text file.
Accept file name from field? When checked, enables you to specify file names in a
field in the input stream.
File name field When the Accept file name from field option is checked,
specify the field that will contain the filenames.
Extension The three-letter file extension to append to the file name.
Include stepnr in filename If you run the step in multiple copies (launching several
copies of a step), the copy number is included in the file
name, before the extension. (_0).
Include partition nr in file name? Includes the data partition number in the file name.
Include date in file name Includes the system date in the filename (_20101231).
Include time in file name Includes the system time (24-hour format) in the filename
(_235959).

| Transformation Step Reference | 158
Option Description
Show file name(s) Displays a list of the files that will be generated. This is a
simulation and depends on the number of rows that will go
into each file.
Content tab
The content tab contains options for describing the file's content.
Option Description
Append When checked, appends lines to the end of the file.
Separator Specifies the character that separates the fields in a single
line of text; typically this is semicolon or a tab.
Enclosure Optionally specifies the character that defines a block of
text that is allowed to have separator characters without
causing separation. Typically a single or double quote.
Force the enclosure around fields? Forces all field names to be enclosed with the character
specified in the Enclosure property above.
Header Enable this option if you want the text file to have a
header row (first line in the file).
Footer Enable this option if you want the text file to have a footer
row (last line in the file).
Format Specifies either DOS or UNIX file formats. UNIX files have
lines that are separated by line feeds, DOS files have
lines that are separated by carriage returns and line feeds.
Compression Specifies the type of compression to use on the output
file -- either zip or gzip. Only one file is placed in a single
archive.
Encoding Specifies the text file encoding to use. Leave blank to use
the default encoding on your system. To use Unicode,
specify UTF-8 or UTF-16. On first use, Spoon searches
your system for available encodings.
Fast data dump (no formatting) Improves the performance when dumping large amounts
of data to a text file by not including any formatting
information.
Right pad fields When checked, fields will be right-padded to their defined
width.
Split every ... rows If the number N is larger than zero, splits the resulting text
file into multiple parts of N rows.
Add Ending line of file Enables you to specify an alternate ending row to the
output file.
Fields tab
The Fields tab defines properties for the exported fields.
Option Description
Name The name of the field.
Type The field's data type; String, Date or Number.
Format The format mask (number type).

| Transformation Step Reference | 159
Option Description
Length The length option depends on the field type. Number:
total number of significant figures in a number; String:
total length of a string; Date: determines how much of the
date string is printed or recorded.
Precision The precision option depends on the field type, but only
Number is supported; it returns the number of floating
point digits.
Currency Symbol used to represent currencies.
Decimal A decimal point; this is either a dot or a comma.
Group A method of separating units of thousands in numbers of
four digits or larger. This is either a dot or a comma.
Trim type Truncates the field (left, right, both) before processing.
Useful for fields that have no static length.
Null Inserts the specified string into the text file if the field value
is null.
Get Retrieves a list of fields from the input stream.
Minimal width Minimizes field width by removing unnecessary characters
(such as superfluous zeros and spaces). If set, string
fields will no longer be padded to their specified length.
Salesforce Delete
This step is not yet documented here. However, there may be a rough definition available in the Pentaho Wiki: http://
wiki.pentaho.com/display/EAI/Pentaho+Data+Integration+Steps.
Option Definition
Step name The name of this step as it appears in the transformation
workspace.
Salesforce Insert
This step is not yet documented here. However, there may be a rough definition available in the Pentaho Wiki: http://
wiki.pentaho.com/display/EAI/Pentaho+Data+Integration+Steps.
Option Definition
Step name The name of this step as it appears in the transformation
workspace.
Salesforce Update
This step is not yet documented here. However, there may be a rough definition available in the Pentaho Wiki: http://
wiki.pentaho.com/display/EAI/Pentaho+Data+Integration+Steps.
Option Definition
Step name The name of this step as it appears in the transformation
workspace.
Salesforce Upsert
This step is not yet documented here. However, there may be a rough definition available in the Pentaho Wiki: http://
wiki.pentaho.com/display/EAI/Pentaho+Data+Integration+Steps.

| Transformation Step Reference | 160
Option Definition
Step name The name of this step as it appears in the transformation
workspace.
Serialize to File
This step is not yet documented here. However, there may be a rough definition available in the Pentaho Wiki: http://
wiki.pentaho.com/display/EAI/Pentaho+Data+Integration+Steps.
Option Definition
Step name The name of this step as it appears in the transformation
workspace.
Splunk Output
The Splunk Output transformation step enables you to connect to a Splunk server and write events to a Splunk index.
By default, the step writes events as name value pairs separated by newline characters, but can also write arbitrary
formats by customizing event data. You must have write access to a Splunk server before you use the Splunk Output
step. To learn more about Splunk see their online documentation.
Option Definition
Step name Name of the step as it appears in the transformation
workspace.
Host name(s) or IP address(es) Specifies the network name or address of the Splunk
instance or instances.
Port Indicates the port number of the Splunk (splunkd) server.
The default value is 8089, but your administrator may
have changed the port number.
Username Specifies the username required to access the Splunk
server.
Password Indicates the password associated with the Username.
Index to write to Specifies the Splunk index where the events are stored.
Usually, this is the main index. Check your Splunk
server for a list of available indices. This field can be
parameterized with incoming fields (?{<Field>}) or
transformation parameters (${Parameter}).
Event host Indicates the hostname of the original event host. If
you want to gather data from a router and write it to
Splunk, use the router's host name. This field can be
parameterized with incoming fields (?{<Field>}) or
transformation parameters (${Parameter}).
Event source type Indicates the format type of the event data. The list of
known source types appears here. To define a new
format, follow these instructions.
Event source Indicates the source of the event data. See Splunk
documentation for more details.
Customize Splunk event If checked, enables the Splunk Event Data option and
allows you to customize the data coming into Splunk. This
is useful if you want to write a different format than the
default, which is name value pairs separated by newline
characters.

| Transformation Step Reference | 161
Option Definition
Splunk event data Allows you to specify customized event text. This field can
be parameterized with incoming fields (?{<Field>}) or
transformation parameters (${Parameter}).
SQL File Output
This step is not yet documented here. However, there may be a rough definition available in the Pentaho Wiki: http://
wiki.pentaho.com/display/EAI/Pentaho+Data+Integration+Steps.
Option Definition
Step name The name of this step as it appears in the transformation
workspace.
Synchronize After Merge
This step is not yet documented here. However, there may be a rough definition available in the Pentaho Wiki: http://
wiki.pentaho.com/display/EAI/Pentaho+Data+Integration+Steps.
Option Definition
Step name The name of this step as it appears in the transformation
workspace.
Table Output
The Table Output step allows you to load data into a database table. Table Output is equivalent to the DML operator,
INSERT. This step provides configuration options for target table and a lot of housekeeping and/or performance-related
options such as Commit Size and Use batch update for inserts.
If you have a Postgres or MySQL database that has identity columns and you are inserting a record, as part of the
insert, the JDBC driver will typically return the auto-generated key it used when performing the insert.
Table Output Options
Option Description
Step name Optionally, you can change the name of this step to fit
your needs.
Connection The database connection to which data is written; see
Managing Connections for more information.
Target Schema The name of the Schema for the table to write data to.
This is important for data sources that allow for table
names with periods in them.
Target table The name of the table to which data is written.
Commit size Use transactions to insert rows in the database table.
Commit the connection every N rows if N is larger than
zero (0); otherwise, don't use transactions. (Slower)
Note: Transactions are not supported on all
database platforms.
Truncate table Select if you want the table to be truncated before the first
row is inserted into the table
Ignore insert errors Makes PDI ignore all insert errors such as violated
primary keys. A maximum of 20 warnings will be logged
however. This option is not available for batch inserts.

| Transformation Step Reference | 162
Option Description
Partition data over tables Used to split the data over multiple tables. For example
instead of inserting all data into table SALES, put the
data into tables SALES_200510, SALES_200511,
SALES_200512, ... Use this on systems that don't have
partitioned tables and/or don't allow inserts into UNION
ALL views or the master of inherited tables. The view
SALES allows you to report on the complete sales:
CREATE OR REPLACE VIEW SALES
AS
SELECT * FROM SALES_200501
NION ALL SELECT *
FROM SALES_200502
UNION ALL
SELECT * FROM SALES_200503
UNION ALL
SELECT * FROM
SALES_200504
Use batch update for inserts Enable if you want to use batch inserts. This feature
groups inserts statements to limit round trips to the
database. This is the fastest option and is enabled by
default.
Note: There are limiting factors depending on the
used database type and further step options. The
batch mode is only used when this check box is
selected and the:
• Commit Size is greater than zero
• Return auto-generated key option is not
enabled
• Transformation is not enabled to use unique
connections (Transformation settings / Misc /
Make the transformation transactional)
• Following rule is false: the database type
supports safe points and step error handling is
enabled (see the database feature list to check
if the database supports safe points)
• Database type supports batch updates (see
the database feature list to check this)
Is the name of the table defined in a field? Use these options to split the data over one or more
tables; the name of the target table is defined in the field
you specify. For example if you store customer data in
the field gender, the data might end up in tables M and
F (Male and Female). There is an option to exclude the
field containing the tablename from being inserted into the
tables.
Return auto-generated key Enable if you want to get back the key that was generated
by inserting a row into the table
Name of auto-generated key field Specifies the name of the new field in the output rows that
contains the auto-generated key
SQL Generates the SQL to create the output table
automatically

| Transformation Step Reference | 163
Text File Output
The Text File Output step is used to export data to text file format. This is commonly used to generate Comma
Separated Values (CSV files) that can be read by spreadsheet applications. It is also possible to generate fixed width
files by setting lengths on the fields in the fields tab.
File Tab
The options under the File tab is where you define basic properties about the file being created, such as:
Option Description
Step name Optionally, you can change the name of this step to fit
your needs.
Filename Specify the CSV file from which to write
Run this as a command instead? Enable to "pipe" the results into the command or script
you specify
Accept file name from field? Enable to specify the file name(s) in a field in the input
stream
File name field When the previous option is enabled, you can specify the
field that will contain the filename(s) at runtime.
Extension Adds a point and the extension to the end of the file
name. (.txt)
Include stepnr in filename If you run the step in multiple copies (Launching several
copies of a step), the copy number is included in the file
name, before the extension. (_0).
Include partition nr in file name? Includes the data partition number in the file name
Include date in file name Includes the system date in the filename (_20101231)
Include time in file name Includes the system time in the filename (_235959)
Show file name(s) Displays a list of the files that will be generated
Note: This is a simulation and depends on the
number of rows that will go into each file.
Content tab
The content tab contains the following options for describing the content being read:
Option Description
Append Enable to append lines to the end of the specified file
Separator Specify the character that separates the fields in a single
line of text; typically this is semicolon (;) or a tab
Enclosure A pair of strings can enclose some fields. This allows
separator characters in fields. The enclosure string is
optional.
Force the enclosure around fields? Forces all field names to be enclosed with the character
specified in the Enclosure property above
Header Enable this option if you want the text file to have a
header row (first line in the file)
Footer Enable this option if you want the text file to have a footer
row (last line in the file)

| Transformation Step Reference | 164
Option Description
Format Can be either DOS or UNIX; UNIX files have lines are
separated by line feeds, DOS files have lines separated
by carriage returns and line feeds
Compression Specify the type of compression, .zip or .gzip to use when
compressing the output.
Note: Only one file is placed in a single archive.
Encoding Specify the text file encoding to use. Leave blank to use
the default encoding on your system. To use Unicode,
specify UTF-8 or UTF-16. On first use, Spoon searches
your system for available encodings.
Fast data dump (no formatting) Improves the performance when dumping large amounts
of data to a text file by not including any formatting
information
Right pad fields Enable so that fields are padded to their defined width on
the right
Split every ... rows If the number N is larger than zero, split the resulting text-
file into multiple parts of N rows
Add Ending line of file Allows you to specify an alternate ending row to the
output file
Fields tab
The fields tab is where you define properties for the fields being exported. The table below describes each of the
options for configuring the field properties:
Option Description
Name The name of the field
Type Type of the field can be either String, Date or Number.
Format The format mask to convert with. See Number Formats for
a complete description of format symbols.
Length The length option depends on the field type follows:
• Number - Total number of significant figures in a
number
• String - total length of string
• Date - length of printed output of the string (for exampl,
4 returns year)
Precision The precision option depends on the field type as follows:
• Number - Number of floating point digits
• String - unused
• Date - unused
Currency Symbol used to represent currencies like $10,000.00 or
E5.000,00
Decimal A decimal point can be a "." (10,000.00) or "," (5.000,00)
Group A grouping can be a "," (10,000.00) or "." (5.000,00)
Trim type Type trim this field (left, right, both) before processing

| Transformation Step Reference | 165
Option Description
Note: Trimming works when there is no field
length given only.
Null If the value of the field is null, insert this string into the text
file
Get Click to retrieve the list of fields from the input fields
stream(s)
Minimal width Change the options in the Fields tab in such a way that
the resulting width of lines in the text file is minimal. So
instead of save 0000001, you write 1, and so on. String
fields will no longer be padded to their specified length.
Update
This step is not yet documented here. However, there may be a rough definition available in the Pentaho Wiki: http://
wiki.pentaho.com/display/EAI/Pentaho+Data+Integration+Steps.
Option Definition
Step name The name of this step as it appears in the transformation
workspace.
XML Output
This step is not yet documented here. However, there may be a rough definition available in the Pentaho Wiki: http://
wiki.pentaho.com/display/EAI/Pentaho+Data+Integration+Steps.
Option Definition
Step name The name of this step as it appears in the transformation
workspace.
Transform
The PDI transformation steps in this section pertain to various data modification tasks.
Add a Checksum
This step calculates checksums for one or more fields in the input stream and adds this to the output as a new field.
Option Description
Step name The name of this step as it appears in the transformation
workspace. Note: This name must be unique within a
single transformation.
Type The type of checksum that needs to be calculated. These
are the types that are available: CRC32: 32-bit Cyclic
Redundancy Check ADLER 32: Checksum algorithm by
Mark Adler MD5: Message Digest algorithm 5 SHA-1 :
Secure Hash Algorithm 1
Result field The name of the result field containing the checksum.
Fields used in the checksum The names of the fields to include in the checksum
calculation. Note: You can use the Get Fields button to
insert all input fields from previous steps.

| Transformation Step Reference | 166
Add Constants
The Add constant values step is a simple and high performance way to add constant values to the stream.
Option Description
Step name The name of this step as it appears in the transformation
workspace. Note: This name must be unique within a
single transformation.
Fields Specify the name, type, and value in the form of a string.
Then, specify the formats to convert the value into the
chosen data type.
Add Sequence
Use the Add sequence step to add a sequence to a stream. A sequence is a distinct integer value with a specific
start and increment value. You can either use a database sequence to generate the value of the sequence, or you can
generate the sequence using Kettle.
Caution: Kettle-generated sequences should not be used as unique identifiers when the step runs in a
clustered environment.
Sequences generated using Kettle are intended for use within the transformation from which they were created. The
values are regenerated each time the transformation is launched. See the Related Reading section for more information
about creating unique identifiers or sequencing with other transformation steps.
Option Description
Step name The name of this step as it appears in the transformation
workspace. This name must be unique within a single
transformation.
Name of value Name of the new sequence value that is added to the
stream.
Use DB to generate the sequence Enable if you want the sequence to be driven by
a database sequence, then set these parameters:
Connection name, Schema name (optional), Sequence
name.
Connection name The name of the connection on which the database
sequence resides.
Schema name (optional) The table's schema name.
Sequence name The name of the database sequence.
Use a transformation counter to generate the
sequence Enable if you want the sequence to be generated by
Kettle, then set these parameters: Counter name
(optional), Start at, Increment by, Maximum value.
Counter name (optional) If multiple steps in a transformation generate the same
value name, this option enables you to specify the name
of the counter to associate with. Avoids forcing unique
sequencing across multiple steps.
Start at The value to begin the sequence with.
Increment by The amount by which the sequence increases or
decreases.
Maximum value The value after which the sequence returns to the Start At
value.

| Transformation Step Reference | 167
Examples
Start at = 1, increment by = 1, max value = 3
This will produce: 1, 2, 3, 1, 2, 3, 1, 2...
Start at = 0, increment by = -1, max value = -2
This will produce: 0, -1, -2, 0, -1, -2, 0...
Related Reading
These PDI transformation steps are related to sequencing and unique IDs.
•Get ID from slave server - Retrieves unique identifiers from a slave server. The referenced sequence needs to be
configured on the slave server in the XML configuration file.
•Add value fields changing sequence - Adds a sequence depending on if fields value change; each time value of at
least one field change, PDI will reset sequence.
•Group by step - Builds aggregates in a group by fashion.
Add Value Fields Changing Sequence
This step is not yet documented here. However, there may be a rough definition available in the Pentaho Wiki: http://
wiki.pentaho.com/display/EAI/Pentaho+Data+Integration+Steps.
Option Definition
Step name The name of this step as it appears in the transformation
workspace.
Add XML
The XML column step allows you to encode the content of a number of fields in a row in XML. This XML is added to the
row in the form of a String field.
Content Tab
Option Description
Step name The name of this step as it appears in the transformation
workspace. Note: This name must be unique within a
single transformation.
Encoding The encoding to use; this encoding is specified in the
header of the XML file.
Output Value The name of the new field that contains the XML.
Root XML element The name of the root element in the generated element.
Omit XML header Enable to not include the XML header in the output.
Fields tab
The Fields tab is where you configure the output fields and their formats. The table below describes each of the
available properties for a field:
Option Description
Fieldname Name of the field
Element name The name of the element in the XML file to use
Type Type of the field can be either String, Date, or Number.

| Transformation Step Reference | 168
Option Description
Format Format mask with which to convert data; see Number
Formats for a complete description of format specifiers.
Length Output string is padded to this length if it is specified.
Precision The precision to use.
Currency Symbol used to represent currencies like $10,000.00 or
E5.000,00.
Decimal A decimal point can be a "." (10,000.00) or "," (5.000,00).
Grouping A grouping can be a "," (10,000.00) or "." (5.000,00).
Null The string to use in case the field value is null.
Attribute Make this an attribute (N means : element).
Attribute parent name You can specify the name of the parent element to add
the attribute to if previous parameter attribute is set to Y.
If no parent name is specified, the attribute is set in the
parent element.
Calculator
This step provides you with predefined functions that can be executed on input field values.
Besides the arguments (Field A, Field B and Field C) you must also specify the return type of the function. You can also
choose to remove the field from the result (output) after all values are calculated.
The table below contains descriptions of the fields associated with the calculator step:
Function Description Required fields
Set field to constant A Create a field with a constant value. A
A + B A plus B. A and B
A - B A minus B. A and B
A * B A multiplied by B. A and B
A / B A divided by B. A and B
A * A The square of A. A
SQRT( A ) The square root of A. A
100 * A / B Percentage of A in B. A and B
A - ( A * B / 100 ) Subtract B% of A. A and B
A + ( A * B / 100 ) Add B% to A. A and B
A + B *C Add A and B times C. A, B and C
SQRT( A*A + B*B ) Calculate ?(A2+B2). A and B
ROUND( A ) Round A to the nearest integer. A
ROUND( A, B ) Round A to B decimal positions. A and B
NVL( A, B ) If A is not NULL, return A, else B.
Note that sometimes your variable
won't be null but an empty string.
A and B
Date A + B days Add B days to Date field A. A and B
Year of date A Calculate the year of date A. A

| Transformation Step Reference | 169
Function Description Required fields
Month of date A Calculate number the month of date
A. A
Day of year of date A Calculate the day of year (1-365). A
Day of month of date A Calculate the day of month (1-31). A
Day of week of date A Calculate the day of week (1-7). A
Week of year of date A Calculate the week of year (1-54). A
ISO8601 Week of year of date A Calculate the week of the year
ISO8601 style (1-53). A
ISO8601 Year of date A Calculate the year ISO8601 style. A
Byte to hex encode of string A Encode bytes in a string to a
hexadecimal representation. A
Hex encode of string A Encode a string in its own
hexadecimal representation. A
Char to hex encode of string A Encode characters in a string to a
hexadecimal representation. A
Hex decode of string A Decode a string from its hexadecimal
representation (add a leading 0 when
A is of odd length).
A
Checksum of a file A using CRC-32 Calculate the checksum of a file using
CRC-32. A
Checksum of a file A using Adler-32 Calculate the checksum of a file using
Adler-32. A
Checksum of a file A using MD5 Calculate the checksum of a file using
MD5. A
Checksum of a file A using SHA-1 Calculate the checksum of a file using
SHA-1. A
Levenshtein Distance (Source A and
Target B) Calculates the Levenshtein Distance. A and B
Metaphone of A (Phonetics) Calculates the metaphone of A. A
Double metaphone of A Calculates the double metaphone of
A. A
Absolute value ABS(A) Calculates the Absolute value of A. A
Remove time from a date A Removes time value of A. A
Date A - Date B (in days) Calculates difference, in days,
between A date field and B date field. A and B
A + B + C A plus B plus C. A, B, and C
First letter of each word of a string A
in capital Transforms the first letter of each
word within a string. A
UpperCase of a string A Transforms a string to uppercase. A
LowerCase of a string A Transforms a string to lowercase. A
Mask XML content from string A Escape XML content; replace
characters with &values. A

| Transformation Step Reference | 170
Function Description Required fields
Protect (CDATA) XML content from
string A Indicates an XML string is general
character data, rather than non-
character data or character data with
a more specific, limited structure. The
given string will be enclosed into <!
[CDATA[String]]>.
A
Remove CR from a string A Removes carriage returns from a
string. A
Remove LF from a string A Removes linefeeds from a string. A
Remove CRLF from a string A Removes carriage returns/linefeeds
from a string. A
Remove TAB from a string A Removes tab characters from a string. A
Return only digits from string A Outputs only Outputs only digits (0-9)
from a string from a string. A
Remove digits from string A Removes all digits (0-9) from a string. A
Return the length of a string A Returns the length of the string. A
Load file content in binary Loads the content of the given file
(in field A) to a binary data type (e.g.
pictures).
A
Add time B to date A Add the time to a date, returns date
and time as one value. A and B
Quarter of date A Returns the quarter (1 to 4) of the
date. A
variable substitution in string A Substitute variables within a string. A
Unescape XML content Unescape XML content from the
string. A
Escape HTML content Escape HTML within the string. A
Unescape HTML content Unescape HTML within the string. A
Escape SQL content Escapes the characters in a String to
be suitable to pass to an SQL query. A
Date A - Date B (working days) Calculates the difference between
Date field A and Date field B (only
working days Mon-Fri).
A and B
Date A + B Months Add B months to Date field A. A
Check if an XML file A is well formed Validates XML file input. A
Check if an XML string A is well
formed Validates XML string input. A
Get encoding of file A Guess the best encoding (UTF-8) for
the given file. A
Dameraulevenshtein distance
between String A and String B Calculates Dameraulevenshtein
distance between strings. A and B
NeedlemanWunsch distance between
String A and String B Calculates NeedlemanWunsch
distance between strings. A and B
Jaro similitude between String A and
String B Returns the Jaro similarity coefficient
between two strings. A and B

| Transformation Step Reference | 171
Function Description Required fields
JaroWinkler similitude between String
A and String B Returns the Jaro similarity coefficient
between two strings. A and B
SoundEx of String A Encodes a string into a Soundex
value. A
RefinedSoundEx of String A Retrieves the Refined Soundex code
for a given string object A
Date A + B Hours Add B hours to Date field A A and B
Date A + B Minutes Add B minutes to Date field A A and B
Date A - Date B (milliseconds) Subtract B milliseconds from Date
field A A and B
Date A - Date B (seconds) Subtract B seconds from Date field A A and B
Date A - Date B (minutes) Subtract B minutes from Date field A A and B
Date A - Date B (hours) Subtract B hours from Date field A A and B
Closure Generator
This step is not yet documented here. However, there may be a rough definition available in the Pentaho Wiki: http://
wiki.pentaho.com/display/EAI/Pentaho+Data+Integration+Steps.
Option Definition
Step name The name of this step as it appears in the transformation
workspace.
Example Plugin
This step is not yet documented here. However, there may be a rough definition available in the Pentaho Wiki: http://
wiki.pentaho.com/display/EAI/Pentaho+Data+Integration+Steps.
Option Definition
Step name The name of this step as it appears in the transformation
workspace.
Get ID From Slave Server
When processing large amounts of data on multiple distinct systems (for example when running a clustered
transformation) you sometimes still need to generate a unique numeric ID for each one. Since a GUID is not guaranteed
to be unique and consumes a lot more memory and space compared to a numeric integer (long) ID, you may prefer to
use numerical IDs.
A unique ID identifies a piece of information, which is useful for: looking up data, support cases, incremental processing,
error handling (recovering from where you left off by looking up the last inserted ID) and so on. Typically you would use
a database to generate such an ID, for example using an Oracle sequence. However, there are cases where you don't
have a database available (such as when you add a unique ID to a text/log file), when the database doesn't support
sequences (column databases, typically), or when retrieving the ID from a database is slow (going back and forth to
the database for each row severely limits performance). In all these situations, you need a high-performance way of
providing unique IDs to a PDI transformation. The Get ID From Slave Server step is designed to fit this need.
Note: The "old way" of generating a unique ID locally was with the Add Sequence step. This is fast, but not
unique across multiple systems. Getting a unique ID from a remote database sequence (also possible with
the Add Sequence step) will work, but it will be slow and won't scale. Get ID From Slave Server uses a hybrid
approach by getting value ranges from a central server which keeps track of the ranges for the various slave
sequences, with the ability to use them locally.
Assuming you have (or are now configuring) Carte slave servers set up in PDI, this step retrieves a unique ID from
the Carte slave server of your choice. It works by asking a slave server for a range of values. In other words, the step

| Transformation Step Reference | 172
reserves a range of IDs for a certain given central slave server sequence. It then increments by one until there are
no more values in the range, asks another range, and so forth. This means that the returned IDs can be sequential,
however this is not guaranteed. The only thing you know is that after each execution for each input row you get
a unique ID that has a higher value than the last one returned. The last value returned plus the size of the range
(increment) are stored in a database table to persist the value over several runs of a transformation.
Option Definition
Step name The name of this step as it appears in the transformation
workspace.
Name of value The name of the (Integer type) output field (sequence or
ID)
Slave server The slave server to get the unique ID range from. This can
be specified using a variable
Sequence name The name of the sequence as defined on the slave server
(see below). The sequence name can be specified using a
variable
Increment or batch name The number of IDs to generate before a new value (range)
is obtained from the slave server. The higher you make
the increment size, the faster the step can run. However,
it will deplete the available IDs (1x10^15) faster. For
example, if you take 1,000,000,000 as the increment, you
can reserve 1,000,000 times a range of IDs. If you only
use up a few of those ID each time a transformation runs,
you will run out of IDs anyway after 1M executions. Don't
make this value too high; keep it in the 1000-10000 range
to achieve speeds of over 100,000 rows/sec with this step.
This parameter can be specified using a variable
XML Configuration
You need to start your slave server with extra connection and sequence information configured in an XML file. The extra
connection and sequences blocks are what make the sequences work in the following example:
<slave_config>
<slaveserver>
<name>master1</name>
<hostname>localhost</hostname>
<port>8282</port>
<master>Y</master>
</slaveserver>
<connection>
<name>MySQL</name>
<server>localhost</server>
<type>MYSQL</type>
<access>Native</access>
<database>test</database>
<port>3306</port>
<username>matt</username>
<password>Encrypted 2be98afc86aa7f2e4cb79ce10df90acde</password>
</connection>
<sequences>
<sequence>
<name>test</name>
<start>0</start>
<connection>MySQL</connection>
<schema/>
<table>SEQ_TABLE</table>

| Transformation Step Reference | 173
<sequence_field>SEQ_NAME</sequence_field>
<value_field>SEQ_VALUE</value_field>
</sequence>
</sequences>
The start tag is optional and will default to 0 if you leave it out of the definition. You can define as many sequences as
you like.
Servlet Information
Once the configuration files are changed as shown above, slave servers receive a new servlet that can be called as
follows (authentication required):
http://hostname:port/kettle/nextSequence/?
name=SequenceName&increment=NumberOfIDsToReserve
In case no increment is specified, 10000 IDs are reserved, for example:
http://localhost:8282/kettle/nextSequence/?name=test
The servlet will return a simple piece of XML containing both the start of the range as well as the number of IDs
reserved, or the increment:
<seq><value>570000</value><increment>10000</increment></seq>
Continuing with this example, the following row will be present in the SEQ_TABLE table:
mysql> select * from SEQ_TABLE where SEQ_NAME='test';
+----------+-----------+
| SEQ_NAME | SEQ_VALUE |
+----------+-----------+
| test | 580000 |
+----------+-----------+
Note: You must create the sequence table with the sequence field (<sequence_field>) as a primary key. This
will guarantee uniqueness and allow for fast lookup of the sequence value (<value_field>).
Automatic Loading and Creation
It can be a burden to maintain all your sequences in an XML file. Because of this, it is also possible to automatically
load all the sequences from a database table. You can use the following construct to do it:
<autosequence>
<connection>MySQL</connection>
<schema/>
<start>1234</start>
<table>SEQ_TABLE</table>
<sequence_field>SEQ_NAME</sequence_field>
<value_field>SEQ_VALUE</value_field>
<autocreate>N</autocreate>
</autosequence>
The <autocreate> tag allows any sequence name to be specified in the step without error. In that case, the sequence
with the name specified will be created automatically with the start value from the <autosequence> specification.
Note: You should disable auto-creation of slave sequences in a production environment.
Number Range
Create ranges based on numeric fields.

| Transformation Step Reference | 174
Option Definition
Step name The name of this step as it appears in the transformation
workspace.
Input field Designate the field to create ranges for.
Output field Designate the name of the field of ranges to be created.
Default value Value to return if there are no matches within the ranges
specified.
Ranges Designated the upper and lower bound of a range.
Lower Bound Designated the minimum value of a range.
Upper Bound Designate the upper value of a range.
Value Designated a name for the value.
Replace in String
This step is not yet documented here. However, there may be a rough definition available in the Pentaho Wiki: http://
wiki.pentaho.com/display/EAI/Pentaho+Data+Integration+Steps.
Option Definition
Step name The name of this step as it appears in the transformation
workspace.
Row Denormalizer
This step is not yet documented here. However, there may be a rough definition available in the Pentaho Wiki: http://
wiki.pentaho.com/display/EAI/Pentaho+Data+Integration+Steps.
Option Definition
Step name The name of this step as it appears in the transformation
workspace.
Row Flattener
This step is not yet documented here. However, there may be a rough definition available in the Pentaho Wiki: http://
wiki.pentaho.com/display/EAI/Pentaho+Data+Integration+Steps.
Option Definition
Step name The name of this step as it appears in the transformation
workspace.
Row Normalizer
This step is not yet documented here. However, there may be a rough definition available in the Pentaho Wiki: http://
wiki.pentaho.com/display/EAI/Pentaho+Data+Integration+Steps.
Option Definition
Step name The name of this step as it appears in the transformation
workspace.
Select Values
The Select Values step is useful for selecting, removing, renaming, changing data types and configuring the length and
precision of the fields on the stream. These operations are organized into different categories:
•Select and Alter — Specify the exact order and name in which the fields have to be placed in the output rows

| Transformation Step Reference | 175
•Remove — Specify the fields that have to be removed from the output rows
•Meta-data - Change the name, type, length and precision (the metadata) of one or more fields
An example of a transformation that includes this step is located at samples/transformations/Select values
- some variants.ktr and samples/transformations/Select Values - copy field values to new
fields.ktr
Select & Alter Options
This tab contains options for selecting and changing data types and fields. The Get Fields to Select button will retrieve
available fields based on the existing input steps and populate the entries in this tab. Click Edit Mapping to open a
mapping dialog to easily define multiple mappings between source and target fields.
Note: Edit Mapping will only work if there is only one target output step.
Option Description
Step name Optionally, you can change the name of this step to fit
your needs.
Fieldname Click to insert fields from all input steams to the step
Rename to Click to insert fields from all input steams to the step
Length Enable if you want to implicitly select all other fields from
the input stream(s) that are not explicitly selected in the
Fields section.
Precision The precision option depends on the field type, but only
Number is supported; it returns the number of floating
point digits.
Include unspecified fields, ordered by name Enable if you want to implicitly select all other fields from
the input stream(s) that are not explicitly selected in the
Fields section
Remove
Simply name the fields from the inputstream that you want to remove.
Note: Field removals are slow because of the nature of the queries that they generate.
Meta-data
Options under this tab allow you to rename, change data types, and change the length and precision of fields coming
into the Select Values step. Click Get fields to change to import fields from previous steps. A lot of data type
conversions are also possible with this tab.
Option Description
Fieldname The name of the imported field
Rename to If you want to rename this field, this is where you put the
new name
Type The data type for this field
Length The field length
Precision The precision option depends on the field type, but only
Number is supported; it returns the number of floating
point digits
Binary to Normal? Converts a string to a numeric data type, when
appropriate

| Transformation Step Reference | 176
Option Description
Format The format mask (number type or date format)
Date Format Lenient? Determines whether the date parser is strict or lenient.
Leniency means that invalid date values are processed. If
set to N, only strictly valid date values will be accepted; if
set to Y, the parser will attempt to determine the intention
of an incorrect date, if possible, and correct it.
Date Locale Specifies the date locale to use for date conversions and
calculations. Leave blank to use the default encoding
on your system or chose from the populated this list
accordingly.
Date Time Zone Specifies the date time zone to use for date conversions
and calculations. Leave blank to use the default
encoding on your system or chose from the populated list
accordingly.
Lenient number conversion When this option is set to Y, numbers get parsed until
it finds a non-numeric value (e.g. a dash or slash) and
stops parsing without reporting an error. When set
to N, numbers get parsed strictly throwing an error
in case invalid numbers are in the input. The default
behavior is set to N and can be changed by setting the
KETTLE_LENIENT_STRING_TO_NUMBER_CONVERSION
variable to Y.
Encoding Specifies the text file encoding to use. Leave blank to use
the default encoding on your system. To use Unicode,
specify UTF-8 or UTF-16. On first use, Spoon searches
your system for available encodings and populates this list
accordingly.
Decimal A decimal point; this is either a dot or a comma
Grouping A method of separating units of thousands in numbers of
four digits or larger. This is either a dot or a comma.
Currency Symbol used to represent currencies
Set Field Value
Set the value of a field with the value of another field.
Option Definition
Step name The name of this step as it appears in the transformation
workspace.
Field name Displays the fields with values that can be replaced.
Replace by value from field Specify the field value to replace the values in the Field
name column.
Set Field Value to a Constant
This step allows you to set the value of a field with a user-defined constant.
Option Definition
Step name The name of this step as it appears in the transformation
workspace.

| Transformation Step Reference | 177
Option Definition
Use variable in constant Selecting this option allows you to use variable
replacement within a constant.
Field Displays the fields with values that can be replaced.
Replace by value The value that will replace existing values within the
specified field.
Conversion mask (Date) Allows you to specify a date format to convert to.
Sort Rows
This step is not yet documented here. However, there may be a rough definition available in the Pentaho Wiki: http://
wiki.pentaho.com/display/EAI/Pentaho+Data+Integration+Steps.
Option Definition
Step name The name of this step as it appears in the transformation
workspace.
Split Field to Rows
This step is not yet documented here. However, there may be a rough definition available in the Pentaho Wiki: http://
wiki.pentaho.com/display/EAI/Pentaho+Data+Integration+Steps.
Option Definition
Step name The name of this step as it appears in the transformation
workspace.
Split Fields
This step is not yet documented here. However, there may be a rough definition available in the Pentaho Wiki: http://
wiki.pentaho.com/display/EAI/Pentaho+Data+Integration+Steps.
Option Definition
Step name The name of this step as it appears in the transformation
workspace.
String Operations
Apply operations, such as trimming, padding, and others to the string value.
Option Definition
Step name The name of this step as it appears in the transformation
workspace.
In stream field Designate the field to transform.
Out stream field Designate the name of the field to be created.
Trim type Designate the trim type: none, left, right, or both.
Lower/Upper Designate upper or lowercase.
Padding Designate left or right padding.
Pad char Designate the padding character.
Pad Length Designate how long the padding will be.
InitCap Transform to initial capitalization.

| Transformation Step Reference | 178
Option Definition
Escape
Digits Designate whether to return remove, or do nothing to
digits.
Remove Special character Designate a special character to remove.
Strings Cut
This step allows you to cut a portion of a substring. If the designated field is out of range, it returns blank.
Option Definition
Step name The name of this step as it appears in the transformation
workspace.
In stream field Name of the field whose substring to cut.
Out stream field Rename the field upon output.
Cut from Designate where to begin cutting the substring.
Cut to Designate where to end cutting the substring.
Unique Rows
This step is not yet documented here. However, there may be a rough definition available in the Pentaho Wiki: http://
wiki.pentaho.com/display/EAI/Pentaho+Data+Integration+Steps.
Option Definition
Step name The name of this step as it appears in the transformation
workspace.
Unique Rows (HashSet)
The Unique Rows (HashSet) transformation step tracks exact duplicate rows. The step can also remove duplicate
rows and leave only unique occurrences. Unlike the Unique Rows transformation step, which only correctly evaluates
consecutive duplicate rows unless used with a sorted input, the Unique Rows (HashSet) step does not require a sorted
input to process duplicate rows, instead it tracks duplicates in memory.
Option Definition
Step name Name of this step as it appears in the transformation
workspace
Compare using stored row values Stores values for the selected fields in memory for every
record. Storing row values requires more memory, but
it prevents possible false positives if there are hash
collisions.
Redirect duplicate row Processes duplicate rows as an error and redirect rows
to the error stream of the step. Requires you to set error
handling for this step.
Error description Sets the error handling description to display when
duplicate rows are detected. Only available when
Redirect duplicate row is checked.
Fields to compare table Lists the fields to compare—no entries means the step
compares an entire row

| Transformation Step Reference | 179
Value Mapper
This step is not yet documented here. However, there may be a rough definition available in the Pentaho Wiki: http://
wiki.pentaho.com/display/EAI/Pentaho+Data+Integration+Steps.
Option Definition
Step name The name of this step as it appears in the transformation
workspace.
XSL Transformation
This step is not yet documented here. However, there may be a rough definition available in the Pentaho Wiki: http://
wiki.pentaho.com/display/EAI/Pentaho+Data+Integration+Steps.
Option Definition
Step name The name of this step as it appears in the transformation
workspace.
Utility
The PDI transformation steps in this section pertain to various conditional and data processing tasks.
Change File Encoding
This step is not yet documented here. However, there may be a rough definition available in the Pentaho Wiki: http://
wiki.pentaho.com/display/EAI/Pentaho+Data+Integration+Steps.
Option Definition
Step name The name of this step as it appears in the transformation
workspace.
Clone Row
This step is not yet documented here. However, there may be a rough definition available in the Pentaho Wiki: http://
wiki.pentaho.com/display/EAI/Pentaho+Data+Integration+Steps.
Option Definition
Step name The name of this step as it appears in the transformation
workspace.
Delay Row
This step is not yet documented here. However, there may be a rough definition available in the Pentaho Wiki: http://
wiki.pentaho.com/display/EAI/Pentaho+Data+Integration+Steps.
Option Definition
Step name The name of this step as it appears in the transformation
workspace.
Edit to XML
This step is not yet documented here. However, there may be a rough definition available in the Pentaho Wiki: http://
wiki.pentaho.com/display/EAI/Edi+to+XML.

| Transformation Step Reference | 180
Option Definition
Step name The name of this step as it appears in the transformation
workspace.
Execute a Process
You can use the Execute a process step to execute a shell script on the host where a job will run. This is similar to the
Shell job entry, in that it executes a shell script on the host where the job is running, but performs this for every row.
Option Description
Step name The name of this step as it appears in the transformation
workspace.
Process field The field name in the data stream that defines the process
to start (shell script / batch file to start). Arguments can
also be used.
Fail if not success Checking this option means if the exit status is different
than zero the step fails. You can use error handling to get
these rows.
Result fieldname Specify here the name of the result fieldname (STRING)
added to the output stream of the transformation. This
field is populated by the output stream (stdout) of the
process.
Error fieldname Specify here the name of the error fieldname (STRING)
added to the output stream of the transformation. This
field is filled by the error stream (stderr) of the process.
Exit value Specify here the name of the exit fieldname (INTEGER)
added to the output stream of the transformation. This
field is filled by the exit output of the process.
If Field Value is Null
This step is not yet documented here. However, there may be a rough definition available in the Pentaho Wiki: http://
wiki.pentaho.com/display/EAI/Pentaho+Data+Integration+Steps.
Option Definition
Step name The name of this step as it appears in the transformation
workspace.
Mail
This step uses an SMTP server to send an email containing data from the previous step.
Note: The Mail transformation step is similar to the Mail job entry, except the step receives all data from the
stream fields.
Addresses
This tab defines the sender, contact person, and recipients of a PDI-generated email.
Option Definition
Step name The name of this step as it appears in the transformation
workspace.
Destination address The destination for the email. This can be a single
address, a comma-separated list of addresses, or an
email alias for a distribution list.

| Transformation Step Reference | 181
Option Definition
Cc An email address, comma-separate list of email
addresses, or a distribution list to send a carbon copy of
the email to.
Bcc An email address, comma-separate list of email
addresses, or a distribution list to send a blind carbon
copy of the email to.
Sender name The name of the person you want the email to be from.
Sender Address The email address of the person or account you want the
email to be from.
Reply to The email address that recipients will use if they reply to
the email.
Contact The name of the person to contact regarding the email's
contents.
Contact phone The phone number of the contact person defined in the
previous field.
Server
This tab contains details for your SMTP server, including authentication and encryption.
Option Definition
SMTP server URL, hostname, or IP address of your SMTP server.
Port Port number for your SMTP service.
Use authentication If checked, you will be able to enter an SMTP username
and password in the next few fields.
Authentication user The SMTP username to use for server authentication.
Authentication password The password for the previously defined SMTP username.
Use secure authentication If checked you will be able to specify SSL or TLS
encryption in the next field.
Secure connection type Determines whether the server will use SSL or TLS
encryption protocols.
Email Message
This tab determines the text content of the email.
Option Definition
Include date in message? If checked, the date will be printed in the email body.
Only send comment in mail body? If checked, information about the transformation will not
be included -- only the content from the Comment field will
be sent in the message body.
Use HTML format in mail body? If checked, this email will be in HTML format instead of
plain text.
Encoding Character encoding for the text of an HTML email.
Manage priority If checked, enables the following two fields to set email
priority and importance levels.
Priority The priority level to assign in the email metadata.

| Transformation Step Reference | 182
Option Definition
Importance The importance level to assign in the email metadata.
Subject The email subject line.
Comment The email body.
Attached Files
This tab contains options for file attachments.
Option Definition
Dynamic filenames? If checked, you will use the next two fields to define which
streams you want to use to create dynamic filenames for
your attachments.
Filename field The stream field you want to use for dynamic filenames
of attachments. This can also be a folder name, in which
case you would use the Wildcard field to determine
filenames.
Wildcard field A regular expression that creates dynamic filenames for
attachments.
Filename/foldername A static name and location of a file to attach.
Include subfolders If checked, will attach files in subfolders of the specified
folder.
Wildcard A regular expression that identifies a file to attach.
Zip files If checked, multiple file attachments will be zipped into a
single archive before attaching to the email.
Is zip filename dynamic? If checked, the name of the zip archive will be determined
by a data stream.
Zipfilename field The data field to use for the name of the zip archive.
Zip filename A static name for the zip archive.
Zip files if size greater than Only archives file attachments if their combined size is
above this number (in bytes).
Embedded Images
This tab contains options for embedded images in HTML emails.
Option Definition
Filename The name and location of the file you want to embed in
the email.
Content ID A unique identifier for this file. PDI will generate one if you
don't specify one yourself.
# The order that the attachment will be processed.
Image The name of as added image.
Content ID (field) The content ID of an added image.
Metadata Structure of Stream
This step is not yet documented here. However, there may be a rough definition available in the Pentaho Wiki: http://
wiki.pentaho.com/display/EAI/Pentaho+Data+Integration+Steps.

| Transformation Step Reference | 183
Option Definition
Step name The name of this step as it appears in the transformation
workspace.
Null if...
This step is not yet documented here. However, there may be a rough definition available in the Pentaho Wiki: http://
wiki.pentaho.com/display/EAI/Pentaho+Data+Integration+Steps.
Option Definition
Step name The name of this step as it appears in the transformation
workspace.
Process Files
This step is not yet documented here. However, there may be a rough definition available in the Pentaho Wiki: http://
wiki.pentaho.com/display/EAI/Pentaho+Data+Integration+Steps.
Option Definition
Step name The name of this step as it appears in the transformation
workspace.
Run SSH Commands
This step conveniently allows you to execute commands over the secure shell (ssh) TCP/IP protocol.
You can pass text to stdout or stderr in the commands. This information can then be picked up by the step and passed
in a field to subsequent steps.
Note: This step accepts no input from other steps and is executed only once unless_ _the "Get commands from
field" option is enabled.
General tab
Option Description
Step name The name of this step as it appears in the transformation
workspace.
Server name / IP address You can specify the server or IP address of the machine
on which you want to execute a command.
Server port The TCP/IP port on which the ssh protocol lives on the
server. The default is 22.
Timeout The timeout in seconds. If set to a number larger than
zero you can specify a non-default connection timeout.
Username The username to log in with.
Password The password to use.
Use key Enable this option if you want to log in using a private key.
Private key The private key file. The private part of a private/public
RSA key-pair (see: ssh-keygen).
Passphrase The optional pass-phrase used when the key-pair was
generated.
Proxy host The proxy server host to use (name or IP address).
Proxy port The proxy server port to use.

| Transformation Step Reference | 184
Option Description
Proxy username The proxy username.
Proxy password The proxy password.
Test connection Button that allows you to test if the supplied credentials
are sufficient for logging in to the SSH server.
Settings tab
Option Description
Response fieldname The name of the String output field that will contain the
text passed to the standard output channel (stdout) by the
specified commands.
error response fieldname The name of the String output field that will contain the
text passed to the standard error channel (stderr) by the
specified commands.
Get commands from field Enable this option if you want to execute commands
specified in an input field.
Commands fieldname Select the input field that will contain the commands to
execute.
Commands Field allows you to specify the commands to execute.
Send Message to Syslog
This step is not yet documented here. However, there may be a rough definition available in the Pentaho Wiki: http://
wiki.pentaho.com/display/EAI/Pentaho+Data+Integration+Steps.
Option Definition
Step name The name of this step as it appears in the transformation
workspace.
Write to Log
This step is not yet documented here. However, there may be a rough definition available in the Pentaho Wiki: http://
wiki.pentaho.com/display/EAI/Pentaho+Data+Integration+Steps.
Option Definition
Step name The name of this step as it appears in the transformation
workspace.
Flow
The PDI transformation steps in this section pertain to various process control tasks.
Abort
This step type allows you abort a transformation upon seeing input. Its main use is in error handling. For example, you
can use this step so that a transformation can be aborted after x number of rows flow to over an error hop.
Option Description
Step name The name of this step as it appears in the transformation
workspace. Note: This name must be unique within a
single transformation.

| Transformation Step Reference | 185
Option Description
Abort threshold The threshold of number of rows after which to abort the
transformations. E.g. If threshold is 0, the abort step will
abort after seeing the first row. If threshold is 5, the abort
step will abort after seeing the sixth row.
Abort message The message to put in the log upon aborting. If not filled in
a default message will be used.
Always log Always log the rows processed by the Abort step. This
allows the rows to be logged although the log level of
the transformation would normally not do it. This way
you can always see in the log which rows caused the
transformation to abort.
Append Streams
The Append streams step reads the data from two steps, only processing the second stream after the first is finished.
As always, the row layout for the input data coming from both steps has to be identical: the same row lengths, the same
data types, the same fields at the same field indexes in the row.
Important: If you don't care about the order in which the output rows occur, you can use any step to create a
union of 2 or more data streams.
Option Description
Step name The name of this step as it appears in the transformation
workspace. Note: This name must be unique within a
single transformation.
Head hop The name of the step from which will be read from first.
Tail hop The name of the step from which will be read from last.
Block This Step Until Steps Finish
This step is not yet documented here. However, there may be a rough definition available in the Pentaho Wiki: http://
wiki.pentaho.com/display/EAI/Pentaho+Data+Integration+Steps.
Option Definition
Step name The name of this step as it appears in the transformation
workspace.
Blocking Step
This step blocks until all incoming rows have been processed. Subsequent steps only receive the last input row of this
step.
Option Definition
Step name The name of this step as it appears in the transformation
workspace.
Pass all rows? Determines whether to pass one row or all rows.
Spool directory The directory in which the temporary files are stored if
needed; the default is the standard temporary directory for
the system.
Spool-file prefix Choose a recognizable prefix to identify the files when
they appear in the temp directory.
| Transformation Step Reference | 186
Option Definition
Cache size The more rows you can store in memory, the faster the
step works.
Compress spool files? Compresses temporary files when they are needed.
Detect Empty Stream
This step is not yet documented here. However, there may be a rough definition available in the Pentaho Wiki: http://
wiki.pentaho.com/display/EAI/Pentaho+Data+Integration+Steps.
Option Definition
Step name The name of this step as it appears in the transformation
workspace.
Dummy (do nothing)
The Dummy step does not do anything. Its primary function is to be a placeholder for testing purposes. For example, to
have a transformation, you must have at least two steps connected to each other. If you want to test a file input step,
you can connect it to a dummy step.
ETL Metadata Injection
This step is not yet documented here. However, there may be a rough definition available in the Pentaho Wiki: http://
wiki.pentaho.com/display/EAI/Pentaho+Data+Integration+Steps.
Option Definition
Step name The name of this step as it appears in the transformation
workspace.
Filter Rows
The Filter Rows step allows you to filter rows based on conditions and comparisons. Once this step is connected to a
previous step (one or more and receiving input), you can click on the "<field>", "=" and "<value>" areas to construct a
condition.
Note: To enter an IN LIST operator, use a string value separated by semicolons. This also works on numeric
values like integers. The list of values must be entered with a string type, e.g.: 2;3;7;8
Filter Row Options
Option Description
Step name Optionally, you can change the name of this step to fit
your needs.
Send 'true' data to step The rows for which the condition specified is true are sent
to this step
Send 'false' data to step The rows for which the condition specified are false are
sent to this step
The Condition Click the NOT to negate the condition.
| Transformation Step Reference | 187
Option Description
Click <Field> to select from a list of fields from the input
stream(s) to build your condition(s).
Click <value> to enter a specific value into your
condition(s).
To delete a condition, right-click and select Delete
Condition.
Add Condition Click (Add condition) to add conditions. Add condition
converts the original condition into a sub-level condition.
Click a sub-condition to edit it by going down one level in
the condition tree.
Filtering Rows Based on Values from Variables
The filter rows step detects only fields in the input stream. If you want to filter rows based in a variable value, you must
modify the previous step (a table input for example) and include the variable as another field, such as:
${myvar}=5
A query:
SELECT field1,
field2,
${myvar} AS field3
FROM table
WHERE field1=xxxx
Then in the filter row condition, you can have the following...
field1 = field3
Alternatively, you can use the simple Get Variables step to set parameters in fields.
Identify Last Row in a Stream
The Identify last row in a stream transformation step generates a Boolean field filled with true for the last row, and
false otherwise.
Option Definition
Step name Name of this step as it appears in the transformation
workspace
Result fieldname Defines the field to use to mark the last row of a stream
Java Filter
The Java Filter step filters rows with user-defined Java expressions.

| Transformation Step Reference | 188
Option Definition
Step name Name of this step as it appears in the transformation
workspace
Destination step for matching rows (optional) Identifies the where to send rows that match the user-
defined Java expression
Destination step for non-matching rows Identifies the where to send rows that do not match the
user-defined Java expression
Condition (Java expression) Defines the conditions on which to filter the data
Prioritize Streams
This step is not yet documented here. However, there may be a rough definition available in the Pentaho Wiki: http://
wiki.pentaho.com/display/EAI/Pentaho+Data+Integration+Steps.
Option Definition
Step name The name of this step as it appears in the transformation
workspace.
Single Threader
This step is not yet documented here. However, there may be a rough definition available in the Pentaho Wiki: http://
wiki.pentaho.com/display/EAI/Pentaho+Data+Integration+Steps.
Option Definition
Step name The name of this step as it appears in the transformation
workspace.
Switch / Case
This step is not yet documented here. However, there may be a rough definition available in the Pentaho Wiki: http://
wiki.pentaho.com/display/EAI/Pentaho+Data+Integration+Steps.
Option Definition
Step name The name of this step as it appears in the transformation
workspace.
Scripting
The PDI transformation steps in this section pertain to formula and script execution.
Execute Row SQL Script
This step is not yet documented here. However, there may be a rough definition available in the Pentaho Wiki: http://
wiki.pentaho.com/display/EAI/Pentaho+Data+Integration+Steps.
Option Definition
Step name The name of this step as it appears in the transformation
workspace.
Execute SQL Script
This step is not yet documented here. However, there may be a rough definition available in the Pentaho Wiki: http://
wiki.pentaho.com/display/EAI/Pentaho+Data+Integration+Steps.

| Transformation Step Reference | 189
Option Definition
Step name The name of this step as it appears in the transformation
workspace.
Formula
This step is not yet documented here. However, there may be a rough definition available in the Pentaho Wiki: http://
wiki.pentaho.com/display/EAI/Pentaho+Data+Integration+Steps.
Option Definition
Step name The name of this step as it appears in the transformation
workspace.
Modified JavaScript Value
The Modified JavaScript Value step provides a user interface for building JavaScript expressions. This step also allows
you to create multiple scripts for each step. For more information about this step see Modified JavaScript Value in the
Pentaho Wiki.
JavaScript Functions
Function Description
Transformation Scripts Displays a list of scripts you have created in this step
Transformation Constants A list of pre-defined, static constants
including SKIP_TRANSFORMATION,
ERROR_TRANSFORMATION, and
CONTINUE_TRANSFORMATION
Transform Functions Contains a variety of String, Numeric, Date, Logic and
specialized functions you can use to create your script.
To add a function to your script, simply double-click on
the function or drag it to the location in your script that you
wish to insert it.
Input Fields A list of inputs coming into the step. Double-click or use
drag and drop to insert the field into your script.
Output Fields A list of outputs for the step.
JavaScript
This section is where you edit the script for this step. You can insert functions, constants, input fields, etc. from the tree
control on the left by double-clicking on the node you want to insert or by dragging the object onto the Java Script panel.
Fields
The Fields table contains a list of variables from your script including the ability to add metadata like a descriptive name.
Buttons
Get Variables
Retrieves a list of variables from your script.
Test script
Use to test the syntax of your script.
JavaScript Internal API Objects
You can use the following internal API objects (for reference see the classes in the source):
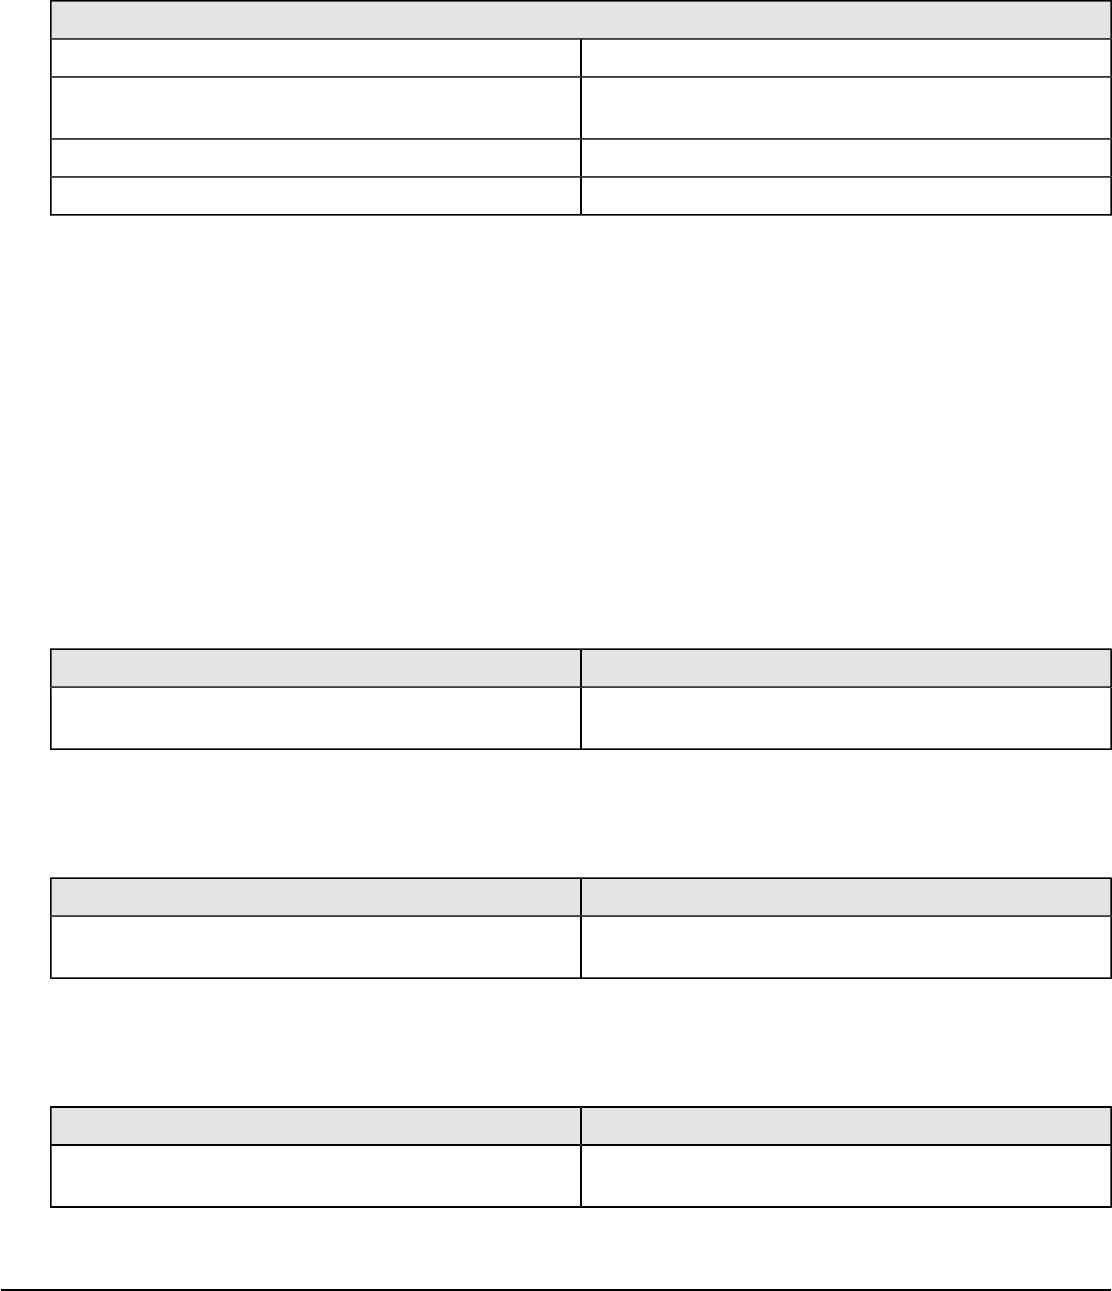
| Transformation Step Reference | 190
Object Description
_TransformationName_ A string with the actual transformation name
_step_ The actual step instance of
org.pentaho.di.trans.steps.scriptvalues_mod.ScriptValuesMod
rowMeta The actual instance of org.pentaho.di.core.row.RowMeta
row The actual instance of the actual data Object[]
Advanced Web Services – Modified Java Script Value and HTTP Post Steps
There are times when the SOAP message generated by the Web Services Lookup step is insufficient. Many Web
Services require security credentials that must be placed in the SOAP request headers. There may also be a need to
parse the response XML to get more information than the response values such as namespaces.
This approach uses a Modified Java Script Value step. You can create the SOAP envelope as needed. The step is
then hopped to an HTTP Post step that accepts the SOAP request through the input stream and posts it to the Web
Services. This is then hopped to another Modified Java Script Value step that is used to parse the response from the
Web service.
The General - Annotated SOAP Web Service call.ktr in the PDI samples folder (...\data-integration\samples
\transformations) illustrates the use of this approach.
Regex Evaluation
This step is not yet documented here. However, there may be a rough definition available in the Pentaho Wiki: http://
wiki.pentaho.com/display/EAI/Pentaho+Data+Integration+Steps.
Option Definition
Step name The name of this step as it appears in the transformation
workspace.
User Defined Java Class
This step is not yet documented here. However, there may be a rough definition available in the Pentaho Wiki: http://
wiki.pentaho.com/display/EAI/Pentaho+Data+Integration+Steps.
Option Definition
Step name The name of this step as it appears in the transformation
workspace.
User Defined Java Expression
This step is not yet documented here. However, there may be a rough definition available in the Pentaho Wiki: http://
wiki.pentaho.com/display/EAI/Pentaho+Data+Integration+Steps.
Option Definition
Step name The name of this step as it appears in the transformation
workspace.
Lookup
The PDI transformation steps in this section pertain to status checking and remote service interaction.
Call DB Procedure
This step is not yet documented here. However, there may be a rough definition available in the Pentaho Wiki: http://
wiki.pentaho.com/display/EAI/Pentaho+Data+Integration+Steps.

| Transformation Step Reference | 191
Option Definition
Step name The name of this step as it appears in the transformation
workspace.
Check if a Column Exists
This step is not yet documented here. However, there may be a rough definition available in the Pentaho Wiki: http://
wiki.pentaho.com/display/EAI/Pentaho+Data+Integration+Steps.
Option Definition
Step name The name of this step as it appears in the transformation
workspace.
Check if File is Locked
This step is not yet documented here. However, there may be a rough definition available in the Pentaho Wiki: http://
wiki.pentaho.com/display/EAI/Pentaho+Data+Integration+Steps.
Option Definition
Step name The name of this step as it appears in the transformation
workspace.
Check if Webservice is Available
This step is not yet documented here. However, there may be a rough definition available in the Pentaho Wiki: http://
wiki.pentaho.com/display/EAI/Pentaho+Data+Integration+Steps.
Option Definition
Step name The name of this step as it appears in the transformation
workspace.
Database Join
This step is not yet documented here. However, there may be a rough definition available in the Pentaho Wiki: http://
wiki.pentaho.com/display/EAI/Pentaho+Data+Integration+Steps.
Option Definition
Step name The name of this step as it appears in the transformation
workspace.
Database Lookup
The Database Lookup step allows you to look up values in a database table. Lookup values are added as new fields
onto the stream.
Database Lookup Options
Option Description
Step name Optionally, you can change the name of this step to fit
your needs.
Connection Select the database connection for the lookup
Lookup schema Specify the target schema to use for the lookup
Lookup table Specifies the name of the table used in the lookup
process

| Transformation Step Reference | 192
Option Description
Enable cache? This option caches database lookups. This means that the
database is expected to return the same value all the time
for a certain lookup value.
Cache size in rows Specify the size of the cache to use in rows.
Load all data from table Pre-loads the cache with all the data in the lookup table.
This can improve performance by lowering lookup latency;
however, if you have a large table you may run out of
memory.
Keys to look up table Specify the keys necessary to perform the lookup.
Do not pass the row if the lookup fails Enable to avoid passing a row when lookup fails
Fail on multiple results? Enable to force the step to fail if the lookup returns
multiple results.
Order by If the lookup query returns multiple results, the ORDER
BY clause helps you to select the record to take. For
example, ORDER BY would allow you to pick the
customer with the highest sales volume in a specified
state.
Get Fields Click to return a list of available fields from the input
stream(s) of the step
Get lookup fields Click to return a list of available fields from the lookup
table that can be added to the step's output stream
Important: ! If other processes are changing values in the table where you perform a lookup, do not cache
values. In all other instances, caching values increases the performance substantially because database
lookups are relatively slow. If you can't use cache, consider launching several copies of the simultaneously. A
simultaneous launch keeps the database busy using different connections.
Dynamic SQL Row
This step is not yet documented here. However, there may be a rough definition available in the Pentaho Wiki: http://
wiki.pentaho.com/display/EAI/Pentaho+Data+Integration+Steps.
Option Definition
Step name The name of this step as it appears in the transformation
workspace.
File Exists
This step is not yet documented here. However, there may be a rough definition available in the Pentaho Wiki: http://
wiki.pentaho.com/display/EAI/Pentaho+Data+Integration+Steps.
Option Definition
Step name The name of this step as it appears in the transformation
workspace.
Fuzzy Match
The Fuzzy Match step finds strings that potentially match using duplicate-detecting algorithms that calculate the
similarity of two streams of data. This step returns matching values as a separated list as specified by user-defined
minimal or maximal values.

| Transformation Step Reference | 193
General Tab
The General tab enables you to define the source transformation step, field, and which algorithm to use to match
similar strings of data.
Option Definition
Step name Name of this step as it appears in the transformation
workspace
Lookup step Identifies the step that contains the fields to match
Lookup field Identifies the field to match
Main stream field Identifies the primary stream to match the Lookup field
with
Algorithm Identifies which string-matching algorithm to use—
options include Levenshtein, Damerau-Levenshtein,
Needleman Wunsch, Jaro, Jaro Winkler, Pair letters
similarity, Metaphone, Double Metaphone, SoundEx, or
Refined SoundEx
Case sensitive Identifies if streams can or cannot differ based on the use
of uppercase and lowercase letters—only for use with the
Levenshtein algorithms
Get closer value When checked, returns a single result with the highest
similarity score—when unchecked, returns all matches
that satisfy the minimal and maximal value setting as a
separated list
Minimum value Identifies the lowest possible similarity score
Maximal value Identifies the highest possible similarity score
Values separator Identifies how the source data is separated
Algorithm Definitions
Within the Algorithm field, there are several options available to compare and match strings.
•Levenshtein and Damerau-Levenshtein—calculate the distance between two strings by looking at how many edit
steps are needed to get from one string to another. The former only looks at inserts, deletes, and replacements. The
latter adds transposition. The score indicates the minimum number of changes needed. For instance, the difference
between John and Jan would be two; to turn the name John into Jan you need one step to replace the O with an A,
and another step to delete the H.
•Needleman Wunsch—calculates the similarity of two sequences and is mainly used in bioinformatics. The algorithm
calculates a gap penalty. The aforementioned example would have a score of negative two.
•Jaro and Jaro Winkler—calculate a similarity index between two strings. The result is a fraction between zero,
indicating no similarity, and one, indicating an identical match.
•Pair letters similarity—dissects the two strings in pairs and calculates the similarity of the two strings by dividing
the number of common pairs by the sum of the pairs from both strings.
•Metaphone, Double Metaphone, SoundEx, and Refined SoundEx—are phonetic algorithms, which try to match
strings based on how they would sound. Each is based on the English language and would not be useful to compare
other languages.
• The Metaphone algorithm returns an encoded value based on the English pronunciation of a given word. The
encoded value of the names John and Jan would return the value JN for both names.
• The Double Metaphone algorithm has fundamental design improvements over its predecessor and uses a more
complex ruleset for coding. It can return a primary and a secondary encoded value for a string. The names John
and Jan each return metaphone key values of JN and AN.
• The Soundex algorthim returns a single encoded value for a name that consists of a letter followed by three
numerical digits. The letter is the first letter of the name, and the digits encode the remaining consonants.

| Transformation Step Reference | 194
• The Refined SoundEx algorithm is an improvement over its predecessor. Encoded values for this algorithm are
six digits long, the initial character is encoded, and multiple possible encodings can be returned for a single
name. Using this algorithm, the name John returns the values 160000 and 460000, as does the name Jan.
Fields Tab
The Fields tab enables you to define how to return the results of a comparison.
Option Definition
Match field Defines the name of the column that contains the
comparison value
Value field Defines the similarity score for which to return a value
HTTP Client
This step is not yet documented here. However, there may be a rough definition available in the Pentaho Wiki: http://
wiki.pentaho.com/display/EAI/Pentaho+Data+Integration+Steps.
Option Definition
Step name The name of this step as it appears in the transformation
workspace.
HTTP Post
This step uses an HTTP POST command to submit form data via a URL.
General Tab
The General tab defines which RSS/Atom URLs you want to use, and optionally which fields contain the URLs.
Option Description
Step name The name of this step in the transformation workspace.
URL The Web service URL to submit to.
Accept URL from field? If checked, you must specify which field to retrieve the
URL from.
URL field name If the previous option is checked, this is where you specify
the URL field.
Encoding The encoding standard for the files being accessed.
Request entity field The name of the field that will contain the POST request.
When enabled, the Post a file option will retrieve the file
named in this field, and post the contents of that file.
Post a file If a file is defined in the Request entity field, its contents
will be posted if this option is checked.
Result fieldname The field that you want to post the result output to.
HTTP status code fieldname The field that you want to post the status code output to.
Response time (milliseconds) fieldname The field that you want to post the response time, in
milliseconds, to.
HTTP login If this form requires authentication, this field should
contain the username.
HTTP password If this form requires authentication, this field should
contain the password that corresponds with the
username.

| Transformation Step Reference | 195
Option Description
Proxy host Hostname or IP address of the proxy server, if you use
one.
Proxy port Port number of the proxy server, if you use one.
Fields tab: Body (Header) Parameters
The Fields tab defines parameters for the HTTP request header and body. If you've filled in the URL and other
necessary details in the General tab, you can use the Get values buttons to pre-populate the fields here. Body
parameters are used in POST and PUT operations.
Option Description
# The order that this parameter will be passed to the Web
application.
Name The name of the field that contains the value to map to the
parameter.
Parameter The parameter to map the value of Name to.
Put in Header? If set to Y, the parameter will be put into the request
header.
Fields tab: Query Parameters
The Fields tab defines parameters for the HTTP request header and body. If you've filled in the URL and other
necessary details in the General tab, you can use the Get values buttons to pre-populate the fields here. Query
parameters are specified in the URL and can be used in any HTTP method.
Option Description
# The order that this parameter will be passed to the Web
application.
Name The name of the field that contains the value to map to the
parameter.
Value The value to map to the parameter.
MaxMind GeoIP Lookup
This step is not yet documented here. However, there may be a rough definition available in the Pentaho Wiki: http://
wiki.pentaho.com/display/EAI/MaxMind+GeoIP+Lookup.
Option Definition
Step name The name of this step as it appears in the transformation
workspace.
RESTClient
The REST Client transformation step enables you to consume RESTfull services. Representational State Transfer
(REST) is a key design idiom that embraces a stateless client-server architecture in which the web services are viewed
as resources and can be identified by their URLs.
General Tab
The General tab is where you enter basic connection information for accessing a resource.

| Transformation Step Reference | 196
Option Definition
Step name Name of this step as it appears in the transformation
workspace
URL Indicates the path to a resource
Accept URL from field Designates the path to a resource is defined from a field
URL field name Indicates the field from which the path to a resource is
defined
HTTP method Indicates how the step interacts with a resource—
options are either GET, PUT, DELETE, POST, HEAD, or
OPTIONS
Get Method from field Designates the GET method is defined from a field
Method fieldname Indicates the field from which the GET method is defined
Body field Contains the request body for POST, PUT, and DELETE
methods
Application type Designates what type of application a resource is—
options are either TEXT PLAIN, XML, JSON, OCTET
STREAM, XHTML, FORM URLENCODED, ATOM XML,
SVG XML, or TEXT XML
Result fieldname Designates the name of the result output field
HTTP status code fieldname Designates the name of the HTTP status code field
Response time (milliseconds) fieldname Designates the name of the response time field
Authentication Tab
If necessary, enter authentication details for a resource in the Authentication tab.
Option Definition
HTTP Login Indicates the username required to access a resource
HTTP Password Indicates the password associated with the provided
HTTP Login user name
Preemptive Option to send the authentication credentials before a
server gives an unauthorized response
Proxy Host Indicates the name of a proxy host, if proxy authentication
is required
Proxy Port Indicates the port number of a proxy host, if proxy
authentication is required
SSL Tab
The SSL tab is where you provide authentication details for accessing a resource that requires SSL certificate
authentication.
Option Definition
Truststore file Indicates the location of a truststore file
Truststore password Indicates the password associated with the provided
truststore file
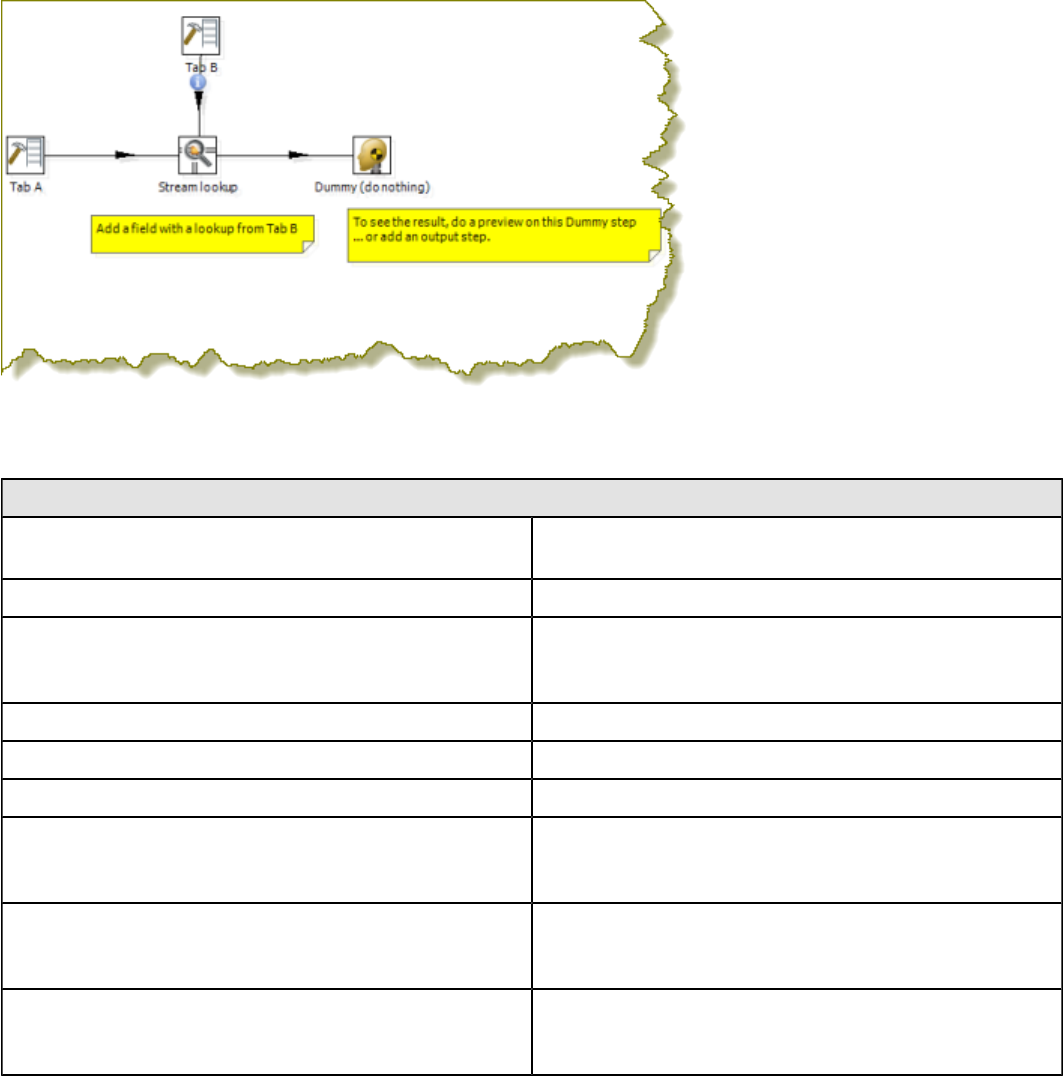
| Transformation Step Reference | 197
Headers Tab
The Headers tab enables you to define the content of any HTTP headers using an existing field. Populate the list of
fields by clicking the Get fields button.
Parameters Tab
The Parameters tab enables you to define parameter values for POST, PUT, and DELETE requests. GET parameters
should be part of the URL directly.
Stream Lookup
The Stream Lookup step type allows you to look up data using information coming from other steps in the
transformation. The data coming from the Source step is first read into memory and is then used to look up data from
the main stream.
Stream Lookup Options
Option Description
Step name Optionally, you can change the name of this step to fit
your needs.
Lookup step The step name where the lookup data is coming from
The keys to lookup... Allows you to specify the names of the fields that are used
to look up values. Values are always searched using the
"equal" comparison
Preserve memory Encodes rows of data to preserve memory while sorting
Specify the fields to retrieve Specifies the fields to retrieve on a successful lookup
Key and value are exactly one integer field Preserves memory while executing a sort
Use sorted list Enable to store values using a sorted list; this provides
better memory usage when working with data sets
containing wide rows
Get fields Automatically fills in the names of all the available fields
on the source side; you can then delete all the fields you
don't want to use for lookup.
Get lookup fields Automatically inserts the names of all the available fields
on the lookup side. You can then delete the fields you
don't want to retrieve

| Transformation Step Reference | 198
Table Exists
This step is not yet documented here. However, there may be a rough definition available in the Pentaho Wiki: http://
wiki.pentaho.com/display/EAI/Pentaho+Data+Integration+Steps.
Option Definition
Step name The name of this step as it appears in the transformation
workspace.
Web Services Lookup
Use the Web Services Lookup step to perform a Web Services lookup using the Web Services Description Language
(WSDL). This step has limitations as described below:
• Only SOAP WSDL requests / responses are understood. The other variations of the WSDL standard are not yet
implemented.
• Not all WSDL XML dialects and formats are as easily read as we would like. In those cases, you need to specify
(manually) what the input and output fields look like.
• Data conversion is performed within the step. In instance where you have dates and numbers you may encounter
errors. If you encounter conversion errors return Strings and convert them in a Select Values step. See Select
Values.
Option Description
Step Name Optionally, you can change the name of this step to fit
your needs.
URL The base URL pointing to the WSDL document that will
be retrieved
Load Loads the WSDL at the specified URL and tries to
populate the input and output tabs and fields automatically
Note: If this does not work, you can still try to
manually specify the input and output fields using
the Add Input and Add Output buttons.
The number of rows per call The number of rows to send with each WSDL call
Pass input data to output If disabled, the input will be discarded and only the WSDL
output will be passed along to the next steps
v2.x/3.x compatibility mode Version 2.0 engine was kept to make sure older steps
would still work correctly
Repeating element name The name of the repeating element in the output XML (if
any).
HTTP authentication The user name and password if these are required for the
Web service.
Proxy to use The proxy host and port information
Add Input / Add Output The input and output specifications of the WSDL service
Basic Web Services - Web Services Lookup Step
In this scenario the Web service that is accessed is described with a WSDL 1.1 specification. The step can load this
specification in one operation allowing the you to select and set input and output parameters. Output parameters are
added to the step’s output steam and passed to another step for processing. There is no need to modify the SOAP
request in this scenario as the Web service does not need any information other that the parameter that is sent.
The Web Services - NOAA Latitude and Longitude.ktr located in the samples folder (...\data-integration
\samples\transformations) is an example of this scenario.
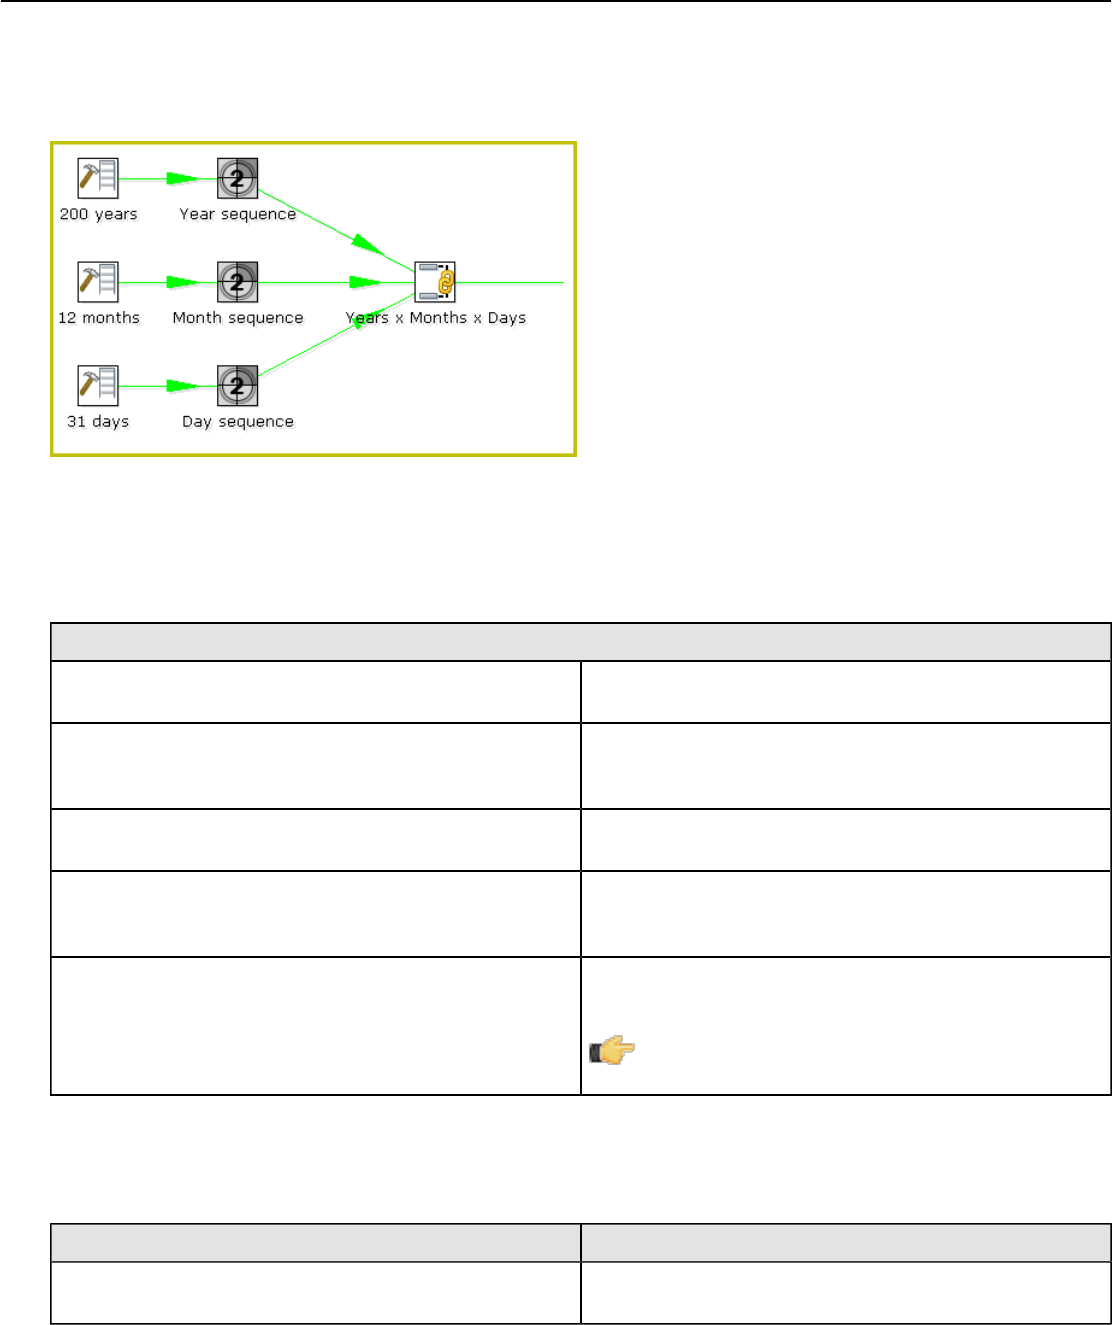
| Transformation Step Reference | 199
Joins
The PDI transformation steps in this section pertain to database and file join operations.
Join Rows (Cartesian Product)
The Join Rows step allows combinations of all rows on the input streams (Cartesian product) as shown below:
The Years x Months x Days step outputs all combinations of Year, Month and Day (for example, 1900, 1, 1 2100, 12,
31) and can be used to create a date dimension.
The Merge Join step provides you with better performance in most cases.
Join Rows Options
Option Description
Step name Optionally, you can change the name of this step to fit
your needs.
Temp directory Specify the name of the directory where the system stores
temporary files in case you want to combine more then
the cached number of rows
TMP-file prefix This is the prefix of the temporary files that will be
generated
Max. cache size The number of rows to cache before the system reads
data from temporary files; required when you want to
combine large row sets that do not fit into memory
The Condition(s) You can enter a complex condition to limit the number of
output row.
Note: The fields in the condition must have
unique names in each of the streams.
Merge Join
This step is not yet documented here. However, there may be a rough definition available in the Pentaho Wiki: http://
wiki.pentaho.com/display/EAI/Pentaho+Data+Integration+Steps.
Option Definition
Step name The name of this step as it appears in the transformation
workspace.
| Transformation Step Reference | 200
Merge Rows (diff)
Merge rows allows you to compare two streams of rows. This is useful for comparing data from two different times. It is
often used in situations where the source system of a data warehouse does not contain a date of last update.
The two streams of rows, a reference stream (the old data) and a compare stream (the new data), are merged. Only the
last version of a row is passed to the next steps each time. The row is marked as follows:
•identical — the key was found in both streams and the values to compare are identical
•changed — The key was found in both streams but one or more values is different;
•new — The key was not found in the reference stream
•deleted — The key was not found in the compare stream
The row coming from the compare stream is passed on to the next steps, except when it is "deleted."
Note: IMPORTANT! Both streams must be sorted on the specified key(s).
Merge Rows Options
Option Description
Step Name Optionally, you can change the name of this step to fit
your needs.
Reference rows origin Specify the step origin for the reference rows
Compare rows origin Specify the step origin for the compare rows
Flag fieldname Specify the name of the flag field on the output stream
Keys to match Specify fields containing the keys on which to match; click
Get Key Fields to insert all of the fields originating from
the reference rows step
Values to compare Specify fields contaning the values to compare; click Get
value fields to insert all of the fields from the originating
value rows step
Sorted Merge
This step is not yet documented here. However, there may be a rough definition available in the Pentaho Wiki: http://
wiki.pentaho.com/display/EAI/Pentaho+Data+Integration+Steps.
Option Definition
Step name The name of this step as it appears in the transformation
workspace.
XML Join
This step is not yet documented here. However, there may be a rough definition available in the Pentaho Wiki: http://
wiki.pentaho.com/display/EAI/Pentaho+Data+Integration+Steps.
Option Definition
Step name The name of this step as it appears in the transformation
workspace.
Data Warehouse
The PDI transformation steps in this section pertain to data warehouse functions.

| Transformation Step Reference | 201
Combination Lookup/Update
The Combination Lookup-Update step allows you to store information in a junk-dimension table. It can sometimes be
used to maintain Kimball pure Type 1 dimensions.
This step will...
• Look up combination of business key field1... fieldn from the input stream in a dimension table
• If this combination of business key fields exists, return its technical key (surrogate id)
• If this combination of business key doesn't exist yet, insert a row with the new key fields and return its (new)
technical key
• Put all input fields on the output stream including the returned technical key, but remove all business key fields if
"remove lookup fields" is true
This step creates/maintains a technical key out of data with business keys. After passing through this step all of the
remaining data changes for the dimension table can be made as updates, as either a row for the business key already
existed or was created.
This step will maintain the key information only. You must update the non-key information in the dimension table; for
example, by putting an update step (based on technical key) after the combination update/lookup step.
Pentaho Data Integration will store the information in a table where the primary key is the combination of the business
key fields in the table. This process can be slow if you have a large number of fields, Pentaho Data Integration
also supports a "hash code" field representing all fields in the dimension. This can speed up lookup performance
dramatically while limiting the fields to index to 1.
Combination Lookup/Update Options
Option Description
Step Name Optionally, you can change the name of this step to fit
your needs.
Connection Name of the database connection on which the dimension
table resides.
Target schema Allows you to specify a schema name to improve
precision in the quoting and allow for table names with
dots '.' in them.
Target table Name of the dimension table.
Commit size Setting this to 10 will generate a commit every 10 inserts
or updates.
Cache size in rows This is the cache size in number of rows that will be held
in memory to speed up lookups by reducing the number of
round trips to the database.
Note: Only the last version of a dimension entry
is kept in memory. If there are more entries
passing than what can be kept in memory, the
technical keys with the highest values are kept
in memory in the hope that these are the most
relevant.
A cache size of 0 caches as many rows as possible and
until your JVM runs out of memory. Use this option wisely
with dimensions that can't grow too large. A cache size of
-1 means that caching is disabled.
Key fields Specify the names of the keys in the stream and in
the dimension table. This will enable the step to do the
lookup.

| Transformation Step Reference | 202
Option Description
Technical key field This indicates the primary key of the dimension. It is also
referred to as Surrogate Key.
Creation of technical key Specify how the technical key is generated, options that
are not available for your connection are disabled:
• Use table maximum + 1 — A new technical key will
be created from the maximum key in the table. Note
that the new maximum is always cached, so that the
maximum does not need to be calculated for each new
row.
• Use sequence — Specify the sequence name if
you want to use a database sequence on the table
connection to generate the technical key (typical for
Oracle, for example)
• Use auto increment field — Use an auto increment
field in the database table to generate the technical
key (typical for DB2, for example.).
Remove lookup fields? Enable to remove all the lookup fields from the input
stream in the output. The only extra field added is then the
technical key.
Use hashcode Enable to use a hash code.
Hashcode field in table Allows you to generate a hash code, representing all
values in the key fields in a numerical form (a signed 64-
bit integer). This hash code has to be stored in the table.
Important: This hash code is NOT unique. As
such it makes no sense to place a unique index
on it.
Date of last update field When required, specify the date of last update field
(timestamp) from the source system to be copied to the
data warehouse. For example, when you have an address
without a primary key. The field will not be part of the
lookup fields (nor be part in the hash code calculation).
The value is written once only because any change
results in a new record being written.
Get Fields Fills in all the available fields on the input stream, except
for the keys you specified.
SQL Generates the SQL to build the dimension and allows you
to execute this SQL.
Note: The Combination Lookup/Update step assumes that the dimension table it maintains is not updated
concurrently by other transformations/applications. For example, when you use the Table Max + 1 method
to create the technical keys, the step will not always go to the database to retrieve the next highest technical
key. The technical keys will be cached locally, so if multiple transformations update the dimension table
simultaneously you will most likely get errors on duplicate technical keys. Pentaho recommends that you do not
concurrently update a dimension table, even if you are using a database sequence or auto increment technical
key, because of possible conflicts between transformations.
Note: It is assumed that the technical key is the primary key of the dimension table or at least has a unique
index on it. It's not 100% required but if a technical key exists multiple times in the dimension table the result for
the Combination Lookup/Update step is unreliable.
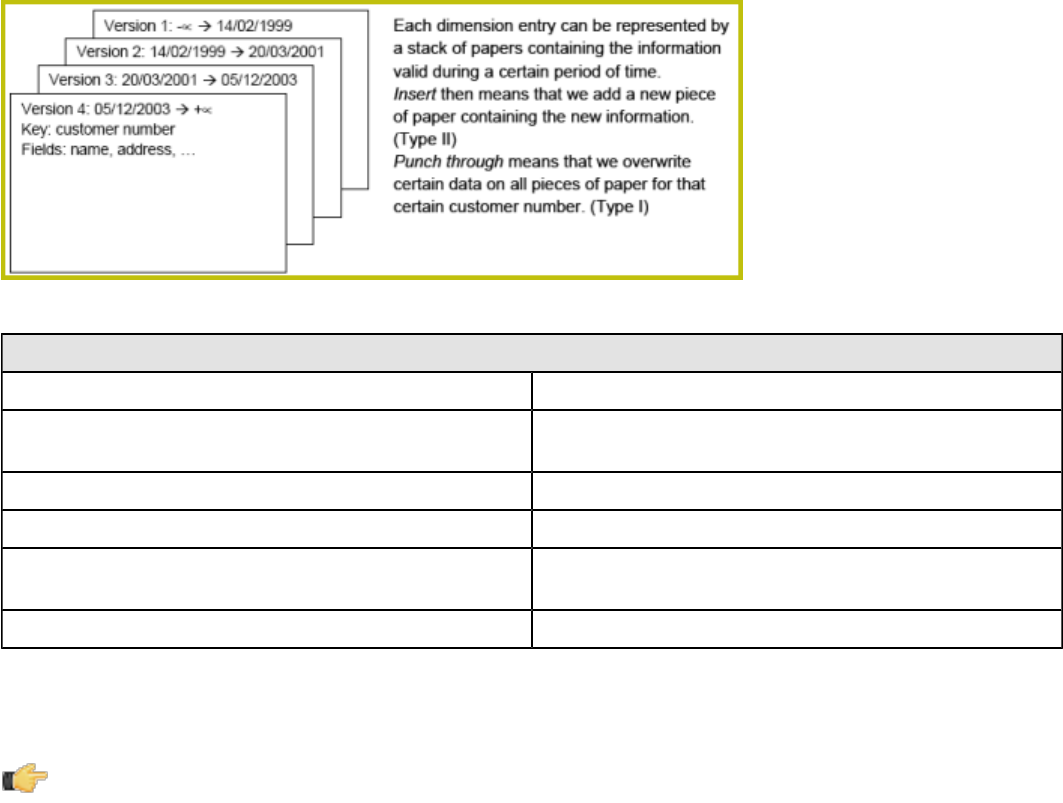
| Transformation Step Reference | 203
Dimension Lookup/Update
The Dimension Lookup/Update step allows you to implement Ralph Kimball's slowly changing dimension for both types:
Type I (update) and Type II (insert). Not only can you use this step to update a dimension table, it may also be used to
look up values in a dimension.
In this dimension implementation each entry in the dimension table has the following properties:
Option Description
Technical key This is the primary key of the dimension.
Version field Shows the version of the dimension entry (a revision
number).
Start of date range This is the field name containing the validity starting date.
End of date range This is the field name containing the validity ending date.
Keys These are the keys used in your source systems. For
example: customer numbers, product id, etc.
Fields These fields contain the actual information of a dimension.
As a result of the lookup or update operation of this step type, a field is added to the stream containing the technical key
of the dimension. In case the field is not found, the value of the dimension entry for not found (0 or 1, based on the type
of database) is returned.
Note: This dimension entry is added automatically to the dimension table when the update is first run. If you
have "NOT NULL" fields in your table, adding an empty row causes the entire step to fail! Make sure that you
have a record with the ID field = 0 or 1 in your table if you do not want PDI to insert a potentially invalid empty
record.
A number of optional fields (in the "Fields" tab) are automatically managed by the step. You can specify the table field
name in the "Dimension Field" column. These are the optional fields:
• Date of last insert or update (without stream field as source): Adds and manages a Date field
• Date of last insert (without stream field as source): Adds and manages a Date field
• Date of last update (without stream field as source): Adds and manages a Date field
• Last version (without stream field as source): Adds and manages a Boolean field. (converted into Char(1) or boolean
database data type depending on your database connection settings and availability of such data type). This acts as
a current valid dimension entry indicator for the last version:. So when a type II attribute changes and a new version
is created (to keep track of the history) the 'Last version' attribute in the previous version is set to 'False/N' and the
new record with the latest version is set to 'True/Y'.
Lookup
In read-only mode (update option is disabled), the step only performs lookups in a slowly changing dimension. The
step will perform a lookup in the dimension table on the specified database connection and in the specified schema.
To perform the lookup it uses not only the specified natural keys (with an "equals" condition) but also the specified
"Stream datefield" (see below). The condition that is applied is: "Start or table date range" >= "Stream
datefield" AND "End or table date range" < "Stream datefield"

| Transformation Step Reference | 204
In the event no "Stream datefield" is specified the step uses the current system date to find the correct dimension
version record.
Note: If you use an "alternative start date" the SQL clause described above will differ slightly.
In the event that no row is found, the "unknown" key is returned. This will be 0 or 1 depending on whether you selected
an auto-increment field for the technical key field). Please note that we don't make a difference between "Unknown",
"Not found", "Empty", "Illegal format", etc. These nuances can be added manually however. Nothing prevents you from
flushing out these types before the data hits this step with a Filter, regular expression, etc. We suggest you manually
add values -1, -2, -3, etc for these special dimension entry cases, just like you would add the specific details of the
"Unknown" row prior to population of the dimension table.
Important: Because SQL is used to look up the technical key in the dimension table, take the following
precautions:
• Do not use NULL values for your natural key(s). Null values cannot be compared and are not indexed by most
databases.
• Be aware of data conversion issues that occur if you have data types in your input streams that are different from the
data types in your natural key(s). If you are have Strings in the steps input and in the database you use an Integer
for example, make sure you are capable of converting the String to number. See it as a best practice to do this
before this step to make sure it works as planned. Another typical example of problems is with floating point number
comparisons. Pentaho recommends you use data types such as Integer or Long Integers. Do not use Double,
Decimal or catch-all data types such as Oracle's Number (without length or precision; it implicitly uses precision 38
causing the use of the slower BigNumber data type)
Update
In update mode (update option is enabled) the step first performs a lookup of the dimension entry as described in the
"Lookup" section above. The result of the lookup is different though. Not only the technical key is retrieved from the
query, but also the dimension attribute fields. A field-by-field comparison then follows. Results are as follows:
• The record was not found, new record is inserted into the table.
• The record was found and any of the following is true:
• One or more attributes were different and had an "Insert" (Kimball Type II) setting: A new dimension record version
is inserted
• One or more attributes were different and had a "Punch through" (Kimball Type I) setting: These attributes in all the
dimension record versions are updated
• One or more attributes were different and had a "Punch through" (Kimbal lType I) setting: These attributes are
updated in all the dimension record versions
• One or more attributes were different and had an "Update" setting: These attributes in the last dimension record
version are updated
• All the attributes (fields) were identical : No updates or insertions are performed
Note: If you mix Insert, Punch Through and Update options in this step, this algorithm acts like a Hybrid Slowly
Changing Dimension. (it is no longer just Type I or II, it is a combination)
The following table provides a more detailed description of the options for the Dimension Lookup/Update step:
Option Description
Step name Optionally, you can change the name of this step to fit
your needs
Update the dimension? Enable to update the dimension based on the information
in the input stream; if not enabled, the dimension only
performs lookups and adds the technical key field to the
streams
Connection Name of the database connection on which the dimension
table resides
Target schema Schema name to improve precision in the quoting and
allow for table names that contain dots '.'

| Transformation Step Reference | 205
Option Description
Target table Name of the dimension table
Commit size Setting commit size to 10 generates a commit every 10
inserts or updates
Caching •Enable the cache? Enable data caching in this step;
set a cache size of >=0 in previous versions or -1 to
disable caching
•Pre-load cache? You can enhance performance by
reading the complete contents of a dimension table
prior to performing lookups. Performance is increased
by the elimination of the round trips to the database
and by the sorted list lookup algorithm.
•Cache size in rows The cache size in number of rows
that will be held in memory to speed up lookups by
reducing the number of round trips to the database.
Note: Only the last version of a dimension entry
is kept in memory (unless pre-load is enabled).
If there are more entries passing than what can
be kept in memory, the technical keys with the
highest values are kept in memory in the hope
that these are the most relevant.
Important: A cache size of 0 caches as many
rows as possible and until your JVM runs out of
memory. Use this option wisely with dimensions
that can't grow too large. A cache size of -1
means that caching is disabled.
Keys tab The names of the keys in the stream and in the dimension
table; enables the step to perform the lookup
Fields tab For each of the fields you must have in the dimension,
you can specify whether you want the values to be
updated (for all versions, this is a Type I operation) or you
want to have the values inserted into the dimension as a
new version. In the example we used in the screenshot
the birth date is something that's not variable in time, so
if the birth date changes, it means that it was wrong in
previous versions. It's only logical then, that the previous
values are corrected in all versions of the dimension entry.
Technical key field The primary key of the dimension; also referred
to as Surrogate Key. Use the new name option
to rename the technical key after a lookup. For
example, if you need to lookup different types
of products like ORIGINAL_PRODUCT_TK,
REPLACEMENT_PRODUCT_TK, ...
Note: Renaming technical keys is only possible
during lookup mode, not when running in update.
Creation of technical key Indicates how the technical key is generated; options that
are not available for your connection are grayed out
•Use table maximum + 1 A new technical key will
be created from the maximum key in the table. Note
that the new maximum is always cached, so that the
maximum does not need to be calculated for each new
row.

| Transformation Step Reference | 206
Option Description
•Use sequence Specify the sequence name if you
want to use a database sequence on the table
connection to generate the technical key (typical for
Oracle e.g.).
•Use auto increment field Use an auto increment field
in the database table to generate the technical key
(typical for DB2 e.g.).
Version field The name of the field in which to store the version
(revision number)
Stream Datefield If you have the date at which the dimension entry was last
changed, you can specify the name of that field here. It
allows the dimension entry to be accurately described for
what the date range concerns. If you do not have such
a date, the system date is used. When the dimension
entries are looked up (Update the dimension is not
selected) the date field entered into the stream datefield
is used to select the appropriate dimension version based
on the date from and date to dates in the dimension
record.
Date range start field Specify the names of the dimension entries start range.
Use an alternative start date? When enabled, you can choose an alternative to the "Min.
Year"/01/01 00:00:00 date that is used. You can use any
of the following:
•System date Use the system date as a variable date/
time
•Start date of transformation Use the system date,
taken at start of the transformation for the start date
•Empty (null) value
•Column value Select a column from which to take the
value
Important: It is possible to create a non-
conformed dimension with these options; use
them wisely, however. Not all possibilities make
sense!
Table date range end The names of the dimension entries end range
Get Fields Fills in all the available fields on the input stream, except
for the keys you specified
SQL Generates the SQL to build the dimension and allows you
to execute this SQL.
Validation
The PDI transformation steps in this section pertain to data validation.
Credit Card Validator
This step is not yet documented here. However, there may be a rough definition available in the Pentaho Wiki: http://
wiki.pentaho.com/display/EAI/Pentaho+Data+Integration+Steps.

| Transformation Step Reference | 207
Option Definition
Step name The name of this step as it appears in the transformation
workspace.
Data Validator
This step is not yet documented here. However, there may be a rough definition available in the Pentaho Wiki: http://
wiki.pentaho.com/display/EAI/Pentaho+Data+Integration+Steps.
Option Definition
Step name The name of this step as it appears in the transformation
workspace.
Mail Validator
This step is not yet documented here. However, there may be a rough definition available in the Pentaho Wiki: http://
wiki.pentaho.com/display/EAI/Pentaho+Data+Integration+Steps.
Option Definition
Step name The name of this step as it appears in the transformation
workspace.
XSD Validator
This step is not yet documented here. However, there may be a rough definition available in the Pentaho Wiki: http://
wiki.pentaho.com/display/EAI/Pentaho+Data+Integration+Steps.
Option Definition
Step name The name of this step as it appears in the transformation
workspace.
Statistics
The PDI transformation steps in this section pertain to statistics and analysis.
Analytic Query
This step allows you to execute analytic queries over a sorted dataset. Examples of common use cases are:
• Calculate the "time between orders" by ordering rows by order date, and LAGing 1 row back to get previous order
time.
• Calculate the "duration" of a web page view by LEADing 1 row ahead and determining how many seconds the user
was on this page.
Option Description
Step name The name of this step as it appears in the transformation
workspace. Note: This name must be unique within a
single transformation.
Group fields table Specify the fields you want to group. Click Get Fields
to add all fields from the input stream(s). The step will
do no additional sorting, so in addition to the grouping
identified (ie, CUSTOMER_ID) here you must also have
the data sorted (ORDER_DATE).
Analytic Functions table Specify the analytic functions to be solved.

| Transformation Step Reference | 208
Option Description
New Field Name the name you want this new field to be named on the
stream (PREV_ORDER_DATE)
Subject The existing field to grab (ORDER_DATE)
Type Set the type of analytic function; Lead - Go forward N
rows and get the value of Subject. Lag - Go backward N
rows and get the value of Subject
N The number of rows to offset (backwards or forwards)
Examples
There are two examples available in the samples folder within Pentaho's distribution of PDI:
samples/transformations/Analytic Query - Lead One Example.ktr
samples/transformations/Analytic Query - Random Value Example.ktr
Group By
This step allows you to calculate values over a defined group of fields. Examples of common use cases are: calculate
the average sales per product or get the number of yellow shirts that we have in stock. Sample transformations that
include this step are located at:
•.../samples/transformations/Group By - Calculate standard deviation.ktr
•.../samples/transformations/Group by - include all rows and calculations .ktr
•.../samples/transformations/Group By - include all rows without a grouping.ktr
Group By Options
Option Description
Step name Optionally, you can change the name of this step to fit
your needs.
Include all rows? Enable if you want all rows in the output, not just the
aggregation; to differentiate between the two types of
rows in the output, a flag is required in the output. You
must specify the name of the flag field in that case (the
type is boolean).
Temporary files directory The directory in which the temporary files are stored if
needed; the default is the standard temporary directory for
the system
TMP-file prefix Specify the file prefix used when naming temporary files
Add line number, restart in each group Enable to add a line number that restarts at 1 in each
group
Line number field name Enable to add a line number that restarts at 1 in each
group
Always give back a row If you enable this option, the Group By step will always
give back a result row, even if there is no input row. This
can be useful if you want to count the number of rows.
Without this option you would never get a count of zero
(0).
Group fields table Specify the fields over which you want to group. Click Get
Fields to add all fields from the input stream(s).

| Transformation Step Reference | 209
Option Description
Aggregates table Specify the fields that must be aggregated, the method
and the name of the resulting new field. Here are the
available aggregation methods:
• Sum
• Average (Mean)
• Minimum
• Maximum
• Number of values (N)
• Concatenate strings separated by , (comma)
• First non-null value
• Last non-null value
• First value (including null)
• Last value (including null)
• Cumulative sum (all rows option only!)
• Cumulative average (all rows option only!)
• Standard deviation
• Concatenate strings separated by <Value>: specify the
separator in the Value column
Memory Group By
This step builds aggregates in a group by fashion and does not require a sorted input.
Option Definition
Step name The name of this step as it appears in the transformation
workspace.
Always give back a result row Option to provide a results summary.
The field that make up the group After retrieving fields using the Get Fields button,
designate the fields to include in the group.
Aggregates After retrieving fields using the Get looup fields
button, designate the fields to include in the group.
Output Steps Metrics
This step is not yet documented here. However, there may be a rough definition available in the Pentaho Wiki: http://
wiki.pentaho.com/display/EAI/Pentaho+Data+Integration+Steps.
Option Definition
Step name The name of this step as it appears in the transformation
workspace.
Reservoir Sampling
The reservoir sampling step allows you to sample a fixed number of rows from an incoming data stream when the total
number of incoming rows is not known in advance. The step uses uniform sampling; all incoming rows have an equal
chance of being selected. This step is particularly useful when used in conjunction with the ARFF output step in order to
generate a suitable sized data set to be used by WEKA. The reservoir sampling step uses Algorithm R by Jeffery Vitter.
Option Description
Step name The name of this step as it appears in the transformation
workspace.

| Transformation Step Reference | 210
Option Description
Sample size Select how many rows to sample from an incoming
stream. Setting a value of 0 will cause all rows to be
sampled; setting a negative value will block all rows.
Random seed Choose a seed for the random number generator.
Repeating a transformation with a different value for
the seed will result in a different random sample being
chosen.
Sample Rows
This step is not yet documented here. However, there may be a rough definition available in the Pentaho Wiki: http://
wiki.pentaho.com/display/EAI/Pentaho+Data+Integration+Steps.
Option Definition
Step name The name of this step as it appears in the transformation
workspace.
Univariate Statistics
This step allows simple, univariate statistics to be computed from incoming data in a Kettle transform.
For more information, including procedures on how to use this step, see Using the Weka Statistics Plugin on our wiki
page.
Palo
The PDI transformation steps in this section pertain to interactivity with Palo business intelligence software.
Palo Cell Input
This step is not yet documented here. However, there may be a rough definition available in the Pentaho Wiki: http://
wiki.pentaho.com/display/EAI/Pentaho+Data+Integration+Steps.
Option Definition
Step name The name of this step as it appears in the transformation
workspace.
Palo Cell Output
This step is not yet documented here. However, there may be a rough definition available in the Pentaho Wiki: http://
wiki.pentaho.com/display/EAI/Pentaho+Data+Integration+Steps.
Option Definition
Step name The name of this step as it appears in the transformation
workspace.
Palo Dim Input
This step is not yet documented here. However, there may be a rough definition available in the Pentaho Wiki: http://
wiki.pentaho.com/display/EAI/Pentaho+Data+Integration+Steps.
Option Definition
Step name The name of this step as it appears in the transformation
workspace.
| Transformation Step Reference | 211
Palo Dim Output
This step is not yet documented here. However, there may be a rough definition available in the Pentaho Wiki: http://
wiki.pentaho.com/display/EAI/Pentaho+Data+Integration+Steps.
Option Definition
Step name The name of this step as it appears in the transformation
workspace.
Job
The PDI transformation steps in this section pertain to interactivity with a PDI job that is calling this transformation (a
parent job).
Copy Rows to Result
This step allows you to transfer rows of data (in memory) to the next transformation (job entry) in a job.
Option Definition
Step name The name of this step as it appears in the transformation
workspace.
Get Files From Result
This step allows you to read filenames used or generate in a previous entry in a job.
Every time a file gets processed, used or created in a transformation or a job, the details of the file, the job entry, the
step, etc. is captured and added to the result. You can access this file information using this step.
Below is a list of the output fields generated by this step including an example of each:
• Type (string): Normal, Log, Error, Error-line, etc.
• Filename (string): somefile.txt
• Path (string): C:\Foo\Bar\somefile.txt
• Parentorigin (string): Process files transformation
• Origin (string): Text File Input
• Comment (string): Read by text file input
• Timestamp (date): 2006-06-23 12:34:56
Option Definition
Step name The name of this step as it appears in the transformation
workspace.
Get Rows From Result
This step returns rows that were previously generated by another transformation in a job. The rows were passed on to
this step using the Copy rows to result step. You can enter the meta-data of the fields you're expecting from the
previous transformation in a job.
Important: There is no validation performed on this metadata; it is intended as an aid during design.
Option Definition
Step name The name of this step as it appears in the transformation
workspace.
Fieldname Name of the field that contains the rows from the previous
result.

| Transformation Step Reference | 212
Option Definition
Type Type of data.
Length For Number: Total number of significant figures in a
number; For String: total length of string; For Date: length
of printed output of the string.
Precision For Number: Number of floating point digits; For String,
Date, Boolean: unused.
Get Variables
This step allows you to get the value of a variable. This step can return rows or add values to input rows.
Note: You must specify the complete variable specification in the format ${variable} or %%variable%%.
That means you can also enter complete strings in the variable column, not just a variable.
Option Definition
Step name The name of this step as it appears in the transformation
workspace.
Name Name of the field.
Variable Allows you to enter variables as complete strings to
return rows or add values to input rows. For example,
you can specify: ${java.io.tmpdir}/kettle/
tempfile.txt and it will be expanded to /tmp/
kettle/tempfile.txt on Unix-like systems.
Type Specifies the field type: String, Date, Number, Boolean,
Integer, BigNumber, Serializable, or Binary..
Format Allows you to specify the format of the field after the type
has been determined.
Length For Number: Total number of significant figures in a
number; For String: total length of string; For Date: length
of printed output of the string (for example, entering 4
would only return the year).
Precision For Number: Number of floating point digits. Not used for
String, Date, or Boolean.
Currency Used to interpret numbers with currency symbols. For
example, $10,000.00 or E5.000,00.
Decimal Used to indicate whether to use a period (".") or comma
(",") for number values.
Group Used to indicate whether to use a period (".") or comma
(",") for number values.
Trim type Type trim this field before processing: select either none,
left, right, or both (left and right).
Set Files in Result
This step allows you to set filenames in the result of a transformation. Subsequent job entries can then use this
information as it routes the list of files to the results stream.
Option Definition
Step name The name of this step as it appears in the transformation
workspace.

| Transformation Step Reference | 213
Option Definition
Filename field Field that contains the filenames of the files to copy.
Type of file to Select the type of file to set in results.
Set Variables
This step is not yet documented here. However, there may be a rough definition available in the Pentaho Wiki: http://
wiki.pentaho.com/display/EAI/Pentaho+Data+Integration+Steps.
Option Definition
Step name The name of this step as it appears in the transformation
workspace.
Mapping
The PDI transformation steps in this section pertain to value mapping.
Mapping (sub-transformation)
This step is not yet documented here. However, there may be a rough definition available in the Pentaho Wiki: http://
wiki.pentaho.com/display/EAI/Pentaho+Data+Integration+Steps.
Option Definition
Step name The name of this step as it appears in the transformation
workspace.
Mapping Input Specification
This step is not yet documented here. However, there may be a rough definition available in the Pentaho Wiki: http://
wiki.pentaho.com/display/EAI/Pentaho+Data+Integration+Steps.
Option Definition
Step name The name of this step as it appears in the transformation
workspace.
Mapping Output Specification
This step is not yet documented here. However, there may be a rough definition available in the Pentaho Wiki: http://
wiki.pentaho.com/display/EAI/Pentaho+Data+Integration+Steps.
Option Definition
Step name The name of this step as it appears in the transformation
workspace.
Bulk Loading
The PDI transformation steps in this section pertain to bulk loading of data.
ElasticSearch Bulk Insert
This step is not yet documented here. However, there may be a rough definition available in the Pentaho Wiki: http://
wiki.pentaho.com/display/EAI/Pentaho+Data+Integration+Steps.

| Transformation Step Reference | 214
Option Definition
Step name The name of this step as it appears in the transformation
workspace.
Greenplum Bulk Loader
This step is not yet documented here. However, there may be a rough definition available in the Pentaho Wiki: http://
wiki.pentaho.com/display/EAI/Pentaho+Data+Integration+Steps.
Option Definition
Step name The name of this step as it appears in the transformation
workspace.
Greenplum Load
This step is not yet documented here. However, there may be a rough definition available in the Pentaho Wiki: http://
wiki.pentaho.com/display/EAI/Pentaho+Data+Integration+Steps.
Option Definition
Step name The name of this step as it appears in the transformation
workspace.
Infobright Loader
This step allows you to load data into an Infobright database table.
Important: If you want to use the InfoBright bulk loader step within Windows copy either one of the files listed
below to your Windows system path (for example %WINDIR%/System32/):
libswt/win32/infobright_jni_64bit.dll (Windows 64-bit)
or
libswt/win32/infobright_jni.dll (Windows 32-bit)
Then rename the file to:
infobright_jni.dll
Option Description
Step name The name of this step as it appears in the transformation
workspace.
Database Drop-down menu allows you to select the appropriate
Infobright database connection. Note: List is populated
only once a database connection has already been
established; if no database connection has been
established, this list will be blank.
Infobright product Select which version of the Infobright product you are
using; Enterprise (EE) or Community (CE) edition.
Target schema The name of the schema for the table to write data to.
This is vital for data sources which allow for table names
with dots (".").
Target table Name of the target table.
Character set The used character set.
Agent port Specify the port of the database.

| Transformation Step Reference | 215
Option Description
Debug file This step generates a .txt file, this option allows you to
specify the file name of the debug file.
Ingres VectorWise Bulk Loader
This step is not yet documented here. However, there may be a rough definition available in the Pentaho Wiki: http://
wiki.pentaho.com/display/EAI/Pentaho+Data+Integration+Steps.
Option Definition
Step name The name of this step as it appears in the transformation
workspace.
LucidDB Streaming Loader
This step is not yet documented here. However, there may be a rough definition available in the Pentaho Wiki: http://
wiki.pentaho.com/display/EAI/Pentaho+Data+Integration+Steps.
Option Definition
Step name The name of this step as it appears in the transformation
workspace.
MonetDB Bulk Loader
This step is not yet documented here. However, there may be a rough definition available in the Pentaho Wiki: http://
wiki.pentaho.com/display/EAI/Pentaho+Data+Integration+Steps.
Option Definition
Step name The name of this step as it appears in the transformation
workspace.
MySQL Bulk Loader
This step is not yet documented here. However, there may be a rough definition available in the Pentaho Wiki: http://
wiki.pentaho.com/display/EAI/Pentaho+Data+Integration+Steps.
Option Definition
Step name The name of this step as it appears in the transformation
workspace.
Oracle Bulk Loader
This step is not yet documented here. However, there may be a rough definition available in the Pentaho Wiki: http://
wiki.pentaho.com/display/EAI/Pentaho+Data+Integration+Steps.
Option Definition
Step name The name of this step as it appears in the transformation
workspace.
PostgreSQL Bulk Loader
This step is not yet documented here. However, there may be a rough definition available in the Pentaho Wiki: http://
wiki.pentaho.com/display/EAI/Pentaho+Data+Integration+Steps.

| Transformation Step Reference | 216
Option Definition
Step name The name of this step as it appears in the transformation
workspace.
Teradata Fastload Bulk Loader
This step is not yet documented here. However, there may be a rough definition available in the Pentaho Wiki: http://
wiki.pentaho.com/display/EAI/Pentaho+Data+Integration+Steps.
Option Definition
Step name The name of this step as it appears in the transformation
workspace.
Inline
The PDI transformation steps in this section pertain to inline data modification.
Injector
This step allows you to insert rows into the transformation using the Kettle API and Java.
Option Definition
Step name The name of this step as it appears in the transformation
workspace.
Fieldname Specify the field name of the rows to inject.
Type Specify the type of data.
Length For Number: Total number of significant figures in a
number; For String: total length of string; For Date: length
of printed output of the string.
Precision For Number: Number of floating point digits; For String,
Date, Boolean: unused.
Socket Reader
This step is not yet documented here. However, there may be a rough definition available in the Pentaho Wiki: http://
wiki.pentaho.com/display/EAI/Pentaho+Data+Integration+Steps.
Option Definition
Step name The name of this step as it appears in the transformation
workspace.
Socket Writer
This step is not yet documented here. However, there may be a rough definition available in the Pentaho Wiki: http://
wiki.pentaho.com/display/EAI/Pentaho+Data+Integration+Steps.
Option Definition
Step name The name of this step as it appears in the transformation
workspace.
Data Mining Steps
The PDI transformation steps in this section pertain to using Data Mining (Weka) plugins.
| Transformation Step Reference | 217
Weka Scoring
This step allows you to use the Weka scoring plugin in PDI. The Weka scoring plugin is a tool that allows classification
and clustering models created with Weka to be used to score (attach a prediction to incoming rows of data) new data as
part of a Kettle transform.
For more information, including procedures on how to use this step, see Using the Weka Scoring Plugin on our wiki
page.
Reservoir Sampling
The reservoir sampling step allows you to sample a fixed number of rows from an incoming data stream when the total
number of incoming rows is not known in advance. The step uses uniform sampling; all incoming rows have an equal
chance of being selected. This step is particularly useful when used in conjunction with the ARFF output step in order to
generate a suitable sized data set to be used by WEKA. The reservoir sampling step uses Algorithm R by Jeffery Vitter.
Option Description
Step name The name of this step as it appears in the transformation
workspace.
Sample size Select how many rows to sample from an incoming
stream. Setting a value of 0 will cause all rows to be
sampled; setting a negative value will block all rows.
Random seed Choose a seed for the random number generator.
Repeating a transformation with a different value for
the seed will result in a different random sample being
chosen.
ARFF Output
This step allows you to output data from PDI to a file in Weka's Attribute Relation File Format (ARFF). ARFF format is
essentially the same as comma separated values (CSV) format, except with the addition of metadata on the attributes
(fields) in the form of a header.
For more information, including procedures on how to use this step, see Using the ARFF Output Plugin on our wiki
page.
Univariate Statistics
This step allows simple, univariate statistics to be computed from incoming data in a Kettle transform.
For more information, including procedures on how to use this step, see Using the Weka Statistics Plugin on our wiki
page.
Knowledge Flow
This step allows entire data mining processes to be run as part of a transformation.
For more information, including procedures on how to use this step, see Using the Knowledge Flow Plugin on our wiki
page.
Univariate Statistics
This step allows simple, univariate statistics to be computed from incoming data in a Kettle transform.
For more information, including procedures on how to use this step, see Using the Weka Statistics Plugin on our wiki
page.
Weka Forecasting
This step can load or import a time series forecasting model created in Weka's time series analysis and forecasting
environment and use it to generate a forecast for future time steps beyond the end of incoming historical data. This
differs from the standard classification or regression scenario covered by the Weka Scoring plugin, where each
| Transformation Step Reference | 218
incoming row receives a prediction (score) from the model, in that incoming rows provide a "window" over the recent
history of the time series that the forecasting model then uses to initiate a closed-loop forecasting process to generate
predictions for future time steps.
For more information, including procedures on how to use this step, see Using the Weka Forecasting Plugin on our wiki
page.
| Job Entry Reference | 219
Job Entry Reference
This section contains reference documentation for job entries.
Note: Many entries are not completely documented in this section, but have rough definitions in the Pentaho
Wiki: http://wiki.pentaho.com/display/EAI/Pentaho+Data+Integration+Job+Entries.
File Encryption
The PDI job entries in this section pertain to file encryption operations.
Decrypt Files With PGP
This entry is not yet documented here. However, there may be a rough definition available in the Pentaho Wiki: http://
wiki.pentaho.com/display/EAI/Pentaho+Data+Integration+Job+Entries.
Option Definition
Job entry name The name of this entry as it appears in the transformation
workspace.
Encrypt Files With PGP
This entry is not yet documented here. However, there may be a rough definition available in the Pentaho Wiki: http://
wiki.pentaho.com/display/EAI/Pentaho+Data+Integration+Job+Entries.
Option Definition
Job entry name The name of this entry as it appears in the transformation
workspace.
Verify File Signature With PGP
This entry is not yet documented here. However, there may be a rough definition available in the Pentaho Wiki: http://
wiki.pentaho.com/display/EAI/Pentaho+Data+Integration+Job+Entries.
Option Definition
Job entry name The name of this entry as it appears in the transformation
workspace.
Big Data
The PDI job entries in this section pertain to Hadoop functions.
Note: PDI is configured by default to use the Apache Hadoop distribution. If you are working with a Cloudera
or MapR distribution instead, you must install the appropriate patch before using any Hadoop functions in PDI.
Patch installation is covered in Data Integration Installation and Work with Big Data.
Amazon EMR Job Executor
This job entry executes Hadoop jobs on an Amazon Elastic MapReduce (EMR) account. In order to use this step, you
must have an Amazon Web Services (AWS) account configured for EMR, and a premade Java JAR to control the
remote job.
Option Definition
Name The name of this Amazon EMR Job Executer step
instance.

| Job Entry Reference | 220
Option Definition
EMR Job Flow Name The name of the Amazon EMR job flow (series of steps)
you are executing.
AWS Access Key Your Amazon Web Services access key.
AWS Secret Key Your Amazon Web Services secret key.
S3 Staging Directory The Amazon Simple Storage Service (S3) address of the
working directory for this Hadoop job. This directory will
contain the MapReduce JAR, and log files will be placed
here as they are created.
MapReduce JAR The Java JAR that contains your Hadoop mapper
and reducer classes. The job must be configured and
submitted using a static main method in any class in the
JAR.
Command line arguments Any command line arguments that must be passed to the
static main method in the specified JAR.
Number of Instances The number of Amazon Elastic Compute Cloud (EC2)
instances you want to assign to this job.
Master Instance Type The Amazon EC2 instance type that will act as
the Hadoop "master" in the cluster, which handles
MapReduce task distribution.
Slave Instance Type The Amazon EC2 instance type that will act as one or
more Hadoop "slaves" in the cluster. Slaves are assigned
tasks from the master. This is only valid if the number of
instances is greater than 1.
Enable Blocking Forces the job to wait until each step completes before
continuing to the next step. This is the only way for PDI to
be aware of a Hadoop job's status. If left unchecked, the
Hadoop job is blindly executed, and PDI moves on to the
next step. Error handling/routing will not work unless this
option is checked.
Logging Interval Number of seconds between log messages.
Amazon Hive Job Executor
This job executes Hive jobs on an Amazon Elastic MapReduce (EMR) account. In order to use this step, you must have
an Amazon Web Services (AWS) account configured for EMR, and a premade Java JAR to control the remote job.
Option Definition
Name The name of this job as it appears in the transformation
workspace.
Hive Job Flow Name The name of the Hive job flow to execute.
Existing JobFlow Id (optional) The name of a Hive Script on an existing EMR job flow.
AWS Access Key Your Amazon Web Services access key.
AWS Secret Key Your Amazon Web Services secret key.
Bootstrap Actions References to scripts to invoke before the
node begins processing data. See http://
docs.amazonwebservices.com/ElasticMapReduce/latest/
DeveloperGuide/Bootstrap.html for more information.
S3 Log Directory The URL of the Amazon S3 bucket in which your job flow
logs will be stored. Artifacts required for execution (e.g.

| Job Entry Reference | 221
Option Definition
Hive Script) will also be stored here before execution.
(Optional)
Hive Script The URL of the Hive script to execute within Amazon S3.
Command Line Arguments A list of arguments (space-separated strings) to pass to
Hive.
Number of Instances The number of Amazon EC2 instances used to execute
the job flow.
Master Instance Type The Amazon EC2 instance type that will act as
the Hadoop "master" in the cluster, which handles
MapReduce task distribution.
Slave Instance Type The Amazon EC2 instance type that will act as one or
more Hadoop "slaves" in the cluster. Slaves are assigned
tasks from the master. This is only valid if the number of
instances is greater than 1.
Keep Job Flow Alive Specifies whether the job flow should terminate after
completing all steps.
Hadoop Copy Files
This job entry copies files in a Hadoop cluster from one location to another.
General
Option Definition
Include Subfolders If selected, all subdirectories within the chosen directory
will be copied as well
Destination is a file Determines whether the destination is a file or a directory
Copy empty folders If selected, will copy all directories, even if they are empty
the Include Subfolders option must be selected for this
option to be valid
Create destination folder If selected, will create the specified destination directory if
it does not currently exist
Replace existing files If selected, duplicate files in the destination directory will
be overwritten
Remove source files If selected, removes the source files after copy (a move
procedure)
Copy previous results to args If selected, will use previous step results as your sources
and destinations
File/folder source The file or directory to copy from; click Browse and select
Hadoop to enter your Hadoop cluster connection details
File/folder destination The file or directory to copy to; click Browse and select
Hadoop to enter your Hadoop cluster connection details
Wildcard (RegExp) Defines the files that are copied in regular expression
terms (instead of static file names), for instance: .*\.txt
would be any file with a .txt extension
Files/folders A list of selected sources and destinations

| Job Entry Reference | 222
Result files name
Option Definition
Add files to result files name Any files that are copied will appear as a result from this
step; shows a list of files that were copied in this step
Hadoop Job Executor
This job entry executes Hadoop jobs on a Hadoop node. There are two option modes: Simple (the default condition), in
which you only pass a premade Java JAR to control the job; and Advanced, in which you are able to specify static main
method parameters. Most of the options explained below are only available in Advanced mode. The User Defined tab
in Advanced mode is for Hadoop option name/value pairs that are not defined in the Job Setup and Cluster tabs.
General
Option Definition
Name The name of this Hadoop Job Executer step instance.
Hadoop Job Name The name of the Hadoop job you are executing.
Jar The Java JAR that contains your Hadoop mapper and
reducer job instructions in a static main method.
Command line arguments Any command line arguments that must be passed to the
static main method in the specified JAR.
Job Setup
Option Definition
Output Key Class The Apache Hadoop class name that represents the
output key's data type.
Output Value Class The Apache Hadoop class name that represents the
output value's data type.
Mapper Class The Java class that will perform the map operation.
Pentaho's default mapper class should be sufficient for
most needs. Only change this value if you are supplying
your own Java class to handle mapping.
Combiner Class The Java class that will perform the combine operation.
Pentaho's default combiner class should be sufficient for
most needs. Only change this value if you are supplying
your own Java class to handle combining.
Reducer Class The Java class that will perform the reduce operation.
Pentaho's default reducer class should be sufficient for
most needs. Only change this value if you are supplying
your own Java class to handle reducing. If you do not
define a reducer class, then no reduce operation will
be performed and the mapper or combiner output will be
returned.
Input Path The path to your input file on the Hadoop cluster.
Output Path The path to your output file on the Hadoop cluster.
Input Format The Apache Hadoop class name that represents the input
file's data type.
Output Format The Apache Hadoop class name that represents the
output file's data type.

| Job Entry Reference | 223
Cluster
Option Definition
HDFS Hostname Hostname for your Hadoop cluster.
HDFS Port Port number for your Hadoop cluster.
Job Tracker Hostname If you have a separate job tracker node, type in the
hostname here. Otherwise use the HDFS hostname.
Job Tracker Port Job tracker port number; this cannot be the same as the
HDFS port number.
Number of Mapper Tasks The number of mapper tasks you want to assign to this
job. The size of the inputs should determine the number of
mapper tasks. Typically there should be between 10-100
maps per node, though you can specify a higher number
for mapper tasks that are not CPU-intensive.
Number of Reducer Tasks The number of reducer tasks you want to assign to this
job. Lower numbers mean that the reduce operations can
launch immediately and start transferring map outputs
as the maps finish. The higher the number, the quicker
the nodes will finish their first round of reduces and
launch a second round. Increasing the number of reduce
operations increases the Hadoop framework overhead,
but improves load balancing. If this is set to 0, then no
reduce operation is performed, and the output of the
mapper will be returned; also, combiner operations will
also not be performed.
Enable Blocking Forces the job to wait until each step completes before
continuing to the next step. This is the only way for PDI to
be aware of a Hadoop job's status. If left unchecked, the
Hadoop job is blindly executed, and PDI moves on to the
next step. Error handling/routing will not work unless this
option is checked.
Logging Interval Number of seconds between log messages.
Oozie Job Executor
This job entry executes Oozie Workflows. It is a front end on top of the OozieClient Java API that submits jobs to an
Oozie server using web service calls.
Oozie is a workflow/coordination system to manage Hadoop jobs. Oozie Workflow jobs are Directed Acyclical Graphs
(DAGs) of actions. Oozie Coordinator jobs are recurrent Oozie Workflow jobs and can be configured so a job is
triggered by time (frequency) and data availability.
Oozie is integrated with the rest of the Hadoop stack supporting several types of Hadoop jobs out of the box (Java
map-reduce, Streaming map-reduce, Pig, Distcp, etc.). To learn more about Oozie and Oozie Workflows, visit Oozie's
website: http://oozie.apache.org/index.html.
Oozie Job Executor (Quick Setup Mode)
Option Definition
Name The name of this job instance.
Oozie URL Field to enter an Oozie URL. This must be a valid Oozie
location.
Enable Blocking Option blocks the rest of a transformation from executing
until the Oozie job finishes when checked.

| Job Entry Reference | 224
Option Definition
Polling Interval (ms) Field allows you to set the interval rate to check for Oozie
workflows.
Workflow Properties Field to enter the Workfile Properties file. This path is
required and must be a valid job properties file. In the
properties file, the oozie.wf.application.path path
must be set.
Oozie Job Executor (Advanced Setup Mode)
If you have not set the Oozie path within your workflow properties file, you can add the needed path with Advanced
Setup Mode within the Oozie Job Executor. To access Advanced Setup Mode, from within the Oozie Job Executor
dialog, click Advanced Options.
Advanced Setup Mode allows you to add the needed Oozie path to your workflow properties file. It does not add the
path directly to the properties file, instead the path is added by the Oozie Job Executor, not directly changing your
workflow properties file.
Option Definition
Workflow Properties Displays the arguments, and their values, that are set
within the workflow properties file found at the Oozie URL
specified within the Oozie URL field.
Add Argument (green plus button) Allows you to add a workflow property argument. Use
this button to add the required Oozie path if it is not
already set. This does not add the path to the properties
file, instead it adds it to the PDI job, which adds it to the
workflow configuration upon execution of the job.
Delete Argument (red "x" button) Allows you to delete an argument. To delete an argument
from the Oozie Executor job, select the desired argument
from Workflow Properties, then click the Delete
Argument button.
Pentaho MapReduce
Note: This entry was formerly known as Hadoop Transformation Job Executor.
This job entry executes transformations as part of a Hadoop MapReduce job. This is frequently used to execute
transformations that act as mappers and reducers in lieu of a traditional Hadoop Java class. The User Defined tab is
for Hadoop option name/value pairs that are not defined in the Job Setup and Cluster tabs. Any properties defined
here will be set in the MapReduce job configuration.
General
Option Definition
Name The name of this Hadoop Job Executer step instance
Hadoop Job Name The name of the Hadoop job you are executing
Mapper
Option Definition
Look in Sets the context for the Browse button. Options are:
Local (the local filesystem), Repository by Name (a
PDI database or solution repository), or Repository by

| Job Entry Reference | 225
Option Definition
Reference (a link to a transformation no matter which
repository it is in).
Mapper Transformation The KTR that will perform the mapping functions for this
job.
Mapper Input Step Name The name of the step that receives mapping data from
Hadoop. This must be a MapReduce Input step.
Mapper Output Step Name The name of the step that passes mapping output back to
Hadoop. This must be a MapReduce Output step.
Combiner
Option Definition
Look in Sets the context for the Browse button. Options are:
Local (the local filesystem), Repository by Name (a
PDI database or solution repository), or Repository by
Reference (a link to a transformation no matter which
repository it is in).
Combiner Transformation The KTR that will perform the combiner functions for this
job.
Combiner Input Step Name The name of the step that receives combiner data from
Hadoop. This must be a MapReduce Input step.
Combiner Output Step Name The name of the step that passes combiner output back to
Hadoop. This must be a MapReduce Output step.
Combine single threaded Indicates if the Single Threaded transformation execution
engine should be used to execute the combiner
transformation. If false, the normal multi-threaded
transformation engine will be used. The Single Threaded
transformation execution engine reduces overhead when
processing many small groups of output.
Reducer
Option Definition
Look in Sets the context for the Browse button. Options are:
Local (the local filesystem), Repository by Name (a
PDI database or solution repository), or Repository by
Reference (a link to a transformation no matter which
repository it is in).
Reducer Transformation The KTR that will perform the reducer functions for this
job.
Reducer Input Step Name The name of the step that receives reducing data from
Hadoop. This must be a MapReduce Input step.
Reducer Output Step Name The name of the step that passes reducing output back to
Hadoop. This must be a MapReduce Output step.
Reduce single threaded Indicates if the Single Threaded transformation
execution engine should be used to execute the reducer
transformation. If false, the normal multi-threaded
transformation engine will be used. The Single Threaded
transformation execution engine reduces overhead when
processing many small groups of output.

| Job Entry Reference | 226
Job Setup
Option Definition
Suppress Output of Map Key If selected the key output from the Mapper transformation
will be ignored and replaced with NullWritable.
Suppress Output of Map Value If selected the value output from the Mapper
transformation will be ignored and replaced with
NullWritable.
Suppress Output of Reduce Key If selected the key output from the Combiner and/or
Reducer transformations will be ignored and replaced with
NullWritable.
Suppress Output of Reduce Value If selected the key output from the Combiner and/or
Reducer transformations will be ignored and replaced with
NullWritable.
Input Path A comma-separated list of input directories , such as /
wordcount/input, from your Hadoop cluster where the
source data for the MapReduce job is stored.
Output Path The directory on your Hadoop cluster where you want the
output from the MapReduce job to be stored., such as //
wordcount/output. The output directory cannot exist
prior to running the MapReduce job.
Input Format The Apache Hadoop class name that describes the input
specification for the MapReduce job. See InputFormat for
more information.
Output Format The Apache Hadoop class name that describes the output
specification for the MapReduce job. See OutputFormat
for more information.
Clean output path before execution If enabled the output path specified will be removed
before the MapReduce job is scheduled.
Cluster
Option Definition
HDFS Hostname Hostname for your Hadoop cluster.
HDFS Port Port number for your Hadoop cluster.
Job Tracker Hostname If you have a separate job tracker node, type in the
hostname here. Otherwise use the HDFS hostname.
Job Tracker Port Job tracker port number; this cannot be the same as the
HDFS port number.
Number of Mapper Tasks The number of mapper tasks you want to assign to this
job. The size of the inputs should determine the number of
mapper tasks. Typically there should be between 10-100
maps per node, though you can specify a higher number
for mapper tasks that are not CPU-intensive.
Number of Reducer Tasks The number of reducer tasks you want to assign to this
job. Lower numbers mean that the reduce operations can
launch immediately and start transferring map outputs
as the maps finish. The higher the number, the quicker
the nodes will finish their first round of reduces and
launch a second round. Increasing the number of reduce
operations increases the Hadoop framework overhead,
but improves load balancing. If this is set to 0, then

| Job Entry Reference | 227
Option Definition
no reduce operation is performed, and the output of
the mapper becomes the output of the entire job; also,
combiner operations will also not be performed.
Enable Blocking Forces the job to wait until each step completes before
continuing to the next step. This is the only way for PDI to
be aware of a Hadoop job's status. If left unchecked, the
Hadoop job is blindly executed, and PDI moves on to the
next job entry. Error handling/routing will not work unless
this option is checked.
Logging Interval Number of seconds between log messages.
Pig Script Executor
Executes a script written in Apache Pig's "Pig Latin" language on a Hadoop cluster. All log entries pertaining to this
script execution that are generated by Apache Pig will show in the PDI log.
General
Option Definition
Job Entry Name The name of this Pig Script Executor instance.
HDFS hostname The hostname of the machine that operates a Hadoop
distributed filesystem.
HDFS port The port number of the machine that operates a Hadoop
distributed filesystem.
Job tracker hostname The hostname of the machine that operates a Hadoop job
tracker.
Job tracker port The port number of the machine that operates a Hadoop
job tracker.
Pig script The path (remote or local) to the Pig Latin script you want
to execute.
Enable blocking If checked, the Pig Script Executor job entry will prevent
downstream entries from executing until the script has
finished processing.
Local execution Executes the script within the same Java virtual machine
that PDI is running in. This option is useful for testing
and debugging because it does not require access to a
Hadoop cluster. When this option is selected, the HDFS
and job tracker connection details are not required and
their corresponding fields will be disabled.
Script Parameters
Option Definition
#The order of execution of the script parameters.
Parameter name The name of the parameter you want to use.
Value The value you're substituting whenever the previously
defined parameter is used.

| Job Entry Reference | 228
Sqoop Export
The Sqoop Export job allows you to export data from Hadoop into an RDBMS using Apache Sqoop. This job has two
setup modes:
•Quick Mode provides the minimum options necessary to perform a successful Sqoop export.
•Advanced Mode's default view provides options for to better control your Sqoop export. Advance Mode also has a
command line view which allows you to reuse an existing Sqoop command from the command line.
For additional information about Apache Sqoop, visit http://sqoop.apache.org/.
Quick Setup
Option Definition
Name The name of this job as it appears in the transformation
workspace.
Namenode Host Host name or IP address of the Hadoop NameNode.
Namenode Port Port number of the Hadoop NameNode.
Jobtracker Host Host name of the Hadoop JobTracker.
Job Tracker Port Port number of the Hadoop JobTracker
Export Directory Path of the directory within HDFS to export from.
Database Connection Select the database connection to export to.
Clicking Edit... allows you to edit an existing connection
or you can create a new connection from this dialog by
clicking New....
Table Destination table to export into. If the source database
requires it a schema may be supplied in the format:
SCHEMA.TABLE_NAME. This table must exist and its
structure must match the input data’s format.
Advanced Setup
Option Definition
Default/List view List of property and value pair settings which can be
modified to suit your needs including options to configure
an export from Hive or HBase.
Command line view Field which accepts command line arguments, typically
used to allow you to paste an existing Sqoop command
line argument.
Sqoop Import
The Sqoop Import job allows you to import data from a relational database into the Hadoop Distributed File System
(HDFS) using Apache Sqoop. This job has two setup modes:
•Quick Mode provides the minimum options necessary to perform a successful Sqoop import.
•Advanced Mode's default view provides options for to better control your Sqoop import. Advance Mode also has a
command line view which allows you to paste an existing Sqoop command line argument into.
For additional information about Apache Sqoop, visit http://sqoop.apache.org/.
| Job Entry Reference | 229
Quick Setup
Option Definition
Name The name of this job as it appears in the transformation
workspace.
Database Connection Select the database connection to import from. Clicking
Edit... allows you to edit an existing connection or you
can create a new connection from this dialog by clicking
New....
Table Source table to import from. If the source database
requires it a schema may be supplied in the format:
SCHEMA.YOUR_TABLE_NAME.
Namenode Host Host name of the target Hadoop NameNode.
Namenode Port Port number of the target Hadoop NameNode.
Jobtracker Host Host name of the target Hadoop JobTracker.
Job Tracker Port Port number of the target Hadoop JobTracker.
Target Directory Path of the directory to import into.
Advanced Setup
Option Definition
Default/List view List of property and value pair settings which can be
modified to suit your needs including options to configure
an import to Hive or HBase.
Command line view Field which accepts command line arguments, typically
used to allow you to paste an existing Sqoop command
line argument.
General
The PDI job entries in this section pertain to general data integration functions.
Start
Start defines the starting point for job execution. Every job must have one (and only one) Start. Unconditional job hops
only are available from a Start job entry. The start job entry settings contain basic scheduling functionality; however,
scheduling is not persistent and is only available while the device is running.
The Data Integration Server provides a more robust option for scheduling execution of jobs and transformations and is
the preferred alternative to scheduling using the Start step. If you want the job to run like a daemon process, however,
enable Repeat in the job settings dialog box.
Dummy
The Dummy job entry does nothing. It is just an entry point on the canvas; however, suppose you have a
transformation that processes one row at a time. You have set the transformation so that it gets the initial five records
and processes the additional records five at a time. The Job script must determine whether or not processing is
complete. It may need to loop back over a few times. The job workflow drawing could be tough to read in this type of
scenario. The Dummy job entry makes the job workflow drawing clearer for looping. Dummy performs no evaluation.
Example Plugin
This entry is not yet documented here. However, there may be a rough definition available in the Pentaho Wiki: http://
wiki.pentaho.com/display/EAI/Pentaho+Data+Integration+Job+Entries.

| Job Entry Reference | 230
Option Definition
Job entry name The name of this entry as it appears in the transformation
workspace.
Job
Use the Job job entry to execute a previously defined job. Job entry jobs allow you to perform "functional
decomposition." That is, you use them to break out jobs into more manageable units. For example, you would not write
a data warehouse load using one job that contains 500 entries. It is better to create smaller jobs and aggregate them.
Below are the job options listed by tab name. The name of the job entry appears above every tab.
Transformation Specification
Option Description
Name of the Job Entry The unique name of the job entry on the canvas. A job
entry can be placed on the canvas several times; however
it will be the same job entry
Job Filename If you are not working in a repository, specify the XML file
name of the transformation to start. Click to browse
through your local files.
Specify by Name and Directory If you are working in the DI Repository or database
repository, specify the name of the transformation to start.
Click the Browse In Jobs button to browse through the DI
Repository.
Specify by Reference If you specify a transformation or job by reference, you
can rename or move it around in the DI Repository. The
reference (identifier) is stored, not the name and directory.
Advanced
Option Description
Copy previous results to args? The results from a previous transformation can be sent to
this one using the Copy rows to result step
Copy previous results to parameters? If Execute for every input row is enabled then each row
is a set of command line arguments to be passed into
the transformation, otherwise only the first row is used to
generate the command line arguments.
Execute for every input row? Implements looping; if the previous job entry returns a
set of result rows, the job executes once for every row
found. One row is passed to the job at every execution.
For example, you can execute a job for each file found in
a directory.
Remote slave server The slave server on which to execute the job
Wait for the remote transformation to finish? Enable to block until the job on the slave server has
finished executing
Follow local abort to remote transformation Enable to send the abort signal to the remote job if it is
called locally
Expand child jobs and transformations on the server When the remote job starts child jobs and
transformations, they are exposed on the slave server and
can be monitored.

| Job Entry Reference | 231
Logging Settings
Option Description
Specify logfile? Enable to specify a separate logging file for the execution
of this transformation
Append logfile? Enable to append to the logfile as opposed to creating a
new one
Name of logfile The directory and base name of the log file; for example
C:\logs
Create parent folder Create the parent folder for the log file if it does not exist
Extension of logfile The file name extension; for example, log or txt
Include date in logfile? Adds the system date to the log file
Include time in logfile? Adds the system time to the log file
Loglevel The logging level to use
Arguments
You can pass job command line arguments to a transformation.
Parameters
You can pass parameters to a transformation.
Set Variables
This entry is not yet documented here. However, there may be a rough definition available in the Pentaho Wiki: http://
wiki.pentaho.com/display/EAI/Pentaho+Data+Integration+Job+Entries.
Option Definition
Job entry name The name of this entry as it appears in the transformation
workspace.
Success
This entry is not yet documented here. However, there may be a rough definition available in the Pentaho Wiki: http://
wiki.pentaho.com/display/EAI/Pentaho+Data+Integration+Job+Entries.
Option Definition
Job entry name The name of this entry as it appears in the transformation
workspace.
Transformation
The Transformation job entry is used to execute a previously defined transformation.
Below are the transformation options listed by tab name. The name of the job entry appears above every tab.
Transformation Specification
Option Description
Name of the Job Entry The unique name of the job entry on the canvas. A job
entry can be placed on the canvas several times; however
it will be the same job entry

| Job Entry Reference | 232
Option Description
Transformation Filename If you are not working in a repository, specify the XML file
name of the transformation to start. Click to browse
through your local files.
Specify by Name and Directory If you are working in the DI Repository, (or database
repository) specify the name of the transformation to start.
Click the Browse In Jobs button to browse through the
repository.
Specify by Reference If you specify a transformation or job by reference, you
can rename or move it around in the repository. The
reference (identifier) is stored, not the name and directory.
Advanced
Option Description
Copy previous results to args? The results from a previous transformation can be sent to
this one using the Copy rows to result step
Copy previous results to parameters? If Execute for every input row is enabled then each row
is a set of command line arguments to be passed into
the transformation, otherwise only the first row is used to
generate the command line arguments.
Execute for every input row? Allows a transformation to be executed once for every
input row (looping)
Clear list of result files before execution? Ensures that the list or result files is cleared before the
transformation is started
Run this transformation in a clustered mode? As described
Remote slave server The slave server on which to execute the job
Wait for the remote transformation to finish? Enable to block until the job on the slave server has
finished executing
Follow local abort to remote transformation Enable to send the abort signal to the remote job if it is
called locally
Logging Settings
By default, if you do not set logging, Pentaho Data Integration will take log entries that are being generated and create
a log record inside the job. For example, suppose a job has three transformations to run and you have not set logging.
The transformations will not output logging information to other files, locations, or special configuration. In this instance,
the job executes and puts logging information into its master job log.
In most instances, it is acceptable for logging information to be available in the job log. For example, if you have
load dimensions, you want logs for your load dimension runs to display in the job logs. If there are errors in the
transformations, they will be displayed in the job logs. If, however, you want all your log information kept in one place,
you must set up logging.
Option Description
Specify logfile? Enable to specify a separate logging file for the execution
of this transformation
Append logfile? Enable to append to the logfile as opposed to creating a
new one
Name of logfile The directory and base name of the log file; for example
C:\logs
| Job Entry Reference | 233
Option Description
Create parent folder Enable to create a parent folder for the log file it it does
not exist
Extension of logfile The file name extension; for example, log or txt
Include date in logfile? Adds the system date to the log file
Include time in logfile? Adds the system time to the log file
Loglevel The logging level to use
Arguments
You can pass job command line arguments to a transformation.
Parameters
You can pass parameters to a transformation.
Mail
The PDI job entries in this section pertain to email operations.
Get Mails (POP3/IMAP)
This entry is not yet documented here. However, there may be a rough definition available in the Pentaho Wiki: http://
wiki.pentaho.com/display/EAI/Pentaho+Data+Integration+Job+Entries.
Option Definition
Job entry name The name of this entry as it appears in the transformation
workspace.
Mail
Use the Mail job entry to send a text or HTML email with optional file attachments. This job entry is used at the end of a
job run in most instances. It can be used to announce both a job failure or success. For example, it is not uncommon at
the end of a successful load, to send an email to a distribution list announcing that the load was successful and include
a log file. If there are errors, an email can be sent to alert individuals on a distribution list.
Important: No email messages are sent when a job crashes during a run. If you are bound by service level
agreements or quality of service agreements you may not want to use this job entry as a notification method.
The Mail job entry requires an SMTP server. You can use authentication and security as part of the connection but you
must have the SMTP credentials.
You can attach files to your email messages such as error logs and regular logs. In addition, logs can be zipped into a
single archive for convenience.
Addresses
Option Description
Job entry name The unique name of the job entry on the canvas. A job
entry can be placed on the canvas several times; however
it will be the same job entry
Destination Address The destination for the email; you can specify multiple
addresses if you separate them with a space or comma.
Note: Do not maintain your distribution list within
a job. Rather, have your email administrators
set up a list so that you can send to a specified

| Job Entry Reference | 234
Option Description
list each time you create the job. Operational
functions such as Email contents, routing, people,
and so on should be managed outside of Pentaho
Data Integration.
Cc: An identical copy of the message is also sent to all the
addresses listed in the Cc: field. To enter more than one
address in the Cc: field, separate them with commas.
BCc: Send to a recipient whose email address does not appear
in the message
Sender name Name of the person sending the email
Sender address Email address of the person sending the email
Reply to Email address of the person to which to send a reply
Contact person The name of the contact person to be placed in the email
Contact phone The contact telephone number to be placed in the email
Server
Option Description
SMTP Server The SMTP server address
Port The port on which the SMTP Server is running
Authentication Enable to set authentication to the SMTP Server
Authentication user SMTP user account name
Authentication password SMTP user account password
Use Secure Authentication? Enable to use secure authentication
Secure Connection Type Select authentication type
Email Message
Option Description
Include date in message? Enable to include date in message
Only send comment in mail body? If not enabled the email will contain information about the
job and its execution in addition to the comment
Use HTML in mail body As described
Encoding Select encoding type
Manage Priority Enable to manage priority
Subject As described
Comment As described
Attached Files
Option Description
Attach files to message? Enable to attach a file to your email message
Select file type As described
Zip files to single archive? Enable to have attachments achived in a zip file

| Job Entry Reference | 235
Option Description
Name of the zip archive As described
Filename Name of a single image file
Content ID Automatically entered
Image The full path to image (used when embedding multiple
images) Click Edit to edit the path; click Delete to delete
the path to the image
Content ID The image content ID (used when embedding multiple
images) Click Edit to edit the content ID; click Delete to
delete the Content ID
Mail Validator
This entry is not yet documented here. However, there may be a rough definition available in the Pentaho Wiki: http://
wiki.pentaho.com/display/EAI/Pentaho+Data+Integration+Job+Entries.
Option Definition
Job entry name The name of this entry as it appears in the transformation
workspace.
File Management
The PDI job entries in this section pertain to file input/output operations.
Add Filenames to Result
This job entry allows you to add a set of files or folders to the result list of the job entry. That list of filenames can then
be used in the various job entries all around.
Option Description
Job entry name The name of the job entry. This name must be unique
within a single job. A job entry can be placed several
times on the canvas, however it will be the same job entry.
Include subfolders Include subfolders of the selected folders
Copy previous results to? Passes the results of the previous entry to the arguments
of this entry.
Clear result filenames? This option clears the list of result files (from previous job
entries) before creating a new list.
File/Folder Specify the list of files or folders with wildcards (regular
expressions) in this grid. You can add a different source/
destination on each line. Note: You can use the Add
button to add a line to the Files/Folders list.
Compare Folders
This job entry compares two folders to determine if the content is identical; the result will either be true or false.
Option Description
Job entry name The name of the job entry. This name must be unique
within a single job. A job entry can be placed several
times on the canvas, however it will be the same job entry.
Include Subfolders Also compare the content of sub-folders.

| Job Entry Reference | 236
Option Description
Compare Specify what to compare: All, Only files, Only
folders, or Let me specify...
Wildcard If you chose Let me specify in the previous option,
you can specify the regular expression of files to compare.
Compare file size Check this to compare file size, in opposed to just
comparing folder names.
Compare file content Checks if files have the same content. Note: this may
cause slower processing speeds.
File/Folder name 1 This is the first file or folder to compare
File/Folder name 2 This is the second file or folder to compare
Convert File Between DOS and Unix
This entry is not yet documented here. However, there may be a rough definition available in the Pentaho Wiki: http://
wiki.pentaho.com/display/EAI/Pentaho+Data+Integration+Job+Entries.
Option Definition
Job entry name The name of this entry as it appears in the transformation
workspace.
Copy Files
You can copy one of more files or folders with this job entry.
General tab
Option Definition
Job entry name The name of this entry as it appears in the transformation
workspace.
Include subfolders Check this option if you want to include subfolders. Note:
This option will only work when the source is a folder.
Destination is a file PDI will consider destination a file.
Copy empty folders Check this option to also copy empty folders.
Create destination folder This option will create a folder; if destination is a file,
parent folder will be created as necessary.
Replace existing files If the destination file or folder exists, this option will
replace it, otherwise PDI will ignore it.
Remove source files Remove the source files after copying. Only files will be
removed.
Copy previous results to args Check this option to pass the results of the previous entry
to the arguments of this entry. Note: Arguments must be
in the following order: 1) source folder/file, 2) destination
folder/file, 3) wildcard.
File/Folder source Enter the file or folder to be copied. Note: If destination is
a folder, PDI will only fetch the files within the folder if the
Include Subfolders option is checked. Note: You can
use the Add button to add a line to the Files/Folders list.
File/Folder destination Enter the destination file or folder.

| Job Entry Reference | 237
Option Definition
Wildcard (RegExp) Allows you to use wildcard expressions to specify source
or destination files or folders.
Files/Folders: Table displays copying parameters set in the fields above
after pressing the Add button.
Result files name tab
Option Definition
Add files to result files name Add destination files to result files name.
Copy or Remove Result Filenames
This entry is not yet documented here. However, there may be a rough definition available in the Pentaho Wiki: http://
wiki.pentaho.com/display/EAI/Pentaho+Data+Integration+Job+Entries.
Option Definition
Job entry name The name of this entry as it appears in the transformation
workspace.
Create a Folder
This entry is not yet documented here. However, there may be a rough definition available in the Pentaho Wiki: http://
wiki.pentaho.com/display/EAI/Pentaho+Data+Integration+Job+Entries.
Option Definition
Job entry name The name of this entry as it appears in the transformation
workspace.
Create File
This entry is not yet documented here. However, there may be a rough definition available in the Pentaho Wiki: http://
wiki.pentaho.com/display/EAI/Pentaho+Data+Integration+Job+Entries.
Option Definition
Job entry name The name of this entry as it appears in the transformation
workspace.
Delete File
This entry is not yet documented here. However, there may be a rough definition available in the Pentaho Wiki: http://
wiki.pentaho.com/display/EAI/Pentaho+Data+Integration+Job+Entries.
Option Definition
Job entry name The name of this entry as it appears in the transformation
workspace.
Delete Filenames From Result
This entry is not yet documented here. However, there may be a rough definition available in the Pentaho Wiki: http://
wiki.pentaho.com/display/EAI/Pentaho+Data+Integration+Job+Entries.
Option Definition
Job entry name The name of this entry as it appears in the transformation
workspace.

| Job Entry Reference | 238
Delete Files
This entry is not yet documented here. However, there may be a rough definition available in the Pentaho Wiki: http://
wiki.pentaho.com/display/EAI/Pentaho+Data+Integration+Job+Entries.
Option Definition
Job entry name The name of this entry as it appears in the transformation
workspace.
Delete Folders
This entry is not yet documented here. However, there may be a rough definition available in the Pentaho Wiki: http://
wiki.pentaho.com/display/EAI/Pentaho+Data+Integration+Job+Entries.
Option Definition
Job entry name The name of this entry as it appears in the transformation
workspace.
File Compare
The File Compare job entry allows you to compare the contents of two files and the flow of the job will depend on the
results. When the contents of the files are the same the success outgoing hop will be followed. When the content of the
files is not the same, the failure hop will be followed.
Option Description
Job entry name The name of the job entry. This name must be unique
within a single job.
File name 1 The name and path of the file of the first file to compare.
File name 2 The name and path of the file of the second file to
compare.
HTTP
Use the HTTP job entry to retrieve a file from a Web server using the HTTP protocol. This job entry could be used to
access data on partner Web sites. For example, the daily data export or daily list of customers is located at a specified
Web site. Also, SaaS providers may give you a URL to locate a report. You can call that URL to retrieve an Excel file or
zip file that contains the data. Salesforce requires that you use SOAP APIs to retrieve data.
If HTTP traffic is too heavy in your corporate environment, you may choose to use a proxy server with HTTP
authentication.
General
Option Definition
Name of job entry The name of the job entry. This name has to be unique in
a single job. A job entry can be placed several times on
the canvas, however it will be the same job entry.
URL The HTTP URL of the file to retrieve, or the directory
name to store an uploaded file to
Run for every result row? If selected, an HTTP request will be made for each result.
Otherwise, the file is only retrieved once
Input field which contains URL If the previous option is selected, the field specified here
will determine the file URL for each row

| Job Entry Reference | 239
Option Definition
Username If the site requires authentication, use this username to
log in
Password If a username is defined, this is the password for it
Proxy server for upload The URL of a proxy server that you want to connect to the
HTTP URL through
Proxy port If a proxy server is defined, this is the port number it
listens on
Ignore proxy for hosts A regular expression list of exceptions for proxy
redirection. This may be useful when working on an
intranet or VPN
Upload file If you are uploading a file, this will be its name on the
remote server
Target file If you are downloading a file, this its name on your local
filesystem
Append to specified target file? If selected, and if the target file already exists, PDI will
append all new data to the end of the file
Add date and time to file name? If selected, the date and time of the HTTP request (in
yyyMMdd_HHmmss format) will be added to the target
filename
Target file extension If the previous option is selected, this field specifies the
extension (letters after the dot) of the target filename
Add filename to result filename Any files that are copied will appear as a result from this
step; shows a list of files that were copied in this step
Headers
Option Definition
# Order that the header should be processed
Name The name of this HTTP header
Value The actual header value to pass
Move Files
This entry is not yet documented here. However, there may be a rough definition available in the Pentaho Wiki: http://
wiki.pentaho.com/display/EAI/Pentaho+Data+Integration+Job+Entries.
Option Definition
Job entry name The name of this entry as it appears in the transformation
workspace.
Unzip File
This entry allows you to unzip one or more files and pass the contents to a transformation.
General tab
Option Description
Job entry name The name of this entry as it appears in the transformation
workspace.

| Job Entry Reference | 240
Option Description
Get args from previous Check this option if you want to use the list of result files
(from a previous job entry) as the list of files to unzip.
Zip file name The name of the zip file or a folder if you want to use a
wildcard.
Source wildcard If the previous option is a folder, you can enter a regular
expression wildcard here. Note: The regex is compared
against the absolute path of the file and a complete
match MUST be made. For example, to match /folder/
test.zip, a regex of te.*\.zip will come up empty.
Use .*te.*\.zip instead to account for the folders
ahead of it.
Use zipfile name as root directory Check this if you want to create a separate directory for
each zip filename (same name as file).
Target directory Allows you to specify the target directory to unzip content
in.
Create folder Check this if you want to create a new folder for the target
folder.
Include wildcard Use this regular expression to select the files in the zip
archives to extract.
Exclude wildcard Use this regular expression to select the files in the zip
archives not to extract.
Include date in filename Include the current date in the unzipped filenames (format
yyyyMMdd).
Include time in filename Include the time in the unzipped filenames (format
HHmmss).
Specify date time format Allows you to specify the date time format.
Date time format Allows you to specify the date time format from a
predefined list of formats.
Add original timestamp Check this option to extract the files with the original
timestamp instead of the current timestamp.
Set modification date to original Set last modification date to the original timestamp.
If files exists Select the action to take if the target (unzipped) file exists.
After extraction Select the action to take after zip file extraction.
Move files to If the previous option is set to Move files, you can
select the target directory here.
Create folder Check this if you want to create a new folder for the target
folder.
Advanced tab
Option Description
Add extracted file to result Add the extracted file names to the list of result files of this
job entry for use in the next job entries.
Success condition: Allows you to specify the success factor of this job entry.
Limit files Allows you to limit the number of files returned.

| Job Entry Reference | 241
Wait For File
This entry is not yet documented here. However, there may be a rough definition available in the Pentaho Wiki: http://
wiki.pentaho.com/display/EAI/Pentaho+Data+Integration+Job+Entries.
Option Definition
Job entry name The name of this entry as it appears in the transformation
workspace.
Write to File
This entry is not yet documented here. However, there may be a rough definition available in the Pentaho Wiki: http://
wiki.pentaho.com/display/EAI/Pentaho+Data+Integration+Job+Entries.
Option Definition
Job entry name The name of this entry as it appears in the transformation
workspace.
Zip File
This step creates a standard ZIP archive using options specified in the dialog.
General Tab
Option Description
Job entry name The name of this entry as it appears in the transformation
workspace.
Get arguments from If this option is selected, you must give four arguments: 1)
Source folder (or file) name. 2) Wildcard to include (turn it
to null if you select file in 1-). 3) Wildcard to exclude (turn
it to null if you select file in 1-). 4) Destination zip filename
(full path).
Source directory The source directory of the files to be zipped.
Include wildcard The wildcard (regular expression) of the files to include in
the zip archive.
Exclude wildcard The wildcard (regular expression) of the files to exclude
from the zip archive.
Include subfolders? Option enables searching of all subfolders within the
selected folder.
Zip File name The full name of the destination archive.
Create Parent folder Check this option if you want to create a parent folder.
Otherwise, PDI will throw an exception when parent folder
doesn't exist.
Include date in filename Check this option if you want to add the date in the zip
filename.
Include time in filename Check this option if you want to add the time in the zip
filename.
Specify Date time format Specify the date or time format to include in the zip
filename.

| Job Entry Reference | 242
Advanced Tab
Option Description
Compression The compression level to be used (Default, Best
Compression, Best speed).
If zip file exists: The action to take when there already is a file at the target
destination.
After zipping Specify the action to take after zipping.
Move files to The target directory to move the source files to after
zipping.
Create folder Create folder if needed.
Add zip file to result Check this option if you want to add the zip file to result's
filename and then attached in an email.
Conditions
The PDI job entries in this section pertain to conditional functions.
Check DB Connections
This job entry allows you to verify connectivity with one or several databases.
Option Definition
Job entry name The name of this entry as it appears in the transformation
workspace.
Connection List of connections.
Wait After the connection was opened, wait x (s, min, hrs).
Units of Time Specify the unit of measurement for the length of time to
remain connected.
Get connections Get available connects.
Check Files Locked
The Check files locked job entry enables you to determine if a file or folder, or several files or folders, were locked by
another process.
Option Definition
Job entry name Name of this entry as it appears in the transformation
workspace
Include Subfolders Searches the folders within the primary directory
Copy previous results to args Passes the results of the previous entry to the arguments
of this entry
File/Folder Specifies files to check
Wildcard Defines the files to check in regular expression terms
instead of static file names—for instance ^.*\.txt
would check any file with a .txt extension
Files/Folders Displays the list of files or folders to check

| Job Entry Reference | 243
Check If a Folder is Empty
This job entry verifies if a folder is empty; that there are no files in the folder.
Option Description
Job entry name The name of the job entry. This name must be unique
within a single job. A job entry can be placed several
times on the canvas, however it will be the same job entry.
Folder name The name of the folder to verify for emptiness.
Limit search to Limits the search for files to those with a certain wildcard
(regular expression)
Wildcard The wildcard (regular expression) to limit the files to look
for with, for example: .*\.txt$
Check Webservice Availability
This step checks if a given URL is valid, can be connected and data can be read from.
If it connects within the given timeout and data can be read, it returns 'true', otherwise 'false'.
Further information of the failing reason can be found in the log as an error log entry.
Option Description
Job entry name The name of the job entry. This name must be unique
within a single job. A job entry can be placed several
times on the canvas, however it will be the same job entry.
URL field Specifies the URL fieldname in the data stream. The URL
is checked for every row that is coming into this step.
Connect timeout (ms) The connect timeout in ms. The value is depending on the
quality of service of this URL and experiences.
Read timeout (ms) After connection, the step tries to read data. This value
gives the read timeout in ms. The value is depending on
the quality of service of this URL and experiences.
Checks If Files Exist
This entry is not yet documented here. However, there may be a rough definition available in the Pentaho Wiki: http://
wiki.pentaho.com/display/EAI/Pentaho+Data+Integration+Job+Entries.
Option Definition
Job entry name The name of this entry as it appears in the transformation
workspace.
Columns Exist in a Table
This job entry verifies that one or more columns exist in a database table.
Option Description
Job entry name The name of the job entry. This name must be unique
within a single job. A job entry can be placed several
times on the canvas, however it will be the same job entry.
Connection The database connection to use
Schema name The schema of the table to use

| Job Entry Reference | 244
Option Description
Table name The name of the table to use
Columns The list of column names to verify (one or more)
Evaluate Files Metrics
This entry is not yet documented here. However, there may be a rough definition available in the Pentaho Wiki: http://
wiki.pentaho.com/display/EAI/Pentaho+Data+Integration+Job+Entries.
Option Definition
Job entry name The name of this entry as it appears in the transformation
workspace.
Evaluate Rows Number in a Table
This entry is not yet documented here. However, there may be a rough definition available in the Pentaho Wiki: http://
wiki.pentaho.com/display/EAI/Pentaho+Data+Integration+Job+Entries.
Option Definition
Job entry name The name of this entry as it appears in the transformation
workspace.
File Exists
Use the File exists job entry to verify that a specified file exists on the server on which Pentaho Data Integration is
running. You must provide the file name. Pentaho Data Integration returns a True or False value depending on whether
or not the file exists.
The File Exists job entry can be an easy integration point with other systems. For example, suppose you have a three-
part data warehouse load process. The first part runs in PERL. You have batch scripts that accesses data from a
remote location, performs first-level row processing, and outputs the data to a specified directory. You do not want to
start the job until this is done, so you put the job on a scheduler. As soon as the task is complete, the file is placed in a
well-known location so that the "file exists." That is the signal that launches the job for final processing.
Note: This job entry performs one check and then moves on. If you want to poll until the files appear, use the
Wait for File or Wait for SQL job entries which have a polling interval parameter.
Option Description
Job entry name The name of this entry as it appears in the transformation
workspace.
File name The name and path of the file to check for.
Simple Evaluation
With this step, you can evaluate contents of a variable or a field in the result stream.
Connect two steps with the output of the Simple Evaluation. The green connection will be called on success, the red
one on failure.
Option Definition
Job entry name The name of this entry as it appears in the transformation
workspace.
Evaluate Select this to evaluate a variable set before.
Field name Enter the variable name using the usual syntax.
Type The type of your variable.

| Job Entry Reference | 245
Option Definition
Success condition Select the condition to be met for a successful result.
Value Value to compare the variable to.
Table Exists
Use the Table exists job entry to verify that a specified table exists on a database. You must provide a connection and
the table name. Pentaho Data Integration returns a True or False value depending on whether or not the table exists.
Suppose you have an external system that creates a summary table or yesterday's data extract. The external system
may not have performed the action yet, so you set up a polling piece that waits for the staged data to arrive in
the database. There is no point in processing the job until the data is available, so you can use this job entry as a
semaphore that polls the database to determine whether or not the table exists.
Note: This job entry performs one check and then moves on. If you want to poll until the tables appear, use the
Wait for File or Wait for SQL job entries which have a polling interval parameter.
Option Description
Job entry name The unique name of the job entry on the canvas. A job
entry can be placed on the canvas several times; however
it will be the same job entry
Connection The connection to use
Schema name The schema name if applicable to your database
Table name The name of the database table to check
Wait For
You can use the Wait for to wait a delay before running the next job entry.
Option Definition
Job entry name The name of this entry as it appears in the transformation
workspace.
Wait for The delay to wait.
Unit time Specify the unit time (second, minute and hour)
Scripting
The PDI job entries in this section pertain to script execution.
JavaScript
Use the JavaScript job entry to calculate a boolean expression. The result can be used to determine which step will
be executed next. You can use functions, procedure calls, ANDs, ampersands, ORs, EQUALs, etc. The Javascript job
entry evaluates (returns?) a true or false.
The following variables are available for the expression:
Variable Description
errors Number of errors in the previous job entry (long)
lines_input Number of rows read from database or file (long)
lines_output Number of rows written to database or file (long)
lines_updated Number of rows updated in a database table (long)

| Job Entry Reference | 246
Variable Description
lines_read number of rows read from a previous transformation step
(long)
lines_written Number of rows written to a next transformation step
(long)
files_retrieved Number of files retrieved from an FTP server (long)
exit_status The exit status of a shell script (integer)
nr (integer) The job entry number; increments at every next job entry
is_windows use if Pentaho Data Integration runs on Windows
(boolean)
Shell
Use the Shell job entry to execute a shell script on the host where the job is running. For example, suppose you have a
program that reads five data tables and creates a file in a specified format. You know the program works. Shell allows
you to do portions of your work in Pentaho Data Integration but reuse the program that reads the data tables as needed.
The Shell job entry is platform agnostic; you can use a batch file, UNIX, and so on. When you use a Shell job entry,
Pentaho Data Integration makes a Java call to execute a program in a specified location. The return status is provided
by the operating system call. For example, in batch scripting a return value of 1 indicates that the script was successful;
a return value of 0 (zero) indicates that it was unsuccessful. You can pass command line arguments and set up logging
for the Shell job entry.
General
Option Description
Job entry name The unique name of the job entry on the canvas. A job
entry can be placed on the canvas several times; however
it will be the same job entry
Insert script Enable to insert the shell script; click on the Script tab to
manually enter your script
Script file name The file name of the shell script to execute
Working directory The working directory for the command or script
Specify logfile? Enable to specify a separate logging file for the execution
of this transformation
Append logfile? Enable to append to the logfile as opposed to creating a
new one
Name of logfile The directory and base name of the log file; for example
C:\logs
Extension of logfile The file name extension; for example, log or txt
Include date in logfile? Adds the system date to the log file
Include time in logfile? Adds the system time to the log file
Loglevel Specifies the logging level for the execution of the shell
Copy previous results to args? The results from a previous transformation can be sent to
the shell script using Copy rows to result step
Execute for every input row? Implements looping; if the previous job entry returns a set
of result rows, the shell script executes once for every row
found. One row is passed to this script at every execution
in combination with the copy previous result to arguments.
The values of the corresponding result row can then be
| Job Entry Reference | 247
Option Description
found on command line argument $1, $2, ... (%1, %2,
%3, ... on Windows).
Fields Values to be passed into the command/script as
command line arguments. (Not used if Copy previous
results to args is used)
Script
An arbitrary script that can be used as the files contents if Insert script is enabled
SQL
Use the SQL job entry to execute an SQL script. You can execute more than one SQL statement, as long as they are
separated by semi-colons. The SQL job entry is flexible; you can perform procedure calls, create and analyze tables,
and more. Common uses associated with the SQL job entry include truncating tables, drop index, partition loading,
refreshing materialized views, disabling constraints, disabling statistics, and so on.
Option Description
Job entry name The unique name of the job entry on the canvas. A job
entry can be placed on the canvas several times; however
it will be the same job entry.
Connection The database connection to use
SQL from file Enable to use SQL script from file
SQL filename Specify SQL file name
Send SQL as single If enabled the entire block is sent as a single statement
on the database. If not enabled, each statement (as
terminated by ‘;’) is executed individually.
Use variable substitution Resolve the SQL block against Pentaho Data Integration
variables
SQL Script The SQL script to execute
Bulk Loading
The PDI job entries in this section pertain to bulk loading of data.
Bulkload From MySQL Into File
This entry is not yet documented here. However, there may be a rough definition available in the Pentaho Wiki: http://
wiki.pentaho.com/display/EAI/Pentaho+Data+Integration+Job+Entries.
Option Definition
Job entry name The name of this entry as it appears in the transformation
workspace.
Bulkload Into MSSQL
This entry is not yet documented here. However, there may be a rough definition available in the Pentaho Wiki: http://
wiki.pentaho.com/display/EAI/Pentaho+Data+Integration+Job+Entries.
Option Definition
Job entry name The name of this entry as it appears in the transformation
workspace.
| Job Entry Reference | 248
Bulkload Into MySQL
This step loads data from a text file into a MySQL table.
Option Description
Job entry name The name of the job entry. This name must be unique
within a single job. A job entry can be placed several
times on the canvas, however it will be the same job entry.
Connection The connection to the MySQL database to use.
Target schema The schema of the table to load
Target table name The name of the table to load into
Source file name The name of the file to load
Local Check this if the file is local
Priority The priority to load the file with
Fields terminated by The field terminator to use
Fields enclosed by The field enclosure to use
Fields escaped by The escape character to use
Lines started by The line start string to use
Lines terminated by The line termination string to use
Fields The fields to load, separated by comma (,)
Replace data Check this option if you want to replace the data in the
target data
Ignore the first ... lines Ignores the first ... lines in the text file
Add files to result Check this option if you want to re-use the filename of the
text file in a next job entry.
MS Access Bulk Load
This entry is not yet documented here. However, there may be a rough definition available in the Pentaho Wiki: http://
wiki.pentaho.com/display/EAI/Pentaho+Data+Integration+Job+Entries.
Option Definition
Job entry name The name of this entry as it appears in the transformation
workspace.
XML
The PDI job entries in this section pertain to XML validation and XSL execution.
Check if XML FIle is Well-Formed
This job entry verifies if one or more files contain well formed (allowed) XML content.
General tab
Option Description
Job entry name The name of the job entry. This name must be unique
within a single job.

| Job Entry Reference | 249
Option Description
Include Subfolders Option to move the content of sub-folders.
Copy previous results to args Check this to pass the results of the previous entry into
the arguments of this entry.
Files/Folders Specify the list of files or folders with wildcards (regular
expressions) in this grid. You can add a different source/
destination on each line. Note: You can use the Add
button to add a line to the Files/Folders list.
Advanced tab
In this tab you can specify the files and/or folders to move.
Option Description
Job entry name The name of the job entry. This name must be unique
within a single job. A job entry can be placed several
times on the canvas, however it will be the same job entry.
Success on Allows you to set specific success conditions: Success if
all files are well formed, Success if at least x files are well
formed, or Success when number of bad formed files less
than.
Result files name Specify which kind of filenames to add: all filenames, only
well formed filenames, or only bad filenames.
DTD Validator
This entry is not yet documented here. However, there may be a rough definition available in the Pentaho Wiki: http://
wiki.pentaho.com/display/EAI/Pentaho+Data+Integration+Job+Entries.
Option Definition
Job entry name The name of this entry as it appears in the transformation
workspace.
XSD Validator
This entry is not yet documented here. However, there may be a rough definition available in the Pentaho Wiki: http://
wiki.pentaho.com/display/EAI/Pentaho+Data+Integration+Job+Entries.
Option Definition
Job entry name The name of this entry as it appears in the transformation
workspace.
XSL Transformation
This entry is not yet documented here. However, there may be a rough definition available in the Pentaho Wiki: http://
wiki.pentaho.com/display/EAI/Pentaho+Data+Integration+Job+Entries.
Option Definition
Job entry name The name of this entry as it appears in the transformation
workspace.
Utility
The PDI job entries in this section pertain to a variety of special-case job operations.

| Job Entry Reference | 250
Abort Job
Use this job entry if you want to abort a job.
Option Description
Name of the job entry The name of this step as it appears in the transformation
workspace. Note: This name must be unique within a
single transformation.
Message Message to add in log when aborting.
Display Msgbox Info
This entry is not yet documented here. However, there may be a rough definition available in the Pentaho Wiki: http://
wiki.pentaho.com/display/EAI/Pentaho+Data+Integration+Job+Entries.
Option Definition
Job entry name The name of this entry as it appears in the transformation
workspace.
HL7 MLLP Acknowledge
This entry is not yet documented here. However, there may be a rough definition available in the Pentaho Wiki: http://
wiki.pentaho.com/display/EAI/Pentaho+Data+Integration+Job+Entries.
Option Definition
Job entry name The name of this entry as it appears in the transformation
workspace.
HL7 MLLP Input
This entry is not yet documented here. However, there may be a rough definition available in the Pentaho Wiki: http://
wiki.pentaho.com/display/EAI/Pentaho+Data+Integration+Job+Entries.
Option Definition
Job entry name The name of this entry as it appears in the transformation
workspace.
Ping a Host
This entry is not yet documented here. However, there may be a rough definition available in the Pentaho Wiki: http://
wiki.pentaho.com/display/EAI/Pentaho+Data+Integration+Job+Entries.
Option Definition
Job entry name The name of this entry as it appears in the transformation
workspace.
Send Information Using Syslog
This entry is not yet documented here. However, there may be a rough definition available in the Pentaho Wiki: http://
wiki.pentaho.com/display/EAI/Pentaho+Data+Integration+Job+Entries.
Option Definition
Job entry name The name of this entry as it appears in the transformation
workspace.

| Job Entry Reference | 251
Send SNMP Trap
This entry is not yet documented here. However, there may be a rough definition available in the Pentaho Wiki: http://
wiki.pentaho.com/display/EAI/Pentaho+Data+Integration+Job+Entries.
Option Definition
Job entry name The name of this entry as it appears in the transformation
workspace.
Talend Job Execution
This entry is not yet documented here. However, there may be a rough definition available in the Pentaho Wiki: http://
wiki.pentaho.com/display/EAI/Pentaho+Data+Integration+Job+Entries.
Option Definition
Job entry name The name of this entry as it appears in the transformation
workspace.
Truncate Tables
This entry is not yet documented here. However, there may be a rough definition available in the Pentaho Wiki: http://
wiki.pentaho.com/display/EAI/Pentaho+Data+Integration+Job+Entries.
Option Definition
Job entry name The name of this entry as it appears in the transformation
workspace.
Wait for SQL
The Wait for SQL job entry scans a database and checks if the database meets user-defined conditions.
Option Definition
Job entry name Name of this entry as it appears in the transformation
workspace
Connection Identifies the database connection to use
Target schema Name of the table schema to evaluate
Target table name Name of the table to evaluate
Success when rows count Defines the evaluation method used to compare the
number of rows with the given value
Value Defines the value used for the evaluation
Maximum timeout After this timeout period, the job entry continues with a
fail, by default, or success, if the Success on timeout
option is checked
Check cycle time Sets the amount time between evaluations
Success on timeout Defines job entry success behavior when timeout
is reached—when checked, reaching the maximum
timeout limit causes the job entry to succeed. When left
unchecked, reaching the maximum timeout limit causes
the job entry to fail.
Custom SQL Enables the use of custom SQL queries
Use variable substitution Replaces environment variables in the SQL script with
their actual value

| Job Entry Reference | 252
Option Definition
Clear list of result rows before execution Clears the list of result rows before running this job entry
Add rows to result Includes returned rows to the result set
Write to Log
This entry is not yet documented here. However, there may be a rough definition available in the Pentaho Wiki: http://
wiki.pentaho.com/display/EAI/Pentaho+Data+Integration+Job+Entries.
Option Definition
Job entry name The name of this entry as it appears in the transformation
workspace.
Repository
The PDI job entries in this section pertain to PDI database or solution repository functions.
Check if Connected to Repository
This entry is not yet documented here. However, there may be a rough definition available in the Pentaho Wiki: http://
wiki.pentaho.com/display/EAI/Pentaho+Data+Integration+Job+Entries.
Option Definition
Job entry name The name of this entry as it appears in the transformation
workspace.
Export Repository to XML File
This entry is not yet documented here. However, there may be a rough definition available in the Pentaho Wiki: http://
wiki.pentaho.com/display/EAI/Pentaho+Data+Integration+Job+Entries.
Option Definition
Job entry name The name of this entry as it appears in the transformation
workspace.
File Transfer
The PDI job entries in this section pertain to file transfer operations.
FTP Delete
This entry is not yet documented here. However, there may be a rough definition available in the Pentaho Wiki: http://
wiki.pentaho.com/display/EAI/Pentaho+Data+Integration+Job+Entries.
Option Definition
Job entry name The name of this entry as it appears in the transformation
workspace.
Get a File with FTP
Use the Get a File with FTP job entry to retrieve one or more files from an FTP server. This job entry does not "crawl"
systems. It will not, for example, access a remote directory and go to other directories to find files that match a wildcard.
This job retrieves files from one directory exclusively.

| Job Entry Reference | 253
General
Option Description
Job entry name The unique name of the job entry on the canvas. A job
entry can be placed on the canvas several times; however
it will be the same job entry
FTP server name/IP address The name of the server or the IP address
Server Port Port number of the FTP server
Username The user name associated with FTP server account
Password The password associated the FTP server account
Proxy host Proxy server host name
Proxy port Proxy server port number
Proxy username Proxy server account user name
Proxy password Proxy server account password
Binary mode Enable if files must be transferred in binary mode
Timeout The FTP server timeout in seconds
Use Active FTP connection Enable if you are connecting to the FTP server using
Active mode; you must set your firewall to accept
connections to the port that your FTP client will open. The
default is Passive mode.
Control Encoding Encoding matters when retrieving file names that contain
special characters. For Western Europe and the USA,
ISO-8859-1 usually suffices. Select encoding that is valid
for your server.
Files
Option Description
Remote directory The remote directory on FTP server from which files are
taken
Wildcard (regular expression) Regular expression when you want to select multiple
files. For example: .*txt$ : get all text files
A.*[ENG:0-9].txt : files starting with A,
ending with a number and .txt
Remove files after retrieval Remove the files on the FTP server, but only after all
selected files have been successfully transferred
Move to Folder Moves files to specified folder
Create Folder Creates folder that will contain files
Target Directory The directory where you want to place the retrieved files
Include date in filename Adds the system date to the filename (_20101231)
Include time in filename Adds the system time to the filename (_235959)
Specify date time format Enable to provide your own date/time format; the default
is yyyyMMdd'_'HHmmss
Date time format Select date time format
Add date before extension Adds date to the file name before the extension

| Job Entry Reference | 254
Option Description
Don't overwrite files Enable to skip, rename, or fail if a file with an identical
name already exists in the target directory
If file exists Action to take if a file with an identical name already exists
in the target directory
Add filenames to result Enable to add the file name(s) read to the result of this job
Advanced
Option Description
Success on Sets conditions of success
Limit files Sets number of files associated with a condition of
success
Socks Proxy
Option Description
Host Socks Proxy host name
Port Socks Proxy port number
Username User name associated with the Socks Proxy account
Password Password associated with the Socks Proxy account
Get a File With FTPS
This entry is not yet documented here. However, there may be a rough definition available in the Pentaho Wiki: http://
wiki.pentaho.com/display/EAI/Pentaho+Data+Integration+Job+Entries.
Option Definition
Job entry name The name of this entry as it appears in the transformation
workspace.
Get a file with SFTP
Use the Get a file with SFTP job entry to retrieve one or more files from an FTP server using the Secure FTP protocol.
Option Description
Job entry name The unique name of the job entry on the canvas. A job
entry can be placed on the canvas several times; however
it will be the same job entry
SFTP server name /IP The name of the SFTP server or the IP address
Port The TCP port to use; usually 22
User name The user name to log onto the SFTP server
Password The password to log onto the SFTP server
Copy previous results to args Enable to use the list of result files from the previous job
entry (entries) instead of the static file list below
Remote directory The remote directory on the SFTP server from which we
retrieve the files
Wildcard (regular expression) Specify a regular expression here if you want to select
multiple files. For example: *txt$ : get all text
files A.*[ENG:0-9].txt : get all files

| Job Entry Reference | 255
Option Description
starting with A ending with a number
and .txt
Remove files after retrieval? Enable to remove the files after they have been
successfully transferred
Target directory The directory where you want to place the transferred files
Add filename to result Enable to add the file name(s) read to the result of this job
Put a File With FTP
This entry is not yet documented here. However, there may be a rough definition available in the Pentaho Wiki: http://
wiki.pentaho.com/display/EAI/Pentaho+Data+Integration+Job+Entries.
Option Definition
Job entry name The name of this entry as it appears in the transformation
workspace.
Put a File With SFTP
This entry is not yet documented here. However, there may be a rough definition available in the Pentaho Wiki: http://
wiki.pentaho.com/display/EAI/Pentaho+Data+Integration+Job+Entries.
Option Definition
Job entry name The name of this entry as it appears in the transformation
workspace.
SSH2 Get
This entry is not yet documented here. However, there may be a rough definition available in the Pentaho Wiki: http://
wiki.pentaho.com/display/EAI/Pentaho+Data+Integration+Job+Entries.
Option Definition
Job entry name The name of this entry as it appears in the transformation
workspace.
SSH2 Put
This entry is not yet documented here. However, there may be a rough definition available in the Pentaho Wiki: http://
wiki.pentaho.com/display/EAI/Pentaho+Data+Integration+Job+Entries.
Option Definition
Job entry name The name of this entry as it appears in the transformation
workspace.
Upload Files to FTPS
This entry is not yet documented here. However, there may be a rough definition available in the Pentaho Wiki: http://
wiki.pentaho.com/display/EAI/Pentaho+Data+Integration+Job+Entries.
Option Definition
Job entry name The name of this entry as it appears in the transformation
workspace.
| Job Entry Reference | 256
Palo
The PDI job entries in this section pertain to Palo databases.
Palo Cube Create
This entry is not yet documented here. However, there may be a rough definition available in the Pentaho Wiki: http://
wiki.pentaho.com/display/EAI/Palo+Cube+Create.
Option Definition
Job entry name The name of this entry as it appears in the transformation
workspace.
Palo Cube Delete
This entry is not yet documented here. However, there may be a rough definition available in the Pentaho Wiki: http://
wiki.pentaho.com/display/EAI/Palo+Cube+Create.
Option Definition
Job entry name The name of this entry as it appears in the transformation
workspace.

| About PDI Marketplace | 257
About PDI Marketplace
Use Marketplace to share, download, and install plugins developed by members of the user community or Pentaho.
The Marketplace presents a list of plugins, indicates whether they have been installed, and displays other information
about the plugin, such as where to obtain technical support. Access Marketplace from the Help menu in Spoon. To
learn how to use Marketplace to install a plugin, see the instructions in the Install Only DI Tools documentation.
To learn more about Marketplace, visit our wiki.
| Troubleshooting | 258
Troubleshooting
This section contains information about changing the Kettle Home directory. More troubleshooting tips will be added to
this document in the future.
Changing the Pentaho Data Integration Home Directory Location (.kettle folder)
The default Pentaho Data Integration (PDI) HOME directory is the user's home directory (for example, in Windows C:
\Documents and Settings\{user}\.kettle or for all other *nix based operating systems ($HOME/.kettle).
The directory may change depending on the user who is logged on. As a result, the configuration files that control the
behavior of PDI jobs and transformations are different from user to user. This also applies when running PDI from the
Pentaho BI Platform.
When you set the KETTLE_HOME variable, the PDI jobs and transformations can be run without being affected by the
user who is logged on. KETTLE_HOME is used to change the location of the files normally in [user home].kettle.
Note: The PDI home directory is independent of the PDI application directory.
Below is a short description of each item in the HOME directory:
Item Description
kettle.properties Default properties file for variables
shared.xml Default shared objects file
db.cache The database cache for metadata
repositories.xml The local repositories file
.spoonrc User interface settings, last opened transformation/job
.languageChoice User language (delete to revert language)
To change set the KETTLE_HOME variable...
Step Description
Step 1 Set the KETTLE_HOME variable according to your needs. This can be performed system wide by the
operating system or just before the start of PDI using a shell script or batch (for example, use the SET
command).
The KETTLE_HOME variable can be set system wide on Windows systems using the environment
variables settings (see below):
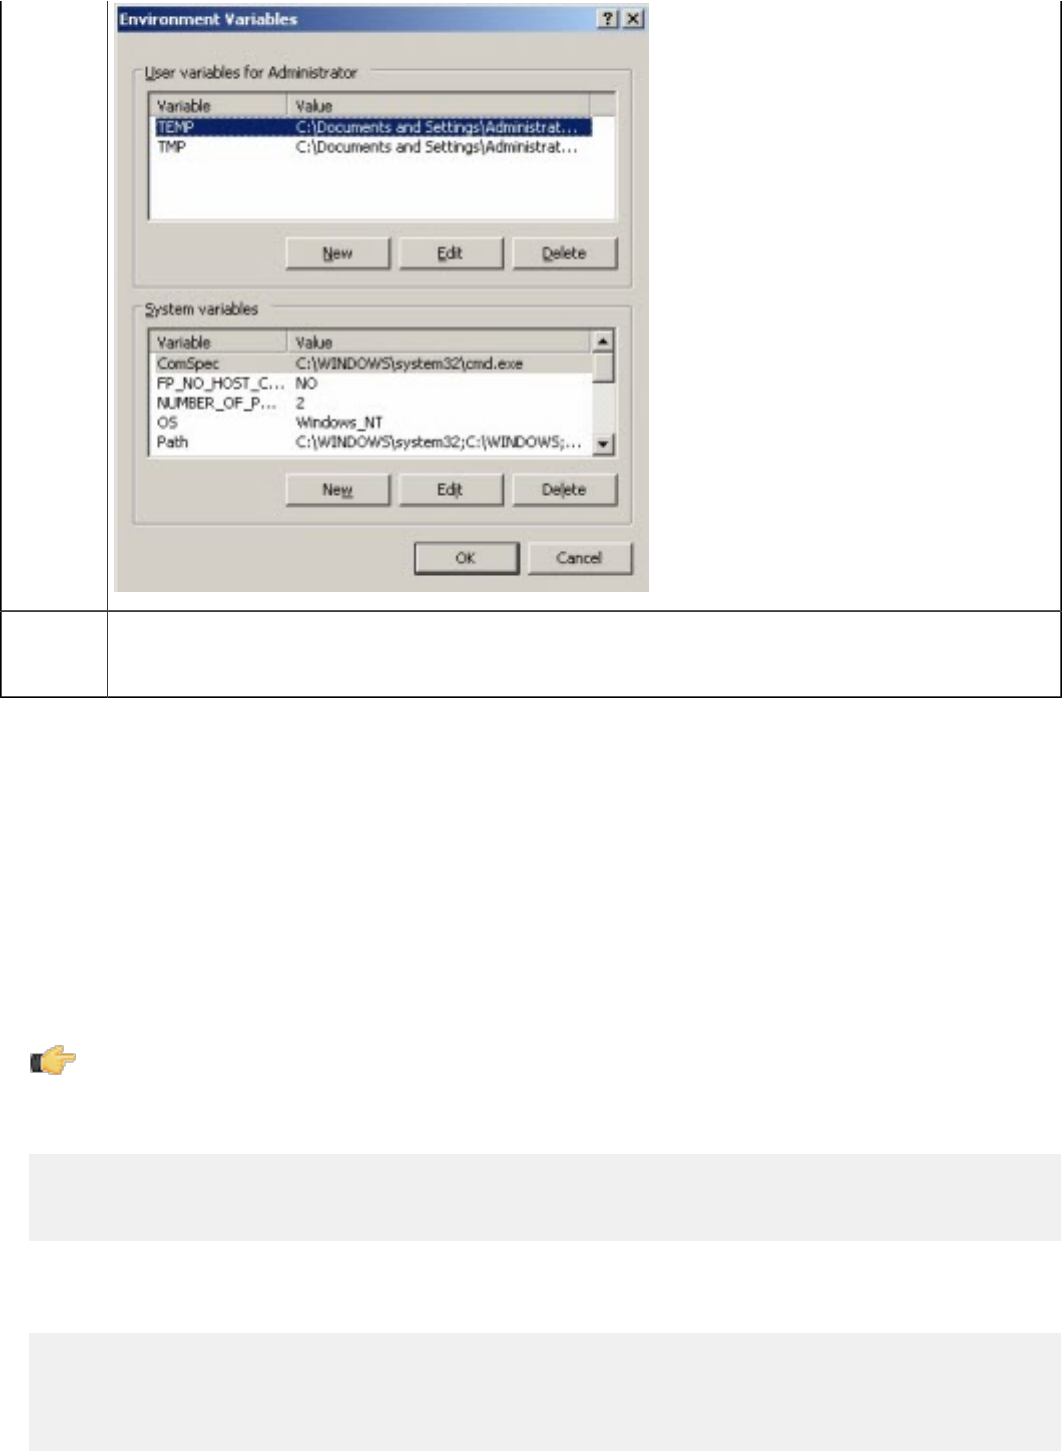
| Troubleshooting | 259
Step 2 Point the KETTLE_HOME to the directory that contains the .kettle directory. The .kettle gets appended by
PDI. For example, when you have stored the common files in C:\Pentaho\Kettle\common\.kettle
you need to set the KETTLE_HOME variable to C:\Pentaho\Kettle\common).
The method above can also be used for configuration management and deployment to switch between the test,
development, and production environments when other variables like the database server of the connection is defined
in kettle.properties.
For testing purposes set a variable in the kettle.properties file of your defined .kettle home directory. Set the
KETTLE_HOME directory accordingly by using the operating system SET command. Start Spoon and go to Edit >
Show Environment Variables. You should see the variables defined in kettle.properties.
Changing the Kettle Home Directory within the Pentaho BI Platform
You can set the KETTLE_HOME directory in the BA Server:
1. When started as a service, edit the registry: HKEY_LOCAL_MACHINE\SOFTWARE\Apache Software
Foundation\Procrun 2.0\pentahobiserver\Parameters\Java
Note: On 64-bit systems, the Apache Software Foundation is under Wow6432Node.
2. Add a new line (not a space!) to the Options associated with the KETTLE_HOME variable, for example, -
Dcatalina.base=C:\Pentaho\3.0.1\Installed/server/biserver-ee/tomcat
[...]
-XX:MaxPermSize=256m
-DKETTLE_HOME=C:\Pentaho\Kettle\KETTLE_HOME
3. Reboot the server.
4. When you start the BA Server from the command line, you must edit the ...server\biserver-ee\start-
pentaho.bat (see below):
[...]
set CATALINA_HOME=%PENTAHO_PATH%tomcat
set CATALINA_OPTS=-Xms256m -Xmx768m -XX:MaxPermSize=256m -
Dsun.rmi.dgc.client.gcInterval=3600000 -Dsun.rmi.dgc.server.gcInterval=3600000 -
DKETTLE_HOME=C:\Pentaho\Kettle\KETTLE_HOME
| Troubleshooting | 260
call startup
endlocal
:quit
Kitchen can't read KJBs from a Zip export
Note: This also applies to Pan and KTR files in Zip archives.
If you are trying to read a KJB file from a Zip export but are getting errors, you may have a syntax error in your Kitchen
command. Zip files must be prefaced by a ! (exclamation mark) character. On Linux and other Unix-like operating
systems, you must escape the exclamation mark with a backslash: \!
Windows:
Kitchen.bat /file:"zip:file:///C:/Pentaho/PDI Examples/Sandbox/
linked_executable_job_and_transform.zip!Hourly_Stats_Job_Unix.kjb"
Linux:
./kitchen.sh -file:"zip:file:////home/user/pentaho/pdi-ee/my_package/
linked_executable_job_and_transform.zip\!Hourly_Stats_Job_Unix.kjb"
Generating a DI Repository Configuration Without Running Spoon
Because it is not always convenient to launch a repository export from Spoon, jobs and transformations can be
launched using the command-line tools Kitchen and Pan.
To deploy a job from Kitchen or a transformation from Pan that will export a repositories.xml file, follow these
instructions.
Connecting to a DI Solution Repositories with Command-Line Tools
To export repository objects into XML format using command-line tools instead of exporting repository configurations
from within Spoon, use named parameters and command-line options when calling Kitchen or Pan from a command-
line prompt.
The following is an example command-line entry to execute an export job using Kitchen:
call kitchen.bat /file:C:\Pentaho_samples\repository\repository_export.kjb
"/param:rep_name=PDI2000" "/param:rep_user=admin" "/param:rep_password=password"
"/param:rep_folder=/public/dev"
"/param:target_filename=C:\Pentaho_samples\repository\export\dev.xml"
Parameter Description
rep_folder Repository Folder
rep_name Repository Name
rep_password Repository Password
rep_user Repository Username
target_filename Target Filename
Note: It is also possible to use obfuscated passwords with Encr a command line tool for encrypting strings for
storage or use by PDI.

| Troubleshooting | 261
The following is an example command-line entry to execute a complete command-line call for the export in addition to
checking for errors:
@echo off
ECHO This an example of a batch file calling the repository_export.kjb
cd C:\Pentaho\pdi-ee-<ph conref="../reuse_files/
reference_reusable.xml#reference_instaview_view_panel/PDIvernum3"/>\data-integration
call kitchen.bat /file:C:\Pentaho_samples\repository\repository_export.kjb "/
param:rep_name=PDI2000"
"/param:rep_user=admin" "/param:rep_password=password" "/param:rep_folder=/public/
dev"
"/param:target_filename=C:\Pentaho_samples\repository\export\dev.xml"
if errorlevel 1 goto error
echo Export finished successfull.
goto finished
:error
echo ERROR: An error occured during repository export.
:finished
REM Allow the user to read the message when testing, so having a pause
pause
Unable to Get List of Repositories Exception
When you are working with a repository and trying to execute a job or transformation remotely on a Carte server, the
following error message often appears:
There was an error posting the transformation on the remote server:
org.pentaho.di.core.exception.KettleException:
Unable to get a list of repositories to locate repository 'repo'
Executing Jobs and Transformations from the Repository on the Carte Server
To execute a job or transformation remotely on a Carte server, you first need to copy the local repositories.xml
from the user's .kettle directory to the Carte server's $HOME/.kettle directory. The Carte service also looks for the
repositories.xml file in the directory from which Carte was started.
For more information about locating or changing the .kettle home directory, see Changing the Pentaho Data
Integration Home Directory Location (.kettle folder).
Database Locks When Reading and Updating From A Single Table
If you create read and updated steps to or from a single table within a transformation you will likely experience database
locking or slowed processing speeds.
For example, if you have a step which reads from a row within a table--a Table Input step--and need to update the step
(with the Update step) this could cause locking issues.
Note: This is known to often cause difficulty with MS SQL databases in particular.
Reading and Updating Table Rows Within a Transformation
Reading rows and updating rows on a table, within a single transformation, can cause the database to stop updating,
referred to as locking, or slow down processing speeds.
Reading rows and updating rows in the same transformation on the same table should be avoided when possible as it is
often causes these issues.
| Troubleshooting | 262
A general solution compatible with all databases is to duplicate the table to be read/updated, then create separate read/
update steps. Arrange the steps to be executed sequentially within the transformation, each on a different, yet identical,
version of the same table.
Adjusting database row locking parameters or mechanisms will also address this issue.
Force PDI to use DATE instead of TIMESTAMP in Parameterized SQL Queries
If your query optimizer is incorrectly using the predicate TIMESTAMP, it is likely because the JDBC driver/database
normally converts the data type from a TIMESTAMP to a DATE. In special circumstances this casting prevents the
query optimizer of the database not to use the correct index.
Use a Select Values step and set the Precision to 1 and Value to DATE. This forces the parameter to set as a
DATE instead of a TIMESTAMP.
For example, if Oracle says it cannot use the index, and generates an error message that states:
The predicate DATE used at line ID 1 of the execution plan contains an implicit
data type conversion on indexed column DATE. This implicit data type conversion
prevents
the optimizer from selecting indices on table A.
After changing the Precision to 1, setting the Value as a DATE, the index can be used correctly.
PDI Does Not Recognize Changes Made To a Table
If PDI does not recognize changes you made to a table, you need to clear the cache of database-related meta
information (field names and their types in each used database table). PDI has this cache to increase processing
speed.
If you edit the table layout outside of Spoon, field changes, deletions or additions are not known to PDI. Clearing the
cache addresses this issue.
To clear the database-related meta information cache from within Spoon:
Select the connection and then Tools > Database > Clear Cache. Or, Database connections > Clear
complete DB cache.
Using ODBC
Although ODBC can be used to connect to a JDBC compliant database, Pentaho does not recommend using it and
it is not supported. For details, this article explains "Why you should avoid ODBC." http://wiki.pentaho.com/pages/
viewpage.action?pageId=14850644.
Sqoop Import into Hive Fails
If executing a Sqoop import into Hive fails to execute on a remote installation, the local Hive installation configuration
does not match the Hadoop cluster connection information used to perform the Sqoop job.
Verify the Hadoop connection information used by the local Hive installation is configured the same as the Sqoop job
entry.
