Roland Resource Book Corporation Books 1998
Roland Corporation Roland Resource Books Resource Book 1998 roland_resource_book_1998 Roland Corporation - Roland Resource Books - Resource Book 1998
User Manual: Pdf Roland Corporation Roland Resource Books Resource Book 1998 Roland Corporation - Roland Resource Books - Resource Book 1998
Open the PDF directly: View PDF ![]() .
.
Page Count: 201 [warning: Documents this large are best viewed by clicking the View PDF Link!]


NQPSMTR®?E6C?2=4@?E24E
=:DE
June 25, 1998
© 1998 Roland Corporation U.S. 6/25/98 Faxback # 90049 Page 1 of 1
Main Phone Number(323) 685-5141
Roland Super Shop (800) 386-7575
Dealer Order Number(800) 868-3737
Extensions
Sales, Parts, Repair, and Owner’s Manuals 289
FAX Back System 271
Literature Orders 331
Product Support Main Menu 770
Hard Disk Recording and Sampling Products 482
Desktop Media Production Products 497
Guitar and Percussion Products 498
CK/Intelligent Arranger/Sequencer Products 499
Keyboards and Sound Modules 463
Fax Numbers
Customer Service (323) 721-4875
Marketing Department (323) 722-9233
Musical Instruments Department (323) 726-2633
Product Support (323) 726-8865
Service Department (323) 722-7408
®ÂØÒňήOnline guide Supplemental
Notes
Febuary 25, 1998 V1.0
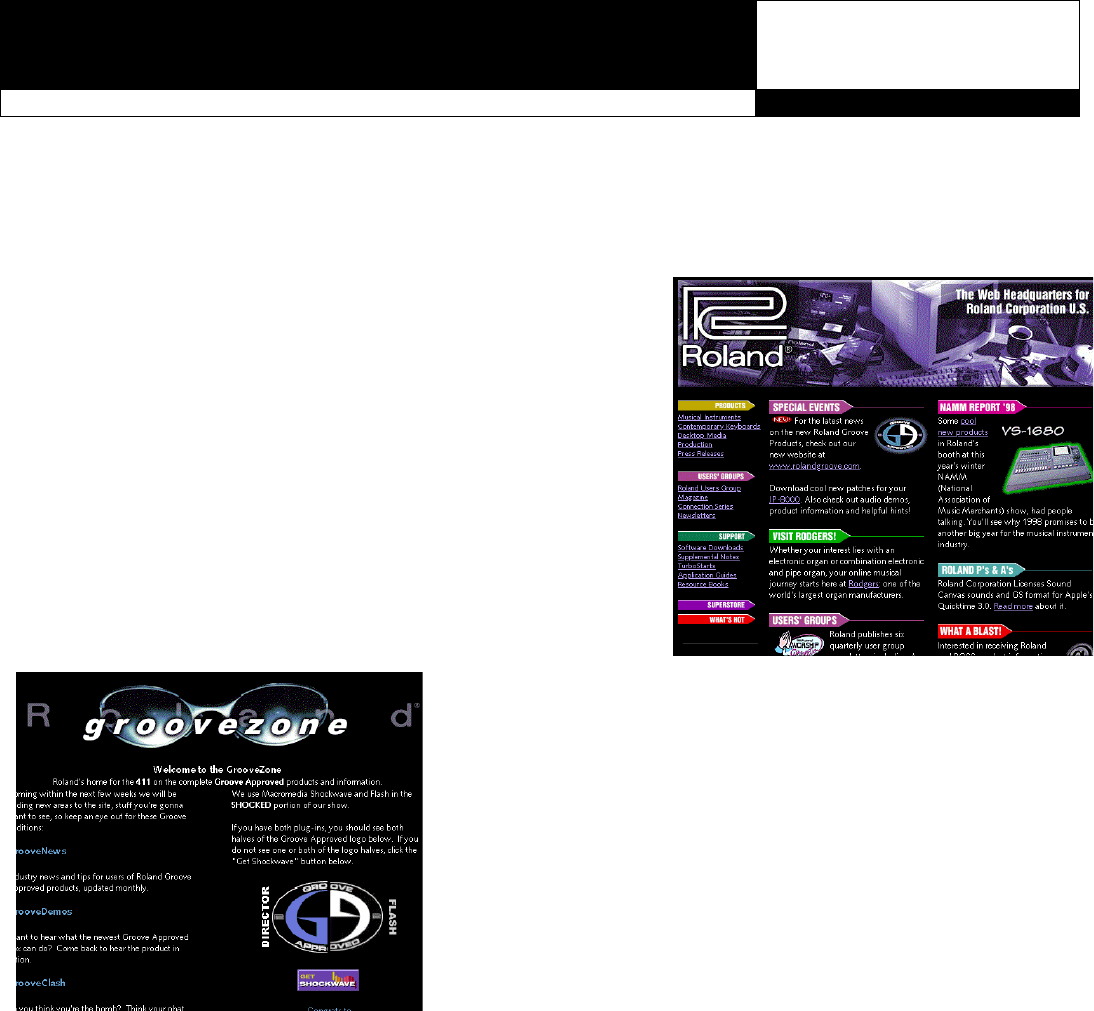
If you’re online, you can get answers to common tech support questions, download
software updates and demo files, and check out everything that’s new at Roland.
On The Internet...
http://www.rolandus.com
To access the Software Downloads area:
1. On the main page, click Software Downloads.
On CompuServe...
GO ROLAND
To access the Software Downloads area:
1. Click on the GO button.
2. Type Roland and click OK.
3. If you haven’t been to the MIDI C Vendor forum before, click the JOIN button.
4. Click the BROWSE LIBRARY button.
5. Choose Roland Corp. files and click SELECT.
6. Select a file from the list and click RETRIEVE.
Also on The Internet...
http://www.rolandgroove.com
N
QPSMTR
+
&DWDORJ2QH
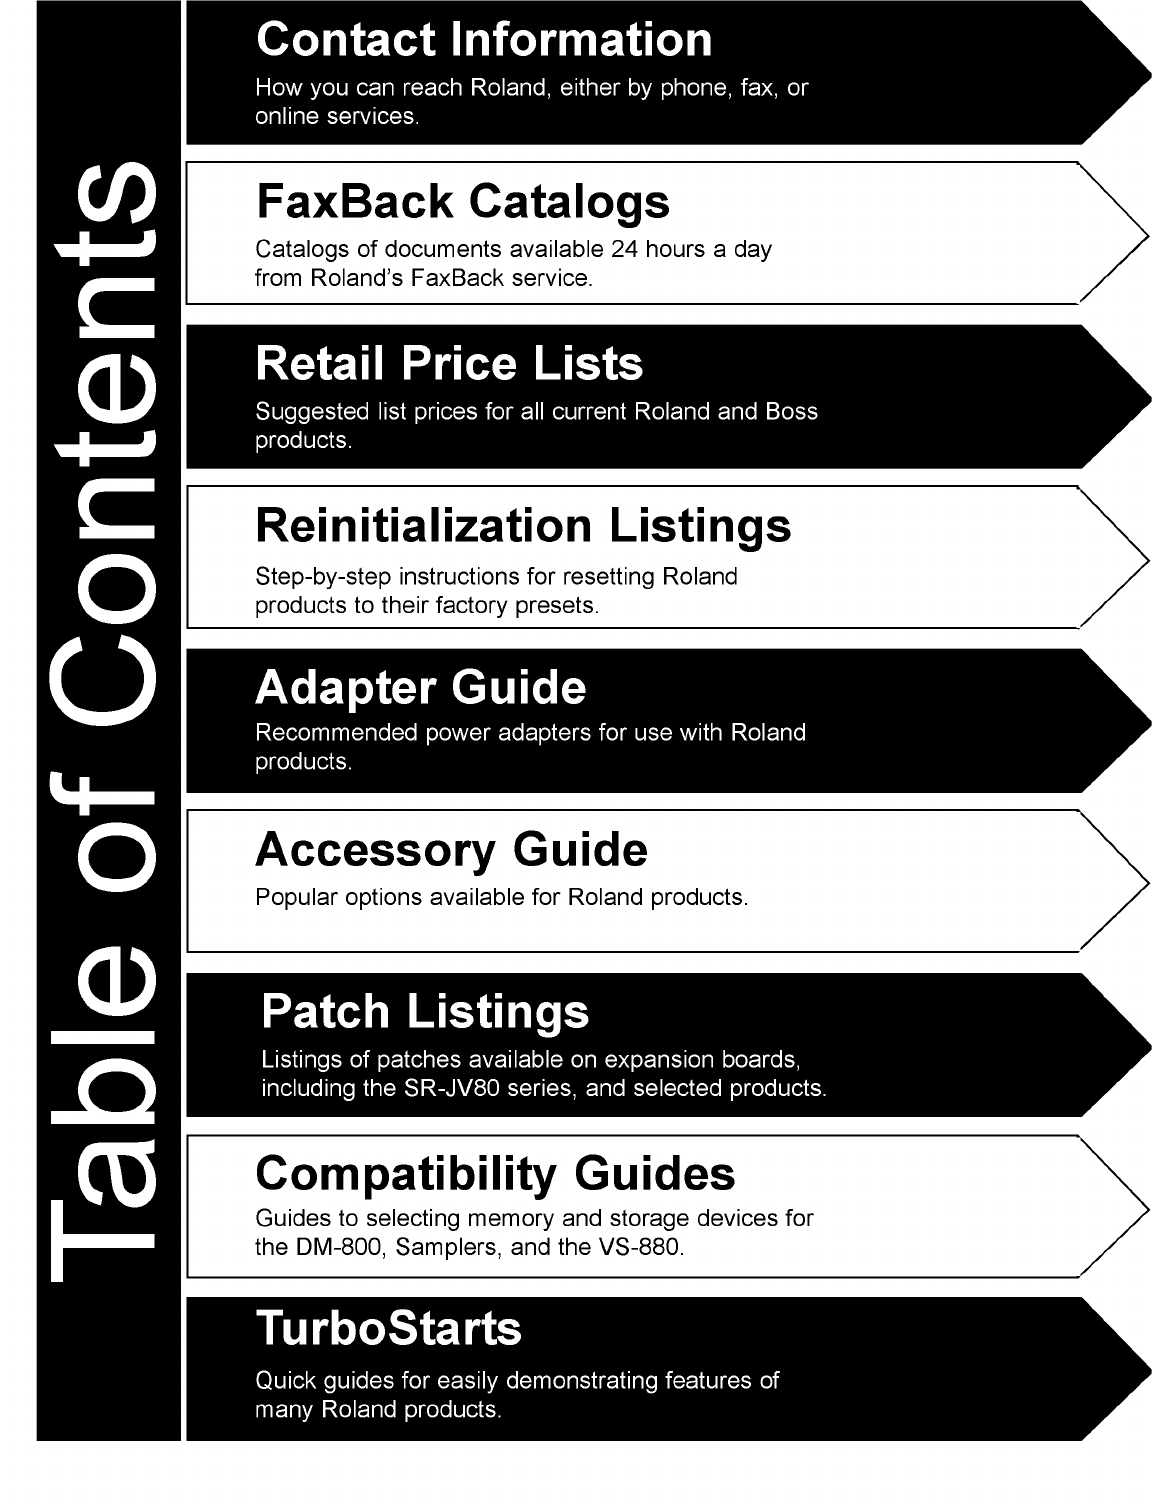
Retail Price Lists
Information on Roland and BOSS products is available to your fax machine
323-685-5141
Ext. 271
24 hours, 7 days a week, from Roland Corporation U.S.
Doc # Price List Pgs
30001 Roland Retail 6
30002 BOSS Retail 2
30003 Roland and BOSS Accessories 2
30004 Roland SuperShop Products 3

N
QPSMTR
+
&DWDORJ7ZR
Product Specifications & Info
Information on Roland and BOSS products is available to your fax machine
323-685-5141
Ext. 271
24 hours, 7 days a week, from Roland Corporation U.S.
© 1998 Roland Corporation U.S. 6/25/98 Page 1 of 4
Doc # Model P
g
s
Keyboards and Sound Modules
10077 A-33 MIDI Keyboard Controller 2
10220 A-70 Expandable Controller 1
10074 A-90/EX Expandable Controller 3
10140 ep-7mkII/9 Digital Piano 1
10006 FP-1 Digital Piano 1
10223 G-600 Arranger Workstation 2
10163 G-800 Arranger Workstation 3
10252 G-1000 Arranger Workstation
NEW!
2
10160 JP-8000 Music Synthesizer 2
10036 JV-1080 Super JV Synth Module 2
10162 JV-2080 Super JV Synth Module 2
10253 JX-305 Groove Synth
NEW!
2
10225 KC-100 Keyboard Amplifier 2
10104 KC-300 Keyboard Amplifier 1
10078 KC-500 Keyboard Amplifier 2
10103 LVC-1N Lyrics Video Converter 1
10203 M-BD1 Bass and Drums Module 2
10028 M-SE1 String Ensemble Module 3
10149 PK-5 Dynamic MIDI Pedal 2
10085 PMA-5 Personal Music Assistant 3
10023 RA-30 Realtime Arranger 3
10102 RA-800 Realtime Arranger 2
10197 RD-600 Digital Piano 2
10230 S-MPU-IIAT MIDI Processing Unit 1
10255 SC-880 64 Voice Synth Module
NEW!
1
10082 SR-JV80-09 Session Exp Board 1
10198 SR-JV80-10 Bass & Drums Exp Board 1
10232 SR-JV80-11 Techno Collection Board 1
10256 SR-JV80-12 Hip Hop Collection Board
NEW!
1
10075 VE-RD1 Voice Expansion Board 1
10201 VK-7 Combo Organ 2
10153 XP-10 Multitimbral Keyboard 2
10260 XP-60 Music Workstation
NEW!
2
10073 XP-80 Music Workstation 2
Doc # Model P
g
s
Digital Recording and Processing
10152 DIF-800 Digital Interface 1
10098 DM-800 Multi Track Disk Recorder 3
10244 SI-80S LANC to MTC Converter
NEW!
1
10081 SN-700 Noise/Hum Eliminator 1
10237 VS-840 Digital Studio Workstation 2
10071 VS-880V2 V-Expanded Digital Studio Workstation 4
10243 VS-880-S1 VS-880 System Expansion 1
10072 VS8F-1 Effects Expansion Board 1
10202 VS-CDR-S2 VS-880 CD Exp. System
NEW!
1
10202 VS-880CDR VS-880 CD Rec. System
NEW!
1
10259 VS-1680HD 24 Bit Digital Studio Workstation
NEW!
2
10277 VSCopy Polarsonics VS-880 Software 1
10276 VS/Link Airworks VS-880 Software 4
Groove Products
10101 DJ-70MKII Sampling Workstation 2
10274 DJ-2000 Professional DJ Mixer
NEW!
2
10253 JX-305 Groove Synth
NEW!
2
10086 MC-303 Groove Box 2
10254 MC-505 Groove Box
NEW!
2
10231 SP-202 Dr. Sample 2
10257 SP-808 Groove Sampler
NEW!
2
Electronic Percussion
10222 DB-12 Dr. Beat 1
10105 DR-5 Dr. Rhythm Section 4
10000 DR-550MKII Dr. Rhythm 4
10000 DR-660 Dr. Rhythm 4
10229 PD-100/120 V-Pads 1
10022 R-8MKII Human Rhythm Composer 3
10021 R-70 Human Rhythm Composer 3
10042 SPD-11 Total Percussion Pad 2
10258 SPD-20 Total Percussion Pad
NEW!
2
10234 Stage Set Percussion Stage Set 1
10235 Trap Set Percussion Trap Set 1
10200 V-PRO KIT V-Drum Compact System 3
10193 TD-10 V-Drum Sound Module 2
N
QPSMTR
+
&DWDORJ7ZR
Product Specifications & Info
Information on Roland and BOSS products is available to your fax machine
323-685-5141
Ext. 271
24 hours, 7 days a week, from Roland Corporation U.S.
© 1998 Roland Corporation U.S. 6/25/98 Page 2 of 4
Doc # Model P
g
s
Digital Samplers
10034 DA-400 4 ch D/A Converter 1
10195 L-CDP-14 Africa Vol.2 CD ROM 1
10024 S-760 Digital Sampler 6
Sequencers
10015 MC-50MKII MicroComposer 3
10141 MT-80SM Digital Sequencer w/Snd Module 2
Signal Processors
10187 AD-5 Acoustic Inst Processor 2
10029 SDE-330 Dimensional Space Delay 4
10164 SDX-330 Dimensional Space Delay 2
10029 SRV-330 Dimensional Space Reverb 4
10084 SX-700 Studio Effects Processor 3
10065 VT-1 Voice Transformer 2
CD ROM Patch Listings
Composer Series CD ROMs
S-750/760/770 / SP-700 / DJ-70MKII / JS-30
10176 L-CDC-01 Jazz Composer CD ROM 2
Project Series CD ROMs
S-750/760/770 / SP-700 / DJ-70MKII / JS-30
10169 L-CDP-01 Drums and Cymbals Vol. 1 3
10177 L-CDP-02 Guitar and Bass Vol. 1 2
10181 L-CDP-03 Orchestral Percussion Vol. 1 2
10174 L-CDP-04 Orchestral Percussion Vol. 1 2
10172 L-CDP-05 Solo Strings Vol. 1 2
10170 L-CDP-06 Brass Sections Vol. 1 2
10167 L-CDP-07 Super Sax Vol. 1 1
10171 L-CDP-08 Symphony Orchestra Vol. 1 2
10175 L-CDP-09 Keyboards of th 60s & 70s Vol. 1 2
10179 L-CDP-10 Keyboards of th 60s & 70s Vol. 2 2
10183 L-CDP-11 Africa Vol. 1 4
10173 L-CDP-12 Solo Brass 2
10184 L-CDP-13 Strings Sections 3
10206 L-CDP-14 Africa Vol. 2 2
Roland Sample Archive CD ROMs
S-750/760/770 / SP-700 / DJ-70MKII / JS-30
10185 L-CD702 Orchestral Family 1&2 (2 Disks) 7
Doc # Model P
g
s
Patch and Waveform Listings
10307 JP-8000 Patch Listing 1
10308 JP-8000 Performance Listing 1
10139 MC-303 MC-303 Patch Listing 3
10288 MC-505 MC-505 Patch Listing 3
10289 MC-505 MC-505 Pattern Listing 3
10138 PMA-5 PMA-5 Patch Listing 2
10296 SPD-20 SPD-20 Instrument Listing 5
10295 SPD-20 SPD-20 Patch Listing 1
10106 SR-JV80-01 Pop Exp Patch Listing 1
10107 SR-JV80-02 Pop Exp Waveform Listing 1
10108 SR-JV80-02 Orchestral Exp Patch Listing 1
10109 SR-JV80-02 Orchestral Exp Waveform Listing 1
10110 SR-JV80-03 Piano Exp Patch Llisting 1
10111 SR-JV80-03 Piano Exp Waveform Listing 1
10112 SR-JV80-04 Vintage Exp Patch Listing 1
10209 SR-JV80-04 Vintage Exp JD Patch Listing 1
10113 SR-JV80-04 Vintage Exp Waveform Listing 1
10114 SR-JV80-05 World Exp Patch Listing 1
10115 SR-JV80-05 World Exp Waveform Listing 1
10118 SR-JV80-07 Super Sound Set Patch Listing 1
10119 SR-JV80-07 Super Sound Set Waveform Listing 1
10120 SR-JV80-08 60s & 70s Keys Patch Listing 1
10121 SR-JV80-08 60s & 70s Keys Waveform Listing 1
10122 SR-JV80-09 Session Exp Patch Listing 1
10123 SR-JV80-09 Session Exp Waveform Listing 1
10165 SR-JV80-10 Bass & Drums Exp Wave Listing 1
10166 SR-JV80-10 Bass & Drums Exp Patch Listing 1
10240 SR-JV80-11 Techno Collection Wave Listing 1
10241 SR-JV80-11 Techno Collection Patch Listing 1
10287 SR-JV80-12 Hip Hop Collection Wave Listing 1
10286 SR-JV80-12 Hip Hop Collection Patch Listing 1
10306 TD-7T TD-7T Patch Listing 9
10293 TD-10 Drum Instrument Listing 6
10294 TD-10 Drum Kit Listing 1
10275 VE-RD1 Expansion Board Patch Listing 1
10279 XP-60/80 Internal Waveform Listing 3
10278 XP-60/80 Internal Patch Listing 1
N
QPSMTR
+
&DWDORJ7ZR
Product Specifications & Info
Information on Roland and BOSS products is available to your fax machine
323-685-5141
Ext. 271
24 hours, 7 days a week, from Roland Corporation U.S.
© 1998 Roland Corporation U.S. 6/25/98 Page 3 of 4
Doc # Model P
g
s
Guitar Products
10033 AC-100 Acoustic Chorus Amplifier 2
10080 BC-30/210 Blues Cube Amplifier 1
10079 BC-60/310 Blues Cube Amplifier 1
10192 GC-405/X Guitar Amplifier 2
10224 GC-408/X Guitar Amplifier 2
10008 GP-100 Guitar Preamp / Processor 2
10161 GR-30 Guitar Synthesizer w/ Arpeg 2
10097 GT-5 Guitar Effects Processor 3
10083 GX-700 Guitar Effects Processor 3
10204 JC-90 Jazz Chorus Amplifier 1
10011 JC-120 Jazz Chorus Amplifier 1
10207 ME-8 Guitar Multi-Effects 3
10227 ME-30 Guitar Multi-Effects 2
10031 VG-8 V-Guitar System 3
10076 VG8D-1/2 VG-8 Data Cards 1
10070 VG8S-1 VG-8 System Expansion 1
10237 VS-840 Digital Studio Workstation 2
Boss Pedals and Accessories
10186 AC-2 Acoustic Simulator 1
10003 BD-2 Blues Driver 2
10189 CT-6 Guitar/BOSS Auto Tuner 1
10194 DB-88 Dr. Beat Metronome 1
10002 DD-5 Digital Delay 2
10191 FZ-3 Fuzz Pedal 1
10010 HR-2 Harmonist 2
10020 OD-2R Turbo Overdrive 1
10228 OD-3 Overdrive 1
10097 PW-2 Power Driver 3
10097 SYB-3 Bass Synthesizer 3
10199 TR-2 Tremolo 1
10097 XT-2 Xtortion 3
Contractor Products
10099 AR-2000 Audio Recorder 3
10100 AR-100 Announcement Recorder 2
Doc # Model P
g
s
Sound Reinforcement Products
10188 AF-70 Feedback Eliminator 2
10205 DR-10/20 Dynamic Microphone 1
10093 EQ-131 Graphic Equalizer 1
10094 EQ-215 Graphic Equalizer 1
10095 EQ-231 Graphic Equalizer 1
10226 MA-4/9 Stereo Micro Monitors 1
10096 MA-8 Stereo Micro Monitors 1
10196 MA-8BK Stereo Micro Monitors 1
10089 PA-410 Powered Mixer 2
10087 RX-62 Stereo Mixer 1
10088 RX-82 Stereo Mixer 1
10090 SRA-260 Power Amplifier 1
10091 SRA-540 Power Amplifier 1
10092 SRA-800 Power Amplifier 1
10233 SST-151/251 Speaker Systems 2
10233 SSW-351 Subwoofer 2
MI and CK Newsletters
10265 Atelier News Vol. 3, No. 1 4
10266 Atelier News Vol. 4, No. 1 4
10271 Axe Facts Vol. 3, No. 2 4
10281 Axe Facts Vol. 4, No. 1 4
10269 Back Beat Vol. 3, No. 2 4
10280 Back Beat Vol. 4, No. 1 4
10273 Border Line Vol. 1, No. 3 4
10283 Border Line Vol. 2, No. 1 4
10210 CK Educator’s Newsletter Vol. 1, No. 1 12
10262 CK Educator’s Newsletter Vol. 1, No. 2 16
10261 CK Educator’s Newsletter Vol. 2, No. 1 12
10272 MIDI in Ministry Vol. 1, No. 1 6
10267 Track Notes Vol. 1, No. 2 4
10268 Track Notes Vol. 1, No. 3 4
10282 Track Notes Vol. 2, No. 1 4
10270 Roland Users Group & Newsletter Signup Form 1
N
QPSMTR
+
&DWDORJ7ZR
Product Specifications & Info
Information on Roland and BOSS products is available to your fax machine
323-685-5141
Ext. 271
24 hours, 7 days a week, from Roland Corporation U.S.
© 1998 Roland Corporation U.S. 6/25/98 Page 4 of 4
Doc # Model P
g
s
Contemporary Keyboard Products
10130 AT-30 Atelier Organ 1
10190 AT-80 Atelier Organ 1
10131 AT-90 Atelier Organ 2
10208 E-14US Intelligent Synthesizer 4
10208 E-28US Intelligent Synthesizer 4
10213 E-500 Intelligent Synthesizer 3
10242 ep-85/75 Digital Piano 2
10245 HP-126 Digital Piano
NEW!
1
10246 HP-236 Digital Piano
NEW!
1
10263 HP-245 Digital Piano
NEW!
1
10247 HP-335 Digital Piano
NEW!
1
10248 HP-535 Digital Piano
NEW!
2
10249 HP-555G Digital Piano
NEW!
2
10238 HP-730 Digital Piano 2
10290 KR-75 Intelligent Piano
NEW!
2
10284 KR-375 Intelligent Piano
NEW!
2
10285 KR-575 Intelligent Piano
NEW!
2
10264 KR-1070 Intelligent Piano
NEW!
2
10103 LVC-1N Lyrics Video Converter 1
10148 MSA/MSD Music Style Disks 2
10141 MT-80S Digital Sequencer w/Snd Module 2
10144 MT-120/S Digital Sequencer w/Snd Module 2
10250 MT-300S Digital Sequencer w/Snd Module
NEW!
2
10149 PK-5 Dynamic MIDI Pedal 2
10146 TN-SC2 Music Style Cards 1
10236 V-MT1 Music Tutor Visual MT 3
N
QPSMTR
+
&DWDORJ7KUHH
Operational Support Documents
Information on Roland and BOSS products is available to your fax machine
323-685-5141
Ext. 271
24 hours, 7 days a week, from Roland Corporation U.S.
© 1998 Roland Corporation U.S. 06/24/98 Page 1 of 3
Support Documentation consists of two series: TurboStarts
and Supplemental Notes. TurboStarts are short 1-2 page
documents with the most basic operations, demo tips, facts
and figures. Supplemental Notes are typically longer and
contain step by step instructions on more complicated or
detailed procedures.
Doc # Pgs
Supplemental Notes
3rd Party
21050 Software Sequencing Basics 13
Arranger MIDI Control Listings for Styles
21044 RA-30 MIDI Ctrl. for Styles 1
21046 RA-90 MIDI Ctrl. for Styles 1
21047 RA-95 MIDI Ctrl. for Styles 1
21045 RA-800/G-800 MIDI Ctrl. for Styles 1
Contractor Products
21038 AR-100/2000 Compatibility Guide 2
21020 AR-2000 Quick Application Guide 2
GR / VG / Guitar Products
21057 Creating an Arpeggio on the GR-30 4
21002 MIDI Sequencing with the GR-1 7
G / JP / JV / JD / MC / XP Series Products
21054 Basics of MIDI 11
21042 DJ-70/DJ-70mkII Basics 13
21041 G-800 Creating User Styles 5
21048 JP-8000 Basic Synthesis 9
21005 JV / XP Part Rx On/Off SysEx 1
21004 JV Master Class 7
21009 JV-90/V-EXP Sequencing 6
21010 JV-1000/V-EXP Sequencing 6
21034 JV-1080 MIDI Sequencing 10
21022 Super JV - Programming the JV Synthesizers 18
21025 MC-303 System Exclusive Messages 1
21037 MC-303 Advanced MIDI Programming 6
21033 MRM-500 Operating Instructions 1
21049 XP-50 Creating RPS Patterns from SMFs 2
21008 XP-50 Sequencing Basics 7
21053 XP-50 Advanced Sequencing 10
21043 XP-50 Using With an External Sequencer 7
21040 XP-50 Frequently Asked Questions 8
21016 XP-80 Sequencing Basics 8
Doc # Pgs
Supplemental Notes continued
Hard Disk Recording and Samplers
21031 DM-80/800 Compatibility Guide 2
21021 DM-800 Tutorial Guide 15
21024 DM-800 Using a Removable Drive for Backup 1
21055 S-50 Basics 3
21056 S-330/550 Basics 4
21013 S-760 Audio Drivers for the CD Player Function 1
21019 Sampler Compatibility Guide 4
21014 SCSI Transfers with the S-760 3
21012 The Roland S-760 Demystified 10
21058 VS-840 Synchronization 5
21023 VS-880 Basic Recording 29
21032 VS-880 Compatibility Guide 2
21026 VS-880 Connectiong Multiple VS-880s 4
21052 VS-880
Hot Tips
Keyboard Magazine Article 9
21059 VS-880
Secrets of the Virtual Studio
Article 7
21027 VS-880 Synchronizing with Software Sequencers 6
21029 VS-880 Updating from SMF with Update Specs 2
21030 VS-880 MIDI Implementation 19
21035 VS-880 MIDI Implementation V-Xpanded 35
21060 VS-1680/880 Synchronization Supp. Notes 3
MIDI Controllers and Digital Pianos
21018 Sequencing with the RD-500 3
21051 Sequencing with the RD-600 4
MPU / Sound Cards / Desktop Media Production
21015 MPU-401 Compatible Installation and
Configuration in Windows 95 8
21006 MPU-401 Compatible Installation and
Configuration in Windows 3.1 7
21017 RAP-10 Compatible Installation and
Configuration in Windows 95 7
21011 SCD-10/15 Daughterboard Installation and
Configuration in Windows 95 3
21036 Serial MIDI Device Windows 3.1 Setup 5
SoundCanvas / GS / GM Instruments
21003 GM Part Rx Channel SysEx for RAP-10/SC-7 1
21001 GS Part Rx Channel SysEx 1
21007 SoundCanvas MIDI Depths 7
N
QPSMTR
+
&DWDORJ7KUHH
Operational Support Documents
Information on Roland and BOSS products is available to your fax machine
323-685-5141
Ext. 271
24 hours, 7 days a week, from Roland Corporation U.S.
© 1998 Roland Corporation U.S. 06/24/98 Page 2 of 3
Doc # Pgs
TurboStarts
20001 A-30 MIDI Keyboard Controller 1
20044 A-33 MIDI Keyboard Controller 1
20068 A-70 Expandable Controller 1
20002 A-80 MIDI Keyboard Controller 1
20035 A-90/EX Expandable Controller 1
20001 AX-1 Remote MIDI Controller 1
20045 DJ-70MKII Sampling Workstation 1
20004 DR-5 Dr. Rhythm Section 2
20003 DR-550MKII Dr. Rhythm 1
20005 DR-660 Dr. Rhythm 1
20006 DS-330 Dr. SoundCanvas 1
20007 E-66 Intelligent Synthesizer 1
20046 FC-200 Foot Controller 1
20060 G-600 Arranger Workstation 1
20008 G-800 Arranger Workstation 1
20009 GP-100 Guitar Preamp/Processor 2
20010 GR-09 Guitar Synthesizer 1
20011 GR-1 Guitar Synthesizer 1
20055 GR-30 Guitar Synthesizer 1
20040 GT-5 Guitar Effects Processor 1
20036 GX-700 Guitar Effects Processor 1
20012 JD-800 Programmable Synthesizer 1
20013 JD-990 Super JD Synthesizer 2
20057 JP-8000 Music Synthesizer 1
20047 JS-30 Sampling Workstation 1
20014 JV-35 Expandable Synthesizer 1
20015 JV-50 Expandable Synthesizer 1
20017 JV-90 Expandable Synthesizer 2
20016 JV-880 Multitimbral Synth Module 1
20050 JV-1000 Music Workstation 2
20041 JV-1080 64-voice Synthesizer 1
20054 JV-2080 64-voice Synthesizer 1
20075 JX-305 Groove Synthesizer 1
Doc # Pgs
TurboStarts continued
20033 MC-50MKII Microcomposer 1
20042 MC-303 Groove Box 1
20070 MC-505 Groove Box 1
20018 ME-6 Guitar Multi Effects 1
20037 ME-8 Guitar Multi Effects 1
20038 ME-8B Bass Multi Effects 1
20019 ME-10 Guitar Multi Effects 1
20065 ME-30 Guitar Multi Effects 1
20049 MS-1 Micro Sampler 1
20020 MSD Music Style Disks 1
20043 PMA-5 Personal Music Assistant 1
20052 R-8MKII Human Rhythm Composer 1
20021 R-70 Human Rhythm Composer 1
20022 RA-90 Intelligent Arranger 1
20064 RA-95 Intelligent Arranger 1
21028 RA-800 Intelligent Arranger 1
20023 RD-500 Digital Stage Piano 1
20058 RD-600 Digital Stage Piano 1
20024 SC-33 SoundCanvas 1
20025 SC-88 SoundCanvas 1
20073 SC-880 64-voice Synthesizer Module 1
20026 SD-35 SoundCanvas 1
20053 SES Expansion Series Modules 1
20066 SP-202 Phrase Sampler 1
20076 SP-808 Groove Sampler 1
20027 SPD-11 Total Percussion Pad 1
20074 SPD-20 Total Percussion Pad 1
20039 SX-700 Studio Effects Processor 1
20062 TD-5 Trap Set Compact Drum System 2
20051 TDE-5K Compact Drum System 2
20063 TD-7T Stage Set Compact Drum System 2
20028 TDE-7K Compact Drum System 2
20061 TD-10 V-Drum Sound Module 1
N
QPSMTR
+
&DWDORJ7KUHH
Operational Support Documents
Information on Roland and BOSS products is available to your fax machine
323-685-5141
Ext. 271
24 hours, 7 days a week, from Roland Corporation U.S.
© 1998 Roland Corporation U.S. 06/24/98 Page 3 of 3
Doc # Pgs
TurboStarts continued
20029 VG-8 V Guitar System 1
20048 VG8S-1 VG-8 System Expansion 1
20059 VK-7 Combo Organ 1
20069 VS-840 Digital Studio Workstation 1
20032 VS-880 Digital Studio Workstation 1
20072 VS-1680 24-bit Digital Studio Workstation 1
20056 VS-880-S1 VS-880 System Expansion 1
20067 VS-CDR-S2 VS-880 CD Writing System 1
20030 XP-10 Multitimbral Synthesizer 1
20031 XP-50 Music Workstation 1
20071 XP-60 Music Workstation 1
20034 XP-80 Music Workstation 1
N
QPSMTR
+
&DWDORJ)RXU
Service Centers & Info
Information on Roland and BOSS products is available to your fax machine
323-685-5141
Ext. 271
24 hours, 7 days a week, from Roland Corporation U.S.
Roland Authorized Service Centers made available through this service are for your
convenience in obtaining repair service locally for both in-warranty or out-of-warranty products.
Roland makes technical consultation available to these service centers. Roland provides
technical training to qualified electronics technicians through formal seminars that include
certification exams. Each Roland Authorized Service Center is required to have a Roland
certified technician on their staff. Nevertheless, these service centers are independent
businesses usually servicing many brands and Roland assumes no responsibility for their
actions. A copy of your sales receipt is the controlling document for warranty service.
Alternatively, you may send product directly to Roland for in-warranty or out-of-warranty
service. Should you choose to do this you must call ahead to obtain a return authorization
(RA) number. Call (213) 685-5141 and select or ask for customer service. You will be asked
for your model and serial numbers and a description of the problem. If the product is in-
warranty you must submit a copy of your sales receipt. Roland maintains a full service repair
department located at the following address:
Roland Corporation U.S.
7200 Dominion Circle
Los Angeles, CA 90040
We’ve divided our listing of Authorized Roland and BOSS Service Centers by telephone Area
Codes to shorten transmission time. In the unlikely event that your instrument needs service,
please call our Roland Fax again to request any of the following Documents for the Area
Code(s) most convenient for you.
Doc # Area Code Pgs
50001 Service Centers in Area Codes 200 - 399 4
50002 Service Centers in Area Codes 400 - 599 3
50003 Service Centers in Area Codes 600 - 799 4
50004 Service Centers in Area Codes 800 - 999 4
N
QPSMTR
+
&DWDORJ)LYH
Product Information Archive
Information on Roland and BOSS products is available to your fax machine
323-685-5141
Ext. 271
24 hours, 7 days a week, from Roland Corporation U.S.
Doc # Model P
g
s
Keyboards and Sound Modules
10221 AX-1 Keyboard Controller 1
10037 JV-35 Expandable Synthesizer 5
10037 JV-50 Expandable Synthesizer 5
10037 JV-90 Expandable Synthesizer 5
10013 JV-880 Synthesizer Module 2
10028 M-GS64 Synthesizer Module 3
10028 M-OC1 Orchestral Module 3
10028 M-VS1 Vintage Synth Module 3
10039 RD-500 Digital Piano 2
10025 SC-50 SoundCanvas 2
10041 SC-55mkII SoundCanvas 1
10027 SC-88 Super SoundCanvas 3
10032 XP-50 Music Workstation 3
Electronic Percussion
10043 TD-5K Compact Drum System 2
10001 TDB- 7K Compact Drum System 4
10001 TDE- 7K Compact Drum System 4
Digital Recording and Processing
10157 AP-700 Advanced Equalizing Proc. 2
Digital Samplers
10012 JS-30 Sampling Workstation 3
10019 MS-1 Digital Sampler 2
Signal Processors
10040 RV-70 Digital Stereo Reverb 1
Guitar Products
10007 GI-10 Guitar MIDI Interface 1
10009 GR-09 Guitar Synthesizer 2
10035 GR-1 Guitar Synthesizer 3
10016 ME-6 Guitar Multi-Effects 4
10018 ME-6B Bass Multi-Effects 2
10060 ME-8B Bass Multi-Effects 1
10016 ME-10 Guitar Multi-Effects 4
10211 SR-GR101 GR-1 Guitar Exp Tone Listing 1
10212 SR-GR101 GR-1 Guitar Exp Patch Listing 1
10030 TM-7 Guitar Monitor w/Amp Sim. 2
Doc # Model Pgs
Contemporary Keyboard Products
10154 AT-50/70 Atelier Organs 2
10132 E-12 Intelligent Synthesizer 2
10133 E-38 Intelligent Synthesizer 2
10005 E-66 Intelligent Synthesizer 2
10208 E-68US Intelligent Synthesizer 4
10135 E-96 Intelligent Synthesizer 2
10140 ep-7mkII/9 Digital Piano 1
10006 FP-1C Digital Piano 1
10242 HP-130 Digital Piano 2
10137 HP-230/330 Digital Piano 3
10137 HP-530 Digital Piano 3
10239 HP-550G Digital Piano 1
10137 HP-1300e Digital Piano 3
10136 HP-1900G Digital Piano w/GS sounds 2
10155 HP-2800/3800 Digital Piano w/GS sounds 2
10142 KP-24 Keyboard Pickup 1
10134 KR-370/570 Intelligent Piano 2
10156 KR-770 Intelligent Piano 1
10147 MA-100 Powered Speaker 1
10023 RA-30/95 Realtime Arranger 3
10143 TL-16 Teaching Lab 2
CD ROM Patch Listings
S-760 / S-750 / S-770 / SP-700 / DJ-70 MkII / JS-30
10182 C50-CD02 Club-50 Foundations 5
10178 DS-60711 Northstar Drumscapes 3
10168 RS-1 Prosonus Orchestral Strings 5
S-760 / S-750 / S-770 / SP-700 / DJ-70 MkII / JS-30
10180 L-CD701 Rhythm Section 1 5
Expansion Board Listings
10116 SR-JV80-06 Dance Exp Patch Listing 1
10117 SR-JV80-06 Dance Exp Waveform Listing 1
Iomega Products
10150 JAZ-EXT1 Iomega Jaz Drive - External 2
10151 ZIP-EXT1 Iomega Zip Drive - External 2

Ø02 / Keyboards/Synthesizers/SoundModules/
Sequencers
A-33 MIDI Keyboard Controller - 76 note . . . . . . . . . . . . . . . . . . . . . . . . . . . . . . . . . . . . . .$695.00
A-70 Expandable Controller - 76 note . . . . . . . . . . . . . . . . . . . . . . . . . . . . . . . . . . . . . . . . .1495.00
A-70EX Expandable Controller - 76 note w/ VE-RD1 Voice Expansion Board . . . . . . . . .1995.00
A-90 Expandable Controller - 88 note w/ weighted PA-4 action . . . . . . . . . . . . . . . . . . . . . .2495.00
A-90EX Expandable Controller - 88 note w/ VE-RD1 Voice Expansion Board . . . . . . . . . . . . . .2995.00
JP-8000 Music Synthesizer . . . . . . . . . . . . . . . . . . . . . . . . . . . . . . . . . . . . . . . . . . . . . . . . . . .1695.00
JP-8080 Synthesizer Module . . . . . . . . . . . . . . . . . . . . . . . . . . . . . . . . . . . . . . . . . . . . . . . .1595.00
JV-1080 64-Voice Synthesizer Module/4x Expansion . . . . . . . . . . . . . . . . . . . . . . . . . . . . . . . .1395.00
JV-2080 64-Voice Synthesizer Module/8x Expansion/3x EFX Processors . . . . . . . . . . . . . . . . .1995.00
M-BD1 Bass and Drums Module . . . . . . . . . . . . . . . . . . . . . . . . . . . . . . . . . . . . . . . . . . . . . . .495.00
MC-50mkII MicroComposer - Sequencer . . . . . . . . . . . . . . . . . . . . . . . . . . . . . . . . . . . . . . . . . . . .795.00
PC-200mkII MIDI Keyboard Controller . . . . . . . . . . . . . . . . . . . . . . . . . . . . . . . . . . . . . . . . . . . . . . .295.00
PK-5 Dynamic MIDI Pedal . . . . . . . . . . . . . . . . . . . . . . . . . . . . . . . . . . . . . . . . . . . . . . . . . . .495.00
PMA-5 Personal Music Assistant - 8-track sequencer/16-part multitimbral . . . . . . . . . . . . . . . .495.00
RD-600 Digital Stage Piano . . . . . . . . . . . . . . . . . . . . . . . . . . . . . . . . . . . . . . . . . . . . . . . . . . .2495.00
SC-880 64-Voice Synthesizer Module . . . . . . . . . . . . . . . . . . . . . . . . . . . . . . . . . . . . . . . . . . .1095.00
VK-7 Combo Organ . . . . . . . . . . . . . . . . . . . . . . . . . . . . . . . . . . . . . . . . . . . . . . . . . . . . . .2495.00
XP-10 Multitimbral Synthesizer . . . . . . . . . . . . . . . . . . . . . . . . . . . . . . . . . . . . . . . . . . . . . . . .895.00
XP-60 Music Workstation - 61 note . . . . . . . . . . . . . . . . . . . . . . . . . . . . . . . . . . . . . . . . . . . .1995.00
XP-80 Music Workstation - 76 note . . . . . . . . . . . . . . . . . . . . . . . . . . . . . . . . . . . . . . . . . . . .2495.00
PMA-5 ACCESSORIES
DB9F-3 Serial Cable - PC - 3 ft. - PMA-5/XP-10/SC-880/SC-55mkII/SC-50 . . . . . . . . . . . . . . . . .10.00
DB9F-10 Serial Cable - PC - 10 ft. - PMA-5/XP-10/SC-880/SC-55mkII/SC-50 . . . . . . . . . . . . . . . .20.00
MD8-3 Serial Cable - MAC - 3 ft. - PMA-5/XP-10/SC-880/SC-55mkII/SC-50 . . . . . . . . . . . . . . . .10.00
MD8-10 Serial Cable - MAC - 10 ft. - PMA-5/XP-10/SC-880/SC-55mkII/SC-50 . . . . . . . . . . . . . . .20.00
DP-2M Start/Stop Pedal for the PMA-5 . . . . . . . . . . . . . . . . . . . . . . . . . . . . . . . . . . . . . . . . . . .19.95
PMA-5S/APL SMF Conversion software, PMA-5 & MAC (includes serial cable) . . . . . . . . . . . . . . . . . .49.95
PMA-5S/AT SMF Conversion software, PMA-5 & PC (includes serial cable) . . . . . . . . . . . . . . . . . . .49.95
STYLUS Replacement Stylus for the PMA-5 . . . . . . . . . . . . . . . . . . . . . . . . . . . . . . . . . . . . . . . . . .9.95
Ø03 / Groove Products
DJ-2000 Professional Groove Mixer . . . . . . . . . . . . . . . . . . . . . . . . . . . . . . . . . . . . . . . . . .1495.00
DR-202 Dr. Groove . . . . . . . . . . . . . . . . . . . . . . . . . . . . . . . . . . . . . . . . . . . . . . . . . . . . . . . .495.00
JX-305 Groove Synthesizer . . . . . . . . . . . . . . . . . . . . . . . . . . . . . . . . . . . . . . . . . . . . . . . . . .1495.00
MC-303 Groove Box . . . . . . . . . . . . . . . . . . . . . . . . . . . . . . . . . . . . . . . . . . . . . . . . . . . . . . . . .895.00
MC-505 Groove Box with D-Beam™ . . . . . . . . . . . . . . . . . . . . . . . . . . . . . . . . . . . . . . . . . . . .1595.00
SP-202 Dr. Sample/Phrase Sampler . . . . . . . . . . . . . . . . . . . . . . . . . . . . . . . . . . . . . . . . . . . . .395.00
SP-808 Groove Sampler with D-Beam™ . . . . . . . . . . . . . . . . . . . . . . . . . . . . . . . . . . . . . . . . .1695.00
SP-808PRO Groove Sampler with D-Beam and Expansion Board Installed . . . . . . . . . . . .2195.00
SP-808-OP1 Expansion Board for SP-808 - Digital I/O, SCSI & 3 stereo outs . . . . . . . . . . . . . . . . . .445.00
(service center installation required)
GROOVE ACCESSORIES
CFX-1 Replacement Cross Fader for DJ-2000 . . . . . . . . . . . . . . . . . . . . . . . . . . . . . . . . . . .40.00
SM-2 Smart Media card (2MB) . . . . . . . . . . . . . . . . . . . . . . . . . . . . . . . . . . . . . . . . . . . . .35.00
SM-4 Smart Media card (4MB) . . . . . . . . . . . . . . . . . . . . . . . . . . . . . . . . . . . . . . . . . . . . .60.00
®ÂØÒÅÎ
RETAIL PRICE LIST
EFFECTIVE July 10, 1998
Model Product Suggested List Price
®
Roland Corporation U.S., 7200 Dominion Circle • Los Angeles, CA 90040-3696 • ph:323.685.5141
Sold by Authorized Roland Dealers only. Prices Subject to change without notice
New Products for Summer NAMM 1998
Musical Instruments
1

®ÂØÒÅÎ RETAIL PRICE LIST EFFECTIVE July 10, 1998
®
Roland Corporation U.S., 7200 Dominion Circle • Los Angeles, CA 90040-3696 • ph:323.685.5141
Sold by Authorized Roland Dealers only. Prices Subject to change without notice
New Products for Summer NAMM 1998
Model Product Suggested List Price
Ø04 / Electronic Percussion
ELECTRONIC DRUM SYSTEMS
AT-5 Acoustic Trigger Package . . . . . . . . . . . . . . . . . . . . . . . . . . . . . . . . . . . . . . . . . . . . . .$695.00
Trap-Set Roland Drum System with Stand (Silver Powder Coat) . . . . . . . . . . . . . . . . . . . . . . . . . . .1495.00
Includes - TD-5, five PD-5s, KD-7, FD-7, MDY-7U, MDH-7U, Trap-Stand and all cables
Stage-Set Roland Drum System with Stand (Charcoal Powder Coat)“Turbo Version” . . . . . . . . . . . . . . . . . .2595.00
Includes - TD-7T, four PD-9s, four PD-7s, KD-7, FD-7, two MDY-7Us, two MDH-7Us, Stage-Stand and all cables
V-Pro-Set V-drum Professional Set with Stand (Navy Powder Coat) . . . . . . . . . . . . . . . . . . . . . . . . .4995.00
Includes - TD-10, three PD-120s, two PD-100s, three PD-9s, PD-7, KD-7, FD-7,
two MDY-7Us, V-Pro-Stand and all cables
RHYTHM COMPOSERS/SOUND MODULES
SPD-20 Total Percussion Pad . . . . . . . . . . . . . . . . . . . . . . . . . . . . . . . . . . . . . . . . . . . . . . . . . .895.00
TD-5 Percussion Sound Module . . . . . . . . . . . . . . . . . . . . . . . . . . . . . . . . . . . . . . . . . . . . . .645.00
TD-7T Percussion Sound Module w/ Sequencer, “Turbo Version” . . . . . . . . . . . . . . . . . . . . . .875.00
TD-10 V-drums Percussion Sound Module w/ Sequencer . . . . . . . . . . . . . . . . . . . . . . . . . . .1895.00
ELECTRONIC DRUM ACCESSORIES
APC-33 Clamp Set . . . . . . . . . . . . . . . . . . . . . . . . . . . . . . . . . . . . . . . . . . . . . . . . . . . . . . . . . . .65.00
FD-7 Hi-Hat Control Pedal . . . . . . . . . . . . . . . . . . . . . . . . . . . . . . . . . . . . . . . . . . . . . . . . . .295.00
KD-7 Kick Trigger for TD-5/7/10 (New and Improved) . . . . . . . . . . . . . . . . . . . . . . . . . . . . . .195.00
KDB-7 Kick Beater for KD-7 . . . . . . . . . . . . . . . . . . . . . . . . . . . . . . . . . . . . . . . . . . . . . . . . . . .39.95
KD-120 V-Kick Trigger . . . . . . . . . . . . . . . . . . . . . . . . . . . . . . . . . . . . . . . . . . . . . . . . . . . . .495.00
MDA-1U Stand Accessory Kit (ten cable clips, six Velco strips, stand adjusting tool) . . . . . . . . . . .39.95
MDA-2U Cable Clip Set (ten cable clips) . . . . . . . . . . . . . . . . . . . . . . . . . . . . . . . . . . . . . . . . . . . .15.00
MDC-7U Mount Clamp . . . . . . . . . . . . . . . . . . . . . . . . . . . . . . . . . . . . . . . . . . . . . . . . . . . . . . . . .15.00
MDH-7U Pad Mount . . . . . . . . . . . . . . . . . . . . . . . . . . . . . . . . . . . . . . . . . . . . . . . . . . . . . . . . . . .32.00
MDJ-7U Stand Joint “T” Fitting . . . . . . . . . . . . . . . . . . . . . . . . . . . . . . . . . . . . . . . . . . . . . . . . . . .15.00
MDK-7U Hand Knob . . . . . . . . . . . . . . . . . . . . . . . . . . . . . . . . . . . . . . . . . . . . . . . . . . . . . . . . . . .10.00
MDP-7U Mounting Plate for TD-5/7/10 and SPD-11 . . . . . . . . . . . . . . . . . . . . . . . . . . . . . . . . . . .20.00
MDS-7U Drum Stand (Black) . . . . . . . . . . . . . . . . . . . . . . . . . . . . . . . . . . . . . . . . . . . . . . . . . . .375.00
MDY-7U Cymbal Mount . . . . . . . . . . . . . . . . . . . . . . . . . . . . . . . . . . . . . . . . . . . . . . . . . . . . . . . .95.00
MH-10 Mesh V-replacement head - 10” . . . . . . . . . . . . . . . . . . . . . . . . . . . . . . . . . . . . . . . . . . .22.95
MH-12 Mesh V-replacement head - 12” . . . . . . . . . . . . . . . . . . . . . . . . . . . . . . . . . . . . . . . . . . .24.95
PCS-5F Dual Trigger Cable - 5 ft. . . . . . . . . . . . . . . . . . . . . . . . . . . . . . . . . . . . . . . . . . . . . . . . .10.00
PCS-10F Dual Trigger Cable - 10 ft. . . . . . . . . . . . . . . . . . . . . . . . . . . . . . . . . . . . . . . . . . . . . . . .12.00
PCS-15F Dual Trigger Cable - 15 ft. . . . . . . . . . . . . . . . . . . . . . . . . . . . . . . . . . . . . . . . . . . . . . . .14.00
PD-5 Single Trigger Pad - 8.5” . . . . . . . . . . . . . . . . . . . . . . . . . . . . . . . . . . . . . . . . . . . . . . .125.00
PD-7 Dual Trigger Pad - 7” . . . . . . . . . . . . . . . . . . . . . . . . . . . . . . . . . . . . . . . . . . . . . . . . . .195.00
PD-9 Dual Trigger Pad - 9” . . . . . . . . . . . . . . . . . . . . . . . . . . . . . . . . . . . . . . . . . . . . . . . . . .245.00
PD-100 Mesh V-Pad - 10” . . . . . . . . . . . . . . . . . . . . . . . . . . . . . . . . . . . . . . . . . . . . . . . . . . . . .395.00
PD-120 Mesh V-Pad - 12” . . . . . . . . . . . . . . . . . . . . . . . . . . . . . . . . . . . . . . . . . . . . . . . . . . . . .445.00
TSC-10 Acoustic Drum Trigger . . . . . . . . . . . . . . . . . . . . . . . . . . . . . . . . . . . . . . . . . . . . . . . . . .39.95
RAD-10U Rack Adapter for TD-10 . . . . . . . . . . . . . . . . . . . . . . . . . . . . . . . . . . . . . . . . . . . . . . . . .79.95
STAGE-STAND Drum Stand for Stage-Set (Charcoal Powder Coat) . . . . . . . . . . . . . . . . . . . . . . . . . . .375.00
TRAP-STAND Drum Stand for Trap-Set (Silver Powder Coat) . . . . . . . . . . . . . . . . . . . . . . . . . . . . . . .375.00
V-DRUMTC Travel Case for V-drum Module and Pads . . . . . . . . . . . . . . . . . . . . . . . . . . . . . . . . . .595.00
V-PRO STAND Drum Stand for V-drum Sets (Navy Powder Coat) . . . . . . . . . . . . . . . . . . . . . . . . . . . .495.00
TD-BAG 2-Bag set for carrying Trap and Stage Drum Sets . . . . . . . . . . . . . . . . . . . . . . . . . . . . .225.00
Ø05 / Guitar Products
GP-100 Guitar Preamp and Effects Processor w/ COSM . . . . . . . . . . . . . . . . . . . . . . . . . . . . . .995.00
GR-30 Guitar Synthesizer w/ Arpeggiator . . . . . . . . . . . . . . . . . . . . . . . . . . . . . . . . . . . . . . . .895.00
GR-30/GK-2A Guitar Synthesizer w/ Arpeggiator and Divided Pickup . . . . . . . . . . . . . . . . . . . . . . . .1095.00
•VG-8EX V-Guitar System . . . . . . . . . . . . . . . . . . . . . . . . . . . . . . . . . . . . . . . . . . . . . . . . . . .1695.00
VG-8EX/GK-2A V-Guitar System and Divided Pickup . . . . . . . . . . . . . . . . . . . . . . . . . . . . . . . . . .1895.00
2

Model Product Suggested List Price
®ÂØÒÅÎ RETAIL PRICE LIST EFFECTIVE July 10, 1998
®
Roland Corporation U.S., 7200 Dominion Circle • Los Angeles, CA 90040-3696 • ph:323.685.5141
Sold by Authorized Roland Dealers only. Prices Subject to change without notice
New Products for Summer NAMM 1998
GUITAR PRODUCT ACCESSORIES
C-13A Cable - 13 Pin - GK-2A to Guitar Synthesizers - 15 ft. . . . . . . . . . . . . . . . . . . . . . . . . . .$65.00
C-13B Cable - 13 Pin - GK-2A to Guitar Synthesizers - 30 ft. . . . . . . . . . . . . . . . . . . . . . . . . . .95.00
C-GKA Guitar to mini jack cable for GK-2A, right angle . . . . . . . . . . . . . . . . . . . . . . . . . . . . . . .10.00
C-GKS Guitar to mini jack cable for GK-2A, straight . . . . . . . . . . . . . . . . . . . . . . . . . . . . . . . . . .10.00
FC-200 Foot Controller . . . . . . . . . . . . . . . . . . . . . . . . . . . . . . . . . . . . . . . . . . . . . . . . . . . . . . .445.00
GK-2A Divided Pickup . . . . . . . . . . . . . . . . . . . . . . . . . . . . . . . . . . . . . . . . . . . . . . . . . . . . . . .275.00
GK-2AKIT Divided Pickup Kit (internal guitar mount) . . . . . . . . . . . . . . . . . . . . . . . . . . . . . . . . . . .275.00
GR-BAG Carrying Bag for GR-1/GR-09/GR-30 . . . . . . . . . . . . . . . . . . . . . . . . . . . . . . . . . . . . . . .65.00
US-20 Unit Selector for Guitar Synthesizer and V-Guitar System . . . . . . . . . . . . . . . . . . . . . . .195.00
VG8D-01 VG-8 Sound Card “TRADITIONAL” . . . . . . . . . . . . . . . . . . . . . . . . . . . . . . . . . . . . . . . .95.00
VG8D-02 VG-8 Sound Card “MODERN” . . . . . . . . . . . . . . . . . . . . . . . . . . . . . . . . . . . . . . . . . . . .95.00
VG8S-1 VG-8 System Expansion . . . . . . . . . . . . . . . . . . . . . . . . . . . . . . . . . . . . . . . . . . . . . . .195.00
VG-8TC Hardshell Travel Case for the VG-8 . . . . . . . . . . . . . . . . . . . . . . . . . . . . . . . . . . . . . . .150.00
Ø06 / Multi-Purpose Accessories
DP-2 Damper Pedal - Black . . . . . . . . . . . . . . . . . . . . . . . . . . . . . . . . . . . . . . . . . . . . . . . . . .19.95
DP-6 Damper Pedal - Silver (Piano-type) . . . . . . . . . . . . . . . . . . . . . . . . . . . . . . . . . . . . . . . .39.95
EV-5 Expression Pedal . . . . . . . . . . . . . . . . . . . . . . . . . . . . . . . . . . . . . . . . . . . . . . . . . . . . .89.95
FS-1 Single Footswitch . . . . . . . . . . . . . . . . . . . . . . . . . . . . . . . . . . . . . . . . . . . . . . . . . . . . . .29.95
FS-5L Footswitch - Latching . . . . . . . . . . . . . . . . . . . . . . . . . . . . . . . . . . . . . . . . . . . . . . . . . . .39.50
FS-5U Footswitch - Unlatching . . . . . . . . . . . . . . . . . . . . . . . . . . . . . . . . . . . . . . . . . . . . . . . . .39.50
PCS-20A Parallel DC Cords for (up to) 8 BOSS pedals . . . . . . . . . . . . . . . . . . . . . . . . . . . . . . . . .16.50
RH-20 Stereo Headphones . . . . . . . . . . . . . . . . . . . . . . . . . . . . . . . . . . . . . . . . . . . . . . . . . . . .39.00
RH-80 Stereo Headphones . . . . . . . . . . . . . . . . . . . . . . . . . . . . . . . . . . . . . . . . . . . . . . . . . . . .99.00
RH-120 Enclosed Stereo Headphones . . . . . . . . . . . . . . . . . . . . . . . . . . . . . . . . . . . . . . . . . . .149.00
SI-80S LANC to MTC converter (Home Video Synchronizer) . . . . . . . . . . . . . . . . . . . . . . . . . .295.00
DIGITAL RECORDING ACCESSORIES
CDR-MEDIA Blank CD for Recording with VS-880CDR and VS-1680CDR . . . . . . . . . . . . . . . . . . . . . .3.50
VS8F-1 Dual Stereo Effect Expansion Board for the VS-880HD, J and V2 . . . . . . . . . . . . . . . . .395.00
COMPUTER INTERFACES
S-MPU-II/AT Intelligent MIDI Processing Unit (Windows Compatible, dual MIDI out) . . . . . . . . . . . . .295.00
VIDEO OWNERS MANUALS
A-90VM Video Owners Manual for the A-90 . . . . . . . . . . . . . . . . . . . . . . . . . . . . . . . . . . . . . . . . .40.00
DR-5VM Video Owners Manual for the DR-5 . . . . . . . . . . . . . . . . . . . . . . . . . . . . . . . . . . . . . . . .40.00
GP-100VM Video Owners Manual for the GP-100 . . . . . . . . . . . . . . . . . . . . . . . . . . . . . . . . . . . . . .40.00
GR-09VM Video Owners Manual for the GR-09 . . . . . . . . . . . . . . . . . . . . . . . . . . . . . . . . . . . . . . .40.00
GR-30VM Video Owners Manual for the GR-30 . . . . . . . . . . . . . . . . . . . . . . . . . . . . . . . . . . . . .40.00
GT-5VM Video Owners Manual for the GT-5 . . . . . . . . . . . . . . . . . . . . . . . . . . . . . . . . . . . . . . . .40.00
GX-700VM Video Owners Manual for the GX-700 . . . . . . . . . . . . . . . . . . . . . . . . . . . . . . . . . . . . . .40.00
JV-1080VM Video Owners Manual for the JV-1080 . . . . . . . . . . . . . . . . . . . . . . . . . . . . . . . . . . . . . .40.00
MC-303VM Video Owners Manual for the MC-303 . . . . . . . . . . . . . . . . . . . . . . . . . . . . . . . . . . . . . .40.00
ME-8VM Video Owners Manual for the ME-8 . . . . . . . . . . . . . . . . . . . . . . . . . . . . . . . . . . . . . . . .40.00
PMA-5VM Video Owners Manual for the PMA-5 . . . . . . . . . . . . . . . . . . . . . . . . . . . . . . . . . . . . . . .40.00
TDE-5KVM Video Owners Manual for the TD-5K, TDE-5K, Trap-Set . . . . . . . . . . . . . . . . . . . . . . . . .40.00
TDE-7KVM Video Owners Manual for the TDE-7K, Stage-Set . . . . . . . . . . . . . . . . . . . . . . . . . . . . . .40.00
VG-8VM Video Owners Manual for the VG-8 . . . . . . . . . . . . . . . . . . . . . . . . . . . . . . . . . . . . . . . .40.00
VS-880VM Video Owners Manual for the VS-880HD, VS-880V2 . . . . . . . . . . . . . . . . . . . . . . . . . . .40.00
XP-10VM Video Owners Manual for the XP-10 . . . . . . . . . . . . . . . . . . . . . . . . . . . . . . . . . . . . . . . .40.00
XP-50VM Video Owners Manual for the XP-50 . . . . . . . . . . . . . . . . . . . . . . . . . . . . . . . . . . . . . . . .40.00
XP-80VM Video Owners Manual for the XP-80 . . . . . . . . . . . . . . . . . . . . . . . . . . . . . . . . . . . . . . . .40.00
TURBOSTART VIDEO GUIDES
AT-5VTS Video “TurboStart” for the AT-5 . . . . . . . . . . . . . . . . . . . . . . . . . . . . . . . . . . . . . . . . . . . .10.00
DR-550VTS Video “TurboStart” for the DR-550mkII . . . . . . . . . . . . . . . . . . . . . . . . . . . . . . . . . . . . . .20.00
3

®ÂØÒÅÎ RETAIL PRICE LIST EFFECTIVE July 10, 1998
®
Roland Corporation U.S., 7200 Dominion Circle • Los Angeles, CA 90040-3696 • ph:323.685.5141
Sold by Authorized Roland Dealers only. Prices Subject to change without notice
New Products for Summer NAMM 1998
Model Product Suggested List Price
DR-660VTS Video “TurboStart” for the DR-660 . . . . . . . . . . . . . . . . . . . . . . . . . . . . . . . . . . . . . . . .$20.00
MC-303VTS Video “TurboStart” for the MC-303 . . . . . . . . . . . . . . . . . . . . . . . . . . . . . . . . . . . . . . . . .20.00
PMA-5VTS Video “TurboStart” for the PMA-5 . . . . . . . . . . . . . . . . . . . . . . . . . . . . . . . . . . . . . . . . . .20.00
VDR-VTS Video TurboStart for the V-drums . . . . . . . . . . . . . . . . . . . . . . . . . . . . . . . . . . . . .20.00
VS-840TS Video TurboStart for the VS-840 . . . . . . . . . . . . . . . . . . . . . . . . . . . . . . . . . . . . . .20.00
VS-880VTS Video “TurboStart” for the VS-880 . . . . . . . . . . . . . . . . . . . . . . . . . . . . . . . . . . . . . . . . .20.00
VS-1680TS Video TurboStart for the VS-1680 . . . . . . . . . . . . . . . . . . . . . . . . . . . . . . . . . . . . .20.00
VT-1VTS Video “TurboStart” for the VT-1 . . . . . . . . . . . . . . . . . . . . . . . . . . . . . . . . . . . . . . . . . . .20.00
Ø07 / Digital Signal Processing
SDE-330 3-Dimensional Space Delay . . . . . . . . . . . . . . . . . . . . . . . . . . . . . . . . . . . . . . . . . . . . .995.00
SRV-330 3-Dimensional Space Reverb . . . . . . . . . . . . . . . . . . . . . . . . . . . . . . . . . . . . . . . . . . . .995.00
Ø08 - DM/Digital Recording & Processing
DM-800 Multi Track Disk Recorder . . . . . . . . . . . . . . . . . . . . . . . . . . . . . . . . . . . . . . . . . . . . .3695.00
DM-800HD Multi Track Disk Recorder w/ 2 Internal 800MB Hard Drives . . . . . . . . . . . . . . . . . . . .4995.00
DM-800RS Roll Around Stand for the DM-800/DM-800HD . . . . . . . . . . . . . . . . . . . . . . . . . . . . . . .120.00
DM-800TC Hardshell Case for the DM-800/DM-800HD . . . . . . . . . . . . . . . . . . . . . . . . . . . . . . . . .100.00
DIGITAL PROCESSING EQUIPMENT
DA-400 4-ch D/A Converter (for S-760 and DM-800) . . . . . . . . . . . . . . . . . . . . . . . . . . . . . . . . . .645.00
DIF-800 ADAT®/DA-88/RS-422 Interface for DM-800 recorders . . . . . . . . . . . . . . . . . . . . . . . .1095.00
RSS-10 3-Dimensional Sound Space Processor . . . . . . . . . . . . . . . . . . . . . . . . . . . . . . . . . . .1995.00
Ø08 - VS/Digital Recording
VS-880EX Digital Studio Workstation - w/2 GB HD and Effects . . . . . . . . . . . . . . . . . . . . . .2195.00
VS-880TC Hard-shell Travel Case for the VS-880 (all models) . . . . . . . . . . . . . . . . . . . . . . . . . . . .150.00
16-TRACK DIGITAL RECORDING
VS-1680HD 24 Bit Digital Studio Workstation . . . . . . . . . . . . . . . . . . . . . . . . . . . . . . . . . . . . . . . . .3195.00
VS-1680HDB 24 Bit Digital Studio Workstation w/ File Exchange Software . . . . . . . . . . . . . . . . . . . .3295.00
VS-1680TC Hard-shell Travel Case for the VS-1680 . . . . . . . . . . . . . . . . . . . . . . . . . . . . . . . . . . . .195.00
VS8F-2 Dual Stereo Effect Expansion Board for the VS-1680 . . . . . . . . . . . . . . . . . . . . . . . . . .395.00
CD RECORDING
VS-CDR CD Recorder System for the VS-880(EX) and VS-1680 w/ VS-880 CD System Software 750.00
Ø09 / Instrument Amplifiers
AC-100 Acoustic Chorus Guitar Amplifier . . . . . . . . . . . . . . . . . . . . . . . . . . . . . . . . . . . . . . . . .1195.00
BC-30 BluesCube - 30 watts . . . . . . . . . . . . . . . . . . . . . . . . . . . . . . . . . . . . . . . . . . . . . . . . . .379.00
BC-30/210 BluesCube - 30 watts w/2 x 10” speakers . . . . . . . . . . . . . . . . . . . . . . . . . . . . . . . . . . .479.00
BC-60 BluesCube - 60 watts . . . . . . . . . . . . . . . . . . . . . . . . . . . . . . . . . . . . . . . . . . . . . . . . . .599.00
BC-60/310 BluesCube - 60 watts w/3 x 10” speakers . . . . . . . . . . . . . . . . . . . . . . . . . . . . . . . . . . .779.00
GC-405 Guitar Amplifier w/ 4 x 5” speakers . . . . . . . . . . . . . . . . . . . . . . . . . . . . . . . . . . . . . . . .249.00
GC-405S Guitar Cabinet w/ 4 x 5” speakers . . . . . . . . . . . . . . . . . . . . . . . . . . . . . . . . . . . . . . . . .150.00
GC-405X Guitar Amplifier Stack w/ 8 x 5” speakers . . . . . . . . . . . . . . . . . . . . . . . . . . . . . . . . . . .399.00
GC-408 Guitar Amplifier w/ 4 x 8” speakers . . . . . . . . . . . . . . . . . . . . . . . . . . . . . . . . . . . . . . . .499.00
GC-408S Guitar Cabinet w/ 4 x 8” speakers . . . . . . . . . . . . . . . . . . . . . . . . . . . . . . . . . . . . . . . . .200.00
GC-408X Guitar Amplifier Stack w/ 8 x 8” speakers . . . . . . . . . . . . . . . . . . . . . . . . . . . . . . . . . . .699.00
JC-90 Jazz Chorus Amplifier . . . . . . . . . . . . . . . . . . . . . . . . . . . . . . . . . . . . . . . . . . . . . . . . .799.00
JC-120 Jazz Chorus Amplifier . . . . . . . . . . . . . . . . . . . . . . . . . . . . . . . . . . . . . . . . . . . . . . . . .1099.00
KC-100 Keyboard Amplifier - 60 watts . . . . . . . . . . . . . . . . . . . . . . . . . . . . . . . . . . . . . . . . . . . .449.00
KC-300 Keyboard Amplifier - 100 watts . . . . . . . . . . . . . . . . . . . . . . . . . . . . . . . . . . . . . . . . . . .599.00
KC-500 Keyboard Amplifier - 150 watts . . . . . . . . . . . . . . . . . . . . . . . . . . . . . . . . . . . . . . . . . . .799.00
4

®ÂØÒÅÎ RETAIL PRICE LIST EFFECTIVE July 10, 1998
®
Roland Corporation U.S., 7200 Dominion Circle • Los Angeles, CA 90040-3696 • ph:323.685.5141
Sold by Authorized Roland Dealers only. Prices Subject to change without notice
New Products for Summer NAMM 1998 **Contact your local Roland dealer for pricing information
Model Product Suggested List Price
Ø09A / Sound Reinforcement
EQUALIZERS
EQ-131 Single Channel 31-Band Graphic Equalizer . . . . . . . . . . . . . . . . . . . . . . . . . . . . . . . .$345.00
EQ-215 Stereo Channel 15-Band Graphic Equalizer . . . . . . . . . . . . . . . . . . . . . . . . . . . . . . . . .395.00
EQ-231 Stereo Channel 31-Band Graphic Equalizer . . . . . . . . . . . . . . . . . . . . . . . . . . . . . . . . .495.00
MIXERS
PA-410 10-Channel Powered Mixer w/ Effects . . . . . . . . . . . . . . . . . . . . . . . . . . . . . . . . . . . .1595.00
RX-62 Stereo Mixer - 6 Channel . . . . . . . . . . . . . . . . . . . . . . . . . . . . . . . . . . . . . . . . . . . . . . .295.00
RX-82 Stereo Mixer - 8 Channel . . . . . . . . . . . . . . . . . . . . . . . . . . . . . . . . . . . . . . . . . . . . . . .395.00
FEEDBACK ELIMINATORS
AF-70 Feedback Eliminator, Direct Box & Phantom Power Supply . . . . . . . . . . . . . . . . . . . . . .395.00
RAF-70 Rack Adapter for 3x AF-70s . . . . . . . . . . . . . . . . . . . . . . . . . . . . . . . . . . . . . . . . . . . . . .39.00
AMPLIFIERS
SRA-260 Stereo Power Amplifier - 260 watts . . . . . . . . . . . . . . . . . . . . . . . . . . . . . . . . . . . . . . .795.00
SRA-540 Stereo Power Amplifier - 540 watts . . . . . . . . . . . . . . . . . . . . . . . . . . . . . . . . . . . . . . .995.00
SRA-800 Stereo Power Amplifier - 800 watts . . . . . . . . . . . . . . . . . . . . . . . . . . . . . . . . . . . . . .1295.00
SPEAKER SYSTEMS
SSM-151 Floor Monitor . . . . . . . . . . . . . . . . . . . . . . . . . . . . . . . . . . . . . . . . . . . . . . . . . . . . . .399.00
SST-151 2-Way Speaker w/ 12” woofer, horn and parallel inputs . . . . . . . . . . . . . . . . . . . . . . . . .399.00
SST-251 2-Way Speaker w/ 15” woofer, horn and parallel inputs . . . . . . . . . . . . . . . . . . . . . . . . .599.00
SSW-351 Subwoofer w/ 18” speaker and internal crossover . . . . . . . . . . . . . . . . . . . . . . . . . . . . .599.00
MICROPHONES
DR-10 Dynamic Microphone w/ Cable and Clip - 400 Ohms . . . . . . . . . . . . . . . . . . . . . . . . . . . . . . .*
DR-20 Dynamic Microphone w/ Cable and Clip - 330 Ohms . . . . . . . . . . . . . . . . . . . . . . . . . . . . . . .*
POWERED MONITORS
MA-4 Powered Monitor - Pair (Beige) w/ stereo presence (4W+4W) . . . . . . . . . . . . . . . . . . . . .79.00
MA-8 Powered Monitor - Pair (Beige) w/ mic Input (8W+8W) . . . . . . . . . . . . . . . . . . . . . . . . . .99.00
MA-8BK Powered Monitor - Pair (Black) w/ mic Input (8W+8W) . . . . . . . . . . . . . . . . . . . . . . . . . .99.00
MA-9 Powered Monitor - Pair (Beige) w/ mic Input and echo (8W+8W) . . . . . . . . . . . . . . . . .149.00
MA-12C Powered Monitor - Single (Beige) shielded (10W) . . . . . . . . . . . . . . . . . . . . . . . . . . . . .145.00
MA-12CP Powered Monitor - Pair (Beige) shielded (10W+10W) . . . . . . . . . . . . . . . . . . . . . . . . .290.00
MA-12V Powered Monitor - Single (Black) w/ mic input (10W) . . . . . . . . . . . . . . . . . . . . . . . . . .145.00
Ø11 / Digital Studios
VS-840 Digital Studio Workstation w/ Zip Drive . . . . . . . . . . . . . . . . . . . . . . . . . . . . . . . . . . . .1395.00
VS-840S Digital Studio Workstation w/ SCSI Expansion . . . . . . . . . . . . . . . . . . . . . . . . . . .1595.00
VS-840BG Carrying Bag for VS-840 and VS-840S . . . . . . . . . . . . . . . . . . . . . . . . . . . . . . . . . . . . . .65.00
VS4S-1 SCSI Expansion Kit for VS-840 (Service Center Installation Required) . . . . . . . . . . . . .150.00
Ø13 / ep and FP Digital Pianos
ep-AK-2E Stand for ep-7mkII Digital Piano . . . . . . . . . . . . . . . . . . . . . . . . . . . . . . . . . . . . . . . . . . . . . .*
ep-7mkll Digital Piano - 76 note . . . . . . . . . . . . . . . . . . . . . . . . . . . . . . . . . . . . . . . . . . . . . . . . .795.00
ep-9 Digital Piano - 88 note w/ stand . . . . . . . . . . . . . . . . . . . . . . . . . . . . . . . . . . . . . . . . .1195.00
FP-1 Digital Piano - 88 note w/ weighted PA-4 action . . . . . . . . . . . . . . . . . . . . . . . . . . . . .1995.00
FPS-1 Stand for FP-1 Digital Piano w/ speakers . . . . . . . . . . . . . . . . . . . . . . . . . . . . . . . . . . .435.00
FP-1C Digital Piano and Stand w/ speakers . . . . . . . . . . . . . . . . . . . . . . . . . . . . . . . . . . . . . .2195.00
PB-7BK Piano Bench - Black . . . . . . . . . . . . . . . . . . . . . . . . . . . . . . . . . . . . . . . . . . . . . . . . . . . .99.00
5

®ÂØÒÅÎ RETAIL PRICE LIST EFFECTIVE July 10, 1998
®
Roland Corporation U.S., 7200 Dominion Circle • Los Angeles, CA 90040-3696 • ph:323.685.5141
Sold by Authorized Roland Dealers only. Prices Subject to change without notice
New Products for Summer NAMM 1998
Model
Product Suggested List Price Net Price
Ø17 / Sound Libraries
CD-ROMS
ROLAND COMPOSER SERIES ON CD-ROM - S-760/S-750/S-770/DJ-70MKII/SP-700/JS-30
L-CDC-01 Composer Series “Jazz” (includes SMF demo disk) . . . . . . . . . . . . . . . . . . . . . . . . . .$215.00
ROLAND PROJECT SERIES ON CD-ROM - S-760/S-750/S-770/DJ-70MKII/SP-700/JS-30
L-CDP-01 Drums and Cymbals Vol.1 . . . . . . . . . . . . . . . . . . . . . . . . . . . . . . . . . . . . . . . . . . . . . .195.00
L-CDP-02 Guitar and Bass Vol. 1 . . . . . . . . . . . . . . . . . . . . . . . . . . . . . . . . . . . . . . . . . . . . . . . .195.00
L-CDP-03 Orchestral Percussion Vol. 1 . . . . . . . . . . . . . . . . . . . . . . . . . . . . . . . . . . . . . . . . . . . .195.00
L-CDP-04 Orchestral Winds Vol.1 . . . . . . . . . . . . . . . . . . . . . . . . . . . . . . . . . . . . . . . . . . . . . . . . .195.00
L-CDP-05 Solo Strings Vol. 1 . . . . . . . . . . . . . . . . . . . . . . . . . . . . . . . . . . . . . . . . . . . . . . . . . . . .195.00
L-CDP-06 Brass Sections Vol. 1 . . . . . . . . . . . . . . . . . . . . . . . . . . . . . . . . . . . . . . . . . . . . . . . . . .195.00
L-CDP-07 Super Sax Vol. 1 . . . . . . . . . . . . . . . . . . . . . . . . . . . . . . . . . . . . . . . . . . . . . . . . . . . . .195.00
L-CDP-08 Symphony Orchestra Vol. 1 . . . . . . . . . . . . . . . . . . . . . . . . . . . . . . . . . . . . . . . . . . . . .195.00
L-CDP-09 Keyboards of the 60’s and 70’s Vol. 1 . . . . . . . . . . . . . . . . . . . . . . . . . . . . . . . . . . . . . .195.00
L-CDP-10 Keyboards of the 60’s and 70’s Vol. 2 . . . . . . . . . . . . . . . . . . . . . . . . . . . . . . . . . . . . . .195.00
L-CDP-11 Africa Vol. 1 . . . . . . . . . . . . . . . . . . . . . . . . . . . . . . . . . . . . . . . . . . . . . . . . . . . . . . . . .195.00
L-CDP-12 Solo Brass Vol. 1 . . . . . . . . . . . . . . . . . . . . . . . . . . . . . . . . . . . . . . . . . . . . . . . . . . . . .195.00
L-CDP-13 String Sections Vol. 1 . . . . . . . . . . . . . . . . . . . . . . . . . . . . . . . . . . . . . . . . . . . . . . . . . .195.00
L-CDP-14 Africa Vol.2 . . . . . . . . . . . . . . . . . . . . . . . . . . . . . . . . . . . . . . . . . . . . . . . . . . . . . . . . . .195.00
ROLAND SAMPLE ARCHIVES CD-ROM - S-760/S-750/S-770/DJ-70MKII/SP-700/JS-30
L-CD702 Orchestral Family 1 & 2 (2 disk set) . . . . . . . . . . . . . . . . . . . . . . . . . . . . . . . . . . . . . . .795.00
MSD-Series
MUSIC STYLE DISKS FOR G-600/G-800/G-1000/RA-95/RA-800
MSD-102 Music Style Disk “Around the World 1” . . . . . . . . . . . . . . . . . . . . . . . . . . . . . . . . . . . . . .19.95
MSD-103 Music Style Disk “Around the World 2” . . . . . . . . . . . . . . . . . . . . . . . . . . . . . . . . . . . . . .19.95
MSD-104 Music Style Disk “Around the World 3” . . . . . . . . . . . . . . . . . . . . . . . . . . . . . . . . . . . . . .19.95
MSD-105 Music Style Disk “Around the World 4” . . . . . . . . . . . . . . . . . . . . . . . . . . . . . . . . . . . . . .19.95
MSD-106 Music Style Disk “Around the World 5” . . . . . . . . . . . . . . . . . . . . . . . . . . . . . . . . . . . . . .19.95
MSD-107 Music Style Disk “American and Piano” . . . . . . . . . . . . . . . . . . . . . . . . . . . . . . . . . . . . .19.95
MSD-108 Music Style Disk “Around the World 6” . . . . . . . . . . . . . . . . . . . . . . . . . . . . . . . . . . . . . .19.95
Expansion Boards
WAVE EXPANSION BOARDS FOR XP-SERIES, JV-SERIES, JD-SERIES
SR-JV80-01 “POP” Expansion Board . . . . . . . . . . . . . . . . . . . . . . . . . . . . . . . . . . . . . . . . . . . . . . . .395.00
SR-JV80-02 “ORCHESTRAL” Expansion Board . . . . . . . . . . . . . . . . . . . . . . . . . . . . . . . . . . . . . . . .395.00
SR-JV80-03 “PIANO” Expansion Board . . . . . . . . . . . . . . . . . . . . . . . . . . . . . . . . . . . . . . . . . . . . . .395.00
SR-JV80-04 “VINTAGE SYNTH” Expansion Board . . . . . . . . . . . . . . . . . . . . . . . . . . . . . . . . . . . . . .395.00
SR-JV80-05 “WORLD” Expansion Board . . . . . . . . . . . . . . . . . . . . . . . . . . . . . . . . . . . . . . . . . . . . .395.00
SR-JV80-07 “SUPER SOUND SET” Expansion Board . . . . . . . . . . . . . . . . . . . . . . . . . . . . . . . . . . .395.00
SR-JV80-08 “KEYBOARD 60/70’S” Expansion Board . . . . . . . . . . . . . . . . . . . . . . . . . . . . . . . . . . . .395.00
SR-JV80-09 “SESSION” Expansion Board . . . . . . . . . . . . . . . . . . . . . . . . . . . . . . . . . . . . . . . . . . . .395.00
SR-JV80-10 “BASS & DRUMS” Expansion Board . . . . . . . . . . . . . . . . . . . . . . . . . . . . . . . . . . . . . .395.00
SR-JV80-11 “TECHNO” Expansion Board . . . . . . . . . . . . . . . . . . . . . . . . . . . . . . . . . . . . . . . . . . . .395.00
SR-JV80-12 “HIP HOP COLLECTION” Expansion Board . . . . . . . . . . . . . . . . . . . . . . . . . . . . . . . . .395.00
SR-JV80-13 VOCAL COLLECTION Expansion Board . . . . . . . . . . . . . . . . . . . . . . . . . . . . . . .395.00
SR-JV80-14 ASIA COLLECTION Expansion Board . . . . . . . . . . . . . . . . . . . . . . . . . . . . . . . . .395.00
SR-JV80-98 “COMPILATION VOL.2” Expansion Board . . . . . . . . . . . . . . . . . . . . . . . . . . . . . . . . . .195.00
VOICE EXPANSION BOARDS FOR A-70/A-90
VE-JV1 Voice Expansion Board (JV-Sounds) for the A-90/A-70 . . . . . . . . . . . . . . . . . . . . . . . . .495.00
VE-RD1 Voice Expansion Board for the A-90/A-70 . . . . . . . . . . . . . . . . . . . . . . . . . . . . . . . . . . .545.00
6

®ÂØÒÅÎ RETAIL PRICE LIST EFFECTIVE July 10, 1998
®
Roland Corporation U.S., 7200 Dominion Circle • Los Angeles, CA 90040-3696 • ph:323.685.5141
Sold by Authorized Roland Dealers only. Prices Subject to change without notice
New Products for Summer NAMM 1998 **Contact your local Roland dealer for pricing information
Model Product Suggested List Price
Memory Cards
M-512E RAM Card - A-Series, GR-Series, JV-Series, R-Series, VG-8, TD-10 . . . . . . . . . . . . . . .$129.00
Ø18/ Intelligent Arrangers
FC-7 Foot Controller for RA-95/RA-800/G-800 . . . . . . . . . . . . . . . . . . . . . . . . . . . . . . . . . . .195.00
G-600 64-Voice Arranger Workstation - 61 note . . . . . . . . . . . . . . . . . . . . . . . . . . . . . . . . . . .1995.00
G-1000 64-Voice Arranger Workstation - 76 note . . . . . . . . . . . . . . . . . . . . . . . . . . . . . . . . . . .2995.00
LVC-1N Lyrics Video Converter . . . . . . . . . . . . . . . . . . . . . . . . . . . . . . . . . . . . . . . . . . . . . . . . . . . . .*
ØAC Adapters Suggested List Price
ACA-120G AC-Adapter . . . . . . . . . . . . . . . . . . . . . . . . . . . . . . . . . . . . . . . . . . . . . . . . . . . . . . . . . .24.95
ACB-120 Power Supply for CM-32/64/CS-10/MT-32/MT-100/PR-100 . . . . . . . . . . . . . . . . . . . . . . .50.00
ACC-120 Power Supply for M-240 . . . . . . . . . . . . . . . . . . . . . . . . . . . . . . . . . . . . . . . . . . . . . . . . .50.00
ACD-120 Power Supply for TL-16 . . . . . . . . . . . . . . . . . . . . . . . . . . . . . . . . . . . . . . . . . . . . . . . . .50.00
ACE-120 Power Supply for BX-8/BX-16 . . . . . . . . . . . . . . . . . . . . . . . . . . . . . . . . . . . . . . . . . . . .50.00
ACF-120 Power Supply for PAD-8/PAD-80/PM-16/SPD-8 . . . . . . . . . . . . . . . . . . . . . . . . . . . . . . .50.00
ACG-120 Power Supply for TR-707/727/WS-20 . . . . . . . . . . . . . . . . . . . . . . . . . . . . . . . . . . . . . . .25.00
ACH-120 Power Supply for R-8mkII/R-8/R-5 . . . . . . . . . . . . . . . . . . . . . . . . . . . . . . . . . . . . . . . . .50.00
ACI-120 Power Supply for D-5/E-36/ep-3/5/GR-1/JV-35/MC-50mkII/R-70/SC-50/SC-55mkII/S . . .50.00
ACK-120 Power Supply for CM-300/500/ep-7mkII/9/707/JV/JW-50/MV-30/W-50 . . . . . . . . . . . . . .50.00
ACL-120 Power Supply for ep-7 . . . . . . . . . . . . . . . . . . . . . . . . . . . . . . . . . . . . . . . . . . . . . . . . . .50.00
ACM-120 Power Supply for SC-7 . . . . . . . . . . . . . . . . . . . . . . . . . . . . . . . . . . . . . . . . . . . . . . . . . .50.00
BRA-120 Power Supply for DR-660/DS-330/ME-6/B/MX-10/SC-33/SPD-11/TU-50 . . . . . . . . . . . . .32.00
BRB-120 Power Supply for SE-50/70/TD-7/TL-8 . . . . . . . . . . . . . . . . . . . . . . . . . . . . . . . . . . . . . .50.00
PSA-120 AC-Adapter . . . . . . . . . . . . . . . . . . . . . . . . . . . . . . . . . . . . . . . . . . . . . . . . . . . . . . . . . .24.95
2P-AC1 2 prong AC cable (square end) for D-50/JD-800 etc. . . . . . . . . . . . . . . . . . . . . . . . . . . .15.00
2P-AC2 2 prong AC cable (round end) for JV-1000/JD-990/FP-1 etc. . . . . . . . . . . . . . . . . . . . . . .15.00
3P-AC1 3 prong AC cable for A-80/S-760 etc. . . . . . . . . . . . . . . . . . . . . . . . . . . . . . . . . . . . . . . .15.00
7

Model Product Suggested List Price
Roland Corporation U.S., 7200 Dominion Circle • Los Angeles, CA 90040-3696 • ph:323.685.5141
Prices Subject to change without notice. BOSS® is a registered trademark of Roland Corporation U.S.
New Products for Summer NAMM 1998
ØGuitar Compact Pedals and Volume Pedals
AC-2 Acoustic Simulator . . . . . . . . . . . . . . . . . . . . . . . . . . . . . . . . . . . . . . . . .$169.50
AD-3 Acoustic Instrument Processor . . . . . . . . . . . . . . . . . . . . . . . . . . . . . .249.00
AW-2 Auto Wah . . . . . . . . . . . . . . . . . . . . . . . . . . . . . . . . . . . . . . . . . . . . . . . . .149.50
BCB-3B BOSS Pedal Carrying Case - 3 Unit . . . . . . . . . . . . . . . . . . . . . . . . . . . . . .59.95
BCB-6G BOSS Pedal Carrying Case - 6 Unit (Gray) . . . . . . . . . . . . . . . . . . . . . . . .164.50
BD-2 Blues Driver . . . . . . . . . . . . . . . . . . . . . . . . . . . . . . . . . . . . . . . . . . . . . . .125.50
BF-2 Flanger . . . . . . . . . . . . . . . . . . . . . . . . . . . . . . . . . . . . . . . . . . . . . . . . . .149.50
CE-5 Stereo Chorus Ensemble . . . . . . . . . . . . . . . . . . . . . . . . . . . . . . . . . . . . .149.50
CH-1 Stereo Super Chorus . . . . . . . . . . . . . . . . . . . . . . . . . . . . . . . . . . . . . . . .135.50
CS-3 Compression Sustainer . . . . . . . . . . . . . . . . . . . . . . . . . . . . . . . . . . . . . .135.50
DD-3 Digital Delay . . . . . . . . . . . . . . . . . . . . . . . . . . . . . . . . . . . . . . . . . . . . . . .209.50
DD-5 Digital Delay w/ Tap Tempo (Optional FS-5U) . . . . . . . . . . . . . . . . . . . . . .239.50
DI-1 Direct Box . . . . . . . . . . . . . . . . . . . . . . . . . . . . . . . . . . . . . . . . . . . . . . . .149.50
DS-1 Distortion . . . . . . . . . . . . . . . . . . . . . . . . . . . . . . . . . . . . . . . . . . . . . . . . . .97.50
DS-2 Turbo Distortion w/ Remote Turbo (Optional FS-5L) . . . . . . . . . . . . . . . . .127.50
FV-50H Stereo Volume Pedal - High Impedance, Guitar/Bass . . . . . . . . . . . . . . . .114.50
FV-50L Stereo Volume Pedal - Low Impedance, Keyboards . . . . . . . . . . . . . . . . .114.50
FV-300H Heavy Duty Stereo Volume Pedal, High Impedance, Guitar/Bass . . . . . . .154.50
FV-300L Heavy Duty Stereo Volume Pedal, Low Impedance, Expression . . . . . . . .154.50
FZ-3 Fuzz . . . . . . . . . . . . . . . . . . . . . . . . . . . . . . . . . . . . . . . . . . . . . . . . . . . . .149.50
GE-7 Equalizer - 7-Band Graphic . . . . . . . . . . . . . . . . . . . . . . . . . . . . . . . . . . .155.50
HM-3 Hyper Metal . . . . . . . . . . . . . . . . . . . . . . . . . . . . . . . . . . . . . . . . . . . . . . .127.50
HR-2 Harmonist - 2-Part “Intelligent” Pitch Shifter . . . . . . . . . . . . . . . . . . . . . . .239.50
LS-2 Line Selector/Power Supply (Optional PCS-20A) . . . . . . . . . . . . . . . . . . .149.50
MT-2 Metal Zone . . . . . . . . . . . . . . . . . . . . . . . . . . . . . . . . . . . . . . . . . . . . . . . .159.50
NS-2 Noise Suppressor/Power Supply (Optional PCS-20A) . . . . . . . . . . . . . . . .159.50
OC-2 Dual Octaver . . . . . . . . . . . . . . . . . . . . . . . . . . . . . . . . . . . . . . . . . . . . . .154.50
OD-2R Turbo Overdrive with remote jack (Optional FS-5L) . . . . . . . . . . . . . . . . . .124.50
OD-3 Overdrive . . . . . . . . . . . . . . . . . . . . . . . . . . . . . . . . . . . . . . . . . . . . . . . . .149.50
OS-2 Overdrive and Distortion . . . . . . . . . . . . . . . . . . . . . . . . . . . . . . . . . . . . . .119.50
PH-2 Super Phaser . . . . . . . . . . . . . . . . . . . . . . . . . . . . . . . . . . . . . . . . . . . . . .169.50
PS-3 Digital Pitch Shifter and Delay (Optional EV-5) . . . . . . . . . . . . . . . . . . . . .239.50
PSM-5 Power Supply for (up to) 7 pedals w/ Cables and Mute . . . . . . . . . . . . . . .189.50
PW-2 Power Driver . . . . . . . . . . . . . . . . . . . . . . . . . . . . . . . . . . . . . . . . . . . . . .149.00
RV-3 Digital Reverb and Delay . . . . . . . . . . . . . . . . . . . . . . . . . . . . . . . . . . . . .229.50
SD-1 Super Overdrive . . . . . . . . . . . . . . . . . . . . . . . . . . . . . . . . . . . . . . . . . . . . .97.50
SD-2 Dual Overdrive (Optional FS-5L) . . . . . . . . . . . . . . . . . . . . . . . . . . . . . . . .149.50
TR-2 Tremolo . . . . . . . . . . . . . . . . . . . . . . . . . . . . . . . . . . . . . . . . . . . . . . . . . .149.00
TU-2 Tuner . . . . . . . . . . . . . . . . . . . . . . . . . . . . . . . . . . . . . . . . . . . . . . . . . . .139.00
XT-2 Xtortion . . . . . . . . . . . . . . . . . . . . . . . . . . . . . . . . . . . . . . . . . . . . . . . . . .149.00
ØBass Compact Pedals
CEB-3 Bass Chorus . . . . . . . . . . . . . . . . . . . . . . . . . . . . . . . . . . . . . . . . . . . . . . .110.50
GEB-7 Bass Equalizer - 7 Band Graphic . . . . . . . . . . . . . . . . . . . . . . . . . . . . . . .124.50
LMB-3 Bass Limiter and Enhancer . . . . . . . . . . . . . . . . . . . . . . . . . . . . . . . . . . .104.50
ODB-3 Bass Overdrive . . . . . . . . . . . . . . . . . . . . . . . . . . . . . . . . . . . . . . . . . . . .124.50
SYB-3 Bass Synthesizer . . . . . . . . . . . . . . . . . . . . . . . . . . . . . . . . . . . . . . . . . . .299.00
RETAIL PRICE LIST
EFFECTIVE July 10, 1998
BOSS

®ÂØÒÅÎ RETAIL PRICE LIST EFFECTIVE July 10, 1998
®
Roland Corporation U.S., 7200 Dominion Circle • Los Angeles, CA 90040-3696 • ph:323.685.5141
Prices Subject to change without notice. BOSS® is a registered trademark of Roland Corporation U.S.
New Products for Summer NAMM 1998
Model Product Suggested List Price
ØMetronomes and Tuners
DB-12 Dr. Beat Metronome w/ Stopwatch & Tap . . . . . . . . . . . . . . . . . . . . .$79.00
DB-66 Dr. Beat Metronome with Tap . . . . . . . . . . . . . . . . . . . . . . . . . . . . . .175.00
DB-88 Talking Dr. Beat Metronome with Tap . . . . . . . . . . . . . . . . . . . . . . . .195.00
CT-6 Guitar/Bass Auto Tuner . . . . . . . . . . . . . . . . . . . . . . . . . . . . . . . . . . . .49.95
TU-6 Guitar/Bass Tuner . . . . . . . . . . . . . . . . . . . . . . . . . . . . . . . . . . . . . . . .59.50
TU-8 Automatic Guitar/Bass Tuner . . . . . . . . . . . . . . . . . . . . . . . . . . . . . . .79.50
TU-12 Automatic Chromatic Tuner . . . . . . . . . . . . . . . . . . . . . . . . . . . . . . . .109.50
TU-12H Automatic Chromatic High Range Tuner . . . . . . . . . . . . . . . . . . . . . .109.50
ØGuitar Multiple Effects
GT-5 Guitar Effects Processor w/ COSM (Floor-Type) . . . . . . . . . . . . . . . .995.00
ME-30 Guitar Multiple Effects w/ Phrase Trainer (Floor-Type) . . . . . . . . . . . .299.00
ME-30BG Carrying Bag for ME-30 . . . . . . . . . . . . . . . . . . . . . . . . . . . . . . . . . . .39.95
ØBOSS Signal Processors
AD-5 Acoustic PreAmp and Direct Box, Feedback Suppresser w/ Effects . .395.00
VT-1 Voice Transformer . . . . . . . . . . . . . . . . . . . . . . . . . . . . . . . . . . . . . . .395.00
ØAmplifiers, Speakers & Accessories
ADS-5 Stand Adaptor for AD-5 . . . . . . . . . . . . . . . . . . . . . . . . . . . . . . . . . . . .79.00
MA-12V Monitor-Amp/Speaker . . . . . . . . . . . . . . . . . . . . . . . . . . . . . . . . . . . .145.00
FS-1 Single Footswitch . . . . . . . . . . . . . . . . . . . . . . . . . . . . . . . . . . . . . . . .29.95
FS-5L Footswitch - Latching . . . . . . . . . . . . . . . . . . . . . . . . . . . . . . . . . . . . .39.50
FS-5U Footswitch - Unlatching . . . . . . . . . . . . . . . . . . . . . . . . . . . . . . . . . . . .39.50
ØRhythm Machines
DR-202 Dr. Groove . . . . . . . . . . . . . . . . . . . . . . . . . . . . . . . . . . . . . . . . . . .495.00
DR-5 Dr. Rhythm Section - Sequencer, Pitch to MIDI, Gig Trainer . . . . . . .495.00
DR-550mkII Dr. Rhythm . . . . . . . . . . . . . . . . . . . . . . . . . . . . . . . . . . . . . . . . . . . .295.00
DR-660 Dr. Rhythm w/ Digital Effects, Roll and Flam . . . . . . . . . . . . . . . . . . .495.00
ØPhrase Samplers
SP-202 Dr. Sample/Phrase Sampler . . . . . . . . . . . . . . . . . . . . . . . . . . . . . . .395.00
SM-2 Smart MediaCard (2MB) . . . . . . . . . . . . . . . . . . . . . . . . . . . . . . .35.00
SM-4 Smart MediaCard (4MB) . . . . . . . . . . . . . . . . . . . . . . . . . . . . . . .60.00
ØPower Supplies
ACA-120G AC-Adapter . . . . . . . . . . . . . . . . . . . . . . . . . . . . . . . . . . . . . . . . . . . . .24.95
PSA-120 AC-Adapter . . . . . . . . . . . . . . . . . . . . . . . . . . . . . . . . . . . . . . . . . . . . .24.95

NQPSMTR®%!'-'"!
AC@465FC6D
Supplemental
Notes
June 24, 1998 SN38
© 1998 Roland Corporation U.S. Re-initialization Procedures Faxback # 90006 Page 1 of 8
A-30 Power on while holding WRITE. (Hold for 15 seconds.)
A-33 Power on while holding WRITE. (Hold for 15 seconds.)
A-50 While holding the first, third, and fourth buttons under the display, press CHANNEL. Then
press any cursor button.
A-70/JV Power on while holding down MANUAL, then press ENTER.
A-80 While holding the first, third, and fourth buttons under the display, press CHANNEL. Then
press any cursor button.
A-90/EX Power on while holding down MANUAL, then press ENTER.
A-220 Power on while holding B and MEMORY.
A-880 Power on while holding SIGNAL and MEMORY.
ADA-8024 No ROM reset.
ALPHA JUNO-1 No ROM reset.
ALPHA JUNO-2 No ROM reset.
AP-700 Power on, then press EXIT repeatedly to get ANALYZER/FILTER screen. Cursor to
MENU, press ENTER. Cursor to SYSTEM, press ENTER. Cursor to INITIALIZE, press
ENTER. Use VALUE to select ALL MEMORY, then press ENTER twice.
AR-Series No ROM reset.
AT-Series (Make sure disk drive is empty.) Power on while holding ONE TOUCH PROGRAM.
AX-1 Power on while holding WRITE. (Hold for 30 seconds.)
AXIS-1 While holding FUNCTION, press the F#0, C#2, and D#2 keys.
CA-30 The CA-30 resets itself every time you turn it off and then on.
CR-80 Power on while holding DEL and REPEAT, then press ENTER.
All Other CR No ROM reset.
CSQ-Series No ROM reset.
D-5 No ROM reset.
D-10/20 No ROM reset.
D-50 No ROM reset.
D-70 No ROM reset.
D-110 No ROM reset.
D-550 No ROM reset.
DDR-30 Power on while holding the #1 button.
DEP-3 Power on while holding MEMORY NO UP (^) and DOWN (v).
DEP-5 Power on while holding MEMORY NO UP (^) and DOWN (v).
DJ-70 Power on while holding the UP ARROW button to enter test mode. Press A, press C,
press S1. When finished the screen will display IC21 = OK.
DJ-70mkII Power on while holding the UP ARROW button to enter test mode. Press A, press B,
press S1. When finished the screen will display IC21 = OK.
DM-Series No ROM reset.
DR-5 Power on while holding FRET LEFT (<) and RIGHT (>), then press ENTER twice.

Supplemental Notes
© 1998 Roland Corporation U.S. Re-initialization Procedures Faxback # 90006 Page 2 of 8
DR-550 Power on while holding -1 and +1 , then press START.
DR-550mkII Power on while holding -1 and +1 , then press START.
DR-660 Press UTILITY, then use LEFT (<) and RIGHT (>) to select [8] INIT. Press ENTER twice.
DS-330 Power on while holding REVERB and SPLIT, then press YES.
E-5 No ROM reset.
E-10 Power on while holding WRITE.
E-12 No ROM reset.
E-14US The unit resets each time you turn it on.
E-15 The unit resets each time you turn it on.
E-16 The unit resets each time you turn it on.
E-20 Power on while holding WRITE.
E-28US The unit resets each time you turn it on.
E-30 Power on while holding WRITE.
E-35 Power on while holding REC/PUNCH IN.
E-36 Power on while holding RECORDER.
E-38 The unit resets each time you turn it on.
E-56 Power on while holding WRITE.
E-66 Power on while holding REC in the DISK RECORDER section.
E-68US Power on while holding WRITE.
E-70 Power on while holding WRITE.
E-86 Power on while holding WRITE.
E-96 Power on while holding WRITE.
E-500 Press UTILITY. Use the buttons under the display that correspond to <<PAGE>> to select
FACTORY PRESET. Press EXECUTE, then press OK. When the screen displays
RESET COMPLETE, turn the unit off, then on.
EM-101 No ROM reset.
EM-303 The unit resets each time you turn it on.
EM-305 The unit resets each time you turn it on.
EP-3 The unit resets each time you turn it on.
EP-5 While holding REC and PLAY, press STRINGS. Power off and then back on.
EP-7 While holding REC and PLAY, press STRINGS. Power off and then back on.
EP-7MKII While holding REC and PLAY, press STRINGS. Power off and then back on.
EP-9 While holding REC and PLAY, press CHOIR. Power off and then back on.
EP-75/85 Power on while holding REC.
EP-707 The unit resets each time you turn it on.
All Other EP No ROM reset.
FC-100 No ROM reset.
FC-100mkII Power on while holding pedals #1, #2, and #8.

Supplemental Notes
© 1998 Roland Corporation U.S. Re-initialization Procedures Faxback # 90006 Page 3 of 8
FC-200 Power on while holding the #10 pedal, then press the CTL pedal.
FG-10 Power on while holding CLEAR and EXIT.
FG-1000 Power on while holding CLEAR and EXIT.
FP-1 The unit resets each time you turn it on.
FP-8 Press FUNC and release. While holding PIANO, press FUNC again.
G-600 Power on while holding WRITE.
G-800 Power on while holding WRITE.
GC-8 No ROM reset.
GI-10 Power on while holding PARAMETER + and -, then press VALUE +.
GM-70 Poly Mode: Power on while holding PLAY, GENERAL EDIT, and IND EDIT.
Mono Mode: Power on while holding TUNE, CONTROL ASSIGN, and DATA TRANSFER.
GP-8 No ROM reset.
GP-16 Power on while holding the #6, #7, and #8 buttons. Use the FUNCTION LEFT (<) and
RIGHT (>) buttons to select “2.All Factory Preset,” then press WRITE three times.
GP-100 Power on while pressing in the PARAMETER knob, then press WRITE.
GR-09 Power on while holding Pedal #2, then press the VALUE + button. Now press EDIT/PLAY.
GR-1 Power on while holding WRITE/COPY, then press YES.
GR-30 Power on while holding Pedal #2, then press the PATCH+ button to select INI. Press
EDIT/PLAY. Then press PATCH+ and PATCH- simultaneously.
All Other GR No ROM reset.
GS-6 No ROM reset.
GT-5 Power on while holding MOD and FEEDBACKER/SLOW GEAR. Press WRITE.
GX-700 Press TUNER/UTILITY. Use PARAMETER LEFT (<) and RIGHT (>) buttons to select
FACT INIT. Cursor to left and dial SYSTEM, then right and dial P#100. Press WRITE,
then TUNER/UTILITY.
HP-100 No ROM reset.
HP-130 Power on while holding REC.
HP-300 No ROM reset.
HP-400 No ROM reset.
All Other HP The unit resets each time you turn it on.
HS-Series No ROM reset.
JD-800 Press DATA TRANSFER. Use PAGE UP (^) and DOWN (v) to select FACTORY
PRESET. Press YES.
JD-990 While holding EXIT, press UTILITY. Press F6 (EXECUTE), then F5 (YES).
JP-6 No ROM reset.
JP-8 No ROM reset.
JP-8000 While holding SHIFT, press INIT/UTIL. Press INIT/UTIL repeatedly to select INITIALIZE
WRITE. Use the DOWN/UP buttons to select FACTORY PRESET, then press WRITE.
JS-30 Power on while holding RECORD located in the SEQUENCER section.
JUNO-6 No ROM reset.

Supplemental Notes
© 1998 Roland Corporation U.S. Re-initialization Procedures Faxback # 90006 Page 4 of 8
JUNO-60 No ROM reset.
JUNO-106 No ROM reset.
JV-30 Press CHORUS and REVERB (above INITIALIZE) simultaneously. Press VALUE UP (^) .
JV-35 Press CONTROL and MASTER simultaneously. Use PARAMETER UP (^) and DOWN
(v) to select ALL. Press VALUE UP (^).
JV-50 Press CONTROL and MASTER simultaneously. Use PARAMETER UP (^) and DOWN
(v) to select ALL. Press VALUE UP (^).
JV-80 Power on while holding NUMBER 8 (also labeled PERFORM 16 and CAPS). Press
ENTER and then press WRITE.
JV-90 Power on while holding NUMBER 8 (also labeled PERFORM 16 and CAPS). Press
ENTER and then press WRITE.
JV-880 Press UTILITY, then use the DATA dial to select FACTORY PRESET. Press ENTER twice.
JV-1000 Power on while holding NUMBER 8 (also labeled PERFORM 16 and CAPS). Press
ENTER, then press WRITE.
JV-1080 Press UTILITY. Cursor down once, then cursor right three times to select FACTORY
PRESET. Press ENTER twice, then press UTILITY.
JV-2080 Press UTILITY. Press F6 twice to select MENU 3. Press F1. Then press F6. If
necessary, use the VALUE DIAL to turn Memory Protect OFF and press F6 twice.
JW-50 Press TUNE/FUNCTION. Press F5 (FACTORY), then F4 (JW RESET), then F3 (GS
RESET), then F4 (YES).
JX-1 Power on while holding WRITE and FLUTE.
JX-3P No ROM reset.
JX-8P No ROM reset.
JX-10 No ROM reset.
JX-305 Press UTILITY. Use PAGE </> to select Factory Preset and press ENTER. Use PAGE
</> to select ALL and press ENTER twice.
KR-33 The unit resets each time you turn it on.
KR-55 Hold MIDI/FUNC and press CARD. Hold both VARIATION buttons for 5 seconds.
KR-100 The unit resets each time you turn it on.
KR-350 While holding LOAD and SAVE, press WRITE.
KR-370 The unit resets each time you turn it on.
KR-500 While holding FROM and TO, press WRITE.
KR-570 While holding PART VOLUME ACCOMP, press TRACK 2 and 4 buttons (Composer
section) simultaneously. Press PART VOLUME ACCOMP repeatedly to get FACTORY
SETUP LOAD in the window. After loading is complete, power off and then back on.
KR-650 While holding LOAD and SAVE, press WRITE.
KR-770 While holding PART VOLUME ACCOMP, press TRACK 2 and 4 buttons (Composer
section) simultaneously. Press PART VOLUME ACCOMP repeatedly to get FACTORY
SETUP LOAD in the window. After loading is complete, power off and then back on.
KR-3000 While holding FROM and TO, press WRITE.
KR-3500 While holding LOAD and SAVE, press WRITE.
KR-4500 While holding LOAD and SAVE, press WRITE.

Supplemental Notes
© 1998 Roland Corporation U.S. Re-initialization Procedures Faxback # 90006 Page 5 of 8
KR-4700 While holding EDIT, press LOAD and SAVE.
KR-5000 While holding EDIT, press LOAD and SAVE.
KR-5500 While holding LOAD and SAVE, press WRITE.
LVC-1N Power on while holding ENTER.
M-660 While holding EDIT, press WRITE. Use PARAMETER UP (^) and DOWN (v) to select
ALL, then press WRITE. When completed, press EDIT to return to Play Mode.
M-760 While holding EDIT, press WRITE. Use PARAMETER UP (^) and DOWN (v) to select
ALL, then press WRITE. When completed, press EDIT to return to Play Mode.
M-BD1 Power on while holding F3.
M-DC1 Power on while holding F3.
M-GS64 Power on while holding F3.
M-OC1 Power on while holding F3.
M-SE1 Power on while holding F3.
M-VS1 Power on while holding F3.
MC-303 Power on while holding down SHIFT, then press ENTER.
MC-505 Power on while holding down SHIFT, then press ENTER. Note, this procedure takes
several minutes.
All Other MC No ROM reset.
ME-5 Power on while holding pedals #1 and #2, then press WRITE immediately.
ME-6 Power on while holding PARAMETER DOWN (v) and LEFT (<), then press WRITE.
ME-6B Power on while holding PARAMETER DOWN (v) and LEFT (<), then press WRITE.
ME-8 Power on while holding PARAMETER LEFT (<) and DOWN (v), then press WRITE/COPY.
ME-8B Power on while holding PARAMETER LEFT (<) and DOWN (v), then press
WRITE/COPY.
ME-10 Power on while holding the BANK DOWN (v) pedal, then press WRITE.
ME-30 Power on while holding the PARAMETER RIGHT (>) and VALUE DOWN (-), then press
WRITE/COPY.
ME-X Power on while holding PARAMETER DOWN (v) and LEFT (<), then press WRITE.
MK-60 No ROM reset.
MK-80 While holding WRITE, press EDIT. While holding the LEFT (<) and RIGHT (>) cursor
buttons, press UP (^).
MKB-Series No ROM reset.
MKS-50 Poly Mode: Power on while holding NUMBER 4 and 8.
Mono Mode: Power on while holding NUMBER 3 and 7.
All Other MKS No ROM reset.
MP-Series No ROM reset.
MS-1 No ROM reset.
MSQ-100 No ROM reset.
MSQ-700 No ROM reset.
MT-32 While holding MASTER VOLUME, press RHYTHM PART. Press PART 1.

Supplemental Notes
© 1998 Roland Corporation U.S. Re-initialization Procedures Faxback # 90006 Page 6 of 8
MT-80s The unit resets each time you turn it on.
MT-100 While holding STOP, press DELETE. After the display flashes ALL CLEAR, press EXECUTE.
MT-120/s Power on while holding REPEAT, SONG (blue button), and PLAY. Press FWD repeatedly,
until the window reads T-13. Press PLAY, then press REC. Power off, then on.
MT-200 Power on while holding REPEAT, SONG (blue button), and PLAY. Use the DIAL to select
T-15 in the window. Press PLAY, then press REC. Power off, then on.
MV-30 No ROM reset.
P-55 Power on while holding both INSTRUMENT buttons, then press PARAM 1.
P-330 No ROM reset.
PAD-8 Power on while holding MIDI CH and NOTE NUMBER. Power off, then back on.
PAD-80 Power on while holding both VALUE (solid < and >) buttons.
PC-150 Power on while holding COMMAND on the left edge of the keyboard.
PC-200 Power on while holding the two buttons under the word STANDARD.
PC-200mkII Power on while holding the two buttons under the word STANDARD.
PK-5 Power on while holding OCT/PARAM .
PM-16 Power on while holding NUMBER buttons 1 and 2. (This reloads the first BANK of settings).
PMA-5 Press UTILITY, then press the RIGHT (>) cursor button repeatedly to select INITIALIZE.
Press ENTER, then [EXEC].
PR-100 The unit resets each time you turn it on.
PRO-E Power on while holding WRITE.
R-5 Power on while holding CURSOR PAGE and PARAM SELECT, then press ENTER twice.
R-8 Power on while holding CURSOR PAGE and PARAM SELECT, then press ENTER twice.
R-8MKII Power on while holding CURSOR PAGE and PARAM SELECT, then press ENTER twice.
R-8M Power on while holding ENTER and the RIGHT (>) CURSOR button, then press ENTER twice.
R-70 Power on while holding MIDI and ASSIGN, then press YES twice.
R-880 No ROM reset.
RA-30 The unit resets each time you turn it on.
RA-50 Power on while holding WRITE.
RA-90 Power on while holding WRITE.
RA-95 Power on while holding REC.
RA-800 (WARNING: This will erase the original factory Performance settings. However, you can
save them to disk before doing this procedure.) Power on while holding WRITE.
RD-500 Power on while holding NUMBER 1 and 8. Press DEC/YES.
RD-600 Press EDIT. Press the RIGHT PAGE button until “Initialize: All” is displayed. Press
INC/YES twice. Press EDIT to return to Play mode.
All Other RD No ROM reset.
RSP-550 Power on while holding PROGRAM/PAGE UP (^) and DOWN (v), then press WRITE.
RSS-10 Power on while holding LOCK and OPTION. (The MCR-8 LED lights.) Press DEMO
PROGRAM four times. Press DEVICE ID.

Supplemental Notes
© 1998 Roland Corporation U.S. Re-initialization Procedures Faxback # 90006 Page 7 of 8
RSS-8048 No ROM reset.
RV-70 Power on while holding WRITE and DOWN. Use the UP (^) and DOWN (v) buttons to
select AL. Press WRITE. Power off, then back on.
SB-55 Power on while holding CLEAR.
SBX-1000 No ROM reset.
S-Series No ROM reset.
SC-7 The unit resets each time you turn it on.
SC-33 Power on while holding REVERB and SPLIT, then press YES.
SC-50 Power on while holding both INSTRUMENT buttons, then press ALL.
SC-55 Power on while holding both INSTRUMENT buttons, then press ALL.
SC-55mkII Power on while holding both INSTRUMENT buttons, then press ALL.
SC-88 While holding SELECT, press both INSTRUMENT buttons. Press ALL.
SC-155 Power on while holding both INSTRUMENT buttons, then press ALL.
SC-880 Press UTILITY. CURSOR UP and use the VALUE DIAL to select Factory Preset.
CURSOR DOWN and use the VALUE DIAL to select ALL. Press ENTER twice.
SCC-700C No ROM reset.
SD-35 Power on while holding CLEAR, then press REC.
SDD-320 No ROM reset.
SDE-330 Power on while holding SYSTEM and PROGRAM. Use the DATA dial to select SYSTEM
+ PROGRAM. Press MEMORY.
All Other SDE No ROM reset.
SDX-330 Power on while holding SYSTEM and PROGRAM. Use the DATA dial to select SYSTEM
+ PROGRAM. Press MEMORY.
SE-50 Power on while holding PARAM UP (^) and VALUE UP (^). Press WRITE. Wait three
seconds and press WRITE again.
SE-70 Power on while holding in the NUMBER/VALUE knob. Press PARAMETER LEFT (<),
then dial to STANDARD mode or GUITAR mode. Press WRITE.
SH-Series No ROM reset.
SN-700 No ROM reset.
SP-202 CAUTION: This procedure will erase all of the internal samples and initialize the unit: Hold
down CANCEL and press DEL, then press the A/B button. Press DEL.
SP-700 No ROM reset.
SPD-8 Power on while holding EDIT, then press COPY. Use the VALUE UP (^) and DOWN (v) to
select F A L in the window. Press ALL/ENTER.
SPD-11 Power on while holding ALL/ENTER and the DOWN ARROW button. Press ALL/ENTER.
SPD-20 Power on while holding ALL/ENTER and the DOWN ARROW button. Press ALL/ENTER.
SRC-2 No ROM reset.
SRV-330 Power on while holding SYSTEM and PROGRAM. Use the DATA dial to select SYSTEM
+ PROGRAM. Press MEMORY.
SRV-1000 No ROM reset.

Supplemental Notes
© 1998 Roland Corporation U.S. Re-initialization Procedures Faxback # 90006 Page 8 of 8
SRV-2000 Factory: Power on while holding WRITE and REVERB NON-LINEAR.
Delay Mode: Power on while holding WRITE, REVERB NON-LINEAR and ROOM SIMULATE.
SSC-8004 No ROM reset.
SX-700 Press UTILITY. Use PARAMETER LEFT (<) and RIGHT (>) to select FACT INIT. Press WRITE.
TB-303 No ROM reset.
TD-5 Power on while holding EDIT and START/STOP, then press START/STOP again.
TD-7 Press SYSTEM. Use the LEFT (<) and RIGHT (>) CURSOR buttons to select INI, then
press ENTER. Cursor to HI HAT and use the DATA dial to select ALL. Press ENTER twice.
TD-10 Press SETUP, then press F4 three times.
TL-Series No ROM reset.
TP-20 No ROM reset.
TR-505 Power on while holding MODE and PATTERN GROUP KEY A .
TR-626 Power on while holding MODE and TRACK #1.
TR-707 Power on while holding TRACK WRITE and TRACK #1 .
TR-727 Power on while holding TRACK WRITE and TRACK #1 .
TR-808 No ROM reset.
TR-909 Power on while holding TRACK #1 and PATTERN #1 .
U-20 No ROM reset.
U-110 Power on while holding PART and EDIT.
U-220 No ROM reset.
VG-8 Power on while holding F1, F3, and F5. Press F6 for All, F4 for Patches, or F2 for System.
VK-7 Power on while holding MAIN, SUB and PEDAL in the HARMONIC BAR PART section.
VK-1000 Press WRITE, then press F3 to access the INIT MENU screen. Press F4 to access the
COLD BOOT screen, then press ENTER.
VP-70 Power on while holding PLAY, VOICE EXPANSION, and MIDI.
VS-840 No ROM reset.
VS-880 No ROM reset.
VS-1680 No ROM reset
VT-1 Power on while holding down the PRESET/USER button.
W-30 No ROM reset.
W-50 Press CONTROL and MASTER simultaneously. Use PARAMETER UP (^) and DOWN
(v) to select ALL. Press VALUE UP (^).
XP-10 Press UTILITY. Use VALUE + and - to select INITIALIZE, then press ENTER. Use
VALUE + and - to select FACTORY PRESET, then press ENTER.
XP-50 Press DISK/UTILITY, select SOUND, select PRESET, then press ENTER. Use the dial to
turn Memory Protect OFF if necessary, then press ENTER twice.
XP-60/80 Press UTILITY, press F6 (MENU) twice to select Factory, then ENTER. Press F6
(EXECUTE). Use the dial to turn Memory Protect OFF if necessary, press ENTER, then
press F6 (EXECUTE).
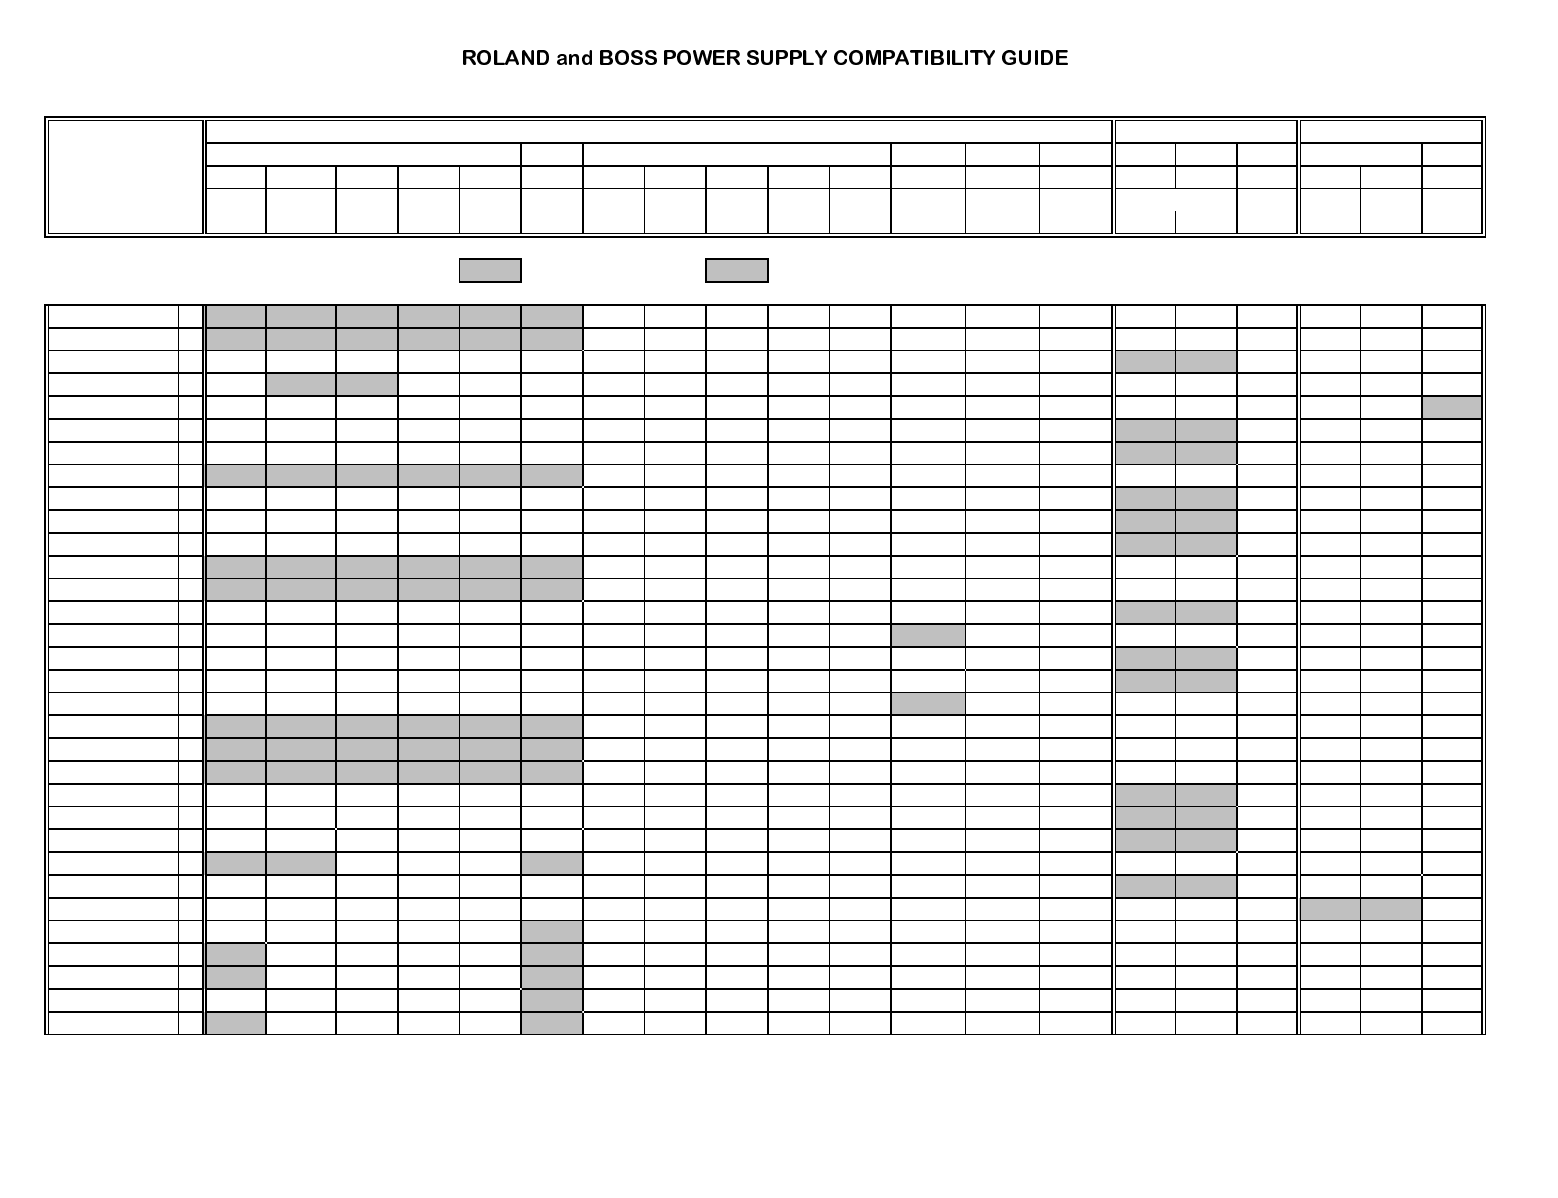
Output: Unregulated DC Regulated DC AC
Volts (V) 9 9.5 12 ±21.5 ±15 ±10 9 9.6 12 12 14
Amps (mA) 1200 1000 500 300 200 1500 1750 1700 1000 500 200 300/300 350/350 500/150 200 200 2000 1500 500 800
ACB ACI ACF ACM ACA ACK ACJ ACL ACO ACN ACG ACE ACD ACH PSA ASA BRB BRA BRC
120/T 120/I/J 120 120 120 120 120 120 120 120 120 120 120 120 120 120T 120 120 120 120
A = Included O = Optional RRecommended Compatible
A-30 OR
A-33 OR
AC-2 OR
AD-5 OR
AF-70 AR
ASC-10 AR
AW-2 OR
AX-1 OR
BD-2 OR
BE-5 AR
BE-5B AR
BF-2 OR
BF-2B OR
BL-1 OR
BX-16 AR
BX-4 OR
BX-400 AR
BX-8 AR
CA-30 AR
CE-2 OR
CE-2B OR
CE-3 OR
CE-5 OR
CEB-3 OR
CF-10 AR
CH-1 OR
CL-50 AR
CM-300 AR
CM-32L AR
CM-32P AR
CM-500 AR
CM-64 AR
© Roland Corporation U.S. Revised 6/25/98 Page 1 of 7
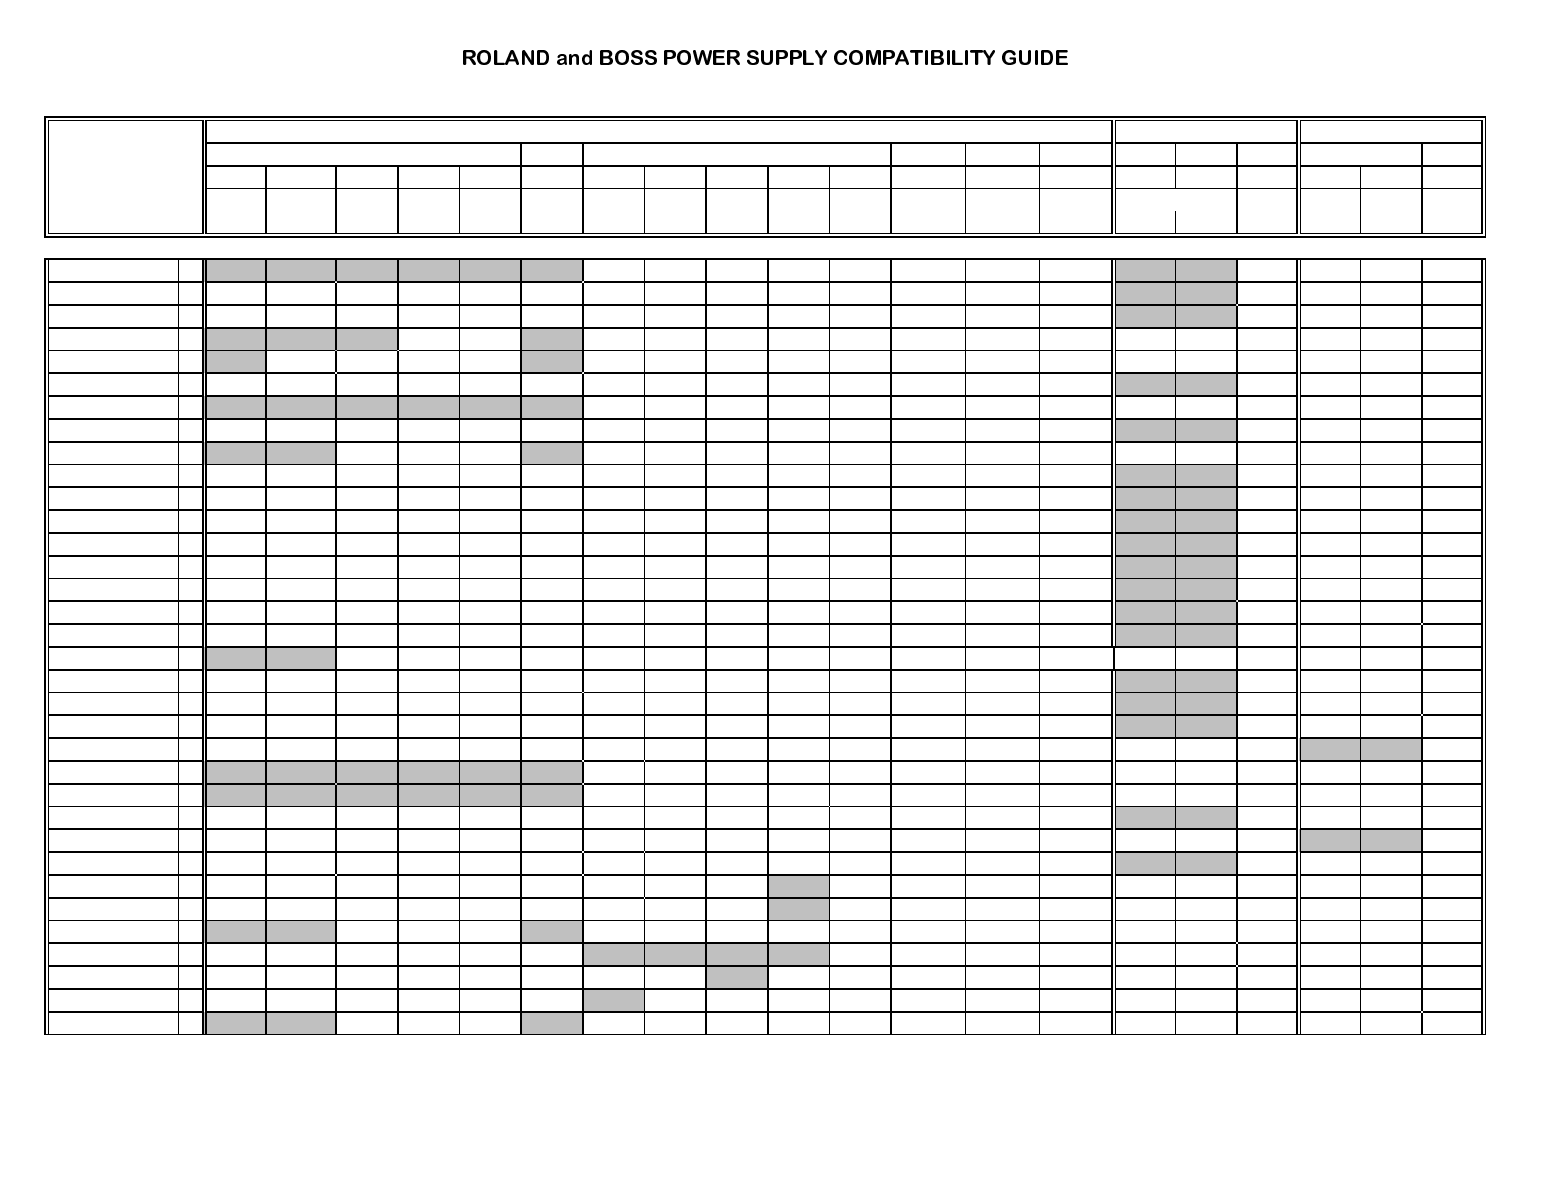
Output: Unregulated DC Regulated DC AC
Volts (V) 9 9.5 12 ±21.5 ±15 ±10 9 9.6 12 12 14
Amps (mA) 1200 1000 500 300 200 1500 1750 1700 1000 500 200 300/300 350/350 500/150 200 200 2000 1500 500 800
ACB ACI ACF ACM ACA ACK ACJ ACL ACO ACN ACG ACE ACD ACH PSA ASA BRB BRA BRC
120/T 120/I/J 120 120 120 120 120 120 120 120 120 120 120 120 120 120T 120 120 120 120
CN-20 AR
CP-40 AR
CR-1000 AR
CR-80 AR
CS-10 AR
CS-2 OR
CS-3 OR
CT-6 OR
D-5 AR
DB-66 OR
DB-88 OR
DC-2 OR
DC-3 OR
DD-3 OR
DD-5 OR
DF-2 OR
DI-1 OR
DIF-800 AR
DR-220A/E OR
DR-5 OR
DR-550/mkII OR
DR-660 AR
DS-1 OR
DS-2 OR
DS-3 OR
DS-330 AR
DSD-2/3 OR
E-12 AR
E-14 AR
E-15 AR
E-16 AR
E-28 AR
E-35 AR
E-36 AR
© Roland Corporation U.S. Revised 6/25/98 Page 2 of 7
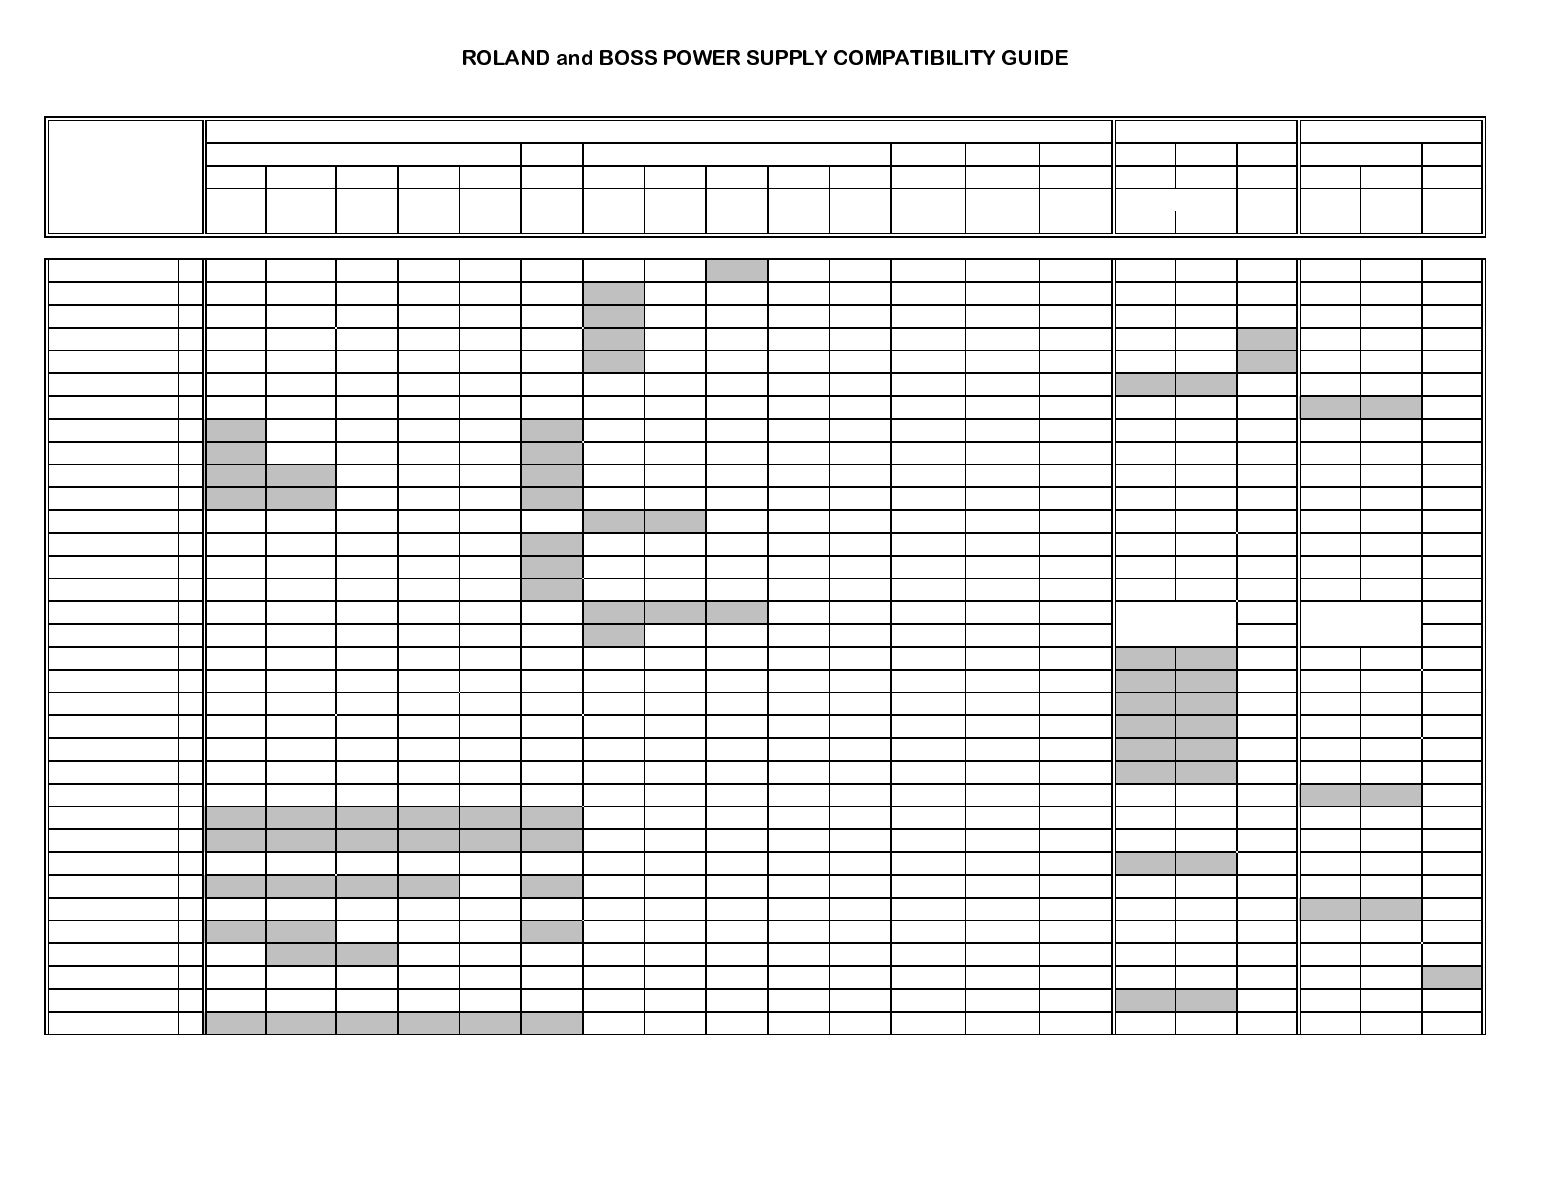
Output: Unregulated DC Regulated DC AC
Volts (V) 9 9.5 12 ±21.5 ±15 ±10 9 9.6 12 12 14
Amps (mA) 1200 1000 500 300 200 1500 1750 1700 1000 500 200 300/300 350/350 500/150 200 200 2000 1500 500 800
ACB ACI ACF ACM ACA ACK ACJ ACL ACO ACN ACG ACE ACD ACH PSA ASA BRB BRA BRC
120/T 120/I/J 120 120 120 120 120 120 120 120 120 120 120 120 120 120T 120 120 120 120
E-38 AR
E-5 AR
E-56 AR
E-66 AR
E-68 AR
EH-2 OR
EH-50 AR
EM-303 AR
EM-305 AR
ep-3 AR
ep-5 AR
ep-7 AR
ep-707 AR
ep-7mkII AR
ep-9 AR
ep-75 AR
ep-85 AR
FC-200 OR
FC-50 OR
FT-2 OR
FW-3 OR
FZ-2 OR
FZ-3 OR
GE-21 AR
GE-7 OR
GE-7B OR
GEB-7 OR
GI-10 AR
GR-09 AR
GR-1 AR
GR-30 AR
GX-700 AR
HC-2 OR
HF-2 OR
© Roland Corporation U.S. Revised 6/25/98 Page 3 of 7

Output: Unregulated DC Regulated DC AC
Volts (V) 9 9.5 12 ±21.5 ±15 ±10 9 9.6 12 12 14
Amps (mA) 1200 1000 500 300 200 1500 1750 1700 1000 500 200 300/300 350/350 500/150 200 200 2000 1500 500 800
ACB ACI ACF ACM ACA ACK ACJ ACL ACO ACN ACG ACE ACD ACH PSA ASA BRB BRA BRC
120/T 120/I/J 120 120 120 120 120 120 120 120 120 120 120 120 120 120T 120 120 120 120
HM-2 OR
HM-3 OR
HR-2 OR
JV-30 AR
JV-35 AR
JV-50 AR
JW-50 AR
JX-1 AR
LM-2 OR
LM-2B OR
LMB-3 OR
LS-2 OR
LVC-1N AR
M-660 AR
MC-50/mkII AR
MC-202 AR
MC-303 AR
ME-6 AR
ME-6B AR
ME-8 AR
ME-8B AR
ME-X AR
MPD-4 AR
MS-1 OR
MSL-15 OR
MT-100 AR
MT-120 AR
MT-2 OR
MT-200 AR
MT-32 AR
MV-30 AR
MX-10 AR
MX-5 OR
MZ-2 OR
© Roland Corporation U.S. Revised 6/25/98 Page 4 of 7

Output: Unregulated DC Regulated DC AC
Volts (V) 9 9.5 12 ±21.5 ±15 ±10 9 9.6 12 12 14
Amps (mA) 1200 1000 500 300 200 1500 1750 1700 1000 500 200 300/300 350/350 500/150 200 200 2000 1500 500 800
ACB ACI ACF ACM ACA ACK ACJ ACL ACO ACN ACG ACE ACD ACH PSA ASA BRB BRA BRC
120/T 120/I/J 120 120 120 120 120 120 120 120 120 120 120 120 120 120T 120 120 120 120
NS-2 OR
NS-50 AR
OC-2 OR
OD-1 OR
OD-2 OR
OD-2R OR
OD-3 OR
ODB-3 OR
OS-2 OR
P-55 AR
PAD-8 AR
PAD-80 AR
PC-200/mkII OR
PH-1R OR
PH-2 OR
PK-5 OR
PM-16 AR
PMA-5 OR
PN-2 OR
PQ-3B OR
PQ-4 OR
PQ-50 AR
PR-1 OR
PR-100 AR
PR-300 AR
PS-2 OR
PS-3 OR
PSM-5 AR
PV-1 R
PW-2 OR
R-5 AR
R-70 AR
R-8 AR
R-8mkII AR
© Roland Corporation U.S. Revised 6/25/98 Page 5 of 7
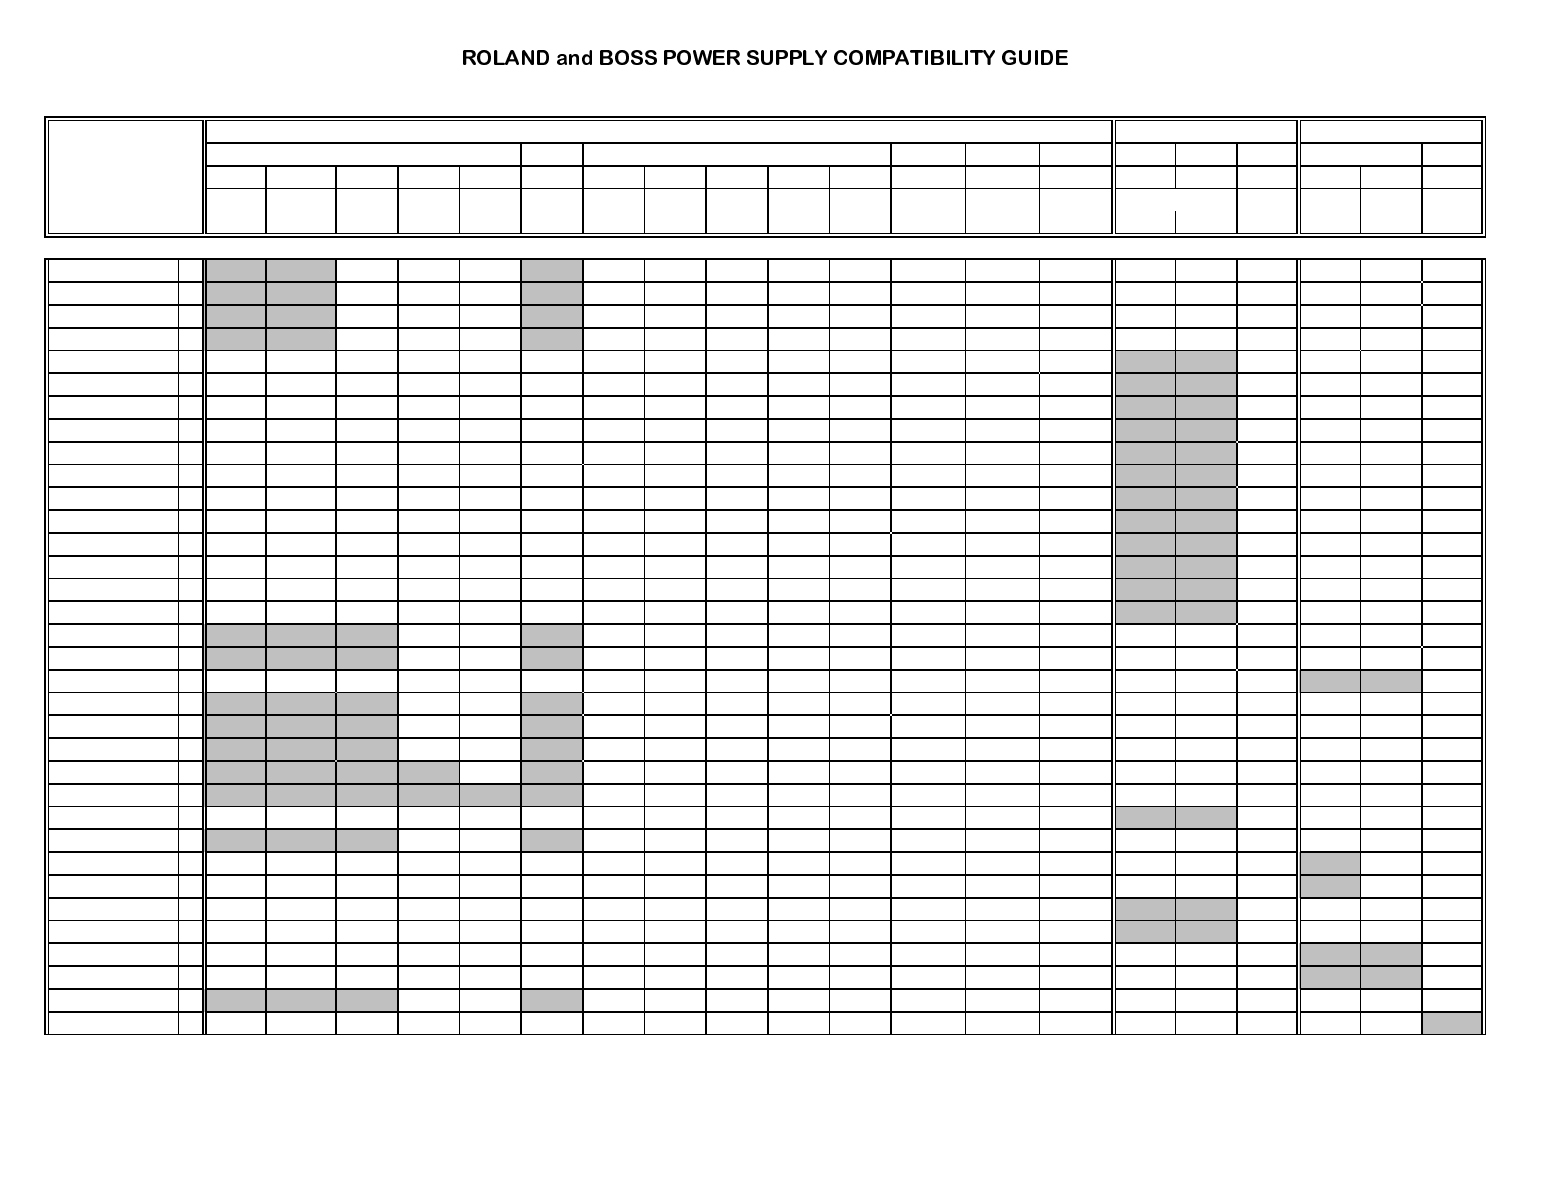
Output: Unregulated DC Regulated DC AC
Volts (V) 9 9.5 12 ±21.5 ±15 ±10 9 9.6 12 12 14
Amps (mA) 1200 1000 500 300 200 1500 1750 1700 1000 500 200 300/300 350/350 500/150 200 200 2000 1500 500 800
ACB ACI ACF ACM ACA ACK ACJ ACL ACO ACN ACG ACE ACD ACH PSA ASA BRB BRA BRC
120/T 120/I/J 120 120 120 120 120 120 120 120 120 120 120 120 120 120T 120 120 120 120
RA-30 AR
RA-50 AR
RA-90 AR
RA-95 AR
RBF-10 AR
RC-3 OR
RCE-10 AR
RDD-20 AR
ROD-10 AR
RPD-10 AR
RPH-10 AR
RPQ-10 AR
RPW-7 AR
RRV-10 AR
RV-2 OR
RV-3 OR
SB-55 AR
SC-155 AR
SC-33 AR
SC-50 AR
SC-55 AR
SC-55mkII AR
SC-7 AR
SD-1 OR
SD-2 OR
SD-35 AR
SE-50 AR
SE-70 AR
SH-101 OR
SP-202 OR
SPD-11 AR
SPD-20 AR
SPD-8 AR
SX-700 AR
© Roland Corporation U.S. Revised 6/25/98 Page 6 of 7
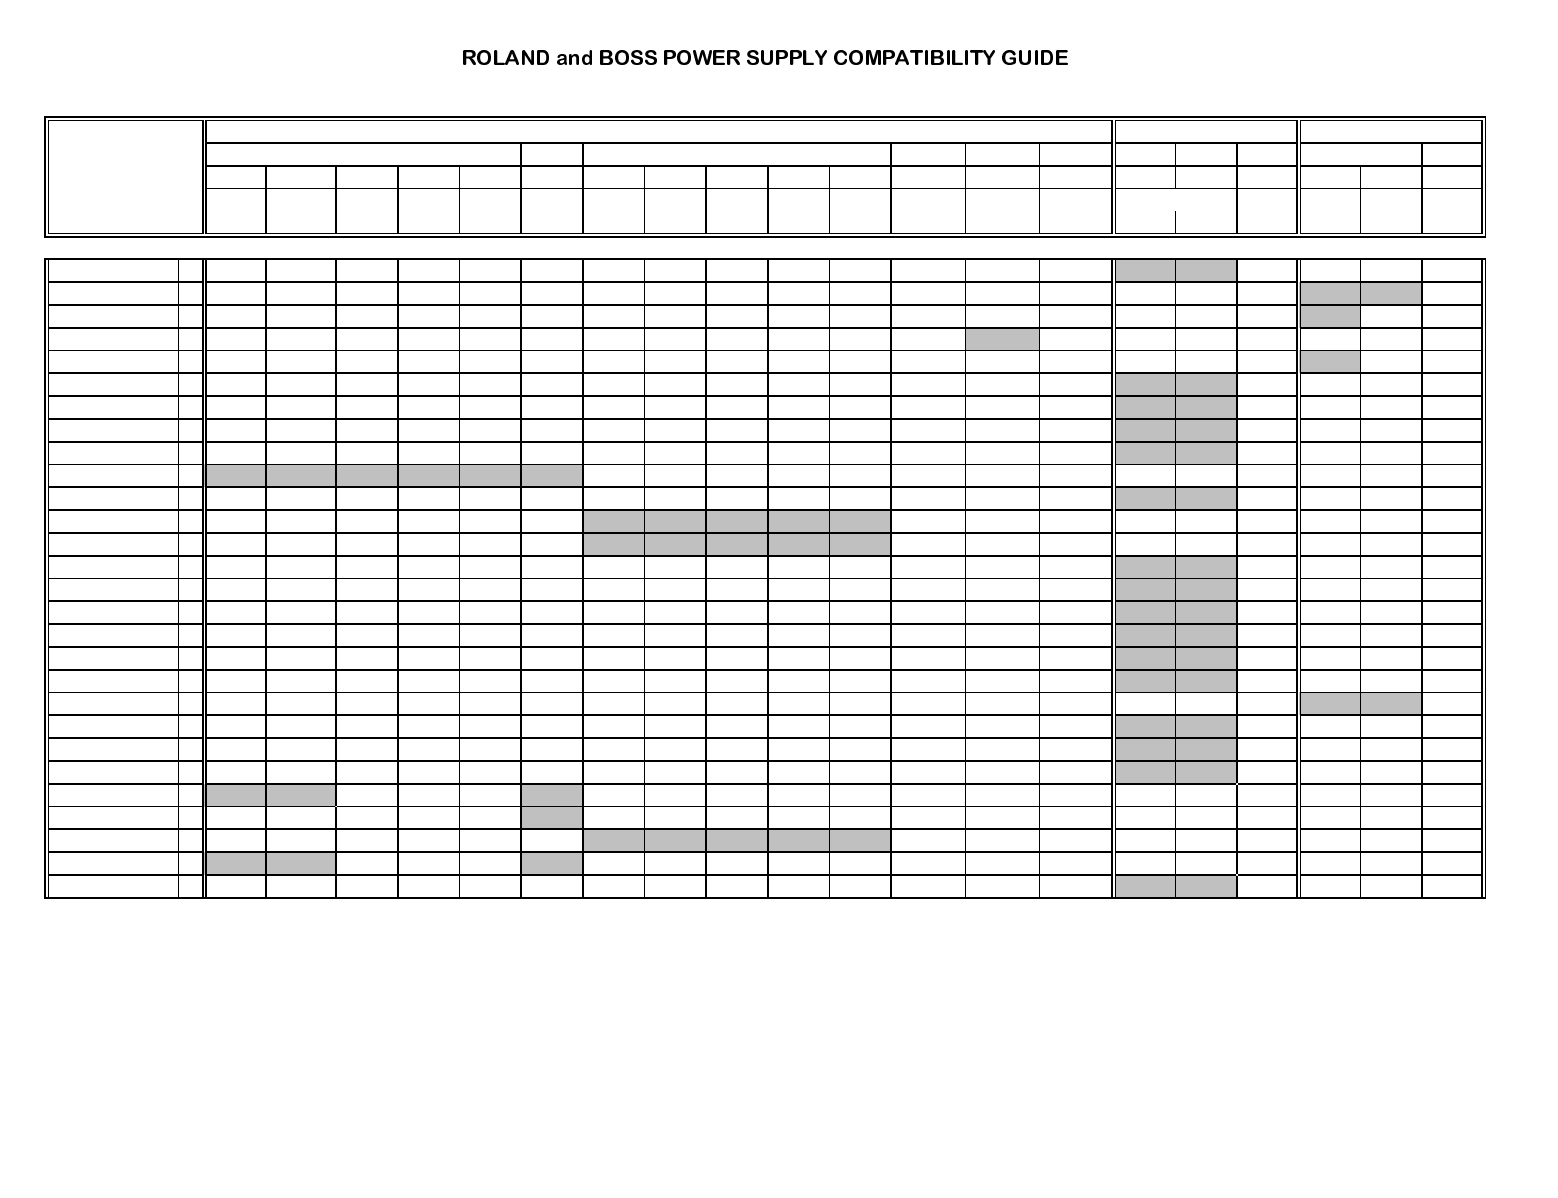
Output: Unregulated DC Regulated DC AC
Volts (V) 9 9.5 12 ±21.5 ±15 ±10 9 9.6 12 12 14
Amps (mA) 1200 1000 500 300 200 1500 1750 1700 1000 500 200 300/300 350/350 500/150 200 200 2000 1500 500 800
ACB ACI ACF ACM ACA ACK ACJ ACL ACO ACN ACG ACE ACD ACH PSA ASA BRB BRA BRC
120/T 120/I/J 120 120 120 120 120 120 120 120 120 120 120 120 120 120T 120 120 120 120
SYB-3 OR
TD-5 AR
TD-7 AR
TL-16 AR
TL-8 AR
TM-3 OR
TM-7 OR
TR-2 OR
TR-505 OR
TR-606 OR
TR-626 OR
TR-707 AR
TR-727 AR
TU-6 OR
TU-8 OR
TU-12/H OR
TU-120 OR
TU-121 OR
TU-12H OR
TU-50 AR
TU-6 OR
TU-8 OR
VB-2 OR
VT-1 AR
W-50 OR
WS-20/20M AR
XP-10 AR
XT-2 OR
© Roland Corporation U.S. Revised 6/25/98 Page 7 of 7
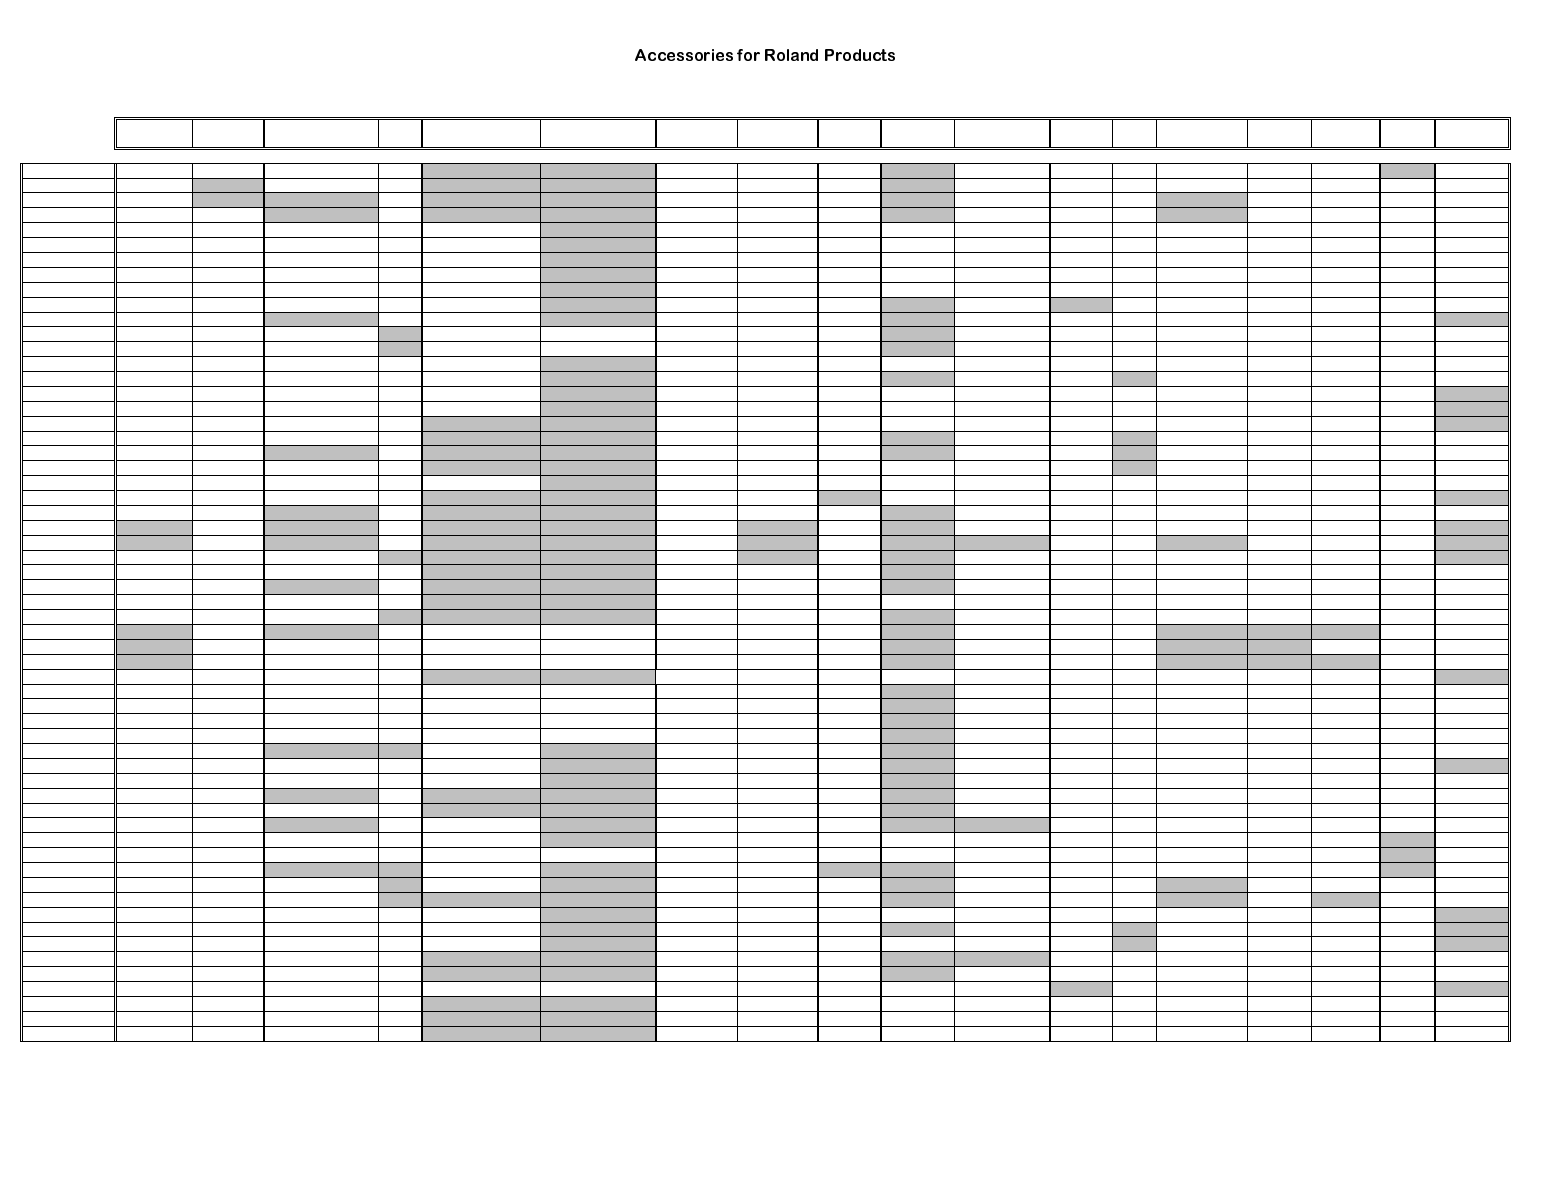
Wave Voice Video Video Continuous Pedal Footswitches Travel Case Travel Case Software TurboStart Supplemental CD-ROM Style Memory Card Patch PCM AC Other
Expansion Expansion Owner's Manual Demo EV-5/FV-300L DP-2/DP-6/FS-5U Hardshell Soft Ba
g
Notes Library Disks M-512E Cards Card Adaptor
A-33
A-70 VE Series
A-90 VE Series
A-90EX
AC-100
BC-30
BC-30/210
BC-60
BC-60/310
DJ-70mkII L-CD7/P
DR-5 App Guide
DR-550mkII
DR-660
E-16
E-66 MSD
ep-7mkII EP-AK-2E
ep-9 PB-7BK
FP-1 FPS-1
G-600 FC-7 MSD
G-800 FC-7 MSD
G-1000 FC-7 MSD
GC-405/405X
GI-10 US-20
GP-100
GR-09 GR9E-1 US-20
GR-1 SR-GR1-01 US-20
GR-30 US-20
GT-5
GX-700
JC-120
JP-8000
JV-1080 SR-JV80 PN-JV80 SO-PCM1
JV-2080 SR-JV80 PN-JV80
JV-880 SR-JV80 PN-JV80 SO-PCM1
JX-305 SM-2, SM-4
M-BD1
M-OC1
M-SE1
M-VS1
MC-303
MC-505 SM-2, SM-4
MC-50mkII
ME-8
ME-8B
MS-1
PC-200mkII
PK-5
PMA-5 DP-2M
R-70
R-8mkII SN-R8
RA-30 FC-7 PK-5
RA-800 FC-7 MSD PK-5
RA-95 FC-7 MSD PK-5
RD-500
RD-600
S-760 L-CD7/P OP-760-01
SDE-330
SDX-330
SE-70
© Roland Corporation U.S. Updated 6/25/98 Faxback # 90007 Pa
g
e 1 of 2
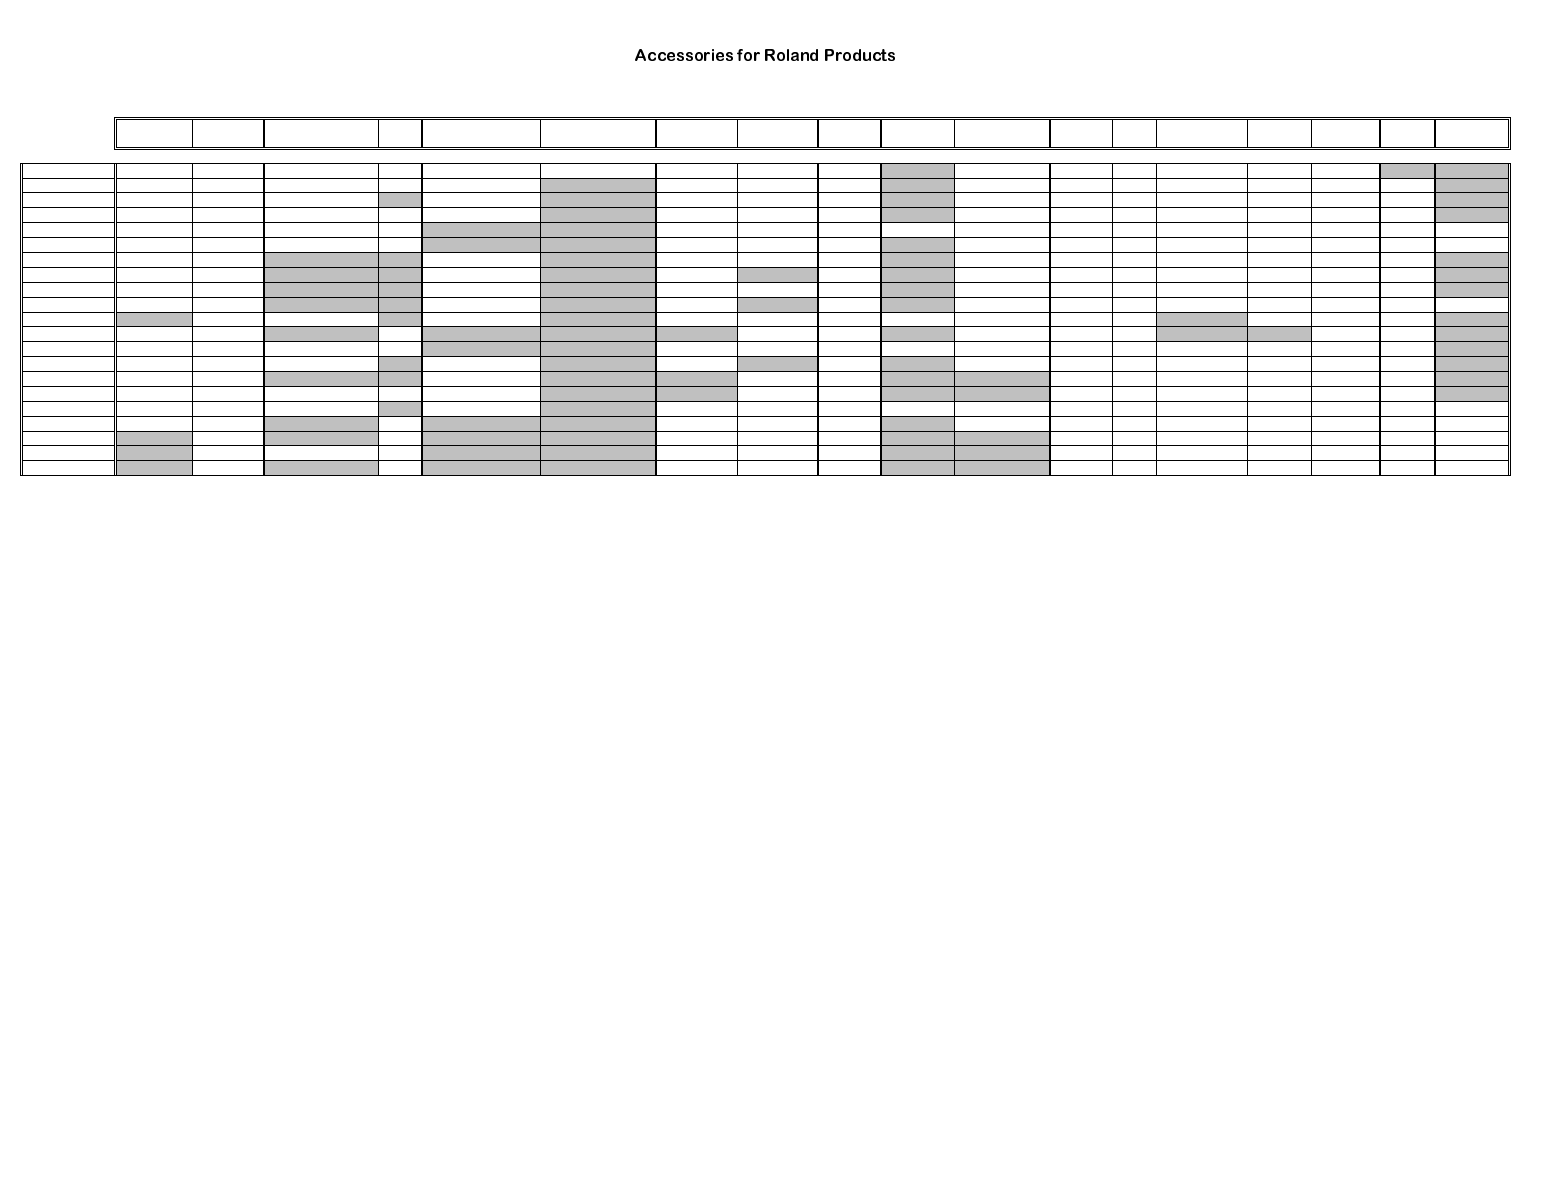
Wave Voice Video Video Continuous Pedal Footswitches Travel Case Travel Case Software TurboStart Supplemental CD-ROM Style Memory Card Patch PCM AC Other
Expansion Expansion Owner's Manual Demo EV-5/FV-300L DP-2/DP-6/FS-5U Hardshell Soft Ba
g
Notes Library Disks M-512E Cards Card Adaptor
SP-202 SM-2, SM-4
SP-808 SP-808-OP1
SPD-11 PD Pads
SPD-20 PD Pads
SRV-330
SX-700
TD-5 PD Pads
TD-5K TDE-5
TD-7 PD Pads
TDE-7K
TD-10 PD Pads
VG-8 VG8D VG8S-1
VK-7 PK-5
VS-840 VS4S-1
VS-880 VS8F-1
VS-1680 VS8F-2
VT-1
XP-10
XP-50 SR-JV80
XP-60 SR-JV80
XP-80 SR-JV80
© Roland Corporation U.S. Updated 6/25/98 Faxback # 90007 Pa
g
e 2 of 2

NQPSMTR ®#2E49!2>6
=:DE:?8D
June 24, 1998
© 1998 Roland Corporation U.S. 6/24/98 Page 1 of 1
The following are the patch lists contained in this book, arranged alphabetically by model number.
JP-8000 Patch Listing
JP-8000 Performance Listing
MC-303 Patch Listing
MC-505 Patch Listing
MC-505 Pattern Listing
PMA-5 Patch Listing
SPD-20 Instrument Listing
SPD-20 Patch Listing
SR-JV80-01 Pop Expansion Board Patch Listing
SR-JV80-01 Pop Expansion Board Waveform Listing
SR-JV80-02 Orchestral Expansion Board Patch Listing
SR-JV80-02 Orchestral Expansion Board Waveform Listing
SR-JV80-03 Piano Expansion Board Patch Listing
SR-JV80-03 Piano Expansion Board Waveform Listing
SR-JV80-04 Vintage Expansion Board Patch Listing
SR-JV80-04 Vintage Expansion Board Waveform Listing
SR-JV80-05 World Expansion Board Patch Listing
SR-JV80-05 World Expansion Board Waveform Listing
SR-JV80-06 Dance Expansion Board Patch Listing
SR-JV80-06 Dance Expansion Board Waveform Listing
SR-JV80-07 Super Sound Set Expansion Board Patch Listing
SR-JV80-07 Super Sound Set Expansion Board Waveform Listing
SR-JV80-08 Keyboards of the 60’s and 70’s Expansion Board Patch Listing
SR-JV80-08 Keyboards of the 60’s and 70’s Expansion Board Waveform Listing
SR-JV80-09 Session Expansion Board Patch Listing
SR-JV80-09 Session Expansion Board Waveform Listing
SR-JV80-10 Bass and Drums Expansion Board Patch Listing
SR-JV80-10 Bass and Drums Expansion Board Waveform Listing
SR-JV80-11 Techno Expansion Board Patch Listing
SR-JV80-11 Techno Expansion Board Waveform Listing
SR-JV80-12 Hip Hop Collection Patch Listing
SR-JV80-12 Hip Hop Collection Waveform Listing
TD-7T ‘Turbo’ Patch Listing
TD-10 Drum Instrument Listing
TD-10 Drum Kit Listing
VE-RD1 Expansion Board Patch Listing
XP-60/80 Internal Patch Listing
XP-60/80 Internal Waveform Listing

NQPSMTR-30XVLF6\QWKHVL]HU 3DWFK/LVWLQJ
1998 Roland Corporation U.S. JP-8000 Patch Listing Faxback # 10307 Page 1 of 1
No : Patch Name *:Mono **:Legato
P:A11: Spit'n Slide Bs **
P:A12: Velo Decay Bass **
P:A13: Wall Bob **
P:A14: Juno Sub Bass **
P:A15: Subsonic Bass **
P:A16: Big & Dark **
P:A17: Bass Flow **
P:A18: Juno Bass Vel **
P:A21: Dubb Bass **
P:A22: Juice Bass **
P:A23: Dreams Are Made **
P:A24: Reso Bass Line **
P:A25: Bass Pedals **
P:A26: Hard Core Bass **
P:A27: MC-202 Bass **
P:A28: Rubber SH-2 *
P:A31: Raging Bass *
P:A32: Blipper Bass **
P:A33: JP-303 **
P:A34: Rave Time
P:A35: Fretless Bass **
P:A36: Digi Strat
P:A37: Fire Wire
P:A38: Proflike Clavit
P:A41: Withmod Comp
P:A42: Juno Clav
P:A43: Gritty Power
P:A44: Separate ways
P:A45: For RPS
P:A46: Bread'n Butter
P:A47: Silk 5ths
P:A48: Ancient Asia
P:A51: Intervalic **
P:A52: Squared Away
P:A53: Velo Syncoid
P:A54: Resonance Chord
P:A55: Resorelease
P:A56: Waspy Synth
P:A57: Euro SAW
P:A58: Dance Sweep
P:A61: Trance Food
P:A62: One Shot Reso
P:A63: The Fat Guy
No : Patch Name *:Mono **:Legato
P:A64: Spit Brass
P:A65: Poly Sync
P:A66: Rave 5th
P:A67: UK Shorty
P:A68: Old Rhodes
P:A71: Wurly Piano 1
P:A72: Wurly Piano 2
P:A73: Moody Organ
P:A74: Org/Rotary>Ribon
P:A75: VK09 PercEchoes
P:A76: Sine Lead **
P:A77: Wichita Lead
P:A78: Creamy **
P:A81: Smoothy **
P:A82: Soaring Mini **
P:A83: Ribn F/B Lead *
P:A84: Sup-Jup Lead **
P:A85: Modular Lead **
P:A86: Syncrosolo **
P:A87: Ripper **
P:A88: Phantom Lead **
P:B11: Whammy Mammy **
P:B12: Wicked Lead **
P:B13: Drefull Dr.
P:B14: Wiggle Mod
P:B15: Feedback Lead **
P:B16: Crunch **
P:B17: Chaos Lead **
P:B18: Out of Control *
P:B21: String Machine
P:B22: Tron Vlns
P:B23: Luxury Symph
P:B24: Debussy
P:B25: BPF Velo Strings
P:B26: Detuned Str.
P:B27: Juno B81 Pad
P:B28: Richland
P:B31: MOD Strings
P:B32: Jupiter Pad
P:B33: Soft Strings
P:B34: Shan-gri-la
P:B35: Fine Wine
P:B36: Glue Pad
No : Patch Name *:Mono **:Legato
P:B37: True Pad
P:B38: Foreboding
P:B41: Skreachea
P:B42: BPM Pulse 1
P:B43: BPM Pulse 2
P:B44: Hi-Pass Puls
P:B45: Sample&Hold Me
P:B46: MKS80 Space
P:B47: Arctic Sweep
P:B48: Replicant CS
P:B51: Stargate
P:B52: Lost in Time
P:B53: Circular
P:B54: Space Choir
P:B55: Hypass Sweep
P:B56: BPF Tides
P:B57: Matrix Sweep
P:B58: MKS80 Bells
P:B61: Tiny bells
P:B62: Chimey
P:B63: Juno Arp
P:B64: Sonar Ping
P:B65: Air Harp
P:B66: Velo FX Percs
P:B67: Quizzled
P:B68: Intermittent
P:B71: Brain Static
P:B72: Computone
P:B73: Pin Matrix
P:B74: Space Cheese
P:B75: Rough Day
P:B76: The Etruscan. *
P:B77: Varese
P:B78: Pipe Dream
P:B81: Meteor
P:B82: Snowman
P:B83: Space Ghost
P:B84: Ozone
P:B85: Cool-a little...
P:B86: Electro Gulls
P:B87: Template 1
P:B88: Template 2

NQPSMTR-30XVLF6\QWKHVL]HU 3HUIRUPDQFH/LVWLQJ
1998 Roland Corporation U.S. JP-8000 Performance Listing Faxback # 10308 Page 1 of 1
No: Performance Name Lower Patch Upper Patch
P: 11: Chariots Chariots L Chariots U
P: 12: Fizzoid Bass Fizzoid Bass L FizzoidBass U **
P: 13: Skreachy Skreachy L Skreachy U
P: 14: Feedback Lead INIT PATCH Feedback Lead U **
P: 15: Trancer Trancer L ** Trancer U
P: 16: Whisper Whisper L Whisper U
P: 17: Dance Split Dance Split L Dance Split U
P: 18: Comb Strings Comb Strings L Comb Strings U
P: 21: Descender Descender L Descender U
P: 22: Glass Columns Glass Columns L* Glass Columns U
P: 23: BPM Pulsating BPM Pulse L BPM Pulse U
P: 24: 1979! 1979 L 1979 U
P: 25: Elliptical Elliptical L Elliptical U
P: 26: MKS80 Bell/Space MKS80Bell/SpaceL MKS80Bell/SpaceU
P: 27: Legato TB-303 Legato TB-303 L* Legato TB-303 U **
P: 28: Massive Pad Massive Pad L MassivePad U
P: 31: AKS Sweep AKS Sweep L * AKS Sweep U
P: 32: Sweepers Sweepers L Sweepers U
P: 33: Juliano Juliano L Juliano U
P: 34: Stargate Stargate L Stargate U
P: 35: Dual Mini's Dual Mini's L ** Dual Mini's U **
P: 36: Spacescapes Spacescapes L Spacescapes U
P: 37: Trance Floor Trance Floor L Trance Floor U
P: 38: Arctic E-know INIT PATCH Arctic E-know U
P: 41: Smooth Split Smooth Split L ** Smooth Split U **
P: 42: Fanfare Fanfare L Fanfare U
P: 43: Touchy Alarmist TouchyAlarmist L TouchyAlarmist U
P: 44: Last Emperor Last Emperor L Last Emperor U **
P: 45: Euroneuro Euroneuro L Euroneuro U
P: 46: Babylon Babylon L Babylon U
P: 47: Str/Whistle Str/Whistle L Str/Whistle U **
P: 48: Back To The 60's BackToThe60's L BackToThe60's U
P: 51: Wicked Wicked L ** Wicked U **
P: 52: Velo NRG Velo NRG L ** Velo NRG U
P: 53: Circuit Bent Circuit Bent L CircuitBent U
P: 54: Arpegg<>Juno Pad Arp<>Juno Pad L * Arp<>Juno Pad U
P: 55: Didjeribbon Didjeribbon L ** Didjeribbon U **
P: 56: Faze Strings Faze Strings L Faze Strings U
P: 57: Dual SynthKlavs DualSynthKlavs L DualSynthKlavs U
P: 58: Pulsing Sweep Pulsing Sweep L PulsingSweep U
P: 61: Mini 5th Mini 5th L ** Mini 5th U **
P: 62: Tubular Tubular L TubularU
P: 63: Synthboy Split Synthboy Split L ** Synthboy Split U
No: Performance Name Lower Patch Upper Patch
P: 64: Water Orchestra WaterOrchestra L WaterOrchestra U
P: 65: Split of 5ths Split of 5ths L ** Split of 5ths U
P: 66: Road To Goa Road To Goa L ** Road ToGoa U *
P: 67: Rain Drops Rain Drops L Rain Drops U
P: 68: Wide Quark Rings WideQuarkRings L WideQuarkRings U
P: 71: Tritouch Layer Tritouch Layer L Tritouch Layer U
P: 72: Aquapeggios Aquapeggios L Aquapeggios U
P: 73: OB Eight OB Eight L OB Eight U
P: 74: Swynk Swynk L * Swynk U
P: 75: GR-300 Solo GR-300 Solo L * GR-300 Solo U *
P: 76: Ring Split Ring Split L Ring Split U
P: 77: Observatory Observatory L Observatory U
P: 78: Tron Strings Tron Strings L Tron Strings U
P: 81: Mirror Balls Mirror Balls L Mirror Balls U
P: 82: Entropy Entropy L EntropynU
P: 83: Template1 Tmp1:Trig Src. Tmp1:Trig Dst.
P: 84: Template2 Tmp2:ChorusSync Tmp2:DelaySync
P: 85: Template3 INIT PATCH Tmp3:LFO Sync
P: 86: Template4 Tmp4:Lower Tmp4:Upper **
P: 87: Template5 Tmp5:Lower Tmp5:Upper
P: 88: Template6 Tmp6:Lower Tmp6:Upper
*: Mono **: Legato

NQPSMTR 0&*URRYHER[ 3DWFK/LVWLQJ
Bank 1: Synthesizer 4 Acid TB 1 4 Fingered Bs 2 23 OB Str. Pad Bank 8: Synth FX
1 Lead TB 1 5 Acid TB 2 5 Picked Bass 1 24 X-MOD Pad 1 UFO FX
2 Lead TB 2 6 Acid TB 3 6 Dust Pick Bass 25 Sweep Pad 1 2 Saw in Saw
3 Wow TB 7 Acid TB 4 7 Picked Bass 2 26 Sweep Pad 2 3 Feed Bell
4 Lead TB 3 8 101 Bass 1 8 Fretless Bass 27 OB Soft Pad 4 Abduction
5 MG Saw 9 101 Bass 2 9 Slap Bass 1 28 Goblin 5 Loop Sweep
6 Voc.Saw 10 101 Bass 3 29 Echo Drops 6 UP FX
7 Cheese Saw 11 House Bass Bank 4: Synth Stack 30 Random Pad 7 Robocorder
8 Saw Lead 12 Sine Bass 1 Syn.Stack 1 31 LFO Sweep 8 Noise Grow
9 Calc.Saw 13 Dub Bass 2 Oct.Stack 32 Horror Pad 9 LFO Techno
10 OB2 Saw 1 14 Pizz.Bass 3 Syn.Stack 2 33 Pulse Key Pad 10 Calculating
11 Juno6 Saw 15 MG Bass 1 4 Saw Stack 11 Emergency!
12 JP8 Pls.1 16 MG Bass 2 5 Syn.SB 1 Bank 6: Strings 12 FX Beats
13 MG Pls.1 17 MG Bass 3 6 Syn.SB 2 1 Real Strings 1 13 Analog FX
14 Flicker Pls. 18 MG Bass 4 7 Brass Perc. 2 Real Strings 2 14 Transformer
15 Tri Lead1 19 FM Super Bs 8 Dirty SB 3 Auh Strings 15 Dusty Scratch
16 Tri Lead2 20 Cheese Bass 4 Hi Strings 16 Space Worms
17 PR5 Squ.1 21 Syn.SB Bass Bank 5: Synth Pad 5 Syn.Strings 1 17 Winky FX
18 JU2 SubOsc. 22 Blip Bass 1 Atmosphere 6 Syn.Strings 2
19 Frog Wave 23 KGP Bass 2 Feed Back 7 Syn.Strings 3 Bank 9: Noise
20 Seq.Synth 24 TBMG Bass 1 3 X-MOD 8 Noise Strings 1 PR5 Noise1
21 Polysynth 25 MG Bass5 4 Pacifica 9 RND Strings 2 PR5 Noise2
22 JP8 Pls.2 26 JPMG Bass 5 7th Atom 10 LFO Strings 3 Pink Noise
23 JP8 Squ. 27 Click Bass 6 Outer Space 11 Slow Strings 4 White Noise
24 260 Pls.90 28 KMP Bass 7 Rev.Atom 12 Slow SynStr. 5 Bomb Wind
25 Reso.Pls. 29 Osc.Bass 8 2.2 Pad 13 Pizzicato Str. 6 Syn.Wind
26 Reso.Stack 30 Reso.Bass 9 Jungle Pad 7 Vinyl Noise
27 Soft Lead 31 Wow MG Bass 10 Psycho Pad Bank 7: Voice 8 Noise Snare
28 8DV Saw 1 32 Wow 101 Bass 11 Pipe Pad 1 Choir Auhs 9 Explosion
29 PR5 Saw 1 33 Sweep Wow Bass 12 Ambient Pad 2 Space Voice 10 Pink Bomb
30 D50 Saw 35 Doom Bass 13 Flanger Pad 3 Sweepvox
31 MG Sweep 36 Rubber Bass 1 14 Bell Pad 4 Synthvox 1 Bank 10: Piano
32 Sweep Lead 37 Rubber Bass 2 15 7th Bell Pad 5 Auh 1 Ac.Piano
33 Vocorderman 38 Acid Bass 16 Fantasia 6 Synthvox 2 2 Bright Piano
34 4th Lead 1 39 Bubble Bass 17 Crystal 7 Leadvox 3 E.Piano 1
35 4th Lead 2 40 Organ Bass 18 Exo.Bell Pad 8 Auh Auh 4 E.Piano 2
19 Echo Bell 9 Sky Vox 5 E.Piano 3
Bank 2: Synth Bass Bank 3: Bass Guitar 20 Warm Pad 10 Auhbient 6 E.Piano 4
1 Normal TB 1 Ac.Bass 1 21 Soundtrack 11 Vibravox 7 Org.E.Piano
2 Dist.TB 1 2 Ac.Bass 2 22 Oct.Pad 12 Noisevox 8 Noise Piano
3 Dist.TB 2 3 Fingered Bs 1 9 Clav.
1996 Roland Corporation U.S. MC-303 Groovebox Page 1 of 3
NQPSMTR 0&*URRYHER[ 3DWFK/LVWLQJ
10 Ana.Clav. Bank 14: Guitar 17 Flute Bank 19: SFX 14 Hi Conga Mute
11 Digi.Clav. 1 Steel Str.Gt. 18 Pan Flute 1 Starship 15 Lo Conga Open
2 12str.Guitar 19 Afro Flute 2 Burst Noise 16 808 Conga
Bank 11: Organ 3 Jazz Guitar 20 Pipe Lead 1 3 Laser-gun 17 Mute Surdo
1 Organ 1 4 Clean Guitar 21 Pipe Lead 2 4 Seashore 18 Open Surdo
2 Lp-Hp Organ 5 Distortion Gt. 22 Shakuhachi 5 Rain 19 Open Pandeiro
3 Organ 2 6 Gt.Harmonics 6 Thunder 20 Mute Pandeiro
4 Percsv Organ 7 Acid Guitar 1 Bank 17: Ethnic 7 Wind 21 Mute Cuica
5 Slow Organ 8 Acid Guitar 2 1 Sitar 1 8 Stream 22 Open Cuica
6 Smokey Org.Chrd 9 Jazz Steel Guitar 2 Sitar 2 9 Bubble 23 Timbale
7 Organ Chord 11 Wah Guitar 3 Kalimba 10 Bird 24 Tablabaya
8 '60s Organ 4 Bagpipe 11 Low Bird 25 Udo
9 Dist.Organ Bank 15: Brass Section 12 Telephone 26 Latin Menu
10 Church Org.1 1 Brass 1 Bank 18: Hit 13 Gun Shot
11 Organ Loop 2 Bright Brass 1 1 MG Blip 1 14 Machine-gun Bank 21: Metal Perc
12 LF-Organ 3 Bright Brass 2 2 Rev.Blip 15 Car-Pass 1 Jungle Tamb.
4 Brass&Strings 3 MG Blip 2 16 Car-Crash 2 Tambourine
Bank 12: Chrom Perc 5 SB Brass Sect. 4 Syn.Perc 17 Siren 3 Hit Tamb.
1 Glockenspiel 6 ST Brass Sect. 5 Powa 18 Jetplane 4 Shake Tamb.
2 Vibraphone 7 OB Brass 6 Douby 19 Helicopter 5 78 Tamb.
3 Beat Glocken 8 Hybrid Brs. 7 P-Mod Perc 20 Laughing 6 Cowbell
4 Marimba 9 4th Brass 8 Bam Hit 21 Screaming 7 808 Cowbell
5 Timpani 9 Bit Hit 22 Punch 8 78 Cowbell
6 Steel Drums Bank 16: Brass/Pipe 10 Orch. Hit 23 Heart Beat 9 Mute Triangle
7 Sqr.Perc. 1 Synth Brass 1 11 BF Hit 24 Applause 10 Open Triangle
8 Juno Bell 2 Synth Brass 2 12 Organ Hit 11 Agogo
9 MG Perc 3 Bright Syn.Brs 1 13 Bim Hit Bank 20: Percussion 12 78 Metal Beat
10 Perc.Glass 4 Bright Syn.Brs 2 14 Dist.Hit 1 909 Tom 13 Jingle Bell
5 Warm Brass 1 15 Brass Fall 2 Synth Tom 14 Bell Tree
Bank 13: Bell 6 Stack Brass 1 16 Strings Hit 3 808 Tom 15 Wind-chime
1 Tubular-bell 7 Warm Brass 2 17 Space Frog 4 Elec. Tom
2 Vib. Bell 8 Strings Brass 18 Hoo! 5 Ac.Tom Bank 22: Other Perc
3 7th Bells 9 Warm Brass 3 19 Ha! 6 78 Tom 1 Maracas
4 Ring Bell 10 Stack Brass 2 20 Afro Feet 7 Hi Bongo Mute 2 808 Maracas
5 Digi.Bell 1 11 Trumpet 21 Breath 3 8 Hi Bongo Open 3 Cabasa Up
6 Ring Mod. 12 Muted Trumpet 22 Scratch Rwnd 9 Lo Bongo Mute 4 Cabasa Down
7 Digi.Bell 2 13 Sax&Trumpet 23 Scratch Push 10 Lo Bongo Open 5 626 Shaker
8 Dirty Bell 1 14 Alto Sax 24 Scratch Pull 11 Hi Conga Slap 6 Short Whistle
9 Dirty Bell 2 15 Baritone Sax 25 Tape Rewind 12 Hi Conga Mute 7 Long Whistle
10 Digi.Bell 3 16 Bright Sax 26 Vinyl Stop 13 Hi Conga Open 8 Short Guiro
1996 Roland Corporation U.S. MC-303 Groovebox Page 2 of 3
NQPSMTR 0&*URRYHER[ 3DWFK/LVWLQJ
9 Long Guiro Bank 25: Clap Bank 28: Bass Drum (Single)
10 78 Guiro 1 808 Clap 1 Blip BD
11 Click Noise 2 Finger Snap 2 Cave BD
13 808 Rim Shot 3 Hip Clap 3 808 BD 1
14 Rim Shot 4 Shake & Light Clap 4 808 BD 2
15 Hyoshigi 5 Rap & Real Clap 5 Elec.BD
16 Claves 6 909 & Hard Clap 6 Afro Feet BD
17 808 Claves 7 HC2 & 707 Clap
18 Wood Block Bank 29: Bass Drum (Kit)
19 Vibra-slap Bank 26: Snare Drum (Single) 1 Dist.BD Kit
1 Funky Ghost 2 Jngl.BD Kit
Bank 23: Hi-Hat 2 Clap SD 3 909 BD Kit 1
1 Real CH 1 3 Fat SD 4 909 BD Kit 2
2 Real PH 1 4 Tight SD 5 909 BD Kit 3
3 Real OH 1 5 909 SD 6 Dry BD Kit
4 Room CH 6 808 SD 7 606 BD Kit
5 Room OH 7 Elec. SD
6 Real CH 2 8 80809 SD
7 Real PH 2 9 Slap
8 Real OH 2 10 Blip SD
9 808 CH
10 808 OH Bank 27: Snare Drum (Kit)
11 78 CH 1 Rim SD Kit
12 78 OH 2 Jngl.SD Kit 1
13 707 CH 3 Jngl.SD Kit 2
14 707 OH 4 Mute SD Kit
15 606 CH 5 Funky SD Kit
16 909 CH 1 6 Rap SD Kit
17 909 CH 2 7 Dry SD Kit
18 909 OH 8 Brush Tap
19 909 Dist.OH 9 Brush Slap
10 Brush Swirl
Bank 24: Cymbal 11 909 SD Kit
1 909 Crash 12 808 SD Kit
2 808 Cymbal 13 Hyper SD Kit
3 909 Ride Cym. 14 FX SD Kit
4 Ride Cymbal 15 808 SD Kit 2
5 Ride Bell 16 606 SD Kit
6 Asian Gong
7 Reverse Cymbal
1996 Roland Corporation U.S. MC-303 Groovebox Page 3 of 3

NQPSMTR0&*URRYH%R[ 3DWFK/LVWLQJ
1998 Roland Corporation U.S. MC-505 Groove Box Patch Listing Faxback # 10288 Page 1 of 3
Preset A
001= Lead TB 1
002= Dist TB 1
003= Dist Sqr TB
004= Dist TB 2
005= Dist TB 3
006= TB + Voco
007= Dist TB 4
008= Lead TB 2
009= Devil TB
010= Dual TB
011= HiLo303ModSw
012= Arpness TB
013= Acid Line
014= Dist TB 5
015= Lead TB 3
016= Lead TB 4
017= TB Tra Bass
018= Acid TB
019= Psyche-TB
020= TB + Sine
021= Hi-Pass TB
022= Moog Saw
023= OB Saw
024= MG Lead
025= Poly Key
026= Synth Pulse
027= Dual Profs
028= Axe of 80
029= MG Square
030= Square Lead1
031= Square Lead2
032= Square Lead3
033= Lucky
034= Synth Lead 1
035= Moon Lead
036= Rezo SynLead
037= Wspy Synth
038= Enorjizor
039= JP8 Sprang
040= PortaSynLead
041= Wah Lead
042= Beep Mod
043= Dist Lead 1
044= Freaky Fry
045= JU2 SubOsc 1
046= JU2 SubOsc 2
047= Froggy
048= Synth Lead 2
049= Singin' MINI
050= Plastic Ton
051= SinusoidRave
052= Sine Me Up
053= Spooky Sine
054= Sine Tone
055= D50 Saw Lead
056= Dst Syn Lead
057= Big Up Massv
058= Warm SawLead
059= Hartnoll Era
060= Skegness 97
061= Simply June
062= The Brothers
063= Dist Lead 2
064= Dark SawLead
065= Dist Lead 3
066= Mosquito
067= Phazyn Vox
068= Voc Saw
069= VT Vox
070= Pure Voice
071= Robo Vox
072= Hallucinate
073= Seq.Synth
074= Analog Seq
075= Ana Punch
076= Atom Brain
077= Fooled MC
078= 101 Bass 1
079= House Bass
080= 101 Bass 2
081= 202 Bass
082= Psycho Funk
083= Talking Lin
084= Inside Bass
085= Bubble Bas
086= Bass Bleep
087= Wiggle Bas
088= Twist Bass
089= Octa Bass
090= BT's Sticky
091= MG Bass
092= FM Super Bs
093= Solid Bass
094= T Nite Bass
095= Front 505
096= Def Bass 1
097= Def Bass 2
098= Sine Bass 1
099= Sine Bass 2
100= RollModRezBs
101= Gate Me Buzz
102= System Bass
103= Spike Bass
104= Solid Goa
105= Rezo Bass
106= Blip Bass
107= Pizz Bass
108= Voco Bass
109= VoCoRoBo
110= Dust Bass
111= ArtCore Bass
112= NU-NRG Bass
113= TalkBox Bass
114= Incontinence
115= Bari Voice
116= Ac.Bass
117= E.Ac.Bass
118= Acid Jazz Bs
119= Soup's Bass
120= Fingered Bs
121= FingBsVeloSw
122= PickedBass 1
123= PickedBass 2
124= Fretless Bs
125= Phot Bass
126= Slap Bass
127= R&B B-Slides
128= Syn Stack 1
Preset B
001= Strong Brass
002= You Can Fl
003= Syn stack 2
004= Dawn Of Man
005= Saw Stack 1
006= Saw Stack 2
007= DLM Stack
008= DOC Stack
009= LN2 Stack
010= Bend Stack
011= Freedom
012= Good Bean
013= JP8000 5th
014= Mega 5th
015= 5th Saw
016= 4th Saw
017= Soundtrack
018= Rise Pad
019= Warm Pad
020= JP + OB Pad
021= Planet
022= Additive
023= Noise Pad
024= Sweep Pad 1
025= Sweep Pad 2
026= Alles Padde
027= Sky Light
028= Stargate MC
029= Middle Grow
030= AiRye Bread-
031= NU-NRG Org
032= Halo Pad
033= Str/Brs Pad
034= Syn Brs Pad
035= Simple Pad
036= OB Rezo Pad
037= Sweet Vocode
038= Thin Pad
039= Attack Pad
040= Metal Pad
041= Atmosphere
042= Fantasia
043= Feedbackwave
044= Pacifica
045= Atmosphere 2
046= Sub Atmosphe
047= Machine Pad
048= Detuned Pad
049= Scoop Pad
050= Psycho Trevor
051= Floating Pad
052= Fancy Pad
053= Strings 1
054= Strings 2
055= Old StringSW
056= Swim Strings
057= Eclip-Str
058= Slow Strings
059= OB Slow Str
060= Syn.Strings1
061= Syn.Strings2
062= OB Strings
063= Rhap Strings
064= Banded Jupe
065= NU-NRG Str
066= Violin
067= Contrabass
068= Tremolo Str
069= Pizzicato 1
070= Pizzicato 2
071= Pizz It
072= Guardians
073= Gat Passion
074= Syn Harp
075= Voice Oohs
076= Solo Vox
077= Syn Vox
078= Choir Aahs
079= Space Voice

NQPSMTR0&*URRYH%R[ 3DWFK/LVWLQJ
1998 Roland Corporation U.S. MC-505 Groove Box Patch Listing Faxback # 10288 Page 2 of 3
080= Star Voice
081= Brightness
082= Vox Lead
083= Auhbient
084= Auh Luv Rave
085= PCM Life
086= Noisevox
087= Trance Voice
088= Effect Acer
089= Alternative
090= Hard Pure
091= Metal EF
092= Dly Tone
093= Osci Frog
094= Cal + After
095= 8b Pad
096= SpaceHighway
097= Trek Storm
098= Abduction
099= 1st Contact
100= Ice Cave
101= Rev Cord
102= Blue Random
103= Sync Tone
104= Seq Up
105= SawLFOSaw
106= Calculating
107= Touch EF
108= Welding
109= Press Machin
110= EF Tribe
111= Scratch Alt
112= Analog FX
113= Non TB
114= Nasty Filt
115= Psy-Ence
116= Music Hi
117= Uber Zone
118= Down Gown
119= For Giving
120= Sound Alarm
121= Acid Drone
122= X-Mod
123= X-FM/Org
124= X-FM Bass
125= Hard BD?
126= S&H Voc
127= X-TlkBxBass
128= X-Kick/TB
Preset C
001= X-Org/Nz
002= X-Pizz/Rng
003= White Noise
004= Pink Noise
005= P5 Noise
006= Toy Noise
007= Rezo Noise
008= Vinyl Noise
009= Tornado Jet
010= Smooth Jet
011= Sweep Noise
012= ModWhtSweep
013= Perk Breath
014= Pink Bomb
015= 64voicePiano
016= Ac.Piano 1
017= Ac.Piano 2
018= Epic House
019= Hush Piano
020= Happy Piano
021= BPF Piano
022= Honky-tonk
023= NY Piano+Str
024= Voice Piano
025= Old E.Piano
026= E.Piano 1
027= E.Piano 2
028= Cool Rhodes
029= Psycho EP
030= Trip E.Piano
031= Rotary Rhode
032= EP-Organ
033= Harpsichord
034= Clavi
035= Digi Clavi
036= FM Clavi
037= AnalogClavi1
038= AnalogClavi2
039= Funky Clavi
040= RotaryOrg Sl
041= RotaryOrg Fs
042= Gospel Spin
043= L Org F
044= Organ 1
045= Lp-Hp Organ
046= Organ 2
047= Percsv Organ
048= Ballad B
049= FM Club Org
050= Pop Organ
051= Cheese Organ
052= Reed Organ
053= Telstar
054= Church Org
055= Organ Bass
056= Strict Organ
057= SmkyChrd Org
058= Sweep Organ
059= Accordion
060= Vibraphone
061= FM Marimba
062= Marimba
063= Xylophone
064= Balaphone
065= Timpani
066= Steel Drum
067= Digi Bell
068= Acid Perc
069= MetaL-SD
070= Classy Pulse
071= Glockenspiel
072= Fanta Bell
073= Crystal
074= Tubular-Bell
075= Shank Bells
076= MKS-30 Melts
077= Trip Lead
078= Steel-Str.Gt
079= Clean Gtr
080= Jazz Gtr 1
081= Jazz Gtr 2
082= Muted Gtr
083= Lo-Fi Gtr
084= Terror Dome
085= Psycho-G
086= Dist Gtr Chd
087= Going Bald
088= Gt.Harmonic1
089= Gt.Harmonic2
090= Shafted Gtr
091= WahGT 2 Menu
092= Gtr Up
093= Gtr Down
094= Gtr Sweep
095= Orch Gtr
096= Brass
097= Bright Brass
098= Hush Brass
099= Synth Brass1
100= Synth Brass2
101= Synth Brass3
102= Syn Brs Lead
103= Obilator
104= OpenUp Brass
105= Brass Fall
106= Trumpet
107= MutedTrumpet
108= Soprano Sax
109= Alto Sax
110= Baritone Sax
111= SlideBiteSax
112= Sax & Tp
113= Tuba
114= Syn F.Horn
115= Oboe
116= Whistle
117= Ocarina
118= Recorder
119= Jazz SynLead
120= Solo Flute
121= Pan Flute
122= Bottle Blow
123= Funky Pipe
124= Breath Noise
125= Shakuhachi
126= Sitar 1
127= Sitar 2
128= Santur
Preset D
001= Kalimba
002= Bagpipes
003= PnoBendM7-m7
004= Org Chd m7
005= BalapChd 9th
006= Wah Gtr Hit
007= Orch Hit 1
008= Orch Hit 2
009= Rave-X-Tasy
010= Philly Hit 1
011= Philly Hit 2
012= Attack Hit
013= Funky Hit
014= Tekno ChdHit
015= Dist Hit
016= Glasgow Hit
017= Happy Hit
018= Scene Hit 1
019= Scene Hit 2
020= Drill Hit
021= Gaia Message
022= Rezo Perc
023= Syn Perc
024= MG Blip
025= Rev Blip
026= Air Blip
027= Radical Perc
028= Machine
029= Metal Hit

NQPSMTR0&*URRYH%R[ 3DWFK/LVWLQJ
1998 Roland Corporation U.S. MC-505 Groove Box Patch Listing Faxback # 10288 Page 3 of 3
030= Tanz Devil
031= Headz Direkt
032= ShoppingCart
033= Noisy Drill
034= Thump Bounce
035= Tape Rewind
036= Stop
037= Ao!
038= Ha!
039= Seashore
040= Bird
041= Telephone
042= Helicopter
043= Applause
044= Gun Shot
045= Machine Gun
046= Laser Gun
047= Sci-Fi Laser
048= Breath
049= Rain
050= Siren
051= TR909 Tom
052= TR808 Tom
053= Syn Tom 1
054= Syn Tom 2
055= Old Syn Tom
056= Taiko
057= Slow Down
058= Boom Drop
059= B-Tom-D
060= Mr.Bong Bass
061= Friends of 0
062= Latin Perc
063= Bongo Fury
064= High Timbale
065= MutePandeiro
066= Open Surdo
067= Brazil Perc
068= Tablabaya
069= Mute Cuica
070= Long Whistle
071= Agogo
072= Short Tamb
073= 808 Cowbell
074= CR78 Cowbell
075= CR78 Beat
076= Wind-Chime
077= Rim Shot
078= TR909 Rim
079= Hyoshigi
080= TR626 Shaker
081= 727 Quijada
082= Real CH
083= TR909 OH
084= Syn OH
085= TR909 Crash
086= Reverse Cym.
087= Asian Gong
088= TR808 Clap
089= Down Clap
090= Clap Tail
091= Rap&Real Clp
092= Maddening
093= TR909 Snare
094= TR808 Snare
095= House Snare
096= Jungle Snr 1
097= Jungle Snr 2
098= TR808 Kick
099= Plastic BD
100= Gate Kick
101= Jungle Kick
102= Scrtch/Vo Mn
103= Flexi Vox Mn
104= Hit Menu
105= Indust Menu
106= Tom Menu
107= Percus1 Menu
108= Percus2 Menu
109= Cowbell Menu
110= Shaker+ Menu
111= Rim Menu
112= Cymbal Menu
113= CHH 1 Menu
114= CHH 2 Menu
115= PHH Menu
116= OHH 1 Menu
117= OHH 2 Menu
118= Clap 1 Menu
119= Clap 2 Menu
120= Snare 1 Menu
121= Snare 2 Menu
122= Snare 3 Menu
123= Snare 4 Menu
124= Snare 5 Menu
125= Snare 6 Menu
126= Kick 1 Menu
127= Kick 2 Menu
128= Kick 3 Menu

NQPSMTR0&*URRYH%R[ 3DWWHUQ/LVWLQJ
1998 Roland Corporation U.S. MC-505 Groove Box Patch Listing Faxback # 10289 Page 1 of 3
Techno
No. Name BPM Measure
P:001 Psy Trance 142 4
P:002 Psy Trance 2 145 4
P:003 Psy Trance 3 145 4
P:004 Psy Trance 4 145 4
P:005 Psy Trance 5 138 4
P:006 Psy Trance 6 142 4
P:007 Psy Trance 7 144 4
P:008 Psy Trance 8 143 4
P:009 Psy Trance 9 145 4
P:010 Psy Trance 10 145 4
P:011 Psy Trance 11 145 4
P:012 Psy Trance 12 142 4
P:013 Psy Trance 13 143 4
P:014 Psy Trance 14 145 4
P:015 Psy Trance 15 135 4
P:016 Psy Trance 16 142 4
P:017 Psy Trance 17 147 4
P:018 Psy Trance 18 141 4
P:019 Trance 1 146 4
P:020 Trance 2 136 8
P:021 Trance 3 138 4
P:022 Trance 4 140 8
P:023 Trance 5 145 4
P:024 Trance 6 119 4
P:025 Trance 7 129 4
P:026 Trance 8 129 4
P:027 Trance 9 130 8
P:028 NU-NRG 1 150 2
P:029 NU-NRG 2 152 2
P:030 NU-NRG 3 145 8
P:031 NU-NRG 4 150 8
P:032 NU-NRG 5 140 8
P:033 NU-NRG 6 152 8
P:034 Epic Trance 1 150 4
P:035 Epic Trance 2 148 8
P:036 Epic Trance 3 148 8
P:037 Minimal 1 135 8
No. Name BPM Measure
P:038 Minimal 2 140 8
P:039 Minimal 3 135 4
P:040 Minimal 4 135 4
P:041 Minimal 5 130 2
P:042 Minimal 6 138 4
P:043 Minimal 7 132 4
P:044 Minimal 8 140 16
P:045 Minimal 9 135 4
P:046 Minimal 10 140 4
P:047 Minimal 11 135 4
P:048 Minimal 12 138 4
P:049 DetroitTechno 1 132 4
P:050 DetroitTechno 2 150 4
P:051 DetroitTechno 3 140 4
P:052 DetroitTechno 4 132 4
P:053 DetroitTechno 5 136 8
P:054 DetroitTechno 6 140 4
P:055 Gabba 1 200 2
P:056 Gabba 2 200 4
P:057 Gabba 3 180 4
P:058 Gabba 4 167 4
P:059 Gabba 5 167 4
P:060 HappyHardcore 1 175 4
P:061 HappyHardcore 2 190 4
P:062 HappyHardcore 3 175 2
P:063 HappyHardcore 4 175 4
P:064 HappyHardcore 5 175 2
P:065 Rave 1 130 8
P:066 Rave 2 130 8
P:067 Rave 3 179 8
P:068 Rave 4 179 8
P:069 Rave 5 172 8
P:070 Rave 6 185 8
P:071 Rave 7 170 8
P:072 Dream Pop 1 145 4
P:073 Dream Pop 2 130 8
P:074 Dream Pop 3 140 8
P:075 Rock 1 132 4
No. Name BPM Measure
P:076 Rock 2 130 4
P:077 Rock 3 137 4
P:078 Rock 4 126 4
P:079 Rock 5 137 4
P:080 Rock 6 128 8
P:081 Rock 7 112 4
P:082 Rock 8 128 4
P:083 Industrial 1 125 4
P:084 Industrial 2 132 8
P:085 Industrial 3 112 4
P:086 Industrial 4 90 8
P:087 Industrial 5 128 4
P:088 Industrial 6 128 4
P:089 Industrial 7 128 4
P:090 Industrial 8 128 4
P:091 Electro 1 122 4
P:092 Electro 2 119 8
P:093 AmbientTechno 1 130 8
P:094 AmbientTechno 2 120 16
P:095 AmbientTechno 3 120 16
P:096 AmbientTechno 4 128 4
P:097 AmbientTechno 5 120 4
P:098 AmbientTechno 6 120 4
Drum'n'Bass
No. Name BPM Measure
P:099 Artcore 1 165 8
P:100 Artcore 2 170 8
P:101 Artcore 3 165 16
P:102 Artcore 4 165 8
P:103 Artcore 5 158 16
P:104 Drum'n'Bass 1 165 8
P:105 Drum'n'Bass 2 156 4
P:106 Drum'n'Bass 3 156 8
P:107 Drum'n'Bass 4 180 16
P:108 Drum'n'Bass 5 180 16
P:109 Drum'n'Bass 6 165 8
P:110 Darkcore 1 195 8

NQPSMTR0&*URRYH%R[ 3DWWHUQ/LVWLQJ
1998 Roland Corporation U.S. MC-505 Groove Box Patch Listing Faxback # 10289 Page 2 of 3
No. Name BPM Measure
P:111 Darkcore 2 160 4
P:112 Darkcore 3 161 8
P:113 Darkcore 4 148 4
P:114 Darkcore 5 185 8
P:115 Darkcore 6 185 8
P:116 Hard Step 1 179 8
P:117 Hard Step 2 165 8
P:118 Hard Step 3 160 4
P:119 Hard Step 4 190 8
P:120 Tech Step 1 165 8
P:121 Tech Step 2 165 8
P:122 Tech Step 3 157 8
P:123 Jazz Step 1 156 4
P:124 Jazz Step 2 160 8
P:125 Jazz Step 3 165 8
P:126 Jazz Step 4 197 8
P:127 Jazz Step 5 170 8
P:128 Ragga/Jungle 1 180 8
P:129 Ragga/Jungle 2 179 8
P:130 Ragga/Jungle 3 163 8
P:131 Ragga/Jungle 4 165 8
P:132 Ragga/Jungle 5 200 8
Hip Hop
No. Name BPM Measure
P:133 HipHop East 1 93 2
P:134 HipHop East 2 93 2
P:135 HipHop East 3 95 4
P:136 HipHop East 4 95 2
P:137 HipHop East 5 95 2
P:138 HipHop East 6 95 2
P:139 HipHop East 7 84 8
P:140 HipHop East 8 85 4
P:141 HipHop East 9 89 2
P:142 HipHop East 10 89 4
P:143 HipHop West 1 99 2
P:144 HipHop West 2 99 4
P:145 HipHop West 3 95 4
No. Name BPM Measure
P:146 HipHop West 4 96 4
P:147 HipHop West 5 89 4
P:148 HipHop West 6 96 4
P:149 HipHop West 7 92 2
P:150 HipHop West 8 92 2
P:151 HipHop West 9 92 2
P:152 Abstract 1 79 2
P:153 Abstract 2 77 4
P:154 Abstract 3 79 2
P:155 Abstract 4 94 4
P:156 Abstract 5 94 4
P:157 Abstract 6 92 4
P:158 Abstract 7 67 2
P:159 Abstract 8 105 4
P:160 Abstract 9 104 4
P:161 Abstract 10 77 4
P:162 Abstract 11 100 4
P:163 HipHop Early 1 107 8
P:164 HipHop Early 2 98 4
P:165 HipHop Early 3 103 8
P:166 HipHop Early 4 98 8
P:167 HipHop Early 5 106 8
P:168 HipHop Early 6 100 2
P:169 HipHop Early 7 87 2
P:170 HipHop Early 8 99 2
P:171 NewJack Swing 1 105 8
P:172 NewJack Swing 2 110 4
P:173 Miami Bass 1 138 8
P:174 Miami Bass 2 127 4
P:175 HipHop Jazz 1 102 4
P:176 HipHop Jazz 2 99 8
P:177 HipHop Jazz 3 103 8
P:178 HipHop Soul 1 76 4
P:179 HipHop Soul 2 90 8
P:180 HipHop Soul 3 80 4
P:181 HipHop Soul 4 80 4
House
No. Name BPM Measure
P:182 House 1 123 8
P:183 House 2 123 8
P:184 House 3 123 8
P:185 House 4 128 4
P:186 House 5 122 8
P:187 House 6 122 4
P:188 House 7 123 8
P:189 Garage House 1 123 8
P:190 Garage House 2 125 8
P:191 Garage House 3 123 8
P:192 Garage House 4 123 8
P:193 Garage House 5 123 8
P:194 Garage House 6 120 4
P:195 Hard House 1 128 4
P:196 Hard House 2 130 4
P:197 Hard House 3 128 8
P:198 Hard House 4 128 8
P:199 Hard House 5 123 8
P:200 Hard House 6 128 8
P:201 Hard House 7 130 4
P:202 Hard House 8 130 4
P:203 Hard House 9 130 4
P:204 Hard House 10 130 4
P:205 Happy Handbag 1 130 2
P:206 Happy Handbag 2 130 4
P:207 Happy Handbag 3 130 8
P:208 Happy Handbag 4 128 8
P:209 Happy Handbag 5 128 8
P:210 Euro Beat 1 145 4
P:211 Euro Beat 2 128 8
P:212 Latin House 1 123 4
P:213 Latin House 2 122 8
P:214 Latin House 3 122 8
P:215 Latin House 4 122 8
P:216 Latin House 5 125 8

NQPSMTR0&*URRYH%R[ 3DWWHUQ/LVWLQJ
1998 Roland Corporation U.S. MC-505 Groove Box Patch Listing Faxback # 10289 Page 3 of 3
Jazz
No. Name BPM Measure
P:217 Funk 1 126 8
P:218 Funk 2 118 8
P:219 Funk 3 118 8
P:220 Funk 4 90 8
P:221 Funk 5 100 4
P:222 Funk 6 95 8
P:223 Funk 7 103 8
P:224 Jazz 1 103 8
P:225 Jazz 2 123 8
P:226 Jazz 3 89 8
P:227 Jazz 4 130 8
P:228 Jazz 5 130 8
Reggae
No. Name BPM Measure
P:229 Dance Hall 1 185 8
P:230 Dance Hall 2 158 8
P:231 Dance Hall 3 180 8
P:232 Dance Hall 4 170 8
P:233 Dance Hall 5 188 8
P:234 Lovers 1 181 8
P:235 Lovers 2 176 8
P:236 Reggae 1 126 8
P:237 Reggae 2 172 16
Latin
No. Name BPM Measure
P:238 Salsa 1 112 4
P:239 Salsa 2 112 4
P:240 Salsa 3 104 4
P:241 Salsa 4 95 4
P:242 Salsa 5 88 4
P:243 Songo 112 4
P:244 Samba 124 8
P:245 ChaCha 84 4
P:246 Merengue 110 2
P:247 Mambo 1 90 2
P:248 Mambo 2 90 2

NQPSMTR 30$3HUVRQDO0XVLF$VVLVWDQW 3DWFK/LVWLQJ
001 Piano 1 017 Organ 1 029 Muted Gt 039 SynthBs1 059 Tuba 082 Saw Wave
Piano 1w Detuned1 Funk Gt. SynBs101 060 MutedTpt Saw
Piano 1d 60's Or1 Funk Gt2 SynthBs3 061 Fr.Horn1 Dr.Solo
002 Piano 2 Organ 4 MutedGt2 TB303Bs1 Fr.Horn2 Big Lead
Piano 2w SC88 Or1 MutedGt3 TB303Bs2 062 Brass 1 WaspySyn
003 Piano 3 Detune88 Pop Gt. TB303Bs3 Brass 2 083 SynCalio
Piano 3w Mixed Or Funk Gt3 P5 Bass 063 SynBrs.1 084 Chiffer
004 Honky. SC88 Or4 Funk Gt4 040 SynthBs2 SynBrs.3 085 Charang
Honky.w Even Bar 030 OvrdrvGt SynthBs4 AnlgBrs1 Dist.Ld1
005 E.Piano1 018 Organ 2 OvdrvGt2 RubberBs SynBrs.5 Dist.Ld2
Detuned1 Detuned2 FbOvdrGt SH101Bs1 Poly Brs FunkLead
EP 1v Organ 5 031 Dist.Gtr SH101Bs2 QuackBrs 086 Solo Vox
60's EP 019 Organ 3 FeedbkGt SH101Bs3 OctavBrs 087 5th Saw
FM+SA EP VS Organ Heavy Gt ModulrBs 064 SynBrs.2 BigFives
60's EP2 020 ChrchOr1 Fb.HvyGt 041 Violin SynBrs.4 088 Bs.&Lead
Rhodes ChrchOr2 MutDstGt Slow Vln AnlgBrs2 Big&Raw
006 E.Piano2 ChrchOr3 RckRhytm 042 Viola Soft Brs Fat&Prky
Detuned2 021 Reed Org 032 GtHarmo 043 Cello VeloBrs1 089 Fantasia
EP 2v 022 Acord.Fr GtFeedbk 044 Contrabs VeloBrs2 090 Warm Pad
St.FM EP Acord.It 033 Acous.Bs 045 TrmloStr 065 Sop.Sax ThickPad
Br.FM EP 023 Harmnica AcousBs2 046 Pizz.Str 066 Alto Sax Horn Pad
007 Harpsi. 024 Bandneon El.Ac.Bs 047 Harp 067 TenorSax 091 Polysyn
Coupld H 025 Nylon Gt 034 FingerBs 048 Timpani 068 Bari.Sax 80'sPoly
Harpsi.w Ukulele FingrBs2 049 Strings 069 Oboe 092 SpaceVox
Harpsi.o NylnGt.o FunkBass Orchstra 070 Eng.Horn 093 Bow.Glas
008 Clav. NylonGt2 ReggaeBs 050 Slow Str 071 Bassoon 094 MetalPad
FunkClav NylonGt3 035 PickedBs 051 Syn.Str1 072 Clarinet PannrPad
009 Celesta 026 Steel Gt Pick.Bs2 Syn.Str3 073 Piccolo 095 Halo Pad
010 Glocken 12str.Gt MutPkBs1 Syn.Str4 074 Flute 096 SweepPad
011 MusicBox Mandolin MutPkBs2 OB Str. 075 Recorder PolarPad
012 Vibraphn SteelGt2 036 Fretless 052 Syn.Str2 076 PanFlute Converge
Vib.w 12strGt2 037 Slap Bs1 053 ChoirAah 077 BttleBlw 097 Ice Rain
013 Marimba Nyln+Stl Slap Bs3 ChoirAh2 078 Shaku. 098 Soundtrk
Marimb.w 027 Jazz Gt. ResoSlap 054 VoiceOoh 079 Whistle Ancestrl
014 Xylophon Hawai.Gt Slap Bs4 055 SynVox 080 Ocarina Prologue
015 Tublrbel 028 Clean Gt 038 Slap Bs2 056 Orch.Hit 081 SquarWav 099 Crystal
ChrchBel ChorusGt 057 Trumpet Square SynMalet
Carillon CleanGt2 058 Trombone SineWave 100 Atmsphre
016 Santur Trmbone2 101 Britenis
102 Goblin
1996 Roland Corporation U.S. PMA-5 Personal Music Assistant Page 1 of 2

NQPSMTR 30$3HUVRQDO0XVLF$VVLVWDQW 3DWFK/LVWLQJ
103 EchoDrop 123 Seashore
EchoBell Rain
EchoPan1 Thunder
EchoPan2 Wind
BigPannr Stream
ResPannr Bubble
104 StarThme 124 Bird
105 Sitar Dog
Sitar 2 HrsGalop
106 Banjo Bird 2
107 Shamisen 125 Telephn1
108 Koto Telephn2
Taisho K DoorCrek
109 Kalimba Door
110 Bagpipe Scratch
111 Fiddle WndChime
112 Shanai 126 Helicptr
113 TinklBel CarEngin
114 Agogo Car-Stop
115 SteelDrm Car-Pass
116 Woodblck CarCrash
Castanet Siren
117 Taiko Train
ConcrtBD Jetplane
118 MeloTom1 Starship
MeloTom2 BrstNoiz
119 SynthDrm Random
808 Tom 127 Applause
ElecPerc Laughing
120 RevrsCym Screming
121 FretNoiz Punch
CutNoise HartBeat
Str.Slap Footstep
Wah Gt. 128 Gun Shot
Gt.Slide MachnGun
GtScrtch Lasergun
Bs.Slide Explosion
122 BrthNoiz
KeyClick
1996 Roland Corporation U.S. PMA-5 Personal Music Assistant Page 2 of 2
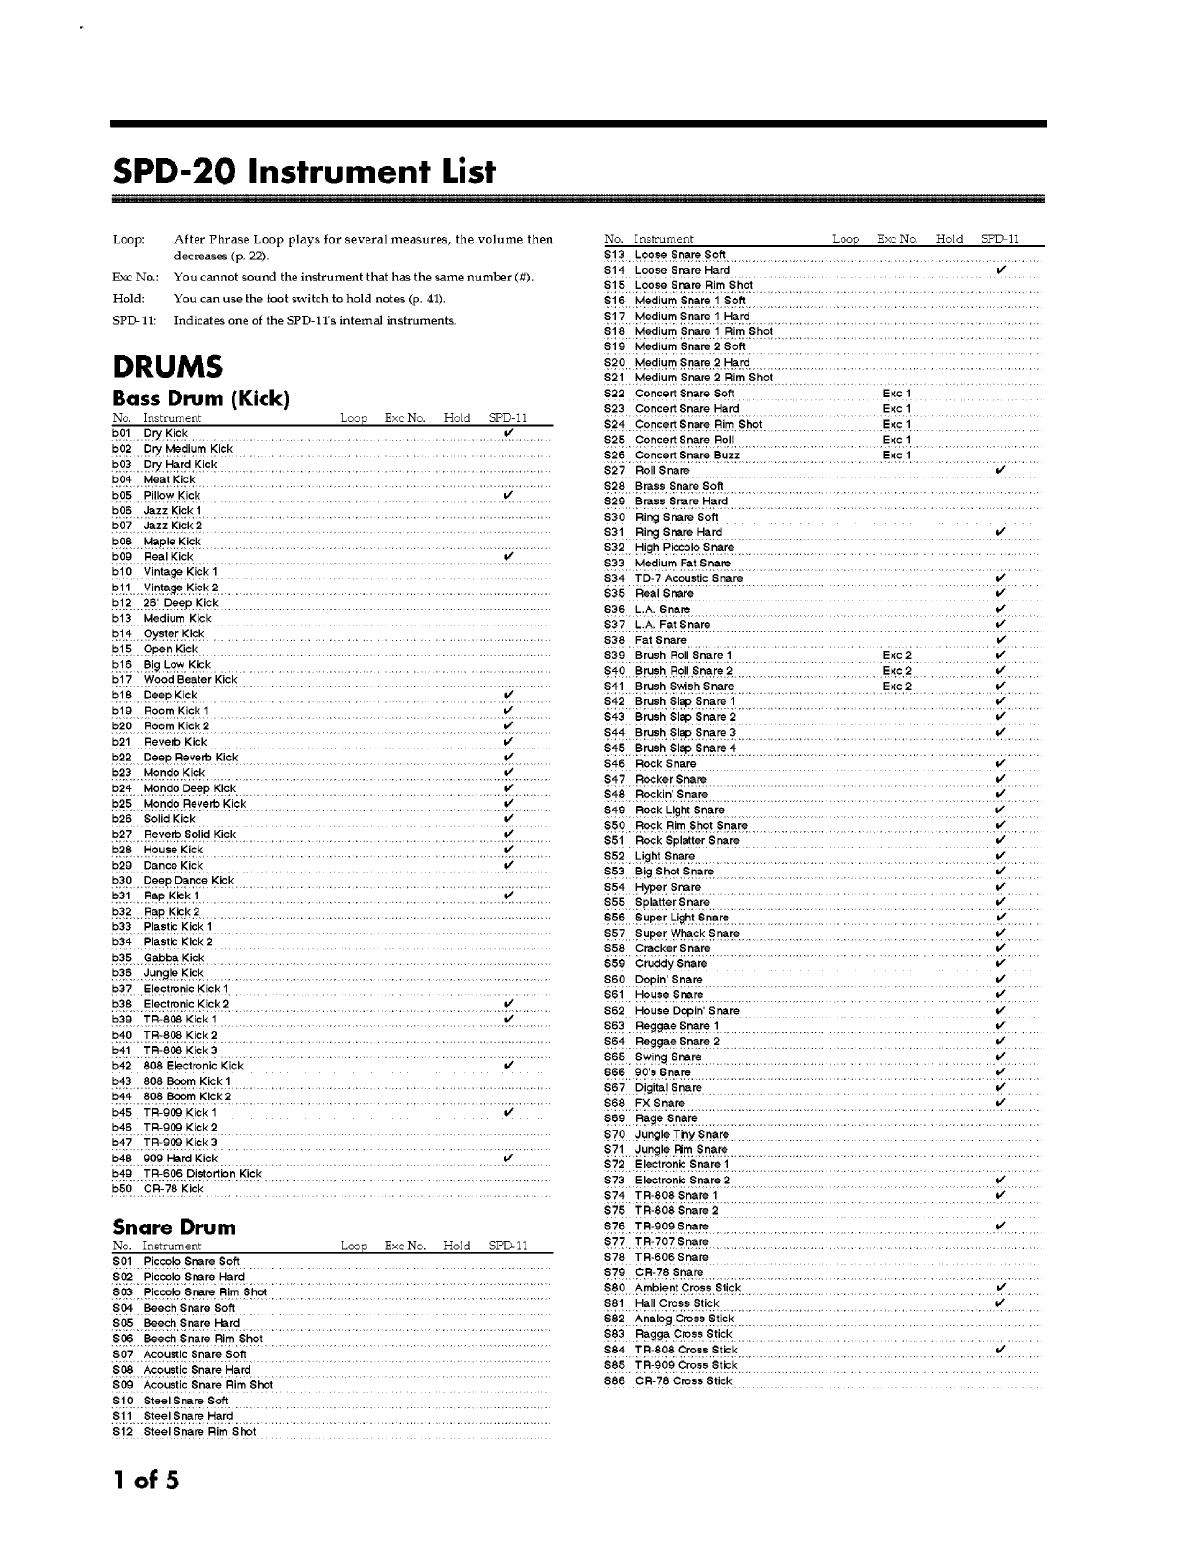
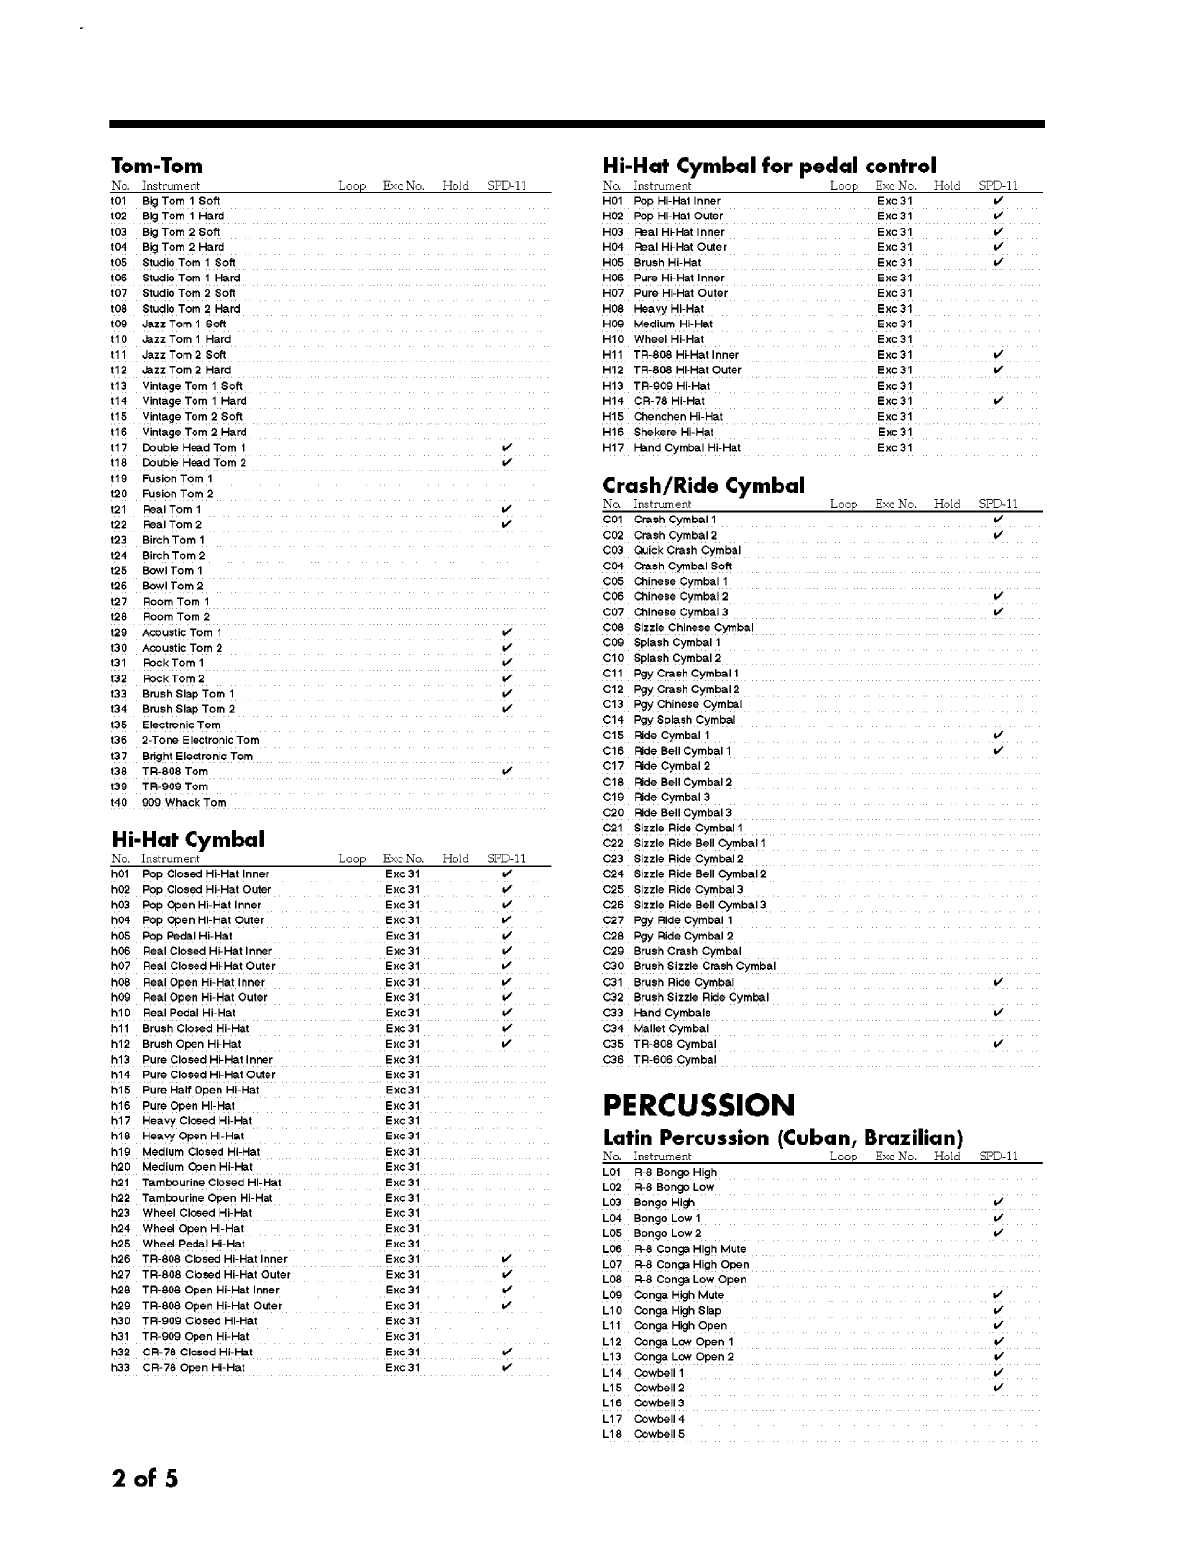

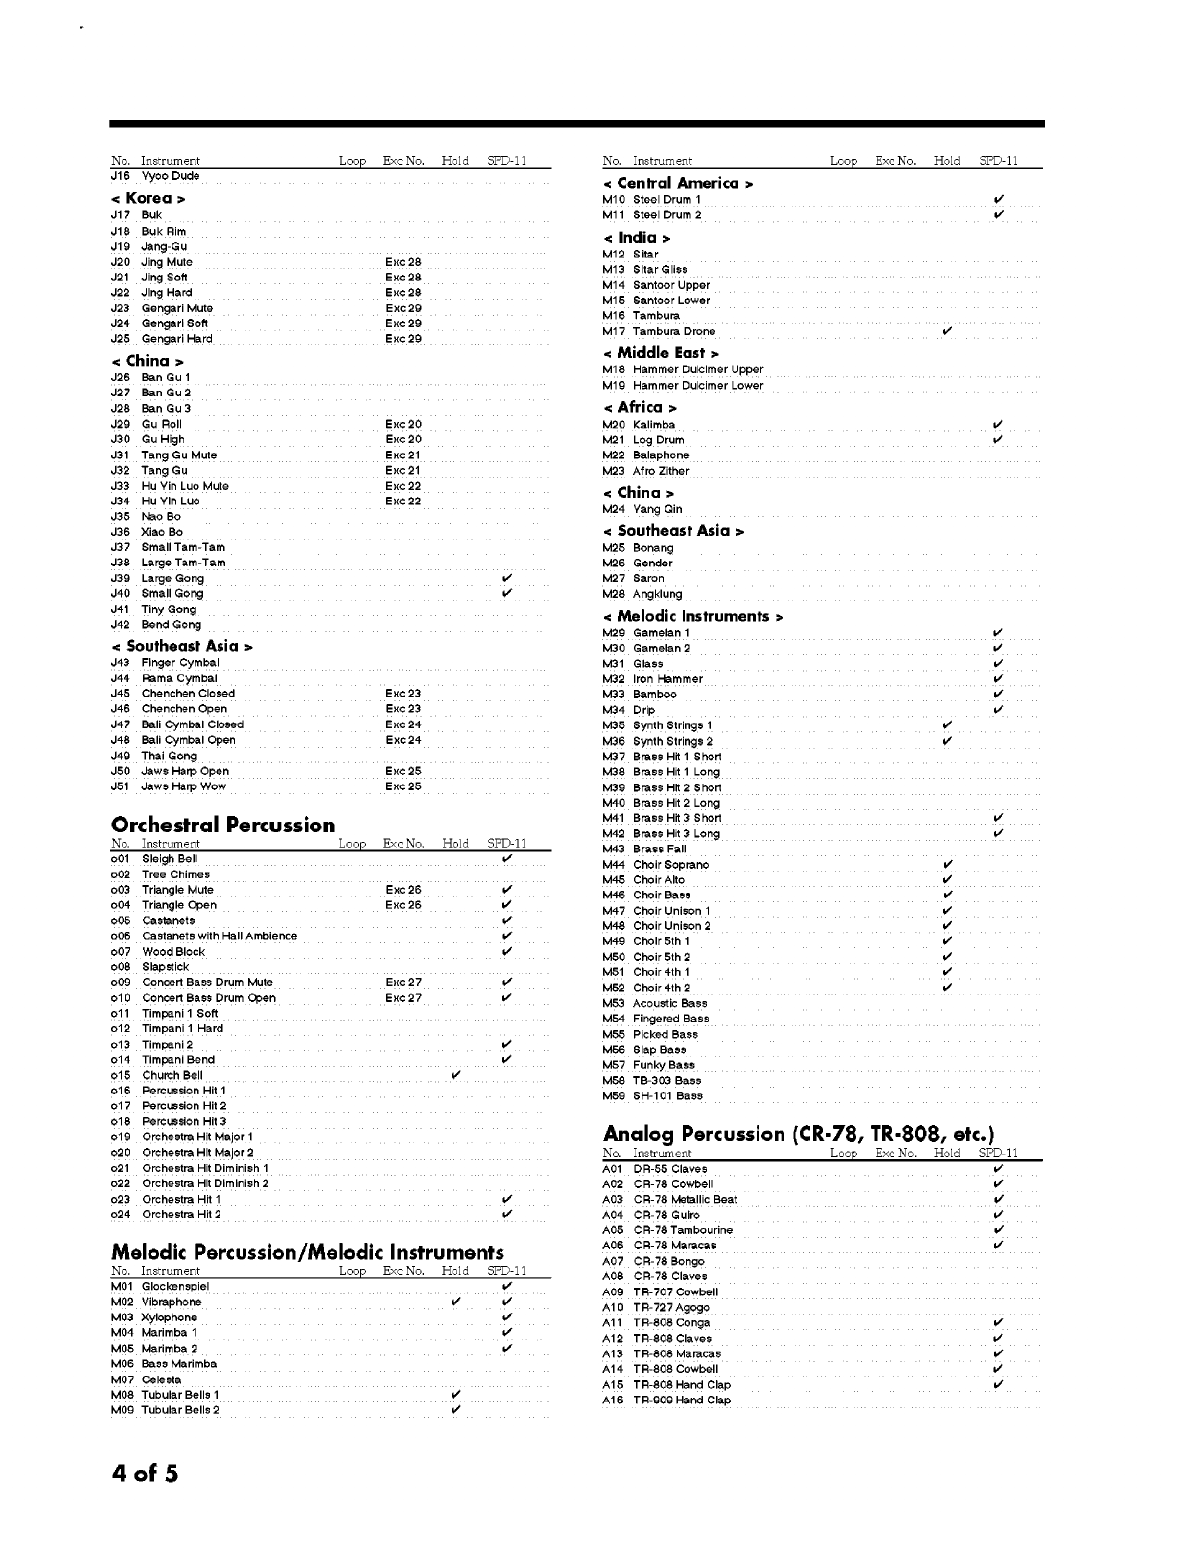
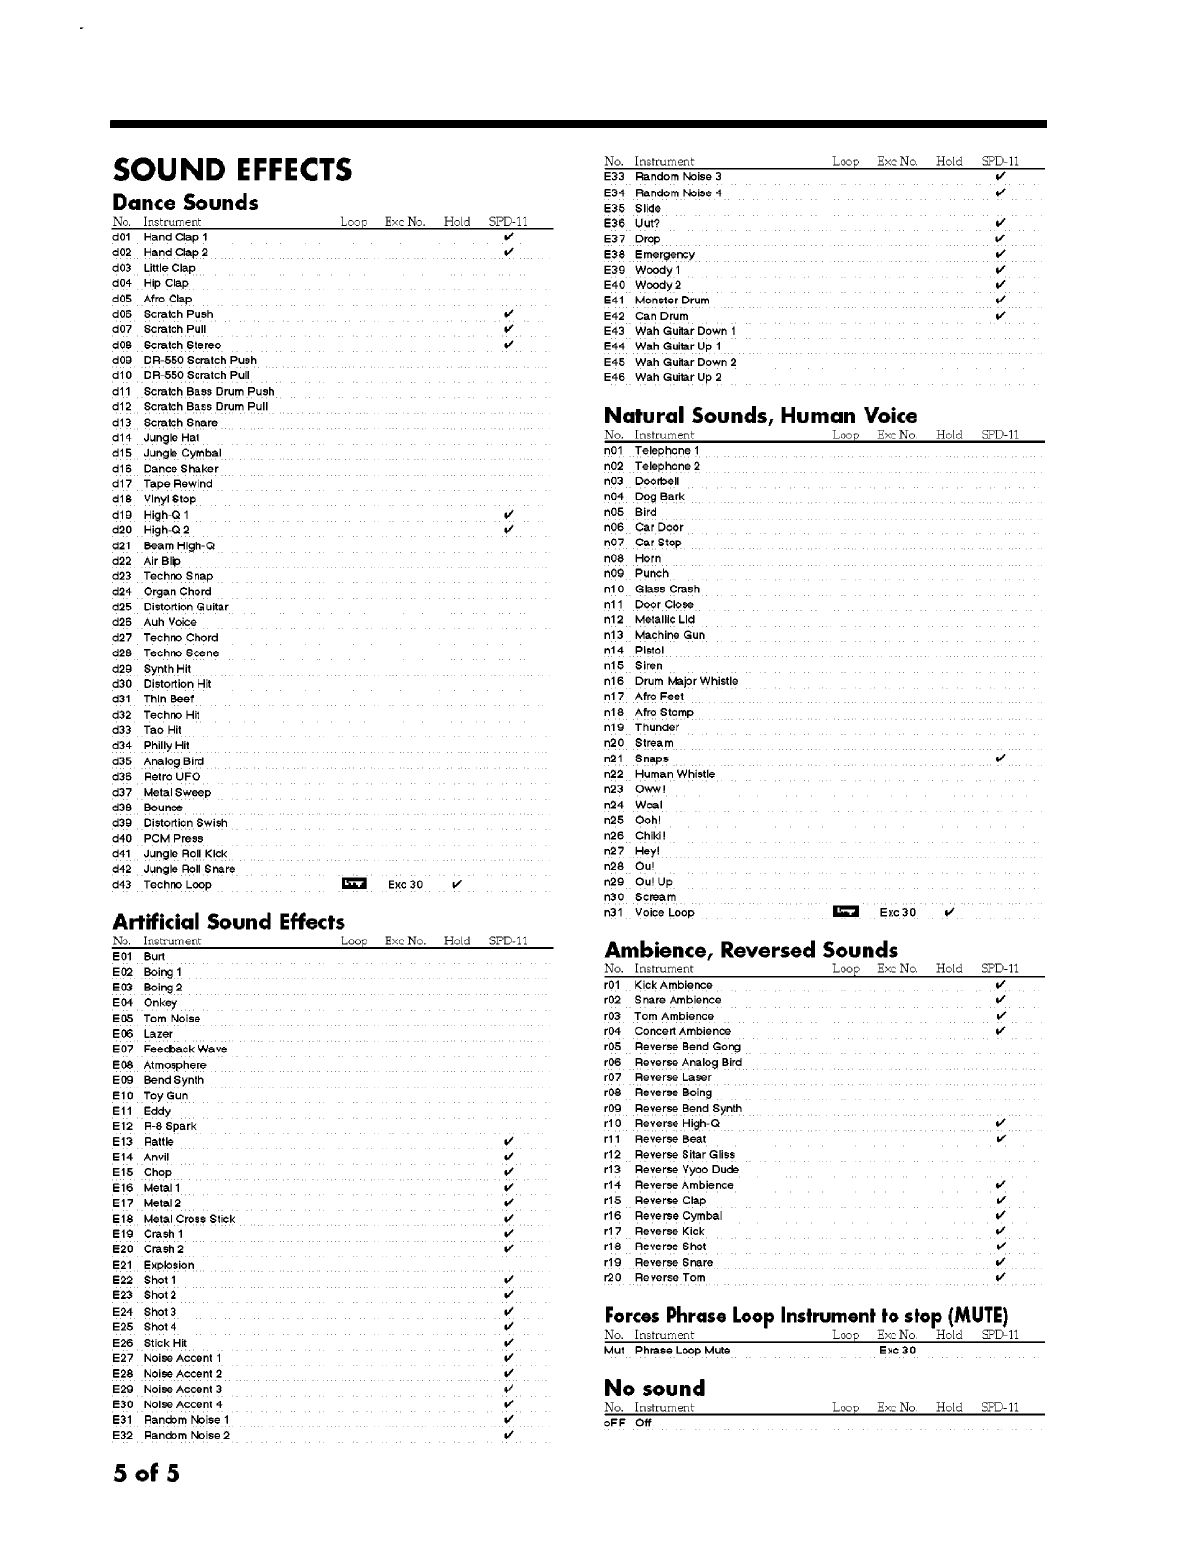


NQPSMTR3RS([SDQVLRQ%RDUG 3DWFK/LVWLQJ
1996 Roland Corporation U.S. SR-JV80-01 Faxback #10106 For use with JV-80/880/90/1000/1080, JD-990, and XP-50/80 synthesizers.
001 770 Grand 1 025 Ac. Bass 1 049 Funk Gtr 073 Jazzy Flute 097 Harmonica Sw 121 Watery Pipe
002 MIDI 3 Grand 026 Ac. Bass 2 050 Heavy Duty 074 ChamberWinds 098 Accordion 1 122 Starry Night
003 E. Grand 1 027 Ac Fretless 051 Lead Gt 1 075 Clarinet 099 Accordion 2 123 Tin Be Tree
004 60s E. Piano 028 Fretless 2 052 Lead Gt 2 076 Oboe 100 Blade Runner 124 Oriellaris
005 Dyna Rhodes 029 Weather Bass 053 Lead Gt 3 077 Bassoon 101 Mondo Chord1 125 Classic Lead
006 Pop Rhodes 030 Jazz Bass 054 PocketRocket 078 Tuba 102 Bell VOX 1 126 Solo MonoFXM
007 BeautyRhodes 031 P. Bass 055 Power Flange 079 ChamberWoods 103 Mondo Chord2 127 GR Lead
008 Airies Piano 032 P. Funk V-Sw 056 Bowed Guitar 080 HighSchool 104 Ethnic Drums 128 Cubic Lead
009 Clav 1x 4 033 Stick 057 Shakupeace 081 Soprano Sax 105 Gladiators 129 Analog Brs 1
010 Wah Clav 034 DelicateStik 058 Cimbalon 1 082 Turbo Alto 106 Enniumill 130 Analog Brs 2
011 Housey Clav 035 Stick V-Sw 059 Sanza 1 083 Turbo Tenor 107 Vaseline 1 131 Brass Pad
012 Ballad Org. 1 036 Bassic House 060 Shamisentur 084 Baritone Sax 108 Multiswept 132 SytheticBRS
013 Even Bars 1 037 Noo Spitbass 061 Praying Monk 085 Multi Sax 1 109 7th Sand 133 Poly Synth
014 Stereo Organ 038 Metal Bass 062 Electrc Koto 086 Multi Sax 2 110 Gabe Pad 1 134 SYNBRAKUN
015 Jazz Organ 3 039 Sync Bass 063 Ravi Sitar 087 Sax Sect. mf 111 Vibe Pad 135 Pad it!
016 8ft. Stop 040 Bs Slide 064 Mystic Mount 088 Sax Sect mp 112 JV Vektors 136 Deja Vu
017 Brite Org. 1 041 Bs Harmonix 065 Velo String2 089 Trumpet V-Sw 113 Digi Compi 137 TransPonder
018 Soft Organ 042 Super Nylon 066 Virtuoso Vln 090 Trumpets x2 114 Ear Candy 138 Hadees Hiway
019 60s Organ x 4 043 Jazz Guitar 067 Virtuoso Vcl 091 Big Band Brass 115 Massive Voxx 139 Galactica
020 Pipe Organ 4 044 Jazz Cascade 068 Contra Bass 092 New Brass 1 116 Distant Pipe 140 ImperialSwrd
021 Church 045 Jazzy Scat 069 ChambrStrngs 093 Trombones 117 Wind Bell 1 141 Steel Works
022 Celeste 046 Pedla Steel 070 Wacky Strngs 094 Flugel Horn 118 Pan Sandwich 142 House Drums
023 Toy Piano 047 Banjo 1 071 New Strings 095 St. LoBrass 1 119 Ethereal Key 143 Jazz Drums
024 Snow Bells 048 E. Sitar 072 Octave Hit 1 096 Noble Horns 120 Belly Glock 144 Snare Set
145 Tom Toms

NQPSMTR3RS([SDQVLRQ%RDUG :DYHIRUP/LVW
1996 Roland Corporation U.S. SR-JV80-01 Faxback # 10107 For use with JV-80/880/90/1000/1080, JD-990, and XP-50/80 synthesizers.
001 Grand sft 1A 027 Ballad Organ 053 Organ Bass 2 079 Glockenspiel 105 Multi Sax 1 131 Synharmon
002 Grand sft 1B 028 Even Bars 054 Jazz Guitar 080 Xylophone 106 Multi Sax 2 132 PWM
003 Grand sft 1C 029 Sft Stop 055 Mute GTR 2 081 Tubular Bell 107 Shakuhachi 133 Rip Lead
004 Grand hrd 1A 030 Mad Organ A 056 Funky Attack 082 Jazz Flute A 108 Harmonica 1 134 Bright Lead
005 Grand hrd 1B 031 Mad Organ B 057 Lead GTR 1A 083 Jazz Flute B 109 Whistle 1 135 GR300 Saw
006 Grand hrd 1C 032 Mad Organ C 058 Lead GTR 1B 084 Jazz Flute C 110 Tb Sect A 136 Vocal Wave
007 E.Grand 2 033 60’s Organ 1 059 Lead GTR 1C 085 Sing Flute 111 Tb Sect B 137 Sync Wave
008 Wurly soft A 034 60’s Organ 2 060 Mute Dist 086 Trumpet 2A 112 Tb Sect C 138 Sync Sweep
009 Wurly soft B 035 60’s Organ 3 061 Overdrive 1A 087 Trumpet 2B 113 T. Sax Sect A 139 Cello Wave
010 Wurly soft C 036 60’s Organ 4 062 Overdrive 1B 088 Trumpet 2C 114 T. Sax Sect B 140 Wally Wave
011 Wurly hard A 037 Celeste 063 Overdrive 1C 089 Flugel A 115 T. Sax Sect C 141 VOX Noise 2
012 Wurly hard B 038 Music Box 064 Power Chords 090 Flugel B 116 Violin A 142 Bottle Lp A
013 Wurly hard C 039 Jazz Bass 1 065 Harmo Lead 091 Flugel C 117 Violin B 143 Bottle Lp B
014 E. Piano 3A 040 Jazz Bass 2 066 E. Sitar 092 Tuba 1 118 Violin C 144 Bottle Lp C
015 E. Piano 3B 041 P. Bass 1 067 Banjo 093 Clarinet 1 119 Cello A 145 Breath Wind
016 E. Piano 3C 042 P. Bass 2 068 Pedal Steel 094 Oboe 1 120 Cello B 146 Breath Atack
017 Clav 2A 043 Stick 069 Shamisen A 095 Bassoon 1 121 Cello C 147 Breath Whisl
018 Clav 2B 044 Fretless 2A 070 Shamisen B 096 Bassoon&Oboe 122 Violin&Cello 148 Breath Hrmon
019 Clav 2C 045 Fretless 2B 071 Shamisen C 097 F. Horn Sect 123 STR Attack A 149 Metal Rain
020 Clav 3A 046 Fretless 2C 072 Koto Attack 098 Soporano Sax 124 STR Attack B 150 Pink Noise
021 Clav 3B 047 Ac. Bass A 073 Sanza soft 099 Alto mp A 125 STR Attack C 151 Orchestra Hit
022 Clav 3C 048 Ac. Bass B 074 Sanza hard 100 Alto mp B 126 Choir 1A 152 Kong
023 Clav 4A 049 Ac. Bass C 075 Pad Hit 101 Alto mp C 127 Choir 1B 153 Timpani
024 Clav 4B 050 Bs Harmonix 076 Santur A 102 TenorBreathy 128 Choir 1C 154 Gong
025 Clav 4C 051 Bs Side 077 Santur B 103 Tenor Sax mf 129 Huge MIDI
026 Jazz Organ 2 052 Organ Bass 1 078 Santur C 104 Baritone Sax 130 Bell VOX

NQPSMTR2UFKHVWUDO([SDQVLRQ%RDUG 3DWFK/LVWLQJ
1996 Roland Corporation U.S. SR-JV80-02 Faxback # 10108 For use with JV-80/880/90/1000/1080, JD-990, and XP-50/80 synthesizers.
001 Warm Violins 046 Bad Guy STR 091 Recorder 136 MuteHrn Sect 181 Dim Hit 1 226 MalletStack7
002 Slow Vlns 1 047 Ominous 092 Oboe 1 137 Horn+Wood 1 182 Major Stab! 227 Choir 1
003 Vins+Vlas I 048 Lo Express 093 Oboe 2 138 Horn+Wood 2 183 Maj Hit 2 228 Choir 2
004 Vi Sect mono 049 DramaStrings 094 Oboe 3 139 Horn+Wood 3 184 Min Hit 2 229 Snare Drum
005 Arco Violins 050 Solo Vln 1 / 095 Oboe 4 140 Wood Sect 1 185 Classical Gt 230 ConcertSNR1/
006 Marcato Vls 1 051 Solo Vin 2 096 Oboe 5 141 Wood Sect 2 186 Harp 1 231 ConcertSNR2/
007 Vins+Vlas 2 052 Chorus Vln 097 English Hrn1 142 Wood Sect 3 187 Harp 2 232 SNR Roll 1
008 Agitato Vis1 053 Stereo Vin 098 English Hrn2 143 Wood Sect 4 188 Plucked Harp 233 Concert BD1
009 Rosin Pad 1 054 Agitato Vin1 099 English Hrn3 144 2 Oboes 189 Harp StrumMj 234 Concert BD2/
010 Dry Mid - High 055 Solo Vla I / 100 Bassoon 1 145 Oboe + Cla 190 Harp StrumMn 235 BD Roll /
011 Natural Vins 056 Solo Via 2 101 Bassoon 2 146 Fit + Piccl 191 Water Harp 236 Timpani 1 /
012 Sad Vin Sect 057 Chorus Viola 102 Clarinet 1 147 Flute + Cla 192 ClasclPiano1 237 Timpani 2 /
013 Marcato Vas 058 Stereo Viola 103 Clarinet 2 148 Bassoon+EHrn 193 ClasciPiano2 238 Timpani 3
014 Arco Violas 059 Agitato Via 104 Bs Clarinet1 149 Hi Woodwinds 194 ClasclPiano3 239 Timpani 4 /
015 Thick Violas 060 Solo Vc 1 / 105 Bs Clarinet2 150 Woodwind Splt 195 ClasclPiano4 240 Tam Tam
016 Va Sect f 061 Solo Vc 2 106 Trumpet 1 151 Multi Reed 196 Harpsichord1 241 Gong
017 Va Small Sec 062 Stereo Cello 107 Trumpet 2 151 4 Trombones 197 Harpsichord2 242 Piatti!!
018 Agitato Vas1 063 Chorus Cello 108 Trumpet 3 153 Tb Sect 1 198 Harpsichord3 243 Sleigh Bells
019 Sad Violas 064 Marcato Vc 1 109 Flugelhorn 1 154 Tb + Tp 199 Harpsichord4 244 Slapstick /
020 Fast Cellos1 065 Solo Cb 1 / 110 Ftugelhorn 2 155 4 Trumpets 200 Celesta 1 245 Wind Chimes1
021 Vcs Legato 1 066 Solo Cb 2 111 Cornet 1 156 3 Trumpets 201 Celesta 2 246 Wind Chimes2
022 Marcato Vcsl 067 Marcato Cb 1 112 Cornet 2 157 Brass ff 1 202 Celesta 3 247 Tambourine /
023 Small Vc Sec 068 Chamber Ens1 113 Solo Tb 1 158 Brass ff 2 203 Glockenleste 248 Castanets /
024 Agitato Vcs I 069 Chamber Ens2 114 Solo Tb 2 159 Brass ff 3 204 Marimba 249 Rhythm Set
025 Small Cellos 070 Vln+Vla Dble 115 Solo Tb 3 / 160 McArthur Brs 205 BassMarimba1 250 Perc Hit 1
026 Sad CelloSec 071 Vln+Vc Dbl1 116 Solo Tb 4 / 161 Big Bones 206 BassMarimba2 251 Perc Hit 2
027 Cb Sect ff 072 Vla+Vc Dbl2 117 Bs Tb 1 162 BassBoneSect 207 Vibe 252 Perc Hit 3
028 Wide Basses 073 Vla+Vc Dble 118 Bs Tb 2 / 163 Brass Swell 208 Xylophone I 253 Presenting!
029 mf Basses 074 Pizzicato I 119 Harmon Mute1 164 Full Brs 1 209 Xylophone 2 254 Presto!
030 Agitato Cbs1 075 Mono Pizz 120 Harmon Mute2 165 Brass Sect1/ 210 Xylophone 3 255 Christmas!!!
031 Vcs+Cbs 076 Pizzicato 2 121 Tuba 1 166 Brass Ens 1 211 Glocken 1
032 2 Basses 077 Room Pizz 122 Tuba 2 167 Brass Ens 2 212 Glocken 2
033 Euro Strings 078 Hall Pizz 123 Solo F.Horn 1 168 Brass Ens 3 213 ChurchBells1
034 Rich Strings 079 Tight Pizz 124 Solo F.Horn2 169 Brass Ens 4 214 ChurchBells2
035 Multi Strs 1 080 Short Pizz 125 Sml F.Hrn sc 170 Brass Ens 5 215 ChurchBells3
036 VIsVasVcsCbs 081 STR Marcato 1 126 Horn Sect 1 / 171 Brass Ens 6 216 TubulaBells1
037 Bright Strs 082 Oct Marcato 127 F.Horn sc x4 172 Brass Ens 7 217 TubulaBells2
038 Classicl Str 083 Lower Marc!! 128 Fr.Horn sfz 173 Brass Ens 8 218 Big Tubulars
039 Full Strings 084 Big Marc! 129 F.Hrn Sect2/ 174 Horn Strings 219 Dawning
040 Med Str Sec 085 STR Spiccato 130 F.Hrn Sect3 175 Full Orch.1 220 MalletStack1
041 Small Strngs 086 Fast Attacks 131 F.Hm Sect4 176 Full Orch.2 221 MalletStack2
042 Strings Arco 087 Flute 132 F.Hrn Sect5/ 177 Full Orch.3 222 MatietStack3
043 Vivace Strs 088 Flute V - Sw 133 F.Hrn Sect6 178 Full Orch.4 223 MalletStack4
044 Agitato STR1 089 Piccolo 134 F.Hrn Sect7 179 Maj Hit 1 224 MalletStack5
045 LowSTR Attak 090 Piccolo Fit 135 F.HmSect8 180 Min Hit 1 225 MalletStack6

NQPSMTR2UFKHVWUDO([SDQVLRQ%RDUG :DYHIRUP/LVW
1996 Roland Corporation U.S. SR-JV80-02 Faxback # 10109 For use with JV-80/880/90/1000/1080, JD-990, and XP-50/80 synthesizers.
001 Vl Sect A 031 Vls Spicc A 061 Bs Clarint 091 F.Hrn Sc1 Lp 121 Timpani f 151 REV Timp 1
002 Vl Sect B 032 Vls Spicc B 062 Multi Cla 092 F.Hrn Sc2 Lp 122 Timp Roll p 152 REV Timp 2
003 Vl Sect C 033 Vls Spicc C 063 Bassoon 093 F.Hrn MuteLp 123 Timp Roll f 153 REV SNR 1
004 Va Sect A 034 Vas Spicc A 064 Multi Reed 094 Tb Sect Lp 124 Concert SNR1 154 REV SNR 2
005 Va Sect B 035 Vas Spicc B 065 Tnr.Recorder 095 BRS Ens Lp 125 Concert SNR2 155 REV SNR 3
006 Va Sect C 036 Vas Spicc C 066 F.Horn Solo 096 ff Brass Lp 126 Concert SNR3 156 REV BD 1
007 Vc Sect A 037 Vcs Spicc A 067 F.Horn Sect1 097 Full Orch Lp 127 SNR Roll 157 REV BD 2
008 Vc Sect B 038 Vcs Spicc B 068 F.Horn Sect2 098 Breath Wind 128 Concert BD 1 158 REV BD 3
009 Vc Sect C 039 Vcs Spicc C 069 F.Horn Mute 099 Breath Atack 129 Concert BD 2 159 REV BD Roll
010 Cb Sect 040 Cbs Spicc A 070 Trumpet 2 100 Breath Whisl 130 Concert BD 3 160 REV Crash
011 Multi STR A 041 Cbs Spicc B 071 Flugelhorn 101 Breath Hrmon 131 BD Roll 161 REV Cym Hit
012 Multi STR B 042 Cbs Spicc C 072 Cornet 102 EuroPiano pA 132 Crash Cymbal 162 REV Tam Tam
013 Multi STR C 043 Multi Spicc 073 HarmonMute2A 103 EuroPiano pB 133 Crash Cym Lp 163 REV Gong
014 Vl Sect Lp 044 VlSolo Spicc 074 HarmonMute2B 104 EuroPiano pC 134 Cymbal Hit 164 REV PercHit1
015 Va Sect Lp 045 VcSolo Spicc 075 HarmonMute2C 105 EuroPiano fA 135 Tam Tam 165 REV PercHit2
016 Vc Sect Lp 046 MultSl Spicc 076 Solo Tb A 106 EuroPiano fB 136 Gong 166 REV Casta 1
017 Cb Sect Lp 047 STR Attack 077 Solo Tb B 107 EuroPiano fC 137 Perc Hit 1 167 REV Casta 2
018 Mulit STR Lp 048 Pizzicato 1 078 Solo Tb C 108 Harpsichord 138 Perc Hit 2 168 REV S.Stick
019 Vl Solo A 049 Pizzicato 2 079 Bass Tb 109 Celesta A 139 Triangle 169 REV Sleigh
020 Vl Solo B 050 Piccolo 080 Tb Sect 110 Celesta B 140 Castanets 1 170 REV Tamb
021 Vl Solo C 051 Oboe 1A 081 Tuba 111 Celesta C 141 Castanets 2 171 SNR Set
022 Va Solo A 052 Oboe 1B 082 BRS Ensemble 112 Harp A 142 Slapstick 172 Perc Set 1
023 Va Solo B 053 Oboe 1C 083 Brass ff 113 Harp B 143 Ratchet 173 Perc Set 2
024 Va Solo C 054 Oboe 2A 084 Full Orch. 114 Harp C 144 Sleigh Bell 174 Perc Set 3
025 Vc Solo A 055 Oboe 2B 085 Orch Hit Maj 115 Glockenspiel 145 Tambourine
026 Vc Solo B 056 Oboe 2C 086 Orch Hit Min 116 Xylophone 146 Wind Chime 2
027 Vc Solo C 057 Eng.Horn A 087 Orch Hit Dim 117 Bass Marimba 147 Rev Hit Maj
028 Cb Solo 058 Eng.Horn B 088 Choir A 118 TubularBells 148 Rev Hit Min
029 Multi Solo 1 059 Eng.Horn C 089 Choir B 119 Church Bells 149 Rev Hit Dim
030 Multi Solo 2 060 Clarinet 090 Choir C 120 Timpani p 150 REV Bell

NQPSMTR3LDQR([SDQVLRQ%RDUG 3DWFK/LVWLQJ
1996 Roland Corporation U.S. SR-JV80-03 Faxback # 10110 For use with JV-80/880/90/1000/1080, JD-990, and XP-50/80 synthesizers.
001 Grand Piano1 025 RD A.Piano3A 049 DynoRhodes 3 073 Piano w/Brs 097 Pop Piano 1T
002 St.Grand Pno 026 RD A.Piano3B 050 Tiny Rhodes 074 Wispy Piano 1 098 RD A. Piano 1 T
003 Grand Piano2 027 RD A.Piano3C 051 Bluesy 2 075 Voikey 099 E.Grand 1T
004 Grand Piano3 028 Sml E.Grand 052 BalladRhodes 076 Vox Piano 3 100 RD Piano3 1T
005 Brite Grand 029 E.Grand 1 053 RD Rhodes 1 077 Windy Piano 101 Rhodes 1T
006 Full Grand 030 E.Grand 2 054 Blend 078 Wispy Piano 2 102 Suitcase 1T
007 Grand Piano4 031 E.Grand 3 055 DynoRhodes 4 079 E.P w/Vox 103 RD Rhodes 1T
008 ClascIPianol 032 Roadcase Pno 056 RD Rhodes Tr 080 Piano Stack 104 Little X 1T
009 ClascIPiano2 033 E.Grand 4 057 Pop Rhodes 1 081 Bells Piano2 105 Velo Clav IT
010 ClasclPiano3 034 Whirly Piano 058 BeautyRhodes 082 Wah Clav 106 Klavdom 1T
011 Grandioso 035 Whirly Road 059 Little X 083 Housey Clavy 107 Clav 1 1T
012 Euro Piano 036 Wurly Trem 060 Pop Rhodes 2 084 Klavdom 1 108 Clav 2 1T
013 Rich Piano 037 60s Rhodes 061 Pop Rhodes 3 085 Klavdom 2 109 Clav 3 1T
014 Pop Piano 1 038 ClassicSound 062 Rhodes X 086 Velo Clav 110 Clav 4 1T
015 Pop Piano 2 039 Dyno Oz! 063 BellRhodes 1 087 Clavidoo 111 Clavi Lead1T
016 Pop Piano 3 040 Dyno Phaze 064 BellRhodes 2 08B Funkee Whirl
017 Pop Piano 4 041 Rhodes 66 065 Schmaltz Pno 089 Moming Mist
018 Pop Piano 5 042 Suitcase Pno 066 Combi Piano 090 Chaos Pad
019 RD A.Piano 1A 043 Mr Fusion 067 MidiElecGrnd 091 Clavi Lead
020 RD A.Piano 1B 044 Sensitivity 068 Piano Pad 092 Funky Lead
021 SA Piano I 045 Rhodes B66 069 Concerto 093 Eclipse
022 SA Piano 2 046 DynoRhodes 1 070 Bells Piano1 094 CadenzPiano
023 E J Piano 047 Dynorhodes 2 071 Vox Piano 1 095 Grand Pno 1T
024 FlinStoneway 048 Bluesy 1 072 Vox Piano 2 096 ClasclPno 1T

NQPSMTR3LDQR([SDQVLRQ%RDUG :DYHIRUP/LVW
1996 Roland Corporation U.S. SR-JV80-03 Faxback # 10111 For use with JV-80/880/90/1000/1080, JD-990, and XP-50/80 synthesizers.
001 Grand sft 1A 017 SApiano p 1B 033 Rhodes 2B 049 Rhodes 5C f 065 Clav 2A
002 Grand sft 1B 018 SApiano p 1C 034 Rhodes 2C 050 Rhodes 6A p 066 Clav 2B
003 Grand sft 1C 019 SApiano f 1A 035 Rhodes 3A 051 Rhodes 6B p 067 Clav 2C
004 Grand hrd 1A 020 SApiano f 1B 036 Rhodes 3B 052 Rhodes 6C p 068 Clav 3A
005 Grand hrd 1B 021 SApiano f 1C 037 Rhodes 3C 053 Rhodes 6A f 069 Clav 3B
006 Grand hrd 1C 022 Sapiano3 038 Rhodes 4A p 054 Rhodes 6B f 070 Clav 3C
007 EuroPiano pA 023 E. Grand BdyA 039 Rhodes 4B p 055 Rhodes 6C f 071 Clav 4A
008 EuroPiano pB 024 E. Grand BdyB 040 Rhodes 4C p 056 Wurly soft A 072 Clav 4B
009 EuroPiano pC 025 E. Grand BdyC 041 Rhodes 4A f 057 Wurly soft B 073 Clav 4C
010 EuroPiano fA 026 E. Grand 1A 042 Rhodes 4B f 058 Wurly soft C
011 EuroPiano fB 027 E. Grand 1B 043 Rhodes 4C f 059 Wurly hard A
012 EuroPiano fC 028 E. Grand 1C 044 Rhodes 5A p 060 Wurly hard B
013 Pop Piano 1 039 E. Grand 2 045 Rhodes 5B p 061 Wurly hard C
014 Pop Piano 1L 030 Rhodes 1 p 046 Rhodes 5C p 062 E. Piano A
015 Pop Piano 1R 031 Rhodes 1 f 047 Rhodes 5A f 063 E. Piano B
016 Sapiano p 1A 032 Rhodes 2A 048 Rhodes 5B f 064 E. Piano C

NQPSMTR9LQWDJH6\QWKV([SDQVLRQ%RDUG 3DWFK/LVWLQJ
1996 Roland Corporation U.S. SR-JV80-04 Faxback # 10112 For use with JV-80/880/90/1000/1080, JD-990, and XP-50/80 synthesizers.
001 Prologue 046 The Big Wave 091 MondoDiGiTaL 136 Retrosweep 181 SH - 2 Bass 226 D - 50 Organ 1
002 EasternTempl 047 Mantrawave 092 Poly Flange 137 Velochord Ld 182 JP - 4 Bass 1 227 D - 50 Organ 2
003 Replicants 048 WavetablePan 093 and thenMIDI 138 Micro MG 183 JP - 4 Bass 2 228 Are am eye?
004 Converge 049 2.3 GlassSEQ 094 JP4Sharp Pad 139 VCO Oct Lead 184 Systm700 Bsl 229 2600 Clk Org
005 JX3P Polaris 050 VS Organbell 095 Splatty 140 ModularLead 185 Systm700 Bs2 230 JX - 3P Pipes
006 Big Pad Swp 051 DigitalChoir 096 MKS80 Sprang 141 Expressolo 186 TB303 AcidBs 231 Tron Choir
007 Big LFOSweep 052 Additive 097 JP8 Stringsl 142 Jupiter Lead 187 Talking Bs 232 Misty Choir
008 Animotion 053 Tower Silvis 098 JP8 Strings2 143 GR500 SlowLd 188 OB Bass 233 Tron Strings
009 Mega 5ths 054 2.2 Rezidue 099 JP+OB Strngs 144 Pats GR - 300 189 2600 Reso Bs 234 Melotron Pad
010 CS - Sixty BPF 055 Polysync 100 Wavestrings 145 SH - 2000 Vox 190 Odyssee Bs 235 Tape Echo
011 Waspy Synth 056 Wavesync 101 PWM Strings 146 P5 Sync Lead 191 House Bass 236 StrawberyFlt
012 Polychrome 057 Rock Sync 102 MemoryMG STR 147 Synkoid 192 Woofer Bass 237 MellowFlutes
013 Euro Sweep 058 Kalimbasynth 103 OB Thick Pad 148 Promars Lead 193 Sharp Sub Bs 238 Cyborg
014 OBig Poly 059 Stacc Heaven 104 OB Soft Pad 149 FM Lead 194 Big Sub Bass 239 MKS80 Vortex
015 OB Synthy 060 D50 Bellpad l 105 OctavaStrngs 150 CS Lead 195 Big Spike Bs 240 Earthquake
016 80s OBxa 061 D50 Bellpad 2 106 CS Saw Pad 151 Wagnerian Ld 196 System 100 Bs 241 Dark Air
017 Thick Matrix 062 D50 Bellpad 3 107 CS Strings 152 Naked Cheese 197 Techno Bass 242 Airdrome Pan
018 Poly X - pandr 063 Snow Lake 108 Solina 153 Telstar 198 Housine Bass 243 Deep Wind
019 Synth - X Poly 064 Time flies 109 Rhapsody STR 154 Limonaire 199 Bark Bass 244 Chronos
020 Prophetic 065 Fanta - Retro 110 Big Strings 155 Lucky Man 200 Super Bass 245 Infinity
021 Oct MG Saw 066 SimpleEP+Pad 111 Juno 106 Pad 156 OB 2 Voice 201 X Wire Bass 246 Atmosphlange
022 Juno - 6 Power 067 Juno - 1 Bells 112 Majesty Pad 157 Fue Pipe 202 T8 Sync 247 Medusa
023 Hyperphases 068 Random Chime 113 Peaceful Pad 158 Living Calli 203 P5 Sync Rush 248 Aquaphone
024 Synth - X Phaz 069 Asia Wave 114 Flange strng 159 Arpy Micro 204 ArpeggiBs+12 249 Computer Net
025 MIDI Brs Pad 070 GoodniteBell 115 JP SquarePad 160 JP6 Bend 5th 205 ArpeggiSaws 250 Faveoravo
026 Poly Palette 071 2600 TRIbell 116 HollowBreath 161
Happy Hollow 206 Planet - S SEQ 251 Insecticide
027 Spit Brass 072 Twinkle 117 Hollow JX 162 Resotrails 207 Synthacon 252 Off The Key
028 Pro - 10 Brass 073 Analog Chime 118 DarkEnsemble 163 70s Sinusolo 208 Palpitating 253 H20 Asylum
029 OB Stab Brs 074 Space Echo 119 LonesomeHill 164 Alpha Lead 209 Descender 254 Aural Enigma
030 Pro - 5 Brass 075 Ethno Stack 120 VP - 330 Choir 165 Dark Brass 210 Playmate 255 RSS Spinner
031 MKS - 7 Brass 076 SH - 1000 MIDI 121 VP - 330 Tutti 166 Intervalead 211 MC8 Sequence
032 Quack Brass 077 ElectraPiano 122 VP - 330 Sweep 167 MG Beef Bass 212 Thips Blips
033 MemoryMG Brs 078 Rhodes Pad 123 RS - 202 Brass 168 Monster MG 213 Techno Perc
034 FM Brass 079 Sine Piano 124 Orchestrator 169 Fat MG Bass 214 Power B
035 Ghost Blow 080 VCO Wurly 125 OBJX Vox Pad 170 Spike Bass 215 DirtyPurple
036 Metal Drone 081 Clavipad 126 Voices JX-8P 171 ClassicMG Bs 216 Velo Rotary
037 Rotary Strng 082 P10 GuitClav 127 D50 Heavenly 172 Reso MG Bass 217 Gospel B
038 Random Pad 083 Gum Clav 128 Mini Lead 1 173 Wet MG Bass 218 Echo - Organ
039 S/H Texture 084 JunoBiteClav 129 Mini Lead 2 174 MG Ow Bass 219 Organwave2.2
040 Warm Shimmer 085 Phazyn Clav 130 Pulse Lead 175 Rogue Bass 220 VS Organ
041 Nervous Pan 086 JP - 8 Clav 131 Shmoog 176 MG Bs Pedals 221 VK - 1 Organ
042 JX - 3P Planet 087 Alpha Clav 132 ClassicLead 177 SH101 Zap Bs 222 Celesty Juno
043 JX Melon Vox 088 Hyper Clav 133 MG Swell 178 Bassic 101 223 Alpharphisa
044 Horror Pad 089 Perky Pad 134 MultiMG 5ths 179 101 Oct Bass 224 Juno6O Organ
045 Shining Wave 090 Perkolator 135 Sharp 5ths 180 101 Ow Bass 225 JX - 8P Organ

NQPSMTR9LQWDJH6\QWKV([SDQVLRQ%RDUG :DYHIRUP/LVW
1996 Roland Corporation U.S. SR-JV80-04 Faxback # 10113 For use with JV-80/880/90/1000/1080, JD-990, and XP-50/80 synthesizers.
001 JP-8 Saw A 046 KG800 Square 091 OB Str 2B 136 KG800 Lead 181 MG BsPdl LpC 226 FX1C-L(RSS)
002 JP-8 Saw C 047 KG MS Square 092 OB Str 2C 137 MG Lead 182 MG Fat Bs 227 FX1A-R(RSS)
003 Sys700 Saw 048 CS Square 093 AP Str Ens A 138 MG Lead Lp 183 MG Sharp Bs 1 228 FX1B-R(RSS)
004 JX-10 Saw 049 JP-8 Pulse 1 094 AP Str Ens B 139 JP-8 Lead 184 MG Big Bs 229 FX1C-R(RSS)
005 D-50 Saw 1 050 JP-8 Pulse 2 095 AP Str Ens C 140 Digiwave 1 185 MG ClassicBs 230 FX2A-L(RSS)
006 D-50 Saw 2 051 JP-8 Pulse 3 096 OBXP Str A 141 Digiwave 2 186 MG Sharp Bs2 231 FX2B-L(RSS)
007 SH-5 Saw 052 JP-8 Pulse 4 097 OBXP Str B 142 Digiwave 3 187 TB-303 Bass 232 FX2C-L(RSS)
008 SH-2 Saw 053 JP-8 Pulse 5 098 OBXP Str C 143 Frog wave 188 JP-4 Bass 1 233 FX2A-R(RSS)
009 SH-101 Saw 054 SH-1000 Puls 099 OBXP Str Lp 144 SRG FM 189 JP-4 Bass 2 234 FX2B-R(RSS)
010 SH-1000 Saw 055 MG Pulse 1A 100 MG Oct A 145 Shimmer wave 190 SH-101 Bs 1 235 FX2C-R(RSS)
011 GR-300 Saw 1 056 MG Pulse 1C 101 MG Oct B 146 VS Organ A 191 SH-101 Bs 2 236 FX3A-L(RSS)
012 GR-300 Saw 2 057 MG Pulse 2A 102 MG Oct C 147 VS Organ C 192 SH-101 Bs 3 237 FX3B-L(RSS)
013 JU-2 Saw 058 MG Pulse 2C 103 MG Dt.Oct A 148 Juno Organ 193 SH-101 Bs 4 238 FX3C-L(RSS)
014 MG Saw 1A 059 OB Pulse 1 104 MG Dt.Oct B 149 Juno Organlp 194 SH-101 Bs 5 239 FX3A-R(RSS)
015 MG Saw 1C 060 OB Pulse 2 105 MG Dt.Oct C 150 FM Punch 195 Sys700 Bs 1 240 FX3B-R(RSS)
016 MG Saw 2 061 OB Pulse 3 106 OBXP Brass A 151 Mondigital 196 Sys700 Bs 2 241 FX3C-R(RSS)
017 OB Saw 1A 062 2600 Pulse 1 107 OBXP Brass B 152 MondigitalLp 197 FM Super Bs 242 REV Waspy
018 OB Saw 1C 063 2600 Pulse 2 108 OBXP Brass C 153 JP-8 Clavi A 198 KG Poly Bs 243 REV P5 X-mod
019 OB Saw 2 064 EM Pulse 109 OBXP BrassLp 154 JP-8 Clav C 199 KG Poly BsLp 244 REV SteamDrm
020 P5 Saw 1A 065 CS Pulse 1 110 FM Brass 155 JP-8 ClaviLp 200 Power B slwA 245 REV Kalimba
021 P5 Saw 1C 066 CS Pulse 2 111 Waspy 156 Juno Clavi 201 Power B slwB 246 REV Additive
022 2600 Saw 067 JU-2 Sub OSC 112 Waspy Lp 157 P5 X-mod 202 Power B slwC 247 REV Blip
023 AP Saw 068 MG Ramp 113 OB Lead 158 Steam Drum 203 Power B fstA 248 REV Thump
024 OSC Saw 069 MG Triangle 114 OB Lead Lp 159 Kalimba Atk 204 Power B fstB 249 REV Attack
025 OSC Reso Saw 070 2600Triangle 115 JP-6 SqLead 160 Additive 205 Power B fstC 250 REV FX1L RSS
026 KG700 Saw 071 2600 Sine 116 JP-6SqLd Lp 161
MG Blip 206 Tron Choir A 251 REV FX1R RSS
027 KG800 Saw 1 072 JP-8 PWM A 117 Blown 1 162 MG Blip Lp 207 Tron Choir B 252 REV FX2L RSS
028 KG800 Saw 2 073 JP-8 PWM B 118 Blown 2 163 MG Thump 208 Tron Choir C 253 REV FX2R RSS
029 KG MS Saw 074 JP-8 PWM C 119 PG Sweep 1A 164 MG Thump Lp 209 Tron Flute A 254 REV FX3L RSS
030 CS Saw 1A 075 MG Dt.Saw A 120 PG Sweep 1C 165 MG Attack 210 Tron Flute B 255 REV FX3R RSS
031 CS Saw 1C 076 MG Dt.Saw B 121 PG Sweep 2A 166 MG Attack Lp 211 Tron Flute C
032 CS Saw 2 077 MG Dt.Saw C 122 PG Sweep 2C 167 VS Bell 1 212 Tron Str A
033 JP-8 SquareA 078 P5 Dt.Saw A 123 D-50 HeavenA 168 VS Bell 2 213 Tron Str B
034 JP-8 SquareC 079 P5 Dt.Saw B 124 D-50 HeavenB 169 JP-6 Bell 214 Tron Str C
035 JX-10 Square 080 P5 Dt.Saw C 125 D-50 HeavenC 170 MKS-80 Xmod1 215 MG White Nz
036 SH-5 Square 081 MG Dt.Squ A 126 JX-8P Vox 171 MKS-80 Xmod2 216 Mg Pink Nz
037 SH-2 Square 082 MG Dt.Squ B 127 JX-8P Vox Lp 172 MKS-80 Xmod3 217 SH-5 Pink Nz
038 MG Square A 083 MG Dt.Squ C 128 VP-330ChoirA 173 MKS-80 Xmod4 218 JP-8 X-mod 1
039 MG Square C 084 JP-8 Str A 129 VP-330ChoirB 174 MKS-80 Xmod5 219 JP-8 X-mod 2
040 OB Square A 085 JP-8 Str B 130 VP-330ChoirC 175 OB Bass 220 P5 Noise 1
041 OB Square C 086 JP-8 Str C 131 P5 Unisync 176 OB Bass Lp A 221 P5 Noise 2
042 P5 Square A 087 OB Str 1A 132 P5 UnisyncLp 177 OB Bass Lp B 222 ZZZ loop
043 P5 Square C 088 OB Str 1B 133 P5 Dipthong 178 OB Bass Lp C 223 Atmosphere
044 2600 Square 089 OB Str 1C 134 P5 DipthngLp 179 MG BsPedal 224 FX1A-L(RSS)
045 OSC Square 090 OB Str 2A 135 FM Lead 180 MG BsPdl LpA 225 FX1B-L(RSS)

NQPSMTR:RUOG([SDQVLRQ%RDUG 3DWFK/LVWLQJ
1996 Roland Corporation U.S. SR-JV80-05 Faxback # 10114 For use with JV-80/880/90/1000/1080, JD-990, and XP-50/80 synthesizers.
001 World Tour! 046 5th Wind 091 Hiten Bells 136 Shamisen 181 Moroco FX 226 2Bar Loop 3
002 Afropunch 047 5th Bell 092 Trash Metal 137 Noo Tye Whan 182 Arabian 227 CylicSweep 6
003 Yo-How 048 Ocarawla 093 Singing Bell 138 Time Vault 183 TablanRhythm 228 Special Loop
004 Kenya Split 049 Conch Call 094 Rama Chimes 139 Afroharp 1 184 Tablafun 229 Samba Break/
005 lntar
Melody 050 Sweep Floot 095 Rama Cymbals 140 OctHarp 185 Rattabla 230 Bushroot
006 BerimbauMenu 051 Space Pipe 096 Tibet Bells 141 ChineseOrch2 186 Sitarchestra 231 Didgeridrone
007 Thumb Chimes 052 PercssivRain 097 Big Bowls 142 Euro Zither 187 Ravis Axe 232 Dingodrone
008 Velo Afro 1 053 Asian Chord 098 Spoke Mallet 143 AfricaZither 188 Passag2India 233 Didgeridoo
009 Bass Kalirnba 054 Dell lkhitt 099 Shakuhachi 144 Zithgliss 189 Tambra Swirl 234 Paila MG
010 Buzz Kalimba 055 Ghost Metal 100 Shaku Accent 145 Hmr.Dulcimer 190 Sitar ++ 235 Ethno Bass I
011 lndalimba 056 Ring-RingPad 101 Shakueko 146 Cymbalom 191 Movie Synth 236 Ethno Bass 2
012 Thumb Piano 057 Misterious 102 Pipe Melodi 147 Brt.Dulcimer 192 Sitarsqeezer 237 Earth Com Bs
013 Kalimba FX 058 Re-mind 103 Flautwist 148 Yangchin 1 193 Sitar Gliss 238 Clay HouseBs
014 AfropercMenu 059 Whistle Vox 104 Flute Press 149 EasternTwang 194 Tambura 239 Berimbass
015 Udu Pot Menu 060 Living Dead 105 Zamponia 150 12th Knight 195 Tamb. Drone 240 Hunter
016 Udu Pots / 061 Earth Child 106 Wosh Chiff 151 Bandolim 196 Breath Drum 241 Jawskin
017 Baateri 062 Spaceilimba 107 Tramaloo 151 Cavaquinho 197 Tribe Switch 242 JawHarp Menu
018 Log Detuner 063 Drop of Rain 108 FantasicPipe 153 Oud 198 Perc. Hit 1 243 AfricaVoices
019 Afroperk 064 Gaia Thought 109 Pan Pipe / 154 Mondo Oud! 199 Perc. Hit
2
244 Voice Set
020 Glass Mallet 065 Es E.Piano 110 Random Zamp 155 HybridStrung 200 Big Perc.Hit 245 Zaghruta
021 Velo Afro 2 066 Piri Rise 111 Zampona tr 2 156 GlobalChorus 201 Doira Drum 246 Maiting Call
022 Balafon / 067 Pandoras Box 112 Ethno Pipes 1 157 Kanoum 202 Bendir 247 Lost my way.
023 Hrd.Balafon 068 Ethno Dreams 113 Ethno Pipes 2 158 MultieastPix 203 Chekere / 248 PlayLoHi F#m
024 Pure Balafon 069 Snow Man 114 Ethno Pipes 3 159 Yuehchin 204 Rek Menu 249 Going Deep
025 Big ole Logs 070 Cuica Steps 115 Ocarina 3 160 Crossbreed 205 Shaker Menu 250 Worm Hofe
026 Afro Log 071 Saintly 116 Quena 161 SoftRezituar 206 Caixa Menu 251 Ethno Splash
027 Angklungs 072 Trade Winds 117 Kawala 162 Ethnic VLNx3 207 Cowbell Menu 252 DinosaurPark
028 BellAngklung 073 Pure Logic 118 Kawallabe 163 Singil Piper 208 Bongo Set 253 BackwardGong
029 Steel Drums] 074 Earth Color 119 Romance Exp 164 Kulture Shok 209 Guiro / 254 AfricanQuee
n
030 Steel Drums2 075 Jawbreath 120 Wind 7 Split 165 Erhu Lead 210 Samba Menu 255 BedRock 5.30
031 War Drums 076 AsiaCYM Menu 121 Uni-Jig Pan 166 ChineseOrch l 211 Pandeiro Menu
032 AfricanMarch 077 Gong Menu 122 OcarinaLead 167 Mosque Reeds 212 Surdo Menu
033 AfricanStomp 078 Gong / 123 Zamp Lead 168 E.Com Lead 1 213 Cuica
034 Tribal Claps 079 China Menu 124 Blown Touch 169 Piri Solo 214 Rain Stick
035 Kawala Str 080 Kabuki Menu 125 Barkit 170 Mizmar 215 Rotating Drm
036 Space-o-rama 081 Biwa 126 Jungle Pipes 171 Shahnai 216 BellsOfSarna
037 Shakupad 082 Genderous 127 C Shell+echo 172 Hichirick 217 Comb.Loop I
038 Ceremony 083 Temple Metal 128 Atmospluck 173 VeloBagpipes 218 Comb Loop 2
039 Los Tremolos 084 Gomelan Tuti 129 Afroharp Arq 174 Bagpipes 219 Conb.Loop 3
040 Lo Celloez 085 African Snow 130 East/WestPIk 175 Dholla Menu 220 Comb.Loop 4
041 Octargans 086 Bonang-Gam. 131 Koto 176 Egypt Tablah 221 Comb-Loop 5
042 Lo Ethnoreed 087 Gamelan x4 132 Zhueng 177 Madal Menu 222 Comb.Loop 6
043 Eastvox 088 Saron-Gameln 133 Kotokeum 178 Dholak Menu 223 Slow.Loop 1
044 Black Rain 089 Temple Chime 134 Kayakeum Plk 179 TablaProcess 224 2Bar Loop 1
045 Steel 5th 090 Prayer Bowls 135 Asian Dawn 180 Tinjaw 225 2Bar Loop 2

NQPSMTR:RUOG([SDQVLRQ%RDUG :DYHIRUP/LVW
1996 Roland Corporation U.S. SR-JV80-05 Faxback # 10115 For use with JV-80/880/90/1000/1080, JD-990, and XP-50/80 synthesizers.
001 Sitar A 046 Shakuhachi 2 091 Kalimba 1 136 AfroDrum Op1 181 Jaw Harp Wow 226 Agogo 2 Hi
002 Sitar B 047 Shaku Attack 092 Kalimba 2 137 AfroDrum Op2 182 Afro Feet 1 227 Agogo 3 Lo
003 Sitar C 048 Shaku Ornam 093 Kalimba 3 138 AfroDrum Flm 183 Afro Feet 2 228 Agogo 3 Hi
004 Sitar Gliss 049 Hunt Pipe 094 Kalimba Gliss 139 AfroDrum Rat 184 Afro Clap 229 Cowbell 1
005 Tambura A 050 Hunt Noise 095 Kalim Gls Lp 140 Tablah MENU 185 Rainstick 230 Cowbell 2
006 Tambura B 051 Bagpipes 1 096 Balaphone 1 141 Tablah Bend 186 Didge MENU 231 Cowbell 3
007 Tambura C 052 Bagpipes 2 097 Balaphone 2 142 Tablah Dom 187 Didgeridoo 1 232 Cuica 2
008 Tambura Drone 053 Bagpipes 3 098 Log Drum 2 143 Tablah Tak 188 Didgeridoo 2 233 Cuica 3
009 Zither A 054 Bagpipes 4 099 Hyoshigi 144 TablahRim 189 Didgeridoo 3 234 Shaker MENU
010 Zither B 055 Hichiriki 100 Clapstick 145 Tablah Roll 190 Voice MENU 235 Shaker Ptn
011 Zither C 056 Hichiriki Lp 101 Slit Drum 146 Doira Dun 191 Yoh ribe 236 Shaker 1
012 HmrDulcimer 057 Shahnai 102 Boomerang 147 Doira Tik 192 Hey Tribe 237 Shaker 2
013 Yuechin 058 Mizmar 103 Ban Gu 1 148 Dohalla MENU 193 Hey Brazil 238 Chekere 1
014 Yangchin 059 Mizmar Lp 104 Ban Gu 2 149 Dohalla Dom 194 Yyoo Dude 239 Chekere 2
015 Bandolim 060 Piri 105 Ban Gu 3 150 Dohalla Sak 195 ZaghrutaLoop 240 SambaWhistle
016 Cavaquinho 061 Piri Lp 106 TablaBy MENU 151 Dohalla Tak 196 ZaghrutaStop 241 Guiro Long
017 Oud A 062 Steel Dr 2 107 TablaBaya Sld 152 Dohalla Roll 197 Bull Scream 242 Guiro Short
018 Oud B 063 Bonang 108 TablaBaya Gin 153 Dohalla Stop 198 Conch Shell1 243 Timbale MENU
019 Oud C 064 Gender 109 TablaBaya Ge 154 Rek MENU 199 Conch Shell2 244 Timbale Lo
020 Kanoun 065 Saron 110 TablaBaya Ka 155 Rek Dom 200 Samba MENU 245 Timbale Hi
021 Koto 066 Blossom Bell 111 TablaBaya Na 156 Rek Tek 201 SambaBateria 246 Timbale Side
022 Shamisen 2 067 Spokes 112 TablaBaya Tin 157 Rek Open 202 PandeiroMENU 247 Bongo MENU
023 Shami Attack 068 Satellite Dr 113 TablaBaya Tun 158 Rek Trill 203 PandeiroL Lo 248 Bongo 1 Lo
024 Kayakeum 069 Finger Cym 114 TablaBaya Te 159 Bendir 1 204 PandeiroL Hi 249 Bongo 1 Ho
025 Oct Harp 070 Ramacymbal 115 TablaBaya Ti 160 Bendir 2 205 PandeiroS Sp 250 Bongo 2 Lo
026 Afro Harp 071 Atarigane 116 Udu Pot MENU 161
Dawul 206 PandeiroS Rm 251 Bongo 2 Hi
027 Biwa MENU 072 AsiaGng MENU 117 Udu Pot1 Lo 162 JapanPrdMENU 207 PandeiroS Op 252 Korean Ens
028 Biwa 1 073 Asian Gong 1 118 Udu Pot1 Hi 163 Taiko 208 PandeiroS Sp 253 Morocco Ens
029 Biwa 2 074 Asian Gong 2 119 Udu Pot1 Slp 164 Sime Taiko 209 PandeiroS Rm 254 African Ens
030 Biwa 3 075 Asian Gong 3 120 Udu Pot1 Acc 165 Tsuzumi Lo 210 TamborimMENU 255 World Tour
031 Esraj 1 076 Asian Gong 4 121 Udu Pot2 Lng 166 Tsuzmui Hi 211 Tamborim Opn
032 Esraj 2 077 Asian Gong 5 122 Udu Pot2 Sht 167 Ohkawa 212 Tamborim Mut
033 Kemanche 078 Asian Gong 6 123 Udu Pot2 Mut 168 ChinaPrcMENU 213 Tamborim Slp
034 Erhu 079 Asian Gong 7 124 Dholak MENU 169 Gu Roll 214 Surdo MENU
035 Zampona 1 080 REV Gong 5 125 Dholak Ga 170 Gu Hi 215 Surdo Open L
036 Zampo Attack 081 REV Gong 7 126 Dholak Ta 171 Rot Drum 216 Surdo Open H
037 Zampo Trem A 082 AsiaCym MENU 127 Dholak Tun 172 BerimbauMENU 217 Surdo Mute
038 Zampo Trem B 083 Chenchen Ptn 128 Dholak Na 173 Berimbau Opn 218 Surdo Rim
039 Zampo Trem C 084 ChenChen Opn 129 Madal MENU 174 Berimbau Up 219 Caixa MENU
040 Sicu Pip 085 ChenChen Cls 130 Madal Da 175 Berimbau Dn 220 Caixa Open1
041 Quena 086 BaliCym Opn 131 Madal Din 176 Berimbau Mut 221 Caixa Open2
042 Ocarina 087 BaliCym Cls 132 Madal Ta 177 Angklung 2 222 Caixa Roll
043 Kawala A 088 Sagat Open 133 TalkingDr Up 178 Aftro Zither 223 Caixa Mute
044 Kawala B 089 Sagat Close 134 TalkingDr Dn 179 Jaw Harp MENU 224 Agogo MENU
045 Kawala C 090 Sarna Bell 135 AfroDrm MENU 180 Jaw Harp Opn 225 Agpgp 2 Lo

NQPSMTR'DQFH([SDQVLRQ%RDUG 3DWFK/LVWLQJ
1996 Roland Corporation U.S. SR-JV80-06 Faxback # 10116 For use with JV-80/880/90/1000/1080, JD-990, and XP-50/80 synthesizers.
001 All night! 046 Jazzy 130 091 JP Sub-Synth 136 2Tone Hit 181 Whoooooooo 226 VCF Bass
002 Tune Up 047 909 Pump 130 092 Saxy Jam 137 Club Hit x4 182 No-No 227 Sharp Rezo
003 Acidic Grv 048 Slammin' 130 093 Reso Pad 138 Big Ol'Stab 183 Ooo^^^^^^^ 228 Technopop Bs
004 Techno'Hood 049 HipHouse 130 094 Fat Stack 139 Loopbits x2 184 Aaaa^^^^^^ 229 Acid Tripper
005 Space Groove 050 Fancy Sw 130 095 ResoSequence 140 Slide Fx x2 185 Laugh-Mix 230 Hood Bass
006 Odd FXM Loop 051 HipNoKik 130 096 Common Synth 141 Spooky 186 Vocamatic 231 Housine Bs
007 Ultrarave 052 FastEuro 136 097 NewAnalogEra 142 Section Hit 187 Girl Ah 232 Anti-digital
008 Easy R&B 83 053 Justicel 136 098 Monstrousnes 143 Gtr Fx x4 188 Vox Menu 233 Dual VCF Bs
009 Caveman 83 054 Justice2 136 099 Sharpy 144 Breath Fx x4 189 Rev Vox Menu 234 Comic Bass
010 SoulShake 83 055 New Jack 136 100 Dance Arp 145 Sax Fx x3 190 Here We Go! 235 TB-303 Bs 1
011 Hip Hop Jz 88 056 Latin Bt 141 101 Oddigeree 146 Tpt Fx x3 191 Outhere Pad 236 TB-303 Bs 2
012 Homeboy 88 057 Darkman 154 102 Monstrousity 147 Scratch x4 192 Tekno Voices 237 SH-101 Bs 1
013 Gangsta 1 94 058 Beat Menu 1 103 Arpeggio 148 Scratch Loop 193 Old Strings 238 SH 101 Bs 2
014 Gangsta 2 94 059 Beat Menu 2 104 Dance Seq 149 Stab Scratch 194 Dance String 239 SH-101 Bs 3
015 Nite'Hood 94 060 Beat Menu 3 105 Fiesta 150 Record Noise 195 Terminator 240 SH-101 Bs 4
016 Party Jam 94 061 Beat Menu 4 106 Trance Stab 151 Fizzzz 196 AmbientSweep 241 SH-101 Bs 5
017 S2S 909 94 062 Dance Split 107 Digistack 152 Hurray! 197 Ambient BPF 242 How Odd?!
018 Ragga 94 063 Dance Piano 108 Raviin’Choir 153 Sci-Fi 198 Oper'Ambient 243 Hell House
019 DeepGrine 94 064 Odd Piano 109 Random Hits 154 Whoo-Whoo! 199 AmbientPad 1 244 Nightmare!!!
020 TopendSw 100 065 House Piano 110 Fizzy 155 Zigzag 200 Ambient Pad 2 245 Flangehead
021 Danger 100 066 Bight Piano 111 Eurostab 156 Hip alarm 201 Lunar Orbit 246 Doublefunky
022 Breakdwn 100 067 Velo Piano 112 Triumph Stab 157 ScratchMenu1 202 Fly-by Pad 247 Mystical
023 Owl’ Hood 100 068 Simple Piano 113 Steet Stab 158 ScratchMenu2 203 Sync Pad 248 Sci-Fi Sweep
024 Lo-Fi 100 069 Night Moods 114 Kik x4 159 ScatchMenu 3 204 Urban Pad 249 Drum Set 1
025 Soulmate 106 070 50's Organ 115 Reverse Nz 160 Tape Spin 205 Deep Analog 250 Drum Set 2
026 SwingTmb 106 071 Organ Tong 116 909 Tom 161 Noise Menu 206 Garage Pad 251 Drum Set 3
027 Squeeky 110 072 Organic 117 HitHat Menu 162 PiknMixnMod 207 UK Swing Pad 252 Drum Set 4
028 Swingin’ 110 073 Old Organ 118 Rev Cymbal 163 Manic Shots 208 Warriors 253 Drum Set 5
029 Shufflin' 110 074 Mod Amb.Pipe 119 Bang x2 164 Sonic Stabs 209 Br.Jupiters 254 Drum Set 6
030 Suprise1 116 075 Notre Dame 120 Ragga Hit 165 Slylostab 210 M+C Big Pad 255 Drum Set 7
031 Suprise2 116 076 Legato Synth 121 Fly Chord 166 CutOff Snare 211 Wonderous Pd
032 Perc Jam 116 077 Summer Time 122 Ravin’Chords 167 Selecta Drum 212 Super OB
033 909Dscol 120 078 Def Lead 123 Powertechit 168 Trans Vox 213 Eurostrings
034 909Dsco2 120 079 Minor Rave 124 Organ Hits 169 Aaaah! 214 Sweep Beat
035 909Dsco3 120 080 Major Rave 125 Choralvibe 170 Ahoo Yell 215 Nice-n-Easy
036 Superfly 120 081 Dance Lead 126 Trancey 171 Oohh!! 216 World Muzic
037 DiscoCga 120 082 Sync Lead 127 Sharp Hit 172 Madmam 217 Tri-dent Brs
038 Caravan 120 083 HyperHiPass 128 Mc Hit x3 173 Oohh Yeah! 218 Dance Brass
039 Jungle 1 124 084 Mono Raver 129 Kutt Hit 174 Bah 219 Space Bass
040 808CowBl 124 085 Mod-Trance 130 Galaxy Hit 175 And! 220 Clix Bass
041 Jungle 2 124 086 Mod-Trance 2 131 Reggae Chord 176 Aaa! 221 System 100m
042 Cruisin' 124 087 Rave at home 132 Saw Horn x2 177 Hey 222 Synbass Five
043 909Swing 124 088 ResoLoot 133 Rave Hit 178 Baby 223 Rawsaw Bass
044 Human Bt 124 089 Square Tone 134 Vinyl Opera 179 Yeah-Yeah 224 Groove Bass
045 Mover 124 090 Trianglular 135 Movin'Hit 180 0ooooooooo 225 Metalrezo Bs

NQPSMTR'DQFH([SDQVLRQ%RDUG :DYHIRUP/LVW
1996 Roland Corporation U.S. SR-JV80-06 Faxback # 10117 For use with JV-80/880/90/1000/1080, JD-990, and XP-50/80 synthesizers.
001 Easy R&B 83 046 Gabba Kick 091 Ping Snare 136 Ooooooooo 181 Scratch Hit 226 NRG Bass
002 Caveman 83 047 Rotterdam K 092 Brick S.nare 137 Whooooooo 182 Vinyl Opera 227 227 Power Bass
003 SoulShake 83 048 909 Kick 1 093 Impact Snare 138 Aaaaaaaaa 183 Movin’ Hit 1 228 Noiz Bass
004 Hip Hop Jz 88 049 909 Kick 2 094 Space Snare 139 No-No 134 Movin’ Hit 2 229 Core Bass
005 Homeboy 88 050 909 Kick 3 095 Reverse Nz 140 Oh-no-no-no 185 2Tone Hit 230 Trance Bass
006 Gangsta 1 94 051 Loop Kick 096 Buzz Roll 141 Ooo^^^^^^^ 186 Gansta Hit 231 Deep Bass
007 Gangsta 2 94 052 Tick Kick 097 Micro Buzz 142 Aaaa^^^^^^^ 187 Classic Hit 232 TB-303 Bass
008 DeepGrine 94 053 909 Kick 4 098 Super Fill 143 Funny 188 Section Hit 233 SH-101 Bs 1
009 Nite’Hood 94 054 HipHop Kick 099 Flange Fill 144 Giggle 189 Intense Hit 234 SH-101 Bs 2
010 Party Jam 94 055 Bubbler Kick 100 Loose Fill 145 Heavy Breath 190 Positive Hit 235 SH-101 Bs 3
011 S2S 909 94 056 Knockout K 101 909 Clap 146 Acid Sync 191 Vintage Hit 236 Sine Loop
012 Ragga 94 057 Massive Kick 102 808 Clap 147 Analog 192 Triumphant 237 VOX Menu
013 TopendSw 100 058 Explosion K 103 Machine Clap 148 Euro Strings 193 Big Ol’Stab 238 Rev Vox Menu
014 Danger 100 059 Leakage Kick 104 Tek Clap 149 Terminator 194 Rev Ol’Stab 239 Noiz Menu
015 Breakdwn 100 060 Solid Kick 105 Ol’Skool Clp 150 TerminatorLp 195 String Gliss 240 Scrtch&Hits1
016 Owl’Hood 100 061 Dance Kick 106 909 Rim 151 House Piano 196 Loop Bit 1 241 Scrtch&Hits2
017 Lo-Fi 100 062 Krash Kick 107 Ragga Tom 152 50’s Organ 197 Loop Bit 2 242 Hit&FX Menu
018 Soulmate 106 063 Pozer Kick 108 909 Tom Hi 153 Tong 198 Evil Bass 243 Kick Set 1
019 Swing Tmb 106 064 606 Snare 109 909 Tom Mid 154 Squeal 1 199 Mouth Music 244 Kick Set 2
020 Squeeky 110 065 808 Snare 110 909 Tom Lo 155 Squeal 2 200 Hammer On 245 Kick Set 3
021 Swingin 110 066 Ragga Snare 111 HiHat Menu 156 Multiponics 201 Short Funk 246 Snare Set 1
022 Shufflin’ 110 067 909 Bryt Sn 112 707 Hi Hat 157 Tpt Kiss 202 Oct Slide 247 Snare Set 2
023 Perc Jam 116 068 909 Fat Sn 113 HiHats Rev 158 Tpt Gliss 203 Guitar Fill 248 Snare Set 3
024 Suprise 116 069 909 ShortSn 114 909 Ride 159 Stab fall 204 Jz Gtr Fall 249 Snare Set 4
025 909Disco 120 070 Hip Hop Sn 1 115 909 Crash 160 Dance Hit 205 Mg Slide Dwn 250 Hat&tom Set
026 Caravan 120 071 New Jack Sn 116 HipHopTamb
161 Club Hit 206 Mg Slide U/D 251 Cymbal Set
027 Superfly 120 072 70’s Snare 117 Aaaah! 162 Flychord 207 Big Bang 252 Beat Menu 1
028 DiscoCga 120 073 Old Rim 118 Girl Ah 163 Choralvibe 208 Sea Wolf 253 Beat Menu 2
029 808CowBl 124 074 Jam Snare 119 Ahoo Yell 164 Trance 5th 209 Tape Stop 254 Beat Menu 3
030 909Swing 124 075 Gated Shot 120 Oohh!! 165 Power Tech 210 DJ 1 255 Beat Menu 4
031 Human Bt 124 076 Reggae Snare 121 Uhhh!! 166 Ragga Hit 211 DJ 2
032 Mover 124 077 Sharp Shot 122 Breath in 167 Maj 7th 212 DJ Loop
033 Cruisin’ 124 078 Trunc Snare 123 Madman 168 Minor Hit 213 Wicked DJ
034 Jungle 124 079 Funk Snare 124 Jam! 169 Major Hit 214 Final Loop
035 Jazzy 130 080 Noiz Snare 125 Here We Go 170 Mystic Pno 215 Spooky
036 909 Pump 130 081 Verb Snare 126 Oh Yeah! 171 Kutt 216 Rewind
037 Slammin’ 130 082 Lil’R&B Sn 127 Once Again 172 Euro Hit 217 Zigzag
038 HipHouse 130 083 80’s Snare 128 Bah 173 Organ Hit 218 Whoo-Whoo
039 Fancy Sw 130 084 Compress Sn 129 And! 174 Org/Piano 219 Hip Alarm
040 HipNoKik 130 085 Def Clap 130 Aaa 175 Dub Hit 220 Sci-Fi
041 FastEuro 136 086 Process Sn 131 Love 176 Minor NRG 221 Cheers
042 Justice 136 087 Chord Snare 132 Oooh Yeah! 177 Hardcore 1 222 60’s Vinyl
043 New Jack 136 088 Hip Hop Sn 2 133 Hey 178 Hardcore 2 223 10000 Mute
044 Latin Bt 141 089 Glass Snare 134 Baby 179 Power Chord 224 Fizzzzzz
045 Darkman 154 090 Iron Snare 135 Yeah-Yeah 180 Rave Hit 225 Euro Bass

NQPSMTR6XSHU6RXQG6HW([SDQVLRQ%RDUG 3DWFK/LVWLQJ
1996 Roland Corporation U.S. SR-JV80-07 Faxback # 10118 For use with JV-80/880/90/1000/1080, JD-990, and XP-50/80 synthesizers.
001 Ac.Piano 1 046 '60 CompKiav 091 St.335 Pick 136 Bs/Musetdet1 181 Brass Sect 1 226 Mello Orch.
002 Ac.Piano 2 047 House Clav. 092 335 VSW Pick 137 Bs/Musetdet2 182 Brass Sect 2 227 Saturn
003 Soft Piano 048 Phase Clav. 093 335 Mute 138 Bs/Masterl 183 Brass Sect 3 228 Orch Hit Maj
004 U-220 APiano 049 Org Flutes 1 094 335 St. Mute 139 Bs/Master2 184 Pizz Brass 229 Orch Hit Min
005 FortePiano 050 Org Flutes 2 095 Echo Mute 140 Bs/Jazz 185 Sax Sect 1 230 Orch Hit Dim
006 Honky Tonk 051 Org Flutes 3 096 VeloMute+Pik 141 Bs/Bandneon1 186 Sax Sect 2 231 Big Hits Maj
007 Pop Piano 052 Org Flute 8' 097 All Mutes 142 Bs/Bandneon2 187 In the Mood 232 Finare /
008 Dusty Piano 053 Church Organ 098 Mute Guitar 143 Reed Organ1 188 Orchestra 233 Owz it !
009 NewAge Piano 054 English Org 099 BriteChorus 144 Reed Organ2 189 BrassOrchest 234 Rave OrcHit
010 E.Grand 1 055 Organ Chord 100 Clean Pick 1 145 Rive Gauche 190 Jazz Quartet 235 OrchHit X
011 E.Grand 2 056 Happy Xmas ! 101 Clean Pick 2 146 Iturbynth 191 B!G Stab 236 OrchGlissMaj
012 E.Grand mod 057 1001 Nights 102 Clean E.Gtr 147 Bandneon Duo 192 Brass Fall 1 237 OrchGlissMin
013 U-220 EGrand 058 G.Star 1 103 Phase Guitar 148 Amsterdam 193 Brass Fall 2 238 Orch End FX
014 Stage EGrand 059 G.Star 2 104 PickChordsX4 149 Sad Musette 194 Brass Fall 3 239 Harp m7
015 E.Grand ff 060 Dream Time 105 Super Picker 150 Fiddle 1 195 Tp Fall 1 240 Harp 9th
016 E.Piano mod 061 Clavi Pad 106 St. Pick 151 Fiddle 2 196 Tp Fall 2 241 Harp +7
017 Soft Rhodes 062 into Dream 107 Dist Guitar 151 Super Fiddle 197 Brass Stacc 242 Harp b9
018 St.Rhodes 063 Not Old 108 HEAVY! 153 Fiddle About 198 F.Horn Rip 1 243 Harp m7 Scrl
019 Tremolo EP 064 Box Guitar 1 109 St.Dist Gtr 154 DigitalCello 199 F.Horn Rip 2 244 Harp 9thScrl
020 Long is... 065 Box Guitar 2 110 Super Heavy 155 Four Seasons 200 Mild ANALOG 245 Harp +7 Scrl
021 ...the Road 066 Reso Guitar 111 Mandolin 1 156 Staccato 201 Black Ring 246 Harp b9 Scrl
022 High Rhodes 067 V-MX Guitar 112 Mandolin 2 157 Tremolo 1 / 202 Steel Brass 247 Grove 1
023 Bright EP 1 068 Flat Picker 113 Mandolin 3 158 Tremolo 2 203 S.JV Marine 248 Drum Set I
024 Bright EP 2 069 Steel Guitar 114 Mandolin 4 159 Tremolo 3 / 204 CarminaB/Aft 249 Drum Set 2
025 Bright EP 3 070 Steel there! 115 Mandolins 160 Sop Rec 1T 205 Cosmic Vox 250 Drum Set 3
026 Bright EP 4 071 BriteJGuitar 116 SuperMando 161 Tenor Rec 1T 206 Digital Vox 251 Drum Set 4
027 Syn.E.Piano 072 Tympanon 117 ResonatorGt1 162 Rec Twin 207 ¥ Empire 252 Drum Set 5
028 Xmod E.Piano 073 Live Guitar 118 ResonatorGt2 163 Rec Sect 208 Cosmic Echo 253 Drum Set 6
029 <D>gtalPiano 074 Arabic Scale 119 ResonatorGt3 164 Recorder 1T 209 She does ... 254 Drum Set 7
030 Hps Front 1 075 Big Twelve 120 Dobraccent 165 Living Pipe 210 Sine Strings 255 Country Drums
031 Hps Front 2 076 Jazz Guitar 121 Dulcimer 1 166 Pipe Lead 211 Chineez Wave
032 Hps Front 3 077 St.Jazz Gtr 122 Dulcimer 2 167 Whistle 212 Metalattack
033 Hps Back 1 078 Pedal Steel1 123 Dulcimer 3 168 Fr'm Scotlnd 213 EG Vox
034 Hps Back 2 079 Pedal Steel2 124 Gamelan Ens. 169 Soft Sax 214 Metal Sweep
035 Hps Back 3 080 Stereo Pedal 125 Guitar Pad 170 Bright Sax 215 Digi Sweep
036 Hps Back 1T 081 Pedal Steel3 126 Bass mix 171 St.Sax 216 Deep Space
037 Hps F/B 082 Dyno Steel 127 Musette tun 172 Bright TP 217 Blue Mist
038 Hps F4/B 083 Super Pedal 128 Musette det1 173 Trombone 218 Trailer Pipe
039 Hps F/B/B4 084 Pedal Steel4 129 Musette det2 174 Trombone SW 219 Cluster
040 Hps Lute 1 085 PedalSteelSw 130 Master1 175 Twinbone 220 Pentatonic
041 Hps Lute 2 086 Steel Fours 131 Master2 176 Super TB 221 RoaringSpace
042 Hps Lute 3 087 Pedal Steel5 132 Jazz 177 St.Trombone 222 Deep Cave
043 Hps Lute 1T 088 Clean'd Comp 133 Bandoneon1 178 St.Soft TB 223 Kokoro
044 Medieval Ens 089 Blues Guitar 134 Bandoneon2 179 St.Bright TB 224 Nothing Air
045 Baroque Ens. 090 335 Guitar 135 Bs/Musettun 180 Fat Trombone 225 Mick'm House

NQPSMTR6XSHU6RXQG6HW([SDQVLRQ%RDUG :DYHIRUP/LVW
1996 Roland Corporation U.S. SR-JV80-07 Faxback # 10119 For use with JV-80/880/90/1000/1080/2080, JD-990, and XP-50/80 synthesizers.
001 U Ac. Piano P 046 Pd.Steel 2A 091 T_Recorder B 136 Tremolo p Lp 181 Bigshot SN 226 Kick & SN 3
002 U Ac. Piano F 047 Pd.Steel 2B 092 T_Recorder C 137 Tremolo sfLp 182 Crack Snare 227 Kick & SN 4
003 U E.Grand P 048 Pd.Steel 2C 093 Musette 1A 138 Tremolo f Lp 183 Atomic Snare 228 Kick & SN 5
004 U E.Grand F 049 335Pick A 094 Musette 1B 139 Cluster Lp 184 Power Snare 229 Kick & SN 6
005 Rhodes 050 335Pick B 095 Musette 1C 140 PentatonicLp 185 Trash Snare 230 Kick & SN 7
006 Rhodes B 051 335Pick C 096 Musette 2A 141 Orch Hit Maj 186 Hard Snare 231 Kick & Snare
007 Rhodes C 052 335Mute A 097 Musette 2B 142 Orch Hit Min 187 Combo Snare 232 Tom Set
008 Bright EP 053 335Mute B 098 Musette 2C 143 Orch Hit Dim 188 Induced SN 233 HiHat Set
009 Bright EP B 054 335Mute C 099 Musette 3A 144 Orch Hit f 189 Tiny Snare 234 Ride & Clap
010 Bright EP C 055 Funk Gt Mute 100 Musette 3B 145 Staccato p 190 Rock Snare 1 235 REV Hit Maj
011 HPS_Front A 056 Funk Gt 101 Musette 3C 146 Staccato f 191 Rock Snare 2 236 REV Hit Min
012 HPS_Front B 057 Clean EG A 102 Master A 147 F.Horn Rip 192 Reverb Snare 237 REV Hi Dim
013 HPS_Front C 058 Clean EG B 103 Master B 148 Brass Fall 193 SharpTom Lo 238 REV Hit f
014 HPS_Back A 059 Clean EG C 104 Master C 149 Tps Fall 194 SharpTom Hi 239 REV Stacc p
015 HPS_Back B 060 Dist Gt P 105 Single A 150 Brass Stacc 195 Rock Tom 1 240 REV Stacc f
016 HPS_Back C 061 Dist Gt PB 106 Single B 151 Harp m7 Up 196 Rock Tom 2 241 REV Hrp m7Up
017 HPS_Lute A 062 Dist Gt PC 107 Single C 152 Harp m7 Dwn 197 Rock Tom 3 242 REV Hrp m7Dn
018 HPS_Lute B 063 Dist Gt F 108 Bandneon1A 153 Harp 9th Up 198 Rock Tom 4 243 REV Hrp9thUp
019 HPS_Lute C 064 Dist Gt FB 109 Bandneon1B 154 Harp 9th Dwn 199 Ambo Tom 1 244 REV Hrp9thDn
020 HPS_Click A 065 Dist Gt FC 110 Bandneon1C 155 Harp +7 Up 200 Ambo Tom 2 245 REV Hrp +7Up
021 Ac.Guitar A 066 Sax P 111 Bandneon2A 156 Harp +7 Dwn 201 Ambo Tom 3 246 REV Hrp +7Dn
022 Ac.Guitar B 067 Sax PB 112 Bandneon2B 157 Harp b9 Up 202 Ambo Tom 4 247 REV Hrp b9Up
023 Ac.Guitar C 068 Sax PC 113 Bandneon2C 158 Harp b9 Dwn 203 Closed Hat1 248 REV Hrp b9Dn
024 Reso.GTR P A 069 Sax M 114 MasterBs A 159 Harp m7 UpLp 204 Closed Hat2 249 REV PillowBD
025 Reso.GTR P B 070 Sax MB 115 MasterBs B 160 Harp m7 DnLp 205 Room Hat 1 250 REV SnappySN
026 Reso.GTR P C 071 Sax MC 116 MasterBs C 161 Harp 9thUpLp 206 Room Hat 2 251 REV Cross SN
027 Reso.GTR F A 072 Trombopet 117 Bs/Musett1 162 Harp 9thDnLp 207 Room Hat 3 252 REV Brash SN
028 Reso.GTR F B 073 Trombopet B 118 Bs/Musett2 163 Harp +7 UpLp 208 Room Hat 4 253 REV Crisp SN
029 Reso.GTR F C 074 Trombopet C 119 Bs/Musett3 164 Harp +7 DnLp 209 Open HH 254 REV Tom Hi
030 F. Mandolin A 075 Trombone P 120 Bs/Master 165 Harp b9 UpLp 210 Open HiHat 255 Rev Gong
031 F. Mandolin B 076 Trombone PB 121 Bs/Single 166 Harp b9 DnLp 211 Pedal HiHat
032 F. Mandolin C 077 Trombone PC 122 Bs/Bandne1 167 Fat BD 212 Claps Real
033 Dulcimer A 078 Trombone M 123 Bs/Bandne2 168 Pillow BD 213 Crash Cym
034 Dulicmer B 079 Trombone MB 124 Fiddle A 169 Mondo Kick 214 Ride Cym
035 Dulcimer C 080 Trombone MC 125 Fiddle B 170 Deep Kick 1 215 Ride Cymbal
036 FretNoise 2 081 Trombone F 126 Fiddle C 171 Solid Kick 216 Ride Bell
037 Jazz Gt P 082 Trombone FB 127 Gliss Maj 172 Ambo Kick 217 China Cym
038 Jazz Gt PB 083 Trombone FC 128 Gliss Min 173 Reverb Kick 1 218 Cowbell 2
039 Jazz G PC 084 ORG_Flute A 129 Tremolo p 174 Deep Kick 2 219 Tambourine
040 Jazz Gt F 085 ORG_Flute B 130 Tremolo sfz 175 Reverb Kick2 220 Gong
041 Jazz Gt FB 086 ORG_Flute C 131 Tremolo f 176 Room Stick 221 Hat & Tom 1
042 Jazz Gt FC 087 S_Recorder A 132 Cluster 177 Snappy SN 222 Hat & Tom 2
043 Pd.Steel 1A 088 S_Recorder B 133 Pentatonic 178 Cross SN 223 Cymbal
044 Pd.Steel 1B 089 S_Recorder C 134 Gliss Maj Lp 179 Crisp SN 224 Kick & SN 1
045 Pd.Steel 1C 090 T_Recorder A 135 Gliss Min Lp 180 Brash SN 225 Kick & SN 2

NQPSMTR.H\ERDUGVRIWKH·VDQG·V 3DWFK/LVWLQJ
1996 Roland Corporation U.S. SR-JV80-08 Faxback # 10120 For use with JV-80/880/90/1000/1080, JD-990, and XP-50/80 synthesizers.
001 Blues Perc 046 Mellow Blues 091 Cheeseball 136 Wide Rhodes 181 Rho/Wurl/Rox 226 Mello Vlns
002 A LittleHelp 047 PentaGospel 092 The Sham 137 Soft Fusion 182 Rox Chorus 227 Tron Cello
003 Big Pink B 048 Sweet&Mellow 093 Cheese Pad 138 Phase Rhodes 183 Rox Harpsi 228 Mello Cello
004 Hush B3 049 2B orNot2B3? 094 Crummy Organ 139 SpaceyRhodes 184 Farfi Harpsi 229 Tron Quartet
005 Sly Family B 050 Green Bee 095 VX Religion 140 I'mNotinLove 185 Octa Harpsi 230 Tron Orch
006 3 Dog B3 051 Whiter Shade 096 Farfi Combo 141 VinylRhodes 186 VX Harpsi 231 DrySt /Choir
007 SanFrancisco 052 Fire Perc 097 RotaryCheese 142 BreadRhodes 187 PowerHowers 232 Tron Vox
008 Full Stops 053 Sunset Strip 098 Iron Farf 143 MutroRhodes 188 Rox Grinder 233 Wet & Wiggly
009 Head Up B3 054 B3 JazzSplit 099 DancingQueen 144 Ray'sPno Bs 189 Clav 1 234 TronChoirDry
010 Full Clique 055 Evil Ways 100 PoorMan's B 145 SynRhodes Bs. 190 Clav 2 235 Tron Choir
011 So Very BS&T 056 Dyno Perc 63 101 Reggae Organ 146 Soft Wurly 191 Clav 3 236 Old Choir
012 R&R B3 1 057 888+3rd 102 Farf Lite 147 What'd I say 192 Clav 4 237 FatTronChoir
013 Organ Banks 058 8888+3rd 103 Wooly Farfy 148 Dry Wurly 193 Clav 5 238 Choir Blend
014 Express Way 059 House Organ 104 Clark Farf 149 Chorus Wurly 194 Clav 6 239 Slow Choir
015 85 8808 880 060 Easy to B 105 Pacemaker 150 Acid Wurly 195 Clav 7 240 Retroactive
016 R&R B3 2 061 Harum Scarem 106 Farf Celeste 151 Hard Wurly 196 Phase Clav 1 241 LamenTron
017 MelloDrama 062 Green Eyed 107 Ham & Cheese 151 Tramp Wurly 197 Rich Clav 242 Anthem
018 B3 Sermon 063 8888+3rd Vel 108 Rox Organ P 153 Tremo Wurly 198 Vibraclav 243 Space Tron
019 British B3 064 Shine On B3 109 Rox Organ Ph 154 Smooth Wurly 199 Mute Clav 1 244 MelloMemries
020 All Skate! 065 Procol Perc 110 Rox Organ PH 155 Grungy Wurly 200 Mute Clav 2 245 5th Tron Str
021 Br.Ballad B3 066 Full Perc 111 Rox Organ L 156 Breakin' Up 201 Flange Clav 246 Tron Vortex
022 Pure Bars 067 Mellow 4' 112 Runaway 157 Dist Wurly 1 202 Comp Clav 247 PlanetClaire
023 R&B B3 068 ZomBee 3 113 Ditty Doo 158 Dist Wurly 2 203 Space Clav 248 Rox Strings
024 Felix Ballad 069 Hi Harmonix 114 VX Wah Org 159 Dist Wurly 3 204 Mute Clav 3 249 Harpsiphase
025 Fudge Ballad 070 Rotary Banks 115 Suitcase 88 160 Dist Wurly 4 205 Bass Clav 250 Cheep Phazer
026 B3 Nice Feel 071 Gimme Some 116 Rhodes mkV 161 Whirling 206 Phase Clav 2 251 Swimming Bee
027 85 5000 050 072 Fuzzhead 117 ChorusRhodes 162 RingMod Solo 207 Brite Clav 252 Old Lead
028 Theatrix 073 Traffiking 118 NY Rhodes 163 Rider/Storm 208 WahWah Clavl 253 Organ Lead
029 Barleycorn 074 B3powerOnOff 119 Touch Rhodes 164 Pnet Tee 209 WahWah Clav2 254 Tekno Cheese
030 Magic Carpet 075 ToneWheelPno 120 Stage 73 165 Stereo Pnet 210 Clv/Pnet Sp 255 33 RPM
031 All Star B3 076 Orgiano 121 Joe's Rhodes 166 ShesNotThere 211 Clv/PnetDuol
032 BT & MG's B3 077 TVA FX ORG 122 Stiff Rhodes 167 R&B Pnet 212 Clv/PnetDuo2
033 Bookin' B 078 Animalistic 123 Dirty Rhodes 168 BrillantPnet 213 TronStrg ENS
034 Rock Steady 079 Animal Mod 124 Mr.Suitcase 169 Rox+Pnet 214 Tron Str Dry
035 NICE L I00 080 Rising Sun 125 Jazz Rhodes 170 Rox Piano 1 215 Rotary Tron I
036 Tenderness 081 Surf Monkeys 126 HybridRhodes 171 Rox Vinyl 216 Rotary Tron2
037 Blue B 082 Palisades 127 Dyno Rhodes l 172 Rox Piano 2 217 St.Tron Dry
038 HeavyTraffic 083 Soul Kitchen 128 Dyno Rhodes 2 173 Crummy Piano 218 TronOctStack
039 Dyno Rotary 084 BreakOnThru 129 Dyno Rhodes 3 174 Rox Lute 219 Smooth Tron 1
040 Concert B3 085 Calif.Sun 130 Ring Rhodes 175 Rox Lute Ch. 220 Smooth Tron 2
041 Salty Dog 086 Steppin'VX 131 LoungeRhodes 176 Rox Full+Acc 221 Slow Tron
042 Stevie's B3 087 Costello+Mod 132 TremSuitcase 177 Rox Pi/Ha 222 SymphonicTrn
043 Hang Twice 088 VX Rotary 133 Preacher 178 Carpet Crawl 223 Moody Tron
044 Let It B 089 Archie's Mod 134 Hard Rhodes 179 Rox Jacuzzi 224 Warm Tape
045 LA Blues 090 Telstar VX 135 BalladRhodes 180 TrickOf Tail 225 Tron Vls Dry

NQPSMTR.H\ERDUGRIWKH·V·V([SDQVLRQ%RDUG :DYHIRUP/LVW
1996 Roland Corporation U.S. SR-JV80-08 Faxback # 10121 For use with JV-80/880/90/1000/1080/2080, JD-990, and XP-50/80 synthesizers.
001 B3 1 A 046 B3 10 Ch B 091 B3 Harm 2 A 136 Farf Noise 181 Pnet f C 226 Clav 6 p C
002 B3 1 B 047 B3 10 Ch C 092 B3 Harm 2 B 137 Suitcase p A 182 R.Chord A 227 Clav 6 f A
003 B3 1 C 048 B3 10 FL A 093 B3 Harm 2 C 138 Suitcase p B 183 R.Chord B 228 Clav 6 f B
004 B3 2 A 049 B3 10 FL B 094 B3 Harm 3 A 139 Suitcase p C 184 R.Chord C 229 Clav 6 f C
005 B3 2 B 050 B3 10 FL C 095 B3 Harm 3 B 140 Suitcase mfA 185 ‘70s Piano A 230 Clav Mute 1A
006 B3 2 C 051 B3 11 096 B3 Harm 3 C 141 Suitcase mfB 186 ‘70s Piano B 231 Clav Mute 1B
007 B3 Ch A 052 B3 Perc 1 A 097 B3 Harm3FL A 142 Suitcase mfC 187 ‘70s Piano C 232 Clav Mute 1C
008 B3 Ch B 053 B3 Perc 1 B 098 B3 Harm3FL B 143 Suitcase f A 188 ‘70s Lute A 233 Clav Mute 2A
009 B3 Ch C 054 B3 Perc 1 C 099 B3 Harm3FL C 144 Suitcase f B 189 ‘70s Lute B 234 Clav Mute 2B
010 B3 2 FL A 055 B3 Perc 2 A 100 B3 Click 145 Suitcase f C 190 ‘70s Lute C 235 Clav Mute 2C
011 B3 2 FL B 056 B3 Perc 2 B 101 VX Organ 1 A 146 Stage p A 191 Clav Pluck A 236 Clav 7 A
012 B3 2 FL C 057 B3 Perc 2 C 102 VX Organ 1 B 147 Stage p B 192 Clav Pluck B 237 Clav 7 B
013 B3 3 A 058 B3 Perc 3 A 103 VX Organ 1 C 148 Stage p C 193 Clav Pluck C 238 Clav 7 C
014 B3 3 B 059 B3 Perc 3 B 104 VX Organ 2 A 149 Stage f A 194 Ch.Clav A 239 Clav Attack
015 B3 3 C 060 B3 Perc 3 C 105 VX Organ 2 B 150 Stage f B 195 Ch.Clav B 240 Tron Str A
016 B3 3 FL A 061 B3 Perc3FL A 106 VX Organ 2 C 151 Stage f C 196 Ch.Clav C 241 Tron Str B
017 B3 3 FL B 062 B3 Perc3FL B 107 VX Organ 3 A 152 RhodesBs p A 197 Clav 1 A 242 Tron Str C
018 B3 3 FL C 063 B3 Perc3FL C 108 VX Organ 3 B 153 RhodesBs p B 198 Clav 1 B 243 Tron Vlns A
019 B3 4 064 B3 12 109 VX Organ 3 C 154 RhodesBs p C 199 Clav 1 C 244 Tron Vlns B
020 B3 5 A 065 B3 13 110 VX Organ 4 A 155 RhodesBs f A 200 Clav 2 A 245 Tron Vlns C
021 B3 5 B 066 B3 14 A 111 VX Organ 4 B 156 RhodesBs f B 201 Clav 2 B 246 Tron Cello A
022 B3 5 C 067 B3 14 B 112 VX Organ 4 C 157 RhodesBs f C 202 Clav 2 C 247 Tron Cello B
023 B3 6 A 068 B3 14 C 113 VX Harpsi A 158 Wurly 1 p A 203 Clav 3 p A 248 Tron Cello C
024 B3 6 B 069 B3 14 Ch A 114 VX Harpsi B 159 Wurly 1 p B 204 Clav 3 p B 249 Tron Cho.1 A
025 B3 6 C 070 B3 14 Ch B 115 VX Harpsi C 160 Wurly 1 p C 205 Clav 3 p C 250 Tron Cho.1 B
026 B3 7 A 071 B3 14 Ch C 116 VX Org Bs A 161 Wurly 1 mf A 206 Clav 3 f A 251 Tron Cho.1 C
027 B3 7 B 072 B3 14 FL A 117 VX Org Bs B 162 Wurly 1 mf B 207 Clav 3 f B 252 Tron Cho.2 A
028 B3 7 C 073 B3 14 FL B 118 VX Org Bs C 163 Wurly 1 mf C 208 Clav 3 f C 253 Tron Cho.2 B
029 B3 7 FL A 074 B3 14 FL C 119 Farf Organ 1 164 Wurly 1 f A 209 Clav 4 p A 254 Tron Cho.2 C
030 B3 7 FL B 075 B3 15 A 120 Farf Organ 2 165 Wurly 1 f B 210 Clav 4 p B 255 RecordNoise
031 B3 7 FL C 076 B3 15 B 121 Farf Organ 3 166 Wurly 1 p C 211 Clav 4 p C
032 B3 8 A 077 B3 15 C 122 Farf Organ 4 167 Wurly 2 p A 212 Clav 4 mf A
033 B3 8 B 078 B3 15 Ch A 123 FarfClar16’A 168 Wurly 2 p B 213 Clav 4 mf B
034 B3 8 C 079 B3 15 Ch B 124 FarfClar16’B 169 Wurly 2 f C 214 Clav 4 mf C
035 B3 8 Ch A 080 B3 15 Ch C 125 FarfClar16’C 170 Wurly 2 mf A 215 Clav 4 f A
036 B3 8 Ch B 081 B3 15 FL A 126 Farf Organ 5 171 Wurly 2 mf B 216 Clav 4 f B
037 B3 8 Ch C 082 B3 15 FL B 127 Farf Organ 6 172 Wurly 2 mf C 217 Clav 4 f C
038 B3 8 FL A 083 B3 15 FL C 128 Farf Organ 7 173 Wurly 2 f A 218 Clav 5 p A
039 B3 8 FL B 084 B3 16 129 Farf Organ 8 174 Wurly 2 f B 219 Clav 5 p B
040 B3 8 FL C 085 B3 17 130 FarfFlut8’ A 175 Wurly 2 f C 220 Clav 5 p C
041 B3 9 086 B3 18 131 FarfFlut8’ B 176 Pnet p A 221 Clav 5 f A
042 B3 10 A 087 B3 19 A 132 FarfFlut8’ C 177 Pnet p B 222 Clav 5 f B
043 B3 10 B 088 B3 19 B 133 Farf 8’+2’ 178 Pnet p C 223 Clav 5 f C
044 B3 10 C 089 B3 19 C 134 Farf 8’+4’ 179 Pnet f A 224 Clav 6 p A
045 B3 10 Ch A 090 B3 Harm 1 135 Farf 8’+5th 180 Pnet f B 225 Clav 6 p B

NQPSMTR6HVVLRQ([SDQVLRQ%RDUG 3DWFK/LVWLQJ
1996 Roland Corporation U.S. SR-JV80-09 Faxback # 10122 For use with JV-80/880/90/1000/1080/2080, JD-990, and XP-50/80 synthesizers
001 St.Concert 044 Legato Tpt 087 X-Fade Metal 130 Trangoa Wave 172 On the move! 214 Voc Solo 5th
002 9ft.Grand 1 045 Dyno Trumpet 088 Velo Power 131 Spiked Cheez 173 XP'ration 215 Dirty Lead
003 9ft.Grand 2 046 Ethno-Trumps 089 Phazy Chunk 132 Glassy Cheez 174 Big Ensemble 216 Boostweeper1
004 Euro Classic 047 Super Tenor 090 Reso Tele 133 Super 808Cow 175 Lazerette 217 Boostweeper2
005 St.Pno & Str 048 TenorExpress 091 Wah Wah BPM 134 Arpeggiatoid 176 Fazed String 218 B3 Filth
006 Compress Pno 049 T.Sax f 092 Rock P.Bass1 135 Euro Hit 1 177 Combing Slow 219 Phazed Organ
007 LA Session 050 Legato Flute 093 Rock P.Bass2 136 Euro Hit 2 178 Jet Stack 220 VSw Vibrafon
008 Water Piano 051 Touch Flute 094 Rock P.Bass3 137 Rave Slice 179 Phazeslopad 221 SA Vibe
009 Vibra Rhodes 052 NewAge Flute 095 Big Jazz Bs 138 Str Torture 180 Rize Mass 222 Rich Vibes
010 Stack Rhodes 053 Flute inMist 096 BriteHazz Bs 139 Juno Harpsi 181 Portent 223 SpaceGamelan
011 ArcoEnsemble 054 Hybrid Flute 097 Ch.Jazz Bs 140 Big Mess Pad 182 DCO Sweeper 224 Toy Vibe
012 Vienna Strgs 055 Flute & Cla 098 Mellow Jz Bs 141 Harpsichoir 183 Sweep Rain 225 Analog Bomb
013 Str Adagio 056 ChristmasFlt 099 Mute E.Bs 142 Echo Juno 184 Sweep Stack 226 Seashore 2
014 Oct Strings 057 Fifth Flute 100 Octabahn Bs 143 Phazerave 185 Big Vectors 227 Cretaion
015 Silky Filter 058 Cosmic Flute 101 Slobbery Bs 144 DanceStack 1 186 Poly Swell 228 Cyberjunkie
016 Soft Strings 059 Acc.de Paris 102 Phase Worm 145 DanceStack 2 187 Alchemy 229 Sci-Fi Bells
017 SlowStr.Sect 060 Paris 50's 103 Euro Rave Bs 146 DanceStack 3 188 Soli-na 230 Shine on
018 GiantStrings 061 Musette Ens 104 Pumpin' Bs 147 DanceStack 4 189 90s Str Mach 231 DEMO Piano1
019 Str+Choir 1 062 Montmartre 105 Tech NoBase 148 DanceStack 5 190 Ultra Cheez 232 DEMO Piano2
020 Str+Choir 2 063 Sad Akordion 106 Bad Acid Bs 149 DanceStack 6 191 Juno-60 Pad 233 DEMO PnoVox
021 Str+Choir 3 064 Fr.Accordion 107 CheepEcho Bs 150 DanceStack 7 192 Progressive 234 DEMO Str 1
022 Breathy Humz 065 Fr.Accord 2 108 Manic Bs 151 DanceStack 8 193 Build-Up Syn 235 DEMO Str 2
023 Dream Voices 066 Troubadour 109 JP6 Sqr Key 152 Eurotek Brs 194 Atlantis 2 236 DEMO Str 3
024 Mmmms 067 SessionNylon 110 Square drops 153 Synergy Brs 195 Perelandra 237 DEMO SynPuls
025 Chorale 068 Solo Nylon 1 111 Celestial 154 PortaSynthex 196 Plutonium 238 DEMO 5thPad
026 Space Men 069 Solo Nylon 2 112 Heavenly Eko 155 Razor VCOs 197 Nautilus 239 DEMO Choir
027 Choir Mm+Aah 070 Nylon & Str 113 JD-800 Nomad 156 Big PWM 198 Metal Dreams 240 DEMO Brass
028 Ivory Mist 071 Nylon & Flt 114 Vibrolater 157 Flutey Stack 199 Glass Clouds 241 DEMO Tenor
029 PercussiVox 072 Nylon Chord 115 MartianChime 158 Wobbly 5th 200 Harmonicloud 242 DEMO Tpt
030 Mysteriouso 073 Stratar 116 Big Wet Blip 159 Tekno Square 201 Shining Veil 243 DEMO Flute
031 Phase Mmhs 074 Clean Tele 117 Amazing Echo 160 Trance VoXxX 202 Ethereal JX 244 DEMO Nylon
032 AmbientStory 075 Nashville 118 DelaySession 161 Random Rave 203 Striking 5th 245 DEMO PhaseGt
033 Venus 076 Super Trem 119 Deletex 162 Raver Circus 204 Meow 5ths 246 DEMO DistGt1
034 SessionBrass 077 SpaghettiGtr 120 Tarlia 163 Resorave 205 Stepflanger 247 DEMO DistGt2
035 Port.Tpts 078 Duanne'sTone 121 Mahoroba 164 Flangomatic 206 Happy LFOs 248 DEMO Strat
036 R&R Brass 079 Big Hair Ld 122 Eurotek Clav 165 O-Zu-Nu 207 Aero Insect 249 DEMO SlapBs
037 Echo Brass 080 Metal Solo 123 Dope Resoclv 166 Sub Divided 208 Beat Sweeper 250 DEMO P.Bass
038 E.Coast Brs 081 Crunch Tone 124 Tekno Juno 167 Ancient Sqr 209 Wormy Lead 251 DEMO SynBs
039 Bop Soli 082 Overdriven 125 Buzzzzzzzzzzz 168 Fat Flange 210 Atmo Lead 252 DEMO SynLead
040 Soft Saxes 083 Blues Tele 126 Slop-a-rama 169 Phaze NRG 211 Caliolead 253 DEMO Insect
041 Orchestral 084 Tube Double 127 Isn't Pretty 170 Phase Vox 212 Tweedles 254 DEMO Buzzzzz
042 Octalog Hrn 085 Neil's Rust 128 Polywasp 171 Systekno 213 Raw PWM 255 DEMO Crowd
043 Tpt Soloist 086 Short Crunch 129 Quixelate

NQPSMTR6HVVLRQ([SDQVLRQ%RDUG :DYHIRUP/LVW
1996 Roland Corporation U.S. SR-JV80-09 Faxback # 10123 For use with JV-80/880/90/1000/1080, JD-990, and XP-50/80 synthesizers.
001 StGrand L pA 036 Clean TC1 C 071 R&R Horns B 106 Gtr Cut Nz 141 Tiny Snr 2 176 REV LoosSnr
002 StGrand L pB 037 Clean TC2 A 072 R&R Horns C 107 Gtr Slap 142 Mute Snr 177 Rev Ring Snr
003 StGrand L pC 038 Clean TC2 B 073 Solo Tpt. A 108 FX MENU 143 909 Rim 2 178 REV 808 Snr2
004 StGrand R pA 039 Clean TC2 C 074 Solo Tpt. B 109 Sm.Club 144 909 Tom 2 179 REV 909 Snr2
005 StGrand R pB 040 Clean TC2 fA 075 Solo Tpt. C 110 Sm.Club fw 145 Clp&Snp MENU 180 REV 909 Snr3
006 StGrand R pC 041 Clean TC2 fB 076 F.AccordianA 111 Sm.Club lp 146 909 Clap 2 181 REV 90’s Snr
007 StGrand L fA 042 Clean TC2 fC 077 F.AccordianB 112 FX Bell 1 147 HC2 Claps1 182 REV Solo Snr
008 StGrand L fB 043 NylonGt2 p A 078 F.AccordianC 113 FX Bell 1 fw 148 707 Claps 183 REV Rap Snr
009 StGrand L fC 044 NylonGt2 p B 079 Vibraphone A 114 FX Bell 2 149 HC2 Claps 2 184 REV Talk Snr
010 StGrand R fA 045 NylonGt2 p C 080 Vibraphone B 115 FX Bell 2 fw 150 Finger Snaps2 185 REV JinglSnr
011 StGrand R fB 046 NylonGt2 mfA 081 Vibraphone C 116 Auhvox 151 Finger Snaps3 186 REV HouseSnr
012 StGrand R fC 047 NylonGt2 mfB 082 VocalWave2 A 117 Tekno Hit 2 152 Bongo3 MENU 187 REV Snr Buzz
013 OrcStrings A 048 NylonGt2 mfC 083 VocalWave2 B 118 Tekno Hit 3 153 Bongo3 Low 188 REV TinySnr 2
014 OrcStrings B 049 NylonGt2 f A 084 VocalWave2 C 119 Tekno Loop 154 Bongo3 High 189 REV Mute Snr
015 OrcStrings C 050 NylonGt2 f B 085 JP Hollo A 120 FX Bomb 155 Tambrin MENU 190 REV 909 Rim2
016 Choir Aah A 051 NylonGt2 f C 086 JP Hollo B 121 Kick MENU 156 Tamb.Short 191 REV 909 Tom2
017 Choir Aah B 052 P.Bass 3 A 087 JP Hollo C 122 Deep Kick 3 157 Tamb.Long 192 REV 909 Clp2
018 Choir Aah C 053 P.Bass 3 B 088 Hard 5th A 123 TD7 Kick 158 CR78 Tamb. 193 REV HC2 Clp1
019 Choir Mmh A 054 P.Bass 3 C 089 Hard 5th B 124 Dance Kick 2 159 Shaker MENU2 194 REV 707 Clps
020 Choir Mmh B 055 Jazz Bass 3 A 090 Hard 5th C 125 Dance Kick 3 160 626 Shaker 195 REV HC2 Clps2
021 Choir Mmh C 056 Jazz Bass 3 B 091 Blaster A 126 Mix Kick 161 Shaker 3 196 REV F.Snaps 2
022 D.Solo Gtr A 057 Jazz Bass 3 C 092 Blaster B 127 Kick Ghost 162 Shaker 4 197 REV F.Snap 3
023 D.Solo Gtr B 058 Muted Bass A 093 Blaster C 128 Snr&Tom MENU 163 Shaker 5 198 REV Bongo3 L
024 D.Solo Gtr C 059 Muted Bass B 094 Juno Rave A 129 Loose Snr 164 REV Gt Scrap 199 REV Bongo3 H
025 D.MuteGt p A 060 Muted Bass C 095 Juno Rave B 130 Ring Snr 165 REV Gt SldNz 200 REV Tamb.Sht
026 D.MuteGt p B 061 Blow Sax A 096 Juno Rave C 131 808 Snr 2 166 REVGt CutNz 201 REV Tamb.Lng
027 D.MuteGt p C 062 Blow Sax B 097 Wah Gtr MENU 132 909 Snr 2 167 Rev Gt Slap 202 REV CR78Tamb
028 D.MuteGt mpA 063 Blow Sax C 098 Wah Down 1 133 909 Snr 3 168 REV TeknHit2 203 REV 626Shakr
029 D.MuteGt mpB 064 T.Sax hrd A 099 Wah Up 1 134 90’s Snare 169 REV TeknHit3 204 REV Shaker 3
030 D.MuteGt mpC 065 T.Sax hrd B 100 Wah Down 2 135 Solo Snr 170 Rev Deep K 3 205 REV Shaker 4
031 D.MuteGt mfA 066 T.Sax hrd C 101 Wah Up 2 136 Rap Snr 171 Rev TD7 Kick 206 REV Shaker 5
032 D.MuteGt mfB 067 Flute Vib A 102 Gtr FX MENU 137 Talk Snr 172 REV Dance K2
033 D.MuteGt mfC 068 Flute Vib B 103 Gtr Feedback 138 Jingle Snr 173 REV Dance K3
034 Clean TC 1 A 069 Flute Vib C 104 Gtr Scrap 139 House Snr 174 REV Mix Kick
035 Clean TC 1 B 070 R&R Horns A 105 Gtr Slid Nz 140 Snr Buzz 175 Rev K.Ghost

NQPSMTR%DVV'UXPV([SDQVLRQ%RDUG-9;3
3DWFK/LVWLQJ
1997 Roland Corporation U.S. SR-JV80-10 Bass & Drums Expansion Board Faxback # 10166 For JV-1080/2080,XP-50/80
1 Marcus 3way 35 John's OctFl 69 AL Mellow 103 All Noises 137 Rock On KIT 171 FAT Hall Sn
2 MM Slap/Hrm 36 B-Motional 70 Marcus Jazz 104 Ac.Bs Noises 138 Natural KIT 172 Funk Sn Dry
3 MM Fat Slap 37 Weather Frls 71 MM Jazz Ch. 105 Kick Menu 139 Pitched KIT 173 Funk Sn Room
4 Miller Pop 38 AcoustiTouch 72 MM Jazz Bs 106 Snare Menu1 140 Basher KIT 174 Natural Ping
5 MM Dynathumb 39 JP Soft A.Bs 73 Marcus Mute 107 Snare Menu2 141 Edgy KIT 175 Room Ping
6 Abe Sr. 4way 40 JP Hard A.Bs 74 Bright Pick 108 Snare Menu3 142 FAT Comp.KIT 176 Dance Snr 1
7 AL 3way/Nz 41 Ac.Bs Club 75 Garden Party 109 Hi-Hat Menu 143 FAT & Tight 177 Dance Snr 2
8 AL 3way P.Bs 42 Dry Acoustic 76 Phaser Mute 110 Tom-Tom Menu 144 Studio KIT 178 Kick&Cym 1/2
9 Abe Limiter 43 Hybrid Wood 77 MM Dry Mute 111 Cymbals Menu 145 Tight FunKIT 179 Kick&Cym 1/4
10 Space Bass 44 John's Rock 78 MM Hip-Hop 112 Drum LP Demo 146 TightPiccKIT 180 Kick&Cym 2
11 Hyper Funk 45 Pick UP 79 Wild Thang 113 Sweeping LPs 147 Dry DanceKIT 181 Butt Kicker
12 Abe's Thumbs 46 JP Rock Pick 80 Distorted Bs 114 Lo-Fi Loops 148 R&B KIT 182 Kick&Cym 2/3
13 AL Dark Slap 47 Dark Pick 81 Rock Phaser 115 AmbGrv/Bs 149 DynoSnareKIT 183 Kick&Cym 2/8
14 Poppin' Abe 48 JP Rock+Slap 82 Mod.Fuzz Bs 116 SlapHappy 150 Room Toms 184 Kick&Cym 3
15 John P.4way 49 JP Rock Fls 83 Sticky Bass 117 PlayC4Fun 151 Natural Toms 185 Kick&Cym 4
16 John P.w/Nz 50 Velo Rock Bs 84 Abe Flangpop 118 Flanged 152 Soft Toms 186 Kick&Cym 5
17 JP Chorus Bs 51 JP P.Bass 1 85 Mutey SynBs 119 BW Jz 6/8 153 Big Toms Dry 187 Kick&Cym 6
18 6StringThing 52 JP P.Bass 2 86 Funkin'WahBs 120 BW Brush 154 Big Toms Wet 188 Kick&Cym 7
19 Mondo Johndo 53 JP P.Bass 3 87 T-Wow Fretls 121 AL Slam 155 Ringer Snare 189 Kick&Cym 6/8
20 JP Fat Slap 54 JP P.Bass 4 88 T-Wow Slappy 122 AL Whack 156 Loud Ring Sn 190 Kick&Cym 8
21 JP Brite Slp 55 Dyno Ballad 89 Bass SOLO!! 123 AL Grunge 157 Live Piccolo 191 Kick&Cym 8/2
22 JP Fing+Slap 56 Velo Fingers 90 Refretter 124 BW Swamp 158 Wet Piccolo 192 Kick&Cym 9
23 Solo Fretles 57 Ch. Fingrs 91 Bass Harmos 125 BW Latin 159 Natural Crak 193 Kick&Cym 9/6
24 MM FretnotBs 58 Studio Mellow 92 Marcus Harms 126 BW Fusion 160 Natural Verb 194 Kick&Cym10
25 Marcus OctFl 59 Fat Fingers 93 Harmonicus 127 AL Funk 161 Natural Bryt 195 Kick&Cym11
26 MM FrtlsBend 60 Touchy Bass 94 Tune Up 128 AL Shuff. 162 Dry Ringer 196 Kick&Cym12
27 MM Smooth Fl 61 Abe's P.Bass 95 Harm Up 129 Fat Rock KIT 163 Rock On Room 197 Kik&Cym11/12
28 MM Weathery 62 AL Solid Fng 96 Harm Down 130 Ringer KIT 164 Rock On Wet 198 Kick&Cym12/4
29 Abe's Fretls 63 AL 2way Fng 97 Harm A#9 131 DynaPicc.KIT 165 FAT Impact 199 Lo-Fi Kick
30 AL French Ch 64 AbeSoftBs/Nz 98 Harm Eb#9 132 Whammer KIT 166 Nice Ballad 200 18"Hi-Hats1
31 AL Layer Fls 65 Abe Latin Bs 99 Harm E+11 133 BigBalladKIT 167 Huge FAT Snr 201 18"Hi-Hats2
32 AL Fls Solo 66 AL Latin Ch. 100 Harm E69 134 Fat PunchKIT 168 Warm Room Sn 202 16"Hi-Hats1
33 JP 6Str Fls 67 AL Fat Latin 101 SlidesNoises 135 Fat Funk KIT 169 Warm Verb Sn 203 16"Hi-Hats2
34 JP Solo Fls 68 AL Old Soul 102 All Slides 136 Garage KIT 170 Dry FAT Sn 204 CR-78 Hi-Hat

NQPSMTR%DVV'UXPV([SDQVLRQ%RDUG :DYHIRUP/LVWLQJ
1997 Roland Corporation U.S. SR-JV80-10 Faxback # 10165 Bass & Drums Expansion Board
001 MM Slap Bs A 042 JP Pop Bs C 082 AL Nz 9 122 SNR SET 4f 162 Lo-Fi K 202 Click Stick
002 MM Slap Bs B 043 JP Frls Bs A 083 JP Frls Nz 1 123 SNR SET 5p 163 SNR MENU 1 203 HAT MENiU
003 MM Slap Bs C 044 JP Frls Bs B 084 JP Frls Nz 2 124 SNR SET 5f 164 SNR MENU 2 204 18 Hat pdl
004 MM Pop Bs A 045 JP Frls Bs C 085 JP Frls Nz 3 125 SNR SET 6p 165 SNR MENU 3 205 18 Hat cls 1
005 MM Fop Bs B 046 JP Pick Bs A 086 JP Frls Nz 4 126 SNR SET 6f 166 Ring sft Sn 206 18 Hat cls 2
006 MM Pop Bs C 047 JP Pick Bs B 087 JP Ac.Nz 1 127 SNR SET 7p 167 Ring hrd Sn 207 18 Hat hlf 1
007 MM Frls Bs A 048 JP Pick Bs C 088 JP Ac.Nz 2 128 SNR SET 7f 168 Ring rol Sn 208 18 Hat hlf 2
008 MM Frls Bs B 049 JP Rock Bs A 089 JP Ac.Nz 3 129 SNR SET 8p 169 Ring flm Sn 209 18 Hat opn1
009 MM Frls Bs C 050 JP Rock Bs B 090 JP Ac.Nz 4 130 SNR SET 3f 170 SlamRm sftSn 210 18 Hat opn2
010 MM Jazz Bs A 051 JP Rock Bs C 091 DrumGrv MENU 131 SNR SET 9p 171 SlamRm hrdSn 211 16 Hat pdl
011 MM Jazz Bs B 052 JP 6StrBs pA 092 BWJz 6/8 132 SNR SET 9f 172 Slam Rm rolSn 212 16 Hat cls 1
012 MM Jazz Bs C 053 JP 6StrBs pB 093 BW Brush 133 SNR SET 10p 173 SlamRm flmSn 213 16 Hat cls 2
013 MM Pick Bs A 054 JP 6StrBs pC 094 AL Slam 134 SNR SET 10f 174 SlmDry sftSn 214 16 Hat hlf 1
014 MM Pick Bs B 055 JP 6StrBs fA 095 AL Whack 135 SNR SET 11p 175 SlmDry hrdSn 215 16 Hat hlf 2
015 MM Pick Bs C 056 JP 6StrBs fB 096 AL Grunge 136 SNR SET 11f 176 Dry sft Sn 216 16 Hat opn 1
016 MM Harm Bs A 057 JP 6StrBs fC 097 BW Swamp 137 HAT SET 1p 177 Dry hrd Sn 217 16 Hat opn 2
017 MM Harm Bs B 058 JP Ac.Bs p A 098 BW Latin 138 HAT SET 1f 178 Dry rol Sn 218 CR78 Hat cls
018 MM Harm Bs C 059 JP Ac.Bs p B 099 BW Fusion 139 HAT SET 1pdl 179 Dry flm Sn 219 CR78 Hat opn
019 AL Funk Bs A 060 JP Ac.Bs p C 100 AL Funk 140 HAT SET 2p 180 RockOn Sn 1 220 TOM MENU
020 AL Funk Bs B 061 JP Ac.Bs f A 101 ALShuff. 141 HAT SET 2f 181 RockOn Sn 2 221 16 MPL sftTm
021 AL Funk Bs C 062 JP Ac.Bs f B 102 Kik&CymSet1 142 HAT SET 2pdl 182 Verb sft Sn 222 16 MPL hrdTm
022 AL Pop Bs A 063 JP Ac.Bs f C 103 Kik&CymSet2 143 HAT SET 3 183 Verb hrd Sn 223 13 MPL sftTm
023 AL Pop Bs B 064 Sld&Nz MENU 104 Kik&CymSet3 144 TOM SET 1p 184 Warm sft Sn 224 13 MPL hrdTm
024 AL Pop Bs C 065 Slides MENU 105 Kik&CymSet4 145 TOM SET 1f 185 Warm hrd Sn 225 12 MPL sftTm
025 AL Frls Bs A 066 E.Bs Nz MENU 106 Kik&CymSet5 146 TOM SET 2 186 Warm flm Sn 226 12 MPL hrdTm
026 AL Frls Bs B 067 A.Bs Nz MENU 107 Kik&CymSet6 147 TOM SET 3p 187 DryFat sftSn 227 10 MPL sftTm
027 AL Frls Bs C 068 MM Slide 1 108 Kik&CymSet7 148 TOM SET 3f 188 DryFat hrdSn 228 10 MPL hrdTm
028 AL Lat in Bs A 069 MM Slide 2 109 Kik&CymSet8 149 KIK MENU 189 DryFat rolSn 229 Soft Low Tom
029 AL LatinBs B 070 AL Slide 110 Kik&CymSet9 150 Meat K 190 DryFat flmSn 230 Soft Mid Tom
030 AL LatinBs C 071 JP Slide 1 111 Kik&CymSet10 151 Boomer K1 191 Funk Sn1 231 Soft Hi Tom
031 AL Old Bs A 072 JP Slide 2 112 Kik&CymSet11 152 Boomer K2 192 Funk Sn2 232 LoVerb sftTm
032 AL Old Bs B 073 JP Slide 3 113 Kik&CymSet12 153 Medium K 193 Picc. sft Sn 233 LoVerb hrdTm
033 AL Old Bs C 074 AL Nz 1 114 Kik&CymSet13 154 Deep Dry K 194 Picc. mid Sn 234 HiVerb sftTm
034 AL P.Bass A 075 AL Nz 2 115 SNR SET 1p 155 Real Dry K1 195 Picc. hrd Sn 235 HiVerb hrdTm
035 AL P.Bass B 076 AL Nz 3 116 SNR SET 1f 156 Real Dry K2 196 Picc. rol Sn 236 CYM MENU
036 AL P.Bass C 077 AL Nz4 117 SNR SET 2p 157 Real Dry K3 197 Picc. flm Sn 237 Long Crash 1
037 JP Funk Bs A 078 AL Nz 5 118 SNR SET 2f 158 Stomp K 198 Choke Sn 238 Long Crash 2
038 JP Funk Bs B 079 AL Nz 6 119 SNR SET 3p 159 Comp K1 199 LiteVerb Sn 239 Long Ride 1
039 JP Funk Bs C 080 AL Nz 7 120 SNR SET 3f 160 Comp K2 200 Live Stick 240 Long Ride 2
040 JP Pop Bs A 081 AL Nz 8 121 SNR SET 4p 161 Comp K3 201 NaturalStick 241 LngRide Bell
041 JP Pop Bs B

NQPSMTR7HFKQR&ROOHFWLRQ%RDUG 3DWFK/LVWLQJ
1997 Roland Corporation U.S. SR-JV80-11 Faxback # 10241 For use with JV-80/880/90/1000/1080/2080, JD-990, and XP-50/80 synthesizers.
001 Teknoperator(132) 046 TB Saw Bass 091 Ring Bell 136 Sirena 181 Organ Stabs 226 Snr Menu 1
002 Transmission(144) 047 303 Ow Bass 092 260 & JUNO 137 After’s Pad 182 Techno Pizz 227 Snr Menu 2
003 X-Tronic Jam(120) 048 TB Square 1 093 260 MIDI 138 Warmer Pad 183 Captain Pizz 228 Kick Menu
004 Dirt Jungle(160) 049 TB Square 2 094 SquareKeys 2 139 Phatt Pad 184 Pizzatek 229 Hi Hat Menu
005 DJ Spinnin(151) 050 TB Square 3 095 Pure Sine 140 OB Sweep Pad 185 Sleepless 230 Perc Menu
006 Zipper Beat(151) 051 Solid Bass 1 096 Ambient ORG 141 Murk Pad 186 Mega 5th 2 231 Tom&Cym Menu
007 Tribal House(151) 052 Solid Bass 2 097 JX Planet 142 Dense Floor 187 Chord maj7th 232 Metal Dream
008 Obsession(144) 053 FM Tube Bass 098 Clavi-Club 143 SecretMelody 188 Chord min7th 233 System D
009 Sonic Empire(144) 054 Drum’m’Bass 099 Sweep Clav 2 144 Vaporish 189 5thDimension 234 Mayday Ring
010 Double Dutch(140 055 Sub Bass 100 Square Tek 145 Vintage Revo 190 StateXLChord 235 Industrial
011 E-tronicBoom(116) 056 Dirty Bass 101 Retro Party 146 Liquid Sky 191 Sixth Sense 236 Tranceporter
012 Chillout=->(116) 057 Gate Me Buzz 102 Rave Nature 147 Exploration 192 Garage Chord 237 Acid Copter
013 MecaTrip-Hop(90) 058 Coprex Bass 103 Alias Square 148 Drama Pad 193 Chordmaj7/5- 238 Roll Over
014 Hero Beat(90) 059 Bass Invader 104 Dirty Stack 149 Vapor Style 194 Planet EKNO 239 Gimme aBreak
015 Hit House(120) 060 Ovdrive Bass 105 Phenomena 150 JP-6 Style 195 Optimum Rave 240 RadicalAbuse
016 Voco Groove(122) 061 Housy Bella 106 Music Hi 151 Obilator 196 Arpege Me 241 Echodrome
017 Hell Fire(151) 062 Bassic Needs 107 Euro-Dance 1 151 Glamour 197 Vtransformer 242 Trance Chime
018 Lo:BD Hi:HH(144) 063 Raver Bass 1 108 Euro Dance 2 153 Medium Solo 198 Analog Attax 243 Altamira
019 Detroit+Perc(132) 064 Raver Bass 2 109 Dance Stack 154 Singing’Mini 199 Maxi Fuzzy ! 244 Locko Motif
020 Crossfader(120) 065 Jericho Bass 110 Raver Blade 155 Analog Flute 200 Only by FXM 245 SpaceFactory
021 Soft & Hard(120) 066 Slippy Bass 111 White Gloves 156 SH-5 Bs/Lead 201 Hit & Run 246 Get Busy
022 Space Shake(130) 067 Rise Bass 112 Touchdown 157 Classy Pulse 202 Photon Attak 247 Ayers Rock
023 Under Ether(85) 068 Cyber Bass 113 Rave Station 158 Jupiter-6 Ld 203 Predator 248 Altern Saw
024 Confusion(147) 069 SH-2000 Bass 114 Time Warp 159 Just Lovely 204 Village Hit 249 JP-6 Sync
025 Amsterdamer(184) 070 FM Bass 115 Thin Rave 160 DJ Devil 205 Hardcore Hit 250 ColdJX
026 House that?(120) 071 Razor Bass 116 Igor Circus 161 Simply June 206 Short Chord 251 Fancy Pad
027 Phrase Menu 072 SquelchyBass 117 Alpha Zone 162 Mr.Raw SAW 207 ShortCircuit 252 Tune Breath
028 Cyber-Trance 073 RaversBass 118 Stars March 163 Crispy Lead 208 SonafaPitch 253 OrchestraGTR
029 Creator 074 Compu Bass 119 JP Velo -Saw 164 Dirty Lead 2 209 Flutish SQUR 254 Gtr Sweep
030 Etherality 075 Jump Bass 120 Rich Teeth 165 Disto Stack 210 FazzyCow 808 255 Trilly
031 Unplugged 076 VocoBass 121 After Saw 166 Velo Chees 211 Blurpy 256 Good Bye Spk
032 Acid Melt 077 Vocoder Menu 122 Saw Cocktail 167 Noiz Mania 212 Static Hit
033 Brain Waves 078 1.2.3.4. BPM 123 Poly Message 168 Power Mutes 213 Hi Attack
034 1ShotGroove 079 TeknoMusic 124 Xpressive 169 V-Beep 214 TonalTension
035 FirstContact 080 Retrocoder 125 Earblower 170 Freaky Fry 215 Jungle sTabs
036 Ambient S/H 081 u/i/e/o V/Sw 126 Cutting Edge 171 SQ Formule 216 Buzz Machine
037 Deep Machine 082 Talk Box 1 127 Stalactica 172 DirtyOrgan 2 217 Zapper
038 Big Blue 083 Talk Box 2 128 LA Heaven 173 Oldies Organ 218 Blip
039 TeeBee V/Sw 084 VT Vox 129 Euforia 174 Edgy Organ 219 Iron Hit
040 303 Agressor 085 Artificial 130 Labo-Feedbak 175 Juno Organ 220 Headz Direct
041 TB or not TB 086 BariVoise 131 Banded Jupe 176 Space Org X 221 Scratchy Hit
042 HiLo303ModSw 087 After D ! 132 Killer Pad 177 Cabin Organ 222 Hit&IndsMenu
043 2Square Bass 088 ARPsychea 133 Mystic Pad 178 Dream Organ 223 GTR FX Menu
044 303 HollowBs 089 Vintage Call 134 D-Mention 179 Club Organ 224 GTR Power 1
045 303 Bass 090 HarmoChimer 135 X-hale 180 Perc. Organ 225 GTR Power 2

NQPSMTR 7HFKQR&ROOHFWLRQ%RDUG :DYHIRUP/LVW
1997 Roland Corporation U.S. SR-JV80-11 Faback # 10240 For use with JV-80/880/90/1000/1080/2080, JD-990, and XP-50/80 synthesizers.
001 PHRASE MENU 046 Dist Synth 091 ElectricDunk 136 TR808 RimLng 181 HC2 Dry Clap 226 Urban Snare
002 120: House 1 047 Dist Square 092 Thrill 137 TR808 Claves 182 Scratch Clap 227 Sim Snare
003 120: House 2 048 P5 Pipe 093 Drill Hit 138 CHH MENU 1 183 Comp Clap 228 Roll Snare
004 120: House 3 049 FM Garage 094 MachineShout 139 CHH MENU 2 184 Claptail 229 KICK MENU 1
005 120: TeknoBNG 050 JUNO Pluck 095 Air Gun 140 TR909 CHH 1 185 SNR MENU 1 230 KICK MENU 2
006 144: Tekno BD 051 Funky Synth 096 Emergency 141 TR909 CHH 2 186 SNR MENU 2 231 TR909 Kick 1
007 144: TeknoHAT 052 JUNO Bowing 097 Buzzer 142 TR909 CHH 3 187 SNR MENU 3 232 TR909 Kick 2
008 160: Drum’nBS 053 JUNO Synth 098 Tonality 143 TR808 CHH 1 188 SNR MENU 4 233 Plastic BD 1
009 184: Gabba 054 JX Synth 099 Aah Formant 144 TR808 CHH 2 189 SNR MENU 5 234 Plastic BD 2
010 132: Detroit 055 Alpha Wave 100 Eeh Formant 145 TR606 CHH 190 TR909 Snr 1 235 TR808 Snr 1
011 132: Agogo 056 Killer 101 lih Formant 146 TR707 CHH 191 TR909 Snr 2 236 TR808 Snr 2
012 116: Elect’80 057 Detuned Saw 102 Ooh Formant 147 CR78 CHH 192 TR909 Snr 3 237 TR808 Snr 3
013 120: Electro 1 058 Fat JP-6 103 Uuh Formant 148 Pop CHH 193 TR909 Snr 4 238 TR606 Kick 1
014 138: Electro 2 059 Euro Dance 104 Dist Ooh Vox 149 Bristol CHH 194 TR909 Snr 5 239 TR606 Kick 2
015 TB Dst Saw 060 Noisy 101 105 Talkbox 150 PHH MENU 195 TR909 Snr 6 240 TR707 Kick 1
016 TB Dist Sqr 1 061 Daft Wave 106 VOCODER MENU 151 TR909 PHH 1 196 TR909 Snr 7 241 TR707 Kick 2
017 TB Dist Sqr 2 062 Pizzy Techno 107 TOM MENU 152 TR909 PHH 2 197 TR808 Snr 1 242 Culture Kick
018 TB Reso Sqr 1 063 Organ Pizz 108 TR909 Tom 153 TR808 PHH 198 TR808 Snr 2 243 Optic Kick
019 TB Reso Sqr 2 064 Garage Org 109 TR909 DstTom 154 TR606 PHH 199 TR808 Snr 3 244 Lo-Fi BD
020 TB Reso Sqr 3 065 FM Club Org 110 TR808 Tom 155 TR707 PHH 200 TR808 Snr 4 245 Wet Kick
021 TB Saw 066 Org Chord 111 TR606 Tom 156 OHH MENU 201 TR808 Snr 1 246 Video Kick
022 TB Solid Saw 067 Dist TekGtr1 112 TR606 CmpTom 157 TR909 OHH 1 202 TR808 Snr 2 247 JungleKick 1
023 TB Reso Saw 068 Dist TekGtr2 113 TR707 Tom 158 TR909 OHH 2 203 TR808 Snr 3 248 Street Kick
024 TB Square 1 069 GTR FX MENU 114 TR707 CmpTom 159 TR909 OHH 3 204 TR707 Snr 1 249 Turbo Kick
025 TB Square 2 070 JP Siren 115 Deep Tom 160 TR909 DstOHH 205 TR707 Snr 2 250 JungleKick 2
026 TB Square 3 071 Cold Dress 116 Kick Tom 161
TR808 OHH 206 CR78 Snare 251 Tekno Kick
027 Octa Bass 072 HIT MENU 1 117 Natural Tom 162 TR606 DstOHH 207 Headz Snare 252 Sim Kick
028 Rave Bass 073 HIT MENU 2 118 Can Tom 163 TR707 OHH 208 Deep Snare 253 Amsterdam BD
029 FM Pluck Bs 074 Beam HiQ 119 PERCUSS MENU 164 CR78 OHH 209 Fat Snare 254 TR909 Dst BD
030 FM Slide Bs 075 Analog Bird 120 TR808 Conga1 165 R8 OHH 210 Antigua Snr 255 Roll Kick
031 Solid Bass 076 ElectronFall 121 TR808 Conga2 166 Cym OHH 211 MC Snr
032 Juno-60 Bass 077 Retro UFO 122 Surdo mute 167 CYMBAL MENU 212 DJ Snare
033 SH-5 Bass 078 Jungle Beep 123 Surdo open 168 TR606 Cym 1 213 Macho Snare
034 Dirty Bass 079 PC-2 Machine 124 TMB&SKR MENU 169 TR606 Cym 2 214 Clap Snare
035 Sub Bass 080 Dr. Beat 125 Tambourine 2 170 TR606 DstCym 215 Rage Snare
036 Jungle Bass 081 Mental Perc 126 Rattle Tamb 171 TR909 Ride 216 Indus Snare
037 JP8000 Saw 1 082 May Day Perc 127 TechnoShaker 172 TR909DstRide 217 TekRok Snare
038 JP8000 Saw 2 083 PC-2 Spacers 128 Dance Shaker 173 TR707 Ride 218 Jungle Snr 1
039 JP-6 Saw 084 Techno Scene 129 COW&RIM MENU 174 TR909 Crash 219 Jungle Snr 2
040 Techno Saw 085 Pure Psycho 130 TR808Cowbell 175 TR909DsCrash 220 Jungle Snr 3
041 SH-1 Square 086 TAO Hit 131 TR707Cowbell 176 CLAP MENU 221 Jungle Snr 4
042 SH-1 Pulse 087 Thin Beef 132 CR78 Cowbell 177 TR909 Clap 222 SideStiker
043 JP8000 PWM 088 Organ Hit 2 133 TR272 Agogo 178 Ts Clap 223 Ragga Snr 2
044 JP8000 FBK 089 INDUST.MENU 134 TR909 Rim 179 Clap Stop 224 Lo-Fi Snare
045 260 Sub OSC 090 PCM Press 135 TR808 Rim 180 TR707 Clap 225 Jungle Snr 5

NQPSMTR+LS+RS&ROOHFWLRQ%RDUG;3-9 3DWFK/LVWLQJ
1998 Roland Corporation U.S. SR-JV80-12 Faxback # 10286 For use with XP-50/60/80 & JV-1080/2080 synthesizers.
001 88:Phat Boyz 046 90:Dirty Lp 091 92:Skreem It 136 Happy Piano 181 Scientist 226 Mr.Underhill
002 89:Saxy Hit 047 90:Projects 092 98:Play W/Me 137 Bad Piano 182 DJ stuff 227 PyrmidBuildr
003 95:Scream! 048 90:Toy LP 093 98:SawBells 138 Roto B 183 Skratchy 228 Wippa Snappa
004 92:Jazzman 049 90:Effectn' 094 85:BumpnNite 139 Old Organ 2 184 Cwisp 4 Toot 229 Funky Santa
005 101:TripRide 050 91:Bender 095 Loops Menu 1 140 Acid D'Organ 185 Eerie Hits 230 Breathalizer
006 91:Hop Chop 051 91:Da Dope! 096 Loops Menu 2 141 Spinning ORG 186 MarchingBand 231 Toy Chest
007 107:MCnDaHse 052 91:BigBeauty 097 Juno Bass 1 142 Buzz Organ 187 Spooky Hits 232 Radio Break
008 123:ColdBuzz 053 96:Vintage 2 098 Juno Bass 2 143 Duck Clav 188 Old Fool 233 Glass Tracks
009 98:Moovin' 054 98:Clubbin' 099 Juno Bass 3 144 Mu-Klav 189 Velo Hit 234 Bad Boys
010 95:PhuzzPhat 055 92:StreetRok 100 Squarz Bass 145 Juno Melody 190 Killer Bees 235 The Heist
011 89:Space Dub 056 92:Boom Town 101 Da Juno Bass 146 Weez Synkomp 191 Voice Menu 236 Bristol 1
012 76:DogCatchr 057 92:Wash&Wax 102 Juno Bass 4 147 Doe P. Synth 192 DJ Voc 237 Bristol 2
013 103:Ol'SciFi 058 92:Ya Mon 103 Sub Bass 2 148 Cheap Syncom 193 1234 x4 238 Evil Storm
014 61:Crawl'n 059 95:Head Bobn 104 PhazSub Bass 149 JUNO Keys 194 Big Mouths! 239 Lunar Surf
015 74:Mystery 060 95:Pure Phat 105 Arrpy Bass 150 CheepnSquare 195 Funky Voxzy 240 Dogs Of Doom
016 138:Kingston 061 98:Box Beat 106 Growl Bass 151 Arrpy Synth 196 Baby...? 241 Cat Song
017 75:Slicer PB 062 98:InsectKng 107 Tick Bass 2 151 JUNO Pluck 197 Good eve...? 242 Short Waves
018 76:Trip Bump 063 95:Fractured 108 Multi Bass 2 153 R&B Pluck 198 SubtleAccnts 243 Sleepers
019 78:Bacon 064 95:Go! 109 Plop Bass 154 Dink Melodie 199 Dust Bunnies 244 SpacePeepers
020 73:Back Seat 065 96:FunkyBnd 110 Low Bass 155 Juno ChoBell 200 Gtr Fx Menu 245 EarlyEvening
021 78:SloMo Grv 066 96:Sub-Loop 111 PulsenSub 156 Analog Bells 201 SquelchCry 246 Radioactive
022 80:Squash 067 100:RazrMaid 112 Whappy Bass 157 RadioSymphny 202 Dual Crunchy 247 Lift Off!
023 80:WahHoo 068 100:Club Mix 113 LoPulse Bass 158 Silky Synthy 203 Chunky Split 248 Swamp World
024 81:Ringn Kit 069 98:Wiggler 114 JX Bass 159 JUNOStrings2 204 Power 2000 249 ScrapDrumKit
025 81:Wicked 070 104:Respect 115 Incarcerated 160 SoftStrings2 205 Dist-A-Vox 250 Kick Menu
026 83:HipHpDJ 071 108:Gargle 116 Twist Bass 161 HorrorString 206 Smooth Strat 251 Snare Menu 1
027 83:Kick It 072 80:Shout Out 117 808Kick Bass 162 JU&JP Phase 207 WahWahMelo 252 Snare Menu 2
028 83:Vintage 1 073 134:Come On 118 Bomd Bass 163 Juno X 208 Solo Sine 253 Rim&Clp Menu
029 85:Slammin 074 136:Echo Mix 119 DBass/Lead 164 PulsingPhase 209 Sat.Nite Ld 254 HH&Cym Menu
030 85:Homie 075 150:Ohyea 120 Saw Mill 165 Slidin' Bye 210 Lo Budg ld 255 Tom Menu
031 86:Street Bt 076 166:JnglCruz 121 Lo-Fi A.Bass 166 Bad Girls 211 JUNO Soft Ld 256 Perc. Menu
032 82:Urban 2 077 172:Get Busy 122 Hiphop EP 1 167 Dummy 212 SH-2000 2
033 88:Rastatube 078 61:Slippery 123 Hiphop EP 2 168 Shimmering 213 JU Reso Ld 1
034 88:HH LoFi 079 61:DopedMetl 124 Soft Rhodes2 169 40's Chord 214 JU Reso Ld 2
035 88:Yo! 080 78:Thin Lead 125 MellowTrem 170 30's Tpt 215 Synfunk Lead
036 88:Pumpin' 081 80:HseShffle 126 Echo Rhodes1 171 Brass Boyz 216 Hard Hat
037 88:WiddimWet 082 90:LP Piano 127 Echo Rhodes2 172 Dist Brass 217 Sus Harmons
038 88:VoxMachin 083 88:HoppyJazz 128 StackRhodes2 173 30's BrsFall 218 Flying 5th
039 88:HmBeatBox 084 88:AftrHours 129 Rotary Rhode 174 Freakout Sax 219 CheapRomance
040 88:Blow Hard 085 89:AlienLoop 130 Sweet Rhodes 175 4Way SaxHits 220 BudgetSynfny
041 88:WaterKing 086 90:Gringely 131 Hard Rhodes2 176 Lo-Fi Hits 221 Spellcaster
042 89:FunkyYeh 087 90:The Fedz 132 Wawa EPiano 177 Brass 4 You! 222 Traf
043 89:Funky #&! 088 90:CatsnMice 133 Shifter EP 178 Hit Menu 223 CrazyBaby
044 89:SnakySplt 089 92:SlapySlop 134 My Duck 179 da Alarm 224 HOP Haunting
045 90:Dirty Lp 090 92:FourHands 135 Comp Piano 180 Ray-gun 225 Roarn Tibet

NQPSMTR+LS+RS&ROOHFWLRQ%RDUG :DYHIRUP/LVWLQJ
1998 Roland Corporation U.S. SR-JV80-12 Faxback # 10288 For use with JV-80/880/90/1000/1080/2080 and XP-50/60/80 synthesizers.
001 Phrase MENU1 046 108:Gargle 091 ClassicHseHt 136 Give it Up 181 TightBoomSnr 226 Real Hat
002 Phrase MENU2 047 JUNO Bass 1 092 JUNO Blip 1 137 Canvas Laugh 182 Slamn' Snr 227 Lil' Hat
003 Phrase MENU3 048 JUNO Bass Lp 093 JUNO Blip 2 138 BeatBox Kick 183 PurePhat Snr 228 Garbage Hat
004 61:Slow Grv 049 Moogish 094 Sci-Fi 2 139 BeatBox Hat 184 R&B Snare 229 Ninja Hat
005 75:BoomRvBel 050 JUNO Bass 2 095 Slice of Trp 140 BeatBox Snr1 185 Hi Snare 230 Junk Hat
006 76:TrpHpKikn 051 JUNO Bs 2 Lp 096 Rattle Hit 141 BeatBox Snr2 186 DR Disco Snr 231 Ragga ClHat
007 78:NinjaBrek 052 Big Saw Bass 097 P.Phatt Hit 142 BeatBox Rim 187 Cruis'n Snr 232 Rock OpHat
008 80:Thump Grv 053 Big SawBs 2 098 BD Scratch 143 BeatBox Kik2 188 Overring Snr 233 HipHopMedHat
009 80:MetalHead 054 JUNO Sine Bs 099 SD Scratch 144 BeatBox Perc 189 Cut Hats Snr 234 CR78 Hat
010 81:Ringn Kit 055 Pure EP 100 Tape Stop 2 145 B.Box Shaker 190 Scrap Snr 235 TR909 OpHat
011 83:Big & Bad 056 Org Rhodes 101 BasicScratch 146 Chiki! 191 Machine Snr 236 TR909 Cymbal
012 83:HmBeatBx1 057 Lo-Fi Wurly 102 Scratch Loop 147 Ahhhhhh 192 DanceHallSnr 237 TR808 Cymbal
013 83:Poing Snr 058 JUNO 60 Buzz 103 Record Noiz 148 B.Box OpHat 193 Dance Snr 1 238 Ragga Crash
014 85:Homie 059 JUNO Pulse 5 104 EFX Tom Lp 149 Kick MENU 1 194 Big Snare 239 Lo-Fi Ride
015 85:Snr Wall 060 Funky JUNO 105 Hip Hop Ride 150 Kick MENU 2 195 Flat Snare 240 Tom MENU
016 86:Street 16 061 Mellow JUNO 106 P5 Noise 3 151 Jungle Kick 196 HipHop Snr 4 241 TR909 Tom
017 86:Bubbles 062 JUNO Strings 107 Toy Gun 1 15 Hip Kick 197 DistortedSnr 242 TR808 Tom
018 88:TrenchTwn 063 JUNO Str Lp 108 Toy Gun 2 153 Ninja Kick 198 Dance Snr 2 243 TR606 Tom 2
019 88:Cut Hats 064 Dist Gtr Chd 109 GeigerCountr 154 Break Kick 199 Sizzle Snr 244 Electro Tom
020 88:Yo! 065 Gtr FX MENU 110 GlassBreakLp 155 Funky Kick 200 Break Snr 245 Garbage Tom
021 88:Crackl'n 066 Wah Gtr Lp 1 111 Voice MENU 1 156 Slamn'Kick 1 201 Whack Snr 2 246 Perc. MENU
022 88:HmBeatBx2 067 Wah Gtr Lp 2 112 Voice MENU 2 157 Too Big Kick 202 Real Snare 247 TR808Claves2
023 89:BuzyFunky 068 Wah Gtr A 113 Voice MENU 3 158 Boom Kick 203 TR808 Snr 5 248 TR808 Cowbel
024 89:Slamn'Grv 069 Wah Gtr B 114 1,2,3,4 159 FarNear Kick 204 TR808 Snr 6 249 Tamb.Short 2
025 90:Swingn 070 D.GtrUpwhine 115 Kick it! 160 Slamn'Kick 2 205 TR808 Snr 7 250 Tamb. Long 2
026 90:NoizyBoys 071 Gtr Thumper 116 Come on! 161 Hall Kick 1 206 TR606 Snr 4 251 CR78 Tamb 2
027 90:Swingdirt 072 Lo-Fi RoomTp 117 Funky! 162 Dance Kick 4 207 Electro Snr 252 Jingle Bell
028 91:NotopHpHp 073 Hit MENU 1 118 Crazy! 163 Thump Kick 208 Echo Snare 253 Belltree
029 91:Cruis'n 074 Hit MENU 2 119 DJ! 164 PurePhatKick 209 TooBig Snr 254 Funky Tri
030 91:Uptown 075 Brass Fall 2 120 Go! 165 Hall Kick 2 210 Rim MENU 255 TR727Quijada
031 91:BigBeauty 076 Smear Hit 1 121 Stop! 166 Plastic Kick 211 Bright Rim
032 92:Jazzman 077 Smear Hit 2 122 Good Eve 167 ElectricKick 212 Ragga Rim 1
033 92:Overring 078 LoFi MinorHt 123 Yeah! 168 TR808 Kick 3 213 TR808 Rim 2
034 92:Boom Town 079 BrassVox Hit 124 Dirty Laugh 169 TR808 KickLp 214 Ragga Rim 2
035 92:Too Big 080 Brass Hit Lp 125 Female Laugh 170 TR707 Kick 3 215 Lo-Fi Rim
036 94:Ya Mon 081 Mean Brs Hit 126 Ow! 171 Lo-Fi Kick 216 Sizzle Rim
037 95:Head Bobn 082 Sax Lick 1 127 Pretty Aou! 172 Snare MENU 1 217 Real Rim
038 95:Pure Phat 083 Sax Lick 2 128 Singing Ahh 173 Snare MENU 2 218 Clap MENU
039 96:PlainJane 084 Sax Cry 129 Oh Yeah! 174 Snare MENU 3 219 Funk Clap
040 96:Jane 2 085 Sax Blast 130 Hoo! 175 HpHpJazzySnr 220 HipHop Clap
041 98:Funkster1 086 Sax Blast Lp 131 Say Yeah! 176 DR Snare 1 221 Crackhed
042 98:Funkster2 087 HipHop Alarm 132 Scream! 177 DR Snare 2 222 MC Clap
043 104:BigBottm 088 Cuica Hit 133 Baby! 178 RealJazz Snr 223 TR909 Clap 2
044 104:Respect 089 Breath Hit 134 Get on Up 179 Ragga Snr 3 224 HH/Cym MENU
045 104:Riddim 090 Bauw Hit 135 MC! 180 HipHop Snr 3 225 Overlord

NQPSMTR7'77XUER3HUFXVVLRQ6RXQG0RGXOH 3DWFK/LVWLQJ
1998 Roland Corporation U.S. TD-7T Patch Listing Faxback # 10306 Page 1of 9
Patch PC# Display Name Pedal Mode Remark
*1 65 Burn! Burn! Kit HiHat1 New Kit
*2 66 Sesion Session kit HiHat1 New Kit
*3 67 NowTek Now Tech kit HiHat1 New Kit
*4 68 Quake Quake kit HiHat1 New Kit
*5 69 Gt&Bas Guitar&Bass kit HiHat1 New Kit
*6 70 Vogue Vogue kit HiHat1 New Kit
*7 71 Trash Trash kit HiHat1 New Kit
*8 72 RimHit RimHit kit HiHat1 New Kit
*9 73 Percus Percussion kit Pitch-W New Kit
*10 74 50sRok 50's Rock kit HiHat1 New Kit
*11 75 Lite Lite kit HiHat1 New Kit
*12 76 Scary! Scary! Kit OFF New Kit
*13 77 X-Stik Cross Stick kit HiHat1 New Kit
*14 78 Studio Studio kit HiHat1 New Kit
*15 79 Stage Stage kit HiHat1 New Kit
*16 80 Latin Latin kit OFF New Kit
*17 81 Reggae Reggae kit HiHat1 New Kit
*18 82 DrSolo Drum Solo kit HiHat1 New Kit
*19 83 Groovy Groovy kit HiHat1 New Kit
*20 84 Live Live kit HiHat1 New Kit
*21 85 DaBlus The Blues kit HiHat1 New Kit
*22 86 X-Fade Cross Fade kit HiHat1 New Kit
*23 87 OdPerc Odd Percussion kit OFF New Kit
24 1 Stndrd Standard kit HiHat2 GM System GS Format
25 9 Room Room kit HiHat2 GS Format
26 17 Power Power kit HiHat2 GS Format
27 25 Electr Electronic kit HiHat2 GS Format
28 26 TR-808 TR-808 kit HiHat2 GS Format
29 33 Jazz Jazz kit HiHat2 GS Format
30 41 Brush Brushes kit HiHat GS Format
31 49 Orch Orchestra kit Pitch-N GS Format
32 88 User User kit HiHat1
* Patch 24 is to be played with the GM Score (Drum Part).
* Patches 24-31 are to be played with the GS music data (Drum Part).
* To play the TD-7 with an FD-7, change the Hi-hat Control Pedal Mode of Patches 24-30 to HiHat1 (TD-7 Owner's Manual p.66).
* Patch 32 is same as patch 24.

NQPSMTR7'77XUER3HUFXVVLRQ6RXQG0RGXOH 3DWFK/LVWLQJ
1998 Roland Corporation U.S. TD-7T Patch Listing Faxback # 10306 Page 2of 9
1. Burn! [EFFECT1: Room EFFECT2: Chorus] Layer Seq.
TRIGGER SOUND1 SOUND2 TYPE MIX Pat. No.
1/KICK 63.Room2.K 512.Off.E OFF -
1/KICK(rim) 70.Solid.K 512.Off.E OFF -
2/SNARE 1 80.Rock1.S 512.Off.E OFF -
2/SNARE(rim) 181.Rock2.S 512.Off.E OFF -
3/HI-HAT 302.AcoOI.H 300.AcoCI.H OFF -
3/HI-HAT(rim) 314.PopCH.H 301.AcoCO.H OFF -
4/TOM1 228.Dubl1.T 512.Off.E OFF -
4/TOM1(rim) 228.Dubl1.T 512.Off.E OFF -
5/TOM2 229.Dubl2.T 512.Off.E OFF -
5/TOM2(rim) 229.Dubl2.T 512.Off.E OFF -
6/TOM3 230.Dubl3.T 512.Off.E OFF -
6/TOM3(rim) 230.Dubl3.T 512.Off.E OFF -
7/TOM4 231.Dubl4.T 512.Off.E OFF -
7/TOM4(rim) 480.RevS.E 512.Off.E OFF -
8/RIDE 334.RRide.C 512.Off.E OFF -
8/RIDE(rim) 335.RRdBl.C 512.Off.E OFF -
9/CRASH 325.Crsh2.C 512.Off.E OFF -
9/CRASH(rim) 331.Chin2.C 512.Off.E OFF 25
PEDAL 303.AcoOO.H 512.Off.E OFF -
2. Sesion [EFFECT1: Hall EFFECT2: Chorus] Layer Seq.
TRIGGER SOUND1 SOUND2 TYPE MIX Pat. No.
1/KICK 11.Comrc.K 512.Off.E OFF -
1/KICK(rim) 1.AcMpl.K 512.Off.E OFF -
2/SNARE 143.Loos1.S 91.AcoRm.S CROSS1 8 -
2/SNARE(rim) 92.Atak1.S 512.Off.E OFF -
3/HI-HAT 302.AcoOI.H 300.AcoCI.H OFF -
3/HI-HAT(rim) 302.AcoOI.H 300.AcoCI.H OFF -
4/TOM1 264.Real1.T 512.Off.E OFF -
4/TOM1(rim) 264.Real1.T 512.Off.E OFF -
5/TOM2 265.Real2.T 512.Off.E OFF -
5/TOM2(rim) 265.Real2.T 512.Off.E OFF -
6/TOM3 266.Real3.T 512.Off.E OFF -
6/TOM3(rim) 266.Real3.T 512.Off.E OFF -
7/TOM4 267.Real4.T 512.Off.E OFF -
7/TOM4(rim) 267.Real4.T 512.Off.E OFF -
8/RIDE 332.Ride.C 512.Off.E OFF -
8/RIDE(rim) 333.RidBl.C 512.Off.E OFF -
9/CRASH 325.Crsh2.C 512.Off.E OFF -
9/CRASH(rim) 331.Chin2.C 331.Chin2.C CROSS1 8 -
PEDAL 304.AcoPH.H 512.Off.E OFF -
3. NowTek [EFFECT1: Room EFFECT2: Chorus] Layer Seq.
TRIGGER SOUND1 SOUND2 TYPE MIX Pat. No.
1/KICK 56.Punch.K 43.Log.K MIX 1 -
1/KICK(rim) 56.Punch.K 29.Gate2.K MIX 5 -
2/SNARE 196.90's.S 512.Off.E OFF -
2/SNARE(rim) 458.LtSht.E 512.Off.E OFF -
3/HI-HAT 309.LaxOH.H 308.LaxCH.H OFF -
3/HI-HAT(rim) 309.LaxOH.H 308.LaxCH.H OFF -
4/TOM1 208.Ambo1.T 268.Rim1.T MIX 1 -
4/TOM1(rim) 208.Ambo1.T 268.Rim1.T MIX 1 -
5/TOM2 209.Ambo2.T 269.Rim2.T MIX 1 -
5/TOM2(rim) 209.Ambo2.T 269.Rim2.T MIX 1 -
6/TOM3 210.Ambo3.T 270.Rim3.T MIX 1 -
6/TOM3(rim) 210.Ambo3.T 270.Rim3.T MIX 1 -
7/TOM4 211.Ambo4.T 271.Rim4.T MIX 1 -
7/TOM4(rim) 211.Ambo4.T 271.Rim4.T MIX 1 -
8/RIDE 334.RRide.C 333.RidBl.C MIX 4 -
8/RIDE(rim) 328.Spla1.C 512.Off.E OFF -
9/CRASH 325.Crsh2.C 512.Off.E OFF -
9/CRASH(rim) 330.Chin1.C 512.Off.E OFF 29
PEDAL 310.LaxPH.H 512.Off.E OFF -
4. Quake [EFFECT1: Hall EFFECT2: Flanger] Layer Seq.
TRIGGER SOUND1 SOUND2 TYPE MIX Pat. No.
1/KICK 37.Huge.K 28.Gate1.K MIX 1 -
1/KICK(rim) 15.Dry1.K 512.Off.E OFF -
2/SNARE 182.Room1.S 148.Megal.S MIX 1 -
2/SNARE(rim) 122.Explo.S 512.Off.E OFF -
3/HI-HAT 306.HvyOH.H 305.HvyCH.H OFF -
3/HI-HAT(rim) 306.HvyOH.H 308.LaxCH.H OFF -
4/TOM1 260.Quak1.T 260.Quak1.T MIX 6 -
4/TOM1(rim) 444.Crsh2.E 512.Off.E OFF -
5/TOM2 261.Quak2.T 261.Quak2.T MIX 6 -
5/TOM2(rim) 477.VbClp.E 512.Off.E OFF -
6/TOM3 262.Quak3.T 262.Quak3.T MIX 6 -
6/TOM3(rim) 340.CowH.P 512.Off.E OFF -
7/TOM4 263.Quak4.T 263.Quak4.T MIX 6 -
7/TOM4(rim) 327.Crsh4.C 324.Crsh1.C MIX 5 -
8/RIDE 334.RRide.C 512.Off.E OFF -
8/RIDE(rim) 333.RidBl.C 512.Off.E OFF -
9/CRASH 327.Crsh4.C 512.Off.E OFF -
9/CRASH(rim) 331.Chin2.C 512.Off.E OFF 26
PEDAL 307.HvyPH.H 512.Off.E OFF -

NQPSMTR7'77XUER3HUFXVVLRQ6RXQG0RGXOH 3DWFK/LVWLQJ
1998 Roland Corporation U.S. TD-7T Patch Listing Faxback # 10306 Page 3of 9
5. Gt&Bas [EFFECT1: Hall EFFECT2: Flanger] Layer Seq.
TRIGGER SOUND1 SOUND2 TYPE MIX Pat. No.
1/KICK 56.Punch.K 512.Off.E OFF 44
1/KICK(rim) 15.Dry1.K 512.Off.E OFF -
2/SNARE 130.Hous3.S 501.Gt5Op.E MIX 1 -
2/SNARE(rim) 157.Picc2.S 512.Off.E OFF -
3/HI-HAT 312.LitOH.H 311.LitCH.H OFF -
3/HI-HAT(rim) 303.AcoOO.H 301.AcoCO.H OFF -
4/TOM1 268.Rim1.T 512.Off.E OFF -
4/TOM1(rim) 328.Spla1.C 512.Off.E OFF -
5/TOM2 269.Rim2.T 512.Off.E OFF -
5/TOM2(rim) 426.80Clp.P 512.Off.E OFF -
6/TOM3 270.Rim3.T 512.Off.E OFF -
6/TOM3(rim) 340.CowH.P 512.Off.E OFF -
7/TOM4 271.Rim4.T 512.Off.E OFF -
7/TOM4(rim) 327.Crsh4.C 327.Crsh4.C SW1 8 -
8/RIDE 512.Off.E 512.Off.E OFF 45
8/RIDE(rim) 333.RidBl.C 335.RRdBl.C MIX 8 -
9/CRASH 325.Crsh2.C 325.Crsh2.C MIX 8 -
9/CRASH(rim) 330.Chin1.C 330.Chin1.C SW1 8 40
PEDAL 313.LitPH.H 512.Off.E OFF -
6. Vogue [EFFECT1: Hall EFFECT2: Chorus] Layer Seq.
TRIGGER SOUND1 SOUND2 TYPE MIX Pat. No.
1/KICK 87.909Ac.K 512.Off.E OFF -
1/KICK(rim) 79.TR909.K 512.Off.E OFF -
2/SNARE 192.TR909.S 512.Off.E OFF -
2/SNARE(rim) 146.Lt909.S 512.Off.E OFF -
3/HI-HAT 318.StiOH.H 300.AcoCI.H OFF -
3/HI-HAT(rim) 318.StiOH.H 300.AcoCI.H OFF -
4/TOM1 284.Side1.T 512.Off.E OFF -
4/TOM1(rim) 284.Side1.T 512.Off.E OFF -
5/TOM2 285.Side2.T 512.Off.E OFF -
5/TOM2(rim) 285.Side2.T 512.Off.E OFF -
6/TOM3 286.Side3.T 512.Off.E OFF -
6/TOM3(rim) 286.Side3.T 512.Off.E OFF -
7/TOM4 287.Side4.T 512.Off.E OFF -
7/TOM4(rim) 287.Side4.T 512.Off.E OFF -
8/RIDE 332.Ride.C 512.Off.E OFF -
8/RIDE(rim) 333.RidBl.C 512.Off.E OFF -
9/CRASH 326.Crsh3.C 512.Off.E OFF -
9/CRASH(rim) 331.Chin2.C 512.Off.E OFF 30
PEDAL 317.StiCH.H 512.Off.E OFF -
7. Trash [EFFECT1: Plate EFFECT2: Chorus] Layer Seq.
TRIGGER SOUND1 SOUND2 TYPE MIX Pat. No.
1/KICK 74.Syn2.K 457.Knock.E MIX 1 -
1/KICK(rim) 26.Flop.K 400.Ethn2.P MIX 1 -
2/SNARE 174.Regg1.S 405.Metl1.P MIX 1 -
2/SNARE(rim) 112.Clip.S 129.Hous2.S MIX 1 -
3/HI-HAT 315.PopOH.H 308.LaxCH.H OFF -
3/HI-HAT(rim) 315.PopOH.H 308.LaxCH.H OFF -
4/TOM1 292.Tank1.T 393.BellL.P MIX 1 -
4/TOM1(rim) 292.Tank1.T 393.BellL.P MIX 1 -
5/TOM2 293.Tank2.T 401.Ethn3.P MIX 1 -
5/TOM2(rim) 293.Tank2.T 401.Ethn3.P MIX 1 -
6/TOM3 294.Tank3.T 396.Can3.P MIX 1 -
6/TOM3(rim) 294.Tank3.T 396.Can3.P MIX 1 -
7/TOM4 295.Tank4.T 397.Can4.P MIX 1 -
7/TOM4(rim) 295.Tank4.T 397.Can4.P MIX 1 -
8/RIDE 337.FeRid.C 349.TriMt.P MIX 1 -
8/RIDE(rim) 335.RRdBl.C 512.Off.E OFF -
9/CRASH 328.Spla1.C 402.Ethn4.P MIX 1 -
9/CRASH(rim) 333.RidBl.C 512.Off.E OFF -
PEDAL 316.PopPH.H 512.Off.E OFF -
8. RimHit [EFFECT1: Delay EFFECT2: Flanger] Layer Seq.
TRIGGER SOUND1 SOUND2 TYPE MIX Pat. No.
1/KICK 36.Hous3.K 512.Off.E OFF -
1/KICK(rim) 15.Dry1.K 512.Off.E OFF -
2/SNARE 129.Hous2.S 512.Off.E OFF -
2/SNARE(rim) 111.Chain.S 512.Off.E OFF -
3/HI-HAT 323.808OH.H 322.808CH.H OFF -
3/HI-HAT(rim) 318.StiOH.H 317.StiCH.H OFF -
4/TOM1 272.Ring1.T 512.Off.E OFF 45
4/TOM1(rim) 498.OrHit.E 512.Off.E OFF -
5/TOM2 273.Ring2.T 512.Off.E OFF 46
5/TOM2(rim) 498.OrHit.E 512.Off.E OFF -
6/TOM3 274.Ring3.T 512.Off.E OFF -
6/TOM3(rim) 498.OrHit.E 512.Off.E OFF -
7/TOM4 275.Ring4.T 512.Off.E OFF -
7/TOM4(rim) 498.OrHit.E 512.Off.E OFF -
8/RIDE 454.HiQ.E 512.Off.E OFF -
8/RIDE(rim) 459.Nois1.E 512.Off.E OFF -
9/CRASH 501.Gt5Op.E 512.Off.E OFF -
9/CRASH(rim) 501.Gt5Op.E 512.Off.E OFF -
PEDAL 310.LaxPH.H 512.Off.E OFF -

NQPSMTR7'77XUER3HUFXVVLRQ6RXQG0RGXOH 3DWFK/LVWLQJ
1998 Roland Corporation U.S. TD-7T Patch Listing Faxback # 10306 Page 4of 9
9. Percus [EFFECT1: Hall EFFECT2: Chorus] Layer Seq.
TRIGGER SOUND1 SOUND2 TYPE MIX Pat. No.
1/KICK 387.SrdMt.P 388.SrdOp.P SW1 6 -
1/KICK(rim) 387.SrdMt.P 388.SrdOp.P SW1 6 -
2/SNARE 384.PndOp.P 512.Off.E OFF 43
2/SNARE(rim) 383.PndMt.P 512.Off.E OFF 43
3/HI-HAT 350.TriOp.P 512.Off.E OFF 43
3/HI-HAT(rim) 349.TriMt.P 512.Off.E OFF 43
4/TOM1 359.CgHOp.P 512.Off.E OFF -
4/TOM1(rim) 363.Talk.P 512.Off.E OFF -
5/TOM2 362.CgLOp.P 512.Off.E OFF -
5/TOM2(rim) 357.CgHMt.P 512.Off.E OFF -
6/TOM3 364.TimbH.P 512.Off.E OFF -
6/TOM3(rim) 340.CowH.P 512.Off.E OFF -
7/TOM4 365.TimbL.P 512.Off.E OFF -
7/TOM4(rim) 329.Spla2.C 512.Off.E OFF -
8/RIDE 369.Gui1L.P 512.Off.E OFF -
8/RIDE(rim) 368.Gui1S.P 512.Off.E OFF -
9/CRASH 377.WhisS.P 512.Off.E OFF -
9/CRASH(rim) 378.WhisL.P 512.Off.E OFF -
PEDAL 367.Vibsl.P 512.Off.E OFF -
10. 50sRok [EFFECT1: Hall EFFECT2: Chorus] Layer Seq.
TRIGGER SOUND1 SOUND2 TYPE MIX Pat. No.
1/KICK 40.Jazz.K 512.Off.E OFF -
1/KICK(rim) 58.Real.K 512.Off.E OFF -
2/SNARE 178.Ring.S 91.AcoRm.S MIX 5 -
2/SNARE(rim) 91.AcoRm.S 512.Off.E OFF -
3/HI-HAT 302.AcoOI.H 300.AcoCI.H OFF -
3/HI-HAT(rim) 302.AcoOI.H 300.AcoCI.H OFF -
4/TOM1 204.Acou1.T 512.Off.E OFF -
4/TOM1(rim) 204.Acou1.T 512.Off.E OFF -
5/TOM2 205.Acou2.T 512.Off.E OFF -
5/TOM2(rim) 205.Acou2.T 512.Off.E OFF -
6/TOM3 206.Acou3.T 512.Off.E OFF -
6/TOM3(rim) 206.Acou3.T 512.Off.E OFF -
7/TOM4 207.Acou4.T 512.Off.E OFF -
7/TOM4(rim) 207.Acou4.T 512.Off.E OFF -
8/RIDE 334.RRide.C 512.Off.E OFF -
8/RIDE(rim) 335.RRdBl.C 512.Off.E OFF -
9/CRASH 325.Crsh2.C 512.Off.E OFF -
9/CRASH(rim) 331.Chin2.C 512.Off.E OFF 28
PEDAL 304.AcoPH.H 512.Off.E OFF -
11. Lite [EFFECT1: Hall EFFECT2: Chorus] Layer Seq.
TRIGGER SOUND1 SOUND2 TYPE MIX Pat. No.
1/KICK 35.Hous2.K 512.Off.E OFF -
1/KICK(rim) 35.Hous2.K 512.Off.E OFF -
2/SNARE 128.Hous1.S 512.Off.E OFF -
2/SNARE(rim) 139.Lite1.S 512.Off.E OFF -
3/HI-HAT 318.StiOH.H 314.PopCH.H OFF -
3/HI-HAT(rim) 318.StiOH.H 314.PopCH.H OFF -
4/TOM1 284.Side1.T 512.Off.E OFF -
4/TOM1(rim) 284.Side1.T 512.Off.E OFF -
5/TOM2 285.Side2.T 512.Off.E OFF -
5/TOM2(rim) 285.Side2.T 512.Off.E OFF -
6/TOM3 286.Side3.T 512.Off.E OFF -
6/TOM3(rim) 286.Side3.T 512.Off.E OFF -
7/TOM4 287.Side4.T 512.Off.E OFF -
7/TOM4(rim) 287.Side4.T 512.Off.E OFF -
8/RIDE 336.BrRid.C 512.Off.E OFF -
8/RIDE(rim) 337.FeRid.C 512.Off.E OFF -
9/CRASH 328.Spla1.C 512.Off.E OFF -
9/CRASH(rim) 331.Chin2.C 512.Off.E OFF 42
PEDAL 317.StiCH.H 512.Off.E OFF -
12. Scary! [EFFECT1: Hall EFFECT2: Chorus] Layer Seq.
TRIGGER SOUND1 SOUND2 TYPE MIX Pat. No.
1/KICK 347.CnBDO.P 512.Off.E OFF -
1/KICK(rim) 441.BnSaw.E 512.Off.E OFF -
2/SNARE 439.Arc.E 464.Pipe.E MIX 6 -
2/SNARE(rim) 401.Ethn3.P 512.Off.E OFF -
3/HI-HAT 465.Rand1.E 512.Off.E OFF -
3/HI-HAT(rim) 483.RevC2.E 512.Off.E OFF -
4/TOM1 464.Pipe.E 464.Pipe.E MIX 5 -
4/TOM1(rim) 439.Arc.E 512.Off.E OFF -
5/TOM2 465.Rand1.E 512.Off.E OFF -
5/TOM2(rim) 439.Arc.E 512.Off.E OFF -
6/TOM3 450.Gun1.E 512.Off.E OFF -
6/TOM3(rim) 342.Tamb1.P 512.Off.E OFF -
7/TOM4 442.CnAmb.E 512.Off.E OFF -
7/TOM4(rim) 452.Gun3.E 512.Off.E OFF -
8/RIDE 472.Sonar.E 512.Off.E OFF -
8/RIDE(rim) 459.Nois1.E 512.Off.E OFF -
9/CRASH 452.Gun3.E 512.Off.E OFF -
9/CRASH(rim) 463.Phase.E 512.Off.E OFF -
PEDAL 439.Arc.E 512.Off.E OFF -

NQPSMTR7'77XUER3HUFXVVLRQ6RXQG0RGXOH 3DWFK/LVWLQJ
1998 Roland Corporation U.S. TD-7T Patch Listing Faxback # 10306 Page 5of 9
13. X-Stik [EFFECT1: Hall EFFECT2: Chorus] Layer Seq.
TRIGGER SOUND1 SOUND2 TYPE MIX Pat. No.
1/KICK 22.EzPlw.K 512.Off.E OFF -
1/KICK(rim) 11.Comrc.K 512.Off.E OFF -
2/SNARE 200.HicSt.S 512.Off.E OFF -
2/SNARE(rim) 201.MplSt.S 512.Off.E OFF -
3/HI-HAT 315.PopOH.H 314.PopCH.H OFF -
3/HI-HAT(rim) 315.PopOH.H 314.PopCH.H OFF -
4/TOM1 264.Real1.T 512.Off.E OFF -
4/TOM1(rim) 264.Real1.T 512.Off.E OFF -
5/TOM2 265.Real2.T 512.Off.E OFF -
5/TOM2(rim) 265.Real2.T 512.Off.E OFF -
6/TOM3 266.Real3.T 512.Off.E OFF -
6/TOM3(rim) 266.Real3.T 512.Off.E OFF -
7/TOM4 267.Real4.T 512.Off.E OFF -
7/TOM4(rim) 267.Real4.T 512.Off.E OFF -
8/RIDE 332.Ride.C 512.Off.E OFF -
8/RIDE(rim) 333.RidBl.C 512.Off.E OFF -
9/CRASH 326.Crsh3.C 512.Off.E OFF -
9/CRASH(rim) 331.Chin2.C 512.Off.E OFF 36
PEDAL 316.PopPH.H 512.Off.E OFF -
14. Studio [EFFECT1: Hall EFFECT2: Chorus] Layer Seq.
TRIGGER SOUND1 SOUND2 TYPE MIX Pat. No.
1/KICK 22.EzPlw.K 512.Off.E OFF -
1/KICK(rim) 11.Comrc.K 512.Off.E OFF -
2/SNARE 153.Nshvl.S 512.Off.E OFF -
2/SNARE(rim) 91.AcoRm.S 512.Off.E OFF -
3/HI-HAT 315.PopOH.H 314.PopCH.H OFF -
3/HI-HAT(rim) 315.PopOH.H 314.PopCH.H OFF -
4/TOM1 264.Real1.T 512.Off.E OFF -
4/TOM1(rim) 264.Real1.T 512.Off.E OFF -
5/TOM2 265.Real2.T 512.Off.E OFF -
5/TOM2(rim) 265.Real2.T 512.Off.E OFF -
6/TOM3 266.Real3.T 512.Off.E OFF -
6/TOM3(rim) 266.Real3.T 512.Off.E OFF -
7/TOM4 267.Real4.T 512.Off.E OFF -
7/TOM4(rim) 267.Real4.T 512.Off.E OFF -
8/RIDE 332.Ride.C 512.Off.E OFF -
8/RIDE(rim) 333.RidBl.C 512.Off.E OFF -
9/CRASH 326.Crsh3.C 512.Off.E OFF -
9/CRASH(rim) 331.Chin2.C 512.Off.E OFF 38
PEDAL 316.PopPH.H 512.Off.E OFF -
15. Stage [EFFECT1: Hall EFFECT2: Chorus] Layer Seq.
TRIGGER SOUND1 SOUND2 TYPE MIX Pat. No.
1/KICK 28.Gate1.K 512.Off.E OFF -
1/KICK(rim) 4.Bottm.K 512.Off.E OFF -
2/SNARE 151.MpRck.S 512.Off.E OFF -
2/SNARE(rim) 186.SprWk.S 512.Off.E OFF -
3/HI-HAT 306.HvyOH.H 314.PopCH.H OFF -
3/HI-HAT(rim) 306.HvyOH.H 314.PopCH.H OFF -
4/TOM1 240.Grnd1.T 512.Off.E OFF -
4/TOM1(rim) 240.Grnd1.T 512.Off.E OFF -
5/TOM2 241.Grnd2.T 512.Off.E OFF -
5/TOM2(rim) 241.Grnd2.T 512.Off.E OFF -
6/TOM3 242.Grnd3.T 512.Off.E OFF -
6/TOM3(rim) 242.Grnd3.T 512.Off.E OFF -
7/TOM4 243.Grnd4.T 512.Off.E OFF -
7/TOM4(rim) 243.Grnd4.T 512.Off.E OFF -
8/RIDE 334.RRide.C 512.Off.E OFF -
8/RIDE(rim) 335.RRdBl.C 512.Off.E OFF -
9/CRASH 325.Crsh2.C 512.Off.E OFF -
9/CRASH(rim) 331.Chin2.C 512.Off.E OFF 26
PEDAL 310.LaxPH.H 512.Off.E OFF -
16. Latin [EFFECT1: Plate EFFECT2: Chorus] Layer Seq.
TRIGGER SOUND1 SOUND2 TYPE MIX Pat. No.
1/KICK 410.TaikL.P 512.Off.E OFF -
1/KICK(rim) 367.Vibsl.P 512.Off.E OFF -
2/SNARE 390.DjmbH.P 512.Off.E OFF -
2/SNARE(rim) 391.DjmbL.P 512.Off.E OFF -
3/HI-HAT 368.Gui1S.P 369.Gui1L.P MIX 6 -
3/HI-HAT(rim) 367.Vibsl.P 512.Off.E OFF -
4/TOM1 364.TimbH.P 512.Off.E OFF -
4/TOM1(rim) 365.TimbL.P 512.Off.E OFF -
5/TOM2 353.BngHM.P 512.Off.E OFF -
5/TOM2(rim) 356.BngLO.P 512.Off.E OFF -
6/TOM3 358.CgHSl.P 512.Off.E OFF -
6/TOM3(rim) 359.CgHOp.P 512.Off.E OFF -
7/TOM4 362.CgLOp.P 512.Off.E OFF -
7/TOM4(rim) 363.Talk.P 512.Off.E OFF -
8/RIDE 393.BellL.P 512.Off.E OFF -
8/RIDE(rim) 392.BellH.P 512.Off.E OFF -
9/CRASH 328.Spla1.C 512.Off.E OFF -
9/CRASH(rim) 378.WhisL.P 512.Off.E OFF 41
PEDAL 367.Vibsl.P 512.Off.E OFF -

NQPSMTR7'77XUER3HUFXVVLRQ6RXQG0RGXOH 3DWFK/LVWLQJ
1998 Roland Corporation U.S. TD-7T Patch Listing Faxback # 10306 Page 6of 9
17. Reggae [EFFECT1: Delay EFFECT2: Chorus] Layer Seq.
TRIGGER SOUND1 SOUND2 TYPE MIX Pat. No.
1/KICK 55.Pinch.K 512.Off.E OFF -
1/KICK(rim) 12.Deep.K 512.Off.E OFF -
2/SNARE 200.HicSt.S 512.Off.E OFF -
2/SNARE(rim) 174.Regg1.S 512.Off.E OFF -
3/HI-HAT 302.AcoOI.H 300.AcoCI.H OFF -
3/HI-HAT(rim) 302.AcoOI.H 300.AcoCI.H OFF -
4/TOM1 364.TimbH.P 512.Off.E OFF -
4/TOM1(rim) 328.Spla1.C 512.Off.E OFF -
5/TOM2 365.TimbL.P 512.Off.E OFF -
5/TOM2(rim) 477.VbClp.E 512.Off.E OFF -
6/TOM3 289.Surd2.T 512.Off.E OFF -
6/TOM3(rim) 340.CowH.P 512.Off.E OFF -
7/TOM4 290.Surd3.T 512.Off.E OFF -
7/TOM4(rim) 327.Crsh4.C 512.Off.E OFF -
8/RIDE 332.Ride.C 512.Off.E OFF -
8/RIDE(rim) 333.RidBl.C 512.Off.E OFF -
9/CRASH 328.Spla1.C 512.Off.E OFF -
9/CRASH(rim) 331.Chin2.C 512.Off.E OFF 39
PEDAL 304.AcoPH.H 512.Off.E OFF -
18. DrSolo [EFFECT1: Delay EFFECT2: Flanger] Layer Seq.
TRIGGER SOUND1 SOUND2 TYPE MIX Pat. No.
1/KICK 81.VbSld.K 512.Off.E OFF -
1/KICK(rim) 15.Dry1.K 512.Off.E OFF -
2/SNARE 181.Rock2.S 512.Off.E OFF -
2/SNARE(rim) 91.AcoRm.S 512.Off.E OFF -
3/HI-HAT 309.LaxOH.H 308.LaxCH.H OFF -
3/HI-HAT(rim) 303.AcoOO.H 301.AcoCO.H OFF -
4/TOM1 240.Grnd1.T 512.Off.E OFF -
4/TOM1(rim) 240.Grnd1.T 512.Off.E OFF -
5/TOM2 241.Grnd2.T 512.Off.E OFF -
5/TOM2(rim) 241.Grnd2.T 512.Off.E OFF -
6/TOM3 242.Grnd3.T 512.Off.E OFF -
6/TOM3(rim) 242.Grnd3.T 512.Off.E OFF -
7/TOM4 243.Grnd4.T 512.Off.E OFF -
7/TOM4(rim) 243.Grnd4.T 512.Off.E OFF -
8/RIDE 332.Ride.C 334.RRide.C CROSS18 -
8/RIDE(rim) 333.RidBl.C 335.RRdBl.C MIX 8 -
9/CRASH 324.Crsh1.C 325.Crsh2.C SW1 8 -
9/CRASH(rim) 330.Chin1.C 331.Chin2.C SW1 8 48
PEDAL 310.LaxPH.H 512.Off.E OFF 48
19. Groovy [EFFECT1: Hall EFFECT2: Flanger] Layer Seq.
TRIGGER SOUND1 SOUND2 TYPE MIX Pat. No.
1/KICK 43.Log.K 512.Off.E OFF -
1/KICK(rim) 15.Dry1.K 512.Off.E OFF -
2/SNARE 131.HsDpn.S 512.Off.E OFF -
2/SNARE(rim) 117.Dance.S 512.Off.E OFF -
3/HI-HAT 318.StiOH.H 317.StiCH.H OFF -
3/HI-HAT(rim) 323.808OH.H 322.808CH.H OFF -
4/TOM1 236.Flot1.T 466.Rand2.E MIX 1 -
4/TOM1(rim) 329.Spla2.C 512.Off.E OFF 32
5/TOM2 238.Flot3.T 463.Phase.E MIX 1 -
5/TOM2(rim) 426.80Clp.P 512.Off.E OFF -
6/TOM3 468.ScrPs.E 512.Off.E OFF -
6/TOM3(rim) 469.ScrPl.E 512.Off.E OFF -
7/TOM4 43.Log.K 512.Off.E OFF -
7/TOM4(rim) 450.Gun1.E 512.Off.E OFF -
8/RIDE 454.HiQ.E 512.Off.E OFF -
8/RIDE(rim) 445.Drop.E 512.Off.E OFF -
9/CRASH 449.Glass.E 512.Off.E OFF -
9/CRASH(rim) 328.Spla1.C 330.Chin1.C MIX 8 31
PEDAL 317.StiCH.H 512.Off.E OFF -
20. Live [EFFECT1: Hall EFFECT2: Flanger] Layer Seq.
TRIGGER SOUND1 SOUND2 TYPE MIX Pat. No.
1/KICK 9.CmAco.K 512.Off.E OFF -
1/KICK(rim) 15.Dry1.K 512.Off.E OFF -
2/SNARE 178.Ring.S 512.Off.E OFF -
2/SNARE(rim) 91.AcoRm.S 512.Off.E OFF -
3/HI-HAT 309.LaxOH.H 300.AcoCI.H OFF -
3/HI-HAT(rim) 309.LaxOH.H 300.AcoCI.H OFF -
4/TOM1 228.Dubl1.T 512.Off.E OFF -
4/TOM1(rim) 228.Dubl1.T 512.Off.E OFF -
5/TOM2 229.Dubl2.T 512.Off.E OFF -
5/TOM2(rim) 229.Dubl2.T 512.Off.E OFF -
6/TOM3 230.Dubl3.T 512.Off.E OFF -
6/TOM3(rim) 230.Dubl3.T 512.Off.E OFF -
7/TOM4 231.Dubl4.T 512.Off.E OFF -
7/TOM4(rim) 231.Dubl4.T 512.Off.E OFF -
8/RIDE 332.Ride.C 334.RRide.C CROSS1 8 -
8/RIDE(rim) 333.RidBl.C 335.RRdBl.C CROSS1 8 -
9/CRASH 326.Crsh3.C 330.Chin1.C CROSS1 8 -
9/CRASH(rim) 330.Chin1.C 326.Crsh3.C CROSS1 8 -
PEDAL 304.AcoPH.H 512.Off.E OFF -

NQPSMTR7'77XUER3HUFXVVLRQ6RXQG0RGXOH 3DWFK/LVWLQJ
1998 Roland Corporation U.S. TD-7T Patch Listing Faxback # 10306 Page 7of 9
21. DaBlus [EFFECT1: Hall EFFECT2: Flanger] Layer Seq.
TRIGGER SOUND1 SOUND2 TYPE MIX Pat. No.
1/KICK 2.Acous.K 512.Off.E OFF -
1/KICK(rim) 15.Dry1.K 512.Off.E OFF -
2/SNARE 143.Loos1.S 512.Off.E OFF -
2/SNARE(rim) 171.Real3.S 512.Off.E OFF -
3/HI-HAT 302.AcoOI.H 300.AcoCI.H OFF -
3/HI-HAT(rim) 303.AcoOO.H 301.AcoCO.H OFF -
4/TOM1 204.Acou1.T 512.Off.E OFF -
4/TOM1(rim) 328.Spla1.C 512.Off.E OFF -
5/TOM2 205.Acou2.T 512.Off.E OFF -
5/TOM2(rim) 426.80Clp.P 512.Off.E OFF -
6/TOM3 206.Acou3.T 512.Off.E OFF -
6/TOM3(rim) 340.CowH.P 512.Off.E OFF -
7/TOM4 207.Acou4.T 512.Off.E OFF -
7/TOM4(rim) 324.Crsh1.C 324.Crsh1.C SW1 8 -
8/RIDE 332.Ride.C 334.RRide.C CROSS1 8 -
8/RIDE(rim) 333.RidBl.C 335.RRdBl.C MIX 8 -
9/CRASH 326.Crsh3.C 326.Crsh3.C MIX 8 -
9/CRASH(rim) 331.Chin2.C 331.Chin2.C MIX 8 34
PEDAL 304.AcoPH.H 512.Off.E OFF -
22. X-Fade [EFFECT1: Room EFFECT2: Chorus] Layer Seq.
TRIGGER SOUND1 SOUND2 TYPE MIX Pat. No.
1/KICK 18.Dry4.K 47.MdVrb.K CROSS1 8 -
1/KICK(rim) 14.DpRom.K 25.Floor.K CROSS1 6 -
2/SNARE 191.TR808.S 115.Crack.S CROSS1 8 -
2/SNARE(rim) 171.Real3.S 162.Punch.S CROSS1 6 -
3/HI-HAT 320.TipOH.H 321.TipPH.H OFF -
3/HI-HAT(rim) 320.TipOH.H 321.TipPH.H OFF -
4/TOM1 244.Lite1.T 280.Room1.T CROSS1 7 -
4/TOM1(rim) 244.Lite1.T 280.Room1.T CROSS1 7 -
5/TOM2 245.Lite2.T 281.Room2.T CROSS1 7 -
5/TOM2(rim) 245.Lite2.T 281.Room2.T CROSS1 7 -
6/TOM3 246.Lite3.T 282.Room3.T CROSS1 7 -
6/TOM3(rim) 246.Lite3.T 282.Room3.T CROSS1 7 -
7/TOM4 247.Lite4.T 283.Room4.T CROSS1 7 -
7/TOM4(rim) 247.Lite4.T 283.Room4.T CROSS1 7 -
8/RIDE 332.Ride.C 333.RidBl.C CROSS1 8 -
8/RIDE(rim) 334.RRide.C 335.RRdBl.C CROSS1 8 -
9/CRASH 329.Spla2.C 325.Crsh2.C CROSS1 7 -
9/CRASH(rim) 325.Crsh2.C 330.Chin1.C CROSS1 7 40
PEDAL 321.TipPH.H 512.Off.E OFF -
23. OdPerc [EFFECT1: Hall EFFECT2: Chorus] Layer Seq.
TRIGGER SOUND1 SOUND2 TYPE MIX Pat. No.
1/KICK 340.CowH.P 388.SrdOp.P MIX 6 -
1/KICK(rim) 361.CgLSl.P 388.SrdOp.P MIX 6 -
2/SNARE 384.PndOp.P 383.PndMt.P CROSS1 8 -
2/SNARE(rim) 381.CuiMt.P 384.PndOp.P MIX 3 -
3/HI-HAT 463.Phase.E 512.Off.E OFF -
3/HI-HAT(rim) 460.Nois2.E 512.Off.E OFF -
4/TOM1 413.TompL.P 465.Rand1.E MIX 5 -
4/TOM1(rim) 397.Can4.P 512.Off.E OFF -
5/TOM2 412.TompH.P 465.Rand1.E MIX 4 -
5/TOM2(rim) 419.78Tmb.P 512.Off.E OFF -
6/TOM3 409.TaikH.P 408.OpenL.P MIX 7 -
6/TOM3(rim) 340.CowH.P 512.Off.E OFF -
7/TOM4 346.CnBDM.P 347.CnBDO.P MIX 8 -
7/TOM4(rim) 449.Glass.E 512.Off.E OFF -
8/RIDE 427.80Cow.P 512.Off.E OFF -
8/RIDE(rim) 397.Can4.P 512.Off.E OFF -
9/CRASH 419.78Tmb.P 512.Off.E OFF -
9/CRASH(rim) 400.Ethn2.P 512.Off.E OFF -
PEDAL 372.Mracs.P 512.Off.E OFF -
24.Stndrd [EFFECT1: Hall EFFECT2: Flanger] Layer Seq.
TRIGGER SOUND1 SOUND2 TYPE MIX Pat. No.
1/KICK 54.Pillw.K 512.Off.E OFF -
1/KICK(rim) 15.Dry1.K 512.Off.E OFF -
2/SNARE 138.LAFat.S 512.Off.E OFF -
2/SNARE(rim) 169.Real1.S 512.Off.E OFF -
3/HI-HAT 302.AcoOI.H 300.AcoCI.H OFF -
3/HI-HAT(rim) 302.AcoOI.H 300.AcoCI.H OFF -
4/TOM1 264.Real1.T 512.Off.E OFF -
4/TOM1(rim) 264.Real1.T 512.Off.E OFF -
5/TOM2 265.Real2.T 512.Off.E OFF -
5/TOM2(rim) 265.Real2.T 512.Off.E OFF -
6/TOM3 266.Real3.T 512.Off.E OFF -
6/TOM3(rim) 266.Real3.T 512.Off.E OFF -
7/TOM4 267.Real4.T 512.Off.E OFF -
7/TOM4(rim) 267.Real4.T 512.Off.E OFF -
8/RIDE 332.Ride.C 334.RRide.C CROSS1 8 -
8/RIDE(rim) 333.RidBl.C 335.RRdBl.C MIX 8 -
9/CRASH 326.Crsh3.C 326.Crsh3.C MIX 8 -
9/CRASH(rim) 331.Chin2.C 331.Chin2.C MIX 8 37
PEDAL 304.AcoPH.H 512.Off.E OFF -

NQPSMTR7'77XUER3HUFXVVLRQ6RXQG0RGXOH 3DWFK/LVWLQJ
1998 Roland Corporation U.S. TD-7T Patch Listing Faxback # 10306 Page 8of 9
25. Room [EFFECT1: Room EFFECT2: Chorus] Layer Seq.
TRIGGER SOUND1 SOUND2 TYPE MIX Pat. No.
1/KICK 61.Revrb.K 512.Off.E OFF -
1/KICK(rim) 12.Deep.K 512.Off.E OFF -
2/SNARE 181.Rock2.S 512.Off.E OFF -
2/SNARE(rim) 168.RckRm.S 512.Off.E OFF -
3/HI-HAT 302.AcoOI.H 300.AcoCI.H OFF -
3/HI-HAT(rim) 302.AcoOI.H 300.AcoCI.H OFF -
4/TOM1 276.Rock1.T 512.Off.E OFF -
4/TOM1(rim) 276.Rock1.T 512.Off.E OFF -
5/TOM2 277.Rock2.T 512.Off.E OFF -
5/TOM2(rim) 277.Rock2.T 512.Off.E OFF -
6/TOM3 278.Rock3.T 512.Off.E OFF -
6/TOM3(rim) 278.Rock3.T 512.Off.E OFF -
7/TOM4 279.Rock4.T 512.Off.E OFF -
7/TOM4(rim) 279.Rock4.T 512.Off.E OFF -
8/RIDE 332.Ride.C 512.Off.E OFF -
8/RIDE(rim) 333.RidBl.C 512.Off.E OFF -
9/CRASH 326.Crsh3.C 512.Off.E OFF -
9/CRASH(rim) 331.Chin2.C 512.Off.E OFF 47
PEDAL 304.AcoPH.H 512.Off.E OFF -
26. Power [EFFECT1: Hall EFFECT2: Chorus] Layer Seq.
TRIGGER SOUND1 SOUND2 TYPE MIX Pat. No.
1/KICK 48.Mondo.K 512.Off.E OFF -
1/KICK(rim) 25.Floor.K 512.Off.E OFF -
2/SNARE 165.Rckin.S 512.Off.E OFF -
2/SNARE(rim) 127.Hard.S 512.Off.E OFF -
3/HI-HAT 306.HvyOH.H 314.PopCH.H OFF -
3/HI-HAT(rim) 306.HvyOH.H 314.PopCH.H OFF -
4/TOM1 280.Room1.T 512.Off.E OFF -
4/TOM1(rim) 280.Room1.T 512.Off.E OFF -
5/TOM2 281.Room2.T 512.Off.E OFF -
5/TOM2(rim) 281.Room2.T 512.Off.E OFF -
6/TOM3 282.Room3.T 512.Off.E OFF -
6/TOM3(rim) 282.Room3.T 512.Off.E OFF -
7/TOM4 283.Room4.T 512.Off.E OFF -
7/TOM4(rim) 283.Room4.T 512.Off.E OFF -
8/RIDE 334.RRide.C 512.Off.E OFF -
8/RIDE(rim) 335.RRdBl.C 512.Off.E OFF -
9/CRASH 325.Crsh2.C 512.Off.E OFF -
9/CRASH(rim) 331.Chin2.C 512.Off.E OFF 27
PEDAL 307.HvyPH.H 512.Off.E OFF -
27. Electr [EFFECT1: Room EFFECT2: Chorus] Layer Seq.
TRIGGER SOUND1 SOUND2 TYPE MIX Pat. No.
1/KICK 19.Elec1.K 512.Off.E OFF -
1/KICK(rim) 39.HQ808.K 512.Off.E OFF -
2/SNARE 124.Fiber.S 512.Off.E OFF -
2/SNARE(rim) 112.Clip.S 512.Off.E OFF -
3/HI-HAT 318.StiOH.H 317.StiCH.H OFF -
3/HI-HAT(rim) 318.StiOH.H 317.StiCH.H OFF -
4/TOM1 232.Elec1.T 512.Off.E OFF -
4/TOM1(rim) 232.Elec1.T 512.Off.E OFF -
5/TOM2 233.Elec2.T 512.Off.E OFF -
5/TOM2(rim) 233.Elec2.T 512.Off.E OFF -
6/TOM3 234.Elec3.T 512.Off.E OFF -
6/TOM3(rim) 234.Elec3.T 512.Off.E OFF -
7/TOM4 235.Elec4.T 512.Off.E OFF -
7/TOM4(rim) 235.Elec4.T 512.Off.E OFF -
8/RIDE 334.RRide.C 512.Off.E OFF -
8/RIDE(rim) 335.RRdBl.C 512.Off.E OFF -
9/CRASH 326.Crsh3.C 512.Off.E OFF -
9/CRASH(rim) 331.Chin2.C 512.Off.E OFF 26
PEDAL 317.StiCH.H 512.Off.E OFF -
28. TR-808 [EFFECT1: Hall EFFECT2: Chorus] Layer Seq.
TRIGGER SOUND1 SOUND2 TYPE MIX Pat. No.
1/KICK 78.TR808.K 512.Off.E OFF -
1/KICK(rim) 57.Rap.K 512.Off.E OFF -
2/SNARE 191.TR808.S 512.Off.E OFF -
2/SNARE(rim) 133.Hyper.S 512.Off.E OFF -
3/HI-HAT 323.808OH.H 322.808CH.H OFF -
3/HI-HAT(rim) 323.808OH.H 322.808CH.H OFF -
4/TOM1 296.808-1.T 512.Off.E OFF -
4/TOM1(rim) 296.808-1.T 512.Off.E OFF -
5/TOM2 297.808-2.T 512.Off.E OFF -
5/TOM2(rim) 297.808-2.T 512.Off.E OFF -
6/TOM3 298.808-3.T 512.Off.E OFF -
6/TOM3(rim) 298.808-3.T 512.Off.E OFF -
7/TOM4 299.808-4.T 512.Off.E OFF -
7/TOM4(rim) 299.808-4.T 512.Off.E OFF -
8/RIDE 3 32.Ride.C 512.Off.E OFF -
8/RIDE(rim) 333.RidBl.C 512.Off.E OFF -
9/CRASH 326.Crsh3.C 512.Off.E OFF -
9/CRASH(rim) 331.Chin2.C 512.Off.E OFF 40
PEDAL 322.808CH.H 512.Off.E OFF -

NQPSMTR7'77XUER3HUFXVVLRQ6RXQG0RGXOH 3DWFK/LVWLQJ
1998 Roland Corporation U.S. TD-7T Patch Listing Faxback # 10306 Page 9of 9
29. Jazz [EFFECT1: Hall EFFECT2: Chorus] Layer Seq.
TRIGGER SOUND1 SOUND2 TYPE MIX Pat. No.
1/KICK 40.Jazz.K 512.Off.E OFF -
1/KICK(rim) 22.EzPlw.K 512.Off.E OFF -
2/SNARE 143.Loos1.S 512.Off.E OFF -
2/SNARE(rim) 169.Real1.S 512.Off.E OFF -
3/HI-HAT 302.AcoOI.H 300.AcoCI.H OFF -
3/HI-HAT(rim) 302.AcoOI.H 300.AcoCI.H OFF -
4/TOM1 224.Dry1.T 512.Off.E OFF -
4/TOM1(rim) 224.Dry1.T 512.Off.E OFF -
5/TOM2 225.Dry2.T 512.Off.E OFF -
5/TOM2(rim) 225.Dry2.T 512.Off.E OFF -
6/TOM3 230.Dubl3.T 512.Off.E OFF -
6/TOM3(rim) 230.Dubl3.T 512.Off.E OFF -
7/TOM4 231.Dubl4.T 512.Off.E OFF -
7/TOM4(rim) 231.Dubl4.T 512.Off.E OFF -
8/RIDE 332.Ride.C 512.Off.E OFF -
8/RIDE(rim) 333.RidBl.C 512.Off.E OFF -
9/CRASH 326.Crsh3.C 512.Off.E OFF -
9/CRASH(rim) 331.Chin2.C 512.Off.E OFF 33
PEDAL 304.AcoPH.H 512.Off.E OFF -
30. Brush [EFFECT1: Hall EFFECT2: Chorus] Layer Seq.
TRIGGER SOUND1 SOUND2 TYPE MIX Pat. No.
1/KICK 40.Jazz.K 512.Off.E OFF -
1/KICK(rim) 21.Ez.K 512.Off.E OFF -
2/SNARE 99.BrRl2.S 512.Off.E OFF -
2/SNARE(rim) 101.BrSl1.S 512.Off.E OFF -
3/HI-HAT 302.AcoOI.H 300.AcoCI.H OFF -
3/HI-HAT(rim) 302.AcoOI.H 300.AcoCI.H OFF -
4/TOM1 220.Brsh1.T 512.Off.E OFF -
4/TOM1(rim) 328.Spla1.C 512.Off.E OFF -
5/TOM2 221.Brsh2.T 512.Off.E OFF -
5/TOM2(rim) 101.BrSl1.S 512.Off.E OFF -
6/TOM3 222.Brsh3.T 512.Off.E OFF -
6/TOM3(rim) 340.CowH.P 512.Off.E OFF -
7/TOM4 223.Brsh4.T 512.Off.E OFF -
7/TOM4(rim) 327.Crsh4.C 512.Off.E OFF -
8/RIDE 336.BrRid.C 512.Off.E OFF -
8/RIDE(rim) 333.RidBl.C 512.Off.E OFF -
9/CRASH 336.BrRid.C 512.Off.E OFF -
9/CRASH(rim) 337.FeRid.C 512.Off.E OFF 35
PEDAL 304.AcoPH.H 512.Off.E OFF -
31. Orch [EFFECT1: Hall EFFECT2: Chorus] Layer Seq.
TRIGGER SOUND1 SOUND2 TYPE MIX Pat. No.
1/KICK 346.CnBDM.P 347.CnBDO.P SW1 7 -
1/KICK(rim) 346.CnBDM.P 512.Off.E OFF -
2/SNARE 169.Real1.S 512.Off.E OFF -
2/SNARE(rim) 171.Real3.S 512.Off.E OFF -
3/HI-HAT 344.Cast1.P 512.Off.E OFF -
3/HI-HAT(rim) 342.Tamb1.P 512.Off.E OFF -
4/TOM1 348.Timpa.P 512.Off.E OFF -
4/TOM1(rim) 498.OrHit.E 512.Off.E OFF -
5/TOM2 348.Timpa.P 512.Off.E OFF -
5/TOM2(rim) 498.OrHit.E 512.Off.E OFF -
6/TOM3 348.Timpa.P 512.Off.E OFF -
6/TOM3(rim) 498.OrHit.E 512.Off.E OFF -
7/TOM4 348.Timpa.P 512.Off.E OFF -
7/TOM4(rim) 498.OrHit.E 512.Off.E OFF -
8/RIDE 377.WhisS.P 512.Off.E OFF -
8/RIDE(rim) 378.WhisL.P 512.Off.E OFF -
9/CRASH 350.TriOp.P 512.Off.E OFF -
9/CRASH(rim) 349.TriMt.P 512.Off.E OFF -
PEDAL 348.Timpa.P 512.Off.E OFF -
32. User [EFFECT1: Hall EFFECT2: Flanger] Layer Seq.
TRIGGER SOUND1 SOUND2 TYPE MIX Pat. No.
1/KICK 54.Pillw.K 512.Off.E OFF -
1/KICK(rim) 15.Dry1.K 512.Off.E OFF -
2/SNARE 138.LAFat.S 512.Off.E OFF -
2/SNARE(rim) 169.Real1.S 512.Off.E OFF -
3/HI-HAT 302.AcoOI.H 300.AcoCI.H OFF -
3/HI-HAT(rim) 302.AcoOI.H 300.AcoCI.H OFF -
4/TOM1 264.Real1.T 512.Off.E OFF -
4/TOM1(rim) 264.Real1.T 512.Off.E OFF -
5/TOM2 265.Real2.T 512.Off.E OFF -
5/TOM2(rim) 265.Real2.T 512.Off.E OFF -
6/TOM3 266.Real3.T 512.Off.E OFF -
6/TOM3(rim) 266.Real3.T 512.Off.E OFF -
7/TOM4 267.Real4.T 512.Off.E OFF -
7/TOM4(rim) 267.Real4.T 512.Off.E OFF -
8/RIDE 332.Ride.C 334.RRide.C CROSS1 8 -
8/RIDE(rim) 333.RidBl.C 335.RRdBl.C MIX 8 -
9/CRASH 326.Crsh3.C 326.Crsh3.C MIX 8 -
9/CRASH(rim) 331.Chin2.C 331.Chin2.C MIX 8 -
PEDAL 304.AcoPH.H 512.Off.E OFF -
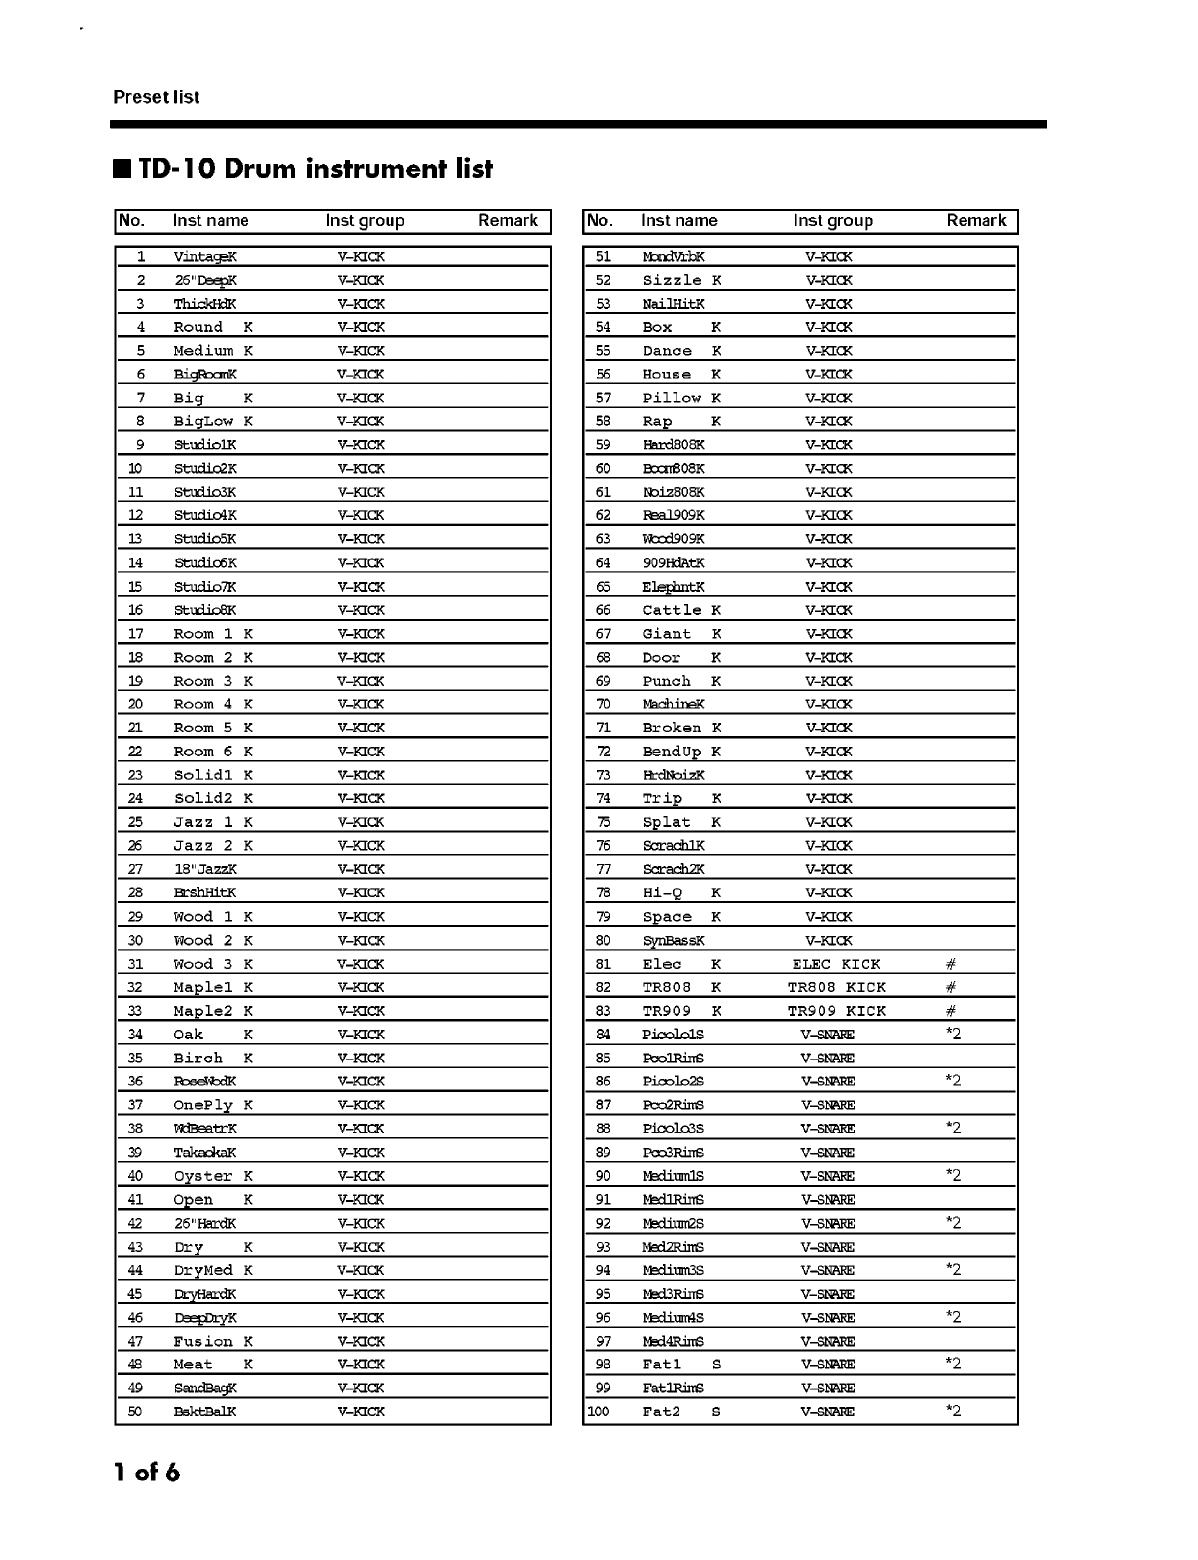
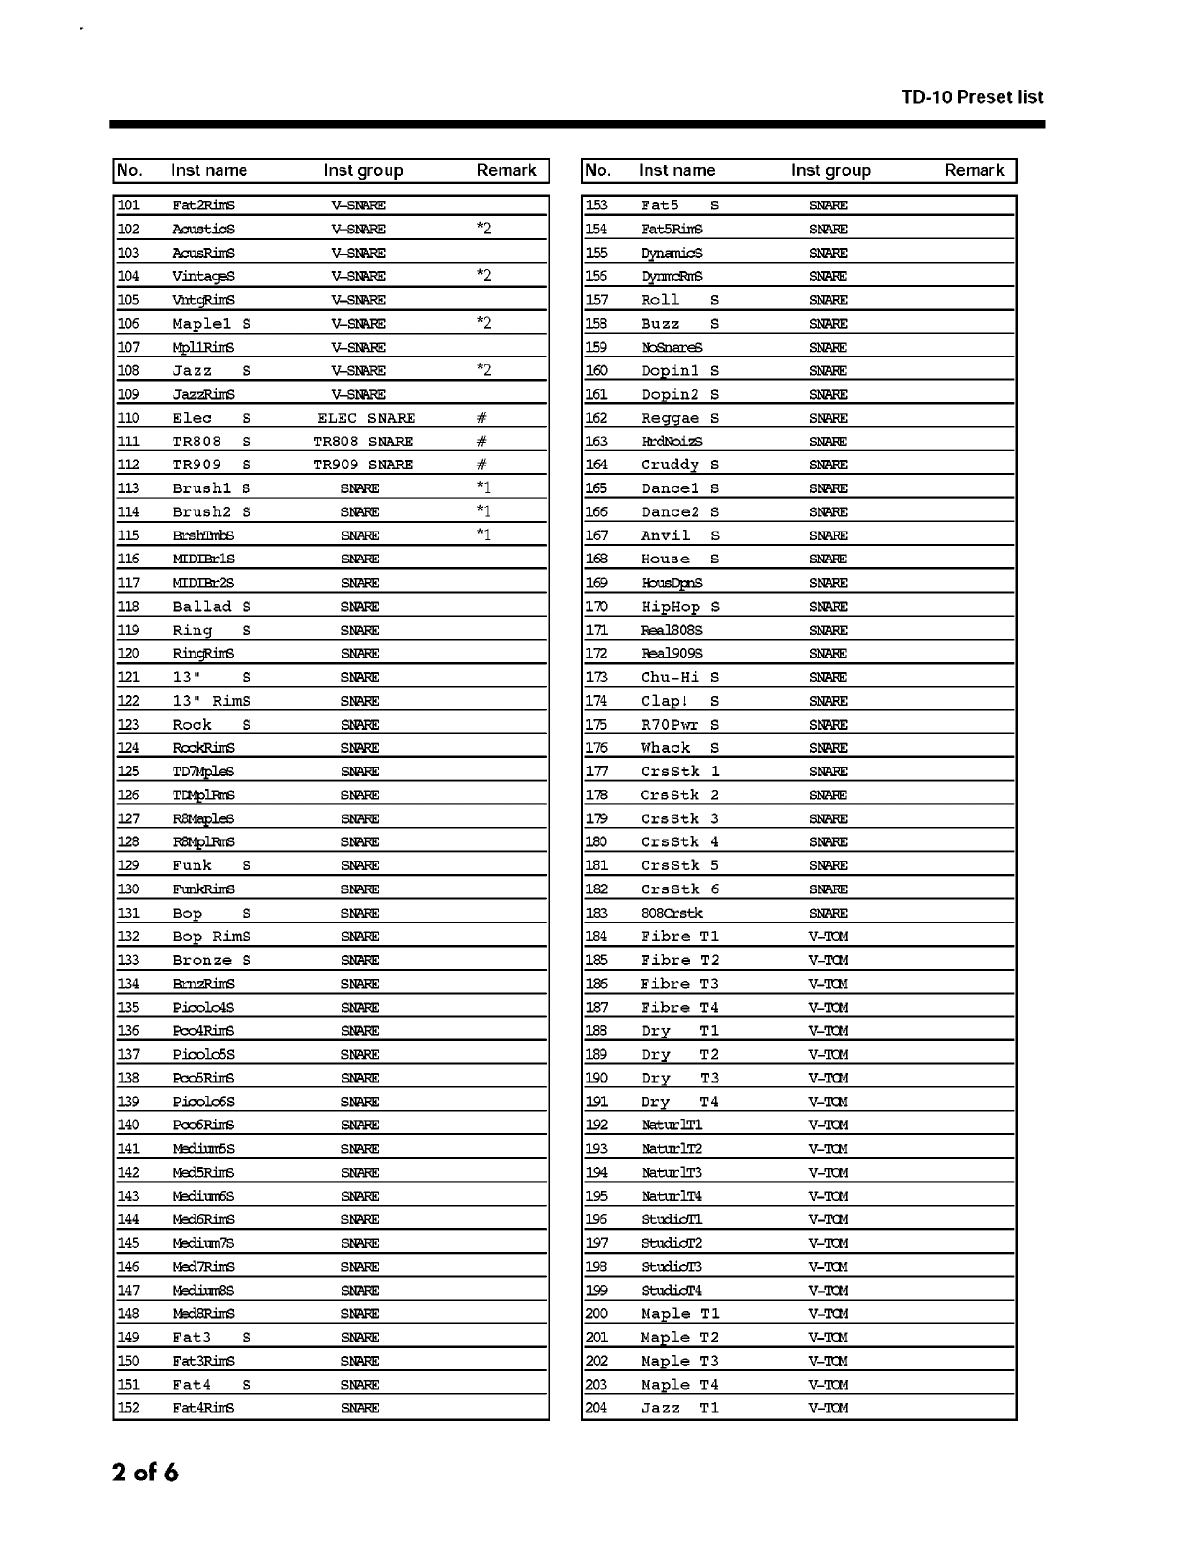
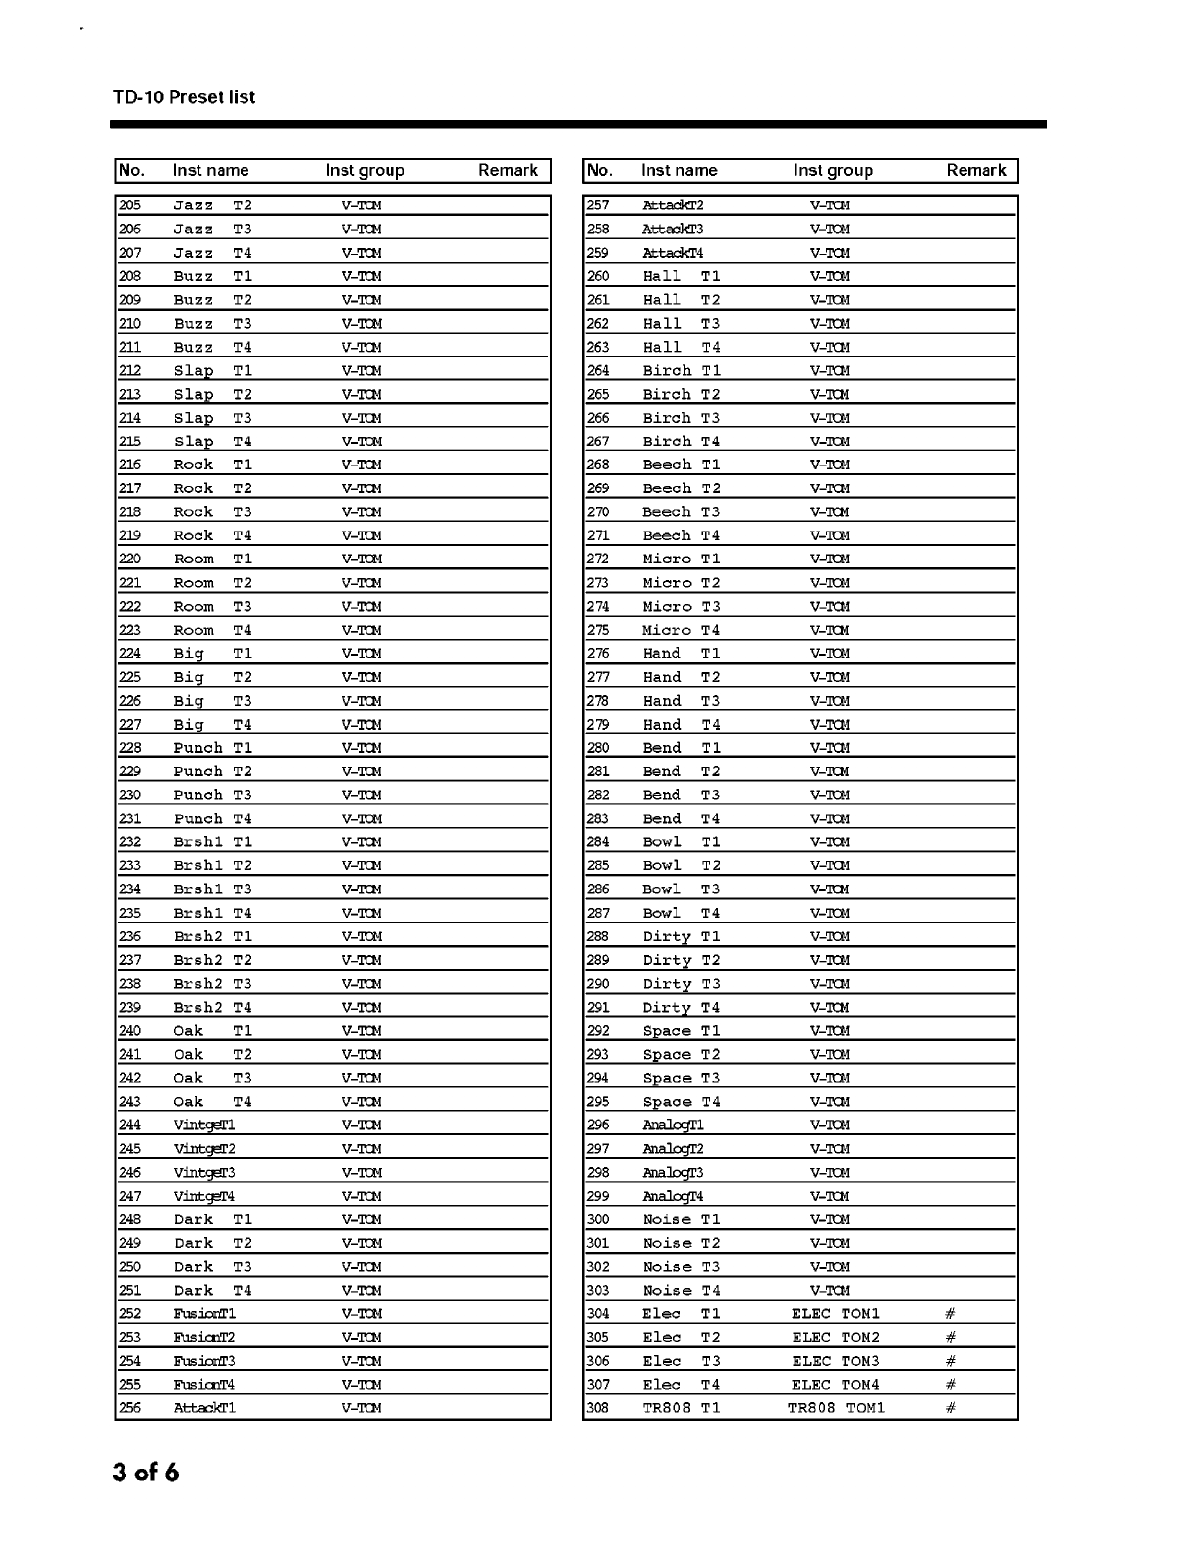
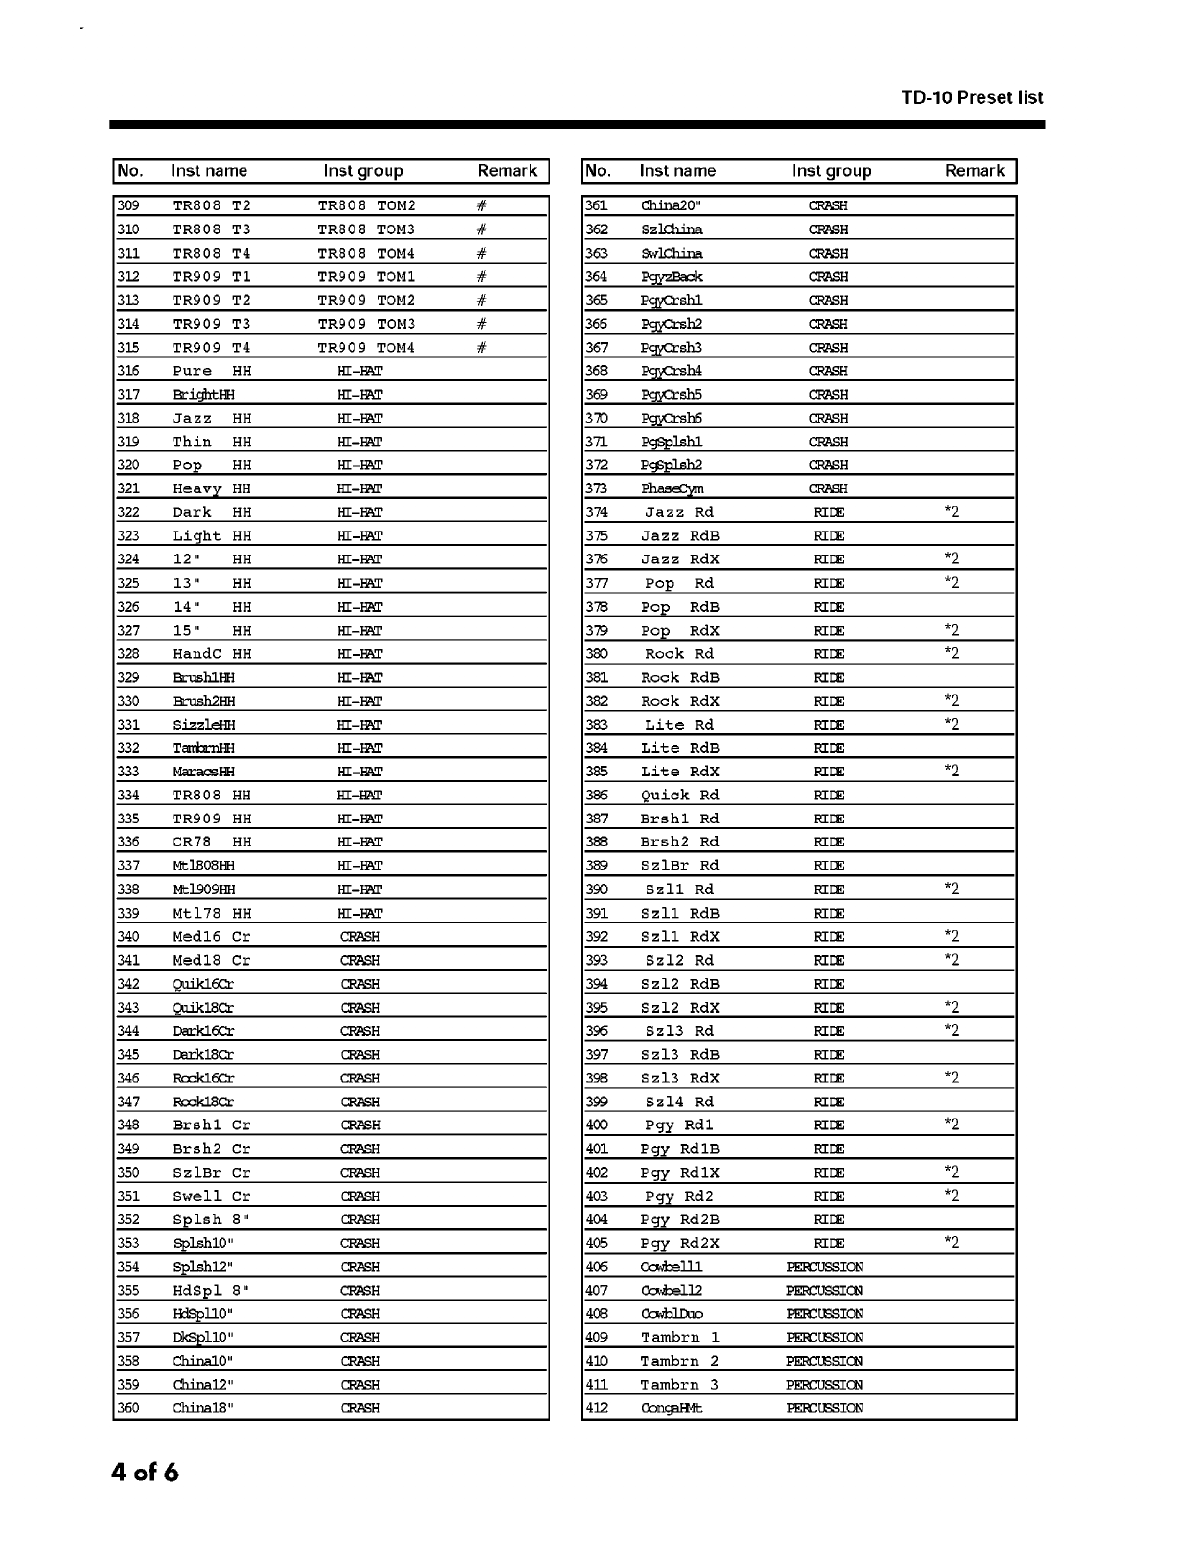
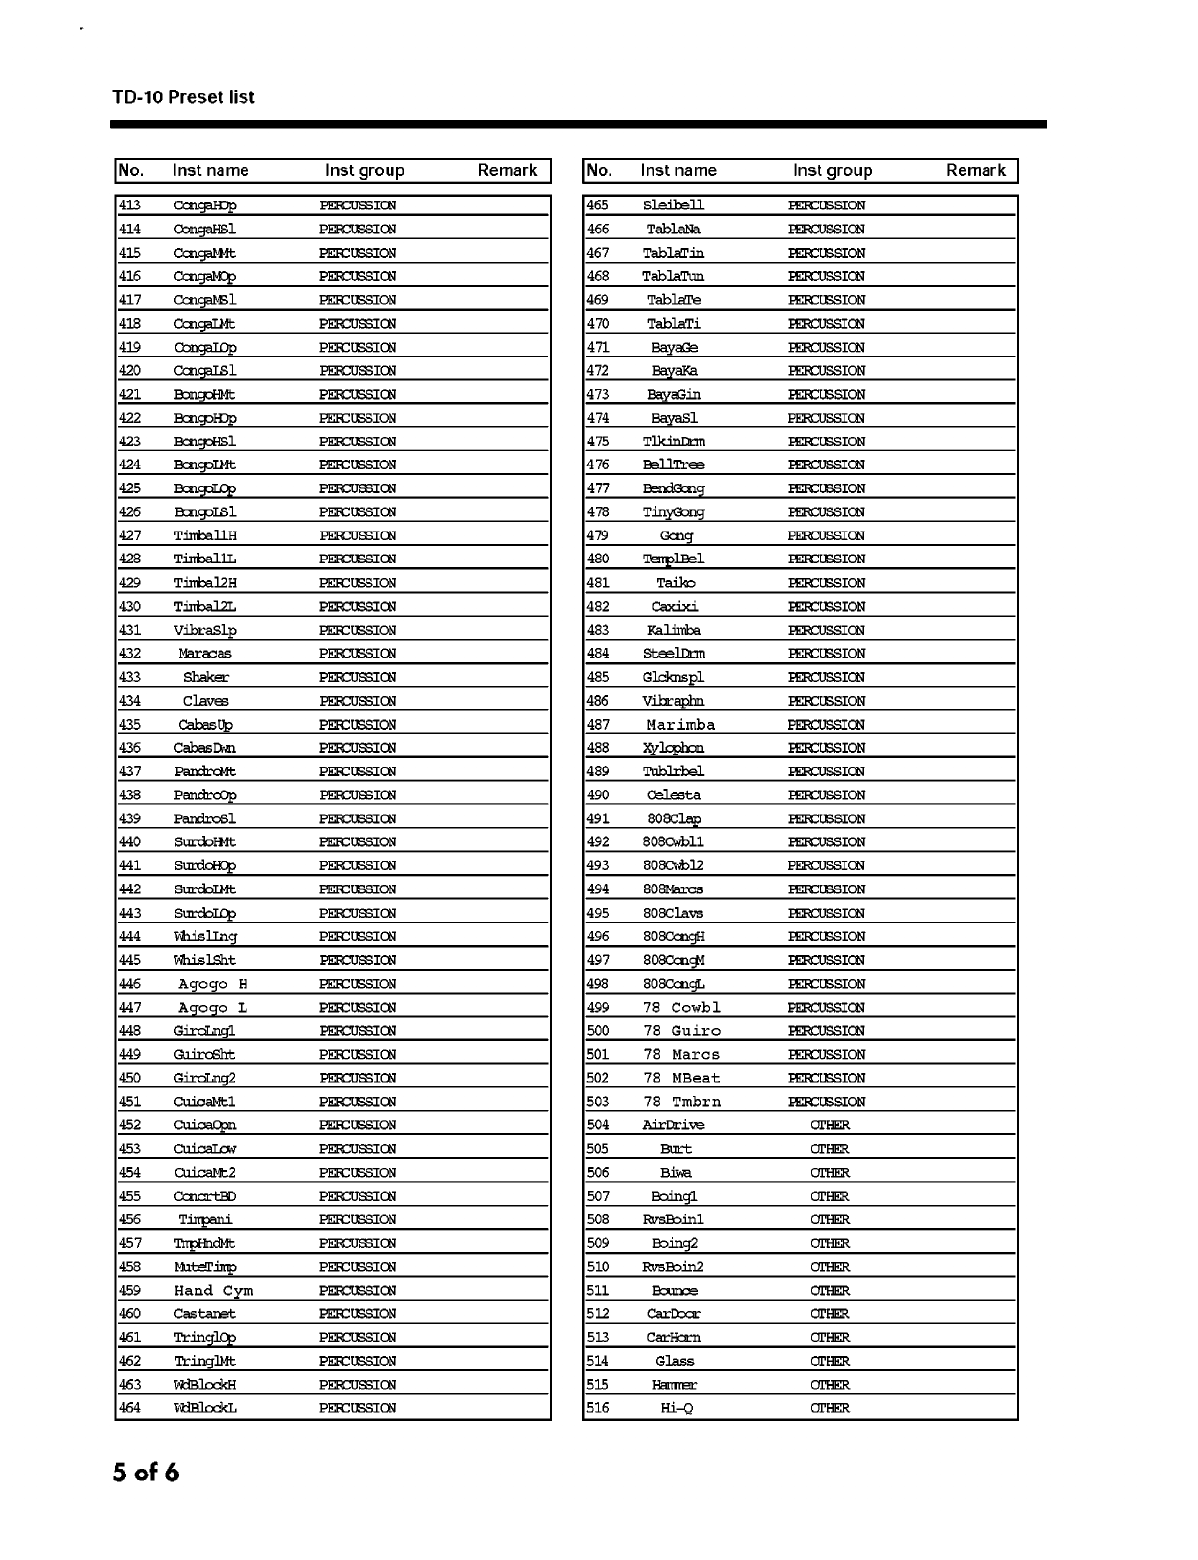
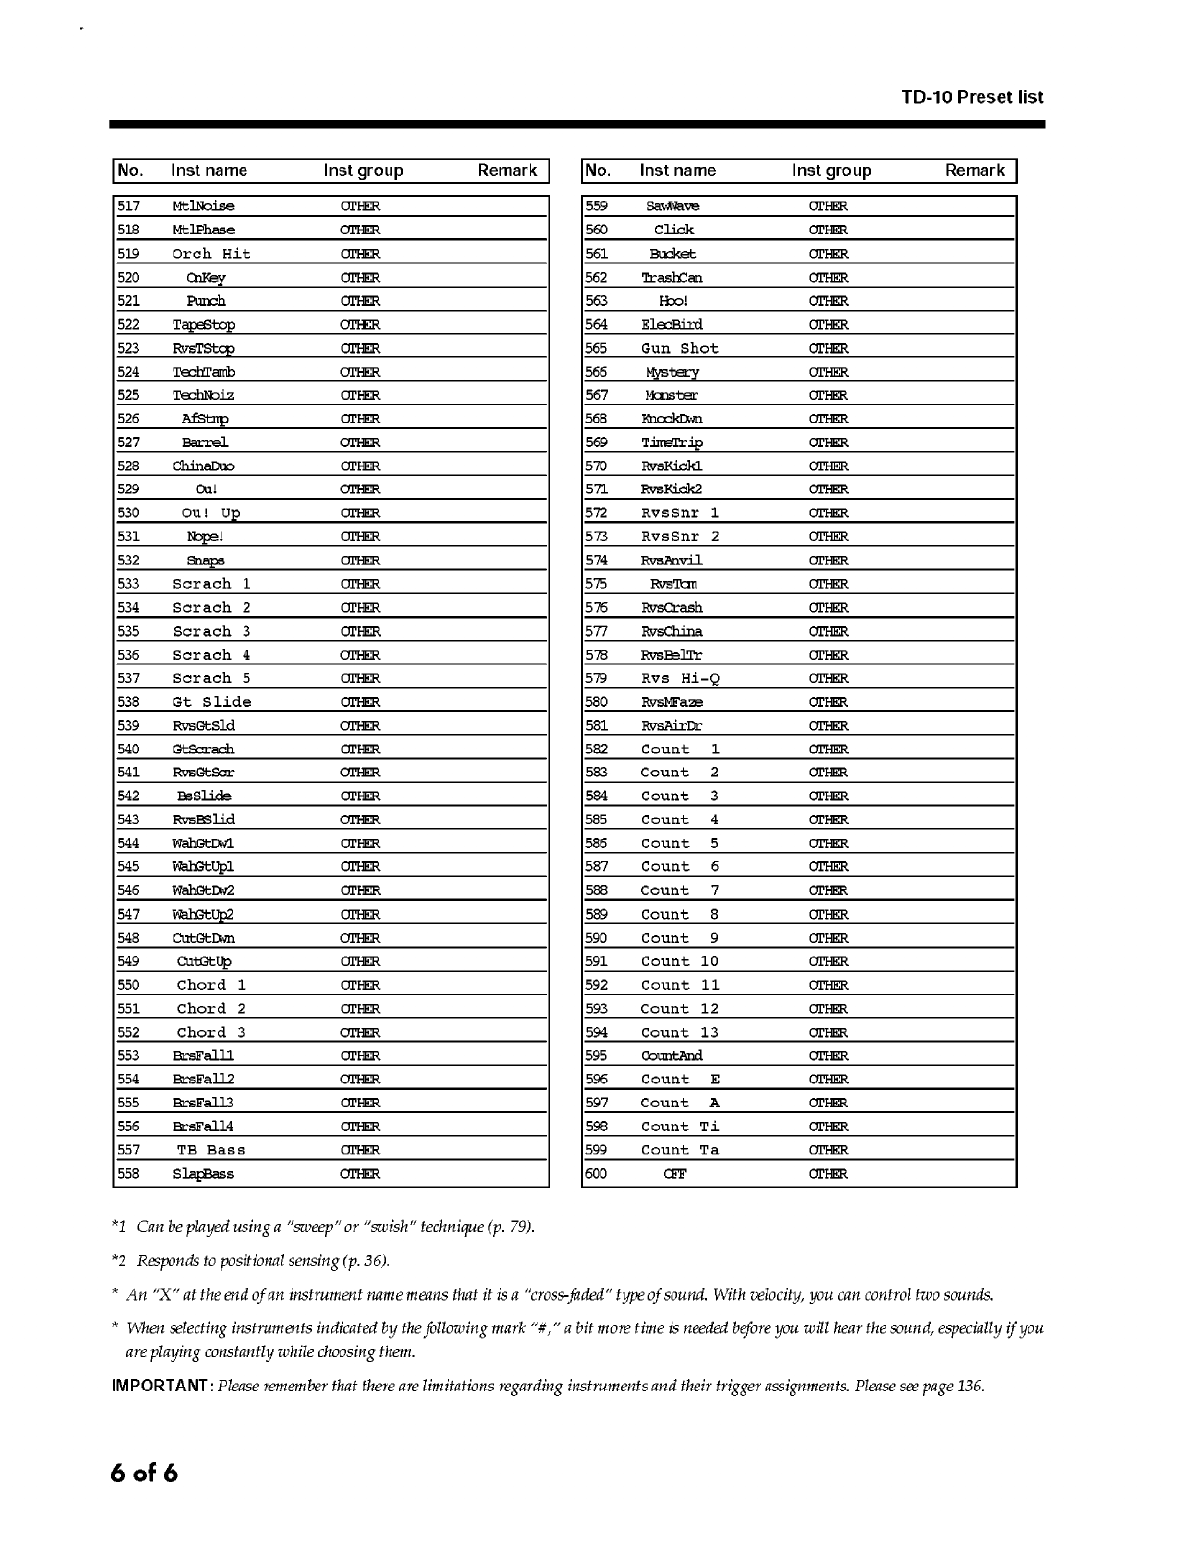
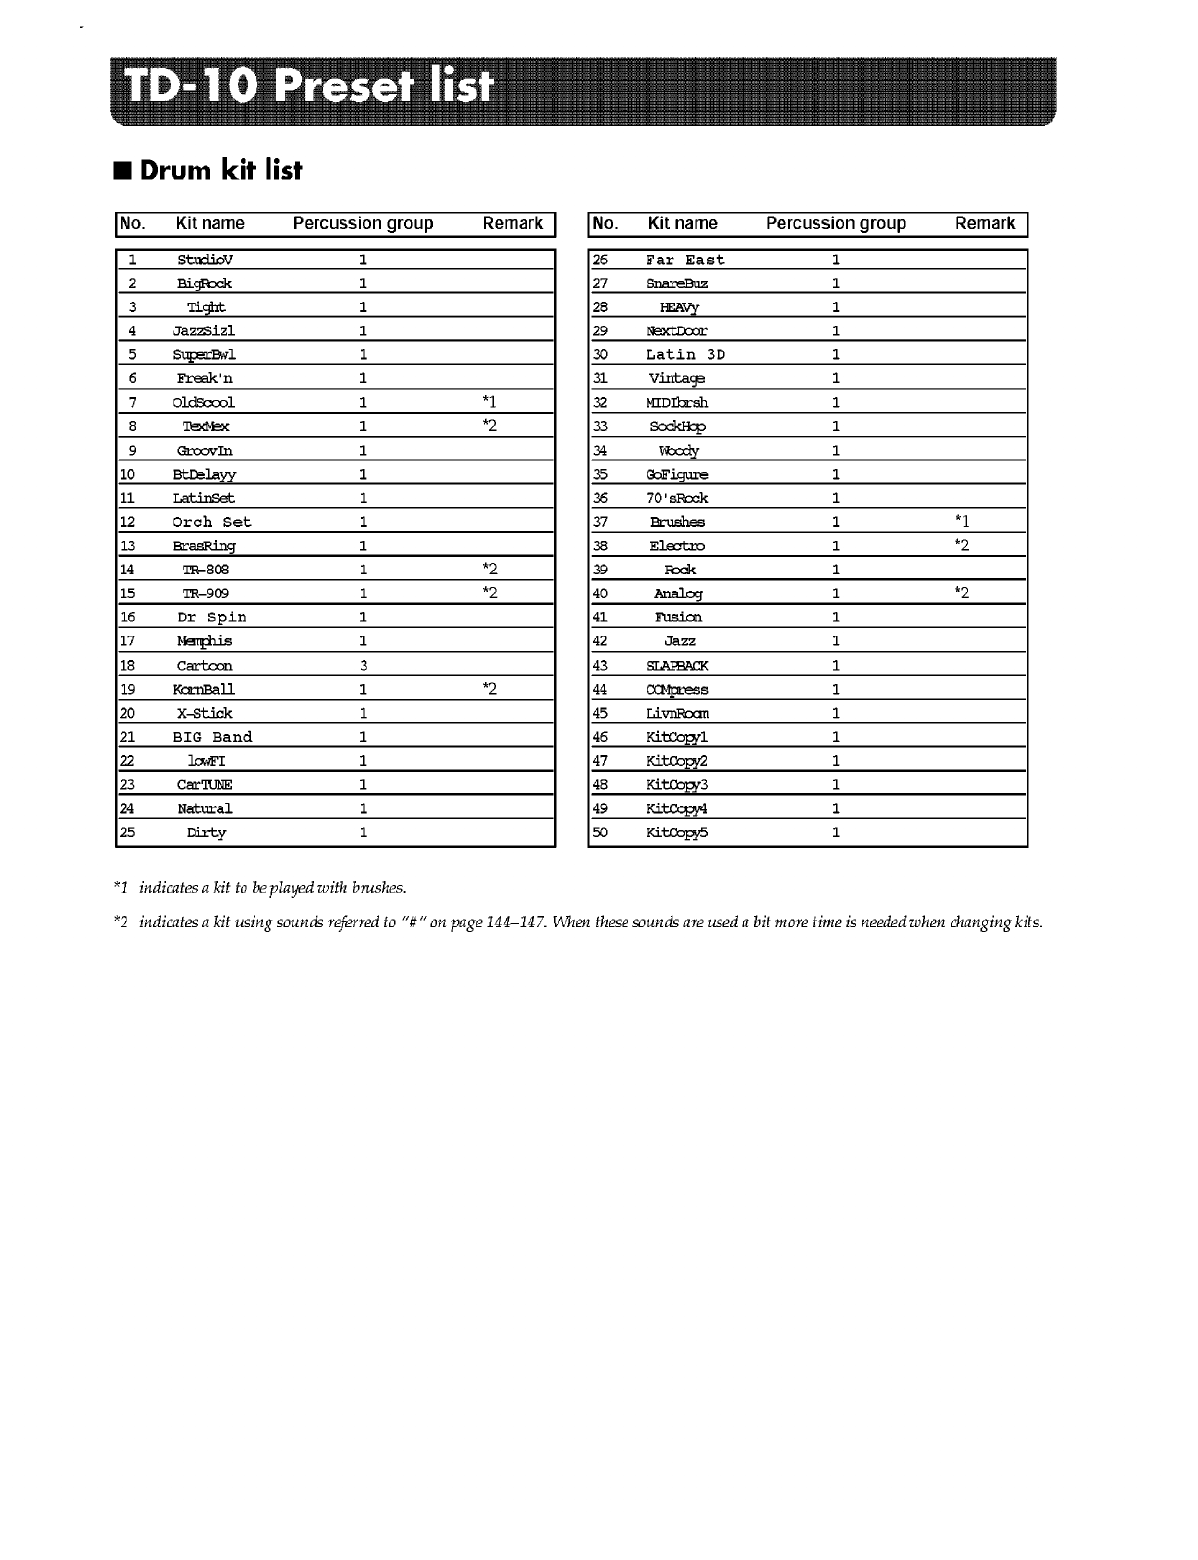

NQPSMTR9(5'9RLFH([SDQVLRQ%RDUG 3DWFK/LVWLQJ
1996 Roland Corporation U.S. VE-RD1 Faxback # 10275 For use with A-90. Included in A-90EX.
No. Name V No. Name V No. Name V No. Name V
1 St.Concert 1 2 33 SA E.Grand 1 1 65 60s Organ 2 1 97 Square Pad 2
2 St.Concert 2 2 34 SA E.Grand 2 3 66 Sqr Organ 2 98 EPno Pad 2
3 St.Concert 3 2 35 CP E.Grand 2 67 Vibe 2 99 7th Sand 4
4 St.Concert 4 2 36 SA Rhodes 1 2 68 Warm Vibes 2 100 Sweep Pad 2
5 St.Concert 5 2 37 SA Rhodes 2 3 69 AmbienceVibe 3 101 A90 Prologue 2
6 St.Concert 6 2 38 Suitcase 2 70 Dvna Marimba 1 102 A90 Rand Pad 2
7 St.Concert 7 2 39 STAGE Rhodes 1 71 Clav 1 2 103 LFO Strings 2
8 St.Concert 8 2 40 Mr.Suitcase 3 72 Clav 2 2 104 A-90 Aurora 3
9 St.Concertff 1 41 Rhodes p 1 73 Clav 3 2 105 A-90 Waltz 4
10 St.SemiGrd 1 2 42 Rhodes m 1 74 Juno Clav 1 106 A-90 Strobe 2
11 St.SemiGrd 2 2 43 Rhodes f 1 75 Poly Synth 2 107 Fooled Again 1
12 St.SemiGrd 3 2 44 DynoRhodes 1 3 76 Pulse Key 1 3 108 Beauty Vox 2
13 St.SemiGrd 4 2 45 DynoRhodes 2 3 77 Pulse Key 2 1 109 Syn Vox 1 1
14 Euro Piano 1 1 46 Wurly 1 78 Square Key 2 110 Syn Vox 2 1
15 Euro Piano 2 1 47 Wurly p 2 79 St.Strings 2 111 Angel Ooohz 2
16 Euro Piano 3 2 48 Wurly mf 2 80 Warm Strings 2 112 Heaven 1
17 Euro Piano 4 2 49 Wurly f 2 81 Slow Strings 2 113 Sawteeth 3
18 Full Grand 1 2 50 D-50 EPianol 1 82 Strings 1 114 Pulse Lead 4
19 Full Grand 2 2 51 D-50 EPiano2 2 83 0B Thick Pad 3 115 Synth Lead 1 2
20 Full Grand 3 2 52 D-50 Stack 4 84 OB Soft Pad 3 116 Synth Lead 2 1
21 Full Grand 4 2 53 Like Dee 2 85 Soft Pad 1 117 GR Lead 2
22 Full Grand 5 2 54 FM EPiano 1 3 86 Pulse Pad 4 118 20 Years ago 3
23 Full Grand 6 2 55 FM EPiano 2 4 87 SynStrings 1 2 119 SquareLead 2
24 Semi Grand1 1 56 FM EP 3_1 1 88 SynStrings 2 2 120 Finger Bass1 1
25 Semi Grand 2 1 57 FM EP 3_2 1 99 SynStrings 3 1 121 Finger Bass2 2
26 Semi Grand 3 2 58 FM EP 3_3 1 90 After Rave 2 122 Pick Bass 1
27 Semi Grand 4 2 59 FM EP 3_4 1 91 JP-8Haunting 4 123 Ac.Bass 2
28 Semi Grand 5 2 60 B-3 Organ 1 2 92 Synth Brass1 2 124 Wonder Bass 2
29 Semi Grand 6 2 61 B-3 Organ 2 2 93 Synth Brass2 1 125 Super JX Bs 2
30 JV80 Piano 1 2 62 B-3 Organ 3 1 94 Synth Brass3 1 126 Synth Bass 1
31 JV80 Piano 2 2 63 B-3 Organ 4 1 95 Synth Brass4 1 127 Rubber Bass 2
32 JV80 Piano 3 2 64 60s Organ 1 1 96 Dawn 2 Dusk 3 128 PedalBass 2
V = number of voices used

NQPSMTR;3,QWHUQDO%DQN 3DWFK/LVWLQJ
1998 Roland Corporation U.S. XP-60/80 Patch Listing Faxback # 10278 5/98
No. Name Tones
1 West Coast 4
2 Mission LFO 4
3 Dusk 2 Dawn 4
4 Purple Spin 4
5 20 Years ago 3
6 Symphonique 4
7 Clear Guitar 3
8 Gamelan v/s. 4
9 Cyber Swing1 4
10 Taj Mahal 1
11 Resosaw Bass 2
12 Impact 4
13 Rock It !!! 2
14 Vocal Phrase 3
15 Raverborg 4
16 ORBit Pad 2
17 Bs/Pno+Brs 4
18 Clarinet mp 1
19 Aurora 4
20 Nice Piano 3
21 Heirborne 4
22 ChamberWoods 3
23 Raggatronic 4
24 PCMEFXHEAVY 2
25 LetterFrmPat 4
26 Hillbillys 4
27 Gospel Spin 3
28 Biosphere 2
29 JUNO Strings 3
30 System 100m 3
31 Tortured 4
32 Flying Waltz 4
33 Sop.Sax mf 2
34 Dist TB-303 2
35 Ring EP 3
36 Rezoid 4
37 JC Strat 1
38 Blade Racer 4
39 PWM Strings 3
40 Brass Orch. 3
No. Name Tones
41 Alternative 2
42 FM Bells 3
43 Saw Mass 4
44 Steel Away 3
45 Poly Pulse 4
46 Velo Tekno 2 2
47 Tone Wh.Solo 3
48 Thin Dist. 1
49 JP-8Haunting 4
50 Jz Gtr Hall 1
51 Vanishing 1
52 Harmonica 2
53 Wave Bells 4
54 Film Octaves 4
55 Sawteeth 3
56 AugerMentive 3
57 JD Ghostrngs 4
58 SA Rhodes 1 4
59 3D Flanged 1
60 Ac.Upright 1
61 Poly Brass 3
62 Stepped Pad 4
63 Sax Section 4
64 Albion 2
65 St.Strings 2
66 AmbienceVibe 4
67 LFO Strings 2
68 AltoLead Sax 3
69 Jet Pad 2 2
70 Childlike 4
71 D-50 Stack2 4
72 Pulse Key 3
73 Velo-Wah Gtr 1
74 3D-Space 4
75 Sitar 2
76 Big BPF 4
77 Plik-Plok 2
78 PsychoRhodes 2
79 Bass Marimba 4
80 MandolinTrem 4
No. Name Tones
81 Poly Saws 4
82 Pulse Pad 4
83 Nylon Gtr 1
84 Majestic Tpt 1
85 Terminate 3
86 SquareLead 1 3
87 House Piano 2
88 Fooled Again 1
89 Pick Bass 1
90 Wide Tubular 4
91 Velo-Rez Clv 1
92 Delicate EP 2
93 Velo Tekno 1 3
94 Running Pad 4
95 Archimede 3
96 Stage Egrand 4
97 Nylon Rhodes 4
98 1key Chord 3
99 Finger Bass 1
100 Slow Voices 3
101 4 Hits 4 You 4
102 Brass Sect 4
103 Sqr Organ 2
104 Atmosfear 3
105 Tenor Sax 4
106 Acid 404 1
107 Mellow Bars 4
108 Raver Clav 1
109 Air Lead 2
110 Raya Shaku 3
111 Greek Power 4
112 Pure Tibet 1
113 Wavin Strngs 2
114 Chambers 3
115 Nomad Perc 3
116 Horn Swell 4
117 Claviduck 2
118 Night Shade 4
119 VOX Flute 4
120 Dark Vox 2
No. Name Tones
121 Bass Pizz 4
122 Full Orchest 4
123 esreveR 3
124 Loop Str 4
125 12str Gtr 1 2
126 Gone withe W 3
127 Trance Pad 1 2
128 Fantasy Vox 4

NQPSMTR;30XVLF:RUNVWDWLRQ :DYHIRUP/LVW
1998 Roland Corporation U.S. XP-60/80 Waveform List Faxback # 10279 5/98
No. Name
INT-A 1 : Ac Piano1 A
INT-A 2 : Ac Piano1 B
INT-A 3 : Ac Piano1 C
INT-A 4 : Ac Piano2 pA
INT-A 5 : Ac Piano2 pB
INT-A 6 : Ac Piano2 pC
INT-A 7 : Ac Piano2 fA
INT-A 8 : Ac Piano2 fB
INT-A 9 : Ac Piano2 fC
INT-A 10 : Piano Thump
INT-A 11 : Piano Up TH
INT-A 12 : MKS-20 P3 A
INT-A 13 : MKS-20 P3 B
INT-A 14 : MKS-20 P3 C
INT-A 15 : SA Rhodes 1A
INT-A 16 : SA Rhodes 1B
INT-A 17 : SA Rhodes 1C
INT-A 18 : SA Rhodes 2A
INT-A 19 : SA Rhodes 2B
INT-A 20 : SA Rhodes 2C
INT-A 21 : E.Piano 1A
INT-A 22 : E.Piano 1B
INT-A 23 : E.Piano 1C
INT-A 24 : E.Piano 2A
INT-A 25 : E.Piano 2B
INT-A 26 : E.Piano 2C
INT-A 27 : E.Piano 3A
INT-A 28 : E.Piano 3B
INT-A 29 : E.Piano 3C
INT-A 30 : MK-80 EP A
INT-A 31 : MK-80 EP B
INT-A 32 : MK-80 EP C
INT-A 33 : D-50 EP A
INT-A 34 : D-50 EP B
INT-A 35 : D-50 EP C
INT-A 36 : Celesta
INT-A 37 : Music Box
INT-A 38 : Clav 1A
INT-A 39 : Clav 1B
INT-A 40 : Clav 1C
No. Name
INT-A 41 : Organ 1
INT-A 42 : Jazz Organ 1
INT-A 43 : Jazz Organ 2
INT-A 44 : Organ 2
INT-A 45 : Organ 3
INT-A 46 : Organ 4
INT-A 47 : Rock Organ
INT-A 48 : Dist. Organ
INT-A 49 : Rot.Org Slw
INT-A 50 : Rot.Org Fst
INT-A 51 : Pipe Organ
INT-A 52 : Nylon Gtr A
INT-A 53 : Nylon Gtr B
INT-A 54 : Nylon Gtr C
INT-A 55 : 6-Str Gtr A
INT-A 56 : 6-Str Gtr B
INT-A 57 : 6-Str Gtr C
INT-A 58 : Gtr Harm A
INT-A 59 : Gtr Harm B
INT-A 60 : Gtr Harm C
INT-A 61 : Comp Gtr A
INT-A 62 : Comp Gtr B
INT-A 63 : Comp Gtr C
INT-A 64 : Comp Gtr A+
INT-A 65 : Mute Gtr 1
INT-A 66 : Mute Gtr 2A
INT-A 67 : Mute Gtr 2B
INT-A 68 : Mute Gtr 2C
INT-A 69 : Pop Strat A
INT-A 70 : Pop Strat B
INT-A 71 : Pop Strat C
INT-A 72 : Jazz Gtr A
INT-A 73 : Jazz Gtr B
INT-A 74 : Jazz Gtr C
INT-A 75 : JC Strat A
INT-A 76 : JC Strat B
INT-A 77 : JC Strat C
INT-A 78 : JC Strat A+
INT-A 79 : JC Strat B+
INT-A 80 : JC Strat C+
No. Name
INT-A 81 : Clean Gtr A
INT-A 82 : Clean Gtr B
INT-A 83 : Clean Gtr C
INT-A 84 : Stratus A
INT-A 85 : Stratus B
INT-A 86 : Stratus C
INT-A 87 : OD Gtr A
INT-A 88 : OD Gtr B
INT-A 89 : OD Gtr C
INT-A 90 : OD Gtr A+
INT-A 91 : Heavy Gtr A
INT-A 92 : Heavy Gtr B
INT-A 93 : Heavy Gtr C
INT-A 94 : Heavy Gtr A+
INT-A 95 : Heavy Gtr B+
INT-A 96 : Heavy Gtr C+
INT-A 97 : PowerChord A
INT-A 98 : PowerChord B
INT-A 99 : PowerChord C
INT-A 100 : EG Harm
INT-A 101 : Gt.FretNoise
INT-A 102 : Syn Gtr A
INT-A 103 : Syn Gtr B
INT-A 104 : Syn Gtr C
INT-A 105 : Harp 1A
INT-A 106 : Harp 1B
INT-A 107 : Harp 1C
INT-A 108 : Banjo A
INT-A 109 : Banjo B
INT-A 110 : Banjo C
INT-A 111 : Sitar A
INT-A 112 : Sitar B
INT-A 113 : Sitar C
INT-A 114 : Dulcimer A
INT-A 115 : Dulcimer B
INT-A 116 : Dulcimer C
INT-A 117 : Shamisen A
INT-A 118 : Shamisen B
INT-A 119 : Shamisen C
INT-A 120 : Koto A
No. Name
INT-A 121 : Koto B
INT-A 122 : Koto C
INT-A 123 : Pick Bass A
INT-A 124 : Pick Bass B
INT-A 125 : Pick Bass C
INT-A 126 : Fingerd Bs A
INT-A 127 : Fingerd Bs B
INT-A 128 : Fingerd Bs C
INT-A 129 : E.Bass
INT-A 130 : Fretless A
INT-A 131 : Fretless B
INT-A 132 : Fretless C
INT-A 133 : UprightBs 1
INT-A 134 : UprightBs 2A
INT-A 135 : UprightBs 2B
INT-A 136 : UprightBs 2C
INT-A 137 : Slap Bass 1
INT-A 138 : Slap & Pop
INT-A 139 : Slap Bass 2
INT-A 140 : Slap Bass 3
INT-A 141 : Jz.Bs Thumb
INT-A 142 : Jz.Bs Slap 1
INT-A 143 : Jz.Bs Slap 2
INT-A 144 : Jz.Bs Slap 3
INT-A 145 : Jz.Bs Pop
INT-A 146 : Syn Bass A
INT-A 147 : Syn Bass C
INT-A 148 : Mini Bs 1A
INT-A 149 : Mini Bs 1B
INT-A 150 : Mini Bs 1C
INT-A 151 : Mini Bs 2
INT-A 152 : Mini Bs 2+
INT-A 153 : MC-202 Bs A
INT-A 154 : MC-202 Bs B
INT-A 155 : MC-202 Bs C
INT-A 156 : Flute 1A
INT-A 157 : Flute 1B
INT-A 158 : Flute 1C
INT-A 159 : Blow Pipe
INT-A 160 : Bottle

NQPSMTR;30XVLF:RUNVWDWLRQ :DYHIRUP/LVW
1998 Roland Corporation U.S. XP-60/80 Waveform List Faxback # 10279 5/98
No. Name
INT-A 161 : Shakuhachi
INT-A 162 : Clarinet A
INT-A 163 : Clarinet B
INT-A 164 : Clarinet C
INT-A 165 : Oboe mf A
INT-A 166 : Oboe mf B
INT-A 167 : Oboe mf C
INT-A 168 : Sop.Sax mf A
INT-A 169 : Sop.Sax mf B
INT-A 170 : Sop.Sax mf C
INT-A 171 : Alto Sax 1A
INT-A 172 : Alto Sax 1B
INT-A 173 : Alto Sax 1C
INT-A 174 : Tenor Sax A
INT-A 175 : Tenor Sax B
INT-A 176 : Tenor Sax C
INT-A 177 : Bari.Sax f A
INT-A 178 : Bari.Sax f B
INT-A 179 : Bari.Sax f C
INT-A 180 : Harmonica A
INT-A 181 : Harmonica B
INT-A 182 : Harmonica C
INT-A 183 : Chanter
INT-A 184 : Tpt Sect. A
INT-A 185 : Tpt Sect. B
INT-A 186 : Tpt Sect. C
INT-A 187 : Trumpet 1A
INT-A 188 : Trumpet 1B
INT-A 189 : Trumpet 1C
INT-A 190 : Trumpet 2A
INT-A 191 : Trumpet 2B
INT-A 192 : Trumpet 2C
INT-A 193 : HarmonMute1A
INT-A 194 : HarmonMute1B
INT-A 195 : HarmonMute1C
INT-A 196 : Trombone 1
INT-A 197 : French 1A
INT-A 198 : French 1C
INT-A 199 : F.Horns A
INT-A 200 : F.Horns B
No. Name
INT-A 201 : F.Horns C
INT-A 202 : Violin A
INT-A 203 : Violin B
INT-A 204 : Violin C
INT-A 205 : Cello A
INT-A 206 : Cello B
INT-A 207 : Cello C
INT-A 208 : ST.Strings-R
INT-A 209 : ST.Strings-L
INT-A 210 : MonoStringsA
INT-A 211 : MonoStringsC
INT-A 212 : Pizz
INT-A 213 : JP Strings1A
INT-A 214 : JP Strings1B
INT-A 215 : JP Strings1C
INT-A 216 : JP Strings2A
INT-A 217 : JP Strings2B
INT-A 218 : JP Strings2C
INT-A 219 : Soft Pad A
INT-A 220 : Soft Pad B
INT-A 221 : Soft Pad C
INT-A 222 : Fantasynth A
INT-A 223 : Fantasynth B
INT-A 224 : Fantasynth C
INT-A 225 : D-50 HeavenA
INT-A 226 : D-50 HeavenB
INT-A 227 : D-50 HeavenC
INT-A 228 : Fine Wine
INT-A 229 : D-50 Brass A
INT-A 230 : D-50 Brass B
INT-A 231 : D-50 Brass C
INT-A 232 : D-50 BrassA+
INT-A 233 : DualSquare A
INT-A 234 : DualSquare C
INT-A 235 : DualSquareA+
INT-A 236 : Pop Voice
INT-A 237 : Syn Vox 1
INT-A 238 : Syn Vox 2
INT-A 239 : Voice Aahs A
INT-A 240 : Voice Aahs B
No. Name
INT-A 241 : Voice Aahs C
INT-A 242 : Voice Oohs1A
INT-A 243 : Voice Oohs1B
INT-A 244 : Voice Oohs1C
INT-A 245 : Voice Oohs2A
INT-A 246 : Voice Oohs2B
INT-A 247 : Voice Oohs2C
INT-A 248 : Voice Breath
INT-A 249 : Male Ooh A
INT-A 250 : Male Ooh B
INT-A 251 : Male Ooh C
INT-A 252 : Org Vox A
INT-A 253 : Org Vox B
INT-A 254 : Org Vox C
INT-A 255 : Vox Noise
INT-B 1 : Kalimba
INT-B 2 : Marimba Wave
INT-B 3 : Log Drum
INT-B 4 : Vibes
INT-B 5 : Bottle Hit
INT-B 6 : Glockenspiel
INT-B 7 : Tubular
INT-B 8 : Steel Drums
INT-B 9 : Fanta Bell A
INT-B 10 : Fanta Bell B
INT-B 11 : Fanta Bell C
INT-B 12 : FantaBell A+
INT-B 13 : Org Bell
INT-B 14 : Agogo
INT-B 15 : DIGI Bell 1
INT-B 16 : DIGI Bell 1+
INT-B 17 : DIGI Chime
INT-B 18 : Wave Scan
INT-B 19 : Wire String
INT-B 20 : 2.2 Bellwave
INT-B 21 : 2.2 Vibwave
INT-B 22 : Spark VOX
INT-B 23 : MMM VOX
INT-B 24 : Lead Wave
INT-B 25 : Synth Reed
No. Name
INT-B 26 : Synth Saw 1
INT-B 27 : Synth Saw 2
INT-B 28 : Syn Saw 2inv
INT-B 29 : Synth Saw 3
INT-B 30 : JP-8 Saw A
INT-B 31 : JP-8 Saw B
INT-B 32 : JP-8 Saw C
INT-B 33 : P5 Saw A
INT-B 34 : P5 Saw B
INT-B 35 : P5 Saw C
INT-B 36 : D-50 Saw A
INT-B 37 : D-50 Saw B
INT-B 38 : D-50 Saw C
INT-B 39 : Synth Square
INT-B 40 : JP-8 SquareA
INT-B 41 : JP-8 SquareB
INT-B 42 : JP-8 SquareC
INT-B 43 : Synth Pulse1
INT-B 44 : Synth Pulse2
INT-B 45 : Triangle
INT-B 46 : Sine
INT-B 47 : Org Click
INT-B 48 : White Noise
INT-B 49 : Pink Noise
INT-B 50 : Metal Wind
INT-B 51 : Wind Agogo
INT-B 52 : Feedbackwave
INT-B 53 : Spectrum
INT-B 54 : BreathNoise
INT-B 55 : Rattles
INT-B 56 : Ice Rain
INT-B 57 : Tin Wave
INT-B 58 : Anklungs
INT-B 59 : Wind Chimes
INT-B 60 : Orch. Hit
INT-B 61 : Tekno Hit
INT-B 62 : Back Hit
INT-B 63 : Philly Hit
INT-B 64 : Scratch 1
INT-B 65 : Scratch 2

NQPSMTR;30XVLF:RUNVWDWLRQ :DYHIRUP/LVW
1998 Roland Corporation U.S. XP-60/80 Waveform List Faxback # 10279 5/98
No. Name
INT-B 66 : Scratch 3
INT-B 67 : Natural SN1
INT-B 68 : Natural SN2
INT-B 69 : Piccolo SN
INT-B 70 : Ballad SN
INT-B 71 : SN Roll
INT-B 72 : 808 SN
INT-B 73 : Brush Slap
INT-B 74 : Brush Swish
INT-B 75 : Brush Roll
INT-B 76 : Dry Stick
INT-B 77 : Side Stick
INT-B 78 : Lite Kick
INT-B 79 : Hybrid Kick1
INT-B 80 : Hybrid Kick2
INT-B 81 : Old Kick
INT-B 82 : Verb Kick
INT-B 83 : Round Kick
INT-B 84 : 808 Kick
INT-B 85 : Verb Tom Hi
INT-B 86 : Verb Tom Lo
INT-B 87 : Dry Tom Hi
INT-B 88 : Dry Tom Lo
INT-B 89 : Cl HiHat 1
INT-B 90 : Cl HiHat 2
INT-B 91 : Op HiHat
INT-B 92 : Pedal HiHat
INT-B 93 : 606 HiHat Cl
INT-B 94 : 606 HiHat Op
INT-B 95 : 808 Claps
INT-B 96 : Hand Claps
INT-B 97 : Finger Snaps
INT-B 98 : Ride 1
INT-B 99 : Ride 2
INT-B 100 : Ride Bell 1
INT-B 101 : Crash 1
INT-B 102 : China Cym
INT-B 103 : Cowbell 1
INT-B 104 : Wood Block
INT-B 105 : Claves
No. Name
INT-B 106 : Bongo Hi
INT-B 107 : Bongo Lo
INT-B 108 : Cga Open Hi
INT-B 109 : Cga Open Lo
INT-B 110 : Cga Mute Hi
INT-B 111 : Cga Mute Lo
INT-B 112 : Cga Slap
INT-B 113 : Timbale
INT-B 114 : Cabasa Up
INT-B 115 : Cabasa Down
INT-B 116 : Cabasa Cut
INT-B 117 : Maracas
INT-B 118 : Long Guiro
INT-B 119 : Tambourine
INT-B 120 : Open Triangl
INT-B 121 : Cuica
INT-B 122 : Vibraslap
INT-B 123 : Timpani
INT-B 124 : Applause
INT-B 125 : REV Orch.Hit
INT-B 126 : REV TeknoHit
INT-B 127 : REV Back Hit
INT-B 128 : REV PhillHit
INT-B 129 : REV Steel DR
INT-B 130 : REV Tin Wave
INT-B 131 : REV NatrlSN1
INT-B 132 : REV NatrlSN2
INT-B 133 : REV PiccloSN
INT-B 134 : REV BalladSN
INT-B 135 : REV Side Stk
INT-B 136 : REV SN Roll
INT-B 137 : REV Brush 1
INT-B 138 : REV Brush 2
INT-B 139 : REV Brush 3
INT-B 140 : REV LiteKick
INT-B 141 : REV HybridK1
INT-B 142 : REV HybridK2
INT-B 143 : REV Old Kick
INT-B 144 : REV Timpani
INT-B 145 : REV VerbTomH
No. Name
INT-B 146 : REV VerbTomL
INT-B 147 : REV DryTom H
INT-B 148 : REV DryTom M
INT-B 149 : REV ClHiHat1
INT-B 150 : REV ClHiHat2
INT-B 151 : REV Op HiHat
INT-B 152 : REV Pedal HH
INT-B 153 : REV 606HH Cl
INT-B 154 : REV 606HH Op
INT-B 155 : REV Ride
INT-B 156 : REV Cup
INT-B 157 : REV Crash 1
INT-B 158 : REV China
INT-B 159 : REV DrySick
INT-B 160 : REV RealCLP
INT-B 161 : REV FingSnap
INT-B 162 : REV Cowbell
INT-B 163 : REV WoodBlck
INT-B 164 : REV Clve
INT-B 165 : REV Conga
INT-B 166 : REV Tamb
INT-B 167 : REV Maracas
INT-B 168 : REV Guiro
INT-B 169 : REV Cuica
INT-B 170 : REV Metro
INT-B 171 : Loop 1
INT-B 172 : Loop 2
INT-B 173 : Loop 3
INT-B 174 : Loop 4
INT-B 175 : Loop 5
INT-B 176 : Loop 6
INT-B 177 : Loop 7
INT-B 178 : R8 Click
INT-B 179 : Metronome 1
INT-B 180 : Metronome 2
INT-B 181 : MC500 Beep 1
INT-B 182 : MC500 Beep 2
INT-B 183 : Low Saw
INT-B 184 : Low Saw inv
INT-B 185 : Low P5 Saw
No. Name
INT-B 186 : Low Pulse 1
INT-B 187 : Low Pulse 2
INT-B 188 : Low Square
INT-B 189 : Low Sine
INT-B 190 : Low Triangle
INT-B 191 : Low White NZ
INT-B 192 : Low Pink NZ
INT-B 193 : DC

®ÂØÒňή
AR Series
Compatible Media Guide
Current Operating Systems
AR-100 1.07 Flash RAM
AR-2000 1.19 Flash RAM
©1997 Roland Corporation U.S. AR Series Compatible Media Guide— 5/97 SN69 Faxback#21038 Page 1 of 2
PC Cards
Manufacturer Model Capacity
SanDisk SDP5-1.8 1.8Mb
SDP3B-2 2.0Mb
SDP5-2.5 2.5Mb
SDP3B-4 4Mb
SDP5-5 5Mb
SDP3B-6 6Mb
SDPB-8 8Mb
SDP5-10 10Mb
SDP5-20 20Mb
SDP5A-40 40Mb
Hewlett-Packard F1012A 5Mb
F1013A 10Mb
F1014A 20Mb
Motorola MCM390180ATA 1.8Mb
MCM390250ATA 2.5Mb
MCM390500ATA 5Mb
MCM391000ATA 10Mb
MCM392000ATA 20Mb
MCM394000ATA 40Mb
Verbatim 89759 5Mb
89760 10Mb
89761 20Mb
090655 40Mb
H Co Computer Products PCMCIA-ATA2 2Mb
PCMCIA/2BN 2Mb SRAM

©1997 Roland Corporation U.S. AR Series Compatible Media Guide — 5/97 SN69 Faxback#21038 Page 2 of 2
Contact Sources
PCMCIA Flash RAM and SRAMCards and PCMCA type III Hard Drives
HCo Computer Products (800) 726-2477
Prima International (800) 737-7462
AV Labs (818) 293-8822
Essex (408) 229-8035
Fixed Hard Drives
Manufacturer Model Capacity
H Co HD 260 260Mb
®ÂØÒňή
DM-80/800 Multi Track Disk Recorder
Compatibility Guide
DM-800
Current Operating System
E-PROM 2.10
DIF-800
ver. 1.20
©1997 Roland Corporation U.S. DM-800 Media Compatibility Guide — 5/97 SN64 Faxback#21031 Page 1 of 2
Removable Media Drives
Winchester Mechanism
Manufacturer Model Capacity Storage Record/Playback
Nomai * M540 MCD 540 MB* Yes Yes
Syquest** 230 230 MB Yes No
Syquest** SyJet 1.5 GB` Yes Yes
*Cannot do Physical Format – Initialize Only
** These drives should be physically formatted before use.
Fixed Hard Drives
Most SCSI hard drives that adhere to “AV” specifications will work with the DM-80/800. Keep in mind,
drives that do not meet AV specs are often still reliable for data storage – but we don’t recommend them
for recording. In the following charts, we’ve made a distinction as to the reliability of each drive for both
storage and recording/playback.
The DM-800 can format a compatible drive with a capacity of up to 4 GB per SCSI buss (A and B) –
including the internal drive. If you’re using multiple external drives, the DM-800 is capable of cascading
up to six SCSI devices per buss with the same 4 GB per buss limit. Again, any internal drive is included
in the 4 GB total. Rackmount drives are available from companies listed under
Contact Sources
.
Manufacturer Model Capacity Storage Record/Playback
Quantum Trailblazer 850 MB Yes Yes
Quantum Fireball 1 GB Yes Yes
Quantum Atlas 4.3 GB Yes Yes
XP34300W
Seagate ST15150N 4 GB Yes Yes
Suggested specifications for recordable hard drives:
• 13ms Access Time
• No or Intelligent Recalibration
• Active Termination
• 1:1 Interleave
• Slip Sectoring
• Macintosh Compatible
DM-80
Current Operating System
E-PROM 2.23
Track Manager Software
ver. 2.04

RGB Monitors
Manufacturer Model
Atari SC-1224
Atari SC-1435
Commodore 1080 & 1084
Darius TSM 1431
Magnavox 8762
SCSI DAT Drives
Manufacturer Model Storage Record/Playback
Wang Data DAT 1300 Yes No
Archive Python Data DAT 4360XT Yes No
APS Call for current drive Yes No
Dynatek Call for current drive Yes No
Teac Data Cassette MT-2St/F50 Yes No
©1997 Roland Corporation U.S. DM-800 Media Compatibility Guide — 5/97 faxback#21031 Page 2 of 2
Contact Sources
Rackmount SCSI Drives:
Pacific Coast Technologies (619) 693-0209
Dynatek (902) 832-3000
RAMTEK (313) 513-7440
SoundLogic (619) 789-6558
Glyph Technologies (800) 335-0345
Rorke Data (800) 328-8147
Desktop SCSI Drives:
APS (800) 354-1213
Dynatek (902) 832-3000
Nomai (888) 996-6624
Pacific Coast Technologies (PCT)(619) 693-0209
Monitor Cables:
Redmond Cable (WA) (206) 882-2009
Redmond Cable (TN) (423) 478-5760
RGB Monitors:
Direction Sound & Vision (310) 276-2063
SoundLogic (619) 789-6558
Monitors (S-Video):
AVVID (800) 924-2932
Computer Video Capture
Cards (S-Video and Composite)
MacWarehouse (MAC) (800) 255-6227
Tiger Software (IBM) (800) 888-4437
S-Video
The Roland DM-800 can be used with TV monitors, A/V Computers and Computer Video capture boards
(Mac & IBM compatible) to display their output. The DM-800 can supply either S-Video or Color
Composite signals. See the Contact Sources list for companies that sell these monitors and boards.
These monitors require special adapter cables. See th
e Contact Sources
list for suppliers.
Manufacturer Model
Mitsubishi Diamondscan
NEC 3D
Sony PVM
Sony KV 1311
Taxan 610/420
Zenith ZVM 133
Optical (MO) Drives*
Manufacturer Model Capacity Storage Record/Playback
Olympus 2.6GB MO 2.3 GB Yes No
Sony Vertex 2.6GB 2.3 GB Yes No
Fujitsu** 640/230 540/230 MB Yes Yes
*Can format 512KB sector optical media only.
**Record/Playback depends on disc’s filled capacity and fragmentation of files.
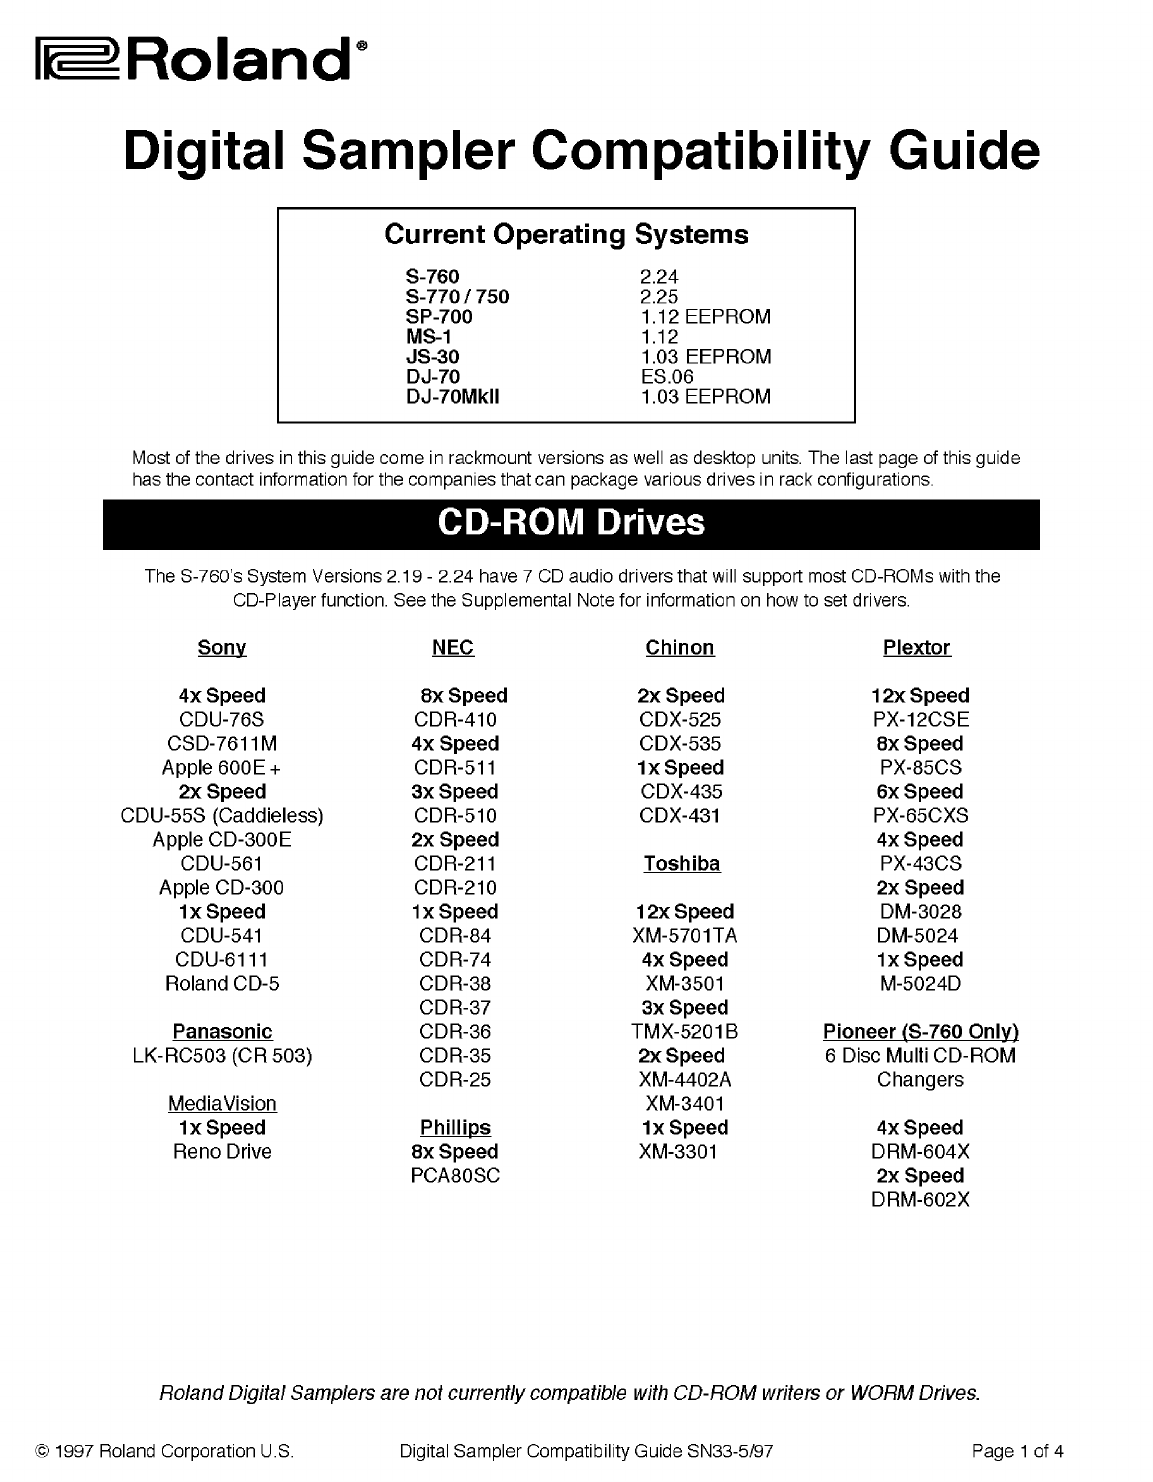
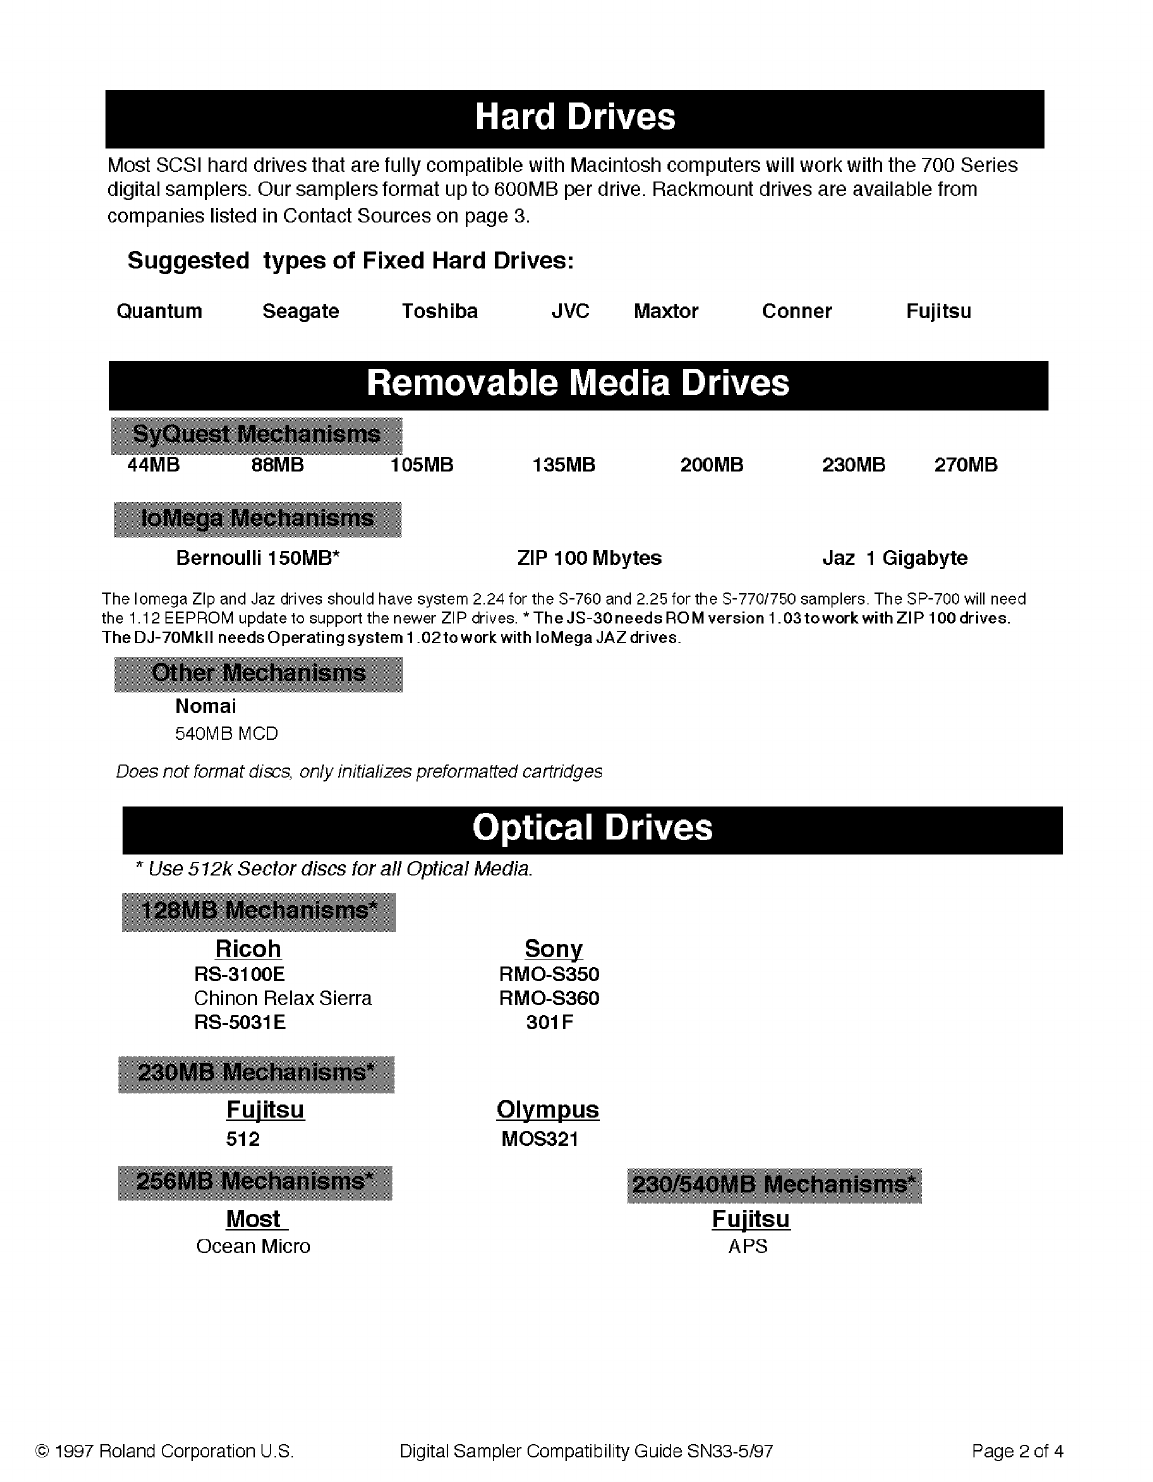

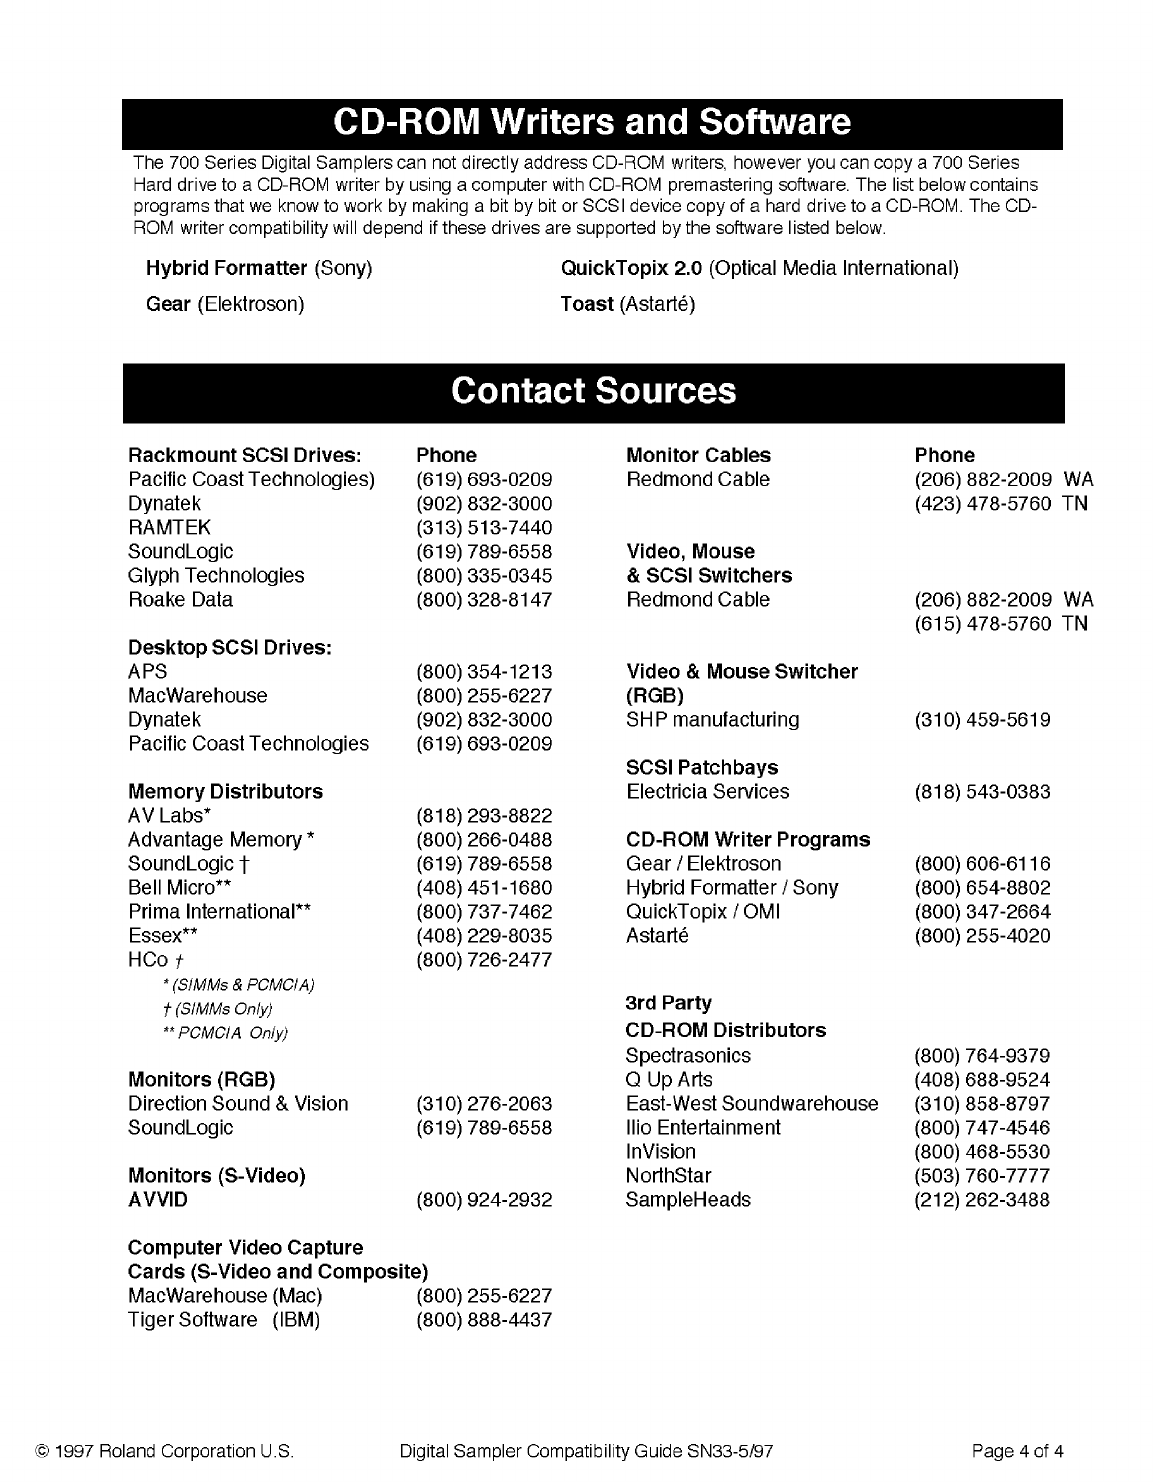

®ÂØÒÅή
VS-Series Digital Studio Workstation
Compatible Media Guide
Current Operating Systems
VS-840 1.02
VS-880 3.100
VS-1680 1.014
© 1998 Roland Corporation U.S. VS-880 Media Compatibility Guide — 6/98 SN65 Faxback # 21032 Page 1 of 2
Fixed Hard Drives (VS-880/1680)
If a drive is not listed in this guide, it does not necessarily mean that it is not compatible. To make
suggestions for future compatibility testing, please contact Roland at (323) 685-5141 ext. 482.
The VS-880 can format a compatible drive in either 512 MB or 1 GB (1000 MB) partitions. For drives
larger than 1 GB, the VS-880 is capable of addressing up to four 1 GB partitions per SCSI I.D. Therefore,
drives with up to 4 gigabytes can be fully utilized by the VS-880. Drives smaller than 500 MB will auto-
matically be formatted to their fullest capacity in a single partition.
The VS-1680 can format a compatible drive in either 1 GB or 2 GB partitions and can also access up to
four partitions. Therefore, drives with up to 8 gigabytes can be fully utilized by the VS-1680.
Most SCSI hard drives that adhere to “AV” specifications will work with the VS-880 and VS-1680. Keep
in mind, drives that do not meet AV specs, though not recommended for recording and playback, are
often still reliable for data storage. In the following charts, we’ve made a distinction as to the reliability of
each drive for both storage and recording/playback.
Suggested specifications for recordable hard drives:
• 13ms Access Time
• No or Intelligent Recalibration
• Active Termination
• 1:1 Interleave
• Slip Sectoring
• Macintosh Compatible
Internal -IDE
Manufacturer Model Capacity
IBM DBOA-2540, DHAA-2540 540MB
IBM DPRA-20810, DSOA-20810 810MB
IBM DSOA-21080 Travelstar 2LP, DMCA-21080 1GB
IBM DMCA-21440 1.44GB
IBM DTNA-22160 2.1GB
Hitachi DK222A-54 540MB
Hitachi DK212A-81, DK223A-81 810MB
Hitachi DK212A-10 1GB
Hitachi DK 223A-11 1.1GB
Hitachi DK 213A-13 1.3GB
Hitachi DK224A-14, DK225A-14 1.4GB
Hitachi DK225A-21, DK226A-21 2.1GB
Quantum Europa 540AT 540MB
Quantum Europa 810AT 810MB
Toshiba HDD2731 or MK-1002 MAV 1GB
Toshiba HDD2716 or MK-2103 MAV 2GB
Toshiba HDD2619 or MK-3003 MAV 3GB
Manufacturer Model Capacity Storage Record/Playback
Quantum Atlas 4.3 GB Yes Yes
XP34300W
Quantum Atlas 4.3 GB Yes Yes
XP34550W
External - SCSI
Fixed Hard Drives cont. (VS-880/1680)
Contact Sources
Rackmount SCSI Drives:
RAMTEK (313) 513-7440
SoundLogic (619) 789-6558
Glyph Technologies (800) 335-0345
Rorke Data (800) 328-8147
Desktop SCSI Drives:
APS (800) 354-1213
Dynatek (902) 832-3000
Nomai (888) 996-6624
Magneto Optical Drives*
Manufacturer Model Capacity Storage Record/Playback
Olympus 2.6GB MO 2.3 GB Yes No
Sony Vertex 2.6GB 2.3 GB Yes No
Fujitsu** 640/230 540/230 MB Yes Yes
*Can format 512KB sector optical media only
**Record/Playback depends on disc’s filled capacity and fragmentation of files.
Note: These drives have not yet been tested with the VS-1680.
Removable Media Drives (VS-840/880/1680)
Winchester Mechanism
Manufacturer Model Capacity Storage Record/Playback
Syquest 135 135 MB Yes Yes (VS-880 only)
Syquest ** SyJet 1.5 GB Yes Yes (VS-880 only)
Nomai M540 MCD 540 MB* Yes Yes (VS-880 only)
Syquest ** 230 230 MB Yes Yes (VS-880 only)
IoMega ZIP-100 100MB Yes Yes (VS-880 only)
*Cannot do Physical Format – Initialize Only
** Should be physically formatted before use.
Internal IDE Drives
HCo Computer Products (800) 726-2477
© 1998 Roland Corporation U.S. VS-880 Media Compatibility Guide — 6/98 SN65 Faxback # 21032 Page 2 of 2
Note: The VS-1680 is currently recommended for backup only with these drives. Also, the VS-840 is
currently only compatible with the IoMega ZIP-100 drive for backup only.

NQPSMTR ®'FC3@&E2CE
=:DE:?8
June 25, 1998
© 1998 Roland Corporation U.S. 625/98 Page 1 of 1
The following is a listing of the TurboStarts contained in this book. TurboStarts are arranged alphabetically by
model number.
A-30/AX-1 MIDI Keyboard Controller
A-33 MIDI Keyboard Controller
A-70 Expandable Controller
A-80 MIDI Keyboard Controller
A-90/EX Expandable Controller
DJ-70mkII Sampling Workstation
DR-5 Dr. Rhythm Section
DR-550mkII Dr. Rhythm
DR-660 Dr. Rhythm
DS-330 Dr. SoundCanvas
E-66 Intelligent Synthesizer
FC-200 Foot Controller
G-600 Arranger Workstation
G-800 Arranger Workstation
GP-100 Guitar Preamp/Processor
GR-09 Guitar Synthesizer
GR-1 Guitar Synthesizer
GR-30 Guitar Synthesizer
GT-5 Guitar Effects Processor
GX-700 Guitar Effects Processor
JD-800 Programmable Synthesizer
JD-990 Super JD Synthesizer
JP-8000 Music Synthesizer
JS-30 Sampling Workstation
JX-305 Groove Synthesizer
JV-35 Expandable Synthesizer
JV-50 Expandable Synthesizer
JV-90 Expandable Synthesizer
JV-880 Multitimbral Synth Module
JV-1000 Music Workstation
JV-1080 Multitimbral Synth Module
JV-2080 Multitimbral Synth Module
MC-50mkII Microcomposer
MC-303 Groove Box
MC-505 Groove Box
ME-6 Guitar Multi-Effects
ME-8 Guitar Multi Effects
ME-8B Bass Multi Effects
ME-10 Guitar Multi Effects
ME-30 Guitar Multi-Effects
MS-1 Micro Sampler
MSD Music Style Disks
PMA-5 Personal Music Assistant
R-8mkII Human Rhythm Composer
R-70 Human Rhythm Composer
RA-90 Intelligent Arranger
RA-95 Intelligent Arranger
RA-800 Realtime Arranger
RD-500 Digital Stage Piano
RD-600 Digital Stage Piano
SC-33 SoundCanvas
SC-88 SoundCanvas
SC-880 64-Voice Synthesizer Module
SD-35 SoundCanvas
SES Sound Expansion Series Modules
SP-202 Dr. Sample
SP-808 Groove Sampler
SPD-11 Total Percussion Pad
SPD-20 Total Percussion Pad
SX-700 Studio Effects Processor
TD-5K Compact Drum System
TDE-7K Compact Drum System
TD-7T TD-7 Turbo Version
TD-10 V Drums
VG-8 V Guitar System
VG8S-1 VG-8 System Expansion
VK-7 Combo Organ
VS-1680 24-bit Digital Studio Workstation
VS-840 Digital Studio Workstation
VS-880 Digital Studio Workstation
VS-880-S1 VS-880 System Expansion
VS-CDR-S2 CD Recorder System for the VS-880
XP-10 Multitimbral Synthesizer
XP-50 Music Workstation
XP-60 Music Workstation
XP-80 Music Workstation
NQPSMTR®
2+
TBS01© 1994 Roland Corporation U.S., 7200 Dominion Circle, Los Angeles, CA 90040 Faxback # 20001 12/95
••• ROLAND A-30/AX-1 TURBO FACTS •••
Perfect for playing sounds from a GS/GM sound module,
these MIDI keyboard controllers can transmit on two MIDI
channels simultaneously, create splits and layers, and can
Start/Stop a sequencer from the front panel.
• Initializing
To restore the original factory settings, hold down the
WRITE button and then turn the power on.
• Selecting Patches
1) Press the PATCH button so the LED is lit.
2) Use the numbered buttons to select patches 1-
16 (The numbers ABOVE the buttons indicate
the patch number).
3) To select patches 17-32, press the boxed-in “17-
32” button, then press the patch button (now the
boxed-in numbers above the buttons indicate the
patch number).
• Editing
You can transmit on two MIDI channels
simultaneously (upper and lower) with completely
programmable split points. KBD MODE allows you to
enable the lower part, the upper part or both parts.
The SPLIT LEDs will indicate your choice. The EDIT
buttons allow you to select which of the two parts you
wish to edit. Again, an LED will indicate your choice.
You can avoid much confusion by making sure that
the part you are editing is the same as the part you
have enabled under KBD Mode. The procedures
described in the following sections concern editing
patches. To properly edit a patch:
1) Make sure PATCH LED is OFF (Press PATCH
button if necessary).
2) Use the SPLIT buttons to choose which part you
are listening to (Upper or Lower).
3) Use the EDIT buttons to choose the part to be
edited (Upper or Lower).
To write a patch, press and hold down WRITE, then
push the patch button corresponding to the patch
location desired. When writing a patch, the
information remembered will include:
- Data Entry assignment.
- Value of Beats Per Minute.
- Values of CC00, CC32 and Program Change.
- Effects settings.
- CC07 (volume) settings.
- MIDI channel assignments.
- Splits and parts enabled.
- Octave assignments.
• Editing (cont.)
- Filters for control messages (Pitch Bender,
Modulation, Sustain)
- Assignment of Expression Lever
(Modulation/Aftertouch)
• Setting Split Point
There are three different keyboard modes: Single
(Upper or Lower alone), Split (Upper on right
keyboard side, Lower on left), and Layer (two sounds
overlapping). To configure your keyboard into one of
these modes, you will need to set the upper limit of
the Lower part and the lower limit of the Upper part
like this:
1) Make sure the PATCH LED is OFF.
2) Press and hold the LOWER button under KBD
Mode until the LED begins flashing.
3) Now press the key that corresponds to your
desired limit point.
4) Repeat this process with the UPPER button.
• Sending Program Changes
To send a program change message (which will call-
up the Capital Tones on a GS instrument):
1) Make sure the PATCH LED is OFF.
2) Press the PROGRAM CHANGE button.
3) Now use the buttons numbered 1-0 (underneath
the buttons) to select your Program Change
number.
4) Press ENTER to send the message.
Each factory patch (1-32) is programmed to send a
program change number corresponding to a specific
instrument belonging to a family of instruments that
is listed in blue above the numerical buttons (Piano,
Chromatic Percussion, Guitar, etc.) Each of these
instrument families consists of several sounds of a
similar type.
• Sending a Bank Select message to access a
Variation (Sub-Capital) Tone
1) Press the PATCH button if necessary (the LED
should be OFF).
2) Press the CC00 button.
3) Now use the buttons numbered 1-0 to enter the
Bank value (usually either 8 or 127 on GS
products).
4) Press ENTER.
5) Now use the buttons numbered 1-0 to select
your Program Change number.
6) Press ENTER to send the message.

NQPSMTR®
TBS50 © 1996 Roland Corporation U.S., 7200 Dominion Circle, Los Angeles, CA 90040 Faxback # 20044 9/96
••• ROLAND A-33 TURBO FACTS •••
The A-33 is a versatile 76-note master keyboard which
combines advanced MIDI control with user-friendly
functions. This professional quality controller can run on
batteries or AC power. It offers a semi-weighted action,
two key zones for creating layers and splits, dedicated
buttons for changing octaves, programmable
transposition, and 64 Patch locations (32 user and 32
preset). In addition to the new preset Patches, the A-33
also has several new features including keyboard
velocity scaling, external inputs for both sustain and
expression pedals, and two selectable MIDI outputs. It
has a new button layout which makes it easy to use and
it comes in an attractive black finish.
• Initialize
1) Hold WRITE and turn the power on.
• Selecting Patches
1) Connect a MIDI cable from the A-33’s MIDI OUT to
the MIDI IN of a sound module (preferably a GM/GS
module such as the MGS-64).
2) Press PATCH A and use the PATCH buttons to
select Patches 1-16 (The Patch numbers are labeled
above the buttons).
3) To select the second set of 16 Patches, press
PATCH B, and use the PATCH buttons 1-16.
• Creating a Layer or Split
1) Select Patch A-1. KBD MODE/UPPER will light and a
program change message for a Piano (if your module
is General MIDI compatible) will be assigned to
channel 1.
2) Press KBD MODE/LOWER to layer a Bass (GM), on
channel 2, with the Piano.
3) Press KBD MODE/SPLIT to split the UPPER and
LOWER. The Piano and Bass will split between the
E and F below middle C.
• Changing the Split Point
1) Using the same Patch, hold SPLIT.
2) While holding SPLIT, press the key where you want
the split point.
• Changing Octaves & Transposition
1) Press SELECT/UPPER and use the OCTAVE UP
and DOWN buttons to change the octave of the
Piano Part. (There is a five octave range available).
2) Press SELECT/LOWER and repeat this procedure
for the lower Part.
3) Pressing TRANSPOSE will transpose the entire
keyboard up a half step.
4) To set the transpose to a different interval, hold
TRANSPOSE and press a key up to an octave
above or below middle C.
• Selecting Tones with Program Change
1) Press EDIT followed by SELECT/LOWER if it is not lit.
2) Press PROGRAM CHANGE (also labeled 15).
3) Use the buttons numbered 1 through 0 (labeled under
the buttons) to select your Program Change number.
To call up Synth Strings, press 5 followed by 1.
4) Press ENTER to send the message.
5) Activate the KBD MODE/ UPPER and LOWER
buttons to create a layer of Piano and Strings.
• Selecting Variation Tones with Bank Select
1) Press EDIT followed by SELECT/LOWER if it is not lit.
2) Press CC00 (also labeled 13).
3) Use the buttons numbered 1 through 0 to select your
Bank value. (Depending on the sound module,
variations of Synth Strings are found using a bank
select 0 value of 8, 64, and 65).
4) Press 8 followed by ENTER to send the bank select
message.
5) Press ENTER again to re-send program change 51,
or select a new Program Change number and press
ENTER to send the message.
• Data Entry Slider
1) The Data Entry Slider can be assigned to any of the
127 Controllers. Currently it controls volume for the
lower Strings Part.
2) Press EDIT followed by SELECT/LOWER.
3) Press DATA ENTRY ASSIGN.
4) Use the buttons numbered 1-0 to select the desired
controller number. For example, 91 will control
Reverb level.
5) Press ENTER. The Data Entry Slider will now send
the controller information over the selected Part’s
MIDI channel.
• Writing Patches
1) Press PATCH A or B (under Mode) to select the
desired Patch group.
2) Hold WRITE.
3) Press the desired Patch button (1-16).
• Sequencer Start/Stop
The A-33 can START/STOP and control the tempo of an
external MIDI sequencer.
1) Connect the MIDI OUT of the A-33 to the MIDI IN of
the sequencer. Set your sequencer to sync to MIDI
Clock.
2) Assign the Data Entry Slider to #129. The slider will
now control the tempo of your sequencer (the default
tempo is 120 BPM).
3) START/STOP will start and stop your sequencer and
the tempo setting can be stored as part of the Patch.
NQPSMTR®
2
TBS71 © 1998 Roland Corporation U.S., 7200 Dominion Circle, Los Angeles, CA 90040 Faxback # 20068 1/98
••• Roland A-70 TURBO FACTS •••
The A-70 is an expandable keyboard controller that offers
extensive MIDI control combined with simple, one-touch
operation. Here are a few of the features:
• 76 note partially weighted keyboard with aftertouch
• 4 independent MIDI outputs and 8 zones allow control of
up to 64 channels
• 64 Programmable Performances
• 15 Assignable controllers (sliders, buttons, pedals)
• External Sequencer Control (Tempo, Start, Stop, Reset,
Song Select)
• Expandable with the VE-RD1,VE-GS1 or the VE-JV1
Voice Expansion Boards
• Displays Patch names with a built-in database containing
preset Patch lists for many sound sources as well as 4
user-definable Patch lists
• Initializing
Use the following procedure to restore the factory settings:
1) Hold MANUAL and turn the power on.
2) Press ENTER.
• Selecting a Performance
Use the following procedure to select a Performance:
1) Make sure that the EDIT button as well as the INT
and EXT buttons are not lit.
2) Use the INC/DEC buttons, or type a number
(01-64) on the 10 Key Pad and press ENTER to
select a Performance.
• Selecting a V-EXP Tone
Use the following procedure to select a tone from a
Roland Voice Expansion Board that has been installed in
the A-70:
1) Under ZONE, Press INT A so it is lit.
2) Under DESTINATIONS, Press INT so it is lit.
3) Under PARAMETER SELECT, press PATCH.
4) Use the INC/DEC buttons to select the desired Patch.
• Layering Sounds
Use the following procedure to layer two sounds:
1) Under ZONE, press INT A so it is lit.
2) Under DESTINATIONS, press INT so it is lit.
3) Under PARAMETER SELECT, press PATCH.
4) CURSOR LEFT to select the first number, which
corresponds to Zone A.
5) Use the INC/DEC buttons to select the desired sound.
6) Under ZONE, press INT B so it is lit.
7) CURSOR RIGHT to select the next number, which
corresponds to Zone B.
8) Use the INC/DEC buttons to select the desired
sound.
• Setting up a Split
Use the following procedure to create a split on the A-70:
1) Assign a Tone to Zones A and B as described in the
previous section.
2) Under DESTINATIONS, press INT so it is lit.
3) Under PARAMETER SELECT, press KEY RANGE.
4) CURSOR UP to Key Range Lower.
5) CURSOR LEFT to select the first number, which
corresponds to Zone A.
6) Hold ENTER, and press C3 on the keyboard.
7) CURSOR DOWN to Key Range Upper.
8) CURSOR RIGHT to select the second number,
which corresponds to Zone B.
9) Hold ENTER and press C#3 on the keyboard. Zone
A should now play above C3 and Zone B should play
below.
• Controlling an External Sequencer
1) Set the external sequencer to MIDI sync.
2) Press TEMPO and use the SONG SELECT
LEFT/RIGHT buttons to select a song on the
external sequencer.
3) Use the DATA ENTRY slider to adjust the tempo of
your sequencer.
4) Press START to start the song.
5) Press RESET to return to the beginning of the song.
• Viewing Patch Names of External Devices
The A-70 allows you to display Patch Names for many
devices using bank select MSB and LSB messages.
Use the following procedure to display the Patch Names
for the Roland SC-55:
1) Double click the EDIT button.
2) Type 0,2 on the 10 key pad and press ENTER.
3) Under ZONE, press EXT A so that it is lit.
4) Use the INC/DEC buttons to select #6 (SC-55).
5) Press EDIT so it is off.
6) Under DESTINATIONS, press EXT.
7) Under PARAMETER SELECT, press BANK SELECT.
8) CURSOR UP to display BM in upper the left corner.
9) CURSOR LEFT to select ZONE A.
10) Press 0 on the 10 Key pad.
11) CURSOR DOWN to display BL in the upper left corner.
12) Press 0 on the 10 Key pad.
13) Under PARAMETER SELECT, press PGM CHANGE.
14) Use the INC/DEC buttons to select the desired
Tones. The Tone names will be displayed.
• Soloing Zones / Outputs
Use the following procedure solo a Zone or Output:
1) Double click the desired ZONE or OUTPUT button.
2) Double click a second time to return to the previous
settings.

NQPSMTR®
2
TBS02 © 1994 Roland Corporation U.S., 7200 Dominion Circle, Los Angeles, CA 90040 Faxback # 20002 12/95
••• ROLAND A-80 TURBO FACTS •••
The A-80 is a powerful 88-note, MIDI controller
keyboard with the key range and feel of a concert
grand piano. System Exclusive information can be
stored in a Patch which can also transmit on four
independent MIDI Zones.
• Initializing
1) Hold down the 1st, 3rd & 4th buttons under the
display screen and the CHANNEL button.
2) Press any cursor button.
Before using the A-80, you may wish to plug a
footswitch into the pedal 3 jack. It is set (by default)
for sustain on all Zones.
• Selecting Patches
To select patches on the A-80:
1) Press the PATCH button (if it is not already lit)
2) Select bank and number of the desired patch
using PATCH BANK and PATCH NUMBER
buttons
• Muting and Soloing Zones or Outputs
The 4 MIDI outputs from the A-80 carry identical
information. This allows different modules (or banks
of modules) to be easily muted or soloed.
To mute an output:
1) Press the OUTPUT button (if it is not already lit)
2) Press the MUTE button (if it is not already lit)
3) To mute an output, press the corresponding
output button until it is unlit. Active tracks are lit,
muted tracks are unlit
4) To solo any output, press the solo button &
corresponding output button
To mute a zone:
1) Press the ZONE button
2) Press the MUTE button
3) Active zones are lit, muted zones are unlit
4) To solo any zone, press the solo button &
corresponding zone button
• Setting Zone MIDI channels
Before doing any editing on the A-80, it is important
to understand that the A-80 has no buffer memory.
Therefore, any edits are made directly on a patch,
and take effect immediately. For this reason, you
should only turn the EDIT light on when making a
change, then immediately turn it off.
• Setting Zone MIDI Channels (cont.)
To simplify this procedure, let’s begin by working on
one zone.
1) From the main screen, press View, then press
Zone
2) Select the zone you wish to set by first pressing
the ZONE button, then turn off SOLO and MUTE
buttons.
3) Now select zone to be edited (using A, B, C or D
buttons)
4) Press the EDIT button and use slider 3 to set the
MIDI channel. Notice that there will be MIDI
channels that cannot be assigned. This is
because the A-80 will not let you assign the
same MIDI channel to more than one zone.
• Setting Key Zone Limits
The A-80 can transmit on 4 separate zones, each
with its own upper and lower keyboard limits. To set
the key limits of the 4 zones:
1) From the main screen, press View, then press
Zone
2) Select the zone you wish to set by first pressing
the ZONE button, then turn off SOLO and MUTE
buttons.
3) Now select zone to be edited (using A, B, C or D
buttons)
2) Press the EDIT button and use sliders 1 and 2 to
set the lower and upper key zone limits
• Assigning Program Changes
The A-80 will transmit a program change for each
zone when a Patch is selected. To set the program
number sent by each zone:
1) From the main screen, press View, then press
the ZONE button.
2) Select the zone you wish to set by first pressing
the ZONE button, then turn off SOLO and MUTE
buttons.
3) Now select zone to be edited (using A, B, C or D
buttons)
4) Press PrgmCh and make sure the Zone light is
on.
5) Turn-on the Edit light and use the Bank and
Number buttons to set the desired program
number.
6) Turn off the Edit light.
7) This program change message is now
incorporated into the Zone you chose on this
Patch. Repeat this process for any other Zone
you wish to incorporate a Program Change
message into.
NQPSMTR®
26I
TBS39 © 1996 Roland Corporation U.S., 7200 Dominion Circle, Los Angeles, CA 90040 Faxback # 20035 10/96
••• ROLAND A-90 TURBO FACTS •••
The A-90 is a comprehensive, expandable keyboard
controller that offers simple, one-touch operation.
Roland’s proprietary PA-4 hammer-action provides
the natural resistance and rebound of a fine acoustic
grand. The A-90 has 4 independent MIDI outputs,
can control up to 8 Zones, stores 64 User
Performances, and displays patch names with a
built-in database containing patch lists for many
Roland sound sources. The A-90EX (A-90 with the
VE-RD1 installed) becomes a 64-voice, 4-part
multitimbral digital piano/synthesizer with 128
Tones, true stereo piano samples, and built-in
effects. The A-90 is also compatible with the VE-
GS1 and VE-JV1 Expansion Boards.
• Initializing
To restore the factory settings:
1) Hold CHAIN and turn the power on.
2) Press ENTER.
• Listen to the A-90EX Demo Songs
1) Press PGM CHANGE and AUX2 simultaneously.
2) Use SONG SELECT to choose a demo song.
3) Press START.
4) To stop playing, press STOP.
5) Press EXIT to return to the previous mode.
• Selecting a Performance
Performances contain up to 4 Tones, the effect and
editing (Attack, Release, Decay, etc.) parameters for
the Internal and External Zones. Disable all
FUNCTION and ZONE buttons.
1) Use the INC/DEC buttons to select a Performance.
You can also type in the desired PATCH number
on the keypad and press ENTER.
• Selecting an Internal Tone
Disable all FUNCTION and ZONE buttons.
1) Under ZONE, Press INT A
2) Under DESTINATIONS, Press INT.
3) Under PARAMETERS, press PATCH.
4) Use INC/DEC to change the Patch.
Note: When changing Tones of a Performance,
the parameters of that Performance (like Attack
and Decay) are still active.
• Layering Sounds
Disable all FUNCTION and DESTINATION buttons.
1) Use INC/DEC to select St. Concert 1.
2) Press ZONE INT B. The indicator will light.
3) Press INT under DESTINATIONS.
4) Press PATCH so that it is lit.
5) Cursor right to select Zone A or B.
6) Use INC/DEC to select the desired sound.
7) Use the same procedure to layer additional
internal or external zones.
• Setting up a Split
1) Assign a Tone to Zones 1 and 2. See “Layering
Sounds”
2) Press INT under Destinations so that it is lit.
3) Press KEY RANGE under Parameter Select.
4) Cursor up to Key Range Lower.
5) Cursor left or right to select the desired Zone.
6) Hold ENTER, and press the key on the keyboard
you wish to be the lowest key in this Zone.
7) Cursor down and repeat steps 5 & 6 to set the
Upper Key Range.
• Controller Assignment
1) Press EDIT.
2) Move the controller or slider to activate.
3) Use the CURSOR and INC/DEC to choose the
type and specific controller.
4) Cursor right twice and use INC/DEC to change
the controller range.
5) Press EDIT again to return to previous mode.
• Controlling an External Sequencer
1) Set the external sequencer to MIDI sync.
2) Use the SONG SELECT LEFT & RIGHT to
select a song on an external sequencer.
3) Press TEMPO and use the DATA ENTRY slider
to adjust the tempo of your sequencer.
4) Press RESET to go to the beginning of the song.
5) Press START to start the song.
• Viewing Patch Names of External Devices
Disable all FUNCTION and DESTINATION buttons.
1) Press EDIT.
2) Cursor to select SYS, then press Enter
3) Cursor down to display N-MAP Assign.
4) Press ZONE EXT A so that it is lit.
5) Use INC/DEC to select the desired Patch Map.
6) Press EDIT.
7) Under DESTINATIONS, press EXT.
8) Press BANK SELECT.
9) Cursor up to display BM in upper left corner.
10) Cursor left to select ZONE A.
11) Use the Ten-Key pad to Enter MSB/CC 0 value (i.e. 81).
12) Cursor down to display BL in upper left corner.
13) Use the Ten-Key pad to Enter LSB/CC 32 value (i.e. 0).
14) Under PARAMETER SELECT, press PGM CHANGE.
15) Use the INC/DEC to select the desired Tones.
• Writing a Performance to Memory
1) Press UTILITY.
2) Cursor to WRITE and press ENTER.
3) Use INC/DEC to select the memory location.
4) Press ENTER twice.
NQPSMTR®
><
TBS51© 1996 Roland Corporation U.S., 7200 Dominion Circle, Los Angeles, CA 90040 Faxback # 20045 9/96
••• ROLAND DJ-70MkII TURBO FACTS •••
The DJ-70MkII 16 bit Stereo Sampler provides
everything users need to create hot mixes with
professional sound quality. New features include
memory expansion of up to 32Mbytes using
standard 4x16 72-pin SIMMs chips and a built-in
SCSI interface for saving and loading sounds. The
DJ-70MkII can read the Roland S-700 Series and
Akai S-1000/1100 CD Rom sample libraries. It
offers additional unique features such as a large
graphic display, a Scratch Wheel, 8 play pads, a
37-note keyboard, and an 8 track Realtime Phrase
Sequencer. The DJ-70mkII will even let you
synchronize tempos of multiple drum loops with its
BPM Adjust function and it also lets you load
samples while playing. These innovative features
and more make the DJ-70MkII a powerful remix
and sampling workstation.
• Playing the Demo Song
1) Turn the power off and insert the factory demo disk.
2) Turn the power on and the demo song will
automatically load.
3) Press START/STOP (under SEQUENCER) to
hear the demo. Notice that you can play along
with the demo using the samples assigned to the
keys, pads, and Scratch Dial.
• Loading a Patch
1) Make sure that the demo disk is still in the drive
and press DISK.
2) Cursor up to Target and use the VALUE dial to
select Patch.
3) Use the CURSOR buttons to highlight the
desired Patch. Press F1 followed by S1.
4) The Patch is now loaded into memory. Press
PLAY and use the VALUE dial to select the
Patch. Now you can play it from the keyboard.
• Recording a Realtime Phrase Sequence (RPS)
After you have loaded the Demo song, the DJ-70MkII
will have several sounds already available to use with
the RPS sequencer.
1) Press RPS.
2) Check to see if there are any tracks currently
recorded (indicated by the ‘•’ under Rec). If so,
you can erase them by highlighting the track with
the cursor arrows and pressing F4 (ERASE).
3) Press REC when you are ready to record.
4) Play the keys, Scratch Dial, or user pads to start
recording. In addition to the key and pad
presses, the sequencer will record pitch bend,
modulation, and even Scratch Dial movements.
5) Press START/STOP to stop recording.
6) Press START/STOP to hear your RPS
sequence.
• Sampling from a CD
1) Plug a CD player into the stereo inputs on the
back of the DJ-70MkII.
2) Press PLAY on the DJ-70mkII.
3) Press F5 (SAMPLE) followed by F1 (READY).
4) Play your CD and use the Sampling Level knob
to adjust the input level so that the LCD peaks at
about 3/4 of the way up the meter.
5) To start or stop sampling, press SAMPLE
START/END. If you are sampling a drum loop,
start sampling at the beginning of the first bar
and stop sampling after one or two complete
bars by pressing SAMPLE START/END again.
6) Your sample is now complete, and has been
automatically made into a Patch and assigned to
the Scratch Dial. You can play it by pressing F4
(the middle F) on the keyboard.
7) If you want to retry sampling, press F1 (READY).
Press F1 again(YES), then repeat step 5.
8) Once you have a sample that you're satisfied
with, press PLAY. The sample will be assigned
to the Scratch Dial, on pad H, and on the first
key on the keyboard.
• Using the BPM Adjust Function
This function allows you to match the tempo of
multiple drum loops.
1) After creating your sample, hold the H pad and
press HOLD. You should hear your sample
playback continuously without holding the pad.
2) Press F3 to get to the BPM Tap screen.
3) Tap CUE/TAP at the same tempo as your drum
loop. You will hear a beep sound each time you
press the button.
4) After matching the tempo, press F1 (SET).
5) Press PLAY (under MODE).
6) Repeat steps 1-5 to assign a tempo to additional
samples.
7) Hold the H pad and press HOLD. You should
hear your sample playback continuously.
Depending on the Performance tempo setting,
your sample may be faster or slower than when
you originally recorded it.
8) From the Performance Play screen, use the
CURSOR ARROWS to select the BPM display.
9) Use the VALUE dial to increase or decrease the
tempo. All samples that were assigned tempos will
now play back at the Performance tempo.
%
TBS04 © 1994 Roland Corporation U.S., 7200 Dominion Circle, Los Angeles CA 90040 Faxback # 20004 12/95
••• BOSS DR-5 TURBO FACTS •••
The DR-5 Dr. Rhythm Section is a programmable
backing section including drum, bass and keyboard
sounds. It uses "fret-board" buttons and guitar chord
macros to program its 4-track sequencer. The DR-5
includes 256 CD-quality sounds, 64 rhythm kits, 200
preset and 200 user patterns of up to 4 bars each,
each pattern with three instrument tracks and a drum
track. There are 20 song locations with up to 250
parts per song. It has a guitar-in jack with speaker
simulation, a tuner, and the ability to program
instrument lines from guitar, and single or double
footswitch options for live performance.
• Initializing
1) Hold down both FRET keys while powering on.
2) Press ENTER twice.
• Playing the Demo Song
1) Turn the DATA dial to CIRCUS.
2) Press START to hear the Demo Song.
(Press STOP and use FWD or BWD to select
specific demo parts, press START to resume.)
• Playing Preset Patterns
1) Hold the SHIFT button and press PTN.
2) Press START.
3) Turn the dial to select additional patterns.
• One-Button Fill and Variation
The BOSS DR-5 can play a pattern, fill to variation,
and fill to the original pattern—each with the press of
a single button. Each pattern is normally four bars
long, placing 16 bars in your control with no repeats
or programming! Note: preset patterns are named in
sets of four by bank and number, i.e. Rock11,
Rock12, Rock13, Rock14, to group them for this
feature.
1) Press STOP, then hold SHIFT and press PTN.
2) Turn the dial to select number1 in any pattern
group (such as Pattern 004 is Rock21).
3) Press START and pattern will begin to play.
4) Use VAR, FTO, and FTV buttons to choose
between the four patterns in the group.
START/VAR toggles between the Original
pattern (#1) and the Variation pattern (#3). FTV
(pattern #2) is Fill To Variation. FTO (pattern
#4) is Fill To Original.
• Playing Rhythm Kits
1) Press the button labeled KIT.
2) Use the DATA DIAL to select one of the 64 kits.
3) The TRACK SEL button switches between the
drum track and 3 instrument tracks. Play the
pads to hear the sounds.
• Playing Chords from Pads
1) Press TRACK SEL until TRACK 1 is selected.
2) Press CHORD ON to the right of the instrument
pads. CHORD will appear in the display.
3) Select a chord root by holding down a note letter
pad on the bottom three rows of pads.
4) Now tap on the different chord type pads on the
top three rows and you will hear the chords.
• Creating a Song
1) Hold the SHIFT button and press SONG.
2) Use the DATA DIAL to select song number 01.
3) Press the red REAL/STEP button two times to
enter recording standby for step time write.
4) If the PART display does not say PTN use the
CURSOR to select it and use the DATA DIAL to
change it to PTN.
5) Now use the CURSOR > button to select a
pattern, then use the DATA DIAL to select the
first pattern that you want to use for your song.*
6) Once you have selected the pattern press
ENTER. The upper number in the PART display
will advance to 002?, and wait for a second part.
7) Repeat steps 5) and 6) several more times
adding more pattern parts to your song.
9) Press REAL/STEP to exit record mode, then
press the START button to hear your
masterpiece.
*HOT TIP - when the pattern number on the top line
ends in a question mark you can experiment with
different patterns without recording them - use the
Start and Stop buttons to hear parts before
pressing Enter.
• Amp Simulation and Tuner
The DR-5 has a Guitar In Jack with a built in
speaker simulator and a tuner.
1) Plug a guitar into BOSS distortion pedal, then
into the back of the DR-5.
3) Hold SHIFT and press the GTR IN pad.
4) Use the DATA Dial to select AMPSIM.
5) To tune guitar, hold SHIFT and press TUNER.
%
TBS04 © 1994 Roland Corporation U.S., 7200 Dominion Circle, Los Angeles CA 90040 Faxback # 20004 12/95
• Selecting & Editing Sounds
1) Press KIT button and use the DATA DIAL and
scroll to user kit number U15 Orchestra.
2) Press and hold the SHIFT key and press PAD
pad.
3) Press TRACK SEL until is says DRUM in display
4) If it does not also say Inst in the display, then
CURSOR < to call up instrument assign
parameters.
5) Use the DATA DIAL to scroll through all 174
drum and percussion sounds.
6) Use the CURSOR buttons to access editing
parameter: Pitch, Decay, Pan and Volume.
7) Use the DATA DIAL to alter the setting.
8) Now press TRACK SEL to select TRACK1
9) Use the CURSOR < button to call up the
instrument assign parameter.
10) You can hear the sound by playing the pads
which are laid out like a guitar fretboard.
11) Use the DATA DIAL to scroll through 82
instrument sounds .
12) Use the CURSOR buttons to access the edit
parameters available: Pitch, Decay, Pan,
Volume and OctaveShift.
13) Select an edit parameter and use the DATA
DIAL to alter its setting.
• The Footswitch Jack
The DR-5 has a footswitch jack that will
accommodate up to two momentary footswitches at
the same time. If you only need one footswitch
function, plug a sustain pedal directly into the
footswitch jack on the back - the default function is
Start/Stop (S/S). If you want to use two
footswitches, you need a PCS-31 stereo insert
cable and two FS-5U footswitches.
1) Connect footswitches to the back of the DR-5.
2) Press and hold the SHIFT key and press the
UTIL button on the top row of the Pads.
3) Use the CURSOR to select between Foot1 and
Foot2 and the DATA DIAL to select the value for
each footswitch - there are many options!
• Writing Multi-track User Patterns
1) Hold the SHIFT button and press PTN.
2) Use the DATA DIAL to select any User pattern
200 through 399.
3) Press the CURSOR > button until you access
the Time Signature parameter (T.Sign) and use
the DATA DIAL to set pattern length. Example -
for a four bar 4/4 pattern set 16/4.
• Writing Multi-track User Patterns (cont.)
4) Press KIT and select one using the DATA DIAL.
5) If the display says KitSelect, press Exit. Press
TRACK SEL and select the DRUM Track.
7) Press the Red REAL/STEP button.
Note
: The DR-5 loop-records. During recording the
pattern will repeat every 16 metronome ticks. The
first tick will be louder that the other 15.
8) Press the START button to begin recording.
Tap on drum pads to make a drum pattern.
Holding ERASE and a specific drum pad will
delete mistakes for that drum.
9) Press the STOP button to end Recording.
10) Press TRACK SEL to select TRACK 1.
11) Press CHORD (the word Chord will appear).
12) Select the chord root by holding down one of the
note letter pads on the bottom three rows of
pads. Tap on the different chord quality pads on
the top three rows to hear chords.
13) Press START to play your drum pattern and
experiment with different chord progressions
until you get something that you like.
14) Press STOP so that the DR-5 is not playing.
Press REAL/STEP followed by START. Record
you chord progression.
15) Press the STOP button to end Recording.
16) Press TRACK SEL to select TRACK 2.
17) Press CHORD and OFF (the word CHORD will
no longer be in the display).
18) There will be a bass sound with a different pitch
on each pad. Press START and practice.
19) Press STOP to stop the pattern playback. Now
press the Red REAL/STEP button which will
activate the REC function and press START.
20) Perform the bass line you have been practicing.
21) When you have your bass line recorded to your
satisfaction press the STOP button and move on
to the next Track if necessary.
• Programming A Part From Guitar
1) Hold SHIFT and press the EXT PITCH pad.
2) Rotate the Data Dial to ON.
3) Hold SHIFT and press the GUITAR IN pad.
4) Rotate the Data Dial to Mix Off.
5) Return to Pattern Mode by holding SHIFT and
pressing the PTN pad.
6) Press the TRACK SEL pad to choose the part
you wish to play.
7) You can now record a monophonic part from
guitar instead of the pads.
HOT TIP: Tune carefully and adjust the guitar input
volume knob on the back for optimum tracking.

%><
TBS03 © 1994 Roland Corporation U.S., 7200 Dominion Circle, Los Angeles, CA 90040 Faxback # 20003 12/95
••• BOSS DR-550mkII TURBO FACTS •••
The DR-550mkII Dr. Rhythm is a powerful rhythm
composer with a wide variety of percussion sounds
and effects. This affordable unit is ideal for home
studio and live performance applications featuring 91
16-bit sounds, extensive sound editing parameters
and four user-programmable pad banks.
• Initializing
Hold the -1/< and >/+1 buttons while powering up.
This will restore the factory demonstration song, the
factory patterns, sound edits and note number
assignments.
• Playing Sounds
1) Press the Drum Pads 1-12 to play the sounds.
2) Press BANK to move between the four pad
Banks, A,B,C, and D.
• Assigning Sounds to Pads
1) Press SHIFT and Pad 7 to enter Pad Edit.
2) Touch any pad, then use the -1/< and >/+1
buttons to assign any sound to that pad.
3) Press BANK to move between Pad Banks to
choose additional Pads to edit.
• Playing Patterns
The DR-550mkII comes with 64 Preset Patterns in
Bank B, and an additional 64 User-programmable
Patterns in Bank A. To play a Preset Pattern B11:
1) Hold SHIFT and press Pad 5 to select Pattern
Play.
2) Hold SHIFT and press BANK to select Pattern
Bank B.
3) Press 1 twice to select Pattern 11.
4) Press START.
5) Press any two number buttons to select another
pattern.
• Playing a User Pattern
1) Hold SHIFT and press BANK to select Pattern
Bank A.
2) Press 3 and 8 to select Pattern A38.
3) Press START.
4) Press any two number buttons to select another
pattern.
• Creating Rhythm Patterns
Bank A contains the 64 user-programmable patterns.
Patterns A11-A48 contain factory demo patterns, so
let's record Pattern A51.
• Real-time Record
1) Press SHIFT and Pad 6 to enter Pattern Edit.
2) Press 5 and 1 to select pattern A51.
3) Press START.
4) Press TEMPO and the -1/< or >/+1 buttons to
set the tempo. Press TEMPO again to return to
recording.
5) Press BANK to select the Pad Bank you wish to
play. You can change Pad Banks while
recording to select additional sounds.
6) Play the Pads!
7) Press STOP when finished.
• Step-time Recording
1) Press SHIFT and Pad 6 to enter Pattern Edit.
2) Press 5 and 2 twice to select pattern A52.
3) Use the >/+1 button to select the Step you wish
to enter.
4) Tap the Pad you wish to play on the current
Step.
5) The Step will increment, and you can tap the
Pad or >/+1 for the next Step.
6) Repeat steps 4 and 5 to complete the Pattern.
• Creating Songs
The DR-550mkII's contains 8 Song locations. Like
most other drum machines, Songs are built by
linking Patterns together. Before creating a new
Song, you will probably want to Clear the existing
Song data:
1) Press SHIFT and Pad 2 to enter Song Edit.
2) Press Number 1- 8 to select a Song.
3) While holding SHIFT, press CLEAR and
ENTER.
• Inputing new Patterns into the Song
1) Press SHIFT and Pad 2 to enter Song Edit.
2) Press SHIFT and BANK to select the Bank for
the first Pattern.
3) Press the number buttons to select a Pattern
number.
4) Press ENTER. The DR-550mkII will move to the
next measure, and you can repeat steps 2-4 to
select the next pattern.
5) Press SHIFT and Pad 1 to enter Song Play when
all your patterns have been entered into the
Song.
6) Press START to play your Song
%
TBS05 © 1994 Roland Corporation U.S., 7200 Dominion Circle, Los Angeles, CA 90040 Faxback # 20005 12/95
••• BOSS DR-660 TURBO FACTS •••
The DR-660 Dr. Rhythm is a professional quality
rhythm composer with 255 editable sounds. Each of
the 16 pads is touch and velocity sensitive providing
expressive control. Digital reverb and chorus and
four assignable audio outputs make this affordable
instrument ideal for both studio and live applications.
• Initializing
1) With the power on, press UTILITY.
2) Cursor right > to 8 INIT.
3) Press ENTER twice.
• Playing the Demo Song
1) Press SONG so the display indicates Song
Mode.
2) Scroll the Data Wheel past Song 99 to "Arsenal".
3) Press Play.
• Playing Preset Patterns
1) Press PATTERN/SONG so that the display
indicates Pattern Mode.
2) Select Pattern P00 8Beat 1 using the Data
Wheel or the 10-Key.
3) Press TEMPO. Use the Wheel to set the desired
Tempo. Press TEMPO to return to Play mode.
4) Press START.
5) Select new Patterns using the Wheel.
• Playing Realtime Pattern Change
1) Press SONG to select Pattern Mode.
2) Select Pattern P00 8Beat 1 using the Data
Wheel or the 10-Key.
3) Press START.
4) Press FWD for the Fill-to-Variation.
5) Press BWD for the Fill-to-Original.
6) Press START while the pattern is running to
alternate between the Original and Variation
Pattern.
• Play Drum Kits
1) Press DRUM KIT.
2) Play the Pads then, scroll the Data Wheel to
select Power 1. Play the Pads.
3) Use the Data Wheel to choose the TR808,
Brush 1, Cheap, and Bass Kits and X Fade kit as
you play the Pads.
4) Choose X Fade kit. Hold roll and show cross
fading with ride cymbal and snare.
• Demonstrating A/B banks and layering
1) Play the Pads with various velocity levels.
2) Press Pad Bank to select Bank B.
3) Press Pad Bank again to Layer A and B.
4) Hold the ROLL button while applying aftertouch
to a pad to control the roll volume.
• Using Effects
1) Press REVERB or CHORUS.
2) Tap the Pad you want to edit.
3) Use the Data Wheel to set the amount of Effect
for this Pad.
4) Press EFFECT.
5) Cursor right to select the Effect parameter, and
use the Data Wheel to set its value.
For an example of these effects in action, press
DRUM KIT and select Kits 29-31, Chorus, Delay,
and Vrb&Dly.
• Sound Editing
1) Press PAD.
2) Cursor right to the desired parameter, such as
Nuance.
3) Tap the Pad you wish to edit. Ride Cymbal
works well.
4) Use the Data Wheel to set the value.
5) Press SONG to return to Song or Pattern mode.
• Assigning sounds to Pads
1) Press the pad button.
2) Assign? will show, press ENTER (yes).
3) Tap a pad.
4) Use arrow up and down keys to change sound.
• Real-time pattern write
1) Press SONG and REAL so that Pattern Real
Mode is displayed.
2) Use the Wheel to select a User Patter, numbers
100-249.
3) Press DRUM KIT and use the wheel to select a
Kit for your pattern.
4) Press REC.
5) Press START and play the pads into your
pattern.
D
TBS06 © 1994 Roland Corporation U.S., 7200 Dominion Circle, Los Angeles, CA 90040 Faxback # 20006 12/95
••• BOSS DS-330 TURBO FACTS •••
The perfect sound module to supplement a digital
piano or MIDI studio, the desktop DS-330 Dr. Synth
offers 156 CD-quality sounds with onboard digital
effects and complete tone editing.
• Initializing
1) Hold down the REVERB and SPLIT buttons
while powering-up.
2) Press the up arrow/YES button.
• Playing the Demo Song
1) Hold down the DRUMS and ((•)) buttons while
powering-up.
2) Press the up arrow/YES button.
3) Press the down arrow/NO button to stop the
demo song.
4) Press EXIT to return to single play mode.
• Selecting an instrument in single mode
1) Simply press any of the 16 tone bank buttons to
select a instrument group of your choice.
2) Upon selecting a bank, use the NUMBER up and
down buttons to select individual instruments.
3) Depending upon the instrument, you can press
the VALUE/VARIATION up and down buttons to
select variation tones.
4) Any of these sounds can be heard by pressing
the ((•)) button.
• Selecting a drum kit
1) Press the DRUMS button.
2) Use the VALUE/VARIATION up and down
buttons to select any of the 8 drum kits.
3) The sounds in each kit can now be played
directly from the 16 instrument buttons, which
are now drum pads.
4) To exit DRUMS mode, press the DRUMS button.
• Creating a split patch
1) Select Piano 1-1 by pressing the PIANO button.
2) Press the SPLIT button.
3) Now, any note below F3 will be Acoustic Bass 5-
1 and the upper part will be Piano 1-1.
4) To alter the split point or change the lower
instrument, press the LOW/SUB> button and
continue pressing it to go through the
parameters.
• Creating a layer patch
1) Select Piano 1-1 by pressing the PIANO button.
2) Press the DUAL button.
3) Now, Piano 1-1 will be layered with Strings 7-1.
4) To change the layer instrument and its level,
press the LOW/SUB> button and continue
pressing it to go through the parameters.
• Fattening the sound
1) Select Piano 1-1 by pressing the PIANO button.
2) Press the FAT button.
3) Playing a note now, will actually trigger two notes
– the one played and the octave below it.
• Changing the default patch
When a bank is selected, the first tone in that bank is
automatically is selected. To change to default tone
to your preference, follow these steps:
1) Select Piano 1-1 by pressing the PIANO button.
2) Press the NUMBER up button to select E.Piano 2
1-6.
3) At this point, the "6" should be blinking. Press
the PIANO button again.
4) Press the ORGAN button and then go back to
the PIANO bank. It should register as E.Piano 2
1-6.
• Creating a multitimbral setup.
1) Press the UTILITY button until you see SINGLE
Mode.
2) Use the VALUE/VARIATION up button to select
MULTI Mode.
3) Press EXIT.
4) You will see the Part/MIDI channel displayed on
the lower-right of the screen.
5) To change Parts, press the PART (CH) up and
down buttons.
6) Instruments can be selected for each Part by
pressing the bank and number buttons.
7) To change MIDI channels for a given Part, press
the PART EDIT button until you see Part:Ch, and
use the VALUE/VARIATION up and down
buttons to select any of the 16 MIDI channels.
8) Press EXIT to return normal Multi play mode
NQPSMTR®
TBS07 © 1994 Roland Corporation U.S., 7200 Dominion Circle, Los Angeles CA 90040 Faxback # 20007 12/95
••• ROLAND E-66 TURBO FACTS •••
The E-66 Intelligent Synthesizer offers Intelligent Arranger
features with an 18 bit quality JV-type sound source, 28
note polyphony and both General MIDI and GS
compatibility. It has on-board reverb and chorus effects,
241 tones, 56 internal styles, and a 3.5 inch floppy disk
drive to provide access to a growing library of Roland
Music Style Disks (MSD) and can play Standard MIDI
Files (SMF) directly from disk, without lengthy load times.
• Initializing
1) Press and hold the REC button (in the display
section) during 'power up'.
• Playing the Demo Songs
1) Press and hold the blue DEMO button in the Music
Style section, then press the #5 button in the
MUSIC STYLE section to listen to Demo Song #1.
2) Press the DEMO button to stop the Demo.
3) Repeat steps 1 and 2 with Music Style #6 for Demo
2, or Music Style #7 for Demo 3.
• Playing Styles
Under 'Key Mode' press the 'Arranger', Arranger 'Hold',
'Sync Start' and 'Split Upper' buttons so that their LEDs
are lit. This gives us a common start point.
1) Select a Style - in the Music Style section, press the
number '1', then the number '7' to call up Style 17 -
Funk 1 (see the reference list at the top left of the E-
66).
2) Press the Intro button if you would like to begin with
a preset four bar intro.
3) Play a major chord at the lower end of the keyboard
to start a major arrangement. Try switching to a
minor chord - most arrangments will change subtly.
You may try a wide variety of chords, or even a
single key or two note interval to change the
harmony and arrangement.
4) Experiment with 'Fill-in To Variation', 'Fill-in To
Original', and 'Advanced Arranger' (below).
5) Press Start/Stop to stop, or press Ending for a four
bar pre-programmed ending.
• Fill-in Buttons & Advanced Arranger
The Roland E-66 can play a fill-to-variation or fill-to-
original pattern, each with the press of one dedicated
button. Each fill is up to one bar long.
Just press the appropriate 'fill to...' button during the bar
before the new version is desired.
The 'Advanced' Arranger button can be selected at any
time to increase the complexity of the arrangement
without interruption of the beat.
• Muting or Changing Volume of Parts
You can mute or adjust the volume of the arrangement
parts in the BALANCE section.
1) Use the left and right buttons to decrease or
increase the volume of each part.
2) To mute a selected part, simply press the left and
right buttons simultaneously.
• Playing a Standard MIDI File from disk
1) Insert a floppy disk with prerecorded SMFs and wait
for the disk light to go out (about 5 sec.).
2) Press the SONG SELECT button located in the
display area - the display will read "01", confirming
that the first song is selected.
3) Use the PREV and NEXT buttons to scroll through
all the songs available on the disk.
4) To play SMF songs, press the white PLAY button
located in the display section.
To switch from SMF to Music Style play, see below.
• Playing Along with a Standard MIDI File
1) To play along with most SMFs, mute the Upper part
in the BALANCE section (see instructions for muting
and volume changing of parts).
2) Any sound chosen in the Tone section will be
assigned to the upper part of the keyboard.
To switch from SMF to Music Style play, see below.
• Formatting a Floppy Disk
1) Insert a DD or HD floppy disk with the protection tab
set to WRITE position (down).
2) Hold the FUNCTION button and press REC.
3) Display reads "SUr", asking if you are sure you want
to format the disk. Press the REC buton again to
answer 'yes', or press any other button to exit the
operation.
• Recording a Song to Disk
1) Insert a disk into the disk drive.
2) Press the REC button and the REC indicator will
light and the display will show the number of the
song being recorded.
3) To start recording, press the PLAY button, or to start
recording with the Arranger, press the white
Start/Stop button.
4) To stop recording press the STOP button in the
display section.
*To switch from SMF to Music Style play, see below.
*NOTE: To switch back to playing Styles instead of
Standard MIDI Files, hold the Reverb and Chorus buttons
down at the same time for several seconds - the red
Tempo light will return to flashing the tempo.
NQPSMTR®
@@E@?EC@==6C
TBS52 ©1996 Roland Corporation U.S. , 7200 Dominion Circle , Los Angeles , CA 90040 Faxback # 20046 09/96
••• ROLAND FC-200 TURBO FACTS •••
The Roland FC-200 MIDI Foot Controller is the perfect
companion for the Roland GP-100 and BOSS GX-700.
This powerful MIDI foot pedal can call up patches and
send MIDI controller messages to other devices right
from the floor. There is even a built-in expression pedal.
In addition, up to 6 expression and/or foot pedals can
be used for additional realtime control. It can also send
MIDI notes, MIDI Start/Continue/Stop, and even MIDI
Machine Control messages. The FC-200 can send
system exclusive messages for ‘no hands’ editing of the
GP-100 and GX-700. These features and more make
the FC-200 the best choice in MIDI foot controllers.
• Initialize
1) Hold the 10 foot switch and turn the power on.
2) Press CTL.
• Selecting Patches
1) Connect a MIDI cable from the FC-200’s MIDI OUT
to MIDI IN of a Roland GP-100 or BOSS GX-700.
2) The foot switches (1-10) will change Patches. Use
BANK UP and DOWN to change to the next bank of
10 Patches.
Note: If the FC-200 is not changing patches on the
GP-100 or GX-700, make sure that it is in Program
Change Mode (press MODE until 0 is displayed). If a
problem continues, make sure that the GP-100 or
GX-700 is set to receive on MIDI channel 1.
• Using the Built-in Expression Pedal
The FC-200 comes with a built-in expression pedal. It
defaults to MIDI controller 7 (volume). The factory
patches in the GP-100 and GX-700 are programmed to
respond to controller 7.
1) Select Patch 1 STUDIO SPACE on the GX-700, or
Patch 001 CLASSIC STACK on the GP-100.
2) Play your guitar and use the expression pedal on the
FC-200. It will function as a volume pedal.
Note: This function will work with any MIDI device
that is set to respond to controller 7. This may
require some additional setup depending on the MIDI
device you are using. If you have a device that uses
a controller other than 7, the FC-200’s expression
pedal can be set to transmit a variety of MIDI
controllers.
The FC-200 has jacks for adding up to six more
expression or foot pedals. The default controller
messages sent from these inputs are listed under the
inputs. There is also a jack for changing modes with a
foot switch.
• Using Manual Mode with the GX-700
When using an FC-200 with a GX-700, it is possible to use
the foot switches to turn effects on and off in a patch.
1) Press MODE until SE appears in the display.
2) Use the foot switches (1-10) to turn the GX-700’s
effects on or off.
• No Hands Editing on the GX-700
Using an FC-200 with a GX-700, it is possible to do ‘no
hands’ editing. This requires connecting additional foot
switches to the back of the FC-200. Make sure that the
FC-200 is in Exclusive Mode (SE) and use the following
procedure for ‘no hands’ editing:
1) Use external foot switches 5 and 6 to control the
PARAMETER LEFT and RIGHT commands.
2) Use external foot switch 4 to return to PLAY MODE.
3) External foot switches connected to jacks 1, 2, and 3
will control the LEVEL/CHAIN, BYPASS, and
TUNER/UTILITY commands respectively.
4) Use the built-in foot switches (1-10) as you would
use the EFFECTS SELECT button on the GX-700.
Pressing a foot switch enters the edit mode for each
effect, and the external foot switches select the
various parameters.
5) Use the expression pedal to change the value.
• No Hands Editing on the GP-100
It is also possible to do ‘no hands’ editing with the GP-100.
As with the GX-700, this requires connecting additional foot
switches to the back of the FC-200. Make sure that the FC-
200 is in Exclusive Mode (SE) and use the following
procedure for ‘no hands’ editing:
1) Use the FC-200’s built-in foot switches 4 and 5 as you
would use the PARAMETER knob on the GP-100.
2) Use the built-in foot switch 1 for the WRITE command.
3) Use the built-in foot switch 2 for the EXIT command.
4) Use the BANK DOWN and CTL foot switches on the
FC-200 as you would use the NUMBER/VALUE knob
on the GP-100 (the built-in expression pedal will change
values quickly).
5) External foot switches connected to the FOOT SW/EXP
jacks 1-6 will access the VOLUME, BASS, MIDDLE,
TREBLE, PRESENCE, and MASTER parameters
respectively.
• Control Mode and Note Mode
Control and Note modes allow you to assign different
controllers or note numbers to each of the FC-200’s foot
switches (external foot switches can be assigned as
well). These modes do not apply to the GP-100 or GX-
700, but they are extremely useful when using a MIDI
sequencer, sound module, or Intelligent Arranger. You
can use the Control mode to start or stop your sequencer
from the FC-200. You can use Note mode to trigger
sounds in your sound module or to change chords on an
Intelligent Arranger, as you would with MIDI bass pedals.
NQPSMTR®
8
TBS63 © 1997 Roland Corporation U.S., 7200 Dominion Circle, Los Angeles, CA 90040 Faxback # 20060 5/97
••• ROLAND G-600 TURBO FACTS •••
The G-600 is part of a new generation of Roland Arranger
Workstations. It is ideal for one-man bands, songwriters, and is
perfect to enjoy a wide variety of Music Styles and Standard MIDI
Files at home. The G-600 features 689 Tones, 64-notes polyphony,
128 Music Styles, 192 Performance Setups, and a 61-note
keyboard. The 8-Track Music Style Recorder lets you create your
own Music Styles, and it also features direct-to-disk recording and
playback of SMFs. The G-600 is 16 part multi-timbral, and features
built-in reverb, chorus, delay and EQ. Operation is made easy
thanks, in part, to the large 240 x 64 pixel display.
• Initializing
Use the following procedure to restore the factory settings:
1) Hold WRITE, and turn the power on.
• Playing the Demo Songs
The G-600 comes with 2 floppy disks containing demo songs.
Use the following procedure to listen to all of the demo songs:
1) Simultaneously press [ ] DOWN and [ ] UP (under
Performance Memory) so that “ 00 Free Pnl” is displayed.
2) Insert one of the demo disks into the disk drive.
3) Press PLAY/STOP (under Recorder) to start playback
and adjust the VOLUME slider as desired.
4) Press PLAY/STOP again to stop playback.
NOTE: To play a specific song, press SONG SELECT so
it is lit and use the PREVIOUS and NEXT buttons to
select the desired song after step 2 above. Then proceed
with the remaining steps.
• Selecting Tones
The G-600 features 689 high quality, PCM sampled Tones.
Use the following procedure to select Tones:
1) Press UPPER 1 (under the display) so it is lit.
2) Press GROUP A-D, (in the Tone area) to select the
desired group of instruments.
3) Use the [1]-[8] buttons to select the desired Bank.
4) Use the [1]-[8] buttons again to select the Tone from within
that Bank.
5) Press VARIATION to select a variation Tone.
• Selecting Music Styles
The professional quality of the G-600 is evident in the 128
built-in Music Styles. Additional styles are available on MSA /
MSD series floppy disks. Use the following procedure:
1) Press GROUP (under Music Style / MIDI Set) to select
Group A, B, or USER as desired.
2) Use the [1]-[8] buttons (under Music Style / MIDI Set) to
select the desired bank.
3) Use the [1]-[8] buttons again to select a Music Style from
within that bank.
4) Press SYNCHRO START so it is lit.
5) Play a chord on the keyboard below middle C.
6) Press START/STOP to stop the arranger.
• Setting Split Points - Up to 3 Zones
The G-600 can have up to three instruments assigned to
different sections of the keyboard.
1) Press SYNCHRO START so it is not lit.
2) Press SPLIT.
3) Press UPPER1, LOWER, and UP2 SPLIT (under
Keyboard Mode) so they are lit. This will divide the
keyboard into 3 independent sections.
4) Press F2.
5) Press PAGE down to select page #2.
6) Use the DRUMS/PART [ ] buttons (under the display) to
adjust the split point between the Upper and Lower zones.
7) Use the ACCOMP/GROUP [ ] buttons (under the
display) to adjust the split point between the Upper 1 and
Upper 2 zones.
• Layering Tones
Use the following procedure to layer two Tones across the
whole keyboard:
1) Press UPPER1 (under Keyboard Mode) so it is lit.
2) Press UPPER2 (under Keyboard Mode) so it is lit.
3) Press WHOLE RIGHT.
• Playing Standard MIDI Files
The G-600 features direct-from-disk playback of Standard
MIDI Files, giving you access to the thousands of MIDI files
available from various manufacturers at the touch of a button.
Use the following procedure:
1) Insert a disk containing a Standard MIDI File.
2) Press GM/GS so it is lit.
3) Press SONG SELECT so it is lit.
4) Use the PREVIOUS and NEXT buttons to select the
desired song title and press PLAY.
5) If the SMF includes lyrics, press F4 to view the lyrics in
the display.
• Using the G-600 with the LVC-1N
The Roland LVC-1N Lyrics Converter allows you to project
the lyrics being read by the G-600 onto a video monitor. Use
the following procedure to setup the G-600 for use with the
LVC-1N and Standard MIDI Files containing lyric information:
1) Press F3 (MIDI).
2) Hold SHIFT and press F1 (BASIC).
3) Use the PAGE DOWN button to access the “TX” display.
4) Use the LOWER [ ] (under the display) to select “Lyrics”
and press UPPER 2 (under the display) to select “ON” (if
necessary).
5) Play the Standard MIDI File (as previously described).
••• Options •••
FC-7 MIDI Foot Controller, PK-5 Dynamic MIDI Pedal, FV-
300L Expression Pedal, DP-6/2 Pedal Switch, MSD/MSA-
Series Style Disks, LVC-1N Lyrics Converter.

NQPSMTR®
8
TBS36© 1995 Roland Corporation U.S., 7200 Dominion Circle, Los Angeles, CA 90040 Faxback # 20008 12/95
••• ROLAND G-800 TURBO FACTS •••
The G-800 is the first of a new generation of Roland
Arranger Workstations. It is ideal for one-man bands,
songwriters, and is perfect to enjoy a wide variety of
Music Styles and Standard MIDI Files at home. The
G-800 features 689 Tones, 64-notes polyphony, 128
Music Styles, 192 Performance Setups and a new
76-note keyboard. The 8-Track Music Style
Recorder lets you create your own Music Styles, and
it also features direct-to-disk recording/playback of
SMFs. The G-800 is 32 part multi-timbral with two
MIDI ports, and features built-in reverb, chorus,
delay and EQ.
• Initializing
1) Hold WRITE, and turn the power on.
• Selecting Tones
1) Press UPPER 1 under the display.
2) Press GROUP A-D, (in the Tone area) to select
the desired group of the instruments.
3) Press Bank and Tone 1-8 to select the Bank.
4) Press Tone 1-8 again to select the Tone.
5) Press VARIATION to select a variation Tone.
• Selecting Music Styles
1) Press GROUP A-B in the Music Style area.
2) Press BANK.
3) Press Music Style 1-8 to select a Bank.
4) Press Music Style 1-8 to select a Music Style.
• Setting Split Points - Up to 3 Zones
The G-800 can have up to three key zones and
transmit on three MIDI channels simultaneously.
1) Press SPLIT.
2) Press UPPER1 and UPPER2 (under Keyboard
Mode) for two zones; also press LOWER for
three zone split. The buttons will be lit.
3) Press F2.
4) Press PAGE down to select page #2.
5) Use DRUMS rotary knob to choose split point.
For three zone split, use the ACCOMP rotary
knob to choose the additional split point.
• Layering Tones
To layer two Tones across the whole keyboard:
1) Press UPPER1 under Keyboard Mode.
2) Press UPPER2 under Keyboard Mode.
3) Press WHOLE RIGHT.
4) Press SYNCHRO START so it is off.
• Storing Performances in Memory
You can save selected and edited Tones, Music
Styles, Split Points, and Effect Settings into a
Performance Memory.To store your setup:
1) Press WRITE.
2) Press UPPER1 (under the display) to turn the
memory protect OFF, if it is on.
3) Hold WRITE and press GROUP A-C in the
Performance Memory area.
4) Continue to hold WRITE and press BANK.
5) Press PERFORMANCE MEMORY 1-8 for the
Bank value.
6) Press PERFORMANCE MEMORY 1-8 for the
Number value.
• Saving and Loading data to Disk
You can save created Music Styles, Style Sets, MIDI
Sets, Chord Sequences and Performances on the
floppy disk.
1) Press F5.
2) Press F1 for Load or F2 for Save.
3) Press PAGE to select the type of data to
Load/Save.
4) Press UPPER1 in the display area to Load;
press MBASS to Save.
• Playing Standard MIDI Files
1) Insert the disk.
2) Press GM/GS.
3) Press SONG SELECT Previous or Next to select
the desired song title.
4) Press PLAY.
5) If the SMF includes lyrics, press F4 to view the
lyrics in the display.
• Editing Tones
You can edit the tones of the RealTime Parts
as Upper, Upper2, Lower, M.Bass or M. Drums:
1) Press Tone in the display area.
2) Press F4 Edit.
3) Select the Part with the DRUM rotary knob.
4) Select the parameter with the ACCOMP knob.
5) Adjust the value of the parameter with the
UPPER rotary knob.
••• Options •••
FC-7 MIDI Foot Controller, PK-5 Dynamic MIDI
Pedal, FV-300L Expression Pedal, DP-6/2 Pedal
Switch, MSD-Series Style Disks.
N QPSMTR®
#
TBS38 © 1995 Roland Corporation U.S., 7200 Dominion Circle, Los Angeles CA 90040 Faxback # 20009 12/95
••• Roland GP-100 TURBO FACTS •••
The Roland GP-100 Guitar Preamp/Processor is the
first rack mount effects processor to use Composite
Object Sound Modeling (COSM). This new
technology allows the GP-100 to accurately
reproduce classic guitar amps, a large selection of
speaker cabinets and several different microphones.
Dedicated knobs are provided to allow you to easily
change the preamp settings of the GP-100. The
GP-100 can produce up to 16 effects simultaneously
which can be arranged in any order. These include a
wide variety of effects like ducking delay, tap delay,
noise suppressor, phaser, reverb, slow gear,
tremolo/pan, chorus, compressor /limiter, equalizer
and intelligent pitch shifting. The 200 Preset and 200
User Patches include 16 realtime controllers,
selectable stereo outputs, two programmable effects
loops and two external control switches. The system
can be set up with a guitar amp or direct to the board
for recording. The GP-100 also includes a built in
chromatic guitar tuner.
• Initializing the GP-100
1) Hold the PARAMETER knob while powering on.
2) Press WRITE.
• Connecting the GP-100 to a Sound System
Both pair of stereo outputs can be individually setup
to work with a standard guitar amp or direct into a full
range PA or recording system. The factory presets
are setup to use the OUTPUT A L(MONO) and R
connections. Connect a set of cables from these
outputs.
1) Press GLOBAL.
2) Rotate PARAMETER to Amp Being Used:A.
3) Rotate VALUE to select Solid State or Tube to
determine the amplifier you are using.
4) Dial PARAMETER to SP(eakers) Being Used:A.
VALUE to the appropriate cabinet type - Built In
for combo amps or stack for separated.
5) Dial PARAMETER to SP(eaker) Color:A. Dial
VALUE to Adjust for guitar amp.
6) Press EXIT to return to play mode.
• Tuning the Guitar
1) Connect a guitar to the INPUT on the front
panel.
2) Press the TUNER button and play each string.
3) Adjust the tuning of each string to the center
position of the meter.
4) Press EXIT to return to play mode.
• Auditioning Patches
The GP-100 has 200 user programmable (001 to
200) and 200 preset patches (201 to 400). To scroll
through patches one at a time, rotate the NUMBER
knob. Pressing the NUMBER knob in while rotating it
will change patches in increments of 10. Check out
the following patches:
1) 001 CLASSIC STACK - 1959 Marshal stack with
realistic dynamic control.
2) 002 JC-120 Clean - Original sound of the Roland
JC-120 Jazz Chorus amplifier.
3) 007 5VOICE HARMONY - Thick harmony in the
key of C.
4) 011 BOOGIE LEAD - Mesa Boogie Lead
channel with stack.
5) 012 VINTAGE TWIN - Classic Fender Twin with
2 x 12” speakers.
• Editing Sounds
The PREAMP knobs are similar to knobs on a
standard guitar amplifier. Rotate the knob past the
original value so that it catches the number, then
continue to rotate to change the value of the selected
parameter.
1) Select any patch as a starting point.
2) Rotate the PARAMETER knob. The effects will
be abbreviated with two letters.
3) Press the VALUE knob to turn effects ON or
OFF. Rotate VALUE to change the placement of
the selected effect in the chain. (The DUAL
algorithm can not reorder the effects).
4) Continue rotating PARAMETER to access the
parameters of each effect. Press and rotate
PARAMETER to skip through each effect
quickly.
5) Rotate VALUE to change effects settings. Press
and rotate VALUE knob to change values
quickly.
• Writing a Patch
Once you have edited a sound you can write it to any
of the 200 user programmable memory locations.
1) Press WRITE. The number of the PATCH will
flash.
2) Use the VALUE dial to select the location in
which you want to store your Patch.
3) Press WRITE again.
N QPSMTR®
#
TBS38 © 1995 Roland Corporation U.S., 7200 Dominion Circle, Los Angeles CA 90040 Faxback # 20009 12/95
• Realtime Control
With an FC-200 MIDI Foot Controller, expression
pedal, or foot switch, it is possible to control up to 16
parameters of the GP-100 in realtime - 8 continuous
and 8 effects on/off. Connect the FC-200 to the MIDI
IN and an expression pedal to the EXP Pedal jack on
the back. The CONTROL 1/2 jack can be used with
a PCS-31 insert cable and two FS-5U foot pedals to
turn effects on and off without changing a patch. To
program the GP-100 to respond to the expression
and control pedal on the FC-200:
1) Rotate PARAMETER until the screen reads
[Assign 2 Target]. Rotate VALUE to select
parameters. (Assign 1 can only be used for
volume or wah. Assign 2 through 8 can target
any parameter).
2) Rotate PARAMETER to [Assign 2 Min] and use
VALUE to set the range. Repeat for [Assign 2
Max].
3) Rotate PARAMETER to [Assign 2 Source] and
VALUE to [MIDI CTL #7] for FC pedal, [MIDI
CTL #80] for FC switch, [EXP PEDAL] or
[CONTROL 1/2] for pedals.
4) Experiment with the pedal to see how it controls
the sound parameters in realtime.
• Understanding Algorithms
The top row of the display screen shows the Patch
number and Algorithm name. Algorithms are a
collection of effects with the parameters available for
each effect. The GP-100 has five algorithms: BASIC,
DELAY, HARMONY, VINTAGE and DUAL.
BASIC: A set of effects that are quick and easy
to program, including Compressor,
Wah, EQ, Noise Suppressor,
Harmonist, Delay, Chorus and Reverb.
DELAY: All the effects available in BASIC plus
Phase, Flange and a more powerful 4
tap ducking delay.
HARMONY: The BASIC effects with an impressive
intelligent pitch-shifter.
VINTAGE: The BASIC effects along with some
unique BOSS pedals including
Tremolo/Pan, Vibrato, Auto Wah, Slow
Gear and Feedbacker.
DUAL: Two chains of effects which include the
Preamp along with EQ, Delay, Chorus
and Reverb. These chains can be
layered, switched or morphed in
realtime with a foot pedal or other
controller.
••• GP-100 COSM Models* •••
Amplifiers
Roland JC-120
Fender Twin
Matchless (Vox AC-30 clone)
Mesa Boogie Lead
Marshall 1959
Soldano
Peavey 5150 Rhythm
Peavey 5150 Lead
Pedals
OD-1 Overdrive
OD-2 Turbo Overdrive
DS-1 Distortion
FZ-2 Fuzz pedal
Speaker Cabinets
Small open-back enclosure - 1 x 10”
Open-back enclosure - 1 x 12”
Open-back enclosure - 2 x 12”
Large sealed enclosure - 4 x 12”
Large dual stack - 4 x 12”
Microphones
SM-57
Electro Voice RE-20
U-87 condenser mic
* All products are trademarks of their respective
companies.

NQPSMTR®
%
TBS09 © 1994 Roland Corporation U.S., 7200 Dominion Circle, Los Angeles, CA 90040 Faxback # 20010 12/95
••• GR-09 GUITAR SYNTH TURBO FACTS •••
The new Roland GR-09 is an inexpensive Guitar
Synthesizer featuring 180 high quality tones, 128
patches, 2 independent effects processors and Roland's
exclusive high speed tracking technology. The 180 tones
(2 megabytes) have been hand-picked from Roland's
extensive sample library. The operations of the GR-09
have been consolidated to 2 easy to use dials to choose
various parameters. Assignable expression pedal per
patch and multiple pedal operations make the GR-09
suitable for live applications. The GR-09's 28 notes of
polyphony accomodate even the most extensive sounds
like layers and splits. The sounds of the GR-09 can be
expanded to 360 tones with the optional GR9E-1 4
megabyte expansion board.
• Initializing
1) While holding PEDAL 2, turn on the GR-09.
2) Press + followed by EDIT/PLAY.
• ROM Play
1) While holding PEDAL 1, turn on the GR-09.
2) Press EDIT/PLAY.
3) Press EDIT/PLAY again to stop.
4) Turn the unit off and on to return it to its normal
state.
• Tuning your Guitar
The GR-09 uses high speed pitch conversion to activate
its internal sounds. It is for this reason, that proper guitar
tuning is essential.
1) Hold down the S1 button on the GK-2 or GK-2A,
press PEDAL 1.
2) Play each individual string. The left of the display will
indicate what string number you have played.
3) Tune your guitar to the display using the group of five
LED lights and display as your guide.
4) The right of the display indicates the current pitch.
The middle light of these five LED's indicates proper
tuning.
5) Tune all your strings to the GR-09 using this method.
• Playing Patches
There are two methods used to change patches on the
GR-09: from the front panel switches and with the foot
switches.
• Front Panel method
1) Use the +/- value buttons to select various patches.
• Playing Patches (cont.)
• Changing patches with the footswitches:
1) Hold the S1 button on the GK-2 or GK-2A and press
Pedal 2 entitled NEXT GROUP to change the group
(A,b,C,d)
2) Hold the S1 button on the GK-2 or GK-2A and press
Pedal 3 (BANK DOWN) or Pedal 4 (BANK UP) .
3) Release the S1 button and press Pedals 1-4 to
choose the desired Patch.
• Using Pedals for Pitch Bend or Modulation
The Pedals can be used to control Pitch Shift,
Modulation, Hold 1 and Hold 2. Pitch Shift will raise or
lower the pitch of the synth sound. Modulation adds
vibrato to the current synth sound. Both the Hold 1 and 2
functions are used for sustaining the synth sound of the
GR-09. The Hold 1 function will sustain currently active
synth notes and let you play the guitar sound on top. The
Hold 2 function will sustain only the currently held strings
and let you play guitar or synth sound on top.
1) Press the S2 button on the GK-2 or GK-2A.
2) 'Pdl' will appear in the display.
3) Pedals 1 thru 4 will now function as Pitch Shift,
Modulation, Hold 1 and Hold 2.
4) Press the S2 button to return to normal play mode.
• Creating Custom Sounds on the GR-09
The GR-09 contains 128 patches, the first 64 of which
are pre-programmed from the factory with various
sounds. The last 64 sounds are initialized settings
available for you to edit and change. A patch is made up
of up to two samples called Tones. Patches also control
various editing parameters involved with the Tones.
Choosing new Tones
1) Choose Patch C11.
2) Press EDIT/PLAY.
3) Turn the MODE knob to PATCH EDIT 1.
4) Turn the PATCH PARAMATER knob to MAIN
TONE#.
5) Select the new Tone (1-180) with the VALUE +/-
buttons.
6) Press EDIT/PLAY when completed.
Modifying Other Parameters
1) Turn PATCH PARAMETER to the desired parameter
for example - ATTACK.The ATTACK parameter
controls how fast the sounds come in.
2) Modify values with the VALUE +/- buttons.
Saving the Changes
1) Turn the MODE knob to WRITE.
2) Press VALUE + and - simultaneously.
NQPSMTR®
%
8F:E2CDJ?E96D:K6C
TBS08 © 1994 Roland Corporation U.S., 7200 Dominion Circle, Los Angeles, CA 90040 Faxback # 20011 12/95
••• ROLAND GR-1 TURBO FACTS •••
The revolutionary GR-1 is the guitarist's guitar
synthesizer. The user-friendly, floor-module design
with lightning-fast tracking allows performers to take
advantage of the 200 CD-quality sounds – designed
exclusively for guitarists. The onboard digital reverb
and chorus add the professional touch whether
playing live or using the 2,000 note sequencer.
• Initializing
1) Turn power off.
2) Hold WRITE/COPY while turning on.
3) Press ENTER/YES.
• Playing patches
1) Press BANK footswitch (bank number flashes).
2) Press footswitches 1 through 4.
3) Press GROUP UP, and repeat above to access
the second group of 32 patches.
Note: The first eight patches (bank 1-1 through bank
2-4) are demo patches of the quickest tracking
sounds and give an idea of the GR-1 sonic
capabilities.
• Auditioning Tones
1) Choose patch 1-1.
2) Press 1ST TONE.
3) Use DEC/INC buttons or VALUE knob (vibrato
rate) to choose any of the 200 tones.
4) Press EXIT when done.
• Layering Tones
1) Choose patch 3-1 “GRAND.”
2) Press string mode select CHANGE until 1ST and
2ND both appear.
3) Strings are automatically selected. Press 2ND
TONE and use INC/DEC to choose new 2nd
tones.
4) Press EXIT when done.
• Layering Guitar
1) Choose patch 1-4 (group 1) “SCATIN.”
2) Put GK-2 switch on MIX and play jazzy riffs.
3) Choose patch 4-2 “BIG STGS.”
4) Layer clean guitar sound and play chords.
5) Choose patch 2-1 “FEEDBACKER.”
6) Layer metal guitar sound with it.
• Quick edit-tones
1) Choose patch 2-4 “GIT+STGS.”
2) Put TARGET knob on 2ND.
3) Turn ATTACK slightly counterclockwise to speed
it up.
• Quick edit-effects
1) Put TARGET knob on COMMON.
2) Turn LEVEL and TIME clockwise to hear more
reverb.
• Show splits and v-switch/v-mix modes
1) Choose patch 6-1 in GROUP 2 “BEAT KIT.”
2) Choose patch 7-3 in GROUP 2 “BASS>PNO.”
3) Choose patch 4-1 in GROUP 1 “V-SW STNGS.”
• Playing the Sequencer demo
1) Press START/STOP
• Playing along with the sequencer
1) Let sequencer continue after demo song.
2) Choose patch 3-4 “ROCK BEE.”
3) Play along with demo.
• Recording a quick sequence
1) Turn unit off.
2) Press and hold EXIT/NO while turning on (song
init OK ?).
3) Press ENTER (reboots).
4) Press RECORDER/PART.
5) Press ENTER/YES, the display reads “1-2-3-D-.”
These are the 3 parts and drums.
The part with the flashing underline is the one
selected to record. The CURSOR takes you to other
parts.
6) Press ENTER/YES.
7) Press REC.
8) Press START/STOP. You’ll hear 2 bars in and
the recording begins at the 3rd bar.
9) Press START/STOP when you done recording.
10) To play, press START/STOP.
By pressing EXIT, you will be returned to the track
select screen to select another part by cursoring to it.
NQPSMTR®
%
TBS56 © 1997 Roland Corporation U.S., 7200 Dominion Circle, Los Angeles, CA 90040 Faxback # 20055 1/97
••• ROLAND GR-30 TURBO FACTS •••
The GR-30 is the newest guitar synthesizer from Roland. It
features 8 megabytes of ROM waveform data, 256
Patches (128 Preset and 128 User) and 384 high quality
tones such as Pianos, Violins, Organs, Drums, and
Percussion. The GR-30 includes an impressive
Arpeggiator that allows you to create independent string
sequences of various finger picking patterns. The GR-30
also includes Intelligent Pitch Shifting, Reverb, Chorus,
Delay, Wah, Whammy Effects, and a Chromatic Tuner.
• Initialization
To reset the factory settings:
1) Power on while holding down Pedal 2.
2) Press PATCH [+] to select the type of initialization
(“PAt” intializes Patches, “SyS” initializes system
settings, and “ini” initializes all settings).
3) Press EDIT/PLAY.
4) Press the PATCH +/- buttons simultaneously
• Setting String Sensitivity
Setting the string sensitivity is critical for obtaining
maximum performance from your GR-30. Use the
following procedure:
1) Turn the PARAMETER SELECT knob to select
PICKUP SENS (1-6).
2) Press EDIT/PLAY, then play a string.
3) Use the PATCH (VALUE) +/- buttons to set the level.
Turn the level up until the red light appears, then back
off the level by one.
4) Press EDIT/PLAY to return to Play Mode.
• Using The Guitar Tuner
Use the following procedure to tune your guitar:
1) While pressing the S1 button on GK-2A, press Pedal 1
(or press PATCH [-] while holding EDIT/PLAY.
2) Play a string and tune accordingly. When the light in the
center turns from green to red you are in tune.
3) Press any pedal or the S2 button to return to Play
Mode.
• Auditioning Patches and Tones
The GR-30 includes 128 Preset and 128 User Patches
that allow you to combine two of the 384 tones. Use the
following procedure to access the patches using the GK-
2A pickup:
1) Turn the PARAMETER SELECT knob to select
PATCH INC/DEC BY S1/S2 Guitar Select.
2) Use the S1/S2 buttons on the GK-2A to change
patches up and down.
To access Tones:
1) Turn the PARAMETER SELECT knob to A.
2) Turn the EDIT TARGET knob to 1st or 2nd TONE.
3) Use the PATCH (VALUE) +/- buttons to change
Tones.
• Selecting Arpeggiator Patches
The GR-30 allows you to create individual string
sequences similar to finger picking styles. The
following Patches use the Arpeggiator:
Patch A11
Try some different chords.
Patch A14
Try a few chords, be sure to let arpeggio play out.
Patch A21
Try the chord sequence Am, E, G, D, F, C, Dm, E.
Patch A31
Play strings 2 and 6 simultaneously.
• Using The Harmonist
The Harmonist feature allows you to add harmonies
that intelligently follow your notes in the selected
key. Use the following procedure:
1) Select Patch A81 and press EDIT/PLAY.
2) Turn the PARAMETER SELECT knob to A.
3) Turn the EDIT TARGET knob to ARPEGGIO/harmony.
5) Use the PATCH (VALUE) +/- buttons to select h-1.
6) Turn the PARAMETER SELECT knob to B.
7) Use the PATCH (VALUE) +/- buttons to select
Harmony Interval.
8) Turn the PARAMETER SELECT knob to C.
9) Use the PATCH (VALUE) +/- buttons to select Key.
10) Turn the PARAMETER SELECT knob to WRITE TO
and use the PATCH (VALUE) +/- buttons to select a
Patch location.
11) Turn the PARAMETER SELECT knob to WRITE PATCH.
12) Press thePATCH (VALUE) +/- buttons simultaneously to
permanently save the new Patch.
• Effects
The GR-30 offers several effects such as Reverb
and Chorus. Use the following procedure to select
the desired effect:
1) Press EDIT/PLAY.
2) Turn the PARAMETER SELECT knob to A.
3) Turn the EDIT TARGET knob to EFFECT.
4) Use the PATCH (VALUE) +/- buttons to select Reverb Type.
5) Turn the PARAMETER SELECT knob to B, and use the
PATCH (VALUE) +/- buttons to adjust Reverb Level.
6) Turn the PARAMETER SELECT knob to C, and use
the PATCH (VALUE) +/- buttons to adjust Reverb Time.
7) Turn the PARAMETER SELECT knob to D, and use
the PATCH (VALUE) +/- buttons to select the type of
CHORUS or FLANGE.
8) Turn the PARAMETER SELECT knob to WRITE TO
and use the PATCH (VALUE) +/- buttons to select a
Patch location.
9) Turn the PARAMETER SELECT knob to WRITE
PATCH and press the PATCH (VALUE) +/- buttons
simultaneously to permanently save the new Patch.
E
TBS47 ©1996 Roland Corporation U.S. , 7200 Dominion Circle , Los Angeles , CA 90040 Faxback # 20040 6/96
••• BOSS GT-5 TURBO FACTS •••
The BOSS GT-5 is the first pedal board style Guitar Multi
Effects Processor to incorporate Composite Object Sound
Modeling (COSM ).This technology allows the GT-5 to
emulate several of the world’s most popular guitar amps and
speaker cabinets. The GT-5 includes 28 digital effects and 11
BOSS Overdrive and Distortion pedals. There’s a wide variety
of Modulation, Delay, and Reverb Effects such as the
Humanizer, Harmonist, Trem/Pan, Sound On Sound Delay,
and Reverb. The new Acoustic Guitar Simulator and HRM
Guitar Synth Waveforms make the GT-5 extremely versatile.
Up to 10 controllers can be assigned per patch and they can
be controlled by the built-in control or expression pedals,
external pedals or assignable MIDI controllers. Manual Mode
allows you to turn effects On and Off with the pedal board.
The built-in effects loop of the GT-5 allows you to add
additional pedals and effects. A chromatic guitar tuner is also
included in the GT-5.
• Initialization
The GT-5 allows you to select which areas of the system
to initialize. Use the following procedure to return the
entire system back to it’s factory settings:
1) Turn the Power ON while holding down the MOD and
FEEDBACKER/SLOW GEAR buttons.
2) Use the VALUE DIAL to select System and #4-5-5.
3) Press WRITE.
• Connecting the GT-5 to an Amp or PA System
The GT-5 can be used with a guitar amp or full range PA.
You can specify the type of amp being used such as
Tube or Solid State. Connect two audio cables from the
Stereo Outputs to the L & R Inputs of your sound system.
1) Press UTILITY.
2) Use the VALUE DIAL to select the type of amp.
3) Press the PARAMETER RIGHT button to select
SPEAKER SIMULATOR. Use VALUE to select PATCH
DATA (speaker simulator on/off is determined by the
Patch), ALWAYS ON, or ALWAYS OFF.
4) Press EXIT.
5) Connect your guitar cable to the back panel INPUT.
6) Use the INPUT MIN/MAX Volume Knob to adjust the
input level, so the Overload Light does not light up.
• Tuning the Guitar
The Chromatic Tuner allows you to tune your guitar to
normal pitch, or you can set it to display a half or whole
step below normal tuning.
1) Press TUNER/BYPASS and play each string.
2) Adjust the pitch of each string to the center position
on the meter.
3) Use the PARAMETER buttons to access additional
tuning options, if desired.
4) Press EXIT.
• Selecting Patches
The GT-5 includes 250 Patches that are organized by
Group, Bank, and Number. There are 4 User Groups
and 6 Preset Groups. The Preset Numbers are
highlighted in the LCD Display. The Patches can be
switched by pressing the appropriate foot pedal.
1) Press the GROUP button to select the GROUP.
2) Press the FOOT PEDAL marked B to change
BANKS followed by one of the five pedals. The
Bank Number in the LCD will blink until you press a
number pedal.
3) Press Pedals 1-5 for Patches. The red light on the
pedal will be lit when the Patch is being used.
• Editing Patches
The GT-5 has 16 buttons that correspond with the 28
effects that can be individually edited. When the
corresponding red light is ON, the effect is being used.
1) Press the desired Effect Button.
2) Turn the VALUE DIAL so that the Effect is ON or to
select the desired User (U) or Preset (P).
3) Use the PARAMETER buttons and the VALUE DIAL
to select the Effect Parameters.
4) Press WRITE to save the settings.
5) Use the VALUE DIAL to select a Patch Location.
6) Press WRITE to complete.
• Real Time Control
The pedal board on the GT-5 includes a built-in Control
and Expression Pedal which can be used to control up
to 10 parameters at once, per patch. You can also
assign real time controllers to external foot pedals or
MIDI controllers.
1) Press PEDAL/ASSIGN.
2) Turn the VALUE DIAL to select Expression Pedal
ON, or to choose between User (U) and Preset (P).
3) Use the PARAMETER RIGHT button to select
Target, and use the VALUE DIAL to choose the
desired Target.
4) Use the PARAMETER buttons and VALUE DIAL to
select and change the MIN and MAX assign
settings.
5) Press WRITE to save to the desired Patch location.
• Manual Mode
Manual Mode allows you to use Pedals 1-5 as ON and
OFF switches for selected Effects. It is not necessary to
change patch numbers to enter Manual Mode.
1) Press MANUAL.
2) Use the PARAMETER buttons to select the Effect
Type and the VALUE DIAL to make a selection.
NQPSMTR
+
TBS41 © 1996 Roland Corporation U.S., 7200 Dominion Circle, Los Angeles CA 90040 Faxback # 20036 2/96
••• BOSS GX-700 TURBO FACTS •••
The GX-700 Guitar Effects Processor is a single rack
space preamp/processor which combines 21 highly
sophisticated guitar effects with unprecedented
operational ease. Up to 13 effects, including intelligent
pitch shifting, can be used simultaneously and the
connection order is user assignable.The GX-700 uses
Roland's proprietary Composite Object Sound
Modeling(COSM) technology and offers the flexibility of
a built-in preamp and speaker simulator.
• Auditioning Patches
The GX-700 has 100 user programmable Patches in
memory locations 1 to 100, and 100 preset patches in
101 to 200. To scroll through patches, simply rotate
the NUMBER knob. Pressing the NUMBER knob in
and rotating it will change patches in increments of 10.
• The Tuner
1) Connect a guitar to the INPUT.
2) Press the TUNER button (it can also be assigned
to a foot pedal) and tune each string.
3) Press PLAY to return to play mode.
• Effects On/Off & Editing Parameters
1) VALUE knob to select preset patch [101].
2) Press the EFFECT SELECT button of your choice
to access the parameters.
3) Pressing the button again toggles effect on/off.
4) PARAMETER buttons to scroll through the
parameters in the selected effect.
5) VALUE knob to change the selected effects setting
in single increments. Press and rotate VALUE
knob to change in increment of 10.
• The Order Of Effects
1) Press LEVEL/CHAIN to access edit mode.
2) PARAMETER right to the effects list. Move the
cursor (a little man) to the position where you want
to move an effect. For example, move the man in
between the WAH and OD/DS effect.
3) To move effect into new location press the
EFFECT SELECT button with effect.
• The Preamp
1) Select any patch as a starting point.
2) Press the EFFECT SELECT PREAMP button.
3) Use the PARAMETER buttons to select [Type] and
pick an amp with the VALUE knob.
4) Continue using the PARAMETER buttons and the
VALUE knob to program the amp settings.
5) Repeat the same procedure with EFFECT
SELECT SP.SIM for selecting and programming a
speaker cabinet to go with the preamp.
• The Effects Loop
1) Press EFFECT SELECT PREAMP to turn off.
2) Press EFFECT SELECT LOOP until it turns on. If
your guitar preamp is in the loop you should hear it.
3) Make the setting in your normal guitar amp to your
liking. Don't worry about volume.
4) PARAMETER right to access the [Level] of the
loop and VALUE it to a good setting.
• The Harmonist
1) The Harmonist is one of the MOD effects. Press
the EFFECT SELECT MOD button to on.
2) PARAMETER right one time to [Mode] and VALUE
to [Harmonist].
4) PARAMETER to [Key] and select one.
5) PARAMETER to [Harmony 1], VALUE to [+3rd].
Play a scales in your selected key. You will
discover the pitch shifted interval changes from a
major to minor 3rds.
• Real Time Control Assign:
With an FC-200 MIDI Foot Controller, and/or an
expression pedal and foot switches plugged into back,
it's possible to control up to seven parameters in real
time, three preset & four user programmable. Connect
FC-200 to MIDI In and/or the expression pedal and
momentary foot switch (FS-5U or DP-2). (The FC-
200's Expression and Controller foot switch transmit
MIDI CTL# 7 and 80).
• Volume Pedal
1) Press EFFECT SELECT LEVEL/CHAIN button and
PARAMETER right to [Assign 1 Target].
2) Rotate VALUE knob to select [FV : Level] for foot
volume control before the delay.
3) PARAMETER to [Assign 1 Min] / [Assign 1 Max].
VALUE to appropriate settings.
4) PARAMETER to [Assign 1 Source], VALUE to
[MIDI CTL #7] for FC-200 expression pedal or
[EXP PEDAL] for an expression pedal in back.
5) Experiment with the pedal to see how it controls
the sound parameter in real time.
• Naming The Patch
1) PARAMETER right until you reach [Name Edit].
2) Use VALUE to select letters and PARAMETER
to move the cursor left and right. Press VALUE
to toggle between CAPITOL and small letters.
• Writing The Patch
1) Press WRITE, The PATCH number will flash.
2) VALUE to select a different location (optional).
3) Press WRITE again

NQPSMTR®
TBS10 © 1994 Roland Corporation U.S., 7200 Dominion Circle, Los Angeles, CA 90040 Faxback # 20012 12/95
••• ROLAND JD-800 TURBO FACTS •••
The JD-800 is Roland’s preeminent synthesizer,
featuring CD-quality waveforms with incredible
dynamic range, dedicated front panel controls for
patch editing or performance nuances, and a multi-
effects processor capable of producing up to eight
effects at once.
• Initializing
1) Press DATA TRANSFER.
2) Use the cursor buttons to select [FACTORY
RESET].
3) Choose YES.
• Selecting Patches
Single Mode
1) Press SINGLE.
2) Press a Bank and Number key.
Multi Mode
1) Press MULTI.
2) Press PART < > to select your Part.
3) Press a Bank and Number key.
• Editing Patches
Patches can be edited in either Single or Multi mode.
Each Patch contains up to four Tones, A-D. Active
Tones are indicated for each Patch by the Tone
LEDs under the Patch block.
1) If you’re in MULTI mode, press PART < > to
select which Part you wish to edit.
2) Press ACTIVE.
3) Press Tone A-D button to select which Tone to
edit. You can edit all four Tones at once if they’re
all selected. If none are selected, use the Tone
Palette sliders to edit the Tones.
4) Move any slider, knob or button to edit the Tone.
5) Press LAYER and a Tone button to activate/de-
activate additional Tones.
• Using the JD-800 to edit a JD-990
From Single mode on the JD-800:
1) Connect the MIDI Out of the JD-800 to the MIDI
In of the JD-990.
2) Press the MIDI button.
3) Use the Cursor arrows to find “TX edit data.”
4) Use the Value buttons to turn this parameter ON.
From Patch mode on the JD-990:
1) Press the System Setup button.
2) Press the F4 button, “MIDI RX”
3) Cursor to RX Exclusive and turn it to “ON-2.”
• Sequencing
The JD-800 is 6-Part multitimbral for sequencing
applications, including 5 Patches and a Special
Setup for drum, percussion or special effects. It must
be in Multi Mode in order to play multiple Patches
simultaneously.
Setting the Transmit channel:
1) Press MIDI.
2) PAGE Up to “MIDI Tx Channel”.
3) Use the Value slider to set it to PART.
4) Press EXIT.
Setting the Part Parameters:
1) Press PART EDIT.
2) Use the PART < > and the Value slider to set the
Receive Channel for each Part.
3) PAGE Up to additional Part Parameters like
Level, Pan, Output Assign, etc.
4) Press EXIT.
Selecting Patches:
The JD-800 will now automatically transmit on the
channel of the current Part.
1) Press PART < > to select a Part.
2) Press a Bank and Number key.
• Splitting the Keyboard
Each Tone within a Patch has its own key range. To
Split the keyboard, you must assign each Tone the
appropriate zone.
1) In Single Mode, press COMMON.
2) Press PAGE Up until the display reads Range A.
3) Set the Low and High Range for Tone A using
the Value slider and cursor.
4) PAGE Up for Tones B, C, and D.
• Sound Card Library for the JD-800
1) SL-JD80 Series:
A diverse library of Waveforms and Patches
ranging from Acoustic, Dance and Rock drums
to Strings, Brass, Pianos and even Accordian.
Each set contains both a Waveform card and a
Data card with 64 patches which utilize the
sounds on the Waveform card.
2) SO-PCM Series:
These cards contain new Waveforms for use
with either the JV or JD-series synthesizers. The
JD-800 can use these Waveforms to enhance its
internal library and allow users to build new
Patches.
NQPSMTR®
TBS11 © 1994 Roland Corporation U.S., 7200 Dominion Circle, Los Angeles, CA 90040 Faxback # 20013 12/95
••• ROLAND JD-990 TURBO FACTS •••
The JD-990 Super JD is Roland's most powerful and
programmable synthesizer ever. It features 6 Mb of our
highest quality 44.1kHz waveforms, a powerful and
flexible synthesizer architecture with extensive real-time
control, 4 pairs of stereo outputs, and a dynamic multi-
effects processor for creating stunning synth textures, as
well as expressive acoustic instruments.
•Initializing
To return the Super JD to its factory setup:
1) Hold EXIT and press UTILITY.
2) Press F6 EXECUTE.
• ROM Demo
To play the Super JD's demo songs:
1) Press EXIT and CURSOR DOWN simultaneously.
2) Press F5 START to play the chain of songs. Or,
CURSOR DOWN to any of the songs and press F5
START.
• Selecting Patches
The Super JD features 192 Patches – 128 Preset
Patches (A/B), and 64 User Patches (I). An M-256E
card can hold an additional 64 User Patches (C).
1) Press PATCH.
2) Press A, B, or INT to select a Patch bank.
3) Use the VALUE dial to select new Patches.
4) Press the VALUE dial to open a window of the current
Patch bank.
5) Use the VALUE dial, or use the cursors, to move
among the Patches.
6) Press the VALUE dial again to move to the next patch
bank.
• Using Controllers with Patches
Most of the Patches in the Internal Bank are setup to
respond to controllers "4 "and "1" or "11" for real-
time control of various parameters. Use a controller
keyboard or sequencer that can transmit one or both
of these controllers to shape the sound of the
JD-990 Tones in real-time.
Patch I-11 DeepSEAmphony is a good example of
how these controllers can be used. Controllers can
be assigned to control a wide range of parameters
including pitch, cutoff, resonance, level, and LFOs.
Two controllers can be assigned for each Tone.
• Editing Patch Parameters
The JD-990 features extensive Patch editing
capabilities. In the Patch mode, you can easily
move to these parameters using the F keys.
•Patch Parameter Edits (cont.)
1) Press F5 LFO&CTL.
2) Press F5 to toggle between individual Tone view
and Palette view. For now go to Tone view.
3) Press F2 LFO1. The LFO structure is displayed for
the active Tone.
4) Cursor to each parameter and use the VALUE
dial to change the values. The graphic display shows
your changes as you make them.
5) Use the F keys to select other parameters and their
graphic displays.
• Sequencing
The Super JD is 8-part multitimbral in Performance mode.
To quickly get started sequencing with the Super JD,
choose one of the Preset Performances B-09 through B-
16. These Performances are already configured for
multitimbral setup on channels 1-7 with Rhythm on 10.
1) Press PERFORM.
2) Press B.
3) Press the VALUE dial until the bank of Performances
Pop Kit through Ethnic Kit appears.
4) Select a Performance for sequencing.
To select sounds, levels, panning and other parameters
for each Part:
1) Press F2 PART.
2) Press F6 Palette.
3) Cursor to your desired parameter.
4) Use the VALUE dial or INC/DEC buttons to make
your changes.
• Using Expansion Boards & PCM Cards
The Super JD's 6 Mb of memory can be user-expanded to
16 Mb using the SR-JV80 Series Expansion Boards, and
SO-JD80 and SO-PCM1 Waveform Cards. Both the SR-
JV80 Boards and SO-PCM1 Cards also contain Patches.
These Patches must be loaded into User Memory
locations before they can be played normally.
1) Install the Expansion Board, or insert an
SO-PCM1 Card.
2) Press PATCH.
3) Press UTILITY.
4) Press F4 CARD.
5) Press F5 LD PRM.
6) Use the Data Wheel to select either PCM Card or
EXP Board.
7) Cursor to the right, and use the Data Wheel to select
a Patch.
8) Press F6 EXECUTE.
The Patch is now in temporary memory. You can use the
WRITE procedure (UTILITY, F1) to store it in any User
Patch location.
NQPSMTR®
TBS11 © 1994 Roland Corporation U.S., 7200 Dominion Circle, Los Angeles, CA 90040 Faxback # 20013 12/95
• Using the Effects
An integral part of the Super JD's sound is its tremendous
multi-effects processor. Any Patch can use up to 8 effects
at one time. The effects are divided in to two Groups, A
and B. Group A includes Distortion, Phaser, Spectrum
EQ, and an Enhancer. Group B features Chorus, a
Stereo Multi-Tap Delay, and Reverb. The delay has been
expanded to 3000ms, and will sync to MIDI clock. Two
effect Parameters can be controlled in real-time via MIDI.
To setup Effect control via MIDI:
1) Press PATCH.
2) Select PATCH I-15 DistSynChorus.
3) Press EFFECTS.
4) Press F2 FX Control.
5) Choose your control Source. This is the controller you
will transmit from your keyboard or sequencer.
6) Choose a Destination for your controller.
7) Set the desired depth of effect.
Note: Your destination Effect must be enabled
under F4 Group A and F5 Group B.
• Assigning Outputs
The JD-990 has four pairs of stereo outputs to which any
of the eight multitimbral parts can be assigned in
Performance mode. By panning a Part all the way to the
left or the right, you can effectively assign each Part to its
own output.
To assign a Part to a Stereo Pair:
1) Press PERFORM.
2) Press F4 Out & FX.
3) Cursor down to bottom row.
4) Cursor left or right to the desired Part.
5) Turn dial to select D-1, D-2 or D-3.
Now pan the Part hard right or left within the stereo
pair for individual outputs.
6) Press F2 (Part).
7) Press F6 Palette.
8) Cursor to Pan for the desired Part.
9) Dial to L50 for “hard left” or R50 for “hard right".
If you are using a stereo Patch, each Tone must be
panned to the center for these settings to take
effect. From the Patch mode, press F4, cursor to
Pan, and set all 4 Tones to "0".
• Using the Oscillator Sync Function
This function lets you create interesting effects by forcing
any waveform to be “slaved” to any other waveform in a
Patch. Any Tone (waveform) within a Patch can be
designated the “master.” Each remaining Tone can then
be slaved to the frequency of the "master". Pitch
envelopes can be applied to the "slave" Tone(s) to try to
force them out of tune, creating new harmonics and
resulting in the characteristic Sync sound. This effect only
works when Solo is ON. Also, the Tone switch for the
selected Master Tone must be turned ON.
1) In Patch Play mode, select a Patch to edit.
2) Press F1 COMMON.
3) Press F2 Key FX.
4) Press CURSOR DOWN to <SOLO> Switch.
5) Use the VALUE dial to turn SOLO Switch ON.
6) Press CURSOR DOWN to Sync Master.
5) Use the VALUE dial to select a master Tone.
6) Press EXIT.
7) Press F2 WG.
8) Press F1 Wave.
9) Press CURSOR DOWN to Sync Slave SW.
10) Press TONE SELECT to select a Slave Tone.
11) Use the VALUE dial to turn the Sync Slave Switch
ON.
12) Repeat steps 10 and 11 for the remaining Tones as
desired.
13) Press EXIT.
• Use a JD-800 to edit Patches
Each of the edit sliders on the front panel of the
JD-800 can be used to edit the Tones in the JD-990
in real-time.
1) Press SYSTEM.
2) Press F4 RX MIDI.
3) CURSOR to RX EXCLUSIVE.
4) Use the VALUE dial to select ON-2.
5) Turn on the TX EDIT function in the JD-800 MIDI
Menu.
6) Use the edit Sliders on the JD-800 to alter the JD-990
Tones in real-time.
If the appropriate edit window is open in the JD-990,
the graphic display will show your changes as you
make them. Make sure the correct Tone Switch
is enabled for the parameter you are editing.
NQPSMTR®
A
>FD:4&J?E96D:K6C
TBS57 © 1997 Roland Corporation U.S., 7200 Dominion Circle, Los Angeles, CA 90040 Faxback # 20057 1/97
••• ROLAND JP-8000 TURBO FACTS •••
The JP-8000 is a new generation synthesizer, bridging the gap
between analog and digital synths. It uses Roland’s Analog
Modeling technology, instead of sampled waveforms, in
combination with front panel knob and sliders to create incredible
new sounds.
• DSP Oscillators simulate 7 different analog waveforms
• 8 voice polyphony
• Keyboard layers & splits
• Oscillator Sync, Cross & Ring Modulation
• 48 Arpeggiator styles
• 48 recordable RPS patterns
• EQ, Chorus, Flanger, Phaser & Delay
• Sliders and knobs transmit MIDI data
• Arpeggiator, LFOs, & effects sync to MIDI
• 256 Patches & 128 Performances
• New Super Saw waveform that models 7 saw waves using
just one voice of polyphony.
• Initialize
Use the following procedure to restore the factory settings:
1) Hold SHIFT and press INIT/UTIL.
2) Press INIT/UTIL until “Initialize [WRITE]” is displayed.
3) Use the DOWN/UP buttons to select “FACTORY
PRESET.”
4) Press WRITE.
• Play the ROM Demos
1) Press ARP HOLD and REC simultaneously. Song 1 will
begin to play.
2) Use the [1]-[8] buttons to select a different song.
3) Press EXIT to return to the previous screen.
• Selecting Sounds
On the JP-8000, each musical sound that you play is called
a Performance. There are always 2 Patches selected
(Upper and Lower) in each Performance and you can play
either one or both. Patch selections for the Upper and
Lower parts, front panel settings, arpeggiator/RPS settings,
and a variety of other settings are stored with each
Performance. Use the following procedure to listen to
Performances:
1) Press PERFORM/PATCH until “PERFORM” is displayed.
2) Use the BANK/VALUE buttons to select the desired bank
(each bank contains 8 Performances).
3) Use the [1]-[8] buttons to select the desired Performance.
• Using the Arpeggiator
1) Select a Performance.
2) Hold SHIFT and press PFM COMMON [1].
3) Press PFM COMMON [1] until “Arpeggio Dest” is
displayed. Use the DOWN/UP buttons to select LOWER
& UPPER (if it is not already selected).
4) Press PFM COMMON until “ARP BEAT PATTERN” is
displayed. Use the DOWN/UP buttons to select the
desired arpeggio pattern.
5) Press ON/OFF (under Arpeggiator/RPS) so that it is lit.
6) Play the keyboard to hear the arpeggio.
7) Use the TEMPO knob to adjust the tempo as desired.
8) Press ON/OFF to turn the arpeggiator off.
• Playing RPS Patterns
RPS Patterns are short sequences (1 to 4 bars) that are
assigned to various notes on the keyboard. There are 48
Preset RPS Patterns that you can choose from or you can
create your own. RPS settings such as ON/OFF and
TEMPO can be stored in each Performance.
To play an RPS Pattern:
1) Select the desired sound.
2) Press ON/OFF (under Arpeggiator/RPS) so that it is lit.
3) Press MODE until all three indicators (UP,DOWN, and
RND) are lit.
4) Play the keyboard to hear the RPS patterns.
To record an RPS Pattern:
1) Hold REC and press the C4 key.
2) Press CLEAR [6] followed by WRITE.
3) Press REC and play the keyboard when “M=1 B=1” is
displayed.
4) Press REC when finished.
5) Make sure that ON/OFF is lit and press the C4 key to
hear your new RPS Pattern.
• Recording a Motion Control
The Motion Control function allows you to store multiple
slider and knob movements as a ‘Motion’ for automated
playback. Up to 4 different ‘Motions’ can be stored in
memory and you can activate them by pressing the
MOTION CONTROL [1] or [2] buttons. Before recording a
new ‘Motion’ you must first clear any existing ones:
1) Hold REC and press MOTION CONTROL [2].
2) Press CLEAR [6].
3) Press WRITE followed by EXIT.
To record a new ‘Motion’:
1) Select Performance P:88 Template6.
2) Press LOWER.
3) Hold REC and press MOTION CONTROL [2].
4) Press LOOP LENGTH [1] and use the DOWN/UP
buttons to select “4.” Press EXIT.
5) Adjust the sliders and/or knobs as desired, then press REC.
6) Hold a note(s) on the keyboard to hear the effect of the
‘Motion’ you created.
• Assigning the Ribbon Controller
The ribbon controller allows you to control the movements
of multiple sliders and/or knobs with a single control. Use
the following procedure to assign the slider/knob functions
to the ribbon controller:
1) Select the desired Performance.
2) Press RIBBON ASSIGN.
3) Press WRITE. “Ribbon Assign (Not Assigned)” will be
displayed.
4) Adjust sliders and/or knobs as desired (try CUTOFF
FREQ and RESONANCE).
5) Press RIBBON ASSIGN.
6) While playing the keyboard, press the center of the
ribbon controller and slide your finger to the right. The
sound will change as it it did previously when the
sliders and knobs were adjusted.
NQPSMTR®
&
TBS53 ©1996 Roland Corporation U.S. , 7200 Dominion Circle , Los Angeles , CA 90040 Faxback # 20047 09/96
••• ROLAND JS-30 TURBO FACTS •••
The JS-30 Sampling Workstation is a self contained
Phrase Sampler designed for DJ’s in both live and
studio applications. It is 8 note polyphonic, 16 part
multitimbral, and contains 36 specialized ROM
sounds. Also included is a Beats Per Minute (BPM)
function for matching tempos of various samples.
The JS-30 features a 4-Track Realtime Phrase
Sequencer (RPS) for sample playback. The
sampling RAM can be expanded to 4MB using
standard SIMMs memory chips. A SCSI port comes
standard for saving and loading data. The JS-30 can
read Roland S-700 Series and Akai S-1000/1100 CD
Rom libraries.
• Initialize
1) Hold RECORD (in the PERFORMANCE section)
and turn the power on.
• Playing Demos or other Sequences
1) Press DEMO.
2) Press TRACK 1 and Demo 1 will play.
3) Press STOP to stop the Demo.
4) Press the TRACK 2 after pressing DEMO to
select Demo 2.
• Selecting Banks and Samples
1) Press FACTORY BANK under BANK SELECTOR.
Each time you press the button you can shift
between the 3 banks of built-in sounds.
• Creating a Sample
1) Connect an input source (such as a microphone)
to the JS-30’s “Mic In” input or rear input jack.
2) Press the RECORD (in the EDITING section), the
LED should light.
3) Play your input source and adjust the level with the
“Sampling Level” fader. Be sure that the horizontal
fader is set to “INPUT” (all the way left). You can
monitor the input level in the Level Indicator
section of the display.
4) Press the grey SAMPLING button to begin
sampling.
5) Press SAMPLING again to stop recording.
6) The sample you just created will be the last one
in memory. “r 01” will be displayed indicating that
a sample has been created. You can now play
the pads and hear the sample.
•Recording a Realtime Phrase Sequence (RPS)
1) Press RECORD. TRACK 1 will flash indicating that
it is in Standby mode.
2) Play the pads to begin recording.
3) Press START/STOP when finished recording.
4) Press RECORD followed by TRACK 2 to record
on the next track. It will flash indicating that it is
in Standby mode.
5) Play the pads (or press START/STOP)
to record on Track 2.
6) Continue this process to record Tracks 3 & 4.
7) Press START/STOP to play back your
sequence.
• Using the Beats Per Measure (BPM) Function
This function allows you to match the tempo of
multiple drum loops.
1) From PLAY mode, play the drum loop on the D
pad of FACTORY BANK 1.
2) Press EDIT followed by the F pad to hear the
sample at its original pitch.
3) Hold pad 9 and press HOLD. The sample will
play continuously.
4) Hold the blue 2ND FUNCTION button and press
BPM SET, “b—“ will be displayed.
5) Press BPM SET.
6) Tap the grey TAP-TEMPO- SAMPLING pad at
the same tempo as the drum loop. You should
hear a beep sound as you tap the pad.
7) Once you have chosen the tempo, press ENTER
to assign the tempo to the pad.
8) Press PLAY to return to Play mode.
9) Repeat steps 1-5 to assign the tempo for
additional drum loops and/or samples.
10) Hold the blue 2ND FUNCTION button and
press MASTER BPM to display the Master
Tempo of the Performance. It will display “b---.”
11) Press MASTER BPM.
12) Tap the gray TAP-TEMPO- SAMPLING pad at
the desired tempo for the drum loops. You will
hear a beep sound as you tap the pad.
13) After you set the tempo, press ENTER to assign
the tempo to the performance. All samples that
were assigned tempos will now play back at the
Performance tempo.
The JS-30’s memory can be expanded with up
to three 30 pin, 1X8Mbyte SIMMs memory chips.
Call Roland Corporation U.S. (213) 685-5141,
ext. 482 for recommended distributors of RAM
and SCSI devices for the JS-30.
NQPSMTR
®
+
TBS77 ©1998 Roland Corporation U.S., 7200 Dominion Circle, Los Angeles, CA 90040 Faxback # 20075 5/98
••• ROLAND JX-305 TURBO FACTS •••
The Roland JX-305 is a performance-oriented
synthesizer with killer sounds and massive realtime
control. Features include:
• 61 note, velocity-sensitive keyboard with aftertouch
• 64 voice polyphony
• 640 Preset and 256 User Patches, 42 Rhythm Kits
• Reverb, Delay, and 24 Multi-Effects
• 8 track pattern-oriented sequencer with 768 preset,
256 user Patterns, and 75,000 note internal memory
• Powerful onboard Arpeggiator and Realtime Phrase
Sequencer functions
• 9 control knobs for intuitive real-time control. All
control knobs transmit MIDI controller values
• SmartMedia memory card for external storage of up
to 480,000 notes
• Initializing
Use the following procedure to initialize the JX-305 and
restore the factory settings:
1) Press UTILITY.
2) Use the PAGE </> buttons to select “FACTORY
PRESET,” and press ENTER.
3) Use the PAGE </> buttons to select “ALL.”
4) Press ENTER twice.
Note: Initialization will take several minutes.
• Playing the Demo Songs
The JX-305 has 8 demo songs. Use the following
procedure to listen to the demo songs:
1) Simultaneously press EXIT and ENTER.
2) Use the VALUE dial to select the desired demo song.
3) Press STOP/PLAY to begin playback
4) Press STOP/PLAY to halt playback.
5) Press EXIT to return to play mode.
• Selecting Patterns
Use the following procedure to select a pattern for playback:
1) Press MODE so it is not lit.
2) Press PTN/SONG in the Display section.
3) Press PRESET/USER/CARD several times to
select PRESET and use the VALUE DIAL to select
“P A:22 Psy Trance 10.”
4) Press STOP/PLAY to begin playback.
5) Press STOP/PLAY to halt playback.
6) Use the above steps to try the following Patterns:
P B:28 Rock 6 P B:78 Tech Step 1
P C:15 Hip Hop East 1 P D:41 Funk 1
P D:57 Dance Hall 3 P D:66 Salsa 1
• Muting Parts in a Pattern
Use the following procedure to mute parts of a Pattern:
1) Select Pattern “P A:11 Psy Trance 1” (see above).
2) Press STOP/PLAY to begin playback.
3) Press PART MUTE so it is lit.
4) Use the Bank 1-8 buttons to mute parts. Note that
when a button is blinking, it is muted.
5) Press STOP/PLAY to halt playback.
• Auditioning Sounds
Use the following procedure to audition Patches and
Effects together:
1) Press PART SELECT so it is lit, then press PART 1.
2) Press PART SELECT so it is not lit.
3) While holding SHIFT, press PATCH.
4) Press the Bank 1 button to select a Piano sound
with Reverb and play the keyboard.
5) Try the following sounds:
Bank 3 - an Electric Piano sound with Auto Pan
Number 1 - a String sound with EQ
Number 8 - a Synth sound with the Slicer effect.
• Using the Arpeggiator
The Arpeggiator sequentially triggers notes that are
held on the keyboard in time with the current Pattern.
The JX-305 has 43 preset and 10 user arpeggio styles.
Use the following procedure:
1) Press ARP so it is lit.
2) Hold several keys down on the keyboard.
3) Hold the ARP button and use the VALUE DIAL to
select other arpeggio styles.
• Using RPS
RPS allows you to trigger patterns from the keyboard.
There are 60 RPS sets, each containing 16 patterns.
Like the Arpeggiator, RPS patterns are played back in
sync with the internal Patterns. Use the following
procedure:
1) Press RPS SET so it is lit.
2) Use the VALUE DIAL to select “U:13 NU NRG.”
3) Press RPS so it is lit.
4) Press the bottom 17 keys to trigger the selected
patterns.
The SmartMedia Cards are available in 2 and 4
megabyte versions; SM-2 ($35.00 retail) and SM-4
($60.00 retail). Contact your local Authorized Roland
dealer to order these cards.
NQPSMTR®
)
TBS12 © 1994 Roland Corporation U.S., 7200 Dominion Circle, Los Angeles, CA 90040 Faxback # 20014 12/95
••• ROLAND JV-35 TURBO FACTS •••
The JV-35 is a 16-Part multitimbral, 28-voice
polyphonic, GS/GM compatible synthesizer, with 226
Tones and 9 Drum Sets. An additional 256 User
Tones and 9 User Drum Sets can be customized
and stored by the user. It can be expanded to 56-
voice polyphony by installing the VE-JV1 or the VE-
GS1 Voice Expansion Boards.
•Initializing
1) Press CONTROL and MASTER.
2) Press VALUE UP to restore the original settings.
•ROM Play
1) Press LEVEL and PAN.
2) Use PARAMETER UP/DOWN to select the
desired song.
3) Press VALUE UP to start song playback.
4) Press VALUE DOWN to stop playback.
5) To exit ROM Play mode, press LEVEL and PAN.
•Auditioning Sounds
The JV-35's 16 Preset Banks are stenciled on the
upper right corner for easy location of the Tones.
1) Press Bank 1, Number 1: Piano 1
2) Press Bank 4, Number 1: Nylon Str-Gtr
3) Press Bank 3, Number 1: Organ1
4) Press Bank 5, Number 7: Synth Bass 1
5) Press Bank 12, Number 2: Warm Pad
Some Tones will have Variations as well. Press
VARIATION to hear them.
• Customizing Tones
1) Select a Tone.
2) Press Envelope, then move the corresponding
slider to alter the Attack, Decay or Release time.
3) Press Filter, then edit the Cutoff and Resonance.
4) Press Vibrato, then ease the Depth slider up to
add vibrato.
5) To store an edited Tone, hold WRITE, toggle
VARIATION to specify the User Tone Map 1 or
2, then press the flashing number button.
•Selecting Drum Sets
Two of the JV-35's 16 Parts can contain Drum Kits.
Part 10 defaults as Drum 1. Any other Part can be
assigned Drum 2 by pressing the DRUM 2 button.
1) Press DRUM 2 to make the selected Part Drum
2, or press PART <> to move to Part 10.
2) Press Number 1: Standard
3) Press Number 3: Power
4) Press Number 7: Brush
5) Press Number 8: Orchestra
6) Press Variation: SFX
•Drum Set Editing
1) While in a Drum Kit, press both PARAMETER
UP/DOWN simultaneously.
2) Use the Value Slider to change the Pitch.
3) Press PARAMETER UP to access LEVEL,
PANNING, PITCH, and the REVERB DEPTH.
•Splitting the Keyboard
1) Select the sound for the upper range of the
keyboard.
2) Press the SPLIT button.
3) Move the cursor to the bottom of the display
using the PARAMETER DOWN button.
4) Use Bank and Number to select a sound for the
lower range of the keyboard.
5) To set the Split Point: Hold SPLIT, use the Value
Slider to set the split point.
•Layering Sounds
1) Select a sound, then press DUAL.
2) Move the cursor to the bottom of the display by
using the PARAMETER DOWN button.
3) Use Bank and Number to select a second
sound.
4) Use LEVEL to balance the volume of each
sound.
•Performances
The JV-35 has 8 Performances which store the
entire16-Part multitimbral setup, plus Key Modes
such as Split and Layer.
1) To recall a Performance, hold PERFORMANCE
and press a Number button, 1 thru 8.
2) To store a Performance, hold WRITE and
PERFORMANCE, and press a Number button, 1
thru 8.
•Using an External Sequencer
When initialized, each Part 1-16 transmits and
receives on its respective MIDI channel.
1) Use PART <> to select a Part.
2) Use Bank and Number to select a sound.
3) Record your track.
4) Use PART <> to select a new Part.
5) Repeat steps 2-4.
•Using a Voice Expander
When installed, the VE-JV1 or VE-GS1 can increase
polyphony for sequencing or layering sounds. The
VE-JV1 will also add 512 new sounds. To use a
Voice Expander sound, press EXPANSION then
Bank and Number.
NQPSMTR®
)
TBS13 © 1994 Roland Corporation U.S., 7200 Dominion Circle, Los Angeles, CA 90040 Faxback # 20015 12/95
••• ROLAND JV-50 TURBO FACTS •••
The JV-50 is a 16-Part multitimbral, 28-voice polyphonic,
GS/GM compatible synthesizer, with 226 Tones and 9
Drum Sets and a Direct from Disk SMF Player. An
additional 256 User Tones and 9 User Drum Sets can be
customized and stored by the user. It can be expanded to
56-voice polyphony by installing the VE-JV1 or the VE-GS1
Voice Expansion Boards.
•Initializing
1) Press CONTROL and MASTER.
2) Press VALUE UP to restore the original settings.
•ROM Play
1) Press LEVEL and PAN.
2) Use PARAMETER UP/DOWN to select the
desired song.
3) Press VALUE UP to start song playback.
4) Press VALUE DOWN to stop playback.
5) To exit ROM Play mode, press LEVEL and PAN.
•Auditioning Sounds
The JV-50's 16 Preset Banks are stenciled on the
upper right corner for easy location of the Tones.
1) Press Bank 1, Number 1: Piano 1
2) Press Bank 4, Number 1: Nylon Str-Gtr
3) Press Bank 3, Number 1: Organ1
4) Press Bank 5, Number 7: Synth Bass 1
5) Press Bank 12, Number 2: Warm Pad
Some Tones will have Variations as well. Press
VARIATION to hear them.
• Customizing Tones
1) Select a Tone.
2) Press Envelope, then move the corresponding
slider to alter the Attack, Decay or Release time.
3) Press Filter, then edit the Cutoff and Resonance.
4) Press Vibrato, then ease the Depth slider up to
add vibrato.
5) To store an edited Tone, hold WRITE, toggle
VARIATION to specify the User Tone Map 1 or 2,
then press the flashing number button.
•Selecting Drum Sets
Two of the JV-50's 16 Parts can contain Drum Kits.
Part 10 defaults as Drum 1. Any other Part can be
assigned to Drum 2 by pressing the DRUM 2 button.
1) Press DRUM 2 to make the selected Part Drum
2, or press PART <> to move to Part 10.
2) Press Number 1: Standard
3) Press Number 3: Power
4) Press Number 7: Brush
5) Press Number 8: Orchestra
6) Press Variation: SFX
•Splitting the Keyboard
1) Select the sound for the upper range of the
keyboard.
2) Press the SPLIT button.
3) Move the cursor to the bottom of the display by
using the PARAMETER DOWN button.
4) Use Bank and Number to select a sound for the
lower range of the keyboard.
5) To set the Split Point: Hold SPLIT, use the
Value Slider to set the split point.
•Layering Sounds
1) Select a sound, then press DUAL.
2) Move the cursor to the bottom of the display by
using the PARAMETER DOWN button.
3) Use Bank and Number to select a second sound.
4) Use LEVEL to balance the volume of each sound.
•Performances
The JV-50 has 8 Performances which store the entire
16-Part multitimbral setup, plus Key Modes such as
Split and Layer.
1) To recall a Performance, hold PERFORMANCE
and press a Number button, 1 thru 8.
2) To store a Performance, hold WRITE and
PERFORMANCE, and press a Number button, 1
thru 8.
•Using an External Sequencer
When initialized, each Part 1-16 transmits and
receives on its respective MIDI channel.
1) Use PART <> to select a Part.
2) Use Bank and Number to select a sound.
3) Record your track.
4) Use PART <> to select a new Part.
5) Repeat steps 2-4.
•Using Standard MIDI Files
The onboard disk drive accepts 720K DOS-format
Standard MIDI Files (SMF). SMFs created on a PC
or MC-50mkII can be saved to floppy disk then played
on the JV-50. Macintosh SMFs can be converted to
DOS SMFs via Apple File Exchange.
1) Press DISPLAY to show Title, Measure & Tempo.
2) Press PLAY.
•Using a Voice Expander
When installed, the VE-JV1 or VE-GS1 can increase
polyphony for sequencing or layering sounds. The
VE-JV1 will also add 512 new sounds. To use a Voice
Expander sound, press EXPANSION then Bank and
Number.
NQPSMTR®
)
TBS14 © 1994 Roland Corporation U.S., 7200 Dominion Circle, Los Angeles, CA 90040 Faxback # 20017 12/95
••• ROLAND JV-90 TURBO FACTS •••
The JV-90 is an 8-Part multitimbral, 28-voice polyphonic,
fully programmable synthesizer, with complete MIDI
controller functions and a 76-note keyboard. It can be
expanded to 56-voice polyphony by installing the VE-JV1
or the VE-GS1 Voice Expansion Boards. The JV-90
sound library can also be enhanced by the SR-JV80
series of 8MB expansion boards as well as SO-PCM
sound cards and PN-JV80 parameter cards.
•Initializing
1) Hold CAPS, and POWER ON.
2) Press ENTER.
3) Press WRITE.
•ROM Play
1) Press the LEVEL and WAVE buttons under the
EDIT PALETTE.
2) Press ENTER.
•Auditioning Sounds
The JV-90 has four Preset Patch Groups, A, B, C, D,
and one User-programmable Patch Group I, each
with 64 Patches, for a total of 320 on board Patches.
An M-256E or PN-JV80 Card can hold an additional
64 User Patches. The JV-90 can also directly access
Patches on any SR-JV80 Expansion Board or SO-
PCM1 Card, providing immediate access to over 600
Patches.
1) Press PATCH.
2) In the PATCH GROUP buttons select USER,
PRESET or W–EXP.
3) For Preset Patches:
Select A, B, C, or D from the PATCH GROUP
buttons.
For User Patches:
Select INT or CARD from the PATCH GROUP
buttons.
For Expansion Board Patches,:
Select A, B, C, or D from the PATCH GROUP
buttons.
For SO-PCM1 Card Patches:
Select PCM CARD A from the PATCH GROUP
buttons.
4) After selecting your Group, use the eight BANK
and NUMBER buttons to select Patches within
that Group.
•Customizing Patches
The Edit Palette provides a quick and intuitive
method for mastering the JV-90’s powerful
synthesizer controls, allowing you to customize your
Patches. Each Patch combines 1–4 Tones, indicated
by the Tone Switch LEDs.
Customizing Patches (cont.)
1) Press PATCH.
2) Press LEVEL in the Edit Palette.
3) Use Sliders 1–4 to remix the Levels of the
enabled Tones.
4) Press the other Edit Palette controls, PAN,
TUNE, WAVE, CUTOFF, RESONANCE,
ATTACK or RELEASE, and use the sliders to
change the sound.
5) The s and t in the display indicate you can
CURSOR to related parameters from any of the
eight Edit Palette screens.
•Writing a new Patch in memory
1) Press WRITE.
2) Cursor to Write and press ENTER.
3) Select a User Patch location using the Patch
Group, Bank and Number buttons, or Slider 1.
4) Press ENTER.
•Performances
Like Patches, there are both Preset and User
Performances in the JV-90. There are three types of
Performances:
LAYER: for layering Patches.
ZONE: for splitting Patches across the
keyboard.
SINGLE : for multitimbral sequencing.
To set the Performance mode:
1) Press PERFORMANCE.
2) Press EDIT.
3) Cursor down to KEY MODE.
4) Use INC/DEC or Slider 1 to set the desired
Mode.
•Using the JV-90 with a sequencer
1) Select Preset Performance A16 “PopOrchestra”.
2) Cursor right to listen to the patches in this
Performance.
3) Cursor right to the Rhythm Part.
4) Record on track one on your Sequencer.
5) To listen to your Track, press PLAY.
To record additional Tracks:
1) Cursor to your next instrument.
2) Repeat steps 4 and 5, selecting a new Track
each time.
To select new Patches:
1) Press PATCH on the Edit Palette.
2) Use the Group, Bank and Number buttons, or
Sliders, to select Patches for each Part.
NQPSMTR®
)
TBS14 © 1994 Roland Corporation U.S., 7200 Dominion Circle, Los Angeles, CA 90040 Faxback # 20017 12/95
•Compu-Mixing
Compu–Mixing turns the JV-90’s sliders into an
automated MIDI mixer, controlling the volume and
pan information of your sequence tracks.
1) Record a sequence, as above.
2) Press TX VOL on the Edit Palette.
3) Press REC and select an empty Track for
recording.
4) Press PLAY to start recording, and move the
sliders to mix the volume levels.
5) Press STOP and RESET.
6) The sequencer will play back your volume
changes.
7) You can do the same with TX PAN, to move the
sounds throughout the stereo field.
•VE-JV/GS Voice Expanders
In addition to SR-JV80 Expansion Boards, the JV-90
can be expanded with the VE-GS1 and VE-JV1
Voice Expanders, which provide additional polyphony
and multitimbral parts.
To select Voice Expander sounds:
1) Press V-EXP.
2) Press V-EXP and A in the Patch Group buttons.
3) Use the BANK and NUMBER buttons to select
the sounds.
4) Use PART SEL (under Edit Palette) to toggle
between Parts 1–8 and 9–16. Cursor between
individual Parts.
To select GS Variation Tones: (VE-GS1 only)
1) Press BANK LOW in the Patch Group buttons.
2) Press BANK and NUMBER buttons to select a
new Bank. (Not all Banks contain Variations -
see a GS Tone Chart)
•MIDI Internal/External Switch
In order to provide independent access to both the
internal sounds of the JV-90 and the V-EXP sounds
of either a VE-JV1 or VE-GS1 Voice Expansion
Board, there are two MIDI inputs. To allow the two
sound sources to be addressed separately the MIDI
switch must be set to External.
In External position, the JV-90 sound source will be
accessible from the JV-90 MIDI In and the Voice
Expansion Board will be addressed only from the
V-EXP MIDI In.
This concept has the following ramifications:
1) If you're addressing a sound source via the
JV-90 MIDI In, the internal processor will update
the display when MIDI data is received, i.e.
MIDI Internal/External Switch (cont.)
program changes, volume changes, etc.
2) Subsequently, when set to EXT, the V-EXP MIDI
In bypasses the JV-90 and the display is not
updated when MIDI data is received.
EXPANSION BOARDS
There are essentially two kinds of optional expansion
boards for the JV-90: Voice Expanders and
Waveform Expanders.
Voice Expansion Boards
These expansion boards increase the JV-90's
polyphony, multitimbral capability, the number of
sounds, and includes its own effects processor.
• The VE-GS1-01 General MIDI/GS compatible board
provides 226 new sounds, 28 additional voices of
polyphony and 16 more multitimbral parts.
• The VE-JV1 board provides 512 sounds (64 of which are
not in the internal JV-90 library), 28 additional JV-90
quality voices of polyphony and 8 more multitimbral parts.
Waveform Expansion Boards
The SR-JV series Sound Expansion Boards are 8
Megabyte libraries of new sounds. These sounds are
grouped by style. Currently, there are four libraries:
Pop, Orchestral, Piano, and Vintage Synth. In
addition to 8MB of new waveforms, these boards
also contain a large library of Patches that utilize the
waveforms on the Expansion Board.
• SR-JV80-01 Pop Expansion Board:
Pianos, organs, basses, synth pads and leads—the kinds
of sounds typically associated with Pop music.
• SR-JV80-02 Orchestral Expansion Board:
One of the most accurate collections of virtually every
orchestral instrument necessary for composing or
performing in this genre.
• SR-JV80-03 Piano Expansion Board:
Everything from classic Rhodes to stunning grand
pianos—Steinway to Bosendorfer. A "best of" collection
of the worlds best electric and acoustic pianos.
• SR-JV80-04 Vintage Synth Expansion Board:
An amazing collection of all the sounds that defined early
synthesis. Oberheim®, Moog®, Hammond®, Mellotron®,
and of course, Roland—they're all here with breathtaking
realism and playability.
• SR-JV80-05 World Expansion Board:
Over 255 waveforms that cover an extensive collection of
ethnic instruments from around the world. Includes 255
patches using internal and SR-JV80-05 waveforms.
• SR-JV80-06 Dance Expansion Board:
255 waveforms and 255 patches for dance music appli-
cations such as techno, industrial, acid-house, hip-hop,
trance, and more. Includes phrases, scratch noises,
human voice exclamations, beat-loops, vocal samples,
TR-808/909, TB-303, SH-101, and more.
NQPSMTR®
)
TBS15 © 1994 Roland Corporation U.S., 7200 Dominion Circle, Los Angeles, CA 90040 Faxback # 20016 12/95
••• ROLAND JV-880 TURBO FACTS •••
The JV-880 puts the latest in Roland's leading-edge
sound technology in a single-space rack module. It's
incredible sounds – expandable to 14 Mbytes, 8-part
multitimbral capabilities and impressive sound editing
features make it an ideal instrument for any
professional or home studio environment.
• Initializing
1) Press UTILITY.
2) Rotate the DATA dial to Factory Preset.
3) Press ENTER twice.
• Playing the ROM demos
There are 3 ROM demos in the JV-880. To access
them:
1) Press UTILITY.
2) Rotate the DATA dial to ROM Play.
3) CURSOR to the bottom line of the display.
4) Rotate the DATA dial to select the desired song.
5) Press UTILITY to exit.
• Selecting Patches
1) Press PATCH/PERFORMANCE so that it is lit.
2) Use the DATA dial to select the desired patch.
Press the DATA dial while turning it to select
Banks A, B, or I.
• Sequencing with Performances
1) Press PATCH/PERFORMANCE so that it is unlit.
2) Rotate the DATA dial to select Performance
A-16 PopOrchestra. Press the dial to change
Banks A, B, or I.
3) Transmit MIDI channel 1 from your keyboard.
Part 1, Warm Vibe, will sound.
4) Cursor right once to display Warm Vibe.
5) Rotate the dial to select a different Patch for Part
1.
6) Cursor right to Part 2, Pick Bass.
7) Transmit MIDI channel 2 from your keyboard to
play Pick Bass.
8) Cursor right to Parts 3-8 and select Patches for
each Part, and a Rhythm Kit for Part 8.
Note: Part 8 is reserved for Rhythm Kits and
defaults to receive on MIDI channel 10.
• Loading single patches from a PCM card or
Expansion Board
To load single patches from either a PCM card or
Expansion Board:
1) Press UTILITY.
2) Scroll to ‘Load patch single’.
3) Position the cursor in the bottom left corner of the
screen.
4) Select either PCM or EXP.
5) Press the right cursor button once.
6) Use DATA dial to select desired patch; notice that
as you change patches, you can audition them
immediately.
7) Press ENTER; this loads the selected patch into
the temporary patch buffer.
8) Now the patch can be written into internal
memory by using the Patch write command under
the UTILITY menu. Select desired memory
location and press ENTER.
• Loading Patch groups from a PCM card or
Expansion Board
The JV-880 lets you load patches in groups, either
from PCM cards or Expansion Boards. To access this
function:
1) Press UTILITY.
2) Turn DATA dial until ‘Load patch group’ appears
in display.
3) Position the cursor in the bottom left corner of the
screen.
4) Select either PCM or EXP.
5) Press the right cursor button once.
6) Select the bank that you want to load into
memory.
7) Press ENTER.
8) Press UTILITY to exit back to normal operation.
• Using Multiple Outputs
The JV-880 can operate in either 2 or 4 Output
Modes. When the 4 output mode is used, all internal
effects are disabled at all outputs.
To select the Output Mode:
1) Press SYSTEM.
2) Turn the DATA dial until the display reads ‘Output
Mode’.
3) Cursor right and select either 2 or 4 Output mode.
NQPSMTR®
)
TBS16 © 1994 Roland Corporation U.S., 7200 Dominion Circle, Los Angeles, CA 90040 Faxback # 20050 6/95
••• ROLAND JV-1000 TURBO FACTS •••
The JV-1000 is a 76 key Music Workstation featuring
320 Patches, 80 Performances, 5 Rhythm Sets and
an extensive sequencer supporting Roland S-MRC
and Standard MIDI File format. It can be expanded
using any of the SR-JV80-Series Wave Expansion
Boards and/or the VE-Series Voice Expanders, as
well as all SO-PCM-Series Sound Cards and PN-
JV80-Series Parameter Cards. The on-board
sequencer provides powerful recording and editing
features, with a total memory capacity of 40,000
events. Each of the eight Tracks can utilize all 16
MIDI channels.
• Initialize
1) Hold CAPS while powering on.
2) Press ENTER.
3) Press WRITE.
• Playing the Demonstration Songs
1) Insert Demonstration Disk into disk drive.
2) Press DISK MODE.
3) Press ENTER two times.
4) Use the ALPHA-DIAL to select a song title.
5) Press ENTER.
6) Press LOAD.
7) Press DISK MODE when loading is complete.
8) Press PLAY.
• Playing Patches
The JV-1000 has four Preset Patch Groups, A, B, C,
D, and one User-programmable Patch Group I, each
with 64 Patches, for a total of 320 on-board Patches.
An M-256E can hold an additional 64 User Patches.
The JV-1000 can also directly access Patches on
any SR-JV80 Expansion Board, PN-JV80 Parameter
Card or SO-PCM1 Card, providing immediate
access to over 600 Patches.
1) Press PATCH.
2) In the PATCH GROUP buttons select USER,
PRESET or W–EXP.
3)
For User Patches
:
Select INT or CARD from the PATCH GROUP
buttons.
For Preset Patches
:
Select A, B, C, or D from the PATCH GROUP
buttons.
For Expansion Board Patches
,:
Select A, B, C, or D from the PATCH GROUP
buttons.
For SO-PCM1 Card Patches:
Select PCM CARD A from the PATCH GROUP
buttons.
• Playing Patches cont.
4) After selecting your Group, use the eight BANK
and NUMBER buttons to select Patches within
that Group.
• Sequencing
The sequencer can record data into any of the eight
phrase Tracks on any MIDI channel. Tracks can be
merged together and each Track can contain data
on all 16 MIDI channels. There are eight song
locations in internal memory and up to 108 songs
can be stored on a single disk.
1) Select the Performance Preset A16
“PopOrchestra.”
2) Cursor right and left to listen to the Patches in
this Performance.
3) Cursor right to the Rhythm Part.
4) Press REC and PAUSE on the Sequencer.
Track 1 will begin to flash, and it will begin to
record when you play the keyboard.
5) Play your drum part, then press STOP and
RESET.
6) To listen to your Track, press PLAY.
To record additional Tracks:
1) Cursor to you next instrument.
2) Press REC, PAUSE and TRACK 2.
3) Repeat steps 1 and 2, selecting a new Track
each time.
To select new Patches:
1) Press WAVE/PATCH in the EDIT PALETTE.
2) Use the Group, Bank and Number buttons, or
Sliders, to select Patches for each Part.
• Compu-Mixing
Compu-Mixing turns the JV-1000’s sliders into an
automated MIDI mixer, controlling the volume and
pan information of your sequence Tracks.
1) Record a sequence, as shown above.
2) Press LEVEL in the EDIT PALETTE.
3) Press REC and select an empty Track for
recording.
4) Press PLAY to start recording, and move the
sliders to mix the volume levels.
5) Press STOP and RESET.
6) Press PLAY and the sequencer will playback
your volume changes.
7) You can do the same with TX PAN, to move the
sounds throughout the stereo field.
NQPSMTR®
)
TBS16 © 1994 Roland Corporation U.S., 7200 Dominion Circle, Los Angeles, CA 90040 Faxback # 20050 6/95
• Using VE-Series Voice Expanders
If you have a VE-Series Voice Expander installed,
the sequencer’s MIDI THRU Condition (MIDI-3)
determines whether the keyboard will sound the
Internal Performance, the Voice Expander or both.
To set the MIDI THRU Transmit condition:
1) Press MIDI in the sequencer section.
2) Press 3, then press ENTER.
3) Set the desired sound source.
THRU OUT 1: JV Internal Performance
THRU OUT 2: Voice Expander
THRU 1 + 2L Both Internal and V-EXP
Likewise, Sequencer Output Assign (Function 11)
determines whether the sequencer Tracks plays the
Internal Performance, the Voice Expander, or both.
Each Track can have its own output assignment.
To assign the output of a Track:
1) Press FUNCTION.
2) Use the ALPHA-DIAL to select “FUNC11
OUTPUT ASSIGN,” and press ENTER.
The numbers in the lower right corner of the
display represent Tracks 1-8 and R. The default
setting is both sound sources (3).
3) Use the ALPHA-DIAL and cursors to set each
Track to the desired Output Assignment.
The possible settings are:
OFF: No data is output from the Track
OUT 1: Data is sent to Internal Performance
OUT 2: Data is sent to the V-EXP.
1+2: DATA is sent to both the Internal
Performance and the V-EXP.
4) Press STOP.
• Customizing Patches with the Edit Palette
The Edit Palette provides a quick, intuitive method
for mastering the JV-1000’s powerful synthesizer
controls. Each Patch combines from 1 to 4 Tones,
indicated by the Tone Switch LEDs.
1) Press PATCH.
2) Press LEVEL in the EDIT PALETTE.
3) Use sliders 1–4 to remix the Levels of the
enabled Tones.
4) Press the other EDIT PALETTE controls, PAN,
TUNE, WAVE, CUTOFF, RESONANCE,
ATTACK or RELEASE, and use the sliders to
change the sound.
• Customizing Patches cont.
5) The s and t in the display indicate additional
parameter windows. You can cursor to related
parameters from any of the eight Edit Palette
screens.
To store your new Patch in memory:
1) Press WRITE.
2) Cursor to Write and press ENTER.
3) Select a User Patch location using the Patch
Group, Bank and Number buttons, or slider 1.
4) Press ENTER.
• Using Performances
Performances are the eight-Part multitimbral setups
in the JV-1000. Like Patches, there are both Preset
and User Performances available.
1) Press PERFORMANCE.
2) In the PATCH GROUP select USER or
PRESET.
3)
For Preset Performances:
Select A, B, C, or D from the PATCH GROUP.
For User Performances:
Select INT or CARD from the PATCH GROUP.
4) Use the Bank and Number buttons to choose a
Performance.
There are three types of Performances:
LAYER: For layering Patches
ZONE: For splitting Patches across the keyboard
SINGLE: For multitimbral sequencing.
A Word about the Expansion Boards
The JV-1000 can be expanded with one Voice
Expander and one Wave Expander.
The SR-JV80-Series Wave Expanders add 8 Mb of
additional waveforms and Patches to the JV-1000.
These Waves and Patches can be used in Patch or
Performance Mode.
The VE-Series Voice Expanders add an additional 28
voices of polyphony, hundreds of sounds, additional
multitimbral Parts, plus digital effects for use by these
Parts.
Note: The added polyphony is used only by the Voice
Expander Parts. Adding a VE-Series Voice Expander
does not increase the polyphony of the Internal
Performance.
NQPSMTR®
)
&FA6C)&J?E96D:K6C
TBS17 Roland Corporation U.S., 7200 Dominion Circle, Los Angeles CA 90040 Faxback # 20041 6/96
••• ROLAND JV-1080 TURBO FACTS •••
The JV-1080 Super JV Synthesizer module is a
powerful instrument based on a 32-bit RISC
processor. It is 64 note polyphonic, and offers 16
part multitimbral capability. In addition to its 8 MBytes
of onboard ROM waveforms, the user can install up
to four 8 MByte Expansion Boards (from the SR-
JV80 Series) for a total of 40 MBytes of accessible
waveforms. There are 512 Preset Patches and 128
User Patches. The effects include reverb and
chorus, plus 40 Insert Effects like Rotary, Distortion,
Flanging, Phasing, and MultiTap Delays.
• Initialize
1) Press UTILITY.
2) Use the CURSOR buttons to select FACTORY
PRESET.
3) Press ENTER.
• Play the ROM Demos
1) Hold SHIFT and press ENTER.
2) Use the VALUE DIAL to select desired song.
3) Press ENTER to begin play and EXIT to stop.
• Selecting Patches
There are 512 Preset Patches in the JV-1080 as well
as 128 User Patches. Any installed expansion
boards also have patches that can be accessed
directly from the JV-1080’s front panel.
1) Press PATCH.
2) Use the USER/CARD, PRESET and EXP
buttons to select the desired group of patches.
3) Use the A/B/C/D buttons to determine which
bank of Patches you wish to use.
4) Use the VALUE DIAL to choose Patches; notice
that turning the dial moves through Patches one-
by-one, and turning the dial while pressing it in
moves through Patches in increments of 10.
(This feature works in all editing pages as well!)
• Editing Patches
1) Press PATCH.
2) Notice that there are 4 Tone Switch buttons
under the display. Any tone(s) that are lit are
active in the Patch you have chosen. To enable
or disable any tone(s), press its Tone Switch
button.
3) Make sure that the Tone Select button is lit to
correspond to an active Tone; otherwise, you will
not be able to hear any edits that you make.
4) Press PARAMETER; you are now in Edit Mode.
5) Press WAVE (written in orange); this will show
you the Waveform being used for the selected
tone. Notice the arrow in the display; this
indicates that you can access more Wave
parameters by using CURSOR UP or DOWN.
• Editing Patches (cont.)
6) All other Patch parameters are accessed by
pressing a corresponding button (i.e. COMMON,
EFFECTS, CONTROL, etc).
7) You can press the PALETTE button at any time
to view the selected parameter setting for all 4
tones simultaneously.
• Storing an edited Patch
To store a modified Patch to a User location:
1) Press UTILITY.
2) Select WRITE by using the CURSOR buttons.
3) Press ENTER.
4) Use the VALUE dial to choose the Patch location
you wish to write to.
5) Press ENTER.
6) Press UTILITY to write the Patch.
• Sequencing
The JV-1080 is a 16-part multitimbral instrument.
There are 64 Preset Performances and 32 User
Performances. To select a Performance:
1) Press PERFORMANCE.
2) Press USER/CARD or PRESET to choose a
Performance Bank.
3) Use the VALUE dial to select a Performance.
To change a Patch for a Part, or adjust levels,
panning and other Part parameters:
1) Press PARAMETER.
2) Press PART (written in blue). This shows the
Patch currently selected for this Part.
3) To access the Patches for other Parts, press
PARAMETER again (turning it off). Now you can
use the 8 PART SELECT buttons (written in
blue) to choose which Part you want to edit; the
1-8/9-16 button will choose between Parts 1
through 8 or 9 through 16.
4) You can select other Part parameters by
pressing PARAMETER again and then pressing
any PERFORMANCE EDIT button written in blue
(i.e. COMMON, EFFECTS, MIDI, etc).
5) You can also press the PALETTE button to view
the parameter setting for Parts 1-8 or 9-16.
• Using the JV-1080 for General MIDI
The Super JV contains all of the sounds required by
General MIDI; they are found in Preset bank D. If
you want to play GM sequences through the JV-
1080, you can quickly set-up all 16 parts for General
MIDI by doing the following:
1) Press and hold SHIFT.
2) Press GM.
3) To exit the GM mode, press the
PERFORMANCE or PATCH buttons.

NQPSMTR®
)
&FA6C)&J?E96D:K6C
TBS55 © 1997 Roland Corporation U.S., 7200 Dominion Circle, Los Angeles, CA 90040 Faxback # 20054 1/97
••• ROLAND JV-2080 TURBO FACTS •••
The JV-2080 Super JV Synthesizer module is a
powerful addition to Roland’s popular JV series sound
modules. It contains the same exceptional features of
the JV-1080 in addition to some new ones such as:
• 640 Preset and 128 User Patches.
• Eight SR-JV80 compatible Expansion Slots for a
total of 144 Mbytes of waveform data and 2900
Patches accessible from the front panel.
• Patch Finder function for quickly locating the
desired Patches by category.
• Phrase Preview function for auditioning sounds
with a short musical phrase.
• Large 320 x 80 dot backlit LCD display.
• Three independent EFX sets in addition to chorus
and reverb. Each EFX set contains 40 effects
such as Rotary, Distortion, Flanging, Phasing, and
MultiTap Delays.
• Initialize
1) Press UTILITY.
2) Press F6 two times to select (Menu 3). Press F1.
3) Press F6 to restore the factory settings. If
necessary, use the VALUE DIAL to turn Memory
Protect OFF and press F6 two times.
• Play the ROM Demos
1) Hold EXIT and press the down CURSOR button.
2) Use the VALUE DIAL to select desired song.
3) Press F6 to begin playback (press F6 to stop).
4) Press EXIT to return to the previous display.
• Selecting Patches
The JV-2080 contains 640 Preset and 128 User
Patches. The JV-2080 can be expanded up to 2900
Patches with up to eight optional SR-JV80 Series
Expansion Boards.
1) Press PATCH.
2) Use the USER, CARD, PRESET and EXP buttons
to select the desired group of patches.
3) Use the A-H buttons to determine the desired
Bank of Patches.
4) Use the VALUE DIAL to choose Patches.
Note: Pushing the VALUE DIAL displays a list of 10
Patches at once. You can use the FUNCTION buttons
to scroll through Patches 10 at a time.
• Using Phrase Preview
The JV-2080 allows you to audition sounds from the
front panel using musical phrases associated with that
sound.
1) Select the Patch you would like to hear.
2) Push the VOLUME knob.
• Using the Patch Finder
1) Press PATCH followed by CATEGORY.
2) Use the VALUE DIAL to select the desired
category. For example, select ORCHESTRAL for
a string sound.
3) Press F5 and use the VALUE DIAL to select the
desired sub-category.
4) Press F5. All Patches (including Expansion
Boards) from that category will be displayed in
groups of 10.
5) Use the VALUE DIAL to select the desired Patch.
Note: This function will also work in Performance
Mode from the Part display.
• Using the Graphic Display
The JV-2080 features a comprehensive display that is
very useful for editing filters, envelopes, LFOs, etc.
Use the following procedure to view the graphic
display of the TVF page:
1) Press PATCH and use the VALUE DIAL to select
the PATCH you wish to edit.
2) Press F3 (TVF).
3) Use the CURSOR buttons to select Filter Type.
4) Use the VALUE DIAL to change the filter type.
Notice the graphic reflects the filter that you have
chosen.
5) Use the CURSOR buttons to select Cutoff Frequency.
6) Use the VALUE DIAL to change the cutoff
frequency. Notice the graphic reflects the changes
that are made.
7) Press EXIT to return to the previous display.
• Sequencing
The JV-2080 is a 16-part multitimbral instrument. There
are 64 Preset Performances and 32 User Performances.
To select a Performance for sequencing:
1) Press PERFORMANCE.
2) Press PRESET followed by A to select the Preset
A Bank.
3) Use the VALUE DIAL to select PR-A:01
Seq:Template.
Use the following procedure to choose sounds, adjust
levels, panning or other Part parameters:
1) Press F3 (Part) followed by F6 (Palette).
2) Use the left and right CURSOR buttons to select
the desired Part.
3) Push the VALUE DIAL to access the Sound List
display and turn the dial to select a Patch. Press
EXIT to return to the Part display.
4) Use the CURSOR buttons to select additional Part
parameters (Level, Pan, Coarse Tune, Fine Tune,
and Voice Reserve) and use the VALUE DIAL to
adjust these parameters as desired.
NQPSMTR
TBS18 © 1994 Roland Corporation U.S., 7200 Dominion Circle, Los Angeles CA 90040 Faxback # 20033 2/96
••• ROLAND MC-50mkII TURBO FACTS •••
The MC-50mkII Micro Composer is a dedicated
sequencer featuring professional-level sequencing
(S-MRC), MIDI data storage (40,000 events), live
performance capabilities (S-MRP) and tape sync, all
in one compact unit. Each of it’s 8 tracks holds 16
MIDI channels for a total of 128 parts. It can output
32 channels simultaneously, via it’s two MIDI OUT
connections. It can load and save Standard MIDI
Files and uses a 3.5” disk drive for storage.
• Formatting a Disk
1) Insert a 3.5” Double Density disk.
2) Hold SHIFT, press MODE, then #4.
3) Press ENTER three times.
4) When completed, press STOP.
5) Hold SHIFT, press MODE, then ENTER.
• Realtime Recording
1) Press REC, then PLAY.
2) After the two measure count-in, start playing.
When finished, press STOP, then RESET.
3) To record another track, press REC then any
TRACK button 2-8 (since you’ve already
recorded on Track 1).
• Quantizing
1) Press EDIT, #9, then ENTER.
2) Use the DIAL to select the track to be
quantized, then ENTER.
3) Use the DIAL to select which track the
quantized data will go to, then ENTER.
4) Select the data’s MIDI channel, then ENTER.
5) Select a Quantize Resolution, then ENTER.
6) Select a Quantize Rate, to set how close a note
is pulled to the point of resolution (the normal
setting is 1.0), then ENTER.
7) Select the measure you want to start at, then
the number of measures you want to quantize.
8) Press ENTER, then REC.
• Erasing measures
1) Press EDIT, then ENTER.
2) Select the track, then ENTER.
3) Select the MIDI channel, then ENTER.
4) Select the events (ex. ALL), then ENTER.
5) Select first measure to be erased, then ENTER.
6) Select total amount of measures to be erased,
then ENTER.
7) Press REC.
• Creating an Individual Event
1) Press MICROSCOPE.
2) Press a TRACK button to select a track.
3) Select the
measure-beat-clock
position where
the event will go (ex. 1-1-000), then ENTER.
4) Press EDIT, #3, then ENTER.
5) Dial the event type (ex. NOTE), then ENTER.
6) Select the value for each section, then ENTER.
• Editing an Individual Event
1) Follow the above steps 1-2.
2) Hold SHIFT and dial to an event.
3) Press EDIT, then ENTER.
4) Select the value for each section, then ENTER.
• Tempo Settings
To set a song’s Basic Tempo:
1) Press FUNC, #9, then ENTER.
2) Dial the Basic Tempo for the song.
To insert individual tempo
changes
:
1) Press MICROSCOPE, then TEMPO.
2) Press EDIT.
3) Dial [CREATE EVENT], then ENTER.
4) Dial the tempo, then ENTER.
To record tempo changes in real-time:
1) Press REC, then TEMPO.
2) Press PLAY to begin recording.
3) Dial tempo changes while the music is playing.
• Loading Files: S-MRC or Standard MIDI Files
1) Insert DOS- or S-MRC-formatted disk with
S-MRC Files or Standard MIDI Files (SMF).
2) Hold SHIFT, press MODE, #2, then ENTER.
3) S-MRC: Press ENTER two more times.
Standard MIDI Files: Dial LOAD [MIDI FILE],
then ENTER twice..
4) Dial a song, press ENTER, then LOAD.
5) Hold SHIFT, press MODE, then ENTER.
• Saving Files: S-MRC or Standard MIDI Files
1) Insert DOS- or S-MRC-formatted disk.
2) Hold SHIFT, press MODE, #2, then ENTER.
3) S-MRC: Dial [SAVE], then ENTER twice.
Standard MIDI Files: Dial SAVE [MIDI FILE],
then ENTER twice.
4) Create song name with the DIAL or 10-key pad.
5) Press ENTER, then SAVE.
6) Hold SHIFT, press MODE, then ENTER.
NQPSMTR®
TBS48 ©1996 Roland Corporation U.S. , 7200 Dominion Circle , Los Angeles , CA 90040 Faxback # 20042 6/96
••• ROLAND MC-303 TURBO FACTS •••
The MC-303 provides 448 dedicated Dance sounds,
including 40 synth basses, 35 synth leads, 33 synth pads
and 12 different rhythm kits. The sounds of the MC-303
are derived from classic analog products such as the TB-
303, SH-101, TR-808, and TR-909. It includes 133
preset patterns with 300 variations and 50 User patterns.
The MC-303 features a Real time Modify (RTM) function
that allows you to make changes to a sound during
playback with knobs and buttons. In addition, a Real time
Phrase Sequencer (RPS) allows simultaneous playback
of phrases triggered from front-panel buttons. Other
features include: Grid, Shuffle, and Groove Quantize and
built-in vintage synth arpeggios. A unique low-boost
circuit adds emphasis to the low frequencies, providing a
powerful sound.
• Restoring Factory Settings
1) Hold SHIFT and power on.
2) Press ENTER.
• Playing the Demo Song
1) Hold SHIFT and press PLAY MODE.
2) Press PLAY.
3) Press STOP to end playback. Press EXIT to leave
the Demo Mode.
• Playing Patterns
The MC-303 contains 133 preset patterns with 300
variations. In addition, it includes 50 user patterns. Use
the following procedure to play these patterns.
1) Press PLAY MODE to make the PATTERN indicator
light (lower left corner of display).
2) Use the SELECT buttons to make the PTN/SONG
indicator light.
3) Use the VALUE-DIAL to select a pattern.
Hold SHIFT and rotate the VALUE-DIAL, to change
patterns in increments of ten.
4) Press PLAY. Rotate the VALUE-DIAL to select a
new pattern. The new Pattern number will appear
under NEXT in the display and will play after the
current Pattern finishes.
5) You can adjust the tempo of the Pattern by pressing
TAP three times at the desired tempo.
6) Press STOP to end playback.
• Playing Rhythm Sets
1) Press the PTN SET and RPS SET buttons so their
indicators are off.
2) Press the PART SELECT button to make the
indicator light.
3) Press PART R to select the Rhythm Part.
• Playing Rhythm Sets (cont.)
4) Use SELECT buttons to make the TONE
indicator light.
5) Rotate the VALUE-DIAL to select the desired
rhythm set.
6) Play the built-in keyboard to hear the instruments.
Use the Octave - or + buttons to access all of the
instruments in a rhythm set.
• Modifying the Sounds in Realtime
1) Press PLAY MODE to make the PATTERN
indicator light.
2) Use the SELECT buttons to make PTN/SONG light.
3) Rotate the VALUE-DIAL to select pattern A11.
4) Press PART SELECT to make the indicator light.
5) Press the PART 4 button, then press PLAY.
6) Rotate the RESONANCE knob all the way to the right.
Change the sound by rotating the CUTOFF knob.
Note: LFO and ENVELOPE can also be edited in
realtime.
• Using the Arpeggiator
1) Press the PTN SET and RPS SET buttons so their
indicators are off.
2) Press PART SELECT to make the indicator light.
3) Press a PART button (1-7).
4) Press ARPEGGIO ON to make the indicator light.
5) Play a few chords on the Keyboard pad.
6) Adjust the emphasis of the arpeggio by rotating the
ACCENT RATE knob.
• Recording a Pattern
1) Select a User pattern (u01-u50).
Refer to Playing
Patterns.
2) Press REC. The indicator will blink.
3) Press the desired PART button (R,1-7) to record.
4) Press PLAY. Recording will begin after the selected
Count-In measure(s).
5) Press STOP when finished.
Note: While recording, you can erase previously played
data. Hold SHIFT and press ERASE to enter Erase
Mode (Ers). Hold the Keyboard Pad that corresponds
to the note/instrument you wish to erase (hold REC to
erase all notes/instruments).
• Playing RPS Phrases
1) Press RPS SET to make the indicator light.
2) Use the SELECT buttons to make RPS SET light.
3) Play the keyboard. Layer phrases by pressing keys
simultaneously.
4) Rotate the VALUE-DIAL to change the RPS SET
(there are 30 RPS Sets to choose from).
5) Press the RPS SET button to stop this function.

NQPSMTR®
TBS72 ©1998 Roland Corporation U.S., 7200 Dominion Circle, Los Angeles, CA 90040 Faxback # 20070 1/98
••• ROLAND MC-505 TURBO FACTS •••
The MC-505 Groovebox builds upon the successfulMC-303 as a
self-contained, retro-styled dance music sequencer and sound
module with powerful new sounds and realtime controls.
Features include:
• High performance sound engine with 64 voice polyphony
• Multi-mode resonant filters
• Front panel ADSR envelope controls
• Revolutionary D-Beam Controller for effects and sound/note
control via hand movement over an infrared light beam
• 714 onboard dance music Patterns
• 512 built-in sounds and 26 rhythm sets.
• 3 independent effects processors
• MEGAMIX function allows for intuitive pattern creation by
combining rhythms and Parts of one Pattern with another
• Enhanced MIDI implementation
• 6 Audio Outputs
• Low Boost circuit with octave control provides low end punch
• Uses Smart Media cards for external Pattern and Patch
storage (512 Patches/200 Patterns on a single card).
• Onboard sequencer capacity increased to 95,000 notes
(up to 480,000 notes on a 4MB Smart Media card).
• Restoring Factory Settings
1) Hold SHIFT and turn the power on.
2) Press ENTER.
Note: The procedure takes approximately 4 minutes
• Playing the Demo Songs
1) If the MC-505 is playing, press STOP.
2) Simultaneously press EXIT and ENTER.
3) Use the VALUE DIAL to select a demo song.
4) Press PLAY to start playback.
5) Press STOP to end playback. Press EXIT to leave the
Demo Mode.
• Playing Patterns
The MC-505 contains 714 onboard preset Patterns. Use
the following procedure to play these Patterns.
1) Press MODE so that the PTN indicator lights.
2) Press PTN/SONG in the DISPLAY section.
3) Press PRESET in the BANK section.
4) Use the VALUE DIAL to select the desired Pattern.
5) Press PLAY. While the Pattern is playing, you can use
the VALUE DIAL to select the next Pattern.
6) Press STOP to halt playback.
• Using the Mute Function
Use the following procedure to mute any Part of a Pattern
while it is playing back:
1) Select a Pattern and press PLAY.
2) Press PART MUTE so it is lit.
3) Press the PART BUTTONS (R-7) to Mute the
selected Part. The PART BUTTON will blink.
4) Press the PART BUTTONS (R-7) again to activate the
selected Part.
• Modifying Sounds in Realtime
Use the following procedure to modify the sound you are
currently playing using the front panel controls:
1) Press PART SELECT so it is lit.
2) Use the PART BUTTONS (R-7) to select a Part.
3) Play the keyboard pads and the selected Patch will
sound. Use the OCTAVE -/+ buttons to shift the Patch
down or up.
4) Rotate the CUTOFF knob as you play the keyboard pads.
5) Experiment with the RESONANCE, LFO DEPTH, and
PORTAMENTO knobs.
6) Now try changing the ENVELOPE A, D, S and R sliders.
Note: You can use the same controls to modify a Part
that is playing back in a Pattern.
• Using the Arpeggiator
Use the following procedure to activate the Arpeggiator:
1) Use PART SELECT and the PART BUTTONS (R-7)
to select a Part.
2) Press ON (in the arpeggiator section) so it is lit.
3) Hold down several keyboard pads and the sound will
cycle between them.
4) Hold SHIFT and press keyboard pad #1.
5) Use the VALUE DIAL to select other arpeggio styles.
6) Press EXIT to return to the main screen.
• Using MegaMix
MegaMix allows you to select Parts from different Patterns
and combine them in realtime. Use the following procedure:
1) Select Pattern ”P:133 HipHop East 1” (as described
previously) and press PLAY to begin playback.
2) Press MIXER SELECT (above MUTE CTRL)
repeatedly until the MEGAMIX indicator is lit.
3) Press PART SELECT so it is lit.
4) Use the PART BUTTONS (R-7) to select a Part and
the VALUE DIAL to select the desired Pattern. You
can have up to 8 tracks playing musical information
from different Patterns.
• Using the D-Beam
Use the following procedure to activate the D-Beam:
1) Select a Pattern and press PLAY to begin playback.
2) Press ON in the D-Beam section so it is lit.
3) Use the D-Beam select button to select “TURNTABLE.”
4) With the Pattern running, slowly lower and raise your
hand above the D-Beam lens.
5) Hold down the D-Beam select button and use the
VALUE DIAL to select other options.
6) Press STOP when you are finished.
Note: Some DBeam settings will affect only the currently
selected Part and some will affect the whole Pattern.
* D-Beam controller technology has been licensed from
Interactive Light, Inc.
>6
TBS19 © 1994 Roland Corporation U.S., 7200 Dominion Circle, Los Angeles, CA 90040 Faxback # 20018 12/95
••• BOSS ME-6 TURBO FACTS •••
The ME-6 is a versatile effects processor featuring a
user-friendly, floor-pedal design and six popular
effects that can be combined simultaneously with
noise-free performance. It has real analog distortion
and overdrive which can be configured and saved to
15 patch locations.
• Initializing
1) Turn power off.
2) Press and hold CURSOR DOWN and LEFT.
3) Turn power on.
4) Press WRITE.
• Choosing Patches
1) Press bank (B) footswitch and choose bank 2
with #2 footswitch. Choose patch 4 Mega Stack.
2) Choose patch 5 (in bank 2) Chorus Distortion.
3) Press bank (B) footswitch and choose bank 3
with #3 footswitch. Choose patch 3 Clean
Chorus.
4) Choose patch 1 (in bank 3) Sweet Overdrive.
• Audition Distortions
1) Choose patch bank 2, number 4.
2) Press EDIT/ESC (you are now in edit mode).
3) Press the left/right cursors until
OVERDRIVE/DISTORTION flashes.
4) The parameter LED (on the right) should
be on MODE, if not press the up cursor until
you’re at the top.
5) Use VALUE up/down to select modes.
1-Mild overdrive such as a BOSS OD-1.
2-High gain overdrive like a BOSS OD-2.
3-Distortion with a mid boost like a BOSS DS-2.
4-Distortion like a MT-2 Metal Zone with
enhanced low end.
5-OD-2 with EQ placed before the EQ.
• Delay
1) Turn DELAY on by pressing footswitch #4.
2) Cursor over to DELAY TIME.
3) Set to 500 milliseconds (50.) with VALUE.
4) Adjust EFFECT LEVEL (3) and FEEDBACK (1).
• Compressor
1) Turn COMPRESSOR on by pressing footswitch
#1.
2) Cursor over to COMPRESSOR SUSTAIN.
3) Set to 10 using VALUE.
• Reverb
1) Turn Reverb on by pressing footswitch #6.
2) Cursor over to REVERB MODE.
3) Set the MODE to 1-4.
• Writing to Manual Memory
1) Press WRITE.
2) Press MANUAL twice.
3) Press WRITE again.
• Manual Mode
Manual mode can be used to turn on and off
individual effects with the pedals of the ME-6. This
allows a user to treat the ME-6 as 6 separate effects
pedals.
1) Press MANUAL.
2) Individual effects can now be turned on/off at will
with the footswitches, just as if you had individual
BOSS compact pedals.
The correlation of footpedal-to-effect is as follows:
1) Compressor.
2) Overdrive/Distortion.
3) Equalizer.
4) Delay.
5) Chorus/Flanger.
6) Reverb.
• Controlling the Volume of the ME-6 in Real-
time
1) Connect a FV-300L, FV-300H or EV-5 to the
EXP Pedal with a stereo 1/4 inch cable.
2) The Volume of the ME-6 will be controlled
between the Noise Suppressor and the Delay
effects.
NQPSMTR
TBS42 © 1996 Roland Corporation U.S., 7200 Dominion Circle, Los Angeles CA 90040 Faxback # 20037 2/96
••• BOSS ME-8 TURBO FACTS •••
The ME-8 Guitar Multiple Effects is a BOSS pedal
board-style unit, which combines impressive proprietary
technology with the most popular BOSS effects. It has
100 Patches, 50 User and 50 Preset, plus an easy to
use manual mode and built in tuner.
• Selecting Patches
There are 4 Groups each with 5 Banks of 5 Patches.
Groups 1 & 2 are User, 3 & 4 are Presets.
1) Press GROUP.
2) Pressing a numbered pedal selects the GROUP.
3) Press the BANK foot switch.
4) Pressing a numbered pedal selects the BANK.
5) Pressing a numbered pedal selects the Patch.
• The Tuner
1) Press TUNER, or an FS-5U connected to TUNER
REMOTE.
2) Play a note, the letter will appear in the display.
3) Tune value will show up on the LED's.
Activating the tuner mutes the sound.
• Manual Mode
There is one additional memory for manual mode.
1) Press MANUAL or an FS-5U connected to the
MANUAL REMOTE input.
2) Effects can be turned on/off with the pedals.
• Delay Remain
Delay Remain makes transition between patch changes
smooth when the newly selected patch doesn't have
Delay and/or Reverb on.
1) Turn DELAY on. (If you're not in edit mode, press
EDIT and press the BANK pedal).
2) Press WRITE twice to write the patch into 1-1-1.
3) Patch 1-1-2 has DELAY off. Play staccato note or
chord and change to Patch 1-1-2 with out DELAY.
• Patch Editing
Parameters are a matrix directly below effect type. Four
PARAMETER buttons select the parameters. The LED
on the right shows where you are. VALUE up and
down buttons change the value of the parameter and
foot pedals turn effects on/off.
1) Select patch 1-1-1. Press EDIT.
2) Use the foot switches to turn effects on or off.
3) PARAMETER to select the MASTER effects.
4) Use VALUE to modify the Level.
5) PARAMETER down twice to GUITAR AMP
SIMULATOR.
6) Use VALUE to select [S] or [L] cabinet sizes.
• Writing A Patch Into Memory
There are 100 patch location (plus one manual mode
patch). The first 50 are user programmable.
1) Make desired modification, then press WRITE.
2) You can write this patch into any user location.
3) Press WRITE again and the patch will be saved.
• Programming the Crunch (EDIT Mode)
1) Press EDIT, use pedal 2 to turn the OD/DS on.
2) PARAMETER left/right to select 2: OD/DS.
3) VALUE up/down to TYPE and try them.
4) PARAMETER up/down to select other OD/DS
parameters including DRIVE, TREBLE, BASS &
LEVEL and set them to your liking.
5) ORDER swaps position of EQ and OD/DS.
• The Noise Suppressor (EDIT Mode)
1) PARAMETER to select MASTER.
2) PARAMETER down to NS Threshold and use
VALUE up till the noise disappears.
• The Harmonist (EDIT Mode)
1) PARAMETER to 4:HARMONIST. Press pedal 4 to
activate it.
2) PARAMETER up/down to type and select [Hr].
3) PARAMETER down to KEY, VALUE to one you
are comfortable with.
4) To set the two intervals, PARAMETER up to
PITCH and VALUE up or down for two octaves.
(Use PARAMETER left/right to select between
PITCH 1 & 2. Selection will be indicated with the
LED at the top of the row).
5) Turn the OD/DS effect on/off to check out the
HARMONIST with clean and crunch settings.
6) Press pedal 4 to turn the HARMONIST off.
• Bells, Whistles & Real Time Effects
Programming unique effects and real time control to the
controller CTR pedal:
1) PARAMETER left/right to select MASTER.
2) PARAMETER to ASSIGN (CTR). VALUE to [2-1]
FEEDBACKER.
3) Try effect- play a note and step on the pedal.
4) VALUE to [2-3] RING MODULATOR, [2-4]
INTELLIGENT R.M., & [3] SLOW ATTACK. Try
these unique effects with the guitar.
5) VALUE to [5-1] ARM DOWN 1. Experiment with
the pressure sensitivity of the CTR pedal.
6) CTR pedal can do the same TEMPO function as
the TEMPO foot switch plugged in back.
7) CTR pedal can do REMOTE effects on/off.
NQPSMTR
TBS43 © 1996 Roland Corporation U.S., 7200 Dominion Circle, Los Angeles CA 90040 Faxback # 20038 2/96
••• BOSS ME-8B TURBO FACTS •••
The ME-8B is a tough floor type multiple effects unit
offering the extra expressiveness bassists need.
Maintaining the operational ease of the ME series, the
ME-8B is powerful enough to accommodate the sonic
requirements of any bass player, easily and affordably.
• Initializing the ME-8B
1) Turn power off.
2) Press/hold CURSOR DOWN & LEFT buttons.
3) Turn power on.
4) Press WRITE.
• Calling Up Patches
The ME-8B has 64 patches; four groups each with four
banks of four patches. Group 1 & 2 are user, 3 & 4 are
presets. Here is how you call up the patches:
1) Press the GROUP button.
2) Pressing a numbered pedal selects the GROUP.
3) Press the BANK foot switch.
4) Pressing a numbered pedals selects the BANK.
5) Pressing a numbered pedals selects the patch.
• The Tuner
1) Press the TUNER button or an FS-5U connected to
the TUNER REMOTE input.
2) Play a note, the letter will appear in the display.
3) Tune value will show up on the LED's.
4) Activating the tuner also mutes the sound.
• Manual Mode
Like having BOSS pedals on the floor. There is one
additional memory for manual mode.
1) Press the MANUAL button or an FS-5U connected
to the MANUAL REMOTE input.
2) Effects can be turned on/off with the pedals.
• Patch Editing
Parameters are a matrix directly below effect type. Four
PARAMETER buttons select the parameters. The LED
on the right shows where you are. VALUE up and
down buttons change the value of the parameter and
foot pedals turn effects on/off.
1) Select patch 1-1-1. Press the EDIT button.
2) Use the foot switches to turn effects on or off.
3) PARAMETER to select the MASTER effects.
4) Use the VALUE buttons to modify the Level.
• Writing A Patch Into Memory
There are 64 patch location (plus one manual mode
patch). The first 32 are user programmable.
1) Make desired modification, then press WRITE.
2) You can write this patch into any user location.
3) Press WRITE again and the patch will be saved.
• The Defretter (EDIT Mode)
1) Press EDIT, use the PARAMETER left/right to
select DEFRETTER.
2) VALUE up/down to select TYPE [dF].
3) PARAMETER up/down to select ATTACK, SENS,
DEPTH & LEVEL - set them to your liking
.
• The Synth Bass (EDIT Mode)
1) PARAMETER to 4: SYNTH BASS. Turn on with pedal 4.
2) PARAMETER to WAVE and try the different
waveforms. (There are eight Synth Bass
waveforms. The ninth selection is Touch Wah.)
3) PARAMETER to select LEVEL and Direct LEVEL
and VALUE to set a balance between the normal
and synth bass sounds.
4) There are eight parameters for programming
SYNTH BASS. PARAMETER up/down and
left/right buttons to select them, and VALUE to set
them to your liking.
5) Press pedal 4 to turn the SYNTH BASS off.
• Tap Tempo Modulation (EDIT Mode)
Program a patch using the Hi Band Flanger effect set
to respond to the TEMPO foot switch:
1) PARAMETER to BANK: FLANGER. Press the
BANK pedal to activate it.
2) PARAMETER to MODE and VALUE to [HFL].
3) PARAMETER to RATE and VALUE to [t-1].
4) PARAMETER to DEPTH and VALUE to [30].
5) PARAMETER to RESO and VALUE to [-90].
6) To set the rate, tap four times on the FS-5U foot
switch, connected to the TEMPO In.
7) Turn the OD/DS effect on and off to check out the
FLANGER with clean and crunch settings.
8) Press BANK pedal to turn the FLANGER off.
• Bells, Whistles & Real Time Effects
Programming effects and control to the CTR pedal:
1) PARAMETER left/right to select MASTER.
2) PARAMETER to ASSIGN (CTR). VALUE to[1]
PEDAL WAH.
3) Try this unique effect by playing a note and
stepping on the pedal. Experiment with the
pressure sensitivity of the CTR pedal.
4) VALUE to [2-1] RING MODULATOR, [2-2]
INTELLIGENT R.M., & [3] SLOW ATTACK. Try
these unique effects with the bass.
5) VALUE to [5-1] ARM DOWN 1. Experiment with
the pressure sensitivity of the CTR pedal.
6) The CTR pedal can be set to SYNTH HOLD. Turn
the SYNTH BASS on and try this.
7) CTR pedal can do the same TEMPO function as
the TEMPO foot switch plugged in back.
8) CTR pedal can do REMOTE effects on/off.
>6
TBS20 © 1994 Roland Corporation U.S., 7200 Dominion Circle, Los Angeles, CA 90040 Faxback # 20019 12/95
••• BOSS ME-10 TURBO FACTS •••
The ME-10 is a fully integrated guitar effects
processor in a user-friendly floor-pedal configuration.
It features analog overdrive and 14 other effects –
nine of which can be used simultaneously. The ME-
10 has 128 memory locations, a built-in tuner and is
fully MIDI compatible.
• Initializing
1) Turn power off.
2) Press and hold the BANK DOWN pedal.
3) Turn power on.
4) Press WRITE.
• Demo Patches
Like many other Roland and BOSS products the ME-
10 uses the Group/Bank/Number G-B-N counting
system. Here is the procedure for calling up Patches:
1) Press the GROUP button and the Group number
will change from 1 through 4.
2) Use the BANK UP and DOWN pedals and the
bank number will change from 1 through 8.
3) Use the 1, 2, 3 or 4 pedals to call up the
appropriate number.
Call up the following set of Patches to demonstrate
the versatility of the ME-10:
1) Select G-1, B-1, N-1 for a Monster Stack.
2) Select G-1, B-2, N-3 for Processed Metal.
3) Select G-1, B-3, N-2 for a Phunky Phaser.
4) Select G-1, B-4, N-4 for a Pitch Echo Effect.
5) Select G-2, B-1, N-4 for Flanging Metal.
• Using the Tuner
The tuner is fully chromatic and can mute the output
while tuning. An optional BOSS FS-5U footswitch can
also engage the tuner.
1) Press TUNER button.
2) Play each string and tune. Center LED is in tune.
• Turning Effects On and Off
1) Select G-1, B-1, N-1.
2) Turn the Chorus on and off by pressing the
STEREO CHORUS button.
3) Do the same thing with several other effects like
the DELAY, FLANGER and
DISTORTION/OVERDRIVE.
• Editing Sounds
Distortion/Overdrive:
1) Choose patch 1-1 (group 1).
2) Press MODE under distortion/overdrive.
3) Use the shuttle dial to hear the four modes as
follows:
OD 1-Mild overdrive such as a BOSS OD-1.
OD 2-High gain overdrive like a BOSS OD-2.
DS 1-Distortion like a MT-2 Metal Zone.
DS 2-Distortion with a mid boost like a BOSS DS-2.
Delay:
1) Press DELAY button to turn it on.
2) Press DELAY TIME to alter time.
3) Set to 600 milliseconds with shuttle dial.
4) Adjust FEEDBACK (6) and EFFECT LEVEL (14).
Chorus:
1) Press STEREO CHORUS button to turn it on.
2) Press EFFECT LEVEL under stereo chorus.
3) Set to 40 with shuttle dial.
4) Press RATE and adjust chorus rate with shuttle
dial.
5) Press DEPTH and adjust chorus depth with
shuttle dial.
• Writing Patches into Memory
Once you edit a sound, you can write it into any of the
128 memory locations. Lets write the edited patch into
a new location:
1) Press WRITE.
2) Choose G-1, B-1, N-4 by pressing footpedal #4.
(If you wanted a different Bank, simply press the
Bank up/down footswitches).
3) Press WRITE again.
• Real-Time effects parameter control
With a expression pedal, you can assign a effects
parameter to be controlled in real-time per each
patch. You can use a EV-5, EV-10, or FV-300L
connected to the expression pedal 1 input on the
back of the ME-10. Parameters such as reverb level,
delay time, chorus rate/depth, pitch shift tuning
(whammy bar effect), and wah wah are assignable to
an expression pedal.
Chorus depth and other parameters:
1) Choose patch 1-2.
2) Press ASSIGN.
3) Rotate the shuttle dial up until the light resides on
the DEPTH (stereo chorus) button.
4) Press MIN.
TBS67 ©1997 Roland Corporation U.S., 7200 Dominion Circle, Los Angeles, CA 90040 Faxback # 20065 10/97
••• Boss ME-30 TURBO FACTS •••
The Boss ME-30 Guitar Multiple Effects processor is
a new pedalboard-style effects unit that combines
innovative features and an affordable price. The
ME-30 features include:
• 16 high-quality effects (9 available at once)
• Built-in expression pedal
• 60 Patch memories (30 User/30 Preset)
• Onboard Amp Simulator
• AC or battery power capability
• Easy to use icon-based display
• Phrase Trainer which allows you to record and loop
up to 12 seconds of a song and change the tempo
without affecting the pitch
• Initialization
Use the following procedure to restore the factory
settings:
1) Turn the power off.
2) Hold PARAMETER [ ] and VALUE [ - ] and turn
the power on.
3) Press WRITE/COPY.
• Tuning Your Guitar
The ME-30 features a built-in chromatic tuner. Use the
following procedure to tune your guitar:
1) Press TUNER.
2) Use the VALUE [ + ] or [ - ] buttons to select the
desired pitch standard.
3) Play a string on your guitar. The note value will
appear in the BANK display.
4) Tune the string until the correct note value
appears and the arrows in the center of the
display light up.
5) Repeat this process for each string.
6) Press TUNER to return to Play Mode.
• Manual Mode
Manual Mode allows you to turn individual effects on
and off using the pedals, as if you were using a
collection of individual pedals. Use the following
procedure to select Manual Mode:
1) Press MANUAL to enter Manual Mode. Each
pedal now controls individual effects as follows:
Pedal 1 - Overdrive/Distortion
Pedal 2 - Delay
Pedal 3 - Modulation
Bank Down (∇) - Compressor
Bank Up (∆) - Reverb
2) Press the desired pedal to switch effects on or off.
3) Press MANUAL to return to Play Mode.
• Selecting Patches
The ME-30 has 2 Patch groups; User and Preset.
Each group is divided into 10 banks of 3 Patches. Use
the following procedure to select a Patch:
1) Press USER/PRESET to select the desired group.
2) Use the BANK UP/ DOWN (pedals to select a
Bank (the pedal LEDs will flash).
3) Press a pedal (1-3) to select the desired Patch.
• Patch Editing
Within a Patch, effects can be turned on or off and
various parameters can be edited. Use the following
procedure to edit your selected Patch:
1) Press EDIT/ESC.
2) Use the EFFECT buttons to select the effect to
be edited.
3) Use the ON/OFF button to turn the effect on or
off. An icon will be displayed for each effect that
is turned on. Overdrive/Distortion, Compressor,
Delay, Reverb and Modulation can be turned on
or off using the pedals.
4) Use the PARAMETER buttons to select the
desired effect parameter. An icon will flash to
indicate the selected parameter and the current
value will be displayed.
5) Use the VALUE buttons to change settings.
• Using the Phrase Trainer
The Phrase Trainer is perfect for recording your
favorite solos and slowing them down to help you
learn. Use the following procedure:
1) Connect the output from your external sound
source (CD player, tape deck, etc.) to the AUX
IN of the ME-30.
2) Press PHRASE TRAINER ON/OFF to place the
ME-30 in standby mode. “REC” will be displayed
on the screen.
3) Press PLAY [ ] to begin recording and start the
audio from the sound source.
4) Press STOP [ ] to end recording.
5) Press PLAY [ ] to listen to your recording.
Now that you have recorded your phrase, you can play it
back at a slower tempo without changing the pitch:
6) Use the PARAMETER buttons to select “PITCH.”
7) Use the VALUE buttons to select “FIXED.”
8) Use the PARAMETER buttons to select “SPEED.”
9) Use the VALUE buttons to slow the pitch down.
NOTE: You can use the Pedals to control playback
by pressing the pedal that corresponds to the
desired transport function.

NQPSMTR®
&
TBS21 © 1995 Roland Corporation U.S., 7200 Dominion Circle, Los Angeles, CA 90040 Faxback # 20049 2/96
••• ROLAND MS-1 TURBO FACTS •••
The Roland MS-1 Digital Sampler is a 16 bit stereo
Phrase sampler incorporating R-DAC (Roland Digital
Audio Coding). R-DAC provides maximum sampling
time without compromising sound quality. The MS-1
has built-in flash RAM memory to store samples,
even when the power is off. Memory can be
expanded using flash RAM cards. The MS-1 has 8
pads available in two internal and three external
banks, and RPS (Real Time Phrase Sequencer) to
playback the phrases assigned to the pads. Battery
power and a compact design make it perfect as a
portable sampler for multiple applications. A 74
minute Audio Sampling CD is included.
• Sampling from a CD
1) Use the bank A-D buttons to select the desired
pad bank for sampling. Pressing C and D
simultaneously will access pad bank E (Banks
C,D and E are available on a Flash RAM card
only)
2) Press REC. When the “Select Pad 1-8 display
appears, press the pad you wish to assign a
sample.
3) After you select the pad, the (Gain:) display will
appear. Start the CD player, and the sound will
be heard through the headphones or amplifier.
4) By using the +/ - buttons, set the level so that
the “*” in the meter lights up occasionally.
5) Press the REC button shortly before playing the
CD to begin sampling. When the sample is
finished, press REC to stop sampling.
• Auto Mode Sampling from a Microphone
You can use the Auto mode to initiate sampling
when a sound is detected on the audio inputs.
1) Plug the mic into the MIC input.
2) Use the bank A-D buttons to select the desired
pad bank for sampling. ( Pressing C and D
simultaneously will access pad bank E).
3) Press the REC button. When the “Select Pad 1-
8” display appears, press the pad you wish to
assign a sample.
4) When the “GAIN:” meter appears, press the>
button once. The display will read LINE MONO.
From this point, you can change from LINE to
MIC by pressing the “+” button once.
5) Press the > button two more times and you will
come to the Man/Auto settings.
6) Press the + button to set the MS-1 for L1 (Level 1)
7) Press the < button to return to the level display.
Use the + or -buttons to set the level so that the
“*” in the meter lights up occasionally.
• Auto Mode Sampling (cont.)
8) Press REC the screen will display ìStandbyî.
When you speak into the microphone the MS-1
will automatically start recording. When you are
finished, press REC to stop sampling. (The
amount of sampling time available will be
graphically displayed.)
• Turning Loop On/Off & Setting Loop Points
By setting the loop point, you can alter the way a
sample is played. Setting the loop to ON, the sample
will play as long as you hold down the pad. Setting
the loop to OFF, the sample will play only once,
regardless of how long you hold down the pad.
1) After a sample has been recorded, press the
EDIT SAMPLE button. Press the > button to set
the desired loop parameter ( loop on S-E; will
loop from the start point to the end point; Loop
on L-E will loop from the loop point to the end
point. Loop OFF will play the sample as recorded
without looping.Use the “+and –” buttons to
switch between parameters.
2) After the loop has been set, press the > button to
get the loop start point display.
3) Press the < and> to go between the parameter
numbers for Loop Start (Loop P) and Loop end
(End P).
4) Use the “+ and –” buttons to change the value.
You can press the pad of the sample you are
editing and hear the changes for the loop
settings as you change the parameter settings.
5) You can vary between making large and small
edits on the parameters by moving the cursor to
the far left side of the parameter number for
major edits and to the far right side for minor
edits.
• Truncating a Sample
The Truncate function removes unwanted material
from the beginning and ending of a sample.
To truncate a sample:
1) First, set the loop settings using the previous
instructions on ìSetting the Loop Pointsî for the
sample.
2) Press the EDIT UTILITY button. Use the < and>
buttons to select the Truncate: display. Press the
pad you want to truncate.
3) Press the pad you wish to truncate.
4) Press the (REC) YES to execute the procedure.
NOTE: You can cancel the procedure by pressing
the EXIT/NO button.
NQPSMTR®
&
TBS21 © 1995 Roland Corporation U.S., 7200 Dominion Circle, Los Angeles, CA 90040 Faxback # 20049 2/96
• Recording a Phrase Sequence
1) Press the FUNCTION (SEQ) button to enter the
sequence mode.
2) Press one of the four upper pads to select a
sequence.
3) Press the REC button to enter record mode
(recording will actually begin the moment a pad
is pressed).
4) Press the REC button, again, to stop recording.
• Playback a Sequence
1) Press the FUNCTION (SEQ) button to enter
sequence mode.
2) Press one of the four upper pads( labeled Seq
1-4) to select a sequence for playback.
3) Press the PLAY pad to play the sequence.
4) The sequence will stop when it reaches the last
recorded bar, or you can press the STOP button.
5) Pressing the reset pad will return the sequence
to the beginning.
NOTE: When you press pad 8 ( the repeat pad), the
sequence will repeat until the STOP pad is pressed.
• Setting the Sample Grade
The Sample grade will affect audio quality and
sampling time length. You can select between High
(44.1Khz), Standard (32Khz), Long 1 (22.05Khz) and
Long 2 (16Khz). The higher the quality the shorter
the sampling time.
1) Press the EDIT SYSTEM button. Use the
< and> to access the Grade parameter.
2) Press the +/– buttons to select the desired
grade of sampling.
3) Press EXIT to return to Pad Mode.
• Formatting a Memory Card
1) With the power OFF, insert the card into the card
slot, and turn the power on.
2) Press the EDIT UTILITY button. Use the “+ and
–” buttons to access the “C. Format” display.
3) Press the > button to edit “backup files.” The +/–
buttons are used to change the value.
4) To initiate the formatting procedure, press the
REC button. The display will read: “Formatting.”
5) When the card is formatted, the display will read
“Completed.” The normal display will return
automatically.
• Saving to a PCMCIA Flash RAM Card
Besides being able to sample directly to the Flash
RAM card, you can also store your internal sounds
and sequences to Back Up Files on the Flash RAM
card.
1) Press the EDIT UTILITY button. Use the <and>
buttons to select “Save? :BUF1.” This will save
what is currently in memory into the first back up
file location on the disk.
2) The “+ and —” buttons are used to select the
correct backup file.
3) Press the (REC) YES button to save the data.
• Loading from a PCMCIA Flash RAM Card
1) Press the EDIT UTILITY button. Use the <and>
buttons to select “Load? :BUF1.”
2) The “+ and —” buttons are used to select the
correct backup file.
3) Press the (REC) YES button to load the data.
This will overwrite what is currently in the A and
B banks.
About Flash RAM
The MS-1 uses Flash RAM PCMCIA cards available
from SunDisk. Cards are available in 1.8 Mb, 2.5 Mb,
5 Mb, 10 Mb and 20 Mb sizes. Contact your local
Roland dealer, or Roland Corporation U.S., for
additional details. At STANDARD Sample Grade,
these cards will add about 75 seconds per Mb.
NQPSMTR®
&
TBS22 © 1994 Roland Corporation U.S., 7200 Dominion Circle, Los Angeles CA 90040 Faxback # 20020 12/95
••• Roland MSD Music Style Disks •••
The MSD Series of Music Style Disks offer an
inexpensive way to broaden the selection of music
styles available for the E-66 Intelligent Synthesizer.
Each 3.5" floppy disk contains 16 music styles,
covering blues to samba and swing as well as many
other international styles. The MSD Series allows
you to enjoy realtime performance, taking advantage
of the Intelligent Arranger function with complete
accompaniments of up to 8 parts.
Major Features
• 16 Styles on each disk.
• 3.5" floppy disk format.
• For use with the E-66 Intelligent Synthesizer.
• Contain the most popular Styles from Roland's
style library.
• Styles to be loaded from disk to the E-66 as
one of four User Styles for instant access.
• Loading styles from disk
You can load up to four styles from an Music Style
Disk into E-66 User Style locations (underlined in
white in the MUSIC STYLE section).
1) Insert a Music Style Disk with prerecorded
styles and wait for the disk LED in the display
section to go out (approximately 5 seconds).
2) Press the yellow LOAD button located in the
MUSIC STYLE section. The LED Load
indicator will blink, showing that it's ready to
load. The display will read "d01", the number of
the selected Style.
3) To choose a different style, use the two black
PREV and NEXT buttons located in the display
section.
4) Press one of the four USER STYLE buttons
located in the MUSIC STYLE section. The
LOAD button's LED will remain lit until loading is
complete.
5) Once the Load LED begins flashing again, you
may :
a) load another style by repeating steps 2 - 4, or
b) return to Play mode by pressing the Load
button (the Load LED will go out).
The E-66 is shipped with MSD-101, a collection of
sixty-six styles from the TN-SC2 and E-70 style
libraries.
Currently Available Disks and Styles:
Around the World 1 (MSD-102)
• Blues • Slow Swing • Boogie 2 • Ragtime
• Lambada • Son • Samba 2 • Mambo • Slow Waltz
• Standard • Ballad 3 • Reggae 2 • Caribbean
• M'Town • Mexican Rock • Country Waltz
Around the World 2 (MSD-103)
• Rock 1 • Rock 2 • Rap • House • Dance • Funk 1
• Funk 2 • Fusion • 8 Beat 1 • 8 Beat 2 • 8 Beat 3
• 8 Beat 4 • 16 Beat 1 • 16 Beat 2 • 16 Beat 3
• 16 Beat 4
Around the World 3 (MSD-104)
• Boogie • Rock'n • Twist • Charlest • Slow Rock 1
• Slow Rock 2 • Ballad 1 • Ballad 2 • Slow Swing 1
• Slow Swing 2 • Swing • Foxtrot • Big Band
• Shuffle • Swing Waltz • Dixie
Around the World 4 (MSD-105)
• Bossa • Samba • Latin • Salsa • Chacha •
Rhumba • Mambo • Tango • Slow Waltz • Waltz •
March • Polka • Baroque • Country • Beguine •
Reggae
Around the World 5 (MSD-106)
• Rock 1 • Rock 2 • Funk 1 • Funk 2 • 8 Beat 1
• 8 Beat 2 • 16 Beat 1 • 16 Beat 2 • Reggae
• Swing • Country • Waltz 2 • Polka • Bossa
• Rhumba • Fusion
American and Piano Collection (MSD-107)
• Rock 3 • Rock 4 • Funk 4 • R&B • Gospel
• Big Band • Modern Ballad • Jazz Waltz
• Pop Piano 1 • Pop Piano 2 • Contemporary
• 50's Ballad • Ballad Shuffle • Swing Pop
• Jazz Piano • Slow Waltz 3
Around the World (MSD-108)
• 8 Beat 5 • 8 Beat 6 • 16 Beat 5 • 16 Beat 6
• House 2 • Dance 10 • Funk 3 • Blues 2 • Blues 3
• R&B 2 • Swing 2 • 5 / 4 • Latin 2 • Merengue 2
• Meneaito • C'Waltz 3
The current MSD Series contain the most popular
styles from the Roland TN-SC1 and TN-SC2 cards,
the EM-303 and EM-305, and previous E-Series
keyboards.
NQPSMTR
#
TBS46 Roland Corporation U.S., 7200 Dominion Circle, Los Angeles CA 90040 Faxback # 20043 6/96
• Initializing/Screen Calibration
1) Touch VALUE with the Stylus while powering on.
2) Touch the lower left and upper right corners of the
screen to Calibrate.
3) Touch ‘Exec’ to Initialize.
• Playing the Demo Song
1) Touch the Song Number and drag upward, or use the
VALUE buttons to select S21:Finale Demo.
2) Touch the Play ( ) button. Touch Stop ( ) and use Fwd
() or Rew ( ) to select a specific measure.
• Playing Preset Patterns
1) Touch STYLE.
2) Touch the Play ( ) button.
3) Touch the Pattern Number and drag up/down, or use
the VALUE buttons to select other patterns.
4) Touch Stop ( ) when finished.
• Choosing Variation Patterns
In Preset Style mode, the PMA-5 has 600 patterns in 100
styles. Each style is comprised of 6 patterns –
I= Intro, A= Verse, 1= Fill, B= Chorus, 2= Fill, E=Ending
To choose a variation pattern:
1) Select a Preset Pattern and touch Play ( ).
2) Touch the character (I, A, 1, B, 2, E) to the right of the
Style Name. It will begin to blink.
3) Use the VALUE buttons to select other patterns within
that Style.
• Playing the Sounds
The PMA-5 has 306 Preset instrument sounds and 16
drum kits.
1) Select a User Pattern by touching ‘P’ and then
VALUE +. The ‘P’ should now be a ‘U.’
2) Touch the right PAGE ARROW button one time.
3) Touch the Instrument Group [in brackets] and use the
VALUE buttons to select an Inst. Group.
4) Touch the Instrument Name [the word below the
brackets] and drag up/down or, use the VALUE
buttons to select an Instrument.
5) Touch the on screen keyboard to play the sound.
Touch the arrows next to the OCTAVE button to
change the keyboard range.
• Recording a User Pattern
The PMA-5 has 200 User Patterns. A pattern has four
tracks: Accompaniment 1 & 2, Bass and Drums.
1) Use previous steps to select a blank User Pattern.
2) Touch the right PAGE ARROW button one time.
3) Under STYLE touch ‘Dr’. Use previous steps to select
a kit and touch ENTER.
4) Touch SAVE.
5) Touch the right PAGE ARROW button one time.
6) Use the VALUE buttons to set the pattern length.
7) Touch the Record (o) button.
8) Touch the time signature, tempo, & quantize (Qtz)
values and use the VALUE buttons to change them.
9) Audition the sound by touching the on screen keyboard.
10) To begin recording, touch the Play ( ) button.
11) Touch Stop ( ) when finished.
12) To continue recording more tracks, touch EXIT followed
by the right PAGE ARROW and select a new track and
instrument as in step 3, then repeat steps 4-11.
• Creating A Style Track for a Song
A song in the PMA-5 consists of a Style Track, a Chord
Track, and up to 4 melody tracks. Use the following
procedure to create a Style Track.
1) Touch ‘SONG’.
2) Select a blank song (Touch the number next to S and
use the VALUE buttons to change songs).
3) Touch ‘STYLE Tr.’ and then touch the Step button.
4) Touch the ‘+ : + + + +’ area and drag up/down to
select a Preset or User pattern.
5) Touch ENTER to confirm the pattern you chose.
6) Continue this process and touch EXIT when done.
7) Touch Top ( I ) followed by Play ( ) to hear the song
from the beginning.
• Creating a Chord Track
1) Touch ‘CHORD Tr.’
2) Touch Top ( I ) followed by STEP.
3) Select a chord root by touching the left side of the on
screen keyboard and a chord quality by touching the
right side.
4) Touch the Chord Symbol (Ex.Cm7) to hear the chord.
5) Touch ENTER to confirm the chord.
6) Touch Fwd ( ) to advance to the next measure.
7) Repeat steps 4 – 6 to continue entering chord changes.
Touch EXIT when finished.
• Mixing Functions
1) Touch Play ( ) followed by MIX.
2) Touch and drag the faders to change track volume.
3) Touch the right PAGE ARROW button to access
faders for Panning, Reverb and Chorus levels.
4) Touch ENTER to save these level settings.
5) To mute a track, touch MUTE and then touch any
track you wish to mute. Turn on the SOLO switch to
solo a track.
••• ROLAND PMA-5 TURBO FACTS •••
The PMA-5 is a great song writing and accompaniment
instrument for anyone. It is the first hand-held music
workstation that is completely driven from a touch-screen.
It is extremely user friendly and has everything you’d expect
from a music workstation: GM/GS compatible synthesizer
with 306 sounds, 16 drum kits, 8 track sequencer with 20
song memory, serial port for direct connection to any
computer, and 600 built-in patterns in 100 different styles.
Six AA batteries give you approximately 5 hours of portable
operation. With a little creativity and a set of headphones,
the PMA-5 gives you the flexibility to create and produce
songs anytime and anywhere.
NQPSMTR®
%><
TBS23© 1995 Roland Corporation U.S., 7200 Dominion Circle, Los Angeles, CA 90040 Faxback # 20052 10/96
••• ROLAND R-8mkII TURBO FACTS •••
The R-8mkII is a professional rhythm composer that
features Roland’s proprietary Human Feel function,
eight individual outputs, and incredibly realistic
sounds. The R-8mkII is equipped with an expanded
selection of built-in sounds, increased pattern
memory and powerful editing capabilities.
• Initializing
1) Power-on holding the PAGE and
PARAM/SELECT buttons.
2) Press ENTER button two times.
• Playing the Demo Song
1) After initializing, the display will say:
[SONG 0 (HUNT OUT)].
2) To hear demo song, press the START/STOP
button.
• Playing the Sounds on the Pads
1) Play all of the sounds on the drum pads.
2) Use the PAD BANK buttons to select a new pad
bank between A and E.
3) Play all of the sounds in the remaining pad
banks.
• Realtime Pattern Write
1) Press the PATTERN button.
2) Select [REAL] by pressing 3 on the numeric
keypad.
3) Use the + & - buttons or the VALUE slider to
select an empty pattern above [44].
4) Press START and play the pads to create a new
pattern.
• Assigning a Sound to a Pad
1) There are 200 preset instrument sounds
available. To hear them, assign them to a pad.
To do this press the INST ASSIGN button.
2) Select number [1 INST] from the numeric
keypad..
3) Tap a pad.
4) Use the VALUE slider to change instrument
groups, ([K]=kicks, [[S]=snares, etc.).
5) Use the + & - buttons to select an individual
instrument within the selected group.
• Sound Edit
1) Press the EDIT SOUND button.
2) Select [1 EDIT] on the numeric keypad.
3) Select a sound by playing a Pad.
3) Use the PARAM SELECT button to select an
edit parameter. (Pitch, Decay, Nuance, etc.)
4) While playing drum sound, use the +/ - buttons
or the VALUE slider to edit the selected
parameter.
4) Press F5: EXIT.
• Realtime Editing
1) Press PATTERN, select [3 REAL] on the
numeric keypad, and VALUE to a blank pattern.
2) Record a pattern using just the Snare sound.
3) Press the CURSOR PAGE button so the display
says [EDIT].
4) Use the PARAM SELECT button to select [PT]
pitch. (A good parameter to demonstrate
realtime editing.)
5) While holding the Snare Pad, move the VALUE
slider up and down to edit its pitch in real time.
• Great New Features
INST LIST & TEMP ASGN
1) The purpose of the Instrument List is to quickly
see the sounds used in a pattern.
2) Press the PATTERN button and press the
[1PLAY] button on the numeric keypad.
3) Select a preset pattern between [00 & 30].
4) Press the INST LIST button and use the + &-
buttons to see which instruments are used in the
pattern.
5) The purpose of the Temporary Assign button is
to quickly assign a selected instrument to all 16
pads for quick easy editing.
6) Select a drum sound from the instrument list
and press the TEMP ASGN button.
7) This sound will know be set to all 16 pads.
Press the EDIT SOUND button and edit the
sound.
• Additional Features
1) Double the pattern data memory of the original
R-8.
2) RAM and ROM card expandability for adding
sounds and storing song and pattern data.
3) External foot switch control.
4) 2 stereo and 8 individual outputs.
NQPSMTR®
%
TBS25 © 1994 Roland Corporation U.S., 7200 Dominion Circle, Los Angeles, CA 90040 Faxback # 20021 12/95
••• ROLAND R-70 TURBO FACTS •••
The R-70 is a professional rhythm composer that features
210 high-quality sounds, expansive editing and programming
capability, and built in digital effects. It also offers Roland’s
new Rhythm Expert System for automatic song and pattern
generation, along with the innovative Positional Pad and the
Human Feel function.
• Initializing
1) Power On while holding MIDI & ASSIGN.
2) Press YES twice.
• Playing the two demo songs
1) To play the ROM demo, hold down SHIFT and
press SONG/PLAY.
2) [ROM PLAY Gray Zone] will appear in the display.
Press START to hear the ROM demo song.
3) To hear the second demo song, press the + button
or use the VALUE slider to select [FAT CITY].
4) Press START/STOP.
• Playing the sounds on the Pads
1) Play all of the sounds on the drum pads.
2) Play from side to side on the POSITION PAD.
3) Use the PAD BANK button to select a new pad
bank between A and F.
4) There are 3 groups of 6 PAD BANKS. Hold SHIFT
and press the PAD BANK button. [Pad group: ?]
will appear in the display
• Real-time pattern write
1) Press PATTERN PLAY.
2) Use the +/- buttons or the VALUE slider to select a
blank pattern between 36 and 99.
3) Press REC and START and play the pads to create
a new pattern.
• Assigning Sounds to a Pad
1) Press ASSIGN.
2) Select number [1 Pad assign] and press YES.
3) Tap a pad.
4) Use +/- buttons or the VALUE slider to change
sound while you tap it.
• Programming the POSITIONAL PAD
1) Hold down SHIFT and press the POSITIONAL
PAD.
2) Use the +/- buttons or the VALUE slider to change
sound while you tap it.
3) Use the CURSOR/PAGE buttons to select [Pitch]
and value it to [WIDE].
4) Play from side to side on the POSITIONAL PAD to
change the pitch.
• Editing a Sound
1) Press the SOUND button.
2) Select [1 Edit] and press YES.
3) Select a sound by playing a Pad.
4) Use the left and right CURSOR/PAGE buttons to
select an edit parameter. (Pitch, Decay Nuance,
etc.)
5) While playing drum sound, use the +/ - buttons or
the VALUE slider to edit the selected parameter.
•Real-time Editing
1) Press PATTERN/PLAY and select a blank pattern.
2) Record a pattern using just the Snare sound.
3) Press EDIT and CURSOR to [VL] volume.
4) Use the + button to select [PT] pitch. (A better
parameter to demonstrate realtime editing.)
5) CURSOR right one time to access the pitch value.
6) While holding the Snare Pad, Mode the VALUE
slider up and down to change its pitch.
• Effects –FX1=Reverb/Delay;FX2=Chorus/Flanger
1) Press EFFECTS.
2) Select [1FX1:???] and press YES.
3) Use the +/- buttons or the VALUE slider to select a
different REVERB or DELAY type.
• Mixer – Volume, Output pan & FX level
1) Press MIXER. The display will say [VOL].
2) CURSOR to the number in the upper right corner
of the display.
3) Press each of the drum Pads and use the VALUE
slider to adjust their Volume (or Output pan) levels.
• Rhythm Expert System
1) Push the PATTERN MODEL button.
2) Use the +/- buttons of the VALUE slider to select 1
of the 17 available musical genres.
3) Press the YES button two times and the R-70 will
create a 2 bar pattern.
4) Use the CURSOR/PAGE button to select pattern
type [BASIC, FILL, INTRO, ENDING], pattern
length [1-4], pattern variation [1-8], pattern idea [1-
8] and pattern feel [1-8]. A huge variety of patterns
are available using combinations of these
parameters.
5) To Convert a Pattern Model into a Pattern, press
the CONVERT button and use the + &- buttons to
select the pattern destination.
6) The R-70 also has a SONG EXPERT MODEL
which can create entire songs.
NQPSMTR®
%2
TBS24 © 1994 Roland Corporation U.S., 7200 Dominion Circle, Los Angeles, CA 90040 Faxback # 20022 12/95
••• ROLAND RA-90 TURBO FACTS •••
The RA-90 is a professional, multi-instrument auto-
arranger that provides high-quality accompaniments in
virtually any style. Featuring a user-friendly, desktop
design, the RA-90's 56 Styles and 128 CD-quality sounds
can be accessed easily at the touch of a button, giving
you total control of your ensemble as you perform.
• Initializing
The RA-90 has eight MIDI configuration power-up
modes. By turning the unit on while holding down
the appropriate MIDI SET button, the RA-90 will
automatically assign the proper MIDI functions for
use with a piano, guitar, keyboard, or accordion.
• Selecting Music Styles
There are 56 different Music Styles available on the
RA-90 which provide Basic and Advanced
accompaniment patterns with two variations (Original
and Variation) in a wide variety of musical styles.
These patterns change depending on the chord type
played (Major, minor, seventh, etc.) and the
inversion performed.
1) Use the BANK buttons to select a Bank.
2) Use the NUMBER buttons to select your style
number.
3) Press the VARIATION button to select the
Style’s variation pattern (LED will light).
4) Press the ADVANCED button to select the
advanced style. (LED will light).
Each Style also has an Intro, an Ending, a Fill To
Original, and a Fill To Variation.
1) Press the INTRO/ENDING button before the
Style has begun. This will trigger an introductory
passage followed by the beginning of the style.
2) Pressing the same button while a style is playing
will trigger an ending passage after which the
style will end.
3) Pressing the FILL TO ORIGINAL/VARIATION
button will trigger a passage followed by a change
in style.
• Selecting Tones
The RA-90 will allow you to select a tone for the
Upper, Lower, Manual Bass and Manual Drum parts.
The following buttons are found in the TONE/USER
PROGRAM section:
• Selecting Tones (cont.)
1) Use the SELECT buttons to choose either
UPPER, LOWER, M BASS or M DRUM KIT.
2) Use the GROUP button to choose either Group
A or Group B.
3) Use the BANK buttons to choose a sound family
(Chr Perc, Brass, Reed, etc.)
4) Use the NUMBER buttons to select your tone.
For M DRUM KIT selection, only steps #1 and #4
are needed.
• Using User Programs
The RA-90 features 64 User Programs that will store
front panel configurations for instant recall. These
User Programs are preset but can be re-configured
and stored by the user.
To store a User Set from the front panel:
1) Press and hold down the WRITE button.
2) While holding the Write button, press the BANK
and NUMBER buttons corresponding to the User
Program location where you wish to store the
setting.
To select the various User Programs:
1) Use the SELECT buttons to choose USER.
2) Use the BANK and NUMBER buttons to choose
your User Set.
• Setting the Split Point
1) Press the MIDI/Select button.
2) Press the MIDI Part/+ button twice to find the
Upper part RX/TX channel.
3) Use the data knob to ensure that this is the
same channel your MIDI controller (keyboard,
accordian, etc.) is transmitting on.
4) Press the MIDI Part/+ button again to find the
Upper part key range channel. The screen will
read “Lim Lw( ) Up( )” .
5) Use the MIDI Part/+ button to move to each field
and use the Data/Tempo knob to adjust the
values for the Lower and Upper limits of the
Upper part range.
6) Follow this same procedure for the Lower part.
The Lower part can be accessed by continuing
to press the MIDI Part/+ button.
7) By assigning both the Upper and Lower parts to
the same MIDI channel and making the Upper
range from C4 to C9 and the Lower range from
C0 to B3, you will have created a Split.
NQPSMTR®
C
TBS66 Roland Corporation U.S., 7200 Dominion Circle, Los Angeles, CA 90040 Faxback # 20064 10/8/97
• Initializing
1) Power on while holding REC.
• Playing the Demo Song
1) Press START/STOP to stop the rhythm (if it is playing).
2) Press and hold DEMO in the MUSIC STYLE section.
3) Use the [5]-[8] buttons (under MUSIC STYLE) to
start playing one of the 4 demo songs.
4) Press START/STOP to stop playing the demo song.
• Setting up your MIDI Instrument
The RA-95 has several power-up modes for connecting
different MIDI devices. Hold down the desired button
while turning the power on:
Music Style 1 Acoustic Piano setup with KP-24 (RRC)
Music Style 2 Digital Piano and Synth
Music Style 3 Master Keyboard
Music Style 4 Accordion 1
Music Style 5 Accordion 2
Music Style 6 MIDI Guitar with Foot switch
Music Style 7 Organ 1
Music Style 6 Organ 2
Use the following procedure to setup the RA-95 with a
digital piano/synth controlling the arranger in the lower
section and a single instrument in the upper section:
1) Power on the RA-95 while holding MUSIC STYLE 2
2) Set the MIDI/RRC switch to “MIDI IN 2.”
3) Connect a MIDI cable from MIDI OUT of your digital
piano/synth to MIDI IN 2 on the RA-95.
• Selecting Tones
1) Press GROUP A or b in the UPPER TONE section.
2) Use the [1]-[8] buttons (under UPPER TONE) to
select the desired BANK.
3) Use the [1]-[8] buttons (under UPPER TONE) to
select the desired NUMBER.
4) Use the VARIATION button (under UPPER TONE)
to select different variations of that Tone.
• Assigning a Split Point
1) Press PARAMETER (under SONG/EDIT).
2) Use the SELECT+/- buttons (under SONG/EDIT) to
display “SPL.”
3) Use the DATA +/- buttons (under SONG/EDIT) to
select the desired MIDI note number for the split
point. For example, to set a split point of C4
(middle C) you would select “60.”
• Playing Songs (SMF) from Disks
1) Insert a disk containing a Standard MIDI File into the
floppy disk drive.
2) Use the PREV and NEXT buttons to select a song.
3) Press PLAY.
• Muting Parts on SMFs (GS Mode)
1) Press SONG MODE so it is lit.
2) Press PARAMETER.
3) Use the PART LEFT (<) and RIGHT (>) buttons to
select the desired Part.
4) Press the MUTE button to mute the Part.
• Playing Arrangements
1) Press ON/OFF in the ARRANGER SECTION so it is lit.
2) Press CHORD MEMORY so it is lit.
3) Use the [1]-[8] buttons (under MUSIC STYLE) to
select the desired BANK.
4) Use the [1]-[8] buttons (under MUSIC STYLE) to
select the desired NUMBER.
5) Press START/STOP and play a chord on the lower
portion of your keyboard or MIDI controller.
6) Press ORIGINAL, VARIATION, FILL, INTRO or
ENDING to hear each section of the arrangements.
• Changing Accompaniment Part Levels
1) Use the UPPER, ACCOMP, BASS, and DRUMS
< and > buttons (under BALANCE) to adjust the
volume for each accompaniment Part as desired.
2) Press the < and > buttons simultaneously to mute or
unmute that Part.
• Recording
1) Insert a disk into the floppy disk drive.
2) If necessary, format the disk by holding DISK and
pressing FORMAT in the SONG SELECT section.
Press REC. Wait until the format is complete.
3) Press SYNC START if you wish to use the Arranger
section. Press REC and begin playing.
Note: To start recording without activating the
Arranger section, press REC followed by PLAY and
then start playing.
4) Press STOP when you are finished.
• Loading Music Styles
1) Insert a disk containing a Music Style and press LOAD.
2) Use the SEARCH buttons to choose a Style number
on the disk.
3) Choose a Style location by pressing one of the
Music Style buttons (1 to 4).
4) Wait for the red LED next to the word DISK in the
window to stop blinking, then press LOAD.
5) Press DISK in the Music Style section.
6) Press the User Style button designated in step #3 to
select that style.
••• ROLAND RA-95 TURBO FACTS •••
The RA-95 is a real-time arranger featuring a wide variety of
music styles and 241 GS compatible Tones. Its 3.5" HD disk
drive provides direct from disk playback and recording.
Included with the RA-95 is a User Style Disk containing 66
custom Music Styles. GS Mode is provided for using the RA-95
with an external sequencer or playing Standard MIDI Files. The
RA-95 also features an input for the FC-7 Foot Controller,
allowing hands-free control of the elements within the Music
Styles. It can also be used with acoustic keyboards using the
optional KP-24 Acoustic Keyboard Pickup.
NQPSMTR®
%
TBS49© 1995 Roland Corporation U.S., 7200 Dominion Circle, Los Angeles, CA 90040 Faxback # 21028 10/96
••• ROLAND RA-800 TURBO FACTS •••
The RA-800 is a desktop arranger module that provides
realtime accompaniment, backing tracks and display of
MIDI lyrics. It contains a wide variety of Music Styles,
making it ideal for one-man performers and songwriters.
The RA-800 features 689 Tones, 64-voice polyphony, 128
Music Styles, 192 Performance Setups and General
MIDI/GS compatibility. The 8-Track Music Style Recorder
lets you create your own Music Styles, and it also features
direct-to-disk recording & playback of Standard MIDI Files.
The RA-800 is 32 part multi-timbral with two MIDI ports,
and features built-in reverb, chorus, delay and EQ. Plus,
with the Roland LVC-1 Lyrics Video Converter, the RA-
800 can output MIDI lyrics to an external video monitor.
• Initializing
1) Hold WRITE and turn the power on.
• Playing the Demo Songs
1) Insert the Demonstration Disk into the disk drive.
2) Press the NEXT button to select a song.
3) Press PLAY/STOP.
• Playing the RA-800 from a MIDI keyboard
1) Connect the MIDI OUT port of your keyboard to
the MIDI IN A port of the RA-800.
2) Set the keyboard’s MIDI transmit channel to 1.
3) Play any key below middle C to activate the RA-
800 accompaniment.
4) Play any key above middle C to solo along with
the accompaniment.
• Selecting a Music Style
1) Press GROUP A-B in the Music Style area.
2) Press Music Style 1-8 to select a Bank.
3) Press Music Style 1-8 again to select a Music
Style.
• Selecting Tones
1) Press UPPER 1 (under the display).
2) Press GROUP A-D, (in the TONE area) to select
the desired group of instruments.
3) Press Tone 1-8 to select a Bank.
4) Press Tone 1-8 again to select a Tone from that
Bank.
5) Press VARIATION to select a variation Tone.
• Setting Splits and Layers
The RA-800 can have up to two Tones layered on
the right hand and a separate tone on the left.
1) Press KBD MODE.
2) Press F2: SPLIT.
3) Press UPPER1 (if it’s not already ON in the
display) and UPPER2 for a layer; press LOWER
to add a TONE to the left hand.
4) Press F5: EXIT.
• Setting Splits and Layers cont.
5) Press F2: PARAM.
6) Press PAGE down to select page 2.
7) Use the DRUMS rotary knob to choose the split
point. For a three way split, use the ACCOMP
rotary knob to choose the UPPER 2 split point.
• Layering Tones
To layer two Tones across the whole keyboard:
1) Press KBD MODE.
2) Press F3: WHOLE RIGHT.
3) Make sure that UPPER1 is ON (in the display).
4) Press UPPER2 so that it is ON.
5) Press SYNCHRO START so it is not lit.
• Storing Performances in Memory
You can save the current Tones, Music Styles, Split
Points, and Effect Settings (including edits) into a
Performance Memory. To store your setup:
1) Press WRITE.
2) Press UPPER1 (under the display). Make sure
that Memory Protect is OFF.
3) Hold WRITE and press the desired GROUP A-C
button in the Performance Memory area.
3a) Continue to hold WRITE and press the desired
PERFORMANCE MEMORY 1-8 button to select
a Bank location. Continue holding WRITE and
press the desired PERFORMANCE MEMORY 1-
8 button again to select a Number location.
• Playing Standard MIDI Files
1) Insert a DOS format disk into the drive.
2) Press GM/GS MODE.
3) Press PREVIOUS or NEXT to select a song.
4) Press PLAY/STOP.
5) If the SMF includes lyrics, press F4 to view the
lyrics on the display.
• Setting-up the RA-800 for use with the LVC-1
1) Press F3: MIDI
2) Hold SHIFT and press F1: Basic
3) Press PAGE UP/DOWN to access “TX.”
4) Use the LOWER NUMBER dial to select “Lyrics”
in the Filter field.
5) Press the UPPER 2 button to set it to “ON.”
6) Hold WRITE and press MIDI SET button 1 to
save this setting.
7) Everytime you power the RA-800 on, select MIDI
SET 1 for use with the LVC-1.
••• Options •••
LVC-1 Lyrics View Converter, FC-7 MIDI Foot
Controller, PK-5 Dynamic MIDI Pedal, FV-300L
Expression Pedal, DP-6/2 Pedal Switch, MSD-Series
Style Disks.
NQPSMTR®
%
5:8:E2=DE286A:2?@
TBS26 © 1994 Roland Corporation U.S., 7200 Dominion Circle, Los Angeles, CA 90040 Faxback # 20023 12/95
••• ROLAND RD-500 TURBO FACTS •••
The RD-500 is a professional digital piano with 88 weighted
keys, 121 high quality sounds and built-in digital effects. The
RD-500 can layer and split sounds, and can transmit on two
MIDI zones to control external synthesizers. It includes pianos,
electric pianos, clavs, vibes, organs, synths, strings and a full
drum kit. When used with a sequencer, the RD-500 is 8 part
multitimbral.
• Initialize
1) Power on while holding SETUP MEMORY 1 and 8.
2) Press YES.
• Playing the ROM Demo
1) Press FUNC and DEC simultaneously.
2) Use the INC / DEC to select song 1-4.
• Selecting Patches
1) Press an Instrument Group (Grand 1, Rhodes, etc.)
2) Press VARIATION.
3) Press INC and DEC to choose a Variation.
• Creating a Layer
1) Press Layer.
2) Press and hold the Instrument Group you want for the
UPPER Part, then press the Instrument Group you want for
the LOWER Part.
3) Press VARIATION to choose sounds for the upper and
lower parts.
4) Press UPPER o r LOWER (it will flash).
5) Use INC / DEC to choose a Variation for that Part.
6) To set the level for each Part, press LEVEL. Press UPPER
or LOWER to select the Part (it will flash).
7) Use the slider or INC / DEC to set the level.
8) Press VARIATION again to exit the edit mode.
• Creating a Split
1) Press SPLIT.
2) Press and hold the Instrument Group button you want for
the UPPER Part, then press the Instrument Group button
you want for the LOWER Part.
3) Press VARIATION to choose sounds for the upper and
lower parts.
4) Press UPPER o r LOWER (it will flash).
5) Use INC / DEC to choose a Variation for that Part.
6) To set the level for each Part, press LEVEL. Press UPPER
or LOWER to select the Part (it will flash).
7) Use the slider or INC / DEC to set the level.
8) Press VARIATION again to exit the edit mode.
• Set the Split Point
1) Press FUNC.
2) Press ZONE. The UPPER light will flash.
3) Press the key for the low note of the UPPER Zone.
4) Press LOWER and the key for the high note of the
LOWER Zone.
• Storing a Setup
Each of the 32 SETUPs store all the Tone Settings
(Variation, Chorus, Reverb, Tremolo, Detune, Attack,
Decay, Release, Brightness, Sensitivity, and Bend Range)
for each of the 12 Instrument Groups - a total of 12 custom
sounds per setup. Each Setup also stores the Layer, Split,
Local, and Multitimbral information. Setup A-1 is preset
and cannot be changed, the remaining 31 are user
programmable.
To store a Setup into memory:
1) Press FUNC and TRANSPOSE simultaneously.
2) Press A-D 1-8 for the location you want to WRITE to.
3) Press YES.
• Using C1 Slider and Pedal Controls
The C1 Slider, Pedal, Damper, Bender, and Modulation
lever can all be set independently for the Upper and Lower
parts (as well as TX Zones for MIDI output). To make
internal controller assignments:
1) Press FUNC.
2) Press CONTROL (to the right of the display) to cycle
through the controllers - C1 (slider), Pdl (pedal), dnp
(damper), bnd (bender), Nod (modulation). The display will
jump to the currently assigned function for that controller.
3) Use INC / DEC to select the function for your selected
controller.
• Setting MIDI Local Control
1) Press FUNC.
2) Press LOCAL.
3) Use INC / DEC until display reads Off, On-1 or On-2.
4) Press FUNC to exit.
• Set the Transmit Channels for the Upper and
Lower Transmit Zones
1) Press FUNC.
2) Press TX CH. The TX/INT and UPPER TRANSMIT
CONTROL indicators flash.
3) Press INC and DEC to set the Transmit channel for the
UPPER Part.
4) Press the LOWER TRANSMIT CONTROL button. It
flashes.
5) Press INC and DEC to set the Transmit channel for the
LOWER Part.
6) Press FUNC to exit.
7) Press the UPPER and/or LOWER TRANSMIT CONTROLS
to choose a Transmit Zone/Channel.
Note: In Local Off and On 2, the RD-500 will transmit out
MIDI on the RX Channel for the internal Upper and/or
Lower Part, in addition to the TX Zone settings.
NQPSMTR®
C5
5:8:E2=DE286A:2?@
TBS59 © 1997 Roland Corporation U.S., 7200 Dominion Circle, Los Angeles, CA 90040 Faxback # 20058 6/97
••• ROLAND RD-600 TURBO FACTS •••
The RD-600 is an 88-note digital stage piano that
features Roland’s highly acclaimed PA-4 hammer
action keyboard. It also features 128 remarkable
sounds including, piano waveforms designed
specifically for the RD-600 in addition to those made
popular in the VE-RD1 expansion board for the A-90.
It has an EFX processor that consists of 40 stereo
multi-effects in addition to reverb, chorus and a built-
in 3 band analog EQ. Additional features include four
multipurpose sliders for level control and sound
editing, a pitch bender, four balanced outputs
(2 stereo pairs), and a 16x2 backlit LCD display. The
RD-600 offers powerful controller functions such as
64 memory setups and four keyboard zones
(2 internal/2 external). The RD-600 combines all of
these features in an easy-to-use package with a
large display, dedicated knobs, sliders and buttons.
• Initializing
Use the following procedure to restore the factory
settings:
1) Power on while holding EDIT.
2) Press INC/YES twice.
• Playing the Demo Songs
1) Press EDIT and the LEFT PAGE button
simultaneously.
2) Use the RIGHT and LEFT PAGE buttons to
select the desired song.
3) Press EDIT to return to Play mode.
• Selecting Sounds
A Setup consists of two Tones assigned to either the
Upper or Lower Part. Use the following procedure to
listen to the Tones:
1) Press UPPER (above PART SWITCH) so it is lit.
2) Press INT UPPER (under PART SELECT).
3) Press the desired GROUP button (A or B). There
are 64 Tones in each group.
4) Use the INTERNAL TONE CATEGORY and
INTERNAL TONE VARIATION buttons to select
sounds. There are eight variation sounds in each
category.
Settings for the effects, Upper and Lower Tones,
keyboard zones, etc. can be stored as a Setup. There
are 64 Setups available. Use the following procedure
to listen to the Setups:
1) Press A and B (under GROUP) simultaneously.
2) Use the INTERNAL TONE CATEGORY and
INTERNAL TONE VARIATION buttons to select
the desired Setup.
• Layering the Keyboard
1) Press INT UPPER and INT LOWER (above PART
SWITCH) so they are lit.
2) Select the desired sounds for the Upper and Lower
Parts as previously described.
• Splitting the Keyboard
1) Press INT UPPER and INT LOWER (above PART
SWITCH) so they are lit.
2) Select the desired sounds for the Upper and Lower
Parts as previously described.
3) Hold SPLIT and press the note on the keyboard that
corresponds to the desired split point.
• Multitimbral Patch and Channel selection
The RD-600 contains 16 multitimbral Parts. Use the
following procedure to select MIDI channels and Tones
for each of the Parts:
1) Press EDIT.
2) Press the RIGHT PAGE button until “Receive Ch.” is
displayed.
3) Use the INC/DEC buttons to select Part 1.
4) Press the RIGHT PAGE button and use the
INC/DEC buttons to select the desired MIDI channel.
5) Use the INTERNAL TONE CATEGORY and
INTERNAL TONE VARIATION buttons to select the
desired Tone for Part 1.
6) Repeat steps 3-5 for Parts 2-16.
• Using the EFX Set
The EFX processor can be used for the Upper and
Lower Parts. You can choose from effects including
rotary speaker, distortion, and stereo EQ.
1) Press EDIT, use the RIGHT PAGE button to select
the EFX menu.
2) Press UPPER (under EFX) so it is lit.
3) Use the INC/DEC buttons to select the desired EFX
algorithm.
4) Adjust the Rate/Sens and Depth/Level knobs as
desired.
5) Hold UPPER (under EFX) and press LOWER to
assign this effect to the Lower Part.
6) Press EDIT to return to Play mode.
• Transposing the Keyboard
The transpose parameter can be set independently for
the internal and external Parts (Upper and Lower).
1) While holding TRANSPOSE, press the desired note
on the keyboard (above or below middle C) to set the
transposition value. For example, to transpose the
keyboard up a whole step hold TRANSPOSE and
press the D above middle C.
NQPSMTR®
&
TBS27 © 1994 Roland Corporation U.S., 7200 Dominion Circle, Los Angeles, CA 90040 Faxback # 20024 12/95
••• ROLAND SC-33 TURBO FACTS •••
Ideal for use with a digital piano or MIDI studio, this
desktop module has 226 sounds, many of which are
unique to the SC-33 (found on no other Sound
Canvas!). Similar in features and design to the
DS-330 Dr. Synth, the SC-33 has an additional Sound
FX kit and conforms to the stringent Roland GS
standard.
• Initializing
1) Power on while holding REVERB and SPLIT.
2) Press the up arrow/YES button.
• Playing the Demo Song
1) Hold down the DRUMS and ((•)) buttons while
powering-up.
2) Press the up arrow, YES button. The song Worm
Hole will play.
3) Press the down arrow, NO button to stop the
demo song.
4) Press EXIT to return to single play mode.
• Select an Instrument in Single Mode
1) Simply press any of the 16 tone bank buttons to
select a instrument group of your choice.
2) Upon selecting a bank, use the NUMBER up and
down buttons to select individual instruments.
• Auditioning the New GS Tones
1) Depending upon the instrument selected, the
VALUE/VARIATION up and down buttons may be
used to select new GS variation tones.
2) The PIANO bank has many variations as does
the ORGAN bank. You can also find them in the
GUITAR, CHR. PERC., BASS, ENS., BRASS
and SYNTH LEAD banks.
3) Any of these sounds can be heard by pressing
the ((•)) button.
• Selecting a Drum Kit
1) Press the DRUMS button.
2) Use the VALUE/VARIATION up and down
buttons to select any of the 8 drum kits.
3) The sounds in each kit can now be played directly
from the 16 instrument buttons, which are now
drum pads.
4) To exit DRUMS mode, press the DRUMS button.
• Create a split patch
1) Select Piano 1-1 by pressing the PIANO button.
2) Press the SPLIT button.
3) Any note below F3 will be Acoustic Bass 5-1 and
the upper part will be Piano 1-1.
4) To alter the split point or change the lower
instrument, press the LOW/SUB> button and
continue pressing it to go through the
parameters.
• Creating a Layer Patch
1) Select Piano 1-1 by pressing the PIANO button.
2) Press the DUAL button.
3) Now, Piano 1-1 will be layered with Strings 7-1.
4) To change the layer instrument and its level,
press the LOW/SUB> button and continue
pressing it to go through the parameters.
• Fattening the Sound
1) Select Piano 1-1 by pressing the PIANO button.
2) Press the FAT button.
3) Playing a note now will actually trigger two notes
– the one played and the octave below it.
• Changing the Default Patch
When a bank is selected, the first tone in that bank is
automatically is selected. To change to default tone
to your preference, follow these steps:
1) Select Piano 1-1 by pressing the PIANO button.
2) Press the NUMBER up button to select E.Piano 2
1-6.
3) At this point, the "6" should be blinking. Press the
PIANO button again..
4) Press the ORGAN button and then go back to the
PIANO bank. It should register as E.Piano 2 1-6.
• Creating a Multitimbral Setup.
1) Press the UTILITY button until you see SINGLE
Mode.
2) Use the VALUE/VARIATION up button to select
MULTI Mode.
3) Press EXIT.
4) You will see the Part/MIDI channel displayed on
the lower-right of the screen.
5) To change Parts, press the PART (CH) up and
down buttons.
6) Instruments can be selected for each Part by
pressing the bank and number buttons.
7) To change MIDI channels for a given Part, press
the PART EDIT button until you see Part:Ch, and
use the VALUE/VARIATION up and down buttons
to select any of the 16 MIDI channels.
8) Press EXIT to return normal Multi play mode.
NQPSMTR®
&
TBS28 © 1994 Roland Corporation U.S., 7200 Dominion Circle, Los Angeles, CA 90040 Faxback # 20025 12/95
••• ROLAND SC-88 TURBO FACTS •••
The SC-88 sound module is Roland's most powerful
member of the Sound Canvas family. The SC-88 contains
all of the sounds of the entire Sound Canvas library plus
an additional 300 JV series sounds. The SC-88 contains a
variety of effects including reverb, chorus and delay. The
built in Mac/IBM interface allows direct connection to a
computer without the need for an external MIDI interface.
The SC-88 is a giant departure from the rest of the Sound
Canvas family. Here is a list of some of the new features
added with the new SC-88.
•64 notes of polyphony
•32 Part multitimbral via two MIDI inputs
•654 high quality sounds
•256 User instruments
•2 User drum kits
•8 types of Reverb and Chorus
•2-band digital EQ
•10 types of Delay
•Preview button
•Front panel Drum editing
•Programmable drum note arrangement
•Extensive editing facilitated by dedicated front
panel controls
• Initializing
1) Hold down SELECT and press INSTRUMENT left
and right buttons.
2) Press ALL.
• Choosing sounds
There are two instrument maps on the SC-88. The
SC-55 map button will switch you between the SC-88
and SC-55mkII map to access all of the sounds.
1) Choose sounds by pressing INSTRUMENT left
and right.
2) Use VARIATION left and right to select variation
instruments.
• Editing User Instruments
1) Press USER INST EDIT ON/OFF.
2) UseSELECT to choose different groups of
parameters - Vibrato, Filter and Envelope.
3) Use the three sets of left and right edit buttons on
the bottom right side of the SC-88 to alter the
sound.
• Storing User Instruments
1) Make all of the desired edits using the above
procedure.
2) Press USER INST EDIT ON/OFF and SELECT
simultaneously.
3) Press INSTRUMENT left and right buttons
simultaneously to switch between user variation
bank and instrument number adjustment.
Storing User Instruments (cont.)
4) Use the INSTRUMENT left and right buttons to
alter values.
5) Press ALL to store the edited sound or MUTE to
cancel.
6) Press USER INST EDIT ON/OFF.
• Listening to the Drum Kits
1) Use the PART left and right buttons to select Part
10.
2) Change your MIDI controller to MIDI channel 10.
3) Use the INSTRUMENT left and right buttons to
select the different drum kits.
4) Change back to Part 1 when finished.
• Editing a Drum Kit
1) Use the above procedure to select a drum kit.
2) Press USER INST EDIT SELECT and DELAY left
buttons simultaneously.
3) Use the INSTRUMENT left and right value to
choose the desired drum instrument.
4) Use the LEVEL, PAN, REVERB, CHORUS,
DELAY, KEY SHIFT and MIDI CH left and right
buttons to alter the Level, Pan, Reverb, Chorus,
Delay, Coarse Pitch and Assignment of the
currently selected drum sound.
• Adjusting the level of effects
1) Use REVERB left and right to adjust the Reverb
level.
2) Use CHORUS left and right to adjust the Chorus
level.
3) Use DELAY left and right to adjust the Delay
level.
• Adjusting the effect parameters
1) Press ALL.
2) Press PART left and right simultaneously.
3) Use the up (SC-55 Map) and down (EQ) buttons
to select the appropriate parameter.
4) Use INSTRUMENT left and right to modify
values.
5) Press PART left and right simultaneously
followed by ALL to exit.
• Changing the EQ settings
1) Press EQ to turn the EQ on per Part.
2) Press ALL, then SELECT.
3) Use DELAY left and right to choose between
Frequency and Gain.
4) Use INSTRUMENT left and right to change the
Low EQ values, and VARIATION left and right to
change the High EQ values.
5) Press ALL.

NQPSMTR®
&
TBS74 © 1998 Roland Corporation U.S., 7200 Dominion Circle, Los Angeles, CA 90040 Faxback # 20073 3/98
••• ROLAND SC-880 TURBO FACTS •••
The SC-880 stands at the top of Roland’s legendary GS
Sound Module line-up. Patches, a feature new to the
Sound Canvas line, allow creation of sounds previously not
available in instruments of this type. Features include:
• 64-Voice Polyphony
• 32-Part Multitimbral operation
• 1,117 internal Tones, 256 Patches, 42 Rhythm sets
• 5 built-in independent effects: Reverb, Chorus, Delay,
EQ, and Multi-Effects algorithms (64 total)
• Powerful new Layering and Performance features
• Tone Finder automatically finds groups of similar sounds
• Phrase Preview for easy auditioning of sounds
• Large 136 x 32 dot backlit graphic LCD
• Built-In computer interface using optional DB9F-3/10
(PC) or MD8-3/10 (Mac) Cable
• Full MIDI control (In-A, In-B, Out/Thru)
• Initializing
Use the following procedure to initialize the SC-880 and
restore the factory settings:
1) Press UTILITY. Press UP CURSOR and use the
VALUE DIAL to select “Factory Preset.”
2) Press DOWN CURSOR and use the VALUE DIAL to
select “ALL.”
3) Press ENTER twice.
• Listening to the Demo Songs
Use the following procedure to listen to the demo songs in
the SC-880:
1) Press UTILITY and ENTER simultaneously.
2) Press ENTER to start the Demo Songs.
3) Press EXIT to stop playback.
4) Press EXIT again to return to Play Mode.
• Selecting and Auditioning Tones
The Tone Finder function allows you to quickly find
sounds by selecting from specified categories:
1) Press PERFORMANCE followed by TONE.
2) Press the VALUE DIAL to display the categories.
3) Rotate the VALUE DIAL to the desired category then
press the VALUE DIAL.
4) Use the VALUE DIAL to select the desired sound.
5) Press the VOLUME KNOB to audition the sound using
Phrase Preview.
NOTE: If you wish to use a keyboard to trigger these
sounds, set it to transmit on MIDI channel 1.
• Selecting Rhythm Kits
Use the following procedure to select a Rhythm Kit:
1) Press PERFORMANCE followed by TONE.
2) Press the PART > button repeatedly so that A10 is
displayed next to Part.
3) Use the VALUE DIAL to select the desired Rhythm Kit.
4) Press the VOLUME KNOB to audition the kit with
Phrase Preview.
NOTE: If you wish to use a keyboard to trigger Rhythm
Kits, set it to transmit on MIDI channel 10.
• Selecting Patches
A Patch consists of up to six Tones plus Effect settings.
Use the following procedure to select from 256 different
Patches - Preset Patches P001-128 and User U001-U128:
1) Press PATCH. Press the PART < button to select Part A01.
2) Rotate the VALUE DIAL to select Patch “U-002
Alternative 880.”
3) Press the VOLUME KNOB to audition the Patch.
4) Rotate the VALUE DIAL to select the Patch “U-004 LA
Stack” and press the VOLUME KNOB to audition the Patch.
5) Repeat step 4 to audition these additional Patches:
U-015 JC Guitar
U-021 Euro Piano
U-064 String Sect. 2
NOTE: If you wish to use a keyboard to trigger Patches,
set it to transmit on MIDI channel 1. Also, pushing in the
VALUE DIAL while rotating it will change Patches in
increments of 10.
• Selecting Multi-Effects
When it comes to effects, the SC-880 has it all. Reverb,
Chorus, Delay and EQ as well as 64 different Multi-Effects.
Use the following procedure to select a Multi-Effect:
1) Press PATCH. Press the PART < button to select Part A01.
2) Use the VALUE DIAL to select “U-019 Fantasia.”
3) Press M-FX.
4) Use the VALUE DIAL to select “P-00 Thru” and press the
VOLUME KNOB to audition the Patch with no effects.
5) Use the VALUE DIAL to select “P-07 Phaser” and press
the VOLUME KNOB to audition the Patch with this effect.
6) Repeat step 3 to audition other effects
7) Press EXIT when you are finished.
8) If you wish to save the current settings for this Patch
press WRITE and use the VALUE DIAL to select a
destination, then press ENTER twice.
••• ROLAND SOUND CANVAS AND GS FORMAT•••
When two of the world’s leading computer manufacturers
decide to improve and enhance their sound technology,
who do they turn to? Roland, of course. In an agreement
which will serve to enhance the quality and compatibility of
multimedia audio development, Roland Corporation has
licensed its Sound Canvas sound set and GS Format to
Apple Computer Inc.® and Microsoft Corp®.
Apple will be including this technology in Quicktime
3.0™ while Microsoft will be incorporating it into the
Microsoft Network (MSN), DirectMusic™ Architecture,
ActiveX™ and numerous desktop products to be released
in the coming months.
A world leader in the design, manufacture and
distribution of electronic musical instruments, Roland
introduced the world’s first General MIDI/GS Format-
compatible sound module in 1991 with its SC-55 Sound
Canvas.
*All Trademarks are property of their respective owners
NQPSMTR®
&
TBS29 © 1994 Roland Corporation U.S., 7200 Dominion Circle, Los Angeles, CA 90040 Faxback # 20026 12/95
••• ROLAND SD-35 TURBO FACTS •••
Combining a MIDI file player and a Sound Canvas sound
module in one compact desktop unit, the SD-35 offers 223
16-bit quality sampled sounds and convenient play-along
capability with the Minus One function, front panel MIDI IN
and 1/4" audio input jack for mixing a microphone, guitar
or keyboard into the arrangement. SD-35 is ideal for
practicing and live performance applications.
• Initializing
1) While pressing the CLEAR button, turn the
power on.
2) Press REC to execute.
• Using Music Minus One
1) Attach a MIDI cable from the MIDI Out port of
any MIDI keyboard to the MIDI In port of the SD-
35.
2) Attach an audio cable to a sound system or plug
in a pair of headphones.
3) Insert a SMF disk into the disk drive of the SD-
35.
4) Press both PART buttons at the same time to
display the selected part.
5) When the music begins, listen for a moment so
you can hear the various instruments.
6) Press MINUS ONE so that it lights. Use the
PART buttons to select various parts. As you do
so, the displayed part will be silent. Upon
determining the part you wish to play, simply play
the keyboard. The instrument assigned to that
part will be the one you can play from your
keyboard.
• Selecting a User Instrument
Follow Music Minus One, steps 1 – 6.
7) Press the USER INST button.
8) Press the INST buttons to select any of the 128
capital tones.
9) Whatever tone you select, will now be the
instrument you can play from your keyboard.
• Selecting Variation Tones
1) Press both INST buttons simultaneously.
2) Press the SET button and either INST button.
3) The display should now show a three digit
number followed by a period.
4) Use the INST buttons to select a Variation Tone.
The number will change in multiples of eight (8,
16, 24, etc.) depending upon the amount of
variations available.
5) To return to the normal INST display, press the
SET button and either INST button.
• Recording on the SD-35
1) Insert a formatted disk into the SD-35 disk drive.
2) Press PAUSE and RECORD. The number of
the song you are recording will be displayed in
the screen.
3) Start recording by playing an attached MIDI
keyboard or press the PAUSE button or the
PLAY button.
4) When you're finished recording, press the STOP
or PAUSE button.
• Programming the Song Order
1) Press SET and PROG. The PROG button will
blink.
2) Use the SONG buttons to select the first song.
Press SET.
3) Repeat step 2 until the playback order is
satisfactory to you.
4) Press STOP. Press PLAY to hear the chosen
songs in the order you prescribed.
• Set a practice loop
1) Press the SINGLE button.
2) Press the SET and REPEAT buttons
simultaneously. The REPEAT button will blink.
3) Press PLAY. When you arrive at the point in the
song that you want the loop to begin, press SET.
4) When the end of the section you want to repeat
arrives, press SET again.
5) The loop or "block" you've defined will now begin
repeating.
6) Press STOP when you're finished listening or
practicing.
7) To return to normal playback, press the REPEAT
and SINGLE buttons simultaneously.
• Soloing a Track
1) Press both PART buttons simultaneously to
display the part on the screen.
2) Press a PART button to choose any of the 16
possible parts.
3) If you wish to hear any part by itself, simply press
the SOLO button.
• Muting a Track
1) Press both PART buttons simultaneously to
display the part on the screen.
2) Press a PART button to choose any of the 16
possible parts.
3) If you wish to temporarily remove any part from
the arrangement, simply press MUTE.
NQPSMTR®
&"(!6+#!&"!
&6C:6D "(&
• • •
TBS61 ©1997 Roland Corporation U.S., 7200 Dominion Circle, Los Angeles, CA 90040 Faxback # 20053 1/97
••• ROLAND SOUND EXPANSION SERIES •••
The Roland Sound Expansion Series Modules are
1-space rackmount sound modules that include sounds
from the Roland JV and XP-series synthesizers with the
SR-JV80 Series Wave Expansion Boards. Each model
uses 8 to 10MB of wave memory to provide high quality
sounds previously available only to JV-Series or XP-
50/80 owners. In addition to hundreds of sounds on
each module, other features include: 8 Multitimbral
Parts, 28 voices polyphony, 8 Reverb types and 3
Chorus types. Each module also includes audio inputs
(L/R) and audio outputs (L/R) so that audio signals from
multiple Sound Expansion modules can be chained
together, requiring less inputs on your mixer. The
Sound Expansion Series Modules that are currently
available include the M-BD1 Bass & Drum Module, the
M-OC1 Orchestra Module, the M-SE1 String Ensemble
Module and the M-VS1 Vintage Synth Module.
• Initialize
1) Hold SELECT and press F3.
2) Press ENTER.
• Playing the Demo Songs
1) Turn on the power while holding SELECT.
2) Use the VALUE (< >) buttons to select a song.
3) Press MONITOR to start the demo.
4) Press MUTE to stop the demo.
5) Press MUTE again to return to Patch Mode.
• Listening to Sounds in Patch Mode
In Patch Mode, the Sound Expansion Series Modules
function as a sound generator for one Patch at a time.
1) Turn on the power while holding PATCH.
2) Use the VALUE (< >) buttons to select sounds.
• Listening to Sounds in Performance Mode
In Performance Mode, the Sound Expansion Series
Modules can play as many as eight Parts
simultaneously. You can use this mode to layer sounds
or use multiple Patches independently with a MIDI
sequencer.
1) Turn the power on while holding PART.
2) Hold SELECT and press F1.
3) Use the VALUE (< >) keys to select a Performance.
4) Press ENTER.
• Selecting Patches Within a Performance
A Performance can contain seven different Patches and
one Rhythm Set. These Patches are assigned to Parts.
1) Hold PART and use the VALUE (< >) keys to select
a Part (1-8). Part 8 is dedicated as the Rhythm Part.
2) Press PATCH.
3) Use the VALUE (< >) keys to select a Patch or
Rhythm Set.
• Changing Parameter Settings
Part Parameter 1 Level Pan Reverb Chorus
Part Parameter 2 Rx Ch KeyShift Detune Assign
Master Tune DeviceID Reverb Chorus
MIDI Rx Vol&Hold ProgChg Bank Sel SysEx
1) Press SELECT to choose a group of parameters.
2) Press F1 to F4 to select the desired parameter.
3) Use the VALUE (< >) to change a value.
• Muting Parts
The Mute button allows you to isolate a part from a
sequence. Use the PART (< >) buttons to select the
desired part and press MUTE.
• MIDI Monitor Function
The MIDI Monitor Function allows you to see which
Parts are receiving MIDI note messages. If you hold
down PART while in Performance Mode, the LEDs on
the Parameter Grid indicate which Parts are currently
receiving MIDI note messages.
All of the Sound Expansion Series Modules contain
8 to 10MB of wave memory. The number of Patches,
Performances and Rhythm Sets vary in each module.
• M-BD1 Bass & Drum Module
197 Patches, 16 Performances and 17
Rhythm Sets based on the SR-JV80-10
Bass & Drum Expansion Board.
• M-OC1 Orchestra Module
226 Patches, 18 Performances and 2
Rhythm Sets based on the SR-JV80-02
Orchestral Expansion Board.
• M-SE1 String Ensemble Module
10MB of brand new waveforms dedicated to
string instruments. Contains 170 Patches
(including 50 Legato-Controllable Patches),
18 Performances and 2 Rhythm Sets.
• M-VS1 Vintage Synth Module
255 Patches, 18 Performances and 8
Rhythm Sets based on the SR-JV80-04
Vintage Synthesizer Expansion Board.
@DD®
&#
TBS68 ©1997 Roland Corporation U.S., 7200 Dominion Circle, Los Angeles, CA 90040 Faxback # 20066 11/97
••• BOSS SP-202 TURBO FACTS •••
The SP-202 Phrase Sampler is a powerful new
instrument that is perfect for DJs, Musicians, and
Broadcast Professionals. Some of the features include:
• 32 seconds of internal memory (at Hi Fi setting)
• Memory expandable with optional SmartMedia cards.
• Filter, Ring Modulator, and Delay effects
• Tap Tempo allows loops to be synchronized by BPM
• Realtime Time stretch function to allow adjusting the
speed of a loop without affecting the pitch.
• 8 pads (x 4 banks w/ card) to trigger sample playback
• Independent Sample rates for each sample
• Built-in microphone
• Battery power for portable operation.
• Low Retail Price of $395.00.
• Playing a Sample
The SP-202 is shipped with samples in Bank A 1-8.
Use the following procedure to listen to the samples:
1) Connect the unit to an amp, audio system, or
headphones.
2) Press PAD 1. The PAD will light up and the sample
will play back.
3) Press additional pads to listen to the other sounds.
• Sampling with Built-In Microphone
Use the following procedure to record a sample with
the built in Microphone:
1) Set the Source Select switch to MIC.
2) Press the REC button. It will start to blink and the
next available empty bank will flash.
3) Use the control knob to adjust the input volume so
that the gain LED blinks occasionally while you are
speaking.
4) Press the REC button and speak into the
microphone.
5) Press the REC button to stop sampling.
6) Press the PAD to play back your sample.
• Playback Settings
Use the following procedure to set the playback
parameters for your sample:
1) Press the desired PAD to play back the sample.
2) Press the TRIGGER/GATE button to select the
triggering options.
3) Press the LOOP/ONE SHOT button to select
looping or single shot playback.
4) Press the NORMAL/REVERSE button to select
the playback direction.
• Applying Effects to a Sample
1) Press the PAD for the sample you wish to effect.
2) Press an effect button (i.e. Filter) and use the
control knob to adjust the effect as desired.
• Mixing in external Sound Sources
You can mix an external signal (MC-303, VT-1,
turntable, etc.) with the SP-202:
1) Set the Source Select switch to LINE.
2) Set the Source Mix switch to ON.
3) Plug the output of the external device into the LINE
IN jacks on the back of the SP-202.
4) Press REC and use the CONTROL KNOB to set
the level of the external device.
5) Press CANCEL to return to the SP-202 sounds.
• Auto Sampling a Loop
You can preset the tempo of a beat loop so that when it
is sampled, the loop points will be automatically set:
1) Connect a source (MC-303, CD, turntable, etc.)
to the SP-202 input.
2) While holding CANCEL, press REC.
3) Use the CONTROL DIAL to set the recording
threshold (0-8) and press REC.
4) Press REC and the next available PAD will blink.
5) Play your source and use the CONTROL DIAL to
set the level in the SP-202.
6) If you know the BPM of the loop, use the
UP/DOWN ARROWS to set the BPM, or, press the
TAP button in time with the beat to determine the
BPM setting.
7) Stop the source signal.
8) Press REC to place the SP-202 in standby mode.
9) Start playback on the source.
10) Press REC after 1 or 2 measures to stop recording.
11) Press the PAD button to playback the beat. It
should be looped correctly.
• Initializing the SP-202
CAUTION: This procedure will erase all of the
internal samples:
1) Hold down CANCEL and press DEL.
2) Press the A/B button.
3) Press DEL.
The SmartMedia Cards are available in 2 and 4
megabyte versions; SM-2 ($35.00 retail) and SM-4
($60.00 retail). Contact your local Authorized Roland
dealer to order these cards.
NQPSMTR ®
&#
C@@G6&2>A=6C
TBS78 ©1998 Roland Corporation U.S., 7200 Dominion Circle, Los Angeles, CA 90040 Faxback # 20076 6/98
••• Roland SP-808 TURBO FACTS •••
The Roland SP-808 Groove Sampler is the first product
of its kind - a powerful new instrument that combines a
professional-quality phrase sampler and a hard disk
recorder together with a new performance oriented
interface. Features include:
• Hard disk recorder with 4 stereo audio tracks
• Remix-oriented Phrase Sampler with 16 assignable
pads per bank (64 banks total) for up to 1024
samples per disk
• Sampling/Recording direct to built-in Zip™ drive with
up to 64 mono minutes at 44.1kHz
• Automatic tempo calculation and display
• Resampling and Time Stretch functions
• 99 Preset and 99 User onboard effects including
Reverb, Chorus, and Delay, as well as specialized
remix effects such as Lo-fi, Wah, Isolator, and Slicer
• Revolutionary dual D Beam controller allows for effects
and sample control via hand and body movement
• Playing the Demo Songs
Use the following procedure to load and play the demo
songs from the disk supplied with the SP-808:
1) Insert the Demo Disk in the disk drive.
2) Press SONG/TRACK.
3) CURSOR to “Select Song?” and press ENTER.
4) CURSOR to “01 CHIMERA” and press ENTER twice.
5) Bring the faders down and press PLAY [ ] to begin
playback. Adjust the faders to a comfortable listening
level. Press STOP [ ] to halt playback.
6) Repeat steps 2-5 to audition other demo songs.
• Playing Samples
Use the following procedure to select from the 64 Pad
Banks and trigger samples:
1) Press PAD BANK and use the VALUE DIAL to
select “04 BPM161 SET.” Press ENTER.
2) Press any of the lit PADS to trigger samples.
• Using the Isolator
The SP-808 has a built-in Isolator which allows you to do
cool things like dropping the bass out of a song:
1) Select PAD BANK “02 BPM35 SET” (see above).
2) Press REALTIME EFFECTS ON/OFF so it is lit.
3) Hold SHIFT and press SELECT ROW to select row
B then press SELECT ROW to select the Isolator.
4) While holding PAD 5 press HOLD to trigger a beat
loop sample.
5) Rotate the LOW, MID, and HIGH knobs to drop out
parts of the beat. Press HOLD to end playback.
• Using the Filter
Use the following procedure to activate the Filter:
1) Select PAD BANK “02 BPM135 SET” (see above).
2) Press REALTIME EFFECTS ON/OFF so it is lit.
3) Hold SHIFT and press SELECT ROW to select row
B then press SELECT ROW to select the Filter.
4) While holding PAD 13 press HOLD to trigger a
beat loop sample.
5) Rotate the CUTOFF knob counterclock-wise to cut
the low frequencies out.
6) Rotate the RESONANCE knob clockwise to make
the sound thinner. If you move the knob too far
clockwise, the filter will squeal.
7) Rotate the LOW BOOST knob to make the bass
frequencies louder.
8) Press HOLD to end playback.
• Using Effects
Use the following procedure to apply an effect to the pad bank:
1) Hold SHIFT and press SELECT ROW to select row A.
2) Press REALTIME EFFECTS ON/OFF so it is lit.
3) Press EFFECTS above the MIC/LINE/PAD fader
so it is lit.
4) Press FX INFO and use the VALUE DIAL to select
“P22 FL: HardJet.” Press ENTER.
5) Press a PAD to trigger a sample.
6) Use the REALTIME EFFECTS KNOBS to change
the parameters of the effect.
7) Press the STEP MOD button so it is lit to see how
the Step Modulator rhythmically changes the effect.
Try the following effects:
P21 PT: TriadCD P31 PH: See-Saw
P41 LF: Vinyl133 P67 SY: StepTk2
P94 15> 2XA.Wah P97 18> Radio
• Using the D-Beam controller
Use the following procedure to activate the D-Beam:
1) Load Song “03 Effective” (see above).
2) Press PLAY [ ] to begin playback..
3) Press PITCH in the D BEAM CONTROLLER
section.
4) Move your hand over the D BEAM to change the
tuning/speed of the song as it plays back.
5) Press PAD TRIG in the D BEAM CONTROLLER section.
6) Move your hand over the D BEAM to trigger samples.
7) Press EFFECTS in the D BEAM CONTROLLER section.
8) Move your hand over the D BEAM to trigger the effects
(a Theremin-type sound, in this case).
* D Beam controller technology has been licensed
from Interactive Light, Inc.
NQPSMTR®
&#
TBS31 © 1994 Roland Corporation U.S., 7200 Dominion Circle, Los Angeles, CA 90040 Faxback # 20027 12/95
••• ROLAND SPD-11 TURBO FACTS •••
SPD-11 combines eight velocity-sensitive pads with 255
dynamic CD-quality sampled drum and percussion
sounds, creating a versatile, self-contained percussion
instrument for performing, recording and sequencing.
Highly portable, the SPD-11 has digital effects, 64 user-
programmable patches, and can easily be integrated with
other sound modules and pedals using the MIDI ports and
four controller input jacks.
• Initializing
If your SPD-11 has been played before, you may
want to restore the unit to its original factory settings.
1) Power up unit while holding down the
ALL/ENTER and the "t" button.
2) Press ALL/ENTER.
• Selecting patches
1) From the PLAY mode, use the PATCH/VALUE
buttons to select patches. The patch number will
appear in the display.
• Layering sounds
Each patch includes two Pad Banks, A and B. By
enabling the Layer Function, you can simultaneously
play the sounds of both Pad Banks A and B. Most of
the factory-preset Patches use Layer. For each
patch, you can hear the Pad Bank A and B sounds
separately or layered together.
1) From the Play Mode, select a Patch.
2) If both Pad Bank indicators are lit, press LAYER
to turn Layer off (Bank indicator B will go out).
Now play the pads to hear the Bank A sounds.
3) To hear the Bank B sounds, press the BANK A/B
button and play the pads (the Bank indicator will
change to B).
4) To hear both A and B sounds layered together,
press the LAYER button and play the pads (both
Bank indicators will light).
• Assigning a Sound to a Pad
You can assign any of 255 sounds to any pad on any
of the 64 Patches. This is one of the adjustable
SOUND parameters. To assign a sound to a pad:
1) From the Play Mode, select a Patch.
2) Press the EDIT button to enter the Edit Mode.
3) Strike the pad you wish to assign a sound to.
4) Turn Layer off if necessary.
5) Press BANK A/B to select the Pad Bank you
wish to assign a sound to.
6) Use the SELECT button to select the SOUND
parameter group.
• Assigning a Sound to a Pad (cont.)
7) Use the s and t buttons to select INST.
8) Use the PATCH/VALUE buttons to select the
instrument you wish to assign.
9) Press the EDIT button to return to Play Mode.
• Other Sound Editing
Editing the other SOUND parameters allows you to
make adjustments to the sound assigned to each
pad. The adjustable parameters include Level, Pitch,
Decay, Pan, Velocity Curve and Effects Send.
To edit a sound:
1) From the Play Mode, select the Patch to be
edited.
2) Press the EDIT button to enter the Edit Mode.
3) Strike the pad you wish to edit.
4) Turn Layer off if necessary.
5) Press BANK A/B to select the Pad Bank you
wish to edit.
6) Use the SELECT button to select the SOUND
parameter group.
7) Use the s and t buttons to select the parameter
you wish to edit.
8) Use the PATCH/VALUE buttons to set the value.
9) Press the EDIT button to return to Play Mode.
• Connecting External Pads or Pedal Controller
The SPD-11 is designed so that you can connect up
to four external pads like the Roland PD-7 or the FD-
7 Hi Hat Controller. These options provide the user
with more realistic performance setups.
To connect an external pad like the PD-7 or KD-7
Kick Drum Controller:
1) Plug one end of the cable supplied with the pads
into the EXT INPUT jacks at the back of the unit
OR into the HH CONT/EXT 4 jack with the select
switch set to EXT 4.
2) Plug the other end of the cable into your pad
jack.
To connect the FD-7 Hi Hat Controller:
1) Plug one end of the cable supplied with the FD-7
into the HH/CONT/EXT 4 jack and set the select
switch to HH CONT.
2) Plug the other end of the cable into the FD-7.
3) Make sure the pedal is fully open.
4) Move the select switch to EXT 4 and back to
HH CONT.
NQPSMTR®
&#
TBS76 © 1998 Roland Corporation U.S., 7200 Dominion Circle, Los Angeles, CA 90040 Faxback # 20074 4/98
••• ROLAND SPD-20 TURBO FACTS •••
The SPD-20 Total Percussion Pad incorporates a
massive all-new sound set along with new triggering
options. Features include:
• 700 high-quality drum and percussion sounds,
beat-loops, vocal effects and sound effects
• 99 Programmable Patches
• 8 velocity sensitive rubber pads
• Built-in multi effects algorithms including Reverb,
Delay, Chorus, and Flanger
• Four dual-trigger inputs for use with PD-5/7/9 pads
as well as the new PD-100/120 “V-Pads.”
• The KD-7 kick drum trigger and FD-7 hi-hat foot
controllers can also be used
• Inputs can also be triggered directly from accoustic
drums without the need for an external preamp
• Initializing
Use the following procedure to initialize the SPD-20
and restore the factory settings:
1) Power up while holding ALL/ENTER and the
DOWN ARROW button.
2) Press ALL/ENTER.
• Selecting patches
Use the following procedure to select Patches:
1) From the Play Mode, use the PATCH/VALUE
buttons to select Patch #4. Play the pads.
2) Use the PATCH/VALUE buttons to try out the
following Patches:
#1 Drums & Shaker #6 Brushes
#2 Latin Set #7 Delay
#3 Orchestral #8 Dance Chord
#4 Groove #9 Indian
#5 Amazon #10Tex-Mex
• Assigning a Sound to a Pad
Use the following procedure to assign one of the 700
sounds to a pad:
1) From the Play Mode, select a Patch.
2) Press EDIT.
3) Strike the pad you wish to assign a sound.
4) Press LAYER so only Pad Bank A is blinking.
5) Press SELECT repeatedly to select the SOUND
parameter group.
6) Use the UP and DOWN ARROW buttons to
select INST.
7) Use the PATCH/VALUE buttons to select the
instrument you wish to assign to the pad.
8) Press EDIT to return to Play Mode.
• Layering sounds
Each Patch includes two Pad Banks - A and B. By
enabling the Layer Function, you can simultaneously
play the sounds of both Pad Banks A and B. Most of
the factory-preset Patches use Layer. Use the
following procedure to layer two sounds:
1) From the Play Mode, select a Patch.
2) If both Pad Bank indicators are lit, press LAYER
to turn Layer off (Bank indicator B will go out).
Now play the pads to hear the Bank A sounds.
3) To hear the Bank B sounds, press the BANK A/B
button and play the pads (the Bank indicator will
change to B).
4) To hear both A and B sounds layered together,
press the LAYER button and play the pads (both
Bank indicators will light).
• Connecting External Triggers
The SPD-20 is designed so that you can connect up to
four external pads like the Roland PD-5/7/9, PD-100/120
“V-Pads,” KD-7 Bass Drum Pad, FD-7 Hi- Hat Controller,
or even acoustic drum triggers. Use the following
procedure to specify the type of trigger being connected:
1) Connect the pad to one of the EXT INPUT jacks
at the back of the unit.
2) Press EDIT to enter Edit Mode.
3) Press SELECT repeatedly to select System.
4) Use the DOWN ARROW to select Trig Type.
5) Strike the external pad and use the PATCH /
VALUE +/- buttons to select the pad type.
The following Pad Types are available: Roland pads
(PD-5, PD-7, PD-9, PD-100, PD-120, KD-7), generic
pads (P1, P2, K1, K2,) and acoustic drums (kik, snr,
tom, flr).
• Using a Footswitch
You can assign a footswitch such as the DP-2 or DP-6
to sustain a sound (such as a beat loop), or to step
through patches. Use the following procedure to assign
the pedal:
1) Plug the pedal into the FOOT SW jack on the rear
panel of the SPD-20.
2) Depress and hold the pedal while turning the
power on. The screen will display “Set Hold Pedal.”
The pedal will now act as a sustain pedal.
3) Repeat step 2 to alternatively set the pedal to the
Sustain or Patch Shift function.
NQPSMTR
&+
TBS44 © 1996 Roland Corporation U.S., 7200 Dominion Circle, Los Angeles CA 90040 Faxback # 20039 2/96
••• BOSS SX-700 TURBO FACTS •••
The SX-700 Studio Signal Processor offers high quality
spatial effects like reverb, delay and chorus along with
revolutionary new effects like the Harmonist intelligent
pitch shifter, and Roland Sound Space (RSS), a signal
processing technology that uses phase cancellation
and EQ to create the illusion of 3D sound using a 2D
stereo field. The SX-700 is ideal for project and pro
studios, as well as the concert stage.
• Auditioning Patches
The SX-700 has 128 user programmable Patches in
memory locations 1 to 128, and 128 preset patches
from 129 to 256. To scroll through patches one at a
time, simply rotate the NUMBER knob. Pressing the
NUMBER knob in while rotating it will change patches
in increments of 10. To load the selected patch, press
the NUMBER knob in.
• Effects On/Off & Editing Parameters
1) Press one of the five dedicated effects buttons of
your choice to access the parameters.
3) Pressing the button again toggles effect on/off.
4) The PARAMETER buttons scroll through the
parameters in the selected effect.
5) The VALUE knob changes the selected effects
setting in single increments. Press and rotate
VALUE knob to change in increment of 10.
• Selection Algorithms
There are a series of 19 algorithms that determine the
configuration (not order) of the five effects. Type A
algorithms have extra Delay effects and one extra RSS
effect. Type B algorithms have several powerful
modulation effect. Algorithm C combines a powerful
pitch shifter with delay.
1) Press COMMON
2) Use the VALUE dial to select an algorithm.
• The Order Of Effects
The effects can be set in a user programmable order.
1) Press COMMON.
2) PARAMETER right once and use VALUE to select
the effect for the first unit.
3) Repeat this procedure to select the effect for each
of the five units.
• Dry/Wet Balance & Level
A wet/dry mix is programmed per effect per patch.
1) Press LEVEL.
2) PARAMETER right to access the balance
parameters for each effect type.
• The Harmonist
1) Select one of the B algorithms.
2) Press MOD until the effect is on.
2) PARAMETER right one time to [Type] and VALUE
to [Duck].
4) PARAMETER to [Scale] & [Key] and select one.
5) PARAMETER to [Interval 1], VALUE to [+3rd]. Play
a scales in your selected key. The pitch shifted
interval will follow the key.
• The Ducking Delay
1) Select one of the A algorithms.
2) Press DELAY until the effect is on.
3) PARAMETER right many times ducking mode
[DckMd] and VALUE it On.
4) The delay will duck out of the way while you play.
5) PARAMETER to ducking sensitivity and ducking
rise time and experiment.
6) REVERB Room 1 also features ducking & gate.
• RSS - Roland Sound Space
The 3D Panner is a very obvious effect. Try it:
1) RSS is available in all algorithms.
2) Press RSS until the effect is on.
3) PARAMETER right one time to [RsType] and
VALUE to [Paner].
4) PARAMETER through the remaining options and
experiment.
• Real Time Control Assign
With an FC-200 MIDI Foot Controller, and/or an
expression pedal and foot switch plugged into back,
it's possible to control up to three parameters in real
time. (The FC-200's Expression and Controller foot
switch transmit MIDI CTL# 7 and 80).
1) Press COMMON and PARAMETER right to C1
Trigger and select a parameter to control.
2) PARAMETER right to [MIN] and [MAX] and change
them if you want.
3) PARAMETER right to [C1Source] and VALUE
through the options. Select one and try it.
• Naming The Patch
1) Press NAME.
2) Use VALUE to select letters and PARAMETER to
move the cursor left and right. Press VALUE to
toggle between CAPITOL and small letters.
• Writing The Patch
Once you have edited a sound you can write it into any
of the 128 user memory locations.
1) Press WRITE, The PATCH number will flash.
2) VALUE to select a different location (optional).
3) Press WRITE again.
C@=2?5®
'
TBS65 © Roland Corporation US, 7200 Dominion Circle, Los Angeles, CA 90040 Faxback # 20062 6/97
••• ROLAND TD-5 TURBO FACTS •••
The Roland TD-5 (as found in the Trap Set) offers
210 16-bit, CD quality sampled sounds that can be
arranged into 32 different drum kits, an onboard
digital effects processor, an auxiliary input for a CD
player or a cassette tape recorder, headphone
output, and a voice metronome for practice. The
incredibly responsive pads and hi-hat controller
provide a very realistic feel. There are eight dual-
trigger inputs to accommodate a variety of pads,
trigger types, and acoustic drum triggers.
• Initializing
1) Hold down the EDIT button for a few seconds,
until the LED begins to flash faster.
2) Press the instrument < button to choose the
parameters you want to initialize:
(1 to 32) for a single patch
(bcK) for background instruments
(SyS) for trigger, MIDI, and metronome settings
(ALL) for all the TD-5K setting
3) Press the START/STOP button to start the
initialization.
(To stop the procedure, press EDIT instead)
4) Press EDIT again to return to play mode.
• Selecting a Kit
Use the Patch Increment (>) or Patch Decrement (<)
buttons to select one of the 32 available drum kits.
• Editing the Sounds
The TD-5 Percussion Sound Module has dedicated
buttons on the front control panel for quick and easy
editing of sounds.
To assign an instrument to a pad.
1) Select the patch you wish to edit.
2) Press the EDIT button.
3) Strike the pad to trigger the sound you want to
edit.
4) Press the INSTRUMENT< > buttons to select
the desired sound.
(from this point, you can edit the level, pitch,
panning, decay and effect for the instrument by
pressing the dedicated buttons on the front
panel)
5) Press EDIT again to store the instrument in
memory.
• Copying a Patch
To copy a patch from one location to another:
1) While in play mode, select the desired source
patch by pressing the PATCH < > buttons.
2) Press EDIT.
3) Press the PATCH < > buttons to choose the
destination patch.
(to stop this operation, press EDIT)
4) Press the flashing START/STOP button to copy
the patch.
• Metronome Settings
The TD-5 will allow you to change the instrument,
volume, time signature, and tempo of the
metronome.
To change the metronome settings:
1) Press the START/STOP button to start the
metronome.
2) Press the BEAT TYPE < > buttons to select the
correct time signature.
3) Press the TEMPO < > buttons to decrease or
increase the speed of the metronome.
4) To select a different sound for the metronome,
press the INSTRUMENT < > buttons.
5) To adjust the volume, press the LEVEL < >
buttons.
6) To pan the metronome, press the PAN < >
buttons.
NOTE: You can have the metronome play only
through the headphone output jack by pressing
the PAN > button until you see “Pho.”
• Synchronizing the Metronome
The metronome in the TD-5 can be set to
synchronize with an external sequencer.
1) Hold down the EDIT button until the LED begins
to flash rapidly.
2) Press the LEVEL < button to select the MIDI
channel.
3) Press the LEVEL > button to select SYc.
4) Press the PATCH < > buttons to set the external
sync to on or off.
5) Press EDIT again to enter the play mode.
C@=2?5®
'
TBS65 © Roland Corporation US, 7200 Dominion Circle, Los Angeles, CA 90040 Faxback # 20062 6/97
• The Advanced Edit Mode
The TD-5 has an Advanced Edit Mode that is used to
edit trigger parameters that are shared by all 32
patches.
1) To enter the Advanced Edit Mode, hold down the
EDIT button until the LED begins to flash rapidly.
2) To select a trigger type, press PITCH <, then
press the PATCH < > buttons to select the
appropriate trigger type.
NOTE: The TD-5 can recognize the PD-5, PD-7,
PD-9 pads; the KD-7, and KD-5 kick pads, as
well as a variety of other trigger types. In addition
to pads, the TD-5 has settings for acoustic drum
triggers.
3) To adjust the trigger sensitivity, press the PITCH
> button. Use the PATCH < > buttons to change
the setting.
4) To adjust the Threshold, press the DECAY,
button. Use the Patch < > buttons to change the
settings.
5) To set the Trigger Curve, press the DECAY
>button. Use the PATCH < > buttons to change
the setting.
6) Press EDIT to return to the Play Mode.
• Playing The TD-5 from Acoustic Drums
The TD-5 can be triggered from acoustic drums with
a transducer. The response time is a quick 3 ms and
no additional attenuation is needed. When trigger-
ing from acoustic drums, begin by setting the
extended trigger parameters.
To access the extended trigger mode:
1) Hold down EDIT and PITCH < while you turn the
power on.
2) Press the PATCH > button to on. This will put
the TD-5 in extended edit mode.
(Pressing the PATCH < will exit the extended
edit mode)
3) You must turn the power off and then on again to
complete the procedure.
NOTE: The TD-5 will remain in extended edit
mode until turned off.
• Playing from Acoustic Drums (cont.)
To trigger from acoustic drums:
1) Set the TD-5 to the Extended Edit Mode.
2) Hold the EDIT button until it begins to flash
rapidly.
3) Strike the drum you wish to set.
4) Press PITCH, to select Trigger type, then press
the PATCH < > buttons to select the appropriate
trigger type: Kik, for kick drum; Snr, for snare;
toM, for Toms; FLr, for floor tom.
• To eliminate crosstalk between pads, press the
REVERB > button to select crosstalk. Then,
press the PATCH < > buttons to find the most
desirable setting.
• To eliminate “false triggering,” press REVERB <
to select Mask Time. By pressing the PATCH <
> buttons, you can find the best setting.
• To set the Scan Time, or length of time the
trigger signal will be detected, press the
REVERB TYPE < button. Use the PATCH < >
buttons to set the value.
• To eliminate erratic trigger waveforms or signals,
press the REVERB TYPE > button. The PATCH
< > buttons can be used to select the value.
• How to Send a Bulk Dump
You can save all or part of the data in the TD-5
Percussion Sound Module to an external sequencer.
1) Connect the MIDI Out of the TD-5 to the MIDI In
of the sequencer.
2) Hold down the EDIT button for a few seconds
until the LED begins to flash rapidly.
3) Press the INSTRUMENT > button to select dnP,
or Bulk Dump.
4) Use the PATCH < > buttons to select ALL, for all
data in the TD-5, or 1 to 32 to save sound
parameters for the selected patch.
5) Press the START/STOP button to begin sending
the data.
6) Press the EDIT button to return to Play Mode.
Optional Accessories Include:
FD-7 ..... Hi-Hat controller
PD-5 ..... 8.5 inch single trigger pad*
PD-7 ..... 7 inch dual trigger pad**
PD-9 ..... 10 inch dual trigger pad**
PD-100 . 10 inch single trigger V-Pad*
PD-120 . 12 inch dual trigger V-Pad**
KD-7..... Kick Trigger*
FS-5U... footswitch for changing patches*
(* requires a mono 1/4 inch audio cable)
(** requires a stereo 1/4 inch audio cable)
NQPSMTR®
'
TBS33 © 1994 Roland Corporation U.S., 7200 Dominion Circle, Los Angeles, CA 90040 Faxback # 20028 12/95
••• ROLAND TDE/B-7K TURBO FACTS •••
The Roland TD-series Compact Drum Kits are the first
ever to respond to every stylistic nuance and playing
technique of an acoustic drum set. Both kits feature the
TD-7 Percussion Sound Module with over 500 16-bit
quality sounds and digital effects. The TDE-7K includes
the revolutionary FD-7 Hi Hat Control Pedal that responds
just like an acoustic hi hat, the KD-7 Kick Pedal and 8 PD-
7 dual trigger pads. These kits respond to such
techniques as press rolls, rim shots and cymbal chokes.
There are a few procedures to follow before you play the
kit for the first time. Don’t play the kit while the TD-7 is
warming up! When the unit is active, (after you see the
Patch Page), the first thing you need to do is initialize the
hi hat control pedal. This will set up the FD-7 Hi Hat
Controller for optimum performance results and will
remain set even after the power is turned off.
• Initializing
1) From the Patch Page, press SYSTEM.
2) Cursor to INI using the < and > buttons and
press ENTER.
3) Select the word HI HAT using the < and >
buttons and select ALL using the DATA dial.
4) Press ENTER twice.
• Initialize the Hi Hat Control Pedal
1) From the Patch Page, press SYSTEM.
2) Cursor to INI using the < and > buttons and
press ENTER twice.
• Assigning Sounds/Layering
The Instrument Section allows you to assign an
instrument to each Note Number, allowing you to
assign a different sound to each pad. You can also
assign two different instruments to one Note
Number, allowing you to create sounds through
various mixing effects. This is called LAYER. The
two instruments are called SOUND 1 and SOUND 2.
To assign an instrument to a note number:
1) Select your desired patch using the DATA dial.
2) From the Patch Page, press EDIT.
3) Cursor to PATCH using the < and > buttons and
press ENTER.
4) Cursor to NOTE and press ENTER.
5) Strike the pad or rim that will trigger the sound
you wish to edit.
6) Cursor to the Instrument Number and select your
Instrument with the DATA dial.
• Assigning Sounds/Layering (cont.)
To assign LAYER modes and sounds:
1) Select your desired patch using the DATA dial.
2) From the Patch Page, press EDIT.
3) Cursor to PATCH using the < and > buttons and
press ENTER.
4) Cursor to NOTE and press ENTER.
5) Strike the pad or rim that will trigger the sound
you wish to edit.
6) Cursor to the Instrument Number and select your
Instrument for SOUND 1 with the DATA dial.
7) Push CURSOR LEFT (<) twice and select
SOUND 2 with the DATA dial.
8) Cursor to the Instrument Number and select your
Instrument for SOUND 2 with the DATA dial.
9) Press CURSOR LEFT (<) twice and select
LAYER with the DATA dial.
10) Press CURSOR RIGHT (>) once and select your
LAYER mode with the DATA dial.
• Editing Sounds
The TD-7 will allow you to make various types of
edits to the sounds themselves. These Instrument
Parameters include Pitch, Decay, Pan, Nuance,
Brilliance, Pitch Bend, Output Levels and Effect
Send Levels.
To change the Instrument Parameters:
1) From the Patch Page, press EDIT.
2) Cursor to INST using the < and > buttons and
press ENTER.
3) Strike the pad or rim that will trigger the sound
you wish to edit.
4) Cursor to the parameter and select the desired
parameter using the DATA dial.
5) Push the CURSOR RIGHT button (>) once and
change the value using the DATA dial.
NOTE: At the top of the display you'll find useful
information concerning sound editing.
EXAMPLE: R1>N#35>S1>i081
R1 = Pad or Rim being edited (Rim number
one)
N#35 = MIDI Note Number assigned to this Pad or
Rim
S1 = Which sound in layer (S1 is Sound #1, S2
is Sound #2)
i081 = Instrument Number assigned to Note
Number being used. (number 81 out of
512)
NQPSMTR®
'
TBS33 © 1994 Roland Corporation U.S., 7200 Dominion Circle, Los Angeles, CA 90040 Faxback # 20028 12/95
• Setting a Note Number
The TD-7 is equipped with 9 stereo Trigger Input
jacks. Using the supplied stereo cables, each PD-7
can output both a drum head and a rim shot trigger
signal. Both of these trigger signals can be assigned
a separate MIDI note number.
1) Select a patch using the DATA dial.
2) From the Patch Page, press EDIT.
3) Cursor to PATCH using the < and > buttons and
press ENTER.
4) Cursor to TRIG and press ENTER.
5) Select a trigger number by playing the
corresponding pad or rim or by cursoring to
<T1> and rotating the DATA dial.
6) Push the CURSOR RIGHT button (>) twice and
select NOTE # using the DATA dial.
7) Push the CURSOR RIGHT button (>) and select
a note number using the DATA dial.
• Effects
The TD-7 offers two separate digital effect
processors which can be edited.
To select and edit the two effects processors:
1) Select the desired patch using the DATA dial.
2) From the Patch Page, push EDIT.
3) Cursor to PATCH using the < and > buttons and
press ENTER.
4) Cursor to FX and press ENTER.
5) Cursor to EFFECT and select EFFECT 1 or
EFFECT 2 using the DATA dial.
6) Push the CURSOR RIGHT button (>) and select
the desired effect using the DATA dial.
To edit the effect you’ve chosen:
1) Push the CURSOR RIGHT button (>) and select
the parameter to be edited using the DATA dial.
2) Push the CURSOR RIGHT button (>) once and
change the parameter using the DATA dial.
• Triggering a Sequence From a Pad
The TD-7 features a Phrase Sequencer that allows
the user to trigger any of the 48 sequences from any
of the pad/rims.
To assign a sequence to a pad/rim:
1) Select the desired patch using the DATA dial.
2) From the Patch Page, press EDIT.
3) Cursor to PATCH using the < and > buttons and
press ENTER.
4) Cursor to TRIG and press ENTER.
5) Strike the pad or rim you wish to assign a
sequence to.
• Sequence Triggering From Pads (cont.)
6) Cursor to the parameter displayed at bottom left
portion of the screen and select SEQPTN # with
the DATA dial.
7) Push the CURSOR RIGHT button (>) once and
select the desired sequence using the DATA
dial.
• Sequencing Tip
When using an external sequencer to record data
performed on the TDE kit, refer to the following
suggestions.
To RECORD TD-7 data on a sequencer:
1) Attach a MIDI cable from the TD-7 MIDI OUT to
the sequencer's MIDI IN.
To PLAY the TD-7 from a sequencer:
1) Attach a MIDI cable from the sequencer's MIDI
OUT to the TD-7's MIDI IN.
2) Push the SYSTEM button and select "IF"
(interface) with the CURSOR RIGHT (>) button.
3) Press ENTER.
4) Using the DATA dial, change "Standard" to "MIDI
- Sound."
5) Change this back to "Standard" for normal
operation.
• Assigning Sounds to Individual Outputs
The TD-7 offers two assignable independent
outputs.
To assign a sound to an individual output:
1) Press the SYS button.
2) Cursor to SET and press Enter.
3) To change Send 1 to Individual Output, Cursor
to Effect 1, turn the Data Dial to Indiv 1.
4) Press Exit twice.
Now, assign a sound to Individual Output 1.
1) Press the EDIT button.
2) Cursor to INST and press Enter.
3) Hit the a Pad to select the assigned sound.
4) Turn the Data Dial to find OUT LEVEL. Setting
this parameter to “0” will remove the sound from
the stereo outputs.
5) Turn the Data Dial to SEND 1 LEVEL. This will
control the level for the sound now assigned to
Individual Output 1.
6) Repeat this procedure using Indiv 2 and another
instrument to assign Individual Output 2.
NQPSMTR®
''
TBS64 © 1994 Roland Corporation U.S., 7200 Dominion Circle, Los Angeles, CA 90040 Faxback # 20063 6/97
••• ROLAND TD-7T TURBO FACTS •••
The TD-7T
Turbo Version
Percussion Sound Module
features over 500 16-bit quality sounds and digital effects.
The Stage Set includes the revolutionary FD-7 Hi Hat
Control Pedal that responds just like an acoustic hi hat,
the KD-7 Kick Pedal, 4 PD-7, and 4 PD-9 dual trigger
pads. These kits respond to such techniques as press
rolls, rim shots and cymbal chokes.
There are a few procedures to follow before you play the
kit for the first time. Don’t play the kit while the TD-7T is
warming up! When the unit is active, (after you see the
Patch Page), the first thing you need to do is initialize the
hi hat control pedal. This will set up the FD-7 Hi Hat
Controller for optimum performance results and will
remain set even after the power is turned off.
• Initializing
1) Power up while holding SYSTEM and JUMP.
2) Press ENTER.
• Play the ROM Demos
1) Power up while holding ENTER.
2) Use the DATA DIAL to select the desired
demonstration song.
3) Press the ENTER button to start the song.
4) Press EXIT to stop the song.
5) Press EXIT twice to return to Play mode.
• Assigning Sounds/Layering
The Instrument Section allows you to assign an
instrument to each Note Number, allowing you to
assign a different sound to each pad. You can also
assign two different instruments to one Note
Number, allowing you to create sounds through
various mixing effects. This is called LAYER. The
two instruments are called SOUND 1 and SOUND 2.
To assign an instrument to a note number:
1) Select your desired patch using the DATA dial.
2) From the Patch Page, press EDIT.
3) Cursor to PATCH using the < and > buttons and
press ENTER.
4) Cursor to NOTE and press ENTER.
5) Strike the pad or rim that will trigger the sound
you wish to edit.
6) Cursor to the Instrument Number and select your
Instrument with the DATA dial.
• Assigning Sounds/Layering (cont.)
To assign LAYER modes and sounds:
1) Select your desired patch using the DATA dial.
2) From the Patch Page, press EDIT.
3) Cursor to PATCH using the < and > buttons and
press ENTER.
4) Cursor to NOTE and press ENTER.
5) Strike the pad or rim that will trigger the sound
you wish to edit.
6) Cursor to the Instrument Number and select your
Instrument for SOUND 1 with the DATA dial.
7) Push CURSOR LEFT (<) twice and select
SOUND 2 with the DATA dial.
8) Cursor to the Instrument Number and select your
Instrument for SOUND 2 with the DATA dial.
9) Press CURSOR LEFT (<) twice and select
LAYER with the DATA dial.
10) Press CURSOR RIGHT (>) once and select your
LAYER mode with the DATA dial.
• Editing Sounds
The TD-7T will allow you to make various types of
edits to the sounds themselves. These Instrument
Parameters include Pitch, Decay, Pan, Nuance,
Brilliance, Pitch Bend, Output Levels and Effect
Send Levels.
To change the Instrument Parameters:
1) From the Patch Page, press EDIT.
2) Cursor to INST using the < and > buttons and
press ENTER.
3) Strike the pad or rim that will trigger the sound
you wish to edit.
4) Cursor to the parameter and select the desired
parameter using the DATA dial.
5) Push the CURSOR RIGHT button (>) once and
change the value using the DATA dial.
NOTE: At the top of the display you'll find useful
information concerning sound editing.
EXAMPLE: R1>N#35>S1>i081
R1 = Pad or Rim being edited (Rim number one)
N#35 = MIDI Note Number assigned to this Pad or
Rim
S1 = Which sound in layer (S1 is Sound #1, S2
is Sound #2)
i081 = Instrument Number assigned to Note
Number being used. (number 81 out of
512)

NQPSMTR®
''
TBS64 © 1994 Roland Corporation U.S., 7200 Dominion Circle, Los Angeles, CA 90040 Faxback # 20063 6/97
• Setting a Note Number
The TD-7T is equipped with 9 stereo Trigger Input
jacks. Using the supplied stereo cables, each PD-7
can output both a drum head and a rim shot trigger
signal. Both of these trigger signals can be assigned
a separate MIDI note number.
1) Select a patch using the DATA dial.
2) From the Patch Page, press EDIT.
3) Cursor to PATCH using the < and > buttons and
press ENTER.
4) Cursor to TRIG and press ENTER.
5) Select a trigger number by playing the
corresponding pad or rim or by cursoring to
<T1> and rotating the DATA dial.
6) Push the CURSOR RIGHT button (>) twice and
select NOTE # using the DATA dial.
7) Push the CURSOR RIGHT button (>) and select
a note number using the DATA dial.
• Effects
The TD-7T offers two separate digital effect
processors which can be edited.
To select and edit the two effects processors:
1) Select the desired patch using the DATA dial.
2) From the Patch Page, push EDIT.
3) Cursor to PATCH using the < and > buttons and
press ENTER.
4) Cursor to FX and press ENTER.
5) Cursor to EFFECT and select EFFECT 1 or
EFFECT 2 using the DATA dial.
6) Push the CURSOR RIGHT button (>) and select
the desired effect using the DATA dial.
To edit the effect you’ve chosen:
1) Push the CURSOR RIGHT button (>) and select
the parameter to be edited using the DATA dial.
2) Push the CURSOR RIGHT button (>) once and
change the parameter using the DATA dial.
• Triggering a Sequence From a Pad
The TD-7T features a Phrase Sequencer that allows
the user to trigger any of the 48 sequences from any
of the pad/rims.
To assign a sequence to a pad/rim:
1) Select the desired patch using the DATA dial.
2) From the Patch Page, press EDIT.
3) Cursor to PATCH using the < and > buttons and
press ENTER.
4) Cursor to TRIG and press ENTER.
5) Strike the pad or rim you wish to assign a
sequence to.
• Sequence Triggering From Pads (cont.)
6) Cursor to the parameter displayed at bottom left
portion of the screen and select SEQPTN # with
the DATA dial.
7) Push the CURSOR RIGHT button (>) once and
select the desired sequence using the DATA
dial.
• Sequencing Tip
When using an external sequencer to record data
performed on the TDE kit, refer to the following
suggestions.
To RECORD TD-7T data on a sequencer:
1) Attach a MIDI cable from the TD-7T MIDI OUT
to the sequencer's MIDI IN.
To PLAY the TD-7T from a sequencer:
1) Attach a MIDI cable from the sequencer's MIDI
OUT to the TD-7's MIDI IN.
2) Push the SYSTEM button and select "IF"
(interface) with the CURSOR RIGHT (>) button.
3) Press ENTER.
4) Using the DATA dial, change "Standard" to "MIDI
- Sound."
5) Change this back to "Standard" for normal
operation.
• Assigning Sounds to Individual Outputs
The TD-7T offers two assignable independent
outputs.
To assign a sound to an individual output:
1) Press the SYS button.
2) Cursor to SET and press Enter.
3) To change Send 1 to Individual Output, Cursor
to Effect 1, turn the Data Dial to Indiv 1.
4) Press Exit twice.
Now, assign a sound to Individual Output 1.
1) Press the EDIT button.
2) Cursor to INST and press Enter.
3) Hit the a Pad to select the assigned sound.
4) Turn the Data Dial to find OUT LEVEL. Setting
this parameter to “0” will remove the sound from
the stereo outputs.
5) Turn the Data Dial to SEND 1 LEVEL. This will
control the level for the sound now assigned to
Individual Output 1.
6) Repeat this procedure using Indiv 2 and another
instrument to assign Individual Output 2.
NQPSMTR®
'
TBS58 © 1997 Roland Corporation U.S., 7200 Dominion Circle, Los Angeles, CA 90040 Faxback # 20061 6/97
••• ROLAND TD-10 TURBO FACTS •••
The Roland V-Drums TD-10 is a revolutionary, top-of-the-line electronic
percussion sound module, complimenting Roland’s acclaimed Compact
Drum Systems. Utilizing Composite Object Sound Modeling (COSM), Roland
has developed a sound source that far surpasses any existing PCM-based
technology. Additional features include:
• Over 600 drum/percussion sounds and 50 melodic instruments
• Variable Drum Modeling based on COSM technology
• 12 dual trigger inputs - 8 stereo outputs
• Superior triggering response
• Brushes can be used with the new PD-100/120 Mesh V-Pads
• Modeling technology allows the reproduction of even the most delicate
nuances of a drummer, including “ghost notes”
• Positional sensing available on the snare and ride pads
• Compatible with the PD-7/9 Dual Trigger Pads
• Advanced effects processing including individual effects on each pad
• Easy-to-use, built-in sequencer with 50 Preset and 50 User patterns
• Large graphic LCD display for easy editing
• Wave expansion slot for future sound libraries
• Initializing
Use the following procedure to restore the factory settings:
1) Press SETUP followed by F4 [UTIL].
2) Press F4 [INIT] twice. Press F4 [EXEC].
• Play the Demo
Use the following procedure to play the demo song:
1) Press SETUP and CHAIN simultaneously.
2) Press F4 [PLAY]. Press F3 [STOP] to stop the demo.
3) Press F1 [CANCEL] to return to the SETUP MENU.
• Selecting a Drum Kit
The TD-10 contains 50 drum kits (5 are designated as Copy Kit
locations). Use the following procedure to select a drum kit:
1) Press KIT so it is lit and use the VALUE DIAL to select
the desired kit.
• Creating a Drum Instrument
The TD-10 allows you to customize drum sounds that display
the “V-EDIT” symbol by choosing the type of drum head, shell
material, depth, and various types of muffling. Use the
following procedure to edit a snare drum:
1) Press INST (under EDIT) and use the TRIG SELECT
buttons to display “H2 [SNARE]” in the upper, right corner.
2) Press F2 [EDIT] and use the UP CURSOR button to
select “Shell Material.” Use the VALUE DIAL to select the
type of shell material (Wood, Steel or Brass).
3) Press CURSOR DOWN to select “Shell Depth” and use
the VALUE DIAL to adjust the depth (1.0” to 20.0”).
4) Press F2 [HEAD] and use the UP CURSOR button to
select “Head Type.” Use the VALUE DIAL to select the
type of drum head (Clear, Coated, or Pinstripe).
5) Press CURSOR DOWN to select “Head Tuning” and use
the VALUE DIAL to adjust the tuning (+ / - 480) as desired.
6) Select F3 [MUFFLE] and use the UP CURSOR button to
select “Muffling.” Use the VALUE DIAL to select the type of
muffling (duct tape or doughnuts) as desired.
7) Press CURSOR DOWN to select “Strainer Adj.” and use
the VALUE DIAL to adjust the strainer as desired.
• Recording a Sequence
The TD-10 has a powerful, built-in sequencer that allows you
to record up to 50 different patterns (in pattern locations
51-100). Use the following procedure to record a pattern:
1) Press PATTERN so it is lit.
2) Press F4 [NEW] to select the next available empty pattern.
3) Press F2 [FUNC] followed by F2 [SETUP] and use the
VALUE DIAL to select the pattern length (up to 99 bars).
4) Press F3 [TYPE] and use the VALUE DIAL to select a
Play Type (Loop or One Shot).
5) Press the PART button followed by F1 [INST].
6) Press F4 [DRUMS] and use the VALUE DIAL to select the
desired drum kit for your pattern.
7) Press REC, then press CLICK twice.
8) Select F2 [INST] and use the VALUE DIAL to select the
type of instrument to be used for the metronome click.
9) Press PLAY. The sequencer will count one measure
before it starts recording.
10) Play the kit to record your instruments (you can also use
the PREVIEW button to play instruments).
11) Press STOP followed by PLAY to listen to your recorded
pattern. Press CLICK to turn off the metronome.
12) Repeat steps 6 thru 11 to record any additional parts
(Part 1, Part 2, and Bass) as desired.
• Assigning Digital Effects to a Kit
The TD-10 has 30 different effect types including reverb, delay,
chorus, flanger, 3-band parametric eq, and compression. Use
the following procedure to select an overall effect for the kit:
1) Press EXIT followed by F3 [FX SW].
2) Press F4 [EFFECT] to select “ON” (if necessary).
3) Press CONTROL ROOM followed by F4 [EFFECT].
4) Press F3 [FXTYPE].
5) Use the VALUE DIAL to select the desired effect.
• Adjusting the Room Acoustics
The TD-10 allows you to create an environment that emulates
the type of room for your drum kit. There are several settings
to choose from including a garage, the beach, a dome stadium,
a locker room, a bathroom, etc. Use the following procedure:
1) Press EXIT followed by F3 [FX SW].
2) Press F1 [AMBNCE] to select “ON’ (if necessary).
3) Press STUDIO.
4) Use the VALUE DIAL to select the desired environment.
5) Use the F1 thru F4 buttons to access the mic parameters,
room characteristics, and ambient levels as desired.
••• Pad Types •••
The default settings of the TD-10 are optimized for use with
the Roland V-BASIC SET and V-PRO SET. If you are using a
different setup, you will need to select an appropriate Trigger
Type for each input. These settings are necessary to optimize
the tracking for each pad. The Trigger Type settings for each
input can be stored in one of four Trigger Bank locations,
allowing for quick access to multiple configurations.

NQPSMTR®
)
)F:E2C&JDE6>
TBS34 © 1995 Roland Corporation U.S., 7200 Dominion Circle, Los Angeles, CA 90040 Faxback # 20029 12/95
••• ROLAND VG-8 TURBO FACTS •••
The VG-8 V-Guitar begins a new era in guitar
technology, placing the guitar entirely within the digital
domain using COSM, Roland's proprietary Composite
Object Sound Modeling. The VG-8’s COSM technology
can generate a vast array of sounds by simultaneously
performing physical, electric, magnetic and electronic
modeling, shaping the guitar’s own signal in one of two
modes: Variable Guitar Modeling (VMG) or Harmonic
Restructure Modeling (HRM). VGM allows selection of:
body type; pickup selection, placement, angle, and
pickup phase; amp type; speaker cabinet; microphone
type and placement; and more. HRM shapes expressive
new sounds including basses, pads and more. Both
VGM and HRM shape each guitar string’s original
waveform in realtime, resulting in no delay, no tracking,
and amazing expressiveness. Built-in effects include
polyphonic pitch shifting, models of five BOSS effects,
speaker simulation, DSP, EQ, and more. Easy
programming through graphic backlit LCD interface.
Requires a guitar equipped with a Roland GK-2A divided
pickup.
After installing the GK-2A pickup according to the
instructions that came with the pickup, set-up the Driver
Settings shown on page 15 of the VG-8 Owners Manual.
• Setting the GK-2A Pickup Sensitivity
Sensitivity should be set once for each guitar & player
combination. These may be saved in 5 memory locations.
1) Press the SYSTEM button.
2) Press F1 (Function button 1).
3) Play each string to activate its level meter. CURSOR
to the string number and use VALUE dial to adjust
the sensitivity. Set all six string sensitivity settings.
4) Press PLAY to return to play mode.
• Tuning
1) Press PLAY, then F1 to access the built-in tuner.
• Playing patches
There are up to 192 patches; 64 user, 64 preset, 64 on
an optional M-512 memory card. Press PLAY, then...
1) The easiest way to call up patches is the VALUE
dial. – or –
2a) To change groups, hold GK-2A button S1 and press
the VG-8’s GROUP t & s footswitches.
2b) To change banks, use the BANK t & s footswitches.
2c) To change numbers, use footswitches 1 to 4.
• Variable Guitar Modeling (VGM)
Four VGM algorithms are available: Amp Mono, Amp
Poly, Pedal & Amp, and Pedal St(ereo). The algorithm is
shown at the top of the LCD. Nine VGM components are
used in different combinations in different algorithms:
Pickup (selection, placement, and angle), Amp
(selection, tone & volume controls), Speaker (cabinet
selection), Mic (selection and placement), Pedal (models
of five different BOSS pedals), Poly Manager (polyphonic
amp and pedal distortion), Pan (per string), Pitch Shift
(per string), and Noise Suppression.
Preset A53 “JazzITup” is a good starting point for
experimenting:
1) Press Play, select Preset A53 “JazzITup”.
2) Press INST to begin Instrument Editing.
3a) Select F1 to edit the pickup settings.
3b) Preset A53 uses a ‘vari’ model with two pickups -
press PAGE to select pickup type, position, angle,
and phase. Press PAGE again to select the other
pickup. NOTE the helpful graphics in the LCD.
4a) Press Instrument, then F6 to edit Speaker&Mic.
4b) Select a speaker type - press F1 repeatedly or
press F1 and use the value dial.
4c) Press F3 and select a mic type - note the graphic.
4d) Press F5 and select mic placement - watch the
graphic.
5) Press INST to return to the edit menu and continue
experimenting. Watch for a lit PAGE LED, then
press the PAGE button to see all edit options.
• Harmonic Restructure Modeling (HRM)
All thirteen HRM algorithms are shown in Patch Presets
A54 through A84 - the algorithm is shown at the top of
the LCD. Try them all, and select one to experiment
with:
1) Press INST, then F1 to edit parameters.
2) Using the F buttons and the value dial, experiment
with this algorithm. Parameters differ somewhat per
algorithm. If the PAGE LED is lit, the PAGE button
will select additional edit functions.
3) Repeat steps 1 & 2 with different HRM algorithms.
• Digital Signal Processing
All VGM and HRM patches can also access 3 categories
of digital effects: 7 Modulation effects, 3 Delay modes,
and 9 Reverb modes. Press the EFFECT button, then
the odd numbered F buttons edit effects while the even
numbered F buttons switch effects on/off.
NQPSMTR
)&
TBS54 © 1996 Roland Corporation U.S., 7200 Dominion Circle, Los Angeles, CA 90040 Faxback # 20048 09/96
••• ROLAND VG8S-1 TURBO FACTS •••
Roland has substantially expanded the V-Guitar System taking
COSM technology to even greater heights with the new
VG8S-1 System Expansion. Here is what’s new:
•Four new algorithms plus feature enhancements of the
originals.
•HOLLOW algorithm emulates characteristics of acoustic and
hollow body guitars.
•DUAL AMP algorithm to layer or morph between two
chains of pedals, amps and speaker cabinets with a
foot pedal.
•VIO GUITAR algorithm combines VGM and HRM.
•Rick, Tele, LP w/P-90's, Silvertone w/Lipstick's, LP w/PAF's,
Gretch, and Strat w/S-S-H active EMG Pickup Models.
•Flat, Round, f-Hole, Metal (for dobro) and Banjo Guitar
Body models.
•SLDN, British Combo and Modern Stack Guitar Amplifier
Models.
•British 2x12, Classic 4x10, and Modern Stack Speaker
Models.
•Assignable wah wah pedal, pitch pedal, HRM Cutoff,
and other realtime controllers.
•Intelligent harmonist.
•Change guitar pickups with S1 and S2 on the GK-2A.
• Installation
It is important to save your Patches because this
procedure will erase the User memory of the VG-8.
1) Turn the power off.
2) Insert the VG8S-1 card and turn the power on.
3) Press F1 to complete the expansion.
Now use the following procedure to reinitialize the VG-8
to factory settings.
1) Turn off the VG-8.
2) While holding down F1, F3, and F5 turn on the VG-8.
3) Press F6.
• Selecting the New Patches
An expanded VG-8 has an extra 64 preset Patches. Turn
the VALUE dial to select the new Presets in banks C and d.
• Selecting Presets that use the New Algorithms
Algorithm names are listed on the top row of the display
screen.
Presets C11 to C44 - HOLLOW algorithms
Presets C51 to C64 - DUAL AMP algorithms
Presets d51 to 53,
61,63,73 and 74 - VIO-GUITAR
• Selecting the New Bodies
1) Press PLAY and use the VALUE dial to select Patch
C62 MOD BLUZ.
2) Press INST followed by F1 (under the pickup graphic).
3) Press F6 and use the VALUE dial to select the new
guitar models.
• Selecting the New Acoustic Piezo Pickups
1) From the PICKUP screen, press F6 and use the
VALUE dial to select VARI.
2) Press PAGE to access the second page.
3) Press F1 and use the VALUE dial to select a pickup type
(options are Single, Double, Piezo, or Acoustic Piezo).
• Selecting the New Guitar Amplifiers
1) Press PLAY and use the VALUE dial to select Patch
C62 MOD BLUZ.
2) Press INST followed by F3 to select AMP.
3) Press F2 and use the VALUE dial to select the
different amps.
• Selecting the New Speaker Variations
1) Press PLAY and use the VALUE dial to select Patch
C62 MOD BLUZ.
2) Press INST followed by F4 to select SP&MIC.
3) Press F1 and use the VALUE dial to select the different
speaker types.
• Selecting the New Hollow Body Guitar Models
1) Press PLAY and use the VALUE dial to select Patch
C11 ACUSTIC.
2) Press INST followed by F3 (under the BODY graphic).
3) Press PAGE two times to access BODY-TYPE.
4) Press F2 and use the VALUE dial to select the
different hollow body guitar types.
5) After choosing one of the body types, press F6 and
use the VALUE dial to change the body size.
• Expanded Pitch Shifting Capabilities
New pitch shifting effects include intelligent harmonist,
pitch pedal, and glide. Also, the pitch shifter is now
available on all HRM algorithms.
1) From any Patch, press INST and use the cursor
buttons to select P-SHIFT.
2) Cursor to type and use the VALUE dial to select String.
3) Press F2 and use the VALUE dial to select one of
the 11 preset tuning configurations.
4) Press F1 and use the VALUE dial to select Harmo.
5) Press F2 and use the VALUE dial to select +3rd.
6) Press F3 and use the VALUE dial to select the
desired key.
Use the following procedure to set an expression pedal
to control pitch:
1) Connect an EV-5 Expression Pedal to the EXP
PEDAL input.
2) Press COMMON followed by F2.
3) Use the VALUE dial to select P-SHIFT Shift (under
Assigned Parameter).
4) Press INST followed by F2 (under the P-SHIFT graphic).
5) Cursor to TYPE and use the VALUE dial to select Pedal.
6) Press F2 and use the VALUE dial to select Octave Up.
7) Press PLAY and play your guitar. You can now use the
EV-5 to slide up to an octave above the original pitch.
NQPSMTR®
)
TBS60 © 1997 Roland Corporation U.S., 7200 Dominion Circle, Los Angeles, CA 90040 Faxback # 20059 5/97
••• ROLAND VK-7 TURBO FACTS •••
The VK-7 is a totally new combo organ that utilizes Roland’s new
Virtual ToneWheel modeling technology to simulate the principles
behind tonewheel sound generation used in classic organs. Here
are just a few of the features that make the VK-7 a modern day
equivalent of the Hammond B3:
• Full keyboard polyphony with 91 voices in constant,
independent oscillation
• High speed sound generation, allowing the VK-7 to respond to
the rigorous demands of classic organ playing styles
• 9 Harmonic bars for realtime manipulation of organ sounds
• Sophisticated rotary speaker and tube amp simulation based
on Roland’s COSM technology
• 39 orchestral voices built-in
• 11-pin Rotary Tone Cabinet connector for use with Leslie
speaker cabinet
• Real wood finish and portable cabinet design
• 2 MIDI IN connectors allow for a dual manual configuration
with pedals
• MIDI information, including harmonic bar messages, is sent
and received in realtime
• Initializing
Use the following procedure to restore the factory settings:
1) Press EDIT.
2) Press UTILITY [7].
3) Press the RIGHT CURSOR [>] button until “E7: Factory Setup”
is displayed.
4) Press the [+] button.
5) Press EXIT to return to the previous display.
• Playing the Demos
Use the following procedure the play the VK-7 demo songs:
1) Press EDIT.
2) Press DEMO [8].
3) Use the [<]/[>] buttons to select “SinglePlay.”
NOTE: To hear consecutive playback of all demo
songs, select “Chain Play.”
4) Use the [+]/[-] buttons to select the desired song.
5) Press WRITE to start playback.
6) Press EXIT to stop playback.
7) Press EXIT again to return to the previous display.
• Selecting Sounds
The VK-7 has 64 different organ sounds. These sounds are
organized into eight groups (banks) with eight sounds in each
group. There are two modes of operation for the banks. In
“Alternate” mode (the default setting) the BANK button is used to
quickly switch between the first two banks. “Expand” mode is used
to gain access to all eight banks. Use the following procedure to
enable “Expand” mode and select sounds:
1) Press EDIT (the [1]-[8] buttons will start to flash).
2) Press SYSTEM BASIC [1].
3) Use the [<]/[>] buttons to access the “E1: Bank Function”
display and press the [+] button to select “Expand.”
4) Press EXIT.
5) Press BANK (the [1]-[8] buttons will start to flash). Use the [1]-
[8] buttons to select a bank.
6) Use the [1]-[8] buttons to select a sound from that bank.
* All trademarks are property of their respective owners.
• Layering Orchestral Sounds with the Organ Part
The VK-7 contains 39 orchestral sounds that can be used as solo
instruments or layered with the organ sounds to provide more
depth, attack, bass, etc. Use the following procedure to layer an
orchestral sound with an organ sound:
1) Select the desired organ sound (as previously described).
2) Press MAIN (under ORCHESTRAL ASSIGN) so it is lit.
3) Press the desired ORCHESTRAL VOICES sound group
button.
4) Use the VARIATION UP/DOWN buttons to select the desired
instrument within that sound group.
5) Use the ORCHESTRAL LEVEL knob to adjust the volume as
desired.
• Splitting the Keyboard
Use the following procedure to assign a bass sound to the lower
half of the keyboard and then set the split point:
1) Select the desired organ sound (as previously described).
2) Press SUB (under ORCHESTRAL ASSIGN) so it is lit.
3) Press SPLIT [SUB/MAIN].
4) Press the ORCHESTRAL VOICES [BASS] button.
5) Use the VARIATION UP/DOWN buttons to select the desired
bass sound.
6) Press the ORCHESTRAL VOICES [BASS] button again.
7) Press [ORGAN MUTE] to mute the organ sound.
Use the following procedure to set the split point:
1) Press EDIT followed by USER COMMON [3].
2) Use the [<]/[>] buttons to access the “Split Point” display.
3) Use the [+]/[-] buttons to set the split point as desired.
4) Press EXIT to return to the previous display.
• Using a Dual Keyboard Configuration
The VK-7 allows you to emulate a complete Hammond B3 setup
by simply adding an additional MIDI keyboard and a MIDI foot
controller (such as the Roland PK-5). Use the following procedure
to connect a MIDI keyboard and foot controller to the VK-7 in a dual
manual configuration(set the Sub keyboard to transmit on MIDI
channel 3 and the foot controller to channel 2):
1) Connect the MIDI OUT on the additional MIDI keyboard (Sub
keyboard) to the KEYBOARD IN on the VK-7.
2) Set the MIDI Select switch (on the rear panel) to the “SUB
KEYBOARD” position.
3) Connect the MIDI OUT of the MIDI foot controller to the PEDAL
IN on the VK-7.
4) Set the MIDI transmit channel on the Sub keyboard to 3 and
the foot controller to 2.
5) Play the Sub keyboard to hear the Sub Part and play the foot
controller to hear the Pedal Part on the VK-7 (make sure that
the VK-7’s audio outputs are connected).
6) Press MAIN (under HARMONIC BAR PART).
7) Play the VK-7’s keyboard and adjust the Harmonic Bars as
desired. The changes will be reflected in the sound of the Main
Part.
8) Press SUB (under HARMONIC BAR PART).
9) Play the Sub keyboard and adjust the Harmonic Bars on the
VK-7 as desired. The changes will be reflected in the sound of
the Sub Part.
NOTE: If you are using a PK-5 MIDI Foot Controller, you will
probably want to transpose it up one octave from its default
settings.
NQPSMTR
)&
TBS75 ©1998 Roland Corporation U.S., 7200 Dominion Circle, Los Angeles, CA 90040 Faxback # 20072 3/98
••• ROLAND VS-1680 TURBO FACTS •••
The VS-1680 is a major breakthrough in power and
performance in a portable 24-bit Digital Studio Workstation.
Features include:
• 16 Track playback, 8 Track simultaneous recording
• Huge 320 x 240 dot LCD for easy operation
• Advanced waveform editing with 999 levels of undo
• Four stereo multi-effects processors with two optional
24-bit VS8F-2 Effects Boards
• 26 channels of automated digital mixing with EQ
• 24-bit MT-PRO recording mode for superb dynamic range
and phenomenal sounding recordings
• Optional CD writer for audio recording as well as data backup
• SCSI transfer of digital audio using third party software
• EZ routing guides the user through all the steps needed for
recording, bouncing and mixing
• 1000 markers, 64 locator points, 8 Scenes, tempo maps,
MTC, MMC and MIDI Clock synching
• Loading the Demo Song
The VS-1680 ships pre-loaded with several demo songs.
Use the following procedure to select a song:
1) While holding SHIFT press F1 “SONG.”
2) Press PAGE repeatedly until SEL is displayed above F1.
3) Press F1 “Select.”
4) Use the TIME/VALUE dial to select the demo song
“Seems So Right” and press F4 “Exec.”
5) Press YES. If “Re-Load Current?” is displayed, press
YES.
• Listening to the Demo Song
Use the following procedure to load a scene and listen to the
demo song:
1) Press SCENE, so it is lit and press the #1 button.
2) Press PLAY after the scene has loaded.
3) Use the Master Fader to control the level of the song.
4) Use the Channel Faders to adjust the levels of the Tracks.
5) Press STOP to halt playback.
6) Press ZERO to return to the beginning of the song.
7) Use the FF and REW buttons to move forward or
backward in one second steps.
8) Press SCENE so it is lit and press the #2 button to load
Scene #2 which is an acoustic version of the song.
Press PLAY. Try loading other Scenes.
9) Press SCENE so it is lit and press the #1 button to re-
load Scene #1.
• Playing the Virtual Tracks in the Demo Song
The Demo Song “Seems So Right” has 3 vocal parts
recorded on Virtual Tracks 1,2, and 3 of Track 8. Use the
following procedure to select Virtual Tracks:
1) Press the TRACK SELECT button for Channel #8.
2) CURSOR to “V. Trk” in the upper left hand corner.
3) Use the TIME/VALUE dial to select “V Track #2.”
4) Press PLAY. You should now hear a female voice
singing the lead vocal.
NOTE: The VS-1680 must be stopped to change
V Tracks.
• Using the Internal Effects (w/VS8F-2)
The VS-1680 can have up to 4 independent stereo effects processors
on board using 2 optional VS8F-2 Effects Expansion Boards. Use the
following procedure to apply effects to the guitar track:
1) Press SCENE so it is lit and press the #4 button. Press
Locator button # 6 then press AUTOMIX so it is not lit.
2) Press the TRACK SELECT button for Channel #6.
3) CURSOR to “EFX Ins” and press ENTER/YES. Press PLAY.
4) CURSOR to “EFX2” and use the TIME/VALUE DIAL to
select “Off.” You should now hear the track with no effects.
5) Press STOP and use the TIME/VALUE DIAL to select “Ins.”
6) Hold SHIFT and press F3 “EFX A” then press F4 “EFX2.”
7) Press F2 “Sel” and use the TIME/VALUE DIAL to select
“P055 BluesDrv” and press F4 “Exec.” Press Locator #6
followed by PLAY.
8) Press F2 “Sel” and use the TIME/VALUE DIAL to select
another effect (try P059 SLDN Lead) and press F4 “Exec.”
9) Press PLAY/DISPLAY to return to the main screen.
• EZ Routing
EZ Routing makes it simple to set up the VS-1680 for most
recording and mixing applications. Use the following procedure
to configure the VS-1680 to record Input 1 on Track 4:
1) Press EZ ROUTING and CURSOR to [Recording].
2) Press F4 “Exec” followed by F1 “Rec.”
3) Press the Input 1 SELECT button followed by the Track 4
STATUS button. A line should appear in the display
connecting Input 1 to Track 4.
4) Press F2 “Step→.”
5) Use the CURSOR buttons and the TIME/VALUE DIAL to
set the Panning and Level and press F2 “Step→.”
6) Use the CURSOR buttons and the TIME/VALUE DIAL to
select the desired Effect under “EFX1.”
7) If you would like to record the output of the effects
processors, simply press the EFFECT RTN button for the
desired effect processor (EFX 1-4) followed by the Track 4
STATUS button. A line will appear in the display indicating
that EFX1 is connected to Track 4. Press F2 “STEP→” twice.
8) Press F4 “Exec” followed by ENTER/YES.
9) Press PLAY/DISPLAY. The VS-1680 is now ready to record.
10) Re-load the song “Seems So Right” when you are finished
(See “Loading the Demo Song”).
NOTE: The Demo songs in the VS-1680 are protected so
you will not be able to record in these songs.
• Using the Waveform Display
You can display the waveform for any track for more precise
editing. Use the following procedure:
1) Press PLAY/DISPLAY to return to the main screen (if necessary).
2) Use the UP/DOWN CURSOR buttons to select a Track.
3) Press the PAGE button repeatedly until WAVE is
displayed above F5. Press F5 “WAVE.”
4) Use F1, F2, F3, and F4 to adjust the view of the waveform.
5) Use REW and FF to move to a different point of the song.
6) Press F5 “WAVE” to exit.
The VS-1680 can lock to SMPTE for video post-production
or music applications by adding a SMPTE to MTC converter.
Several VS-1680s can be linked together with simple MIDI
and audio connections. This locks the unit’s clocks together
and provides a single audio output for all units.
NQPSMTR
)&
TBS70 ©1998 Roland Corporation U.S., 7200 Dominion Circle, Los Angeles, CA 90040 Faxback # 20069 1/98
••• ROLAND VS-840 TURBO FACTS •••
The VS-840 is a complete, all-in-one digital studio. It is an 8
track, non-destructive disk recorder and editor with the ability
to cut, copy, and move tracks. Each song contains 64 Virtual
Tracks, 8 Scenes, 1000 Markers, and 999 levels of UNDO.
Other features include:
• Records all audio and mix information on low-cost,
removable 100MB Zip™ disks providing up to 103 track
minutes of recording time on each disk.
• New “EZ Routing” feature guides users step-by-step
through basic operations such as recording, mixing, and
bouncing tracks
• “Song Arrange” feature allows users to quickly and easily
reorder song data (choruses, verses, etc.) without having
to perform multiple edits.
• 12 channel digital mixer with up to 24 bands of EQ
• Dedicated guitar input
• Onboard stereo digital multi-effects processor includes
Reverb, Delay, Chorus, COSM Guitar Preamp/Speaker
Simulator, and more.
• Built-in MIDI TIME CODE (MTC), MIDI Machine Control,
and MIDI Clock capabilities
• Compatible with VS-880 Digital Studio Workstation
• Loading the Demo Song
1) Press UTILITY and use the CURSOR buttons to highlight
the SONG icon. Press ENTER.
2) Use the CURSOR buttons to highlight the SELECT icon
and press ENTER.
3) Press UP CURSOR to highlight the first demo song,
“
Mercy Blue
.”
4) Press ENTER and “Select SONG Sure” will be displayed.
5) Press ENTER and “Store Current?” will be displayed.
6) Press NO and the demo song will begin loading.
NOTE: If “Mercy Blue” is already selected, “Re-Load
Current?” will be displayed in step #4. Press ENTER and
the demo song will begin loading.
• Mixing the Demo Song
The transport controls on the VS-840 are located in the lower,
right section of the front panel. They operate in the same
manner as a tape deck or CD player. The ZERO button will
return you to the beginning of the song.
1) Move the TRACK and MASTER faders all the way up and
down and then back to 0dB (the thick line approximately
two-thirds of the way up).
2) Press ZERO followed by PLAY.
3) Move the faders to adjust the levels of the tracks.
• Playing the Virtual Tracks of the Demo Song
Refer to the
“Mercy Blue”
Track Sheet (included with
the unit) for a list of the available Virtual Tracks. This example
will access the Virtual Tracks on Channel #3.
1) Press STOP.
2) Hold SHIFT and press TRACK STATUS 3.
3) Use the TIME/VALUE dial to select “V-TRACK 3.”
4) Press ZERO followed by PLAY to hear a different guitar
part for the intro.
5) Press STOP when you are finished.
• Changing the EQ Settings
Use the following procedure to adjust the EQ settings of the drums:
1) Press ZERO followed by PLAY. Pull down all faders except
for 7/8 and move the 7/8 fader to 0dB.
2) Press the EQ button (in the Channel Parameter section).
3) Press RIGHT CURSOR to select channel 7/8.
4) Use the TIME/VALUE dial to turn the EQ switch on.
5) Press DOWN CURSOR to highlight “Mid Gain.”
6) Use the TIME/VALUE dial to boost or cut levels as desired.
7) Press DOWN CURSOR to highlight “Mid Freq.”
8) Use the TIME/VALUE dial to change the frequency.
9) Press STOP and move all the faders to 0dB.
• Using the Internal Effects Processor
The VS-840 has a built-in effects processor that contains over 200
different effects presets. To listen to some of the guitar effects:
1) Hold SHIFT and press TRACK STATUS 3.
2) If necessary, use the CURSOR buttons to select “TRACK 3”
and use the TIME/VALUE dial to select “V-TRACK 3.”
3) Press ZERO followed by PLAY. You should hear a dry
guitar part. Press STOP.
4) Press EFFECT and use the DOWN CURSOR and
TIME/VALUE dial to select “CH 3 Insert.”
5) Press RIGHT CURSOR to highlight “TYPE” and use the
TIME/VALUE dial to select “Guitar Multi 1.”
6) Press RIGHT CURSOR to highlight “PATCH” and use the
TIME/VALUE dial to select “A-80 ROCK LEAD.” Press ENTER.
7) Press ZERO followed by PLAY to listen to the effect.
8) Use the TIME/VALUE dial to select different effect
Patches and press ENTER to hear the selected effect.
• EZ Routing
EZ Routing guides beginning users through basic recording
procedures such as recording, track bouncing, and mix down. For
this example, we will use EZ Routing to setup the VS-840 to record
a guitar on track 3 from input 1, with effects.
1) Connect your guitar to the GUITAR (Hi-Z) input on the VS-840.
2) Press EZ ROUTING.
3) Use the CURSOR buttons to highlight the RECORDING icon
and press ENTER. “Edit Routing” will be displayed.
4) Press RIGHT CURSOR followed by ENTER.
5) Use the CURSOR buttons to select “Track 3” and the
TIME/VALUE dial to select the desired V-TRACK.
6) Press ENTER and the “Input Select” page will be displayed.
7) Press ENTER and the “Recording Track Destination”
page will be displayed.
8) Use the LEFT CURSOR button to select “CHANNEL 1”
and the TIME/VALUE dial to select “3.”
9) Press ENTER and the “Channel Pan” page will be displayed.
10) Press ENTER and “Use Effect?” will be displayed.
11) Press RIGHT CURSOR followed by ENTER and use the
TIME/VALUE dial to select “TYPE: Guitar Multi 1.”
12) Press DOWN CURSOR, use the TIME/VALUE dial to select
“A-85: STUDIO LEAD” and press ENTER twice.
13) Use the TIME/VALUE dial to select “CH 1 INSERT.” Play your
guitar to hear the effect (use the INPUT SENS 1 knob to adjust
the level).
14) Press ENTER followed by DISPLAY. The VS-840 is now
setup for recording.
NOTE: This song is protected and will not go into record mode.
NQPSMTR
)&
TBS45 ©1996 Roland Corporation U.S., 7200 Dominion Circle, Los Angeles, CA 90040 Faxback # 20032 6/96
••• ROLAND VS-880 TURBO FACTS •••
The VS-880 is a complete, all in one digital studio. It is an 8
track non-destructive disk recorder and editor with the ability
to cut, copy, and move tracks. Each song contains 64 virtual
tracks, 8 Scenes, 1000 Markers, and 999 levels of UNDO.
There is a 14 channel digital mixer with up to 28 bands of
EQ. Built in MIDI TIME CODE (MTC) and MIDI Machine
Control capabilities allow the VS-880 to synchronize as
master or slave. The VS-880 also generates MIDI Clock and
Song Position Pointer messages for syncing with devices
that are not MTC compatible. There is even an independent
tempo track for importing tempo data from your sequencer.
The VS-880 also allows you to VARI-PITCH your song to
tune to outside sources such as an acoustic piano. The user
installable VS-8F1 (optional) offers 2 independent high-
quality stereo effects processors. It contains 100 Preset
Patches that can be edited and stored to one of the 100
User Patch locations. Some of the effects featured on the
VS8F-1 include multi-effects, COSM amp simulators and
Roland Sound Space (RSS) effects. Songs can be stored to
an internal hard-drive or to an external source via the built-in
SCSI interface. The VS-880 comes with a 540 MB internal
hard-drive.
• Loading the Demo Song
1) Press the EDIT CONDITION button marked SONG until
Song Select ? appears in the display.
2) Press YES.
3) Use the TIME/VALUE dial to select VS-880 DEMO.
4) Press YES until NOW WORKING flashes in the display.
5) The display will read COMPLETE when the demo is
finished loading .
• Mixing the Demo Song
The transport controls on the VS-880 are located in the lower
right section of the front panel. They operate in the same
manner as a tape deck or CD player. The ZERO button will
always return you to the beginning of the song.
1) Move the TRACK and MASTER faders all the way up
and then back down to 0db (the thick line approximately
2/3’s the way up).
2) Press PLAY.
3) Move the Faders to adjust the levels of the Tracks.
• Playing the Virtual Tracks in the Demo Song
Refer to the Track sheet of the Demo Song (included with
the unit) for the available Virtual Tracks. This example will
access the Virtual Tracks on Channel #8.
1) Press STOP.
2) Press CH EDIT button #8 (above Channel #8 fader and
STATUS button).
3) Hold SHIFT and press V. TRACK (CH EDIT #2).
4) Use the TIME/VALUE dial to select the desired V Track.
5) Press the LOCATOR button #1 and press PLAY.
• Changing the EQ Settings
This example will adjust the EQ settings of the Drums.
1) Press PLAY.
2) Hold SHIFT and press SOLO followed by CH EDIT #1 to
enter Solo Mode.
3) Press the TRACK STATUS #1 button to solo the drums.
4) Hold SHIFT and press CH EDIT #4 (EQ Mid).
5) Use the TIME/VALUE dial to boost or cut levels .
6) Use the PARAMETER buttons and the TIME/VALUE
dial to adjust the settings.
7) Hold SHIFT and press SOLO to exit Solo Mode.
• Using Effects (with VS-8F1 Expansion)
1) Press CH EDIT #8.
2) Hold SHIFT and press CH EDIT #7 (Effect-1).
3) Use the TIME/VALUE dial to select PSTFADE.
4) Press the EDIT CONDITION button marked EFFECT
until EFFECT-1 PRM? appears in the display, then
press YES.
5) Use the TIME/VALUE dial to select the effect type, then
press YES to make it active.
Note:The VS-880 has 2 independent stereo effects
processors on board using the optional VS-8F1.Press CH
EDIT #8 in step 2 and select EFFECT-2PRM? in step 4 to
use the additional effect processor.
• Basic Editing
The VS-880 offers powerful non-linear editing functions such as
copy, move, exchange, insert, cut, and erase. It even contains
a time compression/expansion function. This can be useful for
adjusting the length of your song to fit a specified length, or for
pitch correcting an incorrect note. The following procedure
shows how to erase a portion of a track on the VS-880 demo
song. Most of the edit functions are performed in a similar fashion.
1) Press STOP.
2) Select Virtual Track #2 (female vocal) for Track #8.
3) Press LOCATOR #1.
4) Press the EDIT CONDITION button marked TRACK
until TRACK ERASE ? appears in the display, press YES.
5) Press CH EDIT #8.
6) Press the RIGHT PARAMETER button.
7) Press LOCATOR #1 for the START of the erase.
8) Press the RIGHT PARAMETER button.
9) Press PLAY and listen to the vocal to the end of the area you
wish to erase, then press STOP.
10) Press the RIGHT PARAMETER button, then press YES.
11) When completed, press LOCATOR #1 and play the
edited version of the track.
Note: If you make a mistake, simply press UNDO, then
press YES (this will not have any effect on a protected song
such as the VS-880 demo).
The VS-880 can lock to SMPTE for video post-production or
music applications by adding a SMPTE to MTC converter.
Several VS-880s can be linked together with simple MIDI
and digital connections. This locks the units clocks together
and provides a single digital output for audio from all units.
NQPSMTR
)&D
TBS62 © 1997 Roland Corporation U.S., 7200 Dominion Circle, Los Angeles, CA 90040 Faxback # 20056 1/97
••• ROLAND VS-880-S1 TURBO FACTS •••
VS-880-S1 is a user-installable update that gives the VS-880
Digital Studio Workstation powerful new features. It also includes
10 new effects algorithms for the VS8F-1 Effects Expansion
Board. Here are a few highlights of the new version:
Onboard Auto Mix functions for recording realtime changes in
volume, panning, effects level and effects type
Ability to switch Scenes via MIDI program change
More effects routing options
Up to 8 channels of 3-band EQ in Input Mix/Track Mix mode
Ability to switch effect programs via MIDI program change
Grab Faders option that allows track levels to move instantly to
the fader position instead of having to cross the Null point
Simultaneous playback of 6 tracks in Mastering mode
New Sync Track options: Tap Tempo and Auto Calculation
Peak/Hold display option for the level meter
100 new preset effects patches using 10 new effects algorithms
including: Voice Transformer (VT-1), COSM microphone
simulators (Neumann U87 &b U47, AKG C451, Sennheiser
MD421 and Shure SM58/57)*, vocal canceller, hum canceller,
19-band vocoder, Lo-Fi processor, Space Chorus (Dimension
D), Reverb 2 w/gate and ducking (available on Effect-1 and
Effect-2), 4-band parametric EQ and 10-band graphic EQ
• Install the Update
The installation procedure requires the VS-880-S1 Expansion
disk and an external Iomega Zip drive. Before performing the
update, make sure the Zip drive and VS-880 are turned off.
1) Connect the Zip drive to the VS-880 with a SCSI cable.
Make sure the termination switch on the drive is
set to On.
2) Insert the VS-880-S1 cartridge into the drive and
turn it on.
3) Turn the VS-880 on.
4) After scanning the SCSI buss, the VS-880 display will
read “Update SYS PRG?” Press YES/ENTER.
5) “Please Reboot OK” will be displayed. Turn the VS-880’s
power off and back on. The new system version number
will be displayed during boot-up.
• Auto Mix — Realtime
While it was previously only possible to automate the
VS-880 mixer via MIDI, the new system provides built-in
automation.
1) Press the SYSTEM button until you see “Scene/Auto
Mix?” and press YES/ENTER.
2) Press PARAMETER>> until “A.Mix Mode=” is displayed
and use the TIME/VALUE dial to select “On.”
3) Hold SCENE and press REC.
4) Press PLAY. Move the faders and turn the pan pots.
5) Press STOP. Start playback from the beginning of the
song and you will hear all of your fader and knob
movements.
* Roland technicians have sought to recreate the sound of the
above listed microphones. This was an independent Roland production
and did not involve any of the aforementioned companies through either
a business or consulting relationship or by way of license agreement.
* All trademarks are property of their respective owners.
• Auto Mix — Snapshot
In addition to the 8 Scene locations, Marker points can be
used to capture current mixer positions.
1) Activate Auto Mix as previously described.
2) Change some mixer parameters at some point in the song.
3) Hold SCENE and press TAP. This takes a “snapshot” of
the current settings and assigns them to a Marker.
4) Play the song from the beginning and you will hear your
mixer settings change at that Marker.
• Selecting the New Effect Algorithms of the VS8F-1
Use the following procedure to view the new effects (B00-99):
1) Press EFFECT to show “Effect-1 PRM?” Press YES.
2) Use the TIME/VALUE dial to access the effects patches.
3) Press YES/ENTER to select a patch.
4) Hold SHIFT and press EFFECT-1 (CH EDIT button 7).
5) Press the desired CH EDIT button (1-8) and use the
VALUE dial to select Insert, PreFade, or PstFade.
• Using the Microphone Simulators of the VS8F-1
1) Press EFFECT (under EDIT CONDITION) until “EFFECT-
1 PRM?” is displayed and press YES/ENTER.
2) Use the VALUE DIAL to select “B-99 MicSimulator.”
3) Press YES/ENTER.
4) Press PARAMETER>> until “MCA:Input” is displayed and
use the VALUE DIAL to select the desired input/mic type.
5) Press PARAMETER>> until “MCA:OUT” is displayed and
use the VALUE DIAL to select the desired microphone
algorithm. For example, if you want to make a dynamic
mic sound like a vintage condenser mic, select “Sml.Dy” in
step 4 and “Vnt.Cn” in step 5.
6) From INPUT MIX mode Hold SHIFT and press EFFECT-1
(CH EDIT button 7).
7) Press the desired CH EDIT button (1-8) and use the
VALUE DIAL to select “Insert.”
8) Set the corresponding STATUS button to SOURCE
(orange) to hear the microphone simulation.
• Using the Voice Transformer of the VS8F-1
1) Connect a microphone to Input 1.
2) Hold SHIFT and press EFFECT-1 (CH EDIT button 7).
3) Press CH EDIT button 1 and use the VALUE DIAL to
select “Insert.”
4) Press STATUS for channel 1 until it is set to SOURCE
(orange). You should be able to hear the mic input.
5) Press EFFECT (under EDIT CONDITION) until “EFFECT-
1 PRM?” is displayed and press YES/ENTER.
6) Use the VALUE DIAL to select “B-07 Voice Trans.”
7) Press YES/ENTER.
8) Press PARAMETER>> until “FE:FaderEdit” is displayed
and use the VALUE dial to select “On.”
9) Speak into the microphone and use faders 1-5 to alter the
sound of your voice (fader 1 controls the ‘Robot’ effect,
fader 2 controls the pitch, fader 3 controls the formant,
fader 4 controls the effect balance, and fader 5 controls
the reverb level).

NQPSMTR
)&%&
TBS69 © 1997 Roland Corporation U.S., 7200 Dominion Circle, Los Angeles, CA 90040 Faxback # 20067 11/97
••• ROLAND VS-CDR-S2 TURBO FACTS •••
VS-CDR-S2 is a complete hardware/software bundle that provides
V-Xpanded users the ability to burn audio CDs directly from the
VS-880 without any additional hardware. Users can now record,
edit, mix, apply effects, and master to CD entirely in the digital
domain. The included CD-R drive will also function as a CD Rom
player and writer for both Macintosh and IBM compatible
computers. The VS-CDR-S2 package consists of the following:
• ZIP™ disk containing VS-880 CD recording software Version 3
• Multi-session 2x write/6x read CD-R drive
• Adaptec Toast CD-R software for Macintosh
• Adaptec Easy CD Pro CD-R software for PC platforms
• SCSI cable and active terminator
• 2 Blank CD-R discs
•Install the Update (Requires VS-880 V-Xpanded 2.0)
The installation procedure requires the VS-880-S2 Expansion
disk and an external SCSI Iomega Zip drive. Before performing
the update, make sure the Zip drive and VS-880 are turned off.
1) Connect the Zip drive to the VS-880 with a SCSI cable.
Make sure the termination switch on the drive is set to On.
2) Insert the VS-880-S2 cartridge into the drive and turn it on.
3) Turn the VS-880 on.
4) After scanning the SCSI buss, the VS-880 display will
read “Update SYS PRG?” Press YES/ENTER.
5) “Please Reboot OK” will be displayed. Turn the VS-880’s
power off.
• Setup
1) With all equipment turned off, connect the SCSI port of
the CD-R drive to the SCSI port of the VS-880.
2) Attach the terminator to the remaining SCSI port on the
CD-R. If you are using multiple SCSI devices, connect them
to the CD-R drive and terminate the last device in the chain.
3) Set the ID numbers of each SCSI device so that they do
not conflict (the VS-880 defaults to SCSI ID #7).
4) Turn on the power in the following order: CD-R drive,
VS-880, audio equipment.
• Mix Down
The VS-880 CD recording system allows you to designate 2
source tracks to provide the audio for your CD. The VS-880
song must be mixed down (including Auto mix, EQ and effects)
to 2 tracks before you create your CD. Use the following
procedure to create a mix down of Tracks 1-6 on Tracks 7-8:
1) Hold SHIFT and press SELECT so that INPUT>TRACK
mode is selected.
2) Hold SHIFT and press CH EDIT 1.
3) Press CH EDIT 7 and use the VALUE DIAL to select
“MIX-L.”
4) Press CH EDIT 8 and use the VALUE DIAL to select
“MIX-R.”
5) Press CH EDIT 1. Use the RIGHT PARAMETER (>>)
button to select the “Mix Sw=” display and use the
VALUE DIAL to select “PstFade.” Repeat for tracks 2-6.
6) Set the Track Status buttons for tracks 1-6 to green (Play)
and tracks 7 and 8 to flashing red (Record Standby).
7) Use the faders to adjust the levels of tracks 1-6 as desired.
Mix Down (continued)
8) Press REC followed by PLAY to record your mix to
Tracks 7 and 8.
9) Press STOP when the song is finished.
NOTE: When creating a CD, the song length is set by
the length of the mix down tracks (7-8). You may need to
cut data on your Tracks to avoid empty space.
• Creating CD Markers (Track IDs)
The VS-CDR-S2 allows you to create a CD one song at a time.
It is also possible to use one long song with special markers to
indicate the Track ID numbers between songs. When using a
VS-880 project that contains multiple songs, it is necessary to
create a track ID number for each song. Use the following
procedure:
1) Advance the VS-880 to the location you would like to use
as the beginning of the second track on your CD.
NOTE: The VS-880 will automatically use 00h00m00s00f
as the first CD Track ID.
2) Hold SONG and press TAP to create a CD marker.
NOTE: In order to comply with audio CD standards,
songs must be at least 4 seconds long.
3) Advance the VS-880 to the location you would like to use
as the beginning of the next CD track. Hold SONG and
press TAP. Repeat this procedure as desired.
• Writing a CD
Use the following procedure to create a CD:
1) Insert a blank CD-R disc in the CD-R drive.
2) Press SONG until “SNG CD-R Write?” appears in the
display and press YES/ENTER. “Write+Finalize” will be
displayed.
NOTE: When writing individual songs to a CD, use the
Write function instead of Write+Finalize mentioned above.
When you have completed all the tracks for your CD, use
Finalize to make the CD playable on a normal CD player.
1) Press YES/ENTER.
2) Press the CH EDIT button for the track to be written to the
CD-R as the left track.
3) Press the CURSOR RIGHT (>) button.
4) Press the CH EDIT button for the track to be written to the
CD-R as the right track.
NOTE: The disk space required will appear under the
“Measure Beat” portion of the display. Make sure that this
number is smaller than the number under “SYNC MODE
SCENE” (the amount of free space on the internal IDE
hard drive) and “REMAINING TIME” (the amount of free
space on the CD-R disc).
5) Press PARAMETER RIGHT (>>) so that “SNG CD-R
Write Sure?” is displayed.
6) Press YES/ENTER. “Obey Copyrights?” will be displayed.
Read the license agreement (p.61 in the VS-CDR-S2
Owner’s Manual). Press YES/ENTER and the VS-880 will
begin to write data to the CD-R.
NQPSMTR®
+#
TBS37 ©1995 Roland Corporation U.S., 7200 Dominion Circle, Los Angeles, CA 90040 Faxback # 20030 12/95
••• ROLAND XP-10 TURBO FACTS •••
The XP-10 Multitimbral Synthesizer features 338
Preset Tones, 256 User Tones, and 16 drum kits.
The keyboard can split and layer sounds, and the X-
Dual function can blend and create new sounds. The
Advanced Arpeggiator includes many patterns
including synth bass, random note patterns and
guitar strum patterns. The XP-10 is fully compatible
with General MIDI and GS, and it includes a built-in
serial port interface for direct connection to
Macintosh or PC computers.
• Restoring Factory Settings
1) Press UTILITY.
2) Use VALUE -/+ to select “Initialize” and press
ENTER.
3) Use VALUE -/+ to select “Factory Preset.”
4) Press ENTER to restore factory setup.
• Playing the Demo Songs
1) Simultaneously press VALUE + and
USER/PRESET.
2) Use VALUE -/+ to select a song.
3) Press ENTER to start playback.
4) Press EXIT to stop playback.
5) Press EXIT again to return to normal keyboard
operation.
• Selecting & Playing Sounds
1) Press PERFORM/TONE until the name of the
currently selected Tone(s) is shown in the
display.
2) Press USER/PRESET to select either User or
Preset tone banks.
3) Use the -/+ buttons or enter numbers to select
tones.
4) You can also select Variation Tones by pressing
the TONE VARIATION button (this only applies
to the Preset tone banks).
• Create a Split or Layered Keyboard
It’s easy to split or layer the XP-10 sounds:
1) Press PERFORM/TONE to select Perform
mode.
2) Press the SPLIT or DUAL buttons.
3) Use the UPPER/LOWER buttons to select a
zone.
4) Use -/+ or the number buttons to select other
tones for each zone.
• Playing the X-Dual Mode
The X-Dual mode allows you to blend two sounds by
using a slider. To try the X-Dual function:
1) Press PERFORM/TONE to select Perform
mode.
2) Select Performance User:09.
3) Move slider 1 to gradually change the sound
from “Soundtrack” to “Echo Drops.”
4) To change the sounds, press PERFORM/TONE
to select Tone mode.
5) Use the UPPER/LOWER buttons to select a
zone.
6) Use -/+ or the number buttons to select other
tones for each part.
• Using the Arpeggiator
The XP-10 has a very powerful arpeggiator that is
completely programmable. To try it out:
1) Press PERFORM/TONE to select Perform
mode.
2) Select Performance User:03. This is a split
keyboard setting with the arpeggiator set to play
a Synth Bass pattern in the left hand. There is
also a synth pad sound in the right hand that is
unaffected by the arpeggiator.
3) Now try Performance Pre:13. This arpeggiator
features a guitar cut-and-strum style. Hold a
chord and use Slider 1 to create a “wah” effect.
By raising Slider 2, you can increase the filter
resonance for a sharper “wah” effect.
4) Press the PALETTE SELECT button. This will
reassign the sliders to control Tempo and
Shuffle for the arpeggiator.
5) To explore the depth of the arpeggiator, press
EDIT, use -/+ to select Perform Common.
6) Use the ARPEGGIO button (0 button) to select
various arpeggiator functions for editing.
• Saving a User Performance
An XP-10 Performance remembers all current
settings, including tones for all Parts, keyboard
mode, even arpeggiator style and sync. To store a
Performance:
1) Press UTILITY.
2) Use -/+ to select Write Perform; press ENTER.
3) Select a destination to save your edited
Performance by using the -/+ buttons or the
number keys.
4) Press ENTER to store the Performance.
NQPSMTR®
+#
TBS35 ©1995 Roland Corporation U.S., 7200 Dominion Circle, Los Angeles, CA 90040 Faxback # 20031 12/95
••• ROLAND XP-50 TURBO FACTS •••
The XP-50 Music Workstation is a powerful new
instrument based on a 32-bit RISC processor with
8 Mb ROM waveforms. It is 64 note polyphonic, 16
part multitimbral, GM compatible, and contains 512
Preset Patches and 128 User Patches. Up to four
SR-JV80 Wave Expansion boards can be installed,
providing up to 40 Mb and 1,660 Patches. The
XP-50 also includes Reverb, Chorus, and 40 other
effects including Rotary, Distortion, Flanging,
Phasing, and MultiTap Delays. Its MRC-Pro
Sequencer features 16 Track linear and loop
recording, plus 100 Patterns, real time non-
destructive editing, event editing, and Direct from
Disk song playback. The XP-50's Realtime Phrase
Sequencer (RPS) allows recorded Patterns to be
triggered from specific keys.
• Initializing
1) Press UTILITY.
2) Press 4: SOUND on the 10-key pad.
3) Press 5: PRESET.
4) Press ENTER.
5) If Memory Protect is on, press DEC, then
ENTER twice.
• Playing Demos or other Sequences
1) Insert a disk that contains an XP-50 sequence or
a Standard MIDI File (SMF).
2) Press SEQUENCER.
3) Rotate the DIAL until the desired song is
displayed.
4) Press PLAY.
• Selecting & Playing Patches
1) Press PATCH.
2) Rotate the DIAL, use the INC / DEC buttons, or
ENTER a number on the 10-key to choose
Patches.
3) Patch Banks are selected by holding SHIFT and
pressing the appropriate number in the 10-key
pad. Patch Banks are listed in gray.
Note: EXP A/B/C/D banks can only be used when
Wave Expansion boards are installed.
• Selecting & Playing Rhythm Sets
1) Press RHYTHM.
2) Rotate the DIAL or press INC / DEC to choose a
Rhythm Set.
• Loop Recording
1) Press PERFORM and turn the DIAL to select PR-
A:12 Pop Set 1.
2) Press SEQUENCER.
3) Press REC and select MODE=MIX, LOOP=4,
the desired tempo and count-in.
4) Press 1-8/9-16, then press Track 10 for Drums.
5) Hold SHIFT and press METRONOME to start
the metronome. Repeating this procedure will
toggle the metronome off.
6) Cursor Down to set desired Input Quantize.
7) Press PLAY and record your Rhythm Set.
8) Press PERFORM and PART to enter PART
Play.
9) Cursor to Part 2 and add bass to your Track.
10) Cursor to other Parts to add new instruments.
• Using the XP-50 for General MIDI
1) Hold SHIFT and press PERFORM.
2) Press PERFORM or PATCH to exit GM mode.
• RPS - Real time Phrase Sequencing
1) Create a recording.
Refer to Loop Recording.
2) Press SEQUENCER, EDIT and 1/9 (Trk Edit).
3) Dial to 3: COPY. Set Source=TRK ALL,
Dest=PTN 001, or other empty Pattern.
4) Press ENTER.
5) Press 6/14 (RPS) on the Edit Grid.
6) Cursor down to Play Pattern. Press a key and
assign it the Pattern Number from step 3. Set
Playback Mode to Loop 2.
7) Press EXIT.
8) Press RPS so it is lit.
9) Press the assigned key. Press it again to stop
playback.
• Splitting the Keyboard
1) Press PERFORM and turn the DIAL to select
PR-A:12 Pop Set 1.
2) Turn on EDIT and press F1(Common).
3) Cursor Down twice to Key Mode. Select Layer.*
4) Press PALETTE.
5) Cursor to KEY RANGE UPPER to select the
upper range for the Parts.
6) Cursor down to KEY RANGE LOWER to select
the lower range for the Parts.
7) Turn off EDIT, then press TX and RX together.
8) Press desired Part buttons (under display) to
turn on the Parts for the Split.
9) Press EDIT, then PART and select a Bank and
Patch for each Part of the Split.
Note: *Single Key Mode is primarily for
sequencing.
NQPSMTR®
+#
TBS73 ©1998 Roland Corporation U.S., 7200 Dominion Circle, Los Angeles, CA 90040 Faxback # 20071 3/98
••• ROLAND XP-60 TURBO FACTS •••
The XP-60 Music Workstation is the newest member
of the powerful XP family. Features include:
• 61-note keyboard with aftertouch
• 64 note polyphonic, 16 part multitimbral
• 512 Preset Patches and 128 User Patches
• Up to four SR-JV80 Wave Expansion boards can
be installed, providing up to 1,660 Patches
• Reverb, Chorus, and a Multi Effect unit with 40
effects including Rotary Speaker, Distortion,
Flanging, Phasing, and MultiTap Delays
• Sound Palette section for realtime control
• Arpeggiator with 33 styles
• Advanced 60,000 note MRC-Pro Sequencer with
16 Tracks and 100 Patterns
• Grid, Shuffle, and Groove Quantize functions
• Direct from Disk song playback
• Realtime Phrase Sequencer (RPS) allows recorded
Patterns to be triggered from specific keys and to
be dynamically controlled by velocity
• Initializing
1) Press UTILITY.
2) Press 8 on the key-pad followed by ENTER.
3) Press F6: EXECUTE.
4) If Memory Protect is on, dial OFF, then ENTER.
5) Press F6: EXECUTE.
• Playing the On-board Demo
1) Hold SEQUENCER and press CHAIN PLAY.
2) Press F5: OK.
• Playing Demos or Sequences from Disk
1) Insert a disk that contains an XP-Series
sequence (.SVQ) or a Standard MIDI File (.MID).
2) Press SEQUENCER.
3) Press F6: LIST to view a list of songs on disk.
4) Use the VALUE DIAL to select a song and press
PLAY.
• Selecting & Playing Patches
The XP-60 has 640 on-board Patches that are
divided into 5 Banks. Use the following procedure to
select a Patch:
1) Press PATCH.
2) Press SOUND LIST.
3) Choose a Patch Bank by pressing F2: -GROUP,
or F3: +GROUP.
4) Use the VALUE DIAL to select a Patch.
5) To enter GM Mode, hold SHIFT and press
PERFORM (press PERFORM again to exit).
• Selecting & Playing Rhythm Sets
1) Press RHYTHM.
2) Select a Rhythm Set with the DIAL or DEC/INC.
• Using the Sound Palette for Realtime Control
1) Select a Patch.
2) Press FILTER/ENV to control envelope
parameters, or LEVEL to control Tone levels.
• Using the Arpeggiator
1) Press Patch and use the VALUE DIAL to select a
Patch.
2) Press ARPEGGIO.
3) Hold a chord on the keyboard.
4) Dial an Arpeggio Style.
5) Press F5: DETAIL.
6) CURSOR to MOTIF and use the VALUE DIAL to
select the note order.
7) CURSOR to BEAT PATTERN and use the
VALUE DIAL to select a pattern.
• Loop Recording
As an example we will record a four bar loop:
1) Press PERFORM and select PR-A:12 Pop Set 1.
2) Press SEQUENCER.
3) Press REC, then select LOOP=4, MODE=MIX,
QNTZ=OFF, CountIn=1, and the desired tempo.
4) Press TRK 10.
5) Press PLAY, wait for count-in, and record drums.
6) Repeat steps 4 - 6, using TRK/PART 2 for bass,
and TRK/PART 1 for piano.
• RPS - Real-time Phrase Sequencing
1) Create a loop recording, as shown above.
2) Press F3: TRK EDIT, then F3: COPY.
3) Cursor to <DEST.> and select PTN 001.
4) Press F6: EXECUTE.
5) Press SEQUENCER, F1: SETUP, then F4: RPS.
6) Press the key C4 to assign the Pattern to it.
7) Cursor to PATTERN and select 001.
8) Press EXIT, RPS, then press C4 to trigger the
pattern.
• Splitting the Keyboard
1) Select PERFORM PR-A:12, then press LOCAL.
2) Cursor to KEY MODE and select LAYER.*
3) Cursor to LOCAL SW.
4) Press PART buttons 1 and 2 (BANK buttons).
5) Press PERFORM, then F2: K.RANGE.
6) Dial C4:G9 for the Part 1 Key Range, and C1:B3
for the Part 2 Key Range.
*Single Key Mode is primarily for sequencing.
NQPSMTR®
+#
TBS40 ©1996 Roland Corporation U.S., 7200 Dominion Circle, Los Angeles , CA 90040 Faxback # 20034 2/96
••• ROLAND XP-80 TURBO FACTS •••
The XP-80 Music Workstation is a powerful new
instrument based on a 32-bit RISC processor with
8 Mb ROM waveforms. It is 64 note polyphonic, 16
part multitimbral, GM compatible, and contains 512
Preset Patches and 128 User Patches. Up to four
SR-JV80 Wave Expansion boards can be installed,
providing up to 40 Mb and 1,660 Patches. The
XP-80 also includes Reverbs, Chorus, and 40 other
effects including Rotary, Distortion, Flanging,
Phasing, and MultiTap Delays. It has a 76-note
weighted keyboard, a Sound Palette section for
realtime control, a sequencer Click Out for other
musicians to keep time with and an Arpeggiator with
33 different styles. It’s Advanced MRC-Pro
Sequencer features a 60,000 note capacity, 16
Track linear and non-stop-loop recording, plus 100
Patterns, realtime non-destructive editing, event
editing, and Direct from Disk song playback. The
XP-80's enhanced Realtime Phrase Sequencer
(RPS) allows recorded Patterns to be triggered from
specific keys and to be dynamically controlled by
velocity.
• Initializing
1) Press UTILITY.
2) Press 8 on the key-pad followed by ENTER.
3) Press F6: EXECUTE.
4) If Memory Protect is on, dial OFF, then ENTER.
5) Press F6: EXECUTE.
• Playing the On-board Demo
1) Hold SEQUENCER and press CHAIN PLAY.
2) Press F5: OK.
• Playing Demos or Sequences from Disk
1) Insert a disk that contains an XP-Series
sequence or a Standard MIDI File (SMF).
2) Press SEQUENCER.
3) Press F6: LIST to view a list of songs on disk.
4) Dial a song and press PLAY.
• Selecting & Playing Patches
1) Press PATCH.
2) Press SOUND LIST.
3) Choose a Patch Bank by pressing F2: -GROUP,
or F3: +GROUP.
4) Dial a Patch Number.
5) To enter GM Mode, hold SHIFT and press
PERFORM (press PERFORM again to exit).
• Selecting & Playing Rhythm Sets
1) Press RHYTHM.
2) Select a Rhythm Set with the DIAL or DEC/INC.
• Using the Sound Palette for Realtime Control
1) Select a Patch.
2) Press FILTER/ENV to control envelope
parameters, or LEVEL to control Tone levels.
• Using the Arpeggiator
1) Press ARPEGGIO.
2) Hold a chord on the keyboard.
3) Dial an Arpeggio Style.
4) Press F5: DETAIL.
5) Cursor to MOTIF and dial the note order.
6) Cursor to BEAT PATTERN and dial a pattern.
• Loop Recording
As an example we will record a four bar loop:
1) Press PERFORM and select PR-A:12 Pop Set 1.
2) Press SEQUENCER.
3) Press REC, then select LOOP=4, MODE=MIX,
QNTZ=OFF, the tempo, and count-in (M=?).
4) Press TRK 10.
5) Press PLAY, wait for count-in, and record drums.
6) Repeat steps 4 - 6, using TRK/PART 2 for bass,
and TRK/PART 1 for piano.
• RPS - Real-time Phrase Sequencing
1) Create a loop recording, as shown above.
2) Press F3: TRK EDIT, then F3: COPY.
3) Cursor to <DEST.> and select PTN 001.
4) Press F6: EXECUTE.
5) Press SEQUENCER, F1: SETUP, then F4: RPS.
6) Press a key to assign the Pattern to.
7) Cursor to PATTERN and select 001.
8) Press EXIT, RPS, then the chosen key.
• Splitting the Keyboard
1) Select PERFORM PR-A:12, then press LOCAL.
2) Cursor to KEY MODE and select LAYER.*
3) Cursor to LOCAL SW.
4) Press PART buttons 1 and 2 (BANK buttons).
5) Press PERFORM, then F2: K.RANGE.
6) Dial C4:G9 for the Part 1 Key Range, and C1:B3
for the Part 2 Key Range.
*Single Key Mode is primarily for sequencing.
