RStudio Server Professional Edition Pro 1.1.423 Admin Guide
User Manual: Pdf
Open the PDF directly: View PDF ![]() .
.
Page Count: 89

®
RStudio Server Pro
Administrator’s Guide
RStudio Server Professional v1.1.423
Copyright ©2016 RStudio, Inc.
Contents
1 Getting Started 3
1.1 Introduction......................................... 3
1.2 Installation ......................................... 4
1.3 ManagementScript..................................... 6
1.4 Activation.......................................... 6
1.5 AccessingtheServer .................................... 7
2 Server Management 8
2.1 CoreAdministrativeTasks................................. 8
2.2 AdministrativeDashboard................................. 11
3 Authenticating Users 13
3.1 PAMAuthentication.................................... 13
3.2 Restricting Access to Specific Users . . . . . . . . . . . . . . . . . . . . . . . . . . . . 15
3.3 GoogleAccounts ...................................... 16
3.4 Customizing the Sign-In Page . . . . . . . . . . . . . . . . . . . . . . . . . . . . . . . 20
3.5 ProxiedAuthentication .................................. 20
4 Access and Security 24
4.1 NetworkPortandAddress................................. 24
4.2 IPAccessRules....................................... 24
4.3 FrameOrigin ........................................ 25
4.4 SecureSockets(SSL).................................... 25
4.5 ServerPermissions ..................................... 26
4.6 RunningwithaProxy ................................... 28
5 R Sessions 32
5.1 R Executable and Libraries . . . . . . . . . . . . . . . . . . . . . . . . . . . . . . . . 32
5.2 UserandGroupProfiles.................................. 34
5.3 MultipleRSessions..................................... 38
5.4 PAMSessions........................................ 38
5.5 Kerberos........................................... 42
5.6 WorkingDirectories .................................... 43
5.7 WorkspaceManagement.................................. 44
5.8 FirstProjectTemplate................................... 47
5.9 ProjectSharing....................................... 48
5.10PackageInstallation .................................... 51
1
CONTENTS 2
5.11FeatureLimits ....................................... 52
5.12Notifications ........................................ 54
5.13RStudioConnectServer .................................. 56
6 R Versions 58
6.1 Overview .......................................... 58
6.2 Installing Multiple Versions of R . . . . . . . . . . . . . . . . . . . . . . . . . . . . . 58
6.3 Configuring the Default Version of R . . . . . . . . . . . . . . . . . . . . . . . . . . . 60
6.4 Using Multiple Versions of R Concurrently . . . . . . . . . . . . . . . . . . . . . . . . 61
6.5 ManagingUpgradesofR.................................. 63
7 Load Balancing 65
7.1 Overview .......................................... 65
7.2 Configuration........................................ 65
7.3 AccessandAvailablity ................................... 69
7.4 BalancingMethods..................................... 71
8 Auditing and Monitoring 73
8.1 AuditingConfiguration................................... 73
8.2 MonitoringConfiguration ................................. 76
8.3 ServerHealthChecks.................................... 77
9 License Management 80
9.1 ProductActivation..................................... 80
9.2 Connectivity Requirements . . . . . . . . . . . . . . . . . . . . . . . . . . . . . . . . 80
9.3 Evaluations ......................................... 82
9.4 FloatingLicensing ..................................... 83
10 Data Connectivity 87
10.1ConnectivityusingODBC................................. 87
10.2 Connectivity using R Packages . . . . . . . . . . . . . . . . . . . . . . . . . . . . . . 87
10.3SnippetFiles ........................................ 87
Chapter 1
Getting Started
1.1 Introduction
RStudio Server enables you to provide a browser based interface (the RStudio IDE) to a version of
R running on a remote Linux server. Deploying R and RStudio on a server has a number of benefits,
including:
•The ability to access R sessions from any computer in any location;
•Easy sharing of code, data, and other files with colleagues;
•
Allowing multiple users to share access to the more powerful compute resources (memory,
processors, etc.) available on a well equipped server; and
•
Centralized installation and configuration of R, R packages, TeX, and other supporting
libraries.
This manual describes RStudio Server Professional Edition, which adds many enhancements to the
open-source version of RStudio Server, including:
•The ability to run multiple concurrent R sessions per-user.
•Flexible use of multiple versions of R on the same server.
•Project sharing for easy collaboration within workgroups.
•Load balancing for increased capacity and higher availability.
•
An administrative dashboard that provides insight into active sessions, server health, and
monitoring of system-wide and per-user performance and resource metrics;
•Authentication using system accounts, ActiveDirectory, LDAP, or Google Accounts;
•Full support for PAM (including PAM sessions for dynamically provisioning user resources);
•Ability to establish per-user or per-group CPU priorities and memory limits;
•HTTP enhancements including support for SSL and keep-alive for improved performance;
•Ability to restrict access to the server by IP;
•Customizable server health checks; and
•
Suspend, terminate, or assume control of user sessions; Impersonate users for assistance and
troubleshooting.
3

CHAPTER 1. GETTING STARTED 4
1.2 Installation
1.2.1 Prerequisites
RStudio Server requires a previous installation of R version 3.0.1 or higher; see below for instructions
on installing R on your specific Linux distribution.
RStudio Server interacts frequently with user home directories. If you mount home directories with
NFS, we recommend using the
async
mount option along with a modern, high-throughput network
connection that can support many simultaneous clients. If you’d like your users to be able to share
their projects with each other, see the section on Project Sharing for additional NFS requirements.
1.2.2 RedHat / CentOS (6+)
1.2.2.1 Installing R
You can install R for RedHat and CentOS using the instructions on CRAN: https://cran.rstudio.
com/bin/linux/redhat/README.
1.2.2.2 Installation Commands
After downloading the appropriate RedHat/CentOS package for RStudio Server Professional you
should execute the following command to complete the installation:
sudo yum install <rstudio-server-package.rpm>
1.2.2.3 Package Validation
The RStudio Server Pro binary is signed with a key belonging to RStudio, Inc. If you wish to
verify this signature, you can obtain the public key from our website; save it into a file (e.g.
rstudio-code-signing.key
). You can also obtain it from a GnuPG keyserver using the following
command:
gpg --keyserver keys.gnupg.net --recv-keys 3F32EE77E331692F
gpg --armor --export 3F32EE77E331692F >rstudio-code-signing.key
Once you have obtained the key, you need to import it into the set of keys RPM uses to validate
package signatures, after which you can validate the package signature using the rpm command:
rpm --import rstudio-code-signing.key
rpm -K <rstudio-server-package.rpm>

CHAPTER 1. GETTING STARTED 5
1.2.3 Debian (8+) / Ubuntu (12.04+)
1.2.3.1 Installing R
To install the latest version of R you should first add the CRAN repository to your system as
described here:
•Debian: https://cran.rstudio.com/bin/linux/debian/README.html
•Ubuntu: https://cran.rstudio.com/bin/linux/ubuntu/README.html
You can then install R using the following command:
$ sudo apt-get install r-base
NOTE: If you do not add the CRAN Debian or Ubuntu repository as described above this command
will install the version of R corresponding to your current system version. Since this version of R
may be a year or two old it is strongly recommended that you add the CRAN repositories so you
can run the most up to date version of R.
1.2.3.2 Installation Commands
After downloading the appropriate Debian/Ubuntu package for RStudio Server Professional you
should execute the following commands to complete the installation:
$ sudo apt-get install gdebi-core
$ sudo gdebi <rstudio-server-package.deb>
1.2.3.3 Package Validation
The RStudio Server Pro binary is signed with a key belonging to RStudio, Inc. If you wish to
verify this signature, you can obtain the public key from our website. You can also obtain it from a
GnuPG keyserver using the following command:
gpg --keyserver keys.gnupg.net --recv-keys 3F32EE77E331692F
Once you have obtained the key, you can validate the .deb file as follows:
dpkg-sig --verify <rstudio-server-package.deb>
1.2.4 openSUSE / SLES (12+)
Installing R
You can install R for openSUSE or SLES using the instructions on CRAN: https://cran.rstudio.
com/bin/linux/suse/.
Note that the binaries linked to from this page have one additional requirement that isn’t satisfied
using the default repositories. Before installing R you should install the
libgfortran43
package.
This package is available from the SUSE Linux Enterprise SDK. If the SDK repository is available
in your environment you can install libgfortran43 as follows:

CHAPTER 1. GETTING STARTED 6
$ sudo zypper install libgfortran43
Installation Commands
After downloading the appropriate RPM package for RStudio Server Professional you should execute
the following command to complete the installation:
$ sudo zypper install <rstudio-server-package.rpm>
1.3 Management Script
RStudio Server management tasks are performed using the
rstudio-server
utility (installed under
/usr/sbin
). This utility enables the stopping, starting, and restarting of the server, enumeration
and suspension of user sessions, taking the server offline, as well as the ability to hot upgrade a
running version of the server.
For example, to restart the server you can use the following command:
$ sudo rstudio-server restart
Note that on some systems (including RedHat/CentOS 5 and SLES 11) the
sudo
utility doesn’t
have the
/usr/sbin
directory in it’s path by default. For these systems you can use a full path to
the management script. For example:
$ sudo /usr/sbin/rstudio-server restart
1.4 Activation
After completing the installation steps described in the previous section you may need to activate
the product before using it. Alternatively, if you haven’t previously installed RStudio Server on
a system then it will run in evaluation mode for a period of time before requiring activation. To
determine the current license status of your system you can use the following command:
$ sudo rstudio-server license-manager status
To activate the product you obtain a product key and then use the following commands:
$ sudo rstudio-server license-manager activate <product-key>
$ sudo rstudio-server restart
Note that you need to restart the server in order for licensing changes to take effect.
Additional details on license management (including discussions of offline activation and activating
through a proxy server) can be found in the License Management section.

CHAPTER 1. GETTING STARTED 7
1.5 Accessing the Server
1.5.1 Logging In
By default RStudio Server runs on port 8787 and accepts connections from all remote clients. After
installation you should therefore be able to navigate a web browser to the following address to
access the server:
http://<server-ip>:8787
RStudio will prompt for a username and password and will authenticate access using the PAM
authentication scheme configured for the server. Some notes related to user authentication:
•RStudio Server will not permit logins by system users (those with ids < 100).
•
By default on Debian/Ubuntu the system default PAM profile (
/etc/pam.d/other
) will be
used (this can be customized by creating an RStudio PAM profile at /etc/pam.d/rstudio).
•
By default on RedHat/CentOS and SLES an RStudio PAM profile (
/etc/pam.d/rstudio
)
that authenticates using the system username/password database will be used (this can be
customized by editing the profile as appropriate).
•User credentials are encrypted using RSA as they travel over the network.
Additional details on customizing RStudio Server authentication are provided in Authenticating
Users. Details on customizing the port and enabling SSL are covered in Access and Security.
1.5.2 Troubleshooting Problems
If you are unable to access the server after installation, you should run the
verify-installation
command to output additional diagnostics:
$ sudo rstudio-server verify-installation
This command will start the server and run and connect to an R session. Note that this will test the
correct installation of RStudio Server and ensure that it can connect to a locally installed version of
R. However, it won’t test whether networking or authentication problems are preventing access to
the server.
If problems persist, you can also consult the system log to see if there are additional messages there.
On Debian/Ubuntu systems this will typically be located at:
/var/log/syslog
On RedHat/CentOS systems this will typically be located at:
/var/log/messages

Chapter 2
Server Management
2.1 Core Administrative Tasks
2.1.1 Configuration Files
RStudio Server uses several configuration files all located within the
/etc/rstudio
directory.
Configuration files include:
rserver.conf Core server settings
rsession.conf Settings related to individual R sessions
notifications.conf Notifications to be delivered to user sessions
profiles User and group resource limits
r-versions Manual specification of additional versions of R
ip-rules IP access rules (allow or deny groups of IP addresses)
load-balancer Load balancing configuration
health-check Template for content to return for server health checks
google-accounts Mappings from Google accounts to local accounts
file-locks Configuration for file locking
login.html Custom HTML for login page
The
rserver.conf
and
rsession.conf
files are created by default during installation however the
other config files are optional so need to be created explicitly.
The notifications.conf file is created, but its entries are commented out as an example.
Whenever making changes to configuration files you need to restart the server for them to take
effect. You can do this using the restart command of the server management utility:
$ sudo rstudio-server restart
2.1.2 Stopping and Starting
During installation RStudio Server is automatically registered as a daemon which starts along with
the rest of the system. The exact nature of this will depend on the init system in use on your system: -
8

CHAPTER 2. SERVER MANAGEMENT 9
On systems using systemd (such as Debian 7, Ubuntu 15, and RedHat/CentOS 7), this registration is
performed as a systemd script at
/etc/systemd/system/rstudio-server.service
. - On systems
using Upstart (such as older versions of Debian and Ubuntu, and RedHat/CentOS 6), this registration
is performed using an Upstart script at
/etc/init/rstudio-server.conf
. - On systems using
init.d, including RedHat/CentOS 5, an init.d script is installed at
/etc/init.d/rstudio-server.
To manually stop, start, and restart the server you use the following commands:
$ sudo rstudio-server stop
$ sudo rstudio-server start
$ sudo rstudio-server restart
To check the current stopped/started status of the server:
$ sudo rstudio-server status
2.1.3 Managing Active Sessions
There are a number of administrative commands which allow you to see what sessions are active
and request suspension of running sessions.
To list all currently active sessions:
$ sudo rstudio-server active-sessions
2.1.3.1 Suspending Sessions
When R sessions have been idle (no processing or user interaction) for a specified period of time
(2 hours by default) RStudio Server suspends them to disk to free up server resources. When the
user next interacts with their session it is restored from disk and the user resumes right back where
they left off. This is all done seamlessly such that users aren’t typically aware that a suspend and
resume has occurred.
To manually suspend an individual session:
$ sudo rstudio-server suspend-session <pid>
To manually suspend all running sessions:
$ sudo rstudio-server suspend-all
The suspend commands also have a “force” variation which will send an interrupt to the session to
request the termination of any running R command:
$ sudo rstudio-server force-suspend-session <pid>
$ sudo rstudio-server force-suspend-all
The
force-suspend-all
command should be issued immediately prior to any reboot so as to
preserve the data and state of active R sessions across the restart.

CHAPTER 2. SERVER MANAGEMENT 10
2.1.3.2 Killing Sessions
If you are for any reason unable to cooperatively suspend an R session using the commands described
above you may need to force kill the session. Force killing a session results in SIGKILL being sent
to the process, causing an immediate termination.
To force kill an individual session:
$ sudo rstudio-server kill-session <pid>
To force kill all running sessions:
$ sudo rstudio-server kill-all
Note that these commands should be exclusively reserved for situations where suspending doesn’t
work as force killing a session can cause user data loss (e.g. unsaved source files or R workspace
content).
2.1.4 Taking the Server Offline
If you need to perform system maintenance and want users to receive a friendly message indicating
the server is offline you can issue the following command:
$ sudo rstudio-server offline
When the server is once again available you should issue this command:
$ sudo rstudio-server online
2.1.5 Upgrading to a New Version
If you perform an upgrade of RStudio Server and an existing version of the server is currently
running, then the upgrade process will also ensure that active sessions are immediately migrated to
the new version. This includes the following behavior:
•
Running R sessions are suspended so that future interactions with the server automatically
launch the updated R session binary
•
Currently connected browser clients are notified that a new version is available and automati-
cally refresh themselves.
•The core server binary is restarted
To upgrade to a new version of RStudio Server you simply install the new version. For example on
Debian/Ubuntu:
$ sudo gdebi <rstudio-server-package.deb>
For RedHat/CentOS:
$ sudo yum install --nogpgcheck <rstudio-server-package.rpm>
For openSUSE / SLES:

CHAPTER 2. SERVER MANAGEMENT 11
$ sudo zypper install <rstudio-server-package.rpm>
2.2 Administrative Dashboard
RStudio Server includes an administrative dashboard with the following features:
1) Monitoring of active sessions and their CPU and memory utilization;
2) The ability to suspend, forcibly terminate, or assume control of any active session;
3) Historical usage data for individual server users (session time, memory, CPU, logs);
4) Historical server statistics (CPU, memory, active sessions, system load); and
5) Searchable server log (view all messages or just those for individual users)
The dashboard can be an invaluable tool in understanding server usage and capacity as well as to
diagnose and resolve problems.
2.2.1 Enabling the Dashboard
The administrative dashboard is accessed at the following URL:
http://<server-address>/admin
The administrative dashboard is disabled by default. To enable it you set the
admin-enabled
option. You can also specify that only users of certain group have access to the dashboard using the
admin-group option. For example:
/etc/rstudio/rserver.conf
admin-enabled=1
admin-group=rstudio-admins
Note that changes to the configuration will not take effect until the server is restarted.
2.2.2 Administrator Superusers
You can further designate a certain user or group of users as administrative “superusers”. Superusers
have the following additional privileges:
1) Suspend or terminate active sessions
2) Assume control of active sessions (e.g. for troubleshooting)
3) Login to RStudio as any other server user
Administrative superusers do not have root privilege on the system, but rather have a narrow set
of delegated privileges that are useful in managing and supporting the server. You can define the
users with this privilege using the admin-superuser-group setting. For example:
/etc/rstudio/rserver.conf
admin-superuser-group=rstudio-superuser-admins
Changes to the configuration will not take effect until the server is restarted.

CHAPTER 2. SERVER MANAGEMENT 12
2.2.3 Server Log Time Zone
You can control the time zone in which the server logs are displayed in the admin dashboard by the
use of the admin-monitor-log-use-server-time-zone option. For example:
/etc/rstudio/rserver.conf
admin-monitor-log-use-server-time-zone=1
Setting this option to
1
will display the server logs in the server’s time zone. The default value of
0
will display the log times in UTC.
2.2.3.1 Google Accounts Restrictions
Note that the ability to login as other users and assume control of existing sessions is not available if
you are authenticating with Google Accounts. This is because Google authentication uses a different
user-identity mechanism which isn’t compatible with the way that user session impersonation is
implemented.
Chapter 3
Authenticating Users
R users require local system accounts regardless of what RStudio authentication method you use.
You should set up local system accounts manually and then map authenticating users to these
accounts. You can also use PAM Sessions to mount your user home directory to the server.
Note: Not all RStudio products require local system accounts. Shiny Server and RStudio Connect
serve end users, not R developers, so these products can be configured without local system accounts.
3.1 PAM Authentication
RStudio Server Professional Edition authenticates users via the Linux standard PAM (Pluggable
Authentication Module) API. PAM is typically configured by default to authenticate against the
system user database (
/etc/passwd
) however it can also be configured to authenticate against a
wide variety of other systems including ActiveDirectory and LDAP.
The section describes the PAM configuration used for authentication by default after installation.
Note that PAM can be used for both authentication as well as to tailor the environment for user
sessions (PAM sessions). This section describes only authentication, see the [User Resources and
Limits] section for details on how RStudio Server can be configured to use PAM sessions.
3.1.1 PAM Basics
PAM profiles are are located in the
/etc/pam.d
directory. Each application can have their own
profile, and there is also a default profile used for applications without one (the default profile is
handled differently depending on which version of Linux you are running).
To learn more about PAM and the many options and modules available for it see the following:
•http://en.wikipedia.org/wiki/Pluggable_authentication_module
•http://www.centos.org/docs/5/html/Deployment_Guide-en-US/ch-pam.html
•http://tldp.org/HOWTO/User-Authentication-HOWTO/x115.html
•http://linux.die.net/man/8/pam
13

CHAPTER 3. AUTHENTICATING USERS 14
3.1.2 Default PAM Configuration
Debian / Ubuntu
On Debian and Ubuntu systems RStudio Server does not provide an RStudio specific PAM con-
figuration file. As a result, RStudio Server uses the
/etc/pam.d/other
profile, which by default
inherits from a set of common configuration files:
/etc/pam.d/other
@include common-auth
@include common-account
@include common-password
@include common-session
If the
/etc/pam.d/other
profile reflects the authentication system and policies that you’d like
RStudio Server to use then no further configuration is required. If you want to create a custom
PAM profile for RStudio you would create a file named
/etc/pam.d/rstudio
and specify whatever
settings are appropriate.
RedHat / CentOS / SUSE
On RedHat, CentOS and SUSE systems applications without their own PAM profiles are denied
access by default. Therefore to ensure that RStudio is running and available after installation a
default PAM profile is installed at
/etc/pam.d/rstudio
. This profile is configured to require a
user-id greater than 500 and to authenticate users against local system accounts:
/etc/pam.d/rstudio
auth requisite pam_succeed_if.so uid >= 500 quiet
auth required pam_unix.so nodelay
account required pam_unix.so
This default PAM profile may not reflect the authentication behavior that you want for RStudio
Server. In that case, some customization may be required. If you’ve already set up another PAM
profile (e.g.
/etc/pam.d/login
) with the desired behavior then it may be enough to simply copy
that profile over the RStudio one. For example:
$ sudo cp /etc/pam.d/login /etc/pam.d/rstudio
3.1.3 Diagnosing PAM Authentication Problems
If you are unable to login to RStudio Server there may be an underlying problem with the PAM
configuration. The best way to diagnose PAM configuration problems is to use the
pamtester
utility (which is bundled with RStudio Server). Using
pamtester
enables you to test authentication
in an isolated environment as well as to see much more detailed diagnostics.
The
pamtester
utility is located at
/usr/lib/rstudio-server/bin/pamtester
. To invoke it you
pass several arguments indicating the PAM profile to test, the user to test for, and whether you
want verbose output. For example:

CHAPTER 3. AUTHENTICATING USERS 15
sudo /usr/lib/rstudio-server/bin/pamtester --verbose rstudio <username>authenticate
You can find more detailed documentation on using
pamtester
here: http://linux.die.net/man/1/
pamtester.
3.1.4 Managing PAM Login Lifetimes
When logging in using PAM authentication users have an option to stay signed in across browser
sessions. By default when choosing the stay signed in option users will remain signed in for 30 days.
You can modify this behavior using the auth-stay-signed-in-days setting. For example:
/etc/rstudio/rserver.conf
auth-stay-signed-in-days=7
You can entirely prevent this option from being shown by using the
auth-stay-signed-in
setting.
For example:
/etc/rstudio/rserver.conf
auth-stay-signed-in=0
Setting this option to
0
will result in users being prompted to log in each time they start a new
browser session (i.e. logins will only be valid as long as the browser process in which they originated
in remains running).
3.2 Restricting Access to Specific Users
3.2.1 Minimum User Id
By default RStudio Server only allows normal (as opposed to system) users to successfully authenti-
cate. The minimum user id is determined by reading the
UID_MIN
value from the
/etc/login.defs
file. If the file doesn’t exist or UID_MIN isn’t defined within it then a default value of 1000 is used.
You change the minimum user id by specifying the auth-minimum-user-id option. For example:
/etc/rstudio/rserver.conf
auth-minimum-user-id=100
Note that it’s possible that your PAM configuration is also applying a constraint on user-ids (see
the Default PAM Configuration section above for an example). In this case you should ensure that
the auth-minimum-user-id is consistent with the value specified in your PAM configuration.
3.2.2 Restricting by Group
You can specify that only users of certain groups are allowed to access RStudio Server. To do this
you use the auth-required-user-group setting. For example:
/etc/rstudio/rserver.conf

CHAPTER 3. AUTHENTICATING USERS 16
auth-required-user-group=rstudio-users
You can specify a single group as the above example does or a comma-delimited list of groups. For
example:
/etc/rstudio/rserver.conf
auth-required-user-group=analysts,admins,rstudio-users
Note that this change will not take effect until the server is restarted.
3.2.2.1 Creating and Managing Group Membership
To create a new group you use the groupadd command:
$ sudo groupadd <groupname>
To add a user to an existing group you use the usermod command:
$ sudo usermod -a -G <groupname> <username>
Note that it’s critical that you include the
-a
flag as that indicates that the group should be added
to the user rather than replace the user’s group list in it’s entirety.
3.3 Google Accounts
RStudio Server can be configured to authenticate users via Google Accounts. This enables users to
login with their existing Gmail or Google Apps credentials and to be automatically authenticated
to RStudio Server whenever they are already logged into their Google account.
3.3.1 Registering with Google
In order to use Google Accounts with RStudio Server you need to register your server with Google
for OAuth 2.0 Authentication. You do this by creating a new “Project” for your server in the Google
Developer Console:
https://console.developers.google.com/
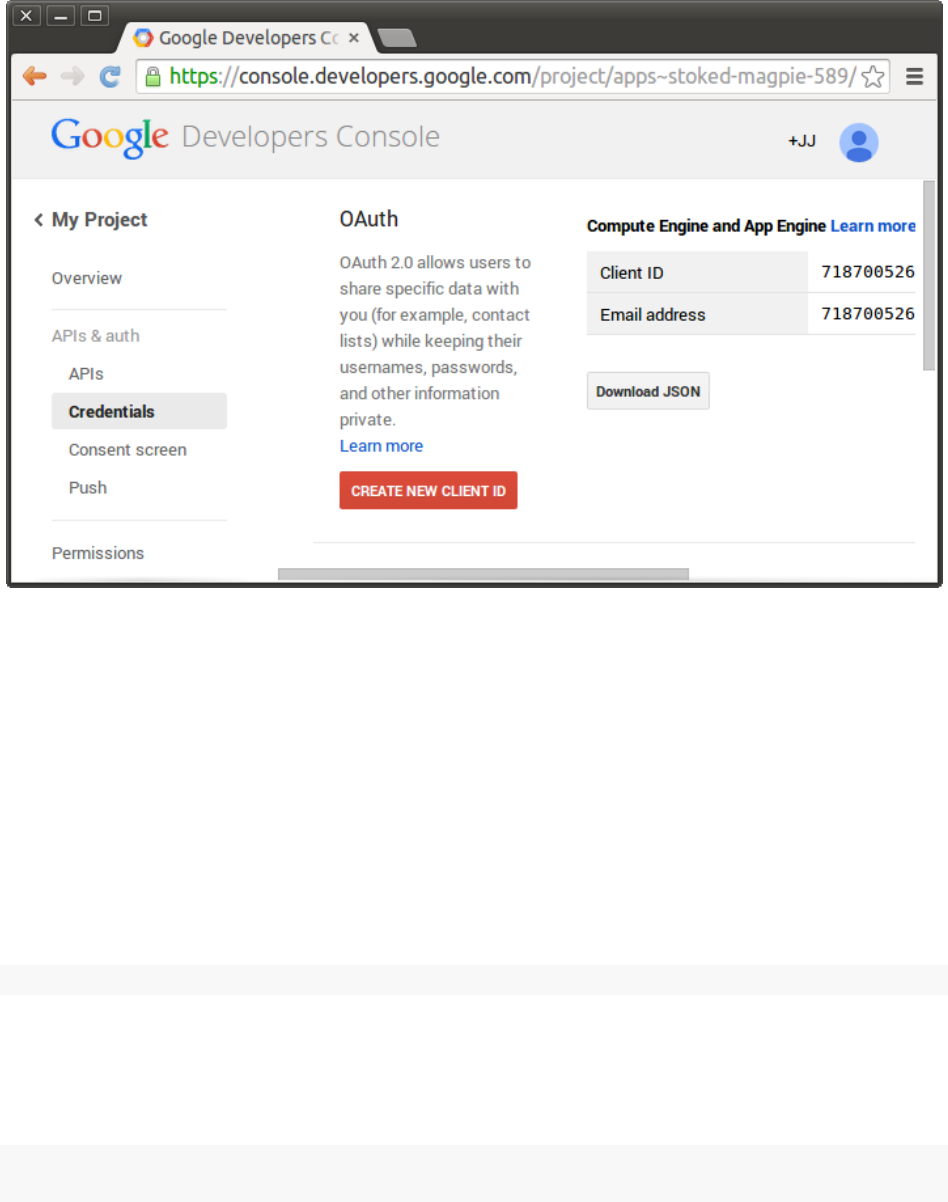
Once you’ve created a project you go to the Credentials area of APIs and auth and choose to
Create New Client ID:
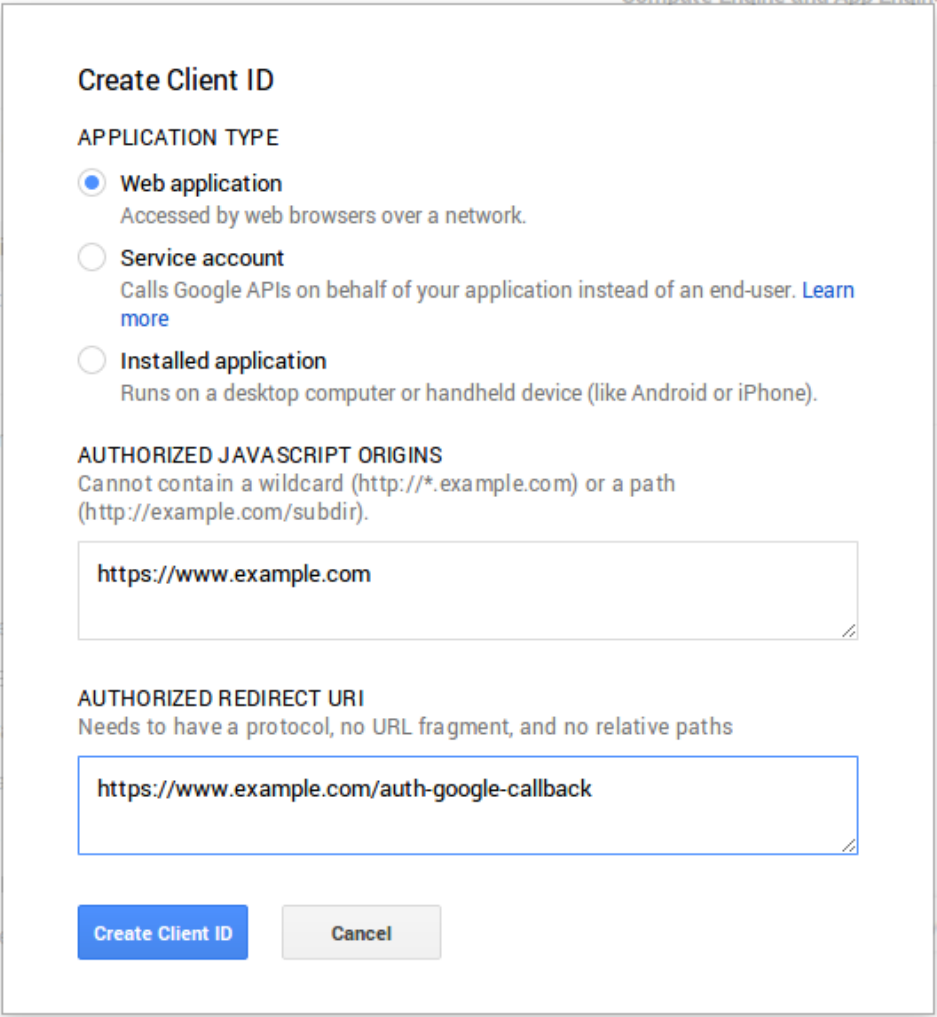
You’ll then be presented with a dialog used to create a new client ID:
You should select “Web application” as the application type and provide two URLs that correspond
to the server you are deploying on. The screenshot above uses
https://www.example.com
as the
host, you should substitute your own domain and port (if not using a standard one like 80 or 443)
in your configuration.
CHAPTER 3. AUTHENTICATING USERS 17
Figure 3.1: Create Client Id
This will result in two values which you’ll need to provide as part of the RStudio Server configuration:
client-id
and
client-secret
(they’ll be displayed in the Google Developer Console after you
complete the dialog).
3.3.2 Enabling Google Accounts
To enable authentication with Google Accounts you add the
auth-google-accounts
option to the
RStudio Server configuration file:
/etc/rstudio/rserver.conf
auth-google-accounts=1
In addition, you need to add a configuration file (
/etc/rstudio/google-client-secret
) containing
the
client-id
and
client-secret
that you received when registering your site with Google. For
example, the configuration file might look like this:
/etc/rstudio/google-client-secret
client-id=lllllllllllll-xxxxxxxxxxxxxxxxxxxxxx.apps.googleusercontent.com
client-secret=BhCC6rK7Sj2ZtPH0ord7lO1w
The
/etc/rstudio/google-client-secret
file should have user read/write file permissions
(i.e. 0600) to protect it’s contents from other users. You can ensure this as follows:
CHAPTER 3. AUTHENTICATING USERS 18
Figure 3.2: Create Client Id

CHAPTER 3. AUTHENTICATING USERS 19
$ sudo chmod 0600 /etc/rstudio/google-client-secret
Note that the above
client-id
and
client-secret
aren’t the actual values you’ll use. Rather, you
should substitute the values that you obtained from Google when registering your site for OAuth
authentication.
Once you enable authentication with Google Accounts that becomes the exclusive means of authen-
tication (you can’t concurrently use both PAM and Google Account authentication).
3.3.3 Translating to Local Accounts
3.3.3.1 Creating Matching Accounts
Once a user is authenticated via Google Accounts it’s necessary to map their Google Accounts
identity to a local system account. The default and most straightforward way to do this is to create
a local account with a username identical to their Google email address.
If you choose to create local accounts that match Google email addresses be sure to use only lowercase
characters in the account name, since Google email addresses are transformed to lower-case prior to
matching them to local account names.
One problem with creating local accounts that match Google email addresses is that they often contain
characters that are invalid by default within Linux usernames (e.g. @ or .). On Debian/Ubuntu
systems it’s possible to force the system to create a user with these characters. Here’s an example
of creating a user with a username that contains typically invalid characters:
$ sudo adduser --force-badname <username>
Note that the
--force-badname
option is only available on Debian/Ubuntu systems and is not
available on RedHat/CentOS or SLES systems.
If the users you are creating will only be accessing the server via RStudio, you may also want to
disable their ability to login as a normal interactive user and to specify that they have no password.
For example:
$ sudo adduser --force-badname --disabled-login --disabled-password <username>
3.3.3.2 Using an Account Mappings File
Alternatively, you map create local accounts that do not match Google email addresses and then
specify a mapping of Google accounts to local accounts via the
/etc/rstudio/google-accounts
configuration file. For example:
/etc/rstudio/google-accounts
john.smith@gmail.com=jsmith
sally.jones@gmail.com=sjones
Note that changes to the
google-accounts
configuration file take effect immediately and do not
require a server restart.

CHAPTER 3. AUTHENTICATING USERS 20
3.3.4 Proxy Considerations
If you are running RStudio behind a proxy, you will need to configure your proxy to set its host
name in the
X-Forwarded-Host
header so that RStudio can tell the Google Web Services to redirect
back to the correct location. For example, if your proxy was set up to serve RStudio requests at
http://testdomain.com/rstudio/, you would want to ensure that the proxy set the
X-Forwarded-Host
header to
http://testdomain.com/rstudio/
. Otherwise, RStudio will attempt to redirect back
to its internal address.
Alternatively, if you are running behind a proxy but cannot set the correct
X-Forwarded-Host
header for whatever reason, you can use the
auth-google-accounts-redirect-base-uri
option
in the RStudio Server configuration file to accomplish the same purpose:
/etc/rstudio/rserver.conf
auth-google-accounts-redirect-base-uri=http://testdomain.com/rstudio/
3.4 Customizing the Sign-In Page
You can customize the content and appearance of the RStudio Server sign-in page by including
custom HTML within the page. This is accomplished by either:
1.
Providing a file at
/etc/rstudio/login.html
that includes additional HTML to include
within the login page; or
2.
Specifying the
auth-login-page-html
option within the
rserver.conf
config file which
points to an alternate location for the login HTML file. For example, the following specifies
that the file located at
/opt/config/rstudio-login.html
should be included within the
login page:
/etc/rstudio/rserver.conf
auth-login-page-html=/opt/config/rstudio-login.html
The contents of the specified HTML file will be included after the standard login header and login
username/password form. If you want to modify the appearance of the header and/or add content
above the username/password form you can use CSS and JavaScript within your login.html file to
modify the page after it loads.
3.5 Proxied Authentication
You can configure RStudio Server to participate in an existing web-based single-sign-on authentication
scheme using proxied authentication. In this configuration all traffic to RStudio Server is handled
by a proxy server which also handles user authentication.
In this configuration the proxy server adds a special HTTP header to requests to RStudio Server
letting it know which authenticated user is making the request. RStudio Server trusts this header,
launching and directing traffic to an R session owned by the specified user.

CHAPTER 3. AUTHENTICATING USERS 21
The specified user must have a local system account on the server. You should set up local system
accounts manually and then map authenticating users to these accounts.
3.5.1 Enabling Proxied Authentication
To enable proxied authentication you need to specify both the
auth-proxy
and
auth-proxy-sign-in-url
settings (the sign-in URL is the absolute URL to the page that users should be redirected to for
sign-in). For example:
/etc/rstudio/rserver.conf
auth-proxy=1
auth-proxy-sign-in-url=http://example.com/sign-in
Note that changes to the configuration will not take effect until the server is restarted.
3.5.2 Implementing the Proxy
3.5.2.1 Sign In URL
The sign in URL should host a page where the user specifies their credentials (this might be for
example the main page for an existing web-based authentication system). After collecting and
authorizing the credentials the sign in URL should then redirect back to the URL hosting the
RStudio Server.
RStudio will redirect to the sign in URL under the following conditions:
1. Whenever an HTTP request that lacks the username header is received by the server; and
2. When the user clicks the “Sign out” button in the RStudio IDE user interface.
You should be sure in setting up the proxy server that traffic bound for the sign-in URL is excluded
from forwarding to RStudio Server (otherwise it will end up in an infinite redirect loop).
3.5.2.2 Forwarding the Username
When proxying pre-authenticated traffic to RStudio Server you need to include a special HTTP
header (by default
X-RStudio-Username
) with each request indicating which user the request is
associated with. For example:
X-RStudio-Username: jsmith
It’s also possible to specify both a system username and a display username (in the case where
system accounts are dynamically provisioned and don’t convey actual user identity). For example:
X-RStudio-Username: rsuser24/jsmith
Note that is highly recommended that you do not use the default
X-RStudio-Username
header
name. The reasons for this are described in the section on security considerations immediately
below.

CHAPTER 3. AUTHENTICATING USERS 22
3.5.2.3 Rewriting Usernames
It may be that the proxy system you are using sends the username in a format that doesn’t match that
of users on the system, however can be easily transformed to one that does (e.g. it has a standard prefix
before the username). If this is the case you can specify the
auth-proxy-user-header-rewrite
option to provide a re-write rule for the inbound header. For example, the following rule strips the
prefix “UID-” from a username header:
auth-proxy-user-header-rewrite=^UID-([a-z]+)$ $1
The format of a re-write rule is a regular expression followed by a space and then a replacement
string. The replacement string can reference captured parts of the regular expression using
$1
,
$2
,
etc.
3.5.3 Security Considerations
3.5.3.1 Keeping the Header Name Secret
Using the the default header name
X-RStudio-Username
creates a security problem: code running
behind the proxy (i.e. code within R sessions) could form requests back to the server which
impersonate other users (by simply inserting the header in their request).
To prevent this issue you can specify a custom header name which is kept secret from end users.
This is done by creating a special configuration file (
/etc/rstudio/secure-proxy-user-header
)
that contains the name of the header, and then setting it’s file permissions so that it’s not readable
by normal users. For example:
sudo sh -c "echo 'X-Secret-User-Header'> /etc/rstudio/secure-proxy-user-header"
sudo chmod 0600 /etc/rstudio/secure-proxy-user-header
3.5.3.2 Preventing Remote Use of the Header
When implementing the proxy it’s important to remember that RStudio Server will always trust
the username header to authenticate users. It’s therefore critical from the standpoint of security
that all requests originating from the proxy have this header set explicitly by the proxy (as opposed
to allowing the header to be specified by a remote client).
3.5.4 Troubleshooting with Access Logs
If you want to see exactly which requests RStudio Server is receiving and whether they include
the expected username information, you can temporarily enable server access logs using the
server-access-log setting as follows:
/etc/rstudio/rserver.conf
server-access-log=1
After restarting RStudio Server the following file will contain a record of each HTTP request made
to the server along with it’s HTTP response code:

CHAPTER 3. AUTHENTICATING USERS 23
/var/log/rstudio-server/rserver-http-access.log
The log file will contain entries that look like this:
127.0.0.1 - - [29/Jun/2015:06:30:41 -0400] "GET /s/f01ddf8222bea98a/ HTTP/1.1"
200 91 "http://localhost:8787/s/f01ddf8222bea98a/" "Mozilla/5.0 (X11; Linux x86_64)
AppleWebKit/537.36 (KHTML, like Gecko) Chrome/43.0.2357.125 Safari/537.36" "jsmith"
Note that the very last item in the log file entry is
"jsmith"
. This is the username that RStudio
Server read from the header passed by the proxy server. If this shows up as blank (
"-"
) then your
proxy server isn’t forwarding the header or using the correct header name in forwarding.
Important Note
: Once you’ve concluded troubleshooting it’s important that you remove the
server-access-log=1
option from the
/etc/rstudio/rserver.conf
file (since this log file is not
rotated it will eventually consume a large amount of disk space if you don’t remove the option).

Chapter 4
Access and Security
4.1 Network Port and Address
After initial installation RStudio accepts connections on port 8787. If you wish to listen on a
different another port you can modify the www-port option. For example:
/etc/rstudio/rserver.conf
www-port=80
By default RStudio binds to address 0.0.0.0 (accepting connections from any remote IP). You can
modify this behavior using the www-address option. For example:
/etc/rstudio/rserver.conf
www-address=127.0.0.1
Note that changes to the configuration will not take effect until the server is restarted.
4.2 IP Access Rules
RStudio Server can be configured to deny access to specific IP addresses or ranges of addresses.
Access rules are defined in the configuration file /etc/rstudio/ip-rules
Access rules are established using the
allow
and
deny
directives and are processed in order, with
the first matching rule governing whether a given address is allowed or denied. For example, to
allow only clients within the
192.168.1.0/24
subnet but also deny access to
192.168.1.10
you
would use these rules:
/etc/rstudio/ip-rules
deny 192.168.1.10
allow 192.168.1.0/24
deny all
All clients outside of the specified subset are denied access because of the
deny all
rule at the end
of the configuration.
24
CHAPTER 4. ACCESS AND SECURITY 25
Note that changes to the configuration will not take effect until the server is restarted.
4.3 Frame Origin
For security reasons, RStudio Server will not load inside a browser frame (such as a frameset or
IFrame) by default. You can modify this behavior by using the
www-frame-origin
option. For
example, if you would like to host RStudio inside a browser frame at
example.com
, you can tell
RStudio to allow this as follows:
/etc/rstudio/rserver.conf
www-frame-origin=example.com
There are several special values available for the www-frame-origin option:
Value Meaning
none The default; do not allow RStudio to load in any frame.
same Allow RStudio to load in a frame if it has the same origin (host
and port) as RStudio.
any Allow RStudio to load in a frame from any origin (not
recommended)
my-domain.com Allow RStudio to load in a frame at my-domain.com
4.4 Secure Sockets (SSL)
4.4.1 SSL Configuration
If your RStudio Server is running on a public network then configuring it to use SSL (Secure Sockets
Layer) encryption is strongly recommended. You can do this via the
ssl-enabled
setting along
with related settings that specify the location of your SSL certificate and key. For example:
/etc/rstudio/rserver.conf
ssl-enabled=1
ssl-certificate=/var/certs/your_domain_name.crt
ssl-certificate-key=/var/certs/your_domain_name.key
The
.crt
file should be encoded in the PEM format; that is, the first line should read
-----BEGIN
CERTIFICATE-----
, and the contents should be base64-encoded data. If your certificate is in another
format, such as DER or PKCS, use the
openssl
command-line tool to convert it to PEM. For
example:
openssl x509 -inform DER -outform PEM -text -in your_domain_name.der -out your_domain_name.crt
It’s important when installing the certificate
.crt
file that you concatenate together any intermediate
certificates (i.e. the generic one from your certificate authority) with the certificate associated with
your domain name. For example you could use a shell command of this form to concatenate the CA
intermediate certificate to your domain name’s certificate:

CHAPTER 4. ACCESS AND SECURITY 26
$ cat certificate-authority.crt >> your_domain_name.crt
The resulting file should then be specified in the ssl-certificate option.
It’s also important to ensure that the file permissions on your SSL certificate key are as restrictive
as possible so it can’t be read by ordinary users. The file should typically be owned by the
root
user and be set as owner readable and writeable. For example:
$ sudo chmod 600 /var/certs/your_domain_name.key
4.4.2 SSL Protocols
By default RStudio Server supports the TLSv1, TLSv1.1, and TLSv1.2 protocols for SSL. The list
of supported protocols can configured via the
ssl-protocols
option. For example, to use only the
TLSv1.1 and TLSv1.2 protocols you would use:
/etc/rstudio/rserver.conf
ssl-protocols=TLSv1.1 TLSv1.2
The list of supported protocols is space delimted (as illustrated above). Valid protocol values are:
SSLv2,SSLv3,TLSv1,TLSv1.1, and TLSv1.2.
4.4.3 SSL Ports
When RStudio Server is configured to use SSL the default behavior with respect to ports is:
1)
SSL is bound to port 443 (enabling access using the standard https protocol within the
browser)
2)
The server also listens on port 80 and redirects all requests to port 443 (allowing users to
specify the domain without the https protocol and be automatically redirected to the secure
port)
However, if SSL is bound to another port (using the
www-port
option) then the automatic redirect
behavior is not enabled. It’s also possible to disable automatic SSL redirects entirely using the
ssl-redirect-http option as follows:
/etc/rstudio/rserver.conf
ssl-redirect-http=0
Note that changes to the configuration will not take effect until the server is restarted.
4.5 Server Permissions
4.5.1 Server Account
RStudio Server runs as the system root user during startup and then drops this privilege and runs
as a more restricted user. RStudio Server then re-assumes root privilege for a brief instant when

CHAPTER 4. ACCESS AND SECURITY 27
creating R sessions on behalf of users (the server needs to call
setresuid
when creating the R
session, and this call requires root privilege).
The user account that RStudio Server runs under in the normal course of operations is
rstudio-server
. This account is automatically added to the system during installation and is
created as a system rather than end user account (i.e. the --system flag is passed to useradd).
4.5.1.1 Alternate Server Account
You can configure RStudio Server so that it will run from an alternate account with the following
steps:
1.
Recursively delete the
/var/log/rstudio-server
and
/var/lib/rstudio-server
directories
(they contain files and directories owned by the default rstudio server user)
2. Create a new system user (if the one you want to use doesn’t already exist)
3.
Assign this user to the
server-user
option in the
/etc/rstudio/rserver.conf
configuration
file (see example below)
4. Restart RStudio Server
Note that the removal of the
/var/*/rstudio-server
directories will reset any already stored
metrics and log files.
For example, to shutdown the server, cleanup files owned by the previous rstudio user, and create a
new system user named rs-user you’d use the following commands:
sudo rstudio-server stop
sudo rm -rf /var/log/rstudio-server
sudo rm -rf /var/log/rstudio-server
sudo useradd --system rs-user
Then’d edit the /etc/rstudio/rserver.conf configuration file as follows:
/etc/rstudio/rserver.conf
server-user=rs-user
Finally, restart RStudio Server to begin running under the new user:
sudo rstudio-server start
4.5.2 AppArmor
On Debian and Ubuntu systems the RStudio Server process runs under an AppArmor profile (you
can find more information about AppArmor here: http://en.wikipedia.org/wiki/AppArmor).
If AppArmor is causing problems in your configuration you can disable it using the
server-app-armor-enabled option. For example:
/etc/rstudio/rserver.conf
server-app-armor-enabled=0

CHAPTER 4. ACCESS AND SECURITY 28
Note that there aren’t known scenarios where the RStudio Server AppArmor profile causes problems
so it’s unlikely that you’ll ever need to modify this setting. Note also that this setting will not take
effect until the server is restarted.
4.5.3 umask
By default, RStudio Server sets its umask to
022
on startup. If you don’t want this behavior, for
instance because you’d prefer the server process to use the default umask set in init, it can be
disabled as follows:
/etc/rstudio/rserver.conf
server-set-umask=0
4.6 Running with a Proxy
4.6.1 Overview
If you are running RStudio Server behind a proxy server you need be sure to configure the proxy
server so that it correctly handles all traffic to and from RStudio Server.
Beyond the normal reverse proxy configuration you’d apply for any HTTP server application, you
also need to to ensure that websockets are forwarded correctly between the proxy server and RStudio
Server to ensure that all RStudio functions work correctly. In particular, they’re needed to ensure
that Shiny applications run from within the IDE work properly - if not, you may find that Shiny
applications “gray out” and close without you being able to interact with them.
This section describes how to correctly configure a reverse proxy with Nginx and Apache.
4.6.2 Nginx Configuration
On Debian or Ubuntu a version of Nginx that supports reverse-proxying can be installed using the
following command:
sudo apt-get install nginx
On CentOS or Red Hat you can install Nginx using the following command:
sudo yum install nginx
To enable an instance of Nginx running on the same server to act as a front-end proxy to RStudio
Server you would add commands like the following to your
nginx.conf
file. Note that you must
add code to proxy websockets in order to correctly display Shiny apps and R Markdown Shiny
documents in RStudio Server. Also note that if you are proxying to a server on a different machine
you need to replace references to
localhost
with the correct address of the server where you are
hosting RStudio.

CHAPTER 4. ACCESS AND SECURITY 29
http {
map $http_upgrade $connection_upgrade {
default upgrade;
'' close;
}
server {
listen 80;
location /{
proxy_pass http://localhost:8787;
proxy_redirect http://localhost:8787/$scheme://$host/;
proxy_http_version 1.1;
proxy_set_header Upgrade $http_upgrade;
proxy_set_header Connection $connection_upgrade;
proxy_read_timeout 20d;
}
}
}
If you want to serve RStudio Server from a custom path (e.g. /rstudio) you would edit your
nginx.conf file as shown below:
http {
map $http_upgrade $connection_upgrade {
default upgrade;
'' close;
}
server {
listen 80;
location /rstudio/{
rewrite ^/rstudio/(.*)$/$1break;
proxy_pass http://localhost:8787;
proxy_redirect http://localhost:8787/$scheme://$host/rstudio/;
proxy_http_version 1.1;
proxy_set_header Upgrade $http_upgrade;
proxy_set_header Connection $connection_upgrade;
proxy_read_timeout 20d;
}
After adding these entries you’ll then need to restart Nginx so that the proxy settings take effect:
sudo /etc/init.d/nginx restart
CHAPTER 4. ACCESS AND SECURITY 30
4.6.3 Apache Configuration
To enable an instance of Apache running on the same server to act as a front-end proxy to
RStudio Server you need to use the
mod_proxy
and
mod_proxy_wstunnel
modules. The steps for
enabling this module vary across operating systems so you should consult your distribution’s Apache
documentation for details.
On Debian and Ubuntu systems Apache can be installed with
mod_proxy
using the following
commands:
sudo apt-get install apache2
sudo apt-get install libapache2-mod-proxy-html
sudo apt-get install libxml2-dev
Then, to update the Apache configuration files to activate
mod_proxy
you execute the following
commands:
sudo a2enmod proxy
sudo a2enmod proxy_http
sudo a2enmod proxy_wstunnel
On CentOS and RedHat systems Apache can be installed with
mod_proxy
and
mod_proxy_wstunnel
by following the instructions here:
http://httpd.apache.org/docs/2.4/platform/rpm.html
By default with Apache 2.4,
mod_proxy
and
mod_proxy_wstunnel
should be enabled. You can
check this by opening the file /etc/httpd/conf.modules.d/00-proxy.conf and making sure the
following lines are included and not commented out:
LoadModule proxy_module modules/mod_proxy.so
LoadModule proxy_wstunnel_module modules/mod_proxy_wstunnel.so
Once you have enabled
mod_proxy
and
mod_proxy_wstunnel
in your Apache installation you need
to add the required proxy commands to your
VirtualHost
definition. Note that you will also
need to include code to correctly proxy websockets in order to correctly proxy Shiny apps and R
Markdown documents within RStudio Server. Also note that if you are proxying to a server on
a different machine you need to replace references to
localhost
with the correct address of the
server where you are hosting RStudio.
<VirtualHost *:80>
<Proxy *>
Allow from localhost
</Proxy>
RewriteEngine on
RewriteCond %{HTTP:Upgrade} =websocket
RewriteRule /(.*) ws://localhost:8787/$1 [P,L]
RewriteCond %{HTTP:Upgrade} !=websocket
RewriteRule /(.*) http://localhost:8787/$1 [P,L]
ProxyPass / http://localhost:8787/

CHAPTER 4. ACCESS AND SECURITY 31
ProxyPassReverse / http://localhost:8787/
ProxyRequests Off
</VirtualHost>
Note that if you want to serve RStudio from a custom path (e.g. /rstudio) you would replace the
directives described above to:
RewriteEngine on
RewriteCond %{HTTP:Upgrade} =websocket
RewriteRule /rstudio/(.*) ws://localhost:8787/$1 [P,L]
RewriteCond %{HTTP:Upgrade} !=websocket
RewriteRule /rstudio/(.*) http://localhost:8787/$1 [P,L]
ProxyPass /rstudio/ http://localhost:8787/
ProxyPassReverse /rstudio/ http://localhost:8787/
ProxyRequests Off
Finally, after you’ve completed all of the above steps you’ll then need to restart Apache so that the
proxy settings take effect:
sudo /etc/init.d/apache2 restart
4.6.4 RStudio Configuration
If your RStudio Server and proxy server are running on the same machine you can also change the
port RStudio Server listens on from 0.0.0.0 (all remote clients) to 127.0.0.1 (only the localhost).
This ensures that the only way to connect to RStudio Server is through the proxy server. You can
do this by adding the www-address entry to the /etc/rstudio/rserver.conf file as follows:
www-address=127.0.0.1
Note that you may need to create this config file if it doesn’t already exist.

Chapter 5
R Sessions
5.1 R Executable and Libraries
5.1.1 Locating R
RStudio Server uses the version of R pointed to by the output of the following command:
$ which R
The
which
command performs a search for the R executable using the system PATH. RStudio will
therefore by default bind to the same version that is run when R is executed from a terminal.
For versions of R installed by system package managers this will be
/usr/lib/R
. For versions of R
installed from source this will typically (but not always) be /usr/local/lib/R.
If you want to override which version of R is used then you can use the
rsession-which-r
setting.
For example:
/etc/rstudio/rserver.conf
rsession-which-r=/usr/local/bin/R
Note that this change will not take effect until the server is restarted.
5.1.1.1 Using Multiple Versions of R
The section above describes how RStudio Server locates the global default version of R. It’s also
possible to specify alternate versions of R either by user or by group. The R Versions section
describes this in more detail.
5.1.2 Locating Shared Libraries
You can add elements to the default
LD_LIBRARY_PATH
for R sessions (as determined by the R
ldpaths
script) by adding an
rsession-ld-library-path
entry to the server config file. This
32

CHAPTER 5. R SESSIONS 33
might be useful for ensuring that packages can locate external library dependencies that aren’t
installed in the system standard library paths. For example:
/etc/rstudio/rserver.conf
rsession-ld-library-path=/opt/someapp/lib:/opt/anotherapp/lib
Note that this change will not take effect until the server is restarted.
5.1.3 Customizing Session Launches
5.1.3.1 Profile Script Execution
RStudio Server launches R sessions under a bash login shell. This means that prior to the execution
of the R session the bash shell will read and execute commands from this file if it exists:
/etc/profile
After reading that file, it looks for the following files and reads and executes commands from the
first one that exists and is readable (it’s important to note that only one of these files will be read
and executed):
~/.bash_profile
~/.bash_login
~/.profile
If you have further RStudio specific initialization logic (exporting environment variables, etc.) you
can optionally create an R session specific profile script at:
/etc/rstudio/rsession-profile
If it exists this script will be executed prior to the bash shell that launches the R session.
In some situations, you will not want to run user shell profile scripts. This is also a good way to
troubleshoot the inability for sessions to launch, as it could indicate a conflict is occuring due to
environment variables being set in the shell profiles. To disable execution of the shell profiles, set
the rsession-no-profile option to 1in /etc/rstudio/rserver.conf. For example:
/etc/rstudio/rserver.conf
rsession-no-profile=1
5.1.3.2 Environment Variables
R sessions inherit environment variables that are explicitly exported from the profile scripts described
above. It’s also possible to append paths to the LD_LIBRARY_PATH environment variable using the
rsession-ld-library-path option (see previous section for details).
Another source of environment variables are PAM sessions. On Debian/Ubuntu systems, the
default PAM profile run by RStudio Server includes the environment variables defined in
/etc/security/pam_env.conf
and
/etc/environment
. To learn more about setting environment

CHAPTER 5. R SESSIONS 34
variables with PAM you should consult the PAM Sessions section as well as the documentation on
the pam_env module here: http://linux.die.net/man/8/pam_env.
5.1.3.3 Program Supervisors
You may also wish to run R sessions under a program supervisor that modifies their environment or
available resources. You can specify a supervisor (and the arguments which control it’s behavior)
using the rsession-exec-command setting. For example:
/etc/rstudio/rserver.conf
rsession-exec-command=nice -n 10
This example uses the
nice
command to run all R sessions with a lower scheduling priority. See
http://linux.die.net/man/1/nice for more details on
nice
. Note that for
nice
in particular it’s
possible to accomplish the same thing using user and group profiles (and even specify a custom
priority level per user or group). See the User and Group Profiles section for more details.
5.2 User and Group Profiles
User and Group Profiles enable you to tailor the behavior of R sessions on a per-user or per-group
basis. The following attributes of a session can be configured within a profile:
1) Version of R used
2) CPU affinity (i.e. which set of cores the session should be bound to)
3) Scheduling priority (i.e. nice value)
4) Resource limits (maximum memory, processes, open files, etc.)
5) R session timeouts (amount of idle time which triggers session suspend)
6)
R session kill timeouts (amount of idle time which triggers a session to be destoryed and
cleaned up)
5.2.1 Creating Profiles
Profiles are defined within the file
/etc/rstudio/profiles
. Note that this file is not created by
default so you’ll need to create it if doesn’t already exist. Profiles are divided into sections of three
different type:
1) Global ([*])
2) Per-group ([@groupname])
3) Per-user ([username])
Here’s an example profiles file that illustrates each of these types:
/etc/rstudio/profiles
[*]
cpu-affinity =1-4
max-processes =100

CHAPTER 5. R SESSIONS 35
max-memory-mb =2048
session-timeout-minutes=60
session-timeout-kill-hours=24
[@powerusers]
cpu-affinity =5-16
nice =-10
max-memory-mb =4096
[jsmith]
r-version =/opt/R/3.1.0
session-timeout-minutes=360
This configuration specifies that by default users will run on cores 1 to 4 with a limit of 100 processes
and 2GB of virtual memory. It also specifies that members of the
powerusers
group will run on
cores 5 to 16 with an elevated nice priority and a limit of 4GB of memory. Finally, the user
jsmith
is configured to use a different version of R from the system default.
Note that the
/etc/rstudio/profiles
file is processed from top to bottom (i.e. settings matching
the current user that occur later in the file always override ones that appeared prior). The settings
available within /etc/rstudio/profiles are described in more depth below.
5.2.2 Session Timeout
To configure the amount of idle time to wait before suspending sessions you can use the
session-timeout-minutes option. For example:
session-timeout-minutes=360
The default value if none is explicitly specified is 120 minutes.
There are some conditions where an R session will not be suspended, these include:
1) When a top-level R computation is running
2) When the R prompt is not in it’s default state (e.g. during a debugging session)
You can also specify that R sessions should never be suspended by setting the
session-timeout-minutes
to zero. For example:
session-timeout-minutes=0
5.2.3 Session Timeout Kill
To configure the amount of idle time to wait before killing and destroying sessions you can use
the
session-timeout-kill-hours
option. This allows you to specify when a session should
automatically be cleaned up when it has been idled, allowing you to automatically reclaim temporary
disk space used by the sessions, and to stop their processes and children.
For example:

CHAPTER 5. R SESSIONS 36
session-timeout-kill-hours=48
The default value if none is explicitly specified is 0 hours, meaning sessions will never be killed and
destroyed automatically. The supplied value should be an integer representing the amount of hours
a session can be idle before being killed.
NOTE: A session is considered to be idle if it has not received input from the user even if the
session is in the process of running a computation. This means that sessions can be destroyed while
important computations are executing. The user whose session is cleaned will also lose all unsaved
code and data.
5.2.4 CPU Affinity and Scheduling Priority
If you have users or groups that consistently require more compute resources than others you can use
profile settings to reserve CPUs (
cpu-affinity
) as well as raise overall scheduling priority (
nice
).
5.2.4.1 CPU Affinity
The
cpu-affinity
setting specifies which cores on a multi-core system should be used to schedule
work for a session. This is specified as a comma-separated list of core numbers (1-based) where
both individual cores and ranges of cores can be specified. For example:
cpu-affinity =1,2,3,4
cpu-affinity =1-4
cpu-affinity =1,2,15-16
To determine the number of addressable cores on your system you can use the nproc command:
$ nproc
5.2.4.2 Scheduling Priority
The
nice
setting specifies a relative priority for scheduling session CPU time. Negative 20 is the
highest nice priority and positive 20 is the lowest priority. The system default niceness for processes
is typically 0. The following are all valid nice values:
nice =-10
nice =0
nice =15
Scheduler behavior around nice priorities varies by system. For more details see nice use and effect.
5.2.5 Resource Limits
Profiles can also be used to specify limits on available memory as well as the maximum number of
processes and open files.

CHAPTER 5. R SESSIONS 37
5.2.5.1 Available Memory
The
max-memory-mb
setting controls the maximum amount of addressable memory for R sessions
(by default memory is unlimited). This example specifies a limit of 2GB:
max-memory-mb =2048
Note that this value sets the amount of virtual memory that can be used by a process. Virtual
memory includes code (i.e. shared libraries) loaded by the process as well as things like memory
mapped files, so can often consume several hundred megabytes even for a vanilla R session. Therefore,
you want to be sure not to set this threshold too low (in no case should you set it below 1024).
5.2.5.2 Number of Processes
The
max-processes
settings controls the maximum number of processes createable by a user. This
setting is useful to prevent either inadvertent or malicious fork bombs. The following example sets
a limit of 200 processes:
max-processes =200
Note that users need to be able to create a minimum number of processes in order to use RStudio
Server so we don’t recommend setting this value below 25.
5.2.5.3 Number of Open Files
In most Linux environments there is a maximum of 1024 open files per process. This is typically
more than enough, but if you have a particular applications that requires more open files the
max-open-files setting can be used to increase the limit. For example:
max-open-files =2048
5.2.6 Using Multiple Versions of R
As illustrated above, you can bind users or groups to distinct versions of R installed on your server.
This is controlled by the r-version option. Here are several examples of it’s use:
r-version =/usr/lib/R
r-version =/usr/local/lib/R
r-version =/opt/R/3.1.0
r-version =/opt/R/3.2.0
Note that r-version specifies the full path to the directory where R is installed.
See the R Versions chapter for additional details on running multiple versions of R on a single server.

CHAPTER 5. R SESSIONS 38
5.3 Multiple R Sessions
RStudio Server Professional enables users to have multiple concurrent R sessions on a single server
or load balanced cluster of servers (the open-source version of RStudio Server supports only a single
session at a time).
5.3.1 Creating New Sessions
You can start a new R Session using the
New Session
command from the
Session
menu (or the
corresponding toolbar button near the top-right of the IDE).
You can also open an existing RStudio project in a new R session by using the
Open Project in
New Session
command. When switching projects there is also a button on the right side of the
projects menu that lets you specify that the project should be opened in a new session rather than
within the current one.
You can review all currently running sessions and switch between them using the
Sessions
toolbar
near the top-right of the IDE.
5.3.2 Session Lifetimes
R Sessions are long-running tasks that continue to be available until you explicitly quit them (you
can think of them as you’d think of multiple top-level RStudio windows running on the desktop).
This means that you can kickoff a long running job in one session and then switch to another session,
revisiting the original session later to check on it’s progress. As is also possible on the desktop, you
can navigate between different projects and working directories within a session.
Sessions will suspend automatically when they are idle and then be automatically resumed next
time they are accessed. To permanently quit a session you can use the
Quit Session
command
located on the File menu or the corresponding toolbar button at the top right of the IDE.
5.3.3 Disabling Multiple Sessions
If you wish disable support for multiple sessions you can use the
server-multiple-sessions
option.
For example:
/etc/rstudio/rserver.conf
server-multiple-sessions=0
5.4 PAM Sessions
RStudio Server Professional uses PAM (Pluggable Authentication Modules) for both user authentica-
tion as well to establish the environment and resources available for R sessions. This is accomplished
using the PAM session API. PAM sessions are used for a variety of purposes:
1. To initialize environment variables

CHAPTER 5. R SESSIONS 39
2. To automatically create local users after authentication against a directory server.
3. To mount remote drives
4. To initialize and destroy Kerberos tickets
This section explains how to configure and customize PAM sessions with RStudio Server.
5.4.1 Session PAM Profile
For PAM authentication RStudio Server uses the either the
/etc/pam.d/other
profile (De-
bian/Ubuntu) or
/etc/pam.d/rstudio
profile (RedHat/CentOS). However, for launching R sessions
a different PAM profile is used. This is because the launching of R sessions may not coincide with
authentication (e.g. returning to the site with login credentials cached in a cookie or resuming a
suspended session). Therefore, the PAM directive that enables authentication with
root
privilege
only (auth sufficient pam_rootok.so) needs to be present in the PAM profile.
The behavior that RStudio Server requires is essentially same as that of the
su
command (imperson-
ation of a user without a password). Therefore by default RStudio Server uses the
/etc/pam.d/su
profile for running R sessions.
5.4.1.1 Creating a Custom Profile
The
/etc/pam.d/su
profile has different default behavior depending upon your version of Linux
and local configuration. Depending upon what type of behavior you want associated with R sessions
(e.g. mounting of disks, setting of environment variables, enforcing of resource limits, etc.) you’ll
likely want to create a custom profile for R sessions. For example, if you wanted to use a profile
named rstudio-session you would add this to the configuration file:
/etc/rstudio/rserver.conf
auth-pam-sessions-profile=rstudio-session
Here is in turn what the custom profile might contain in order to enable a few common features of
PAM sessions (this is based on a modified version of the default su profile on Ubuntu):
/etc/pam.d/rstudio-session
# This allows root to su without passwords (this is required)
auth sufficient pam_rootok.so
# This module parses environment configuration file(s)
# and also allows you to use an extended config
# file /etc/security/pam_env.conf.
# parsing /etc/environment needs "readenv=1"
session required pam_env.so readenv=1
# Locale variables are also kept into /etc/default/locale in etch
# reading this file *in addition to /etc/environment* does not hurt
session required pam_env.so readenv=1envfile=/etc/default/locale
# Enforces user limits defined in /etc/security/limits.conf

CHAPTER 5. R SESSIONS 40
session required pam_limits.so
# The standard Unix authentication modules
@include common-auth
@include common-account
@include common-session
5.4.1.2 Custom Profile with Passwords
Note that in the above configuration we rely on
pam_rootok.so
to enable authentication without a
password. This is necessary because RStudio Server doesn’t retain the passwords used during the
authentication phase.
In some situations however passwords are important for more than just authentication. PAM profiles
support a
use_first_pass
directive to forward passwords used during authentication into other
modules (for example, to request a Kerberos ticket with
pam_krb5.so
or to mount an encrypted or
remote drive with
pam_mount.so
). For these scenarios RStudio Server supports an optional mode
to retain passwords after login and then forward them into the PAM session profile. This is enabled
via the auth-pam-sessions-use-password setting:
/etc/rstudio/rserver.conf
auth-pam-sessions-use-password=1
In this scenario you should remove the
auth sufficient pam_rootok.so
directive and replace
it with whatever authentication directives apply in your environment. You can then employ the
use_first_pass directive to forward the password as necessary to other modules.
For example, here’s a very simple RedHat/CentOS PAM configuration file that uses system default
authentication and forwards the password into the
pam_mount.so
module. Note that we are no
longer using pam_rootok.so because the password is now available when the session is created.
/etc/pam.d/rstudio-session
# Auth/account (use system auth and forward password to pam_mount)
auth include system-auth
auth optional pam_mount.so use_first_pass
account required pam_unix.so
# Session (read environment variables and enforce limits)
session required pam_env.so readenv=1
session required pam_env.so readenv=1envfile=/etc/default/locale
session required pam_limits.so
Note that this configuration requires that RStudio Server retain user passwords in memory. This
retention is done using industry best-practices for securing sensitive in-memory data including
disabling ptrace and core dumps, using mlock to prevent paging into the swap area, and overwriting
the contents of memory prior to freeing it.

CHAPTER 5. R SESSIONS 41
5.4.1.3 More Resources
If you want to learn more about PAM profile configuration the following are good resources:
•http://www.linux-pam.org/Linux-PAM-html/Linux-PAM_SAG.html
•http://linux.die.net/man/8/pam.d
•http://www.linuxjournal.com/article/2120
•http://www.informit.com/articles/article.aspx?p=20968
5.4.2 PAM Session Cleanup
By default, RStudio Server does not close PAM sessions when their associated R process exits. This
is because PAM sessions often initialize and maintain resources that require more persistence that
the lifetime of a single R session (e.g. mounted drives, Kerberos tickets, etc.). If a user has multiple
active R sessions then closing the PAM session associated with one of them might unmount a drive
or revoke a ticket that is still required by another R session.
It is however possible to manually close the PAM session associated with an R session by force
suspending it. This can be accomplished in one of two ways:
1. By pressing the Suspend button on the Sessions page of the Administrative Dashboard.
2.
By executing a
force-suspend
or
force-suspend-all
command as described in Suspending
Sessions.
If you prefer that PAM sessions be closed whenever their associated R session exits you can use the
auth-pam-sessions-close setting. For example:
/etc/rstudio/rserver.conf
auth-pam-sessions-close=1
Note that if you specify this setting be aware that depending upon what resources are managed
by your PAM sessions it may be incompatible with users running multiple concurrent R sessions
(because for example a drive might be unmounted from underneath a running session). In this case
you may wish to disable support for multiple R sessions (see the section on Multiple R Sessions for
details on how to do this).
5.4.3 Disabling PAM Sessions
If you don’t want RStudio Server to utilize PAM sessions you can disable this feature using the
auth-pam-sessions-enabled setting. For example:
/etc/rstudio/rserver.conf
auth-pam-sessions-enabled=0

CHAPTER 5. R SESSIONS 42
5.5 Kerberos
You can use PAM sessions to arrange for Kerberos tickets to be made available for use by R sessions.
This is accomplished using the pam_krb5 PAM module. Note that you may need to install this
module separately depending on which Linux distribution/version you are running.
5.5.1 Configuration
NOTE
: You should be sure to understand the previous section on PAM Sessions before attempting
to modify your configuration to support Kerberos.
The following are simple examples of the
pam_krb5
configuration directives you would need to
add to your RStudio PAM configuration files. Note that
pam_krb5
supports a large number of
options, some of which may be required to get Kerberos working correctly in your environment.
You should consult the pam_krb5 documentation before proceeding to ensure you’ve specified all
options correctly.
The main PAM profile for RStudio should be modified to include the following
pam_krb5
directives:
/etc/pam.d/rstudio
auth sufficient pam_krb5.so debug
account required pam_krb5.so debug
session requisite pam_krb5.so debug
In addition to modifying the main PAM profile, you will also need to create a custom PAM session
profile for RStudio (as described in Creating a Custom Profile). This needs to include the appropriate
pam_krb5 directives based on your local Kerberos configuration. For example:
/etc/pam.d/rstudio-session
auth required pam_krb5.so debug
account [default=bad success=ok user_unknown=ignore] pam_krb5.so debug
password sufficient pam_krb5.so use_authtok debug
session requisite pam_krb5.so debug
Note that typically when you create a custom PAM session profile you include the
auth sufficient
pam_rootok.so
directive. However, in the case of configuring for Kerberos authentication you do
not want this directive, rather you need to specify that authentication is done by Kerberos using an
explicit password as illustrated in the above example.
To ensure that the custom PAM session profile is used by RStudio Server and that PAM passwords
are correctly forwarded to
pam_krb5
you’ll also need to add the following entries to the
rserver.conf
config file:
/etc/rstudio/rserver.conf
auth-pam-sessions-profile=rstudio-session
auth-pam-sessions-use-password=1
Some additional notes regarding configuration:

CHAPTER 5. R SESSIONS 43
•
The
debug
action in the PAM profiles is not required however we recommend adding it as it
makes troubleshooting much more straightforward.
•
The examples above are not complete examples of the contents of the PAM profiles but rather
illustrations of the
pam_krb5
entries that need to be present. Your local environment may
have many additional entries which you should ensure are also included as necessary.
You should be sure to suspend active R sessions and to restart RStudio Server after making
configuration changes to ensure that the new settings are being used. You can do this as follows:
sudo rstudio-server force-suspend-all
sudo rstudio-server restart
5.5.2 Testing and Troubleshooting
After making the required configuration changes you should test your updated PAM configuration
in isolation from RStudio Server using the
pamtester
utility as described in Diagnosing PAM
Authentication Problems. The following command will test both authentication as well as issuing of
Kerberos tickets:
sudo /usr/lib/rstudio-server/bin/pamtester --verbose \
rstudio-session <user>authenticate setcred open_session
Note that you should substitute an actual local username for the
<user>
part of the command line.
The specifics of both PAM configuration and Kerberos configuration can vary substantially by
environment. As a result correct configuration likely requires additional entries and options which
this guide isn’t able to cover. Please refer to the documentation linked to in [PAM Resources] as
well as the pam_krb5 for additional details.
5.6 Working Directories
The default working directory for both new R sessions and new R projects is the user’s home
directory (
~
). You can change this behavior via the
session-default-working-dir
and
session-default-new-project-dir
configuration parameters within the
rsession.conf
config
file.
For example, the set the default values to “~/working” and “~/projects” you’d use the following
configuration:
/etc/rstudio/rsession.conf
session-default-working-dir=~/working
session-default-new-project-dir=~/projects
You should ensure that users have the permissions required to write to the specified default directories.
The specified directories will be automatically created if they don’t already exist.
Note that these settings control only the default working and new project directories (users can still
override these settings locally if they choose to).

CHAPTER 5. R SESSIONS 44
5.7 Workspace Management
5.7.1 Default Save Action
When a user exits an R session they need to choose whether to save their R workspace (i.e.
.RData
file). RStudio has global and per-project settings that control what happens when a workspace has
unsaved changes. Possible values are:
•ask – Ask whether to save the workspace file
•yes – Always save the workspace file
•no – Never save the workspace file
The default global setting is
ask
and the default project-level setting is derived from the current
global setting (these options can be modified by end users via the Global Options and Project
Options dialogs respectively).
The default global setting can also be changed via the
session-save-action-default
configuration
parameter in the
rsession.conf
config file. For example, to change the default value to
no
you
would use this:
/etc/rstudio/rsession.conf
session-save-action-default=no
Note that this setting is specified in the
rsession.conf
config file and takes effect the next time a
user launches an R session (rather than requiring a full restart of the server).
5.7.2 Suspend and Resume
When R sessions have been idle (no processing or user interaction) for a specified period of time
(2 hours by default) RStudio Server suspends them to disk to free up server resources. When the
user next interacts with their session it is restored from disk and the user resumes right back where
they left off. This is all done seamlessly such that users aren’t typically aware that a suspend and
resume has occurred.
5.7.2.1 Session Timeout
To configure the amount of idle time to wait before suspending sessions you can use the
session-timeout-minutes setting in the /etc/rstudio/rsession.conf file. For example:
/etc/rstudio/rsession.conf
session-timeout-minutes=360
The default value if none is explicitly specified is 120 minutes.
Important note: this setting and a few others discussed in this section are specified in the
/etc/rstudio/rsession.conf file (rather than the rserver.conf file previously referenced).
There are some conditions where an R session will not be suspended, these include:
1) When a top-level R computation is running

CHAPTER 5. R SESSIONS 45
2) When the R prompt is not in it’s default state (e.g. during a debugging session)
You can also specify that R sessions should never be suspended by setting the
session-timeout-minutes
to zero. For example:
/etc/rstudio/rsession.conf
session-timeout-minutes=0
You can also set session timeouts on a per-user or per-group basis, see the User and Group Profiles
section for details.
5.7.2.2 Forcing Suspends
You can force the suspend of individual sessions or even all sessions on the server. You can do this
directly from the main page of the Administrative Dashboard or from the system shell as follows:
$ sudo rstudio-server force-suspend-session <pid>
$ sudo rstudio-server force-suspend-all
5.7.2.3 Resume and .Rprofile
By default the
Rprofile.site
and
.Rprofile
files are not re-run when a session is resumed (it’s
presumed that all of their side-effects are accounted for by simply restoring loaded packages, options,
environment variables, etc.).
In some configurations it might be desirable to force the re-execution of profile files. There is an
end user option that controls this on the General options pane which defaults to false. However,
server administrators may wish to ensure that this option defaults to true. To do this you use the
session-rprofile-on-resume-default option. For example:
/etc/rstudio/rsession.conf
session-rprofile-on-resume-default=1
Note that this setting is specified in the
rsession.conf
config file and takes effect the next time a
user launches an R session (rather than requiring a full restart of the server).
5.7.2.4 Child Processes
By default, when sessions are quit or suspended, child processes created in the session
will continue to run. You can specify whether or not that should occur by specifying the
session-quit-child-processes-on-exit
setting in
/etc/rstudio/rsession.conf
. The
allowed values are 1or 0to quit child processes or leave them running, respectively.
For example, to quit child processes when the session exits:
/etc/rstudio/rsession.conf
session-quit-child-processes-on-exit=1

CHAPTER 5. R SESSIONS 46
Note that this setting is specified in the
rsession.conf
config file and takes effect the next time
a user launches an R session (rather than requiring a full restart of the server). Also, users can
specifically override this setting in their project settings.
5.7.2.5 Session Timeout Kill
To configure the amount of idle time to wait before killing and destroying sessions you can use the
session-timeout-kill-hours
option in the
/etc/rstudio/rsession.conf
file. This allows you
to specify when a session should automatically be cleaned up when it has been idled, allowing you
to automatically reclaim temporary disk space used by the sessions, and to stop their processes and
children.
For example:
/etc/rstudio/rsession.conf
session-timeout-kill-hours=48
The default value if none is explicitly specified is 0 hours, meaning sessions will never be killed and
destroyed automatically. The supplied value should be an integer representing the amount of hours
a session can be idle before being killed.
NOTE: A session is considered to be idle if it has not received input from the user even if the
session is in the process of running a computation. This means that sessions can be destroyed while
important computations are executing. The user whose session is cleaned will also lose all unsaved
code and data.
5.7.3 Workspace Storage
Storage of workspaces (.RData files) in RStudio Server does not use compression by default. This
differs from the behavior of base R. Compression is disabled because we’ve observed that for larger
workspaces (> 50MB) compression can result in much lower performance for session startup and
suspend/resume (on the order of 3 or 4 times slower).
The default workspace save options under RStudio Server are as follows:
options(save.defaults=list(ascii=FALSE,compress=FALSE))
options(save.image.defaults=list(ascii=FALSE,safe=TRUE,compress=FALSE))
If you wish to use different defaults you can define the
save.defaults
and/or
save.image.defaults
options in your
Rprofile.site
or per-user
.Rprofile
and RStudio Server will respect the settings
you specify rather than using it’s own defaults.
See https://stat.ethz.ch/R-manual/R-devel/library/base/html/save.html for additional details on
how R saves objects and the storage and performance implications of using compression.

CHAPTER 5. R SESSIONS 47
5.8 First Project Template
5.8.1 Overview
RStudio allows you to specify a first project to automatically open for first time users of the system.
To do this, set the
session-first-project-template-path
parameter in
rsession.conf
to an
RStudio project directory. This directory will be copied into the user’s home directory upon first
running the IDE, and will automatically open the project contained within. For example:
/etc/rstudio/rsession.conf
session-first-project-template-path=/etc/rstudio/welcome-project
In the example above, the project located within /etc/rstudio/welcome-project would be copied to
users’ home directories when first starting RStudio, and the project file
welcome-project.Rproj
would be run.
The project file must be named the same as the directory it is contained in. For the above example,
the project file must be named
welcome-project.Rproj
. In addition, you must ensure that the
project directory is fully readable and executable by your users, as they will be copying the contents
of the directory into their home directory.
If you copy an existing project to be used as a project template, ensure that you delete the RStudio
metadata folders and files contained within the project directory. You will want to ensure you delete
the following:
.Rproj.user .Rhistory .RData
If you are creating the project template for the first time, the project (.Rproj) file must contain the
version specifier at a minimum. For example:
welcome-project.Rproj
Version: 1.0
5.8.2 Project DefaultOpenDocs
Project files allow you to specify default documents that should be opened when a project is opened
for the very first time. For example, you could have your welcome project bring up explanatory
documents to help guide your users. To do this, add the
DefaultOpenDocs
line to the .Rproj file.
For example:
welcome-project.Rproj
Version: 1.0
DefaultOpenDocs: welcome.txt:firstMarkdown.Rmd
The
DefaultOpenDocs
parameters specifies a list of files to automatically be opened when the
project is opened for the first time, separated by a
:
character. These files are relative paths to the
project directory. Only files contained within the project directory can be opened.
CHAPTER 5. R SESSIONS 48
5.9 Project Sharing
5.9.1 Overview
Project Sharing is a feature of RStudio Server Pro that enables users to work together on RStudio
projects. When enabled, a project owner may select any number of other RStudio Server users as
project collaborators. RStudio Server manages the permissions of files in the project to ensure that
all collaborators can access them, enables multiple collaborators to edit a file simultaneously, and
lets collaborators see who else is working inside a project with them.
5.9.2 Prerequisites
5.9.2.1 Access Control Lists
To use Project Sharing, the directories hosting the projects to be shared must be on a volume that
supports Access Control Lists (ACLs). RStudio Server uses ACLs to grant collaborators access to
shared projects; ordinary file permissions are not modified.
Instructions for enabling ACLs vary by Linux distribution and filesystem type (see the Guide to
enabling ACLs on Ubuntu or RedHat, for example). Broadly, you will need to ensure that the
filesystem is mounted with the
user_xattr
and
acl
attributes, and modify
/etc/fstab
if necessary
to persist the attributes.
Note that many Linux distributions now have ACLs enabled by default in which case no special
configuration is required. You can use the
tune2fs
command to inspect the attributes with which
your filesystem is mounted (user_xattr and acl are required for project sharing).
5.9.2.2 Project Sharing and NFS
If you plan to use Project Sharing with NFS-mounted volumes, there are several caveats you should
be aware of.
1.
We recommend mounting NFS with the
noac
mount option. Without this option, NFS caches
file attributes, so it may not be possible for users working simultaneously in a project to know
whether they’re seeing each others’ latest changes. The
noac
option does reduce performance,
however, so we recommend testing to choose the right trade off for your environment.
2.
Some features which automatically update when directory contents change will not update on
NFS. For instance, users may need to manually refresh the Files pane to see new files added
by collaborators.
3.
ACL support on NFS is more complicated than ACL support on local file systems. Read ACLs
on Linux NFS for a discussion of the issues; guidance for configuring specific NFS versions is
provided below.
5.9.2.2.1 Determining NFS Version

CHAPTER 5. R SESSIONS 49
Project Sharing works with versions 3 and 4 of the NFS protocol. However, some additional
configuration may be necessary depending on the NFS version and underlying filesystem. To
determine your NFS client version, run the following command on your RStudio Server Pro instance:
$ nfsstat -m
You should see
vers=3.0
in the output if you’re using NFSv3, and
vers=4.0
if you’re using NFSv4.
Extra RStudio configuration is required for NFSv4 clients (see below).
5.9.2.2.2 NFSv3
When using version 3 of the NFS protocol, the volume must be mounted with the
acl
mount option.
On most systems this is the default, so you need only ensure that
noacl
is not present. It’s also
necessary for the file system on the NFS server to itself be appropriately configured for ACL support;
see the section above on Access Control Lists for guidance. Not all file servers that support the
NFSv3 protocol also support POSIX compatible ACLs.
To test for POSIX compatible ACLs, you can use the setfacl command as follows:
setfacl -m u:user2:x /home/user1/project
where
/home/user1/project
is the full path to a directory owned by
user1
, and
user2
is another
valid user on the system.
5.9.2.2.3 NFSv4
Version 4 of the NFS protocol uses a very different permissions and ACL model from Version 3. Not
all NFSv4 servers support or expose the NFSv4 ACL model, so check with the server administrator
to determine whether the capability exists and/or can be enabled.
NFSv4 ACLs differ from NFSv3 ACLs in that they associate a domain with each user named in the
access control list. This is typically the same as the domain part of the machine’s host name, but
can be any string that the NFSv4 client and server agree on. On Linux systems, the domain can be
set in /etc/idmapd.conf.
In order to use NFSv4 with Project Sharing, you must tell RStudio the NFSv4 domain you want to
use, as follows:
/etc/rstudio/rsession.conf
nfs4-domain=mydomain.com
This setting both enables NFSv4 support and sets the domain. If this setting is not present, RStudio
will only use NFSv3 ACLs.
To test NFSv4 ACL support, you can use the nfs4_setfacl command as follows:
nfs4_setfacl -a A::user2@domain:rax /home/user1/project
where
/home/user1/project
is the full path to a directory owned by
user1
,
user2
is another valid
user on the system, and domain is your system’s user domain.

CHAPTER 5. R SESSIONS 50
5.9.2.3 LDAP and sssd
If you’re using sssd with LDAP, you may need to enable user enumeration so that RStudio Server
Pro can search the directory to create a list of users you can share a project with. To do this, set
the following in your sssd.conf file:
[domain/<domainname>]
enumerate =true
Alternatively, the
auth-required-user-group
setting can be used. This setting allows RStudio
Server Pro to enumerate only the members of the named groups rather than the entire user directory.
Therefore, if you cannot enable user enumeration on your LDAP provider, you can instead create a
group containing all RStudio users and supply it as the auth-required-user-group.
You can read more about user enumeration in the sssd FAQ.
5.9.2.4 Shared Storage
To use Project Sharing, a directory must be specified to which all users on the server can read and
write. In a single-server installation, RStudio uses this location by default:
/var/lib/rstudio-server/shared-storage
In a load-balanced configuration, however, RStudio does not provide a default, so it is necessary to
provision a path both visible to and writeable by all users on the system (typically on the same
filesystem on which home directories are mounted). This path can be supplied to RStudio Server
via the server-shared-storage-path option, for example:
/etc/rstudio/rserver.conf
server-shared-storage-path=/shared/rstudio-server/shared-storage
The
server-shared-storage-path
option (described above) configures the path used for shared
project storage. Note that this storage contains only links to shared projects, not the projects
themselves, so requires a very small amount of physical storage.
5.9.2.5 Proxy Settings
If you are running RStudio Server with a proxy, you’ll need to make sure that your proxy is correctly
configured to pass websocket connections through in order for all Project Sharing features to work.
See the Running with a Proxy section for more on this.
5.9.3 Disabling Project Sharing
Project Sharing is enabled by default however you can disable it using the
server-project-sharing
option, for example:
/etc/rstudio/rserver.conf

CHAPTER 5. R SESSIONS 51
server-project-sharing=0
5.10 Package Installation
You can customize the location of user packages installed from CRAN as well as the default CRAN
repository. You can also configure the user-interface of the RStudio IDE to discourage end-user
package installation in the case where packages are deployed centrally to a site library.
Important note: The settings discussed in this section are specified in the
/etc/rstudio/rsession.conf
file (rather than the rserver.conf file previously referenced).
5.10.1 User Library
By default R packages are installed into a user-specific library based on the contents of the
R_LIBS_USER environment variable (more details on this mechanism are here: http://stat.ethz.ch/
R-manual/R-devel/library/base/html/libPaths.html).
It’s also possible to configure an alternative default for user package installation using the
r-libs-user setting. For example:
/etc/rstudio/rsession.conf
r-libs-user=~/R/library
One benefit of establishing an alternative default user library path is that by doing this you can
remove the R version component of the package library path (which the default path contains).
This makes it possible to upgrade the major version of R on the server and have user’s packages
continue to work.
5.10.2 Discouraging User Installations
It may be that you’ve configured RStudio Server with a site package library that is shared by all users.
In this case you might wish to discourage users from installing their own packages by removing the
package installation UI from the RStudio IDE. To do this you use the
allow-package-installation
setting. For example:
/etc/rstudio/rsession.conf
allow-package-installation=0
Note that this setting merely discourages package installation by removing user-interface elements.
It’s still possible for users to install packages directly using the
utils::install.packages
function.
5.10.3 CRAN Repositories
RStudio Server uses the RStudio CRAN mirror (https://cran.rstudio.com) by default. This mirror is
globally distributed using Amazon S3 storage so should provide good performance for all locales. You

CHAPTER 5. R SESSIONS 52
may however wish to override the default CRAN mirror. This can be done with the
r-cran-repos
settings. For example:
/etc/rstudio/rsession.conf
r-cran-repos=http://cran.at.r-project.org/
Whatever the default CRAN mirror is, individual users are still able to set their own default. To
discourage this, you can set the allow-r-cran-repos-edit settings. For example:
/etc/rstudio/rsession.conf
allow-r-cran-repos-edit=0
Note that even with user editing turned off it’s still possible for users to install packages from
alternative repositories by directly specifying the
repos
parameter in a call to
install.packages
.
5.11 Feature Limits
RStudio Server has a number of other limits that can be configured. This section describes these
limits. Note that these settings are specified in the
/etc/rstudio/rsession.conf
file (rather than
the rserver.conf file previously referenced).
5.11.1 Disabling Access to Features
Besides the limits on package installation and CRAN repository editing described in the previous
section there are a number of other limits that can be specified. The following describes all of the
options that can be used to limit features.
/etc/rstudio/rsession.conf
allow-vcs Allow access to Git and SVN version control features.
allow-vcs-executable-edit Allow editing of the underlying Git or SVN executable.
allow-package-installation
Allow installation of packages using the Packages Pane (note that
even if this is set to 0 it’s still possible to install packages using
utils::install.packages
from the command line).
allow-r-cran-repos-edit
Allow editing of the CRAN repository used for package downloads
(note that it’s still possible to specify an alternate repository using the
repos
parameter of
utils::install.packages).
allow-shell
Allow access to the Tools -> Shell dialog (note that it’s still possible to execute shell
commands using the system function).
allow-file-downloads Allow downloading files using the Export command in the Files Pane.
allow-file-uploads Allow uploading files using the Upload command in the Files pane.
allow-external-publish
Allow content to be published to external (cloud) services. This includes
publishing HTML documents created with R Markdown or R Presentations to RPubs (http:
//rpubs.com), and publishing Shiny applications and documents to ShinyApps.io (http:
CHAPTER 5. R SESSIONS 53
//shinyapps.io). Note that this just removes the relevant user interface elements in the IDE,
and that it may still be possible for users to publish content using the R console.
allow-publish
Allow content to be published. If specified, this option removes all user interface
elements related to publishing content from the IDE, and overrides
allow-external-publish
.
All of these features are enabled by default. Specify 0to disable access to the feature.
Note that these options should be specified in the
/etc/rstudio/rsession.conf
configuration file
(rather than the main rserver.conf configuration file).
5.11.2 Maximum File Upload Size
You can limit the maximum size of a file upload by using the
limit-file-upload-size-mb
setting.
For example, the following limits file uploads to 100MB:
/etc/rstudio/rsession.conf
limit-file-upload-size-mb=100
The default behavior is no limit on the size of file uploads.
5.11.3 CPU Time per Computation
If you want to prevent runaway computations that consume 100% of the CPU you can set
the maximum number of minutes to allow top-level R computations to run for using the
limit-cpu-time-minutes setting. For example:
/etc/rstudio/rsession.conf
limit-cpu-time-minutes=30
This specifies that no top level computation entered at the R console should run for more than 30
minutes. This constraint is implemented by calling the R
setTimeLimit
function immediately prior
to handing off console commands to R. As a result it is possible for a particular script to override
this behavior if it knows that it may exceed the threshold. This would be done as follows:
setTimeLimit(cpu = Inf)
# Long running R code here...
5.11.4 XFS Disk Quotas
If your system uses the XFS file system (http://en.wikipedia.org/wiki/XFS) then RStudio Server
can be configured to notify users when they come close to or exceed their disk quota. You can
enable this using the limit-xfs-disk-quota setting. For example:
/etc/rstudio/rsession.conf
limit-xfs-disk-quota=1

CHAPTER 5. R SESSIONS 54
The user’s XFS disk quota will be checked when the RStudio IDE loads and a warning message will
be displayed if they are near to or over their quota.
5.12 Notifications
Administrators can broadcast notifications to user sessions in real-time using the
notifications.conf
file located at
/etc/rstudio/notifications.conf
. This file comes by default with commented
out entries that you can uncomment and use, and helps show you the available time and message
formats.
Each session monitors for changes in the
notifications.conf
file, and if a new notification is
detected, it will be shown to the user at the appropriate time (as defined in the next section). All
open sessions for a user will receive the notification, and they will continue to see the notification in
any new sessions they open until the notification is acknowledged.
Modifying a notification will cause it to count as a new notification, so make sure to only save
changes to the file when you’ve confirmed what you want the message to be and what time it should
be displayed. Otherwise, the same message could be shown multiple times.
5.12.1 notifications.conf format
The
notifications.conf
file is a file consisting of multiple notification entries separated by a blank
line. The following table lists the fields that are available for each notification entry in the file.
StartTime
The start time at which the notification can start to be delievered.
This must be a time-formatted field. This field is not required.
EndTime
The end time at which the notification will no longer be delivered.
This must be a time-formatted field. This field is required.
Message The message content to show to the users. The message cannot
have empty lines in it. This field is required.
An example
notifications.conf
file is shown below. For more information on the formatting of
each field, see the subsequent sections.
/etc/rstudio/notifications.conf
StartTime: 2017-08-30 12:00:00 -5:00
EndTime: 2017-08-30 20:00:00 -05:00
Message: Please remember to shut down your computers at the end of the day.
StartTime: 2017-05-30 13:55
EndTime: 2017-06-13
Message: This is a test notification. Notifications can span
multiple lines by indenting the next line's message text.
Empty lines are not supported!
It is important that each entry consists of 2-3 fields as specified above (StartTime, EndTime, and

CHAPTER 5. R SESSIONS 55
Message). Each field must go on its own line. There should be no empty lines between field
definitions.
For example, this is okay:
/etc/rstudio/notifications.conf
StartTime: 2017-08-30 12:00:00 -5:00
EndTime: 2017-08-30 20:00:00 -05:00
Message: Please remember to shut down your computers at the end of the day.
But this is not:
/etc/rstudio/notifications.conf
StartTime: 2017-08-30 12:00:00 -5:00
EndTime: 2017-08-30 20:00:00 -05:00
Message: Please remember to shut down your computers at the end of the day.
There must be one empty line (2 new line characters) in between separate notification entries.
For example, this is okay:
/etc/rstudio/notifications.conf
StartTime: 2017-08-30 12:00:00 -5:00
EndTime: 2017-08-30 20:00:00 -05:00
Message: Please remember to shut down your computers at the end of the day.
StartTime: 2017-08-30 12:00:00 -5:00
EndTime: 2017-08-30 20:00:00 -05:00
Message: Remember to drop off any borrowed equipment at Grace's office today only.
But this is not:
StartTime: 2017-08-30 12:00:00 -5:00
EndTime: 2017-08-30 20:00:00 -05:00
Message: Please remember to shut down your computers at the end of the day.
StartTime: 2017-08-30 12:00:00 -5:00
EndTime: 2017-08-30 20:00:00 -05:00
Message: Remember to drop off any borrowed equipment at Grace's office today only.
5.12.1.1 Time format
The time format fields, StartTime and EndTime, must be in one of the following formats:
YYYY-MM-DD
YYYY-MM-DD hh:mm

CHAPTER 5. R SESSIONS 56
YYYY-MM-DD hh:mm:ss zh:zm
The following table shows the meaning of the format sections.
YYYY 4 digit year (example: 2017)
MM 2 digit month (example: 06)
DD 2 digit day (example: 28)
hh 2 digit hours (24 hour clock. example: 19)
mm 2 digit minutes (example: 15)
ss 2 digit seconds (example: 59)
zh Time zone hours offset (example: -06 for CST or
-08 for PST)
zm
Time zone minutes offset (usually just 00, different
for only a few timezones)
If no time is specified, the time will be set to 00:00:00 in the current server time zone for start times
and 23:59:59 in the current server time zone for end times.
If no seconds are specified, they will be set to 00 and the time is interpreted in the current server
time zone.
Note that if you have sessions spanning multiple servers in different time zones and you want
your notifications to display at a uniform time, you MUST manually set the timezone to what is
appropriate. Otherwise, sessions in different time zones will see notifications in their local time.
The following table shows some example dates and how they would be formatted.
January 1st, 2020 at 6:00 PM in the server’s time zone 2020-01-01 18:00
July 31st, 2018 at midnight in the server’s time zone (for a
start time)
2018-07-31
September 23rd, 2019 at 23:59:59 in the server’s time zone
(for an end time)
2019-09-23
November 30th, 2020 at 15:14:12 in Pacific Standard Time 2020-11-30 15:14:12 -08:00
5.12.1.2 Message format
The message to deliver must be plain text and cannot have any empty lines. To start text on
another line, simply indent the line as in the multiline example in the previous section.
5.13 RStudio Connect Server
Users on RStudio Server Pro can publish content to RStudio Connect. To do so, they must first
specify the RStudio Connect server they wish to use. You can set the default RStudio Connect server
URL to use when users are connecting to an account. To do so, use the
default-rsconnect-server
option:
/etc/rstudio/rsession.conf

CHAPTER 5. R SESSIONS 57
default-rsconnect-server=http://connectserver/
Chapter 6
R Versions
6.1 Overview
RStudio Server enables users and administrators to have very fine grained control over which versions
of R are used in various contexts. Capabilities include:
1.
Administrators can install several versions of R and specify a global default version as well as
per-user or per-group default versions.
2. Users can switch between any of the available versions of R as they like.
3.
Users can specify that individual R projects remember their last version of R and always use
that version until explicitly migrated to a new version.
Flexible control over R versions make it much easier to provide upgraded versions of R for users (or
individual projects) that require them; while at the same time not disrupting work that requires
continued use of older versions.
6.2 Installing Multiple Versions of R
6.2.1 Binary and Source Versions
Versions of R can be obtained by various means, the most common of which is installing a binary
version from a standard apt-get (Debian/Ubuntu) or yum (RHEL) repository. Versions installed
this way are nearly always located in the /usr/lib/R directory.
You may also have obtained a binary version of R from a vendor like Oracle, Revolution Analytics,
or TIBCO. In those cases please consult the vendor’s documentation to determine the location
where R is installed and update the
/etc/rstudio/r-versions
file to point to it as described in
Determining Available Versions.
To install additional versions of open-source R side-by-side with a version obtained from an apt-get
or yum repository you will typically need to build R from source. The next section provides further
details and recommendations on building from source.
58

CHAPTER 6. R VERSIONS 59
6.2.2 Building Additional Versions from Source
6.2.2.1 Installing Dependencies
Installing additional versions of R side-by-side with the system version requires building R from
source but is very straightforward. First, ensure that you have the build dependencies required for
R, and that you’ve downloaded the R source code (available here). On RedHat/CentOS you’d use
this command:
$ sudo yum-builddep R
On Debian/Ubuntu systems you’d use this command:
$ sudo apt-get build-dep r-base
6.2.2.2 Configuring and Building R
Once you’ve satisfied the build dependencies, you should obtain and unarchive the source tarball for
the version of R you want to install. Then from within the extracted source directory execute these
commands (this example assumes you are installing R 3.2.0):
$ ./configure --prefix=/opt/R/3.2.0 --enable-R-shlib
$ make
$ sudo make install
Note that the
--enable-R-shlib
option is required in order to make the underlying R shared
library available to RStudio Server.
6.2.2.3 Using the System BLAS Libraries
You may also wish to link to the system BLAS libraries rather than use the R internal versions. For
this you’d use the following configure command:
./configure --prefix=/opt/R/3.1.0 --enable-R-shlib --with-blas --with-lapack
6.2.3 Recommended Installation Directories
RStudio Server automatically scans for versions of R at the following locations:
/usr/lib/R
/usr/lib64/R
/usr/local/lib/R
/usr/local/lib64/R
/opt/local/lib/R
/opt/local/lib64/R
In addition, RStudio Server scans all subdirectories of the following directories within /opt:

CHAPTER 6. R VERSIONS 60
/opt/R
/opt/local/R
For example, any of the following installed versions of R will be automatically detected by RStudio
Server:
/opt/R/3.1.0
/opt/R/3.2.0
/opt/local/R/3.1.0
/opt/local/R/3.2.0
If you have versions of R located at other places in the file system RStudio Server can still utilize
them however you’ll need to explicitly specify their location in a configuration file (this is covered in
more detail in the [Using Multiple Versions] section).
6.3 Configuring the Default Version of R
When multiple versions of R are installed you will need to specify which version is the default one
for new R sessions. This can be done automatically via the system PATH however several other
mechanisms are provided when more flexibility is required.
6.3.1 Single Default Version of R
RStudio Server uses the version of R pointed to by the output of the following command:
$ which R
The
which
command performs a search for the R executable using the system PATH. RStudio will
therefore by default bind to the same version that is run when R is executed from a terminal.
For versions of R installed by system package managers this will be
/usr/lib/R
. For versions of R
installed from source this will typically (but not always) be /usr/local/lib/R.
If you want to override which version of R is used then you can use the
rsession-which-r
setting.
For example:
/etc/rstudio/rserver.conf
rsession-which-r=/usr/local/lib/R
Note that this change will not take effect until the server is restarted.
6.3.2 Default Version Per User or Group
You can use the User and Group Profiles feature to specify distinct default versions of R for various
users and groups. For example, the following profile configuration uses R 3.1.0 as the system default,
R 3.2.0 for the powerusers group, and R 3.0.2 for the user jsmith:
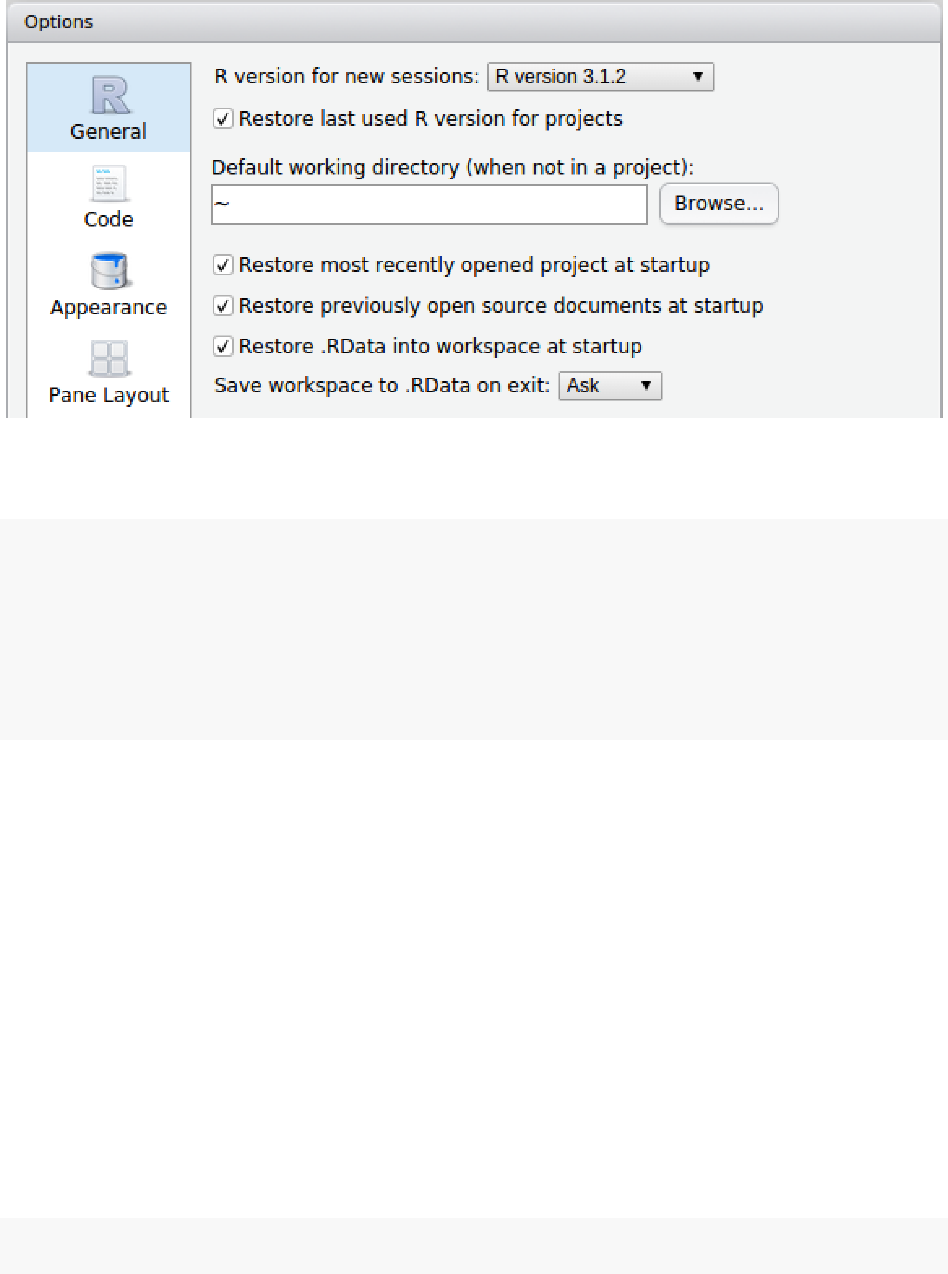
CHAPTER 6. R VERSIONS 61
Figure 6.1: Set Default R Version
[*]
r-version =/opt/R/3.1.0
[@powerusers]
r-version =/opt/R/3.2.0
[jsmith]
r-version =/opt/R/3.0.2
Note that r-version specifies the full path to the directory where R is installed.
6.3.3 User Configurable Default Version
Users can also configure their own default version of R. This is done using the
General
pane of the
Global Options dialog:
See the Disabling Use of Multiple Versions section for details on how to disable version switching
entirely either system-wide or on a per-user or per-group basis.
6.4 Using Multiple Versions of R Concurrently
6.4.1 Determining Available Versions
RStudio Server scans for and automatically discovers versions of R in the following locations:
/usr/lib/R
/usr/lib64/R

CHAPTER 6. R VERSIONS 62
/usr/local/lib/R
/usr/local/lib64/R
/opt/local/lib/R
/opt/local/lib64/R
/opt/R/*
/opt/local/R/*
This is described in more detail in the Recommended Installation Directories section. If you have
installed versions of R in alternate locations you can list them within the
/etc/rstudio/r-versions
configuration file (note that this file is not created by default so you’ll need to create it if doesn’t
already exist). For example:
/etc/rstudio/r-versions
/opt/R-3.2.1
/opt/R-devel-3.3
In addition, any version of R referenced in an
r-version
directive within User and Group Profiles
is also recognized.
In order to be usable, the R home path must be readable by the RStudio server account (usually
rstudio-server; see Access and Security for details).
6.4.1.1 Excluding Versions
If you have versions of R on your system that would normally be picked up by automatic scanning
but which you’d like to exclude, the most straightforward thing to do is to disable R version scanning
altogether and explicitly specify all versions you’d like to use in
/etc/rstudio/r-versions
. For
example:
/etc/rstudio/rserver.conf
r-versions-scan=0
6.4.2 Switching Between Versions
To switch between versions of R you use the version menu near the top right of the IDE:
After switching, the specified version will be used for the duration of the current session (see the
section on Multiple R Sessions for more details on the lifetime of sessions). Newly created R sessions
will continue to use whatever default R version has been configured for the user.
6.4.2.1 Preserving Versions for Projects
It’s often useful to preserve the version used within an R project irrespective of whatever the current
default R version is for a user. This is in fact the behavior by default for RStudio projects however
can be changed from the the General pane of the Global Options dialog.

CHAPTER 6. R VERSIONS 63
Figure 6.2: Switching Versions
This configuration enables users to easily migrate projects one-by-one to a new version of R after
it’s been confirmed that all the code continues to work as expected under the new version.
6.4.3 Disabling Use of Multiple Versions
If you want to prevent users from being able to change R versions entirely you can use the
r-versions-multiple option:
/etc/rstudio/rserver.conf
r-versions-multiple=0
You can also configure this on a per-user or per-group basis by specifying the
r-versions-multiple
option within User and Group Profiles.
6.5 Managing Upgrades of R
There are various ways to handle upgrades to new versions of R ranging from allowing each user to
control exactly when they upgrade all the way to forcing everyone to upgrade all at once.
By combining the various options described above you can create a highly customized upgrade
policy that reflects both your internal policies and the preferences of your users.
6.5.1 User Controlled Migration
The most conservative approach is to start with a default version of R and preserve that default for
the lifetime of the server. In this configuration you can continue to install new versions of R as they
CHAPTER 6. R VERSIONS 64
are released however users won’t ever run those new versions unless they make an explicit gesture
to do so. See the User Configurable Default Version and Switching Between Versions sections for
details on how users can explicitly switch versions.
6.5.2 Partial Migration
If your posture towards new R versions is that you’d like users to migrate to the new version(s) as
quickly as is convenient you can be more aggressive in how you introduce them. In this scenario
you might use the Default Version Per User or Group feature to migrate a portion of new users
immediately but preserve older versions for those who request it.
Note that in this scenario R projects will still preserve their previous R version so long as users
have enabled the option described in Preserving Versions for Projects.
6.5.3 Full Migration
The most aggressive approach is to force all users to upgrade to the new R version immediately
(this is essentially what happens in the open-source version of RStudio Server). To implement this
you’d set a Single Default Version of R as well as disabling the use multiple versions as described in
Disabling Use of Multiple Versions.
Note that via User and Group Profiles you could also have a subset of R users that are always fully
migrated to new versions while preserving user controlled migration or partial migration for others.
Chapter 7
Load Balancing
7.1 Overview
RStudio Server can be configured to load balance R sessions across two or more nodes within a
cluster. This provides both increased capacity as well as higher availability.
Note that load balancing for RStudio Server has some particular “stickiness” requirements stemming
from the fact that users must always return to the same R session where their work resides (i.e. their
traffic can’t be handled by more than one node). As a result, it’s not enough to simply place
multiple RStudio Servers behind a conventional hardware or software load balancer—additional
intelligence and routing is required.
Key characteristics of the RStudio Server load balancer include:
1. Multiple masters for high availability—all nodes can balance traffic to all other nodes.
2.
Support for several load balancing strategies including least busy server (by active sessions or
system load), even distribution by user, or a custom strategy based on an external script.
3. The ability to add and remove nodes while the cluster is running.
4. Works standalone or can be integrated with other front-end load balancing environments.
7.2 Configuration
7.2.1 Requirements
There are several requirements for nodes within RStudio clusters:
1. All nodes must run the same version of RStudio Server Pro.
2. Server configurations (i.e. contents of the /etc/rstudio directory) must be identical.
3.
User accounts must be accessible from each node and usernames and user ids must be identical
on all nodes.
4. The clocks on all nodes must be synchronized.
65

CHAPTER 7. LOAD BALANCING 66
5.
User home directories must be accessible via
shared storage
(e.g. all nodes mounting the
same NFS volume).
6.
To use the Project Sharing feature in a load balanced configuration an explicit server-wide
shared storage path also must be defined. See the Shared Storage section for additional details.
7.2.2 Defining Nodes
To define a cluster node, two configuration files need to be provided:
/etc/rstudio/load-balancer
/etc/rstudio/secure-cookie-key
The first of these defines the available nodes and load balancing strategy. The second defines a
shared key used for signing cookies (in single node configurations this key is generated automatically,
however with multiple nodes explicit coordination is required).
For example, to define a cluster with two nodes that load balances based the number of actively
running R sessions you could use the following configuration:
/etc/rstudio/load-balancer
[config]
balancer = sessions
[nodes]
server1.example.com
server2.example.com
/etc/rstudio/secure-cookie-key
a55e5dc0-d6ae-11e3-9334-000c29635f71
The secure cookie key is simply a unique value (in this case a UUID). Note that this file must have
user read/write file permissions (i.e. 0600) to protect its contents from other users. You can create
a secure cookie key using the uuid utility as follows:
sudo sh -c "echo `uuid`> /etc/rstudio/secure-cookie-key"
sudo chmod 0600 /etc/rstudio/secure-cookie-key
In addition, an explicit server-wide shared storage path must be defined (this is used for inter-node
synchronization). This path is defined in the /etc/rstudio/rserver.conf file. For example:
/etc/rstudio/rserver.conf
server-shared-storage-path=/shared/rstudio-server/shared-storage
For convenience, this path will often be located on the same volume used for shared home directory
storage (e.g. at path /home/rstudio-server/shared-storage).

CHAPTER 7. LOAD BALANCING 67
7.2.3 File Locking
In order to synchronize the creation of sessions across multiple nodes RStudio Server uses a cross-
node locking scheme. This scheme relies on the clocks on all nodes being synchronized. RStudio
Server includes a
locktester
utility which you can use to verify that file locking is working correctly.
To use the
locktester
you should login (e.g. via SSH or telnet) to at least two nodes using the
same user account and then invoke the utility from both sessions as follows:
$ /usr/lib/rstudio-server/bin/locktester
The first node you execute the utility from should print the following message:
*** File Lock Acquired ***
After the message is printed the process will pause so that it can retain the lock (you can cause it
to release the lock by interrupting it e.g. via Ctrl+C).
The second and subsequent nodes you execute the utility from should print the following message:
Unable to Acquire File Lock
If you interrupt the first node (e.g. via Ctrl+C) the lock will be released and you can then acquire
it from the other nodes.
If either of the following occurs then there is an issue with file locking capabilities (or configuration)
that should be addressed prior to using load balancing:
1)
All nodes successfully acquire the file lock (i.e. more than one node can hold it concurrently).
2) No nodes are able to acquire the file lock.
If either of the above conditions hold then RStudio won’t be able to correctly synchronize the
creation of R sessions throughout the cluster (potentially resulting in duplicate sessions and lost
data due to sessions overwriting each others state).
7.2.3.1 Lock Configuration
RStudio’s file locking scheme can be configured using a file at
/etc/rstudio/file-locks
. Valid
entries are:
•lock-type=[linkbased|advisory]
•refresh-rate=[seconds]
•timeout-interval=[seconds]
•enable-logging=[0|1]
•log-file=[path]
The default locking scheme,
linkbased
, uses a file locking scheme whereby locks are considered
acquired when the process successfully hardlinks a dummy file to a location within the folder
RStudio uses for client state (typically
~/.rstudio
). This scheme is generally more robust with
older network file systems, and the locks should survive temporary filesystem mounts / unmounts.
The
timeout-interval
and
refresh-rate
options can be used to configure how often the locks
generated in the
linkbased
locking scheme are refreshed and reaped. By default, a process refreshes
any locks it owns every 20 seconds, and scans for stale locks every 30 seconds. If an
rsession

CHAPTER 7. LOAD BALANCING 68
process crashes, it can leave behind stale lock files; those lock files will be cleaned up after they
expire by any newly-launched rsession processes.
advisory
can be selected to use advisory file locks (using e.g.
fcntl()
or
flock()
). These locks
are robust, but are not supported by all network file systems.
If you are having issues with file locking, you can set
enable-logging=1
, and set the
log-file
option to a path where output should be written. When logging is enabled, RStudio will report
its attempts to acquire and release locks to the log file specified by
log-file
. When
log-file
is
unset, log entries will be emitted to the system logfile, typically located at
/var/lib/messages
or
/var/lib/syslog.
7.2.4 Managing Nodes
7.2.4.1 Starting Up
After creating your configuration files you should ensure that these files (along with all other
configuration defined in
/etc/rstudio
) are copied to all nodes in the cluster. Assuming that
the server is already installed and running on each node, you can then apply the load balancing
configuration by restarting the server:
sudo rstudio-server restart
7.2.4.2 Current Status
Once the cluster is running you can inspect it’s state (which sessions are running where) using the
load balancing status HTTP endpoint. For example, when running the server on the default port
(8787):
curl http://localhost:8787/load-balancer/status
Note that the status endpoint is accessed using localhost rather than an external IP address. This
is because this endpoint is IP restricted to only be accessible within the cluster, so needs to be
accessed directly from one of the nodes.
7.2.4.3 Adding and Removing Nodes
To temporarily remove a node from the cluster you can simply stop it:
sudo rstudio-server stop
R sessions running on that node will be automatically moved to another active node. To restore the
node you can simply start it back up again:
sudo rstudio-server start
Note that adding and removing nodes does not require changing the list of defined nodes in
/etc/rstudio/load-balancer
(traffic is automatically routed around nodes not currently running).

CHAPTER 7. LOAD BALANCING 69
7.2.5 Troubleshooting
If users are having difficulty accessing RStudio Server in a load balanced configuration it’s likely
due to one of the load balancing requirements not being satisfied. This section describes several
scenarios where a failure due to unsatisfied requirements might occur.
7.2.5.1 User Accounts Not Synchronized
One of the load balancing requirements is that user accounts must be accessible from each node and
usernames and user ids must be identical on all nodes. If a user has the same username but different
user ids on different nodes then permissions problems will result when the same user attempts to
access shared storage using different user-ids.
You can determine the ID for a given username via the id command. For example:
id -u jsmith
7.2.5.2 NFS Volume Mounting Problems
If NFS volumes containing shared storage are unmounted during an RStudio session that session
will become unreachable. Furthermore, unmounting can cause loss or corruption of file locks (see
section below). If you are having problems related to accessing user directories then fully resetting
the connections between RStudio nodes and NFS will often resolve them. To perform a full reset:
1) Stop RStudio Server on all nodes (sudo rstudio-server stop).
2) Fully unmount the NFS volume from all nodes.
3) Remount the NFS volume on all nodes.
4) Restart RStudio Server on all nodes (sudo rstudio-server start).
7.2.5.3 File Locking Problems
Shared user storage (e.g. NFS) must support file locking so that RStudio Server can synchronize
access to sessions across the various nodes in the cluster. File locking will not work correctly if the
clocks on all nodes in the cluster are not synchronized. You can verify that file locking is working
correctly by following the instructions in the File Locking section above.
7.3 Access and Availablity
Once you’ve defined a cluster and brought it online you’ll need to decide how the cluster should be
addressed by end users. There are two distinct approaches to this:
1. Single Master
. Provide users with the address of one of the nodes. This node will auto-
matically route traffic and sessions as required to the other nodes. This has the benefit of
simplicity (no additional software or hardware required) but also results in a single point of
failure.

CHAPTER 7. LOAD BALANCING 70
2. Multiple Masters
. Put the nodes behind some type of system that routes traffic to them
(e.g. dynamic DNS or a software or hardware load balancer). While this requires additional
configuration it also enables all of nodes to serve as points of failover for each other.
Both of these options are described in detail below.
7.3.1 Single Master
In a Single Master configuration, you designate one of the nodes in the cluster as the primary one
and provide end users with the address of this node as their point of access. For example:
[nodes]
rstudio.example.com
rstudio2.example.com
rstudio3.example.com
Users would access the cluster using **http://rstudio.example.com**. This node would in turn
route traffic and sessions both to itself and the other nodes in the cluster in accordance with the
active load balancing strategy.
Note that in this configuration the
rstudio2.example.com
and
rstudio3.example.com
nodes
can either fail or be removed from the cluster at any time and service will continue to users. However,
if the main node fails or is removed then the cluster is effectively down.
7.3.2 Multiple Masters
In a Multiple Masters configuration all of the nodes in the cluster are peers and provide failover for
each other. This requires that some external system (dynamic DNS or a load balancer) route traffic
to the nodes. In this scenario any of the nodes can fail and service will continue (so long as the
external router can respond intelligently to a node being unreachable).
For example, here’s an Nginx reverse-proxy configuration that you could use with the cluster defined
above:
http {
upstream rstudio-server {
server rstudio1.example.com;
server rstudio2.example.com backup;
server rstudio3.example.com backup;
}
server {
listen 80;
location / {
proxy_pass http://rstudio-server;
proxy_redirect http://rstudio-server/ $scheme://$host/;
}
}
}

CHAPTER 7. LOAD BALANCING 71
In this scenario the Nginx software load balancer would be running on
rstudio.example.com
and reverse proxy traffic to
rstudio1.example.com
,
rstudio2.example.com
, etc. Note that one
node is designated as primary so traffic is routed there by default. However, if that node fails then
Nginx automatically makes use of the backup nodes.
This is merely one example as there are many ways to route traffic to multiple servers—RStudio
Server load balancing is designed to be compatible with all of them.
7.3.3 Using SSL
If you are running an RStudio Server on a public facing network then using SSL encryption is
strongly recommended. Without this all user session data is sent in the clear and can be intercepted
by malicious parties.
The recommended SSL configuration depends on which access topology you’ve deployed:
1.
For a Single Master deployment, you would configure each node of the cluster to use SSL as
described in the Secure Sockets (SSL) section. The nodes will then use SSL for both external
and intra-machine communication.
2.
For a Multiple Masters deployment, you would configure SSL within the external routing layer
(e.g. the Nginx server in the example above) and use standard unencrypted HTTP for the
individual nodes. You can optionally configure the RStudio nodes to use SSL as well, but this
is not strictly required if all communication with outside networks is done via the external
routing layer.
7.4 Balancing Methods
There are four methods available for balancing R sessions across a cluster. The most appropriate
method is installation specific and depends on the number of users and type of workloads they
create.
7.4.1 Sessions
The default balancing method is
sessions
, which attempts to evenly distribute R sessions across
the nodes of the cluster:
[config]
balancer =sessions
This method allocates new R sessions to the node with the least number of active R sessions. This
is a good choice if you expect that users will for the most part have similar resource requirements.
7.4.2 System Load
The system-load balancing method distributes sessions based on the active workload of available
nodes:

CHAPTER 7. LOAD BALANCING 72
[config]
balancer =system-load
The metric used to establish active workload is the 5-minute load average. This is a good choice
if you expect widely disparate CPU workloads and want to ensure that machines with high CPU
utilization don’t receive new sessions.
7.4.3 User Hash
The
user-hash
balancing method attempts to distribute load evenly and consistently across nodes
by hashing the username of clients:
[config]
balancer =user-hash
The hashing algorithm used is CityHash, which will produce a relatively even distribution of users
to nodes. This is a good choice if you want the assignment of users/sessions to nodes to be stable.
7.4.4 Custom
The custom balancing method calls out to external script to make load balancing decisions:
[config]
balancer =custom
When
custom
is specified, RStudio Server will execute the following script when it needs to make a
choice about which node to start a new session on:
/usr/lib/rstudio-server/bin/rserver-balancer
This script will be passed two environment variables:
RSTUDIO_USERNAME — The user on behalf or which the new R session is being created.
RSTUDIO_NODES — Comma separated list of the IP address and port of available nodes.
The script should return the node to start the new session on using it’s standard output. Note that
the format of the returned node should be identical to it’s format as passed to the script (i.e. include
the IP address and port).

Chapter 8
Auditing and Monitoring
8.1 Auditing Configuration
8.1.1 R Console Auditing
RStudio Server can be optionally configured to audit all R console activity by writing console input
and output to a central location (the
/var/lib/rstudio-server/audit/r-console
directory by
default). This feature can be enabled using the audit-r-console setting. For example:
/etc/rstudio/rserver.conf
audit-r-console=input
This will audit all R console input. If you wish to record both console input and output then you
can use the all setting. For example:
/etc/rstudio/rserver.conf
audit-r-console=all
Note that if you choose to record both input and output you’ll need considerably more storage
available than if you record input only. See the Storage Options section below for additional
discussion of storage requirements and configuration.
8.1.1.1 Data Format
The R console activity for each user is written into individual files within the
r-console
data
directory (by default
/var/lib/rstudio-server/audit/r-console
). The following fields are
included:
session_id Unique identifier for R session where this action occurred.
project
Path to RStudio project directory if the action occurred within a
project.
pid Unix process ID where this console action occurred.
username Unix user which executed this console action.
timestamp Timestamp of action in milliseconds since the epoch.
73
CHAPTER 8. AUDITING AND MONITORING 74
type Console action type (prompt, input, output, or error).
data Console data associated with this action (e.g. output text).
The
session_id
field refers to a concurrent R session as described in the section on Multiple R
Sessions (i.e. it can span multiple projects and/or pids).
The default format for the log file is CSV (Comma Separated Values). It’s also possible to write the
data to Newline Delimited JSON by using the audit-r-console-format option. For example:
audit-r-console-format=json
Note that when using the JSON format the entire file is not a valid JSON object but rather each
individual line is one. This follows the Newline Delimited JSON specification supported by several
libraries including the R jsonlite package.
8.1.1.2 Storage Options
You can customize both the location where audit data is written as well as the maximum amount of
data to log per-user (by default this is 50 MB). To specify the root directory for audit data you use
the audit-data-path setting. For example:
/etc/rstudio/rserver.conf
audit-data-path=/audit-data
Note that this path affects the location of both R console auditing and R session auditing data.
To specify the maximum amount of data to write to an individual user’s R console log file you use
the audit-r-console-user-limit-mb setting. For example:
/etc/rstudio/rserver.conf
audit-r-console-user-limit-mb=100
The default maximum R console log file size is 50 megabytes per-user. To configure no limit to the
size of files which can be written you set the value to 0, for example:
/etc/rstudio/rserver.conf
audit-r-console-user-limit-mb=0
Note that there is no automatic rotation of the audit log files as they get larger. Depending on
the number of users and their activity level this means that you should either create a scheduled
(e.g. cron) job to periodically move the files off the server onto auxiliary storage and/or ensure that
the volume they are stored on has sufficient capacity.
8.1.2 R Session Auditing
RStudio Server can be optionally configured to write an audit log of session related events (e.g. lo-
gin/logout, session start/suspend/exit) to a central location (the
/var/lib/rstudio-server/audit/r-sessions
directory by default). This feature can be enabled using the
audit-r-sessions
setting. For
example:

CHAPTER 8. AUDITING AND MONITORING 75
/etc/rstudio/rserver.conf
audit-r-sessions=1
8.1.2.1 Data Format
The R session event log is written by default to the file at
/var/lib/rstudio-server/audit/r-sessions/r-sessions.csv
.
The following fields are included:
pid
Unix process ID the event is associated with (for auth events this
will be the main rserver process, for session events the
rsession process).
username Unix user that the event is associated with.
timestamp Timestamp of event in milliseconds since the epoch.
type Event type (see documentation on event types below).
data Administrative user that initiated event (only applies to admin
events and auth_login for login-as-user by admin).
The following values are valid for the event type field:
auth_login User logged in to RStudio Server
auth_logout User logged out of RStudio Server
auth_login_failed User login attempt failed
session_start R session started
session_suicide R session exiting due to suicide (internal error)
session_suspend R session exiting due to suspend
session_quit R session exiting due to user quit
session_exit R session exited
session_admin_suspend Administrator attempt to suspend R session
session_admin_terminate Administrator attempt to terminate R session
The default format for the log file is CSV (Comma Separated Values). It’s also possible to write the
data to Newline Delimited JSON by using the audit-r-sessions-format option. For example:
audit-r-sessions-format=json
Note that when using the JSON format the entire file is not a valid JSON object but rather each
individual line is one. This follows the Newline Delimited JSON specification supported by several
libraries including the R jsonlite package.
8.1.2.2 Storage Options
You can customize both the location where audit data is written as well as the maximum amount of
R session event data to log (by default this is 1 GB). To specify the root directory for audit data
you use the audit-data-path setting. For example:
/etc/rstudio/rserver.conf

CHAPTER 8. AUDITING AND MONITORING 76
audit-data-path=/audit-data
Note that this path affects the location of both R console auditing and R session auditing data.
To specify the maximum amount of R session event data to log you use the
audit-r-sessions-limit-mb
setting. For example:
/etc/rstudio/rserver.conf
audit-r-sessions-limit-mb=2048
The default maximum R session event log file size is 1 GB (1024 MB). To configure no limit to the
size of files which can be written you set the value to 0, for example:
/etc/rstudio/rserver.conf
audit-r-sessions-limit-mb=0
Note that there is no automatic rotation of the R session event log file as it gets larger. This means
that you should either create a scheduled (e.g. cron) job to periodically move the file off the server
onto auxiliary storage and/or ensure that the volume that it is stored on has sufficient capacity.
In any case, the amount of data written to the R session event log file is not large (less than 1 KB
per session) so a large number of session events can be stored within the default 1 GB maximum
log file size.
8.2 Monitoring Configuration
8.2.1 System and Per-User Resources
RStudio Server monitors the use of resources (CPU, memory, etc.) on both a per-user and system
wide basis. By default, monitoring data is written to a set of RRD (http://oss.oetiker.ch/rrdtool/)
files and can be viewed using the Administrative Dashboard.
The storage of system monitoring data requires about 20MB of disk space and the storage
of user monitoring data requires about 3.5MB per user. This data is stored by default at
/var/lib/rstudio-server/monitor
. If you have a large number of users you may wish to specify
an alternate volume for monitoring data. You can do this using the
monitor-data-path
setting.
For example:
/etc/rstudio/rserver.conf
monitor-data-path=/monitor-data
You also might wish to disable monitoring with RRD entirely. You can do this using the
monitor-rrd-enabled setting. For example:
/etc/rstudio/rserver.conf
monitor-rrd-enabled=0
Note that changes to the configuration will not take effect until the server is restarted.
CHAPTER 8. AUDITING AND MONITORING 77
8.2.2 Using Graphite
If you are managing several servers it might be convenient to send server monitoring data to a
centralized database and graphing facility as opposed to local RRD files. You can do this by
configuring the server to send monitoring data to Graphite (or any other engine compatible with
the Carbon protocol). This can be done in addition to or entirely in place of RRD.
There are four settings that control interaction with Graphite:
monitor-graphite-
enabled
Write monitoring data to Graphite (defaults to 0)
monitor-graphite-host Host running Graphite (defaults to 127.0.0.1)
monitor-graphite-port Port Graphite is listening on (defaults to 2003)
monitor-graphite-
client-id
Optional client ID for sender
For example, to enable Graphite monitoring on a remote host with the default Graphite port you
would use these settings:
/etc/rstudio/rserver.conf
monitor-graphite-enabled=1
monitor-graphite-host=134.47.22.6
If you are using a service like hosted graphite.com that requires that you provide an API key as
part of reporting metrics you can use the monitor-graphite-client-id setting. For example:
/etc/rstudio/rserver.conf
monitor-graphite-enabled=1
monitor-graphite-host=carbon.hostedgraphite.com
monitor-graphite-client-id=490662a4-1d8c-11e5-b06d-000c298f3d04
Note that changes to the configuration will not take effect until the server is restarted.
8.3 Server Health Checks
8.3.1 Enabling Health Checks
You may wish to periodically poll RStudio Server to ensure that it’s still responding to requests as
well as to examine various indicators of server load. You can enable a health check endpoint using
the server-health-check-enabled setting. For example:
/etc/rstudio/rserver.conf
server-health-check-enabled=1
After restarting the server, the following health-check endpoint will be available:

CHAPTER 8. AUDITING AND MONITORING 78
http://<server-address-and-port>/health-check
By default, the output of the health check will appear as follows:
active-sessions: 1
idle-seconds: 0
cpu-percent: 0.0
memory-percent: 64.2
swap-percent: 0.0
load-average: 4.1
8.3.2 Customizing Responses
The response to the health check is determined by processing a template that includes several
variables. The default template is:
active-sessions: #active-sessions#
idle-seconds: #idle-seconds#
cpu-percent: #cpu-percent#
memory-percent: #memory-percent#
swap-percent: #swap-percent#
load-average: #load-average#
You can customize this template to return an alternate format (e.g. XML or JSON) that is parse-
able by an external monitoring system. To do this you simply create a template and copy it to
/etc/rstudio/health-check For example:
/etc/rstudio/health-check
<?xml version="1.0" encoding="UTF-8"?>
<health-check>
<active-sessions>#active-sessions#</active-sessions>
<idle-seconds>#idle-seconds#</idle-seconds>
<cpu-percent>#cpu-percent#</cpu-percent>
<memory-percent>#memory-percent#</memory-percent>
<swap-percent>#swap-percent#</swap-percent>
<load-average>#load-average#</load-average>
</health-check>
8.3.3 Changing the URL
It’s also possible to customize the URL used for health checks. RStudio Server will use the first file
whose name begins with
health-check
in the
/etc/rstudio
directory as the template, and require
that the full file name be specified in the URL. For example, a health check template located at the
following path:
/etc/rstudio/health-check-B64C900E
Would be accessed using this URL:

CHAPTER 8. AUDITING AND MONITORING 79
http://<server-address-and-port>/health-check-B64C900E
Note that changes to the health check template will not take effect until the server is restarted.

Chapter 9
License Management
9.1 Product Activation
9.1.1 Activation Basics
When RStudio Server is first installed on a system it operates in evaluation mode for a period of
time and then subsequently requires activation for continued use.
To determine the current license status of your system you can use the following command:
$ sudo rstudio-server license-manager status
After purchasing a license to RStudio Server you’ll receive a license key that can be used to activate
the license on a given system.
You can activate your license key with the command:
$ sudo rstudio-server license-manager activate <product-key>
$ sudo rstudio-server restart
Note that you need to restart the server in order for licensing changes to take effect.
If you want to move your license of RStudio Server to another system you should first deactivate it
on the old system with the command:
$ sudo rstudio-server license-manager deactivate
9.2 Connectivity Requirements
In order to activate or deactivate RStudio Server, internet connectivity is required for communication
with the licensing server. If your server is behind an internet proxy or not connected to the Internet
at all this section describes what’s required to successfully activate.
80
CHAPTER 9. LICENSE MANAGEMENT 81
9.2.1 Proxy Servers
If your server is behind an internet proxy, you may need to add an additional command line flag
indicating the address and credentials required to communicate through the proxy. This may not
be necessary if either the
http_proxy
or
all_proxy
environment variable is defined (these are read
and used by the license manager when available).
If you do need to specify a proxy server explicitly you can do so using the
--proxy
command line
parameter. For example:
$ sudo rstudio-server license-manager --proxy=http://127.0.0.1/ activate <product-key>
Proxy settings can include a host-name, port, and username/password if necessary. The following
are all valid proxy configurations:
http://127.0.0.1/
http://127.0.0.1:8080/
http://user:pass@127.0.0.1:8080/
If the port is not specified, the license manager will default to using port 1080.
9.2.2 Offline Activation
If your system has no connection to the Internet it’s also possible to perform an offline activation.
To do this, we recommend using our offline activation application which will walk you through the
process: RStudio Offline Activation
To activate your license offline, you first generate an offline activation request as follows:
$ sudo rstudio-server license-manager activate-offline-request <product-key>
Executing this command will print an offline activation request to the terminal which you should
copy and paste and enter into our offline activation application or send to RStudio customer support
(support@rstudio.com). You will receive a reply with a file attachment that can be used to activate
offline as follows:
$ sudo rstudio-server license-manager activate-offline <activation-file>
$ sudo rstudio-server restart
Note that you need to restart the server in order for licensing changes to take effect.
If you are renewing your license or want to move your license of RStudio Server to another system
you can also perform license deactivation offline. You can do this as follows:
$ sudo rstudio-server license-manager deactivate-offline
Executing this command will print an offline deactivation request to the terminal which you should
copy and paste and enter into the offline activation application then send to RStudio customer
support (support@rstudio.com).
You can also perform an offline check of your current license status using the following command:

CHAPTER 9. LICENSE MANAGEMENT 82
$ sudo rstudio-server license-manager status-offline
9.3 Evaluations
9.3.1 Extending Evaluations
If you are unable to evaluate RStudio Server during the initial evaluation period, you can obtain a
key for extending the evaluation period from RStudio customer support (support@rstudio.com).
Once you have the key, supply it to RStudio Server using the extend-evaluation command.
$ sudo rstudio-server license-manager extend-evaluation <key>
If you are performing the evaluation on a physical machine (not on virtualized hardware or containers)
without a network connection, you may also request an offline evaluation extension key, which does
not require an internet connection. This key may be supplied to RStudio Server as follows:
$ sudo rstudio-server license-manager extend-evaluation-offline <key>
Note that offline evaluation extension keys are valid only on machines which do not have Internet
access and are not virtualized. For most offline evaluation extensions, you will need to generate an
offline evaluation request (see below for details).
9.3.2 Connectivity Requirements
9.3.2.1 Beginning Evaluations
Generally speaking, there are no network requirements during the evaluation period. Inside virtual
machines or sandboxes (such as Docker), however, Internet access is required to begin the evaluation
period.
If you have a proxy, you can supply it using the
--proxy
argument as described above. If however
you have no means of connecting to the Internet from inside the virtual environment, you can begin
the evaluation as follows:
$ sudo rstudio-server license-manager begin-evaluation-request
Executing this command will print an offline activation request to the terminal which you should
copy and paste and then send to RStudio customer support (support@rstudio.com). You will receive
a reply with a file attachment that can be used to begin the evaluation offline as follows:
$ sudo rstudio-server license-manager begin-evaluation-offline <evaluation-file>
$ sudo rstudio-server restart
9.3.2.2 Extending Evaluations
You may extend evaluations offline using the same pattern described above (just use
extend-evaluation-request and extend-evaluation-offline):

CHAPTER 9. LICENSE MANAGEMENT 83
$ sudo rstudio-server license-manager extend-evaluation-request
Then, when you’ve received the evaluation file:
$ sudo rstudio-server license-manager extend-evaluation-offline <evaluation-file>
$ sudo rstudio-server restart
9.4 Floating Licensing
If you stop and start RStudio Server instances frequently, for instance because you’re running them
inside virtual machines or containers, you may wish to use floating licensing instead of traditional
licensing.
To use floating licensing, you run a small, lightweight server, which holds a license that grants you
the right to run a certain number of concurrent RStudio Server instances.
When RStudio Server starts, it will connect to the license server and obtain a temporary lease,
releasing it when RStudio Server is stopped. Using this method, you can have any number of
RStudio Server instances, so long as you do not run more instances at once than specified in your
license.
9.4.1 The RStudio Server Pro License Server
The RStudio License Server site contains license server downloads for all RStudio products. Download
and install the license server for RStudio Server Pro. You then activate your license key with the
command:
$ sudo dpkg -i rsp-license-server-1.0.3-x86_64.deb
$ sudo rsp-license-server activate <product-key>
$ sudo rsp-license-server start
A license key which distributes floating license leases is not the same as a traditional license key,
and the two cannot be used interchangeably. If you have purchased traditional license keys and
wish to exchange them for a floating license key, or vice versa, please get in touch with RStudio
customer support (support@rstudio.com).
The file
/etc/rsp-license-server.conf
contains configuration settings for the RStudio Server
Pro License server, including the network port to listen on and any proxy settings required for
connecting to the Internet.
9.4.2 License Server Offline Activation
The
rsp-license-server activate
command requires an internet connection. If your license
server has no connection to the Internet it’s also possible to perform an offline activation. The
process for doing this on the license server is identical to the process used to activate RStudio Server
offline. Generate an offline activation request as follows:

CHAPTER 9. LICENSE MANAGEMENT 84
$ sudo rsp-license-server activate-offline-request <product-key>
Executing this command will print an offline activation request to the terminal which you should
copy and paste and then send to RStudio customer support (support@rstudio.com). You will receive
a reply with a file attachment that can be used to activate offline as follows:
$ sudo rsp-license-server activate-offline <activation-file>
$ sudo rsp-license-server restart
9.4.3 Using Floating Licensing
Once your license server is up and running, you need to tell RStudio Server to use floating licensing
instead of traditional licensing.
/etc/rstudio/rserver.conf
server-license-type=remote
The value
remote
indicates that RStudio Server should connect to a remote licensing server to
obtain a license; the value local can be used to explicitly specify traditional (local) activation.
Then, tell RStudio Server which licensing server to connect to:
$ sudo rstudio-server license-manager license-server <server-hostname-or-ip>
$ sudo rstudio-server restart
You only need to run the
license-server
command once; RStudio Server saves the server name
and will use it on each subsequent startup.
By default, the RStudio Server Pro License Server listens on port 8989. If you wish to use a
different port, you will need to specify the port in
/etc/rsp-license-server.conf
, and specify
license-server to RStudio Server as <server-hostname-or-ip:port>.
Depending on your system configuration, it is possible that the RStudio Server service will be
started before the service which allows hostname resolution (this is known to be the case for example
on some Amazon EC2 systems). If this is the case, you’ll want to specify the license server using a
private IP address rather than a hostname, so that RStudio Server can acquire a license immediately
when starting up.
9.4.4 Configuring License Leases
When using floating licenses, you can optionally determine how long the license leases last by setting
the
lease length
value on the licensing server. This value is in seconds, so for instance to make
license leases last 30 minutes you would use the following syntax:
/etc/rsp-license-server.conf
<lease length="1800"/>
The lease length controls how frequently the RStudio Server instances need to contact the licensing
server to renew their license leases in order for the lease to remain valid.

CHAPTER 9. LICENSE MANAGEMENT 85
A
shorter
lease length will increase tolerance to failures on RStudio Server instances by making
leases available for reuse more quickly. RStudio Server will release its lease immediately if shut
down normally, but if abnormally terminated, the lease will not be released until it expires.
A
longer
lease length will increase tolerance to transient failures on the network and the RStudio
Server Pro License Server. Any such issues that can be resolved before the lease is due for renewal
won’t interrupt use of RStudio Server.
We generally recommend using a longer lease length. Use a short lease length only if your environment
routinely encounters abnormal terminations of the server or the container/instance on which it runs.
9.4.5 Lease Expiration and Renewal
Under normal conditions RStudio Server will automatically renew its license lease in a configurable
interval as described above. However, there are situations in which it will be unable to do so, such
as a network problem, or an issue on the host running the license server.
When RStudio Server cannot obtain a license lease, either because there are no leases currently
available or because it can’t reach the licensing server, it will begin automatically attempting to
acquire a lease every 10 seconds. This interval is configurable; for instance, to retry every 30 seconds
instead you would set the following value:
/etc/rstudio/rserver.conf
license-retry-seconds=30
If you don’t want RStudio Server to attempt to reestablish a license lease automatically, set the
value to
0
to disable retries. In this case you will need to manually restart RStudio Server in order
to reestablish the lease. This can be useful if you often run more instances than you have keys for,
and wish to have more control over which RStudio Server instances receive license leases from the
limited pool on the license server.
9.4.6 Troubleshooting Floating Licensing
To validate that the license server has been successfully activated, run the
activation-status
command. This will report the version of the server as well as the license key and the number of
available slots.
$ sudo rsp-license-server activation-status
If your server is activated but you’re still having trouble with floating licensing, you can tell the
RStudio Server Pro License Server to emit more detailed logs. Change the log level to
notification
:
/etc/rsp-license-server.conf
<log file="/var/log/rstudio-licensing.log" level="notification"/>
Then, restart the license server, tail the licensing log, and start your RStudio Server instances.
$ sudo rsp-license-server restart
$ tail -f /var/log/rstudio-licensing.log
CHAPTER 9. LICENSE MANAGEMENT 86
At the
notification
level, the licensing log will tell you the total number of licenses associated
with your key, and how many are currently in use. It will also notify you when RStudio Server
instances acquire leases, and when those leases are released, renewed, or expired. No rotation is
done for this log, so it’s recommended to use the warning level in production.

Chapter 10
Data Connectivity
10.1 Connectivity using ODBC
RStudio Server makes ODBC connections available in the Connections Pane. ODBC connections
are obtained from the odbcinst.ini file and can be further customized using Snippet Files.
Note: RStudio Server Pro provides connectivity to data sources through RStudio Professional Drivers,
see Getting Started with RStudio Professional Drivers and Databases using R for more information.
10.2 Connectivity using R Packages
For R Packages that provide data connectivity through the Connections Contract, RStudio Server
makes these connections also available in the Connections Pane and can be further customized using
Snippet Files. Currently, the odbc and sparklyr packages provide this connectivity.
10.3 Snippet Files
A Connection Snippet File is an R code snippet with additional metadata which is intended to
initialize a connection. This file can be as simple as:
library(readr)
data <- read_csv(readr_example("mtcars.csv"))
Once this file is saved under
/etc/rstudio/connections/
as
Motor Trend Cars.R
, RStudio will
make this connection as available under the Connection Pane.
The path is configurable through the
connections-path
environment variable and multiple connec-
tion files can be specified.
In order to parameterize this connection, one can create fields using using the
${Position:Label=Default}
syntax:
•Position: The row position starting at zero.
87

CHAPTER 10. DATA CONNECTIVITY 88
•Label: The label assigned to this field.
•Default: An optional default value.
For example, we can filter out this dataframe to produce the following connection interface:
library(readr)
data <- read_csv(readr_example("mtcars.csv"))
data[data$mpg == ${0:Miles per Gallon=21.4}|data$cyl == ${1:Cylinders=6}, ]
In order to craete a
;
separated list of values, one can use the syntax
${Position:Label=Default:Key}
.
Semicolon-separated list are common in database connections and therefore, natevely supported in
snippet files, for instance:
"${2:Letters=ABC:LettersKey}${3:Numbers=123:NumbersKey}"
There are a couple escape characters supported: $colon$ to escape :and $equal to escape =.
Additional resources are available under RStudio Extensions - Connections.
