Server Operations Guide
server_operations_guide
User Manual: Pdf
Open the PDF directly: View PDF ![]() .
.
Page Count: 125 [warning: Documents this large are best viewed by clicking the View PDF Link!]
- Server Operations Guide
- Table of Contents
- Chapter 1. Introduction
- Chapter 2. Server Configuration with bw.xml
- 2.1. The entry parentFile
- 2.2. User dependent configuration
- 2.3. Command-Line Options
- 2.4. General Configuration Options
- 2.5. Network Configuration Options
- 2.6. Load Balancing Configuration Options
- 2.7. BaseApp Configuration Options
- 2.8. BaseAppMgr Configuration Options
- 2.9. Bots Configuration Options
- 2.10. CellApp Configuration Options
- 2.11. CellAppMgr Configuration Options
- 2.12. DBMgr Configuration Options
- 2.13. LoginApp Configuration Options
- 2.14. Reviver Configuration Options
- Chapter 3. Admin Tools
- 3.1. WebConsole
- 3.2. Logger Daemons
- 3.2.1. MessageLogger
- 3.2.2. StatLogger
- 3.2.2.1. Requirements
- 3.2.2.2. Installation
- 3.2.2.3. Usage
- 3.2.2.4. Output
- 3.2.2.5. Configuration
- 3.2.2.6. Database
- 3.3. Server Command-Line Utilities
- 3.4. Standard GUI Applications
- Chapter 4. Watcher (Web Interface)
- Chapter 5. Fault Tolerance
- Chapter 6. Backups and Disaster Recovery
- Chapter 7. Controlled Startup and Shutdown
- Chapter 8. Stress Testing with Bots
- Chapter 9. Security
- Chapter 10. BigWorld Server Across Multiple Machines
- Chapter 11. Multiple BigWorld Servers in a Single LAN
- Chapter 12. DBMgr MySQL Support
- Chapter 13. RPM
- Chapter 14. First Aid After a Crash
- Chapter 15. Common Log Messages
- Chapter 16. Clock

Server Operations Guide
BigWorld Technology 1.9.1. Released 2008.
Software designed and built in Australia by BigWorld.
Level 3, 431 Glebe Point Road
Glebe NSW 2037, Australia
www.bigworldtech.com
Copyright © 1999-2008 BigWorld Pty Ltd. All rights reserved.
This document is proprietary commercial in confidence and access is restricted to authorised users. This document is
protected by copyright laws of Australia, other countries and international treaties. Unauthorised use, reproduction or
distribution of this document, or any portion of this document, may result in the imposition of civil and criminal penalties as
provided by law.

ii
Table of Contents
1. Introduction .................................................................................................................................. 5
2. Server Configuration with bw.xml ................................................................................................ 6
2.1. The entry parentFile ....................................................................................................... 6
2.2. User dependent configuration ............................................................................................. 7
2.3. Command-Line Options ...................................................................................................... 7
2.4. General Configuration Options ........................................................................................... 7
2.5. Network Configuration Options ........................................................................................ 13
2.6. Load Balancing Configuration Options .............................................................................. 14
2.6.1. Entities Cardinality Configuration Options ............................................................. 14
2.7. BaseApp Configuration Options ........................................................................................ 15
2.7.1. Secondary Database Configuration Options ............................................................ 20
2.7.2. Packet Log Configuration Options .......................................................................... 20
2.7.3. ID Configuration Options ....................................................................................... 21
2.7.4. Client Upstream Limits ........................................................................................... 21
2.8. BaseAppMgr Configuration Options ................................................................................. 22
2.9. Bots Configuration Options ............................................................................................... 23
2.10. CellApp Configuration Options ....................................................................................... 25
2.10.1. Noise Configuration Options ................................................................................ 30
2.10.2. ID Configuration Options ..................................................................................... 30
2.10.3. CellApp Profiles Configuration Options ................................................................ 31
2.11. CellAppMgr Configuration Options ................................................................................ 32
2.12. DBMgr Configuration Options ........................................................................................ 35
2.12.1. Data Consolidation Options .................................................................................. 39
2.13. LoginApp Configuration Options .................................................................................... 39
2.14. Reviver Configuration Options ........................................................................................ 42
2.14.1. Reviver's BaseAppMgr Configuration Options ...................................................... 43
2.14.2. Reviver's CellAppMgr Configuration Options ....................................................... 43
2.14.3. Reviver's DBMgr Configuration Options ............................................................... 43
2.14.4. Reviver's LoginApp Configuration Options ........................................................... 44
3. Admin Tools ................................................................................................................................ 45
3.1. WebConsole ...................................................................................................................... 45
3.1.1. Modules ................................................................................................................. 45
3.1.2. Configuration ......................................................................................................... 49
3.1.3. How to Start ........................................................................................................... 49
3.2. Logger Daemons ............................................................................................................... 50
3.2.1. MessageLogger ....................................................................................................... 50
3.2.2. StatLogger .............................................................................................................. 55
3.3. Server Command-Line Utilities ......................................................................................... 67
3.3.1. control_cluster.py ........................................................................................... 67
3.3.2. eload (Entity Loader) ............................................................................................. 69
3.3.3. MessageLogger Related Utilities ............................................................................. 69
3.3.4. mls (Machine List) ................................................................................................. 70
3.3.5. runscript ............................................................................................................. 70
3.4. Standard GUI Applications ............................................................................................... 70
3.4.1. BWPanel ................................................................................................................. 71
3.4.2. Space Viewer .......................................................................................................... 75
4. Watcher (Web Interface) ............................................................................................................... 84
5. Fault Tolerance ............................................................................................................................ 86
5.1. CellApp Fault Tolerance .................................................................................................... 86
5.2. BaseApp Fault Tolerance ................................................................................................... 86
5.2.1. Distributed BaseApp Backup Method ..................................................................... 87
5.2.2. Non-Distributed BaseApp Backup Method .............................................................. 87
5.2.3. IP Address Change ................................................................................................. 89
5.2.4. Further Considerations ........................................................................................... 89

iii
5.3. Fault Tolerance with Reviver ............................................................................................. 90
5.3.1. Specifying Components to Support ......................................................................... 90
5.3.2. Command-Line Options .......................................................................................... 91
6. Backups and Disaster Recovery ................................................................................................... 92
6.1. Disaster Recovery .............................................................................................................. 92
6.2. Database Snapshot Tool .................................................................................................... 92
6.2.1. Configuration ......................................................................................................... 93
6.3. Data Consolidation Tool .................................................................................................... 95
6.3.1. Skipping Data Consolidation .................................................................................. 95
6.3.2. Ignoring SQLite Errors ............................................................................................ 96
7. Controlled Startup and Shutdown ............................................................................................... 97
8. Stress Testing with Bots ............................................................................................................... 98
8.1. The Login Process ............................................................................................................. 98
8.2. Watcher Interface .............................................................................................................. 99
8.3. Python Interface .............................................................................................................. 100
8.3.1. Python Controller (bot_op.py) ............................................................................ 100
8.3.2. Methods and Attributes ........................................................................................ 101
8.4. Controlling Movement .................................................................................................... 104
8.4.1. NodeProperties Section ......................................................................................... 105
8.5. Extending Bots ................................................................................................................ 106
8.5.1. Creating New Movement Controllers .................................................................... 106
9. Security ...................................................................................................................................... 108
9.1. Security of the Server ...................................................................................................... 108
9.2. Server Ports ..................................................................................................................... 109
9.3. Blocking Ports and Related Security Considerations ......................................................... 110
10. BigWorld Server Across Multiple Machines .............................................................................. 111
10.1. How To Start ................................................................................................................. 111
10.1.1. WebConsole ........................................................................................................ 111
10.1.2. Auto Configuration Via control_cluster.py ................................................... 111
10.1.3. Hard-Coded Scripts ............................................................................................. 111
10.1.4. Manual Start ....................................................................................................... 111
10.2. How To Stop ................................................................................................................. 111
10.3. How To Monitor ............................................................................................................ 111
10.4. LoginApp and Scalability .............................................................................................. 111
11. Multiple BigWorld Servers in a Single LAN ............................................................................. 113
11.1. Keeping Processes Separate ............................................................................................ 113
11.2. Centralised Cluster Monitoring ...................................................................................... 113
11.3. Auto-Detection of LoginApps ........................................................................................ 113
12. DBMgr MySQL Support ........................................................................................................... 114
12.1. Compiling DBMgr with MySQL Support ....................................................................... 114
12.2. Update bw.xml To Use MySQL ..................................................................................... 114
12.3. Initialise Database With Entity Definitions .................................................................... 114
12.4. Disabling Schema-Modifying Capability ........................................................................ 115
12.5. Enabling Secondary Databases ....................................................................................... 115
13. RPM ......................................................................................................................................... 116
13.1. Directory Structures and Files ........................................................................................ 116
13.2. How to Generate Binary RPM Packages ......................................................................... 116
13.3. Customising RPM Packages ........................................................................................... 117
13.4. Setting up a Yum Repository .......................................................................................... 117
13.5. Install, Upgrade and Uninstall using Yum Command ..................................................... 119
13.5.1. Install and Upgrade using a RPM Package Directly .............................................. 119
13.5.2. Install and Upgrade using Yum Repository .......................................................... 119
13.5.3. Remove an Installed Package ............................................................................... 119
13.6. How to Obtain Version Number of an Installed Package ................................................. 119
14. First Aid After a Crash ............................................................................................................. 121
14.1. Procedure For Crash Reporting ...................................................................................... 121

iv Copyright 1999-2008 BigWorld Pty. Ltd. All rights reserved. Proprietary commercial in confidence.
14.2. Q & A ........................................................................................................................... 121
15. Common Log Messages ............................................................................................................ 122
15.1. Warnings ....................................................................................................................... 122
15.2. Errors ............................................................................................................................. 123
16. Clock ........................................................................................................................................ 125
16.1. BigWorld Timing Methods ............................................................................................. 125
16.2. Linux Clock Source ........................................................................................................ 125

5
Chapter 1. Introduction
BigWorld Technology is BigWorld's middleware for implementing Massively Multiplayer Online Games.
This document is a guide to performing operations with the server software. It is not intended for game
designers or game logic implementers, but rather for 'machine room' or 'cluster control' operators and
administrators.
It is assumed that the server has been installed according to the instructions in the document Server
Installation Guide. An understanding of the basic BigWorld processes is also assumed. For more details on
these processes, see the document Server Overview's chapters Design Introduction and Server Components.
Note
For details on BigWorld terminology, see the document Glossary of Terms.
6
Chapter 2. Server Configuration with bw.xml
The single most important configuration file on the server is <res>/server/bw.xml, where <res> is the
resource tree used by the server (usually specified in ~/.bwmachined.conf).
All sever processes read this file. It contains many parameters, all of which are described in this chapter. The
default values are appropriate for many different games, and care should be taken when changing them,
since it might affect performance.
On the description of the parameters, please note the following:
▪Boolean parameters should be specified as true or false.
▪Where a tag is specified as tag1/tag2, the second tag is specified inside the scope of the first one. For
example, the tag dbMgr/allowEmptyDigest is specified as:
<dbMgr>
<allowEmptyDigest> true </allowEmptyDigest>
</dbMgr>
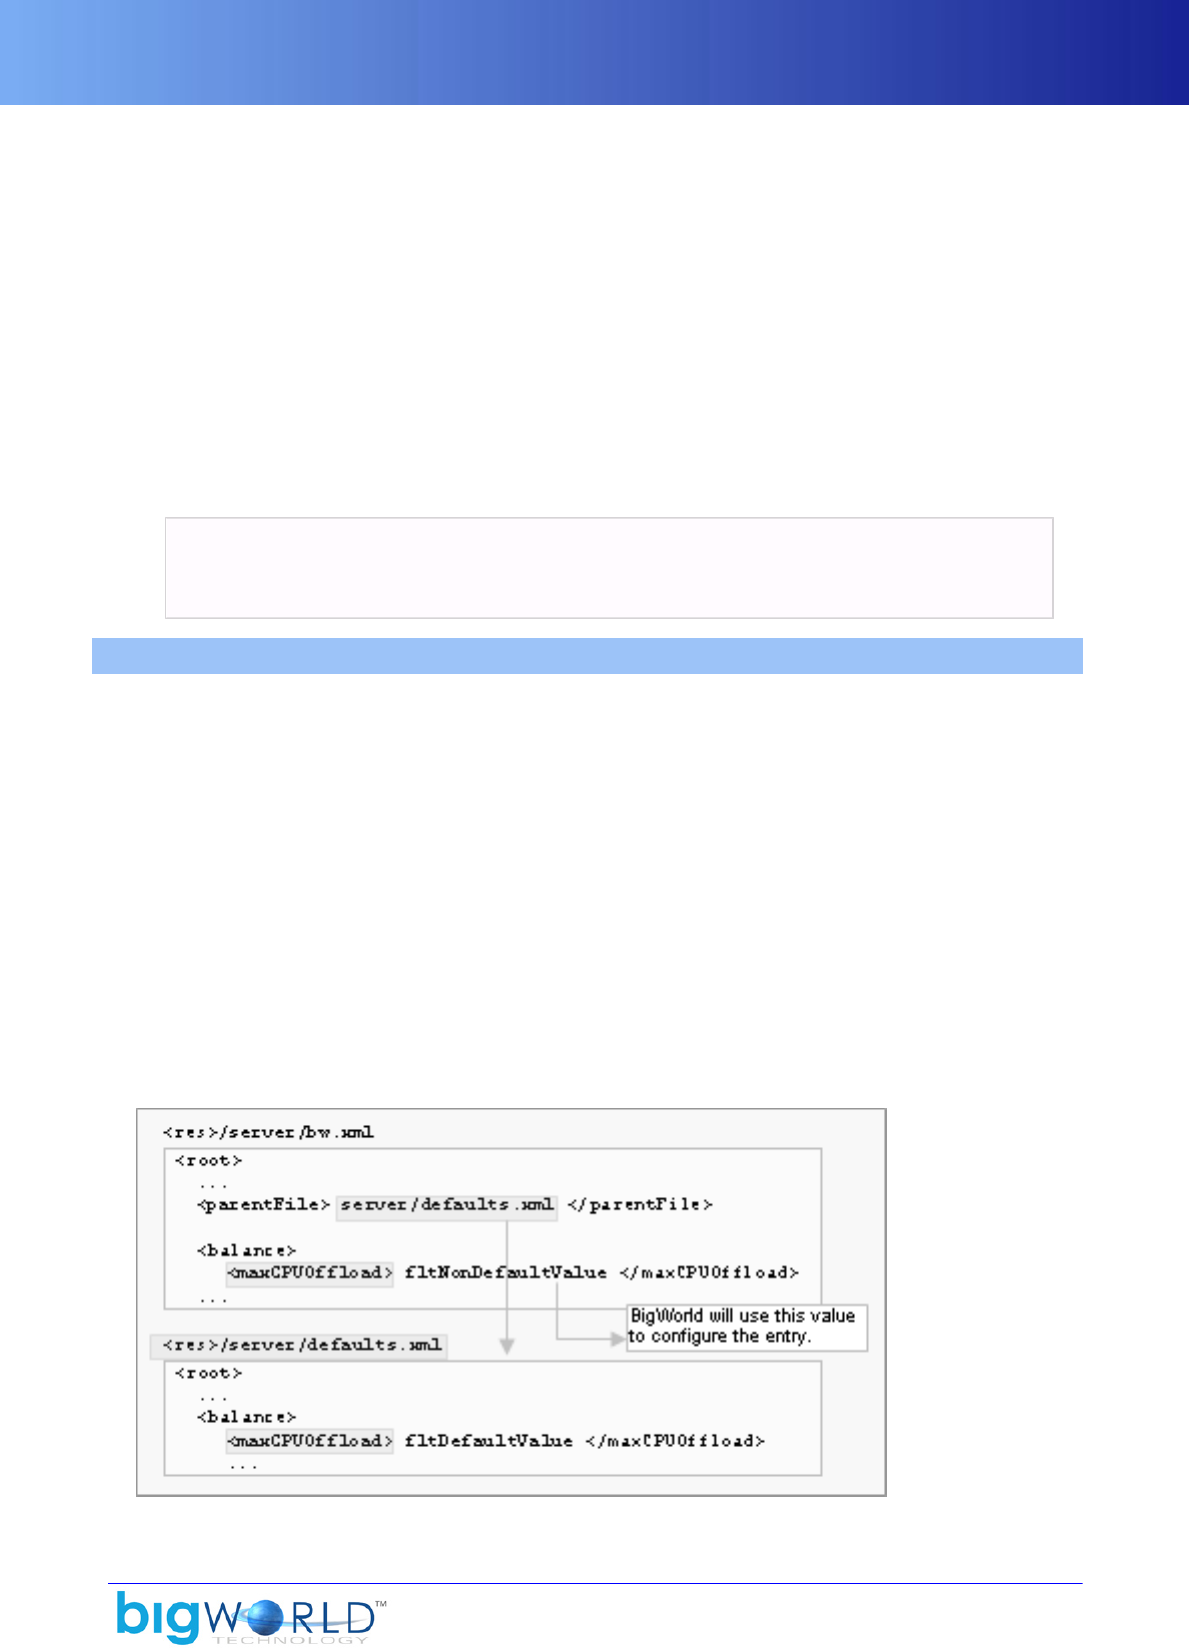
2.1. The entry parentFile
The entry parentFile in the configuration file specifies the next file in the chain of files where BigWorld
should look for an entry for a configuration option.
To assign a default value to a configuration option, BigWorld follows the steps below:
▪Searches for an entry for the configuration option in file <res>/server/bw.xml.
▪If the file does not contain an entry for the configuration option, then the chain of configuration files is
inspected, until the entry is found.
▪If the entry is not specified in any of these files, a hard-coded default is used.
All default values are stored in file bigworld/res/server/defaults.xml. Typically, the entry
parentFile in file <res>/server/bw.xml is set to server/defaults.xml, and only non-default
options are stored in your server/bw.xml.
The example below shows the configuration option maxCPUOffload in section balance having its default
value overridden:

User dependent configuration
7
Overriding default values for configuration options
2.2. User dependent configuration
A file that is user dependent can be used instead of bw.xml. This is useful to allow multiple users to run
from the same resource tree. In a production environment, for example, you may run the resources using a
test user before using the production user.
If a file with the name server/bw_<username>.xml exists, this is used as the start of the server
configuration chain instead of server/bw.xml.
Typically, the parentFile section in this file would refer to server/bw.xml and only options specific to
the user, such as dbMgr/databaseName would be in this file.
2.3. Command-Line Options
The configuration options specified in file <res>/server/bw.xml can also be overridden via command-
line arguments.
To override a default value, add arguments in the format +optionName value.
The example shows the baseApp section's configuration option pythonPort having its default value
changed to 40001, and the option archivePeriod changed to 0:
baseapp +baseApp/pythonPort 40001 +baseApp/archivePeriod 0
Values changed via the command line are not sent to components started via BWMachined. This includes
using WebConsole, control_cluster.py, and components started by a Reviver process.
2.4. General Configuration Options
The list below describes the general configuration options:
▪bitsPerSecondToClient (Integer)
Desired default bandwidth from server to the client. To calculate the number of bytes to be sent in each
packet, the formula below is used (where UDP_OVERHEAD is 28 bytes):
packetSize = (bitsPerSecondToClient / 8 / gameUpdateHertz) - UDP_OVERHEAD
▪debugConfigOptions (Integer)
Level of logging information generated when processing configuration parameters in file <res>/
server/ bw.xml.
The possible values are described in the list below:
▪0
No log is generated.
▪1
A log message is generated for each configuration option read.
▪2

General Configuration Options
8Copyright 1999-2008 BigWorld Pty. Ltd. All rights reserved. Proprietary commercial in confidence.
A verbose message is generated for each configuration option read.
▪desiredBaseApps (Integer)
Number of BaseApps that need to be running for the server to start.
▪desiredCellApps (Integer)
Number of CellApps that need to be running for the server to start.
▪externalInterface (String)
Network adapter interface to use for external communication, if not explicitly set by the server component.
In a production environment, BaseApps are recommended to have two Ethernet adapters: one adapter
connected to the Internet, and a separate one connected to the internal LAN.
During development, there is no problem with using the same interface.
Accepted formats are:
▪Adapter name ‐ Examples: eth0, eth1
▪IP[/netmask] ‐ Examples: 10.5.2.1, 10.0.0.0/8, 192.168.5.0/24
▪Domain name ‐ Examples: intern0.cluster/24, extern5.cluster/24
This value can be overridden by a tag with same name in the following sections:
▪baseApp ‐ For more details, see “BaseApp Configuration Options” on page 15 .
▪loginApp ‐ For more details, see “LoginApp Configuration Options” on page 39 .
▪externalLatencyMax (Float)
Maximum number of seconds by which packets sent from the server process will be artificially delayed.
Each packet will be randomly delayed between this value and externalLatencyMin.
This value can be overridden by a tag with the same name in the following sections:
▪baseApp ‐ For more details, see “BaseApp Configuration Options” on page 15 .
▪loginApp ‐ For more details, see “LoginApp Configuration Options” on page 39 .
This feature is useful for testing during development.
See also ??? on page 9 , ??? on page 8
▪externalLatencyMin (Float)
Minimum number of seconds by which packets sent from the server process will be artificially delayed.
Each packet will be randomly delayed between this value and externalLatencyMax.
This value can be overridden by a tag with the same name in the following sections:
▪baseApp ‐ For more details, see “BaseApp Configuration Options” on page 15 .
▪loginApp ‐ For more details, see “LoginApp Configuration Options” on page 39 .
This feature is useful for testing during development.

General Configuration Options
9
See also ??? on page 9 , ??? on page 8
▪externalLossRatio (Float)
Proportion of outgoing packets that will be dropped by this processes external nub to simulate loss on
the external network. This is a value between 0.0 and 1.0 indicating what proportion of packets will be
dropped.
This value can be overridden by a tag with the same name in the following sections:
▪baseApp ‐ For more details, see “BaseApp Configuration Options” on page 15 .
▪loginApp ‐ For more details, see “LoginApp Configuration Options” on page 39 .
This feature is useful for testing during development.
See also ??? on page 8 , ??? on page 8
▪gameUpdateHertz (Integer)
Number of times per second that the server should send an update to the clients. This corresponds to the
game tick frequency.
▪hasDevelopmentAssertions (Boolean)
Flag indicating whether server should be aggressive in its use of assertions.
This option should be set to true during development, and to false when running a production server.
For example, if this option is set to true, then a corrupted packet sent from a client can cause an assertion
on the server, while if this is set to false, then only an error message is generated and the server component
continues to run.
▪internalInterface (String)
This tag is deprecated, and its use is not recommended. For details, see the document Server Overview's section
Server Components → BWMachined → BWMachined interface discovery.
Network adapter interface to use for internal communication, if not explicitly set by the server component.
Accepted formats are:
▪Adapter name ‐ Examples: eth0, eth1
▪IP[/netmask] ‐ Examples: 10.5.2.1, 10.0.0.0/8, 192.168.5.0/24
▪Domain name ‐ Examples: intern0.clust/24, extern5.clust/24
This value can be overridden by a tag with the same name in the following sections:
▪baseApp ‐ For details, see “BaseApp Configuration Options” on page 15 .
▪baseAppMgr ‐ For details, see “BaseAppMgr Configuration Options” on page 22 .
▪cellApp ‐ For details, see “CellApp Configuration Options” on page 25 .
▪cellAppMgr ‐ For details, see “CellApp Configuration Options” on page 25 .
▪dbMgr ‐ For details, see “DBMgr Configuration Options” on page 35 .

General Configuration Options
10 Copyright 1999-2008 BigWorld Pty. Ltd. All rights reserved. Proprietary commercial in confidence.
▪loginApp ‐ For details, see “LoginApp Configuration Options” on page 39 .
▪internalLatencyMax (Float)
Maximum number of seconds by which packets sent from the application's internal nub will be delayed.
For more details, see internalLatencyMin.
See also internalLossRatio.
▪internalLatencyMin (Float)
Minimum number of seconds by which packets sent from the application's internal nub will be delayed.
Each packet will be randomly delayed between this value and internalLatencyMax.
This feature is useful for testing during development.
This value can be overridden by a tag with the same name in the following sections:
▪baseApp ‐ For details, see “BaseApp Configuration Options” on page 15 .
▪baseAppMgr ‐ For details, see “BaseAppMgr Configuration Options” on page 22 .
▪cellApp ‐ For details, see “CellApp Configuration Options” on page 25 .
▪cellAppMgr ‐ For details, see “CellApp Configuration Options” on page 25 .
▪dbMgr ‐ For details, see “DBMgr Configuration Options” on page 35 .
▪loginApp ‐ For details, see “LoginApp Configuration Options” on page 39 .
▪reviver ‐ For details, see “Reviver Configuration Options” on page 42 .
See also options internalLatencyMax and internalLossRatio.
▪internalLossRatio (Float)
Proportion of packets on this application's internal nub that will be dropped to simulate loss on the internal
network. This is a ratio between 0.0 and 1.0.
This feature is useful for testing during development.
This value can be overridden by a tag with the same name in the following sections:
▪baseApp ‐ For details, see “BaseApp Configuration Options” on page 15 .
▪baseAppMgr ‐ For details, see “BaseAppMgr Configuration Options” on page 22 .
▪cellApp ‐ For details, see “CellApp Configuration Options” on page 25 .
▪cellAppMgr ‐ For details, see “CellApp Configuration Options” on page 25 .
▪dbMgr ‐ For details, see “DBMgr Configuration Options” on page 35 .
▪loginApp ‐ For details, see “LoginApp Configuration Options” on page 39 .
▪reviver ‐ For details, see “Reviver Configuration Options” on page 42 .
See also options internalLatencyMax and internalLatencyMin.

General Configuration Options
11
▪loggerID (Integer)
The ID used by the process when registering with MessageLoggers. If this ID does not match a
MessageLogger's filter, the process will not log to that MessageLogger. (For details on MessageLogger, see
“MessageLogger” on page 50 ).
The value range of the ID is 0-255.
Multiple BigWorld servers can share the same logger process. If this behaviour is not desired, then you
can use a unique loggerID per server instance ‐ this will cause MessageLogger to filter out all messages
that do not match the loggerID it has been told to monitor.
▪logSpamPatterns (List of Strings)
A list of log message prefixes can be specified which will be suppressed on a per-second basis if the number
sent to MessageLogger exceeds a certain threshold. Note that this is not intended a mechanism to sweep
error messages "under the carpet"; it is designed to reduce the network load that can be generated by log
traffic, which tests have indicated can be in excess of actual game traffic in some situations if suppression
is disabled.
This option can be overridden by a tag with the same name in any app section. Note that the overriding
does not merge the suppression lists, it simply replaces the global list with the one defined at the app level.
Additionally, the list of suppression patterns can be modified at runtime using the logger/
addSpamSuppressionPattern and logger/delSpamSuppressionPattern watchers.
Please see bigworld/res/server/defaults.xml for an example of a suppression list.
▪logSpamThreshold (Integer)
The number of a particular log message that can be sent to MessageLogger in a single second before
suppression will take place. Note that only messages matching one of the <logSpamPatterns> (see
above) will be suppressed.
▪monitoringInterface (String)
Network adapter interface to use for non-game communications, such as logging output, telnet sessions,
and watcher requests. For example: eth0.
See the BaseApp's configuration option externalInterface for accepted formats.
▪numStartupRetries (Integer)
Number of times that CellApps and BaseApps will try to locate other components when starting up.
Each attempt is one second apart, so this value roughly indicates the number of seconds that these two
components can be started before the other 'global' server components have started.
▪outputFilterThreshold (Integer)
Value used to filter the messages that are printed and sent to the logger.
All messages are tagged with an integer value. If the message number is greater than or equal to the filter
value, then the message is allowed (the bigger the value, the more messages are filtered out).
For example, a threshold of 2 allows only INFO messages and higher (TRACE and DEBUG messages are
filtered out).
The possible values and their message thresholds are described in the list below:
▪0 ‐ MESSAGE_PRIORITY_TRACE

General Configuration Options
12 Copyright 1999-2008 BigWorld Pty. Ltd. All rights reserved. Proprietary commercial in confidence.
▪1 ‐ MESSAGE_PRIORITY_DEBUG
▪2 ‐ MESSAGE_PRIORITY_INFO
▪3 ‐ MESSAGE_PRIORITY_NOTICE
▪4 ‐ MESSAGE_PRIORITY_WARNING
▪5 ‐ MESSAGE_PRIORITY_ERROR
▪6 ‐ MESSAGE_PRIORITY_CRITICAL
▪7 ‐ MESSAGE_PRIORITY_HACK
▪8 ‐ MESSAGE_PRIORITY_SCRIPT
▪personality (String)
Name of the personality module for the server.
This module should contain things such as methods to be called back from the server (for example, when
the server is ready). The personality module is usually named after your game.
If not specified, the module named BWPersonality is used.
▪production (Boolean)
If set to true, enables the server processes to run in a production mode which makes a best attempt
at emitting ERROR messages when encountering configuration settings that are considered detrimental
for a production environment. In rare cases this may also prevent server processes from starting if the
configuration options are seen to be completely unrealistic for a production environment.
Currently this is a global configuration option and cannot be set per server application type.
▪shutDownServerOnBadState (Boolean)
Flag indicating whether server should be shut down when in an unrecoverable state.
Currently, the following scenarios are handled:
▪All CellApps are dead.
▪Currently, the following scenarios are handled:
▪All BaseApps are dead.
▪Old BaseApp fault tolerance style is being used, and there are no backup BaseApps.
▪Two BaseApps die in quick succession, and thus base entities originally residing on the first BaseApp
are not restored from the second one to a third one, and are therefore lost forever.
▪shutDownServerOnBaseAppDeath (Boolean)
If set to true, the entire server will be shut down if a single BaseApp dies. Normally, the fault tolerance
system would allow the server to continue running.
▪shutDownServerOnCellAppDeath (Boolean)
If set to true, the entire server will be shut down if a single CellApp dies. Normally, the fault tolerance
system would allow the server to continue running.

Network Configuration Options
13
▪shouldUseChecksums (Boolean)
If set to true, then all packets sent between server components will be checksummed to verify their
correctness. This is in addition to the UDP checksum automatically provided by the Linux kernel and
protects against packet corruption by buggy network drivers. If a corrupted packet is detected by Mercury
(meaning that it has somehow passed the UDP checksum), you will see an error message like:
ERROR Nub::processFilteredPacket( 10.40.9.103:32823 ): Packet (flags 178, size
1459) failed checksum (wanted 3dc56738, got 9fe7000a)
If after running servers for long enough and not seeing this error message you feel confident that the
UDP checksum is reliable enough on your hardware, you can disable this option for a small performance
improvement. The checksum is very simple and fast to calculate so this is likely to have only a small impact
on performance.
▪shuttingDownDelay (Float)
Number of seconds that the server should wait before a requested controlled shutdown is actually
performed.
▪useDefaultSpace (Boolean)
Flag indicating whether to automatically create an initial space when he server starts.
This option is ignored if spaces are loaded from the database during start-up.
2.5. Network Configuration Options
The configuration options specified in this section relate to network communication and the behaviour of
various aspects of communication channels.
The options specified in the following list are specifically related to the behaviour of channels when packets
start overflowing. This can occur when the send window fills up and buffering of packets is required in order
to handle packet resends.
The maximum packet options defines a per channel type threshold to assist in preventing channels from
using indefinate amounts of memory while buffering overflow packets.
▪maxChannelOverflow/isAssert (Boolean)
Specifies whether the offending channel should raise a program assertion, effectively terminating the
process, when the maximum number of overflow packets has been reached.
▪maxChannelOverflow/external (Integer)
Number of packets to allow to overflow on an external channel before raising an ERROR message, or
ASSERT'ing if <isAssert> has been set to true. A value of 0 disables any log messages and assertions
from occuring.
▪maxChannelOverflow/internal (Integer)
Number of packets to allow to overflow on an internal channel before raising an ERROR message, or
ASSERT'ing if <isAssert> has been set to true. A value of 0 disables any log messages and assertions
from occuring.
▪maxChannelOverflow/indexed (Integer)
Number of packets to allow to overflow on an indexed channel before raising an ERROR message, or
ASSERT'ing if <isAssert> has been set to true. A value of 0 disables any log messages and assertions
from occuring.

Load Balancing Configuration Options
14 Copyright 1999-2008 BigWorld Pty. Ltd. All rights reserved. Proprietary commercial in confidence.
An indexed channel is a channel that is used for communicating directly to an entity.
2.6. Load Balancing Configuration Options
The load balancing configuration options are specified in file <res>/server/bw.xml under the section
<balance>, and are described below:
▪maxCPUOffload (Float)
Estimated amount of CPU processing that can be offloaded from a cell to another in one tick of load
balancing.
A larger value should result in faster changes to the server's load balancing. This value is a fraction of 100%
CPU usage, and its range is from 0.0 through 1.0, but is likely to always be less than 0.1.
▪minEntityOffload (Integer)
Using the option maxCPUOffload, the load balancing algorithm may decide that less than one entity needs
to be offloaded. Since this can get rounded down to zero, the load balancing can get restricted when small
adjustments need to be made.
This option set a minimum value for this, so if it's set to 1 (the default), then the load balancing will have
the capacity to make small adjustments.
▪minMovement (Float)
Minimum number of metres that a partition line should move when load balancing.
A non-zero value can be useful to avoid the load balancing getting stuck.
▪slowApproachFactor (Float)
Aggressiveness of the load balancing when cells are close to being balanced.
The value range is from 0 through 1.
A smaller value will result in a slower approach to being balanced. Too high a value may result in some
instability when the space is close to being balanced.
2.6.1. Entities Cardinality Configuration Options
The configuration options for load balancing based on the number of entities are specified in file <res>/
server/bw.xml under section <balance>/<demo>, and are described below:
▪enable (Boolean)
Flag indicating whether the number of entities should be used to calculate load, rather than CPU load.
In normal situations, the server uses the CPU load on the CellApps to load balance. But sometimes it is
desirable to use the number of entities per CellApp instead.
This may be useful, for example, when running multiple CellApps on a single machine for testing.
See also option demo/numEntitiesPerCell.
▪numEntitiesPerCell (Float)
If option demo/enable is true, then this option is used for calculating a CellApp's load.

BaseApp Configuration Options
15
The load is calculated as numEntities / numEntitiesPerCell.
See also option demo/enable.
2.7. BaseApp Configuration Options
The BaseApp configuration options are specified in file <res>/server/bw.xml under the section
<baseApp>, and are described below:
▪archivePeriod (Float)
Period length in seconds where each entity is written to the database for the purpose of disaster recovery.
Each Entity is guaranteed to have an archive less than 2 x archivePeriod old. Setting it to zero switches
off archiving.
A large value increases performance, but reduces the effectiveness of eventual disaster recovery. The
opposite is true for a small value.
If secondary databases are disabled, this configuration option controls how often the entity is written to
the primary database. In this case, this configuration option has a dramatic impact on the performance of
the primary database when there are a large number of BaseApps. It is recommended to start with large
values (a few minutes), and perform database testing and tuning before reducing it.
If secondary databases are enabled, this configuration option controls how often the entity is written to the
secondary database. In this case, this configuration option can be set to a relatively small value (less than
a minute) since it only impacts the BaseApp machine and the load is independent of number of BaseApps
- unless the secondary database directory is on a shared network drive. For more details on secondary
databases, see Server Programming Guide's chapter Secondary Databases.
This option is also available for CellAppMgr.
▪backupPeriod (Float)
Number of seconds between backups of each base entity to its backup BaseApp. This value is rounded
to the nearest game tick.
As a first level of fault tolerance, base entities can be copied to a backup BaseApp (i.e., backup to RAM),
while cell entities are copied to their base entity. For more details on BaseApp and CellApp fault tolerance,
see the document Server Programming Guide's chapter Fault Tolerance.
The value for this option is very dependant on the game. A small value means frequent backups, and
consequently less lost data in case a BaseApp fails. But backups cost bandwidth and CPU on the BaseApp.
In general this period can be much smaller than the one specified in option archivePeriod.
See also option backupPeriod on “CellApp Configuration Options” on page 25 .
▪backupTimeout (Float)
Number of seconds for a BaseApp to respond to the watchdog messages from its backup BaseApp before
it is considered dead and the backup BaseApp takes its place.
▪backUpUndefinedProperties (Boolean)
Flag indicating whether undefined properties should be backed up.
Properties of an entity are defined in the entity's definition file. However, it is possible to define additional
properties for this entity in the base script of this entity. For example, an additional property can be

BaseApp Configuration Options
16 Copyright 1999-2008 BigWorld Pty. Ltd. All rights reserved. Proprietary commercial in confidence.
defined by initialising it in the constructor of this entity class. These additional properties are referred to
as undefined properties.
If this option is set to true, undefined properties will be backed up and an error will be emitted for each of
the properties that cannot be pickled. If this option is set to false, undefined properties will not be backed
up. Default value is true.
▪clientOverflowLimit (Integer)
If the send window for the channel to the client grows larger than this many packets, the client is
disconnected.
Generally, it is better to rely on inactivityTimeout to detect an unresponsive client and so this option
should be set to greater than inactivityTimeout * gameUpdateHertz.
See also option inactivityTimeout on “BaseApp Configuration Options” on page 15
▪createBaseElsewhereThreshold (Float)
Threshold of local BaseApp load below which calls to BigWorld.createBaseAnywhere cause the new
base entity to be created locally.
▪externalInterface
For details, see “General Configuration Options” on page 7 .
▪externalLatencyMax
For details, see “General Configuration Options” on page 7 .
▪externalLatencyMin
For details, see “General Configuration Options” on page 7 .
▪externalLossRatio
For details, see “General Configuration Options” on page 7 .
▪externalPort (Integer)
Port that may be used for the BaseApp's external socket ‐ the BaseApp can have more than one
externalPort definition.
This option is useful when BaseApp is running behind a firewall and NAT port mappings need to be set up.
If the BaseApps are run behind a firewall, then each BaseApp expected to run on a single machine should
have an externalPort definition.
If this option is not specified, or all specified externalPorts are taken. then the BaseApp will bind to any
available port on the external interface.
▪inactivityTimeout (Integer)
Number of seconds that a proxy will proceed without communication from the client before it considers
the connection to be dead.
See also option clientOverflowLimit on “BaseApp Configuration Options” on page 15
▪internalInterface
For details, see “General Configuration Options” on page 7 .

BaseApp Configuration Options
17
This tag is deprecated, and its use is not recommended. For details, see the document Server Overview's section
Server Components → BWMachined → BWMachined interface discovery.
▪internalLatencyMax
For details, see “General Configuration Options” on page 7 .
▪internalLatencyMin
For details, see “General Configuration Options” on page 7 .
▪internalLossRatio
For details, see “General Configuration Options” on page 7 .
▪loadSmoothingBias (Float)
Value to smooth the load changes on a component by when calculating new load.
The BigWorld server uses the load on a component to perform its load balancing. Unfiltered, the load can
change too quickly to be useful. The option loadSmoothingBias is used to smooth out this value.
The filtered value is calculated at each game tick as follows:
newSmoothedLoad = (1 - loadSmoothingBias) * oldSmoothedLoad + loadSmoothingBias
* load
This option is also available for CellApps and CellAppMgr.
▪minClientInactivityResendDelay (Float)
Minimum number of seconds that the BaseApp waits before resending unacknowledged packets to the
client. BigWorld also uses other metrics like the round-trip-time to the client to adjust the resend timeout
period. However, BigWorld will not set the resend timeout period to less than the value specified in this
configuration option.
The BaseApp will resend packets to the client due various reasons like lost packets, network jitter or client
delays in sending packet acknowledgements. Increasing the minimum resend delay will generally reduce
the number of packet resends. However, increasing this value will also increase the impact of a lost packet
on the end user experience. The client will only process packets in order. Therefore, a lost packet will cause
the client to buffer subsequent packets from the server and wait for the lost packet to arrive. If the resend
timeout is long, the user will notice a temporary halting of updates from the server.
▪noSuchPortTimeout (Float)
Number of seconds of grace given to a client connection encountering a REASON_NO_SUCH_PORT error
before the connection is terminated.
The REASON_NO_SUCH_PORT error indicates that the host is no longer reachable, a condition that is
sometimes temporary, caused by intermittent network problems.
Note that this setting is only approximate ‐ the timeout is shortened if the server sends more than one
packet per tick to the client.
▪oldStyleBaseDestroy (Boolean)
This tag is deprecated, and its use is not recommended. This option is planned for removal in BigWorld 2.0.
Flag indicating whether the destruction of a base entity should be carried out like in BigWorld versions
earlier than 1.6.

BaseApp Configuration Options
18 Copyright 1999-2008 BigWorld Pty. Ltd. All rights reserved. Proprietary commercial in confidence.
In those versions, the base entity could be destroyed before the cell entity; doing so would also destroy
the cell entity. From BigWorld 1.6 and later versions, the base entity must be destroyed after the cell entity.
Calling the method Base.destroy on an entity that still has its cell part raises a Python exception.
If this option is set to true, calling the method Base.destroy on an entity with a cell part causes the method
Base.destroyCellEntity to be called. After the cell entity has been destroyed, it the callback onLoseCell is
not implemented on the base entity, then the base entity is destroyed.
▪pythonPort (Integer)
Port that the Python telnet session listener should listen on.
If set to zero, then a random port is chosen.
If the option is missing, then the port number will be set according to the formula:
40,000 + BaseApp ID
If the desired port is not available in any case, then a random one is used.
This option is also available for CellApps.
▪reservedTickFraction (Float)
Percentage of tick time that should be remaining on current tick so the next one is considered to be pending.
This value is expressed as fraction. For example, setting it to 0.2 means that the next tick will be considered
pending when there is still 20% of the current tick's time remaining.
Increasing this parameter will make the server more conservative in its CPU usage.
This affects how aggressive the method BigWorld.fetchFromChunks will be about yielding processing
to the next tick.
Note: This should rarely be changed from the default value.
▪sendAuthToClient (Boolean)
Flag indicating whether BaseApps must send authentication messages to clients (clients always send
authentication to the server).
Use this feature to avoid hacking of clients, and prevent users from spoofing server messages to other
clients.
Without this authentication, someone can send fake messages to clients, pretending to be the server (they
will need the IP address of the client, and the port that the server is using, which can only be determined
from the target client's data stream).
This option's value defaults to false, in order to save bandwidth.
▪sendWindowCallbackThreshold (Float)
The fraction of an entity channel's send window that needs to be used before the onWindowOverflow
callback is called on the associated Base entity.
▪shouldResolveMailBoxes (Boolean)
Flag indicating whether a mailbox shoud be resolved to a Base entity, when possible. If a mailbox refers to
a Base entity on the local BaseApp, the entity is used instead of the mailbox.
BaseApp Configuration Options
19
Although it is more efficient to have this option set, it is generally better to have it disabled. Having this
enabled can lead to hard to find errors as behaviour changes depending on whether an entity happens
to be local or not.
▪verboseExternalNub (Boolean)
Flag indicating whether to generate verbose log output related to external network traffic.
▪warnOnNoDef (Boolean)
Flag indicating whether to generate a warning when Base entity properties are set that do not have a
description in the entity's def file.
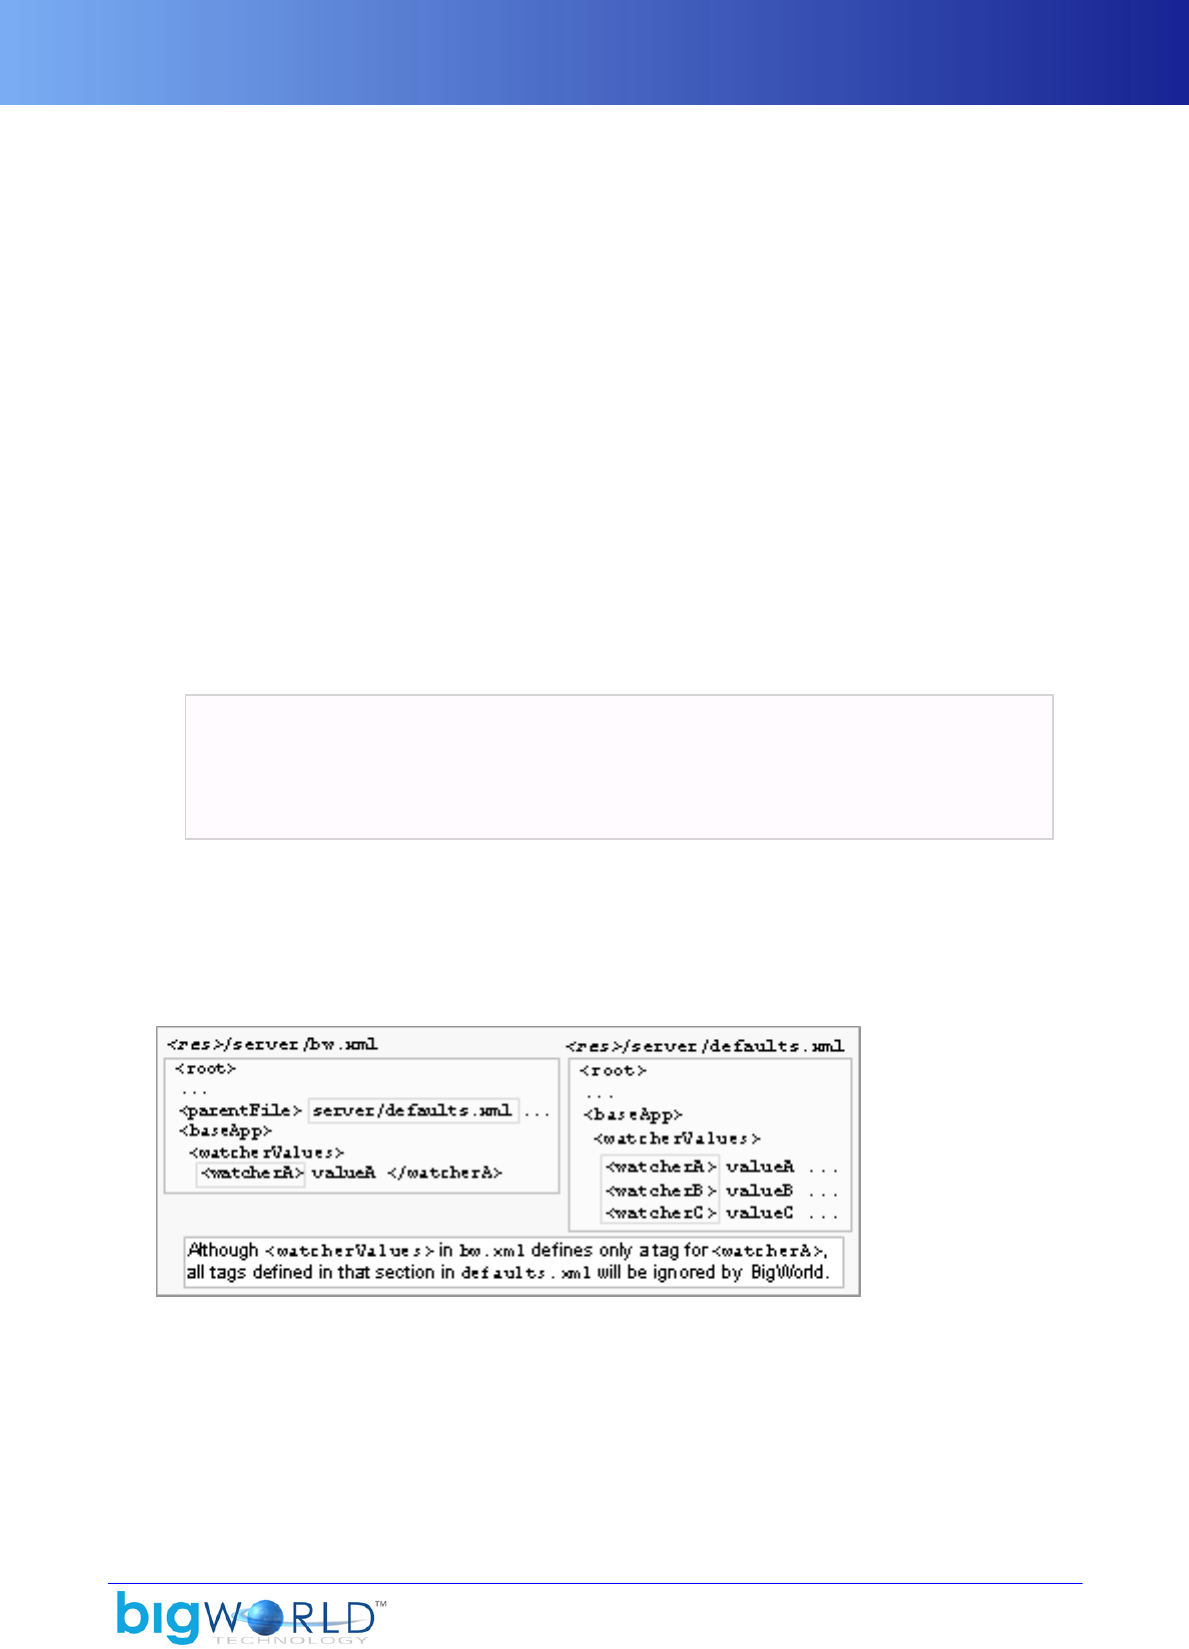
▪watcherValues (String)
This is not an actual configuration option, but instead a sub-section inside the section <baseApp>, used
to set arbitrary watcher values for the BaseApp at initialisation time.
This might be useful when there is a watcher value with no corresponding entry on file <res>/server/
bw.xml.
For example, to set value of debug/baseapp.cpp to 2:
<baseApp>
<watcherValues>
<debug>
<baseapp.cpp> 2 </baseapp.cpp>
...
Do not use this feature if there is a parameter that can be set directly. Like all configuration options,
this one is only evaluated once. It means that if there is an entry for watcherValues in <res>/server/
defaults.xml, then all tags defined in it will be ignored if <res>/server/ bw.xml also has an entry
for watcherValues (even if different tags are specified in each one). This option is also available for
CellApps.
File hierarchy
▪writePythonLog (Boolean)
Flag indicating whether to write the output of Python scripts to the local log file
<game_executable_folder>/python.log.
This should generally be set to false, since the data is sent to the central logger anyway, and the disk I/O
generated by logging could block the process.

Secondary Database Configuration Options
20 Copyright 1999-2008 BigWorld Pty. Ltd. All rights reserved. Proprietary commercial in confidence.
This option is also available for CellApps.
2.7.1. Secondary Database Configuration Options
The BaseApp secondary database configuration options are specified in file <res>/server/ bw.xml under
section <baseApp>/<secondaryDB>, and are described below:
▪enable (Boolean)
Flag indicating whether to use secondary databases.
For more details about secondary databases, see Server Programming Guide 's section Secondary
Databases.
▪maxCommitPeriod (Float)
Maximum number of seconds between each commit. Higher values will result in better performance.
Lower values will reduce the amount of data loss in case of a total system crash.
Explicit BigWorld.writeToDB calls will always result in a commit. This option only affects the automatic
archiving of entities.
If set to zero or this option is empty, the value defaults to 5.
▪directory (String)
Directory where the secondary database files are stored. Secondary databases are SQLite files.
The secondary database files are cleaned up when the system shuts down. However, these files should
not be treated as normal temporary files since they are crucial to the data recovery process in case of a
complete system crash.
If the first character of the path is a / character, the path is treated as an absolute path. Otherwise, the path
is treated as relative to the first <res> path that contains the directory.
2.7.2. Packet Log Configuration Options
The BaseApp packet logging configuration options are specified in file <res>/server/ bw.xml under
section <baseApp>/<packetLog>, and are described below:
▪addr (String)
Client for which the packet's content should be logged.
The address is specified as dotted decimal format (e.g., 10.40.1.1).
If this option is empty, then all packets will be logged.
▪enable (Boolean)
Flag indicating whether to write all packets to a local log file proxy.log.
This can be useful for debugging.
▪flushMode (Boolean)
Flag indicating whether the log file should be flushed after each write.
This option is useful to ensure all log writes are captured if the BaseApp is crashing.
▪hexMode (Boolean)

ID Configuration Options
21
Flag indicating whether the logged packets' contents should be written in hexadecimal.
2.7.3. ID Configuration Options
The BaseApp ID configuration options are specified in file <res>/server/bw.xml under section
<baseApp>/<ids>, and are described below:
▪criticallyLowSize (Integer)
Minimum number of IDs in the BaseApp's available ID pool before the other limits are automatically
adjusted.
The adjustment aims to help avoid this from occurring again.
▪desiredSize (Integer)
Target number of IDs in the BaseApp's available ID pool when requesting IDs to the parent broker ID (in
case it fell below lowSize), or returning IDs to it (in case it rose above highLevel) ‐ for CellApps and
BaseApps, the parent ID broker is the CellAppMgr, while for CellAppMgr it is DBMgr.
▪highSize (Integer)
Maximum number of IDs in the BaseApp's available ID pool before IDs are returned to the parent ID broker
‐ for CellApps and BaseApps, the parent ID broker is the CellAppMgr, while for CellAppMgr it is DBMgr.
ID recycling is currently disabled, so this value is actually never used.
▪lowSize (Integer)
Minimum number of IDs that should be available in the BaseApp's available ID pool before a request is
sent to the parent ID broker to restore it to the value specified in configuration option desiredSize ‐ for
CellApps and BaseApps, the parent ID broker is the CellAppMgr, while for CellAppMgr it is DBMgr.
2.7.4. Client Upstream Limits
The client upstream bandwidth can be limited so as to prevent denial-of-service attacks from malicious
clients, or errant script code that cause messages from the client to be sent in high volume. This can lead to
Mercury channels within the server to become heavily loaded.
To prevent this, limits can be specified on the count and size of incoming messages from clients to BaseApps.
Once hard limits are reached on the count/size of incoming messages, messages are buffered and played
back over time. Once the hard limits on buffering are reached, clients are disconnected.
The configuration parameters are specified in the file <res>/server/bw.xml in the <baseApp>/
<clientUpstreamLimits> section. The available sub-elements are described in the following table.
▪warnMessagesPerSecond (Integer)
This is a warning limit for the number of received messages from a client that are dispatched, measured
in number of messages per second. When messages are received above this limit, a warning is emitted.
No further warnings for this client of this type are emitted until the incoming message frequency drops
below this limit.
▪maxMessagesPerSecond (Integer)
This is a hard limit for the number of received messages from a client that are dispatched, measured
in number of messages per second. When messages are received above this limit, those and subsequent
messages are buffered for later playback until the buffer is empty. The message queue for all clients are
checked every tick to replay any eligible messages.

BaseAppMgr Configuration Options
22 Copyright 1999-2008 BigWorld Pty. Ltd. All rights reserved. Proprietary commercial in confidence.
▪warnBytesPerSecond (Integer)
This is a warning limit for the throughput (in bytes) of received messages that are dispatched, measured
in bytes per second. When this limit is exceeded, a warning is emitted. No further warnings for this client
of this type are emitted until the incomng message data throughput drops below this limit.
▪maxBytesPerSecond (Integer)
This is a hard limit for the size of data (in bytes) in received messages that are dispatched per second. When
messages are received above this limit, those and subsequent messages are buffered for later playback
until the buffer is empty. The message queue for all clients are checked every tick to replay any eligible
messages.
▪warnMessagesBuffered (Integer)
This is a warning limit for the number of received messages that may be buffered from the client. When
this limit is exceeded, a warning is emitted. No further warnings for this client of this type are emitted
until the number of queued messages drops below this threshold as a result of queue playback.
▪maxMessagesBuffered (Integer)
This is a maximum limit for the number of received messages that may be buffered from the client. When
this limit is exceeded, the client is disconnected and any messages that are buffered are discarded and not
dispatched.
▪warnBytesBuffered (Integer)
This is a warning limit for the total number of bytes that may be buffered for a client. When this limit is
exceeded, a warning is emitted. No further warnings for this client of this type are emitted until the total
size of buffered messages drops below this threshold as a result of queue playback.
▪maxBytesBuffered (Integer)
This is a maximum limit for the total number of bytes that may be buffered for a client. When this limit is
exceeded, the client is disconnected and any messages that are buffered are discarded and not dispatched.
2.8. BaseAppMgr Configuration Options
The BaseAppMgr configuration options are specified in file <res>/server/bw.xml under section
baseAppMgr, and are described below:
▪baseAppOverloadLevel (Float)
Minimum load level that all BaseApps should reach for the system to be considered in overload, and thus
reject new logins.
Similar overload levels are specified for for any CellApp (by option <cellAppOverloadLevel> ‐ for
more details, see “CellAppMgr Configuration Options” on page 32 ), and for DBMgr (by option
<overloadLevel> ‐ for more details, see “DBMgr Configuration Options” on page 35 ).
▪baseAppTimeout (Float)
Number of seconds for a BaseApp to respond before it is considered dead.
▪hardKillDeadBaseApps (Boolean)
Determines if a non-responsive BaseApp will be terminated with a SIGQUIT signal.
Non-responsive BaseApps must be terminated in order for its backup to take over its IP address and
ID. BaseApp non-responsiveness is determined by its backup, so a BaseApp running without a backup

Bots Configuration Options
23
will never be reported as being non-responsive (see also configuration option baseApp/backupTimeout in
“BaseApp Configuration Options” on page 15 ).
When this option is set to false, no signal is sent to the non-responsive BaseApp.
Only use this option for debugging, e.g., to attach a debugger to the hung process.
▪internalInterface
For details, see “General Configuration Options” on page 7 .
This tag is deprecated, and its use is not recommended. For details, see the document Server Overview's section
Server Components → BWMachined → BWMachined interface discovery.
▪internalLatencyMax
For details, see “General Configuration Options” on page 7 .
▪internalLatencyMin
For details, see “General Configuration Options” on page 7 .
▪internalLossRatio
For details, see “General Configuration Options” on page 7 .
▪overloadLogins (Integer)
Maximum amount of logins that will be accepted during the overload tolerance period (see the
overloadTolerancePeriod option) before rejecting any further logins.
▪overloadTolerancePeriod (Float)
Number of seconds that logins will be accepted during a situation where the BaseApps are overloaded
(see the baseAppOverloadLevel option). After this period of time, any further logins will be rejected.
▪timeSyncPeriod (Float)
Number of seconds between each synchronisation of game time between BaseAppMgr and CellAppMgr.
▪useNewStyleBackup (Boolean)
Old-style backup is deprecated and its use is not recommended. It is planned for removal in BigWorld 2.0.
Flag indicating whether Distributed BaseApp Backup method should be used, instead of the older Non-
distributed BaseApp Backup method.
In the Distributed BaseApp Backup method, a BaseApp's entities are backed up in various other real
BaseApps, while in the Non-distributed BaseApp Backup method, various BaseApps would back up all
their entities on a dedicated Backup BaseApp.
For details, see “BaseApp Fault Tolerance” on page 86 , and the document Server Overview's section
Server Components → BaseApp → Fault tolerance.
2.9. Bots Configuration Options
The Bots configuration options are specified in file <res>/server/bw.xml under the section <bots>, and
are described below:
▪controllerData (String)

Bots Configuration Options
24 Copyright 1999-2008 BigWorld Pty. Ltd. All rights reserved. Proprietary commercial in confidence.
Default data that the bot's controller will be created with (when bots are created, they get a controller
associated with them to control their movement).
This may have different meanings for different controller types. For example, some controller types may
interpret this as a filename to load data from.
▪controllerType (String)
Type of the controller to be created with bot.
▪password (String)
Password that the bots should use when logging in to the server.
▪port (Integer)
Port on the server machine in which bots process will log to (only used if the option <serverName> is
specified).
Ignored if bots automatically locates the LoginApp.
▪pythonPort (Integer)
Port that the Python telnet session listener should listen to.
▪randomName (Boolean)
Flag indicating whether a random suffix should be added to each bots name, in order to make them unique.
You should only set this option to false if you plan to use only a single bot. If you plan to use more than one
bot, then you will need them to have different names ‐ otherwise only the first one will be able to log in.
See also option username.
▪scripts (Boolean)
Flag indicating whether the bots process should use Python scripting for received entities.
If set to false, then received entities are effectively ignored. Turning this option on has a significant
performance penalty.
▪serverName (String)
Name of the server machine that the bots process should log in to (i.e., the machine running LoginApp).
If this option is empty, then the bots process will attempt to find an appropriate LoginApp on the local
network.
▪shouldLog (Boolean)
Flag indicating whether messages generated by the bots process should be sent to the central logger.
▪standinEntity(String)
Default entity script to be used when a specific Entity type does not have its corresponding game script.
▪loginMD5Digest(String)
MD5 digest string (in hex readable form) for server login.
▪userName (String)

CellApp Configuration Options
25
Username that bots should use when logging in to the server.
When randomName is true, this is the prefix before the randomly generated part of the name.
See also option randomName.
2.10. CellApp Configuration Options
The CellApp configuration options are specified in file <res>/server/bw.xml under the section
<cellApp>, and are described below:
▪backupPeriod (Float)
Number of seconds between backups of each cell entity to its base entity. This value is rounded to the
nearest game tick.
As a first level of fault tolerance, cell entities are copied to their base entities, while base entities can
be copied to their backup BaseApps. For more details on BaseApp and CellApp fault tolerance, see the
document Server Programming Guide's chapter Fault Tolerance.
The value for this option is very dependant on the game. A small value means frequent backups, and
consequently less lost data in case a CellApp fails. But backups cost bandwidth and CPU on the CellApp.
See also options archivePeriod and backupPeriod on “BaseApp Configuration Options” on page
15 .
▪checkOffloadsPeriod (Float)
Number of seconds between offload checks.
This is a periodic check if entities need to be offloaded, or new ghosts created.
Other options affected by this setting are: ghostingMaxPerCheck and offloadMaxPerCheck.
▪chunkLoadingPeriod (Float)
Number of seconds between checks on the progress of loading and unloading chunks.
Chunk loading occurs in a separate thread, but this check in the main thread queues up more chunks for
the loading thread to load (or unload).
▪defaultAoIRadius (Float)
The default AoI radius of new cell entities for proxy entities when they are created. See also the CellApp
Python API documentation's entry Main → Cell → BigWorld → Classes → Entity → setAoIRadius.
Note: If this is larger than GHOST_DISTANCE (500m), then the AoI radius of player entities is clamped to
GHOST_DISTANCE across cell boundaries.
▪enforceGhostDecorators (Boolean)
Specifies whether to enforce the requirement of adding a decorator to methods that can safely be called
on ghost entities.
When enabled, methods that have not been labelled as safe and are called on an entity that could be a ghost
will generate a Python exception. To be considered safe, the method must either be described in the .def
file or be decorated with @bwdecorators.callableOnGhost.
import bwdecorators

CellApp Configuration Options
26 Copyright 1999-2008 BigWorld Pty. Ltd. All rights reserved. Proprietary commercial in confidence.
class Table( BigWorld.Entity ):
@bwdecorators.callableOnGhost
def getArea( self ):
return self.width * self.height
▪entitySpamSize (Integer)
Number of bytes that an entity can send to another before a warning message is displayed.
This can be useful to identify entities that are causing a lot of network traffic.
▪fastShutdown (Boolean)
Specifies whether to avoid normal chunk unloading when the system is being shut down. This
considerably speeds up the shutdown process.
▪ghostingMaxPerCheck (Integer)
Maximum number of ghost creation messages that can be sent per offload check.
The frequency of the offload check is determined by option checkOffloadsPeriod.
▪ghostUpdateHertz (Integer)
Number of seconds between the flushing messages to channels of neighbouring CellApps.
Channels are created between neighbouring CellApps. Messages (such as ghost data) sent over these
channels are not sent immediately, but are instead flushed periodically. This is done to avoid the high
overhead of sending a packet.
If the value of this option is decreased, then there will be more lag for cross-cell communications.
Be careful about increasing this value, because CellApps have a fixed window size, after which they are
flagged as dead. This window is currently 4096, which mean that if 4,096 packets are not acknowledged,
then the CellApp is flagged as dead. At 50Hz, this takes around a minute, which is enough to survive
occasional heavy bouts of unexpected swapping.
Note: Bases always flush messages immediately.
▪internalInterface
For details, see “General Configuration Options” on page 7 .
This tag is deprecated, and its use is not recommended. For details, see the document Server Overview's section
Server Components, BWMachined, BWMachined interface discovery.
▪internalLatencyMax
For details, see “General Configuration Options” on page 7 .
▪internalLatencyMin
For details, see “General Configuration Options” on page 7 .
▪internalLossRatio
For details, see “General Configuration Options” on page 7 .
▪loadDominantTextureMaps (Boolean)
Specifies whether to load the terrain's dominant texture maps. By default, this flag is set to false.

CellApp Configuration Options
27
Loading the dominant texture maps enables using features such as material kinds returned by
BigWorld.collide.
▪loadSmoothingBias (Float)
Value to smooth the load changes on a component by when calculating new load.
The BigWorld server uses the load on a component to perform its load balancing. Unfiltered, the load can
change too quickly to be useful. The option loadSmoothingBias is used to smooth out this value.
The filtered value is calculated at each game tick as follows:
newSmoothedLoad = (1 - loadSmoothingBias) * oldSmoothedLoad + loadSmoothingBias
* load
This option is also available for CellAppMgr and BaseApps.
▪maxControllersAbsolute (Integer)
Number of controllers that an entity must have before an exception is raised on attempts to create a new
controller on it.
▪maxControllersExpected (Integer)
Minimum number of controllers an entity must have before a warning is generated on attempts to create
a new controller on it.
▪maxGhostsToDelete (Integer)
Maximum number of ghosts to be deleted from other cells on every offload check (the frequency of this
check is set via checkOffloadsPeriod).
This option is useful for adding antihysteresis and for smoothing the load caused by ghost deletion.
▪minGhostLifespan (Float)
Minimum number of seconds for which a real entity will keep a ghost one.
This is useful for adding antihysteresis to the ghost creation and to the deletion process.
▪maxPhysicsNetworkJitter (Float)
Maximum number of seconds to allow for when network jitter when considering movement cheating.
The movement of a player may vary slightly due to variations in network latency. This value sets the level
of tolerance for this jitter.
▪navigatorUseGirthGrids (Boolean)
Specifies if the waypoint search optimisation scheme should be used.
Girth grid is an optimisation scheme for waypoint search in a chunk. When this scheme is used, a chunk
is divided up into a set of 12x12 grids according to the girth provided (you can have a list of 12x12 grid
set for different girth sizes). Every grid square contains a subset of waypoints that overlap the covered
area in a chunk.
During a (waypoint) search, only targeted grid squares (i.e., subset of waypoints) are searched for the
waypoint, instead of searching through the full set of waypoints. This scheme will generally improve the
waypoint search performance.

CellApp Configuration Options
28 Copyright 1999-2008 BigWorld Pty. Ltd. All rights reserved. Proprietary commercial in confidence.
▪obstacleTreeDepth (Integer)
Depth of the obstacle tree to create.
Higher numbers increase the speed of collision detection but use more memory.
▪offloadHysteresis (Float)
Number of metres that an entity has to be over a cell boundary before it is actually offloaded.
This helps avoid entities being offloaded back and forth between cells when standing very close to the
border.
▪offloadMaxPerCheck (Integer)
Maximum number of entities that can be offloaded from a cell during an offload check.
The frequency of the offload check is determined by option checkOffloadsPeriod.
▪pythonPort (Integer)
Port that the Python telnet session listener should listen on.
If set to zero, then a random port is chosen.
If the option is missing, then the port number will be set according to the formula:
50,000 + CellApp ID
If the desired port is not available in any case, then a random one is used.
This option is also available for CellApps.
▪reservedTickFraction (Float)
Percentage of tick time that should be remaining on current tick so the next one is considered to be pending.
This value is expressed as fraction. For example, setting it to 0.2 means that the next tick will be considered
pending when there is still 20% of the current tick's time remaining.
Increasing this parameter will make the server more conservative in its CPU usage.
This affects how aggressive the method BigWorld.fetchFromChunks will be about yielding processing
to the next tick.
Note: This should rarely be changed from the default value.
▪sendWindowCallbackThreshold (Float)
The fraction of an entity channel's send window that needs to be used before the onWindowOverflow
callback is called on the associated entity.
▪shouldResolveMailBoxes (Boolean)
Flag indicating whether a mailbox shoud be resolved to a Cell entity, when possible. If a mailbox refers to
a Cell entity on the local CellApp, the entity is used instead of the mailbox.
Although it is more efficient to have this option set, it is generally better to have it disabled. Having this
enabled can lead to hard to find errors as behaviour changes depending on whether an entity happens
to be local or not.
CellApp Configuration Options
29
▪treatAllOtherEntitiesAsGhosts (Boolean)
Puts the CellApp in a debugging mode in which a script running on it will see only its own entity as real
‐ all other entities will be treated as ghosts.
Method calls, property access, and other functions will operate as if the other entities really are ghosts.
This mean that:
▪Method calls will go via the network.
▪Property access will be read-only, and limited to CELL_PUBLIC (or more public) properties (for more
details, see the document Server Programming Guide's section Properties → Data distribution).
▪Many internal functions will not work, e.g., adding a new Controller.
This is very useful for testing how your scripts work when dealing with ghost entities, especially if two
interacting entities are nearby and would consequently rarely be ghosts.
▪watcherValues (String)
This is not an actual configuration option, but instead a sub-section inside the section cellApp, used to
set arbitrary watcher values for the CellApp at initialisation time.
This might be useful when there is a watcher value with no corresponding entry on <res>/server/
bw.xml.
For example, to set the watcher value debug/cellapp.cpp to 2:
<cellApp>
<watcherValues>
<debug>
<cellapp.cpp> 2 </cellapp.cpp>
...
Do not use this feature if there is a parameter that can be set directly.
Like all configuration options, this one is only evaluated once. It means that if there is an entry for
watcherValues in <res>/server/defaults.xml, then all tags defined in it will be ignored if <res>/
server/bw.xml also has an entry for watcherValues (even if different tags are specified in each one).
This option is also available for BaseApps.
File hierarchy
▪writePythonLog (Boolean)
Indicates if output of Python scripts should be written to <game_executable_folder>/python.log.

Noise Configuration Options
30 Copyright 1999-2008 BigWorld Pty. Ltd. All rights reserved. Proprietary commercial in confidence.
This should generally be set to false, since the data is sent to the central logger anyway, and the disk I/O
generated by logging could block the process.
This option is also available for BaseApps.
2.10.1. Noise Configuration Options
The CellApp noise configuration options are specified in file <res>/server/bw.xml under section
<cellApp>/<noise>, and are described below:
▪horizontalSpeed (Float)
If an entity's horizontal speed exceeds this value (in metres per second), the entity makes a noise.
See Entity.makeNoise script method for more information. The event and info are 0 for noises
generated this way.
▪standardRange (Float)
Distance in metres through which a noise is propagated.
This value is multiplied by the level of a noise. For details, see the CellApp Python API documentation's
entry Main → Cell → BigWorld → Classes → Entity → makeNoise.
▪verticalSpeed (Float)
If an entity's falling speed exceeds this value (in metres per second), the entity makes a noise.
This is done via script method Entity.makeNoise ‐ for noises generated this way, the parameter event
and info are set to 0. For details, see the CellApp Python API documentation's entry Main → Cell →
BigWorld → Classes → Entity → makeNoise.
2.10.2. ID Configuration Options
The CellApp ID configuration options are specified in file <res>/server/bw.xml under section
<cellApp>/<ids>, and are described below:
▪criticallyLowSize (Integer)
Minimum number of IDs in the CellApp's available ID pool before the other limits are automatically
adjusted.
The adjustment aims to help avoid this from occurring again.
▪desiredSize (Integer)
Target number of IDs in the CellApp's available ID pool when requesting IDs to the parent broker ID (in
case it fell below lowSize), or returning IDs to it (in case it rose above highSize) ‐ for CellApps and
BaseApps, the parent ID broker is the CellAppMgr, and for CellAppMgr it is DBMgr.
▪highSize (Integer)
Maximum number of IDs in the CellApp's available ID pool before IDs are returned to the parent ID broker
‐ for CellApps and BaseApps, the parent ID broker is the CellAppMgr, and for CellAppMgr it is DBMgr.
ID recycling is currently disabled, so this value is actually never used.
▪lowSize (Integer)

CellApp Profiles Configuration Options
31
Minimum number of IDs that should be available in the CellApp's available ID pool before a request is
sent to the parent ID broker to restore it to the value specified in configuration option desiredSize ‐ for
CellApps and BaseApps, the parent ID broker is the CellAppMgr, and for CellAppMgr it is DBMgr.
2.10.3. CellApp Profiles Configuration Options
The CellApp profiles configuration options are specified in file <res>/server/bw.xml under section
<cellApp>/<profiles>. It contains sub-sections for enabling profiling of specific CellApp functionality.
All the profiling options specified below can be modified after server startup on a per CellApp basis by using
Watchers. The values are exposed in the CellApp watcher tree under profilesConfigs/<option>.
The list below details the available profiling sub-sections and options:
▪initGhost
The initGhost sub-options define profiling information relating to the initialisation of ghost entities.
Specifically the maximum time taken and network stream size required to initialise ghost entities from
their reals after which a WARNING message will be generated. The initialisation primarily consists of the
streaming of ghosted entity properties.
▪sizeWarningLevel (Integer)
The size (in bytes) that an initGhost() method receives before a WARNING message is displayed.
▪timeWarningLevel (Float)
The amount of time (in seconds) that an initGhost() method can take before a WARNING message is
displayed. An example of the type of message generated is as follows.
WARNING Profile initGhost/timeWarningLevel exceeded (Creature 23 of size
12338 bytes took 0.00477 seconds)
▪initReal
Similar to the initGhost option, the initReal sub-options define profiling information relating to the
initialisation of real entities. Specifically the maximum time taken and network stream size required to
initialise real entities from their reals after which a WARNING message will be generated. The initialisation
primarily consists of the streaming of entity properties.
▪sizeWarningLevel (Integer)
The size (in bytes) that an initReal() method receives before a WARNING message is displayed. An
example of the type of message generated is as follows.
WARNING Profile initReal/sizeWarningLevel exceeded (Creature 13 of size
68765 bytes took 0.3726 seconds)
▪timeWarningLevel (Float)
The amount of time (in seconds) that an initReal() method can take before a WARNING message is
displayed.
▪onLoad
The onLoad() operation is invoked when creating a real entity that had been offloaded from another
CellApp.

CellAppMgr Configuration Options
32 Copyright 1999-2008 BigWorld Pty. Ltd. All rights reserved. Proprietary commercial in confidence.
▪sizeWarningLevel (Integer)
The size (in bytes) that an onLoad() method receives before a WARNING message is displayed. An
example of the type of message generated is as follows. The size is considered as the total size of the
real entity and which is comprised of non-ghosted (i.e. CELL_PRIVATE) properties and other state
information such as entities in the AoI, controller state etc.
▪timeWarningLevel (Float)
The amount of time (in seconds) that an onLoad() method can take before a WARNING message is
displayed.
▪backup/sizeWarningLevel (Integer)
backup is the operation of performing a fixed point in time copy of the cell entity to the database (via the
base). The size (in bytes) is the maximum persistent size of the entity (i.e. only persistent properties) after
which a WARNING message is displayed.
2.11. CellAppMgr Configuration Options
The CellAppMgr configuration options are specified in file <res>/server/bw.xml under the section
<CellAppMgr>, and are described below:
▪archivePeriod (Float)
Number of seconds between database writes of space configuration and space data, for the purpose of
disaster recovery.
Setting it to zero switches off database writes.
A large value increases performance, but reduces the effectiveness of eventual disaster recovery. The
opposite is true for a small value.
Please note that unlike the BaseApp configuration option of the same name, this configuration option is
not affected by the use of secondary databases. The data is always written to the primary database. It is
recommended to start with large values (a few minutes), and perform database testing and tuning before
reducing it.
This option is also available for BaseApps.
▪archiveSpaceData (Boolean)
Boolean indicating whether or not the space data should be archived to the database during each
archivePeriod. Disabling this will help reduce database load if your game is not reliant on recovering
spaces to their previous configuration after a server crash.
▪cellAppLoadLowerBound (Float)
Minimum average load that a CellApp must achieve before being retired.
This value is a fraction, and its range is 0.0 through 1.0.
Together with cellAppLoadUpperBound, this option should be tuned as to conserve CPU, while still
allowing for temporary overloads (which depend on game code characteristics, such as AI usage).
This value must be less than the cellAppLoadUpperBound.
See also option cellAppLoadUpperBound.
▪cellAppLoadSafetyBound (Float)

CellAppMgr Configuration Options
33
Limit that the load balancing can increase a cell's load to.
This value has to be greater than cellAppLoadUpperBound.
In some situations, such as adding a new cell, some cells may have their load temporarily increased.
▪cellAppLoadSafetyRatio (Float)
Cell's average load safety ratio.
When the average load of the cells in a space is high, the limit that the load balancing can safely increase a
cell's load to is calculated by multiplying this value by the average load. The real boundary is calculated as:
max( cellAppLoadSafetyRatio, avgCellAppLoad * cellAppLoadSafetyRatio )
▪cellAppLoadUpperBound (Float)
Minimum average load that a CellApp must achieve before a new cell is considered to be required.
This value is a fraction, and its range is 0.0 through 1.0.
Too low an upper bound will waste CPU, but too high an upper bound could potentially allow a CPU
spike to kill a CellApp.
This value must be greater than the cellAppLoadLowerBound.
See also option cellAppLoadLowerBound.
▪cellAppLoadWarningLevel (Float)
Minimum value that average load of CellApps must achieve (when there are no other CellApps available
to share the load) before warning messages are sent to the log.
▪cellAppOverloadLevel (Float)
Minimum load level that any CellApp should reach for the system to be considered in overload, and thus
reject new logins.
Similar overload levels are specified for all BaseApps (by option <baseAppOverloadLevel> ‐ for
details, see “BaseAppMgr Configuration Options” on page 22 ), and for DBMgr (by option
<overloadLevel> ‐ for details, see “DBMgr Configuration Options” on page 35 ).
▪cellAppTimeout (Float)
Number of seconds for a CellApp to respond before it is considered dead.
▪hardKillDeadCellApps (Boolean)
Determines if a non-responsive CellApp will be terminated with a SIGQUIT signal.
CellApp non-responsiveness is determined by cellAppTimeout option.
It is important to terminate the non-responsive CellApp, in order to prevent duplicate entities, since some
of the entities on the non-responsive CellApp will be recreated on neighbouring CellApps (for details, see
“CellApp Fault Tolerance” on page 86 ).
When this option is set to false, no signal will be sent to the non-responsive CellApp. This option should
only be used for debugging purposes, e.g., to attach a debugger to the hung process.
▪internalInterface

CellAppMgr Configuration Options
34 Copyright 1999-2008 BigWorld Pty. Ltd. All rights reserved. Proprietary commercial in confidence.
For details, see “General Configuration Options” on page 7 .
This tag is deprecated, and its use is not recommended. For details, see the document Server Overview's section
Server Components, BWMachined, BWMachined interface discovery.
▪internalLatencyMax
For details, see “General Configuration Options” on page 7 .
▪internalLatencyMin
For details, see “General Configuration Options” on page 7 .
▪internalLossRatio
For details, see “General Configuration Options” on page 7 .
▪loadBalancePeriod (Float)
Number of seconds between adjustments of the cell boundaries to improve the load balance on CellApps.
▪loadSmoothingBias (Float)
Value to smooth the load changes on a component by when calculating new load.
The BigWorld server uses the load on a component to perform its load balancing. Unfiltered, the load can
change too quickly to be useful. The option loadSmoothingBias is used to smooth out this value.
The filtered value is calculated at each game tick as follows:
newSmoothedLoad = (1 - loadSmoothingBias) * oldSmoothedLoad + loadSmoothingBias
* load
The CellAppMgr further smooths the CellApp loads when it is informed of them.
This option is also available for BaseApps and CellApps.
▪maxLoadingCells (Integer)
Maximum number of cells that the meta-load balancing will try to add to a space to help it initially load
its geometry.
To disable this feature, set this value to 0.
▪metaLoadBalancePeriod (Float)
Number of seconds between checking whether any cells should be added to or removed from any spaces
to improve the load balance on CellApps.
▪minLoadingArea (Integer)
Minimum average area (in square metres) that the cells in a space must have for it to be added by the
meta-load balancing when attempting to initially load the geometry of a space.
If the average area is less than this value, then no more cells will be added to the meta-load balancing ‐
this is meant to prevent too many cells being allocated to small spaces.
▪overloadTolerancePeriod (Float)
Number of seconds that logins will be accepted during a situation where the CellApps are overloaded (see
the cellAppOverloadLevel option). After this period of time, any further logins will be rejected.

DBMgr Configuration Options
35
▪shouldLimitBalanceToChunks (Boolean)
Determines if the loaded chunks of cells should be considered when load balancing.
This is enabled by default, so that load balancing will not cause a cell to cover an area that has not yet
been loaded.
2.12. DBMgr Configuration Options
The DBMgr configuration options are specified in file <res>/server/bw.xml under the section <dbMgr>,
and are described below:
▪allowEmptyDigest (Boolean)
Flag indicating whether DBMgr should allow clients to log in with an empty MD5 digest.
When a client logs in, an MD5 digest of the entity definitions is sent to the server. This is to ensure that the
client is using resources consistent with the server's.
This should be true if you are using egclient or bots to log in, since those programs do not read the entity
definition files (named <res>/scripts/entity_defs/<entity>.def).
▪backupDatabases (List)
Only valid when the MySQL database layer is used.
Each element in the list describes a backup database to use in case the primary database fails. The format
of this list is:
<label>
<host> hostname </host>
<username> username </username>
<password> password </password>
<databaseName> database_name </databaseName>
</label>
For details on each tag, see host, username, password and databaseName configuration options in
this table.
If one of the above tags is not specified, then the backup database is assumed to be the same as the primary
one. <label> can be any valid XML tag, and is currently purely cosmetic.
DBMgr immediately switches to a backup database when the connection to the primary database
unexpectedly fails. It assumes that the backup database is an up-to-date replica of the primary one.
Database replication must be set up manually prior to using DBMgr's automatic fail-over feature.
If multiple backup databases are specified, then DBMgr connects to them in the order specified in the
configuration. If the last backup database fails, then DBMgr tries to connect to the primary database again.
And so on.
EXAMPLE:
The example below configures two backup databases. Since username, password, and name of the
second backup database are omitted, they are inherited from the primary database ‐ i.e., username is
biguser, password is bigpwd, and databaseName is fantasydemo.
<dbMgr>
<host> dbnode01 </host>

DBMgr Configuration Options
36 Copyright 1999-2008 BigWorld Pty. Ltd. All rights reserved. Proprietary commercial in confidence.
<username> biguser </username>
<password> bigpwd </password>
<databaseName> fantasydemo </databaseName>
<backupDatabases>
<backup>
<host> dbnode02 </host>
<username> bckpuser </username>
<password> bckpusrpass </password>
<databaseName> fantasy_bkp </databaseName>
</backup>
<anotherBackup>
<host> dbnode03 </host>
</anotherBackup>
</backupDatabases>
</dbMgr>
▪clearRecoveryData (Boolean)
Flag indicating whether the previous state of the server should be cleared from the database.
If set to true, then the previous state of the server is cleared from the database, and is not loaded.
If set to false, then the previous state of the server is loaded from the database.
▪createUnknown (Boolean)
If true, a user can log in with an unknown login name and a new entity of type specified in entityType
will be created. If loadUnknown is also true, a new entity is created only if an existing entity is not found.
See also options entityType, loadUnknown and rememberUnknown.
▪databaseName
Only valid when the MySQL database layer is used.
Name of the underlying database to use.
▪dumpEntityDescription (Integer)
Level of logging information generated when loading entity definition files (named <res>/scripts/
entity_defs/<entity>.def).
The possible values are described in the list below:
▪0 ‐ No log is generated.
▪1 ‐ Brief details about the entity are generated.
▪2 ‐ Full listing of entity is generated.
▪entityType (String)
Type of entity to create when client logs in with an unknown name.
This option only has effect if option createUnknown is set to true.
See also option createUnknown.
▪host (String)
Only valid when the MySQL database layer is used.

DBMgr Configuration Options
37
Machine where the database is running.
The localhost identified can be used to refer to the current machine.
▪internalInterface
For details, see “General Configuration Options” on page 7 .
This tag is deprecated, and its use is not recommended. For details, see the document Server Overview's section
Server Components, BWMachined, BWMachined interface discovery.
▪internalLatencyMax
For details, see “General Configuration Options” on page 7 .
▪internalLatencyMin
For details, see “General Configuration Options” on page 7 .
▪internalLossRatio
For details, see “General Configuration Options” on page 7 .
▪loadUnknown (Boolean)
Flag indicating whether a user can log in with an unknown name if there is an entity of type specified in
entityType with the same name as the Username.
See also options entityType, createUnknown, and rememberUnknown.
▪maxSpaceDataSize (Integer)
Only valid when the MySQL database layer is used.
The maximum size (in bytes) of space data that can be written to the database. The maximum value is
16MB.
See also the CellAppMgr option archiveSpaceData.
▪name (String)
This tag is deprecated, and its use is not recommended. Use databaseName instead.
▪numConnections (Integer)
Only valid when the MySQL database layer is used.
Number of connections to make to the underlying database.
This must be greater than or equal to 1. The default is 5.
▪overloadLevel (Float)
Minimum load level that DBMgr should reach for the system to be considered in overload, and thus reject
new logins.
Similar overload levels are specified for all BaseApp's (using baseAppOverloadLevel ‐ for
details, see “BaseAppMgr Configuration Options” on page 22 ), and for any CellApp (using
cellAppOverloadLevel ‐ for details, see “CellAppMgr Configuration Options” on page 32 .
▪overloadTolerancePeriod (Float)

DBMgr Configuration Options
38 Copyright 1999-2008 BigWorld Pty. Ltd. All rights reserved. Proprietary commercial in confidence.
Number of seconds that logins will be accepted during a situation where the CellApps are overloaded (see
the overloadLevel option). After this period of time, any further logins will be rejected.
▪Password (String)
Only valid when the MySQL database layer is used.
Password to be used when the DBMgr connects to the underlying database.
▪port (String)
Only valid when the MySQL database layer is used.
Port to be used when the DBMgr connects to the underlying database. Set it to 0 to use the MySQL default
port.
▪rememberUnknown (Boolean)
Only valid when the MySQL database layer is used.
Flag indicating whether unknown users allowed to log in (due to createUnknown or loadUnknown
options being true) will be stored in the database so that future logins by the same user will no longer
be unknown.
See also options createUnknown and loadUnknown.
▪syncTablesToDefs (Boolean)
Flag indicating whether changes to entity definition should be replicated to the MYSQL database.
The possible values are described below:
▪false
No changes will be made to MySQL database structure.
▪true
Make all necessary changes to the database structure to match the entity definitions. This includes
deleting redundant columns and tables.
DBMgr will fail to start if the database structure does not exactly match the entity definitions.
This option is intended to help prevent accidental deletion of data in case there are unintended changes
to the entity definitions.
It is recommended to set this option to a safe mode (i.e., false), then manually update the MySQL database
structure by running DBMgr with the command line option ‐ --sync-tables-to-defs.
▪type (String)
Type of database to use. Current options are: xml and mysql.
▪username (String)
Only valid when the MySQL database layer is used.
Username used when the DBMgr connects to the underlying database.
▪writePythonLog (Boolean)

Data Consolidation Options
39
Flag indicating whether to write the output of Python scripts to the local log file
<game_executable_folder>/python.log.
This should generally be set to false, since the data is sent to the central logger anyway, and the disk I/O
generated by logging could block the process.
This option is also available for CellApps.
2.12.1. Data Consolidation Options
The options for data consolidation tool are located in the <dbMgr>/<consolidation> section of the server
configuration file <res>/server/bw.xml
For more detail about the data consolidation process, see “Data Consolidation Tool” on page 95 ).
▪directory (String)
Directory where the data consolidation tool puts temporary secondary database files copied from BaseApp
machines. These files are automatically deleted when the data consolidation process completes.
If the first character of the path is a / character, the path is treated as an absolute path. Otherwise, the path
is treated as relative to the first <res> path that contains the directory.
2.13. LoginApp Configuration Options
The LoginApp configuration options are specified in file <res>/server/bw.xml under the section
<loginApp>, and are described below:
▪allowLogin (Boolean)
Flag indicating whether login attempts should be accepted.
This is useful when the server needs to be started without accepting logins for a while (e.g., to have the
server load chunks before allowing logins).
Logins can be enabled by setting allowLogin watcher on each LoginApp to true ‐ for a simpler way
to achieve this for all running LoginApps, see control_cluster.py's set command (for details on
control_cluster.py, see “control_cluster.py” on page 67 ).
▪allowProbe (Boolean)
Flag indicating whether login probes should be accepted.
It is recommended to have this flag set to false for servers running on the public Internet.
This setting can be changed at runtime by settings the allowProbe watcher.
See also option logProbes.
▪allowUnencryptedLogins (Boolean)
Flag indicating whether a client sending a plaintext login request and/or a null session key should be
allowed to connect.
This flag should only be used for testing purposes. Setting this flag to true on a production system is not
recommended.
▪externalAddress (String)
Address to be returned to client if he is outside the server cluster LAN.

LoginApp Configuration Options
40 Copyright 1999-2008 BigWorld Pty. Ltd. All rights reserved. Proprietary commercial in confidence.
If the client is outside the server cluster LAN (the option localNetMask is used to determine that), then
LoginApp will return the IP address set in this option, instead of the address that the BaseApp thinks it
is on.
This option is intended for use only during development, when the machines that the BaseApps are
running on do not have real IP addresses (i.e., they are behind a NAT'ing firewall), but you still want clients
to log in from the Internet.
See also option localNetMask.
▪externalInterface
For details, see “General Configuration Options” on page 7 .
▪externalLatencyMax
For details, see “General Configuration Options” on page 7 .
▪externalLatencyMin
For details, see “General Configuration Options” on page 7 .
▪externalLossRatio
For details, see “General Configuration Options” on page 7 .
▪internalInterface
For details, see “General Configuration Options” on page 7 .
This tag is deprecated, and its use is not recommended. For details, see the document Server Overview's section
Server Components, BWMachined, BWMachined interface discovery.
▪internalLatencyMax
For details, see “General Configuration Options” on page 7 .
▪internalLatencyMin
For details, see “General Configuration Options” on page 7 .
▪internalLossRatio
For details, see “General Configuration Options” on page 7 .
▪localNetMask (String)
Mask to be used against the client's IP address in order to determine whether he is inside the server cluster
LAN.
The net mask is an IP address followed by the number of bits to match. For example, 10.0.0.0/8 would
match any IP starting with 10 (i.e., 10.*.*.*). The default is 0.0.0.0/0, in which case no redirecting
will be done.
If it is determined that the client is not on the server cluster LAN, the LoginApp will return the IP address
set in option externalAddress.
See also option externalAddress.
▪loginRateLimit (Integer)

LoginApp Configuration Options
41
Specifies the number of allowed logins when rate-limiting. As many logins as this are allowed during each
rate-limiting period as specified in option rateLimitDuration.
For example, if option loginRateLimit is set to 100, and option rateLimitDuration is set to 10, then
100 logins will be allowed every 10 seconds. If the login rate limit quota is exceeded during this period, no
further logins are allowed until the start of the next 10 second period.
See also option rateLimitDuration.
▪logProbes (Boolean)
Flag indicating whether login probe attempts should generate a log message.
This might be useful for servers running on the public Internet, to verify users who are attempting to probe
and/or hack the server.
See also option allowProbe.
▪port (Integer)
Port that the LoginApp should listen to for login requests.
If set to zero, then a random port is chosen, which is useful when running multiple BigWorld server
instances in a LAN. The client would then need to auto-detect the available servers. For more details, see
“Auto-Detection of LoginApps” on page 113 .
Note: This option can be overridden when starting LoginApp with the command-line
-loginPort n
▪privateKey (String)
This is the filename to read the LoginApp's RSA private key from. This is the key that is used to decrypt
the client's login credentials.
Please see Encrypting Client-Server Traffic for more information about the encryption support in
BigWorld.
▪rateLimitDuration (Integer)
Specifies the rate-limiting time period in seconds. As many logins as is specified in option
loginRateLimit are allowed during every one of these periods.
For example, if option loginRateLimit is set to 100, and option rateLimitDuration is set to 10, then
100 logins will be allowed every 10 seconds. If the login rate limit quota is exceeded during this period, no
further logins are allowed until the start of the next 10 second period.
Setting this value to 0 disables login rate limiting.
See also option loginRateLimit.
▪registerExternalInterface (Boolean)
If set to true, the LoginApp's external interface will be registered with bwmachined. This may be useful
during development to allow clients to discover running server. This should be set to false in a production
environment.
▪shouldShutDownIfPortUsed (Boolean)

Reviver Configuration Options
42 Copyright 1999-2008 BigWorld Pty. Ltd. All rights reserved. Proprietary commercial in confidence.
Flag indicating whether the LoginApp should shut down if the specified port to listen to is not available.
If set to true, the LoginApp will shut down if the specified port to listen to is not available. If set to false,
the LoginApp will find another port to listen to.
See also option port.
▪shutDownSystemOnExit (Boolean)
Flag indicating whether the server should be also shut down when LoginApp is shut down.
If set to true, then a controlled shutdown is performed on the server.
▪verboseExternalNub (Boolean)
Flag indicating whether to generate verbose log output related to external network traffic.
What is verbose about it? what should they expect to see and why would they want to use it
2.14. Reviver Configuration Options
The Reviver configuration options are specified in file <res>/server/bw.xml under the reviver section,
and are described below:
▪internalLatencyMax
For details, see “General Configuration Options” on page 7 .
▪internalLatencyMin
For details, see “General Configuration Options” on page 7 .
▪internalLossRatio
For details, see “General Configuration Options” on page 7 .
▪pingPeriod (Float)
Number of seconds between pings sent to monitored processes for execution check purposes.
Reviver's monitor processes periodically by pinging them to check that they are still running and
functioning normally.
See also option subjectTimeout.
▪reattachPeriod (Float)
Number of seconds between each time that Reviver checks processes to determine if it can monitor them.
If another Reviver stops monitoring a process, this option allows this Reviver to start monitoring that
process.
See also option subjectTimeout.
▪shutDownOnRevive (Boolean)
Flag indicating whether the Reviver itself should be shut down after reviving a monitored process.
This is usually set to true, since once a Reviver has started a process, that machine should probably be
considered busy.

Reviver's BaseAppMgr Configuration Options
43
See also option subjectTimeout.
▪subjectTimeout (Float)
Number of seconds that a monitored process will wait for a response from its current Reviver before
accepting to be monitored by another one.
If a monitored process does not receive a response from its current Reviver, then it is assumed that the
Reviver has been stopped after reviving another one of its monitored processes (this behaviour is set by
option shutDownOnRevive).
See also options pingPeriod, reattachPeriod and shutDownOnRevive.
▪timeoutInPings (Integer)
Number of pings that can be missed by a monitored process before Reviver assumes it is dead.
2.14.1. Reviver's BaseAppMgr Configuration Options
The BaseAppMgr configuration options are specified in file <res>/server/bw.xml under section
<reviver>/<baseAppMgr>. These are the same as general Reviver options, but specific to BaseAppMgr.
If the setting is not specified, then the general one is used. For details on these options, see “Reviver
Configuration Options” on page 42 .
The options are listed below:
▪pingPeriod (Float)
▪subjectTimeout (Float)
▪timeoutInPings (Integer)
2.14.2. Reviver's CellAppMgr Configuration Options
The CellAppMgr configuration options are specified in file <res>/server/bw.xml under section
<reviver>/<cellAppMgr>. These are the same as general Reviver options, but specific to CellAppMgr.
If the setting is not specified, then the general one is used. For details on these options, see “Reviver
Configuration Options” on page 42 .
The options are listed below:
▪pingPeriod (Float)
▪subjectTimeout (Float)
▪timeoutInPings (Integer)
2.14.3. Reviver's DBMgr Configuration Options
The DBMgr configuration options are specified in file <res>/server/bw.xml under section <reviver>/
<dbMgr>. These are the same as general Reviver options, but specific to DBMgr. If the setting is not specified,
then the general one is used. For details on these options, see “Reviver Configuration Options” on page
42 .
The options are listed below:
▪pingPeriod (Float)
▪subjectTimeout (Float)

Reviver's LoginApp Configuration Options
44 Copyright 1999-2008 BigWorld Pty. Ltd. All rights reserved. Proprietary commercial in confidence.
▪timeoutInPings (Integer)
2.14.4. Reviver's LoginApp Configuration Options
The LoginApp configuration options are specified in file <res>/server/bw.xml under section
<reviver>/<loginApp>. These are the same as general Reviver options, but specific to LoginApp. If the
setting is not specified, then the general one is used. For details on these options, see “Reviver Configuration
Options” on page 42 .
The options are listed below:
▪pingPeriod (Float)
▪subjectTimeout (Float)
▪timeoutInPings (Integer)

45
Chapter 3. Admin Tools
A variety of tools are provided to assist in managing the BigWorld server. Broadly, these fall into four
categories:
▪WebConsole (See “WebConsole” on page 45 .)
▪Logger daemons (See “Logger Daemons” on page 50 .)
▪Server command-line utilities (e.g., control_cluster.py) (See “Server Command-Line Utilities” on
page 67 .)
▪Standard GUI applications (e.g., SpaceViewer and BWPanel) (See “Standard GUI Applications” on page
70 .)
The server tools are implemented almost entirely in Python, and can be easily extended by any customer,
if additional functionality is desired.
BigWorld 1.8 moved most of the server tools functionality into the new WebConsole, in order to improve
and unify the server toolset and simplify server administration for remote users and non-programmers
(e.g., artists, game designers, etc.) that may need to run and administer servers. Functionality formerly
provided by tools such as ServerViewer, GMeter, watcher, and bw_log_viewer.cgi has been consolidated
under WebConsole's single easy-to-use web interface.
Almost all server tool functionality is still available via command-line utilities, which is useful when only
system console access is available (e.g., when remotely administering a server cluster via ssh).
Where possible, documentation for the server tools is maintained as online help. For WebConsole, this means
the Help link displayed in the navigation menu for each module. For command-line utilities, help is available
via the --help switch.
This chapter provides an overview of the suite of tools available. For detailed documentation, however,
please refer to the online help.
3.1. WebConsole
Located under bigworld/tools/server/web_console folder, WebConsole provides a simple web
interface to manage and monitor a BigWorld server. For details on how to install and run WebConsole, see
the document Server Tools Installation Guide.
Complete documentation for each WebConsole module is provided as online help, accessible as a link on
the left hand side of the WebConsole page.
WebConsole consolidates functionality that was provided by a number of discrete tools BigWorld releases
prior to 1.8, and is composed of the modules described below.
3.1.1. Modules
3.1.1.1. ClusterControl
▪Allows users to start, stop, and restart the game server.
▪Can browse the active machines and users on the local network.
▪Can inspect the watcher tree of any running process.

WebConsole
46 Copyright 1999-2008 BigWorld Pty. Ltd. All rights reserved. Proprietary commercial in confidence.
▪Can establish a connection to a BigWorld process's Python server.
ClusterControl module
Note
This module replaces Server Viewer, Watcher, and some parts of BWPanel.
3.1.1.2. LogViewer
▪Allows users to view, filter, and search server message logs.
▪Provides a live view of server output, similar to calling tail -f on a logfile.
▪Provides summaries of per-user log usage.
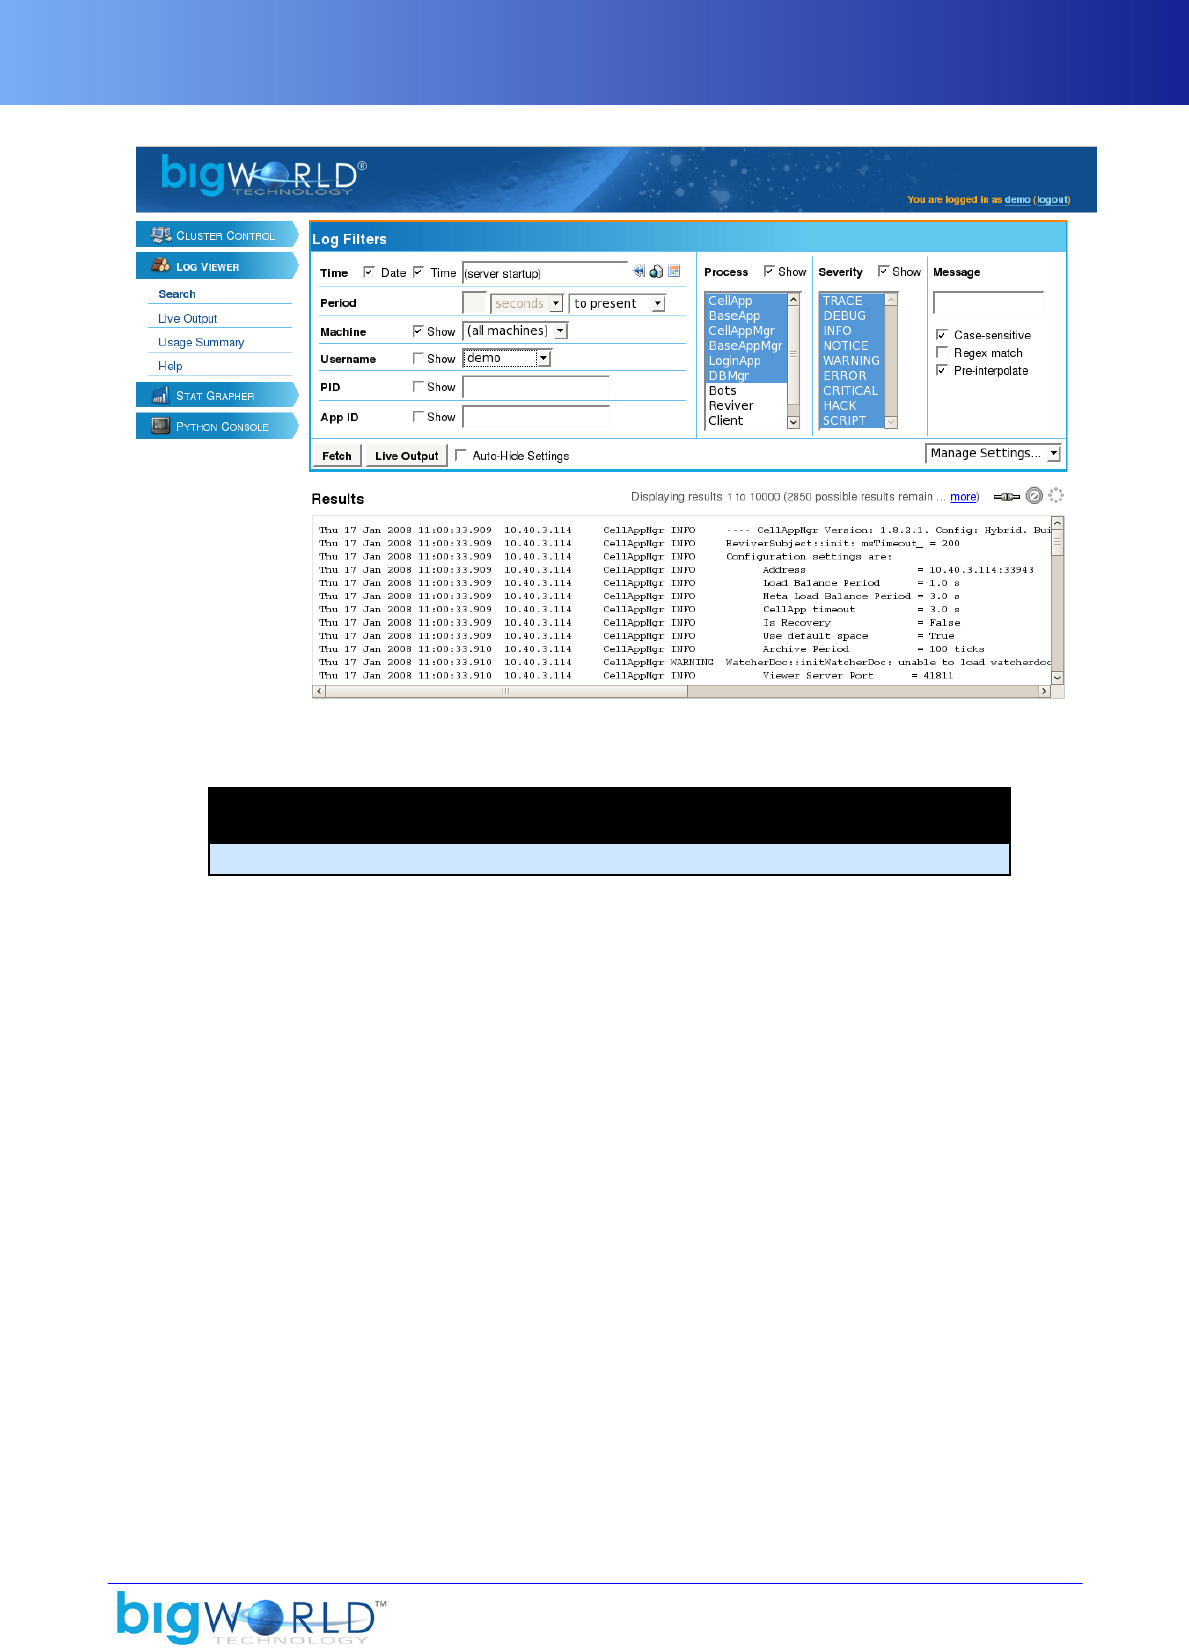
WebConsole
47
LogViewer module
Note
This module replaces bw_log_viewer.cgi.
3.1.1.3. StatGrapher
▪Provides live and historic graphic views of server statistics.
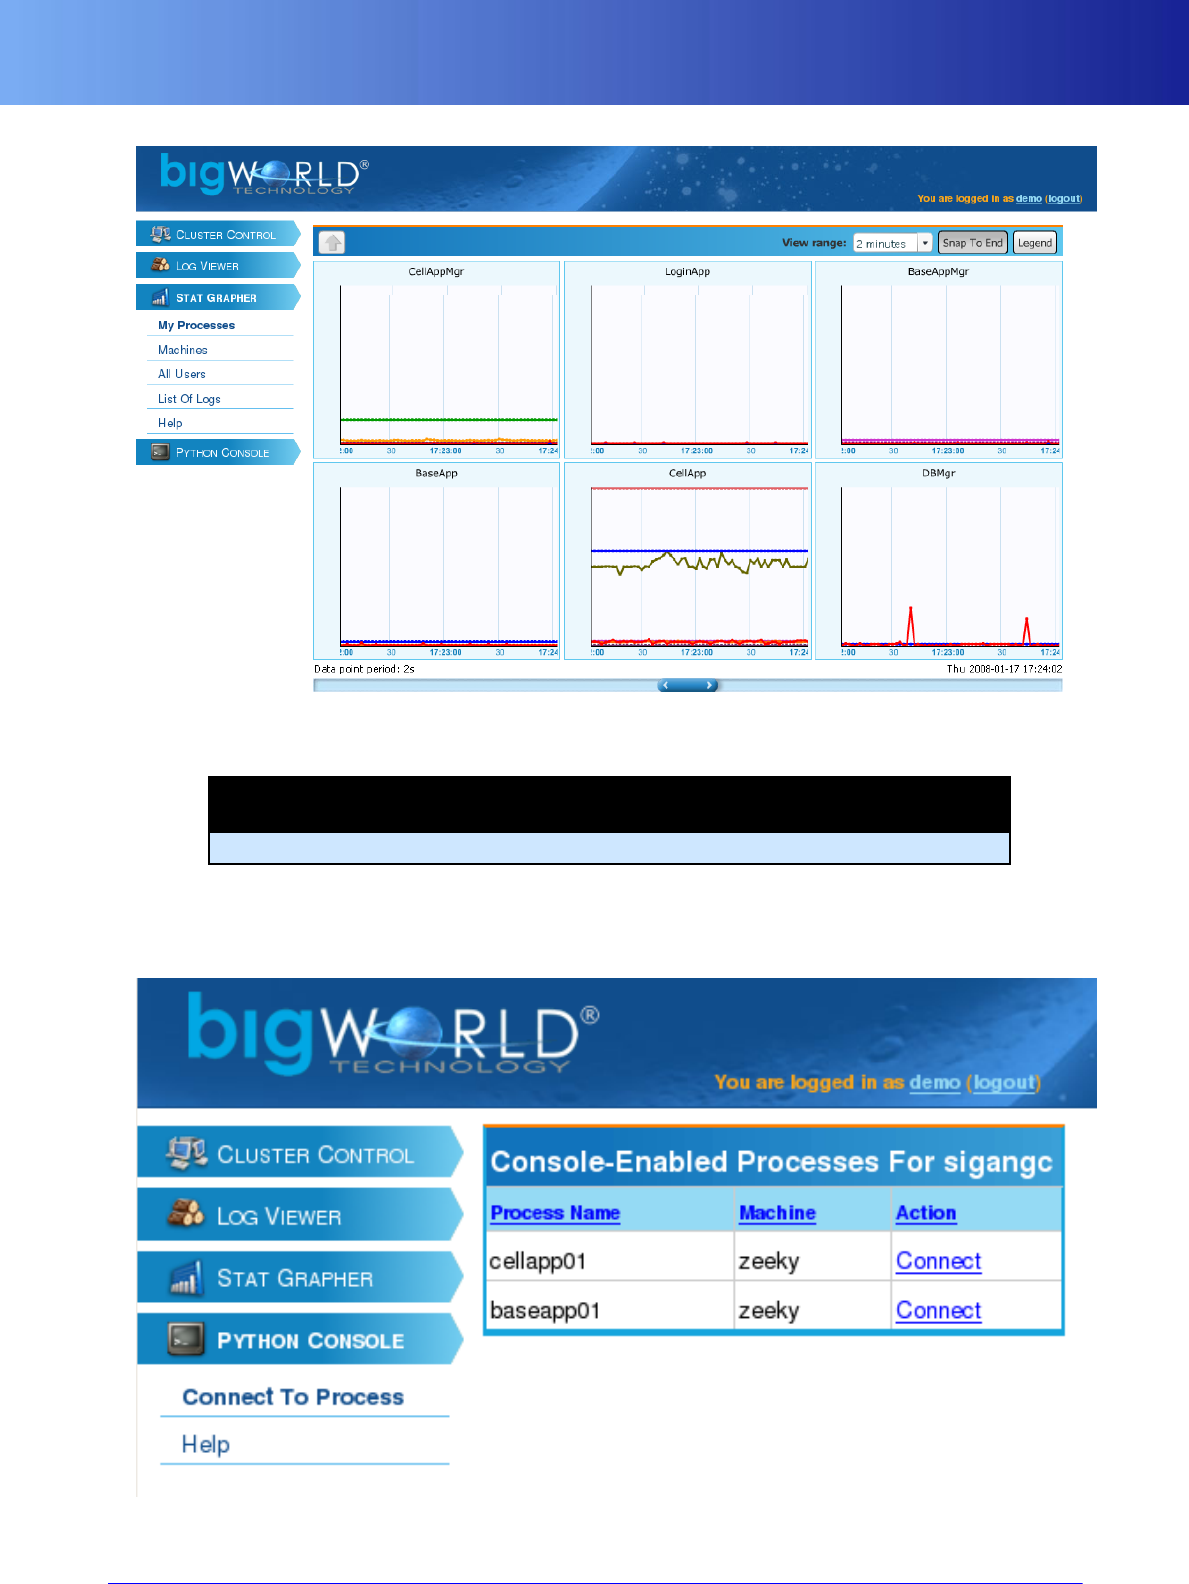
WebConsole
48 Copyright 1999-2008 BigWorld Pty. Ltd. All rights reserved. Proprietary commercial in confidence.
StatGrapher module
Note
This module replaces GMeter.
3.1.1.4. Python Console
▪Allows users to connect to the Python server of any process that has one (i.e., CellApp, BaseApp, Bots).

Configuration
49
Python Console module
3.1.2. Configuration
When the server tools are installed using the install_tools.py script (for details, see the document Server
Tools Installation Guide), a system-wide configuration file (/etc/bigworld.conf) is used to locate tool
components/tool configuration files and environment settings needed to run the server tools.
The primary user of this configuration file is the system startup/shutdown scripts installed into /etc/init.d.
However, server tools such as MessageLogger may use this file to locate a working environment, if no
appropriate command-line options are provided.
The format of the configuration file is in a Windows INI style format — comments may be provided by
preceding them with the # (pound sign) or ; (semicolon) characters.
The keywords in the /etc/bigworld.conf are described in the list below:
▪username
Username that maps to a valid system account. All server tool daemon processes will be run as this user.
▪groupname
Group that should own all server tools.
▪piddir
Folder on which server tools running in daemon mode should write their .pid files with their process ID.
This file is used to later identify whether that daemon process is running, and if so, what system process
it is. Most system daemons write their .pid files to /var/run or one of its sub-folders. The default folder for
the BigWorld server tools .pid files is /var/run/bigworld.
▪location
Base folder of the server tools. Used by the system initialisation scripts, in order to be able to launch the
server tools. Within a normal BigWorld package/checkout, this would refer to [prefix]/mf/bigworld/
tools/server. For a server installation, it is recommended that this folder is located within the home
directory of the user username.
Below is an example /etc/bigworld.conf configuration file:
[tools]
username = bwtools
piddir = /var/run/bigworld
location = /home/bwtools/mf/bigworld/tools/server
groupname = bwtools
Example /etc/bigworld/conf
A sample configuration file can also be found in bigworld/tools/server/install/ bigworld.conf.
3.1.3. How to Start
WebConsole can be started using two methods:
▪As a system daemon — for details, see the document Server Tools Installation Guide's section Post-
Installation.
▪From the command line.
Generally, only developers working on modifying the web page templates or underlying code will run
WebConsole in this fashion.

Logger Daemons
50 Copyright 1999-2008 BigWorld Pty. Ltd. All rights reserved. Proprietary commercial in confidence.
Make sure that the current folder is bigworld/tools/server/web_console, then issue the command:
./start-web_console.py
There are some minor operational differences when running WebConsole in the two mentioned modes:
▪When run as a system daemon, WebConsole uses the configuration file prod.cfg, which defines a
production environment mode.
▪When run from the command line, WebConsole uses a development environment configuration file called
dev.cfg.
Running in development mode leaves the web server in a state where an automatic restart is triggered if
there are any changes to the template files or Python code it is using.
The production configuration file does not exist by default in bigworld/tools/server/ web_console,
as it is partially generated during the installation process while using the install_tools.py script.
The original production configuration file that the installation script uses is bigworld/tools/server/
install/web_console.cfg.
Both configuration files need to specify the database to use. Before running WebConsole, make sure that the
appropriate configuration file has a line that looks like this:
sqlobject.dburi="notrans_mysql://username:password@localhost:3306/
bw_web_console"
Specifying the database
To modify the bigworld/tools/server/install/web_console.cfg file to a working configuration
file, replace the line:
###BW_SQLURI###
with an sqlobject.dburi line as indicated above.
For information regarding TurboGears configuration files and content, we recommend the TurboGears
documentation website http://docs.turbogears.org/1.0/Configuration.
If you have never run WebConsole before and choose to run it from the command line (as opposed to
installing the system service), it is necessary to create a database for WebConsole within MySQL. To do this,
connect to your MySQL database using the username and password that you have defined in dev.cfg, then
issue the following command:
CREATE DATABASE bw_web_console;
3.2. Logger Daemons
3.2.1. MessageLogger
MessageLogger replaces bwlogger as the server output logger — its source code is located in bigworld/
src/server/tools/message_logger, while its executable and related Python tools and libraries are
located in bigworld/tools/server/message_logger.
Detailed documentation for the supported command-line switches is available as online help, and can be
viewed via the --help switch. This document provides an overview of how MessageLogger works, and the
structure of the files it generates.

Logger Daemons
51
When a server process (e.g., a CellApp) is started, it searches the cluster for all active MessageLogger
processes, and proceeds to route to each discovered MessageLogger process all output generated by script
calls to print, or calls to INFO_MSG, ERROR_MSG, etc.... MessageLogger processes that are started after a server
process will notify all running server components of their existence, in order to start immediate logging.
The BigWorld Client can also be configured to send messages to the message logger. By default this is enabled
in the Hybrid build and disabled in the Release build. The Consumer build has this controlled by a set of
defines in src/lib/cstdmf/config.hpp.
The following defines should be enabled in Consumer to enable the client to send messages to the message
logger:
#define FORCE_ENABLE_MSG_LOGGING 1
#define FORCE_ENABLE_DPRINTF 1
#define FORCE_ENABLE_WATCHERS 1
Messages from the client are by default sent to the root user. To send to a different user, set a UID
environment variable for the user running client. The UID should be set to the numerical value of the user's
Linux UID.
3.2.1.1. Configuration
Except where overridden by corresponding command-line options, MessageLogger reads its configuration
from the file message_logger.conf, located in the same folder as the executable itself. An alternate
configuration file can be specified on the command-line with the -c/--config switch.
The configuration file is in standard Windows INI file format, and supports the options:
▪logdir
The location of the top-level folder to which MessageLogger will write its logs. This option can be either
a relative or an absolute path. If a relative path is specified, then it is calculated relative to the location of
the configuration file — not relative to the folder current at the time of execution.
▪segment_size
Size (in bytes) at which the logger will automatically roll the current log segment for a particular user.
▪default_archive
File used by mltar.py when the -d/--default_archive switch is used. This file is also inserted into
MessageLogger's logrotate script by install_tools.py.
3.2.1.2. File Format
MessageLogger generates files in binary format, but it supports the generation of text files (in the BigWorld
1.7 format) via the --text option. This option generates text files in addition to the binary files, in case you
have tools that depend on the old logfile format.
Included in MessageLogger, along with the message_logger binary itself, are Python modules that provide
an interface to this binary format:
▪bwlog.so — A Python extension, compiled from MessageLogger source code
▪message_log.py — Provides pure Python classes that simplify and extend the functionality exposed
in bwlog.so.

Logger Daemons
52 Copyright 1999-2008 BigWorld Pty. Ltd. All rights reserved. Proprietary commercial in confidence.
For examples on how to use these modules, browse the source code of the command-line message logger
utilities (mlcat.py, mlls.py, etc...) described in “Command-Line Utilities” on page 52 .
MessageLogger generates logs in a two-level folder structure — the top-level folder contains files that are
common to all users, as well as one sub-folder per user. The files in the top-level folder are:
▪component_names
List of all distinct component names (i.e., CellApp, BaseApp, etc...) that have sent messages to this logger.
This is used to resolve numeric component type IDs to names, when displaying log output.
▪hostnames
Mapping from IP addresses to hostnames. This is used for resolving hostnames when displaying log
output.
▪strings
List of all unique format strings that have been sent by server components, along with parser data for
interpreting arguments to each. This is used to reconstruct the log messages from format string IDs and
binary argument blobs.
▪version
Log format version. This is used to prevent accidental mixing two log formats.
▪pid
PID of active MessageLogger process. This is used by tools and MessageLogger to identify the process (if
any) currently generating logs.
Each user's sub-folder has a file containing its UID, as well as the following files:
▪components
A record of each individual process instance registered with this logger.
▪entries.<timestamp>, args.<timestamp>
A segment of log messages. The fixed-length portion of each log message (time, component ID, etc...) is
stored in the entries.<timestamp> file, while the variable-length portion of the entry (i.e., arguments
to printf) is stored in the corresponding args.<timestamp> file.
▪text.<timestamp>
BigWorld 1.7-compatible plain-text record of the log entries, from the corresponding
entries.<timestamp>/args.<timestamp> pair. This file is generated if the --text option was
specified.
3.2.1.3. Command-Line Utilities
The bigworld/tools/server/message_logger folder contains a variety of command-line utilities,
providing the functionality of standard UNIX shell utilities for message logs. Using these utilities, you can
operate on the binary logs using standard UNIX shell utilities and pipelines, in the same way you could with
the old text format logs.
The following tools are provided:
▪mlcat.py
Provides both cat and tail -f style of text dumping of the logs.

Logger Daemons
53
▪mlls.py
Displays information about log segments, such as start and end times, entry counts, and sizes; for
individual users or all of them.
▪mltar.py
Provides an easy way to select log segments from a user's log and archive them, as well as all the required
shared files for viewing on another machine.
▪mlrm.py
Provides an easy way to clean up unwanted log segments.
The detailed documentation for each utility is maintained as online help, which can be accessed via the
--help option.
The list below provides some common examples of tasks you might wish to achieve using the MessageLogger
tools:
▪mlcat.py -f
Watches live server logs.
▪mlcat.py --around="Mon 22 Jan 2007 19:00:00" -u devuser
Views output surrounding a log entry of interest for user devuser.
▪mltar.py -zcf bwsupport.tar.gz --active-segment
Collects logs to email to support.
▪mltar.py -u <uid> -zcf bwsupport.tar.gz --active-segment
Collects logs for the Unix user whose uid is uid to email to support.
▪mlls.py -u gameuser
Displays all log segments for user gameuser, to determine the segment with entries of interest.
▪mlrm.py --days=30
Removes logs over a month old.
▪mltar.py -xf lastweek.tar.gz -o samplelogs
Extracts the archive lastweek.tar.bz2 to the folder samplelogs.
Note
Since the archives are compressed tar files, you can use tar to achieve the same results
if you find that easier, as illustrated below:
$ mkdir samplelogs
$ tar -zxf lastweek.tar.gz -C samplelogs
▪mltar.py -xd
Extracts the latest archive back to the default logdir.

Logger Daemons
54 Copyright 1999-2008 BigWorld Pty. Ltd. All rights reserved. Proprietary commercial in confidence.
3.2.1.4. Configuration Options
The MessageLogger command-line options are described in the list below:
▪-u UID
UID of the user whose processes should be logged. If UID is all, then messages from all users will be
logged. If no UID is specified, then processes by all users will be logged.
▪-p NAME (this option is mutually exclusive to -d NAME)
Name of the process which messages should be logged. Multiple names may be specified, using multiple
-p options. By default, messages from processes of any name are logged. Appropriate names include:
CellAppMgr, CellApp, BaseApp, BaseAppMgr, DBMgr, LoginApp, WPGen.
▪-d NAME (this option is mutually exclusive to -p NAME)
Name of the process which messages should not be logged. Multiple names may be specified, using
multiple -d options. By default messages from processes of any name are logged.
▪-l loggerID
ID of the processes whose messages should be logged — value range is 0-255. The default is 0, a special
value that causes logging all processes, regardless of loggerID.
▪-v
Prints all messages to standard output (verbose mode).
▪--daemon
Runs MessageLogger as daemon.
▪-c|--config <file>
Configuration file to use. The default is message_logger.conf in the MessageLogger folder. Option
overridden by [outdir] option.
▪-t|--text
Generates BigWorld 1.7-style text logs, as well as binary logs.
▪-q|--quiet
Turns off the display of messages generated by the MessageLogger process (quiet mode). By default, these
are output to standard error.
▪-o filename
Redirects standard output to filename.
▪-e filename
Redirects standard error to filename.
▪-[TRACE|DEBUG|INFO|NOTICE|WARNING|ERROR|CRITICAL|HACK|SCRIPT]
Disables logging of specific type of message.
▪+[TRACE|DEBUG|INFO|NOTICE|WARNING|ERROR|CRITICAL|HACK|SCRIPT]
Enables logging of specific type of message. The first option of this type disables logging of other messages.

StatLogger
55
▪[outdir]
Folder on which to write logs generated by MessageLogger. This option overrides any log folders specified
in either the default configuration file, or any configuration file provided on the command line using the
-c option.
3.2.1.5. Logrotate
Logrotate is used to rotate, archive, and delete old log files on a daily basis, which saves space on disk.
A logrotate configuration file, /etc/logrotate.d/bw_message_logger, is set up as part of the Server
Tools installation. For more information about logrotate, please see the logrotate manpage:
$ man 8 logrotate
There are two issues to consider when customising the logrotate:
▪Log rotation can put a load on the logging machine.
▪If rotation is configured to occur more frequently, for example the rotation is changed to occur on hourly
basis, then in this case the rotate option should be updated to 168 (i.e. 7 x 24) to ensure that the log files
cover the same period of time.
3.2.2. StatLogger
Written in Python, StatLogger is a daemon process that runs in the background, polling all servers on
the network at regular intervals (by default, every 2 seconds). Any computer running BWMachined will
be automatically discovered, along with any BigWorld components running on that machine. StatLogger
collects and logs information for every server component discovered, regardless of which user is running
them.
Statistics for machines and processes are collected in 2 ways:
▪Communication with BWMachined daemons running on each computer.
▪Requests made directly to the processes via the Watcher mechanism.
Once collected, StatLogger logs this data to a MySQL database. For details on the structure of the database,
see “Statistics Database Structure” on page 66 .
The main objective of StatLogger is to collect and store data in a format that can be used by StatGrapher
(for details, see “StatGrapher” on page 47 ), which is the visualisation counterpart to StatLogger, and
presents the data in a graphical format. Together, StatLogger and StatGrapher are a replacement for the now
defunct server tool GMeter.
3.2.2.1. Requirements
The list below describes the requirement for running StatLogger:
▪CPU
On an Athlon 2700+, monitoring 230 processes (which includes 200 CellApps) with StatLogger consumes
roughly a constant 15% of available CPU time. The MySQL daemon will also be subject to load due to
the large amount of database queries being generated — tests showed 5.5% of CPU time being used at
a constant rate.
▪Disk
Due to the amount of data being collected, StatLogger can potentially consume a lot of disk space. The
rate at which disk space is consumed depends on the amount of machines and server process for which

StatLogger
56 Copyright 1999-2008 BigWorld Pty. Ltd. All rights reserved. Proprietary commercial in confidence.
statistics are collected. 4GB is recommended for a large amount of processes (around 250) and machines
over a month. The disk space consumption rate of a single log gets smaller the longer a log is run, since
StatLogger stores older data in lower detail than newer data.
▪Network
StatLogger's network requirements depend on the number of server machines and components present.
It can potentially require a large amount of network throughput. For example, 230 processes and 9 server
machines require 100Kb/s of downstream traffic, and 20kb/s of upstream traffic, while 6 processes (i.e., for
a minimal server) and 9 server machines require 4kb/s of downstream and 2kb/s of upstream traffic.
▪RAM
Memory requirements are low, as statistics are immediately logged to the database, rather than being kept
in memory. Tests indicate an average usage of memory between 7MB to 10MB, regardless of the amount
of processes running.
▪Software
MySQL 4.1+ and Python 2.4 with MySQLdb (officially known as mysql-python, available at http://
sourceforge.net/projects/mysql-python. It should be available as a package for every common Linux
distribution)
Also, StatLogger must be run on the same local network as the servers. This is due to the machine and server
component discovery, which only searches the local network.
StatLogger requires a valid MySQL user with access to create databases. Normally the creation and
configuration of this MySQL user is handled during the tools installation script (for details, see the document
Server Tools Installation Guide), but an existing database user can be can used instead, by manually editing
the configuration file. For details, see “Configuration” on page 58 .
3.2.2.2. Installation
Located in bigworld/tools/server/stat_logger, the StatLogger script is part of the BigWorld
package.
The tools installation script should be run before using StatLogger, as it performs the following actions:
1. Creates the MySQL user with the appropriate permissions for StatLogger, and sets the configuration file
to use this user.
2. Installs init scripts into /etc/init.d, to enable running StatLogger as a daemon.
3.2.2.3. Usage
The script can be run from the command line, or it can be run in daemon mode with the use of a startup
script created during the tool installation routine and placed in /etc/init.d/bw_stat_logger.
This script should be run as the root user, and can be run with the following actions:
▪start
Starts StatLogger.
▪stop
Stops StatLogger.
▪restart
Restarts StatLogger.

StatLogger
57
▪status
Shows the current status of StatLogger.
Although in most cases stat_logger.py will not need any arguments when run from the command line, it
provides the following options
▪-h --help
Show script's help message.
▪-f <pref_file> --config-file=<pref_file>
Specifies a preference file to use instead of the default preferences.xml.
▪-n <db_name> --database-name=<db_name>
Specified the name of the database to use. If the database does not exist, then it will be automatically
created, unless -p was specified. Note: If using an existing database, it is recommended to enable --use-
db-prefs as well.
▪-p --no-auto-create-db
Prevents creation of a new log database under any circumstance.
▪--pid=<pid_file>
Daemon mode option. Although available for command-line use, the use of this type of option is recommended only
for advanced users.
Specifies location to store PID file.
▪--use-db-prefs
Retrieves and uses preferences from the log database being used (ignores preference file).
▪-l --list
Prints a list of log databases.
▪-o <out_file> --output=<out_file>
Logs file to dump message output (default is stdout).
▪-e <out_file> --erroutput=<out_file>
Logs file to dump error output (default is stderr).
▪-d --daemon
Runs StatLogger in daemon mode (default is to run in foreground).
▪--winpdb
Allow a Winpdb client to attach upon starting up. Winpdb is available at http://www.digitalpeers.com/
pythondebugger.
▪--home=<path>
Daemon mode option. Although available for command-line use, the use of this type of option is recommended only
for advanced users.
Specifies home folder of StatLogger (default is bigworld/ tools/server/stat_logger).

StatLogger
58 Copyright 1999-2008 BigWorld Pty. Ltd. All rights reserved. Proprietary commercial in confidence.
3.2.2.4. Output
StatLogger outputs various status messages describing which machines and processes it discovers or loses
(i.e., from the process or machine shutting down) from the network, each prefixed with a timestamp.
When running StatLogger manually, it by default prints this information to the terminal in which it is run
(unless the -o option is specified).
When installed as a daemon, these messages are output to /var/log/bigworld/ stat_logger.out by default.
3.2.2.5. Configuration
Located in StatLogger's folder, the preference file preferences.xml is used to configure the script. Apart
from the database user configuration, in most cases the provided standard settings should be sufficient for
development and production environments.
The preferences.xml file configures database setup options, as well as what data StatLogger should collect
from the server components and machines.
The example below illustrates the basic structure of a configuration:
<preferences>
<options>
...
</options>
<collect>
?<aggregation>
...
</aggregation>
?<processList>
*<process>
?<statisticList>
*<statistic>
...
?<machineStatisticList>
*<statistic>
...
</statistic>
</machineStatisticList>
?<allProcessStatisticList>
*<statistic>
...
</statistic>
</allProcessStatisticList>
</collect>
</preferences>
StatLogger's preferences.xml — Basic structure
3.2.2.5.1. Option Configuration
The options section contains the following tags:
▪dbHost
Hostname or IP address of the MySQL database server that will contain the log databases.

StatLogger
59
▪dbUser
Database user with which StatLogger (and StatGrapher) will access the database. For details on
StatGrapher, see “StatGrapher” on page 47 .
▪dbPass
Database user's password.
▪dbPort
Port on which the MySQL server is listening for connections.
▪dbPrefix
Prefix of database names which StatLogger can accesses.
▪sampleTickInterval
Interval in seconds at which StatLogger will poll the components and store statistics — decimals are
supported. Generally this value does not need to be changed — if it does, then it should not be any smaller
than 2 seconds (the recommended value).
3.2.2.5.2. Aggregation Window Configuration
This collect/aggregation/window section configures the aggregation windows that will be stored in the
database.
StatLogger has been designed so that it stores multiple versions of data at varying levels of detail — the idea
is that long-term data does not need to be stored at the same level of detail as the more recent, short-term data.
StatLogger requires at least one aggregation window setting in this section with a samplePeriodTicks value
of 1.
Multiple aggregation window setting takes the form of:
<preferences>
...
<collect>
<aggregation>
*<window>
<samples> <num_samples_in_this_win> </samples>
<samplePeriodTicks> <num_of_ticks_per_sec> </samplePeriodTicks>
</window>
...
Multiple aggregation window settings — Grammar
There are some constraints that must be adhered to when creating this list of aggregation window settings:
▪There must always be an aggregation window with samplePeriodTicks value of 1.
▪Aggregation window settings must be ordered in ascending order by their samplePeriodTicks value, with
the smallest values first.
▪Each successive aggregation window should cover a larger range of ticks than the previous one. The tick
range is calculated by multiplying samples value by the samplePeriodTicks value (i.e., number of samples
x ticks consolidated into one sample).
▪Each successive samplePeriodTicks value must be a multiple of the samplePeriodTicks value from the
previous window.

StatLogger
60 Copyright 1999-2008 BigWorld Pty. Ltd. All rights reserved. Proprietary commercial in confidence.
These aggregation windows are used directly by StatGrapher, so it is advised not to have large
discrepancies between the samplePeriodTick values of successive aggregation windows. Furthermore, the
final aggregation window setting should not have a large samples value, as this may place a very heavy load
on StatGrapher, both on the server running WebConsole, as well as the Flash-based client.
An example aggregation section is shown below, with a samples value of 365:
<preferences>
...
<collect>
<aggregation>
<!-- Every sample (2secs) in most recent 24hrs. 43200 samples -->
<window>
<samples> 43200 </samples>
<samplePeriodTicks> 1 </samplePeriodTicks>
</window>
<!-- Every 10th sample (20secs) in most recent 48hrs. 8760samples -->
<window>
<samples> 8760 </samples>
<samplePeriodTicks> 10 </samplePeriodTicks>
</window>
<!-- Every 150th sample (5mins) in most recent 30 days. 8760 samples -->
<window>
<samples> 8760 </samples>
<samplePeriodTicks> 150 </samplePeriodTicks>
</window>
<!-- Every 1800th sample (60mins) in most rcnt 365 days. 8760 samples
-->
<window>
<samples> 8760 </samples>
<samplePeriodTicks> 1800 </samplePeriodTicks>
</window>
<!-- Every 43200th sample (1day) in most recent 365 days. 365 samples
-->
<window>
<samples> 365 </samples>
<samplePeriodTicks> 43200 </samplePeriodTicks>
</window>
</aggregation>
...
Multiple aggregation window settings — Example
3.2.2.5.3. Machine Statistic Configuration
The collect/machineStatisticList section is similar to statisticList (for details, see “Process
Statistic Configuration” on page 61 ) and allProcessStatisticList (for details, see “Generic
Process Statistic Configuration” on page 60 ) sections, except in that watcher values are not supported
(since machines do not have a Watcher interface), and hence, the valueAt settings only support
strings representing members of the Machine class defined in bigworld/tools/ server/pycommon/
cluster.py.
3.2.2.5.4. Generic Process Statistic Configuration
The collect/allProcessStatisticList section is similar to the statisticList (for details, see
“Process Statistic Configuration” on page 61 ) section, except in that its statistics are regarded as common

StatLogger
61
to all processes being monitored — i.e., those specified in the processList section (for details, see “Process
Configuration” on page 61 ).
It is recommended that any watcher values used in this section be supported by all processes being
monitored, although StatLogger will store empty values for processes that do not support a watcher value.
3.2.2.5.5. Process Configuration
The collect/processList/process section configures the statistics that will be collected for each
process — there must be one process section for each server component to be monitored
The process section contains the following tags:
▪name
Display name for the process type.
▪matchtext
Name of the component type's executable. Value must be in lowercase, like the executable names.
▪statisticList
List of statistics to be collected for this process by StatLogger — for details, see section “Process Statistic
Configuration” on page 61 .
An example process section is shown below:
<preferences>
...
<collect>
...
<processList>
<process>
<name> CellApp </name>
<matchtext> cellapp </name>
<statisticList>
...
</statisticList>
</process>
...
Process configuration — Example
3.2.2.5.6. Process Statistic Configuration
The collect/processList/process/statisticList/statistic section specifies the statistics that must be collected for
each process.
The statistic section contains the following tags:
▪name
Display name for the statistic type.
▪valueAt
Where to retrieve the values from — there are two distinct sources of information, depending on the first
character of this tag's value:
If first character is a slash (/)

StatLogger
62 Copyright 1999-2008 BigWorld Pty. Ltd. All rights reserved. Proprietary commercial in confidence.
valueAt will be interpreted as a watcher. The best way to list the watchers that can be graphed is via the
WebConsole's ClusterControl module (for details, see “ClusterControl” on page 45 ).
Any single scalar value present in ClusterControl can be added to StatGrapher (including any new ones
that you have created yourself).
Example: /stats/numInAoI
If first character is not a slash (/)
Any valueAt string that does not begin with a slash is regarded as a Process class defined in script
bigworld/tools/server/pycommon/cluster.py.
In this case, the string refers to the member of the Process class that StatLogger should retrieve. (Strictly
speaking, valueAt is eval'ed against the Process object, which is slightly more flexible than just being
able to reference class members).
Example: mem — This is eval'ed to Process.mem, which retrieves the value of memory usage of a
process.
Note: Caution is required with this type of value, as it is possible to use a function call that changes the state
of the process (e.g., causing a process to shutdown). It is highly unlikely that this will occur by accident,
unless the exact function call is entered in the valueAt setting.
▪maxAt
Not explicitly used in StatLogger — however it is used by StatGrapher to determine the scale of the graph.
Note: For some watcher values (which are simply constantly increasing values with no upper bound),
there is no appropriate maxAt value. In this case just set it to an arbitrary value, as these are not likely to
be displayed in StatLogger.
▪type
Unused as of BigWorld 1.8.
▪consolidate
Consolidation function to use when moving data up an aggregation window.
Possible values are: MAX, MIN, and AVG.
Example: We consolidate four data samples at 4 seconds per sample into the next aggregation window,
which stores data at 16 seconds per sample. The data represents CPU load consumed by a process. The
consolidate value is specified as AVG, so StatLogger averages the four data samples, then store this
value as a single value in the higher aggregation window.
▪display
Contains two tags that affect the appearance of the statistic in StatGrapher:
▪colour — Colour (in hexadecimal RGB) to represent this statistic in StatGrapher.
▪show — Sets whether StatGrapher shows this statistic by default. Possible values are true and false
▪description — Description of this statistic. This will be displayed in the tooltip when the user mouse
over this statistic in the Legend section of the StatGrapher in the WebConsole.
An example statisticList section is shown below:

StatLogger
63
<preferences>
...
<collect>
...
<processList>
<process>
<name> CellApp </name>
<matchtext> cellapp </name>
<statisticList>
<statistic>
<name> Cell Load </name>
<valueAt> /load </valueAt>
<maxAt> 1.0 </maxAt>
<logicalMax> None </logicalMax>
<type> FLOAT </type>
<consolidate> AVG </consolidate>
<display>
<colour> #FF6600 </colour>
<show> true </show>
<description>
The load of this CellApp.
</description>
</display>
</statistic>
<statistic>
<name> Num Entities Ever </name>
<valueAt> /stats/totalEntitiesEver </valueAt>
<maxAt> 10000.0 </maxAt>
<type> FLOAT </type>
<consolidate> MAX </consolidate>
<display>
<colour> #663366 </colour>
<show> false </show>
<description>
The number of entities created on the CellApp since server
startup.
</description>
</display>
</statistic>
<statistic>
<name> Process CPU </name>
<valueAt> load </valueAt>
<maxAt> 1.0 </maxAt>
<type> FLOAT </type>
<consolidate> AVG </consolidate>
<display>
<colour> #FF0000 </colour>
<show> true </show>
<description>
The percentage of the CPU time allocated to the process.
</description>
</display>
</statistic>
...
Process statistic configuration — Example
3.2.2.5.6.1. Useful Configuration Values for Processes and Machines
The table below lists some recommended values for process statistic configuration (for details, see “Generic
Process Statistic Configuration” on page 60 ):

StatLogger
64 Copyright 1999-2008 BigWorld Pty. Ltd. All rights reserved. Proprietary commercial in confidence.
<name> <valueAt> <max>
Cell Load /load 1.0
Cell Spare Time /nub/spare time 1.0
Cell Backlog /nub/receive queue 1048576
Max Tick Period /resetOnRead/
maxTickPeriod
0.2
Num Entities /stats/numEntities1 10000.0
Num RealEntities /stats/
numRealEntities
10000.0
Num Witnesses /stats/numWitnesses 10000.0
Num Entities Ever /stats/
totalEntitiesEver
10000.0
Num RealEntities
Ever /stats/
totalRealEntitiesEver
10000.0
Num Witnesses
Ever /stats/
totalWitnessesEver
10000.0
Num In AoI /stats/numInAoI 10000.0
Num In AoI Ever /stats/totalInAoIEver 10000.0
CellApp
Cell scale back /throttle/value 1.0
BaseApp Load /load 1.0
Num Bases /numBases 10000.0
BaseApp
Num Proxies /numProxies 10000.0
Max BaseApp
Load /baseAppLoad/max 1.0
Average
BaseApp Load /baseAppLoad/average 1.0
Min BaseApp
Load /baseAppLoad/min 1.0
Total Bases /numBases 10000.0
BaseAppMgr
Total Proxies /numProxies 10000.0
Max CellApp
Load /cellAppLoad/max 1.0
Avg CellApp Load /cellAppLoad/average 1.0
Min CellApp Load /cellAppLoad/min 1.0
Total Entities /numEntities 50000.0
CellAppMgr
Number of Cells /numCells 20
Process CPU load 1.0All
processes Process Memory mem 1.0
The table below lists some recommended values for machine statistic configuration:

StatLogger
65
<name> <valueAt> <max>
Machine CPU load() 1.0
Machine Mem mem 1.0
Machine Recv
Loss inDiscards 256
Machine Send
Loss outDiscards 256
Packets In (eth0) ifStats["eth0"].packIn 256
Packets Out
(eth0) ifStats["eth0"].packOut 256
Bits In (eth0) ifStats["eth0"].bitsIn 256
Bits Out (eth0) ifStats["eth0"].bitsOut 256
Packets In (eth1) ifStats["eth1"].packIn 256
Packets Out
(eth1) ifStats["eth1"].packOut 256
Bits In (eth1) ifStats["eth1"].bitsIn 256
Machines
Bits Out (eth1) ifStats["eth1"].bitsOut 256
3.2.2.5.7. Further Notes on Configuration
The configuration file directly affects the database structure used for storing the statistics. If the collect section
of the configuration file is changed, then StatLogger will detect the change when it is next run, and will
subsequently create a new statistics database from scratch, in order to accommodate the new structure.
3.2.2.6. Database
The sections below describe the databases used by StatLogger and the tables in the statistics database.
3.2.2.6.1. Naming and Creation
StatLogger might end up using many databases on the MySQL server, although the minimum required is
two — one for actual statistics, and one for the meta-database that keeps track of all the statistics databases.
By default, the meta-database is named bw_stat_log_info, and contains a single table called
bw_stat_log_databases, which holds the names of the statistics databases. The meta-database is always
created if it does not exist in the MySQL server.
The statistics databases by default are named bw_stat_log_data<n>, where <n> is the incremental
database number. However, users can choose to create statistics databases with specific names, using the -n
option when running StatLogger — for details, see “Usage” on page 56 .
New statistics databases are created in the following situations:
▪There are no statistics databases in the MySQL server.
▪The preferences file was structurally changed, which causes a new statistic database to be created — for
details on preferences.xml, see “Configuration” on page 58 .
▪StatLogger was started with the -n <database_name> command-line option, and there was no statistic
database with that name in the MySQL server.
Typically, only one statistics database will be needed once StatLogger has been properly configured. There
is usually no need to arbitrarily create new statistics databases, unless isolated sets of statistics are needed
(which might be the case when performing tests with the BigWorld server).

StatLogger
66 Copyright 1999-2008 BigWorld Pty. Ltd. All rights reserved. Proprietary commercial in confidence.
3.2.2.6.2. Statistics Database Structure
Below is an overview of the tables in a statistics database:
▪pref_processes
Process preferences specified in configuration file's collect/ processList section. For details, see “Process
Configuration” on page 61 .
▪pref_statistics
Statistic preferences specified in configuration file.
▪seen_machines
Machines observed while StatLogger was running.
▪seen_processes
Processes observed while StatLogger was running.
▪seen_users
Users observed while StatLogger was running.
▪stat_<proc>_lvl_<lvl>
Statistics collected for processes of type <proc>, with <lvl> index of aggregation.
Examples: stat_baseapp_lvl_001, stat_cellapp_lvl_004
▪stat_machines_level_<lvl>
Statistics collected for machines, with <lvl> index of aggregation — the higher the aggregation level, the
lower the resolution of the data being stored in that table
▪std_aggregation_windows
Aggregation level details specified in configuration file's collect/aggregation section.
For details, see “Aggregation Window Configuration” on page 59 .
▪std_info
Contains two pieces of information:
▪sampleTickInterval specified in the configuration file's options section — for details, see “Option
Configuration” on page 58 .
▪Database structure version (internally used by StatLogger).
▪std_session_times
Start end times of when StatLogger was run.
▪std_tick_times
Timestamps of the start of each interval.
▪std_touch_time

Server Command-Line Utilities
67
Last time the database was written to, in database local time.
Only used by StatGrapher (for details, see “StatGrapher” on page 47 ), whether StatLogger is currently
logging to this database or not.
3.3. Server Command-Line Utilities
3.3.1. control_cluster.py
Located under bigworld/tools/server, this tool is used for managing a BigWorld cluster and the
processes running on it.
For detailed information on actual usage, please see the online help (with the --help switch).
The options for invoking control_cluster.py are described in the list below:
▪start
Starts a server on the cluster.
The set of machines to be used can be specified in a number of different ways.
▪stop
Stops a currently running server in the most controlled way possible.
▪kill
Forces shutdown of server components with SIGINT.
▪nuke
Forces shutdown of server components with SIGQUIT.
▪restart
Restarts the server. Same as running with stop option, and then with start option.
▪startproc
Starts a new server process.
▪stopproc
Stops a specific server process.
▪nukeproc
Kill a specific server process, and cause it to dump core.
▪restartproc
Restarts a specific server process.
▪killproc
Kills a specific server process.
▪restartproc

Server Command-Line Utilities
68 Copyright 1999-2008 BigWorld Pty. Ltd. All rights reserved. Proprietary commercial in confidence.
Restarts a specific server process.
▪display
Displays information about the currently running server.
▪summary
Shows an abridged version of the display output.
▪check
Indicates whether a server is running.
▪checklayout
Indicates whether a server is running with a given layout.
▪cinfo
Displays information about the machines on the cluster that are running BWMachined.
▪netinfo
Show network statistics for a set of machines.
▪users
Displays information about users who are running server processes on the cluster.
▪save
Saves the current server layout to an XML file.
▪load
Starts the server according to a layout from an XML file.
▪watch
Queries watcher values from server processes. Also available under the command alias get.
▪set
Sets a watcher value on one or more processes.
▪set
Sets a watcher value on one or more processes.
▪pyconsole
Telnets to the Python server port on a server process.
▪runscript
Non-interactively run Python script on given processes.
▪querytags

eload (Entity Loader)
69
Queries BWMachined tags on the cluster.
▪mdlist
Displays a comma-separated list of machines on the network.
This is useful for passing to pdsh (http://www.llnl.gov/linux/pdsh/pdsh.html) or similar utilities.
▪flush
Forces machines to flush their tag and user mappings.
▪checkring
Discovers the machined buddy ring, and verifies its correctness.
▪log
Sends a once-off log message to MessageLogger processes.
▪pyprofile
Print a report on Python profiling.
▪cprofile
Print a report on internal BigWorld profiling on processes.
▪eventprofile
Print a report on script method and data propagation profiling.
▪mercuryprofile
Print a report on per-message-type profile statistics from processes.
3.3.2. eload (Entity Loader)
The eload tool reads any entities from a file formatted as a .chunk file, and instantiates them on the base
(or on the cell, if the -cell option is used). For details on the format of .chunk files, see the document Client
Programming Guide's chapter Chunks.
Note
As of BigWorld 1.7, the purpose of eload (to automatically have the server load entities
in the space) is supported by WorldEditor — hence this tool is deprecated.
There are two suggested methods for interactively loading entities on a running server:
▪The runscript utility — for details, see “runscript” on page 70 .
▪Calling a loading function on the server, using a Python telnet console — for details,
see “control_cluster.py” on page 67 .
3.3.3. MessageLogger Related Utilities
For details on the tools available for interacting with server message logs, see “Command-Line Utilities” on
page 52 .

mls (Machine List)
70 Copyright 1999-2008 BigWorld Pty. Ltd. All rights reserved. Proprietary commercial in confidence.
3.3.4. mls (Machine List)
The tool mls lists all machines on the local network that are running BWMachined and processes registered
with it.
Note
As of BigWorld 1.7, the functionality of mls and other utilities is provided by
control_cluster.py (for details, see “control_cluster.py” on page 67 ).
The mls utility now exists primarily as an example of how to use the C++ side of the
MachineGuardMessage API in src/lib/ network/ machine_guard.[ch]pp
for talking to BWMachined.
This utility is no longer being actively developed, and should be considered deprecated.
3.3.5. runscript
The runscript executable is a simple server-side tool that interfaces with the cell and the base to execute
arbitrary scripts for the management of a BigWorld server.
It is located in folder bigworld/tools/server, and has the following syntax:
runscript [-base|-cell [-space <spaceid>]] [-all] [script]
The options for invoking run_script are described in the list below:
▪-h --help
Displays command-line option help and exits.
▪-base
Executes the script on BaseApp. By default, the least loaded BaseApp is used.
▪-cell
Executes the script on CellApp. By default, the least loaded CellApp that has a space is used.
▪-all
Modifies the option -base or -cell default to execute the script on all BaseApps and CellApps.
▪-space <spaceid>
Modifies the option -cell to execute only on a cell (or cells) in the space specified.
Note
Most of this functionality is supported by control_cluster.py.
control_cluster.py should be preferred over using this tool.
3.4. Standard GUI Applications
The section below described the following server GUI applications:
▪BWPanel — See “BWPanel” on page 71 .
▪Space Viewer — See “Space Viewer” on page 75 .
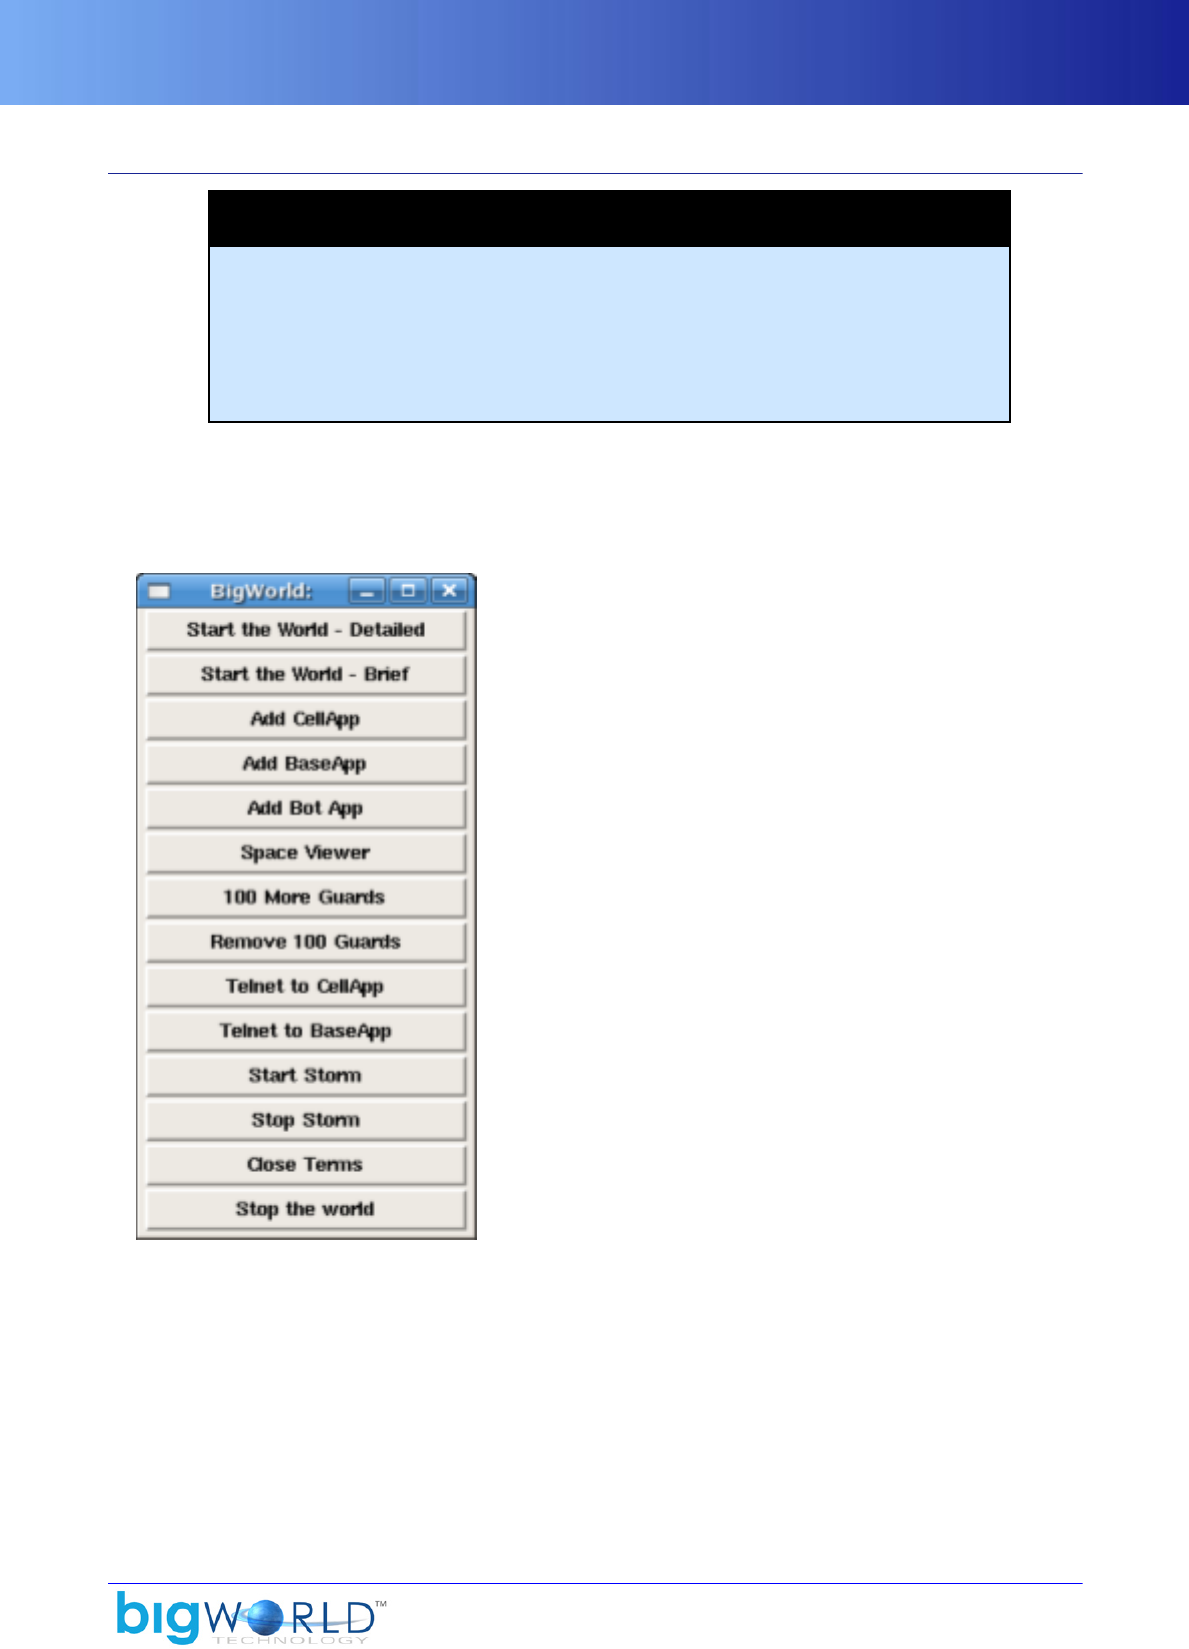
BWPanel
71
3.4.1. BWPanel
Note
As of BigWorld 1.9, BWPanel is deprecated. All interactions with the server (i.e.
starting, stopping, interacting with watchers, calling python script etc) are expected
to be done with either Web Console or the supported command-line utilities
(control_cluster.py and bot_op.py). In particular, servers started with BWPanel
will not set the timing method from the [TimingMethod] section in /etc/
bwmachined.conf. You must manually export BW_TIMING_METHOD into your
environment if you wish to use gettimeofday timing.
A simple way to control the server during development is by using the tool BWPanel. It is implemented as
a simple script that displays a list of buttons, which allow you to run other scripts. It is quite easy to extend
BWPanel with your own buttons, which are themselves just scripts.
Located on bigworld/tools/server/bwpanel, its main window is displayed below:
BWPanel's window
BWPanel is designed for running the server on a single machine during development. It is not designed
for production use — for that purpose, use WebConsole (for details, see “WebConsole” on page 45 ) or
control_cluster.py (for details, see “control_cluster.py” on page 67 ).
3.4.1.1. Standard Buttons on BWPanel
The buttons on BWPanel are listed on the table below:
▪Start the world — Detailed

BWPanel
72 Copyright 1999-2008 BigWorld Pty. Ltd. All rights reserved. Proprietary commercial in confidence.
Starts on the local machine all components required for a server, each on its own terminal.
The components are started in the following order: CellAppMgr, BaseAppMgr, DBMgr, LoginApp,
CellApp, and BaseApp.
▪Start the world — Brief
Starts on the local machine all components required for a server.
It starts three terminals, as listed below:
▪world — DBMgr, CellAppMgr, BaseAppMgr, and LoginApp
▪CellApp — CellApp
▪BaseApp — BaseApp
See also the Stop the World button .
▪Add CellApp
Starts a CellApp process.
It starts an extra CellApp process for a single-machine server, which is useful for dual CPUs, or for testing
multiple cells within a single machine.
It can also start a CellApp by itself, on a separate machine that you wish to add to the server farm. To do
this, run BWPanel under the same UID on another machine, and add a CellApp. The CellApp will register
with the existing server, and start load balancing with the existing CellApps.
The Python script control_cluster.py is a more convenient way to start CellApps on remote
machines. For details, see “control_cluster.py” on page 67 .
See also the Stop the World button.
▪Add BaseApp
Starts a BaseApp process on the local machine.
Similarly to the mechanism of the Add CellApp button, the new BaseApp will join the rest of the system
running on that UID.
See also the Add CellApp and Stop the World buttons.
▪Add Bot App
Starts a Bot process on the local machine.
Similarly to the mechanism of the Add CellApp button, the new Bot process will join the rest of the system
running on that UID.
See also the Add CellApp and Stop the World buttons.
▪Space Viewer
Launches the Space Viewer tool. For more details, see “Space Viewer” on page 75 .
▪100 More Guards
This button is specific to FantasyDemo example world.

BWPanel
73
Adds 100 NPCs to the world.
These are very simple simulated players driven by AI server scripts to act like guards.
▪Remove 100 Guards
This button is specific to FantasyDemo example world.
Removes 100 of the entities added by the 100 More Guards button.
▪Telnet to CellApp
Opens a terminal window with a prompt to Python on the CellApp's port.
▪Telnet to BaseApp
Opens a terminal window with a prompt to Python on the BaseApp's port.
▪Start Storm
This button is specific to FantasyDemo example world.
Starts a thunderstorm in the world.
▪Stop Storm
This button is specific to FantasyDemo example world.
Stops the thunderstorm in the world.
▪Close Terms
Closes all terminal windows associated with running the world.
It is used in conjunction with the Stop the World button, which does not close the terminals.
See also the Stop the World button.
▪Stop the World
Stops all components of the running BigWorld server started by the following buttons:
▪Start single-machine world
▪Add CellApp
▪Add BaseApp
It does not stop BWMachined, which should be running all the time, nor tools such as the watcher process
or GUI apps (Space Viewer, General Meter, etc...).
The terminals are left open so that final output from the components can be examined.
The Close Terms button closes the terminal windows associated with the world.
3.4.1.2. Adding Buttons to BWPanel
When launched, BWPanel reads all files with extension .but in its folder. These files are shell scripts, each
defining a single button.

BWPanel
74 Copyright 1999-2008 BigWorld Pty. Ltd. All rights reserved. Proprietary commercial in confidence.
The code fragment below illustrates the implementation of the Display Details button by the
View_Info.but file:
#!/bin/sh
#BWPANEL 2.5 'Display Details'
# start the cell up in a terminal.
$MF_ROOT/bigworld/tools/myscript.sh
Example View_Info.but file — Implementation of the Display Details button
As displayed in the example code above, the button definition file has the sections below:
▪Code interpreter
Program to use to run the script
▪Display information
Optional display information. The parameters are described in the list below:
▪Button order
Floating-point specifying the order in which button is to be displayed.
Button will not be displayed if value specified is not unique.
▪Button label
Label to be displayed for the button.
If you choose to not specify it, then it will be derived from the file name (underscores are converted to
spaces, and the extension is dropped).
In the example above, if Display Details was not specified, then the button would have been labelled
View Info (the file name is View_Info.but)
▪Code
Code to be executed when button is clicked — the syntax is specific to whatever interpreter was chosen.
3.4.1.3. Command-Line Options
Located under the bigworld/tools/server/bwpanel folder, BWPanel can be called via command line
with the following syntax:
bwpanel [-display display]
The options for bwpanel are interpreted by Tcl/Tk's wish command, and are described in the list below:
▪-display display
Specifies the display (and screen) on which to display window.
The display argument specifies the X window on which to display instead of the one specified in the
DISPLAY environment variable.
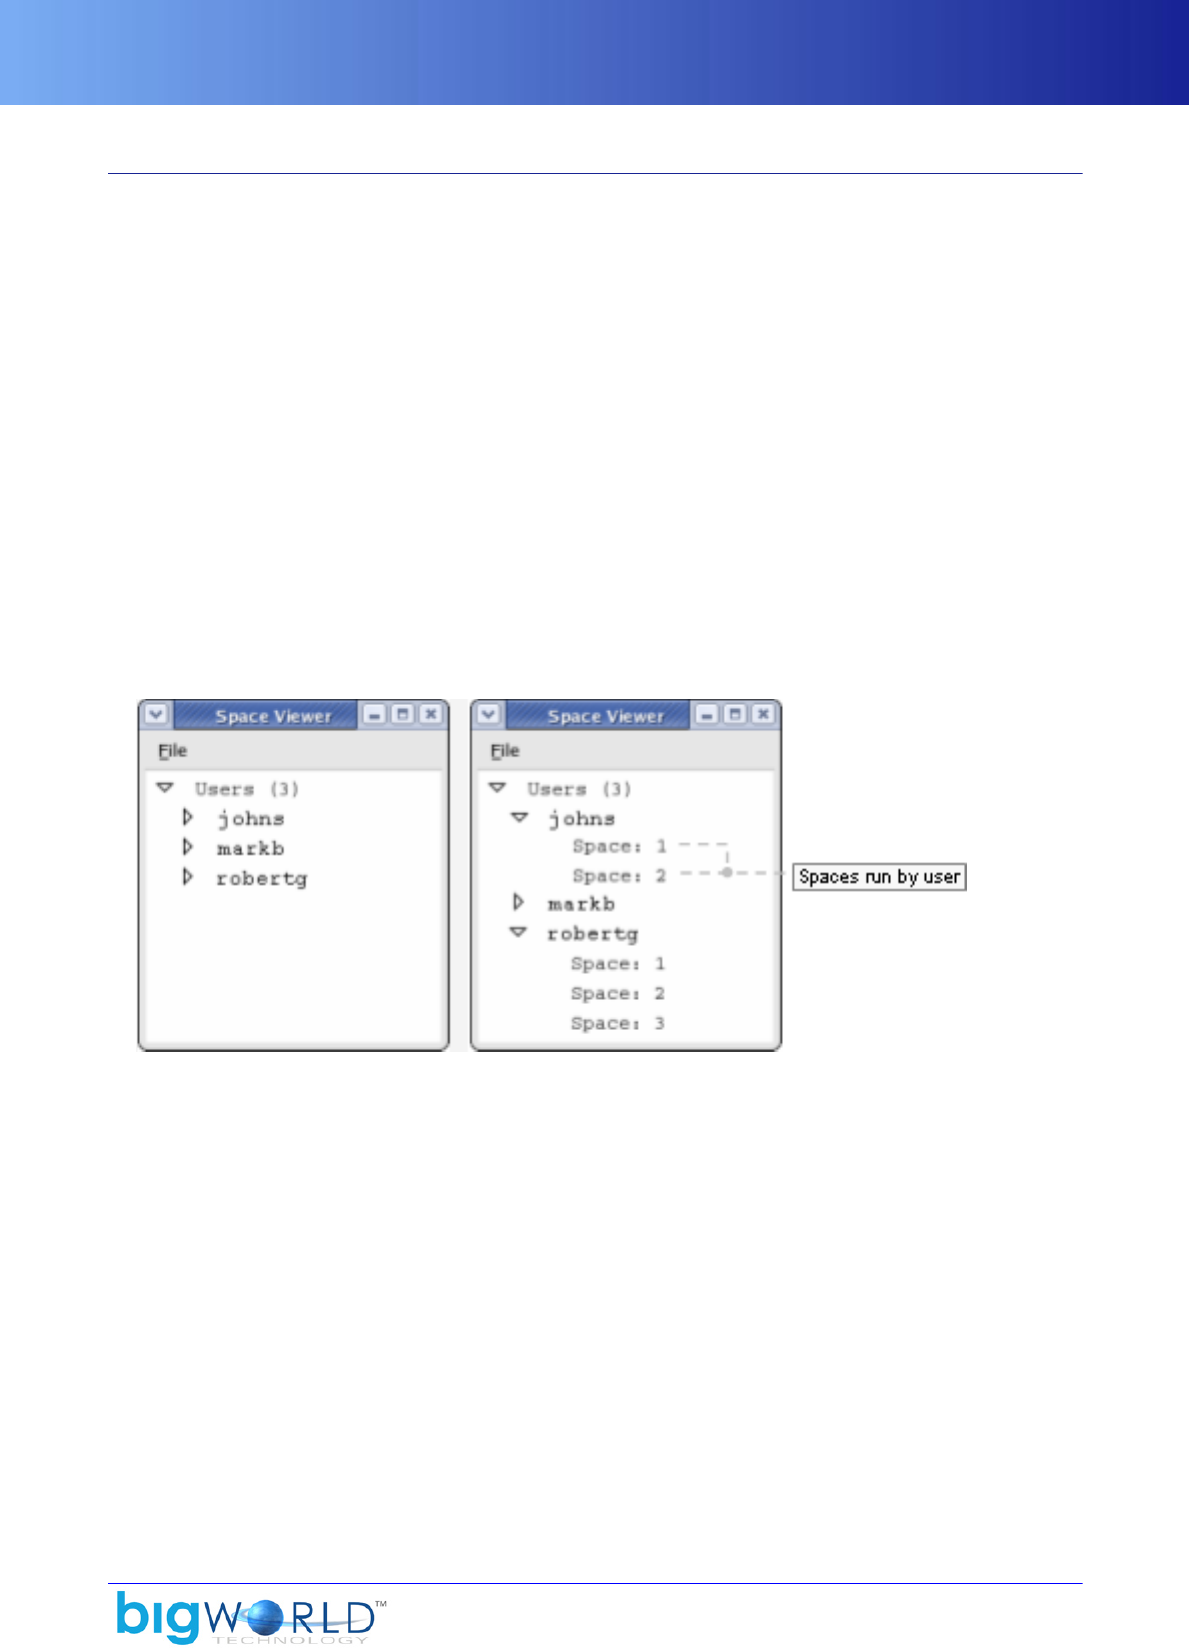
Space Viewer
75
3.4.2. Space Viewer
Space Viewer (located in bigworld/tools/server/space_viewer) logs and displays a dynamic graphic
representation of the distribution of cells on a space, and the entities (player characters, NPCs, and other
objects) on those cells.
Space Viewer uses a client/server architecture, and is therefore composed of two distinct parts, which may
be used simultaneously or separately. The "server" side either communicates with the BigWorld server to
collect and log information about a space, or reads a previously written log. The "client" side connects to the
server process and displays the space information it provides.
Since the two halves of Space Viewer communicate via TCP, they can be run on different machines, although
obviously the client is most responsive when both parts are run on the same machine.
The most common use of Space Viewer is generally to monitor the state of a live BigWorld server, and as such,
both the client and server components are run in tandem. Other times, when space data needs to be collected
over long periods of time (for example, during testing), the server part of Space Viewer (svlogger.py) will be
run on its own, with the option to connect a client window to it at any time to examine the current state or
look back through the log recorded thus far.
In the most common case of merely wanting to monitor an active server, and not being interested in
extended period logging, Space Viewer will be started by simply running space_viewer.py. Its main window
is displayed below:
Space Viewer window
3.4.2.1. Selecting Spaces to View
SpaceViewer displays a list of user IDs that are currently running BigWorld server clusters. If you do not see
your UID listed in Space Viewer, then select File → Refresh menu item — this is necessary because the list
is not automatically refreshed.
In the example above, users 502, 573 and 589 are running server clusters.
Clicking the icon to the left of user name expands the list to display all spaces available for that server instance.
In the example above, the server cluster run by user 502 has spaces 2, 5 and 9. To see the map of a space, double
click its entry on the list. This will start an svlogger process logging data from the selected space, as well as a
client window that is connected to it. Closing the client window will cause the logger to terminate and exit.
3.4.2.2. Menu Items
The list below describes the menu item available in the Space window:

Space Viewer
76 Copyright 1999-2008 BigWorld Pty. Ltd. All rights reserved. Proprietary commercial in confidence.
▪File → Close window and terminate Logger
Closes the Space window and terminates the Logger. This item does not quit the Space Viewer.
▪File → Close window
Closes the Space window. This item does not quit the Space Viewer.
▪View → Update entities
Specifies that entities' position is determined by polling the currently selected cell.
Note: It is possible to view entities from only one cell at a time.
▪View → Set Cell App Update Frequency
Opens the Change Display Update Interval dialog box, where you can change how often entity positions
are queried from the cell.
Smaller values for this settings cause greater load on the cell. In large systems, it is recommended to
increase the delay (e.g., to 3 seconds)
▪View → Set Cell App Manager Update Frequency
Opens the Change Display Update Interval dialog box, where you can change how often the cell
boundaries are queried from the CellAppMgr and redrawn.
▪View → Zoom in
Displays a smaller area of the space.
▪View → Zoom out
Displays a bigger area of the space.
▪View → Zoom to space bounds
Automatically zooms to the extents of the current space.
▪View → Image overlay → Display image overlay
Opens the Choose An Image To Overlay dialog box, where you can choose the file with the image to
superimpose onto the display.
The image would typically be a screenshot from inside WorldEditor.
Examples are provided in fantasydemo/res/server/space_images.
▪View → Image overlay → Remove image overlay
Disables the display of an image overlay.
▪View → Image overlay → Recent image overlays
List of most recent image overlays.
▪View → Graph overlay → Display graph overlay
Opens the Choose A Graph File dialog box, where you can choose the file with the graph topology to
superimpose onto the display.
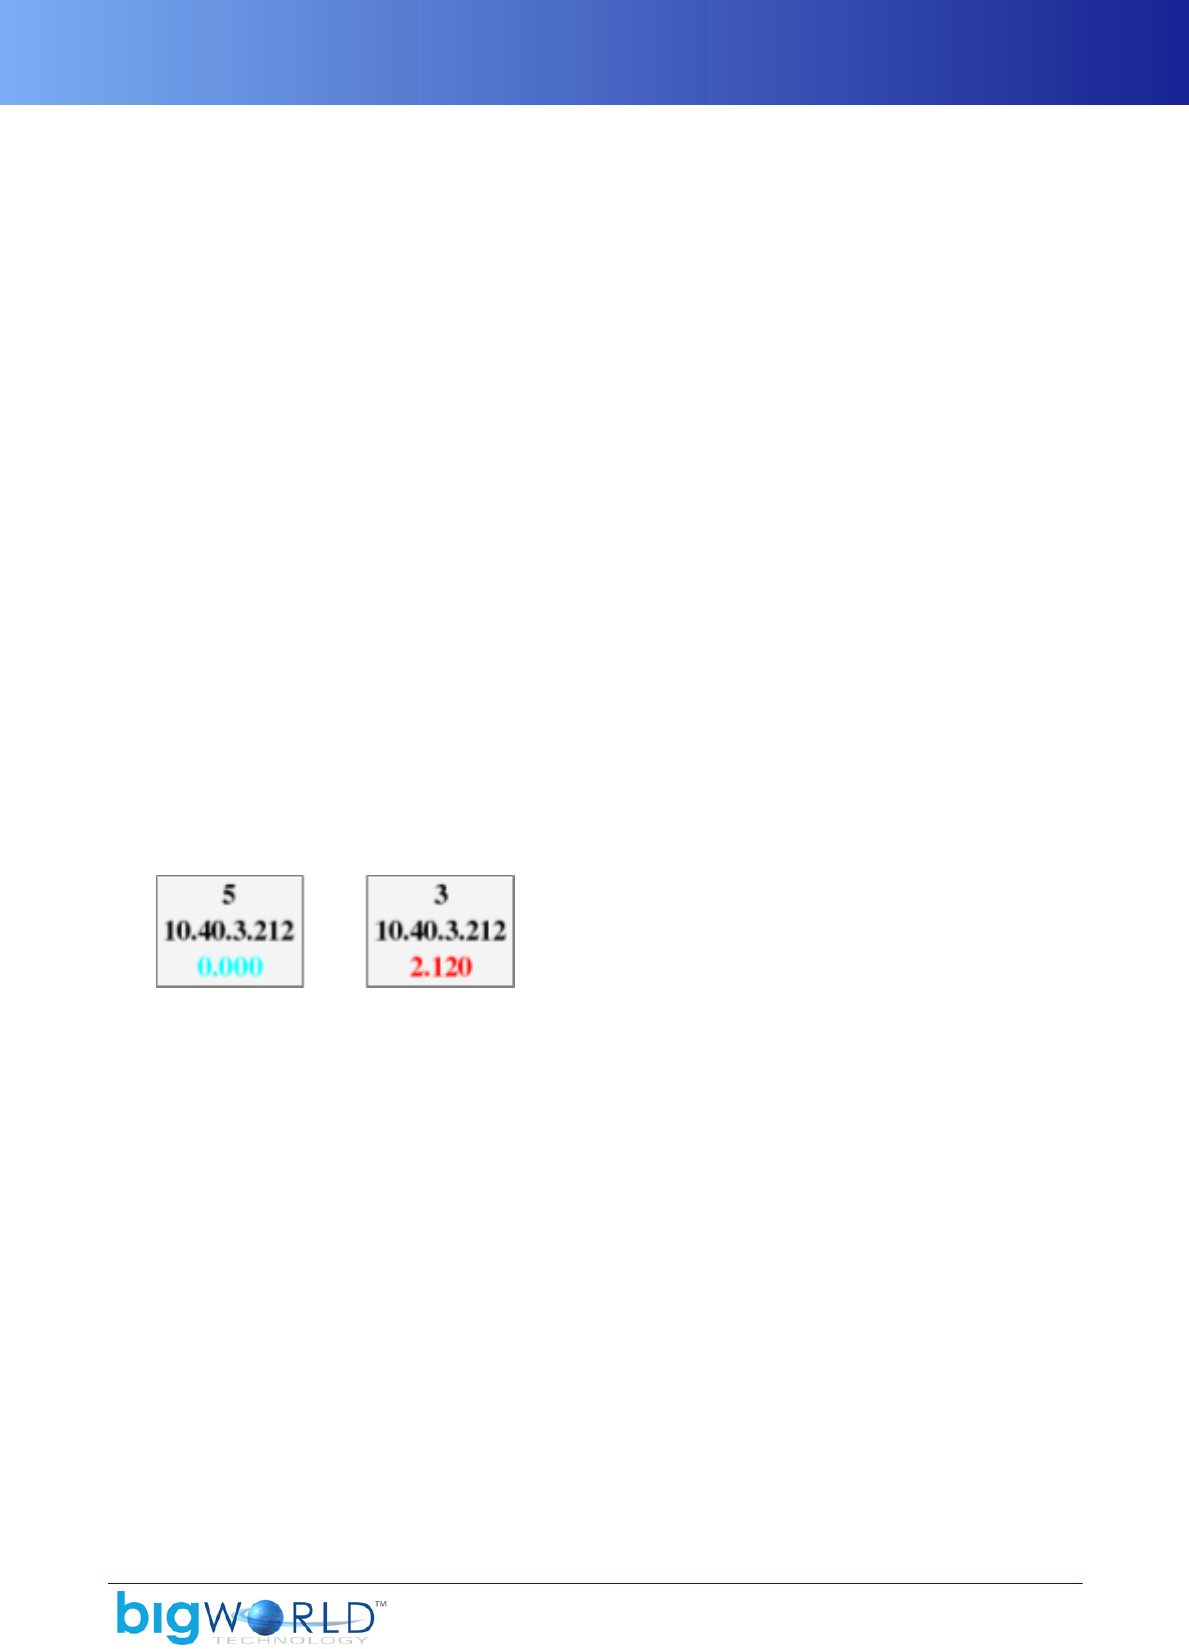
Space Viewer
77
File should have the XML format accepted by the standard bots Patrol movement controller. For more
details, see “Controlling Movement” on page 104 .
The user will be prompted to specify the factor by which the specified graph should be resized.
This feature is useful when you are running tests with bots.
Sample graph topologies can be found in fantasydemo/res/server/ bots.
▪View → Graph overlay → Remove graph overlay
Disables the display of a graph overlay.
▪View → Graph overlay → Recent graph overlays
List of most recent graph overlays.
▪Colour → CellApp ID, Colour → IP address, Colour → Cell load, Colour → Partition load, Colour
→ Entity bounds, Colour → Space boundary, Colour → Grid, Colour → Ghost entity, Colour → Cell
boundary
Lets you select a colour to draw the specified element in.
A sub-menu displays the colours available for rendering the element.
If you do not want the item to be displayed, then select None.
▪Colour → Relative colouring
Colours the CellApp load information according to its load.
Colour will range from aqua blue (light loaded) to full red (heavy loaded).
Light-load CellApp and Heavy-load CellApp
▪Entity size → 25%, Entity size → 50%, Entity size → 75%, Entity size → 100%, Entity size → 150%, Entity
size → Custom scale...
Sets the size of the entity symbol to the specified scale.
If the Custom Scale menu item is selected, then a dialog will open, letting you specify a value ranging
from 1 through 1,000.
▪Util → Retire selected cell
Item available mainly for debugging purposes.
Removes the selected cell from the system.
Note that CellAppMgr will probably add the cell back when it performs auto load balancing.
▪Util → Stop selected CellApp
Item available mainly for debugging purposes.
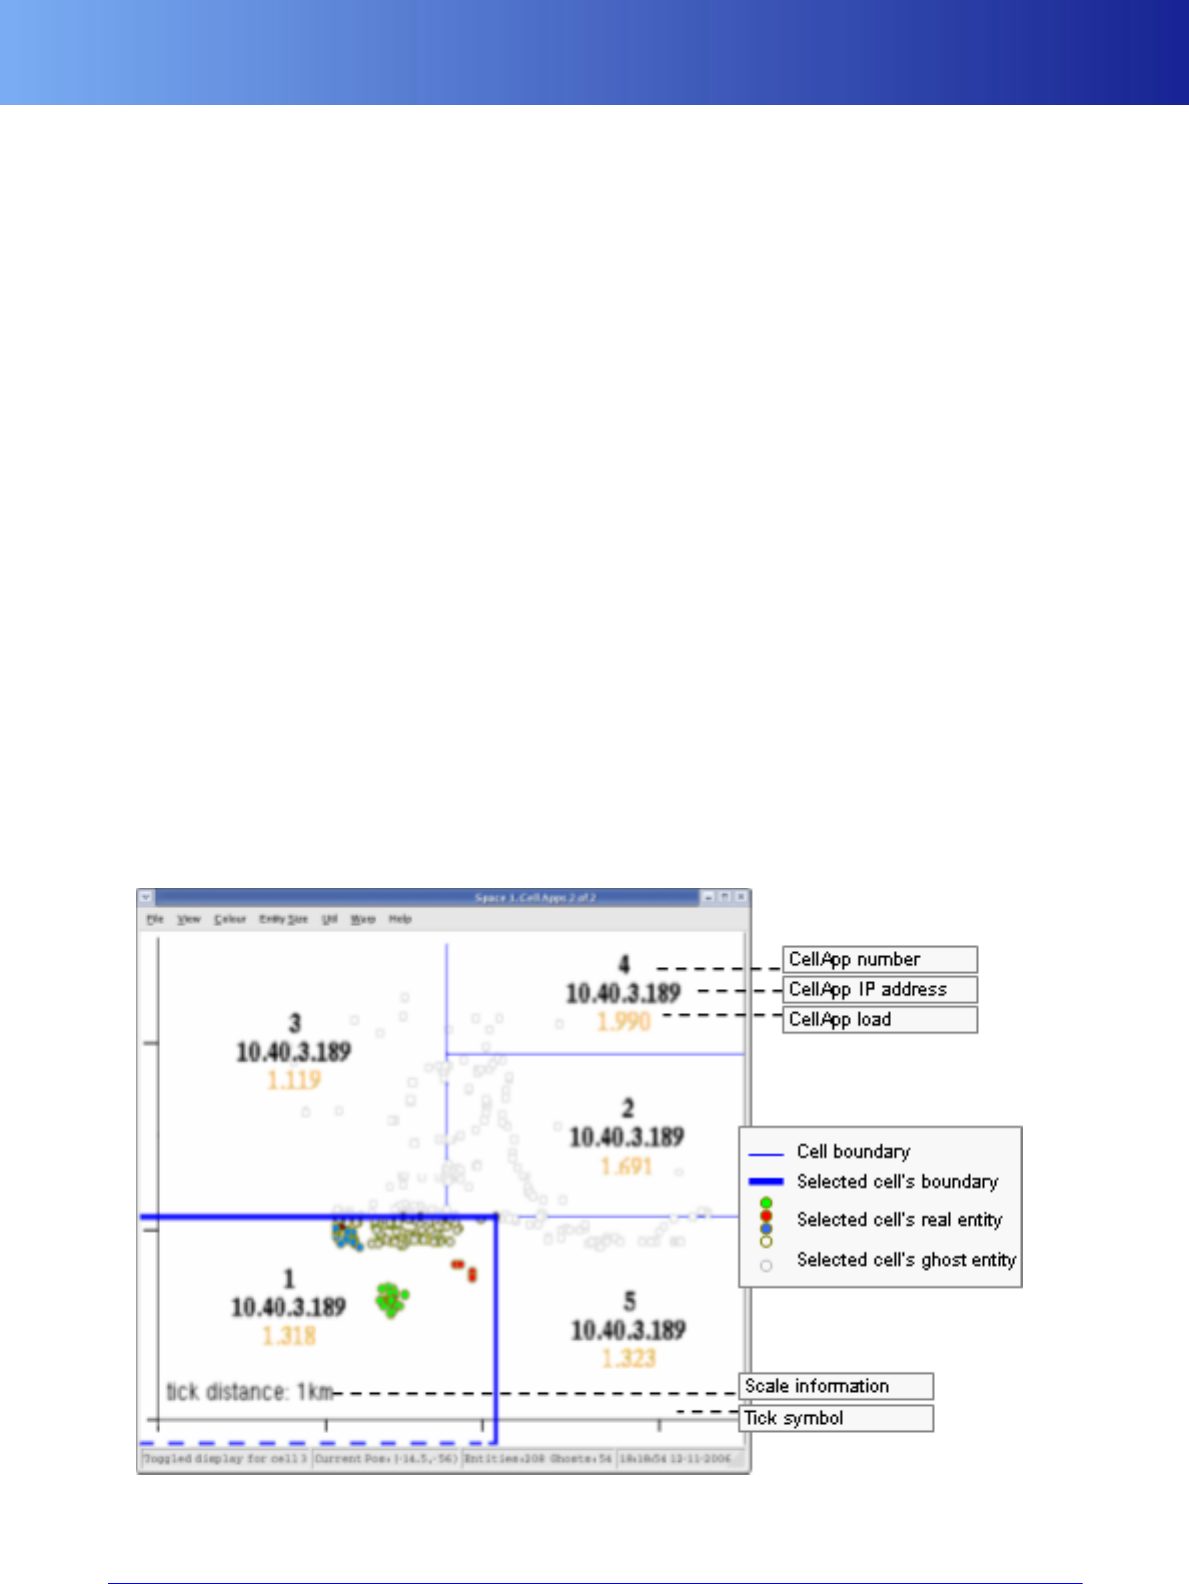
Space Viewer
78 Copyright 1999-2008 BigWorld Pty. Ltd. All rights reserved. Proprietary commercial in confidence.
Stops the selected CellApp process.
▪Visible entities → Show all
This will set all entity types in the selected cell as visible, giving a complete view of all entities.
▪Warp → Warp to time
Opens the Warp dialog box, where you can specify the date and time for which you want to display space
data.
▪Warp → Warp to log event
Opens the Choose A Timestamped Log dialog box, where you can specify the log file containing the space
data that you want to display.
▪Help → Help
Displays help for Space window.
3.4.2.3. Viewing Spaces
Multiple spaces can be viewed simultaneously, each in their own window. To view a space, double-click its
entry on the space list displayed in Space Viewer.
The example below shows a space being handled by five cells. It is important to note that in the selected cell
only the entity types selected in the Visible Entities menu item will be displayed. All ghost entities will be
drawn regardless of the entities selected in this menu.
Initially, no cell on the space will be selected for viewing. The cell boundaries and the cell information (IP
address, load, etc...) will always be shown, but to see the entities on a particular cell (as with cell #1 in the
screenshot below) it must be selected with a single click

Space Viewer
79
Space window
The list below describe some of the components of the Space window:
▪CellApp load
CPU load calculated by the CellApp itself.
▪Selected cell's real entity
The dots are coloured according to their type. For more details see “Customising Entity and Display
Colours” on page 80 .
▪Scale information
Indicates the size of the viewed area (space and cells). In the example above, the space is slightly over
3km x 4km.
▪Cell boundary
If the displayed space contains more than one cell, then the geographic tessellation will be indicated.
▪Cursor position
Displays the current position of the cursor (x,z) in metres.
▪Entities information
Displays the number of real and ghost entities on selected cell.
To change the visualisation of the space via keyboard or mouse, you have the following options:
▪Select a cell
Click anywhere in a cell to make it active. Click on the cell again to deselect it.
▪Move the view
Click within the display and drag the mouse to move the cell display.
▪Zoom in/out
To zoom in and out of the display, use the Page Up and Page Down keys, or the mouse wheel.
You can also use the middle mouse button to draw a rectangle, thus selecting the new area to view. As
you zoom, scale information is updated to reflect the changes. If you get lost, restart the visualisation by
selecting the View�Zoom To Space Bounds menu item, or by pressing Ctrl+Home.
You can also seek the space view forwards or backwards in time using the keyboard. You can seek backwards
as far as the time the logger was started, and if you seek forward to the current time, then the window will
start updating in real time again.
The list below displays the keyboard shortcuts for controlling playback:
▪LEFT ARROW
Moves the playback 1 second backwards.
▪RIGHT ARROW
Moves the playback 1 second forward.
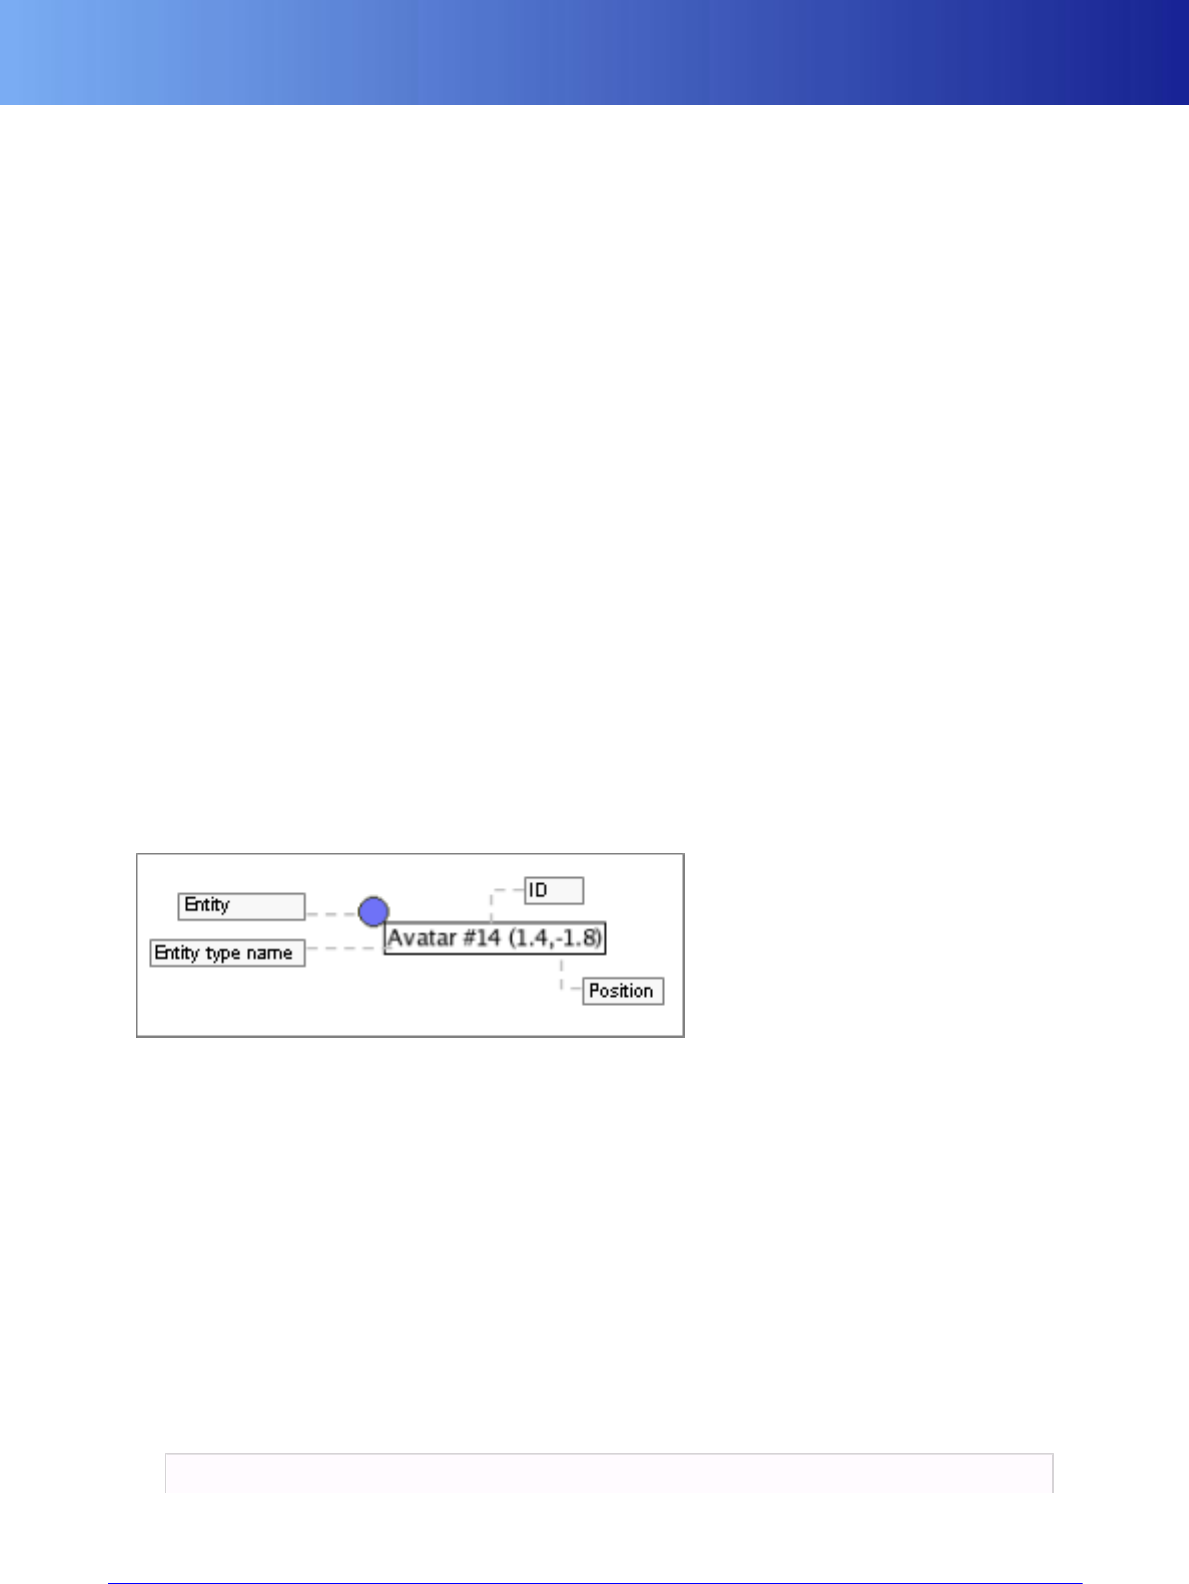
Space Viewer
80 Copyright 1999-2008 BigWorld Pty. Ltd. All rights reserved. Proprietary commercial in confidence.
▪UP ARROW
Moves the playback 60 seconds backwards.
▪DOWN ARROW
Moves the playback 60 seconds forward.
▪Home
Moves the playback to the beginning of the log.
▪END
Moves the playback to the end of the log.
▪Ctrl+L
Prompts the user to select a command log file — this can be any file in which each line contains date/time
string like 'Thu Nov 17 17:45:45 2005'..
Once the file is selected, the script will display all logged events contained in the log file, and prompt the
user to select one.
Once event is selected, playback time will be warped to the time of selected event.
▪Ctrl+W
Prompts the user to enter a time to warp the playback to.
In order to facilitate identification of entities there is also tool tip information for all non-ghosted entities.
This information will appear if the cursor hovers over an entity marker for a sufficiently long time.
Entity tooltip
The entity type name is retrieved from file <res>/scripts/entities.xml, and corresponds to the IDs
in the menu Visible Entities described above.
3.4.2.4. Customising Entity and Display Colours
Space Viewer allows you to customise the colours to be used when drawing the elements in the Space
window. But this customisation is not saved, and will not be in effect the next time the application is started.
However, it is possible to permanently change the colours by customising a Python file.
Entities in the current cell are displayed with a coloured dot. The colour can be customised in the local file
style.py. The simplest way is to update the dictionary colours (which contains RGB colour definitions for
each entity type).
The code fragment below illustrates the definition of permanent entity colours:
# specify colour for entity Types.

Space Viewer
81
entityColours = {
0: ((111, 114, 247), 2.0),
1: ((244, 111, 247), 1.0),
2: ((124, 247, 111), 1.0),
3: ((114, 241, 244), 1.0),
4: ((21, 168, 179), 1.0)
}
Example local file style.py
The entity's number is defined by its order of appearance in file <res>/scripts/entity.xml. Entities
which ID is not defined in the dictionary are coloured with RGB (255,192,192).
So assuming the following file <res>/scripts/entities.xml, these will be the entities' display colours:
<root>
<Knight/>
<Warlock/>
<Merchant/>
<Guard/>
<Ripper/>
<Thief/>
<Foreigner/>
</root>
Example file <res>/scripts/entities.xml and their display colours in Space Viewer
You can also replace the entire function getColourForEntity(entityID, entityTypeID), using your own
algorithm to colour the entities.
All other colours are defined by the dictionary colourOptions. They can be changed to any of the colours
defined by the colours array.
3.4.2.5. Running the Client and Server Parts of Space Viewer Separately
As described at the start of this section, Space Viewer's two halves can be run separately as needed. This
would usually take the form of running svlogger over an extended period of time, connecting clients to it to
monitor live state as necessary, then eventually shutting down the logger. Later, the logger can be connected
to its previously recorded log (instead of a live server) and client windows can be attached to it to replay
the log data.
3.4.2.5.1. svlogger.py
The svlogger script provides log writing and reading for Space Viewer. In writing mode, it is responsible for
gathering the space data from the actual running BigWorld server (which it does by polling the CellAppMgr
every second or so). In reading mode, it opens a previously recorded log for replay via any client connections.
The basic options for svlogger include:
▪-l <listenip:listenport>
Specifies the port that svlogger will listen for connections from svreplay. If not specified, any available
port will be used.

Space Viewer
82 Copyright 1999-2008 BigWorld Pty. Ltd. All rights reserved. Proprietary commercial in confidence.
▪-o <logdir>
Specifies the directory to write the data log to. Default is /tmp/svlog.
▪-p <prefix>
Specifies the prefix for the log files. Default is svlog.
▪-s <spaceid>
Specifies the space to log data for. Default is the server’s default space.
▪-u <uid>
Specifies the user to log data for. Default is current user's ID.
▪-k | --keepalive
Specifies that the logger should terminate once the last client connection is terminated. Useful when only
interested in monitoring a live server, and not interested in logs.
▪-r <logpath>
Activates replay mode for the log stored at the given path.
The path is the concatenation of the <logdir> and <prefix> specified for -o and -p switches,
respectively. For example, if you want to replay the default log location, you would specify /tmp/svlog/
svlog as the <logpath>.
This option can also be passed to space_viewer.py to open a log with svlogger and automatically
connect a viewer window to it.
3.4.2.5.2. Connecting a Client Window to svlogger
If you have started svlogger manually, then you will also need to manually connect client windows to the
logger if you wish to view its space data. This is easily done by running space_viewer.py with the -c
<ip:port> option. The address passed to this option should be the address that svlogger is listening for
connections on (which is displayed in the initial output from svlogger after it starts up).
3.4.2.6. Command-Line Options
Located under folder bigworld/tools/server/space_viewer, space_viewer.py can be called via
command line with the following syntax:
space_viewer.py [{-u |--uid=}<user_id>]
[{-s |--space=}<space_id>]
[{-c |--connect=}<ip:port>]
[{-r |--replay=}<log_prefix>]
[{-d |--dump-db=}<log_db>]
[--autoselect]
[-h|--help]
The options for space_viewer.py are interpreted by Tcl/Tk's wish command, and are described in the list
below:
▪{-u |--uid=} <user_id>
User for whose space is to be viewed. If this option is used, then -s|--space must also be specified.
▪{-s |--space=} <space_id>

Space Viewer
83
Space to view. If option -u|--uid is not specified, then the viewed space_id will be that of current user.
▪{-c |--connect=} <ip:port>
Address on which to connect to svlogger.py. For details, see “Connecting a Client Window to svlogger”
on page 82 . If this option is specified, the -u option must not be specified.
▪{-r |--replay=} <log_prefix>
Opens log with svlogger and automatically connects a viewer window to it.
▪{-d |--dump-db=} <log_db>
Displays all values from log_db.
▪--autoselect
On startup, automatically selects a cell on specified space. If this option is used, then -s|--space must
also be specified.
▪-h|--help
Displays online help.

84
Chapter 4. Watcher (Web Interface)
A Watcher is a general mechanism that exposes internal operational parameters of a running BigWorld
Server, so that an administrator can view and change them.
Note
As of BigWorld 1.8, this tool is replaced by the new tool WebConsole. For details, see
“WebConsole” on page 45 .
The Watcher web interface process collects watcher data and publishes it through an HTTP interface. It is
mainly used to diagnose and rectify an isolated problem once it has been discovered. For details on how to
instrument your own server processes and extensions, see Server Programming Guide, chapter The Watcher
Interface.
Located on bigworld/tools/server, the watcher process listens for UDP broadcast messages from the server
components containing announcements of new sources of watchers. It then publishes this information via
an HTTP interface. When links are clicked on, the interface performs deeper watcher requests on behalf of
the user.
To start a watcher process, execute the following command on any machine in the server cluster:
$MF_ROOT/bigworld/tools/server/watcher &
The watcher process listens for HTTP requests on port 20017. To view watcher information, just open a
browser (on Windows or Linux) on address http://yourhostname:20017. The hyperlinks give you access to
the watcher tree.
Note
Each watcher only shows the components registered under the UID that was used to
start the watcher process — client machines are shown on all watchers, since they run
on Windows boxes, and therefore do not have Unix UIDs.
You can run multiple watcher processes on the network.
The illustrations below display a watcher tree being traversed on a web browser:
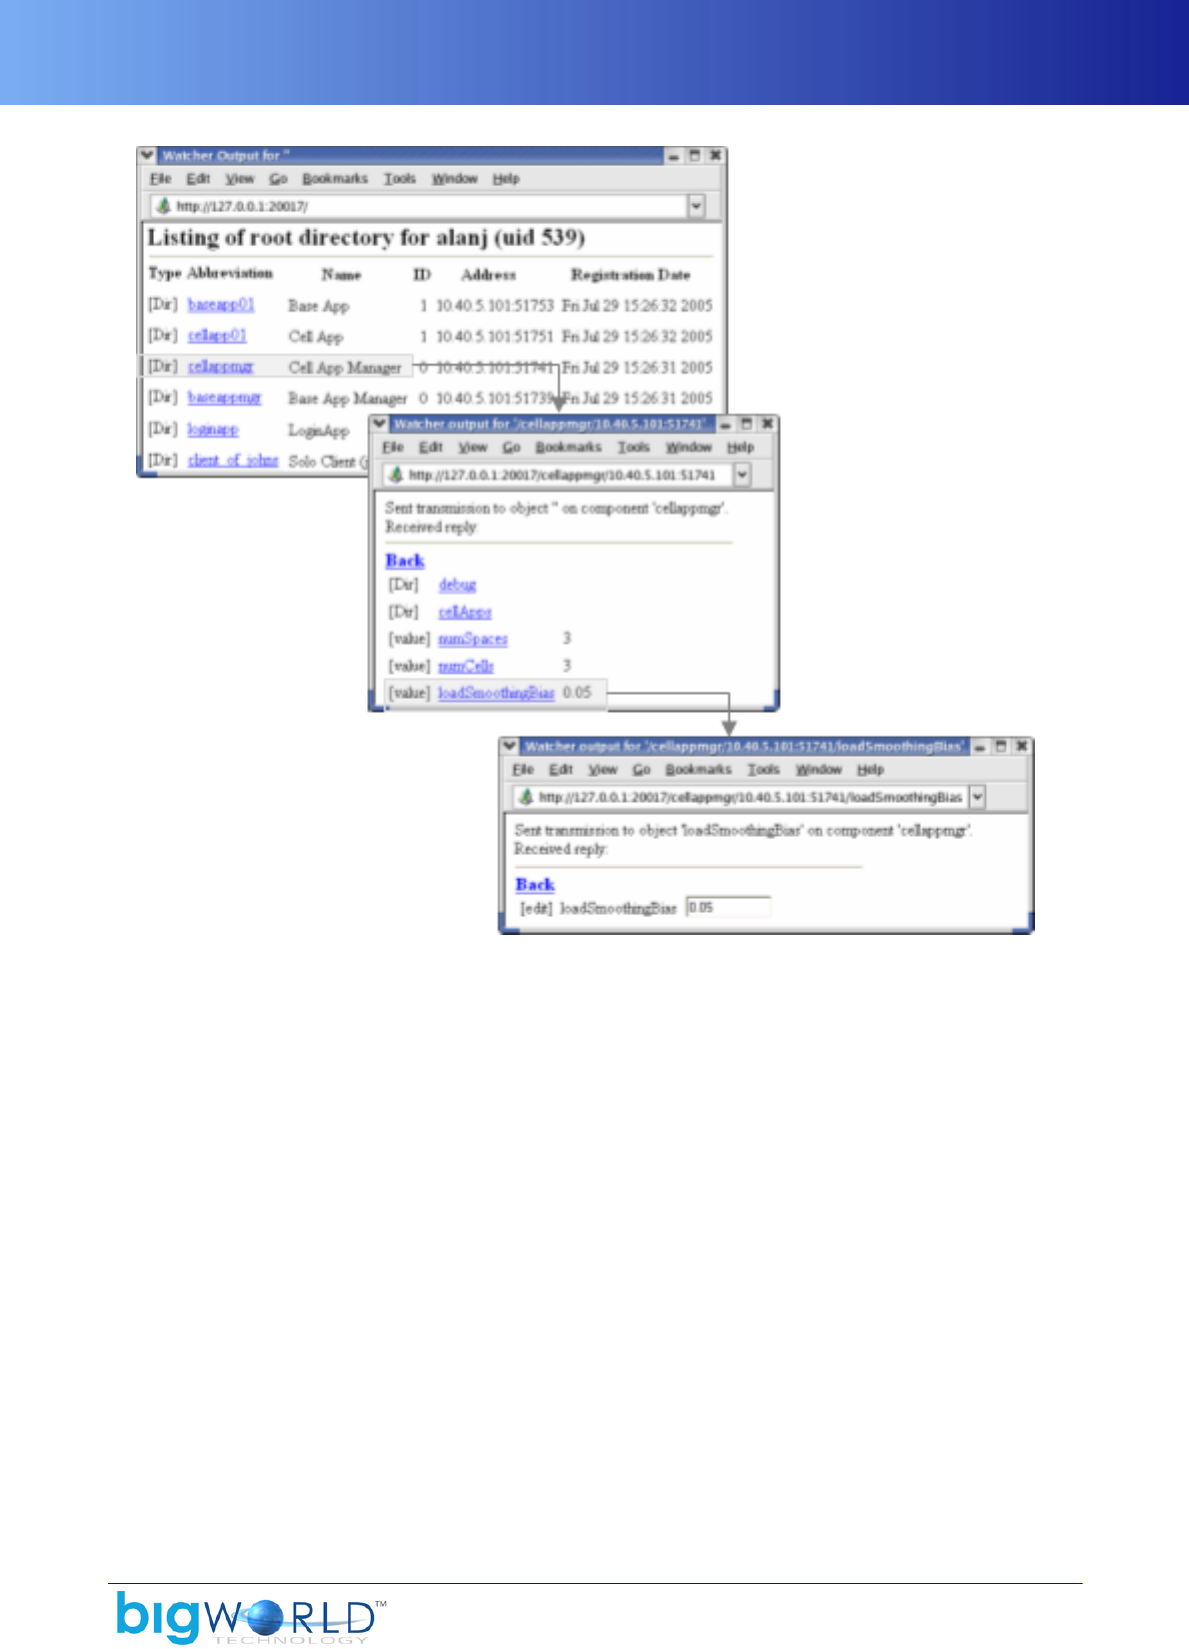
85
Web page with CellAppMgr's loadSmoothingBias watcher

86
Chapter 5. Fault Tolerance
The Fault Tolerance system in BigWorld is designed to transparently cope with the loss of a machine due to
physical, electrical, or logical fault.
The game systems in general should not be affected, and the game experience will continue normally for
most clients, with possibly a brief interruption for clients closest to the faulty machine.
The loss of any single machine (running a single process) is always handled. The loss of multiple machines in
a short time frame may not always be adequately handled. In such extreme cases — for example, a complete
power outage affecting all machines — the Disaster Recovery system will be invoked. For more details, see
“Disaster Recovery” on page 92 .
Note that, in spite of handling failures, the Fault Tolerance system should not be relied upon to cover up a
software bug that causes a component to crash. All such bugs should be found and fixed in the source code.
If the bug is believed to be in BigWorld Technology code (and not in a customer's extension), then contact
BigWorld Support with details of the problem. For more details, see First Aid After a Crash on page 121 .
5.1. CellApp Fault Tolerance
CellApp fault tolerance works by backing up the cell entities to their base entities.
As long as a backup period is specified for the cell entities, the fault tolerance for the CellApp processes is
automatic. An operator should ensure that there is enough spare capacity in available CellApps to take up
the load of a lost process.
For details on how to specify the CellApp backup period, see “CellApp Configuration Options” on page 25 .
Note
Cell entities without a base entity are not backed up, and therefore will not be restored
if their process is lost.
Note
Since cell entities back up to base entities, running CellApp and BaseApp processes on
the same machine should be avoided. If the entire machine is lost, this level of fault
tolerance will not work.
For more details on the implementation of CellApp fault tolerance on code level, see the document Server
Programming Guide's chapter Fault Tolerance.
5.2. BaseApp Fault Tolerance
The BaseApp supports a choice of two schemes for fault tolerance:
▪Distributed BaseApp Backup
Each BaseApp backs up its entities on other (more than one) regular BaseApps.
▪Non-distributed BaseApp Backup
Regular BaseApps back up all their entities on dedicated Backup BaseApps.
Note
As of BigWorld 1.9, non-distributed BaseApp is deprecated. It is planned that support
for this feature will be removed in BigWorld 2.0.
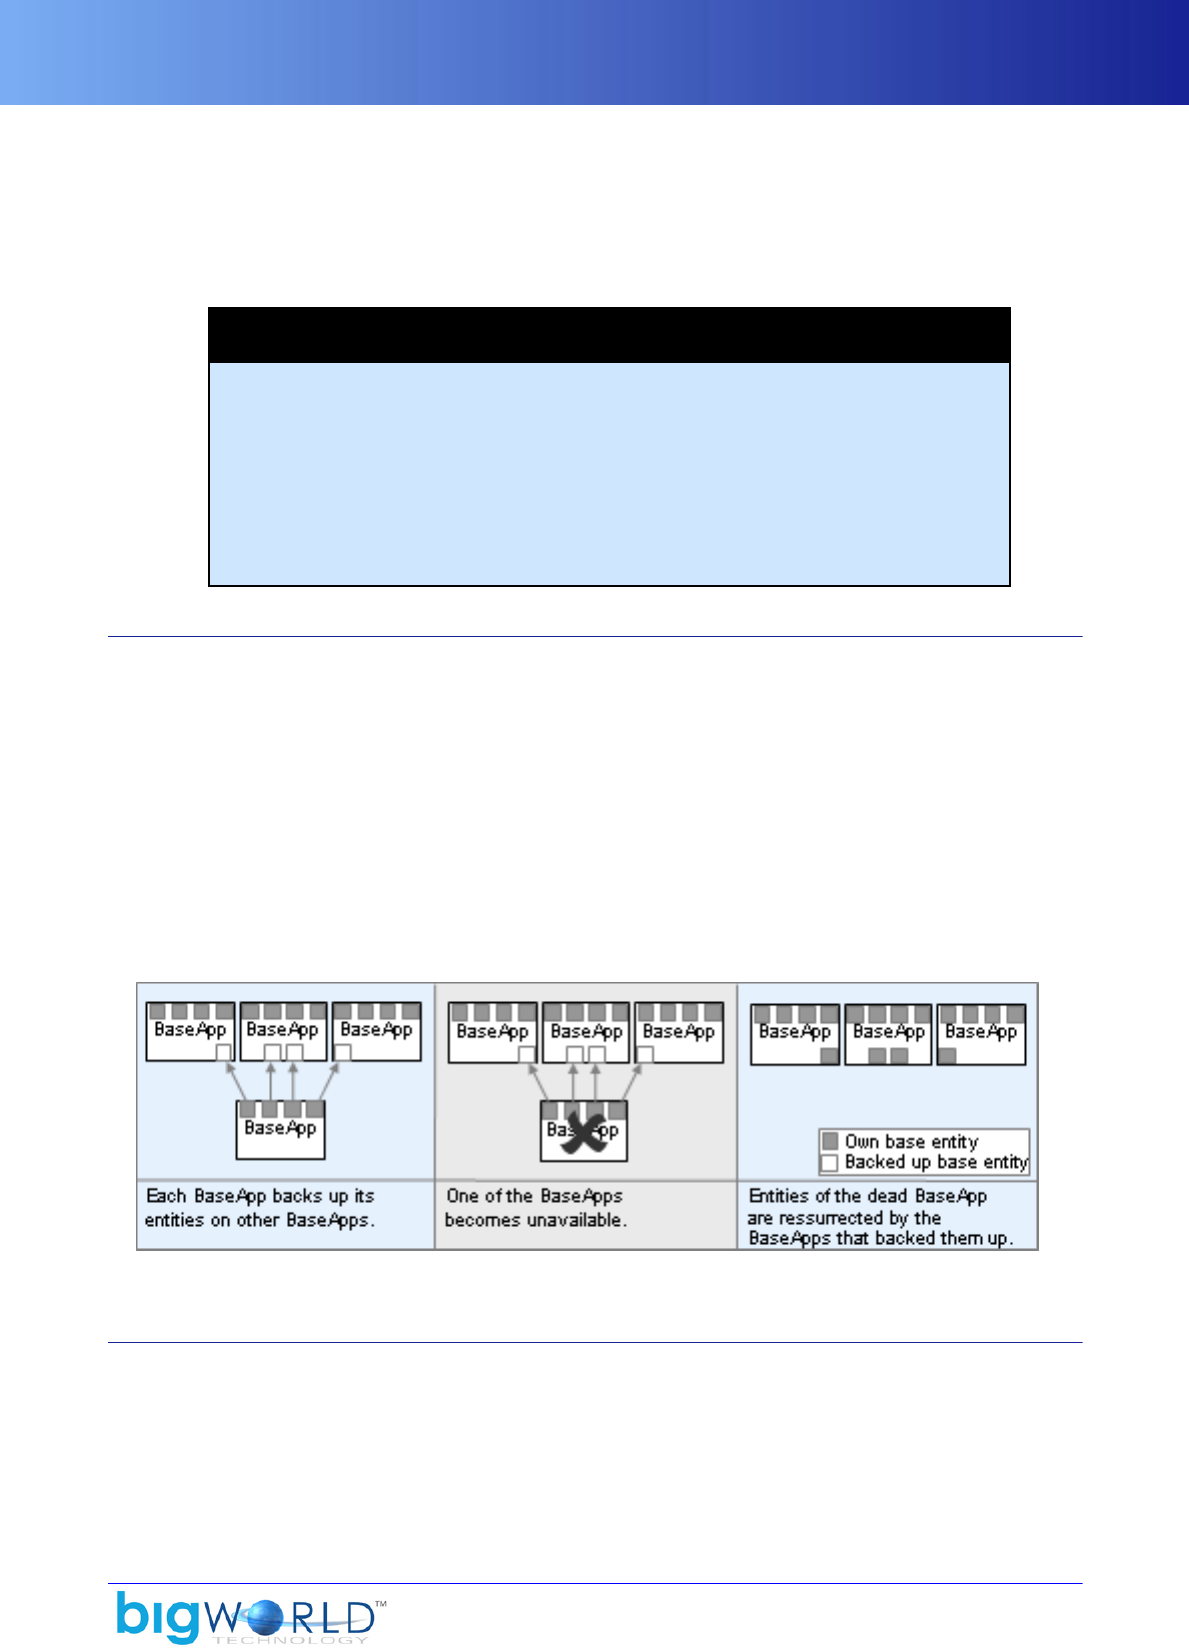
Distributed BaseApp Backup Method
87
For more details, see the document Server Overview's section Server Components → BaseApp → Fault
tolerance. For details on the implementation of BaseApp fault tolerance on code level, see the document
Server Programming Guide's chapter Fault Tolerance.
The backup method is determined by bw.xml's configuration option baseAppMgr/useNewStyleBackup.
For details, see “BaseAppMgr Configuration Options” on page 22 .
Note
BigWorld recommends the Distributed BaseApp Backup method, for the following
reasons:
▪No need for dedicated Backup BaseApps.
▪Backup load is distributed over a period of time.
▪No need for IP switching, which might not be allowed by operating system and/or
router. This also makes cluster management easier.
5.2.1. Distributed BaseApp Backup Method
This fault tolerance method does not require differentiating between normal and backup BaseApps — all
BaseApps can perform both roles.
Each BaseApp is assigned a set of other BaseApps and a hash function from an entity's ID to one of these
backups. Over a period of time, all entities are backed up. This is then repeated. If a BaseApp dies, then the
entities are restored on to the appropriate backup.
Advantages of this method include that the backup can be done over a period of time, there is no need for
dedicated backup BaseApps or IP switching.
Disadvantages include the possibility of base entities that were previously on the same BaseApp end up on
different BaseApps (which places limits on scripting), and the fact that attached clients will be disconnected
on BaseApp failure, requiring a re-login.
Distributed BaseApp Backup — Dead BaseApp's entities can be restored to Backup BaseApp
5.2.2. Non-Distributed BaseApp Backup Method
In this method, a BaseApp can be started as either a normal BaseApp (which services requests and contains
bases), or as a Backup BaseApp. A Backup BaseApp stores bases and entities backed up by one or more
normal BaseApps, and takes over if one of them stops replying to watchdog pings.
The fact that Backup BaseApp can back up more than one BaseApp allows you to trade risk against hardware
cost when deciding how many Backup BaseApps to install.
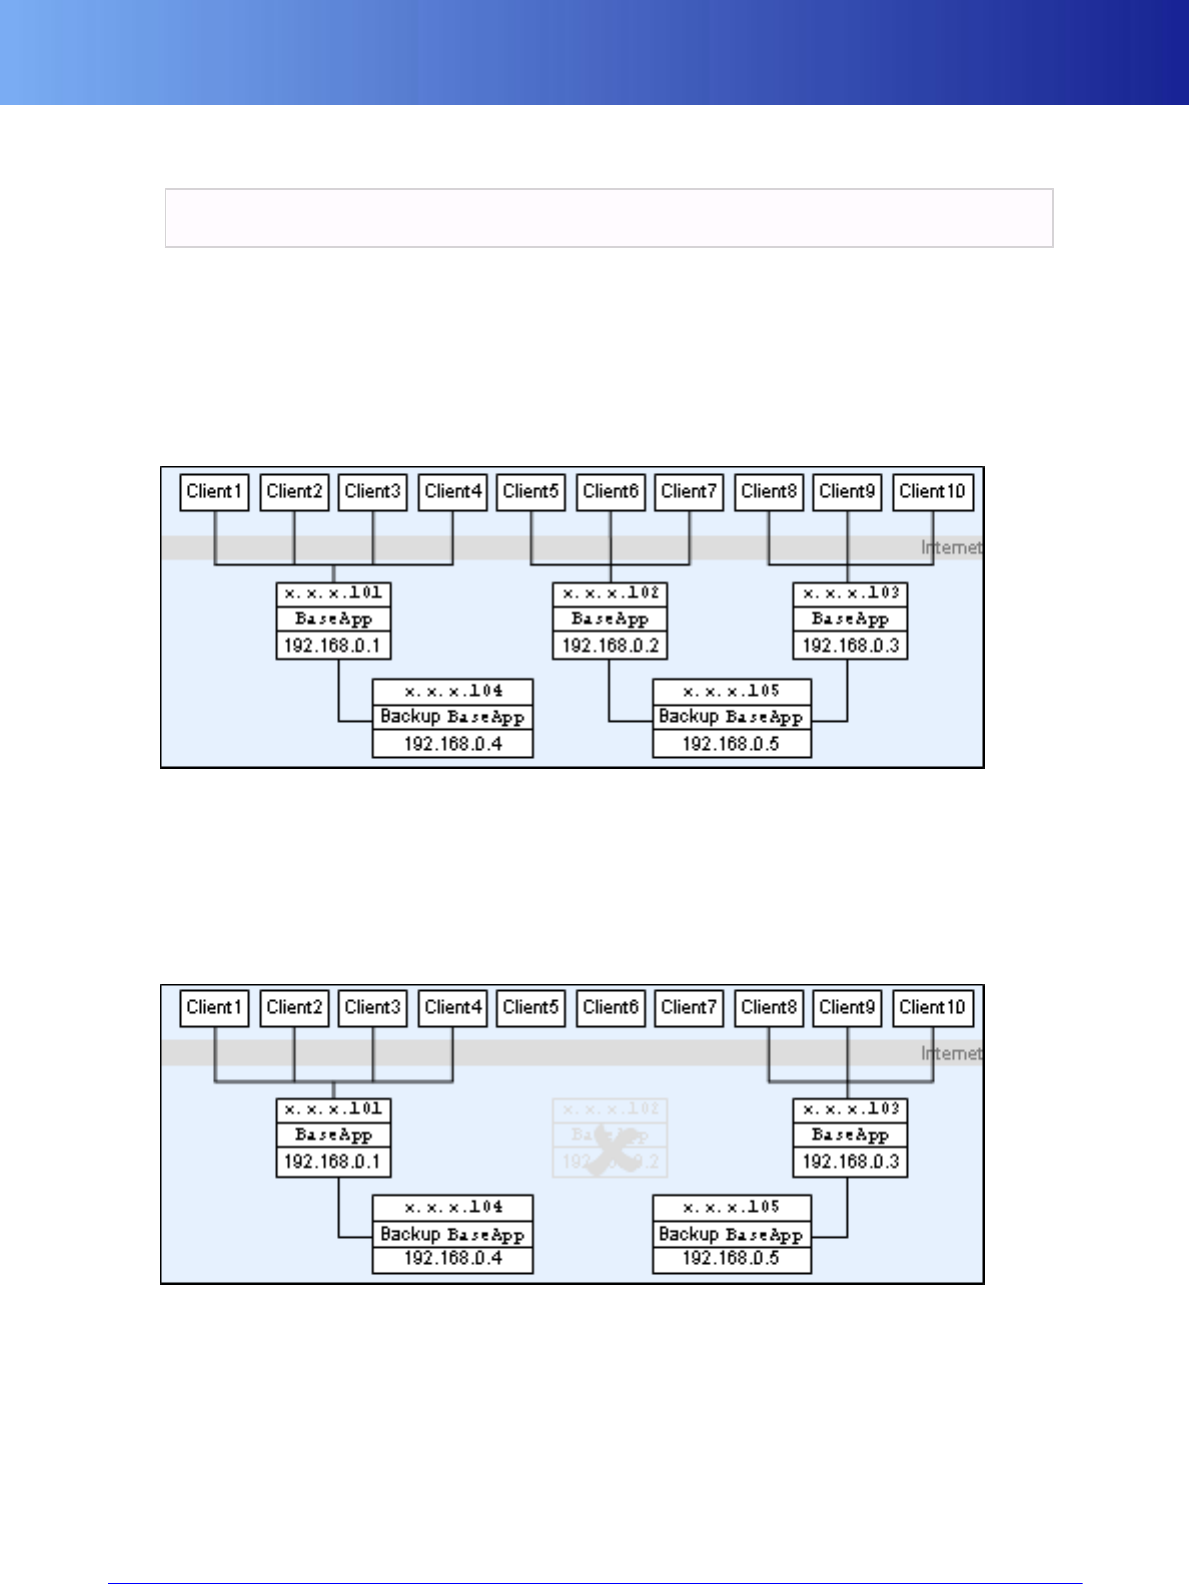
Non-Distributed BaseApp Backup Method
88 Copyright 1999-2008 BigWorld Pty. Ltd. All rights reserved. Proprietary commercial in confidence.
To start a BaseApp as a Backup, use the command below:
baseapp -backup
If a BaseApp does not have a corresponding Backup BaseApp, then it will search for one on the network.
This is done as illustrated in the series of steps below:
1. Initial state
This example supposes a class C network x.x.x.0 as the connection to the Internet, and a private network
of 192.168.0.0, as illustrated below:
Initial state
2. BaseApp becomes unavailable
If BaseApp x.x.x.102 becomes unavailable, then all base mailboxes for bases on it will still refer to
the address 192.168.0.2, and Client5, Client6 and Client7 will have no proxy to communicate with, as
illustrated below:
BaseApp becomes unavailable
3. Backup BaseApp replaces unavailable BaseApp
Once the Backup BaseApp x.x.x.105 detects that it needs to replace the unavailable BaseApp, the following
steps will take place.
a. Backup BaseApp x.x.x.105 changes its internal and external IP addresses to the old BaseApp's ones.
b. From this point one, Backup BaseApp on x.x.x.105 becomes know on the network as BaseApp x.x.x.102.
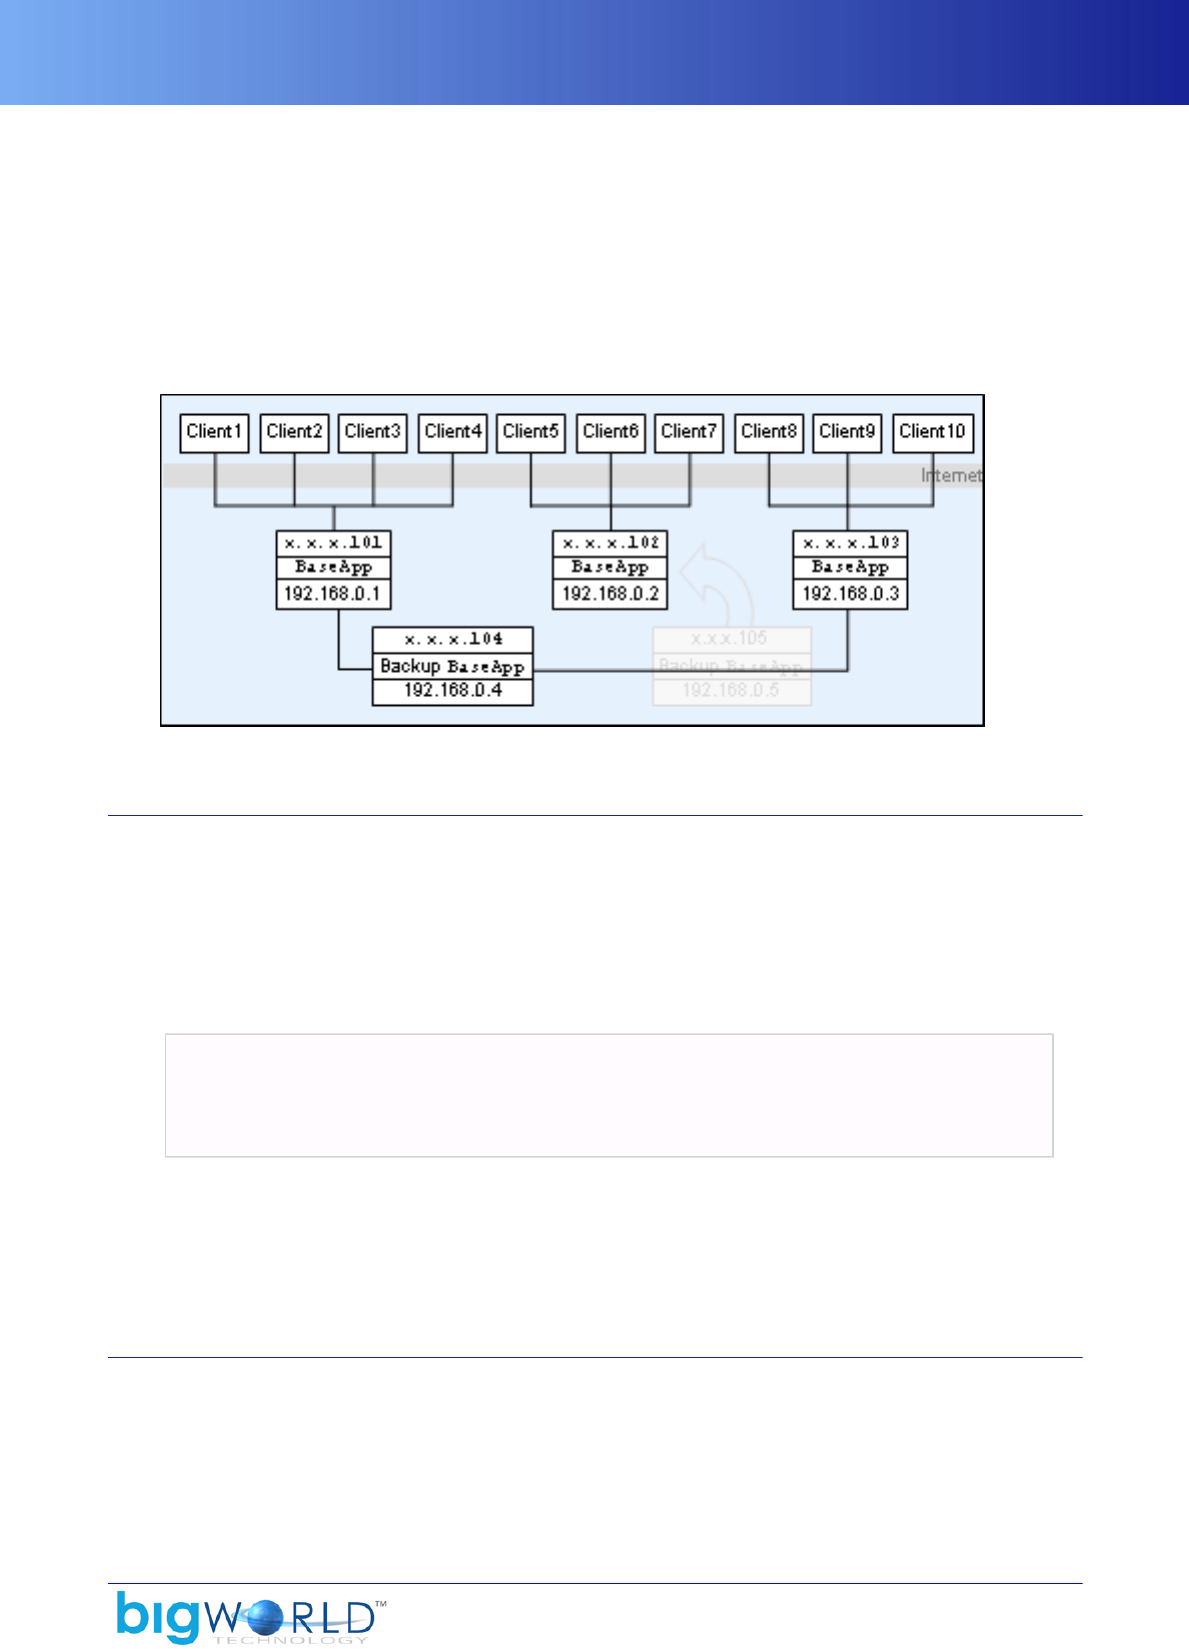
IP Address Change
89
c. If the old machine is still responding, then new BaseApp x.x.x.102 issues a request to change its
addresses.
d. New BaseApp x.x.x.102 creates all entities stored from the original one, calling onRestore for each one.
e. BaseApp x.x.x.103 and the new BaseApp x.x.x.102 can find a new Backup BaseApp.
f. Any process communicating with the old BaseApp x.x.x.102 can keep doing so with the new one,
without any impact.
The final network configuration is illustrated below:
Backup BaseApp replaces unavailable BaseApp
5.2.3. IP Address Change
Since all network configurations have their own peculiarities, the process of changing IP addresses is
delegated to a shell script. However, the BaseApp first executes a program called change_ip, since changing
IP addresses is typically restricted to the root user, and Linux does not allow shell scripts to be launched
with suid root. This program calls setuid(0), and then executes the script ../scripts/change_ip.sh
relative to its working directory.
Because of this, you should ensure that appropriate permissions are set for each of these two files. The
permissions can be set with the commands below:
chown root bigworld/bin/scripts/change_ip.sh
chmod 700 bigworld/bin/scripts/change_ip.sh
chown root bigworld/bin/Hybrid/change_ip
chmod +s bigworld/bin/Hybrid/change_ip
The source code is located in folder src/server/tools/change_ip/main.c, and is compiled into
$MF_ROOT/bigworld/bin/$MF_CONFIG/change_ip.
The script change_ip.sh is expected to be customised for each particular installation. The script is called
with two command line parameters: the first is the interface to change the IP address for, and the second is
the new IP address for the machine.
5.2.4. Further Considerations
Things to consider while configuring BaseApp fault tolerance include:
▪Do your routers place any special requirements on the IP changeover, such as forcing ARP broadcasts, or
changing MAC addresses as well?

Fault Tolerance with Reviver
90 Copyright 1999-2008 BigWorld Pty. Ltd. All rights reserved. Proprietary commercial in confidence.
▪Do you need to have a separate monitoring network?
Both the internal and external BaseApp IP addresses are subject to change, and so it can be useful to have
a fixed IP address on the system, for administrative purposes. This may just be an alias on the internal
interface (established with the command call ipconfig eth1:0 192.168.0.1, for example.) This
could be very useful, for example, to ssh a machine with problems.
Due to a number of issues that can arise from changing the IP address of the machine, BigWorld has an
option to only pair backup BaseApps with BaseApps on the same machine, which removes the need to
change IP address of a machine. This is set by bw.xml's baseAppMgr/onlyUseBackupOnSameMachine
configuration option (for details, see “BaseAppMgr Configuration Options” on page 22 .).
5.3. Fault Tolerance with Reviver
Fault tolerance for BaseAppMgr, CellAppMgr, DBMgr, and LoginApp is provided by the Reviver, by starting
a new instance of the process to replace the unavailable one.
Although it is possible for one Reviver to watch all processes, it is recommended to run a few of them on
different machines, since Revivers normally stop after reviving a process.
For more details on Reviver, see the document Server Overview's chapters Design Introduction and Server
Components.
5.3.1. Specifying Components to Support
The file /etc/bwmachined.conf can contain entries for categories, and a list of items pertaining to it, with
the syntax below (the asterisk character —*— meaning 0 or more occurrences):
*[<category>]
*<item>
Please note that this setting can only be specified on the global configuration file.
Tools can query BWMachined to find the tags associated with categories. Categories may be used by future
tools or customer-created tools.
An example /etc/bwmachined.conf would have its bottom part as below (since the top part will contain
user settings, as described in the section above):
[Colours]
blue
green
red
When the Reviver starts, it queries the local BWMachined process, and will only support the components
that have an entry in a special <category> called Components on /etc/bwmachined.conf.
An example /etc/bwmachined.conf specifying that the Reviver should support all singleton server
components would have its bottom part as below:
[Components]
baseApp
baseAppMgr
cellApp
cellAppMgr
dbMgr

Command-Line Options
91
loginApp
Note
If the [Components] category does not contain any entries, then Reviver will support
all singleton server components.
BaseApp and CellApp will not be restarted by Reviver — the [Components] entries
are used by WebConsole and control_cluster.py to determine which processes
should be started by BWMachined on that host.
The configuration file is only read when BWMachined starts. It will have to be restarted if you want it to
acknowledge your changes.
5.3.2. Command-Line Options
The supported components can also be specified via command-line (even though we recommend that you
use /etc/bwmachined.conf for that), as below:
reviver [--add|--del {baseAppMgr|cellAppMgr|dbMgr|loginApp} ]
If reviver is invoked with no options, then it will try to monitor all singleton processes specified in category
Components of /etc/bwmachined.conf.
The options for invoking reviver are described in the list below:
▪--add { baseAppMgr | cellAppMgr | dbMgr | loginApp }
Starts the Reviver, trying to monitor only the components specified in this option. That means that the
components list in /etc/bwmachined.conf will be ignored.
▪--del { baseAppMgr | cellAppMgr | dbMgr | loginApp }
Starts the Reviver, trying to monitor all components specified in the list in /etc/bwmachined.conf,
except the ones specified in this option.
▪To start Reviver trying to monitor all processes specified in Components in /etc/bwmachined.conf:
reviver
▪To start Reviver trying to monitor only DBMgr and LoginApp:
reviver --add dbMgr --add loginApp
▪To start Reviver trying to monitor all processes specified in Components in /etc/bwmachined.conf,
except DBMgr and LoginApp:
reviver -del dbMgr -del loginApp

92
Chapter 6. Backups and Disaster Recovery
BigWorld's fault tolerance ensures that the server continues to operate if a single process is lost. The server
also provides a second level of fault tolerance known as disaster recovery that comes into play when multiple
server components fail at once and the server needs to be shut down.
For additional protection against exploits or bugs the database should be backed up regularly. The snapshot
tool facilitates making backups of the database.
6.1. Disaster Recovery
The server's state can be written periodically to the database. In case the entire server fails, then it can be
restarted using this information. To enable the periodic archiving of entities, an archive period needs to be
set via the configuration option archivePeriod for BaseApp and CellAppMgr processes. For more details,
see “BaseApp Configuration Options” on page 15 , and “CellAppMgr Configuration Options” on page 32 .
Disaster recovery only works when the underlying database is MySQL — it does not work when the XML
version is used. Please see DBMgr MySQL Support on page 114 for more information about about enabling
MySQL support in BigWorld.
Starting the server using recovery information from the database is the same as starting it from a controlled
shutdown. For more details, see Controlled Startup and Shutdown on page 97 .
For details on the scripting API related to disaster recovery, see the document Server Programming Guide's
chapter Disaster Recovery.
6.2. Database Snapshot Tool
For background information on the need for the snapshot tool see Server Programming Guide's chapter
Database Snapshot.
The snapshot tool is a Python script that facilitates making a backup copy of the database that combines
information from the primary database and secondary databases. It is located in bigworld/tools/
server/snapshot/snapshot.py. In its current form, it should be considered as example code. It should
be reviewed and customised for each environment.
The snapshot tool should be run on a separate machine to avoid interfering with the normal operation of
the server. The snapshot tool can use a significant amount of CPU and disk resources and does so in a fairly
spiky manner. We will refer to the machine running the snapshot tool as the snapshot machine.
The snapshot tool performs the following sequence of operations:
1. Runs the transfer_db command on each BaseApp. transfer_db performs a snapshot of the secondary
database and sends the snapshot to the snapshot machine using the rsync command.
2. Runs the transfer_db command on the primary database's MySQL server. transfer_db performs an LVM
snapshot of the primary database and sends the LVM snapshot to the snapshot machine using the rsync
command.
3. Starts a MySQL server on the snapshot machine and specifies its data directory to be the copy of the
primary database.
4. Runs the data consolidation tool on copies of the primary and secondary databases.
5. Archives the consolidated snapshot.
The snapshot tool logs all messages to message_logger. A snapshot should be considered invalid if there
is an error.

Configuration
93
The snapshot tool accepts a single command-line argument and command line options. The snapshot tools
help message is below:
Usage: snapshot.py [options] SNAPSHOT_DIR
Options:
-h, --help show this help message and exit
-b BWLIMIT_KBPS, --bwlimit-kbps=BWLIMIT_KBPS
file transfer bandwidth limit in kbps, default is
unlimited
-n, --no-consolidate skip consolidation, default is false
The list below provides some common examples of using the snapshot tool:
▪snapshot.py /home/bwtools/snapshots
Takes a snapshot. The snapshot is archived to/home/bwtools/snapshots.
▪snapshot.py /home/bwtools/snapshots --bwlimit-kbps=5000
Takes a snapshot. The snapshot is archived to/home/bwtools/snapshots. Each secondary and primary
database is transferred with a 5000 kbps bandwidth limit.
▪snapshot.py /home/bwtools/snapshots --no-consolidate
Takes a snapshot. The unconsolidated snapshot is archived to/home/bwtools/snapshots.
▪snapshot.py /home/bwtools/snapshots -n -b5000
Takes a snapshot. The unconsolidated snapshot is archived to/home/bwtools/snapshots. Each
secondary and primary database is transferred with a 5000 kbps bandwidth limit.
6.2.1. Configuration
For the snapshot tool to work, the following conditions must be met:
▪bwmachined must be running on the primary database machine. For background information see Server
Overview's chapter Server Components→BWMachined.
▪All the entity scripts and entity definition files must be present on the snapshot server.
.bwmachined.conf must be configured correctly for the user running the snapshot tool.
▪The snapshot section in /etc/bigworld.conf must be configured correctly on the primary database
machine.
▪The primary database is stored in an LVM volume and there is sufficient unpartitioned space on the
primary database machine to perform an LVM snapshot.
▪The directory the LVM volume is to be mounted to exists and has no other devices mounted to it.
▪The snapshot user must be able to connect to the snapshot machine using ssh from the primary database
machine and BaseApp machines without a password. For a user whose $HOME directory is on a NFS,
this can be done via the command-line as below:
$ ssh-keygen -t dsa
$ cat ~/.ssh/id_dsa.pub >> ~/.ssh/authorized_keys

Configuration
94 Copyright 1999-2008 BigWorld Pty. Ltd. All rights reserved. Proprietary commercial in confidence.
▪lvcreate, lvremove, mount, unmount and chmod must be installed and on the path of the primary
database machine.
▪mysqld_multi must be installed and on the path of the snapshot machine.
▪rsync must be installed and be on the path of the snapshot, the primary database and all the BaseApp
machines.
▪The snapshot_helper utility must be built. To build snapshot_helper, MySQL development files must
be installed. Please see “Compiling DBMgr with MySQL Support” on page 114 for details on how to
install MySQL development files. After installing MySQL development files, issue the make command
from within the bigworld/src/server/tools/snapshot_helper directory.
▪snapshot_helper has its setuid attribute set so user ID is root upon execution on the primary database
machine. This can be done via the command-line as below:
# chown root:root $MF_ROOT/bigworld/tools/server/snapshot/snapshot_helper
# chmod 4511 $MF_ROOT/bigworld/tools/server/snapshot/snapshot_helper
For security, all privileged commands (lvcreate, lvremove, mount, unmount and chmod) are invoked via
snapshot_helper which reads command arguments from the trusted /etc/bigworld.conf.
The keywords in the /etc/bigworld.conf are described in the list below:
▪datadir
The primary database MySQL server's data directory.
▪lvgroup
The name of the LVM volume group in which the primary database belongs to. The LVM snapshot volume
will also belong to this group.
▪lvorigin
The name of the origin LVM volume snapshotted. The MySQL data directory should be on this volume.
▪lvsnapshot
The name of the LVM snapshot volume that will be created and deleted by the snapshot tool. This name
is also use to generate the snapshot volume mount path, /mnt/lvsnapshot, which must already exists.
▪lvsizegb
The size of the LVM snapshot volume in gigabytes. The snapshot does not need the same amount of storage
the origin has as only the modified files are copied, in a typical scenario, 15-20% might be enough. If the
LVM snapshot volume becomes full it will be dropped ,so it is important to allocate enough space.
Below is an example /etc/bigworld.conf configuration file:
[snapshot]
datadir = /var/lib/mysql
lvgroup = VolGroup00
lvorigin = LogVol00
lvsnapshot = bwsnapshot
lvsizegb = 2
Note: The snapshot tool also reads <res>/server/bw.xml for the dbMgr/host, dbMgr/username,
dbMgr/password and dbMgr/databaseName.

Data Consolidation Tool
95
6.3. Data Consolidation Tool
The data consolidation tool is used to incorporate data from secondary databases into the primary database. It
is called consolidate_dbs and is located in bigworld/bin/Hybrid/commands. This tool is only provided
in source code form and must be built before use. Please see “Enabling Secondary Databases” on page 115
for details on how to build the data consolidation tool.
Once this tool is built, it will be automatically run during system shutdown or during system start-up
if the system was not shutdown correctly. There should be no need to manually run this tool except for
consolidating backups created by the snapshot tool (see “Database Snapshot Tool” on page 92 ). This
tool logs messages to Message Logger which can be viewed using the Log Viewer tool in Web Console.
This tool will accept two command-line arguments:
▪Primary Database
The parameters required to connect to the primary database should be specified in the form
host;username;password;database_name. When specifying this on the command-line, it is
necessary to quote the entire parameter to prevent the shell from treating it as multiple commands.
▪Secondary Databases
A file containing a newline separated list of fully qualified paths to secondary database files.
When run without command line arguments, it will use DBMgr's configuration options located
in <res>/server/bw.xml to connect to the primary database. It will use the data in the
bigworldSecondaryDatabase table to retrieve the secondary databases.
The data consolidation tool uses the transfer_db utility located in located in bigworld/bin/Hybrid/
command to transfer the secondary database files from the BaseApp machines to the machine where the data
consolidation tool is running. The transfer_db utility will be launched (via bwmachined) on each machine
that contains a secondary database file. The transfer_db utility then opens a TCP connection to the data
consolidation tool through which it will send the secondary database file.
The data consolidation tool will store the secondary databases locally in the directory specified by the
<dbMgr>/<consolidation>/<directory> configuration option. It will incorporate the data from the
secondary databases into the primary database once all the secondary database files have been transfered
to its local machine. If the data consolidation process is sucessful, both the local and remote copies of the
secondary databases will be deleted, and the bigworldSecondaryDatabase table will be cleared. If the
data consolidation process is unsuccessful, only the local copy of secondary database files are deleted.
The data consolidation tool logs to Message Logger under the ConsolidateDBs process. Under most
circumstances, the data consolidation tool will log errors from transfer_db as well. However, under some
circumstances, transfer_db errors will appear under the Tools process. The bwmachined logs, in /var/
log/messages on each machine where secondary databases are located, can help to diagnose problems,
especially those related to the failure to run transfer_db.
6.3.1. Skipping Data Consolidation
If, for some reason, there is a problem with the data consolidation tool and the server refuses to start,
the bigworldSecondaryDatabase table can be manually cleared to skip the data consolidation process.
Alternatively, consolidate_dbs can be run with the command-line parameter --clear to achieve the same
result.
While skipping the data consolidation process may allow the server to start again, the data in the secondary
databases that were not consolidated is essentially lost. Though the secondary database files still exists, it
is not recommended to try to consolidate the data after the server is restarted since the data in the primary
database may be more recent than the data in the left over secondary databases.

Ignoring SQLite Errors
96 Copyright 1999-2008 BigWorld Pty. Ltd. All rights reserved. Proprietary commercial in confidence.
6.3.2. Ignoring SQLite Errors
When consolidate_dbs encounters an error in reading a secondary database file, it will abort the entire data
consolidation process. Such errors should be investigated and, hopefully, corrected. However, if a secondary
database file is genuinely corrupted and cannot be repaired, then it may be preferable for consolidate_dbs
to read as much data from the corrupted secondary database and then proceed to consolidate the rest
of the secondary databases. When the --ignore-sqlite-errors command-line option is specified,
consolidate_dbs will proceed to consolidating the next secondary database when it encounters an error
instead of aborting the consolidation process.

97
Chapter 7. Controlled Startup and Shutdown
There are times when the server might need to be shut down, and restarted later in a similar state.
To tell the server to shut down in a controlled way, a message must be sent to all LoginApps.
This may be in the form of a Watcher message or a USR1 signal. The easiest way to do this is to
use the script control_cluster.py with the option stop or via WebConsole. For more details, see
“control_cluster.py” on page 67 .
Controlled startup and shutdown only work when the underlying database is MySQL — it does not work
when the XML version is used.
If the bw.xml's dbMgr/clearRecoveryData configuration option is set to false, then the server is
automatically started using information written during the controlled shutdown. If the server had failed
unexpectedly, then it is started using the disaster recovery information. Setting that configuration option to
true will cause the server to be started in its initial state, i.e., an empty space with no entities. For more
details, see “DBMgr Configuration Options” on page 35 .
The main information that is restored from the database is:
▪Spaces and their data
▪Game time
▪Which entities should be in each space.
When using MySQL as the underlying database, this information is stored in the following tables:
▪Spaces and their data — bigworldSpaces, bigworldSpaceData
▪Game time — bigworldGameTime
▪Which entities should be in each space — bigworldLogOns
For details on these tables, see the document Server Programming Guide's section MySQL Database Schema
→ Non-entity tables
For details on related scripting, see the document Server Programming Guide's chapter Controlled Startup
and Shutdown.

98
Chapter 8. Stress Testing with Bots
The Bots application is a process that can command arbitrary numbers of simulated clients to log into the
server and perform activities. It is written in C++, but controlled through Python, like the BigWorld Client.
8.1. The Login Process
The bots are designed to log in a server just like a real client. By default, the Bots process locates a LoginApp
by broadcasting a message requesting all LoginApps to respond, and then using the first one to reply. This
is the simplest method to log in if there is only one instance of a BigWorld server running.
The script is located in folder bigworld/bin/$MF_CONFIG, and has the following syntax:
bots [-serverName <srv> [-port <port>]]
[-username <user> [-password <pwd>] [-randomName]] [-scripts]
The options for invoking bots are described in the list below:
▪-serverName <srv>
Server that the bot clients will login to (overrides the auto-locate method).
▪-port <port>
Login port. Ignored if Bots is using auto-locate method.
▪-username <user>
Username that the bot clients will log in as.
▪-password <pwd>
Password for bot clients' login.
▪-randomName
Randomises the login name based on the specified <username>.
▪-scripts
Enables Bots to run scripts. This has a considerable performance cost.
The auto-locate procedure can be overridden by specifying the option -serverName <serverName> on
the command line. If both methods fail, then the Bots process requests the server name on stdin (if attached
to a terminal). If all these methods fail, then the process starts, but cannot create new bots until the server is
set (via the Python method setDefaultServer).
If the option -scripts is specified then Bots looks for the entity definition files under folder <res>/
scripts/entity_defs, and for scripts under folder <res>/scripts/bot.
Specific scripts can be created for Bots, but if a client script does not reference the client's C++ modules, then
it can be reused. Note that the bots process does not support the BigWorld Client APIs, since it is intended
to be lightweight.
In many operation scenarios the entity definition file for Bots could be either missing or different from the
definition files for the server. The Bots would use an incorrect message digest for login; and hence the login
will fail because LoginApp relies on the digest for verifying entity definition consistency. Previously, only

Watcher Interface
99
way around this problem is turn the digest checking on the server off in <res>/server/bw.xml's dbMgr
options section (for details check allowEmptyDigest option in “DBMgr Configuration Options” on page
35 . This option can also be changed on the fly via a watcher, using WebConsole's ClusterControl module;
see “ClusterControl” on page 45 ). However, this is not a viable option, if you want to use Bots on production
servers. You can now set custom MD5 digest in the <res>/server/bw.xml's bots section under option
loginMD5Digest. This option can also be modified on the fly through WebConsole.
Bots can now realistically simulate general Internet networking environment by introduce artificial packet
loss, network delays, sudden disconnections and frequent relogins. All this simulation can be programmed
with Bots' personality script.
8.2. Watcher Interface
It is possible to control Bots using WebConsole's ClusterControl module (for details, see “WebConsole” on
page 45 ).
The list below describes the watchers exposed by Bots:
▪command/addBots (Data type — int, Access — Write only)
Adds to the system the specified number of bots.
▪command/delBots (Data type — int, Access — Write only)
Deletes from the system the specified number of bots.
▪command/updateMovement (Data type — string, Access — Write only)
Updates the movement controllers of all bots matching the input tag, based on the current default values.
If the input tag is empty, all bots are changed.
▪defaultControllerData (Data type — string, Access — Read/Write)
The argument string that default movement controllers are to be constructed with.
▪defaultControllerType
The name of the movement controller for the bots, if that is not specified individually.
▪defaultStandinEntity
Default entity script to be used when a specific Entity type does not have its corresponding game script.
▪loginMD5Digest
32 character long MD5 digest string (in hex readable form) for server login.
▪delTaggedEntities (Data type — string, Access — Write only)
Deletes all bots matching the input tag.
▪numBots (Data type — int, Access — Read only)
Number of bots being controlled by this process.
▪pythonServerPort (Data type — int, Access — Read only)
The telnet port the process is listening on (if it was available when the application started).
▪tag (Data type — string, Access — Read/Write)

Python Interface
100 Copyright 1999-2008 BigWorld Pty. Ltd. All rights reserved. Proprietary commercial in confidence.
The current tag.
Note the unusual use of write-only fields to perform actions. The Watcher interface is rarely used, since bots
are easier to control with the script bigworld/tools/server/ bot_op.py, or the Python interface.
For more details on changing a watcher via WebConsole, see “ClusterControl” on page 45 .
8.3. Python Interface
Bots was designed to be controlled programmatically via Python, but since Python can be used interactively,
it is also a quick way to get some bots into the system and control them.
You can telnet to port 6075 to talk to the bots process, as illustrated below:
$ telnet 10.40.7.12 6075
Welcome to the Bot process
>>> BigWorld.getDefaultServer()
10.40.7.1
>>> BigWorld.setDefaultServer('server2')
>>> BigWorld.setDefaultTag('red')
>>> BigWorld.addBotsSlowly(500, 0.1)
>>> BigWorld.setDefaultTag('blue')
>>> BigWorld.addBotsSlowly(500, 0.1)
>>> BigWorld.addBotsWithName( [('Bot_01', '01'), ('Bot_02', '02')] )
Example of use of Python interface to Bots
8.3.1. Python Controller (bot_op.py)
BigWorld provides a Python program to simplify the management of large numbers of bots.
It automatically starts bot processes as needed, load balancing (based on CPU load) on all available machines
not running any other BigWorld components.
The script is located in folder bigworld/tools/server and has the following syntax:
python bot_op.py [add [<number_of_bots>]]
[del [<number_of_bots>]]
[movement <controller_type> <controller_data> [<bot_tag>]]
[set (<watcher_name> <value>)+]
[run [<command>]]
[addprocs [<num_of_procs>]]
-u [username or uid]
The options for invoking bot_op.py are described in the list below:
▪add [<number_of_bots>]
Adds the specified number of bots to the system. If <number_of_bots> is not specified, then one bots is
added.
Bots are added 16 at a time, up to a maximum of 256 per bots process.
The script waits 1 second after each add, to check it a bot was effectively added. When all bots processes
are full, it creates a new process on an available machine that is using less than 80% CPU (preferably one
that is already running some bots processes).

Methods and Attributes
101
▪addprocs [<num_of_procs>]
Spawns the given number of bots processes on each machine that is considered eligible for running them,
or 1 on each if no number is given.
▪del [<number_of_bots>]
Deletes the specified number of bots from the system. If <number_of_bots> is not specified, then it defaults
to 1. The number of bots will be ceiling clamped to the actual number of bots on the server.
▪movement <controller_type> <controller_data> [<bot_tag>]
Changes the bot's movement controller. If option <bot_tag> is specified, then only bots matching it will be
changed. Otherwise, all bots will be changed.
▪set (<watcher_name> <value>)+
Sets the watcher to specified value on all bot applications.
▪run [<command>]
Runs the specified Python command on all bots. If <command> is not specified, then it is read from stdin.
▪-u [username|uid]
Manually specify the UID of the server that the script will take action on.
8.3.2. Methods and Attributes
The list below describes the bots' attributes and methods on ClientApp and BigWorld:
▪ClientApp Attributes
▪id (int) — Bot ID (read-only).
▪spaceID(int) — ID of the space the bot is currently in. 0 means not in any space (read-only).
▪loginName(string) — Bot's login name.
▪loginPassword(string) — Bot's login password.
▪tag (string) — Bot's user-specified tag. Allows the control of partial sets of bots.
▪speed (float) — Bot's speed.
▪position (Vector3) — Bot's position.
▪yaw (float) — Bot's yaw.
▪pitch (float) — Bot's pitch.
▪roll (float) — Bot's roll.
▪isOnline(bool) — Indicates whether the bot is connected to a server (read-only).
▪isDestroyed(bool) — Indicates whether the bot has been destroyed (read-only).
▪entities(PyObject)
Dictionary-like attribute containing the list of entities that are in the simulated client's current AOI.

Methods and Attributes
102 Copyright 1999-2008 BigWorld Pty. Ltd. All rights reserved. Proprietary commercial in confidence.
▪ClientApp Methods
▪logOn()
Initiate log on process for the simulated client to connect to a BW server.
▪logOff()
Make a simulate client disconnect from server gracefully. If the simulated client is not online, it will do
nothing.
▪dropConnection()
Make a simulate client drop the connection with the server. If the simulated client is not online, it will
do nothing.
▪setConnectionLossRatio( float lossRatio )
Set up network packet loss ratio for simulating unstable network environment. Range between 0.0 and
1.0. 0.0 means no packet loss. 1.0 mean 100 percent packet loss.
▪setConnectionLatency( float minLatency, float maxLatency )
Set up simulated network data latency (in milliseconds).
▪moveTo( Math.Vector3 position )
Set next destination position for the player avatar of the simulated client.
▪snapTo( Math.Vector3 position )
Set the player avatar position for the simulated client.
▪stop()
Stop the player avatar of the simulated client moving.
▪faceTowards( Math.Vector3 direction )
Set the direction of avatar of the simulated client.
▪addTimer()
Add a timer for the bot client. This function returns an integer timer id; otherwise it returns -1.
▪delTimer( int timerID )
deletes an active timer corresponding the timerID.
▪onTick()
This optional function is invoked every game tick, should it be defined in the player Avatar script.
▪BigWorld Attrbutes
▪bots
Dictionary-like attribute containing the list of simulated clients. The key is the player's ID, and value is
an instance of ClientApp.
▪bots [<player_id>]. entities

Methods and Attributes
103
Dictionary-like attribute containing the list of entities created under the simulated client specified by
<player_id>. The key is the entity's ID, and the value is the reference to the entity.
In non-script bots, only the player entity is created and stored in this attribute.
▪bots [<player_id>].entities[<ent_id>].clientApp
Attribute referring to the ClientApp that owns the entity. An entity can access its owner ClientApp
via this attribute. BigWorld.bots[<player_id>].entities[<ent_id>].clientApp equals to
BigWorld.bots[<player_id>].
▪BigWorld Methods
▪setMovementController(string type, string data) — Context: ClientApp
Sets a new movement controller for the bot. On failure, the controller is left unchanged. Returns true
on success, false on failure.
▪setLoginMD5Digest(string MD5Digest) — Context: BigWorld
Set the 32 character long MD5Digest (in hex readable form) for server login. If the input string length is
not exactly 32 character, the MD5 digest will be reset to empty.
▪addBots( int numBots ) — Context: BigWorld
Immediately adds the specified number of simulated clients to the application. If too many bots are
added at once, then some of them may time out, depending on how long it takes to log in all of them.
▪addBotsSlowly(int numBots,float delayBetweenAdd,int groupSize=1) — Context: BigWorld
Adds bots to the system in groups of groupSize, and add a delay between each group. This method
returns immediately, adding the bots in the background, and is the best way to add bots to a system.
▪addBotsWithName( PyObject loginInfo )
Immediately add a set of bots with login name and login password specified from loginInfo. The
structure of the loginInfo is a list of tuples which consist of two strings. The first string is the login name
and the second one is login password. In the event of incorrect loginInfo, a Python exception will be
thrown.
▪delBots( int numBots) — Context: BigWorld
Deletes the specified number of simulated clients from the application. The method
onClientAppDestroy() of the personality module is called.
▪getDefaultServer() — Context: BigWorld
Returns the server name that the bots try to log in.
▪setDefaultServer( string serverName ) — Context: BigWorld
Sets the server name that the bots try to log in.
▪onTick() — Context: BWPersonality
This optional function is invoked every game tick, should it be defined in the personality module in
<res>/server/bw.xml.
▪onLoseConnection( int playerID ) — Context: BWPersonality

Controlling Movement
104 Copyright 1999-2008 BigWorld Pty. Ltd. All rights reserved. Proprietary commercial in confidence.
If this callback function is defined in the personality module specified in file <res>/server/bw.xml, it
will be invoked when a simulated client loses its connection with a server abnormally. The personality
script can decide whether the client should be destroyed or remain dormant for later reactivation by
return True or False respectively. NOTE: if this callback is not defined, bots that lose connection will be
automatically destroyed.
▪onClientAppDestroy( int playerID ) — Context: BWPersonality
If defined in the personality module specified in file <res>/server/bw.xml, this callback method is called
for each destroyed bot client. The argument is the ID of the deleted player entity. A bot client may be
destroyed due to either loss of server connection or by BigWorld.delBots() method call. If a bot client
is destroyed by BigWorld.delBots() method call, it will be disconnected from the server gracefully. We
recommend client should execute additional log off procedure in this onClientAppDestroy callback
function. An example is as following:
def onClientAppDestroyed( playerID ):
bot = BigWorld.bots[playerID]
if bot.isOnline:
bot.entities[playerID].base.logOff()
The implementation above assumes that the player entity on the server has an exposed base method
logOff(), which will then destroy the player cell and base entities on the server. The script must to be
placed under the script folder <res>/scripts/bot.
8.4. Controlling Movement
The default movement controller Patrol moves the bots along a graph read from a file.
The name of the file containing the movement graph is specified in file <res>/server/ bw.xml, on section
<bots>, by the configuration option controllerData.
<root>
...
<bots>
<controllerData> server/bots/test.bwp </controllerData>
<controllerType> Patrol </controllerType>
<password> passwd </password>
<username> Bot </username>
<shouldLog> true </shouldLog>
<serverName> </serverName>
<randomName> false </randomName>
<scripts> false </scripts>
<port> 0 </port>
<publicKey> loginapp.pubkey </publicKey>
</bots>
...
</root>
Example file <res>/server/bw.xml
The file name might have the suffix random, in which case the start position of the bot is chosen randomly
from the set of node positions in the graph.
The format specification for the movement graph file is illustrated below:
<controller>

NodeProperties Section
105
<nodeDefaults>
?NodeProperties
</nodeDefaults>
<nodes>
*<node>
<pos> integer integer integer </pos>
?<name> string_node_name </name>
?NodeProperties
*<edges>
<edge> string_node_name </edge>
</edges>
</node>
</nodes>
</controller>
Grammar of movement graph files
The list below describes the tags in the movement graph file:
▪edge (section nodes/node/edges)
Name of one of the nodes that this node borders. Must be the same value specified for a name section
in the file.
▪edges (section nodes/node)
Tag specifying all the nodes that this node borders.
▪name (section nodes/node)
Name used to refer to the node. If this tag is not specified for a node, then you can refer to it by an integer
sequential number, with the first node having an index of zero.
▪node (section nodes)
Tag for section specifying a specific node in the graph.
▪nodeDefaults
Tag for section specifying default values for all nodes. These values can be overridden on a per-node basis
in section nodes/node.
▪NodeProperties (section NodeDefaults and nodes/node)
For details, see “NodeProperties Section” on page 105 .
▪nodes
Tag for section specifying all the nodes in the graph.
▪pos (section nodes/node)
XYZ position of the centre of the node. The node is the area around pos, extending for n metres around
it (n being the value of NodeProperties' tag radius).
8.4.1. NodeProperties Section
The format specification for the NodeProperties section is illustrated below:
?<minStay> float </minStay>

Extending Bots
106 Copyright 1999-2008 BigWorld Pty. Ltd. All rights reserved. Proprietary commercial in confidence.
?<maxStay> float </maxStay>
?<radius> float </radius>
?<minSpeed> float </minSpeed>
?<maxSpeed> float </maxSpeed>
Grammar of NodeProperties section
The list below describes the tags in the NodeProperties section:
▪maxSpeed
Maximum speed of the bot.
▪maxStay
Maximum number of seconds that the bot should stay in the node.
▪minSpeed
Minimum speed of the bot.
▪minStay
Minimum number of seconds that the bot should stay in the node.
▪radius
Number of metres around the node's pos location to be considered as the node. When a bot is travelling
between two nodes, it chooses a random point of arrival in the destination node. This way, the bots do not
follow the exact same line. The point is chosen to lie within the radius of the destination node.
An example movement graph file is displayed below:
<patrolGraph>
<nodeDefaults>
<minStay> 5 </minStay>
<maxStay> 10 </maxStay>
<radius> 20 </radius>
</nodeDefaults>
<nodes>
<node>
<name> Town1 </name>
<minStay> 7 </minStay>
<pos> 5000 0 0 </pos>
<edges><edge> Town2 </edge></edges>
</node>
<node>
<name> Town2 </name>
<pos> 5000 0 5000 </pos>
</node>
</nodes>
</patrolGraph>
Example movement graph file
8.5. Extending Bots
8.5.1. Creating New Movement Controllers
The default movement controller is Patrol, but you might want to create one that better represents the
expected traffic patterns and entity distributions of your game, or to stress test other aspects of the system.

Extending Bots
107
To create a new movement Controller, derive its class from the MovementController class. Also derive a class
from the MovementFactory class. The factory is used to parse the Controller data argument, and instantiate
a new movement controller, while the movement controller moves the bot around.
The fragments below list the relevant methods in the base classes:
▪Class MovementController
bool nextStep( float speed, float dTime, Vector3& position, Direction3D&
direction)
▪Class MovementFactory
MovementFactory(const char* name)
MovementController* create(
const std::string& data,
const Vector3& startPosition)

108
Chapter 9. Security
Security has been of paramount importance in the design and implementation of all parts of BigWorld.
The basic philosophy is to always handle with care any client-initiated actions or messages. This should be
accomplished in a way that does not unduly limit potential game designs.
For more details, see the document Server Programming Guide, chapter Security Systems in BigWorld
Technology.
9.1. Security of the Server
The internal network is assumed to be secure — BigWorld does not implement security measures to
safeguard processes against an attacker gaining access to the cluster's internal LAN. Operators should
ensure that the usual protections for an internal network are in place. Remote access should be very strictly
controlled.
The external points of contact are the area of most concern when running an exposed server. For BigWorld,
these are LoginApp and BaseApp, as illustrated below:
BigWorld Server components
Due to the bandwidth needs of a massively multiplayer online game, LoginApp and BaseApp are intended to
be run on machines with external access. In some sense they are the firewall. For more details, see “Blocking
Ports and Related Security Considerations” on page 110 .

Server Ports
109
LoginApp receives only fixed-length queries, making it easy and transparent to secure. This process is
expected to be tailored by customers to suit their game, but care should be taken when doing so.
BaseApp receives more complex data, including script method calls, and is the gateway to the rest of the
BigWorld Server. It has many checks in place to ensure the integrity of received data, and to discard (and
warn about) corrupted data and hacking attempts. The string CHEAT is used in the log messages when
BigWorld receives potentially malicious data that does not conform to its protocols (the CellApp may also
use this indicator.) It is advised that MessageLogger logs be monitored for messages containing that string
(for details on MessageLogger, see “MessageLogger” on page 50 ).
The security of the game-level logic rests to a certain extent with the Python scripts that implement it. For
example, an entity should not be able to stab another entity that is 100 metres away. For more details on this
topic and on server features such as physics checking, see the document Server Programming Guide.
9.2. Server Ports
The list below describes the ports used by BigWorld server:
▪20013 (Protocol: UDP, Access: External)
Used by LoginApp, this port can be overridden in the following ways:
▪In <res>/server/bw.xml file's loginApp section, set the port configuration option.
▪In the command-line arguments to LoginApp, use the -loginPort <portNum> option.
▪20017 (Protocol: UDP, Access: Internal)
The HTTP interface of Watcher. To start the interface, run bigworld/tools/server/watcher, then
connect to this port with a web browser.
▪20018 (Protocol: UDP, Access: Internal)
Used by BWMachined.
▪40001-49999 (Protocol: TCP, Access: Internal)
The Python server on BaseApp.
All BaseApps have a Python server that can be telnetted to. The port number is 40000, plus the BaseApp ID.
BaseApp ID numbers start at 1, so to talk to the third started BaseApp, telnet to 40003.
▪50001-59999 (Protocol: TCP, Access: Internal)
The Python server on CellApp.
All CellApps have a Python server that can be telnetted to. The port number is 50000, plus the CellApp
ID. CellApp ID number start at 1, so to talk to the third started CellApp, telnet to 50003.
Note
CellApp ID is not the same as the Cell ID. Cell IDs are allocated sequentially, as they
are allocated to a cluster, not when the CellApp is started.
▪32768-61000 (Protocol: TCP, Access: Internal)
Used by CellAppMgr and CellApp for viewer applications such as Space Viewer. Automatically assigned
by the kernel (see UDP entry).

Blocking Ports and Related Security Considerations
110 Copyright 1999-2008 BigWorld Pty. Ltd. All rights reserved. Proprietary commercial in confidence.
▪32768-61000 (Protocol: UDP, Access: Internal [External for BaseApp])
Used by the server components: CellApp, CellAppMgr, BaseApp, BaseAppMgr, DBMgr, MessageLogger
and StatLogger. Only the BaseApp has an external port.
Automatically assigned by the kernel, in the range of the kernel setting /proc/sys/net/ipv4/
ip_local_port_range, which defaults to 32768-61000.
The BaseApp external port may be exempted from random assignment, by specifying it in the <res>/
server/bw.xml file's baseApp section's externalPort configuration option.
The port chosen can be displayed via the Watcher interface under:
▪/(internal|external) nub/address on BaseApp.
▪/nub/address on other components.
9.3. Blocking Ports and Related Security Considerations
Since TCP/IP is not used externally, you can block all TCP traffic. Leave all UDP/IP ports 32768 and above
open, as well as the login port (20013 by default).
Use of a separate firewall machine is strongly discouraged. The BaseApp machines are designed to be the
firewalls themselves, and perform a very similar proxying function for clients. Their amount of processing
is small enough so that they can handle a whole network adapter's worth of Internet traffic. Adding another
machine would only be a waste of hardware, maintenance time, and latency. BaseApps only listen on one
UDP port — and so the whole TCP stack can be disabled on the external interface. The use of standard
firewall software such as iptables may be an appropriate way to accomplish this.
Network tools such as lsof and netstat should be consulted, to ensure that you are not running any daemons
listening on the external (or common) interface. Apart from BWMachined, you should not need to run
any daemons with BigWorld, but if you wish to, then you should ensure that their ports are blocked.
BWMachined should not listen on the external interface, only the internal interface.
Barring all TCP packets greatly improves the security of a BaseApp machine. TCP is a complicated protocol,
and requires many tables and buffers to implement or firewall. By this rationale, the security of a BaseApp
machine may be considered even better than that of an ordinary firewall, which must conditionally pass
TCP packets.
To reduce exposure to DDOS attacks, it is recommended that the BaseApp be left to choose, within the range
allocated by the operating system, a random port. This way, if an attacker discovers the IP and port of one of
the BaseApp machines, then it does not mean he will automatically know those details for the other BaseApp
machines.

111
Chapter 10. BigWorld Server Across Multiple
Machines
To start a server cluster consisting of multiple machines, you can start each process in any of the following
ways:
▪the command line
▪the control_cluster.py script
▪WebConsole's ClusterControl module
CellApps, BaseApps, and LoginApps can have multiple instances running, while the other processes can
have only one. The clients should connect to the IP address of a machine that is running a LoginApp.
10.1. How To Start
The following sub-sections describe how to start server components.
10.1.1. WebConsole
WebConsole can be used to easily start, stop and control server components.
For an outline of WebConsole, see “WebConsole” on page 45 . For operational behaviour, see the online
WebConsole documentation in the Cluster Control module.
10.1.2. Auto Configuration Via control_cluster.py
The script bigworld/tools/server/control_cluster.py is generally the easiest way to start a multi-
machine BigWorld Server. For details, see “control_cluster.py” on page 67 .
10.1.3. Hard-Coded Scripts
Create your own shell scripts using the script bigworld/tools/server/misc/startsingle.sh as a
guide.
10.1.4. Manual Start
During development and testing, it is feasible to manually start processes individually.
10.2. How To Stop
The method used to stop the system depends on the method used to start it. For example, calling the script
control_cluster.py with the option stop stops a system started with that script. Stopping LoginApp
triggers other processes to terminate, unless this feature is disabled in configuration file <res>/server/
bw.xml.
10.3. How To Monitor
Use WebConsole (for details, see “WebConsole” on page 45 .) and control_cluster.py (for details, see
“control_cluster.py” on page 67 .) for monitoring and recording real-time statistics. You can also get
profiling data from the watchers (via WebConsole's ClusterControl module). Use WebConsole's LogViewer
module to monitor the centralised log.
10.4. LoginApp and Scalability
Just as you can use multiple CellApps and BaseApps in a large cluster, you can also run multiple LoginApps
in a load sharing arrangement.

LoginApp and Scalability
112 Copyright 1999-2008 BigWorld Pty. Ltd. All rights reserved. Proprietary commercial in confidence.
To do that, DNS has to set up so that it returns multiple DNS addresses for the login server's name. If you
are using BIND, then you can simply put multiple A addresses in the zone configuration file. This means
that when a client looks up the DNS address of the login server, it receives a login server randomly selected
from the available pool.
For example, if you are using BIND as your DNS server (most Linux distributions come with BIND as their
default DNS server), the zone file can have configuration similar to the ones in the table below:
Name TTL CLASSTYPE ResourceRecord
600 IN A 10.0.0.1
600 IN A 10.0.0.2
login
600 IN A 10.0.0.3
Example configuration on a BIND zone file
Because there are multiple A records with different IP addresses under one name, the IP address returned
to a client when it looks up the address for the login server will be picked up from the IP address list, in a
round robin manner.

113
Chapter 11. Multiple BigWorld Servers in a Single
LAN
11.1. Keeping Processes Separate
All server components in a BigWorld server cluster run under the same UID. If you want to run multiple
server clusters on the same network (for different stages of testing, for example), then make sure that you
use different UIDs.
You also need to make sure that the LoginApps are on different machines. This is because by default each
LoginApp opens the same specific port, and therefore only one could succeed in binding to it. Alternatively,
multiple LoginApps can be run on a single machine as long as they have different port settings in <res>/
server/bw.xml.
Note
It is important the username and UID mapping is consistent across all machines on the
cluster. It is highly recommended to use centralised logins using LDAP or similar.
11.2. Centralised Cluster Monitoring
The best way to keep track of processes is via WebConsole's StatGrapher module.
The module, which can be run on any web browser, uses log files generated by StatLogger daemon to display
statistics, and has a variety of options to filter the output by user.
For more details, see “StatGrapher” on page 47 , and “StatLogger” on page 55 .
11.3. Auto-Detection of LoginApps
When running multiple servers, it is convenient for the client to auto-detect LoginApp processes (this is only
suitable for a development environment).
The LoginApps have this functionality built in, and do not require any configuration to perform it — they
register themselves with BWMachined, and the client broadcasts a 'find' message to retrieve their contact
details. A probe message is then sent to each server to determine who, where and what it is running. This
functionality is implemented on the client by class ServerDiscovery.

114
Chapter 12. DBMgr MySQL Support
Following is described the minimal set of steps required to enable MySQL support for a server cluster. They
assume that a MySQL database has been installed and configured as outlined in the Server Installation Guide,
section Installing the BigWorld Server, Configure MySQL server.
12.1. Compiling DBMgr with MySQL Support
The DBMgr binary provided with the default BigWorld package does not have MySQL support built-in. This
allows users to quickly start using BigWorld without having to configure a production database to test a
simple package.
First, to enable compilation of DBMgr, make sure that the MySQL development files are installed on the
build system. To do this, as root, issue:
▪On Fedora:
yum install mysql-devel
▪On Debian
apt-get install libmysql++-dev
Next, the DBMgr makefile needs to be modified, to enable MySQL support. Edit bigworld/src/server/
dbmgr/Makefile and change the variable definition from USE_MYSQL=0 to USE_MYSQL=1 (USE_XML can
be left on, without any side effects).
After these alterations, it will be possible to rebuild DBMgr. From within the bigworld/src/server/
dbmgr folder, issue the command make.
12.2. Update bw.xml To Use MySQL
Once DBMgr has been compiled to communicate with a MySQL server, the game resource configuration file
<res>/server/bw.xml needs to be updated with details on username, password and the host machine
the MySQL server is running on.
The example below illustrates FantasyDemo configuration (via fantasydemo/res/server/bw.xml):
<dbMgr>
<type> mysql </type>
<host> my_mysql_server_machine </host>
<username> bigworld </username>
<password> my_pass </password>
<databaseName> fantasydemo </databaseName>
</dbMgr>
Example fantasydemo/res/server/bw.xml
For details on these fields and other relevant configuration options for your production environment, see
Server Configuration with bw.xml on page 6 .
12.3. Initialise Database With Entity Definitions
DBMgr requires the MySQL database table structure to exactly match the current entity definitions.

Disabling Schema-Modifying Capability
115
To initialise the MySQL database with the correct structure, go to the folder containing the server binaries
(e.g., mf/bigworld/bin/Hybrid), then run DBMgr with the appropriate argument:
$ ./dbmgr --sync-tables-to-defs
When run with the --sync-tables-to-defs option, DBMgr updates the table structure and terminates,
to allow the server to be started normally.
12.4. Disabling Schema-Modifying Capability
By default, DBMgr has the ability to alter the database schema through the --sync-tables-to-defs
command-line option or the <dbMgr>/<syncTablesToDefs> configuration option. This feature may be
undesirable in a production environment where the data in the database is highly valuable. Accidental use of
the sync-tables-to-defs feature may result in data loss. For example, if the entity definition files were deleted,
it will cause DBMgr to remove the corresponding tables in the database.
The schema-modifying capability of the DBMgr can be removed by recompiling it after setting the
variable ENABLE_TABLE_SCHEMA_ALTERATIONS to 0 in bigworld/src/server/dbmgr/Makefile.
The resulting DBMgr executable will no longer have the ability to modify the table schema. Use of the -
-sync-tables-to-defs command-line option or the <dbMgr>/<syncTablesToDefs> configuration
option will result in a warning. The DBMgr will fail to start if the database table schema does not match the
entity definitions.
The new DBMgr executable will be able to connect to a database with just the SELECT, INSERT, UPDATE
and DELETE privileges. Please note that the original DBMgr executable required the CREATE TABLE
privilege even when sync-tables-to-defs feature is not used. This is because the original DBMgr executable
automatically creates and modifies BigWorld internal tables (tables with names starting with "bigworld").
It is likely that the original DBMgr executable with the sync-tables-to-defs feature will still be useful since
manually updating the table schema to match the entity definition is a time consuming task. A copy of the
original DBMgr executable can be kept at a location where it is not likely to be invoked in the day-to-day
operations of a production server.
12.5. Enabling Secondary Databases
Secondary databases can only be enabled when MySQL support is enabled. Please see the document Server
Programming Guide's chapter Secondary Databases for details about secondary databases.
To enable secondary database support, you must:
▪Enable MySQL support (see above).
▪Build the data consolidation tool by issuing the make command from within the bigworld/src/
server/tools/consolidate_dbs directory.
▪Set the bw.xml option <baseApp>/<secondaryDB>/<enable> to true.

116
Chapter 13. RPM
BigWorld provides a RPM implementation which allows the creation of binary RPM package for
BWMachined. The RPM implementation uses the RPM system available in Linux distributions such as
Fedora to generate RPM packages. Currently, the RPM implementation only supports building RPM
packages on i386 architecture.
This chapter provides the following information:
▪Directory structure and files related to BigWorld RPM implementation.
▪How to generate BigWorld binary RPM packages.
▪Customising RPM Packages.
▪Setting up a yum repository.
▪Install, upgrade and uninstall using yum command.
▪How to obtain version number of an installed package.
13.1. Directory Structures and Files
The RPM implementation is located in the bigworld/tools/server/rpm directory:
▪The Makefile is used to generate RPM packages.
▪The generate.py is used to facilitate the creation of RPM packages.
▪The binary_rpms directory is where generated RPM packages are placed.
▪The rpm directory also contains package specific directories. For example, the bwmachined directory
contains all the files specific to BWMachined.
13.2. How to Generate Binary RPM Packages
Binary RPM packages must be generated using a normal Unix user account. Binary RPM packages must not
be generated using the root user.
Before generating RPM packages, the normal user used will need to be given read and write access to the the
directory used by the RPM system to build the RPM packages. Run the following command to determine
which directory is used by the RPM system to generate RPM packages:
$ rpm --eval %_topdir
To generate RPM package for BWMachined, go to the rpm directory and run the following command:
$ make
The generated RPM package will be placed in the binary_rpms directory.
The generated RPM package will have the following file name:
bigworld-bwmachined-<version>-<release>.i386.rpm

Customising RPM Packages
117
▪The <version> field is the version number of the BigWorld release that the package was generated from.
This field is based on the version number in bigworld/res/version.xml.
▪The <release> field identifies the specific build of this RPM package. By default, it is not used and is mapped
to patch number in bigworld/res/version.xml.
13.3. Customising RPM Packages
The most common customisation of a RPM package is the configuration file(s) installed by the package.
That is, one RPM package may include the default configuration file and another may include a customised
configuration file. These RPM packages can be distinguished by using the release field in the file name
of these packages.
For example, the configuration file included in a BWMachined RPM package is located in rpm/
bwmachined/bwmachined.conf.
To generate a BWMachined RPM package with the default configuration file and assign it the release
number 0:
▪Use the bwmachined.conf provided by default.
▪Update the Release tag in rpm/bwmachined/bwmachined_template.spec to the following:
Release: 0
▪Generate the RPM package.
The file name of the RPM package generated will be, for example, bigworld-bwmachined-1.9.1.0-
0.i386.rpm.
To generate a BWMachined RPM package with customised configuration file and assign it the release
number 1:
▪Update the bwmachined.conf as required.
▪Update the Release tag to 1.
▪Generate the RPM package.
The file name of the RPM package generated will be, for example, bigworld-bwmachined-1.9.1.0-
1.i386.rpm.
13.4. Setting up a Yum Repository
For a large environment where RPM Packages, e.g. the BWMachined RPM Package, need to be installed on
many machines, we recommend that a yum repository to be set up to provide these RPM packages. This
allows an RPM package to be installed on any machine in the cluster by running the yum command without
the need to manually copy the RPM package to each machine in the cluster.
The yum repository created will need to be made available through a web server such as the Apache HTTP
Server. The setup required is outside the scope of this document. Please consult relevant web server
documentation on how to achieve this.
Steps to set up a yum repository:
▪On the machine that will be hosting the yum repository, create a directory for the BigWorld RPM packages.
The location of this directory will depend on the web server chosen and the web server configuration
which is outside the scope of this document.

Setting up a Yum Repository
118 Copyright 1999-2008 BigWorld Pty. Ltd. All rights reserved. Proprietary commercial in confidence.
▪Copy the RPM packages to the directory created.
▪Install the createrepo package using the following command:
$ yum install createrepo
This is a utility that will generate a common metadata repository from a directory of RPM packages.
Note
You will need to be the root user to install a package.
▪Run the following command to create the necessary metadata for the yum repository:
$ createrepo <path_to_dir>
where <path_to_dir> is the path to the directory created.
For example, if the directory created is /mnt/bigworld_repo, then the command to run is the following:
$ createrepo /mnt/bigworld_repo
This creates a repodata directory in the /mnt/bigworld_repo directory.
▪The /etc/yum.conf on a machine that will access the repository created will need to be updated to
include the following setting:
[<repo_name>]
name=<repo_name>
baseurl=<url_to_repo>
enabled=1
where <repo_name> is replaced by the name given to the repository and <url_to_repo> is replaced by the
URL that refers to the repository.
Note
By default, the /etc/yum.conf contains a [main] entry. The entry above should
be added after the [main] entry.
When the yum repository is updated, for example, a new version of BWMachined RPM package is added,
then the repodata directory should be deleted and the createrepo command should be run again to
generate up-to-date metadata.
If a new RPM package was added to the repository but is not displayed on a machine when running a query
command such as
$ yum info bigworld-bwmachined
run the following command to delete the metadata used by yum to determine the remote availability of
packages:

Install, Upgrade and Uninstall using Yum Command
119
$ yum clean meatadata
When the yum command is run the next time, it will download the up-to-date metadata.
13.5. Install, Upgrade and Uninstall using Yum Command
This section describes how to install, upgrade and uninstall using the yum command. The BWMachined
package is used as an example.
13.5.1. Install and Upgrade using a RPM Package Directly
▪To install a RPM Package directly without using yum repository:
$ yum --nogpgcheck install bigworld-bwmachined-<version>-<release>.i386.rpm
where <version> and <release> are replaced by the actual version and release number.
This assumes that you are running the yum command in a directory containing the specified .rpm file.
Note
The RPM packages created by BigWorld RPM implementation are not signed, since
these packages are from trusted source. Therefore, during installation and upgrade,
GPG check is disabled.
▪To upgrade a package:
$ yum --nogpgcheck upgrade bigworld-bwmachined-<version>-<release>.i386.rpm
13.5.2. Install and Upgrade using Yum Repository
▪To install a package from a yum repository:
$ yum --nogpgcheck install bigworld-bwmachined
▪To upgrade a package:
$ yum --nogpgcheck upgrade bigworld-bwmachined
13.5.3. Remove an Installed Package
To remove an installed package:
$ yum remove bigworld-bwmachined
13.6. How to Obtain Version Number of an Installed Package
To obtain the version number of an installed package such as the BWMachined package, run the following
command:

How to Obtain Version Number of an Installed
Package
120 Copyright 1999-2008 BigWorld Pty. Ltd. All rights reserved. Proprietary commercial in confidence.
$ yum info bigworld-bwmachined

121
Chapter 14. First Aid After a Crash
If a BigWorld server component fails, then there are some steps that you should follow, to allow us to identify
and resolve the problem as quickly as possible.
The first thing you should do is determine which component crashed first. There are many ways to do this
— you can examine the logs or check the cores.
14.1. Procedure For Crash Reporting
A crash may be either intentional (an assert), or unintentional (such as segmentation fault). Intentional
crashes are often due to errors in extensions, or unexpected use of script.
When you report a crash, be sure to include in your e-mail the following information:
▪Backtrace The full call stack for the first process that crashed (use the bt command in gdb).
▪Logs 50 lines before, and 50 lines after the crash (this can be obtained by issuing the command mlcat.py
--around <corefile> --context 50), plus the last 50 lines of output generated by the process that
crashed (this can be obtained by issuing the command mlcat.py --around <corefile> --context
50 --filter pid <deadPID>).
If a more detailed investigation is required by BigWorld support staff, it is likely that it will be necessary
to provide us with the actual raw log data generated at the time of the crash. The interactive segment
selection mode of mltar.py (for details, see MessageLogger, “Command-Line Utilities” on page 52 ) is
useful for archiving the necessary files before sending them.
It is not necessary to send any core files immediately, but do keep them so we can examine them later.
It is also very helpful if you give us access via ssh to a machine where we can examine the core dump, thus
avoiding its time-consuming transmission over the Internet. This is also a good procedure because it allows
us to verify that the correct executable binary is being used, which is an especially important check if you
modified and relinked the executable, or have custom extensions, etc...
14.2. Q & A
Q: What if there is no core dump?
A: Some shells by default prevent the creation of core dumps. To change this default, before running
BigWorld processes issue the command 'ulimit -c unlimited'. This command sets resources limits
— in this case it sets the core files to unlimited.
Q: How to determine the first process that crashed?
A: This is the information that could be used to determine that:
▪Date on the core dump.
▪Log message about the unexpected death of a process.
▪'restore' messages in the backtrace.

122
Chapter 15. Common Log Messages
This section provides the description of common log messages.
15.1. Warnings
▪CellApp WARNING WatcherDoc::initWatcherDoc: unable to load
watcherdoc/cellapp.xml
This WARNING is due to an incomplete feature to add documentation to our watchers. We apologise if
it caused any confusion. You can silence this warning by creating cellapp.xml in bigworld/res/
watcherdoc. The file should contain an empty root section:
<root>
</root>
▪CellApp WARNING InterfaceElement::expandLength: Received a message
longer than normal length
We try to optimise network traffic by using the smallest integer size that can encode the expected length
of the message. For example, if we expect the message to be always less than 255 bytes, we will use just
one byte to encode the length. We use 2 bytes for messages that are expected to be less than 65535 bytes
long, etc. However, if the message exceeds the expected size, we will fallback to using 4 bytes to encode
the length. The above WARNING means that a message has exceeded the expected message length.
Unfortunately, the WARNING does not tell us which message has exceeded the message length. We have
added additional information to the WARNING in BigWorld 1.8.2.
▪ CellApp WARNING CellApp::handleGameTickTimeSlice: Last game tick took
0.21 seconds
This WARNING means that the game tick took longer than the normal 0.1 seconds. This can be due to many
reasons but usually it is due to a script function taking a long time. You should ensure that your script
code does not do anything that takes significant amount of time. You may have to break your processing
into several runs by using a timer.
▪CellApp WARNING CellApp: Scaling back!!
In response to a game tick exceeding 0.1 seconds, the CellApp will skip some of its usual processing to help
decrease the load, e.g. it will reduce the amount of updates sent to the client. This WARNING is to inform
you that clients may receive less updates e.g. entity movements may be jerky.
▪CellApp WARNING cellapp.cpp:1918: Profile CALL_TIMERS took 0.12 seconds
This means that the total time of all onTimer() callbacks in that tick took 0.12 seconds. This is bad because
one tick should be less than 0.1 seconds.
CellApp WARNING cellapp.cpp:1572: Profile GAME_TICK took 0.12 seconds

Errors
123
This means the game tick took more than 0.1 seconds. This time includes the CALL_TIMERS time above
so almost all of the game tick was in onTimer() callbacks.
▪CellApp WARNING Witness::update: 474 has a deficit of 2370 bytes (10.68
packets)
This is related to the <bitsPerSecondToClient> configuration in bw.xml. If
<bitsPerSecondToClient> is 20000, then it means that the maximum number of bytes we can send to
the client every tick is ((20000/BitsPerSecond)/UpdateHertz) - UDPOverhead = ((20000/
8)/10) - 28 = 222 bytes. The above WARNING means that we are sending 2370 bytes to the client
in one tick. This is 10.68 times the allowed data rate.
This is usually caused by method calls to the entities located on the client i.e. entities in the AoI of the player
or the player itself. If many method calls are made, or if the method calls are passing large arguments,
then we will exceed the bandwidth allocation for the client. When bandwidth allocation is exceeded, the
position updates send to the client is reduced so entity movements will become jerky.
▪CellApp WARNING controller.cpp:158: Profile SCRIPT_CALL took 0.63
seconds
CellApp WARNING Controller::standardCallback: method = onTimer; id =
17648; controllerID = 270; userArg = 260
CellApp WARNING timer_controller.cpp:156: Profile ON_TIMER took 0.62
seconds
The above 3 WARNINGs are generated together. They mean a single onTimer() callback took 0.62 seconds.
This is very bad since it means a single entity is using 6 times a normal game tick.
▪CellApp WARNING TimerController::New: Rounding up initial offset to 1
from 0 (initialOffset 0.000000)
This means that you are adding a timer that is less than 0.1 seconds long. Our minimum timeout is 1 tick.
15.2. Errors
▪CellApp ERROR CellApp: Scale back exhausted. spareTime 0.016686
tickPeriod 0.124365, real/entities 887/887, recvs 4504 trys 3958 good 0
errs (546 sels), nub timers 753 calls 752 rescheds
The means that the game tick has exceeded 0.1 seconds for many ticks. The CellApp has already reduced
updates to the clients to a minimum but still cannot keep the game tick shorter than 0.1 seconds.
▪CellApp ERROR Chunk::load: Failed to load chunk
001xfffx/sep/0010fffco: unknown error in item 'model'
This means that there is an error loading a model in the chunk 0010fffco. Unfortunately, there is not enough
information to identify what is causing the error. You can try loading the space in World Editor and see if
the same error occurs. World Editor may be able to provide more information about the error.

Errors
124 Copyright 1999-2008 BigWorld Pty. Ltd. All rights reserved. Proprietary commercial in confidence.
▪CellApp ERROR Received message id 41 for nonexistent entity 2844 from
192.168.50.21:49140
Message 41 is the destroyEntity message. This means that entity 2844 was already destroyed when
the CellApp received this message. Make sure that you have not called "self.destroy()" in the cell and
"self.destroyCellEntity()" in the base at the same time.
This may also be an indication of a bug in BigWorld. If you are not able to resolve the issue, please send
us more log output around the time of this error.
▪CellApp ERROR DirMappingLoader::stepLoad: Stepping a loaded column
CellApp ERROR DirMappingLoader::stepUnload: Unloading UNLOADED column
Please ignore the above ERROR messages. They are not errors. We have removed these error messages in
BigWorld 1.8.2.
▪BaseApp ERROR BaseApp::setClient: Could not find base id 2881
BaseApp ERROR getProxyForCall: No proxy set!
BaseApp ERROR getProxyForCall: No proxy set!
The above messages means that the entity (2881) has been destroyed but is still receiving messages. This
may be due to another entity calling a method using a mailbox of the destroyed entity. You have to
make sure that when an entity is destroyed, all other entities holding a mailbox to the destroyed entity is
informed so that they can reset the mailbox.
This may also be an indication of a bug in BigWorld. If you are unable to resolve the issue please send us
more logs around the time of this error.
▪BaseApp ERROR 0.0.0.0:0: Exception was thrown: REASON_GENERAL_NETWORK
This means that there was an error with the network. Either the machine has been disconnected from the
network, or there is some sort of hardware error.
▪BaseApp ERROR 10.40.3.17:56859: Exception was thrown:
REASON_NO_SUCH_PORT
This means that either the machine has been disconnected from the network, or the destination process
has crashed.

125
Chapter 16. Clock
The BigWorld server relies heavily on having an accurate clock for timers and load calculation. Unstable
clocks (clocks that may move backward) can cause undesired behaviour and even crashes. Therefore properly
configuring how BigWorld reads the time is essential for a stable, efficient server.
16.1. BigWorld Timing Methods
BigWorld provides three timing methods to select between. This can be configured by editing the file /etc/
bwmachined.conf For example, to use the gettime timing method, include a section like this:
[TimingMethod]
gettime
▪rdtsc reads the time stamp counter register on the CPU. It is by far the fastest and least stable method
of deducing the current time. It is known to become unstable in multi-cored machines where a process
moves between cores or if frequency scaling is used. In many systems however is completely stable and
could therefore be used.
▪gettime uses the kernel's clock driver to access the current time. It is far slower than rdtsc but has the
ability to draw on multiple time sources to ensure a good compromise between speed, accuracy and
stability is reachable. For additional system level configuration see: “Linux Clock Source” on page 125
▪gettimeofday is a deprecated timing method. It is similar to gettime but has a lower theoretical
maximum resolution and may be disrupted by NTP.
16.2. Linux Clock Source
Linux should automatically select an appropriate clock driver for its internal timekeeping, however at times
the sysadmin may need to select a different one. If gettime is used as the timing method this will have a
direct impact to how BigWorld behaves.
A user may check which clocksource they are using with the following command run as root:
#cat /sys/devices/system/clocksource/clocksource0/current_clocksource
You may check which options available with:
#cat /sys/devices/system/clocksource/clocksource0/available_clocksource
tsc and jiffies are known to be sometimes unstable and acpi_pm will also be unstable with some
motherboard chipsets. We suggest you use hpet if it is available and if it isn't you should try acpi_pm.
