Setup Instructions
setup_instructions
setup_instructions
User Manual: Pdf
Open the PDF directly: View PDF ![]() .
.
Page Count: 4
HW4 Setup Instructions
cs194/294-129 Spring 2018, Berkeley CA
(Adapted from DRL Bootcamp)
1 Instructions
Step 2 is mandatory. All other steps are only needed in case you want to use
visualizations. No points are given for the visualization, only for your code in the two
Jupyter notebooks and the text output when you run them.
2 Installing Anaconda
You can download the i nstaller f or Python 3.6 at https://www.continuum.io/
downloads (either t he graphical or t he command l ine i s fine). More detailed
instruction i s available here.
After i nstalling i t, open up a new t erminal and navigate to t he root of t he
setup f older, obtained by decompressing the zip file ( there s hould be a file named
environment.yml i n i t). Then, run
conda env create -f environment.yml
This should create a new conda environment and install a list of packages.
If you see an error in the installation process due to missing dependency, you
should install missing dependency and then run the following command to con-
tinue installation of required packages:
conda env update -f environment.yml
3 Installing Docker
•macOS users: You can download the dmg file at https://download.
docker.com/mac/stable/Docker.dmg. Then, click on the file and follow
the standard software installation procedure. Note: some old versions
of Docker are known to be unstable, and make sure you have the latest
version installed.
•For all other users, refer to the official instructions at https://docs.
docker.com/engine/installation/.
1
After installation, open a new terminal window, and run the following com-
mand:
docker pull dementrock/deeprlbootcamp:latest
This will take a while as it needs to download several gigabytes of data.
4 Setting up XQuartz
This step is only needed if you are on macOS. To get visualizations on most
of the environments, you need to have XQuartz installed. We provided a setup
script, and all you need to do is to run the following:
./scripts/setup_xquartz.sh
After running the script, log out of your account and log back in for some
of the initialization changes to take effect. Then, launch XQuartz and keep it
running (you can do so by finding the application from the Launchpad, or type
open -a XQuartz in the terminal. After that, proceed to the next step.
5 Testing environment setup
Run the following test script from the project folder to verify if everything works:
./docker_run.sh scripts/test_environment_setup.py
Ideally, a message should be displayed on the screen saying Your environment
has been successfully set up!.
6 Testing Visualization
Run the following command from the project folder:
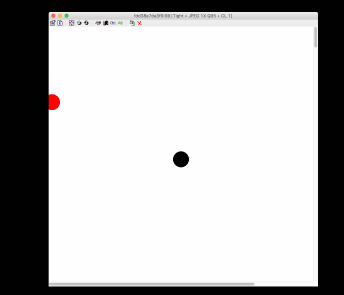
./docker_run.sh simplepg/rollout.py
Ideally, a screen should be displayed like the following:
2

Figure 1: X11 / XQuartz displaying content inside Docker.
You may see an error like “libGL error: No matching fbConfigs or visuals
found; libGL error: failed to load driver: swrast.” As long as the display shows
up, this can be safely ignored.
Common issues:
•If you see an error saying “pyglet.gl.ContextException: Could not create
GL context” and if you are on Linux: try follow the instructions here to
install nvidia-docker, and then run the program again.
•If you see an error saying “pyglet.canvas.xlib.NoSuchDisplayException:
Cannot connect to None” and if you are on macOS: Try running the
following in the terminal:
defaults write org.macosforge.xquartz.X11 nolisten_tcp -bool false
defaults write org.macosforge.xquartz.X11 no_auth -bool false
defaults write org.macosforge.xquartz.X11 enable_iglx -bool true
Then, restart XQuartz, and see if this fixes the issue.
To exit the program, press Ctrl+C in the terminal.
7 Setting up VNC Viewer (Optional)
This step is only needed if you want to enable visualization on Roboschool
environments.
Since Roboschool environments use advanced OpenGL features for the 3D
viewer, which aren’t supported in all X11 versions, we need to use VNC as an
alternative way to visualize the program. To do this we need to install a VNC
3
client. We recommend RealVNC if you are running on Ubuntu 16.04 and above,
or macOS 10.10 and above. For older systems, we recommend TurboVNC.
After setting up the client, run the following command in a terminal:
./docker_run_vnc.sh simplepg/rollout.py
Note the first line displayed in the terminal. It should be something similar
to the following:
Connect to this VNC address to view the display: localhost:3000 Password: 3284
Open your VNC client and connect to the address, using the password that’s
displayed. A screen should be displayed similar to the following (the UI around
the window may be different depending on the client you used):
Figure 2: VNC viewer displaying content inside Docker.
The connection will stay up as long as the program is running. You will
need to establish a new connection every time a program is launched. To exit
the program, close the VNC viewer and press Ctrl+C in the terminal.
4
