Taxcaddy User Guide
User Manual: Pdf
Open the PDF directly: View PDF ![]() .
.
Page Count: 197 [warning: Documents this large are best viewed by clicking the View PDF Link!]

CPA User Guide
Welcome to TaxCaddy! This guide will help you get up and running fast.

Quick Setup Guide 2
Contents
Quick Start Guide................................................................................................................................................. 3
Overview ............................................................................................................................................................. 4
Access TaxCaddy .............................................................................................................................................. 5
Clients I’m following ........................................................................................................................................ 7
Client Activity................................................................................................................................................... 8
Unread Messages ............................................................................................................................................ 9
Client Search .................................................................................................................................................... 9
Client Profiles .................................................................................................................................................... 10
Follow/Unfollow ............................................................................................................................................ 10
Tax Documents .............................................................................................................................................. 11
Questionnaire ................................................................................................................................................ 49
Messages ....................................................................................................................................................... 58
Tax Return ..................................................................................................................................................... 64
Administrative ................................................................................................................................................... 72
Client Management ....................................................................................................................................... 79
Templates .................................................................................................................................................... 118
Document Request List ................................................................................................................................ 145
Firm Details ................................................................................................................................................. 155
Taxpayer view.................................................................................................................................................. 162
Overview ..................................................................................................................................................... 163
Tax Documents ............................................................................................................................................ 175
Messages ..................................................................................................................................................... 185
My Return ................................................................................................................................................... 189
Settings........................................................................................................................................................ 192
Release information......................................................................................................................................... 196
What’s New ................................................................................................................................................. 196
What’s Next ................................................................................................................................................. 196
Past Releases ............................................................................................................................................... 196

Quick Setup Guide 3
Quick Start Guide
Follow these steps to get up and running fast.
1. Assign user group permissions so users can access TaxCaddy.
2. Access TaxCaddy via FileRoom.
3. Upload a firm logo. Optionally edit your firm name to an abbreviated version.
4. Customize the Invite and Reminder templates.
5. Update client records that are missing info and add new clients.
6. Invite (or remind) your clients to create an account.
7. Select categories to display when your clients upload documents.
8. Create Letters templates using the editor or upload Letters templates.
9. Edit the Questionnaire template.
10. Create Custom Document Request Lists.
11. Send Custom Document Request Lists.
12. Send Letters in bulk (via Client Management)
or send Letters to an individual client (via Client Profiles).
13. Send Questionnaires.
Wait for your clients to upload documents, fill out questionnaires and send messages. Then follow these steps to
review what they’ve provided, create a binder and upload a tax return.
1. Message your clients.
2. View and file questionnaire to Tax Documents.
3. Upload any other items to Tax Documents.
4. Create a binder or add documents to an existing binder.
5. Upload the return.
Quick Setup Guide 5
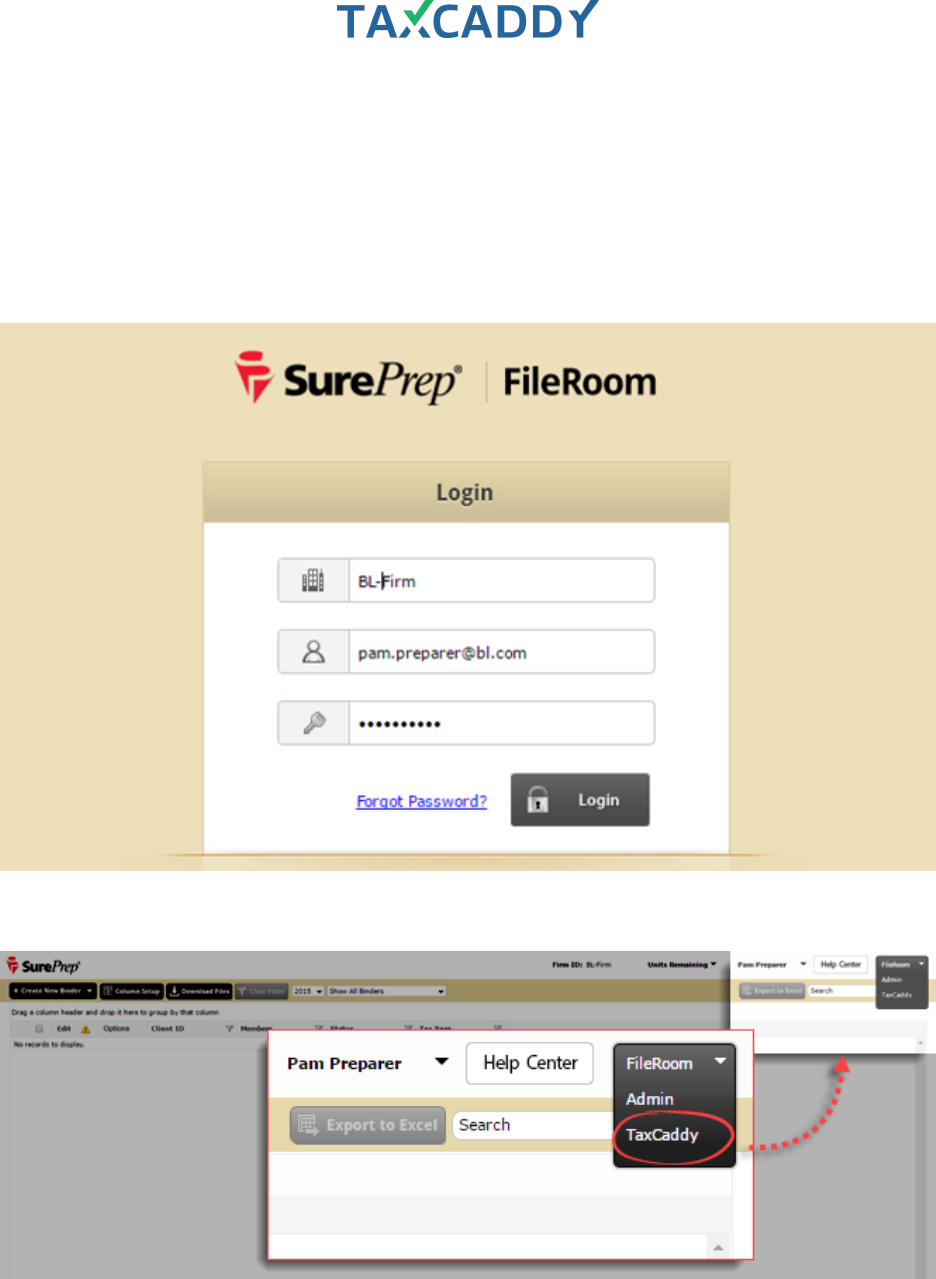
Access TaxCaddy
TaxCaddy is accessible through FileRoom, so you don't have to create separate credentials to log in to TaxCaddy.
Follow these steps to access TaxCaddy via FileRoom.
Tip: Your firm admin might need to set up permissions first.
14. Log in to SurePrep FileRoom.
15. On the upper right, point to the drop-down menu and then click TaxCaddy.
Quick Setup Guide 7
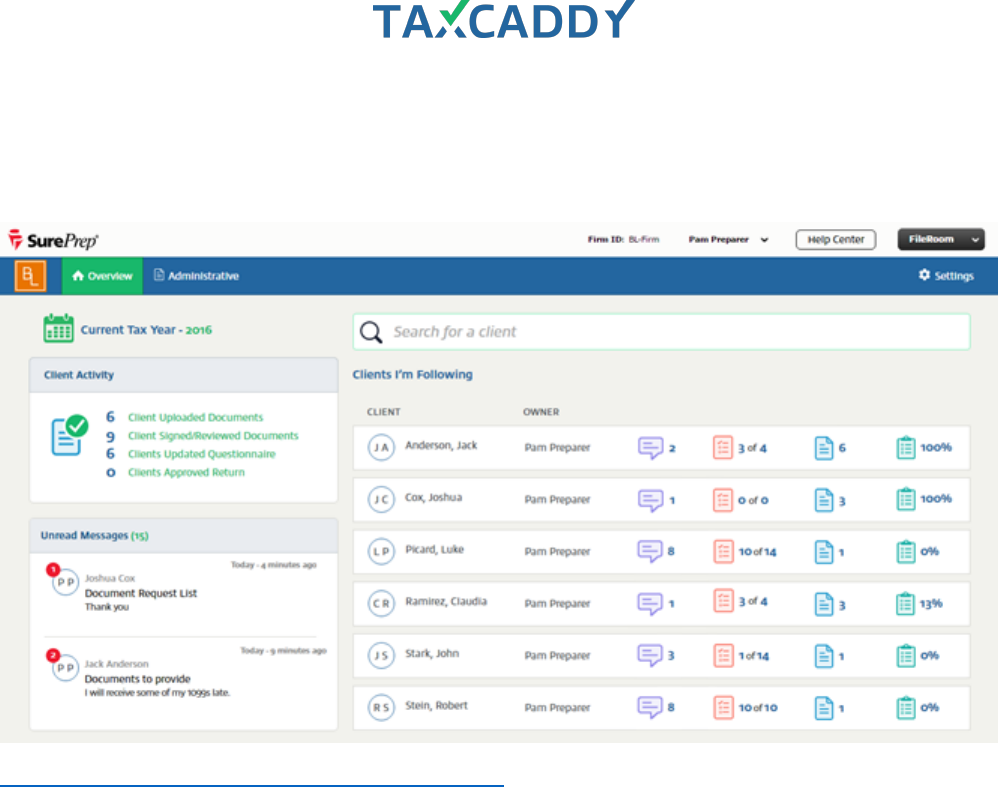
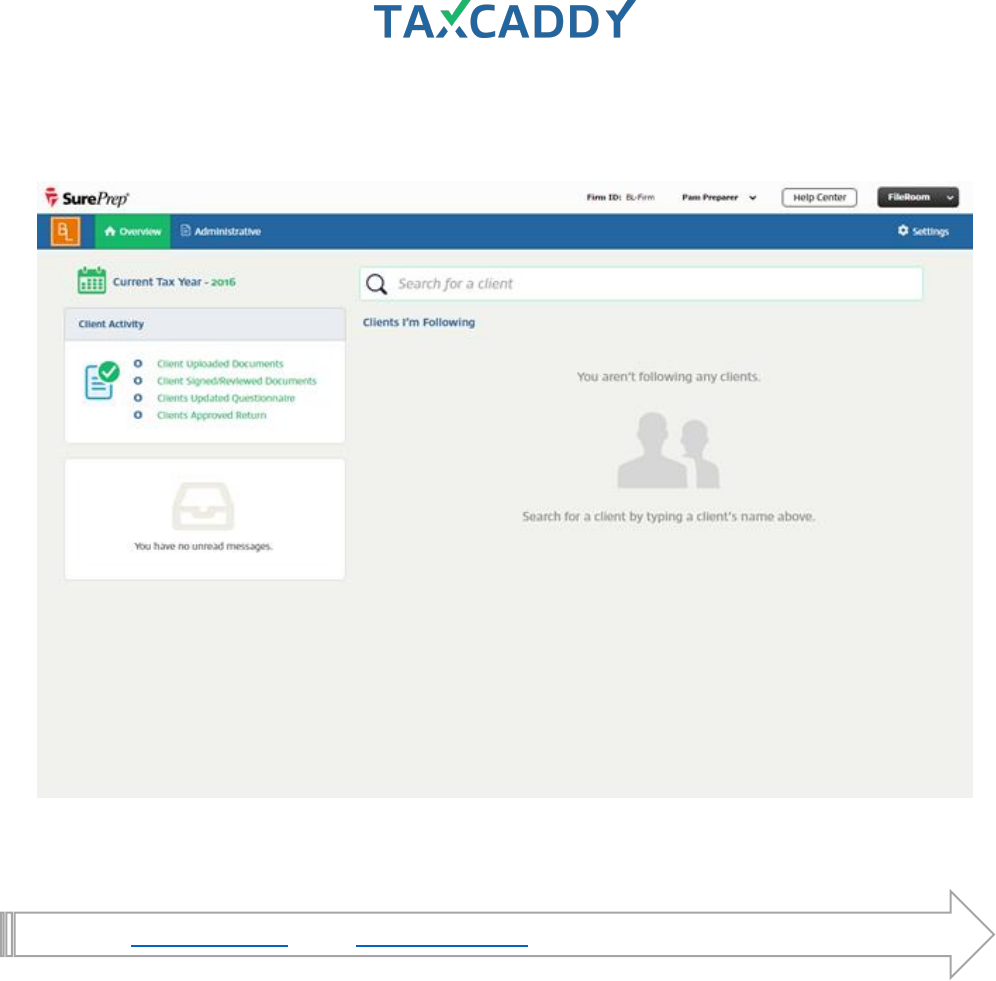
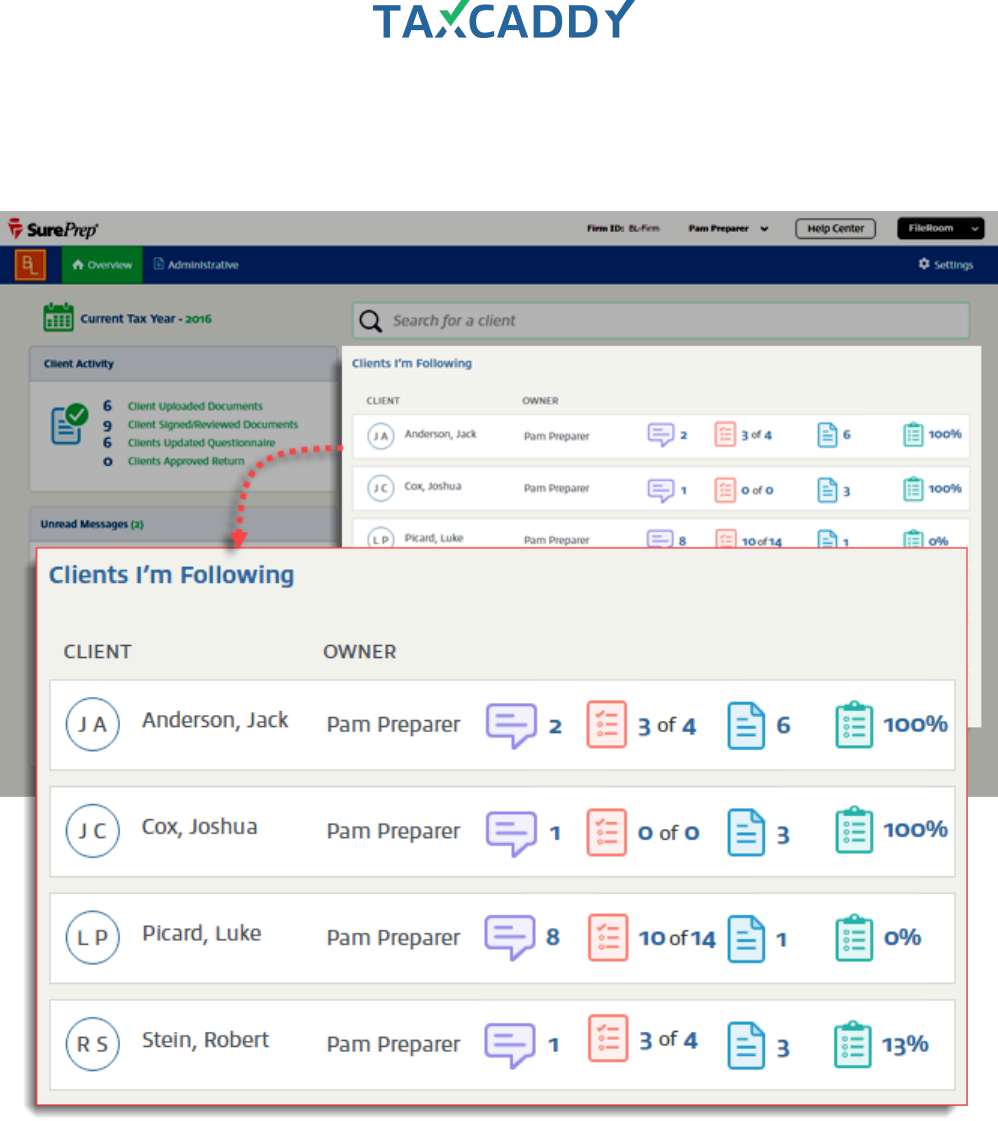
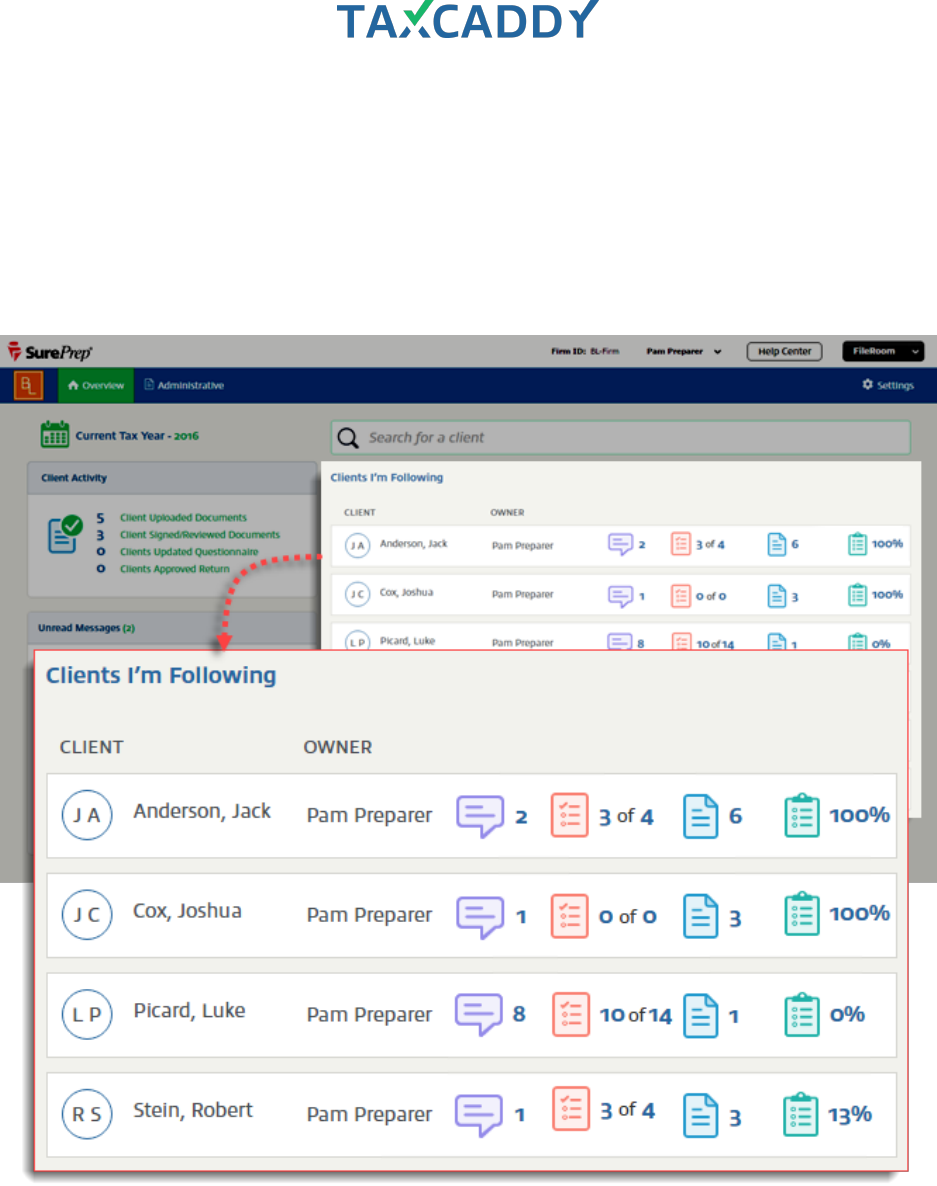
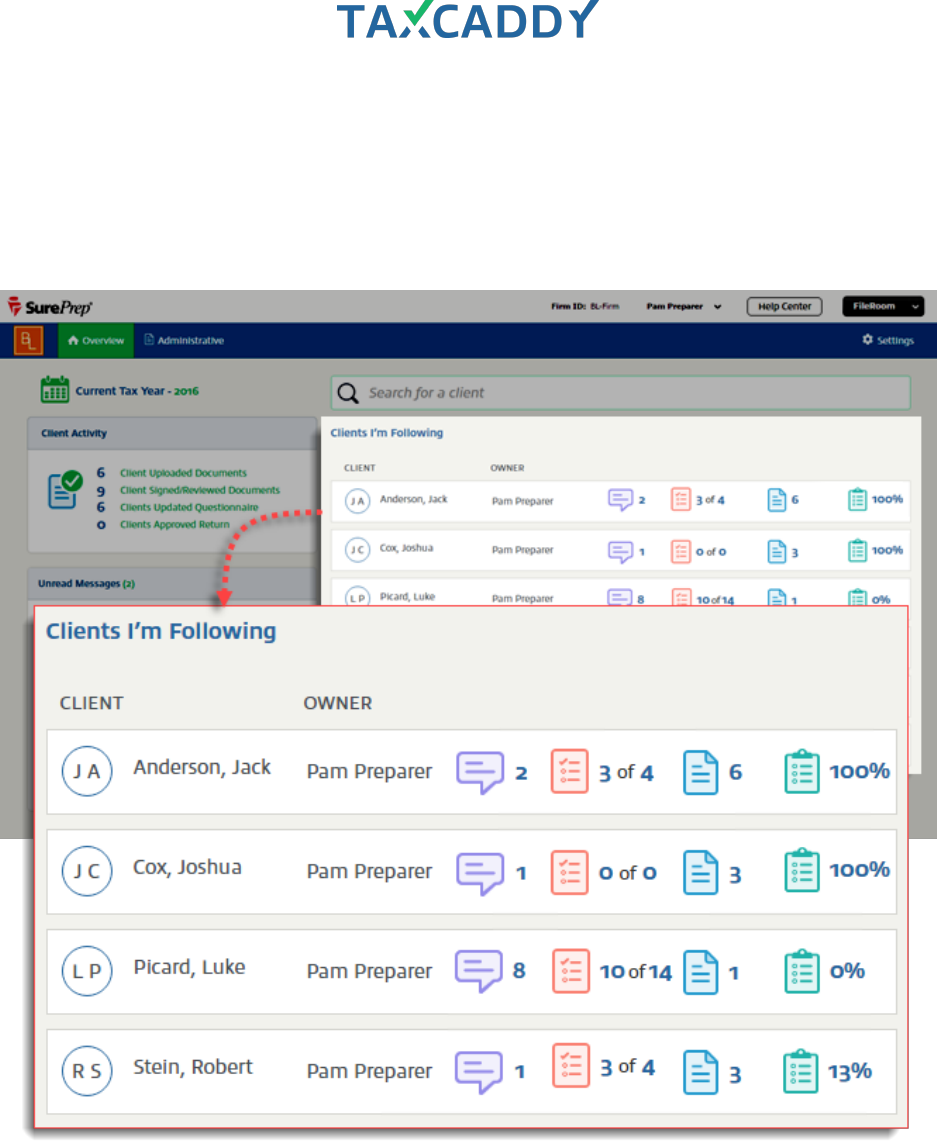
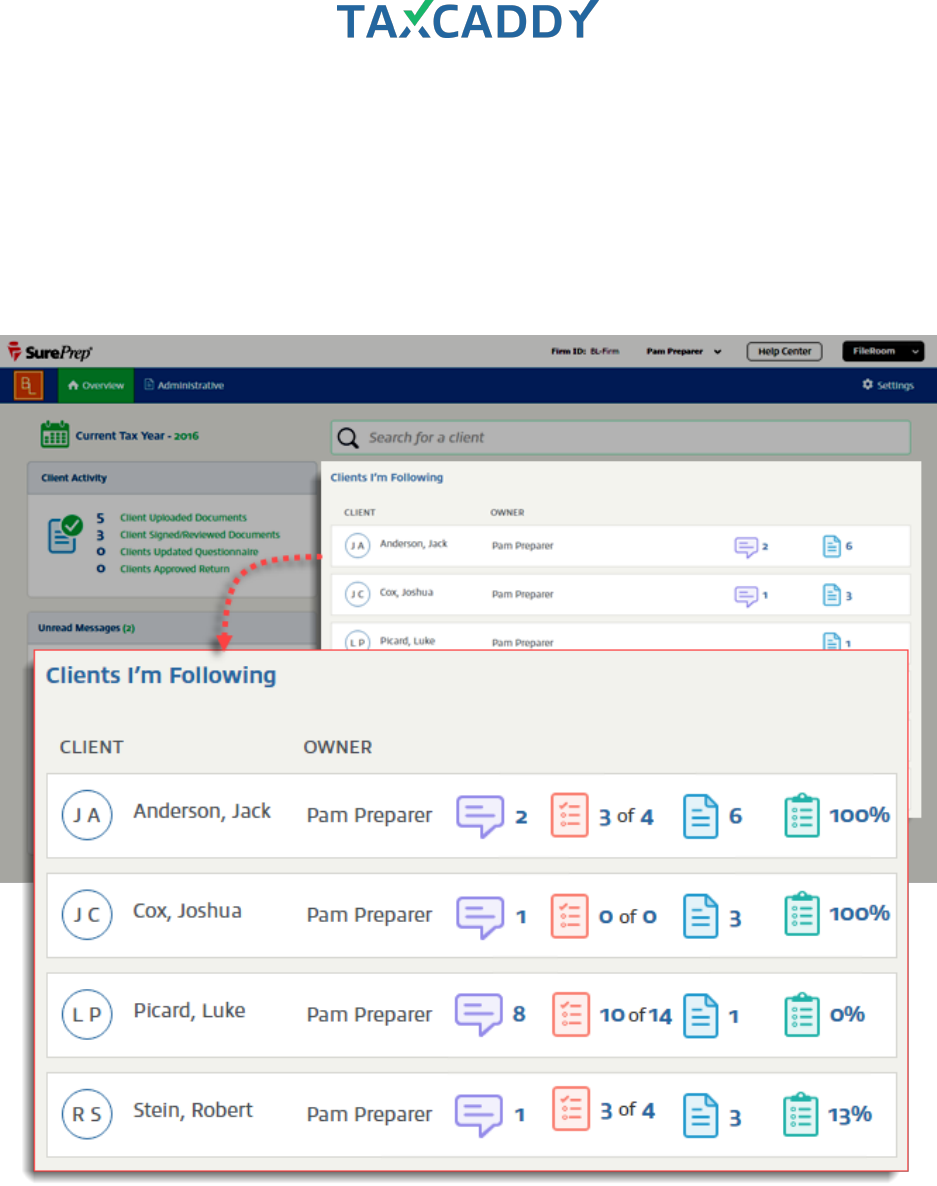
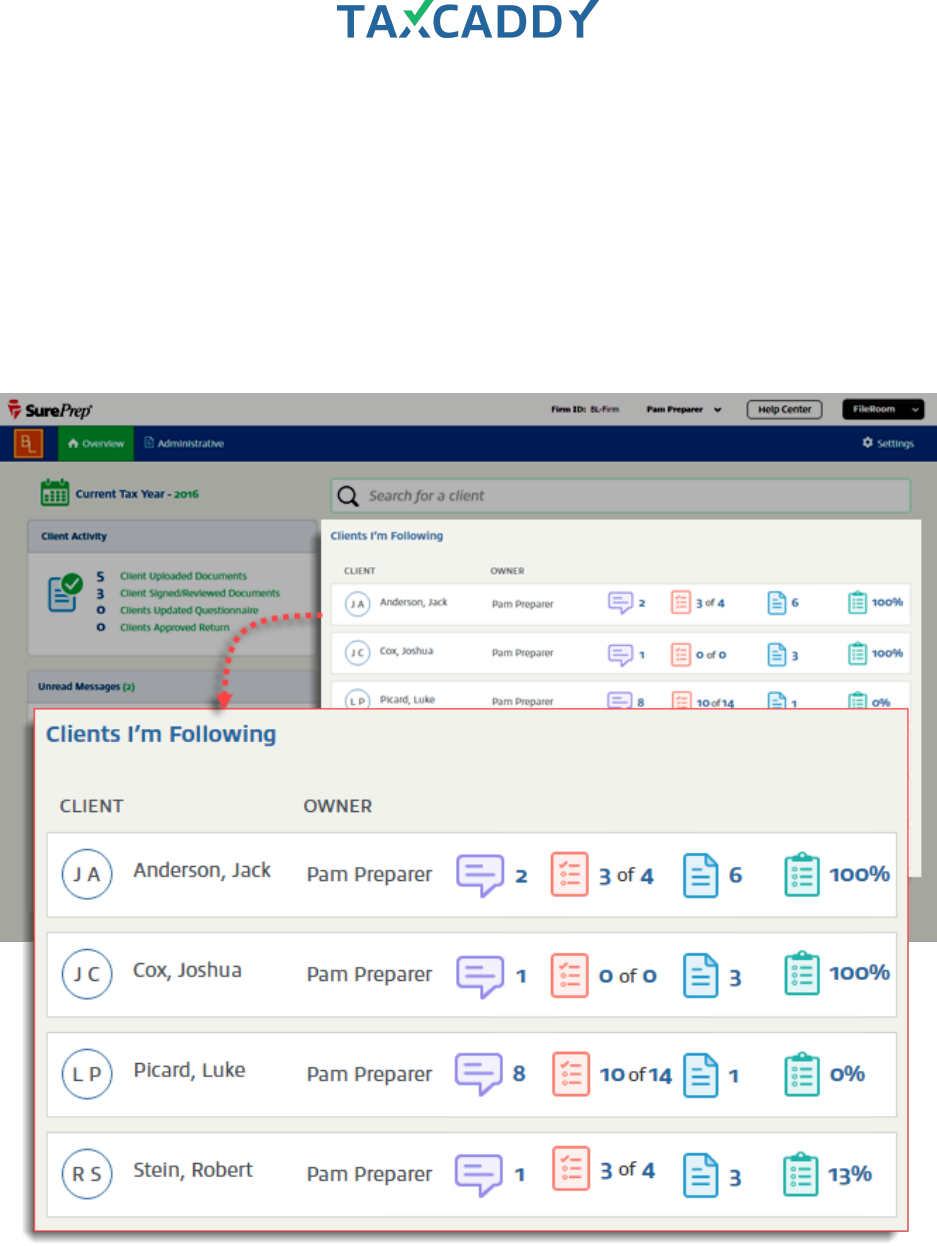
Clients I’m following
The clients you follow appear on the right, with icons indicating the number of unread messages and uploaded
documents .
Quick Setup Guide 8
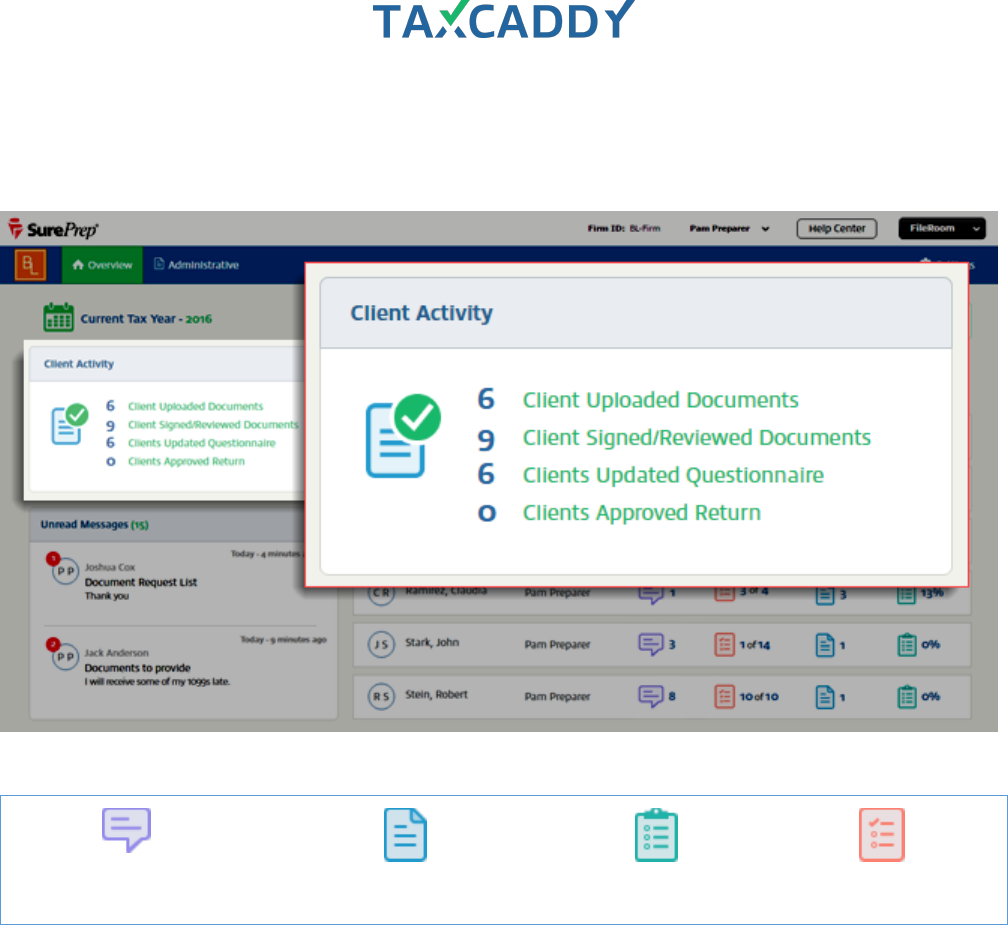
Client Activity
The total number of clients who have uploaded documents or signed/reviewed documents appears on the Client
Activity panel. You can filter clients by their activity by clicking an activity type.
Icons represent activity on the account:
Messages
Tax Documents
Questionnaire
Requested Items
Quick Setup Guide 9
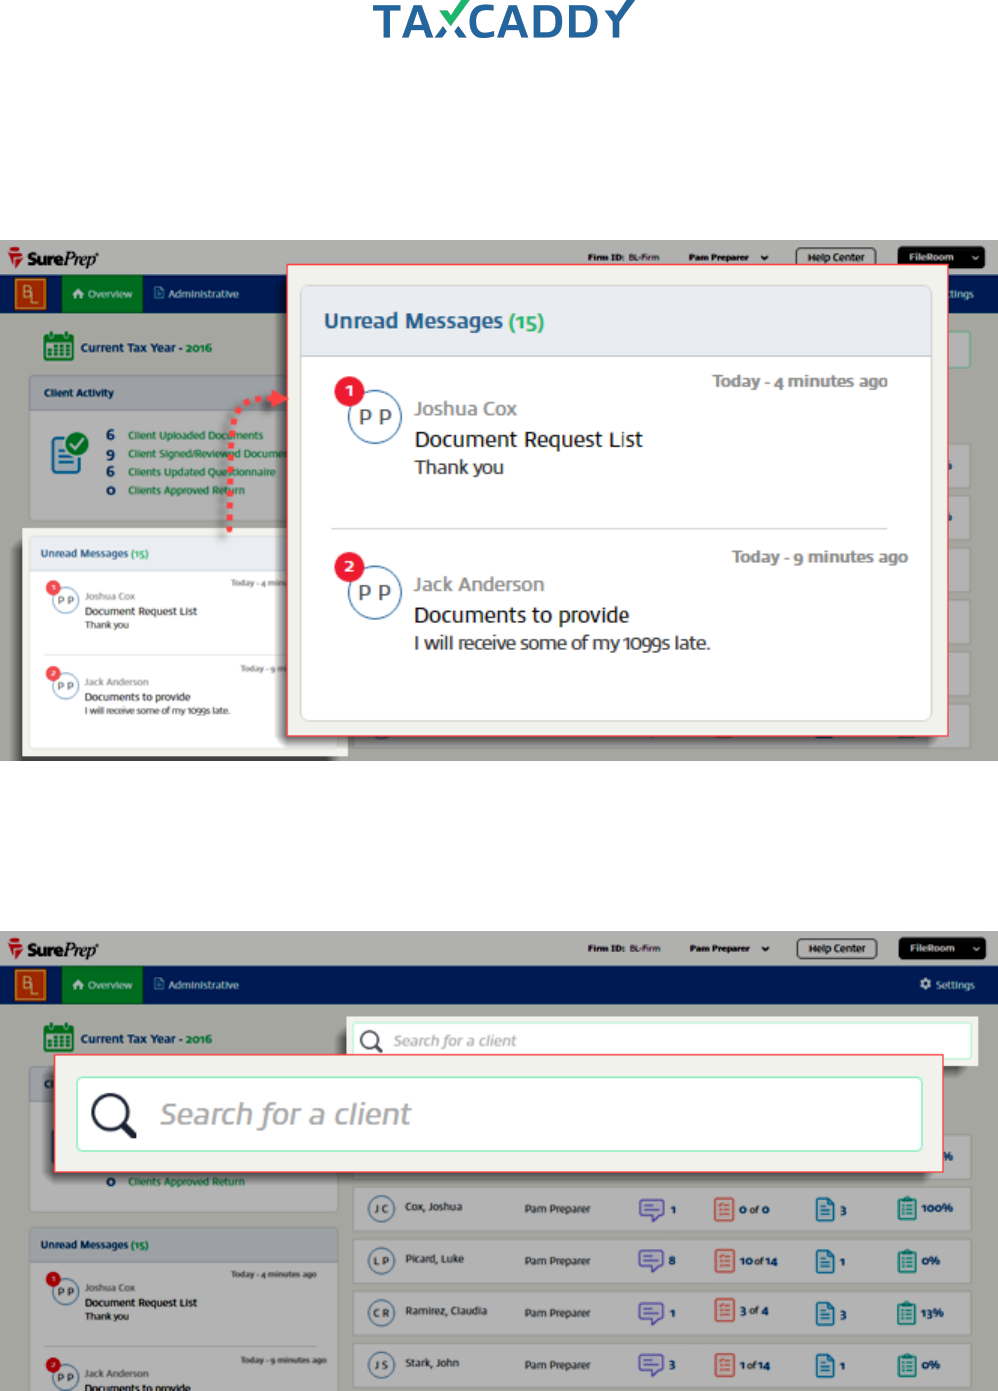
Unread Messages
Any threads containing new messages appear under the Unread Messages, with a red badge indicating the
number of new messages in the thread. Click a message to open the thread in the client’s profile, or point to a
message and click Reply to reply to a message from the Overview screen.
Client Search
You can search for clients by name using the Search box. By default, only profiles associated with current tax
year are displayed.
Quick Setup Guide 10
Client Profiles
Click a client tile from the Overview screen to access the client’s profile. Client Profiles provide detailed
information about each client, including name, ID, tax phase, selected tax year, unread messages, requested
items, uploaded tax documents, and questionnaire status.
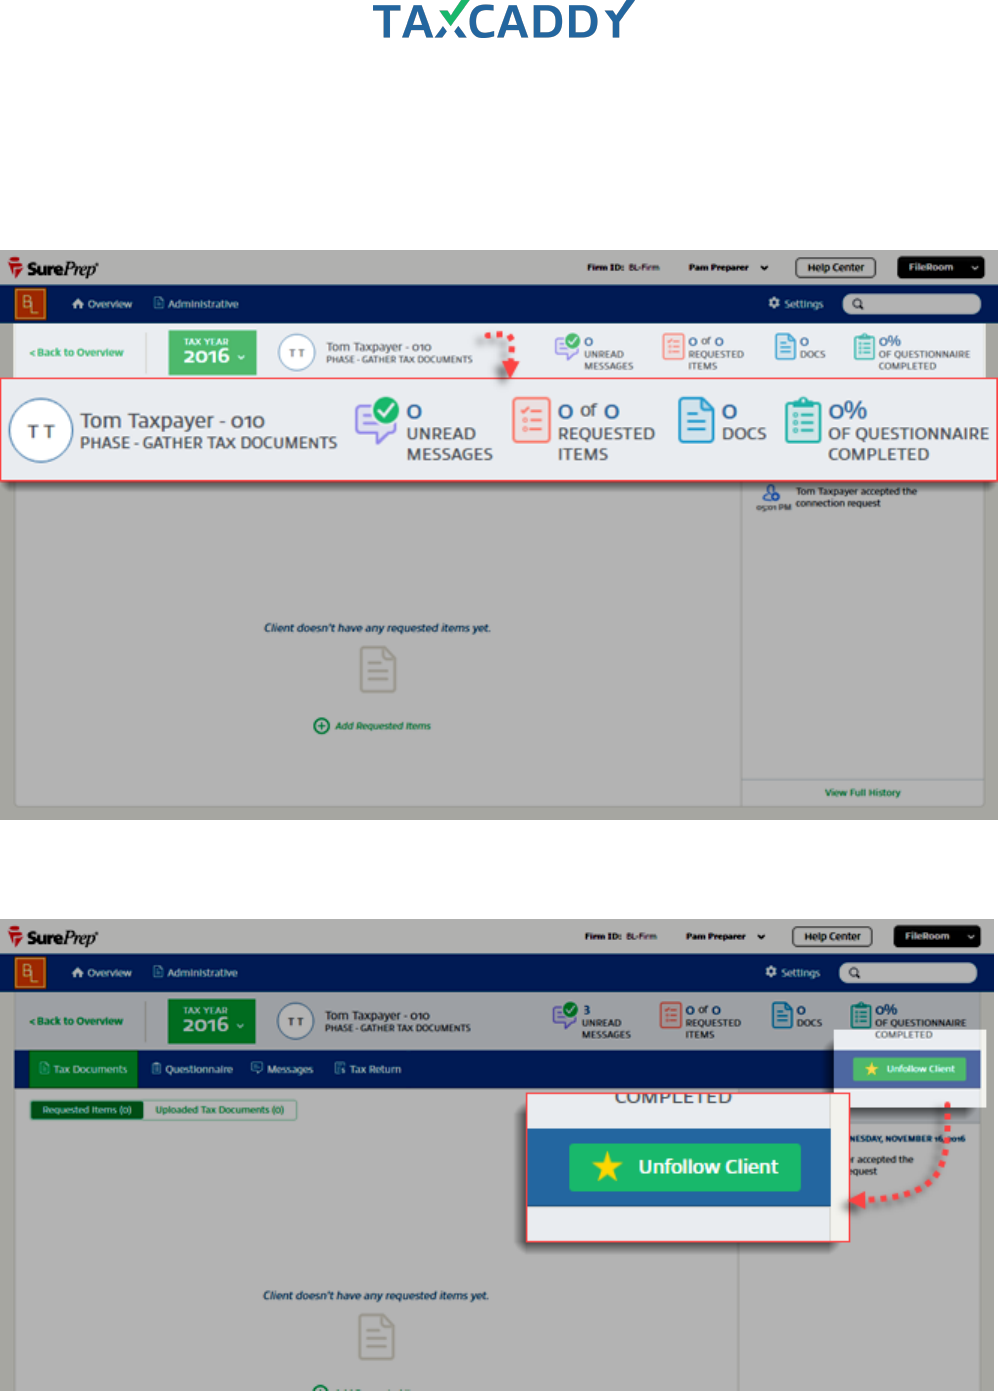
Follow/Unfollow
Click the Follow/Unfollow Client button to follow a client. Clients you follow appear on the Overview screen.

Quick Setup Guide 11
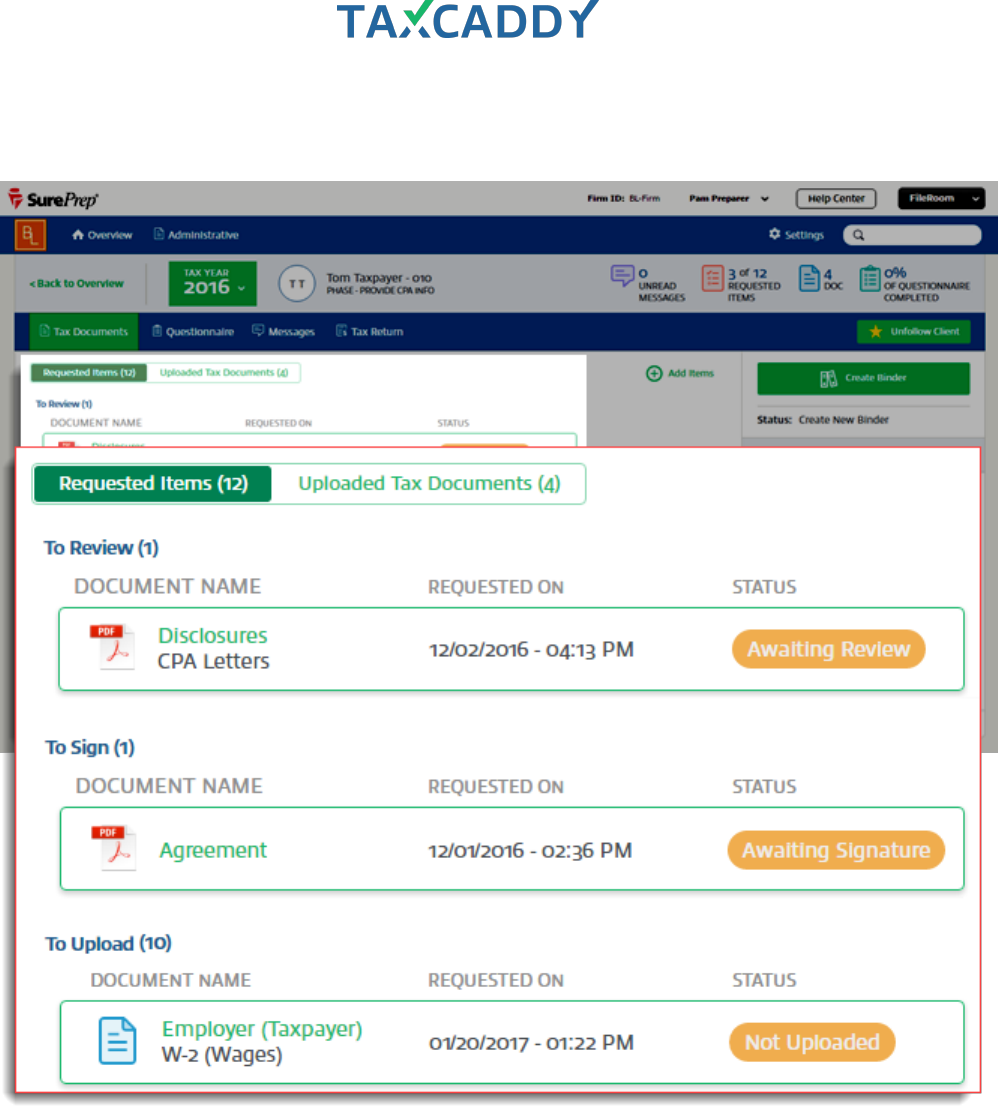
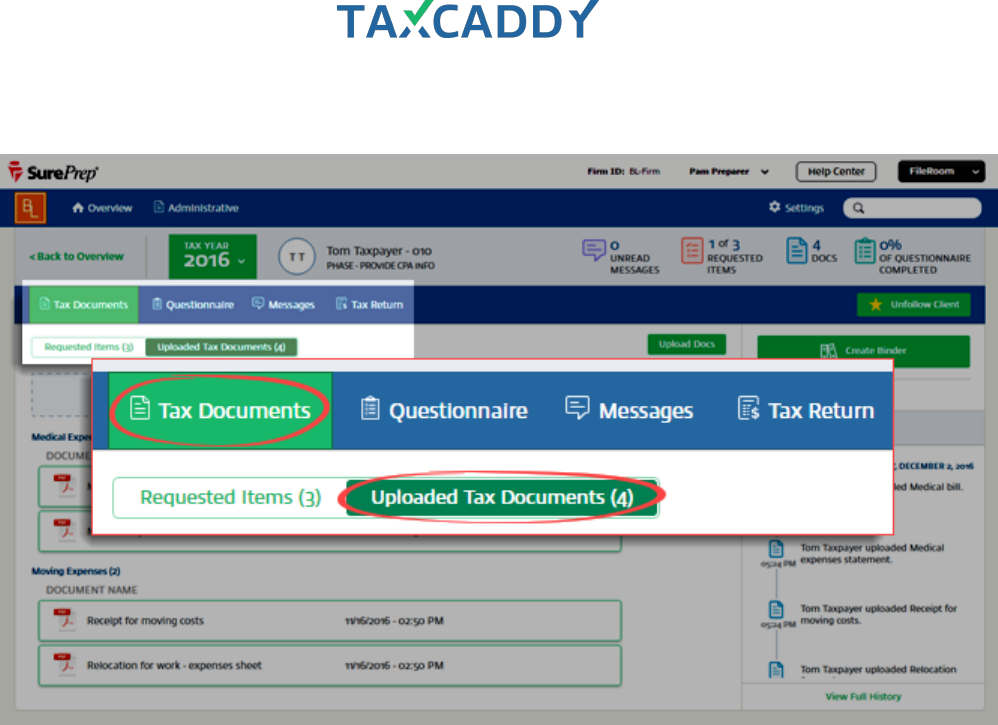
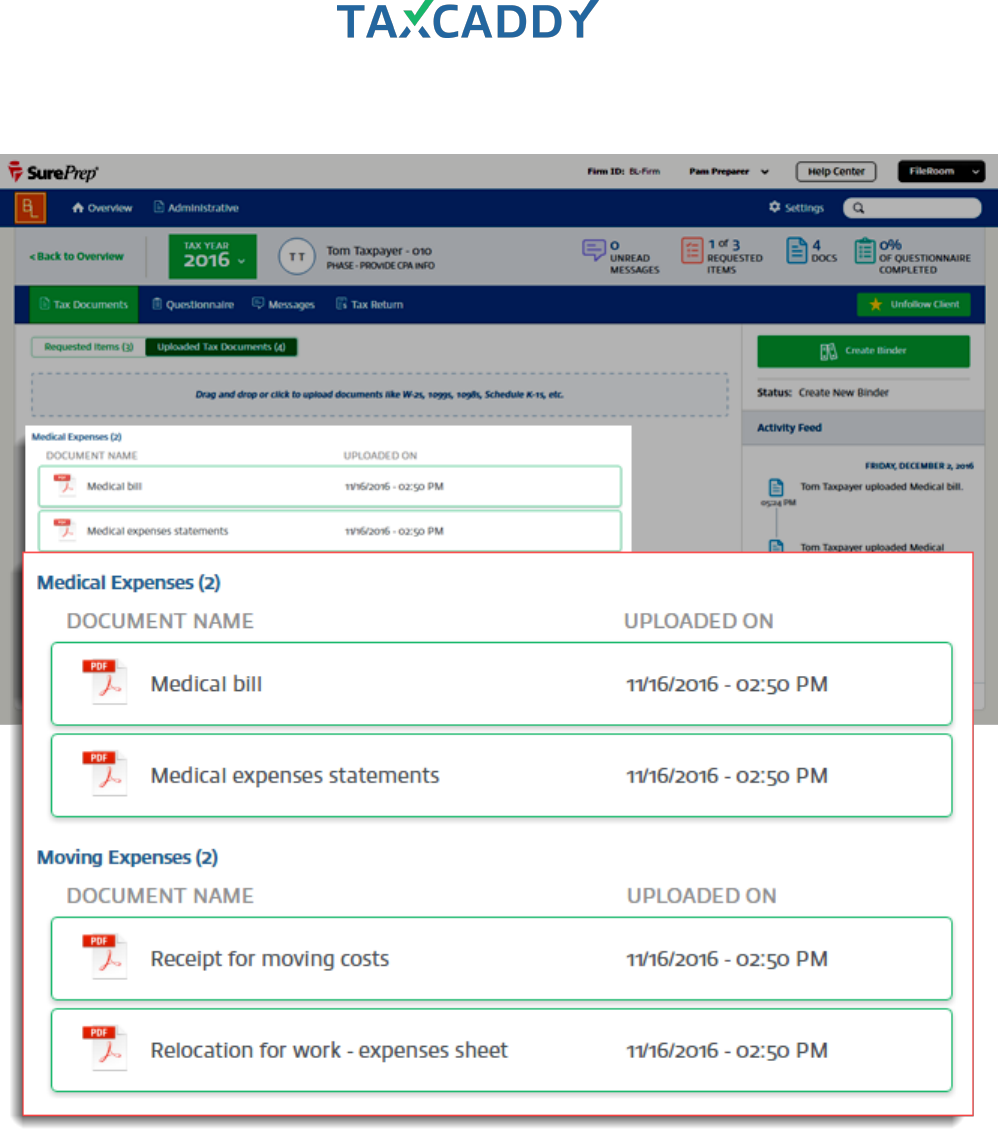
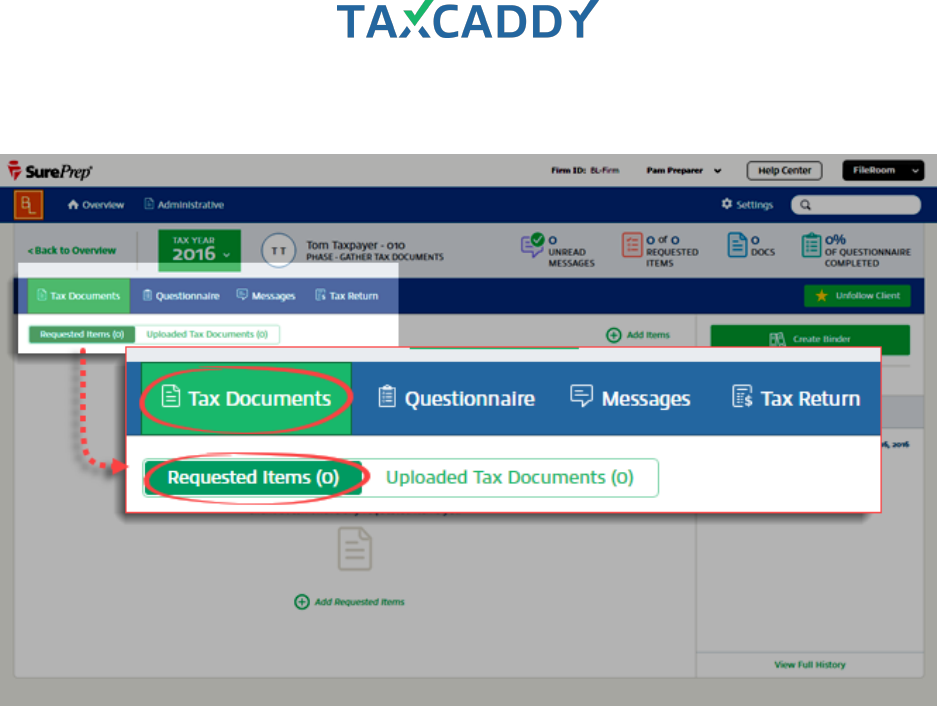
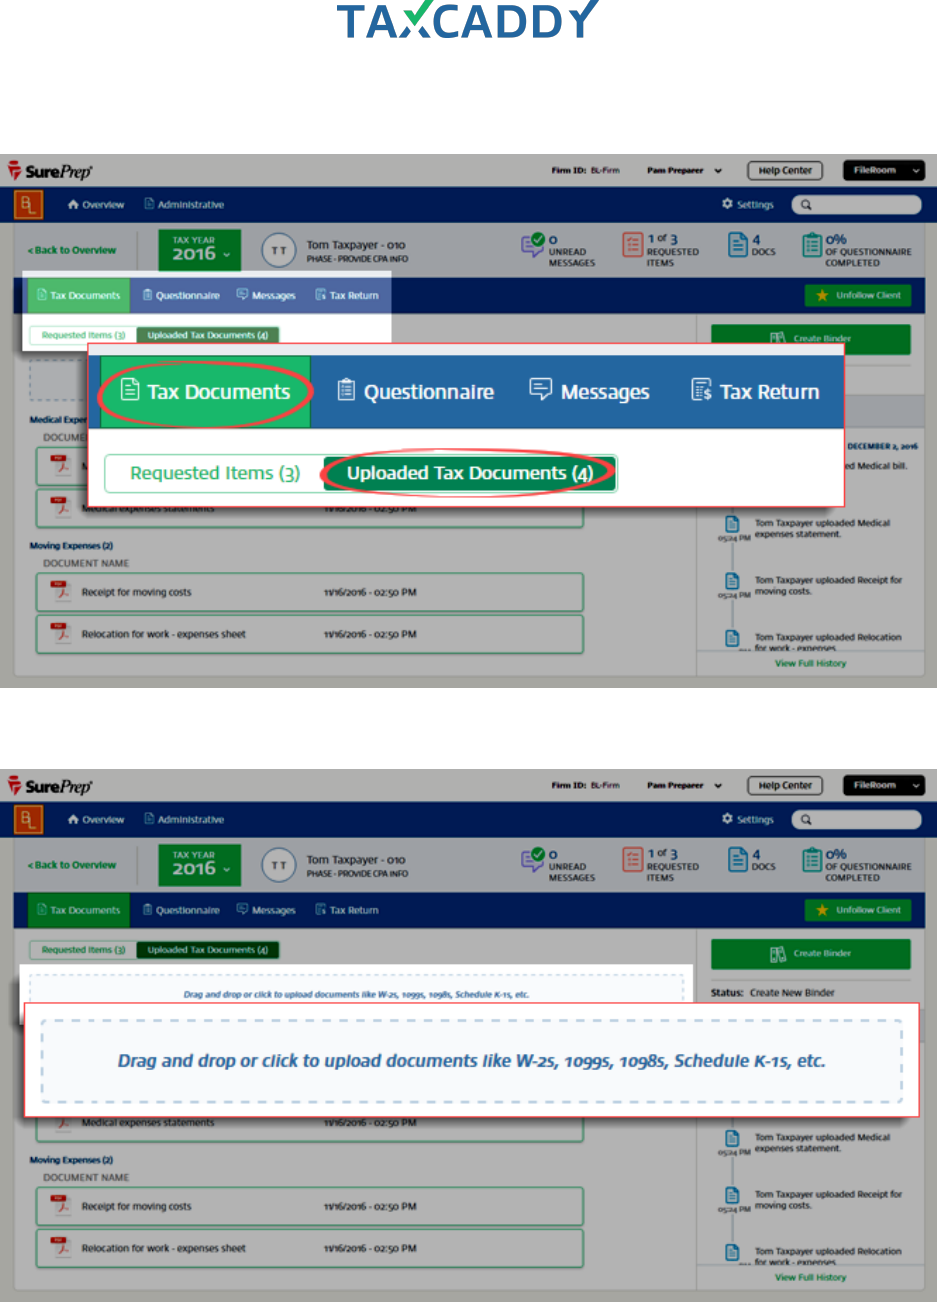
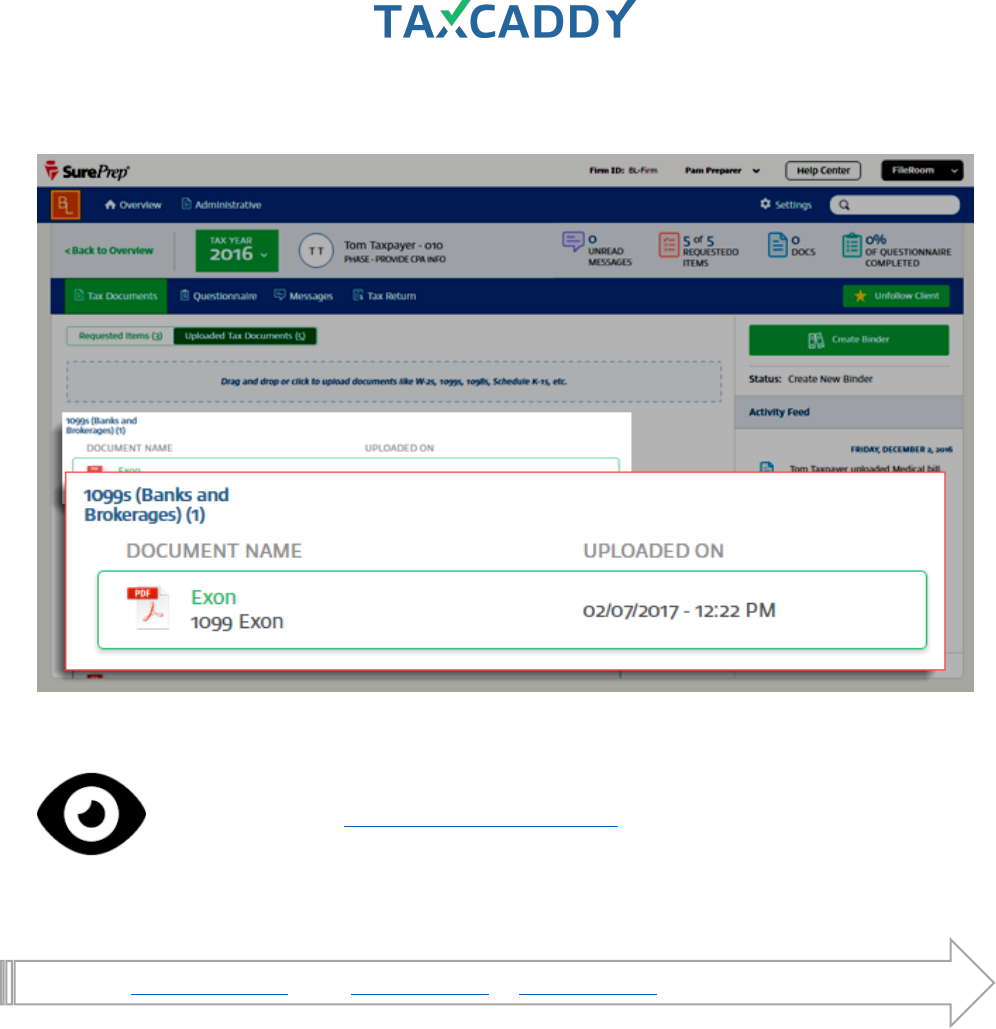
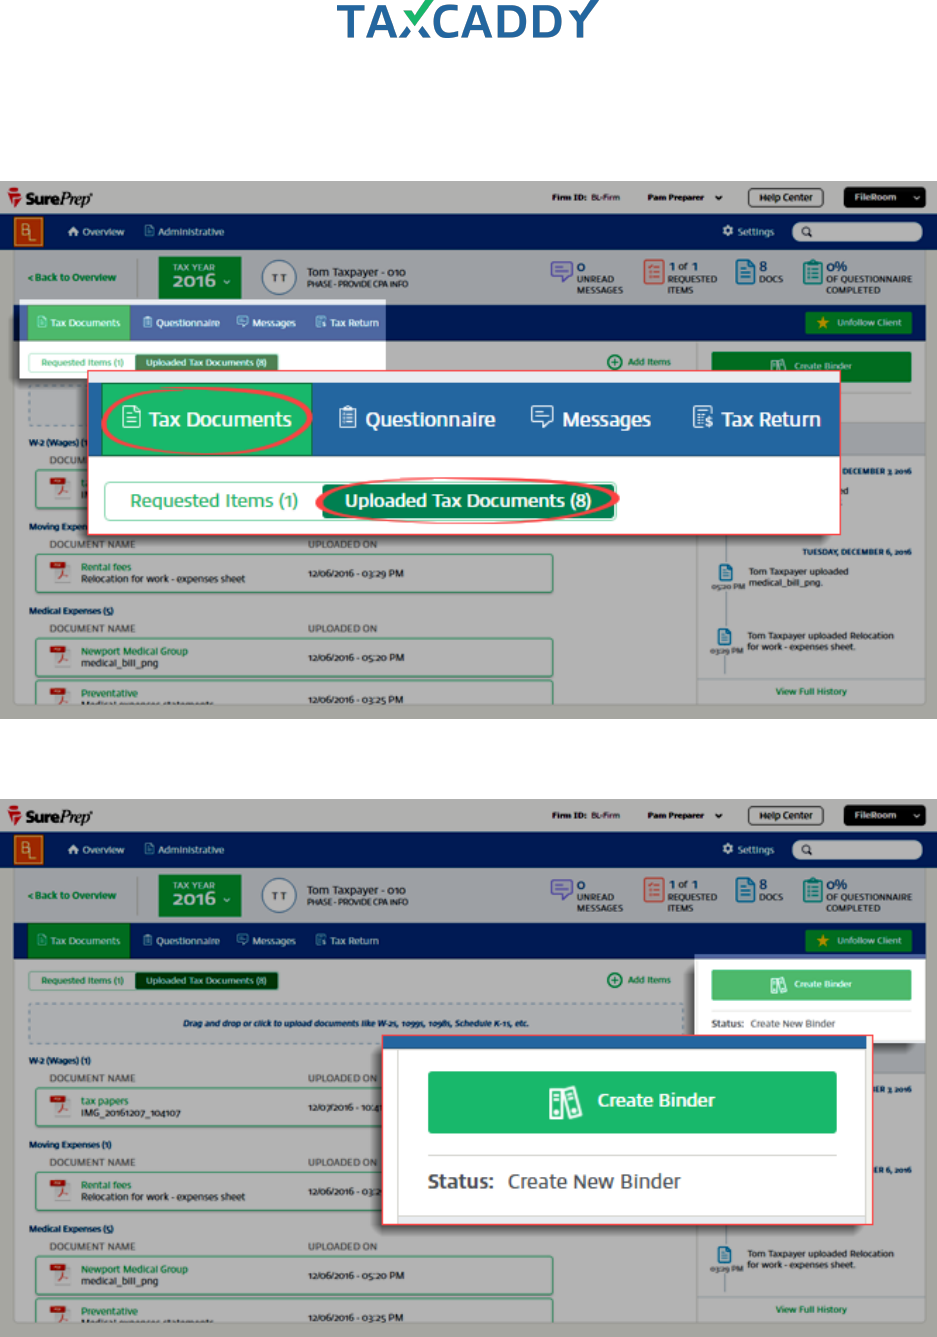
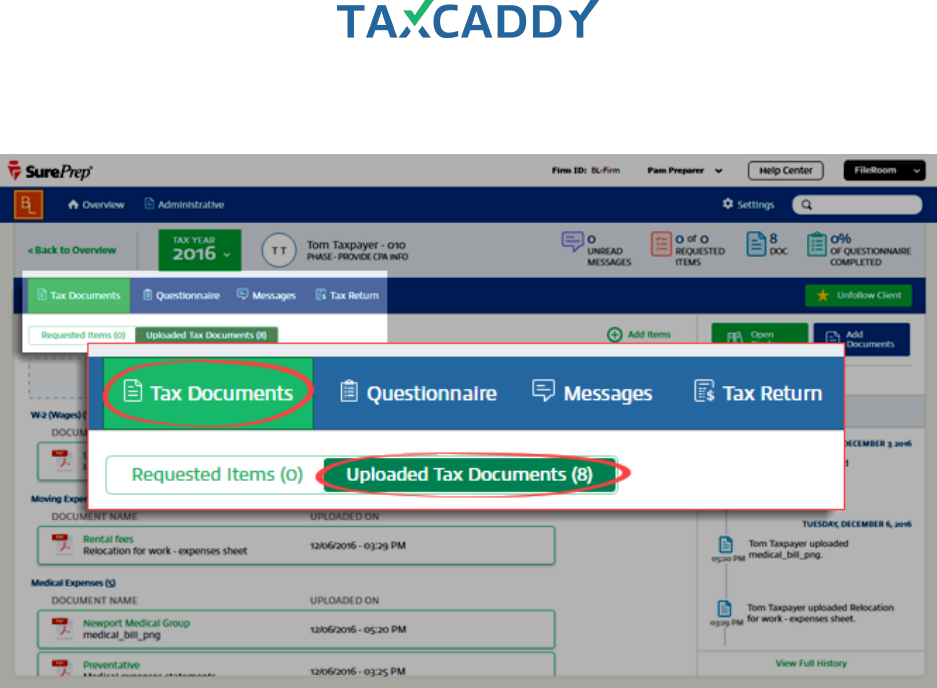
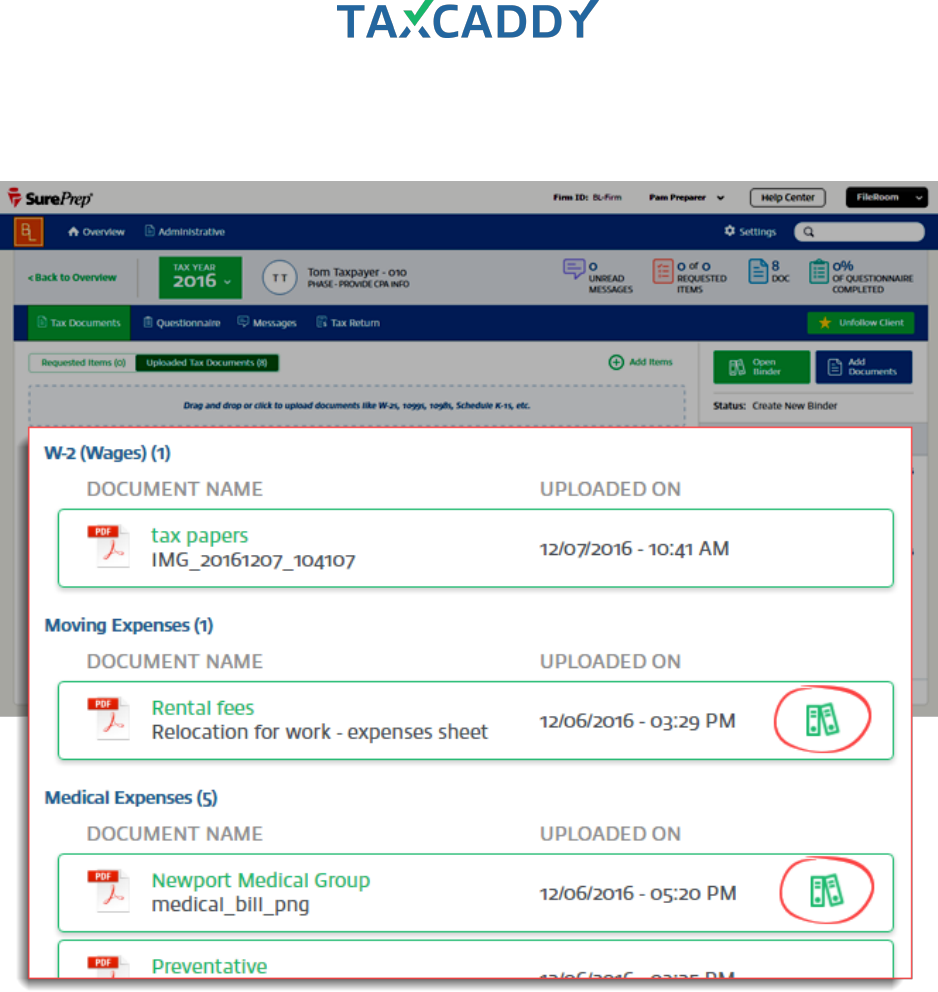
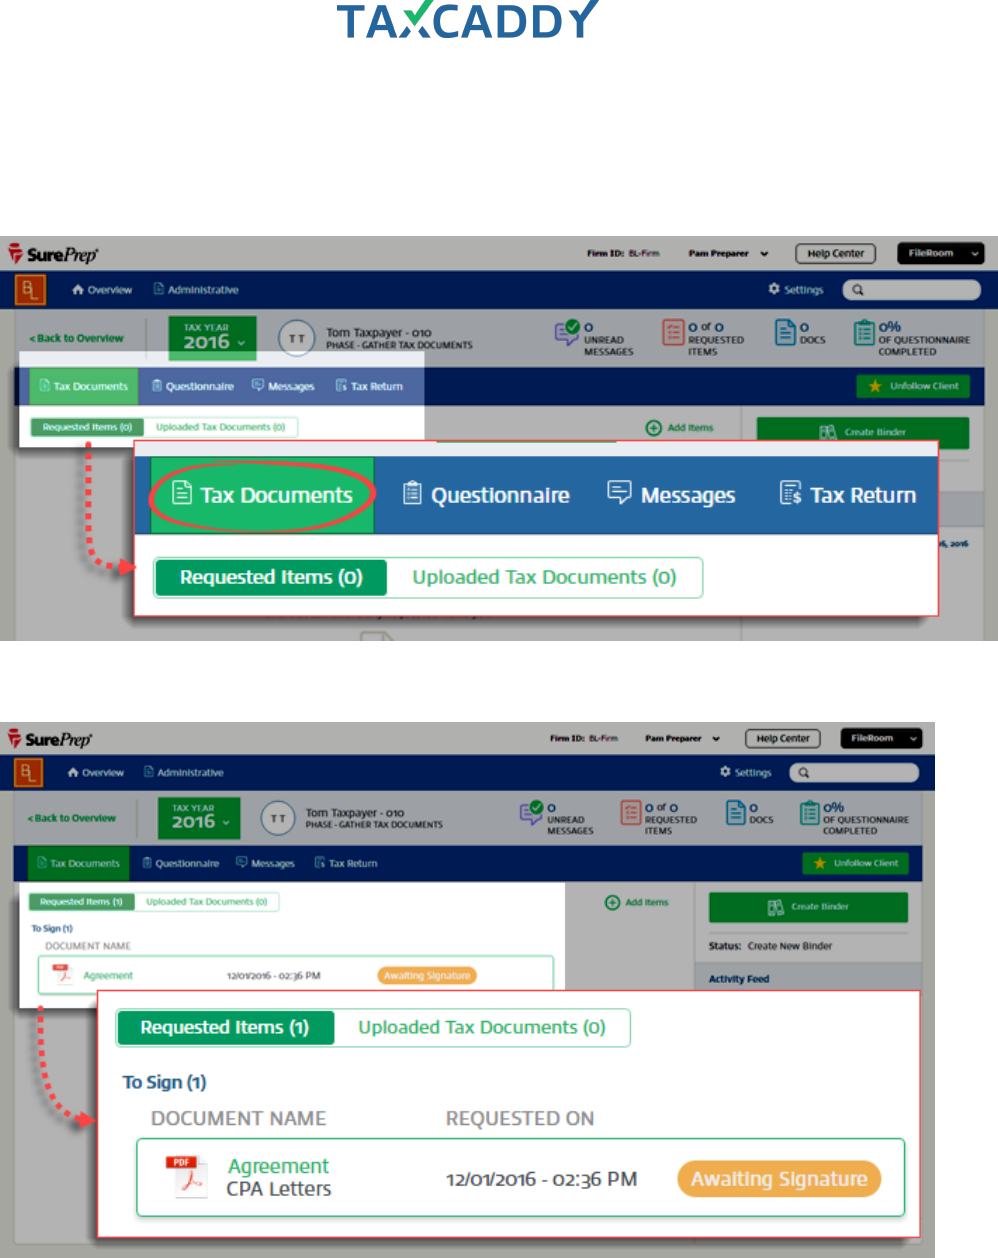
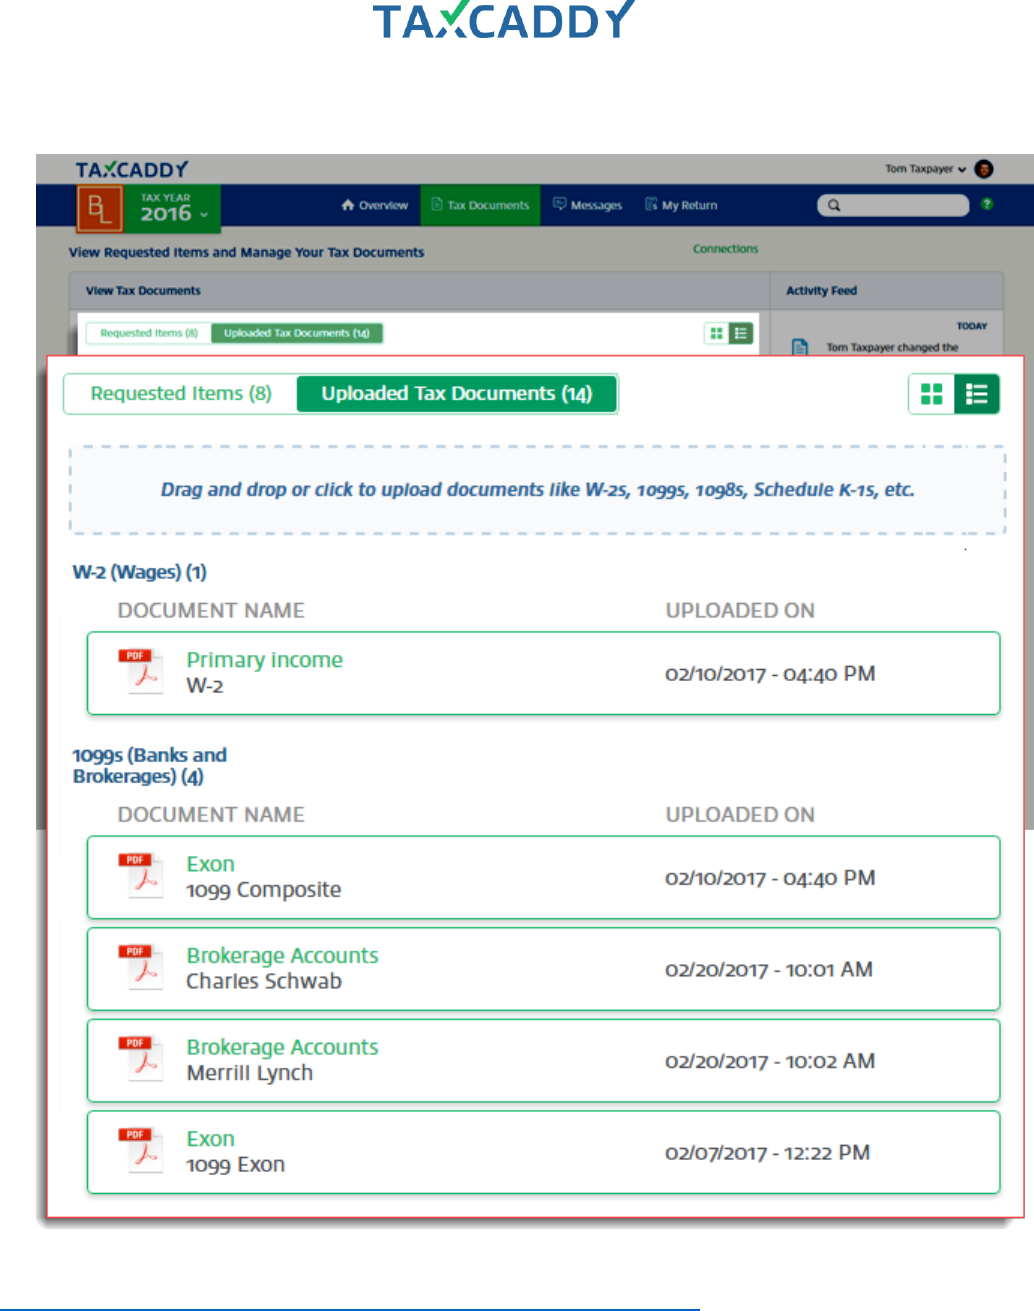
Tax Documents
Tax Documents consists of two sections: Requested Items and Uploaded Tax Documents.
17. Requested Items includes documents you have requested the client sign, review, or upload.
18. Uploaded Tax Documents includes all documents uploaded to the client’s account, including those that were
not requested items or are uncategorized.

Quick Setup Guide 12
View Tax Documents
Tax Documents consists of two sections: Requested Items and Uploaded Tax Documents.
Follow these steps to view Tax Documents.
1. Log in to TaxCaddy.
2. Under Clients I’m Following, click a client tile to go to that client's profile.
Quick Setup Guide 13
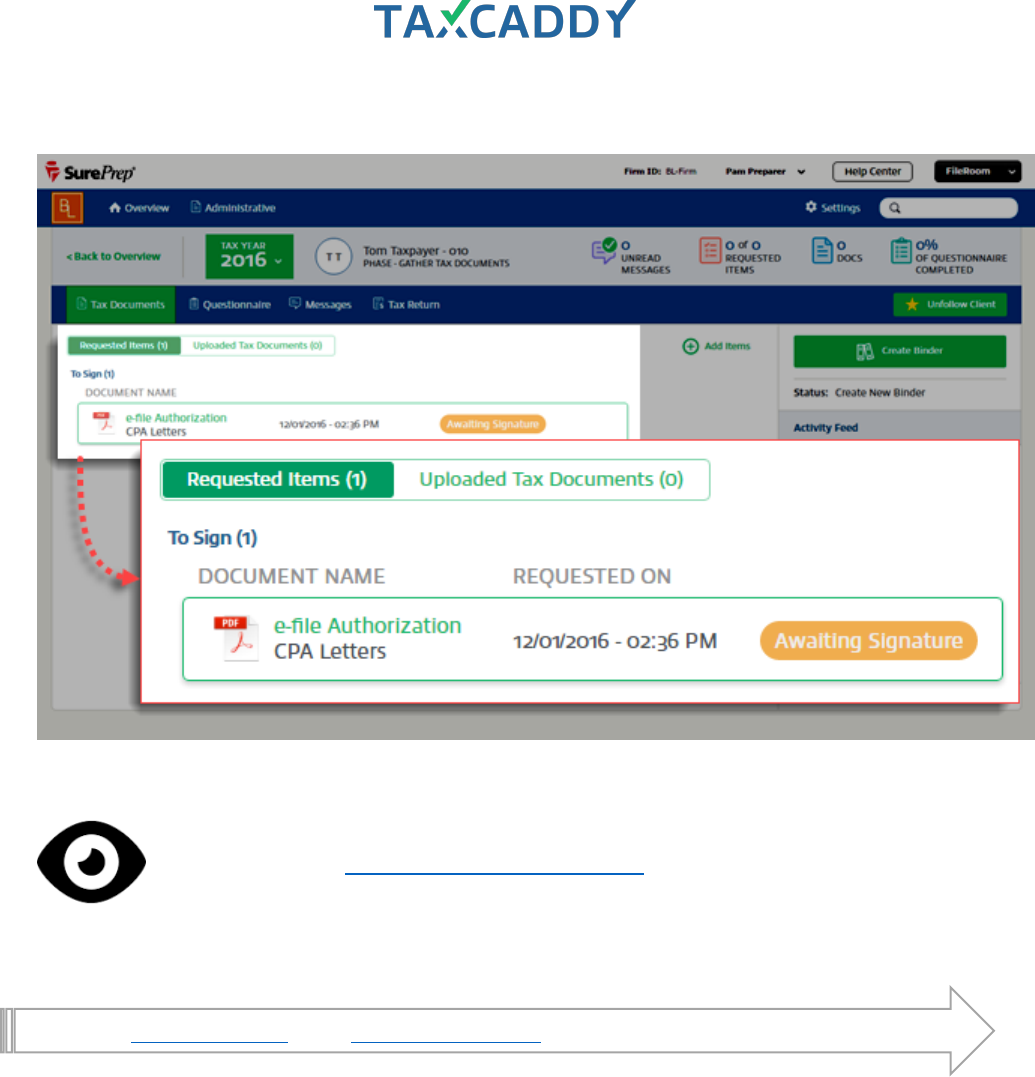
3. Click Tax Documents. The Requested Items tab is open by default and documents appear under sections
titled To Review, To Sign, and To Upload. Click a document under To Review or To Sign to view it.
Quick Setup Guide 14
4. The document opens in the document viewer. Use the message panel on the right to associate a message
thread with this document. When you’re done, click Back to Overview.
Quick Setup Guide 15
5. Click Uploaded Tax Documents.
Quick Setup Guide 16
6. The client's tax documents are organized by category. You can click a document to open it in the viewer.
Quick Setup Guide 17
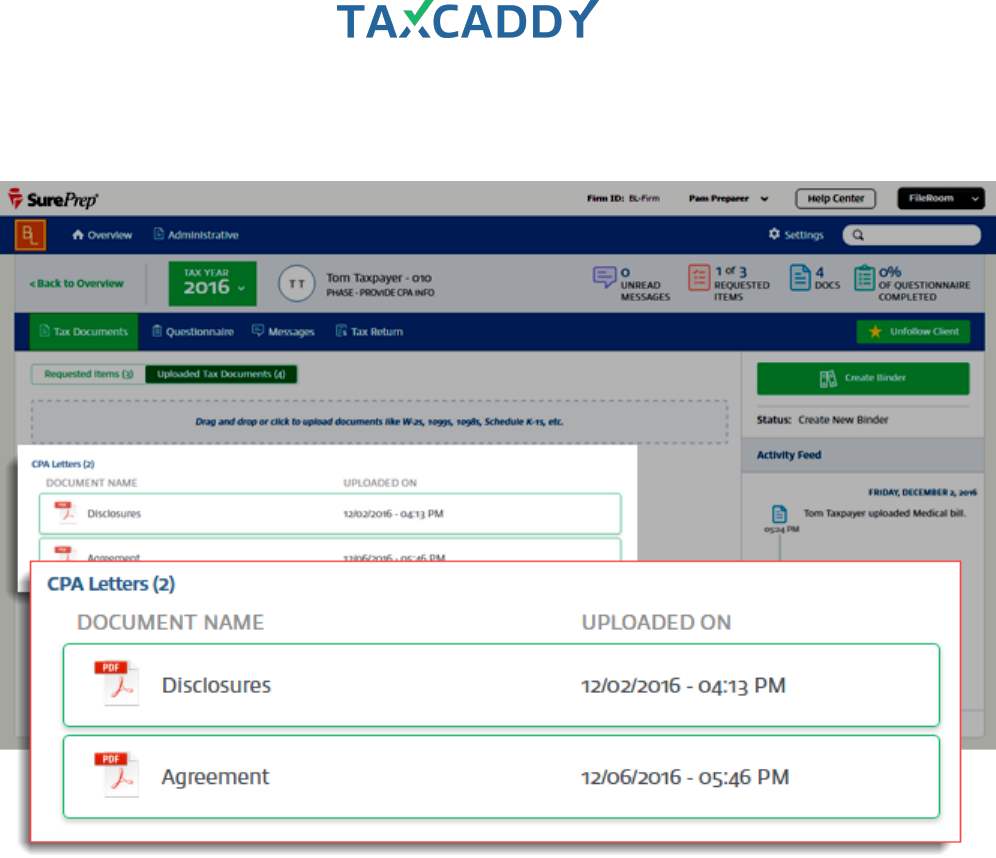
7. Completed To Review or To Sign Requested Items are filed to the clients Uploaded Tax Documents under
the CPA Letters category. Click a document in the CPA Letters category to open it in the document viewer.
Quick Setup Guide 18
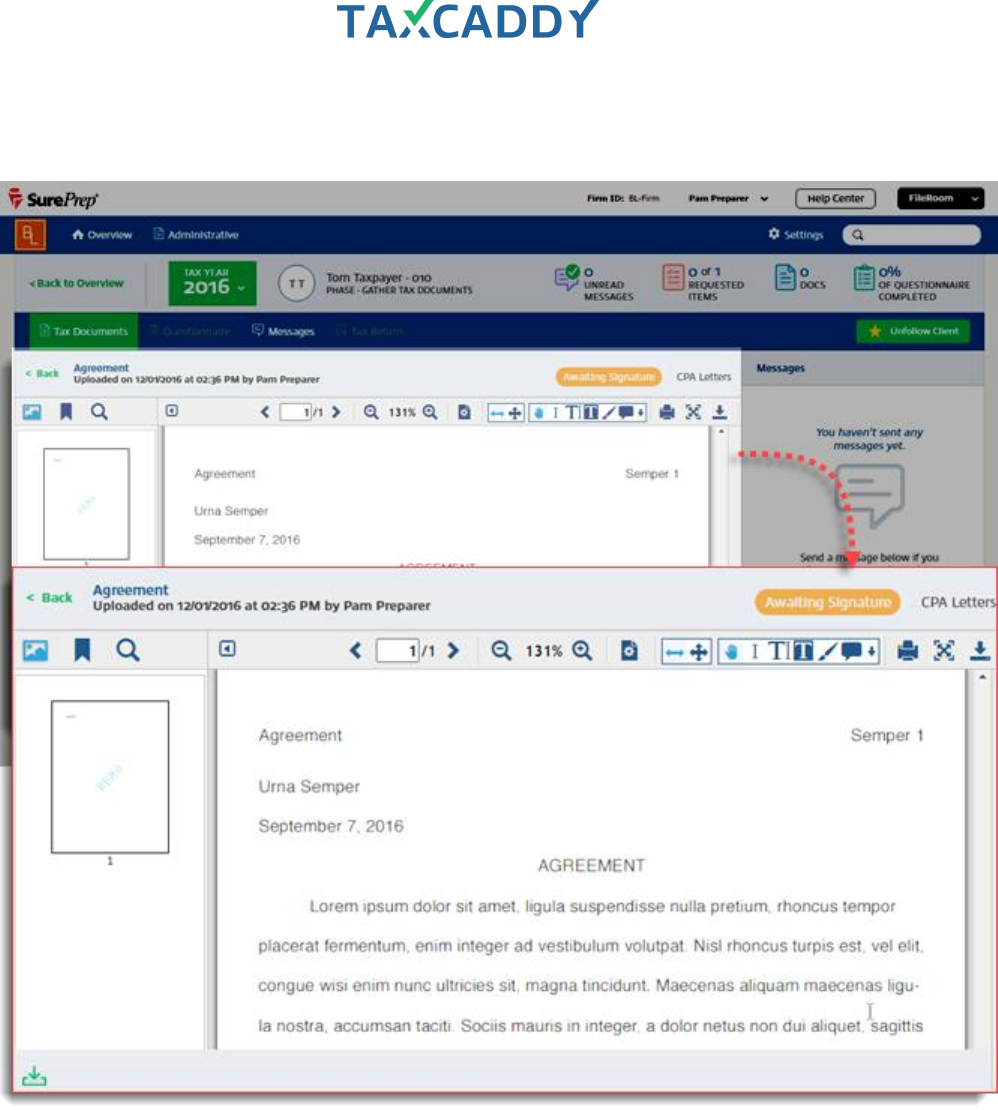
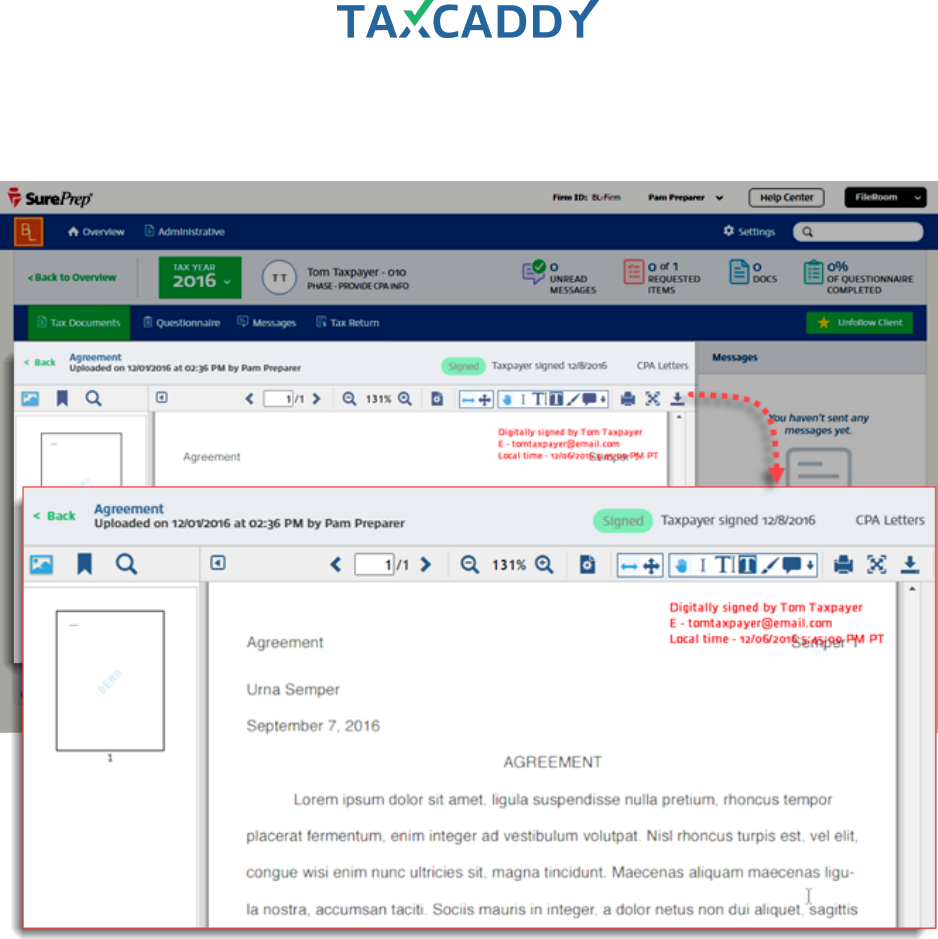
8. Documents that were digitally signed or reviewed by a client are stamped in the top right corner of the first
page of the document. The stamp is visible to all users.
Quick Setup Guide 19
Upload letters to client profiles (individual taxpayers)
Follow these steps to add a To Review or To Sign Requested Item on an individual client’s profile.
Note: Individual To Upload Requested Items via client profiles are coming soon in a future release.
1. Log in to TaxCaddy.
2. Under Clients I’m Following, click a client tile to go to that client's profile.
Quick Setup Guide 20
3. Click Tax Documents and then Requested Items.
Quick Setup Guide 21
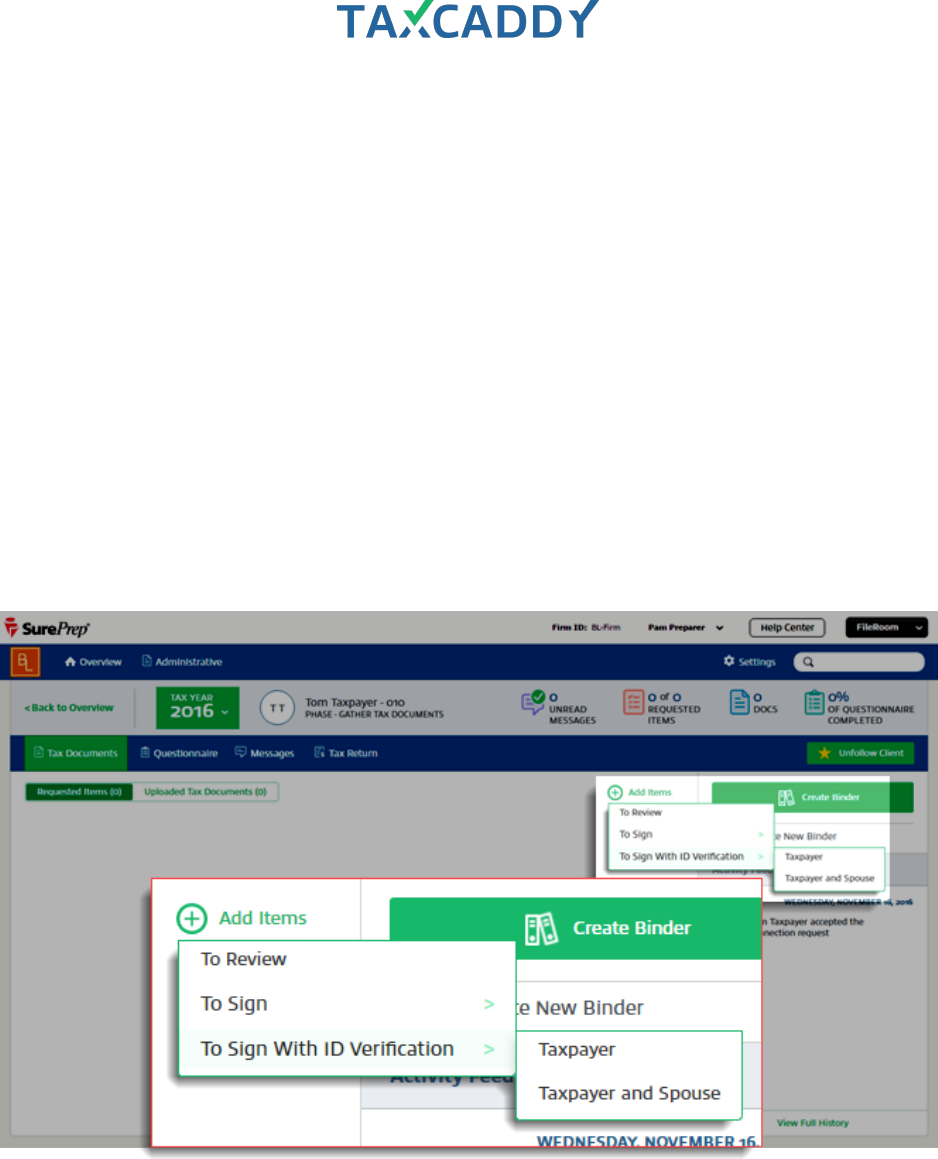
4. Click +Add Items. To upload a document for the client to Review, click To Review. To upload a document for
signature, point to To Sign or To Sign With ID Verification and then select either Taxpayer or Taxpayer and
Spouse, depending on the signature requirement of the document.
To Review: Client marks document as reviewed using the Mark Reviewed button.
To Sign: Client marks document as signed using the Sign & Accept button and entering their first name as
signature capture.
To Sign With ID Verification: Client marks document as signed using the Sign & Accept button, entering their
first name as signature capture and then providing information to confirm their identity using knowledge-
based authentication. If you have specified that the document requires the spouse's signature, the spouse is
prompted to verify their identity using the same KBA process, and may complete their signature process at
the same time as the taxpayer. If either the taxpayer or spouse fails the identity verification, both will be
required to sign the document manually.
Your client is only prompted to complete ID verification once per session, so they can sign other documents
requiring ID verification without completing the knowledge-based authentication (KBA) process again.
Quick Setup Guide 22
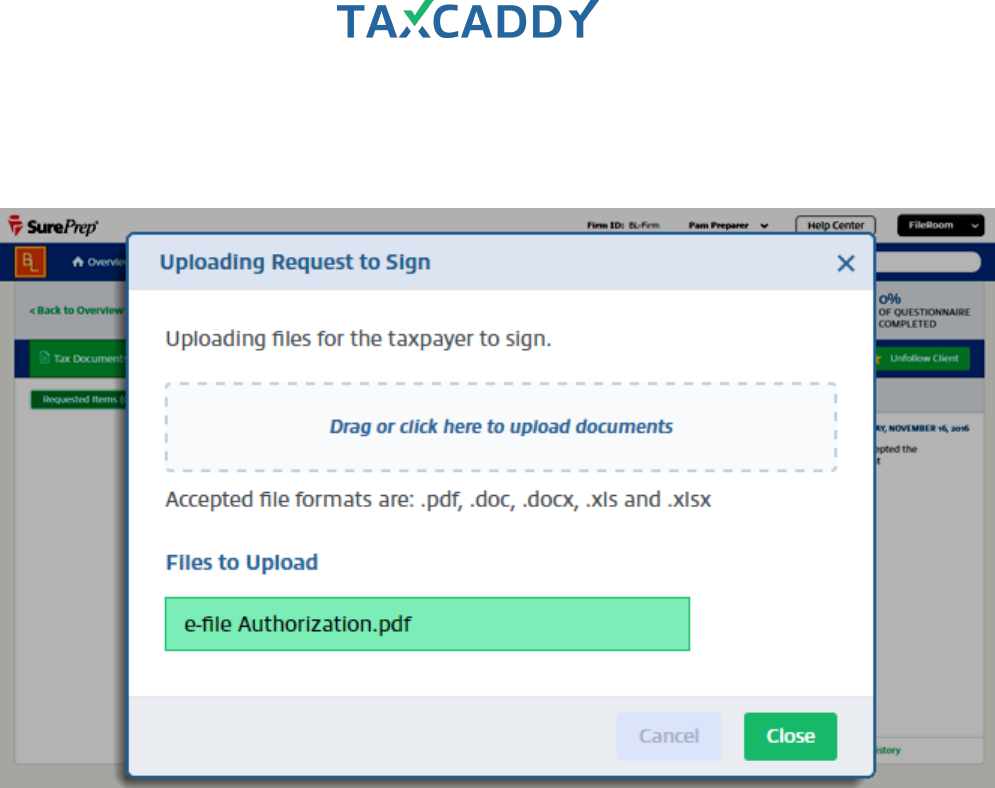
5. Select a file to upload from your device. The file appears under Files to Upload. Click Close.
Tip: You can upload fillable PDFs and password-protected PDFs and those features will be preserved.
Quick Setup Guide 24
Upload tax documents to client profiles (individual taxpayers)
Follow these steps to upload a document to a client's Uploaded Tax Documents.
1. Log in to TaxCaddy.
2. Under Clients I’m Following, click a client tile to go to that client's profile.
Quick Setup Guide 25
3. Click Tax Documents and then click Uploaded Tax Documents.
4. Click or drag documents onto the drop zone.
Quick Setup Guide 26
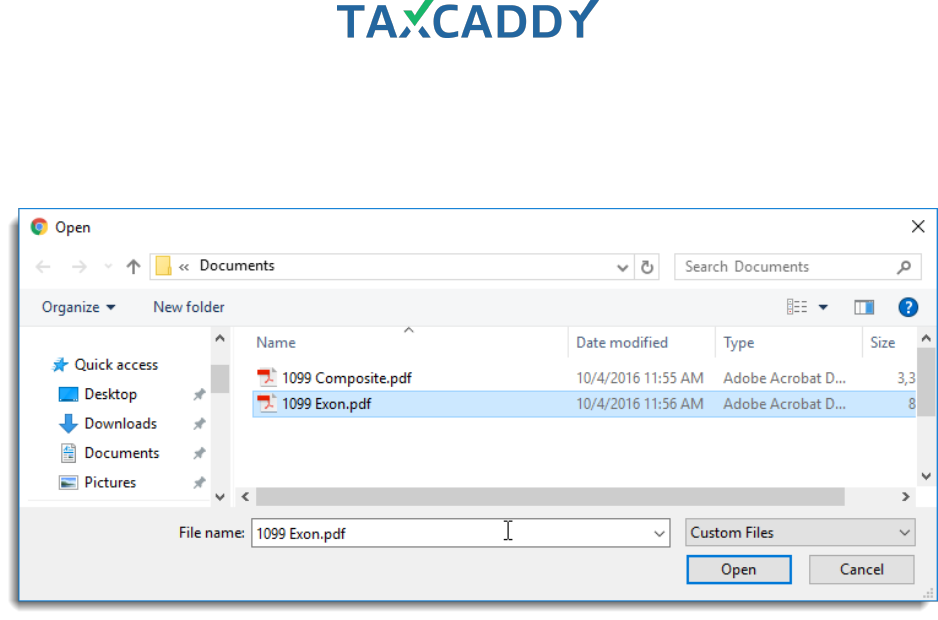
5. Use the file picker to select a document(s) to upload.
Tip: This step is skipped when you drag documents to the drop zone.
Quick Setup Guide 27
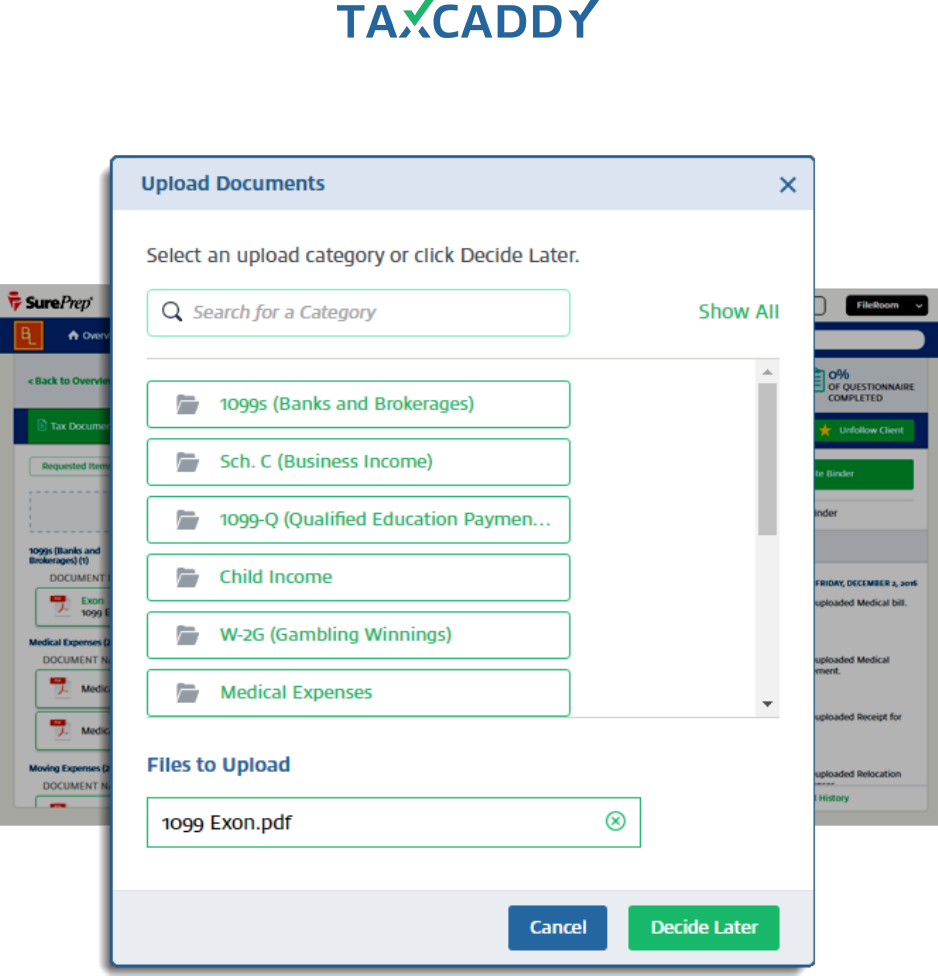
6. Select a category for the document.
Quick Setup Guide 28
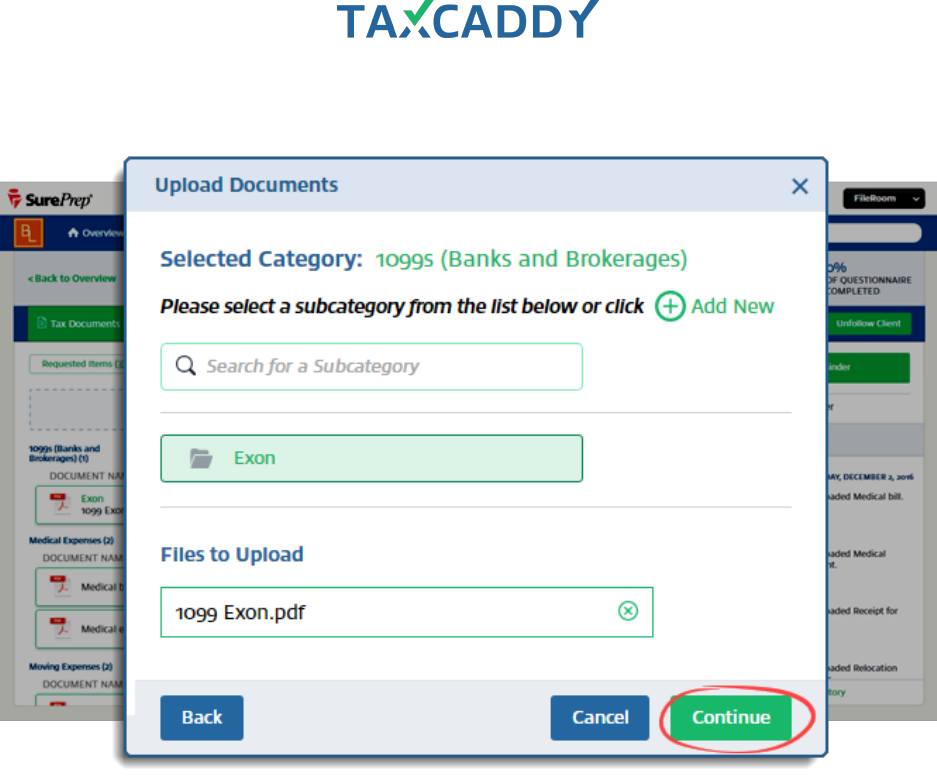
7. Select a subcategory for the document and then click Continue.
Quick Setup Guide 29
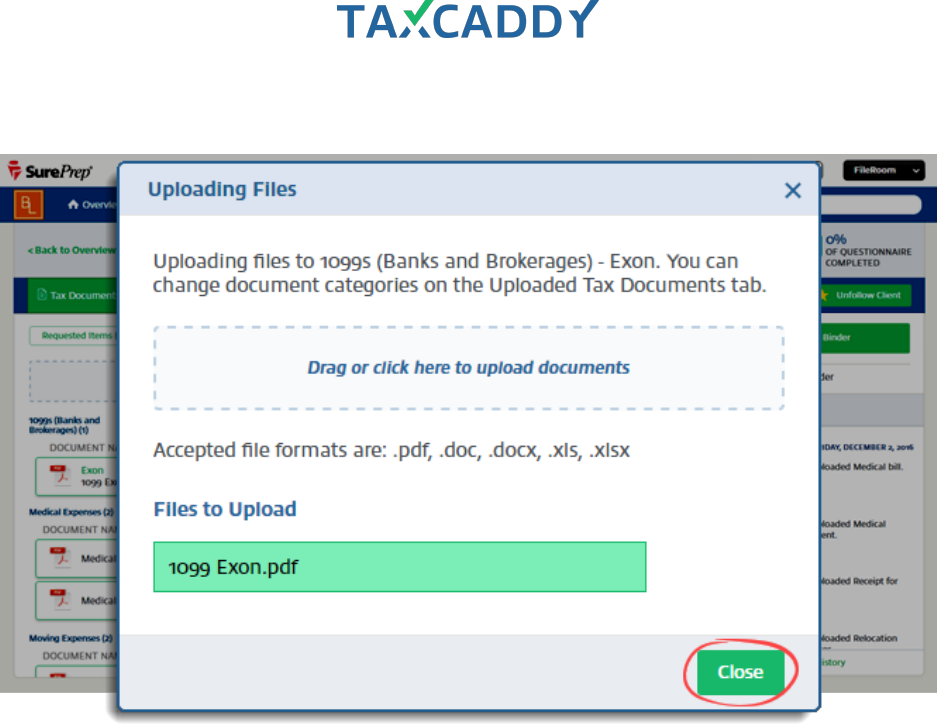
8. Click Close.
Quick Setup Guide 31
Create a binder using a client’s TaxCaddy documents
Follow these steps to create a binder using a client's tax documents gathered in TaxCaddy.
Tip: Documents within the category Schedule K-1s will always be moved to the end of the list of documents.
1. Log in to TaxCaddy.
2. Under Clients I’m Following, click a client tile to go to that client's profile.
Quick Setup Guide 32
3. Click Tax Documents and then click Uploaded Tax Documents. The client’s tax documents are organized by
category.
4. Click the Create Binder button.
Quick Setup Guide 33
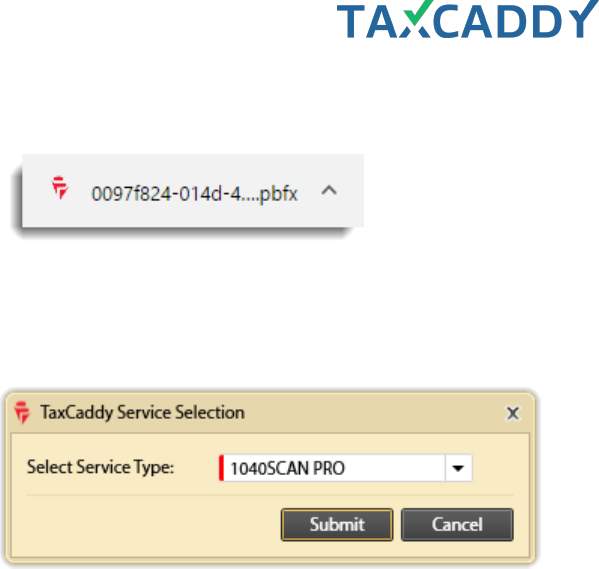
5. Your browser downloads a PBFx file. Click the file to launch the SurePrep submission screen.
6. Select the service type and then click Submit.
Tip: Some firms may have their service selected automatically and bypass this step.
Quick Setup Guide 34
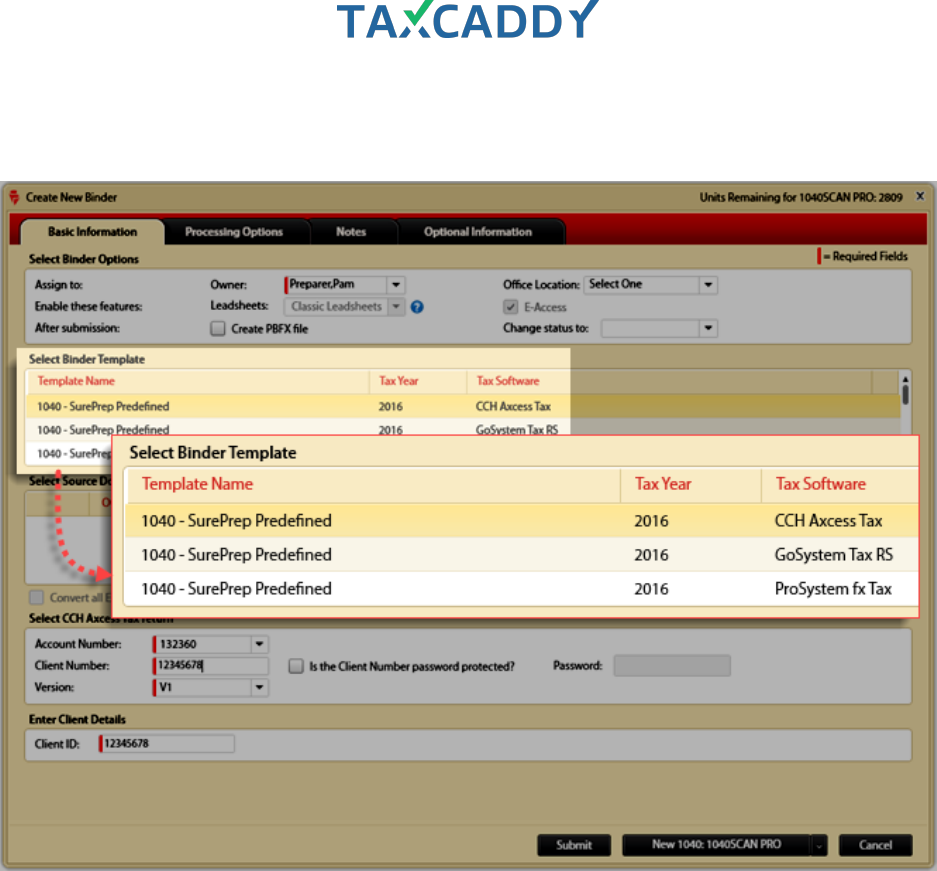
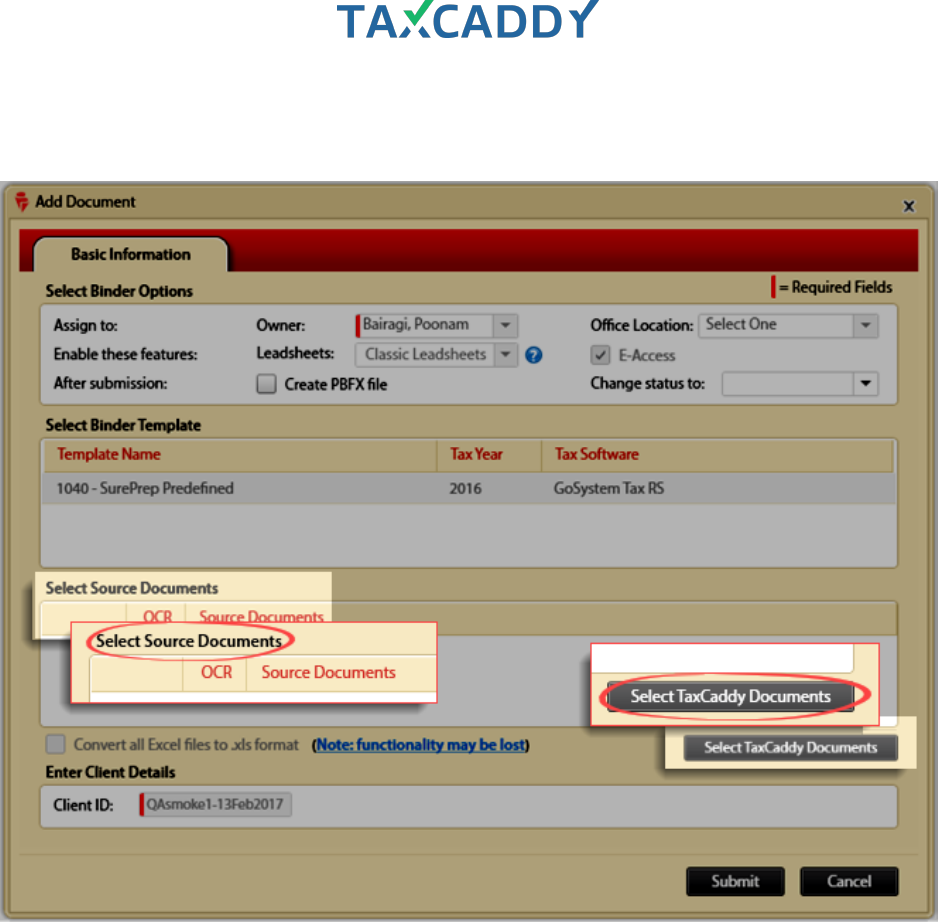
7. The Create New Binder window appears. Under Select Binder template, select the template for your tax
software.

Quick Setup Guide 35
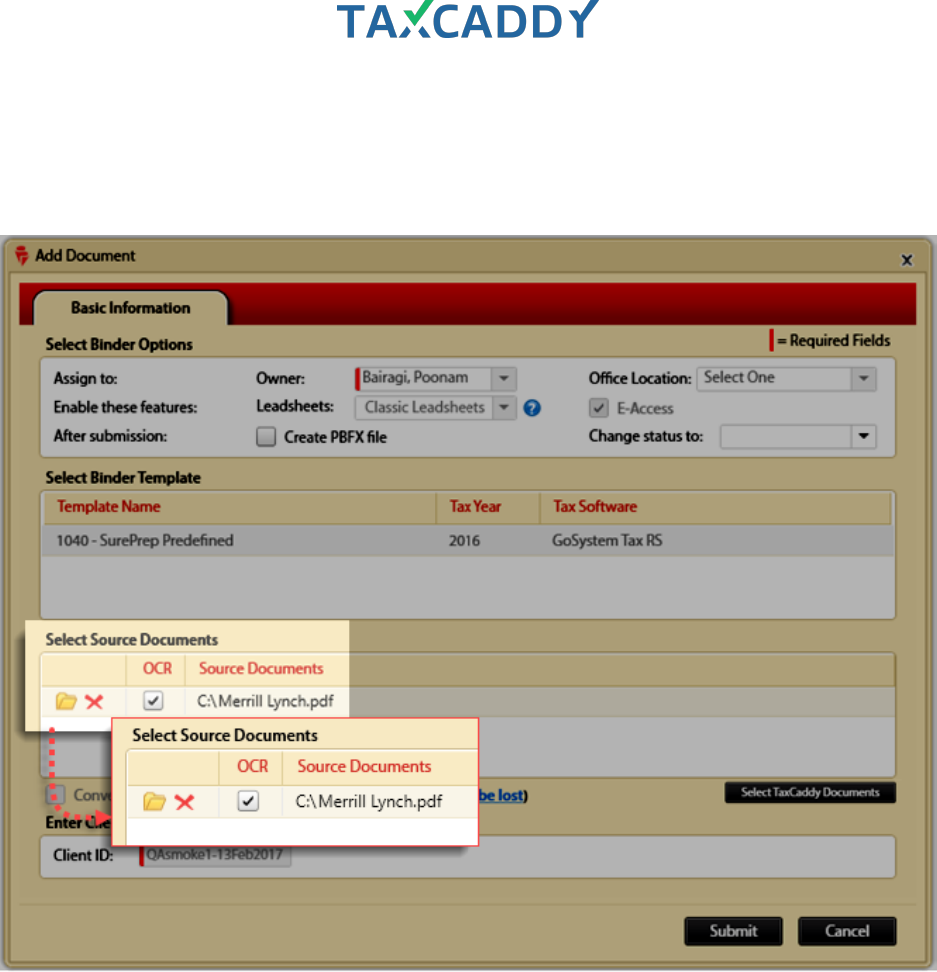
8. Under Select Source Documents, click the Select TaxCaddy Documents button.
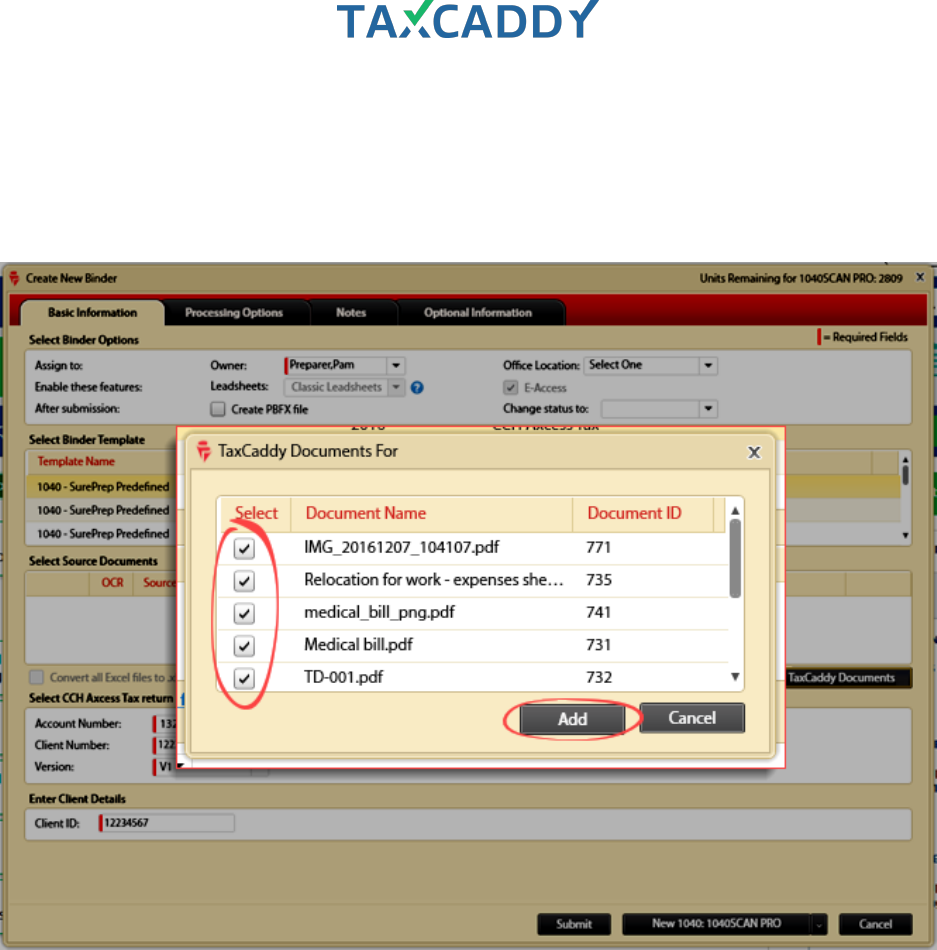
Quick Setup Guide 36
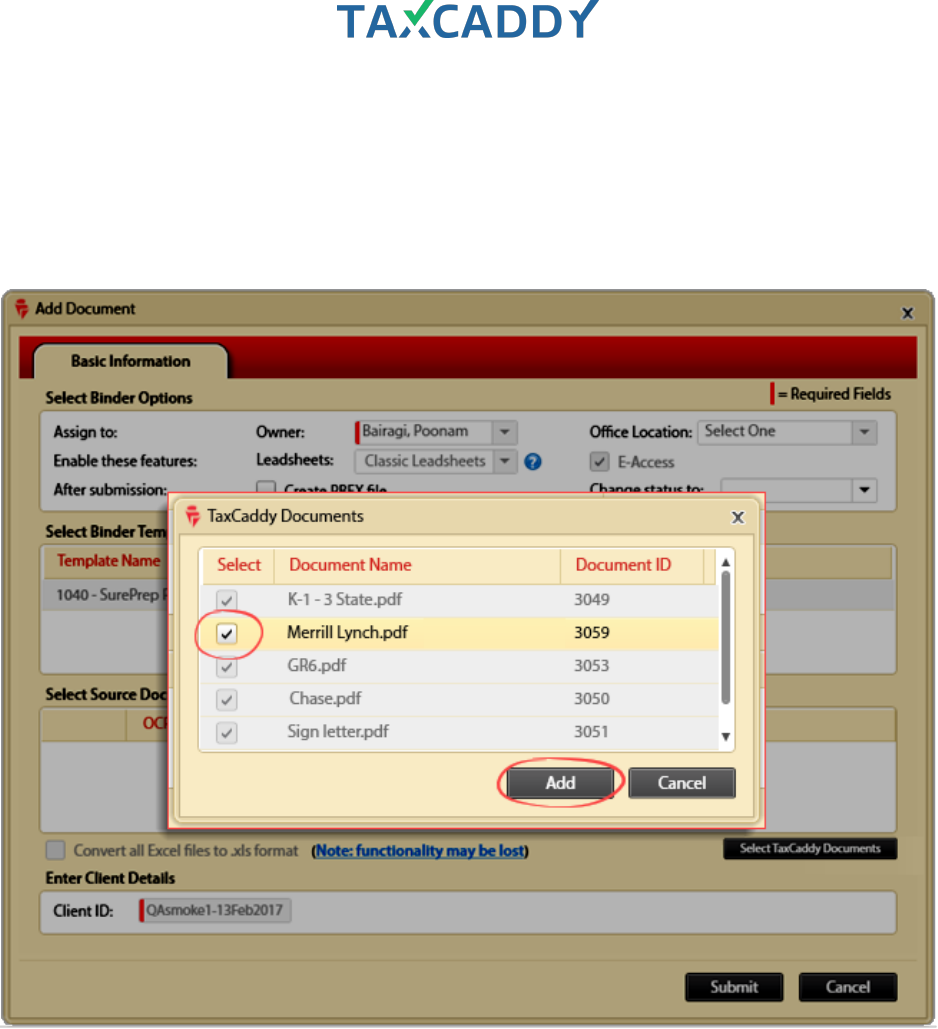
9. Select the documents to include in the binder and then click the Add button.
Tip: Document names are appended with a unique document ID when they are added to a binder. The
Document ID appears after the document name and is preceded by an underscore. Document names longer
than 45 characters are truncated to allow space for the unique ID.
Quick Setup Guide 37
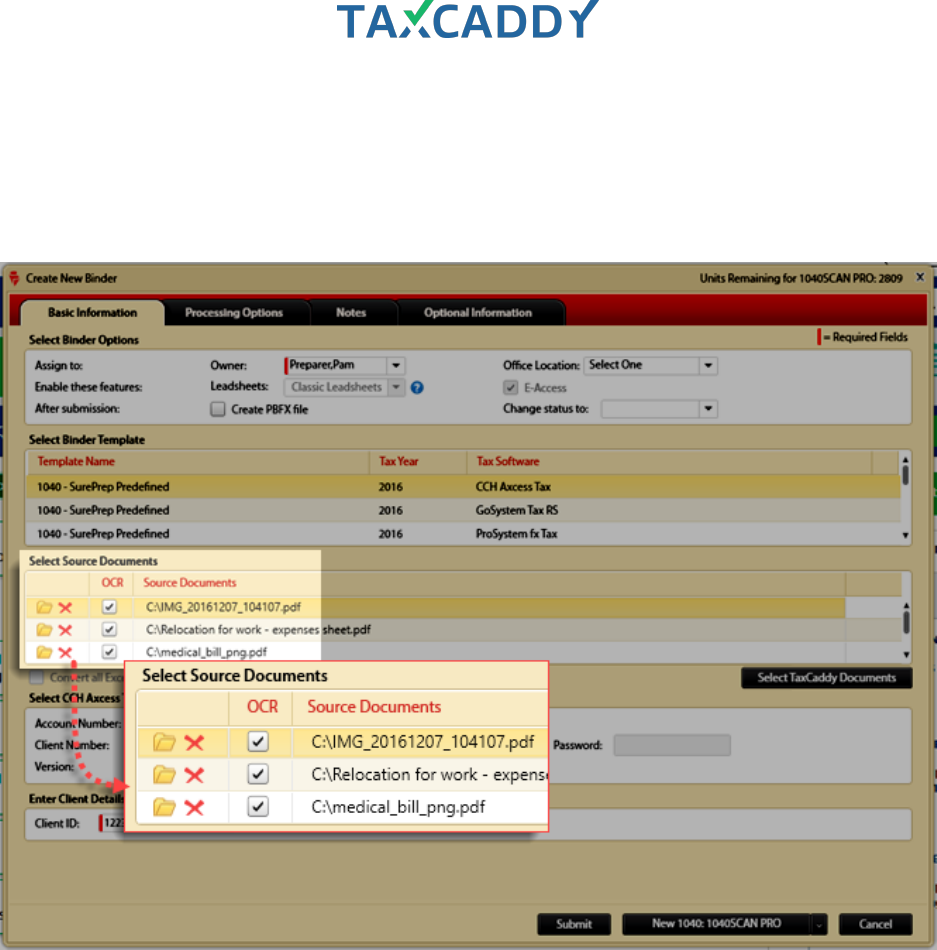
10. The client's documents are imported from TaxCaddy and the documents are automatically selected to be
submitted for OCR (if an OCR SurePrep service was selected).
Tip: Documents within the category Schedule K-1s will always be moved to the end of the list of
documents.
Quick Setup Guide 38
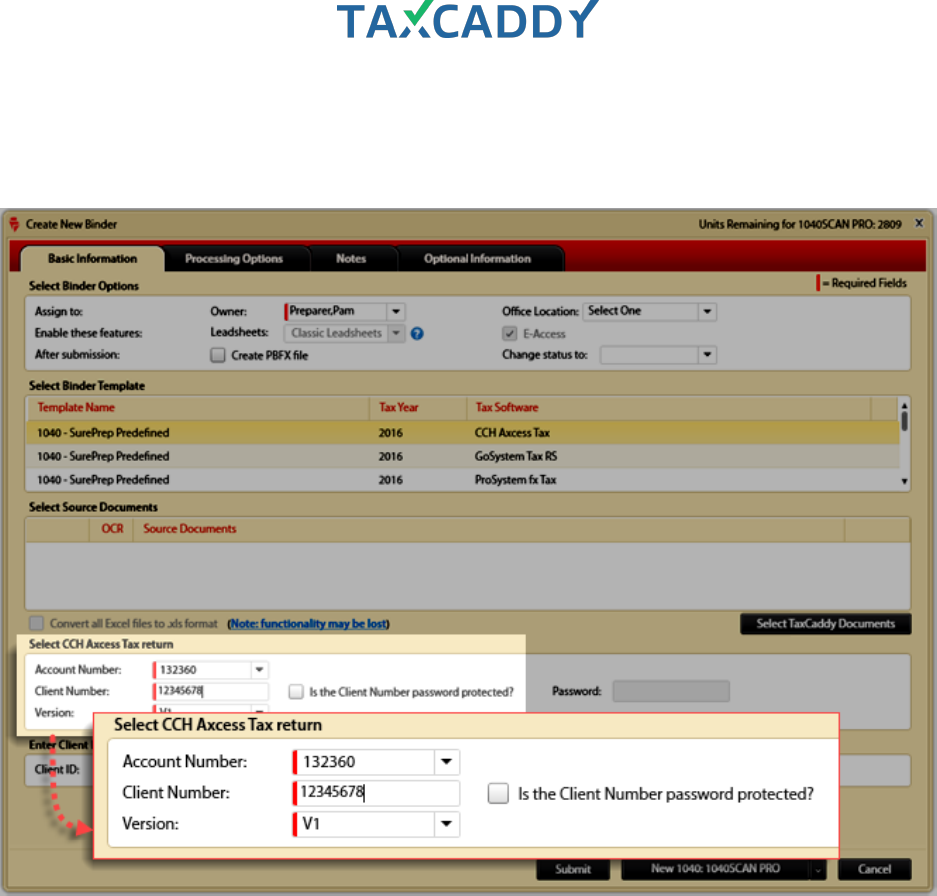
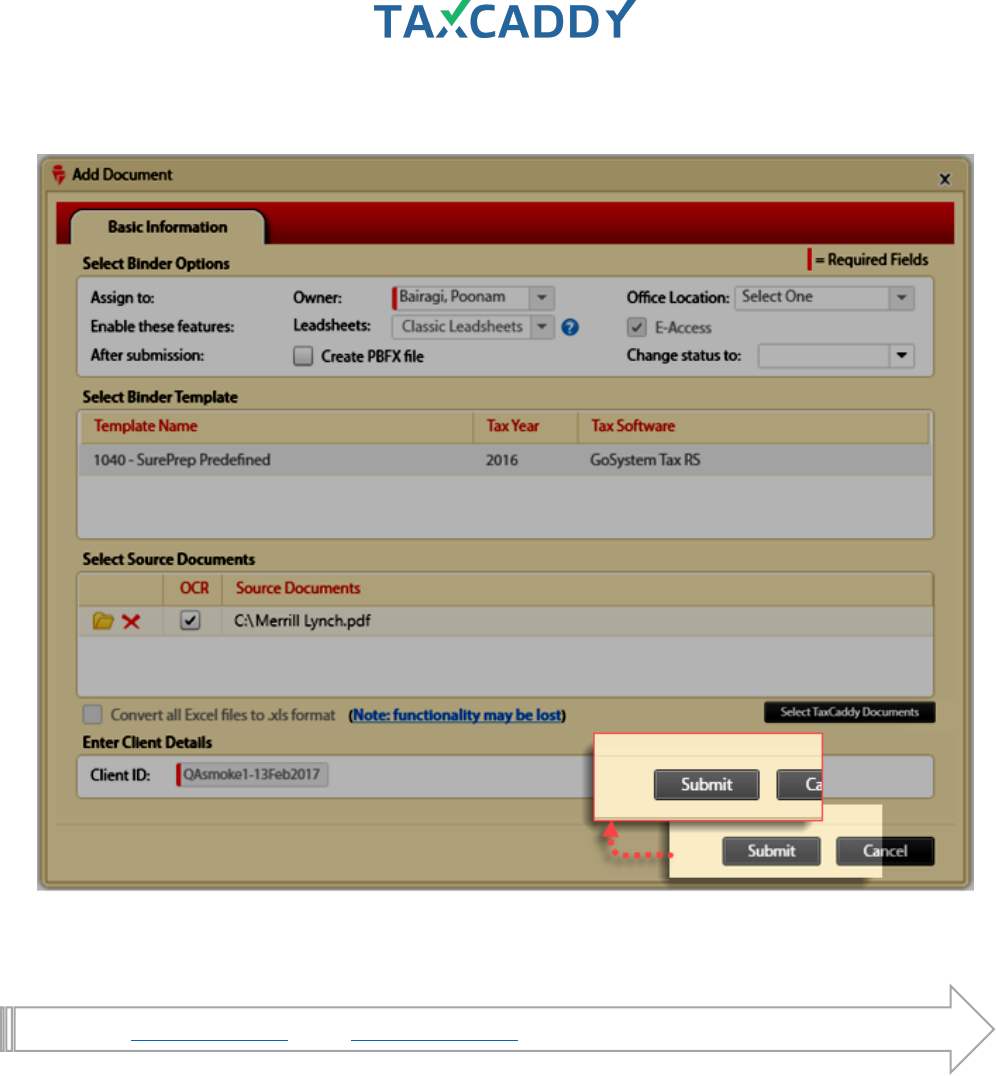
11. Enter the Tax Client ID and other details to link the client in the related tax software.
Tip: This will be automatically populated in a future release of TaxCaddy.
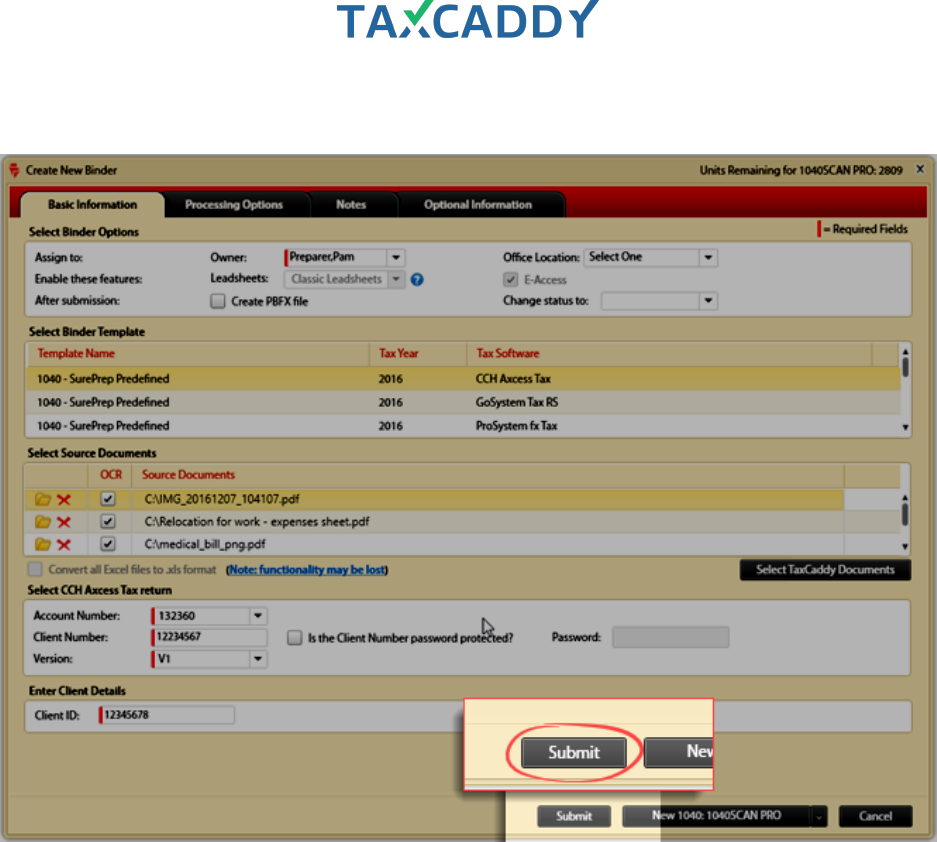
Quick Setup Guide 39
12. Ensure that all information is correct and then click Submit. The binder is created.
Quick Setup Guide 40
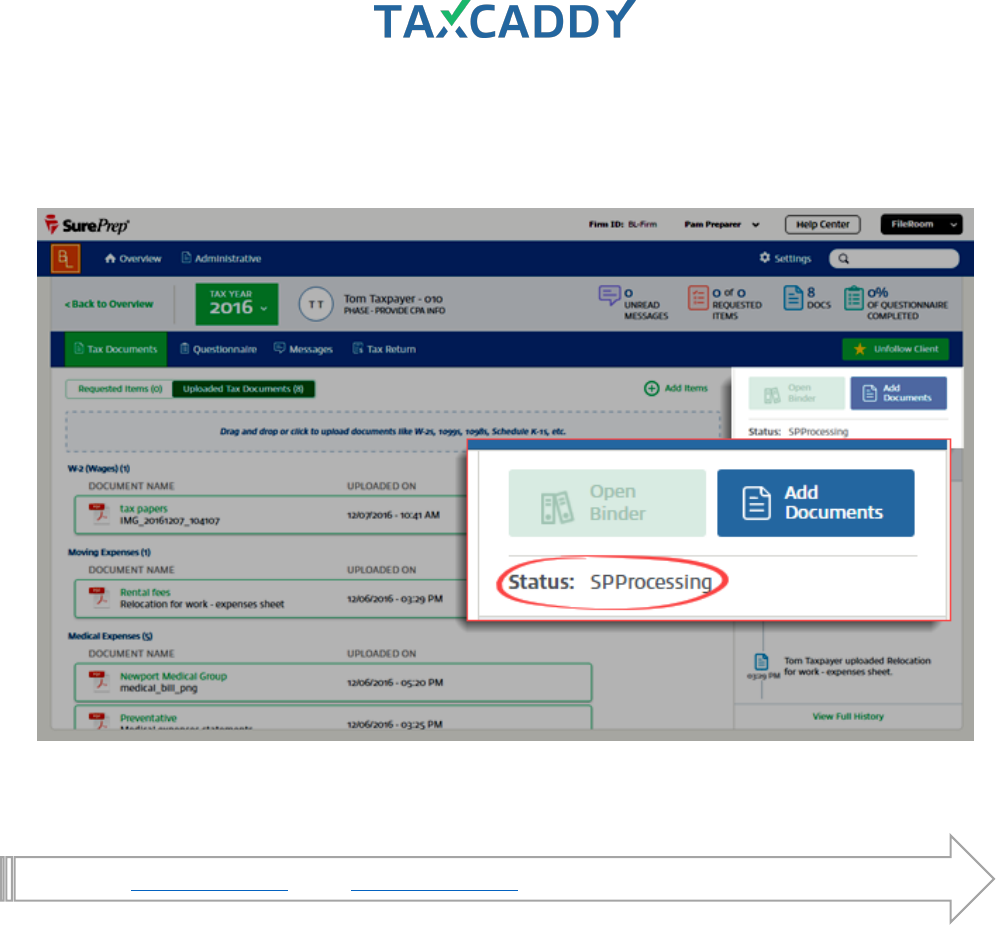
13. The binder status is updated to SP Processing while the binder is in processing with SurePrep. Once the
binder is no longer in SP Processing you can open the binder by clicking the Open Binder button (applicable
for opening both verification wizards and SPbinder).
Go back to Quick Start Guide. Next: Upload the return.
Quick Setup Guide 41
Add documents to an existing binder
Follow these steps to add documents to an existing binder. Note that the binder must be created through
TaxCaddy in order to add documents to the binder through TaxCaddy.
Tip: You can't add additional documents to a binder while the binder is still in SP Processing. Once the binder is
no longer in SP Processing, you will be able to add additional documents from the client's Tax Documents tab.
1. Log in to TaxCaddy.
2. Go to a client profile by clicking a client tile on the Overview screen.
Quick Setup Guide 42
3. Click Tax Documents.
Quick Setup Guide 43
4. An icon indicates which icons have already been added to the binder. These documents will not be added to
the binder again.
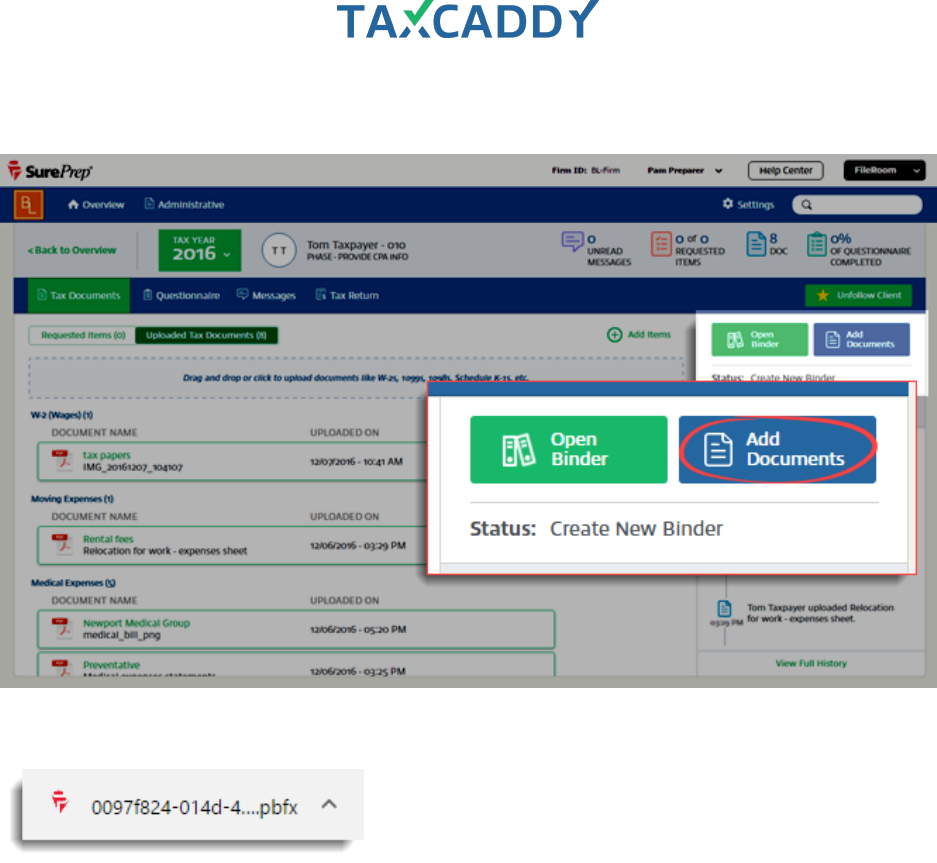
Quick Setup Guide 44
5. Click Add Documents.
6. Your browser downloads a PBFx file. Click the file to launch the SurePrep submission screen.
Quick Setup Guide 45
7. The Add Document window opens. Under Select Source Documents, click the Select TaxCaddy
Documents button.
Quick Setup Guide 46
8. Select the documents to include in the binder and then click the Add button. Documents that have already
been added to the binder are grayed out and cannot be added again.
Tip: Document names are appended with a unique document ID when they are added to a binder. The
Document ID appears after the document name and is preceded by an underscore. Document names longer
than 45 characters are truncated to allow space for the unique ID.
Quick Setup Guide 47
9. The client's documents are imported from TaxCaddy. Select the documents to submit for OCR (if applicable).
Tip: Documents within the category Schedule K-1s will always be moved to the end of the list of
documents.
Quick Setup Guide 49
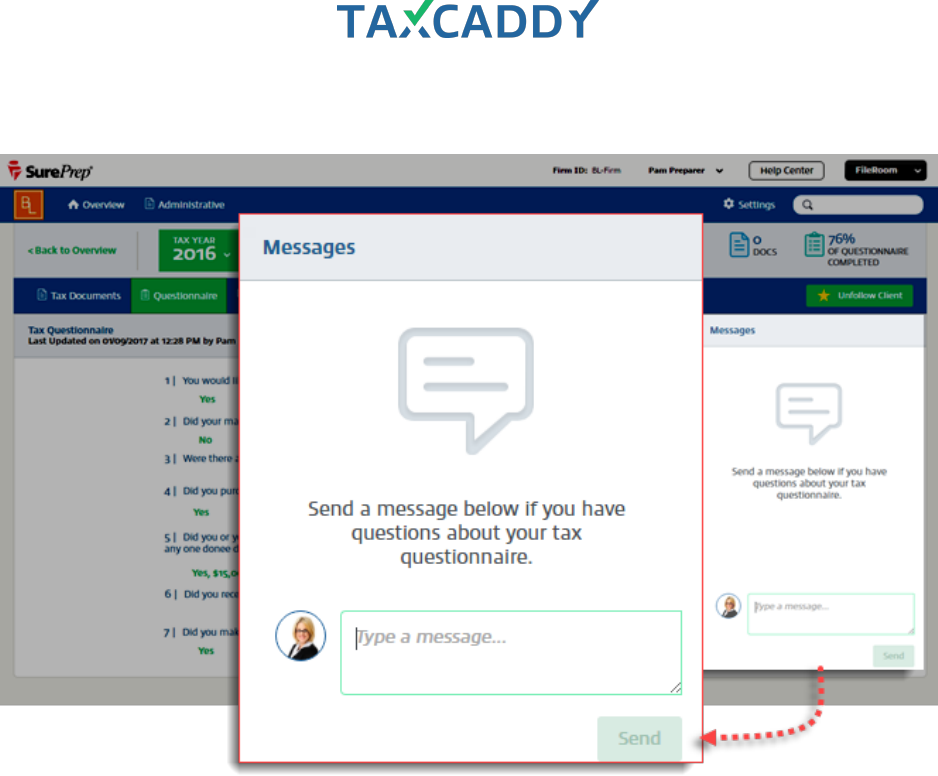
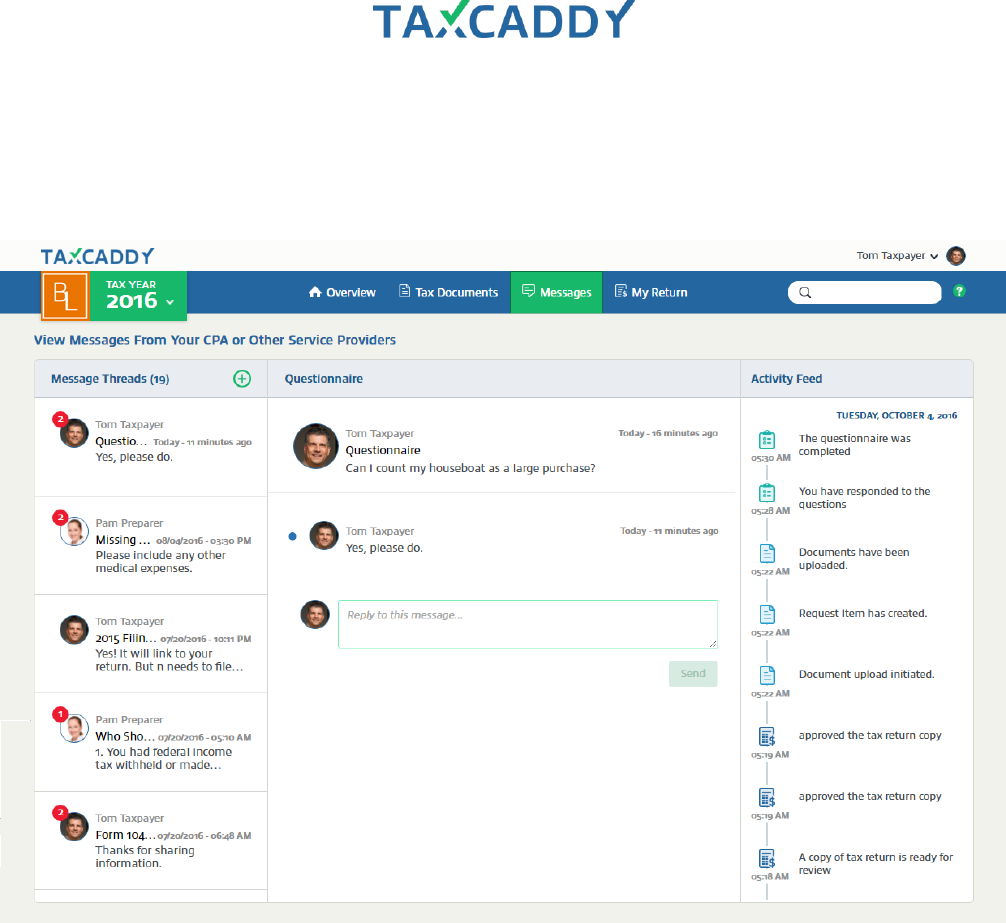
Questionnaire
Questionnaire displays the taxpayer’s questionnaire and answers they have provided. The client can also
message you about the questionnaire using the Messages panel on the right.

Quick Setup Guide 50
View client’s questionnaire
Follow these steps to view a client's questionnaire.
1. Log in to TaxCaddy.
2. Go to a client profile by clicking a client tile on the Overview screen.
Quick Setup Guide 51
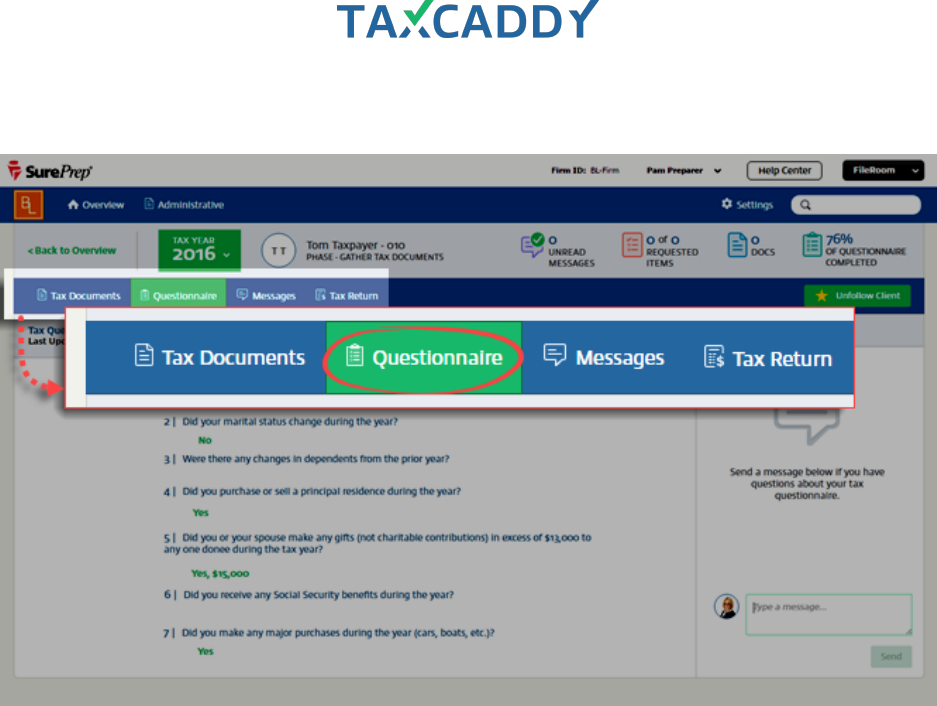
3. Click Questionnaire.
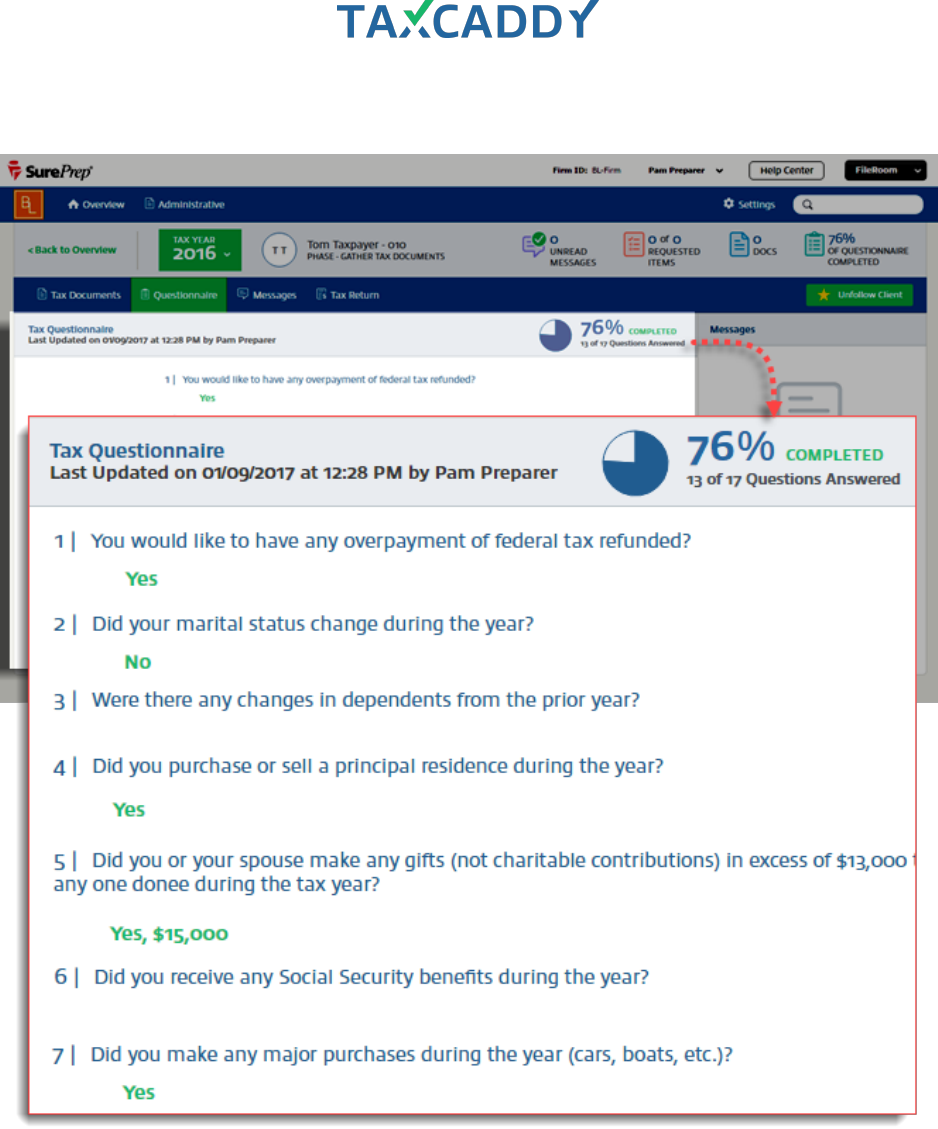
Quick Setup Guide 52
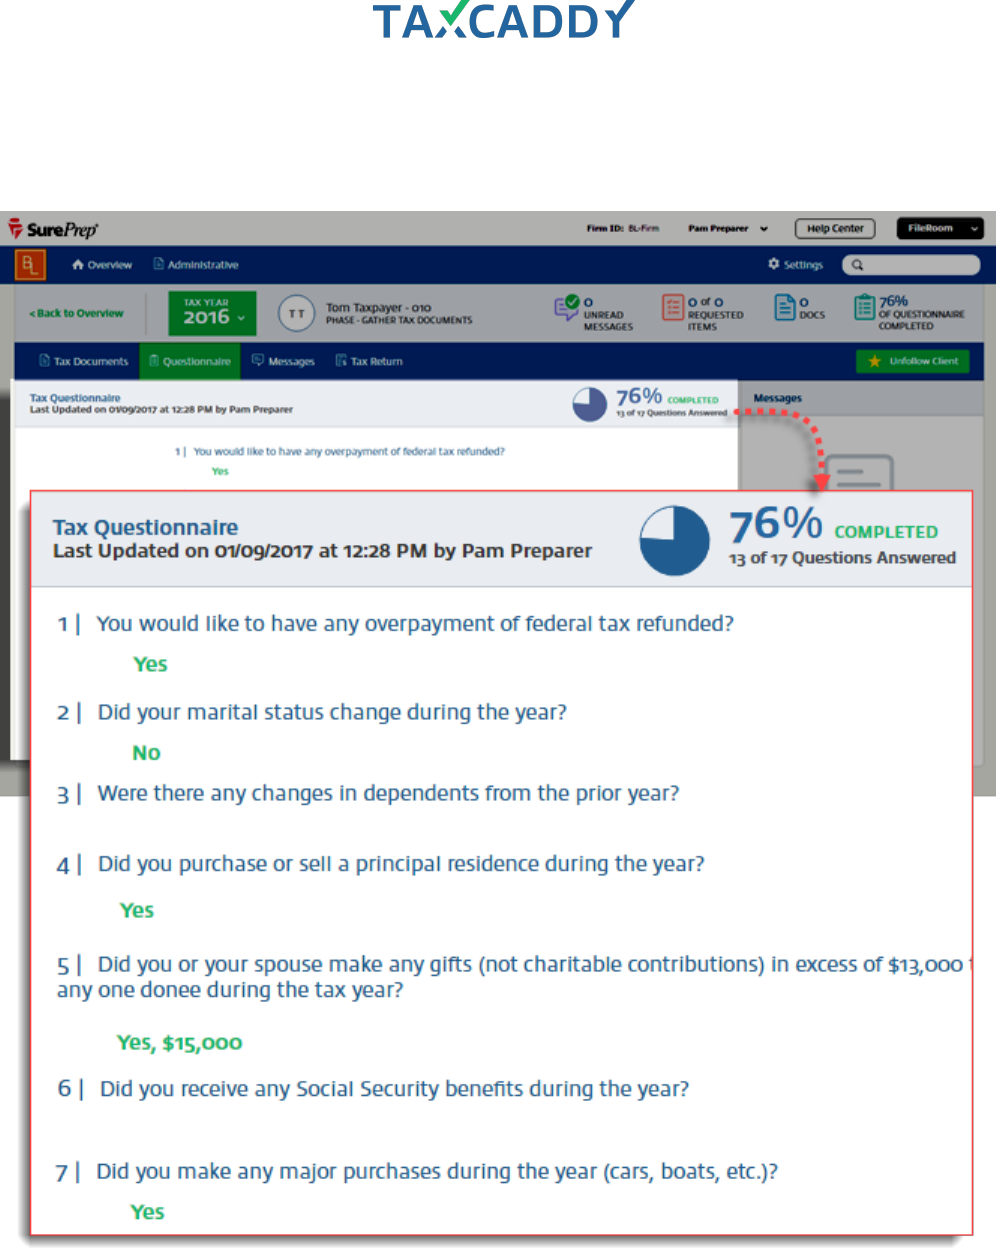
4. Answers the client has provided appear under each question.
Quick Setup Guide 53
5. You can correspond with the client using the Messages panel on the right.
20.

Quick Setup Guide 54
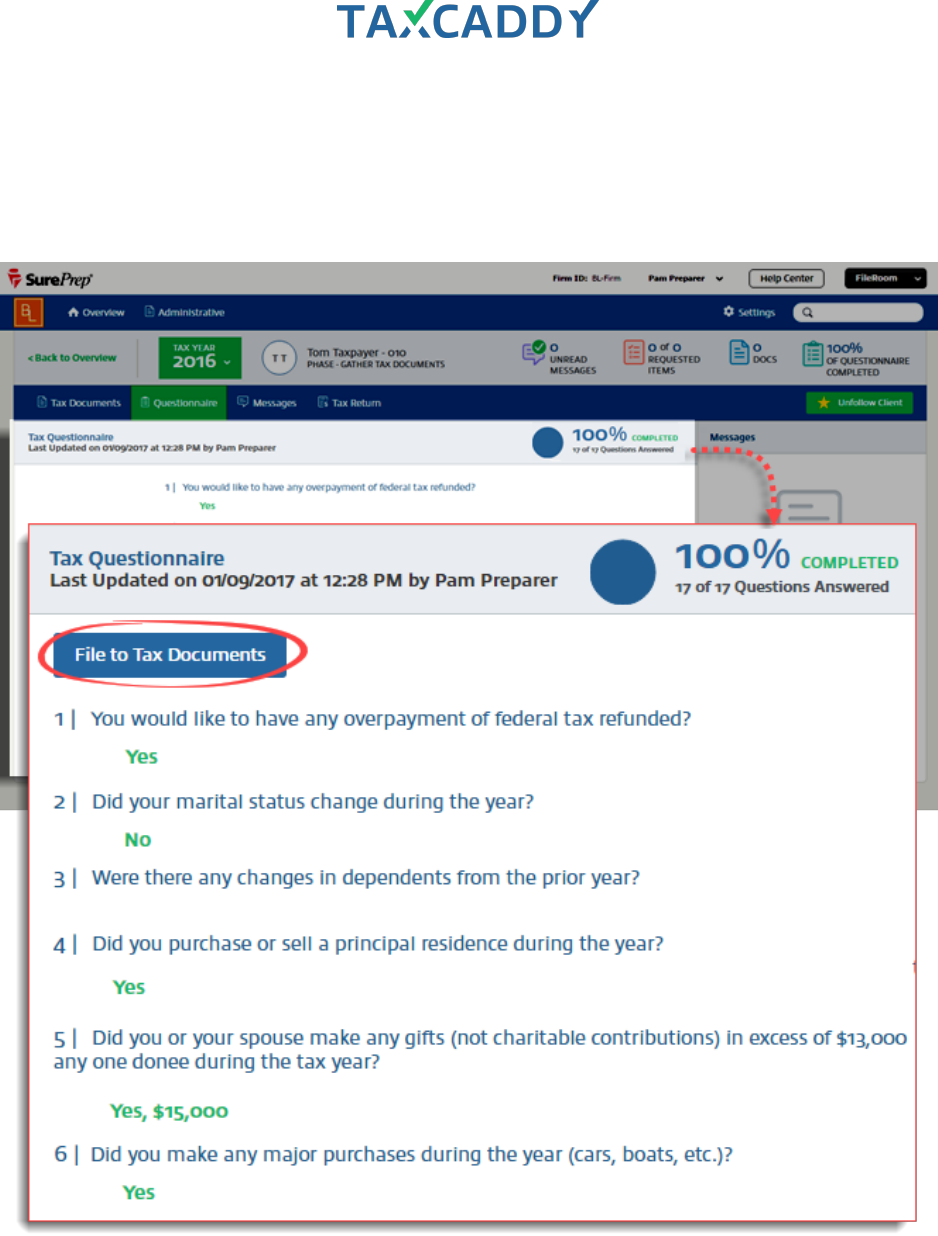
File client's questionnaire to Tax Documents
Follow these steps to file a client's questionnaire to their Uploaded Tax Documents.
1. Log in to TaxCaddy.
2. Go to a client profile by clicking a client tile on the Overview screen.

Quick Setup Guide 55
3. Click Questionnaire.
Quick Setup Guide 56
4. The questionnaire progress appears at the top, and answers the client has provided appear under each
question. Click File to Tax Documents.
Tip: Once you file the questionnaire to Tax Documents, the client won’t be able to answer or edit any
questions.
Quick Setup Guide 57
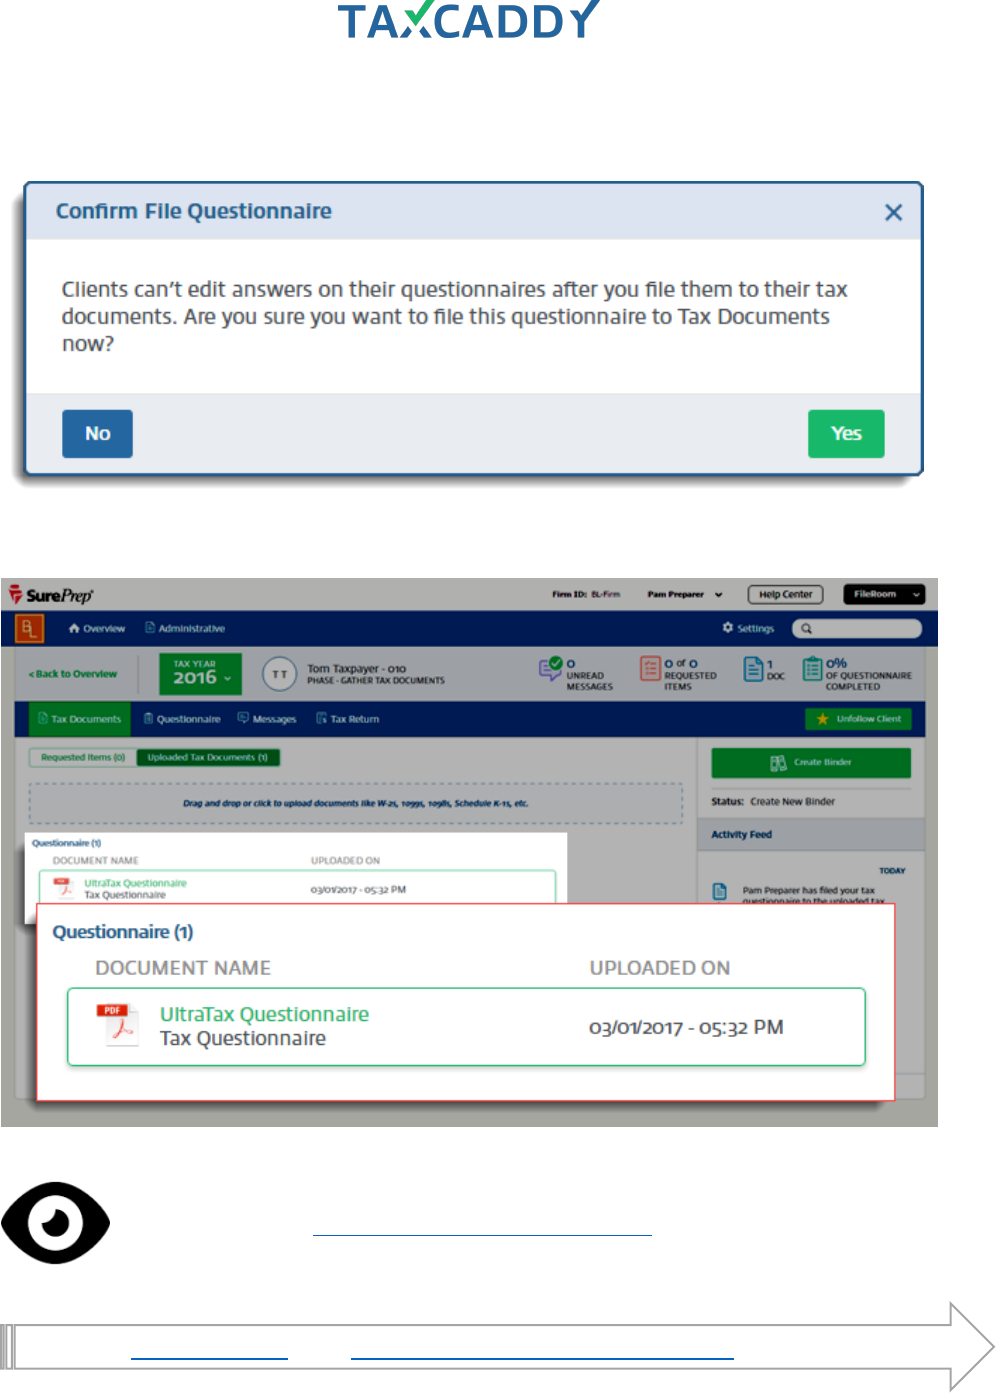
21. TaxCaddy asks if you are sure you want to file the questionnaire to Tax Documents. Click Yes. TaxCaddy
confirms the questionnaire was successfully printed to PDF format.
The questionnaire is filed to the client’s Uploaded Tax Documents, under the category Questionnaire.
See Taxpayer View: Questionnaire filed to Tax Documents
Go back to Quick Start Guide. Next: Upload any other items to Tax Documents.
Quick Setup Guide 58
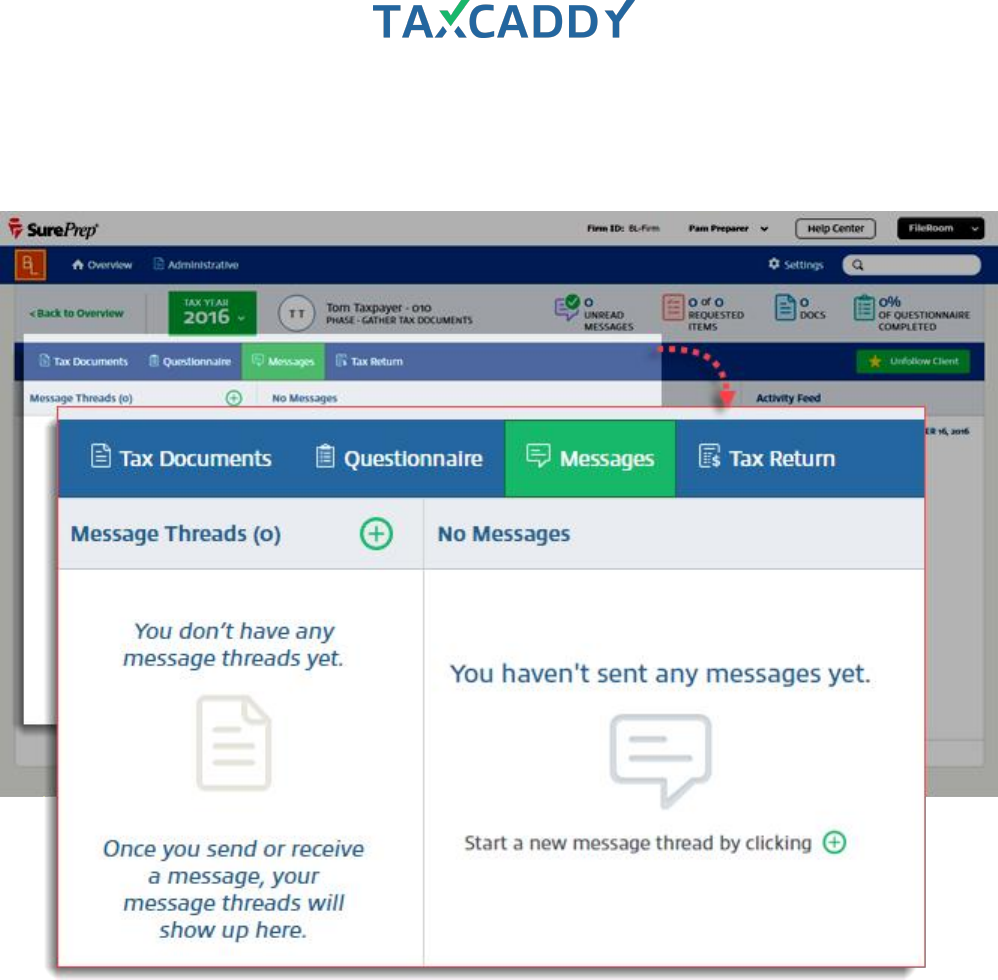
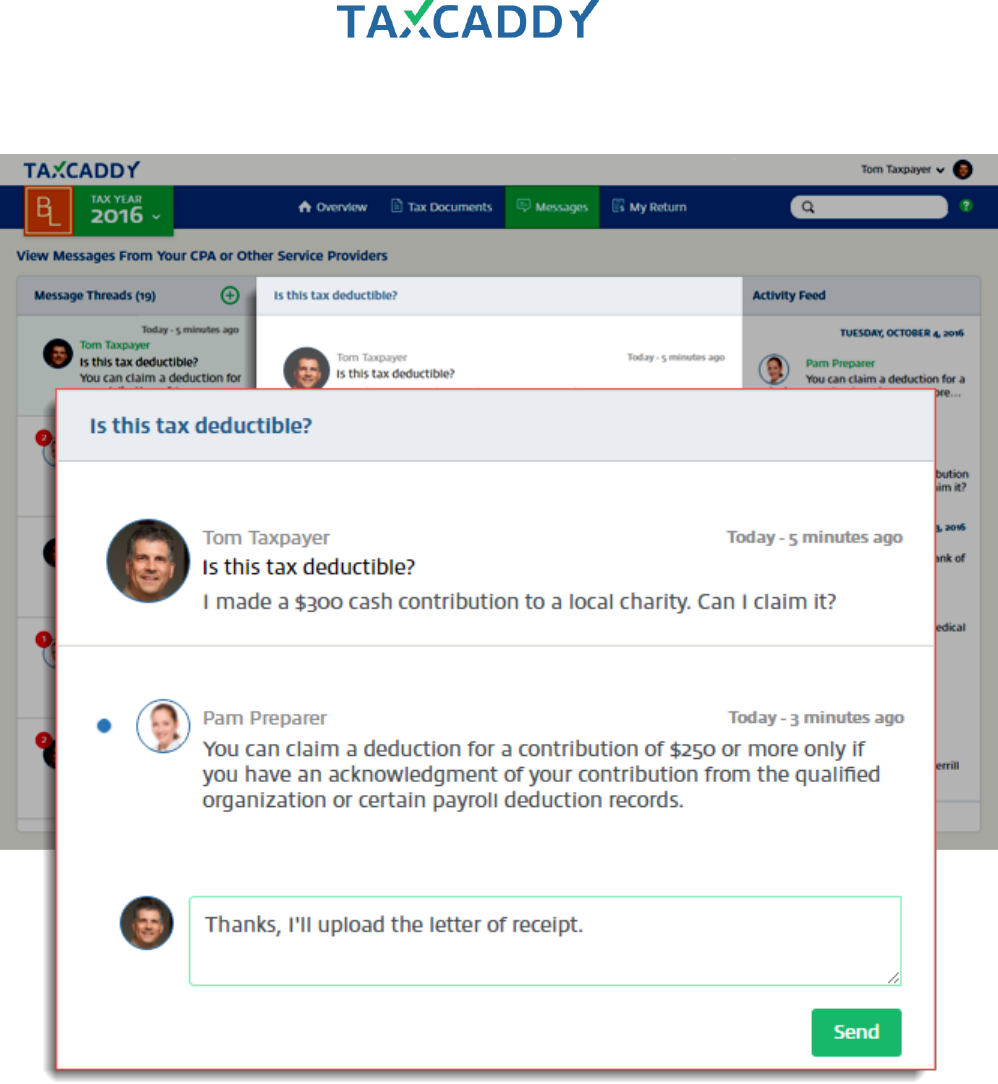
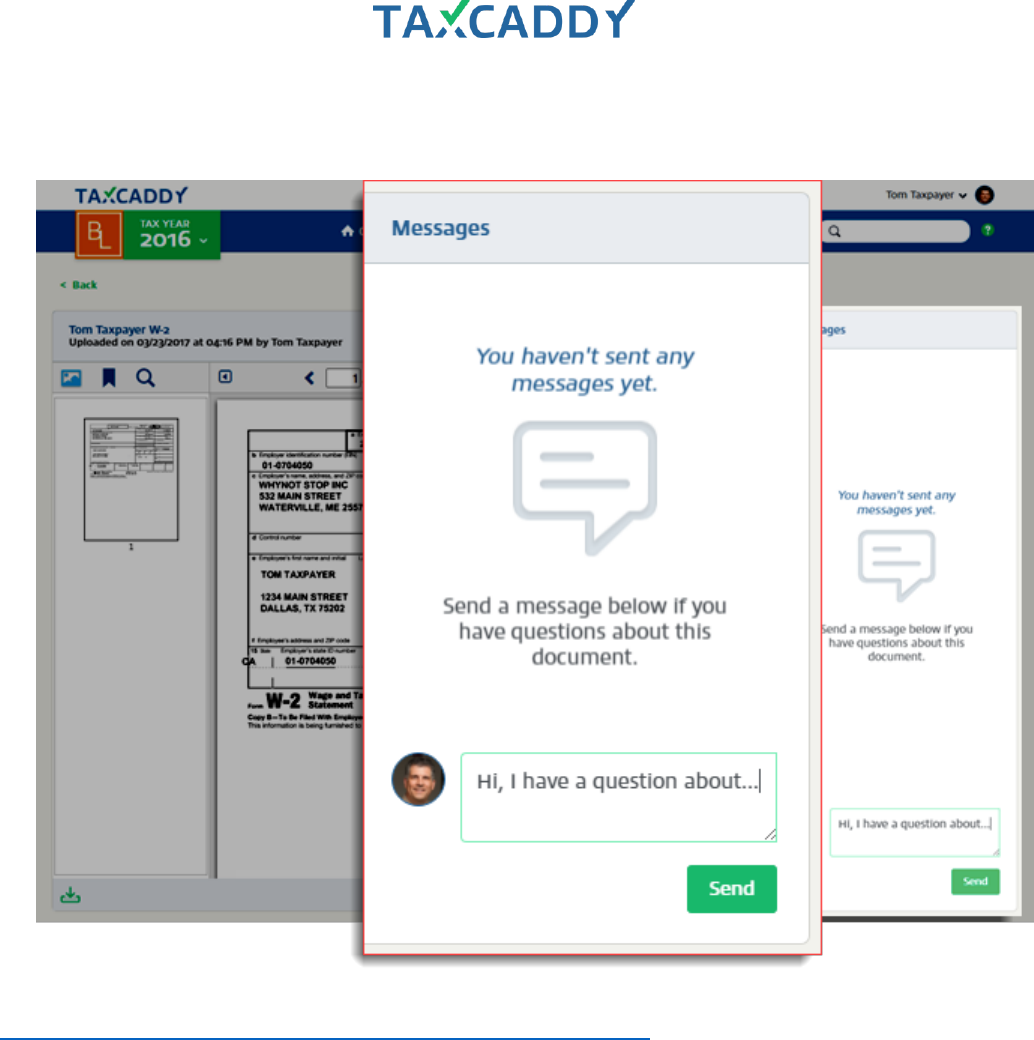
Messages
The Messages screen contains the message threads between you/theCPA and the taxpayer. Message threads
can be associated with specific documents, each version of the return, or the questionnaire.

Quick Setup Guide 59
Message your clients
The Messages tab on each client profile contains message threads between you (or others from your firm) and
the client. You can create new threads on the Messages tab, or associate message threads with specific
documents by sending a message from the message panel in document view.
Follow these steps to message a client from the Messages tab on a client profile.
1. Log in to TaxCaddy.
2. Under Clients I’m Following, click a client tile to go to that client's profile.
Quick Setup Guide 60
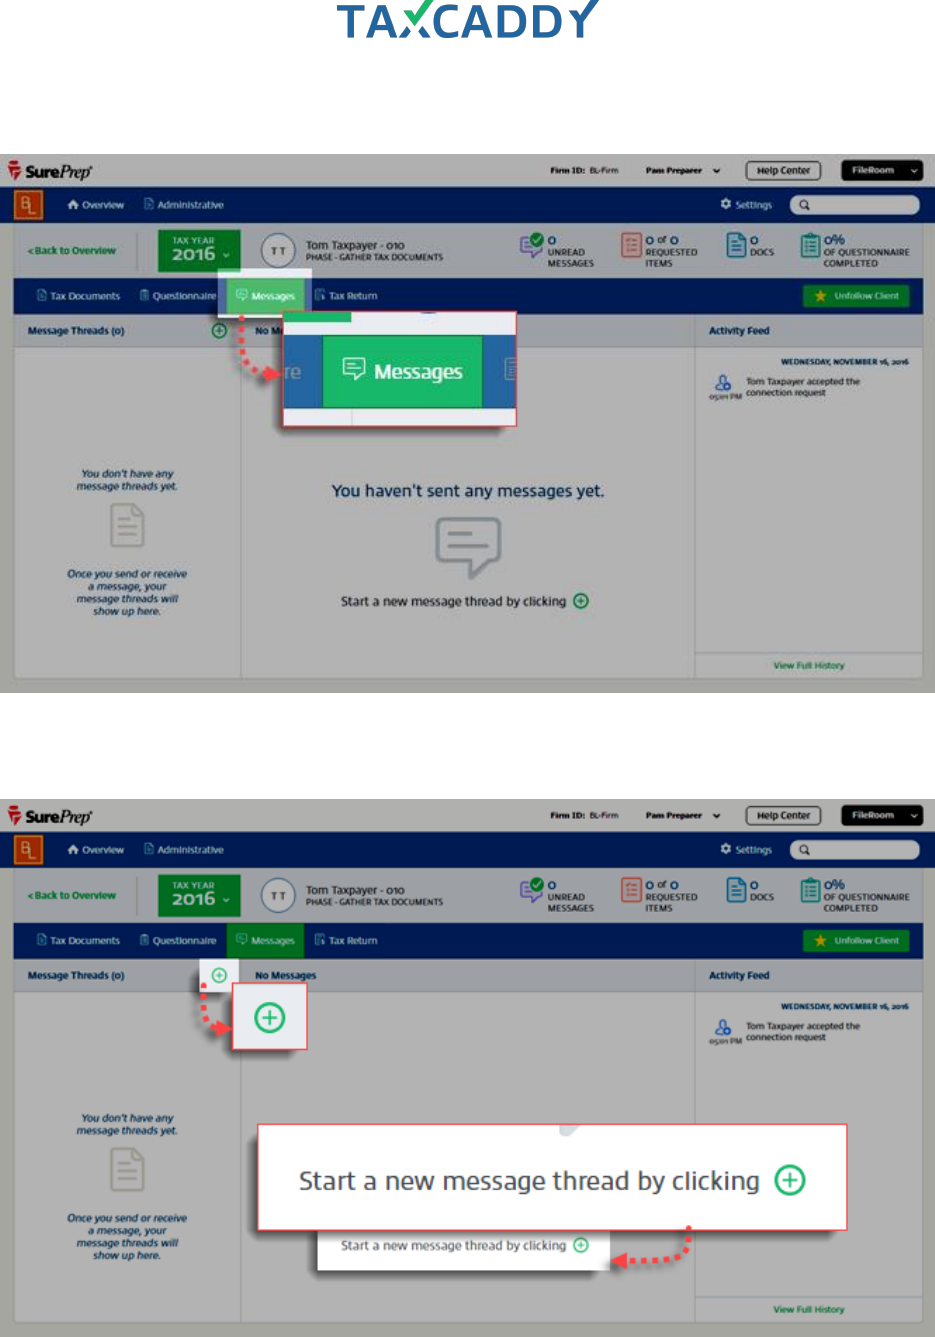
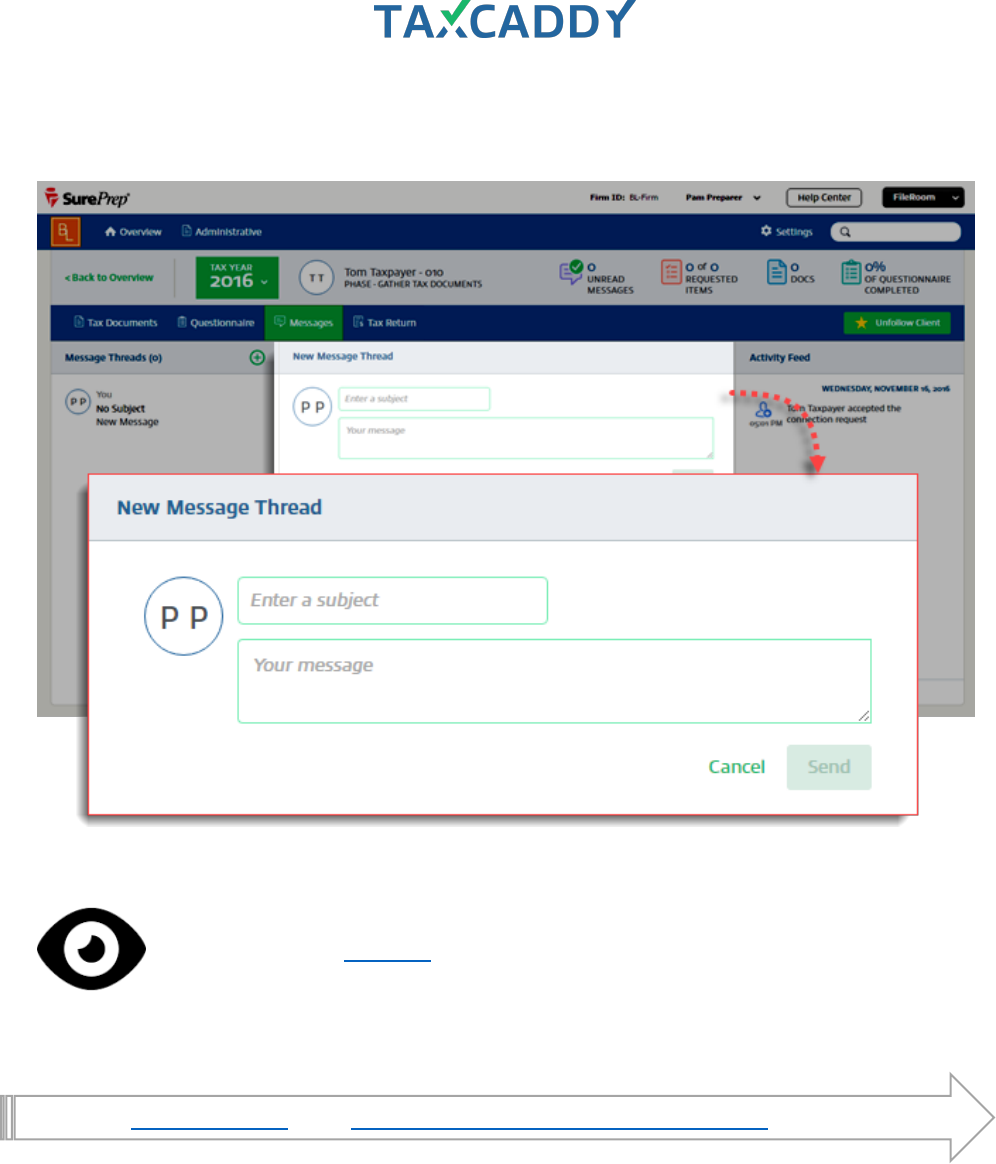
3. Click Messages.
4. You can access an existing thread by clicking it on the Message Threads panel, or create a new thread by
clicking the New icon (green plus sign).
Quick Setup Guide 62
Associating messages with documents
Follow these steps to associate a message thread with a specific document.
1. From the client’s profile, click Tax Documents.
2. In either Requested Items or Uploaded Tax Documents, click the item you want to message about.
Quick Setup Guide 63
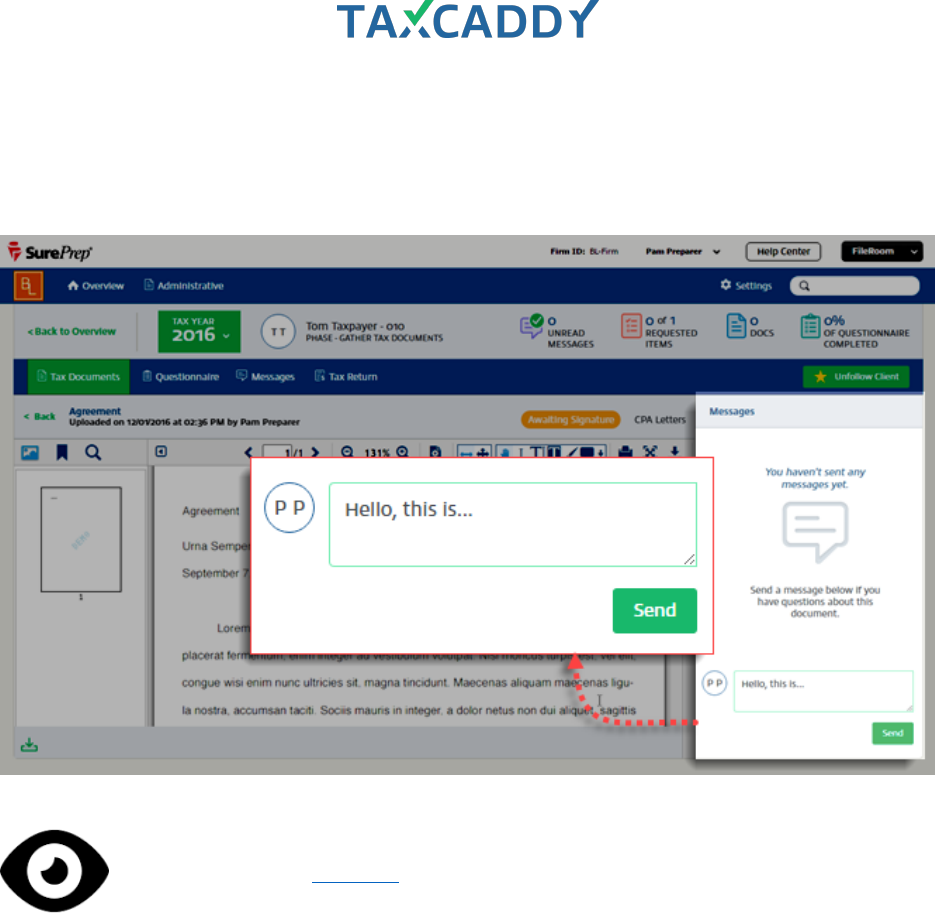
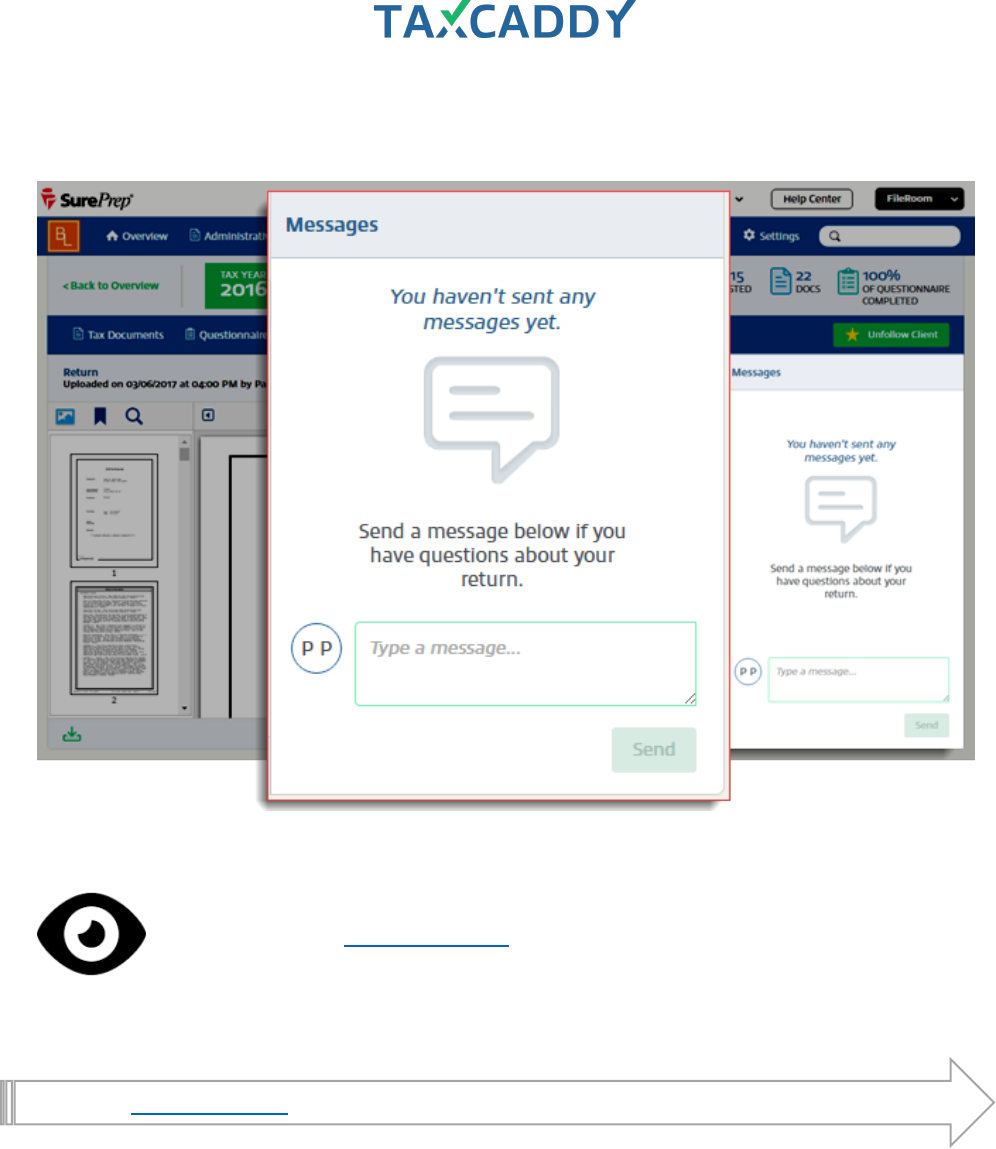
23. The document opens in the document viewer. On the message panel on the right, type your message into
the box and then click Send. The client is notified that they have a new message from you. The thread is
associated with the document and any additional messages will appear in both the document view message
panel and client profile Messages.
See Taxpayer View: Messages
Quick Setup Guide 64
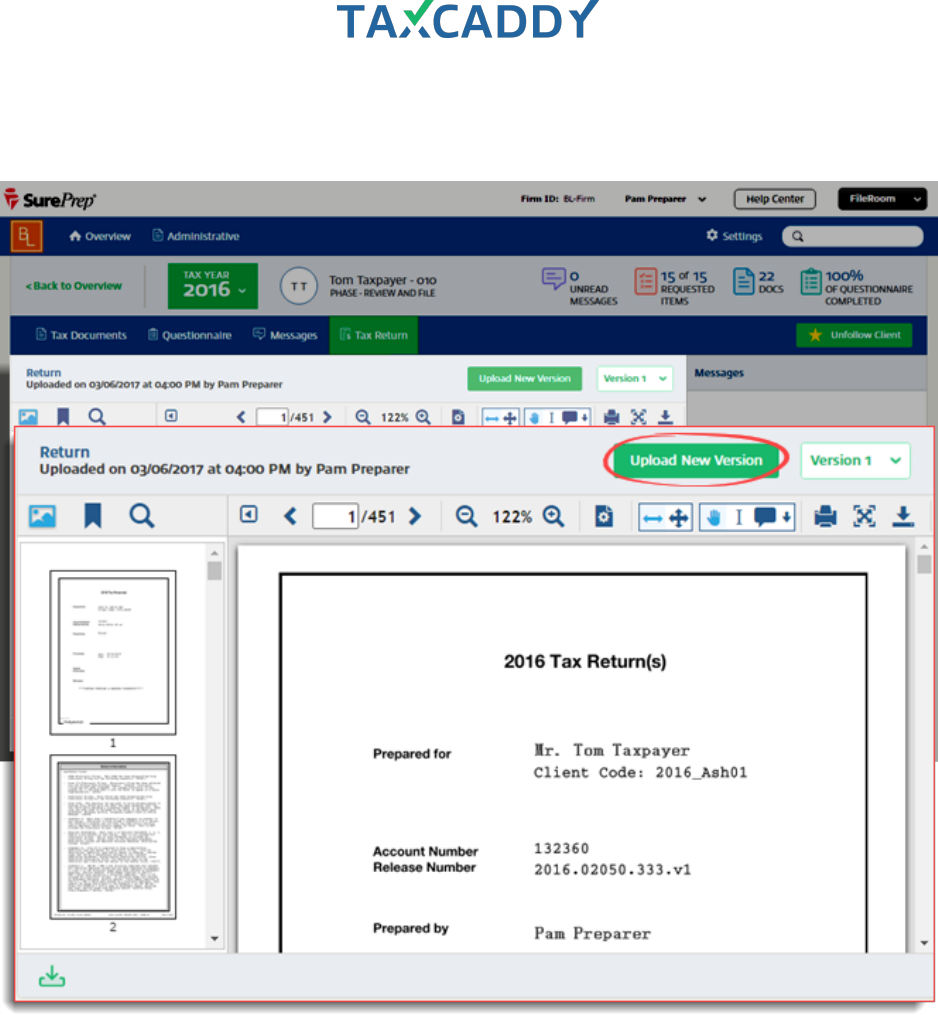
Tax Return
Upload your client’s prepared tax return on the Tax Return screen.

Quick Setup Guide 65
Uploading a tax return
Follow these steps to upload a tax return to a client's Return screen.
1. Log in to TaxCaddy.
2. Under Clients I’m Following, click a client tile to go to that client's profile.
Quick Setup Guide 66
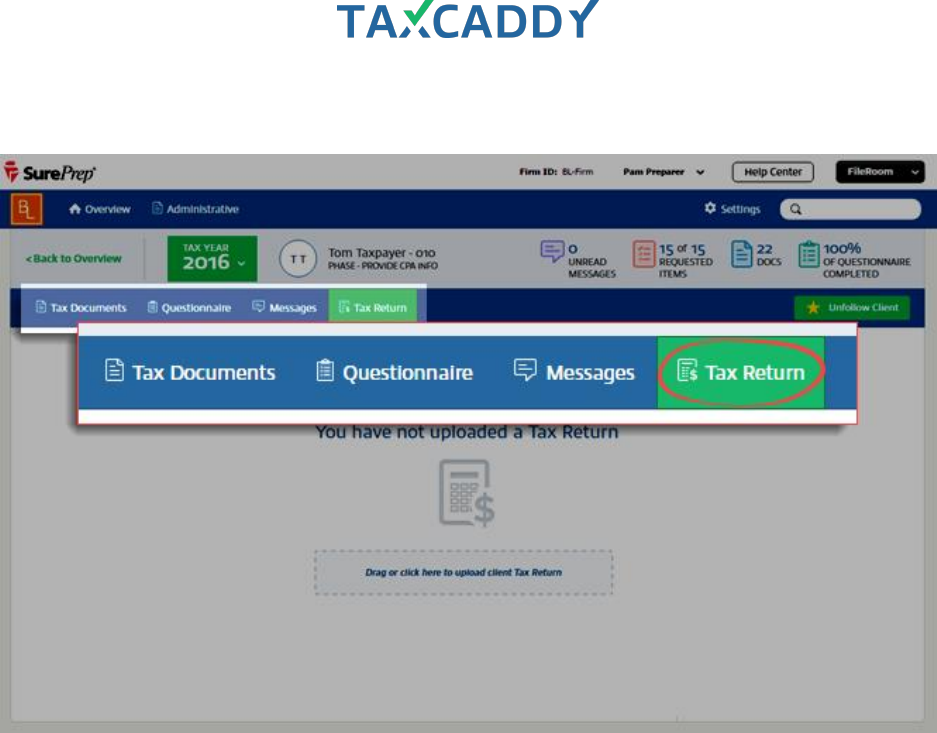
3. Click Tax Return.
Quick Setup Guide 67
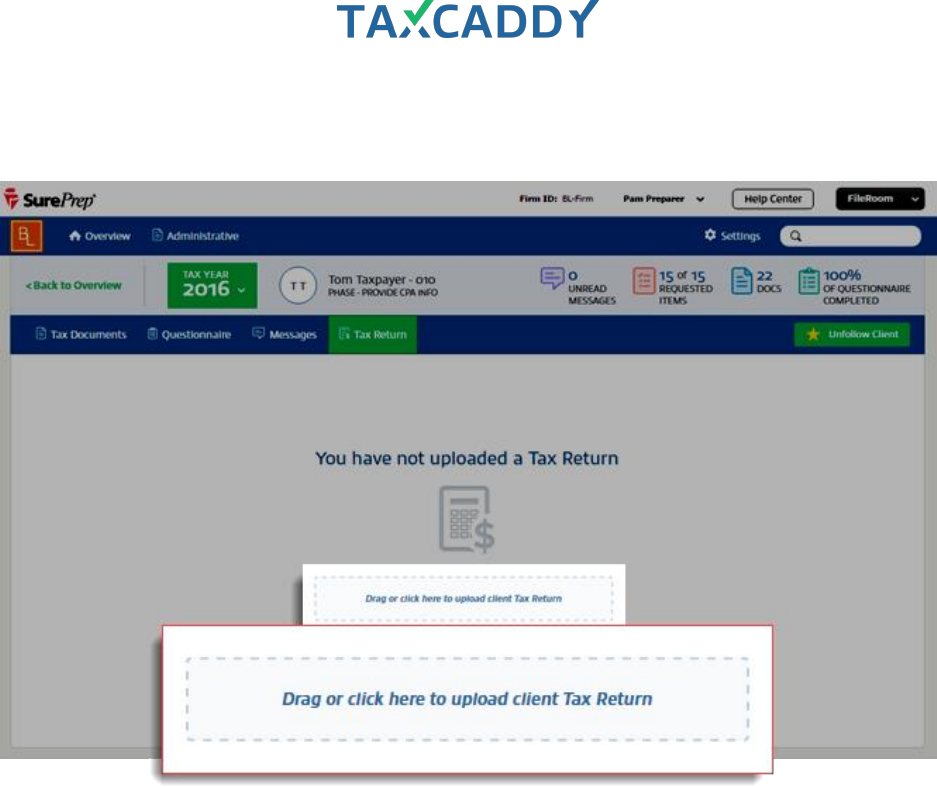
4. If a return has not yet been uploaded for this client, click Drag or click here to upload client Tax Return, or
drag a file onto the drop zone.
Quick Setup Guide 68
5. If the client already has an uploaded return and you want to upload an updated version of the return,
click Upload New Version.

Quick Setup Guide 69
6. Use the file picker to select a document to upload.
7. After the file uploads, click Close.
Quick Setup Guide 70
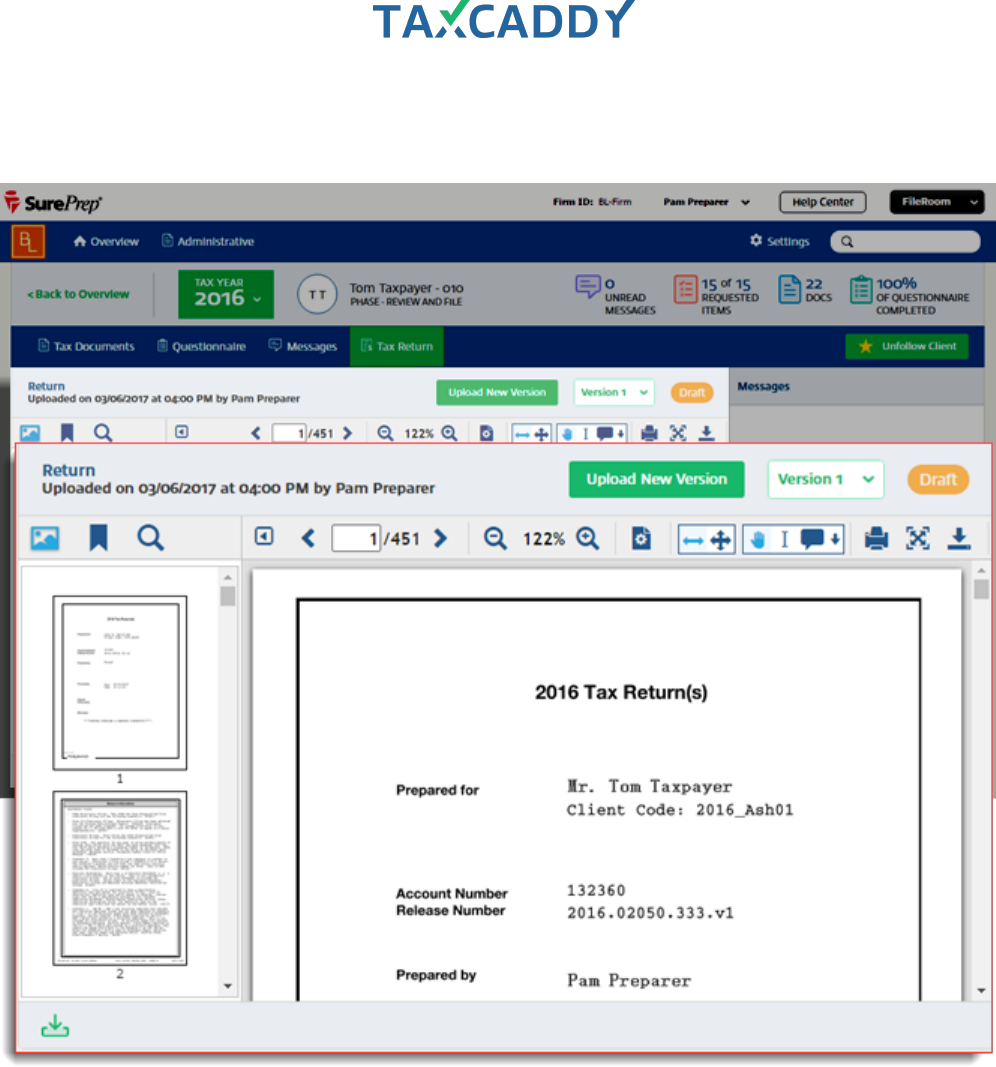
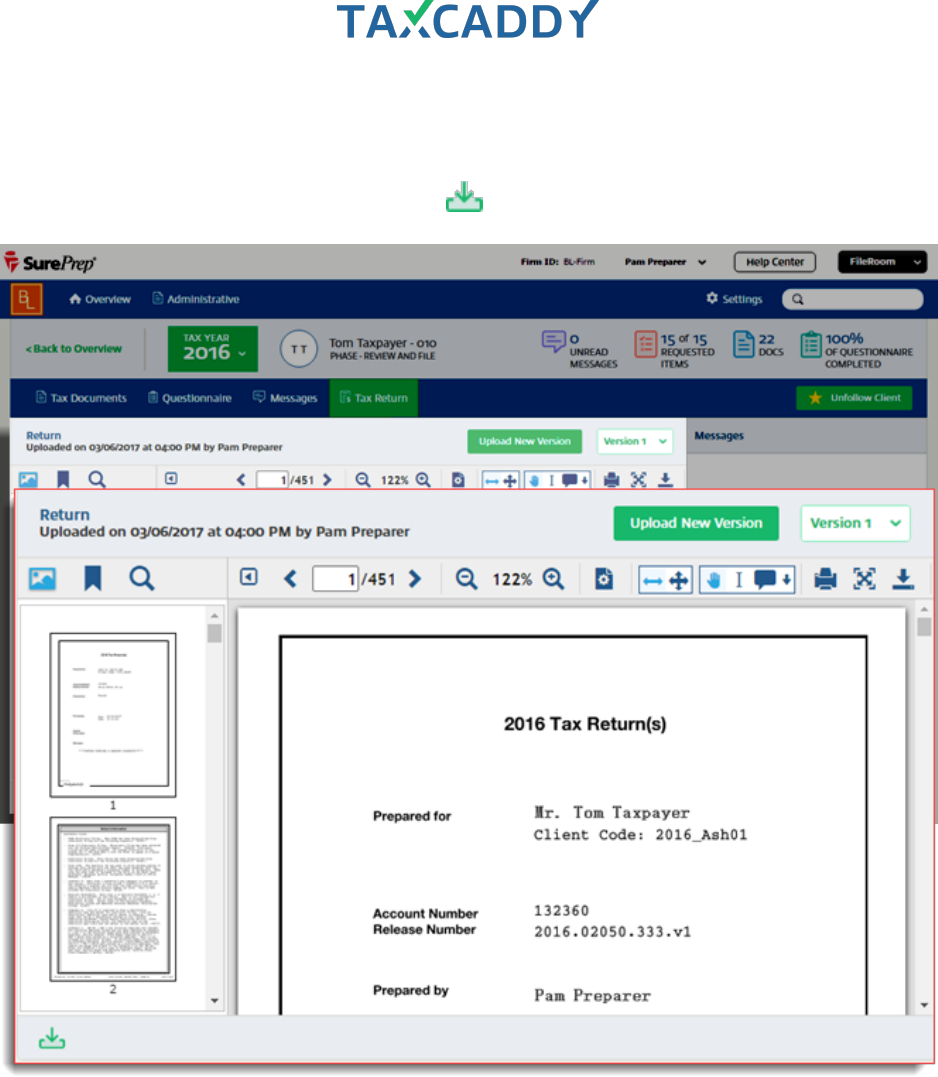
8. The document appears. The upload information and version are indicated in the header. The most recent
version is displayed by default, but you can access previous versions using the dropdown.
You can download a client’s return by clicking the download icon on the lower left.

Quick Setup Guide 72
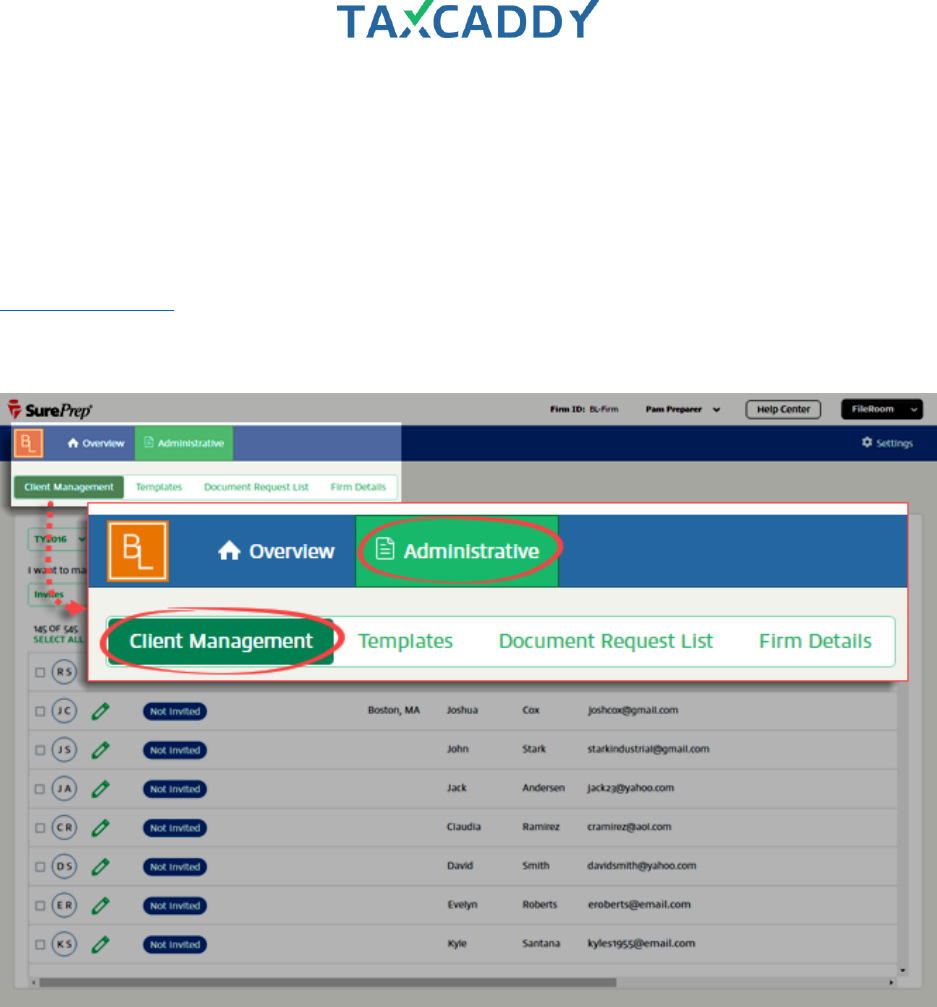
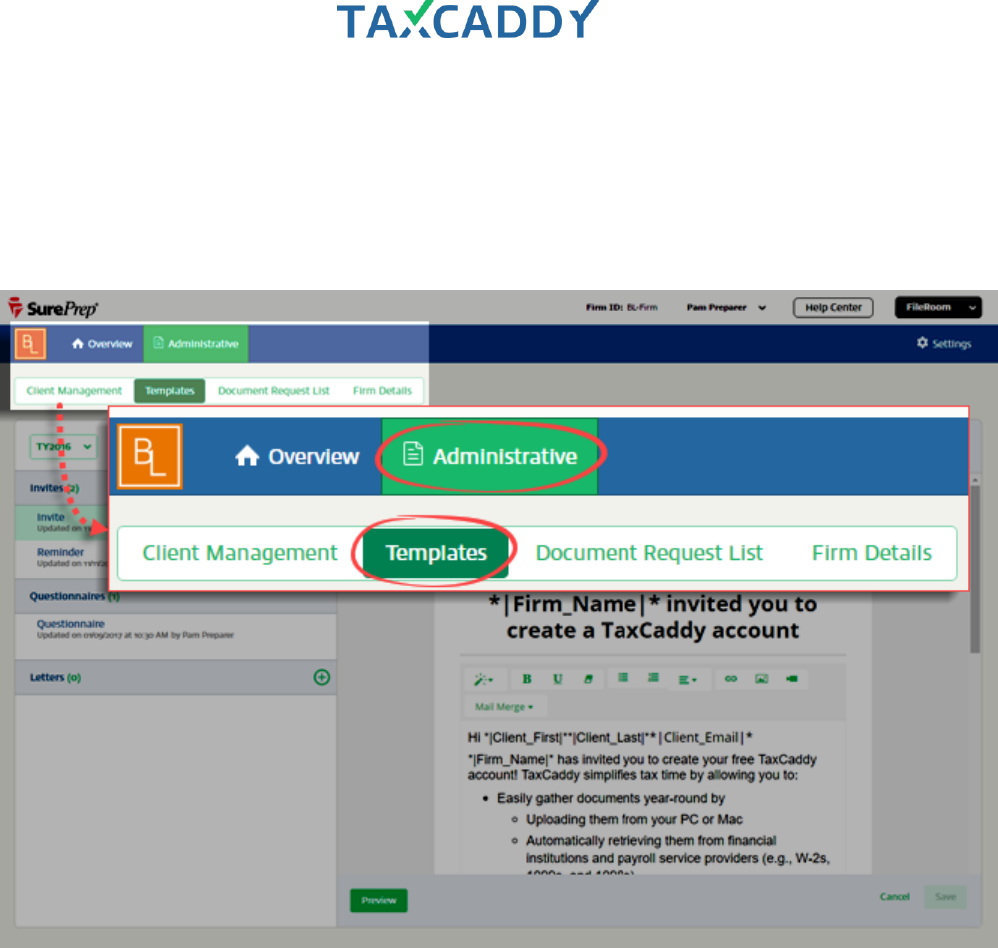
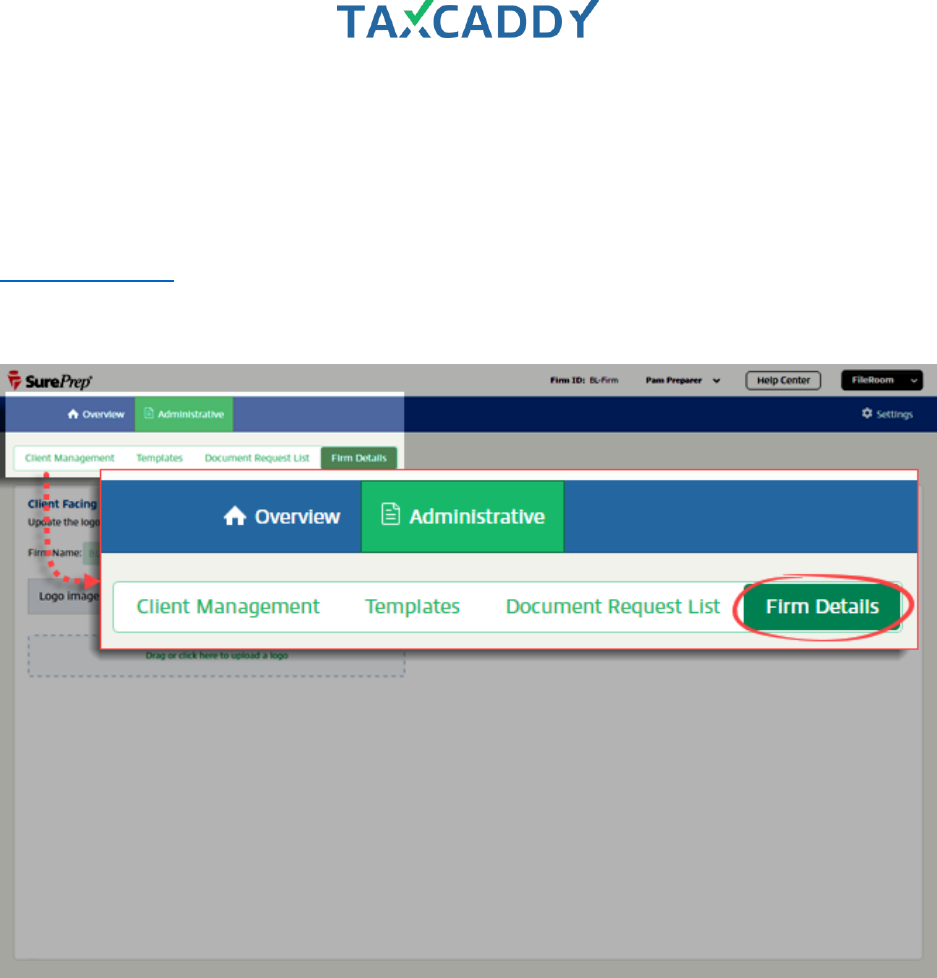
Administrative
The Administrative section includes Client Management, Templates, Firm Details, and Document Request List.
The Administrative section is accessible on the navigation bar, and each screen within it can be accessed on a
subnavigation bar directly below Administrative.
Quick Setup Guide 73
Assign user groups permissions
Follow these steps to configure permissions to allow users to access TaxCaddy, and to allow users with Admin
access to have either full access, or access to only Client Management.
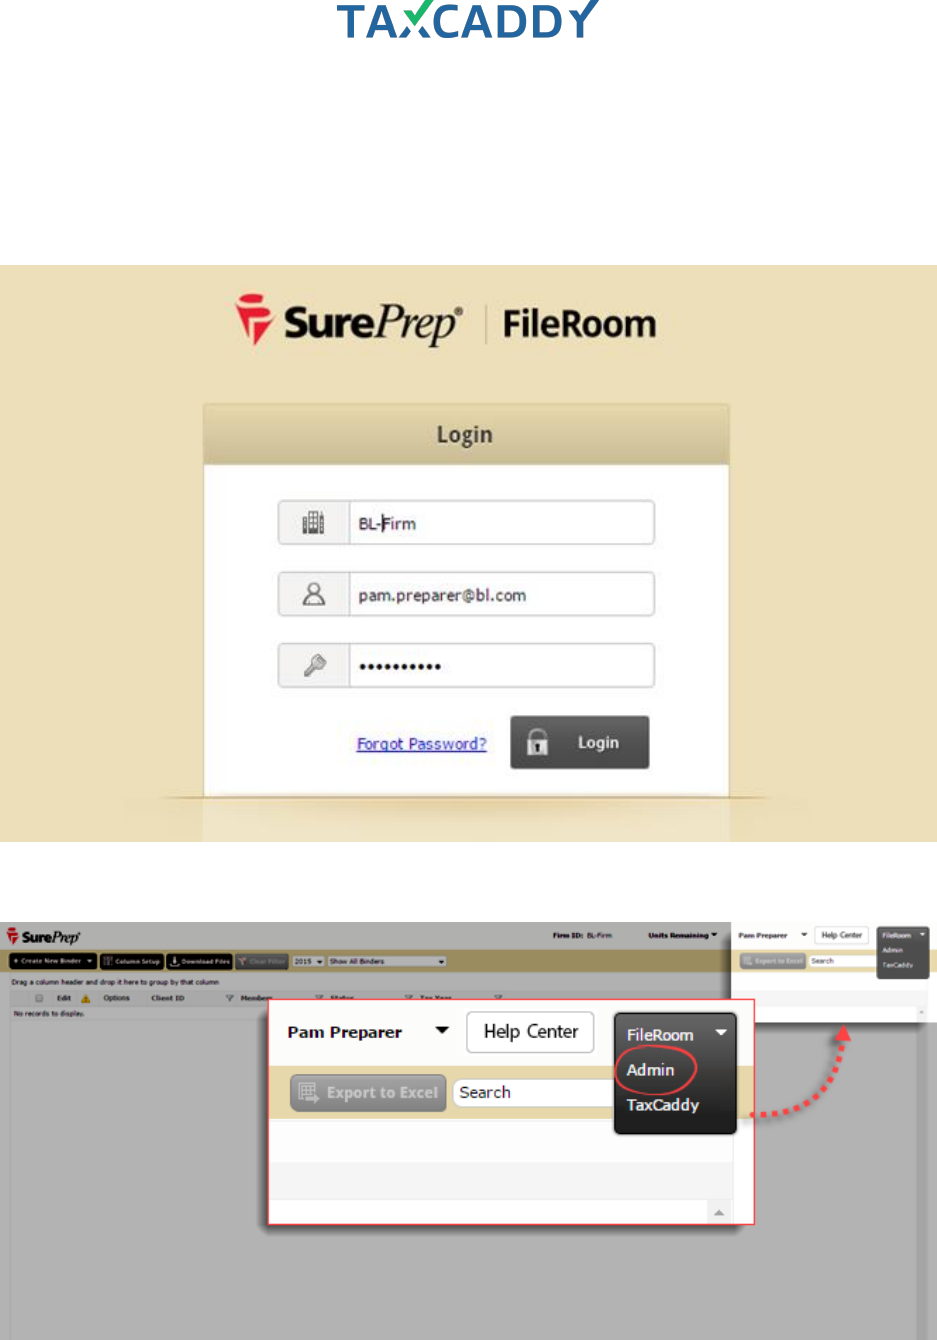
25. Log in to SurePrep FileRoom.
26. On the upper right, point to the drop-down menu and then click Admin.
Quick Setup Guide 74
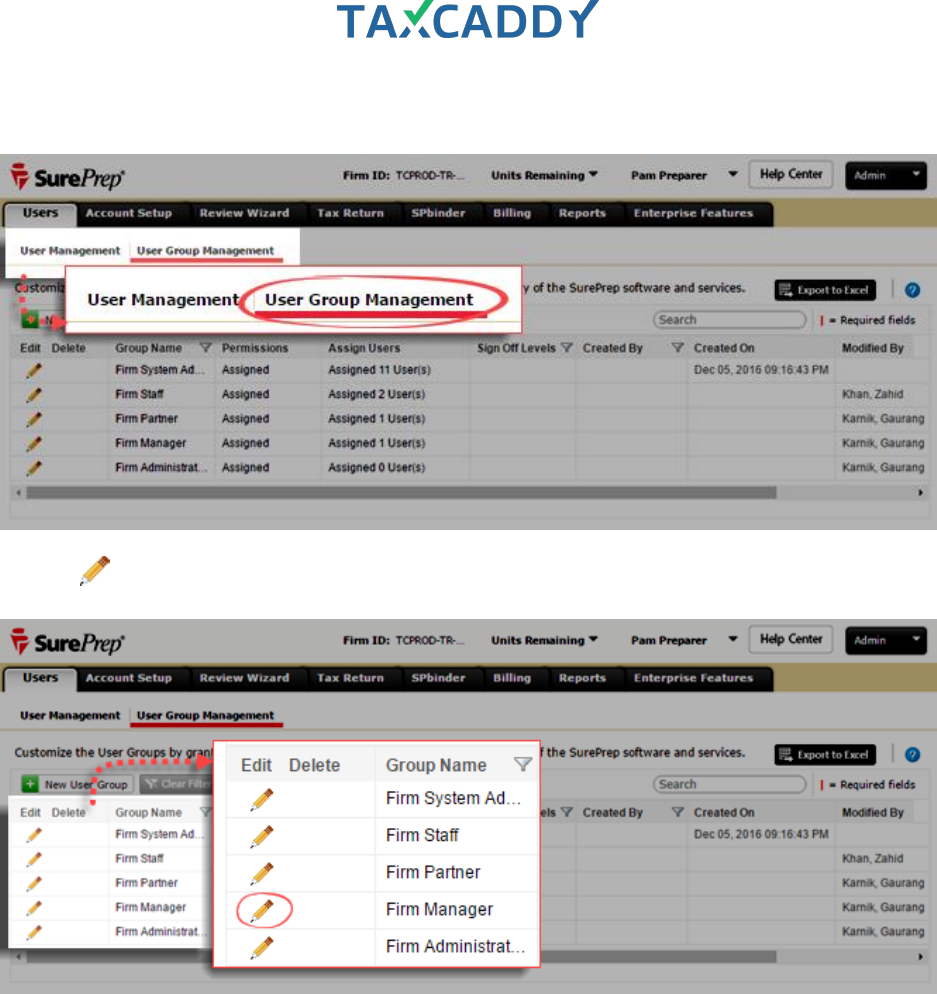
27. Click User Group Management.
28. Click the Edit icon next to the group you want to assign permissions.

Quick Setup Guide 75
29. In the Permissions column, click Assigned. The permissions dropdown opens.
Quick Setup Guide 76
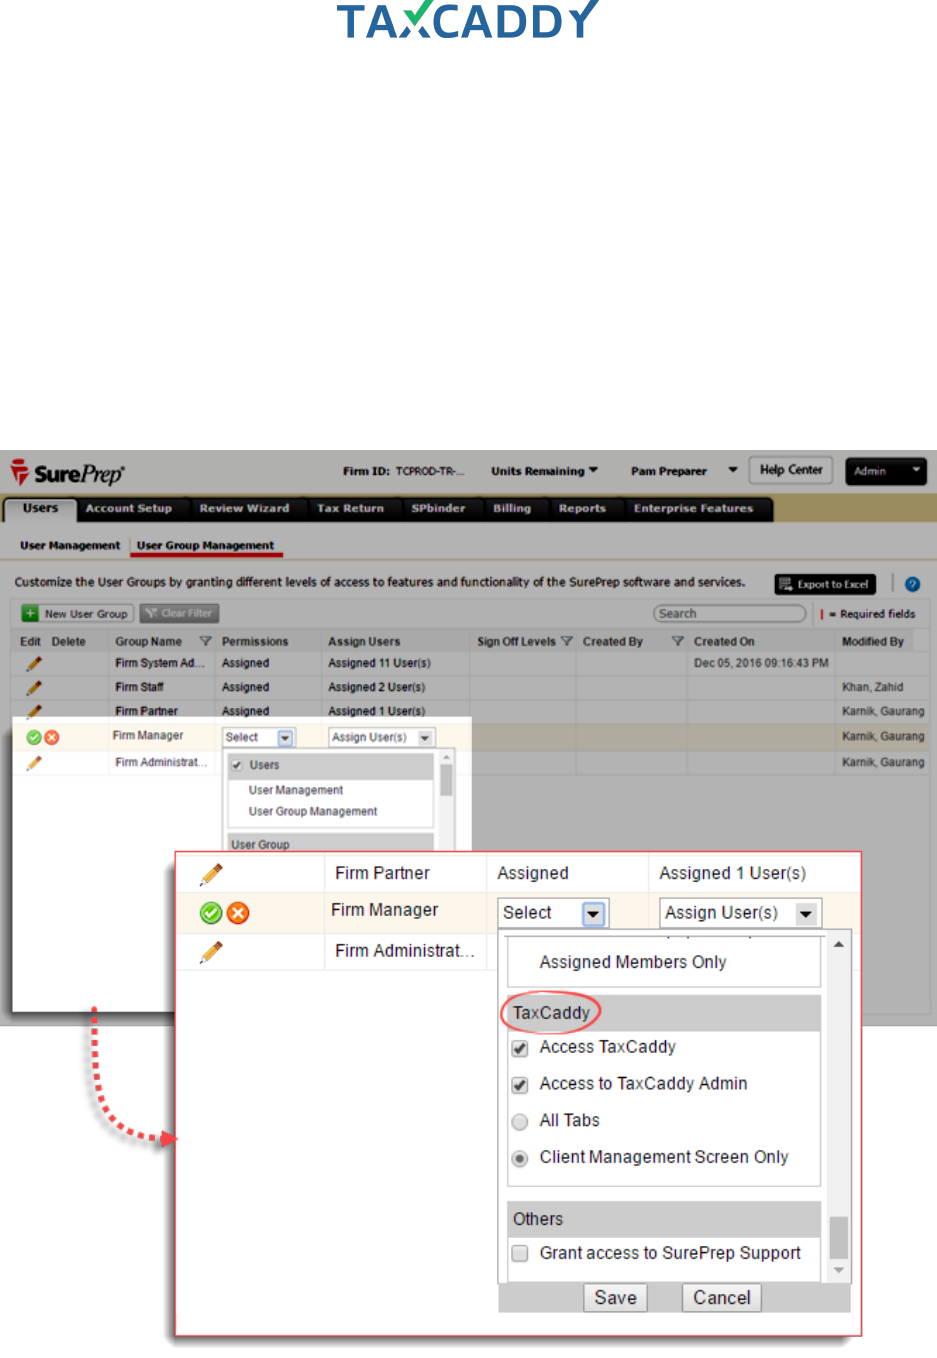
30. Scroll down to the TaxCaddy section. Under TaxCaddy, select permissions to assign to the group.
Access TaxCaddy: Allows access TaxCaddy. This is required for all users who should have access to
TaxCaddy, including those who will have Admin access.
Access to TaxCaddy Admin Allows users access TaxCaddy Admin tab; select sub-permission.
All Tabs (default): Allows access all tabs in the Admin section, including Client Management, Templates,
Document Request List, and Firm Details.
Client Management Screen Only: Allows access to only the Client Management screen. Users will not have
access to Templates, Document Request List, or Firm Details.
Quick Setup Guide 77
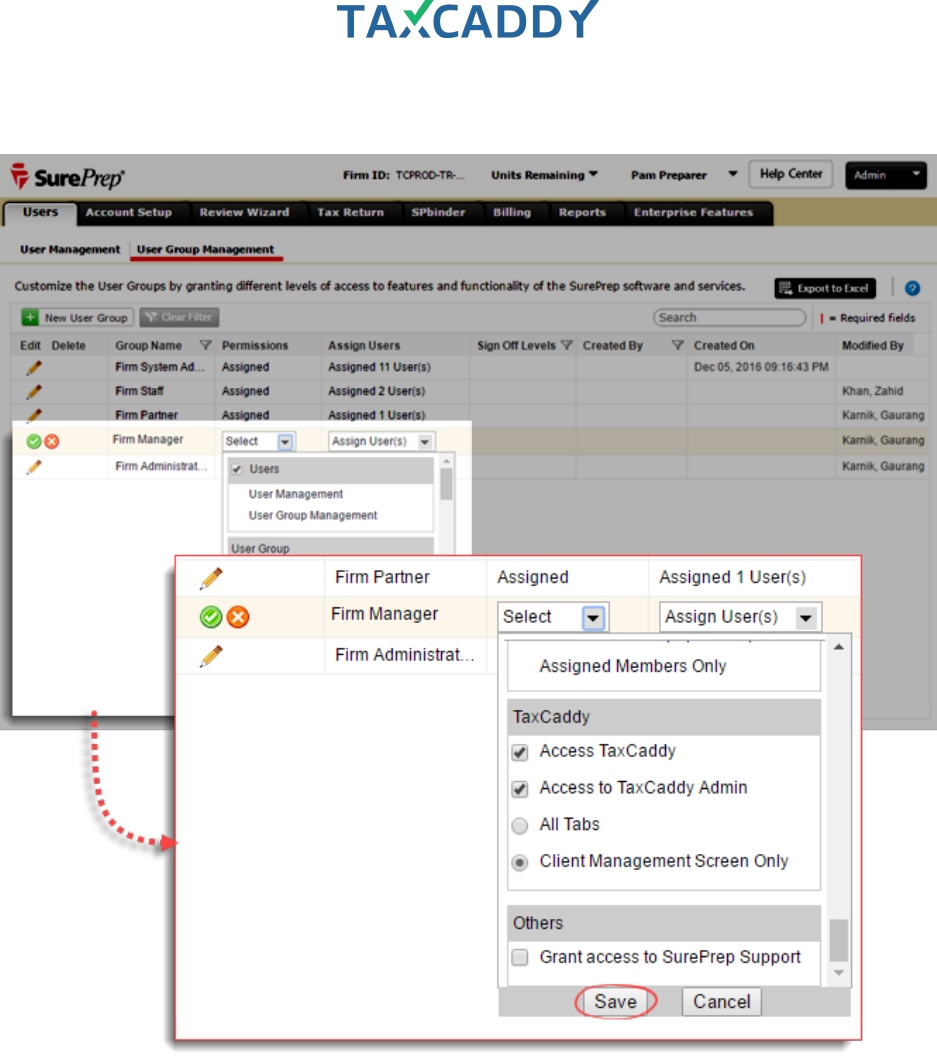
31. Click Save to save changes to the Permissions settings.
Quick Setup Guide 79
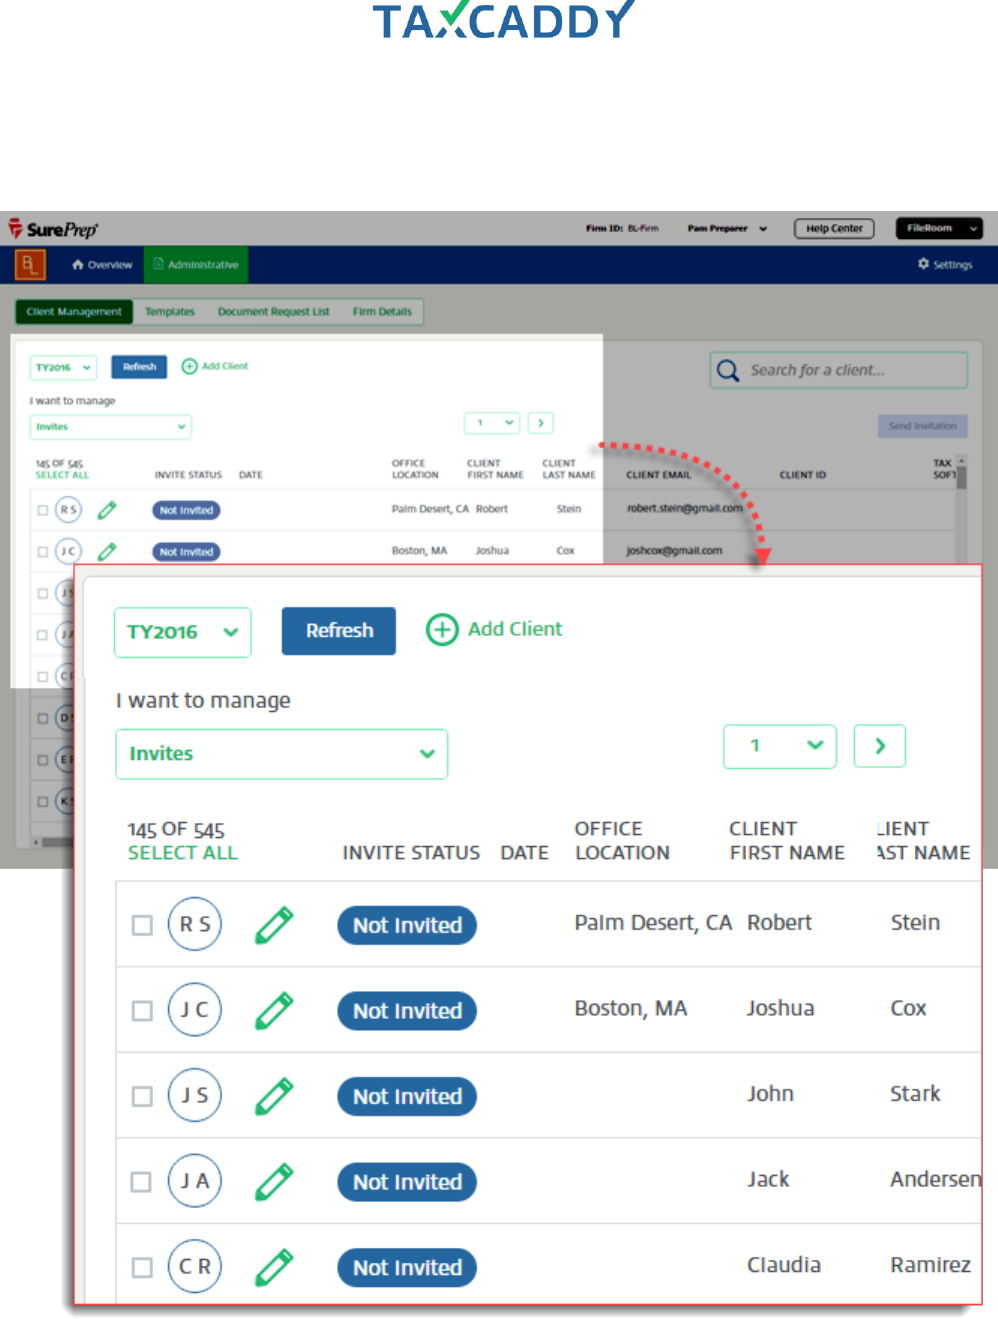
Client Management
Your clients are automatically imported from SurePrep. View client records, add new clients, send templates and
request documents on the Client Management screen.
Quick Setup Guide 80
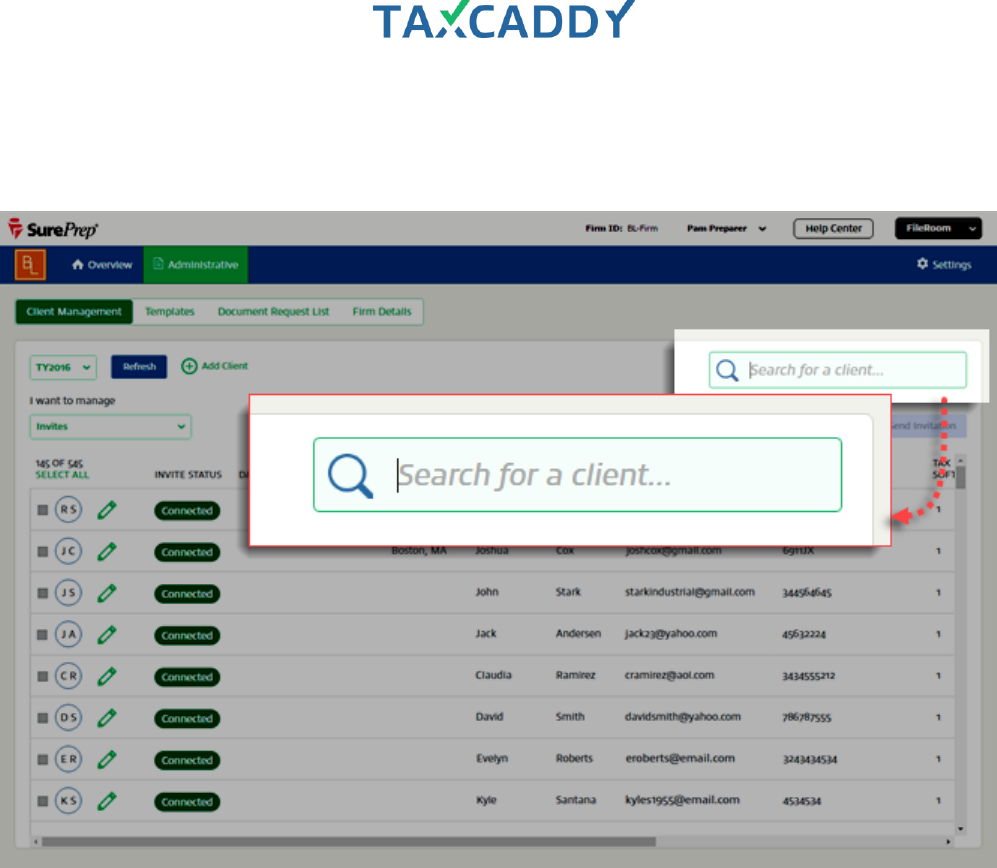
Search client records
You can search all client records by First Name, Last Name, Client ID, or Owner using the Search box on the
Client Management screen. Suggestions appear as you type.
Quick Setup Guide 81
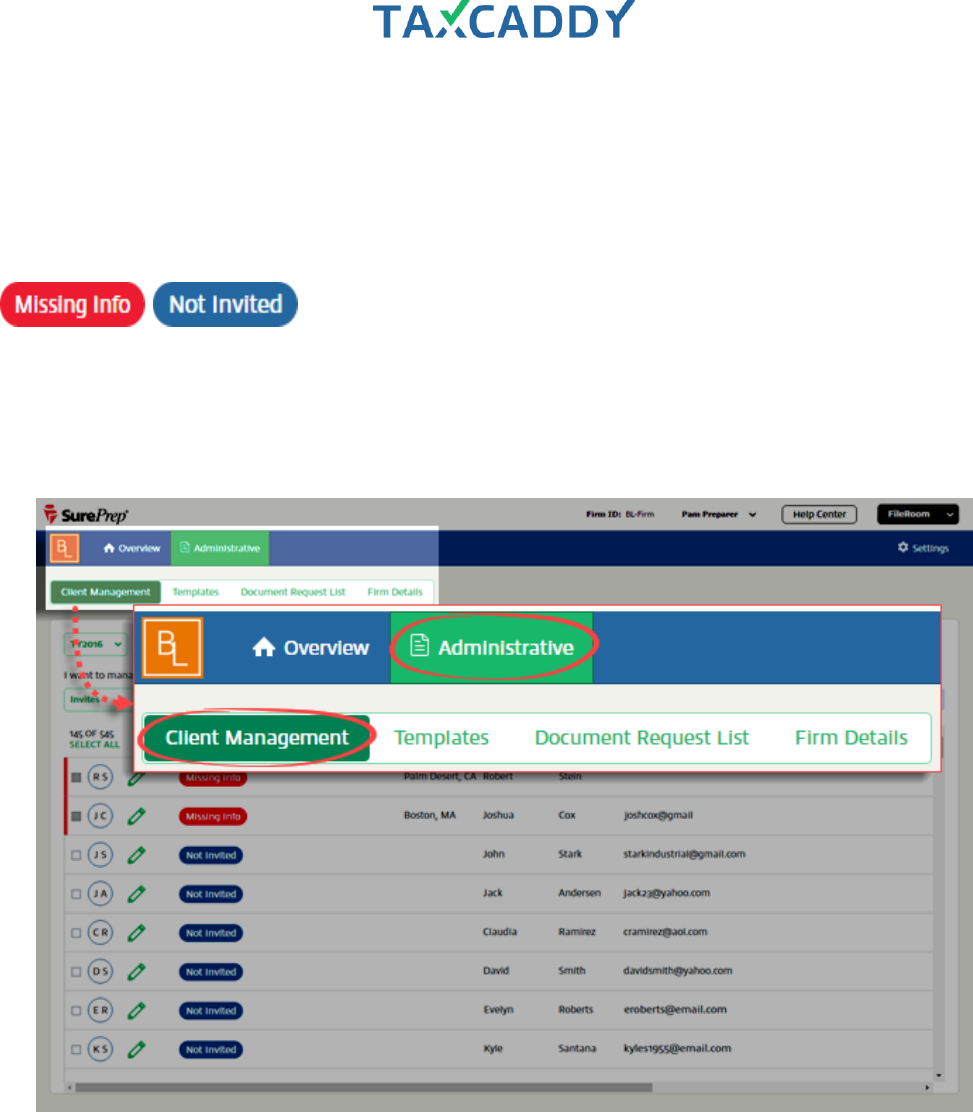
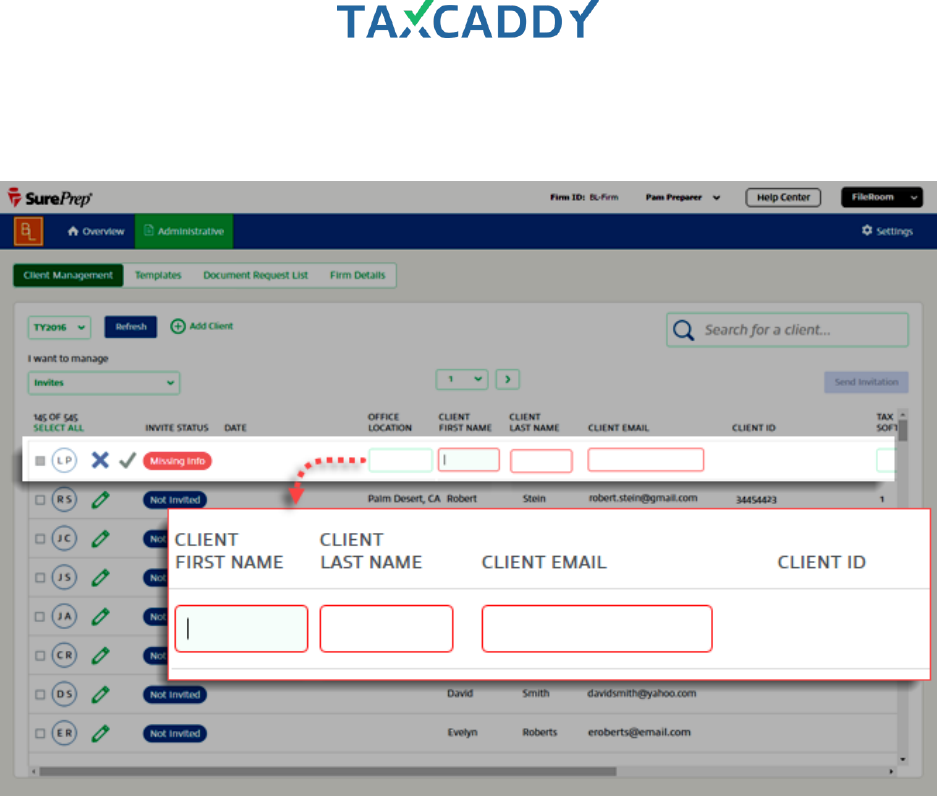
Update client records (provide missing info)
Clients who have the status Missing Info cannot be invited to join TaxCaddy because their client record is
missing required information. Required client record fields are Email, First Name, Last Name, and Owner. When
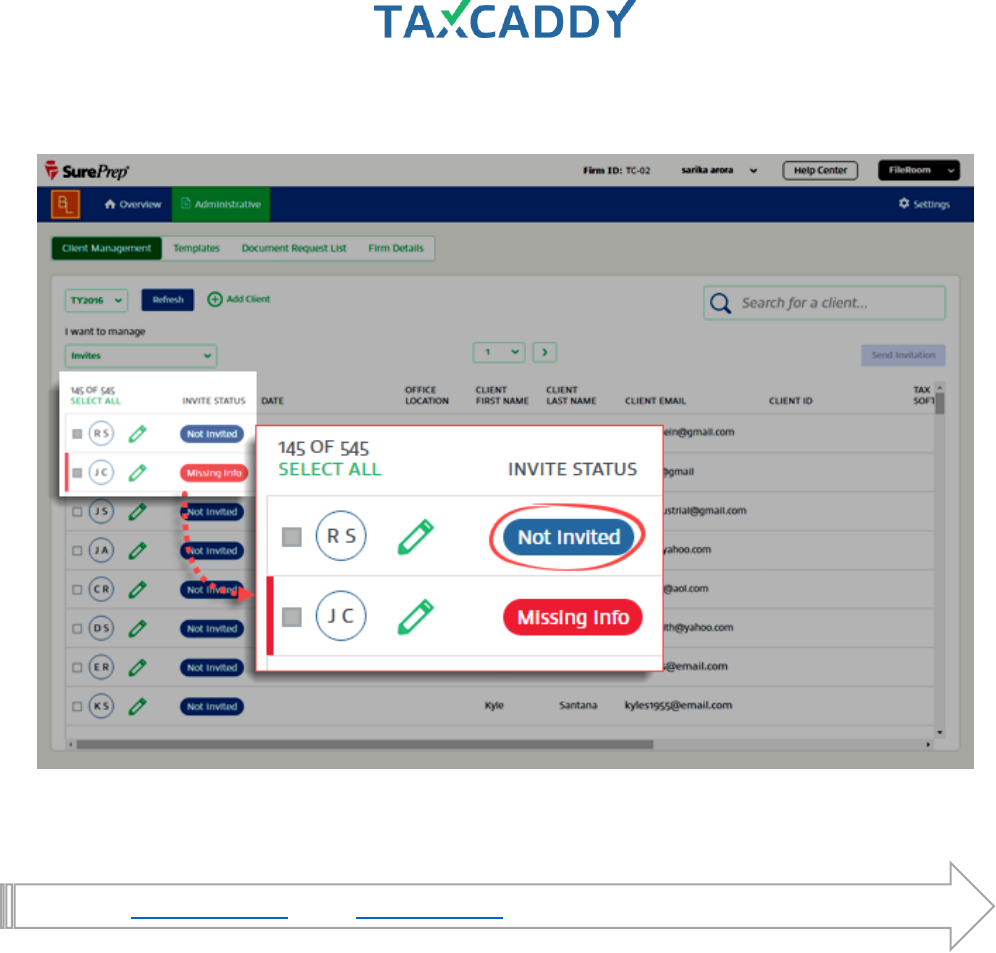
all required fields are updated with valid information, the client's status changes to Not Invited and the client
can then be invited to create an account.
Follow these steps to update client information.
1. Log in to TaxCaddy.
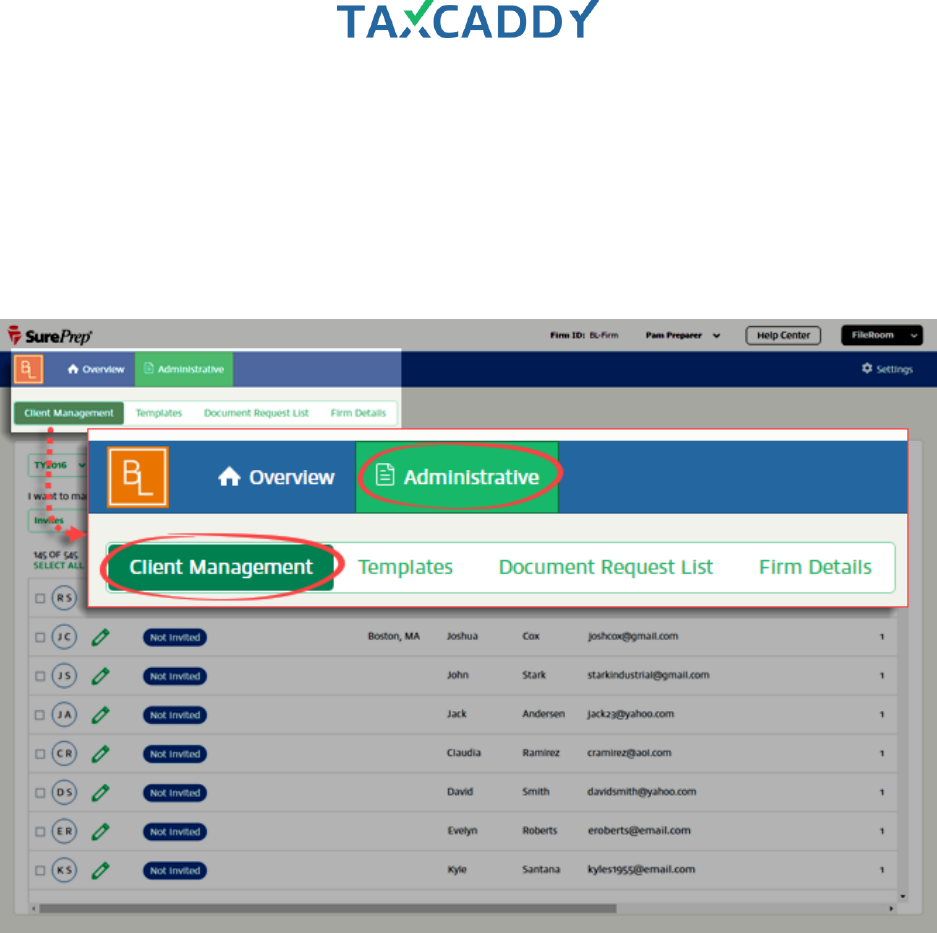
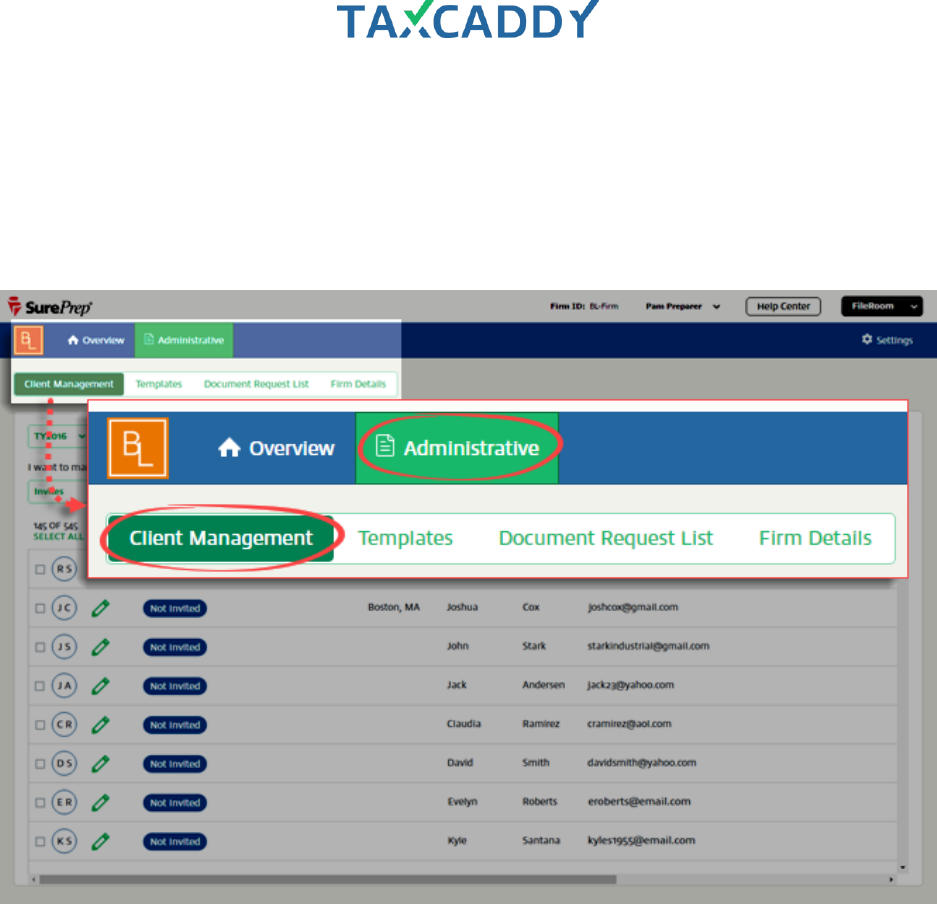
2. Click Administrative and then click Client Management.
Quick Setup Guide 82
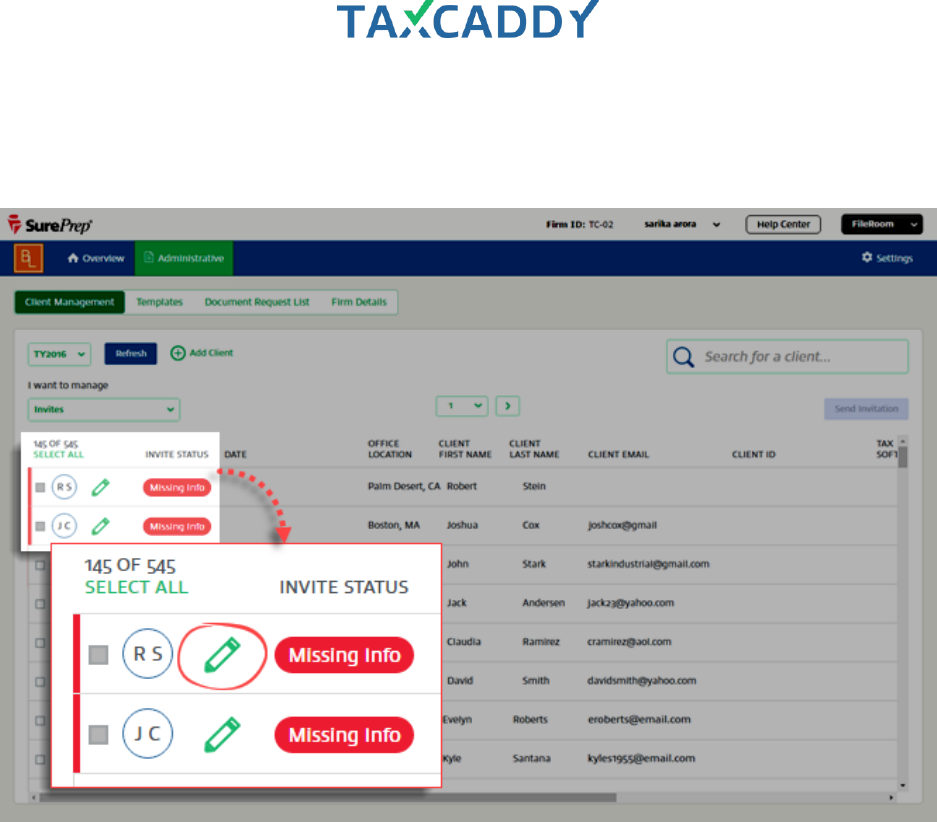
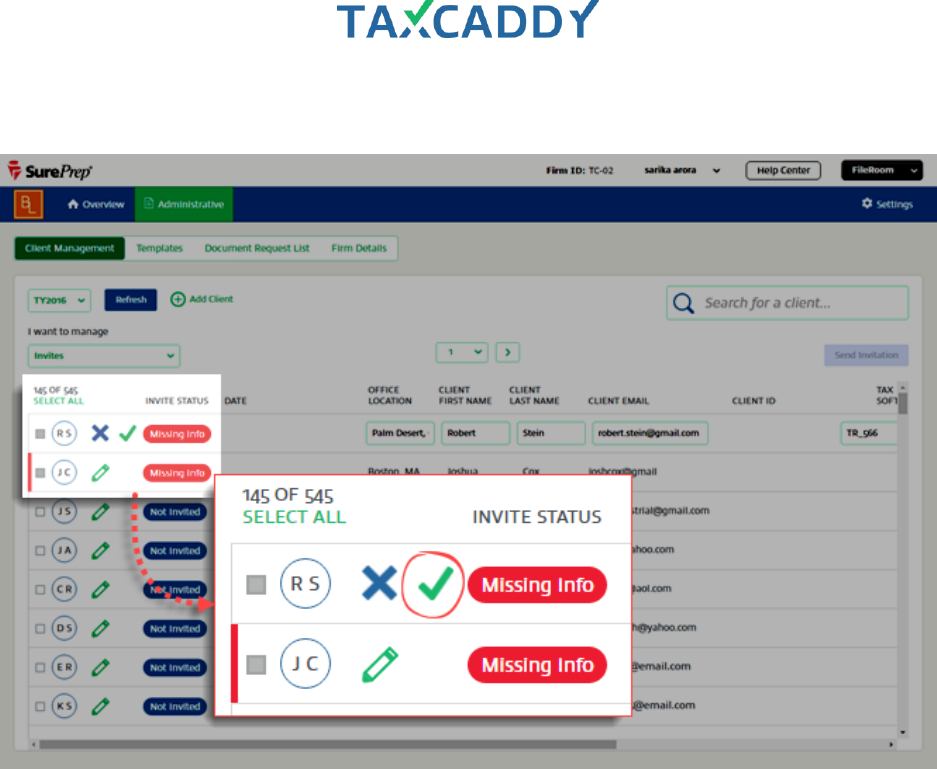
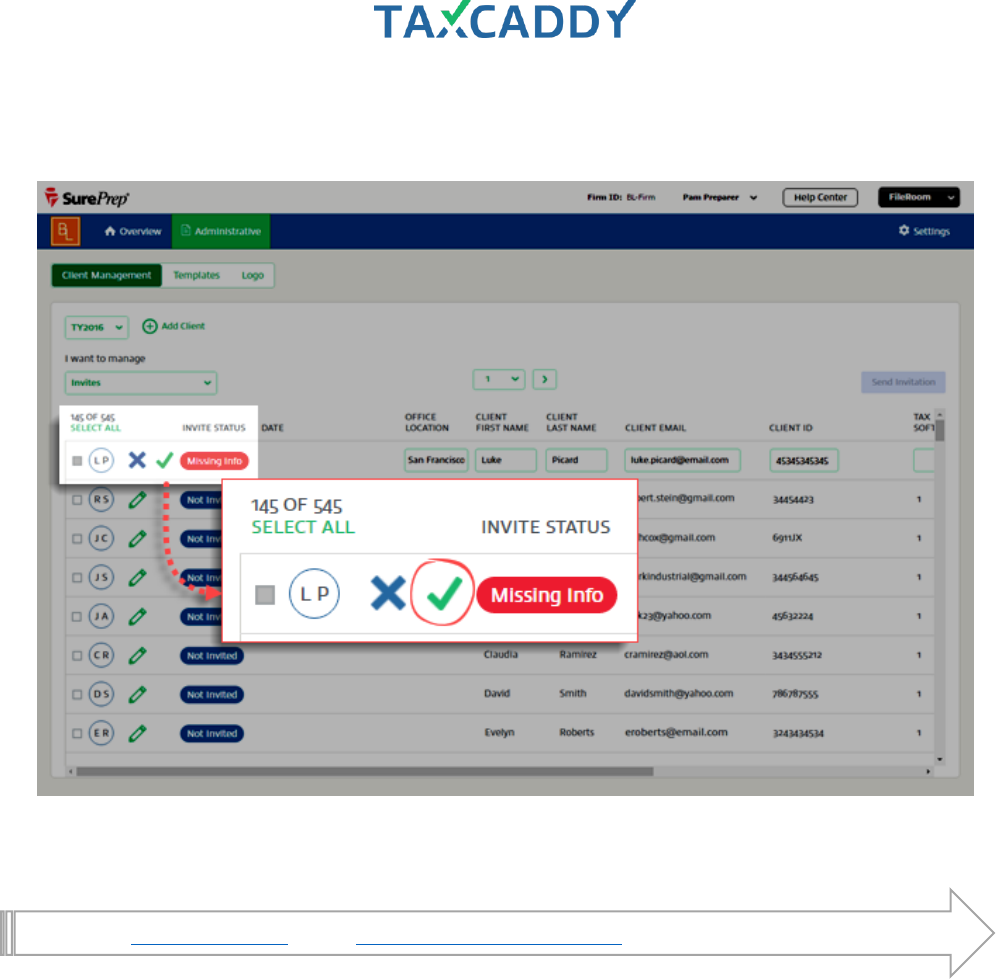
3. Client status appears on the far left of each client record, and those with the status Missing Info are marked
by a red tab on the left side of the client record. Click the Edit icon (green pencil) on a client record you want
to update.
Quick Setup Guide 83
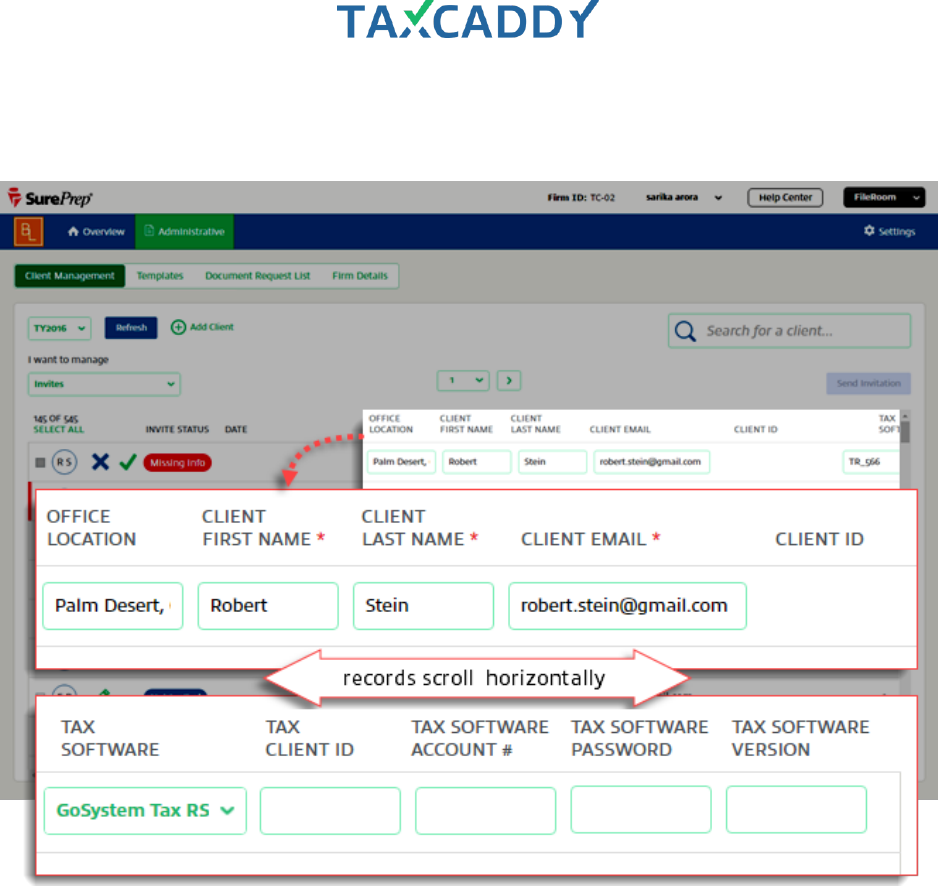
4. Enter missing information. If necessary, use horizontal scroll to see the rest of the client record fields.
Required fields are Email, First Name, Last Name and Owner.
Quick Setup Guide 84
5. Click the Save icon (green check mark) to save your changes.
Quick Setup Guide 86
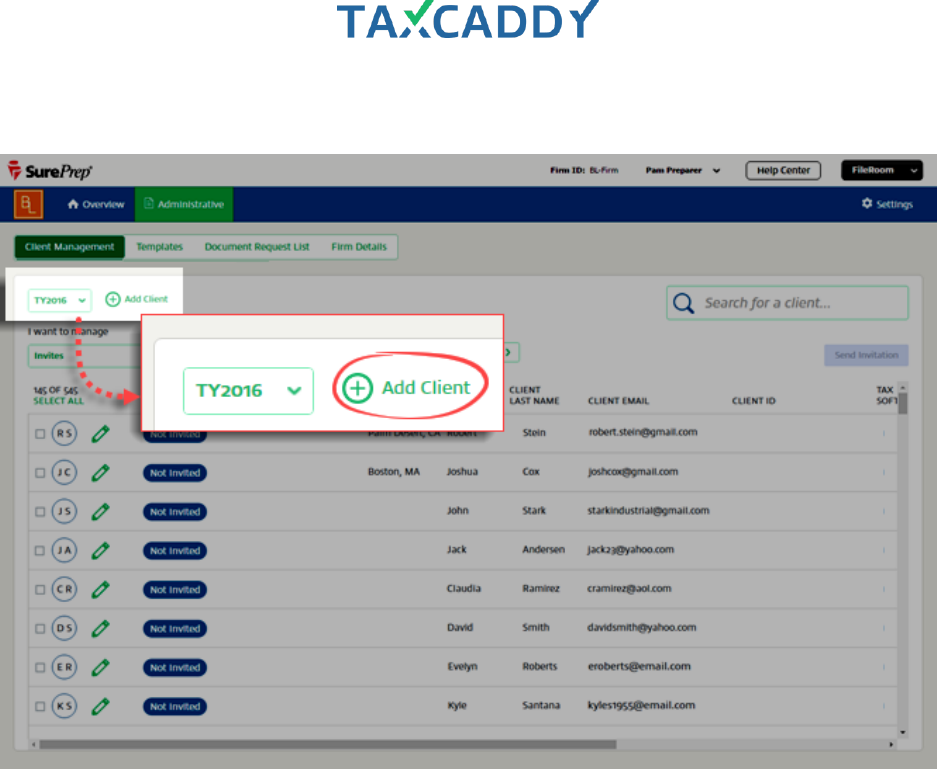
Add new clients
Clients who were not listed in SurePrep last year can be added directly in the Client Management screen. Follow
these steps to add a new client.
1. Log in to TaxCaddy.
2. Click Administrative and then click Client Management.
Quick Setup Guide 87
3. Click Add Client.
Quick Setup Guide 88
4. A new editable row appears at the top of the client records list. Enter the new client’s information. If
necessary, also scroll right to see all fields. Required fields are Email, First Name, Last Name, and Owner.
Quick Setup Guide 89
5. Click the Save icon (green check mark) to save the new client record. You may need to scroll left to see the
Save icon. The new client is added to the list and the focus moves to the newly added client.
Go back to Quick Start Guide. Next: Invite (or remind) your clients to create an account.
Quick Setup Guide 90
Send Invites and Reminders
You can send the Invite template to clients who have not yet been invited to create a TaxCaddy account. Clients
who have already been invited but have not yet created an account can be reminded to do so using the
Reminder template.
Follow these steps to invite your clients to create a TaxCaddy account.
1. Log in to TaxCaddy.
2. Click Administrative and then click Client Management.
Quick Setup Guide 91
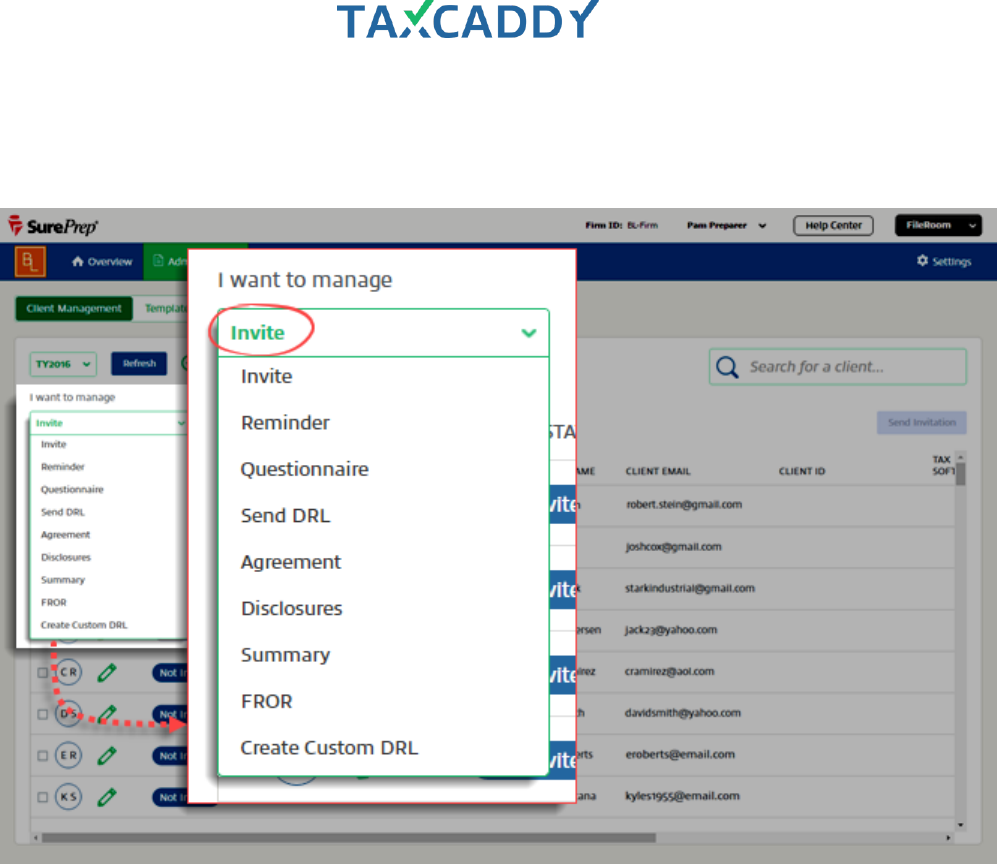
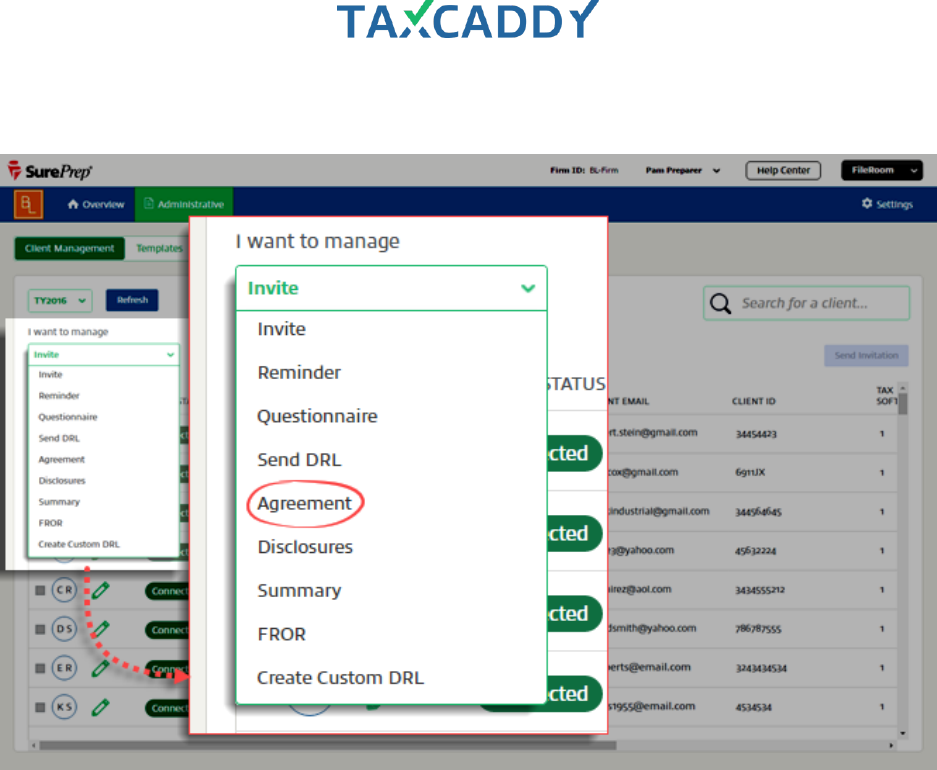
3. Managing Invite is selected by default. To send the Invite template, continue to the next step.
To send the Reminder template, select Reminder under I want to manage.

Quick Setup Guide 92
4. Invite status determines whether clients are eligible to receive the Invite.
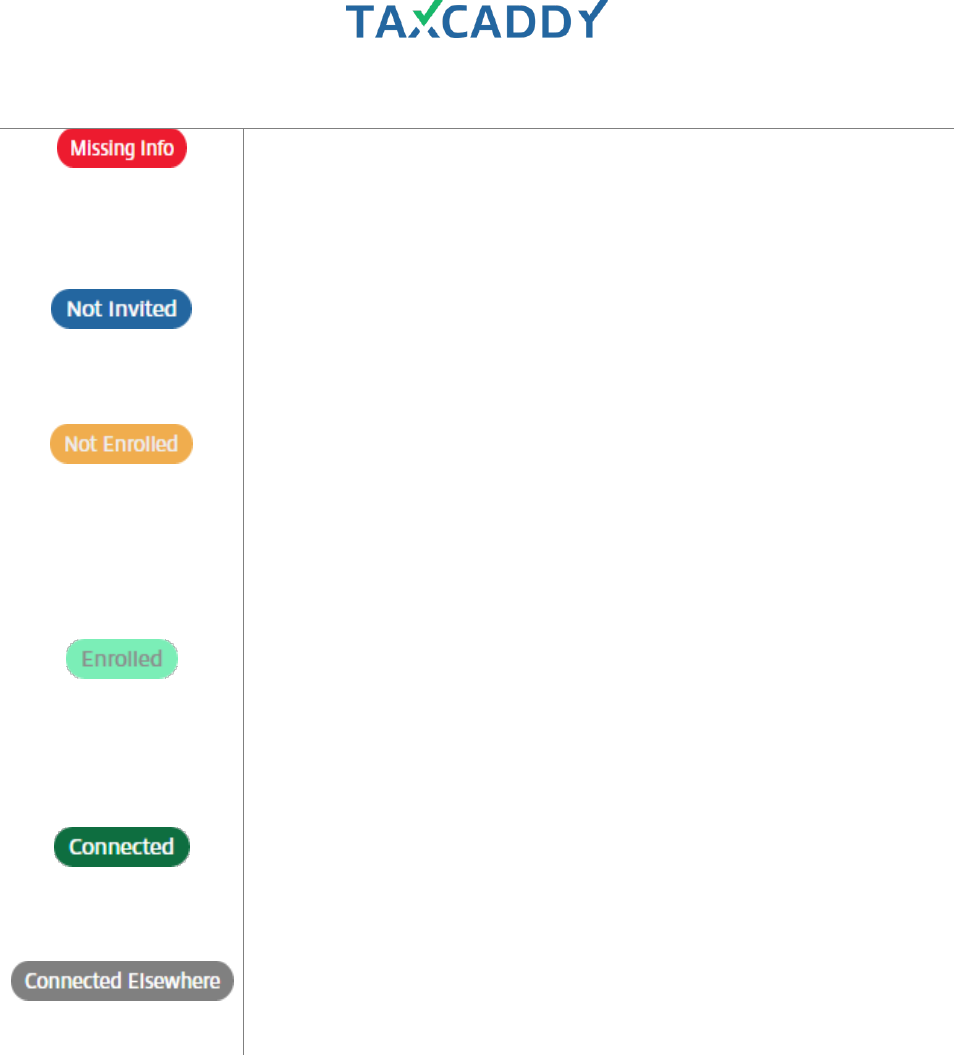
Quick Setup Guide 93
INVITE STATUS
WHAT CAN I SEND?
DESCRIPTION
(MISSING INFO)
Nothing, provide
missing
information
to proceed
Clients with the Invite Status Missing Info cannot
be invited to join TaxCaddy because their client
record is missing required information in one or
more of these fields: Email, First Name, Last
Name, Owner.
(NOT INVITED)
✓ Invite template
Clients who are eligible to be invited (all required
fields are valid) but who have not been invited,
have the status Not Invited. These clients are
eligible to receive the Invite template.
(NOT ENROLLED)
✓ Reminder template
✓ CPA Letters
✓ Questionnaire
✓
Clients who have already been invited but have
not yet created an account have the status Not
Enrolled and can be reminded to create an
account using the Reminder template. CPA letter
and questionnaires you send will become visible to
the client once they accept your connection
request.
(ENROLLED)
✓ CPA Letters
✓ Questionnaire
Clients who have created their account but have
not accepted your Connection Request have the
status Enrolled. These clients must accept the
connection request to proceed. CPA letter and
questionnaires will become visible to the client
once they accept your connection request.
(CONNECTED)
✓ CPA Letters
✓ Document Request
List
✓ Questionnaire
✓ Return
Clients who have accepted your Connection
Request have the status Connected and you can
send CPA letters for review/signature, document
requests, questionnaire, and upload returns.
(CONNECTED
ELSEWHERE)
Nothing, this client
is enrolled with
another firm
Clients who are enrolled in TaxCaddy but
connected with a different firm have the status
Connected Elsewhere.
Quick Setup Guide 94
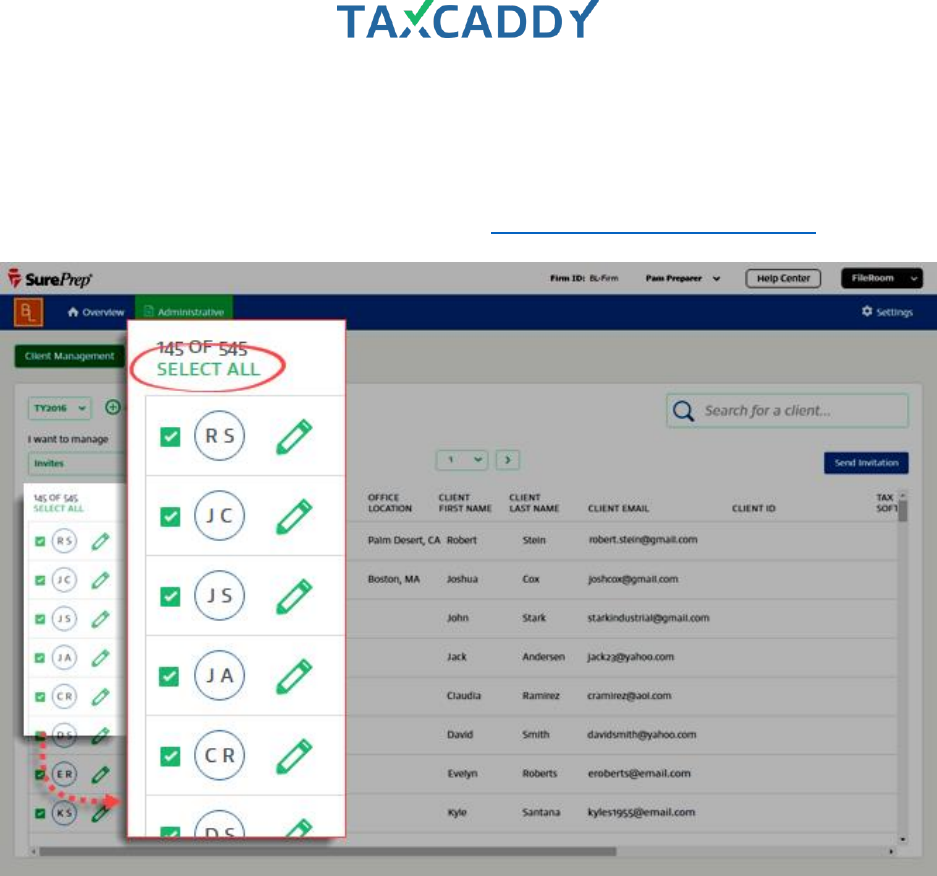
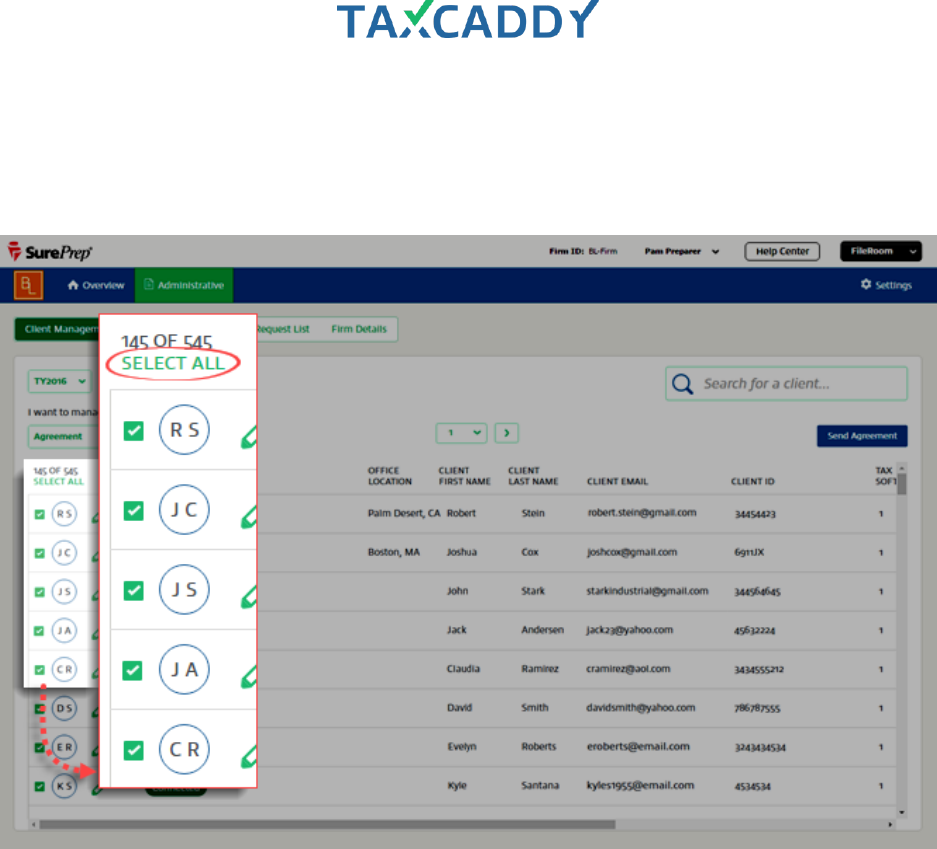
5. Click Select All to select all clients eligible to receive the selected template. Alternatively, you can select or
deselect clients individually using the checkbox on the far left on the client record.
Tip: You can only send the Invite to clients who have the status Not Invited and you can only send the
Reminder to clients who have the status Not Enrolled. Click here for more on Invite Status.
Quick Setup Guide 95
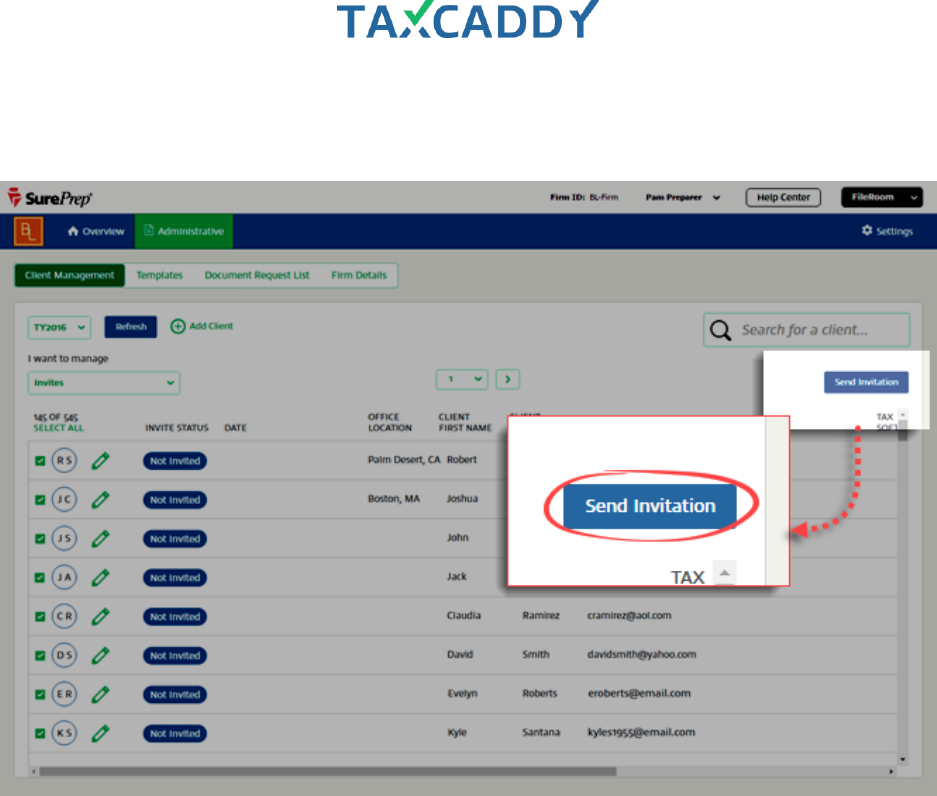
6. Click the Send Invitation or Send Reminder button. TaxCaddy confirms the Invite or Reminder was sent to
the selected clients. Clients who were sent the Invite template have their status updated to Not Enrolled.
Quick Setup Guide 97
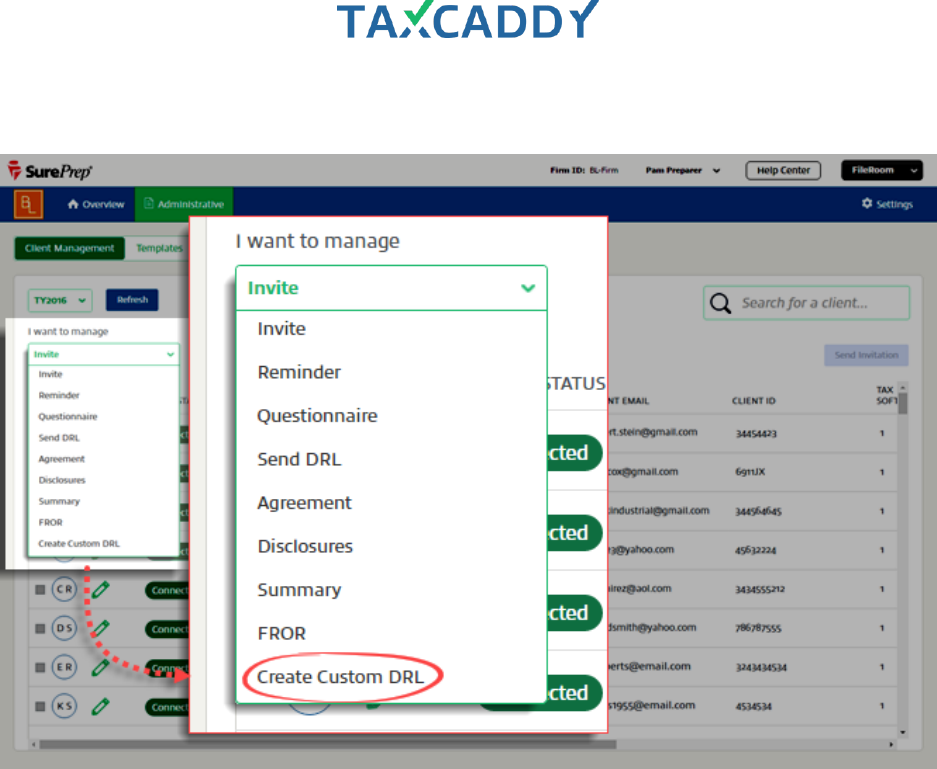
Create Custom DRLs
Follow these steps to create custom document request lists for your clients. (import proforma data)
1. Log in to TaxCaddy.
2. Click Administrative and then click Client Management.
Note: Client record must have valid information for Tax Software, Tax Client ID and Tax Software
Account# (CCH Axcess and GoSystem Tax RS only) filled out in order to create a custom DRL for the client.
For CCH Axcess Tax Software Version is required. If the Tax Client ID requires a password to access the
client's tax return from last year, Tax Software Password is required.
If any of these required fields are missing in the record, then the status will be Missing Tax Details. Once
everything is filled out, the status changes to Eligible for Import. You can edit the client's record by clicking
the Edit icon.
Quick Setup Guide 98
3. From I want to manage, select Create Custom DRL at the bottom of the list (you may need to scroll to see
it).
Quick Setup Guide 99
4. Click Select All to select all clients eligible for proforma data import. Alternatively, you can select/deselect
clients individually using the checkbox on the far left on the client record.
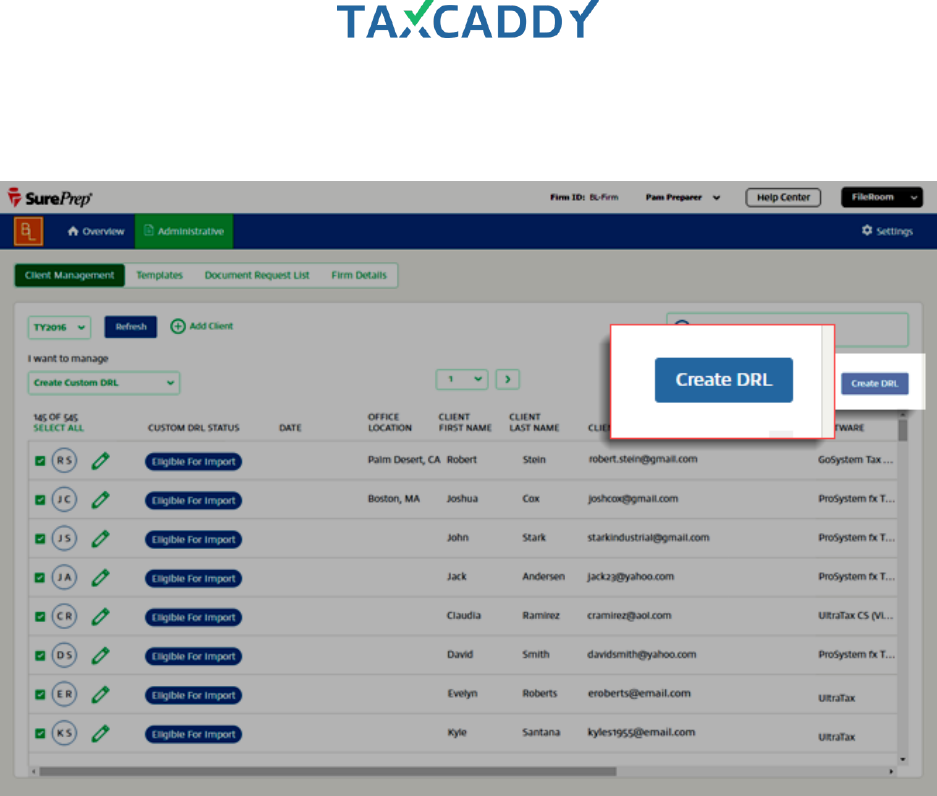
Quick Setup Guide 100
5. Click the Create DRL button. TaxCaddy confirms the import was started successfully and the clients’ Custom
DRL status updates to Completed.
Quick Setup Guide 101
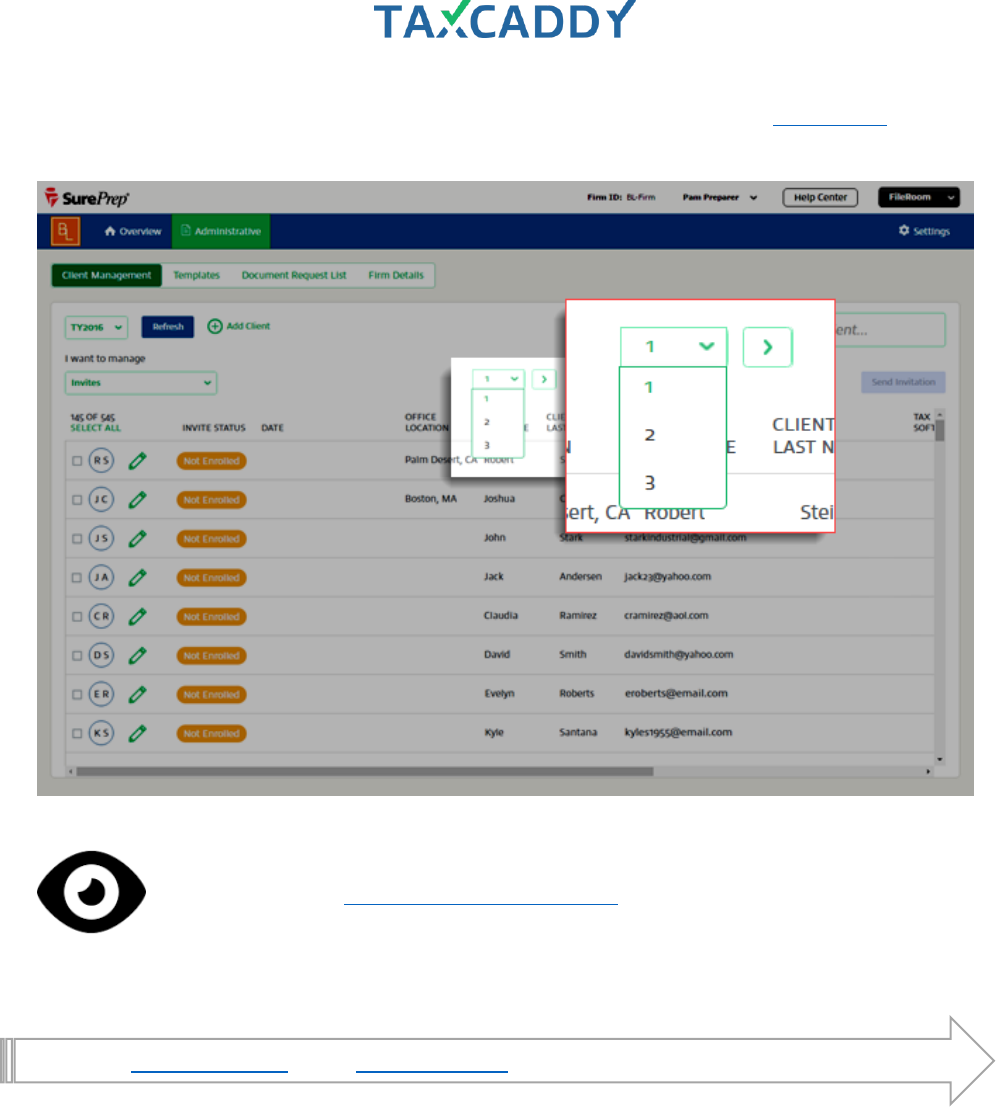
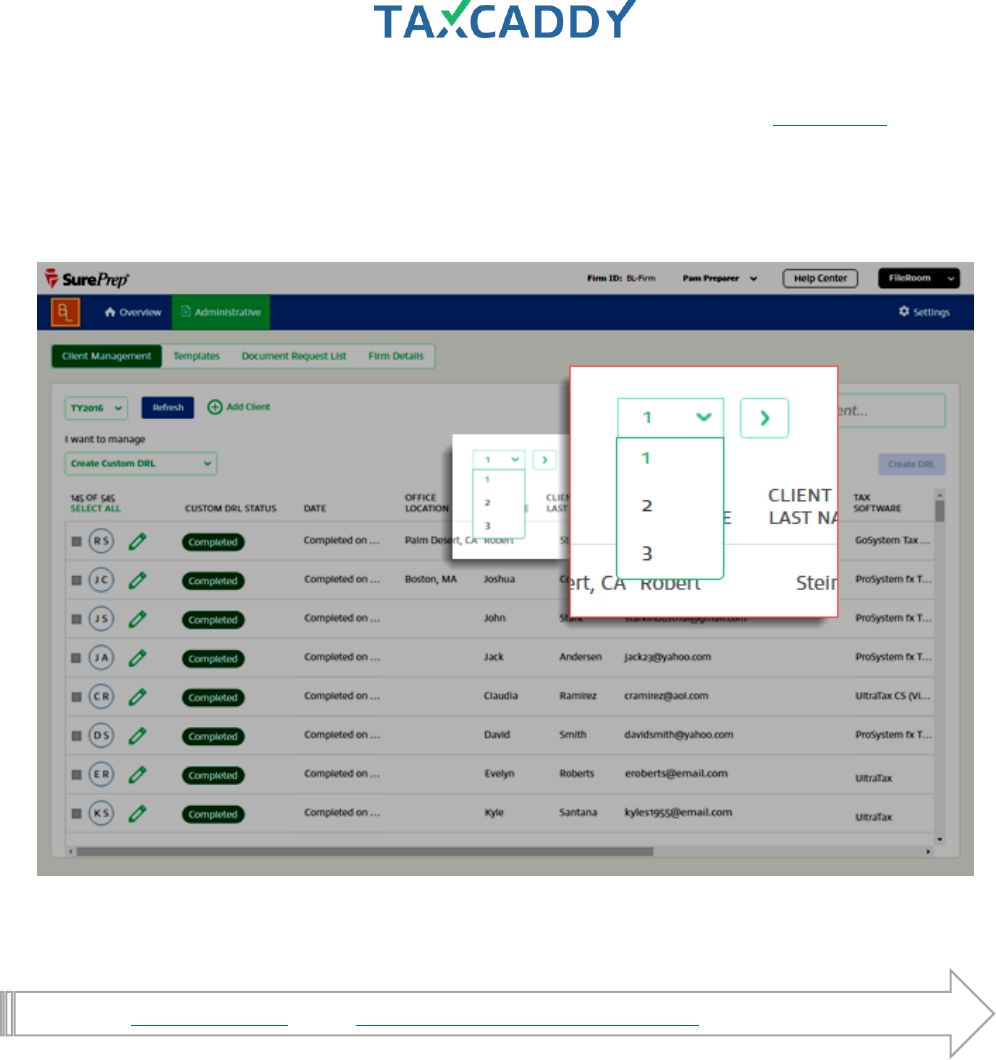
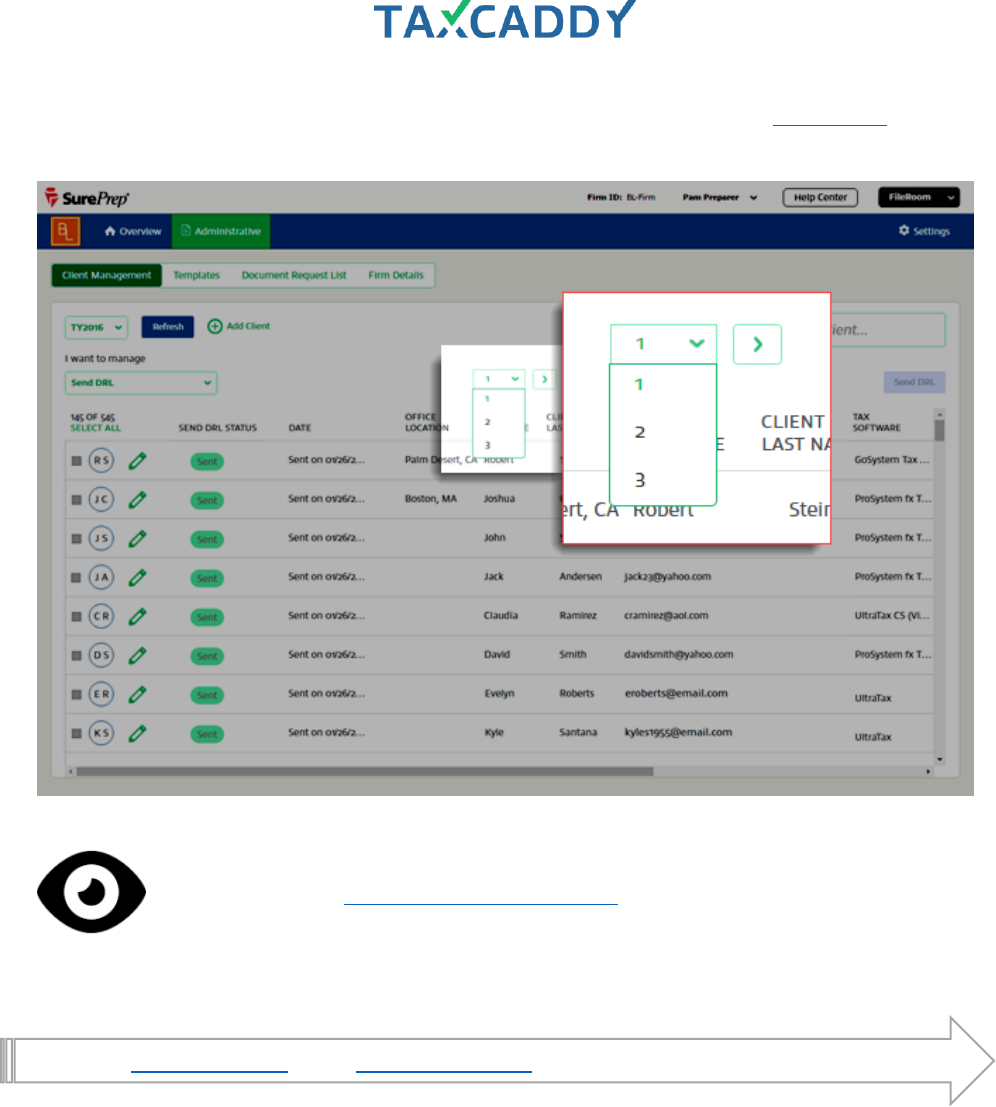
6. If there are multiple pages of client records, select the next page and repeat steps four and five for each
page of clients.
Note: Once Custom DRL is created, the proforma subcategories will appear in the category selection list for
the clients you create custom DRLs for.
Go back to Quick Start Guide. Next: Send Custom Document Request Lists.

Quick Setup Guide 102
Send Custom DRLs
Document Request List are based on your clients' proforma data from last tax year's tax return, as pulled from
your tax software. TaxCaddy also includes a Document Request List with predefined categories, and you can add
more categories as needed. Follow these steps to send Document Request Lists to your clients.
Tip: You can send the Document Request List to Connected clients, as well as to clients who have been invited
but who have not yet created an account.
1. Log in to TaxCaddy.
2. Click Administrative and then click Client Management.
Quick Setup Guide 103
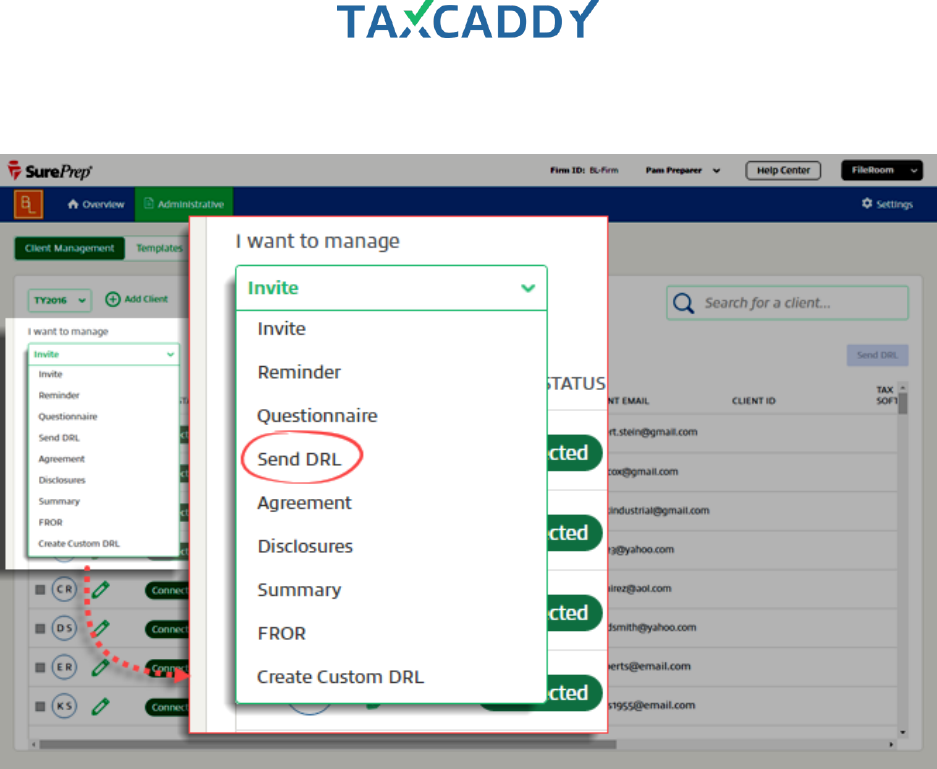
3. Under I want to manage, select Send DRL.
Quick Setup Guide 104
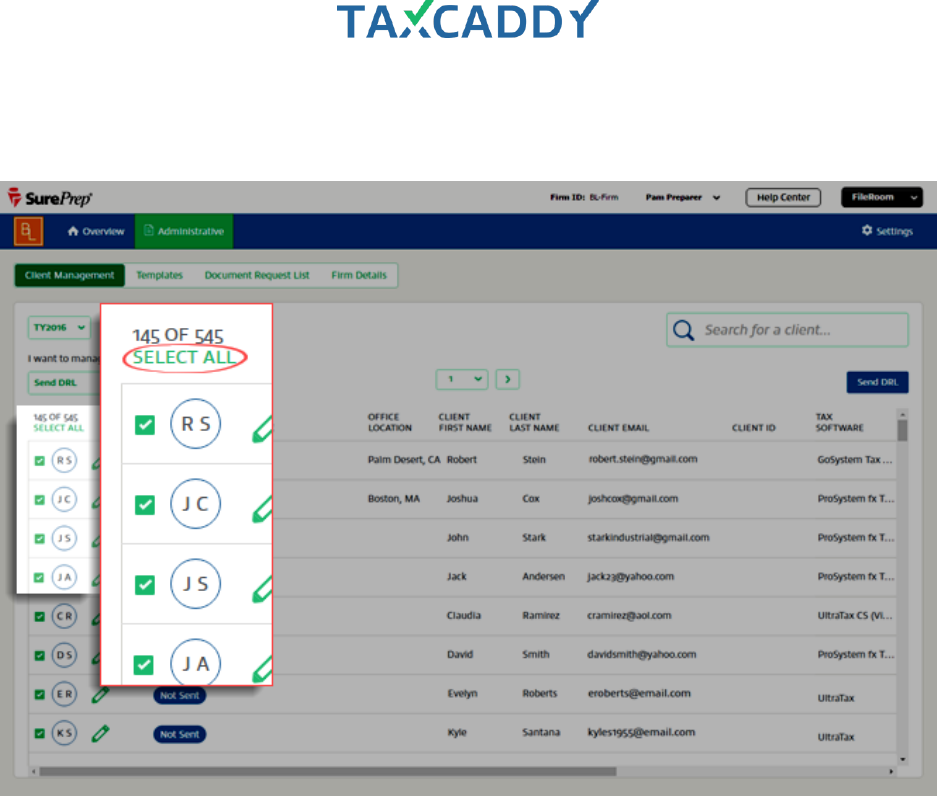
4. Click Select All to select all clients eligible to receive the Document Request List. Alternatively, you can
select/deselect clients individually using the checkbox on the far left on the client record.
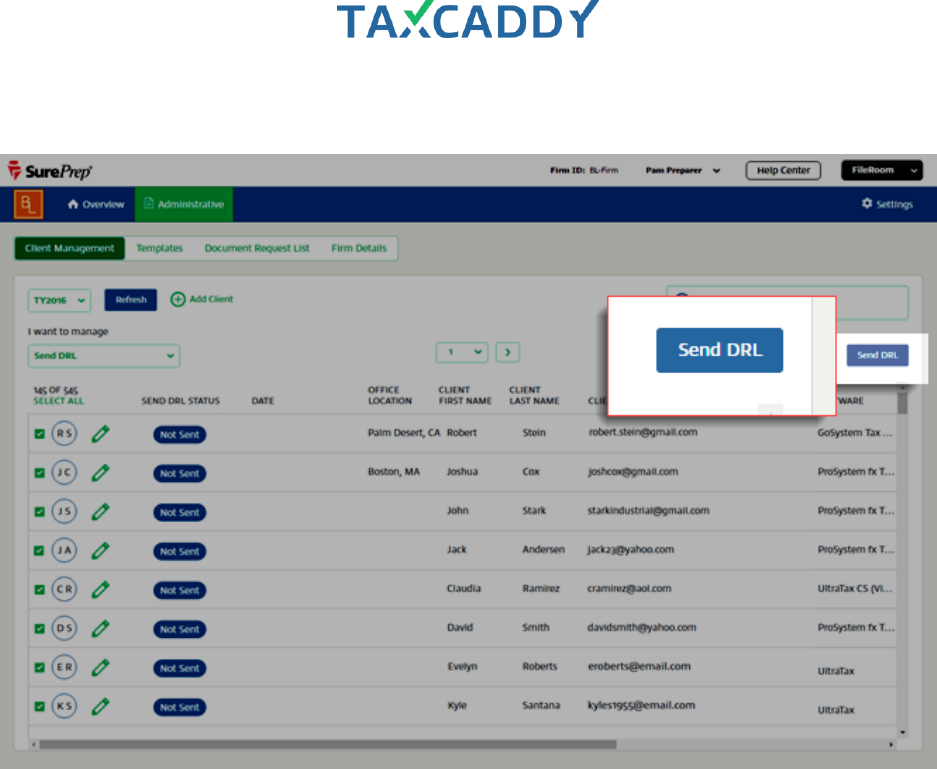
Quick Setup Guide 105
5. Click the Send DRL button. TaxCaddy confirms the Document Request List was sent to the selected clients.
Quick Setup Guide 107
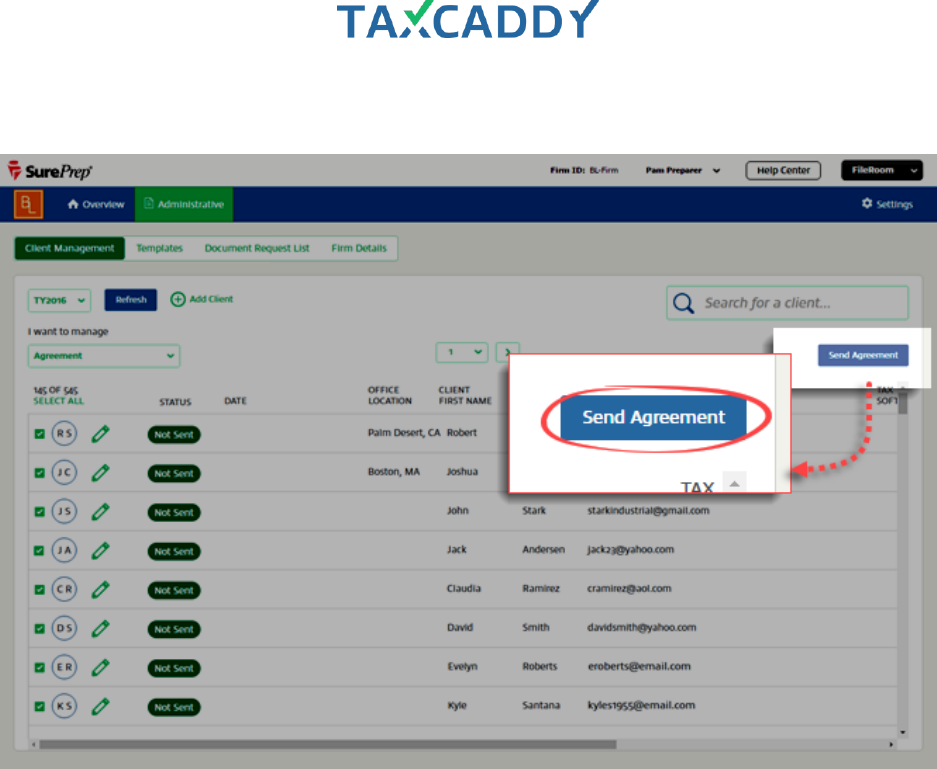
Send CPA Letters
When you send a request for your client to upload, sign or review a document, it is called a Requested Item and
appears in the Requested Items section of your client’s Tax Documents page. You can upload fillable PDFs as To
Sign Requested Item and the information they enter will be available to you when you view the signed
document.
Follow these steps to batch-send Letters templates to your clients.
1. Sign in to TaxCaddy.
2. Click Administrative and then click Client Management.
Quick Setup Guide 108
3. From I want to manage, select the title of the letter to send.
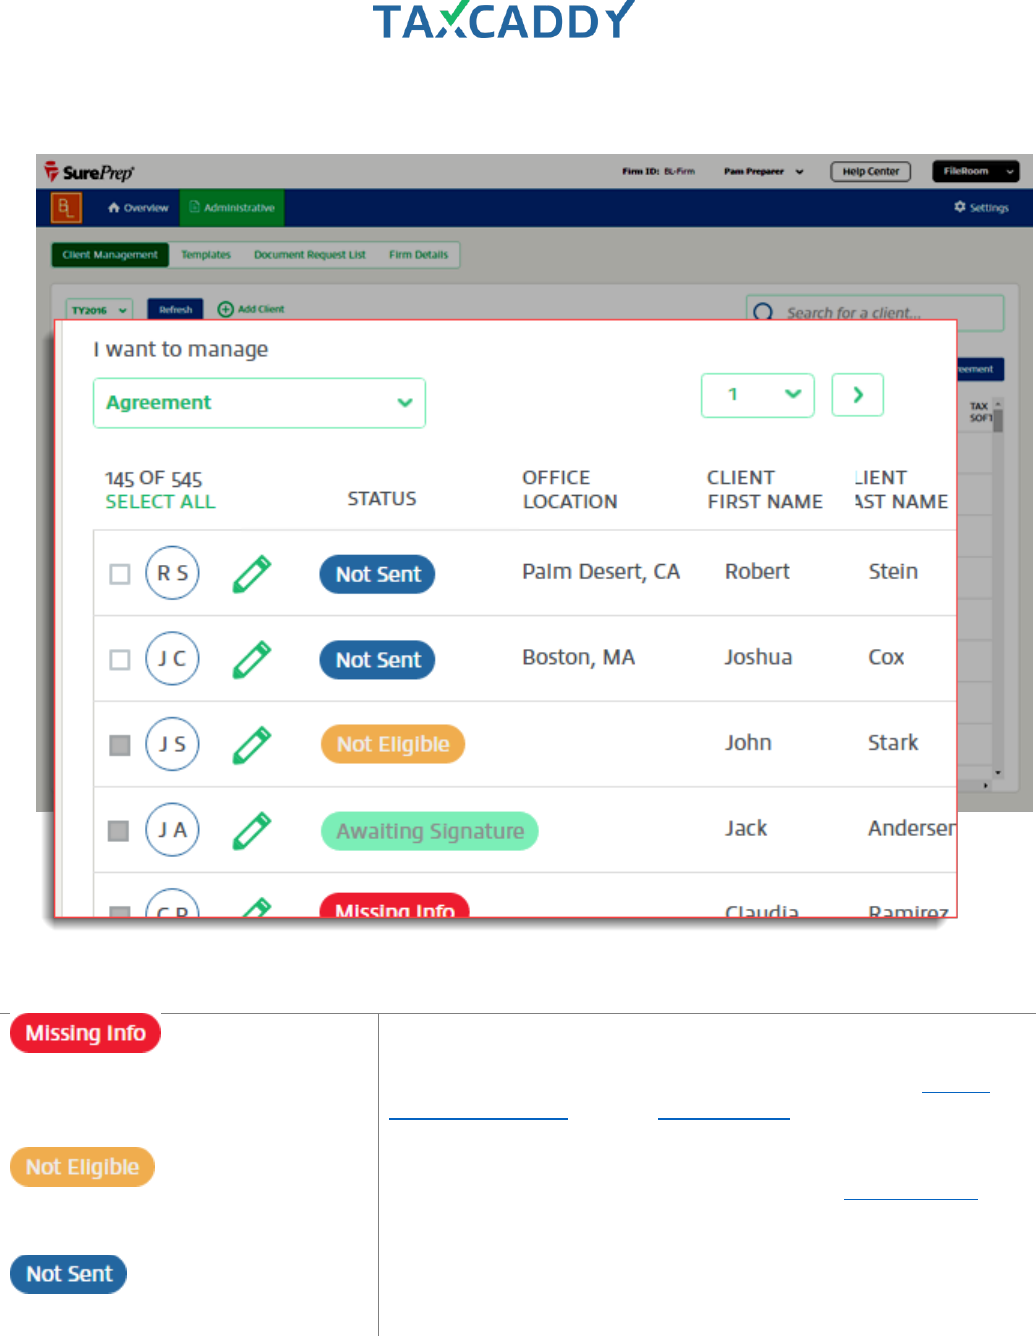
Quick Setup Guide 109
4. You can send letters to clients who have the status Not Sent.
STATUS
DESCRIPTION
Clients with the Status Missing Info cannot be invited to join TaxCaddy
because their client record is missing required information in one or
more of these fields: Email, First Name, Last Name, Owner. Provide
missing information and then send the Invite to proceed.
Clients who are not eligible to be sent the selected letter because they
have not been invited have the status Not Eligible. Send the Invite to
proceed.
Client who are eligible to be sent the selected letter, but who have not
been sent the selected item, have the status Not Sent. Send the
selected letter.
Quick Setup Guide 110
STATUS
DESCRIPTION
Clients who have been sent the selected Letter but who have not
completed the action associate with it (e.g. sign or review) have the
status Awaiting Review/Signature/Spouse's Signature. Wait for client
to complete items.
If a client fails to verify their identity three times when signing with ID
verification, the status becomes Manual Signature Required and they
must download the document and sign it manually. If either the
taxpayer or spouse fails the identity verification, both are required to
sign the document manually.
Clients who have completed the action associate with the Letter (e.g.
sign or review) have the status Reviewed or Signed. Item is complete,
view in Tax Documents
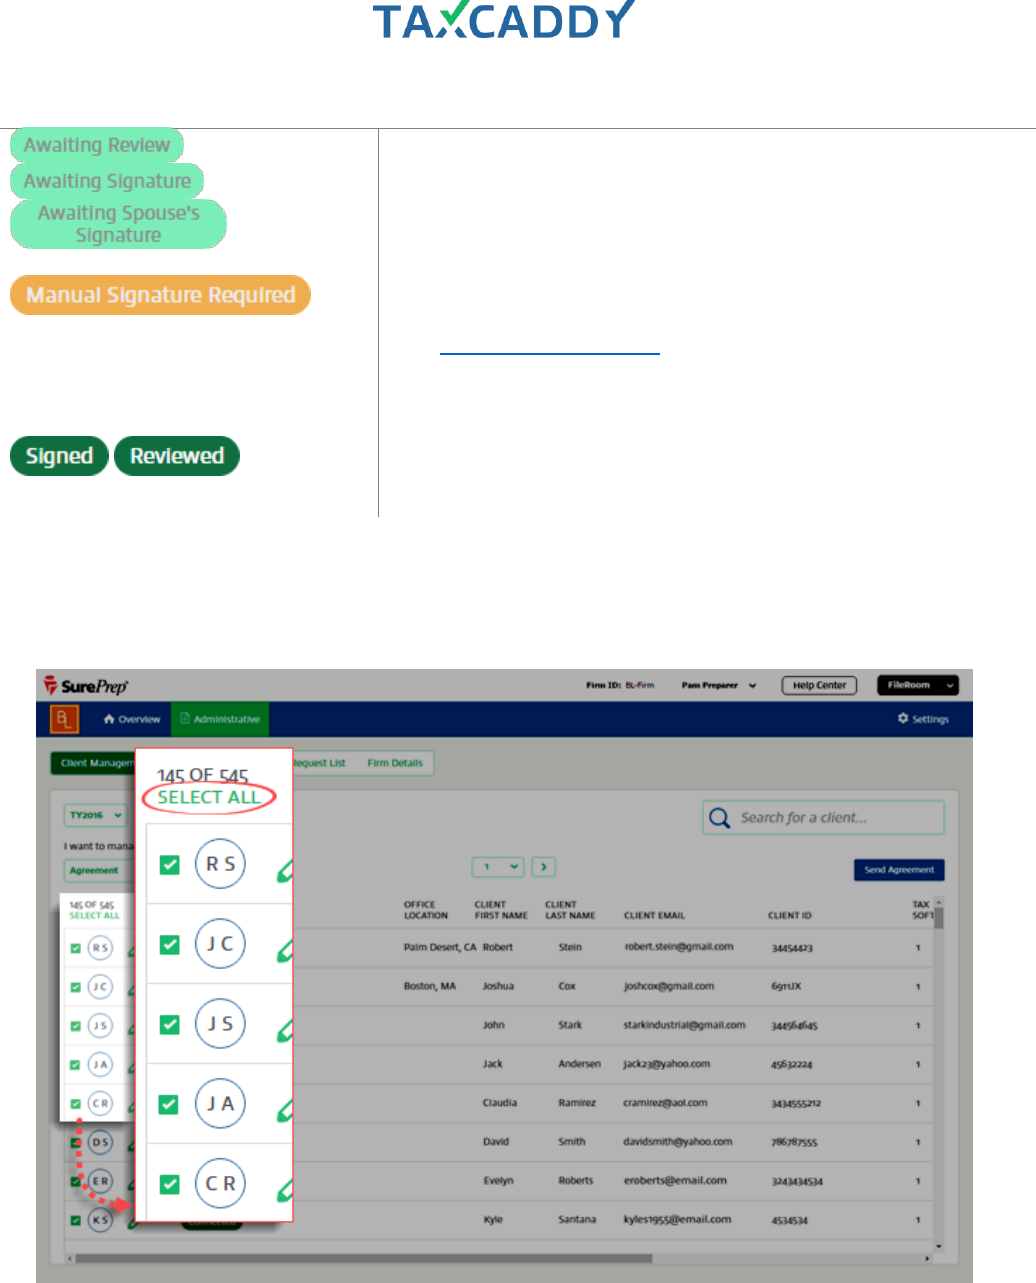
5. Click Select All to select all clients with the status Not Sent, who are eligible to receive the selected letter.
Alternatively, you can select/deselect clients individually using the checkbox on the far left on the client
record.

Quick Setup Guide 111
6. Click the Send Letter Name button. TaxCaddy confirms the letter was sent to the selected clients.
Quick Setup Guide 112
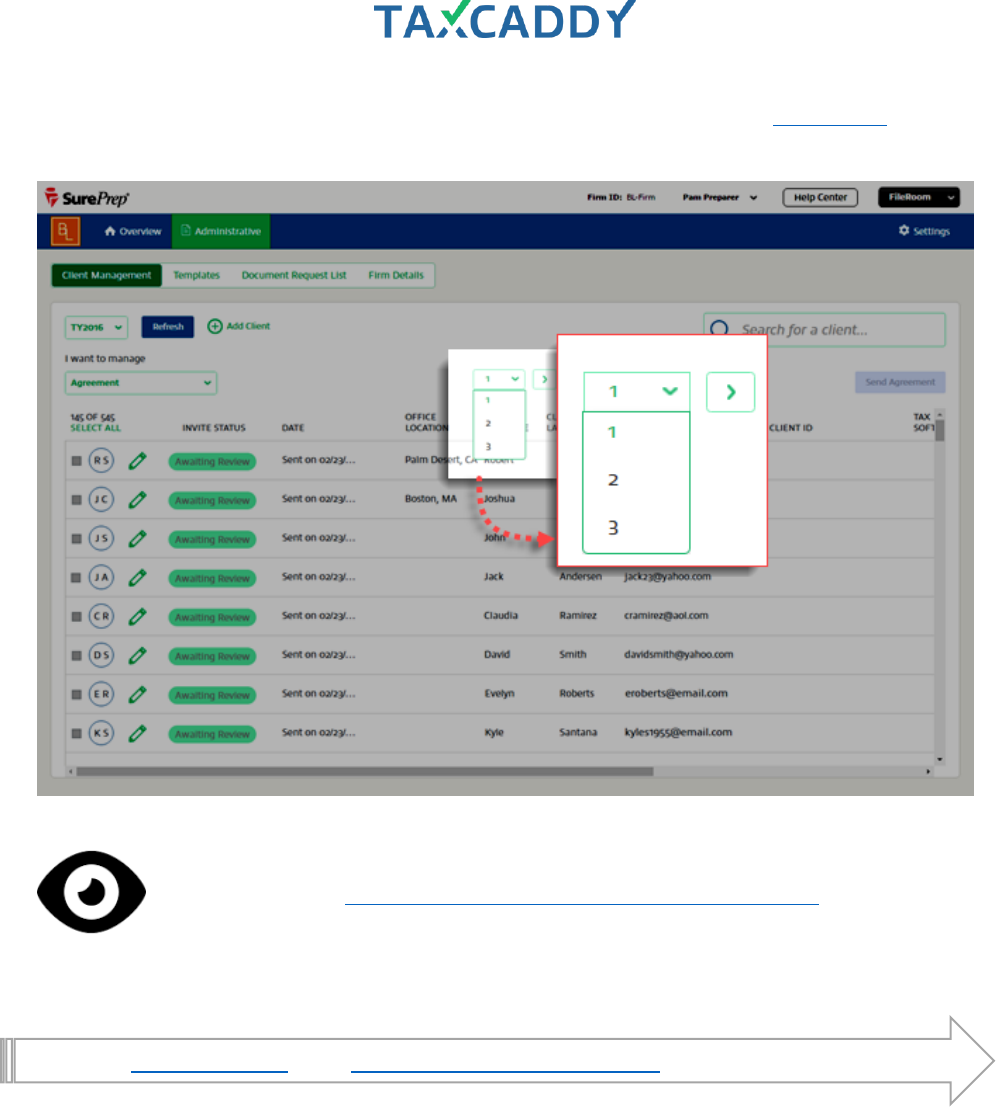
7. If there are multiple pages of client records, select the next page and repeat steps four and five for each
page of clients.
See Taxpayer View: Signing and Reviewing Documents (Requested Items)
Go back to Quick Start Guide. Next: Send Letters to an individual client (via Client Profiles).
Quick Setup Guide 113
Send Questionnaires
Follow these steps to batch-send the Questionnaire template to your clients.
1. Sign in to TaxCaddy.
2. Click Administrative and then click Client Management.
Quick Setup Guide 114
3. From I want to manage, select Questionnaire.
Quick Setup Guide 115
4. Click Select All to select all clients eligible to receive the Questionnaire. Alternatively, you can
select/deselect clients individually using the checkbox on the far left on the client record.
Tip: You can send letters, questionnaire, or DRL to clients who have the status Not Sent.
Quick Setup Guide 116
5. Click the Send Questionnaire button. TaxCaddy confirms the Questionnaire was sent to the selected clients.

Quick Setup Guide 118
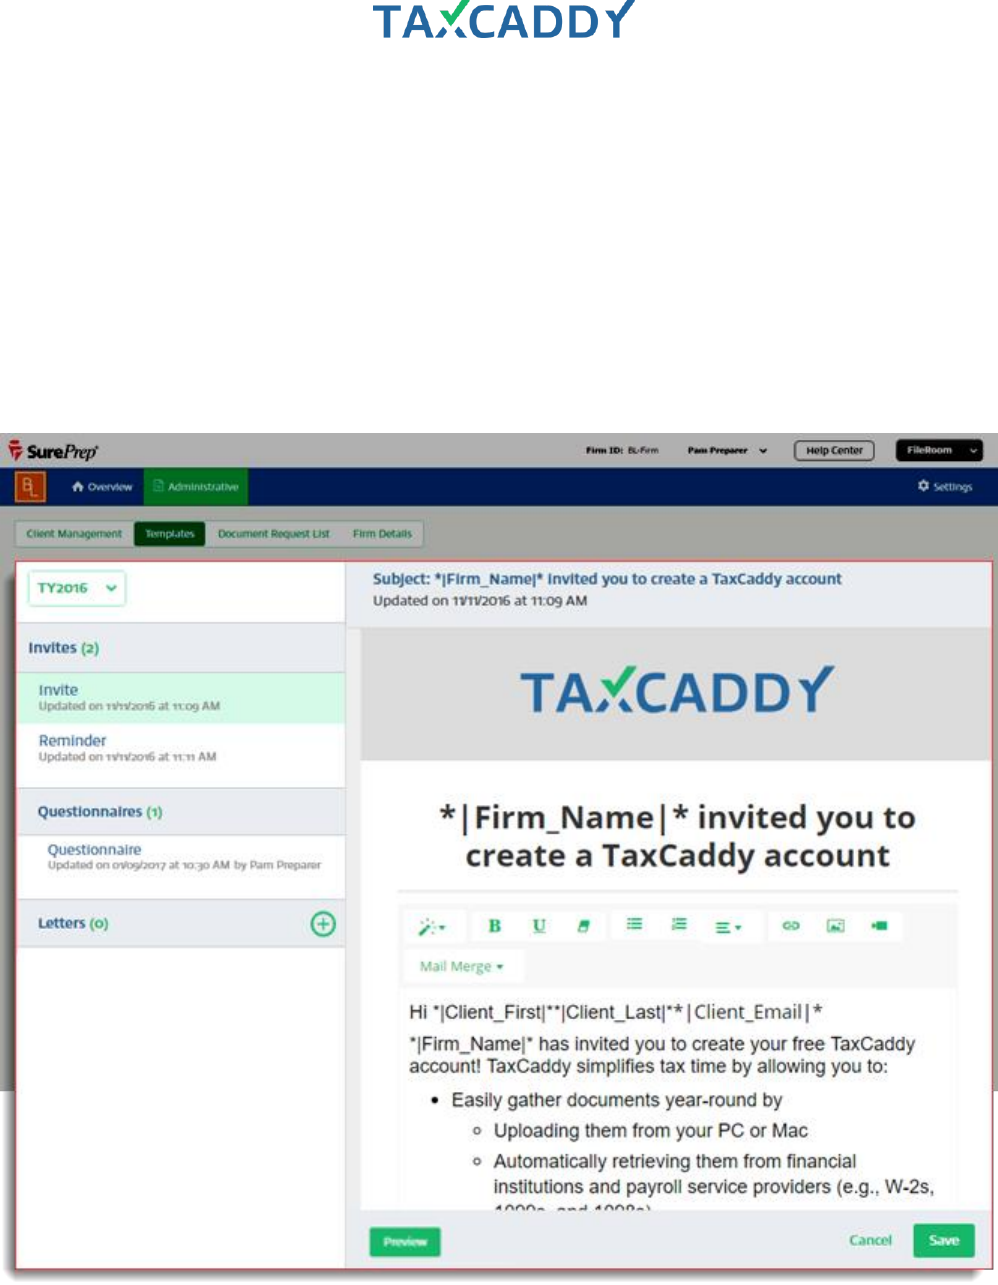
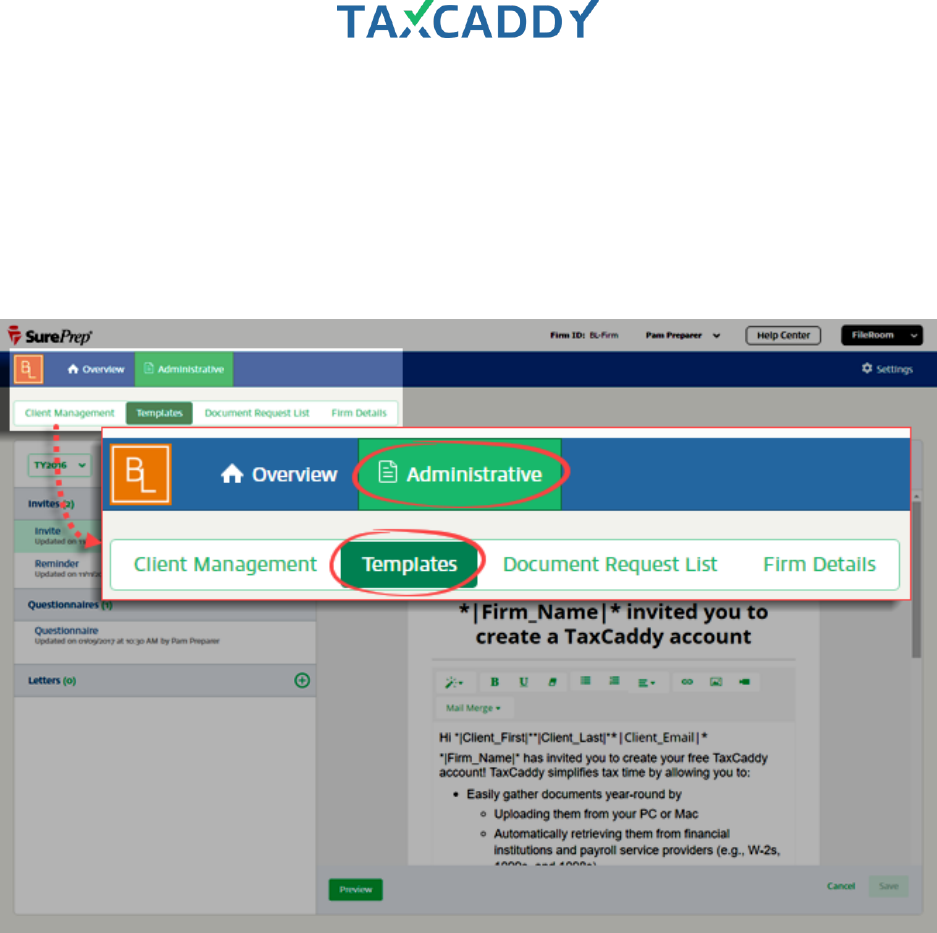
Templates
Manage your templates here, including invitations, CPA letters, and questionnaires. TaxCaddy comes with Invite
and Reminder templates ready to use, but you can use the built-in editor to customize existing templates or
create new templates as needed.
Quick Setup Guide 119
Invite and Reminder
TaxCaddy comes with client invitation and invitation reminder templates ready to use, but you can customize
these templates as desired. Follow these steps to customize the Invite and Reminder templates.
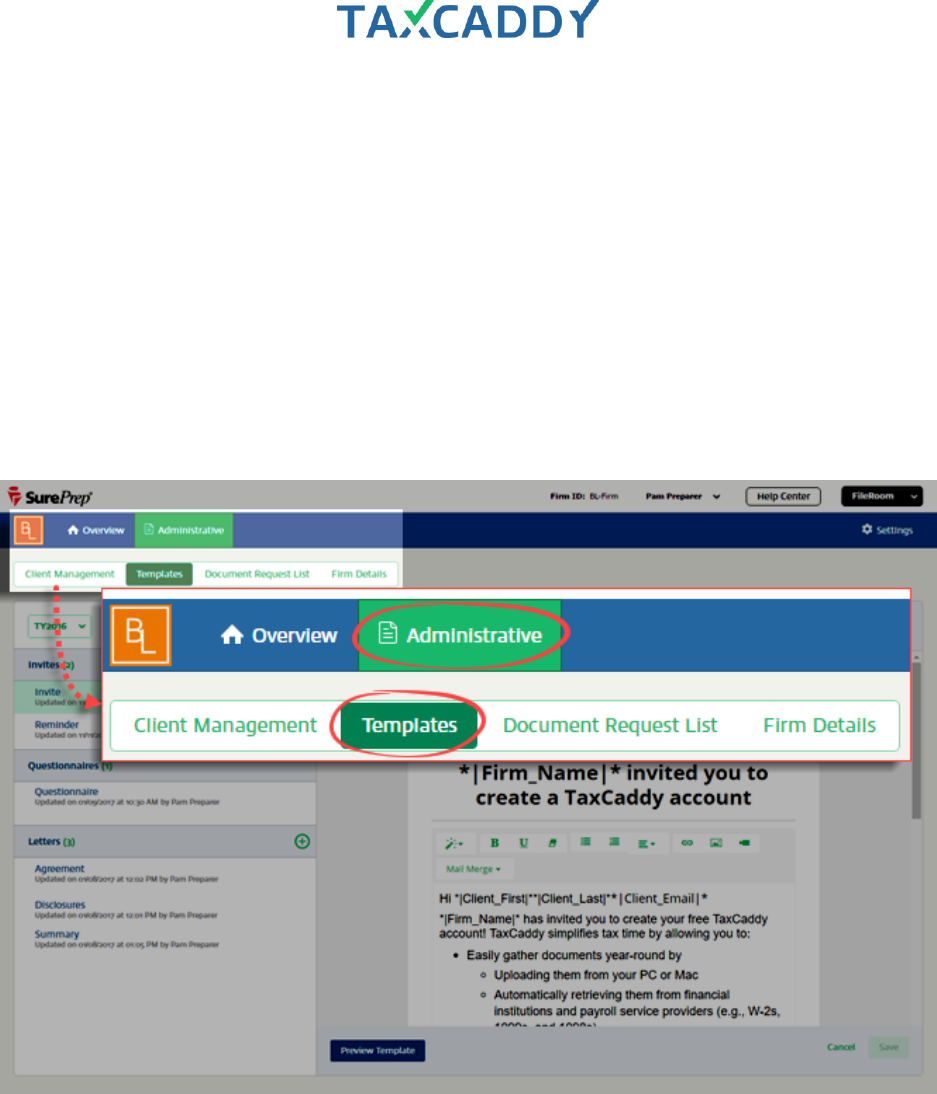
1. Log in to TaxCaddy.
2. Click Administrative and then click Templates.

Quick Setup Guide 120
3. The Invite template is selected by default and open in the editor on the right. Use the built-in editor to edit
the template as desired (i.e. text styles, alignment, etc.). To use Mail Merge, place the cursor where you
want to include a mail merge field, click Mail Merge and select a merge field.
Quick Setup Guide 121
4. To preview the template, including mail merge data, click Preview. Note that preview mode displays sample
data and does not use data from your clients.
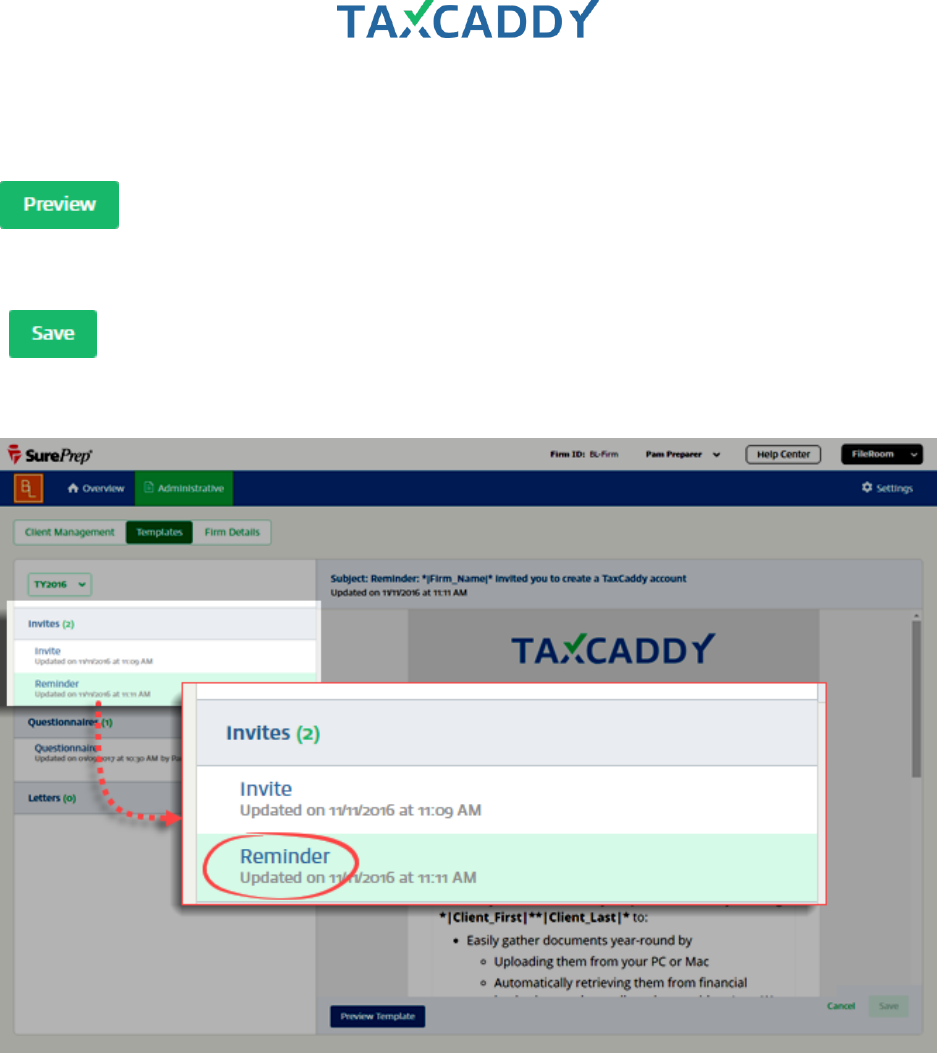
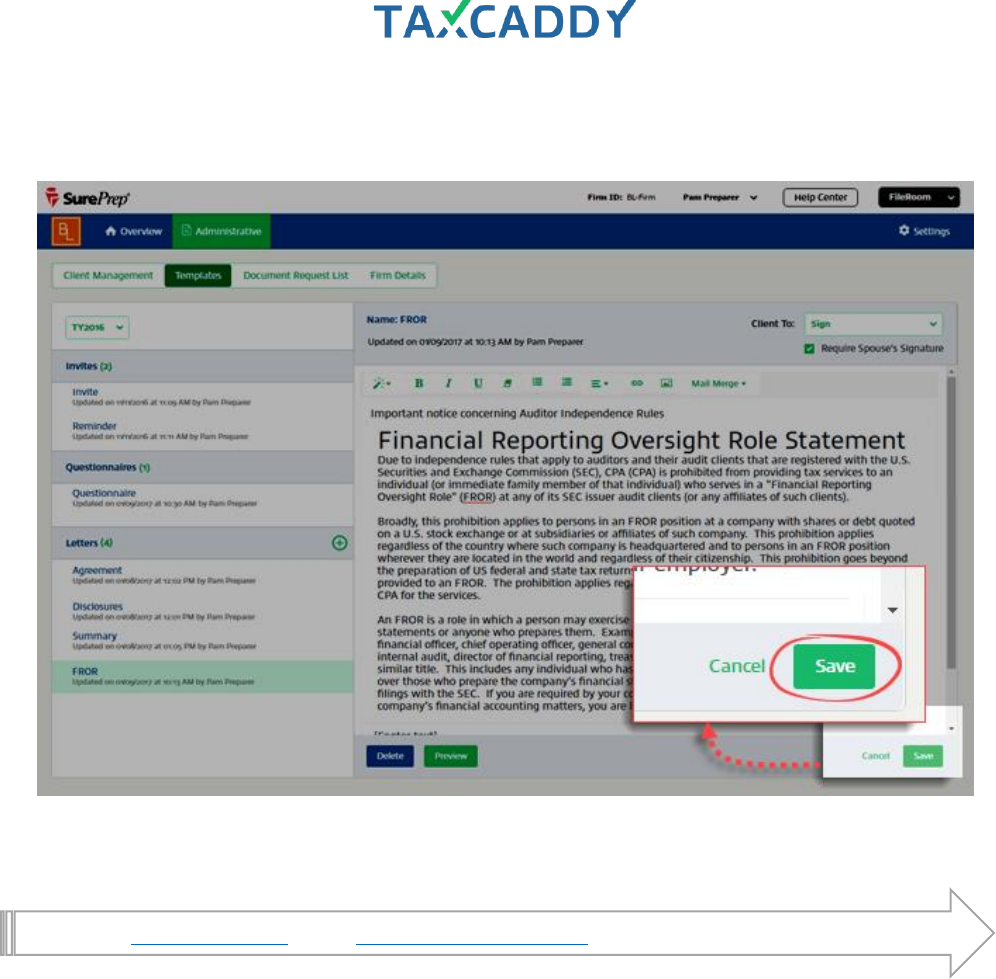
5. When you're done editing the Invite template, click Save. Your changes to the Invite template are saved.
6. Under Invites, click Reminder.
Quick Setup Guide 122
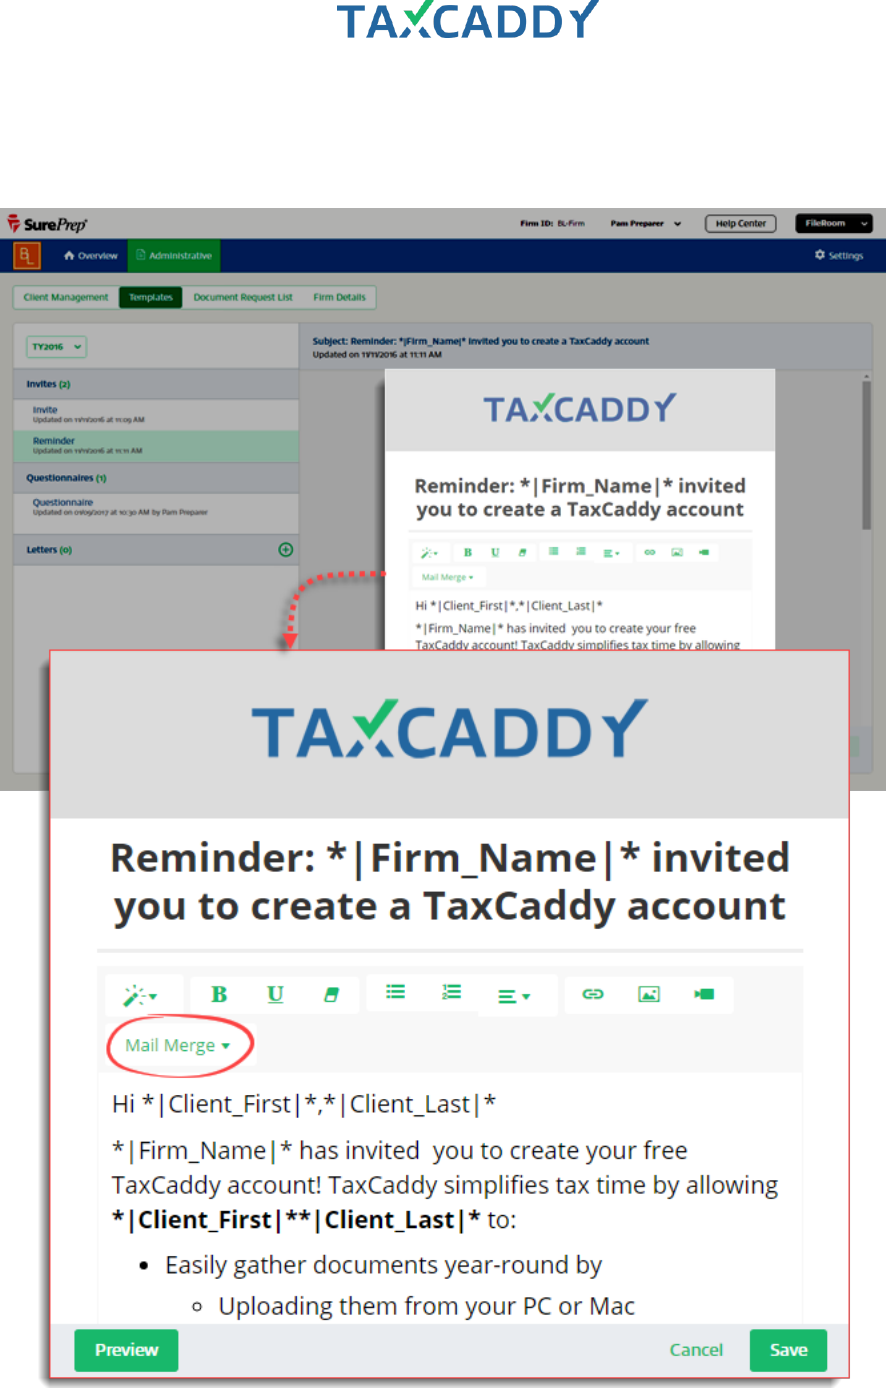
7. The Reminder templates opens in the editor. Use the built-in editor to edit the template as desired (i.e. text
styles, alignment, etc.). To use Mail Merge, place the cursor where you want to include a mail merge field,
click Mail Merge and select a merge field.
Quick Setup Guide 123
8. To preview the template, including mail merge data, click Preview. Note that preview mode displays sample
data and does not use data from your clients.
9. When you’re done, click Save. Your changes to the Reminder template are saved.
Go back to Quick Start Guide. Next: Update client records (provide missing info).
Quick Setup Guide 124
Create Letters
Follow these steps to create a Letters template from scratch using the built-in editor.
1. Log in to TaxCaddy.
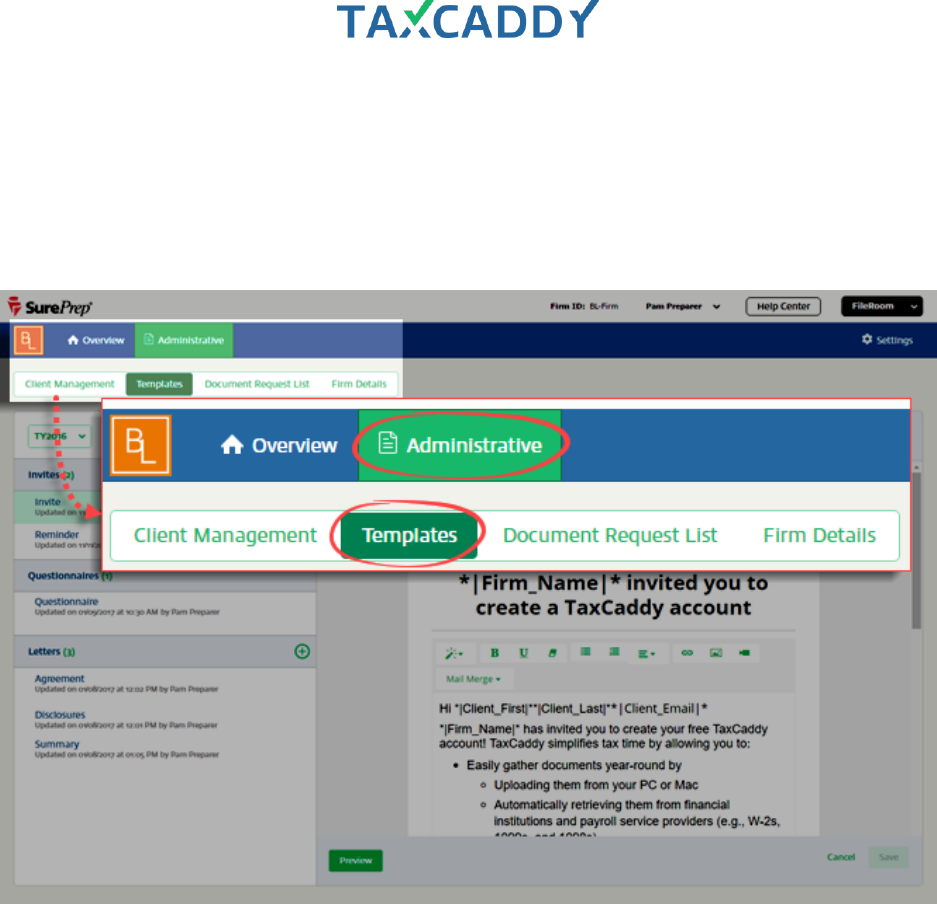
2. Click Administrative and then click Templates.
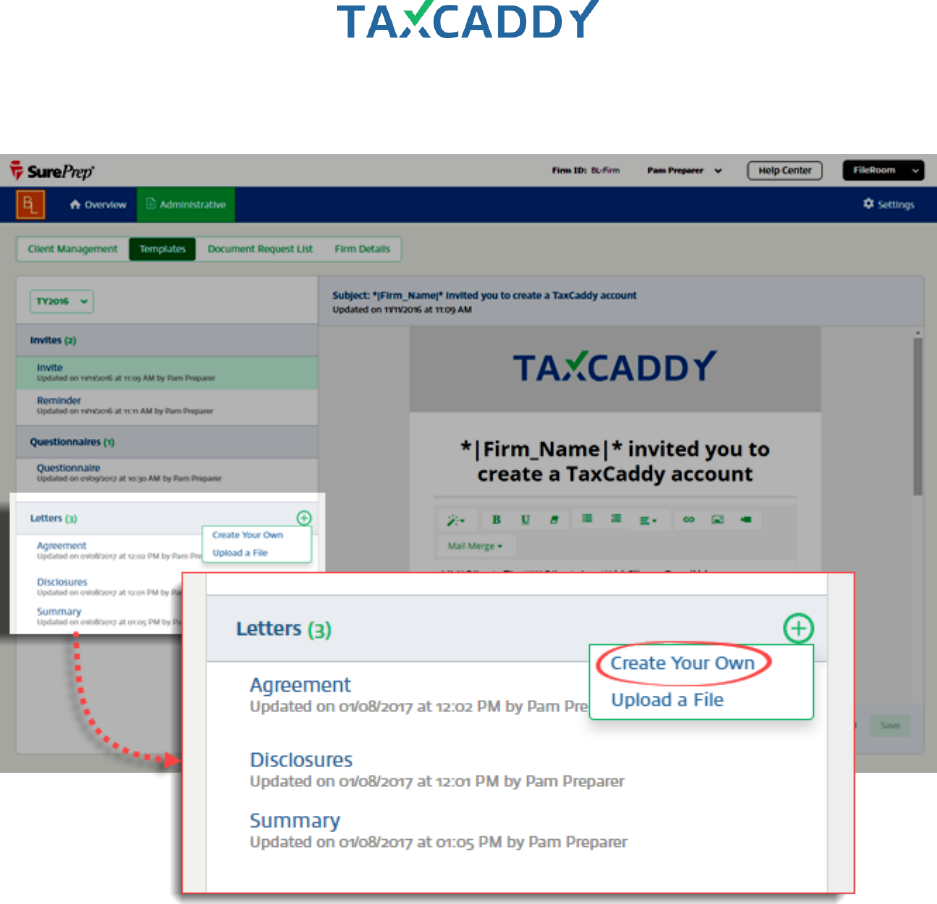
Quick Setup Guide 125
3. Next to Letters, click the New icon and then click Create Your Own.
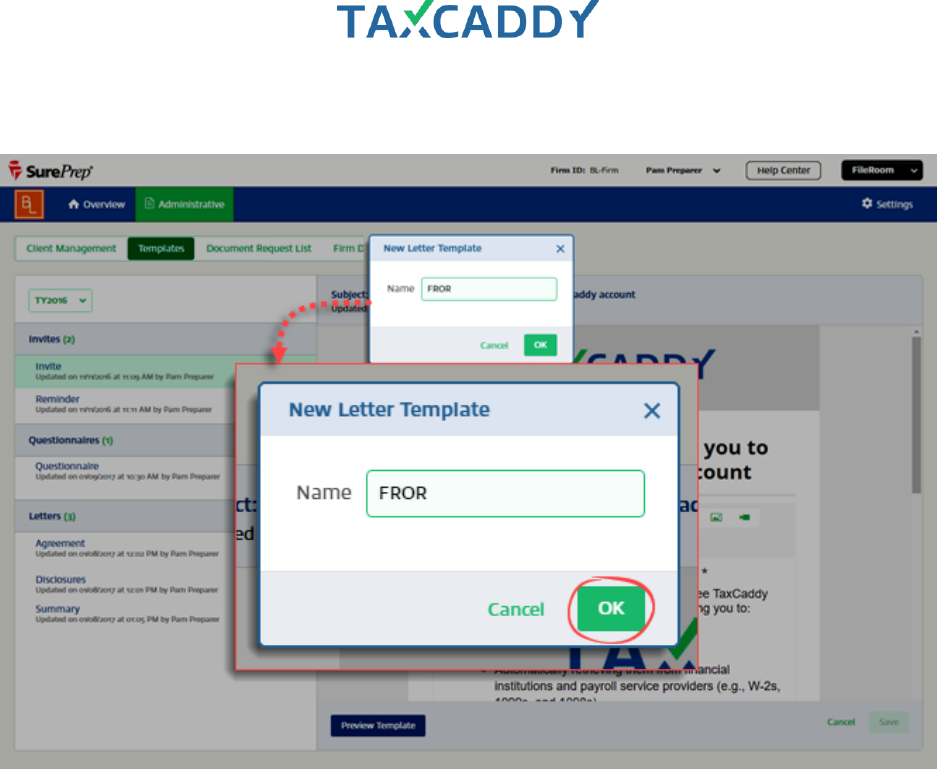
Quick Setup Guide 126
4. Type a name for the new template and click OK.
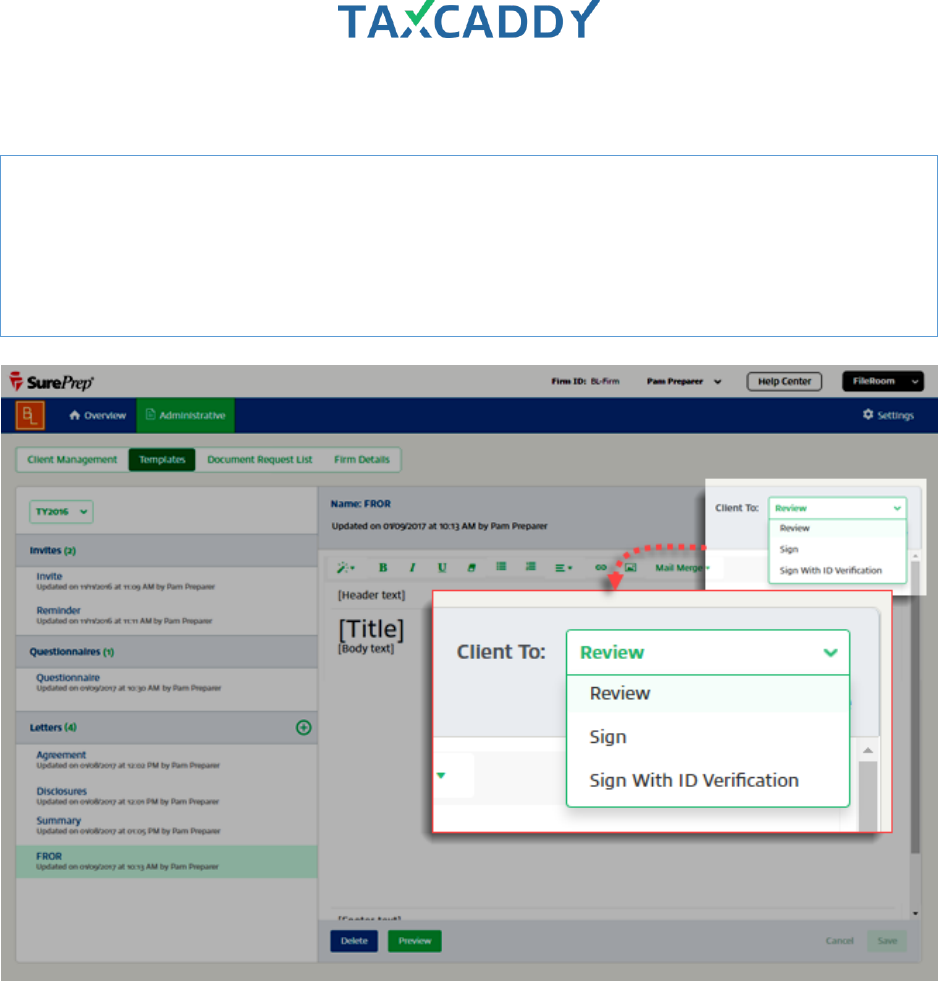
Quick Setup Guide 127
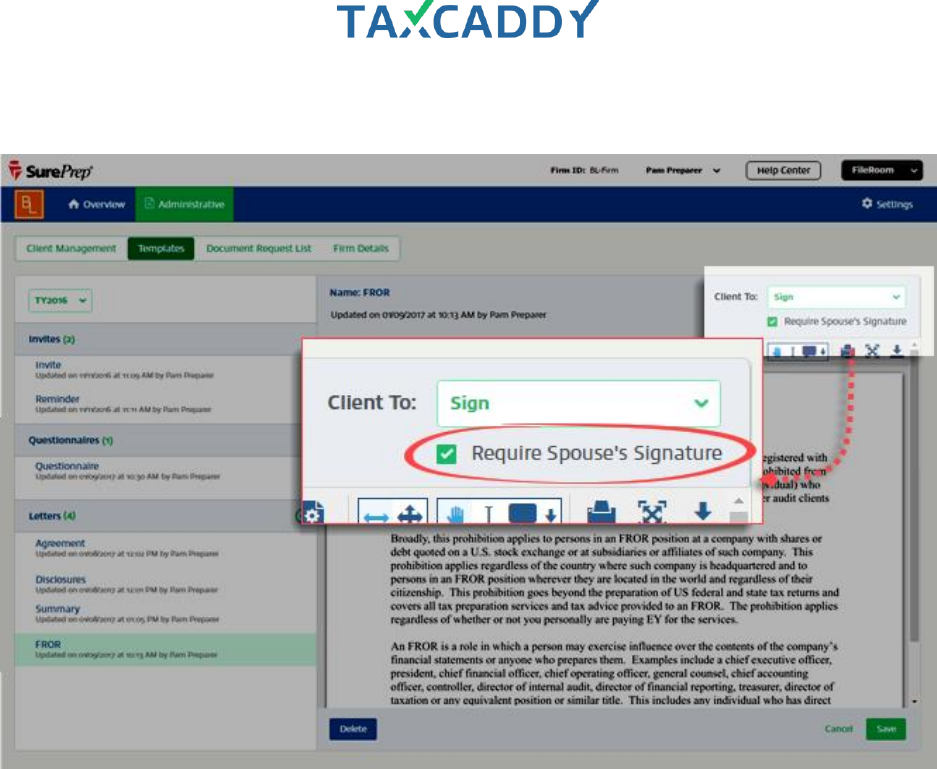
5. From Client To, select either Review, Sign or Sign with ID Verification.
Client to: Review
Client marks document as reviewed using the Mark Reviewed button.
Client to: Sign
Client marks document as signed using the Sign & Accept button and entering
their first name as signature capture.
Client to: Sign with
ID Verification
Client marks document as signed using the Sign & Accept button, entering their
first name as signature capture and then providing information to confirm their
identity using knowledge-based authentication.
Quick Setup Guide 128
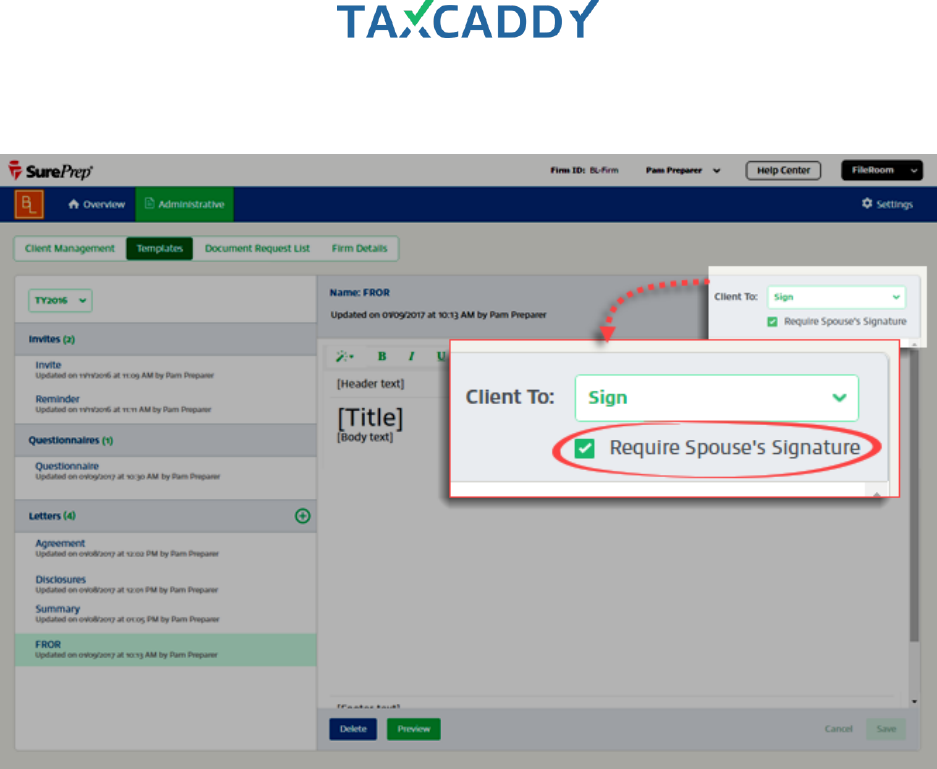
6. For documents that require signature, select whether to also Require Spouse's Signature.
Quick Setup Guide 129
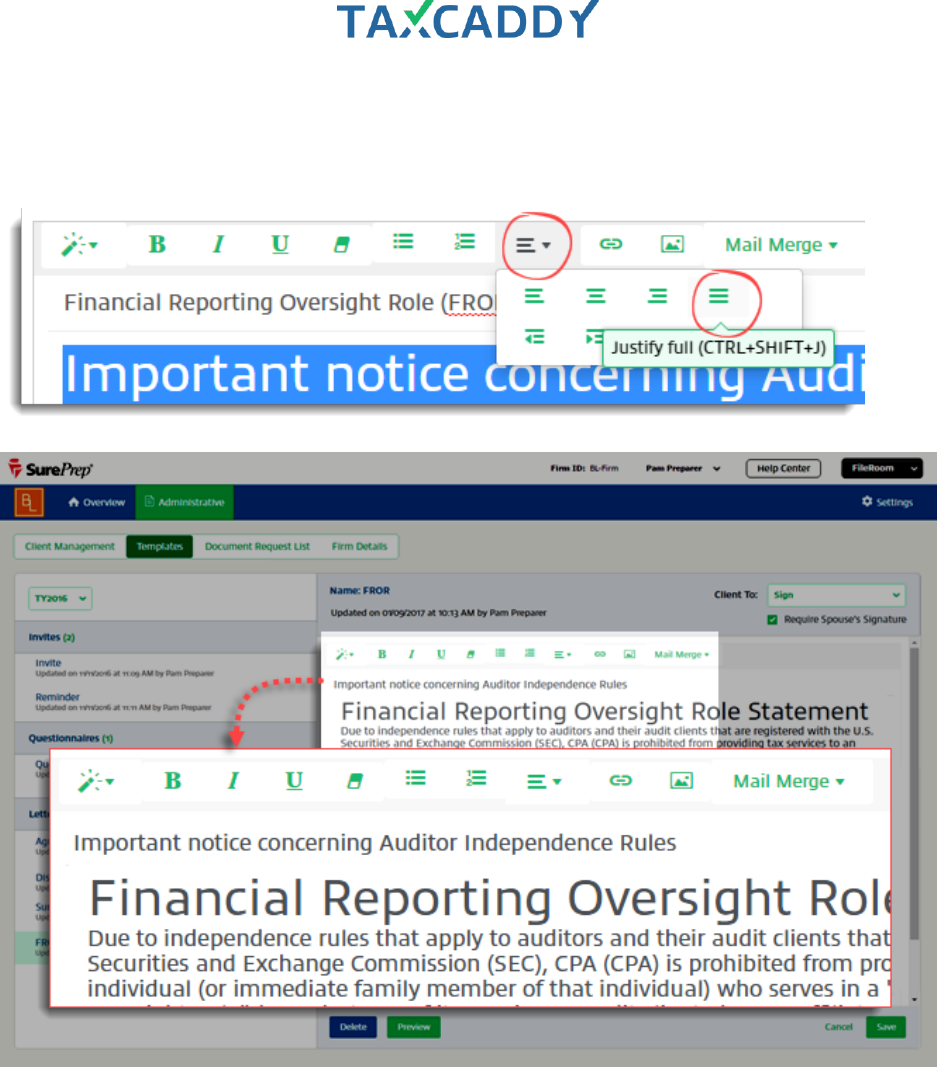
7. Edit the template as desired using the built-in editor.
Tip: For best results, we recommend setting text-alignment to Justified in Letters templates.

Quick Setup Guide 130
8. To use Mail Merge, place the cursor where you want to include a mail merge field, click Mail Merge and
select a merge field.
Quick Setup Guide 131
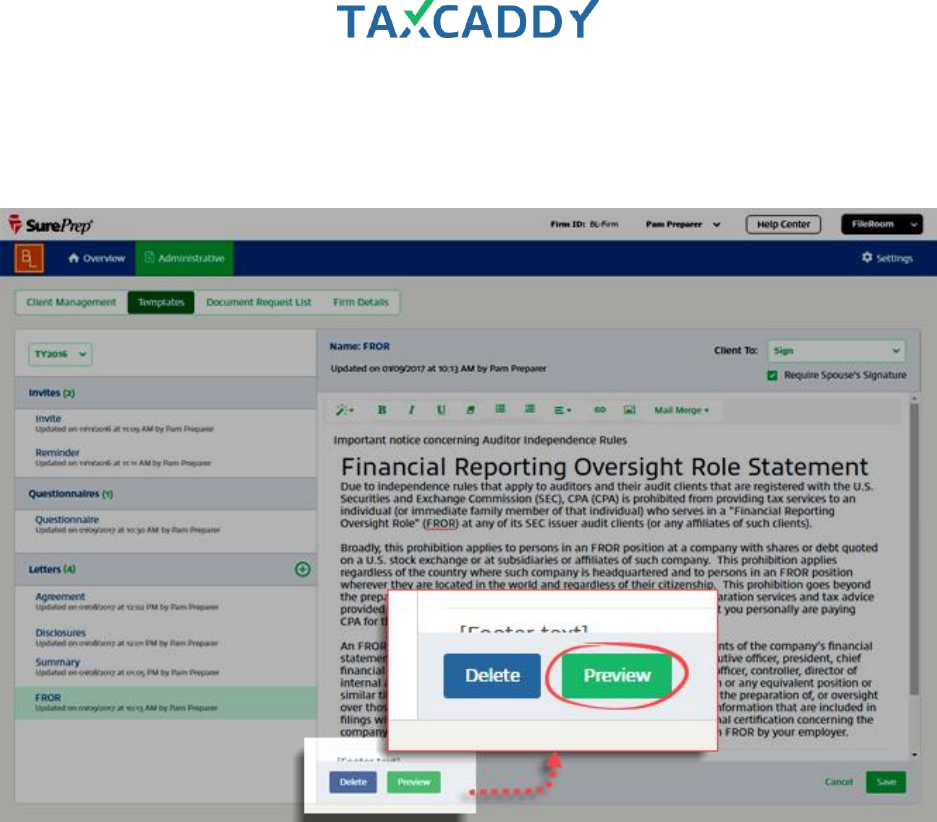
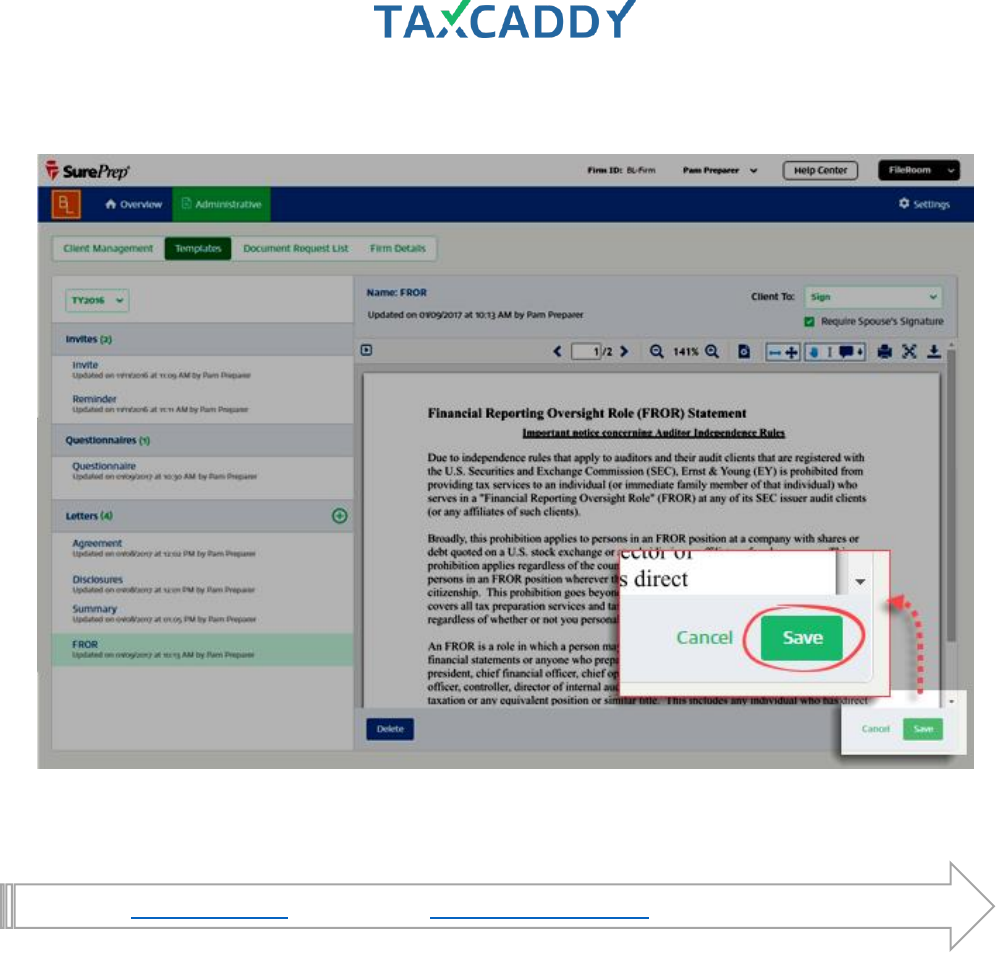
9. To preview the template, including mail merge data, click the Preview button.
Tip: Note that preview mode displays sample data and does not use mail merge data from your clients.
Quick Setup Guide 133
Upload Letters
Follow these steps to upload a file as a Letters template.
1. Log in to TaxCaddy.
2. Click Administrative and then click Templates.

Quick Setup Guide 134
3. Next to Letters, click the New icon and then click Upload a File.
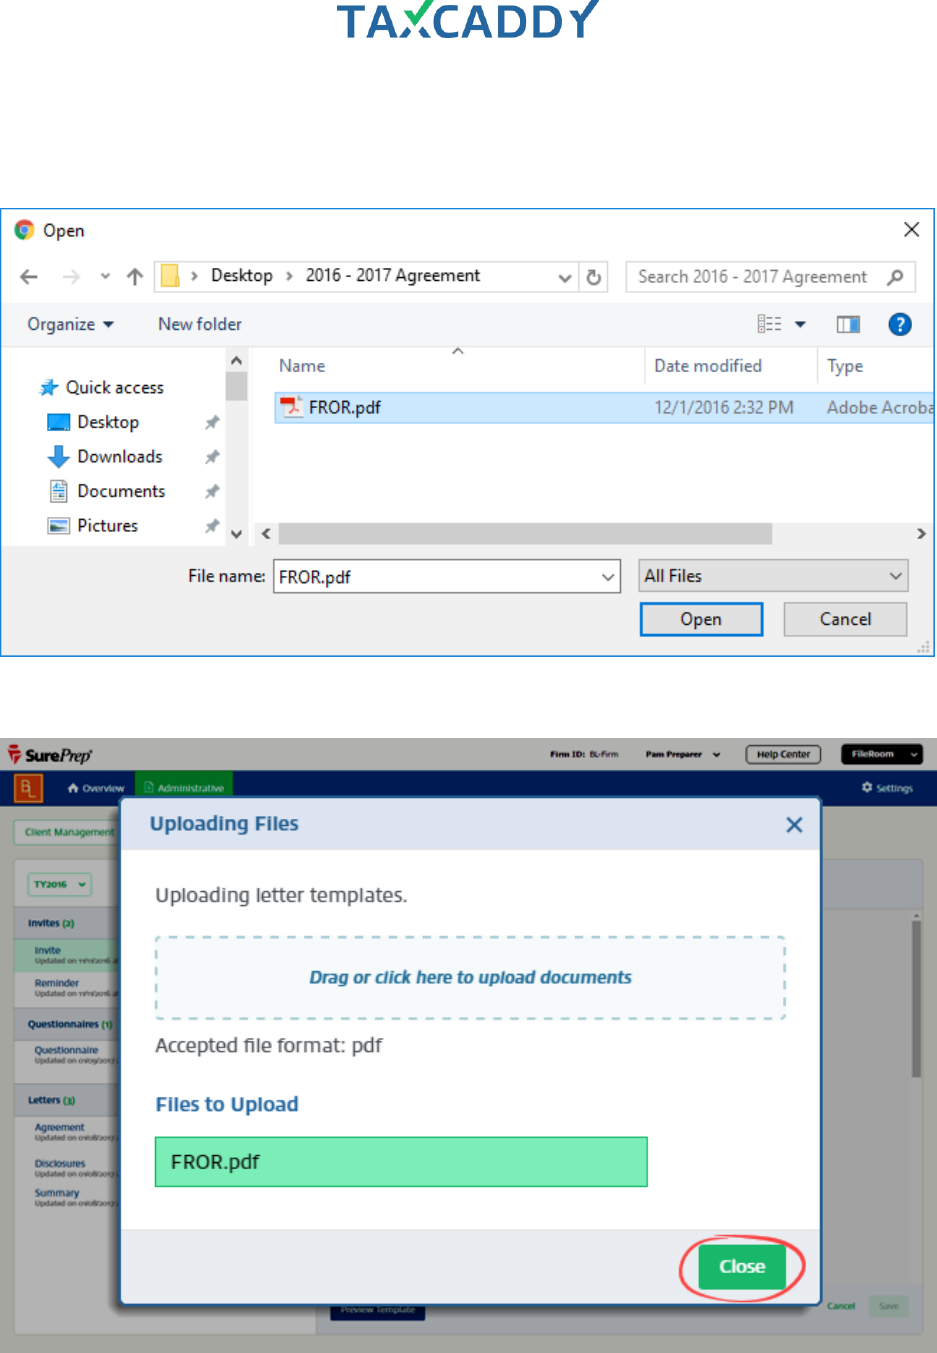
Quick Setup Guide 135
4. Select a file to upload from your device.
Tip: You can upload fillable PDFs for your clients to fill out.
5. When the file upload is complete, click Close.
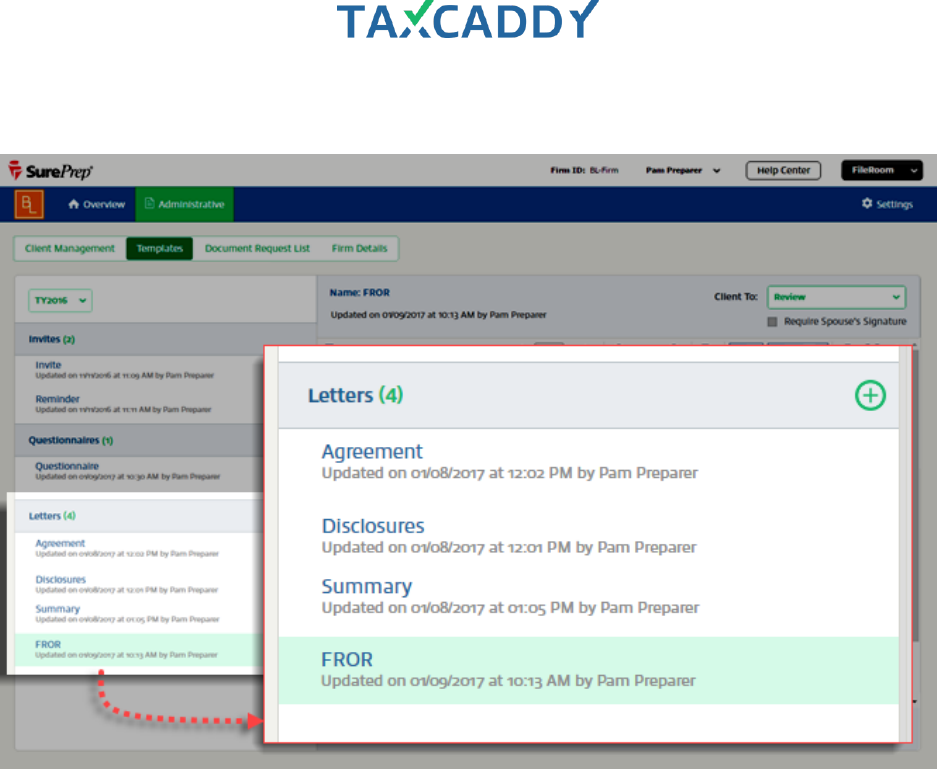
Quick Setup Guide 136
6. The new template appears in the list under Letters. Click the template to view it.
Quick Setup Guide 137
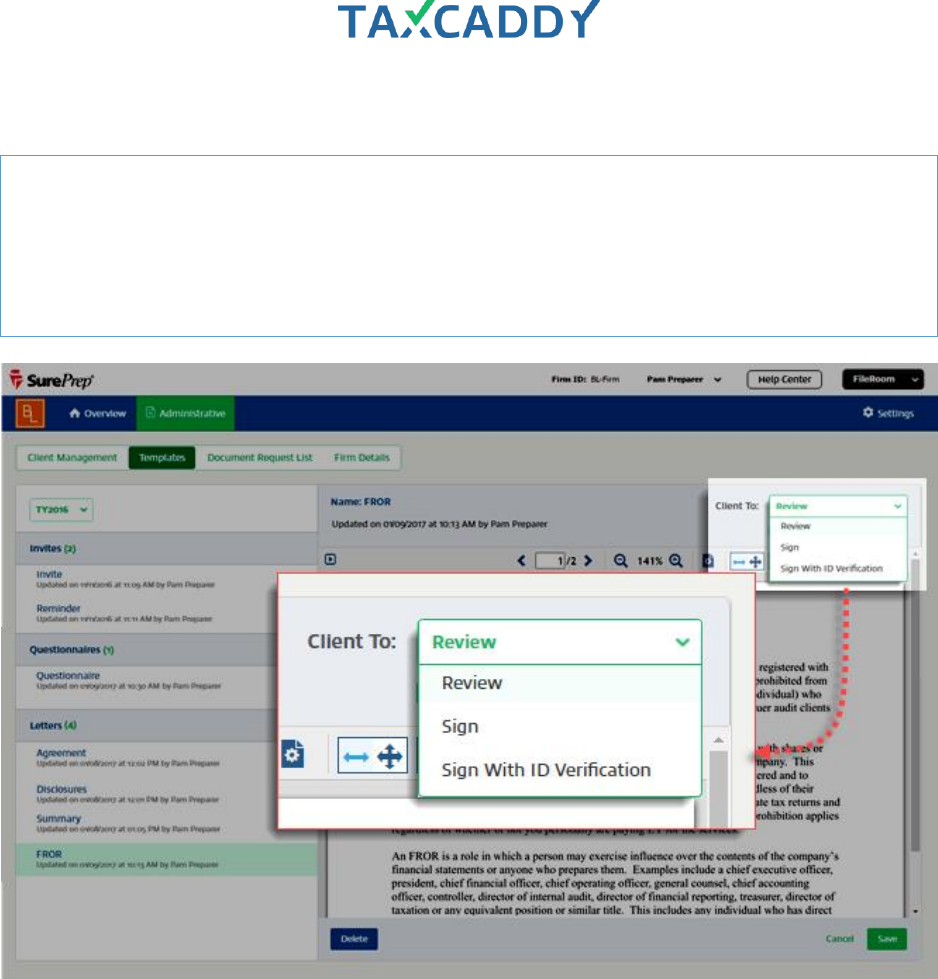
7. From Client To, select either Review, Sign or Sign With ID Verification.
Client to: Review
Client marks document as reviewed using the Mark Reviewed button.
Client to: Sign
Client marks document as signed using the Sign & Accept button and entering
their first name as signature capture.
Client to: Sign with
ID Verification
Client marks document as signed using the Sign & Accept button, entering their
first name as signature capture and then providing information to confirm their
identity using knowledge-based authentication.
9.
Quick Setup Guide 138
8. For documents that require signature, select whether to also Require Spouse's Signature.
Quick Setup Guide 140
Questionnaire
TaxCaddy comes with a Questionnaire template ready to use, but you can customize it as desired. Currently,
only one questionnaire template is available. In the future, TaxCaddy will support multiple questionnaire
templates. Follow these steps to edit the Questionnaire template.
Tip: Clients you already sent the questionnaire template will not see your changes to the template reflected in
their questionnaires. To make changes to questionnaires that have already been distributed to clients, go to the
client's profile, click Questionnaire, and then click Add a Question. Each client's questionnaire will need to be
edited individually.
1. Log in to TaxCaddy.
2. Click Administrative and then click Templates.
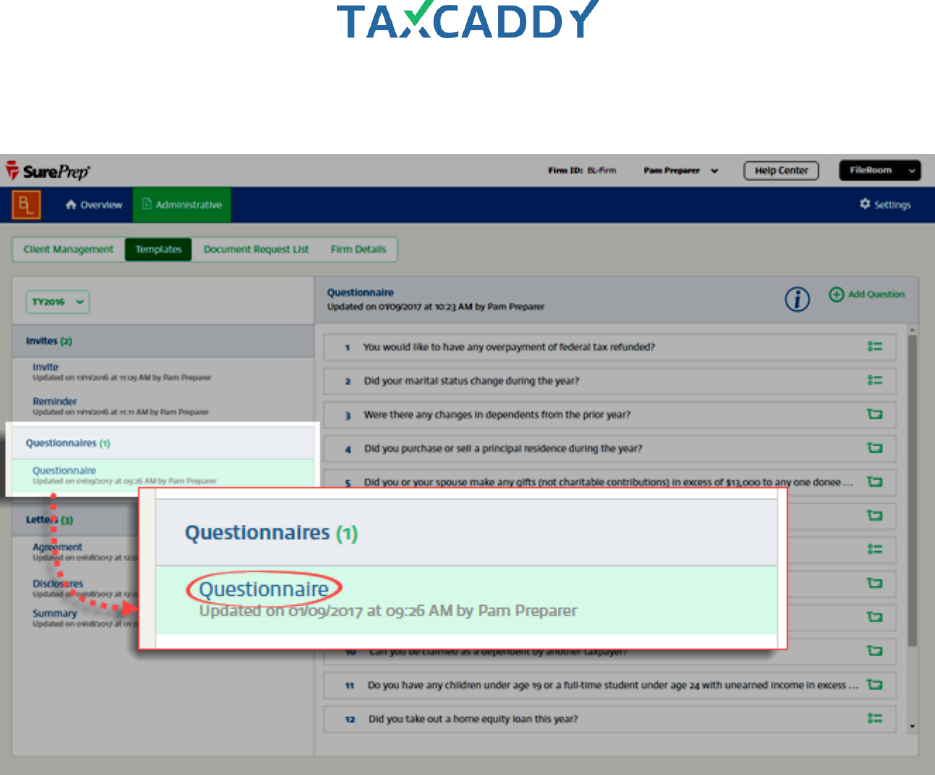
Quick Setup Guide 141
3. Under Questionnaires, click Questionnaire.
Quick Setup Guide 142
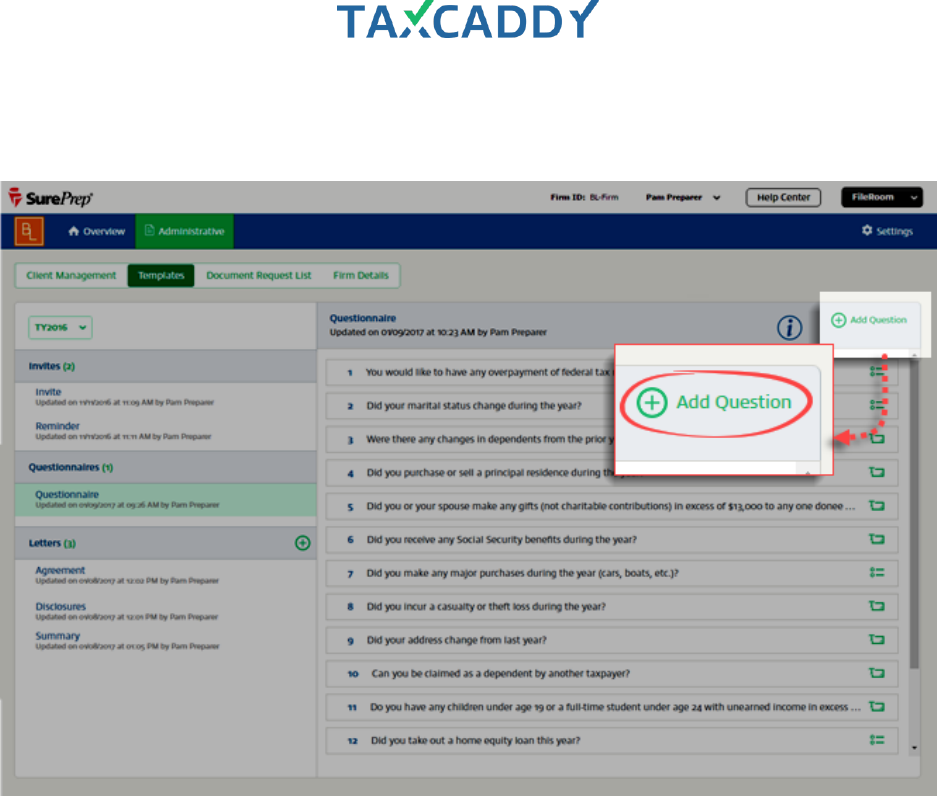
4. The questionnaire template opens in the editor. To add a new question, click Add New. Click an existing
question tile to edit a question.
Quick Setup Guide 143
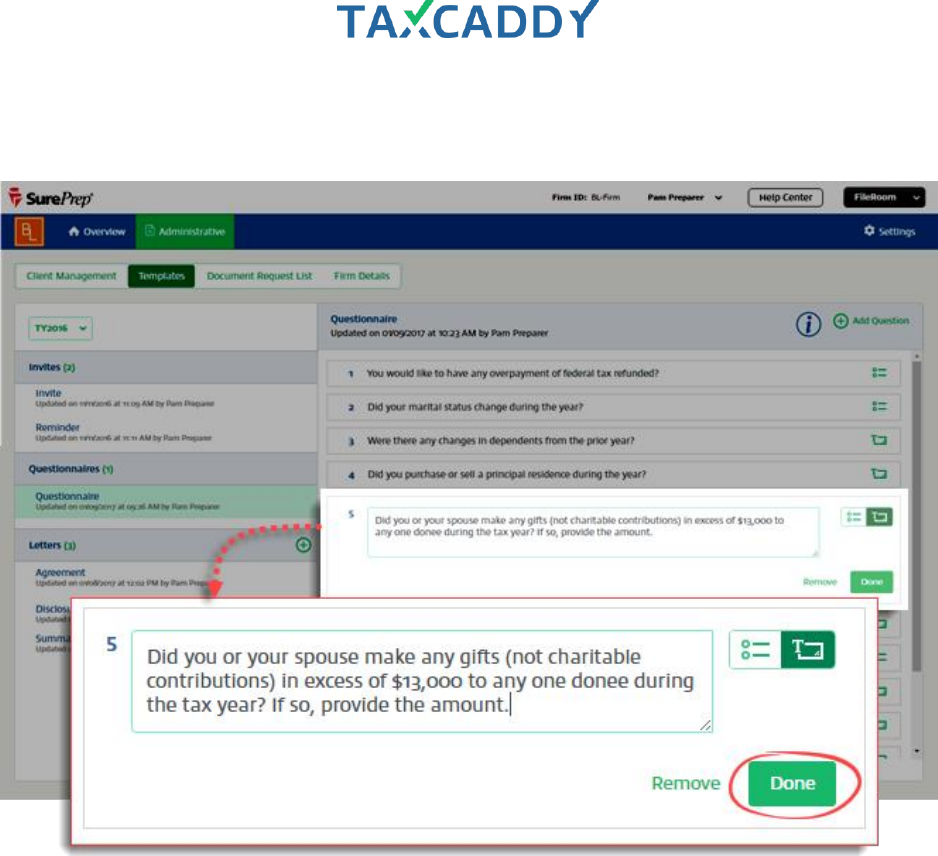
5. Type a question into the box and select the answer type. Answer types can be either a text field or radio
buttons that allow a Yes, No or N/A response from the taxpayer. Click Done to save the question.

Quick Setup Guide 145
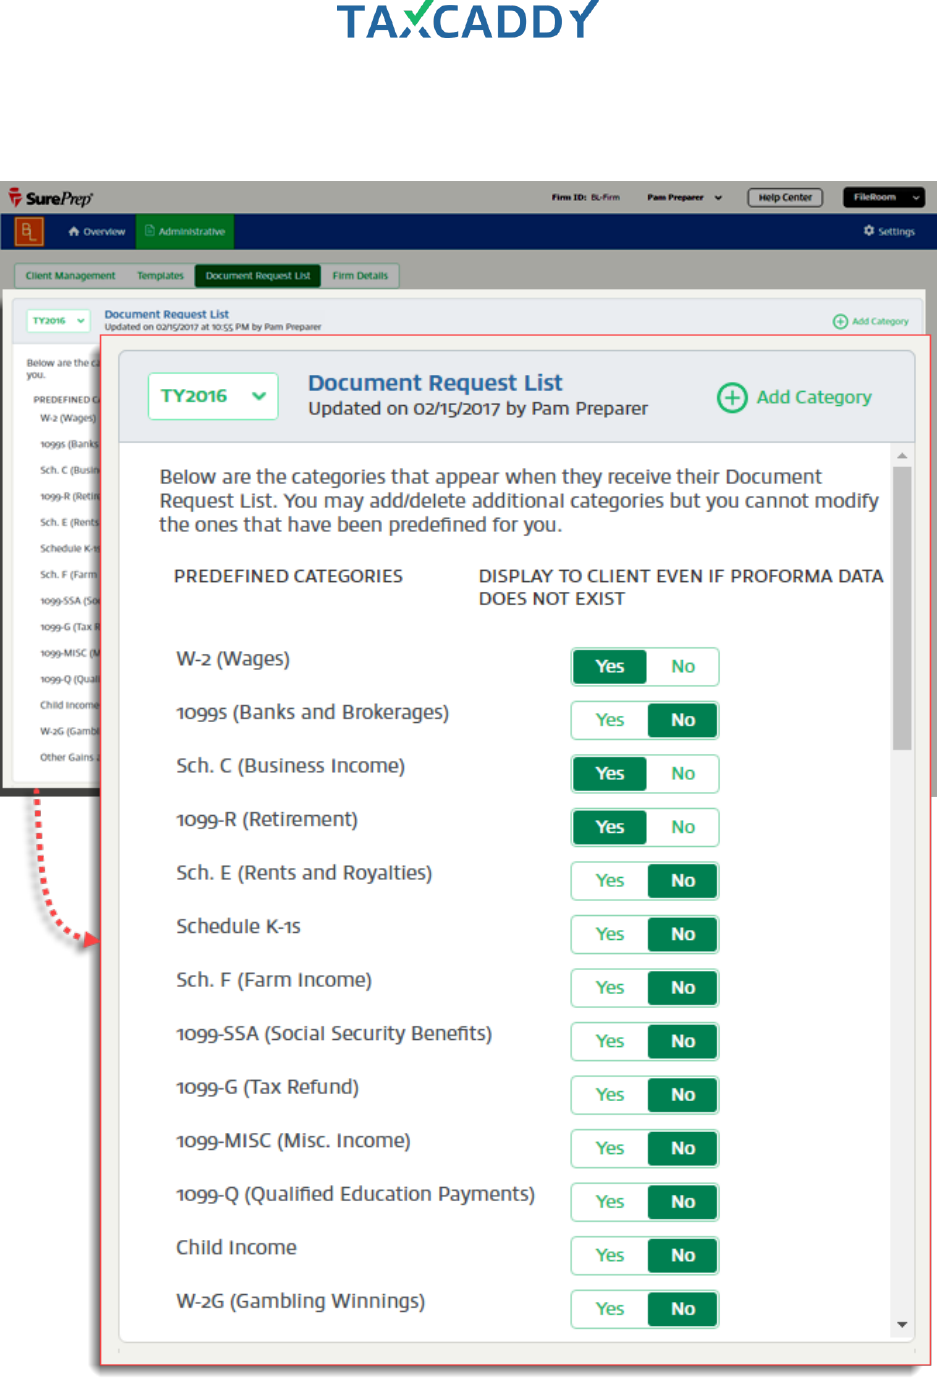
Document Request List
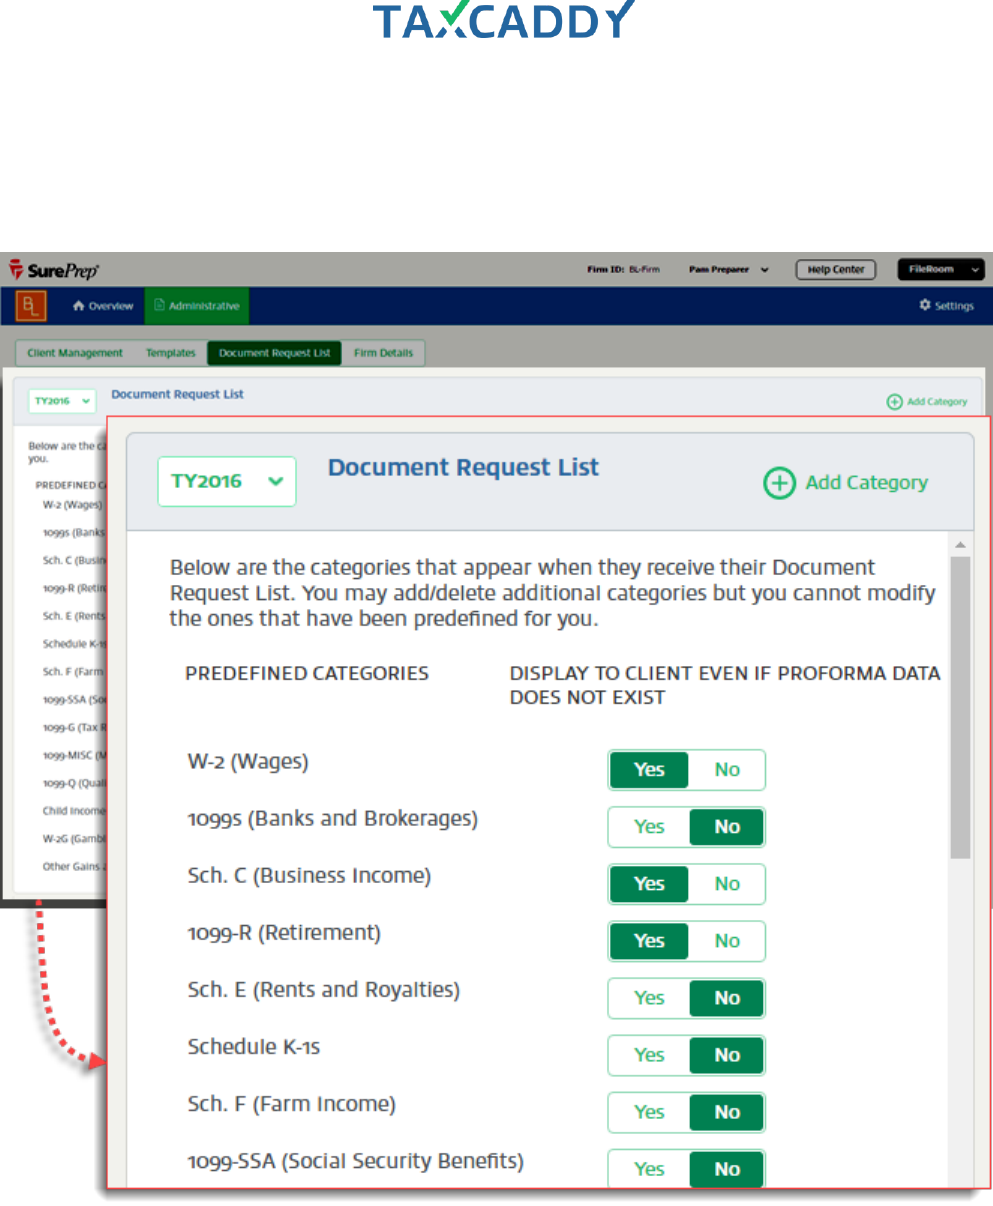
TaxCaddy includes a DRL with predefined categories, and you can add additional categories as needed.
Predefined categories cannot be edited or removed, but you can select whether to display them in your clients'
short list.
Quick Setup Guide 146
Edit the Document Request List
TaxCaddy includes a Document Request List with predefined categories, and you can add more categories as
needed. Predefined categories cannot be removed or edited, but you can opt to not include them in the short
list of categories displayed to your clients. Once these are defined, they appear in the category pick list on the
client side.
Follow these steps to view the Document Request List and add edit, or remove your own categories.
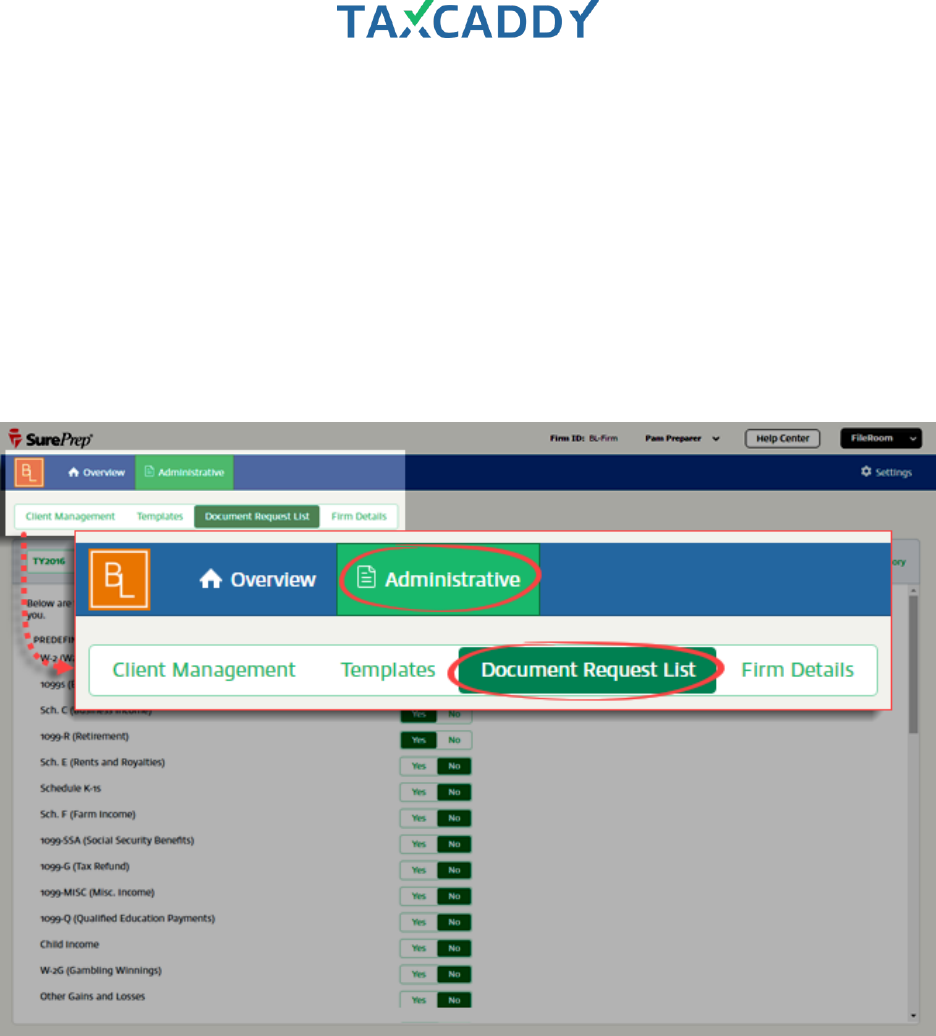
1. Log in to TaxCaddy.
2. Click Administrative and then click Document Request List.
Quick Setup Guide 147
3. Predefined categories appear at the top of the list. To change conditions under which these categories are
displayed to clients, select Yes or No under Display to Client Even if Proforma Data Does Not Exist.
Quick Setup Guide 148
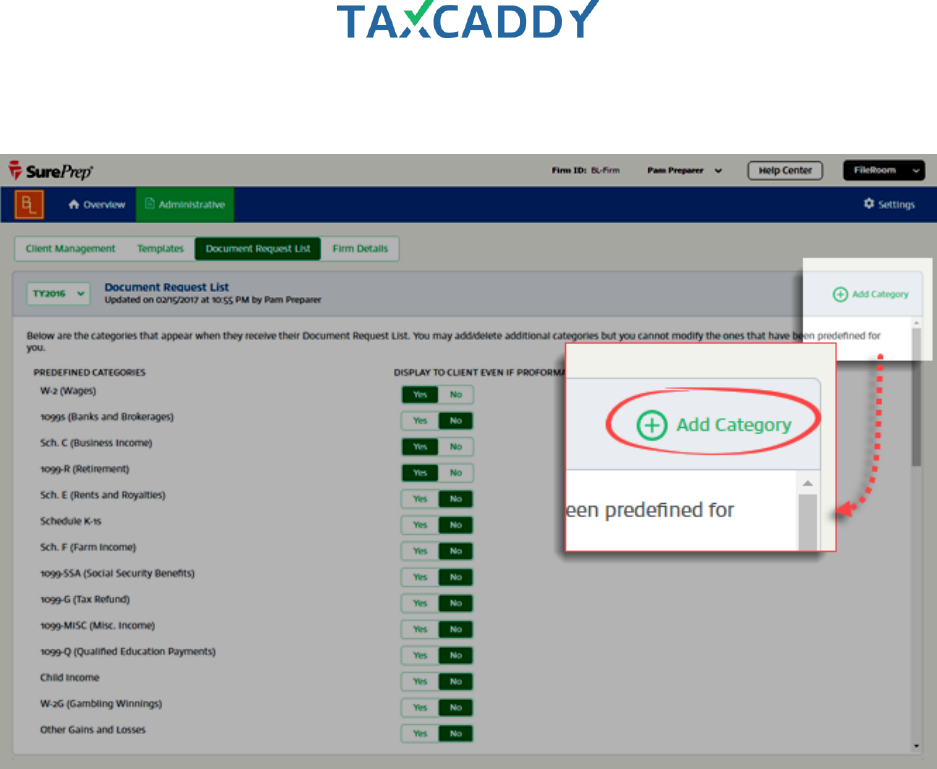
4. User-added categories appear below the predefined categories. To add a new category, click Add Category.

Quick Setup Guide 149
5. A new row appears under Added Categories. Enter a name for the category and then press Enter to save.
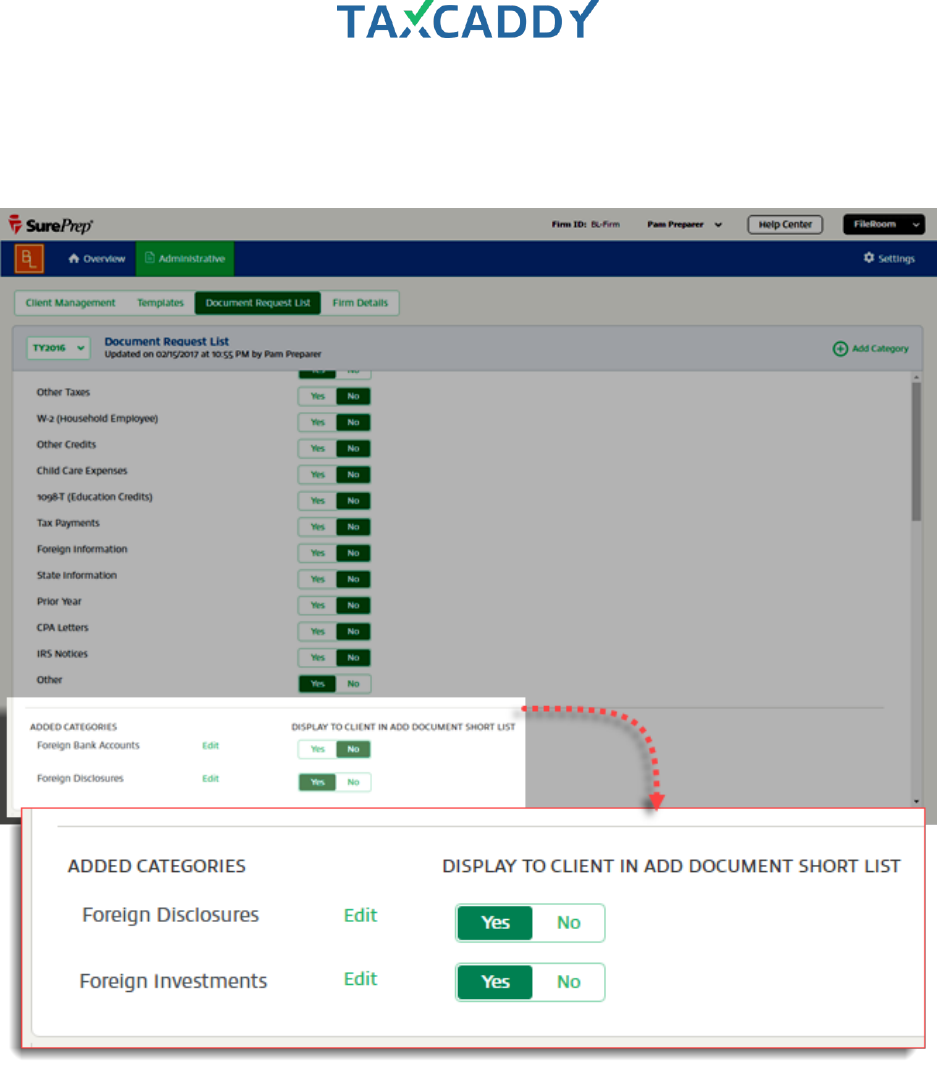
Quick Setup Guide 150
6. The new category is added to the bottom of the list, with the display preference set to Yes, which means
that it will be displayed to your clients even when no proforma data exists for the client. To change this
option, under Display to Client in Add Document Short List, select either Yes or No.

Quick Setup Guide 151
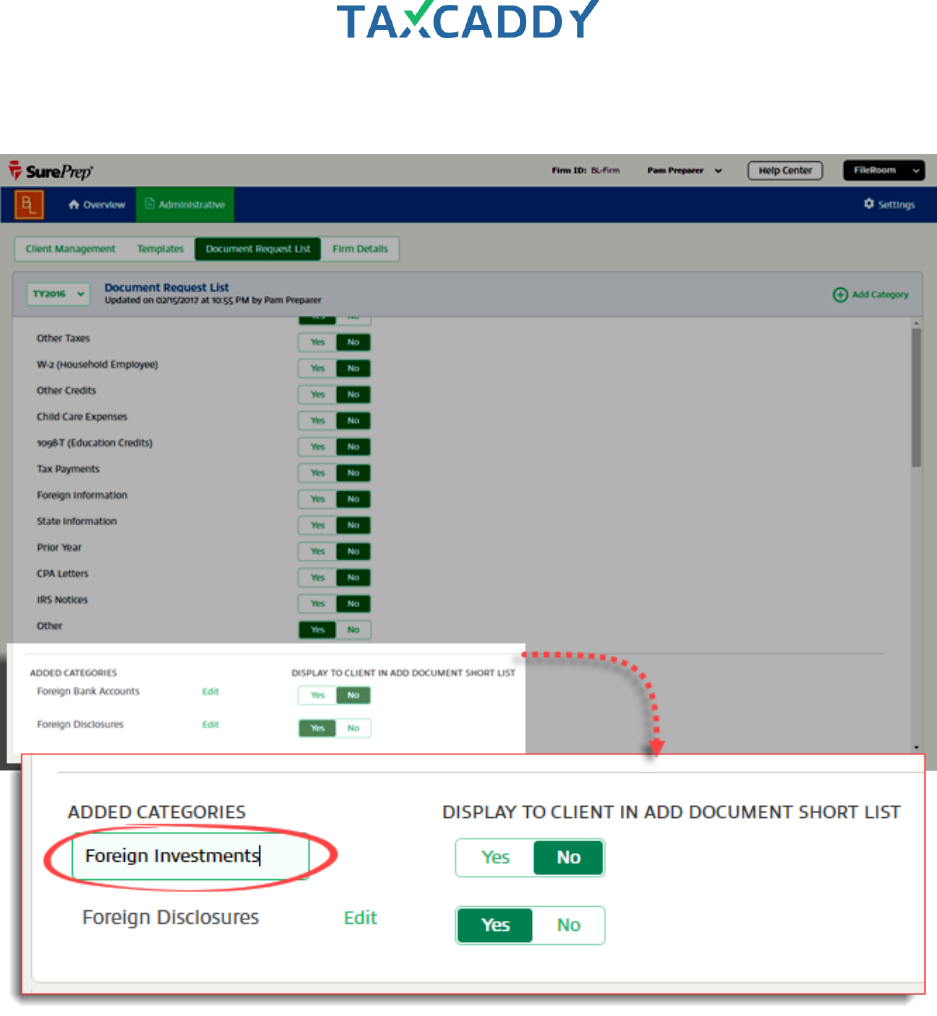
7. To edit a user-added category name, point to the category you want to edit and click Edit.
Tip: Only user-defined categories can be edited. Predefined categories can't be edited or deleted.
Quick Setup Guide 152
8. Type the changes into the box and then press Enter to save your changes.

Quick Setup Guide 153
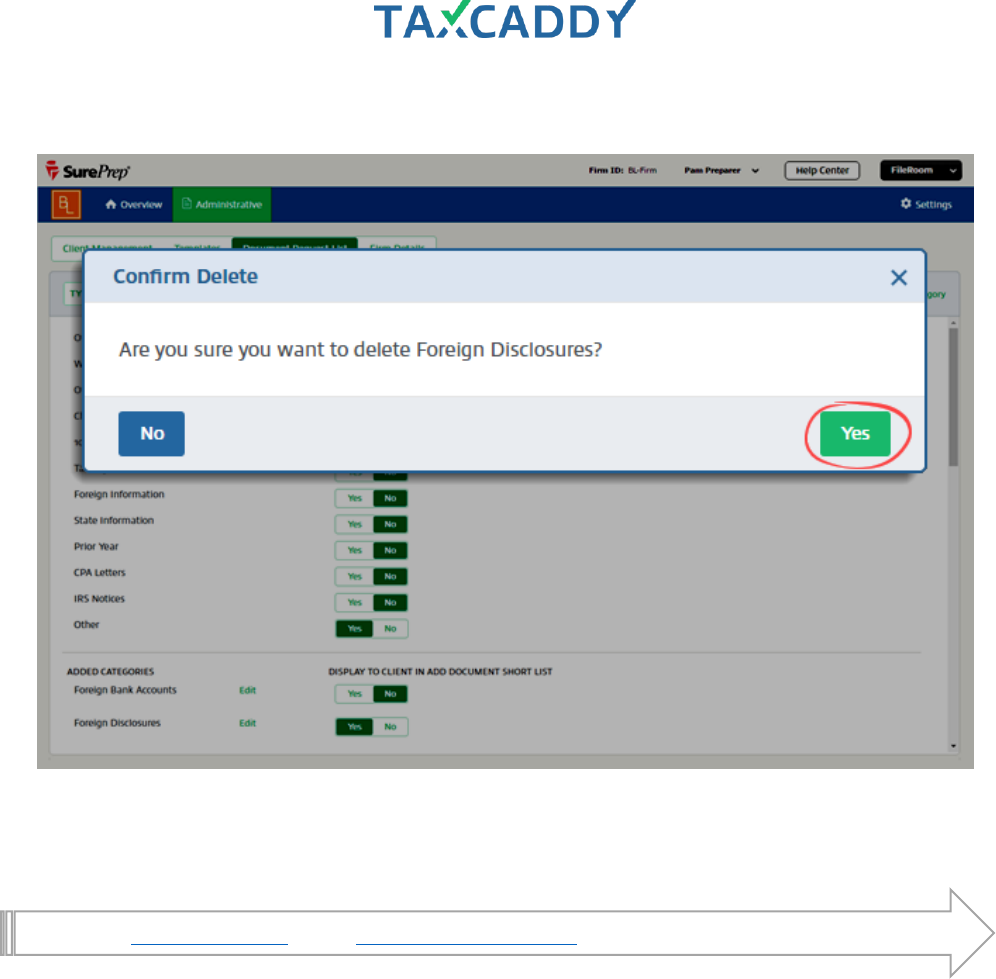
9. To delete a user-define category, point to the category you want to delete and click Remove when
it appears.
Tip: You can only delete user-added categories. Predefined categories can't be deleted.
Quick Setup Guide 155
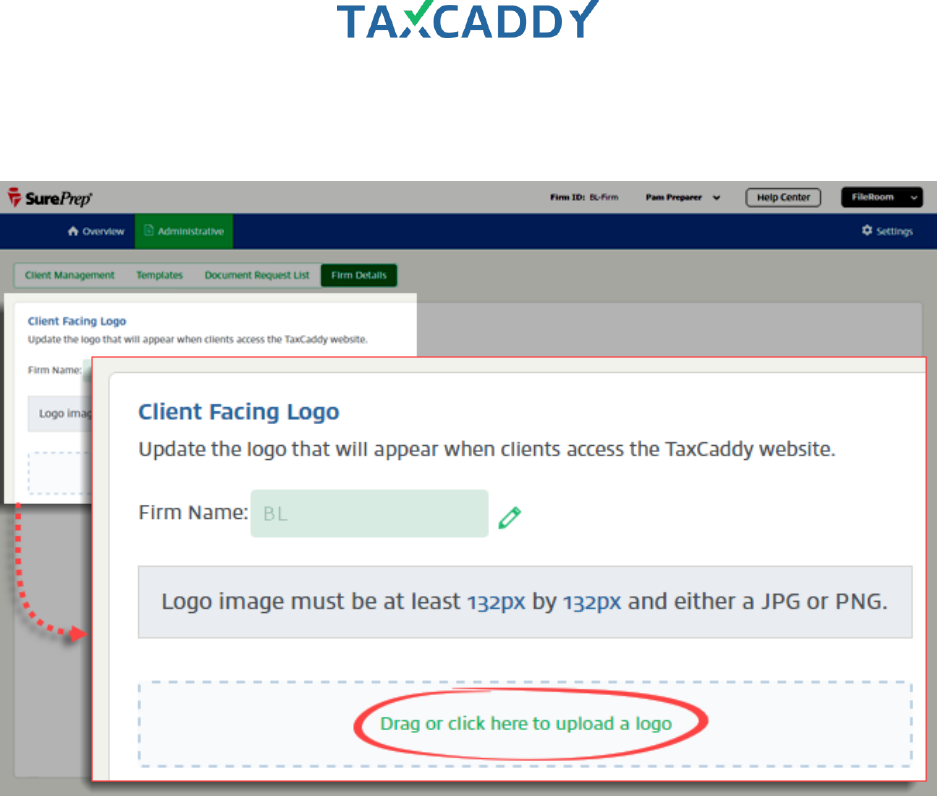
Firm Details
Your firm name and client-facing logo appear on the taxpayer-facing side of TaxCaddy.
Quick Setup Guide 156
Upload firm logo
Your client-facing logo appears on the taxpayer-facing side of TaxCaddy. For best results, upload a logo that is
square or circular (not rectangular) and at least 132px x 132px.
Follow these steps to edit firm name and upload a logo.
1. Log in to TaxCaddy.
2. Click Administrative and then click Firm Details.
Quick Setup Guide 157
3. Drag a file onto the drop zone. Alternatively, you can click Drag or click here to upload a logo and browse
your device for a file.
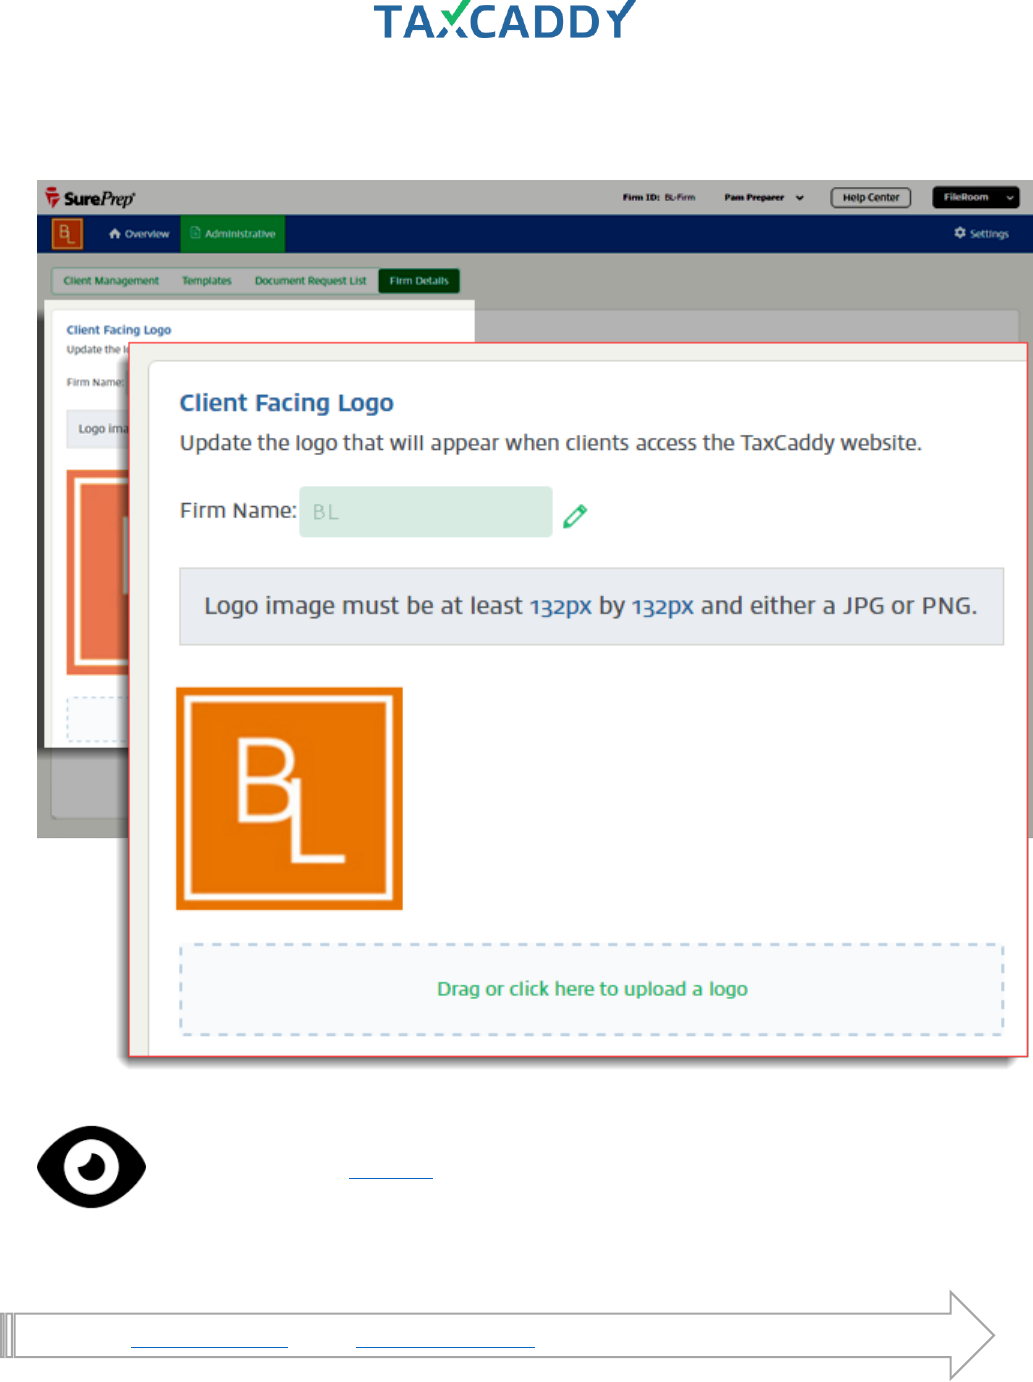
Quick Setup Guide 158
4. Your logo appears on the page. The logo is saved automatically and instantly reflected in your clients'
TaxCaddy accounts. To change an existing logo, drag the new file onto the drop zone.
See Taxpayer View: Overview
Go back to Quick Start Guide. Next: Edit your firm name to an abbreviated version (optional).

Quick Setup Guide 159
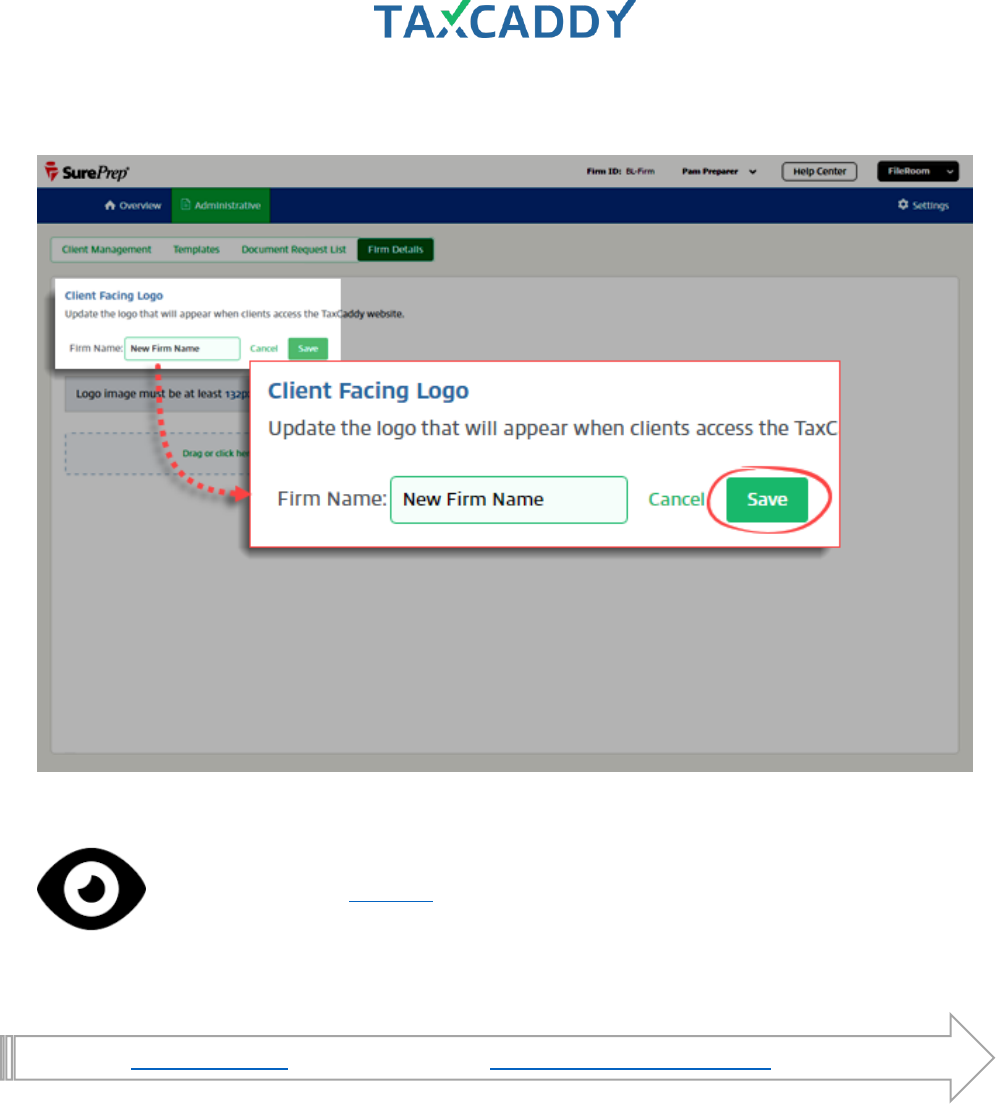
Edit firm name (optional)
Your firm name is automatically imported from SurePrep, but you can edit it using the Firm Name field. You may
want to abbreviate your firm name if it is very long. Changes made to Firm Name are reflected in your templates
and in your clients' TaxCaddy accounts.
Follow these steps to edit your firm name.
1. Log in to TaxCaddy.
2. Click Administrative and then click Firm Details.
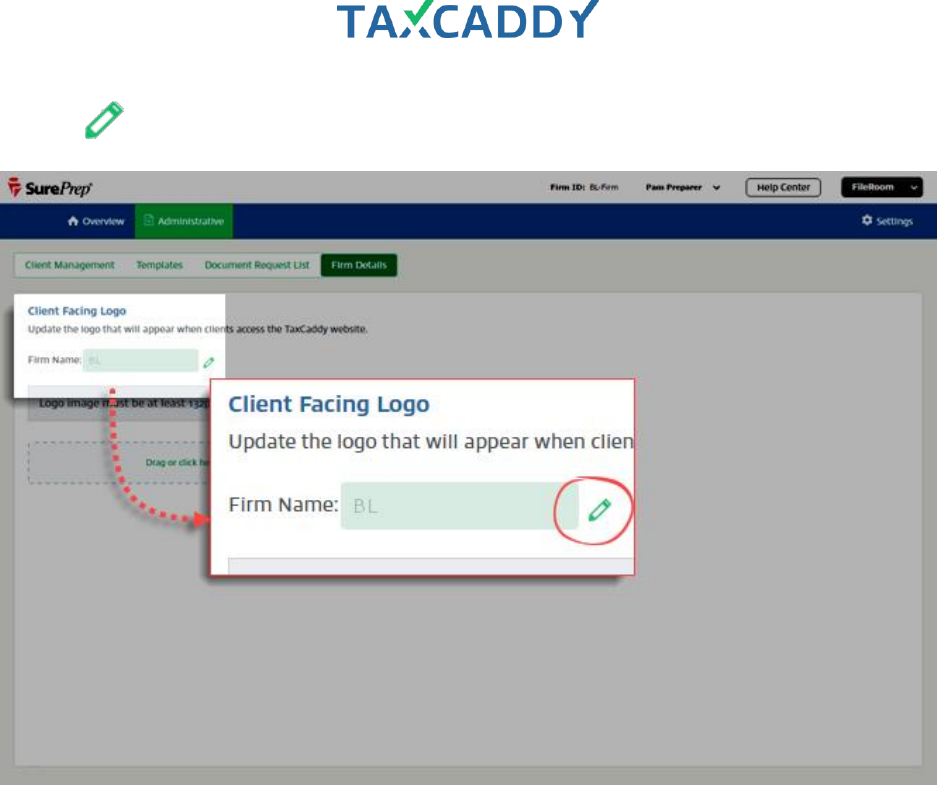
Quick Setup Guide 160
3. Click the Edit icon next to Firm Name.
Quick Setup Guide 162
Taxpayer view
Here’s what your clients see on the taxpayer-facing side of TaxCaddy.
Quick Setup Guide 163
Overview
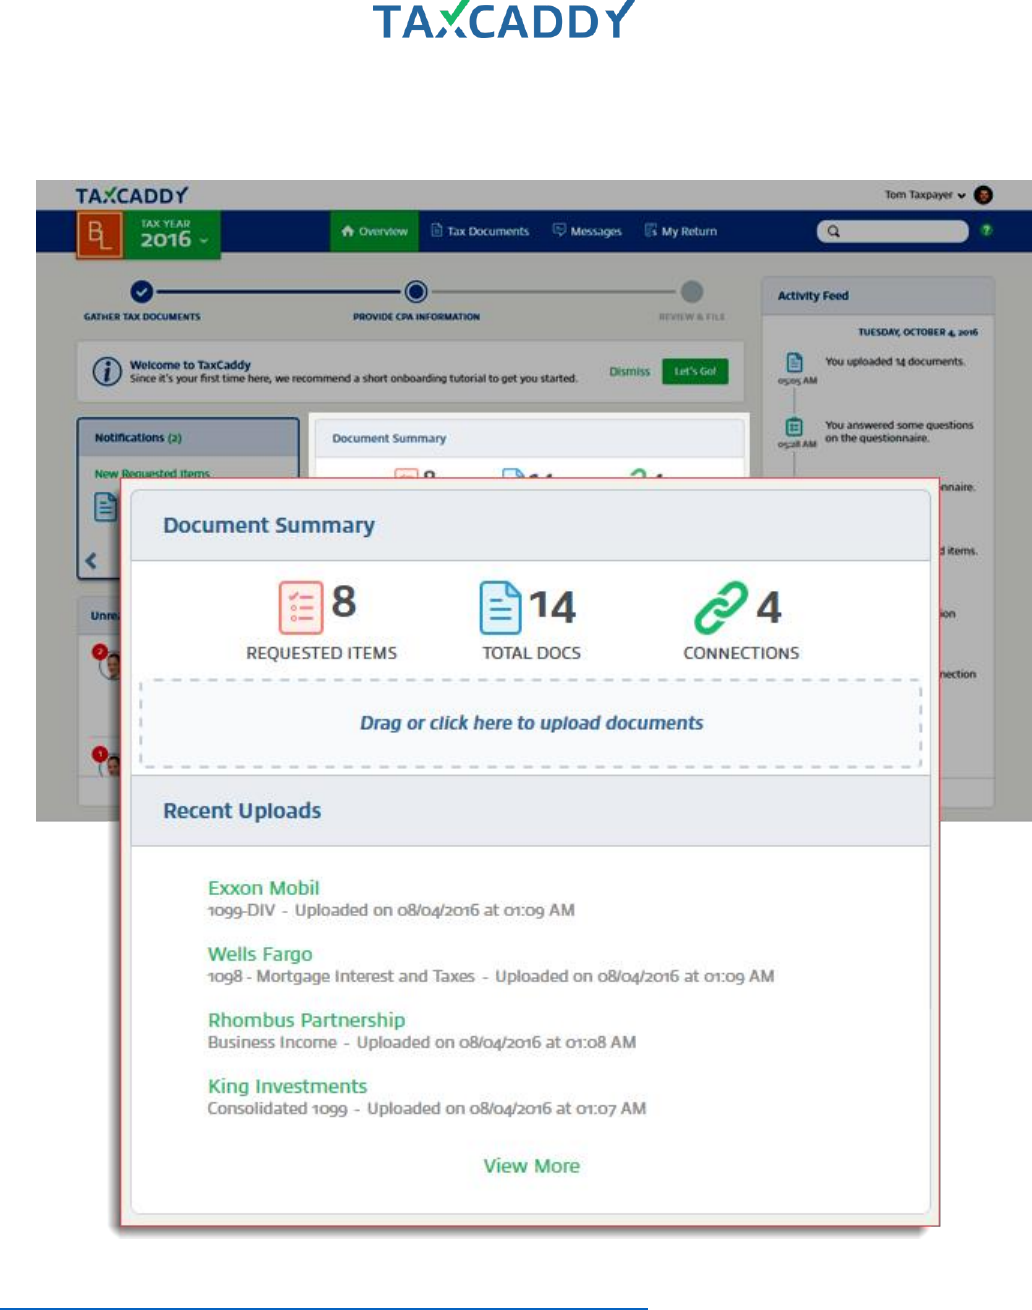
Overview gives your client a snapshot of everything in their account. Here’s what your client sees.
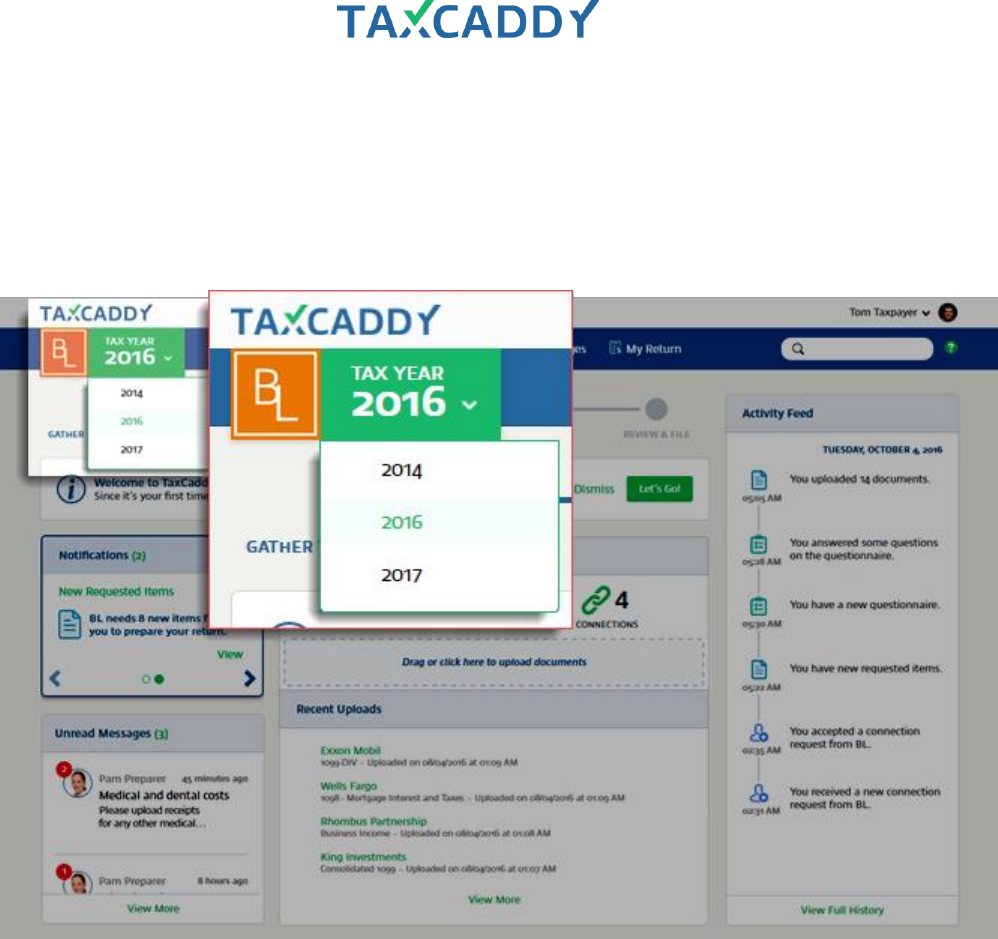
1. If your account is connected with your CPA, your CPA's logo appears on the far left of the navigation bar. By
default, the tax year is set to the current tax year, but you can access previous or future tax years using the
drop-down menu.
Quick Setup Guide 164
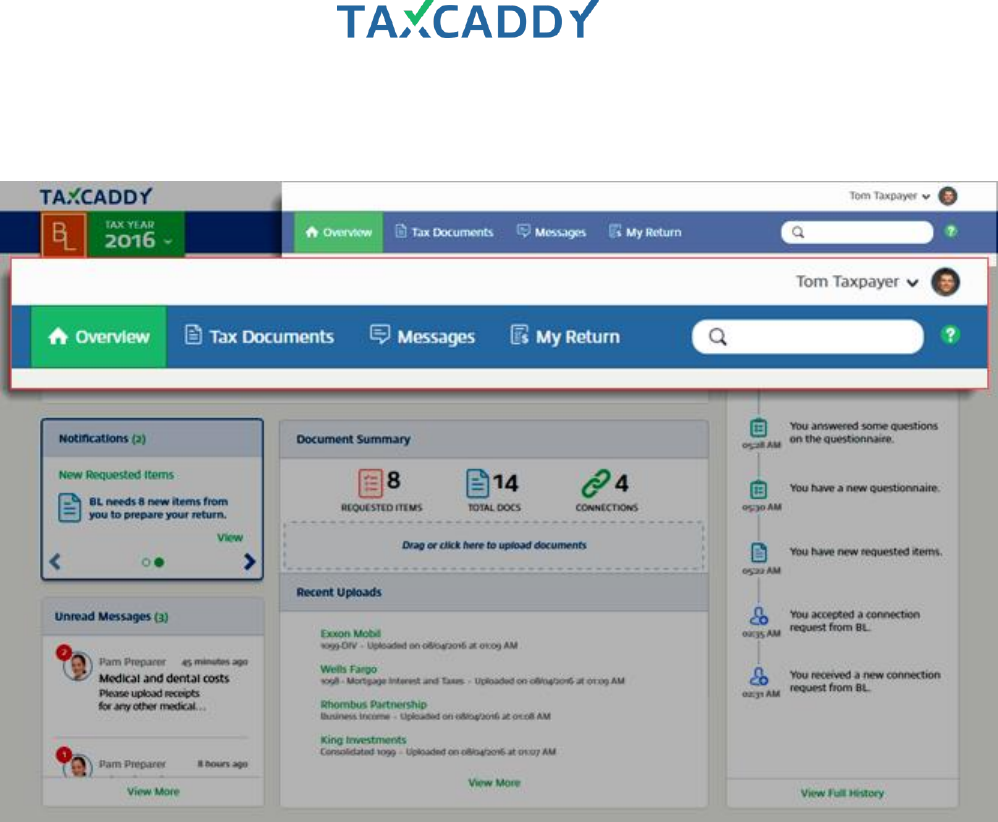
2. Navigation to Overview, Tax Documents, Messages, My Return, search bar and the user menu (access
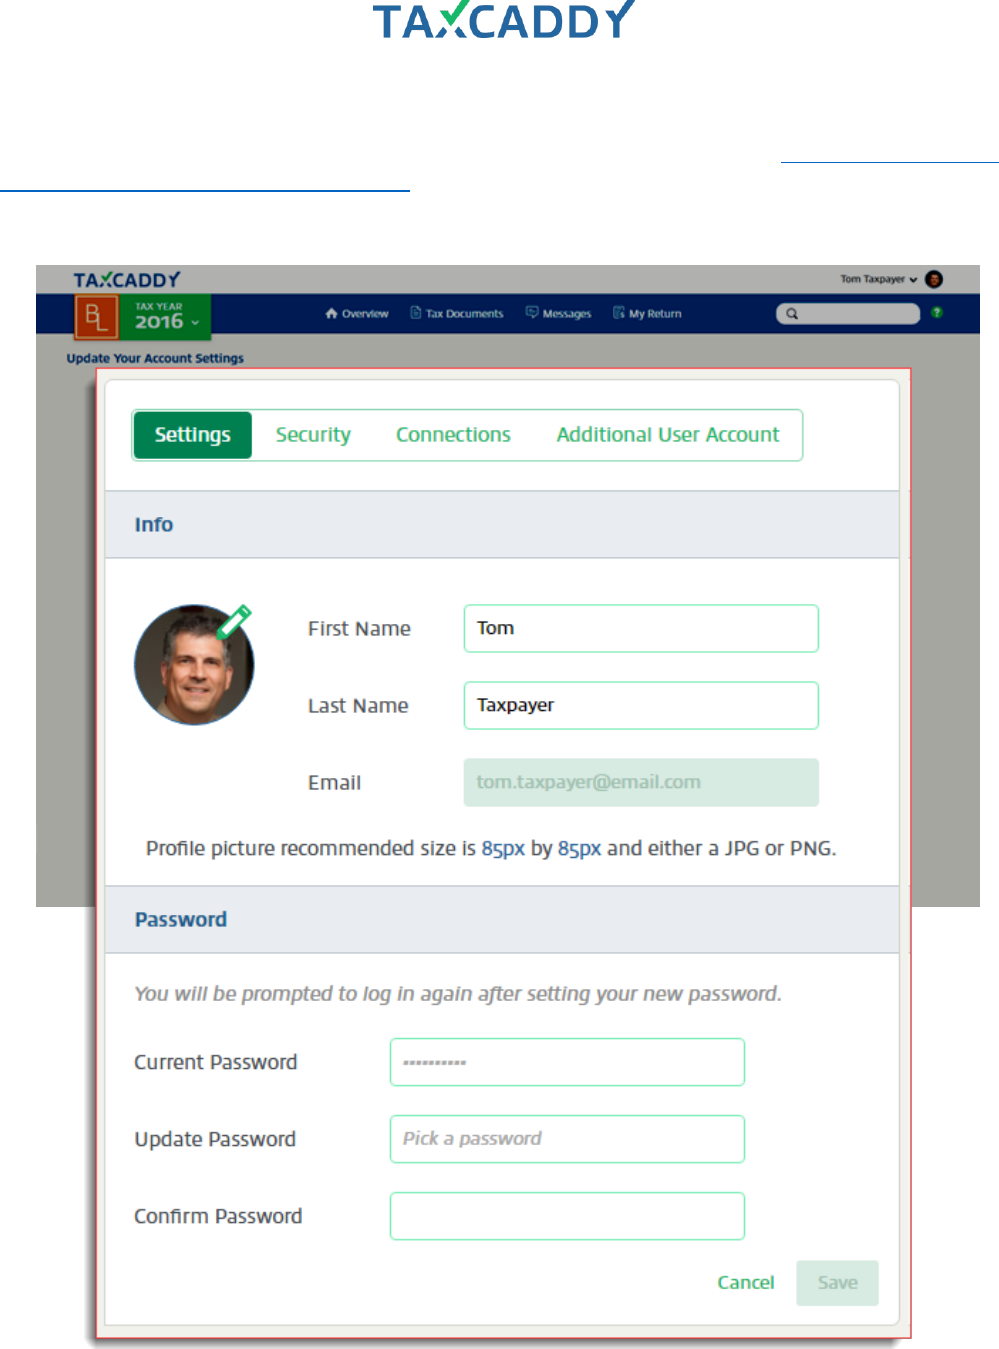
Settings here) appears on the top bar.
Quick Setup Guide 165
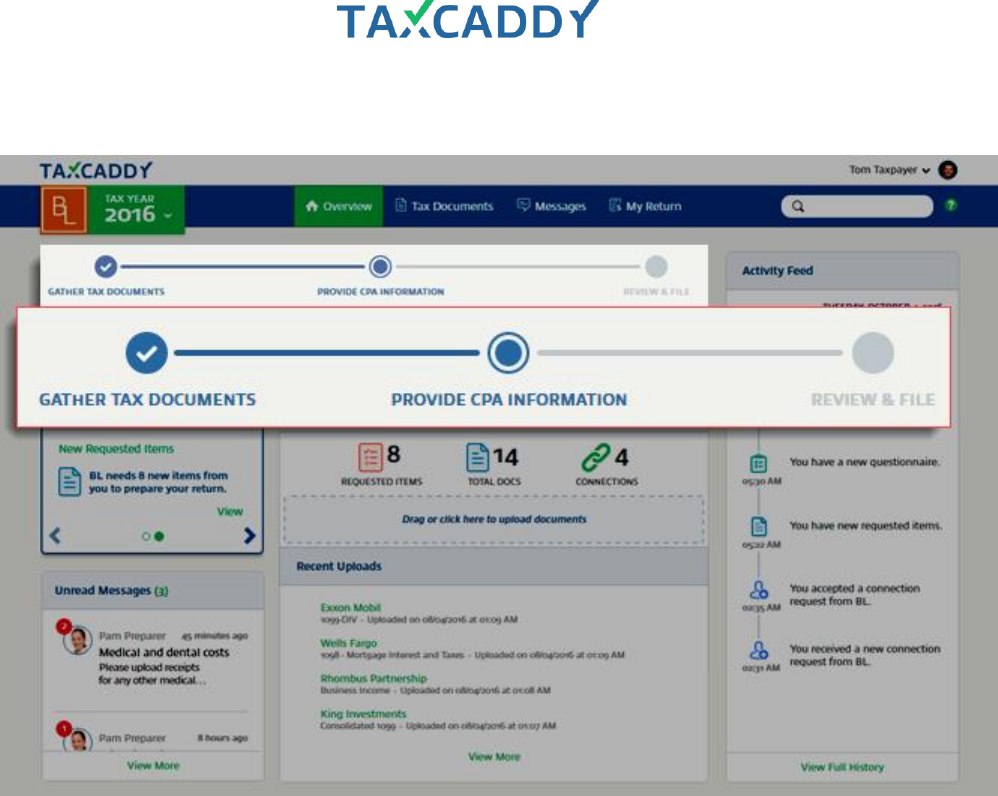
3. The progress bar tells you where you are in the tax preparation process.
Quick Setup Guide 166
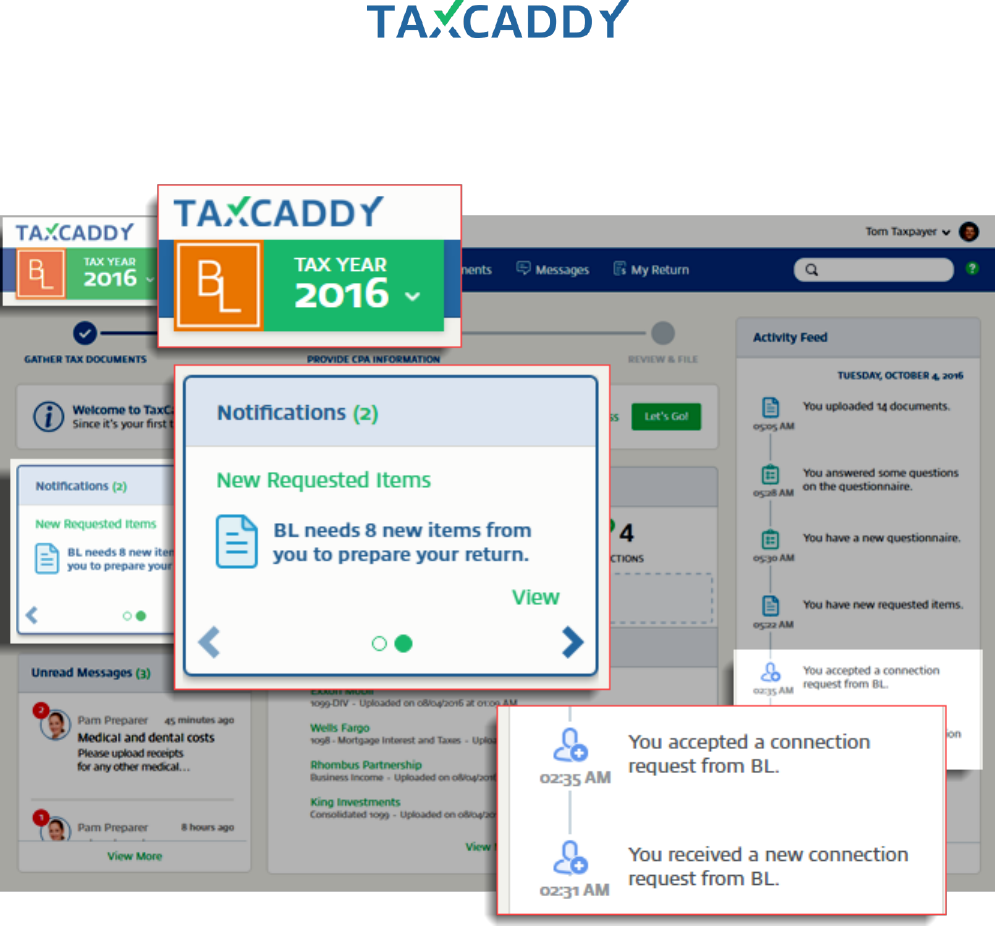
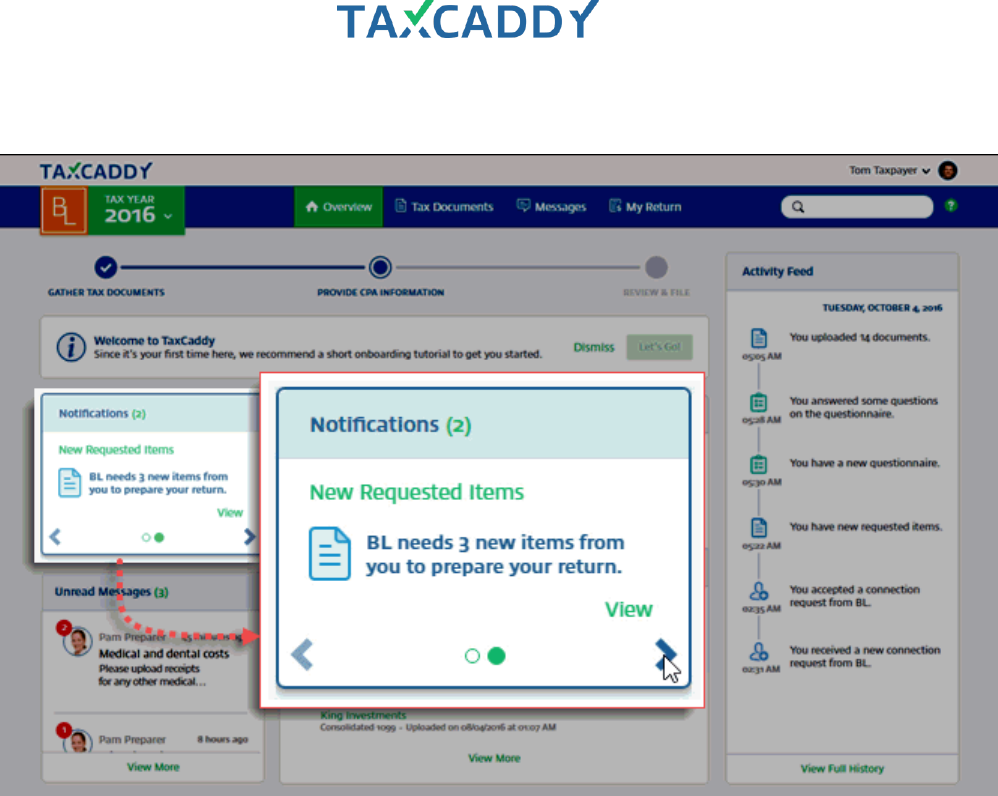
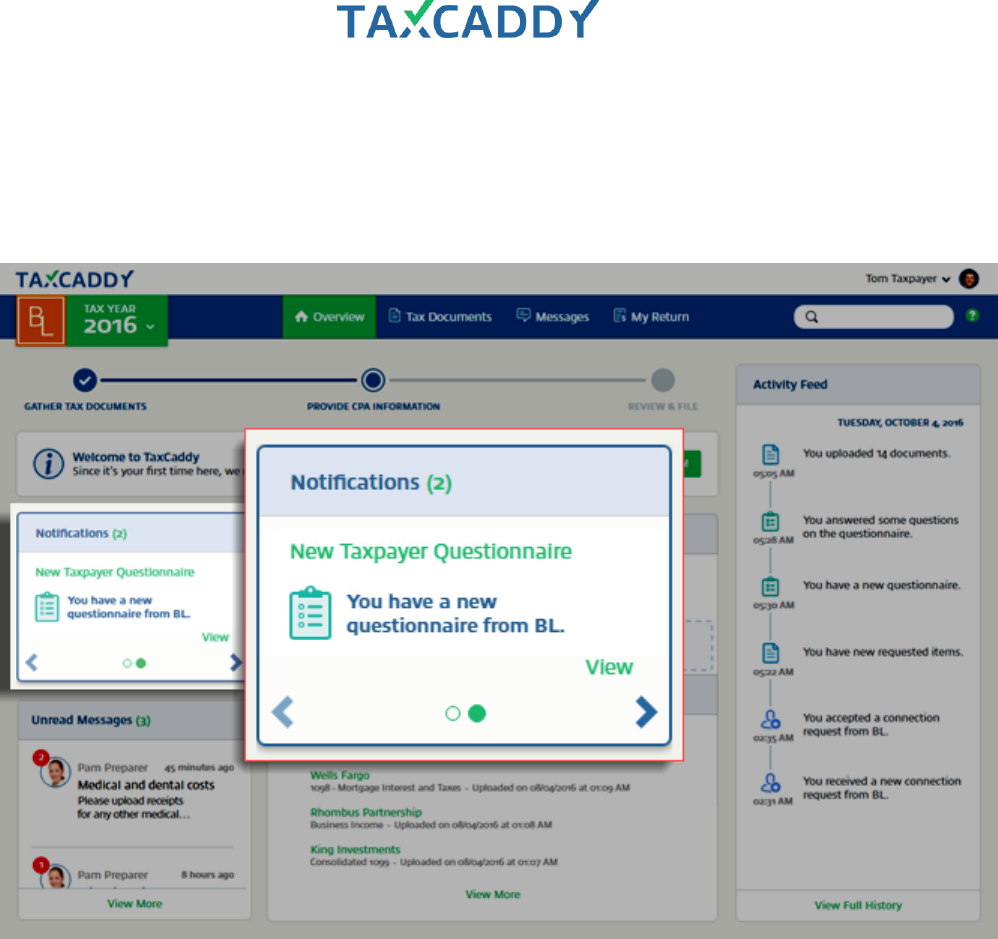
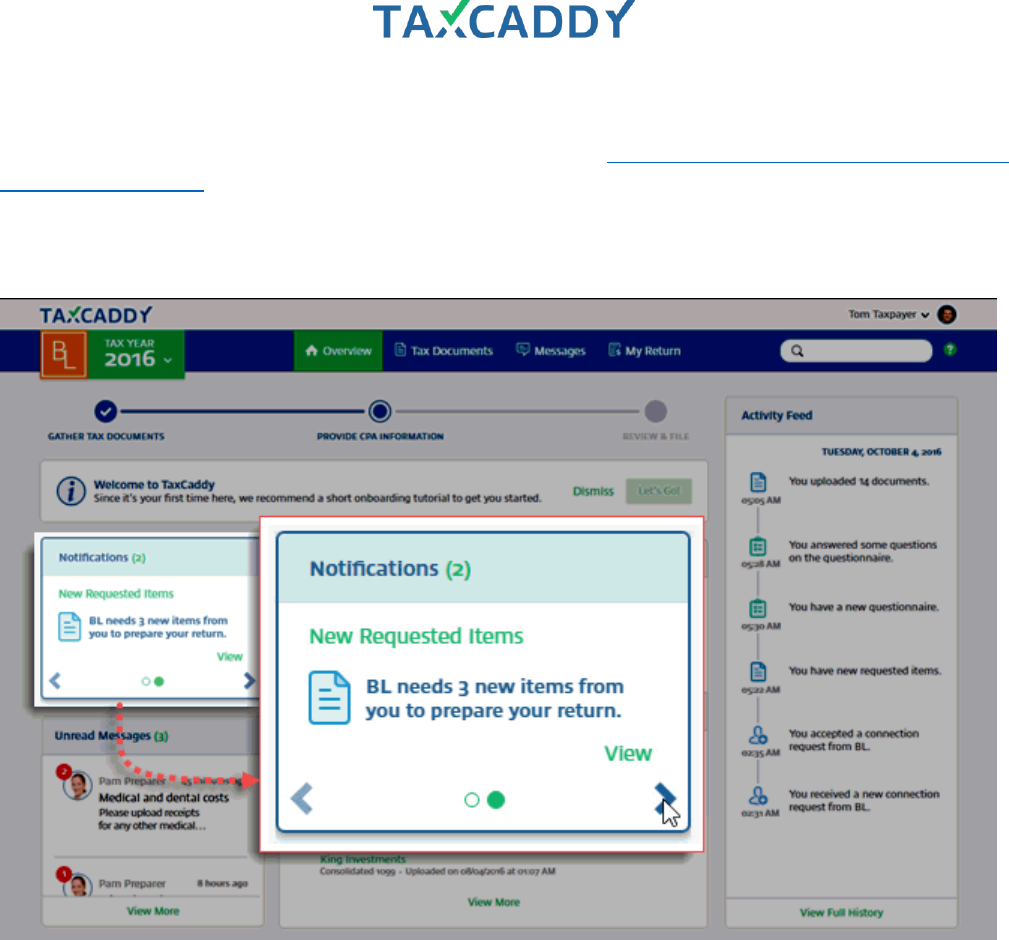
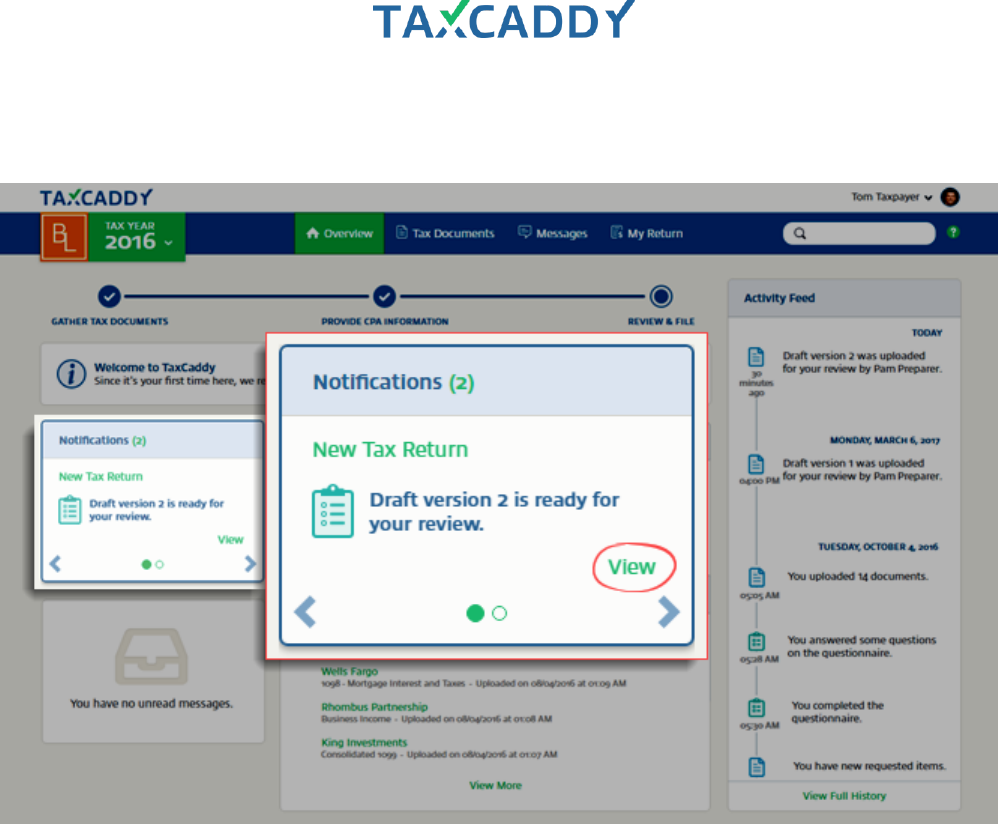
4. Notifications alert you when something in your account needs action.
Quick Setup Guide 167
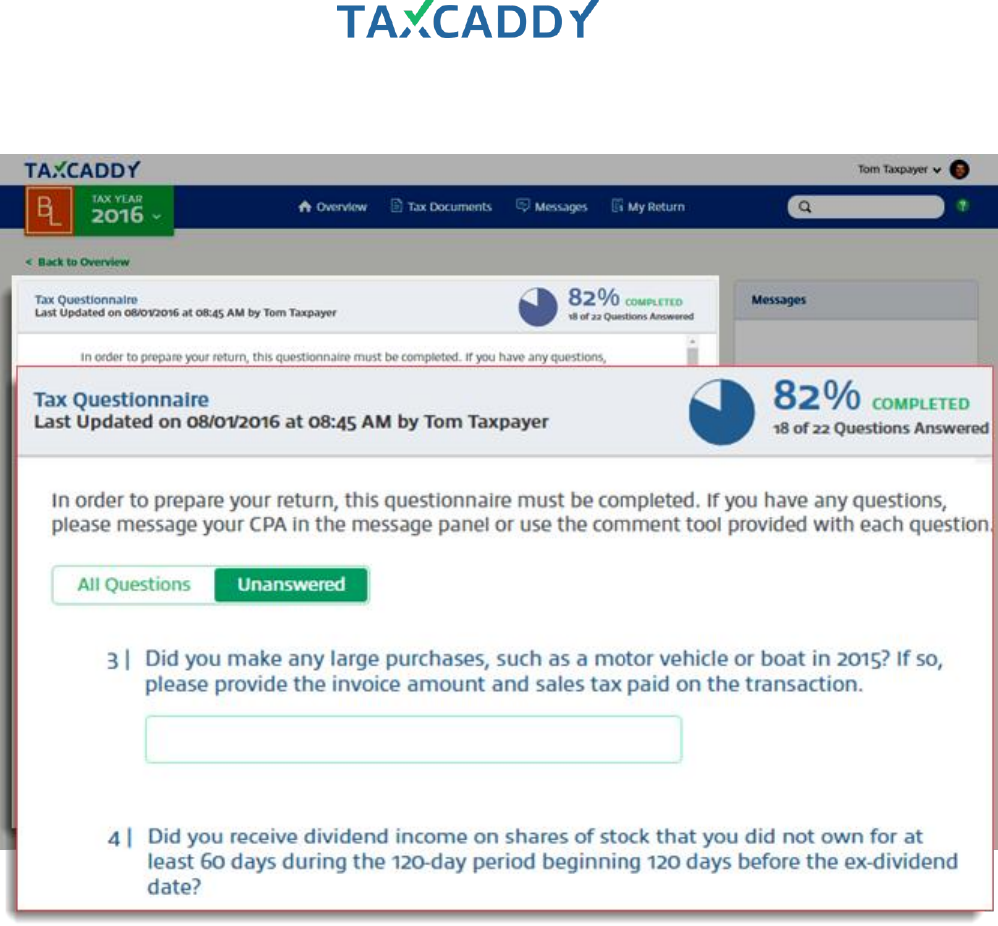
5. Click the Questionnaire notification to access your questionnaire.
Quick Setup Guide 169
Invite and Connection Request
Here’s what your clients see in the Invite and Connection Request.
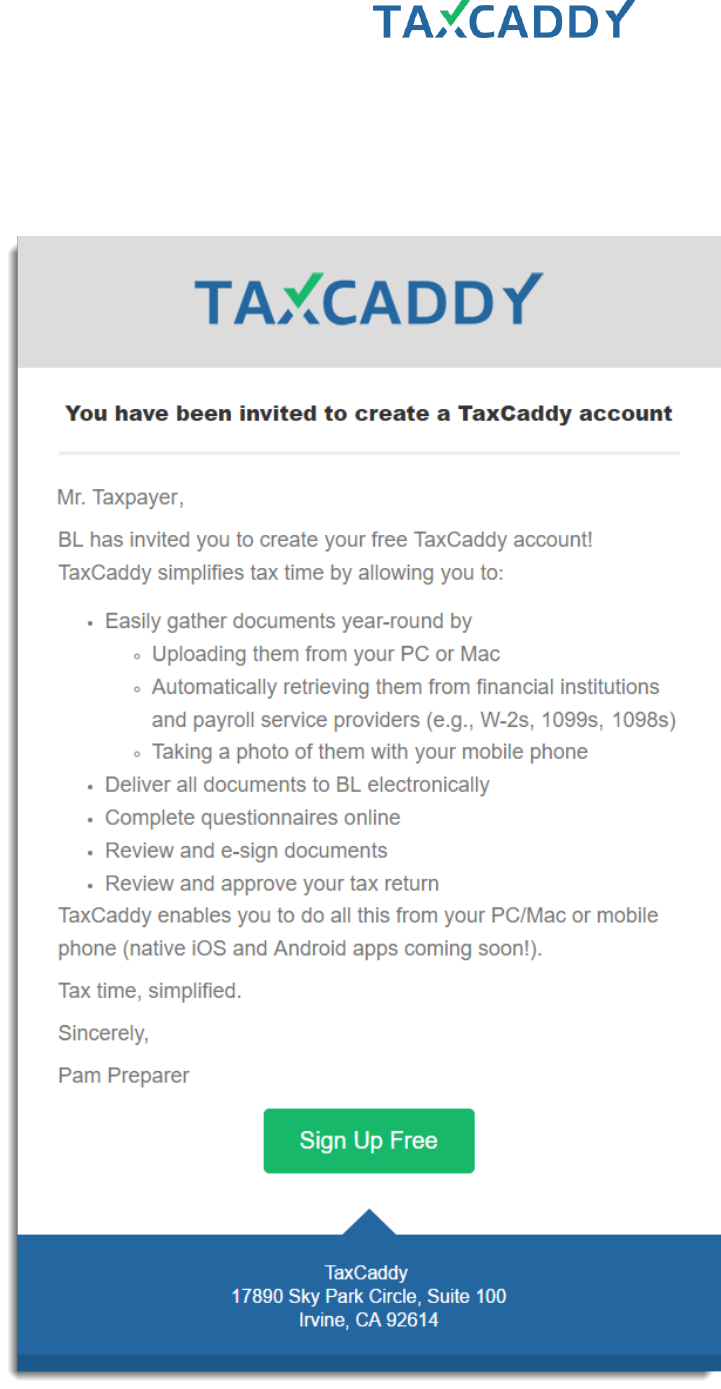
1. Click the Sign Up Free button in your Invite or Reminder email.
Quick Setup Guide 170
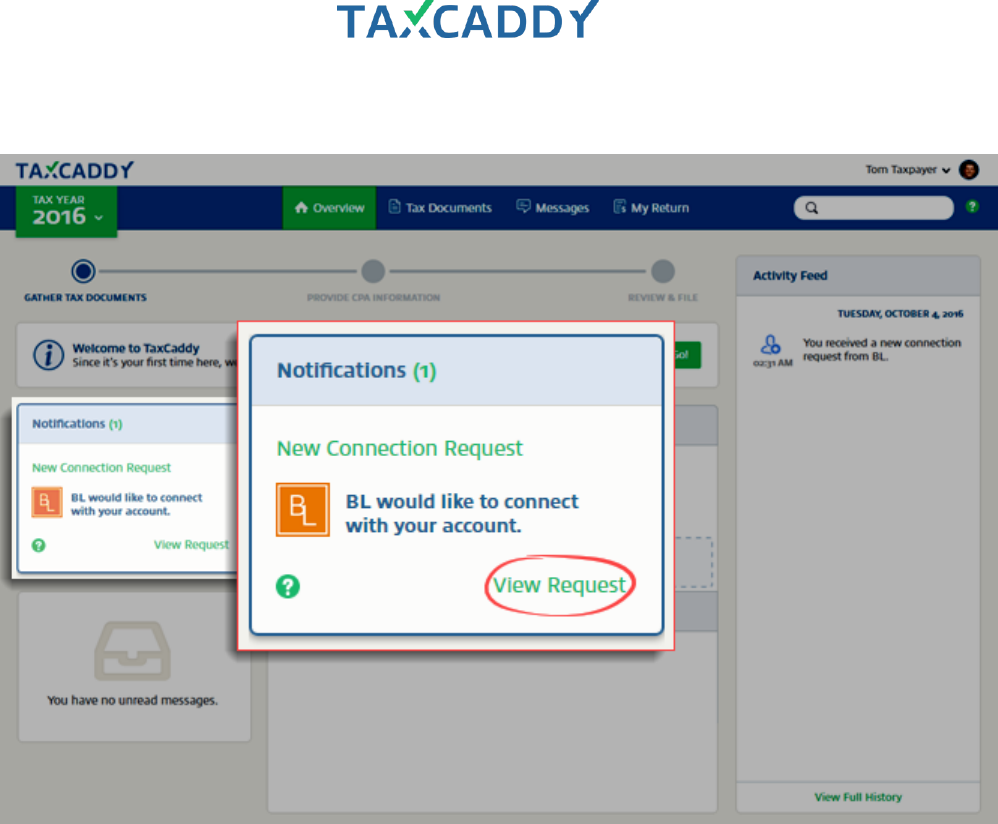
2. On the New Connection Request notification on the Notifications panel, click View Request.

Quick Setup Guide 171
3. To accept the connection, click Accept. Your CPA is now connected to your TaxCaddy account. You'll receive
notifications when your CPA issues a questionnaire and requested items.
Tip: The client must accept your Connection Request to appear as Connected on the Client Management
screen.
Quick Setup Guide 172
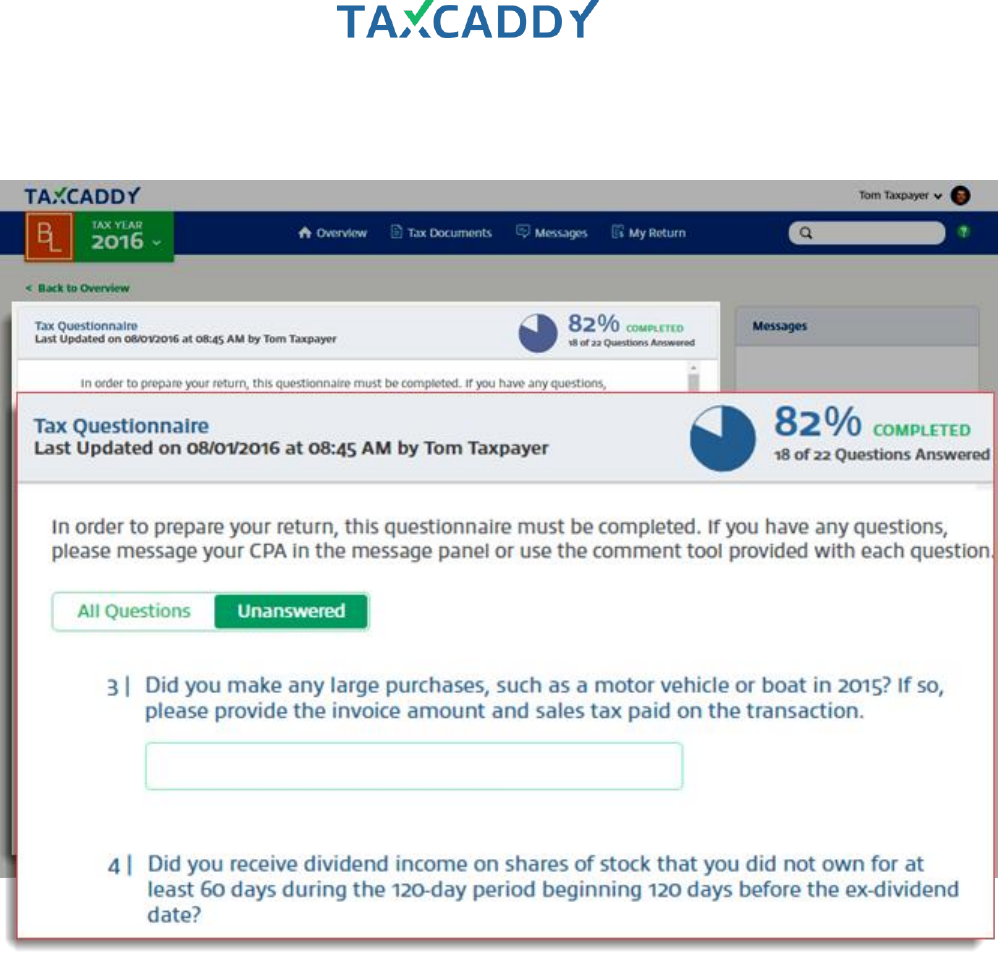
Filling out the Questionnaire
Here’s what your clients see when filling out the questionnaire.
1. On the Notifications panel, click the arrow until you see the notification that says you have a new
questionnaire and then click View.
Quick Setup Guide 173
2. Start answering questions. The questionnaire saves your answers automatically, so you can leave the page
without losing your progress. Your CPA is automatically notified when you complete the questionnaire.
Quick Setup Guide 174
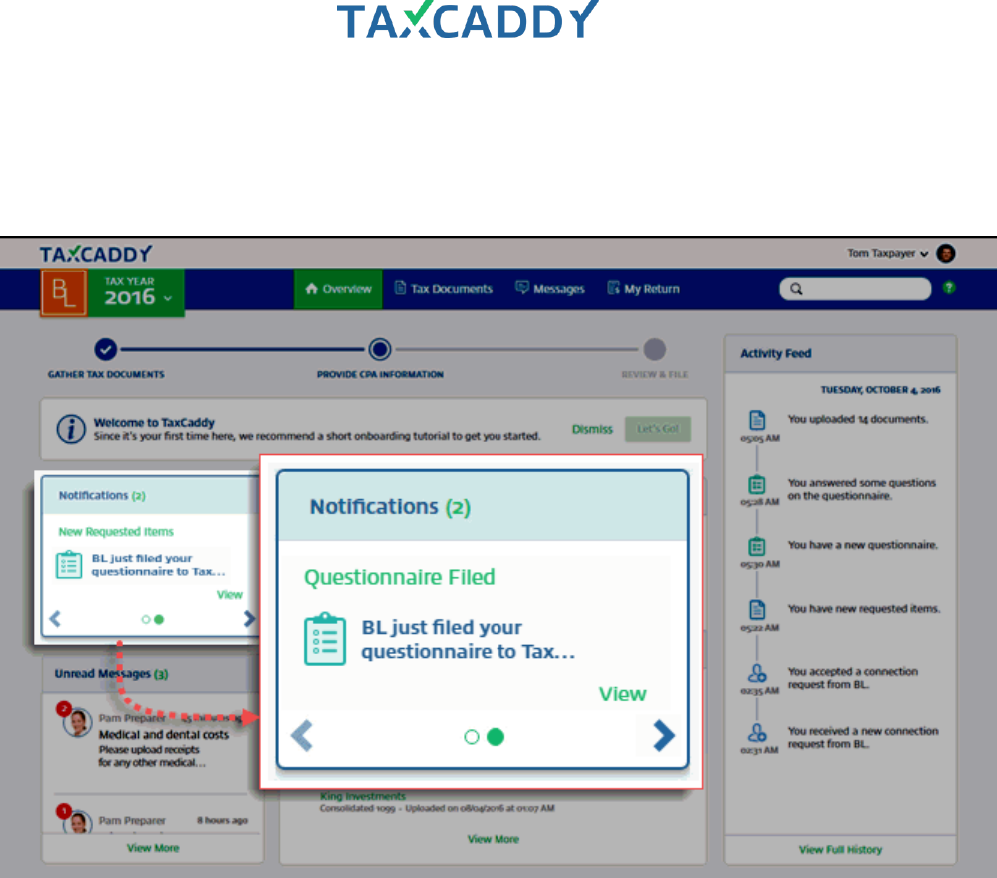
CPA files Questionnaire to Tax Documents
Here’s what your client sees when you file their questionnaire to Tax Documents.
1. Your clients see a notification indicating that you have filed their questionnaire to Tax Documents.
2. The questionnaire is moved to Tax Documents under the category Questionnaire. Once you file the
questionnaire to Tax Documents, the client won’t be able to answer or edit any questions.
Quick Setup Guide 175
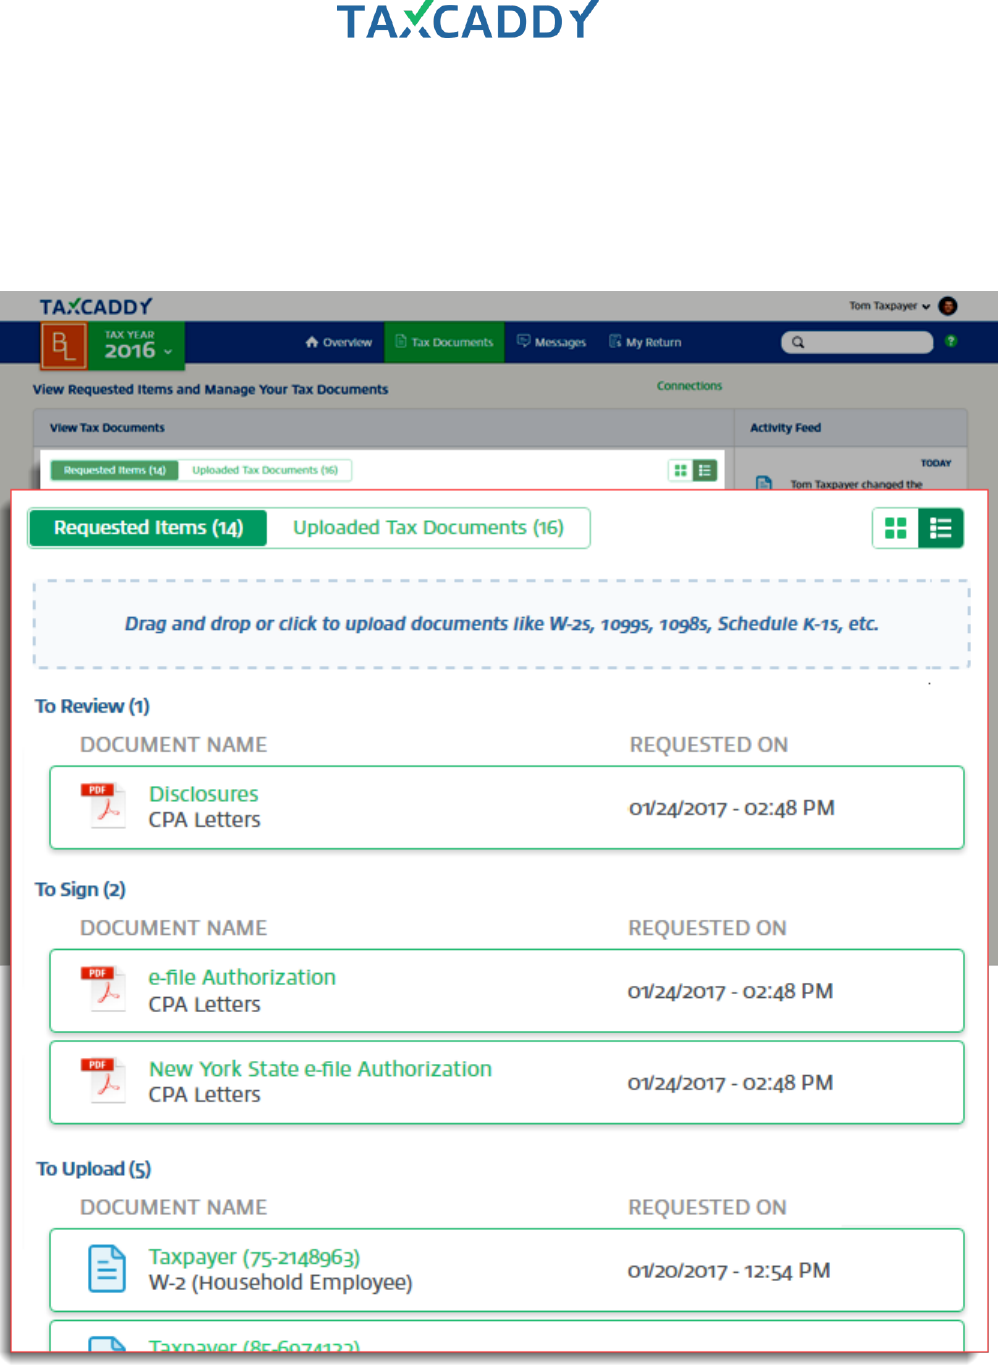
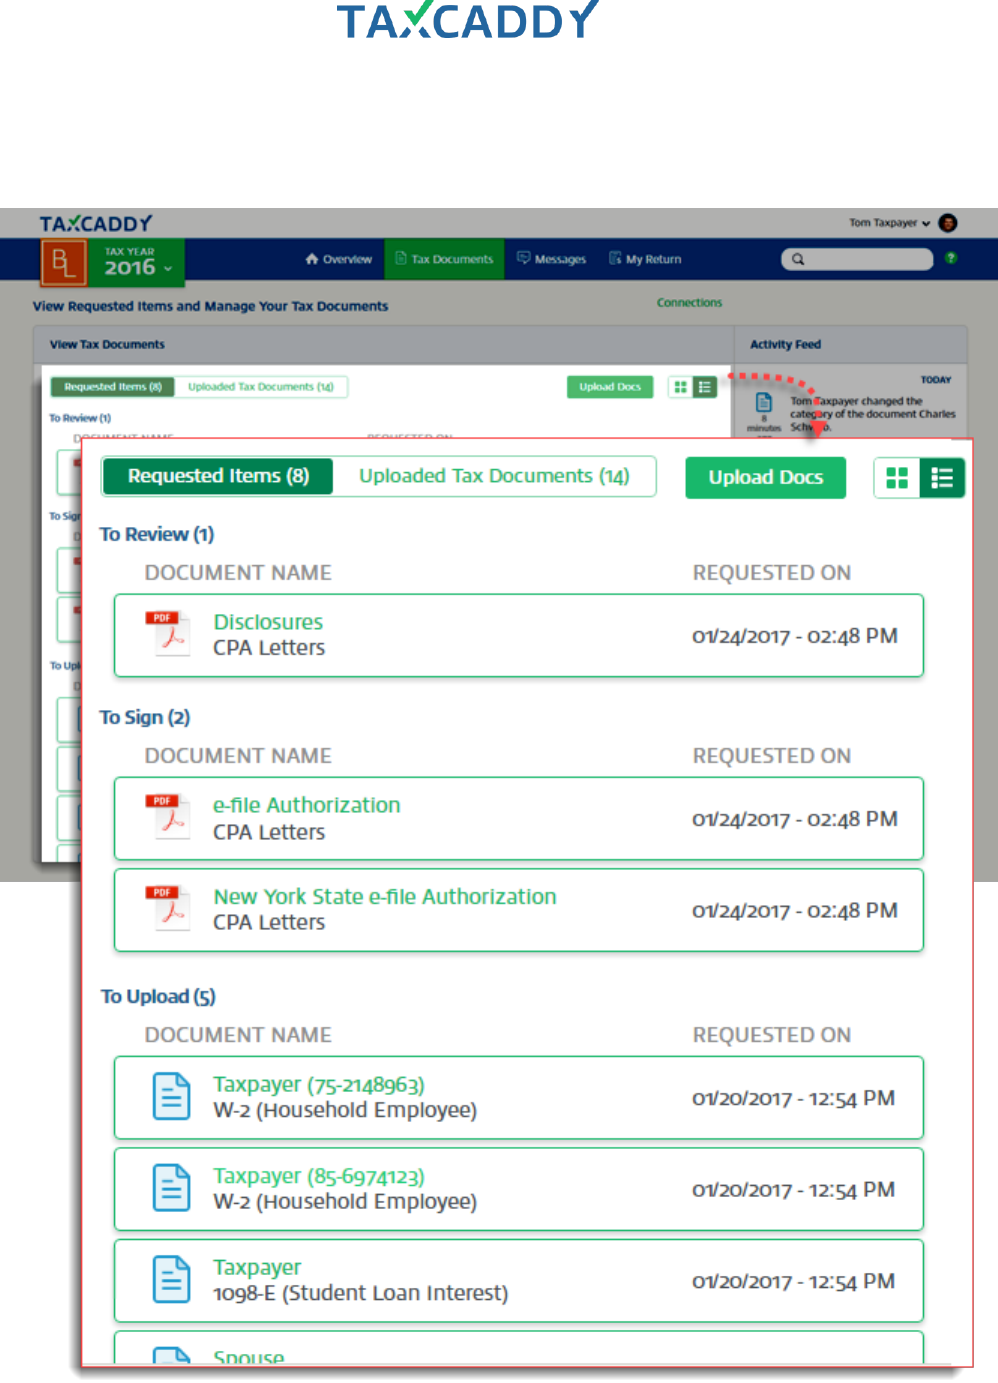
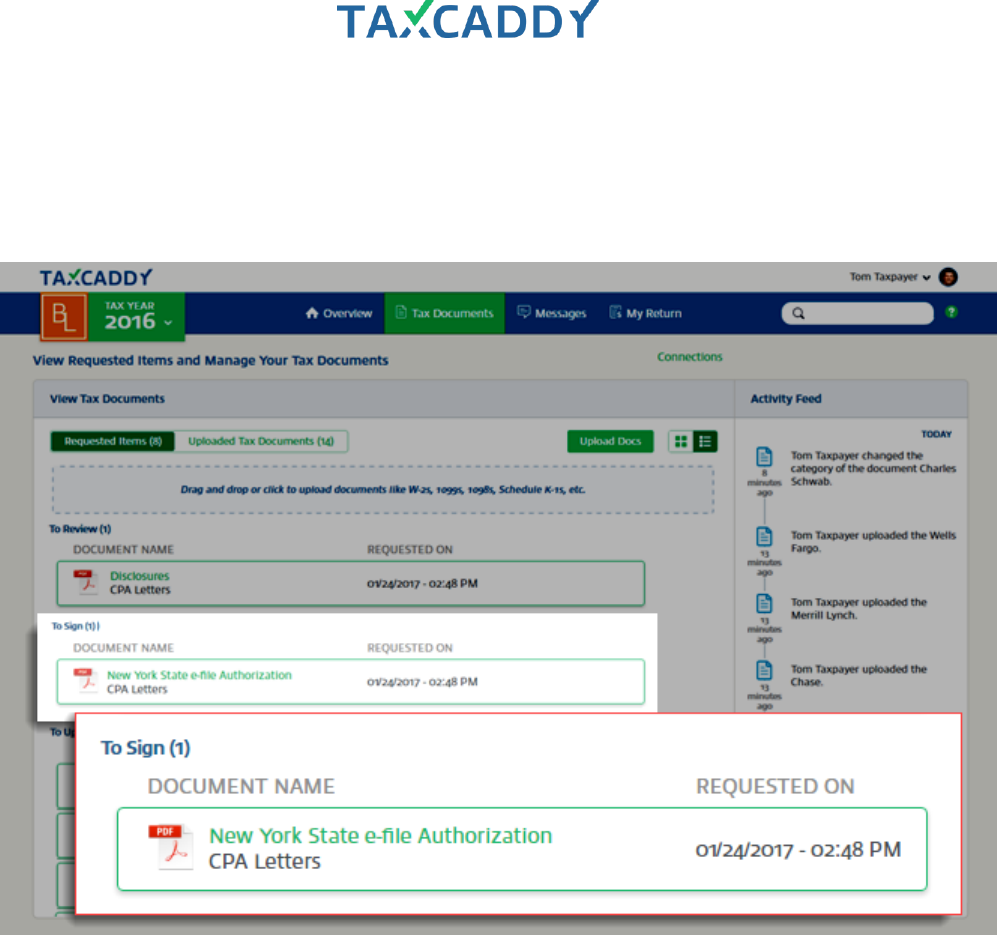
Tax Documents
Tax Documents is where your clients upload, organize and manage their tax documents. The Tax Documents
screen has two views: Requested Items and Uploaded Tax Documents. Here’s what your client sees.
1. Documents your CPA needs you to upload, review or sign appear in Requested Items under sections titled
To Review, To Sign and To Upload.
Quick Setup Guide 177
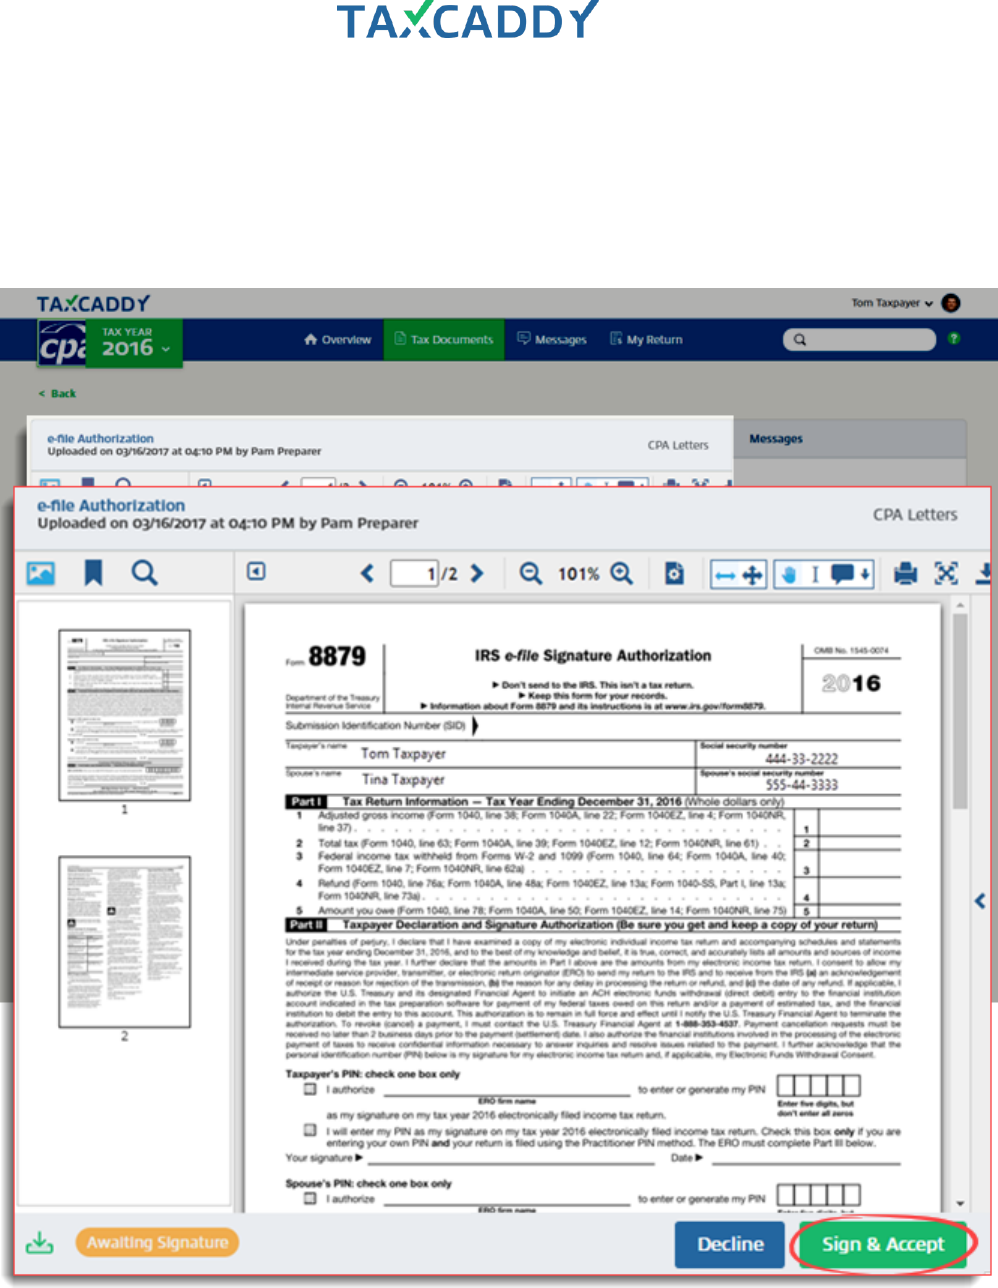
Signing and reviewing documents (Requested Items)
Here’s what your clients see when reviewing or signing documents. See the related article on the taxpayer facing
TaxCaddy Help Center.
When you add new Requested Items for your client, they receive a notification informing them that you need
items from them.
Quick Setup Guide 178
1. Requested Items and appear in the Requested Items view. Click an item to start fulfilling the request.
Note: To Upload Requested Items are coming soon in a future release.
Quick Setup Guide 179
2. The document opens in the document viewer. If you are satisfied with the document, click Sign & Accept or
Review. If the document requires your spouse’s signature but you have not added your spouse as an
additional user on your TaxCaddy account, you are prompted to invite your spouse to join TaxCaddy so they
can complete signing the document.
For Top Review items, this is the last step. For To Sign items, continue to the next step.

Quick Setup Guide 180
3. Enter your first name and then click Submit.
Quick Setup Guide 181
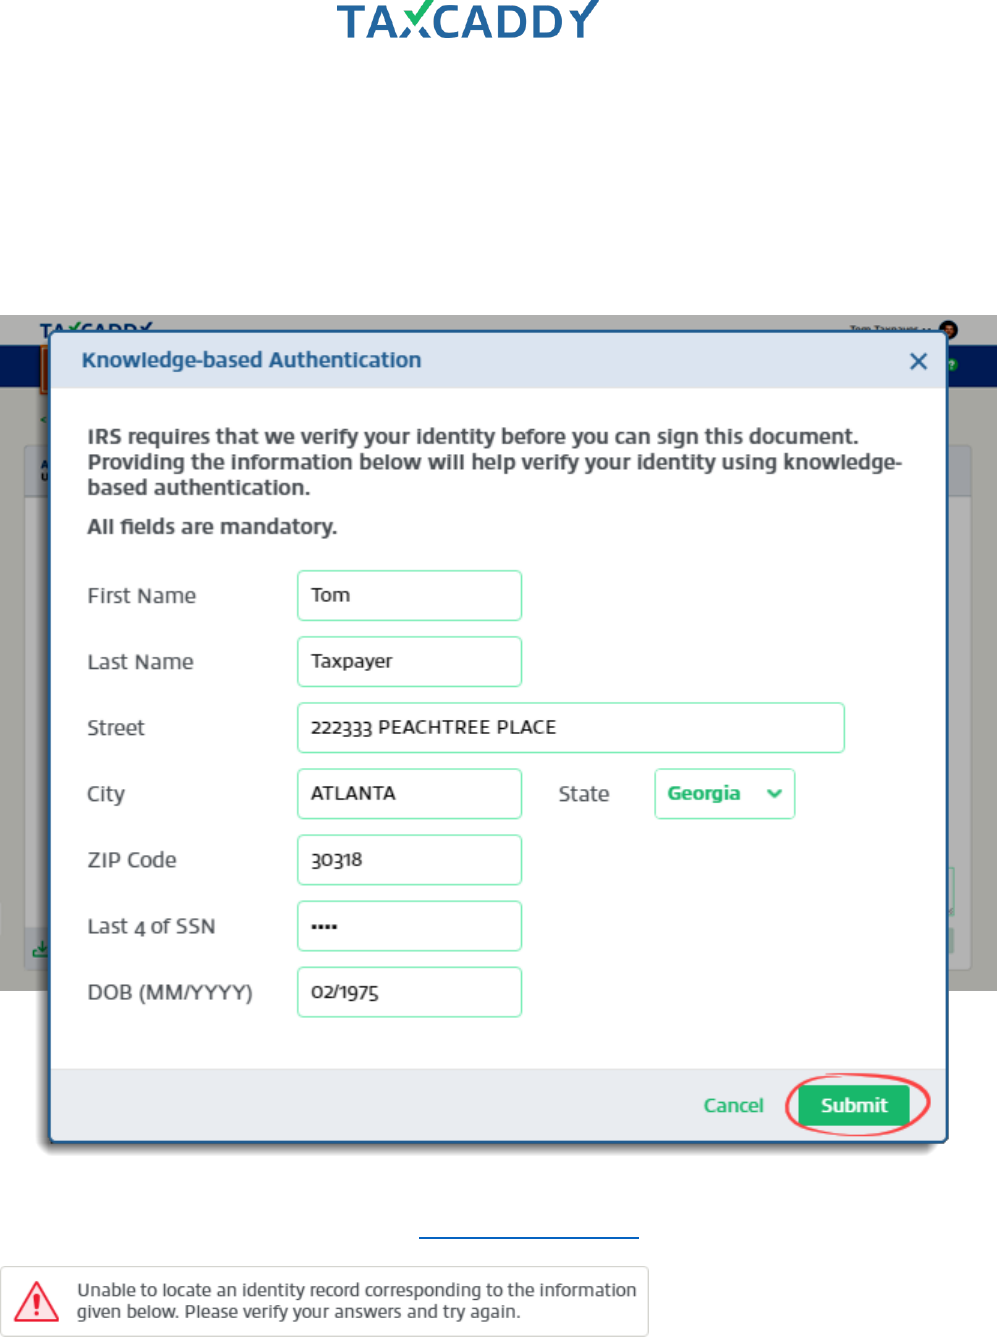
4. If you are required to verify your identity at the time of signing the document, the Knowlege-based
Authentication window appears. Enter the required information and then click Submit.
Tip: If the document requires your spouse's signature, your spouse will be prompted to verify their identity
using the same knowledge-based authentication process, and may complete their signature process at the
same time as you. If either the taxpayer or spouse fails the identity verification, both will be required to sign
the document manually.
Important: If we can’t locate an identity record associated with the taxpayer’s information, they will see the
error message below. In this case, they should download the document and sign it manually.
Quick Setup Guide 182
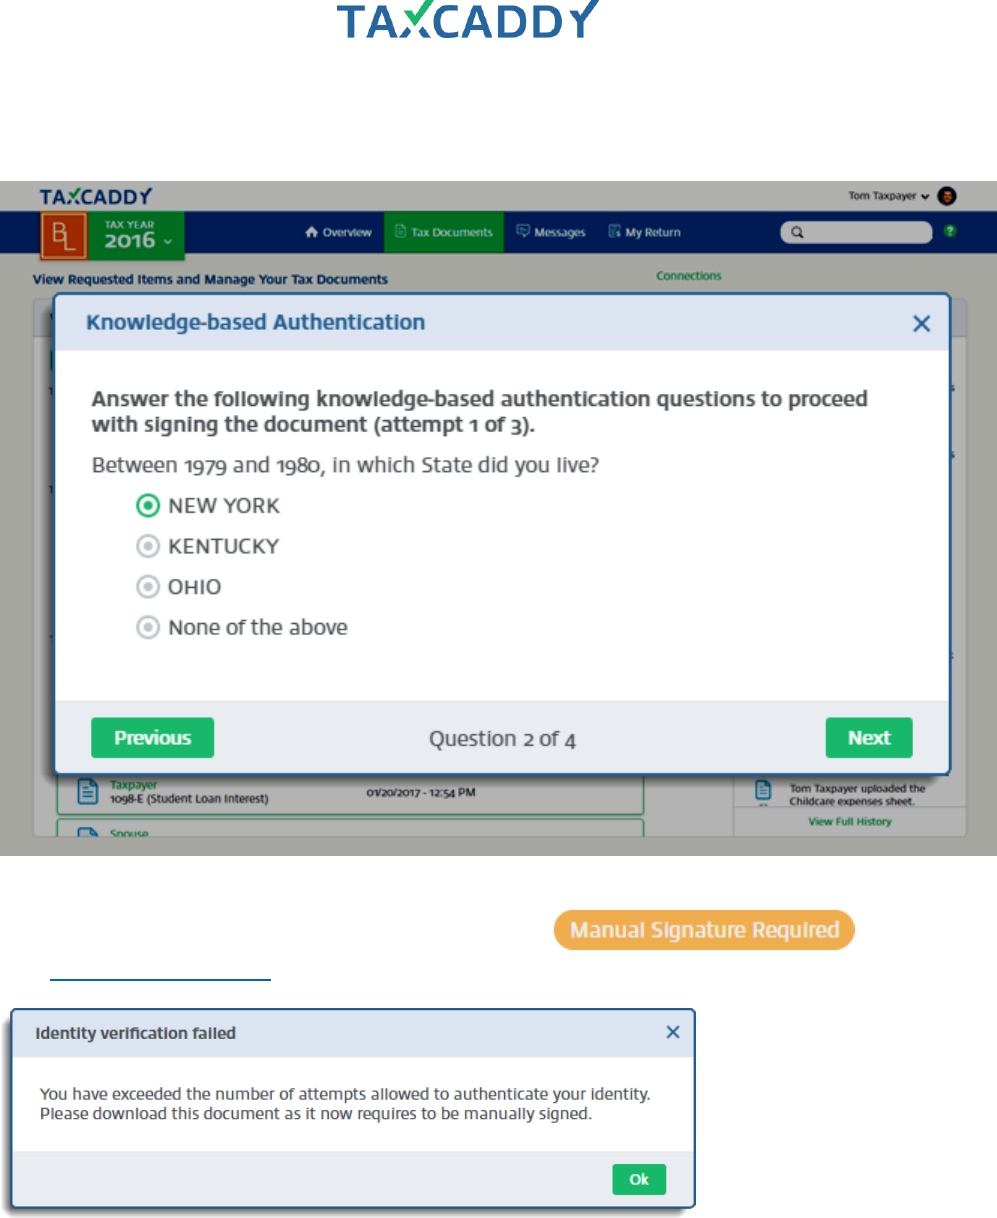
5. A knowledge-based authentication question appears. Select the correct answer and click Next. Repeat this
step until you have answered all four knowledge-based authentication questions.
Tip: You are allowed three attempts to correctly answer a set of four questions, after which the document is
moved to Uploaded Tax Documents, that status is updated to and you
must download the document and sign it manually.
Quick Setup Guide 183
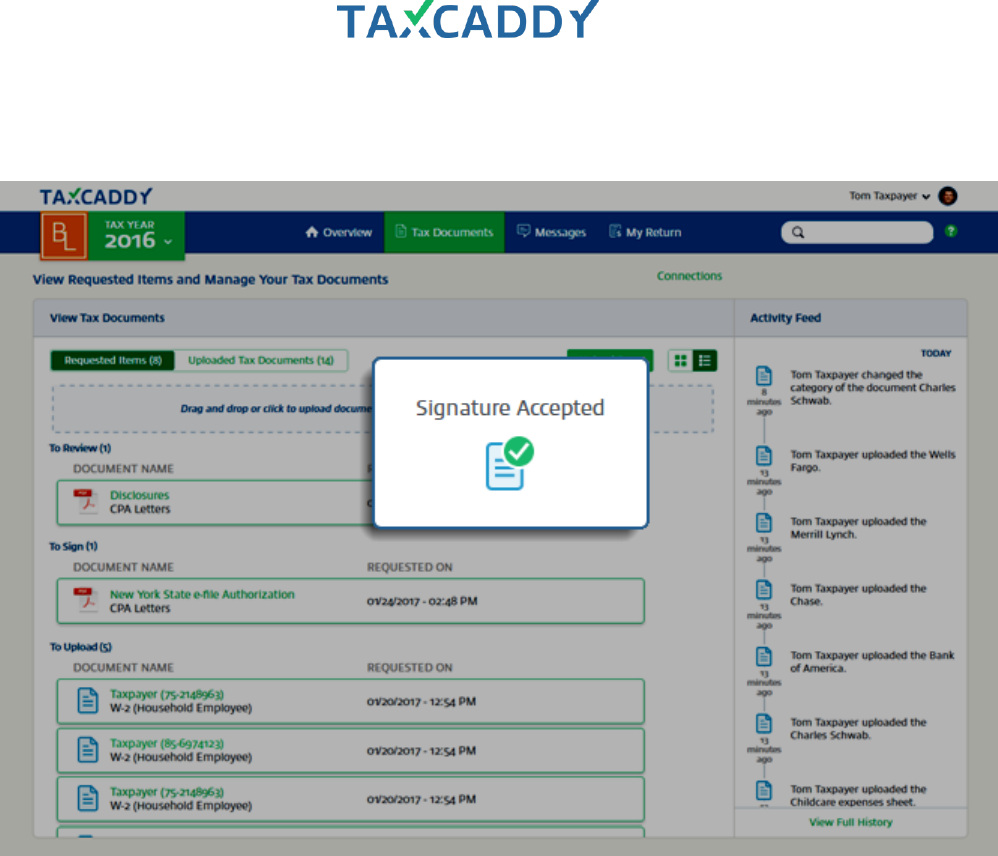
6. TaxCaddy confirms you signed the document. The signed document is moved to Uploaded Tax Documents
under the category CPA Letters and your CPA is notified that you have signed the document.
Quick Setup Guide 184
7. Sign other documents that require ID verification in the same login session to skip the knowledge-based
authentication steps.
Tip: Remember, documents that require your spouse’s signature will require your spouse to complete the
same ID verification process.
Quick Setup Guide 185
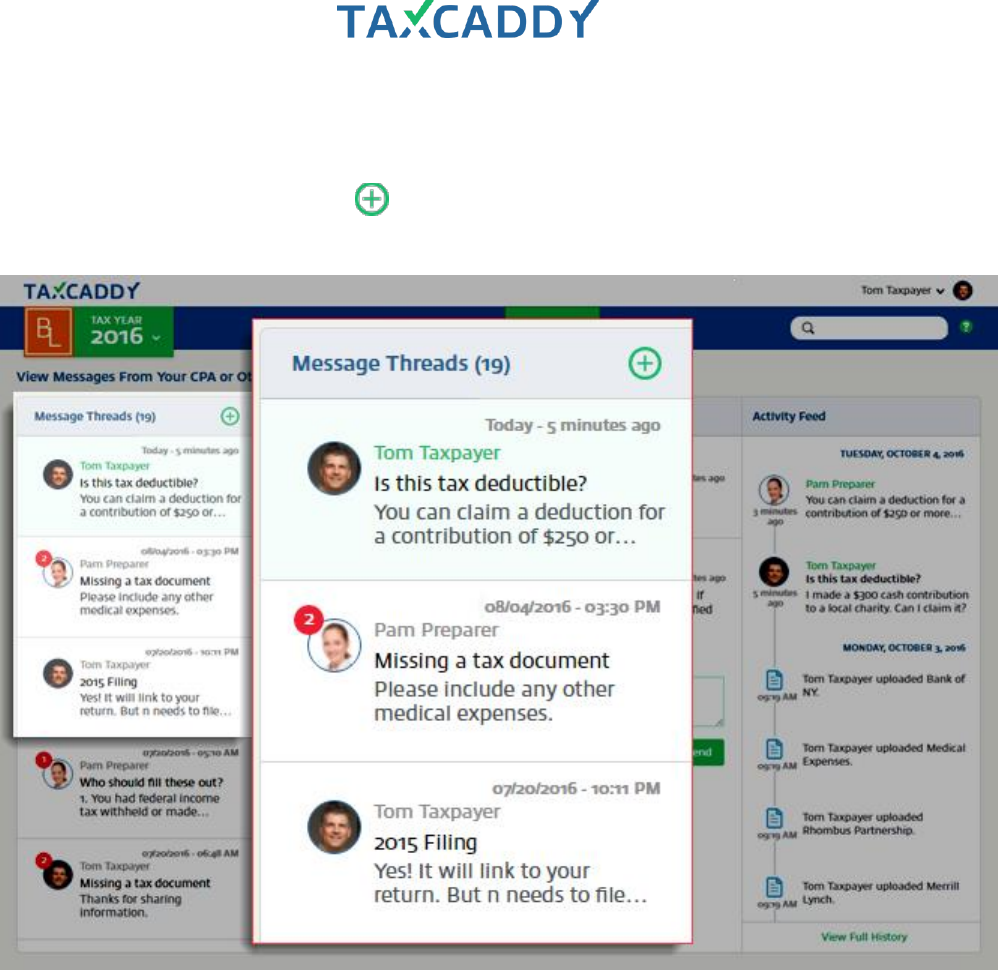
Messages
Messages helps your client keep track of their correspondence with your firm. Here’s what your client sees.
1. Click a thread to view messages or click to create a new thread. The red badge indicates the number of
unread messages in each thread.
Quick Setup Guide 186
2. When you open or create a thread it appears in the center panel.
Quick Setup Guide 188
Viewing messages
All your client’s threads are visible in the Message Threads panel, with a red badge indicating the number of
unread messages in each thread. They can also create a new message thread here by clicking the New icon
(green plus sign). When they open a thread or create a new thread, it appears in the center panel.

Quick Setup Guide 190
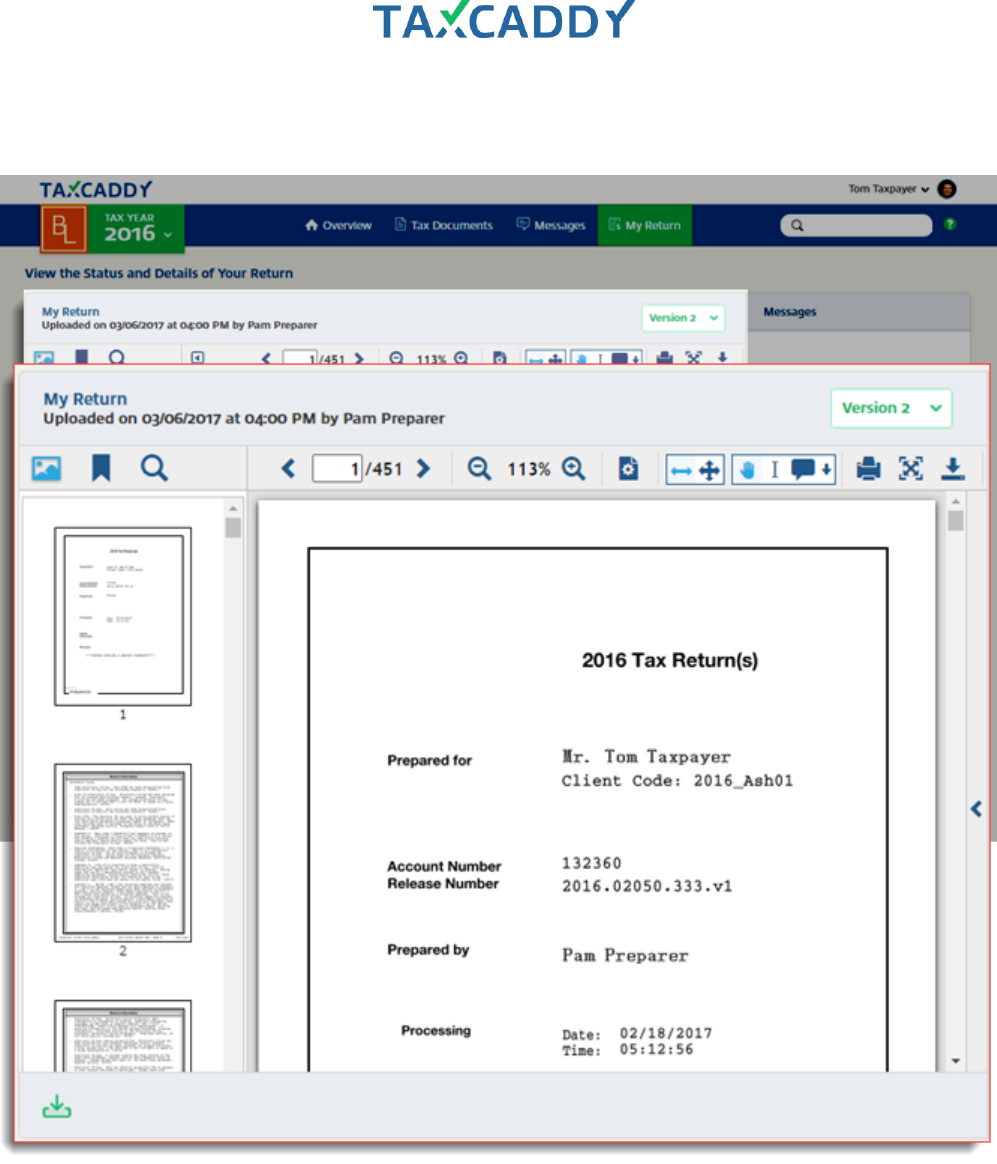
Viewing tax return
Your client is notified when you upload a new version of their return.
Quick Setup Guide 191
The upload information and version are indicated in the header. The most recent version is displayed by default,
but the client can access previous versions using the dropdown.
Quick Setup Guide 193
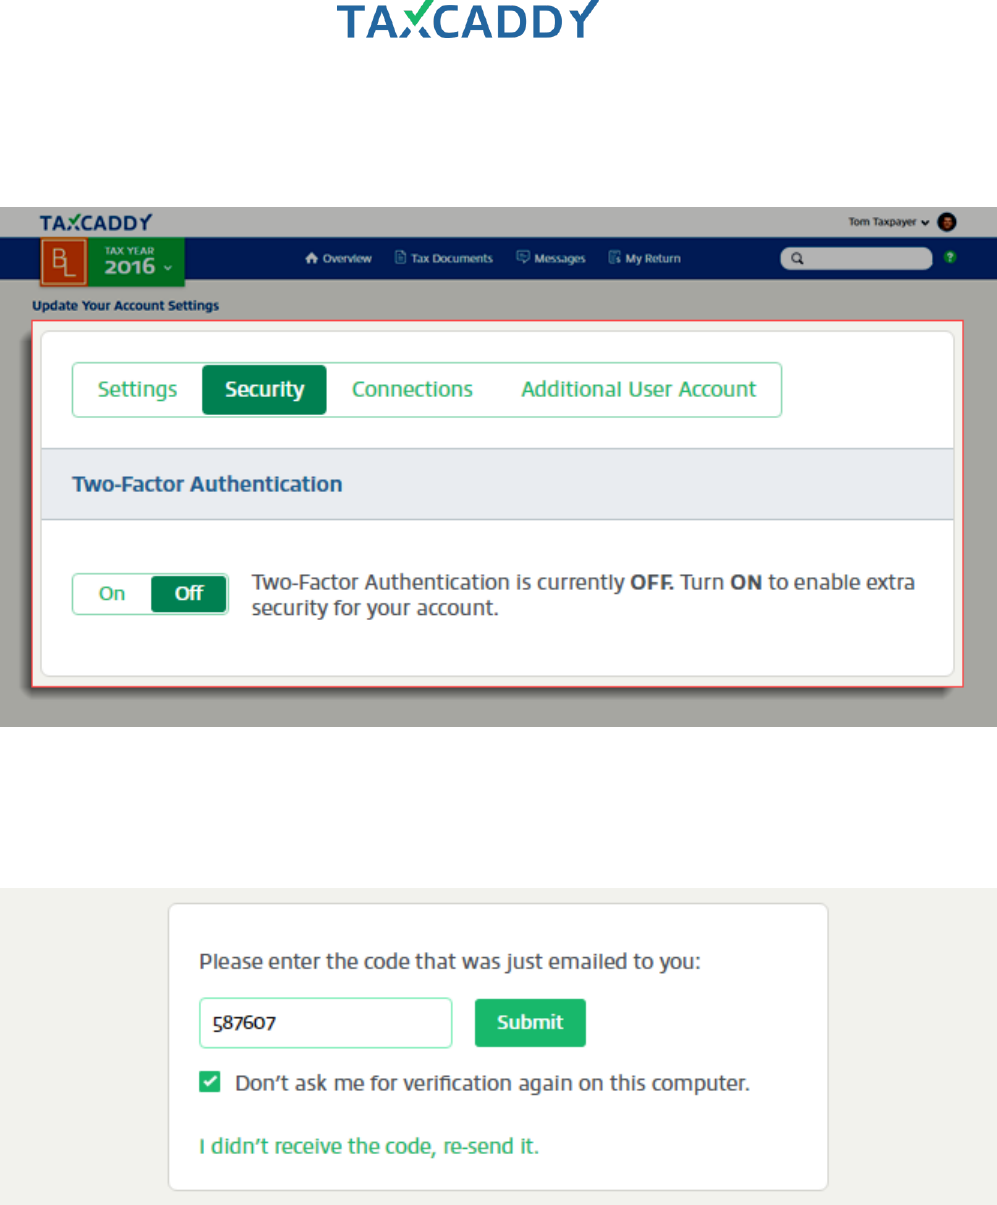
2. On the Security tab, two-factor authentication helps keep taxpayer accounts secure by prompting the user
to enter a security code each time they log in. This feature is enabled by default and we recommend your
clients keep it enabled to enhance the security of their account.
3. When logging in to TaxCaddy while two-factor authentication is enabled, users can select Don't ask me for
verification again on this computer to have TaxCaddy remember the device so they don't need to enter the
code when logging in on the same device in the future. Two-factor authentication will remain enabled and
they will be prompted to enter a code when logging in to TaxCaddy from a different device.
Quick Setup Guide 194
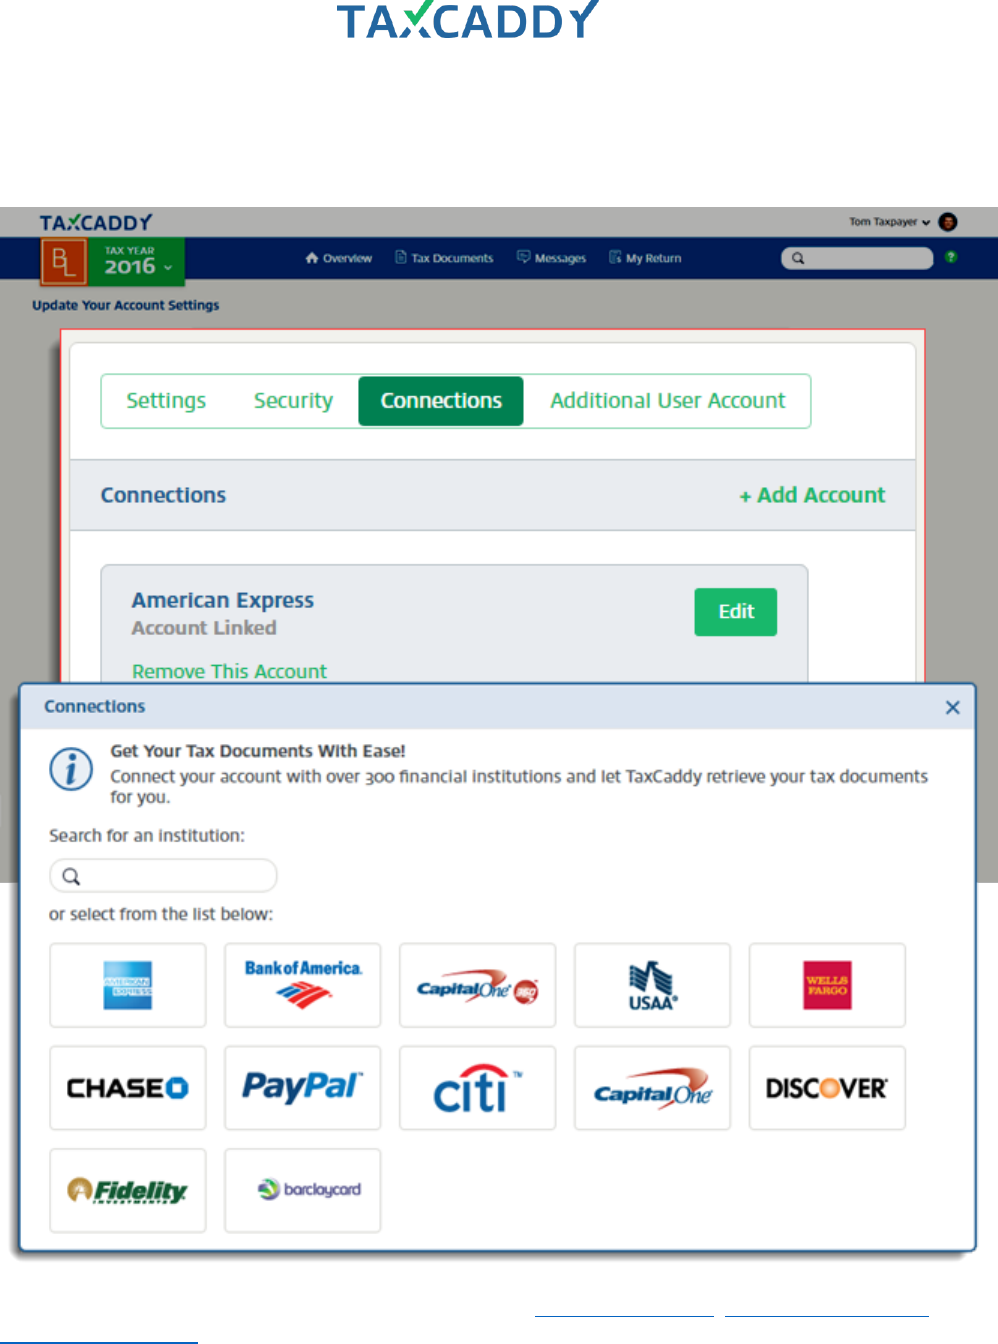
4. Connections with document retrieval accounts create a link between TaxCaddy and your client’s financial
institution, allowing TaxCaddy to retrieve documents directly from the financial institution instead of the
taxpayer having to upload them.
See these taxpayer-facing TaxCaddy Help Center articles on Adding Connections, Removing Connections and
Updating Connections for more information.
Quick Setup Guide 195
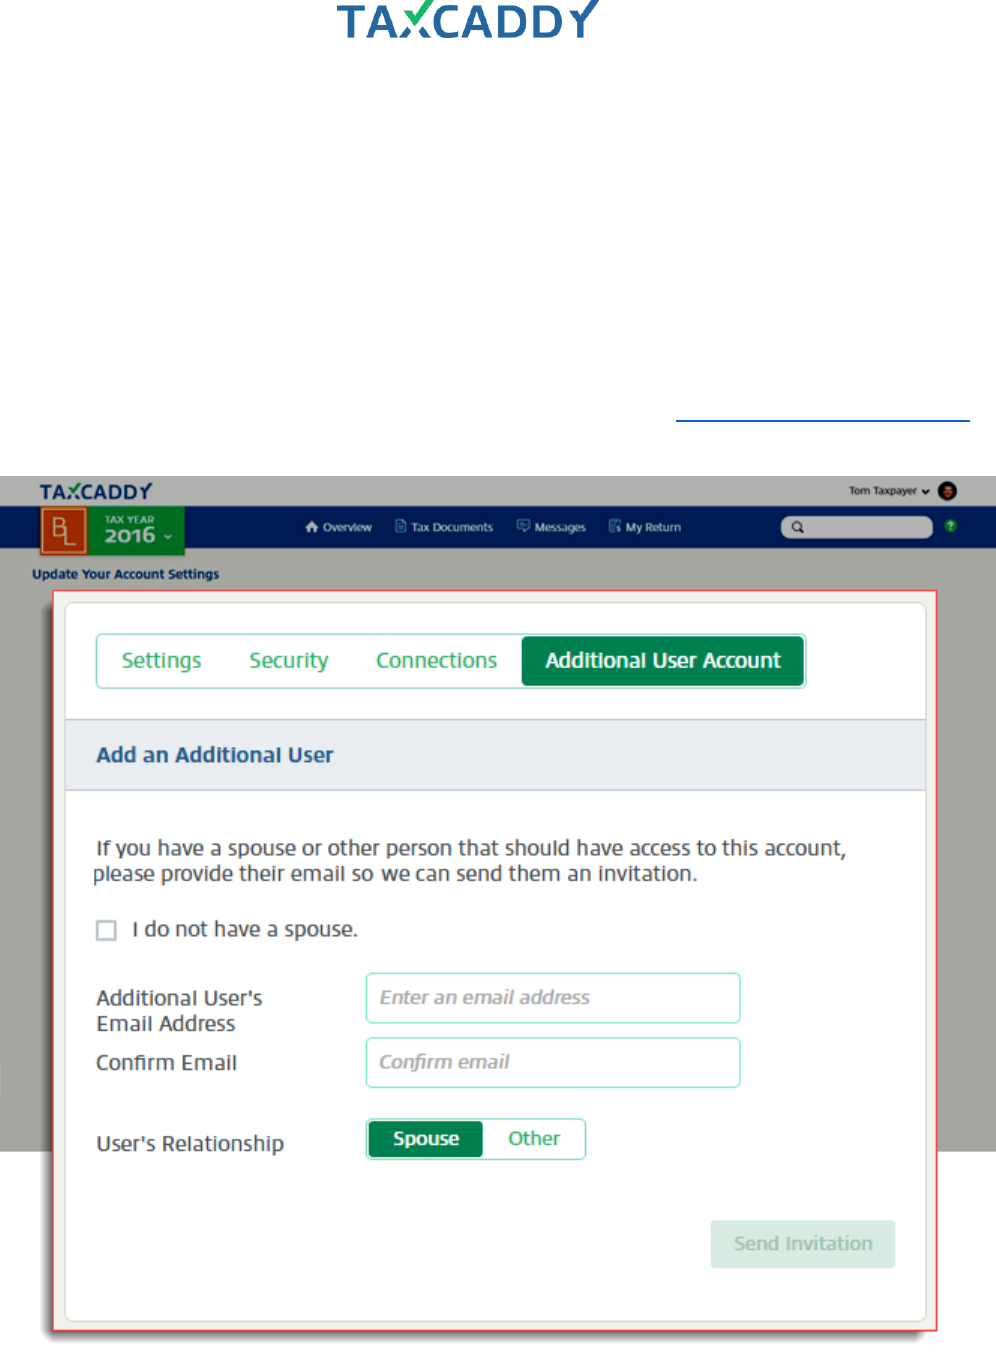
5. Your clients have the option to invite their spouse and one other person to be additional users on their
TaxCaddy account. Additional users can upload documents and view all documents uploaded to the account,
as well as review, approve and sign certain tax documents uploaded by the CPA.
Important! In order for a spouse or other additional user to join a TaxCaddy account, the additional user
must create their account by clicking the link in the additional user invitation email and following that signup
process.
If a spouse or other additional user has signed up for TaxCaddy but is not connected to the taxpayer’s
account, the additional user must create a new TaxCaddy account. They must sign up by clicking the link in
the invitation email. The additional user invitation email is automatically generated by TaxCaddy when the
taxpayer clicks the Send Invitation button following the instructions on the Adding Additional User Accounts
article on the taxpayer-facing TaxCaddy Help Center.

Quick Setup Guide 196
Release information
What’s New
Here’s what’s new since the last release. Click here to see the release note on the SurePrep Help Center.
• You can now request clients sign documents using knowledge-based authentication to confirm their
identity. See updates to these related sections:
o Create Letters templates using the editor
o Upload files as Letters templates
o Individual send letters for signature or review
o What your client sees when signing with ID verification
What’s Next
Here is what’s coming soon in a future release of TaxCaddy.
• Add new questions to individual questionnaire
• Ability for client to mark tax return drafts as approved
• Taxpayers can access their TaxCaddy account using the Android app (early May release
Past Releases
Here’s an overview of what we’ve released recently. Keep in mind this is not an exhaustive list.
• A Frequently Asked Questions article is available on the SurePrep Help Center.
CPA side released features
Administrative
• You can now assign user group permissions for allowing Admin users to access either only the Client
Management tab, or all Admin tabs.
Administrative > Client Management
• Search clients
• Send questionnaire, DRL and letters in bulk
Administrative > Templates
• Customize a questionnaire for bulk distribution
• Create or upload (PDF) letters for bulk distribution using mail merge
Administrative > Document Request List
• Create customized document request lists
Client Profile > Questionnaire
• Ability to access questionnaire filled out by clients

Quick Setup Guide 197
• File questionnaire to client’s tax documents
Client Profile > Tax Return
• Upload tax returns to client profiles
Binder
• Ability to create new binders from TaxCaddy
• Add documents to existing binders that were created from TaxCaddy
• Open a binder created from TaxCaddy
• You can now add documents to an existing binder from inside TaxCaddy.
• Documents within the category Schedule K-1s will always be moved to the end of the list of documents.
•
Taxpayer side released features
Overview
• Receive notifications for: New Questionnaire, Updated Questionnaire (CPA added additional questions),
Questionnaire Progress, and Completed Questionnaire
Overview > Questionnaire
• Access the questionnaire and provide answers; filter to unanswered questions
• Use the questionnaire message panel to send and receive messages regarding the questionnaire
Tax Documents > Requested Items
• Receive request list for uploading document
• Upload Requested Items or mark them as ‘Doesn’t Apply’ or ‘Already Provided’ if they are provided
using a different method
Settings > Document Retrieval Accounts
9. Your clients can now have TaxCaddy automatically retrieve their tax documents from over 300 service
providers and financial institutions. See taxpayer-facing TaxCaddy Help Center article Adding Document
Retrieval Accounts.
Mobile App Specific
10. Access TaxCaddy using the mobile iOS app: Clients can access their TaxCaddy account via their iOS and
Android phone apps and perform all the same tasks available on the TaxCaddy web app including ability to
take pictures of documents, answer questions, send messages etc.
11. Sign into the iOS app using thumbprint (Touch ID)
