Technical Manual
User Manual: Pdf
Open the PDF directly: View PDF ![]() .
.
Page Count: 11
From Nothing to Neural Network
Technical Specification
Lorin Sweeney: 15707415
Neil Lapuz: 15107230
Table of Contents
1. Introduction ............................................................. 1
1.1 Overview ............................................................... 1
1.2 Glossary ................................................................ 1
2. System Architecture................................................. 2
2.1 Web Application System Architecture Diagram ... 2
2.2 Architecture Overview Diagram ........................... 2
2.3 Model-View-Controller (MVC) Design Pattern ..... 4
3. High-level Design ..................................................... 5
3.1 System Context Diagram ...................................... 5
3.2 Sequence diagram for Hand Written Number
Recognition ................................................................. 6
4. Problems & Resolution ............................................ 7
4.1 Web App Design & Implementation ..................... 7
4.2 Line Chart .............................................................. 7
5. Installation Guide ..................................................... 7
5.1 Installation with Nvidia GTX graphics card (GTX
650 or newer) ............................................................. 7
5.2 Installation with CPU ............................................ 8

1
1. Introduction
1.1 Overview
The tool is an interactive Neural Network learning resource that introduces the user to
the subject of Neural Networks and guides them through a series of learning challenges.
The tool consists of a Web App which provides a neural network hand-written number
recognition program, the necessary learning materials, visual aids, optional quizzes, and
a trainable model with various pluggable parameters. The learning material includes a
general introduction to Neural Networks, covering key concepts and terminology, and a
breakdown of the underlying conceptual elements relating to the structure and
function of a Convolutional Neural Network.
The material is cumulative and works towards a defined set of learning goals. The
learning material is supplemented with concrete examples and real-world illustrations.
There are succinct run throughs of the mathematics where required. The Web App
guides the user through some practical exercises in order to solidify their understanding
and give them an introduction into creating their own convolutional neural networks
such as the hand-written number recognition program.
We created our own diagrams and visual aids in order to concretise abstract concepts and
further facilitate the user’s learning. In order to help the user retain the knowledge that
they have just learned we added optional quizzes at the end of sections where applicable.
Moreover, for users who wish to further examine the effects of changing key hyper
parameters in a model, we implemented a trainable model where the user can plug-in
various parameters. This allows the user to change the parameters of a model and train it.
The Web App then shows the resulting loss(cost), validation loss(cost) (val_loss),
accuracy(acc) and validation accuracy (val_acc) of the trained model which is presented in
an interactive line chart.
The Web App provides a user that is already comfortable with programming and has a grasp
of basic python with a comprehensive overview and introduction to Neural Networks, and
insight into creating a Convolutional Neural Networks to recognise hand-written numbers.
Additionally, it enables those that already have some understanding of Neural Networks to
refresh their knowledge and potentially further deepen their understanding or correct any
misunderstandings.
1.2 Glossary
• Neural Network: A series of algorithms that attempts to identify the underlying relationships
in a set of data by using a process that loosely mimics the way the human brain operates.
• Loss: A value that sought to be minimised during the training of the model. It is a summation
of the errors for each example in training.
• Val_loss: It is a summation of the errors for each example in the validation data.
• Acc: A value that is sought to be increased, but not 100%, during the training of the model. It
is simply the percentage of results that produced the correct output for the training data.
• Val_acc: This is the same as acc except for the validation data.
2
2. System Architecture
2.1 Web Application System Architecture Diagram
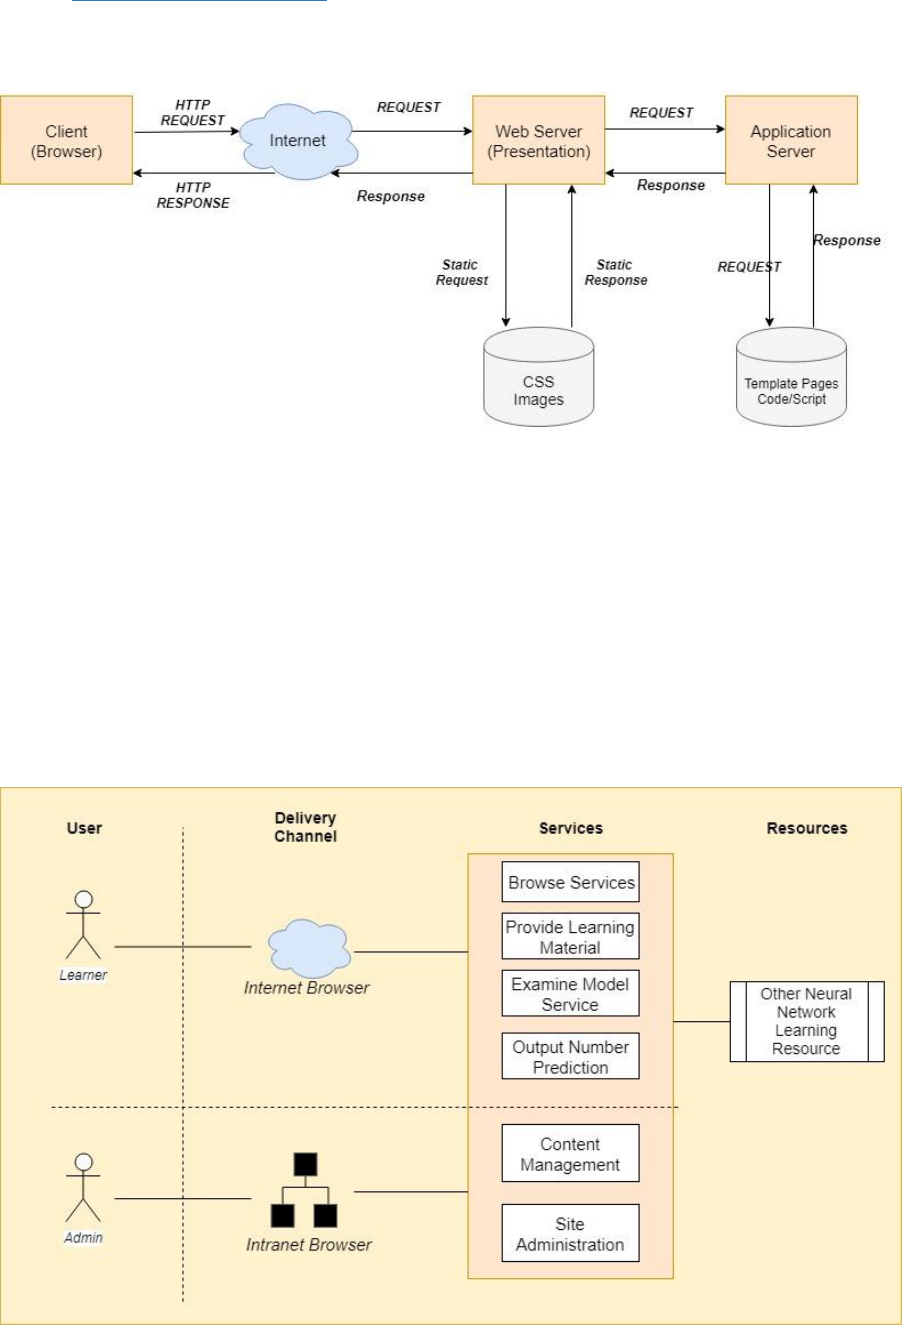
Fig 2.1 shows a fundamental Web Application system architecture diagram when requesting for the
Web App through a HTTP request in the Internet. The diagram illustrates how the Web Client
(Browser) sends a request to the web server through the internet. The web server then responds
back with the static contents of the Web App and presents it to the client.
When a program in the Web App needs to be executed, such as the hand-written number
recognition program, the Web App sends out a request to the application server and executes the
necessary code for the program. After the code execution, it then sends a response back to the
client, presenting its result.
2.2 Architecture Overview Diagram
3
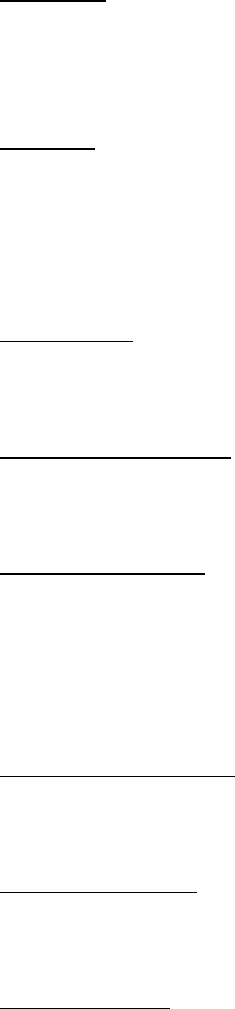
Fig 2.2 illustrates an Architecture Overview Diagram for the Web App. The purpose of this diagram is
to illustrate, at a conceptual level, an understanding of the system. Additionally, it provides a high-
level shared vision of the architecture and scope of the Web App.
We have identified 2 types of users for the entire system:
1. The Learner
This user is anybody who wishes to learn something about Neural Networks and then look
for an online learning material about it. They only have 1 delivery channel to gain access to
the Web App, and that is through the Internet Browser as show in the diagram above.
2. The Admin
The admin of the Web App are the users that has the authorisation to make any changes to
the system. This user interacts with the system through the internal network.
Illustrated in the diagram are 6 key services provided by system for the users:
1. Browse Service
This service allows the learner to explore around the Web App wherever and whenever they
wish to.
2. Provide Learning Material
This simply provides the learning content to the learner through the Web App through the
delivery channel of the internet.
3. Examine Model Service
Allows the learner to plug in different hyper parameters, train a model and be presented
with the resulting information. This is for evaluating the different outcomes a model results
to when certain parameters are plugged in. For example, a model that is trained with a data
sample size of 10, will produce different results from a model that is trained with a sample
size of 10,000.
4. Output Number prediction
This generates the resulting number that is predicted by the Neural Network and allows the
learner to view the result.
5. Content Management
Allows an admin to modify the content of the Web App and perhaps add any extra
functionalities.
6. Site Administration
This allows the admin to maintain or change the links/pages of the Web App and modify it if
there are any problems.
We have identified 1 external resource for the system:

4
1. Other Neural Network Learning Resource
Since Neural Network is one of the cutting edge technologies today, there will be quite a
number of changes as the field continues to progress. This resource will improve the
contents of the Web App in order to keep up to date.
2.3 Model-View-Controller (MVC) Design Pattern
Fig 2.3 Above shows a Model-View-Controller design pattern that is associated with the Web App.
The purpose of this design pattern is to illustrate the separation of the modelling, the presentation
and the actions based on the user input into three separate classes.
• The Controller class interprets the inputs from the user and passes it to the Model class. This
would be such that the user draws a number on the canvas of the Web App and submits its
input.
• The Model represents the underlying, logical structure of the Web App. This executes the
input from the controller class and passes it to the View class as shown from the diagram
above.
• The View manages the display of information triggered by a Controller class. It can be any
output representation of information. In this case, it would be the number output of the
hand written number recognition program. This can then be seen by the user.
5
3. High-level Design
3.1 System Context Diagram
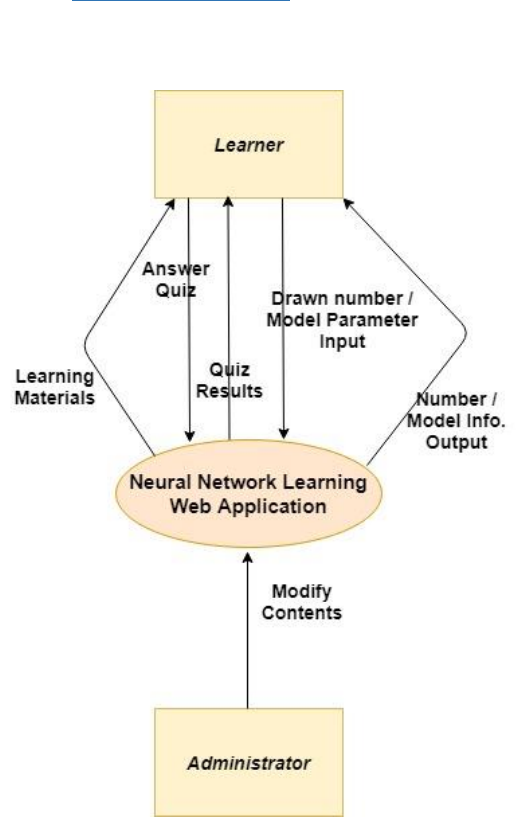
Fig 3.1 above illustrates a System Context Diagram of the Web App. This diagram defines the
boundary between the Web App and its surrounding environment. It shows the key relationships
between the system and external entities along with their inputs and outputs.
As shown in the diagram, the Learner entity interacts with the Web App in numerous ways. The Web
App provides the learning material to the learner. The learner can then submit inputs such as
drawing a number on the canvas of the Web App or submit the parameters for examining a model.
The Web App then presents the results of these inputs to the learner. This scenario would be similar
to the quizzes' functionality ink the Web App.
In order to change or modify the contents of the learning material, the administrator entity needs to
interact with the system.
6
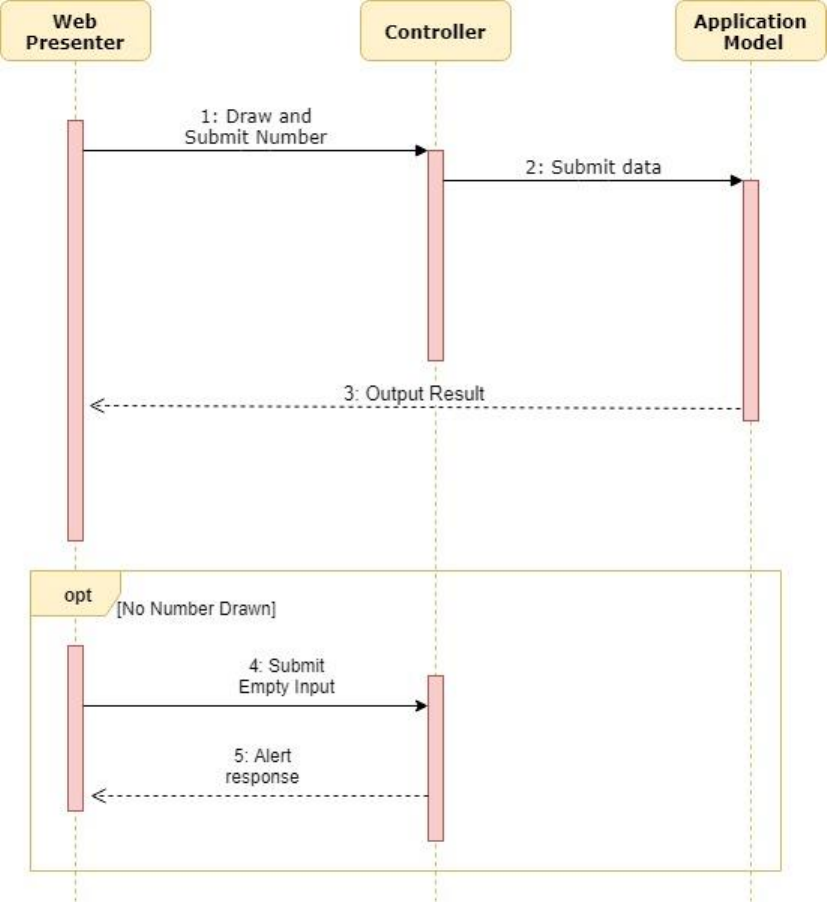
3.2 Sequence diagram for Hand Written Number Recognition
Fig3.2 illustrates a sequence diagram for the Hand Written Recognition of the system. The Web
Presenter passes the drawn out number, inputted by the user to the Controller. The Controller then
submits this data to the Application Model. Once it gets its output, the Application Model then
returns the output to the Web Presenter, presenting it to the user.
There's also the scenario, which shown in the diagram above, that the user did not draw anything
and the Web Presenter passes an empty input to the Controller. In this case, the Controller will
detect this and sends back an alert response to the Web Presenter which is shown to the user.
7
4. Problems & Resolution
4.1 Web App Design & Implementation
Building the Web App towards the start had a few design and implementation problems. At first, it
was built to run from the file system of the computer and we planned on running the whole system
to the student computing server. However, as we progressed through with the tasks, we learned
that the Flask web framework should be wrapped with our HTML files and that the system should be
ran in localhost.
As a result of this, we had to change our approach and almost had to rewrite what we had at that
time implemented already. We wrapped our HTML files with Flask and from there, our system then
runs in localhost.
4.2 Line Chart
Implementing the Line Chart for examining the training of a model had a few problems with the
design. The first approach was such that when the parameters has been submitted, the application
would return the results along with the line chart. However, the implementation wasn't convincing
and we have already spent a lot of time for it.
We resolved this problem by redesigning our approach. Instead of outputting the chart along with
the result of the model, we have the chart already rendered before the model has been trained. The
lines of the chart initially starts off with 0 and dynamically changes as the model is trained, showing
its results(loss,val_loss,acc,val_acc).
5. Installation Guide
For this section, we will go through a step by step software installation guide (Windows 64 bit) for
the Web App in which it can be run in two ways depending on the hardware of the system you are
using. There’s two ways on the installation because the Web App runs Tensorflow in the back-end in
which it has a CPU and GPU version.
5.1 Installation with Nvidia GTX graphics card (GTX 650 or newer)
Before you install the packages involve in this section, you will need to check if your graphics card is
appropriate for the software that is needed to be installed to run Tensorflow. This is the library that
runs/trains the neural network in the server side of the Web App. To check if your graphics card is
able to run the necessary software, you will need to go to this link;
https://developer.nvidia.com/cuda-gpus
and check under _CUDA-Enabled GeForce Products_ that your graphics card is in the list. If it’s in the
list, then stick to this installation section. Otherwise, move on to the CPU section of this installation
guide.
You will need to then install the following packages;
1. Python 3.6.2
2. Numpy
3. Flask
4. Opencv-Python
5. Keras
8
After you have installed the packages, you will need to install the following software and do the
following steps before installing Tensorflow
1. CUDA Tool kit - Version 8
https://developer.nvidia.com/cuda-downloads
After the installation of this software is finished, add the following paths in your
environment variable;
• C:\Program Files\NVIDIA GPU Computing Toolkit\CUDA\v8.0\bin
• C:\Program Files\NVIDIA GPU Computing Toolkit\CUDA\v8.0\libnvvp
• C:\Program Files\NVIDIA GPU Computing Toolkit\CUDA\v8.0\extras\CUPTI\libx64
2. CUDNN 6.0
Select CUDNN 6.0 for CUDA tool kit 8.
https://developer.nvidia.com/rdp/cudnn-download
Once you have downloaded it, extract the zip file contents and place them in your C drive.
Then add the bin path of the folder to your environment variable;
• C:\cuda\bin
Finally, install the GPU version of Tensorflow;
• pip install --ignore-installed –upgrade tensorflow-gpu
and test your installation if it’s working. We can test if our installation of Tensorflow is working
through the following;
• Open a CMD window and fire up python.
• Once it launches, type the following;
import tensorflow as tf
>s = tf.constant('Hello, World!')
>sess = tf.Session()
>print(sess.run(s))
• And it should output “Hello, World!”
From there then, Tensorflow GPU version is runnable in your system and you can then run the entire
Web App.
5.2 Installation with CPU
For this installation section you will need the following;
1. Python 3.6.2
2. Numpy
3. Flask
4. Opencv-python
5. Keras

9
6. Anaconda (https://www.anaconda.com/download/))
After installing Anaconda, take the following steps to install Tensorflow in an Anaconda environment
1. Create a conda environment named tensorflow by entering the command;
• C:> conda create -n tensorflow pip python=3.6
2. Activate the conda environment by issuing the following command;
• C:> activate tensorflow
3. Then enter the following command;
• C:> **pip install --ignore-installed –upgrade tensorflow
Test your Tensorflow installation is working through the following;
• Open a CMD window and fire up python.
• Once it launches, type the following;
> import tensorflow as tf
> s = tf.constant('Hello, World!')
> sess = tf.Session()
> **print**(sess.run(s))
• And it should output “Hello, World!”
From there then, Tensorflow CPU version is runnable in your system and you can then run the entire
Web App.
