User Guide
user-guide
User Manual: Pdf
Open the PDF directly: View PDF ![]() .
.
Page Count: 79
- Welcome
- Installing BC Office
- Overview
- Lodging Your First Application
- Address Book
- Calendar
- Application Register
- About the Application Register
- Using the Find Application form
- Using the Application form
- Using the Select Contact form
- Using the Check form
- Using the Insert Checks form
- Using the Special Fire Services form
- Using the Inspection form
- Using the Action Note form
- Using the Letter Merge form
- Using the Send Email form
- Using the Label Merge form
- Plan Register
- Sighting Claims
- Bulk Merge
- Reporting
- System Administration
- Offline Mode
- Performing Compact And Repair Operations
- Performing BC Office Backups
- Frequently Asked Questions
Version 4.0
User Guide
ROSZE.COM

BC OFFICE USER GUIDE
ROSZE.COM
COPYRIGHT © ROSZE PTY LTD
2
CONTENTS
Welcome ............................................................................................................................................................ 4
BC Office Key Features .................................................................................................................................. 4
Contact Us ..................................................................................................................................................... 4
Installing BC Office ............................................................................................................................................. 6
Single-User Installations ................................................................................................................................ 6
Multi-User Installations ................................................................................................................................. 7
Entering Your BC Office Licence Details ...................................................................................................... 11
Overview .......................................................................................................................................................... 12
The Main Window ....................................................................................................................................... 12
The Dashboard ............................................................................................................................................ 13
A Sample Form ............................................................................................................................................ 14
A Sample Report .......................................................................................................................................... 15
Lodging Your First Application ......................................................................................................................... 16
Add you profile details to Preferences ........................................................................................................ 16
Add a new Suburb to the Suburb register ................................................................................................... 17
Create a New Contact in the Address Book ................................................................................................. 17
Create a New Application ............................................................................................................................ 18
Link a Contact to the Application ................................................................................................................ 19
Generate a Notice of Engagement letter .................................................................................................... 20
Address Book ................................................................................................................................................... 22
About the Address Book .............................................................................................................................. 22
Using the Address Book form ...................................................................................................................... 22
Using the Suburbs form ............................................................................................................................... 23
Calendar ........................................................................................................................................................... 24
About the Calendar ..................................................................................................................................... 24
Using the Calendar form ............................................................................................................................. 24
Using the Repeat Schedule form ................................................................................................................. 27
Using the Find Appointment form ............................................................................................................... 28
Setting Calendar Preferences using the Preferences form .......................................................................... 29
Application Register......................................................................................................................................... 31
About the Application Register ................................................................................................................... 31
Using the Find Application form .................................................................................................................. 31
Using the Application form ......................................................................................................................... 32
Using the Select Contact form ..................................................................................................................... 42
Using the Check form .................................................................................................................................. 43
Using the Insert Checks form ....................................................................................................................... 44
Using the Special Fire Services form ............................................................................................................ 44
Using the Inspection form ........................................................................................................................... 45
Using the Action Note form ......................................................................................................................... 46
Using the Letter Merge form ....................................................................................................................... 47
Using the Send Email form .......................................................................................................................... 48
Using the Label Merge form ........................................................................................................................ 49
Plan Register .................................................................................................................................................... 50
Using the Plan Register form ....................................................................................................................... 50
Sighting Claims ................................................................................................................................................. 52
Using the Sighting Claims form ................................................................................................................... 52

BC OFFICE USER GUIDE
ROSZE.COM
COPYRIGHT © ROSZE PTY LTD
3
Customising the Sighting Claim templates .................................................................................................. 53
Bulk Merge ...................................................................................................................................................... 54
Using the Bulk Merge form ......................................................................................................................... 54
Customising the Reminder Notice bulk merges .......................................................................................... 55
Reporting ......................................................................................................................................................... 57
Using the Hours Worked Report form ......................................................................................................... 57
Using the Fee Report form .......................................................................................................................... 58
Using the Additional Information Report form ........................................................................................... 59
Using the Processing Time Report form ...................................................................................................... 59
System Administration .................................................................................................................................... 61
Using the Codes form .................................................................................................................................. 61
Using the Merge Templates form ............................................................................................................... 62
Using the Document Archiving form ........................................................................................................... 66
Using the Preferences form ......................................................................................................................... 68
Updating your Licence details ..................................................................................................................... 72
Validating all DA Statuses ........................................................................................................................... 73
Resetting the DA Number generator ........................................................................................................... 73
Offline Mode.................................................................................................................................................... 74
Working Offline ........................................................................................................................................... 74
Synchronising Offline changes .................................................................................................................... 75
Cancelling Offline changes .......................................................................................................................... 75
Performing Compact And Repair Operations .................................................................................................. 77
Performing BC Office Backups ......................................................................................................................... 78
Frequently Asked Questions ............................................................................................................................ 79

BC OFFICE USER GUIDE
ROSZE.COM
COPYRIGHT © ROSZE PTY LTD
4
WELCOME
Welcome to the BC Office User Guide.
BC Office is an office software solution designed for Building Certifiers by Building Certifiers. BC Office has been
designed to save you time, by automating your office administration tasks, allowing you to spend more time running
your business.
BC Office works seamlessly with Microsoft Office to deliver an integrated solution in both single and multiuser
environments.
While initially designed to comply with the requirements of the Queensland building regulations, BC Office can easily
be customised to suit your regulatory environment.
BC Office Key Features
Microsoft Windows 10 & Office 2016 - Designed for Microsoft Windows 10 & Office 2016 with backward
compatibility.
Tabbed and Resizable Windows - Common look and feel and tabbed window interface with resizable windows.
Microsoft Word Integration - Generate Quotes, Information Requests, Decision Notices using customisable Word
templates.
Microsoft Outlook Integration - Email application documents & appointment confirmations using Outlook.
Dashboard - Quick access to your applications and appointments to ensure you don’t miss important milestones.
Application Register - Record all your application contacts, checks, documents, fees, inspections in the application
register.
Application Checks - Create custom assessment, consent & certificate checklists to monitor your application
workflow.
Integrated Calendar - Use the customisable built-in calendar to schedule client meetings and book inspection
appointments.
Address Book - Use the Address Book to keep track of your client contact details, information, & notes.
Plan Register - Use the plan register to record your Survey Plans and let BC Office 4 link them to your applications.
Import Documents - Import documents using standard File Explorer drag and drop.
QBSA & QLeave Sighting Claims - Record and process all of your Owner Builder Permit and Receipt Sighting
claims.
Processing Time Reporting - Keep track of your application processing times using the Processing Time Reports.
PDF Reports - All BC Office 4 reports are produced as Adobe Acrobat PDF making them easy to save and
distribute.
Offline Mode - Take BC Office 4 with you in the field to record and generate your inspection certificates.
Contact Us
If you would like more information about us, our services or licensing requirements for BC Office please visit our
website at http://rosze.com.
To contact our sales and support staff please email us at contact@rosze.com.

BC OFFICE USER GUIDE
ROSZE.COM
COPYRIGHT © ROSZE PTY LTD
5
GETTING STARTED GUIDE
BC OFFICE USER GUIDE
ROSZE.COM
COPYRIGHT © ROSZE PTY LTD
6
INSTALLING BC OFFICE
BC Office provides an easy to use Setup program which along with the following instructions will make installing your
copy of BC Office as straightforward as possible.
A BC Office installation will consist of two installs, a Server Install and Client Install.
Server Install – all shared application and database files are installed on the server.
Client Install – all local application files are installed on the client PC.
Before commencing the install, you should first confirm that you have obtained the latest available version of BC
Office by visiting our website at http://rosze.com.
When deciding where to install BC Office the following considerations will guide your choice.
Is this going to be a single-user or multi-user installation?
Is the proposed path included in your backup strategy?
Single-User Installations
A single-user installation is the simplest type of BC Office installation as the server install and client install will both
occur on the same PC and there will be no need to configure any network drive mappings.
To install BC Office in a single-user environment, follow these instructions:
1. Run the downloaded Setup program and follow the onscreen instructions to install the required server files.
BC OFFICE USER GUIDE
ROSZE.COM
COPYRIGHT © ROSZE PTY LTD
7
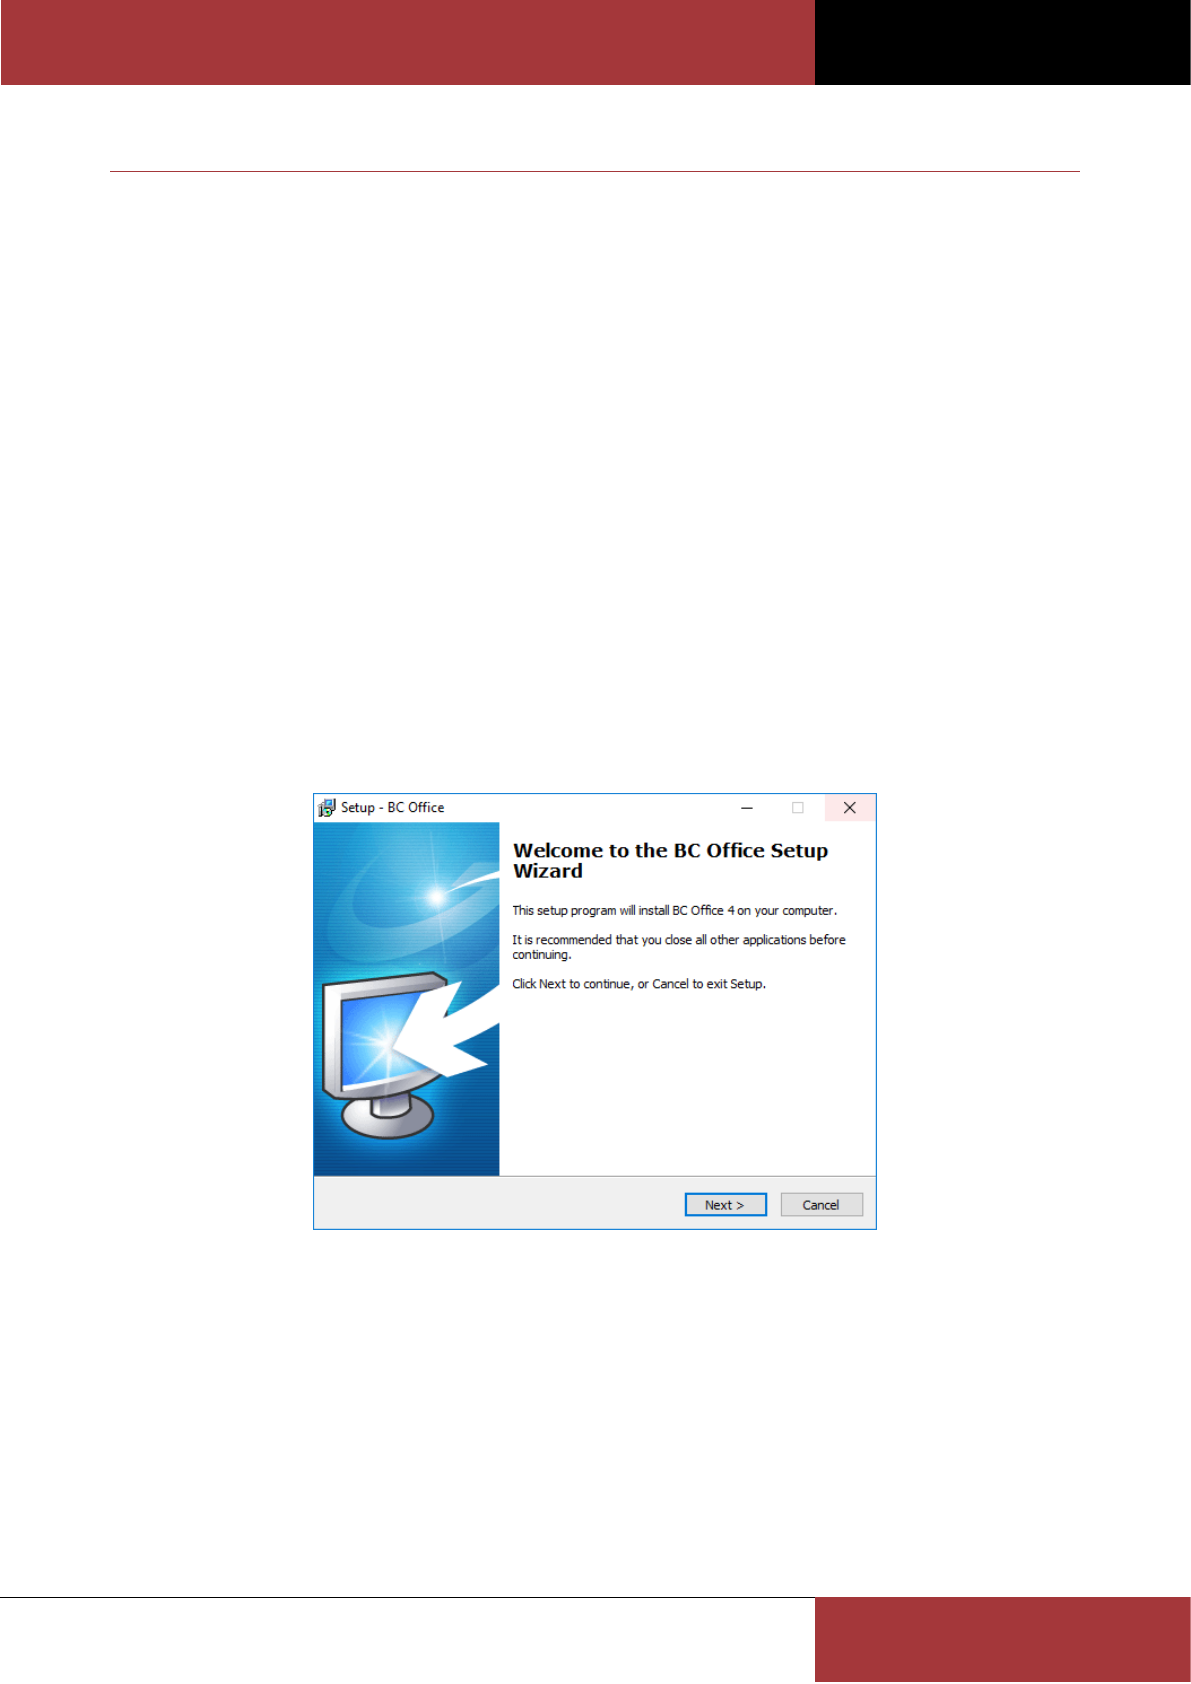
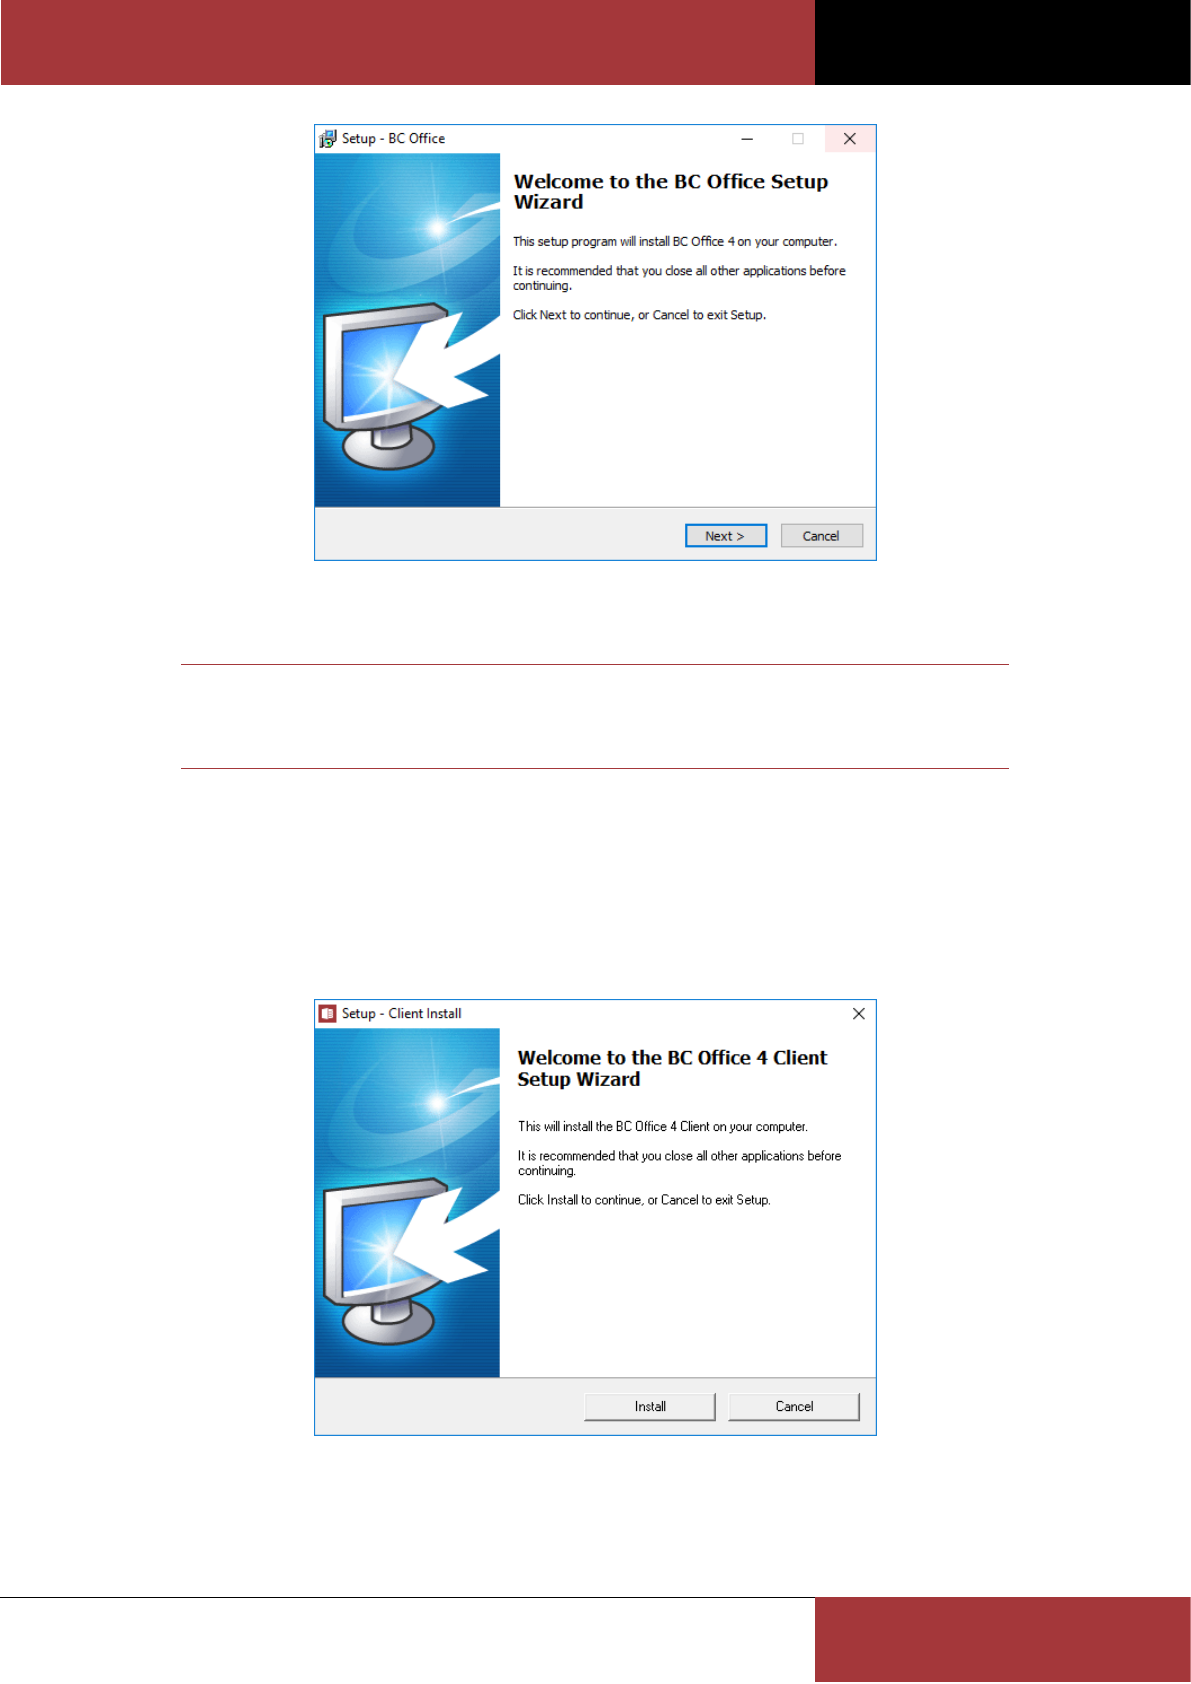
2. Once the server install has completed you will be prompted to finish the install or continue with the client install
at which point you should click Upgrade Client to continue.
If you finish the BC Office setup now, you can still run the client setup program later by running the client setup
program (Setup Client.exe) from the server install folder.
3. Once the client install has completed you are ready to run BC Office, which you can do by clicking Run BC Office
(or by clicking Finish and running BC Office from one of the installed shortcuts).
Multi-User Installations
In a multi-user installation more consideration needs to be given to where BC Office is installed as all users will need
to be able to access the application from a shared network drive located on a server (or a main PC which will act as the
server).
Typically, your system administrator should configure your network share using the following instructions as a guide.
These instructions are based on the Windows 10 operating system and may vary slightly for other versions of
Windows.
BC OFFICE USER GUIDE
ROSZE.COM
COPYRIGHT © ROSZE PTY LTD
8
Shared Network Drive - Server Setup
On the server (or the main PC), create the shared network drive:
1. Using File Explorer, create a new folder (e.g. C:\Data) to use as your shared folder. We recommend creating a
separate folder to use as the source for the share that way you can use the shared network drive to share other
files and applications in addition to BC Office.
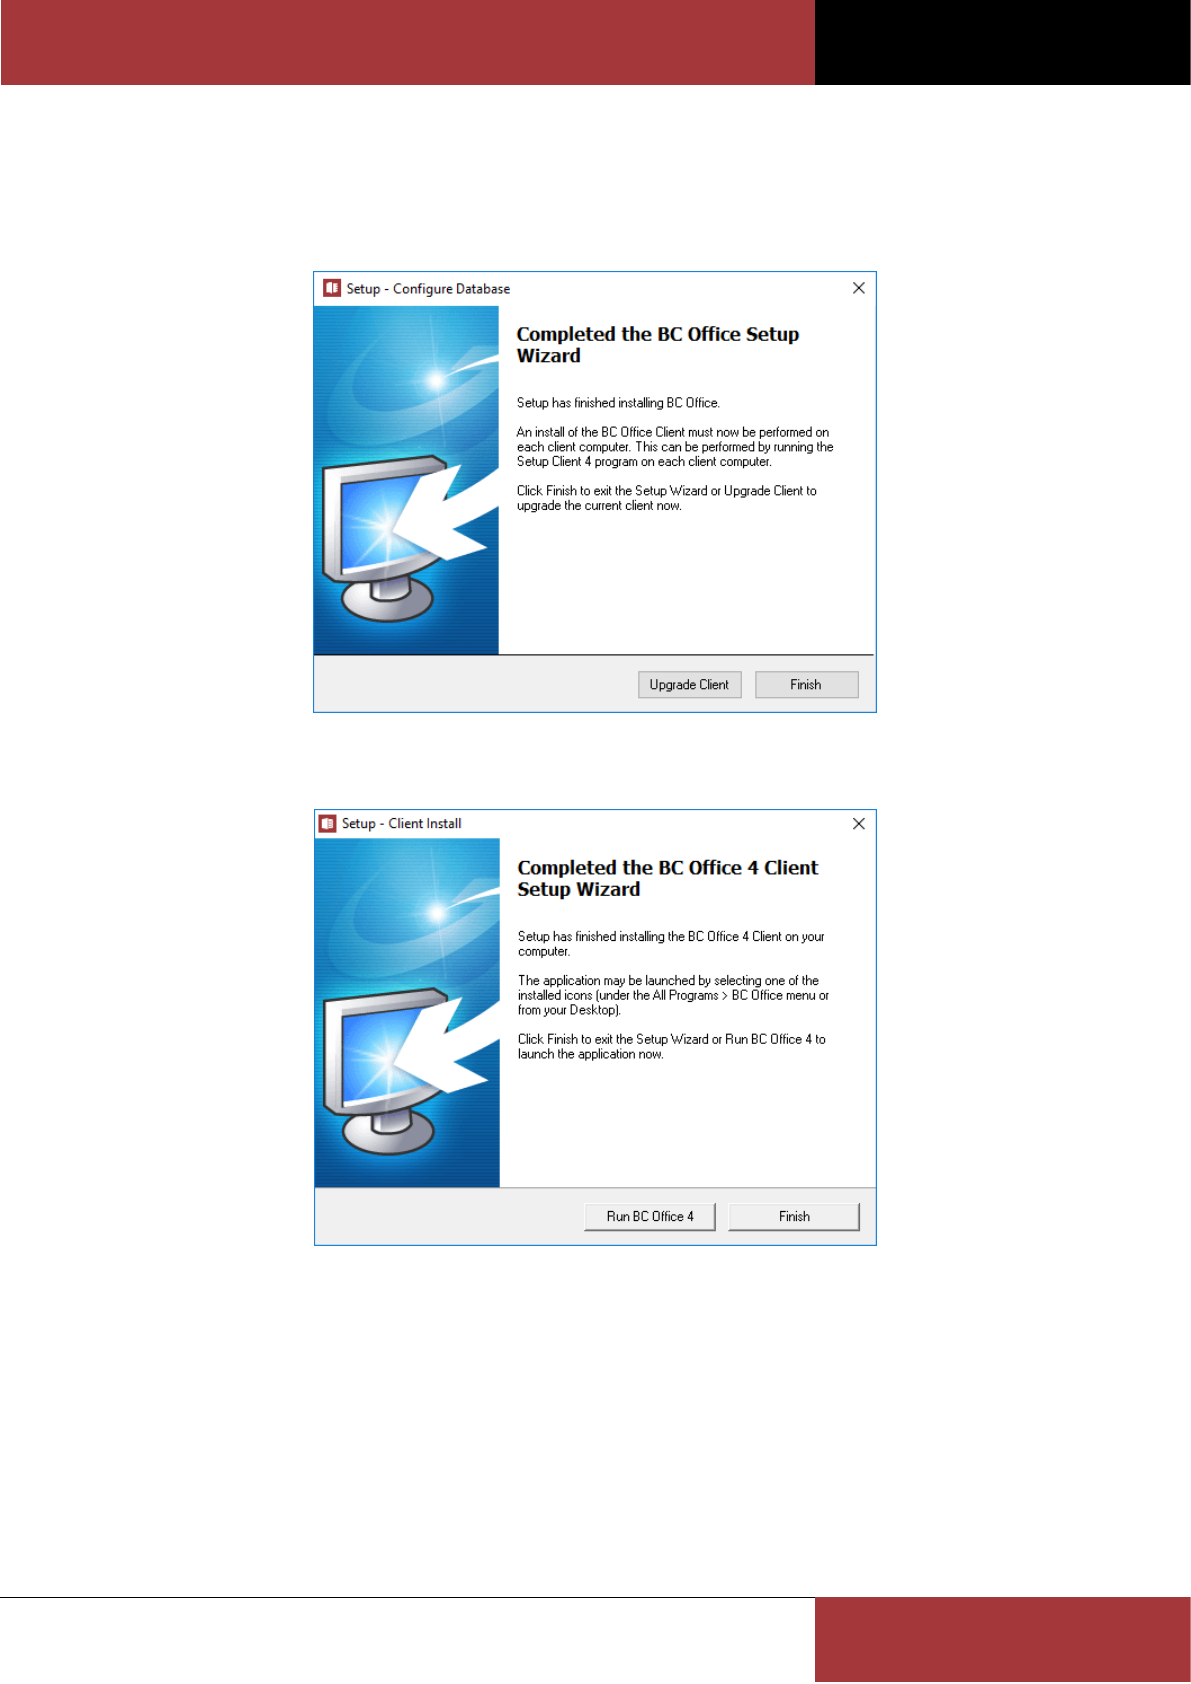
2. Again using File Explorer, right click on the new folder (e.g. C:\Data) and select the Properties menu item.
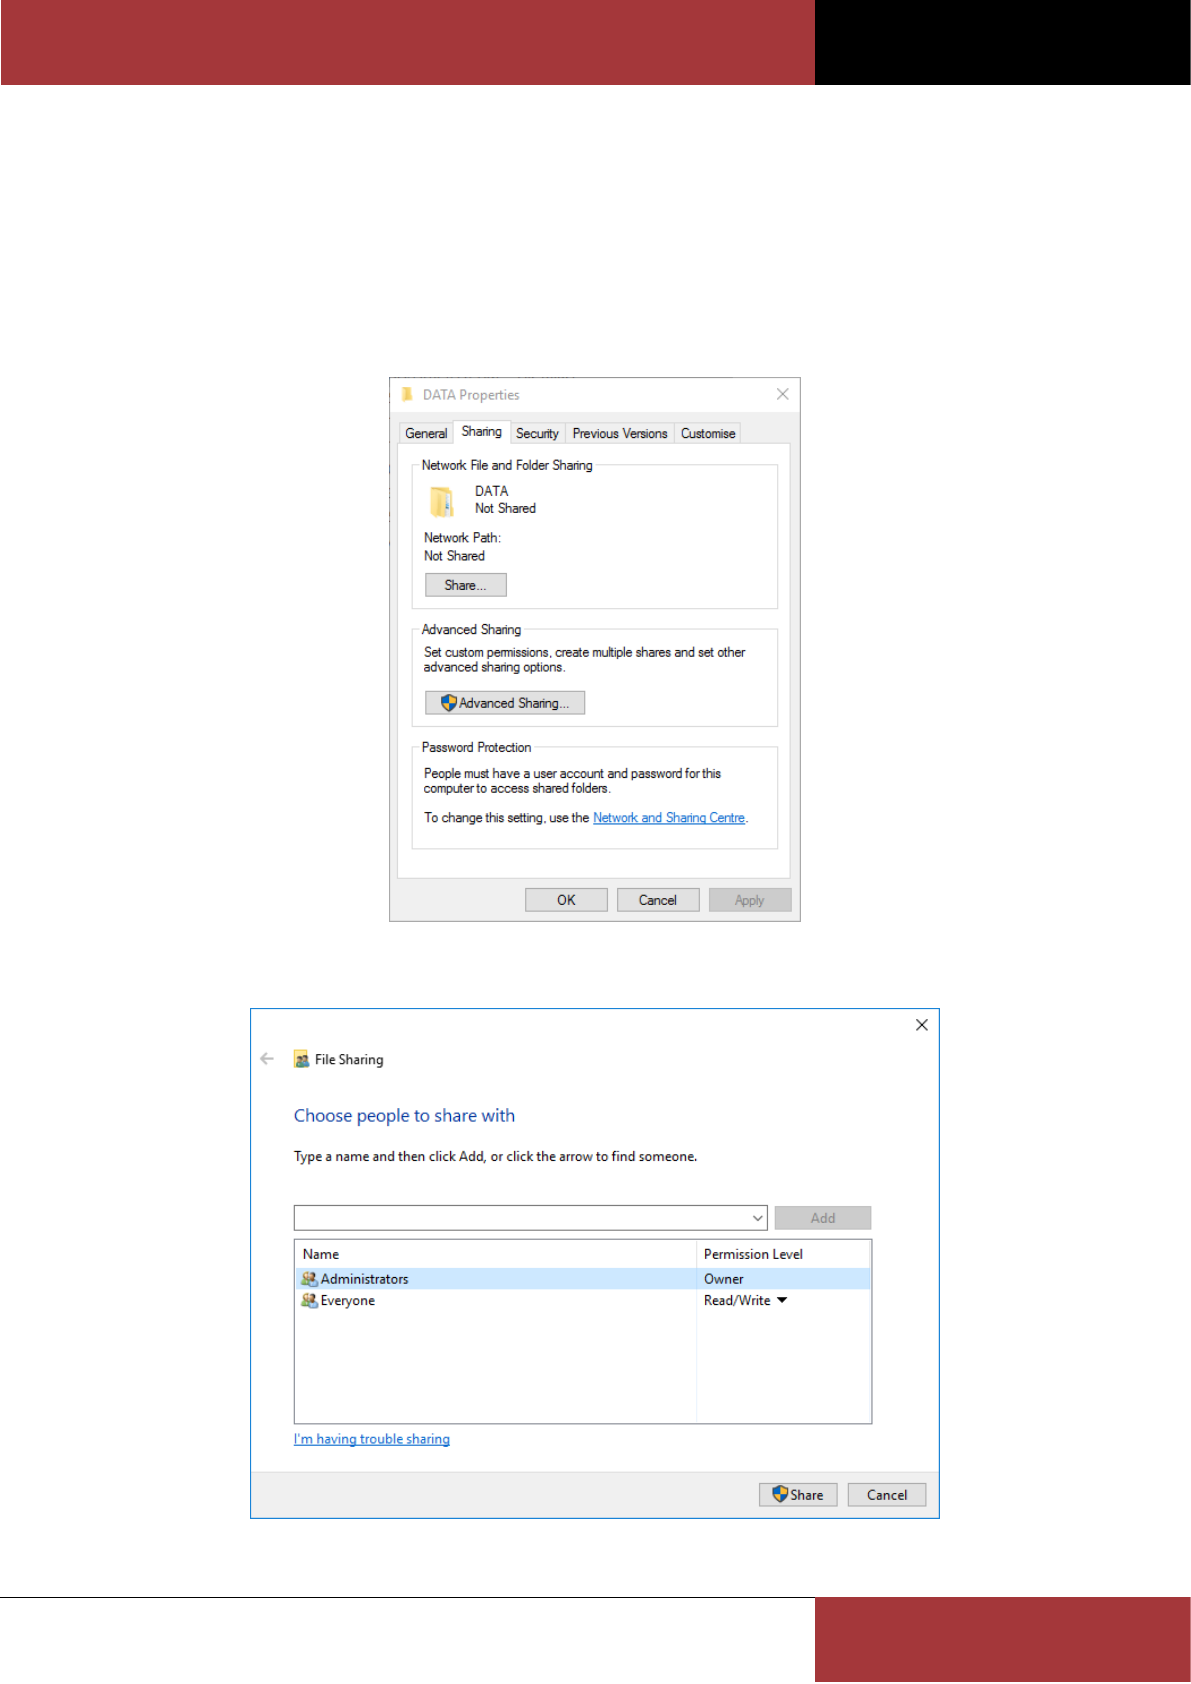
3. Select the Sharing tab on the Properties dialog and click the Share button
4. Add the Read/Write permission to the Everyone group as shown below and click the Share button.

BC OFFICE USER GUIDE
ROSZE.COM
COPYRIGHT © ROSZE PTY LTD
9
Note
If you still have permission problems running BC Office through the share you may need to
check the security settings for the underlying folder on the server. These permissions need
to be set the same as the share permissions (e.g. Read/Write for all users).
Shared Network Drive - Client Setup
On each client PC, create a new network drive mapping to the newly created shared network drive:
1. Using File Explorer, select the Computer menu and click on Map Network Drive.
2. Select a drive letter which you would like to assign to this drive mapping (e.g. G:). This drive letter must be the
same on all client PCs.
3. Enter the shared network drive’s share folder (e.g. \\yourservername\data).
Note
If you intend to run BC Office on the computer which is acting as the server, you must also
configure the server as a client by creating a drive mapping to the shared folder and run the
program through this share.
4. Click Finish to create the new drive mapping.
BC Office - Server Setup
To install the required BC Office server files, follow these instructions:
1. Run the downloaded Setup program and follow the on-screen instructions to install the required server files.
When prompted for the Destination Location point the setup program to the newly created shared network
drive (e.g. G:\BC Office).
BC OFFICE USER GUIDE
ROSZE.COM
COPYRIGHT © ROSZE PTY LTD
10
2. Once the server install has completed you will be prompted to finish the install or continue with the client install
at which point you can click Finish.
Note
If you already have BC Office installed in another location, you can move the entire BC Office
folder into the shared network drive folder using File Explorer.
BC Office - Client Setup
To install the required BC Office client files, follow these instructions:
1. On each client PC, open File Explorer and browse to the BC Office folder on the shared network drive and run
the client Setup program (Setup Client.exe). The client Setup program will now be shown. To complete
the client install click Install.
2. Once the client install has completed you are ready to run BC Office which you can do by clicking Run BC Office (or
by clicking Finish and running BC Office from one of the installed shortcuts).

BC OFFICE USER GUIDE
ROSZE.COM
COPYRIGHT © ROSZE PTY LTD
11
Entering Your BC Office Licence Details
The first time you run BC Office you will be prompted to enter your licence details including your licence key. These
details will be provided to you when you purchase a licence and must be entered exactly as provided.
If you only want to run the trial version of BC Office, you can click Trial here.
BC OFFICE USER GUIDE
ROSZE.COM
COPYRIGHT © ROSZE PTY LTD
12
OVERVIEW
The Main Window
The BC Office interface consists of the Tabbed Menu Ribbon and the Tabbed Form Window. Each of these elements
work together to provide a clean, user friendly environment from which you can access the features of BC Office.
Tabbed Menu Ribbon
The tabbed menu ribbon contains the following tabs.
The File tab contains print options.
The BC Office tab contains menu buttons for the main BC Office functions.
The Administration tab contains menu buttons for BC Office setup and administration functions.
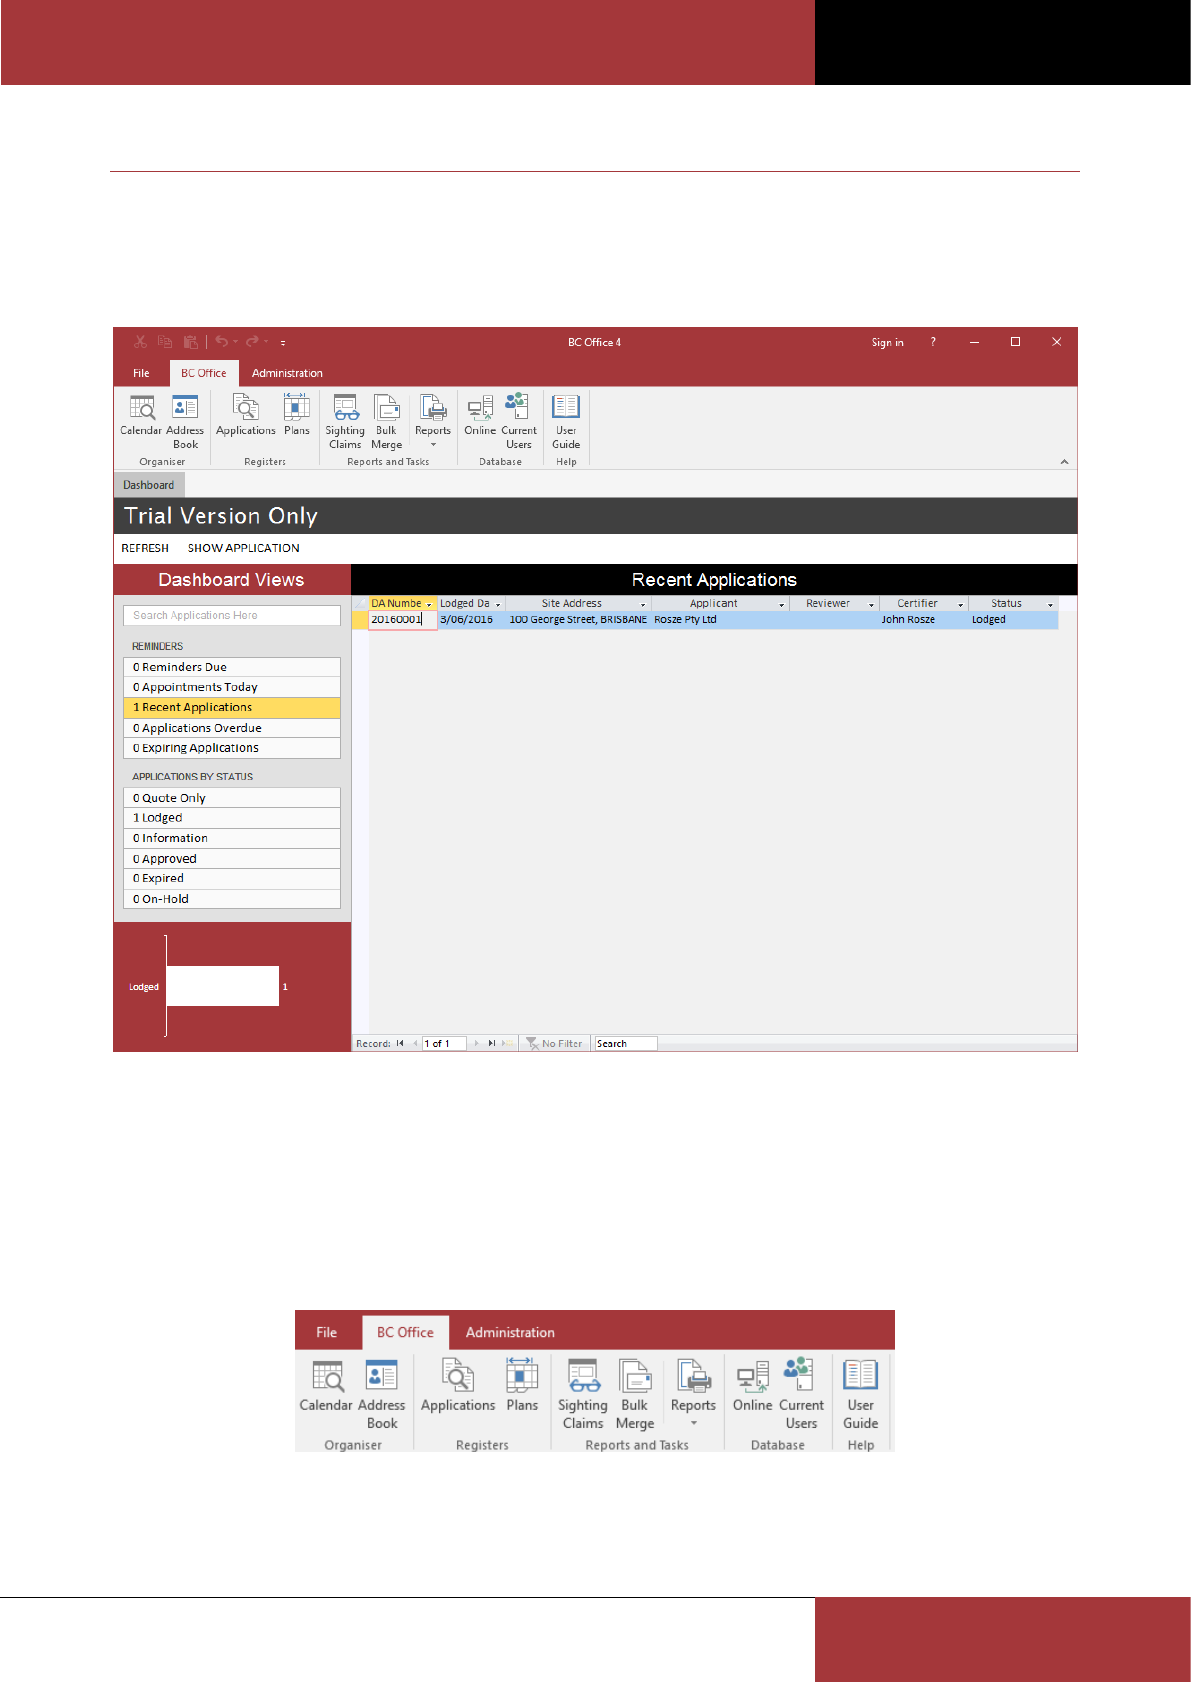
To open a BC Office form you simply use your mouse to select the corresponding menu button from the tabbed menu
ribbon. The following screenshot shows the ribbon with the default BC Office tab selected.
The following keyboard shortcuts can also be used to open the main BC Office forms:
ALT-A – Find Application form
ALT-C – Calendar form
BC OFFICE USER GUIDE
ROSZE.COM
COPYRIGHT © ROSZE PTY LTD
13
ALT-B – Address Book form
ALT-P – Plan Register form
Tabbed Form Window
This is where the BC Office forms will be opened and where you will perform most of your work. BC Office supports
multiple forms being opened at the same time allowing you to quickly switch from one form to another.
You can quickly switch between open forms using CTL-TAB.
The Dashboard
The Dashboard form is always open in BC Office and provides quick access to your information using several views.
These views will ensure you don’t miss important events on your applications.
The Dashboard consists of:
DA quick search – allows you to quickly find and view a particular DA
Reminder views – provides a list view of important appointment and DA reminders (you can enable or
disable individual reminders using the Preferences form)
Status views – provides a list view of all active DAs by status
Status graph – provides a graphical view of all active DAs by status
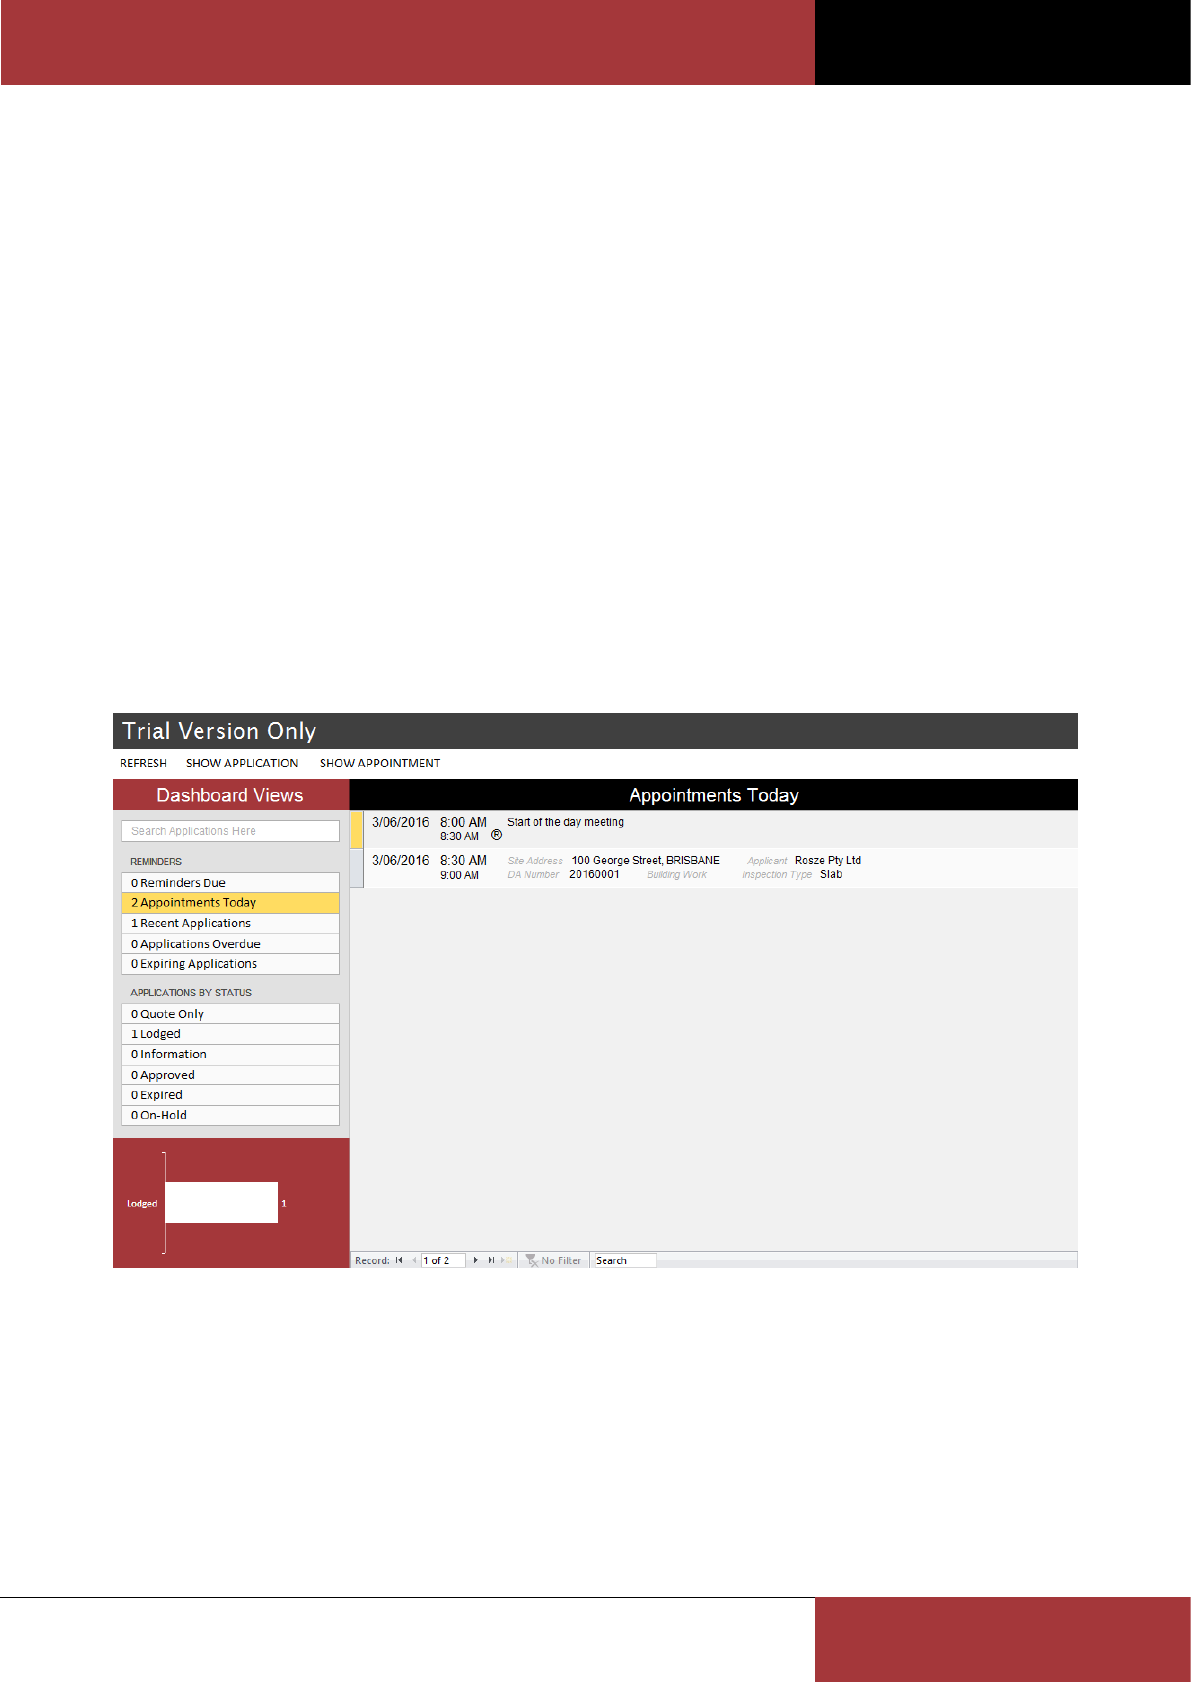
The following screenshot shows the Dashboard’s Appointments Today reminder view.
When in a reminder or DA status view you can quickly access the Application, Calendar or Address Book form by
double-clicking on the view entry or by selecting the appropriate menu command.
The application quick search can also be used to perform a quick DA search by searching for either the DA number or
any portion of the site address. If searching by DA number, the Application form will be opened at the found
application.
Understanding Reminders
Reminders are a simple way for BC Office to notify you of upcoming events or actions which may require your
attention. The following reminders are supported:
BC OFFICE USER GUIDE
ROSZE.COM
COPYRIGHT © ROSZE PTY LTD
14
Reminders Due – this reminder shows Action Note reminders due in the next 7 days.
Appointments Today – this reminder shows calendar appointments due today.
Recent Applications – this reminder shows all applications lodged in the past 28 days.
Applications Overdue – this reminder shows all applications which haven’t been approved within 28 days.
Expiring Applications – this reminder shows all applications which are due to expire within 7 days.
Note
If there are any reminders due today, a reminder alert will be displayed when BC Office is
first opened.
Each reminder can be separately customised and enabled/disabled using the Preferences
form.
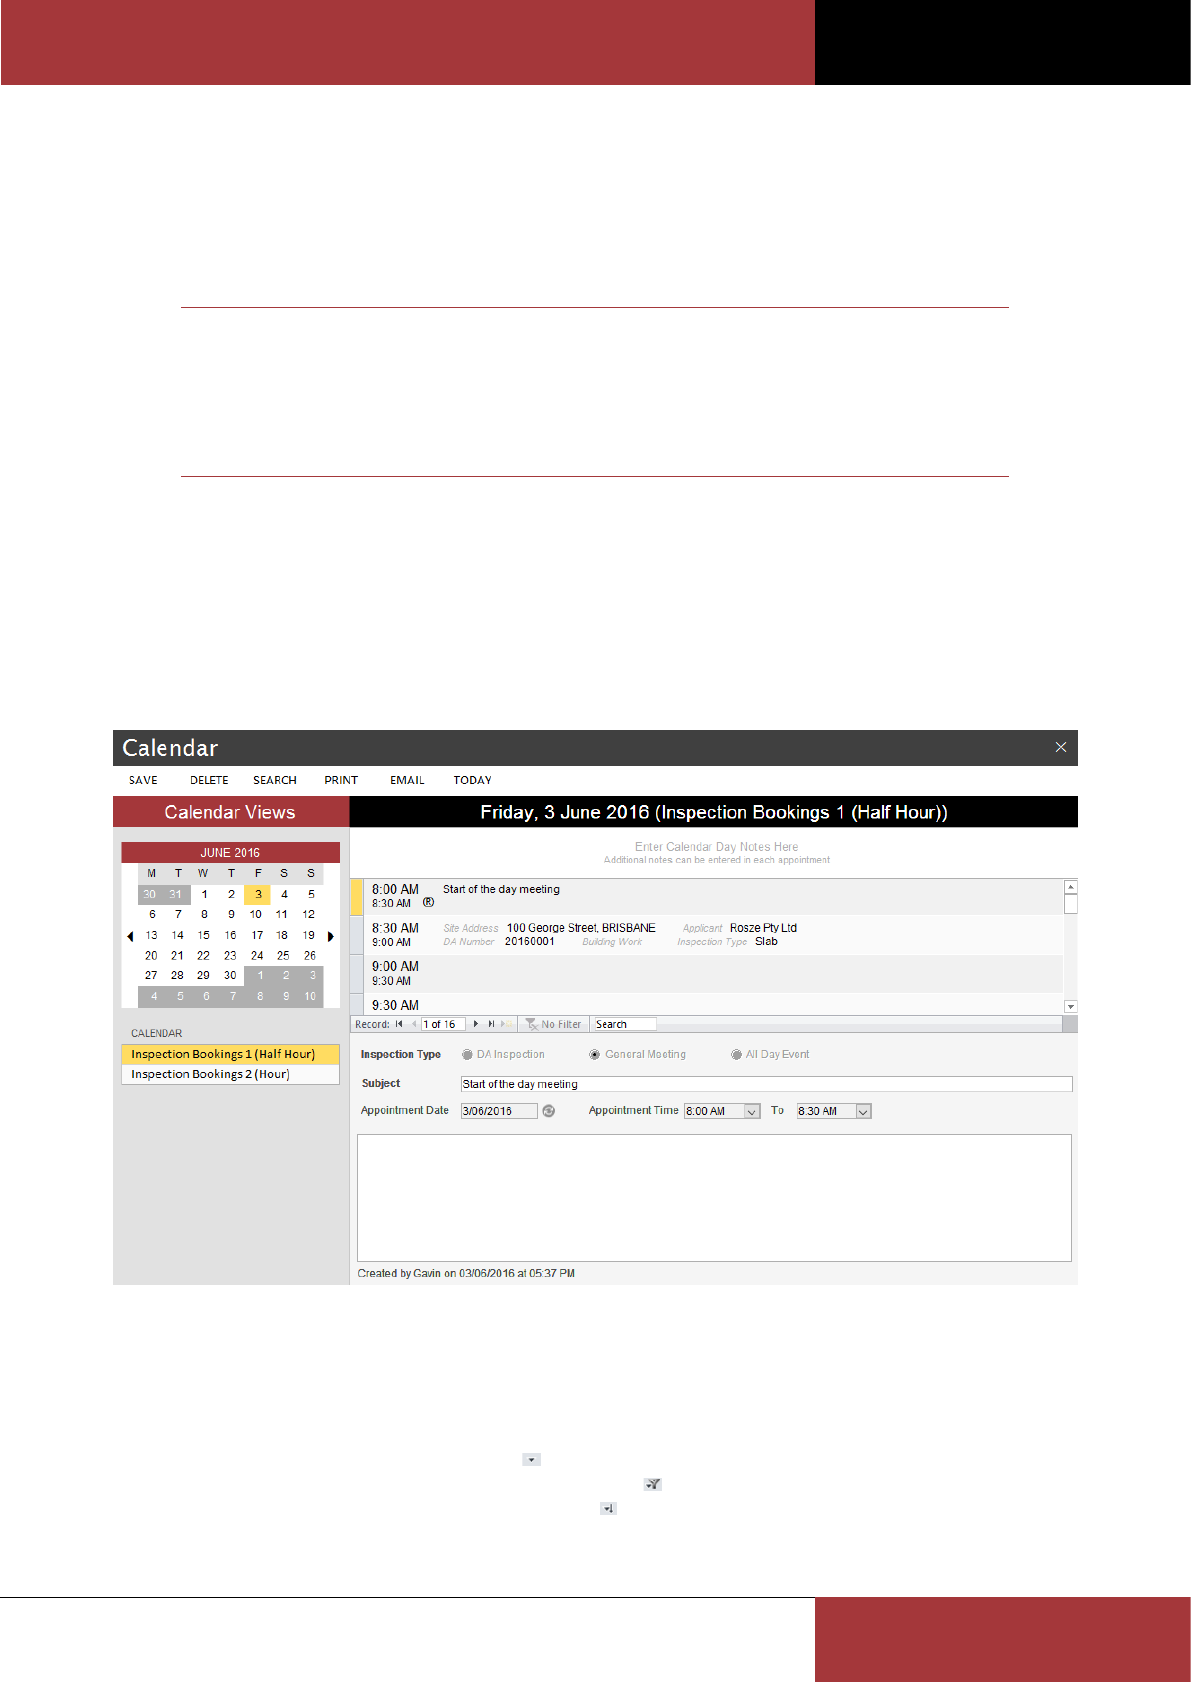
A Sample Form
Each form within BC Office contains a command bar which provides access to the form’s actions. Think of the
command bar as the place where all of the form’s buttons are located. The available command buttons may differ
depending on the task you are performing or on the current status of the displayed record (e.g. the Save command
button will be disabled when viewing a read only record).
The following screenshot shows the Calendar form.
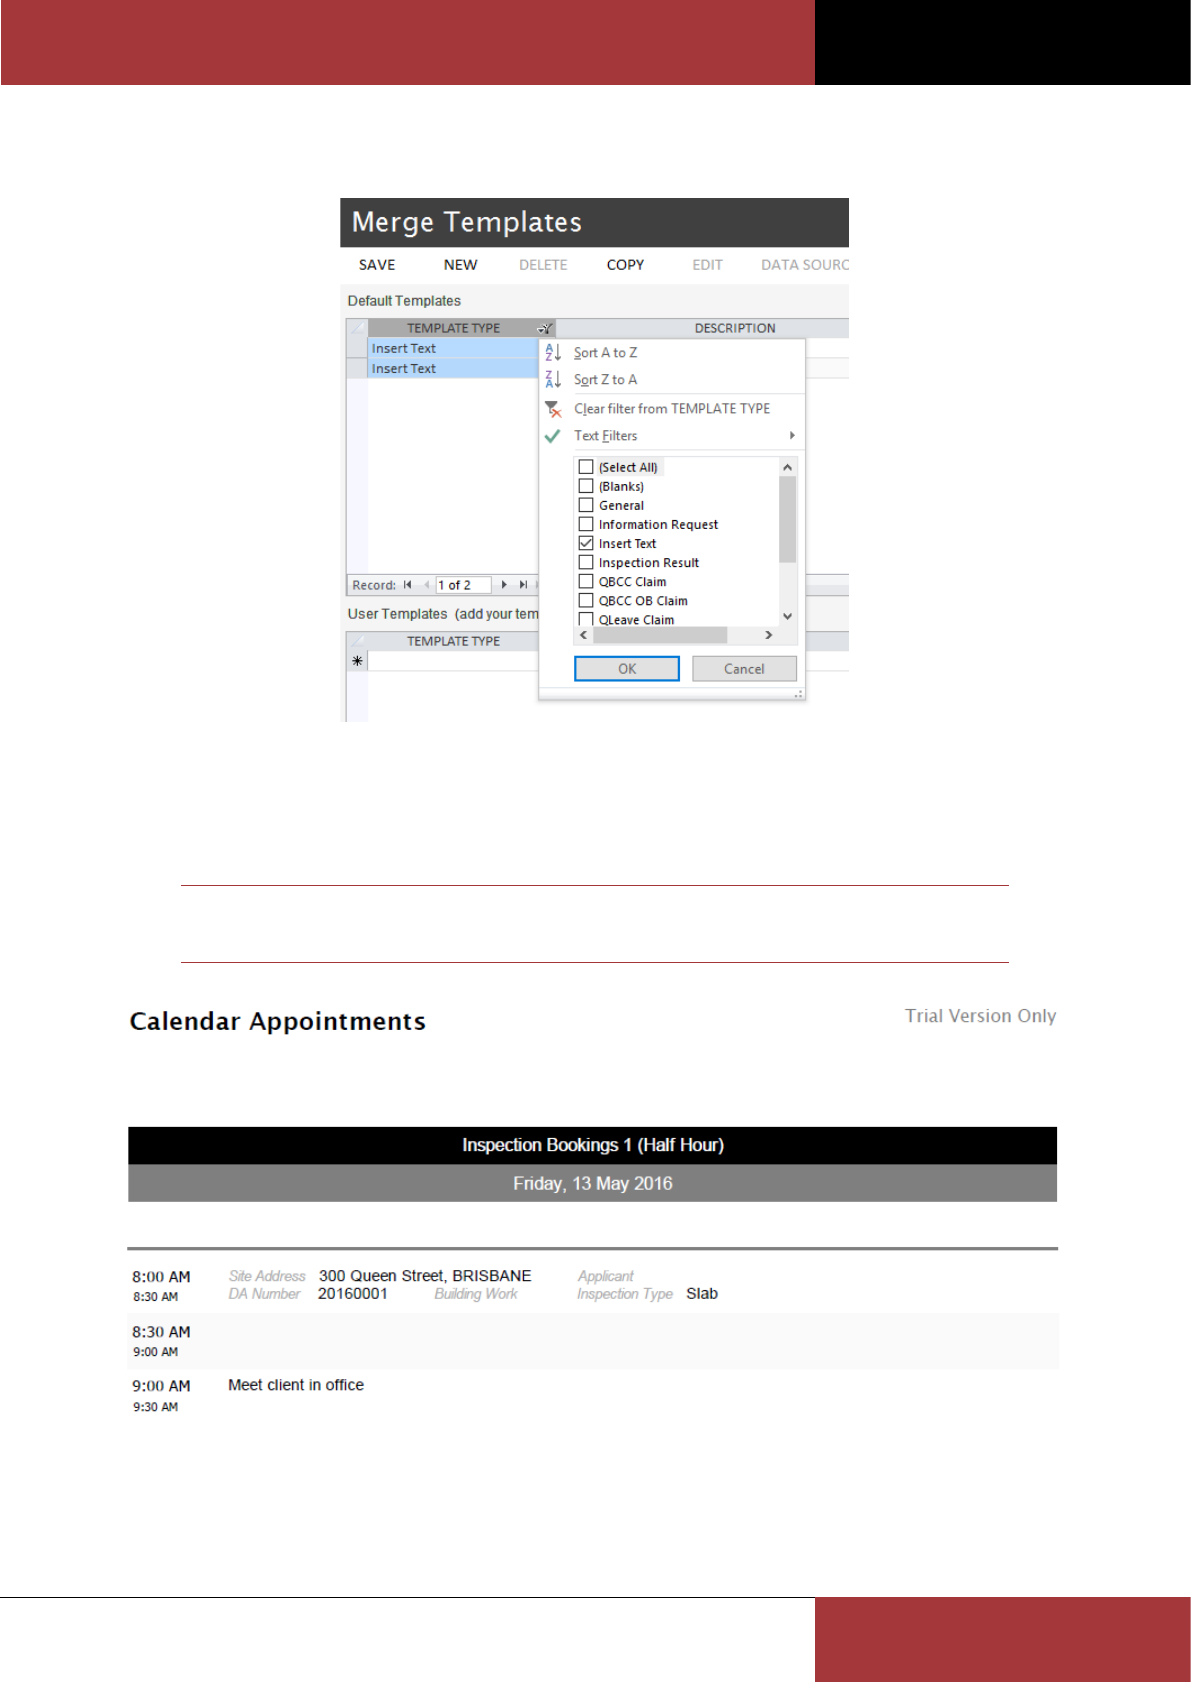
Using the Quick Filter menu
The Quick Filter menu provides useful commands which support temporary filtering and sorting of list results.
Filtering is a feature that lets you cut down the total number of records so you see only those that interest you.
Sorting options allows you to choose the fields and direction you want to sort by.
The Quick Filter menu is available by selecting the dropdown menu on the column header of the field you want to
filter or sort. When a filter has been applied to the list results an icon will appear in the filtered column. When an
alternative sort order has been applied to the list results an icon will appear in the current sort column.
Applied filters and sort orders are only temporary and will be reset once the form is reopened.
BC OFFICE USER GUIDE
ROSZE.COM
COPYRIGHT © ROSZE PTY LTD
15
The following screenshot shows a filter being applied to the Merge Template form to show only Insert Text templates.
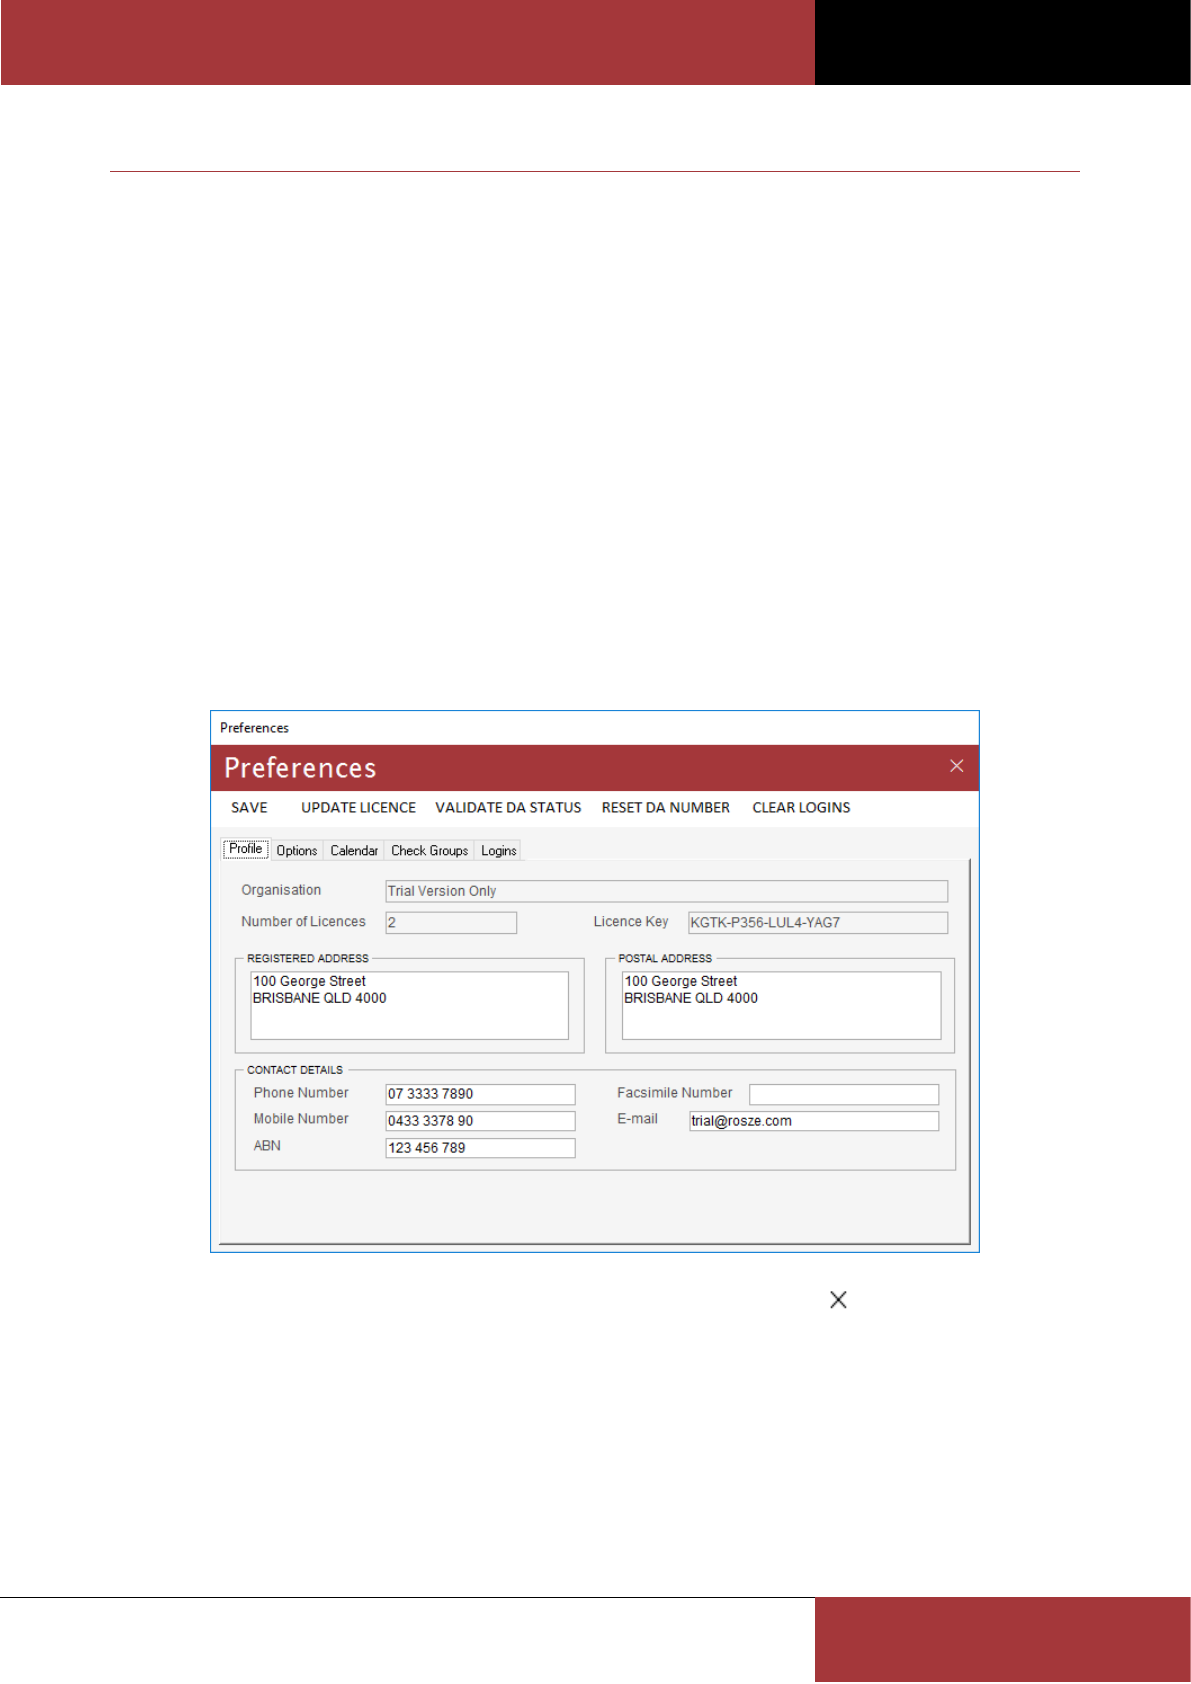
A Sample Report
The following screenshot shows the Calendar Appointments report. Each report within BC Office is generated as an
Adobe Acrobat PDF.
Note
You will need to install the free Adobe Acrobat Reader to open the BC Office reports.
BC OFFICE USER GUIDE
ROSZE.COM
COPYRIGHT © ROSZE PTY LTD
16
LODGING YOUR FIRST APPLICATION
The purpose of this section is to guide you through the steps required to lodge your first application.
Before you can lodge an application you first need to add the application’s Local Authority and Building Certifier
contact details into the Address Book. Once the contacts are in the Address Book you can refer to the contact from
any application.
These steps will show you how to perform the following actions:
Add your profile details to Preferences
Add a new Suburb to the Suburb register
Create a New Contact in the Address Book
Create a New Application
Link a Contact to the Application
Generate a Notice of Engagement letter
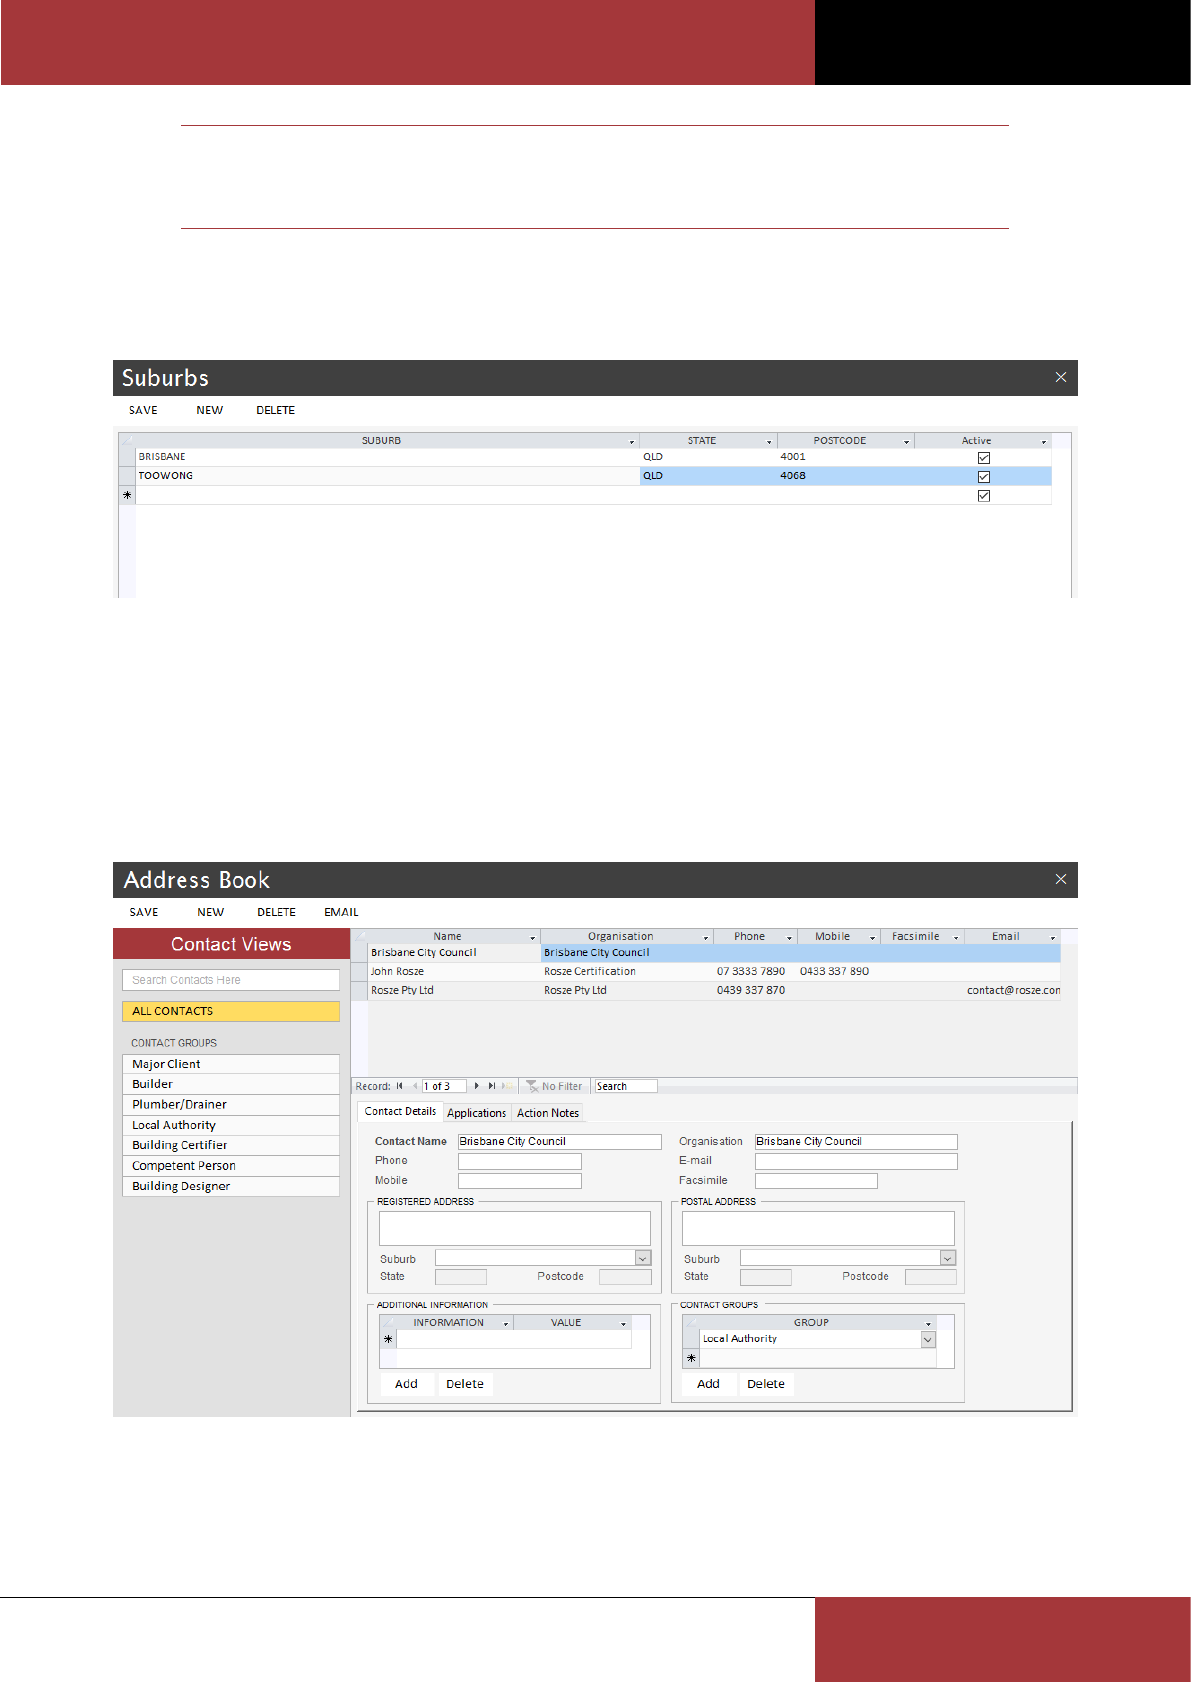
Add you profile details to Preferences
1. Select the Preferences menu button from the Administration tab on the menu ribbon.
2. On the Profile tab enter your business address and contact details.
3. Once you have entered your details click Save and close the form (by clicking the button or pressing ESC on
the keyboard).
BC OFFICE USER GUIDE
ROSZE.COM
COPYRIGHT © ROSZE PTY LTD
17
Note
These profile details will be used by the merge templates and will appear in the merge data
source.
Add a new Suburb to the Suburb register
1. Select the Suburbs menu button from the Administration tab on the menu ribbon.
2. Enter the suburb details for the new application, if not already existing.
3. Once you have completed the suburb entry click Save and close the form.
Create a New Contact in the Address Book
1. Select the Address Book menu button from the BC Office tab on the menu ribbon.
2. Click the New command button.
3. On the Contact Details tab enter the Local Authority’s contact details. At this point the only mandatory contact
information is the Contact Name. However, you should try to complete all of the contact fields as these details
will be used when generating your merge letters.
4. Click Save to save the new contact and enable the Additional Information and Contact Groups fields.
BC OFFICE USER GUIDE
ROSZE.COM
COPYRIGHT © ROSZE PTY LTD
18
5. Under Additional Information, select DA Lodgement Fee for the Information field and enter the Local
Authority’s DA lodgement fee if known.
6. Under Contact Groups, select Local Authority for the Group field.
Note
The Additional Information and Contact Groups fields will only be editable once the new
contact has been saved for the first time.
If you don’t perform this step the Local Authority will not appear in the Local Authority list
on the Application form.
7. Once you have completed the Local Authority contact entry re-click Save.
8. Click the New command button again and repeat the above process to enter the Building Certifier’s contact
details. However, this time select Certifier QBCC Number under Additional Information to enter the certifier’s
licence number and Building Certifier for the Group.
9. Once you have completed the Building Certifier contact entry click Save on the command bar and close the
form.
Hint
Consider entering all of your most frequently used Local Authority, Builder and Building
Certifier contacts into the Address Book before lodging your applications.
Create a New Application
1. Select the Applications menu button from the BC Office tab on the menu ribbon.
2. Click the New command button on the Find Application form.
3. On the Application form, enter the Site Address, Local Authority and Lodged Date then click Save on the
command bar to create the application and to enable the remaining application fields.
4. You can now enter the remaining application details starting with the Real Property Description, Reviewed By
and Certified By fields.
5. Click on the Building Work tab and enter the building work details.
6. If the QBCC Insurance and QLeave Levy are applicable for these building works tick the corresponding checkbox
on the Building Work tab.
BC OFFICE USER GUIDE
ROSZE.COM
COPYRIGHT © ROSZE PTY LTD
19
Link a Contact to the Application
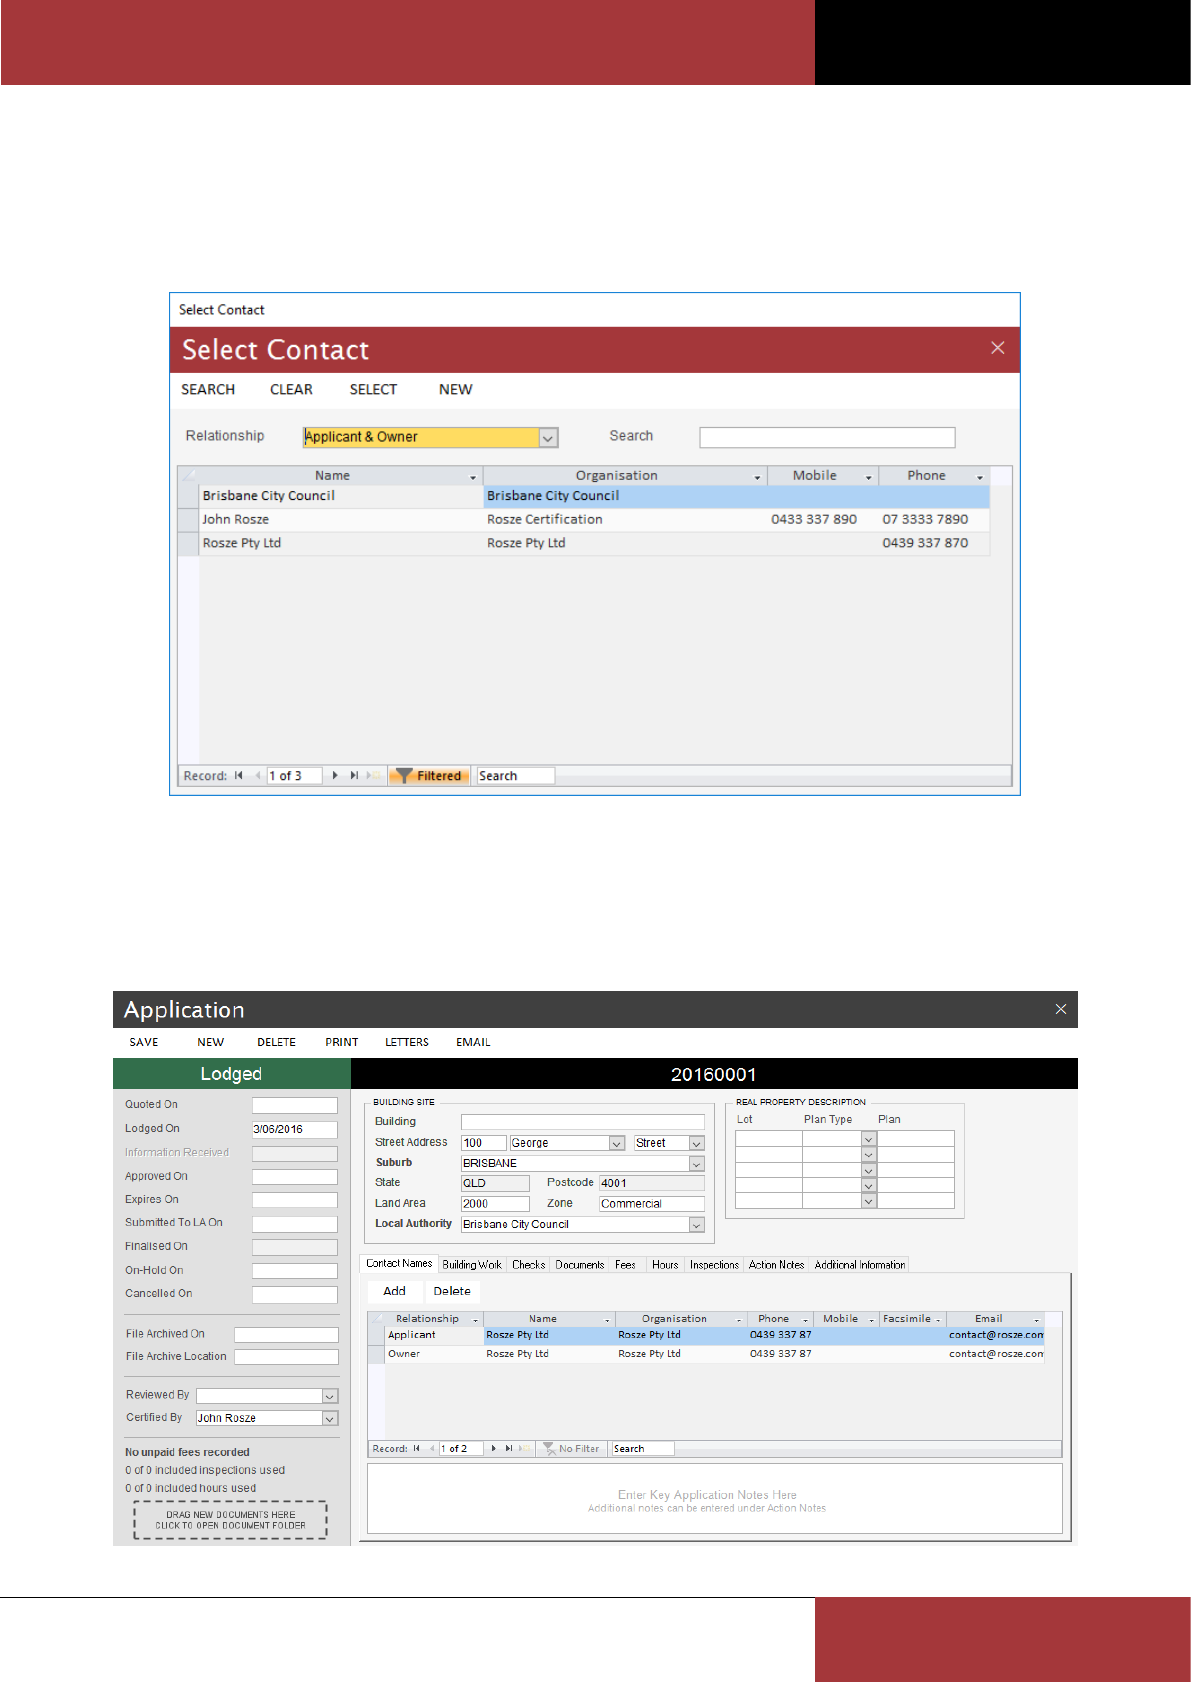
1. Click the Add button on the Contact Names tab of Application form to open the Select Contact form.
2. Select the Relationship type at the top of the form.
3. Using the search criteria perform a search for your contact.
4. If the contact is not in the Address Book, click the New command button and follow the above steps to create
the new contact using the Address Book Contact form. Once the contact is entered perform the search again to
find the contact.
5. Highlight the required contact and click the Select command button to create the relationship link and return to
the Application form.
BC OFFICE USER GUIDE
ROSZE.COM
COPYRIGHT © ROSZE PTY LTD
20
Generate a Notice of Engagement letter
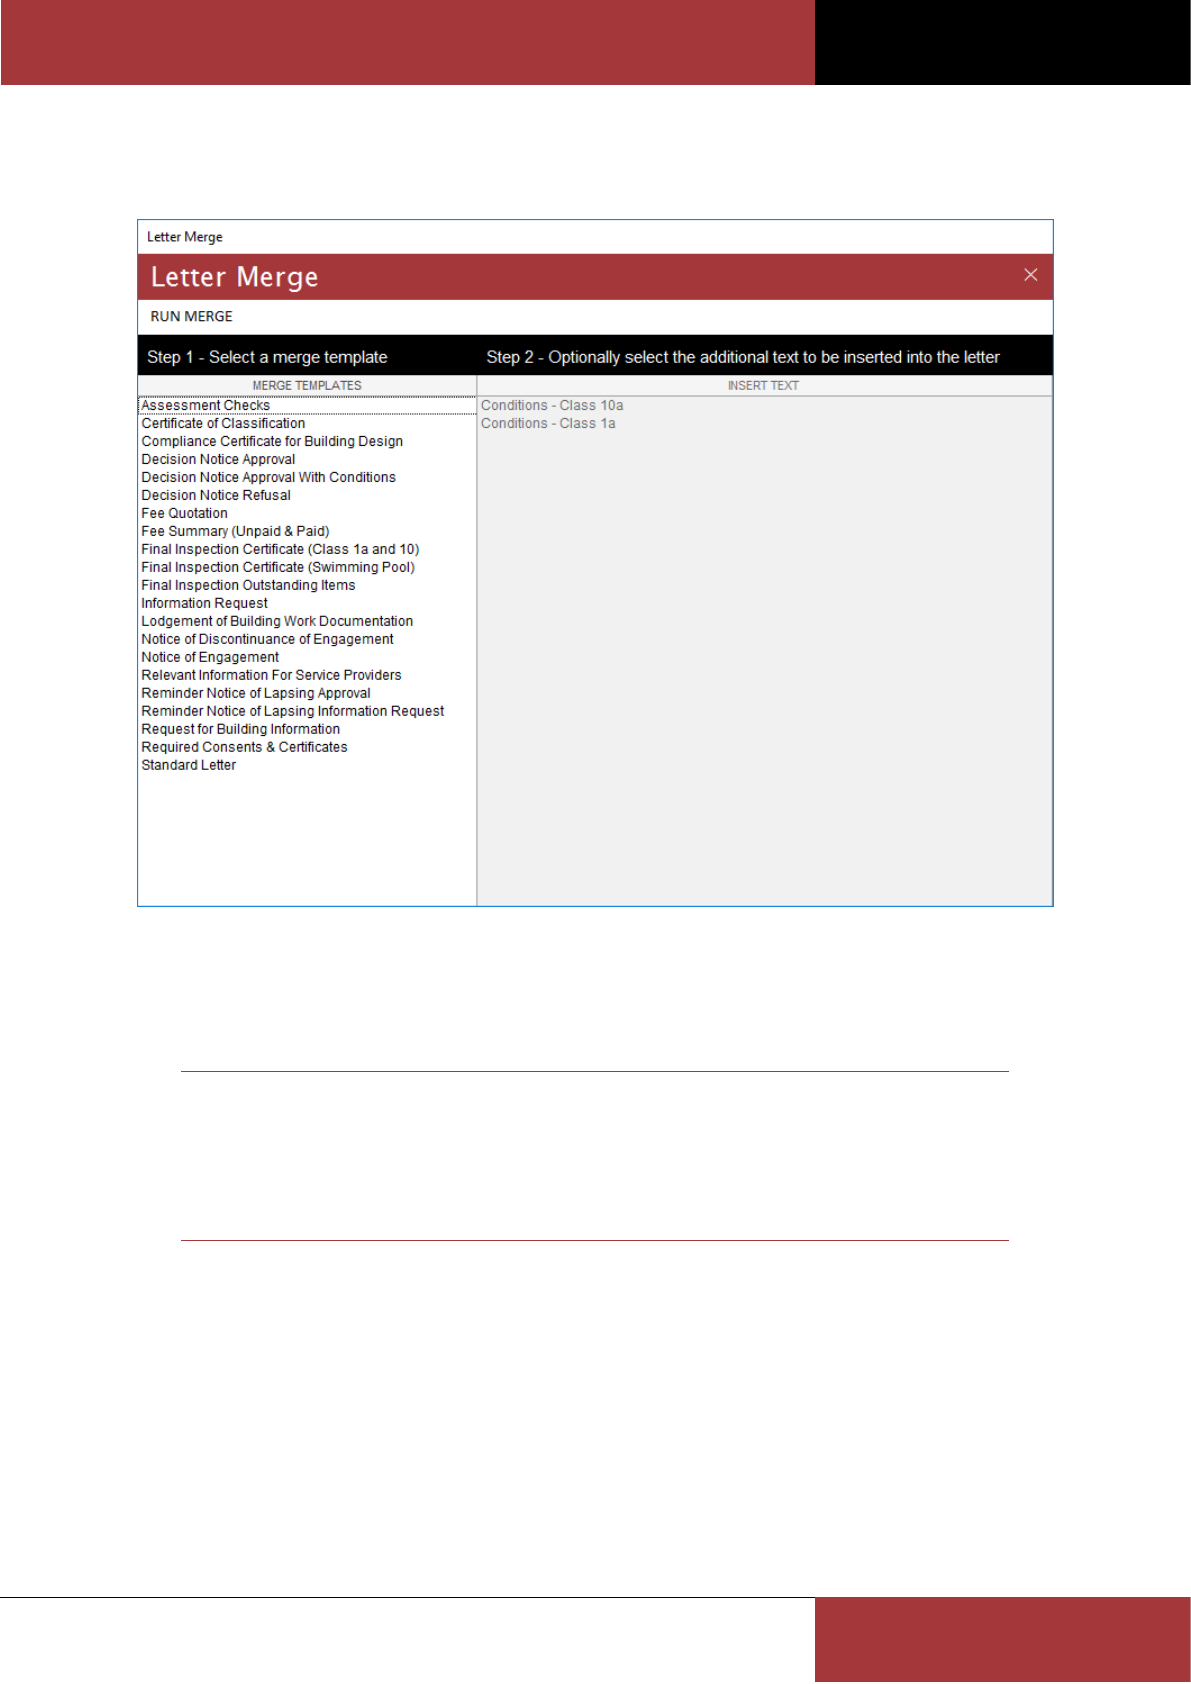
1. Click the Letters command button on the Application form.
2. On the Letter Merge form select the Notice of Engagement template and click the Run Merge command button
and wait for the merge to complete.
3. Edit the generated letter as required before saving your changes in Microsoft Word.
Note
BC Office will automatically generate the letter and will save it under the application’s
document folder (within the server BC Office folder location).
To save additional changes to the generated letter simply select Save within Microsoft
Word. Do not select Save As or try to rename the file.
Congratulations you have just created your first application.
To learn more about each of the BC Office forms please read the Form User Guide.

BC OFFICE USER GUIDE
ROSZE.COM
COPYRIGHT © ROSZE PTY LTD
21
FORM USER GUIDE
(UNDERSTANDING THE BC OFFICE FORMS)
BC OFFICE USER GUIDE
ROSZE.COM
COPYRIGHT © ROSZE PTY LTD
22
ADDRESS BOOK
About the Address Book
The central Address Book helps you keep track of all your important client contact details and related information.
The Address Book consists of the following forms:
Address Book – used to view, add and maintain contacts
Suburbs – used to add and maintain suburbs
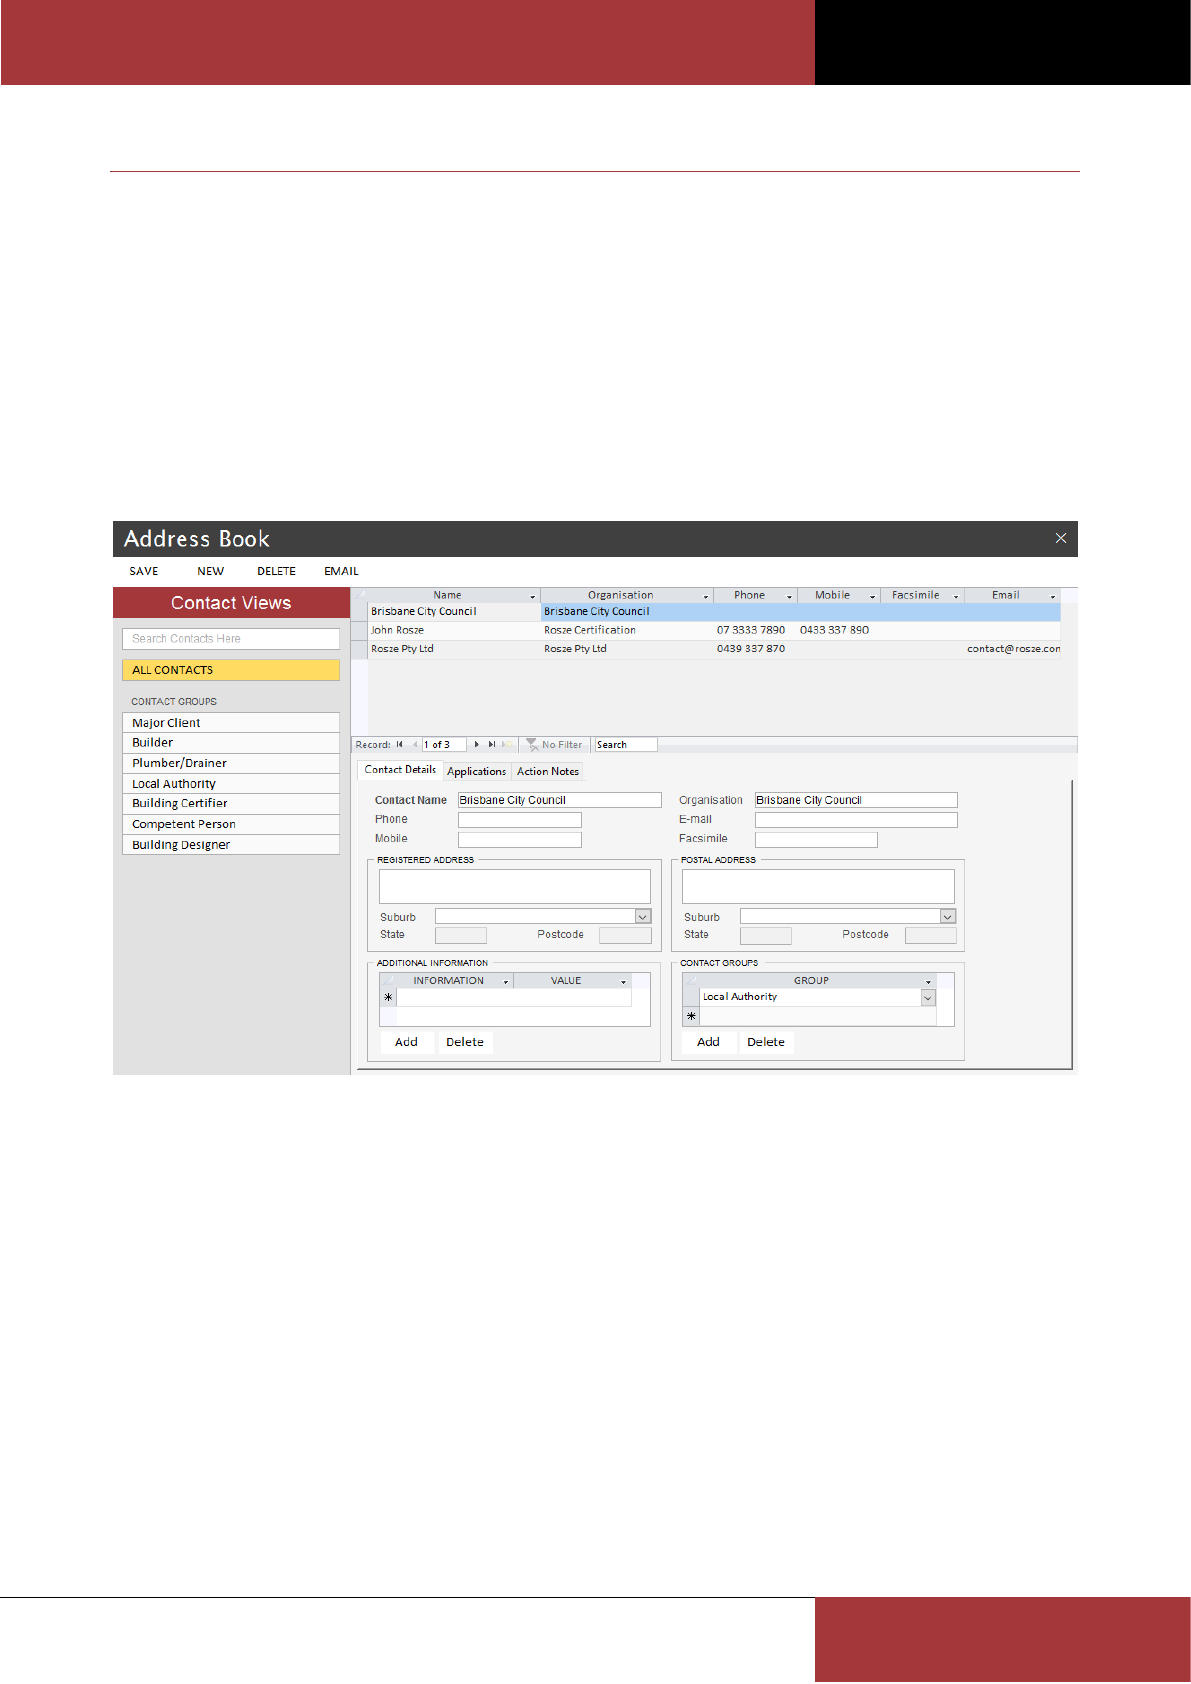
Using the Address Book form
The Address Book form is used to view, add and maintain contacts, including address and contact details. From this
form you can also email the selected contact using your local Microsoft Outlook client.
Search by Group – To view all members of a group, select the group name from the Contact Group views. The Address
Book results will be filtered to show only contacts who are a member of the selected group.
Search by Name – To further refine the Address Book results, within the selected group, you can search by contact
name (or organisation) using the search field. For best results, refer to the following search hints.
The Applications tab can be used to see all applications currently linked to the selected contact. The Action Notes tab
can be used to create notes against the selected contact.
Search Hints
1. If you are not sure which group the contact is a member of, use the ALL CONTACTS group (all contacts are a
member of this group).
2. Try searching using only the first couple of letters of the contact’s name.
3. If you enter a portion of the contact name, try to use a portion of the name which is not easily misspelt (this will
help reduce spelling errors).
BC OFFICE USER GUIDE
ROSZE.COM
COPYRIGHT © ROSZE PTY LTD
23
Note
All contacts will appear in the ALL CONTACTS group and a contact can be a member of more
than one group.
The Additional Information fields allow you to record additional information using a customisable list of information
codes. While BC Office provides several default information codes, you can easily add your own codes using the Codes
form. In the above screenshot the Local Authority's DA Lodgement Fee (which is a default information code) is being
maintained in the information fields.
The Contact Groups field allows you to add the contact to one or more groups. While BC Office provides several
default group codes, you can easily add your own codes using the Codes form. In the above screenshot the contact
has been added to the Local Authority group.
To help speed up the lodgement process we recommend adding all of your most frequently used Local Authority,
Builder and Building Certifier contacts into the Address Book as early as possible.
1. Local Authorities
When lodging new applications, the Local Authority field is mandatory and must be selected from an existing list
of Local Authorities. Therefore, the Local Authority contact must be added before the application can be saved.
To create a new Local Authority contact, add the contact to the Local Authority group and add the Local
Authority's DA Lodgement Fee, if known, to the Additional Information fields.
2. Builders
To create a new Builder contact, add the contact to the Builder group and add the Builder’s Builder QBCC
Number, if known, to the Additional Information fields.
3. Building Certifiers
When approving new applications, the Certified By field is mandatory and must be selected from an existing list
of Building Certifiers. Therefore, the Building Certifier contact must be added before the application can be
approved. To create a new Building Certifier contact, add the contact to the Building Certifier group and add the
Building Certifier’s Certifier QBCC Number, if known, to the Additional Information fields.
Note
All mandatory fields are highlighted by a bolded field label or CAPITALISED column label.
Mandatory fields must contain a valid value before any changes can be saved.
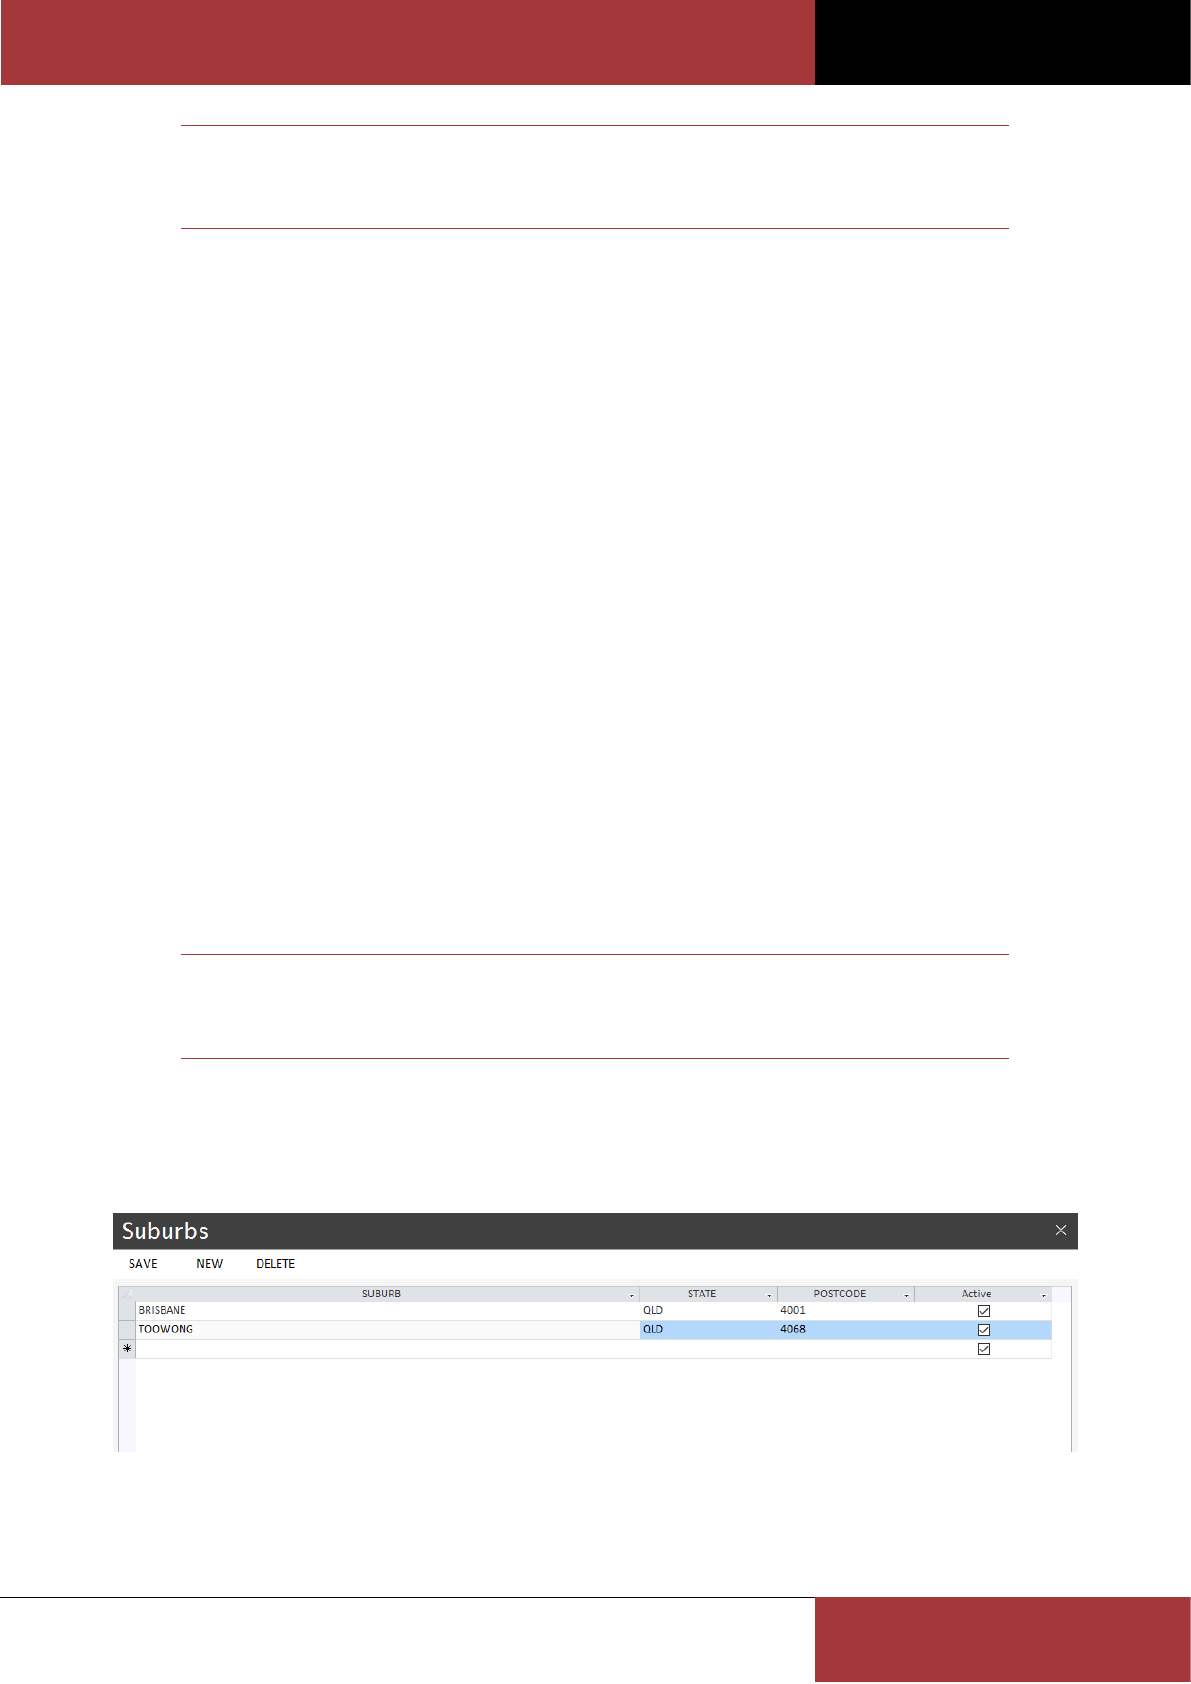
Using the Suburbs form
The Suburbs form is used to maintain the list of suburbs used within BC Office. If a suburb is no longer required, the
suburb can be deactivated by un-checking the Active field.
BC OFFICE USER GUIDE
ROSZE.COM
COPYRIGHT © ROSZE PTY LTD
24
CALENDAR
About the Calendar
The customisable built-in Calendar allows you to schedule client meetings and book inspections for your applications.
The Calendar consists of the following forms:
Calendar – used to add and maintain appointment details
Repeat Schedule – used to create repeat appointment schedules
Find Appointment – used to search for an existing appointment
Preferences (Calendar tab) – used to add and maintain calendars and calendar times
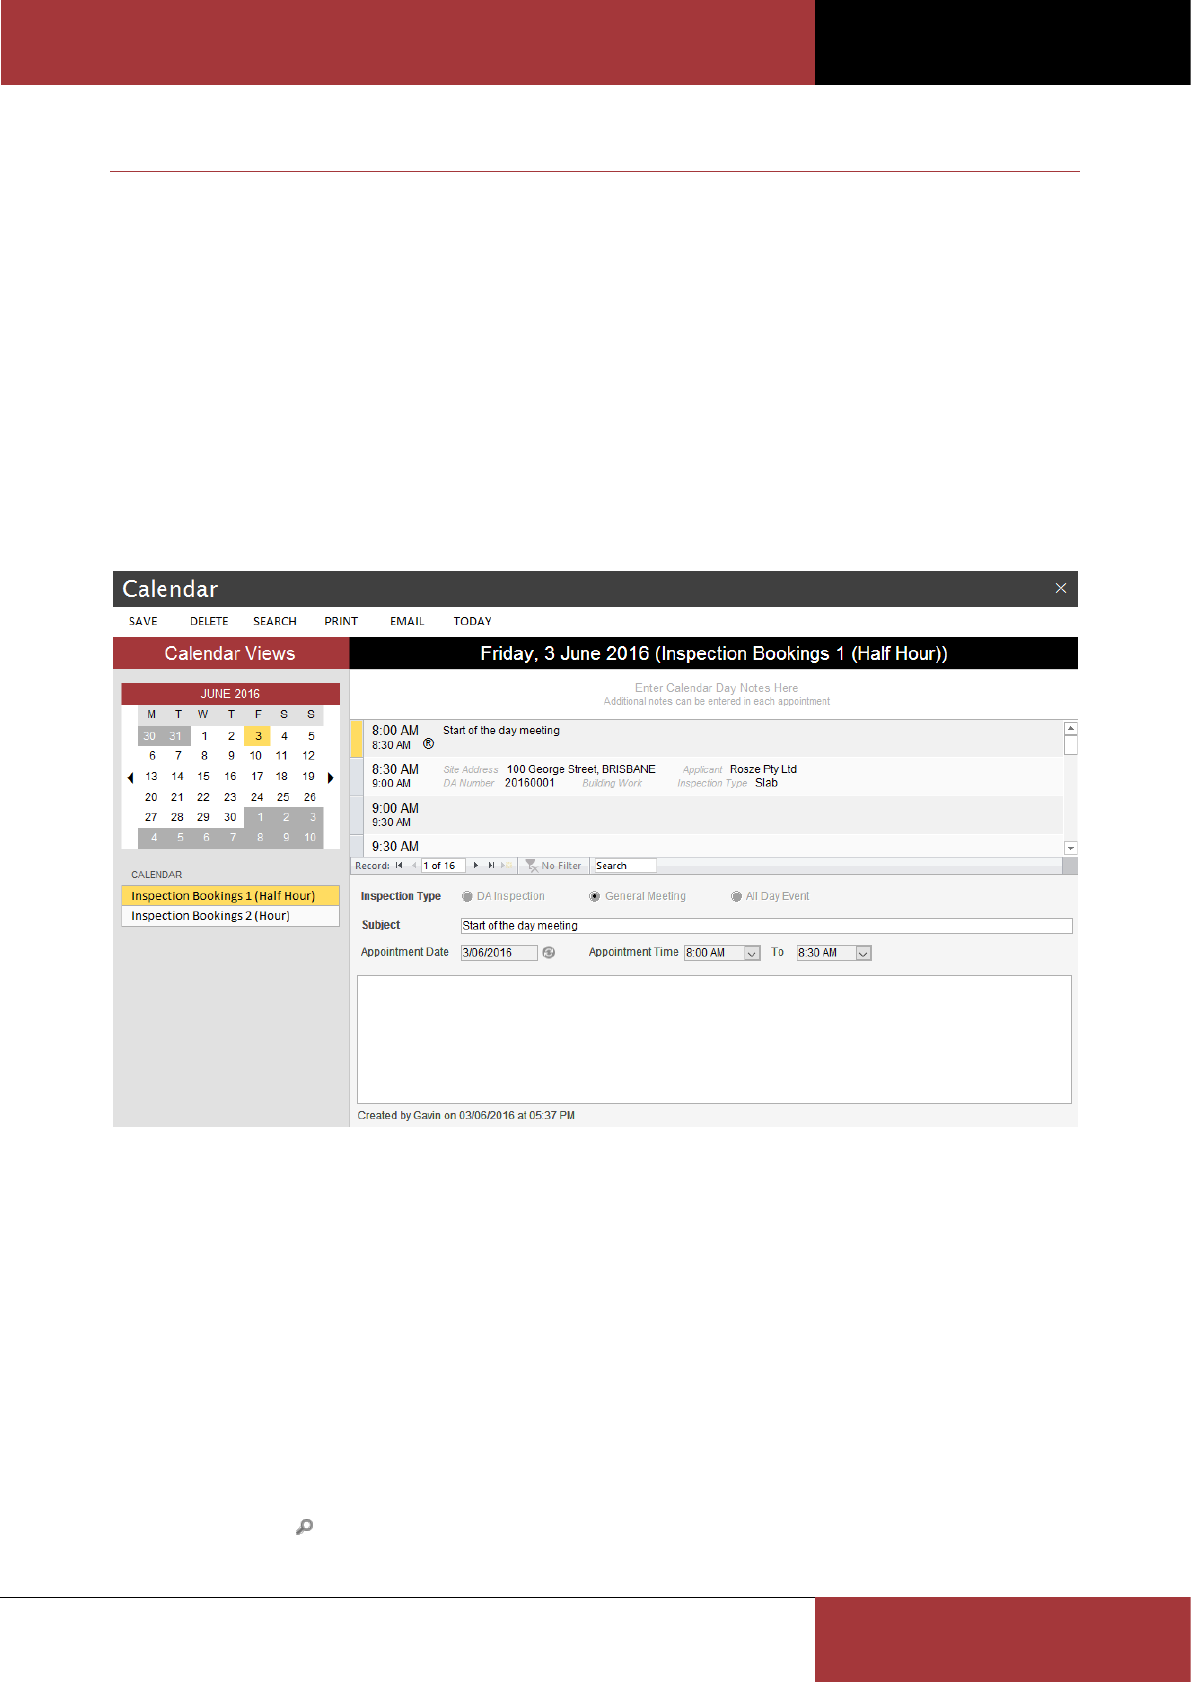
Using the Calendar form
The Calendar form is used to add and maintain appointments. The Calendar form supports multiple calendars
(configured using the Preferences form) each defined with their own set of appointment times.
The Search command button is used to open the Find Appointment form. This form allows you to search for an
existing appointment anywhere within the Calendar.
Use the Print command button to print an appointment report for the selected calendar and date.
Use the Email command button to email the appointment details using your local Microsoft Outlook client.
The Today command button is used to return the calendar to today’s appointments.
The Show Application command button is used to open the Application form on the current appointment’s linked
application (DA Inspection appointments only).
The Show Inspection command button is used to open the Inspection form on the current appointment’s linked
application (DA Inspection appointments only).
The Select Application button is used to open the Select Application form to search for an application to link to the
appointment (DA Inspection appointments only).

BC OFFICE USER GUIDE
ROSZE.COM
COPYRIGHT © ROSZE PTY LTD
25
The Repeat Schedule button is used to open the Repeat Schedule form for the current appointment (General
Meeting and All Day Event appointments only).
Adding a new appointment
To add a new calendar appointment, follow these simple steps:
1. Select the required calendar from the list of Calendars (e.g. in the above screenshot the Inspection Bookings 1
(Half Hour) calendar is selected).
2. Select the appointment date on the calendar.
3. Select the appointment time from the available calendar times.
4. Enter the appointment details and click the Save command button.
Navigating the calendar
You can navigate around the calendar using the calendar control or using the following keyboard shortcuts.
Keyboard Shortcuts
Shortcut
Key
Today’s Date
Home
Previous Appointment
Up
Next Appointment
Down
Previous Calendar
Ctrl+Up
Next Calendar
Ctrl+Down
Previous Day
Left
Next Day
Right
Previous Month
Ctrl+Left
Next Month
Ctrl+Right
DA Inspections
This appointment type is used to record all application inspection bookings. The new appointment will look similar to
the following for DA Inspection appointments.
When entering the appointment’s DA Number, you can type the number directly into the DA Number field or, say you
don’t know the number but you know the site address, you can use the search button , to open the Select
Application form, where you can perform a search for the application.
Once the appointment has been saved, you can use the Show Application command button to open the Application
form and the Show Inspection command button to open the Inspection form.
BC OFFICE USER GUIDE
ROSZE.COM
COPYRIGHT © ROSZE PTY LTD
26
Note
The inspection appointment’s Subject field will automatically be updated with the
application’s site address and building work description.
You cannot create a repeating appointment for a DA Inspection appointment type.
You cannot enter an appointment which will conflict with an existing appointment.
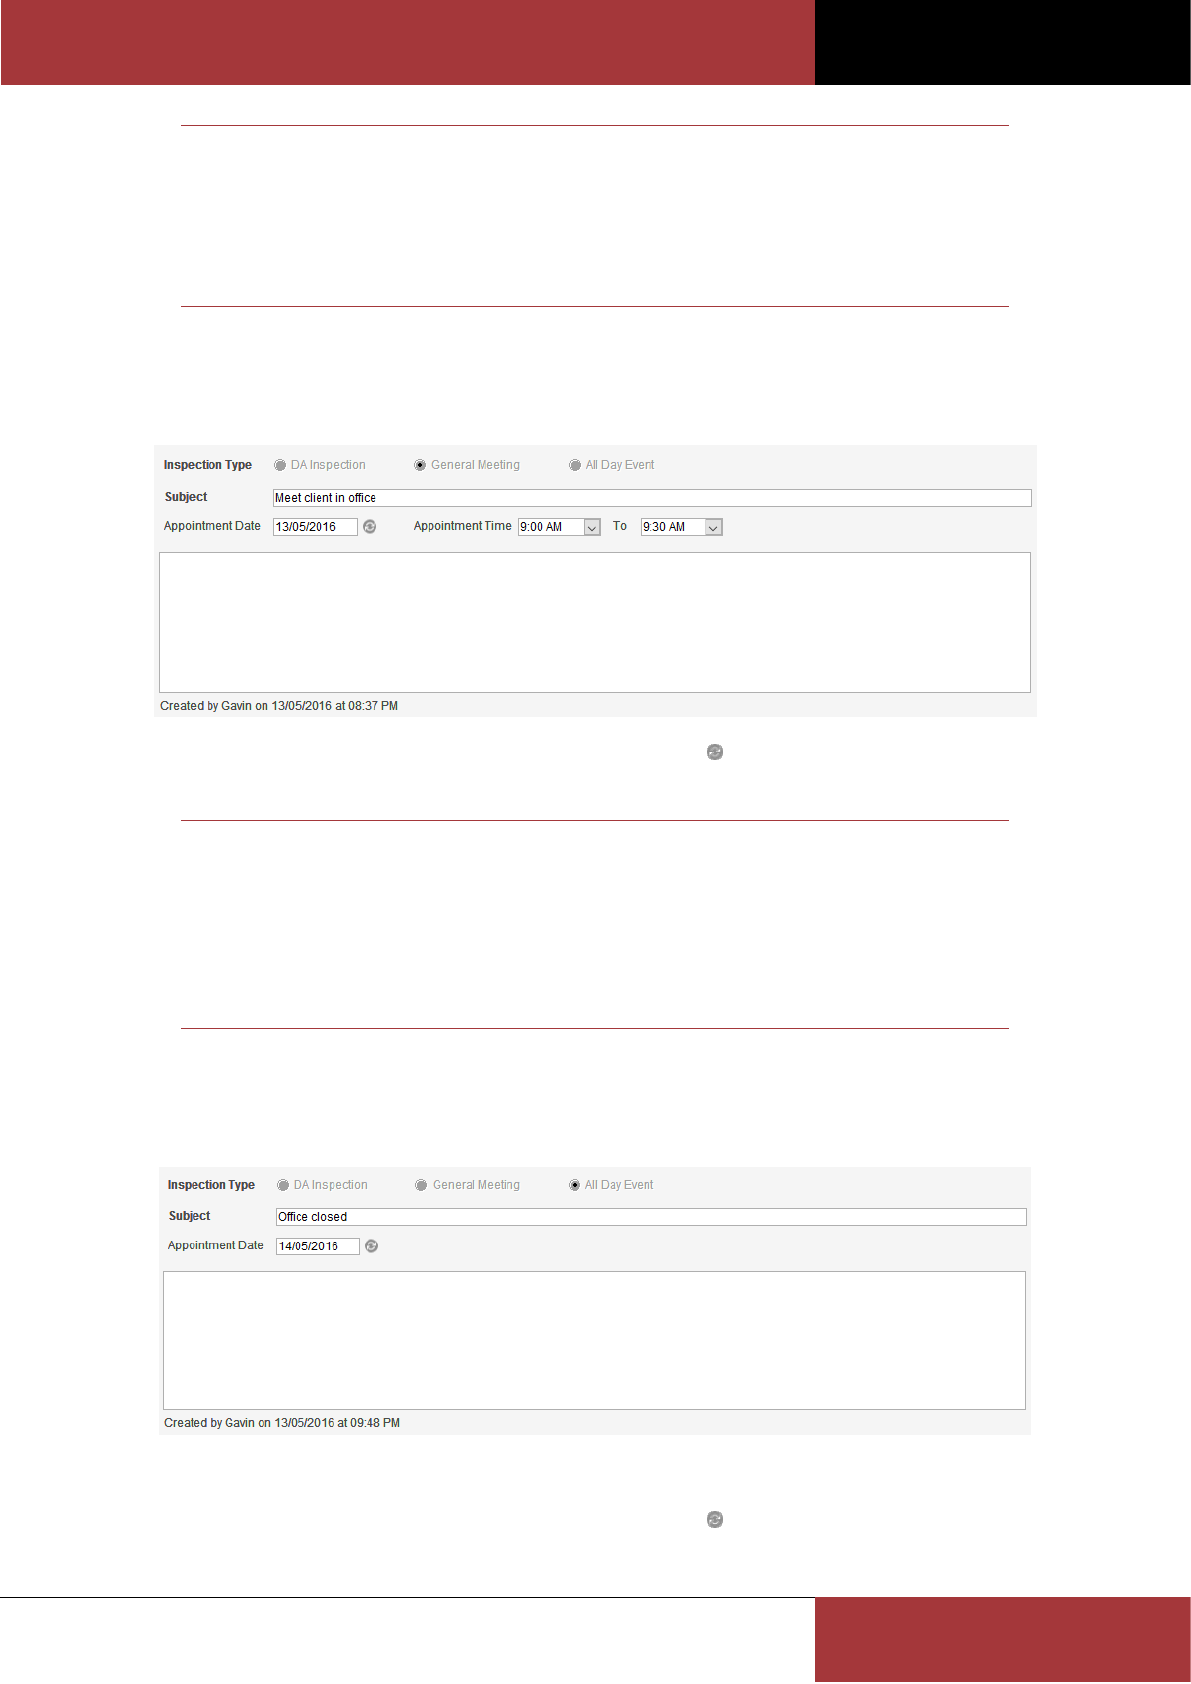
General Meetings
This appointment type is used to record all general appointments. The new appointment will look similar to the
following for General Meeting appointments.
Once the appointment has been saved, you can use the Repeat Schedule button to setup a repeat schedule for the
new appointment.
Note
If you update the Subject or Comment field on the first appointment of a repeat schedule all
repeat appointments will be updated automatically.
Once a repeat schedule has been defined, you cannot change the appointment date or time
on the first appointment of the repeat schedule.
You cannot enter an appointment which will conflict with an existing appointment.
All Day Events
This appointment type is used to record an all-day appointment. The new appointment will look similar to the
following for All Day Event appointments.
An all-day appointment will automatically block out all appointment times for that day.
Once the appointment has been saved, you can use the Repeat Schedule button to setup a repeat schedule for the
new appointment.
BC OFFICE USER GUIDE
ROSZE.COM
COPYRIGHT © ROSZE PTY LTD
27
Note
If you update the Subject or Comment field on the first appointment of a repeat schedule all
repeat appointments will be updated automatically.
Once a repeat schedule has been defined, you cannot change the appointment date or time
on the first appointment of the repeat schedule.
You cannot enter an appointment which will conflict with an existing appointment.
All mandatory fields are highlighted by a bolded field label or CAPITALISED column label.
Mandatory fields must contain a valid value before any changes can be saved.
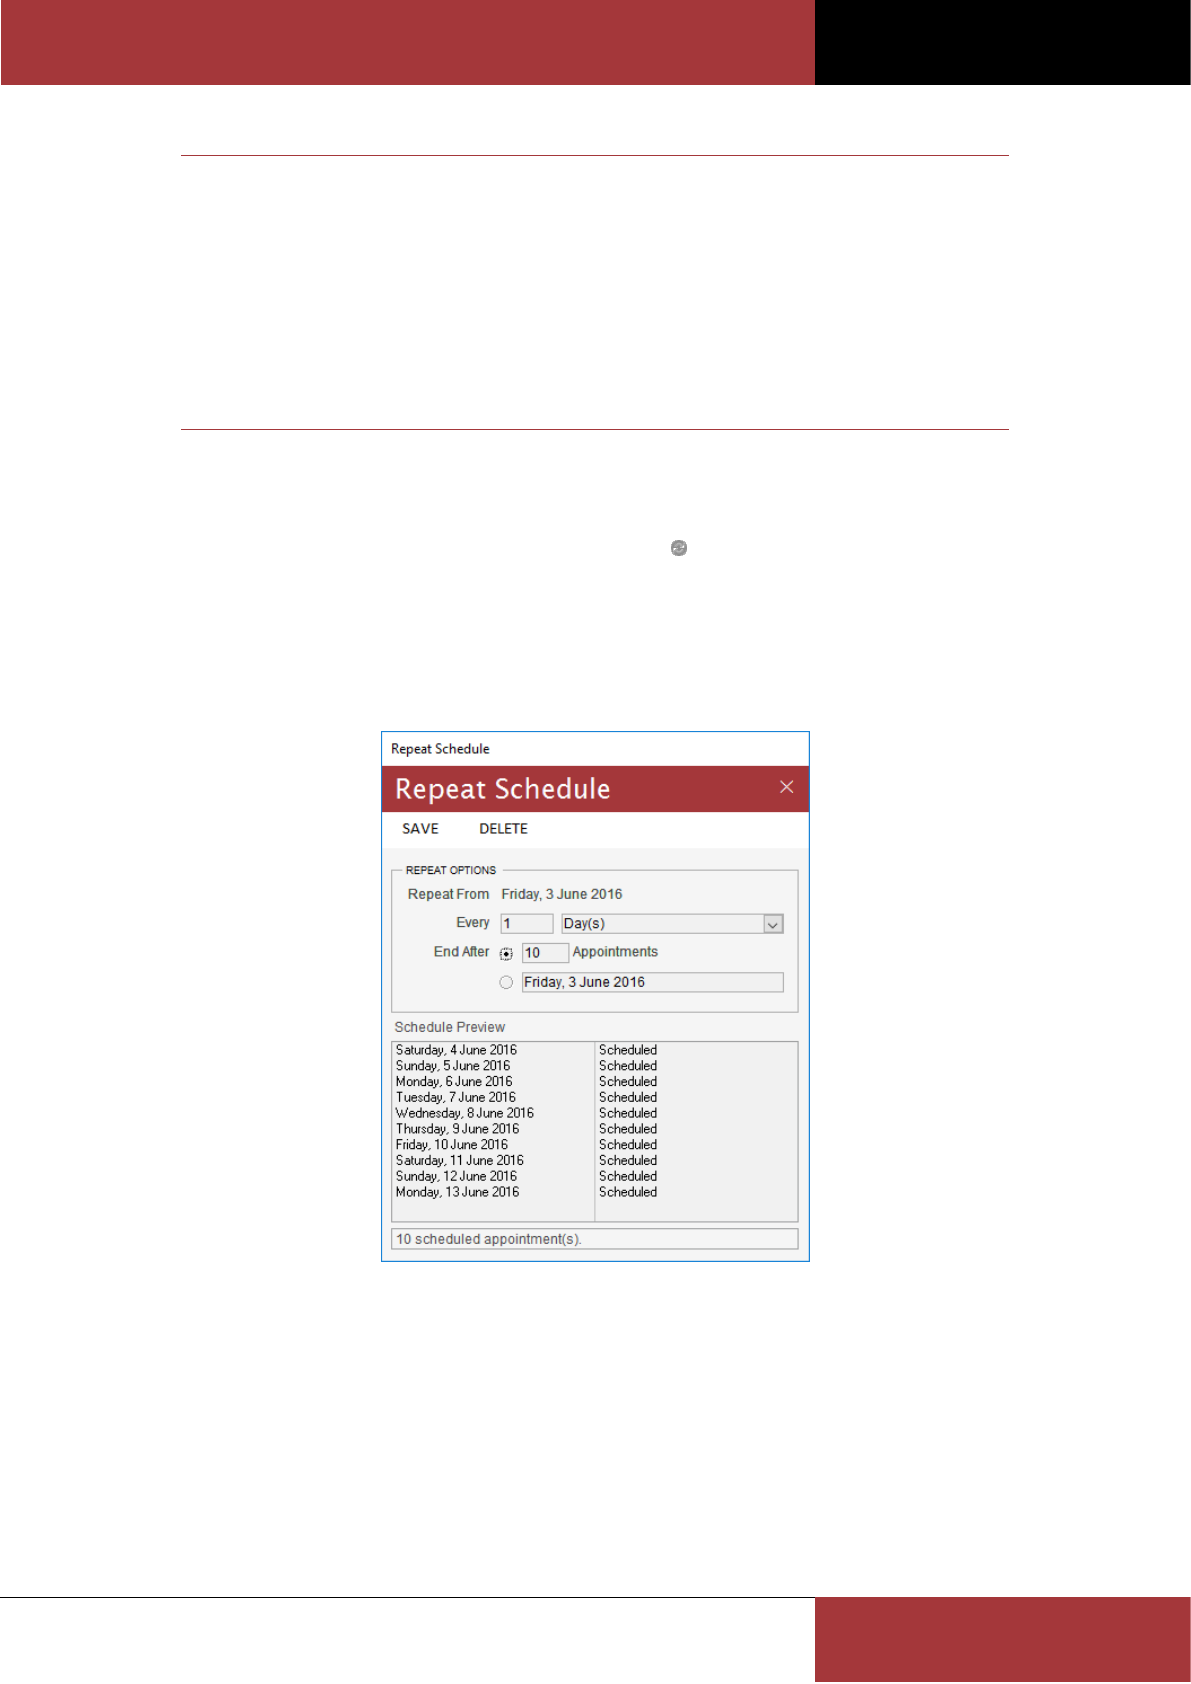
Using the Repeat Schedule form
The Repeat Schedule form is used to create repeat appointment schedules. The Repeat Schedule form can be
accessed from the Calendar form by clicking on the Repeat Schedule button.
To setup a repeat schedule you need to define the repeat interval and repeat range options. The repeat interval can
be defined in Days, Work Days, Weeks, Months and Years. The repeat range can be defined directly, by entering the
number of appointments, or indirectly, by entering an end date for the schedule.
You can delete all repeat appointments by clicking on the Delete command button.
BC OFFICE USER GUIDE
ROSZE.COM
COPYRIGHT © ROSZE PTY LTD
28
Note
A repeat schedule can only be defined for General Meetings and All Day Events.
When deleting a repeat schedule, the original appointment from which the schedule was
created, will not be deleted. Only the repeat appointments will be deleted.
You cannot modify the repeat schedule options once the schedule has been saved. To
modify a repeat schedule, you must remove and recreate the schedule.
All mandatory fields are highlighted by a bolded field label or CAPITALISED column label.
Mandatory fields must contain a valid value before any changes can be saved.
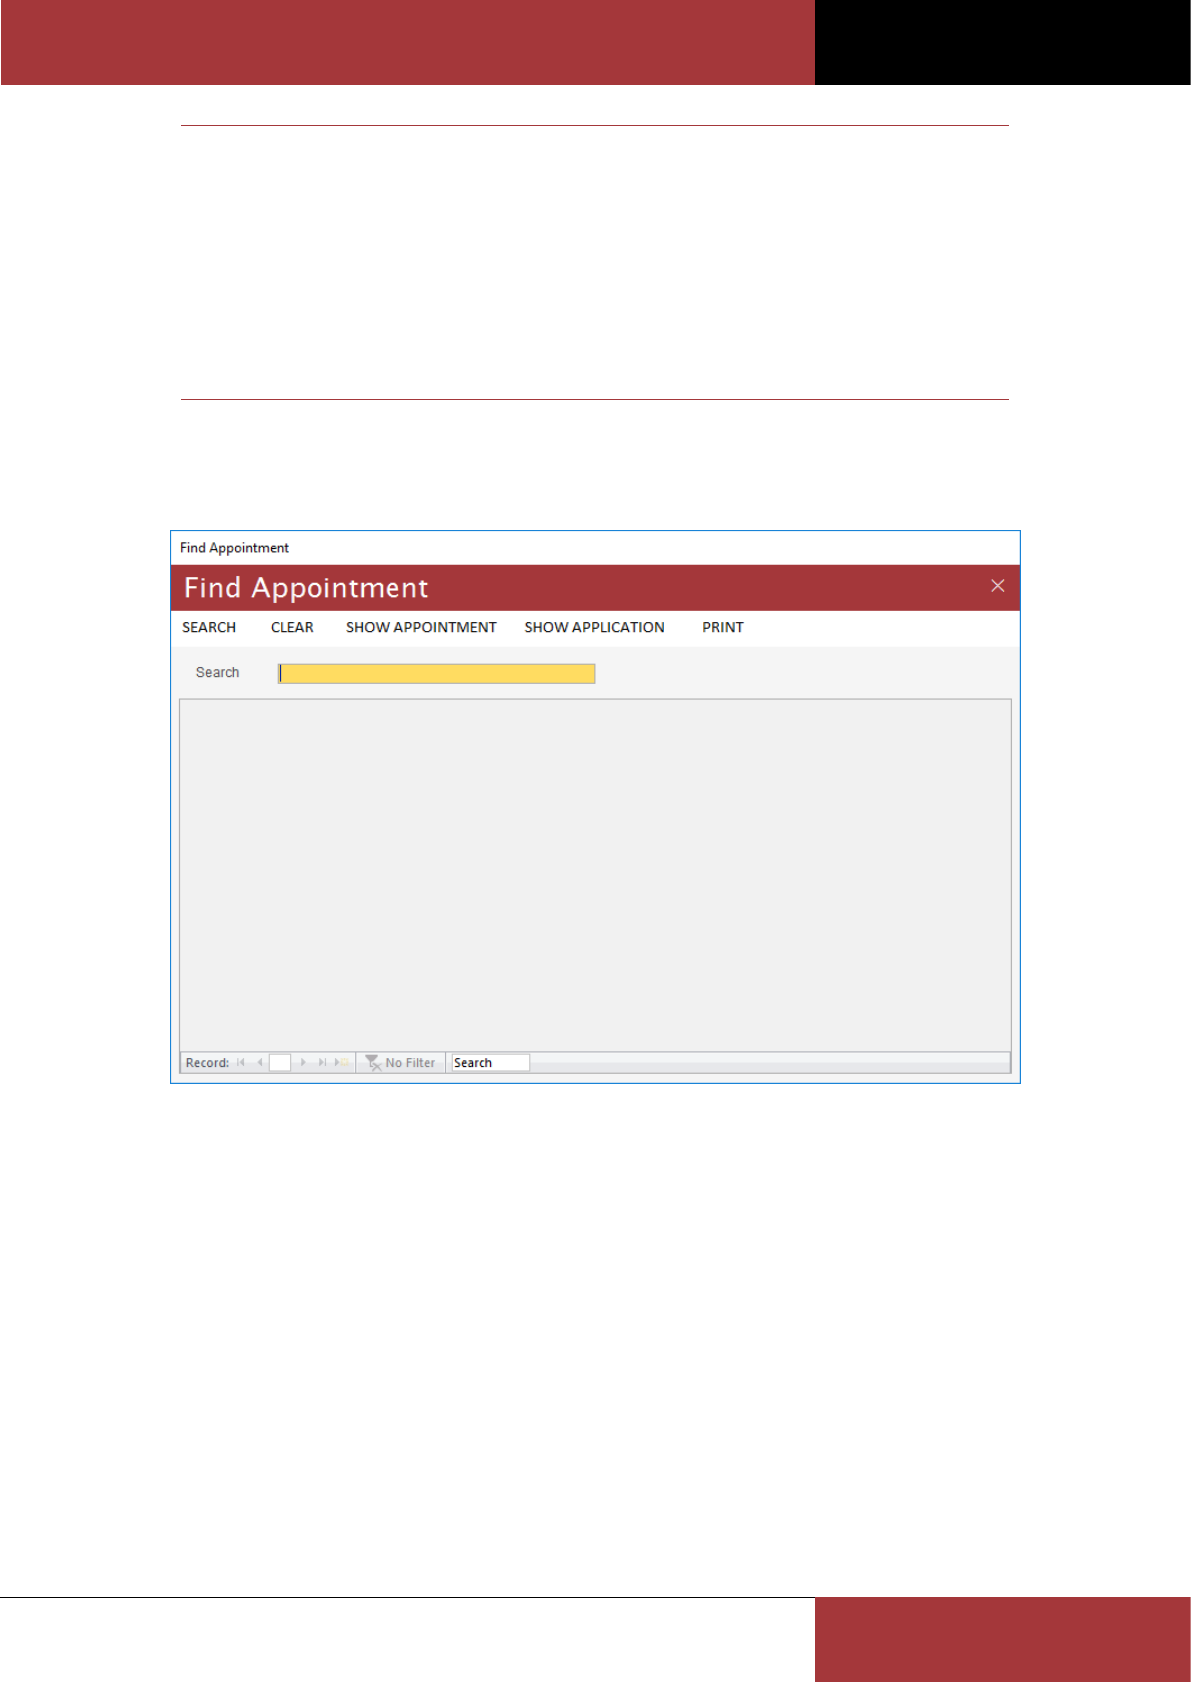
Using the Find Appointment form
The Find Appointment form is used to search for an existing appointment.
To search for an appointment, anywhere within the Calendar, use the Search field. In the above screenshot the
Search field was used to find all appointments related to DA 20160001.
The Show Appointment command button is used to open the Calendar form on the highlighted appointment.
The Show Application command button is used to open the Application form on the highlighted appointment’s related
application (DA Inspection appointments only).
Use the Print command button to print an appointment report for the search results.
BC OFFICE USER GUIDE
ROSZE.COM
COPYRIGHT © ROSZE PTY LTD
29
Note
The Find Appointment form will search through all Subject, DA Number, Inspection Type and
Comment fields, looking for a match to the search criteria.
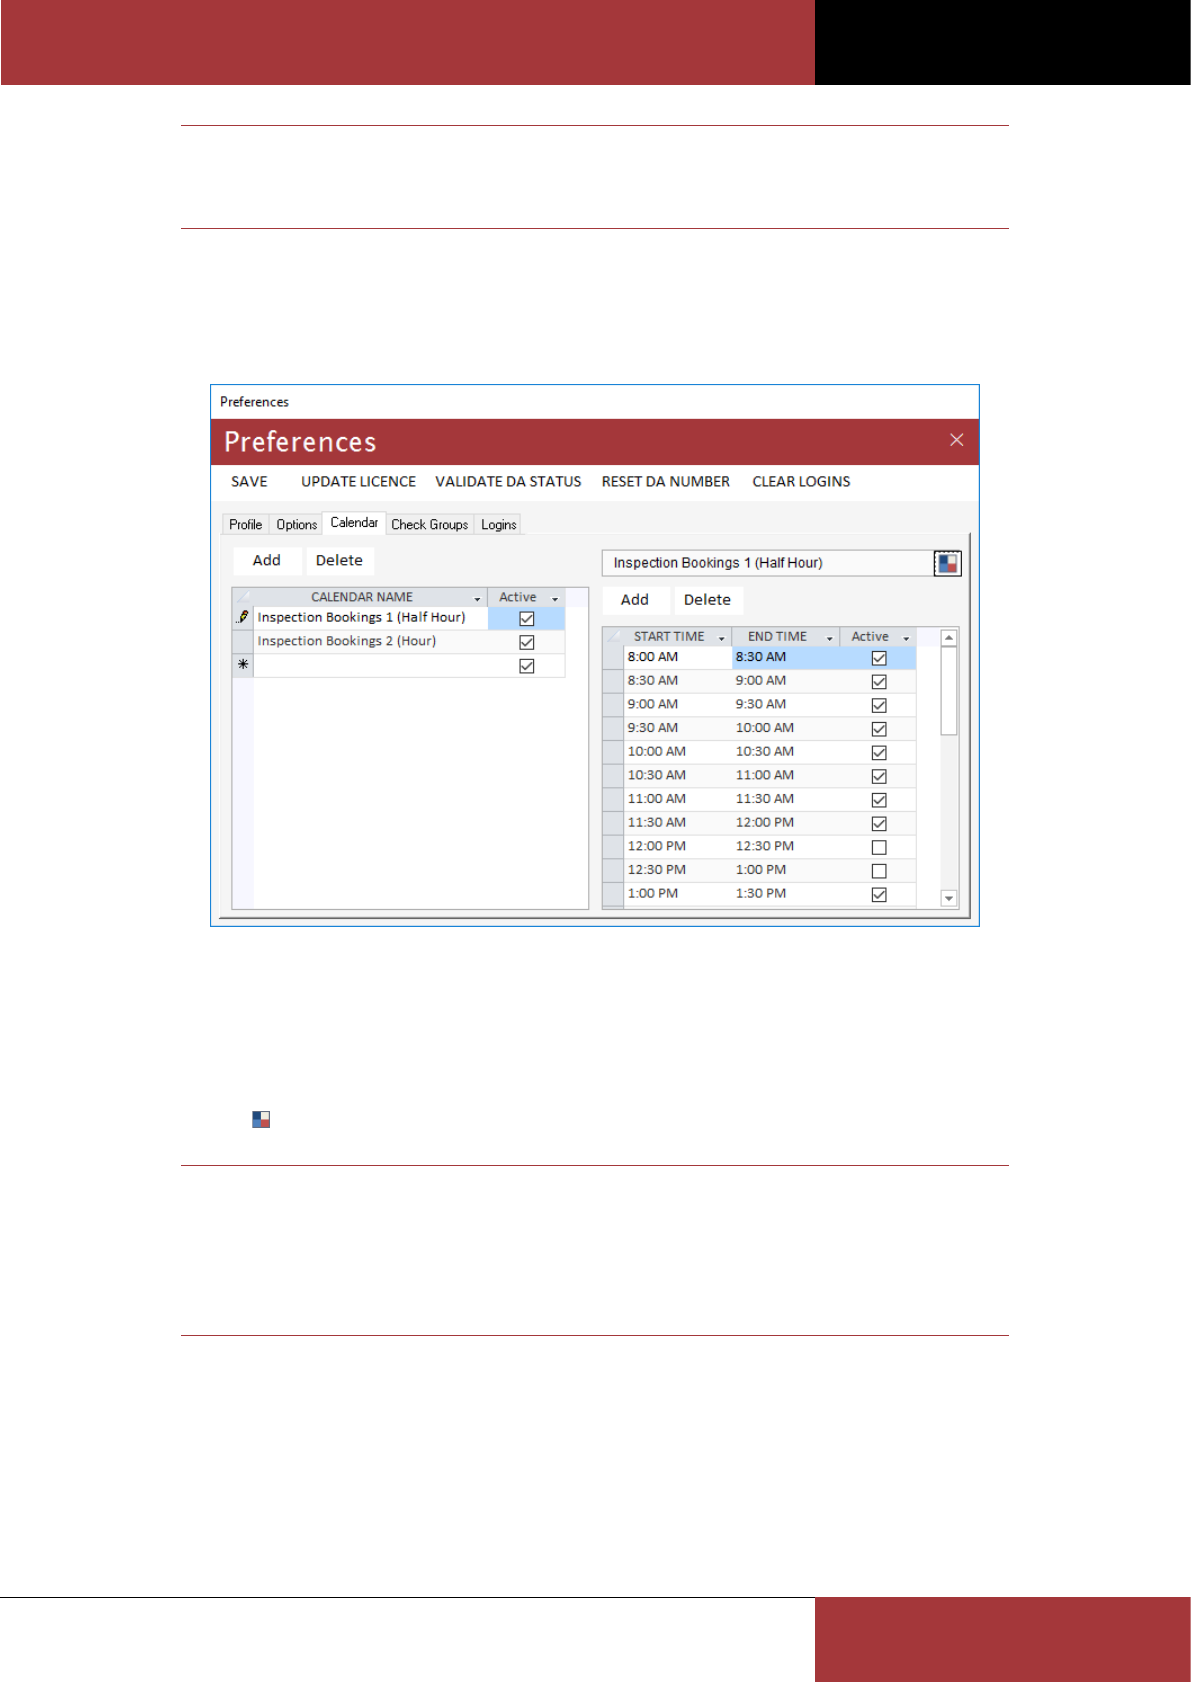
Setting Calendar Preferences using the Preferences form
The Calendar tab on the Preferences form is used to control the Calendar preferences. Using the Preferences form,
you can modify the default calendars (shown below) or add your own calendars.
Modifying an Existing Calendar
You can modify an existing calendar’s description, colour and times to suit your office requirements. The calendar
description will appear in the list of Calendars on the Calendar form. Active calendar times will appear on the
Calendar form as available appointment times.
To add or delete a calendar or time use the Add and Delete command buttons. To set a unique colour for each
calendar use the button.
Note
You cannot delete a calendar or time, which has been used by an existing calendar
appointment. You can only deactivate the entry by unselecting the Active field.
All mandatory fields are highlighted by a bolded field label or CAPITALISED column label.
Mandatory fields must contain a valid value before any changes can be saved.
Adding a New Calendar
1. Click the Add calendar command button or navigate to the new record on the Calendar list.
2. Enter a description for your new calendar.
3. Make sure the Active field is still ticked.
4. On the Times list, enter a Start Time for the first time slot.
5. Enter an End Time for the first time slot.

BC OFFICE USER GUIDE
ROSZE.COM
COPYRIGHT © ROSZE PTY LTD
30
6. Make sure the Active field is still ticked.
7. Navigate to the next new record (you can press Tab to jump to the next field).
8. Enter a Start Time for the next time slot (if your time slots are continuous, this time should match the End Time
of the previous time slot).
9. Enter an End Time for the time slot.
10. Make sure the Active field is still ticked.
11. Repeat Steps 7 to 10 for each additional time slot.
12. Click the Save command button to save any unsaved changes.
13. Re-open the Calendar form to check your new calendar settings.
Note
You cannot create or modify a calendar time which will overlap an existing time slot (i.e. the
Start and End Time must not fall between the Start and End time of another time slot).
BC OFFICE USER GUIDE
ROSZE.COM
COPYRIGHT © ROSZE PTY LTD
31
APPLICATION REGISTER
About the Application Register
The Application Register allows you to record all of your application contacts, checks, documents, hours worked,
inspections, fees and processing history in a central location. The register consists of the following forms:
Find Application – used to search for an existing application
Application – used to add and maintain applications
Select Contact – used to add a new contact relationship to the application
Check – used to add and maintain check details (including consents)
Special Fire Services – used to record Special Fire Service details
Inspection – used to add and maintain inspection results
Action Note – used to add and maintain action notes
Letter Merge – used to perform a letter merge in Microsoft Word
Label Merge – used to perform a label merge in Microsoft Word
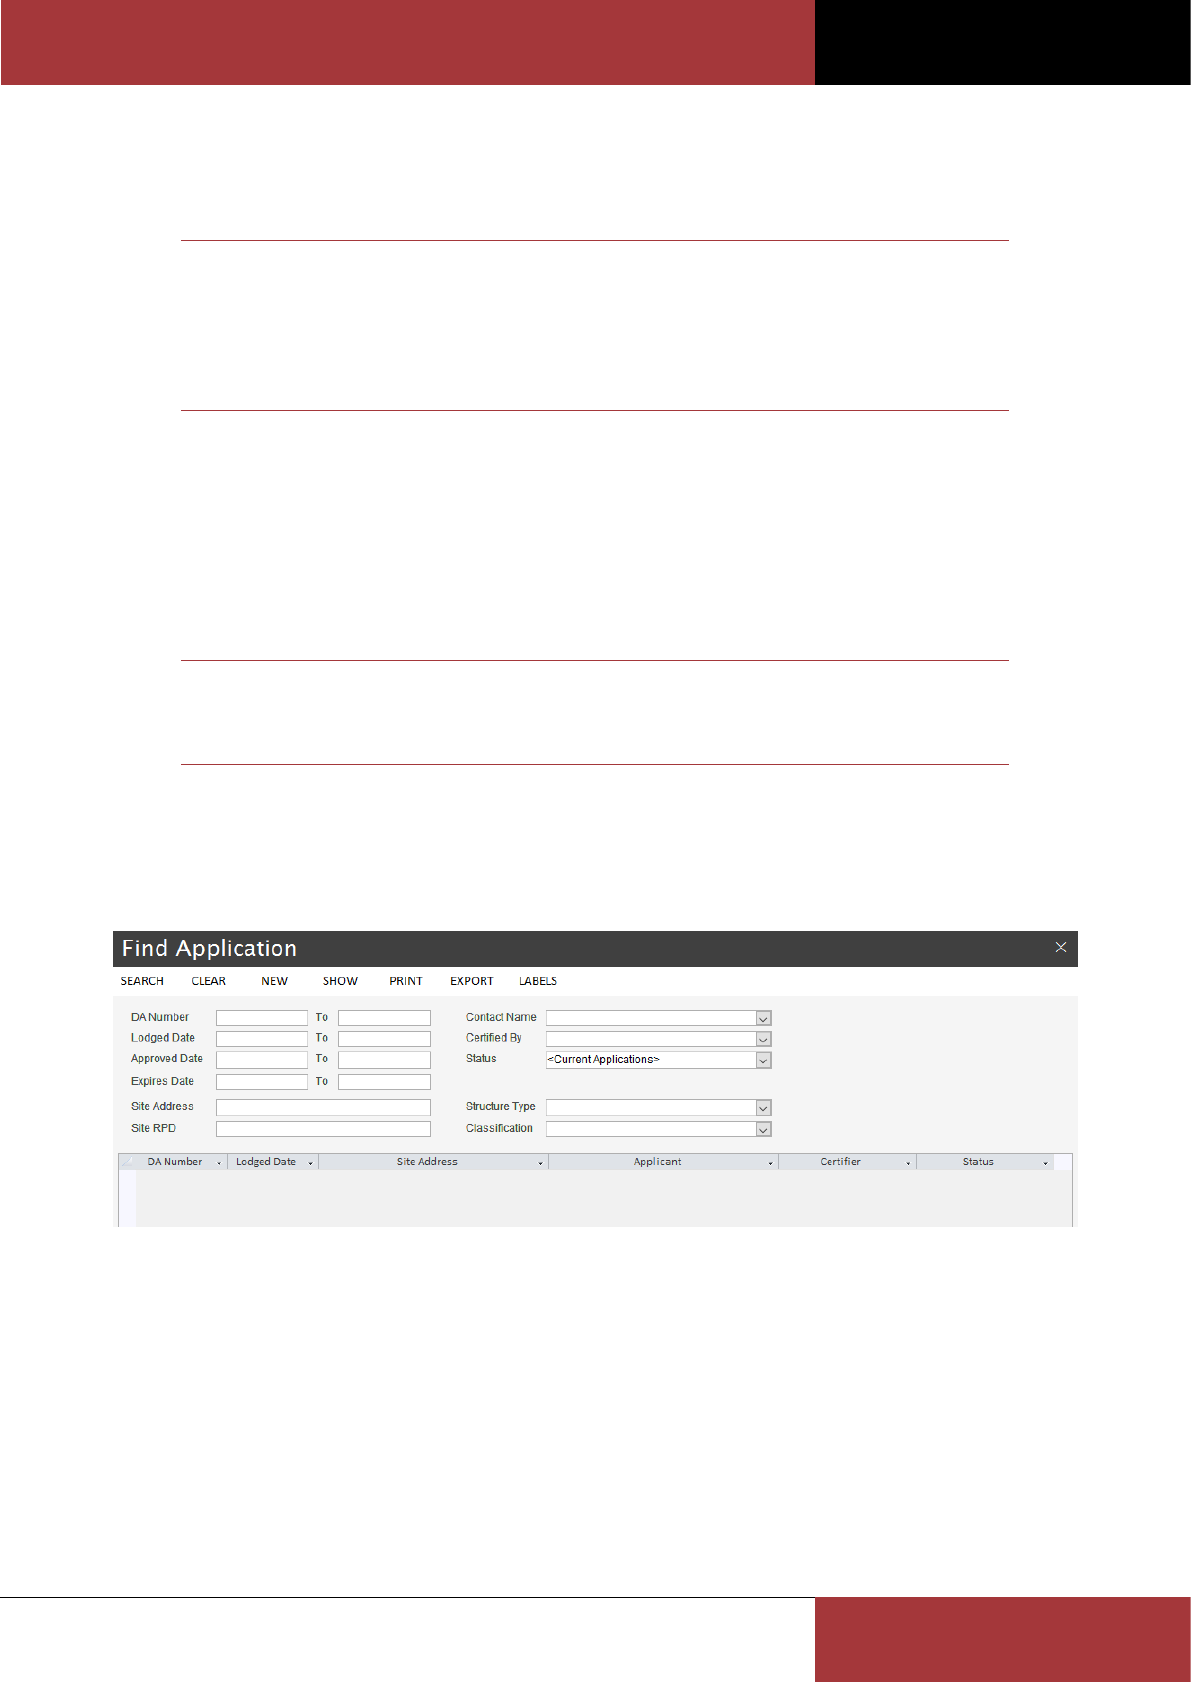
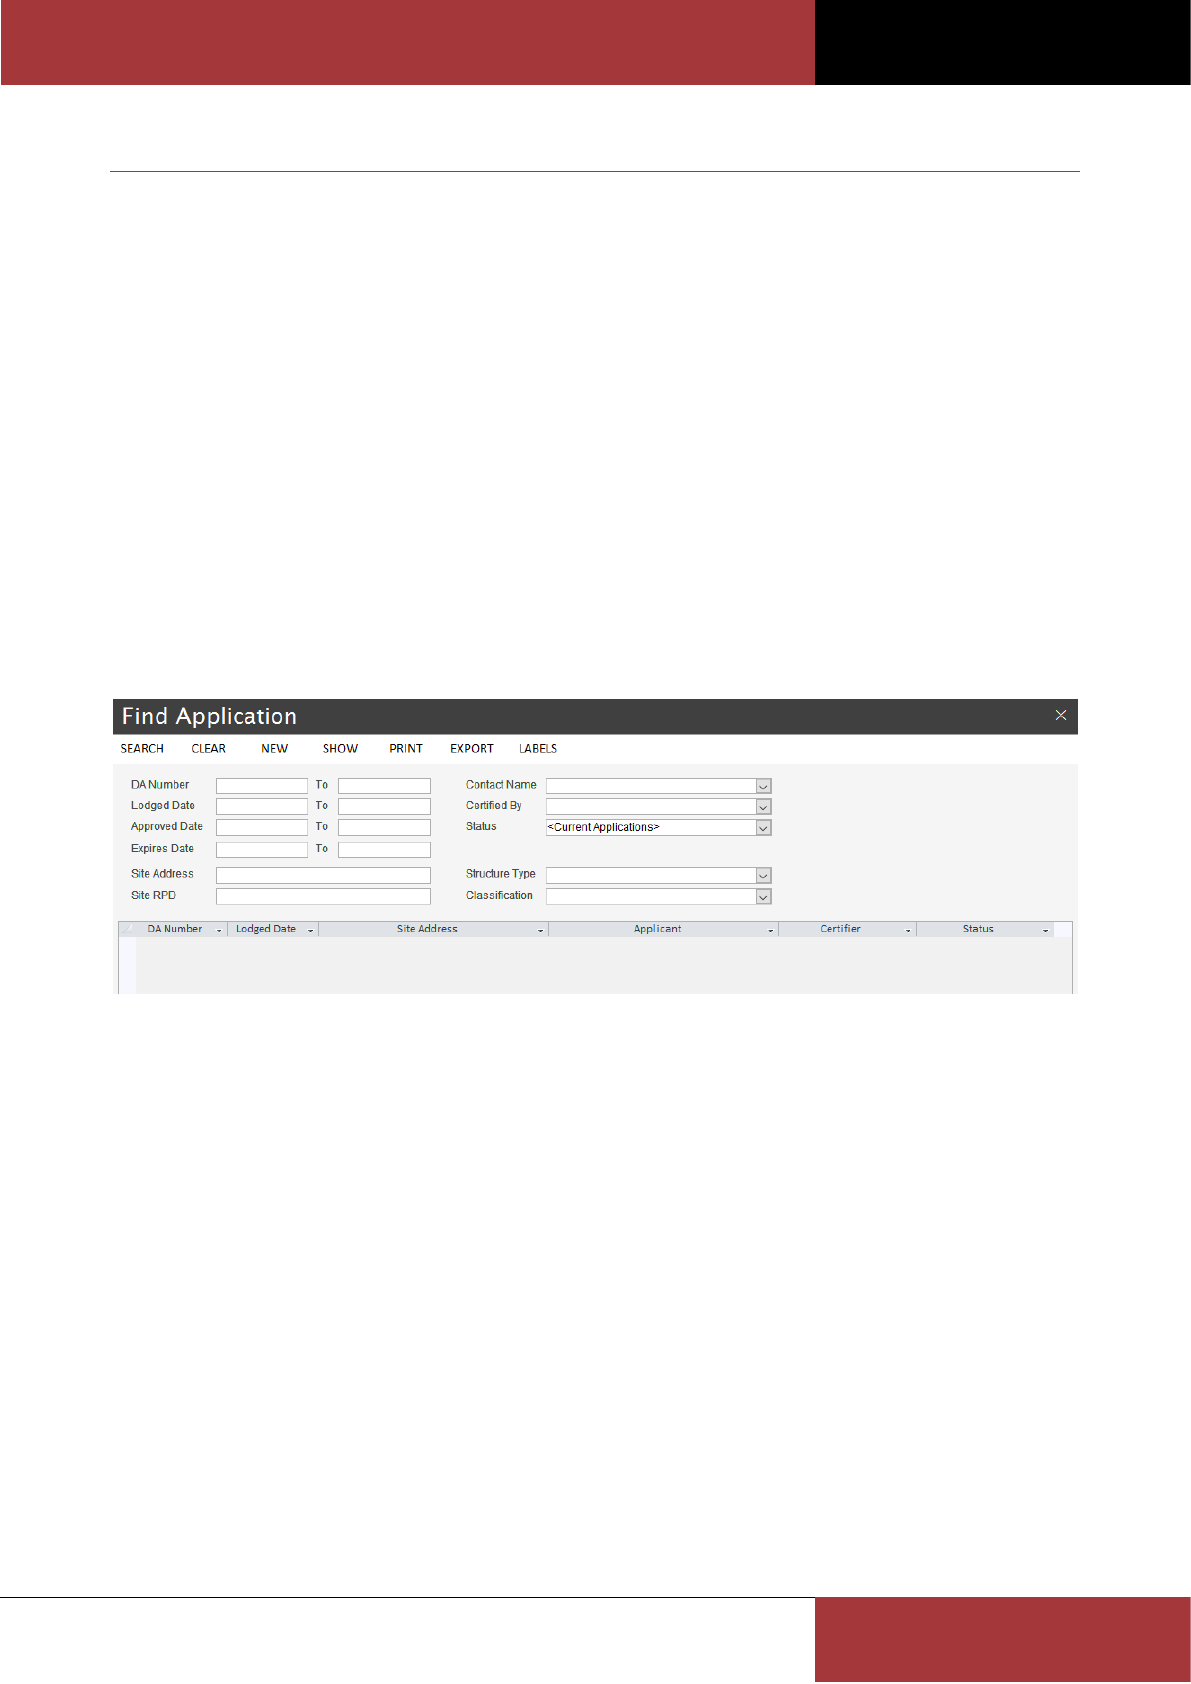
Using the Find Application form
The Find Application form is used to search the register for an existing application. You can perform an application
search by entering your search criteria and clicking the Search command button.
The Clear command button can be used to clear the current search results and criteria, in preparation for performing
another search.
The New command button is used to create a new application using the Application form.
The Show command button is used to open the Application form on the highlighted application. You can also open
the Application form by double clicking the application record.
The Print command button opens the Application Register report showing all search results.
The Export command button exports the search results to Microsoft Excel.
The Label command button opens the Label Merge form.
Search Hints
1. When entering values in the DA Number criteria fields, the values must be numeric.
2. To specify a list of applications to search for, you can enter a comma separated list of values in the DA Number
criteria fields.
3. When searching using the Site Address, choose a portion of the address which is not easily misspelt (i.e. this will
help reduce spelling errors).
BC OFFICE USER GUIDE
ROSZE.COM
COPYRIGHT © ROSZE PTY LTD
32
4. By default, the form will search for current applications only. To search through all applications, change the
Status search criteria to All Applications.
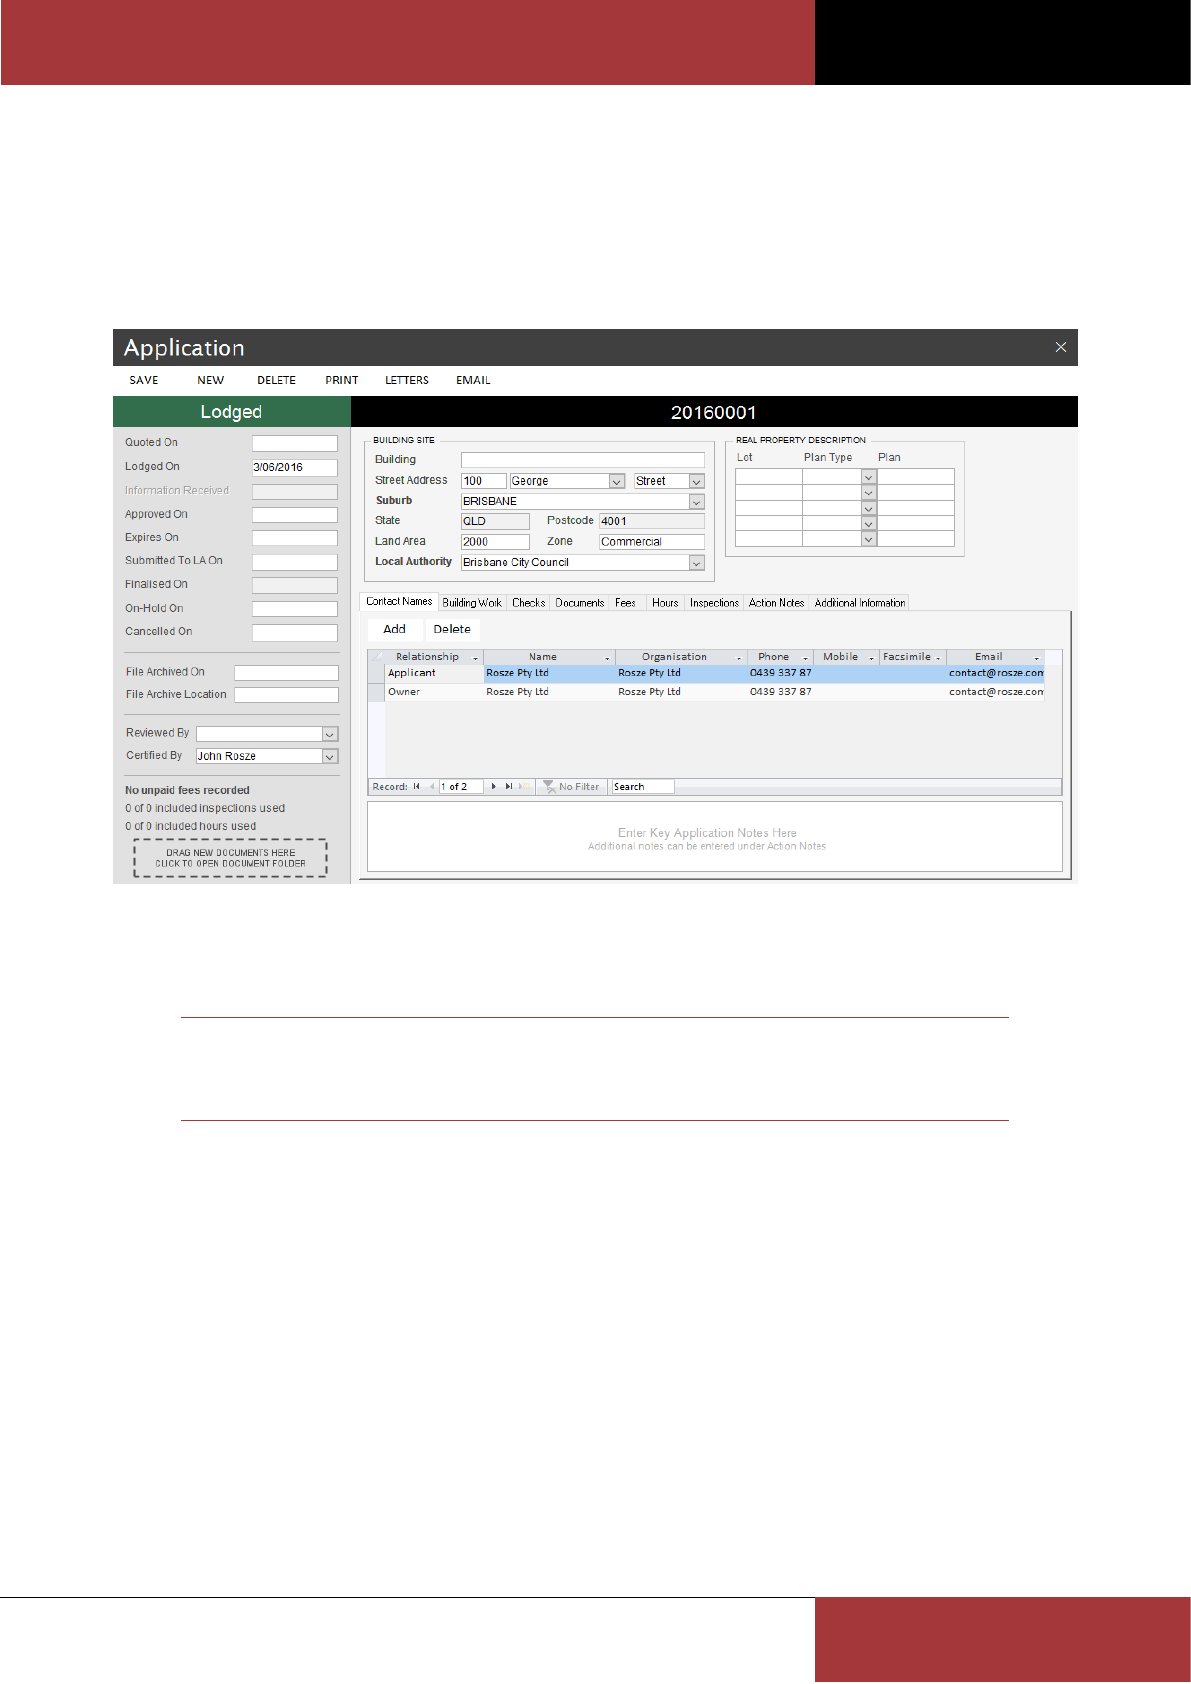
Using the Application form
The Application form is used to add and maintain applications. Application contacts, checks, documents, fees, hours
worked, inspections and actions can also be recorded using the application tabs.
The New command button is used to create a new application.
The Delete command button is used to delete an existing application.
Note
Before you can delete an existing application you need to remove all related application
records first (i.e. all information contained within the tabs).
The Print command button is used to run the Application Details report.
The Email command button is used to send an email using your local Microsoft Outlook client.
The Letters command button opens the Letter Merge form. Using the Letter Merge form you can generate a new
merge letter.
About the DA Number
A system generated number is used for each application’s DA Number. On generation of each new number the
number generator is automatically incremented by 1. You can reset the current number generator value using the
Preferences form.
The following number formats provide examples on how the number generator can be used:
Year & Sequence (Default) – This option uses an 8-digit number for the DA Number. The first 4 digits represent
the year in which the application was received and the last 4 digits represent the number of applications

BC OFFICE USER GUIDE
ROSZE.COM
COPYRIGHT © ROSZE PTY LTD
33
received since the beginning of the year (e.g. 20110001). Under this option the number generator will need to
be reset at the beginning of each year (e.g. in January 2017 the number should be reset to 20170001).
Sequence Only – This option uses a simple number sequence to represent the number of applications received
(e.g. the first application will be 1). Under this option the number generator doesn’t need to be reset as the
number will continue to increment regardless of year.
Note
If you use the default Year & Sequence number generator format and you expect to receive
more than 9999 applications within a year you should increase the 8-digit number to 9 or
more digits.
While the DA Number field is editable, the following restrictions apply when changing the number:
The new number cannot be larger than the current value of the number generator.
The new number cannot be the same as another application.
The following example shows how you can use the DA Number field to swap two DA numbers (e.g. 20160010 and
20160011), which have been entered incorrectly in reverse order.
1. On the first application (e.g. 20160010) set the DA Number to an interim number which is less than the number
generator and which hasn’t already been used. A safe number to use is 0.
2. On the second application (e.g. 20160011) set the DA Number to the first application's original DA Number (e.g.
20160010).
3. Return to the first application, now DA 0, and set the DA Number to the second application's DA Number (e.g.
20160011).
About the application Status
The application Status will be automatically assigned by the system based on the application’s current processing
history (i.e. using the application date fields).
During the application’s history the following status values may be assigned:
Quote Only – An application fee quote has been provided but no application has yet been lodged (i.e. the
application has a Quoted On date and no Lodged On date).
Lodged – The application has been lodged and is currently unapproved.
Information – The unapproved application is awaiting additional information to be provided (i.e. an Information
Request letter has been issued and no Information Received date has been entered). Once the
information is received and an Information Received date is entered the status will return to Lodged.
Approved – The application has been approved (i.e. an Approved On date has been entered). The application can
only be approved once:
an Approved Date has been provided for all prerequisite checks (Checks tab)
all required sighting claim details have been entered on the Sighting Claims form
a Building Certifier has been selected in the Certified By field
Finaled – The application has passed final inspection. The Finalised On date is updated by the system once a
Satisfactory final inspection is entered using the Inspection form.
On-Hold – The application has been placed on-hold (i.e. an On-Hold On date has been entered). On-Hold
applications will be excluded from all future reminders and expiry processing.
Cancelled – The application has been cancelled (i.e. a Cancelled On date has been entered).
Expired – The application has expired (i.e. the application’s Expires On date has passed and the application has
not yet passed a final inspection). The Expires On date will default to the Approved On date plus the
Expiry Period preference value (see the Preferences form).
Archived – The application file has been archived (i.e. a File Archived On date has been).
BC OFFICE USER GUIDE
ROSZE.COM
COPYRIGHT © ROSZE PTY LTD
34
Note
All mandatory fields are highlighted by a bolded field label or CAPITALISED column label.
Mandatory fields must contain a valid value before any changes can be saved.
About the Reviewed By and Certified By fields
The Reviewed By field is an optional field which can be used to record the name of the certifier who is responsible for
reviewing the application.
The Certified By field is used to record the name of the certifier who is responsible for certifying the application
approval. This field must have a valid value before the application can be approved. The Certified By name will also
appear in all merge template data sources.
Note
Only contacts which have been included as a member of the Building Certifier group in the
Address Book will be available for selection in these fields.
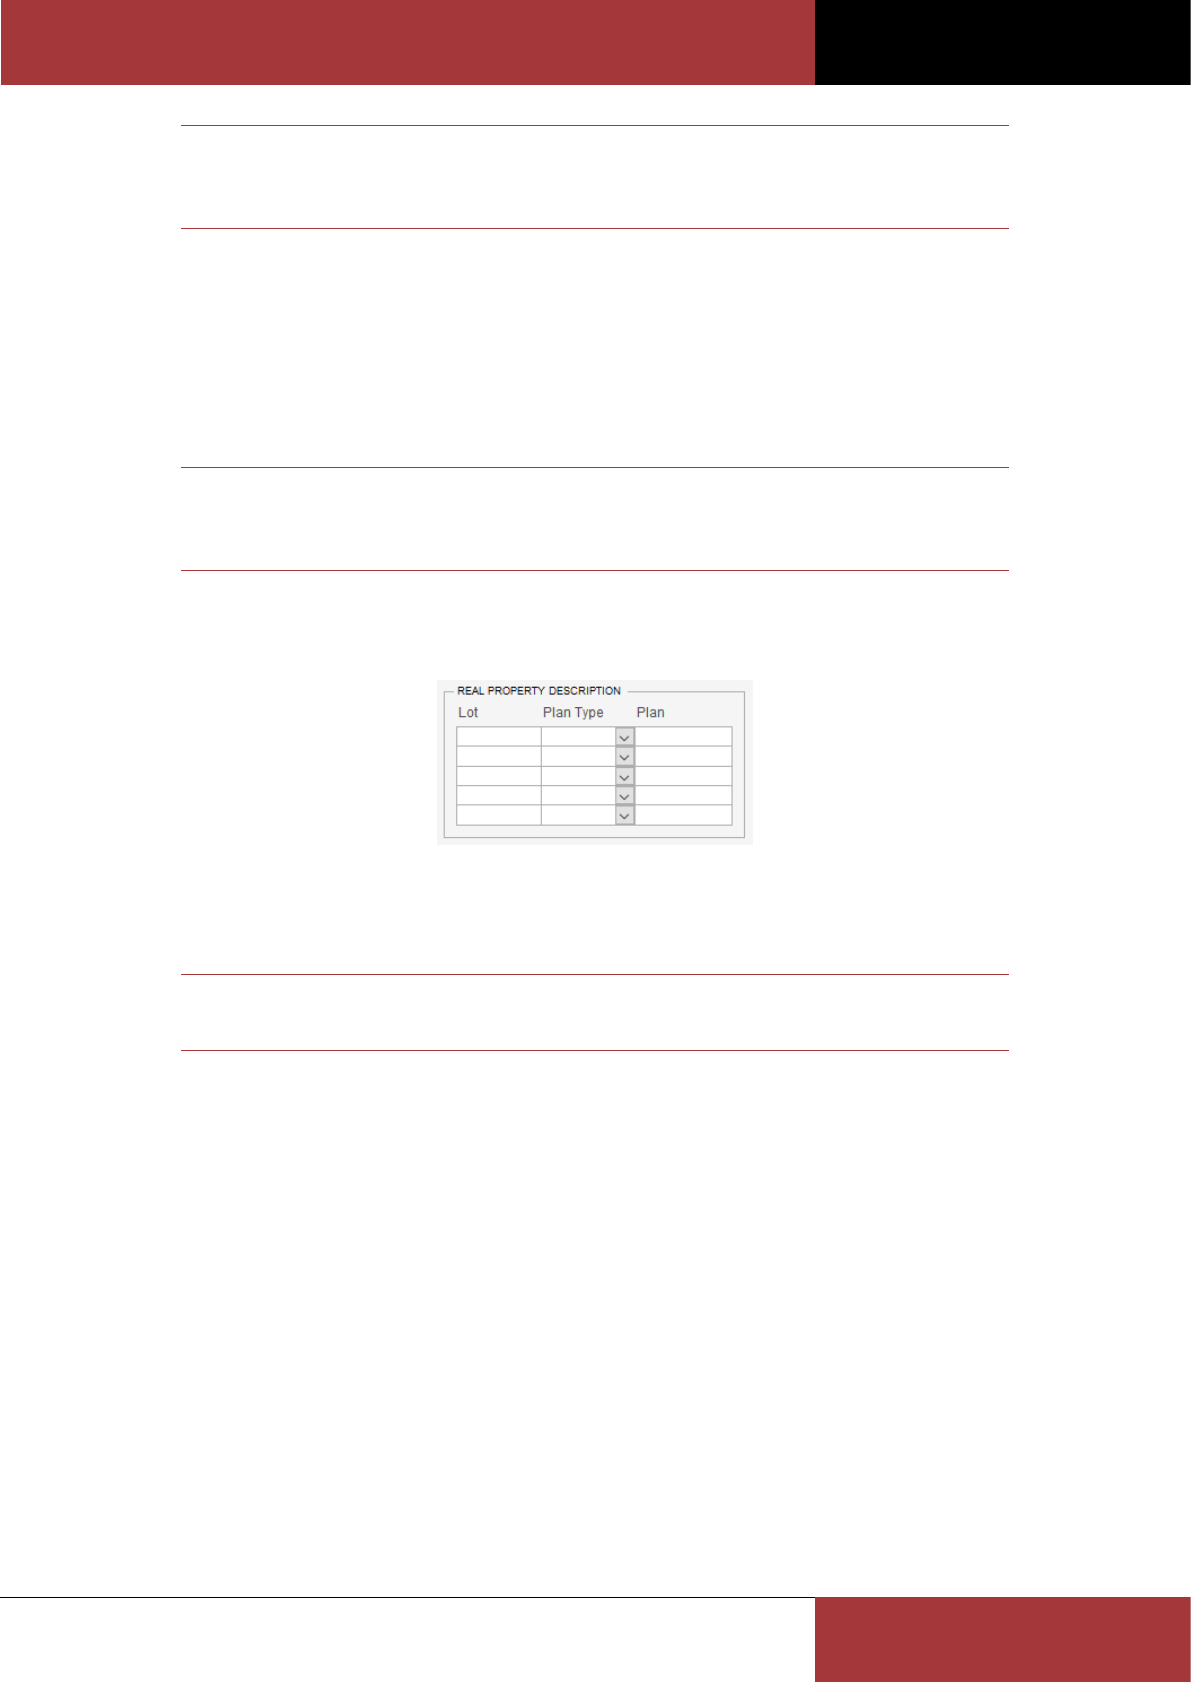
About the Real Property Description fields
The RPD fields are used to enter the building site’s real property description.
Up to 5 lot/plan descriptions can be entered using the PRD fields. In the above screenshot two lot/plan descriptions
has been entered. If the entered lot/plan matches a plan already registered in the Plan Register, then you can open
the matching plan simply by double clicking on the RPD record.
Note
The RPD fields will only be visible once the new application has been saved for the first time.
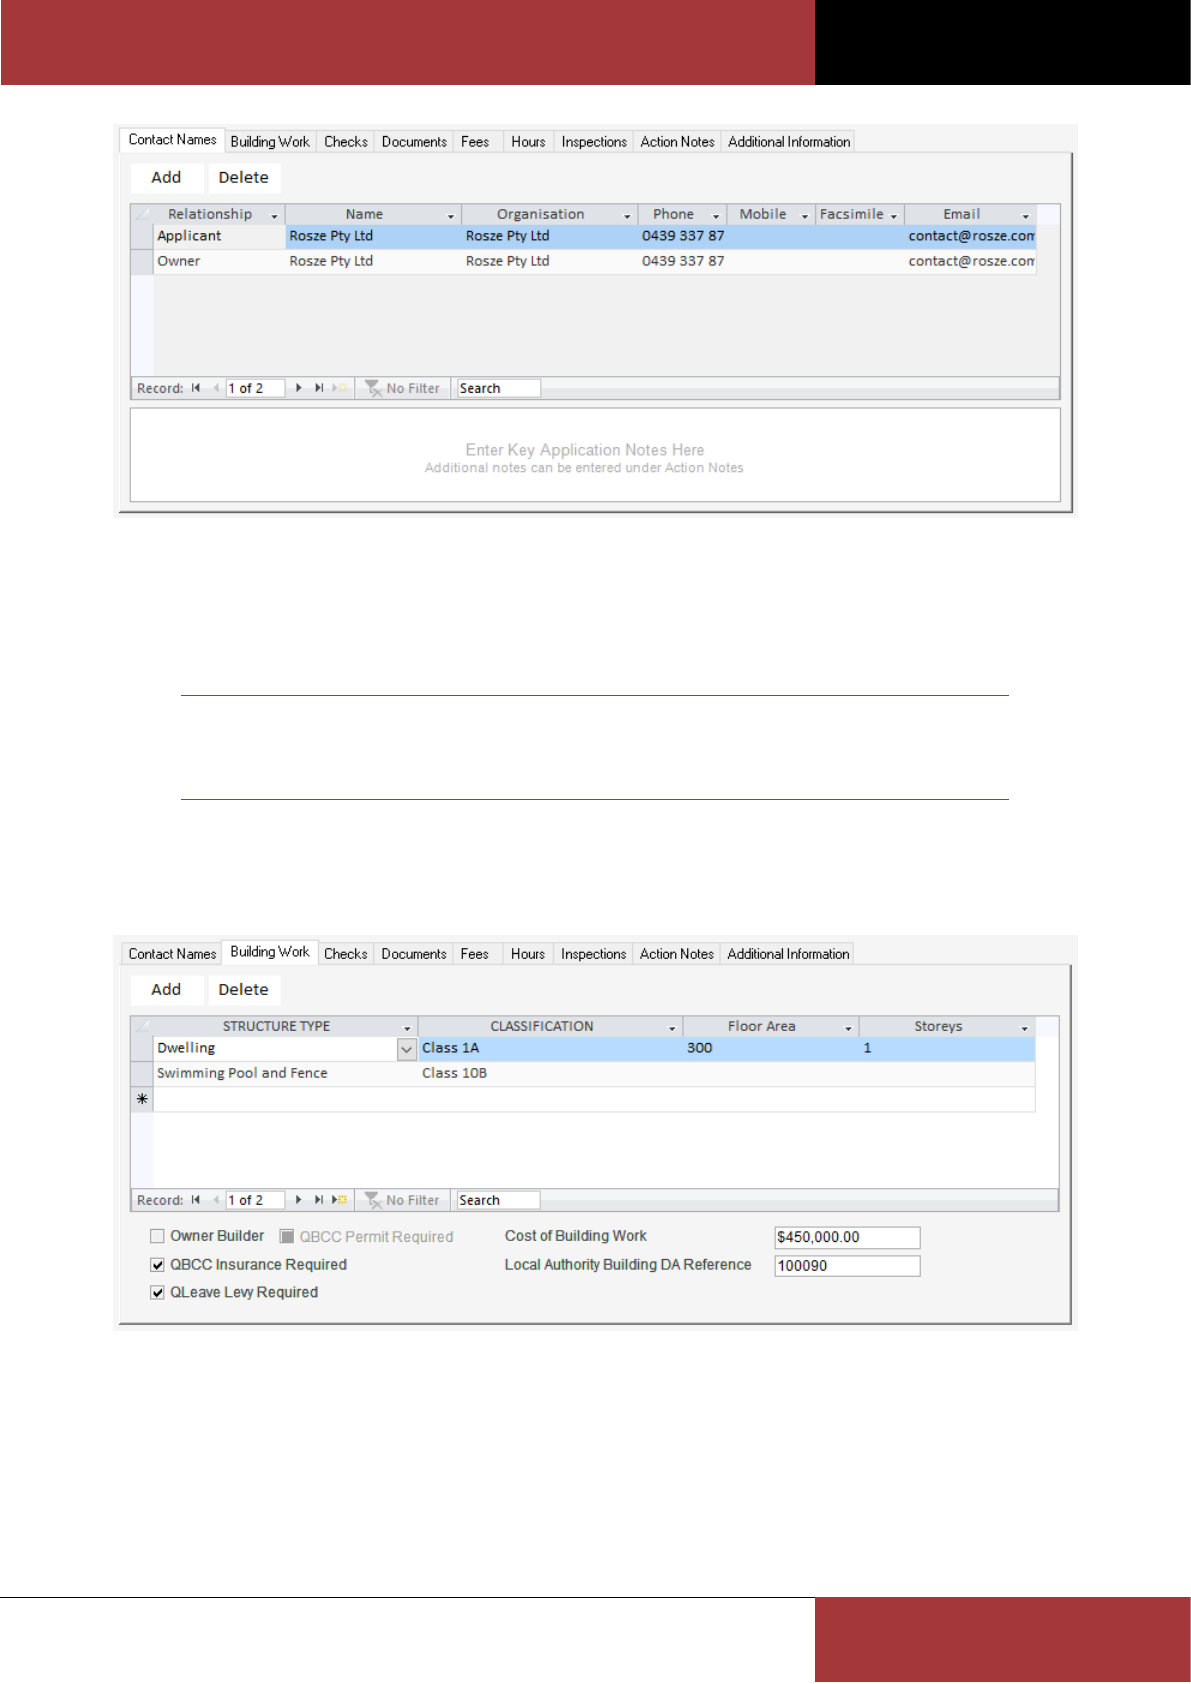
Contact Names Tab
The Contact Names tab is where all application contact relationships are maintained (with the exception of the Local
Authority and Building Certifier contacts, which are maintained by the Local Authority, Reviewed By and Certified By
fields).
BC OFFICE USER GUIDE
ROSZE.COM
COPYRIGHT © ROSZE PTY LTD
35
To add a new contact relationship, via the Select Contact form, click the Add button.
To edit or view the contact details in the Address Book Contact form double click the contact record.
To delete an existing contact relationship, click the Delete button.
Note
All applications should include, as a minimum, a contact relationship for the Owner and
Applicant contacts.
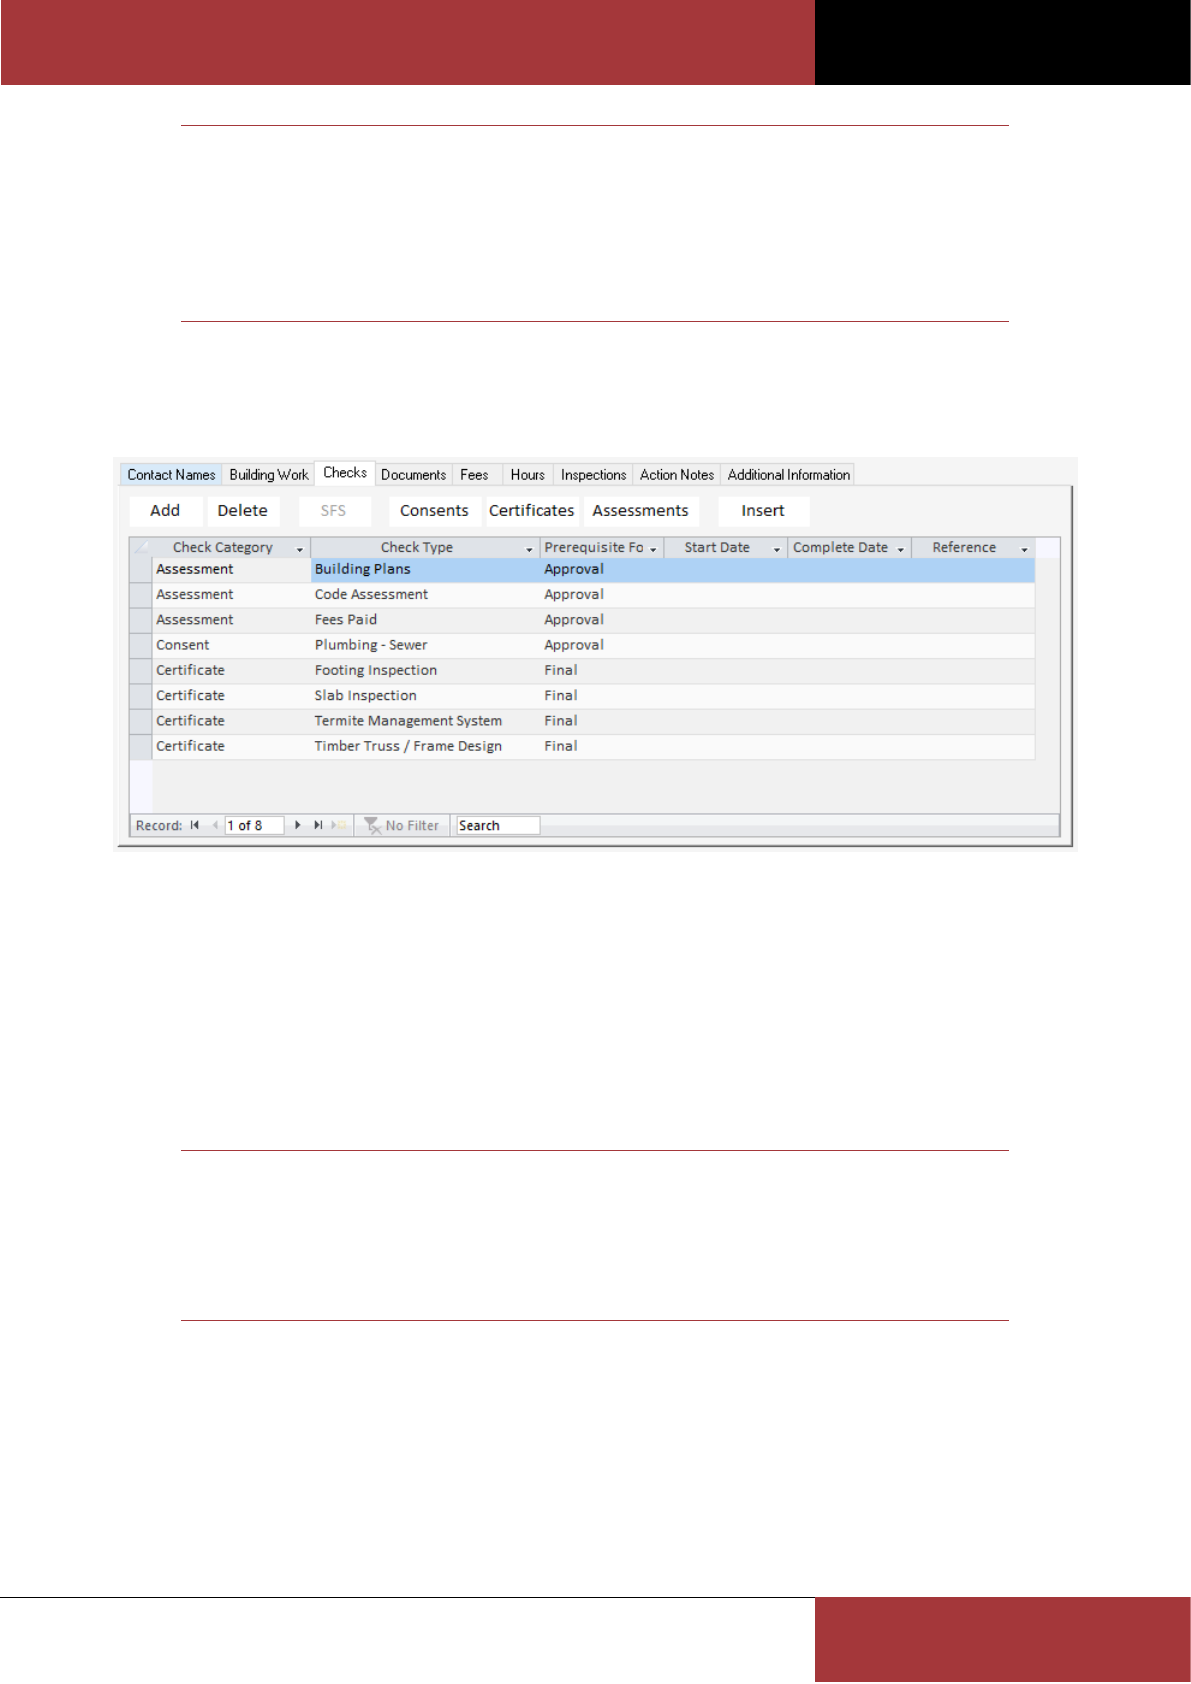
Building Work Tab
The Building Work tab is where you enter the application’s proposed building work details. If needed, you can enter
multiple structure and classification descriptions.
While the Structure Type list of values contains most of the structure descriptions you are likely to encounter, you can
easily add your own structure codes using the Codes form.
The QBCC Permit Required, QBCC Insurance Required and QLeave Levy Required fields are used to indicate that a
permit/receipt sighting is required prior to approval of the application. Permit/Receipt sightings are recorded and
claimed using the Sighting Claims form. The Local Authority Building DA Reference field allows you to record the Local
Authority's reference for the application.
BC OFFICE USER GUIDE
ROSZE.COM
COPYRIGHT © ROSZE PTY LTD
36
Note
If a QBCC Permit, QBCC Insurance or QLeave Levy receipt sighting is required, the application
cannot be approved until the sighting details have been recorded using the Sighting Claims
form.
All mandatory fields are highlighted by a bolded field label or CAPITALISED column label.
Mandatory fields must contain a valid value before any changes can be saved.
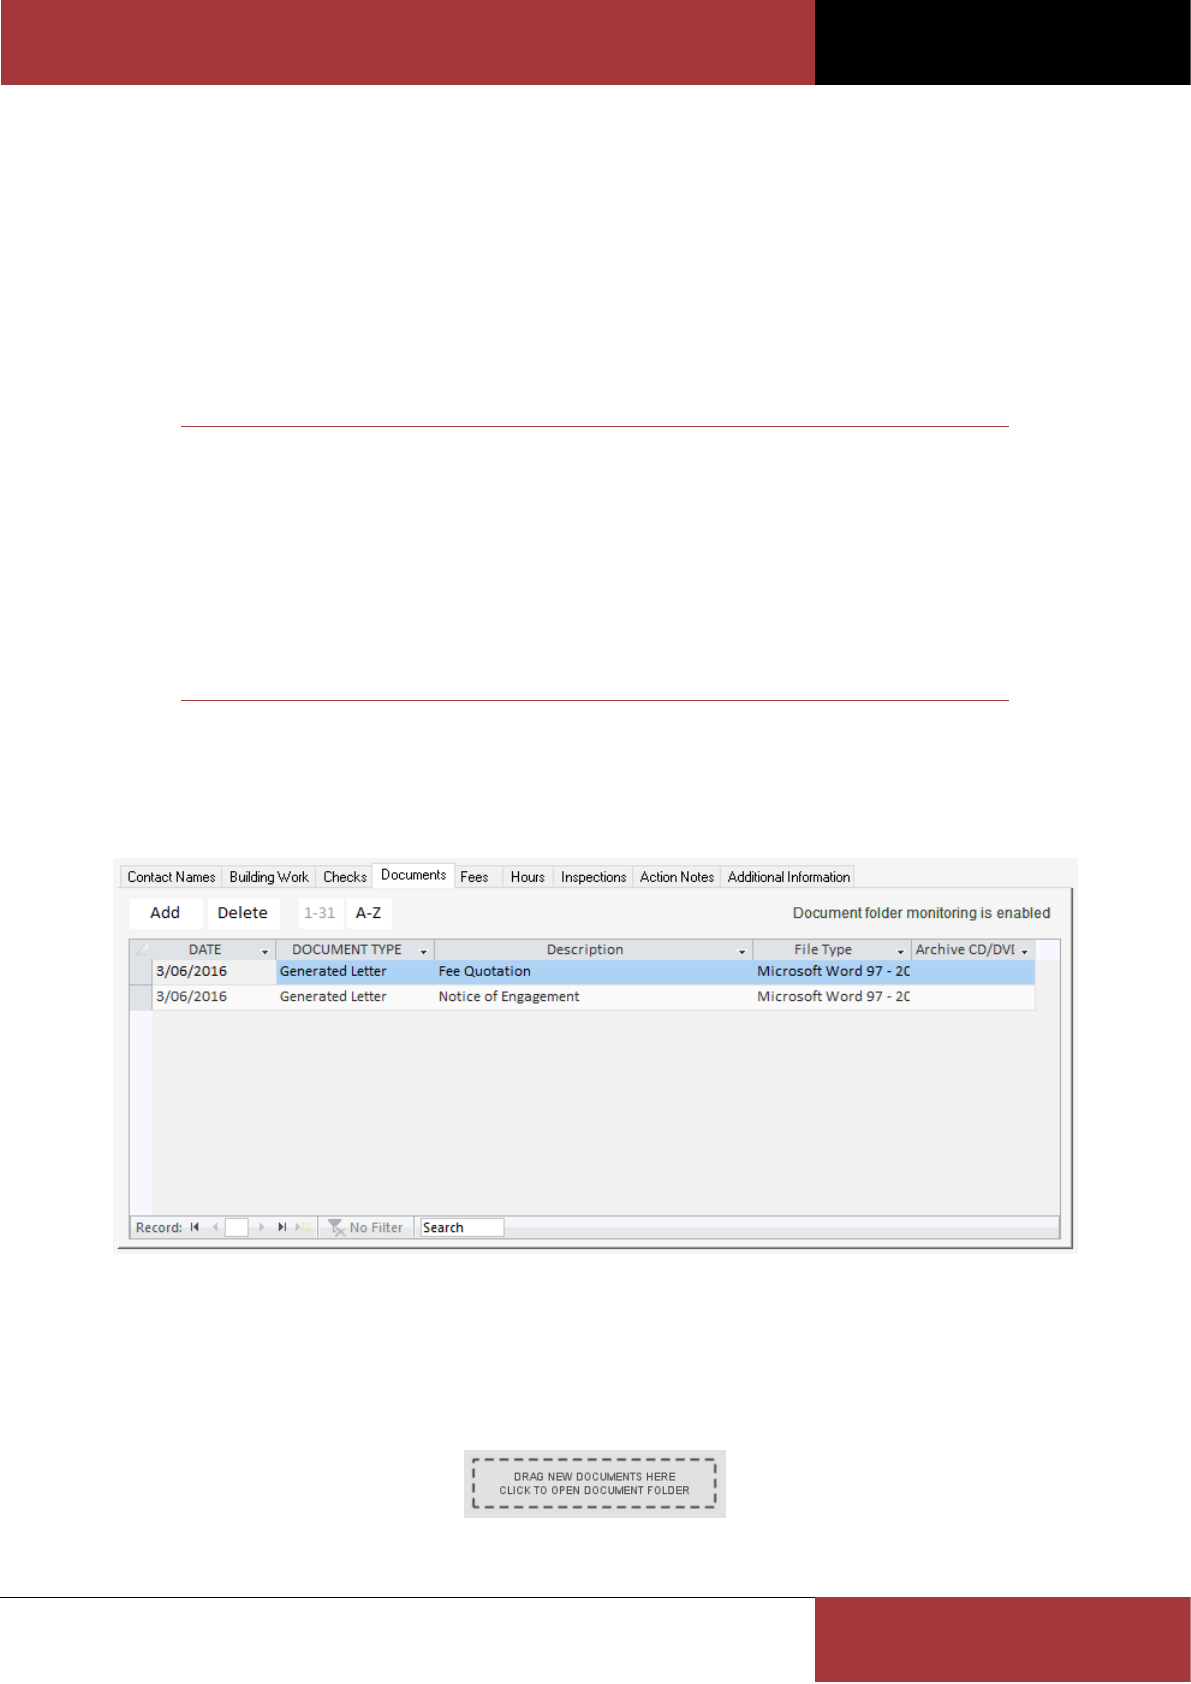
Checks Tab
The Checks tab allows you to create a custom processing checklist for the application. Using these checks you can
prevent an application from being approved or finalised until all required prerequisite checks have been completed.
To add a new check, via the Check form, click the Add button.
The open the check once created, simply double click on the check record.
To delete an existing check, click the Delete button.
The SFS (Special Fire Services) button (visible only after the Special Fire Services consent check is added) is used to
open the Special Fire Services form.
To print a checks report for each category of checks use the Consents, Certificates and Assessments buttons.
Hint
Consider using the check reports as an appendix to your generated letters to notify the
applicant of any required consents and/or certificates required for the application.
These reports will also include the check comments which can be used to record any referral
agency comments/conditions.
The Insert button is used to open the Insert Checks form from which multiple checks can be added using a predefined
check group.
The Check Category field categorises each check as one of the following:
Consent – these checks are used to record any referral agency consents or approvals which are required for the
proposed building work
BC OFFICE USER GUIDE
ROSZE.COM
COPYRIGHT © ROSZE PTY LTD
37
Certificate – these checks are used to record any design, inspection or aspect certificates which are required for
the proposed building work
Assessment – these checks are used to record the key checks undertaken in assessing the application
The Prerequisite For field allows you to define weather the check is required to be completed prior to approving the
application or passing the application’s final inspection. When set to Approval the application cannot be approved
until the check’s Completed Date value is entered. When set to Final the application cannot be finaled until the
check’s Completed Date value is entered.
While the Check Type list of values contains a useful default set of check types, you can easily add your own check
type codes using the Codes form.
Note
All Consent and Assessment category checks will default to the Approval prerequisite
(except for the Plumbing - Sewer check type).
All Certificate category checks will default to the Final prerequisite.
When the Special Fire Services check type is selected the Special Fire Services command
button is enabled.
All mandatory fields are highlighted by a bolded field label or CAPITALISED column label.
Mandatory fields must contain a valid value before any changes can be saved.
Documents Tab
The Documents tab is used to link external files to the application by either importing files (e.g. photos, document,
scanned plans etc) or generating Microsoft Word merge letters. Documents can be sorted by either date added (1-31)
or by document type and description (A-Z).
To import a new document, click the Add button. Once the document is imported you should enter a meaningful
document description as the description is used to help you identify the document when viewed within BC Office.
You can also import new documents by dragging and dropping the document files from Windows Explorer onto the
Application form’s drop zone or by placing the document files directly in the application’s document archive folder
(requires the Document folder monitoring preference to be enabled).
BC OFFICE USER GUIDE
ROSZE.COM
COPYRIGHT © ROSZE PTY LTD
38
Note
When importing a file, a copy of the file will be taken and stored in the BC Office document
archive leaving the original file untouched. BC Office references the copied version of the
file allowing you to remove the original file if desired.
You should never rename or remove files directly from the BC Office document archive.
To generate a new Microsoft Word merge letter, click on the Letters command button. While BC Office contains a
comprehensive set of merge templates, based on the Queensland building regulations, you can easily add your own
merge templates using the Merge Templates form.
To open the document once linked, simply double click on the document record.
To delete an existing document, click the Delete button.
Note
As generated merge letters are automatically linked to the application their Document Type
cannot be changed.
All mandatory fields are highlighted by a bolded field label or CAPITALISED column label.
Mandatory fields must contain a valid value before any changes can be saved.
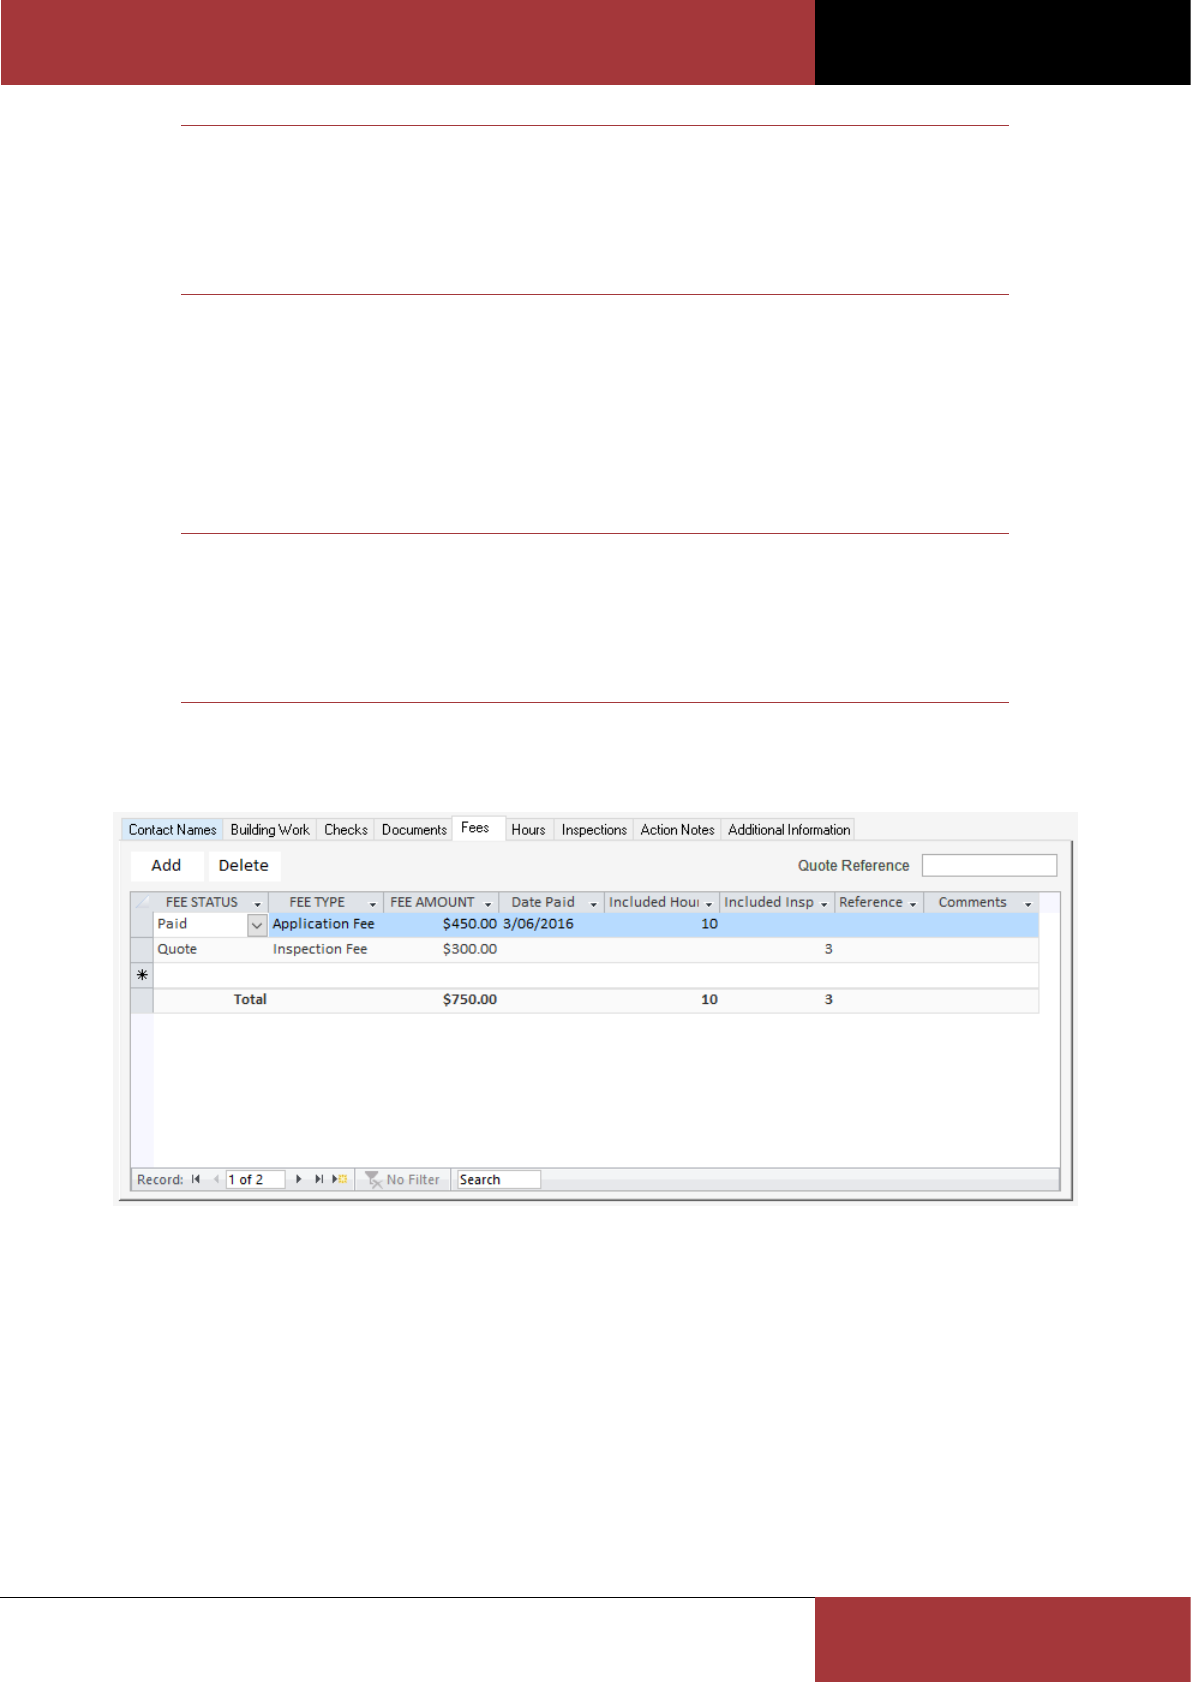
Fees Tab
The Fees tab allows you to record any fees which have been quoted, unpaid or paid for the application.
To add a new fee, click the Add button.
To delete an existing Fee, click the Delete button.
The Quote Reference field can be used to record your formal quote reference number if a quote has been issued. This
field along with all Quote fees will be used on the Fee Quotation merge letter.
The Included Hours and Included Inspections fields are used to record the number of hours and/or inspections which
have been quoted, unpaid or paid for the application. This information is then used by the Fee Credit/Debit
Application Register report. The Reference field can optionally be used to record the fee’s receipt/tax invoice number,
issued by your financial application.
BC OFFICE USER GUIDE
ROSZE.COM
COPYRIGHT © ROSZE PTY LTD
39
While the Fee Type list of values contains a number of common fee types, you can easily add your own fee type codes
using the Codes form.
Note
The hours and inspection fee status information, located beneath the Certified By field,
provides a quick update on the application’s number of paid hours/inspections and
completed (fee required) hours/inspections.
The Fee Credit/Debit Application Register report can be used to obtain a list of all
applications which have had more completed (fee required) hours/inspections than paid
hours/inspections.
All mandatory fields are highlighted by a bolded field label or CAPITALISED column label.
Mandatory fields must contain a valid value before any changes can be saved.
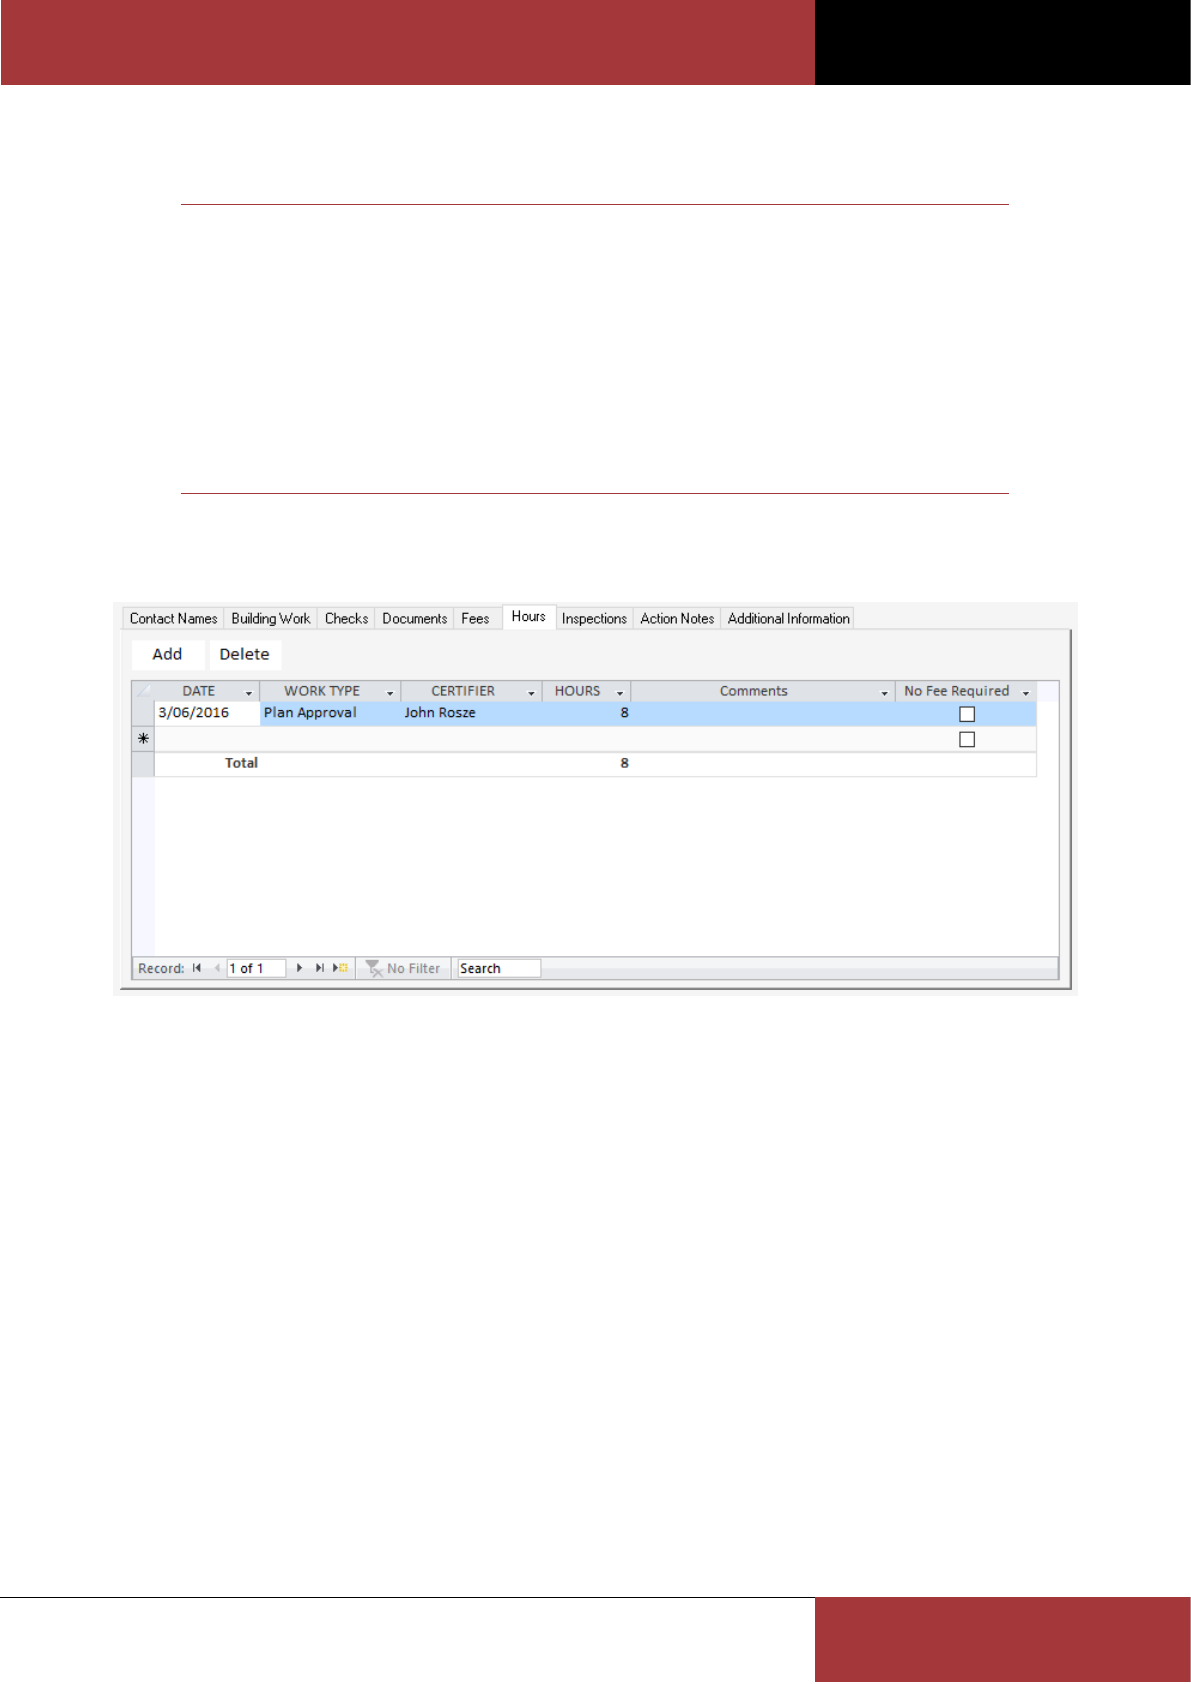
Hours Tab
The Hours tab records all hours worked on the application.
To add new hours worked, click the Add button.
To delete existing hours worked, click the Delete button.
The No Fee Required option allows the current hours worked to be excluded from the Fee Credit/Debit Application
Register report.

BC OFFICE USER GUIDE
ROSZE.COM
COPYRIGHT © ROSZE PTY LTD
40
Note
The hours and inspection fee status information, located beneath the Certified By field,
provides a quick update on the application’s number of paid hours/inspections and
completed (fee required) hours/inspections.
The Hours Worked Report can be used to track the total number of hours worked per
application and/or certifier within the selected reporting period.
The Fee Credit/Debit Application Register report can be used to obtain a list of all
applications which have had more completed (fee required) hours/inspections than paid
hours/inspections.
All mandatory fields are highlighted by a bolded field label or CAPITALISED column label.
Mandatory fields must contain a valid value before any changes can be saved.
Inspections Tab
The Inspections tab records all inspections undertaken on the building work during construction. Both inspections
conducted by the Building Certifier and by other competent persons (i.e. engineers etc) can be recorded here.
To add a new inspection, via the Inspection form, click the Add button.
The open the inspection once created, simply double click on the inspection record.
To delete an existing inspection, click the Delete button.
The No Fee Required option allows the current inspection to be excluded from the Fee Credit/Debit Application
Register report.
Note
When a Satisfactory Final inspection is entered the application Status will be set to Finaled.
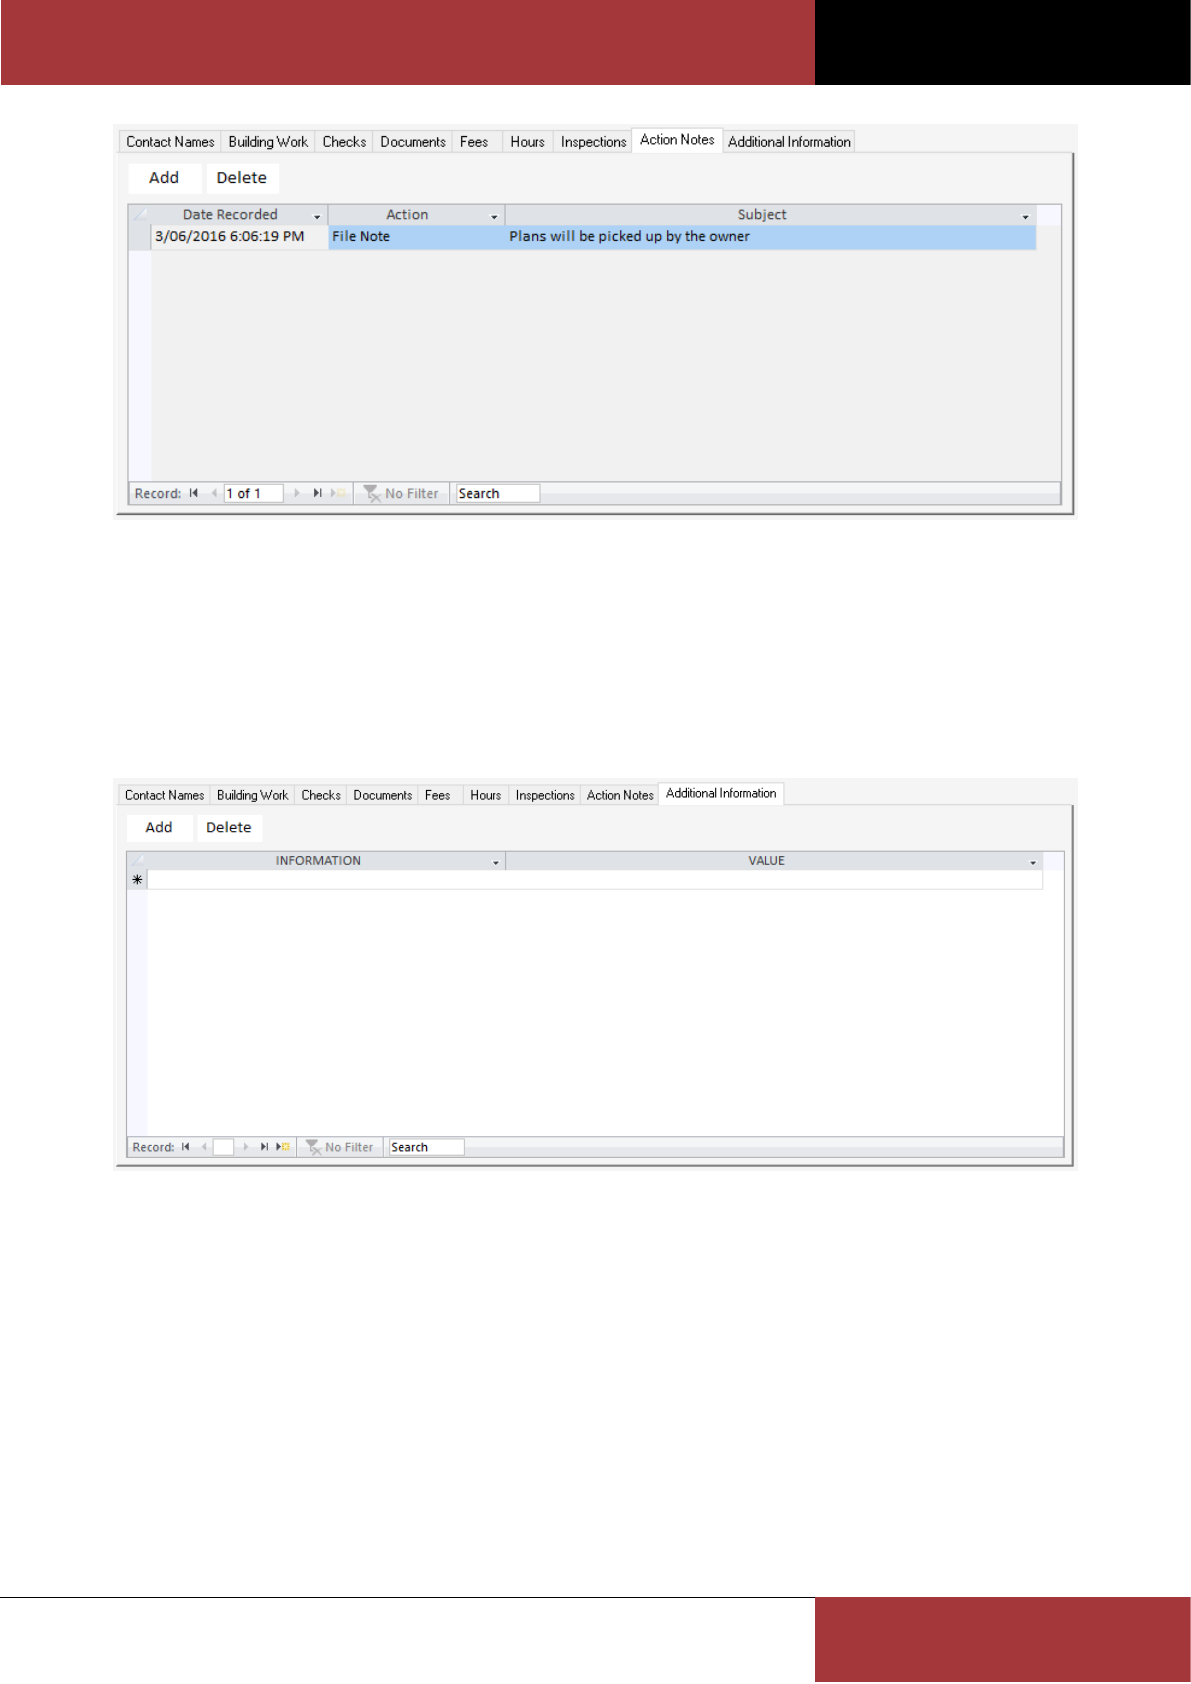
Action Notes Tab
The Action Notes tab allows you to record any additional notes against the application. These notes can be a record of
a telephone conversation or meeting and may include a file attachment.
BC OFFICE USER GUIDE
ROSZE.COM
COPYRIGHT © ROSZE PTY LTD
41
To add a new action note, via the Action Note form, click the Add button.
The open the action note once created, simply double click on the action note record.
To delete an existing action note, click the Delete button.
Additional Information Tab
The Additional Information tab allows you to record any additional miscellaneous information against the application.
To add new additional information, click the Add button.
To delete existing additional information, click the Delete button.
You can easily add your own additional information codes using the Codes form.
This feature allows you to define your own extra information fields, in order to extend the information which can be
recorded against the application. You can then later report on applications which are assigned these extra fields,
using the Additional Information Reporting form.
BC OFFICE USER GUIDE
ROSZE.COM
COPYRIGHT © ROSZE PTY LTD
42
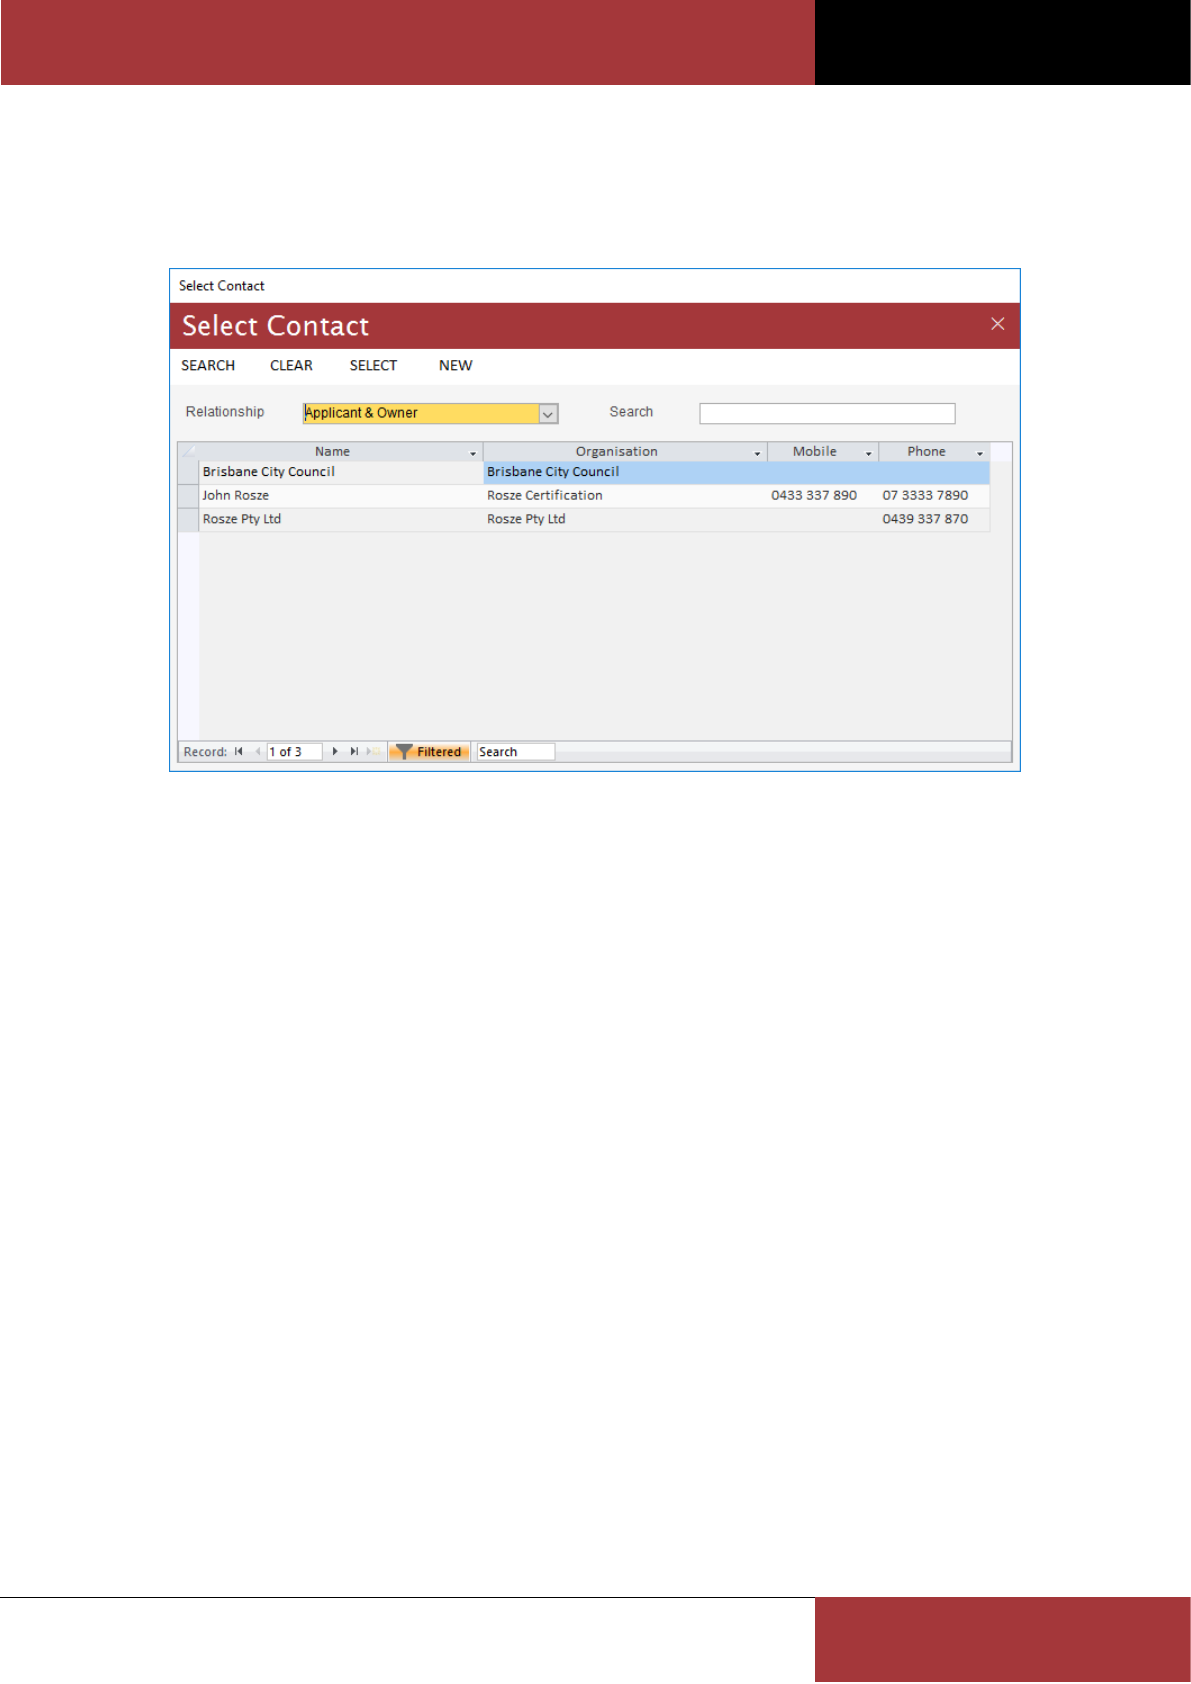
Using the Select Contact form
The Select Contact form is used to add contact relationships to the application. Using this form you can search the
Address Book for the required contact and, if needed, you can add a new contact to the Address Book before adding
the relationship to the application.
To add a new contact relationship, follow these simple steps:
1. From the Application form’s Contact Names tab, click on the Add button.
2. On the Select Contact form, select the Relationship type for this contact.
3. Using the search criteria perform a search for this contact.
4. If the contact is not in the Address Book, click the New command button and follow the usual steps to create
the new contact using the Address Book Contact form. Once the contact is entered perform the search again to
find the contact.
5. Highlight the contact entry and click the Select command button to create the contact relationship and return
to the Application form.
If the owner or builder is also the applicant you can create all relationships at once, by selecting one of the multi-
relationship types in Step 2 above. In the above screenshot, the applicant is also the owner and both relationships are
being created by selecting the Applicant & Owner Relationship type.
BC OFFICE USER GUIDE
ROSZE.COM
COPYRIGHT © ROSZE PTY LTD
43
Note
If you can’t find an existing contact for the selected relationship make sure the contact is a
member of the associated group. To add the contact to the group, use the Address Book
form to locate the contact (under the ALL CONTACTS group) and edit the contact’s group
details.
If you create a second owner, applicant or builder relationship the existing relationship will
be updated to the Owner (Previous), Applicant (Previous) or Builder (Previous) relationship.
All merge documents will be generated using the current relationship details only.
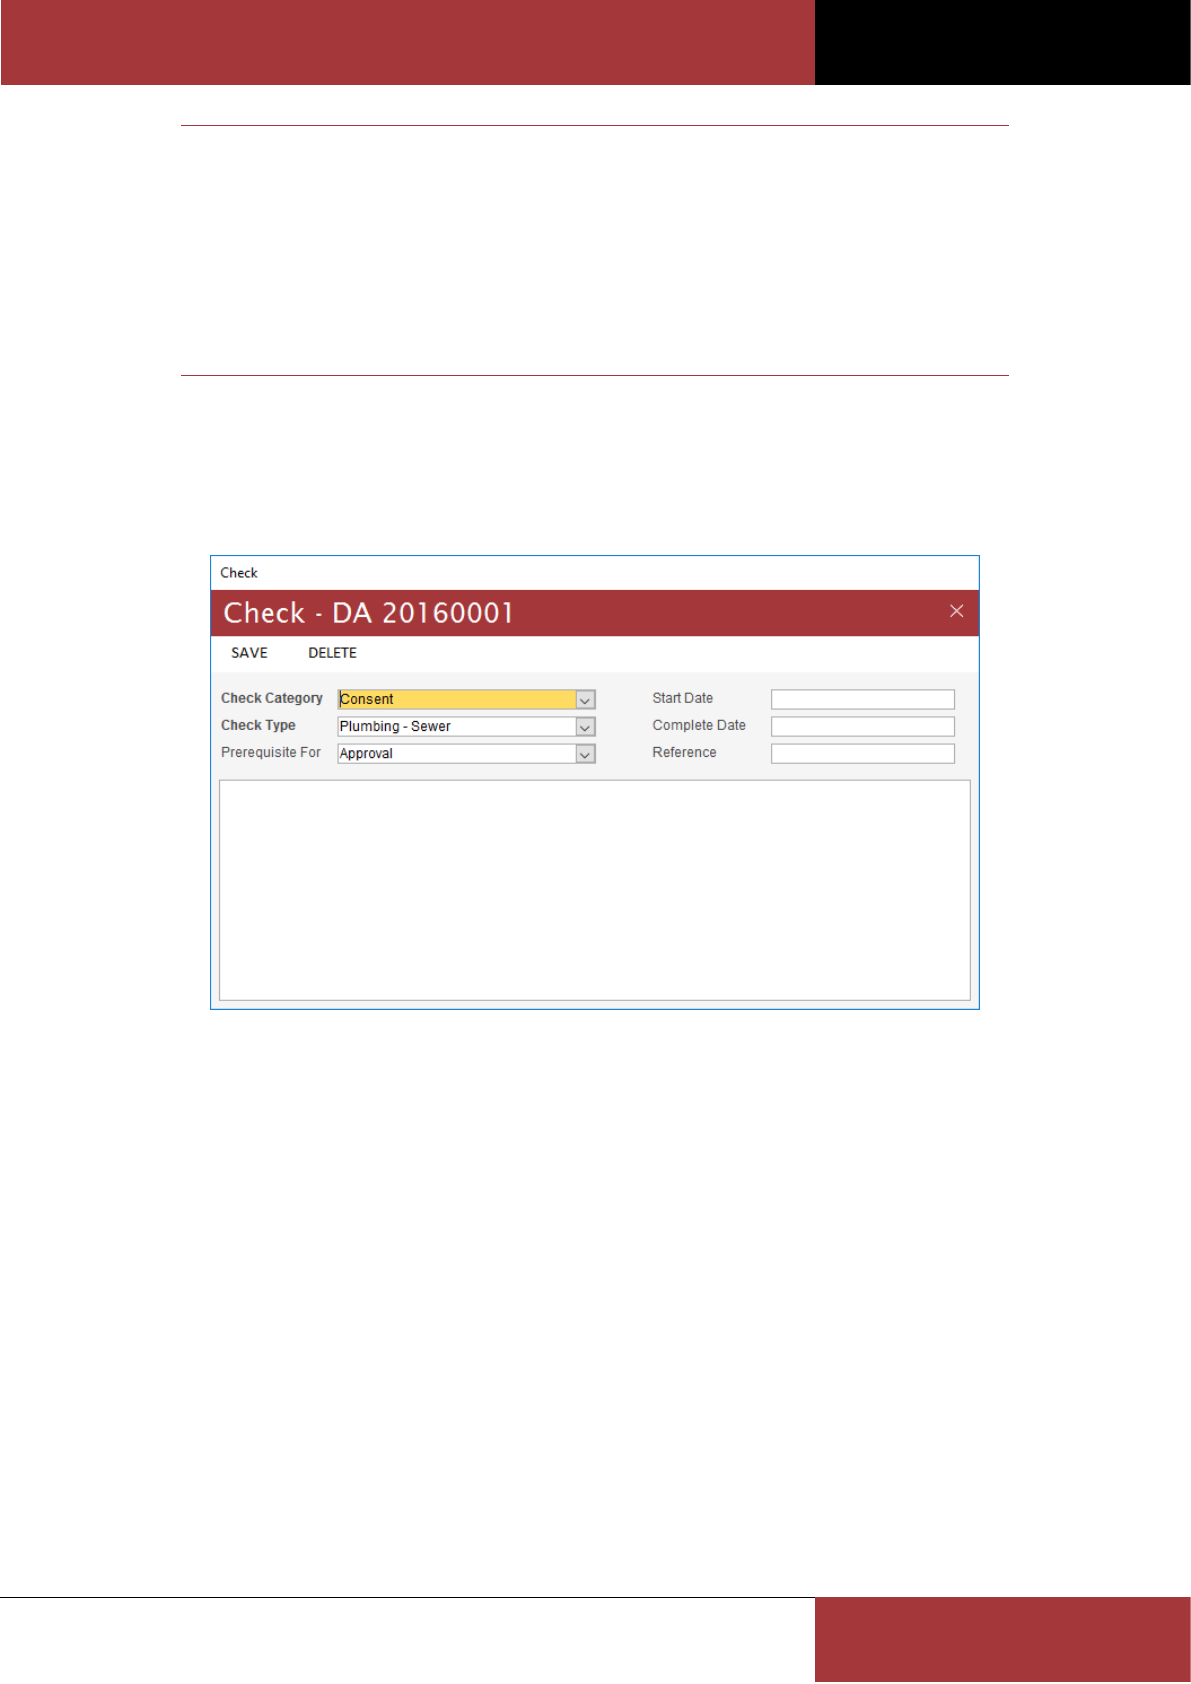
Using the Check form
The Check form is used to add and maintain checks on the application. Using these checks you can create a
customised checklist for each application. You can also prevent the application from being approved or finalised until
all required prerequisite checks have been completed.
The Check Category field categorises each check as one of the following:
Consent – these checks are used to record any referral agency consents or approvals which are required for the
proposed building work
Certificate – these checks are used to record any design, inspection or aspect certificates which are required for
the proposed building work
Assessment – these checks are used to record the key checks undertaken in assessing the application
The Prerequisite For field allows you to define weather the check is required to be completed prior to approving the
application or passing the application’s final inspection. When set to Approval the application cannot be approved
until the check’s Completed Date value is entered. When set to Final the application cannot be finaled until the
check’s Completed Date value is entered.
While the Check Type list of values contains a useful default set of check types, you can easily add your own check
type codes using the Codes form.
BC OFFICE USER GUIDE
ROSZE.COM
COPYRIGHT © ROSZE PTY LTD
44
Note
All Consent and Assessment category checks will default to the Approval prerequisite
(except for the Plumbing - Sewer check type).
All Certificate category checks will default to the Final prerequisite.
All mandatory fields are highlighted by a bolded field label or CAPITALISED column label.
Mandatory fields must contain a valid value before any changes can be saved.
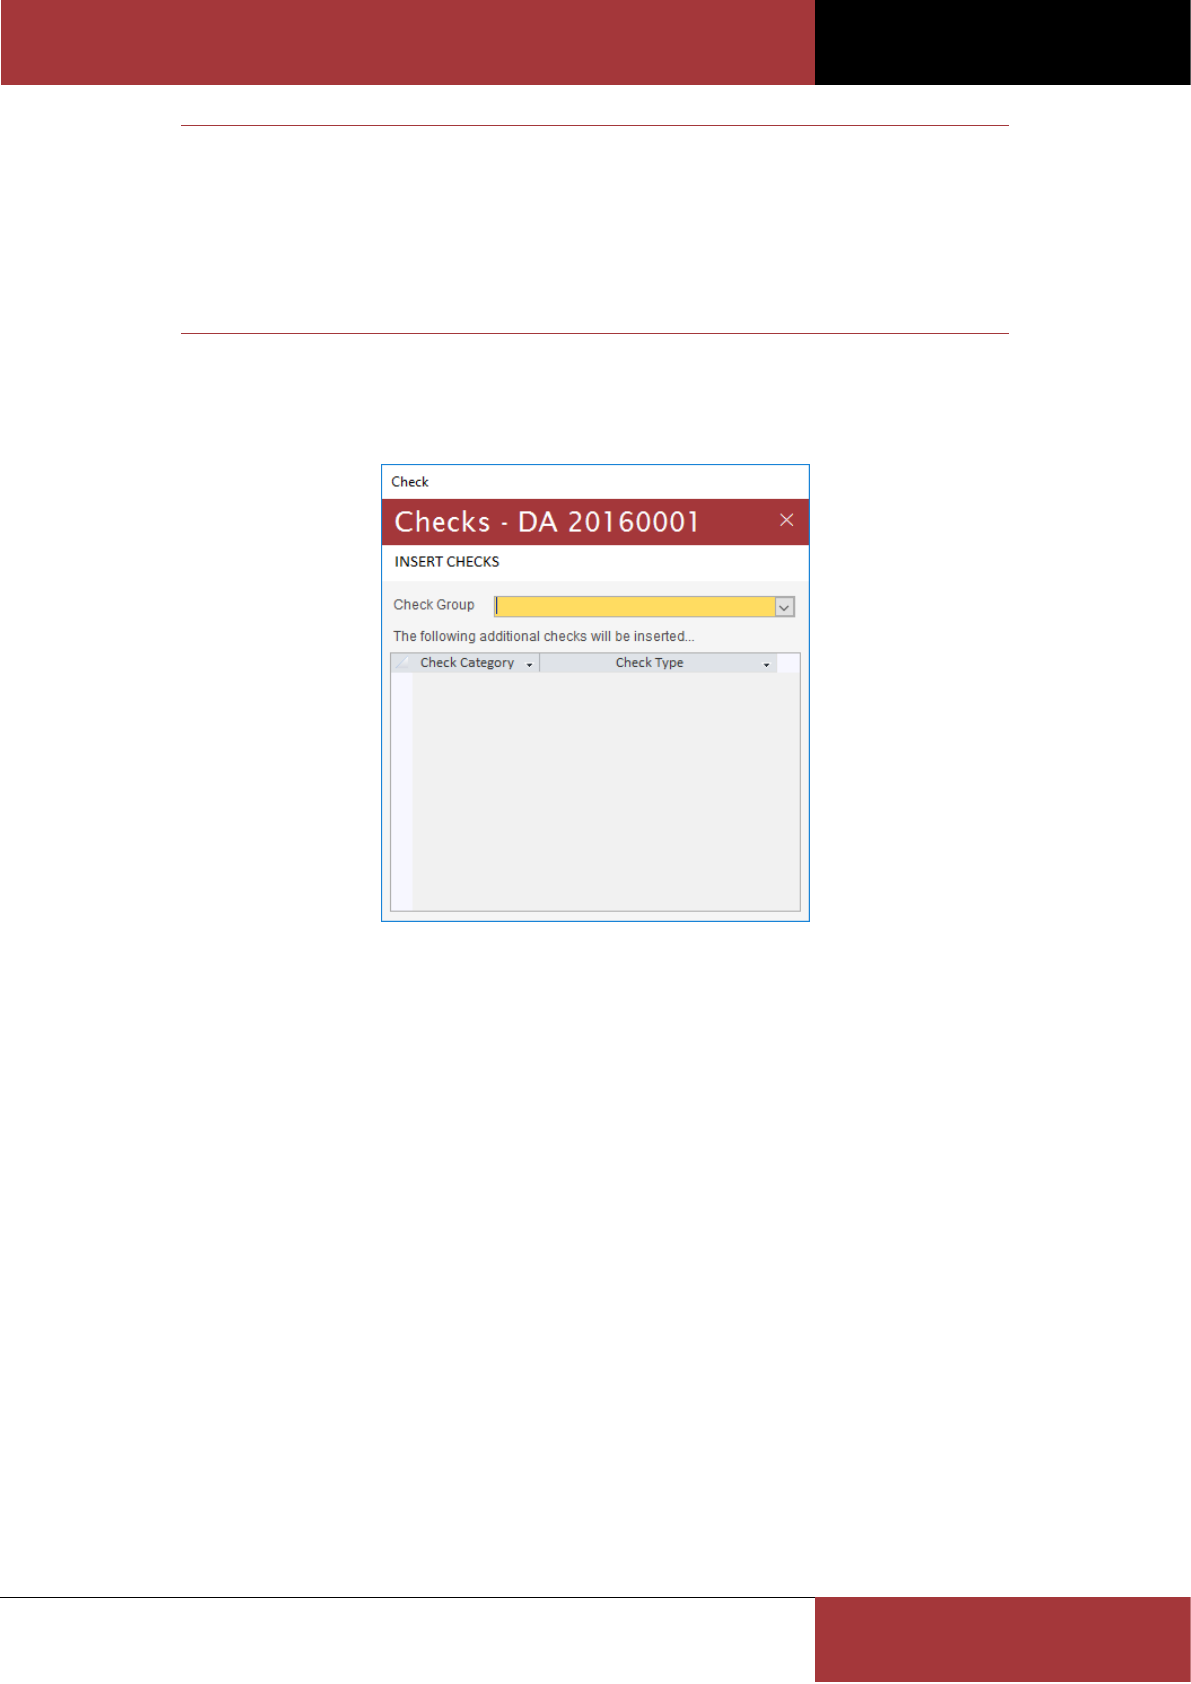
Using the Insert Checks form
The Insert Checks form allows you to add multiple checks using predefined check groups.
To add new checks, follow these simple steps:
1. Select the required Check Group.
2. Review the checks which will be inserted to confirm you wish to proceed. Only additional checks which have
not already been added to the application will be inserted.
3. Click the Insert Checks command button to add each of the checks and return to the Application form.
Check Groups are fully customisable, using the Preferences form, and can be used to create comprehensive checklist
templates.
Using the Special Fire Services form
The Special Fire Services form is used to record any Special Fire Services which may be required to be assessed by the
referral agency (e.g. the Queensland Fire and Emergency Services).

BC OFFICE USER GUIDE
ROSZE.COM
COPYRIGHT © ROSZE PTY LTD
45
Note
To open the Special Fire Services form you must first add the Special Fire Services consent
check type to the application then click on the Special Fire Services button on the Checks
tab.
Using the Inspection form
The Inspection form is used to add and maintain inspections undertaken on the application’s building works.
While the Inspection Type and Result list of values contains most of the inspection types and results you are likely to
need, you can easily add your own inspection type and result codes using the Codes form.
The No Fee Required option allows the current inspection to be excluded from the Fee Credit/Debit Application
Register report.
BC OFFICE USER GUIDE
ROSZE.COM
COPYRIGHT © ROSZE PTY LTD
46
Note
When adding a new inspection, a value for one of the Inspection Date or Certificate Date
(e.g. date of the engineer's certificate) fields must be entered.
You cannot enter a Final inspection unless the application has first been approved and all
prerequisite checks have been completed.
When a Satisfactory Final inspection is entered the application Status will be set to Finaled.
All mandatory fields are highlighted by a bolded field label or CAPITALISED column label.
Mandatory fields must contain a valid value before any changes can be saved.
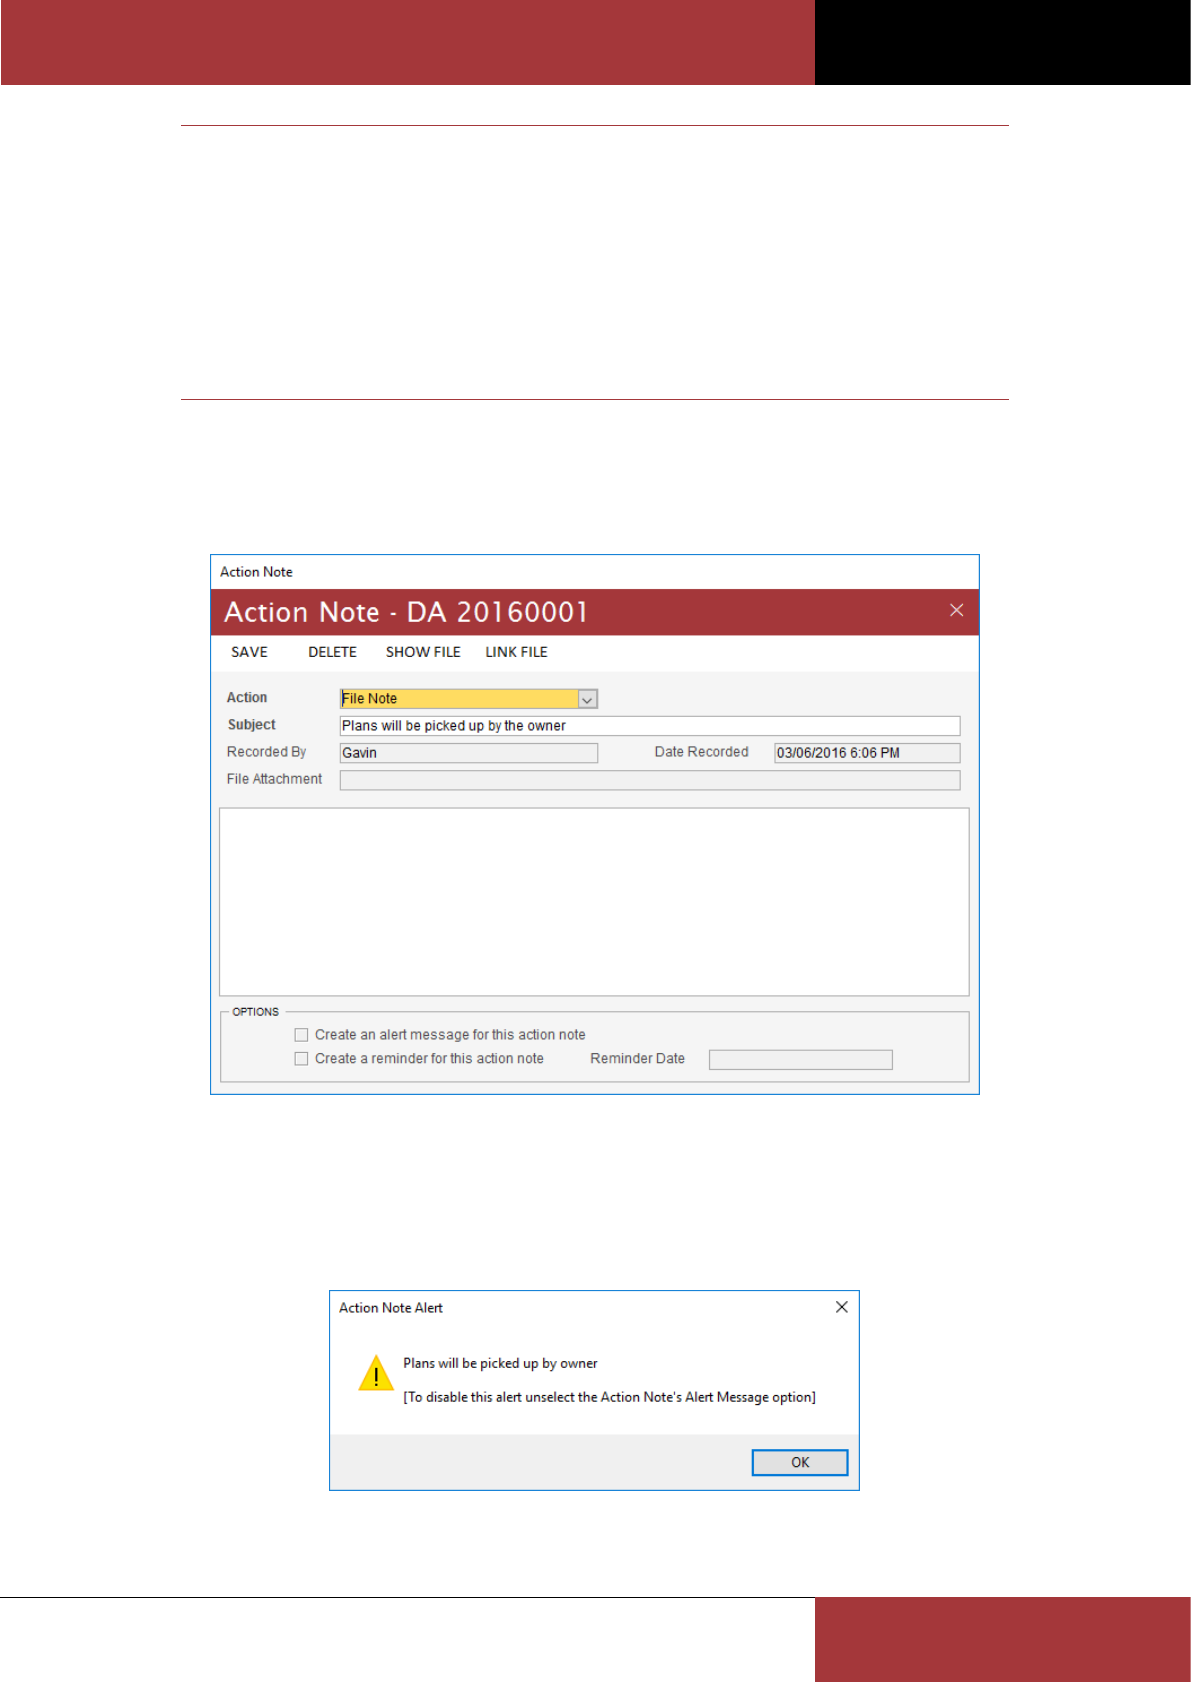
Using the Action Note form
The Action Notes form allows you to add and maintain action notes. These notes can be a record of a telephone
conversation, a meeting or any other action which may have occurred which relates to the application.
The Create an alert message option allows you to create an alert message which will be displayed to each user on
opening of the Application form. Alert messages allow you to notify the user of any important information they
should know about when dealing with this application.
The above Action Note screenshot will produce the following alert message for each user viewing the application. To
deactivate an alert message, simply unselect the Create an alert message option on the Action Note form.
BC OFFICE USER GUIDE
ROSZE.COM
COPYRIGHT © ROSZE PTY LTD
47
The Create a reminder option allows the current action note to be defined as a reminder. Upcoming reminders are
shown on the Dashboard. If any reminders are due today, an alert message will be displayed to each user when
opening BC Office. To deactivate a reminder, simply unselect the Create a reminder option on the Action Note form.
You can also create a link to an external file using the Link File command button. To open the file once linked click on
the Show File command button.
While the Action list of values contains most of the actions you are likely to need, you can easily add your own action
codes using the Codes form.
Note
Linked files on the Action Note form are not imported into the BC Office document archive.
These files will be referenced from their current location.
When opening the linked file, the system will use your Microsoft Windows file association
settings to locate the file’s application.
All mandatory fields are highlighted by a bolded field label or CAPITALISED column label.
Mandatory fields must contain a valid value before any changes can be saved.
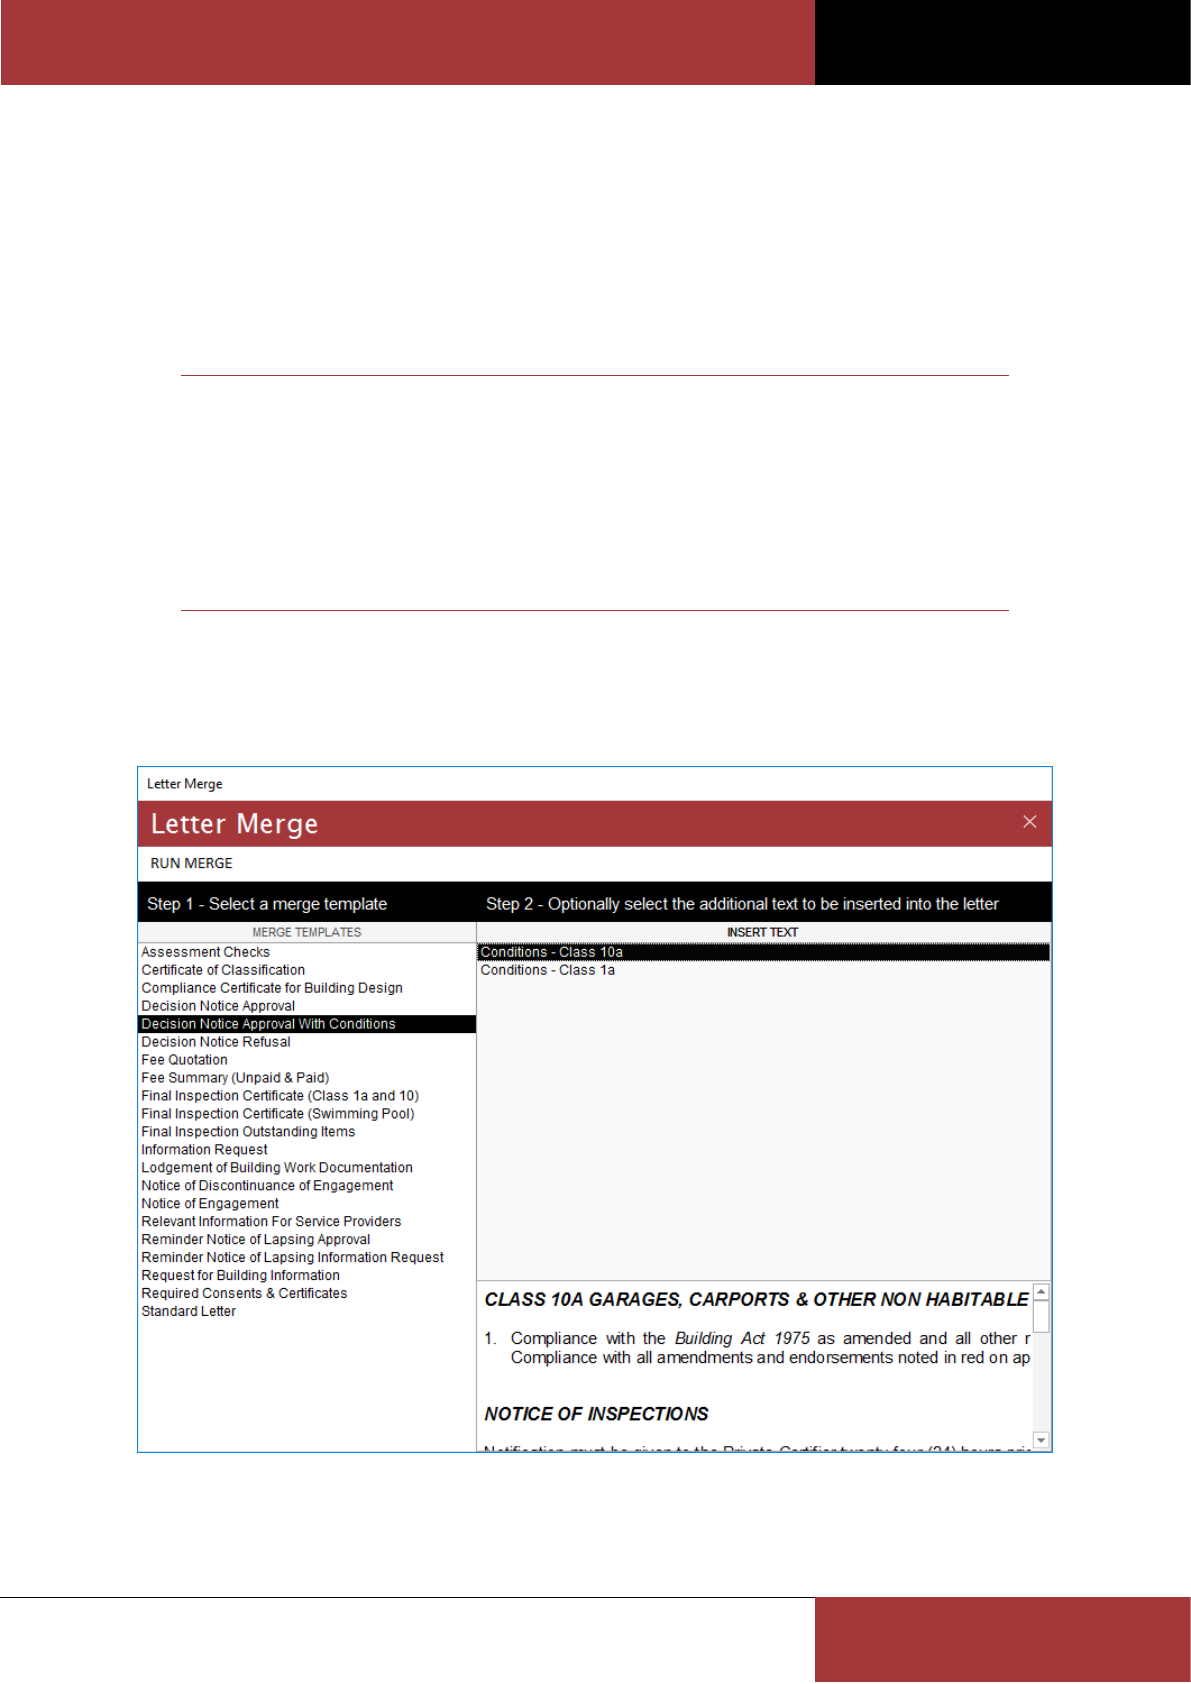
Using the Letter Merge form
The Letter Merge form is used to perform a letter merge in Microsoft Word. The Letter Merge form can be opened by
clicking on the Letters command button on the Application form.
To generate a new Microsoft Word merge letter, you can double click on the required merge template or highlight the
required merge template and click on the Run Merge command button.
BC OFFICE USER GUIDE
ROSZE.COM
COPYRIGHT © ROSZE PTY LTD
48
If the merge template includes Insert Text then you must select one or more Insert Text values to include in the
generated merge letter. If more than one Insert Text value is selected, then they will be combined into a single insert
value when merged with the template. The above screenshot shows a template with a single Insert Text value chosen.
When a single Insert Text value is highlighted a preview for that value will also be shown.
While the list of available merge templates contains most of the templates you will need, you can easily add your own
merge templates using the Merge Templates form. The Merge Templates form is also used to create and maintain the
Insert Text values.
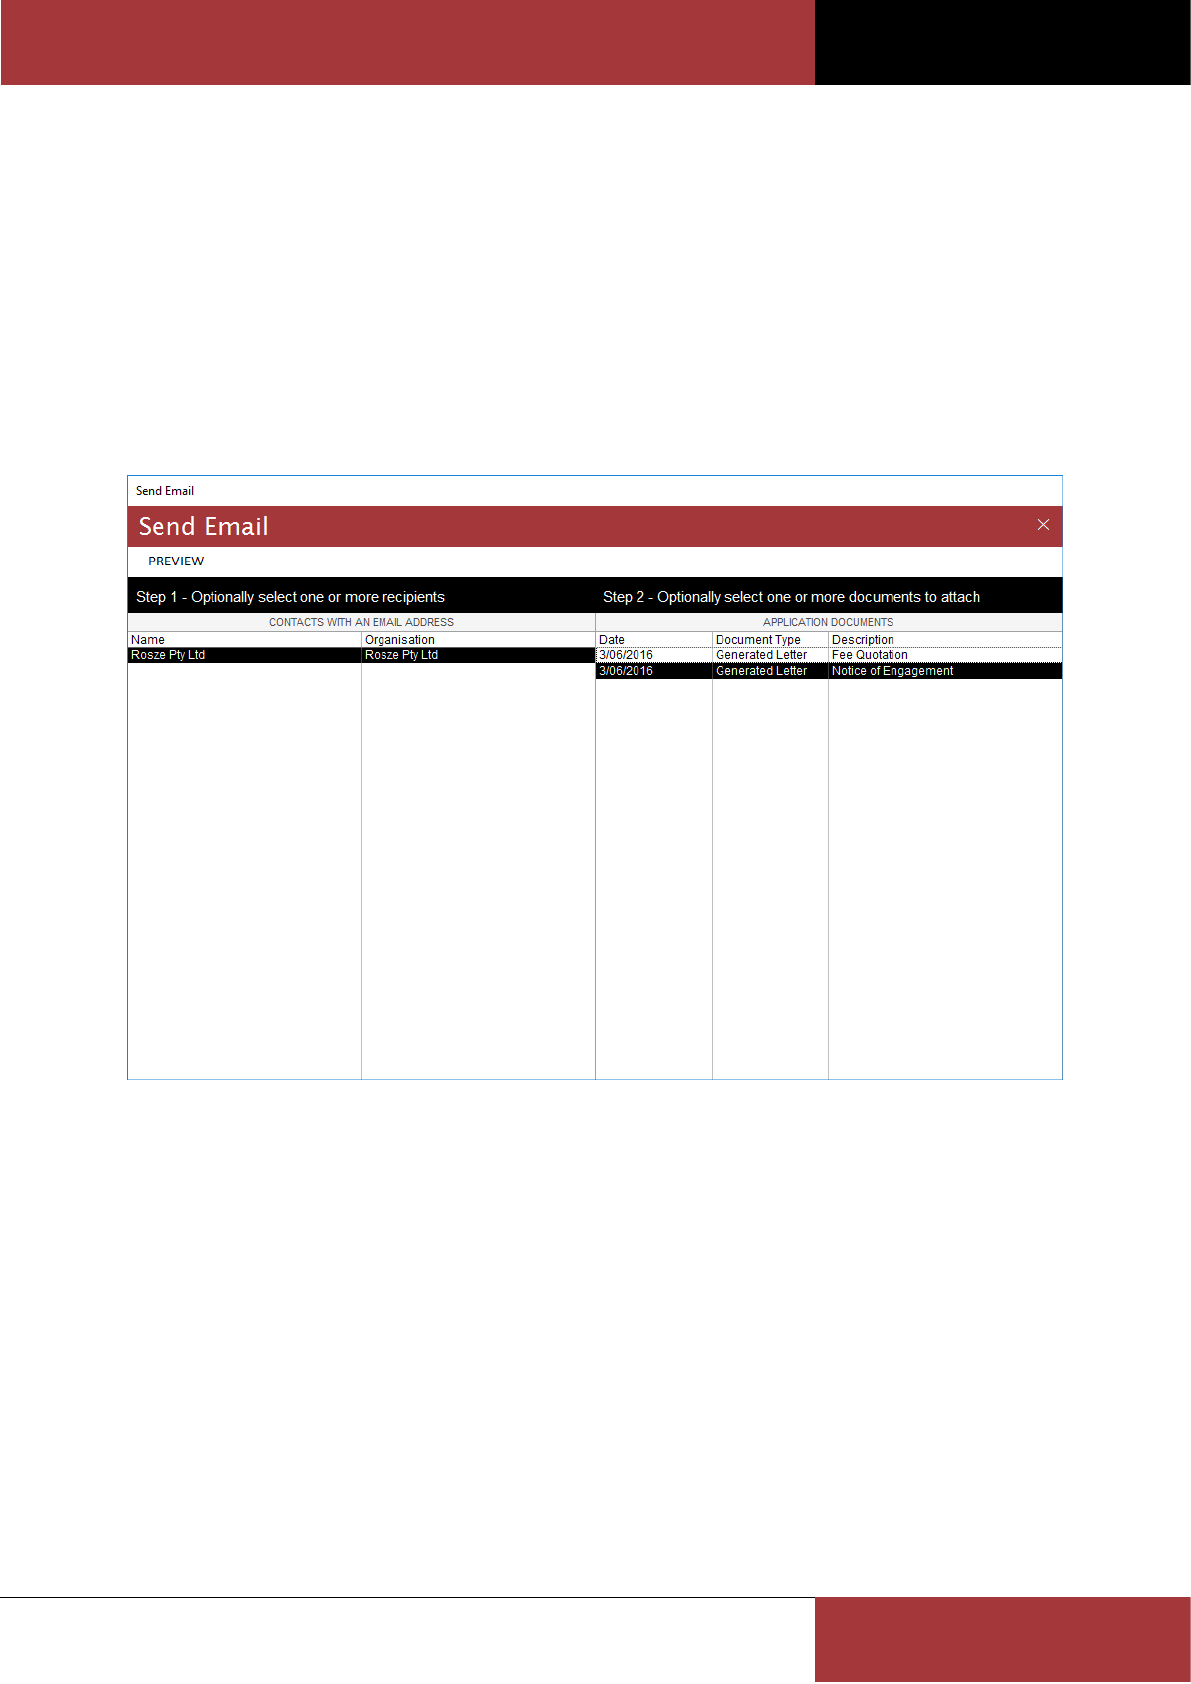
Using the Send Email form
The Send Email form is used to send an email using your local Microsoft Outlook client. The Send Email form can be
opened by clicking on the Email command button on the Application form.
To preview the Microsoft Outlook email, you can optionally select one or more application contacts and document
attachments and click on the Preview command button.
Only application contacts with a current email address will be shown in the contact list. If you don’t select a contact,
you will need to enter the recipient email address directly using Microsoft Outlook once the email has been
previewed.
BC OFFICE USER GUIDE
ROSZE.COM
COPYRIGHT © ROSZE PTY LTD
49
Note
You must have a configured Microsoft Outlook client installed in order to send emails from
BC Office.
The Email command button on the Address Book and Calendar forms will open the
Microsoft Outlook email preview directly.
Using the Label Merge form
The Label Merge form is used to perform a label merge in Microsoft Word. The Label Merge form can be opened by
clicking on the Labels command button, on the Find Application form.
To print a set of labels, use the Find Application form to select one or more applications to be used for the label
merge, then open the Label Merge form, select the required Label Type and click on the Run Merge command button
to generate the label merge.
The Cover Sheet Label merge will generate a set of labels, similar to the following, which can be used to stick on the
front cover of the application folder.
The Envelope Label merge will generate a set of labels, similar to the following, which can be used as envelope labels.
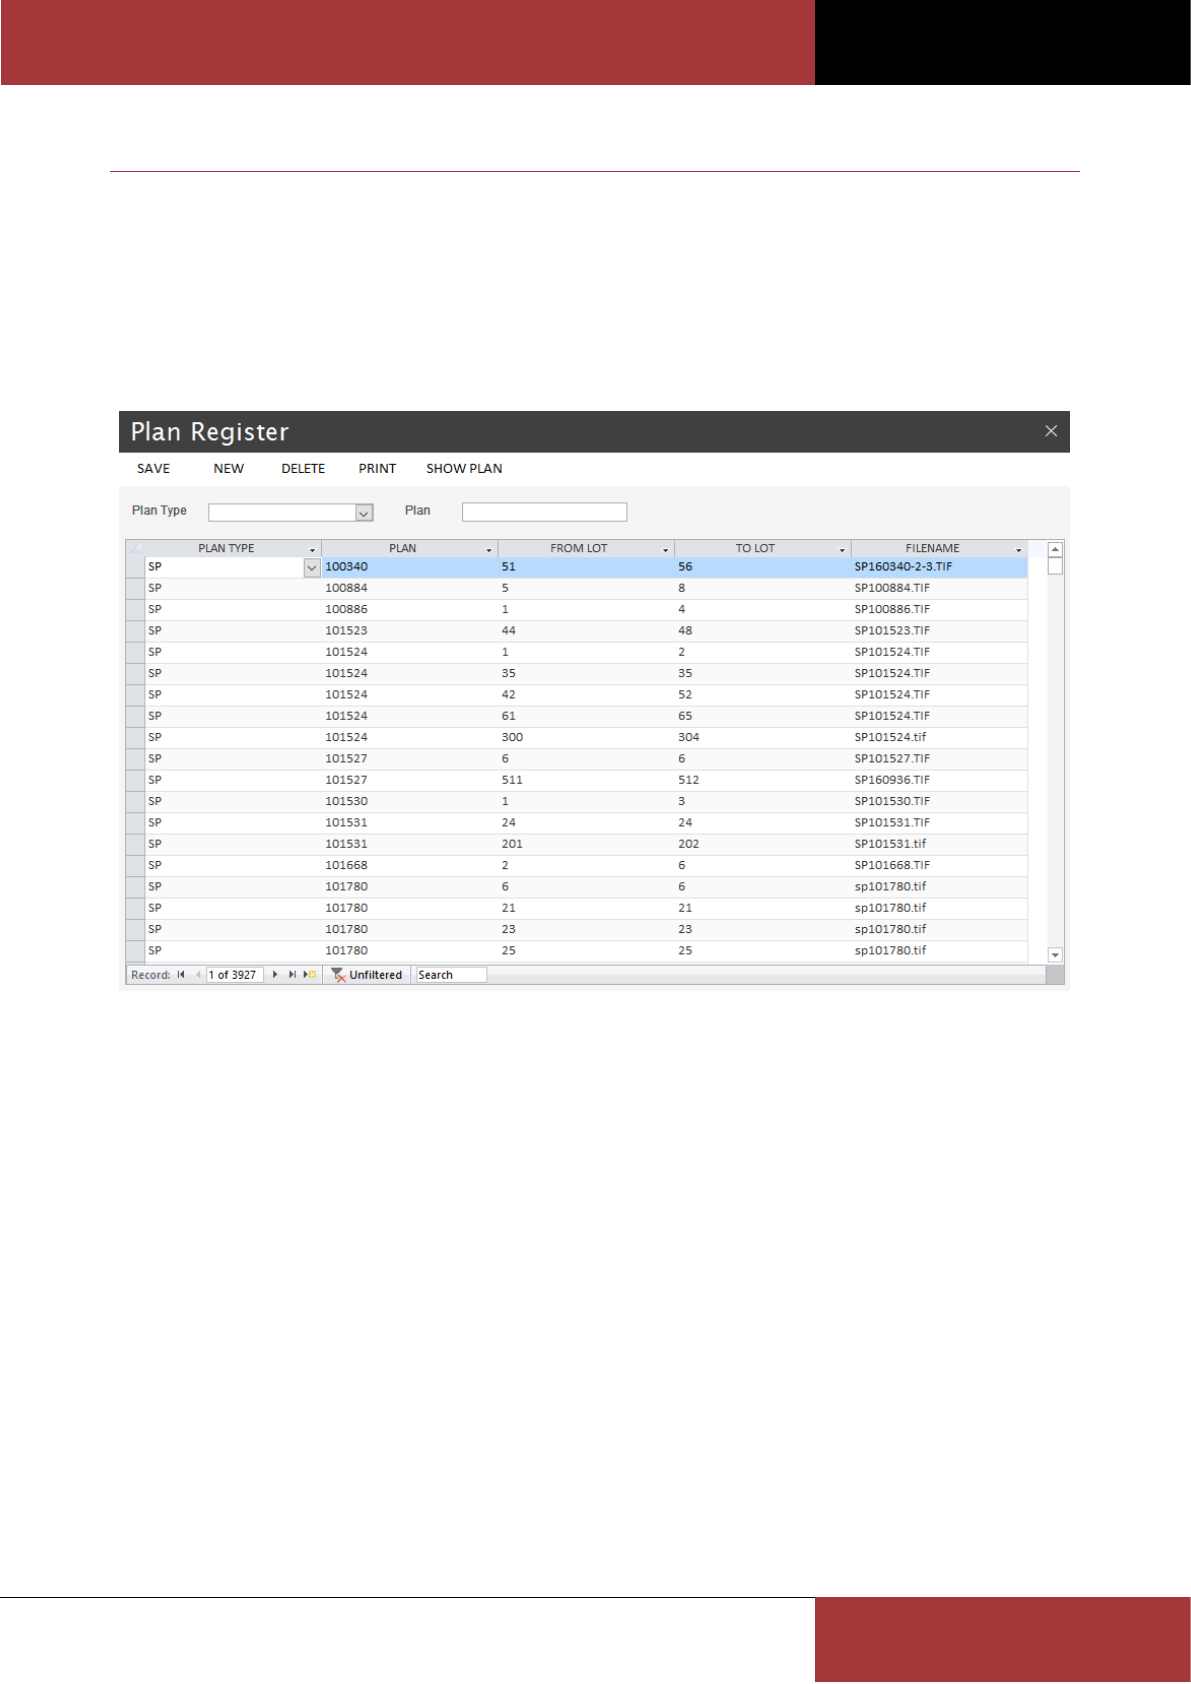
BC OFFICE USER GUIDE
ROSZE.COM
COPYRIGHT © ROSZE PTY LTD
50
PLAN REGISTER
BC Office provides the Plan Register for recording all of your scanned Survey Plans. These plans can then be linked to
your applications to allow quick and easy access to the scanned Survey Plans, directly from the Application form. The
register is maintained using the Plan Register form.
Using the Plan Register form
The Plan Register form is used to add and maintain Survey Plan register entries.
The Show Plan command button is used to open the highlighted Survey Plan. Use the Print command button to print
the Plan Register report. To search for an existing Survey Plan, use the Search fields.
To register a new Survey Plan, follow these simple steps:
1. Using your favourite scanning application, scan the Survey Plan and save the file into the BC Office Plan
Register subfolder.
2. On the Plan Register form, click the New command button.
3. Select the Plan Type and enter the Plan Number.
4. Enter the range of Lots covered by the plan (e.g. from Lot 1 to Lot 17). If the Survey Plan contains multiple Lot
ranges (i.e. due to the Lots not being continuous) a separate entry will be required for each range (e.g. in the
above screenshot SP101527 required 2 entries).
5. Enter the filename for the scanned Survey Plan or double-click anywhere in new record to browse for the
scanned image file (which must be located in the BC Office Plan Register subfolder).
6. Click the Save command button to save the new entry.
Once the Survey Plan is registered, any application which records a Lot/Plan, using the RPD fields, which fall within one
of the registered Lot/Plan ranges will automatically be linked to the Survey Plan.

BC OFFICE USER GUIDE
ROSZE.COM
COPYRIGHT © ROSZE PTY LTD
51
To delete an existing Survey Plan entry, click the Delete command button. Removing the Survey Plan entry will not
remove the scanned image file from BC Office Plan Register subfolder.
While the Plan Type list of values contains most of the plan types you are likely to encounter, you can easily add your
own plan type codes using the Codes form.
Note
To be entered in the Plan Register, all scanned Survey Plan image files must be located in
the BC Office Plan Register subfolder.
When opening the Survey Plan image file, the system will use your Microsoft Windows file
association settings to locate the file’s application.
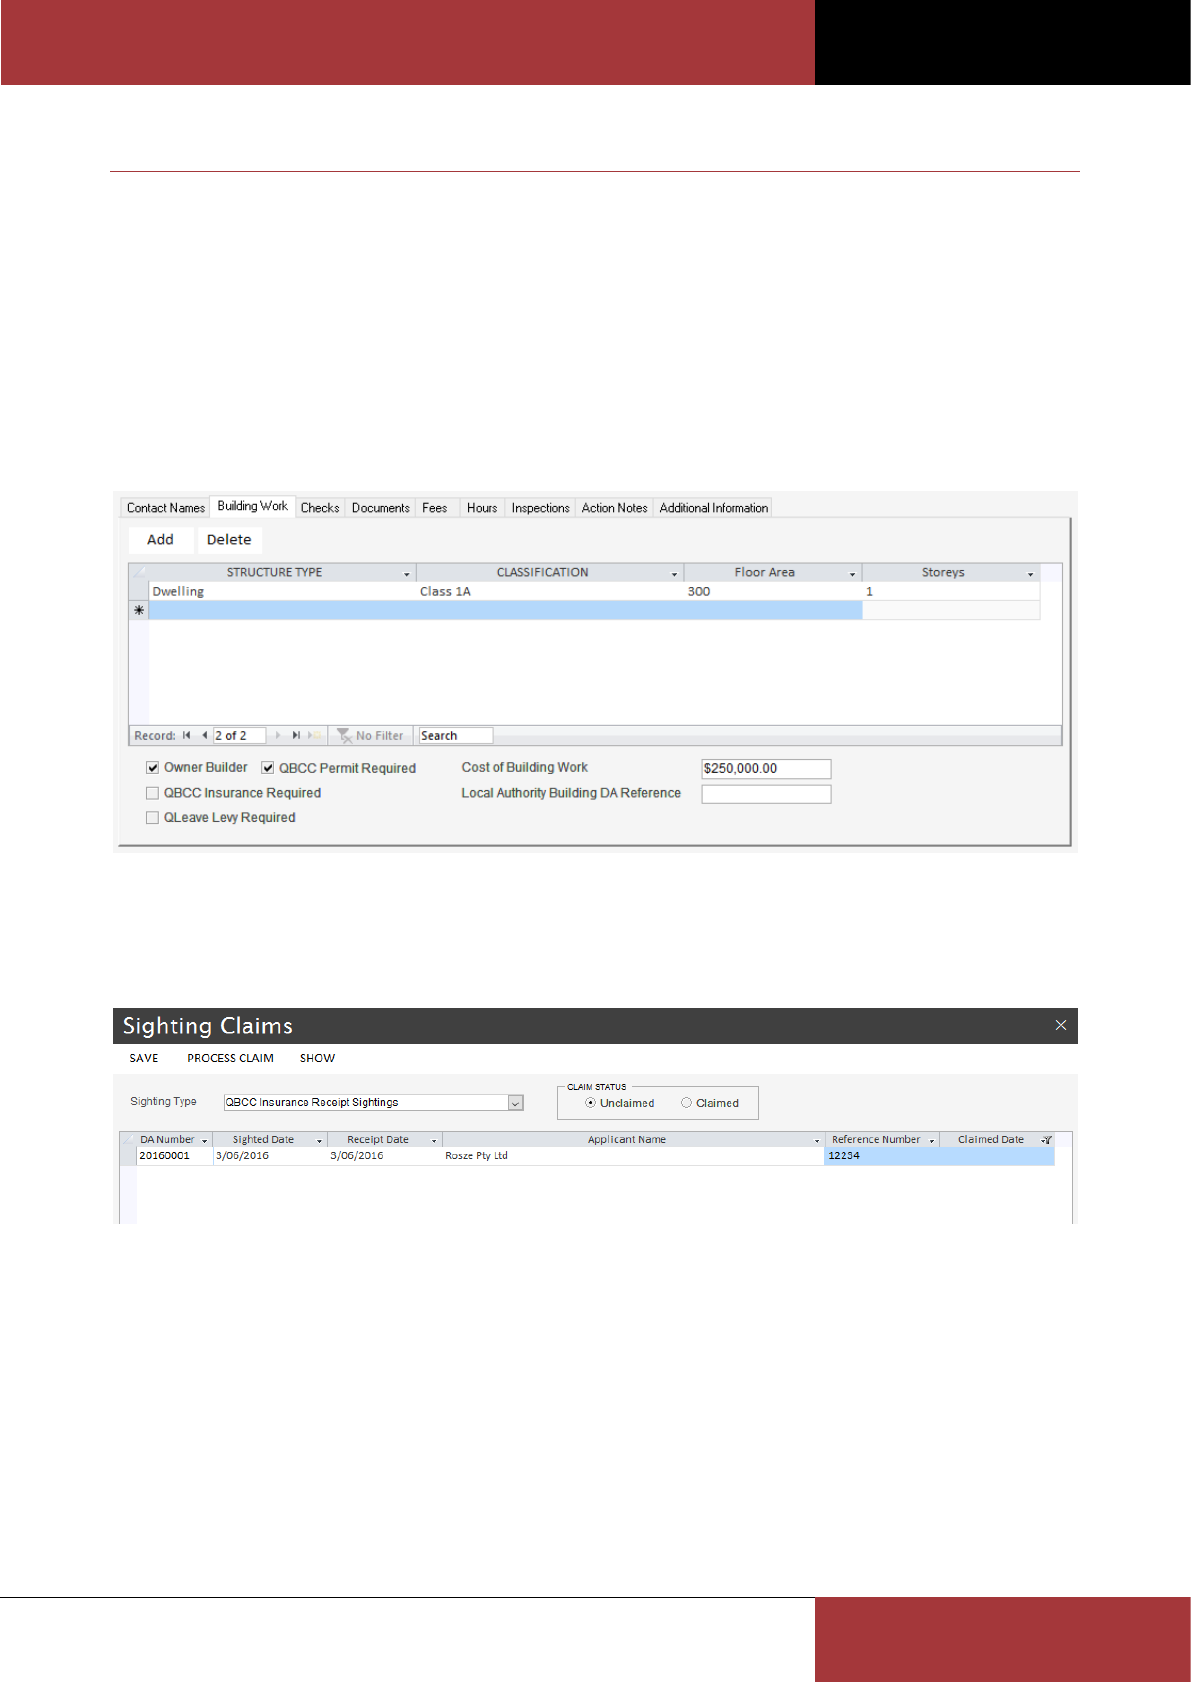
BC OFFICE USER GUIDE
ROSZE.COM
COPYRIGHT © ROSZE PTY LTD
52
SIGHTING CLAIMS
Under legislation, Building Certifiers may be charged with verifying that required Owner Builder permits have been
obtained and that insurance/levy payments have been made prior to approving the application, for which the certifier
may claim a nominal sighting fee. This is often achieved by simply sighting the permit or payment receipt. BC Office
supports the recording and claiming of the following sightings, using the Sighting Claims form:
QBCC Owner Builder permits
QBCC Insurance receipts
QLeave Levy receipts
To indicate that the application requires one or more of these sightings, you must tick the appropriate checkbox on
the Building Work tab of the Application form, as shown in the following screenshot.
Using the Sighting Claims form
The Sighting Claims form is used to record all permit and receipt sighting details and for claiming sighting
reimbursements.
The Process Claim command button can be used to process a sighting claim for the selected Sighting Type.
The Show command button is used to open the Application form on the highlighted application.
The Claim Status field allows you to view Unclaimed or Claimed sightings (claimed sightings are read only).
When entering the sighting details, the Applicant/Owner Name list of values will show all current contact relationships
for the selected application. If the applicant/owner is not in the application’s contacts, you can manually enter the
name in the Applicant/Owner Name field.
To periodically claim a sighting reimbursement, follow these simple steps:
1. Ensure all sighting details for the claim period have been completed.
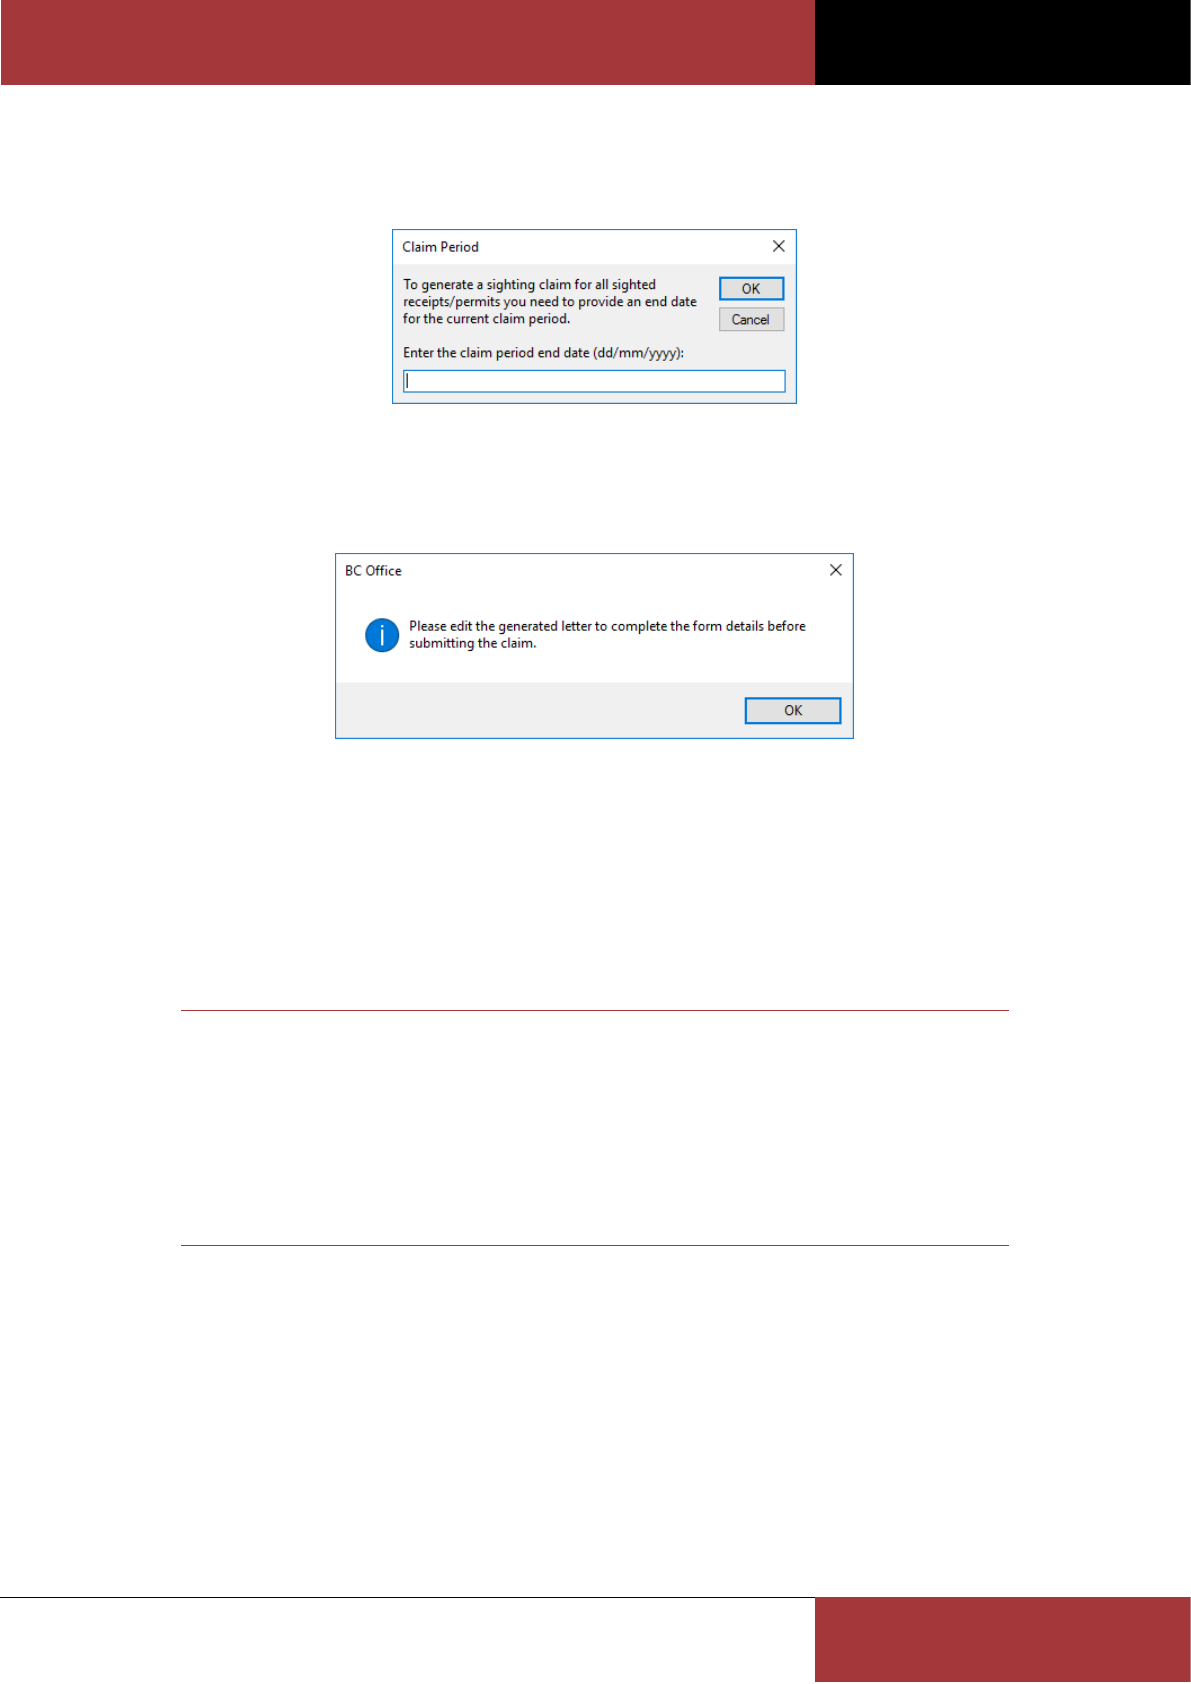
BC OFFICE USER GUIDE
ROSZE.COM
COPYRIGHT © ROSZE PTY LTD
53
2. Click on the Process Claim command button to commence the claim process.
3. When prompted enter the claim period end date (as shown in the following screenshot). All completed and
unclaimed sightings up to and including this date will be included in the current claim.
4. Once you have confirmed the claim details, the claim form will be generated using the respective merge template
and the Claimed Date field will be updated with the current date.
5. After the claim form has been generated you will be prompted to complete the form’s details by editing, using
Microsoft Word, the generated document’s header and footer sections.
6. Once all changes have been made to the claim form you can save and print the final document for submission to
the respective agency.
Once the claim has been processed, a link to the generated document will be included on each application’s
Documents tab.
If you process a sighting claim in error and need to reverse the claim, you can delete the claim document, from the
Application form’ s Documents tab, for one of the included applications. This will remove the document from each
included application and will also clear the Claimed Date on each sighting record.
Note
You must tick the relevant checkbox on the Application form’s Building Work tab, before the
application will be visible on the Sighting Claims form.
Only completed sightings which have been sighted within the claim period will be included
in the generated claim.
All mandatory fields are highlighted by a bolded field label or CAPITALISED column label.
Mandatory fields must contain a valid value before any changes can be saved.
Customising the Sighting Claim templates
Using the Merge Templates form you can create your own copy of the default claim forms, which you can then
customise to meet your business requirements.
When creating your own claim templates the following template requirements will apply:
The template Type must be either QBCC OB Claim, QBCC Claim or QLeave Claim.
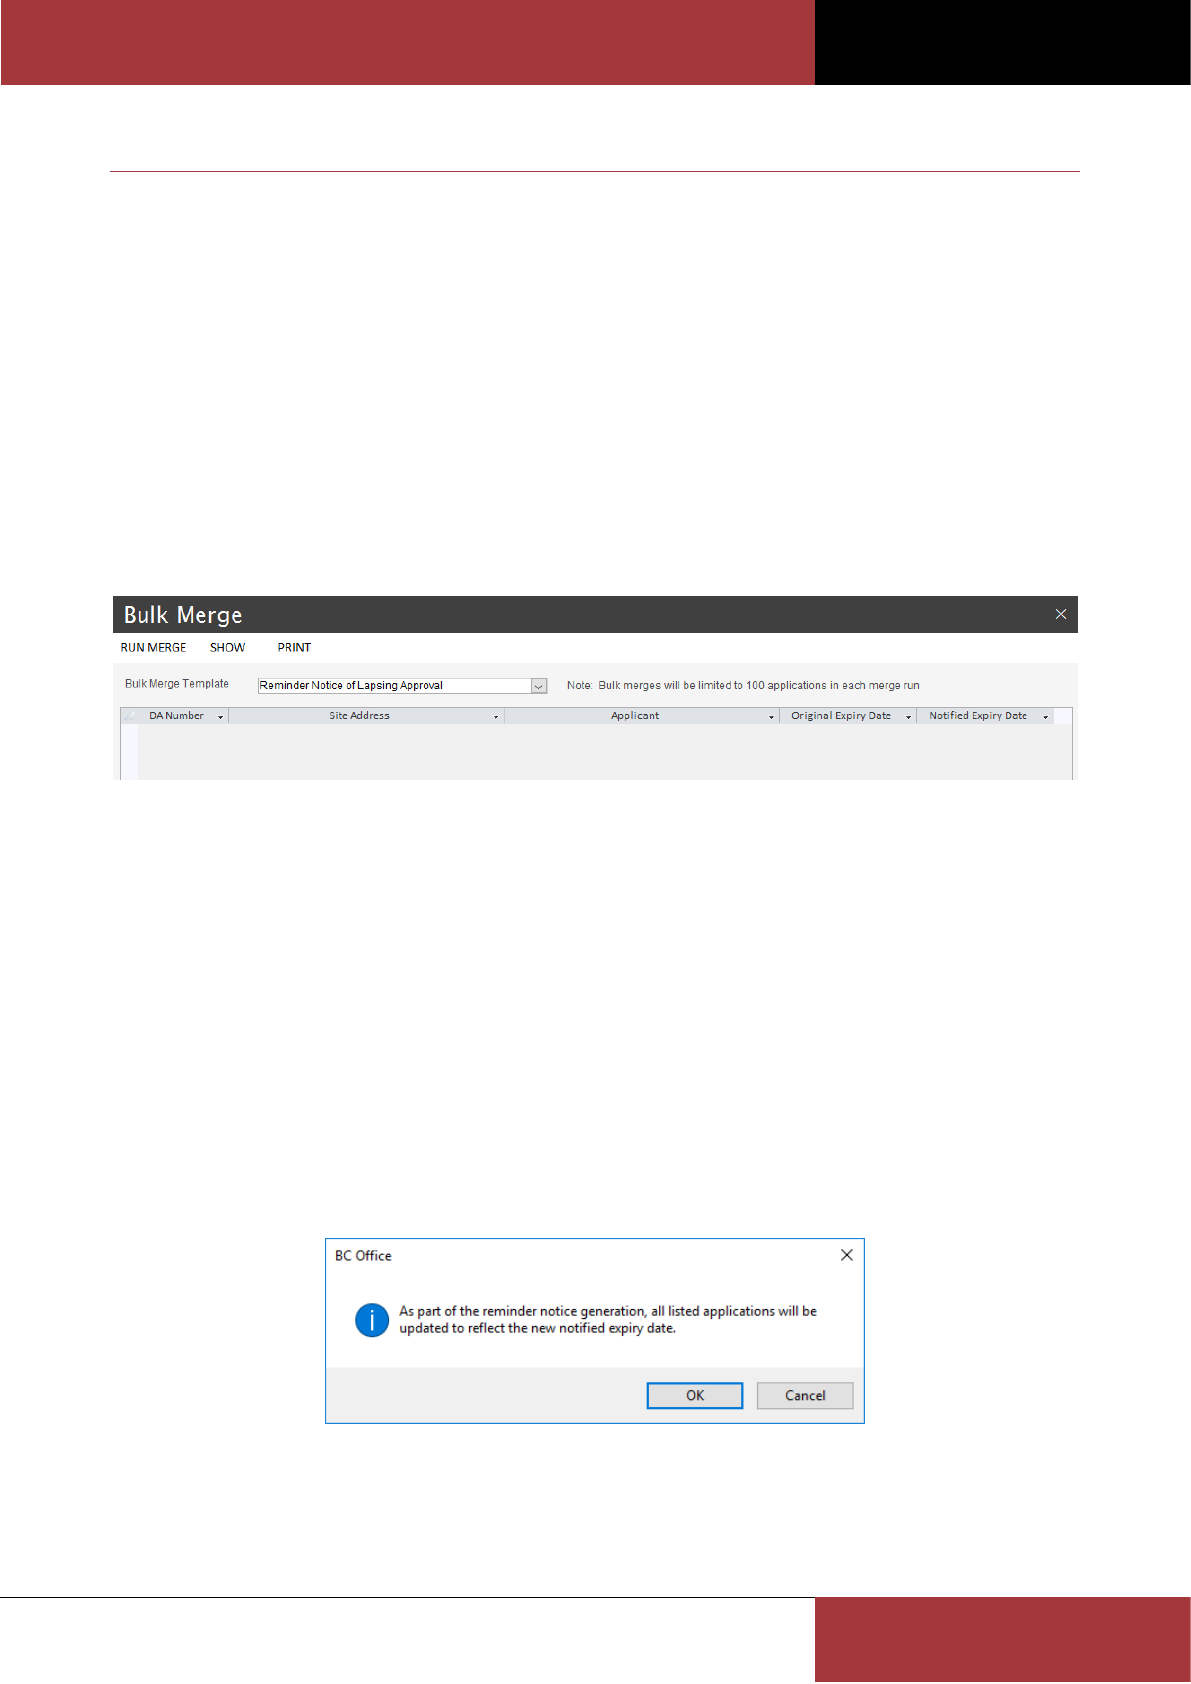
BC OFFICE USER GUIDE
ROSZE.COM
COPYRIGHT © ROSZE PTY LTD
54
BULK MERGE
For those times when you need to generate the same merge letter for a batch of applications, BC Office provides the
Bulk Merge feature. Using the Bulk Merge form you can create a single merge document, from a customisable
template, containing a letter for each application which satisfies a predefined requirement.
Currently only the following bulk merge letter(s) are supported:
Reminder Notice of Lapsing Approval – This bulk merge will generate a reminder notice for each lapsing
application, using the reminder period settings defined on the Preferences form.
Reminder Notice of Lapsing Information Request– This bulk merge will generate a reminder notice for each
lapsing information request, using the reminder period settings defined on the Preferences form.
Using the Bulk Merge form
The Bulk Merge form is used to select the bulk merge template and to preview the applications which will be included
in the bulk merge.
The Run Merge command button is used to commence the bulk merge.
The Show command button is used to open the Application form on the highlighted application.
The Print command button can be used to print a register report of the included applications, prior to commencing
the bulk merge.
To generate a new bulk merge, follow these steps:
1. Select the required Bulk Merge Template from the available templates. All applications which satisfy the
template’s data source query will then be shown in the result list.
2. If desired, click on the Print command button to print a register report of all applications which will be included
in the bulk merge.
3. Click on the Run Merge command button to commence the bulk merge.
4. Depending on the bulk merge chosen you may receive a confirmation notification similar to the following. Click
on the OK button to confirm the bulk merge.
5. Once the bulk merge document has been generated, you can edit the final document to make any required
changes before saving and printing.
On completion of the bulk merge process, a link to the generated document will be included on each application’s
Documents tab.

BC OFFICE USER GUIDE
ROSZE.COM
COPYRIGHT © ROSZE PTY LTD
55
If you process a bulk merge in error, you can delete the bulk merge document, from the Application form’ s
Documents tab, for one of the included applications. This will remove the document from each included application.
Note
Once the bulk merge document has been generated, the application will be excluded from
future bulk merge runs to prevent duplication. For this reason, if you want to print the
register report you should print the report before generating the bulk merge document.
Any updates made to the application (e.g. updating the application’s Expires On date as
part of the Reminder Notice of Lapsing Approval bulk merge) cannot be undone by removing
the bulk merge document.
Customising the Reminder Notice bulk merges
The Options tab on the Preferences form is used to control the reminder notice preferences. Using the Preferences
form, you can modify the default options (shown below) to customise the behaviour of the reminder notice data
source query.
The DA Expiry options are:
Expiry Period – When an application is approved, the Expires On date will default to the Approved On date plus
the number of months set for the Expiry Period.
Reminder Period – This preference is used to define the reminder period in which a reminder notice should be
sent (see below).
Grace Period – When issuing a reminder notice, the Notified Expiry Date will be the greater of the current
Expires On date and the bulk merge date plus the number of the months defined by the Grace Period. This will
ensure that the client is provided the minimum required reminder notification before the application expires.
If the Expires On date falls within the Grace Period, then the Expires On date will be updated, by the bulk merge
process, to the Notified Expiry Date.
Starting DA Number – This preference allows you to set the DA Number from which the reminder notice
requirements will apply (see below).
Information Request Period – The number of months from issuing of the Information Request merge letter in
which the applicant must respond.
Information Request Reminder Period – This preference is used to define the reminder period (in months) in
which an information request reminder notice should be sent.
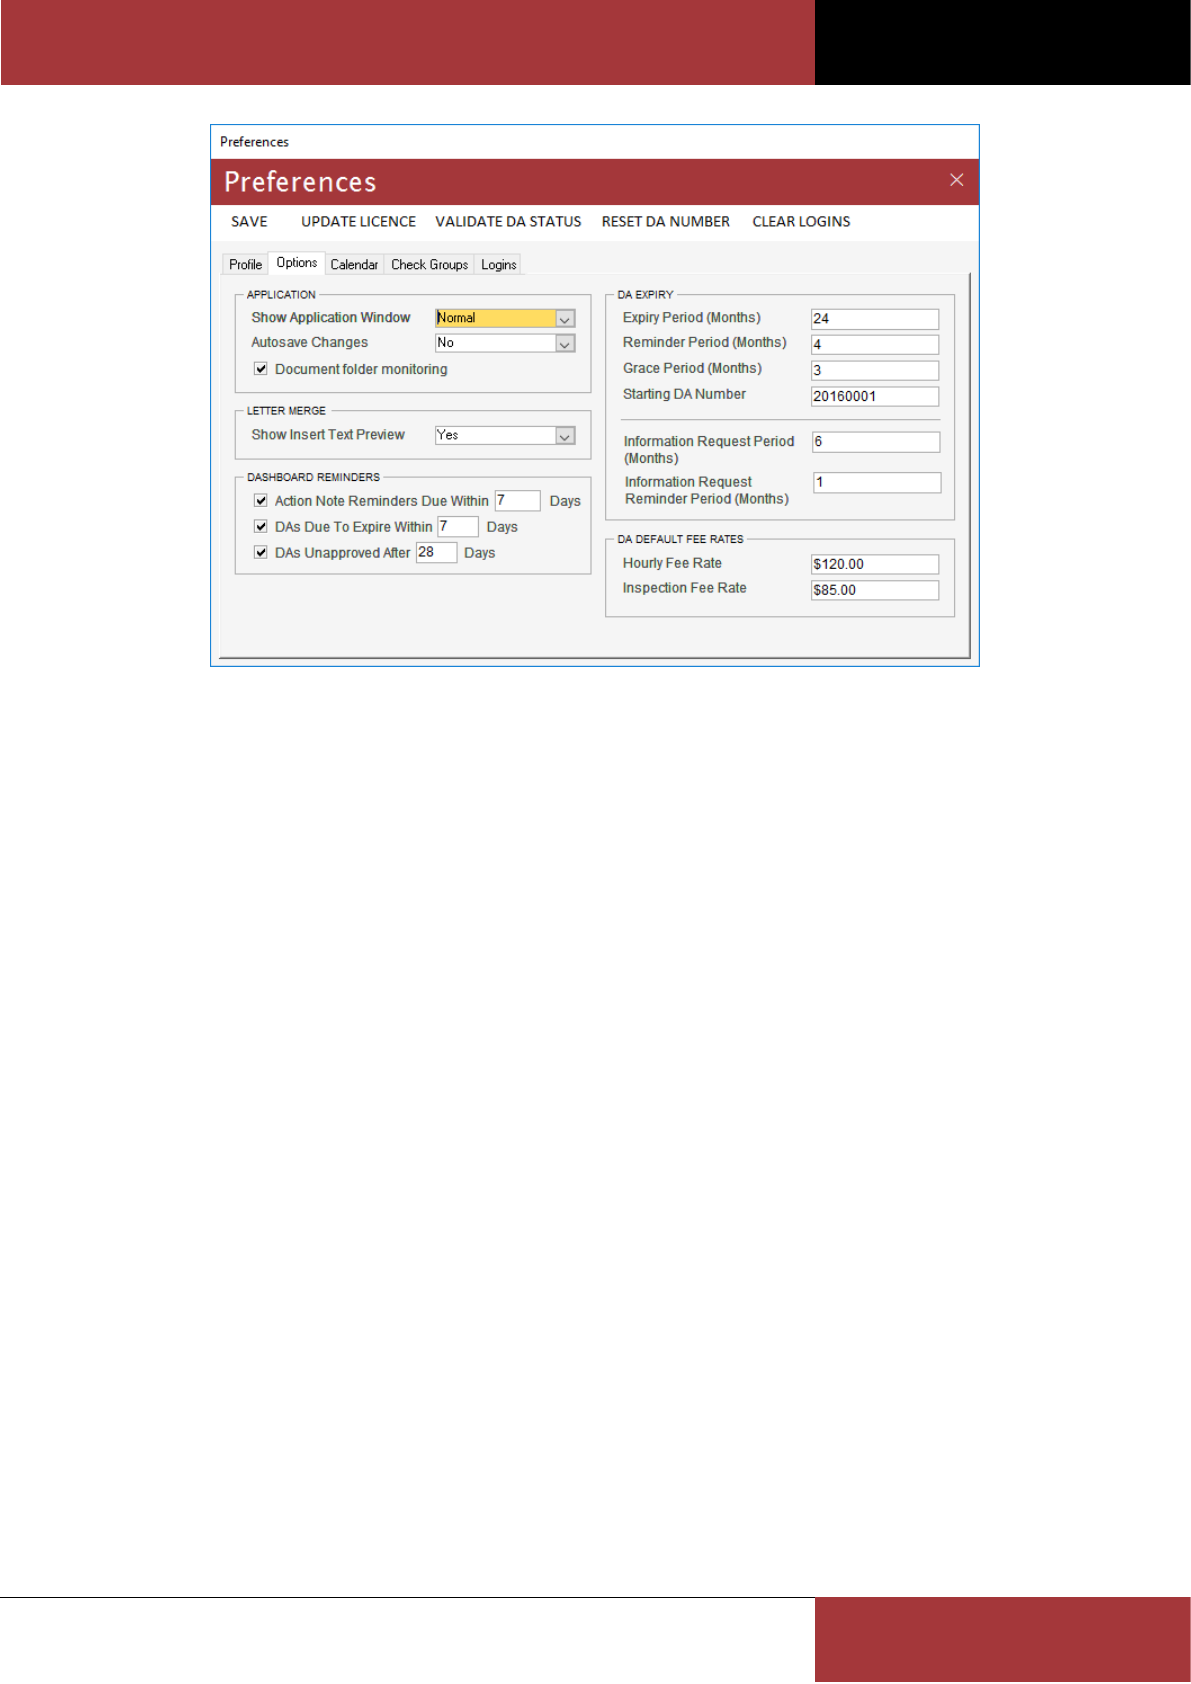
BC OFFICE USER GUIDE
ROSZE.COM
COPYRIGHT © ROSZE PTY LTD
56
The Reminder Notice of Lapsing Approval bulk merge will generate a reminder notice for each application which
satisfies the following requirements:
The application’s DA Number is equal to or greater than the Starting DA Number preference.
The application Status is either Approved or Expired.
The Expires On date falls within the reminder period as defined by the Reminder Period preference (e.g. if the
preference is set to 4 months (the default), then the application must expire within the next 4 months).
A reminder notice must not have already been sent for the application.
The Reminder Notice of Lapsing Information Request bulk merge will generate a reminder notice for each application
which satisfies the following requirements:
The application Status is Information.
The date of the Information Request letter generation plus the request period less the reminder period, as
defined by the Information Request Period and Reminder Period preferences, must have past (e.g. if the
information request period is set to 6 months and the reminder period is set to 1 month (the default
preferences), then the information request letter must have been generated more than 5 months ago).
A reminder notice must not have already been sent for the application.

BC OFFICE USER GUIDE
ROSZE.COM
COPYRIGHT © ROSZE PTY LTD
57
REPORTING
BC Office provides a range of detail and register style reports, which are designed to help you process and monitor
your applications, appointments, hours worked, fees and related information.
The Reports menu, on the BC Office menu ribbon, contains the following reporting options:
Current Unapproved Application Report – Register report listing all current and unapproved applications.
Expired and Unfinalised Applications Report – Register report listing all expired applications.
Hours Worked Report – Work performance report showing all hours worked within the reporting period.
Fee Report – Register report listing the all quoted, unpaid and paid fees, including credit/debit balance of the
application’s including hours and inspections.
Addition Information Report – Register report listing all applications, and their Additional Information values,
which match the reporting criteria.
Processing Time Report – Register report listing all applications, and their processing times, which match the
reporting criteria.
In addition, the following reports are available from various forms:
Calendar Appointments Report – Detail report detailing all current and available appointment times for the
current Calendar view (available from the Calendar form).
Application Details Report – Detail report detailing all information relating to the current application (available
from the Application form).
Application Register Report – Register report listing all applications which match the reporting criteria
(available from the Find Application form).
Reminder Notice Report – Register report listing all applications which are due to be issued a reminder notice
(available from the Bulk Merge form when performing a reminder notice merge).
Plan Register Report – Register report listing all Survey Plans in the Plan Register (available from the Plan
Register form).
Each report will be generated as an Adobe Acrobat PDF which can be saved or printed using Adobe Acrobat Reader.
Note
Adobe Acrobat Reader must be installed on each client PC to view the generated PDFs.
Using the Hours Worked Report form
The Hours Worked Report form is used to show all hours worked within the selected reporting period by application.
Hours worked are entered on the Hours tab of the Application form.
Either a weekly or yearly reporting period can be selected. The hours worked can also be filtered by certifier to
provide a simple work load performance report.
The Clear command button can be used to clear the current search results and criteria, in preparation for performing
another search.
The Export command button exports the search results to Microsoft Excel.
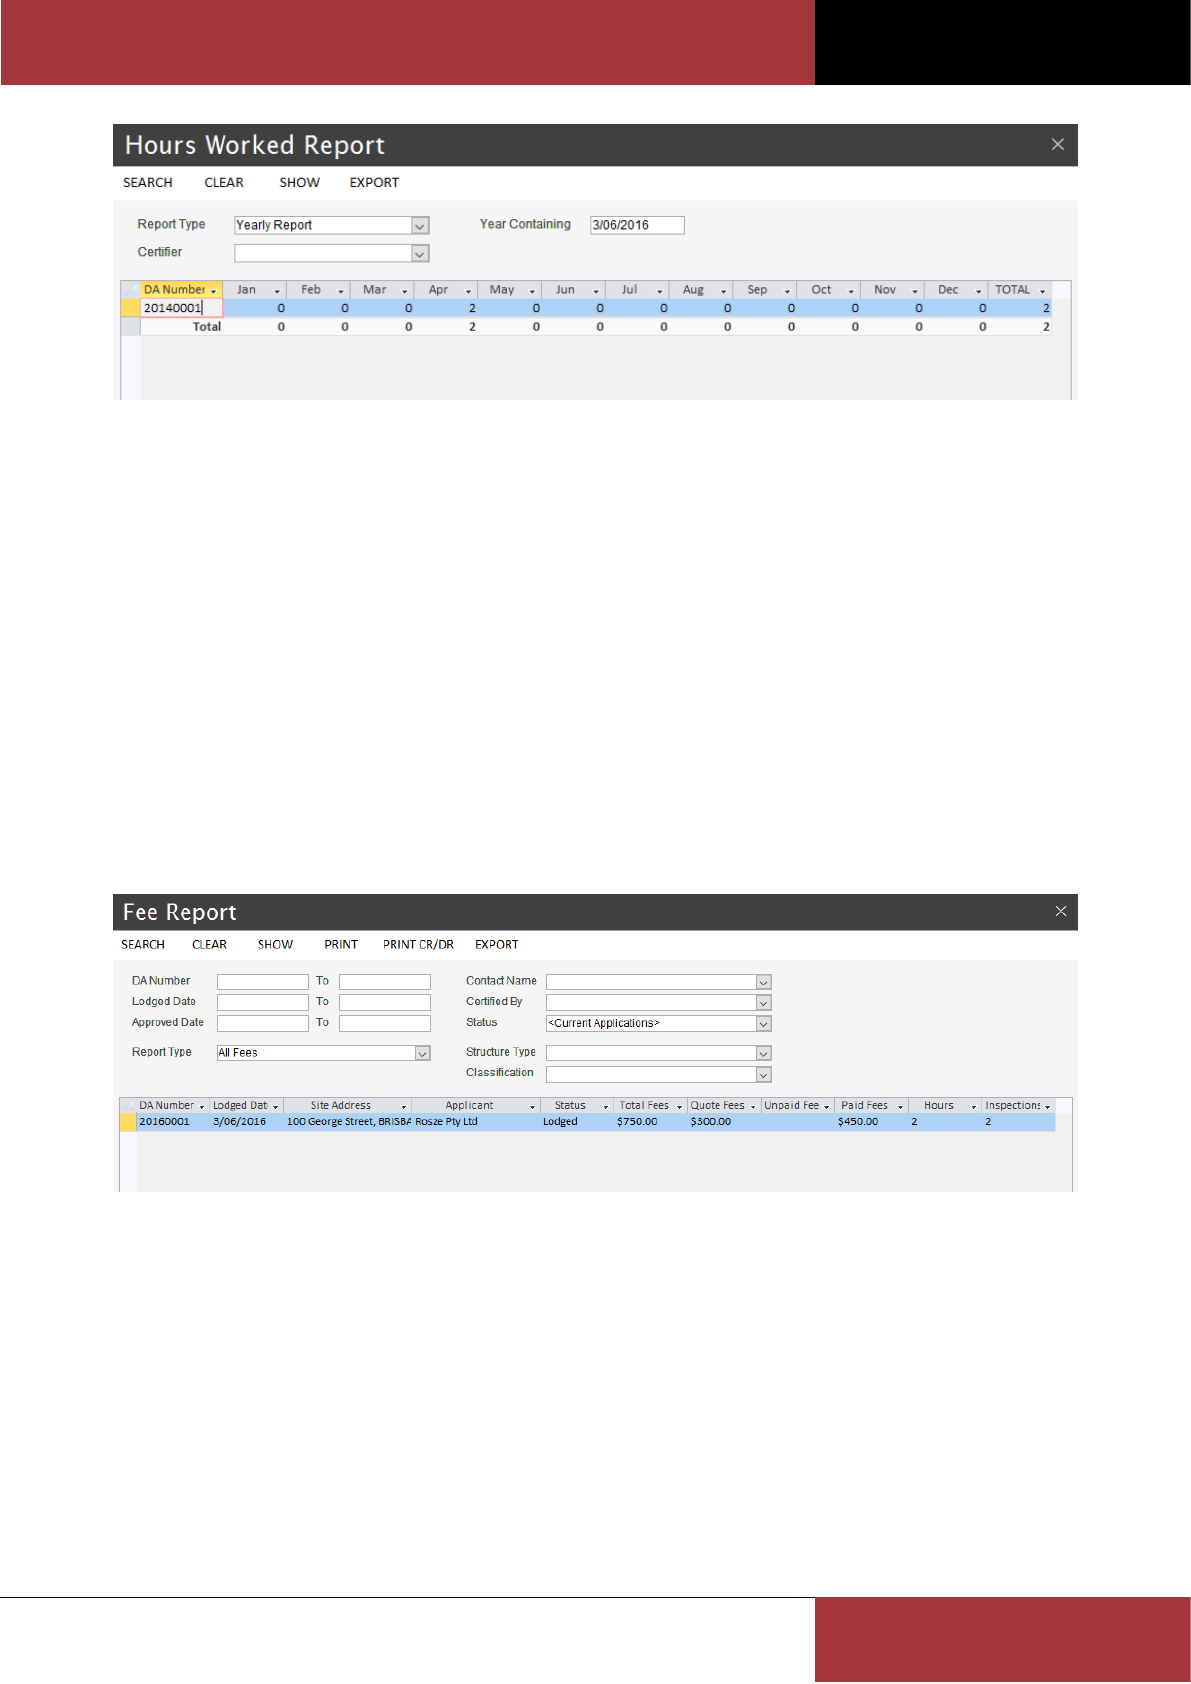
BC OFFICE USER GUIDE
ROSZE.COM
COPYRIGHT © ROSZE PTY LTD
58
Using the Fee Report form
The Fee Report form is used to show a summary for all application and inspection fees. The fee details, along with the
number of included hours and inspections, are entered on the Fees tab of the Application form.
The Report Type field can be used to produce the following types of reports:
All Fees – shows only applications which have a fee recorded on the fees tab.
All Quote Fees – shows only applications which have a quote fee recorded on the fees tab.
All Unpaid Fees – shows only applications which have an unpaid fee recorded on the fees tab.
All Paid Fees – shows only applications which have a paid fee recorded on the fees tab.
All Credits / Debits – shows only applications which have a positive and/or negative balance in paid hours
and/or inspections.
All Credits Hours – shows only applications which have a positive balance in paid hours.
All Credits Inspections – shows only applications which have a positive balance in paid inspections.
All Debit Hours – shows only applications which have a negative balance in paid hours.
All Debit Inspections – shows only applications which have a negative balance in paid inspections.
All Applications - shows all applications along with their balances.
The Clear command button can be used to clear the current search results and criteria, in preparation for performing
another search.
The Show command button is used to open the Application form on the highlighted application. You can also open
the Application form by double clicking the application record.
The Print command button opens the Fee Summary Application Register report showing all search results.
The Print CR/DR command button opens the Fee Credit/Debit Application Register report showing all search results.
The Export command button exports the search results to Microsoft Excel.
Search Hints
1. When entering values in the DA Number criteria fields, the values must be numeric.
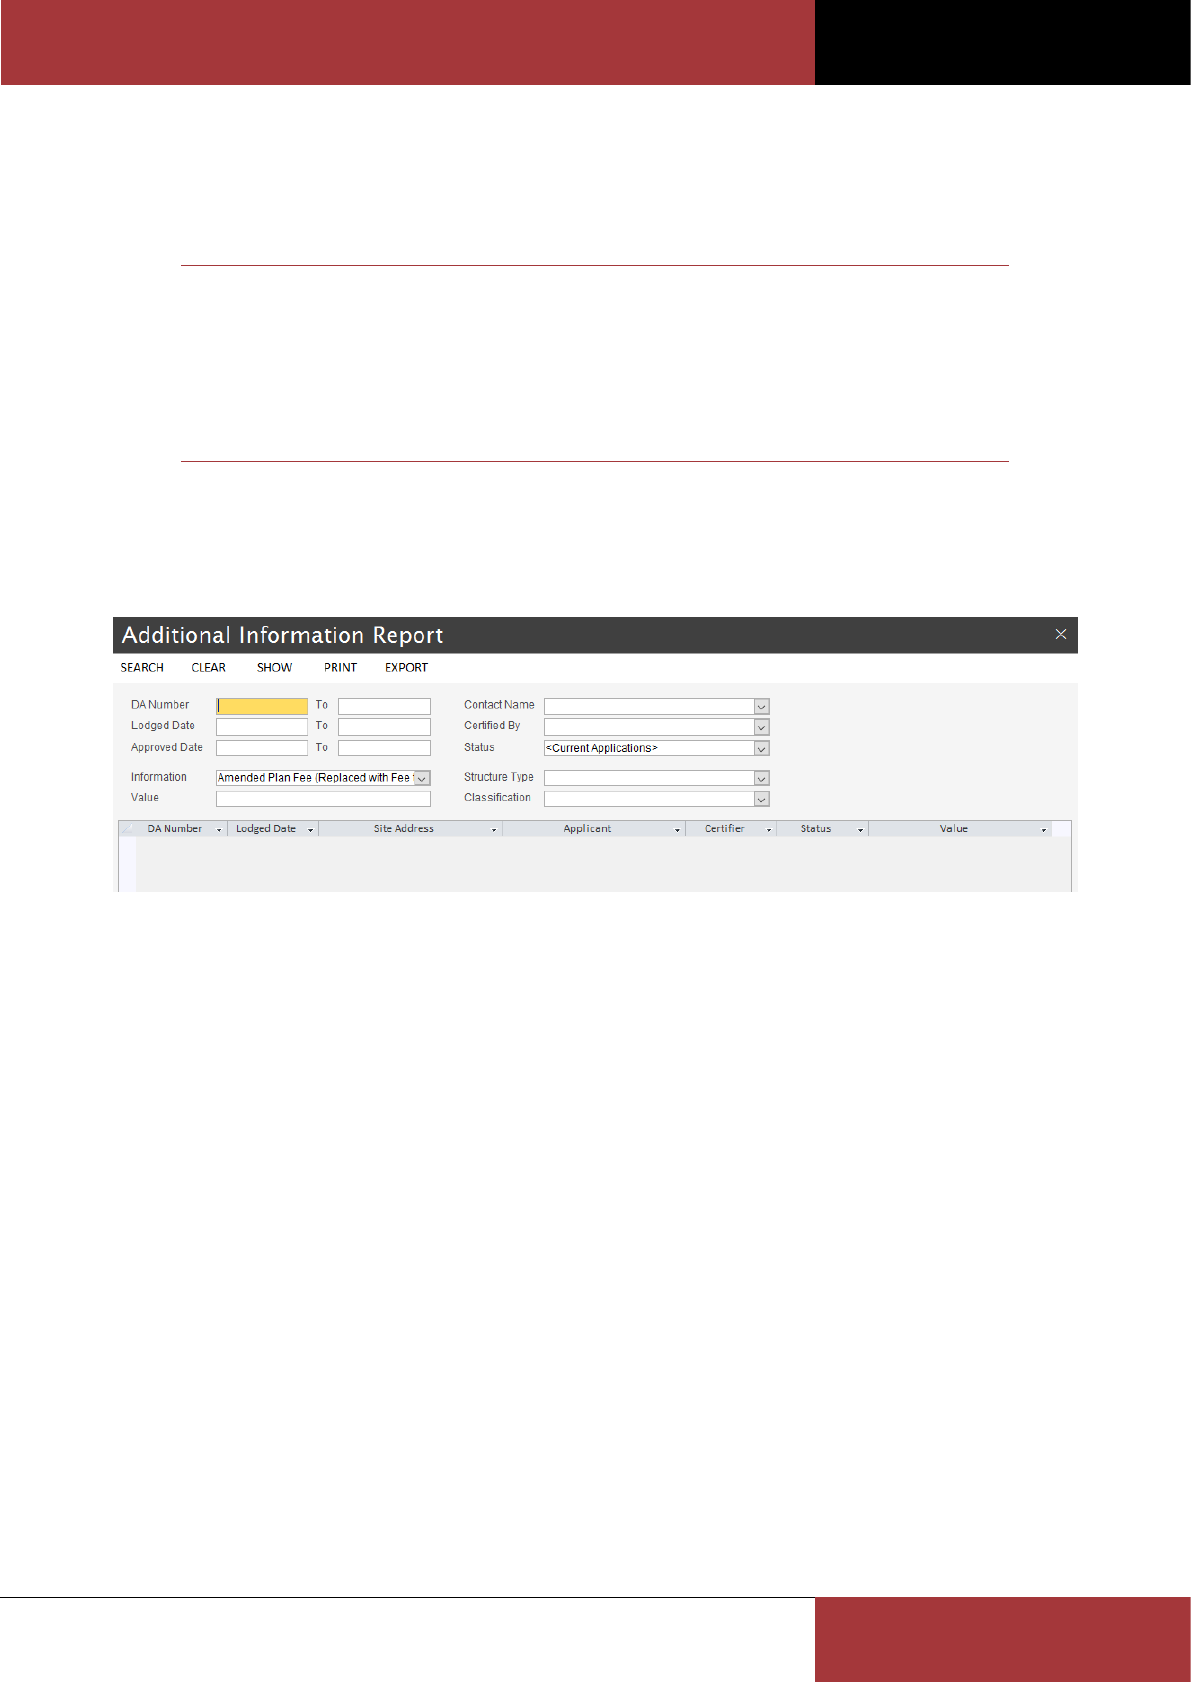
BC OFFICE USER GUIDE
ROSZE.COM
COPYRIGHT © ROSZE PTY LTD
59
2. To specify a list of applications to search for, you can enter a comma separated list of values in the DA Number
criteria fields.
3. By default, the form will search for current applications only. To search through all applications, change the
Status search criteria to All Applications.
Note
All hours worked and inspections undertaken are calculated from the Hours and Inspections
tabs on the Application form. All No Fee Required hours and inspections are excluded from
the credit/debit balance calculations.
A positive balance indicates a credit and a negative balance indicates a debit (i.e. more fees
are required to be paid).
Using the Additional Information Report form
The Additional Information Report form is used to find all applications which have a specific Information code or value
assigned (via the Additional Information tab on the Application form).
The Clear command button can be used to clear the current search results and criteria, in preparation for performing
another search.
The Show command button is used to open the Application form on the highlighted application. You can also open
the Application form by double clicking the application record.
The Print command button opens the Additional Information Application Register report showing all search results.
The Export command button exports the search results to Microsoft Excel.
Search Hints
1. When entering values in the DA Number criteria fields, the values must be numeric.
2. To specify a list of applications to search for, you can enter a comma separated list of values in the DA Number
criteria fields.
3. When searching using the Site Address, choose a portion of the address which is not easily misspelt (i.e. this will
help reduce spelling errors).
4. By default, the form will search for current applications only. To search through all applications, change the
Status search criteria to All Applications.
Using the Processing Time Report form
The Processing Time Report form is used to calculate the processing times (number of days between lodgement and
approval) for all applications which match the reporting criteria.
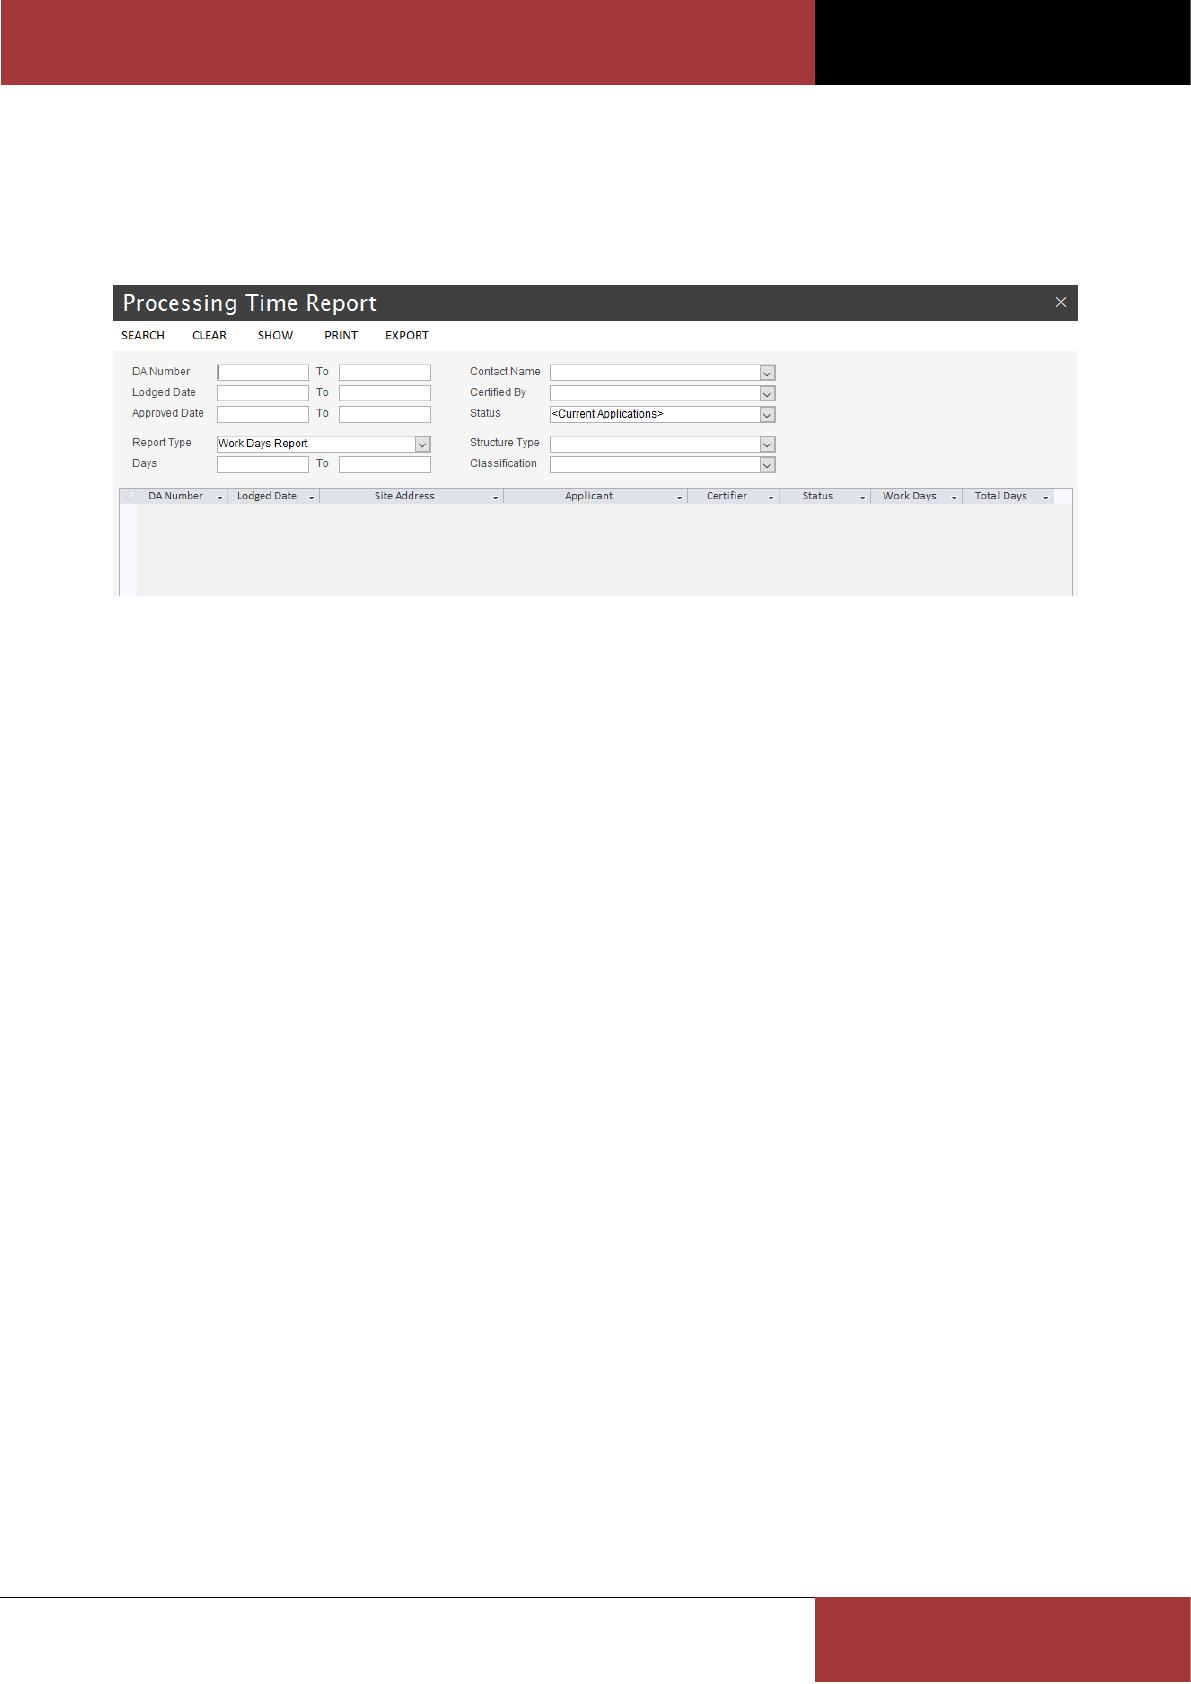
BC OFFICE USER GUIDE
ROSZE.COM
COPYRIGHT © ROSZE PTY LTD
60
The following Report Types are available:
Work Days Report – Only work days will be used to calculate the processing time (i.e. Monday to Friday).
Total Days Report – The processing time will be calculated in total days (i.e. Monday to Sunday).
By default, the form will calculate the processing time in work days for all current applications.
The Clear command button can be used to clear the current search results and criteria, in preparation for performing
another search.
The Show command button is used to open the Application form on the highlighted application. You can also open
the Application form by double clicking the application record.
The Print command button opens the Processing Time Application Register report showing all search results.
The Export command button exports the search results to Microsoft Excel.
Search Hints
1. When entering values in the DA Number criteria fields, the values must be numeric.
2. To specify a list of applications to search for, you can enter a comma separated list of values in the DA Number
criteria fields.
3. When searching using the Site Address, choose a portion of the address which is not easily misspelt (i.e. this will
help reduce spelling errors).
4. By default, the form will search for current applications only. To search through all applications, change the
Status search criteria to All Applications.
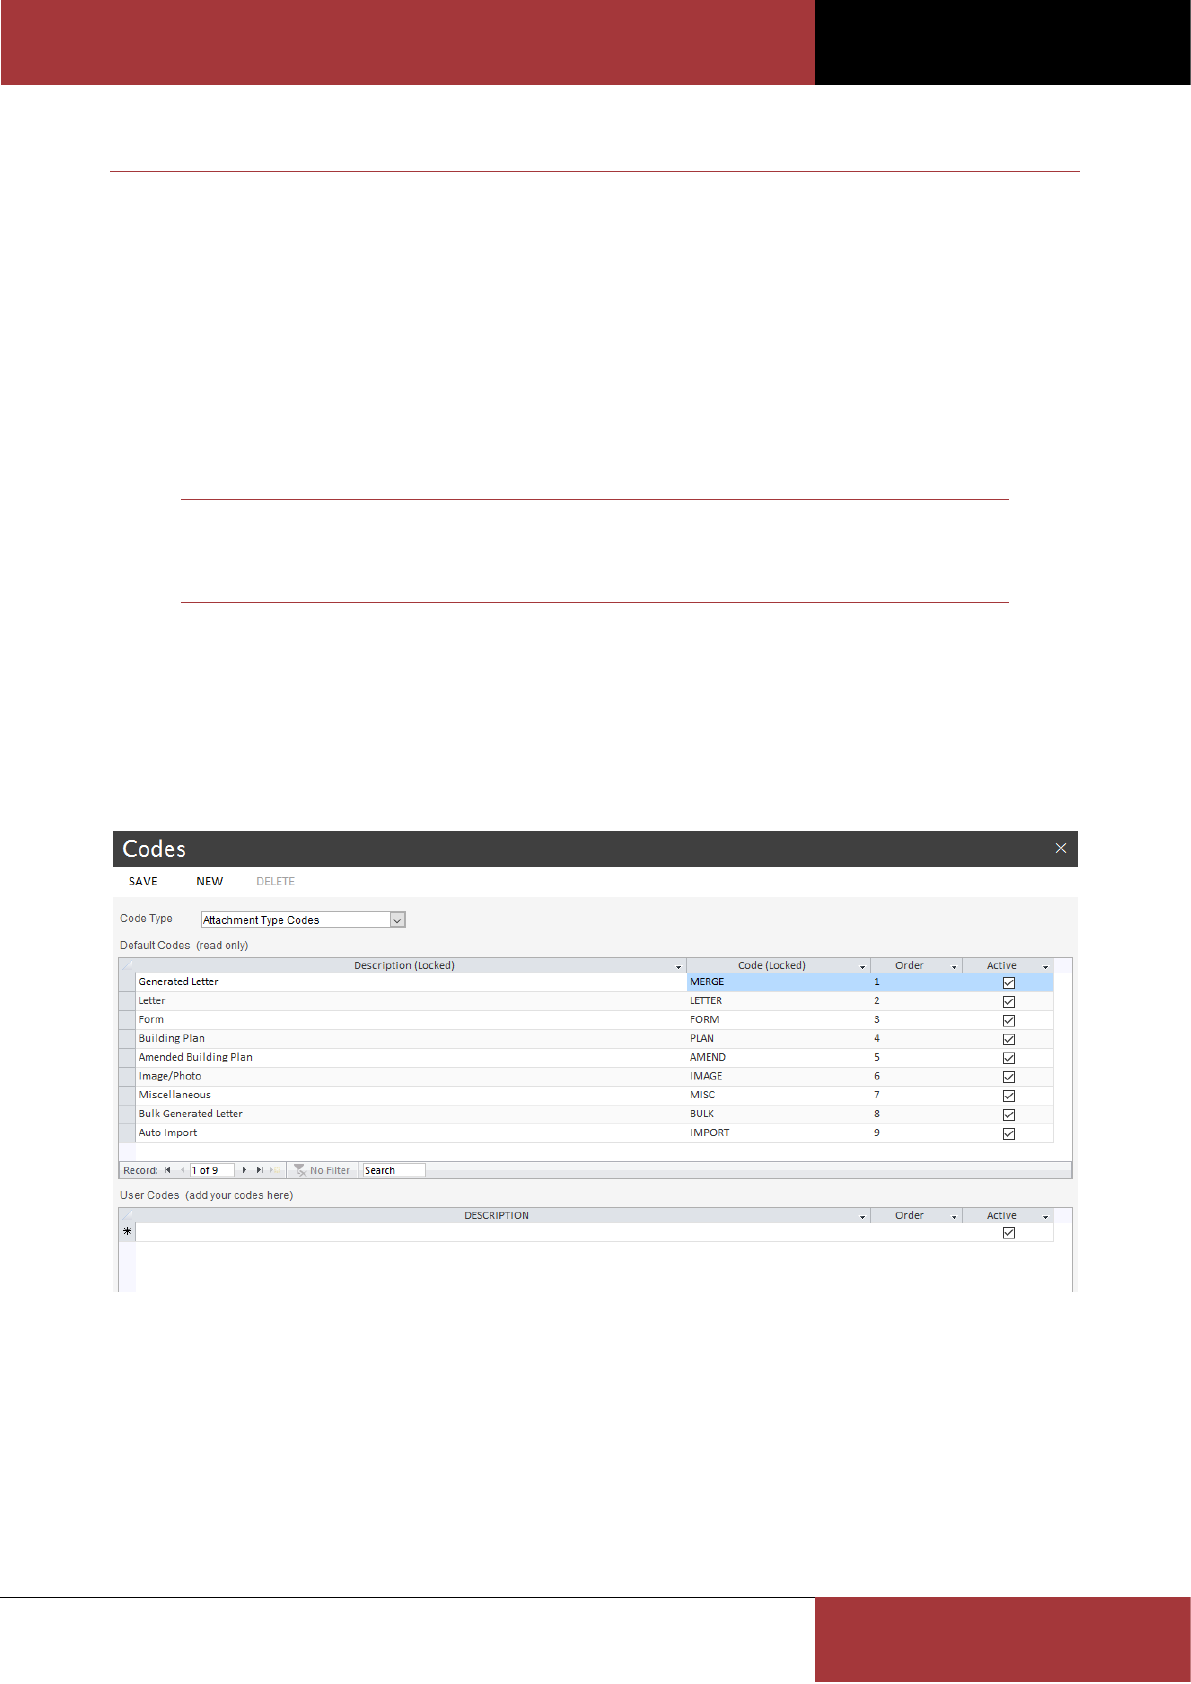
BC OFFICE USER GUIDE
ROSZE.COM
COPYRIGHT © ROSZE PTY LTD
61
SYSTEM ADMINISTRATION
While the BC Office default system settings should satisfy most of your requirements, a large number of these settings
are customisable. This flexibility in customising the system settings allows you to setup BC Office to suit your
particular environment.
The following forms, available from the Administration tab on the menu ribbon, are used to set your own system
settings and preferences:
Merge Templates – used to add and maintain merge templates
Document Archiving – used to archive imported and generated documents
Codes – used to add and maintain the items in the various list of values
Preferences – used to set your profile details and BC Office preferences
Note
By customising these system settings, you could setup BC Office for environments other than
the Queensland building certification environment.
Using the Codes form
The Codes form is used to add and maintain system codes. These system codes are then used to populate the various
selection list of values (i.e. dropdown lists).
Codes are divided into two types of codes, Default Codes and User Codes. The following screenshot shows several
custom user codes being added to the Inspection Type list of values.
Default Codes
These codes come preconfigured with BC Office and are controlled by the system. Default codes cannot be changed
with the exception of the Order and Active fields. The Order field may be used to change the order of the codes when
used in list of values and the Active field may be used to deactivate a default code.
Some default codes have special purposes within BC Office, such as the Inspection Type’s Final code which, when used
by the Inspection form to record a Satisfactory final inspection, will trigger the system to update the application status
to Finaled.

BC OFFICE USER GUIDE
ROSZE.COM
COPYRIGHT © ROSZE PTY LTD
62
Note
If you deactivate a special default codes, the system may not behave as expected. If this
occurs, you should reactivate the default code.
User Codes
User codes are codes which you can add and maintain. When used in a list of values, these codes will be combined
with the active default codes allowing you to extend the list of available codes.
To add a new user code simply select the required Code Type and click the New command button. Then enter a new
code Description in the User Codes section. An optional Order value may also be added.
To delete an existing user code, select the user code and click the Delete command button.
Note
When the default codes and user codes are combined the resulting list of values will be
ordered by the Order field values. By changing the Order field values, you can alter the
order of the list of values.
You cannot remove a user code which has been used (i.e. if you have used an Inspection
Type user code on an Inspection you cannot delete that code).
To remove a used default or user code from the list of values you can deactivate the code by
unticking the Active field.
Using the Merge Templates form
The Merge Templates form is used to add and maintain the merge templates (and any included insert text values)
which are used during letter generation.
While BC Office provides a comprehensive set of default templates, based on the Queensland building certification
requirements, you can easily add or copy and modify your own templates to suit your particular requirements.
There are two basic methods used to create a new merge template:
Creating a new merge template using the copy method – this method is the easiest and involves using an
existing template as the basis for the new template (this is the recommended method)
Creating a new merge template using Microsoft Word – using this method you can create a new template from
scratch using Microsoft Word
Merge templates are divided into two types of templates, Default Templates and User Templates.
Default Templates
Default templates come preconfigured with BC Office and are controlled by the system. Default templates cannot be
changed with the exception of the Active field. The Active field may be used to deactivate a default template.
The Copy command button is used to create a copy of a default template which you can then modify to suit your
requirements.
Note
When you create a copy of a default template, the default template will be deactivated and
the new template will appear in the User Templates section.
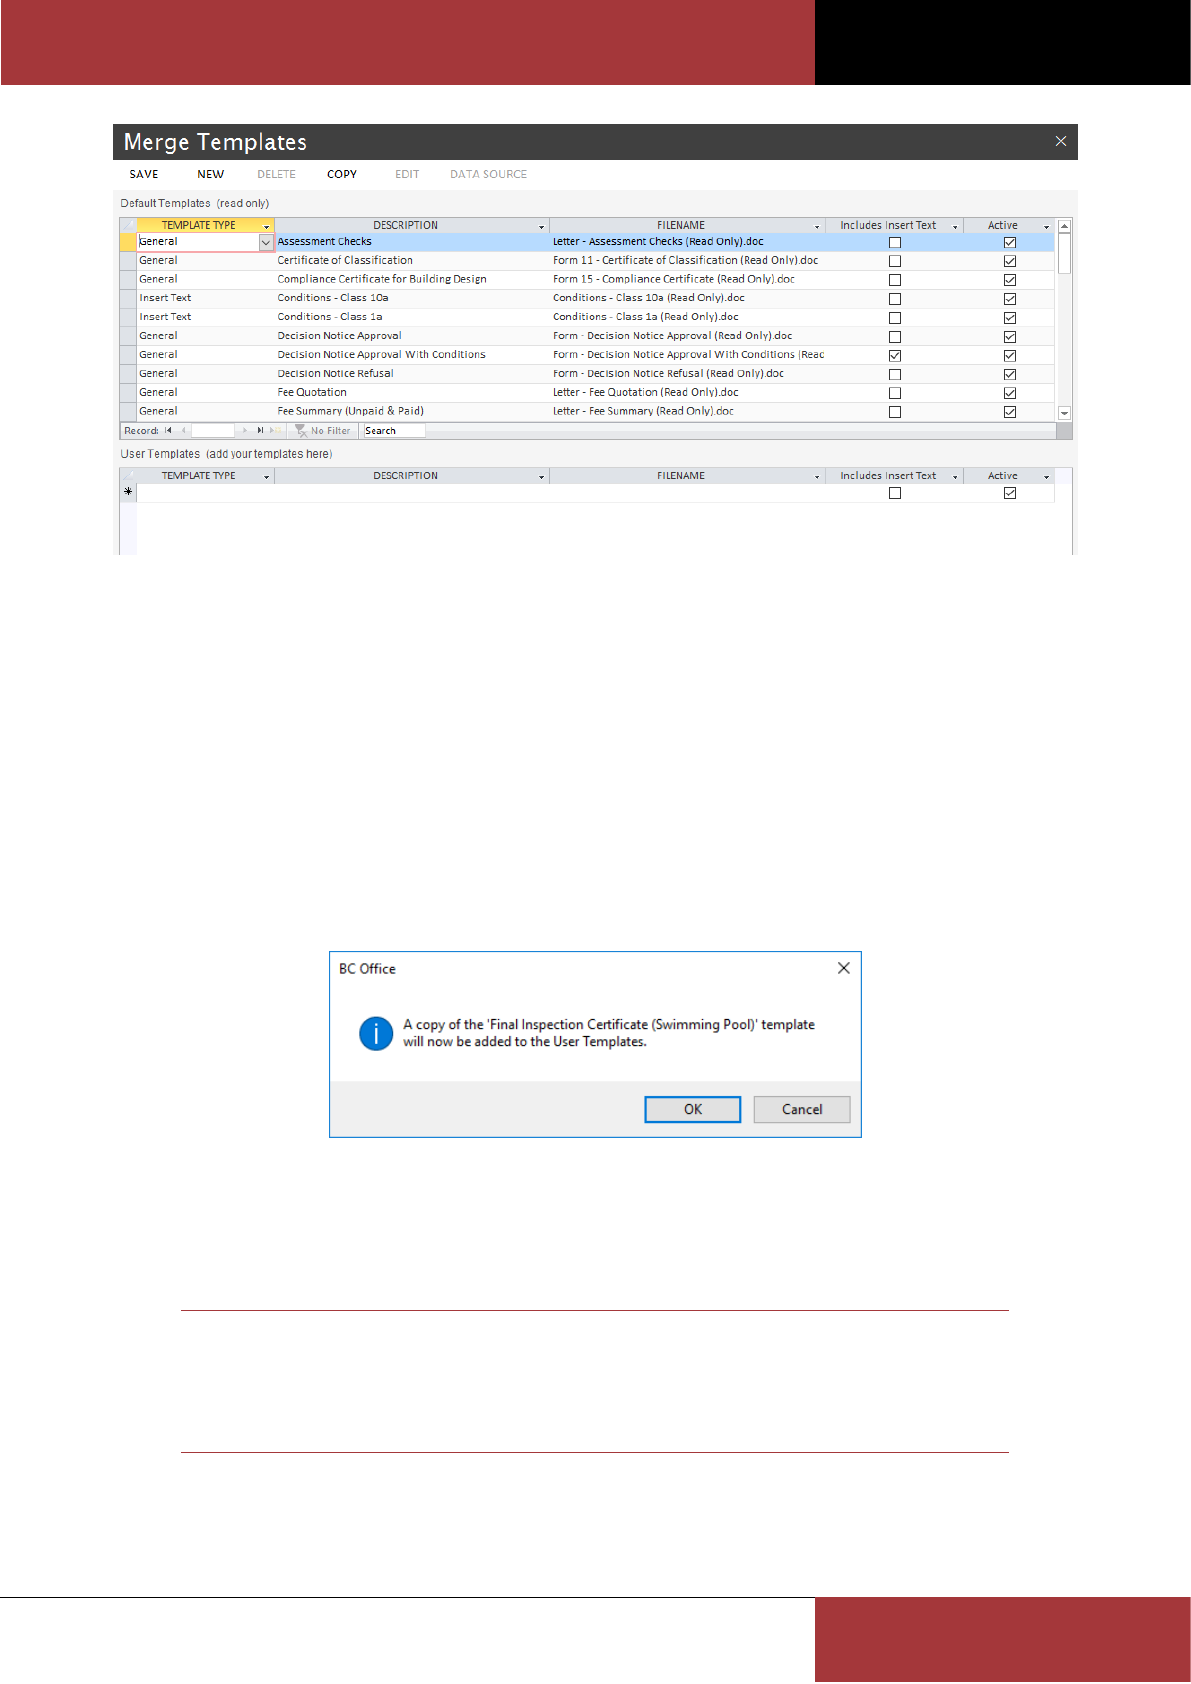
BC OFFICE USER GUIDE
ROSZE.COM
COPYRIGHT © ROSZE PTY LTD
63
User Templates
User templates are templates which you can add and maintain. These templates will be combined with the active
default templates allowing you to extend the available templates.
The Edit command button is used to open the user template in Microsoft Word where you can modify the template.
The Data Source command button is used to create a sample data source file which you can then attach to your user
template while editing the template in Microsoft Word (see below).
Creating a new merge template using the copy method
1. From the Default Templates section, select a template which is similar to your required template and then click
the Copy command button.
2. On the resulting confirmation prompt click OK to continue.
At this point the default template will be deactivated and a new copy of the template will be added to the User
Templates section.
3. Select the new template from the User Templates section.
4. Click on the Data Source command button to create a sample data source file for the new template.
Note
This data source file is required in order to view the available data source fields while editing
the template in Microsoft Word.
Make a note of the generated sample data source’s filename for use below.
5. Click on the Edit command button to open the template in Microsoft Word, where you can customise the
template.

BC OFFICE USER GUIDE
ROSZE.COM
COPYRIGHT © ROSZE PTY LTD
64
6. With the template open in Microsoft Word, use the ribbon to select the Mailings (tab) > Select Recipients > Use
Existing List option and select the data source file you created in Step 4.
7. You can now customise the new template as required remembering to save any changes before closing.
Note
You can add BC Office merge fields to the template using the Insert Merge Fields button on
the Mailings tab.
Creating a new merge template using Microsoft Word
1. Using Microsoft Word, create a blank document and save the document into the BC Office Template subfolder.
2. Click the New command button on the Merge Templates form.
3. Select the Template Type for the new template (see below for more on Template Types).
4. Enter a unique Description for the new template.
5. Select the filename from the Filename list of values.
Note
The Filename list of values will automatically list all template files, located in the Template
subfolder, which are not yet registered in BC Office.
6. Click on the Save command button to register the new template.
7. Click on the Data Source command button to create a sample data source file for the new template.
Note
This data source file is required in order to view the available data source fields while editing
the template in Microsoft Word.
Make a note of the generated sample data source’s filename for use below.
8. With the template open in Microsoft Word, use the ribbon to select the Mailings (tab) > Select Recipients > Use
Existing List option and select the data source file you created in Step 7.
9. You can now customise the new template as required remembering to save any changes before closing.
Note
You can add BC Office merge fields to the template using the Insert Merge Fields button on
the Mailings tab.
Note
All template files must be located in the BC Office Template subfolder.
Assigning a Template
BC Office uses the Template Type field to categorise templates which have special processing requirements. Most
general templates should be assigned the General template type.
The Template Type can be used to divide the templates into three main categories, Bulk Merge templates (which are
only available from the Bulk Merge and Sighting Claims forms), DA Merge templates (which are only available from

BC OFFICE USER GUIDE
ROSZE.COM
COPYRIGHT © ROSZE PTY LTD
65
the Letter Merge form) and Insert Text templates (which are only available from the Letter Merge form once a
supported DA Merge template is selected).
The following Templates Types are categorised as Bulk Merge templates:
QBCC OB Claim – The template assigned this template type will be used by the Sighting Claims form to
generate the QBCC owner builder permit sighting claim. There can only be one active template with this
template type.
QBCC Claim – The template assigned this template type will be used by the Sighting Claims form to generate
the QBCC receipt sighting claim. There can only be one active template with this template type.
QLeave Claim and QLeave Claim Attachment - Templates assigned these template types will be used by the
Sighting Claims form to generate the QLeave receipt sighting claim. There can only be one active template
with each of these template types.
Reminder Notice - The template assigned this template type will be used by the Bulk Merge form to generate
the application reminder notices. There can only be one active template with this template type.
Reminder Notice (Information Request) - The template assigned this template type will be used by the Bulk
Merge form to generate the application information request reminder notices. There can only be one active
template with this template type.
Note
Templates with a template type of QBCC OB Permit, QBCC Claim or QLeave Claim will only
be available from the Sighting Claims form.
Templates with the Reminder Notice or Reminder Notice (Information Request) template
type will only be available from the Bulk Merge form.
The following Templates Types are categorised as DA Merge templates:
General – Most templates should be assigned this template type. These templates will only be available from
the Letter Merge form.
Information Request – This template type should be used on all templates which will be used to request
additional assessment information from the applicant. When an Information Request template is generated
the application Status will be set to Information. These templates will only be available from the Letter Merge
form.
Inspection Result – This template type must be used on all inspection result templates (i.e. templates that you
want to be available on the Inspection form). These templates will only be available from the Letter Merge
form.
Note
Templates with a template type of General and Information Request will only be available
from the Application form’s Letters command.
Templates with the Inspection Result template type will only be available from the
Inspection form’s Letters command.
The Insert Text template type is used to create sub-templates which can be used as insert text values in the above DA
Merge templates. These templates will only be available from the Letter Merge form once a template which includes
insert text has been selected.
Creating a new Insert Text merge template
In addition to the standard data source merge fields, BC Office also supports user customisable Insert Text templates
which can be selected for inclusion in DA Merge templates as an additional merge field. Insert text templates can
contain any amount of formatted text.

BC OFFICE USER GUIDE
ROSZE.COM
COPYRIGHT © ROSZE PTY LTD
66
To create a new Insert Text template, follow these steps:
1. Using Microsoft Word, create a blank document and save the document into the BC Office Template subfolder.
2. Click the New command button on the Merge Templates form.
3. Select the Insert Text as the Template Type for the new template.
4. Enter a unique Description for the new template.
5. Select the filename from the Filename list of values.
Note
The Filename list of values will automatically list all template files, located in the Template
subfolder, which are not yet registered in BC Office.
6. Click on the Save command button to register the new template.
7. Click Edit to edit the content of the new template.
8. Repeat the above steps for each Insert Text template.
Your Insert Text templates can contain as much or as little text as you require (i.e. you could define all of your
approval conditions in a single template or alternatively create a separate template for each condition). If multiple
Insert Text templates are selected during the letter merge, then all templates will be combined into a single merge
field during letter generation.
Once your Insert Text templates have been created you need to flag which of the DA Merge templates will require
insert text selection as part of the letter generation by selecting the Includes Insert Text option on the DA Merge
template (i.e. to include approval conditions using Insert Text templates on a Decision Notice you need to ensure the
Includes Insert Text option is selected on the Decision Notice template).
To define a DA Merge template that supports insert text, follow these steps:
1. Select the DA Merge template and enable the Includes Insert Text option.
2. Click on the Save command button to save the new template properties.
3. Click Edit to edit the content of the DA Merge template in Microsoft Word.
4. Place the cursor at the point in the template where you want the insert text field to be included and enter the
following field marker:
{InsertText}
5. Save the template document.
Note
Only templates which have the Includes Insert Text option enabled will support selection of
Insert Text values on the Letter Merge form.
Multiple Insert Text templates can you be combined into a single insert text merge field by
selecting more than one Insert Text template on the Letter Merge form.
The insert text merge field will be inserted at the {InsertText} field marker location during
the letter generation.
Using the Document Archiving form
The Document Archiving form is used to archive your imported and generated documents to CD or DVD, from which
the document can still be retrieved at a later date.
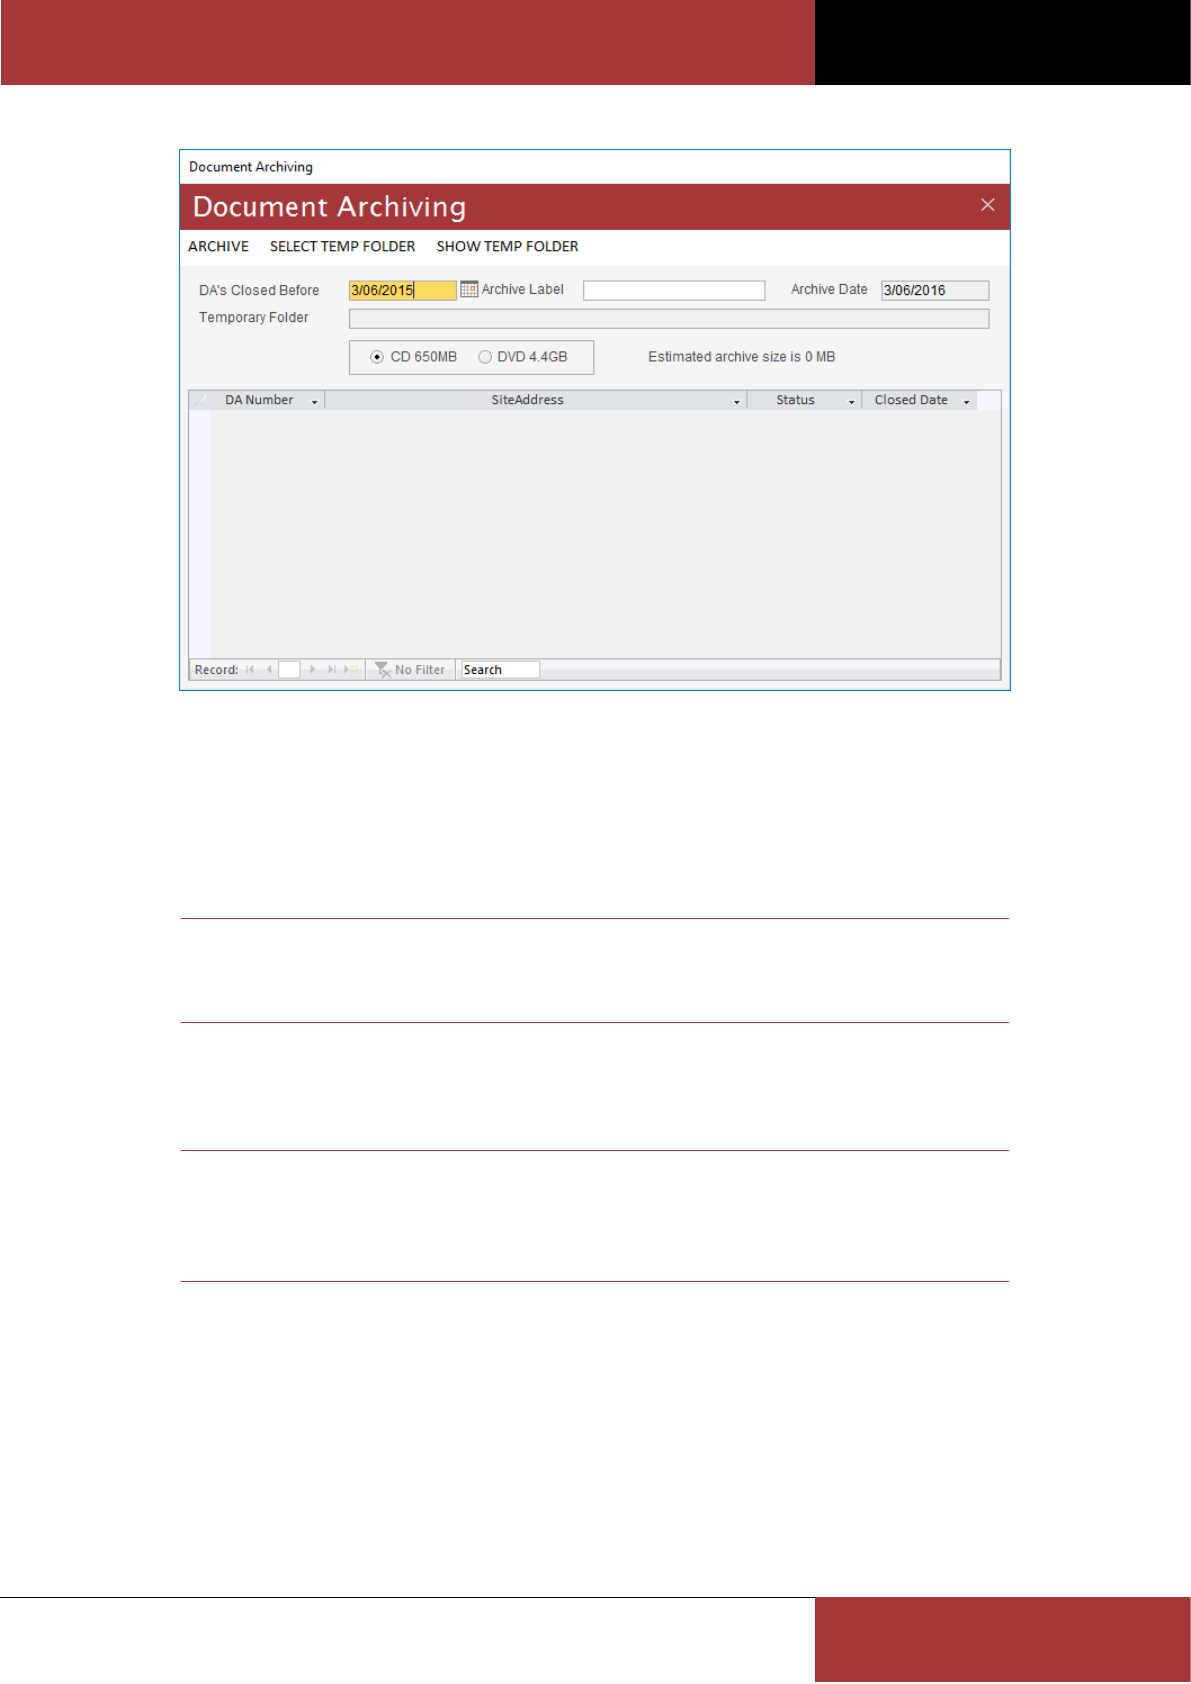
BC OFFICE USER GUIDE
ROSZE.COM
COPYRIGHT © ROSZE PTY LTD
67
While, with today’s hard drive capacities, the need to archive documents to CD or DVD is less of an issue, you may still
find yourself wanting to reduce the size of your BC Office Document subfolder for other reasons (e.g. to reduce your
backup size).
The Document Archiving form allows you to move all imported and generated documents, for the selected
applications, from the BC Office Document subfolders to a temporary folder, from which you can then burn the
contents to CD or DVD, using your preferred burning application.
Note
This Document Archiving utility can only be used when no other users are currently logged in
to BC Office.
To archive documents to CD or DVD, follow these steps:
1. Enter a name for the new CD/DVD label in the Archive Label field.
Note
When labelling your CD/DVD, you should apply a unique naming standard for each CD/DVD
(e.g. BCO_ARCH_1) as BC Office will prompt for this CD/DVD using its label name when you
try to view an archived document in the future.
2. Enter or select an empty folder name in the Temporary Folder field. The archive process will use this folder to
build the new CD/DVD image. You can select or create an empty folder by clicking on the Select Temp Folder
command button.
3. Select the DAs Closed Before date prior to which all closed applications will be selected for archiving.
4. Select the CD or DVD target archive image capacity.
5. If the estimated archive size exceeds the target CD/DVD image capacity, then you will need to readjust the DAs
Closed Before date to reduce the number of selected applications.
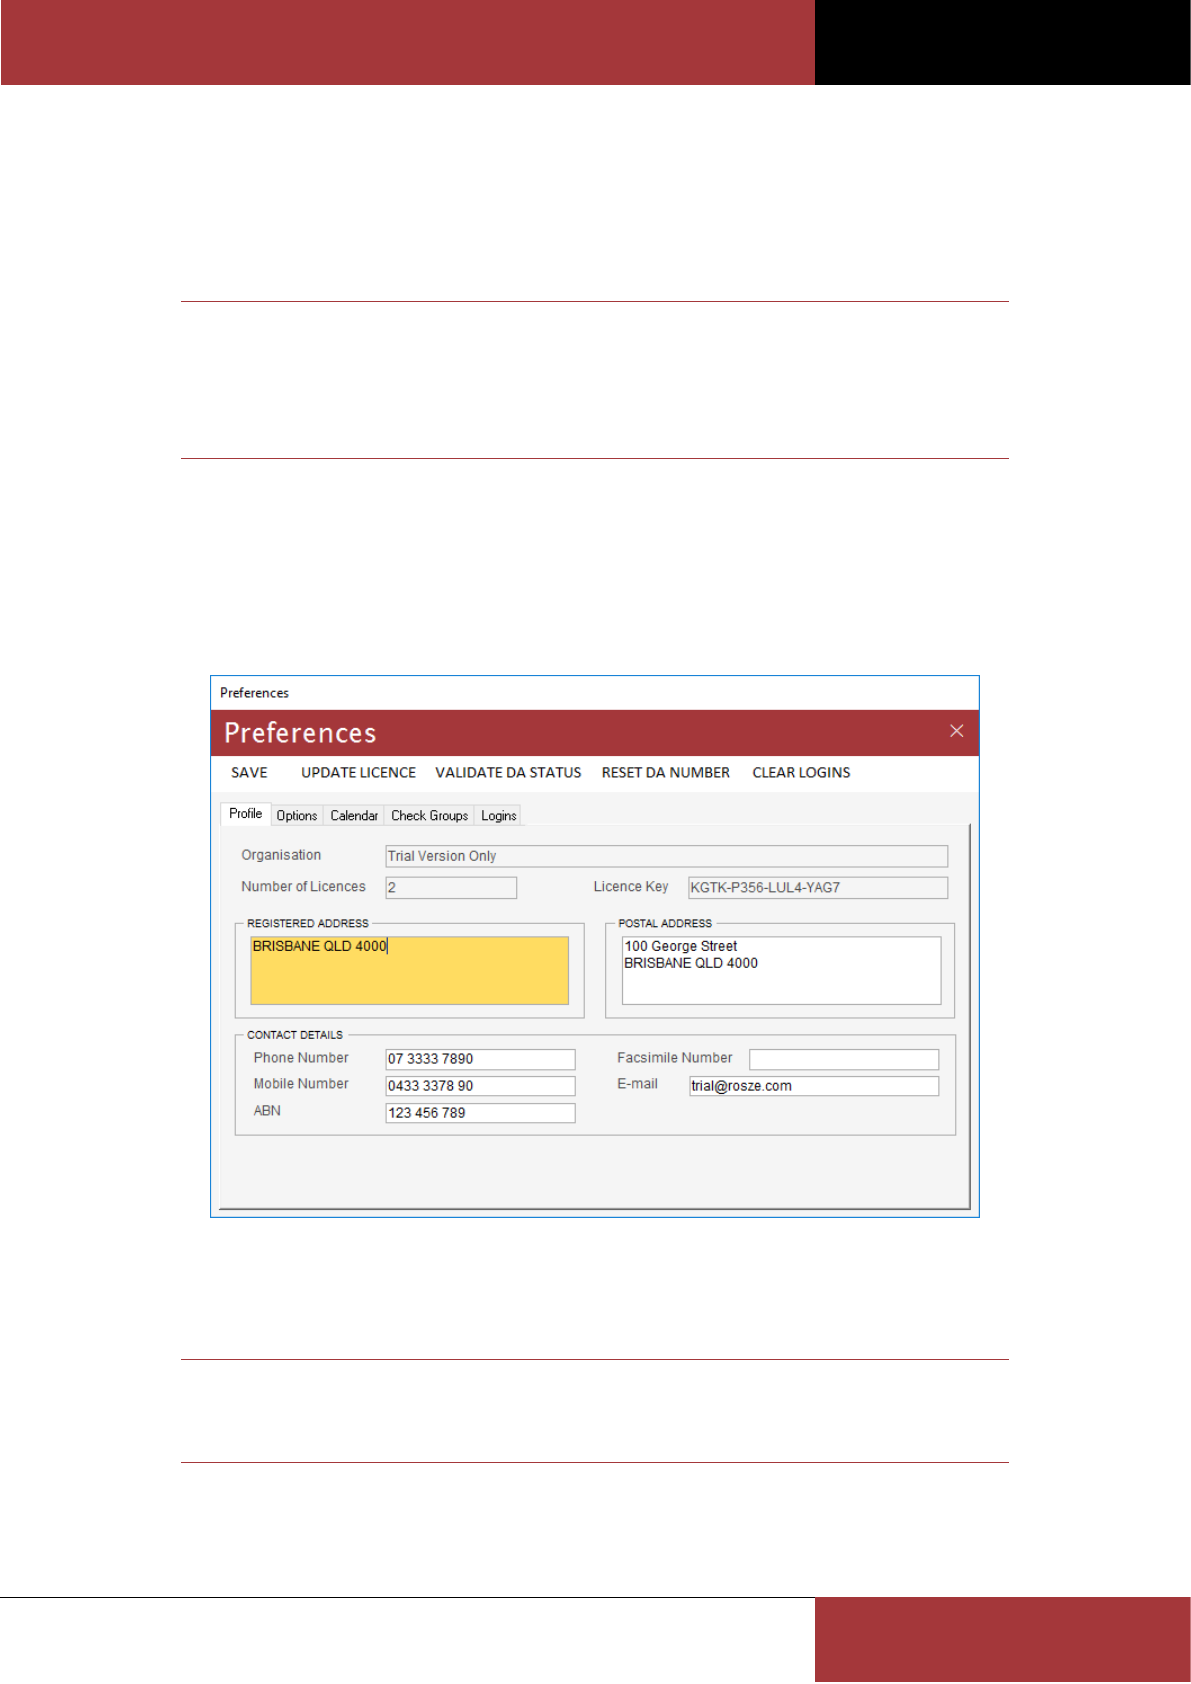
BC OFFICE USER GUIDE
ROSZE.COM
COPYRIGHT © ROSZE PTY LTD
68
6. Once all details are completed and the estimated archive size is within the target image capacity, click on the
Archive command button to commence the archive process.
7. On the Confirm Archive prompt click on the OK button to confirm the archive.
8. When the archiving process is complete, you can use your preferred burning software to copy the contents of
the temporary folder to the CD or DVD.
Note
When copying the contents of the temporary folder to the archive CD/DVD the folder's
contents must be copied into the root of the CD/DVD directory (i.e. copy all of the
subfolders, e.g. 20110100 to the top of the CD/DVD directory, do not copy the temporary
folder itself to the CD/DVD).
To view a document which has been archived to CD or DVD, simply select the document as usual and when prompted,
enter the correct CD/DVD into the CD/DVD drive.
Using the Preferences form
The Preferences form is used to set your profile details and BC Office preferences.
Using the Profile tab
The Profile tab allows you to record your business address and contact details. These details are used on all default
merge templates and are available as merge fields in all merge template data sources.
Note
These details should be entered immediately following installation and prior to generating
your first merge letter. You can change these details at any time.
Using the Options tab
The Options tab allows you to customise the BC Office system settings. These settings will affect all users of BC Office.
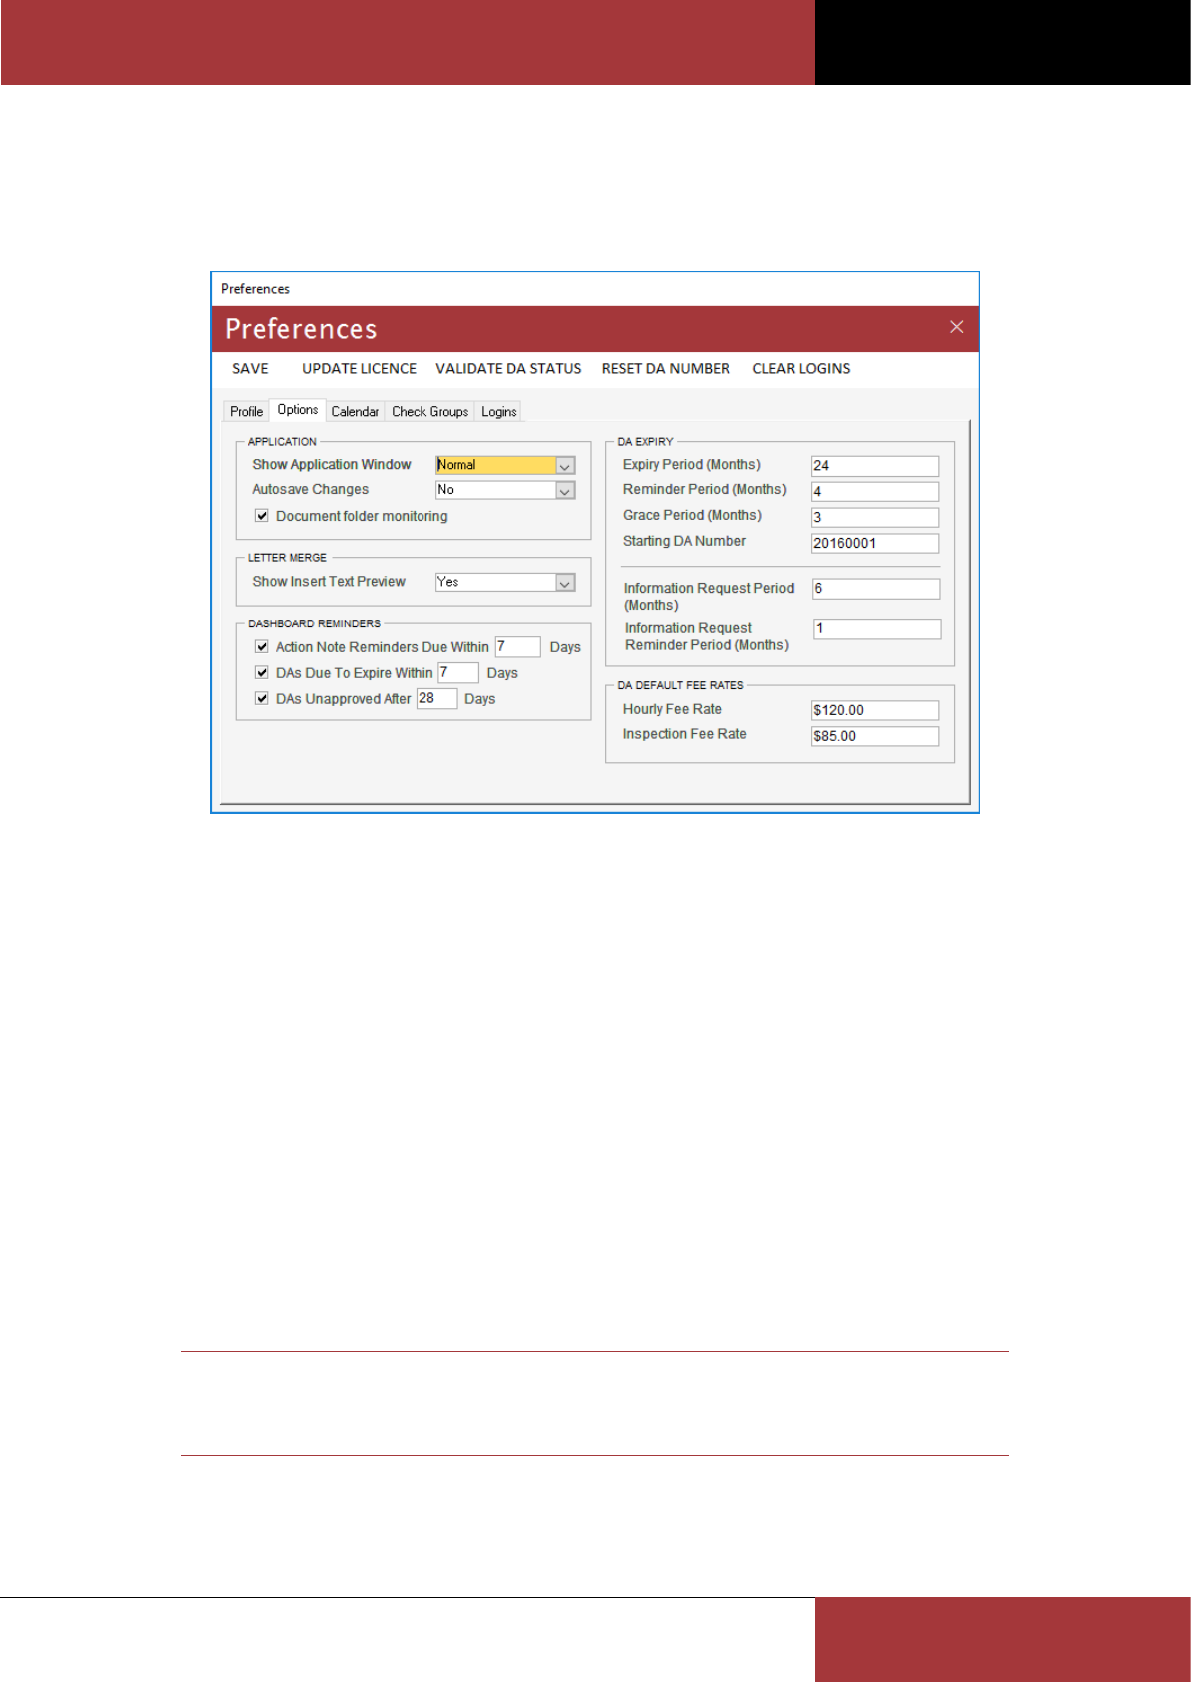
BC OFFICE USER GUIDE
ROSZE.COM
COPYRIGHT © ROSZE PTY LTD
69
The Show Application Window option allows you to set the initial window state of the main BC Office window to either
Normal or Maximised. The Autosave Changes option allows you to choose if a confirmation message should be shown
before saving changes. The Document folder monitoring option controls weather BC Office automatically monitors the
application document archive folders for new document files being manually added to the folder.
The Show Insert Text Preview option is used to enable/disable the Insert Text preview panel on the Letter Merge form.
This might be desirable if the previews are slow to load.
The DA Expiry options allow you to customise the reminder notice bulk merges. These options are:
Expiry Period – When an application is approved, the Expires On date will default to the Approved On date plus
the number of months set for the Expiry Period.
Reminder Period – This preference is used to define the reminder period in which a reminder notice should be
sent.
Grace Period – When issuing a reminder notice, the Notified Expiry Date will be the greater of the current
Expires On date and the bulk merge date plus the number of the months defined by the Grace Period. This will
ensure that the client is provided the minimum required reminder notification before the application expires.
If the Expires On date falls within the Grace Period, then the Expires On date will be updated, by the bulk merge
process, to the Notified Expiry Date.
Starting DA Number – This preference allows you to set the DA Number from which the reminder notice
requirements will apply.
Information Request Period – The number of months from issuing of the Information Request merge letter in
which the applicant must respond.
Information Request Reminder Period – This preference is used to define the reminder period (in months) in
which an information request reminder notice should be sent.
Note
For more information on the use of the DA Expiry options, refer to the section on
Customising the Reminder Notice of Lapsing Approval bulk merge.
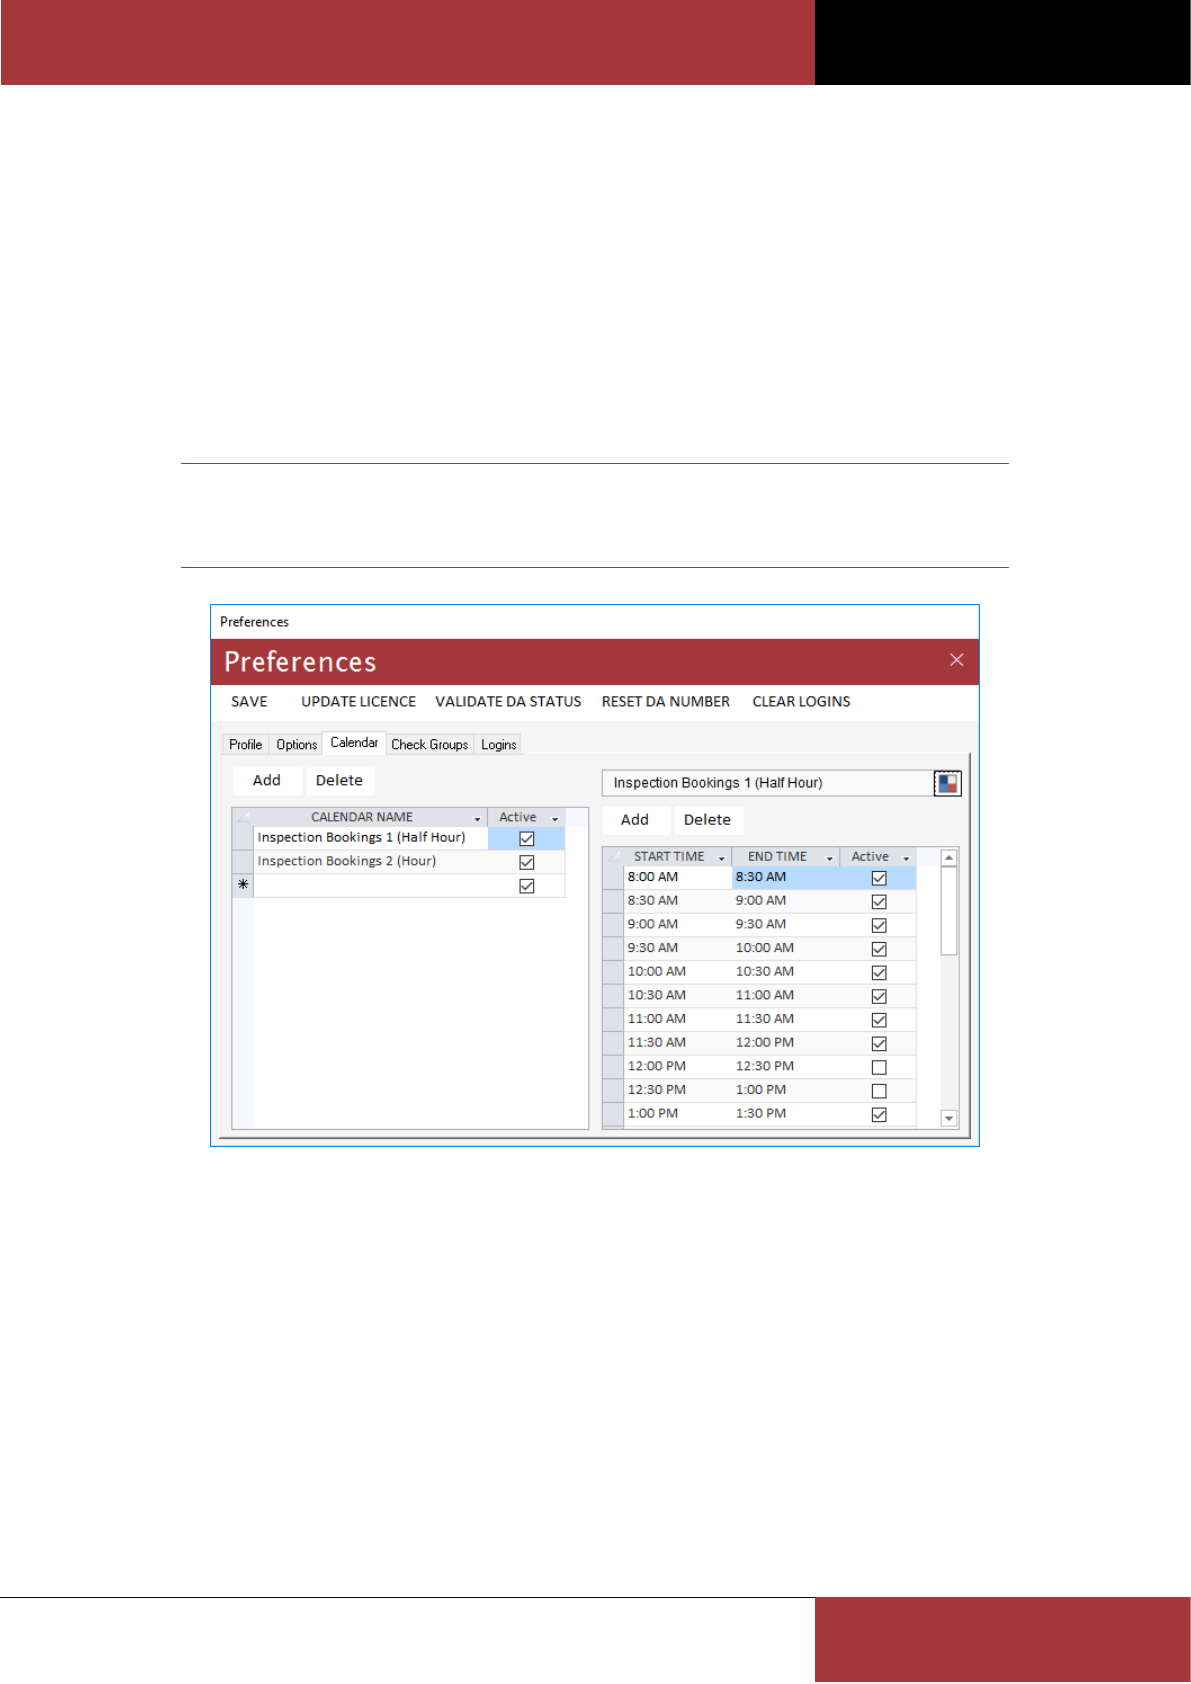
BC OFFICE USER GUIDE
ROSZE.COM
COPYRIGHT © ROSZE PTY LTD
70
The Dashboard Reminders options allow you to customise the active reminders on the dashboard. These options are:
Action Note Reminders – This preference is used to enable/disable the action note reminder. The reminder is
used to show action notes which have a reminder date due to fall within the specified number of days of the
current date.
DAs Due To Expire Reminder – This preference is used to enable/disable the expired application reminder. The
reminder is used to show applications which are due to expire within the specified number of days of the
current date.
DAs Unapproved Reminder – This preference is used to enable/disable the unapproved application reminder.
The reminder is used to show applications which have passed the specified number of days without being
approved.
The Calendar tab is used to add and maintain the calendars and calendar times used on the Calendar form.
Note
For more information on customising the Calendar settings, refer to the section on Setting
Calendar Preferences using the Preferences form.
The Check Group tab is used to add and maintain the check groups used on the Insert Checks form.

BC OFFICE USER GUIDE
ROSZE.COM
COPYRIGHT © ROSZE PTY LTD
71
Adding a New Check Group
1. Click the Add check group command button or navigate to the new record on the Check Group list.
2. Enter a description for your new group.
3. Select the required check category tab:
a. Consent – these checks are used to record any referral agency consents or approvals which are required
for the proposed building work
b. Certificate – these checks are used to record any design, inspection or aspect certificates which are
required for the proposed building work
c. Assessment – these checks are used to record the key checks undertaken in assessing the application
4. Click the Add check type command button or navigate to the new record on the Check Type list.
5. Enter the required Check Types for the new group. While the Check Type list of values contains a useful default
set of check types, you can easily add your own check type codes using the Codes form (see following steps).
6. Click the Save command button to save any unsaved changes.
Adding New Check Type Codes
1. Open the Codes maintenance form from the Administration menu.
2. Select the Check Category Codes code type.
3. Select the new check’s Check Category from the Sub Code field.
4. In the User Codes list enter the new check details.
5. Click the Save command button to save any unsaved changes.
About the Logins tab
The Logins tab shows the user login history for the past 30 days.

BC OFFICE USER GUIDE
ROSZE.COM
COPYRIGHT © ROSZE PTY LTD
72
Updating your Licence details
The Update Licence command button on the Preferences form is used to update your licence details should you
purchase additional licences.
When purchasing additional licences, you will be issued with a new Licence Key which will need to be entered into BC
Office using the following form.
Note
When entering your new licence details, it is important to enter the details exactly as
provided to you.
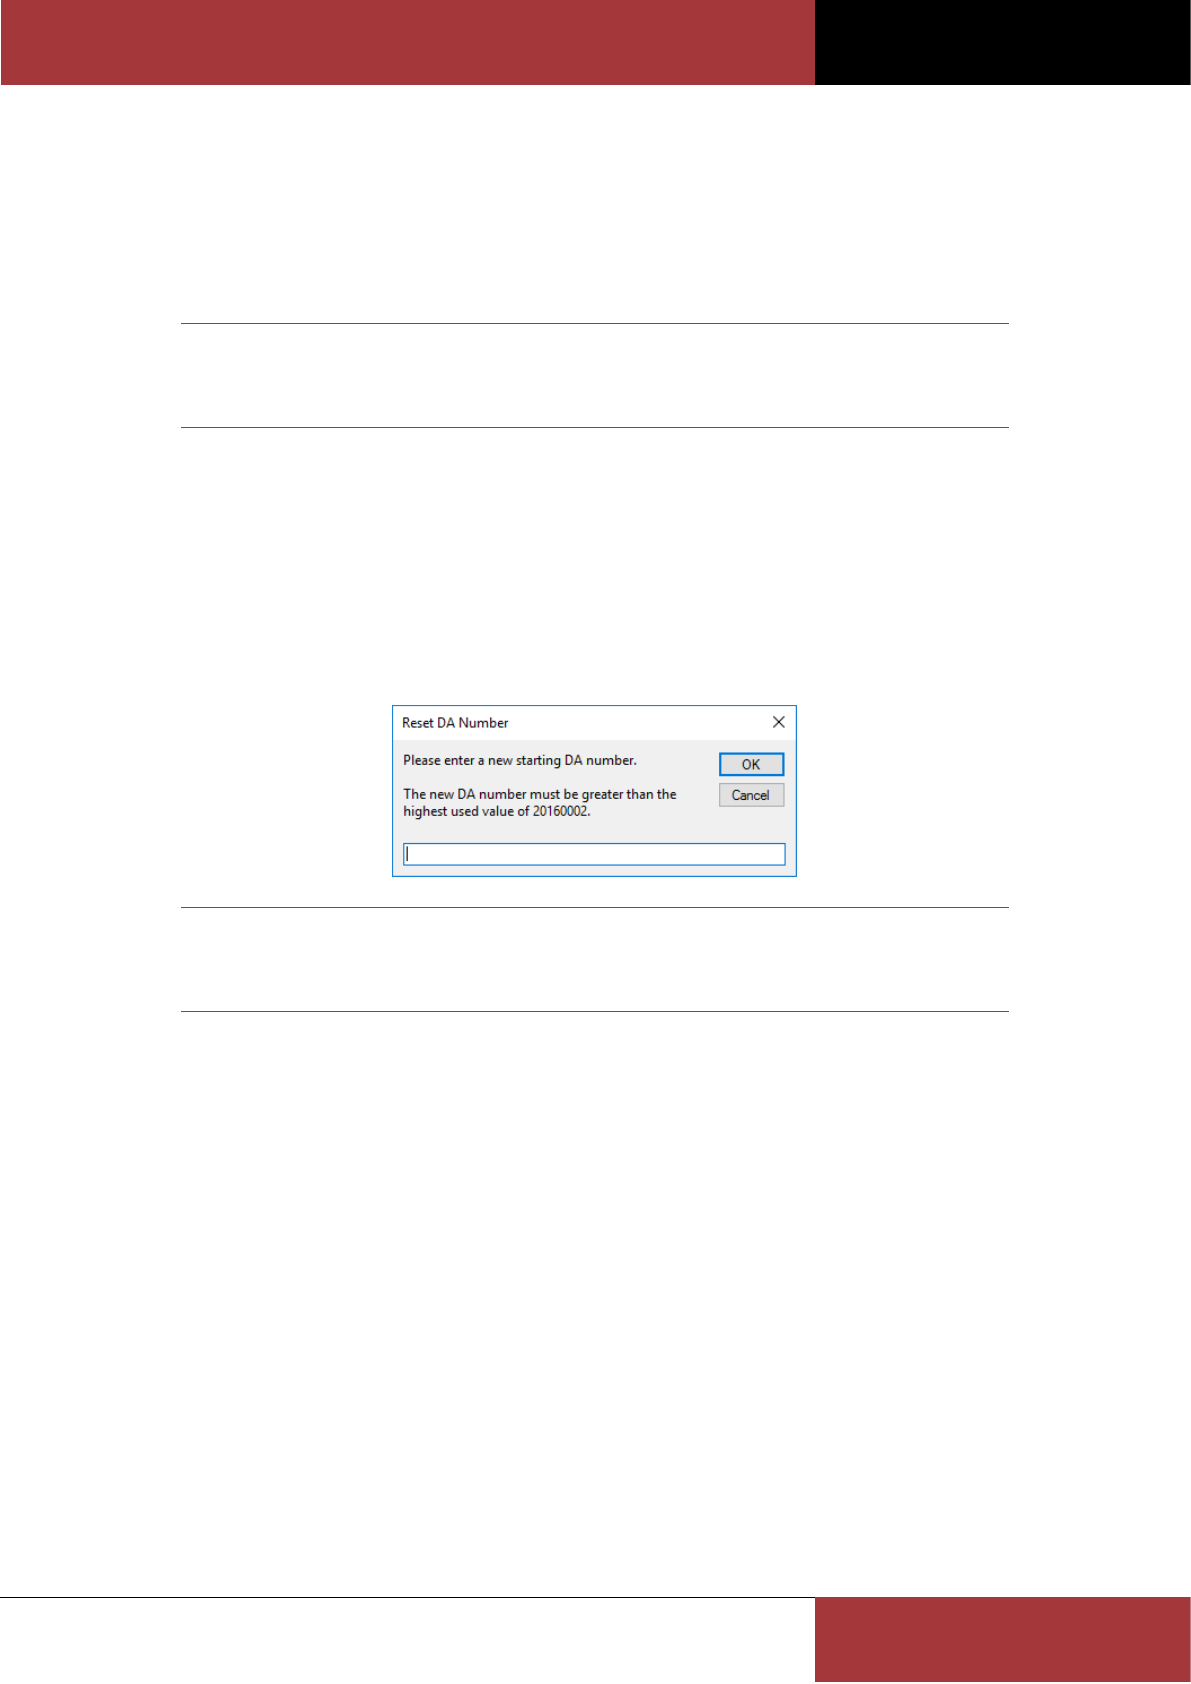
BC OFFICE USER GUIDE
ROSZE.COM
COPYRIGHT © ROSZE PTY LTD
73
Validating all DA Statuses
The Validate DA Status command button on the Preferences form is used to validate all application statuses.
While BC Office maintains the application Status as changes are made to the application, this option allows you
confirm that all statuses are valid by recalculating the Status on all applications. You only need to perform this action
if you suspect the Status field has become invalid.
Note
Depending on the number of applications to process this validation may take several
minutes to complete.
Resetting the DA Number generator
The Reset DA Number command button on the Preferences form is used to reset the application number.
BC Office automatically generates the next DA number based on the number set here. The number must be a valid
number greater than the current DA Number.
When resetting the DA number generator, the following prompt will ask you for the new number to assign to the
number generator. In this example, the current number is 20110004 and the new number is being set to 20120001.
Note
For more information on the DA number generator, refer to the sub-section About the
DA Number, under the Using the Application form section.
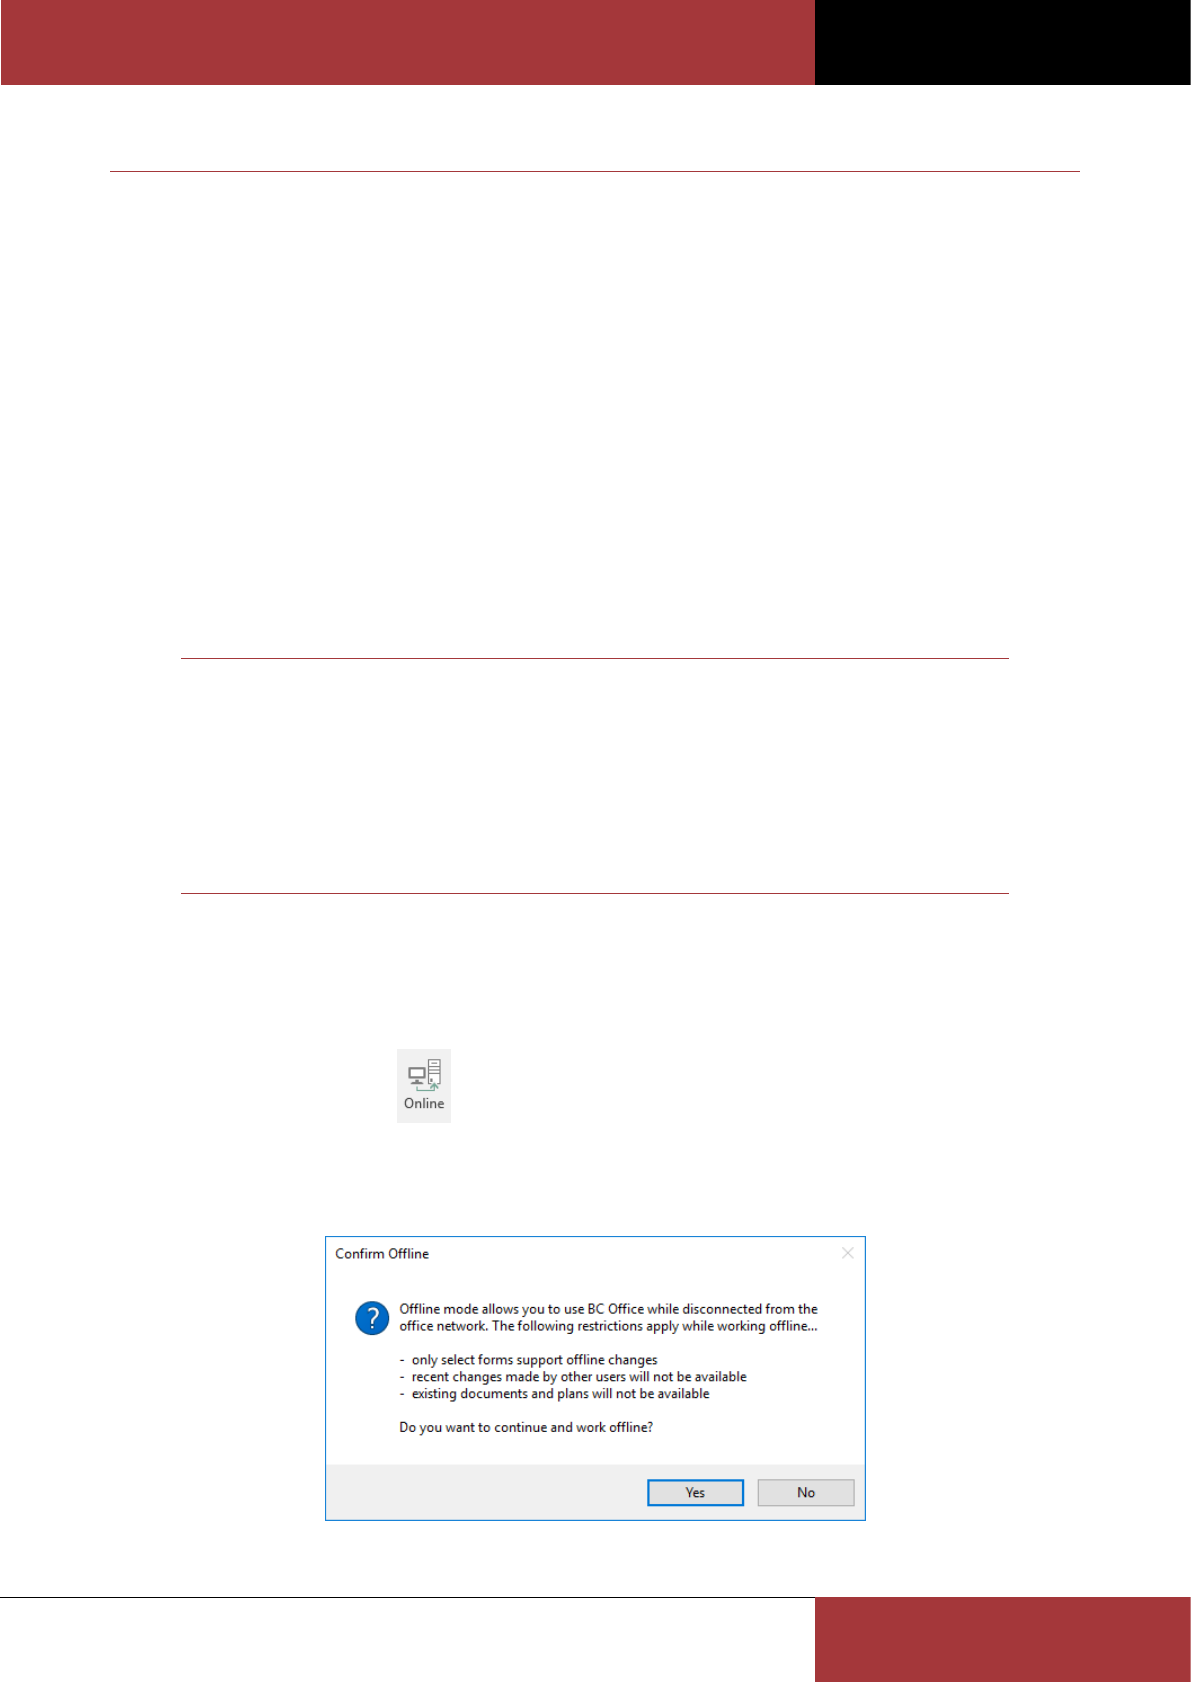
BC OFFICE USER GUIDE
ROSZE.COM
COPYRIGHT © ROSZE PTY LTD
74
OFFLINE MODE
Using Offline Mode, you can disconnect BC Office from the server database and take a local copy of the database with
you on your notebook computer.
While working in Offline Mode your entire BC Office database will be available for read only access, however you will
be able to perform the following changes:
Adding new inspection results using the Inspection form.
Generating new merge letters using the Letter Merge form.
Add new action notes using the Action Note form.
The following limitations will apply while working in Offline Mode:
Changes made by other users will not be available until you return online.
File and document attachments will not be available, including plans from the Plan Register and existing
documents on the Application form’s Documents tab.
The Online/Offline menu button, located on the BC Office tab of the menu ribbon, is used to switch between Online
and Offline Mode. The Online/Offline menu button will always show the current mode.
Note
In Offline Mode, all forms will be read only with the exception of the Inspection and Action
Note forms.
Depending on the size of your BC Office database and the speed of your network, entering
Offline Mode may take several seconds.
If you make any offline changes and don’t synchronise these changes when you reconnect to
the server database, all of these changes will be lost.
Working Offline
To start working offline, perform the following steps:
1. Within BC Office, close any open forms and reports leaving only the Dashboard open.
2. Click the Online menu button from the BC Office tab of the menu ribbon.
3. Click Yes to confirm you want to start working offline.
4. Wait for the offline files to be copied to your local computer.
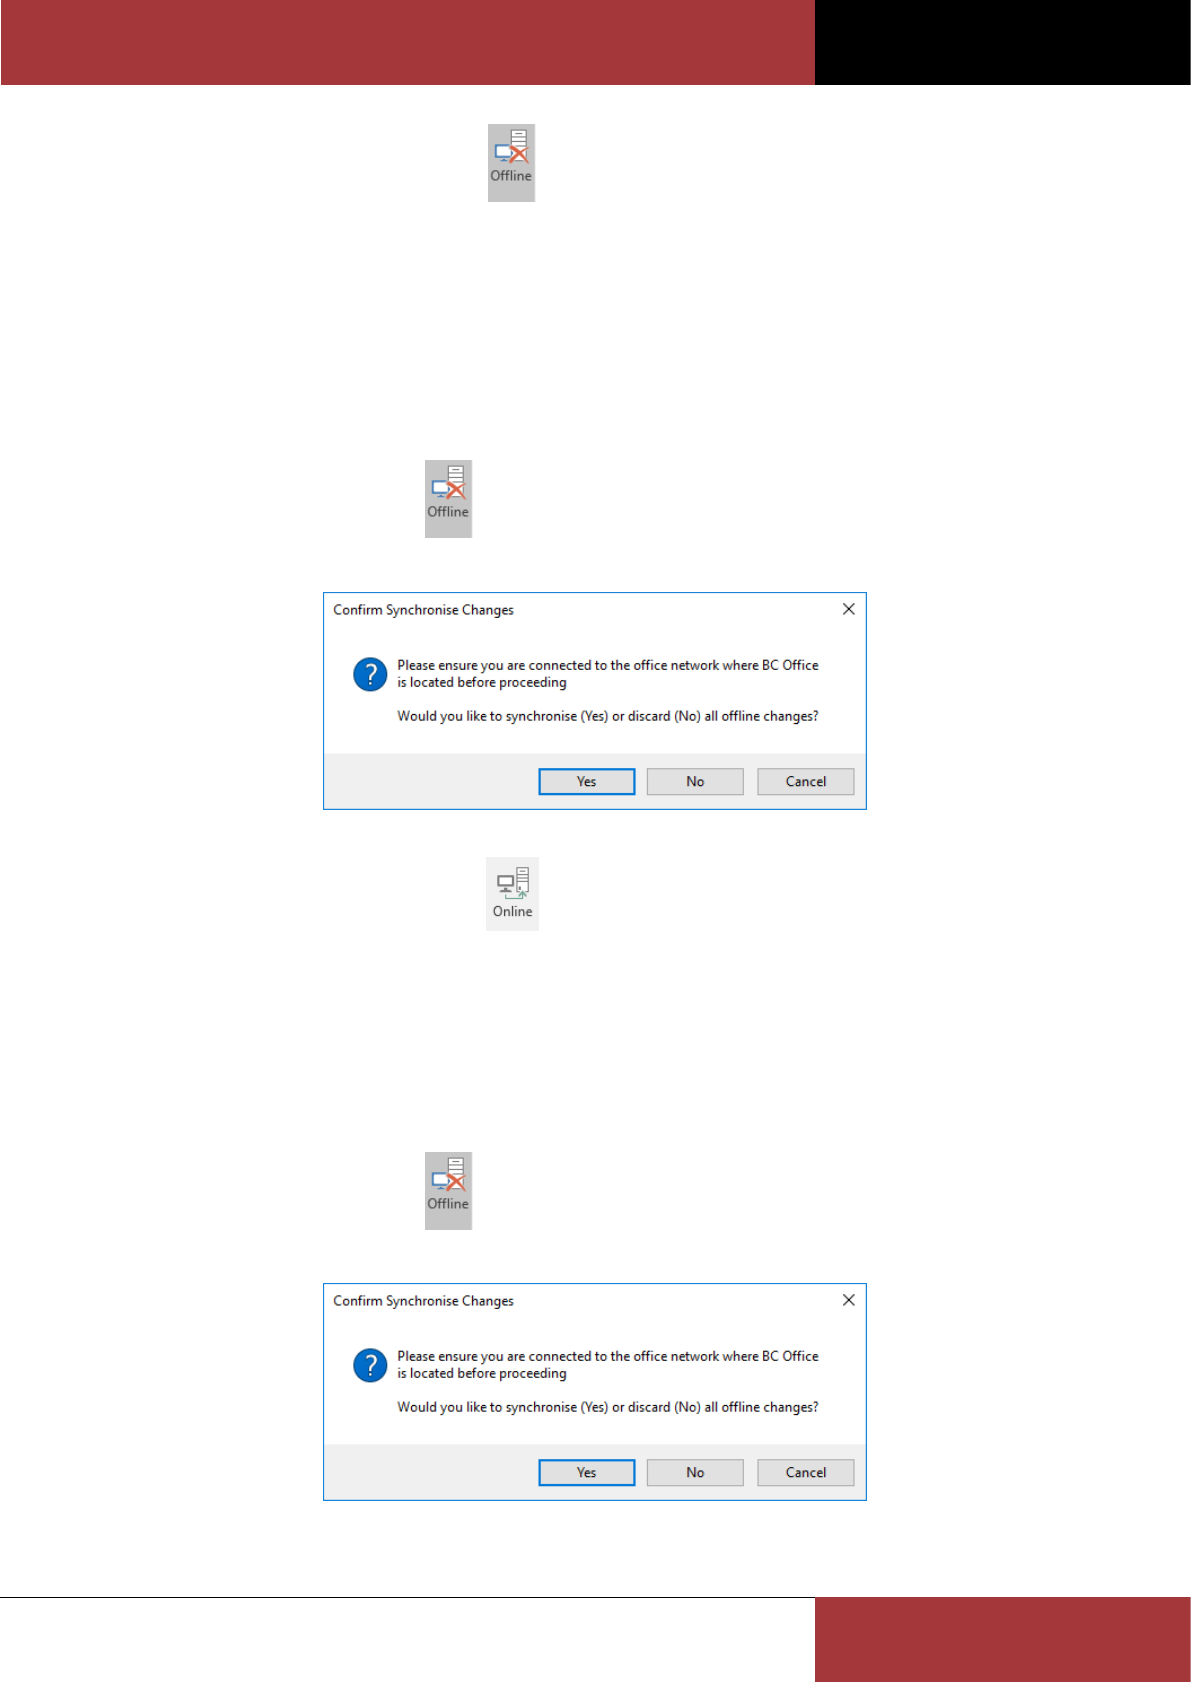
BC OFFICE USER GUIDE
ROSZE.COM
COPYRIGHT © ROSZE PTY LTD
75
5. On completion, the Offline menu button should now indicate that you are offline.
6. You can now disconnect your notebook from the network and take BC Office with you.
Synchronising Offline changes
When you are ready to return to the office and synchronise your offline changes, perform the following steps:
1. Reconnect your notebook to the network and check that the shared network drive, on which the BC Office server
files are located, is available.
2. Within BC Office, close any open forms and reports leaving only the Dashboard open.
3. Click on the Offline menu button from the BC Office tab of the menu ribbon.
4. Click Yes to confirm you want to synchronise the offline changes.
5. Wait for the offline changes to be synchronised with the server database.
6. On completion, the Online menu button should now indicate that you are back online.
Cancelling Offline changes
When you want to return to the office without synchronising your offline changes, perform the following steps:
1. Reconnect your notebook to the network and check that the shared network drive, on which the BC Office server
files are located, is available.
2. Within BC Office, close any open forms and reports leaving only the Dashboard open.
3. Click on the Offline menu button from the BC Office tab of the menu ribbon.
4. Click No to confirm you want to discard the offline changes.
5. Wait for the database to reconnect with the server database.

BC OFFICE USER GUIDE
ROSZE.COM
COPYRIGHT © ROSZE PTY LTD
76
6. On completion, the Online menu button should now indicate that you are back online.
Note
If you make any offline changes and don’t synchronise these changes when you reconnect to
the server database, all of these changes will be lost.
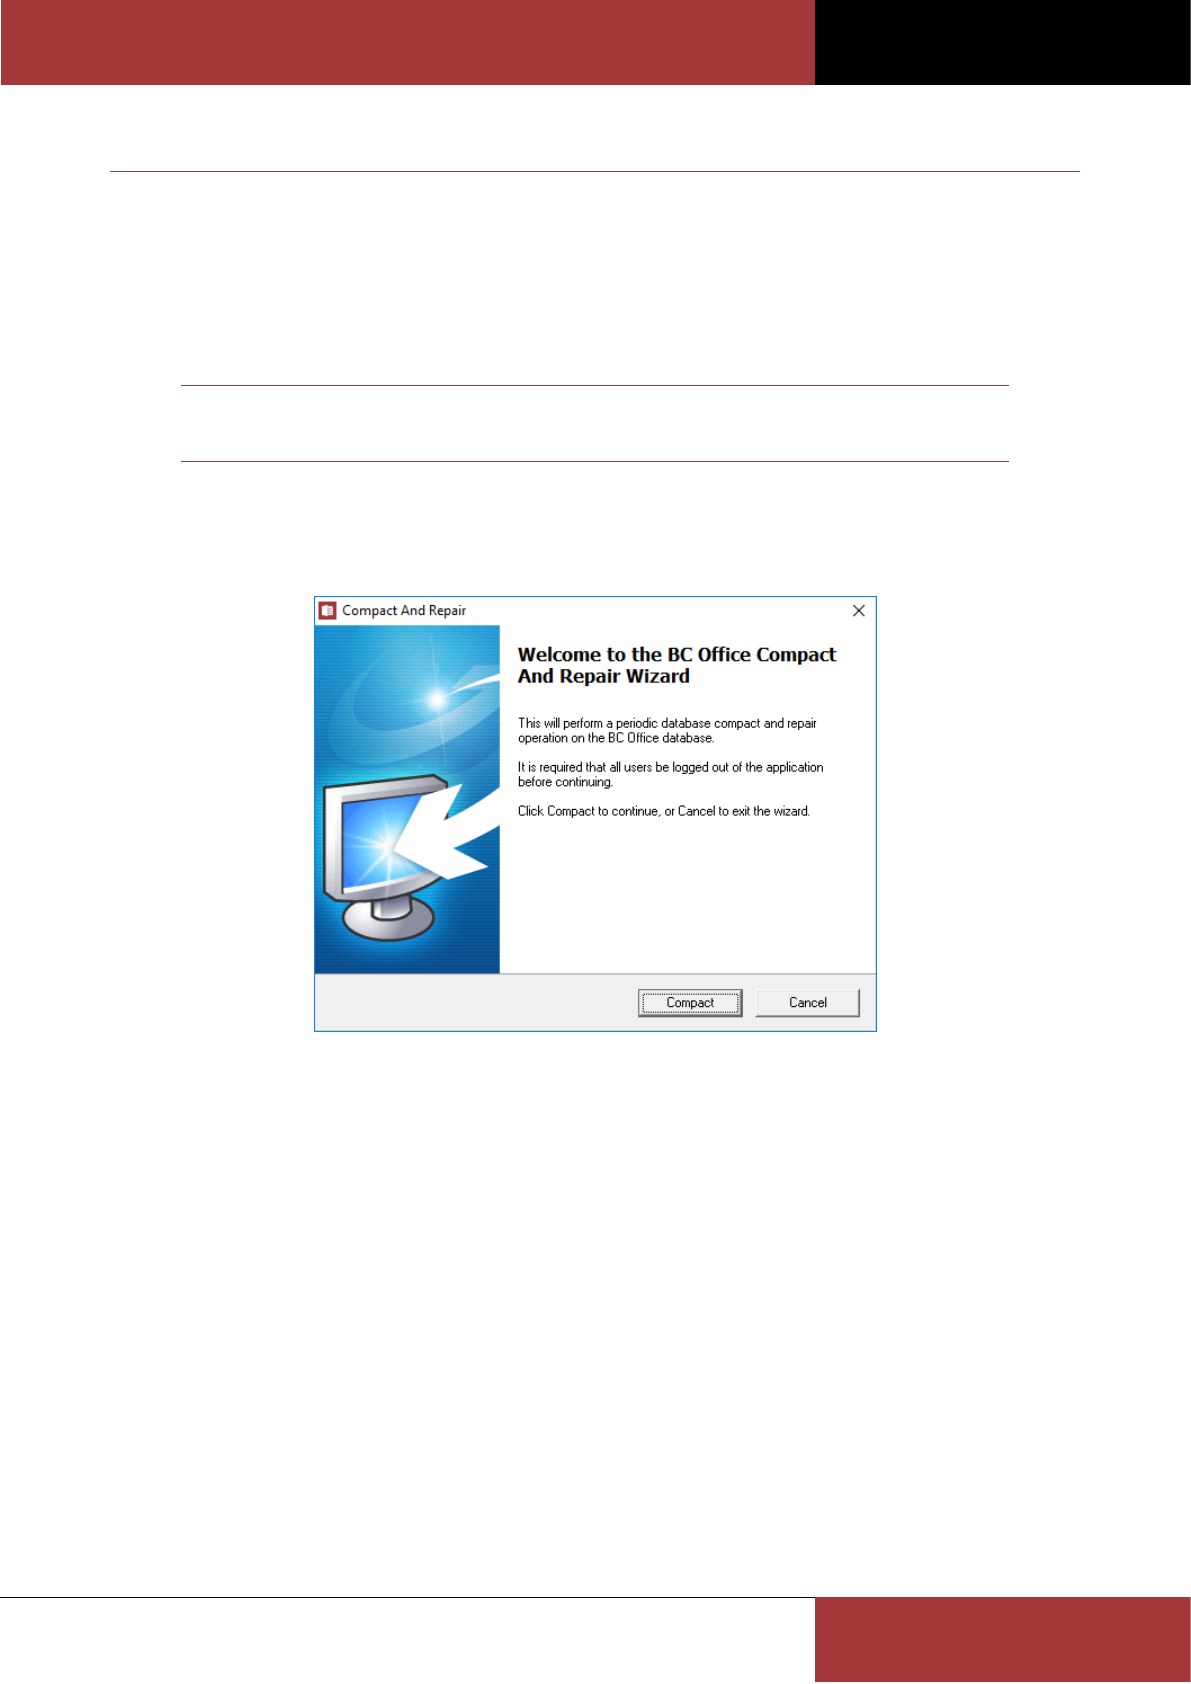
BC OFFICE USER GUIDE
ROSZE.COM
COPYRIGHT © ROSZE PTY LTD
77
PERFORMING COMPACT AND REPAIR OPERATIONS
As data is added to and removed from BC Office, the backend database will continue to grow and may become
fragmented over time. This fragmentation can in turn cause the database to unnecessarily double or triple in size.
To assist in maintaining the database, BC Office uses a Compact and Repair utility to remove any unnecessary
fragmentation. This utility is scheduled to automatically perform the Compact and Repair operation, at regular
periods, upon opening BC Office.
Note
This utility can only be used if no users are currently connected to the database.
When the Compact and Repair is due, you will see the following screen when you open BC Office, from which you can
click Compact to perform the Compact and Repair or Cancel to login to BC Office without performing the Compact and
Repair operation.

BC OFFICE USER GUIDE
ROSZE.COM
COPYRIGHT © ROSZE PTY LTD
78
PERFORMING BC OFFICE BACKUPS
Performing regular backups should be considered a top priority for any business. Although Microsoft Access on which
BC Office is based is generally a reliable product failures can, do, and probably will occur. They may be caused by
hardware failure, power outages or other unforeseen problems.
More likely will be those problems caused by human error resulting in undesired changes to or even deletion of crucial
files.
If you perform regular backups, preferably on a daily basis, you will hopefully reduce the possibility of and increase
your recovery from such file loss.
The safest method of doing backups is to record them on separate media, such as tapes, removable drives, writeable
CD/DVDs, etc., and then store your backup sets in a location separate from your host system, preferable in an offsite
location.
When backing up BC Office you should ensure all users have logged out of the application before backing up the entire
application folder (e.g. C:\BC Office), including the following subfolders:
Document – The document archive where all documents are stored
Plan Register – The location where all Survey Plans are stored
Template – The location where all merge templates are stored
Note
It is also strongly recommended that an additional backup be performed immediately prior
to installing any product upgrade.

BC OFFICE USER GUIDE
ROSZE.COM
COPYRIGHT © ROSZE PTY LTD
79
FREQUENTLY ASKED QUESTIONS
How do I reset the DA Number?
Refer to the Resetting the DA Number generator section.
I can't find the required contact name in the Local Authority or Certified By list of values.
Make sure the contact exists and that the contact has been made a member of the Local Authority or Building
Certifier group. Refer to the Using the Address Book form section.
I can't create a Builder relationship for an existing contact?
You need to ensure the contact is a member of the Builder group. Refer to the Using the Address Book form
section.
How do I add new values to a list of values (e.g. Street type, Consent Type, Inspection Type etc)?
Refer to the Using the Codes form section.
How do I add or customise a merge template?
Refer to the Using the Merge Templates form section.
How do I edit the label merge templates to change the label size?
The two Microsoft Word label templates are located in the BC Office Template subfolder and will need to be
edited manually to suit your label stationary.
The Cover Sheet Label template is named Labels - Cover Sheet (Read Only).doc and the Envelope Label template is
named Labels – Envelope (Read Only).doc.
As these file are saved as read only files, you will need to use Windows Explorer to remove the read only file
attribute (under Properties), before you can edit the file using Microsoft Word.
I get a Compact and Repair error telling me the database is currently in use when all users are already logged out.
Sometimes the Microsoft Access database transaction file doesn't get removed when the last user logs out of the
database. Try logging back into BC Office and logging out again to see if the transaction file gets removed.
If the above doesn’t work and you are certain no one is logged in, you can manually remove the transaction file,
by deleting the file with the .laccdb file extension from the BC Office folder.
Please do not delete any files from the BC Office folder unless you know what you are doing.
