User Guide
User Manual: Pdf
Open the PDF directly: View PDF ![]() .
.
Page Count: 60
Contents
1. Daily Tasks ..................................................................................................................................................................................................................................... 3
1.1. Daily Assignment ................................................................................................................................................................................................................... 3
1.2. Daily Report ............................................................................................................................................................................................................................ 7
1.3. Generate Report Link ........................................................................................................................................................................................................... 9
1.4. Test Execution ..................................................................................................................................................................................................................... 10
1.5. Bug Adjustment ................................................................................................................................................................................................................... 24
1.6. Temporary Off ...................................................................................................................................................................................................................... 26
1.7. Off Planning .......................................................................................................................................................................................................................... 27
1.8. To-Do List ............................................................................................................................................................................................................................. 29
2. Device ........................................................................................................................................................................................................................................... 29
2.1. Manage my device .............................................................................................................................................................................................................. 29
2.2. Search for devices............................................................................................................................................................................................................... 32
2.3. Transfer log .......................................................................................................................................................................................................................... 35
2.4. Device options (only for IS_SUPPORT) .......................................................................................................................................................................... 36
2.5. Add devices (only for IS_SUPPORT) ............................................................................................................................................................................... 40
2.6. Devices management ......................................................................................................................................................................................................... 43
2.7. Devices summary ................................................................................................................................................................................................................ 43
2.8. Team summary .................................................................................................................................................................................................................... 44
3. Contribution .................................................................................................................................................................................................................................. 46
3.1. Share knowledge ................................................................................................................................................................................................................. 46
3.2. Suggestions .......................................................................................................................................................................................................................... 46
3.3. Extra points .......................................................................................................................................................................................................................... 46
4. Training ......................................................................................................................................................................................................................................... 47
4.1. Skill Metrics .......................................................................................................................................................................................................................... 47
4.2. Domain Knowledge ............................................................................................................................................................................................................. 47
5. Statistics ........................................................................................................................................................................................................................................ 49
5.1. Personal report .................................................................................................................................................................................................................... 49
5.2. Daily timesheet .................................................................................................................................................................................................................... 51
5.3. Daily Performance ............................................................................................................................................................................................................... 51
5.4. Monthly Performance .......................................................................................................................................................................................................... 52
5.5. Yearly Performance ............................................................................................................................................................................................................ 54
5.6. Bug data ................................................................................................................................................................................................................................ 54
5.7. Jira filters .............................................................................................................................................................................................................................. 56
5.8. Violation log .......................................................................................................................................................................................................................... 57
6. Activities ........................................................................................................................................................................................................................................ 58
6.1. Surveys ................................................................................................................................................................................................................................. 58
7. Directory ........................................................................................................................................................................................................................................ 59
7.1. User list ................................................................................................................................................................................................................................. 59
7.2. Team list ............................................................................................................................................................................................................................... 59
7.3. Project list ............................................................................................................................................................................................................................. 59
8. Help ............................................................................................................................................................................................................................................... 60
8.1. User guide ............................................................................................................................................................................................................................ 60
8.2. Project Settings guide ......................................................................................................................................................................................................... 60
8.3. Feedback .............................................................................................................................................................................................................................. 60
REVISION HISTORY
Date
Version
By
Description of Change
14 Jan 2014
0.01
Ha Tran
Initial version
1. Daily Tasks
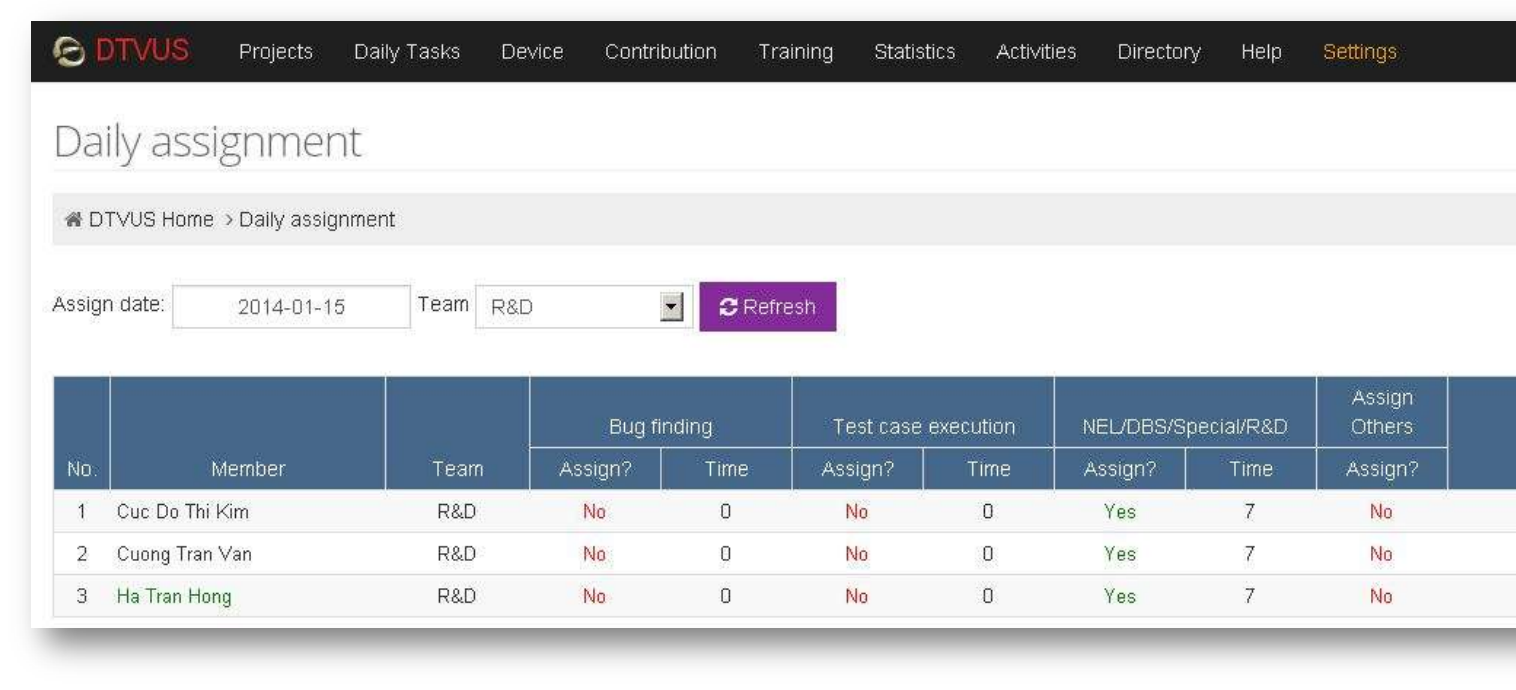
1.1. Daily Assignment
- It shows detail assignment in a specific date for users.
- User needs to have the permission “view_daily_assignment” or “manage_daily_assignment” to access this feature.
o “view_daily_assignment” permission: allows user to view daily assignment only.
o “manage_daily_assignment” permission: allows user to view daily assignment and edit daily assignment for his team(s).
- Viewing daily assignment:
o User will select filters (Assign date & Team) and click on Refresh button to view assignmen. By default, the filters are current date
and current team of the user.
o An assignment will include information below:
Member: members in the selected team.
Team: team name.
Task(s) contains:
Task name.
Assign? Yes/No (while Yes means you are assigned to this task).
Time (depends on specific task): duration of time you are assigned to do this task.
Quantity (depends on specific task): quatity of work you are asigned in the task.
The assignment template is defined by PM.
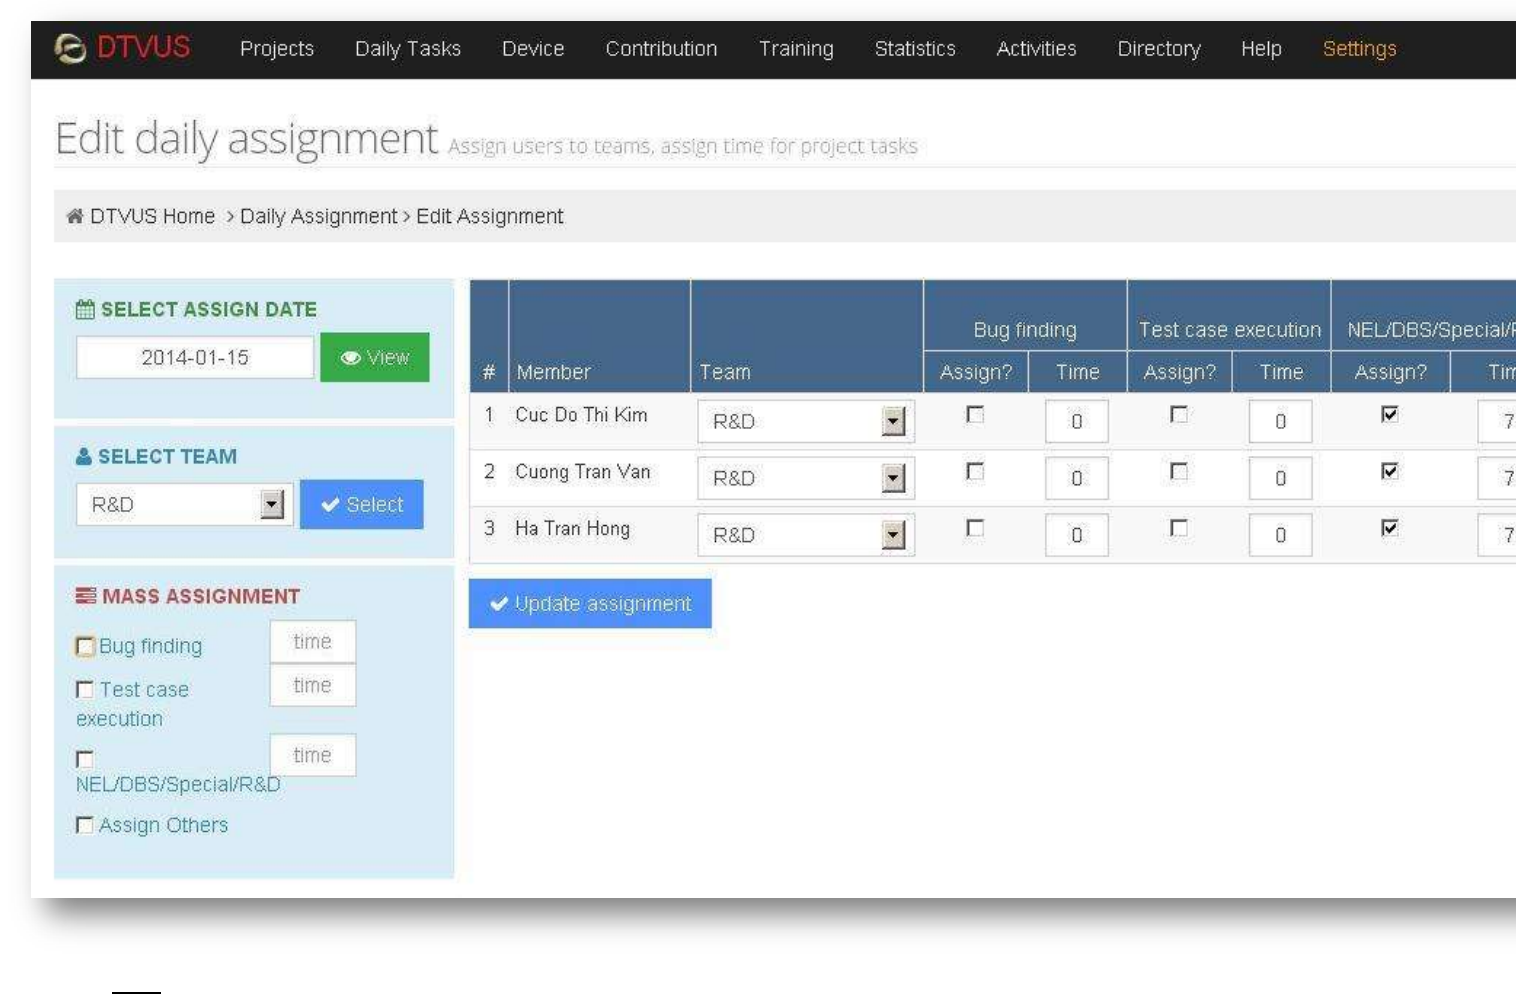
- Editing daily assignment:
o User will select a date and team to view detail assignment of members in the team.
o “Mass assignment”: help user to update assignment for all members quickly by checking/unchecking on each task with an
appropriate value.
o User can also edit assignment on each task for specific members in the left panel, with some notes:
Total assigned time <= 8.
In case a member is changed to support another team, user can update team info for this member in “Team” column.
But after user confirms his update, this member will belong to new team and he can not get this member back to his team
by himself, only the leader of the new team can do it.
A member will noted as a resource of only one team per day.
o After updating, click on “Update assignment” button to save the edition.
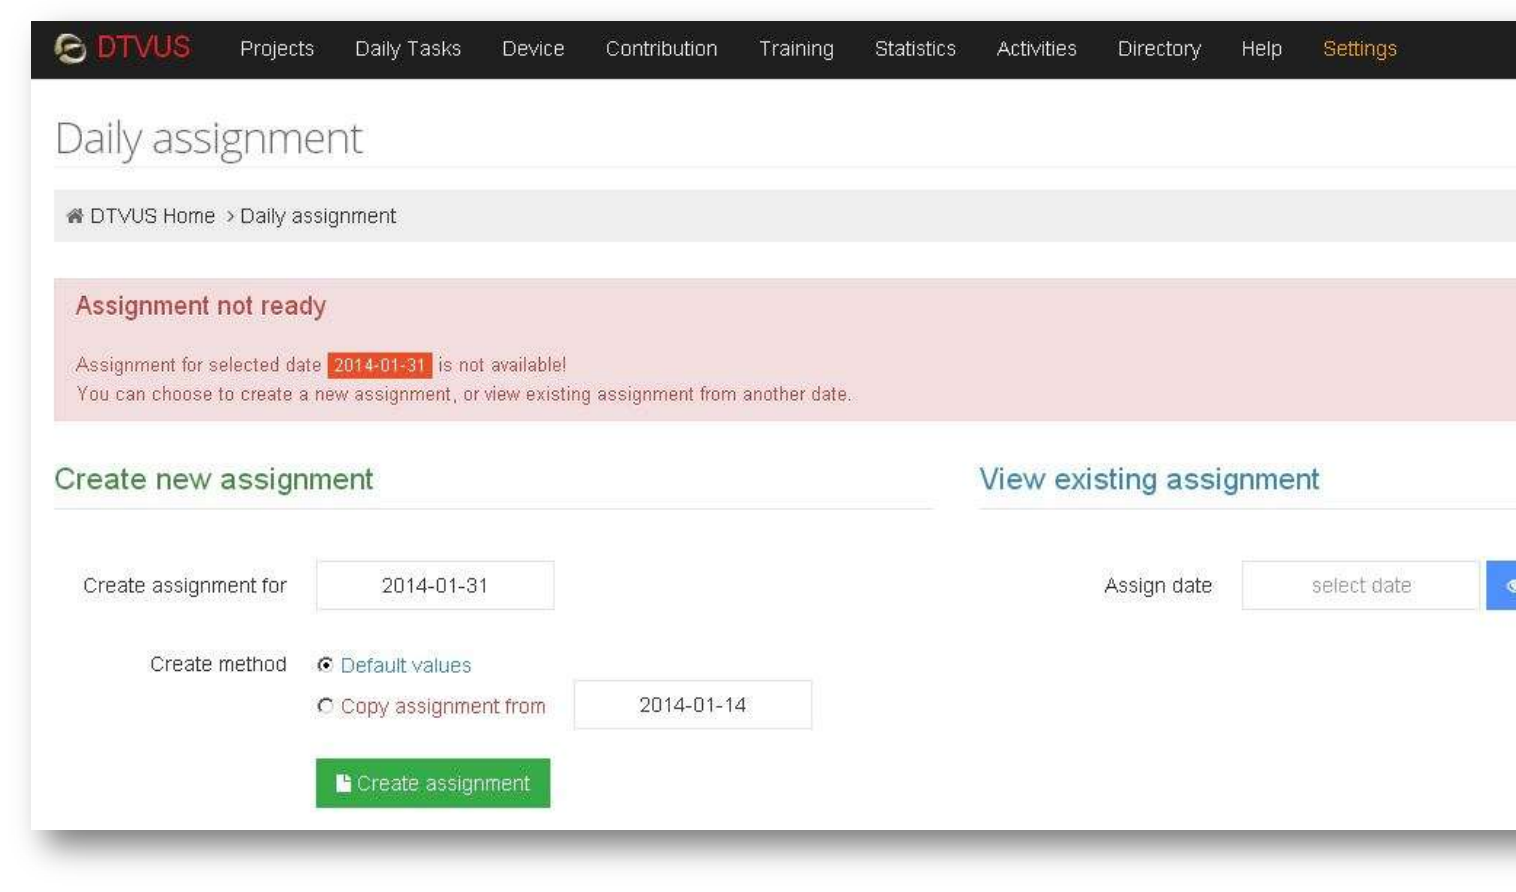
Note: if daily assignment is not available for the selected date, it will be created by PM with two options:
+ Coppy from the previous daily assignment, or.
+ Create new daily assignment.
- Daily assignment data will be an input for daily performance. For example, daily effort will be calculated based on daily assignment and
daily report, if a task is assigned effort of this task in daily report will be counted.
1.2. Daily Report
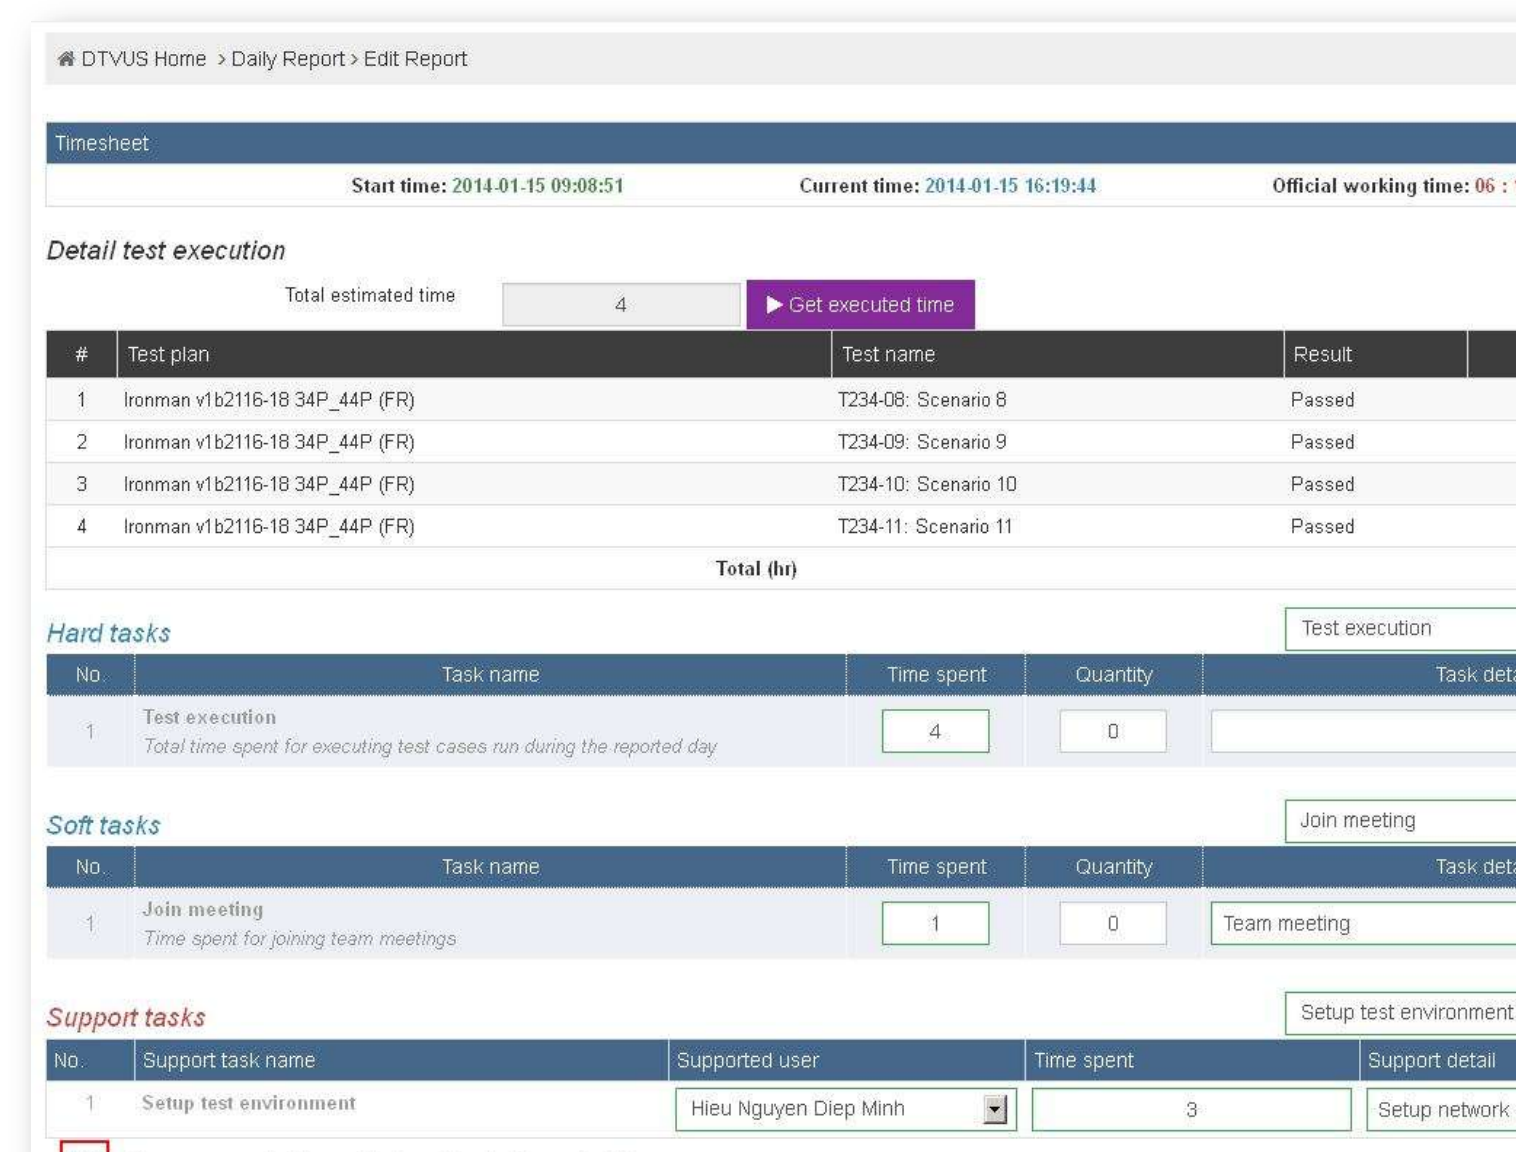
- In daily report, user will report what he has done during the working day.
- User needs to have “do_daily_report” permission to access this feature.
- To update daily report:
o Select “Edit Daily Report” button.
o Select correct tasks and input corresponding values for the tasks.
If user is assigned to do “Test execution” task (with keyword “TEST” defined by PM), system will automatically query and
calculate test execution time of user during the day and display in “Detail test execution” area. This result is based on the
test cases’ estimation in the project.
However, user still need to add a session for “Test execution” in his report to input the real time he has spent for this
task.
By comparing the automatically calculated time and reported time, manager can make an appropriate action: e.g. adjust
the TC estimation or give more trainning for user, etc.
o Check the checkbox “Confirm your report data and device status before submitting”.
o Click on “Update report” button to save daily report.
- Daily report data will be an input for daily performance.
1.3. Generate Report Link
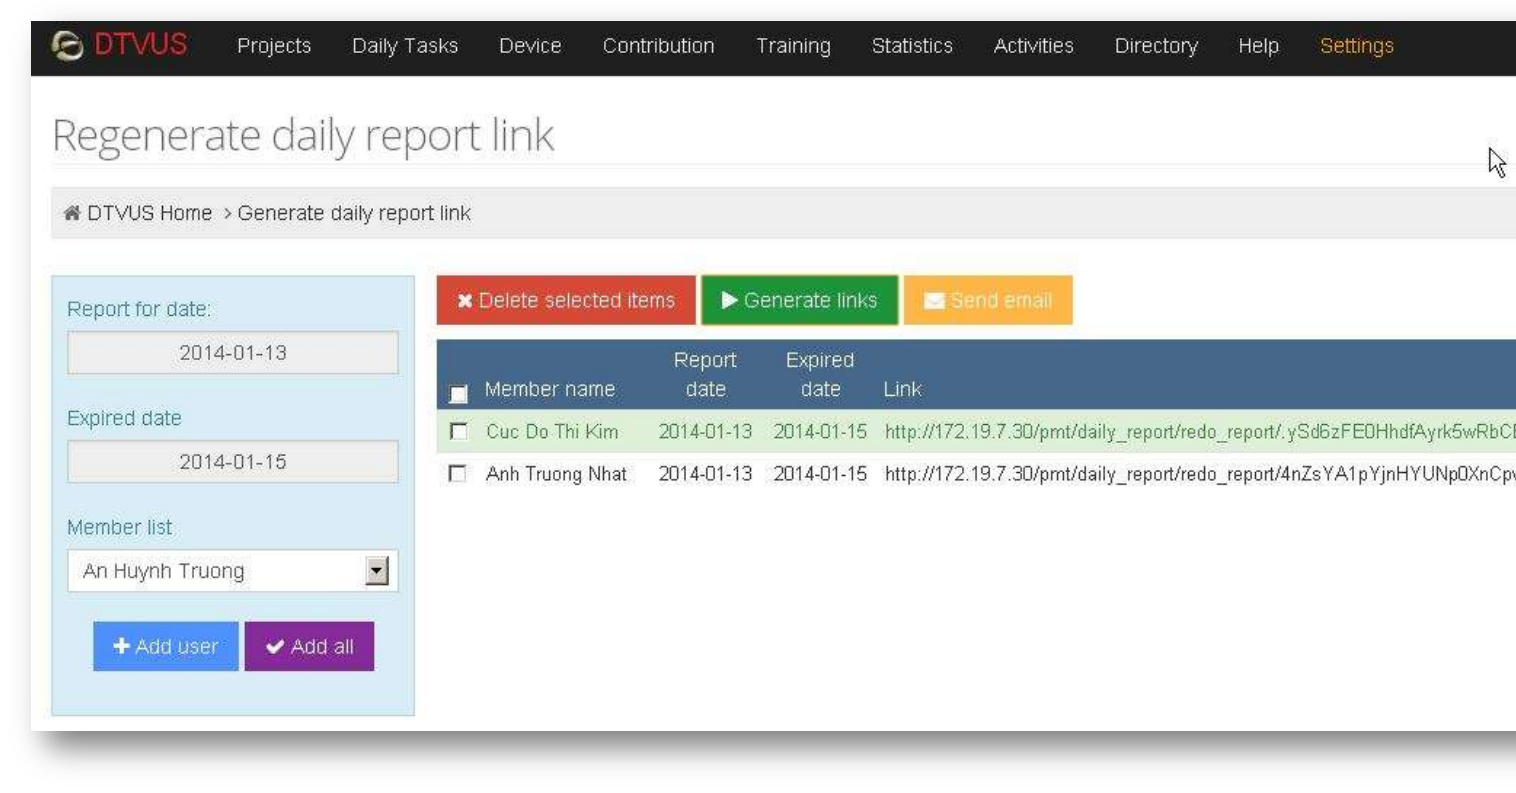
- In case a member did not do daily report or needs to update a daily report for a passed by day, this feature is used to generate a link for
this member to update his daily report for that day.
- User needs “generate_report_link” permission to access this feature.
- To generate a report link, user will:
o Select “Report for date”: it is the date a member needs to do daily report again.
o Select “Expired date”: the link will be expired after this date.
o Select “Member” click on “Add user” button.
o Select item(s) in generated list and click on “Delete selected items” selected item(s) will be removed from the list.
o Click on “Generate links” button report link(s) will be generated for selected member(s).
o Click on “Send email” report link(s) will be sent to selected member(s).
1.4. Test Execution
- Currently, Test Execution is applied for the projects which have Testlink as test execution tracking tool (e.g. DTVUS and DTVLA).
For the others, system will support new feature/module to manage test execution manually/from files/etc???
- In this feature, we have some tabs on the main view: Plan Status, Detail Assignment, View by Category, Sync Status, Manage Test
Plans, Manage Assignment,
Manage Test Case, Report, Manage Test Estimation.
- Number of displayed tabs will be based on user permission:
o “view_test_assignment” permission: allows user to access the tabs below:
Plan Status

Detail Assignment
View by Category
Sync Status: view sync status of the test plans only.
o “manage_test_assignment” permission: allows user to access all the tabs.
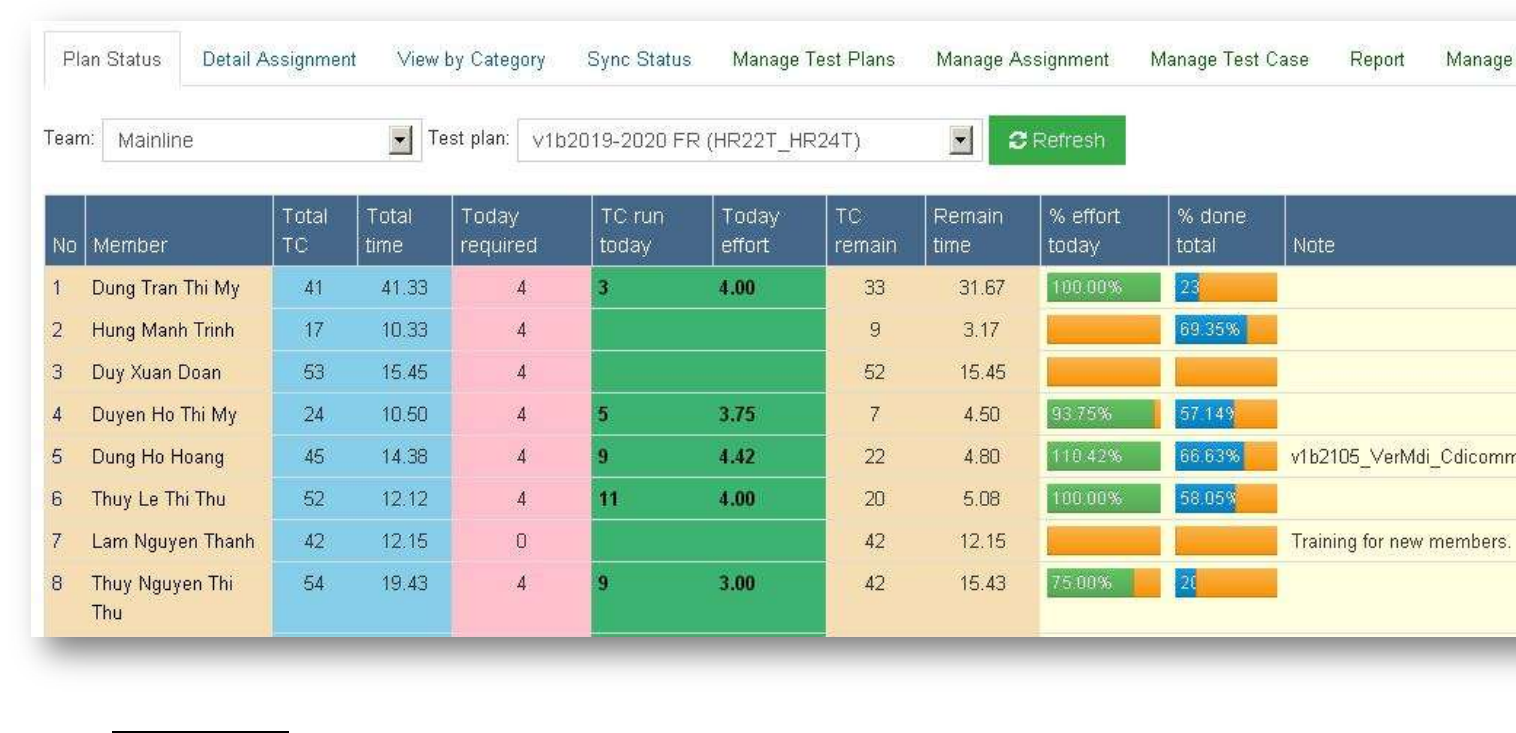
- Plan Status: show the summary status of a specific test plan in a team with the following info:
(User will select a team, then select a test plan of that team to view status)
o Member: all members who are assigned to execute the test plan.
o Total TC: total number of test cases (TCs) assigned to the member.
o Total time: total estimation time of the assigned TCs.
o Today required: time duration assigned for user to do test execution in daily assignment.
o TC run today: number of TCs which are executed today.
o Today effort: total estimation time of TCs which are executed today.
o TC remain: number of remain assigned TCs.
o Remain time: total estimation time of remained TCs.
o % effort today: percentage of “Today effort”/”Today required” in this test plan.
o % done total: percentage of TCs done compared to total of assigned TCs.
o Note.
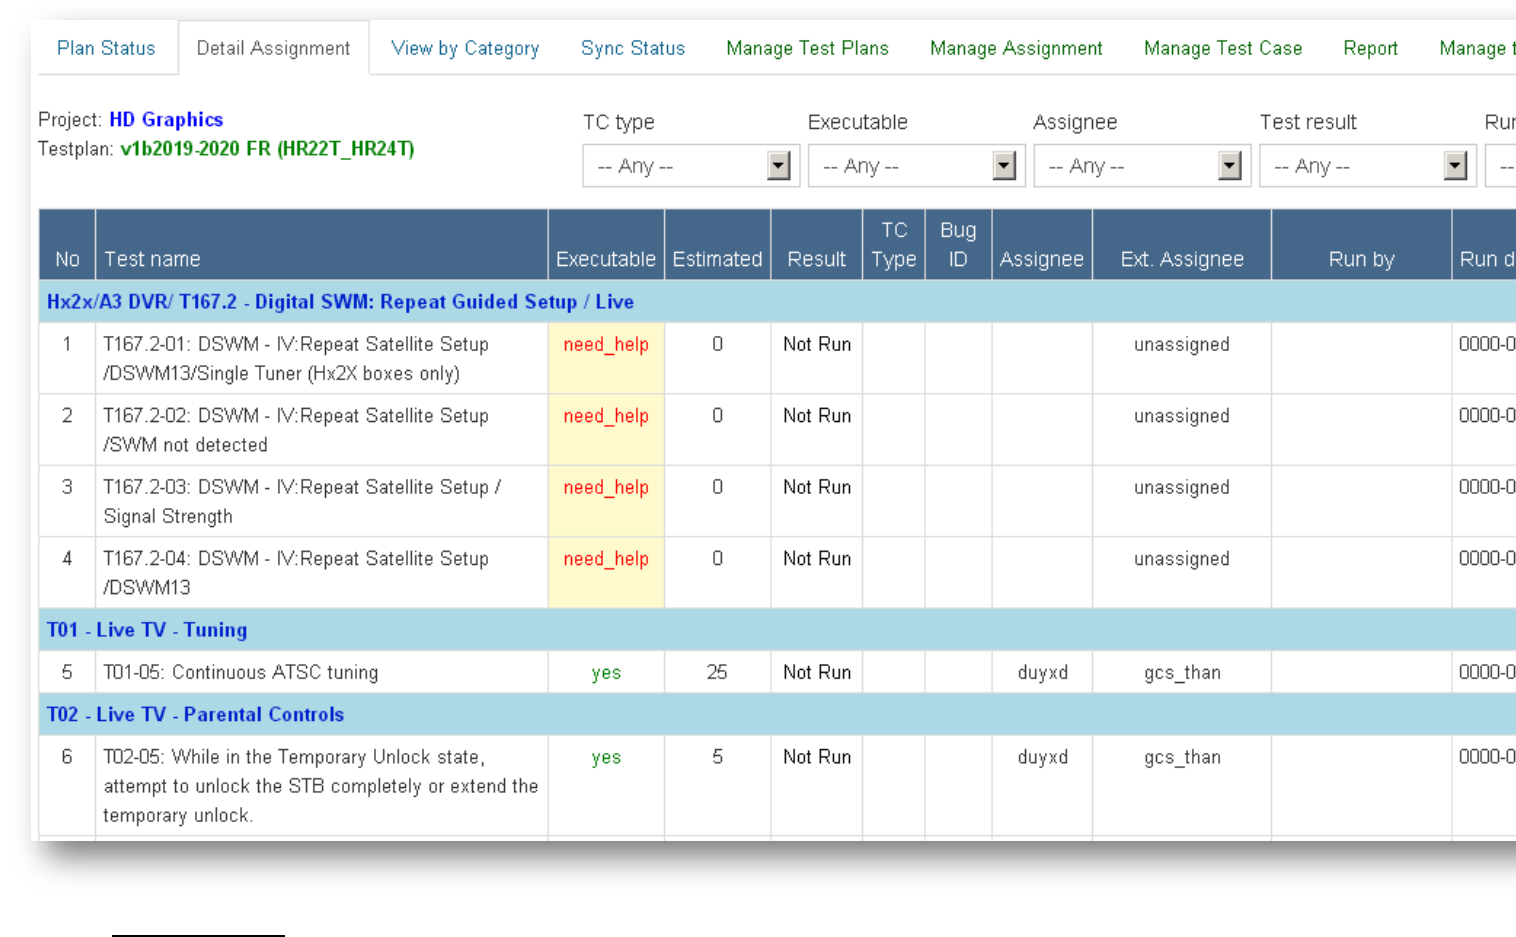
- Detail Assignment: show the detail information of all TCs in a specific test plan with following info:
(User will select a team, then select a test plan of that team from Plan Status tab.
User can change the view by applying different filters, i.e TC type, Executable, Assignee, Test result, Run by)
o Test name: name of TC.
o Executable:
need_help: TC can not be executed at GCS site.
yes: TC is executable.
no: TC can not be executed at any sites.
o Estimated: estimation time (based on platform count of the test plan, this value will be the corresponding estimation time of the
TC).
o Result.
o TC type: type of TCs. It’s useful for filtering TCs when assigning and executing. (TC types list will be defined by PM)
o Bug ID: attached bug ID when a TC is failed.
o Assignee: local assignee.
o Ext. Assignee: assignee on Testlink.
o Run by: executor.
o Run date: execute date.
o Note.
- View by Category: show the categories assignment of a specific test plan in a team with the following info:
(User will select a team, then select a test plan of that team from Plan Status tab.
User can filter Assignee to see which categories assigned to himself.)
o Test category: test category name.
o No. of TC: number of TCs in the category.
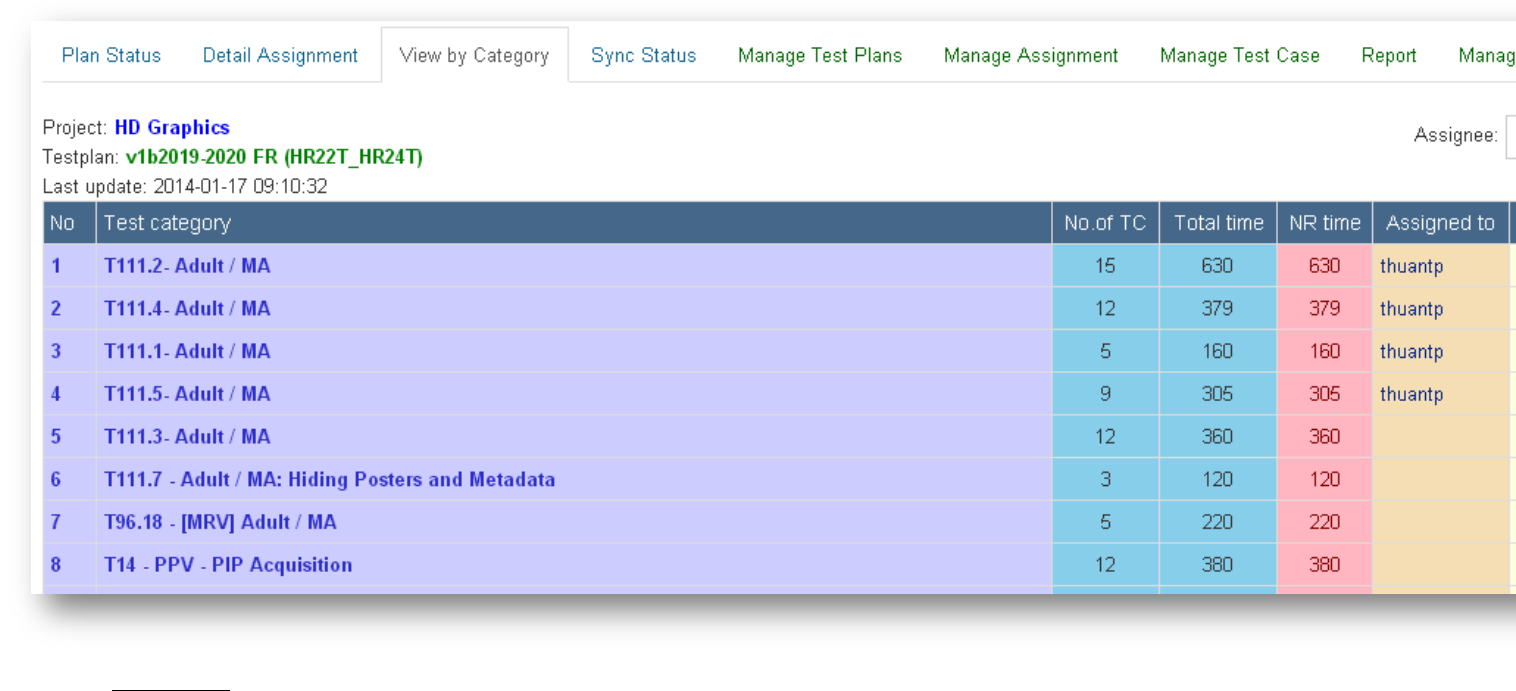
o Total time: total estimation time of the category.
o NR time: total estimation time of Not-Run TCs in the category.
o Assigned to: assignee of the category.
o Type: test case type of the category.
o Note.
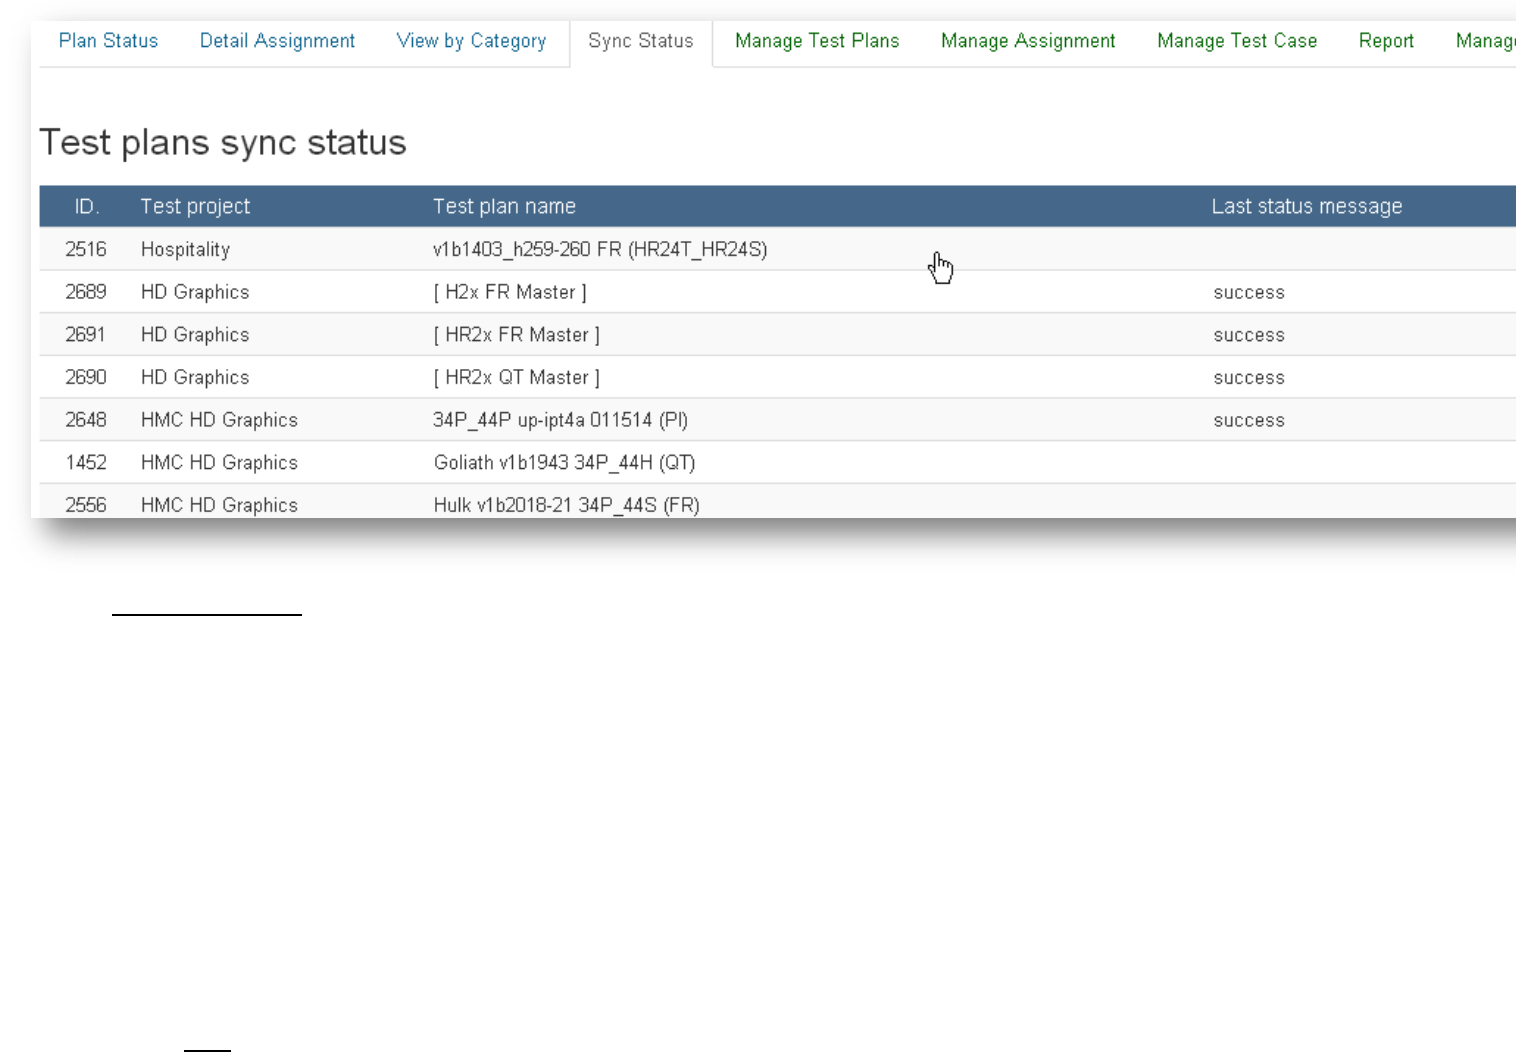
- Sync Status: show the sync status of active test plans in the project with the following info:
o Test project: test project in Testlink.
o Test plan name.
o Last status message: sync status.
o Last sync: time of the last sync.
o Action: click on Download icon to sync a test plan (this column is displayed if user who has “manage_test_assignment”
permission).
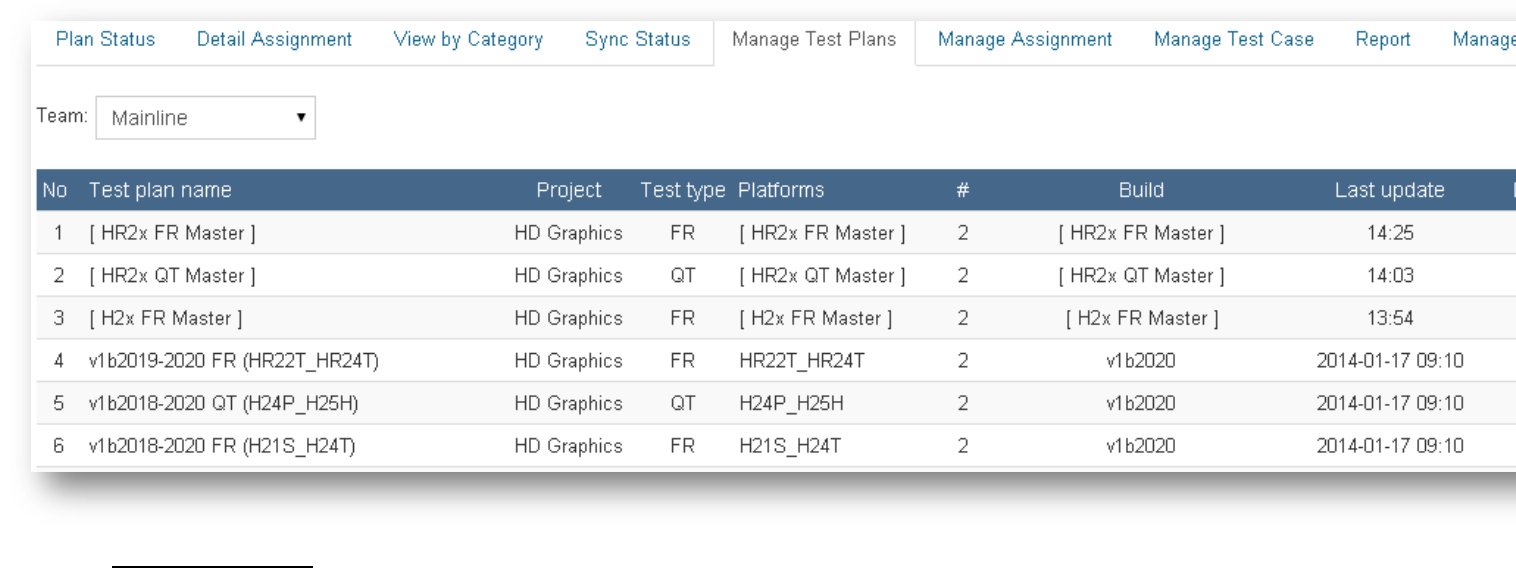
- Manage Test Plans: show the test plans list in a team of the project with the following info:
(User needs “manage_test_assignment” permission to access this page)
o Test plan name: test plan name – need to be exactly the same as test plan name on Testlink (otherwise, it’s unable to sync test
plan later).
o Project: test project in Testlink.
o Test type: test type of the test plan (defined by PM).
o Platforms: platforms executed in the test plan.
o #: number of platforms (this number will determine which estimation column of belonging TCs will be displayed in Detail
Assignment/Manage Test Cases tabs).
o Build: execution build.
o Last update: time of last update.
o Last sync: time of sync.
o Active: status of the test plan, user can activate/deactivate a test plan.
o Note.
o Action (edit/delete): edit/delete test plan.
Note: Once a test plan is deleted, no way to restore it.
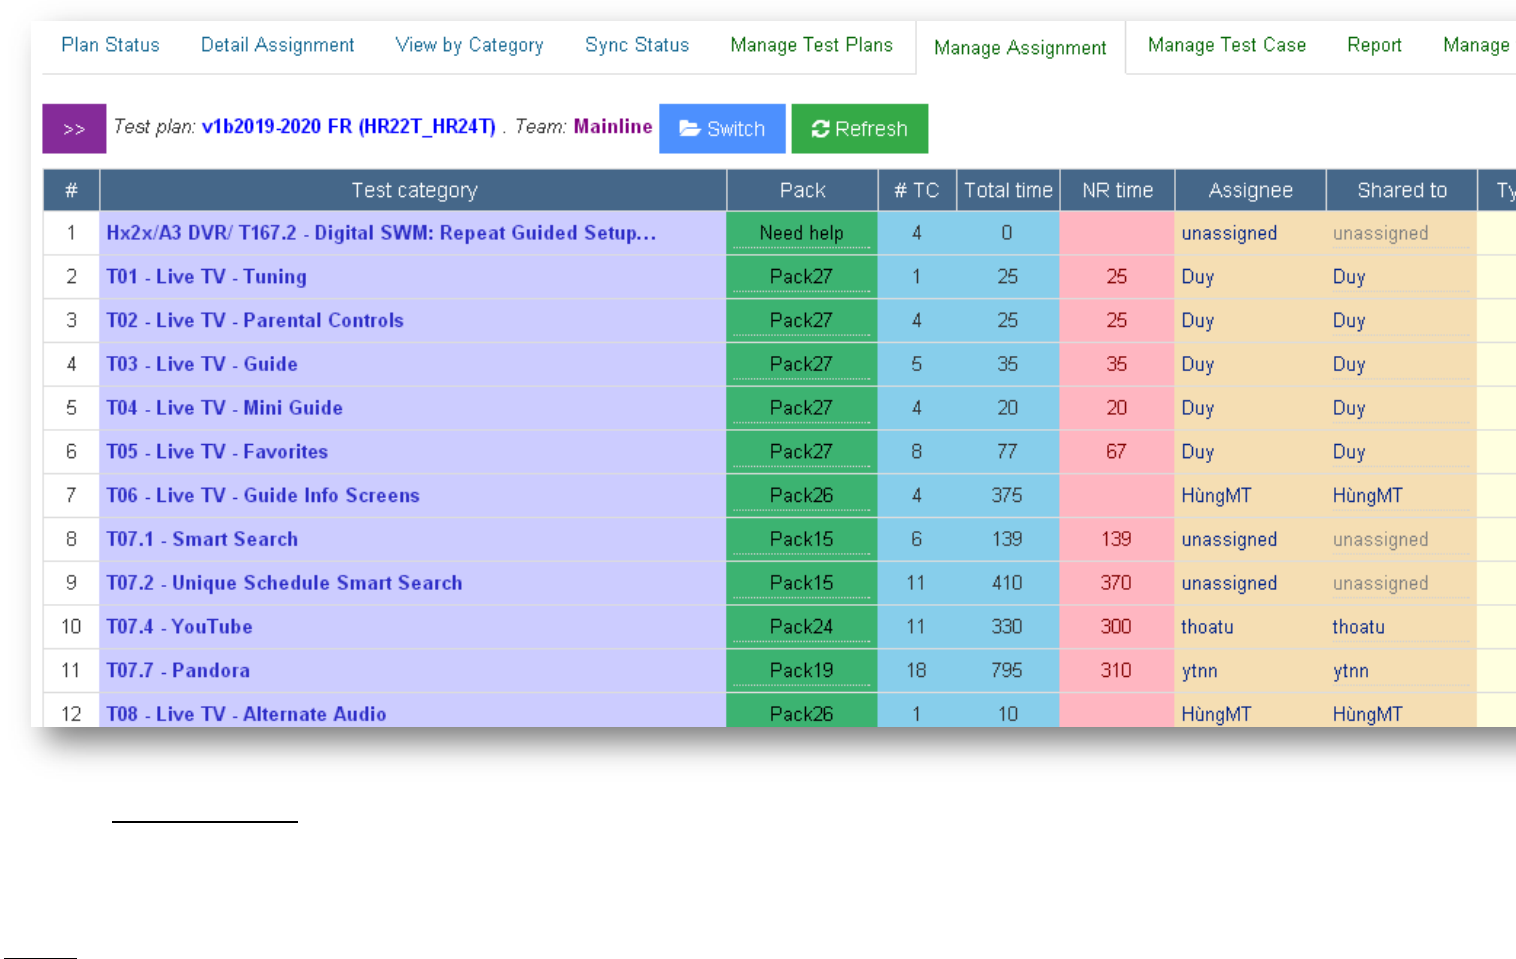
- Manage Assignment: show the summary assignment on a test plan in a team with the following info:
(User needs “manage_test_assignment” permission to access this page)
o Main actions: user can:
switch team and test plan by clicking on “Switch” button
collapse/expand the panels in this page to have a nicer view by clicking on “<”, “<<” or “>>” button
Test plan actions:
Reset status: reset test status (result, executor, exec time) or reset local assignee (for packs, categories and test
cases). Usually, we use after creating a new test plan by cloning from an old one.
Sync test result: sync test result of the test plan from Testlink. Usually, we use this action after Reset Status of a
test plan.
(With this action, all TCs which have new result compare to the local TCs will have the execute date as current
date
Execute date will be incorrect in case a test plan has been executed for some days, and today it’s just been
created and synchronized in the system)
Sync execution time: sync test status (result, executor, exec time) of a test plan. We use this action when updating
execute date is necessary.
(With this action, all updated TCs will have new test status [result, executor, exec time]
It means that execution effort for the old executor will updated too if old executor needs to do his daily
report again for that day.
In case, he does not touch to his old daily report, nothing change in his old effort)
Sync estimation time: sync estimation time for TCs from master TC estimation.
o Summary status with TC type of categories, with info:
Test type
Total (TC, time): number of TCs and total estimation time of all TCs in test plan.
Not run (TC, time): number of TCs and total estimation time for Not-Run TCs.
o Summary status with assignees, with info:
Assignee: all assigneed in test plan.
NR TC: number of NR TCs.
NR time: total time for NR TCs.
Local: number of TCs with the same assignee on Testlink.
Other: number of TCs with different assignee on Testlink.
o Pack distribution: manage assignment with packs, user can:
Add a new pack click on “+” (Plus) icon, then define pack info.
Edit a pack click on a pack name.
Assign a pack to an assignee select corresponding “Assignee” cell and select a user.
Assign single/multiple packs to an assignee check on selected packs, then select “Assign to” [assignee] click Assign
button (at the end of the panel).
o Test category distribution: manage assignment with packs, user can:
Edit a category click on a category name.
Update pack info of a category click corresponding “Pack” cell and select a pack.
Assign a category to an assignee select corresponding “Shared to” cell and select a user.
Assign single/multiple categories to an assignee check on selected categories, then select “Assign selected categories
to” [assignee] click Assign button (at the end of the panel).

- Manage Test Case: same view as Detail Assignment tab, but user has more actions:
o Edit TC by clicking on TC name.
o Export: export the TCs list to excel file.
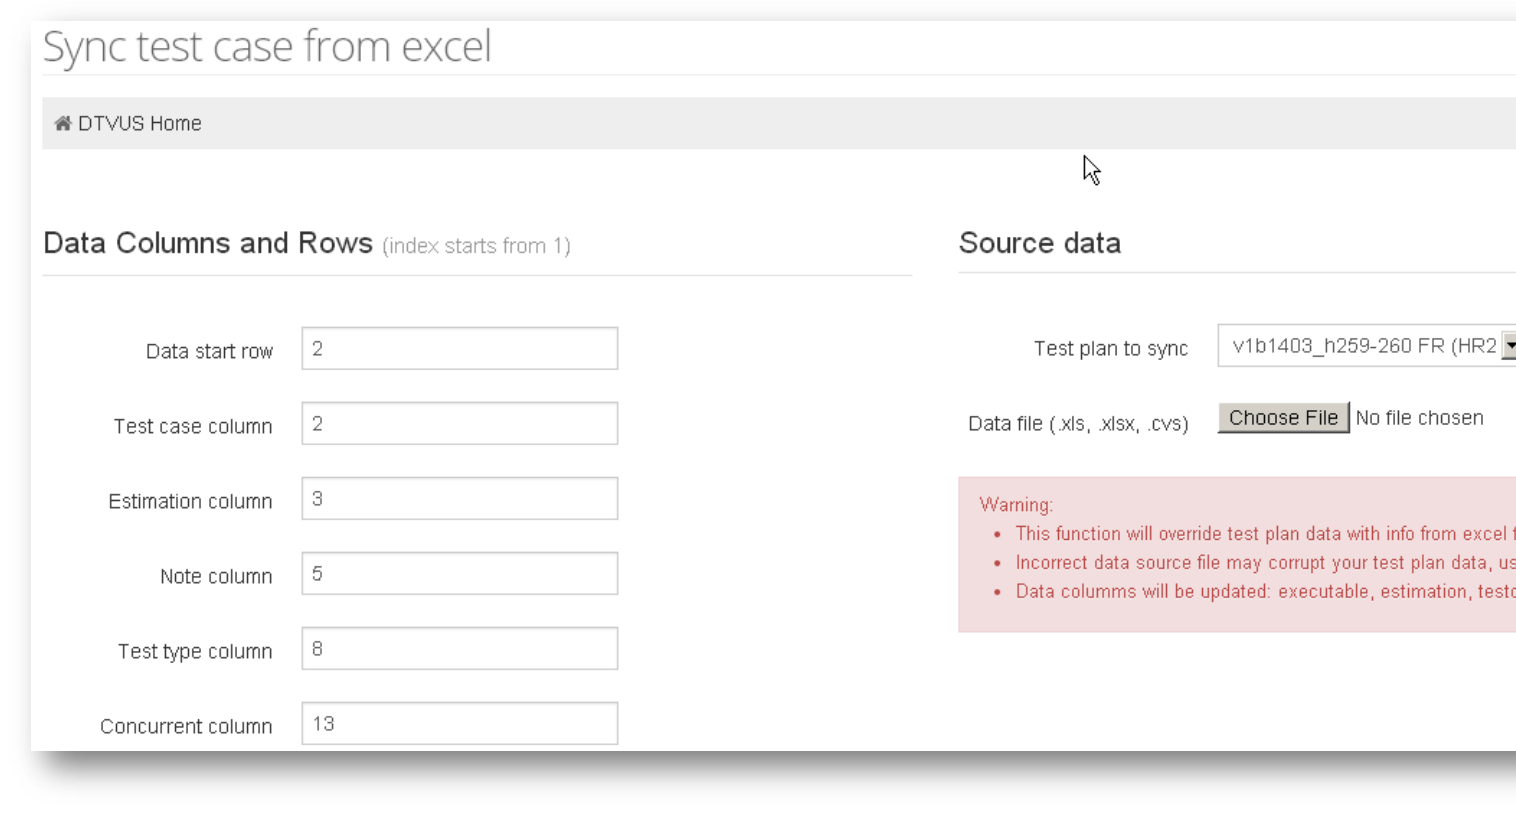
o Import from file: update TCs list with specifice columns from an excel file with standard format.
Edit TC:

Import from file:
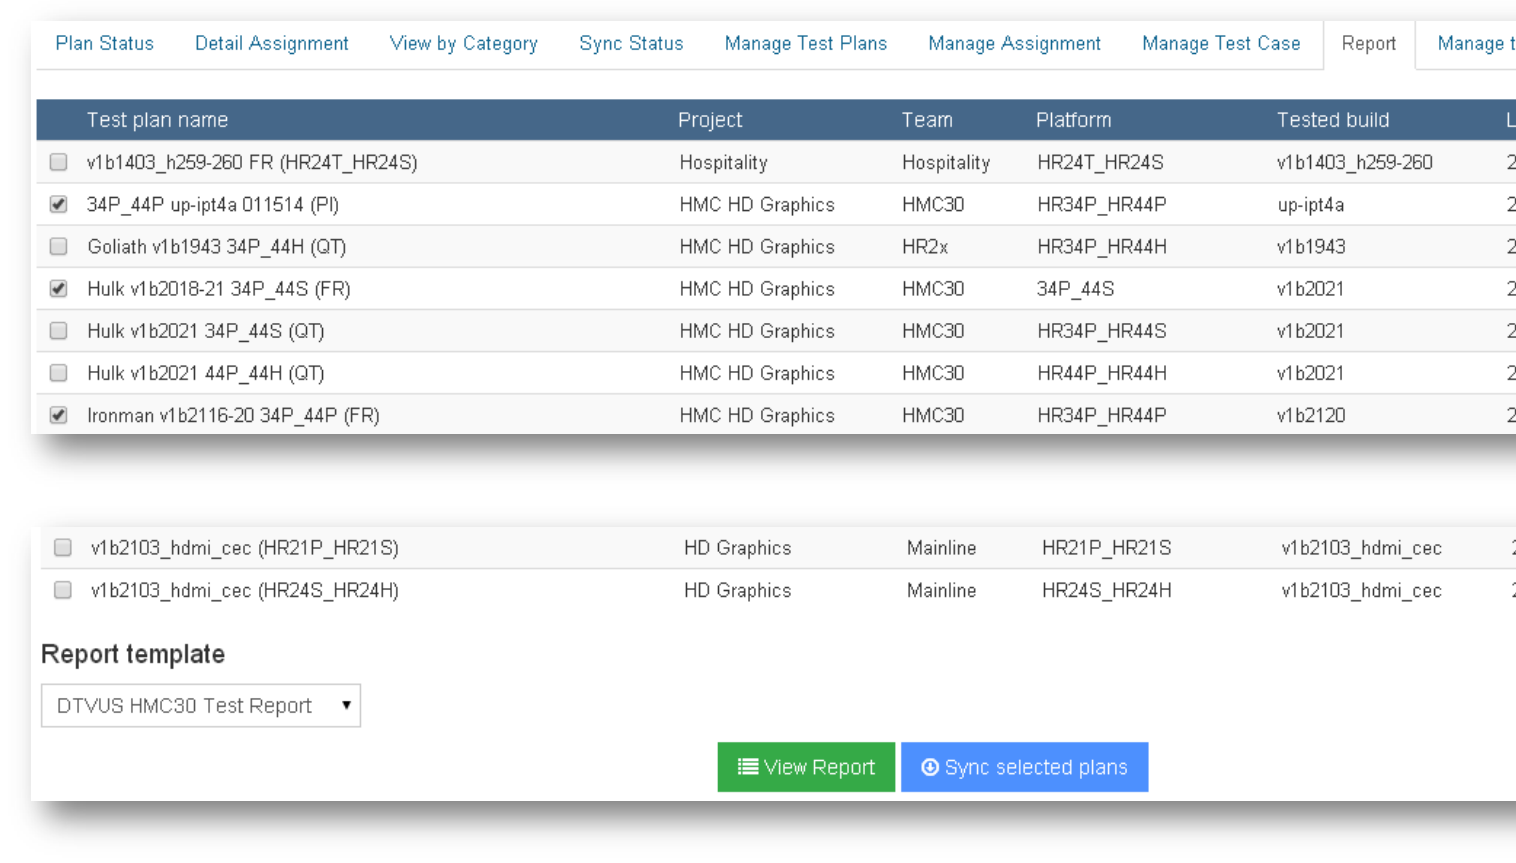
- Report: manage report of all active test plans in the project. User can report for single or multiple test plans at the same time with steps:
o Check the reported test plans.
o Sync selected plans click on “Sync selected plans”.
o Select a Report Template (defined by PM).
o Click on “View Report” button.
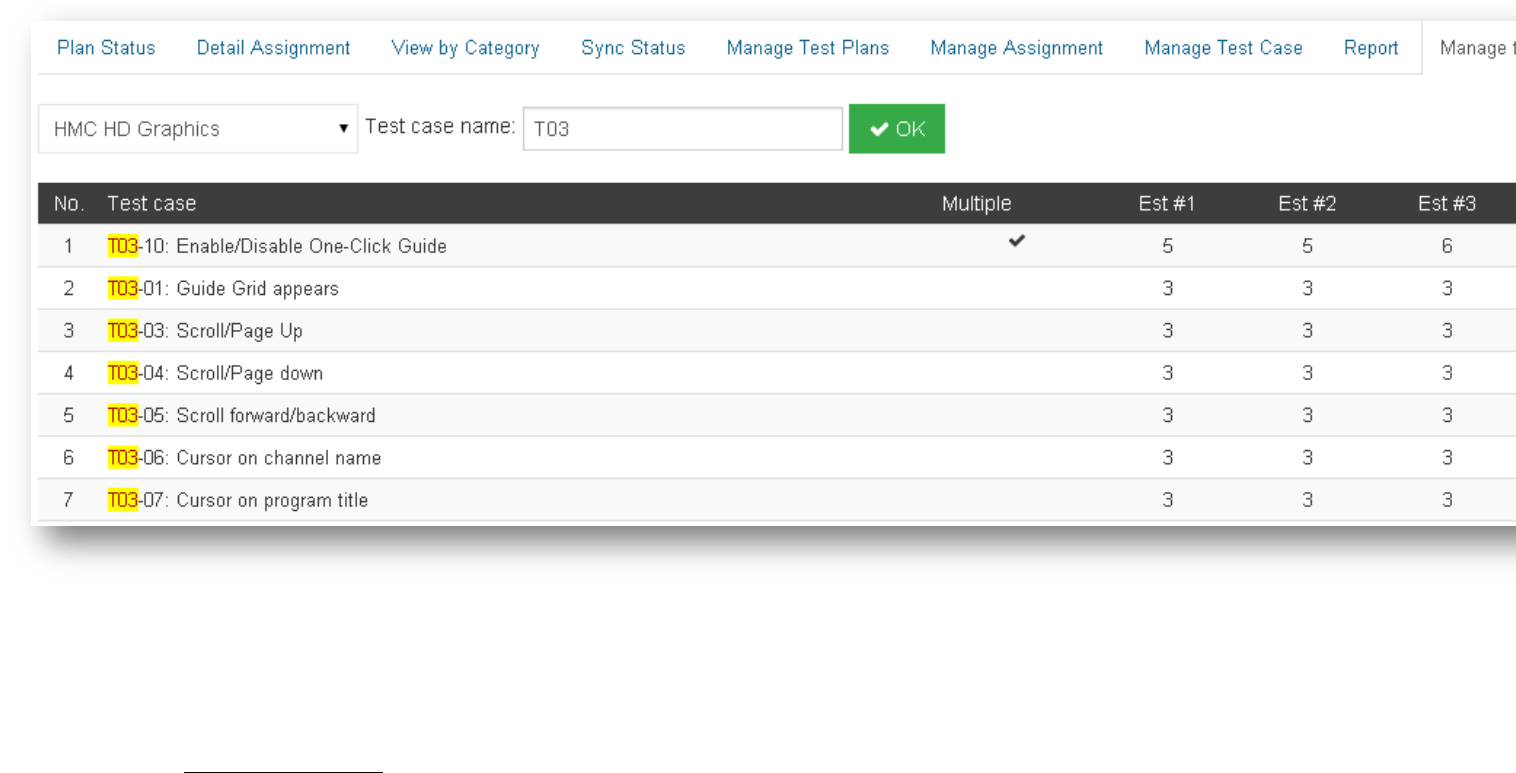
- Manage Test Estimation: manage master test estimation of a test case with steps:
o Select Testlink project.
o Input keyword for search TC name.
o Click OK
o Edit necessary TC.
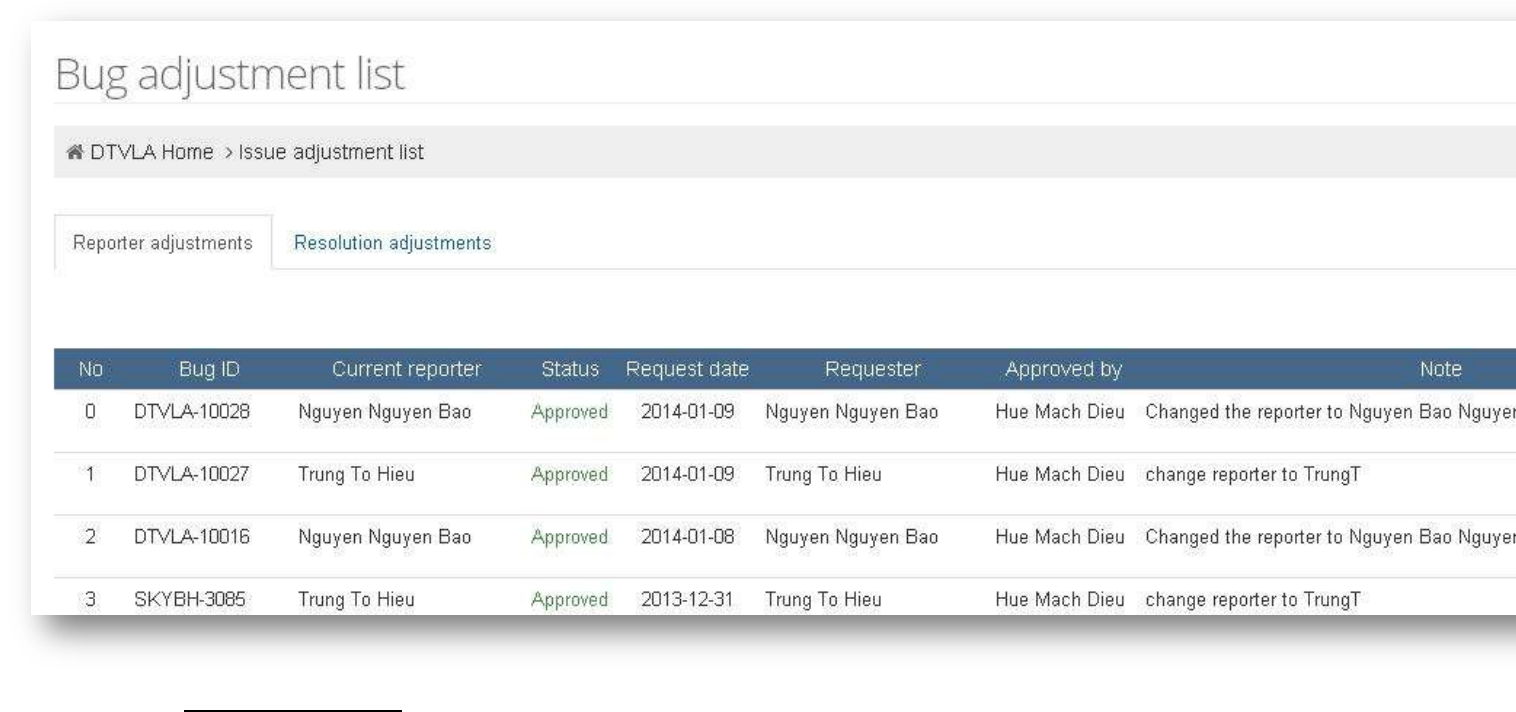
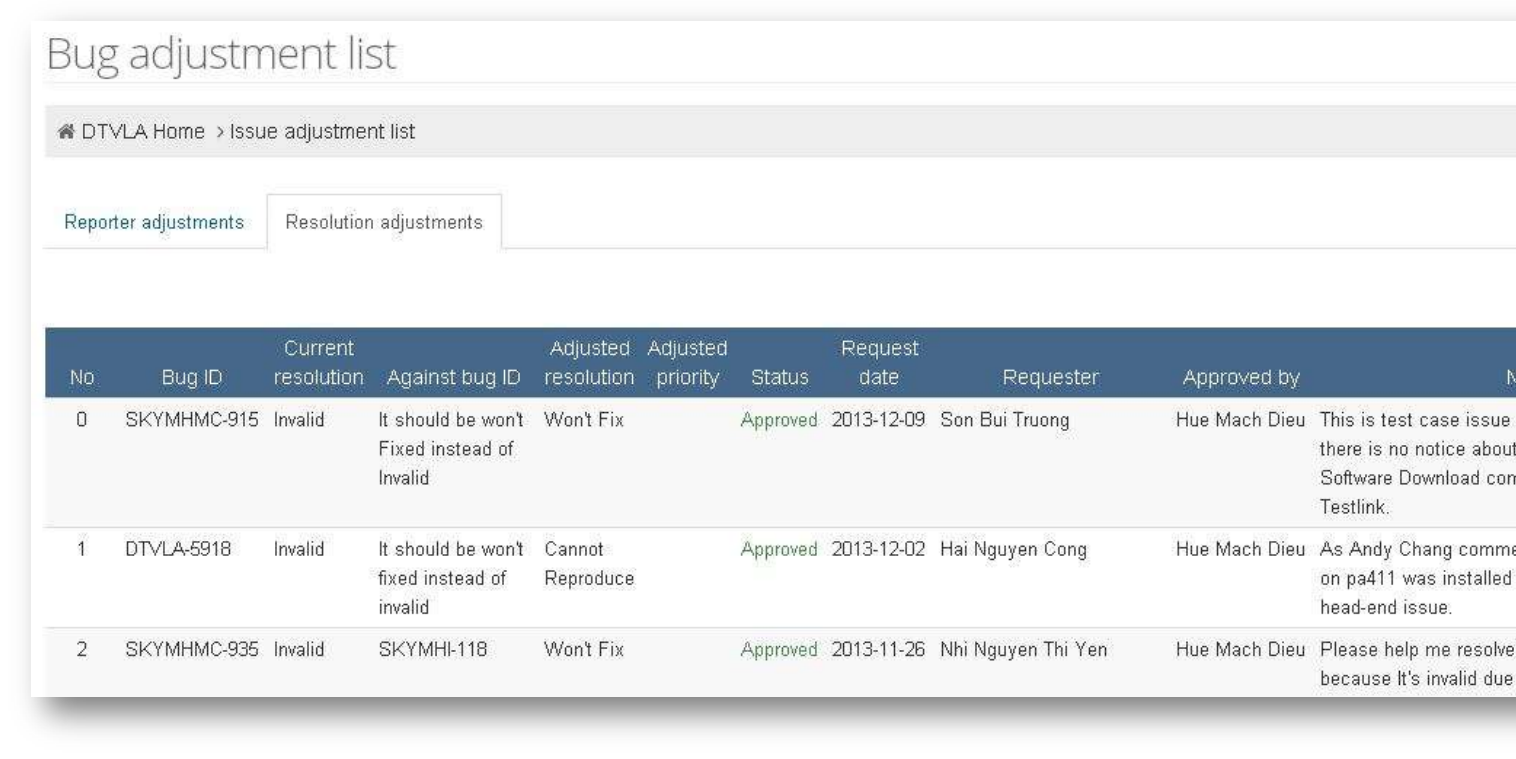
1.5. Bug Adjustment
- Sometimes user needs to change some information of a bug manually & locally, such as reporter/ resolution/priority. This feature will
help user to do that.
- User needs to have “request_bug_adjustment” permission to add a request for bug adjustment.
- A bug adjustment can be: reporter adjustment or resolution adjustment
o Reporter adjustment: requires info:
Bug ID
Current reporter: the reporter on bug tracking system.
Note
This request means to update bug reporter from “Current reporter” to “Requester”.
o Resolution adjustment (including priority update if needed): requires info:
Bug ID
Current resolution: the resolution on bug tracking system.
Against bug ID: a proof for the request.
Adjusted resolution
Adjustted priority (optional)
Note
o This request means to ask for updating bug resolution from ”Current resolution” to “Adjusted resolution” (adjusted priority will be
input if needed).
- To update status for an adjustment, user needs “manage_bug_adjustment” permission.
- Data in this feature will be an input when calculating finding bug performance for members.
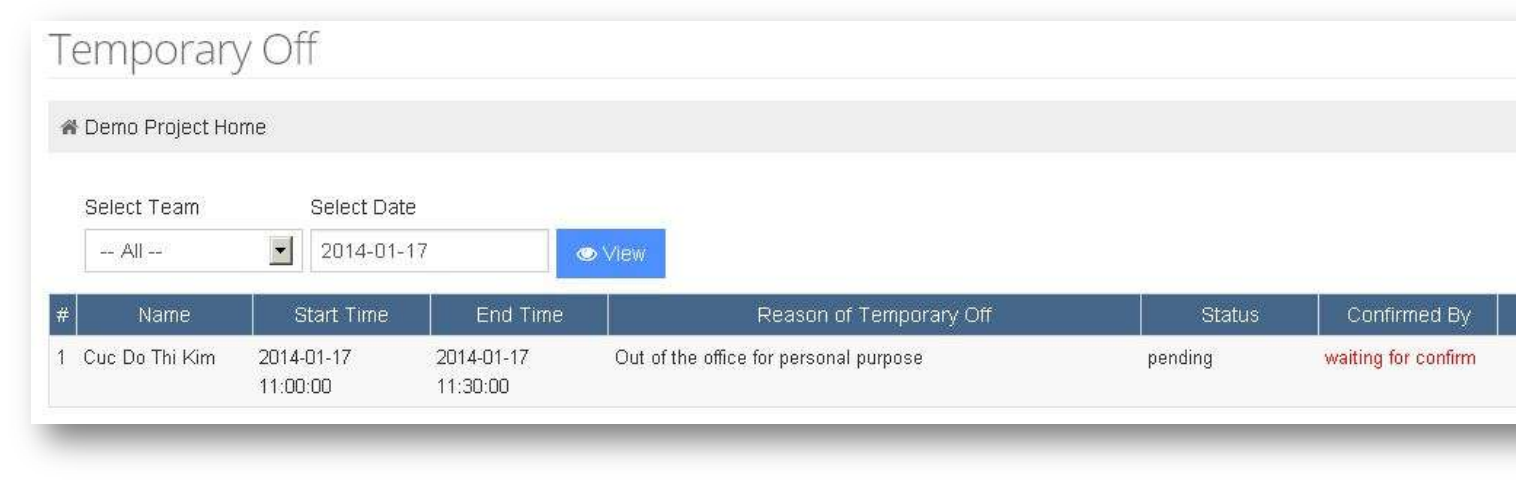
1.6. Temporary Off
- Where user can submit his plan for being off temporarily in working time.
- User does not need any permission to add a new temporary off.
If user has “leader” or “manager” role, he can approve/disapprove a temporary off by clicking on the Status cell to invoke the approval
form.
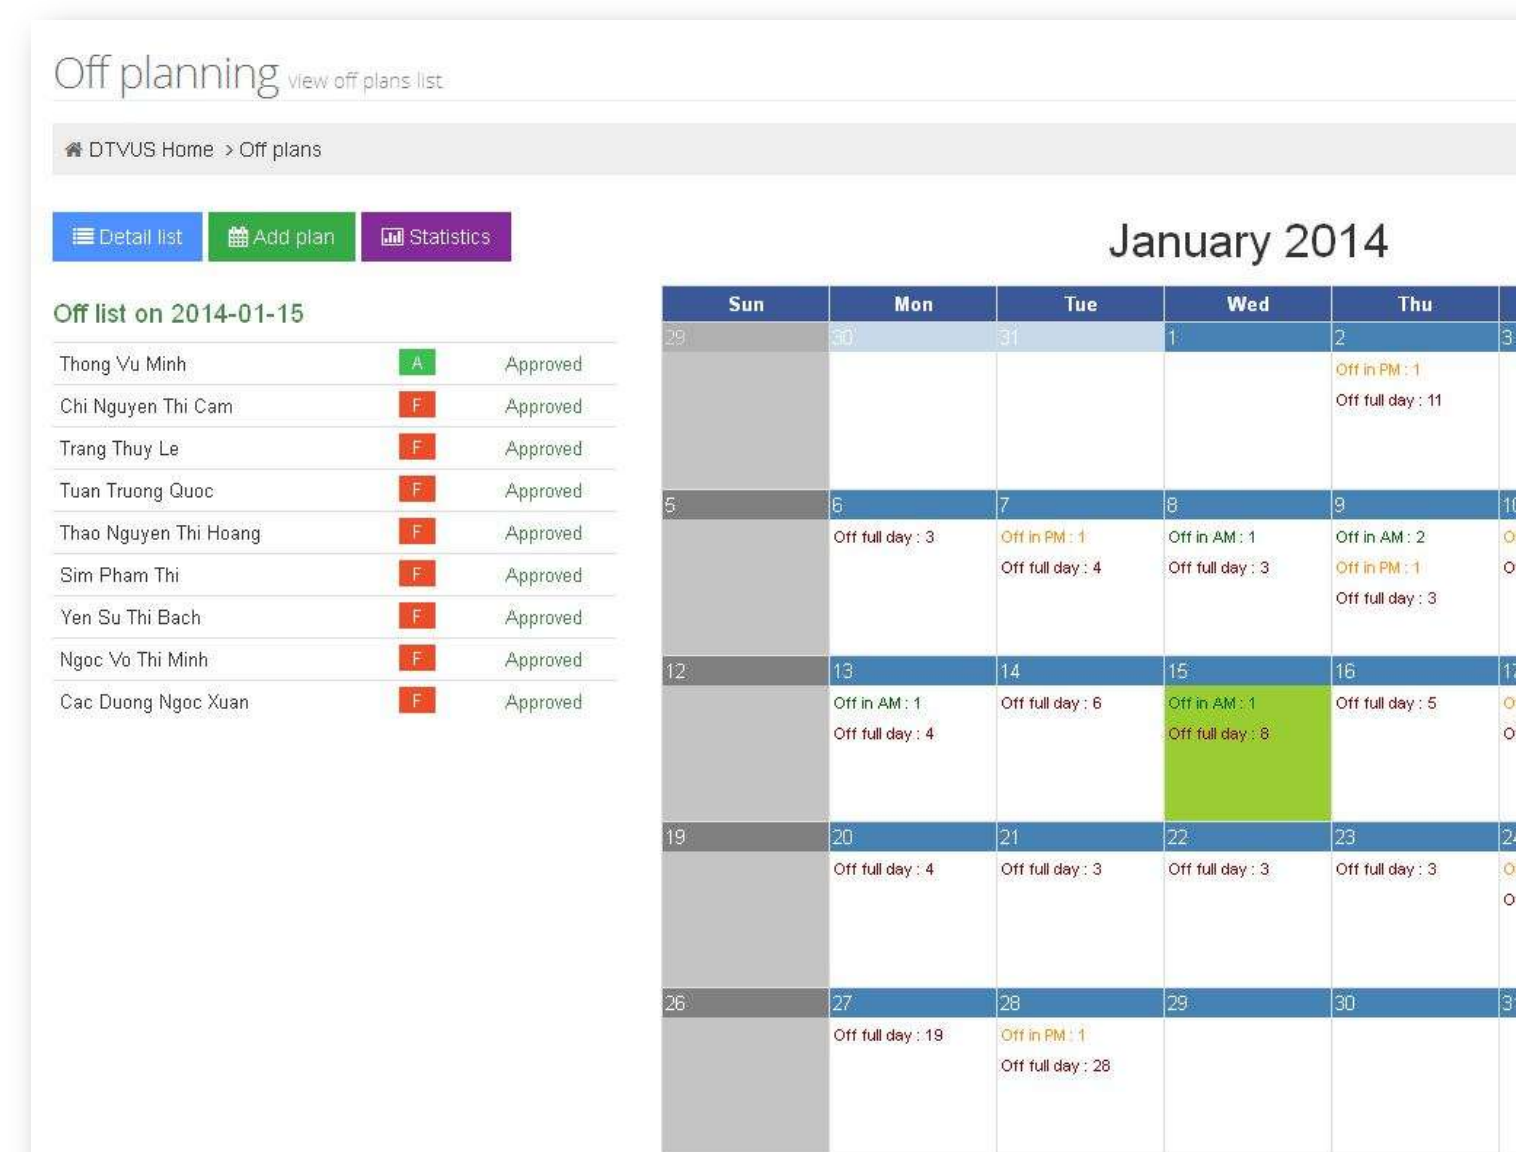
1.7. Off Planning
- Where user can submit his plan for being off officially in working days.
- User needs “manage_off_planning” permission to access this feature.
- In this feature, user can:
o View the summary of off planning in project with calendar view.
Calendar has monthly view.
Calendar will shows the total number of each off type (AM, PM, Full) in corresponding cells.
When clicking on a cell, the off list of that date will be displayed on the left panel.
o View his own detail off plan list in a selected year.
o Add new plan.
o View off plan statistics in specific duration of time.
- Daily report data will be an input for monthly performance.
1.8. To-Do List
- As its name, this is a personal To-Do list.
- It show all the To-Do items which are assigned to user or created/watched by user.
o User can view detail and update progress for these To-Do items.
- User can create a new To-Do item and assign to himself or other member(s).
- User can edit To-Do items created by himself.
- Do not need to have any permission to access this feature.
2. Device
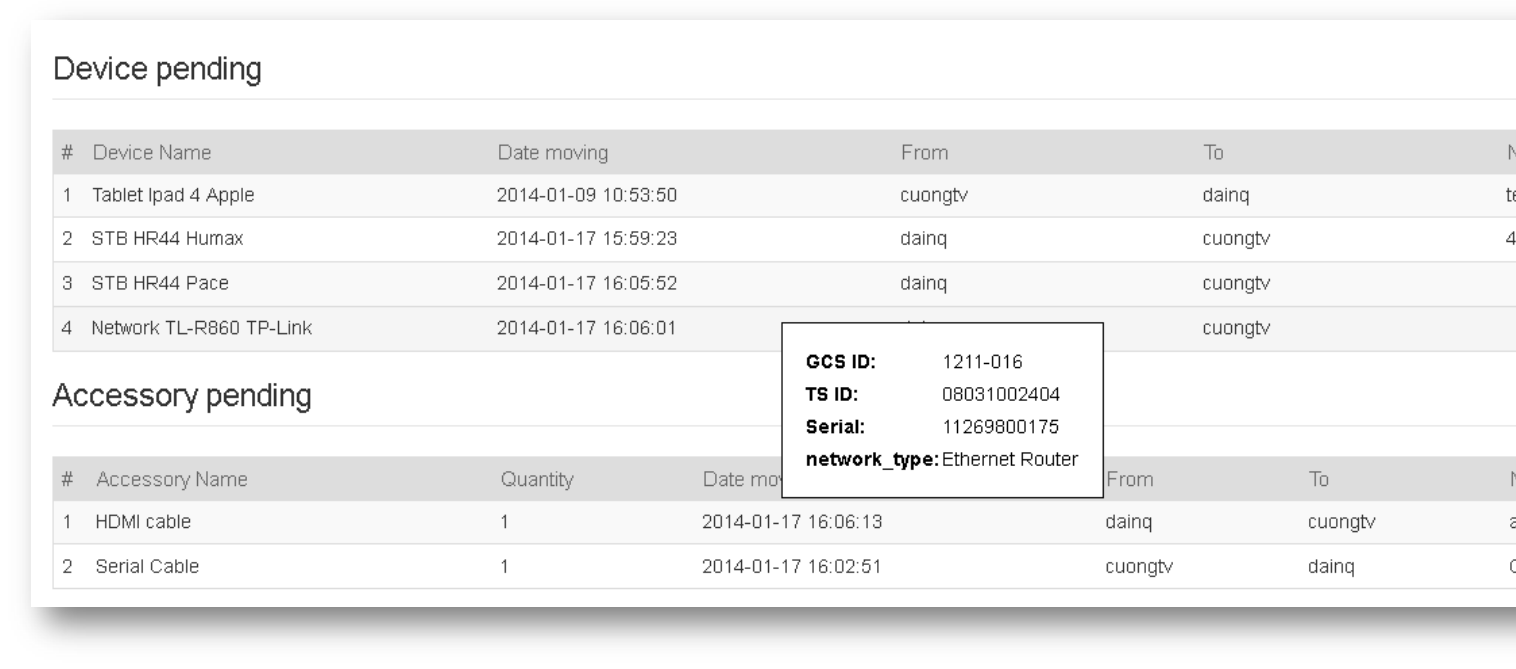
2.1. Manage my device
- Pending List: Display all pending devices/accessories that are moving to or from user. User can:
o Accept transfer.
o Decline transfer.
o View quick info of pending device by click on its row (Accessory pending don’t have this function).
- My Device List: Display all user owner devices, group by device type. On each device, user can:
o Transfer Device: From Action menu, click link “Transfer” to transfer this device.
o View Device Info & Device transfer history: From Action menu, click link “Show Device History” to view device info & device
transfer history.
o On the left navigation (Index), click on each type name to quick focus to its table.
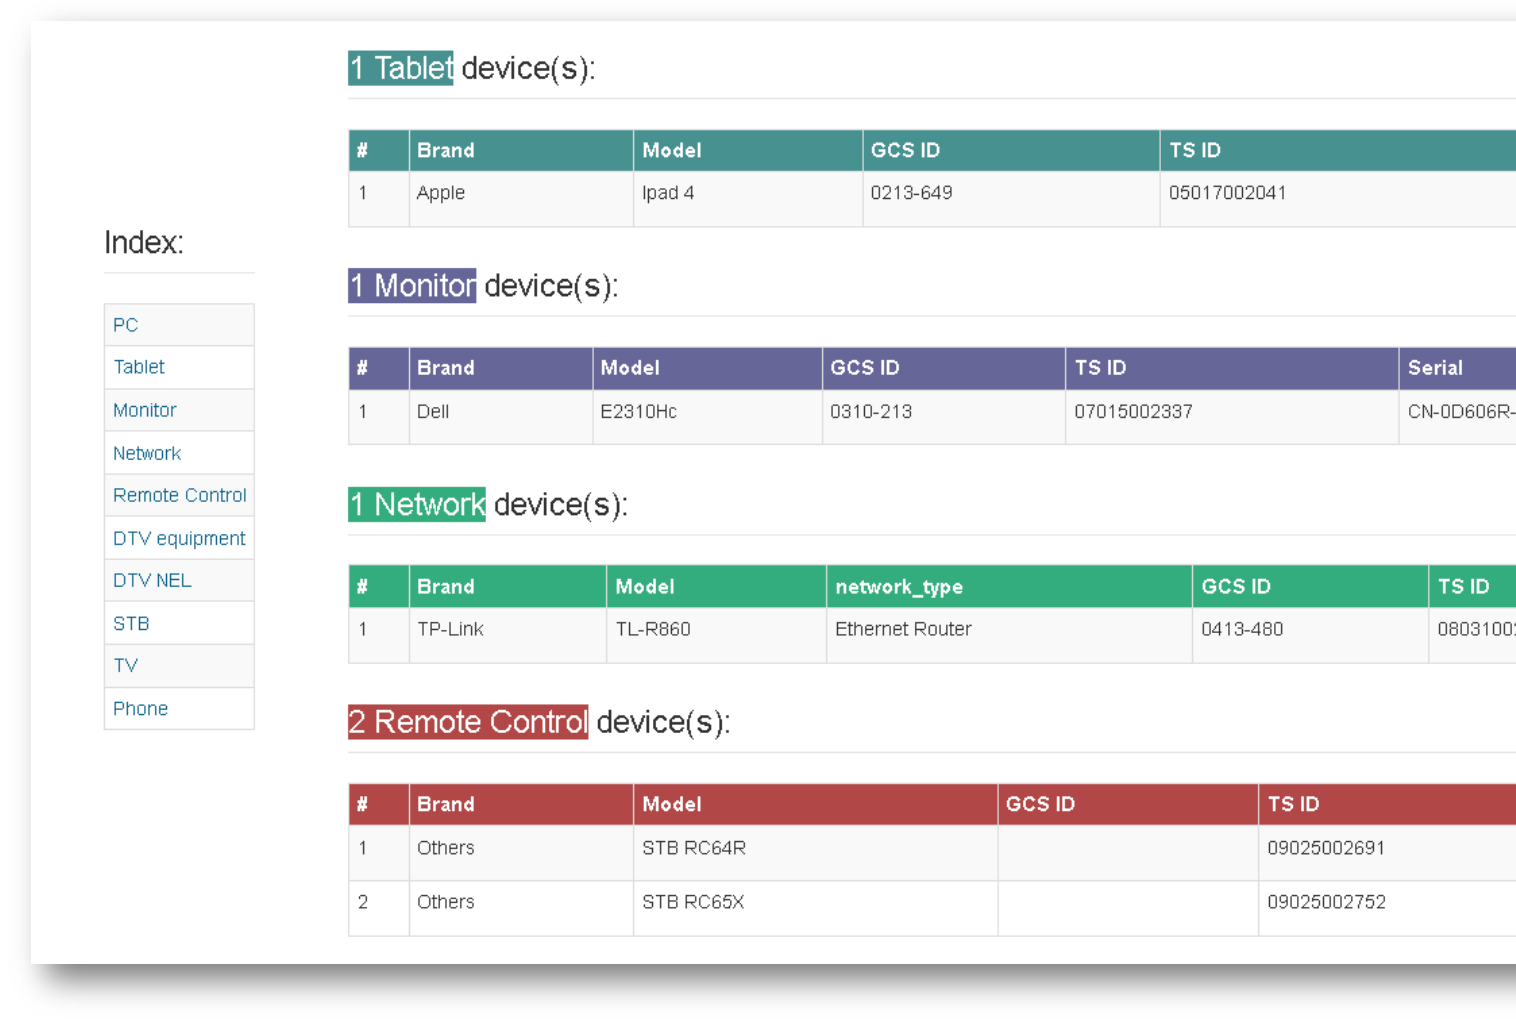
- My Accessory List: Display all accessories with the number of accessory that are owned by user. User can:
o Transfer Accessory: click on Transfer icon then input the quantities of accessory that user want to move.
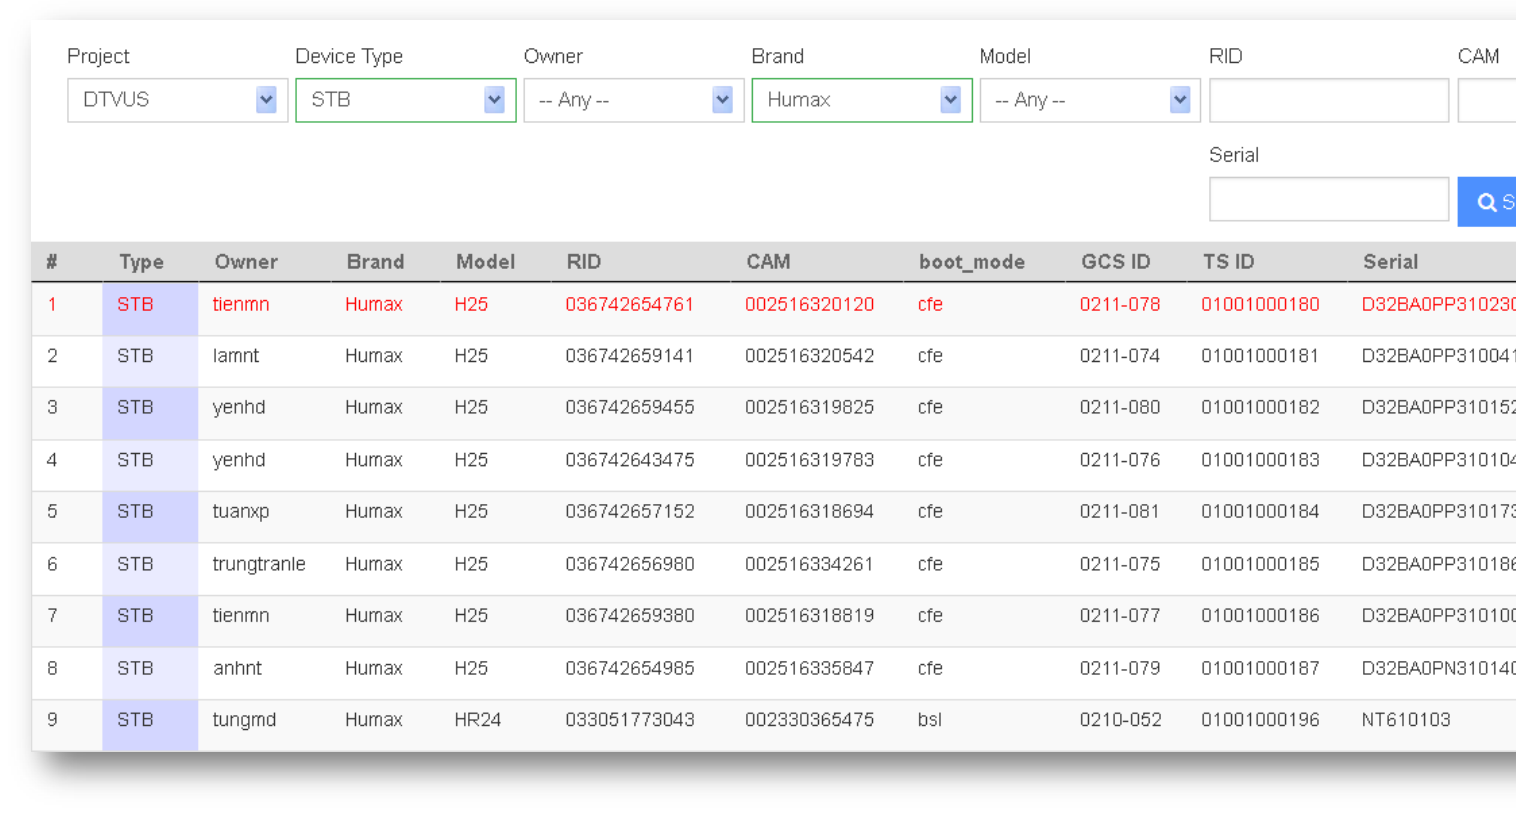
2.2. Search for devices
- Search rules:
o Device Type field must be selected first.
o User must enter at least 1 more search field for performance reason. (This rule does not affect to IS_SUPPORT users).
o Only search devices on current user’s project. (With IS_SUPPORT user, have 1 option to filter device by project).
o Item list of Device Model appears based on each of device type selected.
o “Custom Fields” (the designed field that use only for each device type) appears for more search criteria options.
o GCS-ID, TS-ID, Serial field: search exactly the keywords input.
o Custom fields: search approximately the keywords input.
o Search result is paginated with 25 items per page.
o The failed items are red highlight.
o Current owner device will be light-green marked in action button.
- User Action on Search page:
o Result Sort: click on each table header column to toggle sort data.
o View full info of device: From Action button, click “Show device full info”.
o View Transfer history of device: From Action button, click “Show transfer history”.
o With current owned device, user can transfer this item directly from search page by click on “Transfer” link.
o With IS_SUPPORT users, have more 2 options:
Get back: get device back to my-own (if device is not current owned). Will have an email informs to related users and will
be logged to transfer log with note: “Device was got back!”.
Edit / Remove: to edit or remove device data.
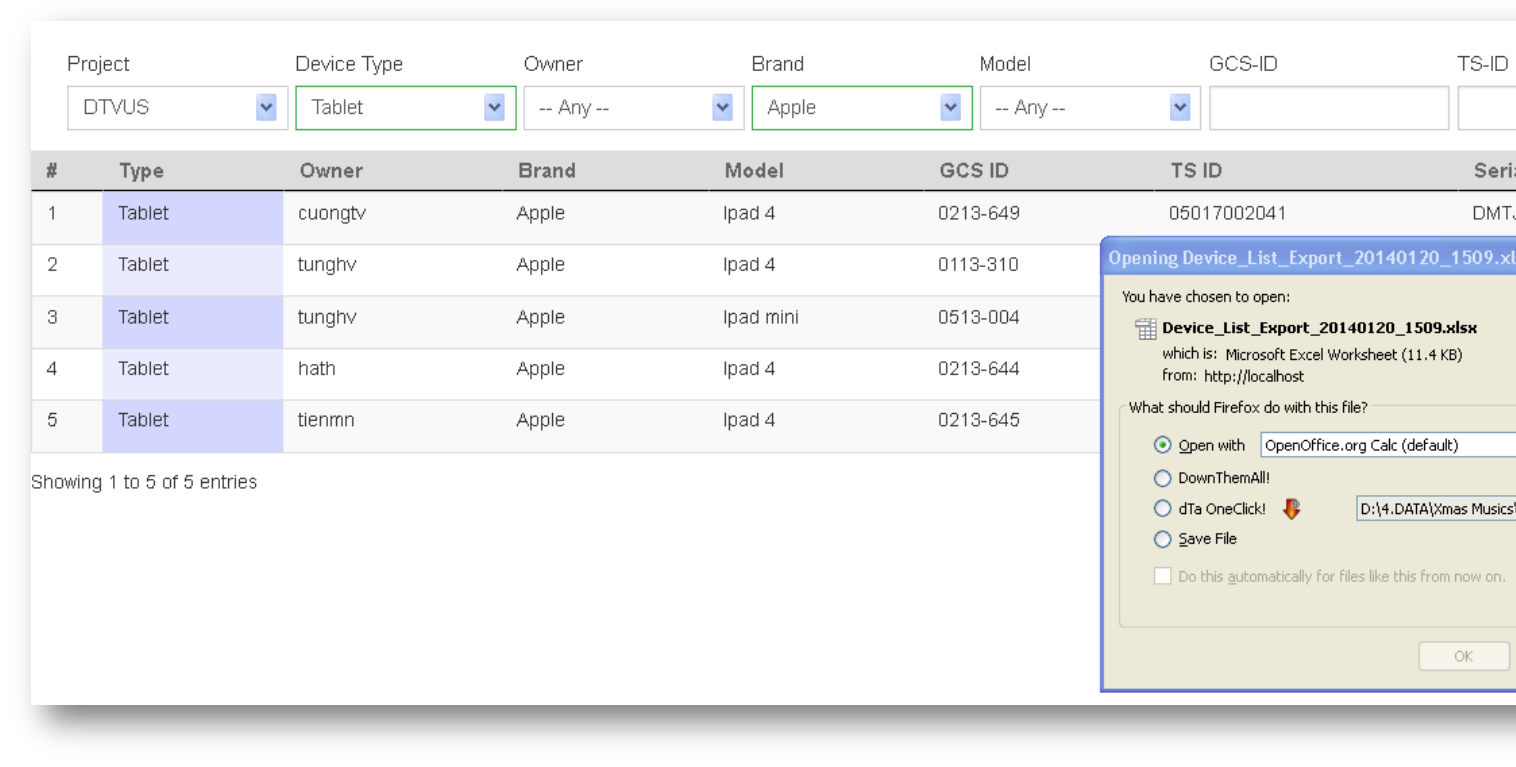
- Export Data from search result: (only for IS_SUPPORT)
o Take your search criterion, then click Export button to export the search result to excel file (.xlsx).
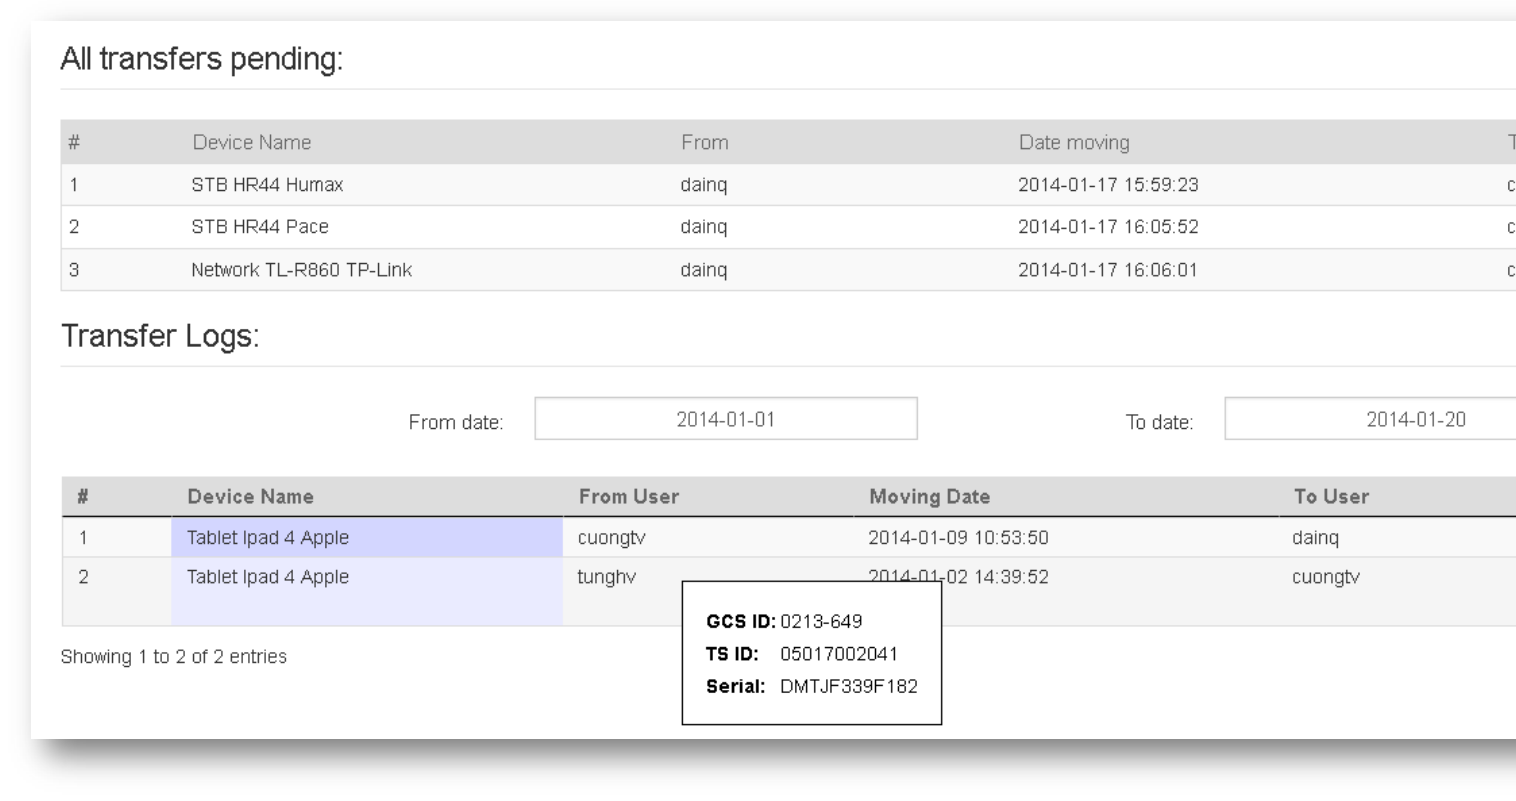
2.3. Transfer log
- All Transfer Pending:
o Show all current transfer pending of devices. Click on each rows to show quick info of device.
- Transfer Log:
o Default: show all transfer logs of current date.
o Change From Date / To Date to optional log data filter.
o Click on row to show quick info of each devices.
o Transfer log was pagination with 20 items per page.
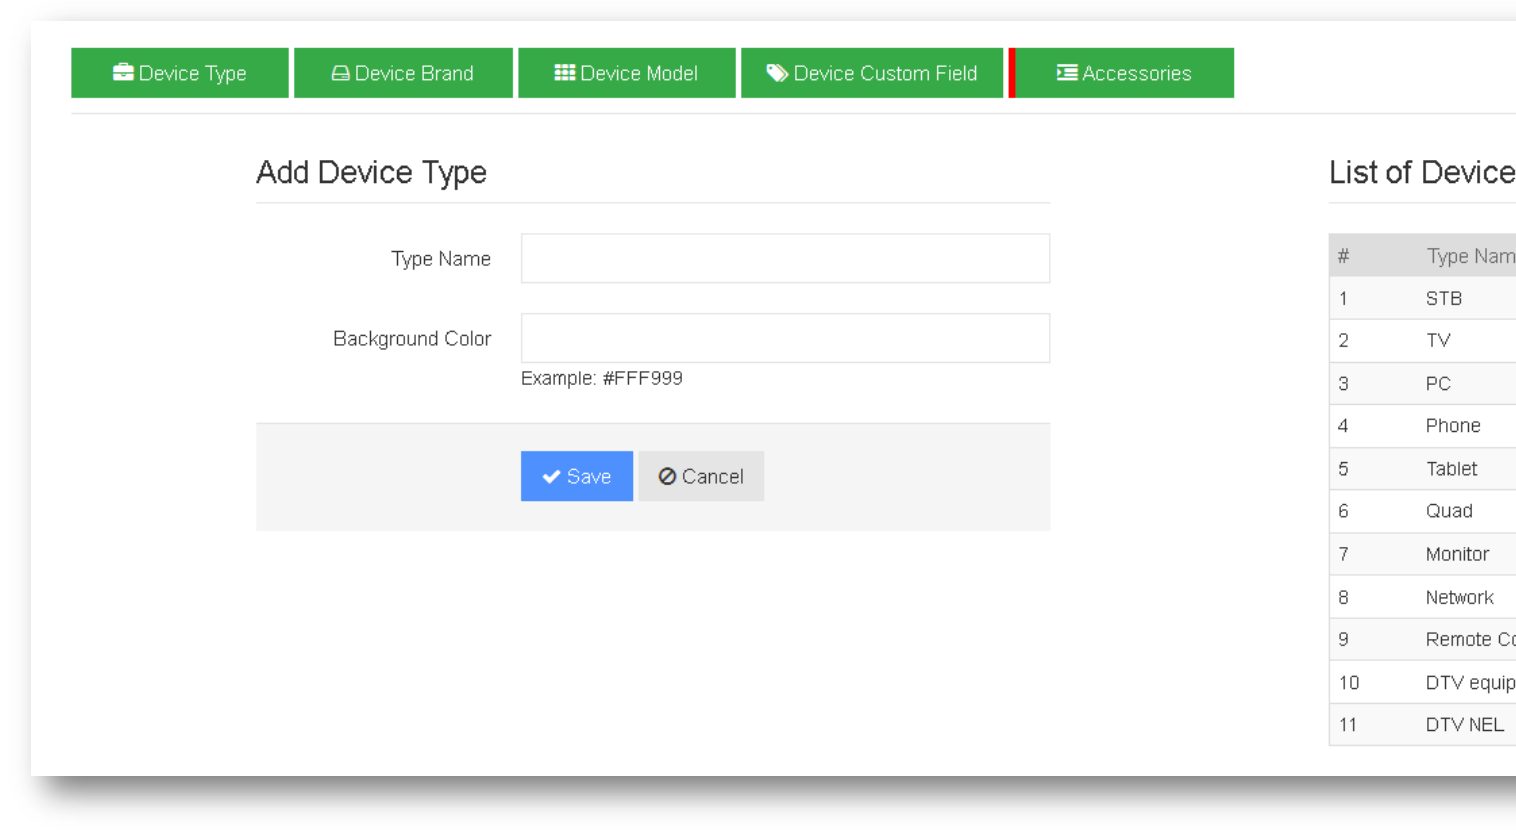
2.4. Device options (only for IS_SUPPORT)
- Device Type: to add/ edit/ remove a device type.
o Type Name is unique.
o Background Color is defined here will impact to the bg-color display at My Device page.
o When Delete an item, will have an alert to inform. The related items of this type should be empty before removing type.
- Device Brand:
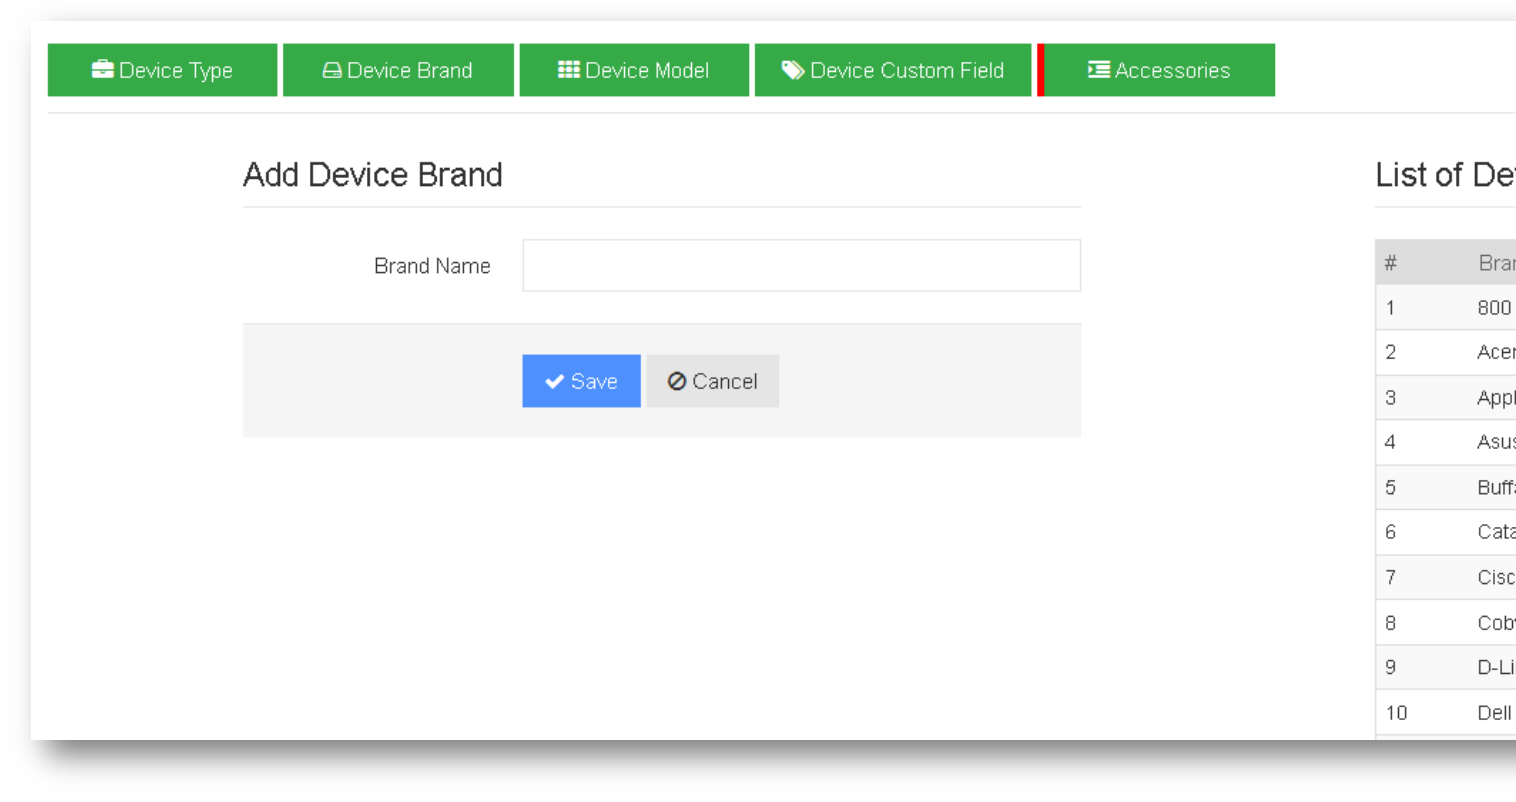
o Brand Name is unique.
o A brand name can be used for more types. (ex: STB HR24 - Samsung, TV 32 inches – Samsung, Phone Galaxy Note 2 –
Samsung, ..).
o When Delete an item, will have an alert to inform. The related items of this brand should be empty before removing brand.
- Device Model:
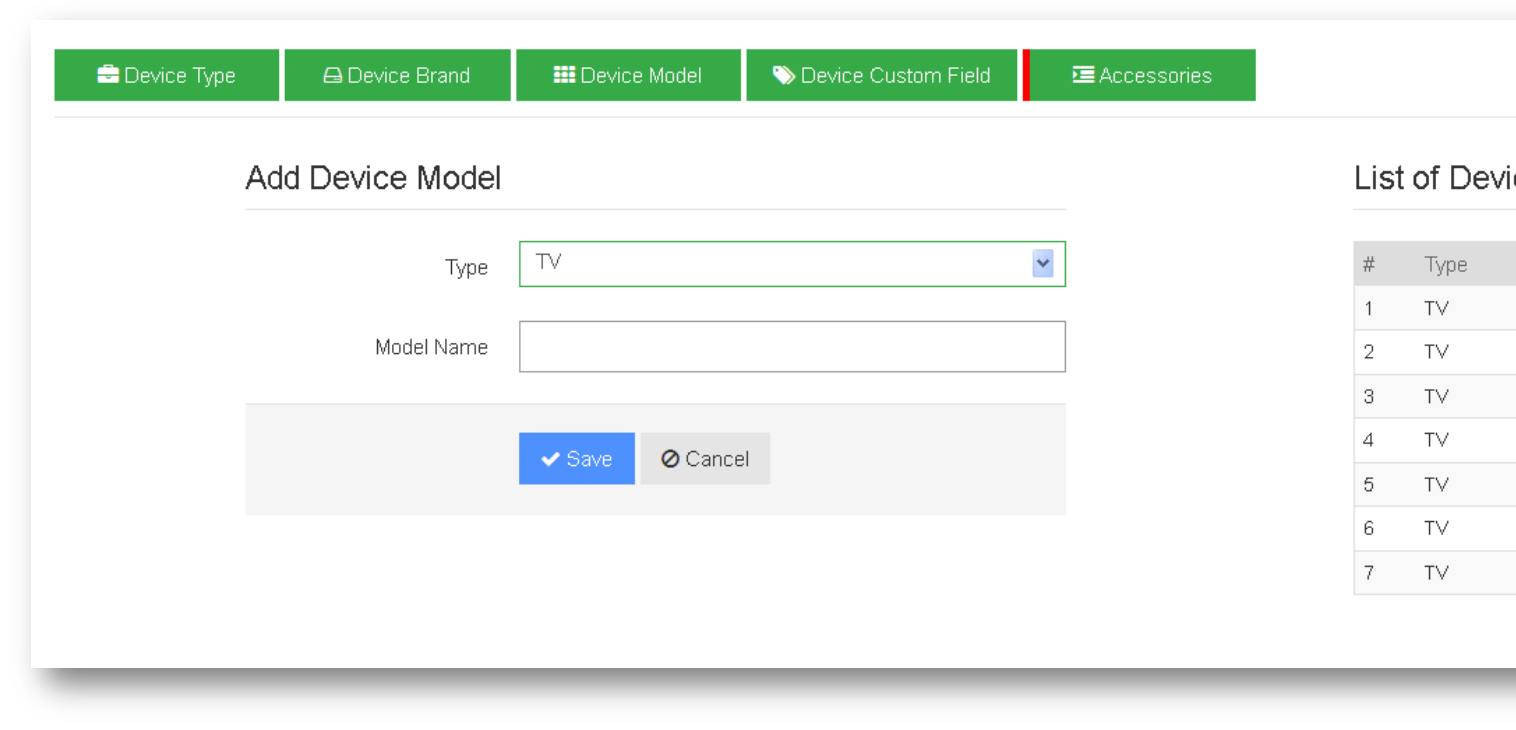
o Device Model is separately designed for each of device types.
o When Delete an item, will have an alert to inform. The related items of this model should be empty before removing model.
- Device Custom Field:
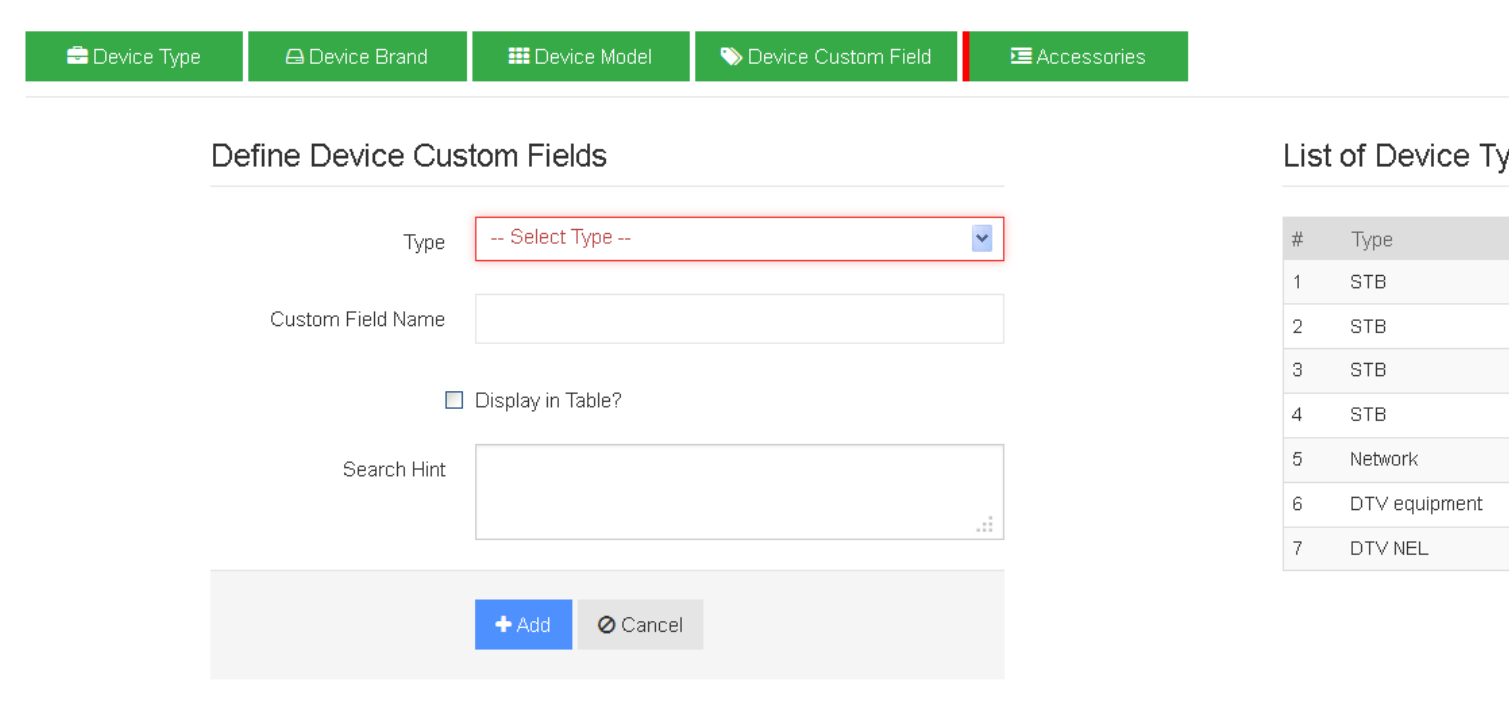
o Device Custom is separately designed for each of device types.
o Custom field name must have not special characters. It’s used for db column query. This name is unique.
o Display in Table: Check to enable this custom field is available in current project. Uncheck to disable.
o Search hint: Suggest the custom field values to use in search page.
- Accessories:
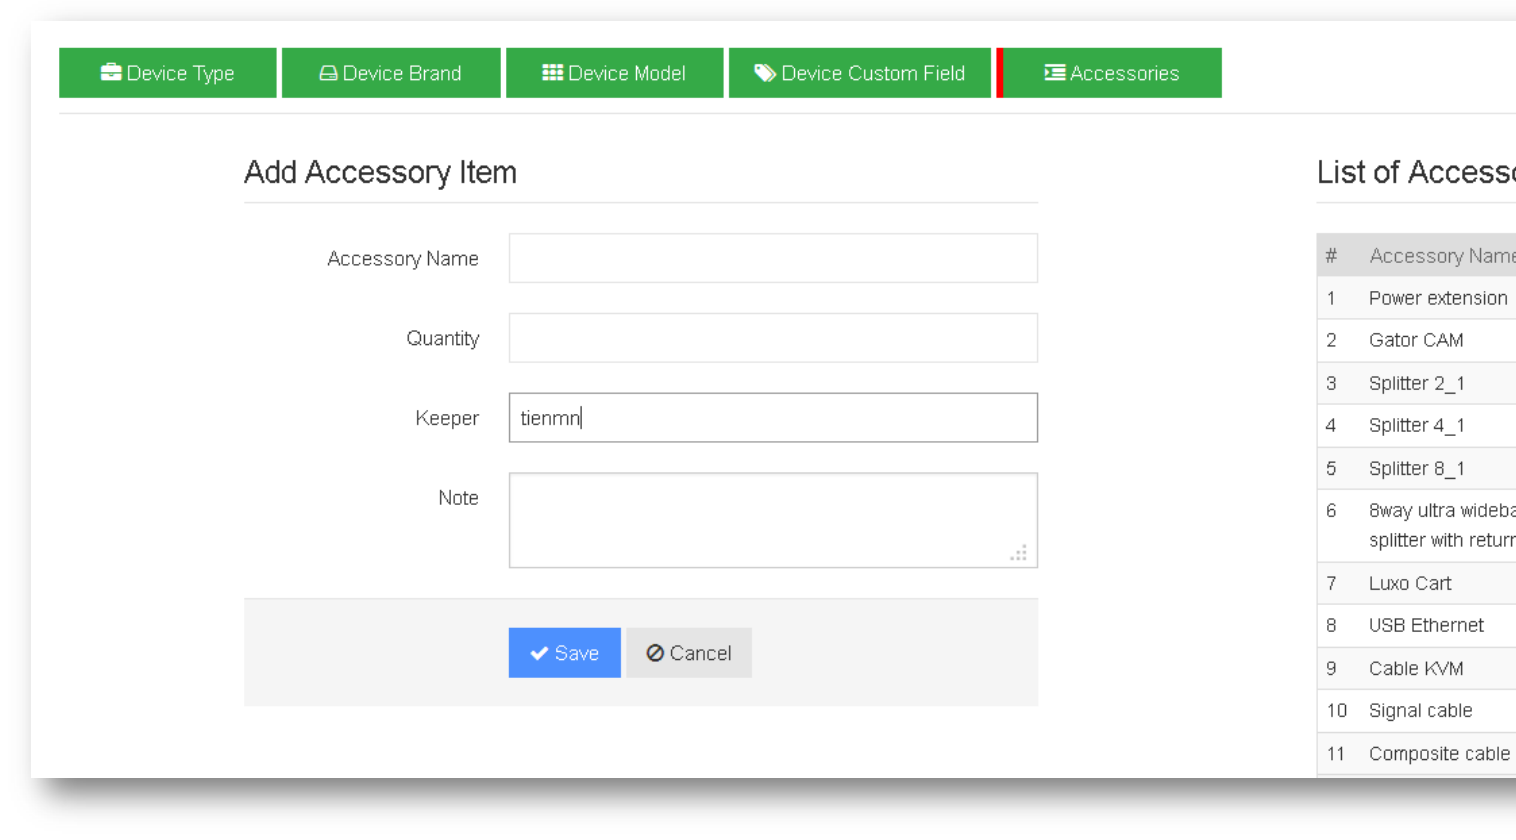
o Add new accessory name: the accessory quantity will count to current user as default.
o Edit Accessory: only edit the accessory name, note.
o Add More Quantities: only input the quantity of selected accessory. The quantity number will be count for current user.
o Delete Accessory: will have a alert to inform. Besure before action.
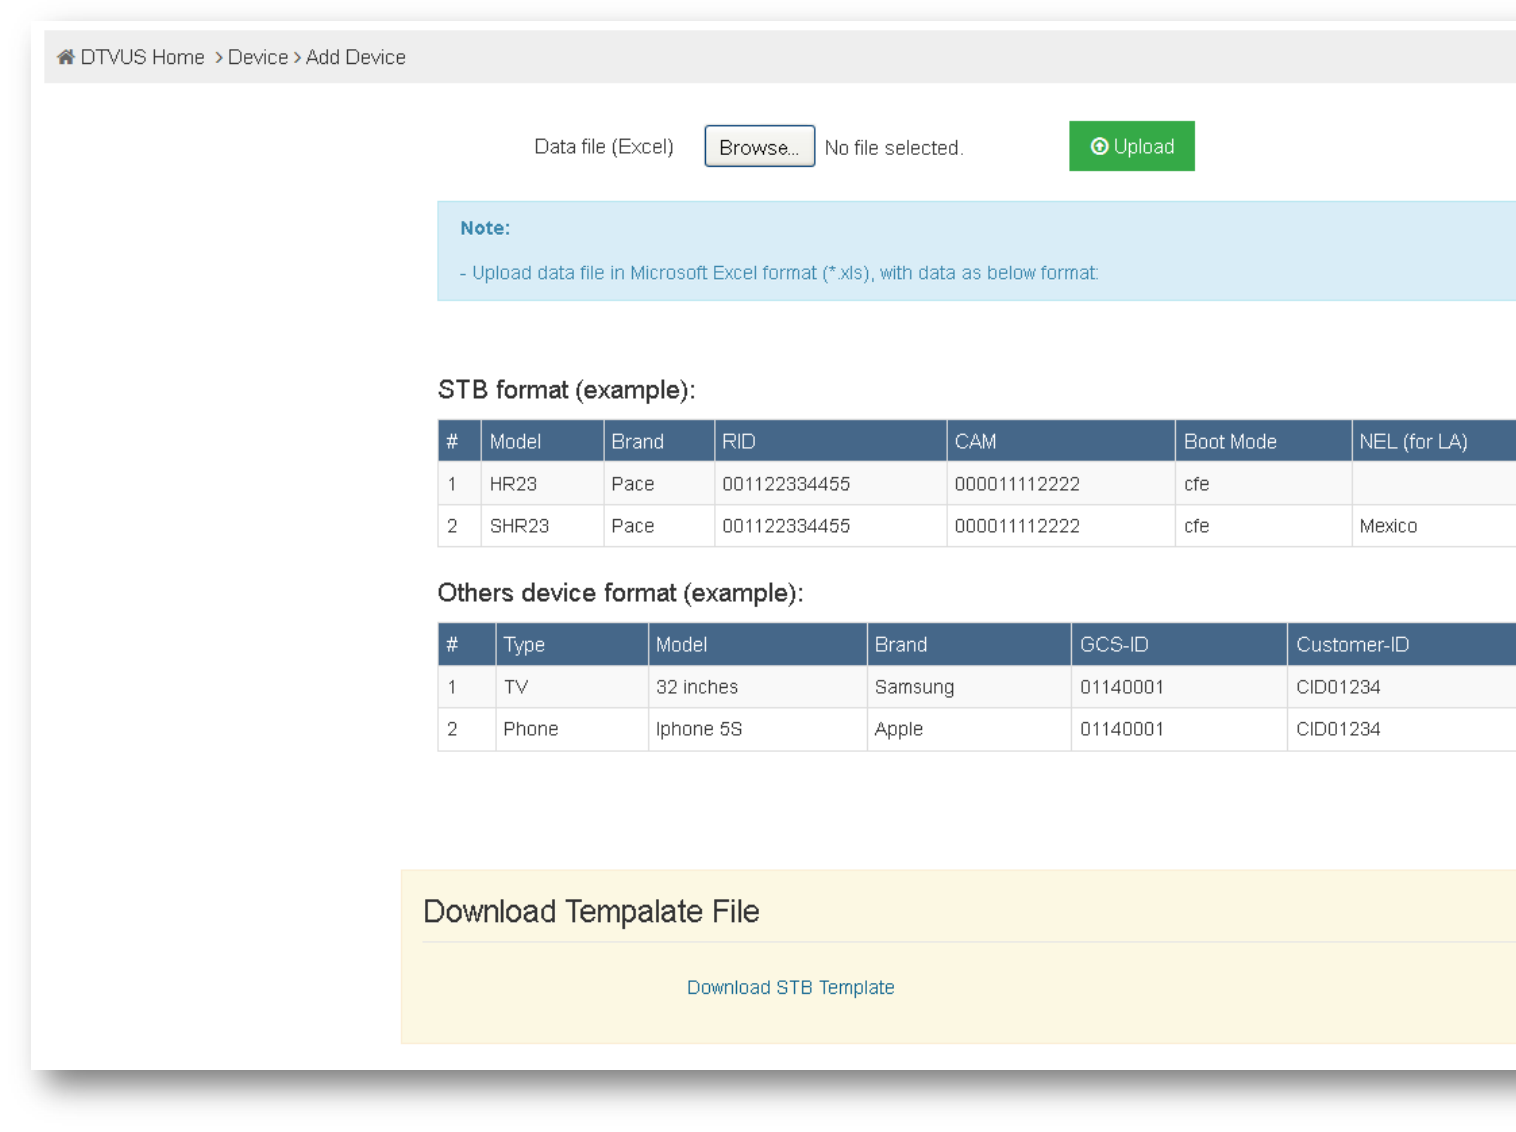
2.5. Add devices (only for IS_SUPPORT)
- Add Device: Field all required fields to add single devices.
- Import Devices: Click on Import button from Add Device page.
o Use correct template (download template file from link) for STB or Others remain devices.
o Fill enough info of device list to file then, browse the file then click Upload button to import data.
o With “Others device”, note to correct the “custom data” (if have) after importing the file.
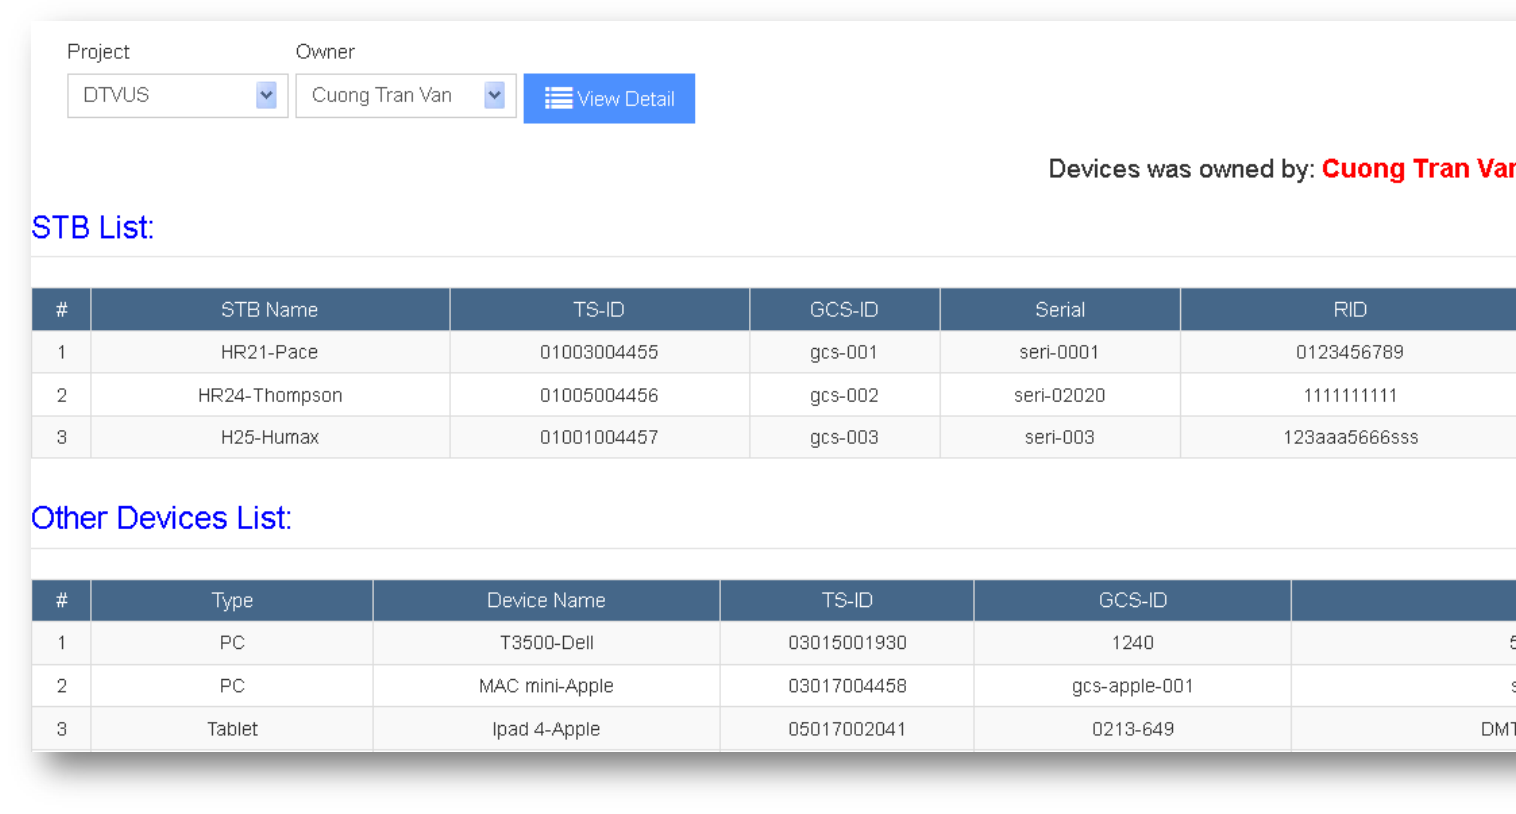
2.6. Devices management
- Show all devices that owned by filtered user (on selected project).
- Have 3 list of STB device, Other devices (show for all device types, excluded STB), and Accessory list.
- Print page (only for IS_SUPPORT): print the result page with printing format.
2.7. Devices summary
- Summary the selected device type by platform (model name + brand name). Show total number, the number of working & the number of
failed devices.
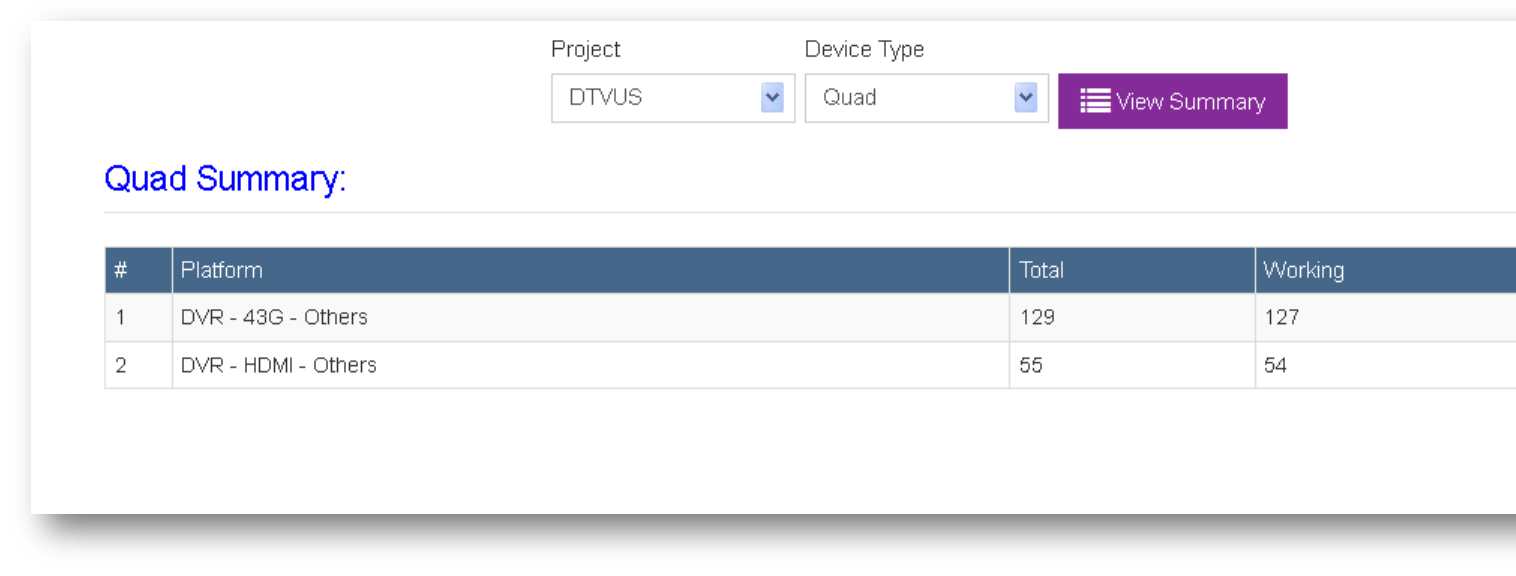
- User can filter on each project or filter from all project.
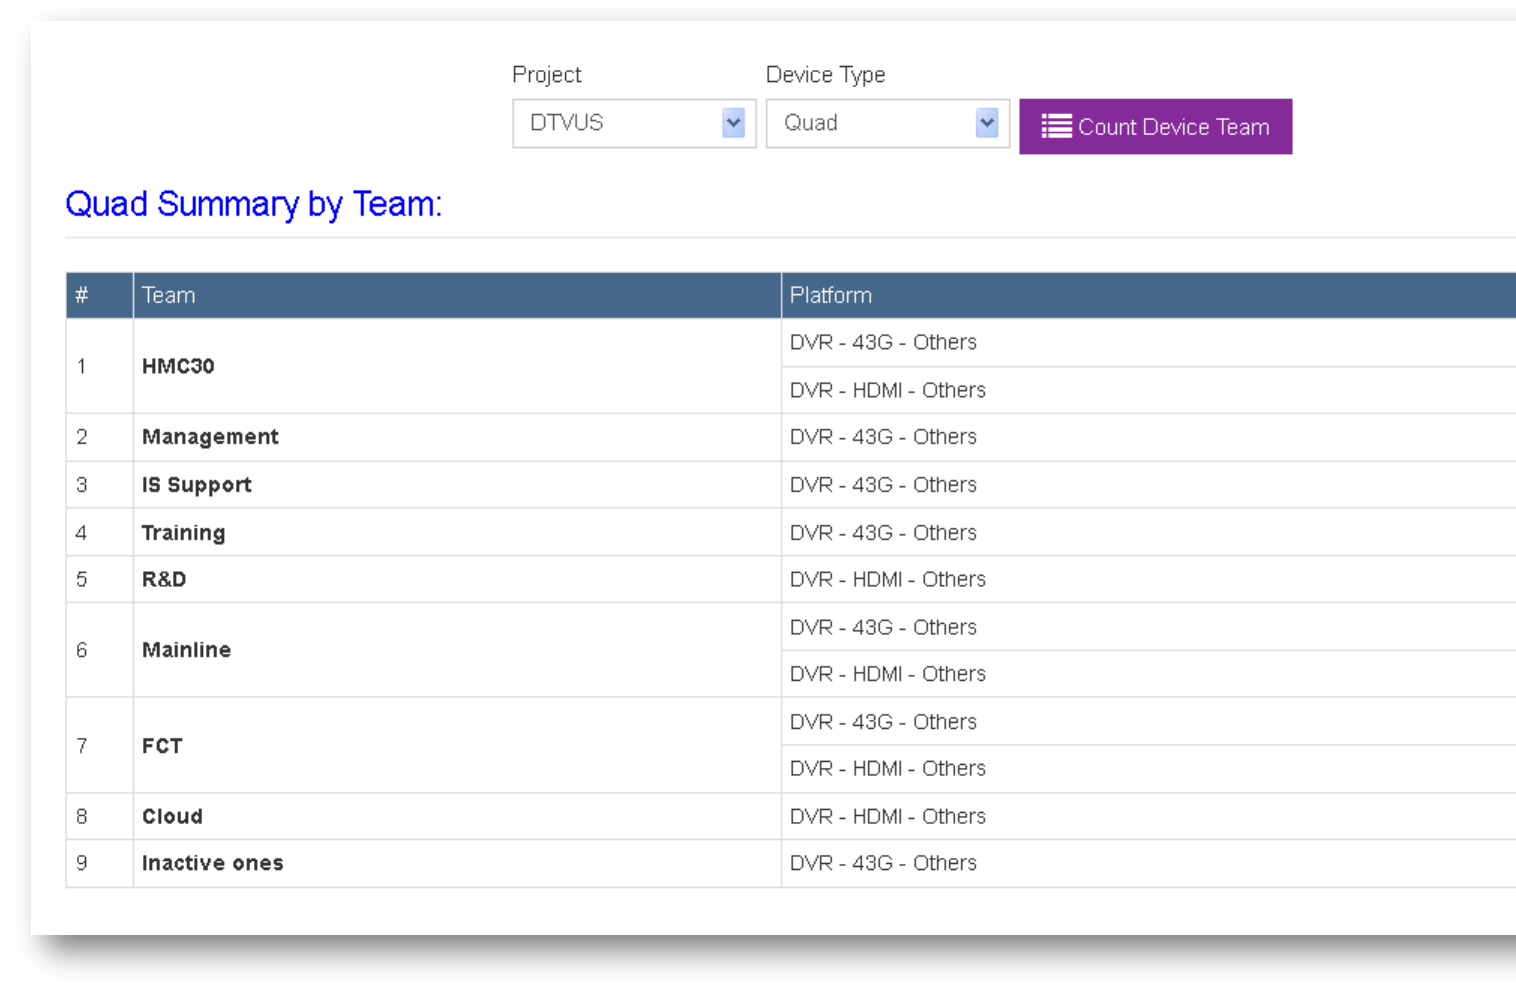
2.8. Team summary
- Summary the selected device type by team.
- The filter is apply on whole project only.
- Filter display rules:
o Team name: Show the team is current “active” in project.
o Team member: ignore the team is “active” but the members of team is zero.
o Filter the selected device type by platform (model name + brand name) on each team. Show total quantity of platform.

3. Contribution
3.1. Share knowledge
- When accessing this page, it will list all the contributions in current project. User can:
o View contributions by searching a category or keyword.
o View detail of a contribution and add comment(s).
o Create a new contribution.
o Manage his own contribution???? (currently, no update/delete)
- User needs “view_contribution” permission to access this feature.
3.2. Suggestions
- When accessing this page, it will list all the suggestions in current project. User can:
o View detail of a contribution and add comment(s).
o Create a new suggestion.
o Manage his own suggestion, e.g update info/change status???? (currently, no update/delete)
- User needs “view_suggestion” permission to access this feature.
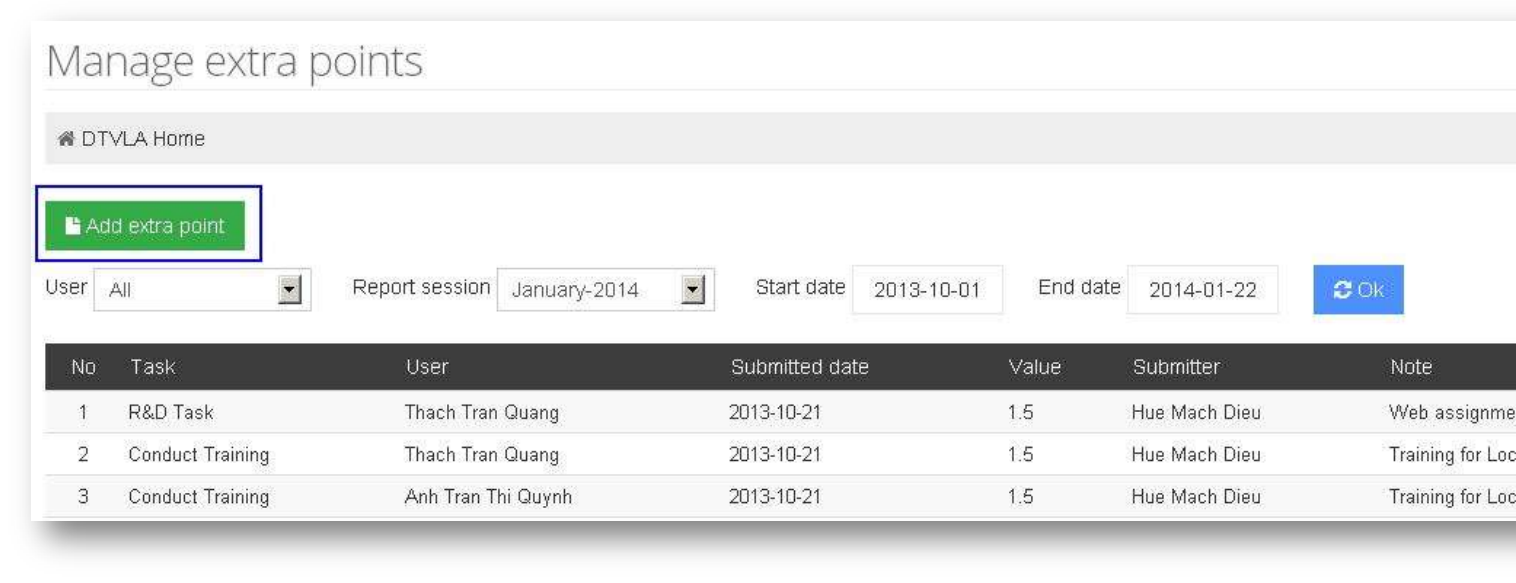
3.3. Extra points
- Sometimes members do extra works or work more than expected, they are deserved to have extra points for their tasks.
This feature will help to manage the extra points.
- When accessing this page, it will list all the extra points of project in a specific duration of time (by default, time duration is current report
session.
- User needs “view_extra_point” or “manage_extra_point” permission to access this feature.
o “view_extra_point” permission: allows user to view the extra points list.
o “manage_extra_point” permission: allows user to view the extra points list and add/edit/delete an extra point.
- Extra points will be an input for monthly performance.
4. Training
4.1. Skill Metrics
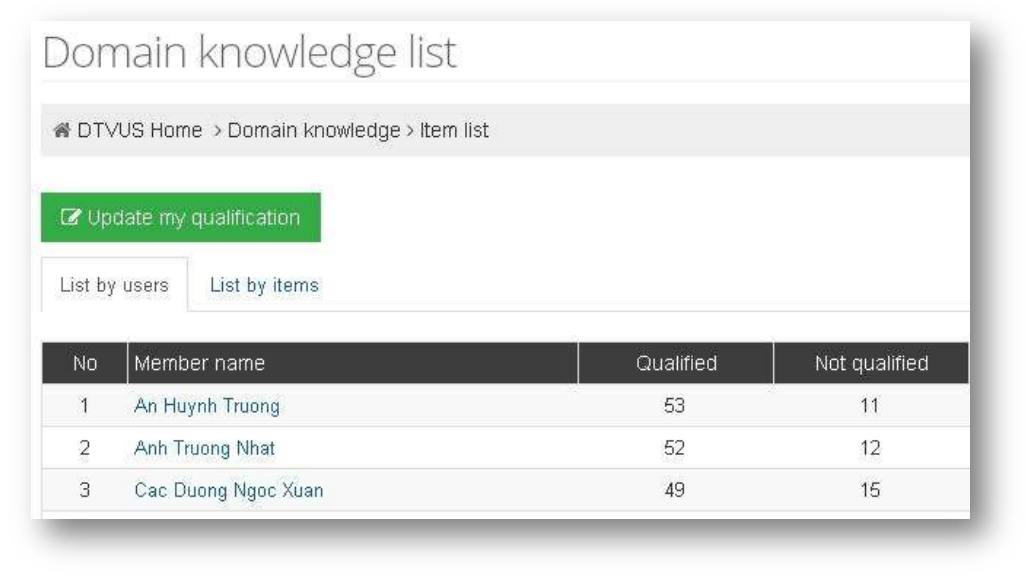
4.2. Domain Knowledge
- Domain Knowledge will show how many domain knowledge items in the project that members are qualified.
There are 2 lists:
o List by users: show list of members with number of qualified/unqualified items of each one.
o List by items: show list of domain knowledge items with number of qualified/unqualified members of each one.
- List of domain knowledge items is defined by PM.
- User needs “view_domain_knowledge” permission to access this feature.
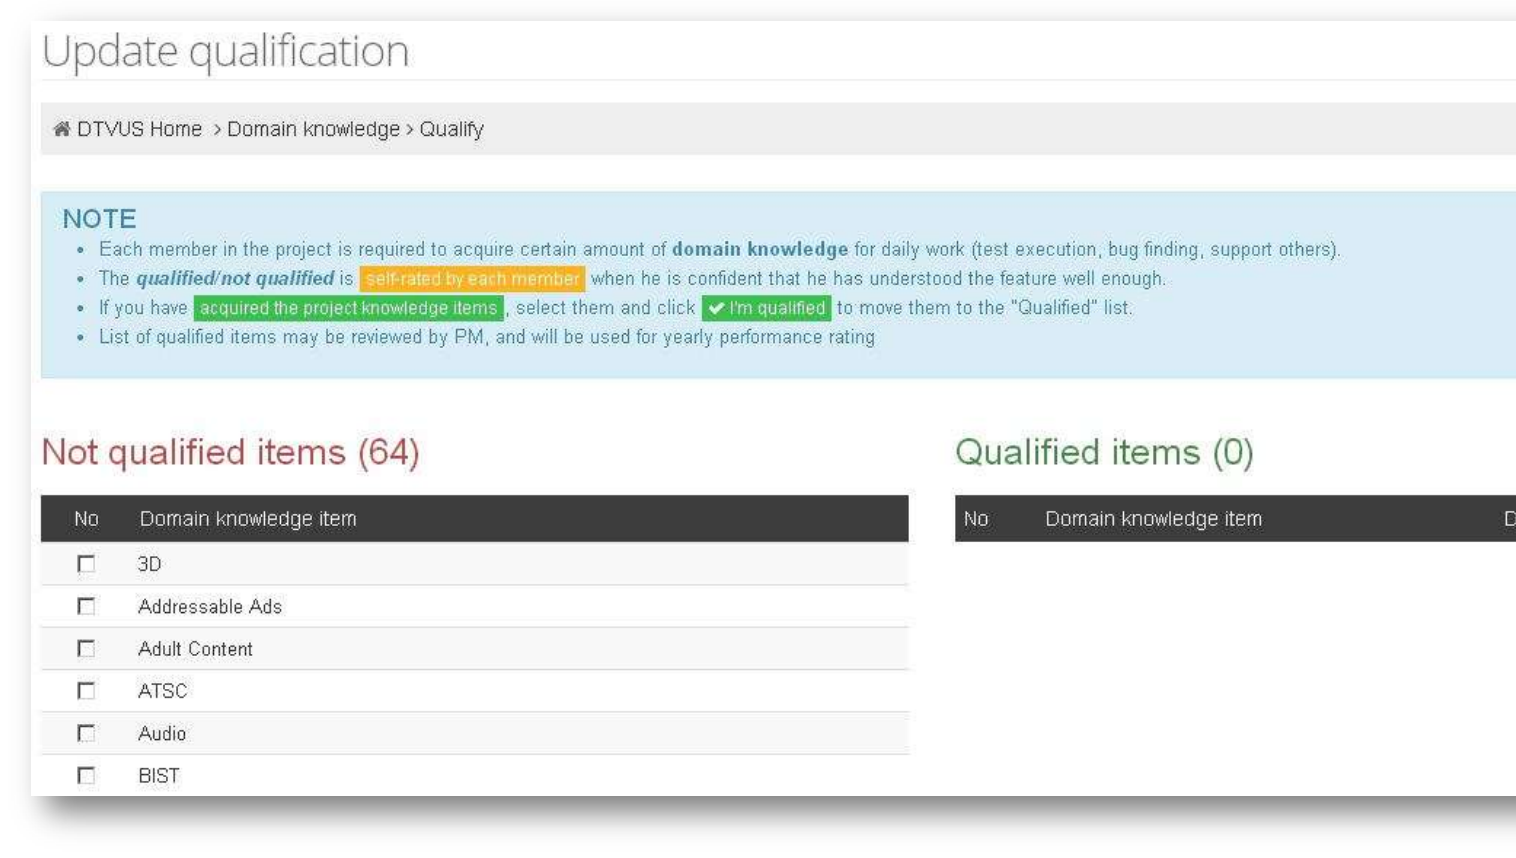
- User can update his qualification by clicking on “Update my qualification” button on the main view.
- Domain Knowledge output will be an input for monthly performance.
5. Statistics
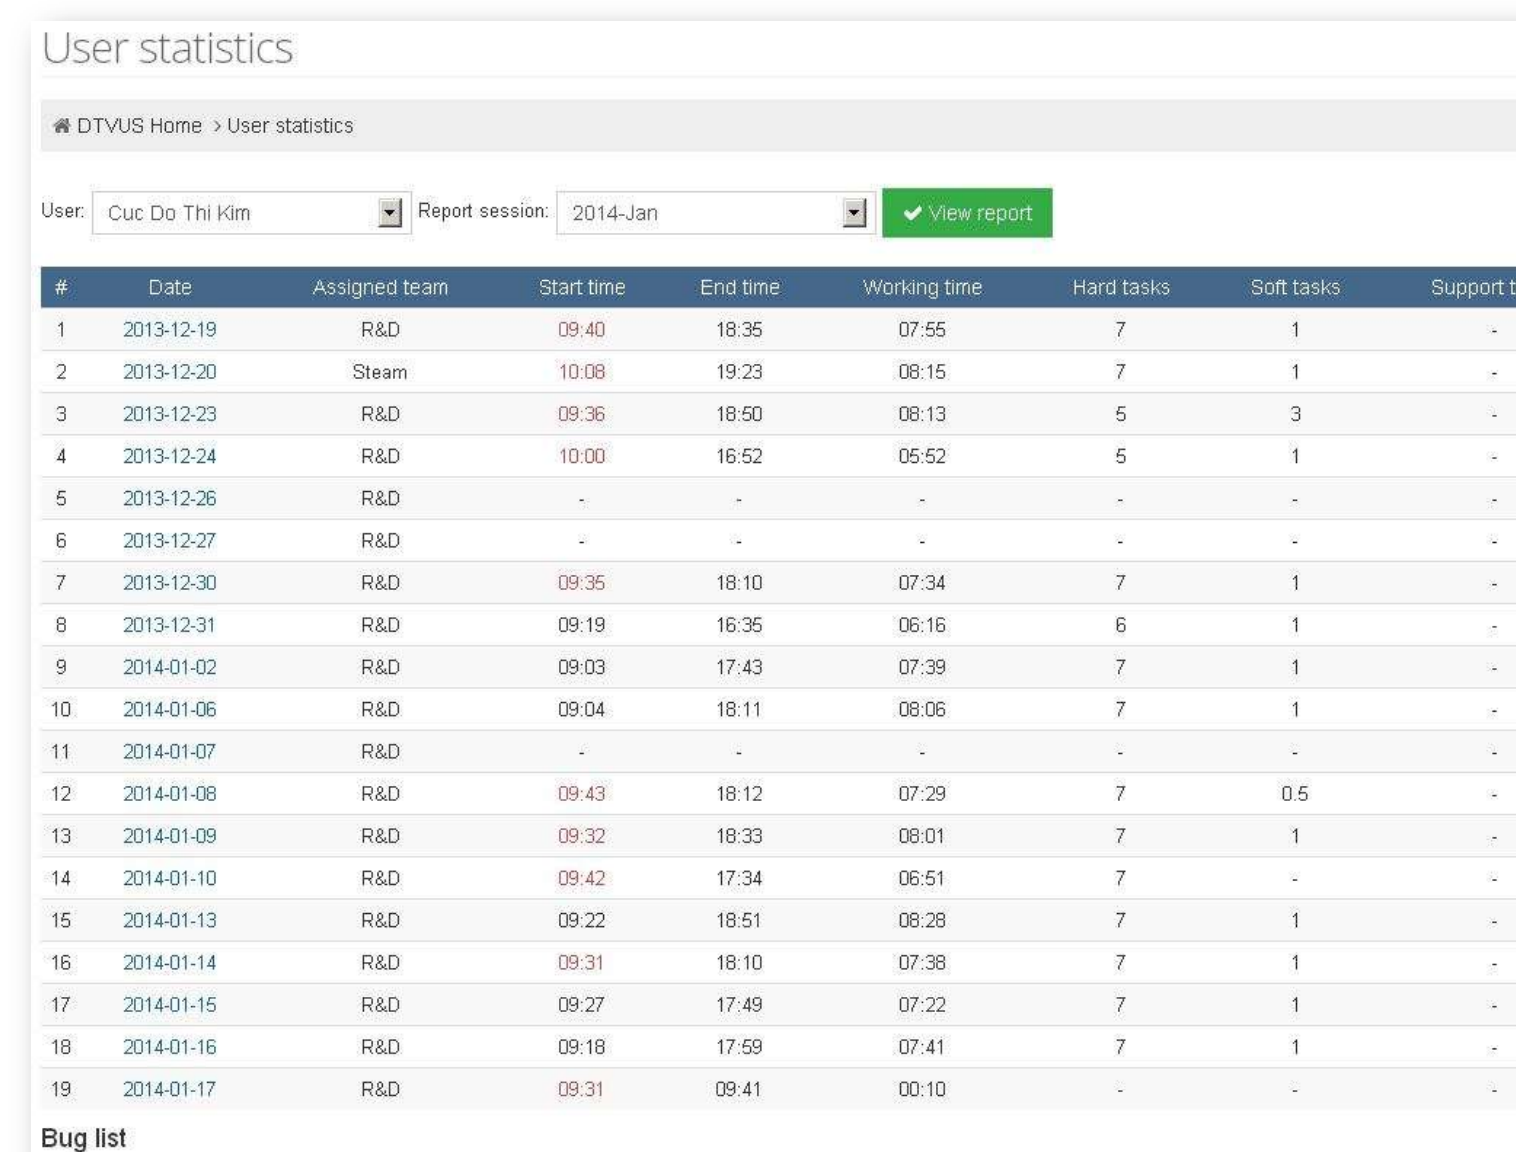
5.1. Personal report
- It shows all timesheets and brief daily reports of user’s working days in a specific report session.
- Statistics template is defined by PM.
- User needs “view_statistics” permission to access this page.
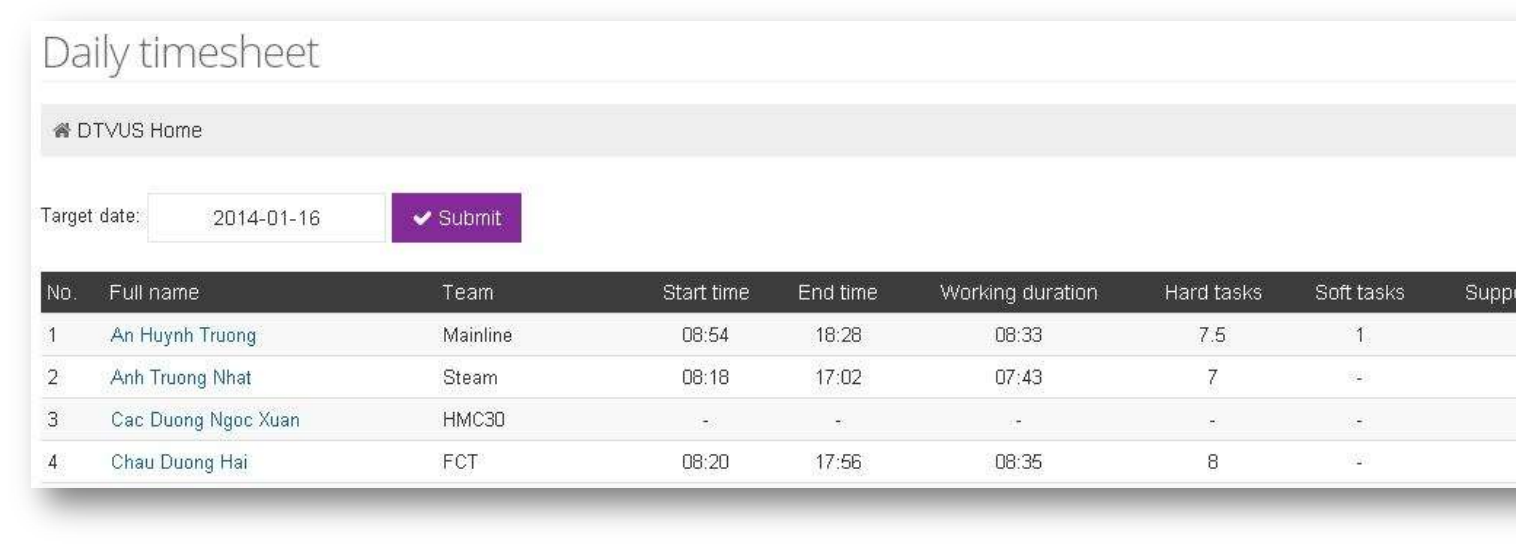
5.2. Daily timesheet
- It shows the timesheet and brief daily report of all project members in a specific day.
- The table is sortable.
- Statistics template is defined by PM.
- User needs “view_statistics” permission to access this page.
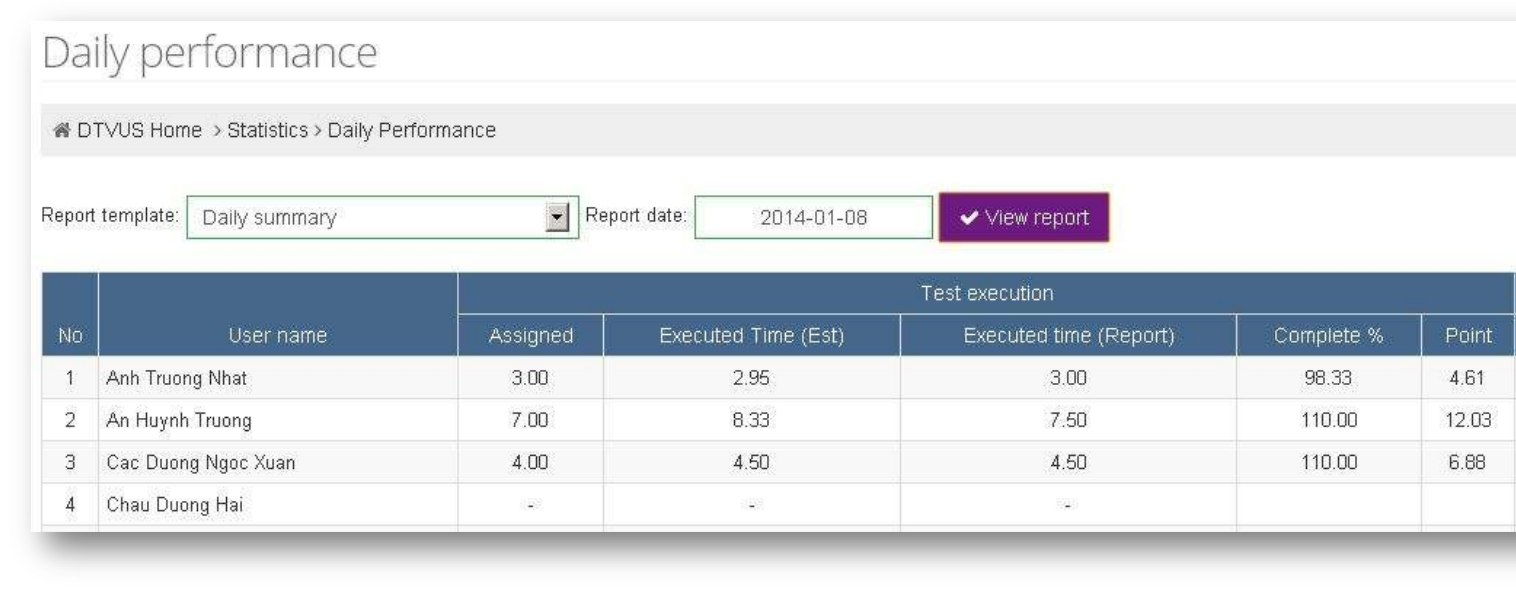
5.3. Daily Performance
- It shows performance of all project members in a specific day.
- The table is sortable.
- Statistics template is defined by PM.
- User needs “view_statistics” permission to access this page.
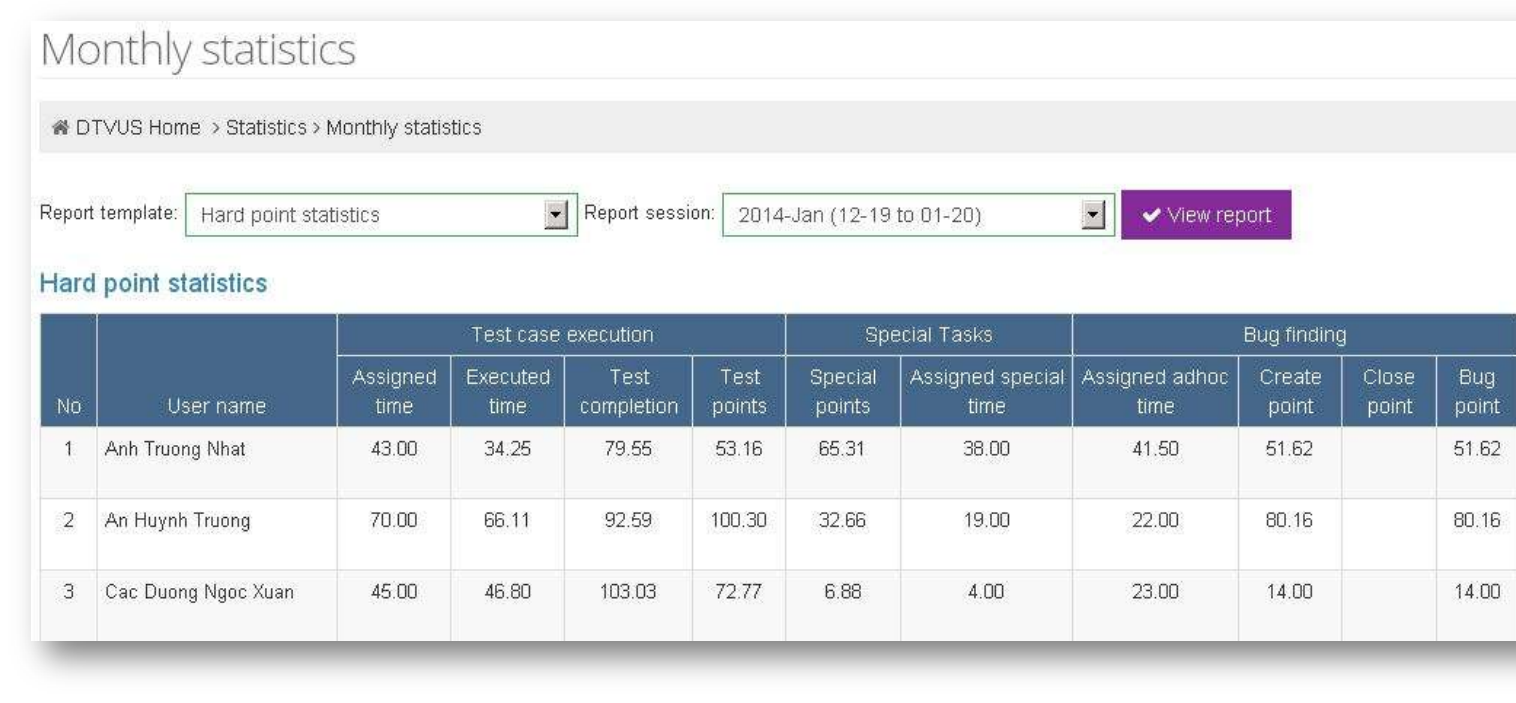
5.4. Monthly Performance
- It shows performance of all project members in a specific report session.
- The tables are sortable.
- Statistics templates are defined by PM.
- User needs “view_statistics” permission to access this page.

5.5. Yearly Performance
- It shows performance of all project members in a specific year.
- The table is sortable.
- Statistics template is defined by PM.
- User needs “view_statistics” permission to access this page.
5.6. Bug data
- It shows performance of all project members in a specific report session.
- User needs “view_bug” or “manage_bug” permission to access this page.
o “view_bug”: with this permission, user can:
View the bug list with filters.
Export the bug list.
o “manage_bug”: allows user to do some actions below:
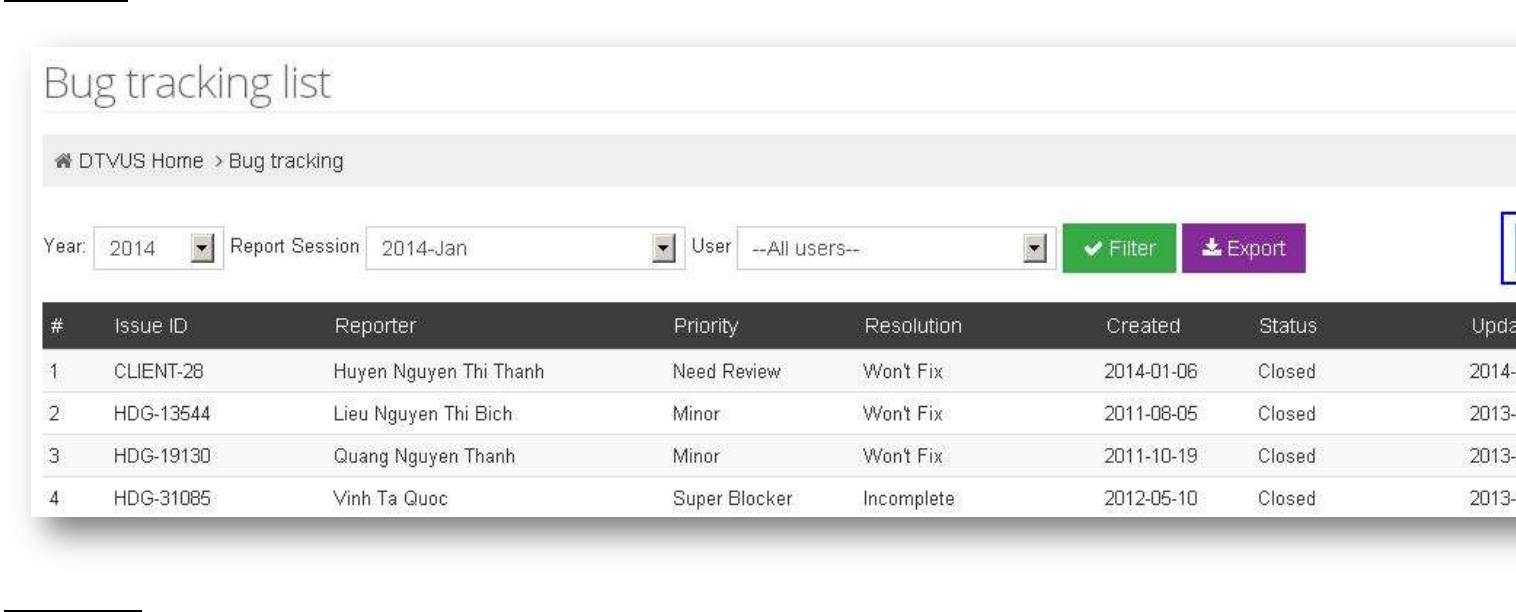
View the bug list with filters.
Export the bug list.
Edit/delete a bug.
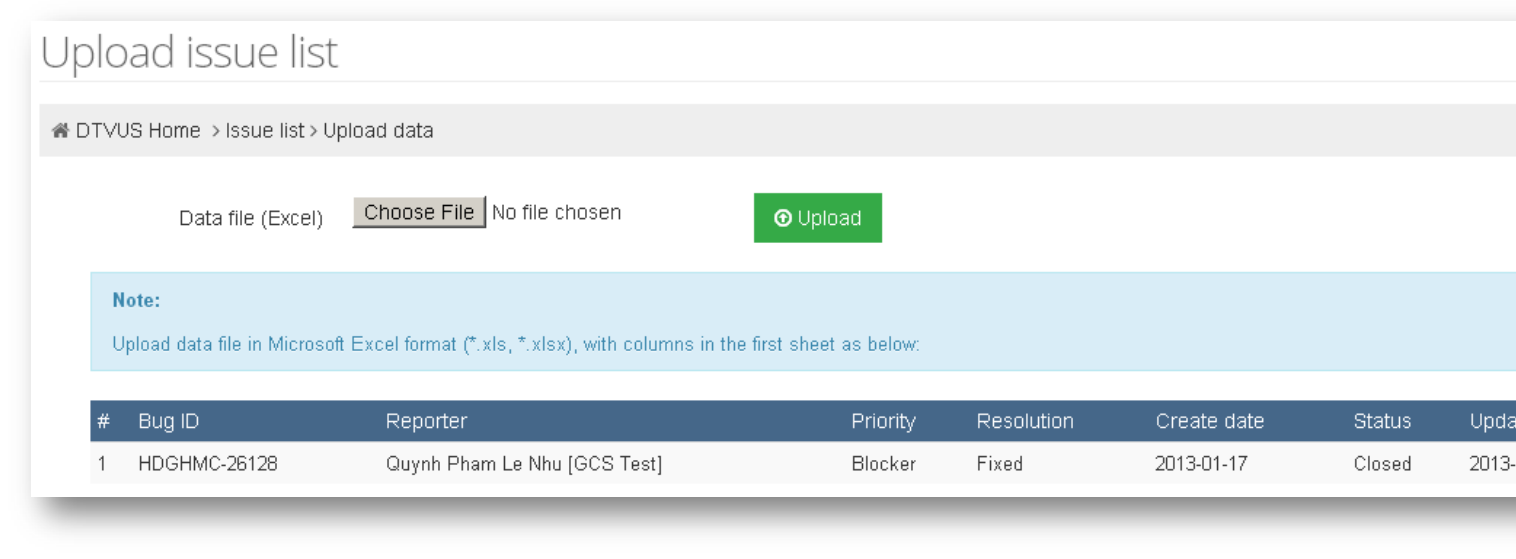
Add a new bug manually.
Import bugs from file with standard fields defined in the picture.
- Statistics template is defined by PM.
View bug list: (icons and buttons in blue rectangles are displayed when user has “manage_bug” permission)
Import bug list:
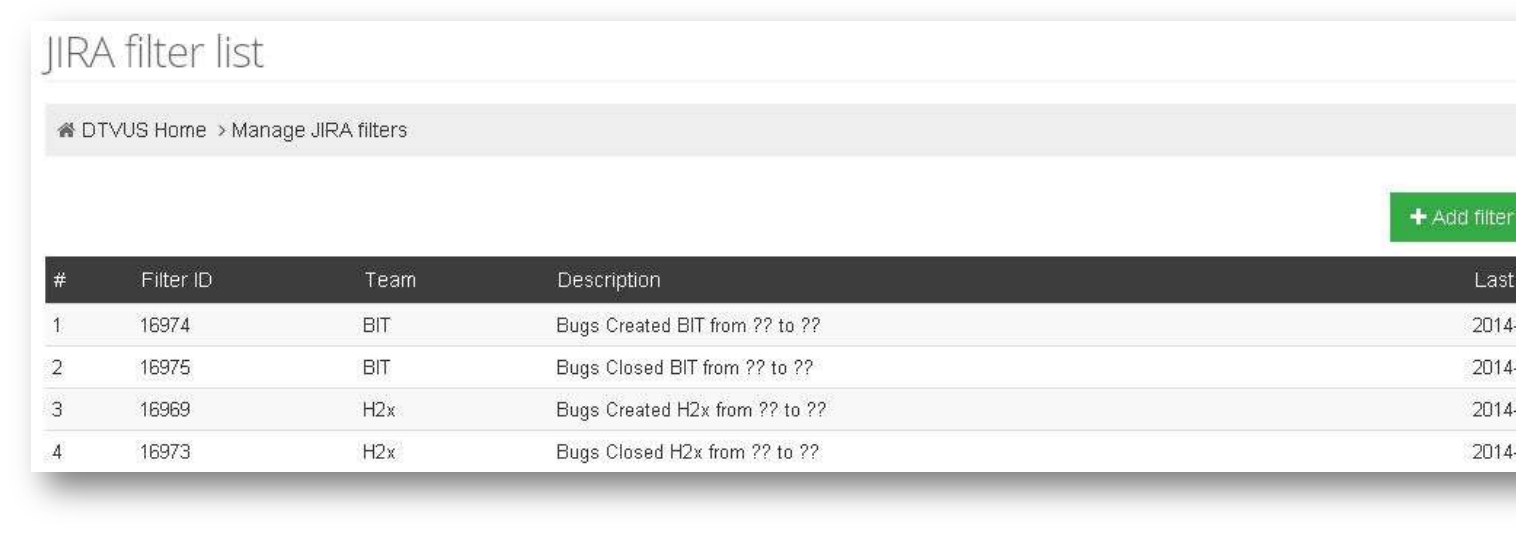
5.7. Jira filters
- Curently, this feature support JIRA bug tracking system only.
- User needs “manage_bug” permission to access this feature.
- In this feature, user can:
o Add a new filter. In which, filter ID is the filter ID on the bug tracking tool.
o Edit/delete a filter.
o Sync bug list from a specific filter or all filters at one time bug list will be updated to bug data.
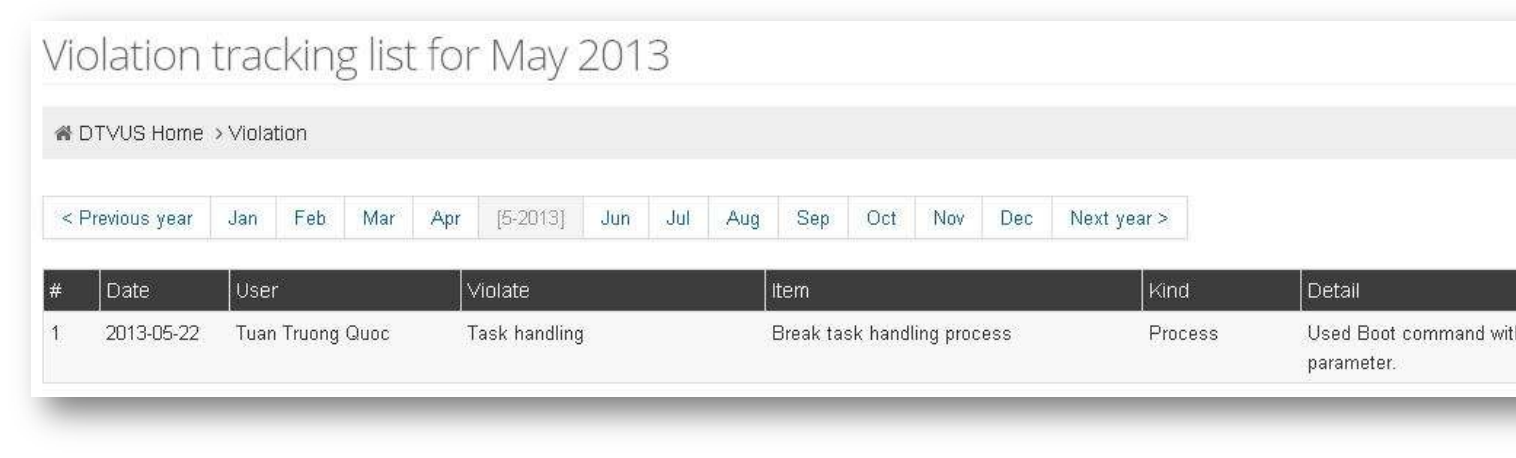
5.8. Violation log
- In an organization, we usually have regulation/rules/principles/process/etc. to help everyone easy in working and cooperating together.
In case a member violates an aggreement above, a violation will be logged.
- User needs “view_violation” or “manage_violation” permission to access this feature.
o “view_violation”: allows user to:
View the violation list in a specific month.
View information of violation items in the project.
o “manage_violation”: allows user to:
View the violation list in a specific month.
View information of violation items in the project.
Add a new violation
Edit/delete a violation if user is the submitter.
- Violation items will be defined by PM.
6. Activities
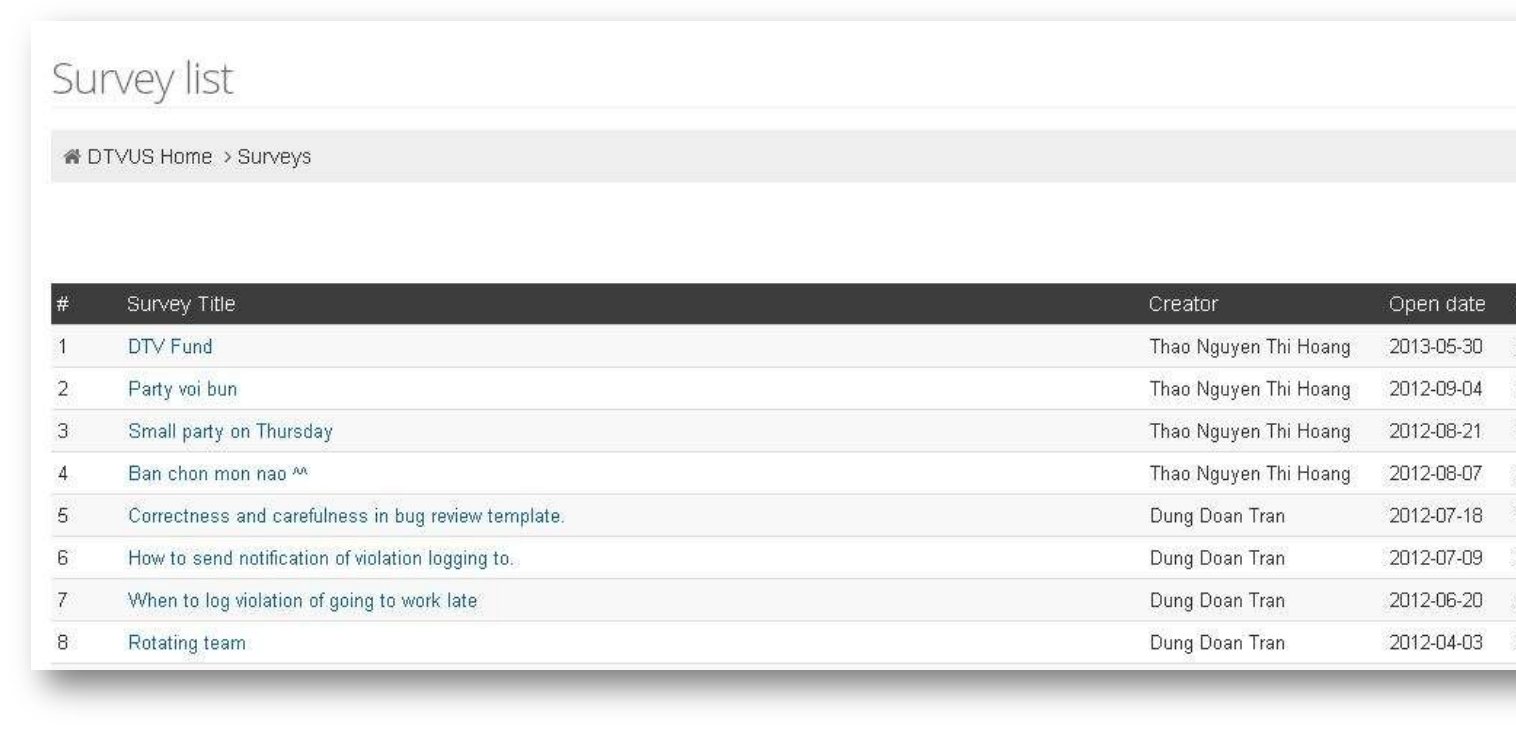
6.1. Surveys
- When accessing this page, it will list all the surveys in current project. User can:
o View detail of a survey and add comment(s).
o Make a vote if the survey still open.
o Go to “Manage surveys” to add a new survey or edit his own surveys.
- User needs “join_surveys” permission to access this feature.
7. Directory
7.1. User list
- List all active users in the current project.
7.2. Team list
- List all teams in the current project with: team name, number of members, note of team.
7.3. Project list
- List all projects in the system with: Project name, Description, number of active members, and list of Project manager(s).
8. Help
8.1. User guide
- Brief guidline for users to work with available features in the system.
8.2. Project Settings guide
- Brief guidline for PMs to setup all necessary settings for his project.
8.3. Feedback
- When user wants to give feedback to development team, he can submit a feedback here.
- Every user in the system can access this feature.
