System Administration VRealize. Automation 6.2 V Realize Vrealize 62
User Manual: Pdf vRealize Automation - 6.2 - System Administration User Guide for VMware vRealize Software, Free Instruction Manual
Open the PDF directly: View PDF ![]() .
.
Page Count: 92
- System Administration
- Contents
- System Administration
- Updated Information
- Configuring vRealize Automation
- Configuring System Settings
- Configuring IaaS
- The Customer Experience Improvement Program
- Configure the vRealize Automation Appliance Database
- Perform an Appliance Database Failover
- Validate Appliance Database Replication
- Bulk Import, Update, or Migrate Virtual Machines
- Managing vRealize Automation
- Managing Tenants
- Brand Tenant Login Pages
- Install a Hotfix
- Updating vRealize Automation Certificates
- Extracting Certificates and Private Keys
- Update vRealize Automation Certificates when all are Expired
- Updating the Identity Appliance Certificate
- Updating the vRealize Appliance Certificate
- Updating the IaaS Certificate
- Replace the Identity Appliance Management Site Certificate
- Updating the vRealize Appliance Management Site Certificate
- Replace a Management Agent Certificate
- Resolve Certificate Revocation Errors
- View License Usage
- Monitoring Logs and Services
- Starting Up and Shutting Down vRealize Automation
- Customize Data Rollover Settings
- Remove an Identity Appliance from a Domain
- Backup and Recovery for vRealize Automation Installations
- Backing Up vRealize Automation
- Activate the Failover IaaS Server
- vRealize Automation System Recovery

System Administration
vRealize Automation 6.2
System Administration
VMware, Inc. 2
You can find the most up-to-date technical documentation on the VMware website at:
https://docs.vmware.com/
If you have comments about this documentation, submit your feedback to
docfeedback@vmware.com
Copyright © 2008–2016 VMware, Inc. All rights reserved. Copyright and trademark information.
VMware, Inc.
3401 Hillview Ave.
Palo Alto, CA 94304
www.vmware.com
Contents
System Administration 5
Updated Information 6
1Configuring vRealize Automation 7
Configuring System Settings 7
Configure Branding for the vRealize Automation Console 7
Configuring Global Email Servers for Notifications 8
Configuring IaaS 10
Setting Resource-Intensive Concurrency Limits 10
Configuring Templates for Automatic IaaS Emails 14
Enabling Remote Desktop Connections 18
Enabling Users to Select Datacenter Locations 19
Enabling Visual Basic Scripts in Provisioning 20
The Customer Experience Improvement Program 21
Join or Leave the Customer Experience Improvement Program for vRealize Automation 21
Configure Data Collection Time 22
2Configure the vRealize Automation Appliance Database 23
Configure Database Virtual IP 24
Configure Internal Appliance Database 24
Configure Appliance Database Replication on the Secondary Appliance 26
Test Appliance Database Failover 27
Test Appliance Database Failback 28
3Perform an Appliance Database Failover 30
4Validate Appliance Database Replication 32
5Bulk Import, Update, or Migrate Virtual Machines 34
Generate Virtual Machine CSV Data File 35
Edit Virtual Machine CSV Data File 36
Import, Update, or Migrate One or More Virtual Machines 37
6Managing vRealize Automation 39
Managing Tenants 39
Tenancy Overview 39
Create and Configure a Tenant 44
VMware, Inc. 3
Brand Tenant Login Pages 47
Install a Hotfix 48
Updating vRealize Automation Certificates 49
Extracting Certificates and Private Keys 50
Update vRealize Automation Certificates when all are Expired 50
Updating the Identity Appliance Certificate 51
Updating the vRealize Appliance Certificate 54
Updating the IaaS Certificate 58
Replace the Identity Appliance Management Site Certificate 61
Updating the vRealize Appliance Management Site Certificate 62
Replace a Management Agent Certificate 65
Resolve Certificate Revocation Errors 67
View License Usage 68
Monitoring Logs and Services 68
View the Event Log 69
Viewing Host Information for Clusters in Distributed Deployments 69
vRealize Automation Services 71
Starting Up and Shutting Down vRealize Automation 72
Start Up vRealize Automation 72
Restart vRealize Automation 73
Shut Down vRealize Automation 74
Customize Data Rollover Settings 75
Remove an Identity Appliance from a Domain 76
7Backup and Recovery for vRealize Automation Installations 78
Backing Up vRealize Automation 78
Backing Up vRealize Automation Databases 79
Backing Up the Identity Appliance 80
Backing Up the vRealize Appliance 80
Backing Up Load Balancers 81
Backing Up IaaS Components 82
Backing Up vRealize Automation Certificates 83
Activate the Failover IaaS Server 83
vRealize Automation System Recovery 84
Restoring vRealize Automation Databases 84
Restoring the Identity Appliance 86
Restore the vRealize Appliance and Load Balancer 87
Restoring the IaaS Website, Manager Services, and Their Load Balancers 89
Reinstall the DEM Orchestrator and the DEM Workers 91
Reinstall the IaaS Agents 92
System Administration
VMware, Inc. 4

System Administration
System Administration tells you how to customize, configure, and manage vRealize Automation. It
includes information about customizing the vRealize Appliance and VMware Infrastructure as a Service
servers as well as information about managing tenants, using the bulk import feature, and performing
backup and restore procedures.
Note Not all features and capabilities of vRealize Automation are available in all editions. For a
comparison of feature sets in each edition, see https://www.vmware.com/products/vrealize-automation/.
Intended Audience
This information is intended for anyone who wants to configure and manage vRealize Automation. The
information is written for experienced Windows or Linux system administrators who are familiar with
virtual machine technology and datacenter operations.
vCloud Suite Licensing and Integration
You can license vRealize Automation individually or as part of vCloud Suite. You should consider the
licensing and integration options that are available to you.
Some vCloud Suite components are available as standalone products that are licensed on a per-virtual
machine basis. When the products are part of vCloud Suite, they are licensed on a per-CPU basis. You
can run an unlimited number of virtual machines on CPUs that are licensed with vCloud Suite. For more
information, see vCloud Suite Architecture Overview and Use Cases.
VMware Technical Publications Glossary
VMware Technical Publications provides a glossary of terms that might be unfamiliar to you. For
definitions of terms as they are used in VMware technical documentation, go to
http://www.vmware.com/support/pubs.
VMware, Inc. 5

Updated Information
This System Administration guide for vRealize Automation is updated with each release of the product or
when necessary.
This table provides the update history of the System Administration guide.
Revision Description
EN-001648-08 nUpdated Modify an Existing Automatic Email Template.
nUpdated Customize the Date for Email Notification for Machine Expiration.
nAdded Install a Hotfix.
nAdded Resolve Certificate Revocation Errors.
EN-001648-07 Updated documentation for Start Up vRealize Automation.
EN-001648-06 nNew documentation for Brand Tenant Login Pages
nNew documentation for importing virtual machines with static IP addresses. See Edit Virtual Machine CSV
Data File.
EN-001648-05 nUpdated documentation for Chapter 2 Configure the vRealize Automation Appliance Database
EN-001648-04 nNew documentation for Chapter 2 Configure the vRealize Automation Appliance Database
nUpdated documentation for Chapter 7 Backup and Recovery for vRealize Automation Installations.
EN-001648-03 Clarification of steps in the following topics:
nUpdate the vRealize Appliance with the Identity Appliance Certificate
nUpdate the vRealize Appliance with the IaaS Certificate
EN-001648-02 nNew documentation for Starting Up and Shutting Down vRealize Automation.
nRevised and updated documentation for Management Agents. See Manually Update Management Agents to
Recognize a vRealize Appliance Management Site Certificate
EN-001648-01 nRevised and updated documentation for Chapter 7 Backup and Recovery for vRealize Automation
Installations.
EN-001648-00 Initial release.
VMware, Inc. 6
Configuring
vRealize Automation 1
System administrators can change the appearance of the vRealize Automation console, configure
notifications for the vRealize Automation appliance, and configure Infrastructure as a Service features.
This chapter includes the following topics:
nConfiguring System Settings
nConfiguring IaaS
nThe Customer Experience Improvement Program
Configuring System Settings
System administrators can configure system settings to change the appearance of the
vRealize Automation console and configure inbound and outbound email servers to handle system
notifications.
Configure Branding for the vRealize Automation Console
System administrators can change the appearance of the vRealize Automation console to meet site-
specific branding guidelines by changing the logo, the background color, and information in the header
and footer.
System administrators control the default branding for tenants. Tenant administrators can use the default
or reconfigure branding for each tenant.
As you make changes, a preview of each change appears at the bottom of the form. The changes take
effect when they are saved.
Prerequisites
Log in to the vRealize Automation console as a system administrator or tenant administrator.
Procedure
1Select Administration > Branding.
2Clear the Use default check box.
VMware, Inc. 7

3Create a banner.
a Click Choose File to upload a logo image.
b Follow the prompts to finish creating the banner.
4Click Next.
5Type the copyright information in the Copyright notice text box and press Enter to preview your
selection.
6(Optional) Type the URL to your privacy policy in the Privacy policy link text box and press Enter to
preview your selection.
7(Optional) Type the URL to your contact page in the Contact link text box and press Enter to preview
your selection.
8Click Update.
The console is updated with your changes.
Configuring Global Email Servers for Notifications
Tenant administrators can add email servers as part of configuring notifications for their own tenants. As a
system administrator, you can set up global inbound and outbound email servers that appear to all
tenants as the system defaults. If tenant administrators do not override these settings before enabling
notifications, vRealize Automation uses the globally configured email servers.
Create a Global Inbound Email Server
System administrators create a global inbound email server to handle inbound email notifications, such as
approval responses. You can create only one inbound server, which appears as the default for all tenants.
If tenant administrators do not override these settings before enabling notifications, vRealize Automation
uses the globally configured email server.
Prerequisites
Log in to the vRealize Automation console as a system administrator.
Procedure
1Select Administration > Email Servers.
2Click the Add icon ( ).
3Select Email – Inbound.
4Click OK.
5Enter a name in the Name text box.
6(Optional) Enter a description in the Description text box.
7(Optional) Select the SSL check box to use SSL for security.
8Choose a server protocol.
System Administration
VMware, Inc. 8

9Type the name of the server in the Server Name text box.
10 Type the server port number in the Server Port text box.
11 Type the folder name for emails in the Folder Name text box.
This option is required only if you choose IMAP server protocol.
12 Enter a user name in the User Name text box.
13 Enter a password in the Password text box.
14 Type the email address that vRealize Automation users can reply to in the Email Address text box.
15 (Optional) Select Delete From Server to delete from the server all processed emails that are
retrieved by the notification service.
16 Choose whether vRealize Automation can accept self-signed certificates from the email server.
17 Click Test Connection.
18 Click Add.
Create a Global Outbound Email Server
System administrators create a global outbound email server to handle outbound email notifications. You
can create only one outbound server, which appears as the default for all tenants. If tenant administrators
do not override these settings before enabling notifications, vRealize Automation uses the globally
configured email server.
Prerequisites
Log in to the vRealize Automation console as a system administrator.
Procedure
1Select Administration > Email Servers.
2Click the Add icon ( ).
3Select Email – Outbound.
4Click OK.
5Enter a name in the Name text box.
6(Optional) Enter a description in the Description text box.
7Type the name of the server in the Server Name text box.
8Choose an encryption method.
nClick Use SSL.
nClick Use TLS.
nClick None to send unencrypted communications.
9Type the server port number in the Server Port text box.
System Administration
VMware, Inc. 9
10 (Optional) Select the Required check box if the server requires authentication.
a Type a user name in the User Name text box.
b Type a password in the Password text box.
11 Type the email address that vRealize Automation emails should appear to originate from in the
Sender Address text box.
This email address corresponds to the user name and password you supplied.
12 Choose whether vRealize Automation can accept self-signed certificates from the email server.
13 Click Test Connection.
14 Click Add.
Configuring IaaS
A system administrator can adjust concurrency limits for an IaaS Windows server to best use resources,
customize email sent from the server, and enable connections to other machines.
Setting Resource-Intensive Concurrency Limits
To conserve resources, vRealize Automation limits the number of concurrently running instances of
machine provisioning and data collection. You can change the limits.
Configuring Concurrent Machine Provisioning
Multiple concurrent requests for machine provisioning can impact the performance of
vRealize Automation. You can make some changes to limits placed on proxy agents and workflow
activities to alter performance.
Depending on the needs of machine owners at your site, the vRealize Automation server may receive
multiple concurrent requests for machine provisioning. This can happen under the following
circumstances:
nA single user submits a request for multiple machines
nMany users request machines at the same time
nOne or more group managers approve multiple pending machine requests in close succession
The time required for vRealize Automation to provision a machine generally increases with larger
numbers of concurrent requests. The increase in provisioning time depends on three important factors:
nThe effect on performance of concurrent resource-intensive vRealize Automation workflow activities,
including the SetupOS activity (for machines created within the virtualization platform, as in WIM-
based provisioning) and the Clone activity (for machines cloned within the virtualization platform).
nThe configured vRealize Automation limit on the number of resource-intensive (typically lengthy)
provisioning activities that can be executed concurrently. By default this is two. Concurrent activities
beyond the configured limit are queued.
System Administration
VMware, Inc. 10
nAny limit within the virtualization platform or cloud service account on the number of
vRealize Automation work items (resource-intensive or not) that can be executed concurrently. For
example, the default limit in vCenter Server is four, with work items beyond this limit being queued.
By default, vRealize Automation limits concurrent virtual provisioning activities for hypervisors that use
proxy agents to two per proxy agent. This ensures that the virtualization platform managed by a particular
agent never receives enough resource-intensive work items to prevent execution of other items. Plan to
carefully test the effects of changing the limit before making any changes. Determining the best limit for
your site may require that you investigate work item execution within the virtualization platform as well as
workflow activity execution within vRealize Automation.
If you do increase the configured vRealize Automation per-agent limit, you may have to make additional
configuration adjustments in vRealize Automation, as follows:
nThe default execution timeout intervals for the SetupOS and Clone workflow activities are two hours
for each. If the time required to execute one of these activities exceeds this limit, the activity is
cancelled and provisioning fails. To prevent this failure, increase one or both of these execution
timeout intervals.
nThe default delivery timeout intervals for the SetupOS and Clone workflow activities are 20 hours for
each. Once one of these activities is initiated, if the machine resulting from the activity has not been
provisioned within 20 hours, the activity is cancelled and provisioning fails. Therefore, if you have
increased the limit to the point at which this sometimes occurs, you will want to increase one or both
of these delivery timeout intervals.
Configuring Concurrent Data Collections
By default, vRealize Automation limits concurrent data collection activities. If you change this limit, you
can avoid unnecessary timeouts by changing the default execution timeout intervals for the different types
of data collection.
vRealize Automation regularly collects data from known virtualization compute resources through its
proxy agents and from cloud service accounts and physical machines through the endpoints that
represent them. Depending on the number of virtualization compute resources, agents, and endpoints in
your site, concurrent data collection operations may occur frequently.
Data collection running time depends on the number of objects on endpoints including virtual machines,
datastores, templates, and compute resources. Depending on many conditions, a single data collection
can require a significant amount of time. As with machine provisioning, concurrency increases the time
required to complete data collection.
By default, concurrent data collection activities are limited to two per agent, with those over the limit being
queued. This ensures that each data collection completes relatively quickly and that concurrent data
collection activities are unlikely to affect IaaS performance.
System Administration
VMware, Inc. 11

Depending on the resources and circumstances at your site, however, it may be possible to raise the
configured limit while maintaining fast enough performance to take advantage of concurrency in proxy
data collection. Although raising the limit can increase the time required for a single data collection, this
might be outweighed by the ability to collect more information from more compute resources and
machines at one time.
If you do increase the configured per-agent limit, you might have to adjust the default execution timeout
intervals for the different types of data collection that use a proxy agent—inventory, performance, state,
and WMI. If the time required to execute one of these activities exceeds the configured timeout intervals,
the activity is canceled and restarted. To prevent cancellation of the activity, increase one or more of
these execution timeout intervals.
Adjust Concurrency Limits and Timeout Intervals
You can change the per-agent limits on concurrent provisioning, data collection activities, and the default
timeout intervals.
When typing a time value for these variables, use the format hh:mm:ss (hh=hours, mm=minutes, and
ss=seconds).
Prerequisites
Log in as an administrator to the server hosting the IaaS Manager Service. For distributed installations,
this is the server on which the Manager Service was installed.
Procedure
1Open the ManagerService.exe.config file in an editor. The file is located in the
vRealize Automation server install directory, typically %SystemDrive%\Program Files
x86\VMware\vCAC\Server.
2Locate the section called workflowTimeoutConfigurationSection.
3Update the following variables, as required.
Parameter Description
MaxOutstandingResourceIntensiveWor
kItems
Concurrent provisioning limit (default is two)
CloneExecutionTimeout Virtual provisioning execution timeout interval
SetupOSExecutionTimeout Virtual provisioning execution timeout interval
CloneTimeout Virtual provisioning clone delivery timeout interval
SetupOSTimeout Virtual provisioning setup OS delivery timeout interval
CloudInitializeProvisioning Cloud provisioning initialization timeout interval
MaxOutstandingDataCollectionWorkIte
ms
Concurrent data collection limit
InventoryTimeout Inventory data collection execution timeout interval
PerformanceTimeout Performance data collection execution timeout interval
StateTimeout State data collection execution timeout interval
System Administration
VMware, Inc. 12

4Save and close the file.
5Select Start > Administrative Tools > Services.
6Stop and then restart the vRealize Automation service.
7(Optional) If vRealize Automation is running in High Availability mode, any changes made to the
ManagerService.exe.config file after installation must be made on both the primary and failover
servers.
Adjust Execution Frequency of Machine Callbacks
You can change the frequency of several callback procedures, including the frequency that the
vRealize Automation callback procedure is run for changed machine leases.
vRealize Automation uses a configured time interval to run different callback procedures on the Model
Manager service, such as ProcessLeaseWorkflowTimerCallbackIntervalMiliSeconds which searches for
machines whose leases have changed. You can change these time intervals to check more or less
frequently.
When entering a time value for these variables, enter a value in milliseconds. For example, 10000
milliseconds = 10 seconds and 3600000 milliseconds = 60 minutes = 1 hour.
Prerequisites
Log in as an administrator to the server hosting the IaaS Manager Service. For distributed installations,
this is the server on which the Manager Service was installed.
Procedure
1Open the ManagerService.exe.config file in an editor. The file is located in the
vRealize Automation server install directory, typically %SystemDrive%\Program Files
x86\VMware\vCAC\Server.
2Update the following variables, as desired.
Parameter Description
RepositoryWorkflowTimerCallbackMili
Seconds
Checks the repository service, or Model Manager Web Service, for activity.
Default value is 10000.
ProcessLeaseWorkflowTimerCallbackI
ntervalMiliSeconds
Checks for expired machine leases. Default value is 3600000.
BulkRequestWorkflowTimerCallbackMi
liSeconds
Checks for bulk requests. Default value is 10000.
MachineRequestTimerCallbackMiliSec
onds
Checks for machine requests. Default value is 10000.
MachineWorkflowCreationTimerCallba
ckMiliSeconds
Checks for new machines. Default value is 10000.
3Save and close the file.
4Select Start > Administrative Tools > Services.
System Administration
VMware, Inc. 13

5Stop and then restart the vCloud Automation Center service.
6(Optional) If vRealize Automation is running in High Availability mode, any changes made to the
ManagerService.exe.config file after installation must be made on both the primary and failover
servers.
Configuring Templates for Automatic IaaS Emails
You can configure the templates for automatic notification emails sent to machine owners by the IaaS
service about events involving their machines.
The events that trigger these notifications include, for example, the expiration or approaching expiration of
archive periods and virtual machine leases.
Tenant administrators can enable or disable IaaS email notifications for machine owners, and machine
owners can choose to receive or not receive email notifications. Anyone with access to the
directory \Templates under the vRealize Automation server install directory (typically %SystemDrive
%\Program Files x86\VMware\vCAC\Server) can configure the templates for these email notifications.
Email Template Object Reference
You can add email template objects to automatic email templates to return information about URIs,
machines, blueprints, costs, and requests.
You can use the following email template objects to return information to automatic email templates.
nWebsiteURIItems
nWebsiteURIInbox
nVirtualMachineEx
nVirtualMachineTemplateEx
nReservationHelper
nRequest
nRequestWithAudit
The WebsiteURIItems object returns the URL of the Items tab on the vRealize Automation console, for
example https://vcac.mycompany.com/shell-ui-app/org/mytenant/#csp.catalog.item.list.
To use this object to provide a link to the My Items page in the console, consider the following sample
lines.
Click
<a>
<xsl:attribute name="href">
<xsl:value-of select="//WebsiteURIItems"/>
</xsl:attribute><xsl:value-of select="//WebsiteURIItems"/>here</a>
for your provisioned items.
System Administration
VMware, Inc. 14
The WebsiteURIInbox object returns the URL of the Inbox tab on the vRealize Automation console, for
example https://vcac.mycompany.com/shell-ui-app/org/mytenant/#cafe.work.items.list. To
use this object to provide a link to the My Inbox page in the console, consider the following sample lines.
Click
<a>
<xsl:attribute name="href">
<xsl:value-of select="//WebsiteURIInbox"/></xsl:attribute><xsl:value-of
select="//WebsiteURIInbox"/>here</a>
for your assigned tasks.
The VirtualMachineEx object returns a specific item of information about the machine associated with the
event triggering the email. The information is determined by the attribute provided with the object; see the
table Selected Attributes of the VirtualMachineEx Object for more information. For example, you could
use the following line to include the expiration date of the machine in an email.
<xsl:value-of select="//VirtualMachineEx/Expires"/>
Table 1‑1. Selected Attributes of the VirtualMachineEx Object
Attribute Returns
Name Name of machine as generated by vRealize Automation
Description Machine’s description
DnsName Machine’s DNS name
TemplateName Name of blueprint from which machine was provisioned
StoragePath If a virtual machine, name of storage path on which machine was provisioned
State/Name Status of machine
Owner Owner of machine
Expires Date on which machine expires
ExpireDays Number of days until machine expires
CreationTime Date and time at which machine was provisioned
HostName If a virtual machine, name of host where machine was provisioned
GroupName Name of business group in which machine was provisioned
ReservationName Name of reservation on which machine was provisioned
Group/AdministratorE
mail
Names of users or groups who receive group manager emails for business group for which machine was
provisioned
In addition, the special attribute Properties lets you search the custom properties associated with the
machine for a specific property and return the value if found. For example, to include the value of
Image.WIM.Name, which specifies the name of the WIM image from which a machine was provisioned,
you could use the following lines.
<xsl:for-each select="//VirtualMachineEx/Properties/NameValue">
<xsl:if test="starts-with(Name, 'Image.WIM.Name')">
<xsl:value-of select="Value"/>
System Administration
VMware, Inc. 15

If the machine does not have the Image.WIM.Name property, nothing is returned.
The VirtualMachineTemplateEx object returns a specific item of information about the source blueprint of
the machine associated with the even triggering the email. The information is determined by the attribute
provided with the object; see the table Selected Attributes of the VirtualMachineTemplateEx Email Object
for more information. For example, to include the daily cost specified in the source blueprint you could
use the following line:
<xsl:value-of select="//VirtualMachineTemplateEx/Cost"/>
Table 1‑2. Selected Attributes of the VirtualMachineTemplateEx Email Object
Attribute Returns
Name Name of blueprint
Description Blueprint’s description
MachinePrefix Machine prefix specified in blueprint
LeaseDays Number of lease days specified in blueprint
ExpireDays If a virtual blueprint, number of archive days specified
Cost Daily cost specified in blueprint
VirtualMachineTemplateEx also takes the special attribute Properties to let you search the custom
properties included in the blueprint for a specific property and return the value if found, as described for
the VirtualMachineEx object.
The ReservationHelper object returns information about the daily cost of the machine, as specified by the
attributes in the table Selected Attributes of the ReservationHelper Email Object, when a cost profile
applies to the virtual or physical machine associated with the event triggering the email.
Table 1‑3. Selected Attributes of the ReservationHelper Email Object
Attribute Returns
DailyCostFormatted Daily cost of machine
LeaseCostFormatted Daily cost times the number of days in the machine’s lease.
Modify an Existing Automatic Email Template
You can edit the automatic email templates used by the IaaS service when notifying machine owners and
managers.
You can customize the text and format of the automatic email for an IaaS event by editing the XSLT
template for the event. You can find the following IaaS templates in the directory \Templates under the
vRealize Automation server install directory (typically %SystemDrive%\Program Files
x86\VMware\vCAC\Server).
For related information about configuring vRealize Automation email notifications, see the following
Knowledge Base articles:
nCustomizing email templates in vRealize Automation (2088805)
System Administration
VMware, Inc. 16
nExamples for customizing email templates in vRealize Automation (2102019)
To modify the email notification setting for machine expirations, use the vRealize Automation Global
Properties page. See Customize the Date for Email Notification for Machine Expiration.
nArchivePeriodExpired
nEpiRegister
nEpiUnregister
nLeaseAboutToExpire
nLeaseExpired
nLeaseExpiredPowerOff
nManagerLeaseAboutToExpire
nManagerLeaseExpired
nManagerReclamationExpiredLeaseModified
nManagerReclamationForcedLeaseModified
nReclamationExpiredLeaseModified
nReclamationForcedLeaseModified
nVdiRegister
nVdiUnregister
Prerequisites
Log in to the IaaS Manager Service host using administrator credentials.
Procedure
1Change to the directory \Templates.
2Edit an XSLT template as required.
Customize the Date for Email Notification for Machine Expiration
You can choose when to send email to notify users of a machine expiration date.
Procedure
1Log in to vRealize Automation as a vRealize administrator.
2Navigate Infrastructure > Administration > Global Properties > Group: EmailByState.
3On the Global Properties page, locate the WorkflowEmailByState section.
System Administration
VMware, Inc. 17

4Change the value of DaysNotificationBeforeExpire to the number of days prior to machine
expiration that you want the email sent. The default is 7.
This setting requires that the LeaseExpired option is set to true. You can set separate values for
owners and managers.
Enabling Remote Desktop Connections
A system administrator can create a custom remote desktop protocol file that tenant administrators and
business group managers use in blueprints to configure RDP settings.
The following high-level overview is the sequence of tasks required to enable machine users to connect
using RDP.
1 A system administrator creates a custom RDP file and places it in the Website\Rdp subdirectory of
the vRealize Automation installation directory. Provide fabric administrators, tenant administrators,
and business group managers with the full pathname for the custom RDP file so that it can be
included in blueprints.
2 (Optional) A fabric administrator creates a build profile using the property set
RemoteDesktopProtocolProperties to compile RDP custom properties and values for tenant
administrators and business group managers to include in their blueprints.
3 A tenant administrator or business group manager adds the RDP custom properties to a blueprint to
configure the RDP settings of machines provisioned from the blueprint.
4 A tenant administrator or business group manager enables the Connect using RDP or SSH option in
a blueprint.
5 A tenant administrator or business group manager entitles users or groups to use the Connect using
RDP or SSH option. See Tenant Administration.
Create a Custom RDP file
A system administrator creates a custom RDP file and provides fabric administrators, tenant
administrators, and business group managers with the full pathname for the file so it can be included in
blueprints.
Note If you are using Internet Explorer with Enhanced Security Configuration enabled, .rdp files cannot
be downloaded.
Prerequisites
Log in to the IaaS Manager Service as an administrator.
Procedure
1Set your current directory to <vCAC_installation_dir>\Rdp.
2Copy the file Default.rdp and rename it to Console.rdp in the same directory.
3Open the Console.rdp file in an editor.
System Administration
VMware, Inc. 18

4Add RDP settings to the file.
For example, connect to console:i:1.
5If you are working in a distributed environment, log in as a user with administrative privileges to the
IaaS Host Machine where the Model Manager Website component is installed.
6Copy the Console.rdp file to the directory <vCAC_installation_dir>\Website\Rdp.
What to do next
See Enabling Remote Desktop Connections for an overview of steps and options for making RDP
connections available. Consult your IaaS configuration guide for next steps for your site configuration.
Enabling Users to Select Datacenter Locations
The Display location on request check box on the Blueprint Information tab allows users to select a
particular datacenter location at which to provision a requested virtual or cloud machine.
For example, if you have an office in London and an office in Boston, you might have compute resources
and business groups in both locations. By enabling the Display location on request check box, your
business group users can choose to provision their machines with the resources that are local, for
example.
The following is a high-level overview of the sequence of steps required to enable users to select
datacenter locations:
1 A system administrator adds datacenter location information to a locations file.
2 A fabric administrator edits a compute resource to associate it with a location.
3 A tenant administrator or business group manager creates a blueprint that prompts users to choose a
datacenter location when submitting a machine request.
Add Datacenter Locations
The first step in making location choices available to users is for a system administrator to add location
information to a locations file.
Prerequisites
Log in to the IaaS web site host using administrator credentials.
Procedure
1Edit the file WebSite\XmlData\DataCenterLocations.xml in the Windows server install directory
(typically %SystemDrive%\Program Files x86\VMware\vCAC\Server).
2For each location, create a Data Name entry in the CustomDataType section of the file. For example:
- <CustomDataType>
<Data Name="London" Description="London datacenter" />
<Data Name="Boston" Description="Boston datacenter" />
</CustomDataType
System Administration
VMware, Inc. 19

3Save and close the file.
4Restart the manager service.
A fabric administrator can edit a compute resource to associate it with a location. See IaaS Configuration
for Cloud Platforms or IaaS Configuration for Virtual Platforms.
Removing Datacenter Locations
To remove a datacenter location from a user menu, a system administrator must remove the location
information from the locations file and a fabric administrator must remove location information from the
compute resource.
For example, if you add London to the locations file, associate ten compute resources with that location,
and then remove London from the file, the compute resources are still associated with the location
London and London is still included in the location drop-down list on the Confirm Machine Request page.
To remove the location from the drop-down list, a fabric administrator must edit the compute resource and
reset the Location to blank for all compute resources that are associated with the location.
The following is a high-level overview of the sequence of steps required to remove a datacenter location:
1 A system administrator removes the datacenter location information from the locations file.
2 A fabric administrator removes all the compute resource associations to the location by editing the
locations of each associated compute resource.
Enabling Visual Basic Scripts in Provisioning
Visual Basic scripts are run outside of vRealize Automation as additional steps in the machine life cycle
and can be used to update the custom property values of machines. Visual Basic scripts can be used with
any provisioning method.
For example, you could use a script to generate certificates or security tokens before provisioning and
then use those certificates and tokens in provisioning a machine.
Note This information does not apply to Amazon Web Services.
When executing a Visual Basic script, the EPI agent passes all machine custom properties as arguments
to the script. To return updated property values to vRealize Automation, you must place these properties
in a dictionary and call a function provided by vRealize Automation.
The sample Visual Basic script PrePostProvisioningExample.vbs is included in the Scripts
subdirectory of the EPI agent installation directory. This script contains a header to load all arguments into
a dictionary, a body in which you can include your functions, and a footer to return updated custom
properties to vRealize Automation.
The following is a high-level overview of the steps required to use Visual Basic scripts in provisioning:
1 A system administrator installs and configures an EPI agent for Visual Basic scripts. See Installation
and Configuration.
System Administration
VMware, Inc. 20

2 A system administrator creates Visual Basic scripts and places them on the system where the EPI
agent is installed.
3 Gather the following information for tenant administrators and business group managers for each
Visual Basic script:
nThe complete path to the Visual Basic script, including the filename and extension. For example,
%System Drive%Program Files (x86)\VMware\vCAC
Agents\EPI_Agents\Scripts\SendEmail.vbs.
Note A fabric administrator can create a build profile by using the property sets
ExternalPreProvisioningVbScript and ExternalPostProvisioningVbScript to provide this required
information. Doing so makes it easier for tenant administrators and business group managers to
include this information correctly in their blueprints.
4 Tenant administrators and business group managers use custom properties in their blueprints to call
the Visual Basic scripts.
The Customer Experience Improvement Program
This product participates in VMware's Customer Experience Improvement Program (CEIP). The CEIP
provides VMware with information that enables VMware to improve its products and services, to fix
problems, and to advise you on how best to deploy and use our products. You can choose to join or leave
the CEIP for vRealize Automation at any time.
Details regarding the data collected through CEIP and the purposes for which it is used by VMware are
set forth at the Trust & Assurance Center at http://www.vmware.com/trustvmware/ceip.html.
Join or Leave the Customer Experience Improvement Program for
vRealize Automation
You can join or leave the Customer Experience Improvement Program (CEIP) for vRealize Automation at
any time.
vRealize Automation gives you the opportunity to join the Customer Experience Improvement Program
(CEIP) when you initially install and configure the product. After installation, you can join or leave the
CEIP by following these steps.
Procedure
1Log in as root to the vRealize Appliance management interface.
https://vrealize-automation-appliance-FQDN:5480
2Click the Telemetry tab.
3Check or uncheck the Join the VMware Customer Experience Improvement Program option.
When checked, the option activates the Program and sends data to https://vmware.com.
4Click Save Settings.
System Administration
VMware, Inc. 21

Configure Data Collection Time
You can set the day and time when the Customer Experience Improvement Program (CEIP) sends data
to VMware.
Procedure
1Log in to a console session on the vRealize Appliance as root.
2Open the following file in a text editor.
/etc/telemetry/telemetry-collector-vami.properties
3Edit the properties for day of week (dow) and hour of day (hod).
Property Description
frequency.dow=<day-of-week>Day when data collection occurs.
frequency.hod=<hour-of-day>Local time of day when data collection occurs. Possible
values are 0–23.
4Save and close telemetry-collector-vami.properties.
5Apply the settings by entering the following command.
vcac-config telemetry-config-update --update-info
Changes are applied to all nodes in your deployment.
System Administration
VMware, Inc. 22

Configure the vRealize
Automation Appliance Database 2
The vRealize Automation system has been updated to use an internal database that now offers clustering
and streaming replication. Users must update new and existing vRealize Automation 6.x systems to use
this new Appliance Database.
Designate one vRealize Appliance as the primary Appliance Database machine and the second as the
secondary Appliance Database machine. When configured correctly, each appliance can support the
Appliance Database as needed.
Note The Appliance Database replication channel is not encrypted.
Prerequisites
nCreate DNS entry, for example: dbCluster.domain.local
nIP address allocated for load balancer.
nTwo installed vRealize Appliances freshly deployed and resolvable through DNS.
nThe user configuring the Appliance Database must have Administrator access to vSphere in order to
add new disks to the vRealize Appliances.
nDownload the 2108923_dbCluster.zip file from the VMware Knowledge Base.
The link is http://kb.vmware.com/selfservice/microsites/search.do?
cmd=displayKC&docType=kc&externalId=2108923 if you need to paste it into a browser.
Procedure
1Configure Database Virtual IP
Configure the database virtual IP (VIP) as appropriate for your system configuration in accordance
with VMware guidelines.
2Configure Internal Appliance Database
Configure an Appliance Database on both the designated primary and secondary vRealize
Appliances.
3Configure Appliance Database Replication on the Secondary Appliance
Configure the secondary or failover virtual appliance to support appliance database replication.
4Test Appliance Database Failover
Test failover functionality from the primary appliance database machine to the secondary machine.
VMware, Inc. 23
5Test Appliance Database Failback
Test that failback from the secondary appliance database machine to the primary machine functions.
Configure Database Virtual IP
Configure the database virtual IP (VIP) as appropriate for your system configuration in accordance with
VMware guidelines.
The appropriate virtual IP for your system depends upon numerous factors, including whether or not it
uses a load balancer. Most distributed production systems use a load balancer.
The active node in the network load balancer should be the master node with the writeable database.
Procedure
1Review your system configuration and choose an appropriate virtual IP (VIP configuration.
Consult the VMware Knowledge Base for information about choosing a VIP configuration.
2Configure the database virtual IP (VIP) as appropriate for your system configuration.
When configuring the VIP, observe the following.
nPort 5432 must be balanced.
nOnly the current master node can be active in the load balancer.
Configure Internal Appliance Database
Configure an Appliance Database on both the designated primary and secondary vRealize Appliances.
For related information, see the following content:
nAdd a New Hard Disk to a Virtual Machine in vSphere Web Client in vSphere product documentation
nGracefully Shutting Down a Windows Guest When the Virtual Machine Powers Off (1744) in the
VMware Knowledge Base.
Procedure
1Perform a graceful shutdown of the target appliance using shut down guest in the
VMware vCenter Server™.
2Add a 20 GB disk to the virtual appliance by using the VMware vCenter Server™.
3Power on the appliance.
4Verify that SSH is enabled on the virtual appliance.
a Log in to the Virtual Appliance Management Interface at https://appliance_IP:5480.
b Click the Admin tab.
c Ensure that the SSH service enabled and Administrator SSH login enabled check boxes are
selected.
d Click Save Settings.
System Administration
VMware, Inc. 24

5Unzip the 2108923_dbCluster.zip file that you downloaded from the VMware Knowledge Base and
copy the 2108923_dbCluster.tar file to the appliance.
6Extract the configureDisk.sh and pgClusterSetup.sh files using the tar xvf
2108923_dbCluster.tar command.
# tar xvf 2108923_dbCluster.tar
configureDisk.sh
pgClusterSetup.sh
7Locate the disk you added using the parted -1 command.
Note For a fresh vRealize Automation deployment, the disk name should be /dev/sdd. The name
differs depending on the original version of vRealize Automation deployed.
# parted -1
...
Error: /dev/sdd: unrecognized disk label
Sector size (logical/physical): 512B/512B
8Configure the disk using the ./configureDisk.sh disk name command.
For a vRealize Automation deployment, the exact command is ./configureDisk.sh /dev/sdd.
# ./configureDisk.sh /dev/sdd
...
Ownership changed successfully
WAL Archive disk configured successfully
9Run the pgClusterSetup.sh script using the following command.
/pgClusterSetup.sh [-d] <db_fqdn> [-D] <db_vip> [-w] <db_pass> [-r]
<replication_password> [-p] <postgres_password>
Replace the parameters with the following values as appropriate for your system.
Option Value
[-d] Database load balancer FQDN
[-D] Database virtual IP address. Optional, will create /etc/hosts entry.
[-w] Sets the database password to the specified entry.
[-r] Replication password. Optional, will use the database password if not set.
[-p] Postgres password. Optional, will use database password if not set.
System Administration
VMware, Inc. 25

For example, ./pgClusterSetup.sh -d pgCluster.domain.local -w changeMe1! -r
changeMe1! -p changeMe1!
Note If you are using a load balancer virtual IP, specify the -D parameter using the IP address of the
virtual IP.
# ./pgClusterSetup.sh -d dbCluster.domain.local -w changeMe1! -r changeMe1! -p changeMe1!
...
11.) Updating vRealize Automation to utilize database cluster fully qualified domain name
Finished
10 Update the password from ChangeMe! to one that is appropriate for your system.
What to do next
Configure Appliance Database Replication on the Secondary Appliance.
Configure Appliance Database Replication on the
Secondary Appliance
Configure the secondary or failover virtual appliance to support appliance database replication.
Set up database replication on the designated secondary appliance so that the appliance database on the
primary appliance is replicated on the secondary appliance in the case of failover.
Prerequisites
The appliance database is installed and configured as described in vRealize Automation Installation and
Configuration.
Procedure
1Log in to the virtual appliance as root using SSH with the su - postgres command.
2Configure replication as the postgres user using the following command.
./run_as_replica -h <Primary Appliance> -b -W -U replicate
Replace the parameters with the following values.
Option Value
[-h] Hostname of the master database server. Port 5432 is assumed.
[-b] Take a base backup from the master. This option destroys the current contents of the data
directory.
System Administration
VMware, Inc. 26

Option Value
[-W] Prompt for the password of the user performing the replication.
[-U] The user performing the replication. Generally this user is replicate.
For example:
# su - postgres
/opt/vmware/vpostgres/current/share/run_as_replica -h app1.domain.local -b -W -U replicate
3Enter the replicate user password when prompted.
4Type "yes" after verifying the thumb print of the primary machine when prompted.
5Enter the postgres user password when prompted.
6Type "yes" in response to the following message.
"Type yes to enable WAL archiving on primary."
7Type "yes" in response to the following message.
"WARNING: the base backup operation will replace the current contents of the data directory. Please
confirm by typing yes."
What to do next
Validate that the replication was successful. See Chapter 4 Validate Appliance Database Replication.
Test Appliance Database Failover
Test failover functionality from the primary appliance database machine to the secondary machine.
For this test, the appliance database is failed over, and the replica database on the secondary appliance
becomes the master database.
Prerequisites
The appliance database is installed and configured on primary and secondary vRealize Appliances as
described in vRealize Automation Installation and Configuration.
Procedure
1Log in to your primary, or master, appliance as root using SSH.
2Stop the vpostgres service using the service vpostgres stop command.
A message similar to the following appears.
# service vpostgres stop
Stopping VMware vPostgres: Last login: Mon Apr 27 19:49:26 UTC 2015 on pts/0
ok
3Log in to the secondary appliance as root using SSH.
System Administration
VMware, Inc. 27

4Run the /opt/vmware/vpostgres/current/share/promote_replica_to_primary command as
the postgres user to promote the replica database to master.
su - postgres
/opt/vmware/vpostgres/current/share/promote_replica_to_primary
server promoting
Note After running this command, the replica database on the secondary appliance becomes the
master. The appliance database on the original primary appliance does not become an actual replica
until you run the run_as_replica command.
5Log in to the targeted replica appliance machine as root using SSH.
6Configure replication using the following command.
./run_as_replica -h master database appliance -b -W -U replicate
Replace the parameters with the following values.
Option Value
[-h] Host name of the master database server. Port 5432 is assumed.
[-b] Take a base backup from the master. This option destroys the current contents of the data
directory.
[-W] Prompt for the password of the user performing the replication.
[-U] The user performing the replication. Generally this user is replicate.
For example:
# su - postgres
/opt/vmware/vpostgres/current/share/run_as_replica -h app2.domain.local -b -W -U replicate
7Enter the replicate user password when prompted.
8Type "yes" after verifying the thumb print of the primary machine when prompted.
9Enter the postgres user password when prompted.
10 Type "yes" in response to the following message.
"WARNING: the base backup operation will replace the current contents of the data directory. Please
confirm by typing yes."
What to do next
Validate that the replication was successful. See Chapter 4 Validate Appliance Database Replication.
Test Appliance Database Failback
Test that failback from the secondary appliance database machine to the primary machine functions.
System Administration
VMware, Inc. 28

For this test, the appliance database is failed back from the secondary appliance to the original primary
appliance.
Prerequisites
The appliance database is installed and configured as described in vRealize Automation Installation and
Configuration.
Procedure
1Log in to the replica appliance machine, which currently contains the master appliance database, as
root using SSH.
2Stop the vpostgres service using the service postgres stop command.
# service postgres stop
Stopping VMware vPostgres: Last login: Mon Apr 27 19:49:26 UTC 2015 on pts/0
ok
3Log in to the primary appliance machine as root using SSH.
4Promote the replicate database to master as the postgres user with
the /opt/vmware/vpostgre/current/share/promote_replica_to_primary command.
# su - postgres
/opt/vmware/vpostgres/current/share/promote_replica_to_primary
server promoting
5Log in to the replica appliance machine as root using SSH.
6Configure database replication as the postgres user with a command of the
form ./run_as_replica-h Primary Appliance -b -W -U replicate
# su - postgres
/opt/vmware/vpostgres/current/share/run_as_replica -h appl.domain.local
-b -W -U replicate
7Enter the replicate user password when prompted.
8Type "yes" in response to the following message.
"Warning: the base backup operation will replace the current contents of the data directory. Please
confirm by typing yes."
What to do next
Validate that the replication was successful. See Chapter 4 Validate Appliance Database Replication.
System Administration
VMware, Inc. 29

Perform an Appliance Database
Failover 3
If your designated primary Appliance Database fails, implement a failover to the designated replica
database on the secondary appliance to maintain system operation.
Prerequisites
Configure the Appliance Database as applicable for your system configuration. See Chapter 2 Configure
the vRealize Automation Appliance Database.
Procedure
1If possible, log in to the appliance hosting the primary Appliance Database as root using SSH.
If the appliance or its host machine is not running, skip to step 3.
2Stop the vpostgres service using the service postgres stop command.
# service postgres stop
Stopping Vmware vPostgres: Last login: Mon Apr 27 19:49:26 UTC 2015 on pts/0
ok
3Promote the replica database on the secondary appliance to be the primary database.
a Log in the secondary appliance as root using SSH.
b Promote the replica database to master as the postrgres user using
the /opt/vmware/vpostgres/current/share/promote_replica_to_primary command.
# su - postgres
/opt/vmware/vpostgres/current/share/promote_replica_to_primary
server promoting
VMware, Inc. 30

4Configure the database virtual IP for the new Appliance Database configuration.
VIP Configuration Option Procedure
If you are using a DNS entry for the Appliance Database,
change the DNS entry point as appropriate for your system.
1 Modify the IP of the DNS entry to point at the new primary
appliance.
2 Log in to each vRealize Appliance as root and execute a
service network restart.
If you configured a virtual IP for the Appliance Database, edit
the pool that you created containing the two
vRealize Automation appliances as nodes.
1 Disable the old primary node.
2 Enable the new primary node.
5Rebuild the replica database on the original primary Appliance Database host machine.
a Log in to the appliance as root using SSH.
b Configure database replication as the postrgres user using the ./run_as_replica-h primary
appliance -b-W-U replicate command.
# su -postgres
/opt/vmware/vpostgres/current/share/run_as_replica -h appl.domain.local -b -W -U replicate
c Enter the replicate user password when prompted.
d Type yes in response to the following message.
"WARNING: the base backup operation will replace the current contents of the data directory.
Please confirm by typing yes."
What to do next
Validate that the replication was successful. See Chapter 4 Validate Appliance Database Replication.
System Administration
VMware, Inc. 31

Validate Appliance Database
Replication 4
When testing failover or failback of the Appliance Database, validate that the database was replicated
correctly.
After configuring the Appliance Database on designated master and replica appliance host machines, test
that the database on either machine can function with your system.
Prerequisites
Procedure
1Log in to the appliance that contains the primary or master database.
2Run the ps -ef |grep wal command to validate that the WAL process is running.
# ps -ef |grep wal
postgres 4784 4779 0 21:42 ? 00:00:00 postgres: wal writer
process
postgres 20901 4779 0 22:49 ? 00:00:00 postgres: wal sender process replicate
10.26.36.64(55887) streaming 0/70000B8
3Run the pg_is_in_recovery command to validate that the master appliance database is ready for
read-write connections.
su - postgres
=
SELECT pg_is_in_recovery() ;
The command returns f for false.
vcac=# SELECT pg_is_in_recovery () ;
pg_is_in_recovery
--------------------
f
(1 row)
4Quit psql using the \q command.
5Log in to the secondary appliance with the replica database using SSH.
VMware, Inc. 32

6Run the pg_is_in_recovery command to validate that the replica database is read only.
su - postgres
/opt/vmware/vpostgres/current/bin/psql vcac
SELECT pg_is_in_recovery () ;
The command returns t for true.
vcac=# SELECT pg_is_in_recovery () ;
pg_is_in_recovery
----------------------
t
(1 row)
7Quit psql using the \q command.
System Administration
VMware, Inc. 33
Bulk Import, Update, or Migrate
Virtual Machines 5
You can use the Bulk Import feature to import one or more virtual machines to a vRealize Automation
deployment. You can also use ths feature to update one or more virtual machines without the need to re-
import them or to migrate machines from one environment to another.
The Bulk Import feature imports virtual machines intact with defining data such as reservation, storage
path, blueprint, owner, and any custom properties. Bulk Import supports the following administrative
tasks:
nImport one or more unmanaged virtual machines so that they can be managed in a
vRealize Automation deployment
nImport one or more managed virtual machines from a vRealize Automation deployment into an
upgraded deployment
nMake a global change to a virtual machine property, such as a storage path
nMigrate a virtual machine from one environment to another
You can execute the Bulk Import feature commands using either the vRealize Automation console or the
CloudUtil command-line interface. For more information about using the CloudUtil command-line
interface, see the Machine Extensibility documentation.
Prerequisites
Log in to the vRealize Automation console as a fabric administrator and as a business group
manager.
Procedure
1Generate Virtual Machine CSV Data File
You generate a virtual machine CSV data file to import, update, or migrate virtual machines to a
vRealize Automation deployment.
2Edit Virtual Machine CSV Data File
Before you import or update one or more virtual machines, you must edit the virtual machine CSV
data file so that each machine value matches a value that exists in the target deployment. If you are
migrating a virtual machine from one environment to another, editing is optional.
VMware, Inc. 34

3Import, Update, or Migrate One or More Virtual Machines
After you edit the virtual machine CSV data file, you can import, update, or migrate one or more
virtual machines into a vRealize Automation deployment.
Generate Virtual Machine CSV Data File
You generate a virtual machine CSV data file to import, update, or migrate virtual machines to a
vRealize Automation deployment.
Prerequisites
Log in to the vRealize Automation console as a fabric administrator and as a business group
manager.
Procedure
1Select Infrastructure > Infrastructure Organizer > Bulk Imports.
2Click Generate CSV File.
3Select the machine type from the Machines drop-down menu.
Option Description
Managed Virtual machine is managed in a vRealize Automation deployment and can be
viewed in the console. Select this option if you are updating a machine or
migrating from one environment to another.
Unmanaged Virtual machine exists in a hypervisor but is not managed in a
vRealize Automation deployment and cannot be viewed in the console. Select this
option if you are importing a virtual machine.
4Select the Business group default value.
5Select the Owner default value.
6Select the Blueprint default value.
If you select Unmanaged for the machine type and select a value for Business group and
Blueprint, you might see the following results in the CSV data file:
nHost Reservation (Name or ID) = INVALID_RESERVATION
nHost To Storage (Name or ID) = INVALID_HOST_RESERVATION_TO_STORAGE
This happens when you do not have a reservation in the selected business group for the host
machine that also hosts the unmanaged machine. If you have a reservation in that business group for
the unmanaged machine's host, the Host Reservation and Host To Storage values fill in properly.
7Select the resource type from the Resource drop-down menu.
Option Description
Endpoint Information required to access a virtualization host.
Compute Resource Information required to access a group of virtual machines performing a similar
function.
System Administration
VMware, Inc. 35
8Select the name of the virtual machine resource from the Name drop-down menu.
9Click OK.
Edit Virtual Machine CSV Data File
Before you import or update one or more virtual machines, you must edit the virtual machine CSV data
file so that each machine value matches a value that exists in the target deployment. If you are migrating
a virtual machine from one environment to another, editing is optional.
To import, update or migrate virtual machines contained in a CSV data file, each machine must be
associated with a reservation, storage location, blueprint, and owner that already exists in the target
vRealize Automation deployment. All of the values for each machine must be present in the target
vRealize Automation deployment for the operation to succeed. You can change the values for reservation,
storage location, blueprint, and owner for any operation on each machine by editing the CSV file.
If you are importing a virtual machine that uses a static IP address, you must append the appropriate
command to the CSV file.
Prerequisites
Generate Virtual Machine CSV Data File
Procedure
1Open the CSV file and edit the data categories so that they match existing categories in the target
vRealize Automation deployment.
Heading Comment
# Import--Yes or No Can change to No to prevent a particular machine from being imported.
Virtual Machine Name Do not change.
Virtual Machine ID Do not change because it is ignored during the import process.
Host Reservation (Name or ID) Must match the name of a reservation in the target vRealize Automation instance.
Host To Storage (Name or ID) Must match the name of a storage location in the target vRealize Automation instance.
Blueprint (Name or ID) Must match a blueprint in the target vRealize Automation instance.
Owner Name Must match a domain user in the target vRealize Automation instance.
Custom properties are exported only for managed machines and appear in the CSV file following the
data categories. This table presents the custom property format.
Heading Comment
Property Name Custom property name, for example, __Legacy.Workflow.User.
Property Value Custom property value, for example, user%40org.sqa-horizon.local.
(H|N)(E|O)(R|P) Custom property flags: (H|N) = Hidden|Not Hidden - (E|O) Encrypted|NotEncrypted - (R|P) Runtime|
NotRuntime, for example, NOP = Not Hidden, Not Encrypted, Not Runtime.
System Administration
VMware, Inc. 36

Custom properties ensure that each managed machine is imported with all of the machine properties
from the previous environment. The custom properties vary from machine to machine, and there is no
standard set of custom properties that appear for each machine by default.
2If you are importing a virtual machine with a static IP address, append a command in the following
form to the CSV file.
,VirtualMachine.Network#.Address, w.x.y.z, HOP
Configure the command with the appropriate information for your virtual machine.
nChange the # to the number of the network interface being configured with this static IP address.
For example, VirtualMachineNetwork0.Address
nChange w.x.y.z to be the static IP address for the virtual machine.
nThe HOP string sets the visibility of the property. This default property is removed from the virtual
machine after a successful import.
Note For a successful import, the IP address must be available in a properly configured address
pool. If the address cannot be found or is already in use, the import will succeed without the static IP
address definition, and an error will be logged.
3Save the CSV file and close it.
Import, Update, or Migrate One or More Virtual Machines
After you edit the virtual machine CSV data file, you can import, update, or migrate one or more virtual
machines into a vRealize Automation deployment.
You can import a managed machine or an unmanaged machine. You can migrate or update only
managed machines. A managed machine is a virtual machine that is managed in a vRealize Automation
deployment and that you can view in the console. An unmanaged machine is a virtual machine that exists
in a hypervisor but is not managed in a vRealize Automation deployment and cannot be viewed in the
console.
Prerequisites
Edit Virtual Machine CSV Data File
Procedure
1Select Infrastructure > Infrastructure Organizer > Bulk Imports.
2Click New Bulk Import.
3Enter a name for this task in the Name text box.
4Enter the CSV file name in the CSV file text box by browsing to the CSV file name.
System Administration
VMware, Inc. 37

5Import the file using these options.
nSelect Now to begin the import, update, or migrate process immediately.
nSelect a start date and time in the Start time drop-down menu.
Note The specified start time is the server's local time and not the local time of the user's
workstation.
nSelect the number of seconds to delay each virtual machine registration in the Delay (seconds)
drop-down menu.
Note To specify no delay, leave the option blank. Selecting this option slows the import process.
Select this option when you import a large number of virtual machines.
nSelect the total number of machines being registered at a given time in the Batch size menu.
Note To specify no limit, leave the option blank. Selecting this option slows the import process.
Select this option when you import a large number of virtual machines.
nIf you are importing virtual machines, select Ignore managed machines to omit managed
machines during the import process.
Note By selecting this option, you can rerun the import without editing the CSV file to exclude
machines that are already successfully imported.
nIf you are updating virtual machines, do not select Ignore managed machines.
nIf you are migrating machines, select Ignore managed machines in the target environment so
that you can reprocess the CSV file.
nSelect Skip user validation to omit validating users during the import process.
Note Selecting this option sets a machine's owner to the value listed in the Owner column of the
CSV data file without verifying that the user exists. Selecting this option can decrease the import
time.
nSelect Test import to run the import process without importing machines.
Note Testing the import process allows you to test the CSV file for errors before you actually
import the machines.
6Click OK.
The progress of the operation appears on the Bulk Import Details page.
System Administration
VMware, Inc. 38

Managing vRealize Automation 6
The system administrator configures a default tenant for the vRealize Automation. They can update SSL
certificates and licenses, and monitor logs, services, and license usage.
This chapter includes the following topics:
nManaging Tenants
nBrand Tenant Login Pages
nInstall a Hotfix
nUpdating vRealize Automation Certificates
nView License Usage
nMonitoring Logs and Services
nStarting Up and Shutting Down vRealize Automation
nCustomize Data Rollover Settings
nRemove an Identity Appliance from a Domain
Managing Tenants
The system administrator performs the initial configuration of single sign-on and basic tenant setup,
including designating at least one identity store and a tenant administrator for each tenant. Thereafter, a
tenant administrator can configure additional identity stores and assign roles to users or groups from the
identity stores.
Note You cannot delete a tenant that contains a business group. You must remove all business groups
and then delete the tenant.
Tenancy Overview
A tenant is an organizational unit in a vRealize Automation deployment. A tenant can represent a
business unit in an enterprise or a company that subscribes to cloud services from a service provider.
Each tenant has its own dedicated configuration. Some system-level configuration is shared across
tenants.
VMware, Inc. 39

Table 6‑1. Tenant Configuration
Configuration Area Description
Login URL Each tenant has a unique URL to the vRealize Automation console.
nThe default tenant URL is in the following format: https://hostname/vcac
nThe URL for additional tenants is in the following format:
https://hostname/vcac/org/tenantURL
Identity stores Each tenant requires access to one or more directory services, such as OpenLDAP or
Microsoft Active Directory servers, that are configured to authenticate users. You can
use the same directory service for more than one tenant, but you must configure it
separately for each tenant.
Branding A tenant administrator can configure the branding of the vRealize Automation console
including the logo, background color, and information in the header and footer. System
administrators control the default branding for all tenants.
Notification providers System administrators can configure global email servers that process email
notifications. Tenant administrators can override the system default servers, or add
their own servers if no global servers are specified.
Business policies Administrators in each tenant can configure business policies such as approval
workflows and entitlements. Business policies are always specific to a tenant.
Service catalog offerings Service architects can create and publish catalog items to the service catalog and
assign them to service categories. Services and catalog items are always specific to a
tenant.
Infrastructure resources The underlying infrastructure fabric resources, for example, vCenter servers, Amazon
AWS accounts, or Cisco UCS pools, are shared among all tenants. For each
infrastructure source that vRealize Automation manages, a portion of its compute
resources can be reserved for users in a specific tenant to use.
About the Default Tenant
When the system administrator configures single sign-on during the installation of vRealize Automation, a
default tenant is created with the built-in system administrator account to log in to the
vRealize Automation console. The system administrator can then configure the default tenant and create
additional tenants.
The default tenant supports all of the functions described in Tenant Configuration. In the default tenant,
the system administrator can also manage system-wide configuration, including global system defaults for
branding and notifications, and monitor system logs.
The default tenant is the only tenant that supports native Active Directory authentication. All other tenants
must use Active Directory over OpenLDAP.
User and Group Management
All user authentication is handled through single sign-on. Each tenant has one or more identity stores,
such as Active Directory servers, that provide authentication.
System Administration
VMware, Inc. 40
The system administrator performs the initial configuration of single sign-on and basic tenant setup,
including designating at least one identity store and a tenant administrator for each tenant. Thereafter, a
tenant administrator can configure additional identity stores and assign roles to users or groups from the
identity stores.
Tenant administrators can also create custom groups within their own tenant and add users and groups
defined in the identity store to custom groups. Custom groups, like identity store groups and users, can
be assigned roles or designated as the approvers in an approval policy.
Tenant administrators can also create business groups within their tenant. A business group is a set of
users, often corresponding to a line of business, department or other organizational unit, that can be
associated with a set of catalog services and infrastructure resources. Users, identity store groups, and
custom groups can be added to business groups.
Comparison of Single-Tenant and Multitenant Deployments
vRealize Automation supports deployments with either a single tenant or multiple tenants. The
configuration can vary depending on how many tenants are in your deployment.
System-wide configuration is always performed in the default tenant and can apply to one or more
tenants. For example, system-wide configuration might specify defaults for branding and notification
providers.
Infrastructure configuration, including the infrastructure sources that are available for provisioning, can be
configured in any tenant and is shared among all tenants. The infrastructure resources, such as cloud or
virtual compute resources or physical machines, can be divided into fabric groups managed by fabric
administrators. The resources in each fabric group can be allocated to business groups in each tenant by
using reservations.
Single-Tenant Deployment
In a single-tenant deployment, all configuration can occur in the default tenant. Tenant administrators can
manage users and groups, configure tenant-specific branding, notifications, business policies, and
catalog offerings.
All users log in to the vRealize Automation console at the same URL, but the features available to them
are determined by their roles.
System Administration
VMware, Inc. 41

Figure 6‑1. Single-Tenant Example
Tenant
admin
Business
group mgr
Business
Group
Business
goup mgr
Business
Group
http://vra.mycompany.com/vcac/
Default Tenant
(System and
infrastructure config)
System
admin
IaaS
admin Infrastructure Fabric
Hypervisors Public
clouds
Physical
servers
Default Tenant
• User management
• Tenant branding
• Tenant notification
providers
• Approval policies
• Catalog management
• Tenant creation
• System branding
• System notification
poviders
• Event logs
Fabric
admin Fabric
Group
Reservation Reservation
Fabric
admin Fabric
Group
Reservation Reservation
Fabric
admin Fabric
Group
Reservation Reservation
(Tenant config)
http://vra.mycompany.com/vcac/
Note In a single-tenant scenario, it is common for the system administrator and tenant administrator
roles to be assigned to the same person, but two distinct accounts exist. The system administrator
account is always administrator@vsphere.local. The tenant administrator must be a user in one of the
tenant identity stores, such as username@mycompany.com.
Multitenant Deployment
In a multitenant environment, the system administrator creates tenants for each organization that uses
the same vRealize Automation instance. Tenant users log in to the vRealize Automation console at a URL
specific to their tenant. Tenant-level configuration is segregated from other tenants and from the default
tenant. Users with system-wide roles can view and manage configuration across multiple tenants.
There are two main scenarios for configuring a multi-tenant deployment.
System Administration
VMware, Inc. 42
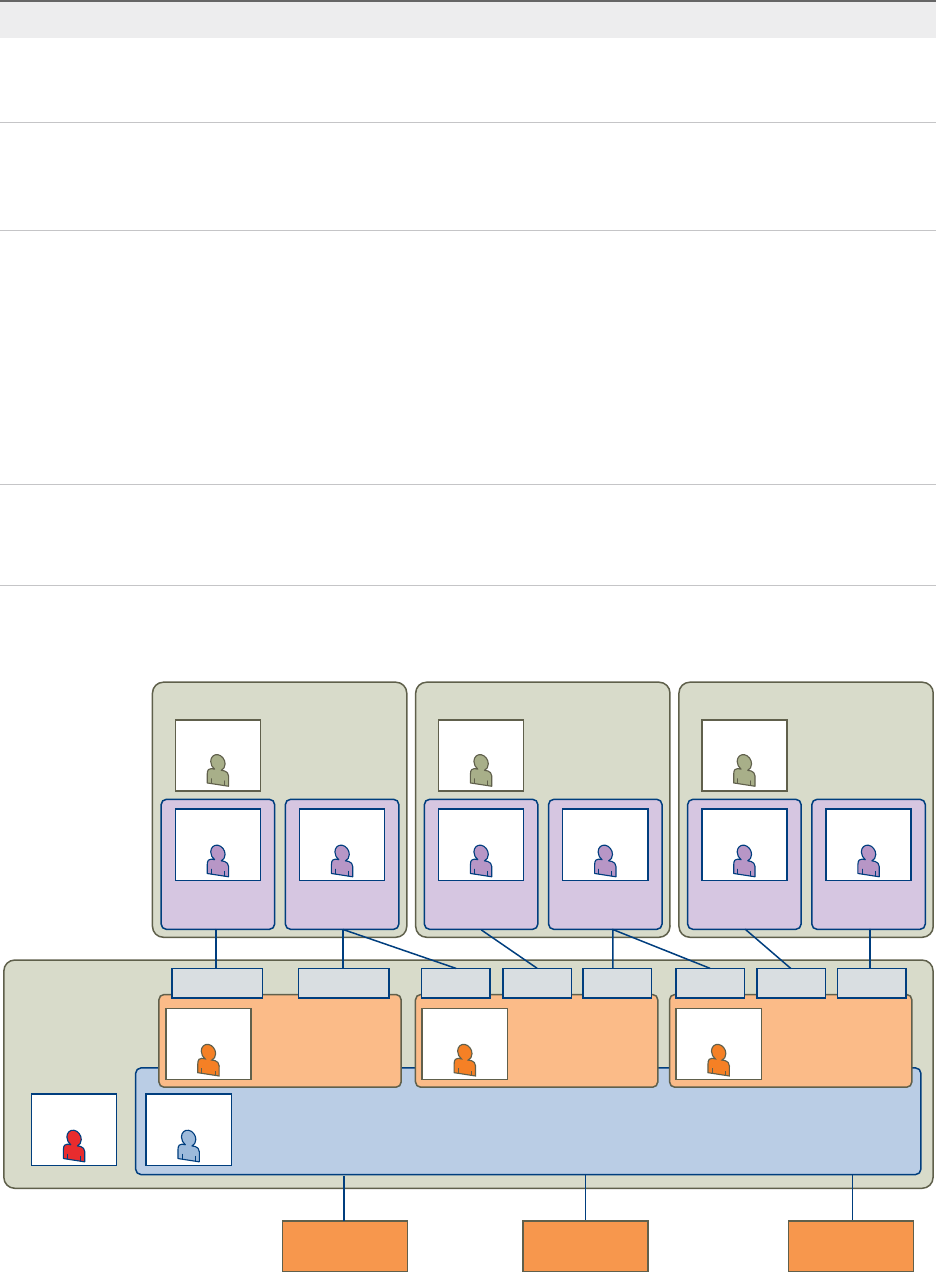
Table 6‑2. Multitenant Deployment Examples
Example Description
Manage infrastructure configuration only
in the default tenant
In this example, all infrastructure is centrally managed by IaaS administrators and
fabric administrators in the default tenant. The shared infrastructure resources are
assigned to the users in each tenant by using reservations.
Manage infrastructure configuration in
each tenant
In this scenario, each tenant manages its own infrastructure and has its own IaaS
administrators and fabric administrators. Each tenant can provide its own infrastructure
sources or can share a common infrastructure. Fabric administrators manage
reservations only for the users in their own tenant.
The following diagram shows a multitenant deployment with centrally managed infrastructure. The IaaS
administrator in the default tenant configures all infrastructure sources that are available for all tenants.
The IaaS administrator can organize the infrastructure into fabric groups according to type and intended
purpose. For example, a fabric group might contain all virtual resources, or all Tier One resources. The
fabric administrator for each group can allocate resources from their fabric groups. Although the fabric
administrators exist only in the default tenant, they can assign resources to business groups in any
tenant.
Note Some infrastructure tasks, such as importing virtual machines, can only be performed by a user
with both the fabric administrator and business group manager roles. These tasks might not be available
in a multitenant deployment with centrally managed infrastructure.
Figure 6‑2. Multitenant Example with Infrastructure Configuration Only in Default Tenant
Tenant
admin
Tenant A
Business
group mgr
Business
Group
Business
group mgr
Business
Group
http://vra.mycompany.com/
vcac/org/tenanta/
Tenant
admin
Tenant B
Business
group mgr
Business
Group
Business
group mgr
Business
Group
http://vra.mycompany.com/
vcac/org/tenantb/
Tenant
admin
Tenant C
Business
group mgr
Business
Group
Business
group mgr
Business
Group
http://vra.mycompany.com/
vcac/org/tenantc/
Default
Tenant
(System and
infrastructure config)
System
admin
Fabric
admin
IaaS
admin
Fabric Group
Reservation Reservation
Fabric
admin Fabric Group
Resv Resv
Resv
Fabric
admin Fabric Group
Resv Resv
Resv
Infrastructure Fabric
Hypervisors Public
clouds
Physical
servers
http://vra.mycompany.com/vcac/
System Administration
VMware, Inc. 43

The following diagram shows a multitenant deployment where each tenant manages their own
infrastructure. The system administrator is the only user who logs in to the default tenant to manage
system-wide configuration and create tenants.
Each tenant has an IaaS administrator, who can create fabric groups and appoint fabric administrators
with their respective tenants. Although fabric administrators can create reservations for business groups
in any tenant, in this example they typically create and manage reservations in their own tenants. If the
same identity store is configured in multiple tenants, the same users can be designated as IaaS
administrators or fabric administrators in each tenant.
Figure 6‑3. Multitenant Example with Infrastructure Configuration in Each Tenant
IaaS
admin
IaaS
admin
Tenant
admin
Tenant A
http://vra.mycompany.com/
vcac/org/tenanta/
Tenant
admin
Tenant B
Business
group mgr
Business
Group
Business
group mgr
Business
Group
http://vra.mycompany.com/
vcac/org/tenantb/
Tenant
admin
Tenant C
Business
group mgr
Business
Group
Business
group mgr
Business
Group
http://vra.mycompany.com/
vcac/org/tenantc/
Default
Tenant
(System config)
Hypervisors Public
clouds
Physical
servers
IaaS
admin Fabric
Fabric
admin Fabric Group
Business
group mgr
Business
Group
Business
group mgr
Business
Group
Reservation Reservation
Fabric
admin Fabric Group
Fabric
admin Fabric Group
Reservation Reservation Reservation Reservation
System
admin Infrastructure
http://vra.
mycompany.com/
vcac/
Create and Configure a Tenant
System administrators create tenants and specify basic configuration such as name, login URL, identity
stores, and administrators.
Prerequisites
Log in to the vRealize Automation console as a system administrator.
Procedure
1Specify Tenant Information
The first step to configuring a tenant is to add the new tenant to vRealize Automation and create the
tenant-specific access URL.
System Administration
VMware, Inc. 44

2Configure Identity Stores
Each tenant must be associated with at least one identity store. Identity stores can be OpenLDAP or
Active Directory. Use of Native Active Directory is also supported for the default tenant.
3Appoint Administrators
You can appoint one or more tenant administrators and IaaS administrators from the identity stores
you configured for a tenant.
Specify Tenant Information
The first step to configuring a tenant is to add the new tenant to vRealize Automation and create the
tenant-specific access URL.
Prerequisites
Log in to the vRealize Automation console as a system administrator.
Procedure
1Select Administration > Tenants.
2Click the Add icon ( ).
3Enter a name in the Name text box.
4(Optional) Enter a description in the Description text box.
5Enter a unique identifier for the tenant in the URL Name text box.
This URL token is used to append a tenant-specific identifier to the vRealize Automation console
URL.
For example, enter mytenant to create the URL https://vrealize-appliance-
hostname.domain.name/vcac/org/mytenant.
6(Optional) Enter an email address in the Contact Email text box.
7Click Submit and Next.
Your new tenant is saved and you are automatically directed to the Identity Stores tab for the next step
in the process.
Configure Identity Stores
Each tenant must be associated with at least one identity store. Identity stores can be OpenLDAP or
Active Directory. Use of Native Active Directory is also supported for the default tenant.
Prerequisites
Specify Tenant Information.
System Administration
VMware, Inc. 45

Procedure
1Click the Add icon ( ).
2Enter a name in the Name text box.
3Select the type of identity store from the Type drop-down menu.
4Enter the URL for the identity store in the URL text box.
For example, ldap://ldap.mycompany.com:389 .
5Enter the domain for the identity store in the Domain text box.
6(Optional) Enter the domain alias in the Domain Alias text box.
The alias allows users to log in by using userid@domain-alias rather than userid@identity-store-
domain as a user name.
7Enter the Distinguished Name for the login user in the Login User DN text box.
Use the display format of the user name, which can include spaces and is not required to be identical
to the user ID.
For example, cn=Demo Admin,ou=demo,dc=dev,dc=mycompany,dc=com.
8Enter the password for the identity store login user in the Password text box.
9Enter the group search base Distinguished Name in the Group Search Base DN text box.
For example, ou=demo,dc=dev,dc=mycompany,dc=com.
10 (Optional) Enter the user search base Distinguished Name in the User Search Base DN text box.
For example, ou=demo,dc=dev,dc=mycompany,dc=com.
11 Click Test Connection.
Check that the connection is working.
12 Click Add.
13 (Optional) Repeat Step 1 to Step 12 to configure additional identity stores.
14 Click Next.
Your new identity store is saved and associated with the tenant. You are directed to the Administrators
tab for the next step in the process.
Appoint Administrators
You can appoint one or more tenant administrators and IaaS administrators from the identity stores you
configured for a tenant.
Tenant administrators are responsible for configuring tenant-specific branding, as well as managing
identity stores, users, groups, entitlements, and shared blueprints within the context of their tenant. IaaS
Administrators are responsible for configuring infrastructure source endpoints in IaaS, appointing fabric
administrators, and monitoring IaaS logs.
System Administration
VMware, Inc. 46
Prerequisites
nConfigure Identity Stores.
nBefore you appoint IaaS administrators, you must install IaaS. For more information about installation,
see Installation and Configuration.
Procedure
1Enter the name of a user or group in the Tenant Administrators search box and press Enter.
For faster results, enter the entire user or group name, for example myAdmins@mycompany.domain.
Repeat this step to appoint additional tenant administrators.
2If you have installed IaaS, enter the name of a user or group in the Infrastructure Administrators
search box and press Enter.
For faster results, enter the entire user or group name, for example
IaaSAdmins@mycompany.domain. Repeat this step to appoint additional infrastructure
administrators.
3Click Add.
Brand Tenant Login Pages
You can apply custom branding on a customer level to vRealize Automation tenant login pages.
Custom branding configured using this procedure applies to all tenants for a particular customer.
Prerequisites
Complete the tenant configuration process as described in Create and Configure a Tenant.
Procedure
1Create a file named mybranding.txt that contains your branding content, and save it to the /etc/
folder under your vRealize Appliance installation.
The content must be what you want for the value of the "vmwSTSBrandName" LDAP string.
2Run the following command to ensure that the vcac user has read permissions for the branding file.
Chmod 744/etc/mybranding.txt
3Add the following instruction to the /etc/vcac/setenv-user file.
VCAC_OPTS="$VCAC_OPTS -Dcom.vmware.vcac.tenant.branding.file=/etc/mybranding.txt
4Run the following command to restart the vRealize Automation Tomcat server.
/etc/init.d/vcac-server restart
5Log in to the system as a tenant manager and update existing tenants to implement the branding.
The specified branding applies to all new tenants automatically.
System Administration
VMware, Inc. 47

What to do next
Verify that the tenant login page is appropriately branded by logging in and accessing the updated tenant.
Install a Hotfix
Technical support for your vRealize Automation installation might involve a software patch, or hotfix, that
you can install using the vRealize Appliance management interface.
The hotfix installer cannot patch the following vRealize Automation components.
nThe Management Agent
nNon vSphere agents such as XenServer, VDI, or Hyper-V
Prerequisites
nObtain the hotfix file, and copy it to the file system available to the machine where you run your Web
browser.
nVerify that all nodes in your vRealize Automation installation are up and running.
If you attempt to install a hotfix without all nodes running, the vRealize Appliance management
interface might become unresponsive. If that happens, contact technical support. Do not attempt to
install patches through other means or otherwise use vRealize Automation until resolving the issue.
Procedure
1Log in to the vRealize Appliance management interface as root.
https://vrealize-automation-appliance-FQDN:5480
2Click vRA Settings > Hotfix.
3Click New.
4Click Browse, and navigate to the hotfix file.
You can click Back to select a different hotfix, or to return to the Hotfix page.
5Click Upload.
6Select the uploaded patch, and click Install.
It might take several moments to install the patch. When installed, the status changes to
COMPLETED.
If you need to uninstall a hotfix, Technical Support can provide a rollback hotfix that you install using the
same procedure.
If you need to enable or disable the hotfix interface, use the following commands from a root login
vRealize Appliance console session.
/opt/vmware/share/htdocs/service/hotfix/hotfix.sh enable
/opt/vmware/share/htdocs/service/hotfix/hotfix.sh disable
System Administration
VMware, Inc. 48

Updating vRealize Automation Certificates
A system administrator can replace certificates for vRealize Automation components. Typically, you
replace a certificate to switch from self-signed certificates to certificates provided by a certificate authority
or when a certificate expires.
When you replace a certificate for a vRealize Automation component, components that have a
dependency on this certificate are affected. You must register the new certificate with these components
to ensure certificate trust.
You must update all components of the same type in a distributed system. For example, if you update a
certificate for one vRealize Appliance in a distributed environment, you must update all instances of
vRealize Appliance for that installation.
Certificates for the Identity Appliance management site and vRealize Appliance management site do not
have registration requirements.
Note vRealize Automation supports both SHA1 and SHA2 certificates. The self-signed certificates
generated by the system use SHA-256 With RSA Encryption. You may need to update
vRealize Automation components to use SHA2 certificates due to browser requirements.
Update components in the following order:
1 Identity Appliance
2 vRealize Appliance
3 IaaS components
With one exception, changes to later components in this list do not affect earlier ones. For example, if you
import a new certificate to a vRealize Appliance, you must register this change with the IaaS server, but
not with the Identity Appliance. The exception is that an updated certificate for IaaS components must be
registered with vRealize Appliance.
The following table shows registration requirements when you update a certificate.
Table 6‑3. Registration Requirements
Updated Certificate
Register new certificate
with Identity Appliance
Register new certificate
with vRealize Appliance
Register new certificate with
IaaS
Identity Appliance Not applicable Done automatically when you
replace the vRealize
Appliance certificate
Done automatically when you
replace the vRealize Appliance
certificate
vRealize Appliance No Not applicable Yes
IaaS No Yes Not applicable
Note If your certificate uses a passphrase for encryption and you do not enter it when you replace your
certificate on the virtual appliance, the certificate replacement fails and the message Unable to load
private key appears.
System Administration
VMware, Inc. 49

In addition to certificates for the Identity Appliance, the vRealize Appliance, IaaS Website components,
and Manager Service components, your deployment can have certificates for the Identity Appliance
management site and the vRealize Appliance management site. Management Agents also have
certificates. Each IaaS machine runs a Management Agent.
For important information about troubleshooting, supportability, and trust requirements for certificates, see
the VMware knowledge base article at http://kb.vmware.com/kb/2106583.
Extracting Certificates and Private Keys
Certificates that you use with the virtual appliances must be in the PEM file format.
The examples in the following table use Gnu openssl commands to extract the certificate information you
need to configure the virtual appliances.
Table 6‑4. Sample Certificate Values and Commands (openssl)
Certificate Authority Provides Command Virtual Appliance Entries
RSA Private Key openssl pkcs12 -in path _to_.pfx
certificate_file -nocerts -out key.pem
RSA Private Key
PEM File openssl pkcs12 -in path _to_.pfx
certificate_file -clcerts -nokeys -out
cert.pem
Certificate Chain
(Optional) Pass Phrase n/a Pass Phrase
Update vRealize Automation Certificates when all are Expired
As a system administrator, you need to update all of your vRealize Automation certificates because they
have expired or are no longer appropriate for your deployment.
You must update certificates and appropriate trust relationships for all vRealize Automation system
components in the specified order.
After updating certificates, if you encounter problems with trust relationships between
vRealize Automation components, see the following Knowledge Base article:
https://kb.vmware.com/selfservice/microsites/search.do?
language=en_US&cmd=displayKC&externalId=2110207
Prerequisites
nObtain the appropriate valid, fresh certificates for your vRealize Automation deployment, if applicable.
nIf you are using signed certificates, the certificate root CA, Intermediate CA, and CRL servers are all
reachable by all vRealize Automation components.
Procedure
1Back up all vRealize Automation appliances and related databases.
See Replace a Certificate in the vRealize Appliance.
System Administration
VMware, Inc. 50
2Replace the Identity Appliance certificate.
See Update the vRealize Appliance with the Identity Appliance Certificate.
3Update the Identity Appliance trust relationship.
See . Update the vRealize Appliance with the Identity Appliance Certificate
4Replace the vRealize Appliance certificate on all appliances.
See Replace a Certificate in the vRealize Appliance.
5Update SSO registration for all instances of the vRealize Appliance.
See Update SSO Registration for the vRealize Appliance.
6Replace the certificates on all IIS components running on Infrastructure Web Servers.
See Replace the Internet Information Services Certificate.
7Update the trust relationship with Model Manager Data artifacts on Infrastructure Web Servers.
See Update the IaaS Servers with the vRealize Appliance Certificate.
8Update the certificates of Infrastructure components on he Infrastructure Web Server with Model
Manager Data artifacts in order to establish trust between the appliances and the infrastructure.
See Update the vRealize Appliance with the IaaS Certificate
9If the Manager Service resides on a separate tier from the Web Server, ensure that the Web Server
tier certificate is trusted on all Infrastructure nodes.
10 Update the Manager Service certificate.
See Replace the Internet Information Services Certificate.
11 Verify that all Infrastructure nodes trust the certificate on the Manager Service.
12 Update the vRealize Orchestrator plugins to trust the Infrastructure Web Appliance and SSO
certificates.
13 Update all templates to trust the Manager Service certificates.
In the case of a combined deployment, this would be the Web/Manager Service.
Updating the Identity Appliance Certificate
The system administrator can replace a self-signed certificate with another self-signed certificate or a
domain certificate after the installation is complete.
1Replace a Certificate in the Identity Appliance
The system administrator can replace a self-signed certificate with one from a certificate authority.
The same certificate can be used on multiple machines.
System Administration
VMware, Inc. 51
2Update the vRealize Appliance with the Identity Appliance Certificate
After the Identity Appliance certificate is updated, the system administrator updates the vRealize
Appliance with the new certificate information. This process reestablishes trusted communications
between the virtual appliances.
Replace a Certificate in the Identity Appliance
The system administrator can replace a self-signed certificate with one from a certificate authority. The
same certificate can be used on multiple machines.
The labels for the private key and certificate chain headers and footers depend on the certificate authority
in use. Information here is based on headers and footers for a certificate generated by openssl.
Procedure
1Navigate to the Identity Appliance management console by using its fully qualified domain name,
https://identity-hostname.domain.name:5480/.
2Log in with user name root and the password you specified when you deployed the Identity
Appliance.
3Click the SSO tab.
The red text is a prompt, not an error message.
System Administration
VMware, Inc. 52

4Select the certificate type from the Choose Action menu.
If you are using a PEM-encoded certificate, for example for a distributed environment, select Import
PEM Encoded Certificate.
Certificates that you import must be trusted and must also be applicable to all instances of vRealize
Appliance and any load balancer by using Subject Alternative Name (SAN) certificates.
Note If you use certificate chains, specify the certificates in the following order:
nThe client/server certificate signed by the intermediate CA certificate
nOne or more intermediate certificates
nA root CA certificate
Option Action
Import PEM Encoded Certificate a Copy the certificate values from BEGIN PRIVATE KEY to END PRIVATE KEY,
including the header and footer, and paste them in the RSA Private Key text
box.
b Copy the certificate values from BEGIN CERTIFICATE to END
CERTIFICATE, including the header and footer, and paste them in the
Certificate Chain text box.
c (Optional) If your certificate uses a pass phrase to encrypt the certificate key,
copy the pass phrase and paste it in the Pass Phrase text box.
Generate Self-Signed Certificate a Type a common name for the self-signed certificate in the Common Name
text box. You can use the fully qualified domain name of the virtual appliance
(hostname.domain.name) or a wild card, such as *.mycompany.com.
b Type your organization name, such as your company name, in the
Organization text box.
c Type your organizational unit, such as your department name or location, in
the Organizational Unit text box.
d Type a two-letter ISO 3166 country code, such as US, in the Country text
box.
Keep Existing Leave the current SSL configuration. Select this option to cancel your changes.
5Click Apply Settings.
The certificate is updated.
Update the vRealize Appliance with the Identity Appliance Certificate
After the Identity Appliance certificate is updated, the system administrator updates the vRealize
Appliance with the new certificate information. This process reestablishes trusted communications
between the virtual appliances.
Use the import-certificate command to import the SSL certificate from the Identity Appliance into the
SSL keystore used by the vRealize Appliance. The alias value specifies the alias under which the
imported certificate is stored in the keystore, and url is the address of the SSL endpoint.
System Administration
VMware, Inc. 53
Prerequisites
Replace a Certificate in the Identity Appliance.
Procedure
1Start Putty or another Unix SSL remote login tool.
2Log in to the vRealize Appliance with user name root and the password you specified when
deploying the appliance.
3Execute the import-certificate command:
/usr/sbin/vcac-config import-certificate --alias websso --url https://identity-
hostname.domain.name:7444
For example:
/usr/sbin/vcac-config import-certificate --alias websso --url https://identity-
vm76-115.eng.mycompany.com:7444
4Restart the vRealize Appliance.
5Navigate to the vRealize Appliance management console by using its fully qualified domain name,
https://vra-va-hostname.domain.name:5480/.
6Select System > Reboot.
7Click Services and wait for all services to be registered.
The certificate is updated on the vRealize Appliance.
Updating the vRealize Appliance Certificate
The system administrator can replace a self-signed certificate with another self-signed certificate or a
domain certificate. You can use Subject Alternative Name (SAN) certificates, wildcard certificates, or any
other method of multi-use certification appropriate for your environment as long as you satisfy the trust
requirements.
1Replace a Certificate in the vRealize Appliance
The system administrator can replace a self-signed certificate with a trusted one from a certificate
authority. You can use Subject Alternative Name (SAN) certificates, wildcard certificates, or any
other method of multi-use certification appropriate for your environment as long as you satisfy the
trust requirements.
2Update SSO Registration for the vRealize Appliance
When the host name for a vRealize Appliance is changed, the system administrator must update
Identity Appliance SSO registration.
3Update the IaaS Servers with the vRealize Appliance Certificate
After the virtual appliance certificates are updated, the system administrator updates the IaaS server
running the Model Manager Data component registry to reestablish trusted communications
between the virtual appliances and IaaS components.
System Administration
VMware, Inc. 54
Replace a Certificate in the vRealize Appliance
The system administrator can replace a self-signed certificate with a trusted one from a certificate
authority. You can use Subject Alternative Name (SAN) certificates, wildcard certificates, or any other
method of multi-use certification appropriate for your environment as long as you satisfy the trust
requirements.
Procedure
1Navigate to the vRealize Appliance management console by using its fully qualified domain name,
https://vra-va-hostname.domain.name:5480/.
2Log in with user name root and the password you specified when deploying the Identity Appliance.
3Navigate to vRA Settings > Host Settings.
4Go to the SSL Configuration pane.
System Administration
VMware, Inc. 55

5Select the certificate type from the Certificate Action menu.
If you are using a PEM-encoded certificate, for example for a distributed environment, select Import.
Certificates that you import must be trusted and must also be applicable to all instances of vRealize
Appliance and any load balancer through the use of Subject Alternative Name (SAN) certificates.
Note If you use certificate chains, specify the certificates in the following order:
nClient/server certificate signed by the intermediate CA certificate
nOne or more intermediate certificates
nA root CA certificate
Option Action
Import a Copy the certificate values from BEGIN PRIVATE KEY to END PRIVATE KEY,
including the header and footer, and paste them in the RSA Private Key text
box.
b Copy the certificate values from BEGIN CERTIFICATE to END
CERTIFICATE, including the header and footer, and paste them in the
Certificate Chain text box. For multiple certificate values, include a BEGIN
CERTIFICATE header and END CERTIFICATE footer for each certificate.
c (Optional) If your certificate uses a pass phrase to encrypt the certificate key,
copy the pass phrase and paste it in the Passphrase text box.
Generate Certificate a Type a common name for the self-signed certificate in the Common Name
text box. You can use the fully qualified domain name of the virtual appliance
(hostname.domain.name) or a wild card, such as *.mycompany.com. If you
use a load balancer, you need to specify the FQDN of the load balancer or a
wildcard that matches the name of the load balancer. If the name is the same
as the host name for the virtual appliance, you can leave the text box empty.
Do not accept a default value if one is shown, unless it matches the host
name of the virtual appliance.
b Type your organization name, such as your company name, in the
Organization text box.
c Type your organizational unit, such as your department name or location, in
the Organizational Unit text box.
d Type a two-letter ISO 3166 country code, such as US, in the Country text
box.
Keep Existing Leave the current SSL configuration. Select this option to cancel your changes.
6Click Save Settings.
After a few minutes, the certificate details appear on the page.
The certificate is updated.
Update SSO Registration for the vRealize Appliance
When the host name for a vRealize Appliance is changed, the system administrator must update Identity
Appliance SSO registration.
System Administration
VMware, Inc. 56

Prerequisites
Replace a Certificate in the vRealize Appliance.
Procedure
1Navigate to the vRealize Appliance management console by using its fully qualified domain name,
https://vra-va-hostname.domain.name:5480/.
2Log in with user name root and the password you specified when deploying the Identity Appliance.
3Go to vRA Settings > SSO.
4Verify that the fully qualified name for the Identity Appliance, identity-va-hostname.domain.name,
appears in the SSO Host text box.
For example, vra-sso.mycompany.com.
The https:// prefix is not used.
5Verify that :7444 is the entry in the SSO Port text box.
6Verify that the SSO default tenant is vsphere.local.
Do not change this name.
7Type the default administrator name administrator@vsphere.local in the SSO Admin User text
box.
8Type the SSO administrator password in the SSO Admin Password text box.
The password must match the password you specified in the SSO settings for the Identity Appliance.
9Click Save Settings.
The Identity Appliance is updated with certificate information for the new vRealize Appliance host name.
Update the IaaS Servers with the vRealize Appliance Certificate
After the virtual appliance certificates are updated, the system administrator updates the IaaS server
running the Model Manager Data component registry to reestablish trusted communications between the
virtual appliances and IaaS components.
Execute the vcac-Config.exe command with the UpdateServerCertificates argument to update the
IaaS database to recognize the new vRealize Appliance certificate.
For help on the vcac-Config command, type the following at a command prompt:
vcac-Config.exe help
Prerequisites
Update SSO Registration for the vRealize Appliance.
System Administration
VMware, Inc. 57

Procedure
1Open a command prompt as an administrator and navigate to the Cafe directory on the Model
Manager Data installation machine.
C:\Program Files (x86)\VMware\vCAC\Server\Model Manager Data\Cafe
2Type the following command to update the IaaS database with the certificate information in one step.
Supply the IaaS database name (vcac, by default) and the fully qualified domain name of the
database server.
vcac-Config.exe UpdateServerCertificates -d vcac_database -s sql_database_server
-v
For example:
vcac-Config.exe UpdateServerCertificates -d vCAC -s tr-w2008-13.eng.mycompany -v
Note The version of the command shown here, without the thumbprint argument, downloads the
certificate in one step.
3(Optional) If you use self-signed certificates or certificates signed by a custom certificate authority
(CA), verify that the Windows servers that host the Manager Service, DEMs, and IaaS Website trust
the new certificate and its certificate chain.
4(Optional) Add the virtual appliance certificate to the trusted store if it is not trusted and recheck that
Windows servers now trust the certificate and its certificate chain.
5Type iisreset to reset IIS.
For high-availability installations, reset IIS for all servers that are part of your installation.
Updating the IaaS Certificate
The system administrator can replace a self-signed certificate with another self-signed certificate or a
certificate from a certificate authority after the installation is complete. Certificate updates are required
when the certificate type changes or the certificate expires.
1Replace the Internet Information Services Certificate
The system administrator can replace an expired certificate or a self-signed certificate with one from
a certificate authority to ensure security in a distributed deployment environment.
2Update the vRealize Appliance with the IaaS Certificate
After certificates are updated on the IaaS servers, the system administrator updates the component
registry to reestablish trusted communications between the virtual appliances and IaaS components.
3Update Guest Agent Trust Relationship
You may need to update the trust relationship between vRealize Automation and Guest Agents if
you updated or replaced an IaaS certificate. Guest Agents run on the virtual machine template that
is used for provisioning through vRealize Automation.
System Administration
VMware, Inc. 58

Replace the Internet Information Services Certificate
The system administrator can replace an expired certificate or a self-signed certificate with one from a
certificate authority to ensure security in a distributed deployment environment.
You can use a Subject Alternative Name (SAN) certificate on multiple machines. Import the certificate to
the trusted root certificate store of all machines on which you installed the Website Component and
Manager Service (the IIS machines) during the IaaS installation.
Procedure
1Obtain a certificate from a trusted certificate authority.
2Open the Internet Information Services (IIS) Manager.
3Double-click Server Certificates from Features View.
4Click Import in the Actions pane.
a Enter a file name in the Certificate file text box, or click the browse button (…), to navigate to the
name of a file where the exported certificate is stored.
b Enter a password in the Password text box if the certificate was exported with a password.
c Select Mark this key as exportable.
5Click OK.
6Click on the imported certificate and select View.
7Verify that the certificate and its chain is trusted.
If the certificate is untrusted, you see the message, This CA root certificate is not trusted.
Note You must resolve the trust issue before proceeding with the installation. If you continue, your
deployment fails.
8Update IIS bindings.
a Select the site that hosts the component Web site and model manager.
b Click Bindings in the Action pane.
c Click Edit on the https (443) in the Site Bindings dialog box.
d Change the SSL certificate to the newly imported one.
9Restart IIS or open an elevated command prompt window and type iisreset.
Update the vRealize Appliance with the IaaS Certificate
After certificates are updated on the IaaS servers, the system administrator updates the component
registry to reestablish trusted communications between the virtual appliances and IaaS components.
System Administration
VMware, Inc. 59

As part of updating an IaaS certificate, you must register the new certificate with the vRealize Appliance.
You can use the hostname or IP address of the IaaS machines in the following commands. If you are
using a load balancer, supply the host name of the load balancer instead. Note that URL paths are case-
sensitive.
If you encounter errors, see the troubleshooting section in the installation documentation.
Prerequisites
Replace the Internet Information Services Certificate.
Procedure
1On the IaaS machine that has an updated certificate, open a command prompt as Administrator, and
navigate to the following directory.
C:\Program Files (x86)\VMware\vCAC\Server\Model Manager Data\Cafe
2Register the address for applicable IaaS components by entering the following command:
Vcac-Config.exe RegisterEndpoint --EndpointAddress
https://<iaas-web-server-or-load-balancer-hostname> -v
For example:
Vcac-Config.exe RegisterEndpoint --EndpointAddress
https://vcac.tech.mycompany.com -v
3Restart the vRealize Appliance service by entering the following command:
service vcac-server restart
Wait approximately 15 minutes for the service to restart.
Update Guest Agent Trust Relationship
You may need to update the trust relationship between vRealize Automation and Guest Agents if you
updated or replaced an IaaS certificate. Guest Agents run on the virtual machine template that is used for
provisioning through vRealize Automation.
You do not need to entirely reinstall Guest Agents in order to reestablish the trust relationship with
vRealize Automation. The cert.pem file that resides on the machine on which the Guest Agent is
installed contains the certificate trust data. In order to reestablish trust, this file must be updated.
The location of this file depends on whether the Guest Agent runs under Windows or Linux.
Table 6‑5. Guest Agent Certificate File Locations
Operating System Folder
Windows c:\vrmguestagent\cert.pem
Linux /usr/share/gugent/cert.pem
Update the cert.pem file by running the appropriate commands.
System Administration
VMware, Inc. 60

Prerequisites
nObtain the server name and IP address of the server that runs the IaaS Manager Service.
nIf necessary, convert the template on which the Guest Agent is installed to a virtual machine.
Procedure
1Run the operating system appropriate commands in an elevated command prompt.
Option Description
Windows Run the following commands:
acd c:\vrmguestagent
becho | openssl s_client -connect
manager_service_load_balancer.mycompany.com:443 | sed -ne '/-
BEGIN CERTIFICATE-/,/-END CERTIFICATE-/p' > cert.pem
Linux Run the following commands:
acd /usr/share/gugent
becho | openssl s_client -connect
manager_service_load_balancer.mycompany.com:443 | sed -ne '/-
BEGIN CERTIFICATE-/,/-END CERTIFICATE-/p' > cert.pem
2If applicable, convert the Guest Agent virtual machine back to a template.
Replace the Identity Appliance Management Site Certificate
The Identity Appliance uses lighttpd to run its own management site. You can replace the SSL certificate
of the management site service, for example, if your certificate expires or if you are using a self-signed
certificate and your company security policy requires you to use its SSL certificates. You secure the
management site service on port 5480.
Prerequisites
To install a new certificate, the certificate must be in PEM format and the private key cannot be encrypted.
By default the Identity Appliance management site SSL certificate and private key are stored in a PEM file
located at /opt/vmware/etc/lighttpd/server.pem.
See Extracting Certificates and Private Keys if you require information about exporting a certificate and
private key from a Java keystore to a PEM file.
Procedure
1Login through the appliance console or through SSH.
2Back up your current certificate file.
cp /opt/vmware/etc/lighttpd/server.pem /opt/vmware/etc/lighttpd/server.pem-bak
3Copy the new certificate to your appliance by replacing the content of the
file /opt/vmware/etc/lighttpd/server.pem with the new certificate information.
System Administration
VMware, Inc. 61
4Run the following command to restart the lighttpd server.
service vami-lighttp restart
5Login to the management console and validate that the certificate is replaced. You might need to
restart your browser.
The new Identity Appliance management site certificate is installed.
Updating the vRealize Appliance Management Site Certificate
The system administrator can replace the SSL certificate of the management site service when it expires
or to replace a self-signed certificate with one issued by a certificate authority. You secure the
management site service on port 5480.
The vRealize Appliance uses lighttpd to run its own management site. When you replace a management
site certificate, you must also configure all Management Agents to recognize the new certificate.
If you are running a distributed deployment, you can update Management Agents automatically or
manually. If you are running a minimal deployment, you must update the management agent manually.
See Manually Update Management Agents to Recognize a vRealize Appliance Management Site
Certificate for more information.
1Replace the vRealize Automation Appliance Management Site Certificate
The vRealize Appliance uses lighttpd to run its own management site. You can replace the SSL
certificate of the management site service if your certificate expires or if you are using a self-signed
certificate and your company security policy requires you to use its SSL certificates. You secure the
management site service on port 5480.
2Manually Update Management Agents to Recognize a vRealize Appliance Management Site
Certificate
After replacing a vRealize Appliance management site certificate, a system administrator updates all
Management Agents to recognize the new certificate to reestablish trusted communications between
the virtual appliance management site and Management Agents on IaaS hosts. Each IaaS hosts
runs a Management Agent and each Management Agent must be updated.
3Automatically Update Management Agents in a Distributed Environment to Recognize a vRealize
Appliance Management Site Certificate
After the Management Site certificate is updated in a high-availability deployment, the Management
Agent configuration must be modified so that it recognizes the new certificate. This is necessary to
reestablish trusted communications between the virtual appliance management site and
Management Agents on IaaS host. Each IaaS host runs a Management Agent and each
Management Agent must be updated.
System Administration
VMware, Inc. 62

Replace the vRealize Automation Appliance Management Site Certificate
The vRealize Appliance uses lighttpd to run its own management site. You can replace the SSL certificate
of the management site service if your certificate expires or if you are using a self-signed certificate and
your company security policy requires you to use its SSL certificates. You secure the management site
service on port 5480.
You can choose to install a new certificate or reuse the certificate used byvCloud Automation Center
service on port 443.
When you request a new certificate to update another CA-issued certificate, it is a best practice to reuse
the Common Name from the existing certificate.
Prerequisites
nNew certificates must be in PEM format and the private key cannot be encrypted. By default, the
vRealize Appliance management site SSL certificate and private key are stored in a PEM file located
at /opt/vmware/etc/lighttpd/server.pem.
See Extracting Certificates and Private Keys if you require information about exporting a certificate
and private key from a Java keystore to a PEM file.
Procedure
1Login through the appliance console or through SSH.
2Back up your current certificate file.
cp /opt/vmware/etc/lighttpd/server.pem /opt/vmware/etc/lighttpd/server.pem-bak
3Copy the new certificate to your appliance by replacing the content of the
file /opt/vmware/etc/lighttpd/server.pem with the new certificate information.
4Run the following command to restart the lighttpd server.
service vami-lighttp restart
5Login to the management console and validate that the certificate is replaced. You might need to
restart your browser.
The new vRealize Appliance management site certificate is installed.
What to do next
Update all Manangement Agents to recognize the new certificate.
For distributed deployments, you can update Management Agents manually or automatically. For minimal
installations, you must update agents manually.
System Administration
VMware, Inc. 63

For information about automatic update, see Automatically Update Management Agents in a Distributed
Environment to Recognize a vRealize Appliance Management Site Certificate. For information about
manual update, see Manually Update Management Agents to Recognize a vRealize Appliance
Management Site Certificate
Manually Update Management Agents to Recognize a vRealize Appliance
Management Site Certificate
After replacing a vRealize Appliance management site certificate, a system administrator updates all
Management Agents to recognize the new certificate to reestablish trusted communications between the
virtual appliance management site and Management Agents on IaaS hosts. Each IaaS hosts runs a
Management Agent and each Management Agent must be updated.
Perform these steps for each Management Agent in your deployment after you replace a certificate for
the vRealize Appliance management site.
For distributed deployments, you can update Management Agents manually or automatically. For
information about automatic update, see Automatically Update Management Agents in a Distributed
Environment to Recognize a vRealize Appliance Management Site Certificate
For minimal deployments, you must update Management Agents manually as described in this
procedure.
Prerequisites
Obtain the SHA1 thumbprints of the new vRealize Appliance management site certificate.
Procedure
1Stop the VMware vCloud Automation Center Management Agent service.
2Navigate to the Management Agent configuration file located at
[vcac_installation_folder]\Management
Agent\VMware.IaaS.Management.Agent.exe.Config, typically C:\Program Files
(x86)\VMware\vCAC\Management Agent\VMware.IaaS.Management.Agent.exe.Config.
3Open the file for editing and locate the endpoint configuration setting for the old management site
certificate. which you can identify by the endpoint address.
For example:
<agentConfiguration id="C816CFBC-4830-4FD2-8951-C17429CEA291" pollingInterval="00:03:00">
<managementEndpoints>
<endpoint address="https://vra-va.local:5480"
thumbprint="D1542471C30A9CE694A512C5F0F19E45E6FA32E6" />
</managementEndpoints>
</agentConfiguration>
System Administration
VMware, Inc. 64

4Change the thumbprint to the SHA1 thumbprint of the new certificate.
For example:
<agentConfiguration id="C816CFBC-4830-4FD2-8951-C17429CEA291" pollingInterval="00:03:00">
<managementEndpoints>
<endpoint address="https://vra-va.local:5480"
thumbprint="8598B073359BAE7597F04D988AD2F083259F1201" />
</managementEndpoints>
</agentConfiguration>
5If there are other managementEndpoint entries, delete them.
6Start the VMware vCloud Automation Center Management Agent service.
7Login to the virtual appliance management site and go tovRA Settings > Cluster.
8Check the Distributed Deployment Information table to verify that the IaaS server has contacted the
virtual appliance recently, which confirms that the update is successful.
Automatically Update Management Agents in a Distributed Environment to
Recognize a vRealize Appliance Management Site Certificate
After the Management Site certificate is updated in a high-availability deployment, the Management Agent
configuration must be modified so that it recognizes the new certificate. This is necessary to reestablish
trusted communications between the virtual appliance management site and Management Agents on
IaaS host. Each IaaS host runs a Management Agent and each Management Agent must be updated.
You can update vRealize Appliance management site certificate information for distributed systems
manually or automatically. For information about manually updating Management Agents, see Manually
Update Management Agents to Recognize a vRealize Appliance Management Site Certificate.
Use this procedure to update the certificate information automatically.
Procedure
1When Management Agents are running, replace the certificate on a single vRealize Appliance
management site in your deployment.
2Wait fifteen minutes for the Management Agent to synchronize with the new vRealize Appliance
management site certificate.
3Replace certificates on other vRealize Appliance management sites in your deployment.
Management Agents are automatically updated with the new certificate information.
Replace a Management Agent Certificate
The system administrator can replace the Management Agent certificate when it expires or replace a self-
signed certificate with one issued by a certificate authority.
System Administration
VMware, Inc. 65

Each IaaS host runs its own Management Agent. Repeat this procedure on each IaaS node whose
Management Agent you want to update.
Prerequisites
nBefore you replace a Management Agent certificate, remove its entry from the Distributed
Deployment Information table. Note the Management Agent identifier in the Node ID column before
you remove the record. You use this identifier when you create the new Management Agent certificate
and when you register it. For more information, see the procedure about removing a node from the
Distributed Deployment Information table in System Administration for vRealize Automation.
nWhen you request a new certificate, ensure that the Common Name (CN) attribute in the certificate
subject field for the new certificate is typed in in the following format:
VMware Management Agent 00000000-0000-0000-0000-000000000000
Use the string VMware Management Agent, followed by a single space and the GUID for the
Management Agent in the numerical format shown.
nRecord the SHA1 thumbprint of the new Management Agent certificate.
Procedure
1Stop the Management Agent service from your Windows Services snap-in.
a From your Windows machine, click Start.
b In the Windows Start Search box, type services.msc and press Enter.
c Right-click VMware vCloud Automation Center Management Agent service and click Stop to
stop the service.
2Remove the current certificate from the machine. For information about managing certificates on
Windows Server 2008 R2, see the Microsoft Knowledge Base article at
http://technet.microsoft.com/en-us/library/cc772354.aspx or the Microsoft wiki article at
http://social.technet.microsoft.com/wiki/contents/articles/2167.how-to-use-the-certificates-
console.aspx.
System Administration
VMware, Inc. 66

3Register the Management Agent certificate with the vRealize Appliance management site.
a Open a command prompt as an administrator and navigate to the Cafe directory on the machine
on which the Management Agent is installed at <vra-installation-dir>\Management
Agent\Tools\Cafe, typically C:\Program Files (x86)\VMware\vCAC\Management
Agent\Tools\Cafe
b Type the Vcac-Config.exe RegisterNode command with options to register the Management
Agent identifier and certificate in one step. Include the Management Agent identifier you recorded
earlier as the value for the -nd option and the thumbprint of the new certificate as the value of the
-tp.
Table 6‑6. Required Options and Arguments for Vcac-Config.exe RegisterNode
Option Argument Notes
-url "vra-va-hostname.domain.name:5480" The URL of the management site host,
including a port specification
-cu "root" The user name, which must be the root
user
-cp "password" Password for the root user as a quoted
string
-hn "machine-hostname.domain.name" The machine name of the Management
Agent host, including domain information
-nd "00000000-0000-0000-0000-000000000000" Management Agent identifier
-tp "0000000000000000000000000000000000000000 Thumbprint for the new certificate
The following example shows the command format:
Vcac-Config.exe RegisterNode -v -url "vra-va-hostname.domain.name:5480"
-cu "root" -cp "password" -hn "machine-hostname.domain.name"
-nd "00000000-0000-0000-0000-000000000000"
-tp "0000000000000000000000000000000000000000"
Example: Command to Register a Management Agent Certificate
Vcac-Config.exe RegisterNode -v -url "vra-va.eng.mycompany:5480" -cu "root" -cp
"secret" -hn "iaas.eng.mycompany" -nd "C816CFBX-4830-4FD2-8951-C17429CEA291" -tp
"70928851D5B72B206E4B1CF9F6ED953EE1103DED"
Resolve Certificate Revocation Errors
If you have a certificates generated by a Certificate Authority that is not located on the addressable
network, HTTP requests will fail with an invalid certificate error. You can resolve this issue by editing the
web.config file so that web applications on vRealize Automation components ignore certificate
revocation errors.
System Administration
VMware, Inc. 67

Certificate revocation errors will result in certificates not being trusted which prevents your remote server
from authenticating. You can determine if certificate revocation errors are causing problems by running
the Windows vcac-config command CheckServerCertificates and then examining the log files.
If you make this change to configure your deployment to accept revoked certificates, these certificates are
accepted until their expiration date.
Procedure
1Open the Internet Information Services (IIS) Manager.
The exact procedure for opening IIS varies according to the version of Windows you are using.
2Right-click the applicable site for your deployment.
3Select Explore.
4In the Windows Explorer window that opens containing the web.config file, locate the Configuration
section and add the following commands.
<system.net>
<settings>
<servicePointManager checkCertificateRevocationList="false"/>
</settings>
</system.net>
5Save the file and close it.
6Repeat these steps for all applicable sites and IIS servers.
View License Usage
A system administrator can view the average number of servers and desktop licenses per endpoint. The
average is calculated to the current day and the last time data collection ran. License usage information
for the past twelve months is available to view.
Prerequisites
Log in to the vRealize Automation console as an IaaS administrator.
Procedure
1Navigate to Infrastructure > Administration > Licensing.
2In License Report, click Select Month and select the month you want to display.
The average number of servers and desktop licenses per endpoint appears.
Monitoring Logs and Services
A system administrator can monitor events and the state of services from the administration console.
System Administration
VMware, Inc. 68
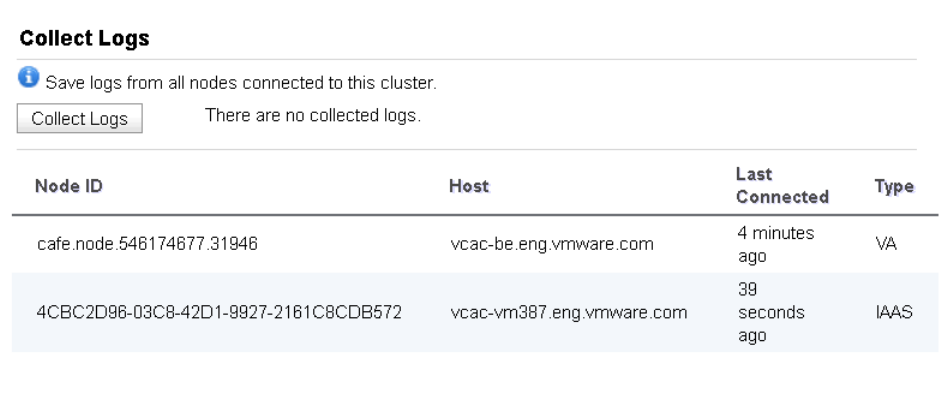
View the Event Log
The Event Log displays alert and audit events for tenants. Advanced search capabilities are available.
Prerequisites
nLog in to the vRealize Automation console as a system administrator.
Procedure
1Select Administration > Event Logs.
2(Optional) Click Advanced Search, specify information for the event you are looking for and click the
Search icon.
3Select an event and click View Details.
Viewing Host Information for Clusters in Distributed Deployments
You can collect logs for all nodes that are clustered in a distributed deployment from the vRealize
Appliance management console.
You can also view information for each host in your deployment. The Cluster tab on the
vRealize Automation management console includes a Distributed Deployment Information table that
displays the following information:
nA list of all nodes in your deployment
nThe host name for the node. The host name is given as a fully qualified domain name.
nThe time since the host last replied to the management console. Nodes for IaaS components report
availability every three minutes and nodes for virtual appliances report every nine minutes.
nThe vRealize Automation component type. Identifies whether the node is a virtual appliance or an
IaaS server.
Figure 6‑4. Distributed Deployment Information table
System Administration
VMware, Inc. 69
You can use this table to monitor activity in your deployment. For example, if the Last Connected column
indicates a host has not connected recently, that can be an indication of a problem with the host server.
Log Collection
You can create a zip file that contains log files for all hosts in your deployment. For more information, see
Collect Logs for Clusters and Distributed Deployments.
Removing Nodes from the Table
When you remove a host from your deployment, remove the corresponding node from the Distributed
Deployment Information table to optimize log collection times. For more information, see Remove a Node
from the Distributed Deployment Information Table.
Collect Logs for Clusters and Distributed Deployments
You can create a zip file that includes all log files for servers in your deployment.
The Distributed Deployment Information table lists the nodes from which log files are collected.
Procedure
1Log in to the vRealize Appliance with user name root and the password you specified when
deploying the appliance.
2Click vRA Settings.
3Click the Cluster tab.
The Distributed Deployment Information table displays a list of nodes for the distributed deployment.
4Click Collect Logs.
Log files for each node are collected and copied to a zip file.
Remove a Node from the Distributed Deployment Information Table
You delete the entry for a node from the Distributed Deployment Information table when the node is
removed from your deployment cluster or when you are replacing a Management Agent certificate.
Procedure
1Log in to the vRealize Appliance by using the user name root and the password you specified when
you deployed the appliance.
2Click vRA Settings.
3Click the Cluster tab.
The Distributed Deployment Information table displays a list of nodes for the distributed deployment.
4Locate the node ID for the node to be deleted and copy the ID to use in the next step.
System Administration
VMware, Inc. 70

5Open a command prompt and type a command of the following form, using the node ID you
previously copied.
/usr/sbin/vcac-config cluster-config-node
--action delete --id node-UID
6Click Refresh.
The node no longer appears in the display.
vRealize Automation Services
A system administrator can view the status of vRealize Automation services from the Event Log on the
system administrator console.
Subsets of services are required to run individual product components. For example, identity services and
UI core services must be running before you can configure a tenant.
The following tables tell you which services are associated with areas of vRealize Automation
functionality.
Table 6‑7. Identity Service Group
Service Description
management-service Identity Service Group
sts-service Single Sign-on Appliance
authorization Authorization Service
authentication Authentication
eventlog-service Event log service
licensing-service Licensing service
Table 6‑8. UI Core services
Service Description
shel-ui-app Shell Service
branding-service Branding Service
plugin-service Extensibility (Plug-in) Service
portal-service Portal Service
All the following services are required to run the IaaS component.
Table 6‑9. Service Catalog Group (Governance Services)
Service Description
notification-service Notification service
workitem-service Work Item service
System Administration
VMware, Inc. 71

Table 6‑9. Service Catalog Group (Governance Services) (Continued)
Service Description
approval-service Approval Service
catalog-service Service Catalog
Table 6‑10. IaaS Services Group
Service Description
iaas-proxy-provider IaaS Proxy
iaas-server IaaS Windows machine
Table 6‑11. Advanced Services Designer
Service Description
vco vRealize Orchestrator
advanced-designer-service Advanced Services
Starting Up and Shutting Down vRealize Automation
A system administrator performs a controlled shutdown or startup of vRealize Automation to preserve
system and data integrity.
You can also use a controlled shutdown and startup to resolve performance or product behavior issues
that can result from an incorrect initial startup. Use the restart procedure when only some components of
your deployment fail.
Start Up vRealize Automation
When you start vRealize Automation from the beginning, such as after a power outage or a controlled
shutdown, you must start its components in a specified order.
Prerequisites
Verify that the load balancers that your deployment uses are running.
Procedure
1Start the MSSQL database machine. If you are using a legacy PostgreSQL standalone database,
start that machine as well.
2Start your Identity Appliance or vSphere SSO appliance and wait for the startup to finish.
3Start the primary vRealize Appliance instance and wait for the startup to finish.
The primary vRealize Appliance instance contains the writeable Appliance Database, if applicable,
and is the last appliance that you shut down in an ordered shutdown procedure.
System Administration
VMware, Inc. 72
4(Optional) If you are running a distributed deployment, start the secondary virtual appliances and wait
for the startup to finish.
You must wait for one appliance to boot before you start up another appliance. Make sure that all
services, besides IaaS and vRealize Orchestrator, are running on the appliance before you start
another appliance.
5Start the primary Web node and wait for the startup to finish.
6(Optional) If you are running a distributed deployment, start all secondary Web nodes and wait 5
minutes.
7Start the primary Manager Service node and wait for 2 to 5 minutes, depending on your site
configuration.
8Start the Distributed Execution Manager Orchestrator and Workers and all vRealize Automation
agents.
You can start these components in any order and you do not need to wait for one startup to finish
before you start another.
9Verify that the startup succeeded.
a Navigate to the vRealize Appliance management console by using its fully qualified domain
name, https://vra-va-hostname.domain.name:5480/.
b Click the Services tab.
c Click the Refresh tab to monitor the progress of service start up.
When all services are listed as registered, the system is ready to use.
Restart vRealize Automation
When you restart more than one vRealize Automation component, you must restart the components in a
specified order.
You might need to restart some components in your deployment to resolve anomalous product behavior.
If you are using vCenter Server to manage your virtual machines, use the guest restart command to
restart vRealize Automation.
If you cannot restart a component or service, follow the instructions in Shut Down vRealize Automation
and Start Up vRealize Automation.
Prerequisites
Verify that load balancers that your deployment uses are running.
Procedure
1Restart your Identity Appliance or vSphere SSO appliance and wait for the startup to finish.
System Administration
VMware, Inc. 73
2Restart the primary vRealize Appliance and wait for the start up to finish.
The primary vRealize Appliance is the one containing the writeable Appliance Database, if applicable,
and the last appliance that you shut down in an ordered shut down procedure.
3For distributed deployments, restart secondary virtual appliances, and wait for all appliances to
restart.
You do not need to wait for one appliance to finish booting up before you restart another appliance.
4Restart the primary Web node and wait for the startup to finish.
5If you are running a distributed deployment, start all secondary Web nodes and wait for the startup to
finish.
6Restart all Manager Service nodes and wait for the startup to finish.
7Restart the Distributed Execution Manager Orchestrator and Workers and all vRealize Automation
agents, and wait for the startup to finish for all components.
You can restart these components in any order.
8Verify that the service you restarted is registered.
a Navigate to the vRealize Appliance management console by using its fully qualified domain
name, https://vra-va-hostname.domain.name:5480/.
b Click the Services tab.
c Click the Refresh tab to monitor the progress of service start up.
When all services are listed as registered, the system is ready to use.
Shut Down vRealize Automation
To preserve data integrity, you must shut down vRealize Automation in a specified order.
If you are using vCenter Server to manage your virtual machines, use the guest shutdown command to
shut down vRealize Automation.
Procedure
1Shut down the Distributed Execution Manager Orchestrator and Workers and all vRealize Automation
agents in any order and wait for all components to finish shutting down.
2Shut down virtual machines that are running the Manager Service and wait for the shutdown to finish.
3(Optional) For distributed deployments, shut down all secondary Web nodes and wait for the
shutdown to finish.
4Shut down the primary Web node, and wait for the shutdown to finish.
5(Optional) For distributed deployments, shut down all secondary vRealize Appliance instances and
wait for the shutdown to finish.
System Administration
VMware, Inc. 74
6Shut down the primary vRealize Appliance and wait for the shutdown to finish.
If applicable, the primary vRealize Appliance is the one that contains the master, or writeable,
Appliance Database. Make a note of the name of the primary vRealize Appliance. You use this
information when you restart vRealize Automation.
7Shut down the MSSQL virtual machines in any order and wait for the shutdown to finish.
8If you are using a legacy standalone PostgreSQL database, also shut down that machine.
9Shut down your SSO appliance, which could be an Identity Appliance or a vSphere SSO appliance.
You shut down your vRealize Automation deployment.
Customize Data Rollover Settings
You can enable and configure vRealize Automation data rollover settings to control how your system
retains, archives or deletes legacy data.
Use the data rollover feature to configure the maximum number of days for the vRealize Automation
system to retain data in the IaaS SQL Server database before archiving or deleting it. By default, this
feature is disabled. To enable data rollover or configure settings, modify the data rollover settings on the
vRealize Automation Global Properties page. When enabled, this feature queries and purges data only
from the following SQL Server database tables.
nUserLog
nAudit
nCategoryLog
nVirtualMachineHistory
nVirtualMachineHistoryProp
nAuditLogItems
nAuditLogItemsProperties
nTrackingLogItems
nWorkflowHistoryInstances
nWorkflowHistoryResults
If the data rollover DataRolloverIsArchiveEnabled feature is set to True, archive versions of the tables are
created in the dbo schema. For instance, the archive version of UserLog would be UserLogArchive, and
the archive version of VirtualMachineHistory would be VirtualMachineHistoryArchive.
System Administration
VMware, Inc. 75
When enabled, the data rollover workflow runs once a day at a predetermined time of 3 a.m. according to
the vRealize Appliance time zone configuration. Using the DataRollover MaximumAgeInDays setting, you
can set the maximum number of days that you want to retain the data. If archive is set to True, data older
than that specified in the DataRollover MaximumAgeInDays is moved to the archive tables. If archive is
set to False, data is permanently deleted and no data archiving occurs. Deleted data is not recoverable.
Note Consider existing system data and the potential impact on system performance before enabling
data rollover. For example, if you enable this feature one year after vRealize Automation began running in
your environment, verify that you have set the value of DataRollover MaximumAgeInDays property to 300
or greater to ensure that enabling data rollover feature does not impact system performance.
Procedure
1Log in to vRealize Automation as a vRealize administrator.
2Navigate Infrastructure > Administration > Global Properties.
3On the Global Properties page, locate the Data Rollover section of the table and review and set
properties as appropriate.
Property Description
DataRollover IsArchiveEnabled By default this property is set to True and it moves the data to
the archive tables.
Note: If you set this property to False, all data older than that
specified in the DataRollover MaximumAgeInDays field is
permanently deleted.
DataRollover MaximumAgeInDays Specifies the maximum number of days that the system
retains data in the database before moving to archive or
purging. By default this property is set to 90 days.
DataRollover Status By default this property is set to Disabled. To enable this
feature, set the DataRollover Status property to Enabled. If
you disable this feature while it is running, the current
workflow is not impacted, but the next workflow is disabled.
4Click the Edit icon ( ) in the first table column to edit a property.
The Value field for the applicable property becomes editable and you can place your cursor within it to
change the value.
5Click the Save icon ( ) in the first table column to save your changes.
Remove an Identity Appliance from a Domain
You can remove an Identity Appliance host machine from your domain.
In some cases, you might need to remove an Identity Appliance from your domain. For instance, if the
Identity Appliance domain account becomes corrupted or is deleted, you might need to remove the
existing appliance and then add another instance of it with updated account information.
System Administration
VMware, Inc. 76
Procedure
uRun the following command on the target Identity Appliance host server machine.
cd opt/likewise/bin./domainjoin-cli leave
The targeted Identity Appliance is removed from the domain.
System Administration
VMware, Inc. 77
Backup and Recovery for
vRealize Automation
Installations 7
To minimize system downtime and data loss in the event of failures, administrators back up the entire
vRealize Automation installation on a regular basis. If your system fails, you can recover by restoring the
last known working backup and reinstalling some components.
This chapter includes the following topics:
nBacking Up vRealize Automation
nActivate the Failover IaaS Server
nvRealize Automation System Recovery
Backing Up vRealize Automation
A system administrator backs up the full vRealize Automation installation on a regular basis.
Users can employ several strategies, singly or in combination, to back up vRealize Automation system
components. For virtual machines, you can use the Snapshot function to create snapshot images of
critical components. If a system failure occurs, you can use these images to restore components to their
state when the images were created. Alternatively, and for non-virtual machine components, you can
create copies of critical configuration files for system components, which can be used to restore these
components to a customer configured state following reinstallation.
A complete backup includes the following components:
nIaaS MS SQL database.
nPostgreSQL database. (Applicable only for legacy installations that do not use an Appliance
Database.)
nIdentity Appliance or other SSO appliance.
nvRealize Appliance.
nIaaS components.
n(Optional) Application Services load balancers.
n(Optional) Load balancers that support your distributed deployment. Consult the vendor
documentation for your load balancer for information about backup considerations.
VMware, Inc. 78

Guidelines for Planning Backups
Use these guidelines to plan backups:
nWhen you back up a complete system, back up the Identity Appliance, all instances of the vRealize
Appliance, and databases at the same time.
nMinimize the number of active transactions before you begin a backup.
nBack up all databases at the same time.
nBack up the virtual appliance load balancer at the same time you back up the Identity Appliance.
nCreate a backup of instances of the vRealize Appliance when you update certificates.
nCreate a backup of IaaS components when you update certificates.
In addition, back up the Identity Appliance in the following cases:
nYou change the configuration.
nYou add or delete a tenant.
nYou create, delete, or modify an identity store.
Backing Up vRealize Automation Databases
The database administrator backs up the IaaS MSSQL Server and Appliance Database or legacy
PostgreSQL database.
As a best practice, back up MSSQL and Appliance Database or legacy PostgreSQL databases as nearly
simultaneously as possible to prevent or minimize data loss. Also, if possible, back up the databases with
Point-in-Time enabled. By using Point-in-Time recovery, you ensure that the two databases are consistent
with each other. If only one database fails, you must restore the running database to the most recent
backup so that the databases are consistent.
IaaS MSSQL Database
Follow your in-house procedures to back up the IaaS MSSQL database outside of the
vRealize Automation framework.
Use the following guidelines when creating a backup:
nIf possible, check that all IaaS workflows are complete and that all IaaS services are stopped or that
activity is minimized.
nBack up with Point-in-Time enabled.
nBack up the MSSQL database at the same time that you back up the other components.
nBack up the passphrase for your database.
Note Your database is protected by a passphrase. Have the passphrase available when you restore the
database. Typically, you record the passphrase in a safe and accessible location at install time.
System Administration
VMware, Inc. 79
Appliance Database or Legacy PostgreSQL Database
If you are using an Appliance Database or a legacy PostgreSQL database embedded in a vRealize
Appliance, you can back up the database by backing up the entire appliance with one of the methods
described in Backing Up the vRealize Appliance. If you are using a legacy PostgreSQL database, you
can also backup the database separately. See the VMware Knowledge Base article Migrating from
external vPostgres appliance to vPostgres instance located in the vCAC appliance (2083562) at
http://kb.vmware.com/kb/2083562 for more information.
A standalone legacy PostgreSQL appliance must be backed up separately. See the VMware Knowledge
Base article Migrating from external vPostgres appliance to vPostgres instance located in the vCAC
appliance (2083562) at http://kb.vmware.com/kb/2083562 for more information.
Backing Up the Identity Appliance
The system administrator schedules backups of the Identity Appliance single sign-on server on a regular
basis.
As a best practice, back up your Identity Appliance, vRealize Appliance, and databases at the same time.
In addition, back up the Identity Appliance in the following cases:
You can use one or more of the following methods to create backups.
nThe vSphere Export function.
nCloning.
nVMware vSphere Data Protection, to create backups of the entire appliance.
nvSphere Replication, to replicate the virtual appliance to another site.
nVMware Recovery Manager, to enable high availability by backing up the appliance to a different data
center.
You can use snapshots for backups only if you store or replicate them to a location other than the
appliance location. If the snapshot image is accessible after a failure, using it is the most direct way to
recover the appliance.
Backing Up the vRealize Appliance
The system administrator backs up the vRealize Appliance by exporting or cloning the appliance. You can
also copy configuration files to use to recreate the configuration that was in place at the time of the
backup.
Back up appliances by exporting or cloning them.
As a best practice, back up your Identity Appliance, vRealize Appliance, and databases on the same
schedule.
You can use the following methods to create backups.
nThe vSphere Export function.
System Administration
VMware, Inc. 80
nCloning.
nVMware vSphere Data Protection, to create backups of the entire appliance.
nvSphere Replication, to replicate the virtual appliance to another site.
nVMware Recovery Manager, to enable high availability by backing up the appliance to a different data
center.
You can use snapshots to backup virtual appliances only if you store or replicate them to a location other
than the appliance location. If the snapshot image is accessible after a failure, using it is the most direct
way to recover the appliance.
To preserve only the configuration information for the appliance, back up the following files, preserving the
owner, group, and permissions for each file. These files are also backed up as part of exporting or cloning
an appliance.
n/etc/vcac/encryption.key
n/etc/vcac/vcac.keystore
n/etc/vcac/vcac.properties
n/etc/vcac/security.properties
n/etc/vcac/server.xml
n/etc/vcac/solution-users.properties
n/etc/apache2/server.pem
n/etc/vco/app-server/sso.properties
n/etc/vco/app-server/plugins/*
n/etc/vco/app-server/vmo.properties
n/etc/vco/app-server/js-io-rights.conf
n/etc/vco/app-server/security/*
n/etc/vco/app-server/vco-registration-id
n/etc/vco/app-server/vcac-registration.status
n/etc/vco/configuration/passwd.properties
n/var/lib/rabbitmq/.erlang.cookie
n/var/lib/rabbitmq/mnesia/**
Backing Up Load Balancers
Load balancers distribute work among servers in high-availability deployments. The system administrator
backs up the load balancers on a regular basis at the same time as other components.
System Administration
VMware, Inc. 81
Follow your site policy for backing up load balancers, keeping in mind the preservation of network
topology and vRealize Automation backup planning.
As a best practice, always back up your load balancer when you back up the Identity Appliance.
Backing Up IaaS Components
The system administrator backs up IaaS components. Use these guidelines to plan backups.
You can back up IaaS components by taking a snapshot or by copying configuration files to a second
location. If you choose to copy files, copy back up components in the following order:
nAgents and DEMs
nManager Service
nWebsites
For agents, back up the following information:
1 The agent name.
2 The endpoint name. Note that this is different from the endpoint address.
3 The following files located in the Agent's installation folder (<vCAC Folder>\Agents\<Agent
Name>\):
- VRMAgent.exe.config file
- RepoUtil.exe.config file
For agents, back up the following information:
1 The agent name.
2 The endpoint name. Note that this is different from the endpoint address.
3 The following files located in the Agent's installation folder (<vCAC Folder>\Agents\<Agent
Name>\):
- VRMAgent.exe.config file
- RepoUtil.exe.config file
For DEMs, back up the following information:
1 The agent name.
2 The following files located in the DEM's installation folder (<vCAC Folder>\Distributed
Execution Manager\<DEM Name>\):
- ManagerService.exe.config file
- policy.config file
System Administration
VMware, Inc. 82
For Web components, back up the following files:
1 For the primary Web node only, in the Model Manager Data folder (<vCAC Folder>\Server )
- ConfigTool folder (applicable only for the primary Web node)
- policy.config file
2 The following files located in the installation folder (<vCAC Folder>\Server\Website\):
- Web.config file
3 The following files located in the installation folder (<vCAC Folder>\Web API\):
- Web.config file
- policy.config file
4 The name of the IIS instance.
Backing Up vRealize Automation Certificates
A system administrator backs up certificates and certificate chains at installation time or when a certificate
is replaced.
Back up the following certificates:
nThe SSO certificate and its entire chain.
nvRealize Appliance certificates and the entire corresponding certificate chain.
nIaaS certificates and the entire corresponding certificate chain.
Activate the Failover IaaS Server
If a system failure occurs on the Manager Service host and your system is configured appropriately, you
can activate a secondary failover server.
Prerequisites
Procedure
1Change the startup type of the vCloud Automation Center Manager Service on the primary Manager
Service host to manual start up.
a Select Start > Administrative Tools > Services on the primary server.
b Select Manual as the startup type of the vCloud Automation Center service.
2Make the secondary Manager Service host the active host by changing the startup type of the vCloud
Automation Center service to automatic start up.
a Select Start > Administrative Tools > Services on the primary server.
b Select Automatic as the startup type of the vCloud Automation Center service.
3Verify that the secondary node is enabled on the load balancer.
System Administration
VMware, Inc. 83
4Restart vCloud Automation Center services.
a Select Start > Administrative Tools > Services.
b Start the vCloud Automation Center service, the Distributed Execution Manager services, and
vCloud Automation Center agent services, in that order.
c Wait five minutes and check that the services you started are running.
vRealize Automation System Recovery
A system administrator uses backups to restore vRealize Automation to a functional state after a system
failure. If IaaS components such as Manager Service machines fail, you must reinstall them.
If you restore from a backup, machines that were provisioned after the backup still exist, but are not
managed by vRealize Automation. For example, they do not appear in the items list for the owner. Use
the Infrastructure Organizer to import virtual machines and bring them back under management.
Perform these steps in order, beginning with the first component that needs to be restored. If a
component is functioning normally, you do not have to restore it.
1Restoring vRealize Automation Databases
A system administrator restores the IaaS MSSQL database and the PostgreSQL database.
2Restoring the Identity Appliance
If a failure occurs, a system administrator restores the Identity Appliance.
3Restore the vRealize Appliance and Load Balancer
If a failure occurs, a system administrator restores the vRealize Appliance. If a load balancer is
used, the administrator restores the load balancer and the virtual appliances that it manages. If a
host name changes during restoration, you must update configuration files appropriately.
4Restoring the IaaS Website, Manager Services, and Their Load Balancers
A system administrator restores the IaaS Website and Manager Service and their associated load
balancers. If you change a host name or IP address for a load balancer, you must update this
information in associated configuration files.
5Reinstall the DEM Orchestrator and the DEM Workers
If a failure occurs, a system administrator reinstalls all DEMs.
6Reinstall the IaaS Agents
The system administrator reinstalls all IaaS agents that need to be restored.
Restoring vRealize Automation Databases
A system administrator restores the IaaS MSSQL database and the PostgreSQL database.
Recover a database in the following situations:
nIf both databases fail, restore them from the last known time when both databases were backed up.
System Administration
VMware, Inc. 84

nIf one database fails, restore it and revert the functional database to the version that was in use when
the backup used to restore the failed database was created.
The backup time for each database can differ. The greater the gap between the last working time of the
databases, the greater the potential for data loss.
For information about how to restore a PostgreSQL database, see the VMware Knowledge Base article
Migrating from external vPostgres appliance to a vPostgres instance located in the vCAC appliance
(2083562)..
Database Passphrases
IaaS MSSQL database security requires a security passphrase to generate an encryption key that
protects the data. You specify this passphrase when you install vRealize Automation.
If you lose the passphrase, or want to change the passphrase, consult VMware technical support for
more information.
Configure vRealize Automation MSSQL Databases with New Host Names
You can restore an MSSQL database from a backup with no additional steps required. If the hostname of
the MSSQL database machine changes, you must revise configuration information for the MSSQL
database.
Procedure
1Update the database entries.
a Open SQL Server Management Studio and locate the DynamicOps.RepositoryModel.Models
table.
b Locate the string Data Source in the table and change the original SQL Server host name to the
new host name for each instance of the connection string.
For example:
Data Source=MACHINE-NAME.domain.name;...
System Administration
VMware, Inc. 85

2For each machine not being reinstalled that contains a Web site component, update the host name in
the configuration file.
a Open the C:\Program Files (x86)\VMware\vCAC\Server\Model Manager
Web\Web.config file in an editor.
b Locate the repository element and make the following changes:
nModify the value of the server attribute for the database hostname. For example:
server=DB-repository-hostname.domain.name
nIf you changed the database name, modify the value of the database attribute to use the
new name.
c Save and close the Web.config file.
3Run the iisreset command from an account with administrator privileges.
4For each machine not being reinstalled that contains a Manager Service component, update the host
name in the configuration file.
a Open the C:\Program Files (x86)\VMware\vCAC\Server\ManagerService.exe.config file
in an editor.
b Locate the string Data Source and change the original SQL Server host name to the new host
name for each instance of the connection string. For example:
server=DB-hostname.domain.name
c If you changed the database name, modify the value of the Initial Catalog attribute to use the
new name. For example:
Initial Catalog=DBName;
d Save and close the ManagerService.exe.config file.
5Restart the Manager Service.
What to do next
Restore the Identity Appliance. See Restoring the Identity Appliance.
Restoring the Identity Appliance
If a failure occurs, a system administrator restores the Identity Appliance.
System Administration
VMware, Inc. 86
You can restore the Identity Appliance either by redeploying it or by importing a snapshot of the
appliance.
nTo restore the Identity Appliance by redeploying, see Installation and Configuration documentation for
vRealize Automation.
nIf you have tenants other than the default tenant, reconfigure them.
nIf you change the hostname of the Identity Appliance, reconfigure the SSO settings on each
vCloud Automation Center Appliance management console to point to the new name.
nTo restore the Identity Appliance from a snapshot, import it from an appropriate image.
nTo restore the Identity Appliance using VMware vSphere Data Protection or Replication, follow the
steps to deploy the Identity Appliance in Installation and Configuration.
After you restore the Identity Appliance, restore the vCloud Automation Center Appliance and, if required,
your load balancers. See Restore the vRealize Appliance and Load Balancer.
Restore the vRealize Appliance and Load Balancer
If a failure occurs, a system administrator restores the vRealize Appliance. If a load balancer is used, the
administrator restores the load balancer and the virtual appliances that it manages. If a host name
changes during restoration, you must update configuration files appropriately.
You might need to restore a failed virtual appliance in the following circumstances:
nYou are running a minimal deployment and your only vRealize Appliance fails or becomes corrupted.
nYou are running a distributed deployment and some, but not all, virtual appliances fail.
nYou are running a distributed deployment and all virtual appliances fail.
How you restore a vRealize Appliance or virtual appliance load balancer depends on your deployment
type and on which appliances failed.
nIf you are using a single virtual appliance whose name is unchanged, restore the virtual appliance, or
redeploy it and restore a set of backed up files. No further steps are required.
nIf you are running a distributed deployment that uses a load balancer, and you change the name of
the virtual appliance or the IP address of the load balancer, you must redeploy the appliance and
restore its backup files. Also, you must regenerate and copy certificates for your deployment.
If you are redeploying, reconfiguring, or adding virtual appliances to a cluster, see the Installation and
Configuration documentation for vRealize Appliance for more information.
Procedure
1Redeploy the virtual appliance.
You must also configure the Appliance Database after redeploying the vRealize Appliance if it is
applicable to your system configuration.
2Restore all backed up files.
System Administration
VMware, Inc. 87

3Check the file permissions and owners for the restored files.
a Verify that the vcac user owns the files in the vcac directory and that only the vcac user has read
and write permissions. Update any settings that have changed.
b Verify that the root user owns the files in the apache2 directory and that only the owner has read
and write permissions. Update any settings that have changed.
c Verify that the vco user owns the files in the vco directory and that only the owner has read and
write permissions. Update any settings that have changed.
If the hostname or virtual IP address is unchanged, the restore procedure is finished.
4If the hostname of a stand-alone virtual appliance has changed, or if you are using a load balancer
and its virtual IP address has changed, regenerate and copy certificates for each of the virtual
appliances.
a Obtain a certificate by using a command of the following form:
C:\Program Files (x86)\VMware\vCAC\Server\Model Manager Data\Cafe
\Vcac-Config.exe GetServerCertificates -url https://VA FQDN
--FileName .\Vcac-Config-time-stamp.data -v
b Register your solution user certificate by using a command of the following form:
C:\Program Files (x86)\VMware\vCAC\Server\Model Manager Data\Cafe
\Vcac-Config.exe RegisterSolutionUser -url https://VA FQDN --Tenant vsphere.local
-cu administrator@vsphere.local -cp vmware --FileName .\Vcac-Config-time-stamp.data -v
c Move your solution user certificate information to the database by using a command of the
following form:
C:\Program Files (x86)\VMware\vCAC\Server\Model Manager Data\Cafe
\Vcac-Config.exe MoveRegistrationDataToDB -d vcac -s localhost
-f .\Vcac-Config-time-stamp.data -v
5Navigate to the vRealize Appliance management console and verify that the host, SSL, database,
and SSO settings are correct.
6Update settings that changed.
7Start the vRealize Automation server service or save the SSO settings page.
8Configure the load balancer to distribute traffic to the virtual appliances.
What to do next
Restore the IaaS Website Service or Web Load Balancer
System Administration
VMware, Inc. 88

Restoring the IaaS Website, Manager Services, and Their Load
Balancers
A system administrator restores the IaaS Website and Manager Service and their associated load
balancers. If you change a host name or IP address for a load balancer, you must update this information
in associated configuration files.
1Restore the IaaS Website Service or Web Load Balancer
If the server for your IaaS Website service or Web load balancer fails, a system administrator
restores the IaaS Web site components, and reconfigures the load balancer if host names change.
2Restore the Manager Service or Manager Service Load Balancer
If the server for your Manager Service or load balancer fails, a system administrator restores the
Manager Service and reconfigures the load balancer if host names change.
Restore the IaaS Website Service or Web Load Balancer
If the server for your IaaS Website service or Web load balancer fails, a system administrator restores the
IaaS Web site components, and reconfigures the load balancer if host names change.
You can restore the server or load balancer by reinstalling. You can also rename the server or load
balancer. If you rename the server, you must edit the configuration files to use the new host name for
components that are not being restored.
For more information see the Installation and Configuration documentation for vRealize Automation.
Procedure
1Install the Website component by using the custom IaaS installer.
Do not install the ModelManagerData component now.
To avoid losing encrypted data, use the same passphrase as used for the original installation.
2If you have backups of configuration files, copy the files to the server on which you are installing,
verifying that these settings are correct for your current deployment.
3If you changed the hostname when you reinstalled the Website machine or load balancer, update the
host name in the associated configuration files.
If your deployment does not use a load balancer, the address is the hostname of the machine where
the Model Manager Data component is installed. For an environment with a Web load balancer, use
the Website load balancer address.
File Path Machine Type
<vCAC
Folder>\Server\Website\Web.config
Machines where the Website component is installed.
<vCAC
Folder>\Server\ManagerService.exe
.config
Machines that have a Manager Service Component installed.
System Administration
VMware, Inc. 89
File Path Machine Type
<vCAC Folder>\Distributed
Execution Manager\<DEM
Name>\DynamicOps.DEM.exe.config
Machines that have DEM Worker or DEM Orchestrator installed.
<vCAC Folder>\Agents\<Agent
Name>\<Agent Config File>
All machines and agents that are installed.
4For each file, locate the key="repositoryAddress" line, and change the value of the value
attribute to point to your Web site address.
For example:
value="https://myWebsite.myhostname.name:Port/repository/
5If you are reinstalling the primary IaaS Website component and you have a backup of Meta Model
data, copy the data to the new Web site.
Do not perform this step if you are reinstalling a secondary Website component.
Copy the following folders from the installation folder at (<vCAC Folder>\Server\):
nModel Manager Data folder
nConfigTool folder
Restore the Manager Service or Manager Service Load Balancer
If the server for your Manager Service or load balancer fails, a system administrator restores the Manager
Service and reconfigures the load balancer if host names change.
If the server for your Manager Service or load balancer fails, you can restore it by reinstalling. If you
rename the server or load balancer, you must edit the configuration files for components not being
restored so that they use the new hostname.
Prerequisites
Restore the IaaS Website Service or Web Load Balancer.
Procedure
1Reinstall all applicable Manager Service machines.
a Verify that the fully qualified domain names (FQDNs) for databases are correct for the restore
location.
b Verify that the FQDN for the Manager Server, not the load balancer, matches the FQDN for the
local host.
c Verify that the passphrase is the same as the one used in the original installation.
System Administration
VMware, Inc. 90
2If the Manager Service hostname or load balancer hostname has changed, update all DEM
configuration files.
a On the server that hosts the agent or DEM, open the DynamicOps.DEM.exe.config file in an
editor.
The file location is as follows, where DEO is the name of the Distributed Execution Manager
Orchestrator for the Distributed Execution Manager Worker.
C:\Program Files (x86)\VMware\vCAC\Distributed Execution Manager\DEO
Name\DynamicOps.DEO.exe.config
b Locate the endpoint element and change the value of the address attribute to the new Manager
Service or Manager Service Load Balancer hostname.
For example, address="https://MSHostName.domain.name/VMPS.
c Repeat this step for each agent or DEM in your deployment.
3If the Manager Service hostname or load balancer hostname has changed, update all agent
configuration files.
a On the server that hosts the agent, open the DynamicOps.DEM.exe.config file in an editor.
The file location is as follows, where DEO is the name of the Distributed Execution Manager
Orchestrator for the Distributed Execution Manager Worker.
C:\Program Files (x86)\VMware\vCAC\Agents\Agent Name\DynamicOps.Agent
Name.exe.config
b Locate the endpoint element and change the value of the address attribute to the new Manager
Service or Manager Service Load Balancer hostname.
For example: address="https://MSHostName.domain.name/VMPS
c Repeat this step for each agent in your deployment.
4For every ManagerService.exe.config file, restart the service.
What to do next
Reinstall the DEM Orchestrator and the DEM Workers
Reinstall the DEM Orchestrator and the DEM Workers
If a failure occurs, a system administrator reinstalls all DEMs.
Follow the instructions in Installation and Configuration for installing a DEM orchestrator and DEM
workers.
System Administration
VMware, Inc. 91

When you reinstall a DEM worker or orchestrator you might want to use the same names as used
previously. If you specify names that were used previously, you receive a message similar to the following
message.
DEM name already exists. Click yes to enter a different name for
this DEM. Click No if you are restoring or reinstalling a DEM with
the same name.
Click No to reuse the name and continue with the installation.
What to do next
Reinstall the IaaS Agents.
Reinstall the IaaS Agents
The system administrator reinstalls all IaaS agents that need to be restored.
After you reinstall the DEM Orchestrator and the DEM Workers, reinstall IaaS agents. For instructions on
installing IaaS agents, see Installation and Configuration.
When you reinstall vSphere agents, keep the same endpoint name used at installation time.
System Administration
VMware, Inc. 92
