Configuring VRealize Automation 7.4 V Realize 74 Configuration
User Manual: Pdf vRealize Automation - 7.4 - Configuring User Guide for VMware vRealize Software, Free Instruction Manual
Open the PDF directly: View PDF ![]() .
.
Page Count: 621 [warning: Documents this large are best viewed by clicking the View PDF Link!]
- Configuring vRealize Automation
- Contents
- Configuring vRealize Automation
- External Preparations for Blueprint Provisioning
- Preparing Your Environment for vRealize Automation Management
- Checklist for Preparing NSX Network and Security Configuration
- Checklist For Providing Third-Party IPAM Provider Support
- Checklist for Configuring Containers for vRealize Automation
- Preparing Your vCloud Director Environment for vRealize Automation
- Preparing Your vCloud Air Environment for vRealize Automation
- Preparing Your Amazon AWS Environment
- Preparing Red Hat OpenStack Network and Security Features
- Preparing Your SCVMM Environment
- Configure Network-to-Azure VPC Connectivity
- Preparing for Machine Provisioning
- Choosing a Machine Provisioning Method to Prepare
- Checklist for Running Visual Basic Scripts During Provisioning
- Using vRealize Automation Guest Agent in Provisioning
- Checklist for Preparing to Provision by Cloning
- Preparing for vCloud Air and vCloud Director Provisioning
- Preparing for Linux Kickstart Provisioning
- Preparing for SCCM Provisioning
- Preparing for WIM Provisioning
- Preparing for Virtual Machine Image Provisioning
- Preparing for Amazon Machine Image Provisioning
- Scenario: Prepare vSphere Resources for Machine Provisioning in Rainpole
- Preparing for Software Provisioning
- Preparing Your Environment for vRealize Automation Management
- Tenant and Resource Preparations for Blueprint Provisioning
- Configuring Tenant Settings
- Choosing Directories Management Configuration Options
- Directories Management Overview
- Using Directories Management to Create an Active Directory Link
- Configure an Active Directory over LDAP/IWA Link
- Configure an OpenLDAP Directory Connection
- Configure Directories Management for High Availability
- Configure a Bi Directional Trust Relationship Between vRealize Automation and Active Directory
- Configure SAML Federation Between Directories Management and SSO2
- Add Users or Groups to an Active Directory Connection
- Select Attributes to Sync with Directory
- Add Memory to Directories Management
- Create a Domain Host Lookup File to Override DNS Service Location (SRV) Lookup
- Configure Just-in-Time User Provisioning
- Managing User Attributes that Sync from Active Directory
- Managing Connectors and Connector Clusters
- Join a Connector Machine to a Domain
- About Domain Controller Selection
- Managing Access Policies
- Configuring Additional Identity Provider Connections
- Integrating Alternative User Authentication Products with Directories Management
- Configuring SecurID for Directories Management
- Configuring RADIUS for Directories Management
- Configuring a Certificate or Smart Card Adapter for Use with Directories Management
- Configuring a Third-Party Identity Provider Instance to Authenticate Users
- Managing Authentication Methods to Apply to Users
- Configuring Kerberos for Directories Management
- Upgrading External Connectors for Directories Management
- Scenario: Configure an Active Directory Link for a Highly Available vRealize Automation
- Configure External Connectors for Smart Card and Third-party Identity Provider Authentication in vRealize Automation
- Create a Multi Domain or Multi Forest Active Directory Link
- Configuring Groups and User Roles
- Create Additional Tenants
- Delete a Tenant
- Configuring Security Settings for Multi-tenancy
- Configuring Custom Branding
- Checklist for Configuring Notifications
- Configuring Global Email Servers for Notifications
- Add a Tenant-Specific Outbound Email Server
- Add a Tenant-Specific Inbound Email Server
- Override a System Default Outbound Email Server
- Override a System Default Inbound Email Server
- Revert to System Default Email Servers
- Configure Notifications
- Customize the Date for Email Notification for Machine Expiration
- Configuring Templates for Automatic IaaS Emails
- Subscribe to Notifications
- Create a Custom RDP File to Support RDP Connections for Provisioned Machines
- Scenario: Add Datacenter Locations for Cross Region Deployments
- Configuring vRealize Orchestrator
- Choosing Directories Management Configuration Options
- Configuring Resources
- Checklist for Configuring IaaS Resources
- Configuring Endpoints
- Choosing an Endpoint Scenario
- Endpoint Settings Reference
- Create a vSphere Endpoint
- Create an NSX Endpoint and Associate to a vSphere Endpoint
- Create a vCloud Air Endpoint
- Create a vCloud Director Endpoint
- Create an Amazon Endpoint
- Create a Proxy Endpoint and Associate to a Cloud Endpoint
- Create a Proxy Endpoint for OVF Host Web Site
- Create a vRealize Orchestrator Endpoint
- Create a vRealize Operations Manager Endpoint
- Create a Third-Party IPAM Provider Endpoint
- Create a Microsoft Azure Endpoint
- Create a Puppet Endpoint
- Create a Hyper-V (SCVMM) Endpoint
- Create an OpenStack Endpoint
- Create a Hyper-V, XenServer, or Xen Pool Endpoint
- Considerations When Using Test Connection
- Import or Export Endpoints Programmatically
- Viewing Endpoint Sources and Running Data Collection
- Considerations When Working With Upgraded or Migrated Endpoints
- Considerations When Deleting Endpoints
- Troubleshooting Attached vSphere Endpoint Cannot be Found
- Create a Fabric Group
- Configure Machine Prefixes
- Creating a Network Profile
- Using Network Profiles to Control IP Address Ranges
- Understanding CSV File Format for Importing Network Profile IP Addresses
- Creating an External Network Profile For an Existing Network
- Creating a Routed Network Profile For an On-Demand Network
- Creating a NAT Network Profile For an On-Demand Network
- Releasing IP Addresses By Destroying Provisioned Machines
- Configuring Reservations and Reservation Policies
- Reservations
- Choosing a Reservation Scenario
- Creating Cloud Category Reservations
- Creating Virtual Category Reservations
- Edit a Reservation to Assign a Network Profile
- Reservation Policies
- Storage Reservation Policies
- Reservations
- Workload Placement
- Managing Key Pairs
- Scenario: Apply a Location to a Compute Resource for Cross Region Deployments
- Provisioning a vRealize Automation Deployment Using a Third-Party IPAM Provider
- Configuring Endpoints
- Configuring XaaS Resources
- Creating and Configuring Containers
- Installing Additional Plug-Ins on the Default vRealize Orchestrator Server
- Working With Active Directory Policies
- Checklist for Configuring IaaS Resources
- User Preferences for Notifications and Delegates
- Configuring Tenant Settings
- Providing Service Blueprints to Users
- Designing Blueprints
- Building Your Design Library
- Designing Machine Blueprints
- Space-Efficient Storage for Virtual Provisioning
- Understanding and Using Blueprint Parameterization
- Configure a Machine Blueprint
- Machine Blueprint Settings
- Designing Blueprints with NSX Settings
- New Blueprint and Blueprint Properties Page Settings with NSX
- Configuring Network and Security Component Settings
- Using Network Components in the Design Canvas
- Using Load Balancer Components in the Design Canvas
- Using Security Components in the Design Canvas
- Associating Network and Security Components
- Configuring a Blueprint to Provision from an OVF
- Using Container Components in Blueprints
- Creating Microsoft Azure Blueprints and Incorporating Resource Actions
- Creating Puppet Enabled vSphere Blueprints
- Add RDP Connection Support to Your Windows Machine Blueprints
- Scenario: Add Active Directory Cleanup to Your CentOS Blueprint
- Scenario: Allow Requesters to Specify Machine Host Name
- Scenario: Enable Users to Select Datacenter Locations for Cross Region Deployments
- Designing Software Components
- Designing XaaS Blueprints and Resource Actions
- vRealize Orchestrator Integration in vRealize Automation
- List of vRealize Orchestrator Plug-Ins
- Creating XaaS Blueprints and Resource Actions
- Mapping Other Resources to Work with XaaS Resource Actions
- Designing Forms for XaaS Blueprints and Actions
- XaaS Examples and Scenarios
- Create an XaaS Blueprint and Action for Creating and Modifying a User
- Create and Publish an XaaS Action to Migrate a Virtual Machine
- Create an XaaS Action to Migrate a Virtual Machine With vMotion
- Create and Publish an XaaS Action to Take a Snapshot
- Create and Publish an XaaS Action to Start an Amazon Virtual Machine
- Troubleshooting Incorrect Accents and Special Characters in XaaS Blueprints
- Publishing a Blueprint
- Designing Machine Blueprints
- Working with Blueprints Programmatically
- Assembling Composite Blueprints
- Customizing Blueprint Request Forms
- Managing the Service Catalog
- Checklist for Configuring the Service Catalog
- Creating a Service
- Working with Catalog Items and Actions
- Creating Entitlements
- Working with Approval Policies
- Examples of Approval Policies Based on the Virtual Machine Policy Type
- Example of Actions with Approval Policies Applied in a Composite Deployment
- Example of an Approval Policy in Multiple Entitlements
- Processing Approval Policies in the Service Catalog
- Create an Approval Policy
- Modify an Approval Policy
- Deactivate an Approval Policy
- Delete an Approval Policy
- Scenario: Create and Apply CentOS with MySQL Approval Policies
- Request Machine Provisioning By Using a Parameterized Blueprint
- Scenario: Make the CentOS with MySQL Application Blueprint Available in the Service Catalog
- Managing Deployed Catalog Items
- Running Actions for Provisioned Resources
- Action Menu Commands for Provisioned Resources
- Configure a Metrics Provider
- Send Reclamation Requests
- Track Reclamation Requests
- Change the Reservation of a Managed Machine
- Create a Snapshot of Your Machine
- Connect Remotely to a Machine
- Configuring Remote Consoles for vSphere with Untrusted SSL Certificates
- Force Destroy a Deployment After a Failed Destroy Request
- Troubleshooting Missing Actions in the Resource Actions Menu
- Troubleshooting a Failed Deployment That Includes a vRealize Orchestrator Workflow
- Specify Machine Reconfiguration Settings and Considerations for Reconfiguration
- Reconfigure a Load Balancer in a Deployment
- Change NAT Rules in a Deployment
- Add or Remove Security Items in a Deployment
- Display All NAT Rules for an Existing NSX Edge
- Running Actions for Provisioned Resources
Configuring vRealize
Automation
12 April 2018
vRealize Automation 7.4
Configuring vRealize Automation
VMware, Inc. 2
You can find the most up-to-date technical documentation on the VMware website at:
https://docs.vmware.com/
If you have comments about this documentation, submit your feedback to
docfeedback@vmware.com
Copyright © 2015–2018 VMware, Inc. All rights reserved. Copyright and trademark information.
VMware, Inc.
3401 Hillview Ave.
Palo Alto, CA 94304
www.vmware.com
Contents
Configuring vRealize Automation 6
1External Preparations for Blueprint Provisioning 7
Preparing Your Environment for vRealize Automation Management 7
Checklist for Preparing NSX Network and Security Configuration 8
Checklist For Providing Third-Party IPAM Provider Support 12
Checklist for Configuring Containers for vRealize Automation 16
Preparing Your vCloud Director Environment for vRealize Automation 17
Preparing Your vCloud Air Environment for vRealize Automation 17
Preparing Your Amazon AWS Environment 18
Preparing Red Hat OpenStack Network and Security Features 24
Preparing Your SCVMM Environment 25
Configure Network-to-Azure VPC Connectivity 26
Preparing for Machine Provisioning 27
Choosing a Machine Provisioning Method to Prepare 28
Checklist for Running Visual Basic Scripts During Provisioning 30
Using vRealize Automation Guest Agent in Provisioning 31
Checklist for Preparing to Provision by Cloning 39
Preparing for vCloud Air and vCloud Director Provisioning 52
Preparing for Linux Kickstart Provisioning 53
Preparing for SCCM Provisioning 56
Preparing for WIM Provisioning 57
Preparing for Virtual Machine Image Provisioning 64
Preparing for Amazon Machine Image Provisioning 65
Scenario: Prepare vSphere Resources for Machine Provisioning in Rainpole 67
Preparing for Software Provisioning 70
Preparing to Provision Machines with Software 71
Scenario: Prepare a vSphere CentOS Template for Clone Machine and Software Component
Blueprints 74
Scenario: Prepare for Importing the Dukes Bank for vSphere Sample Application Blueprint 78
2Tenant and Resource Preparations for Blueprint Provisioning 83
Configuring Tenant Settings 83
Choosing Directories Management Configuration Options 84
Upgrading External Connectors for Directories Management 144
Scenario: Configure an Active Directory Link for a Highly Available vRealize Automation 152
Configure External Connectors for Smart Card and Third-party Identity Provider Authentication
in vRealize Automation 154
VMware, Inc. 3
Create a Multi Domain or Multi Forest Active Directory Link 161
Configuring Groups and User Roles 163
Create Additional Tenants 169
Delete a Tenant 171
Configuring Security Settings for Multi-tenancy 172
Configuring Custom Branding 172
Checklist for Configuring Notifications 174
Create a Custom RDP File to Support RDP Connections for Provisioned Machines 185
Scenario: Add Datacenter Locations for Cross Region Deployments 185
Configuring vRealize Orchestrator 187
Configuring Resources 191
Checklist for Configuring IaaS Resources 191
Configuring XaaS Resources 310
Creating and Configuring Containers 322
Installing Additional Plug-Ins on the Default vRealize Orchestrator Server 340
Working With Active Directory Policies 340
User Preferences for Notifications and Delegates 343
3Providing Service Blueprints to Users 345
Designing Blueprints 345
Building Your Design Library 347
Designing Machine Blueprints 349
Designing Software Components 435
Designing XaaS Blueprints and Resource Actions 447
Publishing a Blueprint 506
Working with Blueprints Programmatically 507
Exporting and Importing Blueprints and Content 507
Downloading and Configuring the Supplied Standalone Blueprint 513
Assembling Composite Blueprints 513
Understanding Nested Blueprint Behavior 515
Using Machine Components and Software Components When Assembling a Blueprint 518
Creating Property Bindings Between Blueprint Components 519
Creating Dependencies and Controlling the Order of Provisioning 520
Customizing Blueprint Request Forms 521
Create a Custom Request Form with Active Directory Options 524
Custom Form Designer Field Properties 532
Using vRealize Orchestrator Actions in the Custom Forms Designer 537
Using the Data Grid Element in the Custom Forms Designer 539
Using External Validation in the Custom Forms Designer 542
Managing the Service Catalog 546
Checklist for Configuring the Service Catalog 547
Creating a Service 548
Configuring vRealize Automation
VMware, Inc. 4
Working with Catalog Items and Actions 550
Creating Entitlements 553
Working with Approval Policies 560
Request Machine Provisioning By Using a Parameterized Blueprint 585
Scenario: Make the CentOS with MySQL Application Blueprint Available in the Service Catalog 586
Managing Deployed Catalog Items 590
Running Actions for Provisioned Resources 590
Specify Machine Reconfiguration Settings and Considerations for Reconfiguration 610
Reconfigure a Load Balancer in a Deployment 617
Change NAT Rules in a Deployment 618
Add or Remove Security Items in a Deployment 620
Display All NAT Rules for an Existing NSX Edge 621
Configuring vRealize Automation
VMware, Inc. 5
Configuring vRealize Automation
Configuring vRealize Automation provides information about configuring vRealize Automation and your
external environments to prepare for vRealize Automation provisioning and catalog management.
Intended Audience
This information is intended for IT professionals who are responsible for configuring vRealize Automation
environment, and for infrastructure administrators who are responsible for preparing elements in their
existing infrastructure for use in vRealize Automation provisioning. The information is written for
experienced Windows and Linux system administrators who are familiar with virtual machine technology
and datacenter operations.
VMware Technical Publications Glossary
VMware Technical Publications provides a glossary of terms that might be unfamiliar to you. For
definitions of terms as they are used in VMware technical documentation, go to
http://www.vmware.com/support/pubs.
VMware, Inc. 6
External Preparations for
Blueprint Provisioning 1
You may need to create or prepare some elements outside of vRealize Automation to support catalog
item provisioning. For example, if you want to provide a catalog item for provisioning a clone machine,
you need to create a template on your hypervisor to clone from.
This chapter includes the following topics:
nPreparing Your Environment for vRealize Automation Management
nConfigure Network-to-Azure VPC Connectivity
nPreparing for Machine Provisioning
nPreparing for Software Provisioning
Preparing Your Environment for vRealize Automation
Management
Depending on your integration platform, you might have to make some configuration changes before you
can bring your environment under vRealize Automation management, or before you can leverage certain
features.
Table 1‑1. Preparing Your Environment for vRealize Automation Integration
Environment Preparations
NSX
If you want to leverage NSX to manage
networking and security features of machines
provisioned with vRealize Automation, prepare
your NSX instance for integration. See
Checklist for Preparing NSX Network and
Security Configuration.
vCloud Director Install and configure your vCloud Director
instance, set up your vSphere and cloud
resources, and identify or create appropriate
credentials to provide vRealize Automation with
access to your vCloud Director environment.
See Preparing Your vCloud Director
Environment for vRealize Automation.
VMware, Inc. 7
Table 1‑1. Preparing Your Environment for vRealize Automation Integration (Continued)
Environment Preparations
vCloud Air Register for your vCloud Air account, set up
your vCloud Air environment, and identify or
create appropriate credentials to provide
vRealize Automation with access to your
environment. See Preparing for vCloud Air and
vCloud Director Provisioning.
Amazon AWS Prepare elements and user roles in your
Amazon AWS environment for use in
vRealize Automation, and understand how
Amazon AWS features map to
vRealize Automation features. See Preparing
Your Amazon AWS Environment.
Microsoft Azure Configure networking to use VPN tunneling to
support Software components on Azure
blueprints. See Configure Network-to-Azure
VPC Connectivity.
Red Hat OpenStack If you want to leverage Red Hat OpenStack to
manage networking and security features of
machines provisioned with
vRealize Automation, prepare your
Red Hat OpenStack instance for integration.
See Preparing Red Hat OpenStack Network
and Security Features.
SCVMM Configure storage, networking, and understand
template and hardware profile naming
restrictions. See Preparing Your SCVMM
Environment.
External IPAM Providers Register an external IPAM provider package or
plug-in, run the configuration workflows, and
register the IPAM solution as a new
vRealize Automation endpoint. See Checklist
For Providing Third-Party IPAM Provider
Support.
All other environments You do not need to make changes to your
environment. You can begin preparing for
machine provisioning by creating templates,
boot environments, or machine images. See
Preparing for Machine Provisioning.
Checklist for Preparing NSX Network and Security Configuration
Before you can use NSX network and security options in vRealize Automation, you must configure the
external NSX network and security environment that you intend to use.
Configuring vRealize Automation
VMware, Inc. 8

Beginning in vRealize Automation 7.3, you no longer need to install the NSX plug-in to obtain integrated
NSX functionality. All integrated NSX functionality is now sourced directly from the NSX APIs, rather than
from the NSX plug-in. However, if you want to use XaaS to extend your vRealize Automation and NSX
integration, you must install the NSX plug-in in vRealize Orchestrator as described here.
In preparation for using NSX network, security, and load balancing capabilities in vRealize Automation,
when using NSX Manager credentials you must use the NSX Manager administrator account.
For related information about NSX, see NSX documentation at
https://www.vmware.com/support/pubs/nsx_pubs.html and public blogs and articles such as Integrating
NSX with vRealize Automation.
Much of the vRealize Automation support for network and security configuration that you specify in
blueprints and reservations is configured externally and made available to vRealize Automation after data
collection is run on the compute resources.
For more information about NSX settings that you can configure for vRealize Automation blueprints, see
Configuring Network and Security Component Settings.
Table 1‑2. Preparing NSX Networking and Security Checklist
Task Location Details
Configure NSX
network settings,
including gateway
and transport zone
settings.
Configure network settings in NSX. See the NSX Administration Guide.
Create NSX
security policies,
tags, and groups.
Configure security settings in NSX. See the NSX Administration Guide.
Configure NSX
load balancer
settings.
Configure an NSX load balancer to work with
vRealize Automation.
See the NSX Administration Guide.
Also see Custom Properties for
Networking in Custom Properties
Reference.
For cross-virtual
center
deployments, verify
that the compute
NSX manager has
the primary NSX
manager role.
vRealize Automation provisioning requires that the compute
NSX manager for the region in which the machines reside has
the primary NSX manager role.
See Administrator Requirements for
Provisioning NSX Universal Objects.
See the NSX Installation Guide and NSX
Administration Guide for information about
cross-virtual center deployment, universal
objects, and the primary NSX manager
role.
Install the NSX Plug-In on vRealize Orchestrator
Installing the NSX plug-in requires that you download the vRealize Orchestrator installer file, use the
vRealize Orchestrator Configuration interface to upload the plug-in file, and install the plug-in on a
vRealize Orchestrator server.
For general plug-in update and troubleshooting information, see vRealize Orchestrator documentation.
Configuring vRealize Automation
VMware, Inc. 9
Prerequisites
Beginning in vRealize Automation 7.3, you no longer need to install the NSX plug-in to obtain integrated
NSX functionality. All integrated NSX functionality is now sourced directly from the NSX APIs, rather than
from the NSX plug-in. However, if you want to use XaaS to extend your vRealize Automation and NSX
integration, you must install the NSX plug-in in vRealize Orchestrator as described here.
If you are using an embedded vRealize Orchestrator that already contains an installed NSX plug-in, you
can skip this procedure.
nVerify that you are running a supported vRealize Orchestrator instance.
For information about setting up vRealize Orchestrator, see Installing and Configuring VMware
vRealize Orchestrator.
nVerify that you have credentials for an account with permission to install vRealize Orchestrator plug-
ins and to authenticate through vCenter Single Sign-On.
nVerify that you installed the vRealize Orchestrator client and that you can log in with Administrator
credentials.
nConfirm the correct version of the NSX plug-in in the vRealize Automation support matrix.
Procedure
1Download the plug-in file to a location accessible from the vRealize Orchestrator server.
The plug-in installer file name format, with appropriate version values, is o11nplugin-
nsx-1.n.n.vmoapp. Plug-in installation files for the NSX networking and security product are
available from the VMware product download site at http://vmware.com/web/vmware/downloads.
2Open a browser and start the vRealize Orchestrator configuration interface.
An example of the URL format is https://orchestrator_server.com:8283.
3Click Plug-Ins in the left pane and scroll down to the Install new plug-in section.
4In the Plug-In file text box, browse to the plug-in installer file and click Upload and install.
The file must be in .vmoapp format.
5At the prompt, accept the license agreement in the Install a plug-in pane.
6In the Enabled plug-ins installation status section, confirm that the correct NSX plug-in name is
specified.
See vRealize Automation Support Matrix for version information.
The status Plug-in will be installed at next server startup, appears.
7Restart the vRealize Orchestrator server service.
8Restart the vRealize Orchestrator configuration interface.
9Click Plug-Ins and verify that the status changed to Installation OK.
Configuring vRealize Automation
VMware, Inc. 10
10 Start the vRealize Orchestrator client application, log in, and use the Workflow tab to navigate
through the library to the NSX folder.
You can browse through the workflows that the NSX plug-in provides.
What to do next
Create a vRealize Orchestrator endpoint in vRealize Automation to use for running workflows. See Create
a vRealize Orchestrator Endpoint.
Run a vRealize Orchestrator and NSX Security Workflow
Before you use the NSX security policy features from vRealize Automation, an administrator must run the
Enable security policy support for overlapping subnets workflow in vRealize Orchestrator.
Security policy support for the overlapping subnets workflow is applicable to an NSX 6.1 and later
endpoint. Run this workflow only once to enable this support.
Prerequisites
nVerify that a vSphere endpoint is registered with an NSX endpoint. See Create a vSphere Endpoint.
nLog in to the vRealize Orchestrator client as an administrator.
nVerify that you ran the Create NSX endpoint vRO work flow.
Procedure
1Click the Workflow tab and select NSX > NSX workflows for VCAC.
2Run the Create NSX endpoint workflow and respond to prompts.
3Run the Enable security policy support for overlapping subnets workflow.
4Select the NSX endpoint as the input parameter for the workflow.
Use the IP address you specified when you created the vSphere endpoint to register an NSX
instance.
After you run this workflow, the distributed firewall rules defined in the security policy are applied only on
the vNICs of the security group members to which this security policy is applied.
What to do next
Apply the applicable security features for the blueprint.
Administrator Requirements for Provisioning NSX Universal Objects
To provision machines in a cross vCenter NSX environment when using NSX universal objects, you must
provision to a vCenter in which the NSX compute manager has the primary role.
In a cross vCenter NSX environment, you can have multiple vCenter servers, each of which must be
paired with its own NSX manager. One NSX manager is assigned the role of primary NSX manager, and
the others are assigned the role of secondary NSX manager.
Configuring vRealize Automation
VMware, Inc. 11
The primary NSX manager can create universal objects, such as universal logical switches. These
objects are synchronized to the secondary NSX managers. You can view these objects from the
secondary NSX managers, but you cannot edit them there. You must use the primary NSX manager to
manage universal objects. The primary NSX manager can be used to configure any of the secondary
NSX managers in the environment.
For more information about the NSX cross-vCenter environment, see Overview of Cross-vCenter
Networking and Security in the NSX Administration Guide in the NSX product documentation.
For a vSphere (vCenter) endpoint that is associated to the NSX endpoint of a primary NSX manager,
vRealize Automation supports NSX local objects, such as local logical switches, local edge gateways,
and local load balancers, security groups, and security tags. It also supports NAT one-to-one and one-to-
many networks with universal transport zone, routed networks with universal transport zone and universal
distributed logical routers (DLRs), and a load balancer with any type of network.
vRealize Automation does not support NSX existing and on-demand universal security groups or tags.
To provision local on-demand networks as the primary NSX manager, use a vCenter-specific local
transport zone. You can configure vRealize Automation reservations to use the local transport zone and
virtual wires for deployments in that local vCenter.
If you connect a vSphere (vCenter) endpoint to a corresponding secondary NSX manager endpoint, you
can only provision and use local objects.
You can only associate an NSX endpoint to one vSphere endpoint. This association constraint means that
you cannot provision a universal on-demand network and attach it to vSphere machines that are
provisioned on different vCenters.
vRealize Automation can consume an NSX universal logical switch as an external network. If a universal
switch exists, it is data-collected and then attached to or consumed by each machine in the deployment.
nProvisioning an on-demand network to a universal transport zone can create a new universal logical
switch.
nProvisioning an on-demand network to a universal transport zone on the primary NSX manager
creates a universal logical switch.
nProvisioning an on-demand network to a universal transport zone on a secondary NSX manager fails,
as NSX cannot create a universal logical switch on a secondary NSX manager.
See the VMware Knowledge Base article Deployment of vRealize Automation blueprints with NSX objects
fail (2147240) at http://kb.vmware.com/kb/2147240 for more information about NSX universal objects.
Checklist For Providing Third-Party IPAM Provider Support
You can obtain IP addresses and ranges for use in network profile definition from a supported third-party
IPAM provider, such as Infoblox.
Before you can create and use an external IPAM provider endpoint in a vRealize Automation network
profile, you must download or otherwise obtain a vRealize Orchestrator IPAM provider plug-in or package,
import the plug-in or package and run required workflows in vRealize Orchestrator, and register the IPAM
solution as a vRealize Automation endpoint.
Configuring vRealize Automation
VMware, Inc. 12

For an overview of the provisioning process for using an external IPAM provider to supply a range of
possible IP addresses, see Provisioning a vRealize Automation Deployment Using a Third-Party IPAM
Provider.
Table 1‑3. Preparing for External IPAM Provider Support Checklist
Task Description Details
Obtain and
import the
supported external
IPAM Provider
vRealize
Orchestrator plug-
in.
Download the IPAM provider plug-in or package, for example
The Infoblox IPAM Plug-in for vRealize Orchestrator plug-in
and supporting documentation, from the VMware Solution
Exchange
(https://solutionexchange.vmware.com/store/category_group
s/cloud-management) and import the plug-in or package to
vRealize Orchestrator.
If the VMware Solution Exchange does not contain the IPAM
provider package that you need, you can create your own by
using a third-party IPAM Solution Provider SDK and supporting
documentation.
A vRealize Automation version-specific third-party IPAM
Solution Provider SDK, supporting documentation, and
associated starter package for vRealize Orchestrator and
vRealize Automation is available at
https://code.vmware.com/sdks or
https://code.vmware.com/samples.
See Obtain and Import a Third-Party IPAM
Provider Package in vRealize
Orchestrator.
Run the required
configuration
workflows and
register the external
IPAM solution as a
vRealize
Automation
endpoint.
Run the vRealize Orchestrator configuration workflows and
register the IPAM provider endpoint type in
vRealize Orchestrator.
See Run Workflow to Register Third-Party
IPAM Endpoint Type in vRealize
Orchestrator.
Obtain and Import a Third-Party IPAM Provider Package in
vRealize Orchestrator
To prepare to define and use an third-party IPAM provider endpoint, you must first obtain the third-party
IPAM provider package and import the package in vRealize Orchestrator.
You can download and use an existing third-party IP Address Management provider plug-in, such as
Infoblox IPAM. You can also create your own third-party IPAM plug-in or package by using a VMware-
supplied starter package and accompanying SDK documentation for use with another third-party IPAM
solution provider, such as Bluecat.
nObtain the existing Infoblox IPAM Plug-in for vRealize Orchestrator plug-in and supporting
documentation from marketplace.vmware.com. The download also contains documentation for
installing and using the plug-in.
Configuring vRealize Automation
VMware, Inc. 13
nCreate your own third-party IPAM solution by obtaining and using a third-party IPAM Solution Provider
SDK, supporting documentation, and an associated starter package for vRealize Orchestrator and
vRealize Automation from code.vmware.com/web/sdk on the vRealize Automation Third-Party IPAM
Integration SDK 7.3 page.
After you import the third-party IPAM provider plug-in or package in vRealize Orchestrator, you must run
the required workflows, and register the IPAM endpoint type in vRealize Orchestrator.
For more information about importing plug-ins and packages and running vRealize Orchestrator
workflows, see Using the VMware vRealize Orchestrator Client. For more information about extending
vRealize Automation with vRealize Orchestrator plug-ins, packages, and workflows, see Life Cycle
Extensibility.
This step sequence uses the Infoblox IPAM plug-in as an example. Your step sequence may differ
depending on your vRealize Automation or plug-in version.
Prerequisites
nDownload the package or plug-in from marketplace.vmware.com.
nLog in to vRealize Orchestrator with administrator privileges for importing, configuring, and registering
a vRealize Orchestrator plug-in or package.
Procedure
1Open the marketplace.vmware.com site.
2Locate and download the plug-in or package.
For example, import the Infoblox plug-in that supports the Infoblox third-party IPAM endpoint in
vRealize Orchestrator and vRealize Automation 7.1 and later.
a In the Publisher category, select Infoblox and click Apply.
b Select The Infoblox Plug-in for vRealize Orchestrator.
c Click Tech Specs and review the prerequisites.
d Click Try for additional information and to receive an email that contains a link to the download.
e Download the zip file as specified in the emailed instructions.
Version 4.0 and greater of the plug-in supports vRealize Automation 7.1 and greater. The zip file
also contains documentation about the plug-in.
3In vRealize Orchestrator, click the Administrator tab and click Import package.
4Select the package to import.
5Select all workflows and artifacts and click Import selected elements.
What to do next
Run Workflow to Register Third-Party IPAM Endpoint Type in vRealize Orchestrator.
Configuring vRealize Automation
VMware, Inc. 14

Run Workflow to Register Third-Party IPAM Endpoint Type in
vRealize Orchestrator
Run the registration workflow in vRealize Orchestrator to support vRealize Automation use of the third-
party IPAM provider and register the IPAM endpoint type for use in vRealize Automation.
Prerequisites
nObtain and Import a Third-Party IPAM Provider Package in vRealize Orchestrator
nVerify that you are logged in to vRealize Orchestrator with the authority to run registration workflows.
nBe prepared to enter the vRealize Automation administrator credentials when prompted by the
registration workflow. When you register IPAM endpoint types in vRealize Orchestrator, you are
prompted to enter vRealize Automation administrator credentials.
Procedure
1In vRealize Orchestrator, click the Design tab, select Administrator > Library, and select IPAM
Service Package SDK.
Each IPAM provider package is uniquely named and contains unique workflows. Each provider
supplies their own registration workflow. While the workflow names might be similar between provider
packages, the location of the workflows in vRealize Orchestrator can be different and is provider-
specific.
2For this example, run the Register IPAM Endpoint registration workflow and specify the IPAM
Infloblox endpoint type.
3At the prompt for vRealize Automation credentials, enter your vRealize Automation administrator
credentials, for example fabric administrator credentials.
You must supply the registration workflow with vRealize Automation system administrator credentials.
Even if a non-system administrator user is logged in to the vRealize Orchestrator client, if the
vRealize Automation system administrator credentials are provided to the workflow the registration
will succeed.
In this example, the package registers Infoblox as a new IPAM endpoint type in the vRealize Automation
endpoint service and makes the endpoint type available when you create or edit endpoints in
vRealize Automation.
Note If the Infoblox IPAM connection disappears from the vRealize Orchestrator Inventory tab after you
restart the vRealize Orchestrator server in the vRealize Orchestrator Control Center. To resolve this issue,
run the Create IPAM Connection workflow from the vRO admin > Library > Infoblox > vRA > Helpers
menu sequence. You can then the vRealize Orchestrator Inventory tab, select Infoblox IPAM, and
refresh the page to display the Infoblox IPAM connection.
Configuring vRealize Automation
VMware, Inc. 15

What to do next
You can now create an IPAM Infloblox type endpoint, or and endpoint for whatever third-party package or
plug-in you have just registered, in vRealize Automation. See Create a Third-Party IPAM Provider
Endpoint.
Checklist for Configuring Containers for vRealize Automation
To get started with Containers, you must configure the feature to support vRealize Automation user roles.
After you configure container definitions in Containers you can add and configure container components
in a blueprint.
Table 1‑4. Checklist for Configuring Containers for vRealize Automation
Task Details
Assign the container administrator and container architect roles. See Container roles information in Foundations and
Concepts.
Define container definitions in the Containers tab in vRealize Automation. See Configuring vRealize Automation.
Add container components and container networking components to
blueprints in the Design tab in vRealize Automation.
See Configuring vRealize Automation.
Configuring Containers Using the vRealize Automation Appliance
Xenon service information is accessible in the vRealize Automation vRealize Automation appliance (vRA
Settings > Xenon.
It contains information about the Xenon host VM, listening port, and service status. It also displays
information about clustered Xenon nodes.
You can manage the Xenon Linux service with the following CLI commands in the vRealize Automation
appliance.
Command Description
service xenon-service status Shows the status of the service as either running or stopped.
service xenon-service start Starts the service.
service xenon-service stop Stops the service.
service xenon-service restart Restarts the service.
service xenon-service get_host Shows the hostname on which the service is running.
service xenon-service get_port Shows the service port.
service xenon-service status_cluster Shows information about all clustered nodes in JSON format.
service xenon-service reset Deletes the directory where Xenon keeps all configuration files and restarts the
service.
Clustering Containers
You can use the Xenon service in conjunction with Containers for vRealize Automation to join nodes to a
cluster. If the nodes are clustered, the Xenon service connects other nodes automatically when it starts.
Configuring vRealize Automation
VMware, Inc. 16

You can monitor the cluster status on the Xenon tab in the vRealize Automation appliance or by running
the following command in a CLI:
service xenon-service status_cluster
Xenon works on quorum-based clustering. The quorum is calculated by using the (number of nodes /
2) + 1 formula.
Preparing Your vCloud Director Environment for
vRealize Automation
Before you can integrate vCloud Director with vRealize Automation, you must install and configure your
vCloud Director instance, set up your vSphere and cloud resources, and identify or create appropriate
credentials to provide vRealize Automation with access to your vCloud Director environment.
Configure Your Environment
Configure your vSphere resources and cloud resources, including virtual datacenters and networks. For
more information, see the vCloud Director documentation.
Required Credentials for Integration
Create or identify either organization administrator or system administrator credentials that your
vRealize Automation IaaS administrators can use to bring your vCloud Director environment under
vRealize Automation management as an endpoint.
User Role Considerations
vCloud Director user roles in an organization do not need to correspond with roles in vRealize Automation
business groups. If the user account does not exist in vCloud Director, vCloud Director performs a lookup
in the associated LDAP or Active Directory and creates the user account if the user exists in the identity
store. If it cannot create the user account, it logs a warning but does not fail the provisioning process. The
provisioned machine is then assigned to the account that was used to configure the vCloud Director
endpoint.
For related information about vCloud Director user management, see the vCloud Director documentation.
Preparing Your vCloud Air Environment for vRealize Automation
Before you integrate vCloud Air with vRealize Automation, you must register for your vCloud Air account,
set up your vCloud Air environment, and identify or create appropriate credentials to provide
vRealize Automation with access to your environment.
Configure Your Environment
Configure your environment as instructed in the vCloud Air documentation.
Configuring vRealize Automation
VMware, Inc. 17

Required Credentials for Integration
Create or identify either virtual infrastructure administrator or account administrator credentials that your
vRealize Automation IaaS administrators can use to bring your vCloud Air environment under
vRealize Automation management as an endpoint.
User Role Considerations
vCloud Air user roles in an organization do not need to correspond with roles in vRealize Automation
business groups. For related information about vCloud Air user management, see the vCloud Air
documentation.
Preparing Your Amazon AWS Environment
Prepare elements and user roles in your Amazon AWS environment, prepare Amazon AWS to
communicate with the guest agent and Software bootstrap agent, and understand how Amazon AWS
features map to vRealize Automation features.
Amazon AWS User Roles and Credentials Required for vRealize Automation
You must configure credentials in Amazon AWS with the permissions required for vRealize Automation to
manage your environment.
vRealize Automation requires access keys for endpoint credentials and does not support user names and
passwords.
nRole and Permission Authorization in Amazon Web Services
While the Power User role in AWS provides an AWS Directory Service user or group with full access
to AWS services and resources, it is not required. Lower privileged user roles are also supported. The
AWS security policy that meets the needs of vRealize Automation functionality is:
{
"Version": "2012-10-17",
"Statement": [{
"Effect": "Allow",
"Action": [
"ec2:DescribeInstances",
"ec2:DescribeImages",
"ec2:DescribeKeyPairs",
"ec2:DescribeVpcs",
"ec2:DescribeSubnets",
"ec2:DescribeSecurityGroups",
"ec2:DescribeVolumes",
"ec2:DescribeVpcAttribute",
"ec2:DescribeAddresses",
"ec2:DescribeAvailabilityZones",
"ec2:DescribeImageAttribute",
"ec2:DescribeInstanceAttribute",
"ec2:DescribeVolumeStatus",
Configuring vRealize Automation
VMware, Inc. 18

"ec2:DescribeVpnConnections",
"ec2:DescribeRegions",
"ec2:DescribeTags",
"ec2:DescribeVolumeAttribute",
"ec2:DescribeNetworkInterfaces",
"ec2:DescribeNetworkInterfaceAttribute",
"ec2:DisassociateAddress",
"ec2:GetPasswordData",
"ec2:ImportKeyPair",
"ec2:ImportVolume",
"ec2:CreateVolume",
"ec2:DeleteVolume",
"ec2:AttachVolume",
"ec2:ModifyVolumeAttribute",
"ec2:DetachVolume",
"ec2:AssignPrivateIpAddresses",
"ec2:UnassignPrivateIpAddresses",
"ec2:CreateKeyPair",
"ec2:DeleteKeyPair",
"ec2:CreateTags",
"ec2:AssociateAddress",
"ec2:ReportInstanceStatus",
"ec2:StartInstances",
"ec2:StopInstances",
"ec2:ModifyInstanceAttribute",
"ec2:MonitorInstances",
"ec2:RebootInstances",
"ec2:RunInstances",
"ec2:TerminateInstances",
"elasticloadbalancing:RegisterInstancesWithLoadBalancer",
"elasticloadbalancing:DeregisterInstancesFromLoadBalancer",
"elasticloadbalancing:DescribeLoadBalancerAttributes",
"elasticloadbalancing:DescribeLoadBalancers",
"elasticloadbalancing:DescribeInstanceHealth"
],
"Resource": "*"
}
]}
nAuthentication Credentials in Amazon Web Services
For management of Amazon Identity and Access Management (IAM) users and groups, you must be
configured with AWS Full Access Administrator credentials.
Configuring vRealize Automation
VMware, Inc. 19
When you create an AWS endpoint in vRA, you're prompted to enter a key and secret key. To obtain the
access key needed to create the Amazon endpoint, the administrator must either request a key from a
user who has AWS Full Access Administrator credentials or be additionally configured with the AWS Full
Access Administrator policy. See Create an Amazon Endpoint.
For information about enabling policies and roles, see the AWS Identity and Access Management (IAM)
section of Amazon Web Services product documentation.
Allow Amazon AWS to Communicate with the Software Bootstrap Agent and
Guest Agent
If you intend to provision application blueprints that contain Software, or if you want the ability to further
customize provisioned machines by using the guest agent, you must enable connectivity between your
Amazon AWS environment, where your machines are provisioned, and your vRealize Automation
environment, where the agents download packages and receive instructions.
When you use vRealize Automation to provision Amazon AWS machines with the vRealize Automation
guest agent and Software bootstrap agent, you must set up network-to-Amazon VPC connectivity so your
provisioned machines can communicate back to vRealize Automation to customize your machines.
For more information about Amazon AWS VPC connectivity options, see the Amazon AWS
documentation.
Using Optional Amazon Features
vRealize Automation supports several Amazon features, including Amazon Virtual Private Cloud, elastic
load balancers, elastic IP addresses, and elastic block storage.
Using Amazon Security Groups
Specify at least one security group when creating an Amazon reservation. Each available region requires
at least one specified security group.
A security group acts as a firewall to control access to a machine. Every region includes at least the
default security group. Administrators can use the Amazon Web Services Management Console to create
additional security groups, configure ports for Microsoft Remote Desktop Protocol or SSH, and set up a
virtual private network for an Amazon VPN.
When you create an Amazon reservation or configure a machine component in the blueprint, you can
choose from the list of security groups that are available to the specified Amazon account region. Security
groups are imported during data collection.
For information about creating and using security groups in Amazon Web Services, see Amazon
documentation.
Understanding Amazon Web Service Regions
Each Amazon Web Services account is represented by a cloud endpoint. When you create an
Amazon Elastic Cloud Computing endpoint in vRealize Automation, regions are collected as compute
resources. After the IaaS administrator selects compute resources for a business group, inventory and
state data collections occur automatically.
Configuring vRealize Automation
VMware, Inc. 20
Inventory data collection, which occurs automatically once a day, collects data about what is on a
compute resource, such as the following data:
nElastic IP addresses
nElastic load balancers
nElastic block storage volumes
State data collection occurs automatically every 15 minutes by default. It gathers information about the
state of managed instances, which are instances that vRealize Automation creates. The following are
examples of state data:
nWindows passwords
nState of machines in load balancers
nElastic IP addresses
A fabric administrator can initiate inventory and state data collection and disable or change the frequency
of inventory and state data collection.
Using Amazon Virtual Private Cloud
Amazon Virtual Private Cloud allows you to provision Amazon machine instances in a private section of
the Amazon Web Services cloud.
Amazon Web Services users can use Amazon VPC to design a virtual network topology according to your
specifications. You can assign an Amazon VPC in vRealize Automation. However, vRealize Automation
does not track the cost of using the Amazon VPC.
When you provision using Amazon VPC, vRealize Automation expects there to be a VPC subnet from
which Amazon obtains a primary IP address. This address is static until the instance is terminated. You
can also use the elastic IP pool to also attach an elastic IP address to an instance in
vRealize Automation. That would allow the user to keep the same IP if they are continually provisioning
and tearing down an instance in Amazon Web Services.
Use the AWS Management Console to create the following elements:
nAn Amazon VPC, which includes Internet gateways, routing table, security groups and subnets, and
available IP addresses.
nAn Amazon Virtual Private Network if users need to log in to Amazon machines instances outside of
the AWS Management Console.
vRealize Automation users can perform the following tasks when working with an Amazon VPC:
nA fabric administrator can assign an Amazon VPC to a cloud reservation. See Create an Amazon
EC2 Reservation.
nA machine owner can assign an Amazon machine instance to an Amazon VPC.
For more information about creating an Amazon VPC, see Amazon Web Services documentation.
Configuring vRealize Automation
VMware, Inc. 21
Using Elastic Load Balancers for Amazon Web Services
Elastic load balancers distribute incoming application traffic across Amazon Web Services instances.
Amazon load balancing enables improved fault tolerance and performance.
Amazon makes elastic load balancing available for machines provisioned using Amazon EC2 blueprints.
The elastic load balancer must be available in the Amazon Web Services,
Amazon Virtual Private Network and at the provisioning location. For example, if a load balancer is
available in us-east1c and a machine location is us-east1b, the machine cannot use the available load
balancer.
vRealize Automation does not create, manage, or monitor the elastic load balancers.
For information about creating Amazon elastic load balancers by using the
Amazon Web Services Management Console, see Amazon Web Services documentation.
Using Elastic IP Addresses for Amazon Web Services
Using an elastic IP address allows you to rapidly fail over to another machine in a dynamic
Amazon Web Services cloud environment. In vRealize Automation, the elastic IP address is available to
all business groups that have rights to the region.
An administrator can allocate elastic IP addresses to your Amazon Web Services account by using the
AWS Management Console. There are two groups of elastic IP addresses in any given a region, one
range is allocated for non-Amazon VPC instances and another range is for Amazon VPCs. If you allocate
addresses in a non-Amazon VPC region only, the addresses are not available in an Amazon VPC. The
reverse is also true. If you allocate addresses in an Amazon VPC only, the addresses are not available in
a non-Amazon VPC region.
The elastic IP address is associated with your Amazon Web Services account, not a particular machine,
but only one machine at a time can use the address. The address remains associated with your
Amazon Web Services account until you choose to release it. You can release it to map it to a specific
machine instance.
An IaaS architect can add a custom property to a blueprint to assign an elastic IP address to machines
during provisioning. Machine owners and administrators can view the elastic IP addresses assigned to
machines, and machine owners or administrators with rights to edit machines can assign an elastic IP
addresses after provisioning. However, if the address is already associated to a machine instance, and
the instance is part of the Amazon Virtual Private Cloud deployment, Amazon does not assign the
address.
For more information about creating and using Amazon elastic IP addresses, see Amazon Web Services
documentation.
Using Elastic Block Storage for Amazon Web Services
Amazon elastic block storage provides block level storage volumes to use with an Amazon machine
instance and Amazon Virtual Private Cloud. The storage volume can persist past the life of its associated
Amazon machine instance in the Amazon Web Services cloud environment.
Configuring vRealize Automation
VMware, Inc. 22
When you use an Amazon elastic block storage volume in conjunction with vRealize Automation, the
following caveats apply:
nYou cannot attach an existing elastic block storage volume when you provision a machine instance.
However, if you create a new volume and request more than one machine at a time, the volume is
created and attached to each instance. For example, if you create one volume named volume_1 and
request three machines, a volume is created for each machine. Three volumes named volume_1 are
created and attached to each machine. Each volume has a unique volume ID. Each volume is the
same size and in the same location.
nThe volume must be of the same operating system and in the same location as the machine to which
you attach it.
nvRealize Automation does not manage the primary volume of an elastic block storage-backed
instance.
For more information about Amazon elastic block storage, and details on how to enable it by using
Amazon Web Services Management Console, see Amazon Web Services documentation.
Scenario: Configure Network-to-Amazon VPC Connectivity for a Proof of
Concept Environment
As the IT professional setting up a proof of concept environment to evaluate vRealize Automation, you
want to temporarily configure network-to-Amazon VPC connectivity to support the vRealize Automation
Software feature.
Network-to-Amazon VPC connectivity is only required if you want to use the guest agent to customize
provisioned machines, or if you want to include Software components in your blueprints. For a production
environment, you would configure this connectivity officially through Amazon Web Services, but because
you are working in a proof of concept environment, you want to create temporary network-to-Amazon
VPC connectivity. You establish the SSH tunnel and then configure an Amazon reservation in
vRealize Automation to route through your tunnel.
Prerequisites
nInstall and fully configure vRealize Automation. See Installing and Configuring vRealize Automation
for the Rainpole Scenario.
nCreate an Amazon AWS security group called TunnelGroup and configure it to allow access on port
22.
nCreate or identify a CentOS machine in your Amazon AWS TunnelGroup security group and note the
following configurations:
nAdministrative user credentials, for example root.
nPublic IP address.
nPrivate IP address.
nCreate or identify a CentOS machine on the same local network as your vRealize Automation
installation.
Configuring vRealize Automation
VMware, Inc. 23

nInstall OpenSSH SSHD Server on both tunnel machines.
Procedure
1Log in to your Amazon AWS tunnel machine as the root user or similar.
2Disable iptables.
# service iptables save
# service iptables stop
# chkconfig iptables off
3Edit /etc/ssh/sshd_config to enable AllowTCPForwarding and GatewayPorts.
4Restart the service.
/etc/init.d/sshd restart
5Log in to the CentOS machine on the same local network as your vRealize Automation installation as
the root user.
6Invoke the SSH Tunnel from the local network machine to the Amazon AWS tunnel machine.
ssh -N -v -o "ServerAliveInterval 30" -o "ServerAliveCountMax 40" -o "TCPKeepAlive yes” \
-R 1442:vRealize_automation_appliance_fqdn:5480 \
-R 1443:vRealize_automation_appliance_fqdn:443 \
-R 1444:manager_service_fqdn:443 \
User of Amazon tunnel machine@Public IP Address of Amazon tunnel machine
You configured port forwarding to allow your Amazon AWS tunnel machine to access
vRealize Automation resources, but your SSH tunnel does not function until you configure an Amazon
reservation to route through the tunnel.
What to do next
1 Install the software bootstrap agent and the guest agent on a Windows or Linux reference machine to
create an Amazon Machine Image that your IaaS architects can use to create blueprints. See
Preparing for Software Provisioning.
2 Configure your Amazon reservation in vRealize Automation to route through your SSH tunnel. See
Scenario: Create an Amazon Reservation for a Proof of Concept Environment.
Preparing Red Hat OpenStack Network and Security Features
vRealize Automation supports several features in OpenStack including security groups and floating IP
addresses. Understand how these features work with vRealize Automation and configure them in your
environment.
Using OpenStack Security Groups
Security groups allow you to specify rules to control network traffic over specific ports.
Configuring vRealize Automation
VMware, Inc. 24
You can specify security groups in a reservation when requesting a machine. You can also specify an
existing or on-demand NSX security group in the design canvas.
Security groups are imported during data collection.
Each available region requires at least one specified security group. When you create a reservation, the
available security groups that are available to you in that region are displayed. Every region includes at
least the default security group.
Additional security groups must be managed in the source resource. For more information about
managing security groups for the various machines, see the OpenStack documentation.
Using Floating IP Addresses with OpenStack
You can assign floating IP addresses to a running virtual instance in OpenStack.
To enable assignment of floating IP addresses, you must configure IP forwarding and create a floating IP
pool in Red Hat OpenStack. For more information, see the Red Hat OpenStack documentation.
You must entitle the Associate Floating IP and Disassociate Floating IP actions to machine owners. The
entitled users can then associate a floating IP address to a provisioned machine from the external
networks attached to the machine by selecting an available address from the floating IP address pool.
After a floating IP address has been associated with a machine, a vRealize Automation user can select a
Disassociate Floating IP option to view the currently assigned floating IP addresses and disassociate an
address from a machine.
Preparing Your SCVMM Environment
Before you begin creating SCVMM templates and hardware profiles for use in vRealize Automation
machine provisioning, you must understand the naming restrictions on template and hardware profile
names, and configure SCVMM network and storage settings.
For related information about preparing your environment, see SCVMM requirements information in
Installing vRealize Automation.
For related information about machine provisioning, see Create a Hyper-V (SCVMM) Endpoint.
vRealize Automation does not support a deployment environment that uses an SCVMM private cloud
configuration. vRealize Automation cannot currently collect from, allocate to, or provision based on
SCVMM private clouds.
Template and Hardware Profile Naming
Because of naming conventions that SCVMM and vRealize Automation use for templates and hardware
profiles, do not start your template or hardware profile names with the words temporary or profile. For
example, the following terms are ignored during data collection:
nTemporaryTemplate
nTemporary Template
nTemporaryProfile
Configuring vRealize Automation
VMware, Inc. 25
nTemporary Profile
nProfile
Required Network Configuration for SCVMM Clusters
SCVMM clusters only expose virtual networks to vRealize Automation, so you must have a 1:1
relationship between your virtual and logical networks. Using the SCVMM console, map each logical
network to a virtual network and configure your SCVMM cluster to access machines through the virtual
network.
Required Storage Configuration for SCVMM Clusters
On SCVMM Hyper-V clusters, vRealize Automation collects data and provisions on shared volumes only.
Using the SCVMM console, configure your clusters to use shared resource volumes for storage.
Required Storage Configuration for Standalone SCVMM Hosts
For standalone SCVMM hosts, vRealize Automation collects data and provisions on the default virtual
machine path. Using the SCVMM console, configure default virtual machine paths for your standalone
hosts.
Configure Network-to-Azure VPC Connectivity
You must configure network-to-Azure connectivity if you want to use Software components in Azure
blueprints.
Prerequisites
nInstall and fully configure vRealize Automation. See Installing and Configuring vRealize Automation
for the Rainpole Scenario.
nCreate an Azure security group called TunnelGroup and configure it to allow access on port 22.
nCreate or identify a CentOS machine in your Azure TunnelGroup security group and note the
following configurations:
nAdministrative user credentials, for example root.
nPublic IP address.
nPrivate IP address.
nCreate or identify a CentOS machine on the same local network as your vRealize Automation
installation.
nInstall OpenSSH SSHD Server on both tunnel machines.
Procedure
1Log in to your Azure tunnel machine as the root user or similar.
Configuring vRealize Automation
VMware, Inc. 26

2Disable iptables.
# service iptables save
# service iptables stop
# chkconfig iptables off
3Edit /etc/ssh/sshd_config to enable AllowTCPForwarding and GatewayPorts.
4Restart the service.
/etc/init.d/sshd restart
5Log in to the CentOS machine on the same local network as your vRealize Automation installation as
the root user.
6Invoke the SSH Tunnel from the local network machine to the Azure tunnel machine.
ssh -N -v -o "ServerAliveInterval 30" -o "ServerAliveCountMax 40" -o "TCPKeepAlive yes” \
-R 1442:vRealize_automation_appliance_fqdn:5480 \
-R 1443:vRealize_automation_appliance_fqdn:443 \
-R 1444:manager_service_fqdn:443 \
User of Azure tunnel machine@Public IP Address of Azure tunnel machine
You configured port forwarding to allow your Azure tunnel machine to access vRealize Automation
resources, but your SSH tunnel does not function until you configure an Azure reservation to route
through the tunnel.
What to do next
1 Install the software bootstrap agent and the guest agent on a Windows or Linux reference machine to
create an Azure Machine Image that your IaaS architects can use to create blueprints. See Preparing
for Software Provisioning.
2 Configure your Azure reservation in vRealize Automation to route through your SSH tunnel. See
Create a Reservation for Microsoft Azure.
Preparing for Machine Provisioning
Depending on your environment and your method of machine provisioning, you might need to configure
elements outside of vRealize Automation.
For example, you might need to configure machine templates or machine images. You might also need to
configure NSX settings or run vRealize Orchestrator workflows.
For related information about specifying ports when preparing to provision machines, see Secure
Configuration Guide and Reference Architecture at VMware vRealize Automation Information.
Configuring vRealize Automation
VMware, Inc. 27

Choosing a Machine Provisioning Method to Prepare
For most machine provisioning methods, you must prepare some elements outside of
vRealize Automation.
Table 1‑5. Choosing a Machine Provisioning Method to Prepare
Scenario
Supported
Endpoint Agent Support Provisioning Method Pre-provisioning Preparations
Configure
vRealize Automation to run
custom Visual Basic scripts
as additional steps in the
machine life cycle, either
before or after machine
provisioning. For example,
you could use a pre-
provisioning script to
generate certificates or
security tokens before
provisioning, and then a
post-provisioning script to
use the certificates and
tokens after machine
provisioning.
You can run
Visual Basic
scripts with
any
supported
endpoint
except
Amazon
AWS.
Depends on the
provisioning
method you
choose.
Supported as an
additional step in any
provisioning method,
but you cannot use
Visual Basic scripts
with Amazon AWS
machines.
Checklist for Running Visual Basic
Scripts During Provisioning
Provision application
blueprints that automate
the installation,
configuration, and life cycle
management of
middleware and application
deployment components
such as Oracle, MySQL,
WAR, and database
Schemas.
nvSphere
nvCloud
Air
nvCloud
Director
nAmazon
AWS
n(Required)
Guest agent
n(Required)
Software
bootstrap agent
and guest
agent
nClone
nClone (for
vCloud Air or
vCloud Director)
nLinked clone
nAmazon Machine
Image
If you want the ability to use Software
components in your blueprints,
prepare a provisioning method that
supports the guest agent and
Software bootstrap agent. For more
information about preparing for
Software, see Preparing for Software
Provisioning.
Further customize
machines after provisioning
by using the guest agent.
All virtual
endpoints
and
Amazon
AWS.
n(Required)
Guest agent
n(Optional)
Software
bootstrap agent
and guest
agent
Supported for all
provisioning methods
except Virtual
Machine Image.
If you want the ability to customize
machines after provisioning, select a
provisioning method that supports
the guest agent. For more
information about the guest agent,
see Using vRealize Automation
Guest Agent in Provisioning.
Provision machines with no
guest operating system.
You can install an
operating system after
provisioning.
All virtual
machine
endpoints.
Not supported Basic No required pre-provisioning
preparations outside of
vRealize Automation.
Configuring vRealize Automation
VMware, Inc. 28

Table 1‑5. Choosing a Machine Provisioning Method to Prepare (Continued)
Scenario
Supported
Endpoint Agent Support Provisioning Method Pre-provisioning Preparations
Provision a space-efficient
copy of a virtual machine
called a linked clone.
Linked clones are based
on a snapshot of a VM and
use a chain of delta disks
to track differences from a
parent machine.
vSphere n(Optional)
Guest agent
n(Optional)
Software
bootstrap agent
and guest
agent
Linked Clone You must have an existing vSphere
virtual machine.
If you want to support Software, you
must install the guest agent and
software bootstrap agent on the
machine you intend to clone.
The VM snapshot identified in the
blueprint should be powered off
before you provision the linked clone
VMs.
Provision a space-efficient
copy of a virtual machine
by using
Net App FlexClone
technology.
vSphere (Optional) Guest
agent
NetApp FlexClone Checklist for Preparing to Provision
by Cloning
Provision machines by
cloning from a template
object created from an
existing Windows or Linux
machine, called the
reference machine, and a
customization object.
nvSphere
nKVM
(RHEV)
nSCVMM
n(Optional)
Guest agent
n(Optional for
vSphere only)
Software
bootstrap agent
and guest
agent
Clone See Checklist for Preparing to
Provision by Cloning.
If you want to support Software, you
must install the guest agent and
software bootstrap agent on the
vSpheremachine you intend to clone.
Provision vCloud Air or
vCloud Director machines
by cloning from a template
and customization object.
nvCloud
Air
nvCloud
Director
n(Optional)
Guest agent
n(Optional)
Software
bootstrap agent
and guest
agent
vCloud Air or
vCloud Director
Cloning
See Preparing for vCloud Air and
vCloud Director Provisioning.
If you want to support Software,
create a template that contains the
guest agent and software bootstrap
agent. For vCloud Air, configure
network connectivity between your
vRealize Automation environment
and your vCloud Air environment.
Provision a machine by
booting from an ISO
image, using a kickstart or
autoYaSt configuration file
and a Linux distribution
image to install the
operating system on the
machine.
nAll
virtual
endpoint
s
nRed Hat
OpenSt
ack
Guest agent is
installed as part of
the preparation
instructions.
Linux Kickstart Preparing for Linux Kickstart
Provisioning
Configuring vRealize Automation
VMware, Inc. 29

Table 1‑5. Choosing a Machine Provisioning Method to Prepare (Continued)
Scenario
Supported
Endpoint Agent Support Provisioning Method Pre-provisioning Preparations
Provision a machine and
pass control to an SCCM
task sequence to boot from
an ISO image, deploy a
Windows operating
system, and install the
vRealize Automation guest
agent.
All virtual
machine
endpoints.
Guest agent is
installed as part of
the preparation
instructions.
SCCM Preparing for SCCM Provisioning
Provision a machine by
booting into a WinPE
environment and installing
an operating system using
a Windows Imaging File
Format (WIM) image of an
existing Windows
reference machine.
nAll
virtual
endpoint
s
nRed Hat
OpenSt
ack
Guest agent is
required. When you
create the WinPE
image, you must
manually insert the
guest agent.
WIM Preparing for WIM Provisioning
Launch an instance from a
virtual machine image.
Red Hat
OpenStack
Not supported Virtual Machine Image See Preparing for Virtual Machine
Image Provisioning.
Launch an instance from
an Amazon Machine
Image.
Amazon
AWS
n(Optional)
Guest agent
n(Optional)
Software
bootstrap agent
and guest
agent
Amazon Machine
Image
Associate Amazon machine images
and instance types with your
Amazon AWS account.
If you want to support Software,
create an Amazon Machine Image
that contains the guest agent and
software bootstrap agent, and
configure network-to-VPC
connectivity between your
Amazon AWS and
vRealize Automation environments.
Checklist for Running Visual Basic Scripts During Provisioning
You can configure vRealize Automation to run your custom Visual Basic scripts as additional steps in the
machine life cycle, either before or after machine provisioning. For example, you could use a pre-
provisioning script to generate certificates or security tokens before provisioning, and then a post-
provisioning script to use the certificates and tokens after machine provisioning. You can run Visual Basic
scripts with any provisioning method, but you cannot use Visual Basic scripts with Amazon AWS
machines.
Configuring vRealize Automation
VMware, Inc. 30
Table 1‑6. Running Visual Basic Scripts During Provisioning Checklist
Task Location Details
Install and configure the EPI agent for
Visual Basic scripts.
Typically the Manager Service host See Installing vRealize Automation.
Create your visual basic scripts. Machine where EPI agent is installed vRealize Automation includes a sample
Visual Basic script
PrePostProvisioningExample.vbs in
the Scripts subdirectory of the EPI agent
installation directory. This script contains a
header to load all arguments into a
dictionary, a body in which you can
include your functions, and a footer to
return updated custom properties to
vRealize Automation.
When executing a Visual Basic script, the
EPI agent passes all machine custom
properties as arguments to the script. To
return updated property values to
vRealize Automation, place these
properties in a dictionary and call a
function provided by vRealize Automation.
Gather the information required to
include your scripts in blueprints.
Capture information and transfer to your
infrastructure architects
Note A fabric administrator can create
a property group by using the property
sets ExternalPreProvisioningVbScript
and ExternalPostProvisioningVbScript to
provide this required information. Doing
so makes it easier for blueprint architects
to include this information correctly in
their blueprints.
nThe complete path to the Visual Basic
script, including the filename and
extension. For example, %System
Drive%Program Files
(x86)\VMware\vCAC
Agents\EPI_Agents\Scripts\Send
Email.vbs.
nTo run a script before provisioning,
instruct infrastructure architects to
enter the complete path to the script
as the value of the custom property
ExternalPreProvisioningVbScrip
t. To run a script after provisioning,
they need to use the custom property
ExternalPostProvisioningVbScri
pt.
Using vRealize Automation Guest Agent in Provisioning
You can install the guest agent on reference machines to further customize a machine after deployment.
You can use the reserved guest agent custom properties to perform basic customizations such as adding
and formatting disks, or you can create your own custom scripts for the guest agent to run within the
guest operating system of a provisioned machine.
After the deployment is completed and the customization specification is run (if you provided one), the
guest agent creates an XML file that contains all of the deployed machine's custom properties
c:\VRMGuestAgent\site\workitem.xml, completes any tasks assigned to it with the guest agent
custom properties, and then deletes itself from the provisioned machine.
Configuring vRealize Automation
VMware, Inc. 31

You can write your own custom scripts for the guest agent to run on deployed machines, and use custom
properties on the machine blueprint to specify the location of those scripts and the order in which to run
them. You can also use custom properties on the machine blueprint to pass custom property values to
your scripts as parameters.
For example, you could use the guest agent to make the following customizations on deployed machines:
nChange the IP address
nAdd or format drives
nRun security scripts
nInitialize another agent, for example Puppet or Chef
You can also provide an encrypted string as a custom property in a command line argument. This allows
you to store encrypted information that the guest agent can decrypt and understand as a valid command
line argument.
Note The Linux guest agent assigns static IPs during the create and cloning actions for Linux Kickstart
and PXE provisioning relative to vRealize Automation custom properties in work items. The guest agent is
unable to accommodate the newer consistent network naming scheme, such as in Ubuntu 16.x, when it
assigns static IPs.
Your custom scripts do not have to be locally installed on the machine. As long as the provisioned
machine has network access to the script location, the guest agent can access and run the scripts. This
lowers maintenance costs because you can update your scripts without having to rebuild all of your
templates.
You can configure security settings for the virtual machines to be provisioned by specifying information in
a reservation, blueprint, or guest agent script. If the machines to be provisioned requires a guest agent,
you must add a security rule that contains that requirement to the reservation or the blueprint. For
example, if you use a default security policy that denies communication between all machines, and rely
on a separate security policy to allow communication between specific machines, the guest agent might
be unable to communicate with vRealize Automation during the customization phase. To avoid this
problem during machine provisioning, use a default security policy that allows communication during the
customization phase.
If you choose to install the guest agent to run custom scripts on provisioned machines, your blueprints
must include the appropriate guest agent custom properties. For example, if you install the guest agent
on a template for cloning, create a custom script that changes the provisioned machine's IP address, and
place the script in a shared location, you need to include a number of custom properties in your blueprint.
Configuring vRealize Automation
VMware, Inc. 32

Table 1‑7. Custom Properties for Changing IP Address of a Provisioned Machine with a Guest
Agent
Custom Property Description
VirtualMachine.Admin.UseGuestAgent Set to true to initialize the guest agent when the provisioned
machine is started.
VirtualMachine.Customize.WaitComplete Set to True to prevent the provisioning workflow from sending
work items to the guest agent until all customizations are
complete.
Configuring vRealize Automation
VMware, Inc. 33

Table 1‑7. Custom Properties for Changing IP Address of a Provisioned Machine with a Guest
Agent (Continued)
Custom Property Description
VirtualMachine.SoftwareN.ScriptPath Specifies the full path to an application's install script. The path
must be a valid absolute path as seen by the guest operating
system and must include the name of the script filename.
You can pass custom property values as parameters to the
script by inserting {CustomPropertyName} in the path string. For
example, if you have a custom property named ActivationKey
whose value is 1234, the script path is D:\InstallApp.bat –
key {ActivationKey}. The guest agent runs the command
D:\InstallApp.bat –key 1234. Your script file can then be
programmed to accept and use this value.
Insert {Owner} to pass the machine owner name to the script.
You can also pass custom property values as parameters to the
script by inserting {YourCustomProperty} in the path string. For
example, entering the
value \\vra-
scripts.mycompany.com\scripts\changeIP.bat runs the
changeIP.bat script from a shared location, but entering the
value \\vra-
scripts.mycompany.com\scripts\changeIP.bat
{VirtualMachine.Network0.Address} runs the changeIP
script but also passes the value of the
VirtualMachine.Network0.Address property to the script as
a parameter.
VirtualMachine.ScriptPath.Decrypt Allows vRealize Automation to obtain an encrypted string that is
passed as a properly formatted
VirtualMachine.SoftwareN.ScriptPath custom property
statement to the gugent command line.
You can provide an encrypted string, such as your password, as
a custom property in a command-line argument. This allows you
to store encrypted information that the guest agent can decrypt
and understand as a valid command-line argument. For
example, the VirtualMachine.Software0.ScriptPath =
c:\dosomething.bat password custom property string is not
secure as it contains an actual password.
To encrypt the password, you can create a vRealize Automation
custom property, for example MyPassword = password, and
enable encryption by selecting the available check box. The
guest agent decrypts the [MyPassword] entry to the value in the
custom property MyPassword and runs the script as
c:\dosomething.bat password.
nCreate custom property MyPassword = password where
password is the value of your actual password. Enable
encryption by selecting the available check box.
nSet custom property
VirtualMachine.ScriptPath.Decrypt as
VirtualMachine.ScriptPath.Decrypt = true.
Configuring vRealize Automation
VMware, Inc. 34

Table 1‑7. Custom Properties for Changing IP Address of a Provisioned Machine with a Guest
Agent (Continued)
Custom Property Description
nSet custom property
VirtualMachine.Software0.ScriptPath as
VirtualMachine.Software0.ScriptPath =
c:\dosomething.bat [MyPassword].
If you set VirtualMachine.ScriptPath.Decrypt to false, or
do not create the VirtualMachine.ScriptPath.Decrypt
custom property, then the string inside the square brackets
( [ and ]) is not decrypted.
For more information about custom properties you can use with the guest agent, see Custom Properties
Reference.
Configuring the Guest Agent to Trust a Server
Installing the public key PEM file for the vRealize Automation Manager Service Host in the correct guest
agent folder is the most secure approach to configuring the guest agent to trust a server.
Locate the guest agent folder on each template for the cert.pem PEM file for the Manager Service Host
to trust a server:
nWindows guest agent folder on each template that uses the gugent
C:\VRMGuestAgent\cert.pem
nLinux guest agent folder on each template that uses the gugent
/usr/share/gugent/cert.pem
If you do not put the cert.pem file in this location, the template reference machine cannot use the
guest agent. For example, if you try to collect the public key information after the VM is started for by
altering scripts, you break the security condition.
Additional considerations apply, depending on your configured environment:
nFor WIM installations, you must add the public key PEM file contents to the console executable and
user interface. The console flag is /cert filename.
nFor RedHat kickstart installations, you must cut and paste the public key into the sample file,
otherwise the guest agent fails to execute.
nFor SCCM installation, the cert.pem file must reside in the VRMGuestAgent folder.
Configuring vRealize Automation
VMware, Inc. 35

nFor Linux vSphere installs, the cert.pem file must reside in the /usr/share/gugent folder.
Note You can optionally install software and guest agents together by downloading the following script
from https://APPLIANCE/software/index.html. The script allows you to handle acceptance of SSL
certificate fingerprints as you create the templates.
nLinux
prepare_vra_template.sh
nWindows
prepare_vra_template.ps1
If you install the software and guest agent together, you do not need to use the instructions in Install the
Guest Agent on a Linux Reference Machine or Install the Guest Agent on a Windows Reference Machine.
Install the Guest Agent on a Linux Reference Machine
Install the Linux guest agent on your reference machines to further customize machines after deployment.
Prerequisites
nIdentify or create the reference machine.
nThe guest agent files you download contain both tar.gz and RPM package formats. If your operating
system cannot install tar.gz or RPM files, use a conversion tool to convert the installation files to your
preferred package format.
nEstablish secure trust between the guest agent and your Manager Service machine. See Configuring
the Guest Agent to Trust a Server.
Procedure
1Navigate to the vRealize Automation appliance management console page.
For example: https://va-hostname.domain.com.
2Click Guest and software agents page in the vRealize Automation component installation section of
the page.
For example: https://va-hostname.domain.com/software/index.html.
The Guest and Software Agent Installers page opens, displaying links to available downloads.
3Click Linux guest agent packages in the guest agent installers section of the page to download and
save the LinuxGuestAgentPkgs.zip file.
4Unpack the downloaded LinuxGuestAgentPkgs.zip file to create the VraLinuxGuestAgent folder.
Configuring vRealize Automation
VMware, Inc. 36

5Install the guest agent package that corresponds to the guest operating system you are deploying
during provisioning.
a Navigate to the VraLinuxGuestAgent subdirectory that corresponds to the guest operating
system to deploy during provisioning, for example rhel32.
b Locate your preferred package format or convert a package to your preferred package format.
c Install the guest agent package on your reference machine.
For example, to install the files from the RPM package, run rpm -i gugent-
gugent-7.1.0-4201531.i386.rpm.
6Configure the guest agent to communicate with the Manager Service by running installgugent.sh
Manager_Service_Hostname_fdqn:portnumber ssl platform.
The default port number for the Manager Service is 443. Accepted platform values are ec2, vcd, vca,
and vsphere.
Option Description
If you are using a load balancer Enter the fully qualified domain name and port number of your Manager Service
load balancer. For example:
cd /usr/share/gugent
./installgugent.sh load_balancer_manager_service.mycompany.com:
443 ssl ec2
With no load balancer Enter the fully qualified domain name and port number of your Manager Service
machine. For example:
cd /usr/share/gugent
./installgugent.sh manager_service_machine.mycompany.com:443
ssl vsphere
7If deployed machines are not already configured to trust the Manager Service SSL certificate, you
must install the cert.pem file on your reference machine to establish trust.
nFor the most secure approach, obtain the cert.pem certificate and manually install the file on the
reference machine.
nFor a more convenient approach, you can connect to the manager service load balancer or
manager service machine and download the cert.pem certificate.
Option Description
If you are using a load balancer As the root user on the reference machine, run the following command:
echo | openssl s_client -connect
manager_service_load_balancer.mycompany.com:443 | sed -ne '/-
BEGIN CERTIFICATE-/,/-END CERTIFICATE-/p' > cert.pem
With no load balancer As the root user on the reference machine, run the following command:
echo | openssl s_client -connect
manager_service_machine.mycompany.com:443 | sed -ne '/-BEGIN
CERTIFICATE-/,/-END CERTIFICATE-/p' > cert.pem
Configuring vRealize Automation
VMware, Inc. 37

8If you are installing the guest agent on a Ubuntu operating system, create symbolic links for shared
objects by running one of the following command sets.
Option Description
64-bit systems cd /lib/x86_64-linux-gnu
sudo ln -s libssl.so.1.0.0 libssl.so.10
sudo ln -s libcrypto.so.1.0.0 libcrypto.so.10
32-bit systems cd /lib/i386-linux-gnu
sudo ln -s libssl.so.1.0.0 libssl.so.10
sudo ln -s libcrypto.so.1.0.0 libcrypto.so.10
What to do next
Convert your reference machine into a template for cloning, an Amazon Machine Image, or a snapshot
that your IaaS architects can use when creating blueprints.
Install the Guest Agent on a Windows Reference Machine
Install the vRealize Automation Windows guest agent on a Windows reference machine to run as a
Windows service and enable further customization of machines.
Prerequisites
nIdentify or create the reference machine.
nEstablish secure trust between the guest agent and your Manager Service machine. See Configuring
the Guest Agent to Trust a Server.
Procedure
1Navigate to the vRealize Automation appliance Guest and Software Agent Installers page:
https://vrealize-automation-appliance-FQDN/software
2Under Guest Agent Installers, download and save the 32-bit or 64-bit executable to the root of the
C: drive.
Note There is a command-line alternative to this procedure for guest agent installation. Instead of
downloading the executables, you may go to Windows Software Installers on the Guest and
Software Agent Installers page. There, you can download and run the prepare_vra_template.ps1
PowerShell script:
PowerShell -NoProfile -ExecutionPolicy Bypass -Command prepare_vra_template.ps1
3Extract the Windows guest agent files by running the executable.
Extraction creates C:\VRMGuestAgent and adds the files.
Do not rename C:\VRMGuestAgent.
Configuring vRealize Automation
VMware, Inc. 38

4Configure the guest agent to communicate with the Manager Service.
a Open an elevated command prompt.
b Navigate to C:\VRMGuestAgent.
c Put the trusted Manager Service PEM file in the C:\VRMGuestAgent\ directory to configure the
guest agent to trust your Manager Service machine.
d Run winservice -i -h Manager_Service_Hostname_fdqn:portnumber -p ssl.
The default port number for the Manager Service is 443.
Option Description
If you are using a load balancer Enter the fully qualified domain name and port number of your Manager
Service load balancer. For example, winservice -i -h
load_balancer_manager_service.mycompany.com:443 -p ssl.
With no load balancer Enter the fully qualified domain name and port number of your Manager
Service machine. For example, winservice -i -h
manager_service_machine.mycompany.com:443 -p ssl.
If you are preparing an Amazon
machine image
You need to specify that you are using Amazon. For example, winservice -i
-h manager_service_machine.mycompany.com:443:443 -p ssl -c ec2
The name of the Windows service is VCACGuestAgentService. You can find the installation log VCAC-
GuestAgentService.log in C:\VRMGuestAgent.
What to do next
Convert your reference machine into a template for cloning, an Amazon machine image, or a snapshot so
your IaaS architects can use your template when creating blueprints.
Checklist for Preparing to Provision by Cloning
You must perform some preparation outside of vRealize Automation to create the template and the
customization objects used to clone Linux and Windows virtual machines.
Cloning requires a template to clone from, created from a reference machine.
Configuring vRealize Automation
VMware, Inc. 39
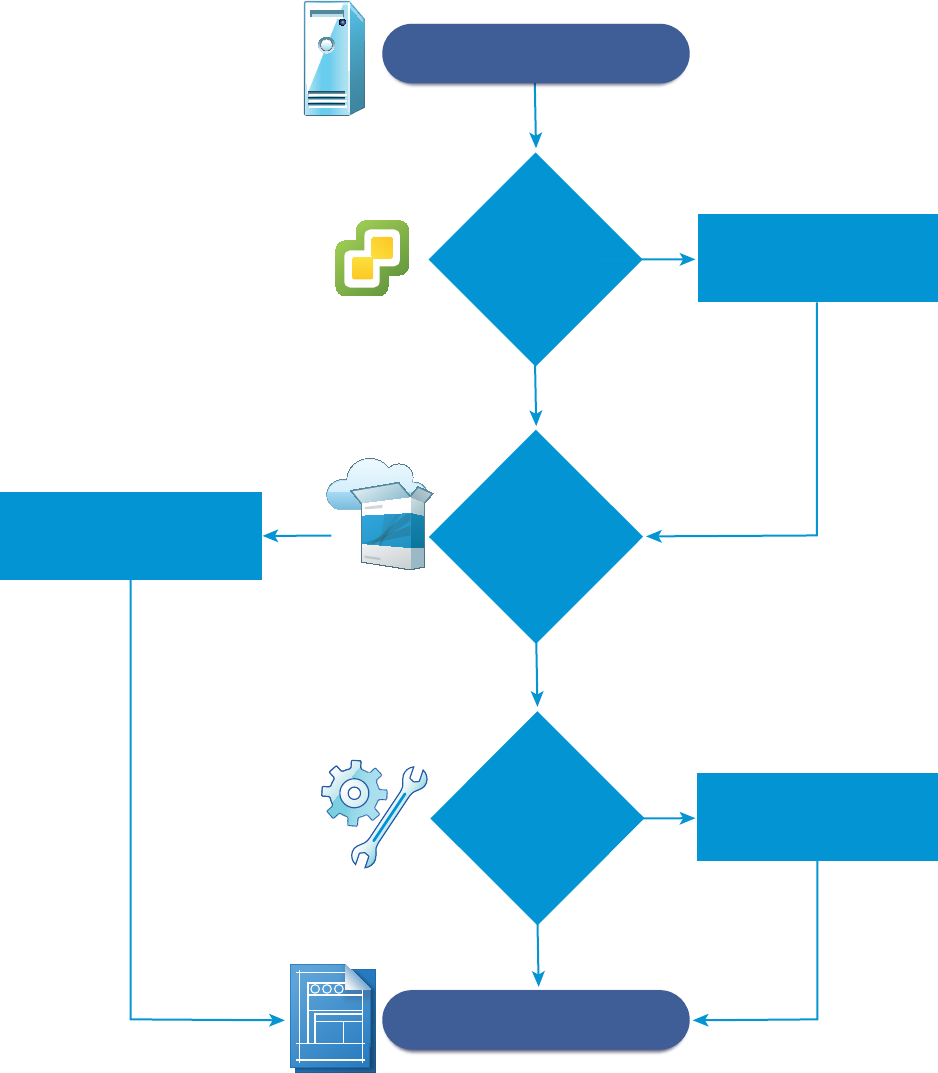
TEMPLATE
Identify or create
a reference machine.
No
Yes
No
No
Convert your reference
machine to a template.
Install the guest agent and
the software bootstrap
agent.
Install the guest agent.
Install VMware Tools.
Yes
Are you working in
vCenter Server?
Do you want
to support software
components in
your blueprints?
Do you want
the ability to
customize
machines after
deployment?
Yes
If you are provisioning a Windows machine by cloning, the only way to join the provisioned machine to an
Active Directory domain is by using the customization specification from vCenter Server or by including a
guest operating system profile with your SCVMM template. Machines provisioned by cloning cannot be
placed in an Active Directory container during provisioning. You must do this manually after provisioning.
Configuring vRealize Automation
VMware, Inc. 40

Table 1‑8. Checklist for Preparing to Provision by Cloning
Task Location Details
Identify or create the reference machine. Hypervisor See the documentation provided by your
hypervisor.
(Optional) If you want your clone template to
support Software components, install the
vRealize Automation guest agent and software
bootstrap agent on your reference machine.
Reference machine For Windows reference machines, see Prepare
a Windows Reference Machine to Support
Software.
For Linux reference machines, see Prepare a
Linux Reference Machine to Support Software.
(Optional) If you do not need your clone template
to support Software components, but you do want
the ability to customize deployed machines, install
the vRealize Automation guest agent on your
reference machine.
Reference machine See Using vRealize Automation Guest Agent in
Provisioning.
If you are working in a vCenter Server
environment, install VMware Tools on the reference
machine.
vCenter Server See the VMware Tools documentation.
Use the reference machine to create a template
for cloning.
Hypervisor The reference machine may be powered on or
off. If you are cloning in vCenter Server, you can
use a reference machine directly without
creating a template.
See the documentation provided by your
hypervisor.
Create the customization object to configure
cloned machines by applying System Preparation
Utility information or a Linux customization.
Hypervisor If you are cloning for Linux you can install the
Linux guest agent and provide external
customization scripts instead of creating a
customization object. If you are cloning with
vCenter Server, you must provide the
customization specification as the customization
object.
See the documentation provided by your
hypervisor.
Gather the information required to create
blueprints that clone your template.
Capture information and
transfer to your IaaS
architects.
See Worksheet for Virtual Provisioning by
Cloning.
Worksheet for Virtual Provisioning by Cloning
Complete the knowledge transfer worksheet to capture information about the template, customizations,
and custom properties required to create clone blueprints for the templates you prepared in your
environment. Not all of this information is required for every implementation. Use this worksheet as a
guide, or copy and paste the worksheet tables into a word processing tool for editing.
Configuring vRealize Automation
VMware, Inc. 41

Required Template and Reservation Information
Table 1‑9. Template and Reservation Information Worksheet
Required Information My Value Details
Template name
Reservations on which the template
is available, or reservation policy to
apply
To avoid errors during provisioning, ensure that
the template is available on all reservations or
create reservation policies that architects can
use to restrict the blueprint to reservations
where the template is available.
(vSphere only) Type of cloning
requested for this template
nClone
nLinked Clone
nNetApp FlexClone
Customization specification name
(Required for cloning with static IP
addresses)
You cannot perform customizations of Windows
machines without a customization specification
object.
(SCVMM only) ISO name
(SCVMM only) Virtual hard disk
(SCVMM only) Hardware profile to
attach to provisioned machines
Required Property Groups
You can complete the custom property information sections of the worksheet, or you can create property
groups and ask architects to add your property groups to their blueprints instead of numerous individual
custom properties.
Required vCenter Server Operating System
You must supply the guest operating system custom property for vCenter Server provisioning.
Table 1‑10. vCenter Server Operating System
Custom Property My Value Description
VMware.VirtualCenter.OperatingSy
stem
Specifies the vCenter Server guest
operating system version
(VirtualMachineGuestOsIdentifier)
with which vCenter Server creates the
machine. This operating system version
must match the operating system version
to be installed on the provisioned machine.
Administrators can create property groups
using one of several property sets, for
example,
VMware[OS_Version]Properties, that
are predefined to include the correct
VMware.VirtualCenter.OperatingSyst
em values. This property is for virtual
provisioning.
Configuring vRealize Automation
VMware, Inc. 42
Visual Basic Script Information
If you configured vRealize Automation to run your custom Visual Basic scripts as additional steps in the
machine life cycle, you must include information about the scripts in the blueprint.
Note A fabric administrator can create a property group by using the property sets
ExternalPreProvisioningVbScript and ExternalPostProvisioningVbScript to provide this required
information. Doing so makes it easier for blueprint architects to include this information correctly in their
blueprints.
Table 1‑11. Visual Basic Script Information
Custom Property My Value Description
ExternalPreProvisioningVbScript Run a script before provisioning. Enter the
complete path to the script including the
filename and extension. %System Drive
%Program Files (x86)\VMware\vCAC
Agents\EPI_Agents\Scripts\SendEmai
l.vbs.
ExternalPostProvisioningVbScript Run a script after provisioning. Enter the
complete path to the script including the
filename and extension. %System Drive
%Program Files (x86)\VMware\vCAC
Agents\EPI_Agents\Scripts\SendEmai
l.vbs
Linux Guest Agent Customization Script Information
If you configured your Linux template to use the guest agent for running customization scripts, you must
include information about the scripts in the blueprint.
Configuring vRealize Automation
VMware, Inc. 43

Table 1‑12. Linux Guest Agent Customization Script Information Worksheet
Custom Property My Value Description
Linux.ExternalScript.Name Specifies the name of an optional
customization script, for example
config.sh, that the Linux guest agent
runs after the operating system is
installed. This property is available for
Linux machines cloned from templates on
which the Linux agent is installed.
If you specify an external script, you must
also define its location by using the
Linux.ExternalScript.LocationType
and Linux.ExternalScript.Path
properties.
Linux.ExternalScript.LocationTy
pe
Specifies the location type of the
customization script named in the
Linux.ExternalScript.Name property.
This can be either local or nfs.
You must also specify the script location
using the Linux.ExternalScript.Path
property. If the location type is nfs, also
use the Linux.ExternalScript.Server
property.
Linux.ExternalScript.Server Specifies the name of the NFS server, for
example lab-ad.lab.local, on which the
Linux external customization script
named in Linux.ExternalScript.Name
is located.
Linux.ExternalScript.Path Specifies the local path to the Linux
customization script or the export path to
the Linux customization on the NFS
server. The value must begin with a
forward slash and not include the file
name, for
example /scripts/linux/config.sh.
Other Guest Agent Custom Properties
If you installed the guest agent on your reference machine, you can use custom properties to further
customize machines after deployment.
Configuring vRealize Automation
VMware, Inc. 44

Table 1‑13. Custom Properties for Customizing Cloned Machines with a Guest Agent
Worksheet
Custom Property My Value Description
VirtualMachine.Admin.AddOwnerToAd
mins
Set to True (default) to add the machine’s
owner, as specified by the
VirtualMachine.Admin.Owner property, to
the local administrators group on the
machine.
VirtualMachine.Admin.AllowLogin Set to True (default) to add the machine
owner to the local remote desktop users
group, as specified by the
VirtualMachine.Admin.Owner property.
VirtualMachine.Admin.UseGuestAgen
t
If the guest agent is installed as a service on
a template for cloning, set to True on the
machine blueprint to enable the guest agent
service on machines cloned from that
template. When the machine is started, the
guest agent service is started. Set to False
to disable the guest agent. If set to False,
the enhanced clone workfow will not use the
guest agent for guest operating system
tasks, reducing its functionality to
VMwareCloneWorkflow. If not specified or
set to anything other than False, the
enhanced clone workflow sends work items
to the guest agent.
VirtualMachine.DiskN.Active Set to True (default) to specify that the
machine's disk N is active. Set to False to
specify that the machine's disk N is not
active.
VirtualMachine.DiskN.Label Specifies the label for a machine’s disk N.
The disk label maximum is 32 characters.
Disk numbering must be sequential. When
used with a guest agent, specifies the label
of a machine's disk N inside the guest
operating system.
VirtualMachine.DiskN.Letter Specifies the drive letter or mount point of a
machine’s disk N. The default is C. For
example, to specify the letter D for Disk 1,
define the custom property as
VirtualMachine.Disk1.Letter and enter
the value D. Disk numbering must be
sequential. When used in conjunction with a
guest agent, this value specifies the drive
letter or mount point under which an
additional disk N is mounted by the guest
agent in the guest operating system.
Configuring vRealize Automation
VMware, Inc. 45

Table 1‑13. Custom Properties for Customizing Cloned Machines with a Guest Agent
Worksheet (Continued)
Custom Property My Value Description
VirtualMachine.Admin.CustomizeGue
stOSDelay
Specifies the time to wait after customization
is complete and before starting the guest
operating system customization. The value
must be in HH:MM:SS format. If the value is
not set, the default value is one minute
(00:01:00). If you choose not to include this
custom property, provisioning can fail if the
virtual machine reboots before guest agent
work items are completed, causing
provisioning to fail.
VirtualMachine.Customize.WaitComp
lete
Set to True to prevent the provisioning
workflow from sending work items to the
guest agent until all customizations are
complete.
VirtualMachine.SoftwareN.Name Specifies the descriptive name of a software
application N or script to install or run during
provisioning. This is an optional and
information-only property. It serves no real
function for the enhanced clone workflow or
the guest agent but it is useful for a custom
software selection in a user interface or for
software use reporting.
VirtualMachine.SoftwareN.ScriptPa
th
Specifies the full path to an application's
install script. The path must be a valid
absolute path as seen by the guest
operating system and must include the
name of the script filename.
You can pass custom property values as
parameters to the script by inserting
{CustomPropertyName} in the path string.
For example, if you have a custom property
named ActivationKey whose value is
1234, the script path is
D:\InstallApp.bat –key
{ActivationKey}. The guest agent runs
the command D:\InstallApp.bat –key
1234. Your script file can then be
programmed to accept and use this value.
Configuring vRealize Automation
VMware, Inc. 46

Table 1‑13. Custom Properties for Customizing Cloned Machines with a Guest Agent
Worksheet (Continued)
Custom Property My Value Description
VirtualMachine.SoftwareN.ISOName Specifies the path and filename of the ISO
file relative to the datastore root. The format
is /folder_name/subfolder_name/file_
name.iso. If a value is not specified, the
ISO is not mounted.
VirtualMachine.SoftwareN.ISOLocat
ion
Specifies the storage path that contains the
ISO image file to be used by the application
or script. Format the path as it appears on
the host reservation, for example
netapp-1:it_nfs_1. If a value is not
specified, the ISO is not mounted.
Networking Custom Properties
You can specify configuration for specific network devices on a machine by using custom properties.
Common networking-related custom properties are listed in the following table. For additional and related
custom properties, see Custom Properties for Clone Blueprints and Custom Properties for Networking in
Custom Properties Reference.
Table 1‑14. Custom Properties for Networking Configuration
Custom Property My Value Description
VirtualMachine.NetworkN.Address Specifies the IP address of network
device N in a machine provisioned with a
static IP address.
VirtualMachine.NetworkN.MacAddr
essType
Indicates whether the MAC address of
network device N is generated or user-
defined (static). This property is available
for cloning.
The default value is generated. If the
value is static, you must also use
VirtualMachine.NetworkN.MacAddres
s to specify the MAC address.
VirtualMachine.NetworkN custom
properties are specific to individual
blueprints and machines. When a
machine is requested, network and IP
address allocation is performed before
the machine is assigned to a reservation.
Because blueprints are not guaranteed to
be allocated to a specific reservation, do
not use this property on a reservation.
This property is not supported for on-
demand NAT or on-demand routed
networks.
Configuring vRealize Automation
VMware, Inc. 47

Table 1‑14. Custom Properties for Networking Configuration (Continued)
Custom Property My Value Description
VirtualMachine.NetworkN.MacAddr
ess
Specifies the MAC address of a network
device N. This property is available for
cloning.
If the value of
VirtualMachine.NetworkN.MacAddres
sType is generated, this property contains
the generated address.
If the value of
VirtualMachine.NetworkN.MacAddres
sType is static, this property specifies the
MAC address. For virtual machines
provisioned on ESX server hosts, the
address must be in the range specified by
VMware. For details, see vSphere
documentation.
VirtualMachine.NetworkN custom
properties are specific to individual
blueprints and machines. When a
machine is requested, network and IP
address allocation is performed before
the machine is assigned to a reservation.
Because blueprints are not guaranteed to
be allocated to a specific reservation, do
not use this property on a reservation.
This property is not supported for on-
demand NAT or on-demand routed
networks.
Configuring vRealize Automation
VMware, Inc. 48

Table 1‑14. Custom Properties for Networking Configuration (Continued)
Custom Property My Value Description
VirtualMachine.NetworkN.Name Specifies the name of the network to
connect to, for example the network
device N to which a machine is attached.
This is equivalent to a network interface
card (NIC).
By default, a network is assigned from the
network paths available on the
reservation on which the machine is
provisioned. Also see
VirtualMachine.NetworkN.AddressTy
pe and
VirtualMachine.NetworkN.ProfileNa
me.
You can ensure that a network device is
connected to a specific network by setting
the value of this property to the name of a
network on an available reservation. For
example, if you give properties for N= 0
and 1, you get 2 NICs and their assigned
value, provided the network is selected in
the associated reservation.
VirtualMachine.NetworkN custom
properties are specific to blueprints and
machines. When a machine is requested,
network and IP address allocation is
performed before the machine is
assigned to a reservation. Because
blueprints are not guaranteed to be
allocated to a specific reservation, do not
use this property on a reservation. This
property is not supported for on-demand
NAT or on-demand routed networks.
For an example of how to use this custom
property to dynamically set
VirtualMachine.Network0.Name based
on a consumer's selection from a list of
predefined available networks, see the
Adding a Network Selection Drop-Down
in vRA 7 blog post.
Configuring vRealize Automation
VMware, Inc. 49

Table 1‑14. Custom Properties for Networking Configuration (Continued)
Custom Property My Value Description
VirtualMachine.NetworkN.PortID Specifies the port ID to use for network
device N when using a dvPort group with
a vSphere distributed switch.
VirtualMachine.NetworkN custom
properties are specific to individual
blueprints and machines. When a
machine is requested, network and IP
address allocation is performed before
the machine is assigned to a reservation.
Because blueprints are not guaranteed to
be allocated to a specific reservation, do
not use this property on a reservation.
This property is not supported for on-
demand NAT or on-demand routed
networks.
VirtualMachine.NetworkN.Profile
Name and
VirtualMachine.NetworkN.Network
ProfileName
Specifies the name of a network profile
from which to assign a static IP address
to network device N or from which to
obtain the range of static IP addresses
that can be assigned to network device N
of a cloned machine, where N=0 for the
first device, 1 for the second, and so on.
nUse
VirtualMachine.NetworkN.Profil
eName to select any network from the
reservation regardless of whether it
has a corresponding network profile.
nUse
VirtualMachine.NetworkN.Networ
kProfileName to only select
networks that have a corresponding
network profile with the same name.
The network profile that the property
points to is used to allocate an IP
address. However, the provisioned
machine is attached to any network that is
selected in the reservation using a round-
robin fashion model.
Configuring vRealize Automation
VMware, Inc. 50

Table 1‑14. Custom Properties for Networking Configuration (Continued)
Custom Property My Value Description
nVirtualMachine.NetworkN.Subn
etMask
nVirtualMachine.NetworkN.Gate
way
nVirtualMachine.NetworkN.Prim
aryDns
nVirtualMachine.NetworkN.Seco
ndaryDns
nVirtualMachine.NetworkN.Prim
aryWins
nVirtualMachine.NetworkN.Seco
ndaryWins
nVirtualMachine.NetworkN.DnsS
uffix
nVirtualMachine.NetworkN.DnsS
earchSuffixes
Appending a name allows you to create
multiple versions of a custom property.
For example, the following properties
might list load balancing pools set up for
general use and machines with high,
moderate, and low performance
requirements:
nVCNS.LoadBalancerEdgePool.Name
s
nVCNS.LoadBalancerEdgePool.Name
s.moderate
nVCNS.LoadBalancerEdgePool.Name
s.high
nVCNS.LoadBalancerEdgePool.Name
s.low
Configures attributes of the network
profile specified in
VirtualMachine.NetworkN.ProfileNa
me.
VCNS.LoadBalancerEdgePool.Names.
name
Specifies the NSX load balancing pools to
which the virtual machine is assigned
during provisioning. The virtual machine
is assigned to all service ports of all
specified pools. The value is an edge/pool
name or a list of edge/pool names
separated by commas. Names are case-
sensitive.
Appending a name allows you to create
multiple versions of a custom property.
For example, the following properties
might list load balancing pools set up for
general use and machines with high,
moderate, and low performance
requirements:
nVCNS.LoadBalancerEdgePool.Name
s
nVCNS.LoadBalancerEdgePool.Name
s.moderate
nVCNS.LoadBalancerEdgePool.Name
s.high
nVCNS.LoadBalancerEdgePool.Name
s.low
Configuring vRealize Automation
VMware, Inc. 51

Table 1‑14. Custom Properties for Networking Configuration (Continued)
Custom Property My Value Description
VCNS.SecurityGroup.Names.name Specifies the NSX security group or
groups to which the virtual machine is
assigned during provisioning. The value is
a security group name or a list of names
separated by commas. Names are case-
sensitive.
Appending a name allows you to create
multiple versions of the property, which
can be used separately or in combination.
For example, the following properties can
list security groups intended for general
use, for the sales force, and for support:
nVCNS.SecurityGroup.Names
nVCNS.SecurityGroup.Names.sales
nVCNS.SecurityGroup.Names.suppo
rt
VCNS.SecurityTag.Names.name Specifies the NSX security tag or tags to
which the virtual machine is associated
during provisioning. The value is a
security tag name or a list of names
separated by commas. Names are case-
sensitive.
Appending a name allows you to create
multiple versions of the property, which
can be used separately or in combination.
For example, the following properties can
list security tags intended for general use,
for the sales force, and for support:
nVCNS.SecurityTag.Names
nVCNS.SecurityTag.Names.sales
nVCNS.SecurityTag.Names.support
Preparing for vCloud Air and vCloud Director Provisioning
To prepare for provisioning vCloud Air and vCloud Director machines by using vRealize Automation, you
must configure the organization virtual data center with templates and customization objects.
To provision vCloud Air and vCloud Director resources using vRealize Automation, the organization
requires a template to clone from that consists of one or more machine resources.
Configuring vRealize Automation
VMware, Inc. 52

Templates that are to be shared across organizations must be public. Only reserved templates are
available to vRealize Automation as a cloning source.
Note When you create a blueprint by cloning from a template, that template's unique identifier becomes
associated with the blueprint. When the blueprint is published to the vRealize Automation catalog and
used in the provisioning and data collection processes, the associated template is recognized. If you
delete the template in vCloud Air or vCloud Director, subsequent vRealize Automation provisioning and
data collection fails because the associated template no longer exists. Instead of deleting and recreating
a template, for example to upload an updated version, replace the template using the vCloud Air
vCloud Director template replacement process. Using vCloud Air or vCloud Director to replace the
template, rather than deleting and recreating the template, keeps the template's unique ID intact and
allows provisioning and data collection to continue functioning.
The following overview illustrates the steps you need to perform before you use vRealize Automation to
create endpoints and define reservations and blueprints. For more information about these administrative
tasks, see vCloud Air and vCloud Director product documentation.
1 In vCloud Air or vCloud Director, create a template for cloning and add it to the organization catalog.
2 In vCloud Air or vCloud Director, use the template to specify custom settings such as passwords,
domain, and scripts for the guest operating system on each machine.
You can use vRealize Automation to override some of these settings.
Customization can vary depending on the guest operating system of the resource.
3 In vCloud Air or vCloud Director, configure the catalog to be shared with everyone in the organization.
In vCloud Air or vCloud Director, configure account administrator access to applicable organizations
to allow all users and groups in the organization to have access to the catalog. Without this sharing
designation, the catalog templates are not be visible to endpoint or blueprint architects in
vRealize Automation.
4 Gather the following information so that you can include it in blueprints:
nName of the vCloud Air or vCloud Director template.
nAmount of total storage specified for the template.
Preparing for Linux Kickstart Provisioning
Linux Kickstart provisioning uses a configuration file to automate a Linux installation on a newly
provisioned machine. To prepare for provisioning you must create a bootable ISO image and a Kickstart
or autoYaST configuration file.
The following is a high-level overview of the steps required to prepare for Linux Kickstart provisioning:
1 Verify that a DHCP server is available on the network. vRealize Automation cannot provision
machines by using Linux Kickstart provisioning unless DHCP is available.
2 Prepare the configuration file. In the configuration file, you must specify the locations of the
vRealize Automation server and the Linux agent installation package. See Prepare the Linux Kickstart
Configuration Sample File.
Configuring vRealize Automation
VMware, Inc. 53

3 Edit the isolinux/isolinux.cfg or loader/isolinux.cfg to specify the name and location of the
configuration file and the appropriate Linux distribution source.
4 Create the boot ISO image and save it to the location required by your virtualization platform. See the
documentation provided by your hypervisor for information about the required location.
5 (Optional) Add customization scripts.
a To specify post-installation customization scripts in the configuration file, see Specify Custom
Scripts in a kickstart/autoYaST Configuration File.
b To call Visual Basic scripts in blueprint, see Checklist for Running Visual Basic Scripts During
Provisioning.
6 Gather the following information so that blueprint architects can include it in their blueprints:
a The name and location of the ISO image.
b For vCenter Server integrations, the vCenter Server guest operating system version with which
vCenter Server is to create the machine.
Note You can create a property group with the property set BootIsoProperties to include the required
ISO information. This makes it easier to include this information correctly on blueprints.
Prepare the Linux Kickstart Configuration Sample File
vRealize Automation provides sample configuration files that you can modify and edit to suit your needs.
There are several changes required to make the files usable.
Procedure
1Navigate to the vRealize Automation appliance management console page.
For example: https://va-hostname.domain.com.
2Click Guest and software agents page in the vRealize Automation component installation section of
the page.
For example: https://va-hostname.domain.com/software/index.html.
The Guest and Software Agent Installers page opens, displaying links to available downloads.
3Click Linux guest agent packages in the guest agent installers section of the page to download and
save the LinuxGuestAgentPkgs.zip file.
4Unpack the downloaded LinuxGuestAgentPkgs.zip file to create the VraLinuxGuestAgent folder.
5Navigate to the VraLinuxGuestAgent subdirectory that corresponds to the guest operating system to
deploy during provisioning.
For example: rhel32.
6Open a file in the samples subdirectory that corresponds to your target system.
For example, samples/sample-https-rhel6-x86.cfg.
Configuring vRealize Automation
VMware, Inc. 54
7Replace all instances of the string host=dcac.example.net with the IP address or fully qualified
domain name and port number for the Manager Service or the load balancer for the Manager Service.
Platform Required Format
vSphere ESXi IP Address, for example: --host=172.20.9.59
vSphere ESX IP Address, for example: --host=172.20.9.58
SUSE 10 IP Address, for example: --host=172.20.9.57
All others FQDN, for example: --host=mycompany-host1.mycompany.local:443
8Locate each instance of gugent.rpm or gugent.tar.gz and replace the URL rpm.example.net
with the location of the guest agent package.
For example:
rpm -i nfs:172.20.9.59/suseagent/gugent.rpm
9Save the file to a location accessible to newly provisioned machines.
Specify Custom Scripts in a kickstart/autoYaST Configuration File
You can modify the configuration file to copy or install custom scripts onto newly provisioned machines.
The Linux agent runs the scripts at the specified point in the workflow.
Your script can reference any of the ./properties.xml files in
the /usr/share/gugent/site/workitem directories.
Prerequisites
nPrepare a kickstart or autoYaST configuration file. See Prepare the Linux Kickstart Configuration
Sample File.
nYour script must return a non-zero value on failure to prevent machine provisioning failure.
Procedure
1Create or identify the script you want to use.
2Save the script as NN_scriptname.
NN is a two digit number. Scripts are executed in order from lowest to highest. If two scripts have the
same number, the order is alphabetical based on scriptname.
3Make your script executable.
4Locate the post-installation section of your kickstart or autoYaST configuration file.
In kickstart, this is indicated by %post. In autoYaST, this is indicated by post-scripts.
Configuring vRealize Automation
VMware, Inc. 55

5Modify the post-installation section of the configuration file to copy or install your script into
the /usr/share/gugent/site/workitem directory of your choice.
Custom scripts are most commonly run for virtual kickstart/autoYaST with the work items SetupOS
(for create provisioning) and CustomizeOS (for clone provisioning), but you can run scripts at any
point in the workflow.
For example, you can modify the configuration file to copy the script 11_addusers.sh to
the /usr/share/gugent/site/SetupOS directory on a newly provisioned machine by using the
following command:
cp nfs:172.20.9.59/linuxscripts/11_addusers.sh /usr/share/gugent/site/SetupOS
The Linux agent runs the script in the order specified by the work item directory and the script file name.
Preparing for SCCM Provisioning
vRealize Automation boots a newly provisioned machine from an ISO image, and then passes control to
the specified SCCM task sequence.
SCCM provisioning is supported for the deployment of Windows operating systems. Linux is not
supported. Software distribution and updates are not supported.
The following is a high-level overview of the steps required to prepare for SCCM provisioning:
1 Consult with your network administrator to ensure that the following network requirements are met:
nCommunication with SCCM requires the NetBios name of the SCCM server. At least one
Distributed Execution Manager (DEM) must be able to resolve the fully qualified name of the
SCCM server to its NetBios name.
nThe SCCM server and the vRealize Automation server must be on the same network and
available to each other.
2 Create a software package that includes the vRealize Automation guest agent. See Create a
Software Package for SCCM Provisioning.
3 In SCCM, create the desired task sequence for provisioning the machine. The final step must be to
install the software package you created that contains the vRealize Automation guest agent. For
information about creating task sequences and installing software packages, see SCCM
documentation.
4 Create a zero touch boot ISO image for the task sequence. By default, SCCM creates a light touch
boot ISO image. For information about configuring SCCM for zero touch ISO images, see SCCM
documentation.
5 Copy the ISO image to the location required by your virtualization platform. If you do not know the
appropriate location, refer to the documentation provided by your hypervisor.
6 Gather the following information so that blueprint architects can include it on blueprints:
a The name of the collection containing the task sequence.
Configuring vRealize Automation
VMware, Inc. 56
b The fully qualified domain name of the SCCM server on which the collection containing the
sequence resides.
c The site code of the SCCM server.
d Administrator-level credentials for the SCCM server.
e (Optional) For SCVMM integrations, the ISO, virtual hard disk, or hardware profile to attach to
provisioned machines.
Create a Software Package for SCCM Provisioning
The final step in your SCCM task sequence must be to install a software package that includes the
vRealize Automation guest agent.
Procedure
1Navigate to the vRealize Automation appliance management console page.
For example: https://va-hostname.domain.com.
2Click Guest and software agents page in the vRealize Automation component installation section of
the page.
For example: https://va-hostname.domain.com/software/index.html.
The Guest and Software Agent Installers page opens, displaying links to available downloads.
3Click Windows guest agent files (32-bit) or (64-bit) in the component installation section of the page
to download and save the GuestAgentInstaller.exe or GuestAgentInstaller_x64.exe file.
4Extract the Windows guest agent files to a location available to SCCM.
This produces the directory C:\VRMGuestAgent. Do not rename this directory.
5Create a software package from the definition file SCCMPackageDefinitionFile.sms.
6Make the software package available to your distribution point.
7Select the contents of the extracted Windows guest agent files as your source files.
Preparing for WIM Provisioning
Provision a machine by booting into a WinPE environment and then install an operating system using a
Windows Imaging File Format (WIM) image of an existing Windows reference machine.
The following is a high-level overview of the steps required to prepare for WIM provisioning:
1 Identify or create the staging area. The staging area should be a network directory that can be
specified as a UNC path or mounted as a network drive by
nThe reference machine.
nThe system where you build the WinPE image.
nThe virtualization host where you provision the machines.
Configuring vRealize Automation
VMware, Inc. 57

2 Ensure that the network has a DHCP server. vRealize Automation cannot provision machines with a
WIM image unless DHCP is available.
3 Identify or create the reference machine in the virtualization platform you intend to use for
provisioning. For vRealize Automation requirements, see Reference Machine Requirements for WIM
Provisioning. For information about creating a reference machine, see the documentation provided by
your hypervisor.
4 Using the System Preparation Utility for Windows, prepare the reference machine's operating system
for deployment. See SysPrep Requirements for the Reference Machine.
5 Create the WIM image of the reference machine. Do not include any spaces in the WIM image file
name or provisioning fails.
6 Create a WinPE image that contains the vRealize Automation guest agent.
n(Optional) Create any custom scripts you want to use to customize provisioned machines and
place them in the appropriate work item directory.
nIf you are using VirtIO for network or storage interfaces, you must ensure that the necessary
drivers are included in your WinPE image and WIM image. See Preparing for WIM Provisioning
with VirtIO Drivers.
When you create the WinPE image, you must manually insert the vRealize Automation guest agent.
See Manually Insert the Guest Agent into a WinPE Image.
7 Place the WinPE image in the location required by your virtualization platform. If you do not know the
location, see your hypervisor documentation.
8 Gather the following information to include in the blueprint:
a The name and location of the WinPE ISO image.
b The name of the WIM file, the UNC path to the WIM file, and the index used to extract the desired
image from the WIM file.
c The user name and password under which to map the WIM image path to a network drive on the
provisioned machine.
d (Optional) If you do not want to accept the default, K, the drive letter to which the WIM image path
is mapped on the provisioned machine.
e For vCenter Server integrations, the vCenter Server guest operating system version with which
vCenter Server is to create the machine.
f (Optional) For SCVMM integrations, the ISO, virtual hard disk, or hardware profile to attach to
provisioned machines.
Note You can create a property group to include all of this required information. Using a property
group makes it easier to include all the information correctly in blueprints.
1Reference Machine Requirements for WIM Provisioning
WIM provisioning involves creating a WIM image from a reference machine. The reference machine
must meet basic requirements for the WIM image to work for provisioning in vRealize Automation.
Configuring vRealize Automation
VMware, Inc. 58

2SysPrep Requirements for the Reference Machine
A SysPrep answer file contains several required settings that are used for WIM provisioning.
3Preparing for WIM Provisioning with VirtIO Drivers
If you are using VirtIO for network or storage interfaces, you must ensure that the necessary drivers
are included in your WinPE image and WIM image. VirtIO generally offers better performance when
provisioning with KVM (RHEV).
4Manually Insert the Guest Agent into a WinPE Image
You must manually insert the vRealize Automation guest agent into your WinPE image.
Reference Machine Requirements for WIM Provisioning
WIM provisioning involves creating a WIM image from a reference machine. The reference machine must
meet basic requirements for the WIM image to work for provisioning in vRealize Automation.
The following is a high-level overview of the steps to prepare a reference machine:
1 If the operating system on your reference machine is Windows Server 2008 R2, Windows Server
2012, Windows 7, or Windows 8, the default installation creates a small partition on the system's hard
disk in addition to the main partition. vRealize Automation does not support the use of WIM images
created on such multi-partitioned reference machines. You must delete this partition during the
installation process.
2 Install NET 4.5 and Windows Automated Installation Kit (AIK) for Windows 7 (including WinPE 3.0) on
the reference machine.
3 If the reference machine operating system is Windows Server 2003 or Windows XP, reset the
administrator password to be blank. (There is no password.)
4 (Optional) If you want to enable XenDesktop integration, install and configure a
Citrix Virtual Desktop Agent.
5 (Optional) A Windows Management Instrumentation (WMI) agent is required to collect certain data
from a Windows machine managed by vRealize Automation, for example the Active Directory status
of a machine’s owner. To ensure successful management of Windows machines, you must install a
WMI agent (typically on the Manager Service host) and enable the agent to collect data from
Windows machines. See Installing vRealize Automation.
SysPrep Requirements for the Reference Machine
A SysPrep answer file contains several required settings that are used for WIM provisioning.
Table 1‑15. Windows Server or Windows XP reference machine SysPrep required settings
GuiUnattended Settings Value
AutoLogon Yes
AutoLogonCount 1
Configuring vRealize Automation
VMware, Inc. 59
Table 1‑15. Windows Server or Windows XP reference machine SysPrep required settings
(Continued)
GuiUnattended Settings Value
AutoLogonUsername username
(username and password are the credentials used for auto
logon when the newly provisioned machine boots into the guest
operating system. Administrator is typically used.)
AutoLogonPassword password corresponding to the AutoLogonUsername.
Table 1‑16. Required SysPrep Settings for reference machine that are not using Windows
Server 2003 or Windows XP:
AutoLogon Settings Value
Enabled Yes
LogonCount 1
Username username
(username and password are the credentials used for auto
logon when the newly provisioned machine boots into the guest
operating system. Administrator is typically used.)
Password password
(username andpassword are the credentials used for auto logon
when the newly provisioned machine boots into the guest
operating system. Administrator is typically used.)
Note For reference machines that use a Windows platform
newer than Windows Server 2003/Windows XP, you must set
the autologon password by using the custom property
Sysprep.GuiUnattended.AdminPassword. A convenient way
to ensure this is done is to create a property group that includes
this custom property so that tenant administrators and business
group managers can include this information correctly in their
blueprints.
Preparing for WIM Provisioning with VirtIO Drivers
If you are using VirtIO for network or storage interfaces, you must ensure that the necessary drivers are
included in your WinPE image and WIM image. VirtIO generally offers better performance when
provisioning with KVM (RHEV).
Windows drivers for VirtIO are included as part of the Red Hat Enterprise Virtualization and are located in
the /usr/share/virtio-win directory on the file system of the Red Hat Enterprise Virtualization
Manager. The drivers are also included in the Red Hat Enterprise Virtualization Guest Tools
located /usr/share/rhev-guest-tools-iso/rhev-tools-setup.iso.
The high-level process for enabling WIM-based provisioning with VirtIO drivers is as follows:
1 Create a WIM image from a Windows reference machine with the VirtIO drivers installed or insert the
drivers into an existing WIM image.
2 Copy the VirtIO driver files and insert the drivers into a WinPE image.
Configuring vRealize Automation
VMware, Inc. 60
3 Upload the WinPE image ISO to the Red Hat Enterprise Virtualization ISO storage domains using the
rhevm-iso-uploader command. For more information about managing ISO images in RHEV refer
to the Red Hat documentation.
4 Create a KVM (RHEV) blueprint for WIM provisioning and select the WinPE ISO option. The custom
property VirtualMachine.Admin.DiskInterfaceType must be included with the value VirtIO. A
fabric administrator can include this information in a property group for inclusion on blueprints.
The custom properties Image.ISO.Location and Image.ISO.Name are not used for KVM (RHEV)
blueprints.
Manually Insert the Guest Agent into a WinPE Image
You must manually insert the vRealize Automation guest agent into your WinPE image.
Prerequisites
nSelect a Windows system from which the staging area you prepared is accessible and on which .NET
4.5 and Windows Automated Installation Kit (AIK) for Windows 7 (including WinPE 3.0) are installed.
nCreate a WinPE.
Procedure
1Install the Guest Agent in a WinPE
You must manually copy the guest agent files to your WinPE image.
2Configure the doagent.bat File
You must manually configure the doagent.bat file.
3Configure the doagentc.bat File
You must manually configure the doagentc.bat file.
4Configure the Guest Agent Properties Files
You must manually configure the guest agent properties files.
Procedure
1Install the Guest Agent in a WinPE.
2Configure the doagent.bat File.
3Configure the doagentc.bat File.
4Configure the Guest Agent Properties Files.
Install the Guest Agent in a WinPE
You must manually copy the guest agent files to your WinPE image.
Prerequisites
nSelect a Windows system from which the staging area you prepared is accessible and on which .NET
4.5 and Windows Automated Installation Kit (AIK) for Windows 7 (including WinPE 3.0) are installed.
Configuring vRealize Automation
VMware, Inc. 61
nCreate a WinPE.
Procedure
uDownload and install the vRealize Automation guest agent from
https://vRealize_VA_Hostname_fqdn/software/index.html.
a Download GugentZip_version to the C drive on the reference machine.
Select either GuestAgentInstaller.exe (32-bit) or GuestAgentInstaller_x64.exe (64-bit)
depending on which is appropriate for your operating system.
b Right-click the file and select Properties.
c Click General.
d Click Unblock.
e Extract the files to C:\.
This produces the directory C:\VRMGuestAgent. Do not rename this directory.
What to do next
Configure the doagent.bat File.
Configure the doagent.bat File
You must manually configure the doagent.bat file.
Prerequisites
Install the Guest Agent in a WinPE.
Procedure
1Navigate to the VRMGuestAgent directory within your WinPE Image.
For example: C:\Program Files (x86)\VMware\Plugins\VRM Agent\VRMGuestAgent.
2Make a copy of the file doagent-template.bat and name it doagent.bat.
3Open doagent.bat in a text editor.
4Replace all instances of the string #Dcac Hostname# with the fully qualified domain name and port
number of the IaaS Manager Service host.
Option Description
If you are using a load balancer Enter the fully qualified domain name and port of the load balancer for the IaaS
Manager Service. For example,
manager_service_LB.mycompany.com:443
With no load balancer Enter the fully qualified domain name and port of the machine on which the IaaS
Manager Service is installed. For example,
manager_service.mycompany.com:443
Configuring vRealize Automation
VMware, Inc. 62

5Replace all instances of the string #Protocol# with the string /ssl.
6Replace all instances of the string #Comment# with REM (REM must be followed by a trailing space).
7(Optional) If you are using self-signed certificates, uncomment the openSSL command.
echo QUIT | c:\VRMGuestAgent\bin\openssl s_client –connect
8Save and close the file.
9Edit the Startnet.cmd script for your WinPE to include the doagent.bat as a custom script.
What to do next
Configure the doagentc.bat File.
Configure the doagentc.bat File
You must manually configure the doagentc.bat file.
Prerequisites
Configure the doagent.bat File.
Procedure
1Navigate to the VRMGuestAgent directory within your WinPE Image.
For example: C:\Program Files (x86)\VMware\Plugins\VRM Agent\VRMGuestAgent.
2Make a copy of the file doagentsvc-template.bat and name it doagentc.bat.
3Open doagentc.bat in a text editor.
4Remove all instance of the string #Comment#.
5Replace all instances of the string #Dcac Hostname# with the fully qualified domain name and port
number of the Manager Service host.
The default port for the Manager Service is 443.
Option Description
If you are using a load balancer Enter the fully qualified domain name and port of the load balancer for the
Manager Service. For example,
load_balancer_manager_service.mycompany.com:443
With no load balancer Enter the fully qualified domain name and port of the Manager Service. For
example,
manager_service.mycompany.com:443
6Replace all instances of the string #errorlevel# with the character 1.
7Replace all instances of the string #Protocol# with the string /ssl.
8Save and close the file.
Configuring vRealize Automation
VMware, Inc. 63
What to do next
Configure the Guest Agent Properties Files.
Configure the Guest Agent Properties Files
You must manually configure the guest agent properties files.
Prerequisites
Configure the doagentc.bat File.
Procedure
1Navigate to the VRMGuestAgent directory within your WinPE Image.
For example: C:\Program Files (x86)\VMware\Plugins\VRM Agent\VRMGuestAgent.
2Make a copy of the file gugent.properties and name it gugent.properties.template.
3Make a copy of the file gugent.properties.template and name it gugentc.properties.
4Open gugent.properties in a text editor.
5Replace all instances of the string GuestAgent.log the string
X:/VRMGuestAgent/GuestAgent.log.
6Save and close the file.
7Open gugentc.properties in a text editor.
8Replace all instances of the string GuestAgent.log the string
C:/VRMGuestAgent/GuestAgent.log.
9Save and close the file.
Preparing for Virtual Machine Image Provisioning
Before you provision instances with OpenStack, you must have virtual machine images and flavors
configured in the OpenStack provider.
Virtual Machine Images
You can select an virtual machine image from a list of available images when creating blueprints for
OpenStack resources.
A virtual machine image is a template that contains a software configuration, including an operating
system. Virtual machine images are managed by the OpenStack provider and are imported during data
collection.
If an image that is used in a blueprint is later deleted from the OpenStack provider, it is also removed from
the blueprint. If all the images have been removed from a blueprint, the blueprint is disabled and cannot
be used for machine requests until it is edited to add at least one image.
Configuring vRealize Automation
VMware, Inc. 64
OpenStack Flavors
You can select one or more flavors when creating OpenStack blueprints.
OpenStack flavors are virtual hardware templates that define the machine resource specifications for
instances provisioned in OpenStack. Flavors are managed by the OpenStack provider and are imported
during data collection.
vRealize Automation supports several flavors of OpenStack. For the most current information about
OpenStack flavor support, see the vRealize Automation Support Matrix at
https://www.vmware.com/support/pubs/vcac-pubs.html.
Preparing for Amazon Machine Image Provisioning
Prepare your Amazon Machine Images and instance types for provisioning in vRealize Automation.
Understanding Amazon Machine Images
You can select an Amazon machine image from a list of available images when creating Amazon
machine blueprints.
An Amazon machine image is a template that contains a software configuration, including an operating
system. They are managed by Amazon Web Services accounts. vRealize Automation manages the
instance types that are available for provisioning.
The Amazon machine image and instance type must be available in an Amazon region. Not all instance
types are available in all regions.
You can select an Amazon machine image provided by Amazon Web Services, a user community, or the
AWS Marketplace site. You can also create and optionally share your own Amazon machine images. A
single Amazon machine image can be used to launch one or many instances.
The following considerations apply to Amazon machine images in the Amazon Web Services accounts
from which you provision cloud machines:
nEach blueprint must specify an Amazon machine image.
A private Amazon machine image is available to a specific account and all its regions. A public
Amazon machine image is available to all accounts, but only to a specific region in each account.
nWhen the blueprint is created, the specified Amazon machine image is selected from regions that
have been data-collected. If multiple Amazon Web Services accounts are available, the business
group manager must have rights to any private Amazon machine images. The Amazon machine
image region and the specified user location restrict provisioning request to reservations that match
the corresponding region and location.
nUse reservations and policies to distribute Amazon machine images in your Amazon Web Services
accounts. Use policies to restrict provisioning from a blueprint to a particular set of reservations.
Configuring vRealize Automation
VMware, Inc. 65
nvRealize Automation cannot create user accounts on a cloud machine. The first time a machine
owner connects to a cloud machine, she must log in as an administrator and add her
vRealize Automation user credentials or an administrator must do that for her. She can then log in
using her vRealize Automation user credentials.
If the Amazon machine image generates the administrator password on every boot, the Edit Machine
Record page displays the password. If it does not, you can find the password in the Amazon Web
Services account. You can configure all Amazon machine images to generate the administrator
password on every boot. You can also provide administrator password information to support users
who provision machines for other users.
nTo allow remote Microsoft Windows Management Instrumentation (WMI) requests on cloud machines
provisioned in Amazon Web Services accounts, enable a Microsoft Windows Remote Management
(WinRM) agent to collect data from Windows machines managed by vRealize Automation. See
Installing vRealize Automation.
nA private Amazon machine image can be seen across tenants.
For related information, see Amazon Machine Images (AMI) topics in Amazon documentation.
Understanding Amazon Instance Types
An IaaS architect selects one or more Amazon instance types when creating Amazon EC2 blueprints. An
IaaS administrator can add or remove instance types to control the choices available to the architects.
An Amazon EC2 instance is a virtual server that can run applications in Amazon Web Services. Instances
are created from an Amazon machine image and by choosing an appropriate instance type.
To provision a machine in an Amazon Web Services account, an instance type is applied to the specified
Amazon machine image. The available instance types are listed when architects create the Amazon EC2
blueprint. Architects select one or more instance types, and those instance types become choices
available to the user when they request to provision a machine. The instance types must be supported in
the designated region.
For related information, see Selecting Instance Types and Amazon EC2 Instance Details topics in
Amazon documentation.
Add an Amazon Instance Type
Several instance types are supplied with vRealize Automation for use with Amazon blueprints. An
administrator can add and remove instance types.
The machine instance types managed by IaaS administrators are available to blueprint architects when
they create or edit an Amazon blueprint. Amazon machine images and instance types are made available
through the Amazon Web Services product.
Prerequisites
Log in to vRealize Automation as an IaaS administrator.
Configuring vRealize Automation
VMware, Inc. 66
Procedure
1Click Infrastructure > Administration > Instance Types.
2Click New.
3Add a new instance type, specifying the following parameters.
Information about the available Amazon instances types and the setting values that you can specify
for these parameters is available from Amazon Web Services documentation in EC2 Instance Types -
Amazon Web Services (AWS) at aws.amazon.com/ec2 and Instance Types at
docs.aws.amazon.com.
nName
nAPI name
nType Name
nIO Performance Name
nCPUs
nMemory (GB)
nStorage (GB)
nCompute Units
4Click the Save icon ( ).
When IaaS architects create Amazon Web Services blueprints, they can use your custom instance types.
What to do next
Add the compute resources from your endpoint to a fabric group. See Create a Fabric Group.
Scenario: Prepare vSphere Resources for Machine Provisioning in
Rainpole
As the vSphere administrator creating templates for vRealize Automation, you want to use the vSphere
Web Client to prepare for cloning CentOS machines in vRealize Automation.
TEMPLATE
You are here
Prepare
Installation Install Prepare
Template
Request Initial
Content
Configuring vRealize Automation
VMware, Inc. 67

You want to convert an existing CentOS reference machine into a vSphere template so you and your
Rainpole architects can create blueprints for cloning CentOS machines in vRealize Automation. To
prevent any conflicts that might arise from deploying multiple virtual machines with identical settings, you
also want to create a general customization specification that you and your architects can use to create
clone blueprints for Linux templates.
Procedure
1Scenario: Convert Your CentOS Reference Machine into a Template for Rainpole
Using the vSphere Client, you convert your existing CentOS reference machine into a vSphere
template for your vRealize Automation IaaS architects to reference as the base for their clone
blueprints.
2Scenario: Create a Customization Specification for Cloning Linux Machines in Rainpole
Using the vSphere Client, you create a standard customization specification for your
vRealize Automation IaaS architects to use when they create clone blueprints for Linux machines.
Scenario: Convert Your CentOS Reference Machine into a Template for
Rainpole
Using the vSphere Client, you convert your existing CentOS reference machine into a vSphere template
for your vRealize Automation IaaS architects to reference as the base for their clone blueprints.
Procedure
1Log in to your reference machine as the root user and prepare the machine for conversion.
a Remove udev persistence rules.
/bin/rm -f /etc/udev/rules.d/70*
b Enable machines cloned from this template to have their own unique identifiers.
/bin/sed -i '/^\(HWADDR\|UUID\)=/d'
/etc/sysconfig/network-scripts/ifcfg-eth0
c Power down the machine.
shutdown -h now
2Log in to the vSphere Web Client as an administrator.
3Click the VM Options tab.
4Right-click your reference machine and select Edit Settings.
5Enter Rainpole_centos_63_x86 in the VM Name text box.
6Even though your reference machine has a CentOS guest operating system, select Red Hat
Enterprise Linux 6 (64-bit) from the Guest OS Version drop-down menu.
If you select CentOS, your template and customization specification might not work as expected.
Configuring vRealize Automation
VMware, Inc. 68
7Right-click your Rainpole_centos_63_x86 reference machine in the vSphere Web Client and select
Template > Convert to Template.
vCenter Server marks your Rainpole_centos_63_x86 reference machine as a template and displays the
task in the Recent Tasks pane.
What to do next
To prevent any conflicts that might arise from deploying multiple virtual machines with identical settings,
you create a general customization specification that you and your Rainpole architects can use to create
clone blueprints for Linux templates.
Scenario: Create a Customization Specification for Cloning Linux Machines in
Rainpole
Using the vSphere Client, you create a standard customization specification for your vRealize Automation
IaaS architects to use when they create clone blueprints for Linux machines.
Procedure
1On the home page, click Customization Specification Manager to open the wizard.
2Click the New icon.
3Specify properties.
a Select Linux from the Target VM Operating System drop-down menu.
b Enter Linux in the Customization Spec Name text box.
c Enter Rainpole Linux cloning with vRealize Automation in the Description text box.
d Click Next.
4Set computer name.
a Select Use the virtual machine name.
b Enter the domain on which cloned machines are going to be provisioned in the Domain name
text box.
For example, rainpole.local.
c Click Next.
5Configure time zone settings.
6Click Next.
7Select Use standard network settings for the guest operating system, including enabling
DHCP on all network interfaces.
8Follow the prompts to enter the remaining required information.
9On the Ready to complete page, review your selections and click Finish.
Configuring vRealize Automation
VMware, Inc. 69

You have a general customization specification that you can use to create blueprints for cloning Linux
machines.
What to do next
Log in to the vRealize Automation console as the configuration administrator you created during the
installation and request the catalog items that quickly set up your proof of concept.
Preparing for Software Provisioning
Use Software to deploy applications and middleware as part of the vRealize Automation provisioning
process for vSphere, vCloud Director,vCloud Air, and Amazon AWS machines.
You can deploy Software on machines if your blueprint supports Software and if you install the guest
agent and software bootstrap agent on your reference machines before you convert them into templates,
snapshots, or Amazon Machine Images.
For related information about specifying ports when preparing for provisioning, see Secure Configuration
Guide and Reference Architecture at VMware vRealize Automation Information.
Table 1‑17. Provisioning Methods that Support Software
Machine Type
Provisioning
Method Required Preparation
vSphere Clone A clone blueprint provisions a complete and independent virtual machine based on a
vCenter Server virtual machine template. If you want your templates for cloning to support
Software components, install the guest agent and software bootstrap agent on your
reference machine as you prepare a template for cloning. See Checklist for Preparing to
Provision by Cloning.
vSphere Linked Clone A linked clone blueprint provisions a space-efficient copy of a vSphere machine based on a
snapshot, using a chain of delta disks to track differences from the parent machine. If you
want your linked clone blueprints to support Software components, install the guest agent
and software bootstrap agent on the machine before you take the snapshot.
If your snapshot machine was cloned from a template that supports Software, the required
agents are already installed.
vCloud Director Clone A clone blueprint provisions a complete and independent virtual machine based on a
vCenter Server virtual machine template. If you want your templates for cloning to support
Software components, install the guest agent and software bootstrap agent on your
reference machine as you prepare a template for cloning. See Checklist for Preparing to
Provision by Cloning.
Configuring vRealize Automation
VMware, Inc. 70

Table 1‑17. Provisioning Methods that Support Software (Continued)
Machine Type
Provisioning
Method Required Preparation
vCloud Air Clone A clone blueprint provisions a complete and independent virtual machine based on a
vCenter Server virtual machine template. If you want your templates for cloning to support
Software components, install the guest agent and software bootstrap agent on your
reference machine as you prepare a template for cloning. See Checklist for Preparing to
Provision by Cloning.
Amazon AWS Amazon
Machine
Image
An Amazon machine image is a template that contains a software configuration, including
an operating system. If you want to create an Amazon machine image that supports
Software, connect to a running Amazon AWS instance that uses an EBS volume for the root
device. Install the guest agent and software bootstrap agent on the reference machine, then
create an Amazon Machine Image from your instance. For instruction on creating Amazon
EBS-backed AMIs, see the Amazon AWS documentation.
For the guest agent and Software bootstrap agent to function on provisioned machines, you
must configure network-to-VPC connectivity.
Preparing to Provision Machines with Software
To support Software components, you must install the guest agent and Software bootstrap agent on your
reference machine before you convert to a template for cloning, create an Amazon machine image, or
take a snapshot.
Prepare a Windows Reference Machine to Support Software
You use a single script to install the Java Runtime Environment, guest agent, and Software bootstrap
agent on a Windows reference machine. From the reference machine, you can create a template for
cloning, a snapshot, or an Amazon machine image that supports Software components.
Software supports scripting with Windows CMD and PowerShell 2.0.
Important The startup process must not be interrupted. Configure the virtual machine so that nothing
pauses the virtual machine startup process before reaching the login prompt. For example, verify that no
processes or scripts prompt for user interaction while the virtual machine starts.
Prerequisites
nIdentify or create a Windows reference machine.
nEstablish secure trust between the reference machine and your IaaS Manager Service host. See
Configuring the Guest Agent to Trust a Server.
nOn the reference machine, verify that the Darwin user has Log on as a service access.
nIf you plan to remotely access the machine for troubleshooting or other reasons, install Remote
Desktop Services (RDS).
nRemove network configuration artifacts from the network configuration files.
Configuring vRealize Automation
VMware, Inc. 71

Procedure
1Log in to the Windows reference server as an administrator.
2Open a browser to the software download page on the vRealize Automation appliance.
https://vrealize-automation-appliance-FQDN/software
3Save the template ZIP to the Windows server.
prepare_vra_template_windows.zip
4Extract the ZIP contents to a folder, and run the batch file.
.\prepare_vra_template.bat
5Follow the prompts.
6When finished, shut down the Windows virtual machine.
The script removes any previous guest or Software bootstrap agents, and installs the supported versions
of the Java Runtime Environment, the guest agent, and the Software bootstrap agent.
What to do next
Convert the reference machine into a template for cloning, a snapshot, or an Amazon machine image.
Each supports Software components, and infrastructure architects can use them when creating
blueprints.
Prepare a Linux Reference Machine to Support Software
You use a single script to install the Java Runtime Environment, guest agent, and Software bootstrap
agent on your Linux reference machine. From the reference machine, you can create a template for
cloning, a snapshot, or an Amazon machine image that supports Software components.
Software supports scripting with Bash.
Important The boot process must not be interrupted. Configure the virtual machine so that nothing
pauses the virtual machine boot process before reaching the login prompt. For example, verify that no
processes or scripts prompt for user interaction while the virtual machine starts.
Prerequisites
nIdentify or create a Linux reference machine.
nVerify that the following commands are available, depending on your Linux system:
nyum or apt-get
nwget or curl
npython
ndmidecode as required by cloud providers
Configuring vRealize Automation
VMware, Inc. 72
nCommon requirements such as sed, awk, perl, chkconfig, unzip, and grep depending on your
Linux distribution
You might also use an editor to inspect the downloaded prepare_vra_template.sh script, which
exposes the commands that it uses.
nIf you plan to remotely access the machine for troubleshooting or other reasons, install OpenSSH.
nRemove network configuration artifacts from the network configuration files.
Procedure
1Log in to your reference machine as root.
2Download the template tar.gz package from the vRealize Automation appliance.
wget https://vrealize-automation-appliance-
FQDN/software/download/prepare_vra_template.tar.gz
If your environment is using self-signed certificates, you might need the --no-check-certificate
option.
wget --no-check-certificate https://vrealize-automation-appliance-
FQDN/software/download/prepare_vra_template.tar.gz
3Untar the package.
tar -xvf prepare_vra_template.tar.gz
4In the untar output, find the installer script, and make it executable.
chmod +x prepare_vra_template.sh
5Run the installer script.
./prepare_vra_template.sh
If you need information about non-interactive options and expected values, see the script help.
./prepare_vra_template.sh --help
6Follow the prompts.
A confirmation appears when installation succeeds. If errors and logs appear, resolve the errors and
rerun the script.
7When finished, shut down the Linux virtual machine.
The script removes any previous guest or Software bootstrap agents, and installs the supported versions
of the Java Runtime Environment, the guest agent, and the Software bootstrap agent.
What to do next
On your hypervisor or cloud provider, turn the reference machine into a template for cloning, a snapshot,
or an Amazon machine image. Each supports Software components, and infrastructure architects can
use them when creating blueprints.
Configuring vRealize Automation
VMware, Inc. 73

Updating Existing Virtual Machine Templates in vRealize Automation
If you are updating your templates, Amazon Machine Images, or snapshots for the latest version of the
Windows Software bootstrap agent, or if you are manually updating to the latest Linux Software bootstrap
agent instead of using the prepare_vra_template.sh script, you need to remove any existing
versions and delete any logs.
Linux
For Linux reference machines, running the prepare_vra_template.sh script script resets the agent
and removes any logs for you before reinstalling. However, if you intend to manually install, you need to
log in to the reference machine as the root user and run the command to reset and remove the artifacts.
/opt/vmware-appdirector/agent-bootstrap/agent_reset.sh
Windows
For Windows reference machines, you remove the existing Software agent bootstrap and
vRealize Automation 6.0 or later guest agent, and delete any existing runtime log files. In a PowerShell
command window, run the commands to remove the agent and artifacts.
c:\opt\vmware-appdirector\agent-bootstrap\agent_bootstrap_removal.bat
c:\opt\vmware-appdirector\agent-bootstrap\agent_reset.bat
Scenario: Prepare a vSphere CentOS Template for Clone Machine
and Software Component Blueprints
As a vCenter Server administrator, you want to prepare a vSphere template that your
vRealize Automation architects can use to clone Linux CentOS machines. You want to ensure that your
template supports blueprints with software components, so you install the guest agent and the software
bootstrap agent before you turn your reference machine into a template.
Prerequisites
nIdentify or create a Linux CentOS reference machine with VMware Tools installed. Include at least
one Network Adapter to provide internet connectivity in case blueprint architects do not add this
functionality at the blueprint level. For information about creating virtual machines, see the vSphere
documentation.
nYou must be connected to a vCenter Server to convert a virtual machine to a template. You cannot
create templates if you connect the vSphere Client directly to an vSphere ESXi host.
Configuring vRealize Automation
VMware, Inc. 74
Procedure
1Scenario: Prepare Your Reference Machine for Guest Agent Customizations and Software
Components
So that your template can support software components, you install the software bootstrap agent
and its prerequisite, the guest agent, on your reference machine. The agents ensure that
vRealize Automation architects who use your template can include software components in their
blueprints.
2Scenario: Convert Your CentOS Reference Machine into a Template
After you install the guest agent and software bootstrap agent onto your reference machine, you turn
your reference machine into a template that vRealize Automation architects can use to create clone
machine blueprints.
3Scenario: Create a Customization Specification for vSphere Cloning
Create a customization specification for your blueprint architects to use with your
cpb_centos_63_x84 template.
You created a template and customization specification from your reference machine that blueprint
architects can use to create vRealize Automation blueprints that clone Linux CentOS machines. Because
you installed the Software bootstrap agent and the guest agent on your reference machine, architects can
use your template to create elaborate catalog item blueprints that include Software components or other
guest agent customizations such as running scripts or formatting disks. Because you installed
VMware Tools, architects and catalog administrators can allow users to perform actions against
machines, such as reconfigure, snapshot, and reboot.
What to do next
After you configure vRealize Automation users, groups, and resources, you can use your template and
customization specification to create a machine blueprint for cloning. See Installing and Configuring
vRealize Automation for the Rainpole Scenario.
Scenario: Prepare Your Reference Machine for Guest Agent Customizations
and Software Components
So that your template can support software components, you install the software bootstrap agent and its
prerequisite, the guest agent, on your reference machine. The agents ensure that vRealize Automation
architects who use your template can include software components in their blueprints.
To simplify the process, you download and run a vRealize Automation script that installs both agents,
instead of downloading and installing separate packages.
The script also connects to the Manager Service instance and downloads the SSL certificate, which
establishes trust between the Manager Service and machines deployed from the template. Note that
having the script download the certificate is less secure than manually obtaining the Manager Service
SSL certificate and installing it on your reference machine in /usr/share/gugent/cert.pem.
Configuring vRealize Automation
VMware, Inc. 75

Procedure
1In your Web browser, open the following URL.
https://vrealize-automation-appliance-FQDN/software/index.html
2Save the prepare_vra_template.sh script to your reference machine.
3On the reference machine, make prepare_vra_template.sh executable.
chmod +x prepare_vra_template.sh
4Run prepare_vra_template.sh.
./prepare_vra_template.sh
5Follow the prompts.
If you need non-interactive information about options and values,
enter ./prepare_vra_template.sh --help.
A confirmation message appears when installation finishes. If error messages and logs appear, correct
the issues and rerun the script.
Scenario: Convert Your CentOS Reference Machine into a Template
After you install the guest agent and software bootstrap agent onto your reference machine, you turn your
reference machine into a template that vRealize Automation architects can use to create clone machine
blueprints.
After you convert your reference machine to a template, you cannot edit or power on the template unless
you convert it back to a virtual machine.
Procedure
1Log in to your reference machine as the root user and prepare the machine for conversion.
a Remove udev persistence rules.
/bin/rm -f /etc/udev/rules.d/70*
b Enable machines cloned from this template to have their own unique identifiers.
/bin/sed -i '/^\(HWADDR\|UUID\)=/d'
/etc/sysconfig/network-scripts/ifcfg-eth0
Configuring vRealize Automation
VMware, Inc. 76

c If you rebooted or reconfigured the reference machine after installing the software bootstrap
agent, reset the agent.
/opt/vmware-appdirector/agent-bootstrap/agent_reset.sh
d Power down the machine.
shutdown -h now
2Log in to the vSphere Web Client as an administrator.
3Right-click your reference machine and select Edit Settings.
4Enter cpb_centos_63_x84 in the VM Name text box.
5Even though your reference machine has a CentOS guest operating system, select Red Hat
Enterprise Linux 6 (64-bit) from the Guest OS Version drop-down menu.
If you select CentOS, your template and customization specification might not work as expected.
6Right-click your reference machine in the vSphere Web Client and select Template > Convert to
Template.
vCenter Server marks your cpb_centos_63_x84 reference machine as a template and displays the task in
the Recent Tasks pane. If you have already brought your vSphere environment under
vRealize Automation management, your template is discovered during the next automated data
collection. If you have not configured your vRealize Automation yet, the template is collected during that
process.
Scenario: Create a Customization Specification for vSphere Cloning
Create a customization specification for your blueprint architects to use with your cpb_centos_63_x84
template.
Procedure
1Log in to the vSphere Web Client as an administrator.
2On the home page, click Customization Specification Manager to open the wizard.
3Click the New icon.
4Click the New icon.
5Specify properties.
a Select Linux from the Target VM Operating System drop-down menu.
b Enter Customspecs in the Customization Spec Name text box.
c Enter cpb_centos_63_x84 cloning with vRealize Automation in the Description text box.
d Click Next.
Configuring vRealize Automation
VMware, Inc. 77
6Set computer name.
a Select Use the virtual machine name.
b Enter the domain on which cloned machines are going to be provisioned in the Domain name
text box.
c Click Next.
7Configure time zone settings.
8Click Next.
9Select Use standard network settings for the guest operating system, including enabling
DHCP on all network interfaces.
Fabric administrators and infrastructure architects handle network settings for provisioned machine by
creating and using Network profiles in vRealize Automation.
10 Follow the prompts to enter the remaining required information.
11 On the Ready to complete page, review your selections and click Finish.
Scenario: Prepare for Importing the Dukes Bank for vSphere
Sample Application Blueprint
As a vCenter Server administrator, you want to prepare a vSphere CentOS 6.x Linux template and
customization specification that you can use to provision the vRealize Automation Dukes Bank sample
application.
You want to ensure that your template supports the sample application software components, so you
install the guest agent and the software bootstrap agent onto your Linux reference machine before you
convert it to a template and create a customization specification. You disable SELinux on your reference
machine to ensure your template supports the specific implementation of MySQL used in the Dukes Bank
sample application.
Prerequisites
nInstall and fully configure vRealize Automation. See Installing and Configuring vRealize Automation
for the Rainpole Scenario.
nIdentify or create a CentOS 6.x Linux reference machine with VMware Tools installed. For information
about creating virtual machines, see the vSphere documentation.
nYou must be connected to a vCenter Server to convert a virtual machine to a template. You cannot
create templates if you connect the vSphere Client directly to an vSphere ESXi host.
Configuring vRealize Automation
VMware, Inc. 78

Procedure
1Scenario: Prepare Your Reference Machine for the Dukes Bank vSphere Sample Application
You want your template to support the Dukes Bank sample application, so you must install both the
guest agent and the software bootstrap agent on your reference machine so vRealize Automation
can provision the software components. To simplify the process, you download and run a
vRealize Automation script that installs both the guest agent and the software bootstrap agent
instead of downloading and installing the packages separately.
2Scenario: Convert Your Reference Machine into a Template for the Dukes Bank vSphere Application
After you install the guest agent and software bootstrap agent on your reference machine, you
disable SELinux to ensure your template supports the specific implementation of MySQL used in the
Dukes Bank sample application. You turn your reference machine into a template that you can use
to provision the Dukes Bank vSphere sample application.
3Scenario: Create a Customization Specification for Cloning the Dukes Bank vSphere Sample
Application Machines
You create a customization specification to use with your Dukes Bank machine template.
You created a template and customization specification from your reference machine that supports the
vRealize Automation Dukes Bank sample application.
Scenario: Prepare Your Reference Machine for the Dukes Bank vSphere
Sample Application
You want your template to support the Dukes Bank sample application, so you must install both the guest
agent and the software bootstrap agent on your reference machine so vRealize Automation can provision
the software components. To simplify the process, you download and run a vRealize Automation script
that installs both the guest agent and the software bootstrap agent instead of downloading and installing
the packages separately.
Procedure
1Log in to your reference machine as the root user.
2Download the installation script from your vRealize Automation appliance.
wget https://vRealize_VA_Hostname_fqdn/software/download/prepare_vra_template.sh
If your environment is using self-signed certificates, you might have to use the wget option --no-
check-certificate option. For example:
wget --no-check-certificate
https://vRealize_VA_Hostname_fqdn/software/download/prepare_vra_template.sh
3Make the prepare_vra_template.sh script executable.
chmod +x prepare_vra_template.sh
Configuring vRealize Automation
VMware, Inc. 79

4Run the prepare_vra_template.sh installer script.
./prepare_vra_template.sh
You can run the help command ./prepare_vra_template.sh --help for information about non-
interactive options and expected values.
5Follow the prompts to complete the installation.
You see a confirmation message when the installation is successfully completed. If you see an error
message and logs in the console, resolve the errors and run the installer script again.
You installed both the software bootstrap agent and its prerequisite, the guest agent, to ensure the Dukes
Bank sample application successfully provisions software components. The script also connected to your
Manager Service instance and downloaded the SSL certificate to establish trust between the Manager
Service and machines deployed from your template. This is a less secure approach than obtaining the
Manager Service SSL certificate and manually installing it on your reference machine
in /usr/share/gugent/cert.pem, and you can manually replace this certificate now if security is a high
priority.
Scenario: Convert Your Reference Machine into a Template for the Dukes
Bank vSphere Application
After you install the guest agent and software bootstrap agent on your reference machine, you disable
SELinux to ensure your template supports the specific implementation of MySQL used in the Dukes Bank
sample application. You turn your reference machine into a template that you can use to provision the
Dukes Bank vSphere sample application.
After you convert your reference machine to a template, you cannot edit or power on the template unless
you convert it back to a virtual machine.
Procedure
1Log in to your reference machine as the root user.
a Edit your /etc/selinux/config file to disable SELinux.
SELINUX=disabled
If you do not disable SELinux, the MySQL software component of the Duke's Bank Sample
application might not work as expected.
b Remove udev persistence rules.
/bin/rm -f /etc/udev/rules.d/70*
c Enable machines cloned from this template to have their own unique identifiers.
/bin/sed -i '/^\(HWADDR\|UUID\)=/d'
/etc/sysconfig/network-scripts/ifcfg-eth0
Configuring vRealize Automation
VMware, Inc. 80

d If you rebooted or reconfigured the reference machine after installing the software bootstrap
agent, reset the agent.
/opt/vmware-appdirector/agent-bootstrap/agent_reset.sh
e Power down the machine.
shutdown -h now
2Log in to the vSphere Web Client as an administrator.
3Right-click your reference machine and select Edit Settings.
4Enter dukes_bank_template in the VM Name text box.
5If your reference machine has a CentOS guest operating system, select Red Hat Enterprise Linux 6
(64-bit) from the Guest OS Version drop-down menu.
If you select CentOS, your template and customization specification might not work as expected.
6Click OK.
7Right-click your reference machine in the vSphere Web Client and select Template > Convert to
Template.
vCenter Server marks your dukes_bank_template reference machine as a template and displays the task
in the Recent Tasks pane. If you have already brought your vSphere environment under
vRealize Automation management, your template is discovered during the next automated data
collection. If you have not configured your vRealize Automation yet, the template is collected during that
process.
Scenario: Create a Customization Specification for Cloning the Dukes Bank
vSphere Sample Application Machines
You create a customization specification to use with your Dukes Bank machine template.
Procedure
1Log in to the vSphere Web Client as an administrator.
2On the home page, click Customization Specification Manager to open the wizard.
3Click the New icon.
4Specify properties.
a Select Linux from the Target VM Operating System drop-down menu.
b Enter Customspecs_sample in the Customization Spec Name text box.
c Enter Dukes Bank customization spec in the Description text box.
d Click Next.
Configuring vRealize Automation
VMware, Inc. 81
5Set computer name.
a Select Use the virtual machine name.
b Enter the domain on which you want to provision the Dukes Bank sample application in the
Domain name text box.
c Click Next.
6Configure time zone settings.
7Click Next.
8Select Use standard network settings for the guest operating system, including enabling
DHCP on all network interfaces.
Fabric administrators and infrastructure architects handle network settings for provisioned machine by
creating and using Network profiles in vRealize Automation.
9Follow the prompts to enter the remaining required information.
10 On the Ready to complete page, review your selections and click Finish.
You created a template and customization specification that you can use to provision the Dukes Bank
sample application.
What to do next
1 Create an external network profile to provide a gateway and a range of IP addresses. See Create an
External Network Profile by Using A Third-Party IPAM Provider.
2 Map your external network profile to your vSphere reservation. See Create a Reservation for Hyper-V,
KVM, SCVMM, vSphere, or XenServer. The sample application cannot provision successfully without
an external network profile.
3 Import the Duke's Bank sample application into your environment. See Scenario: Importing the Dukes
Bank for vSphere Sample Application and Configuring for Your Environment.
Configuring vRealize Automation
VMware, Inc. 82

Tenant and Resource
Preparations for Blueprint
Provisioning 2
You can configure multiple tenant environments, each with their own groups of users and unique access
to resources that you bring under vRealize Automation management.
This chapter includes the following topics:
nConfiguring Tenant Settings
nConfiguring Resources
nUser Preferences for Notifications and Delegates
Configuring Tenant Settings
Tenant administrators configure tenant settings such as user authentication, and manage user roles and
business groups. System administrators and tenant administrators configure options such as email
servers to handle notifications, and branding for the vRealize Automation console.
You can use the Configuring Tenant Settings Checklist to see a high-level overview of the sequence of
steps required to configure tenant settings.
Table 2‑1. Checklist for Configuring Tenant Settings
Task
vRealize
Automation Role Details
Create local user accounts and assign a tenant
administrator.
System
administrator
For an example of creating local user
accounts, see Installing and Configuring
vRealize Automation for the Rainpole
Scenario.
Configure Directories Management to set up tenant identity
management and access control settings.
Tenant
administrator
Choosing Directories Management
Configuration Options
Create business groups and custom groups, and grant
user access rights to the vRealize Automation console.
Tenant
administrator
Configuring Groups and User Roles
(Optional) Create additional tenants so users can access
the appropriate applications and resources they need to
complete their work assignments.
System
administrator
Create Additional Tenants
(Optional) Configure custom branding on the tenant login
and application pages of the vRealize Automation console.
nSystem
administrator
nTenant
administrator
Configuring Custom Branding
VMware, Inc. 83
Table 2‑1. Checklist for Configuring Tenant Settings (Continued)
Task
vRealize
Automation Role Details
(Optional) Configure vRealize Automation to send users
notifications when specific events occur.
nSystem
administrator
nTenant
administrator
Checklist for Configuring Notifications
(Optional) Configure vRealize Orchestrator to support
XaaS and other extensibility.
nSystem
administrator
nTenant
administrator
Configuring vRealize Orchestrator
(Optional) Create a custom remote desktop protocol file
that IaaS architects use in blueprints to configure RDP
settings.
System
administrator
Create a Custom RDP File to Support RDP
Connections for Provisioned Machines
(Optional) Define datacenter locations that your fabric
administrators and IaaS architects can leverage to allow
users to select an appropriate location for provisioning when
they request machines.
System
administrator
For an example of adding datacenter
locations, see Scenario: Add Datacenter
Locations for Cross Region Deployments.
Choosing Directories Management Configuration Options
You can use vRealize Automation Directories Management features to configure an Active Directory link
in accordance with your user authentication requirements.
Directories Management provides many options to support a highly customized user authentication.
Table 2‑2. Choosing Directories Management Configuration Options
Configuration Option Procedure
Configure a link to your Active Directory. 1 Configure a link to your Active Directory. See Configure an
Active Directory over LDAP/IWA Link.
2 If you configured vRealize Automation for high availability,
see Configure Directories Management for High Availability.
(Optional) Enhance security of a user ID and password based
directory link by configuring bi-directional integration with Active
Directory Federated Services.
Configure a Bi Directional Trust Relationship Between vRealize
Automation and Active Directory
(Optional) Add users and groups to an existing Active Directory
Link .
Add Users or Groups to an Active Directory Connection.
(Optional) Edit the default policy to apply custom rules for an
Active Directory link.
Manage the User Access Policy.
(Optional) Configure network ranges to restrict the IP addresses
through which users can log in to the system, manage login
restrictions (timeout, number of login attempts before lock-out).
Add or Edit a Network Range.
Directories Management Overview
Tenant administrators can configure tenant identity management and access control settings using the
Directories Management options on the vRealize Automation application console.
Configuring vRealize Automation
VMware, Inc. 84

You can manage the following settings from the Administration > Directories Management tab.
Table 2‑3. Directories Management Settings
Setting Description
Directories The Directories page enables you to create and manage Active Directory links to support
vRealize Automation tenant user authentication and authorization. You create one or more
directories and then sync those directories with your Active Directory deployment. This page
displays the number of groups and users that are synced to the directory and the last sync time.
You can click Sync Now, to manually start the directory sync.
See Using Directories Management to Create an Active Directory Link.
When you click on a directory and then click the Sync Settings button, you can edit the sync
settings, navigate the Identity Providers page, and view the sync log.
From the directories sync settings page you can schedule the sync frequency, see the list of
domains associated with this directory, change the mapped attributes list, update the user and
groups list that syncs, and set the safeguard targets.
Connectors The Connectors page lists deployed connectors for your enterprise network. A connector syncs
user and group data between Active Directory and the Directories Management service, and when
it is used as the identity provider, authenticates users to the service. Each vRealize Automation
appliance contains a connector by default. See Managing Connectors and Connector Clusters.
User Attributes The User Attributes page lists the default user attributes that sync in the directory and you can add
other attributes that you can map to Active Directory attributes. See Select Attributes to Sync with
Directory.
Network Ranges This page lists the network ranges that are configured for your system. You configure a network
range to allow users access through those IP addresses. You can add additional network ranges
and you can edit existing ranges. See Add or Edit a Network Range.
Identity Providers The Identity Providers page lists identity providers that are available on your system.
vRealize Automation systems contain a connector that serves as the default identity provider and
that suffices for many user needs. You can add third-party identity provider instances or have a
combination of both.
See Configure a Third Party Identity Provider Connection.
Policies The Policies page lists the default access policy and any other web application access policies you
created. Policies are a set of rules that specify criteria that must be met for users to access their
application portals or to launch Web applications that are enabled for them. The default policy
should be suitable for most vRealize Automation deployments, but you can edit it if needed. See
Manage the User Access Policy.
Important Concepts Related to Active Directory
Several concepts related to Active Directory are integral to understanding how Directories Management
integrates with your Active Directory environments.
Connector
nSyncs user and group data between Active Directory and the service.
nWhen being used as an identity provider, authenticates users to the service.
Configuring vRealize Automation
VMware, Inc. 85
The connector is the default identity provider. For the authentication methods the connector supports,
see VMware Identity Manager Administration. You can also use third-party identity providers that
support the SAML 2.0 protocol. Use a third-party identity provider for an authentication type the
connector does not support or for an authentication type the connector does support, if the third-party
identity provider is preferable based on your enterprise security policy.
Directory
The Directories Management service has its own concept of a directory, which uses Active Directory
attributes and parameters to define users and groups. You create one or more directories and then sync
those directories with your Active Directory deployment. You can create the following directory types in
the service.
nActive Directory over LDAP. Create this directory type if you plan to connect to a single Active
Directory domain environment. For the Active Directory over LDAP directory type, the connector
binds to Active Directory using simple bind authentication.
nActive Directory, Integrated Windows Authentication. Create this directory type if you plan to connect
to a multi-domain or multi-forest Active Directory environment. The connector binds to Active
Directory using Integrated Windows Authentication.
The type and number of directories that you create varies depending on your Active Directory
environment, such as single domain or multi-domain, and on the type of trust used between domains. In
most environments, you create one directory.
The service does not have direct access to Active Directory. Only the connector has direct access to
Active Directory. Therefore, you associate each directory created in the service with a connector instance.
Worker
When you associate a directory with a connector instance, the connector creates a partition for the
associated directory called a worker. A connector instance can have multiple workers associated with it.
Each worker acts as an identity provider. You define and configure authentication methods per worker.
The connector syncs user and group data between Active Directory and the service through one or more
workers.
You cannot have two workers of the Integrated Windows Authentication type on the same connector
instance.
Active Directory Environments
You can integrate the service with an Active Directory environment that consists of a single Active
Directory domain, multiple domains in a single Active Directory forest, or multiple domains across multiple
Active Directory forests.
Single Active Directory Domain Environment
A single Active Directory deployment allows you to sync users and groups from a single Active Directory
domain.
Configuring vRealize Automation
VMware, Inc. 86
See Configure an Active Directory over LDAP/IWA Link. For this environment, when you add a directory
to the service, select the Active Directory over LDAP option.
Multi-Domain, Single Forest Active Directory Environment
A multi-domain, single forest Active Directory deployment allows you to sync users and groups from
multiple Active Directory domains within a single forest.
You can configure the service for this Active Directory environment as a single Active Directory, Integrated
Windows Authentication directory type or, alternatively, as an Active Directory over LDAP directory type
configured with the global catalog option.
nThe recommended option is to create a single Active Directory, Integrated Windows Authentication
directory type.
See Configure an Active Directory over LDAP/IWA Link. When you add a directory for this
environment, select the Active Directory (Integrated Windows Authentication) option.
Multi-Forest Active Directory Environment with Trust Relationships
A multi-forest Active Directory deployment with trust relationships allows you to sync users and groups
from multiple Active Directory domains across forests where two-way trust exists between the domains.
See Configure an Active Directory over LDAP/IWA Link. When you add a directory for this environment,
select the Active Directory (Integrated Windows Authentication) option.
Multi-Forest Active Directory Environment Without Trust Relationships
A multi-forest Active Directory deployment without trust relationships allows you to sync users and groups
from multiple Active Directory domains across forests without a trust relationship between the domains. In
this environment, you create multiple directories in the service, one directory for each forest.
See Configure an Active Directory over LDAP/IWA Link. The type of directories you create in the service
depends on the forest. For forests with multiple domains, select the Active Directory (Integrated Windows
Authentication) option. For a forest with a single domain, select the Active Directory over LDAP option.
Using Directories Management to Create an Active Directory Link
After you create vRealize Automation tenants, you must log in to the system console as a tenant
administrator and create an Active Directory link to support user authentication.
There are three Active Directory communication protocol options when configuring an Active Directory
connection using Directories Management.
nActive Directory over LDAP - An Active Directory over LDAP protocol supports DNS Service Location
lookup by default.
nActive Directory (Integrated Windows Authentication) - With Active Directory (Integrated Windows
Authentication), you configure the domain to join. Active Directory over LDAP is appropriate for single
domain deployments. Use Active Directory (Integrated Windows Authentication) for all multi-domain
and multi-forest deployments.
Configuring vRealize Automation
VMware, Inc. 87

nOpenLDAP - You can use the open source version of LDAP to support Directories Management user
authentication.
After you select a communication protocol and configure an Active Directory link, you can specify the
domains to use with the Active Directory configuration and then select the users and groups to sync with
the specified configuration.
Configure an Active Directory over LDAP/IWA Link
You can configure an Active Directory over LDAP/IWA link to support user authentication using the
Directories Management feature to configure a link to Active Directory to support user authentication for
all tenants and select users and groups to sync with the Directories Management directory.
For information and instructions about using OpenLDAP with Directories Management, see Configure an
OpenLDAP Directory Connection.
For Active Directory (Integrated Windows Authentication), when you have multi-forest Active Directory
configured and the Domain Local group contains members from domains in different forests, make sure
that the Bind user is added to the Administrators group of the domain in which the Domain Local group
resides. If you fail to do this, these members will be missing from the Domain Local group.
Prerequisites
nSelect the required default attributes and add additional attributes on the User Attributes page. See
Select Attributes to Sync with Directory.
nList of the Active Directory groups and users to sync from Active Directory.
nIf your Active Directory requires access over SSL or STARTTLS, the Root CA certificate of the Active
Directory domain controller is required.
nLog in to vRealize Automation as a tenant administrator.
Procedure
1Select Administration > Directories Management > Directories.
2Click Add Directory and select Add Active Directory over LDAP/IWA.
3On the Add Directory page, specify the IP address for the Active Directory server in the Directory
Name text box.
4Select the appropriate Active Directory communication protocol using the radio buttons under the
Directory Name text box.
Option Description
Windows Authentication Select Active Directory (Integrated Windows Authentication). For Active
Directory Integrated Windows Authentication, required information includes the
domain's Bind user UPN address and password.
LDAP Select Active Directory over LDAP. For Active Directory over LDAP, information
required includes the Base DN, Bind DN, and Bind DN password.
Configuring vRealize Automation
VMware, Inc. 88

5Configure the connector that synchronizes users from the Active Directory to the VMware
Directories Management directory in the Directory Sync and Authentication section.
Option Description
Sync Connector Select the appropriate connector to use for your system. Each
vRealize Automation appliance contains a default connector. Consult your system
administrator if you need help in choosing the appropriate connector.
Authentication Click the appropriate radio button to indicate whether the selected connector also
performs authentication.
If you are using Active Directory (Integrated Windows Authentication), with a third
party identity provider to authenticate users, click No. After you configure the
Active Directory connection to sync users and groups use the Identity Providers
page to add the third-party identity provider for authentication.
For information about using authentication adapters such as
PasswordIpddAdapter, SecurIDAdapter, and RadiusAuthAdapter, see the
VMware Identity Manager Administration Guide.
Directory Search Attribute Select the appropriate account attribute that contains the user name. VMware
recommends using the sAMAccount attribute rather than userPrincipleName. If
you use userPrincipleName for sync operations, integration with second and third
party software that requires a user name may not function correctly.
Note If you select sAMAccountName when using a global catalog, indicated by
selecting theThis Directory has a Global Catalog check box in the Server
Location area, users will be unable to log in.
Configuring vRealize Automation
VMware, Inc. 89

6Enter the appropriate information in the Server Location text box if you selected Active Directory over
LDAP, or enter information in the Join Domain Details text boxes if you selected Active Directory
(Integrated Windows Authentication).
Option Description
Server Location - Displayed when
Active Directory over LDAP is selected
nIf you want to use DNS Service Location to locate Active Directory domains,
leave the This Directory supports DNS Service Location check box
selected.
Note You cannot change the port assignment to 636 if you select this option.
A domain_krb.properties file, auto-populated with a list of domain
controllers, is created along with the directory. See About Domain Controller
Selection.
If the Active Directory requires STARTTLS encryption, select the This
Directory requires all connections to use STARTTLS check box in the
Certificates section and copy and paste the Active Directory Root CA
certificate in the SSL Certificate field.
nIf the specified Active Directory does not use DNS Service Location lookup,
deselect the check box beside This Directory supports DNS Service
Location in the Server Location fields and enter the Active Directory server
host name and port number in the appropriate text boxes.
Select the This Directory has a Global Catalog check box if the associated
Active Directory uses a global catalog. A global catalog contains a
representation of all objects in every domain in a multi-domain Active
Directory forest.
To configure the directory as a global catalog, see the Multi-Domain Single
Forest Active Directory Environment section in Active Directory
Environments.
If Active Directory requires access over SSL, select the This Directory
requires all connections to use SSL check box under the Certificates
heading and provide the Active Directory SSL certificate.
When you select this option, port 636 is used automatically and cannot be
changed.
Ensure that the certificate is in PEM format and includes the BEGIN
CERTIFICATE and END CERTIFICATE lines.
Join Domain Details - Displayed when
Active Directory (Integrated Windows
Authentication) is selected
Enter the appropriate credentials in the Domain Name, Domain Admin User
Name, and Domain Admin Password text boxes.
If the Active Directory requires STARTTLS encryption, select the This Directory
requires all connections to use STARTTLS check box in the Certificates
section and copy and paste the Active Directory Root CA certificate in the SSL
Certificate field.
Ensure that the certificate is in PEM format and includes the BEGIN
CERTIFICATE and END CERTIFICATE lines.
If the directory uses multiple domains, add the Root CA certificates for all
domains, one at a time.
Note If the Active Directory requires STARTTLS and you do not provide the
certificate, you cannot create the directory.
Configuring vRealize Automation
VMware, Inc. 90
7In the Bind User Details section, enter the appropriate credentials to facilitate directory
synchronization.
For Active Directory over LDAP:
Option Description
Base DN Enter the search base distinguished name. For example,
cn=users,dc=corp,dc=local.
Bind DN Enter the bind distinguished name. For example,
cn=fritz infra,cn=users,dc=corp,dc=local
For Active Directory (Integrated Windows Authentication):
Option Description
Bind User UPN Enter the User Principal Name of the user who can authenticate with the domain.
For example, UserName@example.com.
Bind DN Password Enter the Bind User password.
8Click Test Connection to test the connection to the configured directory.
This button does not appear if you selected Active Directory (Integrated Windows Authentication).
9Click Save & Next.
The Select the Domains page appears with the list of domains.
10 Review and update the domains listed for the Active Directory connection.
nFor Active Directory (Integrated Windows Authentication), select the domains that should be
associated with this Active Directory connection.
nFor Active Directory over LDAP, the available domain is listed with a checkmark.
Note If you add a trusting domain after the directory is created, the service does not
automatically detect the newly trusting domain. To enable the service to detect the domain, the
connector must leave and then rejoin the domain. When the connector rejoins the domain, the
trusting domain appears in the list.
11 Click Next.
12 Verify that the Directories Management directory attribute names are mapped to the correct Active
Directory attributes.
If the directory attribute names are not mapped correctly, select the correct Active Directory attribute
from the drop-down menu.
13 Click Next.
Configuring vRealize Automation
VMware, Inc. 91
14 Click to select the groups you want to sync from Active Directory to the directory.
When you add a group from Active Directory, if members of that group are not in the Users list, they
are added. When you sync a group, any users that lack Domain Users as their primary group in
Active Directory are not synced.
Note The Directories Management user authentication system imports data from Active Directory
when adding groups and users, and the speed of the system is limited by Active Directory
capabilities. As a result, import operations may require significant time depending on the number of
groups and users being added. To minimize the potential for delays or problems, limit the number of
groups and users to only those required for vRealize Automation operation.
If your system performance degrades or if errors occur, close any unneeded applications and ensure
that your system has appropriate memory allocated to Active Directory. If problems persist, increase
the Active Directory memory allocation as needed. For systems with a large number of users and
groups, you may need to increase the Active Directory memory allocation to as much as 24 GB.
15 Click Next.
16 Click to add additional users.
The appropriate values are as follows:
nSingle user: CN=username,CN=Users,OU=Users,DC=myCorp,DC=com
nMultiple users: OU=Users,OU=myUnit,DC=myCorp,DC=com
To exclude users, click to create a filter to exclude some types of users. You select the user
attribute to filter by, the query rule, and the value.
17 Click Next.
18 Review the page to see how many users and groups are syncing to the directory.
If you want to make changes to users and groups, click the Edit links.
Note Ensure that you specify user DNs that are under the Base DN specified previously. If the user
DN is outside of the Base DN, users from that DN are synced but will be unable to log in.
19 Click Push to Workspace to start the synchronization to the directory.
The connection to the Active Directory is complete and the selected users and groups are added to the
directory. You can now assign user and groups to the appropriate vRealize Automation roles by selecting
Administration > Users and Groups > Directory Users and Groups. See Assign Roles to Directory
Users or Groups for more information.
What to do next
If your vRealize Automation environment is configured for high availability, you must specifically configure
Directories Management for high availability. See Configure Directories Management for High Availability.
Configuring vRealize Automation
VMware, Inc. 92

Configure an OpenLDAP Directory Connection
You can configure an OpenLDAP Directory connection with Directories Management.
Though there are several different LDAP protocols, OpenLDAP is the only protocol that is tested and
approved for use with vRealize Automation Directories Management.
To integrate your LDAP directory, you create a corresponding Directories Management directory and sync
users and groups from your LDAP directory to the Directories Management directory. You can set up a
regular sync schedule for subsequent updates.
You also select the LDAP attributes that you want to sync for users and map them to
Directories Management attributes.
Your LDAP directory configuration may be based on default schemas or you may have created custom
schemas. You may also have defined custom attributes. For Directories Management to be able to query
your LDAP directory to obtain user or group objects, you need to provide the LDAP search filters and
attribute names that are applicable to your LDAP directory.
Specifically, you need to provide the following information.
nLDAP search filters for obtaining groups, users, and the bind user
nLDAP attribute names for group membership, UUID, and distinguished name
Prerequisites
nReview the configuration on the User Attributes page and add any other attributes that you want to
sync. You will map the Directories Management attributes to your LDAP directory attributes when you
create the directory. These attributes will be synced for the users in the directory.
Note When you make changes to user attributes, consider the effect on other directories in the
service. If you plan to add both Active Directory and LDAP directories, ensure that you do not mark
any attributes as required except for userName. The settings on the User Attributes page apply to all
directories in the service. If an attribute is marked required, users without that attribute are not synced
to the Directories Management service.
nA Bind DN user account. Using a Bind DN user account with a non-expiring password is
recommended.
nIn your LDAP directory, the UUID of users and groups must be in plain text format.
nIn your LDAP directory, a domain attribute must exist for all users and groups.
You map this attribute to the Directories Management domain attribute when you create the
Directories Management directory.
nUser names must not contain spaces. If a user name contains a space, the user is synced but
entitlements are not available to the user.
nIf you use certificate authentication, users must have values for userPrincipalName and email
address attributes.
Configuring vRealize Automation
VMware, Inc. 93

Procedure
1Select Administration > Directories Management > Directories.
2Click Add Directory and select Add LDAP Directory.
3Enter the required information in the Add LDAP Directory page.
Option Description
Directory Name Enter a name for the Directories Management directory.
Directory Sync and Authentication a In the Sync Connector field, select the connector you want to use to sync
users and groups from your LDAP directory to the Directories Management
directory.
A connector component is always available with the Directories Management
service by default. This connector appears in the drop-down list. If you install
multiple Directories Management appliances for high availability, the
connector component of each appears in the list.
You do not need a separate connector for an LDAP directory. A connector
can support multiple directories, regardless of whether they are Active
Directory or LDAP directories.
b In the Authentication field, if you want to use this LDAP directory to
authenticate users, select Yes.
If you want to use a third-party identity provider to authenticate users, select
No. After you add the directory connection to sync users and groups, go to
the Administration > Directories Management > Identity Providers page
to add the third-party identity provider for authentication.
c For most configurations, leave the Custom default selected in the Directory
Search Attribute text box. In the Custom Directory Search Attribute field,
specify the LDAP directory attribute to be used for user and group names.
This attribute uniquely identifies entities, such as users and groups, from the
LDAP server. For example, cn.
Server Location Enter the LDAP Directory server host and port number. For the server host, you
can specify either the fully-qualified domain name or the IP address. For example,
myLDAPserver.example.com or 100.00.00.0.
If you have a cluster of servers behind a load balancer, enter the load balancer
information instead.
Configuring vRealize Automation
VMware, Inc. 94

Option Description
LDAP Configuration Specify the LDAP search filters and attributes that Directories Management can
use to query your LDAP directory. Default values are provided based on the core
LDAP schema.
Filter Queries
nGroups: The search filter for obtaining group objects.
For example: (objectClass=group)
nBind user: The search filter for obtaining the bind user object, that is, the
user that can bind to the directory.
For example: (objectClass=person)
nUsers: The search filter for obtaining users to sync.
For example:(&(objectClass=user)(objectCategory=person))
Attributes
nMembership: The attribute that is used in your LDAP directory to define the
members of a group.
For example: member
nObject UUID: The attribute that is used in your LDAP directory to define the
UUID of a user or group.
For example: entryUUID
nDistinguished Name: The attribute that is used in your LDAP directory for
the distinguished name of a user or group.
For example: entryDN
Certificates If your LDAP directory requires access over SSL, select the This Directory
requires all connections to use SSL check box. Then copy and paste the LDAP
directory server's root CA SSL certificate into the SSL Certificate text box.
Ensure the certificate is in PEM format and include the "BEGIN CERTIFICATE"
and "END CERTIFICATE" lines.
Finally, ensure that the correct port number is specified in the Server Port field in
the Server Location section of the page.
Bind User Details Base DN: Enter the DN from which to start searches. For example,
cn=users,dc=example,dc=com
All applicable users must reside under the Base DN. If a particular user is not
located under the Base DN, that user will be unable to log in even if he is a
member of a group that is under the Base DN.
Bind DN: Enter the DN to use to bind to the LDAP directory. You can also enter
user names, but a DN is more appropriate for most deployments.
Note Using a Bind DN user account with a non-expiring password is
recommended.
Bind DN Password: Enter the password for the Bind DN user.
4To test the connection to the LDAP directory server, click Test Connection.
If the connection is not successful, check the information you entered and make the appropriate
changes.
5Click Save & Next.
6Verify the correct domain is selected on the Select the Domains page, and then click Next.
Configuring vRealize Automation
VMware, Inc. 95

7In the Map Attributes page, verify that the Directories Management attributes are mapped to the
correct LDAP attributes.
These attributes will be synced for users.
Important You must specify a mapping for the domain attribute.
You can add attributes to the list from the User Attributes page.
8Click Next.
9Click + to select the groups you want to sync from the LDAP directory to the Directories Management
directory on Select the groups (users) you want to sync page.
If you have multiple groups with the same name in your LDAP directory, you must specify unique
names for them in the groups page.
When you add a group from Active Directory, if members of that group are not in the Users list, they
are added. When you sync a group, any users that lack Domain Users as their primary group in
Active Directory are not synced.
The Sync nested group members option is enabled by default. When this option is enabled, all the
users that belong directly to the group you select as well as all the users that belong to nested groups
under it are synced. Note that the nested groups are not synced; only the users that belong to the
nested groups are synced. In the Directories Management directory, these users will appear as
members of the top-level group that you selected for sync. In effect, the hierarchy under a selected
group is flattened and users from all levels appear in Directories Management as members of the
selected group.
If this option is disabled, when you specify a group to sync, all the users that belong directly to that
group are synced. Users that belong to nested groups under it are not synced. Disabling this option is
useful for large directory configurations where traversing a group tree is resource and time intensive.
If you disable this option, ensure that you select all the groups whose users you want to sync.
Note The Directories Management user authentication system imports data from Active Directory
when adding groups and users, and the speed of the system is limited by Active Directory
capabilities. As a result, import operations may require a significant amount of time depending on the
number of groups and users being added. To minimize the potential for delays or problems, limit the
number of groups and users to only those required for vRealize Automation operation.
If your system performance degrades or if errors occur, close any unneeded applications and ensure
that your system has appropriate memory allocated to Directories Management. If problems persist,
increase the Directories Management memory allocation as needed. For systems with large numbers
of users and groups, you may need to increase the Directories Management memory allocation to as
much as 24 GB.
10 Click Next.
Configuring vRealize Automation
VMware, Inc. 96
11 Click + to add additional users. For example, enter
CN=username,CN=Users,OU=myUnit,DC=myCorp,DC=com.
You can add organizational units as well as individual users here.
You can create a filter to exclude some types of users. Select the user attribute to filter by, the query
rule, and the value.
12 Click Next.
13 Review the page to see how many users and groups will sync to the directory and to view the default
sync schedule.
To make changes to users and groups, or to the sync frequency, click the Edit links.
14 Click Sync Directory to start the directory sync.
The connection to the LDAP directory is established and users and groups are synced from the LDAP
directory to the Directories Management directory.
You can now assign user and groups to the appropriate vRealize Automation roles by selecting
Administration > Users and Groups > Directory Users and Groups. See Assign Roles to Directory
Users or Groups for more information.
Limitations of LDAP Directory Integration
There are several important limitations related to LDAP Directory integration in Directories Management.
nYou can only integrate a single-domain LDAP directory environment.
To integrate multiple domains from an LDAP directory, you need to create additional
Directories Management directories, one for each domain.
nThe following authentication methods are not supported for Directories Management directories of
type LDAP directory.
nKerberos authentication
nRSA Adaptive Authentication
nADFS as a third-party identity provider
nSecurID
nRadius authentication with Vasco and SMS Passcode server
nYou cannot join an LDAP domain.
nIntegration with View or Citrix-published resources is not supported for Directories Management
directories of type LDAP directory.
nUser names must not contain spaces. If a user name contains a space, the user is synced but
entitlements are not available to the user.
Configuring vRealize Automation
VMware, Inc. 97
nIf you plan to add both Active Directory and LDAP directories, ensure that you do not mark any
attributes required in the User Attributes page, except for userName, which can be marked required.
The settings in the User Attributes page apply to all directories in the service. If an attribute is marked
required, users without that attribute are not synced to the Directories Management service.
nIf you have multiple groups with the same name in your LDAP directory, you must specify unique
names for them in the Directories Management service. You can specify the names when you select
the groups to sync.
nThe option to allow users to reset expired passwords is not available.
nThe domain_krb.properties file is not supported.
Configure Directories Management for High Availability
You can use Directories Management to configure a high availability Active Directory connection in
vRealize Automation.
Each vRealize Automation appliance includes a connector that supports user authentication, although
only one connector is typically configured to perform directory synchronization. It does not matter which
connector you choose to serve as the sync connector. To support Directories Management high
availability, you must configure a second connector that corresponds to your second vRealize Automation
appliance, which connects to your Identity Provider and points to the same Active Directory. With this
configuration, if one appliance fails, the other takes over management of user authentication.
In a high availability environment, all nodes must serve the same set of Active Directories, users,
authentication methods, etc. The most direct method to accomplish this is to promote the Identity Provider
to the cluster by setting the load balancer host as the Identity Provider host. With this configuration, all
authentication requests are directed to the load balancer, which forwards the request to either connector
as appropriate.
Prerequisites
nConfigure your vRealize Automation deployment with at least two instance of the
vRealize Automation appliance.
nInstall vRealize Automation in Enterprise mode operating in a single domain with two instances of
thevRealize Automation appliance.
nInstall and configure an appropriate load balancer to work with your vRealize Automation deployment.
nConfigure tenants and Directories Management using one of the connectors supplied with the
installed instances of the vRealize Automation appliance. For information about tenant configuration,
see Configuring Tenant Settings.
Procedure
1Log in to the load balancer for your vRealize Automation deployment as a tenant administrator.
The load balancer URL is <load balancer address>/vcac/org/tenant_name.
2Select Administration > Directories Management > Identity Providers.
Configuring vRealize Automation
VMware, Inc. 98
3Click the Identity Provider that is currently in use for your system.
The existing directory and connector that provide basic identity management for your system
appears.
4On the Identity Provider properties page, click the Add a Connector drop-down list, and select the
connector that corresponds to your secondary vRealize Automation appliance.
5Enter the appropriate password in the Bind DN Password text box that appears when you select the
connector.
6Click Add Connector.
7The main connector appears in the IdP Hostnametext box by default. Change the host name to point
to the load balancer.
Configure a Bi Directional Trust Relationship Between vRealize Automation and Active
Directory
You can enhance system security of a basic vRealize Automation Active Directory connection by
configuring a bi directional trust relationship between your identity provider and Active Directory
Federated Services.
To configure a bi-directional trust relationship between vRealize Automation and Active Directory, you
must create a custom identity provider and add Active Directory metadata to this provider. Also, you must
modify the default policy used by your vRealize Automation deployment. Finally, you must configure
Active Directory to recognize your identity provider.
Prerequisites
nVerify that you have configured tenants for your vRealize Automation deployment set up an
appropriate Active Directory link to support basic Active Directory user ID and password
authentication.
nActive Directory is installed and configured for use on your network.
nObtain the appropriate Active Directory Federated Services (ADFS) metadata.
nLog in to vRealize Automation as a tenant administrator.
Procedure
1Obtain the Federation Metadata file.
You can download this file from
https://servername.domain/FederationMetadata/2007-06/FederationMetadata.xml
Configuring vRealize Automation
VMware, Inc. 99
2Search for the word logout, and edit the location of each instance to point to
https://servername.domain/adfs/ls/logout.aspx
For example, the following:
SingleLogoutService
Binding="urn:oasis:names:tc:SAML:2.0:bindings:HTTP-POST"
Location="https://servername.domain/adfs/ls/ "/>
Should be changed to:
SingleLogoutService
Binding="urn:oasis:names:tc:SAML:2.0:bindings:HTTP-POST"
Location="https://servername.domain/adfs/ls/logout.aspx"/>
3Create a new Identity Provider for you deployment.
a Select Administration > Directories Management > Identity Providers.
b Click Add Identity Provider and complete the fields as appropriate.
Option Description
Identity Provider Name Enter a name for the new identity provider
Identity Provider Metadata (URI or
XML)
Paste the contents of your Active Directory Federated Services metadata file
here.
Name ID Policy in SAML Request
(Optional)
If appropriate, enter a name for the identity policy SAML request.
Users Select the domains to which you want users to have access privileges.
Process IDP Metadata Click to process the metadata file that you added.
Network Select the network ranges to which you want users to have access.
Authentication Methods Enter a name for the authentication method used by this identity provider.
SAML Context Select the appropriate context for your system.
SAML Signing Certificate Click the link beside the SAML Metadata heading to download the Directories
Management metadata.
c Save the Directories Management metadata file as sp.xml.
d Click Add.
4Add a rule to the default policy.
a Select Administration > Directories Management > Policies.
b Click the default policy name.
Configuring vRealize Automation
VMware, Inc. 100

c Click the + icon under the Policy Rules heading to add a new rule.
Use the fields on the Add a Policy Rule page to create a rule that specifies the appropriate
primary and secondary authentication methods to use for a specific network range and device.
For example, if your network range is My Machine, and you need to access content from
All Device Types then, for a typical deployment, you must authenticate by using the following
method: ADFS Username and Password.
d Click Save to save your policy updates.
e On the Default Policy page, drag the new rule to the top of the table so that it takes precedence
over existing rules.
5Using the Active Directory Federated Services management console, or another appropriate tool, set
up a relying party trust relationship with the vRealize Automation identity provider.
To set up this trust, you must import the Directories Management metadata that you previously
downloaded. See the Microsoft Active Directory documentation for more information about
configuring Active Directory Federated Services for bi-directional trust relationships. As part of this
process, you must do the following:
nSet up a Relying Party Trust. When you set up this trust, you must import the VMware Identity
Provider service provider metadata XML file that you copied and saved
nCreate a claim rule that transforms the attributes retrieved from LDAP in the Get Attributes rule
into the desired SAML format. After you create the rule, edit the rule by adding the following text:
c:[Type == "http://schemas.xmlsoap.org/ws/2005/05/identity/claims/emailaddress"]
=> issue(Type = "http://schemas.xmlsoap.org/ws/2005/05/identity/claims/nameidentifier", Issuer
= c.Issuer, OriginalIssuer = c.OriginalIssuer, Value = c.Value, ValueType = c.ValueType,
Properties["http://schemas.xmlsoap.org/ws/2005/05/identity/claimproperties/format"] =
"urn:oasis:names:tc:SAML:1.1:nameid-format:emailAddress",
Properties["http://schemas.xmlsoap.org/ws/2005/05/identity/claimproperties/spnamequalifier"] =
"vmwareidentity.domain.com");
Configure SAML Federation Between Directories Management and SSO2
You can establish SAML federation between vRealize Automation Directories Management and systems
that use SSO2 to support single sign on.
Establish federation between Directories Management and SSO2 by creating a SAML connection
between the two parties. Currently, the only supported end-to-end flow is where SSO2 acts as the Identity
Provider (IdP) and Directories Management acts as the service provider (SP).
For SSO2 user authentication, the same account must exist in both Directories Management and SSO2.
Minimally, the UserPrincipalName (UPN) of the user has to match on both ends. Other attributes can
differ as they are required to identify the SAML subject.
For local users in SSO2, such as admin@vsphere.local, corresponding accounts must also exist in
Directories Management, where at least the UPN of the user matches. Create these accounts manually
or with a script using the Directories Management local user creation APIs.
Configuring vRealize Automation
VMware, Inc. 101

Setting up SAML between SSO2 and Directories Management involves configuration on the Directories
Management and SSO components.
Table 2‑4. SAML Federation Component Configuration
Component Configuration
Directories Management Configure SSO2 as a third-party Identity Provider on Directories Management and update the
default authentication policy. You can create an automated script to set up
Directories Management.
SSO2 component Configure Directories Management as a service provider by importing the
Directories Management sp.xml file. This file enables you to configure SSO2 to use
Directories Management as the Service Provider (SP).
Prerequisites
nConfigure tenants for your vRealize Automation deployment. See Create Additional Tenants.
nSet up an appropriate Active Directory link to support basic Active Directory user ID and password
authentication.
nLog in to vRealize Automation as a tenant administrator.
Procedure
1Download SSO2 Identity Provider metadata through the SSO2 user interface.
a Log in to vCenter as an administrator at https://<cloudvm-hostname>/ .
b Click the Log in to vSphere Web Client link.
c On the left navigation pane, select Administration > Single Sign On > Configuration.
d Click Download adjacent to the Metadata for your SAML service provider heading.
The vsphere.local.xml file should begin downloading.
e Copy the contents of the vsphere.local.xml file.
2On the vRealize Automation Directories Management Identity Providers page, create a new Identity
Provider.
a Log in to vRealize Automation as a tenant administrator.
b Select Administration > Directories Management > Identity Providers.
Configuring vRealize Automation
VMware, Inc. 102

c Click Add Identity Provider and provide the configuration information.
Option Action
Identity Provider Name Enter a name for the new Identity Provider.
Identity Provider Metadata (URI or
XML) text box
Paste the contents of your SSO2 idp.xml metadata file in the text box and
click Process IDP Metadata.
Name ID Policy in SAML Request
(Optional)
Enter http://schemas.xmlsoap.org/claims/UPN.
Users Select the domains to which you want users to have access privileges.
Network Select the network ranges from which you want users to have access
privileges.
If you want to authenticate users from an IP addresses, select All Ranges.
Authentication Methods Enter a name for the authentication method. Then, use the SAML Context
drop down menu to the right to map the authentication method to
urn:oasis:names:tc:SAML:2.0:ac:classes:Password.
SAML Signing Certificate Click the link beside the SAML Metadata heading to download the Directories
Management metadata.
d Save the Directories Management metadata file as sp.xml.
e Click Add.
3Update the relevant authentication policy using the Directories Management Policies page to redirect
authentication to the third party SSO2 identity provider.
a Select Administration > Directories Management > Policies.
b Click the default policy name.
c Click the authentication method under the Policy Rules heading to edit the existing
authentication rule.
d On the Edit a Policy Rule page, change the authentication method from password to the
appropriate method.
In this case, the method should be SSO2.
e Click Save to save your policy updates.
4On the left navigation pane, select Administration > Single Sign On > Configuration, and click
Update to upload the sp.xml file to vSphere.
Add Users or Groups to an Active Directory Connection
You can add users or groups to an existing Active Directory connection.
The Directories Management user authentication system imports data from Active Directory when adding
groups and users. The speed of the data transport is limited by Active Directory capabilities. As a result,
actions can take a long time depending on the number of groups and users that are added. To minimize
problems, limit the groups and users to only the groups and users required for a vRealize Automation
Configuring vRealize Automation
VMware, Inc. 103

action. If problems occur, close unneeded applications and verify that your deployment has appropriate
memory allocated to Active Directory. If problems continue, increase the Active Directory memory
allocation. For deployments with large numbers of users and groups, you might need to increase the
Active Directory memory allocation to as much as 24 GB.
When you sync a vRealize Automation deployment with a many users and groups, there might be a delay
before the Log details are available. The time stamp on the log file can differ from the completed time
displayed on the console.
If members of a group are not in the Users list, when you add the group from Active Directory, the
members are added to the list. When you sync a group, any users that do not have Domain Users as
their primary group in Active Directory are not synced.
Note You cannot cancel a synchronize action after you start the action.
Prerequisites
nConnector installed and the activation code activated. Select the required default attributes and add
additional attributes on the User Attributes page.
See Select Attributes to Sync with Directory in Configuring vRealize Automation.
nList of the Active Directory groups and users to sync from Active Directory.
nFor Active Directory over LDAP, information required includes the Base DN, Bind DN, and Bind DN
password.
nFor Active Directory Integrated Windows Authentication, the information required includes the
domain's Bind user UPN address and password.
nIf Active Directory is accessed over SSL, a copy of the SSL certificate is required.
nIf you have a multi-forest Active Directory integrated with Windows Authentication and the Domain
Local group contains members from different forests, do the following. Add the Bind user to the
Administrators group of the Domain Local group. If the Bind user is not added, these members are
missing from the Domain Local group.
nLog in to vRealize Automation as a tenant administrator.
Procedure
1Select Administration > Directories Management > Directories.
2Click the desired directory name.
3Click Sync Settings to open a dialog box with synchronization options.
4Click the appropriate icon depending on whether you want to change the user or group configuration.
To edit the group configuration:
nTo add groups, click the + icon to add a line for group DN definitions and enter the appropriate
group DN.
nIf you want to delete a group DN definition, click the x icon for the desired group DN.
Configuring vRealize Automation
VMware, Inc. 104
To edit the user configuration:
uTo add users, click the + icon to add a line for a user DN definition and enter the appropriate user
DN.
If you want to delete a user DN definition, click the x icon for the desired user DN.
5Click Save to save your changes without synchronizing your updates immediately. Click Save &
Sync to save your changes and synchronize your updates immediately.
Select Attributes to Sync with Directory
When you set up the Directories Management directory to sync with Active Directory, you specify the user
attributes that sync to the directory. Before you set up the directory, you can specify on the User Attributes
page which default attributes are required and, if you want, add additional attributes that you want to map
to Active Directory attributes.
When you configure the User Attributes page before the directory is created, you can change default
attributes from required to not required, mark attributes as required, and add custom attributes.
For a list of the default mapped attributes, see Managing User Attributes that Sync from Active Directory.
After the directory is created, you can change a required attribute to not be required, and you can delete
custom attributes. You cannot change an attribute to be a required attribute.
When you add other attributes to sync to the directory, after the directory is created, go to the directory's
Mapped Attributes page to map these attributes to Active Directory Attributes.
Procedure
1Log in to vRealize Automation as a system or tenant administrator.
2Click the Administration tab.
3Select Directories Management > User Attributes
4In the Default Attributes section, review the required attribute list and make appropriate changes to
reflect what attributes should be required.
5In the Attributes section, add the Directories Management directory attribute name to the list.
6Click Save.
The default attribute status is updated and attributes you added are added on the directory's Mapped
Attributes list.
7After the directory is created, go to the Identity Stores page and select the directory.
8Click Sync Settings > Mapped Attributes.
9In the drop-down menu for the attributes that you added, select the Active Directory attribute to map
to.
10 Click Save.
The directory is updated the next time the directory syncs to the Active Directory.
Configuring vRealize Automation
VMware, Inc. 105

Add Memory to Directories Management
You may need to allocate additional memory to Directories Management if you have Active Directory
connections that contain a large number of users or groups.
By default, 4 GB of memory is allocated to the Directories Management service. This is sufficient for many
small to medium sized deployments. If you have an Active Directory connection that uses a large number
of users or groups, you may need to increase this memory allocation. Increased memory allocation is
appropriate for systems with more than 100,000 users , each in 30 groups and 750 groups overall. For
these system, VMware recommends increasing the Directories Management memory allocation to 6 GB.
Directories Management memory is calculated based on the total memory allocated to the
vRealize Automation appliance The following table shows memory allocations for relevant components.
Table 2‑5. vRealize Automation Appliance Memory Allocation
Virtual Appliance memory vRA service memory vIDM service memory
18 GB 3.3 GB 4 GB
24 GB 4.9 GB 6 GB
30 GB 7.4 GB 9.1 GB
Note These allocations assume that all default services are enabled and running on the virtual
appliance. They may change if some services are stopped.
Prerequisites
nAn appropriate Active Directory connection is configured and functioning on your
vRealize Automation deployment.
Procedure
1Stop each machine on which a vRealize Automation appliance is running.
2Increase the virtual appliance memory allocation on each machine.
If you are using the default memory allocation of 18 GB, VMware recommends increasing the
memory allocation to 24 GB.
3Restart the vRealize Automation appliance machines.
Create a Domain Host Lookup File to Override DNS Service Location (SRV) Lookup
When you enable Integrated Windows Authentication, the Directory configuration is changed to enable
the DNS Service Location field. The connector service location lookup is not site aware. If you want to
override the random DC selection, you can create a file called domain_krb.properties and add the
domain to host values that take precedence over SRV lookup.
Procedure
1From the appliance-va command line, log in as the user with root privileges.
Configuring vRealize Automation
VMware, Inc. 106

2Change directories to /usr/local/horizon/conf and create a file called
domain_krb.properties.
3Edit the domain_krb.properties file to add the list of the domain to host values. Add the information as
<AD Domain>=<host:port>, <host2:port2>, <host2:port2>.
For example, enter the list as example.com=examplehost.com:636,
examplehost2.example.com:389
4Change the owner of the domain_krb.properties file to horizon and group to www. Enter
chown horizon:www /usr/local/horizon/conf/domain_krb.properties.
5Restart the service. Enter service horizon-workspace restart.
Configure Just-in-Time User Provisioning
You can configure Just-in-Time (JIT) provisioning to support adding users without syncing from your
Active Directory.
To support Just-in-Time provisioning, you must add a third party identity provider and then configure a
connection to it within your vRealize Automation deployment to integrate Directories Management with
other SSO providers via a SAML protocol. In addition, you must create a new directory with the
appropriate name, such as JIT Directory.
When you enable Just-in-Time provisioning, you can add Just-in-Time users to a designated custom
group. To support this functionality, create a custom group with the appropriate members. See Add Just-
in-Time Users with Custom Groups and Rules.
Note As a best practice, do not configure Just-in-Time provisioning on the default vsphere.local tenant.
Prerequisites
Configure an appropriate third party identity provider for use with JIT provisioning.
Configuring vRealize Automation
VMware, Inc. 107
Procedure
1Create an identity provider for Just-in-Time provisioning.
a Select Administration > Directories management > Identity Providers
b Click Add Identity Provider and edit the identity provider instance settings as appropriate.
nFor just in time provisioning, create a third party identity provider.
nIn the Create Just-in-Time Directory section, enter names for the directory and one or more
domains.
nYou must select a network for the third party identity provider configuration.
nIf you are using an external VMware Identity Manager as your third party identity provider,
and you are using userPrincipleName to authenticate users, you must change the Name ID
mapping configuration for userPrincipleName from the default of x509SubjectName to
unspecified.
See Configure a Third Party Identity Provider Connection for more information about creating
identity providers.
2Configure SAML on the Just-in-Time identity provider.
a Copy IdP metadata from your identity provider.
b In vRealize Automation, select your identity provider and paste the IdP metadata into the Identity
Provider Metadata (URL or XML) text box.
c Click Save.
d In the Name ID policy in SAML Request (Optional) drop-down menu, select the appropriate
format.
For example, if you are using the emal address as the unique user identifier, you would select
urn:oasis:names:tc:SAML:1.1:nameid-format:emailAddress.
e Select the appropriate directory under the Users heading.
f Select the networks for use by this identity provider under the Network heading.
g Specify an appropriate name in the Authentication Methods text box.
h In the SAML Context drop down, select urn:oasis:names:tc:SAML:
2.0:ac:classes:PasswordProtectedTransport
i Right-click the Service Provider (SP) Metadata link, and open it in a separate browser tab.
j Use this metadata to configure the SAML connection on your identity provider.
If you are using VMware Identity Manager see the VMware Identity Manager documentation for
complete instructions on configuring SAML.
3Click Add.
The new directory is created using the Directory Name provided.
Configuring vRealize Automation
VMware, Inc. 108

4Configure the vRealize Automation Access Policy.
a Select Administration > Policies.
b Click the green + icon at the top right of the policy rules table.
c Set the policy rule to apply to applicable ranges and device types.
d Select the authentication method that you created when configuring the third party identity
provider for JIT provisioning for the authentication method.
Managing User Attributes that Sync from Active Directory
The Directories Management User Attributes page lists the user attributes that sync to your Active
Directory connection.
Changes that you make and save in the User Attributes page are added to the Mapped Attributes page in
the Directories Management directory. The attributes changes are updated to the directory with the next
sync to Active Directory.
The User Attributes page lists the default directory attributes that you can map to Active Directory
attributes. You select the attributes that are required, and you can add other Active Directory attributes to
sync to the directory.
Table 2‑6. Default Active Directory Attributes to Sync to Directory
Directory Attribute Name Default Mapping to Active Directory Attribute
userPrincipalName userPrincipalName
distinguishedName distinguishedName
employeeId employeeID
domain canonicalName. Adds the fully qualified domain name of the object.
disabled (external user disabled) userAccountControl. Flagged with UF_Account_Disable.
When an account is disabled, users cannot log in to access their
applications and resources. The resources that users were entitled
to are not removed from the account so that when the flag is
removed from the account users can log in and access their entitled
resources.
phone telephoneNumber
lastName sn
firstName givenName
email mail
userName sAMAccountName
The User Attributes page lists the default directory attributes that you can map to Active Directory
attributes. You select the attributes that are required, and you can add other Active Directory attributes to
sync to the directory.
Configuring vRealize Automation
VMware, Inc. 109

Table 2‑7. Default Active Directory Attributes to Sync to Directory
Directory Attribute Name Default Mapping to Active Directory Attribute
userPrincipalName userPrincipalName
distinguishedName distinguishedName
employeeId employeeID
domain canonicalName. Adds the fully qualified domain name of the object.
disabled (external user disabled) userAccountControl. Flagged with UF_Account_Disable.
When an account is disabled, users cannot log in to access their
applications and resources. The resources that users were entitled
to are not removed from the account so that when the flag is
removed from the account users can log in and access their entitled
resources.
phone telephoneNumber
lastName sn
firstName givenName
email mail
userName sAMAccountName
Managing Connectors and Connector Clusters
The Connectors page lists deployed connectors for your enterprise network. A connector syncs user and
group data between Active Directory and the Directories Management service, and when it is used as the
identity provider, authenticates users to the service.
In vRealize Automation, each vRealize Automation appliance contains its own connector, and these
connectors are suitable for most deployments.
When you associate a directory with a connector instance, the connector creates a partition for the
associated directory called a worker. A connector instance can have multiple associated workers. Each
worker acts as an identity provider. The connector syncs user and group data between Active Directory
and the service through one or more workers. You define and configure authentication methods on a per
worker basis.
You can manage various aspects of an Active Directory link from the Connectors page. This page
contains a table and several buttons that enable you to complete various management tasks.
nIn the Worker column, select a worker to view the connector details and navigate to the Auth
Adapters page to see the status of the available authentication methods. For information about
authentication, see Integrating Alternative User Authentication Products with Directories
Management.
nIn the Identity Provider column, select the IdP to view, edit or disable. See Configure a Third Party
Identity Provider Connection.
nIn the Associated Directory column, access the directory associated with this worker.
Configuring vRealize Automation
VMware, Inc. 110
nClick Join Domain to join the connector to a specific Active Directory domain. For example when you
configure Kerberos authentication, you must join the Active Directory domain either containing users
or having trust relationship with the domains containing users.
nWhen you configure a directory with an Integrated Windows Authentication Active Directory, the
connector joins the domain according to the configuration details.
Connectors in a Clustered Environment
In a distributed, vRealize Automation deployment, all available connectors perform any required user
authorization, while a single designated connector handles all configuration synchronization. Typically,
synchronization would include additions, deletions, or changes to the user configuration, and
synchronization occurs automatically as long as all connectors are available. There are some specific
situations in which automatic synchronization may not occur.
For changes related to directory configuration, such as base dn, vRealize Automation attempts to
automatically push updates to all connectors in a cluster. If a connector is inoperable or unreachable for
some reason, that connector will not receive the update, even when it resumes online operation. To
implement configuration changes to connectors that may not have received them automatically, system
administrators must manually save the changes to all applicable connectors.
For directory sync profile related changes, vRealize Automation attempts to automatically push updates
to all connectors as well. If the sync connector is operational, the update is saved and pushed to all
available authorization connectors. If one or more connectors is unreachable, the system admin receives
a warning indicating that not all connectors were updated. If the sync connector is inoperable, the update
fails and an error occurs. If the system admin changes the connector designated as the sync connector,
the new sync connector receives the latest available profile information, and this information is pushed to
all applicable, and available, connectors.
Join a Connector Machine to a Domain
In some cases, you may need to join a machine containing a Directories Management connector to a
domain.
For Active Directory over LDAP directories, you can join a domain after creating the directory. For Active
Directory (Integrated Windows Authentication) directories, the connector is joined to the domain
automatically when you create the directory. In both cases, you must supply the appropriate credentials.
To join a domain, you need Active Directory credentials that have the privilege to "join computer to AD
domain". This is configured in Active Directory with the following rights:
nCreate Computer Objects
nDelete Computer Objects
When you join a domain, a computer object is created in the default location in Active Directory.
If you do not have the rights to join a domain, or if your company policy requires a custom location for the
computer object, you must ask your administrator to create the object and then join the connector
machine to the domain.
Configuring vRealize Automation
VMware, Inc. 111
Procedure
1Ask your Active Directory administrator to create the computer object in Active Directory in a location
determined by your company policy. You must provide the host name of the connector. Ensure that
you provide the fully-qualified domain name, for example server.example.com.
You can find the host name in the Host Name column on the Connectors page in the administrative
console. Select Administration > Directories Management > Connectors.
2After the computer object is created, click Join Domain on the Connectors page to join the domain
using any domain user account available in Directories Management.
About Domain Controller Selection
The domain_krb.properties file determines which domain controllers are used for directories that have
DNS Service Location (SRV records) lookup enabled. It contains a list of domain controllers for each
domain. The connector creates the file initially, and you must maintain it subsequently. The file overrides
DNS Service Location (SRV) lookup.
The following types of directories have DNS Service Location lookup enabled.
nActive Directory over LDAP with the This Directory supports DNS Service Location option
selected
nActive Directory (Integrated Windows Authentication), which always has DNS Service Location
lookup enabled
When you first create a directory that has DNS Service Location lookup enabled, a
domain_krb.properties file is created automatically in the /usr/local/horizon/conf directory of the
virtual machine and is auto-populated with domain controllers for each domain. To populate the file, the
connector attempts to find domain controllers that are at the same site as the connector and selects two
that are reachable and that respond the fastest.
When you create additional directories that have DNS Service Location enabled, or add new domains to
an Integrated Windows Authentication directory, the new domains, and a list of domain controllers for
them, are added to the file.
You can override the default selection at any time by editing the domain_krb.properties file. As a best
practice, after you create a directory, view the domain_krb.properties file and verify that the domain
controllers listed are the optimal ones for your configuration. For a global Active Directory deployment that
has multiple domain controllers across different geographical locations, using a domain controller that is
in close proximity to the connector ensures faster communication with Active Directory.
You must also update the file manually for any other changes. The following rules apply.
nThe file is created, and auto-populated with domain controllers for each domain, when you first create
a directory that has DNS Service Location lookup enabled.
nDomain controllers for each domain are listed in order of priority. To connect to Active Directory, the
connector tries the first domain controller in the list. If it is not reachable, it tries the second one in the
list, and so on.
Configuring vRealize Automation
VMware, Inc. 112

nThe file is updated only when you create a new directory that has DNS Service Location lookup
enabled or when you add a domain to an Integrated Windows Authentication directory. The new
domain and a list of domain controllers for it are added to the file.
Note that if an entry for a domain already exists in the file, it is not updated. For example, if you
created a directory, then deleted it, the original domain entry remains in the file and is not updated.
nThe file is not updated automatically in any other scenario. For example, if you delete a directory, the
domain entry is not deleted from the file.
nIf a domain controller listed in the file is not reachable, edit the file and remove it.
nIf you add or edit a domain entry manually, your changes will not be overwritten.
How Domain Controllers are Selected to Auto-Populate the domain_krb.properties File
To auto-populate the domain_krb.properties file, domain controllers are selected by first determining
the subnet on which the connector resides (based on the IP address and netmask), then using the Active
Directory configuration to identify the site of that subnet, getting the list of domain controllers for that site,
filtering the list for the appropriate domain, and picking the two domain controllers that respond the
fastest.
To detect the domain controllers that are the closest, VMware Identity Manager has the following
requirements.
nThe subnet of the connector must be present in the Active Directory configuration, or a subnet must
be specified in the runtime-config.properties file.
The subnet is used to determine the site.
nThe Active Directory configuration must be site aware.
If the subnet cannot be determined or if your Active Directory configuration is not site aware, DNS Service
Location lookup is used to find domain controllers, and the file is populated with a few domain controllers
that are reachable. Note that these domain controllers may not be at the same geographical location as
the connector, which can result in delays or timeouts while communicating with Active Directory. In this
case, edit the domain_krb.properties file manually and specify the correct domain controllers to use
for each domain.
Sample domain_krb.properties File
example.com=host1.example.com:389,host2.example.com:389
nOverride the Default Subnet Selection
To auto-populate the domain_krb.properties file, the connector attempts to find domain
controllers that are at the same site so there is minimal latency between the connector and Active
Directory.
Configuring vRealize Automation
VMware, Inc. 113
nEdit the domain_krb.properties file
The /usr/local/horizon/conf/domain_krb.properties file determines the domain controllers
to use for directories that have DNS Service Location lookup enabled. You can edit the file at any
time to modify the list of domain controllers for a domain, or to add or delete domain entries. Your
changes will not be overridden.
nTroubleshooting domain_krb.properties
Use this information to troubleshoot the domain_krb.properties file.
Override the Default Subnet Selection
To auto-populate the domain_krb.properties file, the connector attempts to find domain controllers that
are at the same site so there is minimal latency between the connector and Active Directory.
To find the site, the connector determines the subnet on which it resides, based on its IP address and
netmask, then uses the Active Directory configuration to identify the site for that subnet. If the subnet of
the virtual machine is not in Active Directory, or if you want to override the automatic subnet selection, you
can specify a subnet in the runtime-config.properties file.
Procedure
1Log in to the virtual machine as the root user.
2Edit the /usr/local/horizon/conf/runtime-config.properties file and add the following
attribute.
siteaware.subnet.override=subnet
where subnet is a subnet for the site whose domain controllers you want to use. For example:
siteaware.subnet.override=10.100.0.0/20
3Save and close the file.
4Restart the service.
service horizon-workspace restart
Edit the domain_krb.properties file
The /usr/local/horizon/conf/domain_krb.properties file determines the domain controllers to
use for directories that have DNS Service Location lookup enabled. You can edit the file at any time to
modify the list of domain controllers for a domain, or to add or delete domain entries. Your changes will
not be overridden.
The file is initially created and auto-populated by the connector. You need to update it manually in some
scenarios.
nIf the domain controllers selected by default are not the optimal ones for your configuration, edit the
file and specify the domain controllers to use.
nIf you delete a directory, delete the corresponding domain entry from the file.
nIf any domain controllers in the file are not reachable, remove them from the file.
Configuring vRealize Automation
VMware, Inc. 114

See also About Domain Controller Selection.
Procedure
1Log in to the virtual machine as the root user.
2Change directories to /usr/local/horizon/conf.
3Edit the domain_krb.properties file to add or edit the list of domain to host values.
Use the following format:
domain=host:port,host2:port,host3:port
For example:
example.com=examplehost1.example.com:389,examplehost2.example.com:389
List the domain controllers in order of priority. To connect to Active Directory, the connector tries the
first domain controller in the list. If it is not reachable, it tries the second one in the list, and so on.
Important Domain names must be in lowercase.
4Change the owner of the domain_krb.properties file to horizon and group to www using the
following command:
chown horizon:www /usr/local/horizon/conf/domain_krb.properties
5Restart the service.
service horizon-workspace restart
Troubleshooting domain_krb.properties
Use this information to troubleshoot the domain_krb.properties file.
"Error resolving domain" error
If the domain_krb.properties file already includes an entry for a domain, and you try to create a new
directory of a different type for the same domain, an "Error resolving domain" error occurs. You must edit
the domain_krb.properties file and manually remove the domain entry before creating the new
directory.
Domain controllers are unreachable
Once a domain entry is added to the domain_krb.properties file, it is not updated automatically. If any
domain controllers listed in the file become unreachable, edit the file manually and remove them.
Managing Access Policies
The Directories Management policies are a set of rules that specify criteria that must be met for users to
access their app portal or to launch specified Web applications.
Configuring vRealize Automation
VMware, Inc. 115

You create the rule as part of a policy. Each rule in a policy can specify the following information.
nThe network range, where users are allowed to log in from, such as inside or outside the enterprise
network.
nThe device type that can access through this policy.
nThe order that the enabled authentication methods are applied.
nThe number of hours the authentication is valid.
nCustom access denied message.
Note The policies do not control the length of time that a Web application session lasts. They control the
amount of time that users have to launch a Web application.
The Directories Management service includes a default policy that you can edit. This policy controls
access to the service as a whole. See Applying the Default Access Policy. To control access to specific
Web applications, you can create additional policies. If you do not apply a policy to a Web application, the
default policy applies.
Configuring Access Policy Settings
A policy contains one or more access rules. Each rule consists of settings that you can configure to
manage user access to their application portals as a whole or to specified Web applications.
Network Range
For each rule, you determine the user base by specifying a network range. A network range consists of
one or more IP ranges. You create network ranges from the Identity & Access Management tab, Setup >
Network Ranges page prior to configuring access policy sets.
Device Type
Select the type of device that the rule manages. The client types are Web Browser, Identity Manager
Client App, iOS, Android, and All device types.
Authentication Methods
Set the priority of the authentication methods for the policy rule. The authentication methods are applied
in the order they are listed. The first identity provider instances that meets the authentication method and
network range configuration in the policy is selected, and the user authentication request is forwarded to
the identity provider instance for authentication. If authentication fails, the next authentication method in
the list is selected. If Certificate authentication is used, this method must be the first authentication
method in the list.
Configuring vRealize Automation
VMware, Inc. 116

You can configure access policy rules to require users to pass credentials through two authentication
methods before they can sign in. If one or both authentication method fails and fallback methods are also
configured, users are prompted to enter their credentials for the next authentication methods that are
configured. The following two scenarios describe how authentication chaining can work.
nIn the first scenario, the access policy rule is configured to require users to authenticate with their
password and with their Kerberos credential. Fallback authentication is set up to require the password
and the RADIUS credential for authentication. A user enters the password correctly, but fails to enter
the correct Kerberos authentication credential. Since the user entered the correct password, the
fallback authentication request is only for the RADIUS credential. The user does not need to re-enter
the password.
nIn the second scenario, the access policy rule is configured to require users to authenticate with their
password and their Kerberos credential. Fallback authentication is set up to require RSA SecurID and
a RADIUS for authentication. A user enters the password correctly but fails to enter the correct
Kerberos authentication credential. The fallback authentication request is for both the RSA SecurID
credential and the RADIUS credential for authentication.
Authentication Session Length
For each rule, you set the length that this authentication is valid. The value determines the maximum
amount of time users have since their last authentication event to access their portal or to launch a
specific Web application. For example, a value of 4 in a Web application rule gives users four hours to
launch the web application unless they initiate another authentication event that extends the time.
Custom Access Denied Error Message
When users attempt to sign in and fail because of invalid credentials, incorrect configuration, or system
error, an access denied message is displayed. The default message is
Access denied as no valid authentication methods were found.
You can create a custom error message for each access policy rule that overrides the default message.
The custom message can include text and a link for a call to action message. For example, in a policy
rules for mobile devices that you want to manage, if a user tries to sign in from an unenrolled device, the
follow custom error message could appear:
Please enroll your device to access corporate resources by clicking the link at the end of this
message. If your device is already enrolled, contact support for help.
Example Default Policy
The following policy serves as an example of how you can configure the default policy to control access
to the apps portal. See Manage the User Access Policy.
The policy rules are evaluated in the order listed. You can change the order of the policy by dragging and
dropping the rule in the Policy Rules section.
In the following use case, this policy example applies to all applications.
Configuring vRealize Automation
VMware, Inc. 117
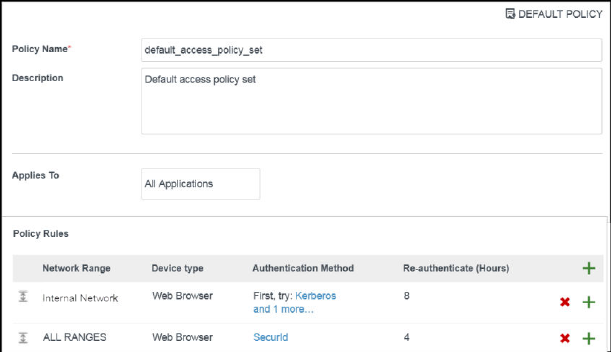
1nFor the internal network (Internal Network Range), two authentication methods are configured for
the rule, Kerberos and password authentication as the fallback method. To access the apps portal
from an internal network, the service attempts to authenticate users with Kerberos authentication
first, as it is the first authentication method listed in the rule. If that fails, users are prompted to
enter their Active Directory password. Users log in using a browser and now have access to their
user portals for an eight-hour session.
nFor access from the external network (All Ranges), only one authentication method is configured,
RSA SecurID. To access the apps portal from an external network, users are required to log in
with SecurID. Users log in using a browser and now have access to their apps portals for a four-
hour session.
2 When a user attempts to access a resource, except for Web applications covered by a Web-
application-specific policy, the default portal access policy applies.
For example, the re-authentication time for such resources matches the re-authentication time of the
default access policy rule. If the time for a user who logs in to the apps portal is eight hours according
to the default access policy rule, when the user attempts to launch a resource during the session, the
application launches without requiring the user to re-authenticate.
Managing Web-Application-Specific Policies
When you add Web applications to the catalog, you can create Web-application-specific access policies.
For example, you can create an policy with rules for a Web application that specifies which IP addresses
have access to the application, using which authentication methods, and for how long until
reauthentication is required.
The following Web-application-specific policy provides an example of a policy you can create to control
access to specified Web applications.
Example 1 Strict Web-Application-Specific Policy
In this example, a new policy is created and applied to a sensitve Web application.
Configuring vRealize Automation
VMware, Inc. 118
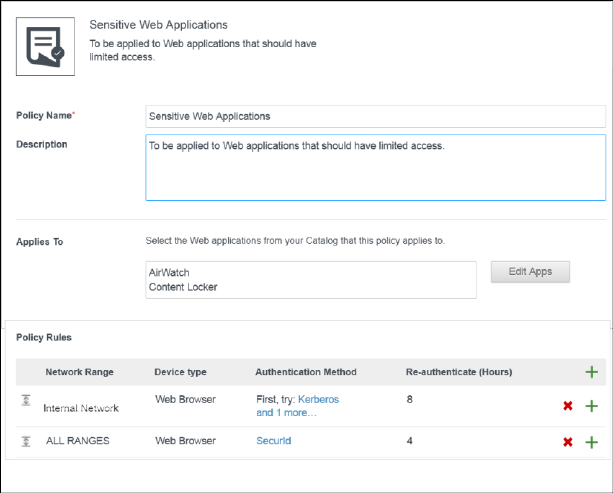
1 To access the service from outside the enterprise network, the user is required to log in with RSA
SecurID. The user logs in using a browser and now has access to the apps portal for a four hour
session as provided by the default access rule.
2 After four hours, the user tries to launch a Web application with the Sensitive Web Applications policy
set applied.
3 The service checks the rules in the policy and applies the policy with the ALL RANGES network
range since the user request is coming from a Web browser and from the ALL RANGES network
range.
The user logs in using the RSA SecurID authentication method, but the session just expired. The user
is redirected for reauthentication. The reauthentication provides the user with another four hour
session and the ability to launch the application. For the next four hours, the user can continue to
launch the application without having to reauthenticate.
Example 2 Stricter Web-Application-Specific Policy
For a stricter rule to apply to extra sensitve Web applications, you could require re-authentication With
SecureId on any device after 1 hour. The following is an example of how this type of policy access rule is
implemented.
1 User logs in from an inside the enterprise network using the password authentication method.
Now, the user has access to the apps portal for eight hours, as set up in Example 1.
2 The user immediately tries to launch a Web application with the Example 2 policy rule applied, which
requires RSA SecurID authentication.
3 The user is redirected to an identity provider that provides RSA SecurID authentication.
Configuring vRealize Automation
VMware, Inc. 119
4 After the user successfully logs in, the service launches the application and saves the authentication
event.
The user can continue to launch this application for up to one hour but is asked to reauthenticate after
an hour, as dictated by the policy rule.
Manage the User Access Policy
vRealize Automation is supplied with a default user access policy that you can use as is or edit as needed
to manage tenant access to applications.
vRealize Automation is supplied with a default user access policy, and you cannot add new policies. You
can edit the existing policy to add rules.
Prerequisites
nSelect or configure the appropriate identity providers for your deployment. See Configure a Third
Party Identity Provider Connection.
nConfigure the appropriate network ranges for your deployment. See Add or Edit a Network Range.
nConfigure the appropriate authentication methods for your deployment. See Integrating Alternative
User Authentication Products with Directories Management.
nIf you plan to edit the default policy (to control user access to the service as a whole), configure it
before creating Web-application-specific policy.
nAdd Web applications to the Catalog. The Web applications must be listed in the Catalog page before
you can add a policy.
nLog in to vRealize Automation as a tenant administrator.
Procedure
1Select Administration > Directories Management > Policies.
2Click Edit Policy to add a new policy.
3Add a policy name and description in the respective text boxes.
4In the Applies To section, click Select and in the page that appears, select the Web applications that
are associated with this policy.
5In the Policy Rules section, click + to add a rule.
The Add a Policy Rule page appears.
a Select the network range to apply to this rule.
b Select the type of device that can access the web applications for this rule.
c Select the authentication methods to use in the order the method should be applied.
d Specify the number of hours a Web application session open.
e Click Save.
6Configure additional rules as appropriate.
Configuring vRealize Automation
VMware, Inc. 120
7Click Save.
Configuring Additional Identity Provider Connections
You can configure additional identity provider connections as needed to support different identity
management scenarios, including additional built-in identity providers and third-party identity providers.
You can create three types of identity provider connections using Directories Management.
nCreate Third-Party IDP - Use this item to create a connection to an external third-party identity
provider. Ensure that you have following before adding a third-party identity provider instance.
nVerify that the third-party instances are SAML 2.0 compliant and that the service can reach the
third-party instance.
nObtain the appropriate third-party metadata information to add when you configure the identity
provider in the administration console. The metadata information you obtain from the third-party
instance is either the URL to the metadata or the actual metadata.
nCreate Workspace IDP - When you enable a connector to authenticate users during Directories
Management configuration, a Workspace IDP is created as the identity provider and password
authentication is enabled. You can configure additional workspace identity providers behind different
load balancers.
nCreate Built-in IDP - Built in Identity Providers use the internal Directories Management mechanisms
to support authentication. You can configure built-in identity providers to use authentication methods
that do not require the use of an on premises connector. When you configure the built-in provider, you
associate the authentication methods to use with the provider.
nConfigure a Third Party Identity Provider Connection
vRealize Automation is supplied with a default identity provider connection instance. Users may
want to create additional identity provider connections to support just-in-time user provisioning or
other custom configurations.
nConfigure Additional Workspace Identity Providers
When you configure a Directories Management connector to authenticate users, a Workspace IDP is
created and password authentication is enabled.
nConfigure a Built-in Identity Provider Connection
You can configure multiple built-in identity providers and associate authentication methods with
them.
Configure a Third Party Identity Provider Connection
vRealize Automation is supplied with a default identity provider connection instance. Users may want to
create additional identity provider connections to support just-in-time user provisioning or other custom
configurations.
vRealize Automation is supplied with an default identity provider. In most cases, the default provider is
sufficient for customer needs. If you use an existing enterprise identity management solution, you can set
up a custom identity provider to redirect users to your existing identity solution.
Configuring vRealize Automation
VMware, Inc. 121

When using a custom identity provider, Directories Management uses SAML metadata from that provider
to establish a trust relationship with the provider. After this relationship is established, Directories
Management maps the users from the SAML assertion to the list of internal vRealize Automation users
based the subject name ID.
Prerequisites
nConfigure the network ranges that you want to direct to this identity provider instance for
authentication. See Add or Edit a Network Range.
nAccess to the third-party metadata document. This can be either the URL to the metadata or the
actual metadata.
nLog in to vRealize Automation as a tenant administrator.
Procedure
1Select Administration > Directories Management > Identity Providers.
This page displays all configured Identity Providers.
2Click Add Identity Provider.
A menu appears with Identity Provider options.
3Select Create Third Party IDP.
4Enter the appropriate information to configure the identity provider.
Option Description
Identity Provider Name Enter a name for this identity provider instance.
SAML Metadata Add the third party IdPs XML-based metadata document to establish trust with the identity
provider.
1 Enter the SAML metadata URL or the xml content into the text box.
2 Click Process IdP Metadata. The NameID formats supported by the IdP are extracted from
the metadata and added to the Name ID Format table.
3 In the Name ID value column, select the user attribute in the service to map to the ID formats
displayed. You can add custom third-party name ID formats and map them to the user
attribute values in the service.
4 (Optional) Select the NameIDPolicy response identifier string format.
Users Select the Directories Management directories of the users that can authenticate using this
identity provider.
Just-in-Time User
Provisioning
Select the appropriate options to support just-in-time provisioning using an appropriate third party
identity provider.
Enter the Directory Name to use for just-in-time provisioning.
Enter one or more Domains that exist within the external identity provider that you will use for
just-in-time provisioning.
Network The existing network ranges configured in the service are listed.
Select the network ranges for the users, based on their IP addresses, that you want to direct to
this identity provider instance for authentication.
Configuring vRealize Automation
VMware, Inc. 122

Option Description
Authentication Methods Add the authentication methods supported by the third-party identity provider. Select the SAML
authentication context class that supports the authentication method.
SAML Signing Certificate Click Service Provider (SP) Metadata to see URL to Directories Management SAML service
provider metadata URL . Copy and save the URL. This URL is configured when you edit the
SAML assertion in the third-party identity provider to map Directories Management users.
Hostname If the Hostname field displays, enter the hostname where the identity provider is redirected to for
authentication. If you are using a non-standard port other than 443, you can set this as
Hostname:Port. For example, myco.example.com:8443.
5Click Add.
What to do next
nCopy and save the Directories Management service provider metadata that is required to configure
the third-party identity provider instance. This metadata is available either in the SAML Signing
Certificate section of the Identity Provider page.
nAdd the authentication method of the identity provider to the services default policy.
See the Setting Up Resources in Directories Management guide for information about adding and
customizing resources that you add to the catalog.
Configure Additional Workspace Identity Providers
When you configure a Directories Management connector to authenticate users, a Workspace IDP is
created and password authentication is enabled.
You can configure additional connectors to operate behind multiple load balancers. When your
deployment includes more than one load balancer, you can configure additional Workspace identity
providers for authentication in each load balancer configuration.
Procedure
1Select Administration > Directories Management > Identity Providers.
This page displays all configured Identity Providers.
2Click Add Identity Provider.
A menu appears with Identity Provider options.
3Select Create Workspace IDP.
4Enter the appropriate information to configure the identity provider.
Option Description
Identity Provider Name Enter the name for this built-in identity provider instance.
Users Select the users to authenticate. The configured directories are listed.
Users Select the group of users who can authenticate using this Workspace identity provider.
Configuring vRealize Automation
VMware, Inc. 123

Option Description
Network The existing network ranges configured in the service are listed. Select the network range
for the users based on the IP addresses that you want to direct to this identity provider
instance for authentication.
Authentication Methods Authentication methods that are configured for the service are displayed. Select the check
box for the authentication methods to associate with this identity provider.
For device compliance and Password, with AirWatch and AirWatch Connector, ensure that
the option is enabled on the AirWatch configuration page.
5Click Add.
Configure a Built-in Identity Provider Connection
You can configure multiple built-in identity providers and associate authentication methods with them.
Prerequisites
If you are using Built-in Keberos authentication, download the KDC issuer certificate to use in the
AirWatch configuration of the iOS device management profile.
Procedure
1Select Administration > Directories Management > Identity Providers.
This page displays all configured Identity Providers.
2Click Add Identity Provider.
A menu appears with Identity Provider options.
3Select Create Built-in IDP.
4Enter the appropriate information to configure the identity provider.
Option Description
Identity Provider Name Enter the name for this built-in identity provider instance.
Users Select the users to authenticate. The configured directories are listed.
Network The existing network ranges configured in the service are listed. Select the network range
for the users based on the IP addresses that you want to direct to this identity provider
instance for authentication.
Authentication Methods The authentication methods that are configured for the service are displayed. Select the
check box for the authentication methods to associate with this identity provider.
For device compliance and Password, with AirWatch and AirWatch Connector, ensure that
the appropriate option is enabled on the AIrWatch configuration page.
5Click Add.
Configuring vRealize Automation
VMware, Inc. 124

Integrating Alternative User Authentication Products with Directories
Management
Typically, when you initially configure Directories Management, you use the connectors supplied with your
existing vRealize Automation infrastructure to create an Active Directory connection for user ID and
password based authentication and management. Alternatively, you can integrate Directories
Management with other authentication solutions such as Kerberos or RSA SecurID.
The identity provider instance can be the Directories Management connector instance, third-party identity
provider instances, or a combination of both.
The identity provider instance that you use with the Directories Management service creates an in-
network federation authority that communicates with the service using SAML 2.0 assertions.
When you initially deploy the Directories Management service, the connector is the initial identity provider
for the service. Your existing Active Directory infrastructure is used for user authentication and
management.
The following authentication methods are supported. You configure these authentication methods from
the administration console.
Table 2‑8. User Authentication Types Supported by Directories Management
Authentication Types Description
Password (on-premise deployment) Without any configuration after Active Directory is configured, Directories Management
supports Active Directory password authentication. This method authenticates users
directly against Active Directory.
Kerberos for desktops Kerberos authentication provides domain users with single sign-in access to their apps
portal. Users do not need to sign in again after they sign in to the network.
Certificate (on-premise deployment) Certificate-based authentication can be configured to allow clients to authenticate with
certificates on their desktop and mobile devices or to use a smart card adapter for
authentication.
Certificate-based authentication is based on what the user has and what the person
knows. An X.509 certificate uses the public key infrastructure standard to verify that a
public key contained within the certificate belongs to the user.
RSA SecurID (on-premise deployment) When RSA SecurID authentication is configured, Directories Management is configured
as the authentication agent in the RSA SecurID server. RSA SecurID authentication
requires users to use a token-based authentication system. RSA SecurID is an
authentication method for users accessing Directories Management from outside the
enterprise network.
RADIUS (on-premise deployment) RADIUS authentication provides two-factor authentication options. You set up the
RADIUS server that is accessible to the Directories Management service. When users
sign in with their user name and passcode, an access request is submitted to the RADIUS
server for authentication.
RSA Adaptive Authentication (on-
premise deployment)
RSA authentication provides a stronger multi-factor authentication than only user name
and password authentication against Active Directory. When RSA Adaptive Authentication
is enabled, the risk indicators specified in the risk policy set up in the RSA Policy
Management application. The Directories Management service configuration of adaptive
authentication is used to determine the required authentication prompts.
Configuring vRealize Automation
VMware, Inc. 125

Table 2‑8. User Authentication Types Supported by Directories Management (Continued)
Authentication Types Description
Mobile SSO (for iOS) Mobile SSO for iOS authentication is used for single sign-on authentication for AirWatch-
managed iOS devices. Mobile SSO (for iOS) authentication uses a Key Distribution
Center (KDC) that is part of the Directories Management service. You must initiate the
KDC service in the VMware Identity Manager service before you enable this
authentication method.
Mobile SSO (for Android) Mobile SSO for Android authentication is used for single sign-on authentication for
AirWatch-managed Android devices. A proxy service is set up between the
Directories Management service and AirWatch to retrieve the certificate from AirWatch for
authentication.
Password (AirWatch Connector) The AirWatch Cloud Connector can be integrated with the Directories Management
service for user password authentication. You configure the
Directories Managementservice to sync users from the AirWatch directory.
Users are authenticated based on the authentication methods, the default access policy rules, network
ranges, and the identity provider instance you configure. After the authentication methods are configured,
you create access policy rules that specify the authentication methods to be used by device type.
Configuring SecurID for Directories Management
When you configure RSA SecurID server, you must add the service information as the authentication
agent on the RSA SecurID server and configure the RSA SecurID server information on the service.
When you configure SecurID to provide additional security, you must ensure that your network is properly
configured for your Directories Management deployment. For SecurID specifically, you must ensure that
the appropriate port is open to enable SecurID to authenticate users outside your network.
After you run the Setup wizard and configured your Active Directory connection, you have the information
necessary to prepare the RSA SecurID server. After you prepare the RSA SecurID server for
Directories Management, you enable SecurID in the administration console.
nPrepare the RSA SecurID Server
The RSA SecurID server must be configured with information about the appliance as the
authentication agent. The information required is the host name and the IP addresses for network
interfaces.
nConfigure RSA SecurID Authentication
After Directories Management is configured as the authentication agent in the RSA SecurID server,
you must add the RSA SecurID configuration information to the connector.
Prepare the RSA SecurID Server
The RSA SecurID server must be configured with information about the appliance as the authentication
agent. The information required is the host name and the IP addresses for network interfaces.
Configuring vRealize Automation
VMware, Inc. 126

Prerequisites
nVerify that one of the following RSA Authentication Manager versions is installed and functioning on
the enterprise network: RSA AM 6.1.2, 7.1 SP2 and later, and 8.0 and later. The server uses
AuthSDK_Java_v8.1.1.312.06_03_11_03_16_51 (Agent API 8.1 SP1), which only supports the
preceding versions of RSA Authentication Manager (the RSA SecurID server). For information about
installing and configuring RSA Authentication Manager (RSA SecurID server), see RSA
documentation.
Procedure
1On a supported version of the RSA SecurID server, add the connector as an authentication agent.
Enter the following information.
Option Description
Hostname The host name of .
IP address The IP address of .
Alternate IP address If traffic from the connector passes through a network address translation (NAT)
device to reach the RSA SecurID server, enter the private IP address of the
appliance.
2Download the compressed configuration file and extract the sdconf.rec file.
Be prepared to upload this file later when you configure RSA SecurID in Directories Management.
What to do next
Go to the administration console and in the Identity & Access Management tab Setup pages, select the
connector and in the AuthAdapters page configure SecurID.
Configure RSA SecurID Authentication
After Directories Management is configured as the authentication agent in the RSA SecurID server, you
must add the RSA SecurID configuration information to the connector.
Prerequisites
nVerify that RSA Authentication Manager (the RSA SecurID server) is installed and properly
configured.
nDownload the compressed file from the RSA SecurID server and extract the server configuration file.
Procedure
1As a tenant administrator, navigate to Administration > Directories Management > Connectors
2On the Connectors page, select the Worker link for the connector that is being configured with RSA
SecurID.
3Click Auth Adapters and then click SecurIDldpAdapter.
You are redirected to the identity manager sign in page.
Configuring vRealize Automation
VMware, Inc. 127

4In the Authentication Adapters page SecurIDldpAdapter row, click Edit.
5Configure the SecurID Authentication Adapter page.
Information used and files generated on the RSA SecurID server are required when you configure the
SecurID page.
Option Action
Name A name is required. The default name is SecurIDldpAdapter. You can change this.
Enable SecurID Select this box to enable SecurID authentication.
Number of
authentication
attempts
allowed
Enter the maximum number of failed login attempts when using the RSA SecurID token. The default is five
attempts.
Connector
Address
Enter the IP address of the connector instance. The value you enter must match the value you used when
you added the connector appliance as an authentication agent to the RSA SecurID server. If your RSA
SecurID server has a value assigned to the Alternate IP address prompt, enter that value as the connector
IP address. If no alternate IP address is assigned, enter the value assigned to the IP address prompt.
Agent IP
Address
Enter the value assigned to the IP address prompt in the RSA SecurID server.
Server
Configuration
Upload the RSA SecurID server configuration file. First, you must download the compressed file from the
RSA SecurID server and extract the server configuration file, which by default is named sdconf.rec.
Node Secret Leaving the node secret field blank allows the node secret to auto generate. It is recommended that you
clear the node secret file on the RSA SecurID server and intentionally do not upload the node secret file.
Ensure that the node secret file on the RSA SecurID server and on the server connector instance always
match. If you change the node secret at one location, change it at the other location.
6Click Save.
What to do next
Add the authentication method to the default access policy. Navigate to Administration > Directories
Management > Policies and click Edit Default Policy to edit the default policy rules to add the SecurID
authentication method to the rule in the correct authentication order.
Configuring RADIUS for Directories Management
You can configure Directories Management so that users are required to use RADIUS (Remote
Authentication Dial-In User Service) authentication. You configure the RADIUS server information on the
Directories Management service.
RADIUS support offers a wide range of alternative two-factor token-based authentication options.
Because two-factor authentication solutions, such as RADIUS, work with authentication managers
installed on separate servers, you must have the RADIUS server configured and accessible to the identity
manager service.
Configuring vRealize Automation
VMware, Inc. 128
When users sign in to their My Apps portal and RADIUS authentication is enabled, a special login dialog
box appears in the browser. Users enter their RADUS authentication user name and passcode in the
login dialog box. If the RADIUS server issues an access challenge, the identity manager service displays
a dialog box prompting for a second passcode. Currently support for RADIUS challenges is limited to
prompting for text input.
After a user enters credentials in the dialog box, the RADIUS server can send an SMS text message or
email, or text using some other out-of-band mechanism to the user's cell phone with a code. The user can
enter this text and code into the login dialog box to complete the authentication.
If the RADIUS server provides the ability to import users from Active Directory, end users might first be
prompted to supply Active Directory credentials before being prompted for a RADIUS authentication
username and passcode.
Prepare the RADIUS Server
Set up the RADIUS server and then configure it to accept RADIUS requests from the
Directories Management service.
Refer to your RADIUS vendor's setup guides for information about setting up the RADIUS server. Note
your RADIUS configuration information as you use this information when you configure RADIUS in the
service. To view the type of RADIUS information required to configure Directories Management see
Configure RADIUS Authentication in Directories Management.
You can set up a secondary Radius authentication server to be used for high availability. If the primary
RADIUS server does not respond within the server timeout configured for RADIUS authentication, the
request is routed to the secondary server. When the primary server does not respond, the secondary
server receives all future authentication requests.
Configure RADIUS Authentication in Directories Management
You enable RADIUS software on an authentication manager server. For RADIUS authentication, follow
the vendor's configuration documentation.
Prerequisites
Install and configure the RADIUS software on an authentication manager server. For RADIUS
authentication, follow the vendor's configuration documentation.
You need to know the following RADIUS server information to configure RADIUS on the service.
nIP address or DNS name of the RADIUS server.
nAuthentication port numbers. Authentication port is usually 1812.
nAuthentication type. The authentication types include PAP (Password Authentication Protocol), CHAP
(Challenge Handshake Authentication Protocol), MSCHAP1, MSCHAP2 (Microsoft Challenge
Handshake Authentication Protocol, versions 1 and 2).
nRADIUS shared secret that is used for encryption and decryption in RADIUS protocol messages.
nSpecific timeout and retry values needed for RADIUS authentication.
nLog in to vRealize Automation as a tenant administrator.
Configuring vRealize Automation
VMware, Inc. 129

Procedure
1Select Administration > Directories Management > Connectors.
2On the Connectors page, select the Worker link for the connector that is being configured for RADIUS
authentication.
3Click Auth Adapters and then click RadiusAuthAdapter.
You are redirected to the identity manager sign-in page.
4Click Edit to configure these fields on the Authentication Adapter page.
Option Action
Name A name is required. The default name is RadiusAuthAdapter. You can change this.
Enable Radius
Adapter
Select this box to enable RADIUS authentication.
Number of
authentication
attempts
allowed
Enter the maximum number of failed login attempts when using RADIUS to log in. The default is five
attempts.
Number of
attempts to
Radius server
Specify the total number of retry attempts. If the primary server does not respond, the service waits for the
configured time before retrying again.
Radius server
hostname/addr
ess
Enter the host name or the IP address of the RADIUS server.
Authentication
port
Enter the Radius authentication port number. This is usually 1812.
Accounting port Enter 0 for the port number. The accounting port is not used at this time.
Authentication
type
Enter the authentication protocol that is supported by the RADIUS server. Either PAP, CHAP, MSCHAP1,
OR MSCHAP2.
Shared secret Enter the shared secret that is used between the RADIUS server and the VMware Identity Manager service.
Server timeout
in seconds
Enter the RADIUS server timeout in seconds, after which a retry is sent if the RADIUS server does not
respond.
Realm Prefix (Optional) The user account location is called the realm.
If you specify a realm prefix string, the string is placed at the beginning of the user name when the name is
sent to the RADIUS server. For example, if the user name is entered as jdoe and the realm prefix DOMAIN-
A\ is specified, the user name DOMAIN-A\jdoe is sent to the RADIUS server. If you do not configure these
fields, only the user name that is entered is sent.
Realm Suffix (Optional) If you specify a realm suffix, the string is placed at end of the user name. For example, if the suffix
is @myco.com, the username jdoe@myco.com is sent to the RADIUS server.
Login page
passphrase
hint
Enter the text string to display in the message on the user login page to direct users to enter the correct
Radius passcode. For example, if this field is configured with AD password first and then SMS passcode,
the login page message would read Enter your AD password first and then SMS passcode. The default
text string is RADIUS Passcode.
Configuring vRealize Automation
VMware, Inc. 130
5You can enable a secondary RADIUS server for high availability.
Configure the secondary server as described in step 4.
6Click Save.
What to do next
Add the RADIUS authentication method to the default access policy. Select Administration >
Directories Management > Policies and click Edit Default Policy to edit the default policy rules to add
the RADIUS authentication method to the rule in the correct authentication order.
Configuring a Certificate or Smart Card Adapter for Use with Directories Management
You can configure x509 certificate authentication to allow clients to authenticate with certificates on their
desktop and mobile devices or to use a smart card adapter for authentication. Certificate-based
authentication is based on what the user has (the private key or smart card), and what the person knows
(the password to the private key or the smart-card PIN.) An X.509 certificate uses the public key
infrastructure (PKI) standard to verify that a public key contained within the certificate belongs to the user.
With smart card authentication, users connect the smart card with the computer and enter a PIN.
The smart card certificates are copied to the local certificate store on the user's computer. The certificates
in the local certificate store are available to all the browsers running on this user's computer, with some
exceptions, and therefore, are available to a Directories Management instance in the browser.
nUsing User Principal Name for Certificate Authentication
You can use certificate mapping in Active Directory. Certificate and smart card logins uses the user
principal name (UPN) from Active Directory to validate user accounts. The Active Directory accounts
of users attempting to authenticate in the Directories Management service must have a valid UPN
that corresponds to the UPN in the certificate.
nCertificate Authority Required for Authentication
To enable logging in using certificate authentication, root certificates and intermediate certificates
must be uploaded to the .
nUsing Certificate Revocation Checking
You can configure certificate revocation checking to prevent users who have their user certificates
revoked from authenticating. Certificates are often revoked when a user leaves an organization,
loses a smart card, or moves from one department to another.
nConfigure Certificate Authentication for Directories Management
You enable and configure certificate authentication from the vRealize Automation administration
console Directories Management feature.
Using User Principal Name for Certificate Authentication
You can use certificate mapping in Active Directory. Certificate and smart card logins uses the user
principal name (UPN) from Active Directory to validate user accounts. The Active Directory accounts of
users attempting to authenticate in the Directories Management service must have a valid UPN that
corresponds to the UPN in the certificate.
Configuring vRealize Automation
VMware, Inc. 131
You can configure the to use an email address to validate the user account if the UPN does not exist in
the certificate.
You can also enable an alternate UPN type to be used.
Certificate Authority Required for Authentication
To enable logging in using certificate authentication, root certificates and intermediate certificates must be
uploaded to the .
The certificates are copied to the local certificate store on the user's computer. The certificates in the local
certificate store are available to all the browsers running on this user's computer, with some exceptions,
and therefore, are available to a Directories Management instance in the browser.
For smart-card authentication, when a user initiates a connection to a the Directories Management
instance, the Directories Management service sends a list of trusted certificate authorities (CA) to the
browser. The browser checks the list of trusted CAs against the available user certificates, selects a
suitable certificate, and then prompts the user to enter a smart card PIN. If multiple valid user certificates
are available, the browser prompts the user to select a certificate.
If a user cannot authenticate, the root CA and intermediate CA might not be set up correctly, or the
service has not been restarted after the root and intermediate CAs were uploaded to the server. In these
cases, the browser cannot show the installed certificates, the user cannot select the correct certificate,
and certificate authentication fails.
Using Certificate Revocation Checking
You can configure certificate revocation checking to prevent users who have their user certificates
revoked from authenticating. Certificates are often revoked when a user leaves an organization, loses a
smart card, or moves from one department to another.
Certificate revocation checking with certificate revocation lists (CRLs) and with the Online Certificate
Status Protocol (OCSP) is supported. A CRL is a list of revoked certificates published by the CA that
issued the certificates. OCSP is a certificate validation protocol that is used to get the revocation status of
a certificate.
You can configure certificate revocation checking in the administration console Connectors > Auth
Adapters > CertificateAuthAdapter page when you configure certificate authentication.
You can configure both CRL and OCSP in the same certificate authentication adapter configuration.
When you configure both types of certificate revocation checking and the Use CRL in case of OCSP
failure checkbox is enabled, OCSP is checked first and if OCSP fails, revocation checking falls back to
CRL. Revocation checking does not fall back to OCSP if CRL fails.
Logging in with CRL Checking
When you enable certificate revocation, the server reads a CRL to determine the revocation status of a
user certificate.
If a certificate is revoked, authentication through the certificate fails.
Configuring vRealize Automation
VMware, Inc. 132
Logging in with OCSP Certificate Checking
When you configure Certificate Status Protocol (OCSP) revocation checking, sends a request to an
OCSP responder to determine the revocation status of a specific user certificate. The server uses the
OCSP signing certificate to verify that the responses it receives from the OCSP responder are genuine.
If the certificate is revoked, authentication fails.
You can configure authentication to fall back to CRL checking if it does not receive a response from the
OSCP responder or if the response is invalid.
Configure Certificate Authentication for Directories Management
You enable and configure certificate authentication from the vRealize Automation administration console
Directories Management feature.
Prerequisites
nObtain the Root certificate and intermediate certificates from the CA that signed the certificates
presented by your users.
n(Optional) List of Object Identifier (OID)s of valid certificate policies for certificate authentication.
nFor revocation checking, the file location of the CRL, the URL of the OCSP server.
n(Optional) OCSP Response Signing certificate file location.
nConsent form content, if enabling a consent form to display before authentication.
Procedure
1As a tenant administrator, navigate to Administration > Directories Management > Connectors
2On the Connectors page, select the Worker link for the connector that is being configured.
3Click Auth Adapters and then click CertificateAuthAdapter.
You are redirected to the identity manager sign in page.
4In the CertificateAuthAdapter row, click Edit.
5Configure the Certificate Authentication Adapter page.
Note An asterisk indicates a required field. All other fields are optional.
Option Description
*Name A name is required. The default name is CertificateAuthAdapter. You can change
this name.
Enable certificate adapter Select the check box to enable certificate authentication.
*Root and intermediate CA certificates Select the certificate files to upload. You can select multiple root CA and
intermediate CA certificates that are encoded as DER or PEM.
Configuring vRealize Automation
VMware, Inc. 133

Option Description
Uploaded CA certificates The uploaded certificate files are listed in the Uploaded Ca Certificates section of
the form.
You must restart the service before the new certificates are made available.
Click Restart Web Service to restart the service and add the certificates to the
trusted service.
Note Restarting the service does not enable certificate authentication. After the
service is restarted, continue configuring this page. Clicking Save at the end of
the page enables certificate authentication on the service.
Use email if no UPN in certificate If the user principal name (UPN) does not exist in the certificate, select this
checkbox to use the emailAddress attribute as the Subject Alternative Name
extension to validate user accounts.
Certificate policies accepted Create a list of object identifiers that are accepted in the certificate policies
extensions.
Enter the object ID numbers (OID) for the Certificate Issuing Policy. Click Add
another value to add additional OIDs.
Enable cert revocation Select the check box to enable certificate revocation checking. This prevents
users who have revoked user certificates from authenticating.
Use CRL from certificates Select the check box to use the certificate revocation list (CRL) published by the
CA that issued the certificates to validate a certificate's status, revoked or not
revoked.
CRL Location Enter the server file path or the local file path from which to retrieve the CRL.
Enable OCSP Revocation Select the check box to use the Online Certificate Status Protocol (OCSP)
certificate validation protocol to get the revocation status of a certificate.
Use CRL in case of OCSP failure If you configure both CRL and OCSP, you can check this box to fall back to using
CRL if OCSP checking is not available.
Send OCSP Nonce Select this check box if you want the unique identifier of the OCSP request to be
sent in the response.
OCSP URL If you enabled OCSP revocation, enter the OCSP server address for revocation
checking.
OCSP responder's signing certificate Enter the path to the OCSP certificate for the responder, /path/to/file.cer.
Enable consent form before
authentication
Select this check box to include a consent form page to appear before users log
in to their My Apps portal using certificate authentication.
Consent form content Type the text that displays in the consent form in this text box.
6Click Save.
What to do next
nAdd the certificate authentication method to the default access policy.Navigate to Administration >
Directories Management > Policies and click Edit Default Policy to edit the default policy rules and
add Certificate and make it the first authentication method for the default policy. Certificate must be
first authentication method listed in the policy rule, otherwise certificate authentication fails.
Configuring vRealize Automation
VMware, Inc. 134
nWhen Certificate Authentication is configured, and the service appliance is set up behind a load
balancer, make sure that the Directories Management connector is configured with SSL pass-through
at the load balancer and not configured to terminate SSL at the load balancer. This configuration
ensures that the SSL handshake is between the connector and the client in order to pass the
certificate to the connector.
Configuring a Third-Party Identity Provider Instance to Authenticate Users
You can configure a third-party identity provider to be used to authenticate users in the
Directories Management service.
Complete the following tasks prior to using the administration console to add the third-party identity
provider instance.
nVerify that the third-party instances are SAML 2.0 compliant and that the service can reach the third-
party instance.
nObtain the appropriate third-party metadata information to add when you configure the identity
provider in the administration console. The metadata information you obtain from the third-party
instance is either the URL to the metadata or the actual metadata.
Configure a Third Party Identity Provider Connection
vRealize Automation is supplied with a default identity provider connection instance. Users may want to
create additional identity provider connections to support just-in-time user provisioning or other custom
configurations.
vRealize Automation is supplied with an default identity provider. In most cases, the default provider is
sufficient for customer needs. If you use an existing enterprise identity management solution, you can set
up a custom identity provider to redirect users to your existing identity solution.
When using a custom identity provider, Directories Management uses SAML metadata from that provider
to establish a trust relationship with the provider. After this relationship is established, Directories
Management maps the users from the SAML assertion to the list of internal vRealize Automation users
based the subject name ID.
Prerequisites
nConfigure the network ranges that you want to direct to this identity provider instance for
authentication. See Add or Edit a Network Range.
nAccess to the third-party metadata document. This can be either the URL to the metadata or the
actual metadata.
nLog in to vRealize Automation as a tenant administrator.
Procedure
1Select Administration > Directories Management > Identity Providers.
This page displays all configured Identity Providers.
Configuring vRealize Automation
VMware, Inc. 135

2Click Add Identity Provider.
A menu appears with Identity Provider options.
3Select Create Third Party IDP.
4Enter the appropriate information to configure the identity provider.
Option Description
Identity Provider Name Enter a name for this identity provider instance.
SAML Metadata Add the third party IdPs XML-based metadata document to establish trust with the identity
provider.
1 Enter the SAML metadata URL or the xml content into the text box.
2 Click Process IdP Metadata. The NameID formats supported by the IdP are extracted from
the metadata and added to the Name ID Format table.
3 In the Name ID value column, select the user attribute in the service to map to the ID formats
displayed. You can add custom third-party name ID formats and map them to the user
attribute values in the service.
4 (Optional) Select the NameIDPolicy response identifier string format.
Users Select the Directories Management directories of the users that can authenticate using this
identity provider.
Just-in-Time User
Provisioning
Select the appropriate options to support just-in-time provisioning using an appropriate third party
identity provider.
Enter the Directory Name to use for just-in-time provisioning.
Enter one or more Domains that exist within the external identity provider that you will use for
just-in-time provisioning.
Network The existing network ranges configured in the service are listed.
Select the network ranges for the users, based on their IP addresses, that you want to direct to
this identity provider instance for authentication.
Authentication Methods Add the authentication methods supported by the third-party identity provider. Select the SAML
authentication context class that supports the authentication method.
SAML Signing Certificate Click Service Provider (SP) Metadata to see URL to Directories Management SAML service
provider metadata URL . Copy and save the URL. This URL is configured when you edit the
SAML assertion in the third-party identity provider to map Directories Management users.
Hostname If the Hostname field displays, enter the hostname where the identity provider is redirected to for
authentication. If you are using a non-standard port other than 443, you can set this as
Hostname:Port. For example, myco.example.com:8443.
5Click Add.
What to do next
nCopy and save the Directories Management service provider metadata that is required to configure
the third-party identity provider instance. This metadata is available either in the SAML Signing
Certificate section of the Identity Provider page.
nAdd the authentication method of the identity provider to the services default policy.
See the Setting Up Resources in Directories Management guide for information about adding and
customizing resources that you add to the catalog.
Configuring vRealize Automation
VMware, Inc. 136

Managing Authentication Methods to Apply to Users
The Directories Management service attempts to authenticate users based on the authentication
methods, the default access policy, network ranges, and the identity provider instances you configure.
When users attempt to log in, the service evaluates the default access policy rules to select which rule in
the policy to apply. The authentication methods are applied in the order they are listed in the rule. The first
identity provider instance that meets the authentication method and network range requirements of the
rule is selected and the user authentication request is forwarded to the identity provider instance for
authentication. If authentication fails, the next authentication method configured in the rule is applied.
You can add rules that specify the authentication methods to be used by device type or by device type
and from a specific network range. For example, you could configure a rule requiring users that sign in
using iOS devices from a specific network to authenticate using RSA SecurID and another rule that
specifies all device types signing in from the internal network IP address to authenticate using their
password.
Add or Edit a Network Range
You can manage the network ranges to define the IP addresses from which users can log in via an Active
Directory link. You add the network ranges you create to specific identity provider instances and to access
policy rules.
Define network ranges for your Directories Management deployment based on your network topology.
One network range, called ALL RANGES, is created as the default. This network range includes every IP
address available on the Internet, 0.0.0.0 to 255.255.255.255. Even if your deployment has a single
identity provider instance, you can change the IP address range and add other ranges to exclude or
include specific IP addresses to the default network range. You can create other network ranges with
specific IP addresses that you can apply for specific purpose.
Note The default network range, ALL RANGES, and its description, "a network for all ranges," are
editable. You can edit the name and description, including changing the text to a different language, by
clicking the network range name on the Network Ranges page.
Prerequisites
nYou have configured tenants for your vRealize Automation deployment set up an appropriate Active
Directory link to support basic Active Directory user ID and password authentication.
nActive Directory is installed and configured for use on your network.
nLog in to vRealize Automation as a tenant administrator.
Procedure
1Select Administration > Directories Management > Network Ranges.
Configuring vRealize Automation
VMware, Inc. 137
2Edit an existing network range or add a new network range.
Option Description
Edit an existing range Click the network range name to edit.
Add a range Click Add Network Range to add a new range.
3Complete the form.
Form Item Description
Name Enter a name for the network range.
Description Enter a description for the Network Range.
IP Ranges Edit or add IP ranges until all desired and no undesired IP addresses are included.
What to do next
nAssociate each network range with an identity provider instance.
nAssociate network ranges with access policy rule as appropriate. See Configuring Access Policy
Settings.
Select Attributes to Sync with Directory
When you set up the Directories Management directory to sync with Active Directory, you specify the user
attributes that sync to the directory. Before you set up the directory, you can specify on the User Attributes
page which default attributes are required and, if you want, add additional attributes that you want to map
to Active Directory attributes.
When you configure the User Attributes page before the directory is created, you can change default
attributes from required to not required, mark attributes as required, and add custom attributes.
For a list of the default mapped attributes, see Managing User Attributes that Sync from Active Directory.
After the directory is created, you can change a required attribute to not be required, and you can delete
custom attributes. You cannot change an attribute to be a required attribute.
When you add other attributes to sync to the directory, after the directory is created, go to the directory's
Mapped Attributes page to map these attributes to Active Directory Attributes.
Procedure
1Log in to vRealize Automation as a system or tenant administrator.
2Click the Administration tab.
3Select Directories Management > User Attributes
4In the Default Attributes section, review the required attribute list and make appropriate changes to
reflect what attributes should be required.
5In the Attributes section, add the Directories Management directory attribute name to the list.
Configuring vRealize Automation
VMware, Inc. 138
6Click Save.
The default attribute status is updated and attributes you added are added on the directory's Mapped
Attributes list.
7After the directory is created, go to the Identity Stores page and select the directory.
8Click Sync Settings > Mapped Attributes.
9In the drop-down menu for the attributes that you added, select the Active Directory attribute to map
to.
10 Click Save.
The directory is updated the next time the directory syncs to the Active Directory.
Applying the Default Access Policy
The Directories Management service includes a default access policy that controls user access to their
apps portals. You can edit the policy to change the policy rules as necessary.
When you enable authentication methods other than password authentication, you must edit the default
policy to add the enabled authentication method to the policy rules.
Each rule in the default access policy requires that a set of criteria be met in order to allow user access to
the apps portal. You apply a network range, select which type of user can access content and select the
authentication methods to use. See Managing Access Policies.
The number of attempts the service makes to login a user using a given authentication method varies.
The services only makes one attempt at authentication for Kerberos or certificate authentication. If the
attempt is not successful in logging in a user, the next authentication method in the rule is attempted. The
maximum number of failed login attempts for Active Directory password and RSA SecurID authentication
is set to five by default. When a user has five failed login attempts, the service attempts to log in the user
with the next authentication method on the list. When all authentication methods are exhausted, the
service issues an error message.
Apply Authentication Methods to Policy Rules
Only the password authentication method is configured in the default policy rules. You must edit the policy
rules to select the other authentication methods you configured and set the order in which the
authentication methods are used for authentication.
Prerequisites
Enable and configure the authentication methods that your organization supports. See Integrating
Alternative User Authentication Products with Directories Management
Procedure
1Select Administration > Directories Management > Policies
2Click the default access policy to edit.
Configuring vRealize Automation
VMware, Inc. 139
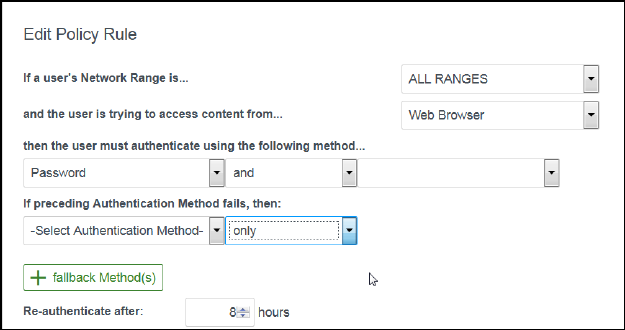
3To edit a policy rule, click the authentication method to edit in the Policy Rules, Authentication Method
column.
The add a new policy rule, click the + icon.
4Click Save and click Save again on the Policy page.
5Click Save and click Save again on the Policy page.
Configuring Kerberos for Directories Management
Kerberos authentication provides users who are successfully signed in to their Active Directory domain to
access their apps portal without additional credential prompts. You enable Windows authentication to
allow the Kerberos protocol to secure interactions between users' browsers and the
Directories Management service. You do not need to directly configure Active Directory to make Kerberos
function with your deployment.
Currently, interactions between a user's browser and the service are authenticated by Kerberos on the
Windows operating systems only. Accessing the service from other operating systems does not take
advantage of Kerberos authentication.
nConfigure Kerberos Authentication
To configure the Directories Management service to provide Kerberos authentication, you must join
to the domain and enable Kerberos authentication on the connector.
nConfigure Internet Explorer to Access the Web Interface
You must configure the Internet Explorer browser if Kerberos is configured for your deployment and
if you want to grant users access to the Web interface using Internet Explorer.
nConfigure Firefox to Access the Web Interface
You must configure the Firefox browser if Kerberos is configured for your deployment and you want
to grant users access to the Web interface using Firefox.
nConfigure the Chrome Browser to Access the Web Interface
You must configure the Chrome browser if Kerberos is configured for your deployment and if you
want to grant users access to the Web interface using the Chrome browser.
Configuring vRealize Automation
VMware, Inc. 140

Configure Kerberos Authentication
To configure the Directories Management service to provide Kerberos authentication, you must join to the
domain and enable Kerberos authentication on the connector.
Procedure
1As a tenant administrator, navigate to Administration > Directories Management > Connectors
2On the Connectors page, for the connector that is being configured for Kerberos authentication, click
Join Domain.
3On the Join Domain page, enter the information for the Active Directory domain.
Option Description
Domain Enter the fully qualified domain name of the Active Directory. The domain name you enter must be the same
Windows domain as the connector server.
Domain User Enter the user name of an account in the Active Directory that has permissions to join systems to that Active
Directory domain.
Domain
Password
Enter the password associated with the AD Username. This password is not stored by
Directories Management
.
Click Save.
The Join Domain page is refreshed and displays a message that you are currently joined to the
domain.
4In the Worker column for the connector click Auth Adapters.
5Click KerberosIdpAdapter
You are redirected to the identity manager sign in page.
6Click Edit in the KerberosldpAdapter row and configure the Kerberos authentication page.
Option Description
Name A name is required. The default name is KerberosIdpAdapter. You can change this.
Directory UID
Attribute
Enter the account attribute that contains the user name.
Enable
Windows
Authentication
Select this to extend authentication interactions between users' browsers and Directories Management.
Enable NTLM Select this to enable NT LAN Manager (NTLM) protocol-based authentication only if your Active Directory
infrastructure relies on NTLM authentication.
Enable
Redirect
Select this if round-robin DNS and load balancers do not have Kerberos support. Authentication requests
are redirected to Redirect Host Name. If this is selected, enter the redirect host name in Redirect Host
Name text box. This is usually the hostname of the service.
7Click Save.
Configuring vRealize Automation
VMware, Inc. 141

What to do next
Add the authentication method to the default access policy. Navigate to Administration > Directories
Management > Policies and click Edit Default Policy to edit the default policy rules to add the Kerberos
authentication method to the rule in the correct authentication order.
Configure Internet Explorer to Access the Web Interface
You must configure the Internet Explorer browser if Kerberos is configured for your deployment and if you
want to grant users access to the Web interface using Internet Explorer.
Kerberos authentication works in conjunction with Directories Management on Windows operating
systems.
Note Do not implement these Kerberos-related steps on other operating systems.
Prerequisites
Configure the Internet Explorer browser for each user or provide users with the instructions after you
configure Kerberos.
Procedure
1Verify that you are logged into Windows as a user in the domain.
2In Internet Explorer, enable automatic log in.
a Select Tools > Internet Options > Security.
b Click Custom level.
c Select Automatic login only in Intranet zone.
d Click OK.
3Verify that this instance of the connector virtual appliance is part of the local intranet zone.
a Use Internet Explorer to access the sign in URL at https://myconnectorhost.domain/authenticate/.
b Locate the zone in the bottom right corner on the status bar of the browser window.
If the zone is Local intranet, Internet Explorer configuration is complete.
4If the zone is not Local intranet, add the sign in URL to the intranet zone.
a Select Tools > Internet Options > Security > Local intranet > Sites.
b Select Automatically detect intranet network.
If this option was not selected, selecting it might be sufficient for adding the to the intranet zone.
c (Optional) If you selected Automatically detect intranet network, click OK until all dialog boxes
are closed.
d In the Local Intranet dialog box, click Advanced.
A second dialog box named Local intranet appears.
Configuring vRealize Automation
VMware, Inc. 142
e Enter the URL in the Add this Web site to the zone text box.
https://myconnectorhost.domain/authenticate/
f Click Add > Close > OK.
5Verify that Internet Explorer is allowed to pass the Windows authentication to the trusted site.
a In the Internet Options dialog box, click the Advanced tab.
b Select Enable Integrated Windows Authentication.
This option takes effect only after you restart Internet Explorer.
c Click OK.
6Log in to the Web interface to check access.
If Kerberos authentication is successful, the test URL goes to the Web interface.
The Kerberos protocol secures all interactions between this Internet Explorer browser instance and
Directories Management. Now, users can use single sign-on to access their My Apps portal.
Configure Firefox to Access the Web Interface
You must configure the Firefox browser if Kerberos is configured for your deployment and you want to
grant users access to the Web interface using Firefox.
Kerberos authentication works in conjunction with Directories Management on Windows operating
systems.
Prerequisites
Configure the Firefox browser, for each user, or provide users with the instructions, after you configure
Kerberos.
Procedure
1In the URL text box of the Firefox browser, enter about:config to access the advanced settings.
2Click I'll be careful, I promise!.
3Double-click network.negotiate-auth.trusted-uris in the Preference Name column.
4Enter your URL in the text box.
https://myconnectorhost.domain.com
5Click OK.
6Double-click network.negotiate-auth.delegation-uris in the Preference Name column.
7Enter your URL in the text box.
https://myconnectorhost.domain.com/authenticate/
8Click OK.
Configuring vRealize Automation
VMware, Inc. 143

9Test Kerberos functionality by using the Firefox browser to log in to login URL. For example,
https://myconnectorhost.domain.com/authenticate/.
If the Kerberos authentication is successful, the test URL goes to the Web interface.
The Kerberos protocol secures all interactions between this Firefox browser instance and
Directories Management. Now, users can use single sign-on access their My Apps portal.
Configure the Chrome Browser to Access the Web Interface
You must configure the Chrome browser if Kerberos is configured for your deployment and if you want to
grant users access to the Web interface using the Chrome browser.
Kerberos authentication works in conjunction with Directories Management on Windows operating
systems.
Note Do not implement these Kerberos-related steps on other operating systems.
Prerequisites
nConfigure Kerberos.
nSince Chrome uses the Internet Explorer configuration to enable Kerberos authentication, you must
configure Internet Explorer to allow Chrome to use the Internet Explorer configuration. See Google
documentation for information about how to configure Chrome for Kerberos authentication.
Procedure
1Test Kerberos functionality by using the Chrome browser.
2Log in to at https://myconnectorhost.domain.com/authenticate/.
If Kerberos authentication is successful, the test URL connects with the Web interface.
If all related Kerberos configurations are correct, the relative protocol (Kerberos) secures all interactions
between this Chrome browser instance and Directories Management. Users can use single sign-on
access their My Apps portal.
Upgrading External Connectors for Directories Management
If you use an external connector with your vRealize Automation Directories Management configuration,
you may need to upgrade this connector on occasion.
You may need to upgrade an external connector when upgrading the version of your vRealize Automation
deployment or if a new connector build offers a feature you want.
This documentation applies only to users who have deployed additional, stand-alone external connector
appliances. In vRealize Automation, external connector appliances are used with smart card
authentication, for instance.
Configuring vRealize Automation
VMware, Inc. 144

By default, the connector uses the VMware Web site for the upgrade procedure, which requires the
connector appliance to have Internet connectivity. You must also configure proxy server settings for the
connector appliance, if applicable.
If your connector instance does not have an Internet connection, you can perform the upgrade offline. For
an offline upgrade, you download the upgrade package and set up a local Web server to host the upgrade
file.
Intended Audience
This information is intended for anyone who installs, upgrades, and configures Directories Management.
The information is written for experienced Windows or Linux system administrators who are familiar with
virtual machine technology.
Preparing to Upgrade an External Connector
To prepare for a connector upgrade, you must check for available upgrades and configuring the proxy
server settings for the appliance, if applicable.
nCheck Availability of an External Connector Upgrade Online
If your connector appliance has Internet connectivity, you can check for the availability of upgrades
online from the appliance.
nConfigure Proxy Server Settings for the External Connector Appliance
The connector appliance accesses the VMware update servers through the Internet. If your network
configuration provides Internet access using an HTTP proxy, you must adjust the proxy settings for
the appliance.
Check Availability of an External Connector Upgrade Online
If your connector appliance has Internet connectivity, you can check for the availability of upgrades online
from the appliance.
Procedure
1Log in to the connector appliance as the root user.
2Run the following command.
/usr/local/horizon/update/updatemgr.hzn updateinstaller
3Run the following command to check for an online upgrade.
/usr/local/horizon/update/updatemgr.hzn check
Configure Proxy Server Settings for the External Connector Appliance
The connector appliance accesses the VMware update servers through the Internet. If your network
configuration provides Internet access using an HTTP proxy, you must adjust the proxy settings for the
appliance.
Configuring vRealize Automation
VMware, Inc. 145

Enable your proxy to handle only Internet traffic. To ensure that the proxy is set up correctly, set the
parameter for internal traffic to no-proxy within the domain.
Note Proxy servers that require authentication are not supported.
Prerequisites
nVerify that you have the root password for the connector appliance.
nVerify that you have the proxy server information.
Procedure
1Log in to the connector appliance as the root user.
2Enter YaST on the command line to run the YaST utility.
3Select Network Services in the left pane, then select Proxy.
4Enter the proxy server URLs in the HTTP Proxy URL and HTTPS Proxy URL fields.
5Select Finish and exit the YaST utility.
6Restart the Tomcat server on the connector virtual appliance to use the new proxy settings.
service horizon-workspace restart
The VMware update servers are now available to the connector appliance.
Upgrade an External Connector Online
You can upgrade a Directories Management external connector online if you have an appropriate
connection.
Prerequisites
nVerify that the connector appliance can resolve and reach vapp-updates.vmware.com on port 80 over
HTTP.
nConfirm that a connector upgrade exists. Run the appropriate command to check for upgrades. See
Check for the Availability of a Directories Management Connector Upgrade Online.
nVerify that at least 2 GB of disk space is available on the primary root partition of the appliance.
nVerify that the connector is properly configured.
nTake a snapshot of your connector appliance to back it up. For information about how to take
snapshots, see the vSphere documentation.
nIf an HTTP proxy server is required for outbound HTTP access, configure the proxy server settings
for the connector appliance. See Configure Proxy Server Settings for the Directories Management
Connector Appliance.
Configuring vRealize Automation
VMware, Inc. 146

Procedure
1Log in to the connector appliance as the root user.
2Run the following command.
/usr/local/horizon/update/updatemgr.hzn updateinstaller
3Run the following command to check that on online upgrade exists.
/usr/local/horizon/update/updatemgr.hzn check
4Run the following command to update the appliance.
/usr/local/horizon/update/updatemgr.hzn update
Messages that occur during the upgrade are saved to the update.log file
at /opt/vmware/var/log/update.log.
5Run the updatemgr.hzn check command again to verify that a newer update does not exist.
/usr/local/horizon/update/updatemgr.hzn check
6Check the version of the upgraded appliance.
vamicli version --appliance
The new version is displayed.
7Restart the connector appliance.
reboot
Upgrade an External Connector Oine
If your existing vRealize Automation Directories Management connector appliance cannot connect to the
Internet for upgrade, you can perform an offline upgrade. You must set up an upgrade repository on a
local Web server and configure the connector appliance to use the local Web server for upgrade.
Prerequisites
nConfirm that a connector upgrade exists. Check the My VMware Downloads site at my.vmware.com
for upgrades.
nVerify that at least 2 GB of disk space is available on the primary root partition of the appliance.
nVerify that the connector is properly configured.
nTake a snapshot of your connector appliance to back it up. For information about how to take
snapshots, see the vSphere documentation.
Configuring vRealize Automation
VMware, Inc. 147

nConfigure the connector appliance to user a local Web server to host the upgrade file. See Prepare a
Local Web Server for Offline Upgrade.
Procedure
1Prepare a Local Web Server for Offline Upgrade
Before you start the offline connector upgrade, prepare the local Web server by creating a directory
structure that includes a subdirectory for the connector appliance.
2Configure the Connector and Perform Offline Upgrade
Configure the connector appliance to point to the local Web server to perform an offline upgrade.
Then upgrade the appliance.
Prepare a Local Web Server for Oine Upgrade
Before you start the offline connector upgrade, prepare the local Web server by creating a directory
structure that includes a subdirectory for the connector appliance.
Prerequisites
nDownload the identity-manager-connector-versionNumber-buildNumber-updaterepo.zip
file from My VMware. Go to my.vmware.com, navigate to the VMware Identity Manager Download
page, and download the file listed under VMware Identity Manager Connector offline upgrade
package.
nIf you use an IIS Web server, configure the Web server to allow special characters in file names. You
configure this in the Request Filtering section by selecting the Allow double escaping option.
Procedure
1Create a directory on the Web server at http://YourWebServer/VM/ and copy the downloaded zip file
to it.
2Verify that your Web server includes mime types for .sig (text/plain) and .sha256 (text/plain).
Without these mime types your Web server fails to check for updates.
3Unzip the file.
The contents of the extracted ZIP file are served by http://YourWebServer/VM/.
The extracted contents of the file contain the following subdirectories: /manifest and /package-
pool.
4Run the following updatelocal.hzn command to check that the URL has valid update contents.
/usr/local/horizon/update/updatelocal.hzn checkurl http://YourWebServer/VM
Configure the Connector and Perform Oine Upgrade
Configure the connector appliance to point to the local Web server to perform an offline upgrade. Then
upgrade the appliance.
Configuring vRealize Automation
VMware, Inc. 148

Prerequisites
Prepare a local Web server for offline upgrade.
Procedure
1Log in to the connector appliance as the root user.
2Run the following command to configure an upgrade repository that uses a local Web server.
/usr/local/horizon/update/updatelocal.hzn seturl http://YourWebServer/VM/
Note To undo the configuration and restore the ability to perform an online upgrade, you can run the
following command.
/usr/local/horizon/update/updatelocal.hzn setdefault
3Perform the upgrade.
a Run the following command.
/usr/local/horizon/update/updatemgr.hzn updateinstaller
b Run the following command to check the version of the available upgrade.
/usr/local/horizon/update/updatemgr.hzn check
c Run the following command to update the connector.
/usr/local/horizon/update/updatemgr.hzn update
Messages that occur during the upgrade are saved to the update.log file
at /opt/vmware/var/log/update.log.
d Run the updatemgr.hzn check command again.
/usr/local/horizon/update/updatemgr.hzn check
e Check the version of the upgraded appliance.
vamicli version --appliance
The command should display the new version.
f Restart the connector appliance.
For example, from the command line run the following command.
reboot
Configuring vRealize Automation
VMware, Inc. 149

The connector upgrade is complete.
Configuring Settings After Upgrading an External Connector
After upgrading to connector 2016.3.1.0 or later, you may need to configure some settings.
Rejoin Domain with Kerberos Authentication
If you use Kerberos authentication or Active Directory (Integrated Windows Authentication) directories,
you must leave the domain and then rejoin it. This is required for all the connector virtual appliances in
your deployment.
1 Select Administration > Directories Management > Connectors
2 In the Connectors page, for each connector that is being used for Kerberos authentication or an
Active Directory (Integrated Windows Authentication) directory, click Leave Domain.
3 To join the domain, you need Active Directory credentials with the privileges to join the domain. See
Join a Connector Machine to a Domain for more information.
4 If you are using Kerberos authentication, enable the Kerberos authentication adapter again. To
access the Auth Adapters page, in the Connectors page click the appropriate link in the Worker
column and select the Auth Adapters tab.
5 Verify that the other authentication adapters you are using are enabled.
Update Domains Page
If you are using Active Directory (Integrated Windows Authentication), or Active Directory over LDAP with
the This Directory supports DNS Service Location option enabled, save the directory's Domains page.
1 Select Administration > Directories Management > Directories
2 Select the applicable directory to edit it.
3 Provide the password for the Bind DN user and click Save.
4 Click Sync Settings on the left of the page and select the Domains tab.
5 Click Save.
DNS Service Location and Domain Controllers
Note In connector 2016.3.1.0 and later, a domain_krb.properties file is automatically created and
auto-populated with domain controllers when a directory with DNS Service Location enabled is created.
When you save the Domains page after upgrade, if you had a domain_krb.properties file in your
original deployment, the file is updated with domains that you may have added subsequently and that
were not in the file. If you did not have a domain_krb.properties file in your original deployment, the
file is created and auto-populated with domain controllers. See About Domain Controller Selection for
more information about the domain_krb.properties file.
Configuring vRealize Automation
VMware, Inc. 150

Troubleshooting External Connector Upgrade Errors
You can troubleshoot vRA Directories Management external connector upgrade problems by reviewing
the error logs. If the connector does not start, you can revert to a previous instance by rolling back to a
snapshot.
nChecking the Upgrade Error Logs
Resolve errors that occur during upgrade by reviewing the error logs. Upgrade log files are in
the /opt/vmware/var/log directory.
nRolling Back to Snapshots of Connector
If the connector does not start properly after an upgrade, and you cannot resolve the problem by
reviewing the upgrade error logs and running the upgrade command again, you can roll back to a
previous connector instance.
nCollecting a Log File Bundle
You can collect a bundle of log files to send to VMware support. You obtain the bundle from the
connector configuration page.
Checking the Upgrade Error Logs
Resolve errors that occur during upgrade by reviewing the error logs. Upgrade log files are in
the /opt/vmware/var/log directory.
If any errors occurred, the connector may not start after upgrade.
Procedure
1Log in to the connector appliance.
2Go to the /opt/vmware/var/log directory.
3Open the update.log file and review the error messages.
4Resolve the errors and rerun the upgrade command. The upgrade command resumes from the point
where it stopped.
Note Alternatively, you can revert to a snapshot and run the update again.
Rolling Back to Snapshots of Connector
If the connector does not start properly after an upgrade, and you cannot resolve the problem by
reviewing the upgrade error logs and running the upgrade command again, you can roll back to a
previous connector instance.
Procedure
uRevert to one of the snapshots you took as a backup of your original connector instance. For
information, see the vSphere documentation.
Configuring vRealize Automation
VMware, Inc. 151

Collecting a Log File Bundle
You can collect a bundle of log files to send to VMware support. You obtain the bundle from the connector
configuration page.
The following log files are collected in the bundle.
Table 2‑9. Log Files
Component Location of Log File Description
Apache Tomcat Logs
(catalina.log)
/opt/vmware/horizon/workspace/logs/catal
ina.log
Apache Tomcat records messages that
are not recorded in other log files.
Configurator Logs
(configurator.log)
/opt/vmware/horizon/workspace/logs/confi
gurator.log
Requests that the Configurator receives
from the REST client and the Web
interface.
Connector Logs (connector.log) /opt/vmware/horizon/workspace/logs/conne
ctor.log
A record of each request received from the
Web interface. Each log entry also
includes the request URL, timestamp, and
exceptions. No sync actions are recorded.
Procedure
1Log in to the connector configuration page at https://connectorURL:8443/cfg/logs.
2Click Prepare log bundle.
3Download the bundle and send it to VMware support.
Scenario: Configure an Active Directory Link for a Highly Available
vRealize Automation
As a tenant administrator, you want to configure an Active Directory over LDAP directory connection to
support user authentication for your highly available vRealize Automation deployment.
Each vRealize Automation appliance includes a connector that supports user authentication, although
only one connector is typically configured to perform directory synchronization. It does not matter which
connector you choose to serve as the sync connector. To support Directories Management high
availability, you must configure a second connector that corresponds to your second vRealize Automation
appliance, which connects to your Identity Provider and points to the same Active Directory. With this
configuration, if one appliance fails, the other takes over management of user authentication.
In a high availability environment, all nodes must serve the same set of Active Directories, users,
authentication methods, etc. The most direct method to accomplish this is to promote the Identity Provider
to the cluster by setting the load balancer host as the Identity Provider host. With this configuration, all
authentication requests are directed to the load balancer, which forwards the request to either connector
as appropriate.
Prerequisites
nInstall a distributed vRealize Automation deployment with appropriate load balancers. See Installing
vRealize Automation.
Configuring vRealize Automation
VMware, Inc. 152

nLog in to vRealize Automation as a tenant administrator.
Procedure
1Select Administration > Directories Management > Directories.
2Click Add Directory.
3Enter your specific Active Directory account settings, and accept the default options.
Option Sample Input
Directory Name Add the IP address of your active directory domain name.
Sync Connector Every vRealize Automation appliance contains a connector. Use any of the
available connectors.
Base DN Enter the Distinguished Name (DN) of the starting point for directory server
searches. For example, cn=users,dc=corp,dc=local.
Bind DN Enter the full distinguished name (DN), including common name (CN), of an
Active Directory user account that has privileges to search for users. For
example, cn=config_admin infra,cn=users,dc=corp,dc=local.
Bind DN Password Enter the Active Directory password for the account that can search for users.
4Click Test Connection to test the connection to the configured directory.
If the connection fails, check your entries in all fields and consult your system administrator if
necessary.
5Click Save & Next.
The Select the Domains page with the list of domains appears.
6Leave the default domain selected and click Next.
7Verify that the attribute names are mapped to the correct Active Directory attributes. If not, select the
correct Active Directory attribute from the drop-down menu. Click Next.
8Select the groups and users you want to sync.
aClick the Add icon ( ).
b Enter the user domain and click Find Groups.
For example, cn=users,dc=corp,dc=local.
c Select the Select All check box.
d Click Select.
e Click Next.
Configuring vRealize Automation
VMware, Inc. 153

fClick to add additional users. For example, enter as
CN-username,CN=Users,OU-myUnit,DC=myCorp,DC=com.
To exclude users, click + to create a filter to exclude some types of users. You select the user
attribute to filter by, the query rule, and the value.
g Click Next.
9Review the page to see how many users and groups are syncing to the directory and click Sync
Directory.
The directory sync process takes some time, but it happens in the background and you can continue
working.
10 Configure a second connector to support high availability.
a Log in to the load balancer for your vRealize Automation deployment as a tenant administrator.
The load balancer URL is load balancer address/vcac/org/tenant_name.
b Select Administration > Directories Management > Identity Providers.
c Click the Identity Provider that is currently in use for your system.
The existing directory and connector that provide basic identity management for your system
appears.
d Click the Add a Connector drop-down list, and select the connector that corresponds to your
secondary vRealize Automation appliance.
e Enter the appropriate password in the Bind DN Password text box that appears when you select
the connector.
f Click Add Connector.
g Edit the host name to point to your load balancer.
You connected your corporate Active Directory to vRealize Automation and configured Directories
Management for high availability.
What to do next
To provide enhanced security, you can configure bi-directional trust between your identity provider and
your Active Directory. See Configure a Bi Directional Trust Relationship Between vRealize Automation
and Active Directory.
Configure External Connectors for Smart Card and Third-party
Identity Provider Authentication in vRealize Automation
A system administrator must configure an external connector for your vRealize Automation deployment
using Directories Management if you are using third party identity providers such as Keberos or smart
card authentication.
Configuring vRealize Automation
VMware, Inc. 154
Directories Management supports multiple identity providers and connector clusters for each configured
Active Directory. To use a third-party identity provider or smart card authentication, you can set up either a
single external connector or a connector cluster with an appropriate identity provider behind a load
balancer that permits SSL passthrough. See Managing Connectors and Connector Clusters for more
information.
See Upgrading External Connectors for Directories Management for information about updating an
external connector.
There are various certificate configuration options available for use with smart card authentication. See
Configuring a Certificate or Smart Card Adapter for Use with Directories Management.
Prerequisites
nConfigure an appropriate Active Directory connection for use with your vRealize Automation
deployment.
nDownload the OVA file required to configure a connector from VMware vRealize Automation Tools
and SDK.
nLog in to vRealize Automation as a tenant administrator.
Procedure
1Generate a Connector Activation Token
Before you deploy the connector virtual appliance to use for smart card authentication, generate an
activation code for the new connector from the vRealize Automation console. The activation code is
used to establish communication between Directories Management and the connector.
2Deploy the Connector OVA File
After downloading a connector OVA file, you can deploy it using the VMware vSphere Client or
vSphere Web Client.
3Configure Connector Settings
After deploying the connector OVA, you must run the Setup wizard to activate the appliance and
configure the administrator passwords.
4Apply Public Certificate Authority
When Directories Management is installed, a default SSL certificate is generated. You can use the
default certificate for testing purposes, but you should generate and install commercial SSL
certificates for production environments.
5Create a Workspace Identity Provider
You must create a Workspace identity provider for use with an external connector.
6Configure Certificate Authentication and Configure Default Access Policy Rules
You must configure your external connection for use with your vRealize Automation Active Directory
and domain.
Configuring vRealize Automation
VMware, Inc. 155

Generate a Connector Activation Token
Before you deploy the connector virtual appliance to use for smart card authentication, generate an
activation code for the new connector from the vRealize Automation console. The activation code is used
to establish communication between Directories Management and the connector.
You can configure a single connector or a connector cluster. If you want to use a connector cluster, repeat
this procedure for each connector that you need.
Prerequisites
nLog in to vRealize Automation as a tenant administrator.
Procedure
1Select Administration > Directories Management > Connectors
2Type a name for the new connector in the Connector ID Name text box.
3Press Enter.
The activation code for the connector is displayed in the Connector Activation Code box.
4Copy the activation code for use in configuring the connector using the OVA file.
Deploy the Connector OVA File
After downloading a connector OVA file, you can deploy it using the VMware vSphere Client or vSphere
Web Client.
You deploy the OVA file using the vSphere Client or the vSphere Web Client.
Prerequisites
nIdentify the DNS records and host name to use for your connector OVA deployment.
nIf using the vSphere Web Client, use either Firefox or Chrome browsers. Do not use Internet Explorer
to deploy the OVA file.
nDownload the OVA file required to configure a connector from VMware vRealize Automation Tools
and SDK.
Procedure
1In the vSphere Client or the vSphere Web Client, select File > Deploy OVF Template.
2In the Deploy OVF Template pages, enter the information specific to your deployment of the
connector.
Page Description
Source Browse to the OVA package location, or enter a specific URL.
OVA Template Details Verify that you selected the correct version.
License Read the End User License Agreement and click Accept.
Configuring vRealize Automation
VMware, Inc. 156

Page Description
Name and Location Enter a name for the virtual appliance. The name must be unique within the
inventory folder and can contain up to 80 characters. Names are case sensitive.
Select a location for the virtual appliance.
Host / Cluster Select the host or cluster to run the deployed template.
Resource Pool Select the resource pool.
Storage Select the location to store the virtual machine files.
Disk Format Select the disk format for the files. For production environments, select a Thick
Provision format. Use the Thin Provision format for evaluation and testing.
Network Mapping Map the networks in your environment to the networks in the OVF template.
Properties a In the Timezone setting field, select the correct time zone.
b The Customer Experience Improvement Program checkbox is selected by
default. VMware collects anonymous data about your deployment in order to
improve VMware's response to user requirements. Deselect the checkbox if
you do not want the data collected.
c In the Host Name text box, enter the host name to use. If this is blank,
reverse DNS is used to look up the host name.
d To configure the static IP address for connector, enter the address for each of
the following: Default Gateway, DNS, IP Address, and Netmask.
Important If any of the four address fields, including Host Name, are left
blank, DHCP is used.
To configure DHCP, leave the address fields blank.
Ready to Complete Review your selections and click Finish.
Depending on your network speed, the deployment can take several minutes. You can view the
progress in the progress dialog box.
3When the deployment is complete, select the appliance, right-click, and select Power > Power on.
The appliance is initialized. You can go to the Console tab to see the details. When the virtual
appliance initialization is complete, the console screen displays the version and URLs to log in to the
Setup wizard to complete the set up.
What to do next
Use the Setup wizard to add the activation code and administrative passwords.
Configure Connector Settings
After deploying the connector OVA, you must run the Setup wizard to activate the appliance and configure
the administrator passwords.
Prerequisites
nYou have generated an activation code for the connector.
nEnsure the connector appliance is powered on and you know the connector URL.
nCollect a list of password to use for the connector administrator, root account, and sshuser account.
Configuring vRealize Automation
VMware, Inc. 157
Procedure
1To run the Setup wizard, enter the connector URL that was displayed in the Console tab after the
OVA was deployed.
2On the Welcome Page, click Continue.
3Create strong passwords for the following connector virtual appliance administrator accounts.
Strong passwords should be at least eight characters long and include uppercase and lowercase
characters and at least one digit or special character.
Option Description
Appliance Administrator Create the appliance administrator password. The user name is admin and
cannot be changed. You use this account and password to log in to the connector
services to manage certificates, appliance passwords and syslog configuration.
Important The admin user password must be at least 6 characters in length.
Root Account A default VMware root password was used to install the connector appliance.
Create a new root password.
sshuser Account Create the password to use for remote access to the connector appliance.
4Click Continue.
5On the Activate Connector page, paste in the activation code and click Continue.
6If you are using a self-signed certificate on the vRealize Automation internal connector, you can get
the appropriate certificate by running the following command on the vRealize Automation appliance:
cat /etc/apache2/server-cert.pem
Select the Terminate SSL on a Load Balancer tab, and then click the link
for /horizon_workspace_rootca.pem.
The activation code is verified and communication between the service and the connector instance is
established to complete the connector configuration.
What to do next
In the service, set up your environment based on your needs. For example, if you added an additional
connector because you want to sync two Integrated Windows Authentication directories, create the
directory and associate it with the new connector.
Apply Public Certificate Authority
When Directories Management is installed, a default SSL certificate is generated. You can use the default
certificate for testing purposes, but you should generate and install commercial SSL certificates for
production environments.
If the Directories Management points to a load balancer, the SSL certificate is applied to the load
balancer.
You must check the Mark this key as exportable when importing a certificate.
Configuring vRealize Automation
VMware, Inc. 158

You only need to specify the CN, or certificate authority's site domain name, if you are generating a CSR
for a custom certificate.
Prerequisites
Generate a Certificate Signing Request (CSR) and obtain a valid, signed certificate from a CA. If your
organization provides SSL certificates that are signed by a CA, you can use these certificates. The
certificate must be in the PEM format.
Procedure
1Log in to the connector appliance administrative page as an admin user at the following location:
https://myconnector.mycompany:8443/cfg
2In the administrator console, click Appliance Settings.
VA Configuration is selected by default.
3Click Manage Configurations.
4Enter the VMware Identify Manager server admin user password.
5Select Install Certificate.
6In the Terminate SSL on the Identity Manager Appliance tab, select Custom Certificate.
7In the SSL Certificate Chain text box, paste the host, intermediate, and root certificates, in that
order.
The SSL certificate works only if you include the entire certificate chain in the correct order. For each
certificate, copy everything between and including the lines -----BEGIN CERTIFICATE----- and -----
END CERTIFICATE----
Ensure that the certificate includes the FQDN hostname.
8Paste the private key in the Private Key text box. Copy everything between ----BEGIN RSA PRIVATE
KEY and ---END RSA PRIVATE KEY.
9Click Save.
Example: Certificate Examples
Certificate Chain Example
-----BEGIN CERTIFICATE-----
jlQvt9WdR9Vpg3WQT5+C3HU17bUOwvhp/r0+
...
...
...
W53+O05j5xsxzDJfWr1lqBlFF/OkIYCPcyK1
-----END CERTIFICATE-----
-----BEGIN CERTIFICATE-----
Configuring vRealize Automation
VMware, Inc. 159

Certificate Chain Example
WdR9Vpg3WQT5+C3HU17bUOwvhp/rjlQvt90+
...
...
...
O05j5xsxzDJfWr1lqBlFF/OkIYCPW53+cyK1
-----END CERTIFICATE-----
-----BEGIN CERTIFICATE-----
dR9Vpg3WQTjlQvt9W5+C3HU17bUOwvhp/r0+
...
...
...
5j5xsxzDJfWr1lqW53+O0BlFF/OkIYCPcyK1
-----END CERTIFICATE-----
Private Key Example
-----BEGIN RSA PRIVATE KEY-----
jlQvtg3WQT5+C3HU17bU9WdR9VpOwvhp/r0+
...
...
...
1lqBlFFW53+O05j5xsxzDJfWr/OkIYCPcyK1
-----END RSA PRIVATE KEY-----
Create a Workspace Identity Provider
You must create a Workspace identity provider for use with an external connector.
Prerequisites
nLog in to vRealize Automation as a tenant administrator.
Procedure
1Select Administration > Directories Management > Identity Providers.
2Select Add Identity Provider.
3Select Create Workspace IDP on the displayed menu.
4Type a name for the identity provider in the Identity Provider Name field.
5Select the directory that corresponds to the users that will use this identity provider.
The directory selected determine which connectors are displayed for selection with this identity
provider.
Configuring vRealize Automation
VMware, Inc. 160

6Select the external connector or connectors that you configured for smart card authentication.
Note If the deployment is located behind a load balancer, enter the load balancer URL.
7Select the network for access to this identity provider.
8Click Add.
Configure Certificate Authentication and Configure Default Access Policy
Rules
You must configure your external connection for use with your vRealize Automation Active Directory and
domain.
Prerequisites
Log in to vRealize Automation as a tenant administrator.
Procedure
1Select Administration > Directories Management > Connectors.
2Select the Desired connector in the Worker column.
The selected worker is shown in the Worker Name text box on the Connector Detail tab and
connector type information appears in the Connector Type text box.
3Ensure that the connector is linked to the desired Active Directory by specifying that Directory in the
Associated Directory text box.
4Enter the appropriate domain name in the Associated Domains text box.
5Select the AuthAdapters tab and enable CertificateAuthAdapter.
6Configure certificate authentication as appropriate for your deployment.
See Configure Certificate Authentication for Directories Management.
7Select Administration > Directories Management > Policies.
8Click Edit Default Policy.
9Add Certificate to the policy rules and make it the first authentication method.
Certificate must be the first authentication method listed in the policy rule, otherwise certificate
authentication fails.
Create a Multi Domain or Multi Forest Active Directory Link
As a system administrator, you need to configure a multi domain or multi forest Active Directory link.
The procedure for configuring a multi domain or multi forest Active Directory link is essentially the same.
For a multi forest link, bi-directional trust is required between all applicable domains.
Configuring vRealize Automation
VMware, Inc. 161

Prerequisites
nInstall a distributed vRealize Automation deployment with appropriate load balancers. See Installing
vRealize Automation.
nLog in to vRealize Automation as a tenant administrator.
nConfigure the appropriate domains and Active Directory forests for your deployment.
Procedure
1Select Administration > Directories Management > Directories.
2Click Add Directory.
3On the Add Directory page, specify a name for the Active Directory server in the Directory Name text
box.
4Select Active Directory (Integrated Windows Authentication) under the Directory Name heading.
5Configure the connector that synchronizes users from the Active Directory to the VMware
Directories Management directory in the Directory Sync and Authentication section.
Option Description
Sync Connector Select the appropriate connector to use for your system. Each vRealize
Automation appliance contains a default connector. Consult your system
administrator if you need help in choosing the appropriate connector.
Authentication Click the appropriate radio button to indicate whether the selected connector also
performs authentication.
Directory Search Attribute Select the appropriate account attribute that contains the user name.
Depending on your deployment configuration, you will have one or more connectors available for use.
6Enter the appropriate join domain credentials in the Domain Name, Domain Admin User Name, and
Domain Admin Password text boxes.
As an example, you might enter something like the following: Domain Name: hs.trcint.com,
Domain Admin Username: devadmin, Domain Admin Password: xxxx.
7In the Bind User Details section, enter the appropriate Active Directory (Integrated Windows
Authentication) credentials to facilitate directory synchronization.
Option Description
Bind User UPN Enter the User Principal Name of the user who can authenticate with the domain.
For example, UserName@example.com.
Bind DN Password Enter the Bind User password.
8Click Save & Next.
The Select the Domains page appears with the list of domains.
9Click the appropriate check boxes to select the desired domains for your system deployment.
10 Click Next.
Configuring vRealize Automation
VMware, Inc. 162

11 Verify that the Directories Management directory attribute names are mapped to the correct Active
Directory attributes.
If the directory attribute names are mapped incorrectly, select the correct Active Directory attribute
from the drop-down menu.
12 Click Next.
13 Click to select the groups you want to sync from Active Directory to the directory.
When you add an Active Directory group, if members of that group are not in the Users list, they are
added.
Note The Directories Management user authentication system imports data from Active Directory
when adding groups and users, and the speed of the system is limited by Active Directory
capabilities. As a result, import operations may require a significant amount of time depending on the
number of groups and users being added. To minimize the potential for delays or problems, limit the
number of groups and users to only those required for vRealize Automation operation. If your system
performance degrades or if errors occur, close any unneeded applications and ensure that your
system has appropriate memory allocated to Active Directory. If problems persist, increase the Active
Directory memory allocation as needed. For systems with large numbers of users and groups, you
may need to increase the Active Directory memory allocation to as much as 24 GB.
14 Click Next.
15 Click to add additional users. For example, enter as
CN-username,CN=Users,OU-myUnit,DC=myCorp,DC=com.
To exclude users, click to create a filter to exclude some types of users. You select the user
attribute to filter by, the query rule, and the value.
16 Click Next.
17 Review the page to see how many users and groups are syncing to the directory.
If you want to make changes to users and groups, click the Edit links.
18 Click Push to Workspace to start the synchronization to the directory.
What to do next
Configuring Groups and User Roles
Tenant administrators create business groups and custom groups, and grant user access rights to the
vRealize Automation console.
Assign Roles to Directory Users or Groups
Tenant administrators grant access rights to users by assigning roles to users or groups.
Configuring vRealize Automation
VMware, Inc. 163
To allow users or groups to modify and trigger a pipeline, you must assign permissions to those users and
groups. When you assign users and groups the role of Release Manager, they can modify and trigger the
pipeline. When you assign users and groups the role of Release Engineer, they can trigger the pipeline.
For more information, see the Using vRealize Code Stream guide.
Prerequisites
Log in to vRealize Automation as a tenant administrator.
Procedure
1Select Administration > Users & Groups > Directory Users & Groups.
2Enter a user or group name in the Search box and press Enter.
Do not use an at sign (@), backslash (\), or slash (/) in a name. You can optimize your search by
typing the entire user or group name in the form user@domain.
3Click the name of the user or group to which you want to assign roles.
4Select one or more roles from the Add Roles to this User list.
The Authorities Granted by Selected Roles list indicates the specific authorities you are granting.
5(Optional) Click Next to view more information about the user or group.
6On the User Details page, on the General tab, scroll the list of roles to add the user.
a To give the user permissions to modify and trigger a pipeline, select the Release Manager check
box.
b To give the user permissions to trigger a pipeline, select the Release Engineer check box.
7Click Update.
Users who are currently logged in to the vRealize Automation must log out and log back in to the
vRealize Automation before they can navigate to the pages to which they have been granted access.
What to do next
Optionally, you can create your own custom groups from users and groups in your Active Directory
connections. See Create a Custom Group.
Create a Custom Group
Tenant administrators can create custom groups by combining other custom groups, identity store groups,
and individual identity store users. Custom groups provide more granular control over access within
vRealize Automation than business groups which correspond to a line of business, department, or other
organizational unit.
Custom groups enable you to grant access rights for tasks on a finer basis than the standard
vRealize Automation group assignments. For instance, you may want to create a custom group to allow
tenant administrators to control who has specific permissions within the tenant.
Configuring vRealize Automation
VMware, Inc. 164

You can assign roles to your custom group, but it is not necessary in all cases. For example, you can
create a custom group called Machine Specification Approvers, to use for all machine pre-approvals. You
can also create custom groups to map to your business groups so that you can manage all groups in one
place. In those cases, you do not need to assign roles.
Prerequisites
Log in to vRealize Automation as a tenant administrator.
Procedure
1Select Administration > Users & Groups > Custom Groups.
2Click the Add icon ( ).
3Enter a group name in the New Group Name text box.
Custom group names cannot contain the combination of a semicolon (;) followed by an equal sign (=).
4(Optional) Enter a description in the New Group Description text box.
5Select one or more roles from the Add Roles to this Group list.
The Authorities Granted by Selected Roles list indicates the specific authorities you are granting.
6Click Next.
7Add users and groups to create your custom group.
a Enter a user or group name in the Search box and press Enter.
Do not use an at sign (@), backslash (\), or slash (/) in a name. You can optimize your search by
typing the entire user or group name in the form user@domain.
b Select the user or group to add to your custom group.
8Click Add.
Users who are currently logged in to the vRealize Automation must log out and log back in to the
vRealize Automation before they can navigate to the pages to which they have been granted access.
Add Just-in-Time Users with Custom Groups and Rules
You can add vRealize Automation users to a deployment without access to Active Directory using just-in-
time user provisioning. To invoke just-in-time provisioning for first time users, you must create rules to
populate the applicable custom group.
On initial log on, Just-in-time users are assigned group membership dynamically based on rules that you
create on the Advanced Group Membership wizard page. After initial log on, you can assign group
membership in the usual manner. This second page of this wizard contains four selection boxes for
creating rules based on a variety of criteria that define just-in-time users.
Configuring vRealize Automation
VMware, Inc. 165
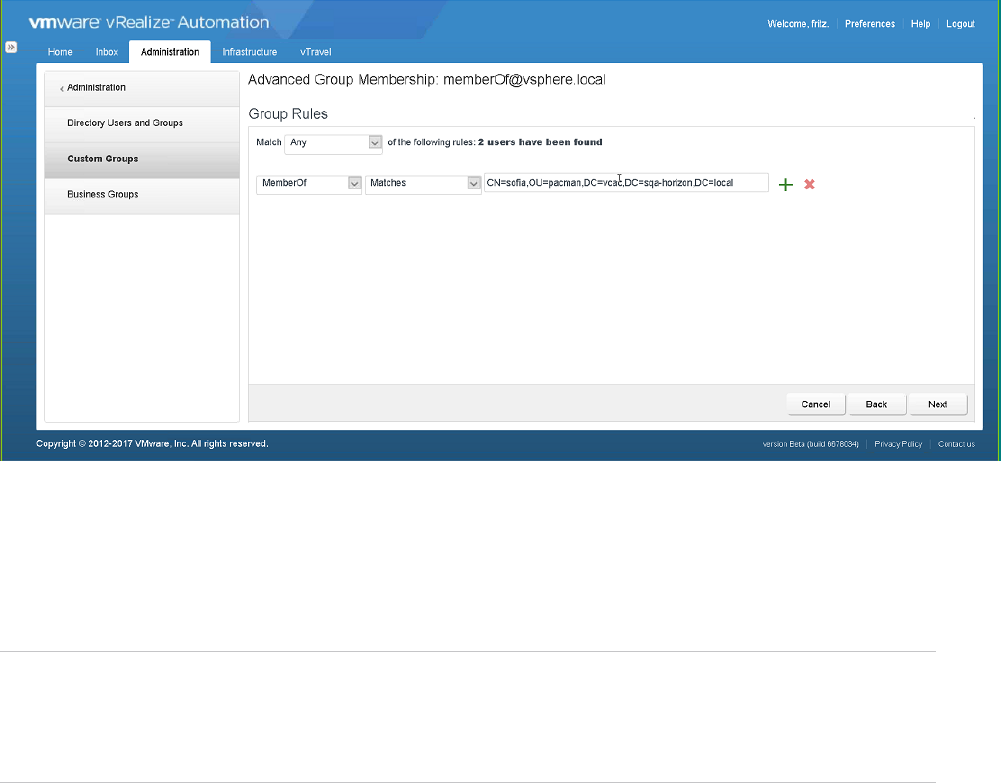
For instance, in the first rule selection box, you can select Domain as a criteria, and then select Matches
in the second box. Then, in the third rule box, you can enter a domain. These selections create a rule that
establishes just-in-time membership based users that are associated with the specified domain. The third
selection box is a free form entry box, and you can enter any information that logically relates to the
selections in the first two selection boxes.
Note You can create multiple rules to populate just-in time users based on a variety of criteria. If you
create multiple rules, you can use the Match rule selection box, located above the main rule boxes, to
indicate whether vRealize Automation should match any or all of the rules when populating just-in-time
users.
Procedure
1Select Administration > Users & Groups > Custom Groups and create or locate an appropriate
custom group for the just-in-time users.
See Create a Custom Group for more information.
2Click the Advanced Membership button.
You can add individual users on the page if desired.
3Click Next to view the Group Rules page.
4In the three main rule selection boxes, located below the Match rule selection box, click the Down
arrows and enter information to activate drop down menus that enable you to create the desired rule.
5Use the rule selection boxes to create one or more rules as appropriate for your user configuration.
6(Optional) If you create multiple rules, you can use the Match rule selection box to designate how
vRealize Automation handles the rules.
7Click Next.
Configuring vRealize Automation
VMware, Inc. 166

8If you want to exclude users from the group, search for and add those users on the Exclude Users
from Group page.
9Click Next.
10 Review the group configuration on the Review page, and then click Save to save and implement your
rules and configuration.
Just-in-time users are added based on the rules that you created.
Create a Business Group
Business groups are used to associate a set of services and resources to a set of users. These groups
often correspond to a line of business, department, or other organizational unit. You create a business
group so that you can configure reservations and entitle users to provision service catalog items for the
business group members.
To add multiple users to a business group role, you can add multiple individual users, or you can add
multiple users at the same time by adding an identity store group or a custom group to a role. For
example, you can create a custom group Sales Support Team and add that group to the support role. You
can also use existing identity store user groups. The users and groups you choose must be valid in the
identity store.
To support vCloud Director integration, the same business group members in the vRealize Automation
business group must also be members of the vCloud Director organization.
After a tenant administrator creates the business group, the business group manager has permission to
modify the manager email address and the members. The tenant administrator can modify all the options.
This procedure assumes that IaaS is installed and configured.
Prerequisites
nLog in to vRealize Automation as a tenant administrator.
nIf you want to add machines created by business group members to a particular Active Directory
organizational unit, configure the Active Directory policy. See Create an Active Directory Policy. You
can and apply the policy when you create the business group, or add it later.
nIf you want to provide a default machine prefix for the group that is prepended to provisioned machine
names, request a prefix from a fabric administrator. See Configure Machine Prefixes. Machine
prefixes are not applicable to XaaS requests.
Procedure
1Select Administration > Users and Groups > Business Groups.
2Click the New icon ( ).
Configuring vRealize Automation
VMware, Inc. 167

3Configure the business group details.
Option Description
Name Enter the name for the business group.
Description Enter the description.
Send manager emails to Enter one or more email addresses of users that must receive capacity alert
notifications. Email alias addresses are not supported, each email addresses
must be for a specific user.
Separate multiple entries with a comma. For example,
JoeAdmin@mycompany.com,WeiMgr@mycompany.com.
Active Directory Policy Select the default Active Directory policy for the business group.
4Add custom properties.
5Enter a user name or custom user group name and press Enter.
You can add one or more individuals or custom user groups to the business group. You can specify
the users now or you can create empty business groups to populate later.
Option Description
Group manager role Can create entitlements and assign approval policies for the group.
Support role Can request and manage service catalog items on behalf of the other members of
the business group.
Shared access role Can use and run actions on the resources that other business group members
deploy.
User role Can request service catalog items to which they are entitled.
6Click Next.
7Configure default infrastructure options.
Option Description
Default machine prefix Select a preconfigured machine prefix for the business group.
This prefix is used by machine blueprints. If the blueprint is uses the default prefix
and you do not provide it here, a machine prefix is created based on the business
group name. The best practice is to provide a default prefix. You can still
configure blueprints with specific prefixes or allow service catalog users to
override it when they request a blueprint.
XaaS blueprints do not use default machine prefixes. If you configure a prefix
here and entitle an XaaS blueprint to this business group, it does not affect the
provisioning of an XaaS machine.
Active Directory container Enter an Active Directory container. This option applies only to WIM provisioning.
Other provisioning methods require extra configuration to join provisioned
machines to an AD container.
8Click Add.
Fabric administrators can allocate resources to your business group by creating a reservation. Business
group managers can create entitlements for members of the business group.
Configuring vRealize Automation
VMware, Inc. 168
What to do next
nCreate a reservation for your business group based on where the business group provisions
machines. See Choosing a Reservation Scenario.
nIf the catalog items are published and the services exist, you can create an entitlement for the
business group members. See Entitle Users to Services, Catalog Items, and Actions.
Troubleshooting Slow Performance When Displaying Group Members
The business group or custom group members are slow to display when viewing a group's details.
Problem
When you view user information in environments with a large number of users, the user names are slow
to load in the user interface.
Cause
The extended time required to load the names occurs in environments with a large Active Directory
environment.
Solution
uTo reduce the retrieval workload, use Active Directory groups or custom groups whenever possible
rather than adding hundreds of individual members by name.
Create Additional Tenants
As a system administrator, you can create additional vRealize Automation tenants so that users can
access the appropriate applications and resources that they need to complete their work assignments.
A tenant is a group of users with specific privileges who work within a software instance. Typically, a
default vRealize Automation tenant is created during system installation and initial configuration. After
that, administrators can create additional tenants so that users can log in and complete their work
assignments. Administrators can create as many tenants as needed for system operation. When creating
tenants, administrators must specify basic configuration such as name, login URL, local users, and
administrators. After configuring basic tenant information, the tenant administrator must log in and set up
an appropriate Active Directory connection using the Directories Management functionality on the
Administrative tab of the vRealize Automation console. In addition, tenant administrators can apply
custom branding to tenants.
Prerequisites
Log in to the vRealize Automation console as a system administrator.
Procedure
1Specify Tenant Information
The first step to configuring a tenant is to name the new tenant and add it to vRealize Automation
and create the tenant-specific access URL.
Configuring vRealize Automation
VMware, Inc. 169

2Configure Local Users
The vRealize Automation system administrator must configure local users for each applicable
tenant.
3Appoint Administrators
You can appoint one or more tenant administrators and IaaS administrators from the identity stores
you configured for a tenant.
Specify Tenant Information
The first step to configuring a tenant is to name the new tenant and add it to vRealize Automation and
create the tenant-specific access URL.
Prerequisites
Log in to the vRealize Automation console as a system administrator.
Procedure
1Select Administration > Tenants.
2Click the New icon ( ).
3Enter a name in the Name text box.
4(Optional) Enter a description in the Description text box.
5Enter a unique identifier for the tenant in the URL Name text box.
This URL token is used to append a tenant-specific identifier to the vRealize Automation console
URL.
For example, enter mytenant to create the URL https://vrealize-appliance-
hostname.domain.name/vcac/org/mytenant.
Note The tenant URL must use lowercase characters only in vRealize Automation 7.0 and 7.1.
6(Optional) Enter an email address in the Contact Email text box.
7Click Submit and Next.
Configure Local Users
The vRealize Automation system administrator must configure local users for each applicable tenant.
After an administrator creates the general information for a tenant, the Local users tab becomes active,
and the administrator can designate users who can access the tenant. When tenant configuration is
complete, local tenant users can log in to their respective tenants to complete work assignments.
Note After you add a user, you cannot change its configuration. If you need to change anything about
the user configuration, you must delete the user and recreate it.
Configuring vRealize Automation
VMware, Inc. 170
Procedure
1Click the Add button on the Local users tab.
2Enter the users first and last names into the First name and Last name fields on the User Details
dialog.
3Enter the user email address into the Email field.
4Enter the user ID and password for the user in the User name and Password fields.
5Click the Add button.
6Repeat these steps as applicable for all local users of the tenant.
The specified local users are created for the tenant.
Appoint Administrators
You can appoint one or more tenant administrators and IaaS administrators from the identity stores you
configured for a tenant.
Tenant administrators are responsible for configuring tenant-specific branding, as well as managing
identity stores, users, groups, entitlements, and shared blueprints within the context of their tenant. IaaS
Administrators are responsible for configuring infrastructure source endpoints in IaaS, appointing fabric
administrators, and monitoring IaaS logs.
Prerequisites
nBefore you appoint IaaS administrators, you must install IaaS. For more information about installing
IaaS, see Installing vRealize Automation.
Procedure
1Enter the name of a user or group in the Tenant Administrators search box and press Enter.
For faster results, enter the entire user or group name, for example myAdmins@mycompany.domain.
Repeat this step to appoint additional tenant administrators.
2If you have installed IaaS, enter the name of a user or group in the IaaS Administrators search box
and press Enter.
For faster results, enter the entire user or group name, for example
IaaSAdmins@mycompany.domain. Repeat this step to appoint additional infrastructure
administrators.
3Click Add.
Delete a Tenant
A system administrator can delete any unwanted tenants from vRealize Automation.
Configuring vRealize Automation
VMware, Inc. 171
If you delete a tenant, that tenant will be removed from the vRealize Automation interface immediately,
but it may take several hours for the tenant to be completely removed from your deployment. If you delete
a tenant and want to create another tenant with the same URL, allow several hours for complete deletion
before creating the new tenant.
Prerequisites
Log in to the vRealize Automation console as a system administrator.
Procedure
1Select Administration > Tenants.
2Select the tenant that you want to delete.
Do not click the actual name to select the tenant. Doing so will open the tenant for editing.
3Click Delete.
The tenant is deleted from your vRealize Automation deployment.
Configuring Security Settings for Multi-tenancy
You can control the availability of NSX security objects across tenants in a multi-tenant environment.
When you create an NSX security object in vRealize Automation, its default availability can be either
global, meaning available in all tenants for which the associated endpoint has a reservation, or hidden to
all users except the administrator.
Availability of security objects across tenants is also relative to whether the associated endpoint has a
reservation or reservation policy in the tenant.
The means by which you control the availability of new security objects across tenants and the behavior
you see in existing security objects, relative to cross-tenancy, after upgrading to this vRealize Automation
release are summarized in related topic Controlling Tenant Access for Security Objects.
(Optional) Configuring Custom Branding
vRealize Automation enables you to apply custom branding to tenant login and application pages.
Custom branding can include text and background colors, business logos, company name, privacy
policies, copyright statements and other relevant information that you want to appear on tenant login or
application pages.
Custom Branding for Tenant Login Page
Use the Login Screen Branding page to apply custom branding to your vRealize Automation tenant login
pages.
You can use default vRealize Automation branding on your tenant login pages, or you can configure
custom branding using the Login Screen Branding page. Note that custom branding applies in the same
manner to all of your tenant applications.
Configuring vRealize Automation
VMware, Inc. 172

This page enables you to configure branding on all tenant login pages.
The Login Screen Branding page displays the currently implemented tenant login branding in the Preview
pane.
Note After saving new tenant login page branding, there may be a delay of up to five minutes before it
becomes visible on all login pages.
Prerequisites
To use a custom logo or other image with your branding, you must have the appropriate files available.
Procedure
1Log in to vRealize Automation as a system or tenant administrator.
2Click the Administration tab.
3Select the desired visual effects using the check boxes under the Effects heading.
All effects are optional.
4Select Branding > Login Screen Branding
5Click Upload beneath the Logo field, then navigate to the appropriate folder and select a logo image
file.
6If desired, click Upload beneath the Image (optional) field, then navigate to the appropriate folder and
select an additional image file.
7If desired, enter the appropriate hex codes in the Background color, Masthead color, Login button
background color and Login button foreground color fields.
Search the internet for a list of hex color codes if needed.
8Click Save to apply your settings.
Tenant users see the custom branding on their login pages.
Custom Branding for Tenant Applications
Use the Application Branding page to apply custom branding to vRealize Automation tenant applications.
You can use default vRealize Automation branding on your user applications, or you can configure
custom branding using the Application Branding page. This page enables you to configure branding on
the header and footer of application pages. Note that custom branding applies in the same manner to all
of your user applications.
The Application Branding page displays the currently implemented header or footer branding at the
bottom of the page.
Prerequisites
If you want to use a custom logo with your branding, you must have the logo image file available.
Configuring vRealize Automation
VMware, Inc. 173
Procedure
1Log in to vRealize Automation as a system or tenant administrator.
2Click the Administration tab.
3Select Branding > Application Branding
4Click the Header tab if it is not already active.
5If you want to use the default vRealize Automation branding, click the Use Default check box.
6To implement custom branding, make the appropriate selections in the fields on the Header and
Footer tabs.
a Click the Browse button in the Header Logo field, then navigate to the appropriate folder and
select an logo image file.
b Type the appropriate company name in the Company name field.
The specified name appears when a user mouses over the logo.
c Type the appropriate name into the Product name field.
The name you enter here appears in the application header adjacent to the logo.
d Enter the appropriate hex color code for the application perimeter background color in the
Background hex color field.
Search the internet for a list of hex color codes if needed.
e Enter the appropriate hex code for the text color in the Text hex color field.
Search the internet for a list of hex text color codes if needed.
f Click Next to activate the Footer tab.
g Type the desired statement into the Copyright notice field.
h Type the link to you company privacy policy statement in the Privacy policy link field.
i Type the desired company contact information in the Contact link field.
7Click Update to implement your branding configuration.
Tenant users see the custom branding on their application pages.
(Optional) Checklist for Configuring Notifications
You can configure vRealize Automation to send users notifications when specific events occur. Users can
choose which notifications to subscribe to, but they can only select from events you enable as notification
triggers.
Configuring vRealize Automation
VMware, Inc. 174
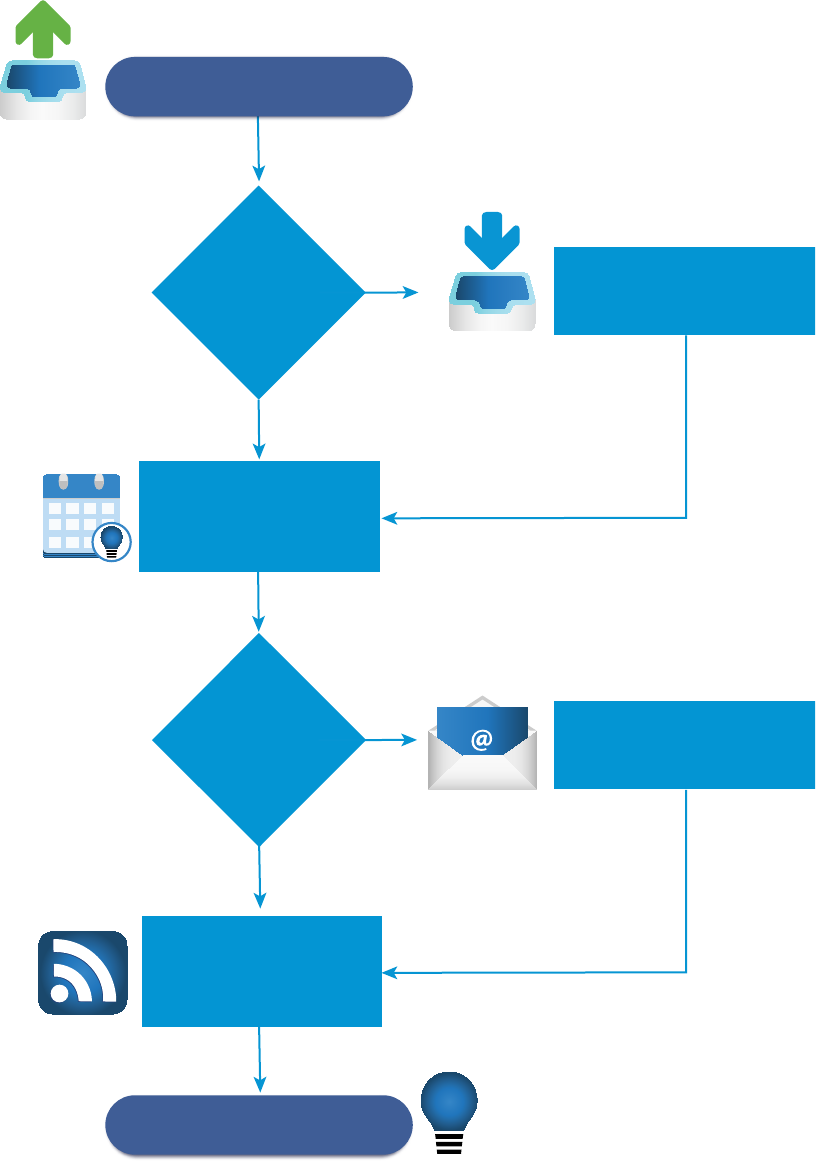
!
TEMPLATE
Configure an outbound mail
server to send notifications.
No
Yes
No
Users get the
notifications they want.
Edit the configuration files
that control IaaS notifications.
Enable notifications for
any events you want
to allow users to
receive updates for.
Configure an inbound mail
server to receive notifications.
Yes
Do you want users
to be able to respond
to notifications?
Do you want to
customize the
templates for IaaS
notifications?
Tell your users how to
subscribe to the
notifications you enabled.
The Configuring Notifications Checklist provides a high-level overview of the sequence of steps required
to configure notifications and provides links to decision points or detailed instructions for each step.
Configuring vRealize Automation
VMware, Inc. 175

Table 2‑10. Checklist for Configuring Notifications
Task Required Role Details
Configure an outbound email server to send notifications. nSystem
administrators
configure
default global
servers.
nTenant
administrators
configure
servers for their
tenants.
To configure a server for your tenant for the
first time, see Add a Tenant-Specific
Outbound Email Server. If you need to
override a default global server, see
Override a System Default Outbound Email
Server. To configure global default servers
for all tenants, see Create a Global
Outbound Email Server.
(Optional) Configure an inbound email server so that users
can complete tasks by responding to notifications.
nSystem
administrators
configure
default global
servers.
nTenant
administrators
configure
servers for their
tenants.
To configure a server for your tenant for the
first time, see Add a Tenant-Specific
Inbound Email Server.
If you need to override a default global
server, see Override a System Default
Inbound Email Server.
To configure a global default server for all
tenants, see Create a Global Inbound Email
Server.
(Optional) Specify when to send an email notification prior
to a machine expiration date.
System
administrator
See Customize the Date for Email
Notification for Machine Expiration.
Select the vRealize Automation events to trigger user
notifications. Users can only subscribe to notifications for
events you enable as notification triggers.
Tenant
administrator
See Configure Notifications.
(Optional) Configure the templates for notifications sent to
machine owners concerning events that involve their
machines, such as lease expiration.
Anyone with access
to the
directory \Templat
es under the
vRealize
Automation server
install directory
(typically
%SystemDrive
%\Program Files
x86\VMware\vCA
C\Server) can
configure the
templates for these
email notifications.
See Configuring Templates for Automatic
IaaS Emails.
Provide your users with instructions about how to
subscribe to the notifications that you enabled. They can
choose to subscribe to only the notifications that are relevant
to their roles.
All users See Subscribe to Notifications.
Configuring vRealize Automation
VMware, Inc. 176

Configuring Global Email Servers for Notifications
Tenant administrators can add email servers as part of configuring notifications for their own tenants. As a
system administrator, you can set up global inbound and outbound email servers that appear to all
tenants as the system defaults. If tenant administrators do not override these settings before enabling
notifications, vRealize Automation uses the globally configured email servers.
Create a Global Inbound Email Server
System administrators create a global inbound email server to handle inbound email notifications, such as
approval responses. You can create only one inbound server, which appears as the default for all tenants.
If tenant administrators do not override these settings before enabling notifications, vRealize Automation
uses the globally configured email server.
Prerequisites
Log in to the vRealize Automation console as a system administrator.
Procedure
1Select Administration > Email Servers.
2Click the Add icon ( ).
3Select Email – Inbound.
4Click OK.
5Enter a name in the Name text box.
6(Optional) Enter a description in the Description text box.
7(Optional) Select the SSL check box to use SSL for security.
8Choose a server protocol.
9Type the name of the server in the Server Name text box.
10 Type the server port number in the Server Port text box.
11 Type the folder name for emails in the Folder Name text box.
This option is required only if you choose IMAP server protocol.
12 Enter a user name in the User Name text box.
13 Enter a password in the Password text box.
14 Type the email address that vRealize Automation users can reply to in the Email Address text box.
15 (Optional) Select Delete From Server to delete from the server all processed emails that are
retrieved by the notification service.
16 Choose whether vRealize Automation can accept self-signed certificates from the email server.
17 Click Test Connection.
Configuring vRealize Automation
VMware, Inc. 177

18 Click Add.
Create a Global Outbound Email Server
System administrators create a global outbound email server to handle outbound email notifications. You
can create only one outbound server, which appears as the default for all tenants. If tenant administrators
do not override these settings before enabling notifications, vRealize Automation uses the globally
configured email server.
Prerequisites
Log in to the vRealize Automation console as a system administrator.
Procedure
1Select Administration > Email Servers.
2Click the Add icon ( ).
3Select Email – Outbound.
4Click OK.
5Enter a name in the Name text box.
6(Optional) Enter a description in the Description text box.
7Type the name of the server in the Server Name text box.
8Choose an encryption method.
nClick Use SSL.
nClick Use TLS.
nClick None to send unencrypted communications.
9Type the server port number in the Server Port text box.
10 (Optional) Select the Required check box if the server requires authentication.
a Type a user name in the User Name text box.
b Type a password in the Password text box.
11 Type the email address that vRealize Automation emails should appear to originate from in the
Sender Address text box.
This email address corresponds to the user name and password you supplied.
12 Choose whether vRealize Automation can accept self-signed certificates from the email server.
13 Click Test Connection.
14 Click Add.
Configuring vRealize Automation
VMware, Inc. 178

Add a Tenant-Specific Outbound Email Server
Tenant administrators can add an outbound email server to send notifications for completing work items,
such as approvals.
Each tenant can have only one outbound email server. If your system administrator has already
configured a global outbound email server, see Override a System Default Outbound Email Server.
Prerequisites
nLog in to vRealize Automation as a tenant administrator.
nIf the email server requires authentication, the specified user must be in an identity store and the
business group.
Procedure
1Select Administration > Notifications > Email Servers.
2Click the Add icon ( ).
3Select Email – Outbound.
4Click OK.
5Enter a name in the Name text box.
6(Optional) Enter a description in the Description text box.
7Type the name of the server in the Server Name text box.
8Choose an encryption method.
nClick Use SSL.
nClick Use TLS.
nClick None to send unencrypted communications.
9Type the server port number in the Server Port text box.
10 (Optional) Select the Required check box if the server requires authentication.
a Type a user name in the User Name text box.
b Type a password in the Password text box.
11 Type the email address that vRealize Automation emails should appear to originate from in the
Sender Address text box.
This email address corresponds to the user name and password you supplied.
Configuring vRealize Automation
VMware, Inc. 179

12 Choose whether vRealize Automation can accept self-signed certificates from the email server.
This option is available only if you enabled encryption.
nClick Yes to accept self-signed certificates.
nClick No to reject self-signed certificates.
13 Click Test Connection.
14 Click Add.
Add a Tenant-Specific Inbound Email Server
Tenant administrators can add an inbound email server so that users can respond to notifications for
completing work items, such as approvals.
Each tenant can have only one inbound email server. If your system administrator already configured a
global inbound email server, see Override a System Default Inbound Email Server.
Prerequisites
nLog in to vRealize Automation as a tenant administrator.
nVerify that the specified user is in an identity store and in the business group.
Procedure
1Select Administration > Notifications > Email Servers.
2Click the Add icon ( ).
3Select Email - Inbound and click OK.
4Configure the following inbound email server options.
Option Action
Name Enter a name for the inbound email server.
Description Enter a description of the inbound email server.
Security Select the Use SSL check box.
Protocol Choose a server protocol.
Server Name Enter the server name.
Server Port Enter the server port number.
5Type the folder name for emails in the Folder Name text box.
This option is required only if you choose IMAP server protocol.
6Enter a user name in the User Name text box.
7Enter a password in the Password text box.
8Type the email address that vRealize Automation users can reply to in the Email Address text box.
Configuring vRealize Automation
VMware, Inc. 180
9(Optional) Select Delete From Server to delete from the server all processed emails that are
retrieved by the notification service.
10 Choose whether vRealize Automation can accept self-signed certificates from the email server.
This option is available only if you enabled encryption.
nClick Yes to accept self-signed certificates.
nClick No to reject self-signed certificates.
11 Click Test Connection.
12 Click Add.
Override a System Default Outbound Email Server
If the system administrator configured a system default outbound email server, the tenant administrator
can override this global setting.
Prerequisites
Log in to vRealize Automation as a tenant administrator.
Procedure
1Select Administration > Notifications > Email Servers.
2Select the Outbound email server.
3Click Override Global.
4Enter a name in the Name text box.
5(Optional) Enter a description in the Description text box.
6Type the name of the server in the Server Name text box.
7Choose an encryption method.
nClick Use SSL.
nClick Use TLS.
nClick None to send unencrypted communications.
8Type the server port number in the Server Port text box.
9(Optional) Select the Required check box if the server requires authentication.
a Type a user name in the User Name text box.
b Type a password in the Password text box.
10 Type the email address that vRealize Automation emails should appear to originate from in the
Sender Address text box.
This email address corresponds to the user name and password you supplied.
Configuring vRealize Automation
VMware, Inc. 181

11 Choose whether vRealize Automation can accept self-signed certificates from the email server.
This option is available only if you enabled encryption.
nClick Yes to accept self-signed certificates.
nClick No to reject self-signed certificates.
12 Click Test Connection.
13 Click Add.
Override a System Default Inbound Email Server
If the system administrator has configured a system default inbound email server, tenant administrators
can override this global setting.
Prerequisites
Log in to vRealize Automation as a tenant administrator.
Procedure
1Select Administration > Notifications > Email Servers.
2Select the Inbound email server in the Email Servers table.
3Click Override Global.
4Enter the following inbound email server options.
Option Action
Name Enter the name of the inbound email server.
Description Enter a description of the inbound email server.
Security Select the SSL check box to use SSL for security.
Protocol Choose a server protocol.
Server Name Enter the server name.
Server Port Enter the server port number.
5Type the folder name for emails in the Folder Name text box.
This option is required only if you choose IMAP server protocol.
6Enter a user name in the User Name text box.
7Enter a password in the Password text box.
8Type the email address that vRealize Automation users can reply to in the Email Address text box.
9(Optional) Select Delete From Server to delete from the server all processed emails that are
retrieved by the notification service.
Configuring vRealize Automation
VMware, Inc. 182
10 Choose whether vRealize Automation can accept self-signed certificates from the email server.
This option is available only if you enabled encryption.
nClick Yes to accept self-signed certificates.
nClick No to reject self-signed certificates.
11 Click Test Connection.
12 Click Add.
Revert to System Default Email Servers
Tenant administrators who override system default servers can revert the settings back to the global
settings.
Prerequisites
Log in to vRealize Automation as a tenant administrator.
Procedure
1Select Administration > Notifications > Email Servers.
2Select the email server to revert.
3Click Revert to Global.
4Click Yes.
Configure Notifications
Each user determines whether to receive notifications, but tenant administrators determine which events
trigger notifications.
Prerequisites
nLog in to vRealize Automation as a tenant administrator.
nVerify that a tenant administrator or system administrator configured an outbound email server. See
Add a Tenant-Specific Outbound Email Server.
Procedure
1Select Administration > Notifications > Scenarios.
2Select one or more notifications.
3Click Activate.
Users who subscribe to notifications in their preference settings now receive the notifications.
Customize the Date for Email Notification for Machine Expiration
You can specify when to send an email notification prior to a machine expiration date.
Configuring vRealize Automation
VMware, Inc. 183

You can change the setting that defines the number of days before a machine's expiration date that
vRealize Automation sends an expiration notification email. The email notifies users of a machine's
expiration date. By default, the setting is 7 days prior to machine expiration.
Procedure
1Log in to the vRealize Automation server by using credentials with administrative access.
2Navigate to and open the /etc/vcac/setenv-user file.
3Add the following line to the file to specify the number of days prior to machine expiration, where 3 in
this example specifies 3 days prior to machine expiration.
VCAC_OPTS="$VCAC_OPTS -Dlease.enforcement.prearchive.notification.days=3"
4Restart the vCAC services on the virtual appliance by running the following command:
service vcac-server restart
What to do next
If you are working in a high availability load balancer environment, repeat this procedure for all the virtual
appliances in the HA environment.
Configuring Templates for Automatic IaaS Emails
You can configure notification emails to be sent to machine owners about various vRealize Automation
events that involve their machines.
The events that trigger notifications can include the expiration or approaching expiration of archive
periods and virtual machine leases.
For information about configuring and enabling or disabling vRealize Automation email notifications, see
the following blog article and Knowledge Base articles:
nEmail Customization in vRealize Automation
nCustomizing email templates in vRealize Automation (2088805)
nExamples for customizing email templates in vRealize Automation (2102019)
Subscribe to Notifications
If your administrators have configured notifications, you can subscribe to receive notifications from
vRealize Automation. Notification events can include the successful completion of a catalog request or a
required approval.
Prerequisites
Log in to vRealize Automation.
Procedure
1Click Preferences.
Configuring vRealize Automation
VMware, Inc. 184

2Select the Enabled check box for the Email protocol in the Notifications table.
3Click Apply.
4Click Close.
(Optional) Create a Custom RDP File to Support RDP Connections
for Provisioned Machines
System administrators create a custom remote desktop protocol file that IaaS architects use in blueprints
to configure RDP settings. You create the RDP file and provide architects with the full pathname for the
file so they can include it in blueprints, then a catalog administrator entitles users to the RDP action.
Note If you are using Internet Explorer with Enhanced Security Configuration enabled, you cannot
download .rdp files.
Prerequisites
Log in to the IaaS Manager Service as an administrator.
Procedure
1Set your current directory to <vRA_installation_dir>\Rdp.
2Copy the file Default.rdp and rename it to Console.rdp in the same directory.
3Open the Console.rdp file in an editor.
4Add RDP settings to the file.
For example, connect to console:i:1.
5If you are working in a distributed environment, log in as a user with administrative privileges to the
IaaS Host Machine where the Model Manager Website component is installed.
6Copy the Console.rdp file to the directory vRA_installation_dir\Website\Rdp.
Your IaaS architects can add the RDP custom properties to Windows machine blueprints, and then
catalog administrators can entitle users to the Connect Using RDP action. See Add RDP Connection
Support to Your Windows Machine Blueprints.
(Optional) Scenario: Add Datacenter Locations for Cross Region
Deployments
As a system administrator, you want to define locations for your Boston and London datacenters so your
fabric administrators can apply the appropriate locations to compute resources in each datacenter. When
your blueprint architects create blueprints, they can enable the locations feature so users can choose to
provision machines in Boston or London when they fill out their catalog item request forms.
Configuring vRealize Automation
VMware, Inc. 185

You have a datacenter in London, and a datacenter in Boston, and you do not want users in Boston
provisioning machines on your London infrastructure or vice versa. To ensure that Boston users provision
on your Boston infrastructure, and London users provision on your London infrastructure, you want to
allow users to select an appropriate location for provisioning when they request machines.
You cannot filter datacenter locations in the xml file based on the tenant or business group. When working
in a multi-tenant environment, you can use property definitions to filter based on the tenant or business
group. For information about using property definitions, see blog post How to use dynamic property
definitions.
Procedure
1Log in to your IaaS Web Server host using administrator credentials.
This is the machine on which you installed the IaaS Website component.
2Edit the file WebSite\XmlData\DataCenterLocations.xml in the Windows server install directory
(typically %SystemDrive%\Program Files x86\VMware\vCAC\Server).
3Edit the CustomDataType section of the file to create Data Name entries for each location.
<CustomDataType>
<Data Name="London" Description="London datacenter" />
<Data Name="Boston" Description="Boston datacenter" />
</CustomDataType
4Save and close the file.
5Restart the manager service.
6If you have more than one IaaS Web Server host, repeat this procedure on each redundant instance.
Your fabric administrator can apply the appropriate location to compute resources located in each
datacenter. See Scenario: Apply a Location to a Compute Resource for Cross Region Deployments.
What to do next
You can add the Vrm.DataCenter.Location property to a blueprint, or enable the Display Location on
Request option in the blueprint, to require that the user supply a datacenter location when they request
machine provisioning.
Configuring vRealize Automation
VMware, Inc. 186
Configuring vRealize Orchestrator
vRealize Orchestrator is an automation and management engine that extends vRealize Automation to
support XaaS and other extensibility. You can configure and use the vRealize Orchestrator server that is
preconfigured in the vRealize Automation appliance, or you can deployvRealize Orchestrator as an
external server instance and associate that external instance with vRealize Automation.
vRealize Orchestrator allows administrators and architects to develop complex automation tasks by using
the workflow designer, and then access and run the workflows from vRealize Automation.
vRealize Orchestrator can access and control external technologies and applications by using
vRealize Orchestrator plug-ins.
Configuring vRealize Automation to use vRealize Orchestrator makes it possible to publish Orchestrator
workflows in the vRealize Orchestrator service catalog as part of the XaaS blueprint management.
If you want to run Orchestrator workflows to extend the management of IaaS machines, you must
configure vRealize Orchestrator as an endpoint.
Configuration Privileges
System and tenant administrators can configure vRealize Automation to use an external or the embedded
vRealize Orchestrator server.
In addition, system administrators can also determine the workflow folders that are available to each
tenant.
Tenant administrators can configure the vRealize Orchestrator plug-ins as endpoints.
Role vRealize Orchestrator-Related Configuration Privileges
System administrators nConfigure the vRealize Orchestrator server for all tenants.
nDefine the default vRealize Orchestrator workflow folders per tenant.
Tenant administrators nConfigure the vRealize Orchestrator server for their own tenant.
nAdd vRealize Orchestrator plug-ins as endpoints.
Configure the Embedded vRealize Orchestrator Server
The vRealize Automation Appliance includes a preconfigured instance of vRealize Orchestrator. The
vRealize Orchestrator server service is running by default but you must start the configuration service
manually to access the Control Center.
Prerequisites
Deploy the vRealize Automation Appliance. For deatils, see Deploy the vRealize Automation Appliance in
Installing vRealize Automation.
Procedure
1Log in to the vRealize Automation console as a system administrator or tenant administrator.
2Select Administration > VRO Configuration > Server Configuration.
Configuring vRealize Automation
VMware, Inc. 187
3Click Use the default Orchestrator server.
Connections to the embedded vRealize Orchestrator server are now configured. The vCAC workflows
folder and the related utility actions are automatically imported. The vCAC > ASD workflows folder
contains workflows for configuring endpoints and creating resource mappings.
Configure the Default Workflow Folder for a Tenant
System administrators can group workflows in different folders and then define workflow categories per
tenant. By doing this, a system administrator can grant users from different tenants access to different
workflow folders on the same vRealize Orchestrator server.
Prerequisites
Log in to the vRealize Automation console as a system administrator.
Procedure
1Select Administration > Advanced Services > Default vRO Folder.
2Click the name of the tenant you want to edit.
3Browse the vRealize Orchestrator workflow library and select a folder.
4Click Add.
You defined the default vRealize Orchestrator workflow folder for a tenant.
What to do next
Repeat the procedure for all of the tenants for which you want to define a default workflow folder.
Log in to the vRealize Orchestrator Configuration Interface
To edit the configuration of the default vRealize Orchestrator instance embedded in vRealize Automation,
you must start the vRealize Orchestrator configuration service and log in to the vRealize Orchestrator
configuration interface.
The vRealize Orchestrator configuration service is not started by default in the vRealize Automation
appliance. You must start the vRealize Orchestrator configuration service to access the
vRealize Orchestrator configuration interface.
Procedure
1Start the vRealize Orchestrator Configuration service.
a Log in to the vRealize Automation appliance Linux console as root.
b Enter service vco-configurator start and press Enter.
2Connect to the vRealize Automation URL in a Web browser.
3Click vRealize Orchestrator Control Center.
You are redirected to https://vra-va-hostname.domain.name_or_load_balancer_address:8283/vco-
controlcenter.
Configuring vRealize Automation
VMware, Inc. 188

4Log in to the vRealize Orchestrator Control Center.
The user name is configured by the vRealize Automation appliance administrator.
Log in to the vRealize Orchestrator Client
To perform general administration tasks or to edit and create workflows in the default
vRealize Orchestrator instance, you must log in to the vRealize Orchestrator client.
The vRealize Orchestrator client interface is designed for developers with administrative rights who want
to develop workflows, actions, and other custom elements.
Procedure
1Connect to the vRealize Automation URL in a Web browser.
2Click vRealize Orchestrator Client.
The client file is downloaded.
3Click the download and following the prompts.
4On the vRealize Orchestrator log in page, enter the IP or the domain name of the
vRealize Automation appliance in the Host name text box, and 443 as the default port number.
For example, enter vrealize_automation_appliance_ip:443.
5Log in by using the vRealize Orchestrator Client user name and password.
The credentials are the default tenant administrator user name and password.
6In the Certificate Warning window select an option to handle the certificate warning.
The vRealize Orchestrator client communicates with the vRealize Orchestrator server by using an
SSL certificate. A trusted CA does not sign the certificate during installation. You receive a certificate
warning each time you connect to the vRealize Orchestrator server.
Option Description
Ignore Continue using the current SSL certificate.
The warning message appears again when you reconnect to the same
vRealize Orchestrator server, or when you try to synchronize a workflow with a
remote vRealize Orchestrator server.
Cancel Close the window and stop the login process.
Install this certificate and do not
display any security warnings for it
anymore.
Select this check box and click Ignore to install the certificate and stop receiving
security warnings.
You can change the default SSL certificate with a certificate signed by a CA. For more information
about changing SSL certificates, see Installing and Configuring VMware vRealize Orchestrator.
What to do next
You can import a package, develop workflows, or set root access rights on the system. See Using the
VMware vRealize Orchestrator Client and Developing with VMware vRealize Orchestrator.
Configuring vRealize Automation
VMware, Inc. 189

Configure an External vRealize Orchestrator Server
You can set up vRealize Automation to use an external vRealize Orchestrator server.
System administrators can configure the default vRealize Orchestrator server globally for all tenants.
Tenant administrators can configure the vRealize Orchestrator server only for their tenants.
Connections to external vRealize Orchestrator server instances require the user account to have view
and execute permissions in vRealize Orchestrator.
nSingle Sign-On authentication. The user information is passed to vRealize Orchestrator with the XaaS
request and the user is granted view and execute permissions for the requested workflow.
nBasic authentication. The provided user account must be a member of a vRealize Orchestrator group
with view and execute permissions or the member of the vcoadmins group.
Prerequisites
nInstall and configure an external vRealize Orchestrator Appliance. See Installing and Configuring
vRealize Orchestrator in the vRealize Orchestrator Information Center at
https://www.vmware.com/support/pubs/orchestrator_pubs.html.
nLog in to the vRealize Automation console as a system administrator or tenant administrator.
nConfigure the default workflow folder. See Configure the Default Workflow Folder for a Tenant.
Procedure
1Select Administration > vRO Configuration > Server Configuration.
2Click Use an external Orchestrator server.
3Enter a name and, optionally, a description.
4Enter the IP or the DNS name of the machine on which the vRealize Orchestrator server runs in the
Host text box.
Note If the external Orchestrator is configured to work in cluster mode, enter the IP address or host
name of the load balancer virtual server that distributes the client requests across the Orchestrator
servers in the cluster.
5Enter the port number to communicate with the external vRealize Orchestrator server in the Port text
box.
8281 is the default port for vRealize Orchestrator.
Configuring vRealize Automation
VMware, Inc. 190

6Select the authentication type.
Option Description
Single Sign-On Connects to the vRealize Orchestrator server by using vCenter Single Sign-On.
This option is applicable only if you configured the vRealize Orchestrator and
vRealize Automation to use a common vCenter Single Sign-On instance.
Basic Connects to the vRealize Orchestrator server with the user name and password
that you enter in the User name and Password text boxes.
The account that you provide must be a member of the vRealize Orchestrator
vcoadmins group or a member of a group with view and execute permissions.
7Click Test Connection.
8Click OK.
You configured the connection to the external vRealize Orchestrator server, and the vCAC workflows
folder and the related utility actions are automatically imported. The vCAC > ASD workflows folder
contains workflows for configuring endpoints and creating resource mappings.
What to do next
Log in to the vRealize Orchestrator Client
Configuring Resources
You can configure resources such as endpoints, reservations, and network profiles to support
vRealize Automation blueprint definition and machine provisioning.
Checklist for Configuring IaaS Resources
IaaS administrators and fabric administrators configure IaaS resources to integrate existing infrastructure
with vRealize Automation and to allocate infrastructure resources to vRealize Automation business
groups.
You can use the Configuring IaaS Resources Checklist to see a high-level overview of the sequence of
steps required to configure IaaS resources.
Configuring vRealize Automation
VMware, Inc. 191
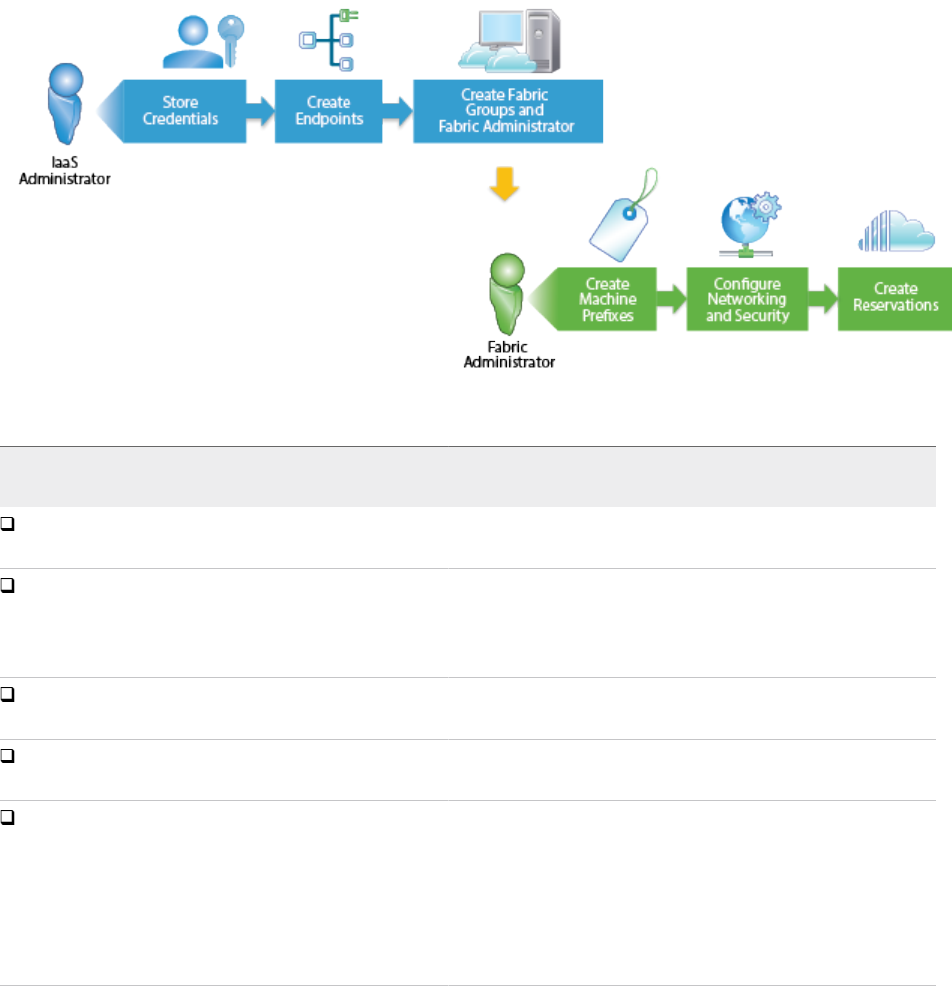
Table 2‑11. Checklist for Configuring IaaS Resources
Task
vRealize
Automation Role Details
Create endpoints for your infrastructure to bring resources
under vRealize Automation management.
IaaS administrator Choosing an Endpoint Scenario.
Create a fabric group to organize infrastructure resources
into groups and assign one or more administrators to manage
those resources as your vRealize Automation fabric
administrators.
IaaS administrator Create a Fabric Group.
Configure machine prefixes used to create names for
machines provisioned through vRealize Automation.
Fabric administrator Configure Machine Prefixes.
(Optional) Create network profiles to configure network
settings for provisioned machines.
Fabric administrator Creating a Network Profile.
Allocate infrastructure resources to business groups by
creating reservations and, optionally, reservation and storage
reservation profiles.
nIaaS
administrator if
also configured
as a Fabric
administrator
nFabric
administrator
Configuring Reservations and Reservation
Policies.
Configuring Endpoints
You create and configure the endpoints that allow vRealize Automation to communicate with your
infrastructure.
Endpoints definitions are categorized based on type:
nCloud
The cloud category contains the vCloud Air, vCloud Director, Amazon EC2, and OpenStack endpoint
types
Configuring vRealize Automation
VMware, Inc. 192

nIPAM
This category is only visible if you have registered a third-party IPAM endpoint type such as Infoblox
IPAM in a vRealize Orchestrator workflow.
nManagement
This category contains the vRealize Operations Manager endpoint only.
nNetwork and Security
This category contains the Proxy and NSX endpoint types.
A Proxy endpoint can be associated to an Amazon, vCloud Air, or vCloud Director endpoint.
An NSX endpoint can be associated to a vSphere endpoint.
nOrchestration
This category contains the vRealize Orchestrator endpoint only.
nStorage
This category contains the NetApp ONTAP endpoint.
nVirtual
The virtual category contains the vSphere, Hyper-V (SCVMM), and KVM (RHEV) endpoint types.
You can configure additional endpoint types in vRealize Orchestrator and use them with supported
endpoint types in vRealize Automation. You can also import, and export, endpoints programmatically.
For information about working with endpoints after upgrade or migration, see Considerations When
Working With Upgraded or Migrated Endpoints.
Choosing an Endpoint Scenario
Choose an endpoint scenario based on the target endpoint type.
For information about available endpoint settings, see Endpoint Settings Reference.
Table 2‑12. Choosing an Endpoint Scenario
Endpoint More Information
vSphere Create a vSphere Endpoint
NSX Create an NSX Endpoint and Associate to a vSphere Endpoint
vCloud Air (Subscription or OnDemand) Create a vCloud Air Endpoint
vCloud Director Create a vCloud Director Endpoint
vRealize Orchestrator Create a vRealize Orchestrator Endpoint
vRealize Operations Create a vRealize Operations Manager Endpoint
Third party IPAM provider Create a Third-Party IPAM Provider Endpoint
Microsoft Azure Create a Microsoft Azure Endpoint
Puppet Create a Puppet Endpoint
Configuring vRealize Automation
VMware, Inc. 193

Table 2‑12. Choosing an Endpoint Scenario (Continued)
Endpoint More Information
Amazon nCreate an Amazon Endpoint
n(Optional) Add an Amazon Instance Type
OpenStack Create an OpenStack Endpoint
Proxy Create a Proxy Endpoint and Associate to a Cloud Endpoint
Hyper-V (SCVMM) Create a Hyper-V (SCVMM) Endpoint
KVM (RHEV) Endpoint Settings Reference
NetApp ONTAP nSpace-Efficient Storage for Virtual Provisioning
nEndpoint Settings Reference
Hyper-V (Standalone), XenServer or Xen Pool Master Create a Hyper-V, XenServer, or Xen Pool Endpoint
Import endpoints Import or Export Endpoints Programmatically
Endpoint Settings Reference
Use endpoint settings to define location and access credentials for data collection and service catalog
deployment.
General Tab
Most vRealize Automation endpoints contain the following options. Settings that are unique to a particular
endpoint type are noted.
Table 2‑13. General Tab Settings
Setting Description
Name Enter the endpoint name.
Description Enter the endpoint description.
Configuring vRealize Automation
VMware, Inc. 194

Table 2‑13. General Tab Settings (Continued)
Setting Description
Address Enter the endpoint address using the endpoint-specific address format.
nFor a KVM (RHEV) or NetApp ONTAP endpoint, the address must be of one
of the following formats:
nhttps://FQDN
nhttps://IP_address
For example: https://mycompany-kvmrhev1.mycompany.local or
netapp-1.mycompany.local.
nFor an OpenStack endpoint, the address must be of the format https://
FQDN/powervc/openstack/ service. For example:
https://openstack.mycompany.com/powervc/openstack/admin.
nFor an OpenStack endpoint, the address must be of one of the following
formats:
nhttps://FQDN:500
nhttps://IP_address:500
nFor a vSphere endpoint, the address must be of the format
https://host/sdk .
nFor an NSX endpoint, the address must be of the format https://host.
nFor a vRealize Orchestrator endpoint, the address must be of the https
protocol and include the fully qualified name or IP address of the
vRealize Orchestrator server and thevRealize Orchestrator port number, for
example https://vrealize-automation-appliance-hostname:
443/vco.
nFor a vRealize Operations endpoint, the address must be of the format
https://host/suite-api.
Integrated credentials If you choose to use your vSphere integrated credentials you do not need to
enter a user name and password.
This setting applies to vSphere endpoints only.
User name Enter the administrator-level user name that you stored for the endpoint in the
endpoint-specific format as suggested in the user interface.
Password Enter the administrator-level password that you stored for the endpoint.
OpenStack project Enter an OpenStack tenant name.
This setting applies to OpenStack endpoints only.
Organization If you are an organization administrator, you can enter a vCloud Director
organization name.
This setting applies tovCloud Director only.
Access key ID Enter the Amazon AWS key ID.
This setting applies to Amazon endpoints only.
Secret access key Enter your Amazon AWS secret access key.
This setting applies to Amazon endpoints only.
Configuring vRealize Automation
VMware, Inc. 195

Table 2‑13. General Tab Settings (Continued)
Setting Description
Port Enter the port value to connect to on the proxy endpoint address.
This setting applies to Proxy endpoints only.
Priority Enter a priority value as an integer greater than or equal to 1. The lower value
specifies a higher priority.
The priority value is associated to the embedded
VMware.VCenterOrchestrator.Priority custom property.
This setting applies to vRealize Orchestrator endpoints only.
Properties Tab
All endpoint types use a properties tab to capture custom properties or property groups and settings. For
examples of custom properties for specific endpoint types, see Custom Properties Reference.
Association Tab
You can create an association to an NSX endpoint or a Proxy endpoint, depending on the endpoint you
are associating from. You can associate a vSphere endpoint with an NSX endpoint to assign NSX
settings to the vSphere endpoint. You can also associate a vCloud Air, vCloud Director, or Amazon
endpoint with a proxy endpoint to assign proxy settings to the vCloud Air, vCloud Director, or Amazon
endpoint.
Test Connection
You can use a test connection action to validate the credentials, host endpoint address, and certificate for
a vSphere, NSX, or vRealize Operations Manager endpoint. See Considerations When Using Test
Connection.
Create a vSphere Endpoint
You can create endpoints that allow vRealize Automation to communicate with the vSphere environment
and discover compute resources, collect data, and provision machines. You can optionally associate NSX
settings to the vSphere endpoint by associating to an NSX endpoint.
If you upgraded or migrated a vSphere endpoint that was using an NSX manager, a new NSX endpoint is
created that contains an association between the source vSphere endpoint and a new NSX endpoint.
If your vSphere environment is integrated with NSX, see Create an NSX Endpoint and Associate to a
vSphere Endpoint.
For more information about validating the connection and certificate trust, see Considerations When
Using Test Connection.
Prerequisites
nLog in to vRealize Automation as an IaaS administrator.
nYou must install a vSphere proxy agent to manage your vSphere endpoint, and you must use the
same exact name for your endpoint and agent. For information about installing the agent, see
Installing vRealize Automation.
Configuring vRealize Automation
VMware, Inc. 196
nIf you plan to use a vSphere endpoint to deploy VMs from OVF templates, verify that your credentials
include the vSphere privilege VApp.Import in the vCenter associated with the endpoint.
The VApp.Import privilege allows you to deploy a vSphere machine by using settings imported from
an OVF. Details about this vSphere privilege are available in the vSphere SDK documentation.
If the OVF is hosted on a Web site, see Create a Proxy Endpoint for OVF Host Web Site.
nIf you want to configure additional NSX network and security settings for the vSphere endpoint, create
an NSX endpoint. You can associate to the NSX endpoint as you create the vSphere endpoint. See
Create an NSX Endpoint and Associate to a vSphere Endpoint.
Procedure
1Select Infrastructure > Endpoints > Endpoints.
2Select New > Virtual > vSphere.
3Enter a name in the Name text box.
The name must match the endpoint name provided to the vSphere proxy agent during installation or
data collection fails.
4(Optional) Enter a description in the Description text box.
5Enter the URL for the vCenter Server instance in the Address text box.
The URL must be of the type: https://hostname/sdk or https://IP_address/sdk.
For example, https://vsphereA/sdk.
6Enter your vSphere administrator-level user name and password or instead use your vSphere
integrated credentials.
Provide credentials with permission to modify custom attributes.
The user name format is domain\username.
Select Use Integrated Credentials to use the vSphere proxy agent's service account to connect to
the vCenter Server.
If you choose to use your vSphere integrated credentials you do not need to enter a user name and
password.
7(Optional) Click Properties and add supplied custom properties, property groups, or your own
property definitions for the endpoint.
8(Optional) To configure NSX network and security settings for the endpoint, click Associations and
associate to an existing NSX endpoint.
You must have at least one NSX endpoint to create an association.
Configuring vRealize Automation
VMware, Inc. 197

9(Optional) Click Test Connection to validate the credentials, host endpoint address, and certificate
trust. The action also checks that the manager service and agent are running so that endpoint can be
data-collected. The OK action tests for these same conditions.
The Test Connection action returns information about any of the following conditions:
nCertificate error
If the certificate is not found, trusted, or has expired, you are prompted to accept a certificate
thumbprint. If you do not accept the thumbprint, you can still save the endpoint but machine
provisioning might fail.
nAgent error
The associated vSphere agent is not found. The agent must be running for the test to succeed.
nHost error
The specified endpoint address is not reachable or the associated manager service is not
running. The manager service must be running for the test to succeed.
nCredentials error
The specified user name and password combination is invalid for the endpoint at the specified
address.
nTimeout
The test action could not complete in the allowed two-minute time period.
If the Test Connection action fails, you can still save the endpoint but machine provisioning might
fail.
If there is a trusted certificate issue, for example the certificate has expired, you are prompted to
accept a certificate thumbprint.
10 Click OK to save the endpoint.
The OK action tests for the same conditions as the Test Connection action. If it finds any of the
preceding conditions, it returns a message. If it can save, it leaves the error on the screen for you to
review.
vRealize Automation collects data from your endpoint and discovers your compute resources.
Note Do not rename vSphere data centers after the initial data collection or provisioning might fail.
What to do next
Add the compute resources from your endpoint to a fabric group. See Create a Fabric Group.
Create an NSX Endpoint and Associate to a vSphere Endpoint
You can create an NSX endpoint and associate its NSX settings to an existing vSphere endpoint.
If you upgraded or migrated a vSphere endpoint that was using an NSX manager, a new NSX endpoint is
created that contains an association between the source vSphere endpoint and a new NSX endpoint.
Configuring vRealize Automation
VMware, Inc. 198
For information about validating the NSX connection and certificate trust, see Considerations When Using
Test Connection.
For related information about creating an NSX endpoint, see public articles such as this vmwarelab blog
post.
Prerequisites
nLog in to vRealize Automation as an IaaS administrator.
nYou must install a vSphere proxy agent to manage your vSphere endpoint, and you must use the
same exact name for your endpoint and agent. For information about installing the agent, see
Installing vRealize Automation.
nConfigure your NSX network settings. See Configuring Network and Security Component Settings.
nCreate a vSphere Endpoint.
In preparation for using NSX network, security, and load balancing capabilities in vRealize Automation,
when using NSX Manager credentials you must use the NSX Manager administrator account.
Procedure
1Select Infrastructure > Endpoints > Endpoints.
2Select New > Network and Security > NSX.
3Enter a name in the Name text box.
4(Optional) Enter a description in the Description text box.
5Enter the URL for the NSX instance in the Address text box.
The URL must be of the type: https://hostname or https://IP_address.
For example, https://nsx-manager.local.
6Enter the NSX administrator-level user name and password that are stored for the NSX endpoint.
7(Optional) Click Properties and add supplied custom properties, property groups, or your own
property definitions for the endpoint.
8To associate the NSX network and security settings to an existing vSphere endpoint, click
Associations and select an existing vSphere endpoint.
You must create the vSphere endpoint before you can create the association.
You can only associate an NSX endpoint to one vSphere endpoint. This association constraint means
that you cannot provision a universal on-demand network and attach it to vSphere machines that are
provisioned on different vCenters.
Configuring vRealize Automation
VMware, Inc. 199
9(Optional) Click Test Connection to validate the credentials, host endpoint address, and certificate
trust. The action also checks that the manager service and agent are running so that endpoint can be
data-collected. The OK action tests for these same conditions.
The Test Connection action returns information about any of the following conditions:
nCertificate error
If the certificate is not found, trusted, or has expired, you are prompted to accept a certificate
thumbprint. If you do not accept the thumbprint, you can still save the endpoint but machine
provisioning might fail.
nAgent error
The associated vSphere agent is not found. The agent must be running for the test to succeed.
nHost error
The specified endpoint address is not reachable or the associated manager service is not
running. The manager service must be running for the test to succeed.
nCredentials error
The specified user name and password combination is invalid for the endpoint at the specified
address.
nTimeout
The test action could not complete in the allowed two-minute time period.
If the Test Connection action fails, you can still save the endpoint but machine provisioning might
fail.
If there is a trusted certificate issue, for example the certificate has expired, you are prompted to
accept a certificate thumbprint.
10 Click OK to save the endpoint.
The OK action tests for the same conditions as the Test Connection action. If it finds any of the
preceding conditions, it returns a message. If it can save, it leaves the error on the screen for you to
review.
vRealize Automation collects data from your endpoint and discovers your compute resources.
What to do next
Add the compute resources from your endpoint to a fabric group. See Create a Fabric Group.
Create a vCloud Air Endpoint
You can create a vCloud Air endpoint for a an OnDemand or subscription service. You can optionally
associate proxy settings to the vCloud Director endpoint by associating to a Proxy endpoint.
Configuring vRealize Automation
VMware, Inc. 200

For information about vCloud Air Management Console, see vCloud Air documentation.
Note Reservations defined for vCloud Air endpoints and vCloud Director endpoints do not support the
use of network profiles for provisioning machines.
For vCloud Air endpoints, the Organization name and the vDC name must be identical for a vCloud Air
subscription instance.
For information about associating proxy settings to your endpoint, see Create a Proxy Endpoint and
Associate to a Cloud Endpoint.
Prerequisites
nLog in to vRealize Automation as an IaaS administrator.
nVerify that you have Virtual Infrastructure Administrator authorization for your vCloud Air
subscription service or OnDemand account.
nIf you want to configure additional security and force connections to pass through a proxy server,
create a Proxy endpoint. You can associate to the Proxy endpoint as you create the vCloud Director
endpoint. See Create a Proxy Endpoint and Associate to a Cloud Endpoint.
Procedure
1Select Infrastructure > Endpoints > Endpoints.
2Select New > Cloud > vCloud Air.
3Enter a name and, optionally, a description.
4Accept the default vCloud Air endpoint address in the Address text box or enter a new one.
The default vCloud Air endpoint address is https://vca.vmware.com, as specified in the Default URL
for vCloud Air endpoint global property.
5Enter your administrator-level user name and password.
The credentials must be those of thevCloud Air subscription service or OnDemand account
administrator.
The user name format is domain\username.
Provide credentials for an organization administrator with rights to connect by using
VMware Remote Console.
6(Optional) Click Properties and add supplied custom properties, property groups, or your own
property definitions for the endpoint.
7(Optional) To configure additional security and force connections to pass through a proxy server, click
Associations and associate to an existing Proxy endpoint.
You must have at least one Proxy endpoint to create an association.
8Click OK.
Configuring vRealize Automation
VMware, Inc. 201

What to do next
Create a Fabric Group.
Create a vCloud Director Endpoint
You can create a vCloud Director endpoint to manage all of the vCloud Director virtual data centers
(vDCs) in your environment, or you can create separate endpoints to manage each vCloud Director
organization. You can optionally associate proxy settings to the vCloud Director endpoint by associating
to a Proxy endpoint.
For information about Organization vDCs, see vCloud Director documentation.
Do not create a single endpoint and individual organization endpoints for the same vCloud Director
instance.
vRealize Automation uses a proxy agent to manage vSphere resources.
Note Reservations defined for vCloud Air endpoints and vCloud Director endpoints do not support the
use of network profiles for provisioning machines.
For information about associating proxy settings to your endpoint, see Create a Proxy Endpoint and
Associate to a Cloud Endpoint.
Prerequisites
nLog in to vRealize Automation as an IaaS administrator.
nIf you want to configure additional security and force connections to pass through a proxy server,
create a Proxy endpoint. You can associate to the Proxy endpoint as you create the vCloud Director
endpoint. See Create a Proxy Endpoint and Associate to a Cloud Endpoint.
Procedure
1Select Infrastructure > Endpoints > Endpoints.
2Select New > Cloud > vCloud Director.
3Enter a name and, optionally, a description.
4Enter the URL of the vCloud Director server in the Address text box.
The URL must be of the type FQDN or IP_address.
For example, https://mycompany.com.
5Enter your administrator-level user name and password.
nTo connect to the vCloud Director server and specify the organization for which the user has the
administrator role, use organization administrator credentials. With these credentials, the
endpoint can access only the associated organization vDCs. You can add endpoints for each
additional organization in the vCloud Director instance to integrate with vRealize Automation.
nTo allow access to all Organization vDCs in the vCloud Director instance, use system
administrator credentials for a vCloud Director and leave the Organization text box empty.
Configuring vRealize Automation
VMware, Inc. 202

6If you are an organization administrator, you can enter a vCloud Director organization name in the
Organization text box.
Option Description
Discover all Organization vCDs If you have implemented vCloud Director in a private cloud, you can leave the
Organization text box blank to allow the application to discover all the available
Organization vDCs.
Separate endpoints for each
Organization vCD
Enter a vCloud Director organization name in the Organization text box.
The Organization name matches your vCloud Director Organization name, which might also appear
as your virtual data center (vDC) name. If you are using a Virtual Private Cloud, then this name is a
unique identifier in the M123456789-12345 format. In a dedicated cloud, it is the given name of the
target vDC.
If you are connecting directly to vCloud Director at the system level, for example leaving the
Organization field blank, you need system administrator credentials. If you are entering an
Organization in the endpoint, you need a user who has Organization Administrator credentials in that
organization.
Provide credentials with rights to connect by using VMware Remote Console.
nTo manage all organizations with a single endpoint, provide credentials for a system
administrator.
nTo manage each organization virtual datacenter (vDC) with a separate endpoint, create separate
organization administrator credentials for each vDC.
Do not create a single system-level endpoint and individual organization endpoints for the same
vCloud Director instance.
7(Optional) Click Properties and add supplied custom properties, property groups, or your own
property definitions for the endpoint.
8(Optional) To configure additional security and force connections to pass through a proxy server, click
Associations and associate to an existing Proxy endpoint.
You must have at least one Proxy endpoint to create an association.
9Click OK.
What to do next
Create a Fabric Group.
Create an Amazon Endpoint
You can create an endpoint to connect to an Amazon instance. You can optionally associate proxy
settings to the Amazon endpoint by associating to a Proxy endpoint.
vRealize Automation provides several Amazon instance types for you to use when creating blueprints, but
if you want to import your own instance types see Add an Amazon Instance Type.
Configuring vRealize Automation
VMware, Inc. 203
For information about associating proxy settings to your endpoint, see Create a Proxy Endpoint and
Associate to a Cloud Endpoint.
Prerequisites
nLog in to vRealize Automation as an IaaS administrator.
nIf you want to configure additional security and force connections to pass through a proxy server,
create a Proxy endpoint. You can associate to the Proxy endpoint as you create the Amazon
endpoint. See Create a Proxy Endpoint and Associate to a Cloud Endpoint.
Procedure
1Select Infrastructure > Endpoints > Endpoints.
2Select New > Cloud > Amazon EC2.
3Enter a name and, optionally, a description.
Typically this name indicates the Amazon account that corresponds to this endpoint.
4Enter the administrative-level access key ID for the Amazon endpoint.
Only one endpoint can be associated with an Amazon access key ID.
To obtain the access key needed to create the Amazon endpoint, you must either request a key from
a user who has AWS Full Access Administrator credentials or be additionally configured with the
AWS Full Access Administrator policy. See Amazon documentation for details.
5Enter the secret access key for the Amazon endpoint.
6(Optional) Click Properties and add supplied custom properties, property groups, or your own
property definitions for the endpoint.
7(Optional) To configure additional security and force connections to pass through a proxy server, click
Associations and associate to an existing Proxy endpoint.
You must have at least one Proxy endpoint to create an association.
8Click OK.
After you create the endpoint, vRealize Automation begins collecting data from the Amazon Web Services
regions.
What to do next
Add the compute resources from your endpoint to a fabric group. See Create a Fabric Group.
Add an Amazon Instance Type
Several instance types are supplied with vRealize Automation for use with Amazon blueprints. An
administrator can add and remove instance types.
The machine instance types managed by IaaS administrators are available to blueprint architects when
they create or edit an Amazon blueprint. Amazon machine images and instance types are made available
through the Amazon Web Services product.
Configuring vRealize Automation
VMware, Inc. 204

Prerequisites
Log in to vRealize Automation as an IaaS administrator.
Procedure
1Click Infrastructure > Administration > Instance Types.
2Click New.
3Add a new instance type, specifying the following parameters.
Information about the available Amazon instances types and the setting values that you can specify
for these parameters is available from Amazon Web Services documentation in EC2 Instance Types -
Amazon Web Services (AWS) at aws.amazon.com/ec2 and Instance Types at
docs.aws.amazon.com.
nName
nAPI name
nType Name
nIO Performance Name
nCPUs
nMemory (GB)
nStorage (GB)
nCompute Units
4Click the Save icon ( ).
When IaaS architects create Amazon Web Services blueprints, they can use your custom instance types.
What to do next
Add the compute resources from your endpoint to a fabric group. See Create a Fabric Group.
Create a Proxy Endpoint and Associate to a Cloud Endpoint
You can create a proxy endpoint and associate its proxy settings to a vCloud Air, vCloud Director, or
Amazon endpoint.
If you upgraded or migrated a vCloud Air, vCloud Director, or Amazon endpoint that was using a proxy
manager, a new vCloud Air, vCloud Director, or Amazon endpoint is created that contains an association
between the vCloud Air, vCloud Director, or Amazon endpoint and a new Proxy endpoint.
Prerequisites
nLog in to vRealize Automation as an IaaS administrator.
nCreate one of the following endpoint types:
nCreate a vCloud Air Endpoint
Configuring vRealize Automation
VMware, Inc. 205
nCreate an Amazon Endpoint
nCreate a vCloud Director Endpoint
You must have at least one vCloud Air, vCloud Director, or Amazon endpoint to create an association
from the Proxy endpoint.
Procedure
1Select Infrastructure > Endpoints > Endpoints.
2Select New > Network and Security > Proxy.
3Enter a name in the Name text box.
4(Optional) Enter a description in the Description text box.
5Enter the URL for the installed proxy agent in the Address text box.
6Enter the port number to use for connecting to the proxy server in the Port text box.
7Enter your administrator-level user name and password.
8(Optional) Click Properties and add supplied custom properties, property groups, or your own
property definitions for the endpoint.
9To associate the proxy settings to a vCloud Air, vCloud Director, or Amazon endpoint, click
Associations and select one or more endpoints.
You must have at least one vCloud Air, vCloud Director, or Amazon endpoint to create an association.
You can associate the Proxy endpoint to more than one endpoint.
10 Click OK.
vRealize Automation collects data from your endpoint and discovers your compute resources.
What to do next
Add the compute resources from your endpoint to a fabric group. See Create a Fabric Group.
Create a Proxy Endpoint for OVF Host Web Site
You can create a proxy endpoint to use when importing OVF to a vSphere machine component in a
blueprint or as a value set for an Image component profile when the OVF is hosted on a Web site.
For information about configuring for OVF deployment, see Create a vSphere Endpoint and Configuring a
Blueprint to Provision from an OVF.
Prerequisites
nLog in to vRealize Automation as an IaaS administrator.
Procedure
1Select Infrastructure > Endpoints > Endpoints.
2Select New > Network and Security > Proxy.
Configuring vRealize Automation
VMware, Inc. 206
3Enter a name in the Name text box.
4(Optional) Enter a description in the Description text box.
5Enter the URL for the Web site that is hosting the OVF in the Address text box.
6Enter the port number to use for connecting to the Web site proxy server in the Port text box.
7Enter your administrator-level user name and password.
8(Optional) Click Properties and add supplied custom properties, property groups, or your own
property definitions for the endpoint.
9Click OK.
You can now use the endpoint to define the Web site at which to obtain OVF. For details, see Define
Blueprint Settings for a vSphere Component By Using an OVF and Define an Image Value Set for a
Component Profile By Using an OVF.
Create a vRealize Orchestrator Endpoint
You can create a vRealize Orchestrator endpoint to connect to a vRealize Orchestrator server.
You can configure multiple endpoints to connect to different vRealize Orchestrator servers, but you must
configure a priority for each endpoint.
When executing vRealize Orchestrator workflows, vRealize Automation tries the highest priority
vRealize Orchestrator endpoint first. If that endpoint is not reachable, then it proceeds to try the next
highest priority endpoint until a vRealize Orchestrator server is available to run the workflow.
Prerequisites
nLog in to vRealize Automation as an IaaS administrator.
Procedure
1Select Infrastructure > Endpoints > Endpoints.
2Select New > Orchestration > vRealize Orchestrator.
3Enter a name and, optionally, a description.
4Enter a URL with the fully qualified name or IP address of the vRealize Orchestrator server and the
vRealize Orchestrator port number.
The transport protocol must be HTTPS. If no port is specified, the default port 443 is used.
To use the default vRealize Orchestrator instance embedded in the vRealize Automation appliance,
type https://vrealize-automation-appliance-hostname:443/vco.
5Provide your vRealize Orchestrator credentials in the User name and Password text boxes to
connect to the vRealize Orchestrator endpoint.
The credentials you use should have Execute permissions for any vRealize Orchestrator workflows to
call from IaaS.
Configuring vRealize Automation
VMware, Inc. 207
To use the default vRealize Orchestrator instance embedded in the vRealize Automation appliance,
the user name is administrator@vsphere.local and the password is the administrator password
that was specified when configuring SSO.
6Enter an integer greater than or equal to 1 in Priority text box.
A lower value specifies a higher priority.
7(Optional) Click Properties and add supplied custom properties, property groups, or your own
property definitions for the endpoint.
8Click OK.
Configuring vRealize Orchestrator Endpoints for Networking
If you are using vRealize Automation workflows to call vRealize Orchestrator workflows, you must
configure the vRealize Orchestrator instance or server as an endpoint.
For information about adding a vRealize Orchestrator endpoint, see Create a vRealize Orchestrator
Endpoint.
You can associate a vRealize Orchestrator endpoint with a machine blueprint to make sure that all of the
vRealize Orchestrator workflows for machines provisioned from that blueprint are run using that endpoint.
vRealize Automation by default includes an embedded vRealize Orchestrator instance. It is
recommended that you use this as your vRealize Orchestrator endpoint for running vRealize Automation
workflows in a test environment or creating a proof of concept.
It is also recommended that you use this vRealize Orchestrator endpoint for running vRealize Automation
workflows in a production environment.
The vRealize Orchestrator plug-in is automatically installed with vRealize Orchestrator 7.1 and later.
There is no separate vRealize Orchestrator plug-in to install.
Create a vRealize Operations Manager Endpoint
You can create a vRealize Operations Manager endpoint to connect to a vRealize Operations Manager
host suite API.
For information about validating the vRealize Operations Manager connection and certificate trust, see
Considerations When Using Test Connection.
Prerequisites
nLog in to vRealize Automation as an IaaS administrator.
Procedure
1Select Infrastructure > Endpoints > Endpoints.
2Select New > Management > vRealize Operations Manager.
3Enter a name and, optionally, a description.
Configuring vRealize Automation
VMware, Inc. 208
4Enter the URL for the vRealize Operations Manager server in the Address text box.
The URL must be of the format: https://hostname/suite-api.
5Enter your vRealize Operations Manager user name and password credentials.
6(Optional) Click Properties and add supplied custom properties, property groups, or your own
property definitions for the endpoint.
7(Optional) Click Test Connection to validate the credentials, host endpoint address, and certificate
trust. The action also checks that the manager service and agent are running so that endpoint can be
data-collected. The OK action tests for these same conditions.
The Test Connection action returns information about any of the following conditions:
nCertificate error
If the certificate is not found, trusted, or has expired, you are prompted to accept a certificate
thumbprint. If you do not accept the thumbprint, you can still save the endpoint but machine
provisioning might fail.
nAgent error
The associated vSphere agent is not found. The agent must be running for the test to succeed.
nHost error
The specified endpoint address is not reachable or the associated manager service is not
running. The manager service must be running for the test to succeed.
nCredentials error
The specified user name and password combination is invalid for the endpoint at the specified
address.
nTimeout
The test action could not complete in the allowed two-minute time period.
If the Test Connection action fails, you can still save the endpoint but machine provisioning might
fail.
If there is a trusted certificate issue, for example the certificate has expired, you are prompted to
accept a certificate thumbprint.
8Click OK.
Create a Third-Party IPAM Provider Endpoint
If you registered and configured a third-party IPAM endpoint type in vRealize Orchestrator, you can create
an endpoint for that IPAM solution provider in vRealize Automation.
Configuring vRealize Automation
VMware, Inc. 209

If you imported a vRealize Orchestrator package for providing an external IPAM solution and registered
the IPAM endpoint type in vRealize Orchestrator, you can select that IPAM endpoint type when you create
a vRealize Automation endpoint.
Note This example is based on use of the Infoblox IPAM plug-in, which is available for download at the
VMware Solution Exchange. You can also use this procedure if you created your own IPAM provider
package using the VMware-supplied IPAM Solution SDK. The procedure for importing and configuring
your own third-party IPAM solution package is the same as described in the prerequisites.
The first IPAM endpoint for vRealize Automation is created when you register the endpoint type for the
IPAM solution provider plug-in in vRealize Orchestrator.
Prerequisites
nObtain and Import a Third-Party IPAM Provider Package in vRealize Orchestrator.
nRun Workflow to Register Third-Party IPAM Endpoint Type in vRealize Orchestrator.
nLog in to vRealize Automation as an IaaS administrator.
For this example, create an Infoblox IPAM endpoint using an endpoint type that you registered in
vRealize Orchestrator for your third-party IPAM provider plug-in or package.
Procedure
1Select Infrastructure > Endpoints > Endpoints.
2Select New > IPAM > IPAM endpoint type.
Select a registered external IPAM provider endpoint type such as Infoblox. External IPAM provider
endpoints are only available if you imported a third-party vRealize Orchestrator package, and run the
package workflows to register the endpoint type.
For Infoblox IPAM, only primary IPAM endpoint types are listed. You can specify secondary IPAM
endpoint types by using custom properties.
For this example, select a registered external IPAM endpoint type, for example Infoblox NIOS.
3Enter a name and, optionally, a description.
4Enter the location of the registered IPAM endpoint in the Address text box using the provider-specific
URL format, for example https:/host_name/name.
For example, you might create several IPAM endpoints, such as https://nsx62-scale-infoblox
and https://nsx62-scale-infoblox2, when you registered the IPAM endpoint type in
vRealize Orchestrator. Enter a primary registered endpoint type. To also specify one or more
secondary IPAM endpoints, you can use custom properties to emulate the extensible attributes that
are specific to the IPAM solution provider.
Configuring vRealize Automation
VMware, Inc. 210
5Enter the user name and password required to access the IPAM solution provider account.
The IPAM solution provider account credentials are required to create, configure, and edit the
endpoint when working in vRealize Automation. vRealize Automation uses the IPAM endpoint
credentials to communicate with the specified endpoint type, for example Infoblox, to allocate IP
addresses and perform other operations. This behavior is similar to how vRealize Automation uses
vSphere endpoint credentials.
6(Optional) Click Properties and add endpoint properties that are meaningful to the specific IPAM
solution provider.
Each IPAM solution provider, for example Infoblox and Bluecat, use unique extensible attributes that
you can emulate by using vRealize Automation custom properties. For example, Infoblox uses
extensible attributes to differentiate primary and secondary endpoints.
7Click OK.
What to do next
Add the compute resources from your endpoint to a fabric group. See Create a Fabric Group.
Create a Microsoft Azure Endpoint
You can create a Microsoft Azure endpoint to facilitate a credentialed connection between
vRealize Automation and an Azure deployment.
An endpoint establishes a connection to a resource, in this case an Azure instance, that you can use to
create virtual machine blueprints. You must have an Azure endpoint to use as the basis of blueprints for
provisioning Azure virtual machines. If you use multiple Azure subscriptions, you need endpoints for each
subscription ID.
As an alternative, you can create an Azure connection directly from vRealize Orchestrator using the Add
an Azure Connection command located under Library > Azure > Configuration in the
vRealize Orchestrator workflow tree. For most scenarios, creating a connection through the endpoint
configuration as described herein is the preferred option.
Azure endpoints are supported by vRealize Orchestrator and XaaS functionality. You can create, delete,
or edit an Azure endpoint. Note that if you make any changes to an existing endpoint and do not execute
any updates on the Azure portal through the updated connection for several hours, then you must restart
the vRealize Orchestrator service using the service vco-service restart command. Failure to
restart the service may result in errors.
Prerequisites
nConfigure a Microsoft Azure instance and obtain a valid Microsoft Azure subscription from which you
can use the subscription ID. See
http://www.vaficionado.com/2016/11/using-new-microsoft-azure-endpoint-vrealize-automation-7-2/ for
more information about configuring Azure and obtaining a subscription ID.
nVerify that your vRealize Automation deployment has at least one tenant and one business group.
Configuring vRealize Automation
VMware, Inc. 211
nCreate an Active Directory application as described in https://azure.microsoft.com/en-
us/documentation/articles/resource-group-create-service-principal-portal.
nMake note of the following Azure related information, as you will need it during endpoint and blueprint
configuration.
nsubscription ID
ntenant ID
nstorage account name
nresource group name
nlocation
nvirtual network name
nclient application ID
nclient application secret key
nvirtual machine image URN
nThere are unique settings required for creating and deploying cloud applications for Azure in the
China environment. For related information, see https://docs.microsoft.com/en-us/azure/china/china-
get-started-developer-guide. When creating a vRealize Automation Azure endpoint for China, the
service URL, login URL, and storage URL must be specified as follows:
nService URL: https://management.chinacloudapi.cn
nLogin URL: https://login.chinacloudapi.cn/
nStorage URL: https://storage_account_name.blob.core.chinacloudapi.cn/
nLog in to vRealize Automation as a tenant administrator.
Procedure
1Select Administration > vRO Configuration > Endpoints.
2Click the New icon ( ).
3On the Plug-in tab, click the Plug-in drop-down menu and select Azure Plug-in.
4Click Next.
5Enter a name and, optionally, a description.
6Click Next.
7Populate the text boxes on the Details tab as appropriate for the endpoint.
Parameter Description
Connection settings
Azure Connection
Configuring vRealize Automation
VMware, Inc. 212

Parameter Description
Connection name Unique name for the new endpoint connection. This name
appears in the vRealize Orchestrator interface to help you
identify a particular connection.
Azure subscription id The identifier for your Azure subscription. The ID defines the
storage accounts, virtual machines and other Azure resources
to which you have access.
Resource manager settings
Azure service URI The URI through which you gain access to your Azure
instance. The default value of
https://management.azure.com/ is appropriate for many
typical implementations.
Tenant Id The Azure tenant ID that you want the endpoint to use.
Client Id The Azure client identifier that you want the endpoint to use.
This is assigned when you create an Active Directory
application.
Client secret The key used with an Azure client ID. This key is assigned
when you create an Active Directory application.
Login URL The URL used to access the Azure instance. The default
value of https://login.windows.net/ is appropriate for
many typical implementations.
Proxy Settings
Proxy host If your company uses a proxy Web server, enter the host
name of that server.
Proxy port If your company uses a proxy Web server, enter the port
number of that server.
8(Optional) Click Properties and add supplied custom properties, property groups, or your own custom
property definitions.
9Click Finish.
What to do next
Create appropriate resource groups, storage accounts, and network security groups in Azure. You should
also create load balancers if appropriate for your implementation.
Configuring vRealize Automation
VMware, Inc. 213

Action Options
Create an Azure resource group nCreate the resource group using the Azure portal. See the
Azure documentation for specific instructions.
nUse the appropriate vRealize Orchestrator workflow found
under the Library/Azure/Resource/Create resource
group.
nIn vRealize Automation, create and publish an XaaS
blueprint that contains the vRealize Orchestrator workflow.
You can request the resource group after attaching it to the
service and entitlements. Note that the Resource Group
resource type is not supported or managed by
vRealize Automation.
Create an Azure storage account nUse Azure to create a storage account. See the Azure
documentation for specific instructions.
nUse the appropriate vRealize Orchestrator workflow found
under Library/Azure/Storage/Create storage
account.
nIn vRealize Automation, create and publish an XaaS
blueprint that contains the vRealize Orchestrator workflow.
You can request the storage account after attaching it to the
service and entitlements.
Create an Azure network security group nUse Azure to create a security group. See the Azure
documentation for specific instructions.
nUse the appropriate vRealize Orchestrator workflow found
under the Library/Azure/Network/Create Network
security group .
nIn vRealize Automation, create and publish an XaaS
blueprint that contains the vRealize Orchestrator workflow.
You can request the security group after attaching it to the
service and entitlements.
Create a Puppet Endpoint
You can create a Puppet endpoint to support addition of Puppet configuration management components
to vSphere virtual machines. These components enable you to use a Puppet Master to enforce
configuration management on virtual machines.
An endpoint establishes a connection to an external resource, in this case a Puppet Master instance. The
endpoint enables you to place Puppet configuration management components on vSphere virtual
machine blueprints. Provisioned virtual machines based on these blueprints contain a Puppet agent that
facilitates control by the associated Puppet Master.
Prerequisites
nInstall and configure Puppet Enterprise as appropriate for your environment.
nDownload and install the Puppet plug-in version 3.0 on your vRealize Orchestrator deployment. You
can download the plug-in from https://solutionexchange.vmware.com/store/products/puppet-plugin-
for-vrealize-automation. See https://docs.puppet.com/pe/latest/vro_intro.html for information about
installing and using the plug-in.
Configuring vRealize Automation
VMware, Inc. 214
Procedure
1Select Administration > vRO Configuration > Endpoints.
2Click the New icon ( ).
3On the Plug-in tab, click the Plug-in drop-down menu and select Puppet Plug-in.
4Click Next.
5Enter a name and, optionally, a description.
6Click Next.
7Populate the text boxes on the Details tab as appropriate for the endpoint.
Parameter Description
Display name for this Puppet Master The name of the Puppet Master associated with the endpoint
connection . This name appears in the vRealize Orchestrator
interface to help you identify a particular connection.
Hostname or IP address The FQDN or IP address of the Puppet Master used by this
endpoint.
SSH Port The port defined for use with secure communication for this
Puppet Master.
SSH RBAC and Username The role based access control username required to connect
with the Puppet Master.
SSH and RBAC Password The role based access control username required for secure
configuration with the Puppet Master.
Use sudo for shell commands on this master? Select this option if you want administrators to be able to use
Sudo commands on Linux servers for security options on
virtual machines based on this endpoint..
8Click OK.
You can now add Puppet configuration management components to vSphere blueprints so that you can
deploy vSphere virtual machines that contain Puppet agents.
Create a Hyper-V (SCVMM) Endpoint
You can create endpoints to allow vRealize Automation to communicate with your SCVMM environment
and discover compute resources, collect data, and provision machines.
Prerequisites
nLog in to vRealize Automation as an IaaS administrator.
nYou must install and configure a DEM agent to manage your Hyper-V (SCVMM) endpoint. For
information, see SCVMM requirements information in the Installing vRealize Automation.
For related information, see Preparing Your SCVMM Environment.
Configuring vRealize Automation
VMware, Inc. 215
Procedure
1Select Infrastructure > Endpoints > Endpoints.
2Select New > Virtual > Hyper-V (SCVMM).
3Enter a name in the Name text box.
4(Optional) Enter a description in the Description text box.
5Enter the URL for the endpoint in the Address text box.
The URL must be of the type: FQDN or IP_address.
For example: mycompany-scvmm1.mycompany.local.
6Enter the administrative-level user name and password that you stored for this endpoint.
If you did not already store the credentials, you can do so now.
7(Optional) Click Properties and add supplied custom properties, property groups, or your own
property definitions for the endpoint.
8Click OK.
vRealize Automation collects data from your endpoint and discovers your compute resources.
What to do next
Add the compute resources from your endpoint to a fabric group. See Create a Fabric Group.
Create an OpenStack Endpoint
You create an endpoint to allow vRealize Automation to communicate with your OpenStack instance.
Prerequisites
nLog in to vRealize Automation as an IaaS administrator.
nVerify that your vRealize Automation DEMs are installed on a machine that meets the OpenStack or
PowerVC requirements. See Installing vRealize Automation.
nVerify that your flavor of OpenStack is currently supported. See vRealize Automation Support Matrix.
After you upgrade or migrate from an earlier vRealize Automation installation, if data collection fails for
OpenStack endpoints you can add the
VMware.Endpoint.Openstack.IdentityProvider.Domain.Name custom property to each Keystone
V3 OpenStack endpoint to specify a valid domain name and enable data collection.
Procedure
1Select Infrastructure > Endpoints > Endpoints.
2Select New > Cloud > OpenStack.
3Enter a name and, optionally, a description.
Configuring vRealize Automation
VMware, Inc. 216

4Enter the URL for the endpoint in the Address text box.
Option Description
PowerVC The URL must be of the format http://myPowerVC.com:5000 or
http://FQDN:5000.
Openstack The URL must be of the format FQDN:5000 or IP_address:5000. Do not include
the /v2.0 suffix in the endpoint address.
5Enter your administrative-level user name and password.
The credentials you provide must have the administrator role in the OpenStack tenant associated with
the endpoint.
6Enter an OpenStack tenant name in the OpenStack project text box.
If you set up multiple endpoints with different OpenStack tenants, create reservation policies for each
tenant. This ensures that machines are provisioned to the appropriate tenant resources.
7Click Properties and add supplied custom properties, property groups, or your own property
definitions for the endpoint.
If Keystone V3 is in effect, add the
VMware.Endpoint.Openstack.IdentityProvider.Domain.Name custom property to designate a
specific domain.
8Click OK.
vRealize Automation collects data from your endpoint and discovers your compute resources.
What to do next
Add the compute resources from your endpoint to a fabric group. See Create a Fabric Group.
Create a Hyper-V, XenServer, or Xen Pool Endpoint
You can create endpoints to allow vRealize Automation to communicate with the Hyper-V, XenServer, or
Xen pool master environment and discover compute resources, collect data, and provision machines.
Prerequisites
nLog in to vRealize Automation as an IaaS administrator.
nA system administrator must install a proxy agent with stored credentials that correspond to your
endpoint. See Installing vRealize Automation.
Procedure
1Select Infrastructure > Endpoints > Agents.
Configuring vRealize Automation
VMware, Inc. 217

2Enter the fully qualified DNS name of your Hyper-V server, Xen server, or Xen pool master in the
Compute resource text box.
Note For a Xen pool endpoint, you must enter the name of the pool master.
To avoid duplicate entries in the vRealize Automation compute resource table, specify an address
that matches the configured Xen pool master address. For example, if the Xen pool master address
uses the host name, enter the host name and not the FQDN. If the Xen pool master address uses
FQDN, then enter the FQDN.
3Select the proxy agent that your system administrator installed for this endpoint from the Proxy agent
name drop-down menu.
4(Optional) Enter a description in the Description text box.
5Click OK.
vRealize Automation collects data from your endpoint and discovers your compute resources.
What to do next
Add the compute resources from your endpoint to a fabric group. See Create a Fabric Group.
Considerations When Using Test Connection
You can use a test connection action to validate the credentials, host endpoint address, and certificate for
a vSphere, NSX, or vRealize Operations Manager endpoint.
The action also checks that the manager service and agent are running so that endpoint can be data-
collected.
The Test Connection action returns information about any of the following conditions:
nCertificate error
If the certificate is not found, trusted, or has expired, you are prompted to accept a certificate
thumbprint. If you do not accept the thumbprint, you can still save the endpoint but machine
provisioning might fail.
nAgent error
The associated vSphere agent is not found. The agent must be running for the test to succeed.
nHost error
The specified endpoint address is not reachable or the associated manager service is not running.
The manager service must be running for the test to succeed.
nCredentials error
The specified user name and password combination is invalid for the endpoint at the specified
address.
nTimeout
The test action could not complete in the allowed two-minute time period.
Configuring vRealize Automation
VMware, Inc. 218
If you receive errors when running Test Connection on upgraded or migrated endpoints, see
Considerations When Working With Upgraded or Migrated Endpoints for steps needed to establish
certificate trust.
Import or Export Endpoints Programmatically
To programmatically import and export endpoints in vRealize Automation 7.3 or later you must use either
new vRealize Automation endpoint-configuration-service REST APIs or use vRealize CloudClient.
The vRealize CloudClient documentation contains all applicable command line formatting, samples, and
usage information.
You can download the vRealize CloudClient application and documentation from the vRealize CloudClient
product page of the https://developercenter.vmware.com/tool/cloudclient.
Viewing Endpoint Sources and Running Data Collection
You can view the machine and compute resource that is associated with a specific endpoint. You can also
manually start data collection.
Prerequisites
nLog in to vRealize Automation as an IaaS administrator.
nVerify that at least one endpoint exists.
Procedure
1Select Infrastructure > Endpoints > Endpoints.
2Select an existing endpoint row and click Actions.
Select any one of the following available actions.
nClick View Compute Resources to open the Infrastructure > Compute Resource page. You
can use this page to view and edit compute resource settings.
nClick View Machines to open the Infrastructure > Managed Machines page.
nClick Data Collection to open the Data Collection page and start data collection for the endpoint.
You can refresh the page to display the current status of the request.
Considerations When Working With Upgraded or Migrated Endpoints
After you upgrade or migrate from a pre-vRealize Automation 7.3 release, the following considerations
are important to understand and act on.
This information applies to endpoints that were upgraded or migrated to this vRealize Automation release.
nWhen you upgrade or migrate from a pre-vRealize Automation 7.3 release, each vCloud Air,
vCloud Director, and Amazon endpoint that contains proxy settings is associated to a new proxy
endpoint that contains its proxy settings.
Configuring vRealize Automation
VMware, Inc. 219
After upgrade or migration, the new Proxy endpoint name is Proxy_YYYYY where YYYYY is a hash
of the proxy's URL, port, and credentials. If you used the same proxy settings (for example the same
URL, port, and credentials) for a different endpoint (for example, a vCloud Air or Amazon endpoint),
after upgrade or migration there is only one Proxy endpoint and an association between the
vCloud Air and Amazon endpoint and the new Proxy endpoint. A proxy endpoint can be associated to
more than one Amazon, vCloud Air or vCloud Director endpoint.
nWhen you upgrade or migrate vSphere endpoints that contain NSX manager settings, each vSphere
endpoint is associated to a new NSX endpoint that contains its NSX manager settings.
After upgrade or migration, the NSX endpoint name is NSX_XXXXX where XXXXX is the name of the
parent vSphere endpoint in the pre-vRealize Automation 7.3 release.
nWhen vRealize Automation upgrade or migration is finished, an infrastructure administrator can
change the new NSX and Proxy endpoint names.
nThe default security setting for upgraded or migrated endpoints is not to accept untrusted certificates.
nAfter upgrading or migrating from an earlier vRealize Automation installation, if you were using
untrusted certificates you must perform the following steps for all vSphere and NSX endpoints to
enable certificate validation. Otherwise, the endpoint operations fail with certificate errors. For more
information, see VMware Knowledge Base articles Endpoint communication is broken after upgrade
to vRA 7.3 (2150230) at http://kb.vmware.com/kb/2150230 and How to download and install vCenter
Server root certificates to avoid Web Browser certificate warnings (2108294) at
http://kb.vmware.com/kb/2108294.
a After upgrade or migration, log in to the vRealize Automation vSphere agent machine and restart
your vSphere agents by using the Services tab.
Migration might not restart all agents, so manually restart them if needed.
b Wait for at least one ping report to finish. It takes a minute or two for a ping report to finish.
c When the vSphere agents have started data collection, log in to vRealize Automation as an IaaS
administrator.
d Click Infrastructure > Endpoints > Endpoints.
e Edit a vSphere endpoint and click Test Connection.
f If a certificate prompt appears, click OK to accept the certificate.
If a certificate prompt does not appear, the certificate might currently be correctly stored in a
trusted root authority of the Windows machine hosting service for the endpoint, for example as a
proxy agent machine or DEM machine.
g Click OK to apply the certificate acceptance and save the endpoint.
h Repeat this procedure for each vSphere endpoint.
i Repeat this procedure for each NSX endpoint.
Configuring vRealize Automation
VMware, Inc. 220
If the Test Connection action is successful but some data collection or provisioning operations fail,
you can install the same certificate on all the agent machines that serve the endpoint and on all DEM
machines. Alternatively, you can uninstall the certificate from existing machines and repeat the
preceding procedure for the failing endpoint.
nThe vRealize Automation REST APIs that were used to programmatically create, edit, and delete
endpoints in vRealize Automation 7.2 and earlier are no longer supported in vRealize Automation 7.3
and later. To programmatically create, edit, and delete endpoints in vRealize Automation 7.3 or later
you must use either new vRealize Automation endpoint-configuration-service REST APIs or use
vRealize CloudClient.
nAfter you upgrade or migrate from an earlier vRealize Automation installation, if data collection fails
for OpenStack endpoints you can add the
VMware.Endpoint.Openstack.IdentityProvider.Domain.Name custom property to each
Keystone V3 OpenStack endpoint to specify a valid domain name and enable data collection.
nWhen you upgrade a third-party IPAM endpoint, such as Infoblox IPAM, the vRealize Orchestrator
package that contains the RegisterIPAMEndpoint workflow is upgraded. You might need to rerun
the workflow in vRealize Orchestrator when the vRealize Automation upgrade is finished.
nTo make a credentials change to multiple endpoints, you can either edit the endpoints individually or
use vRealize CloudClient to perform a bulk update.
nSome endpoint types, such as vCloud Air and vCloud Director, cannot be upgraded or migrated
directly from vRealize Automation 6.2.x to vRealize Automation 7.3 or greater.
nAfter a successful upgrade or migration to vRealize Automation 7.3, if the Infrastructure >
Endpoints page does not show any endpoints or only shows some endpoint types and endpoints,
see Knowledge Base Article 2150252 for a suggested workaround.
Considerations When Deleting Endpoints
You can delete certain endpoint types under certain conditions.
nYou can delete endpoints that have not been data-collected.
nYou can delete an OpenStack, Amazon and VRO endpoint if it has been data collected, but has no
reservations. Other endpoint types cannot be deleted if they have been data collected.
nYou can delete a third-party IPAM endpoint if it has no association to a network profile.
nWhen deleting a vSphere endpoint, the confirmation prompt lists the following dependencies:
nThe endpoint has been data-collected.
nThe endpoint is referenced in a reservation that maps to a compute resource. You cannot delete
an endpoint is referenced in a reservation. Reservations require a compute resource.
nThe endpoint contains a template that is referenced in an existing blueprint.
The blueprint is not deleted when you delete the endpoint.
nThe endpoint is used by virtual machines that are in use.
Configuring vRealize Automation
VMware, Inc. 221

nYou can delete endpoints programmatically by using either the new CREATE, EDIT, and DELETE
vRealize Automation endpoint-configuration-service REST APIs introduced in vRealize Automation
7.3 or by using vRealize CloudClient. You cannot delete endpoints by using the pre-
vRealize Automation 7.3 endpoint-configuration-service REST APIs.
Troubleshooting Attached vSphere Endpoint Cannot be Found
When data collection fails for a vSphere endpoint, it can be due to a mismatch between the proxy name
and the endpoint name.
Problem
Data collection fails for a vSphere endpoint. The log messages return an error similar to the following:
This exception was caught: The attached endpoint
'vCenter' cannot be found.
Cause
The endpoint name you configure in vRealize Automation must match the endpoint name provided to the
vSphere proxy agent during installation. Data collection fails for a vSphere endpoint if there is a mismatch
between the endpoint name and the proxy agent name. Until an endpoint with a matching name is
configured, the log messages return an error similar to the following:
This exception was caught: The attached endpoint
'expected endpoint name' cannot be found.
Solution
1Select Infrastructure > Monitoring > Log.
2Look for an Attached Endpoint Cannot be Found error message.
For example,
This exception was caught: The attached endpoint
'expected endpoint name' cannot be found.
3Edit your vSphere endpoint to match the expected endpoint name shown in the log message.
a Select Infrastructure > Endpoints > Endpoints.
b Click the name of the endpoint to edit.
c Enter the expected endpoint name in the Name text box.
d Click OK.
The proxy agent can commute with the endpoint and data collection is successful.
Configuring vRealize Automation
VMware, Inc. 222
Create a Fabric Group
You can organize infrastructure resources into fabric groups and assign one or more fabric administrators
to manage the resources in the fabric group.
Fabric groups are required for virtual and cloud endpoints. You can grant the fabric administrator role to
multiple users by either adding multiple users one at a time or by choosing an identity store group or
custom group as your fabric administrator.
Prerequisites
nLog in to vRealize Automation as an IaaS administrator.
nCreate at least one endpoint. See Choosing an Endpoint Scenario.
Procedure
1Select Infrastructure > Fabric Groups.
2Click New Fabric Group.
3Enter a name in the Name text box.
4(Optional) Enter a description in the Description text box.
5Enter a user name or group name in the Fabric administrators text box and press Enter.
Repeat this step to add multiple users or groups to the role.
6Click one or more Compute resources to include in your fabric group.
Only resources that exist on the clusters you select for your fabric group are discovered during data
collection. For example, only templates that exist on the clusters you select are discovered and
available for cloning on reservations you create for business groups.
7Click OK.
Fabric administrators can now configure machine prefixes. See Configure Machine Prefixes.
Users who are currently logged in to the vRealize Automation must log out and log back in to the
vRealize Automation before they can navigate to the pages to which they have been granted access.
Configure Machine Prefixes
You can create machine prefixes that are used to create names for machines provisioned through
vRealize Automation. A machine prefix is required when defining a machine component in the blueprint
design canvas.
A prefix is a base name to be followed by a counter of a specified number of digits. When the digits are all
used, vRealize Automation rolls back to the first number.
Machine prefixes must conform to the following limitations:
nContain only the case-insensitive ASCII letters a through z, the digits 0 through 9, and the hyphen (-).
nNot begin with a hyphen.
Configuring vRealize Automation
VMware, Inc. 223

nNo other symbols, punctuation characters, or blank spaces can be used.
nNo longer than 15 characters, including the digits, to conform to the Windows limit of 15 characters in
host names.
Longer host names are truncated when a machine is provisioned, and updated the next time data
collection is run. However, for WIM provisioning names are not truncated and provisioning fails when
the specified name is longer than 15 characters.
nvRealize Automation does not support multiple virtual machines of the same name in a single
instance. If you choose a naming convention that causes an overlap in machine names,
vRealize Automation does not provision a machine with the redundant name. If possible,
vRealize Automation skips the name that is already in use and generates a new machine name using
the specified machine prefix. If a unique name cannot be generated, provisioning fails.
Prerequisites
Log in to vRealize Automation as a fabric administrator.
Procedure
1Click Infrastructure > Administration > Machine Prefixes.
2Click New.
3Enter the machine prefix in the Name text box.
4Specify if the machine prefix is displayed in all tenants or only in the current tenant in the Visibility
column.
5Enter the number of counter digits in the Number of Digits text box.
6Enter the counter start number in the Next Number text box.
7Click the Save icon ( ).
Tenant administrators can create business groups so that users can access vRealize Automation to
request machines.
Creating a Network Profile
A network profile contains IP information such as gateway, subnet, and address range.
vRealize Automation uses vSphere DHCP or a specified IPAM provider to assign IP addresses to the
machines it provisions.
You can create a network profile to define a type of available network, including external network profiles
and templates for on-demand network address translation (NAT) and routed network profiles that build
NSX logical switches and appropriate routing settings for a new network path. Network profiles are
required when adding network components to a blueprint.
Configuring vRealize Automation
VMware, Inc. 224

Network profiles are used to configure network settings when machines are provisioned. Network profiles
also specify the configuration of NSX Edge devices that are created when you provision machines. You
identify a network profile when you create reservations and blueprints. In a reservation, you can assign a
network profile to a network path and specify any one of those paths for a machine component in a
blueprint.
A blueprint creator specifies an appropriate network profile when defining network components in the
blueprint. You can use an existing network profile and an on-demand NAT or routed network profile as
you define network adapters and load balancers for the provisioning machine.
Network profiles also support third party IP Address Management (IPAM) providers, such as Infoblox.
When you configure a network profile for IPAM, your provisioned machines can obtain their IP address
data, and related information such as DNS and gateway, from the configured IPAM solution. You can use
an external IPAM package for a third party provider, such as Infoblox, to define an IPAM endpoint for use
with a network profile.
Note If you are using a third-party IPAM provider and want to specify on which network to deploy your
machine, use a separate network profile for each VLAN to avoid the known issue described in Knowledge
Base Article 2148656.
If you do not use a third-party IPAM provider, but instead use the vRealize Automation-supplied IPAM
endpoint, you can specify the ranges of IP addresses that network profiles can use. Each IP address in
the specified ranges that are allocated to a machine is reclaimed for reassignment when the machine is
destroyed. You can create a network profile to define a range of static IP addresses that can be assigned
to machines. When provisioning virtual machines by cloning or by using kickstart/autoYaST provisioning,
the requesting machine owner can assign static IP addresses from a predetermined range.
You can assign a network profile to a specific network path on a reservation. For some machine
component types, such as vSphere, you can assign a network profile when you create or edit blueprints.
Note While you cannot change the network profile of a deployed virtual machine, you can change the
network to which the VM is connected. If the network is associated to a different network profile,
vRealize Automation assigns an IP address from that network profile to the VM. However the VM
continues to use the old IP address until you update the IP address on the guest operating system.
Alternatively you can use the Reconfigure action on the deployed VM, which also requires you to update
the IP address on the guest operating system.
If you specify a network profile in a reservation and a blueprint, the blueprint value takes precedence. For
example, if you specify a network profile in the blueprint by using the
VirtualMachine.NetworkN.ProfileName custom property and in a reservation that is used by the
blueprint, the network profile specified in the blueprint takes precedence. However, if the custom property
is not used in the blueprint, and you select a network profile for a machine NIC, vRealize Automation uses
the reservation network path for the machine NIC for which the network profile is specified.
For more information about these network types, see NSX Administration Guide in the NSX Information
Center at https://www.vmware.com/support/pubs/nsx_pubs.html.
Configuring vRealize Automation
VMware, Inc. 225

Table 2‑14. Available Network Types for a vRealize Automation Network Profile
Network Type Description
External Existing network configured on the vSphere server. They are the external part of the NAT and routed networks
types. An external network profile can define a range of static IP addresses available on the external network.
You can use IP ranges obtained from the supplied VMware IPAM endpoint or from a third-party IPAM service
provider endpoint that you have registered and configured in vRealize Orchestrator, such as Infoblox IPAM. An
IP range is created from an IP block during allocation.
An external network profile with a static IP range is a prerequisite for NAT and routed networks.
See Creating an External Network Profile For an Existing Network.
NAT On-demand network created during provisioning. NAT networks that use one set of IP addresses for external
communication and another set for internal communications.
With one-to-one NAT networks, every virtual machine is assigned an external IP address from the external
network profile and an internal IP address from the NAT network profile. With one-to-many NAT networks, all
machines share a single IP address from the external network profile for external communication.
You can use IP ranges obtained from the supplied VMware IPAM endpoint or from a third-party IPAM service
provider endpoint that you have registered and configured in vRealize Orchestrator, such as Infoblox IPAM. An
IP range is created from an IP block during allocation.
A NAT network profile defines local and external networks that use a translation table for mutual
communication.
See Creating a NAT Network Profile For an On-Demand Network.
Routed On-demand network created during provisioning. Routed networks contain a routable IP space divided across
subnets that are linked together using Distributed Logical Router (DLR).
Every new routed network has the next available subnet assigned to it and is associated with other routed
networks that use the same network profile. The virtual machines that are provisioned with routed networks
that have the same routed network profile can communicate with each other and the external network.
You can use IP ranges obtained from the supplied VMware IPAM endpoint or from a third-party IPAM service
provider endpoint that you have registered and configured in vRealize Orchestrator, such as Infoblox IPAM. An
IP range is created from an IP block during allocation.
A routed network profile defines a routable space and available subnets.
See Creating a Routed Network Profile For an On-Demand Network.
Using Network Profiles to Control IP Address Ranges
You can use network profiles to assign static IP addresses from a predefined range to virtual machines
that are provisioned by cloning, by using Linux kickstart or autoYaST, or to cloud machines that are
provisioned in OpenStack by using kickstart.
By default, vRealize Automation uses Dynamic Host Configuration Protocol (DHCP) to assign IP
addresses to provisioned machines.
You can create network profiles to define a range of static IP addresses that you can assign to machines.
You can assign network profiles to specific network paths on a reservation. Machines that are provisioned
by cloning or by kickstart or autoYaST and are attached to a network path with an associated network
profile are provisioned with an assigned static IP address. For provisioning with a static IP address
assignment, you must use a customization specification.
Configuring vRealize Automation
VMware, Inc. 226

You can assign a network profile to a vSphere machine component in a blueprint by adding an existing,
on-demand NAT, or on-demand routed network component to the design canvas and selecting a network
profile to which to connect the vSphere machine component. You can also assign network profiles to
blueprints by using the custom property VirtualMachine.NetworkN.ProfileName, where N is the
network identifier.
You can optionally use the supplied vRealize Automation IPAM or a registered and configured third-part
IPAM service provider endpoint in your network profile to obtain and configure IP addresses. For
information about external IPAM requirements, see Checklist For Providing Third-Party IPAM Provider
Support.
When you select a third-party IPAM service provider endpoint in a network profile, vRealize Automation
retrieves IP ranges from the registered external IPAM provider endpoint, such as Infoblox. It then
allocates IP values from that endpoint. The specified range subnet mask is used to allocate subnets from
the IP block.
If you specify a network profile in a reservation and a blueprint, the blueprint value takes precedence. For
example, if you specify a network profile in the blueprint by using the
VirtualMachine.NetworkN.ProfileName custom property and in a reservation that is used by the
blueprint, the network profile specified in the blueprint takes precedence. However, if the custom property
is not used in the blueprint, and you select a network profile for a machine NIC, vRealize Automation uses
the reservation network path for the machine NIC for which the network profile is specified.
Understanding CSV File Format for Importing Network Profile IP Addresses
You can import IP address network ranges to a vRealize Automation network profile by using a properly
formatted CSV file.
The CSV file entries must adhere to the following format.
CSV Field Description
ip_address An IP address in IPv4 format.
machine_name Name of a managed machine in vRealize Automation. If the field is empty, the default is no name. If the field is
empty, the status field value cannot be Allocated.
status Allocated or Unallocated, case-sensitive. If the field is empty, the default value is Unallocated. If the status is
Allocated, the machine_name field cannot be empty.
NIC_offset A non-negative integer. Optional.
The following example entry does not specify a NIC offset:
100.10.100.1,mymachine01,Allocated
Import IP Addresses To a Network Profile From a CSV File
You can add IP addresses to a network profile range by importing a properly formatted CSV file. You can
also change the addresses in the network profile range by editing the range in vRealize Automation or by
importing a changed or different CSV file.
Configuring vRealize Automation
VMware, Inc. 227
You can add or change the IP addresses in a network profile range by importing from a CSV file or by
entering values manually. Alternatively, you can allow a third-party IPAM provider to supply IP addresses.
nImport an initial range of IP addresses into a vRealize Automation network profile.
nApply the imported values to create our first named network range in the network profile.
nDelete one or more IP addresses from the network range vRealize Automation.
nImport a changed or different CSV file to examine how the network range values are changed.
You cannot use the Import from CSV option for network profiles that use a third-party IPAM endpoint
because the IP addresses are managed by the third-party IPAM provider, not by vRealize Automation.
Prerequisites
nLog in to vRealize Automation as a fabric administrator.
nCreate a CSV file containing IP addresses for import to a network range. See Create an External
Network Profile by Using A Third-Party IPAM Provider and Understanding CSV File Format for
Importing Network Profile IP Addresses.
Procedure
1Select Infrastructure > Reservations > Network Profiles.
2Click New and select a network profile type from the drop-down menu.
For this example, select External.
3Enter My Network Profile with CSV in the Name text box.
4Enter Testing network range IP addresses with CSV in the Description text box.
The CSV file import option applies to settings on the Network Ranges and IP Addresses tab pages.
so we will move quickly through the first two tabs to enter basic network profile information.
5Optionally select a configured IPAM endpoint if you have one available. If not, skip this step.
6Enter an appropriate IP address value in the Subnet mask and Gateway text boxes.
7Click the DNS tab.
8Enter applicable information such as a DNS suffix and click the Network Ranges tab.
The Import from CVS option is available when you click the Network Ranges tab.
9Click New to enter a new network range name and IP address range manually or click Import from
CSV to import the IP address information from a properly formatted CSV file.
nClick New.
a Enter a network range name.
b Enter a network range description.
c Enter the start IP address of the range.
Configuring vRealize Automation
VMware, Inc. 228
d Enter the end IP address of the range.
nClick Import from CSV.
a Browse to and select the CSV file or drag the CSV file into the Import from CSV dialog box.
A row in the CSV file has the format ip_address, machine_name, status, NIC offset. For
example:
100.10.100.1,mymachine01,Allocated
CSV Field Description
ip_address An IP address in IPv4 format.
machine_name Name of a managed machine in vRealize Automation. If the field is empty, the default is no name.
If the field is empty, the status field value cannot be Allocated.
status Allocated or Unallocated, case-sensitive. If the field is empty, the default value is Unallocated. If the
status is Allocated, the machine_name field cannot be empty.
NIC_offset A non-negative integer. Optional.
b Click Apply.
10 Click OK.
The IP range name appears in the defined ranges list. The IP addresses in the range appear in the
defined IP addresses list.
The uploaded IP addresses appear on the IP Addresses page when you click Apply or after you
save and then edit the network profile.
11 Click the IP Addresses tab to display the IP address data for the specified range address space.
If you imported the IP address information from a CSV file, the range name is generated as Imported
from CSV.
12 (Optional) Select IP address information from the Network range drop-down menu to filter IP
address entries.
You can display information about all defined network ranges, the network ranges imported from a
CSV file, or a named network range. Details include the start IP address, machine name, last
modification date and timestamp, and IP status.
What to do next
If you import IP addresses from a CSV file again, the previous IP addresses are replaced with the
information from the imported CSV file.
Creating an External Network Profile For an Existing Network
You can create external network profiles to specify network settings to configure existing networks for
provisioning machines, including the configuration of NSX Edge devices to be used during provisioning.
You can use the supplied vRealize Automation IPAM provider endpoint or a third-party IPAM provider
endpoint, such as Infoblox, that you have registered in vRealize Orchestrator.
Configuring vRealize Automation
VMware, Inc. 229
Create an External Network Profile By Using the Supplied IPAM Endpoint
You can create an external network profile to define network properties and a range of static IP addresses
for use when provisioning machines on an existing network.
You can define one or more network ranges of static IP addresses in the network profile for use in
provisioning a machine. If you do not specify a range, you can use a network profile as a network
reservation policy to select a reservation network path for a virtual machine network card (vNIC).
For information about creating an external network profile and using an external IPAM provider endpoint,
see Create an External Network Profile by Using A Third-Party IPAM Provider.
Procedure
1Specify External Network Profile Information By Using the Supplied IPAM Endpoint
An external network profile identifies network properties and settings for an existing network. An
external network profile is a requirement of NAT and routed network profiles.
2Configure External Network Profile IP Ranges By Using the Supplied IPAM Endpoint
You can define one or more network ranges of static IP addresses in the network profile for use in
provisioning a machine. If you do not specify a range, you can use a network profile as a network
reservation policy to select a reservation network path for a virtual machine network card (vNIC).
What to do next
You can assign a network profile to a network path in a reservation or a blueprint architect can specify the
network profile in a blueprint. You can use the external network profile when you create an on-demand
NAT or routed network profile.
Specify External Network Profile Information By Using the Supplied IPAM Endpoint
An external network profile identifies network properties and settings for an existing network. An external
network profile is a requirement of NAT and routed network profiles.
For information about how you can create an external network profile by obtaining IPAM address
information from a registered third-party IPAM endpoint such as Infoblox, see Checklist For Providing
Third-Party IPAM Provider Support and Create an External Network Profile by Using A Third-Party IPAM
Provider. Use the following procedure to create a network profile by using the VMware internal IPAM
endpoint.
Prerequisites
nLog in to vRealize Automation as a fabric administrator.
Procedure
1Select Infrastructure > Reservations > Network Profiles.
2Click New and select Existing or External from the drop-down menu.
3Enter a name and, optionally, a description.
4Accept the default IPAM endpoint value for the supplied vRealize Automation IPAM endpoint.
Configuring vRealize Automation
VMware, Inc. 230
5Enter an IP subnet mask in the Subnet mask text box.
The subnet mask specifies the size of the entire routable address space that you want to define for
your network profile.
For example, enter 255.255.0.0.
6Enter an Edge or routed gateway address in the Gateway text box.
Use a standard IPv4 address format. For example, enter 10.10.110.1.
The gateway IP address defined in the network profile is assigned to the NIC during allocation. If no
value is assigned in the Gateway text box in the network profile, then you must use the
VirtualMachine.Network0.Gateway custom property when provisioning the Edge machine.
7Click the DNS tab.
8Enter DNS and WINS values as needed.
DNS values are used for DNS name registration and resolution. The DNS and WINS fields are
optional if you are using an internal IPAM endpoint. If you are using an external IPAM endpoint, the
DNS and WINS values are provided by the third-party IPAM provider.
a (Optional) Enter a Primary DNS server value.
b (Optional) Enter a Secondary DNS server value.
c (Optional) Enter a DNS suffixes value.
d (Optional) Enter a DNS search suffixes value.
e (Optional) Enter a Preferred WINS server value.
f (Optional) Enter an Alternate WINS server value.
What to do next
You can configure IP ranges for static IP addresses. See Configure External Network Profile IP Ranges
By Using the Supplied IPAM Endpoint.
Configure External Network Profile IP Ranges By Using the Supplied IPAM Endpoint
You can define one or more network ranges of static IP addresses in the network profile for use in
provisioning a machine. If you do not specify a range, you can use a network profile as a network
reservation policy to select a reservation network path for a virtual machine network card (vNIC).
If an external network profile does not have IP ranges defined, you can use it to specify which network is
picked for a virtual network card (vNIC). If you are using the existing network profile in a routed or NAT
network profile, it must have at least one static IP range.
You can define IP range values manually, from an imported CSV file, or by using IP addresses supplied
by an external IPAM provider.
Prerequisites
Specify External Network Profile Information By Using the Supplied IPAM Endpoint.
Configuring vRealize Automation
VMware, Inc. 231

Procedure
1Click the Network Ranges tab.
2Click New to enter a new network range name and IP address range manually or click Import from
CSV to import the IP address information from a properly formatted CSV file.
nClick New.
a Enter a network range name.
b Enter a network range description.
c Enter the start IP address of the range.
d Enter the end IP address of the range.
nClick Import from CSV.
a Browse to and select the CSV file or drag the CSV file into the Import from CSV dialog box.
A row in the CSV file has the format ip_address, machine_name, status, NIC offset. For
example:
100.10.100.1,mymachine01,Allocated
CSV Field Description
ip_address An IP address in IPv4 format.
machine_name Name of a managed machine in vRealize Automation. If the field is empty, the default is no name.
If the field is empty, the status field value cannot be Allocated.
status Allocated or Unallocated, case-sensitive. If the field is empty, the default value is Unallocated. If the
status is Allocated, the machine_name field cannot be empty.
NIC_offset A non-negative integer. Optional.
b Click Apply.
3Click OK.
The IP range name appears in the defined ranges list. The IP addresses in the range appear in the
defined IP addresses list.
The uploaded IP addresses appear on the IP Addresses page when you click Apply or after you
save and then edit the network profile.
4Click the IP Addresses tab to display the IP address data for the specified range address space.
If you imported the IP address information from a CSV file, the range name is generated as Imported
from CSV.
5(Optional) Select IP address information from the Network range drop-down menu to filter IP
address entries.
You can display information about all defined network ranges, the network ranges imported from a
CSV file, or a named network range. Details include the start IP address, machine name, last
modification date and timestamp, and IP status.
Configuring vRealize Automation
VMware, Inc. 232
6(Optional) Select a status type from the IP status drop-down menu to filter IP address entries to only
those that match the selected IP status. Status settings are allocated, unallocated, destroyed, and
expired.
For IP addresses that are in an expired or destroyed state, you can click Reclaim to make those IP
address ranges available for allocation. You must save the profile for the reclamation to take effect.
Addresses are not reclaimed immediately, so the status column does not immediately change from
Expired or Destroyed to Allocated.
7Click OK to complete the network profile.
You can assign a network profile to a network path in a reservation or a blueprint architect can specify the
network profile in a blueprint. If you created an external network profile, you can use the external network
profile when creating a NAT or routed network profile.
Create an External Network Profile by Using A Third-Party IPAM Provider
You can use a third-party IPAM provider solution that you have imported, configured, and registered in
vRealize Orchestrator to obtain IP addresses from that third-party provider.
You can create an external network profile that uses a registered third-party IPAM solution provider
endpoint to obtain gateway, subnet mask, and DHCP/WINS settings.
You can define one or more network ranges of static IP addresses in the network profile for use in
provisioning a machine. If you do not specify a range, you can use a network profile as a network
reservation policy to select a reservation network path for a virtual machine network card (vNIC).
For information about how to create an external network profile without using an IPAM provider or by
using the supplied internal IPAM provider endpoint, see Create an External Network Profile By Using the
Supplied IPAM Endpoint.
Procedure
1Specify External Network Profile Information By Using a Third-Party IPAM Endpoint
An external network profile identifies network properties and settings for an existing network. An
external network profile is a requirement of NAT and routed network profiles. If you registered and
configured an IPAM endpoint in vRealize Orchestrator, you can specify that IP address information
be supplied by an IPAM provider.
2Configure External Network Profile IP Ranges By Using a Third-Party IPAM Endpoint
You can define one or more network ranges of static IP addresses in the network profile for use in
provisioning a machine. If you do not specify a range, you can use a network profile as a network
reservation policy to select a reservation network path for a virtual machine network card (vNIC).
What to do next
You can assign a network profile to a network path in a reservation or a blueprint architect can specify the
network profile in a blueprint. You can use the external network profile when you create an on-demand
NAT or routed network profile.
Configuring vRealize Automation
VMware, Inc. 233
Specify External Network Profile Information By Using a Third-Party IPAM Endpoint
An external network profile identifies network properties and settings for an existing network. An external
network profile is a requirement of NAT and routed network profiles. If you registered and configured an
IPAM endpoint in vRealize Orchestrator, you can specify that IP address information be supplied by an
IPAM provider.
Prerequisites
nVerify that you imported and configured an external IPAM provider plug-in in vRealize Orchestrator
and registered the IPAM provider endpoint type in vRealize Orchestrator. In this example, the
supported external IPAM solution provider is Infoblox. See Checklist For Providing Third-Party IPAM
Provider Support.
nCreate a Third-Party IPAM Provider Endpoint.
nConfigure the vRealize Orchestrator Appliance with the registered IPAM Endpoint workflow as the
standalone Orchestrator in the global tenant (administrator @ vsphere.local ).
nLog in to vRealize Automation as a fabric administrator.
Procedure
1Select Infrastructure > Reservations > Network Profiles.
2Click New and select Existing or External from the drop-down menu.
3Enter a name and, optionally, a description.
4If you have configured one or more third-party IPAM provider endpoints, select a third-party IPAM
endpoint in the IPAM endpoint drop-down menu.
When you select a third-party IPAM provider endpoint that you have registered in
vRealize Orchestrator, IP addresses are obtained from the specified IPAM service provider. IP
specifications such as subnet mask and DNS/WINS options are not available because their functions
are controlled by the selected third-party IPAM endpoint.
What to do next
You can now define network ranges for IP addresses to complete the network profile definition.
Configure External Network Profile IP Ranges By Using a Third-Party IPAM Endpoint
You can define one or more network ranges of static IP addresses in the network profile for use in
provisioning a machine. If you do not specify a range, you can use a network profile as a network
reservation policy to select a reservation network path for a virtual machine network card (vNIC).
You can define IP ranges by using the IP addresses that are supplied by a third-party IPAM provider.
Configuring vRealize Automation
VMware, Inc. 234
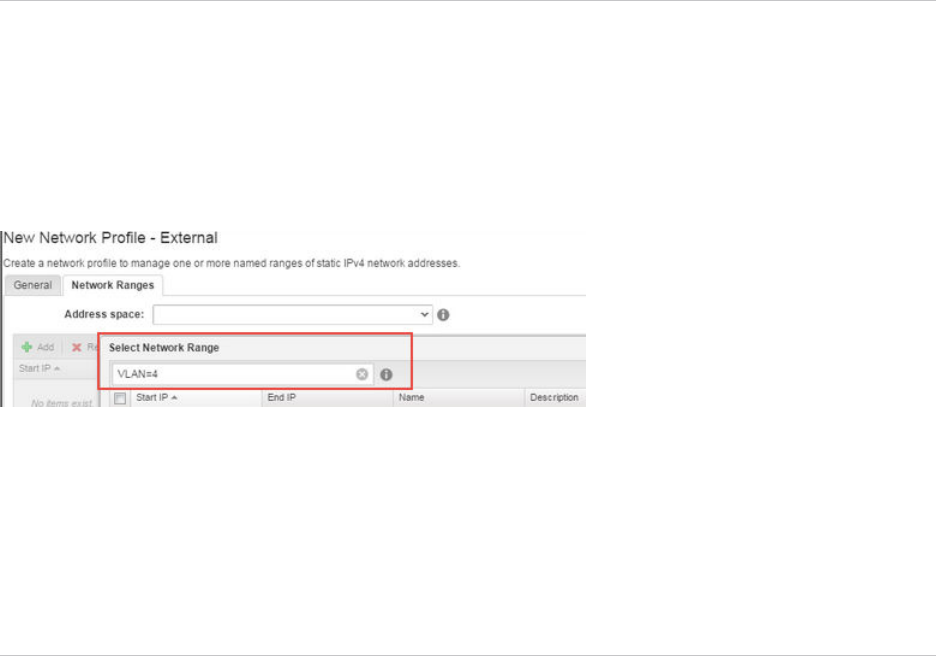
vRealize Automation only saves external IPAM range IDs in the database, not range details. If you edit a
network profile on this page or on a blueprint, vRealize Automation calls the IPAM service to get range
details based on the selected range IDs.
Note There is a known issue with some third-party IPAM providers in which a query can time out when
returning network ranges, resulting in an empty list. As a workaround, you can provide search criteria to
avoid the timeout and obtain the network range information.
For example, depending on your IPAM provider, you may be able to add a property named VLAN to each
network in the IPAM provider application and assign a value to that property, such as 4. You could then
filter on the property and value, for example VLAN=4, in the Select Network Range text box on the
vRealize Automation network profile page.
As an alternative, you can increase the timeout setting by using the following procedure:
1 On each of the vRealize Automation appliance cnodes, open the /etc/vcac/webapps/o11n-
gateway-service/WEB-INF/classes/META-INF/spring/root/o11n-gateway-service-
context.xml file.
2 Change the timeout value from 30 seconds to a higher number.
3 Restart vcac-server by entering service vcac-server restart.
Prerequisites
Specify External Network Profile Information By Using a Third-Party IPAM Endpoint.
Procedure
1Click the Network Ranges tab to create a new network range or select an existing network range.
Details about the selected range appear, including each name, description, and start and end IP
address. Status-related information is also provided.
2Select an address space from the list of all addresses spaces that are available for the endpoint from
the Address space drop-down menu.
3Click Add and select one or more available network ranges for the specified address space.
Selecting a network range may result in an empty list when using a third-party IPAM provider. For
details, see Knowledge Base article 2148656 at http://kb.vmware.com/kb/2148656.
Configuring vRealize Automation
VMware, Inc. 235
4Click OK.
The IP range name appears in the defined ranges list. The IP addresses in the range appear in the
defined IP addresses list.
The uploaded IP addresses appear on the IP Addresses page when you click Apply or after you
save and then edit the network profile.
5Click OK to complete the network profile.
What to do next
You can assign a network profile to a network path in a reservation or a blueprint architect can specify the
network profile in a blueprint.
Creating a Routed Network Profile For an On-Demand Network
You can create an on-demand routed network profile that uses either the supplied vRealize Automation
IPAM endpoint or a properly configured and registered third-party IPAM endpoint.
A routed network profile represent routeable IP space that is divided across multiple networks. Each new
routed network allocates the next available subnet from the routable IP space. A routed network can
access all other routed networks that use the same network profile. Each routed subnet can access all
other subnets created by the same network profile.
For a third-party IPAM provider, the routable IP space is created and managed by the third-party IPAM
provider. The network administrator uses a third-party IPAM provider to define a routable IP space and
create an IP block for it. You can select one or more IP blocks retrieved from the third-party IPAM provider
when you create or edit a routed network profile.
When a new instance of a routed network profile is allocated from the third-party IPAM provider,
vRealize Automation calls the provider to reserve the next available subnet and creates a range, using IP
blocks that are determined by the routed network profile and the subnet size. The resulting range is used
to allocate IP addresses for machines that are assigned to the routed network in the same deployment.
Create a Routed Network Profile By Using the Supplied IPAM Endpoint
When using a routed network profile with the supplied IPAM endpoint, you can define a routable IP space
and available subnets for an on-demand routed network.
Using the supplied vRealize Automation IPAM endpoint, you can assign ranges of static IP addresses and
a base IP address to the routed network profile.
You can use IP ranges obtained from the supplied VMware IPAM endpoint or from a third-party IPAM
service provider endpoint that you have registered and configured in vRealize Orchestrator, such as
Infoblox IPAM. An IP range is created from an IP block during allocation.
Procedure
1Specify Routed Network Profile Information with the vRealize Automation IPAM Endpoint
The network profile information identifies the routed network properties, its underlying external
network profile, and other values used in provisioning the network when using the supplied IPAM
endpoint.
Configuring vRealize Automation
VMware, Inc. 236
2Configure Routed Network Profile IP Ranges with the vRealize Automation IPAM Endpoint
You can define one or more ranges of static IP addresses for use in provisioning a network.
Specify Routed Network Profile Information with the vRealize Automation IPAM Endpoint
The network profile information identifies the routed network properties, its underlying external network
profile, and other values used in provisioning the network when using the supplied IPAM endpoint.
If you want to create a routed network profile by using a third-party IPAM endpoint, see Specify Routed
Network Profile Information with a Third-Party IPAM Endpoint.
Prerequisites
nLog in to vRealize Automation as a fabric administrator.
nCreate an external network profile. See Create an External Network Profile By Using the Supplied
IPAM Endpoint.
Procedure
1Select Infrastructure > Reservations > Network Profiles.
2Click New and select Routed from the drop-down menu.
3Enter a name and, optionally, a description.
4Accept the default IPAM endpoint value for the supplied vRealize Automation IPAM endpoint.
5Select an existing external network profile from the External Network Profile drop-down menu.
6Enter the subnet mask in the Subnet mask text box that is associated with the external network
profile.
The subnet mask specifies the size of the entire routable address space that you want to define for
your network profile.
For example, enter 255.255.0.0.
7Select a value in the Range subnet mask text box drop-down menu to determine how ranges are
generated by the Generate Ranges option on the IP Ranges page.
For example, enter 255.255.255.0.
The range subnet mask defines how you want to partition that space into individual address blocks
that are allocated to every deployment instance of that network profile. When choosing a value for the
range subnet mask, consider the number of deployments that you expect to use the routed network.
A range is used for each deployment that uses a routed network profile. The number of available
routed ranges is equal to the subnet mask divide by the range subnet mask, for example
255.255.0.0/255.255.255.0 = 256.
8Enter the first available IP address in the Base IP text box.
This option is not available if you select a for third-party endpoint.
For example, enter 120.120.0.1.
Configuring vRealize Automation
VMware, Inc. 237
9Click the DNS tab.
10 Enter DNS and WINS values as needed.
DNS values are used for DNS name registration and resolution. The DNS and WINS fields are
optional if you are using an internal IPAM endpoint. If you are using an external IPAM endpoint, the
DNS and WINS values are provided by the third-party IPAM provider.
a (Optional) Enter a Primary DNS server value.
b (Optional) Enter a Secondary DNS server value.
c (Optional) Enter a DNS suffixes value.
d (Optional) Enter a DNS search suffixes value.
e (Optional) Enter a Preferred WINS server value.
f (Optional) Enter an Alternate WINS server value.
What to do next
Configure Routed Network Profile IP Ranges with the vRealize Automation IPAM Endpoint.
Configure Routed Network Profile IP Ranges with the vRealize Automation IPAM Endpoint
You can define one or more ranges of static IP addresses for use in provisioning a network.
During provisioning, every new routed network allocates the next available range and uses it as its IP
space.
Prerequisites
Specify Routed Network Profile Information with the vRealize Automation IPAM Endpoint.
Procedure
1Click the Network Ranges tab to create a new network range or select an existing network range.
Details about the selected range appear, including each name, description, and start and end IP
address. Status-related information is also provided.
2Click Generate Ranges to generate network ranges based on the subnet mask, range subnet mask,
and base IP address information that you entered on the General tab.
Starting with the base IP address, vRealize Automation generates ranges based on the range subnet
mask.
For example, vRealize Automation generates ranges of 255 IP ranges if the subnet mask is
255.255.0.0 and the range subnet mask is 255.255.255.0 using the name Range1 through Rangen.
3Click OK.
Create a Routed Network Profile By Using a Third-Party IPAM Endpoint
When you use a routed network profile with a third-party IPAM endpoint, routable IP space is created and
managed by the third-party IPAM provider.
Configuring vRealize Automation
VMware, Inc. 238
When you use a third-party IPAM endpoint in your routed network profile, the provider creates new IP
ranges for each instance of the on-demand network.
You can use IP ranges obtained from the supplied VMware IPAM endpoint or from a third-party IPAM
service provider endpoint that you have registered and configured in vRealize Orchestrator, such as
Infoblox IPAM. An IP range is created from an IP block during allocation.
Procedure
1Specify Routed Network Profile Information with a Third-Party IPAM Endpoint
The network profile information identifies the routed network properties, its underlying external
network profile, and other values used in provisioning the network when using a third-party IPAM
endpoint.
2Configure Routed Network Profile IP Ranges with a Third-Party IPAM Endpoint
You can manage one or more named ranges of static IPv4 network addresses for use in provisioning
a network.
Specify Routed Network Profile Information with a Third-Party IPAM Endpoint
The network profile information identifies the routed network properties, its underlying external network
profile, and other values used in provisioning the network when using a third-party IPAM endpoint.
Prerequisites
nLog in to vRealize Automation as a fabric administrator.
nCreate an external network profile. See Create an External Network Profile By Using the Supplied
IPAM Endpoint or Create an External Network Profile by Using A Third-Party IPAM Provider.
nCreate and configure a third-party IPAM endpoint. See Create a Third-Party IPAM Provider Endpoint.
Procedure
1Select Infrastructure > Reservations > Network Profiles.
2Click New and select Routed from the drop-down menu.
3Enter a name and, optionally, a description.
4If you have configured one or more third-party IPAM provider endpoints, select a third-party IPAM
endpoint in the IPAM endpoint drop-down menu.
When you select a third-party IPAM provider endpoint that you have registered in
vRealize Orchestrator, IP addresses are obtained from the specified IPAM service provider. IP
specifications such as subnet mask and DNS/WINS options are not available because their functions
are controlled by the selected third-party IPAM endpoint.
5Select an existing external network profile from the External Network Profile drop-down menu.
Only external network profiles that are configured to use the specified IPAM endpoint are listed and
available to select.
Configuring vRealize Automation
VMware, Inc. 239
6Select a value in the Range subnet mask text box drop-down menu to determine how many network
subnets are created for provisioning.
For example, enter 255.255.255.0.
The range subnet mask defines how you want to partition that space into individual address blocks
that are allocated to every deployment instance of that network profile. When choosing a value for the
range subnet mask, consider the number of deployments that you expect to use the routed network.
A range is used for each deployment that uses a routed network profile. The number of available
routed ranges is equal to the subnet mask divide by the range subnet mask, for example
255.255.0.0/255.255.255.0 = 256.
7Click the IP Blocks tab to define an address space and manage one or more named ranges of static
IPv4 network addresses.
The available IP blocks are the source for IP ranges that are created or allocated for on-demand
routing.
What to do next
Configure Routed Network Profile IP Ranges with a Third-Party IPAM Endpoint.
Configure Routed Network Profile IP Ranges with a Third-Party IPAM Endpoint
You can manage one or more named ranges of static IPv4 network addresses for use in provisioning a
network.
During provisioning, each new routed network allocates the next available range and uses that allocated
range as its IP space. The IP blocks are obtained from the third-party IPAM provider. During provisioning,
a routed network is allocated from the block with a subnet mask that matches the provided range subnet
mask.
Prerequisites
Specify Routed Network Profile Information with a Third-Party IPAM Endpoint.
Procedure
1Select an address space from the Address space drop-down menu to limit the available IP blocks
that are available for provisioning.
After you add one or more IP blocks in the section below the Address space text box, you can no
longer select an Address space value. A routed network profile cannot span more than one address
space.
Configuring vRealize Automation
VMware, Inc. 240
2Add one or more IP blocks, or IPAM provider ranges, by using the provider-specific search syntax or
selecting from the Search drop-down menu.
The IP blocks are retrieved from the third-party IPAM provider.
Selecting a network range may result in an empty list when using a third-party IPAM provider. For
details, see Knowledge Base article 2148656 at http://kb.vmware.com/kb/2148656.
a Click Add.
b Click Search.
c Enter search syntax or select one or more IP blocks from the drop-down menu.
d Click OK.
3Click Apply.
4Click OK.
Creating a NAT Network Profile For an On-Demand Network
You can create an on-demand NAT network profile that uses either the supplied vRealize Automation
IPAM endpoint or a properly configured and registered third-party IPAM endpoint.
Create a NAT Network Profile By Using the Supplied IPAM Endpoint
You can create an on-demand NSX NAT network profile relative to an external network profile. When
using the supplied vRealize Automation IPAM endpoint, you can assign ranges of static IP and DHCP
addresses to the NAT network profile.
NAT networks use one set of IP addresses for external communication and another set of IP addresses
for internal communication. External IP addresses are allocated from an external network profile and
internal NAT IP addresses are defined by a NAT network profile. When you provision a new NAT network,
a new instance of the NAT network profile is created and used to allocate machine IP addresses.
You can use IP ranges obtained from the supplied VMware IPAM endpoint or from a third-party IPAM
service provider endpoint that you have registered and configured in vRealize Orchestrator, such as
Infoblox IPAM. An IP range is created from an IP block during allocation.
For a NAT one-to-many network, you can define NAT rules that can be configured when you add a NAT
network component to the blueprint and can be changed when you edit the NAT network in a deployment.
Procedure
1Specify NAT Network Profile Information with the vRealize Automation IPAM Endpoint
The network profile identifies the NAT network properties, underlying external network profile, NAT
type, and other values used to provision the network by using the embedded vRealize Automation
IPAM.
2Configure NAT Network Profile IP Ranges with the vRealize Automation IPAM Endpoint
You can define one or more ranges of static IP addresses for use in provisioning a network.
Configuring vRealize Automation
VMware, Inc. 241

Specify NAT Network Profile Information with the vRealize Automation IPAM Endpoint
The network profile identifies the NAT network properties, underlying external network profile, NAT type,
and other values used to provision the network by using the embedded vRealize Automation IPAM.
If you want to create a NAT network profile that uses a third-party IPAM endpoint, see Specify NAT
Network Profile Information with a Third-Party IPAM Endpoint.
Prerequisites
nLog in to vRealize Automation as a fabric administrator.
nCreate an external network profile. See Create an External Network Profile By Using the Supplied
IPAM Endpoint.
Procedure
1Select Infrastructure > Reservations > Network Profiles.
2Click New and select NAT from the drop-down menu.
3Enter a name and, optionally, a description.
4Accept the default IPAM endpoint value for the supplied vRealize Automation IPAM endpoint.
5Select an existing external network profile from the External Network Profile drop-down menu.
6Select a one-to-one or one-to-many network address translation type from the NAT type drop-down
menu.
Option Description
One-to-One Assign an external static IP address to each network adapter. Every machine can
access the external network and is accessible from the external network.
All external IP addresses that are assigned to an NSX edge uplink must be part of
the same subnet. When using NAT 1:1 in vRealize Automation, the corresponding
external network profile must contain only IP ranges that exist within a single
subnet.
One-to-Many One external IP address is shared among all machines on the network. An
internal machine can have either DHCP or static IP addresses. Every machine
can access the external network, but no machine is accessible from the external
network. Selecting this option enables the Enabled check box in the DHCP
group.
The NAT one-to-many translation type allows you to define NAT rules when you
add a NAT network component to a blueprint.
7Enter an IP subnet mask in the Subnet mask text box.
The subnet mask specifies the size of the entire routable address space that you want to define for
your network profile.
For example, enter 255.255.0.0.
Configuring vRealize Automation
VMware, Inc. 242
8Enter an Edge or routed gateway address in the Gateway text box.
Use a standard IPv4 address format. For example, enter 10.10.110.1.
The gateway IP address defined in the network profile is assigned to the NIC during allocation. If no
value is assigned in the Gateway text box in the network profile, then you must use the
VirtualMachine.Network0.Gateway custom property when provisioning the Edge machine.
9(Optional) In the DHCP group, select the Enabled check box and enter the IP range start and IP
range end values.
You can select the check box only if you set the NAT type to one-to-many.
10 (Optional) Set a DHCP lease time to define how long a machine can use an IP address.
11 Click the DNS tab.
12 Enter DNS and WINS values as needed.
DNS values are used for DNS name registration and resolution. The DNS and WINS fields are
optional if you are using an internal IPAM endpoint. If you are using an external IPAM endpoint, the
DNS and WINS values are provided by the third-party IPAM provider.
a (Optional) Enter a Primary DNS server value.
b (Optional) Enter a Secondary DNS server value.
c (Optional) Enter a DNS suffixes value.
d (Optional) Enter a DNS search suffixes value.
e (Optional) Enter a Preferred WINS server value.
f (Optional) Enter an Alternate WINS server value.
What to do next
Configure NAT Network Profile IP Ranges with the vRealize Automation IPAM Endpoint.
Configure NAT Network Profile IP Ranges with the vRealize Automation IPAM Endpoint
You can define one or more ranges of static IP addresses for use in provisioning a network.
You cannot overlap the start and end network range IP addresses with the DHCP addresses. If you
attempt to save a profile that contains address ranges that overlap, vRealize Automation displays a
validation error.
Prerequisites
Specify NAT Network Profile Information with the vRealize Automation IPAM Endpoint.
Procedure
1Click the Network Ranges tab to create a new network range or select an existing network range.
Details about the selected range appear, including each name, description, and start and end IP
address. Status-related information is also provided.
Configuring vRealize Automation
VMware, Inc. 243

2Click New to enter a new network range name and IP address range manually or click Import from
CSV to import the IP address information from a properly formatted CSV file.
nClick New.
a Enter a network range name.
b Enter a network range description.
c Enter the start IP address of the range.
d Enter the end IP address of the range.
nClick Import from CSV.
a Browse to and select the CSV file or drag the CSV file into the Import from CSV dialog box.
A row in the CSV file has the format ip_address, machine_name, status, NIC offset. For
example:
100.10.100.1,mymachine01,Allocated
CSV Field Description
ip_address An IP address in IPv4 format.
machine_name Name of a managed machine in vRealize Automation. If the field is empty, the default is no name.
If the field is empty, the status field value cannot be Allocated.
status Allocated or Unallocated, case-sensitive. If the field is empty, the default value is Unallocated. If the
status is Allocated, the machine_name field cannot be empty.
NIC_offset A non-negative integer. Optional.
b Click Apply.
3Click OK.
The IP range name appears in the defined ranges list. The IP addresses in the range appear in the
defined IP addresses list.
The uploaded IP addresses appear on the IP Addresses page when you click Apply or after you
save and then edit the network profile.
4Click the IP Addresses tab to display the IP addresses for the named network range.
5(Optional) Select IP address information from the Network range drop-down menu to filter IP
address entries.
You can display information about all defined network ranges, the network ranges imported from a
CSV file, or a named network range. Details include the start IP address, machine name, last
modification date and timestamp, and IP status.
Configuring vRealize Automation
VMware, Inc. 244
6(Optional) Select a status type from the IP status drop-down menu to filter IP address entries to only
those that match the selected IP status. Status settings are allocated, unallocated, destroyed, and
expired.
For IP addresses that are in an expired or destroyed state, you can click Reclaim to make those IP
address ranges available for allocation. You must save the profile for the reclamation to take effect.
Addresses are not reclaimed immediately, so the status column does not immediately change from
Expired or Destroyed to Allocated.
7Click OK.
Create a NAT Network Profile By Using a Third-Party IPAM Endpoint
You can create an on-demand NSX NAT network profile relative to an external network profile. When
using an NSX NAT network profile with a third-party IPAM endpoint, IP space is created and managed by
the third-party IPAM provider.
When you use a third-party IPAM endpoint in your NAT network profile, the provider creates new IP
ranges for each instance of the on-demand network. An internal set of IP addresses defined with one or
more ranges is created in the third-party IPAM provider endpoint for every instance of the NAT network.
These IP ranges are used to allocate IP addresses for machines assigned to the NAT network in the
same deployment. Because there cannot be duplicate IP addresses defined within a single address
space, a new address space is created by the provider for each instance of NAT network. When a NAT
network is destroyed, its ranges are destroyed in the IPAM provider endpoint and in the new address
space.
You can use IP ranges obtained from the supplied VMware IPAM endpoint or from a third-party IPAM
service provider endpoint that you have registered and configured in vRealize Orchestrator, such as
Infoblox IPAM. An IP range is created from an IP block during allocation.
For a NAT one-to-many network, you can define NAT rules that can be configured when you add a NAT
network component to the blueprint and can be changed when you edit the NAT network in a deployment.
Procedure
1Specify NAT Network Profile Information with a Third-Party IPAM Endpoint
The network profile information identifies the NAT network properties, its underlying external network
profile, and other values used in provisioning the network when using a third-party IPAM endpoint.
2Configure NAT Network Profile IP Ranges with a Third-Party IPAM Endpoint
You can define one or more IP address ranges for use in provisioning a network by using NAT.
Specify NAT Network Profile Information with a Third-Party IPAM Endpoint
The network profile information identifies the NAT network properties, its underlying external network
profile, and other values used in provisioning the network when using a third-party IPAM endpoint.
Prerequisites
nLog in to vRealize Automation as a fabric administrator.
Configuring vRealize Automation
VMware, Inc. 245

nCreate an external network profile. See Create an External Network Profile By Using the Supplied
IPAM Endpoint or Create an External Network Profile by Using A Third-Party IPAM Provider.
nCreate and configure a third-party IPAM endpoint. See Create a Third-Party IPAM Provider Endpoint.
Procedure
1Select Infrastructure > Reservations > Network Profiles.
2Click New and select NAT from the drop-down menu.
3Enter a name and, optionally, a description.
4If you have configured one or more third-party IPAM provider endpoints, select a third-party IPAM
endpoint in the IPAM endpoint drop-down menu.
When you select a third-party IPAM provider endpoint that you have registered in
vRealize Orchestrator, IP addresses are obtained from the specified IPAM service provider. IP
specifications such as subnet mask and DNS/WINS options are not available because their functions
are controlled by the selected third-party IPAM endpoint.
5Select an existing external network profile from the External Network Profile drop-down menu.
Only external network profiles that are configured to use the specified IPAM endpoint are listed and
available to select.
6Select a one-to-one or one-to-many network address translation type from the NAT type drop-down
menu.
Option Description
One-to-One Assign an external static IP address to each network adapter. Every machine can
access the external network and is accessible from the external network.
All external IP addresses that are assigned to an NSX edge uplink must be part of
the same subnet. When using NAT 1:1 in vRealize Automation, the corresponding
external network profile must contain only IP ranges that exist within a single
subnet.
One-to-Many One external IP address is shared among all machines on the network. An
internal machine can use only static IP addresses. Every machine can access the
external network, but no machine is accessible from the external network.
DHCP is not supported when using NAT with a third-party IPAM provider.
The NAT one-to-many translation type allows you to define NAT rules when you
add a NAT network component to a blueprint.
7Enter an IP subnet mask in the Subnet mask text box.
The subnet mask specifies the size of the entire routable address space that you want to define for
your network profile.
For example, enter 255.255.0.0.
Configuring vRealize Automation
VMware, Inc. 246
8Enter an Edge or routed gateway address in the Gateway text box.
Use a standard IPv4 address format. For example, enter 10.10.110.1.
The gateway IP address defined in the network profile is assigned to the NIC during allocation. If no
value is assigned in the Gateway text box in the network profile, then you must use the
VirtualMachine.Network0.Gateway custom property when provisioning the Edge machine.
9Click the DNS tab.
10 Enter DNS and WINS values as needed.
DNS values are used for DNS name registration and resolution. The DNS and WINS fields are
optional if you are using an internal IPAM endpoint. If you are using an external IPAM endpoint, the
DNS and WINS values are provided by the third-party IPAM provider.
a (Optional) Enter a Primary DNS server value.
b (Optional) Enter a Secondary DNS server value.
c (Optional) Enter a DNS suffixes value.
d (Optional) Enter a DNS search suffixes value.
e (Optional) Enter a Preferred WINS server value.
f (Optional) Enter an Alternate WINS server value.
What to do next
Configure NAT Network Profile IP Ranges with a Third-Party IPAM Endpoint.
Configure NAT Network Profile IP Ranges with a Third-Party IPAM Endpoint
You can define one or more IP address ranges for use in provisioning a network by using NAT.
Prerequisites
Specify NAT Network Profile Information with a Third-Party IPAM Endpoint.
Procedure
1Click the Network Ranges tab to create a new network range or select an existing network range.
Details about the selected range appear, including each name, description, and start and end IP
address. Status-related information is also provided.
2Click New and define a network range.
a Enter a network range name and description.
b Enter the start and end IP address to define the range.
c Click Apply.
Configuring vRealize Automation
VMware, Inc. 247
3Click OK.
The IP range name appears in the defined ranges list. The IP addresses in the range appear in the
defined IP addresses list.
The uploaded IP addresses appear on the IP Addresses page when you click Apply or after you
save and then edit the network profile.
4Click the IP Addresses tab to display the IP addresses for the named network range.
5(Optional) Select IP address information from the Network range drop-down menu to filter IP
address entries.
You can display information about all defined network ranges, the network ranges imported from a
CSV file, or a named network range. Details include the start IP address, machine name, last
modification date and timestamp, and IP status.
6(Optional) Select a status type from the IP status drop-down menu to filter IP address entries to only
those that match the selected IP status. Status settings are allocated, unallocated, destroyed, and
expired.
For IP addresses that are in an expired or destroyed state, you can click Reclaim to make those IP
address ranges available for allocation. You must save the profile for the reclamation to take effect.
Addresses are not reclaimed immediately, so the status column does not immediately change from
Expired or Destroyed to Allocated.
7Click OK.
Releasing IP Addresses By Destroying Provisioned Machines
When you destroy a deployment, its IP addresses are deleted. The allocated IPs, for example the IPS in
a network profile range, are released and made available for subsequent provisioning.
When you destroy a machine that has a static IP address, its IP address is made available for other
machines to use. Unused addresses might not be available immediately because the process to reclaim
static IP addresses runs every 30 minutes.
If you are using a third-party IPAM provider, vRealize Automation deletes the associated IP addresses by
using the vRealize Orchestrator workflow in the third-party IPAM provider plug-in or package.
Configuring Reservations and Reservation Policies
A vRealize Automation reservation can define policies, priorities, and quotas that determine machine
placement for provisioning requests.
Reservation policies restrict machine provisioning to a subset of available reservations. Storage
reservation policies allow blueprint architects to assign machine volumes to different datastores.
To provision successfully, the reservation must have sufficient available storage. The reservation's
storage availability depends on:
nHow much storage is available on the datastore/cluster.
nHow much of that storage is reserved for that datastore/cluster.
Configuring vRealize Automation
VMware, Inc. 248

nHow much of that storage is already allocated in vRealize Automation
For example, even if the vCenter Server has storage available for the datastore/cluster, if sufficient
storage is not reserved in the reservation then provisioning fails with a "No reservation is available to
allocate..." error. The allocated storage on a reservation depends on the number of VMs (regardless of
their state) on that specific reservation. See the VMware Knowledge Base article Machine XXX: No
reservation is available to allocate within the group XXX. Total XX GB of storage was requested
(2151030) at http://kb.vmware.com/kb/2151030 for more information.
Reservations
You can create a vRealize Automation reservation to allocate provisioning resources in the fabric group to
a specific business group.
For example, you can use reservations to specify that a share of the memory, CPU, networking, and
storage resources of a single compute resource belongs to a particular business group or that certain
machines be allocated to a specific business group.
Note Storage and memory that are assigned to a provisioned machine by a reservation are released
when the machine to which they are assigned is deleted in vRealize Automation by the Destroy action.
The storage and memory are not released if the machine is deleted in the vCenter Server.
You can create a reservation for the following machine types:
nvSphere
nvCloud Air
nvCloud Director
nAmazon EC2
nAzure
nHyper V (SCVMM)
nHyper-V Stand-alone
nKVM (RHEV)
nOpenStack
nXenServer
You can configure security settings for the virtual machines to be provisioned by specifying information in
a reservation, blueprint, or guest agent script. If the machines to be provisioned requires a guest agent,
you must add a security rule that contains that requirement to the reservation or the blueprint. For
example, if you use a default security policy that denies communication between all machines, and rely
on a separate security policy to allow communication between specific machines, the guest agent might
be unable to communicate with vRealize Automation during the customization phase. To avoid this
problem during machine provisioning, use a default security policy that allows communication during the
customization phase.
Configuring vRealize Automation
VMware, Inc. 249

Choosing a Reservation Scenario
You can create reservations to allocate resources to business groups. Depending on your scenario, the
procedure to create a reservation differs.
Choose a reservation scenario based on the target endpoint type.
Each business group must have at least one reservation for its members to provision machines of that
type. For example, a business group with an OpenStack reservation but not an Amazon reservation,
cannot request a machine from Amazon. In this example, the business group must be allocated a
reservation specifically for Amazon resources.
Table 2‑15. Choosing a Reservation Scenario
Scenario Procedure
Create a vSphere reservation. Create a Reservation for Hyper-V, KVM, SCVMM, vSphere, or
XenServer
Create a reservation to allocate resources for a vCloud Air
endpoint.
Create a vCloud Air Reservation
Create a reservation to allocate resources for a vCloud Director
endpoint.
Create a vCloud Director Reservation
Create a reservation to allocate resources on an Amazon
resource (with or without using Amazon Virtual Private Cloud).
Create an Amazon EC2 Reservation
Create a reservation to allocate resources on an OpenStack
resource.
Create an OpenStack Reservation
Create a reservation to allocate resources for Hyper-V. Create a Reservation for Hyper-V, KVM, SCVMM, vSphere, or
XenServer
Create a reservation to allocate resources for KVM. Create a Reservation for Hyper-V, KVM, SCVMM, vSphere, or
XenServer
Create a reservation to allocate resources on an OpenStack.
resource.
Create an OpenStack Reservation
Create a reservation to allocate resources for SCVMM. Create a Reservation for Hyper-V, KVM, SCVMM, vSphere, or
XenServer
Create a reservation to allocate resources for XenServer. Create a Reservation for Hyper-V, KVM, SCVMM, vSphere, or
XenServer
Create a reservation to allocate resources for Microsoft Azure. Create a Reservation for Microsoft Azure
Creating Cloud Category Reservations
A cloud category type reservation provides access to the provisioning services of a cloud service account
for a particular vRealize Automation business group. Available cloud reservation types include Amazon,
OpenStack, vCloud Air, and vCloud Director.
A reservation is a share of the memory, CPU, networking, and storage resources of one compute
resource allocated to a particular vRealize Automation business group.
A business group can have multiple reservations on one endpoint or reservations on multiple endpoints.
Configuring vRealize Automation
VMware, Inc. 250
The allocation model for a reservation depends on the allocation model in the associated datacenter.
Available allocation models are Allocation Pool, Pay As You Go, and reservation pool. For information
about allocation models, see thevCloud Director or vCloud Air documentation.
In addition to defining the share of fabric resources allocated to the business group, a reservation can
define policies, priorities, and quotas that determine machine placement.
To provision successfully, the reservation must have sufficient available storage. The reservation's
storage availability depends on:
nHow much storage is available on the datastore/cluster.
nHow much of that storage is reserved for that datastore/cluster.
nHow much of that storage is already allocated in vRealize Automation
For example, even if the vCenter Server has storage available for the datastore/cluster, if sufficient
storage is not reserved in the reservation then provisioning fails with a "No reservation is available to
allocate..." error. The allocated storage on a reservation depends on the number of VMs (regardless of
their state) on that specific reservation. See the VMware Knowledge Base article Machine XXX: No
reservation is available to allocate within the group XXX. Total XX GB of storage was requested
(2151030) at http://kb.vmware.com/kb/2151030 for more information.
Understanding Selection Logic for Cloud Reservations
When a member of a business group creates a provisioning request for a cloud machine,
vRealize Automation selects a machine from one of the reservations that are available to that business
group. Cloud reservations include Amazon, OpenStack, vCloud Air, and vCloud Director.
The reservation for which a machine is provisioned must satisfy the following criteria:
nThe reservation must be of the same platform type as the blueprint from which the machine was
requested.
nThe reservation must be enabled.
nThe reservation must have capacity remaining in its machine quota or have an unlimited quota.
The allocated machine quota includes only machines that are powered on. For example, if a
reservation has a quota of 50, and 40 machines have been provisioned but only 20 of them are
powered on, the reservation’s quota is 40 percent allocated, not 80 percent.
nThe reservation must have the security groups specified in the machine request.
nThe reservation must be associated with a region that has the machine image specified in the
blueprint.
nThe reservation must have sufficient unallocated memory and storage resources to provision the
machine.
In a Pay As You Go reservation, resources can be unlimited.
nFor Amazon machines, the request specifies an availability zone and whether the machine is to be
provisioned a subnet in a Virtual Private Cloud (VPC) or a in a non-VPC location. The reservation
must match the network type (VPC or non-VPC).
Configuring vRealize Automation
VMware, Inc. 251

nFor vCloud Air or vCloud Director, if the request specifies an allocation model, the virtual datacenter
associated with the reservation must have the same allocation model.
nFor vCloud Director or vCloud Air, the specified organization must be enabled.
nAny blueprint templates must be available on the reservation. If the reservation policy maps to more
than one resources, the templates should be public.
nIf the cloud provider supports network selection and the blueprint has specific network settings, the
reservation must have the same networks.
If the blueprint or reservation specifies a network profile for static IP address assignment, an IP
address must be available to assign to the new machine.
nIf the request specifies an allocation model, the allocation model in the reservation must match the
allocation model in the request.
nIf the blueprint specifies a reservation policy, the reservation must belong to that reservation policy.
Reservation policies are a way to guarantee that the selected reservation satisfies any additional
requirements for provisioning machines from a specific blueprint. For example, if a blueprint uses a
specific machine image, you can use reservation policies to limit provisioning to reservations
associated with the regions that have the required image.
If no reservation is available that meets all of the selection criteria, provisioning fails.
If multiple reservations meet all of the criteria, the reservation from which to provision a requested
machine is determined by the following logic:
nA reservation with a lower priority value is selected before a reservation with a higher priority value.
nIf multiple reservations have the same priority, the reservation with the lowest percentage of its
machine quota allocated is selected.
nIf multiple reservations have the same priority and quota usage, machines are distributed among
reservations in round-robin fashion.
Note While round-robin selection of network profiles is not supported, round-robin selection of
networks (if any) is supported, which can be associated with different network profiles.
If multiple storage paths are available on a reservation with sufficient capacity to provision the machine
volumes, storage paths are selected according to the following logic.
nA storage path with a lower priority value is selected before a storage path with a higher priority value.
nIf the blueprint or request specifies a storage reservation policy, the storage path must belong to that
storage reservation policy.
If the custom property VirtualMachine.DiskN.StorageReservationPolicyMode is set to Not
Exact, and no storage path with sufficient capacity is available in the storage reservation policy, then
provisioning proceeds with a storage path outside the specified storage reservation policy. The
default value of VirtualMachine.DiskN.StorageReservationPolicyMode is Exact.
Configuring vRealize Automation
VMware, Inc. 252

nIf multiple storage paths have the same priority, machines are distributed among storage paths by
using round-robin scheduling.
Create an Amazon EC2 Reservation
You must allocate resources to machines by creating a reservation before members of a business group
can request machine provisioning.
You can work with Amazon reservations for Amazon Virtual Private Cloud or Amazon non-VPC.
Amazon Web Services users can create a Amazon Virtual Private Cloud to design a virtual network
topology according to your specifications. If you plan to use Amazon VPC, you must assign an
Amazon VPC to a vRealize Automation reservation. See .
When you create an Amazon reservation or configure a machine component in the blueprint, you can
choose from the list of security groups that are available to the specified Amazon region. Security groups
are imported during data collection.
Note After you create a reservation, you cannot change the business group or compute resource
associations.
For information about creating an Amazon VPC by using the AWS Management Console, see
Amazon Web Services documentation.
Procedure
1Specify Amazon Reservation Information
Each reservation is configured for a specific business group to grant them access to request
machines on a specified compute resource.
2Specify Resource and Network Settings for Amazon Reservations
Specify resource and network settings for provisioning machines from this vRealize Automation
reservation.
3Specify Custom Properties and Alerts for Amazon Reservations
You can associate custom properties with a vRealize Automation reservation. You can also
configure alerts to send email notifications when reservation resources are low.
Specify Amazon Reservation Information
Each reservation is configured for a specific business group to grant them access to request machines on
a specified compute resource.
Note After you create a reservation, you cannot change the business group or compute resource
associations.
You can control the display of reservations when adding, editing, or deleting by using the Filter By
Category option on the Reservations page. Note that test agent reservations do not appear in the
reservations list when filtering by category.
Configuring vRealize Automation
VMware, Inc. 253

Prerequisites
nLog in to vRealize Automation as a fabric administrator.
nVerify that a tenant administrator created at least one business group.
nVerify that a compute resource exists.
nConfigure network settings.
n(Optional) Configure network profile information.
nVerify that you have access to a desired Amazon network. For example, if you want to use VPC,
verify that you have access to an Amazon Virtual Private Cloud (VPC) network.
nVerify that any required key pairs exist. See Managing Key Pairs.
Procedure
1Select Infrastructure > Reservations > Reservations.
2Click the New icon ( ) and select the type of reservation to create.
Select Amazon EC2.
3(Optional) Select an existing reservation from the Copy from existing reservation drop-down menu.
Data from the selected reservation appears. You can make changes as required for your new
reservation.
4Enter a name in the Name text box.
5Select a tenant from the Tenant drop-down menu.
6Select a business group from the Business group drop-down menu.
Only users in this business group can provision machines by using this reservation.
7(Optional) Select a reservation policy from the Reservation policy drop-down menu.
This option requires that one or more reservation policies exist. You can edit the reservation later to
specify a reservation policy.
You use a reservation policy to restrict provisioning to specific reservations.
8Enter a number in the Priority text box to set the priority for the reservation.
The priority is used when a business group has more than one reservation. A reservation with priority
1 is used for provisioning over a reservation with priority 2.
9(Optional) Deselect the Enable this reservation check box if you do not want this reservation active.
Do not navigate away from this page. Your reservation is not complete.
Specify Resource and Network Settings for Amazon Reservations
Specify resource and network settings for provisioning machines from this vRealize Automation
reservation.
Configuring vRealize Automation
VMware, Inc. 254

When you create an Amazon reservation or configure a machine component in the blueprint, you can
choose from the list of security groups that are available to the specified Amazon account region. Security
groups are imported during data collection. A security group acts as a firewall to control access to a
machine. Every region includes at least the default security group. Administrators can use the
Amazon Web Services Management Console to create additional security groups, configure ports for
Microsoft Remote Desktop Protocol or SSH, and set up a virtual private network for an Amazon VPN. For
information about creating and using security groups in Amazon Web Services, see Amazon
documentation.
For related information about load balancers, see Configuring vRealize Automation.
Prerequisites
Specify Amazon Reservation Information.
Procedure
1Click the Resouces tab.
2Select a compute resource on which to provision machines from the Compute resource drop-down
menu.
Available Amazon regions are listed.
3(Optional) Enter a number in the Machine quota text box to set the maximum number of machines
that can be provisioned on this reservation.
Only machines that are powered on are counted towards the quota. Leave blank to make the
reservation unlimited.
4Select a method of assigning key pairs to compute instances from the Key pair drop-down menu.
Option Description
Not Specified Controls key pair behavior at the blueprint level rather than the reservation level.
Auto-Generated per Business Group Every machine provisioned in the same business group has the same key pair,
including machines provisioned on other reservations when the machine has the
same compute resource and business group. Because key pairs generated this
way are associated with a business group, the key pairs are deleted when the
business group is deleted.
Auto-Generated per Machine Each machine has a unique key pair. This is the most secure method because no
key pairs are shared among machines.
Specific Key Pair Every machine provisioned on this reservation has the same key pair. Browse for
a key pair to use for this reservation.
5If you selected Specific key Pair in the Key pair drop-down menu, select a key pair value from the
Specific key pair drop-down menu.
Configuring vRealize Automation
VMware, Inc. 255

6If you are configured for Amazon Virtual Private Cloud, enable the Assign to a subnet in a VPC
check mark box. Otherwise, leave the box unchecked.
If you select Assign to a subnet in a VPC, the following locations or subnets, security groups, and
load balancers options appear in a popup menu rather than on this same page.
For a VPC reservation, specify the security groups and subnets for each VPC that is allowed in the
reservation.
7Select one or more available locations (non-VPC) or subnets (VPC) from the Locations or Subnets
list.
Select each available location or subnet that you want to be available for provisioning.
8Select one or more security groups that can be assigned to a machine during provisioning from the
Security groups list.
Select each security group that can be assigned to a machine during provisioning. Each available
region requires at least one specified security group.
9Select one or more available load balancers from the Load balancers list.
If you are using the elastic load balancer feature, select one or more available load balancers that
apply to the selected locations or subnets.
You can save the reservation now by clicking Save. Or you can add custom properties to further control
reservation specifications. You can also configure email alerts to send notifications when resources
allocated to this reservation become low.
Specify Custom Properties and Alerts for Amazon Reservations
You can associate custom properties with a vRealize Automation reservation. You can also configure
alerts to send email notifications when reservation resources are low.
Custom properties and email alerts are optional configurations for the reservation. If you do not want to
associate custom properties or set alerts, click Save to finish creating the reservation.
You can add as many custom properties as apply to your needs.
If configured, alerts are generated daily, rather than when the specified thresholds are reached.
Important Notifications are only sent if email alerts are configured and notifications are enabled.
Prerequisites
Specify Resource and Network Settings for Amazon Reservations.
Procedure
1Click the Properties tab.
2Click New.
3Enter a valid custom property name.
4If applicable, enter a property value.
Configuring vRealize Automation
VMware, Inc. 256
5Click Save.
6(Optional) Add any additional custom properties.
7Click the Alerts tab.
8Enable the Capacity Alerts check box to configure alerts to be sent.
9Use the slider to set thresholds for available resource allocation.
10 Enter the AD user or group names (not email addresses) to receive alert notifications in the
Recipients text box.
Enter a name on each line. Press Enter to separate multiple entries.
11 Select Send alerts to group manager to include group managers in the email alerts.
The email alerts are sent to the users included in the business group Send manager emails to list.
12 Specify a reminder frequency (days).
13 Click Save.
The reservation is saved and appears in the Reservations list.
What to do next
You can configure optional reservation policies or begin preparing for provisioning.
Users who are authorized to create blueprints can create them now.
Create an OpenStack Reservation
You must allocate resources to machines by creating a reservation before members of a business group
can request machine provisioning.
Create an OpenStack reservation.
Procedure
1Specify OpenStack Reservation Information
Each reservation is configured for a specific business group to grant them access to request
machines on a specified compute resource.
2Specify Resources and Network Settings for OpenStack Reservations
Specify resource and network settings available to machines that are provisioned from this
vRealize Automation reservation.
3Specify Custom Properties and Alerts for OpenStack Reservations
You can associate custom properties with a vRealize Automation reservation. You can also
configure alerts to send email notifications when reservation resources are low.
Specify OpenStack Reservation Information
Configuring vRealize Automation
VMware, Inc. 257

Each reservation is configured for a specific business group to grant them access to request machines on
a specified compute resource.
Note After you create a reservation, you cannot change the business group or compute resource
associations.
You can control the display of reservations when adding, editing, or deleting by using the Filter By
Category option on the Reservations page. Note that test agent reservations do not appear in the
reservations list when filtering by category.
Prerequisites
nLog in to vRealize Automation as a fabric administrator.
nVerify that a tenant administrator created at least one business group.
nVerify that a compute resource exists.
nVerify that any optional security groups or floating IP addresses are configured.
nVerify that any required key pairs exist. See Managing Key Pairs.
nVerify that a compute resource exists.
nConfigure network settings.
Procedure
1Select Infrastructure > Reservations > Reservations.
2Click the New icon ( ) and select the type of reservation to create.
Select OpenStack.
3(Optional) Select an existing reservation from the Copy from existing reservation drop-down menu.
Data from the selected reservation appears. You can make changes as required for your new
reservation.
4Enter a name in the Name text box.
5Select a tenant from the Tenant drop-down menu.
6Select a business group from the Business group drop-down menu.
Only users in this business group can provision machines by using this reservation.
7(Optional) Select a reservation policy from the Reservation policy drop-down menu.
This option requires that one or more reservation policies exist. You can edit the reservation later to
specify a reservation policy.
You use a reservation policy to restrict provisioning to specific reservations.
Configuring vRealize Automation
VMware, Inc. 258

8Enter a number in the Priority text box to set the priority for the reservation.
The priority is used when a business group has more than one reservation. A reservation with priority
1 is used for provisioning over a reservation with priority 2.
9(Optional) Deselect the Enable this reservation check box if you do not want this reservation active.
Do not navigate away from this page. Your reservation is not complete.
Specify Resources and Network Settings for OpenStack Reservations
Specify resource and network settings available to machines that are provisioned from this
vRealize Automation reservation.
Prerequisites
Specify OpenStack Reservation Information.
Procedure
1Click the Resouces tab.
2Select a compute resource on which to provision machines from the Compute resource drop-down
menu.
Only templates located on the cluster you select are available for cloning with this reservation.
During provisioning, machines are placed on a host that is connected to the local storage. If the
reservation uses local storage, all the machines that are provisioned by the reservation are created
on the host that contains that local storage. However, if you use the
VirtualMachine.Admin.ForceHost custom property, which forces a machine to be provisioned to a
different host, provisioning fails. Provisioning also fails if the template from which the machine is
cloned is on local storage, but attached to a machine on a different cluster. In this case, provisioning
fails because it cannot access the template.
3(Optional) Enter a number in the Machine quota text box to set the maximum number of machines
that can be provisioned on this reservation.
Only machines that are powered on are counted towards the quota. Leave blank to make the
reservation unlimited.
4Select a method of assigning key pairs to compute instances from the Key pair drop-down menu.
Option Description
Not Specified Controls key pair behavior at the blueprint level rather than the reservation level.
Auto-Generated per Business Group Every machine provisioned in the same business group has the same key pair,
including machines provisioned on other reservations when the machine has the
same compute resource and business group. Because key pairs generated this
way are associated with a business group, the key pairs are deleted when the
business group is deleted.
Configuring vRealize Automation
VMware, Inc. 259

Option Description
Auto-Generated per Machine Each machine has a unique key pair. This is the most secure method because no
key pairs are shared among machines.
Specific Key Pair Every machine provisioned on this reservation has the same key pair. Browse for
a key pair to use for this reservation.
5If you selected Specific key Pair in the Key pair drop-down menu, select a key pair value from the
Specific key pair drop-down menu.
6Select one or more security groups that can be assigned to a machine during provisioning from the
Security groups list.
7Click the Network tab.
8Configure a network path for machines provisioned by using this reservation.
a (Optional) If the option is available, select a storage endpoint from the Endpoint drop-down
menu.
The FlexClone option is visible in the endpoint column if a NetApp ONTAP endpoint exists and if
the host is virtual. If there is a NetApp ONTAP endpoint, the reservation page displays the
endpoint assigned to the storage path. When you add, update, or delete an endpoint for a storage
path, the change is visible in all the applicable reservations.
When you add, update, or delete an endpoint for a storage path, the change is visible in the
reservation page.
b Select a network paths for machines provisioned by this reservation from the Network Paths list.
c (Optional) Select a listed network profile from the Network Profile drop-down menu.
This option requires that one or more network profiles exists.
You can select more than one network path on a reservation, but only one network is used when
provisioning a machine.
You can save the reservation now by clicking Save. Or you can add custom properties to further control
reservation specifications. You can also configure email alerts to send notifications when resources
allocated to this reservation become low.
Specify Custom Properties and Alerts for OpenStack Reservations
You can associate custom properties with a vRealize Automation reservation. You can also configure
alerts to send email notifications when reservation resources are low.
Custom properties and email alerts are optional configurations for the reservation. If you do not want to
associate custom properties or set alerts, click Save to finish creating the reservation.
You can add as many custom properties as apply to your needs.
Important Notifications are only sent if email alerts are configured and notifications are enabled.
If configured, alerts are generated daily, rather than when the specified thresholds are reached.
Configuring vRealize Automation
VMware, Inc. 260
Prerequisites
Specify Resources and Network Settings for OpenStack Reservations.
Procedure
1Click the Properties tab.
2Click New.
3Enter a valid custom property name.
4If applicable, enter a property value.
5Click Save.
6(Optional) Add any additional custom properties.
7Click the Alerts tab.
8Enable the Capacity Alerts check box to configure alerts to be sent.
9Use the slider to set thresholds for available resource allocation.
10 Enter the AD user or group names (not email addresses) to receive alert notifications in the
Recipients text box.
Enter a name on each line. Press Enter to separate multiple entries.
11 Select Send alerts to group manager to include group managers in the email alerts.
The email alerts are sent to the users included in the business group Send manager emails to list.
12 Specify a reminder frequency (days).
13 Click Save.
The reservation is saved and appears in the Reservations list.
What to do next
You can configure optional reservation policies or begin preparing for provisioning.
Users who are authorized to create blueprints can create them now.
Create a vCloud Air Reservation
You must allocate resources to machines by creating a vRealize Automation reservation before members
of a business group can request machine provisioning.
Each business group must have at least one reservation for its members to provision machines of that
type.
Procedure
1Specify vCloud Air Reservation Information
You can create a reservation for each vCloud Air machine subscription or OnDemand resource.
Each reservation is configured for a specific business group to grant them access to request
machines.
Configuring vRealize Automation
VMware, Inc. 261

2Specify Resources and Network Settings for a vCloud Air Reservation
Specify resource and network settings available to vCloud Air machines that are provisioned from
this vRealize Automation reservation.
3Specify Custom Properties and Alerts for a vCloud Air Reservation
You can associate custom properties with a vRealize Automation reservation. You can also
configure alerts to send email notifications when reservation resources are low.
What to do next
You can configure optional reservation policies or begin preparing for provisioning.
Users who are authorized to create blueprints can create them now.
Specify vCloud Air Reservation Information
You can create a reservation for each vCloud Air machine subscription or OnDemand resource. Each
reservation is configured for a specific business group to grant them access to request machines.
You can control the display of reservations when adding, editing, or deleting by using the Filter By
Category option on the Reservations page. Note that test agent reservations do not appear in the
reservations list when filtering by category.
Note After you create a reservation, you cannot change the business group or compute resource
associations.
Prerequisites
nLog in to vRealize Automation as a fabric administrator.
nVerify that a tenant administrator created at least one business group.
nVerify that a compute resource exists.
nConfigure network settings.
n(Optional) Configure network profile information.
Procedure
1Select Infrastructure > Reservations > Reservations.
2Click the New icon ( ) and select the type of reservation to create.
The available cloud reservation types are Amazon, OpenStack, vCloud Air, and vCloud Director.
Select vCloud Air.
3(Optional) Select an existing reservation from the Copy from existing reservation drop-down menu.
Data from the selected reservation appears. You can make changes as required for your new
reservation.
4Enter a name in the Name text box.
5Select a tenant from the Tenant drop-down menu.
Configuring vRealize Automation
VMware, Inc. 262

6Select a business group from the Business group drop-down menu.
Only users in this business group can provision machines by using this reservation.
7(Optional) Select a reservation policy from the Reservation policy drop-down menu.
This option requires that one or more reservation policies exist. You can edit the reservation later to
specify a reservation policy.
You use a reservation policy to restrict provisioning to specific reservations.
8Enter a number in the Priority text box to set the priority for the reservation.
The priority is used when a business group has more than one reservation. A reservation with priority
1 is used for provisioning over a reservation with priority 2.
9(Optional) Deselect the Enable this reservation check box if you do not want this reservation active.
Do not navigate away from this page. Your reservation is not complete.
Specify Resources and Network Settings for a vCloud Air Reservation
Specify resource and network settings available to vCloud Air machines that are provisioned from this
vRealize Automation reservation.
The available resource allocation models for machines provisioned from a vCloud Director reservation are
Allocation Pool, Pay As You Go, and Reservation Pool. For Pay As You Go, you do not need to specify
storage or memory amounts but do need to specify a priority for the storage path. For details about these
allocation models, see vCloud Air documentation.
You can specify a standard or disk-level storage profile. Multi-level disk storage is available vCloud Air
endpoints.
For integrations that use Storage Distributed Resource Scheduler (SDRS) storage, you can select a
storage cluster to allow SDRS to automatically handle storage placement and load balancing for
machines provisioned from this reservation. The SDRS automation mode must be set to Automatic.
Otherwise, select a datastore within the cluster for standalone datastore behavior. SDRS is not supported
for FlexClone storage devices.
Note Reservations defined for vCloud Air endpoints and vCloud Director endpoints do not support the
use of network profiles for provisioning machines.
Prerequisites
Specify vCloud Director Reservation Information.
Procedure
1Click the Resouces tab.
2Select a compute resource on which to provision machines from the Compute resource drop-down
menu.
Only templates located on the cluster you select are available for cloning with this reservation.
Configuring vRealize Automation
VMware, Inc. 263
3Select an allocation model.
4(Optional) Enter a number in the Machine quota text box to set the maximum number of machines
that can be provisioned on this reservation.
Only machines that are powered on are counted towards the quota. Leave blank to make the
reservation unlimited.
5Specify the amount of memory, in GB, to be allocated to this reservation from the Memory table.
The overall memory value for the reservation is derived from your compute resource selection.
6Select one or more listed storage paths.
The available storage path options are derived from your compute resource selection.
a Enter a value in the This Reservation Reserved text box to specify how much storage to
allocate to this reservation.
b Enter a value in the Priority text box to specify the priority value for the storage path relative to
other storage paths that pertain to this reservation.
The priority is used for multiple storage paths. A storage path with priority 0 is used before a path
with priority 1.
c Click the Disable option if you do not want to enable the storage path for use by this reservation.
d Repeat this step to configure clusters and datastores as needed.
7Click the Network tab.
8Configure a network path for machines provisioned by using this reservation.
a (Optional) If the option is available, select a storage endpoint from the Endpoint drop-down
menu.
The FlexClone option is visible in the endpoint column if a NetApp ONTAP endpoint exists and if
the host is virtual. If there is a NetApp ONTAP endpoint, the reservation page displays the
endpoint assigned to the storage path. When you add, update, or delete an endpoint for a storage
path, the change is visible in all the applicable reservations.
When you add, update, or delete an endpoint for a storage path, the change is visible in the
reservation page.
b Select a network paths for machines provisioned by this reservation from the Network Paths list.
c (Optional) Select a listed network profile from the Network Profile drop-down menu.
This option requires that one or more network profiles exists.
You can select more than one network path on a reservation, but only one network is used when
provisioning a machine.
You can save the reservation now by clicking Save. Or you can add custom properties to further control
reservation specifications. You can also configure email alerts to send notifications when resources
allocated to this reservation become low.
Configuring vRealize Automation
VMware, Inc. 264

Specify Custom Properties and Alerts for a vCloud Air Reservation
You can associate custom properties with a vRealize Automation reservation. You can also configure
alerts to send email notifications when reservation resources are low.
Custom properties and email alerts are optional configurations for the reservation. If you do not want to
associate custom properties or set alerts, click Save to finish creating the reservation.
You can add as many custom properties as apply to your needs.
If configured, alerts are generated daily, rather than when the specified thresholds are reached.
Important Notifications are only sent if email alerts are configured and notifications are enabled.
Alerts are not available for Pay As You Go reservations that were created with no specified limits.
Prerequisites
Specify Resources and Network Settings for a vCloud Air Reservation
Procedure
1Click the Properties tab.
2Click New.
3Enter a valid custom property name.
4If applicable, enter a property value.
5(Optional) Check the Encrypted check box to encrypt the property value.
6(Optional) Check the Prompt User check box to require that the user enter a value.
This option cannot be overridden when provisioning.
7Click Save.
8(Optional) Add any additional custom properties.
9Click the Alerts tab.
10 Enable the Capacity Alerts check box to configure alerts to be sent.
11 Use the slider to set thresholds for available resource allocation.
12 Enter the AD user or group names (not email addresses) to receive alert notifications in the
Recipients text box.
Enter a name on each line. Press Enter to separate multiple entries.
13 Select Send alerts to group manager to include group managers in the email alerts.
The email alerts are sent to the users included in the business group Send manager emails to list.
14 Specify a reminder frequency (days).
15 Click Save.
Configuring vRealize Automation
VMware, Inc. 265

The reservation is saved and appears in the Reservations list.
Create a vCloud Director Reservation
You must allocate resources to machines by creating a vRealize Automation reservation before members
of a business group can request machine provisioning.
Each business group must have at least one reservation for its members to provision machines of that
type.
Procedure
1Specify vCloud Director Reservation Information
You can create a reservation for each vCloud Director organization virtual datacenter (VDC). Each
reservation is configured for a specific business group to grant them access to request machines on
a specified compute resource.
2Specify Resources and Network Settings for a vCloud Director Reservation
Specify resource and network settings available to vCloud Director machines that are provisioned
from this vRealize Automation reservation.
3Specify Custom Properties and Alerts for vCloud Director Reservations
You can associate custom properties with a vRealize Automation reservation. You can also
configure alerts to send email notifications when reservation resources are low.
What to do next
You can configure optional reservation policies or begin preparing for provisioning.
Users who are authorized to create blueprints can create them now.
Specify vCloud Director Reservation Information
You can create a reservation for each vCloud Director organization virtual datacenter (VDC). Each
reservation is configured for a specific business group to grant them access to request machines on a
specified compute resource.
You can control the display of reservations when adding, editing, or deleting by using the Filter By
Category option on the Reservations page. Note that test agent reservations do not appear in the
reservations list when filtering by category.
Note After you create a reservation, you cannot change the business group or compute resource
associations.
Prerequisites
nLog in to vRealize Automation as a fabric administrator.
nVerify that a tenant administrator created at least one business group.
nVerify that a compute resource exists.
nConfigure network settings.
Configuring vRealize Automation
VMware, Inc. 266

n(Optional) Configure network profile information.
Procedure
1Select Infrastructure > Reservations > Reservations.
2Click the New icon ( ) and select the type of reservation to create.
The available cloud reservation types are Amazon, OpenStack, vCloud Air, and vCloud Director.
Select vCloud Director.
3(Optional) Select an existing reservation from the Copy from existing reservation drop-down menu.
Data from the selected reservation appears. You can make changes as required for your new
reservation.
4Enter a name in the Name text box.
5Select a tenant from the Tenant drop-down menu.
6Select a business group from the Business group drop-down menu.
Only users in this business group can provision machines by using this reservation.
7(Optional) Select a reservation policy from the Reservation policy drop-down menu.
This option requires that one or more reservation policies exist. You can edit the reservation later to
specify a reservation policy.
You use a reservation policy to restrict provisioning to specific reservations.
8Enter a number in the Priority text box to set the priority for the reservation.
The priority is used when a business group has more than one reservation. A reservation with priority
1 is used for provisioning over a reservation with priority 2.
9(Optional) Deselect the Enable this reservation check box if you do not want this reservation active.
Do not navigate away from this page. Your reservation is not complete.
Specify Resources and Network Settings for a vCloud Director Reservation
Specify resource and network settings available to vCloud Director machines that are provisioned from
this vRealize Automation reservation.
The available resource allocation models for machines provisioned from a vCloud Director reservation are
Allocation Pool, Pay As You Go, and Reservation Pool. For Pay As You Go, you do not need to specify
storage or memory amounts but do need to specify a priority for the storage path. For details about these
allocation models, see vCloud Director documentation.
You can specify a standard or disk-level storage profile. Multi-level disk storage is available for
vCloud Director 5.6 and greater endpoints. Multi-level disk storage is not supported for vCloud Director
5.5 endpoints.
Configuring vRealize Automation
VMware, Inc. 267

For integrations that use Storage Distributed Resource Scheduler (SDRS) storage, you can select a
storage cluster to allow SDRS to automatically handle storage placement and load balancing for
machines provisioned from this reservation. The SDRS automation mode must be set to Automatic.
Otherwise, select a datastore within the cluster for standalone datastore behavior. SDRS is not supported
for FlexClone storage devices.
Note Reservations defined for vCloud Air endpoints and vCloud Director endpoints do not support the
use of network profiles for provisioning machines.
Prerequisites
Specify vCloud Director Reservation Information.
Procedure
1Click the Resouces tab.
2Select a compute resource on which to provision machines from the Compute resource drop-down
menu.
Only templates located on the cluster you select are available for cloning with this reservation.
3Select an allocation model.
4(Optional) Enter a number in the Machine quota text box to set the maximum number of machines
that can be provisioned on this reservation.
Only machines that are powered on are counted towards the quota. Leave blank to make the
reservation unlimited.
5Specify the amount of memory, in GB, to be allocated to this reservation from the Memory table.
The overall memory value for the reservation is derived from your compute resource selection.
6Select one or more listed storage paths.
The available storage path options are derived from your compute resource selection.
a Enter a value in the This Reservation Reserved text box to specify how much storage to
allocate to this reservation.
b Enter a value in the Priority text box to specify the priority value for the storage path relative to
other storage paths that pertain to this reservation.
The priority is used for multiple storage paths. A storage path with priority 0 is used before a path
with priority 1.
c Click the Disable option if you do not want to enable the storage path for use by this reservation.
d Repeat this step to configure clusters and datastores as needed.
7Click the Network tab.
Configuring vRealize Automation
VMware, Inc. 268

8Configure a network path for machines provisioned by using this reservation.
a (Optional) If the option is available, select a storage endpoint from the Endpoint drop-down
menu.
The FlexClone option is visible in the endpoint column if a NetApp ONTAP endpoint exists and if
the host is virtual. If there is a NetApp ONTAP endpoint, the reservation page displays the
endpoint assigned to the storage path. When you add, update, or delete an endpoint for a storage
path, the change is visible in all the applicable reservations.
When you add, update, or delete an endpoint for a storage path, the change is visible in the
reservation page.
b Select a network paths for machines provisioned by this reservation from the Network Paths list.
c (Optional) Select a listed network profile from the Network Profile drop-down menu.
This option requires that one or more network profiles exists.
You can select more than one network path on a reservation, but only one network is used when
provisioning a machine.
You can save the reservation now by clicking Save. Or you can add custom properties to further control
reservation specifications. You can also configure email alerts to send notifications when resources
allocated to this reservation become low.
Specify Custom Properties and Alerts for vCloud Director Reservations
You can associate custom properties with a vRealize Automation reservation. You can also configure
alerts to send email notifications when reservation resources are low.
Custom properties and email alerts are optional configurations for the reservation. If you do not want to
associate custom properties or set alerts, click Save to finish creating the reservation.
You can add as many custom properties as apply to your needs.
If configured, alerts are generated daily, rather than when the specified thresholds are reached.
Important Notifications are only sent if email alerts are configured and notifications are enabled.
Alerts are not available for Pay As You Go reservations that were created with no specified limits.
Prerequisites
Specify Resources and Network Settings for a vCloud Director Reservation.
Procedure
1Click the Properties tab.
2Click New.
3Enter a valid custom property name.
4If applicable, enter a property value.
Configuring vRealize Automation
VMware, Inc. 269

5(Optional) Check the Encrypted check box to encrypt the property value.
6(Optional) Check the Prompt User check box to require that the user enter a value.
This option cannot be overridden when provisioning.
7Click Save.
8(Optional) Add any additional custom properties.
9Click the Alerts tab.
10 Enable the Capacity Alerts check box to configure alerts to be sent.
11 Use the slider to set thresholds for available resource allocation.
12 Enter the AD user or group names (not email addresses) to receive alert notifications in the
Recipients text box.
Enter a name on each line. Press Enter to separate multiple entries.
13 Select Send alerts to group manager to include group managers in the email alerts.
The email alerts are sent to the users included in the business group Send manager emails to list.
14 Specify a reminder frequency (days).
15 Click Save.
The reservation is saved and appears in the Reservations list.
Create a Reservation for Microsoft Azure
Create an Azure reservation for a specific business group to grant users in that group the ability to
request Azure virtual machines on a specified compute resource.
If your deployment supports single sign-on through a VPN tunnel, you can configure support for this
functionality with Azure virtual machines using the settings on the Properties tab.
Note Ignore the Alerts tab when creating an Azure reservation as it does not apply. After you create a
reservation, you cannot change the business group associations. Also, unlike other machine types, there
is no direct link between an Azure reservation and a blueprint.
You can control the display of reservations when adding, editing, or deleting by using the Filter By
Category option on the Reservations page. Note that test agent reservations do not appear in the
reservations list when filtering by category.
Prerequisites
nLog in to vRealize Automation as a fabric administrator.
nVerify that a tenant administrator created at least one business group.
n(Optional) Configure network profile information.
nVerify that you have access to any required Azure resources.
Configuring vRealize Automation
VMware, Inc. 270

nVerify that any required key pairs exist. See Configuring vRealize Automation for information about
key pairs.
nObtain a valid Azure Subscription ID that matches the one used with the applicable Azure endpoint. If
you use multiple Azure subscriptions, you must create a reservation for each subscription.
nf your deployment supports single sign-on through a VPN tunnel, you must configure the appropriate
VPC connectivity before creating a reservation. See Configure Network-to-Azure VPC Connectivity.
Configure Microsoft Azure Basic Reservation Information
Specify basic information for a Microsoft Azure reservation.
All information on the Reservation Information page are required except the Reservation Policy. All
information on subsequent Azure reservation pages is optional.
Procedure
1Select Infrastructure > Administration > Reservations.
2Click the New icon ( ) and select the type of reservation to create.
Select Azure.
3(Optional) Select an existing reservation from the Copy from existing reservation drop-down menu.
Data from the selected reservation appears. You can make changes as required for your new
reservation.
4Enter a name in the Name text box.
5Select a business group from the Business group drop-down menu.
Only users in this business group can provision machines by using this reservation.
6Ignore the Reservation policy text box, as it does not apply to Azure reservations.
7Enter a number in the Priority text box to set the priority for the reservation.
The priority is used when a business group has more than one reservation. A reservation with priority
1 is used for provisioning over a reservation with priority 2.
8(Optional) Deselect the Enable this reservation check box if you do not want this reservation active.
9Click OK.
Configure Azure Reservation Resource Information
When setting up an Azure reservation, you can assign resource group and storage account information
based on the Azure instance you are using. When you set up a reservation, the vRealize Automation
provisioning logic attempts to allocate resources, such as resource groups and storage accounts,
according to the resource information specified by the reservation while provisioning a virtual machine.
Configuring vRealize Automation
VMware, Inc. 271

You can configure Resource Group and Storage Account information for an Azure virtual machine in the
reservation, but you can also choose to leave these fields blank in the reservation. If you leave the fields
blank, the default resource group and storage account information related to the specified Azure
subscription ID will be used for any related blueprints. You can also update this information when creating
a blueprint or when you provision a virtual machine.
Prerequisites
Obtain the subscription ID for your Azure instance.
Procedure
1Type or paste your Azure subscription ID in the Subscription ID text box.
2Select the location for the reservation by clicking the Location drop-down.
You can leave this field blank to create a location agnostic reservation, but if you do location
information must be specified either when creating a blueprint or when provisioning an Azure virtual
machine.
3Click New in the Resource Groups table.
a Paste the appropriate Resource Group name information from your Azure instance in the Name
text box.
Note The Name box cannot be left empty.
b Assign a numerical priority value in the Priority text box.
This assignment determines priority when a Resource Group has more than one resource group,
with lower numbers taking precedence.
c Click Save to add the Resource Group to the reservation.
4Click New in the Storage Accounts table.
a Paste the appropriate Storage Account name information from your Azure instance in the Name
text box.
Note The Name box cannot be left empty.
b Assign a numerical priority value in the Priority text box.
c Click Save to add the Storage Account to the reservation.
This assignment determines priority when a reservation has more than one Storage Account, with
lower numbers taking precedence.
5Click OK to proceed to the next tab.
Configure Azure Properties
You can add custom properties to an Azure reservation to support options such as VPN tunneling to
support communication between multiple networks. This functionality also facilitates the addition of
software components to blueprints.
Configuring vRealize Automation
VMware, Inc. 272

You must create custom properties that define the appropriate URLs to support VPN tunneling on your
network. In addition, you must create properties that define the path to the Azure tunneling configuration
scripts downloaded previously.
Use the private IP address of your Azure tunnel physical machine and port 1443, which you assigned for
vRealize_automation_appliance_fqdn when you invoked the SSH tunnel.
The following table shows the names and values for the properties required to support VPN tunneling.
Name Value
Azure.Windows.ScriptPath Specifies the path to the downloaded script that configures
tunneling for Windows-based systems. Update the path as
appropriate for your deployment.
Azure.Linux.ScriptPath Specifies the path to the downloaded script that configures
tunneling for Linux-based systems. Update the path as
appropriate for your deployment.
agent.download.url Specifies the URL for the VPN agent on your deployment. The
URL format is https:// Private_IP:1443/software-
service//resources/noble-agent.jar
software.agent.service.url Enter the VPN software agent service URL for your deployment,
The URL format is https:// Private_IP:1443/software-
service/api
software.ebs.url Enter the event broker service URL for your deployment. The
URL format is https:// Private_IP:1443/event-broker-
service/api
Prerequisites
nDownload the VMware-supplied Azure scripts from the Guest and Software Agent Installers page
on your vRealize Automation Appliance.
These scripts install Azure extensions required to support VPN tunneling. There are two scripts:
script.ps1 and script.sh. The .ps1 file is for Windows systems, and the .sh file is for Linux
systems.
a Run https://vrealize-automation-appliance-fqdn/software to open the VMware
vRealize Automation Appliance page.
b Click the Guest and software agents link under the To install vRealize Automation components
(IaaS, Guest and Software Agents, Tools) heading.
c Download the Azure script files under the Azure Machines heading. Save the script files to an
appropriate location. You must point to this location when configuring Azure reservation custom
properties.
Procedure
1Click the Properties tab.
2Click New.
Configuring vRealize Automation
VMware, Inc. 273
3Enter the appropriate Name and Value for the custom property in the Properties dialog box.
4As you create each property, click OK on the dialog box to add that property.
5When you finish adding all required properties, click OK to save your settings.
What to do next
After you create the custom properties to support VPN tunneling, you can create software components for
your Azure blueprints. See Configuring vRealize Automation for more information.
When setting up a software component for Azure, select Azure Virtual Machine in the Container drop-
down on the New Software page.
Configure Azure Reservation Network Information
You can configure virtual network and load balancer information for an Azure virtual machine in the
reservation.
You can also choose to leave this page partly or completely blank and configure virtual network and load
balancer information when you provision a virtual machine.
If you specify a network profile and do not specify a subnet, then the name of the first existing network
range of the specified network profile is used as the subnet name. If a network profile is specified, you
can choose to leave the vNet text box blank. In this case, the name of this first network range of the
specified network profile is used as the subnet name, and the vNet name is resolved to the first Azure
vNet that contains an applicable subnet.
Prerequisites
Obtain the appropriate virtual network and load balancer information from your Azure instance where
applicable.
Procedure
1Click New in the Networks table to configure the appropriate Azure virtual network to use with your
virtual machine.
a Paste the appropriate vNet name information from your Azure instance into the vNet text box.
b Paste the appropriate Subnet name information from your Azure instance into the Subnet text
box.
The Subnet specification is optional. If you leave this box empty, the subnet of the specified vNet
is used by default.
c Type or paste the appropriate name in the Network Profile text box. You can use the network
profile in the blueprint to associate a network interface card with a network.
The network profile specification is optional. Use if it you want to create you blueprint based on
the network profile is defined in vRealize Automation rather than have it coupled with Azure
network constructs.
Configuring vRealize Automation
VMware, Inc. 274
d Assign a numerical priority value in the Priority text box if applicable.
This assignment determines priority when a virtual network has more than one reservation, with
lower numbers taking precedence.
e Click Save to add the Resource Group to the reservation.
2Click New in the Load Balancers table if you are deploying multiple machines and use a load
balancer.
a Paste the appropriate load balancer name from your Azure instance into the Name text box.
b Paste the appropriate name from your Azure instance into the Backend Address Pool text box.
c Assign a numerical priority value in the Priority text box if applicable.
This assignment determines priority when a virtual network has more than one load balancer, with
lower numbers taking precedence.
d Click Save to add the load balancer to the reservation.
3Click New in the Security Groups table if you are deploying multiple machines that must communicate
through a firewall.
a Paste the security group name from your Azure instance into the Name text box.
b Assign a numerical priority value in the Priority text box if applicable.
This assignment determines priority when a virtual network has more than one security group,
with lower numbers taking precedence.
c Click Save to add the security group to the reservation.
4Click OK.
Scenario: Create an Amazon Reservation for a Proof of Concept Environment
Because you used an SSH tunnel to temporarily establish network-to-Amazon VPC connectivity for your
proof of concept environment, you have to add custom properties to your Amazon reservations to ensure
the Software bootstrap agent and guest agent run communications through the tunnel.
Network-to-Amazon VPC connectivity is only required if you want to use the guest agent to customize
provisioned machines, or if you want to include Software components in your blueprints. For a production
environment, you would configure this connectivity officially through Amazon Web Services, but because
you are working in a proof of concept environment, you configured a temporary SSH tunnel instead.
Using your fabric administrator privileges, you create a reservation to allocate your Amazon Web Services
resources and you include several custom properties to support the SSH tunneling. You also configure
the reservation on the same region and VPC as your tunnel machine.
Prerequisites
nLog in to vRealize Automation as a fabric administrator.
Configuring vRealize Automation
VMware, Inc. 275

nConfigure an SSH tunnel to establish network-to-Amazon VPC connectivity. Make a note of the
subnet, security group, and private IP address of your Amazon AWS tunnel machine. See Scenario:
Configure Network-to-Amazon VPC Connectivity for a Proof of Concept Environment.
nCreate a business group for members of your IT organization who need to architect blueprints in your
proof of concept environment. See Create a Business Group.
nVerify that a tenant administrator created at least one business group.
Procedure
1Scenaro: Specify Amazon AWS Reservation Information for a Proof of Concept Environment
You want to reserve resources for your team of blueprint architects so they can test the functionality
in your proof of concept environment, so you configure this reservation to allocate resources to your
architects business group.
2Scenario: Specify Amazon AWS Network Settings for a Proof of Concept Environment
You configure the reservation to use the same region and networking settings that your tunnel
machine is using, and you restrict the number of machines that can be powered on for this
reservation to manage resource usage.
3Scenario: Specify Custom Properties to Run Agent Communications Through Your Tunnel
When you configured network-to-Amazon VPC connectivity, you configured port forwarding to allow
your Amazon AWS tunnel machine to access vRealize Automation resources.
Scenaro: Specify Amazon AWS Reservation Information for a Proof of Concept Environment
You want to reserve resources for your team of blueprint architects so they can test the functionality in
your proof of concept environment, so you configure this reservation to allocate resources to your
architects business group.
Note After you create a reservation, you cannot change the business group or compute resource
associations.
Procedure
1Select Infrastructure > Reservations > Reservations.
2Click the New icon ( ) and select the type of reservation to create.
Select Amazon.
3Enter Amazon Tunnel POC in the Name text box.
4Select the business group you created for your blueprint architects from the Business Group drop-
down menu.
5Enter a 1 in the Priority text box to set this reservation as the highest priority.
You configured the business group and the priority for the reservation, but you still need to allocate
resources and configure the custom properties for the SSH tunnel.
Scenario: Specify Amazon AWS Network Settings for a Proof of Concept Environment
Configuring vRealize Automation
VMware, Inc. 276

You configure the reservation to use the same region and networking settings that your tunnel machine is
using, and you restrict the number of machines that can be powered on for this reservation to manage
resource usage.
Procedure
1Click the Resouces tab.
2Select a compute resource on which to provision machines from the Compute resource drop-down
menu.
Select the Amazon AWS region where your tunnel machine is located.
3(Optional) Enter a number in the Machine quota text box to set the maximum number of machines
that can be provisioned on this reservation.
Only machines that are powered on are counted towards the quota. Leave blank to make the
reservation unlimited.
4Select Specify Key Pair from the Key pair drop-down menu.
Because this is a proof of concept environment, you choose to share a single key pair for all
machines provisioned by using this reservation.
5Select the key pair you want to share with your architect users from the Key Pair drop-down menu.
6Enable the Assign to a subnet in a VPC checkbox.
7Select the same subnet and security groups that your tunnel machine is using.
You configured the reservation to use the same region and networking settings as your tunnel machine,
but you still need to add custom properties to ensure the Software bootstrap agent and guest agent run
communications through the tunnel.
Scenario: Specify Custom Properties to Run Agent Communications Through Your Tunnel
When you configured network-to-Amazon VPC connectivity, you configured port forwarding to allow your
Amazon AWS tunnel machine to access vRealize Automation resources.
You need to add tunnel custom properties on the reservation to configure the agents to access those
ports.
Note If you are using a PAT or NAT system network between your organization's network and the
vRealize Automation network, you can use these properties to access your private IP address and port.
Procedure
1Click the Properties tab.
2Click New.
Configuring vRealize Automation
VMware, Inc. 277

3Configure the tunnel custom properties.
Use the private IP address of your Amazon AWS tunnel machine and port 1443, which you assigned
for vRealize_automation_appliance_fqdn when you invoked the SSH tunnel.
Option Value
software.ebs.url https://Private_IP:1443/event-broker-service/api
software.agent.service.url https://Private_IP:1443/software-service/api
agent.download.url https://Private_IP:1443/software-service/resources/nobel-
agent.jar
4Click Save.
You created a reservation to allocate Amazon AWS resources to your architects business group. You
configured the reservation to support the guest agent and the Software bootstrap agent. Your architects
can create blueprints that leverage the guest agent to customize deployed machines or include Software
components.
Creating Virtual Category Reservations
A virtual category type reservation provides access to the provisioning services of a virtual machine
deployment for a particular vRealize Automation business group. Available virtual reservation types
include vSphere, Hyper-V, KVM, SCVMM, and XenServer.
A reservation is a share of the memory, CPU, networking, and storage resources of one compute
resource allocated to a particular vRealize Automation business group.
A business group can have multiple reservations on one endpoint or reservations on multiple endpoints.
To provision virtual machines, a business group must have at least one reservation on a virtual compute
resource. Each reservation is for one business group only, but a business group can have multiple
reservations on a single compute resource, or multiple reservations on compute resources of different
types.
In addition to defining the share of fabric resources allocated to the business group, a reservation can
define policies, priorities, and quotas that determine machine placement.
To provision successfully, the reservation must have sufficient available storage. The reservation's
storage availability depends on:
nHow much storage is available on the datastore/cluster.
nHow much of that storage is reserved for that datastore/cluster.
nHow much of that storage is already allocated in vRealize Automation
For example, even if the vCenter Server has storage available for the datastore/cluster, if sufficient
storage is not reserved in the reservation then provisioning fails with a "No reservation is available to
allocate..." error. The allocated storage on a reservation depends on the number of VMs (regardless of
their state) on that specific reservation. See the VMware Knowledge Base article Machine XXX: No
reservation is available to allocate within the group XXX. Total XX GB of storage was requested
(2151030) at http://kb.vmware.com/kb/2151030 for more information.
Configuring vRealize Automation
VMware, Inc. 278
Understanding Selection Logic for Reservations
When a member of a business group create a provisioning request for a virtual machine,
vRealize Automation selects a machine from one of the reservations that are available to that business
group.
The reservation for which a machine is provisioned must satisfy the following criteria:
nThe reservation must be of the same platform type as the blueprint from which the machine was
requested.
A generic virtual blueprint can be provisioned on any type of virtual reservation.
nThe reservation must be enabled.
nThe compute resource must be accessible and not in maintenance mode.
nThe reservation must have capacity remaining in its machine quota or have an unlimited quota.
The allocated machine quota includes only machines that are powered on. For example, if a
reservation has a quota of 50, and 40 machines have been provisioned but only 20 of them are
powered on, the reservation’s quota is 40 percent allocated, not 80 percent.
nThe reservation must have sufficient unallocated memory and storage resources to provision the
machine.
When a virtual reservation’s machine quota, memory, or storage is fully allocated, no further virtual
machines can be provisioned from it. Resources may be reserved beyond the physical capacity of a
virtualization compute resource (overcommitted), but when the physical capacity of a compute
resource is 100% allocated, no further machines can be provisioned on any reservations with that
compute resource until the resources are reclaimed.
nIf the blueprint has specific network settings, the reservation must have the same networks.
If the blueprint or reservation specifies a network profile for static IP address assignment, an IP
address must be available to assign to the new machine.
nIf the blueprint or request specifies a location, the compute resource must be associated with that
location.
If the value of the custom property Vrm.DataCenter.Policy is Exact and there is no reservation for
a compute resource associated with that location that satisfies all the other criteria, then provisioning
fails.
If the value of Vrm.DataCenter.Policy is NotExact and there is no reservation for a compute
resource associated with that location that satisfies all the other criteria, provisioning can proceed on
another reservation regardless of location. This option is the default.
nIf the blueprint or request specifies the custom property VirtualMachine.Host.TpmEnabled, trusted
hardware must be installed on the compute resource for the reservation.
nIf the blueprint specifies a reservation policy, the reservation must belong to that reservation policy.
Configuring vRealize Automation
VMware, Inc. 279

Reservation policies are a way to guarantee that the selected reservation satisfies any additional
requirements for provisioning machines from a specific blueprint. For example, you can use
reservation policies to limit provisioning to compute resources with a specific template for cloning.
If no reservation is available that meets all of the selection criteria, provisioning fails.
If multiple reservations meet all of the criteria, the reservation from which to provision a requested
machine is determined by the following logic:
nA reservation with a lower priority value is selected before a reservation with a higher priority value.
nIf multiple reservations have the same priority, the reservation with the lowest percentage of its
machine quota allocated is selected.
nIf multiple reservations have the same priority and quota usage, machines are distributed among
reservations in round-robin fashion.
Note While round-robin selection of network profiles is not supported, round-robin selection of
networks (if any) is supported, which can be associated with different network profiles.
If multiple storage paths are available on a reservation with sufficient capacity to provision the machine
volumes, storage paths are selected according to the following logic:
nIf the blueprint or request specifies a storage reservation policy, the storage path must belong to that
storage reservation policy.
If the value of the custom property VirtualMachine.DiskN.StorageReservationPolicyMode is
NotExact and there is no storage path with sufficient capacity within the storage reservation policy,
then provisioning can proceed with a storage path outside the specified storage reservation policy.
The default value of VirtualMachine.DiskN.StorageReservationPolicyMode is Exact.
nA storage path with a lower priority value is selected before a storage path with a higher priority value.
nIf multiple storage paths have the same priority, machines are distributed among storage paths in
round-robin fashion.
Creating a vSphere Reservation for NSX Network and Security Virtualization
You can create a vSphere reservation to assign external networks and routed gateways to network
profiles for networks, specify the transport zone, and assign security groups to machine components.
If you have configured NSX you can specify NSX transport zone, Edge and routed gateway reservation
policy, and app isolation settings when you create or edit a blueprint. These settings are available on the
NSX Settings tab on the Blueprint and Blueprint Properties pages.
The network and security component settings that you add to the design canvas are derived from your
NSX configuration and require that you have run data collection for the NSX inventory for vSphere
clusters. Network and security components are specific to NSX and are available for use with vSphere
machine components only. For information about configuring NSX, see NSX Administration Guide.
Configuring vRealize Automation
VMware, Inc. 280
When vRealize Automation provisions machines with NAT or routed networking, it provisions a routed
gateway as the network router. The Edge or routed gateway is a management machine that consumes
compute resources. It also manages the network communications for the provisioned machine
components. The reservation used to provision the Edge or routed gateway determines the external
network used for NAT and routed network profiles. It also determines the reservation Edge or routed
gateway used to configure routed networks. The reservation routed gateway links routed networks
together with entries in the routing table.
You can specify an Edge or routed gateway reservation policy to identify which reservations to use when
provisioning the machines using the Edge or routed gateway. By default, vRealize Automation uses the
same reservations for the routed gateway and the machine components.
You select one or more security groups in the reservation to enforce baseline security policy for all
component machines provisioned with that reservation in vRealize Automation. Every provisioned
machine is added to these specified security groups.
Successful provisioning requires the transport zone of the reservation to match the transport zone of a
machine blueprint when that blueprint defines machine networks. Similarly, provisioning a machine's
routed gateway requires that the transport zone defined in the reservation matches the transport zone
defined for the blueprint.
When you select an Edge or routed gateway and network profile on a reservation when configuring
routed networks, select the network path to be used in linking routed networks together and assign it the
external network profile used to configure the routed network profile. The list of network profiles available
to be assigned to a network path is filtered to match the subnet of the network path based on the subnet
mask and primary IP address selected for the network interface.
If you want to use an Edge or routed gateway in vRealize Automation reservations, configure the routed
gateway externally in the NSX environment and then run inventory data collection. For NSX, you must
have a working NSX Edge instance before you can configure the default gateway for static routes or
dynamic routing details for an Edge services gateway or distributed router. See NSX Administration
Guide.
Create a Reservation for Hyper-V, KVM, SCVMM, vSphere , or XenServer
You must allocate resources to machines by creating a reservation before members of a business group
can request machine provisioning.
Each business group must have at least one reservation for its members to provision machines of that
type. For example, a business group with a vSphere reservation, but not a KVM (RHEV) reservation,
cannot request a KVM (RHEV) virtual machine. In this example, the business group must be allocated a
reservation specifically for KVM (RHEV) resources.
Procedure
1Specify Virtual Reservation Information
Each reservation is configured for a specific business group to grant users access to request
machines on a specified compute resource.
Configuring vRealize Automation
VMware, Inc. 281

2Specify Resource and Networking Settings for a Virtual Reservation
Specify resource and network settings for provisioning machines from this vRealize Automation
reservation.
3Specify Custom Properties and Alerts for Virtual Reservations
You can associate custom properties with a vRealize Automation reservation. You can also
configure alerts to send email notifications when reservation resources are low.
Specify Virtual Reservation Information
Each reservation is configured for a specific business group to grant users access to request machines
on a specified compute resource.
You can control the display of reservations when adding, editing, or deleting by using the Filter By
Category option on the Reservations page. Note that test agent reservations do not appear in the
reservations list when filtering by category.
Note After you create a reservation, you cannot change the business group or compute resource
associations.
Prerequisites
nLog in to vRealize Automation as a fabric administrator.
nVerify that a tenant administrator created at least one business group.
nVerify that a compute resource exists.
nConfigure network settings.
n(Optional) Configure network profile information.
Procedure
1Select Infrastructure > Reservations > Reservations.
2Click the New icon ( ) and select the type of reservation to create.
The available virtual reservation types are Hyper-V, KVM, SCVMM, vSphere, and XenServer.
For example, select vSphere.
3(Optional) Select an existing reservation from the Copy from existing reservation drop-down menu.
Data from the selected reservation appears. You can make changes as required for your new
reservation.
4Enter a name in the Name text box.
5Select a tenant from the Tenant drop-down menu.
6Select a business group from the Business group drop-down menu.
Only users in this business group can provision machines by using this reservation.
Configuring vRealize Automation
VMware, Inc. 282
7(Optional) Select a reservation policy from the Reservation policy drop-down menu.
This option requires that one or more reservation policies exist. You can edit the reservation later to
specify a reservation policy.
You use a reservation policy to restrict provisioning to specific reservations.
8Enter a number in the Priority text box to set the priority for the reservation.
The priority is used when a business group has more than one reservation. A reservation with priority
1 is used for provisioning over a reservation with priority 2.
9(Optional) Deselect the Enable this reservation check box if you do not want this reservation active.
Do not navigate away from this page. Your reservation is not complete.
Specify Resource and Networking Settings for a Virtual Reservation
Specify resource and network settings for provisioning machines from this vRealize Automation
reservation.
You can select a FlexClone datastore in your reservation if you have a vSphere environment and storage
devices that use Net App FlexClone technology. SDRS is not supported for FlexClone storage devices.
To provision successfully, the reservation must have sufficient available storage. The reservation's
storage availability depends on:
nHow much storage is available on the datastore/cluster.
nHow much of that storage is reserved for that datastore/cluster.
nHow much of that storage is already allocated in vRealize Automation
For example, even if the vCenter Server has storage available for the datastore/cluster, if sufficient
storage is not reserved in the reservation then provisioning fails with a "No reservation is available to
allocate..." error. The allocated storage on a reservation depends on the number of VMs (regardless of
their state) on that specific reservation. See the VMware Knowledge Base article Machine XXX: No
reservation is available to allocate within the group XXX. Total XX GB of storage was requested
(2151030) at http://kb.vmware.com/kb/2151030 for more information.
Prerequisites
Specify Virtual Reservation Information.
Procedure
1Click the Resouces tab.
2Select a compute resource on which to provision machines from the Compute resource drop-down
menu.
Only templates located on the cluster you select are available for cloning with this reservation.
Configuring vRealize Automation
VMware, Inc. 283
During provisioning, machines are placed on a host that is connected to the local storage. If the
reservation uses local storage, all the machines that are provisioned by the reservation are created
on the host that contains that local storage. However, if you use the
VirtualMachine.Admin.ForceHost custom property, which forces a machine to be provisioned to a
different host, provisioning fails. Provisioning also fails if the template from which the machine is
cloned is on local storage, but attached to a machine on a different cluster. In this case, provisioning
fails because it cannot access the template.
3(Optional) Enter a number in the Machine quota text box to set the maximum number of machines
that can be provisioned on this reservation.
Only machines that are powered on are counted towards the quota. Leave blank to make the
reservation unlimited.
4Specify the amount of memory, in GB, to be allocated to this reservation from the Memory table.
The overall memory value for the reservation is derived from your compute resource selection.
5Select one or more listed storage paths.
The available storage path options are derived from your compute resource selection.
For integrations that use Storage Distributed Resource Scheduler (SDRS) storage, you can select a
storage cluster to allow SDRS to automatically handle storage placement and load balancing for
machines provisioned from this reservation. The SDRS automation mode must be set to Automatic.
Otherwise, select a datastore within the cluster for standalone datastore behavior. SDRS is not
supported for FlexClone storage devices.
You can select either individual disks in the cluster or a storage cluster, but not both. If you select a
storage cluster, SDRS controls storage placement and load balancing for machines that are
provisioned from this reservation.
6If available for the compute resource, select a resource pool in the Resource Pool drop-down menu.
7Click the Network tab.
Configuring vRealize Automation
VMware, Inc. 284

8Configure a network path for machines provisioned by using this reservation.
a (Optional) If the option is available, select a storage endpoint from the Endpoint drop-down
menu.
The FlexClone option is visible in the endpoint column if a NetApp ONTAP endpoint exists and if
the host is virtual. If there is a NetApp ONTAP endpoint, the reservation page displays the
endpoint assigned to the storage path. When you add, update, or delete an endpoint for a storage
path, the change is visible in all the applicable reservations.
When you add, update, or delete an endpoint for a storage path, the change is visible in the
reservation page.
b Select a network paths for machines provisioned by this reservation from the Network Paths list.
c (Optional) Select a listed network profile from the Network Profile drop-down menu.
This option requires that one or more network profiles exists.
You can select more than one network path on a reservation, but only one network is used when
provisioning a machine.
You can save the reservation now by clicking Save. Or you can add custom properties to further control
reservation specifications. You can also configure email alerts to send notifications when resources
allocated to this reservation become low.
Specify Custom Properties and Alerts for Virtual Reservations
You can associate custom properties with a vRealize Automation reservation. You can also configure
alerts to send email notifications when reservation resources are low.
Custom properties and email alerts are optional configurations for the reservation. If you do not want to
associate custom properties or set alerts, click Save to finish creating the reservation.
You can add as many custom properties as apply to your needs.
Important Notifications are only sent if email alerts are configured and notifications are enabled.
If configured, alerts are generated daily, rather than when the specified thresholds are reached.
Prerequisites
Specify Resource and Networking Settings for a Virtual Reservation.
Procedure
1Click the Properties tab.
2Click New.
3Enter a valid custom property name.
4If applicable, enter a property value.
5(Optional) Check the Encrypted check box to encrypt the property value.
Configuring vRealize Automation
VMware, Inc. 285

6(Optional) Check the Prompt User check box to require that the user enter a value.
This option cannot be overridden when provisioning.
7(Optional) Add any additional custom properties.
8Click the Alerts tab.
9Enable the Capacity Alerts check box to configure alerts to be sent.
10 Use the slider to set thresholds for available resource allocation.
11 Enter the AD user or group names (not email addresses) to receive alert notifications in the
Recipients text box.
Enter a name on each line. Press Enter to separate multiple entries.
12 Select Send alerts to group manager to include group managers in the email alerts.
The email alerts are sent to the users included in the business group Send manager emails to list.
13 Specify a reminder frequency (days).
14 Click Save.
The reservation is saved and appears in the Reservations list.
What to do next
You can configure optional reservation policies or begin preparing for provisioning.
Users who are authorized to create blueprints can create them now.
Edit a Reservation to Assign a Network Profile
You can assign a network profile to a reservation, for example to enable static IP assignment for
machines that are provisioned on that reservation.
You can also assign a network profile to a blueprint by using the custom property
VirtualMachine.NetworkN.ProfileName on the Properties tab of the New Blueprint or Blueprint
Properties page.
If you specify a network profile in a reservation and a blueprint, the blueprint value takes precedence. For
example, if you specify a network profile in the blueprint by using the
VirtualMachine.NetworkN.ProfileName custom property and in a reservation that is used by the
blueprint, the network profile specified in the blueprint takes precedence. However, if the custom property
is not used in the blueprint, and you select a network profile for a machine NIC, vRealize Automation uses
the reservation network path for the machine NIC for which the network profile is specified.
Note This information does not apply to Amazon Web Services.
Prerequisites
nLog in to vRealize Automation as a fabric administrator.
nCreate a network profile. See Creating a Network Profile.
Configuring vRealize Automation
VMware, Inc. 286
Procedure
1Select Infrastructure > Reservations > Reservations.
2Point to a reservation and click Edit.
3Click the Network tab.
4Assign a network profile to a network path.
a Select a network path on which to enable static IP addresses.
The network path options are derived from settings on the Resources tab.
b Map an available network profile to the path by selecting a profile from the Network Profile drop-
down menu.
c (Optional) Repeat this step to assign network profiles to additional network paths on this
reservation.
5Click OK.
Reservation Policies
You can use a reservation policy to control how reservation requests are processed. When you provision
machines from the blueprint, provisioning is restricted to the resources specified in your reservation
policy.
Reservation policies provide an optional means of controlling how reservation requests are processed.
You can apply a reservation policy to a blueprint to restrict the machines provisioned from that blueprint to
a subset of available reservations.
You can use a reservation policy to collect resources into groups for different service levels, or to make a
specific type of resource easily available for a particular purpose. When a user requests a machine, it can
be provisioned on any reservation of the appropriate type that has sufficient capacity for the machine. The
following scenarios provide a few examples of possible uses for reservation policies:
nTo ensure that provisioned machines are placed on reservations with specific devices that support
NetApp FlexClone.
nTo restrict provisioning of cloud machines to a specific region containing a machine image that is
required for a specific blueprint.
nAs an additional means of using a Pay As You Go allocation model for machine types that support
that capability.
Configuring vRealize Automation
VMware, Inc. 287

You can add multiple reservations to a reservation policy, but a reservation can belong to only one policy.
You can assign a single reservation policy to more than one blueprint. A blueprint can have only one
reservation policy.
Note Reservations defined for vCloud Air endpoints and vCloud Director endpoints do not support the
use of network profiles for provisioning machines.
Note If you have SDRS enabled on your platform, you can allow SDRS to load balance storage for
individual virtual machine disks, or all storage for the virtual machine. If you are working with SDRS
datastore clusters, conflicts can occur when you use reservation policies and storage reservation policies.
For example, if a standalone datastore or a datastore within an SDRS cluster is selected on one of the
reservations in a policy or storage policy, your virtual machine storage might be frozen instead of driven
by SDRS. If you request reprovisioning for a machine with storage placement on an SDRS cluster, the
machine is deleted if the SDRS automation level is disabled. For related information about provisioning
and SDRS, see the VirtualMachine.Admin.Datastore.Cluster.ResourceLeaseDurationSec
custom property.
Configure a Reservation Policy
You can create reservation policies to collect resources into groups for different service levels, or to make
a specific type of resource easily available for a particular purpose. After you create the reservation policy,
you then must populate it with reservations before tenant administrators and business group managers
can use the policy effectively in a blueprint.
A reservation policy can include reservations of different types, but only reservations that match the
blueprint type are considered when selecting a reservation for a particular request.
Procedure
1Create a Reservation Policy
You can use reservation policies to group similar reservations together.
2Assign a Reservation Policy to a Reservation
You can assign a reservation policy to a reservation when you create the reservation. You can also
edit an existing reservation to assign a reservation policy to it, or change its reservation policy
assignment.
Create a Reservation Policy
You can use reservation policies to group similar reservations together.
Create the reservation policy first, then add the policy to reservations to allow a blueprint creator to use
the reservation policy in a blueprint.
The policy is created as an empty container.
You can control the display of reservation policies when adding, editing, or deleting by using the Filter By
Type option on the Reservation Policies page.
Configuring vRealize Automation
VMware, Inc. 288
Prerequisites
Log in to vRealize Automation as a fabric administrator.
Procedure
1Select Infrastructure > Reservations > Reservation Policies.
2Click Add.
3Enter a name in the Name text box.
4Select Reservation Policy from the Type drop-down menu.
5Enter a description in the Description text box.
6Click Update to save the policy.
Assign a Reservation Policy to a Reservation
You can assign a reservation policy to a reservation when you create the reservation. You can also edit
an existing reservation to assign a reservation policy to it, or change its reservation policy assignment.
Prerequisites
Create a Reservation Policy.
Procedure
1Select Infrastructure > Reservations > Reservations.
2Point to a reservation and click Edit.
3Select a reservation policy from the Reservation Policy drop-down menu.
4Click Save.
Storage Reservation Policies
You can create storage reservation policies to allow blueprint architects to assign the volumes of a virtual
machine to different datastores for the vSphere, KVM (RHEV), and SCVMM platform types or different
storage profiles for other resources, such as vCloud Air or vCloud Director resources.
Assigning the volumes of a virtual machine to different datastores or to a different storage profile allows
blueprint architects to control and use storage space more effectively. For example, they might deploy the
operating system volume to a slower, less expensive datastore, or storage profile, and the database
volume to a faster datastore or storage profile.
Some machine endpoints only support a single storage profile, while others support multi-level disk
storage. Multi-level disk storage is available for vCloud Director 5.6 and greater endpoints and for
vCloud Air endpoints. Multi-level disk storage is not supported for vCloud Director 5.5 endpoints.
Configuring vRealize Automation
VMware, Inc. 289

When you create a blueprint, you can assign a single datastore or a storage reservation policy that
represents multiple datastores to a volume. When they assign a single datastore, or storage profile, to a
volume, vRealize Automation uses that datastore or storage profile at provisioning time, if possible. When
they assign a storage reservation policy to a volume, vRealize Automation uses one of its datastores, or
storage profiles if working with other resources, such as vCloud Air or vCloud Director, at provisioning
time.
A storage reservation policy is essentially a tag applied to one or more datastores or storage profiles by a
fabric administrator to group datastores or storage profiles that have similar characteristics, such as
speed or price. A datastore or storage profile can be assigned to only one storage reservation policy at a
time, but a storage reservation policy can have many different datastores or storage profiles.
You can create a storage reservation policy and assign it to one or more datastores or storage profiles. A
blueprint creator can then assign the storage reservation policy to a volume in a virtual blueprint. When a
user requests a machine that uses the blueprint, vRealize Automation uses the storage reservation policy
specified in the blueprint to select a datastore or storage profile for the machine’s volume.
Note If you have SDRS enabled on your platform, you can allow SDRS to load balance storage for
individual virtual machine disks, or all storage for the virtual machine. If you are working with SDRS
datastore clusters, conflicts can occur when you use reservation policies and storage reservation policies.
For example, if a standalone datastore or a datastore within an SDRS cluster is selected on one of the
reservations in a policy or storage policy, your virtual machine storage might be frozen instead of driven
by SDRS. If you request reprovisioning for a machine with storage placement on an SDRS cluster, the
machine is deleted if the SDRS automation level is disabled. For related information about provisioning
and SDRS, see the VirtualMachine.Admin.Datastore.Cluster.ResourceLeaseDurationSec
custom property.
Storage and memory that are assigned to a provisioned machine by a reservation are released when the
machine to which they are assigned is deleted in vRealize Automation by the Destroy action. The storage
and memory are not released if the machine is deleted in the vCenter Server.
For example, you cannot delete a reservation that is associated with machines in an existing deployment.
If you move or delete deployed machines manually in the vCenter Server, vRealize Automation continues
to recognize the deployed machines as live and prevents you from deleting associated reservations.
Configure a Storage Reservation Policy
You can create storage reservation policies to group datastores that have similar characteristics, such as
speed or price. After you create the storage reservation policy, you must populate it with datastores
before using the policy in a blueprint.
Procedure
1Create a Storage Reservation Policy
You can use a storage reservation policy to group datastores that have similar characteristics, such
as speed or price.
Configuring vRealize Automation
VMware, Inc. 290

2Assign a Storage Reservation Policy to a Datastore
You can associate a storage reservation policy to a compute resource. After the storage reservation
policy is created, populate it with datastores. A datastore can belong to only one storage reservation
policy. Add multiple datastores to create a group of datastores for use with a blueprint.
Create a Storage Reservation Policy
You can use a storage reservation policy to group datastores that have similar characteristics, such as
speed or price.
The policy is created as an empty container.
You can control the display of reservation policies when adding, editing, or deleting by using the Filter By
Type option on the Reservation Policies page.
Prerequisites
Log in to vRealize Automation as a fabric administrator.
Procedure
1Select Infrastructure > Reservations > Reservation Policies.
2Click Add.
3Enter a name in the Name text box.
4Select Storage Reservation Policy from the Type drop-down menu.
5Enter a description in the Description text box.
6Click Update to save the policy.
Assign a Storage Reservation Policy to a Datastore
You can associate a storage reservation policy to a compute resource. After the storage reservation
policy is created, populate it with datastores. A datastore can belong to only one storage reservation
policy. Add multiple datastores to create a group of datastores for use with a blueprint.
Prerequisites
Create a Storage Reservation Policy.
Procedure
1Select Infrastructure > Compute Resources > Compute Resources.
2Point to a compute resource and click Edit.
3Click the Configuration tab.
4Locate the datastore to add to your storage reservation policy in the Storage table.
5Click the Edit icon ( ) next to the desired Storage Path object.
Configuring vRealize Automation
VMware, Inc. 291

6Select a storage reservation policy from the Storage Reservation Policy column drop-down menu.
After you provision a machine, you cannot change its storage reservation policy if doing so would
change the storage profile on a disk.
7Click the Save icon ( ).
8Click OK.
9(Optional) Assign additional datastores to your storage reservation policy.
Workload Placement
When you deploy a blueprint, workload placement uses collected data to recommend where to deploy the
blueprint based on available resources. vRealize Automation and vRealize Operations Manager work
together to provide placement recommendations for workloads in the deployment of new blueprints.
While vRealize Automation manages organizational policies, such as business groups, reservations, and
quotas, it integrates with the capacity analytics of vRealize Operations Manager to place machines.
Workload placement is only available for vSphere endpoints.
Workload Placement Terms Used
Several terms are used with workload placement.
nClusters in vSphere map to compute resources in vRealize Automation.
nReservations include compute and storage, where the storage can consist of individual datastores or
datastore clusters. A reservation can include multiple datastores, datastore clusters, or both.
nMultiple reservations can refer to the same cluster.
nVirtual machines can move to multiple clusters.
nWhen workload placement is enabled, the provisioning workflow uses the placement policy to
recommend where to deploy the blueprint.
Provisioning Blueprints with Workload Placement
When you use workload placement to provision blueprints, the provisioning workflow uses the
reservations in vRealize Automation, and the placement optimization from vRealize Operations Manager.
1 vRealize Automation provides the governance rules to allow placement destinations.
2 vRealize Operations Manager provides placement optimization recommendations according to
analytics data.
3 vRealize Automation continues the provisioning process according to the placement
recommendations from vRealize Operations Manager.
If vRealize Operations Manager cannot provide a recommendation, or the recommendation cannot be
used, then vRealize Automation falls back to its default placement logic.
When a developer selects a catalog item and completes the form to request the catalog item,
vRealize Automation accounts for the following considerations to provision the virtual machines.
Configuring vRealize Automation
VMware, Inc. 292

Table 2‑16. Considerations to Provision Virtual Machines
Consideration Effect
Policies The vRealize Automation reservation policy might indicate more than one reservation.
Reservations vRealize Automation evaluates the request, and determines which reservations can satisfy the constraints
made in the request.
nIf placement is enabled and based on vRealize Operations Manager analytics, vRealize Automation
passes the list of reservations to vRealize Operations Manager to determine which reservation is best
suited for placement based on operational metrics.
nIf placement is not based on vRealize Operations Manager, vRealize Automation decides the
placement based on priorities and availability.
The reservations are updated to track that resources have been consumed.
If vRealize Operations Manager recommends a cluster or datastore that vRealize Automation considers to
be out of capacity or no longer applicable, vRealize Automation logs the exception. vRealize Automation
allows provisioning to continue according to its default placement mechanisms.
To identify resources for a virtual machine, vRealize Automation provides a list of candidate reservations.
Each candidate in the list can include a cluster and one or more datastores or datastore clusters.
vRealize Operations Manager uses the candidate reservations to create the list of destination candidates
and locate the best target.
The policy in vRealize Operations Manager sets the level of balance, utilization, and buffer space for the
cluster. For a single reservation, which is a cluster or datastore cluster, vRealize Automation validates
whether the recommendation is viable placement destination.
nIf the destination is viable, vRealize Automation deploys the blueprint according to the
recommendation.
nIf the destination is not viable, vRealize Automation uses the default placement behavior to place the
virtual machines.
Placement considerations must also account for health and utilization problems. While the cloud
administrator and virtual infrastructure administrator manage the infrastructure, developers care about the
health of their applications. To support developers, the workload placement strategy must also consider
health and utilization problems.
Table 2‑17. Considerations for Health and Utilization Problems
Workload Problem Placement Solution
Developer notices a health
problem in the environment.
vRealize Automation is provisioning blueprints in clusters that are experiencing problems, or that
are overutilized because of large workloads. vRealize Automation must integrate with the
capacity analytics in vRealize Operations Manager to ensure that blueprints are provisioned in
clusters that have sufficient capacity.
Developer notices a utilization
problem.
The clusters in the environment are underutilized. vRealize Automation must integrate with the
capacity analytics that vRealize Operations Manager provides to ensure that blueprints are
provisioned in a cluster where the utilization is maximized.
Users Who Provision Blueprints
The following users perform actions to provision blueprints.
Configuring vRealize Automation
VMware, Inc. 293

Table 2‑18. Users and Roles to Provision Blueprints
Step User Action Role Required
1 Cloud Administrator
or Virtual
Infrastructure (VI)
Administrator
Ensures that the initial placement of virtual machines meets
organizational policies, and that they are optimized
according to the operational analytics data.
IaaS Admin role
1 Fabric Administrator Defines the reservations, reservation policies, and
placement policy in vRealize Automation.
Fabric Administrator role,
Infrastructure Architect
1 IaaS Administrator Defines the endpoints for vSphere and
vRealize Operations Manager, which are necessary for
workload placement.
IaaS Admin role
2 Infrastructure
Architect
As a blueprint architect who works directly with virtual
machine component types, assigns the reservation policies
to virtual machines when authoring a blueprint. Specifies the
reservation policy as a property of the machine component
in the blueprint.
Infrastructure Architect
3 Infrastructure
Architect,
Application
Architect, Software
Architect, and XaaS
Architect
Creates and publishes the blueprint to provision the virtual
machines. Only the Infrastructure Architect works directly
with machine components. The other architect roles can
reuse infrastructure blueprints in nesting, but they cannot
edit the machine component settings.
The blueprint can include a single component, or it can
include nested blueprints, XaaS components, multiple virtual
machines in a multi-tier application, and so on.
vRealize Automation places the virtual machines according
to the configuration of the reservations, and optionally
includes the reservation policy at the machine component
level for the blueprint. For example, your blueprint might
include two machines, with a different policy applied to each
machine.
vRealize Automation also optimizes the virtual machines
according to the operational analytics data that
vRealize Operations Manager provides.
Infrastructure Architect
4 Cloud Administrator
or VI Administrator
Selects the policies that govern the initial placement of the
virtual machines that vRealize Automation provisions.
The Administrator can:
nSelect the policies by using an API.
nUse the default placement policy, which uses each
server in vRealize Automation in turn to balance
workloads. This approach does not require input from
vRealize Operations Manager.
IaaS Admin role, Infrastructure
Architect
5 VI Administrator Builds the custom data center and custom groups in
vRealize Operations Manager. Then, the VI Administrator
applies the policy used to consolidate and balance
workloads to those custom data centers.
IaaS Admin role, Infrastructure
Architect
Configuring vRealize Automation
VMware, Inc. 294

Table 2‑18. Users and Roles to Provision Blueprints (Continued)
Step User Action Role Required
6 Fabric Administrator Selects the placement policy in vRealize Automation.
Use the workload placement policy to have
vRealize Automation determine where to place machines
when you deploy new blueprints. The placement policy
requires input from vRealize Operations Manager
Fabric Administrator role
7 Developer Requests a blueprint to provision virtual machines.
The blueprint can consist of multiple machines to run a
three-tier application.
8 Developer When the developer deploys the blueprint,
vRealize Operations Manager searches for a placement
policy that fits the relevant clusters for the request.
For more information about the placement policy, see Placement Policy.
To configure workload placement, see Configuring Workload Placement.
Distributed Resource Scheduler (DRS) Is Required to Place Virtual Machines
vSphere DRS is the placement engine that vRealize Automation and vRealize Operations Manager use
to provision and place virtual machines.
For vRealize Automation to suggest the best placement for the virtual machines, you must enable DRS
on the cluster, and set it to fully automated. vRealize Automation then uses the vSphere DRS APIs to
determine the correct placement for the virtual machines.
vRealize Automation integrates with the vRealize Operations Manager placement service.
vRealize Operations Manager only provides placement recommendations for clusters that have DRS
enabled and fully automated.
Eect of vRealize Automation Storage Reservation Policies
The presence of vRealize Automation storage reservation policies affects workload placement with
vRealize Operations Manager.
When workload placement with vRealize Operations Manager is enabled, vRealize Automation passes a
list of available reservations to vRealize Operations Manager, and vRealize Operations Manager
evaluates them for storage placement based on operational analysis.
When a blueprint contains storage reservation policies, workload placement recommendations from
vRealize Operations Manager change in the following ways.
Note Workload placement with vRealize Operations Manager only supports virtual machines with one or
more disks, where just one storage reservation policy is present. Multiple policy combinations are not
supported for disk placement because individual disk placement is not supported.
nVirtual machines with one or more disks, where none specifies a storage reservation policy:
Placement occurs as usual. vRealize Operations Manager evaluates the full, unfiltered list of
candidate reservations.
Configuring vRealize Automation
VMware, Inc. 295
nVirtual machines with one or more disks, where all specify the same storage reservation policy:
Candidate reservations are filtered at the storage level so that vRealize Operations Manager only
evaluates datastores that match that storage reservation policy.
nVirtual machines with multiple disks, where some specify the same storage policy but others specify
no storage reservation policy:
nWhen the storage allocation type is COLLECTED, the default, all disks are treated as if they
share that same policy. vRealize Operations Manager evaluates datastores that match that
storage reservation policy.
nWhen the storage allocation type is DISTRIBUTED, virtual machines cannot be placed according
to vRealize Operations Manager recommendations because individual disk placement is not
supported. Placement defaults to vRealize Automation placement algorithms instead.
You can set the storage allocation type by using a custom property.
nVirtual machines with multiple disks, where the disks specify different storage reservation policies:
Because they have conflicting storage reservation policy requirements, these virtual machines cannot
be placed according to vRealize Operations Manager recommendations. Placement defaults to
vRealize Automation placement algorithms instead.
nVirtual machines that require a specific storage path:
These virtual machines are not placed through a vRealize Operations Manager recommendation
because you already specified a storage path. Placement might or might not match what
vRealize Operations Manager would have recommended.
You can set the storage path by using a custom property.
Placement Errors—When vRealize Operations Manager based placement cannot occur, an error
describes the reason. Reasons might include the unsupported conditions described in the preceding list,
or environmental factors such as failed communication between vRealize Operations Manager and
vRealize Automation.
To review errors, go to Requests > Execution. Near the upper right, click View Placement Errors.
Limitations on Workload Placement
When you use the placement policy for workload placement to place machines when you deploy new
blueprints, be aware of the limitations.
nIn vRealize Operations Manager, the vRealize Automation solution identifies the clusters and virtual
machines that vRealize Automation manages.
nWhen vRealize Automation manages the child objects of a data center or custom data center
container in vRealize Operations Manager, the ability to rebalance or move those objects is not
available. You cannot turn on or turn off the exclusion of actions on vRealize Automation managed
objects.
Configuring vRealize Automation
VMware, Inc. 296
nFor the objects that vRealize Automation manages, the workload placement behavior is as follows:
nWhen a custom data center or data center includes a cluster that vRealize Automation manages,
workload placement does not allow you to rebalance the cluster.
nWhen a cluster includes virtual machines that vRealize Automation manages, workload
placement does not allow you to move those virtual machines.
nvRealize Operations Manager does not support workload placement on resource pools in
vCenter Server.
nvRealize Operations Manager does not support vSAN in the current release.
Permissions to Configure Workload Placement
You must have permissions in vRealize Automation and vRealize Operations Manager to configure
workload placement and the placement policy.
In vRealize Automation, you must have the Fabric Administrator role to configure workload placement.
See User Roles Overview in the vRealize Automation Information Center.
In vRealize Operations Manager, you must create a user role for workload placement, and assign
permissions to the role.
nOn the user account, assign the read-only permission to vSphere Hosts and Clusters, and vSphere
Storage, in the object hierarchy.
nTo have the user role use API calls in workload placement, assign read and write permissions on
APIs. Select Administration > Access Control > Permissions, and select REST APIs > All other
Read, Write APIs.
vRealize Automation uses the vRealize Operations Manager role when you register the endpoint, and to
request placement recommendations during provisioning on behalf of users who request catalog items.
For more information, see Access Control in the vRealize Operations Manager Information Center.
Placement Policy
You can use the placement policy to have vRealize Automation determine where to place machines when
you deploy new blueprints. The placement policy uses the analytics of vRealize Operations Manager to
identify workloads on your clusters so that it can suggest placement destinations.
You must perform several steps before you can use the placement policy. In vRealize Automation, you
create endpoints for the vRealize Operations Manager and vCenter Server instances. Then, you create a
fabric group, and add reservations to your vCenter Server endpoint.
To ensure that vRealize Operations Manager provides workload placement analytics to
vRealize Automation, you must:
nInstall the vRealize Automation Solution in the vRealize Operations Manager instance that is being
used for workload placement.
nConfigure vRealize Operations Manager to monitor the vCenter Server.
To configure vRealize Automation and vRealize Operations Manager for workload placement, see
Configuring Workload Placement.
Configuring vRealize Automation
VMware, Inc. 297
Locating the Placement Policy
In your vRealize Automation instance, select Infrastructure > Reservations > Placement Policy.
To use the workload placement analytics that vRealize Operations Manager provides, select Use
vRealize Operations Manager for placement recommendations
If you do not use the workload placement policy, vRealize Automation uses default placement method.
Configuring Workload Placement
To use the placement policy to place machines when you deploy new blueprints, you configure
vRealize Automation to use the analytics that vRealize Operations Manager provides. You also configure
vRealize Operations Manager to apply a policy to consolidate and balance workloads to your cluster
compute resources.
In vRealize Automation, you configure endpoints, create a fabric group, and add reservations. In
vRealize Operations Manager, you configure a policy to support workload balance, and apply that policy
to a custom group that includes your custom compute resources.
Prerequisites
Before the placement policy can suggest placement destinations for blueprints, you must perform several
steps.
nUnderstand the placement policy. See Placement Policy.
nVerify that an endpoint exists in vRealize Automation for the vRealize Operations Manager instance
being used for workload placement. See Create a vRealize Operations Manager Endpoint.
nVerify that an endpoint exists in vRealize Automation for the vCenter Server instance. See Create a
vSphere Endpoint.
nAdd reservations to the vCenter Server endpoint. See Reservations.
nAdd a fabric group, and verify that your user is a fabric group administrator. See Create a Fabric
Group.
nVerify that vRealize Operations Manager is monitoring the same infrastructure that
vRealize Automation is monitoring, to ensure that they include the same vCenter Server instances.
See VMware vSphere Solution in vRealize Operations Manager in the vRealize Operations Manager
Information Center.
nUnderstand reservations, storage reservation, blueprints, and delegate providers. See the
vRealize Automation Information Center.
nUnderstand and define the fill and balance settings in the vRealize Operations Manager policy used
for workload placement. See Workload Automation Details in the vRealize Operations Manager
Information Center.
Configuring vRealize Automation
VMware, Inc. 298
Procedure
1Configure vRealize Automation for Workload Placement
To use workload placement analytics to place machines when you deploy new blueprints, you must
prepare the vRealize Automation instance.
2Configure vRealize Operations Manager for Workload Placement in vRealize Automation
To provide workload placement analytics to vRealize Automation to place machines when you
deploy new blueprints, you must prepare the vRealize Operations Manager instance.
You configured vRealize Automation and vRealize Operations Manager to use workload placement
analytics to suggest placement destinations for new blueprints.
Configure vRealize Automation for Workload Placement
To use workload placement analytics to place machines when you deploy new blueprints, you must
prepare the vRealize Automation instance.
To prepare your vRealize Automation instance to use the placement policy, you configure endpoints,
create a fabric group, and add reservations.
Configuring vRealize Automation
VMware, Inc. 299
Does an
endpoint
exist for the vCenter
Server in the vRealize
Automation instance
used for workload
placement?
Is Workload
Placement
enabled?
Does an endpoint
exist for the vRealize
Operations Manager
instance?
Create a vRealize Operations
Manager endpoint.
Infrastructure > Endpoints >
Endpoints
Create a vSphere endpoint.
Infrastructure > Endpoints >
Endpoints
Add reservations to the
vCenter Server endpoint.
Infrastructure > Reservations >
Reservations
Enable Placement.
Infrastructure > Reservations >
Placement Policy > Use vRealize
Operations Manager for
placement recommendations
Is vRealize
Operations Manager
monitoring the vCenter
Server instance?
Go to vRealize Operations Manager,
and configure workload placement
to use the vCenter Server instance.
See Configuring vRealize Operations
Manager for Workload Placement
in vRealize Automation.
vRealize Automation uses the
vRealize Operations Manager
workload placement analytics
to deploy new blueprints.
Yes
Yes
Yes
No
No
Yes
No
No
Prerequisites
nTo use workload placement, understand the requirements. See Configuring Workload Placement.
nIn vRealize Automation, add a specific user role and permissions for vRealize Operations Manager to
validate credentials. See User Roles Overview in the vRealize Automation Information Center.
Configuring vRealize Automation
VMware, Inc. 300

Procedure
1In your vRealize Automation instance, add an endpoint for the vRealize Operations Manager
instance, and click OK.
a Select Infrastructure > Endpoint > Endpoints.
b Select New > Management > vRealize Operations Manager.
c Enter the general information for the vRealize Operations Manager endpoint.
You do not need to specify properties for the endpoint.
2In your vRealize Automation instance, add an endpoint for the vCenter Server instance, and click OK.
a Select Infrastructure > Endpoint > Endpoints.
b Select New > Virtual > vSphere (vCenter).
c Enter the general information, properties, and associations for the vCenter Server endpoint.
After you add endpoints, and vRealize Automation collects data from them, the compute resources
for those endpoints are available. You can then add those compute resources to the fabric group that
you create.
3Create a fabric group so that other users can create reservations and enable the placement policy.
a Select Infrastructure > Endpoint > Fabric Groups.
b Click New, and enter information about the fabric group.
Option Description
Name Enter a meaningful name for the fabric group.
Description Enter a useful description.
Fabric administrators Enter the email address for each person to designate as a fabric administrator.
Compute resources Select the compute resource clusters that the administrators can manage.
After you add compute resources to a fabric group, and vRealize Automation collects data from them,
fabric administrators can create reservations for the compute resources.
Configuring vRealize Automation
VMware, Inc. 301

4Create reservations for the compute resources in the vCenter Server instance.
a Select Infrastructure > Reservations > Reservations.
b Select New > vSphere (vCenter).
c On each tab, enter the information for the reservation.
Option Action
General Select a reservation policy, the priority for the policy, and click Enable this
reservation.
Resources Select the machine quota, memory, and storage. You do not have to select a
resource pool.
Network Select the network adapter. You do not have to select a network profile.
Properties If necessary, add custom properties to the reservation.
Alert If necessary, select Capacity alerts to notify recipients when the capacity
exceeds the threshold for the reservation.
5Enable the placement policy.
a Select Infrastructure > Reservations > Placement Policy.
b Select the check box named Use vRealize Operations Manager for placement
recommendations.
You configured vRealize Automation to use the analytics of vRealize Operations Manager to place
machines when users deploy blueprints.
What to do next
Configure vRealize Operations Manager to monitor the vCenter Server instance, and apply a workload
placement policy to your cluster compute resources. See Configure vRealize Operations Manager for
Workload Placement in vRealize Automation.
Configure vRealize Operations Manager for Workload Placement in vRealize Automation
To provide workload placement analytics to vRealize Automation to place machines when you deploy new
blueprints, you must prepare the vRealize Operations Manager instance.
Caution You must install the vRealize Automation solution, which includes the management pack, on
only a single vRealize Operations Manager instance.
To prepare your vRealize Operations Manager instance to provide analytics to vRealize Automation, you
install and configure the vRealize Automation solution. You must also configure a policy, and apply the
policy to your cluster compute resources.
After you configure the vRealize Automation solution, you cannot move or rebalance any virtual machines
that vRealize Automation manages.
If the vRealize Automation solution is not installed in the vRealize Operations Manager instance,
workload placement can still move or rebalance virtual machines that vRealize Automation manages.
Configuring vRealize Automation
VMware, Inc. 302

To allow workload placement to move virtual machines, those virtual machines must reside in a data
center or custom data center.
Are one or more
policies configured to
consolidate and
balance workloads?
Is the vRealize
Automation Solution
installed and configured
in the vRealize
Operations Manager
instance?
Install and configure the vRealize
Automation Solution in the vRealize
Operations Manager instance.
Administration > Solutions
Edit or add a policy, and
set workload values.
Administration > Policies > Policy
Library > Add/edit policy >
Workload Automation
Is the Cluster
Compute Resource
that is being used for
advanced placement
a member of a
custom group?
Add the Cluster Compute Resource
to a custom group.
Environment > Custom Groups
See the vRealize Operations
Manager Information Center.
Is the policy applied
to the custom group
that contains the
Cluster Compute
Resource?
Apply the policy to the custom group.
Edit policy > Apply Policy
to Groups > Custom group
vRealize Operations Manager
will now support advanced
placement of vRealize
Automation deployed blueprints.
Yes
Yes
Yes
No
No
No
Yes
No
Prerequisites
nConfigure vRealize Automation to use workload placement analytics. See Configure vRealize
Automation for Workload Placement.
Configuring vRealize Automation
VMware, Inc. 303
nVerify that the vRealize Automation Solution is installed and configured in the
vRealize Operations Manager instance that is being used for workload placement. For details about
this solution, see the Management Pack for vRealize Automation on Solution Exchange. For
information about how workload placement works in vRealize Operations Manager, see Workload
Automation Details and related topics in the vRealize Operations Manager documentation.
Procedure
1In the instance of vRealize Operations Manager that manages workload placement, install and
configure the vRealize Automation solution.
The solution might already be installed.
a To see the solutions that are installed in vRealize Operations Manager, click Administration >
Solutions.
b Verify whether the vRealize Automation solution is already installed.
If the vRealize Automation solution does not appear in the list, download and install the solution.
See Management Pack for vRealize Automation on Solution Exchange.
c If the solution appears in the list, select the VMware vRealize Automation solution, and click
Configure.
d Configure the vRealize Automation solution, and save the settings.
For more information to configure the solution, see Solutions in vRealize Operations Manager in
the vRealize Operations Manager Information Center.
2If you do not use the vRealize Operations Manager Default Policy, you must create a custom group.
Then, add your cluster compute resources to the custom group.
To apply a policy other than Default Policy to your clusters, add a custom group. You then apply the
policy to the custom group. If you use Default Policy, you do not have to create a custom group,
because Default Policy applies to all objects.
a Click Environment > Custom Groups.
b If a custom group does not exist for your clusters, create a custom group.
For details, see User Scenario: Creating Custom Object Groups in the
vRealize Operations Manager Information Center.
c Add the cluster to the custom group, and save the custom group.
Configuring vRealize Automation
VMware, Inc. 304
3Configure a policy to consolidate and balance workloads on your clusters, and apply that policy to the
custom group.
You configure a policy in vRealize Operations Manager to establish the settings for consolidation,
balance, fill, CPU, memory, and disk space. For example, you modify the setting named Consolidate
Workloads to determine the best placement for new managed workloads based on the cluster status
and capacity. You also modify the threshold setting for Balance Workloads to the level of
aggressiveness required to place workloads. You can configure one or more policies, and apply them
to your cluster compute resources.
a To locate the policies, click Administration > Policies > Policy Library .
b To set workload values, click Add/Edit Policy, and click Workload Automation.
The settings named Consolidate Workloads and Cluster Headroom apply to the initial placement
of virtual machines.
nWhen you set Consolidate Workloads to none, workload placement balances the workload
across all the clusters to which the policy is applied. When you set Consolidate Workloads to
a value other than none, workload placement fills the busiest cluster first.
nCluster Headroom is the buffer space reserved in a cluster, as a percentage of the total
capacity. For example, if you set the cluster headroom to 20%, that buffer might prevent
workload placement from placing virtual machines on that cluster. The reason it prevents the
placement is because the cluster has 20% less of the free capacity for CPU, memory, or disk
space.
c In the policy workspace, click Apply Policy to Groups.
d Select the custom group.
e Save the policy.
You configured vRealize Operations Manager so that vRealize Automation uses the workload placement
analytics to suggest placement destinations of machines when users deploy blueprints.
What to do next
Wait for vRealize Automation and vRealize Operations Manager to collect data from the endpoints and
objects in your environment. Then, when you deploy new blueprints, vRealize Automation displays the
workload placement recommendations, destination candidates, and selected placement for your
confirmation.
Troubleshooting Workload Placement
If you experience problems with workload placement, use the troubleshooting information to resolve
them.
Configuring vRealize Automation
VMware, Inc. 305

The vRealize Automation Solution Is Required for Workload Placement to Operate Properly
Workload placement is based on individual machines, and placement is done at the machine level. When
vRealize Automation and vRealize Operations Manager are installed together, the vRealize Automation
Solution must also be installed.
The solution, which includes the management pack and adapter, identifies the clusters on which the
rebalance container or move VM actions are disabled. The rebalance action is disabled on the custom
data center to which the cluster belongs.
nFor unmanaged vRealize Automation clusters that belong to a custom data center that does not have
any managed vRealize Automation clusters, the move VM and rebalance container actions are
enabled. For managed vRealize Automation clusters, these actions are disabled.
nIn vRealize Operations Manager, the vRealize Automation Adapter causes VMs on clusters that map
reservations not to be available for move or rebalance.
Caution The vRealize Automation solution must only be installed on a single
vRealize Operations Manager instance.
High Availability Is Enabled, but Must Be Disabled
When HA is enabled, if vRealize Operations Manager is down, the timeout used for workload placement
to call vRealize Operations Manager might fail.
vRealize Automation logs workload placement errors in the catalina.out log file.
vSphere Endpoints in vRealize Automation Are Not Monitored
vRealize Operations Manager is not monitoring the vSphere vCenter Server instance that contains the
reservation clusters.
If vRealize Operations Manager does not recognize the vRealize Automation candidate reservations for a
cluster, datastore, or datastore cluster when it attempts to place them, it ignores them. In the placement
response, vRealize Operations Manager communicates to vRealize Automation that it does not recognize
them.
As a result, in the placement details on the request execution, vRealize Automation displays a warning
icon on the candidate reservation to indicate that it is unrecognized.
When Mismatches Occur, vRealize Automation Appears at the Top of the List
vRealize Automation and vRealize Operations Manager manage different views of the infrastructure. But
they must both manage the same instances of vCenter Server in the same infrastructure.
Must identify disconnects and mismatches, and display details.
What to Do If the vRealize Automation Adapter Is Down
The initial placement always honors the list of destination candidates that it receives from
vRealize Operations Manager, such as when a user adds a cluster immediately after installation.
Configuring vRealize Automation
VMware, Inc. 306

If the vRealize Automation solution, which includes the management pack and adapter, is not available in
the vRealize Operations Manager, the move VM and rebalance container actions are available.
Managing Key Pairs
Key pairs are used to provision and connect to a cloud instance. A key pair is used to decrypt Windows
passwords or to log in to a Linux machine.
Key pairs are required for provisioning with Amazon AWS. For Red Hat OpenStack, key pairs are
optional.
Existing key pairs are imported as part of data collection when you add a cloud endpoint. A fabric
administrator can also create and manage key pairs by using the vRealize Automation console. If you
delete a key pair from the vRealize Automation console, it is also deleted from the cloud service account.
In addition to managing key pairs manually, you can configure vRealize Automation to generate key pairs
automatically per machine or per business group.
nA fabric administrator can configure the automatic generation of key pairs at a reservation level.
nIf the key pair is going to be controlled at the blueprint level, the fabric administrator must select Not
Specified on the reservation.
nA tenant administrator or business group manager can configure the automatic generation of key
pairs at a blueprint level.
nIf key pair generation is configured at both the reservation and blueprint level, the reservation setting
overrides the blueprint setting.
Create a Key Pair
You can create key pairs for use with endpoints by using vRealize Automation.
Prerequisites
nLog in to vRealize Automation as a fabric administrator.
nCreate a cloud endpoint and add your cloud compute resources to a fabric group. See Choosing an
Endpoint Scenario and Create a Fabric Group.
Procedure
1Select Infrastructure > Reservations > Key Pairs.
2Click New.
3Enter a name in the Name text box.
4Select a cloud region from the Compute resource drop-down menu.
5Click the Save icon ( ).
The key pair is ready to use when the Secret Key column has the value ************.
Configuring vRealize Automation
VMware, Inc. 307

Upload the Private Key for a Key Pair
You can upload the private key for a key pair in PEM format.
Prerequisites
nLog in to vRealize Automation as a fabric administrator.
nYou must already have a key pair. See Create a Key Pair.
Procedure
1Select Infrastructure > Reservations > Key Pairs.
2Locate the key pair for which you want to upload a private key.
3Click the Edit icon ( ).
4Use one of the following methods to upload the key.
nBrowse for a PEM-encoded file and click Upload.
nPaste the text of the private key, beginning with -----BEGIN RSA PRIVATE KEY----- and
ending with -----END RSA PRIVATE KEY-----.
5Click the Save icon ( ).
Export the Private Key from a Key Pair
You can export the private key from a key pair to a PEM-encoded file.
Prerequisites
nLog in to vRealize Automation as a fabric administrator.
nA key pair with a private key must exist. See Upload the Private Key for a Key Pair.
Procedure
1Select Infrastructure > Reservations > Key Pairs.
2Locate the key pair from which to export the private key.
3Click the Export icon ( ).
4Browse to the location that you want to save the file and click Save.
Scenario: Apply a Location to a Compute Resource for Cross Region
Deployments
As a fabric administrator, you want to label your compute resources as belonging to your Boston or
London datacenter to support cross region deployments. When your blueprint architects enable the
locations feature on their blueprints, users are able to choose whether to provision machines in your
Boston or London datacenter.
Configuring vRealize Automation
VMware, Inc. 308

You have a datacenter in London, and a datacenter in Boston, and you don't want users in Boston
provisioning machines on your London infrastructure or vice versa. To ensure that Boston users provision
on your Boston infrastructure, and London users provision on your London infrastructure, you want to
allow users to select an appropriate location for provisioning when they request machines.
Prerequisites
nLog in to vRealize Automation as a fabric administrator.
nAs a system administrator, define the datacenter locations. See Scenario: Add Datacenter Locations
for Cross Region Deployments.
Procedure
1Select Infrastructure > Compute Resources > Compute Resources.
2Point to the compute resource located in your Boston datacenter and click Edit.
3Select Boston from the Locations drop-down menu.
4Click OK.
5Repeat this procedure as necessary to associate your compute resources to your Boston and London
locations.
IaaS architects can enable the locations feature so users can choose to provision machines in Boston or
London when they fill out their catalog item request forms. See Scenario: Enable Users to Select
Datacenter Locations for Cross Region Deployments.
Provisioning a vRealize Automation Deployment Using a Third-Party IPAM
Provider
You can obtain IP addresses and ranges for use in a vRealize Automation network profile from a
supported third-party IPAM solution provider, such as Infoblox.
The IP address ranges in the network profile are used in an associated reservation, which you specify in
a blueprint. When an entitled user requests machine provisioning using the blueprint catalog item, an IP
address is obtained from the third-party IPAM-specified range of IP addresses. After machine
deployment, you can discover the IP address used by querying its vRealize Automation item details page.
Configuring vRealize Automation
VMware, Inc. 309

Table 2‑19. Preparing for Provisioning a vRealize Automation Deployment Using Infoblox
IPAM Checklist
Task Description Details
Obtain, import, and configure
the third-party IPAM solution
provider plug-in or package.
Obtain and import the vRealize Orchestrator plug-in,
run the vRealize Orchestrator configuration
workflows, and register the IPAM provider endpoint
type in vRealize Orchestrator.
If the VMware Solution Exchange at
https://marketplace.vmware.com/vsx does not
contain the IPAM provider package that you need,
you can create your own using an IPAM Solution
Provider SDK and supporting documentation. See
the vRealize Automation Third-Party IPAM
Integration SDK 7.3 page at code.vmware.com.
See Checklist For Providing Third-Party
IPAM Provider Support.
Create an third-party IPAM
solution provider endpoint.
Create a new IPAM endpoint in
vRealize Automation.
See Create a Third-Party IPAM Provider
Endpoint.
Specify third-party IPAM
solution provider endpoint
settings in an external network
profile.
Create an external network profile and specify the
defined IPAM endpoint in vRealize Automation.
See Create an External Network Profile by
Using A Third-Party IPAM Provider.
Optionally specify third-party
IPAM solution provider
endpoint settings in a routed
network profile.
Create an on-demand network profile and specify
the defined IPAM endpoint in vRealize Automation.
See Create a Routed Network Profile By
Using a Third-Party IPAM Endpoint or
Create a NAT Network Profile By Using a
Third-Party IPAM Endpoint.
Define a reservation to use the
network profile.
Create a reservation that calls the network profile in
vRealize Automation.
See Create a Reservation for Hyper-V,
KVM, SCVMM, vSphere, or XenServer.
Define a blueprint that uses
the network profile.
Create a blueprint that uses the reservation in
vRealize Automation.
See Chapter 3 Providing Service
Blueprints to Users.
Publish the blueprint to the
catalog to make it available for
use.
Publish the blueprint to the catalog in
vRealize Automation. Add any required
entitlements.
See Publish a Blueprint.
Request machine provisioning
by using the blueprint catalog
item.
Use the blueprint catalog item to request machine
provisioning in vRealize Automation.
See Managing the Service Catalog.
Configuring XaaS Resources
By configuring XaaS endpoints you can connect the vRealize Automation to your environment. When you
configure vRealize Orchestrator plug-ins as endpoints, you use the vRealize Automation user interface to
configure the plug-ins instead of using the vRealize Orchestrator configuration interface.
To use vRealize Orchestrator capabilities and the vRealize Orchestrator plug-ins to expose VMware and
third-party technologies to vRealize Automation, you can configure the vRealize Orchestrator plug-ins by
adding the plug-ins as endpoints. This way, you create connections to different hosts and servers, such
as vCenter Server instances, a Microsoft Active Directory host, and so on.
Configuring vRealize Automation
VMware, Inc. 310

When you add a vRealize Orchestrator plug-in as an endpoint by using the vRealize Automation UI, you
run a configuration workflow in the default vRealize Orchestrator server. The configuration workflows are
located in the vRealize Automation > XaaS > Endpoint Configuration workflows folder.
Important Configuring a single plug-in in vRealize Orchestrator and in the vRealize Automation console
is not supported and results in errors.
Configure the Active Directory Plug-In as an Endpoint
You add an endpoint and configure the Active Directory plug-in to connect to a running Active Directory
instance and manage users and user groups, Active Directory computers, organizational units, and so on.
After you add an Active Directory endpoint, you can update it at any time.
Prerequisites
nVerify that you have access to a Microsoft Active Directory instance. See the Microsoft Active
Directory documentation.
nLog in to vRealize Automation as a tenant administrator.
Procedure
1Select Administration > vRO Configuration > Endpoints.
2Click the New icon ( ).
3In the Plug-in drop-down menu, select Active Directory.
4Click Next.
5Enter a name and, optionally, a description.
6Click Next.
7Configure the Active Directory server details.
a Enter the IP address or the DNS name of the host on which Active Directory runs in the Active
Directory host IP/URL text box.
b Enter the lookup port of your Active Directory server in the Port text box.
vRealize Orchestrator supports the Active Directory hierarchical domains structure. If your
domain controller is configured to use Global Catalog, you must use port 3268. You cannot use
the default port 389 to connect to the Global Catalog server. In addition to ports 389 and 3268,
you can use 636 for LDAPS.
Configuring vRealize Automation
VMware, Inc. 311
c Enter the root element of the Active Directory service in the Root text box.
For example, if your domain name is mycompany.com, then your root Active Directory is
dc=mycompany,dc=com.
This node is used for browsing your service directory after entering the appropriate credentials.
For large service directories, specifying a node in the tree narrows the search and improves
performance. For example, rather than searching in the entire directory, you can specify
ou=employees,dc=mycompany,dc=com. This root element displays all the users in the
Employees group.
d (Optional) To activate encrypted certification for the connection between vRealize Orchestrator
and Active Directory, select Yes from the Use SSL drop-down menu.
The SSL certificate is automatically imported without prompting for confirmation even if the
certificate is self-signed.
e (Optional) Enter the domain in the Default Domain text box.
For example, if your domain name is mycompany.com, type @mycompany.com.
8Configure the shared session settings.
The credentials are used by vRealize Orchestrator to run all the Active Directory workflows and
actions.
a Enter the user name for the shared session in the User name for the shared session text box.
a Enter the password for the shared session in the Password for the shared session text box.
9Click Finish.
You added an Active Directory instance as an endpoint. XaaS architects can use XaaS to publish Active
Directory plug-in workflows as catalog items and resource actions.
What to do next
nTo use vRealize Automation blueprints to manage your Active Directory users in your environment,
create an XaaS blueprint based on Active Directory. For an example, see Create an XaaS Blueprint
and Action for Creating and Modifying a User.
nTo use vRealize Automation to create Active Directory records when a machine is deployed, you can
create different Active Directory policies and apply them to different business groups and blueprints.
See Create and Apply Active Directory Policies.
Configure the HTTP-REST Plug-In as an Endpoint
You can add an endpoint and configure the HTTP-REST plug-in to connect to a REST host.
Prerequisites
nLog in to vRealize Automation as a tenant administrator.
nVerify that you have access to a REST host.
Configuring vRealize Automation
VMware, Inc. 312

Procedure
1Select Administration > vRO Configuration > Endpoints.
2Click the New icon ( ).
3Select HTTP-REST from the Plug-in drop-down menu.
4Click Next.
5Enter a name and, optionally, a description.
6Click Next.
7Provide information about the REST host.
a Enter the name of the host in the Name text box.
b Enter the address of the host in the URL text box.
Note If you use Kerberos access authentication, you must provide the host address in FDQN
format.
c (Optional) Enter the number of seconds before a connection times out in the Connection
timeout (seconds) text box.
The default value is 30 seconds.
d (Optional) Enter the number of seconds before an operation times out in the Operation timeout
(seconds) text box.
The default value is 60 seconds.
8(Optional) Configure proxy settings.
a Select Yes to use a proxy from the Use Proxy drop-down menu.
b Enter the IP of the proxy server in the Proxy address text box.
c Enter the port number to communicate with the proxy server in the Proxy port text box.
9Click Next.
Configuring vRealize Automation
VMware, Inc. 313

10 Select the authentication type.
Option Action
None No authentication is required.
OAuth 1.0 Uses OAuth 1.0 protocol. You must provide the required authentication
parameters under OAuth 1.0.
a Enter the key used to identify the consumer as a service provider in the
Consumer key text box.
b Enter the secret to establish ownership of the consumer key in the
Consumer secret text box.
c (Optional) Enter the access token that the consumer uses to gain access to
the protected resources in the Access token text box.
d (Optional) Enter the secret that the consumer uses to establish ownership of
a token in the Access token secret text box.
OAuth 2.0 Uses OAuth 2.0 protocol.
Enter the authentication token in the Token text box.
Basic Provides basic access authentication. The communication with the host is in
shared session mode.
a Enter the user name for the shared session in the Authentication user
name text box.
b Enter the password for the shared session in the Authentication password
text box.
Digest Provides digest access authentication that uses encryption. The communication
with the host is in shared session mode.
a Enter the user name for the shared session in the Authentication user
name text box.
b Enter the password for the shared session in the Authentication password
text box.
NTLM Provides NT LAN Manager (NTLM) access authentication within the Window
Security Support Provider (SSP) framework. The communication with the host is
in shared session mode.
a Provide the user credentials for the shared session.
nEnter the user name for the shared session in the Authentication user
name text box.
nEnter the password for the shared session in the Authentication
password text box.
b Configure the NTLM details
n(Optional) Enter the workstation name in the Workstation for NTLM
authentication text box.
nEnter the domain name in the Domain for NTLM authentication text
box.
Kerberos Provides Kerberos access authentication. The communication with the host is in
shared session mode.
a Enter the user name for the shared session in the Authentication user
name text box.
b Enter the password for the shared session in the Authentication password
text box.
11 Click Finish.
Configuring vRealize Automation
VMware, Inc. 314
You configured the endpoint and added a REST host. XaaS architects can use XaaS to publish HTTP-
REST plug-in workflows as catalog items and resource actions.
Configure the PowerShell Plug-In as an Endpoint
You can add an endpoint and configure the PowerShell plug-in to connect to a running PowerShell host,
so that you can call PowerShell scripts and cmdlets from vRealize Orchestrator actions and workflows,
and work with the result.
Prerequisites
nVerify that you have access to a Windows PowerShell host. For more information about Microsoft
Windows PowerShell, see the Windows PowerShell documentation.
nLog in to vRealize Automation as a tenant administrator.
Procedure
1Select Administration > vRO Configuration > Endpoints.
2Click the New icon ( ).
3Select PowerShell from the Plug-in drop-down menu.
4Click Next.
5Enter a name and, optionally, a description.
6Click Next.
7Specify the PowerShell host details.
a Enter the name of the host in the Name text box.
b Enter the IP address or the FDQN of the host in the Host/IP text box.
8Select the PowerShell host type to which the plug-in connects.
Option Action
WinRM a Enter the port number to use for communication with the host in the Port text
box under the PowerShell host details.
b Select a transport protocol from the Transport protocol drop-down menu.
Note If you use the HTTPS transport protocol, the certificate of the remote
PowerShell host is imported to the vRealize Orchestrator keystore.
c Select the authentication type from the Authentication drop-down menu.
Note To use Kerberos authentication, enable it on the WinRM service. For
information about configuring Kerberos authentication, see Using the
PowerShell Plug-In.
SSH None.
9Enter the credentials for a shared session communication with the PowerShell host in the User name
and Password text boxes.
Configuring vRealize Automation
VMware, Inc. 315
10 Click Finish.
You added an Windows PowerShell host as an endpoint. XaaS architects can use the XaaS to publish
PowerShell plug-in workflows as catalog items and resource actions.
Configure the SOAP Plug-In as an Endpoint
You can add an endpoint and configure the SOAP plug-in to define a SOAP service as an inventory
object, and perform SOAP operations on the defined objects.
Prerequisites
nVerify that you have access to a SOAP host. The plug-in supports SOAP Version 1.1 and 1.2, and
WSDL 1.1 and 2.0.
nLog in to vRealize Automation as a tenant administrator.
Procedure
1Select Administration > vRO Configuration > Endpoints.
2Click the New icon ( ).
3From the Plug-in drop-down menu, select SOAP.
4Click Next.
5Enter a name and, optionally, a description.
6Click Next.
7Provide the details about the SOAP host.
a Enter the name of the host in the Name text box.
b Select whether to provide the WSDL content as text from the Provide WSDL content drop-down
menu.
Option Action
Yes Enter the WSDL text in the WSDL content text box.
No Enter the correct path in the WSDL URL text box.
c (Optional) Enter the number of seconds before a connection times out in the Connection
timeout (in seconds) text box.
The default value is 30 seconds.
d (Optional) Enter the number of seconds before an operation times out in the Request timeout (in
seconds) text box.
The default value is 60 seconds.
Configuring vRealize Automation
VMware, Inc. 316

8(Optional) Specify the proxy settings.
a To use a proxy, select Yes from the Proxy drop-down menu.
b Enter the IP of the proxy server in the Address text box.
c Enter the port number to communicate with the proxy server in the Port text box.
9Click Next.
10 Select the authentication type.
Option Action
None No authentication is required.
Basic Provides basic access authentication. The communication with the host is in
shared session mode.
a Enter the user name for the shared session in the User name text box.
b Enter the password for the shared session in the Password text box.
Digest Provides digest access authentication that uses encryption. The communication
with the host is in shared session mode.
a Enter the user name for the shared session in the User name text box.
b Enter the password for the shared session in the Password text box.
NTLM Provides NT LAN Manager (NTLM) access authentication in the Window Security
Support Provider (SSP) framework. The communication with the host is in shared
session mode.
a Provide the user credentials.
nEnter the user name for the shared session in the User name text box.
nEnter the password for the shared session in the Password text box.
b Provide the NTLM settings.
nEnter the domain name in the NTLM domain text box.
n(Optional) Enter the workstation name in the NTLM workstation text box.
Negotiate Provides Kerberos access authentication. The communication with the host is in
shared session mode.
a Provide the user credentials.
1 Enter the user name for the shared session in the User name text box.
2 Enter the password for the shared session in the Password text box.
b Enter the Kerberos service SPN in the Kerberos service SPN text box.
11 Click Finish.
You added a SOAP service. XaaS architects can use XaaS to publish SOAP plug-in workflows as catalog
items and resource actions.
Configure the vCenter Server Plug-In as an Endpoint
You can add an endpoint and configure the vCenter Server plug-in to connect to a running vCenter Server
instance to create XaaS blueprints to manage vSphere inventory objects.
Prerequisites
nInstall and configure vCenter Server. See vSphere Installation and Setup.
Configuring vRealize Automation
VMware, Inc. 317

nLog in to vRealize Automation as a tenant administrator.
Procedure
1Select Administration > vRO Configuration > Endpoints.
2Click the New icon ( ).
3Select vCenter Server from the Plug-in drop-down menu.
4Click Next.
5Enter a name and, optionally, a description.
6Click Next.
7Provide information about the vCenter Server instance.
a Enter the IP address or the DNS name of the machine in the IP or host name of the vCenter
Server instance to add text box.
This is the IP address or DNS name of the machine on which the vCenter Server instance you
want to add is installed.
b Enter the port to communicate with the vCenter Server instance in the Port of the vCenter
Server instance text box.
The default port is 443.
c Enter the location of the SDK to use for connecting to your vCenter Server instance in the
Location of the SDK that you use to connect to the vCenter Server instance text box.
For example, /sdk.
8Click Next.
9Define the connection parameters.
a Enter the HTTP port of the vCenter Server instance in the HTTP port of the vCenter Server
instance - applicable for VC plugin version 5.5.2 or earlier text box.
b Enter the credentials for vRealize Orchestrator to use to establish the connection to the
vCenter Server instance in the User name of the user that Orchestrator will use to connect to
the vCenter Server instance and Password of the user that Orchestrator will use to
connect to the vCenter Server instance text boxes.
The user that you select must be a valid user with privileges to manage vCenter Server
extensions and a set of custom defined privileges.
10 Click Finish.
You added a vCenter Server instance as an endpoint. XaaS architects can use the XaaS to publish
vCenter Server plug-in workflows as catalog items and resource actions.
Configuring vRealize Automation
VMware, Inc. 318
Create a Microsoft Azure Endpoint
You can create a Microsoft Azure endpoint to facilitate a credentialed connection between
vRealize Automation and an Azure deployment.
An endpoint establishes a connection to a resource, in this case an Azure instance, that you can use to
create virtual machine blueprints. You must have an Azure endpoint to use as the basis of blueprints for
provisioning Azure virtual machines. If you use multiple Azure subscriptions, you need endpoints for each
subscription ID.
As an alternative, you can create an Azure connection directly from vRealize Orchestrator using the Add
an Azure Connection command located under Library > Azure > Configuration in the
vRealize Orchestrator workflow tree. For most scenarios, creating a connection through the endpoint
configuration as described herein is the preferred option.
Azure endpoints are supported by vRealize Orchestrator and XaaS functionality. You can create, delete,
or edit an Azure endpoint. Note that if you make any changes to an existing endpoint and do not execute
any updates on the Azure portal through the updated connection for several hours, then you must restart
the vRealize Orchestrator service using the service vco-service restart command. Failure to
restart the service may result in errors.
Prerequisites
nConfigure a Microsoft Azure instance and obtain a valid Microsoft Azure subscription from which you
can use the subscription ID. See
http://www.vaficionado.com/2016/11/using-new-microsoft-azure-endpoint-vrealize-automation-7-2/ for
more information about configuring Azure and obtaining a subscription ID.
nVerify that your vRealize Automation deployment has at least one tenant and one business group.
nCreate an Active Directory application as described in https://azure.microsoft.com/en-
us/documentation/articles/resource-group-create-service-principal-portal.
nMake note of the following Azure related information, as you will need it during endpoint and blueprint
configuration.
nsubscription ID
ntenant ID
nstorage account name
nresource group name
nlocation
nvirtual network name
nclient application ID
nclient application secret key
nvirtual machine image URN
Configuring vRealize Automation
VMware, Inc. 319
nThere are unique settings required for creating and deploying cloud applications for Azure in the
China environment. For related information, see https://docs.microsoft.com/en-us/azure/china/china-
get-started-developer-guide. When creating a vRealize Automation Azure endpoint for China, the
service URL, login URL, and storage URL must be specified as follows:
nService URL: https://management.chinacloudapi.cn
nLogin URL: https://login.chinacloudapi.cn/
nStorage URL: https://storage_account_name.blob.core.chinacloudapi.cn/
nLog in to vRealize Automation as a tenant administrator.
Procedure
1Select Administration > vRO Configuration > Endpoints.
2Click the New icon ( ).
3On the Plug-in tab, click the Plug-in drop-down menu and select Azure Plug-in.
4Click Next.
5Enter a name and, optionally, a description.
6Click Next.
7Populate the text boxes on the Details tab as appropriate for the endpoint.
Parameter Description
Connection settings
Azure Connection
Connection name Unique name for the new endpoint connection. This name
appears in the vRealize Orchestrator interface to help you
identify a particular connection.
Azure subscription id The identifier for your Azure subscription. The ID defines the
storage accounts, virtual machines and other Azure resources
to which you have access.
Resource manager settings
Azure service URI The URI through which you gain access to your Azure
instance. The default value of
https://management.azure.com/ is appropriate for many
typical implementations.
Tenant Id The Azure tenant ID that you want the endpoint to use.
Client Id The Azure client identifier that you want the endpoint to use.
This is assigned when you create an Active Directory
application.
Client secret The key used with an Azure client ID. This key is assigned
when you create an Active Directory application.
Configuring vRealize Automation
VMware, Inc. 320

Parameter Description
Login URL The URL used to access the Azure instance. The default
value of https://login.windows.net/ is appropriate for
many typical implementations.
Proxy Settings
Proxy host If your company uses a proxy Web server, enter the host
name of that server.
Proxy port If your company uses a proxy Web server, enter the port
number of that server.
8(Optional) Click Properties and add supplied custom properties, property groups, or your own custom
property definitions.
9Click Finish.
What to do next
Create appropriate resource groups, storage accounts, and network security groups in Azure. You should
also create load balancers if appropriate for your implementation.
Configuring vRealize Automation
VMware, Inc. 321

Action Options
Create an Azure resource group nCreate the resource group using the Azure portal. See the
Azure documentation for specific instructions.
nUse the appropriate vRealize Orchestrator workflow found
under the Library/Azure/Resource/Create resource
group.
nIn vRealize Automation, create and publish an XaaS
blueprint that contains the vRealize Orchestrator workflow.
You can request the resource group after attaching it to the
service and entitlements. Note that the Resource Group
resource type is not supported or managed by
vRealize Automation.
Create an Azure storage account nUse Azure to create a storage account. See the Azure
documentation for specific instructions.
nUse the appropriate vRealize Orchestrator workflow found
under Library/Azure/Storage/Create storage
account.
nIn vRealize Automation, create and publish an XaaS
blueprint that contains the vRealize Orchestrator workflow.
You can request the storage account after attaching it to the
service and entitlements.
Create an Azure network security group nUse Azure to create a security group. See the Azure
documentation for specific instructions.
nUse the appropriate vRealize Orchestrator workflow found
under the Library/Azure/Network/Create Network
security group .
nIn vRealize Automation, create and publish an XaaS
blueprint that contains the vRealize Orchestrator workflow.
You can request the security group after attaching it to the
service and entitlements.
Creating and Configuring Containers
You can use the Containers tab in vRealize Automation to open the Containers for vRealize Automation
integrated application and create and configure the containers and container network settings to make
available to vRealize Automation blueprint architects.
You can define containers by using new and existing templates and images in the integrated Containers
application. You can then add container components, and their associated network settings, to
vRealize Automation blueprints.
Managing Container Hosts and Clusters
You can view and manage the hosts that you add from the Clusters page. In the context of Containers,
the host is a virtual machine or infrastructure that lets you run containers.
Configuring vRealize Automation
VMware, Inc. 322

The Clusters page, under the Infrastructure tab, contains the controls for adding new clusters and hosts.
To add a host in your Containers environment, you must add it to a cluster. You can monitor the state of
the provision requests of existing hosts and view event logs for your containers from any page in the
Library and Deployments tabs. The Requests and Event Log panels are located on the right side of the
pages.
Add a Container Host to a New Cluster
You must add a host to a cluster to deploy containers.
Prerequisites
Select a business group from the top-left side of the Containers tab.
Procedure
1Log in to the vRealize Automation console as a container administrator.
2Click the Containers tab.
3Click Infrastructure > Clusters.
4Click New.
5Enter a name for the Cluster.
6Enter a description for the Cluster.
7In Type select whether you entered the address of a Docker host or a virtual container host (VCH).
Note Only VCH hosts that are version 1.2 and 1.3 are supported in Containers for vRealize
Automation 7.4
8Enter your host IP address or host name using the http(s)://<hostname>:<port> format.
9Select your login credentials from the list.
Containers supports credentials authentication and public-private key authentication. You can add
your credentials from the Identity Management page.
10 Click Save.
You successfully created a new cluster added a host to it.
Using Container Deployment Policies
You can link deployment policies to hosts and container definitions. You use deployment policies in
Containers for vRealize Automation to set a preference for the specific host and quotas for when you
deploy a container.
Deployment policies that are applied to a container have a higher priority than placements that are
applied to container hosts.
Note Deployment policies are deprecated and will be removed in a future release of vRealize
Automation.
Configuring vRealize Automation
VMware, Inc. 323

Set a Deployment Policy on a Host
Set a preference for the specific host and quotas for when you deploy a container.
Note Deployment policies are deprecated and will be removed in a future release of vRealize
Automation.
Prerequisites
Add a host to a cluster.
Procedure
1Log in to the vRealize Automation console as a container administrator.
2Click the Containers tab.
3Click Infrastructure > Clusters.
4Click on the cluster that contains the host you want to edit.
5Click Resources.
6Click the options icon on the host you want to configure and click Edit.
7Select the deployment policy and click Update.
Set a Deployment Policy for a Container Definition
Set a deployment policy for a container definition.
Note Deployment policies are deprecated and will be removed in a future release of vRealize
Automation.
Procedure
1Click the Containers tab.
2Click +Container to start provisioning the container.
3In the provisioning options, click Policy.
4From the Deployment Policy drop-down list, select an existing policy.
5Provision the container or save it as a template.
Configuring Container Settings
You can define a single container or a multi-container application by using new and existing container
configuration properties and settings.
In addition to the core Containers for vRealize Automation settings, the following vRealize Automation
settings are available for deployments that use container components:
nHealth configuration
nLinks
Configuring vRealize Automation
VMware, Inc. 324

nExposed services
nCluster size and scale in-and scale out parameters
Configure Health Checks in Containers
You can configure a health check method to update the status of a container based on custom criteria.
You can use HTTP or TCP protocols when executing a command on the container. You can also specify a
health check method.
Prerequisites
nVerify that Containers for vRealize Automation is enabled in your supported vRealize Automation
deployment.
nVerify that you have container administrator or container architect role privileges.
Procedure
1Log in to vRealize Automation.
2Click the Containers tab.
3Click Templates in the left pane.
4Edit the template or image.
Option Description
To edit a template a Click Edit in the upper-right section of the template that you want to open.
b Click Edit in the upper-right section of the container that you want to open.
To edit an image. Click the arrow next to the image's Provision button, and click Enter additional
info.
5Click the Health Config tab.
6Select a health mode.
Table 2‑20. Health Configuration Modes
Mode Description
None Default. No health checks are configured.
HTTP If you select HTTP, you must provide an API to access and
an HTTP method and version to use . The API is relative and
you do not need to enter the address of the container. You
can also specify a timeout period for the operation and set
health thresholds.
For example, a healthy threshold of 2 means that two
consecutive successful calls must occur for the container to
be considered healthy and in the RUNNING status. An
unhealthy threshold of 2 means that two unsuccessful calls
must occur for the container to be considered unhealthy and
in the ERROR status. For all the states in between the
healthy and unhealthy thresholds, the container status is
DEGRADED.
Configuring vRealize Automation
VMware, Inc. 325

Table 2‑20. Health Configuration Modes (Continued)
Mode Description
TCP connection If you select TCP connection, you must only enter a port for
the container. The health check attempts to establish a TCP
connection with the container on the provided port. You can
also specify a timeout value for the operation and set healthy
or unhealthy thresholds as with HTTP.
Command If you select Command, you must enter a command to be
executed on the container. The success of the health check is
determined by the exit status of the command.
Ignore health check on provision Uncheck this option to force health check on provision. By
forcing it, a container is not considered provisioned until one
successful health check passes.
Autodeploy Automatic redeployment of containers when they are in
ERROR state.
7Click Save.
Configure Links in Containers
Links and exposed services address communication across container services and load balancing across
hosts. You can configure link settings for your containers in Containers.
You can use links to enable communication between multiple services in your application. Links in
Containers are similar to Docker links, but connect containers across hosts. A link consists of two parts: a
service name and an alias. The service name is the name of the service or template being called. The
alias is the host name that you use to communicate with that service.
For example, if you have an application that contains a Web and database service and you define a link in
the Web service to the database service by using an alias of my-db, the Web service application opens a
TCP connection to my-db:{PORT_OF_DB}. The PORT_OF_DB is the port that the database listens to,
regardless of the public port that is assigned to the host by the container settings. If MySQL is checking
for updates on its default port of 3306, and the published port for the container host is 32799, the Web
application accesses the database at my-db:3306.
Note It is recommended that you use networks instead of links. Links are now a legacy Docker feature
with significant limitations when linking container clusters, including:
nDocker does not support multiple links with the same alias. It is recommended that you allow
Containers for vRealize Automation to generate link aliases for you.
nYou cannot update the links of a container runtime. When scaling up or down a linked cluster, the
dependent container’s links will not be updated.
Prerequisites
nVerify that Containers for vRealize Automation is enabled in your supported vRealize Automation
deployment.
nVerify that you have container administrator or container architect role privileges.
Configuring vRealize Automation
VMware, Inc. 326

nVerify that a bridge network is available for linking services.
nVerify that the internal port of the target service is published. For cross communication, the service
can be mapped to any other port but must be accessible from outside the host.
nVerify that the service hosts are able to access each other.
Procedure
1Log in to vRealize Automation.
2Click Templates in the left pane.
3Edit the template or image.
Option Description
To edit a template a Click Edit in the upper-right section of the template that you want to open.
b Click Edit in the upper-right section of the container that you want to open.
To edit an image. Click the arrow next to the image's Provision button, and click Enter additional
info.
4Click the Basic tab.
5In the Services text box, enter a comma-separated list of services that the container is dependant on.
6In the Alias text box, enter a descriptive name for the service or comma-separated list of services.
7Click Save.
Configure Exposed Services in Containers
You can use a unique host name for a load balancer by providing an address and a placeholder in your
container settings.
The placeholder determines the location of an automatically generated part of the URL. This value is
unique for each host name. The address supports the %s format character to specify where the
placeholder is located.
Note If the placeholder is not used, it is positioned as a prefix or suffix of the host name, depending on
the system configuration.
It is recommended you use a load balancer that can target requests to each node if you build an
application which includes a service that must be publicly exposed and which must also scale in and out.
After you provision the application, the load balancer configuration is updated whenever the service is
scaled in or out by vRealize Automation.
Prerequisites
nVerify that Containers for vRealize Automation is enabled in your supported vRealize Automation
deployment.
nVerify that you have container administrator or container architect role privileges.
Configuring vRealize Automation
VMware, Inc. 327

Procedure
1Log in to vRealize Automation.
2Click the Containers tab.
3Click Templates in the left pane.
4Edit the template or image.
Option Description
To edit a template a Click Edit in the upper-right section of the template that you want to open.
b Click Edit in the upper-right section of the container that you want to open.
To edit an image. Click the arrow next to the image's Provision button, and click Enter additional
info.
5Click the Network tab.
6In the Address text box, enter the location of the placeholder.
The address host acts as a virtual host. To access the address host, you can add mapping
information in the etc/hosts file or use a DNS that maps the container address to the host name.
7In the Container Port text box, enter the port number used to expose the service.
Use the sample format provided in the form. If your container application exposes more than one port,
specify which internal port or ports can expose the service.
8Click Save.
Configure Cluster Size and Scale in Containers
You can create container clusters by using Containers placement settings to specify cluster size.
When you configure a cluster, the Containers provisions the specified number of containers. Requests
are load balanced among all containers in the cluster.
You can modify the cluster size on a provisioned container or application to increase or decrease the size
of the cluster by one. When you modify the cluster size at runtime, all affinity filters and placement rules
are considered.
Prerequisites
nVerify that Containers for vRealize Automation is enabled in your supported vRealize Automation
deployment.
nVerify that you have container administrator or container architect role privileges.
Procedure
1Log in to vRealize Automation.
2Click the Containers tab.
3Click Templates in the left pane.
Configuring vRealize Automation
VMware, Inc. 328

4Edit the template or image.
Option Description
To edit a template a Click Edit in the upper-right section of the template that you want to open.
b Click Edit in the upper-right section of the container that you want to open.
To edit an image. Click the arrow next to the image's Provision button, and click Enter additional
info.
5Click the Policy tab.
6Set the container cluster size.
7Click Save.
Configuring and Using Templates and Images in Containers
Containers uses templates to provision containers.
A template is a reusable configuration for provisioning a container or a suite of containers. In a template,
you can define a multi-tier application that consists of linked services.
A service is defined as one or more containers of the same type or image.
You can create a custom container template based on an existing template on the Templates page or
import a properly formatted YAML file. You can also provision a container template or image.
Create a Custom Container Template
You can create a custom template and use it to define a container.
A template is a reusable configuration that you can use for provisioning a container or a suite of
containers.
The Templates page displays template images that are available to you based on registries that you
define. You can create a custom template, based on an existing template image or import a template or
Docker Compose file. See Import a Container Template or Docker Compose File.
You can also create a custom template or image by using the Provision > Enter additional info option
described in Provision a Container from a Template or Image.
Prerequisites
nVerify that you have container administrator role privileges.
Procedure
1Log in to the vRealize Automation console as a container administrator.
2Click the Containers tab.
3Click Templates in the left pane.
A list displays the templates and images that are available for provisioning.
nConfigured templates in the Images view.
Configuring vRealize Automation
VMware, Inc. 329
nExisting or custom templates in the Template view.
nAll available templates and images based on your specified registries in the All view.
The Import and Export options are also available to import or export templates and images.
4Click the arrow next to the Provision button of an image you want to include in the template.
5Click Enter additional info.
6Click Save as Template to save your changes as a new container template in Containers for
vRealize Automation.
What to do next
You can edit a template for future provisioning. Existing applications that were provisioned from the
template are not affected by changes that you make to the template after provisioning.
Import a Container Template or Docker Compose File
You can use an imported Docker Container template or a Docker Compose YAML file as a custom
template in the Containers for vRealize Automation.
If using a YAML file, enter the content of the YAML file as text or browse to and upload the YAML file. The
YAML file represents the template, the configuration for the different containers, and their connections.
The supported format types are Docker Compose YAML and Containers for vRealize Automation YAML.
Containers for vRealize Automation YAML is similar to Docker Compose, but it uses the
vRealize Automation blueprint YAML format visible in the vRealize Automation REST API or in
vRealize CloudClient. The Containers for vRealize Automation YAML allows you to import existing Docker
Compose applications and modify, provision, and manage them by using Containers.
Prerequisites
nVerify that Containers for vRealize Automation is enabled in your supported vRealize Automation
deployment.
nLog in to vRealize Automation as a container administrator.
For information about the YAML format used by vRealize Automation service REST APIs, see vRealize
Automation API Reference.
Procedure
1Click the Containers tab.
2Click Templates in the left pane.
A list displays the templates and images that are available for provisioning.
nConfigured templates in the Images view.
nExisting or custom templates in the Template view.
nAll available templates and images based on your specified registries in the All view.
The Import and Export options are also available to import or export templates and images.
Configuring vRealize Automation
VMware, Inc. 330

3Click the Import template or Docker Compose icon.
The Import Template page appears.
4Provide the YAML file content.
Option Description
Load from File Click Load from File to browse to and select the YAML file from a directory.
Enter template or Docker Compose Paste the content of a properly formatted YAML file in the Enter template or
Docker Compose text box.
5Click Import.
The new template appears in the Templates view.
Provision a Container from a Template or Image
You can provision a container from a template or image in your Templates view.
The provisioning process creates a container based on the configuration settings that exist in the
template or image from which you provision.
You can provision a container from a template or image either by using existing configuration settings or
by editing configuration settings and then provisioning.
You can also edit and save configuration settings to create a new, customized container template or
image.
Prerequisites
nVerify that Containers for vRealize Automation is enabled in your supported vRealize Automation
deployment.
nLog in to vRealize Automation as a container administrator.
Procedure
1Click the Containers tab.
2Click Templates in the left pane.
A list displays the templates and images that are available for provisioning.
nConfigured templates in the Images view.
nExisting or custom templates in the Template view.
nAll available templates and images based on your specified registries in the All view.
The Import and Export options are also available to import or export templates and images.
3Use the All, Images, or Templates view options to view the image or template to provision.
Configuring vRealize Automation
VMware, Inc. 331

4Provision the template or image.
Option Description
Provision using existing settings. a Click Provision.
The Provision Requests view displays information about provisioning success.
Provision by editing settings. a Click the arrow next to the Provision button.
b Click Enter additional info.
c Enter the additional information for the container in the Provision a
Container form.
d When you have completed the form updates, click Provision to provision
using the modified settings.
e Click Save as Template to save your changes as a new container template in
Containers for vRealize Automation.
The Provision Requests view displays information about provisioning success.
Export a Container Template or Docker Compose File
You can export a container template as a Docker Compose YAML file or a Containers for vRealize
Automation YAML file.
You can import a template, modify it programmatically by using the vRealize Automation REST API or
vRealize CloudClient, or graphically in Containers. You can then export the modified file. For example,
you can import in Docker Compose format and export in the blueprint YAML format used in the
vRealize Automation composition-service API. However, some configurations that are specific to
Containers, such as health configuration and affinity constraints are not included if you export the
template in Docker Compose format.
Prerequisites
nVerify that Containers for vRealize Automation is enabled in your supported vRealize Automation
deployment.
nLog in to vRealize Automation as a container administrator.
For information about the YAML format used by vRealize Automation service REST APIs, see vRealize
Automation API Reference.
Procedure
1Click the Containers tab.
2Click Templates in the left pane.
A list displays the templates and images that are available for provisioning.
nConfigured templates in the Images view.
nExisting or custom templates in the Template view.
nAll available templates and images based on your specified registries in the All view.
The Import and Export options are also available to import or export templates and images.
3Point to a template and click its Export icon.
Configuring vRealize Automation
VMware, Inc. 332

4When prompted, select an output format type:
nYAML Blueprint
This format adheres to the blueprint YAML format used in the vRealize Automation composition-
service API.
nDocker Compose
This format adheres to the YAML format used in the Docker Compose application.
5Click Export.
6Save the file or open it with an appropriate application when prompted.
Using Container Registries
A Docker registry is a stateless, server-side application. You can use registries in Containers for vRealize
Automation to store and distribute Docker images.
To configure a registry, you need to provide its address, a custom registry name, and optionally
credentials. The address must start with HTTP or HTTPS to designate whether the registry is secured or
unsecured. If the connection type is not provided, HTTPS is used by default.
Note For HTTP you must declare port 80; for HTTPS you must declare port 443. If no port is specified,
the Docker engine expects port 5000, which can result in broken connections.
Note It is recommended you do not use HTTP registries because HTTP is considered insecure. If you
want to use HTTP, you must modify the DOCKER_OPTS property on each host as follows:
DOCKER_OPTS="--insecure-registry myregistrydomain.com:5000".
For more information, see the Docker documentation at https://docs.docker.com/registry/insecure/.
Containers can interact with both Docker Registry HTTP API V1 and V2 in the following manner:
V1 over HTTP
(unsecured, plain HTTP
registry)
You can freely search this kind of registry, but you must manually configure
each Docker host with the --insecure-registry flag to provision
containers based on images from insecure registries. You must restart the
Docker daemon after setting the property.
V1 over HTTPS Use behind a reverse proxy, such as NGINX. The standard implementation
is available through open source at https://github.com/docker/docker-
registry.
V2 over HTTPS The standard implementation is open sourced at
https://github.com/docker/distribution.
Configuring vRealize Automation
VMware, Inc. 333

V2 over HTTPS with
basic authentication
The standard implementation is open sourced at
https://github.com/docker/distribution.
V2 over HTTPS with
authentication through
a central service
You can run a Docker registry in standalone mode, in which there are no
authorization checks. Supported third-party registries are JFrog Artifactory
and Harbor. Docker Hub is enabled by default for all tenants and is not
present in the registry list, but it can be disabled with a system property.
Note Docker does not normally interact with secure registries configured with certificates signed by
unknown authority. The container service handles this case by automatically uploading untrusted
certificates to all docker hosts and enabling the hosts to connect to these registries. If a certificate cannot
be uploaded to a given host, the host is automatically disabled.
Create and Manage Container Registries
You can configure multiple registries to gain access to both public and private images.
Registries are public or private stores, from which you upload or download images. You can disable, edit,
or delete the registries that you created. The images shown in the Templates tab are based on the
registries that you define.
When you create or manage registries in the Existing Registries page, you can click the Credentials or
Certificate buttons to add or manage credentials and certificates.
Prerequisites
nLog in to vRealize Automation as a container administrator.
nVerify that at least one host is configured and available for container network configuration.
Procedure
1Click the Containers tab.
2Click Registries.
The Existing Registries page appears.
3Click +Registry.
4Enter the registry address.
5Enter a name for the registry.
6Select your login credentials from the drop-down list.
7(Optional) Click Verify to confirm that the configured parameters are valid.
8Click Save to add the registry.
Configuring Network Resources for Containers
You can create, modify, and attach network configurations to containers and container templates in the
Containers for vRealize Automation application.
Configuring vRealize Automation
VMware, Inc. 334
When you provision а container, the network configuration is embedded and available. You can customize
the network settings for container components that you added to a vRealize Automation blueprint.
Create a New Network for Containers
If a suitable network configuration is not available, you can create a new one in vRealize Automation.
Prerequisites
nVerify that you have container administrator, container architect, or IaaS administrator role
privileges.
nVerify that at least one host is configured and available for container network configuration.
Procedure
1Log in to vRealize Automation.
2Click the Containers tab.
3Select Networks in the left pane.
The main panel displays the existing network configurations that can be provisioned as a part of the
container deployment. The network configurations include both those collected from added Docker
hosts and those created in vRealize Automation. The icons representing the network configurations
display the network and IPAM drivers, subnet, gateway, and IP range information, the number of
containers using the network configuration, and the number of hosts.
4Click +Network.
5Enter a name for the network.
When you finish creating the new configuration, the name value will be appended with a unique
identifier.
6(Optional) To add more detailed configuration settings, select the Advanced check box.
Additional network configuration settings appear in the Add Network panel.
Configuring vRealize Automation
VMware, Inc. 335

7Configure the advanced network configuration settings.
Option Description
IPAM configuration Subnet Provide subnet and gateway addresses that are unique
to this network configuration. They must not overlap with
any other networks on the same container host.
Custom properties Optionally, specify custom properties for the new network configuration.
containers.ipam
.driver
For use with containers only. Specifies the IPAM driver
to be used when adding a Containers network
component to a blueprint. The supported values depend
on the drivers installed in the container host environment
in which they are used. For example, a supported value
might be infoblox or calico depending on the IPAM
plug-ins that are installed on the container host.
This property name and value are case-sensitive. The
property value is not validated when you add it. If the
specified driver does not exist on the container host at
provisioning time, an error message is returned and
provisioning fails.
containers.netw
ork.driver
For use with containers only. Specifies the network
driver to be used when adding a Containers network
component to a blueprint. The supported values depend
on the drivers installed in the container host environment
in which they are used. By default, Docker-supplied
network drivers include bridge, overlay, and macvlan,
while Virtual Container Host (VCH)-supplied network
drivers include the bridge driver. Third-party network
drivers such as weave and calico might also be
available, depending on what network plug-ins are
installed on the container host.
This property name and value are case-sensitive. The
property value is not validated when you add it. If the
specified driver does not exist on the container host at
provisioning time, an error message is returned and
provisioning fails.
Note If you create the network without advanced settings, vRealize Automation supplies the settings
automatically.
8From the drop-down menu, select the host to which you want to connect the network.
9Click Create.
Add a Network to a Container Template
You can add a network configuration to a container template to connect the containers to each other. This
network configuration is automatically implemented for any applications that use the template. You can
add either an existing network or configure and add a new network, as necessary.
Configuring vRealize Automation
VMware, Inc. 336

Prerequisites
nVerify that you have a template available. If not, you must first create one.
nVerify that you have container administrator, container architect, or IaaS administrator role
privileges.
nVerify that at least one host is configured and available for container network configuration.
Procedure
1Log in to vRealize Automation.
2Click the Containers tab.
3Click Templates in the left pane.
An array of icons displays the templates and images that are available for provisioning.
4(Optional) Modify the view to show only templates by clicking View: Templates in the upper right
header above the icons.
5Click Edit in the upper-right section of the template that you want to customize.
The Edit Template page appears, displaying the container icons and a blank icon with a plus-sign.
6Point to the blank icon.
The Add Network icon appears.
7Click the Add Network icon.
The Add Network panel appears.
8Add an existing network or create and add a new network.
Option Description
Add an existing network. a Click the Existing check box.
b Click inside the Name field to display a list of existing networks.
c Select the network you want to use and click Save.
Configure and add a new network. a Enter a name for the network.
b To add more detailed configuration settings, click the Advanced check box.
c Click Save.
The Add Network Configuration panel disappears and the added network appears as a horizontal
icon below the container icons in the Edit Template page. A network icon also appears on the bottom
border of the container icons.
9Connect the network to a container, by dragging the network connector icon from the container to any
point on the horizontal icon representing the network.
Configuring Volumes for Containers
You can create, modify, and attach volumes to containers and container templates in the Containers for
vRealize Automation application.
Configuring vRealize Automation
VMware, Inc. 337

Containers for vRealize Automation uses Docker volumes for persistent data management. With volumes
you can perform the following tasks:
nShare volumes between different containers within the same host.
nUpdate data instantly.
nSave the volume data after the container is deleted.
Create a New Volume for Containers
To extend your container storage, you must first create a data volume.
Prerequisites
nVerify that you have container administrator, container architect, or IaaS administrator role
privileges.
nVerify that at least one host is configured and available for container volume configuration.
Procedure
1Log in to vRealize Automation.
2Click the Containers tab.
3Click Volumes in the left pane.
The main panel displays the existing volume configurations that can be connected to the deployed
containers. The volume configurations include both those collected from added Docker hosts and
those created in vRealize Automation. The volume instances display the driver, scope, and driver
options.
4Click +Volume.
5Enter a name for the volume.
When you finish creating the configuration, the name value is appended with a unique identifier.
6In the Driver text box, enter the driver of the volume plug-in you want to use. If you do not enter
anything, local is used as the default value.
7(Optional) To add more detailed configuration settings, click the Advanced check box.
Additional configuration settings appear.
8(Optional) Configure the advanced volume settings.
Option Description
Driver Options Specify the driver options you want to use. The options depend on the volume
plug-in you are using.
Custom properties Specify custom properties for the new configuration.
9From the drop-down menu, select the host to which you want to connect the volume.
Configuring vRealize Automation
VMware, Inc. 338

10 Click Create.
The Create Volume panel disappears and the added volume appears in the Volumes tab.
What to do next
Add a Volume to a Container Template
Add a Volume to a Container Template
Connect a volume to a container by adding it to a template.
Prerequisites
nVerify that you have a template available. If not, you must first create one.
nVerify that you have container administrator, container architect, or IaaS administrator role
privileges.
nVerify that at least one host is configured and available for container volume configuration.
Procedure
1Log in to vRealize Automation.
2Click the Containers tab.
3Click Templates in the left pane.
An array of icons displays the templates and images that are available for provisioning.
4(Optional) Modify the view to show only templates by clicking View: Templates in the upper right
header above the icons.
5Click Edit in the upper-right section of the template that you want to customize.
The Edit Template page appears, displaying the container icons, including a blank icon with a plus-
sign.
6Hover the cursor over the blank icon with the plus sign until the Add Volume icon appears.
7Click the Add Volume icon.
8Add an existing volume or create and add a new volume.
Option Description
Add an existing volume. a Click the Existing check box.
b Click inside the Name field to display a list of existing volumes.
c Select the volume you want to use and click Save.
Configure and add a new volume. a Enter a name for the volume.
b In the Driver text box, enter the driver of the volume plug-in you want to use.
If you are not using an external storage system, enter local.
c To add more detailed configuration settings, click the Advanced check box.
d Click Save.
Configuring vRealize Automation
VMware, Inc. 339
The Add Volume panel disappears and the added volume appears as a horizontal icon below the
container icons in the Edit Template page. A volume icon also displays on the bottom border of the
container icons.
9Connect the volume to a container, by dragging the volume connector icon from the container to any
point on the horizontal icon representing the volume.
10 (Optional) Click on the container path to change the location where the volume is mounted.
What to do next
Provision a Container from a Template or Image
Installing Additional Plug-Ins on the Default vRealize Orchestrator
Server
You can install additional packages and plug-ins on the default vRealize Orchestrator server by using the
vRealize Orchestrator configuration interface.
You can install additional plug-ins on the default vRealize Orchestrator server and use the workflows with
XaaS.
You can also import additional packages on the default vRealize Orchestrator server for configuration as
vRealize Automation external IPAM provider endpoint types. For example, for information about obtaining,
importing, and configuring the Infoblox IPAM package, see Checklist For Providing Third-Party IPAM
Provider Support.
Package files (.package) and plug-in installation files (.vmoapp or .dar) are available from the VMware
Solution Exchange at https://solutionexchange.vmware.com/store/category_groups/cloud-management.
For information about plug-in files, see vRealize Orchestrator Plug-Ins Documentation at
https://www.vmware.com/support/pubs/vco_plugins_pubs.html.
For more information about installing new plug-ins, see Installing and Configuring VMware vCenter
Orchestrator.
Working With Active Directory Policies
Active Directory policies define the properties of a machine record, for example, domain, as well as the
organizational unit in which the record is created using a vRealize Automation blueprint.
If you apply a policy to a business group, all the machine requests from the business group members are
added to the specified organizational unit. You can create different policies for different organizational
units, and then apply the different policies to different business groups.
Using Custom Properties to Override an Active Directory Policy
Using the provided Active Directory custom properties, you can override the Active Directory policy,
domain, organizational unit, and other values on a particular blueprint when it is deployed.
The list of the provided Active Directory custom properties is included in the Custom Properties
Reference. The custom property prefix is ext.policy.activedirectory.
Configuring vRealize Automation
VMware, Inc. 340
In addition to the provided properties, you can create your own custom properties. You must prefix you
custom properties with ext.policy.activedirectory. For example,
ext.policy.activedirectory.domain.extension or
ext.policy.activedirectory.yourproperty. The properties are passed to your custom
vRealize Orchestrator Active Directory workflows.
For more information about custom properties, see Custom Properties Reference. Depending on what
values you are overriding, you might need to create a property definition. For example, you might create a
property definition that retrieves the available Active Directory policies from vRealize Automation.
Alternatively, you might create definition that allows the requesting user to select from two or more
alternative organizational units. See Custom Properties Reference.
Create and Apply Active Directory Policies
You create one or more Active Directory policies so that you can assign different policies to different
business groups. You can use the different policies to add machine records to different organizational
units based on business group membership.
If necessary, you can override the assigned Active Directory policy.
Procedure
1Create an Active Directory Policy
You create an Active Directory policy to define where records are added in an Active Directory
instance when your users deploy machines. You can assign a policy to a business group so that all
machines deployed by the business group members result in a record created in the specified
organizational unit.
2Scenario: Add a Custom Property to Blueprints to Override an Active Directory Policy
As a blueprint architect for the development business group, you have a blueprint that includes an
application machine and a database machine. You want the database machine record added to an
organizational unit that is different from the applied Active Directory policy.
Create an Active Directory Policy
You create an Active Directory policy to define where records are added in an Active Directory instance
when your users deploy machines. You can assign a policy to a business group so that all machines
deployed by the business group members result in a record created in the specified organizational unit.
You create different Active Directory policies when you want machines deployed by different business
groups to have different domains or to be added to different Active Directory instances.
Prerequisites
nVerify that you created an Active Directory endpoint. See Configure the Active Directory Plug-In as an
Endpoint.
nIf you use an external vRealize Orchestrator server, verity that it is set up correctly. See Configure an
External vRealize Orchestrator Server.
nLog in to vRealize Automation as a tenant administrator.
Configuring vRealize Automation
VMware, Inc. 341
Procedure
1Select Administration > AD Policies.
2Click the New icon ( ).
3Configure the Active Directory policy details.
Option Description
ID Enter the permanent value.
The value cannot include any spaces or special characters.
You cannot change this value at a later time. You can only re-create the policy
with a different ID.
Description Describe of the policy.
Active Directory Endpoint Select the Active Directory endpoint for which this policy is created.
Domain Enter the root domain. The format is mycompany.com.
Organizational Unit Enter the organizational unit distinguished name for this policy.
The hierarchy must be entered as a comma-separated list. For example,
ou=development,dc=corp,dc=domain,dc=com.
4Click OK.
The vRealize Orchestrator Active Directory endpoint is added to the list. You can apply the policy in
business groups or use the policy in blueprints or business groups.
What to do next
nTo provide multiple policy options, create more policies.
nTo add records to Active Directory based on business group membership when a blueprint is
deployed, add the appropriate Active Directory policy to a business group. See Create a Business
Group. You can apply the policy when you create the business group, or you can add it later.
nTo override the Active Directory policy for the business group for a particular blueprint, add Active
Directory custom properties to the blueprint. See Scenario: Add a Custom Property to Blueprints to
Override an Active Directory Policy.
Scenario: Add a Custom Property to Blueprints to Override an Active Directory Policy
As a blueprint architect for the development business group, you have a blueprint that includes an
application machine and a database machine. You want the database machine record added to an
organizational unit that is different from the applied Active Directory policy.
You have an existing policy that is applied to the development business group. The policy adds machine
records to ou=development,dc=corp,dc=domain,dc=com. You want all database machines to be added to
ou=databases,dc=corp,dc=domain,dc=com. In a blueprint that includes a database server, you override
the Active Directory organizational unit to add the database machine record to
ou=databases,dc=corp,dc=domain,dc=com.
Configuring vRealize Automation
VMware, Inc. 342

This scenario makes the following assumptions:
nYour Active Directory includes organizational units for development and databases.
nYou have a test blueprint that is included in a service and the service is entitled.
In addition to this simple example of how you can override the policy, you can use custom properties with
Active Directory policy to make other changes to Active Directory when you deploy blueprints. See
Working With Active Directory Policies.
Prerequisites
nVerify that you have at last one Active Directory policy. See Create an Active Directory Policy. For
example, you create a development policy that adds records to
ou=development,dc=corp,dc=domain,dc=com.
nVerify that you have a business group to which you applied an Active Directory policy. See Create a
Business Group. For example, your development business group uses the development policy.
Procedure
1In your test blueprint, select the database machine in the canvas.
2Click the Properties tab.
3Click the Custom Properties tab.
4Click the New icon ( ).
5Add the custom property to change the default organizational unit.
a In the Name text box, enter ext.policy.activedirectory.orgunit.
b In the Value text box, enter ou=databases,dc=corp,dc=domain,dc=com.
c Deselect Overridable.
d Click OK.
6Click Finish.
The test blueprint includes the custom property, but your users do not see the custom property in the
request form.
What to do next
Request your test blueprint. Verify that the record for the database machine was added to the database
organizational unit, and that the record for the application machine is added to the development
organizational unit. When you are satisfied with the results, you can add the custom property to your
production blueprints.
User Preferences for Notifications and Delegates
You use the user preference to individually override the default configuration of for your system approver
notifications and your notification language preferences.
Configuring vRealize Automation
VMware, Inc. 343

To access the user preferences, click Preferences on the toolbar next to your name.
The following options are specific to you as the logged in user.
Table 2‑21. User Preference Options
Option Description
Assign Delegates Allows you to reassign your approval requests to other users.
For example, you are an approver for catalog requests, but you
are going on holiday. You delegate all your approval notifications
to one or more approvers. This assignment immediately
forwards the requests to your delegate. The delegates are active
until your remove them from the list.
Notifications Allows you to change your notification language so that the
email messages are sent to you in the language of your choice
rather than the default language. Select the language and add
the notification subscription that supports your language
preference.
Configuring vRealize Automation
VMware, Inc. 344
Providing Service Blueprints to
Users 3
You deliver on-demand services to users by creating catalog items and actions, then carefully controlling
who can request those services by using entitlements and approvals.
This chapter includes the following topics:
nDesigning Blueprints
nBuilding Your Design Library
nWorking with Blueprints Programmatically
nAssembling Composite Blueprints
nCustomizing Blueprint Request Forms
nManaging the Service Catalog
nManaging Deployed Catalog Items
Designing Blueprints
Blueprint architects build Software components, machine blueprints, and custom XaaS blueprints and
assemble those components into the blueprints that define the items users request from the catalog. The
catalog can display a default request form, or you can create a custom form for each published blueprint.
You can create and publish blueprints for a single machine, or a single custom XaaS blueprint, but you
can also combine machine components and XaaS blueprints with other building blocks to design
elaborate catalog item blueprints that include multiple machines, networking and security, software with
full life cycle support, and custom XaaS functionality.
Depending on the catalog item you want to define, the process can be as simple as a single infrastructure
architect publishing one machine component as a blueprint, or the process can include multiple architects
creating many different types of components to design a complete application stack for users to request.
VMware, Inc. 345

Software Components
You can create and publish software components to install software during the machine provisioning
process and support the software life cycle. For example, you can create a blueprint for developers to
request a machine with their development environment already installed and configured. Software
components are not catalog items by themselves, and you must combine them with a machine
component to create a catalog item blueprint. See Designing Software Components.
Configuring vRealize Automation
VMware, Inc. 346
Machine Blueprints
You can create and publish simple blueprints to provision single machines or you can create more
complex blueprints that contain additional machine components and optionally any combination of the
following component types:
nSoftware components
nExisting blueprints
nNSX network and security components
nXaaS components
nContainers components
nCustom or other components
See Designing Machine Blueprints.
XaaS Blueprints
You can publish your vRealize Orchestrator workflows as XaaS blueprints. For example, you can create a
custom resource for Active Directory users, and design an XaaS blueprint to allow managers to provision
new users in their Active Directory group. You create and manage XaaS components outside of the
design tab. You can reuse published XaaS blueprints to create application blueprints, but only in
combination with at least one machine component. See Designing XaaS Blueprints and Resource
Actions.
Application Blueprints with Multi-Machine, XaaS , and Software
Components
You can add any number of machine components, Software components, and XaaS blueprints to a
machine blueprint to deliver elaborate functionality to your users.
For example, you can create a blueprint for managers to provision a new hire setup. You can combine
multiple machine components, software components, and a XaaS blueprint for provisioning new Active
Directory users. The QE Manager can request your New Hire catalog item, and their new quality
engineering employee is provisioned in Active Directory and given two working virtual machines, one
Windows and one Linux, each with all the required software for running test cases in these environments.
Building Your Design Library
You can build out a library of reusable blueprint components that your architects can assemble into
application blueprints for delivering elaborate on-demand services to your users.
Build out a library of the smallest blueprint design components: single machine blueprints, Software
components, and XaaS blueprints, then combine these base building blocks in new and different ways to
create elaborate catalog items that deliver increasing levels of functionality to your users.
Configuring vRealize Automation
VMware, Inc. 347

Note that sample blueprints are available at the VMware Solution Exchange at
https://solutionexchange.vmware.com and at https://code.vmware.com.
Table 3‑1. Building Your Design Library
Catalog Item Role Components Description Details
Machines Infrastructure
architect
Create machine
blueprints on the
Blueprints tab.
You can create machine blueprints to
rapidly deliver virtual, private and public, or
hybrid cloud machines to your users.
Published machine blueprints are available
for catalog administrators to include in the
catalog as standalone blueprints, but you
can also combine machine blueprints with
other components to create more
elaborate catalog items that include
multiple machine blueprints, Software, or
XaaS blueprints.
Configure a Machine
Blueprint
NSX Network
and security
on machines
Infrastructure
architect
Add NSX network
and security
components to
vSphere machine
blueprints on the
Blueprints tab.
You can configure network and security
components such as network profiles and
security groups, to allow virtual machines
to communicate with each other over
physical and virtual networks securely and
efficiently.
You must combine network and security
components with at least one vSphere
machine component before catalog
administrators can include them in the
catalog. You can only apply NSX network
and security components to vSphere
machine blueprints.
Designing Blueprints
with NSX Settings
Software on
machines
Software architect
To successfully add
software
components to the
design canvas, you
must also have
business group
member, business
group
administrator, or
tenant
administrator role
access to the
target catalog.
Create and publish
Software
Components on
the Software tab,
then combine them
with machine
blueprints on the
Blueprints tab.
Add Software components to your
machine blueprints to standardize, deploy,
configure, update, and scale complex
applications in cloud environments. These
applications can range from simple Web
applications to elaborate custom
applications and packaged applications.
Software components cannot appear in the
catalog alone. You must create and publish
your Software components and then
assemble an application blueprint that
contains at least one machine.
Create a Software
Component
Configuring vRealize Automation
VMware, Inc. 348

Table 3‑1. Building Your Design Library (Continued)
Catalog Item Role Components Description Details
Custom IT
Services
XaaS architects Create and publish
XaaS blueprints on
the XaaS tab.
You can create XaaS catalog items that
extend vRealize Automation functionality
beyond machine, networking, security, and
software provisioning. Using existing
vRealize Orchestrator workflows and plug-
ins, or custom scripts you develop in
vRealize Orchestrator, you can automate
the delivery of any IT services.
Published XaaS blueprints are available
for catalog administrators to include in the
catalog as standalone blueprints, but you
can also combine them with other
components on the Blueprints tab to
create more elaborate catalog items.
Designing XaaS
Blueprints and
Resource Actions
Assemble
published
blueprint
building
blocks into
new catalog
items
nApplication
architect
nInfrastructure
architect
nSoftware
architect
Combine additional
machine blueprints,
XaaS blueprints,
and Software
components with at
least one machine
component or
machine blueprint
on the Blueprints
tab.
You can reuse published components and
blueprints, combining them in new ways to
create IT service packages that deliver
elaborate functionality to your users.
Assembling Composite
Blueprints
Designing Machine Blueprints
Machine blueprints are the complete specification for a machine, determining a machine's attributes, the
manner in which it is provisioned, and its policy and management settings. Depending on the complexity
of the catalog item you are building, you can combine one or more machine components in the blueprint
with other components in the design canvas to create more elaborate catalog items that include
networking and security, Software components, XaaS components, and other blueprint components.
Space-Ecient Storage for Virtual Provisioning
Space-efficient storage technology eliminates the inefficiencies of traditional storage methods by using
only the storage actually required for a machine's operations. Typically, this is only a fraction of the
storage actually allocated to machines. vRealize Automation supports two methods of provisioning with
space-efficient technology, thin provisioning and FlexClone provisioning.
When standard storage is used, the storage allocated to a provisioned machine is fully committed to that
machine, even when it is powered off. This can be a significant waste of storage resources because few
virtual machines actually use all of the storage allocated to them, just as few physical machines operate
with a 100% full disk. When a space-efficient storage technology is used, the storage allocated and the
storage used are tracked separately and only the storage used is fully committed to the provisioned
machine.
Configuring vRealize Automation
VMware, Inc. 349
Thin Provisioning
Thin provisioning is supported for all virtual provisioning methods. Depending on your virtualization
platform, storage type, and default storage configuration, thin provisioning might always be used during
machine provisioning. For example, for vSphere ESX Server integrations using NFS storage, thin
provisioning is always employed. However, for vSphere ESX Server integrations that use local or iSCSI
storage, thin provisioning is only used to provision machines if the custom property
VirtualMachine.Admin.ThinProvision is specified in the blueprint. For more information about thin
provisioning, please see the documentation provided by your virtualization platform.
Net App FlexClone Provisioning
You can create a blueprint for Net App FlexClone provisioning if you are working in a vSphere
environment that uses Network File System (NFS) storage and FlexClone technology.
You can only use NFS storage, or machine provisioning fails. You can specify a FlexClone storage path
for other types of machine provisioning, but the FlexClone storage path behaves like standard storage.
The following is a high-level overview of the sequence of steps required to provision machines that use
FlexClone technology:
1 An IaaS administrator creates a NetApp ONTAP endpoint. See Endpoint Settings Reference.
2 An IaaS administrator runs data collection on the endpoint to enable the endpoint to be visible on the
compute resource and reservation pages.
The FlexClone option is visible on a reservation page in the endpoint column if a NetApp ONTAP
endpoint exists and if the host is virtual. If there is a NetApp ONTAP endpoint, the reservation page
displays the endpoint assigned to the storage path.
3 A fabric administrator creates a vSphere reservation, enables FlexClone storage, and specifies an
NFS storage path that uses FlexClone technology. See Create a Reservation for Hyper-V, KVM,
SCVMM, vSphere, or XenServer.
4 An infrastructure architect or other authorized user creates a blueprint for FlexClone provisioning.
Understanding and Using Blueprint Parameterization
You can use component profiles to parameterize blueprints. Rather than create a separate small,
medium, and large blueprint for a particular deployment type, you can create a single blueprint with a
choice of small, medium, or large size virtual machine. Users can select one of these sizes when they
deploy the catalog item.
Component profiles minimize blueprint sprawl and simplify your catalog offerings. You can use
component profiles to define vSphere machine components in a blueprint. The available component
profile types are Size and Image. When you add component profiles to a machine component, the
component profile settings override other settings on the machine component, such as number of CPUs
or amount of storage.
Component profiles are only available for vSphere machine components.
For information about defining value sets for the Size and Image component profiles, see in Custom
Properties Reference
Configuring vRealize Automation
VMware, Inc. 350
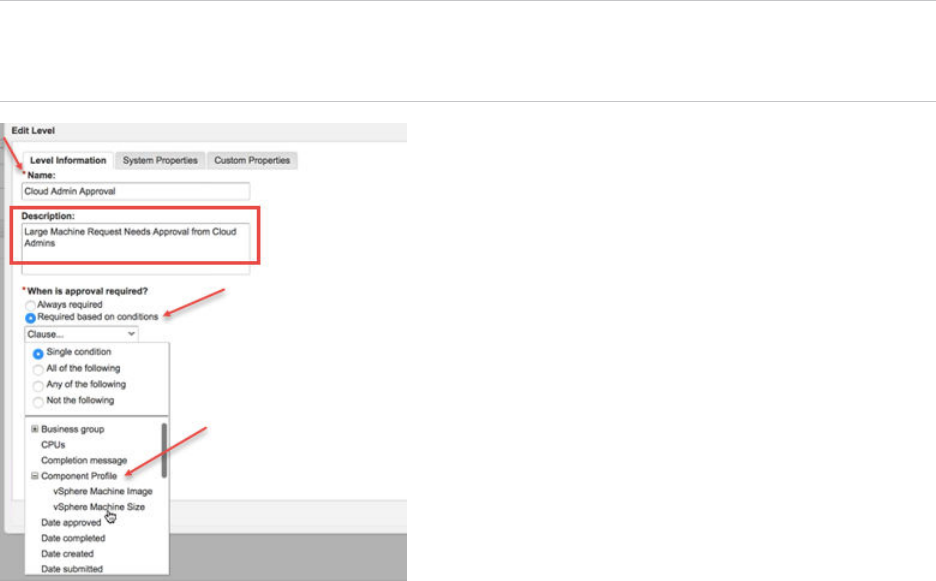
For information about adding component profiles and selected value sets for a vSphere machine
component in a blueprint, see vSphere Machine Component Settings.
For information about adding component profile information by using settings imported from an OVF, see
Configuring a Blueprint to Provision from an OVF.
For information about using component profiles when requesting machine provisioning, see Request
Machine Provisioning By Using a Parameterized Blueprint.
Note You can create approval policies to require pre-approval when requesting machine provisioning of
blueprints relative to value set conditions for the Size and Image component profile. For more
information, see Examples of Approval Policies Based on the Virtual Machine Policy Type
For information about using blueprint parameterization when requesting machine provisioning from the
catalog, see Request Machine Provisioning By Using a Parameterized Blueprint.
Configure a Machine Blueprint
Configure and publish a machine component as a standalone blueprint that other architects can reuse as
a component in application blueprints, and catalog administrators can include in catalog services.
This procedure provides a simple overview of the blueprint creation process. For added detail, see the
following:
nDesigning Blueprints with NSX Settings
nUnderstanding and Using Blueprint Parameterization
nConfiguring a Blueprint to Provision from an OVF
nExporting and Importing Blueprints and Content
nCreating Microsoft Azure Blueprints and Incorporating Resource Actions
Configuring vRealize Automation
VMware, Inc. 351

nCreating Puppet Enabled vSphere Blueprints
Prerequisites
nLog in to vRealize Automation as an infrastructure architect.
nComplete external preparations for provisioning, such as creating templates, WinPEs, and ISOs, or
gather the information about external preparations from your administrators.
nConfigure your tenant. See Configuring Tenant Settings.
nConfigure your IaaS resources. See Checklist for Configuring IaaS Resources.
nSee Configuring vRealize Automation.
Procedure
1Select Design > Blueprints.
2Click the New icon ( ).
3Follow the prompts on the New Blueprint dialog box to configure general settings.
4Click OK.
5Click Machine Types in the Categories area to display a list of available machine types.
6Drag the type of machine you want to provision onto the design canvas.
7Follow the prompts on each of the tabs to configure machine provisioning details.
8Click Finish.
9Select your blueprint and click Publish.
You configured and published a machine component as a standalone blueprint. Catalog administrators
can include this machine blueprint in catalog services and entitle users to request this blueprint. Other
architects can reuse this machine blueprint to create more elaborate application blueprints that include
Software components, XaaS blueprints, or additional machine blueprints.
What to do next
You can combine a machine blueprint with Software components, XaaS blueprints, or additional machine
blueprints to create more elaborate application blueprints. See Assembling Composite Blueprints and
Understanding Nested Blueprint Behavior.
Machine Blueprint Settings
You can define configuration settings and custom properties for the overall blueprint.
Blueprint Properties Settings
You can specify settings that apply to the entire blueprint by using the Blueprint Properties page when
you create the blueprint. After you create the blueprint, you can edit these settings on the Blueprint
Properties page.
Configuring vRealize Automation
VMware, Inc. 352

General Tab
Apply settings across your entire blueprint, including all components you intend to add now or later.
Table 3‑2. General Tab Settings
Setting Description
Name Enter a name for your blueprint.
Identifier The identifier field automatically populates based on the name you entered.
You can edit this field now, but after you save the blueprint you can never
change it. Because identifiers are permanent and unique within your tenant,
you can use them to programmatically interact with blueprints and to create
property bindings.
Description Summarize your blueprint for the benefit of other architects. This description
also appears to users on the request form.
Deployment limit Specify the maximum number of deployments that can be created when this
blueprint is used to provision machines.
Lease days: Minimum and Maximum Enter a minimum and maximum value to allow users to choose from within a
range of lease lengths. When the lease ends, the deployment is either
destroyed or archived. If you do not specify a minimum or maximum value,
the lease is set to never expire.
Archive days You can specify an archival period to temporarily retain deployments instead
of destroying deployments as soon as their lease expires. Specify 0 (default)
to destroy the deployment when its lease expires. The archive period begins
on the day the lease expires. When the archive period ends, the deployment
is destroyed.
Propagate updates to existing deployments When checked, specifies that any broadening of the limits that you make to
the CPU, Memory, and Storage minimum or maximum settings in the
blueprint are pushed to all active deployments that were provisioned from the
blueprint. For example, if you specify a minimum of 2 and maximum of 4
(2,4) originally, a change such as (1,4) or (2,5) would take effect upon
reconfiguration but a change of (3,4) or (2,3) would not.
The changes takes effect upon the next reconfigure action. For related
information about reconfigure actions, see Action Menu Commands for
Provisioned Resources.
NSX Settings Tab
If you have configured NSX you can specify NSX transport zone, Edge and routed gateway reservation
policy, and app isolation settings when you create or edit a blueprint. These settings are available on the
NSX Settings tab on the Blueprint and Blueprint Properties pages.
For information about NSX settings, see New Blueprint and Blueprint Properties Page Settings with NSX.
Properties Tab
Custom properties you add at the blueprint level apply to the entire blueprint, including all components.
However, they can be overridden by custom properties assigned later in the precedence chain. For more
information about order of precedence for custom properties, see Custom Properties Reference.
Configuring vRealize Automation
VMware, Inc. 353

Table 3‑3. Properties Tab Settings
Tab Setting Description
Property Groups Property groups are reusable groups of properties that are designed to simplify the
process of adding custom properties to blueprints. Your tenant administrators and fabric
administrators can group properties that are often used together so you can add the
property group to a blueprint instead of individually inserting custom properties.
Add Add one or more existing property groups and
apply them to the overall blueprint.
The following Containers-related property
groups are supplied:
nContainer host properties with certificate
authentication
nContainer host properties with
user/password authentication
Move up /Move down Control the order of precedence given to each
property group in relation to one another by
prioritizing the groups. The first group in the
list has the highest priority, and its custom
properties have first precedence. You can also
drag and drop to reorder.
View properties View the custom properties in the selected
property group.
View merged properties If a custom property is included in more than
one property group, the value included in the
property group with the highest priority takes
precedence. You can view these merged
properties to assist you in prioritizing property
groups.
Custom Properties You can add individual custom properties instead of property groups.
New Add an individual custom property and apply it
to the overall blueprint.
Name Enter the property name. For a list of custom
properties and their definitions, see Custom
Properties Reference.
Value Enter the value for the custom property.
Encrypted You can choose to encrypt the property value,
for example, if the value is a password.
Configuring vRealize Automation
VMware, Inc. 354

Table 3‑3. Properties Tab Settings (Continued)
Tab Setting Description
Overridable You can specify that the property value can be
overridden by the next or subsequent person
who uses the property. Typically, this is
another architect, but if you select Show in
request, your business users are able to see
and edit property values when they request
catalog items.
Show in request If you want to display the property name and
value to your end users, you can select to
display the property on the request form when
requesting machine provisioning. You must
also select overridable if you want users to
provide a value.
vSphere Machine Component Settings
Understand the settings and options that you can configure for a vSphere machine component in the
vRealize Automation blueprint design canvas. vSphere is the only machine component type that can use
NSX network and security component settings in the design canvas.
General Tab
Configure general settings for a vSphere machine component.
Table 3‑4. General Tab Settings
Setting Description
ID Enter a name for your machine component, or accept the default.
Description Summarize your machine component for the benefit of other architects.
Display location on request In a cloud environment, such as vCloud Air, this allows users to select a
region for their provisioned machines.
For a virtual environment, such as vSphere, you can configure the locations
feature to allow users to select a particular data center location at which to
provision a requested machine. To fully configure this option, a system
administrator adds data center location information to a locations file and a
fabric administrator edits a compute resource to associate it with a location.
Reservation policy Apply a reservation policy to a blueprint to restrict the machines provisioned
from that blueprint to a subset of available reservations. Fabric
administrators create reservation policies to provide an optional and helpful
means of controlling how reservation requests are processed, for example to
collect resources into groups for different service levels, or to make a specific
type of resource easily available for a particular purpose. If your fabric
administrator did not configure reservation policies, you do not see any
available options in this drop-down menu. Only the reservation policies that
are applicable to the current tenant are available.
Configuring vRealize Automation
VMware, Inc. 355

Table 3‑4. General Tab Settings (Continued)
Setting Description
Machine prefix Machine prefixes are created by fabric administrators and are used to create
the names of provisioned machines. If you select Use group default,
machines provisioned from your blueprint are named according to the
machine prefix configured as the default for the user's business group. If no
machine prefix is configured, one is generated for you based on the name of
the business group. Only the machine prefixes that are applicable to the
current tenant are available.
If your fabric administrator configures other machine prefixes for you to
select, you can apply one prefix to all machines provisioned from your
blueprint, no matter who the requestor is.
Instances: Minimum and Maximum Configure the maximum and minimum number of instances users can
request for a deployment or for a scale in or scale out action. If you do not
want to give users a choice, entering the same value in the Minimum and
Maximum fields configures exactly how many instances to provision and
disables scale actions against this machine component.
XaaS components are not scalable and are not updated during a scale
operation. If you are using XaaS components in your blueprint, you could
create a resource action for users to run after a scale operation, which could
either scale or update your XaaS components as required. Alternatively, you
could disable scale by configuring exactly the number of instances you want
to allow for each machine component.
Build Information Tab
Configure build information settings for a vSphere machine component.
Configuring vRealize Automation
VMware, Inc. 356

Table 3‑5. Build Information Tab
Setting Description
Blueprint type For record-keeping and licensing purposes, select whether
machines provisioned from this blueprint are classified as
Desktop or Server.
Action The options you see in the action drop-down menu depend on
the type of machine you select.
The following actions are available:
nCreate
Create the machine component specification without use of
a cloning option.
nClone
Make copies of a virtual machine from a template and
customization object.
nLinked Clone
Provision a space-efficient copy of a virtual machine called a
linked clone. Linked clones are based on a snapshot of a
VM and use a chain of delta disks to track differences from a
parent machine.
The VM snapshot identified in the blueprint should be
powered off before you provision the linked clone VMs.
nNetApp FlexClone
If your fabric administrators configured your reservations to
use NetApp FlexClone storage, you can clone space-
efficient copies of machines using this technology.
Configuring vRealize Automation
VMware, Inc. 357

Table 3‑5. Build Information Tab (Continued)
Setting Description
Provisioning workflow The options you see in the provisioning workflow drop-down
menu depend on the type of machine you select, and the action
you select.
nBasicVmWorkflow
Provision a machine with no guest operating system.
nExternalProvisioningWorkflow
Create a machine by starting from either a virtual machine
instance or cloud-based image.
nImportOvfWorkflow
Allows you to deploy a vSphere virtual machine from an
OVF template in the same manner as a CloneWorkflow
allows you to deploy a vSphere virtual machine from a
virtual machine template. You can import to a vSphere
component in a machine blueprint or to an Image
component profile for a parameterized blueprint.
nLinuxKickstartWorkflow
Provision a machine by booting from an ISO image, using a
kickstart or autoYaSt configuration file and a Linux
distribution image to install the operating system on the
machine.
nVirtualSccmProvisioningWorkflow
Provision a machine and pass control to an SCCM task
sequence to boot from an ISO image, deploy a Windows
operating system, and install the vRealize Automation guest
agent.
nWIMImageWorkflow
Provision a machine by booting into a WinPE environment
and installing an operating system using a Windows Imaging
File Format (WIM) image of an existing Windows reference
machine.
When using a WIM provisioning workflow in a blueprint, specify
a storage value that accounts for the size of each disk to be
used on the machine. Use the total value of all disks as the
minimum storage value for the machine component. Also specify
a size for each disk that is large enough to accommodate the
operating system.
Clone from Select a machine template to clone from. You can refine the list
of available templates by using the Filters option in each
column drop-down menu, for example the Filters menu option in
the Names column.
For Linked Clone, you only see machines that have available
snapshots to clone from and that you manage as a tenant
administrator or business group manager.
You can only clone from templates that exist on machines that
you manage as a business group manager or tenant
administrator.
Configuring vRealize Automation
VMware, Inc. 358

Table 3‑5. Build Information Tab (Continued)
Setting Description
Clone from snapshot For Linked Clone, select an existing snapshot to clone from
based on the selected machine template. Machines only appear
in the list if they already have an existing snapshot, and if you
manage that machine as a tenant administrator or business
group manager.
If you select Use current snapshot, the clone is defined with
the same characteristics as the latest state of the virtual
machine. If you instead want to clone relative to an actual
snapshot, click the drop-down menu option and select the
specific snapshot from the list.
Note Use of the term snapshot can be confusing. If you select
an existing snapshot, the option creates a new disk that is
parented by the snapshot. The Use current snapshot option
has no base disk to use as a parent and silently performs a full
clone action. As a workaround, you can create snapshots on the
base disk, or use a vRealize Orchestrator workflow to create a
snapshot and then clone immediately from the snapshot.
This option is only available for the Linked Clone action.
Customization spec Specify an available customization specification. A
customization spec is required only if you are cloning with static
IP addresses.
You cannot perform customization of Windows machines without
a customization specification. For Linux clone machines, you
can perform customization by using a customization spec, an
external script, or both.
Machine Resources Tab
Specify CPU, memory, and storage settings for your vSphere machine component.
Configuring vRealize Automation
VMware, Inc. 359

Table 3‑6. Machine Resources Tab
Setting Description
CPUs: Minimum and Maximum Enter a minimum and maximum number of CPUs that can be
provisioned by this machine component.
Memory (MB): Minimum and Maximum Enter a minimum and maximum amount of memory that can be
consumed by machines that are provisioned by this machine
component.
Storage (GB): Minimum and Maximum Enter a minimum and maximum amount of storage that can be
consumed by machines that are provisioned by this machine
component. For vSphere, KVM (RHEV), SCVMM, vCloud Air,
and vCloud Director, minimum storage is set based on what you
enter on the Storage tab.
When using a WIM provisioning workflow in a blueprint, specify
a storage value that accounts for the size of each disk to be
used on the machine. Use the total value of all disks as the
minimum storage value for the machine component. Also specify
a size for each disk that is large enough to accommodate the
operating system.
Storage Tab
You can add storage volume settings, including one or more storage reservation policies, to the machine
component to control storage space.
Table 3‑7. Storage Tab Settings
Setting Description
ID Enter an ID or name for the storage volume.
Capacity (GB) Enter the storage capacity for the storage volume.
Drive Letter/Mount Path Enter a drive letter or mount path for the storage volume.
Label Enter a label for the drive letter and mount path for the storage
volume.
Storage Reservation Policy Enter the existing storage reservation policy to use with this storage
volume. Only the storage reservation policies that are applicable to
the current tenant are available.
Custom Properties Enter any custom properties to use with this storage volume.
Maximum volumes Enter the maximum number of allowed storage volumes that can be
used when provisioning from the machine component. Enter 0 to
prevent others from adding storage volumes. The default value is
60.
Allow users to see and change storage reservation
policies
Select the check box to allow users to remove an associated
reservation policy or specify a different reservation policy when
provisioning.
Configuring vRealize Automation
VMware, Inc. 360

Network Tab
You can configure network settings for a vSphere machine component based on NSX network and load
balancer settings that are configured outside vRealize Automation. You can use settings from one or
more existing and on-demand NSX network components in the design canvas.
For information about adding and configuring NSX network and security components before using
network tab settings on a vSphere machine component, see Configuring Network and Security
Component Settings.
For information about specifying blueprint-level NSX settings that apply to vSphere machine components,
see New Blueprint and Blueprint Properties Page Settings with NSX.
Table 3‑8. Network Tab Settings
Setting Description
Network Select a network component from the drop-down menu. Only
network components that exist in the design canvas are listed.
Only the network profiles that are applicable to the current
tenant are available.
Assignment Type Accept the default assignment derived from the network
component or select an assignment type from the drop-down
menu. The DHCP and Static option values are derived from
settings in the network component.
Address Specify the IP address for the network. The option is available
only for the static address type.
Load Balancing Enter the service to use for load balancing.
Custom Properties Display custom properties that are configured for the selected
network component or network profile.
Maximum network adapters Specify the maximum number of network adapters, or NICs, to
allow for this machine component. The default is unlimited. Set
to 0 to disable adding NICs for the machine components.
Security Tab
You can configure security settings for a vSphere machine component based on NSX settings that are
configured outside vRealize Automation. You an optionally use settings from existing and on-demand
NSX security components in the design canvas.
The security settings from existing and on-demand security group and security tag components in the
design canvas are automatically available.
For information about adding and configuring NSX network and security components before using
security tab settings on a vSphere machine component, see Configuring Network and Security
Component Settings.
For information about specifying blueprint-level NSX information that applies to vSphere machine
components, see New Blueprint and Blueprint Properties Page Settings with NSX.
Configuring vRealize Automation
VMware, Inc. 361

Table 3‑9. Security Tab Settings
Setting Description
Name Display the name of an NSX security group or tag. The names
are derived from security components in the design canvas.
Select the check box next to a listed security group or tag to use
that group or tag for provisioning from this machine component.
Type Indicate if the security element is an on-demand security group,
an existing security group, or a security tag.
Description Display the description defined for the security group or tag.
Endpoint Display the endpoint used by the NSX security group or tag.
Properties Tab
Optionally specify custom property and property group information for your vSphere machine component.
You can add individual and groups of custom properties to the machine component by using the
Properties tab. You can add also custom properties and property groups to the overall blueprint by using
the Properties tab when you create or edit a blueprint by using the Blueprint Properties page.
You can use the Custom Properties tab to add and configure options for existing custom properties.
Custom properties are supplied with vRealize Automation and you can also create property definitions.
Table 3‑10. Properties > Custom Properties Tab Settings
Setting Description
Name Enter the name of a custom property or select an available
custom property from the drop-down menu. For example, enter
the custom property name Machine.SSH to specify whether
machines provisioned by using this blueprint allow SSH
connections. Properties only appear in the drop-down menu if
your tenant administrator or fabric administrator created property
definitions.
Value Enter or edit a value to associate with the custom property
name. For example, set the value as true to allow entitled users
to connect by using SSH to machines provisioned by using your
blueprint.
Encrypted You can choose to encrypt the property value, for example, if the
value is a password.
Overridable You can specify that the property value can be overridden by the
next or subsequent person who uses the property. Typically, this
is another architect, but if you select Show in request, your
business users are able to see and edit property values when
they request catalog items.
Show in Request If you want to display the property name and value to your end
users, you can select to display the property on the request form
when requesting machine provisioning. You must also select
overridable if you want users to provide a value.
Configuring vRealize Automation
VMware, Inc. 362

You can use the Property Groups tab to add and configure settings for existing custom property groups.
You can create your own property groups or use property groups that have been created for you.
Table 3‑11. Properties > Property Groups Tab Settings
Setting Description
Name Select an available property group from the drop-down menu.
Move Up and Move Down Control the precedence level of listed property groups in
descending order. The first-listed property group has
precedence over the next-listed property group and so on.
View Properties Display the custom properties in the selected property group.
View Merged Properties Display all the custom properties in the listed property groups in
the order in which they appear in the list of property groups.
Where the same property appears in more than one property
group, the property name appears only once in the list based on
when it is first encountered in the list.
Profiles Tab
Component profiles provide a means of parameterizing blueprints, for example rather than creating a
separate small, medium, and large blueprint you can create a single blueprint with a small, medium, and
large capability and enable your use to select one of the sizes when the deploy the catalog item.
Component profiles are specifically designed to minimize blueprint sprawl and simplify your catalog.
If you have created value sets for the supplied vRealize Automation component profiles Size and Image,
you can add and configure those settings for the machine component in the blueprint. You can also select
different a value set when you deploy the catalog item.
Component profiles are only available for vSphere machine components.
When you add a component profile to the vSphere machine component in a blueprint, the settings
defined in the profile's selected value set or value sets override other settings on the machine component,
such as number of CPUs and storage.
The component profile value set is applied to all vSphere machines in a cluster.
You cannot reconfigure machines by using the Size or Image component profiles but the range of CPU,
memory, and storage that is calculated based on the profile remains available for reconfigure actions. For
example if you used a small (1 CPU, 1024MB memory, and 10 GB storage), medium (3 CPUs, 2048 MB
memory, 12 GB storage) and large (5 CPUs, 3072 MB memory, 15 GB storage) Size value set, the
available ranges during machine reconfiguration are 1-5 CPUs, 1024-3072 memory, and 1-15 GB
storage.
For more information about defining value sets for component profiles, see Custom Properties Reference.
Configuring vRealize Automation
VMware, Inc. 363

Table 3‑12. Profiles Tab Settings
Setting Description
Add Add the Size or Image component profile.
Edit Value Sets Assign one or more value sets for the selected component
profile by selecting from a list of defined value sets. You can
select one of the value sets as the default.
Remove Remove the Size or Image component profile.
vCloud Air Machine Component Settings
Understand the settings and options that you can configure for a vCloud Air machine component in the
vRealize Automation blueprint design canvas.
General Tab
Configure general settings for a vCloud Air machine component.
Table 3‑13. General Tab Settings
Setting Description
ID Enter a name for your machine component, or accept the default.
Description Summarize your machine component for the benefit of other architects.
Display location on request In a cloud environment, such as vCloud Air, this allows users to select a
region for their provisioned machines.
For a virtual environment, such as vSphere, you can configure the locations
feature to allow users to select a particular data center location at which to
provision a requested machine. To fully configure this option, a system
administrator adds data center location information to a locations file and a
fabric administrator edits a compute resource to associate it with a location.
Reservation policy Apply a reservation policy to a blueprint to restrict the machines provisioned
from that blueprint to a subset of available reservations. Fabric
administrators create reservation policies to provide an optional and helpful
means of controlling how reservation requests are processed, for example to
collect resources into groups for different service levels, or to make a specific
type of resource easily available for a particular purpose. If your fabric
administrator did not configure reservation policies, you do not see any
available options in this drop-down menu. Only the reservation policies that
are applicable to the current tenant are available.
Configuring vRealize Automation
VMware, Inc. 364

Table 3‑13. General Tab Settings (Continued)
Setting Description
Machine prefix Machine prefixes are created by fabric administrators and are used to create
the names of provisioned machines. If you select Use group default,
machines provisioned from your blueprint are named according to the
machine prefix configured as the default for the user's business group. If no
machine prefix is configured, one is generated for you based on the name of
the business group. Only the machine prefixes that are applicable to the
current tenant are available.
If your fabric administrator configures other machine prefixes for you to
select, you can apply one prefix to all machines provisioned from your
blueprint, no matter who the requestor is.
Instances: Minimum and Maximum Configure the maximum and minimum number of instances users can
request for a deployment or for a scale in or scale out action. If you do not
want to give users a choice, entering the same value in the Minimum and
Maximum fields configures exactly how many instances to provision and
disables scale actions against this machine component.
XaaS components are not scalable and are not updated during a scale
operation. If you are using XaaS components in your blueprint, you could
create a resource action for users to run after a scale operation, which could
either scale or update your XaaS components as required. Alternatively, you
could disable scale by configuring exactly the number of instances you want
to allow for each machine component.
Build Information Tab
Configure build information settings for a vCloud Air machine component.
Table 3‑14. Build Information Tab
Setting Description
Blueprint type For record-keeping and licensing purposes, select whether
machines provisioned from this blueprint are classified as
Desktop or Server.
Action The options you see in the action drop-down menu depend on
the type of machine you select.
The only provisioning action available for a vCloud Air machine
component is Clone.
nClone
Make copies of a virtual machine from a template and
customization object.
Configuring vRealize Automation
VMware, Inc. 365

Table 3‑14. Build Information Tab (Continued)
Setting Description
Provisioning workflow The options you see in the provisioning workflow drop-down
menu depend on the type of machine you select, and the action
you select.
The only provisioning action available for a vCloud Air machine
component is CloneWorkflow.
nCloneWorkflow
Make copies of a virtual machine, either by Clone, Linked
Clone, or NetApp Flexclone.
Clone from Select a machine template to clone from. You can refine the list
of available templates by using the Filters option in each
column drop-down menu, for example the Filters menu option in
the Names column.
For Linked Clone, you only see machines that have available
snapshots to clone from and that you manage as a tenant
administrator or business group manager.
You can only clone from templates that exist on machines that
you manage as a business group manager or tenant
administrator.
Machine Resources Tab
Specify CPU, memory and storage settings for your vCloud Air machine component.
Table 3‑15. Machine Resources Tab
Setting Description
CPUs: Minimum and Maximum Enter a minimum and maximum number of CPUs that can be
provisioned by this machine component.
Memory (MB): Minimum and Maximum Enter a minimum and maximum amount of memory that can be
consumed by machines that are provisioned by this machine
component.
Storage (GB): Minimum and Maximum Enter a minimum and maximum amount of storage that can be
consumed by machines that are provisioned by this machine
component. For vSphere, KVM (RHEV), SCVMM, vCloud Air,
and vCloud Director, minimum storage is set based on what you
enter on the Storage tab.
Storage Tab
You can add storage volume settings, including one or more storage reservation policies, to the machine
component to control storage space.
Table 3‑16. Storage Tab Settings
Setting Description
ID Enter an ID or name for the storage volume.
Capacity (GB) Enter the storage capacity for the storage volume.
Configuring vRealize Automation
VMware, Inc. 366

Table 3‑16. Storage Tab Settings (Continued)
Setting Description
Drive Letter/Mount Path Enter a drive letter or mount path for the storage volume.
Label Enter a label for the drive letter and mount path for the storage
volume.
Storage Reservation Policy Enter the existing storage reservation policy to use with this storage
volume. Only the storage reservation policies that are applicable to
the current tenant are available.
Custom Properties Enter any custom properties to use with this storage volume.
Maximum volumes Enter the maximum number of allowed storage volumes that can be
used when provisioning from the machine component. Enter 0 to
prevent others from adding storage volumes. The default value is
60.
Allow users to see and change storage reservation
policies
Select the check box to allow users to remove an associated
reservation policy or specify a different reservation policy when
provisioning.
Properties Tab
Optionally specify custom property and property group information for your vCloud Air machine
component.
You can add individual and groups of custom properties to the machine component by using the
Properties tab. You can add also custom properties and property groups to the overall blueprint by using
the Properties tab when you create or edit a blueprint by using the Blueprint Properties page.
You can use the Custom Properties tab to add and configure options for existing custom properties.
Custom properties are supplied with vRealize Automation and you can also create property definitions.
Table 3‑17. Properties > Custom Properties Tab Settings
Setting Description
Name Enter the name of a custom property or select an available
custom property from the drop-down menu. For example, enter
the custom property name Machine.SSH to specify whether
machines provisioned by using this blueprint allow SSH
connections. Properties only appear in the drop-down menu if
your tenant administrator or fabric administrator created property
definitions.
Value Enter or edit a value to associate with the custom property
name. For example, set the value as true to allow entitled users
to connect by using SSH to machines provisioned by using your
blueprint.
Encrypted You can choose to encrypt the property value, for example, if the
value is a password.
Configuring vRealize Automation
VMware, Inc. 367

Table 3‑17. Properties > Custom Properties Tab Settings (Continued)
Setting Description
Overridable You can specify that the property value can be overridden by the
next or subsequent person who uses the property. Typically, this
is another architect, but if you select Show in request, your
business users are able to see and edit property values when
they request catalog items.
Show in Request If you want to display the property name and value to your end
users, you can select to display the property on the request form
when requesting machine provisioning. You must also select
overridable if you want users to provide a value.
You can use the Property Groups tab to add and configure settings for existing custom property groups.
You can create your own property groups or use property groups that have been created for you.
Table 3‑18. Properties > Property Groups Tab Settings
Setting Description
Name Select an available property group from the drop-down menu.
Move Up and Move Down Control the precedence level of listed property groups in
descending order. The first-listed property group has
precedence over the next-listed property group and so on.
View Properties Display the custom properties in the selected property group.
View Merged Properties Display all the custom properties in the listed property groups in
the order in which they appear in the list of property groups.
Where the same property appears in more than one property
group, the property name appears only once in the list based on
when it is first encountered in the list.
Amazon Machine Component Settings
Understand the settings and options that you can configure for an Amazon machine component in the
vRealize Automation blueprint design canvas.
General Tab
Configure general settings for an Amazon machine component.
Table 3‑19. General Tab Settings
Setting Description
ID Enter a name for your machine component, or accept the default.
Description Summarize your machine component for the benefit of other architects.
Display location on request In a cloud environment, such as vCloud Air, this allows users to select a
region for their provisioned machines.
For a virtual environment, such as vSphere, you can configure the locations
feature to allow users to select a particular data center location at which to
provision a requested machine. To fully configure this option, a system
administrator adds data center location information to a locations file and a
fabric administrator edits a compute resource to associate it with a location.
Configuring vRealize Automation
VMware, Inc. 368

Table 3‑19. General Tab Settings (Continued)
Setting Description
Reservation policy Apply a reservation policy to a blueprint to restrict the machines provisioned
from that blueprint to a subset of available reservations. Fabric
administrators create reservation policies to provide an optional and helpful
means of controlling how reservation requests are processed, for example to
collect resources into groups for different service levels, or to make a specific
type of resource easily available for a particular purpose. If your fabric
administrator did not configure reservation policies, you do not see any
available options in this drop-down menu. Only the reservation policies that
are applicable to the current tenant are available.
Machine prefix Machine prefixes are created by fabric administrators and are used to create
the names of provisioned machines. If you select Use group default,
machines provisioned from your blueprint are named according to the
machine prefix configured as the default for the user's business group. If no
machine prefix is configured, one is generated for you based on the name of
the business group. Only the machine prefixes that are applicable to the
current tenant are available.
If your fabric administrator configures other machine prefixes for you to
select, you can apply one prefix to all machines provisioned from your
blueprint, no matter who the requestor is.
Instances: Minimum and Maximum Configure the maximum and minimum number of instances users can
request for a deployment or for a scale in or scale out action. If you do not
want to give users a choice, entering the same value in the Minimum and
Maximum fields configures exactly how many instances to provision and
disables scale actions against this machine component.
XaaS components are not scalable and are not updated during a scale
operation. If you are using XaaS components in your blueprint, you could
create a resource action for users to run after a scale operation, which could
either scale or update your XaaS components as required. Alternatively, you
could disable scale by configuring exactly the number of instances you want
to allow for each machine component.
Build Information Tab
Configure build information settings for an Amazon machine component.
Table 3‑20. Build Information Tab
Setting Description
Blueprint type For record-keeping and licensing purposes, select whether
machines provisioned from this blueprint are classified as
Desktop or Server.
Provisioning workflow The only provisioning workflow available for an Amazon
machine component is CloudProvisioningWorkflow.
nCloudProvisioningWorkflow
Create a machine by starting from either a virtual machine
instance or cloud-based image.
Configuring vRealize Automation
VMware, Inc. 369

Table 3‑20. Build Information Tab (Continued)
Setting Description
Amazon machine image Select an available Amazon machine image. An Amazon
machine image is a template that contains a software
configuration, including an operating system. Machine images
are managed by Amazon Web Services accounts. You can
refine the list of Amazon machine image names in the display by
using the Filters option in the AMI ID column drop-down menu.
Key pair Key pairs are required for provisioning with Amazon Web
Services.
Key pairs are used to provision and connect to a cloud instance.
They are also used to decrypt Windows passwords and to log in
to a Linux machine.
The following key pair options are available:
nNot specified
Controls key pair behavior at the blueprint level rather than
at the reservation level.
nAuto-generated per business group
Specifies that each machine provisioned in the same
business group has the same key pair, including machines
provisioned on other reservations when the machine has the
same compute resource and business group. Because the
key pairs are associated with a business group, the key
pairs are deleted when the business group is deleted.
nAuto-generated per machine
Specifies that each machine has a unique key pair. The
auto-generated per machine option is the most secure
method because no key pairs are shared among machines.
Enable Amazon network options on machine Choose whether to allow users to provision a machine in a
virtual private cloud (VPC) or a non-VPC location when they
submit the request.
Instance types Select one or more Amazon instance types. An Amazon
instance is a virtual server that can run applications in Amazon
Web Services. Instances are created from an Amazon machine
image and by choosing an appropriate instance type.
vRealize Automation manages the machine image instance
types that are available for provisioning.
For information about using Amazon instance types in
vRealize Automation, see Understanding Amazon Instance
Types and Add an Amazon Instance Type.
Machine Resources Tab
Specify CPU, memory, storage, and EBS volume settings for your Amazon machine component.
You can also reconfigure all Amazon machine storage volumes in the deployment except for the root
volume.
Configuring vRealize Automation
VMware, Inc. 370

Table 3‑21. Machine Resources Tab
Setting Description
CPUs: Minimum and Maximum Enter a minimum and maximum number of CPUs that can be
provisioned by this machine component.
Memory (MB): Minimum and Maximum Enter a minimum and maximum amount of memory that can be
consumed by machines that are provisioned by this machine
component.
Storage (GB): Minimum and Maximum Enter a minimum and maximum amount of storage that can be
consumed by machines that are provisioned by this machine
component. For vSphere, KVM (RHEV), SCVMM, vCloud Air,
and vCloud Director, minimum storage is set based on what you
enter on the Storage tab.
EBS Storage (GB): Minimum and Maximum Enter a minimum and maximum amount of Amazon Elastic
Block Store (EBS) storage volume that can be consumed by
machine resources that are provisioned by this machine
component.
When destroying a deployment that contains an Amazon
machine component, all EBS volumes that were added to the
machine during its life cycle are detached, rather than
destroyed. vRealize Automation does not provide an option for
destroying the EBS volumes.
Properties Tab
Optionally specify custom property and property group information for your Amazon machine component.
You can add individual and groups of custom properties to the machine component by using the
Properties tab. You can add also custom properties and property groups to the overall blueprint by using
the Properties tab when you create or edit a blueprint by using the Blueprint Properties page.
You can use the Custom Properties tab to add and configure options for existing custom properties.
Custom properties are supplied with vRealize Automation and you can also create property definitions.
Table 3‑22. Properties > Custom Properties Tab Settings
Setting Description
Name Enter the name of a custom property or select an available
custom property from the drop-down menu. For example, enter
the custom property name Machine.SSH to specify whether
machines provisioned by using this blueprint allow SSH
connections. Properties only appear in the drop-down menu if
your tenant administrator or fabric administrator created property
definitions.
Value Enter or edit a value to associate with the custom property
name. For example, set the value as true to allow entitled users
to connect by using SSH to machines provisioned by using your
blueprint.
Encrypted You can choose to encrypt the property value, for example, if the
value is a password.
Configuring vRealize Automation
VMware, Inc. 371

Table 3‑22. Properties > Custom Properties Tab Settings (Continued)
Setting Description
Overridable You can specify that the property value can be overridden by the
next or subsequent person who uses the property. Typically, this
is another architect, but if you select Show in request, your
business users are able to see and edit property values when
they request catalog items.
Show in Request If you want to display the property name and value to your end
users, you can select to display the property on the request form
when requesting machine provisioning. You must also select
overridable if you want users to provide a value.
You can use the Property Groups tab to add and configure settings for existing custom property groups.
You can create your own property groups or use property groups that have been created for you.
Table 3‑23. Properties > Property Groups Tab Settings
Setting Description
Name Select an available property group from the drop-down menu.
Move Up and Move Down Control the precedence level of listed property groups in
descending order. The first-listed property group has
precedence over the next-listed property group and so on.
View Properties Display the custom properties in the selected property group.
View Merged Properties Display all the custom properties in the listed property groups in
the order in which they appear in the list of property groups.
Where the same property appears in more than one property
group, the property name appears only once in the list based on
when it is first encountered in the list.
OpenStack Machine Component Settings
Understand the settings and options you can configure for an OpenStack machine component in the
vRealize Automation blueprint design canvas.
General Tab
Configure general settings for an OpenStack machine component.
Table 3‑24. General Tab Settings
Setting Description
ID Enter a name for your machine component, or accept the default.
Description Summarize your machine component for the benefit of other architects.
Display location on request In a cloud environment, such as vCloud Air, this allows users to select a
region for their provisioned machines.
For a virtual environment, such as vSphere, you can configure the locations
feature to allow users to select a particular data center location at which to
provision a requested machine. To fully configure this option, a system
administrator adds data center location information to a locations file and a
fabric administrator edits a compute resource to associate it with a location.
Configuring vRealize Automation
VMware, Inc. 372

Table 3‑24. General Tab Settings (Continued)
Setting Description
Reservation policy Apply a reservation policy to a blueprint to restrict the machines provisioned
from that blueprint to a subset of available reservations. Fabric
administrators create reservation policies to provide an optional and helpful
means of controlling how reservation requests are processed, for example to
collect resources into groups for different service levels, or to make a specific
type of resource easily available for a particular purpose. If your fabric
administrator did not configure reservation policies, you do not see any
available options in this drop-down menu. Only the reservation policies that
are applicable to the current tenant are available.
Machine prefix Machine prefixes are created by fabric administrators and are used to create
the names of provisioned machines. If you select Use group default,
machines provisioned from your blueprint are named according to the
machine prefix configured as the default for the user's business group. If no
machine prefix is configured, one is generated for you based on the name of
the business group. Only the machine prefixes that are applicable to the
current tenant are available.
If your fabric administrator configures other machine prefixes for you to
select, you can apply one prefix to all machines provisioned from your
blueprint, no matter who the requestor is.
Instances: Minimum and Maximum Configure the maximum and minimum number of instances users can
request for a deployment or for a scale in or scale out action. If you do not
want to give users a choice, entering the same value in the Minimum and
Maximum fields configures exactly how many instances to provision and
disables scale actions against this machine component.
XaaS components are not scalable and are not updated during a scale
operation. If you are using XaaS components in your blueprint, you could
create a resource action for users to run after a scale operation, which could
either scale or update your XaaS components as required. Alternatively, you
could disable scale by configuring exactly the number of instances you want
to allow for each machine component.
Build Information Tab
Configure build information settings for an OpenStack machine component.
Configuring vRealize Automation
VMware, Inc. 373

Table 3‑25. Build Information Tab
Setting Description
Blueprint type For record-keeping and licensing purposes, select whether
machines provisioned from this blueprint are classified as
Desktop or Server.
Provisioning workflow The following provisioning workflows are available for an
OpenStack machine component:
nCloudLinuxKickstartWorkflow
Provision a machine by booting from an ISO image, using a
kickstart or autoYaSt configuration file and a Linux
distribution image to install the operating system on the
machine.
nCloudProvisioningWorkflow
Create a machine by starting from either a virtual machine
instance or cloud-based image.
nCloudWIMImageWorkflow
Provision a machine by booting into a WinPE environment
and installing an operating system using a Windows Imaging
File Format (WIM) image of an existing Windows reference
machine.
When using a WIM provisioning workflow in a blueprint,
specify a storage value that accounts for the size of each
disk to be used on the machine. Use the total value of all
disks as the minimum storage value for the machine
component. Also specify a size for each disk that is large
enough to accommodate the operating system.
OpenStack image Select an available OpenStack image. An OpenStack image is a
template that contains a software configuration, including an
operating system. The images are managed by OpenStack
accounts. You can refine the list of OpenStack image names in
the display by using the Filters option in the Names column
drop-down menu.
Configuring vRealize Automation
VMware, Inc. 374

Table 3‑25. Build Information Tab (Continued)
Setting Description
Key pair Key pairs are optional for provisioning with OpenStack.
Key pairs are used to provision and connect to a cloud instance.
They are also used to decrypt Windows passwords and to log in
to a Linux machine.
The following key pair options are available:
nNot specified
Controls key pair behavior at the blueprint level rather than
at the reservation level.
nAuto-generated per business group
Specifies that each machine provisioned in the same
business group has the same key pair, including machines
provisioned on other reservations when the machine has the
same compute resource and business group. Because the
key pairs are associated with a business group, the key
pairs are deleted when the business group is deleted.
nAuto-generated per machine
Specifies that each machine has a unique key pair. The
auto-generated per machine option is the most secure
method because no key pairs are shared among machines.
Flavors Select one or more OpenStack flavors. An OpenStack flavor is a
virtual hardware template that defines the machine resource
specifications for instances provisioned in OpenStack. Flavors
are managed within the OpenStack provider and are imported
during data collection.
Machine Resources Tab
Specify CPU, memory and storage settings for your OpenStack machine component.
Configuring vRealize Automation
VMware, Inc. 375

Table 3‑26. Machine Resources Tab
Setting Description
CPUs: Minimum and Maximum Enter a minimum and maximum number of CPUs that can be
provisioned by this machine component.
Memory (MB): Minimum and Maximum Enter a minimum and maximum amount of memory that can be
consumed by machines that are provisioned by this machine
component.
Storage (GB): Minimum and Maximum Enter a minimum and maximum amount of storage that can be
consumed by machines that are provisioned by this machine
component. For vSphere, KVM (RHEV), SCVMM, vCloud Air,
and vCloud Director, minimum storage is set based on what you
enter on the Storage tab.
When using a WIM provisioning workflow in a blueprint, specify
a storage value that accounts for the size of each disk to be
used on the machine. Use the total value of all disks as the
minimum storage value for the machine component. Also specify
a size for each disk that is large enough to accommodate the
operating system.
Properties Tab
Optionally specify custom property and property group information for your OpenStack machine
component.
You can add individual and groups of custom properties to the machine component by using the
Properties tab. You can add also custom properties and property groups to the overall blueprint by using
the Properties tab when you create or edit a blueprint by using the Blueprint Properties page.
You can use the Custom Properties tab to add and configure options for existing custom properties.
Custom properties are supplied with vRealize Automation and you can also create property definitions.
Table 3‑27. Properties > Custom Properties Tab Settings
Setting Description
Name Enter the name of a custom property or select an available
custom property from the drop-down menu. For example, enter
the custom property name Machine.SSH to specify whether
machines provisioned by using this blueprint allow SSH
connections. Properties only appear in the drop-down menu if
your tenant administrator or fabric administrator created property
definitions.
Value Enter or edit a value to associate with the custom property
name. For example, set the value as true to allow entitled users
to connect by using SSH to machines provisioned by using your
blueprint.
Encrypted You can choose to encrypt the property value, for example, if the
value is a password.
Configuring vRealize Automation
VMware, Inc. 376

Table 3‑27. Properties > Custom Properties Tab Settings (Continued)
Setting Description
Overridable You can specify that the property value can be overridden by the
next or subsequent person who uses the property. Typically, this
is another architect, but if you select Show in request, your
business users are able to see and edit property values when
they request catalog items.
Show in Request If you want to display the property name and value to your end
users, you can select to display the property on the request form
when requesting machine provisioning. You must also select
overridable if you want users to provide a value.
You can use the Property Groups tab to add and configure settings for existing custom property groups.
You can create your own property groups or use property groups that have been created for you.
Table 3‑28. Properties > Property Groups Tab Settings
Setting Description
Name Select an available property group from the drop-down menu.
Move Up and Move Down Control the precedence level of listed property groups in
descending order. The first-listed property group has
precedence over the next-listed property group and so on.
View Properties Display the custom properties in the selected property group.
View Merged Properties Display all the custom properties in the listed property groups in
the order in which they appear in the list of property groups.
Where the same property appears in more than one property
group, the property name appears only once in the list based on
when it is first encountered in the list.
Using Network Custom Properties
You can specify network and security information for machine components other than vSphere and
blueprints that do not contain NSX by using network custom properties at either the blueprint or machine
component level.
The Network & Security components are only available for use with vSphere machine components.
Non-vSphere machine components do not contain a Network or Security tab.
For machine components that do not have a Network or Security tab, you can add network and security
custom properties, such as VirtualMachine.Network0.Name, to their Properties tab in the design
canvas. NSX network, security, and load balancer properties are only applicable to vSphere machines.
You can define custom properties individually or as part of an existing property group by using the
Properties tab when configuring a machine component in the design canvas. The custom properties that
you define for a machine component pertain to machines of that type that are provisioned from the
blueprint.
For information about the available custom properties, see Custom Properties Reference.
Configuring vRealize Automation
VMware, Inc. 377

Troubleshooting Blueprints for Clone and Linked Clone
When creating a linked clone or clone blueprint, machine or templates are missing. Using your shared
clone blueprint to request machines fails to provision machines.
Problem
When working with clone or linked clone blueprints, you might encounter one of the following problems:
nWhen you create a linked clone blueprint, no machines appear in the list to clone, or the machine you
want to clone does not appear.
nWhen you create a clone blueprint, no templates appear in the list of templates to clone, or the
template you want does not appear.
nWhen machines are requested by using your shared clone blueprint, provisioning fails.
nBecause of data collection timing, a template that has been removed is still visible to users as they
create or edit linked clone blueprints.
Cause
There are multiple possible causes for common clone and linked clone blueprint problems.
For related information about the Clone from and Clone from snapshot with Use current snapshot
options that are available when you create blueprints, see vSphere Machine Component Settings.
Table 3‑29. Causes for Common Clone and Linked Clone Blueprints Problems
Problem Cause Solution
Machines missing You can only create linked clone blueprints by using
machines you manage as a tenant administrator or
business group manager.
A user in your tenant or business
group must request a vSphere
machine. If you have the
appropriate roles, you can do this
yourself.
You can also see unmanaged
machines in this dialog.
Managed machines may have been
imported. There is no requirement
that machines be provisioned from
vRealize Automation to be visible in
this dialog.
Templates missing Data collection has failed on a given endpoint or no
endpoints are available for the component's platform.
nIf your endpoints are clustered
and contain multiple compute
resources, verify that your IaaS
administrator added the cluster
containing the templates to your
fabric group.
nFor new templates, verify that IT
placed the templates on the
same cluster included in your
fabric group.
Configuring vRealize Automation
VMware, Inc. 378

Table 3‑29. Causes for Common Clone and Linked Clone Blueprints Problems (Continued)
Problem Cause Solution
Provisioning failure with a shared
blueprint
For blueprints, no validation is available to ensure
that the template you select exists in the reservation
used to provision a machine from your shared clone
blueprint.
Consider using entitlements to
restrict the blueprint to users who
have a reservation on the compute
resource where the template exists.
Provisioning failure with a guest
agent
The virtual machine might be rebooting immediately
after the guest operating system customization is
completed, but before the guest agent work items are
completed, causing provisioning to fail. You can use
the custom property
VirtualMachine.Admin.CustomizeGuestOSDelay
to increase the time delay.
Verify that you have added the
custom property
VirtualMachine.Admin.Customi
zeGuestOSDelay. The value must
be in HH:MM:SS format. If the value
is not set, the default value is one
minute (00:01:00).
Linked clone provisioning fails when
using SDRS
When using linked clone provisioning and SDRS, the
new machine must reside on the same cluster. A
provisioning error occurs if the source machine's
disks are on one cluster and you request to provision
a machine on a different cluster.
When using SDRS and linked clone
provisioning, provision machines to
the same cluster as the linked clone
source. Do not provision to a
different cluster.
Clone or linked clone blueprint
provisioning fails because the
template on which the clone is
based cannot be found
It is not possible to provision machines from a
blueprint that is cloned from a template that no longer
exists.
vRealize Automation runs data collection periodically,
default every 24 hours. If a template is removed, the
change is not reflected until the next data collection
and so it is possible to create a blueprint based on a
non-existent template.
Redefine the blueprint using an
existing template and then request
provisioning.
As a precaution and as applicable,
you can run data collection before
defining the clone or linked clone
blueprint.
Designing Blueprints with NSX Settings
If you have an NSX instance integrated with vRealize Automation, you can configure your vSphere
blueprints to leverage NSX for network and security virtualization.
If you have configured vRealize Automation integration with NSX, you can use network, security, and load
balancer components in the design canvas to configure your blueprint for machine provisioning. You can
also add the following NSX network and security settings to the overall blueprint when you create a new
blueprint or edit an existing blueprint.
nTransport zone - contains the networks used for the provisioned machine deployment
nEdge and routed gateway reservation policy - manages network communication for the provisioned
machine deployment
nApp isolation - allows only internal traffic between machines used in the provisioned machine
deployment
For additional information about vRealize Automation and NSX integration and the use of the NSX
network and security components in the vRealize Automation blueprint, see this vRA and NSX - Intro to
Network and Security Automation blog article.
NSX settings are only applicable to vSphere machine component types.
Configuring vRealize Automation
VMware, Inc. 379

New Blueprint and Blueprint Properties Page Settings with NSX
You can specify settings that apply to the entire blueprint, including some NSX settings, by using the New
Blueprint page when you create the blueprint. After you create the blueprint, you can edit these settings
on the Blueprint Properties page.
General Tab
Apply settings across your entire blueprint, including all components you intend to add now or later.
Table 3‑30. General Tab Settings
Setting Description
Name Enter a name for your blueprint.
Identifier The identifier field automatically populates based on the name you entered.
You can edit this field now, but after you save the blueprint you can never
change it. Because identifiers are permanent and unique within your tenant,
you can use them to programmatically interact with blueprints and to create
property bindings.
Description Summarize your blueprint for the benefit of other architects. This description
also appears to users on the request form.
Deployment limit Specify the maximum number of deployments that can be created when this
blueprint is used to provision machines.
Lease days: Minimum and Maximum Enter a minimum and maximum value to allow users to choose from within a
range of lease lengths. When the lease ends, the deployment is either
destroyed or archived. If you do not specify a minimum or maximum value,
the lease is set to never expire.
Archive days You can specify an archival period to temporarily retain deployments instead
of destroying deployments as soon as their lease expires. Specify 0 (default)
to destroy the deployment when its lease expires. The archive period begins
on the day the lease expires. When the archive period ends, the deployment
is destroyed.
Propagate updates to existing deployments When checked, specifies that any broadening of the limits that you make to
the CPU, Memory, and Storage minimum or maximum settings in the
blueprint are pushed to all active deployments that were provisioned from the
blueprint. For example, if you specify a minimum of 2 and maximum of 4
(2,4) originally, a change such as (1,4) or (2,5) would take effect upon
reconfiguration but a change of (3,4) or (2,3) would not.
The changes takes effect upon the next reconfigure action. For related
information about reconfigure actions, see Action Menu Commands for
Provisioned Resources.
NSX Settings Tab
If you have configured NSX you can specify NSX transport zone, Edge and routed gateway reservation
policy, and app isolation settings when you create or edit a blueprint. These settings are available on the
NSX Settings tab on the Blueprint and Blueprint Properties pages.
For information about configuring NSX, see NSX Administration Guide.
Configuring vRealize Automation
VMware, Inc. 380

Table 3‑31. NSX Settings Tab Settings
Setting Description
Transport zone Select an existing NSX transport zone to contain the network or networks
that the provisioned machine deployment can use.
A transport zone defines which clusters the networks can span. When
provisioning machines, if a transport zone is specified in a reservation and in
a blueprint, the transport zone values must match. Only the transport zones
that are applicable to the current tenant are available.
A transport zone is only required for blueprints that have an on-demand
network. For security groups, security tags, and load balancers, the transport
zone is optional. If you do not specify a transport zone, the endpoint is
determined by the location of the security group, security tag, or network that
the load balancer connects to.
Edge and routed gateway reservation policy Select an NSX Edge or routed gateway reservation policy. This reservation
policy applies to routed gateways and to all edges that are deployed as part
of provisioning. There is only one edge provisioned per deployment.
For routed networks, edges are not provisioned, but you can use a
reservation policy to select a reservation with the routed gateways to be
used for routed network provisioning.
When vRealize Automation provisions a machine with NAT or routed
networking, it provisions a routed gateway as the network router. The Edge
or routed gateway is a management machine that consumes compute
resources like other virtual machines but manages the network
communications all machine in that deployment. The reservation used to
provision the Edge or routed gateway determines the external network used
for NAT and load balancer virtual IP addresses. As a best practice, use
separate management clusters for management machines such as NSX
Edges.
App isolation Select the App isolation check box to use the app isolation security policy
configured in NSX. The app isolation policy is applied to all vSphere machine
components in the blueprint. You can optionally add NSX security groups
and tags to allow vRealize Orchestrator to open the isolated network
configuration to allow additional paths in and out of the app isolation.
Properties Tab
Custom properties you add at the blueprint level apply to the entire blueprint, including all components.
However, they can be overridden by custom properties assigned later in the precedence chain. For more
information about order of precedence for custom properties, see Custom Properties Reference.
Configuring vRealize Automation
VMware, Inc. 381

Table 3‑32. Properties Tab Settings
Tab Setting Description
Property Groups Property groups are reusable groups of properties that are designed to simplify the
process of adding custom properties to blueprints. Your tenant administrators and fabric
administrators can group properties that are often used together so you can add the
property group to a blueprint instead of individually inserting custom properties.
Add Add one or more existing property groups and
apply them to the overall blueprint.
The following Containers-related property
groups are supplied:
nContainer host properties with certificate
authentication
nContainer host properties with
user/password authentication
Move up /Move down Control the order of precedence given to each
property group in relation to one another by
prioritizing the groups. The first group in the
list has the highest priority, and its custom
properties have first precedence. You can also
drag and drop to reorder.
View properties View the custom properties in the selected
property group.
View merged properties If a custom property is included in more than
one property group, the value included in the
property group with the highest priority takes
precedence. You can view these merged
properties to assist you in prioritizing property
groups.
Custom Properties You can add individual custom properties instead of property groups.
New Add an individual custom property and apply it
to the overall blueprint.
Name Enter the property name. For a list of custom
properties and their definitions, see Custom
Properties Reference.
Value Enter the value for the custom property.
Encrypted You can choose to encrypt the property value,
for example, if the value is a password.
Configuring vRealize Automation
VMware, Inc. 382

Table 3‑32. Properties Tab Settings (Continued)
Tab Setting Description
Overridable You can specify that the property value can be
overridden by the next or subsequent person
who uses the property. Typically, this is
another architect, but if you select Show in
request, your business users are able to see
and edit property values when they request
catalog items.
Show in request If you want to display the property name and
value to your end users, you can select to
display the property on the request form when
requesting machine provisioning. You must
also select overridable if you want users to
provide a value.
Applying an NSX Transport Zone to a Blueprint
An NSX administrator can create transport zones to control cluster use of networks.
If the blueprint contains an on-demand network, you must specify the NSX transport zone that contains
the networks used by the provisioned machine deployment. The same transport zone must be specified
in the reservation.
Only the transport zones that are applicable to the current tenant are exposed when authoring a blueprint.
Specifically, transport zones are made available if they are used by a reservation in the current tenant.
Applying an NSX Edge or Routed Gateway Reservation Policy to a Blueprint
You can specify a reservation policy to manage the network communications for machines provisioned by
the blueprint. When requesting machine provisioning, the reservation policy is used to group the
reservations that can be considered for the deployment. The routed gateway reservation policy is also
referred to as an edge reservation policy.
Networking information is contained in each reservation. When the machines are provisioned, an edge or
routed gateway is allocated as the network router to manage network communications for the provisioned
machines in the deployment. You can add or edit blueprint-level properties by using the blueprint
properties page.
A routed gateway reservation policy is optional. It controls which reservation or reservations can be used
to provision the NSX edge associated to on-demand networking and on-demand load balancer
components specified in the blueprint.
You use reservation policies to control the selection of reservations. You select a reservation policy in
your virtual machine definition in the blueprint and then assign that policy to the reservations that you
want your virtual machines to use.
You cannot share reservations among multiple business groups.
Configuring vRealize Automation
VMware, Inc. 383

vRealize Automation provisions a routed gateway, for example an edge services gateway (ESG), for NAT
networks and for load balancers. For routed networks, vRealize Automation uses existing distributed
routers.
A NAT network profile and load balancer enable vRealize Automation to deploy an NSX edge services
gateway. A routed network profile uses an NSX logical distributed router (DLR). The DLR must be created
in NSX before it can be consumed by vRealize Automation. vRealize Automation cannot create DLRs.
After data collection, vRealize Automation can use the DLR for virtual machine provisioning.
The reservation used to provision the edge or routed gateway determines the external network used for
NAT and routed network profiles, as well as the load balancer virtual IP addresses.
When you use the blueprint to provision a machine deployment, vRealize Automation attempts to use
only the reservations associated with the specified reservation policy to provision the edge or routed
gateway.
Applying an NSX App Isolation Security Policy to a Blueprint
An NSX app isolation policy acts as a firewall to block all inbound and outbound traffic to and from the
provisioned machines in the deployment. When you specify a defined NSX app isolation policy, the
machines provisioned by the blueprint can communicate with each other but cannot connect outside the
firewall.
You can apply app isolation at the blueprint level by using the New Blueprint or Blueprint Properties
page.
When using an NSX app isolation policy, only internal traffic between the machines provisioned by the
blueprint is allowed. When you request provisioning, a security group is created for the machines to be
provisioned. An app isolation security policy is created in NSX and applied to the security group. Firewall
rules are defined in the security policy to allow only internal traffic between the components in the
deployment. For related information, see Create an NSX Endpoint and Associate to a vSphere Endpoint.
Note When provisioning with a blueprint that uses both an NSX edge load balancer and an NSX app
isolation security policy, the dynamically provisioned load balancer is not added to the security group. This
prevents the load balancer from communicating with the machines for which it is meant to handle
connections. Because edges are excluded from the NSX distributed firewall, they cannot be added to
security groups. To allow load balancing to function properly, use another security group or security policy
that allows the required traffic into the component VMs for load balancing.
Configuring vRealize Automation
VMware, Inc. 384

The app isolation policy has a lower precedence compared to other security policies in NSX. For
example, if the provisioned deployment contains a web component machine and an app component
machine and the web component machine hosts a web service, then the service must allow inbound
traffic on ports 80 and 443. In this case, users must create a web security policy in NSX with firewall rules
defined to allow incoming traffic to these ports. In vRealize Automation, users must apply the web security
policy on the web component of the provisioned machine deployment.
Note If a blueprint contains one or more load balancers and app isolation is enabled for the blueprint,
the load balancer VIPs are added to the app isolation security group as an IPSet. If a blueprints contains
an on-demand security group that is associated to a machine tier that is also associated to a load
balancer, the on-demand security group includes the machine tier and the IPSet with the load balancer
VIP.
If the web component machine needs access to the app component machine using a load balancer on
ports 8080 and 8443, the web security policy should also include firewall rules to allow outbound traffic to
these ports in addition to the existing firewall rules that allow inbound traffic to ports 80 and 443.
For information about security features that can be applied to a machine component in a blueprint, see
Using Security Components in the Design Canvas.
Configuring Network and Security Component Settings
vRealize Automation supports virtualized networks based on the NSX platform. Integrated Containers for
vRealize Automation networks are also supported.
To integrate network and security with vRealize Automation, an IaaS administrator must configure
vSphere and NSX endpoints.
For information about external preparation, see Configuring vRealize Automation.
You can create network profiles that specify network settings in reservations and in the design canvas.
External network profiles define existing physical networks. NAT and routed profiles are templates that will
build NSX logical switches and appropriate routing settings for a new network path and for configuring
network interfaces to connect to network path when you provision virtual machines and configure NSX
Edge devices.
The network and security component settings that you add to the design canvas are derived from your
NSX configuration and require that you have run data collection for the NSX inventory for vSphere
clusters. Network and security components are specific to NSX and are available for use with vSphere
machine components only. For information about configuring NSX, see NSX Administration Guide.
For machine components that do not have a Network or Security tab, you can add network and security
custom properties, such as VirtualMachine.Network0.Name, to their Properties tab in the design
canvas. NSX network, security, and load balancer properties are only applicable to vSphere machines.
Configuring vRealize Automation
VMware, Inc. 385
If you specify a network profile in a reservation and a blueprint, the blueprint value takes precedence. For
example, if you specify a network profile in the blueprint by using the
VirtualMachine.NetworkN.ProfileName custom property and in a reservation that is used by the
blueprint, the network profile specified in the blueprint takes precedence. However, if the custom property
is not used in the blueprint, and you select a network profile for a machine NIC, vRealize Automation uses
the reservation network path for the machine NIC for which the network profile is specified.
Depending on the compute resource, you can select a transport zone that identifies a vSphere endpoint.
A transport zone specifies the hosts and clusters that can be associated with logical switches created
within the zone. A transport zone can span multiple vSphere clusters. The blueprint and the reservations
used in the provisioning must have the same transport zone setting. Transport zones are defined in the
NSX environments. See NSX Administration Guide.
You can configure security settings for the virtual machines to be provisioned by specifying information in
a reservation, blueprint, or guest agent script. If the machines to be provisioned requires a guest agent,
you must add a security rule that contains that requirement to the reservation or the blueprint. For
example, if you use a default security policy that denies communication between all machines, and rely
on a separate security policy to allow communication between specific machines, the guest agent might
be unable to communicate with vRealize Automation during the customization phase. To avoid this
problem during machine provisioning, use a default security policy that allows communication during the
customization phase.
You can also add a Containers network component to a blueprint.
Using Network Components in the Design Canvas
You can add one or more NSX network components to the design canvas and configure their settings for
vSphere machine components in the blueprint.
You can add network components to the design canvas to make their configured settings available to one
or more machine components in the blueprint.
The network and security component settings that you add to the design canvas are derived from your
NSX configuration and require that you have run data collection for the NSX inventory for vSphere
clusters. Network and security components are specific to NSX and are available for use with vSphere
machine components only. For information about configuring NSX, see NSX Administration Guide.
Add an Existing Network Component
You can add an existing NSX network component to the design canvas in preparation for associating its
settings to one or more vSphere machine components in the blueprint.
You can use an existing network component to add an NSX network to the design canvas and configure
its settings for use with vSphere machine components and Software or XaaS components that pertain to
vSphere.
When you associate an existing network component or an on-demand network component with a
machine component, the NIC information is stored with the machine component. The network profile
information that you specify is stored with the network component.
You can add multiple network and security components to the design canvas.
Configuring vRealize Automation
VMware, Inc. 386
For machine components that do not have a Network or Security tab, you can add network and security
custom properties, such as VirtualMachine.Network0.Name, to their Properties tab in the design
canvas. NSX network, security, and load balancer properties are only applicable to vSphere machines.
Only the network profiles that are applicable to the current tenant are exposed when authoring a
blueprint. Specifically, network profiles are made available if there is at least one reservation in the current
tenant that has at least one network assigned to the profile.
Prerequisites
nCreate and configure network settings for NSX. See Configuring vRealize Automation and NSX
Administration Guide.
nVerify that the NSX inventory has executed successfully for your cluster.
To use NSX configurations in vRealize Automation, you must run data collection.
nCreate a network profile.
nLog in to vRealize Automation as an infrastructure architect.
nOpen a new or existing blueprint in the design canvas by using the Design tab.
Procedure
1Click Network & Security in the Categories section to display the list of available network and
security components.
2Drag an Existing Network component onto the design canvas.
3Click in the Existing network text box and select an existing network profile.
The description, subnet mask and gateway values are populated based on the selected network
profile.
4(Optional) Click the DNS/WINS tab.
5(Optional) Specify or accept provided DNS and WINS settings for the network profile.
nPrimary DNS
nSecondary DNS
nDNS Suffix
nPreferred WINS
nAlternate WINS
You cannot change the DNS or WINS settings for an existing network.
6(Optional) Click the IP Ranges tab.
The IP range or ranges specified in the network profile are displayed. You can change the sort order
or column display. For NAT networks, you can also change IP range values.
7Click Finish to save the blueprint as draft or continue configuring the blueprint.
Configuring vRealize Automation
VMware, Inc. 387
What to do next
You can continue configuring network settings by adding additional network components and by selecting
settings in the Network tab of a vSphere machine component in the design canvas.
Creating and Using NAT Rules
You can add NAT rules to a one-to-many NAT network component in a blueprint when the NAT network
component is associated to a non-clustered vSphere machine component or an on-demand NSX load
balancer component.
You can define NAT rules for any NSX-supported protocol. You can map a port or a port range from the
external IP address of an Edge to a private IP address in the NAT network component.
nvSphere Machine Component
You can create NAT rules for a NAT one-to many network component that is associated to a non-
clustered vSphere machine component.
For example, if two machines are associated to a NAT one-to-many network component on the
blueprint, you can define a NAT rule that allows port 443 on the external IP to connect to the
machines through port 80 on the NAT network using TCP protocol.
nNSX Load Balancer Component
You can create NAT rules for a NAT one-to many network component that is associated to the VIP
network of an NSX load balancer component.
For example, if the NAT network component is associated to a load balancer component that is load
balancing three machines, you can define a NAT rule that allows port 90 on the external IP to connect
to the load balancer VIP through port 80 on the NAT network using UDP protocol.
You can create any number of NAT rules and you can control the order in which the rules are processed.
The following elements are not supported for NAT rules:
nNICs that are not in the current network
nNICs that are configured to get IP addresses by using DHCP
nMachine clusters
To add NAT rules to a NAT network component in a blueprint, see Add an On-Demand NAT or On-
Demand Routed Network Component.
For related information about using NAT rules, see public articles such as this vmwarelab blog post.
Add an On-Demand NAT or On-Demand Routed Network Component
You can add an NSX on-demand NAT network component or NSX on-demand routed network component
to the design canvas in preparation for associating their settings to one or more vSphere machine
components in the blueprint.
When you associate an existing network component or an on-demand network component with a
machine component, the NIC information is stored with the machine component. The network profile
information that you specify is stored with the network component.
Configuring vRealize Automation
VMware, Inc. 388
You can add multiple network and security components to the design canvas.
You can have more than one on-demand network component in a single blueprint. However, all of the on-
demand network profiles that are used in the blueprint must reference the same external network profile.
For machine components that do not have a Network or Security tab, you can add network and security
custom properties, such as VirtualMachine.Network0.Name, to their Properties tab in the design
canvas. NSX network, security, and load balancer properties are only applicable to vSphere machines.
Only the network profiles that are applicable to the current tenant are exposed when authoring a
blueprint. Specifically, network profiles are made available if there is at least one reservation in the current
tenant that has at least one network assigned to the profile.
Prerequisites
nCreate and configure network settings for NSX. See Configuring vRealize Automation and NSX
Administration Guide.
nVerify that the NSX inventory has executed successfully for your cluster.
To use NSX configurations in vRealize Automation, you must run data collection.
nCreate an on-demand network profile. See Creating a Network Profile.
For example, if you are adding an on-demand NAT network component see Creating a NAT Network
Profile For an On-Demand Network.
nLog in to vRealize Automation as an infrastructure architect.
nOpen a new or existing blueprint in the design canvas by using the Design tab.
nIf you want to specify NAT rules for a NAT network component, you must use a NAT one-to-many
network profile. See Create a NAT Network Profile By Using the Supplied IPAM Endpoint or Create a
NAT Network Profile By Using a Third-Party IPAM Endpoint. For information about NAT rules, see
Creating and Using NAT Rules.
Procedure
1Click Network & Security in the Categories section to display the list of available network and
security components.
2Drag an on-demand NAT or on-demand routed network component onto the design canvas.
3Enter a component name in the ID text box to uniquely label the component in the design canvas.
4Select an appropriate network profile from the Parent network profile drop-down menu. For
example, if you want to add a NAT network component, select a NAT network profile that is
configured to support your intended network settings.
If you want to specify NAT rules in a NAT network component, you must use a parent network profile
that is configured for NAT one-to-many.
Configuring vRealize Automation
VMware, Inc. 389
Depending on the profile type you select, the following network settings are populated based on your
network profile selection. Changes to these values must be made in the network profile:
nExternal network profile name
nNAT type (On-Demand NAT Network)
nSubnet mask
nRange subnet mask (On-Demand Routed Network)
nRange subnet mask (On-Demand Routed Network)
nBase IP address (On-Demand Routed Network)
5(Optional) Enter a component description in the Description text box.
6(Optional) Click the DNS/WINS tab.
7(Optional) Specify or accept provided DNS and WINS settings for the network profile.
nPrimary DNS
nSecondary DNS
nDNS Suffix
nPreferred WINS
nAlternate WINS
You cannot change the DNS or WINS settings for an existing network.
8Click the IP Ranges tab.
The IP range or ranges specified in the network profile are displayed. You can change the sort order
or column display. For NAT networks, you can also change IP range values.
a Enter a start IP address value in the IP range start text box.
b Enter a start IP address value in the IP range start text box.
9If you are using a NAT network that is based on a one-to-many NAT network profile that uses static IP
ranges, you can use the NAT Rules tab to add rules that enable an external IP to access
components in the internal NAT network.
For a NAT one-to-many network, you can define NAT rules that can be configured when you add a
NAT network component to the blueprint and can be changed when you edit the NAT network in a
deployment.
The options that are available for selection are based on the vSphere machine or NSX load balancer
components that you have associated to the NAT network component.
nName - Enter a unique rule name.
nComponent - Select from a list of associated vSphere machine or load balancer components to
which the NAT network is associated.
Configuring vRealize Automation
VMware, Inc. 390
nSource port - Select the ANY option, enter a valid port or port range, or specify a valid property
binding.
nDestination port - Select the ANY option, enter a valid port or port range, or specify a valid
property binding.
nProtocol - Enter any valid NSX-supported protocol or select the TCP, UDP, or ANY option.
nDescription - Enter a brief description of what the NAT rule is designed to do.
10 Click Finish to save the blueprint as draft or continue configuring the blueprint.
What to do next
You can continue configuring network settings by adding additional network components and by selecting
settings in the Network tab of a vSphere machine component in the design canvas.
Using Load Balancer Components in the Design Canvas
You can add one or more on-demand NSX load balancer components to the design canvas to configure
vSphere machine component settings in the blueprint.
The network and security component settings that you add to the design canvas are derived from your
NSX configuration and require that you have run data collection for the NSX inventory for vSphere
clusters. Network and security components are specific to NSX and are available for use with vSphere
machine components only. For information about configuring NSX, see NSX Administration Guide.
The following rules apply to load balancer pools and VIP network settings in the blueprint.
nIf the pool network profile is NAT, the VIP network profile can be part of the NAT network profile.
nIf the pool network profile is routed, the VIP network profile can only be on the same routed network.
nIf the pool network profile is external, the VIP network profile can only be the same external network
profile.
Each load balancer component can have multiple virtual servers, which are also referred to as load
balancer services. Each virtual server in the load balancer component has one port and protocol. For
example, you can load balance an HTTP service or HTTPS service. A load balancer can have multiple
services that it is load balancing.
The NSX Edge is the network device that contains the load balancer virtual servers. While you can have
more than one load balancer component in a blueprint, when you provision the deployment, the virtual
servers defined in each load balancer component are contained in a single NSX Edge.
If a blueprint contains one or more load balancers and app isolation is enabled for the blueprint, the load
balancer VIPs are added to the app isolation security group as an IPSet. If a blueprints contains an on-
demand security group that is associated to a machine tier that is also associated to a load balancer, the
on-demand security group includes the machine tier and the IPSet with the load balancer VIP.
You can reconfigure load balancer settings in an existing deployment to add, edit, or remove virtual
servers. For information, see Reconfigure a Load Balancer in a Deployment.
Configuring vRealize Automation
VMware, Inc. 391
For information about working with load balancer components after upgrade or migration, see
Considerations When Working With Upgraded or Migrated Load Balancer Components.
Considerations When Working With Upgraded or Migrated Load Balancer Components
The following considerations are important to understand and act on relative to NSX load balancer
components in the target vRealize Automation release.
This information applies to NSX load balancer components that were upgraded or migrated to this
vRealize Automation release.
nYou must run NSX Network and Security Inventory data collection before and after upgrading or
migrating to this release to avoid issues when running the Reconfigure Load Balancer action. The
Reconfigure Load Balancer action for new deployments is not affected.
For more information, see Upgrading from vRealize Automation 7.1, 7.2, or 7.3 and Migrating
vRealize Automation.
nAs of vRealize Automation 7.3, you can reconfigure a load balancer. The required catalog entitlement
is Reconfigure (Load Balancer). For related information, see Reconfigure a Load Balancer in a
Deployment.
nFor deployments that were upgraded or migrated from vRealize Automation 7.x to this
vRealize Automation release, load balancer reconfiguration is limited to deployments that contain a
single load balancer.
nThe Reconfigure Load Balancer operation is not supported for deployments that were upgraded or
migrated from vRealize Automation 6.2.x to this vRealize Automation release.
Add an On-Demand Load Balancer Component
You can drag an NSX on-demand load balancer component onto the design canvas and configure its
settings for use with vSphere machine components and container components in the blueprint.
For related information about creating NSX application profiles to define the behavior of a particular type
of network traffic, see the NSX Administration Guide for your release at
https://www.vmware.com/support/pubs/nsx_pubs.html.
Procedure
1Define Load Balancer Member Settings
You can define an on-demand NSX load balancer component to distribute task processing among
provisioned vSphere member machines or container machines in a network.
2Define Virtual Server General Settings
You can define a single virtual server protocol and port for your load balancer or you can add
additional virtual servers to customize additional NSX load balancer options.
Configuring vRealize Automation
VMware, Inc. 392
3Define Virtual Server Distribution Settings
By selecting the Customize option on the General tab, you can specify information about the pool
members such as the port on which the members receive traffic, the protocol type that the NSX load
balancer can use for accessing that port, the algorithm used for load balancing, and persistence
settings.
4Define Virtual Server Health Check Settings
By selecting the Customize option on the General tab, you can specify how, or if, the NSX load
balancer performs health checks on pool members within the virtual server.
5Define Virtual Server Advanced Settings
By selecting the Customize option on the General tab, you can customize the NSX load balancer
component to specify settings such as the number of concurrent connections that a single pool
member can recognize and the maximum number of concurrent connections that the virtual server
can process.
6Define Load Balancer Logging Options
You can define the types of load balancer logging actions that are captured and recorded in the load
balancer logs.
Define Load Balancer Member Settings
You can define an on-demand NSX load balancer component to distribute task processing among
provisioned vSphere member machines or container machines in a network.
When you add a load balancer component to a blueprint in the design canvas, you can choose either a
default or custom option when creating or editing your virtual server definitions in the load balancer
component. The default option allows you to specify the virtual server protocol, port, and description and
use defaults for all other settings. The custom option allows you to define additional levels of detail.
If the load balancer is provisioned with an external network, the VIP (specified with VIP Network) and
member pool (specified with Member Network) must be on the same existing network. If the VIP and
pool are not on the same external network, an error occurs during provisioning.
Prerequisites
nCreate and configure load balancer settings for NSX. See Configuring vRealize Automation and NSX
Administration Guide.
nVerify that the NSX inventory has executed successfully for your cluster.
To use NSX configurations in vRealize Automation, you must run data collection.
nCreate a network profile.
nLog in to vRealize Automation as an infrastructure architect.
nOpen a new or existing blueprint in the design canvas by using the Design tab.
nVerify that at least one vSphere machine component or container component exists in the blueprint.
Configuring vRealize Automation
VMware, Inc. 393
Procedure
1Click Network & Security in the Categories section to display the list of available network and
security components.
2Drag an On-Demand Load Balancer component onto the design canvas.
3Enter a component name in the ID text box to uniquely label the component in the design canvas.
4Select a vSphere machine component or container component name from the Member drop-down
menu.
The list contains only the vSphere machine components and container components in the active
blueprint.
5Select the NIC to load balance from the Member network drop-down menu.
The list contains NICs that are defined for the selected vSphere machine member.
6Select an available virtual IP address network from the VIP Network drop-down menu. For example,
select an available external or NAT network.
While you can have multiple NSX load balancer and NSX on-demand network components in a
blueprint, they must all be associated to the same VIP network.
7(Optional) Enter a valid IP address for the NIC in the IP Address text box.
The default setting is the static IP address that is associated with the VIP network. You can specify
another IP address or an IP address range. By default, the next available IP address is allocated from
the associated VIP network.
Leave the IP address field empty to allow the IP address to be allocated from the associated VIP
network during provisioning.
You can only specify an IP address when the VIP is created on a NAT network.
8To create a virtual server definition, click New and see Define Virtual Server General Settings.
Each load balancer component requires at least one virtual server.
To specify logging options, see Define Load Balancer Logging Options.
Define Virtual Server General Settings
You can define a single virtual server protocol and port for your load balancer or you can add additional
virtual servers to customize additional NSX load balancer options.
For example, you can customize the load balancer component to define settings such as health check
protocol and port, algorithm, persistence, and transparency.
Prerequisites
Define Load Balancer Member Settings.
Procedure
1Click the General tab on the New Virtual Server page.
Configuring vRealize Automation
VMware, Inc. 394

2Select the network traffic protocol in the Protocol drop-down menu to use for load balancing the
virtual server.
The protocol options are HTTP, HTTPS, TCP, and UDP.
3Enter a port value in the Port text box.
The selected protocol determines the default port setting.
Protocol Default port
HTTP 80
HTTPS 443
TCP 8080
UDP no default
The HTTP, HTTPS, and TCP protocols can share a port with UDP. For example, if service 1 uses
TCP, HTTP, or HTTPS on port 80, service 2 can use UDP on port 80. If service 1 uses UDP on port
80 though, service 2 cannot use UDP on port 80.
4(Optional) Enter a description for the virtual server component.
5Select one of the Settings options.
nUse default value for all other settings
Accept all other default settings. Click OK to finish the load balancer component definition and
continue working in the blueprint.
You can display the defaults by clicking Customize and examining the additional tab options. If
the default settings are acceptable, click Use default value for all other settings on the General
tab.
nCustomize
Configure the load balancer component with additional settings, for example to define a different
protocol for health monitoring or a different port for monitoring member traffic.
Additional tabs appear that allow you to add customized settings.
If you selected Use default value for all other settings and clicked OK you are done and can
continue to define or edit your blueprint in the design canvas. If you selected Customize, continue to
the step.
6Click the Distribution tab and proceed to the Define Virtual Server Distribution Settings topic to
continue defining the virtual server in the NSX load balancer component.
Define Virtual Server Distribution Settings
By selecting the Customize option on the General tab, you can specify information about the pool
members such as the port on which the members receive traffic, the protocol type that the NSX load
balancer can use for accessing that port, the algorithm used for load balancing, and persistence settings.
A pool represents a cluster of machines that are being load balanced. A pool member represents one
machine in that cluster.
Configuring vRealize Automation
VMware, Inc. 395

The default member protocol and member port settings match the protocol and port settings on the
General page.
The pool of member machines is shown in the Member option value in the blueprint load balancer
component user interface. The Member entry is set to the pool or cluster of machines.
Prerequisites
Define Virtual Server General Settings.
Procedure
1(Optional) The Member protocol setting matches the protocol that you specified on the General tab.
This setting defines how the pool member is to receive network traffic.
2(Optional) Enter a port number in the Member port text box to specify the port on which the pool
member is to receive network traffic.
For example, if the incoming request on the load balancer virtual IP address (VIP) is on port 80, you
might want to route the request to another port, for example port 8080, on the pool members.
3(Optional) Select the algorithm balancing method for this pool.
The algorithm options and the algorithm parameters for the options that require them are described in
the following table.
Option Description and algorithm parameters
ROUND_ROBIN Each server is used in turn according to the weight assigned to it.
If the load balancer was created in vRealize Automation, the weight is the same
for all members.
This is the smoothest and fairest algorithm when the server's processing time
remains equally distributed.
Algorithm parameters are disabled for this option.
IP-HASH Selects a server based on a hash of the source IP address and the total weight of
all the running servers.
Algorithm parameters are disabled for this option.
LEASTCONN Distributes client requests to multiple servers based on the number of
connections already on the server.
New connections are sent to the server that has the fewest connections.
Algorithm parameters are disabled for this option.
Configuring vRealize Automation
VMware, Inc. 396

Option Description and algorithm parameters
URI The left part of the URI (before the question mark) is hashed and divided by the
total weight of the running servers.
The result designates which server receives the request. This ensures that a URI
is always directed to the same server as long as no server goes up or down.
The URI algorithm parameter has two options -- uriLength=<len> and
uriDepth=<dep>. Enter the length and depth parameters on separate lines in the
Algorithm parameters text box.
Length and depth parameters are followed by a positive integer number. These
options can balance servers based on the beginning of the URI only.
The length parameter indicates that the algorithm should only consider the
defined characters at the beginning of the URI to compute the hash. The length
parameter range should be 1<=len<256.
The depth parameter indicates the maximum directory depth to be used to
compute the hash. One level is counted for each slash in the request. The depth
parameter range should be 1<=dep<10.
If both parameters are specified, the evaluation stops when either parameter is
reached.
HTTPHEADER The HTTP header name is looked up in each HTTP request.
The header name in parenthesis is not case sensitive which is similar to the ACL
'hdr()' function.
The HTTPHEADER algorithm parameter has one option headerName=<name>.
For example, you can use host as the HTTPHEADER algorithm parameter.
If the header is absent or does not contain any value, the round robin algorithm is
applied.
URL The URL parameter specified in the argument is looked up in the query string of
each HTTP GET request.
The URL algorithm parameter has one option urlParam=<url>.
If the parameter is followed by an equal sign = and a value, then the value is
hashed and divided by the total weight of the running servers. The result
designates which server receives the request. This process is used to track user
identifiers in requests and ensure that a same user ID is always sent to the same
server as long as no server goes up or down.
If no value or parameter is found, then a round robin algorithm is applied.
4(Optional) Select the persistence method for this pool.
Persistence tracks and stores session data, such as the specific pool member that serviced a client
request. With persistence, client requests are directed to the same pool member for the life of a
session or during subsequent sessions.
Protocol Persistence method supported
HTTP None, Cookie, Source IP
HTTPS None, Source IP and SSL Session ID
Configuring vRealize Automation
VMware, Inc. 397

Protocol Persistence method supported
TCP None, Source IP, MSRDP
UDP None, Source IP
nSelect Cookie to insert a unique cookie to identify the session the first time a client accesses the
site. The cookie is referred in subsequent requests to persist the connection to the appropriate
server.
nSelect Source IP to track sessions based on the source IP address. When a client requests a
connection to a virtual server that supports source address affinity persistence, the load balancer
checks to see if that client previously connected, and if so, returns the client to the same pool
member.
nSelect SSL Session ID and select the SSL Passthrough HTTPS traffic pattern.
nSSL Passthrough - Client -> HTTPS-> LB (SSL passthrough) -> HTTPS -> server
nClient - HTTP-> LB -> HTTP -> servers
Note vRealize Automation currently supports SSL Passthrough only. The SSL Passthrough
method is used regardless of which option you select.
nSelect MSRDP to maintain persistent sessions between Windows clients and servers that are
running the Microsoft Remote Desktop Protocol (RDP) service. The recommended scenario for
enabling MSRDP persistence is to create a load balancing pool that consists of members running
the supported Windows Server, where all members belong to a Windows cluster and participate
in a Windows session directory.
nSelect None to specify that session actions are not stored for subsequent recall.
5If you are using a cookie persistence setting, enter the cookie name.
6(Optional) Select the mode by which the cookie is inserted from the Mode drop-down menu.
Option Description
Insert The NSX Edge sends a cookie.
If the server sends one or more cookies, the client receives an extra cookie (the
server cookie(s) + the NSX Edge cookie). If the server does not send a cookie,
the client receives the NSX Edge cookie.
Prefix The server sends a cookie. Use this option if your client does not support more
than one cookie.
If you have a proprietary application using a proprietary client that supports only
one cookie, the Web server sends a cookie but the NSX Edge injects (as a prefix)
its cookie information in the server cookie value
App Session The server does not send a cookie. Instead, it sends the user session information
as a URL.
For example,
http://mysite.com/admin/UpdateUserServlet;jsessionid=X000X0XXX0XXXX,
where jsessionid is the user session information and is used for persistence.
Configuring vRealize Automation
VMware, Inc. 398
7(Optional) Enter the persistence expiration time for the cookie in seconds.
As an example, for L7 load balancing with a TCP source IP, the persistence entry times out if no new
TCP connections are made for the specified expiration time, even if the existing connections are still
live.
8(Optional) Click the Health Check tab and proceed to the Define Virtual Server Health Check
Settings topic to continue defining the virtual server in the NSX load balancer component.
Define Virtual Server Health Check Settings
By selecting the Customize option on the General tab, you can specify how, or if, the NSX load balancer
performs health checks on pool members within the virtual server.
The default health check protocol and health check port settings match the protocol and port settings on
the General tab.
For related information see Create a Service Monitor in NSX Product Documentation at
https://www.vmware.com/support/pubs/nsx_pubs.html. Note that the NSX documentation refers to the
virtual server member as a pool member.
Prerequisites
Define Virtual Server General Settings.
Procedure
1(Optional) Select a heath check protocol in the Health check protocol drop-down menu to specify
how the pool member is accessed when the load balancer listens to determine the health of the pool
member.
The protocol options are HTTP, HTTPS, TCP, ICMP, UDP, and None.
You can also accept the default protocol as specified on the General tab.
2(Optional) Enter a value in the Health check port box to specify on which port the load balancer
listens to monitor the health of the virtual server member or pool member.
Note that the NSX documentation refers to a virtual server member as a pool member.
The HTTP, HTTPS, and TCP protocols can share a port with UDP. For example, if service 1 uses
TCP, HTTP, or HTTPS on port 80, service 2 can use UDP on port 80. If service 1 uses UDP on port
80 though, service 2 cannot use UDP on port 80.
3Enter the Interval value in seconds at which a server is to be pinged.
4Enter the maximum Timeout value in seconds within which a response from the server must be
received.
5Enter a Max. retries value as the number of times the server must be pinged before it is declared
down.
Configuring vRealize Automation
VMware, Inc. 399
6Specify additional health check settings based on your selected Health check protocol.
a Enter the Method to be used for detecting server status. The options are GET, OPTIONS, and
POST.
b Enter the URL to be used in the request for detecting server status. This is the URL that is used
for by GET and POST ("/" by default) method options.
c In the Send text box, enter the string to be sent to the server after a connection is established.
In the Send text box, enter the string to be sent to the server after a connection is established.
d In the Receive text box, enter the string expected to receive from the server.
Only when the received string matches this definition is the server is considered as up.
The string can be a header or in the body of the response.
7Click the Advanced tab and proceed to the Define Virtual Server Advanced Settings topic to continue
defining the virtual server in the NSX load balancer component.
To specify logging options, see Define Load Balancer Logging Options.
Define Virtual Server Advanced Settings
By selecting the Customize option on the General tab, you can customize the NSX load balancer
component to specify settings such as the number of concurrent connections that a single pool member
can recognize and the maximum number of concurrent connections that the virtual server can process.
Prerequisites
Define Virtual Server General Settings.
Procedure
1Enter a value in the Connection limit text box to specify the maximum concurrent connections in
NSX that the virtual server can process.
This setting considers the number of all member connections.
Enter a value of 0 to specify no limit.
2Enter a value in the Connection rate limit text box to specify the maximum number of incoming
connection requests in NSX that can be accepted per second.
This setting considers the number of all member connections.
Enter a value of 0 to specify no limit.
3(Optional) Select the Enable acceleration check box to specify that each virtual IP (VIP) uses the
faster L4 load balancer rather than the L7 load balancer.
4(Optional) Select the Transparent check box to allow the load balancer pool members to view the IP
address of the machines that are calling the load balancer.
If not selected, the members of the load balancer pool view the traffic source IP address as a load
balancer internal IP address.
Configuring vRealize Automation
VMware, Inc. 400
5Enter a value in the Max connections text box to specify the maximum number of concurrent
connections that a single pool member can recognize.
If the number of incoming requests is higher than this value, requests are queued and then processed
in the order in which they are received as connections are released.
Enter a value of 0 to specify no maximum value.
6Enter a value in the Min connections text box to specify the minimum number of concurrent
connections that a single pool member must always accept.
Enter a value of 0 to specify no minimum value.
7Click OK to complete the virtual server definition.
8To specify logging options, see Define Load Balancer Logging Options, otherwise click Save or
Finish.
Define Load Balancer Logging Options
You can define the types of load balancer logging actions that are captured and recorded in the load
balancer logs.
After you define a load balancer component, or while you are defining a load balancer component, you
can specify a logging level for collecting load balancer traffic logs. The logging levels that you define for
any load balancer component on the blueprint apply to all load balancers that are defined in the blueprint.
Logging levels include debug, info, warning, error, and critical. Debug and info options log user requests
while warning, error, and critical options do not log users requests.
For additional information about NSX load balancer logging, see the NSX Administration Guide.
Prerequisites
Define Load Balancer Member Settings.
Procedure
1Select the Global tab on the load balancer component in the design canvas.
2Select one or more logging options from the Logging level drop-down menu.
Select a logging level for collecting load balancer traffic logs. The setting applies to all NSX load
balancer components in the blueprint.
The logging settings are defined in the vSphere web client.
nNone
nInfo
nEmergency
nAlert
nCritical
nError
Configuring vRealize Automation
VMware, Inc. 401
nWarning
nNotice
nDebug
3Click Save.
You can view and download the logs in the vSphere web client by using the Actions menu for the NSX
Edge as described in Download Tech Support Logs for NSX Edge in NSX Product Documentation at
https://www.vmware.com/support/pubs/nsx_pubs.html.
Using Security Components in the Design Canvas
You can add NSX security components to the design canvas to make their configured settings available
to one or more vSphere machine components in the blueprint.
Security groups, tags, and policies are configured outside of vRealize Automation in the NSX application.
The network and security component settings that you add to the design canvas are derived from your
NSX configuration and require that you have run data collection for the NSX inventory for vSphere
clusters. Network and security components are specific to NSX and are available for use with vSphere
machine components only. For information about configuring NSX, see NSX Administration Guide.
You can add security controls to blueprints by configuring security groups, tags, and policies for the
vSphere compute resource in NSX. After you run data collection, the security configurations are available
for selection in vRealize Automation.
Security Group
A security group is a collection of assets or grouping objects from the vSphere inventory that is mapped
to a set of security policies, for example distributed firewall rules and third party security service
integrations such as anti-virus and intrusion detection. The grouping feature enables you to create custom
containers to which you can assign resources, such as virtual machines and network adapters, for
distributed firewall protection. After a group is defined, you can add the group as source or destination to
a firewall rule for protection.
Configuring vRealize Automation
VMware, Inc. 402
You can add NSX existing or on-demand security groups to a blueprint, in addition to the security groups
specified in the reservation.
You can create one or more on-demand security groups. You can select one or more security policies to
configure on a security group.
Security groups are managed in the source resource. For information about managing security groups for
various resource types, see the NSX documentation.
If a blueprint contains one or more load balancers and app isolation is enabled for the blueprint, the load
balancer VIPs are added to the app isolation security group as an IPSet. If a blueprints contains an on-
demand security group that is associated to a machine tier that is also associated to a load balancer, the
on-demand security group includes the machine tier and the IPSet with the load balancer VIP.
Security Tag
A security tag is a qualifier object or categorizing entry that you can use as a grouping mechanism. You
define the criteria that an object must meet to be added to the security group you are creating. This gives
you the ability to include machines by defining a filter criteria with a number of parameters supported to
match the search criteria. For example, you can add all of the machines tagged with a specified security
tag to a security group.
You can add a security tag to the design canvas.
Security Policy
A security policy is a set of endpoint, firewall, and network introspection services that can be applied to a
security group. You can add security policies to a vSphere virtual machine by using an on-demand
security group in a blueprint. You cannot add a security policy directly to a reservation. After data
collection, the security policies that have been defined in NSX for a compute resource are available for
selection in a blueprint.
App Isolation
When App isolation is enabled, a separate security policy is created. App isolation uses a logical firewall
to block all inbound and outbound traffic to the applications in the blueprint. Component machines that are
provisioned by a blueprint that contains an app isolation policy can communicate with each other but
cannot connect outside the firewall unless other security groups are added to the blueprint with security
policies that allow access.
Controlling Tenant Access for Security Objects
You can control the cross-tenancy availability of NSX security objects in vRealize Automation.
When you create an NSX security object in vRealize Automation, its default availability can be either
global, meaning available in all tenants for which the associated endpoint has a reservation, or hidden to
all users except the administrator.
Availability of security objects across tenants is also relative to whether the associated endpoint has a
reservation or reservation policy in the tenant.
Configuring vRealize Automation
VMware, Inc. 403

NSX does not tenant security groups. However, you can control security group availability in
vRealize Automation by using the VMware.Endpoint.NSX.HideDiscoveredSecurityObjects custom
property.
By default, new security objects are available to all tenants for the associated NSX endpoints in which
you have a reservation. If the endpoint does not have a reservation in the active tenant, the security
objects are not available in the active tenant.
If you have not set the VMware.Endpoint.NSX.HideDiscoveredSecurityObjects custom property on
NSX endpoints, new security objects are set to global by default. Security objects that existed prior to
upgrading to this release of vRealize Automation are set to global regardless of the custom property.
Note When you upgrade to this vRealize Automation release, security groups from the previous release
are set to global by default. Existing security groups and security tags are available in all tenants in which
the associated endpoint has a reservation.
You can hide new security groups by default by adding the
VMware.Endpoint.NSX.HideDiscoveredSecurityObjects custom property to the associated NSX
endpoint. This setting takes effect the next time the NSX endpoint is data-collected and applied only to
new security objects.
You can also change the tenancy setting of an existing security object programmatically. For example, if a
security group is set to global, you can change the tenant availability of a security object by using the
associated NSX endpoint's Tenant ID setting in the vRealize Automation REST API or
vRealize CloudClient. The available Tenant ID settings for the NSX endpoint are as follows:
n"<global>" - the security object is available to all tenants. This is the default setting for existing
security objects after upgrade to this release and for all new security objects that you create.
n"<unscoped>" - the security object is not available to any tenants. Only the system administrator can
access the security object. This is an ideal setting when defining security objects that are to
eventually be assigned to a specific tenant.
n"tenant_id_name" - the security object is only available to a single, named tenant.
You can use the vRealize Automation REST API or vRealize CloudClient tools to assign the Tenant ID
parameter (tenantId) of security objects that are associated to a specific endpoint to a named tenant. For
related information, see https://code.vmware.com/apis/vrealize-automation and
https://code.vmware.com/web/dp/explorer-apis. For information about vRealize CloudClient, see
https://code.vmware.com/web/dp/tool/cloudclient. For additional information, see the vRealize Automation
Programming Guide at https://docs.vmware.com/en/vRealize-Automation.
Add an Existing Security Group Component
You can add an existing NSX security group component to the design canvas in preparation for
associating its settings to one or more machine components or other available component types in the
blueprint.
Configuring vRealize Automation
VMware, Inc. 404
You can use an existing security group component to add an NSX security group to the design canvas
and configure its settings for use with vSphere machine components and Software or XaaS components
that pertain to vSphere.
By default, security groups that are applicable to the current tenant are exposed when authoring a
blueprint. Specifically, security groups are made available if the associated endpoint has a reservation in
the current tenant. For additional information about controlling tenancy access, see Controlling Tenant
Access for Security Objects.
Prerequisites
nCreate and configure a security group in NSX. See Configuring vRealize Automation and NSX
Administration Guide.
nVerify that the NSX inventory has executed successfully for your cluster.
To use NSX configurations in vRealize Automation, you must run data collection.
nReview security component concepts. See Using Security Components in the Design Canvas.
nLog in to vRealize Automation as an infrastructure architect.
nOpen a new or existing blueprint in the design canvas by using the Design tab.
Procedure
1Click Network & Security in the Categories section to display the list of available network and
security components.
2Drag an Existing Security Group component onto the design canvas.
3Select an existing security group from the Security Group drop-down menu.
4Click OK.
5Click Finish to save the blueprint as draft or continue configuring the blueprint.
You can continue configuring security settings by adding additional security components and by selecting
settings in the Security tab of a vSphere machine component in the design canvas.
Add an On-Demand Security Group Component
You can add an on-demand NSX security group component to the design canvas in preparation for
associating its settings to one or more vSphere machine components or other available component types
in the blueprint.
When you create an on-demand security group you add security policies to create the group. The security
policies can be globally exposed or hidden by default. Policies are only exposed in tenants for which the
associated NSX endpoint has a reservation in that tenant.
By default, security groups that are applicable to the current tenant are exposed when authoring a
blueprint. Specifically, security groups are made available if the associated endpoint has a reservation in
the current tenant. For additional information about controlling tenancy access, see Controlling Tenant
Access for Security Objects.
Configuring vRealize Automation
VMware, Inc. 405
Prerequisites
nCreate and configure a security policy in NSX. See NSX Administration Guide.
nVerify that the NSX inventory has executed successfully for your cluster.
To use NSX configurations in vRealize Automation, you must run data collection.
nLog in to vRealize Automation as an infrastructure architect.
nReview security component concepts. See Using Security Components in the Design Canvas.
nOpen a new or existing blueprint in the design canvas by using the Design tab.
Procedure
1Click Network & Security in the Categories section to display the list of available network and
security components.
2Drag an On-Demand Security Group component onto the design canvas.
3Enter a name and, optionally, a description.
4Add one or more security policies by clicking the Add icon in the Security policies area and selecting
available security policies.
5Click OK.
6Click Finish to save the blueprint as draft or continue configuring the blueprint.
You can continue configuring security settings by adding additional security components and by selecting
settings in the Security tab of a vSphere machine component in the design canvas.
Add an Existing Security Tag Component
You can add an NSX security tag component to the blueprint design canvas in preparation for associating
its settings to one or more machine components in the blueprint.
You can use a security tag component to add an NSX security tag to the design canvas and configure its
settings for use with vSphere machine components and Software components that pertain to vSphere.
By default, security tags that are applicable to the current tenant are exposed when authoring a blueprint.
Specifically, security tags are made available if the associated endpoint has a reservation in the current
tenant. For additional information about controlling tenancy access, see Controlling Tenant Access for
Security Objects.
You can add multiple network and security components to the design canvas.
Prerequisites
nCreate and configure security tags in NSX. See Configuring vRealize Automation and NSX
Administration Guide.
nVerify that the NSX inventory has executed successfully for your cluster.
To use NSX configurations in vRealize Automation, you must run data collection.
Configuring vRealize Automation
VMware, Inc. 406

nLog in to vRealize Automation as an infrastructure architect.
nOpen a new or existing blueprint in the design canvas by using the Design tab.
Procedure
1Click Network & Security in the Categories section to display the list of available network and
security components.
2Drag a Existing Security Tag component onto the design canvas.
3Click in the Security tag text box and select an existing security tag.
4Click OK.
5Click Finish to save the blueprint as draft or continue configuring the blueprint.
You can continue configuring security settings by adding additional security components and by selecting
settings in the Security tab of a vSphere machine component in the design canvas.
Associating Network and Security Components
You can drag network and security components onto the design canvas to make their settings available
for machine component configuration in the blueprint. After you have defined network and security
settings for the machine, you can optionally associate settings from a load balancer component.
After you add an NSX network or security component to the design canvas and define its available
settings, you can open the network and security tabs of a vSphere machine component in the canvas and
configure its settings.
You can drag an on-demand NAT network component onto the design canvas and associate it with a
vSphere machine component or NSX load balancer component in the blueprint.
The network and security component settings that you add to the design canvas are derived from your
NSX configuration and require that you have run data collection for the NSX inventory for vSphere
clusters. Network and security components are specific to NSX and are available for use with vSphere
machine components only. For information about configuring NSX, see NSX Administration Guide.
Note If a blueprint contains one or more load balancers and app isolation is enabled for the blueprint,
the load balancer VIPs are added to the app isolation security group as an IPSet. If a blueprints contains
an on-demand security group that is associated to a machine tier that is also associated to a load
balancer, the on-demand security group includes the machine tier and the IPSet with the load balancer
VIP.
For information about using NAT rules to allow a TCP or UDP port to map from the external IP address of
an Edge (source port) to a private IP address in the NAT network component (target port), see Creating
and Using NAT Rules.
Configuring vRealize Automation
VMware, Inc. 407
Configuring a Blueprint to Provision from an OVF
You can use an OVF to define vSphere machine properties and hardware settings that are ordinarily
defined on blueprint configuration pages in vRealize Automation or programmatically by using
vRealize Automation REST APIs or vRealize CloudClient.
You can also import settings from an OVF to define a value set for an image component profile.
Parameterized blueprints use the image and size component profile types.
OVF is an open-source standard for packaging and distributing software applications for virtual machines.
OVF provisioning is similar to cloning, except that the source machine is an OVF template that's hosted
on a server or a Web site, instead of a virtual machine template that's hosted in vCenter.
An OVF file is typically used to describe a single virtual machine or virtual appliance. It can contain
information about the format of a virtual disk image file and a description of the virtual hardware that
should be emulated to run the OS or application contained on the disk image. An OVA file is a virtual
appliance package that contains files used to describe a virtual machine, including an OVF descriptor file,
optional manifest and certificate files, and other related files.
The ImportOvfWorkflow provisioning option is available on a vSphere machine component when you
define a blueprint. It's also available when you define a value set for an image component profile in the
property dictionary.
You can add blueprint configuration settings to an OVF to describe the following types of information:
nMinimum CPU, memory, and storage allocations.
nUser-configurable custom properties.
nComponent profile settings for blueprint parameterization.
OVF and OVA with multiple machines is not supported.
Essential considerations include the following statements:
nOVF files and OVA packages are supported.
nBasic user name and password authentication for the HTTP server on which the hosted OVF or OVA
resides is supported. The specified URL is validated in the blueprint.
nOVFs and OVAs are not data-collected from the vCenter Server.
nEBS subscriptions are supported.
nYou can define custom properties when you import user-configurable OVF settings into the blueprint.
nYou can add, change, or remove settings obtained from an OVF import when requesting vSphere
machine provisioning.
nYou can add, change, or remove, settings during machine reconfiguration.
Define Blueprint Settings for a vSphere Component By Using an OVF
You can import settings from an OVF to simplify the process of configuring vSphere machine component
settings in a vRealize Automation blueprint.
Configuring vRealize Automation
VMware, Inc. 408
This procedure assumes that you have a basic familiarity with the vRealize Automation blueprint creation
process.
Prerequisites
nLog in to vRealize Automation as an infrastructure architect.
nMeet the remaining prerequisites specified in Configure a Machine Blueprint.
Procedure
1Select Design > Blueprints.
2Click the New icon ( ).
3Enter a blueprint name and description and click OK.
4Click Machine Types in the Categories area and drag a vSphere (vCenter) Machine component
onto the design canvas.
5Click the Build Information tab and specify the following options:
nBlueprint type: Server
nAction: Create
nProvisioning workflow: ImportOvfWorkflow
The ImportOvfWorkflow setting allows the URL option to become available.
6Specify the location of the OVF.
nEnter the path to the OVF URL using the format https://server/folder/name.ovf or
name.ova.
If you enable authentication with the server that is hosting the OVF, enter the credentials for the
authenticating user.
nIf the OVF is hosted on a Web site, and you have created a Proxy endpoint to use in accessing
the Web site, select Use proxy and select the available Proxy endpoint.
Configuring vRealize Automation
VMware, Inc. 409

7Click Configure.
Note If you receive an authentication error message, the server on which the OVF is hosted
requires authentication credentials. If this happens, check the Authentication needed check box,
enter the Username and Password credentials required to authenticate with the HTTP server on
which the OVF resides, and click Configure again.
The Configure option opens a wizard, displaying all the user-configurable properties and values to
import from the OVF as custom properties. If there are no configurable properties to import, the pane
is empty.
a Use the wizard to either accept the default values to be imported or change those values for the
blueprint prior to import.
b Click OK to import the properties and values.
All user-configurable properties in the OVF template are imported into the blueprint as editable
vRealize Automation custom properties, prefaced with VMware.Ovf, while others are imported as
hidden properties that are not meant to be edited after import.
8Click the Machine Resources tab to display the results of the OVF import reflected in the minimum
value entries for the CPUs, Memory(MB), and Storage(GB) options.
You can change any of these values after import.
9Click the Storage tab to display the results of the OVF import.
10 Click the Properties > Custom Properties tab sequence to display the results of the OVF import.
11 Click Save.
What to do next
Continue defining blueprint settings or click Finish.
Define an Image Value Set for a Component Profile By Using an OVF
You can import settings from an OVF to create one or more value sets for an image component profile to
be used in a parameterized vRealize Automation blueprint.
After you import value set definitions for the Image component profile, you can add one or more value
sets to the component profile for a vSphere machine component in a blueprint. When a user requests a
catalog item, they can select an available Image and deploy using parameters that are defined in the
image's value set.
Configuring vRealize Automation
VMware, Inc. 410
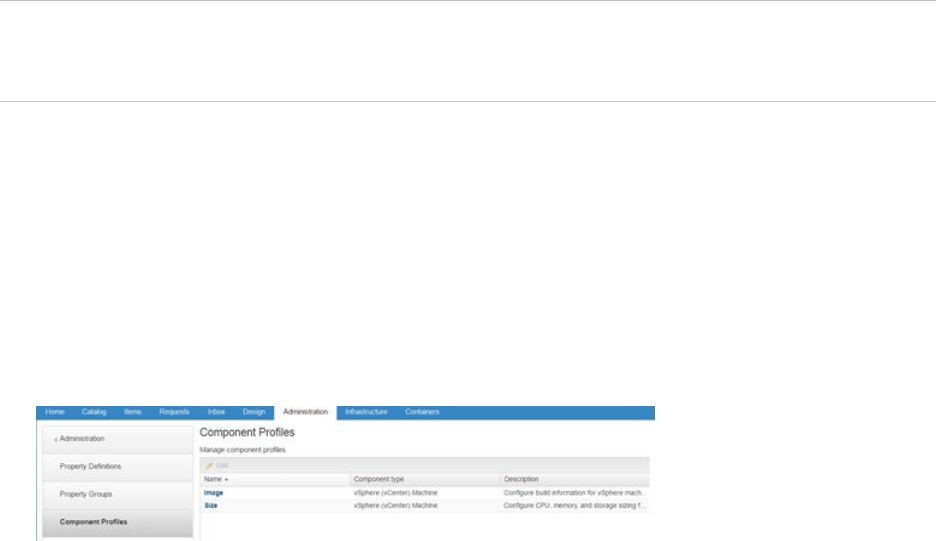
When you import the OVF, user-configurable properties and values in the OVF are not imported as
custom properties in the value set. If you want to use new custom properties from the imported OVF in
relation to the image value set, you must manually define the new custom properties in the vSphere
machine component or overall blueprint. The custom properties created in the parameterized blueprint
should be applicable to the value set for each component profile image.
Note The OVF custom properties for vRealize Automation are not applicable to OVF custom properties
for vSphere. Consider creating one image value set for vRealize Automation and one image value set for
vSphere.
For more information about using component profiles for blueprint parameterization, see Understanding
and Using Blueprint Parameterization.
Prerequisites
nLog in to vRealize Automation as an administrator with tenant administrator and IaaS
administrator access rights.
Procedure
1Select Administration > Property Dictionary > Component Profiles.
2Click Image in the Name column.
Information about the supplied image component property is displayed.
3Click the Value Sets tab.
4To define a new value set click New and configure the Image settings.
a Enter a value in the Display name field to append to the ValueSet delimeter, for example
ProdOVF.
b Accept the default value shown in the Name text box or enter a custom name.
c Enter a description such as Build settings for cloning scenario A in the Description
text box.
d Select Active or Inactive in the Status drop down menu.
Select Active to allow the value set to be visible in the catalog provisioning request form.
e Select the Create build action.
f Select Server or Desktop as the blueprint type.
g Select the ImportOvfWorkflow provisioning workflow.
Configuring vRealize Automation
VMware, Inc. 411

h Enter the path to the OVF URL using the format https://server/folder/name.ovf or
name.ova.
i If you enable authentication with the server that is hosting the OVF, enter the credentials for the
authenticating user.
j If the OVF is hosted on a Web site, and you have created a Proxy endpoint to use in accessing
the Web site, select Use proxy and select the available Proxy endpoint.
5Click Save.
6When you are satisfied with your settings, click Finish.
What to do next
After you have created the image and imported the OVF to define the image value set, you can add the
image to a vSphere machine component in a blueprint.
Using Container Components in Blueprints
You can configure and use container components in the blueprint.
After a container administrator has created container definitions in Containers for vRealize Automation, a
container architect can add and configure container components for vRealize Automation blueprints in the
design canvas.
Container Component Settings
You can configure blueprint settings and options for a Containers for vRealize Automation container
component in the vRealize Automation design canvas.
General Tab
Configure general settings for the blueprint container component in the design canvas.
Table 3‑33. General Tab Settings
Setting Description
Name Enter a name for your container component in the blueprint.
Description Summarize your container component for the benefit of other architects.
Image Enter the full name of an image in a managed registry such as a private
registry or Docker Hub registry, for example
registry.hub.docker.com/library/python.
Commands Enter a command that applies to the specified image, such as python app.py.
The command is run when the container provisioning process is started.
Links Links provide another way to connect containers on a single host or across
hosts. Enter one or more services to which this container is to be linked,
such as redis or datadog.
Network Tab
Configure network settings for the blueprint container component in the design canvas.
Configuring vRealize Automation
VMware, Inc. 412

You can attach a container to a network. The network is represented as a container network component
on the design canvas. Information about available networks is specified in Network page of the container
component form.
Table 3‑34. Network Tab Settings
Setting Description
Networks Specify the existing networks that are defined for the selected
image. You can also create a new network.
When you add a network container component to the design
form, the networks that you specify here are listed as available
options for selection.
Port bindings Specify the port bindings for the selected network. Point
bindings consist of protocol host, host port, and container port.
Publish All Ports Select the check mark box to expose the ports that are used in
the container image to all users.
Host name Specify the container host name. If no name is specified, the
value defaults to the name of the container component in the
blueprint.
Network mode Specify the networking stack of the container. If no value is
specified, the container is configured in Bridge network mode.
Storage Tab
Configure storage settings for the blueprint container component in the design canvas.
Table 3‑35. Storage Tab Settings
Settings Description
Volumes Specify the storage volumes that are mapped from the host to
be used by the container.
Volumes from Specify the storage volumes to be inherited from another
container.
Working directory Specify the directory from which to run commands.
Policy Tab
Configure policy settings such as deployment policy and affinity constraints for the blueprint container
component in the design canvas.
Configuring vRealize Automation
VMware, Inc. 413

Table 3‑36. Policy Tab Settings
Settings Description
Deployment policy Specify a deployment policy to set preferences for which set of
hosts to use for deploying this container. You can associate
deployment policies to hosts, policies, and container definitions
to set a preference for hosts, policies, and quotas when
deploying a container.
You can add a deployment policy by using the Containers tab in
vRealize Automation.
Cluster size Specify the number of instances to generate as a cluster from
this container.
Restart policy Specify a restart policy for how a container is restarted on exit.
Max restart If you selected on-failure as a restart policy, you can specify the
maximum number of restarts.
CPU shares Specify the number of CPU shares allocated for the provisioned
resource.
Memory limit Specify a number between 0 and the memory available in the
placement zone. This is the total memory available for resources
in this placement. 0 means no limit.
Memory swap Total memory limit.
Affinity constraints Defines rules for provisioning of containers on the same or
different hosts.
nAffinity type
For anti-affinity, the containers are placed on different hosts,
otherwise they are placed on the same host .
nService
The service name that is available from the drop-down
menu matches the container component name specified in
the Name field on the General tab.
nConstraint
A hard constraint specifies that if the constraint cannot be
satisfied, provisioning should fail. A soft constraint specifies
that if the constraint cannot be satisfied, provisioning should
continue.
Environment Tab
Configure environment settings such as property bindings for the blueprint container component in the
design canvas.
Configuring vRealize Automation
VMware, Inc. 414

Table 3‑37. Environment Tab Settings
Setting Description
Name The variable name.
Binding Bind the variable to another property, that is a part of the
template. When you select binding, you must input a value in the
_resource~TemplateComponent~TemplateComponentProper
ty syntax.
Value The value of the environment variable or if you selected binding,
the value of the property you want to bind.
Properties Tab
Configure individual and groups of custom properties for the blueprint container component in the design
canvas.
If you select the Property Groups tab and click Add, the following options are available:
nContainer host properties with certificate authentication
nContainer host properties with user/password authentication
If additional property groups have been defined, they are also listed.
If you select the Custom Properties tab and click Add you can add individual custom properties to the
container component.
Table 3‑38. Properties Tab Settings for Custom Properties
Setting Description
Name Enter the name of a custom property or select an available
custom property from the drop-down menu.
Value Enter or edit a value to associate with the custom property
name.
Encrypted You can choose to encrypt the property value, for example, if the
value is a password.
Overridable You can specify that the property value can be overridden by the
next or subsequent person who uses the property. Typically, this
is another architect, but if you select Show in request, your
business users are able to see and edit property values when
they request catalog items.
Show in Request If you want to display the property name and value to your end
users, you can select to display the property on the request form
when requesting machine provisioning. You must also select
Overridable if you want users to provide a value.
Health Config Tab
Specify a health configuration mode for the blueprint container component in the design canvas.
Configuring vRealize Automation
VMware, Inc. 415

Table 3‑39. Health Config Tab Settings
Mode setting Description
None Default. No health checks are configured.
HTTP If you select HTTP, you must provide an API to access and an
HTTP method and version to use . The API is relative and you
do not need to enter the address of the container. You can also
specify a timeout period for the operation and set health
thresholds.
For example, a healthy threshold of 2 means that two
consecutive successful calls must occur for the container to be
considered healthy and in the RUNNING status. An unhealthy
threshold of 2 means that two unsuccessful calls must occur for
the container to be considered unhealthy and in the ERROR
status. For all the states in between the healthy and unhealthy
thresholds, the container status is DEGRADED.
TCP connection If you select TCP connection, you must only enter a port for the
container. The health check attempts to establish a TCP
connection with the container on the provided port. You can also
specify a timeout value for the operation and set healthy or
unhealthy thresholds as with HTTP.
Command If you select Command, you must enter a command to be
executed on the container. The success of the health check is
determined by the exit status of the command.
Ignore health check on provision Uncheck this option to force health check on provision. By
forcing it, a container is not considered provisioned until one
successful health check passes.
Autodeploy Automatic redeployment of containers when they are in ERROR
state.
Log Config Tab
Specify a logging mode, and optional logging options, for the blueprint container component in the design
canvas.
Table 3‑40. Log Config Tab Settings
Setting Description
Driver Select a logging format from the drop-down menu.
Options Enter driver options using a name and value format that adheres
to the logging format.
Using Container Properties and Property Groups in a Blueprint
You can add predefined property groups to a containers component in a vRealize Automation blueprint.
When machines are provisioned by using a blueprint that contain these properties, the provisioned
machine is registered as a Docker Container host machine.
Configuring vRealize Automation
VMware, Inc. 416

Containers for vRealize Automation supplied the following two property groups of container-specific
custom properties. When you add a container component to a blueprint you can add these property
groups to the container to register provisioned machines as container hosts.
nContainer host properties with certificate authentication
nContainer host properties with user/password authentication
These property groups are visible in vRealize Automation when you select Administration > Property
Dictionary > Property Groups.
Because property groups are shared by all tenants, if you are working in a multi-tenant environment,
consider cloning and customizing your properties. By uniquely naming property groups and properties in
the groups, you can edit them to define custom values for use in a specific tenant.
The most commonly used properties are Container.Auth.PublicKey and
Container.Auth.PrivateKey in which the container administrator provides the client certificate for
authenticating with the container host.
Table 3‑41. Containers Custom Properties
Property Description
containers.ipam.driver For use with containers only. Specifies the IPAM driver to be
used when adding a Containers network component to a
blueprint. The supported values depend on the drivers installed
in the container host environment in which they are used. For
example, a supported value might be infoblox or calico
depending on the IPAM plug-ins that are installed on the
container host.
containers.network.driver For use with containers only. Specifies the network driver to be
used when adding a Containers network component to a
blueprint. The supported values depend on the drivers installed
in the container host environment in which they are used. By
default, Docker-supplied network drivers include bridge, overlay,
and macvlan, while Virtual Container Host (VCH)-supplied
network drivers include the bridge driver. Third-party network
drivers such as weave and calico might also be available,
depending on what network plug-ins are installed on the
container host.
Container For use with containers only. The default value is App.Docker
and is required. Do not modify this property.
Container.Auth.User For use with containers only. Specifies the user name for
connecting to the Containers host.
Container.Auth.Password For use with containers only. Specifies either the password for
the user name or the public or private key password to be used.
Encrypted property value is supported.
Container.Auth.PublicKey For use with containers only. Specifies the public key for
connecting to the Containers host.
Container.Auth.PrivateKey For use with containers only. Specifies private key for
connecting to the Containers host. Encrypted property value is
supported.
Configuring vRealize Automation
VMware, Inc. 417

Table 3‑41. Containers Custom Properties (Continued)
Property Description
Container.Connection.Protocol For use with containers only. Specifies the communication
protocol. The default value is API and is required. Do not modify
this property.
Container.Connection.Scheme For use with containers only. Specifies the communication
scheme. The default is https.
Container.Connection.Port For use with containers only. Specifies the Containers
connection port. The default is 2376.
Extensibility.Lifecycle.Properties.VMPSMasterWorkfl
ow32.MachineActivated
For use with containers only. Specifies the event broker property
to expose all Containers properties and is used for registering a
provisioned host. The default value is Container* and is
required. Do not modify this property.
Extensibility.Lifecycle.Properties.VMPSMasterWorkfl
ow32.Disposing
For use with containers only. Specifies the event broker property
to expose all Containersproperties above and is used for
unregistering a provisioned host. The default value is
Container* and is required. Do not modify this property.
Using Containers Network Components in the Design Canvas
You can add one or more Containers network components to the design canvas and configure their
settings for vSphere machine components in the blueprint.
You can add the containers.ipam.driver and containers.network.driver to the component when
you add it to the blueprint.
Add a Container Network Component
You can add container network information to a vRealize Automation blueprint that contains container
components.
You can configure containers in Containers for vRealize Automation by using the vRealize Automation
Containers tab. You can add those containers and their network settings as components in a blueprint by
using options on the vRealize Automation Design tab.
Prerequisites
nLog in to vRealize Automation as a container architect.
nOpen a new or existing blueprint in the design canvas by using the Design tab.
Procedure
1Click Network & Security in the Categories section to display the list of available network and
security components.
2Drag a Container Network component onto the design canvas.
3Enter a name in the Name text box to uniquely label the component in the design canvas.
4(Optional) Enter a component description in the Description text box.
Configuring vRealize Automation
VMware, Inc. 418

5(Optional) Select the External check box if you do not want to specify external IPAM settings.
If you select the External check box, the IPAM Configuration tab is removed.
6Click the IPAM Configuration tab to specify a new or edit an existing subnet, IP range, and gateway
for the network specified in a container component in the blueprint.
IPAM configuration applies to new networks that are created by vRealize Automation as opposed to
those that have been previously created in Docker or other supported container application. These
settings are not validated and provisioning fails if the settings overlap with other networks. For
example, the subnet and gateway must be unique within the container host.
7Click the Properties tab to specify custom properties for the component.
If you select the Property Groups tab and click Add, the following options are available:
nContainer host properties with certificate authentication
nContainer host properties with user/password authentication
If additional property groups have been defined, they are also listed.
If you select the Custom Properties tab and click Add you can add individual custom properties to
the container component.
Table 3‑42. Properties Tab Settings for Custom Properties
Setting Description
Name Enter the name of a custom property or select an available
custom property from the drop-down menu.
Value Enter or edit a value to associate with the custom property
name.
Encrypted You can choose to encrypt the property value, for example, if
the value is a password.
Overridable You can specify that the property value can be overridden by
the next or subsequent person who uses the property.
Typically, this is another architect, but if you select Show in
request, your business users are able to see and edit property
values when they request catalog items.
Show in Request If you want to display the property name and value to your
end users, you can select to display the property on the
request form when requesting machine provisioning. You
must also select Overridable if you want users to provide a
value.
8Click Finish to save the blueprint as draft or continue configuring the blueprint.
What to do next
You can continue configuring container network settings in the Network tab of a container component in
the design canvas.
Configuring vRealize Automation
VMware, Inc. 419
Pushing Container Templates for Use in Blueprints
You can make a container template available for use in a vRealize Automation blueprint.
A container template can include multiple containers. When you push a multi-container template to
vRealize Automation, the template is created as a multi-component blueprint in vRealize Automation.
The container-specific properties that you add to the container template are recognized in the
vRealize Automation blueprint. See Using Container Properties and Property Groups in a Blueprint.
When you request to provision a blueprint published in the vRealize Automation catalog, you provision
the source container application for that blueprint.
You can add other components to the vRealize Automation blueprint, including the following component
types:
nMachine types
nSoftware components
nOther blueprints
nNSX network and security components
nXaaS components
nCustom components
You can push a template from Containers to vRealize Automation. Changes that you make to the
vRealize Automation blueprint have no affect on the Containers template.
You can make subsequent changes in the Containers template and push again to overwrite the blueprint
in vRealize Automation. Pushing the template to vRealize Automation overwrites the blueprint, and any
changes made to the blueprint in vRealize Automation between pushes are lost. To avoid losing blueprint
changes, use vRealize CloudClient to clone a new blueprint or to export the blueprint.
Provisioning a Docker Container or Host from a Blueprint
You can create and use vRealize Automation blueprints to provision machines as registered Docker
Container hosts.
For a provisioned machine to be registered as a container host, it must meet the following requirements:
nThe machine is provisioned by a blueprint that contains Containers-specific custom properties.
The required container-specific custom properties are supplied in two property groups. See Using
Container Properties and Property Groups in a Blueprint.
For information about using custom properties and property groups in vRealize Automation, see
Custom Properties Reference.
nThe machine is accessible over the network.
For example, the machine must have a valid IP address and be powered on.
Configuring vRealize Automation
VMware, Inc. 420
You can define a vRealize Automation blueprint to contain specific custom properties that designate a
machine as a container host when provisioned using the blueprint.
When a machine with the required blueprint properties is successfully provisioned, it is registered in the
Containers and receives events and actions from vRealize Automation.
Creating Microsoft Azure Blueprints and Incorporating Resource Actions
As a cloud or fabric administrator, you can create Microsoft Azure virtual machine blueprints that business
group administrators employ as a building block to create customized provisioned machines for
consumers. DevOps administrators can also create Azure machine blueprints, or they can use existing
Azure machine blueprints when creating composite blueprints.
nCreate a Blueprint for Microsoft Azure
You can create Microsoft Azure virtual machine blueprints that provide access to Azure virtual
machine resources.
nCreate Azure Custom Resource Actions
You can create and use custom resource actions to control Azure virtual machines.
Create a Blueprint for Microsoft Azure
You can create Microsoft Azure virtual machine blueprints that provide access to Azure virtual machine
resources.
A default Azure Machine template appears in the Machine Types category on the vRealize Automation
Edit Blueprint page. You can use this virtual machine template as the basis of an Azure blueprint as
described in the following procedure. After you create an Azure blueprint, you can publish and deploy it
as designed, or you can use it in conjunction with custom Azure resources or with other blueprints to
create a composite blueprint.
After creating and publishing the blueprint, users with appropriate privileges can request and provision an
Azure instance through the vRealize Automation Service Catalog.
Note that Azure blueprints define virtual machine requirements. vRealize Automation uses these
requirements to select the most appropriate reservation for the deployment.
For information about the NSX Settings and Properties tab on the New Blueprint dialog box, see
Configuring vRealize Automation.
If you want to create two virtual machines from a single deployment simultaneously, you must create two
network interface names and two virtual machine names.
Prerequisites
nObtain a valid Azure subscription ID and related information including resource group, storage
account, and virtual network information that you may need to create a blueprint.
nConfigure an Azure endpoint to create a connection to Azure for use with your vRealize Automation
deployment.
nConfigure Azure reservations as appropriate for your business groups.
Configuring vRealize Automation
VMware, Inc. 421
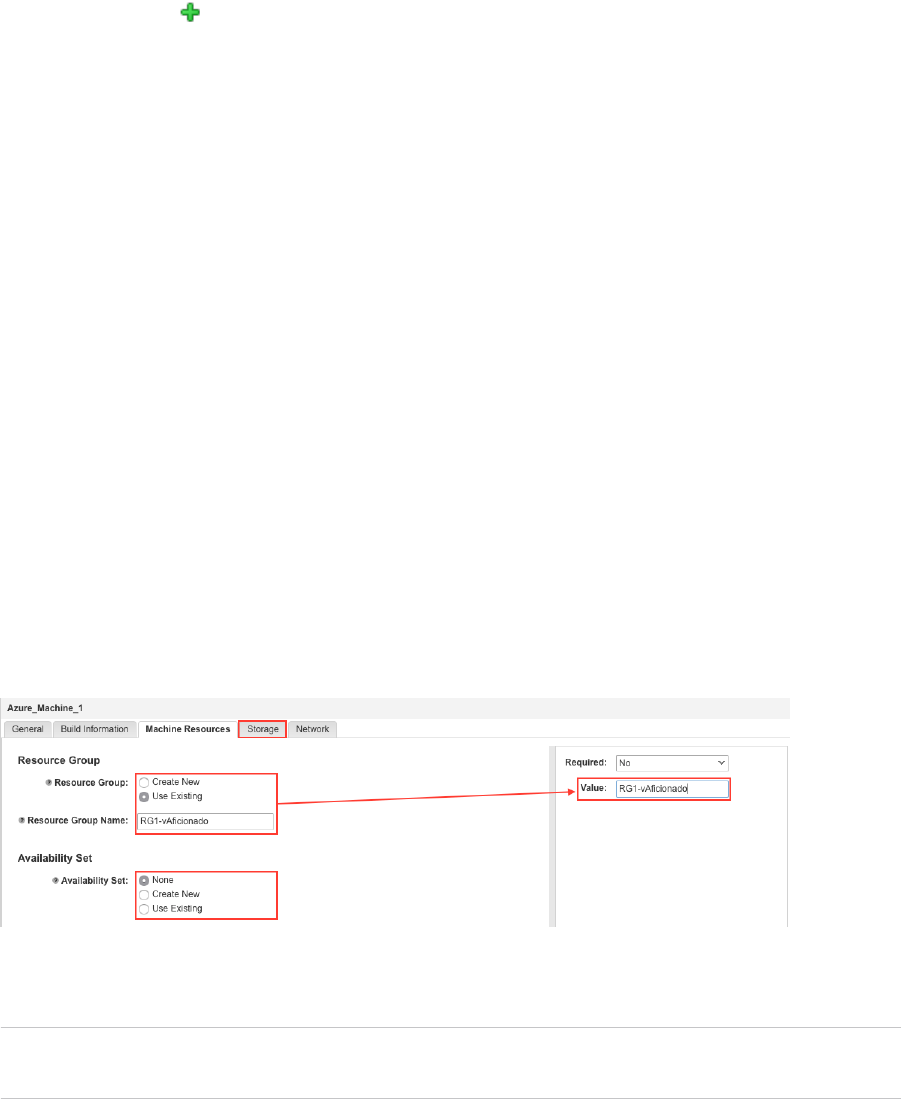
Procedure
1Select Design > Blueprints.
2Click the New icon ( ).
3Enter a blueprint name in the Name text box.
The name you enter also populates the ID text box. For most cases, you can ignore the NSX
Settings and Properties tabs.
4Click OK.
5Click Machine Types in the Categories menu.
6Drag the Azure Machine virtual machine template to the Design canvas.
If you created a custom Azure resource for use as the basis of a blueprint, you can select that
resource from the assigned category in the Categories list.
7Enter the required information for the Azure virtual machine in the text boxes on the tabbed pages
located on the bottom half of the Design Canvas that appear when you drag the Azure Machine
template to the Design Canvas.
Available selections for text boxes and other parameters on all of these tabs are determined primarily
by the Azure endpoint that was configured as a basis for blueprints.
For most parameters, when you can click the text box beside the parameter name, a new pane opens
on the right side of the page. In this pane, you can enter parameter values in the Value text box and
indicate whether or not it is Required. Note that in some cases you can also enter a Minimum value
and a Maximum value. Click Apply within the right pane to populate the initial text box.
Figure 3‑1. Azure blueprint right side menu
Most parameters also have an Advanced Options button. These options enable you to specify
parameter lengths and even hide parameters from end users.
Note You must populate required parameters on each tab in order to proceed with the blueprint
configuration. If you want to leave a field empty, you can go back and delete the entry before saving.
Configuring vRealize Automation
VMware, Inc. 422

Tab Description Important Parameters
General Select basic connection
information for the Azure virtual
machine such as the endpoint
to be used.
ID - Identifies the Azure virtual machine you are creating. If you
change this name, the Azure virtual machine image on the Design
Canvas is also updated automatically.
Description - Identifies the virtual machine you are creating and
whether or not it is required.
Instances - This selection enables you to create a scalable virtual
machine. Use the Minimum and Maximum fields to identity the
number of Azure instances that can be spawned from this machine.
Use password authentication: Select Yes to use password
authentication or No to use SSH.
Admin username - Leave this blank and it can be assigned by the
user provisioning the machine.
Admin password - Leave this field blank, and the individual who
provisions the machine can supply the appropriate password,
Build Information Enables you to configure
information about the virtual
machine being created.
Location - Select the geographical location where this virtual
machine will be deployed.
Machine Prefix - Select the appropriate radio button to indicate
whether you want to use the machine prefix from the associated
business group or to create a custom prefix. If you want to use a
custom prefix, enter it in the Custom Machine Prefix text box.
Virtual machine image type - Choose the appropriate radio button
for a Custom or Stock virtual machine image. A custom virtual
machine is created from the Azure classic deployment and offers
more configuration options regarding cloud services, storage
accounts, and availability sets,
Virtual Machine Image - Identify the Azure virtual machine image
that the blueprint will be based upon.
nFor a stock virtual machine image, the machine image URN
should match the following format: (publisher):(offer):(sku):
(version).
nFor a custom virtual machine image, the machine image URN
should match the following format:
https://storageaccount.blob.core.windows.net/contain
er/image.vhd
Also you must complete OS Image Type (Windows or Linux) text box
for Custom images.
Admin User - Type the name of the designated admin user
configured for virtual machines based on this blueprint. Alternatively,
it can be left blank here entered on the request form.
Authentication - Select the appropriate radio button to indicate
whether virtual machines based on this blueprint will require
password or SSH authentication.
Admin Password - The administrator password for the virtual
machine instance.
Series - Defines the general size of a virtual machine instance. See
the Azure documentation at https://azure.microsoft.com/en-
us/documentation/articles/virtual-machines-windows-sizes/ for series
information.
Configuring vRealize Automation
VMware, Inc. 423

Tab Description Important Parameters
Size - Defines the specific virtual machine instance size within a
series. Size is related to the selected Series. If you have a valid
connection to an Azure instance, the available sizes fare populated
dynamically based on the subscription and selected location and
series. See the Azure documentation for size information.
Instance Size Details - Optional information about the virtual
machine instance series and size.
Machine Resources Organize virtual machine
resources into buckets. A
resource group is an
organizational construct that
groups virtual machine
resources such as Web sites,
accounts, databases and
networks.
An Availability Set is a
mechanism for managing two
or more virtual machines to
support redundancy. See
https://azure.microsoft.com/en-
us/documentation/articles/virtu
al-machines-windows-manage-
availability/ for more
information about Azure
Availability Sets.
Note If you configure a
blueprint with the maximum
number of Azure instances set
to a value greater than 1, then
you should use the existing
resource group and availability
set rather than create new
ones. Using new resource
groups or new availability sets
on more than one instance in
the same deployment will
cause errors and other
problems if associated with
load balancers.
Create or reuse Resource group: - Select the appropriate radio
button to indicate whether you want to use the existing Azure
resource group or create a new one. You can find this name of the
existing resource group on the Resource Groups page in the Azure
portal. If you choose to create a new resource group, an appropriate
name for the new group appears automatically in the Resource
Group text box.
Create or reuse Availability set: Select the appropriate radio button
depending on what you want to do. If you select Create New, the
appropriate information for the new Availability set info appears in the
text box.
Configuring vRealize Automation
VMware, Inc. 424

Tab Description Important Parameters
Storage Enables you to organize Azure
storage accounts. A storage
account provides access to the
different types of Azure
storage, such as Azure Blob,
Queue Table, and File storage.
For most blueprints, you can
accept the defaults.
Storage account - Enter the storage account name for the virtual
machine if appropriate. The Azure virtual machine operating system
disk is deployed to this storage account. You can find storage group
information in the Azure portal. You may have one or more storage
accounts.
Note Storage account names with underscores or other special
characters may cause errors.
Add Diagnostic Storage - Select this check box if you use
diagnostic data with your Azure instance.
Number of Storage Disks - Select the appropriate number of data
storage disks as used with your virtual machine. You can specify up
to four disks. These disks are in addition to the operating system disk
as specified in the Storage account text box.
Storage Disk #
nDisk Name - Identifying name assigned to the disk.
nDisk Type - Storage device type.
nDisk Size - Storage size.
nReplication - Redundancy method used for disk back up.
nHost Caching - Indicates whether read/writes are cached to
increase performance.
Configuring vRealize Automation
VMware, Inc. 425

Tab Description Important Parameters
Network Enables you to select
networking for the virtual
machine blueprint. For most
blueprints, you can accept the
defaults and the consumer will
enter the appropriate network
information during deployment.
Note You can create only one
virtual machine per interface,
but each virtual machine can
have up to four interfaces.
Click the table to open a dialog to the right that contains another
editable table with the following fields.
nLoad Balancer Name - The load balancer used with the Azure
instance.
nNumber of Network Interfaces - Select the number of network
interfaces used with the Azure instance. The number of network
interfaces must be supported by the virtual machine size as
selected on the Storage tab.
nNetwork interface - Select the appropriate network interface for
the virtual machine blueprint. If you enter an existing network,
you can ignore all other network tabs. If you enter a network
interface name that does not exist, a new interface with that
name is created, and you can use the other Network tabs to
configure the interface.
nNIC Name Prefix - The prefix for the network interface card.
nIP Address Type - Indicate whether the virtual machine uses a
static or dynamic IP address.
nNetworking Configuration - Enter the appropriate networking
configuration. Network profiles are supported. There are two
options, Specify Azure Networks and Use Network Profile,
and the subsequent fields change depending on which option
you select.
nThe following options are available if you select Specify
Azure Networks. If you leave these text boxes empty, then
default network constructs are used based on information
specified in the applicable reservation.
nvNet Name - Name of the virtual network
nsubNet Name - The domain name of the Azure subnet.
Note You can set the public IP address for Azure during
day 2 operations.
nIf you select Use Network Profile, the network configuration
is detached from underlying Azure constructs and is instead
coupled with the vRealize Automation networking profile.
nIf you leave the Network Profile text box empty, the
default Azure vNet and subnet pair are resolved based
on applicable reservations which have a network profile
specified.
nIf you enter a network profile, then the Azure vNet and
subnet are resolved based on the matching reservation.
Properties Enables you to add custom
properties to your blueprint.
Custom properties applied
here can be overridden by
properties assigned later in the
precedence chain. For more
information about order of
precedence for custom
properties, see Custom
Properties Reference.
There are two options for adding custom properties as represented
by two tabs on the Properties dialog.
nProperty Groups: These are reusable groups that simplify the
process of adding custom properties. There are four options for
selecting property groups:
nAdd - Enables you to add an available property group to the
blueprint.
nMove up/Move down - Enables you to control the
precedence of property groups. The first group has the
highest priority, and its custom properties take first
precedence.
Configuring vRealize Automation
VMware, Inc. 426

Tab Description Important Parameters
nView properties - Enables you to view the custom properties
within the selected group.
nView merged properties - If a custom property is included in
more than one property group, the value in the property
group with the highest priority takes precedence. Viewing
these merged properties can assist you in prioritizing
property groups.
nCustom Properties: Use this tab to add individual custom
properties.
nNew - Enables you to add an individual custom property to
the blueprint.
nName - Enter a name to identify the property. For a list of
custom properties and their definitions, see Custom
Properties Reference.
nValue - Enter a value for the custom property.
nEncrypted - You can encrypt the property.
nOverridable - You can specify that the property value can be
overridden by the next or subsequent user. Typically, this is
another architect, but if you select Show in request, business
users can see and edit property values when they request
catalog items.
nShow in request - If you want to display the property name
and value to end users, you can select to display the
property on the request form when requesting machine
provisioning. You must also select overridable if you want
users to provide a value.
8Click Finish to save the blueprint configuration and return to the main Blueprints page.
What to do next
If you have configured custom properties in your Azure reservation to support a VPN tunnel, you can add
software components to Azure blueprints.
1 Select Software Components on the Categories menu. Software components that you have
configured Azure blueprints appear in the pane below.
2 Select Azure Virtual Machine in the container drop-down values.
3 Select the desired software component and drag it to the Azure virtual machine on the Design
Canvas.
4 If there are properties required for the software component, enter them in the appropriate parameter
text boxes below the Design Canvas.
5 Click Save.
If you want to publish the blueprint, select it on the main Blueprints page and click Publish. A published
blueprint is available on Catalog Items page. Also, a business group manager or equivalent can use this
published blueprint as the basis of a composite blueprint.
Configuring vRealize Automation
VMware, Inc. 427

Create Azure Custom Resource Actions
You can create and use custom resource actions to control Azure virtual machines.
The vRealize Automation Azure implementation is supplied with two custom resource actions out of the
box:
nStart virtual machine
nStop virtual machine
In addition, you can create custom resource actions using workflows that are accessible through
vRealize Orchestrator library available from the vRealize Automation interface.
You can work with Azure resource actions just as with any other XaaS resource actions in
vRealize Automation. See Creating XaaS Blueprints and Resource Actions and vRealize Orchestrator
Integration in vRealize Automation in Configuring vRealize Automation for more information about XaaS
resource actions.
Prerequisites
Configure a valid Azure Endpoint for your vRealize Automation deployment.
Procedure
1Select Design > XaaS > Resource Actions
2Click New.
3Navigate to Orchestrator > Library > Azure in thevRealize Orchestrator workflow library.
4Select the desired folder and workflow.
5Configure the action for your needs as you would any other XaaS resource action.
Creating Puppet Enabled vSphere Blueprints
You can create Puppet enabled vSphere blueprints that support Puppet-based configuration management
of vSphere virtual machines.
Puppet-based configuration management typically uses roles and environments to define and manage
software configuration. Be aware that the meaning of role and environment in Puppet differs for the more
IT generic meaning.
An endpoint establishes a connection with an existing Puppet enterprise deployment. When the endpoint
is created, vRealize Automation retrieves the list of environments and roles associated with the specified
deployments. You can use these environments and roles in either early binding or late binding scenarios
when configuring a Puppet enabled virtual machine blueprint.
Note Puppet components are currently supported only on vSphere blueprints and virtual machines.
Add a Puppet Component to a vSphere Blueprint
You can add a Puppet configuration management component to a vSphere blueprint to facilitate enforced
management of vSphere virtual machines using a Puppet Master.
Configuring vRealize Automation
VMware, Inc. 428

Adding a Puppet component to a vSphere blueprint adds a Puppet agent to virtual machines created from
that blueprint.
When creating Puppet-enabled vSphere blueprints, you must choose whether to create an early binding
or late binding configuration.
With early binding, users define the Puppet role and environment settings for all virtual machines based
on a particular blueprint when the Puppet component is added to the blueprint. These settings remain
static during the life of the blueprint. For late binding, you have several options.
nLeave the Puppet environment andPuppet role text boxes empty in the blueprint, and users provide
these settings at request time.
nSpecify a Puppet environment and leave the Puppet role box empty. Users must specify the role at
request time.
Prerequisites
Create an appropriate vSphere blueprint. See vSphere Machine Component Settings for more
information.
Procedure
1Select Design > Blueprints.
2Select Configuration Management from the Categories menu on the Design page for blueprints.
3Select the Puppet component and drag it to the vSphere component on the Design Canvas.
4Enter an ID and Description for the Puppet component on the General tab at the bottom of the page.
The ID and description are arbitrary.
5Click the Server tab.
6Click the drop-down and select the appropriate Puppet Master for the blueprint.
7Select the appropriate Puppet environment and Puppet role if you want to use early binding for this
component.
To configure early binding, select a Puppet environment and role. If you want to create a component
with late binding, select a Puppet environment, or leave the Puppet environment and Puppet role
text boxes empty and select the Set in Request form check boxes.
Note The Set in Request form check boxes are tied together. If you select one, the other is
selected automatically.
8Click Finish to save the Puppet component configuration and return to the main blueprint Design
page.
Configuring vRealize Automation
VMware, Inc. 429

Add RDP Connection Support to Your Windows Machine Blueprints
To allow catalog administrators to entitle users to the Connect using RDP action for Windows blueprints,
add RDP custom properties to the blueprint and reference the RDP file that the system administrator
prepared.
Note If your fabric administrator creates a property group that contains the required custom properties
and you include it in your blueprint, you do not need to individually add the custom properties to the
blueprint.
Prerequisites
nLog in to vRealize Automation as a tenant administrator or business group manager.
nObtain the name of the custom RDP file that your system administrator created for you. See Create a
Custom RDP File to Support RDP Connections for Provisioned Machines.
nCreate at least one Windows machine blueprint.
Procedure
1Select Design > Blueprints.
2Point to the blueprint to update and click Edit.
3Select the machine component on your canvas to edit the details.
4Click the Properties tab.
5Click the Custom Properties tab.
Configuring vRealize Automation
VMware, Inc. 430

6Configure RDP settings.
a Click New Property.
b Enter the RDP custom property names in the Name text box and the corresponding values in the
Value text box.
Option Description and Value
(Required)
RDP.File.Name
Specifies an RDP file from which to obtain settings, for example
My_RDP_Settings.rdp. The file must reside in the Website\Rdp subdirectory
of the vRealize Automation installation directory.
(Required)
VirtualMachine.Rdp.SettingN
Specifies the RDP settings to be used when opening an RDP link to the
machine. N is a unique number used to distinguish one RDP setting from
another. For example, to specify the RDP authentication level so that no
authentication requirement is specified, define the custom property
VirtualMachine.Rdp.Setting1 and set the value to authentication level:i:3.
For information about available RDP settings, and their correct syntax, see
Microsoft Windows RDP documentation such as RDP Settings for Remote
Desktop Services in Windows Server.
VirtualMachine.Admin.NameComplet
ion
Specifies the domain name to include in the fully qualified domain name of the
machine that the RDP or SSH files generate for the user interface options
Connect Using RDP or Connect Using SSH option. For example, set the
value to myCompany.com to generate the fully qualified domain name my-
machine-name.myCompany.com in the RDP or SSH file.
c Click Save.
7Select the blueprint row and click Publish.
Your catalog administrators can entitle users to the Connect Using RDP action for machines provisioned
from your blueprint. If users are not entitled to the action, they are not able to connect by using RDP.
Scenario: Add Active Directory Cleanup to Your CentOS Blueprint
As an IaaS architect, you want to configure vRealize Automation to clean up your Active Directory
environment whenever provisioned machines are removed from your hypervisors. So you edit your
existing vSphere CentOS blueprint to configure the Active Directory cleanup plugin.
Using the Active Directory Cleanup Plugin, you can specify the following Active Directory account actions
to occur when a machine is deleted from a hypervisor:
nDelete the AD account
nDisable the AD account
nRename AD account
nMove the AD account to another AD organizational unit (OU)
Prerequisites
Note This information does not apply to Amazon Web Services.
nLog in to vRealize Automation as an infrastructure architect.
Configuring vRealize Automation
VMware, Inc. 431

nGather the following information about your Active Directory environment:
nAn Active Directory account user name and password with sufficient rights to delete, disable,
rename, or move AD accounts. The user name must be in domain\username format.
n(Optional) The name of the OU to which to move destroyed machines.
n(Optional) The prefix to attach to destroyed machines.
nCreate a machine blueprint. See Installing and Configuring vRealize Automation for the Rainpole
Scenario.
Procedure
1Select Design > Blueprints.
2Point to your Centos on vSphere blueprint and click Edit.
3Select the machine component on your canvas to bring up the details tab.
4Click the Properties tab.
5Click the Custom properties tab to configure the Active Directory Cleanup Plugin.
a Click New Property.
b Type Plugin.AdMachineCleanup.Execute in the Name text box.
c Type true in the Value text box.
dClick the Save icon ( ).
6Configure the Active Directory Cleanup Plugin by adding custom properties.
Option Description and Value
Plugin.AdMachineCleanup.UserName Enter the Active Directory account user name in the Value text box. This user
must have sufficient privileges to delete, disable, move, and rename Active
Directory accounts. The user name must be in the format domain\username.
Plugin.AdMachineCleanup.Password Enter the password for the Active Directory account user name in the Value text
box.
Plugin.AdMachineCleanup.Delete Set to True to delete the accounts of destroyed machines, instead of disabling
them.
Plugin.AdMachineCleanup.MoveToOu Moves the account of destroyed machines to a new Active Directory
organizational unit. The value is the organization unit to which you are moving the
account. This value must be in ou=OU, dc=dc format, for example
ou=trash,cn=computers,dc=lab,dc=local.
Plugin.AdMachineCleanup.RenamePre
fix
Renames the accounts of destroyed machines by adding a prefix. The value is
the prefix string to prepend, for example destroyed_.
7Click OK.
Whenever machines provisioned from your blueprint are deleted from your hypervisor, your Active
Directory environment is updated.
Configuring vRealize Automation
VMware, Inc. 432

Scenario: Allow Requesters to Specify Machine Host Name
As a blueprint architect, you want to allow your users to choose their own machine names when they
request your blueprints. So you edit your existing CentOS vSphere blueprint to add the Hostname custom
property and configure it to prompt users for a value during their requests.
Note If your fabric administrator creates a property group that contains the required custom properties
and you include it in your blueprint, you do not need to individually add the custom properties to the
blueprint.
Prerequisites
nLog in to vRealize Automation as an infrastructure architect.
nCreate a machine blueprint. See Installing and Configuring vRealize Automation for the Rainpole
Scenario.
Procedure
1Select Design > Blueprints.
2Point to your Centos on vSphere blueprint and click Edit.
3Select the machine component on your canvas to bring up the details tab.
4Click the Properties tab.
5Click New Property.
6Enter Hostname in the Name text box.
7Leave the Value text box blank.
8Configure vRealize Automation to prompt users for a hostname value during request.
a Select Overridable.
b Select Show in Request.
Because host names must be unique, users can only request one machine at a time from this
blueprint.
9Click the Save icon ( ).
10 Click OK.
Users who request a machine from your blueprint are required to specify a host name for their machine.
vRealize Automation validates that the specified host name is unique.
Configuring vRealize Automation
VMware, Inc. 433
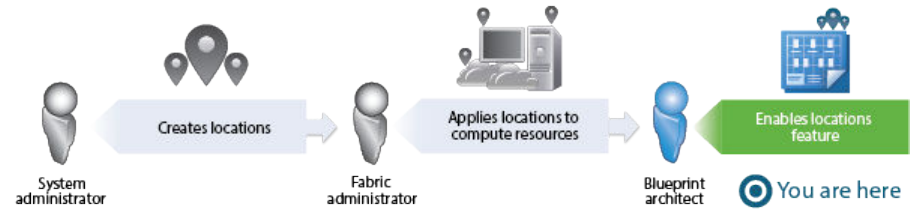
Scenario: Enable Users to Select Datacenter Locations for Cross Region
Deployments
As a blueprint architect, you want to allow your users to choose whether to provision machines on your
Boston or London infrastructure, so you edit your existing vSphere CentOS blueprint to enable the
locations feature.
You have a datacenter in London, and a datacenter in Boston, and you don't want users in Boston
provisioning machines on your London infrastructure or vice versa. To ensure that Boston users provision
on your Boston infrastructure, and London users provision on your London infrastructure, you want to
allow users to select an appropriate location for provisioning when they request machines.
Prerequisites
nLog in to vRealize Automation as an infrastructure architect.
nAs a system administrator, define the datacenter locations. See Scenario: Add Datacenter Locations
for Cross Region Deployments.
nAs a fabric administrator, apply the appropriate locations to your compute resources. See Scenario:
Apply a Location to a Compute Resource for Cross Region Deployments.
nCreate a machine blueprint. See Installing and Configuring vRealize Automation for the Rainpole
Scenario.
Procedure
1Select Design > Blueprints.
2Point to your Centos on vSphere blueprint and click Edit.
3Select the machine component on your canvas to bring up the General details tab.
4Select the Display location on request check box.
5Click Finish.
6Point to your Centos on vSphere blueprint and click Publish.
Business group users are now prompted to select a datacenter location when they request a machine to
be provisioned from your blueprint.
Configuring vRealize Automation
VMware, Inc. 434

Designing Software Components
As the software architect, you create reusable software components, standardizing configuration
properties and using action scripts to specify exactly how components are installed, configured,
uninstalled, or updated during deployment scale operations. You can rewrite these action scripts at any
time and publish live to push changes to provisioned software components.
You can design your action scripts to be generic and reusable by defining and consuming name and
value pairs called software properties and passing them as parameters to your action scripts. If your
software properties have values that are unknown or need to be defined in the future, you can either
require or allow other blueprint architects or end users to provide the values. If you need a value from
another component in a blueprint, for example the IP address of a machine, you can bind your software
property to that machine's IP address property. Using software properties to parameterize your action
scripts makes them generic and reusable so you can deploy software components on different
environments without modifying your scripts.
Table 3‑43. Life Cycle Actions
Life Cycle Actions Description
Install Install your software. For example, you might download Tomcat server installation bits and install a
Tomcat service. Scripts you write for the Install life cycle action run when software is first provisioned,
either during an initial deployment request or as part of a scale out.
Configure Configure your software. For the Tomcat example, you might set the JAVA_OPTS and
CATALINA_OPTS. Configuration scripts run after the install action completes.
Start Start your software. For example, you might start the Tomcat service using the start command in the
Tomcat server. Start scripts run after the configure action completes.
Update If you are designing your software component to support scalable blueprints, handle any updates that
are required after a scale in or scale out operation. For example, you might change the cluster size for
a scaled deployment and manage the clustered nodes using a load balancer. Design your update
scripts to run multiple times (idempotent) and to handle both the scale in and the scale out cases.
When a scale operation is performed, update scripts run on all dependent software components.
Uninstall Uninstall your software. For example, you might perform specific actions in the application before a
deployment is destroyed. Uninstall scripts run whenever software components are destroyed.
You can download predefined Software components for a variety of middleware services and applications
from the VMware Solution Exchange. Using either the vRealize CloudClient or vRealize Automation
REST API, you can programmatically import predefined Software components into your
vRealize Automation instance.
nTo visit the VMware Solution Exchange, see
https://solutionexchange.vmware.com/store/category_groups/cloud-management.
nFor information about the vRealize Automation REST API, see Programming Guide and vRealize
Automation Content Service API at https://code.vmware.com.
nFor information about vRealize CloudClient, see https://developercenter.vmware.com/tool/cloudclient.
Configuring vRealize Automation
VMware, Inc. 435

Property Types and Setting Options
You can design your action scripts to be generic and reusable by defining and consuming name and
value pairs called software properties and passing them as parameters to your action scripts. You can
create software properties that expect string, array, content, boolean, or integer values. You can supply
the value yourself, require someone else to supply the value, or retrieve the value from another blueprint
component by creating a binding.
Property Options
You can compute the value of any string property by selecting the computed check box, and you can
make any property encrypted, overridable, or required by selecting the appropriate check boxes when
you configure Software properties. Combine these options with your values to achieve different purposes.
For example, you want to require blueprint architects to supply a value for a password and encrypt that
value when they use your software component in a blueprint. Create the password property, but leave the
value text box blank. Select Overridable, Required, and Encrypted. If the password you are expecting
belongs to your end user, the blueprint architect can select Show in Request to require your users to
enter the password when they fill out the request form.
Option Description
Encrypted Mark properties as encrypted to mask the value and display as
asterisks in vRealize Automation. If you change a property from
encrypted to unencrypted, vRealize Automation resets the
property value. For security, you must set a new value for the
property.
Overridable Allow architects to edit the value of this property when they are
assembling an application blueprint. If you enter a value, it
displays as a default.
Required Require architects to provide a value for this property, or to
accept the default value you supply.
Computed Values for computed properties are assigned by the INSTALL,
CONFIGURE, START, or UPDATE life cycle scripts. The
assigned value is propagated to the subsequent available life
cycle stages and to components that bind to these properties in
a blueprint. If you select Computed for a property that is not a
string property, the property type is changed to string.
If you select the computed property option, leave the value for your custom property blank. Design your
scripts for the computed values.
Configuring vRealize Automation
VMware, Inc. 436

Table 3‑44. Scripting Examples for the Computed Property Option
Sample String Property Script Sytax Sample Usage
my_unique_id = "" Bash - $my_unique_id export
my_unique_id="012345678
9"
Windows CMD - %my_unique_id% set
my_unique_id=0123456789
Windows PowerShell - $my_unique_id $my_unique_id =
"0123456789"
String Property
String properties expect string values. You can supply the string yourself, require someone else to supply
the value, or retrieve the value from another blueprint component by creating a binding to another string
property. String values can contain any ASCII characters. To create a property binding, use the
Properties tab on the design canvas to select the appropriate property for binding. The property value is
then passed to the action scripts as raw string data. When you bind to a blueprint string property, make
sure the blueprint component you bind to is not clusterable. If the component is clustered, the string value
becomes an array and you do not retrieve the value you expect.
Sample String Property Script Syntax Sample Usage
admin_email = "admin@email987.com" Bash - $admin_email echo $admin_email
Windows CMD - %admin_email% echo %admin_email%
Windows PowerShell - $admin_email write-output $admin_email
Array Property
Array properties expect an array of string, integer, decimal, or boolean values defined as [“value1”,
“value2”, “value3”…]. You can supply the values yourself, require someone else to supply the values, or
retrieve the values from another blueprint component by creating a property binding.
When you create a software property of type Array, where the data type is integer or decimal, you must
use a semicolon as an array element separator, regardless of the locale. Do not use a comma (,) or a dot
(.). For some locales, you can use a comma (,) as the decimal separator. For example:
nA valid array for French resembles: [1,11;2,22;3,33]
nA valid array for English resembles: [1.11,2.22,3.33]
Configuring vRealize Automation
VMware, Inc. 437

When you pass large numbers into an array, do not use the grouping format. For example: do not use
4444 444.000 (French), 4.444.444,000 (Italian), or 4,444,444.000 (English), because data files that
contain locale-specific formats might be misinterpreted when they are transferred to a machine that has a
different locale. The grouping format is not allowed, because a number such as 4,444,444.000 would be
considered as three separate numbers. Instead, just enter 4444444.000.
When you define values for an array property you must enclose the array in square brackets. For an array
of strings, the value in the array elements can contain any ASCIl characters. To properly encode a
backslash character in an Array property value, add an extra backslash, for example,
["c:\\test1\\test2"]. For a bound property, use the Properties tab in the design canvas to select the
appropriate property for binding. If you bind to an array, you must design your software components so
they don't expect a value array in any specific order.
For example, consider a load balancer virtual machine that is balancing the load for a cluster of
application server virtual machines. In such a case, an array property is defined for the load balancer
service and set to the array of IP addresses of the application server virtual machines.
These load balancer service configure scripts use the array property to configure the appropriate load
balancing scheme on the Red Hat, Windows, and Ubuntu operating systems.
Sample Array Property Script Syntax Sample Usage
operating_systems = ["Red
Hat","Windows","Ubuntu"]
Bash - ${operating_systems[@]}
for the entire array of strings
${operating_systems[N]}
for the individual array element
for (( i = 0 ; i < $
{#operating_systems[@]}; i++ )); do
echo ${operating_systems[$i]}
done
Windows CMD - %operating_systems_N%
where N represents the position of the element
in the array
for /F "delims== tokens=2" %%A in
('set operating_systems_') do (
echo %%A
)
Windows PowerShell - $operating_systems
for the entire array of strings
$operating_systems[N]
for the individual array element
foreach ($os in $operating_systems){
write-output $os
}
Content Property
The content property value is a URL to a file to download content. Software agent downloads the content
from the URL to the virtual machine and passes the location of the local file in the virtual machine to the
script.
Content properties must be defined as a valid URL with the HTTP or HTTPS protocol. For example, the
JBOSS Application Server Software component in the Dukes Bank sample application specifies a content
property cheetah_tgz_url. The artifacts are hosted in the Software appliance and the URL points to that
location in the appliance. The Software agent downloads the artifacts from the specified location into the
deployed virtual machine.
For information about software.http.proxy settings that you can use with content properties, see
Custom Properties Reference.
Configuring vRealize Automation
VMware, Inc. 438

Sample String Property Script Syntax Sample Usage
cheetah_tgz_url =
"http://app_content_server_ip:port/artifacts/software/jboss/cheetah-2.4.4.tar.gz"
Bash -
$cheetah_tgz_url tar -zxvf
$cheetah_tgz_url
Windows CMD -
%cheetah_tgz_url% start /wait
c:\unzip.exe
%cheetah_tgz_url%
Windows PowerShell
- $cheetah_tgz_url & c:\unzip.exe
$cheetah_tgz_url
Boolean Property
Use the boolean property type to provide True and False choices in the Value drop-down menu.
Integer Property
Use the integer property type for zeros, and positive or negative integers.
Decimal Property
Use the decimal property type for values representing non-repeating decimal fractions.
When Your Software Component Needs Information from Another
Component
In several deployment scenarios, a component needs the property value of another component to
customize itself. You can do this with vRealize Automation by creating property bindings. You can design
your Software action scripts for property bindings, but the actual bindings are configured by the architect
that assembles the blueprint.
In addition to setting a property to a hard-coded value, a software architect, IaaS architect, or application
architect can bind Software component properties to other properties in the blueprint, such as an IP
address or an installation location. When you bind a Software property to another property, you can
customize a script based on the value of another component property or virtual machine property. For
example, a WAR component might need the installation location of the Apache Tomcat server. In your
scripts, you can configure the WAR component to set the server_home property value to the Apache
Tomcat server install_path property value in your script. As long as the architect who assembles the
blueprint binds the server_home property to the Apache Tomcat server install_path property, then the
server_home property value is set correctly.
Your action scripts can only use properties that you define in those scripts, and you can only create
property bindings with string and array values. Blueprint property arrays are not returned in any specific
order, so binding to clusterable or scalable components might not produce the values you expect. For
example, your software component requires each of the machine IDs of a cluster of machines, and you
allow your users to request a cluster from 1-10, and to scale the deployment from 1-10 machines. If you
configure your software property as a string type, you get a single randomly selected machine ID from the
cluster. If you configure your software property as an array type, you get an array of all the machine IDs in
Configuring vRealize Automation
VMware, Inc. 439

the cluster, but in no particular order. If your users scale the deployment, the order of values could be
different for each operation. To make sure you never lose values for clustered components, you can use
the array type for any software properties. However, you must design your software components so they
don't expect a value array in any specific order.
See the Examples of String Property Bindings table for examples of a string property value when binding
to different types of properties.
Table 3‑45. Examples of String Property Bindings
Sample Property Type Property Type to Bind Binding Outcome (A binds to B)
String (property A) String (property B="Hi") A="Hi"
String (property A) Content (property
B="http://my.com/content")
A="http://my.com/content"
String (property A) Array (property B=["1","2"]) A="["1","2"]"
String (property A) Computed (property B="Hello") A="Hello"
See the Examples of Array Property Bindings table for examples of an array property value when binding
to different types of properties.
Table 3‑46. Examples of Array Property Bindings
Sample Property Type Property Type to Bind Binding Outcome (A binds to B)
Array (property A) String (property B="Hi") A="Hi"
Array (property A) Content (property
B="http://my.com/content")
A="http://my.com/content"
Array (property A) Computed (property B="Hello") A="Hello"
For a detailed explanation of supported property types, see Property Types and Setting Options.
Passing Property Values Between Life Cycle Stages
You can modify and pass property values between life cycle stages by using the action scripts.
For a computed property, you can modify the value of a property and pass the value to the next life cycle
stage of the action script. For example, if component A has the progress_status value defined as staged,
in the INSTALL and CONFIGURE life cycle stage you change the value to progress_status=installed in
the respective action scripts. If component B is bound to component A, the property values of
progress_status in the life cycle stages of the action script are the same as component A.
Define in the software component that component B depends on A. This dependency defines the passing
of correct property values between components whether they are in the same node or across different
nodes.
For example, you can update a property value in an action script by using the supported scripts.
nBash progress_status="completed"
nWindows CMD set progress_status=completed
Configuring vRealize Automation
VMware, Inc. 440

nWindows PowerShell $progress_status="completed"
Note Array and content property do not support passing modified property values between action scripts
of life cycle stages.
Best Practices for Developing Components
To familiarize yourself with best practices for defining properties and action scripts, you can download and
import Software components and application blueprints from the VMware Solution Exchange.
Follow these best practices when developing Software components.
nFor a script to run without any interruptions, the return value must be set to zero (0). This setting
allows the agent to capture all of the properties and send them to the Software server.
nSome installers might need access to the tty console. Redirect the input from /dev/console. For
example, a RabbitMQ Software component might use the ./rabbitmq_rhel.py --setup-
rabbitmq < /dev/console command in its install script.
nWhen a component uses multiple life cycle stages, the property value can be changed in the
INSTALL life cycle stage. The new value is sent to the next life cycle stage. Action scripts can
compute the value of a property during deployment to supply the value to other dependent scripts.
For example, in the Clustered Dukes Bank sample application, JBossAppServer service computes
the JVM_ROUTE property during the install life cycle stage. This property is used by the
JBossAppServer service to configure the life cycle. Apache load balancer service then binds its
JVM_ROUTE property to the all (appserver:JbossAppServer:JVM_ROUTE) property to get the final
computed value of node0 and node1. If a component requires a property value from another
component to complete an application deployment successfully, you must state explicit dependencies
in the application blueprint.
Note You cannot change the content property value for a component that uses multiple life cycle
stages.
Create a Software Component
Configure and publish a Software component that other software architects, IaaS architects, and
application architects can use to assemble application blueprints.
Prerequisites
Log in to vRealize Automation as a software architect.
Procedure
1Select Design > Software Components.
2Click the Add icon ( ).
Configuring vRealize Automation
VMware, Inc. 441
3Enter a name and, optionally, a description.
Using the name you specified for your Software component, vRealize Automation creates an ID for
the Software component that is unique within your tenant. You can edit this field now, but after you
save the blueprint you can never change it. Because IDs are permanent and unique within your
tenant, you can use them to programmatically interact with blueprints and to create property bindings.
4(Optional) If you want to control how your Software component is included in blueprints, select a
container type from the Container drop-down menu.
Option Description
Machines Your Software component must be placed directly on a machine.
One of your published Software
components
If you are designing a Software component specifically to install on top of another
Software component that you created, select that Software component from the
list. For example, if you are designing an EAR component to install on top of your
previously created JBOSS component, select your JBOSS component from the
list.
Software components If you are designing a Software component that should not be installed directly on
a machine, but can be installed on several different Software components, then
select the software components option. For example, if you are designing a WAR
component and you want it to be installed on your Tomcat Server Software
component, and your Tcserver Software component, select the software
components container type.
5Click Next.
6Define any properties you intend to use in your action scripts.
aClick the Add icon ( ).
b Enter a name for the property.
c Enter a description for the property.
This description displays to architects who use your Software component in blueprints.
Configuring vRealize Automation
VMware, Inc. 442

d Select the expected type for the value of your property.
e Define the value for your property.
Option Description
Use the value you supply now nEnter a value.
nDeselect Overridable.
nSelect Required.
Require architects to supply a value nTo provide a default, enter a value.
nSelect Overridable.
nSelect Required.
Allow architects to supply a value if
they choose
nTo provide a default, enter a value.
nSelect Overridable.
nDeselect Required.
Architects can configure your Software properties to show to users in the request form. Architects
can use the Show in Request option to require or request that users fill in values for properties
that you mark as overridable.
7Follow the prompts to provide a script for at least one of the software life cycle actions.
Table 3‑47. Life Cycle Actions
Life Cycle Actions Description
Install Install your software. For example, you might download Tomcat server installation bits and install a
Tomcat service. Scripts you write for the Install life cycle action run when software is first
provisioned, either during an initial deployment request or as part of a scale out.
Configure Configure your software. For the Tomcat example, you might set the JAVA_OPTS and
CATALINA_OPTS. Configuration scripts run after the install action completes.
Start Start your software. For example, you might start the Tomcat service using the start command in
the Tomcat server. Start scripts run after the configure action completes.
Update If you are designing your software component to support scalable blueprints, handle any updates
that are required after a scale in or scale out operation. For example, you might change the cluster
size for a scaled deployment and manage the clustered nodes using a load balancer. Design your
update scripts to run multiple times (idempotent) and to handle both the scale in and the scale out
cases. When a scale operation is performed, update scripts run on all dependent software
components.
Uninstall Uninstall your software. For example, you might perform specific actions in the application before a
deployment is destroyed. Uninstall scripts run whenever software components are destroyed.
Include exit and status codes in your action scripts. Each supported script type has unique exit and
status code requirements.
Script Type Success Status Error Status Unsupported Commands
Bash nreturn 0
nexit 0
nreturn non-zero
nexit non-zero
None
Windows CMD exit /b 0 exit /b non-zero Do not use exit 0 or exit non-zero codes.
PowerShell exit 0 exit non-zero; Do not use warning, verbose, debug, or host calls.
Configuring vRealize Automation
VMware, Inc. 443

8Select the Reboot checkbox for any script that requires you to reboot the machine.
After the script runs, the machine reboots before starting the next life cycle script.
9Click Finish.
10 Select your Software component and click Publish.
You configured and published a Software component. Other software architects, IaaS architects, and
application architects can use this Software component to add software to application blueprints.
What to do next
Add your published Software component to an application blueprint. See Assembling Composite
Blueprints.
Software Component Settings
Configure general settings, create properties, and write custom action scripts to install, configure, update,
or uninstall your Software component on provisioned machines.
As a software architect, click Design > Software components and click the Add icon to create a new
Software component.
New Software General Settings
Apply general settings to your Software component.
Table 3‑48. New Software General Settings
Setting Description
Name Enter a name for your Software component.
ID Using the name you specified for your Software component,
vRealize Automation creates an ID for the Software component
that is unique within your tenant. You can edit this field now, but
after you save the blueprint you can never change it. Because
IDs are permanent and unique within your tenant, you can use
them to programmatically interact with blueprints and to create
property bindings.
Configuring vRealize Automation
VMware, Inc. 444

Table 3‑48. New Software General Settings (Continued)
Setting Description
Description Summarize your Software component for the benefit of other
architects.
Container On the design canvas, blueprint architects can only place your
Software component inside the container type you select.
nSelect Machines to require architects to place your
Software component directly on a machine component in
the design canvas.
nSelect Software components if you are designing a
Software component that should never be placed directly on
a machine component, but can be nested inside one of
several different Software components.
nSelect a specific published Software component if you are
designing a Software component specifically to nest inside
another Software component that you created.
nSelect Azure Virtual Machine if you are designing a
Software component specifically for an Azure blueprint.
New Software Properties
Software component properties are used to parameterize scripts to pass defined properties as
environment variables to scripts running in a machine. Before running your scripts, the Software agent in
the provisioned machine communicates with vRealize Automation to resolve the properties. The agent
then creates script-specific variables from these properties and passes them to the scripts.
Table 3‑49. New Software Properties
Setting Description
Name Enter a name for your Software property. Property names are
case-sensitive and can contain only alphabetic, numeric, hyphen
(-), or underscore (_) characters.
Description For the benefit of other users, summarize your property and any
requirements for the value.
Type Software supports string, array, content, boolean, and integer
types. For a detailed explanation of supported property types,
see Property Types and Setting Options. For information about
property bindings, see When Your Software Component Needs
Information from Another Component and Creating Property
Bindings Between Blueprint Components.
Configuring vRealize Automation
VMware, Inc. 445

Table 3‑49. New Software Properties (Continued)
Setting Description
Value nTo use the value you supply:
nEnter a Value.
nSelect Required.
nDeselect Overridable.
nTo require architects to supply a value:
n(Optional) Enter a Value to provide a default.
nSelect Overridable.
nSelect Required.
nAllow architects to supply a value or leave the value blank:
n(Optional) Enter a Value to provide a default.
nSelect Overridable.
nDeselect Required.
Encrypted Mark properties as encrypted to mask the value and display as
asterisks in vRealize Automation. If you change a property from
encrypted to unencrypted, vRealize Automation resets the
property value. For security, you must set a new value for the
property.
Important If secured properties are printed in the script using
the echo command or other similar commands, these values
appear in plain text in the log files. The values in the log files are
not masked.
Overridable Allow architects to edit the value of this property when they are
assembling an application blueprint. If you enter a value, it
displays as a default.
Required Require architects to provide a value for this property, or to
accept the default value you supply.
Computed Values for computed properties are assigned by the INSTALL,
CONFIGURE, START, or UPDATE life cycle scripts. The
assigned value is propagated to the subsequent available life
cycle stages and to components that bind to these properties in
a blueprint. If you select Computed for a property that is not a
string property, the property type is changed to string.
New Software Actions
You create Bash, Windows CMD, or PowerShell action scripts to specify exactly how components are
installed, configured, uninstalled, or updated during deployment scale operations.
Table 3‑50. Life Cycle Actions
Life Cycle Actions Description
Install Install your software. For example, you might download Tomcat server installation bits and install a
Tomcat service. Scripts you write for the Install life cycle action run when software is first provisioned,
either during an initial deployment request or as part of a scale out.
Configure Configure your software. For the Tomcat example, you might set the JAVA_OPTS and
CATALINA_OPTS. Configuration scripts run after the install action completes.
Configuring vRealize Automation
VMware, Inc. 446
Table 3‑50. Life Cycle Actions (Continued)
Life Cycle Actions Description
Start Start your software. For example, you might start the Tomcat service using the start command in the
Tomcat server. Start scripts run after the configure action completes.
Update If you are designing your software component to support scalable blueprints, handle any updates that
are required after a scale in or scale out operation. For example, you might change the cluster size for
a scaled deployment and manage the clustered nodes using a load balancer. Design your update
scripts to run multiple times (idempotent) and to handle both the scale in and the scale out cases.
When a scale operation is performed, update scripts run on all dependent software components.
Uninstall Uninstall your software. For example, you might perform specific actions in the application before a
deployment is destroyed. Uninstall scripts run whenever software components are destroyed.
Select the Reboot checkbox for any script that requires you to reboot the machine. After the script runs,
the machine reboots before starting the next life cycle script. Verify that no processes are prompting for
user interaction when the action script is running. Interruptions pause the script, causing it to remain in an
idle state indefinitely, eventually failing. Additionally, your scripts must include proper exit codes that are
applicable to the application deployment. If the script lacks exit and return codes, the last command that
ran in the script becomes the exit status. Exit and return codes vary between the supported script types,
Bash, Windows CMD, PowerShell.
Script Type Success Status Error Status Unsupported Commands
Bash nreturn 0
nexit 0
nreturn non-zero
nexit non-zero
None
Windows CMD exit /b 0 exit /b non-zero Do not use exit 0 or exit non-zero codes.
PowerShell exit 0 exit non-zero; Do not use warning, verbose, debug, or host calls.
Designing XaaS Blueprints and Resource Actions
The XaaS blueprints can be published as catalog items or used in the blueprint design canvas. The
resource actions are actions that you run on deployed items.
XaaS uses vRealize Orchestrator to run workflows that provision items or run actions. For example, you
can configure the workflows to create vSphere virtual machines, Active Directory users in groups, or run
PowerShell scripts. If you create a custom vRealize Orchestrator workflow, you can provide that workflow
as an item in the service catalog so that the entitled users can run the workflow.
You can use an XaaS blueprint as a component in a blueprint that you create in the design canvas, or you
can publish it directly to the service catalog.
If you use a blueprint as a component in another blueprint, you can configure it to scale when the
deployed blueprint is scaled in or out.
vRealize Orchestrator Integration in vRealize Automation
vRealize Orchestrator is the workflow engine integrated in vRealize Automation.
Configuring vRealize Automation
VMware, Inc. 447
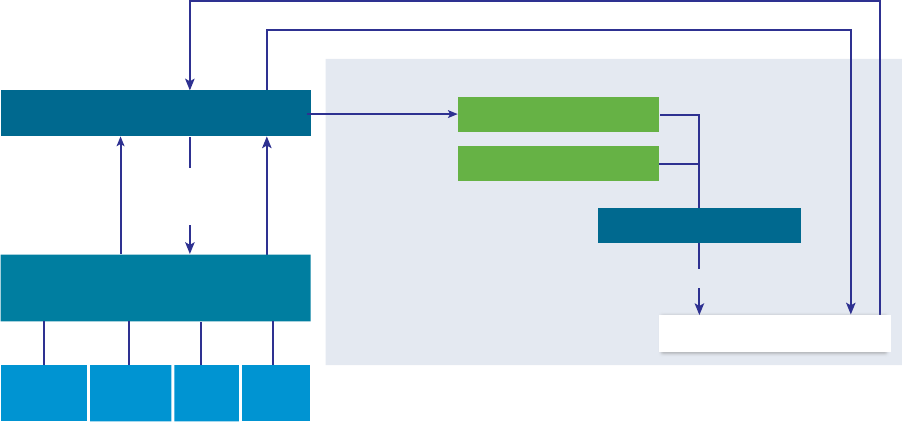
The vRealize Orchestrator server distributed with vRealize Automation is preconfigured, and therefore
when your system administrator deploys the vRealize Automation Appliance, the vRealize Orchestrator
server is up and running.
Figure 3‑2. Create and Request Catalog Items Included in an XaaS to Provision a Custom
Resource
Map vRealize
Orchestrator
object types
and workflows
to vRealize
Automation
Active
Directory
vCenter
Server SOAP HTTP-
REST
Request a catalog item
Provision the custom resource
XaaS blueprint
vRealize Automation
Catalog
Orchestrator Workflow
Engine and Library
XaaS
Run a
vRealize
Orchestrator
Custom Resource
Expose new
object and
actions in
vRealize
Automation
Publish catalog item
XaaS
XaaS architects add custom resources related to the supported endpoints and provided workflows, and
then create XaaS blueprints and actions based on those resources. Tenant administrators and business
group managers can add the XaaS blueprints and actions to the service catalog. The XaaS blueprint can
also be used in the blueprint designer.
When the service catalog user requests an item, vRealize Automation runs a vRealize Orchestrator
workflow to provision the custom resource.
Configuring vRealize Automation
VMware, Inc. 448
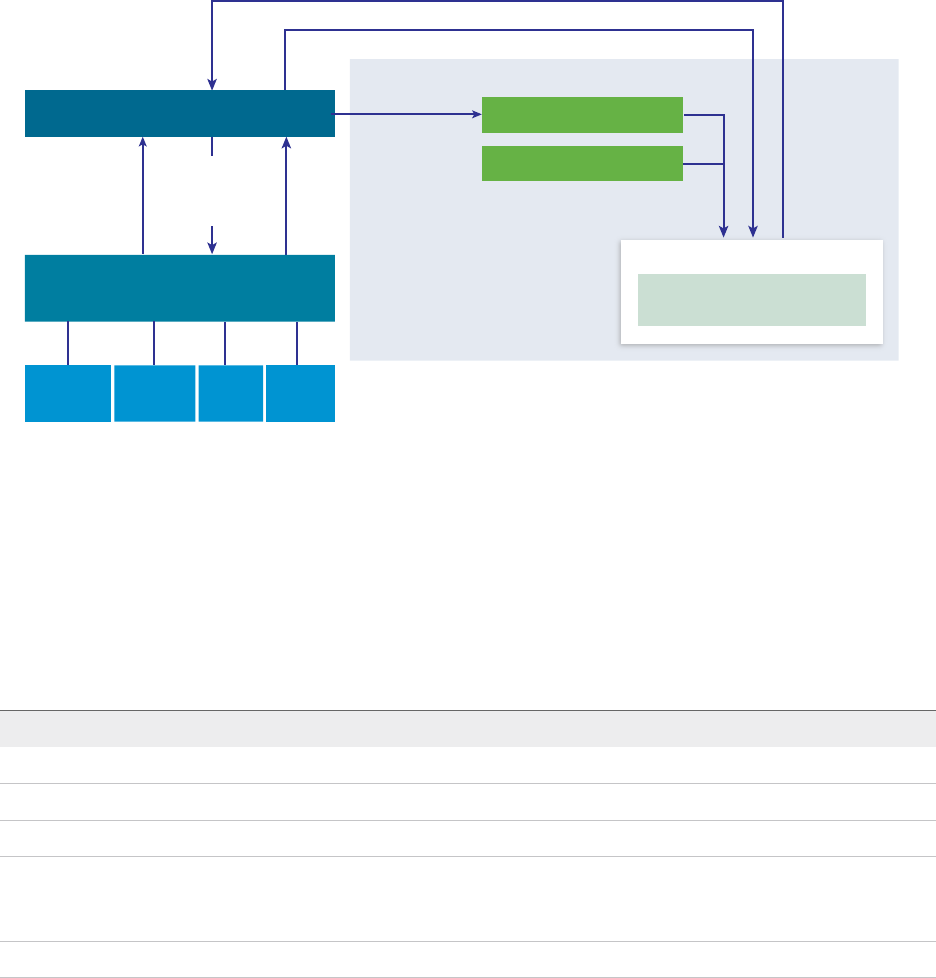
Figure 3‑3. Create and Request Custom Resource Actions to Modify a Custom Resource
Map vRealize
Orchestrator
object types
and workflows
to vRealize
Automation
Active
Directory
vCenter
Server SOAP HTTP-
REST
Request a resource action
Modify the custom resource
Resource Action
vRealize Automation
Catalog
Orchestrator Workflow
Engine and Library
XaaS
Run a
vRealize
Orchestrator
Workflow
Custom Resource
Expose new
object and
actions in
vRealize
Automation
Custom post-provisioning
action
XaaS architects can also add vRealize Orchestrator workflows as resource actions to extend
vRealize Automation capabilities. After the service catalog users provision a custom resource, they can
run post-provisioning action. This way, the consumers run a vRealize Orchestrator workflow and modify
the provisioned custom resource.
When a service catalog user requests an XaaS blueprint or resource action as a catalog item, the XaaS
service runs the corresponding vRealize Orchestrator workflow passing the following data as global
parameters to the workflow:
Table 3‑51. XaaS Global Parameters
Parameter Description
__asd_tenantRef The tenant of the user requesting the workflow.
__asd_subtenantRef The business group of the user requesting the workflow.
__asd_catalogRequestId The request id from the catalog for this workflow run.
__asd_requestedFor The target user of the request. If the request is on behalf of a
user, then this is the user on behalf of whom the workflow is
requested, otherwise it is the user requesting the workflow.
__asd_requestedBy The user requesting the workflow.
If an XaaS blueprint or resource action uses a vRealize Orchestrator workflow that contains a User
Interaction schema element, when a consumer requests the service, the workflow suspends its run and
waits for the user to provide the required data. To answer to a waiting user interaction, the user must
navigate to Inbox > Manual User Action.
The default vRealize Orchestrator server inventory is shared across all tenants and cannot be used per
tenant. For example, if a service architect creates a service blueprint for creating a cluster compute
resource, the consumers from different tenants have to browse through the inventory items of all
vCenter Server instances although they might belong to a different tenant.
Configuring vRealize Automation
VMware, Inc. 449

System administrators can install vRealize Orchestrator or deploy the
vRealize Orchestrator Applianceseparately to set up an external vRealize Orchestrator instance and
configure vRealize Automation to work with that external vRealize Orchestrator instance.
System administrators can also configure vRealize Orchestrator workflow categories per tenant and
define which workflows are available to each tenant.
In addition, tenant administrators can also configure an external vRealize Orchestrator instance but only
for their own tenants.
For information about configuring an external vRealize Orchestrator instance and vRealize Orchestrator
workflow categories, see Configuring vCenter Orchestrator and Plug-Ins.
List of vRealize Orchestrator Plug-Ins
With plug-ins you can use vRealize Orchestrator to access and control external technologies and
applications. By exposing an external technology in a vRealize Orchestrator plug-in, you can incorporate
objects and functions in workflows that access the objects and functions of the external technology.
The external technologies that you can access by using plug-ins can include virtualization management
tools, email systems, databases, directory services, remote control interfaces, and so on.
You can use the standard set of vRealize Orchestrator plug-ins to incorporate external technologies such
as the vCenter Server API and email capabilities into workflows. In addition, you can use the
vRealize Orchestrator open plug-in architecture to develop plug-ins to access other applications.
Table 3‑52. Plug-Ins Included by Default in vRealize Orchestrator
Plug-In Purpose
vCenter Server Provides access to the vCenter Server API so that you can incorporate all of the
vCenter Server objects and functions into the management processes that you
automate by using vRealize Orchestrator.
Configuration Provides workflows for configuring the vRealize Orchestrator authentication,
database connection, SSL certificates, and so on.
vCO Library Provides workflows that act as basic building blocks for customization and
automation of client processes. The workflow library includes templates for life
cycle management, provisioning, disaster recovery, hot backup, and other
standard processes. You can copy and edit the templates to modify them
according to your needs.
SQL Provides the Java Database Connectivity (JDBC) API, which is the industry
standard for database-independent connectivity between the Java programming
language and a wide range of databases. The databases include SQL databases
and other tabular data sources, such as spreadsheets or flat files. The JDBC API
provides a call-level API for SQL-based database access from workflows.
SSH Provides an implementation of the Secure Shell v2 (SSH-2) protocol. Allows
remote command and file transfer sessions with password and public key-based
authentication in workflows. Supports keyboard-interactive authentication.
Optionally, the SSH plug-in can provide remote file system browsing directly in
the vRealize Orchestrator client inventory.
Configuring vRealize Automation
VMware, Inc. 450

Table 3‑52. Plug-Ins Included by Default in vRealize Orchestrator (Continued)
Plug-In Purpose
XML A complete Document Object Model (DOM) XML parser that you can implement
in workflows. Alternatively, you can use the ECMAScript for XML (E4X)
implementation in the vRealize Orchestrator JavaScript API.
Mail Uses Simple Mail Transfer Protocol (SMTP) to send email from workflows.
Net Wraps the Jakarta Apache Commons Net Library. Provides implementations of
Telnet, FTP, POP3, and IMAP. The POP3 and IMAP part is used for reading
email. In combination with the Mail plug-in, the Net plug-in provides complete
email send and receive capabilities in workflows.
Enumeration Provides common enumerated types that can be used in workflows by other plug-
ins.
Workflow documentation Provides workflows that let you generate information in PDF format about a
workflow or a workflow category.
HTTP-REST Lets you manage REST Web services by providing interaction between vCenter
Orchestrator and REST hosts.
SOAP Lets you manage SOAP Web services by providing interaction between vCenter
Orchestrator and SOAP hosts.
AMQP Lets you interact with Advanced Message Queuing Protocol (AMQP) servers also
known as brokers.
SNMP Enables vCenter Orchestrator to connect and receive information from SNMP-
enabled systems and devices.
Active Directory Provides interaction between vCenter Orchestrator and Microsoft Active
Directory.
vCO WebOperator A Web view that lets you to access the workflows in the vRealize Orchestrator
library and interact with them across a network by using a Web browser.
Dynamic Types Lets you define dynamic types and create and use objects of these dynamic
types.
PowerShell Lets you manage PowerShell hosts and run custom PowerShell operations.
Multi-Node Contains workflows for hierarchical orchestration, management of Orchestrator
instances, and scale-out of Orchestrator activities.
vRealize Automation Lets you create and run workflows for interaction between vRealize Orchestrator
and vRealize Automation.
For more information about the vRealize Orchestrator plug-ins that VMware develops and distributes, see
the VMware vRealize ™ Orchestrator ™ Documentation landing page.
Creating XaaS Blueprints and Resource Actions
The XaaS blueprints can be entitled to users as catalog items, or they can be assembled into a composite
blueprints using the design canvas. The resource actions run on the provisioned items to manage the
items after they are provisioned.
For example, you can use an XaaS blueprint to create Active Directory users in a group . You can then
use a resource action to require that the user change the password.
Configuring vRealize Automation
VMware, Inc. 451
XaaS Blueprint Workflow
The workflow that you follow to create an XaaS blueprint and any optional resource actions varies
depending on how you intend to use the blueprint. The following workflow provides the basic process.
Configuring vRealize Automation
VMware, Inc. 452
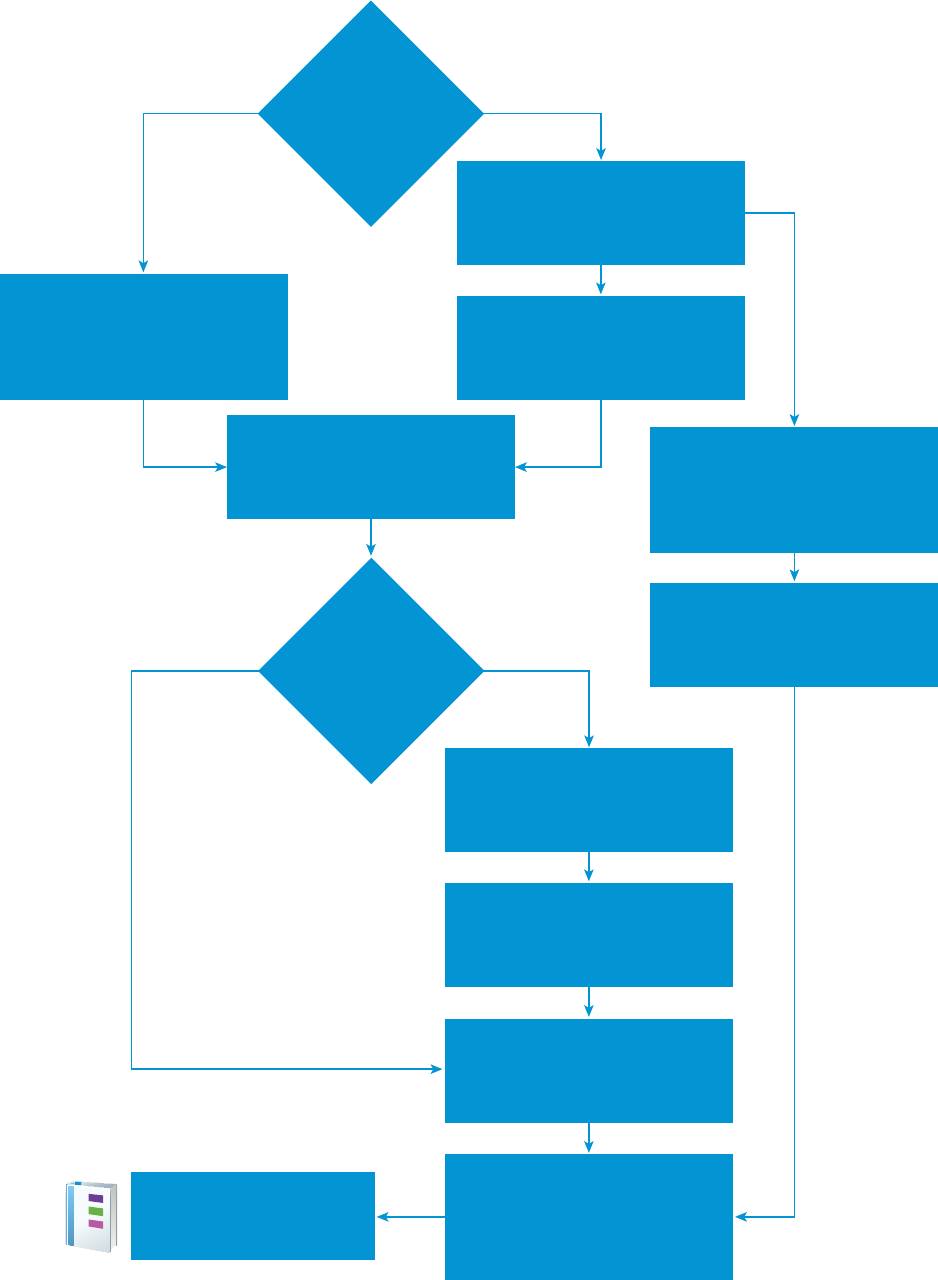
Create a custom resource type.
Design > XaaS > Custom
Resources > New
Create a blueprint to provision
a resource.
Design > XaaS > XaaS
Blueprints > New
Add the XaaS blueprint to
a composite blueprint.
Design > Blueprints > New
Add to a service.
Administration > Catalog
Management > Services > New
Verify the blueprint in
the service catalog.
Catalog
Entitle service catalog users
to the blueprint and actions.
Administration > Catalog
Management >
Entitlements > New
Publish the
composite blueprint.
Design > Blueprints > Publish
(Optional) Create XaaS
resource actions that run on
deployed XaaS blueprints.
Design > XaaS >
Resource Action > New
Publish the resource actions.
Design > XaaS > Resource
Action > New
Publish the blueprint.
Design > XaaS > XaaS
Blueprints > Publish
Create a blueprint that runs
a workflow but does not
provision resources.
Design > XaaS >
XaaS Blueprints > New
Does your
XaaS blueprint
provision a
resource?
No Yes
Are you using
the blueprint as a
component in a
composite
blueprint?
No Yes
Configuring vRealize Automation
VMware, Inc. 453
XaaS Blueprint Terminology
XaaS blueprints are vRealize Orchestrator workflows that can provision resources, make changes to
provisioned resources, or behave as a service that performs a task in your environment. The blueprints
and the resource actions have several nuances that you must understand when you design blueprints for
your service catalog users.
The following definitions help you understand the terms used when working with XaaS blueprints.
Custom resource A vRealize Orchestrator object type that is exposed as a resource through
the API of a vRealize Orchestrator plug-in. You create a custom resource to
define the output parameter of an XaaS provisioning blueprint and to define
an input parameter of a resource action.
XaaS blueprint
component
A provisioning or non-provisioning blueprint that you can use in the
blueprint design canvas. This blueprint might also be a standalone XaaS
blueprint.
Standalone XaaS
blueprint
A provisioning or non-provisioning blueprint that is published and entitled
directly to the service catalog.
Provisioning blueprint A provisioning blueprint that runs a vRealize Orchestrator workflow to
provision resources on the target endpoint using the vRealize Orchestrator
plug-in API for the endpoint. For example, add virtual NICs to a network
device in vSphere. To create a provisioning blueprint, you must have a
custom resource that defines the vRealize Orchestrator resource type.
When a service catalog user requests this type of catalog items, the
workflow provisions the item and the deployed item is stored on the Items
tab. You can define post-provisioning operations for this type of provisioned
resources. You can also make the blueprints scalable by adding or
removing instance when needed.
Non-provisioning
blueprint
A non-provisioning blueprint runs a vRealize Orchestrator workflow to
perform a task that does not require the API to make changes to an
endpoint. For example, the workflow that runs builds a report and then
emails it or posts it to a target communication system.
When a service catalog user requests this type of catalog item, the
workflow runs to perform the scripted task, but the item is not added on the
Items tab. You cannot perform post-provisioning operations on this type of
blueprint. You can use non-provisioning blueprints as supporting workflows
in scalable blueprints. For example, you can create a blueprint to update a
high availability load balancer.
Composite blueprint A blueprint that was created using the design canvas. The composite
blueprint uses one or more components. For example, a machine
component, a software component, or an XaaS component. When you add
it to a service, it is listed as a Deployment. When you add it to an
Configuring vRealize Automation
VMware, Inc. 454

entitlement to make it available to the service catalog users, it is listed as a
Composite Blueprint. A composite blueprint can have one blueprint
component, or it can include an entire application with multiple machines,
software, and networking.
Resource action A workflow that you can run on a deployed provisioning blueprint. The
deployed blueprint can be an XaaS blueprint or blueprint component, or it
can be a machine type that you mapped to a vRealize Orchestrator
resource type.
XaaS Blueprint Design Considerations
Before you create an XaaS blueprint, you must understand the intent of your blueprint so that you can
create one that correctly provisions your resources.
You can create and use XaaS blueprints as a blueprint component in the design canvas or as a
standalone blueprint. The blueprint can be a provisioning blueprint or a non-provisioning blueprint.
Table 3‑53. XaaS Blueprint Types and Outcomes
XaaS Blueprint Type
Is a custom resource
required?
Is the blueprint scalable in
a deployment?
Can I run a resource action
on the deployed blueprint?
Blueprint component that
provisions resources
Yes Yes.
If it is configured to scale, it
will scale when the
deployment is scaled.
Yes.
It scales when the deployment
is scaled, and you can run
other resource actions on the
deployed component.
The blueprint component
appears on your Items tab.
Blueprint component that runs
a workflow but does not
provision resources
No.
The blueprint uses the
vRealize Orchestrator server
configuration, but it does not
require an XaaS custom
resource.
No.
It does not provision
resources, but it can run as
part of a scale operation.
For example, update a load
balancer with the new
configuration based on the
scale operation.
No.
You cannot run a resource
action on a non-provisioning
component.
Standalone blueprint that
provisions resources
Yes No.
You must create resource
actions to add or destroy
instances.
Yes.
You can run resource actions
on the deployed resource,
including any actions that you
created to support scaling.
The blueprint appears on your
Items tab.
Standalone blueprint that runs
a workflow but does not
provision resources
No.
The blueprint uses the
vRealize Orchestrator server
configuration, but it does not
require an XaaS custom
resource.
No.
It does not provision
resources, but it can run as
part of a resource action.
No.
You cannot run a resource
action on a non-provisioning
component.
Configuring vRealize Automation
VMware, Inc. 455

Add an XaaS Custom Resource
You create a custom resource to define the XaaS item for provisioning. Before you can create an XaaS
blueprint or action, you must have a custom resource that is compatible with the object type of the
blueprint or action workflow.
By creating a custom resource, you map an object type exposed through the API of a
vRealize Orchestrator plug-in as a resource. The custom resource defines the output parameter of an
XaaS blueprint for provisioning and to define an input parameter of a resource action.
If a blueprint or resource action workflow does not provision a resource or run on a deployed blueprint,
you do not need to create a custom resource. For example, you do not need a custom resource if your
workflow updates a database value or sends an email message after a provisioning operation.
As you create a custom resource, you can specify the fields of the read-only form on the details of a
provisioned item. See Designing a Custom Resource Form.
Prerequisites
nLog in to vRealize Automation as an XaaS architect.
nUse the detailed options information to configure the custom resource. See XaaS Custom Resource
Wizard Options.
Procedure
1Select Design > XaaS > Custom Resources.
2Click the New icon ( ).
3Configure the values on the Resource type tab.
a Enter or select the vRealize Orchestrator object type in the Orchestrator Type text box.
For example, enter v to see the types that contain the letter v. To see all types, enter a space.
b Enter a name and, optionally, a description.
c Enter a version.
The supported format extends to major.minor.micro-revision.
d Click Next.
4Edit the Details Form tab as needed.
You can edit the custom resource form by deleting, editing, and rearranging elements. You can also
add a form and form pages and drag elements to the new form and form page.
5Click Finish.
You created a custom resource and you can see it on the Custom Resources page. You can create XaaS
blueprints or actions based on this custom resource.
What to do next
nCreate an XaaS blueprint. See Add an XaaS Blueprint.
Configuring vRealize Automation
VMware, Inc. 456

nCreate an XaaS resource action. See Create an XaaS Resource Action.
XaaS Custom Resource Wizard Options
You use these custom resource options to create or modify a custom resource so that you can run XaaS
blueprint and resource action workflows that provision resources or modify provisioned resources.
You can create only one custom resource for an object type. You can use the custom resource for
multiple blueprints and resource actions.
To create a custom resource action, select Design > XaaS > Custom Resources
Resource Type
The list of possible object types that appears on the Resource type tab based on the installed plug-ins in
the configured vRealize Orchestrator instance. vRealize Automation collects the values from the
configured vRealize Orchestrator instance.
Table 3‑54. Resource Type Options
Option Description
Orchestrator type Enter or select the type that supports the workflow that you are
using to provision.
The type is composed of the plug-in name as it appears in the
scripting API, for example, VC for vCenter, and the object type,
for example, VirtualMachine. In this example, the API uses the
value VC:VirtualMachine.
This type can be the blueprint workflow output parameter or the
resource action workflow input parameter.
Name Enter an informative name for the custom resource so that you
can identify it when you create XaaS blueprints or resource
actions.
Description Enter a verbose description.
Version The supported form extends to major.minor.micro-revision.
Details Form
These form fields appear as read-only values when your service catalog users provision an item that uses
this custom resource. You can modify the existing fields and add new externally defined fields.
For more information about configuring the forms, see Designing a Custom Resource Form.
Where Used
Because you can create only one custom resource per object type, you can use this page of the wizard to
understand how the custom resource is used.
This tab is available for saved custom resources, not when you create the resource.
Configuring vRealize Automation
VMware, Inc. 457

Table 3‑55. Where Used Options
Option Description
XaaS Blueprints A list of the blueprints that are configured to use this custom
resource.
From this page you can perform the following actions:
nEdit. Opens the blueprint so that you can see how it is
configured or to modify it.
nPublish/Unpublish. Change the state of the blueprint by
making it available to use in a composite blueprint or to add
to a service. If you unpublish a blueprint, you can potentially
make it unavailable for use in composite blueprints, to add
to a service, or make it unavailable in the service catalog.
nDelete. Remove this blueprint from the system.
Resource Actions A list of the resource actions that are configured to use this
custom resource.
From this page you can perform the following actions:
nEdit. Opens the resource action so that you can see how it
is configured or modify it.
nPublish/Unpublish. Change the state of the resource
action by making it available in an entitlement. If you
unpublish a resource action, you can potentially make it
unavailable to add to a service, or make it unavailable to run
on deployed blueprints.
nDelete. Remove this resource action from the system.
Create an XaaS Blueprint
An XaaS blueprint is a provisioning or non-provisioning blueprint. Some of the provided
vRealize Orchestrator provisioning workflows include creating virtual machines, adding users to Active
Directory, or taking virtual machine snapshots. Some of the non-provisioning workflows that you might
create include updating your load balancer or to building a report and sending it to recipients.
You can create XaaS blueprints based on workflows provided in vRealize Orchestrator or you can use
workflows that you create to accomplish goals specific to your environment.
Procedure
1Add an XaaS Blueprint
An XaaS blueprint is a specification to run a vRealize Orchestrator workflow that makes a change to
a target system in your environment. The blueprint includes the workflow, and it can include the input
parameters, submission and read-only forms, sequence of actions, and the provisioning or non-
provisioning operation.
2Add an XaaS Blueprint to a Composite Blueprint
You add an XaaS blueprint as a component of a composite blueprint similar to how you add other
blueprint components in the design canvas.
Configuring vRealize Automation
VMware, Inc. 458

Add an XaaS Blueprint
An XaaS blueprint is a specification to run a vRealize Orchestrator workflow that makes a change to a
target system in your environment. The blueprint includes the workflow, and it can include the input
parameters, submission and read-only forms, sequence of actions, and the provisioning or non-
provisioning operation.
You can create XaaS blueprints that you use in one or more of the following ways:
nCreate an XaaS blueprint component. A component blueprint is a provisioning or non-provisioning
blueprint that you can use in the blueprint design canvas as part of a composite blueprint. If you are
using it as a component, you must configure the component life cycle options that support scale-in
and scale-out operations on the deployed composite blueprint.
This blueprint type might also be published as a standalone blueprint.
nCreate a standalone XaaS blueprint. A standalone blueprint is a provisioning or non-provisioning
blueprint that is published and entitled directly to the service catalog.
For an example of how to create Active Directory users using an XaaS blueprint, see Create an XaaS
Blueprint and Action for Creating and Modifying a User.
Prerequisites
nLog in to vRealize Automation as an XaaS architect.
nIf the blueprint must provision resources, create a custom resource corresponding to the output
parameter of the service blueprint. See Add an XaaS Custom Resource. If it does not use a
vRealize Orchestrator plug-in API, you do not need to configure a custom resource.
nBy creating an XaaS blueprint, you publish a vRealize Orchestrator workflow as a potential
component blueprint or catalog item. The blueprint includes a form that you might edit. See Designing
an XaaS Blueprint Form.
nUse the detailed options information to configure the blueprint. See XaaS Blueprint New or Edit
Wizard Options.
Procedure
1Select Design > XaaS > XaaS Blueprints.
2Click the New icon ( ).
3On the Workflow tab, select the workflow that runs when the blueprint provisions the resource.
This tab is not available if you are editing a blueprint.
a Navigate through the vRealize Orchestrator workflow library and select a workflow relevant to
your custom resource.
b Review the input and output parameters to ensure that you can later provide the correct values.
c Click Next.
Configuring vRealize Automation
VMware, Inc. 459

4On the General tab, configure the options and click Next.
a In the Name text box, enter a name that differentiates this blueprint from similar blueprints.
b If you do not want to use this blueprint as a component in a composite blueprint, deselect the
Make available as a component in the design canvas check box.
5On the Blueprint Form tab, edit the form as needed and click Next.
6On the Provisioned Resource page, select a value and click Next.
Option Description
No provisioning If the workflow does not provision resources, you can select this option or leave
the field empty.
<A custom resource that you
previously created>
Select the custom resource that supports this provisioning workflow.
7On the Component Lifecycle tab, define how this blueprint behaves during scale-in, scale-out, and
destroy operations.
These workflows run on a deployed composite blueprint where this blueprint is a component. The
availability of the different options depends on blueprint. Not all blueprint workflows support or require
all the options.
8Click Finish.
9Select the row for you blueprint and click Publish.
You created and published an XaaS blueprint.
What to do next
nTo add this blueprint directly to the service catalog as a standalone blueprint, add a service and add
the blueprint to a service. See Add a Service.
nTo use this blueprint as a component in a composite blueprint, see Add an XaaS Blueprint to a
Composite Blueprint.
XaaS Blueprint New or Edit Wizard Options
You use these options to create an XaaS blueprint that runs a vRealize Orchestrator workflow when the
blueprint is deployed. The workflow changes a target system in your environment.
For the steps that you follow to create the blueprint, see Add an XaaS Blueprint.
To use this wizard, select Design > XaaS > XaaS Blueprints.
Workflow Tab
Select the workflow that runs when the blueprint provisions the resource.
This tab is not available if you are editing a blueprint.
In the following figure, the workflow tree is on the left and the parameters are on the right.
Configuring vRealize Automation
VMware, Inc. 460
Figure 3‑4. Workflow Tab in the XaaS Blueprint Wizard
Review the input and output parameters to ensure that you or your service catalog users can provide the
correct values under the following circumstances:
nIf you customize the blueprint form in this wizard or in the blueprint design canvas.
nIf you leave all the input parameters blank, the service catalog users can set the values.
General Tab
Configure the metadata about and the behavior of the blueprint.
Table 3‑56. General Tab Options
Option Description
Name The name of the blueprint as you want it to appear in the
following locations:
nDesign canvas. If you select Make available as a component
in the design canvas, this value is the name that appears in
the categories list.
nServices. If you use this blueprint as a standalone blueprint,
this value is the name that you see when you add catalog
items to service.
nEntitlements. If you entitle the blueprint as an individual
item, this value is the name that you see in the Add Items
list.
Description Provide a verbose description that helps you differentiate
between similar items.
Hide catalog request information page Select the check box when you do not want to require the
service catalog consumers to provide a description and reason
when they request the item. The check box is selected by
default.
Configuring vRealize Automation
VMware, Inc. 461

Table 3‑56. General Tab Options (Continued)
Option Description
Version The supported format extends to major.minor.micro-revision.
Make available as a component in the design canvas If you plan to use the blueprint as a component in a design
canvas blueprint, select this option.
When it is published, the blueprint is available in the category
you selected when you configured the custom resource.
If you do not select this option, the blueprint does not appear in
the design canvas. However, you can still add it to a service and
entitle users to deploy it as a standalone blueprint.
Blueprint Form Tab
The fields that appear on this page of the wizard are the workflow input parameters. You can make one or
more of the following changes:
nAdd fields to the form.
nModify existing fields by deleting or rearranging the fields.
nProvide default values as the input parameters.
Any changes affect the form that is presented to:
nThe application architect working in the design canvas when this XaaS blueprint is used as a
blueprint component.
nThe service catalog user if this blueprint is published as a standalone blueprint.
For more information about configuring the forms, see Designing an XaaS Blueprint Form.
Provisioned Resource
The provisioned resource links the blueprint to a relevant XaaS custom resource that you configured on
the Custom Resource page at Design > XaaS > Custom Resource .
Configuring vRealize Automation
VMware, Inc. 462

Table 3‑57. Provisioned Resource Options
Option Description
A custom resource that you previously created Select the custom resource that defines the
vRealize Orchestrator resource type required to run the
provisioning blueprint.
A provisioning blueprint runs a vRealize Orchestrator workflow
to provision resources on the target endpoint using the
vRealize Orchestrator plug-in API for the endpoint. For example,
add virtual NICs to a network device in vSphere.
You can define post-provisioning operations for this type of
provisioned resources. You can also make the blueprint
scalable, by adding or removing instances when needed.
Results
nThe blueprint is eligible to for scaling.
nThe blueprint appears in the design canvas in the category
specified for the selected custom resource.
nThe blueprint is displayed on the Items tab when you deploy
a blueprint that includes it, and you can run any actions on
the item after deployment.
No provisioning A non-provisioning blueprint runs a vRealize Orchestrator
workflow to perform a task that does not require the API to make
changes to an endpoint. For example, build a report and email
or post it to a target communication system.
Results
nThe blueprint is not eligible for scaling. You can use non-
provisioning blueprints as supporting workflows in scalable
blueprints. For example, you can create a blueprint to
update a high availability load balancer.
nThe blueprint appears in the XaaS category in the design
canvas.
nThe blueprint is not displayed on the Items tab when you
deploy a blueprint that includes it, nor can you run any
actions on the item after deployment.
Component Lifecycle Tab
The Component Lifecycle tab is available if you selected Make available as a component in the design
canvas on the General tab.
You use these options to define how this blueprint behaves post-deployment during scale-in and scale-out
operations when it is used as a component in a composite blueprint.
The availability of the different options depends on the blueprint. Not all blueprint workflows support or
require all the options. Because your XaaS might be used in a composite blueprint, you should configure
the update and destroy options, as well as allocate and decallocate, if they are available for the blueprint
so that the blueprint scales correctly.
Configuring vRealize Automation
VMware, Inc. 463

Table 3‑58. Component Lifecycle Options
Option Description
Scalable Select the option to allow the service catalog user to change the
number of instances of this blueprint component after it is
deployed as part of a scale-in or scale-out operation.
This option is available if you selected a custom resource on the
Provisioned Resource tab. It is not available if you selected the
No provisioning option.
If you make this blueprint scalable, the Instances option is
added to the General tab in the design canvas. See the example
below. If you do not select Scalable, the Instances option is not
available in the design canvas.
Provisioning workflow The workflow that runs during a provisioning or scale-out
operation. This workflow was selected when you created this
blueprint, and you cannot edit the value.
Allocation workflow Select the workflow that runs before any initial provisioning or
scale-out operation.
This life cycle workflow type is available for Azure allocations. If
you create an allocation workflow for a scale operation, it must
include the following values:
nInput parameters
nParameter name is requestData and the parameter
type is Properties.
nParameter name is subtenant and the parameter type
is Properties.
nreservations and the parameter type is
Arrays/Properties.
nOutput parameter
nMust include a parameter where the parameter type is
Properties.
Configuring vRealize Automation
VMware, Inc. 464

Table 3‑58. Component Lifecycle Options (Continued)
Option Description
Update workflow Select the workflow that runs during update operations,
including scale-in or scale out where a component is not
scalable, but it can be updated.
For example, a load balancer is updated with the new
configuration created with the scale-in or scale-out operation for
any of the components in the composite blueprint.
The update workflow might apply to a component that is bound
to the scaled component, but which is not itself scalable. This
update workflow can change the non-scalable component based
on an update operation.
If you create an update workflow for a scale operation, it must
include the following values:
nInput parameters.
nMust include a parameter, regardless of the parameter
name, that matches the output parameter type of the
provisioning workflow.
nParameter name is data and the parameter type is
Properties.
Destroy workflow Select the workflow that runs during a scale-in or destroy
operation.
If you create a destroy workflow for a scale operation, it must
include the following value:
nInput parameter.
nMust include a parameter, regardless of the parameter
name, that matches the output parameter type of the
provisioning workflow.
For example, if the Create simple virtual machine
provisioning workflow includes the output parameter
VC:VirtualMachine, the destroy workflow must include
an input parameter where the type is
VC:VirtualMachine.
Configuring vRealize Automation
VMware, Inc. 465

Table 3‑58. Component Lifecycle Options (Continued)
Option Description
Deallocation workflow Select the workflow that runs after any destroy or scale-in
operation. If the deallocation fails during the operation, the
destroy workflow still runs as expected.
Deallocation is the final process when you scale-in or destroy a
composite blueprint. It runs after to the destroy operation,
releasing resources.
This life cycle workflow type is available for Azure allocations. If
you create an deallocation workflow for a scale operation, it
must include the following value:
nInput parameter.
nParameter name is data and the parameter type is
Properties.
Category To specify where the XaaS blueprint appears in the design
canvas, select a value in the Design canvas category drop-
down menu.
If you do not select a category, the blueprint is added to the
XaaS category when it is published.
Add an XaaS Blueprint to a Composite Blueprint
You add an XaaS blueprint as a component of a composite blueprint similar to how you add other
blueprint components in the design canvas.
Use this method to add an XaaS to a composite blueprint. This blueprint can be the only blueprint
component or it can be one of several components that make up an application blueprint.
If the XaaS blueprint is all that you want to provide to your users, you can add it to a service and entitle
users to it without adding it to a composite blueprint.
If you run a scale-in or scale-out operation on a deployed application blueprint, the XaaS blueprint scales
based on how you configured the blueprint life cycle options.
Prerequisites
nLog in to vRealize Automation as an infrastructure architect.
nCreate and publish an XaaS blueprint. See Create an XaaS Blueprint. When you created the
blueprint, you specified the category where the blueprint is located in the design canvas.
nReview how to customize the XaaS blueprint forms in the composite blueprint. See Designing Forms
for XaaS Blueprints and Actions.
Procedure
1Select Design > Blueprints.
2Select the name of the blueprint to which you are adding the XaaS.
The design canvas appears. It contains the current application component blueprints and other
components.
Configuring vRealize Automation
VMware, Inc. 466
3In the Categories list, locate the blueprint.
4Drag your blueprint to the canvas.
5Configure the default values on the General and Create tabs.
These are the default values that appear in the service catalog form when a user requests the item.
6Click Finish.
7Select the blueprint and click Publish.
The XaaS blueprint is now part of the composite blueprint.
What to do next
Add the composite blueprint to a service. See Managing the Service Catalog.
Create an XaaS Resource Action
You create a resource action so that you can manage provisioned items using vRealize Orchestrator
workflows.
Prerequisites
nLog in to vRealize Automation as an XaaS architect.
nVerify that you have a custom resource that support the action. See Add an XaaS Custom Resource.
nIf you are creating actions to run on items not provisioned as XaaS catalog items, verify that you
mapped the target resources. See Mapping Other Resources to Work with XaaS Resource Actions.
Procedure
1Create a Resource Action
A resource action is an XaaS workflow that service catalog users can run on provisioned catalog
items. As an XaaS architect, you can create resource actions to define the operations that
consumers can perform on the provisioned items.
2Publish a Resource Action
The newly created resource action is in draft state, and you must publish the resource action.
3Assign an Icon to an XaaS Resource Action
After you create and publish a resource action, you can edit it and assign an icon to the action.
Create a Resource Action
A resource action is an XaaS workflow that service catalog users can run on provisioned catalog items.
As an XaaS architect, you can create resource actions to define the operations that consumers can
perform on the provisioned items.
By creating a resource action, you associate a vRealize Orchestrator workflow as a post-provisioning
operation. During this process, you can edit the default submission and read-only forms. See Designing a
Resource Action Form.
Configuring vRealize Automation
VMware, Inc. 467

Prerequisites
nLog in to vRealize Automation as an XaaS architect.
nCreate a custom resource corresponding to the input parameter of the resource action.
Procedure
1Select Design > XaaS > Resource Actions.
2Click the New icon ( ).
3Navigate through the vRealize Orchestrator workflow library and select a workflow relevant to your
custom resource.
You can see the name and description of the selected workflow, and the input and output parameters
as they are defined in vRealize Orchestrator.
4Click Next.
5Select the custom resource that you previously created from the Resource type drop-down menu.
6Select the input parameter for the resource action from the Input parameter drop-down menu.
7Click Next.
8Enter a name and, optionally, a description.
The Name and Description text boxes are prepopulated with the name and description of the
workflow as they are defined in vRealize Orchestrator.
9(Optional) If you do not want to prompt consumers to enter a description and reason for requesting
this resource action, select the Hide catalog request information page check box.
10 Enter a version.
The supported format extends to major.minor.micro-revision.
11 (Optional) Select the type of the action.
Option Description
Disposal The input parameter of the resource action workflow is disposed and the item is
removed from the Items tab. For example, the resource action is for deleting a
provisioned machine.
Provisioning The resource action is for provisioning. For example, the resource action is for
copying a catalog item.
From the drop-down menu, select an output parameter. You can select a custom
resource that you previously created so that when the consumers request this
resource action, the provisioned items are added on the Items tab. If you have
only the No provisioning option, either the resource action is not for provisioning,
or you did not create a proper custom resource for the output parameter, and you
cannot proceed.
Depending on the action workflow, you can select one, both, or none of the options.
12 Select the conditions under which the resource action is available to users, and click Next.
Configuring vRealize Automation
VMware, Inc. 468

13 (Optional) Edit the form of the resource action on the Form tab.
The form of the resource action maps the vRealize Orchestrator workflow presentation. You can
change the form by deleting, editing, and rearranging the elements. You can also add a new form and
form pages and drag the necessary elements to the new form and form page.
Option Action
Add a form Click the New Form icon ( ) next to the form name, provide the required
information, and click Submit.
Edit a form Click the Edit icon ( ) next to the form name, make the necessary changes,
and click Submit.
Regenerate the workflow presentation Click the Rebuild icon ( ) next to the form name and click OK.
Delete a form Click the Delete icon ( ) next to the form name, and in the confirmation dialog
box click OK.
Add a form page Click the New Page icon ( ) next to the form page name, provide the required
information, and click Submit.
Edit a form page Click the Edit icon ( ) next to the form page name, make the necessary
changes, and click Submit.
Delete a form page Click the Delete icon ( ) next to the form name, and in the confirmation dialog
box click OK.
Add an element to the form page Drag an element from the New Fields pane on the left to the pane on the right.
You can then provide the required information and click Submit.
Edit an element Click the Edit icon ( ) next to the element to edit, make the necessary changes,
and click Submit.
Delete an element Click the Delete icon ( ) next to the element to delete, and in the confirmation
dialog box click OK.
14 Click Finish.
You created a resource action and you can see it listed on the Resource Actions page.
What to do next
Publish the resource action. See Publish a Resource Action.
Publish a Resource Action
The newly created resource action is in draft state, and you must publish the resource action.
Prerequisites
Log in to vRealize Automation as an XaaS architect.
Procedure
1Select Design > XaaS > Resource Actions.
2Select the row of the resource action to publish, and click Publish.
Configuring vRealize Automation
VMware, Inc. 469
The status of the resource action changes to Published.
What to do next
Assign an icon to the resource action. See Assign an Icon to an XaaS Resource Action. Business group
managers and tenant administrators can then use the action when they create an entitlement.
Assign an Icon to an XaaS Resource Action
After you create and publish a resource action, you can edit it and assign an icon to the action.
Prerequisites
Log in to vRealize Automation as an XaaS architect.
Procedure
1Select Administration > Catalog Management > Actions.
2Select the resource action that you created.
3Click Configure.
4Click Browse and select the icon to add.
5Click Open.
6Click Update.
You assigned an icon to the resource action. Business group managers and tenant administrators can
use the resource action in an entitlement.
Mapping Other Resources to Work with XaaS Resource Actions
You map items that were not provisioned using XaaS so that you can run resource actions to run on those
items.
Resource Mapping Script Actions and Workflows
You can use the provided resource mappings for vSphere, vCloud Director, or vCloud Air virtual machines
or you can create custom vRealize Orchestrator script actions or workflows to map other
vRealize Automation catalog resource types to vRealize Orchestrator inventory types.
Resource Mappings Provided With vRealize Automation
vRealize Automation includes resource mappings for IaaS vSphere virtual machines, IaaS
vCloud Director, and deployments.
vRealize Automation includes vRealize Orchestrator resource mapping script actions for each of the
provided XaaS resource mappings. Script actions for the provided resource mappings are located in the
com.vmware.vcac.asd.mappings package of the embedded vRealize Orchestrator server.
Configuring vRealize Automation
VMware, Inc. 470

When you create a resource action that runs on a deployed composite blueprint that uses a
vRealize Orchestrator workflow with vCACAFE:CatalogResource as an input parameter, the Deployment
mapping is applied as the input resource type. The Deployment mapping is applied only if the selected
workflow includes vCACAFE:CatalogResource as an input parameter. For example, if you create an
action to request a resource action on behalf of a user, the resource type on the Input Resource tab is
Deployment because this workflow uses vCACAFE:CatalogResource.
The IaaS vCD VM and IaaS VC VirtualMachine resource mappings are used by an action to map the
virtual machines that match the IaaS resource to the vRealize Orchestrator vSphere or vCloud Director
virtual machine.
Developing Resource Mappings
Depending on your version of vRealize Orchestrator, you can create either a vRealize Orchestrator
workflow or a script action to map resources between vRealize Orchestrator and vRealize Automation.
To develop the resource mapping, you use an input parameter of type Properties, which contains a key-
value pair defining the provisioned resource, and an output parameter of a vRealize Orchestrator
inventory type expected by the corresponding vRealize Orchestrator plug-in. The properties available for
the mapping depend on the type of resource. For example, the EXTERNAL_REFERENCE_ID property is a
common key parameter that defines individual virtual machines, and you can use this property to query a
catalog resource. If you are creating a mapping for a resource that does not use an
EXTERNAL_REFERENCE_ID, you can use one of the other properties that are passed for the individual
virtual machines. For example, name, description, and so on.
For more information about developing workflows and script actions, see Developing with VMware
vCenter Orchestrator.
Create a Resource Mapping
vRealize Automation provides resource mappings for vSphere, vCloud Director, and vCloud Air
machines. You can create additional resource mappings for other types of catalog resources.
Prerequisites
nLog in to vRealize Automation as an XaaS architect.
nVerify that the mapping script or workflow is available in vRealize Orchestrator. See Resource
Mapping Script Actions and Workflows
Procedure
1Select Design > XaaS > Resource Mappings.
2Click the New icon ( ).
3Enter a name and, optionally, a description.
4Enter a version.
The supported format extends to major.minor.micro-revision.
Configuring vRealize Automation
VMware, Inc. 471

5Enter the type of the catalog resource in the Catalog Resource Type text box and press enter.
The type of catalog resource appears on the details view of the provisioned item.
6Enter the vRealize Orchestrator object type in the Orchestrator Type text box and press enter.
This is the output parameter of the resource mapping workflow.
7(Optional) Add target criteria to restrict the availability of resource actions created by using this
resource mapping.
Resource actions are also subject to restrictions based on approvals and entitlements.
a Select Available based on conditions.
b Select the type of condition.
Option Description
All of the following If all of the clauses you define are satisfied, resource actions created by using
this resource mapping are available to the user.
Any of the following If any one of the clauses you define are satisfied, resource actions created by
using this resource mapping are available to the user.
Not the following If the clause you define exists, resource actions created by using this resource
mapping are not available.
c Follow the prompts to build your clauses and complete the condition.
8Select your resource mapping script action or workflow from the vRealize Orchestrator library.
9Click OK.
Designing Forms for XaaS Blueprints and Actions
The XaaS includes a form designer that you can use to design submission and details forms for
blueprints and resources actions. Based on the presentation of the workflows, the form designer
dynamically generates default forms and fields you can use to modify the default forms.
You can create interactive forms that the users can complete for submission of catalog items and
resource actions. You can also create read-only forms that define what information the users can see on
the details view for a catalog item or a provisioned resource.
As you create XaaS custom resources, XaaS blueprints, and resource actions, forms are generated for
common use cases.
Configuring vRealize Automation
VMware, Inc. 472

Table 3‑59. XaaS Object Types and Associated Forms
Object Type Default Form Additional Forms
Custom resource Resource details form based on the attributes
of the vRealize Orchestrator plug-in inventory
type (read-only).
nNone
XaaS blueprint Request submission form based on the
presentation of the selected workflow.
nCatalog item details (read-only)
nSubmitted request details (read-only)
Resource action Action submission form based on the
presentation of the selected workflow.
nSubmitted action details (read-only)
You can modify the default forms and design new forms. You can drag fields to add and reorder them on
the form. You can place constraints on the values of certain fields, specify default values, or provide
instructional text for the end user who is completing the form.
Because of their different purposes, the operations you can perform to design read-only forms are limited
compared to the operations for designing submission forms.
Fields in the Form Designer
You can extend the workflow presentation and functionality by adding new predefined fields to the default
generated forms of resource actions and XaaS blueprints.
If an input parameter is defined in the vRealize Orchestrator workflow, in vRealize Automation it appears
on the default generated form. If you do not want to use the default generated fields in the form, you can
delete them and drag and drop new fields from the palette. You can replace default generated fields
without breaking the workflow mappings if you use the same ID as the field you are replacing.
You can also add new fields, other than the ones that were generated based on the vRealize Orchestrator
workflow inputs, so that you can extend the workflow presentation and functionality in the following cases:
nAdd constraints to the existing fields
For example, you can create a new drop-down menu and name it dd. You can also create predefined
options of Gold, Silver, Bronze, and Custom. If there is a predefined field, such as CPU, you can add
the following constraints to this field:
nIf dd equals Gold, then CPU is 2000 MHz
nIf dd equals Silver, then CPU is 1000 MHz
nIf dd equals Bronze then CPU is 500 MHz
nIf dd equals Custom, the CPU field is editable, and the consumer can specify a custom value
nAdd external value definitions to fields
You can add an external value definition to a field so that you can run vRealize Orchestrator script
actions and supply additional information to consumers on the forms you design. For instance, you
might want to create a workflow to change the firewall settings of a virtual machine. On the resource
action request page, you want to provide the user with the ability to change the open port settings, but
Configuring vRealize Automation
VMware, Inc. 473

you also want to restrict the options to ports that are open. You can add an external value definition to
a dual list field and select a custom vRealize Orchestrator script action that queries for open ports.
When the request form loads, the script actions runs, and the open ports are presented as options to
the user.
nAdd new fields that are handled in the vRealize Orchestrator workflow as global parameters
For instance, the workflow provides an integration with a third-party system and the workflow
developer defined input parameters to be handled in the general case, but has also provided a way
for passing custom fields. For example, in a scripting box, all global parameters that start with
my3rdparty are handled. Then, if the XaaS architect wants to pass specific values for consumers to
provide, the XaaS architect can add a new field named my3rdparty_CPU.
Table 3‑60. New Fields in the Resource Action or XaaS Blueprint Form
Field Description
Text field Single-line text box
Text area Multi-line text box
Link Field in which consumers enter a URL
Email Field in which consumers enter an email address
Password field Field in which consumers enter a password
Integer field Text box in which consumers entre an integer
You can make this field a slider with a minimum and maximum value, as
well as an increment.
Decimal field Text box in which consumers enter a decimal
You can make this field a slider with a minimum and maximum value, as
well as an increment.
Date & time Text boxes in which consumers specify a date (by selecting a date from
a calendar menu) and can also select the time (by using up and down
arrows)
Dual List A list builder in which consumers move a predefined set of values
between two lists, the first list contains all unselected options and the
second list contains the user's choices.
Check box Check box
Yes/No Drop-down menu for selecting Yes or No
Drop-down Drop-down menu
List List
Check box list Check box list
Radio button group Group of radio buttons
Search Search text box that auto completes the query and where consumers
select an object
Configuring vRealize Automation
VMware, Inc. 474

Table 3‑60. New Fields in the Resource Action or XaaS Blueprint Form (Continued)
Field Description
Tree Tree that consumers use to browse and select available objects
Map Map table that consumers use to define key-value pairs for properties
You can also use the Section header form field to split form pages in sections with separate headings
and the Text form field to add read-only informational texts.
Constraints and Values in the Form Designer
When you edit an element of the blueprint or resource action form, you can apply various constraints and
values to the element.
Constraints
The constraints that you can apply to an element vary depending on the type of element you are editing
or adding to the form. Some constraint values might be configured in the vRealize Orchestrator workflow.
Those values do not appear on the Constraints tab because they are often dependent on conditions that
are evaluated when the workflow runs. Any constraint values that you configure for the blueprint form
overrides any constraints included in the vRealize Orchestrator workflow.
For each constraint you apply to an element, you can select one of the following options to define the
constraint:
Not set Gets the property from the vRealize Orchestrator workflow presentation.
Constant Sets the element you are editing to required or optional.
Field Binds the element to another element from the form. For example, you can
set the element to be required only when another element, such as a check
box, is selected.
Conditional Applies a condition. Use the conditions to create various clauses and
expressions and apply them to the state or constraints of the element.
External Select a vRealize Orchestrator script action that defines the value.
Table 3‑61. Constraints in the Forms Designer
Constraint Description
Required Indicates whether the element is required.
Read only Indicates whether the field is read-only.
Value Sets a value for the element.
Configuring vRealize Automation
VMware, Inc. 475

Table 3‑61. Constraints in the Forms Designer (Continued)
Constraint Description
Visible Indicates whether the consumer can see the element.
If you apply a visibility constraint on a display group in the
vRealize Orchestrator workflow, the constraint is ignored in the XaaS Submitted
Request Details form and the fields that you want hidden appear in the form.
To hide fields that you do not want to appear in the Submitted Request Details
form, and they are not required for the requesting user, remove the fields from
the Submitted Request Details form on the Blueprints Form tab in the XaaS
blueprint designer. To locate this tab, see Add a New XaaS Blueprint Form.
Minimum length Sets a minimum number of characters of the string input element.
Maximum length Sets a maximum allowed number of characters of the string input element.
Minimum value Sets a minimum value of the number input element.
Maximum value Sets a maximum value of the number input element.
Increment Sets an increment for an element such as a Decimal or Integer field. For
example, when you want an Integer field to be rendered as a Slider, you can
use the value of the step.
Minimum count Sets a minimum count of items of the element that can be selected.
For example, when you add or edit a Check box list you can set the minimum
number of check boxes that the consumer must select to proceed.
Maximum count Sets a maximum count of items of the element that can be selected.
For example, when you add or edit a Check box list you can set the maximum
number of check boxes that the consumer must select to proceed.
Values
You can apply values to some of the elements and define what the consumers see for some of the fields.
The options available depend on the type of element you are editing or adding to the form.
Table 3‑62. Values in the Form Designer
Value Description
Not set Get the value of the element you are editing from the
vRealize Orchestrator workflow presentation.
Predefined values Select values from a list of related objects from the
vRealize Orchestrator inventory.
Value Define a static custom value with labels.
External Values Select a vRealize Orchestrator script action that defines your
value with information not directly exposed by the workflow.
External Value Definitions in the Form Designer
When you edit some elements in the forms designer, you can assign external value definitions that use
custom vRealize Orchestrator script actions to supply information not directly exposed by the workflow.
Configuring vRealize Automation
VMware, Inc. 476

For instance, you might want to publish a resource action to install software on a provisioned machine.
Instead of providing the consumer with a static list of all software available for download, you can
dynamically populate that list with software that is relevant for the machine's operating system, software
that the user has not previously installed on the machine, or software that is out of date on the machine
and requires an update.
To provide custom dynamic content for your consumer, you create a vRealize Orchestrator script action
that retrieves the information you want to display to your consumers. You assign your script action to a
field in the form designer as an external value definition. When the resource or service blueprint form is
presented to your consumers, the script action retrieves your custom information and displays it to your
consumer.
You can use external value definitions to supply default or read-only values, to build boolean expressions,
to define constraints, or to provide options for consumers to select from lists, check boxes, and so on.
Working With the Form Designer
When you create XaaS blueprints, custom resource actions, and custom resources, you can edit the
forms of the blueprints, actions, and resources by using the form designer. You can edit the
representation and define what the consumers of the item or action see when they request the catalog
item or run the post-provisioning operation.
By default, any XaaS blueprint, resource action, or custom resource form is generated based on the
workflow presentation in vRealize Orchestrator.
Configuring vRealize Automation
VMware, Inc. 477

The steps in the vRealize Orchestrator presentation are represented as form pages and the
vRealize Orchestrator presentation groups are represented as separate sections. The input types of the
selected workflow are displayed as various fields in the form. For example, the vRealize Orchestrator type
string is represented by a text box. A complex type such as VC:VirtualMachine is represented by a
search box or a tree, so that the consumers can type an alphanumeric value to search for a virtual
machine or browse to select a virtual machine.
You can edit how an object is represented in the form designer. For example, you can edit the default
VC:VirtualMachine representation and make it a tree instead of a search box. You can also add new
fields such as check boxes, drop-down menus, and so on, and apply various constraints. If the new fields
you add are not valid or are not correctly mapped to the vRealize Orchestrator workflow inputs, when the
consumer runs the workflow, vRealize Orchestrator skips the invalid or unmapped fields.
Designing a Custom Resource Form
All fields on the resource details form are displayed as read-only to the consumer on the item details page
when they provision your custom resource. You can perform basic edit operations to the form, such as
deleting, modifying, or rearranging fields, or you can add new externally defined fields that use
vRealize Orchestrator script actions to supply additional read-only information to consumers.
nEdit a Custom Resource Element
You can edit some of the characteristics of an element on the custom resource Details Form page.
Each default field on the page represents a property of the custom resource. You cannot change the
type of a property or the default values, but you can edit the name, size, description.
nAdd a New Custom Resource Form Page
You can add a new page to rearrange the form into multiple tabs.
nInsert a Section Header in a Custom Resource Form
You can insert a section header to split the form into sections.
Configuring vRealize Automation
VMware, Inc. 478
nInsert a Text Element in a Custom Resource Form
You can insert a text box to add some descriptive text to the form.
nInsert an Externally Defined Field in a Custom Resource Form
You can insert a new field and assign it an external value definition to dynamically provide read-only
information that consumers can see on the item details page when they provision a custom
resource.
Edit a Custom Resource Element
You can edit some of the characteristics of an element on the custom resource Details Form page. Each
default field on the page represents a property of the custom resource. You cannot change the type of a
property or the default values, but you can edit the name, size, description.
Prerequisites
nLog in to vRealize Automation as a tenant administrator or XaaS architect.
nAdd an XaaS Custom Resource.
Procedure
1Select Design > XaaS > Custom Resources.
2Click the custom resource to edit.
3Click the Details Form tab.
4Point to the element you want to edit and click the Edit icon.
5Enter a new name for the field in the Label text box to change the label.
6Edit the description in the Description text box.
7Select an option from the Size drop-down menu to change the size of the element.
8Select an option from the Label size drop-down menu to change the size of the label.
9Click Submit.
10 Click Finish.
Add a New Custom Resource Form Page
You can add a new page to rearrange the form into multiple tabs.
Prerequisites
nLog in to vRealize Automation as a tenant administrator or XaaS architect.
nAdd an XaaS Custom Resource.
Procedure
1Select Design > XaaS > Custom Resources.
2Click the custom resource to edit.
Configuring vRealize Automation
VMware, Inc. 479

3Click the Details Form tab.
4Click the New Page icon ( ) next to the Form page name.
5Select the unused screen type and click Submit.
If you already have a resource details or resource list view, you cannot create two of the same type.
6Click Submit.
7Configure the form.
8Click Finish.
You can delete some of the elements from the original form page and insert them in the new form page,
or you can add new fields that use external value definitions to provide information to consumers that is
not directly exposed by the vRealize Orchestrator workflow.
Insert a Section Header in a Custom Resource Form
You can insert a section header to split the form into sections.
Prerequisites
nLog in to vRealize Automation as a tenant administrator or XaaS architect.
nAdd an XaaS Custom Resource.
Procedure
1Select Design > XaaS > Custom Resources.
2Click the custom resource to edit.
3Click the Details Form tab.
4Drag the Section header element from the Form pane to the Form page pane.
5Type a name for the section.
6Click outside of the element to save the changes.
7Click Finish.
Insert a Text Element in a Custom Resource Form
You can insert a text box to add some descriptive text to the form.
Prerequisites
nLog in to vRealize Automation as a tenant administrator or XaaS architect.
nAdd an XaaS Custom Resource.
Procedure
1Select Design > XaaS > Custom Resources.
2Click the custom resource to edit.
Configuring vRealize Automation
VMware, Inc. 480
3Click the Details Form tab.
4Drag the Text element from the Form pane to the Form page pane.
5Enter the text you want to add.
6Click outside of the element to save the changes.
7Click Finish.
Insert an Externally Defined Field in a Custom Resource Form
You can insert a new field and assign it an external value definition to dynamically provide read-only
information that consumers can see on the item details page when they provision a custom resource.
Prerequisites
nLog in to vRealize Automation as a tenant administrator or XaaS architect.
nAdd an XaaS Custom Resource.
nDevelop or import a vRealize Orchestrator script action to retrieve the information you want to provide
to consumers.
Procedure
1Select Design > XaaS > Custom Resources.
2Click the custom resource to edit.
3Click the Details Form tab.
4Drag an element from the New Fields pane and drop it to the Form page pane.
5Enter an ID for the element in the ID text box.
6Enter a label in the Label text box.
Labels appear to consumers on the forms.
7(Optional) Select a type for the field from the Type drop-down menu.
8Enter the result type of your vRealize Orchestrator script action in the Entity Type search box and
press Enter.
For example, if you want to use a script action to display the current user, and the script returns a
vRealize Orchestrator result type of LdapUser, enter LdapUser in the Entity Type search box and
press Enter.
9Click Add External Value.
10 Select your custom vRealize Orchestrator script action.
11 Click Submit.
12 Click Submit again.
13 Click Finish.
Configuring vRealize Automation
VMware, Inc. 481

When the form is presented to your consumers, the script action retrieves your custom information and
displays it to your consumer.
Designing an XaaS Blueprint Form
When you create an XaaS blueprint, you can edit the form of the blueprint by adding new fields to the
form, modifying the existing fields, deleting, or rearranging fields. You can also create new forms and form
pages, and drag and drop new fields to them.
nAdd a New XaaS Blueprint Form
When you edit the default generated form of a workflow that you want to publish as a XaaS
blueprint, you can add a new XaaS blueprint form.
nEdit an XaaS Blueprint Element
You can edit some of the characteristics of an element on the Blueprint Form page of a XaaS
blueprint. You can change the type of an element, its default values, and apply various constraints
and values.
nAdd a New Element
When you edit the default generated form of a XaaS blueprint, you can add a predefined new
element to the form. For example, if you do not want to use a default generated field, you can delete
it and replace it with a new one.
nInsert a Section Header in a XaaS Blueprint Form
You can insert a section header to split the form into sections.
nAdd a Text Element to an XaaS Blueprint Form
You can insert a text box to add some descriptive text to the form.
Add a New XaaS Blueprint Form
When you edit the default generated form of a workflow that you want to publish as a XaaS blueprint, you
can add a new XaaS blueprint form.
By adding a new XaaS blueprint form, you define the look and feel of the catalog item details and
submitted request details pages. If you do not add a catalog item details and submitted request details
forms, the consumer sees what is defined in the request form.
Prerequisites
nLog in to vRealize Automation as a tenant administrator or XaaS architect.
nAdd an XaaS Blueprint.
Procedure
1Select Design > XaaS > XaaS Blueprints.
2Click the XaaS blueprint you want to edit.
3Click the Blueprint Form tab.
4Click the New Form icon ( ).
Configuring vRealize Automation
VMware, Inc. 482
5Enter a name and, optionally, a description.
6Select the screen type from the Screen type menu.
Option Description
Catalog item details A catalog item details page that consumers see when they click a catalog item.
Request form The default XaaS blueprint form. The consumers see the request form when they
request the catalog item.
Submitted request details A request details page that consumers see after they request the item and want
to view the request details on the Request tab.
7Click Submit.
What to do next
Add the fields you want by dragging them from the New fields pane to the Form page pane.
Edit an XaaS Blueprint Element
You can edit some of the characteristics of an element on the Blueprint Form page of a XaaS blueprint.
You can change the type of an element, its default values, and apply various constraints and values.
Prerequisites
nLog in to vRealize Automation as a tenant administrator or XaaS architect.
nAdd an XaaS Blueprint.
Procedure
1Select Design > XaaS > XaaS Blueprints.
2Click the XaaS blueprint you want to edit.
3Click the Blueprint Form tab.
4Locate the element you want to edit.
5Click the Edit icon ( ).
6Enter a new name for the field in the Label text box to change the label that consumers see.
7Edit the description in the Description text box.
8Select an option from the Type drop-down menu to change the display type of the element.
The options vary depending on the type of element you edit.
9Select an option from the Size drop-down menu to change the size of the element.
10 Select an option from the Label size drop-down menu to change the size of the label.
Configuring vRealize Automation
VMware, Inc. 483
11 Edit the default value of the element.
Option Description
Not set Gets the value of the element you are editing from the vRealize Orchestrator
workflow presentation.
Constant Sets the default value of the element you are editing to a constant value that you
specify.
Field Binds the default value of the element to a parameter of another element from the
representation.
Conditional Applies a condition. By using conditions you can create various clauses and
expressions and apply them to an element.
External Select a vRealize Orchestrator script action to define the value.
12 Apply constraints to the element on the Constraints tab.
Option Description
Not set Gets the value of the element you are editing from the vRealize Orchestrator
workflow presentation.
Constant Sets the default value of the element you are editing to a constant value that you
specify.
Field Binds the default value of the element to a parameter of another element from the
representation.
Conditional Applies a condition. By using conditions you can create various clauses and
expressions and apply them to an element.
External Select a vRealize Orchestrator script action to define the value.
13 Add one or more values for the element on the Values tab.
The options available depend on the type of element you are editing.
Option Description
Not set Gets the value of the element you are editing from the vRealize Orchestrator
workflow presentation.
Predefined values Select values from a list of related objects from the vRealize Orchestrator
inventory.
a Enter a value in the Predefined values search box to search the
vRealize Orchestrator inventory.
b Select a value from the search results and press Enter.
Value Define custom values with labels.
a Enter a value in the Value text box.
b Enter a label for the value in the Label text box.
cClick the Add icon ( ).
External Values Select a vRealize Orchestrator script action to define your value with information
not directly exposed by the workflow.
nSelect Add External Value.
nSelect your vRealize Orchestrator script action.
nClick Submit.
Configuring vRealize Automation
VMware, Inc. 484

14 Click Submit.
15 Click Finish.
Add a New Element
When you edit the default generated form of a XaaS blueprint, you can add a predefined new element to
the form. For example, if you do not want to use a default generated field, you can delete it and replace it
with a new one.
Prerequisites
nLog in to vRealize Automation as a tenant administrator or XaaS architect.
nAdd an XaaS Blueprint.
Procedure
1Select Design > XaaS > XaaS Blueprints.
2Click the XaaS blueprint you want to edit.
3Click the Blueprint Form tab.
4Drag an element from the New Fields pane and drop it to the Form page pane.
5Enter the ID of a workflow input parameter in the ID text box.
6Enter a label in the Label text box.
Labels appear to consumers on the forms.
7(Optional) Select a type for the field from the Type drop-down menu.
8Enter a vRealize Orchestrator object in the Entity type text box and press Enter.
This step is not required for all field types.
Option Description
Result Type If you are using a script action to define an external value for the field, enter the
result type of your vRealize Orchestrator script action.
Input Parameter If you are using the field to accept consumer input and pass parameters back to
vRealize Orchestrator, enter the type for the input parameter accepted by the
vRealize Orchestrator workflow.
Output Parameter If you are using the field to display information to consumers, enter the type for
the output parameter of the vRealize Orchestrator workflow.
9(Optional) Select the Multiple values check box to allow consumers to select more than one object.
This option is not available for all field types.
10 Click Submit.
11 Click Update.
Configuring vRealize Automation
VMware, Inc. 485
What to do next
You can edit the element to change the default settings and apply various constraints or values.
Insert a Section Header in a XaaS Blueprint Form
You can insert a section header to split the form into sections.
Prerequisites
nLog in to vRealize Automation as a tenant administrator or XaaS architect.
nAdd an XaaS Blueprint.
Procedure
1Select Design > XaaS > XaaS Blueprints.
2Click the XaaS blueprint you want to edit.
3Click the Blueprint Form tab.
4Drag the Section header element from the Form pane to the Form page pane.
5Type a name for the section.
6Click outside of the element to save the changes.
7Click Update.
Add a Text Element to an XaaS Blueprint Form
You can insert a text box to add some descriptive text to the form.
Prerequisites
nLog in to vRealize Automation as a tenant administrator or XaaS architect.
nAdd an XaaS Blueprint.
Procedure
1Select Design > XaaS > XaaS Blueprints.
2Click the XaaS blueprint you want to edit.
3Click the Blueprint Form tab.
4Drag the Text element from the New Fields pane to the Form page pane.
5Enter the text you want to add.
6Click outside of the element to save the changes.
7Click Update.
Configuring vRealize Automation
VMware, Inc. 486
Designing a Resource Action Form
When you create a resource action, you can edit the form of the action by adding new fields to the form,
modifying the existing fields, deleting, or rearranging fields. You can also create new forms and form
pages, and drag and drop new fields to them.
Add a New Resource Action Form
When you edit the default generated form of a workflow you want to publish as a resource action, you can
add a new resource action form.
By adding a new resource action form, you define how the submitted action details page looks. If you do
not add a submitted action details form, the consumer sees what is defined in the action form.
Prerequisites
nLog in to vRealize Automation as a tenant administrator or XaaS architect.
nCreate a Resource Action.
Procedure
1Select Design > XaaS > Resource Actions.
2Click the resource action you want to edit.
3Click the Form tab.
4Click the New Form icon ( ).
5Enter a name and, optionally, a description.
6Select the screen type from the Screen type menu.
Option Description
Action form The default resource action form that consumers see when they decide to run the
post-provisioning action.
Submitted action details A request details page that consumers see when they request the action and
decide to view the request details on the Request tab.
7Click Submit.
What to do next
Add the fields you want by dragging them from the New fields pane to the Form page pane.
Add a New Element to a Resource Action Form
When you edit the default generated form of a resource action, you can add a predefined new element to
the form. For example, if you do not want to use a default generated field, you can delete it and replace it
with a new one.
Prerequisites
nLog in to vRealize Automation as a tenant administrator or XaaS architect.
Configuring vRealize Automation
VMware, Inc. 487

nCreate a Resource Action.
Procedure
1Select Design > XaaS > Resource Actions.
2Click the resource action you want to edit.
3Click the Form tab.
4Drag an element from the New Fields pane and drop it to the Form page pane.
5Enter the ID of a workflow input parameter in the ID text box.
6Enter a label in the Label text box.
Labels appear to consumers on the forms.
7(Optional) Select a type for the field from the Type drop-down menu.
8Enter a vRealize Orchestrator object in the Entity type text box and press Enter.
This step is not required for all field types.
Option Description
Result Type If you are using a script action to define an external value for the field, enter the
result type of your vRealize Orchestrator script action.
Input Parameter If you are using the field to accept consumer input and pass parameters back to
vRealize Orchestrator, enter the type for the input parameter accepted by the
vRealize Orchestrator workflow.
Output Parameter If you are using the field to display information to consumers, enter the type for
the output parameter of the vRealize Orchestrator workflow.
9(Optional) Select the Multiple values check box to allow consumers to select more than one object.
This option is not available for all field types.
10 Click Submit.
11 Click Finish.
What to do next
You can edit the element to change the default settings and apply various constraints or values.
Edit a Resource Action Element
You can edit some of the characteristics of an element on the resource action Form page. You can
change the type of an element, its default values, and apply various constraints and values.
Prerequisites
nLog in to vRealize Automation as a tenant administrator or XaaS architect.
nCreate a Resource Action.
Configuring vRealize Automation
VMware, Inc. 488
Procedure
1Select Design > XaaS > Resource Actions.
2Click the resource action you want to edit.
3Click the Form tab.
4Locate the element you want to edit.
5Click the Edit icon ( ).
6Enter a new name for the field in the Label text box to change the label that consumers see.
7Edit the description in the Description text box.
8Select an option from the Type drop-down menu to change the display type of the element.
The options vary depending on the type of element you edit.
9Select an option from the Size drop-down menu to change the size of the element.
10 Select an option from the Label size drop-down menu to change the size of the label.
11 Edit the default value of the element.
Option Description
Not set Gets the value of the element you are editing from the vRealize Orchestrator
workflow presentation.
Constant Sets the default value of the element you are editing to a constant value that you
specify.
Field Binds the default value of the element to a parameter of another element from the
representation.
Conditional Applies a condition. By using conditions you can create various clauses and
expressions and apply them to an element.
External Select a vRealize Orchestrator script action to define the value.
12 Apply constraints to the element on the Constraints tab.
Option Description
Not set Gets the value of the element you are editing from the vRealize Orchestrator
workflow presentation.
Constant Sets the default value of the element you are editing to a constant value that you
specify.
Field Binds the default value of the element to a parameter of another element from the
representation.
Conditional Applies a condition. By using conditions you can create various clauses and
expressions and apply them to an element.
External Select a vRealize Orchestrator script action to define the value.
Configuring vRealize Automation
VMware, Inc. 489

13 Add one or more values for the element on the Values tab.
The options available depend on the type of element you are editing.
Option Description
Not set Gets the value of the element you are editing from the vRealize Orchestrator
workflow presentation.
Predefined values Select values from a list of related objects from the vRealize Orchestrator
inventory.
a Enter a value in the Predefined values search box to search the
vRealize Orchestrator inventory.
b Select a value from the search results and press Enter.
Value Define custom values with labels.
a Enter a value in the Value text box.
b Enter a label for the value in the Label text box.
cClick the Add icon ( ).
External Values Select a vRealize Orchestrator script action to define your value with information
not directly exposed by the workflow.
nSelect Add External Value.
nSelect your vRealize Orchestrator script action.
nClick Submit.
14 Click Submit.
15 Click Update.
Insert a Section Header in a Resource Action Form
You can insert a section header to split the form into sections.
Prerequisites
nLog in to vRealize Automation as a tenant administrator or XaaS architect.
nCreate a Resource Action.
Procedure
1Select Design > XaaS > Resource Actions.
2Click the resource action you want to edit.
3Click the Form tab.
4Drag the Section header element from the Form pane to the Form page pane.
5Type a name for the section.
6Click outside of the element to save the changes.
7Click Finish.
Add a Text Element to a Resource Action Form
You can insert a text box to add some descriptive text to the form.
Configuring vRealize Automation
VMware, Inc. 490
Prerequisites
nLog in to vRealize Automation as a tenant administrator or XaaS architect.
nCreate a Resource Action.
Procedure
1Select Design > XaaS > Resource Actions.
2Click the resource action you want to edit.
3Click the Form tab.
4Drag the Text element from the New Fields pane to the Form page pane.
5Enter the text you want to add.
6Click outside of the element to save the changes.
7Click Finish.
XaaS Examples and Scenarios
The examples and scenarios suggest ways that you can use vRealize Automation to accomplish common
tasks using XaaS blueprints and resource actions.
Create an XaaS Blueprint and Action for Creating and Modifying a User
By using XaaS, you can create and publish a catalog item for provisioning a user in a group. You can also
associate a new post-provisioning operation to the provisioned user. For example, an operation so that
the service catalog users can change the user password.
As an XaaS architect, you create a custom resource, an XaaS blueprint, and publish a catalog item for
creating a user. You also create a resource action for changing the password of the user.
As a catalog administrator, you create a service and include the blueprint catalog item in the service. In
addition, you edit the workflow presentation of the catalog item by using the form designer and change
the way the consumers see the request form.
As a business group manager or a tenant administrator, you entitle the newly created service, catalog
item, and resource action to a consumer.
Prerequisites
Verify that the Active Directory plug-in is properly configured and you have the rights to create users in
Active Directory.
Procedure
1Create a Test User as a Custom Resource
You can create a custom resource and map it to the vRealize Orchestrator object type AD:User.
Configuring vRealize Automation
VMware, Inc. 491

2Create an XaaS Blueprint for Creating a User
You create the Create a user in a group XaaS blueprint so that you can run the workflow that adds
an Active Directory user and assigns the user to an Active Directory group. You can create the
blueprint as a standalone XaaS blueprint or as a blueprint component. In this scenario, you are
creating a standalone blueprint.
3Create a Resource Action to Change a User Password
You can create a resource action to allow the consumers of the XaaS create a user blueprint to
change the password of the user after they provision the user.
4Create a Service and Add Creating a Test User Blueprint to the Service
You can create a service to display the Create a user catalog item in the service catalog.
5Entitle the Service and the Resource Action to a Consumer
Business group managers and tenant administrators can entitle the service and the resource action
to a user or a group of users. After they are entitled, they can see the service in their catalog and
request the Create a test user catalog item that is included in the service. After the consumers
provision the item, they can request to change the user password.
Create a Test User as a Custom Resource
You can create a custom resource and map it to the vRealize Orchestrator object type AD:User.
Prerequisites
Log in to vRealize Automation as an XaaS architect.
Procedure
1Select Design > XaaS > Custom Resources.
2Click the New icon ( ).
3In the Orchestrator type text box, enter AD:User and press Enter.
4Select AD:User in the list.
5Type a name for the resource.
For example, Test User.
6Enter a description for the resource.
For example,
This is a test custom resource that I will use for my catalog item to create a
user in a group.
7Click Next.
8Leave the default values in the form.
9Click Finish.
You created a Test User custom resource and you can see it on the Custom Resources page.
Configuring vRealize Automation
VMware, Inc. 492

What to do next
Create an XaaS blueprint.
Create an XaaS Blueprint for Creating a User
You create the Create a user in a group XaaS blueprint so that you can run the workflow that adds an
Active Directory user and assigns the user to an Active Directory group. You can create the blueprint as a
standalone XaaS blueprint or as a blueprint component. In this scenario, you are creating a standalone
blueprint.
Prerequisites
nVerify that you create a custom resource action that supports provisioning Active Directory users. See
Create a Test User as a Custom Resource.
nLog in to vRealize Automation as an XaaS architect.
Procedure
1Select Design > XaaS > XaaS Blueprints.
2Click the New icon ( ).
3In the Select a workflow pane, navigate to Orchestrator > Library > Microsoft > Active Directory >
User and select the Create a user in a group workflow.
4Click Next.
5Configure the General tab options.
a Change the name of the blueprint to Create a test user, and leave the description as is.
b Deselect the Make available as a component in the design canvas check box.
You are publishing this blueprint directly to the service catalog rather than using it as a blueprint
component in the design canvas. You do not need to configure any scale-in or scale-out
workflows.
The Component Lifecycle tab is removed from the user interface.
6Click Next.
7Edit the blueprint form.
a Click The domain name in Win2000 form.
b Click the Constraints tab.
c Click the Value drop-down arrow, select Constant in the drop-down menu, and enter
test.domain.
Configuring vRealize Automation
VMware, Inc. 493

d Click the Visible drop-down arrow, select Constant in the drop-down menu, and select No in the
drop-down menu.
You made the domain name invisible to the consumer of the catalog item.
e Click Apply to save the changes.
8Click Next.
9Select newUser [Test User] as an output parameter to be provisioned.
10 Click Next.
11 Click Finish.
12 On the XaaS Blueprints page, select the Create a test user row and click Publish.
You created a blueprint for creating a test user and you made the blueprint available to add to a service.
What to do next
Create an action to run on the provisioned user account. See Create a Resource Action to Change a
User Password.
Create a Resource Action to Change a User Password
You can create a resource action to allow the consumers of the XaaS create a user blueprint to change
the password of the user after they provision the user.
Prerequisites
nLog in to vRealize Automation as an XaaS architect.
nVerify that you create a custom resource action that supports provisioning Active Directory users. See
Create a Test User as a Custom Resource.
Procedure
1Select Design > XaaS > Resource Actions.
2Click the New icon ( ).
3Navigate to Orchestrator > Library > Microsoft > Active Directory > User in the
vRealize Orchestrator workflow library, and select the Change a user password workflow.
4Click Next.
5Select Test User from the Resource type drop-down menu.
This selection is the custom resource you created previously.
6Select user from the Input parameter drop-down menu.
7Click Next.
8Change the name of the resource action to Change the password of the Test User, and leave
the description as it appears on the Details tab.
Configuring vRealize Automation
VMware, Inc. 494

9Click Next.
10 (Optional) Leave the form as is.
11 Click Finish.
12 On the Resource Actions page, select the Change the password of the Test User row and click
Publish.
You created a resource action for changing the password of a user, and you made it available to add to
an entitlement.
What to do next
Add the Create a test user blueprint to a service. See Create a Service and Add Creating a Test User
Blueprint to the Service.
Create a Service and Add Creating a Test User Blueprint to the Service
You can create a service to display the Create a user catalog item in the service catalog.
Prerequisites
nLog in to vRealize Automation as a tenant administrator or catalog administrator.
nVerify that you created an XaaS blueprint. See Create an XaaS Blueprint for Creating a User.
Log in to vRealize Automation as a tenant administrator or catalog administrator.
Procedure
1Select Administration > Catalog Management > Services.
2Click the New icon ( ).
3Enter Active Directory Test User as the name of the service.
4Select Active from the Status drop-down menu.
5Leave the other text boxes blank.
6Click OK.
7In the Services list, select the Active Directory Test User row and click Manage Catalog Items.
8Click the New icon ( ).
9Select Create a test user, and click OK.
The Create a test user XaaS blueprint is added to the list of catalog items.
10 Click Close.
The Active Directory Test User service now includes the Create a test user blueprint. You do not need to
add actions to services.
Configuring vRealize Automation
VMware, Inc. 495

What to do next
You can entitle users to request the blueprint and the run the action. See Entitle the Service and the
Resource Action to a Consumer.
Entitle the Service and the Resource Action to a Consumer
Business group managers and tenant administrators can entitle the service and the resource action to a
user or a group of users. After they are entitled, they can see the service in their catalog and request the
Create a test user catalog item that is included in the service. After the consumers provision the item,
they can request to change the user password.
Prerequisites
nLog in to vRealize Automation as a tenant administrator or business group manager.
nVerify that the Create a user blueprint is added to a service. See Create a Service and Add Creating a
Test User Blueprint to the Service.
nVerify that the Change a User Password resource action exists. See Create a Resource Action to
Change a User Password.
Procedure
1Select Administration > Catalog Management > Entitlements.
2Click the New icon ( ).
3Enter Create an Active Directory user in the Name text box.
4Leave the Description and Expiration Date text boxes empty.
5Select Active from the Status drop-down menu.
6Select the target business group from the Business Group drop-down menu.
For example, IT account managers.
7Select All Users and Groups to entitle all the members of the business group, for example, IT
account managers, to create a user account.
The users that you select can see the service and the catalog items included in the service in the
catalog. They can run the change password action on the user account after it is created.
8Click Next.
9In the Entitled Services text box, enter Active Directory Test User and press Enter.
10 In the Entitled Actions text box, enter Change the password of the Test User and press Enter.
11 Click Finish.
You created an active entitlement so that users who are members of the IT account managers business
group can create users. After the user is provisioned, they can run the change password resource action
on the provisioned user account.
Configuring vRealize Automation
VMware, Inc. 496

What to do next
Log in as user who is entitled to create an Active Directory user. On the Catalog tab, verify that the XaaS
blueprint creates the user as expected. After the user is created, run the change password action from
the Items tab.
Create and Publish an XaaS Action to Migrate a Virtual Machine
You can create and publish an XaaS resource action to extend the operations that consumers can
perform on IaaS-provisioned vSphere virtual machines.
In this scenario, you create a resource action for quick migration of a vSphere virtual machine.
Prerequisites
Log in to vRealize Automation as an XaaS architect.
Procedure
1Create a Resource Action to Migrate a vSphere Virtual Machine
You create a custom resource action to allow the consumers to migrate vSphere virtual machines
after they provision the vSphere virtual machines with IaaS.
2Publish the Action for Migrating a vSphere Virtual Machine
To use the Quick migration of virtual machine resource action as a post-provisioning operation, you
must publish it.
Create a Resource Action to Migrate a vSphere Virtual Machine
You create a custom resource action to allow the consumers to migrate vSphere virtual machines after
they provision the vSphere virtual machines with IaaS.
Procedure
1Select Design > XaaS > Resource Actions.
2Click Add ( ).
3Navigate to Orchestrator > Library > vCenter > Virtual Machine management > Move and
migrate in the vRealize Orchestrator workflow library and select the Quick migration of virtual
machine workflow.
4Click Next.
5Select IaaS VC VirtualMachine from the Resource type drop-down menu.
6Select vm from the Input parameter drop-down menu.
7Click Next.
8Leave the name of the resource action and the description as they appear on the Details tab.
9Click Next.
10 Leave the form as is.
Configuring vRealize Automation
VMware, Inc. 497
11 Click Finish.
You created a resource action for migrating a virtual machine and you can see it listed on the Resource
Actions page.
What to do next
Publish the Action for Migrating a vSphere Virtual Machine
Publish the Action for Migrating a vSphere Virtual Machine
To use the Quick migration of virtual machine resource action as a post-provisioning operation, you must
publish it.
Procedure
1Select Design > XaaS > Resource Actions.
2Select the row of the Quick migration of virtual machine resource action, and click the Publish button.
You created and published a vRealize Orchestrator workflow as a resource action. You can navigate to
Administration > Catalog Management > Actions and see the Quick migration of virtual machine
resource action in the list of actions. You can assign an icon to the resource action. See Assign an Icon to
an XaaS Resource Action.
What to do next
Add the action to the entitlements that contain the IaaS-provisioned vSphere virtual machines. See Entitle
Users to Services, Catalog Items, and Actions.
Create an XaaS Action to Migrate a Virtual Machine With vMotion
By using XaaS, you can create and publish a resource action to migrate an IaaS-provisioned virtual
machine with vMotion.
In this scenario, you create a resource action to migrate a vSphere virtual machine with vMotion. In
addition, you edit the workflow presentation by using the form designer and change the way the
consumers see the action when they request it.
Prerequisites
Log in to vRealize Automation as an XaaS architect.
Procedure
1Create an Action to Migrate a vSphere Virtual Machine With vMotion
You can create a custom resource action to allow the service catalog users to migrate a vSphere
virtual machine with vMotion after they provision the machine with IaaS.
2Edit the Resource Action Form
The resource action form maps the vRealize Orchestrator workflow presentation. You can edit the
form and define what the consumers of the resource action see when they decide to run the post-
provisioning operation.
Configuring vRealize Automation
VMware, Inc. 498

3Add a Submitted Action Details Form and Save the Action
You can add a new form to the Migrate a virtual machine with vMotion resource action to define what
the consumers see after they request to run the post-provisioning operation.
4Publish the Action for Migrating a Virtual Machine with vMotion
To use the Migrate a virtual machine with vMotion resource action as a post-provisioning operation,
you must publish it.
Create an Action to Migrate a vSphere Virtual Machine With vMotion
You can create a custom resource action to allow the service catalog users to migrate a vSphere virtual
machine with vMotion after they provision the machine with IaaS.
Procedure
1Select Design > XaaS > Resource Actions.
2Click Add ( ).
3Navigate to Orchestrator > Library > vCenter > Virtual Machine management > Move and
migrate in the vRealize Orchestrator workflow library and select the Migrate virtual machine with
vMotion workflow.
4Click Next.
5Select IaaS VC VirtualMachine from the Resource type drop-down menu.
6Select vm from the Input parameter drop-down menu.
7Click Next.
8Leave the name of the resource action and the description as they appear on the Details tab.
9Click Next.
What to do next
Edit the Resource Action Form.
Edit the Resource Action Form
The resource action form maps the vRealize Orchestrator workflow presentation. You can edit the form
and define what the consumers of the resource action see when they decide to run the post-provisioning
operation.
Procedure
1Click the Delete icon ( ) to delete the pool element.
2Edit the host element.
aClick the Edit icon ( ) next to the host field.
b Type Target host in the Label text box.
c Select Search from the Type drop-down menu.
Configuring vRealize Automation
VMware, Inc. 499

d Click the Constraints tab.
e Select Constant from the Required drop-down menu and select Yes.
You made the host field always required.
f Click Submit.
3Edit the priority element.
aClick the Edit icon ( ) next to the priority field.
b Type Priority of the task in the Label text box.
c Select Radio button group from the Type drop-down menu.
d Click the Values tab, and deselect the Not set check box.
e Enter lowPriority in the Predefined values search text box, and press Enter.
f Enter defaultPriority in the Predefined values search text box, and press Enter.
g Enter highPriority in the Predefined values search text box, and press Enter.
h Click Submit.
When the consumers request the resource action, they see a radio button group with three radio
buttons: lowPriority, defaultPriority, and highPriority.
4Edit the state element.
aClick the Edit icon ( ) next to the state field.
b Type Virtual machine state in the Label text box.
c Select Drop-down from the Type drop-down menu.
d Click the Values tab, and deselect the Not set check box.
e Enter poweredOff in the Predefined values search text box, and press Enter.
f Enter poweredOn in the Predefined values search text box, and press Enter.
g Enter suspended in the Predefined values search text box, and press Enter.
h Click Submit.
When the consumers request the resource action, they see a drop-down menu with three options:
poweredOff, poweredOn, and suspended.
You edited workflow presentation of the Migrate a virtual machine with vMotion workflow.
What to do next
Add a Submitted Action Details Form and Save the Action.
Configuring vRealize Automation
VMware, Inc. 500

Add a Submitted Action Details Form and Save the Action
You can add a new form to the Migrate a virtual machine with vMotion resource action to define what the
consumers see after they request to run the post-provisioning operation.
Procedure
1Click the New Form icon ( ) next to the Form drop-down menu.
2Type Submitted action in the Name text box.
3Leave the Description field blank.
4Select Submitted action details from the Screen type menu.
5Click Submit.
6Click the Edit icon ( ) next to the Form page drop-down menu.
7Type Details in the Heading text box.
8Click Submit.
9Drag the Text element from the Form pane and drop it to the Form page.
10 Type
You submitted a request to migrate your machine with vMotion. Wait until the
process completes successfully.
11 Click outside of the text box to save the changes.
12 Click Submit.
13 Click Add.
You created a resource action to migrate a virtual machine with vMotion and you can see it listed on the
Resource Actions page.
What to do next
Publish the Action for Migrating a Virtual Machine with vMotion.
Publish the Action for Migrating a Virtual Machine with vMotion
To use the Migrate a virtual machine with vMotion resource action as a post-provisioning operation, you
must publish it.
Procedure
1Select Design > XaaS > Resource Actions.
2Select the row of the Migrate a virtual machine with vMotion action, and lick the Publish button.
Configuring vRealize Automation
VMware, Inc. 501

You created and published a vRealize Orchestrator workflow as a resource action. You can navigate to
Administration > Catalog Management > Actions and see the Migrate virtual machine with vMotion
resource action in the list of actions. You can assign an icon to the resource action. See Assign an Icon to
an XaaS Resource Action.
You also edited the presentation of the workflow and defined the look and feel of the action.
What to do next
Business group managers and tenant administrators can include the Migrate a virtual machine with
vMotion resource action in an entitlement. For more information about how to create and publish IaaS
blueprints for virtual platforms, see Designing Machine Blueprints.
Create and Publish an XaaS Action to Take a Snapshot
By using XaaS, you can create and publish a resource action to take a snapshot of a vSphere virtual
machine that was provisioned with IaaS.
In this scenario, you create a resource action to take a snapshot of a vSphere virtual machine provisioned
withIaaS. In addition, you edit the workflow presentation by using the form designer and change the way
the consumers see the action when they request it.
Prerequisites
Log in to vRealize Automation as an XaaS architect.
Procedure
1Create the Action to Take a Snapshot of a vSphere Virtual Machine
You can create a custom resource action to allow the consumers to take a snapshot of a vSphere
virtual machine after they provision the machine with IaaS.
2Publish the Action for Taking a Snapshot
To use the Create a snapshot resource action as a post-provisioning operation, you must publish it.
Create the Action to Take a Snapshot of a vSphere Virtual Machine
You can create a custom resource action to allow the consumers to take a snapshot of a vSphere virtual
machine after they provision the machine with IaaS.
Procedure
1Select Design > XaaS > Resource Actions.
2Click Add ( ).
3Navigate to Orchestrator > Library > vCenter > Virtual Machine management > Snapshot in the
vRealize Orchestrator workflow library and select the Create a snapshot workflow.
4Click Next.
5Select IaaS VC VirtualMachine from the Resource type drop-down menu.
6Select vm from the Input parameter drop-down menu.
Configuring vRealize Automation
VMware, Inc. 502
7Click Next.
8Leave the name of the resource action and the description as they appear on the Details tab.
9Click Next.
10 Leave the form as is.
11 Click Add.
You created a resource action for taking a snapshot of a virtual machine and you can see it listed on the
Resource Actions page.
What to do next
Publish the Action for Taking a Snapshot.
Publish the Action for Taking a Snapshot
To use the Create a snapshot resource action as a post-provisioning operation, you must publish it.
Procedure
1Select Design > XaaS > Resource Actions.
2Select the row of the Create a snapshot action, and click the Publish button.
You created and published a vRealize Orchestrator workflow as a resource action. You can navigate to
Administration > Catalog Management > Actions and see the Create a snapshot resource action in
the list of actions. You can assign an icon to the resource action. See Assign an Icon to an XaaS
Resource Action.
What to do next
Business group managers and tenant administrators can include the Create a snapshot resource action
in an entitlement. For more information about how to create and publish IaaS blueprints for virtual
platforms, see Designing Machine Blueprints.
Create and Publish an XaaS Action to Start an Amazon Virtual Machine
By using XaaS, you can create and publish actions to extend the operations that the consumers can
perform on third-party provisioned resources.
In this scenario, you create and publish a resource action for quick starting of Amazon virtual machines.
Prerequisites
nInstall the vRealize Orchestrator plug-in for Amazon Web Services on your default
vRealize Orchestrator server.
nCreate or import a vRealize Orchestrator workflow for resource mapping of Amazon instances.
Configuring vRealize Automation
VMware, Inc. 503

Procedure
1Create a Resource Mapping for Amazon Instances
You can create a resource mapping to associate Amazon instances provisioned by using IaaS with
the vRealize Orchestrator type AWS:EC2Instance exposed by the Amazon Web Services plug-in.
2Create a Resource Action to Start an Amazon Virtual Machine
You can create a resource action so that the consumers can start provisioned Amazon virtual
machines.
3Publish the Action for Starting Amazon Instances
To use the newly created Start Instances resource action for post-provisioning operations on
Amazon virtual machines, you must publish it.
Create a Resource Mapping for Amazon Instances
You can create a resource mapping to associate Amazon instances provisioned by using IaaS with the
vRealize Orchestrator type AWS:EC2Instance exposed by the Amazon Web Services plug-in.
Prerequisites
nLog in to vRealize Automation as an XaaS architect.
nCreate or import a vRealize Orchestrator resource mapping workflow or script action.
Procedure
1Select Design > XaaS > Resource Mappings.
2Click Add ( ).
3Enter EC2 Instance in the Name text box.
4Enter Cloud Machine in the Catalog Resource Type text box.
5Enter AWS:EC2Instance in the Orchestrator Type text box.
6Select Always available.
7Select the type of resource mapping to use.
8Select your custom resource mapping script action or workflow from the vRealize Orchestrator library.
9Click Add.
You can use your Amazon resource mapping to create resource actions for Amazon machines
provisioned by using IaaS.
What to do next
Create a Resource Action to Start an Amazon Virtual Machine.
Create a Resource Action to Start an Amazon Virtual Machine
You can create a resource action so that the consumers can start provisioned Amazon virtual machines.
Configuring vRealize Automation
VMware, Inc. 504

Prerequisites
Log in to vRealize Automation as an XaaS architect.
Procedure
1Select Design > XaaS > Resource Actions.
2Click Add ( ).
3Select Orchestrator > Library > Amazon Web Services > Elastic Cloud > Instances and select
the Start Instances workflow in the workflows folder.
4Click Next.
5Select EC2 Instance from the Resource type drop-down menu.
This is the name of the resource mapping you previously created.
6Select instance from the Input parameter drop-down menu.
This is the input parameter of the resource action workflow to match the resource mapping.
7Click Next.
8Leave the name and the description as they are.
The default name of the resource action is Start Instances.
9Click Next.
10 Leave the fields as they are on the Form tab.
11 Click Add.
You created a resource action for starting Amazon virtual machines and you can see it on the Resource
Actions page.
What to do next
Publish the Action for Starting Amazon Instances.
Publish the Action for Starting Amazon Instances
To use the newly created Start Instances resource action for post-provisioning operations on Amazon
virtual machines, you must publish it.
Prerequisites
Log in to vRealize Automation as an XaaS architect.
Procedure
1Select Design > XaaS > Resource Actions.
2Select the row of the Start Instances resource action, and click Publish.
The status of the Start Instances resource action changes to Published.
Configuring vRealize Automation
VMware, Inc. 505

What to do next
Add the start instances action to the entitlement that includes the Amazon catalog item. See Entitle Users
to Services, Catalog Items, and Actions.
Troubleshooting Incorrect Accents and Special Characters in XaaS Blueprints
When you create XaaS blueprints for languages that use non-ASCII strings, the accents and special
characters are displayed as unusable strings.
Cause
A vRealize Orchestrator configuration property that is not set by default, might be enabled.
Solution
1On the Orchestrator server system, navigate to /etc/vco/app-server/.
2Open the vmo.properties configuration file in a text editor.
3Verify that the following property is disabled.
com.vmware.o11n.webview.htmlescaping.disabled
4Save the vmo.properties file.
5Restart the vRealize Orchestrator server.
Publishing a Blueprint
Blueprints are saved in the draft state and must be manually published before you can configure them as
catalog items or use them as blueprint components in the design canvas.
After you publish the blueprint, you can entitle it to make it available for provisioning requests in the
service catalog.
You need to publish a blueprint only once. Any changes you make to a published blueprint are
automatically reflected in the catalog and in nested blueprint components.
Publish a Blueprint
You can publish a blueprint for use in machine provisioning and optionally for reuse in another blueprint.
To use the blueprint for requesting machine provisioning, you must entitle the blueprint after publishing it.
Blueprints that are consumed as components in other blueprints do not required entitlement.
Prerequisites
nLog in to vRealize Automation as an infrastructure architect.
nCreate a blueprint. See Checklist for Creating vRealize Automation Blueprints.
Procedure
1Click the Design tab.
Configuring vRealize Automation
VMware, Inc. 506
2Click Blueprints.
3Point to the blueprint to publish and click Publish.
4Click OK.
The blueprint is published as a catalog item but you must first entitle it to make it available to users in the
service catalog.
What to do next
Add the blueprint to the catalog service and entitle users to request the catalog item for machine
provisioning as defined in the blueprint.
Working with Blueprints Programmatically
In addition to the user interface-driven method of creating vRealize Automation blueprints, you can also
work programmatically using tools such as vRealize CloudClient, with standalone supplied or otherwise
sourced blueprints, and in concert with other developers by using workflows, including
vRealize Orchestrator workflows, and third-party tools.
For information about these methods, see the following topics:
nExporting and Importing Blueprints and Content
nDownloading and Configuring the Supplied Standalone Blueprint
Exporting and Importing Blueprints and Content
You can programmatically export blueprints and content from one vRealize Automation environment to
another by using the vRealize Automation REST API or by using the vRealize CloudClient.
For example, you can create and test your blueprints in a development environment and then import them
into your production environment. Or you can import a property definition from a community forum into
your active vRealize Automation tenant instance.
You can programmatically import and export any of the following vRealize Automation content items:
nApplication blueprints and all their components
nIaaS machine blueprints
nSoftware components
nXaaS blueprints
nComponent profiles
nProperty groups
Property group information is tenant-specific and is only imported with the blueprint if the property
group already exists in the target vRealize Automation instance.
Configuring vRealize Automation
VMware, Inc. 507

When you export a blueprint from one vRealize Automation instance tenant into another, the property
group information defined for that blueprint is not recognized for the imported blueprint unless the
property group already exists in the target tenant instance. For example, if you import a blueprint that
contains a property group named mica1, the mica1 property group is not present in the imported blueprint
unless the mica1 property group already exists in the vRealize Automation instance in which you import
the blueprint. To avoid losing property group information when exporting a blueprint from one
vRealize Automation instance to another, use vRealize CloudClient to create an export package zip file
that contains the property group and import that package zip file into the target tenant before you import
the blueprint. For more information about using vRealize CloudClient to list, package, export, and import
property groups, as well as other vRealize Automation items, see the VMware Developer Center at
https://developercenter.vmware.com/tool/cloudclient.
Table 3‑63. Choosing Your Import and Export Tool
Tool More information
vRealize CloudClient See the vRealize CloudClient page on the VMware
code.vmware.com site at
https://developercenter.vmware.com/tool/cloudclient.
vRealize Automation REST API See API documentation in the VMware API Explorer for
vRealize Automation at https://code.vmware.com/apis/vrealize-
automation.
Note When exporting and importing blueprints programmatically across vRealize Automation
deployments, for example from a test to a production environment or from one organization to another, it
is important to recognize that clone template data is included in the package. When you import the
blueprint package, default settings are populated based on information in the package. For example, if
you export and then import a blueprint that was created using a clone-style workflow, and the template
from which that clone data was derived does not exist in an endpoint in the vRealize Automation
deployment in which you import the blueprint, some imported blueprint settings are not applicable for that
deployment.
Scenario: Importing the Dukes Bank for vSphere Sample Application and
Configuring for Your Environment
As an IT professional evaluating or learning vRealize Automation, you want to import a robust sample
application into your vRealize Automation instance so you can quickly explore the available functionality
and determine how you might build vRealize Automation blueprints that suit the needs of your
organization.
Prerequisites
nPrepare a CentOS 6.x Linux reference machine, convert it to a template, and create a customization
specification. See Scenario: Prepare for Importing the Dukes Bank for vSphere Sample Application
Blueprint.
nCreate an external network profile to provide a gateway and a range of IP addresses. See Create an
External Network Profile by Using A Third-Party IPAM Provider.
Configuring vRealize Automation
VMware, Inc. 508

nMap your external network profile to your vSphere reservation. See Create a Reservation for Hyper-V,
KVM, SCVMM, vSphere, or XenServer. The sample application cannot provision successfully without
an external network profile.
nVerify that you have both the infrastructure architect and software architect privileges. Both roles
are required to import the Dukes Bank sample application and to interact with the Dukes Bank
blueprints and software components.
Procedure
1Scenario: Import the Dukes Bank for vSphere Sample Application
You download the Dukes Bank for vSphere application from your vRealize Automation appliance.
You import the sample application into your vRealize Automation tenant to view a working sample of
a multi-tiered vRealize Automation blueprint that includes multiple machine components with
networking and software components.
2Scenario: Configure Dukes Bank vSphere Sample Components for Your Environment
Using your infrastructure architect privileges, you configure each of the Dukes Bank machine
components to use the customization specification, template, and machine prefixes that you created
for your environment.
You have configured the Dukes Bank for vSphere sample application for your environment to use as a
starting point for developing your own blueprints, as a tool to evaluate vRealize Automation, or as a
learning resource to assist you in understanding vRealize Automation functionality and components.
Scenario: Import the Dukes Bank for vSphere Sample Application
You download the Dukes Bank for vSphere application from your vRealize Automation appliance. You
import the sample application into your vRealize Automation tenant to view a working sample of a multi-
tiered vRealize Automation blueprint that includes multiple machine components with networking and
software components.
Procedure
1Log in to your vRealize Automation appliance as root by using SSH.
2Download the Dukes Bank for vSphere sample application from your vRealize Automation appliance
to /tmp.
wget --no-check-certificate https://vRealize_VA_Hostname_fqdn:
5480/blueprints/DukesBankAppForvSphere.zip
Do not unzip the package.
3Download vRealize CloudClient from http://developercenter.vmware.com/tool/cloudclient to /tmp.
4Unzip the cloudclient-4x-dist.zip package.
5Run vRealize CloudClient under the /bin directory.
$>./bin/cloudclient.sh
Configuring vRealize Automation
VMware, Inc. 509

6If prompted, accept the license agreement.
7Using vRealize CloudClient, log in to the vRealize Automation appliance as a user with software
architect and infrastructure architect privileges.
CloudClient>vra login userpass --server https://vRealize_VA_Hostname_fqdn --user <user@domain.com>
--tenant <TenantName>
8When prompted, enter your login password.
9Validate that the DukesBankAppForvSphere.zip content is available.
vra content import --path /<Path>/DukesBankAppForvSphere.zip --dry-run true --resolution OVERWRITE
Note that the OVERWRITE entry is case-specific and requires uppercase.
By configuring the resolution to overwrite instead of skip, you allow vRealize Automation to correct
conflicts when possible.
10 Import the Dukes Bank sample application.
vra content import --path /<Path>/DukesBankAppForvSphere.zip --dry-run false --resolution OVERWRITE
Note that the OVERWRITE entry is case-specific and requires uppercase.
When you log in to the vRealize Automation console as a user with software architect and infrastructure
architect privileges, you see Dukes Bank blueprints and software components on the Design >
Blueprints tab and the Design > Software Components tab.
Scenario: Configure Dukes Bank vSphere Sample Components for Your Environment
Using your infrastructure architect privileges, you configure each of the Dukes Bank machine components
to use the customization specification, template, and machine prefixes that you created for your
environment.
This scenario configures the machine components to clone machines from the template you created in
the vSphere Web Client. If you want to create space-efficient copies of a virtual machine based on a
snapshot, the sample application also supports linked clones. Linked clones use a chain of delta disks to
track differences from a parent machine, are provisioned quickly, reduce storage cost, and are ideal to
use when performance is not a high priority.
Procedure
1Log in to the vRealize Automation console as an infrastructure architect.
You can configure the Dukes Bank sample application to work in your environment with only the
infrastructure architect role, but if you want to view or edit the sample software components you
also need the software architect role.
2Select Design > Blueprints.
3Select the DukesBankApplication blueprint and click the Edit icon.
Configuring vRealize Automation
VMware, Inc. 510
4Edit the appserver-node so vRealize Automation can provision this machine component in your
environment.
You configure the blueprint to provision multiple instances of this machine component so you can
verify the load balancer node functionality.
a Click the appserver-node component on the design canvas.
Configuration details appear in the bottom panel.
b Select your machine prefix from the Machine prefix drop-down menu.
c Configure your blueprint to provision at least two and up to ten instances of this node by selecting
a minimum of 2 instances and a maximum of 10.
On the request form, users are able to provision at least two and up to ten appserver nodes. If
users are entitled to the scale in and scale out actions, they can scale their deployment to meet
changing needs.
d Click the Build Information tab.
e Select Cloneworkflow from the Provisioning workflow drop-down menu.
f Select your dukes_bank_template from the Clone from dialog.
g Enter your Customspecs_sample in the Customization spec text box.
This field is case sensitive.
h Click the Machine Resources tab.
i Verify that memory settings are at least 2048 MB.
5Edit the loadbalancer-node so vRealize Automation can provision this machine component in your
environment.
a Click the loadbalancer-node component on the design canvas.
b Select your machine prefix from the Machine prefix drop-down menu.
c Click the Build Information tab.
d Select Cloneworkflow from the Provisioning workflow drop-down menu.
e Select your dukes_bank_template from the Clone from dialog.
f Enter your Customspecs_sample in the Customization spec text box.
This field is case sensitive.
g Click the Machine Resources tab.
h Verify that memory settings are at least 2048 MB.
6Repeat for the database-node machine component.
7Click Save and Finish.
Your changes are saved and you return to the Blueprints tab.
Configuring vRealize Automation
VMware, Inc. 511
8Select the DukesBankApplication blueprint and click Publish.
You configured the Dukes Bank sample application blueprint for your environment and published the
finished blueprint.
What to do next
Published blueprints do not appear to users in the catalog until you configure a catalog service, add the
blueprint to a service, and entitle users to request your blueprint. See Checklist for Configuring the
Service Catalog.
After you configure your Dukes Bank blueprint to display in the catalog, you can request to provision the
sample application. See Scenario: Test the Dukes Bank Sample Application.
Scenario: Test the Dukes Bank Sample Application
You request the Dukes Bank catalog item, and log in to the sample application to verify your work and
view vRealize Automation blueprint functionality.
Prerequisites
nImport the Dukes Bank sample application and configure the blueprint components to work in your
environment. See Scenario: Importing the Dukes Bank for vSphere Sample Application and
Configuring for Your Environment.
nConfigure the service catalog and make your published Dukes Bank blueprint available for users to
request. See Checklist for Configuring the Service Catalog.
nVerify that virtual machines you provision can reach the yum repository.
Procedure
1Log in to the vRealize Automation console as a user who is entitled to the Dukes Bank catalog item.
2Click the Catalog tab.
3Locate the Dukes Bank sample application catalog item and click Request.
4Fill in the required request information for each component that has a red asterisk.
a Navigate to the JBossAppServer component to fill in the required request information.
b Enter the fully qualified domain name of your vRealize Automation appliance in the
app_content_server_ip text box.
c Navigate to the Dukes_Bank_App software components to fill in the required request information.
d Enter the fully qualified domain name of your vRealize Automation appliance in the
app_content_server_ip text boxes.
Configuring vRealize Automation
VMware, Inc. 512
5Click Submit.
Depending on your network and your vCenter Server instance, it can take approximately 15-20
minutes for the Dukes Bank sample application to fully provision. You can monitor the status under
the Requests tab, and after the application provisions you can view the catalog item details on the
Items tab.
6After the application provisions, locate the IP address of the load balancer server so you can access
the Dukes Bank sample application.
a Select Items > Deployments.
b Expand your Dukes Bank sample application deployment and select the Apache load balancer
server.
c Click View Details.
d Select the Network tab.
e Make a note of the IP address.
7Log in to the Dukes Bank sample application.
a Navigate to your load balancer server at http://IP_Apache_Load_Balancer:8081/bank/main.faces.
If you want to access the application servers directly, you can navigate to http://IP_AppServer:
8080/bank/main.faces.
b Enter 200 in the Username text box.
c Enter foobar in the Password text box.
You have a working Dukes Bank sample application to use as a starting point for developing your own
blueprints, as a tool to evaluate vRealize Automation, or as a learning resource to assist you in
understanding vRealize Automation functionality and components.
Downloading and Configuring the Supplied Standalone Blueprint
You can download a supplied standalone blueprint, and its associated software components, from the
vRealize Automation appliance.
The Download and Configure vRealize Automation Standalone Blueprint document guides you through
the process of downloading a standalone vRealize Automation blueprint from the vRealize Automation
appliance and then importing, configuring, and using that blueprint in vRealize Automation in conjunction
with several vRealize Orchestrator workflows.
Assembling Composite Blueprints
You can reuse published blueprints and blueprint components, combining them in new ways to create IT
service packages that deliver elaborate functionality to your users.
Configuring vRealize Automation
VMware, Inc. 513
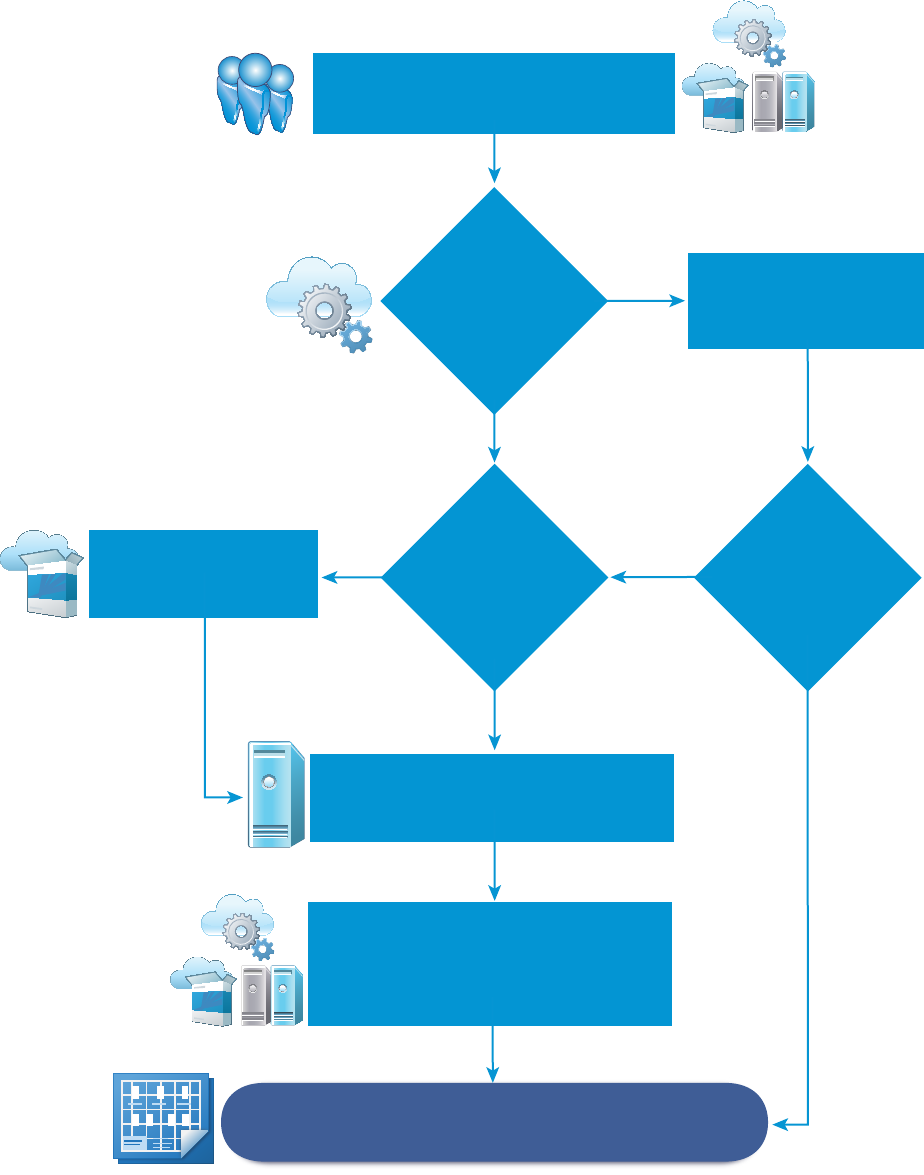
If the component blueprints have custom forms, the custom request forms are not applied to the new
blueprint. You must create new forms for the new blueprint. For more about custom request forms, see
Customizing Blueprint Request Forms.
Figure 3‑5. Workflow for Assembling Composite Blueprints
No
Yes
No
Your blueprint is finished. Catalog administrators can
include it in a service and entitle users to request the item.
Do you want to
combine your
XaaS blueprint
with a Machine
blueprint?
Identify (or create)
a published
XaaS blueprint.
Do you want to
include software
on machines in
your blueprint?
Identify (or create) one or more
published Machine blueprints.
Assemble your blueprint components into
a new blueprint that contains all the
functionality you want to deliver to
your users. Publish your new blueprint.
Identify (or create)
a published
Software component.
Do you want to
publish a vRealize
Orchestrator workflow
as an XaaS
blueprint?
Blueprint architects create
reusable blueprint components
for the design library.
Yes Yes
No
Configuring vRealize Automation
VMware, Inc. 514
nUnderstanding Nested Blueprint Behavior
You can reuse blueprints by nesting them in another blueprint as a component. You nest blueprints
for reuse and modularity control in machine provisioning, but there are specific rules and
considerations when you work with nested blueprints.
nUsing Machine Components and Software Components When Assembling a Blueprint
You deliver Software components by placing them on top of supported machine components when
you assemble blueprints.
nCreating Property Bindings Between Blueprint Components
In several deployment scenarios, a component needs the property value of another component to
customize itself. You can bind properties of XaaS, machines, Software, and custom properties to
other properties in a blueprint.
nCreating Dependencies and Controlling the Order of Provisioning
If you need information from one of your blueprint components to complete the provisioning of
another component, you can draw an explicit dependency on the design canvas to stagger
provisioning so the dependent component is not provisioned prematurely. Explicit dependencies
control the build order of a deployment and trigger dependent updates during a scale in or scale out
operation. Software components are required to be ordered in a blueprint.
Understanding Nested Blueprint Behavior
You can reuse blueprints by nesting them in another blueprint as a component. You nest blueprints for
reuse and modularity control in machine provisioning, but there are specific rules and considerations
when you work with nested blueprints.
A blueprint that contains one or more nested blueprints is called an outer blueprint. When you add a
blueprint component to the design canvas while creating or editing another blueprint, the blueprint
component is called a nested blueprint and the container blueprint to which it is added is called the outer
blueprint.
Using nested blueprints presents considerations that are not always obvious. It is important to understand
the rules and considerations to make the best use of your machine provisioning capabilities.
General Rules and Considerations for Nesting Blueprints
nAs a best practice to minimize blueprint complexity, limit blueprints to three levels deep, with the top-
level blueprint serving as one of the three levels.
nIf a user is entitled to the outer blueprint, that user is entitled to its nested blueprints.
nYou can apply an approval policy to a blueprint. When approved, the blueprint catalog item and all its
components, including nested blueprints, are provisioned. You can also apply different approval
policies to different components. All the approval policies must be approved before the requested
blueprint is provisioned.
Configuring vRealize Automation
VMware, Inc. 515
nWhen you edit a published blueprint, you are not changing deployments that are already provisioned
by using that blueprint. At the time of provisioning, the resulting deployment reads current values from
the blueprint, including from its nested blueprints. The only changes you can pass on to provisioned
deployments are edits to software components, for example edits to update or uninstall scripts.
nSettings you define in the outer blueprint override settings configured in nested blueprints with the
following exceptions:
nYou can change the name of a nested blueprint, but you cannot change the name of a machine
component, or any other component, inside a nested blueprint.
nYou cannot add or delete custom properties for a machine component in a nested blueprint.
However, you can edit those custom properties. You cannot add, edit, or delete property groups
for a machine component in a nested blueprint.
nChanges you or another architect make to nested blueprint settings appear in the outer blueprints,
unless you have overridden those settings in the outer blueprint.
nLimit the maximum lease time on the outer blueprint to the lowest maximum lease value of a
component blueprint.
While the lease time specified on a nested blueprint and on the outer blueprint can be set to any
value, the maximum lease time on the outer blueprint should be limited to the lowest maximum lease
value of a nested blueprint. This allows the application architect to design a composite blueprint that
has uniform and variable lease values, but is within the constraints identified by the infrastructure
architect. If the maximum lease value defined on a nested blueprint is less than that defined on the
outer blueprint, the provisioning request fails.
nWhen working in an outer blueprint, you can override the Machine Resources settings that are
configured for a machine component in a nested blueprint.
nWhen working in an outer blueprint, you can drag a software component onto a machine component
within a nested blueprint.
nIf you open a blueprint in which a machine component in a nested blueprint was removed or its ID
was changed, and the machine component was associated to components in the current blueprint,
the associated components are removed and the following or similar message appears:
A machine component in a nested blueprint that is referenced by components in the current blueprint
was removed or its machine component ID was changed. All components in the current blueprint that
were associated to the missing or changed machine component ID have been removed. Click Cancel
to keep the association history between the missing or changed machine component ID in the nested
blueprint and components in the current blueprint and correct the problem in the nested blueprint.
Open the nested blueprint and re-add the missing machine component with the original ID or change
the machine component ID back to its original ID. Click Save to remove all association history
between the missing or changed machine component ID in the nested blueprint and components in
the current blueprint.
Configuring vRealize Automation
VMware, Inc. 516
nWhen you publish a blueprint, software component data is treated like a snapshot. If you later make
changes to the software component's properties, only new properties are recognized by the blueprint
in which the software component exists. Updates to properties that existed in the software component
at the time you published the blueprint are not updated in the blueprint. Only properties that are
added after you have published the blueprint are inherited by the blueprint. However, you can make
changes to instances of the software component in blueprints in which the software component
resides to change that particular blueprint.
Networking and Security Rules and Considerations for Nesting Blueprints
nNetworking and security components in outer blueprints can be associated with machines that are
defined in nested blueprints.
nNSX network, security, and load balancer components and their settings are not supported in nested
blueprints.
nWhen app isolation is applied in the outer blueprint, it overrides app isolation settings specified in
nested blueprints.
nTransport zone settings that are defined in the outer blueprint override transport zone settings that are
specified in nested blueprints.
nWhen working in an outer blueprint, you can configure load balancer settings relative to network
component settings and machine component settings that are configured in an inner or nested
blueprint.
nFor a nested blueprint that contains an on-demand NAT network component, the IP ranges specified
in that on-demand NAT network component are not editable in the outer blueprint.
nThe outer blueprint cannot contain an inner blueprint that contains on-demand network settings or on-
demand load balancer settings. Using an inner blueprint that contains an NSX on-demand network
component or NSX load balancer component is not supported.
nFor a nested blueprint that contains NSX network or security components, you cannot change the
network profile or security policy information specified in the nested blueprint. You can, however,
reuse those settings for other vSphere machine components that you add to the outer blueprint.
nTo ensure that NSX network and security components in nested blueprints are uniquely named in a
composite blueprint, vRealize Automation prefixes the nested blueprint ID to network and security
component names that are not already unique. For example, if you add a blueprint with the ID name
xbp_1 to an outer blueprint and both blueprints contain an on-demand security group component
named OD_Security_Group_1, the component in the nested blueprint is renamed
xbp_1_OD_Security_Group_1 in the blueprint design canvas. Network and security component
names in the outer blueprint are not prefixed.
Configuring vRealize Automation
VMware, Inc. 517

nComponent settings can change depending on which blueprint the component resides on. For
example, if you include security groups, security tags, or on-demand networks at both the inner and
outer blueprint levels, the settings in the outer blueprint override those in the inner blueprint. Network
and security components are supported only at the outer blueprint level except for existing networks
that work at the inner blueprint level. To avoid issues, add all your security groups, security tags, and
on-demand networks only to the outer blueprint.
Software Component Considerations for Nesting Blueprints
For scalable blueprints, it is a best practice to create single layer blueprints that do not reuse other
blueprints. Normally, update processes during scale operations are triggered by implicit dependencies
such as dependencies you create when you bind a software property to a machine property. However,
implicit dependencies in a nested blueprint do not always trigger update processes. If you need to use
nested blueprints in a scalable blueprint, you can manually draw dependencies between components in
your nested blueprint to create explicit dependencies that always trigger an update.
Using Machine Components and Software Components When
Assembling a Blueprint
You deliver Software components by placing them on top of supported machine components when you
assemble blueprints.
To support Software components, the machine blueprint you select must contain a machine component
based on a template, snapshot, or Amazon machine image that contains the guest agent and the
Software bootstrap agent, and it must use a supported provisioning method.
Because the Software agents do not support Internet Protocol version 6 (IPv6), use IPv4 settings.
Note Software components must have an ordered dependency in the blueprint. Unordered software
components can cause blueprint provisioning to fail. If there is no actual order dependency for the
software components, you can satisfy the blueprint ordering requirement by adding a faux dependency
between the software components.
If you are designing blueprints to be scalable, it is a best practice to create single layer blueprints that do
not reuse other blueprints. Normally, the update processes that are used during scale operations are
triggered by implicit dependencies such as property bindings. However, implicit dependencies in a nested
blueprint do not always trigger update processes.
While IaaS architects, application architects, and software architects can all assemble blueprints, only
IaaS architects can configure machine components. If you are not an IaaS architect, you cannot configure
your own machine components, but you can reuse machine blueprints that your IaaS architect created
and published.
To successfully add software components to the design canvas, you must also have business group
member, business group administrator, or tenant administrator role access to the target catalog.
Configuring vRealize Automation
VMware, Inc. 518
If you need to use nested blueprints in a scalable blueprint, you can manually draw dependencies
between components in your nested blueprint to create explicit dependencies that always trigger an
update.
Note When you publish a blueprint, software component data is treated like a snapshot. If you later
make changes to the software component's properties, only new properties are recognized by the
blueprint in which the software component exists. Updates to properties that existed in the software
component at the time you published the blueprint are not updated in the blueprint. Only properties that
are added after you have published the blueprint are inherited by the blueprint. However, you can make
changes to instances of the software component in blueprints in which the software component resides to
change that particular blueprint.
Table 3‑64. Provisioning Methods that Support Software
Machine Type Provisioning Method
vSphere Clone
vSphere Linked Clone
vCloud Director Clone
vCloud Air Clone
Amazon AWS Amazon Machine Image
Creating Property Bindings Between Blueprint Components
In several deployment scenarios, a component needs the property value of another component to
customize itself. You can bind properties of XaaS, machines, Software, and custom properties to other
properties in a blueprint.
For example, your software architect might modify property definitions in the life cycle scripts of a WAR
component. A WAR component might need the installation location of the Apache Tomcat server
component, so your software architect configures the WAR component to set the server_home property
value to the Apache Tomcat server install_path property value. As the architect assembling the blueprint,
you have to bind the server_home property to the Apache Tomcat server install_path property for the
Software component to provision successfully.
You set property bindings when you configure components in a blueprint. On the Blueprint page, you drag
your component onto the canvas and click the Properties tab. To bind a property to another property in a
blueprint, select the Bind checkbox. You can enter ComponentName~PropertyName in the value text
box, or you can use the down arrow to generate a list of available binding options. You use a tilde
character ~ as a delimiter between components and properties. For example, to bind to the property
dp_port, on your MySQL software component, you could type mysql~db_port. To bind to properties that
are configured during provisioning, such as the IP address of a machine or the host name of a Software
component, you enter _resource~ComponentName~PropertyName. For example, to bind to the
reservation name of a machine, you might enter
_resource~vSphere_Machine_1~MachineReservationName.
Configuring vRealize Automation
VMware, Inc. 519
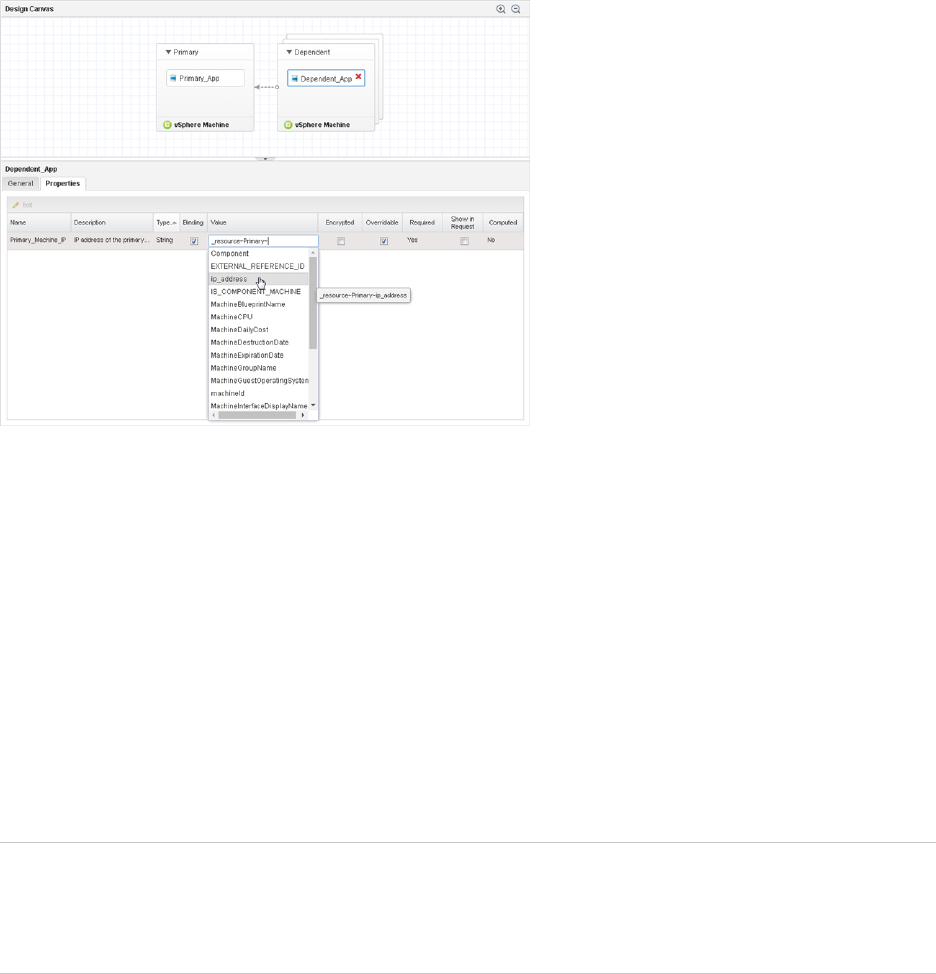
Figure 3‑6. Bind a Software Property to the IP address of a machine
Creating Dependencies and Controlling the Order of Provisioning
If you need information from one of your blueprint components to complete the provisioning of another
component, you can draw an explicit dependency on the design canvas to stagger provisioning so the
dependent component is not provisioned prematurely. Explicit dependencies control the build order of a
deployment and trigger dependent updates during a scale in or scale out operation. Software components
are required to be ordered in a blueprint.
When you design blueprints with multiple machines and applications, you might have properties you need
from one machine to finish an application installation on another. For example, if you are building a Web
server you might need the host name of the database server before you can install the application and
instantiate database tables. If you map an explicit dependency, your database server starts provisioning
when your Web server finishes provisioning.
Note Software components must have an ordered dependency in the blueprint. Unordered software
components can cause blueprint provisioning to fail. If there is no actual order dependency for the
software components, you can satisfy the blueprint ordering requirement by adding a faux dependency
between the software components.
To map a dependency on your design canvas, you draw a line from the dependent component to the
component you are depending on. When you are finished, the component you want to build second has
an arrow pointing to the component you want to build first. For example, in the Controlling the Build Order
by Mapping Dependencies figure, the dependent machine is not provisioned until the primary machine is
built. Alternatively, you can configure both machines to provision simultaneously but draw a dependency
between the software components.
Configuring vRealize Automation
VMware, Inc. 520

Figure 3‑7. Controlling the Build Order by Mapping Dependencies
If you are designing blueprints to be scalable, it is a best practice to create single layer blueprints that do
not reuse other blueprints. Normally, update processes during scale operations are triggered by implicit
dependencies such as dependencies you create when you bind a software property to a machine
property. However, implicit dependencies in a nested blueprint do not always trigger update processes. If
you need to use nested blueprints in a scalable blueprint, you can manually draw dependencies between
components in your nested blueprint to create explicit dependencies that always trigger an update.
Customizing Blueprint Request Forms
Every blueprint that you create and publish displays a form when your users request the blueprint in the
catalog. You can use the default form or you can customize blueprint request forms when you create or
edit a blueprint. You customize a form when the information provided or required on the default form is not
what you want to present to your users.
Customizing Request Forms
You access the custom request form designer from the blueprint data grid or from the blueprint canvas.
Custom Request Form Designer
You use the form designer to create your custom form.
Configuring vRealize Automation
VMware, Inc. 521

To create a custom form:
1 Drag elements (1 and 2) onto the design canvas (3).
2 Configure each element using the properties pane (4).
3 Activate the form (5).
The custom form designer supports data validation by adding constraints to a field or by using an external
validation source. For constraints options that are applied as you create a form, see Custom Form
Designer Field Properties. For a constraint example, see Create a Custom Request Form with Active
Directory Options. For external validation, see Using External Validation in the Custom Forms Designer.
The blueprint elements list includes custom properties unless a property is configured to not allow
overwriting. If the overridable option on the property is set to no, the field is not eligible for customization.
Custom Request Form Actions
You use the action menu items to populate forms and share forms with other systems.
Configuring vRealize Automation
VMware, Inc. 522

Table 3‑65. Custom Request Form Action Menu Items
Action Menu Item Description
Generate Form Adds all the fields associated with each blueprint component to
the form designer. Each component is added to a tab. If you use
this menu item after you created or modified a form, the
generated form overwrites your current form.
If you use this menu item, you can hide or remove fields that you
do not want to present to your users in the catalog. If you do not
generate the form, you can still add and configure the text boxes
that you want your users to see.
Import Form. Imports a custom form JSON or YAML file.
Export Form Exports your current custom form as a JSON file.
Export the file when you want to use part of it that matches a
component that you use in another blueprint.
Export form as YAML Exports your current custom form as YAML.
Export the file as YAML when you want to move a custom from
one vRealize Automation instance to another. For example, from
your test environment to your production environment. If you
prefer to edit the form as YAML, you can export the form, edit it,
and then import it back into the blueprint.
Import CSS Imports a CSS file that enhances the catalog request form.
The file might be similar to the following example. This example
changes the font size and makes the text bold. The field
referenced is the Deploy Machine with Active Directory User
Account text field that appears in the image located in the
Custom Request Form Designer section above.
#<field-ID> .grid-item {
font-size: 16px;
font-weight: bold;
width: 600px;
}
In this example, <field-ID> is the ID for the field in the canvas.
To locate the value, select the field in the canvas. The value is
located in the right pane, below the name. In the image above,
the value is text_d947bc97.
To import the file. Save it as <filename>.css.
Configuring vRealize Automation
VMware, Inc. 523

Table 3‑65. Custom Request Form Action Menu Items (Continued)
Action Menu Item Description
Export CSS Exports your imported CSS.
Remove CSS Discards your custom CSS.
The discarded CSS is not recoverable.
Download format schema Downloads a JSON file that contains the structure and
description of the controls and states used in a custom form.
You can use this schema to create a form or to modify an
existing form. You can import the modified JSON file as the
custom form.
Create a Custom Request Form with Active Directory Options
You create a custom form when the default form provides too much or too little information to the
requesting user. You can add more fields to the form, you can hide fields on a form, or you can pre-
populate fields and either show or hide them.
This use case is based on a blueprint that contains a vSphere virtual machine type and an XaaS blueprint
that configures an Active Directory administrator account on the virtual machine. The XaaS blueprint is
based on the Create a user with a password in a group workflow.
Your goal in this use case is to:
nGive the user the option to configure the administrator password.
nPreconfigure the machine details so that CPU and memory values are both based on GB.
How do you benefit from this use case? The use case includes examples of the following form
customizations:
nAdd specific fields to a blank form.
nConfigure a show/hide check box.
nHide fields until the requesting user selects a check box.
nAdd validation to fields.
nDisplay a memory field in GB even though the blueprint field is calculated in MB.
nUse regular expressions.
Prerequisites
nLog in to vRealize Automation as an application architect, software architect, or infrastructure
architect.
nCreate a YourCo Machine and User blueprint that includes a vSphere blueprint and an XaaS blueprint
to create an Active Directory user account with a password in a group. For an example, see Create
an XaaS Blueprint for Creating a User.
Configuring vRealize Automation
VMware, Inc. 524
Procedure
1Select Design > Blueprints.
2Highlight the row containing YourCo Machine and User blueprint and click Custom Form > Edit.
3Rename the General tab.
a Click the tab.
b In the Title property in the right property pane, enter Configuration.
4On your new Configuration tab, add and configure the following fields with the provided values.
Use the provided Appearance, Values, and Constraints values.
Resolves any errors as you build the form.
Configuring vRealize Automation
VMware, Inc. 525

Field in
Screenshot Blueprint Element Source Appearance Values Constraints
Deploy
Machine with
Active
Directory User
Account
Generic Elements > Text Label and type
nDisplay type = Text
Visibility
nValue source =
Constant
nVisible = Yes
Default value
nDefault value =
Deploy
Machine with
Active Directory
User Account
nValue source =
Constant
Reason for
Request
Blueprint Elements >
vSphere_vCenter_Machine >
Description
Label and type
nLabel = Reason for
request
nDisplay type = Text
Field
Visibility
nValue source =
Constant
nVisible = Yes
Read-only
nValue source =
Constant
nRead-only = No
Custom help
nSignpost help = Provide
the reason for your
request.
Required
nValue source =
Constant
nRequired = Yes
Number of
Deployments
Blueprint Elements > General
> Number of Deployments
Label and type
nLabel = Number of
Deployments
nDisplay type = Integer
Visibility
nValue source =
Constant
nVisible = Yes
Read-only
nValue source =
Constant
nRead-only = No
Custom help
nSignpost help = Select
the number of instances
of the blueprint to
deploy.
Default value
nValue source =
Constant
nDefault value =
1
Required
nValue source =
Constant
nRequired = Yes
Minimum value
nValue source =
Constant
nMin value = 1
Configuring vRealize Automation
VMware, Inc. 526

Field in
Screenshot Blueprint Element Source Appearance Values Constraints
Add Active
Directory
account check
box
Generic Elements >
Checkbox
Label and Type
nLabel = Add Active
Directory account.
nDisplay type =
Checkbox
Visibility
nValue source =
Constant
nVisible = Yes
Username Blueprint Elements > Create a
user with a password in a
group > The account name
for the user
Label and type
nLabel = Username
nDisplay type = Text field
Visibility
Note This visibility
property, configured the
same way in the
subsequent fields, hides the
field unless the Add Active
Directory account check
box is selected.
nValue source =
Conditional value
nExpression =
Set value = Yes
If Add Active Directory
account Equals Yes
Custom help
nSignpost help = Provide
the administrator user
name.
Default value
nValue source =
Constant
nDefault value =
admin
Required
nValue source =
Constant
nRequired = Yes
Regular expression
Note The regular
expressions must
follow the JavaScript
syntax.
nValue source =
Constant
nRegular
expression = "^[a-
z]*$"
nValidation error
message = Your
user name must
not contain any
special characters
or numbers.
Configuring vRealize Automation
VMware, Inc. 527

Field in
Screenshot Blueprint Element Source Appearance Values Constraints
Password Blueprint Elements > Create a
user with a password in a
group > The password to set
for the newly created account
Label and type
nLabel = Password
nDisplay type =
Password
Visibility
nValue source =
Conditional value
nExpression =
Set value = Yes
If Add Active Directory
account Equals Yes
Custom help
nSignpost help = Provide
the password for your
administrator account.
Required
nValue source =
Constant
nRequired = Yes
Regular expression
nValue source =
Constant
nRegular
Expression = "^(?
= .*[A-Z])(?
= .*[0-9])(? = .*[a-
z]).{8,}$"
nMessage = Your
administrator
password must be
at least eight
characters and
can include
alphanumeric and
special
characters.
Confirm
password
Blueprint Elements > Create a
user with a password in a
group > Confirmation of the
password
Label and type
nLabel = Confirm
password
Display type = Password
Visibility
nValue source =
Conditional value
nExpression =
Set value to Yes
If Add Active Directory
account Equals Yes
Custom help
nSignpost help =
Reenter the password
for your administrator
account.
Required
nValue source =
Constant
nRequired = Yes
Match field
nMatch field =
Password
Configuring vRealize Automation
VMware, Inc. 528

Field in
Screenshot Blueprint Element Source Appearance Values Constraints
Email Generic Elements > Text Field Label and type
nLabel = Email
nDisplay type = Text
Field
Visibility
nValue source =
Conditional value
nExpression =
Set value = Yes
If Add Active Directory
account Equals Yes
Custom help
nSignpost help = Provide
the administrator email.
Default value
nValue source =
Computed
value
nOperator =
Concatenate
nAdd value =
Field. Select
Username
nAdd value =
Constant. Enter
@yourco.com
Regular expression
nValue source =
Constant
nRegular
expression = "^[A-
Za-z0-9._%+-]
+@[A-Za-z0-9.-]
+\\.[A-Za-z]{2,}$"
nValidation error
message =
Provide valid
email.
I have read
and accept
the software
policy check
box.
Generic Elements >
Checkbox
Label and type
nElement label = I have
read and accept the
software policy
nDisplay type =
Checkbox
Visibility
nValue source =
Conditional value
nExpression =
Set value = Yes
If Add Active Directory
account Equals Yes
5Click Add Tab and entering Machine Details in the Title property to the right.
Configuring vRealize Automation
VMware, Inc. 529

6Configure the following fields in the Machine Details tab.
Use the provided Appearance, Values, and Constraints values.
Field in
Screenshot Blueprint Elements Source Appearance Values Constraints
Storage (GB) Blueprint Elements >
vSphere_vCenter_Machine >
Storage (GB)
Label and type
nLabel = Storage (GB)
nDisplay type = Integer
Visibility
nValue source =
Constant
nVisibility = Yes
Read-only
nValue source =
Constant
nRead-only = No
Default value
nValue source =
Constant
nDefault value = 4
Minimum value
nValue source
= Constant
nMinimum
value = 2
Number of
CPUs
Blueprint Elements >
vSphere_vCenter_Machine >
CPUs
Label and type
nLabel = Number of
CPUs
nDisplay type = Integer
Visibility
nValue source =
Constant
nVisibility = Yes
Default value
nValue source =
Constant
nDefault value = 1
Minimum value
nValue source
= Constant
nMin value = 1
Configuring vRealize Automation
VMware, Inc. 530

Field in
Screenshot Blueprint Elements Source Appearance Values Constraints
Memory (GB) Generic Elements > Integer Label and type
nLabel = Memory (GB)
nDisplay type = Integer
Visibility
nValue source =
Constant
nVisibility = Yes
Default value
nValue source =
Constant
nDefault value = 1
Minimum value
nValue source
= Constant
nMinimum
value = 1
Memory (MB) Blueprint Elements >
vSphere_vCenter_Machine >
Memory (MB)
Label and type
nLabel = Memory (MB)
nDisplay type = Integer
Visibility
nValue source =
Constant
nVisibility = No
Default value
nValue source =
Computed value
nOperator = Multiply
nAdd Value = Field.
Select Memory
(GB)
nAdd Value =
Constant. Enter
1024
7Resolve any errors. You can save the form but you cannot activate it until the form is free of errors.
8To save the form and close the form designer, click Finish.
9Select the blueprint and click Publish.
10 To make the custom form available when users request the item in the service catalog, on the
Blueprints page toolbar, select Custom Form > Activate.
What to do next
nMake the blueprint available in the service catalog. See Managing the Service Catalog.
Configuring vRealize Automation
VMware, Inc. 531
nIn the catalog, verify that the request form is similar to the following example.
Custom Form Designer Field Properties
The fields properties determine how the selected field looks and what default values are presented to the
user. And they determine what rules you want to apply to the field to ensure that the user provides a valid
entry in the catalog request form in vRealize Automation.
You configure each field individually. Select the field and edit the field properties.
Value Source
For many of the properties, you can select from various value source options. Not all source options are
available for all field types or properties.
nConstant. The value does not change. Depending on the property, the value might be a string, an
integer, a regular expression, or selected from a limited list, for example Yes or No. For example, you
can provide 1 as a default value integer, select No for the Read-only property, or provide the regular
expression to validate a field entry.
Configuring vRealize Automation
VMware, Inc. 532
nConditional value. The value is based on one or more conditions. The conditions are processed in
the order listed. If more than one condition is true, the last condition that is true determines the
behavior of the field for that property. For example, you can create a condition that determines if a
field is visible based on the value in another field.
nExternal source. The value is based on the results of a vRealize Orchestrator action. For example,
calculate cost based on a scripted vRealize Orchestrator action. For an example, see Using vRealize
Orchestrator Actions in the Custom Forms Designer.
nBind field. The value is the same as the field to which is it bound. The available fields are limited to
the same field type. For example, you bind default value for an authentication needed check box field
to another check box field. When one target field check box is selected in the request form, the check
box on the current field is selected.
nComputed value. The value is determined based on how the operator processes the selected fields
and values. Text fields use the concatenate operator. Integer fields use the selected add, subtract,
multiply or divide operations. For example, you can configure an integer field to convert megabytes to
gigabytes using the multiply operation.
Field Appearance
You use the appearance properties to determine whether the field appears on the form and what label
and custom help you want to provide to your catalog users.
Configuring vRealize Automation
VMware, Inc. 533

Table 3‑66. Appearance Tab Options
Option Description
Label and type Provide a label and select a display type.
The available display types depend on the field. Some fields
support multiple text types and others only support integers.
Possible values:
nDecimal
nDrop Down
nImage
nInteger
nMulti Select
nPassword
nRadio Group
nText
nText Area
nText Fields
Drop-down and data grid fields include a Placeholder setting.
The entered value appears as an internal label or instructions in
the drop-down menu, or as a general label or instructions in the
data grid.
Visibility Show or hide a field on the request form.
nConstant. Select Yes to display the field on the form. Select
No to hide the field.
nConditional value. Visibility is determined by the first
expression that is true. For example, a field is visible if a
check box is selected on a form.
nExternal source. Visibility is determined by the results of
the selected vRealize Orchestrator action.
Read-only Prevent users from changing the field values.
nConstant. Select Yes to display the value but prevent
changes. Select No to allow changes.
nConditional value. Status is determined by the first
expression that is true. For example, a field is read-only if
the value in a storage field is greater than 2 GB.
nExternal source. Status is determined by the results of the
selected vRealize Orchestrator action.
Rows per page For data grid elements only.
Enter the number of rows.
Custom help Provide information about the field to your users. This
information appears in signpost help for the field.
You can use simple text or HTML, including href links. For
example, <a
href="https://docs.vmware.com/en/vRealize-
Automation/index.html">vRealize Automation
documentation</a>.
Configuring vRealize Automation
VMware, Inc. 534

Field Values
You use the values properties to provide any default values.
Table 3‑67. Values Tab Options
Option Description
Columns For the data grid element only.
Provide the label, ID, and value type for each column in your
table.
The default value for the data grid must include the header data
that matches the defined columns. For example, if you have
user_name ID for one column and user_role ID for another, then
the first row is user_name,user_role.
For configuration examples, see Using the Data Grid Element in
the Custom Forms Designer.
Default value Populates the field with a default value based on the value
source.
Possible value sources depend on the field.
nConstant. The entered string.
nConditional value. The default value is determined by the
first expression that is true. For example, the default value of
a storage field is 1 GB if the memory field is less than 512
MB.
nExternal source. Value is based on the results of the
selected vRealize Orchestrator action.
nBind field. Value is the same as the selected field.
nComputed value. Value is based on the results of the
provided field values and the selected operator. For
example, the default value of memory in MB is based on the
memory in GB multiplied by 1024.
Value option Populates a drop-down, multi-select, radio group, or value picker
fields.
nConstant. The format for the list is Value|Label,Value|
Label,Value|Label. For example, 2|Small,4|Medium,8|
Large.
nExternal source. Value is based on the results of the
selected vRealize Orchestrator action.
Step For integer or decimal fields, define the incremental or
decremental values.
For example, if the default value is 1 and you set the step value
to 3, then the allowed values are 4, 7, 10, and so on.
Field Constraints
You use the constraint properties to ensure that the requesting user provides valid values in the request
form.
Configuring vRealize Automation
VMware, Inc. 535

You might also use external validation as an alternative method for ensuring valid values. See Using
External Validation in the Custom Forms Designer.
Table 3‑68. Constraints Tab Options
Option Description
Required The requesting user must provide a value for this field.
nConstant. Select Yes to require that the requesting user
provides a value. Select no if the field is optional.
nConditional value. Whether the field is required is
determined by the first expression that is true. For example,
this field is required if the operating system family starts with
Darwin in another field.
nExternal source. Status is based on the results of the
selected vRealize Orchestratoraction.
Regular expression Provide a regular expression that validates the value and a
message that appears when the validation fails.
The regular expressions must follow JavaScript syntax. For an
overview, see Creating a regular expression. For more detailed
guidance, see Syntax.
nConstant. Provide a regular expression. For example, for
an email address, the regular expression might be ^[A-Za-
z0-9._%+-]+@[A-Zaz0-9.-]+\\.[A-Za-z]{2,}$ and the
validation error message is The email address format
is not valid. Please try again.
nConditional value. The regular expression that is used is
determined by the first expression that is true.
Minimum value Specify a minimum numeric value. For example, a password
must have at least 8 characters.
Provide an error message. For example, The password must
be at least 8 characters.
nConstant. Enter the integer.
nConditional value. The minimum value is determined by
the first expression that is true. For example, a minimum
CPU value is 4 if the operating system does not equal Linux.
nExternal source. Value is based on the results of the
selected vRealize Orchestrator action.
Configuring vRealize Automation
VMware, Inc. 536

Table 3‑68. Constraints Tab Options (Continued)
Option Description
Maximum value Maximum numeric value. For example, a field is limited to 50
characters.
Provide an error message. For example, This description
cannot exceed 50 characters.
nConstant. Enter the integer.
nConditional value. The maximum value is determined by
the first expression that is true. For example, a maximum
storage value is 2 GB if the deployment location equals
AMEA.
nExternal source. Value is based on the results of the
selected vRealize Orchestrator action.
Match field This field value must match the selected field value.
For example, a password confirmation field must match the
password field.
Using vRealize Orchestrator Actions in the Custom Forms
Designer
When you customize the request form for a vRealize Automation blueprint, you can base the behavior of
some fields on the results of a vRealize Orchestrator action.
There are several ways that you can use vRealize Orchestrator actions. You might have an action that
pulls the data from a third source, or you can use a script that defines the size and cost. This example
uses a script.
Example: Size and Cost Fields Example
In this use case, you want the catalog user to select a virtual machine size, and then display the cost of
that machine per day. To do this example, you have a vRealize Orchestrator that correlates the size and
cost, and you add a size field and a cost field to the blueprint custom form. The size field determines the
value that appears in the cost field.
1 In vRealize Orchestrator, configure an action, getWindows10Cost, with a deploymentSize script
similar to the following example.
Configuring vRealize Automation
VMware, Inc. 537
Use the following as a script example.
var cost = "Unknown";
switch(deploymentSize) {
case 'small' : cost = "$15";break;
case 'medium' : cost = "$25";break;
case 'large' : cost = "$45";break ;
default : break ;
}
return cost;
2 In vRealize Automation, add and configure a size field and cost field to a blueprint custom form.
Configure the size field as multi select with Small, Medium, and Large values.
Configuring vRealize Automation
VMware, Inc. 538

In vRealize Automation, add and configure a size field and cost field to a blueprint custom form.
On the Values tab, configure the following property values.
nDefault value = Large
nValue options
nValue source = Constant
nValue definition = small|Small,medium|Medium,large|Large
3 Configure the cost field to display the cost as defined in the vRealize Orchestrator action based on
the value selected in the size field.
On the Values tab, configure the following property values.
nDefault value = External source
nSelect action = <your vRealize Orchestrator actions folder>/getWindows10Cost
nAction inputs
ndeploymentSize. This value was configured in the action.
nField
nSize
Using the Data Grid Element in the Custom Forms Designer
When you customize the request form for a blueprint, you add information in a table format. The data that
is presented in the table might be manually provided or based on an external source.
Example: Provided CSV Data Example
In this use case, you have a table of values that you provide in the custom request form. You provide the
information in the table as a constant value source. The source is based on a CSV data structure where
the first row header. The headers are the column IDs separated by a comma. Each additional row is the
data that appears in each row in the table.
1 Add the Data Grid generic element to the design canvas.
2 Select the data grid and define the values in the properties pane.
Configuring vRealize Automation
VMware, Inc. 539

Label ID Type
Username username String
Employee ID employeeId Integer
Manger manager String
Define the CSV values.
username,employeeId,manager
leonardo,95621,Farah
vindhya,15496,Farah
martina,52648,Nikolai
3 Verify that the data grid displays the expected data in the blueprint request form.
Configuring vRealize Automation
VMware, Inc. 540
Example: External Source Example
This example uses the previous example but the values are based on a vRealize Orchestrator action.
Although this is a simple action example, but you can use a more complex action that you retrieve this
information from a local database or system.
1 In vRealize Orchestrator, configure an action, getUserDetails, with an array similar to the following
example.
Use the following script example.
return [{"username":"Fritz", "employeeId":6096,"manager":"Tom"}]
2 In vRealize Automation, add the data grid and configure the data grid columns with the following
values.
Label ID Type
Username username String
Employee ID employeeId Integer
Manger manger String
3 In the Value source list, select External source.
4 In Select action, enter getUserDetails and select the action you created in vRealize Orchestrator.
5 Save and verify the table in the request form.
Configuring vRealize Automation
VMware, Inc. 541
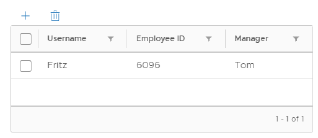
Using External Validation in the Custom Forms Designer
You can customize a request form to ensure that users provide valid values at request time by adding
constraints to fields or using an external validation source.
Some field properties, such as minimum, maximum, regular expressions, match fields, or not empty, can
be configured with constraints to ensure valid values. See Custom Form Designer Field Properties.
External validation checks for valid values from an external source using vRealize Orchestrator actions .
Some examples where you might use external validation includes:
nThe valid values are defined in an external source. For example, vRealize Orchestrator.
nThe validation must affect several fields. For example, a vRealize Orchestrator action collects the disk
size and storage pool capacity, and validates the provided size values based on available space.
How do you order multiple external validations in one blueprint? The validations are processed in the
order that the appear on the External Validation canvas. If you have two validations that validate the same
field, the second validation results will overwrite the first. To reorder the validations, you can click and
drag the cards on the canvas.
Example: vRealize Orchestrator User Example
In this use case, you want the catalog user to provide only a new user name. To do this example, you
have a vRealize Orchestrator action that checks whether the user name provided in the form exists in
your Active Directory database. If the name does exist, an error message appears on the request form.
This use case is applied to the Create a Custom Request Form with Active Directory Options example.
1 In vRealize Orchestrator, configure an action, checkIfUsernameExists, with a script similar to the
following example.
Configuring vRealize Automation
VMware, Inc. 542

Use the following as a script example. In this example, return is the message that appears if the
validation fails.
if (!username) {
return "";
}
var result = ActiveDirectory.search("User", username);
if (result && result.length > 0) {
return "Username '" + username +"' already exists.";
}
return "";
2 In vRealize Automation, open the custom form designer for your blueprint, click External Validation,
and drag the Orchestrator validation type onto the canvas.
3 Configure the external validation options.
Configuring vRealize Automation
VMware, Inc. 543

nValidation label = Check if user name exists
nSelect action = <your vRealize Orchestrator actions folder>/checkIfUsernameExists
nAction inputs
nusername = Field and Username
nHighlighted fields
nClick Add Field and select Username.
A field-level validation error appears in the catalog request form if the entered valued fails validation. If
you want a global error, do not configure the highlighted field.
Example: vRealize Orchestrator Multiple Fields Example
In this use case, you want to base the validation of the CPU, memory, and storage values on the project
value. For example, if the users select the Dev project, then the maximum number of CPUs is 4. If they
select Prod, then the maximum value is 2.
For this use case, add a project field to the Create a Custom Request Form with Active Directory Options
example. Configure project as a drop-down with Dev and Prod.
1 In vRealize Orchestrator, configure an action, validateMachineWithUserForm, with a script similar
to the following example.
Configuring vRealize Automation
VMware, Inc. 544
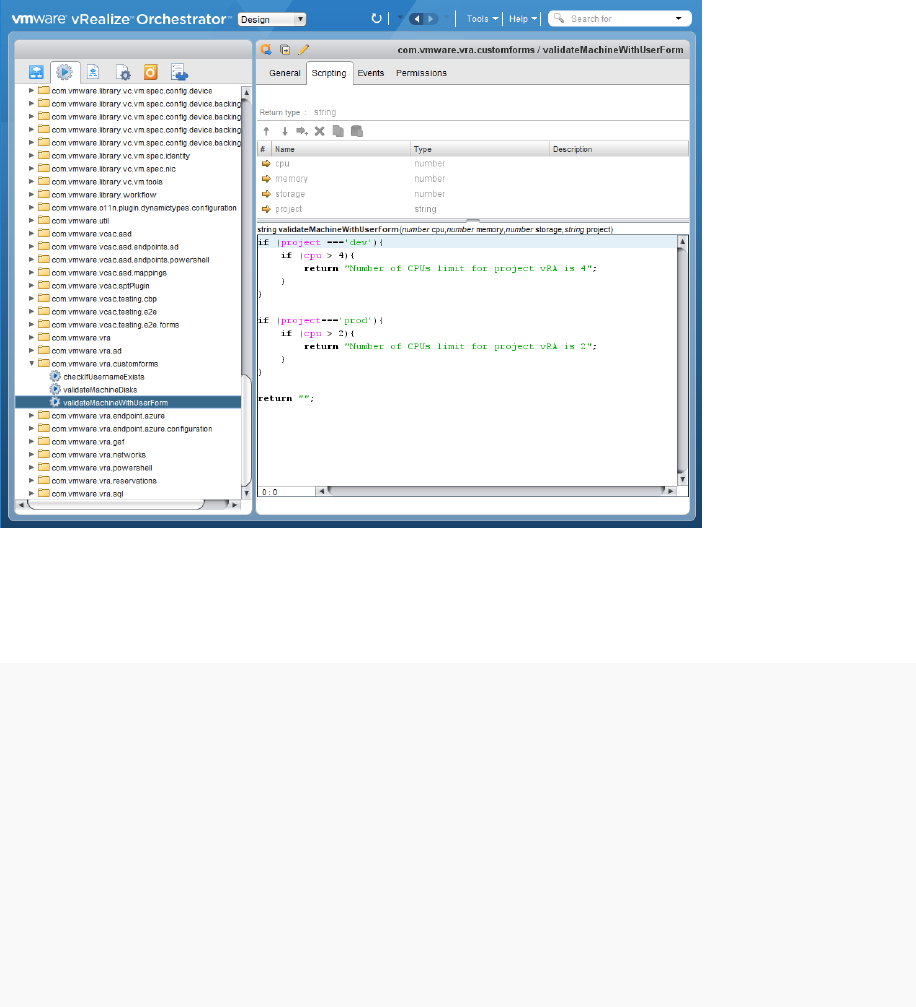
Use the following as a script example for the CPU checking. Continue adding the memory and
storage values to the script, as needed. In this example, return is the message that appears if
validation fails.
if (project ==='dev'){
if (cpu > 4){
return "Number of CPUs limit for project vRA is 4";
}
}
if (project==='prod'){
if (cpu > 2){
return "Number of CPUs limit for project vRA is 2";
}
}
return "";
2 In vRealize Automation, open the custom form designer for your blueprint, click External Validation,
and drag the Orchestrator validation type onto the canvas.
3 Configure the external validation options.
Configuring vRealize Automation
VMware, Inc. 545
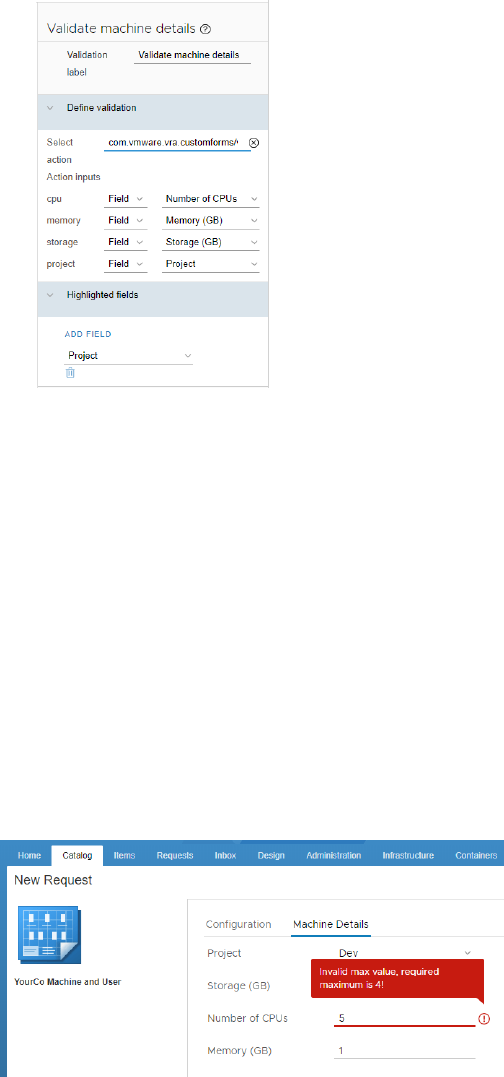
nValidation label = Validate machine details
nSelect action = <your vRealize Orchestrator actions folder>/validateMachineWithUserForm
nAction inputs
ncpu = Field and Number of CPUs
nmemory = Field and Memory (GB)
nstorage = Field and Storage (GB)
nProject = Field and Project
nHighlighted fields
nClick Add Field and select Project.
In the catalog, your catalog user might see a validation error similar to the following example.
Managing the Service Catalog
The service catalog is where your customers request machines and other items to provision for their use.
You manage user access to the service catalog items based on how you build services, entitle users to
one or more items, and apply governance.
The workflow that you follow to add items to the service catalog varies based on whether you create and
apply approval policies.
Configuring vRealize Automation
VMware, Inc. 546
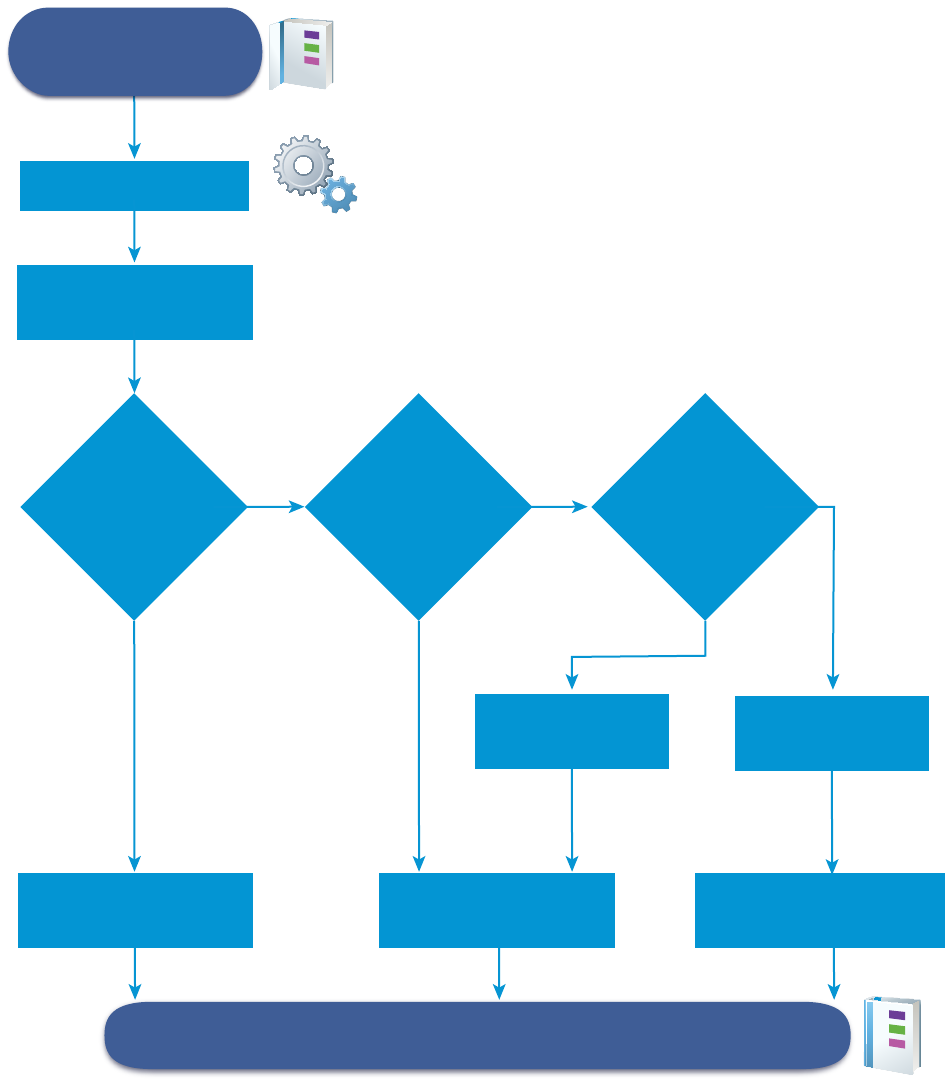
No
Yes
Blueprints and Actions
are published as Catalog
Items and Actions
Add a Catalog Item
to a Service
Create a Service
Do you want
to apply approval
policies to one or more
catalog items that
are included in
the Service?
Create an Entitlement
without approval policies
No
Yes
Do you have an
approval policy
applicable to the
Catalog Items
in Service?
Now Later
Create an approval
policy now or later?
Create an Entitlement
with approval policies
Create or modify
an Approval Policy
Create an
Approval Policy
Modify existing Entitlement
of apply an approval policy
Entitled services and catalog items are available in the Service Catalog.
Verify in the Service Catalog
Checklist for Configuring the Service Catalog
After you create and publish blueprints and actions, you can create a vRealize Automation service,
configure catalog items, and assign entitlements and approvals.
The Configuring the Service Catalog Checklist provides a high-level overview of the steps required to
configure catalog and provides links to decision points or detailed instructions for each step.
Configuring vRealize Automation
VMware, Inc. 547

Table 3‑69. Configuring the Service Catalog Checklist
Task Required Role Details
Add a service. tenant administrator
or catalog
administrator
See Add a Service.
Add a catalog item to a service. tenant administrator
or catalog
administrator
See Add Catalog Items to a Service.
Configure the catalog item in the service. tenant administrator
or catalog
administrator
See Configure a Catalog Item.
Create and apply entitlements to the catalog item. tenant administrator
or business group
manager
See Entitle Users to Services, Catalog
Items, and Actions.
Create and apply approval policies to the catalog item. tenant administrator
or approval
administrator can
create approval
policies
tenant administrator
or business group
manager can apply
approval policies
See Create an Approval Policy.
Creating a Service
A service is a group of catalog items that you want included in the service catalog. You can entitle the
service, which entitles business group users to all the associated catalog items, and you can apply an
approval policy to the service.
A service operates as a dynamic group of catalog items. If you entitle a service, all the catalog items
associated with the service are available in the service catalog to the specified users, and any catalog
items that you add or remove from a service affect the service catalog.
As you create the service, you can use it as a service category so that you can assemble service
offerings for your service catalog users. For example, a Windows desktop service that includes Windows
7, 8, and 10 operating system catalog items, or a Linux service that includes CentOS and RHEL
operating system items.
Add a Service
Add a service to make catalog items available to your service catalog users. All catalog items must be
associated with a service so that you can entitle the items to users.
When the service is entitled to users, the catalog items appear together in the service catalog. You can
also entitle users to the individual catalog items.
Configuring vRealize Automation
VMware, Inc. 548
Prerequisites
Log in to vRealize Automation as a tenant administrator or catalog administrator.
Procedure
1Select Administration > Catalog Management > Services.
2Click the New icon ( ).
3Enter a name and description.
These values appear in the service catalog for the catalog users.
4To add a specific icon for the service in the service catalog, click Browse and select an image.
The supported image file types are GIF, JPG, and PNG. The displayed image is 40 x 40 pixels. If you
do not select a custom image, the default icon appears in the service catalog.
5Select a status from the Status drop-down menu.
Option Description
Inactive The service is not available in the service catalog. When a service is in this state,
you can associate catalog items with the service, but you cannot entitle the
service ot users. If you select Inactive for a service that is active and entitled, it is
removed from the service catalog until you reactivate it.
Active (Default) The service and the associated catalog items are available to entitle to
users and, if entitled, are available for in the service catalog for those users.
Deleted Removes the service from vRealize Automation. All associated catalog items are
still present, but any items associated with the service in the service catalog are
not available to the catalog users.
6Configuring the service settings.
The following settings provide information to the service catalog users. The settings do not affect
service availability.
Option Description
Hours Configure the time to coincide with the availability of the support team. The time is
based on your local time.
The hours of service cannot cross from one day to another. For example, you
cannot set the hours of service as 4:00 PM to 4:00 AM. To cross midnight, create
two entitlements. One entitlement for 4:00 PM to 12:00 AM, and another for 12:00
AM to 4:00 AM.
Owner Specify the user or user group who is the primary owner of the service and the
associated catalog items.
Support Team Specify the custom user group or user who is available to support any problems
that the service catalog users encounter when they provision items using the
service.
Change Window Select a date and time when you plan to make a change to the service. The date
and time specified is informational and does not affect the availability of the
service.
Configuring vRealize Automation
VMware, Inc. 549

7Click Add.
What to do next
Associate catalog items with a service so that you can entitle users to the items. See Add Catalog Items
to a Service.
Add Catalog Items to a Service
Add catalog items to services so that you can entitle users to request the items in the service catalog. A
catalog item can be associated with only one service.
Prerequisites
nLog in to vRealize Automation as a tenant administrator or catalog administrator.
nVerify that a service exists. See Add a Service.
nVerify that one or more catalog items are published. See Configure a Catalog Item.
Procedure
1Select Administration > Catalog Management > Services.
2Select the service to which you are adding catalog items and click Manage Catalog Items.
3Click the Catalog Items icon ( ).
a Select the catalog items to include in this service.
The Select Catalog Items dialog box displays only the items that are not already associated with
a service.
b Click Add.
4Click Close.
What to do next
nYou can add a custom icon to the catalog item that will appear with the item in the service catalog.
See Configure a Catalog Item.
nEntitle users to the services or catalog items so that they can request them in the service catalog.
See Creating Entitlements.
Working with Catalog Items and Actions
Catalog items are published blueprints for machines, software components, and other objects. Actions in
the catalog management area are published actions that you can run on the provisioned catalog items.
You can use the lists to determine what blueprints and actions are published so that you can make them
available to service catalog users.
Configuring vRealize Automation
VMware, Inc. 550
Published Catalog Items
A catalog item is a published blueprint. Published blueprints can also be used in other blueprints. The
reuse of blueprints in other blueprints is not displayed in the catalog items list.
The published catalog items can also include items that are only components of blueprints. For example,
published software components are listed as catalog items, but they are available only as part of a
deployment.
Deployment catalog items must be associated with a service so that you can make them available in the
service catalog to entitled users. Only active items appear in the service catalog. You can configure
catalog items to a different service, disable it if you want to temporarily remove it from the service catalog,
and add a custom icon that appears in the catalog.
Published Actions
Actions are changes that you can make to provisioned catalog items. For example, you can reboot a
virtual machine.
Actions can include built-in actions or actions created using XaaS. Built-in actions are added when you
add a machine or other provided blueprint. XaaS actions must be created and published.
Actions are not associated with services. You must include an action in the entitlement that contains the
catalog item on which the action runs. Actions that are entitled to users do not appear in the service
catalog. The actions are available for the provisioned item on the service catalog user's Items tab based
whether they are applicable to the item and to the current state of the item.
You can add a custom icon to the action that appears on the Items tab.
Configure a Catalog Item
A catalog item is a published blueprint that you can entitle to users. You use the catalog items options to
change the status or associated service. You can also view the entitlements that include the selected
catalog item.
Only catalog items that are associated with a service and entitled to users appear in the service catalog.
Catalog items can be associated with only one service.
If you do not want a catalog item to appear in the service catalog without removing it from an entitlement
or from the published catalog items list, you can deactivate it. The status of a deactivated catalog item is
retired in the grid and inactive in the configuration details. You can activate it later.
Prerequisites
nLog in to vRealize Automation as a tenant administrator or catalog administrator.
nVerify that you have at least one blueprint published as a catalog item. See Publish a Blueprint.
Procedure
1Select Administration > Catalog Management > Catalog Items.
Configuring vRealize Automation
VMware, Inc. 551

2Select the catalog item and click Configure.
3Configure the catalog item settings.
Option Description
Icon Browse for an image. The supported image file types are GIF, JPG, and PNG.
The displayed image is 40 x 40 pixels. If you do not select a custom image, the
default catalog icon appears in the service catalog.
Status Possible values include Active, Inactive, and Staging.
nActive. The catalog item appears in the service catalog and entitled users
can use it to provision resources. The item appears in the catalog item list as
published.
nInactive. The catalog item is not available in the service catalog. The item
appears in the catalog item list as retired.
nStaging. The catalog item is not available in the service catalog. Select this
menu item if the item was once inactive and you are using staging to indicate
that you are considering reactivating it. Appears in the catalog item list as
staging.
Service Select a service. All catalog items must be associated with a service if you want it
to appear in the service catalog for entitled users. The list includes active and
inactive services.
New and noteworthy The catalog item appears in the New & Noteworthy area on the home page.
4To view the entitlements where the catalog item is made available to users, click the Entitlements
tab.
5Click Update.
What to do next
nTo make the catalog item available in the service catalog, you must entitle users to the service
associated with the item or to the individual item. See Creating Entitlements.
nTo specify the entitlements processing order so that the approval policies for individual users are
applied correctly, set the priority order for multiple entitlements for the same business group. See
Prioritize Entitlements.
Configure an Action for the Service Catalog
An action is a change or workflow that can run on provisioned items. You can add an icon or view the
entitlements that include the selected action.
An action is either a built-in action for a provisioned machine, network, and other blueprint components,
or it is a published XaaS action.
For the icon, the supported image file types are GIF, JPG, and PNG. The displayed image is 40 x 40
pixels. If you do not select a custom image, the default action icon appears on the Items tab.
Prerequisites
nLog in to vRealize Automation as a tenant administrator or catalog administrator.
Configuring vRealize Automation
VMware, Inc. 552
nVerify that you have at least one published action. See Publish a Blueprint and Publish a Resource
Action.
Procedure
1Select Administration > Catalog Management > Actions.
2Select the shared action and click View Details.
3Browse for an image.
4To view the entitlements where the action is made available to users, click the Entitlements tab.
5Click Update.
What to do next
Entitle Users to Services, Catalog Items, and Actions.
Creating Entitlements
Entitlements control what items and actions are available in the service catalog for the members of the
selected business group. An entitlement must be active for the items to appear in the service catalog. If
you have items that require governance, you can use entitlements to apply approval policies to different
items.
To configure the entitlement, the catalog items must be included in a service. Entitlements can include
multiple services, catalog items from services that are included in other entitlements, and actions that you
can run on the deployed catalog items.
Understanding Entitlement Option Interactions
How you configure an entitlement determines what appears in the service catalog. The interaction of
services, catalog items and components, action, and approval policies affects what the service catalog
user can request and how approval policies are applied.
You must consider the interactions of services, catalog items, actions, and approvals when you create an
entitlement.
nServices in Entitlements
An entitled service operates as a dynamic group of catalog items. If a catalog item is added to a
service after it is entitled, the new catalog item is available to the specified users without any
additional configuration.
nCatalog Items and Components in Entitlements
Entitled catalog items are blueprints that you can request in the service catalog. Entitled components
are part of the blueprints, but you cannot specifically request them in the service catalog.
Configuring vRealize Automation
VMware, Inc. 553
nActions in Entitlements
Actions run on deployed catalog items. Provisioned catalog items, and the actions you are entitled to
run on them, appear in your Items tab. To run actions on a deployed item, the action must be
included in the same entitlement as the catalog item that provisioned the item from the service
catalog.
nApproval Policies in Entitlements
Approval policies are applied in entitlements so that you can manage resources in your environment.
Services in Entitlements
An entitled service operates as a dynamic group of catalog items. If a catalog item is added to a service
after it is entitled, the new catalog item is available to the specified users without any additional
configuration.
If you apply an approval policy to a service, all the items, when requested, are subject to the same
approval policy.
Catalog Items and Components in Entitlements
Entitled catalog items are blueprints that you can request in the service catalog. Entitled components are
part of the blueprints, but you cannot specifically request them in the service catalog.
Entitled catalog items and components can include any of the following items:
Catalog Items
nItems from any service that you want to provide to entitled users, even services not included in the
current entitlement.
For example, as a catalog administrator you associated several different versions of the Red Hat
Enterprise Linux with a Red Hat service and entitle the service to the quality engineers for product A.
Then you receive a request to create service catalog items that includes only the latest version of
Linux-based operating systems for the training team. You create an entitlement for the training team
that includes the latest versions of the other operating systems in a service. You already have the
latest version of RHEL associated with another service, so you add RHEL as a catalog item rather
than add the entire Red Hat service.
nItems that are included in a service that is included in the current entitlement, but you want to apply
an approval policy to the individual catalog item that differs from the policy you applied to the service.
For example, as a business group manager, you entitle your development team to a service that
includes three virtual machine catalog items. You apply an approval policy that requires the approval
of the virtual infrastructure administrator for machines with more than four CPUs. One of the virtual
machines is used for performance testing, so you add it as a catalog item and apply less restrictive
approval policy for the same group of users.
Components
nComponents are not available by name in the service catalog because they are a part of a catalog
item. You entitle them individually so that you can apply a specific approval policy that differs from the
catalog item in which it is included.
Configuring vRealize Automation
VMware, Inc. 554
For example, an item includes a machine and software. The machine is available as a provisionable
item and has an approval policy that requires site manager approval. The software is not available as
a standalone, provisionable item, only as part of a machine request, but the approval policy for the
software requires approval from your organization's software licensing administrator. When the
machine is requested in the services catalog, it must be approved by the site administrator and the
software licensing administrator before it is provisioned. After it is provisioned, the machine, with the
software entry, appears in the requestor's Items tab as part of the machine.
Actions in Entitlements
Actions run on deployed catalog items. Provisioned catalog items, and the actions you are entitled to run
on them, appear in your Items tab. To run actions on a deployed item, the action must be included in the
same entitlement as the catalog item that provisioned the item from the service catalog.
For example, entitlement 1 includes a vSphere virtual machine and a create snapshot action, and
entitlement 2 includes only a vSphere virtual machine. When you deploy a vSphere machine from
entitlement 1, the create snapshot action is available. When you deploy a vSphere machine from
entitlement 2, there is no action. To make the action available to entitlement 2 users, add the create
snapshot action to entitlement 2.
If you select an action that is not applicable to any of the catalog items in the entitlement, it will not appear
as an action on the Items tab. For example, your entitlement includes a vSphere machine and you entitle
a destroy action for a cloud machine. The destroy action is not available to run on the provisioned
machine.
You can apply an approval policy to an action that is different from the policy applied to the catalog item in
the entitlement.
If the service catalog user is the member of multiple business groups, and one group is only entitled to
power on and power off and the other is only entitled to destroy, that user will have all three actions
available to them for the applicable provisioned machine.
Best Practices When Entitling Users to Actions
Blueprints are complex and entitling actions to run on provisioned blueprints can result in unexpected
behavior. Use the following best practices when entitling service catalog users to run actions on their
provisioned items.
nWhen you entitle users to the Destroy Machine action, entitle them to Destroy Deployment. A
provisioned blueprint is a deployment.
A deployment can contain a machine. If the service catalog user is entitled to run the Destroy
Machine action and is not entitled to run the Destroy Deployment, when the user runs the Destroy
Machine action on the last or only machine in a deployment, a message appears indicating that they
do not have permission to run the action. Entitling both actions ensures that the deployment is
removed from your environment. To manage governance on the Destroy Deployment action, you can
create a pre approval policy and apply it to the action. This policy will allow the designated approver
to validate the Destroy Deployment request before it runs.
Configuring vRealize Automation
VMware, Inc. 555

nWhen you entitle service catalog users to the Change Lease, Change Owner, Expire, Reconfigure
and other actions that can apply to machines and to deployments, entitle them to both actions.
Approval Policies in Entitlements
Approval policies are applied in entitlements so that you can manage resources in your environment.
To apply an approval policy when you create the entitlement, the policy must already exist. If it does not,
you can still create the entitlement and leave it in a draft or inactive state until you create the approval
policies needed for the catalog items and actions in this entitlement, and then apply the policies later.
You are not required to apply an approval policy to any of the items or actions. If no approval policy is
applied, the items and actions are deployed when requested without triggering an approval request.
Entitle Users to Services, Catalog Items, and Actions
When you add a service, catalog item, or action to an entitlement, you allow the users identified in the
entitlement to request the provisionable items in the service catalog. Actions are associated with items
and appear on the Items tab for the requesting user.
There are several user roles with permission to create entitlements for business groups.
nTenant administrators can create entitlements for any business group in their tenant.
nBusiness group managers can create entitlements for the groups that they manage.
nCatalog administrators can create entitlements for any business group in their tenant.
When you create an entitlement, you must select a business group and the members in the business
group for the entitlement.
To understand how to create an entitlement so that you can use the interactions of services, catalog
items, and actions with approvals, see Creating Entitlements.
Prerequisites
nLog in to vRealize Automation as a tenant administrator or catalog administrator.
nVerify that the catalog items to which you are entitling users are associated with a service. See Add
Catalog Items to a Service.
nVerify that the business group for which you are defining the entitlement exists and that the member
users and user groups are defined. See Create a Business Group.
nVerify that the approval policies exist if you plan to add approvals when you create this entitlement.
See Create an Approval Policy. If you want to entitle users to the items in the service catalog without
approvals, you can modify the entitlement later to add approvals.
Procedure
1Select Administration > Catalog Management > Entitlements.
2Click the New icon ( ).
Configuring vRealize Automation
VMware, Inc. 556

3Configure the Details options.
Details determine how the entitlement appears in the entitlement list and which users have access to
the items in the service catalog.
Option Description
Name and Description Information about the entitlement that appears in the entitlements list.
Expiration Date Set the date and time if you want the entitlement to become inactive on a
particular date.
Status Possible values include Active, Inactive, and Deleted.
nActive. Items are available in the service catalog. This option is available
when you add or edit entitlements.
nInactive. Items are not available in the service catalog. The entitlement was
deactivated by the expiration date or by a user.
nDeleted. Deletes the entitlement.
Business Group Select a business group. You can create entitlements for only one business group
and entitled users must be members of the business group.
If you want to make an entitlement available to all users, you must have an All
Users business group, or you must create entitlements for each business group.
If you are logged in as a business group manager, you can create entitlements
only for your business group.
Users and Groups Select All Users and Groups to entitle all the members of the business group to
the catalog items and actions, or you can entitle individual users or groups. To
activate an entitlement, you must select at least one business group user or
group.
4Click Next.
Configuring vRealize Automation
VMware, Inc. 557

5Click an New icon ( ) to entitle users to services, catalog items, or actions with this entitlement.
You can create an entitlement with various combinations of the services, items, and actions.
Option Description
Entitled Services Add a service when you want to allow entitled users access to all the published
catalog items associated with the service.
An entitled service is a dynamic entitlement. If an item is added to the service
later, it is added to the service catalog for the entitled users. Entitlements can
include both services and individual catalog items.
Entitled Catalog Items and
Components
Add individual items that are available to the entitled users.
Entitlements can include both services and individual catalog items. To apply a
different approval policy to an item that is included in the service, add it as a
catalog item. The approval policy on an item takes precedence over the approval
policy on the service to which it belongs when they are in the same entitlement. If
they are in different entitlements, the order is based on the set priority.
Catalog items must be associated with a service to be available in the service
catalog. The catalog item can be associated with any service, not only a service
in the current entitlement.
Components are a part of a catalog item but are not available by name in the
service catalog. For example, MySQL software is a component of a CentOS
virtual machine catalog item. Components are entitled with the catalog item. If you
want to apply an approval policy that is specific to software, you entitle the item
individually. Otherwise, you do not need to entitle a component for it to be
deployed with the parent item.
Entitled Actions Add actions when you want to allow users to run the actions for a provisioned
item.
Actions that you want to run on the items provisioned from this entitlement must
be included in the same entitlement.
Entitled actions do not appear in the service catalog. They appear on the Items
tab for a provisioned item.
Actions only apply to items defined in
this entitlement
Determines if the entitled actions are entitled for all applicable service catalog
items or only the items in this entitlement.
If selected, the actions are entitled to the business group members for the
applicable items in this entitlement. This method of entitling the actions allows you
to specify the actions for the specific items.
If this option is not selected, the actions are entitled to the users specified in the
entitlement for all applicable catalog items, whether or not the items are included
in this entitlement. Any applied approval policies on these actions are also active.
6Use the drop-down menus in each section to filter the available items.
7Select the check boxes to include items to the entitlement.
8To add an approval policy to the selected service, item, or action, select an approval policy from the
Apply this Policy to selected Items drop-down menu.
If you apply an approval policy to a service, all the items in the service have the same approval policy.
To apply a different policy to an item, add it as a catalog item an apply the appropriate policy.
Configuring vRealize Automation
VMware, Inc. 558

9Click OK.
The service, item, or action is added to the entitlement.
10 Click Finish to save the entitlement.
If entitlement status is active, the service and items are added to the service catalog.
What to do next
Verify that the entitled services and catalog items appear in the service catalog for the entitled users and
that the requested items provision the target objects as expected. You can request the item on behalf of
the selected users.
Prioritize Entitlements
If multiple entitlements exist for the same business group, you can prioritize the entitlements so that when
a service catalog user makes a request, the entitlement and associated approval policy are processed in
the specified order.
If you configure an approval policy for a user group, and you want a group member to have a unique
policy for one or more of the services, catalog items, or actions, prioritize the member entitlement before
the group entitlement. When the member requests an item in the service catalog, the approval policy that
is applied is based on the priority order of the entitlements for the business group. The first time that the
member's name is found, either as part of a custom user group or as an individual user, that is the applied
approval policy.
For example, you create two entitlements for the same catalog item so that you can apply one approval
policy for the accounting user group and a different approval policy for Chris, a member of that group.
Table 3‑70. Example Entitlements
Entitlement 1 Entitlement 2
Business Group: Finance
Users and Groups: Accounting group
Catalog Item 1: Policy A
Business Group: Finance
Users and Groups: Chris
Catalog Item 1: Policy C
Chris requests Catalog Item 1 in the service catalog. Depending on the priority order of the entitlements
for the Finance business group, a different policy is applied to Chris's request.
Table 3‑71. Example Results
Configuration and Result Priority Order Priority Order
Priority Order 1: Entitlement 1
2: Entitlement 2
1: Entitlement 2
2: Entitlement 1
Applied Policy Policy A is applied.
Chris is a member of the
Accounting user group. The
search for Chris as an entitled
user stops at Entitlement 1
and the approval policy is
applied.
Policy C is applied.
The search for Chris as an
entitled user stops at
Entitlement 2 and the approval
policy is applied.
Configuring vRealize Automation
VMware, Inc. 559
Prerequisites
Log in to vRealize Automation as a tenant administrator or catalog administrator.
Procedure
1Select Administration > Catalog Management > Entitlements.
2Click the Prioritize icon ( ).
3Select a business group from the Business Group drop-down list.
4Drag an entitlement to a new location in the list to change its priority.
5Select an update method.
Option Description
Update Saves your changes.
Update & Close Saves your changes and closes the Prioritize Elements window.
Working with Approval Policies
Approval policies are governance that you add to service catalog requests so that you can manage
resources in your environment. Each policy is a defined set of conditions that can be applied to services,
catalog items, and actions when you entitle users to those items.
Approval Policy Process
First, a tenant administrator or approval administrator creates the approval policies where provisioning
governance is needed.
Approval policies are created for approval policy types or specific items. If the policy is based on a policy
type, you can apply it to matching catalog item types. For example, if a policy is based on a software
policy type, then you can define it for and apply it to any software items in the entitlements. If the policy is
for a specific item, you should apply it only to that item. For example, if the item is a specific software
item, then you should apply it only to that specific database software item in the entitlement.
Policies can include pre-approval and post-approval requirements. For pre approval, the request must be
approved before the requested item is provisioned. Post approval policies require that the approver
accept the request before the provisioned item is made available to the requesting user.
The pre and post approval configurations are composed of one or more levels that determine when the
approval policy is triggered and who or how the request is approved. You can include multiple levels. For
example, an approval policy can have one level for manager approval, followed by a level for finance
approval.
Next, a tenant administrator or business group manager applies the approval policies to the services,
catalog items, and actions as appropriate.
Configuring vRealize Automation
VMware, Inc. 560

Finally, when a service catalog user requests an item to which an approval policy is applied, the
approvers approve or reject the request on their Inbox tab, on Approvals page . The requesting user can
track the approval status for a specific request on their Requests tab.
Examples of Approval Policies Based on the Virtual Machine Policy Type
You can create an approval policy that you can apply to the same catalog item type, but it produces
different results when an item is requested in the service catalog. Depending on how the approval policy
is defined and applied, the effect on the service catalog user and the approver varies.
The following table includes examples of different approval policies that are all based on the same
approval policy type. These examples illustrate some of the ways that you can configure approval policies
to accomplish different types of governance.
Table 3‑72. Examples of Approval Policies and Results
Governance
Goals
Selected
Policy Type
Pre or Post
Approval
When is
Approval
Required
Who are the
Approvers
How is the
Policy
Applied in
the
Entitlement
Results When
the Item is
Requested in
the Service
Catalog
The business
group manager
must approve
any virtual
machine
requests.
The approval
policy must be
applicable to
multiple business
groups in
multiple
entitlements.
Service Catalog
- Catalog Item
Request -
Virtual Machine
Add to Pre
Approval tab
Select Always
required
Select
Determine
approvers from
the request.
Select condition
Business
Group >
Managers >
Users >
manager.
Select Anyone
can approve.
Entitlements
are based on
business
groups. This
approval can
be used in any
entitlement
where
manager
approval is
required for
the virtual
machine.
When the service
catalog user
requests a virtual
machine to which
this approval was
applied, the
business group
manager must
approve the
request before
the machine is
provisioned.
The virtual
infrastructure
administrator
must verify the
correct
provisioning of
the virtual
machine and
approve the
request before
the virtual
machine is
released to the
requesting user.
Service Catalog
- Catalog Item
Request -
Virtual Machine
Add to Post
Approval tab
Select Always
required
Select Specific
Users and
Groups.
Select your
virtual
infrastructure
administrators
custom users
group.
Select Anyone
can approve.
This approval
can be used in
any
entitlement
where you
want the
virtual
infrastructure
administrator
to check the
virtual
machine on
the vCenter
Server after it
is provisioned.
When the service
catalog user
requests a virtual
machine to which
this approval was
applied, the
virtual machine is
provisioned. If
each member of
the VI admin
group approves
the request, the
machine is
released to the
user.
Configuring vRealize Automation
VMware, Inc. 561

Table 3‑72. Examples of Approval Policies and Results (Continued)
Governance
Goals
Selected
Policy Type
Pre or Post
Approval
When is
Approval
Required
Who are the
Approvers
How is the
Policy
Applied in
the
Entitlement
Results When
the Item is
Requested in
the Service
Catalog
To manage
virtual
infrastructure
resources and to
control prices,
you add two pre-
approval levels
because one
approval is for
machine
resources and
the other is for
price of machine
per day.
Service Catalog
- Catalog Item
Request -
Virtual Machine
Add To Pre
Approval tab
Level 1
Select
Required
based on
conditions.
Configure the
conditions
where CPUs >
6 or Memory >
8 or Storage >
100 GB.
Select
Determine
approvers from
the request.
Select condition
Requested by >
manager.
Select .
Click System
Properties and
select CPUs.
Memory, and
Storage so that
the approver can
change the
value to an
acceptable level.
This approval
policy can be
used in an
entitlement
where you
want the
requesting
user's
manager and
a member of
the finance
department to
approve the
request.
When the service
catalog user
requests a virtual
machine, the
request is
evaluated to
determine
whether the
requested CPU,
memory, or
storage amounts
are over the
amounts
specified in level
1. If they are not,
then the level 2
condition is
evaluated. If the
requests
exceeds at least
one of the level 1
conditions, then
the manager
must approve the
request. The
manager has the
option to
decrease the
requested
configuration
amounts and
approve or the
manager can
reject the
request.
Configuring vRealize Automation
VMware, Inc. 562

Table 3‑72. Examples of Approval Policies and Results (Continued)
Governance
Goals
Selected
Policy Type
Pre or Post
Approval
When is
Approval
Required
Who are the
Approvers
How is the
Policy
Applied in
the
Entitlement
Results When
the Item is
Requested in
the Service
Catalog
Level 2
Select
Required
based on
conditions.
Configure the
condition Price
> 15.00 per
day.
Select Specific
Users and
Groups.
Select the
finance custom
users group.
Select Anyone
can approve.
For
parameterized
blueprint catalog
items, a cloud
administrator
must approve
deployment
requests in
which a vSphere
machine
component
profile of size is
set to large.
Service Catalog
- Catalog Item
Request -
Virtual Machine
Add To Pre
Approval tab
Level 1
Select
Required
based on
conditions.
Level 2
Select Single
Condition.
Select
Component
profile >
vSphere
Machine Size.
Configure the
condition size =
large.
Select Specific
Users and
Groups.
Select users and
groups who are
allowed to
approve the
request.
Select Anyone
can approve.
This approval
policy can be
used in an
entitlement
where you
want a cloud
administrator
to approve the
provisioning
request.
When the service
catalog user
requests a virtual
machine to which
this approval was
applied, a cloud
administrator
must approve the
request before
the machine is
provisioned.
Example of Actions with Approval Policies Applied in a Composite
Deployment
When you apply approval policies to actions that can run on various components in a composite blueprint,
the approval process varies depending on how the entitlement is configured and how the approval
policies are applied.
This example uses specific details to build the blueprint and then apply approval policies to actions that
you can run from the service catalog on the provisioned blueprint in different entitlements. The blueprint is
a composite blueprint that includes another blueprint. The actions used are to destroy the provisioned
items, destroy a deployment for the blueprints and destroy a virtual machine for the machine. The
resulting behavior includes what is destroyed and when the applied approval policies trigger approval
requests.
Configuring vRealize Automation
VMware, Inc. 563
Example Blueprint
In this example, you configure a blueprint that includes a nested blueprint with a virtual machine.
nBlueprint 1 - Continuous Integration Blueprint
nBlueprint 2 - Pre-Production Blueprint
nVirtual Machine 1 - TestAsAService vSphere VM
Approval Policies for Destroy Actions
You configure the two approval policies to destroy provisioned items. A Destroy - Deployment action can
run on Blueprint 1 or Blueprint 2 in this example. A Destroy - Virtual machine action can run on Virtual
Machine 1. You create the approval policies so that you can apply them to the actions in the entitlement.
Approval Policy Name Approval Policy Type
Approval Policy A Service Catalog - Resource Action Request - Destroy - Deployment
Approval Policy B Service Catalog - Resource Action Request - Destroy - Virtual Machine
Entitlements and Approval Policies Applied to Actions
You configure three entitlements. Each entitlement includes the composite blueprint. In each entitlement,
you add the destroy actions and apply the approval policies.
Entitlement Name Entitled Action on Provisioned Machine Applied Approval Policy
Entitlement 1 Destroy - Deployment Approval Policy A
Entitlement 2 Destroy - Virtual Machine Approval Policy B
Entitlement 3 Destroy - Deployment
Destroy - Virtual Machine
Approval Policy A
Approval Policy B
User Actions in the Service Catalog
When the service catalog user runs the action, blueprints or machines are destroyed depending on which
item your user ran the action.
User Action in the
Service Catalog Selected Action
Destroyed Blueprints or
Machines
Action 1 Destroy - Deployment action runs on Blueprint 1 - Continuous
Integration Blueprint
Blueprint 1, Blueprint 2, and Virtual
Machine 1
Action 2 Destroy - Deployment action runs on the nested Blueprint 2 - Pre-
production Blueprint
Blueprint 2 and Virtual Machine 1
Action 3 Destroy - Virtual Machine action runs on the machine that is inside a
deployment, Virtual Machine 1 - TestAsAService vSphere VM
Virtual Machine 1
Approval Policies Applied to Actions in the Entitlements
You apply the approval policies, the approvers receive an approval request depending on the blueprint or
machine on which your service catalog user ran the action.
Configuring vRealize Automation
VMware, Inc. 564

Entitlement
Name
Approval Policy on
Actions User Action
Approval Request
Triggered
If Approved,
Destroyed Blueprints
or Machines
Entitlement 1 -
Destroy
Deployment
Approval Policy
Policy A (Destroy
Deployment Approval
Policy) on Destroy -
Deployment action only
Action 1 (Run Destroy -
Deployment action on Blueprint
1)
Approval requests are
triggered for Blueprint 1
only
Blueprint 1, Blueprint
2, and Virtual Machine
1
Action 2 (Run Destroy -
Deployment action on the
Blueprint 2)
Approval requests are
triggered for Blueprint 2
only
Blueprint 2 and Virtual
Machine 1
Action 3 (Destroy - Virtual
Machine action runs on Virtual
Machine 1)
No Approval requests
are triggered
Virtual Machine 1
Entitlement 2 Policy B (Destroy -
Virtual Machine Policy)
on Destroy - Virtual
Machine action only
Action 1 (Run Destroy -
Deployment action on Blueprint
1)
No Approval requests
are triggered
Blueprint 1, Blueprint
2, and Virtual Machine
1
Action 2 (Run Destroy -
Deployment action on the
Blueprint 2)
No Approval requests
are triggered
Blueprint 2 and Virtual
Machine 1
Action 3 (Destroy - Virtual
Machine action runs on Virtual
Machine 1)
Approval requests are
triggered for Virtual
Machine 1 only
Virtual Machine 1
Entitlement 3 Policy A (Destroy
Deployment Approval
Policy) on Destroy -
Deployment action and
Policy B (Destroy -
Virtual Machine Policy)
on Destroy - Virtual
Machine action
Action 1 (Run Destroy -
Deployment action on Blueprint
1)
Approval requests are
triggered for Blueprint 1
only
Blueprint 1, Blueprint
2, and Virtual Machine
1
Action 2 (Run Destroy -
Deployment action on the
Blueprint 2)
Approval requests are
triggered for Blueprint 2
only
Blueprint 2 and Virtual
Machine 1
Action 3 (Destroy - Virtual
Machine action runs on Virtual
Machine 1)
Approval requests are
triggered for Virtual
Machine 1 only
Virtual Machine 1
Example of an Approval Policy in Multiple Entitlements
If you apply an approval policy to an item that is used in multiple entitlements that are entitled to same
users in a business group, the approval policy is triggered on the item even in the service where the
approval policy is not explicitly applied in the entitlement.
For example, you create the following blueprints, services, approval policies, and entitlements.
Blueprints
nRHEL vSphere virtual machine
Configuring vRealize Automation
VMware, Inc. 565

nQE Testing includes RHEL vSphere virtual machine
nQE Training includes RHEL vSphere virtual machine
Services
nThe QE Testing blueprint is associated with the Testing service
nThe QE Training blueprint is associated with the Training service
Entitlements
nEntitlement 1
nEntitlement 2
Table 3‑73. Entitlement Configurations
Entitlement Name Business Group Entitled Service Entitled Item
Entitlement 1 QE Testing Catalog Item
Request - Virtual
Machine applied to
Virtual Machine
Component
Entitlement 2 QE Training
Results
When the user selects QE Training in the service catalog, the approval policy is triggered for RHEL
vSphere virtual machine because it is a blueprint based on virtual machine component that is used in the
QE Training blueprint.
Processing Approval Policies in the Service Catalog
When a user requests an item in the service catalog that has an approval policy applied, the request is
processed by the approver and the requesting user similar to the following workflow
Configuring vRealize Automation
VMware, Inc. 566
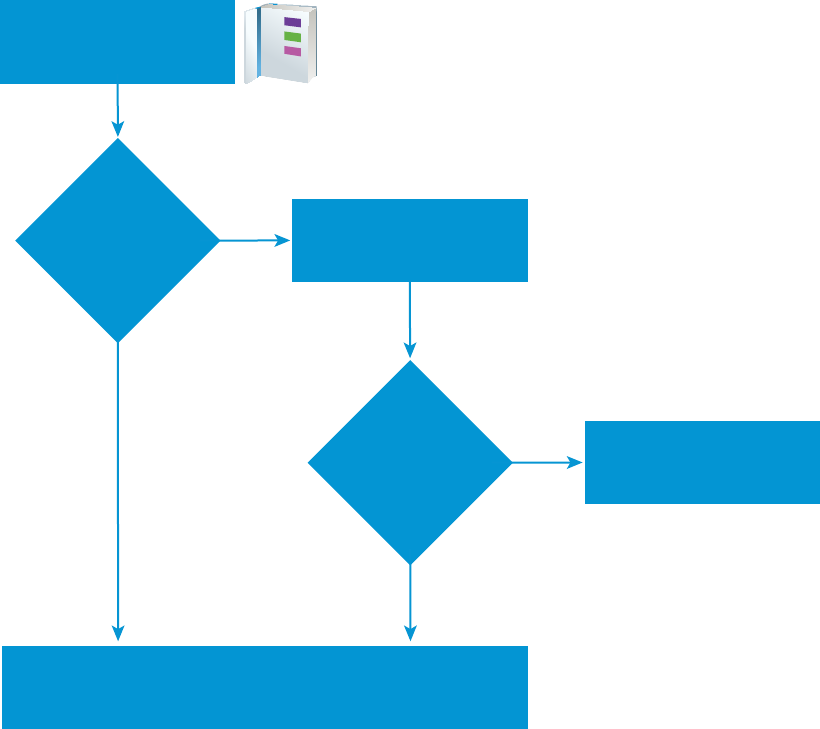
No
Yes
Request item in
the service catalog
Is approval
required on item
or component?
Approval request sent
to approver’s Inbox tab
Yes
Approver
approves
request?
No Requestor notified of
rejection on Requests tab
Item is provisioned
Requester’s Request tab - in progress
Requesters’s Item tab - when provisioned
Create an Approval Policy
Tenant administrators and approval administrators can define approval policies and use them in
entitlements. You can configure the approval policies with multiple levels for pre-approval and post-
approval events.
If you modify a setting in a software component blueprint and an approval policy uses that setting to
trigger an approval request, the approval policy might not work as expected. If you must modify a setting
in a component, verify that your changes do not affect one or more approval policies.
Prerequisites
Log in to vRealize Automation as a tenant administrator or approval administrator.
Procedure
1Specify Approval Policy Information
When you create an approval policy, define the approval policy type, name, description, and status.
2Create an Approval Level
When you create an approval policy, you can add pre-approval and post-approval levels.
Configuring vRealize Automation
VMware, Inc. 567

3Configure the Approval Form to Include System and Custom Properties
You can add system and custom properties that appear on an approval form. You add these
properties so that the approvers can change the values of system properties for machine resource
settings such as CPU, lease, or memory, and custom properties before they complete an approval
request.
4Approval Policy Settings
When you create an approval policy, you configure various options that determine when an item
requested by a service catalog users must be approved. The approval can be required before the
request begins provisioning or after the item is provisioned but before it is released to the requesting
user.
Specify Approval Policy Information
When you create an approval policy, define the approval policy type, name, description, and status.
Prerequisites
Log in to vRealize Automation as a tenant administrator or approval administrator.
Procedure
1Select Administration > Approval Policies.
2Click the New icon ( ).
3Select a policy type or software component.
Option Description
Select an approval policy type Create an approval policy based on the policy request type.
Select this option to define an approval policy that is applicable to all catalog
items of that type. The request type can be a generic request, a catalog item
request, or a resource action request.
The available condition configuration options vary depending on the type. The
more specific the type the more specific the configuration fields. For example,
Service Catalog - Catalog Item Request provides only the fields that are common
to all catalog item requests, but a Service Catalog - Catalog Item Request -
Virtual Machine also includes the common options and options specific to virtual
machines.
The request type limits the catalog items or actions to which you can apply the
approval policy.
Select an item Create an approval policy based on a specific item.
Select this option to define an approval policy that is applicable to specific items
that are not available as individual items in the service catalog, only as part of a
machine or other deployment. For example, software components.
The available condition configuration fields are specific to the item and can be
more detailed than the criteria offered for a policy type item.
List Lists the available policy type or catalog items.
Search or sort the columns to locate a specific item or type.
4Click OK.
Configuring vRealize Automation
VMware, Inc. 568
5Enter a name and, optionally, a description.
6Select the state of the policy from the Status drop-down menu.
Option Description
Draft Saves the approval policy in an editable state.
Active Saves the approval policy in a read-only state that you can use in an entitlement.
Inactive Saves the approval policy in a read-only state that you cannot use in an
entitlement until you activate the policy.
What to do next
Create the pre-approval and post-approval levels.
Create an Approval Level
When you create an approval policy, you can add pre-approval and post-approval levels.
You can create multiple approval levels for an approval policy. When a service catalog user requests an
item to which an approval policy with multiple levels is applied, each the first level must be accepted
before the approval request is sent to the next approver. See Working with Approval Policies.
Prerequisites
Specify Approval Policy Information.
Procedure
1On the Pre Approval or Post Approval tab, click the New icon ( ).
2Enter a name and, optionally, a description.
3Select an approval requirement.
Option Description
Always Required The approval policy is triggered for every request.
Required based on conditions The approval policy is based on one or more condition clauses.
If you select this option, you must create the conditions. When this approval policy
is applied to eligible services, catalog items, or actions in an entitlement, then the
conditions are evaluated. If the conditions are true, then the request must be
approved by the specified approver method before it is provisioned. If the
conditions are false, then the request is provisioned without requiring an approval.
For example, any requests for a virtual machine with 4 or more CPUs must be
approved by the virtual infrastructure administrator.
The availability of the fields on which to base the conditions is determined by the
selected approval policy type or catalog item.
When you enter a value for a condition, the values are case-sensitive.
To configure more than one condition clause, select the Boolean operation for the
clauses.
Configuring vRealize Automation
VMware, Inc. 569

4Select the approvers.
Option Action
Specific Users and Groups Sends the approval request to the selected users.
Determine approvers from the request Sends the approval request to the users based on the defined condition.
Use event subscription Processes the approval request based on defined event subscriptions.
The workflow subscription must be defined in Adminstration > Events >
Subcriptions. The applicable workflow subscriptions are pre-approval and post-
approval.
5Indicate who must approve the request or action.
Option Description
Anyone can approve Only one of the approvers must approve before the request is processed.
When the item is requested in the service catalog, requests for approval are sent
to all approvers. If one approver approves the request, the request is approved
and the request for approval is removed from the other approvers' inboxes.
All must approve All of the specified approvers must approve before the request is processed.
6Add properties to an approval form or save the level.
nTo add properties to the approval form, click System Properties or Custom Properties.
nTo save the level, click OK.
What to do next
To add properties to the approval form, see Configure the Approval Form to Include System and Custom
Properties.
Configure the Approval Form to Include System and Custom Properties
You can add system and custom properties that appear on an approval form. You add these properties so
that the approvers can change the values of system properties for machine resource settings such as
CPU, lease, or memory, and custom properties before they complete an approval request.
The available system properties depend on the approval policy type and how the blueprint is configured.
For some properties, the configured field in the blueprint must include a minimum and maximum value
before the property appears in the system properties list.
Custom properties can be added when you add the approval level. If a custom property is configured and
included in a blueprint, the custom properties you add to the approval form overwrite any other instances
of that custom property for example, in blueprints, property groups, or endpoints.
The approver can modify selected or configured properties in the approval form.
Prerequisites
nLog in to vRealize Automation as a tenant administrator or approval administrator.
nCreate an Approval Level.
Configuring vRealize Automation
VMware, Inc. 570
Procedure
1On the Pre Approval or Post Approval tab, click the New icon ( ).
2Click the System Properties tab.
3Select the check box for each system property that you want the approver to configure during the
approval process.
4Configure the custom properties.
Add one or more custom properties that you want the approver to configure during the approval
process.
a Click the Custom Properties tab.
bClick the New icon ( ).
c Enter the custom property values.
Option Description
Name Enter the property name.
Label Enter the label that is presented to the approver in the approval form.
Description Enter the extended information for the approver.
This information appears as the field tooltip in the form.
d Click Save.
e To delete multiple custom properties, select the rows and click Delete.
5Click OK.
What to do next
nAdd additional pre-approval or post-approval levels.
nSave the approval policy. The policy must be active to apply to services, items, or actions in the
Entitlements.
Approval Policy Settings
When you create an approval policy, you configure various options that determine when an item
requested by a service catalog users must be approved. The approval can be required before the request
begins provisioning or after the item is provisioned but before it is released to the requesting user.
Select Administration > Approval Polices. Click New.
nApproval Policy Type Settings
The approval policy type determines how the approval policy is configured and to what items or
actions you can apply it in the entitlement. When you add approval levels, the policy type or item
affects which fields are available to create conditions for the approval levels.
Configuring vRealize Automation
VMware, Inc. 571
nAdd Approval Policy Settings
You configure the basic information about the approval policy, including the state to the policy, so
that you can manage the policy.
nAdd Level Information to Approval Policy Settings
An approval level includes the conditions that trigger an approval process when the service catalog
user requests the item, and any system properties and customer properties that you want to include.
When triggered, the approval requests are sent to the designated approvers.
nAdd System Properties to Approval Policy Settings
You selected system properties that you want to add to the approval form and allow the approver to
modify the value.
nAdd Custom Properties to Approval Policy Settings
You configure custom properties that you want to add to the approval form to allow the approver to
modify the value.
Approval Policy Type Settings
The approval policy type determines how the approval policy is configured and to what items or actions
you can apply it in the entitlement. When you add approval levels, the policy type or item affects which
fields are available to create conditions for the approval levels.
Select Administration > Approval Polices. Click New.
Configuring vRealize Automation
VMware, Inc. 572

Table 3‑74. Approval Policy Type Options
Option Description
Select an approval policy type Create an approval policy based on the policy request type.
Select this option to define an approval policy that is applicable
to all catalog items of that type. The request type can be a
generic request, a catalog item request, or a resource action
request.
The available condition configuration options vary depending on
the type. The more specific the type the more specific the
configuration fields. For example, Service Catalog - Catalog Item
Request provides only the fields that are common to all catalog
item requests, but a Service Catalog - Catalog Item Request -
Virtual Machine also includes the common options and options
specific to virtual machines.
The request type limits the catalog items or actions to which you
can apply the approval policy.
Select an item Create an approval policy based on a specific item.
Select this option to define an approval policy that is applicable
to specific items that are not available as individual items in the
service catalog, only as part of a machine or other deployment.
For example, software components.
The available condition configuration fields are specific to the
item and can be more detailed than the criteria offered for a
policy type item.
List Lists the available policy type or catalog items.
Search or sort the columns to locate a specific item or type.
Add Approval Policy Settings
You configure the basic information about the approval policy, including the state to the policy, so that you
can manage the policy.
To define the basic approval policy information, select Administration > Approval Polices. Click New.
Select the policy type and click OK.
Table 3‑75. Approval Policy Options
Option Description
Name Name that appears when applying the approval policy in an
entitlement.
Description Provide a verbose description of how the approval policy is
constructed. This information will help you manage your
approval policies.
Configuring vRealize Automation
VMware, Inc. 573

Table 3‑75. Approval Policy Options (Continued)
Option Description
Status Possible values include:
nDraft. The approval policy is not available to apply in
entitlements. After you make a policy active, you can never
return it to draft.
nActive. The approval policy is available to apply in
entitlements.
nInactive. The approval policy is not available to apply in
entitlements. If the policy has not been applied to
entitlements and you make inactive, you can delete the
policy but you cannot reactivate it. If the policy has been
applied and you make inactive, the items to which it applies
must be linked to a different policy or the items are unlinked.
Unlinked items and actions are still entitled to users, but
they do not have an applied approval policy.
Policy Type Displays the approval policy request type.
If you selected a catalog item on which to base the approval
policy, the associated request type is displayed.
Item Displays the selected catalog item.
If you selected a request type on which to base the approval
policy, this field is blank.
Last Updated By Name of the user who made changes to the approval policy.
Last Updated On Date of the last change to the approval policy.
Pre Approval Level To require approval before the requested items is provisioned or
the actions run, configure one or more conditions that trigger an
approval process when the service catalog user requests the
item.
Post Approval Level To require approval after the item is provisioned but before the
provisioned or modified item is released to the requesting
service catalog user, configure one or more conditions that
trigger an approval process.
For example, the virtual infrastructure administrator verifies that
the virtual machine is in a workable state before releasing it to
the service catalog user.
View Linked Entitlements Displays all the entitlements where the approval policy is applied
to services, catalog items, or actions. You can link the items in
one entitlement to a different policy.
This option is only available when you view an active approval
policy.
Add Level Information to Approval Policy Settings
An approval level includes the conditions that trigger an approval process when the service catalog user
requests the item, and any system properties and customer properties that you want to include. When
triggered, the approval requests are sent to the designated approvers.
Configuring vRealize Automation
VMware, Inc. 574

To define the basic approval policy information, select Administration > Approval Polices. Click New.
Select the policy type and click OK. On the Pre Approval or Post Approval tab, click the New icon ( ).
You prioritize levels based on the order that you want them processed. When the approval policy is
triggered, if the first level of approval is rejected, the request is rejected.
Table 3‑76. Level Information Options
Option Description
Name Enter a name.
The level name appears when you are reviewing requests with
approval policies.
Description Enter a level description.
For example, CPU>4 to VI Admin.
When is approval required? Select when the approval policy is triggered.
Always required The approval policy is triggered for every request.
If you select this option and apply this approval policy to eligible
services, catalog items, or actions in an entitlement, then the
request must be approved by the specified approver method
before it is provisioned. For example, all requests must be
approved by the requesting user's manager.
Required based on conditions The approval policy is based on one or more condition clauses.
If you select this option, you must create the conditions. When
this approval policy is applied to eligible services, catalog items,
or actions in an entitlement, then the conditions are evaluated. If
the conditions are true, then the request must be approved by
the specified approver method before it is provisioned. If the
conditions are false, then the request is provisioned without
requiring an approval. For example, any requests for a virtual
machine with 4 or more CPUs must be approved by the virtual
infrastructure administrator.
The availability of the fields on which to base the conditions is
determined by the selected approval policy type or catalog item.
When you enter a value for a condition, the values are case-
sensitive.
To configure more than one condition clause, select the Boolean
operation for the clauses.
nAll of the following. The approval is triggered when all of the
clauses are true. This a Boolean AND operator between
each clause.
nAny of the following. The approval level is triggered when at
least one of clauses is true. This is a Boolean OR operator
between each clause.
nNot the following. The approval level is triggered is none of
the clauses are true. This is a Boolean NOT operator
between each clause.
Approvers Select the approver method.
Configuring vRealize Automation
VMware, Inc. 575

Table 3‑76. Level Information Options (Continued)
Option Description
Specific Users and Groups Sends the approval request to the selected users.
Select the users or user groups that must approve the service
catalog request before it is provisioned or an action runs. For
example, the request goes to the virtual infrastructure
administrator group with Anyone can approve selected.
Determine users from the request Sends the approval request to the users based on the defined
condition.
For example, if you are applying this approval policy across
business groups and you want the business group manger to
approve the request, select Business group > Consumer >
Users > Manager.
Use event subscription Processes the approval request based on defined event
subscriptions.
The workflow subscription must be defined in Adminstration >
Events > Subcriptions. The applicable workflow subscriptions
are pre-approval and post-approval.
Anyone can approve Only one of the approvers must approve before the request is
processed.
When the item is requested in the service catalog, requests for
approval are sent to all approvers. If one approver approves the
request, the request is approved and the request for approval is
removed from the other approvers' inboxes.
If the first approver rejects the request, the requesting user is
notified about the rejection and the approval request is removed
from the approvers' inboxes.
If the first approver approves and the approval request is open
in the second approver's console, the approver is not allowed to
submit the approval request. It was considered completed by the
first approvers response.
If you select Specific Users and Groups or Determine
approvers from the request, and there is more than one
approver, this is one of the additional options. If there is only one
approver, this option to not apply.
All must approve All of the specified approvers must approve before the request is
processed.
If you select Specific Users and Groups or Determine
approvers from the request, and there is more than one
approver, this is one of the additional options. If there is only one
approver, this option to not apply.
Add System Properties to Approval Policy Settings
You selected system properties that you want to add to the approval form and allow the approver to
modify the value.
For example, for a virtual machine approval, select CPU if you want to allow the approver to modify a
request for 6 CPUs to 4 CPUs.
Configuring vRealize Automation
VMware, Inc. 576
To select system properties, select Administration > Approval Polices. Click New. Select the policy
type and click OK. On the Pre Approval or Post Approval tab, click the New icon ( ) and click the
System Properties tab.
Table 3‑77. System Properties Options
Option Description
Properties The list of available system properties depends on the selected
request type or catalog item, and whether system properties
exist for the item.
Some properties are available only when the blueprint is
configured in a particular way. For example, CPUs. The blueprint
to which you are applying the approval policy with the CPU
system property must be configured as a range. For example,
CPU minimum is 2 and the maximum is 8.
Add Custom Properties to Approval Policy Settings
You configure custom properties that you want to add to the approval form to allow the approver to modify
the value.
For example, for a virtual machine approval, add VMware.VirtualCenter.Folder if you want to allow
the approver to specify the folder to which the machine is added in vCenter Server.
You can also add a custom property that is specific to this approval policy form.
To select system properties, select Administration > Approval Polices. Click New. Select the policy
type and click OK. On the Pre Approval or Post Approval tab, click the New icon ( ) and click the
Custom Properties tab.
Table 3‑78. Custom Properties
Option Description
Name Enter the property name.
Label Enter the label that is presented to the approver in the approval
form.
Description Enter the extended information for the approver.
This information appears as the field tooltip in the form.
Modify an Approval Policy
You cannot modify an active or inactive approval policy. You must create a copy of the original policy and
replace the policy that is not producing the required results. Active and inactive approval policies are
read-only. You can modify approval polices that are in a draft state.
When you make the copy of the approval policy, the new policy is based on the original policy type. You
can edit all of the attributes except the policy type. You do this when you want to modify the approval
levels to modify, add, or remove levels, or to add system or custom properties to the forms.
You can create pre-approval and post-approval levels. For instructions about creating an approval level,
see Create an Approval Level.
Configuring vRealize Automation
VMware, Inc. 577
Prerequisites
Log in to vRealize Automation as a tenant administrator or approval administrator.
Procedure
1Select Administration > Approval Policies.
2Select the row of the approval policy to copy.
3Click the Copy icon ( ).
A copy of the approval policy is created.
4Select the new approval policy to edit.
5Enter a name in the Name text box.
6(Optional) Enter a description in the Description text box.
7Select the state of the policy from the Status drop-down menu.
Option Description
Draft Saves the approval policy in an editable state.
Active Saves the approval policy in a read-only state that you can use in an entitlement.
Inactive Saves the approval policy in a read-only state that you cannot use in an
entitlement until you activate the policy.
8Edit the pre-approval and post-approval levels.
9Click OK.
You created a new approval policy based on an existing approval policy.
What to do next
Apply the new approval policy in an entitlement. See Entitle Users to Services, Catalog Items, and
Actions.
Deactivate an Approval Policy
When you determine that an approval policy is outdated, you can deactivate the policy so that it is not
available during provisioning.
To deactivate an approval policy, you must assign a new policy for each entitlement to which the approval
policy is currently applied.
You can later reactiveate a deactivated approval policy, or you can delete a deactivated policy.
Prerequisites
Log in to vRealize Automation as a tenant administrator or approval administrator.
Procedure
1Select Administration > Approval Policies.
Configuring vRealize Automation
VMware, Inc. 578
2Click the approval policy name.
3Click View Linked Entitlements.
a In the Replace All With drop-down menu, select the new approval policy.
If the list includes more than one entitlement, the new approval policy is applied to all the listed
entitlements.
b Click OK.
4After you verify that no entitlements that are linked to the approval policy, select Inactive from the
Status drop-menu.
5Click OK.
6To delete an approval policy, select the row containing the inactive policy.
a Click Delete.
b Click OK.
The approval policy is unlinked from any entitlements where it is used and deactivated. You can later
reactivate and reapply it to items in an entitlement.
What to do next
If you not longer need the approval policy, you can delete it. See Delete an Approval Policy.
Delete an Approval Policy
If you have approval policies that you deactivated and do not need, you can delete them from
vRealize Automation.
Prerequisites
nUnlink and deactivate approval policies. See Deactivate an Approval Policy.
nLog in to vRealize Automation as a tenant administrator or approval administrator.
Procedure
1Select Administration > Approval Policies.
2Select the row containing the inactive policy.
3Click Delete.
4Click OK.
The approval policy is deleted.
Configuring vRealize Automation
VMware, Inc. 579

Scenario: Create and Apply CentOS with MySQL Approval Policies
As the tenant administrator for the development and quality engineering business group, you want to
apply strict governance to catalog item requests. Before your users can provision the CentOS with
MySQL catalog item, you want your vSphere virtual infrastructure administrator to approve the machine
request and you want your software manager to approve the software request.
You create and apply one approval policy for the vSphere CentOS with MySQL service catalog request to
require approval for the machine by a vSphere virtual infrastructure administrator based on specific
conditions, and another approval policy for the MySQL Software component to require approval by your
software manager for every request.
Approval administrators can only create the approvals, and a business group managers can apply them
to entitlements. As a tenant administrator, you can both create the approvals and apply them to
entitlements.
Prerequisites
nLog in to the vRealize Automation console as a tenant administrator. Only a tenant administrator
can both create and apply approval policies.
nEnsure that the CentOS with MySQL catalog item is included in a service. See Scenario: Make the
CentOS with MySQL Application Blueprint Available in the Service Catalog.
Scenario: Create a CentOS with MySQL Virtual Machine Approval Policy
As the tenant administrator you want to ensure that the development and quality engineering group
receives virtual machines that are properly provisioned in your environment, so you create an approval
policy that requires pre approval for certain types of requests.
Because the CentOS with MySQL virtual machine consumes vCenter Server resources, you want the
vSphere virtual infrastructure administrator to approve requests when the requested memory is more than
2048 MB or more than 2 CPUs to ensure that the resources are consumed wisely. You also you give the
approver the ability to modify the requested CPU and memory values before approving a request.
Procedure
1Select Administration > Approval Policies.
2Create an approval policy for virtual machine provisioning.
aClick the New icon ( ).
b Select Select an approval policy type.
c In the list, select Service Catalog - Catalog Item Request - Virtual Machine.
Configuring vRealize Automation
VMware, Inc. 580
d Click OK.
e Configure the following options:
Option Configuration
Name Enter CentOS on vSphere CPU or Memory VM.
Description Enter Requires VI Admin approval for CPU>2 or Memory>2048.
Status Select Active.
3On the Pre Approval tab, click the Add icon ( ).
4Configure the Level Information tab with the triggering criteria and the approval actions.
a In the Name text box, enter CPU>2 or Memory>2048 - VI Admin.
b In the Description text box, enter VI Admin approval for CPU and Memory.
c Select Required based on conditions.
d In the Clause drop-down list, select Any of the following.
e In the new Clause drop-down list, select CPUs and configure the clause with the values CPU > 2.
f Click Add expression and configure the clause with the values Memory (MB) > 2048.
g Select Specific Users and Groups.
h Enter the name of the vSphere virtual infrastructure administrator or administrator group in the
search text box and click the search icon ( ).
i Select the user or group.
j Select Anyone can approve.
The request only needs one virtual infrastructure administrator to verify the resources and
approve the request.
5Click the System Properties tab and select the properties that allow the approver to modify the
requested CPU and Memory values before approving a request.
a Select the CPUs and Memory (MB) check boxes.
b Click OK.
6Click OK.
You created an approval policy for virtual machine requests, but you still want to create an approval for
the MySQL component. Until you apply the policies to an entitlement, no approvals are triggered.
Scenario: Create a MySQL Software Component Approval Policy
As the tenant administrator, your software managers asked you to create and apply approval policies for
MySQL installations to track licensing usage. You create a policy to notify the software license manager
whenever the MySQL for Linux Virtual Machines Software component is requested.
Configuring vRealize Automation
VMware, Inc. 581

In some environments you might need this type of approval because license keys must be provided by
the software manager. In this scenario, you only need the software manager to track and approve the
request. After you create the approval policy, you apply the policy to the MySQL for Linux Virtual
Machines catalog item. This approval policy is very specific and can only be applied to the MySQL for
Linux Virtual Machines Software component in the entitlements.
Procedure
1Select Administration > Approval Policies.
2Create an approval policy for the MySQL Software component.
aClick the New icon ( ).
b Select Select an item.
c Select MySQL for Linux Virtual Machines.
d Click OK.
e Configure the following options:
Option Configuration
Name Enter MySQL tracking approval.
Description Enter Approval request sent to software manager.
Status Select Active.
3On the Pre Approval tab, click the Add icon ( ).
4Configure the Level Information tab with the triggering criteria and the approval actions.
a In the Name text box, enter MySQL software deployment notice.
b In the Description text box, enter Software mgr approval of software installation.
c Select Always required.
d Select Specific Users and Groups.
eEnter the name of the software manager in the search text box and click the search icon ( ) and
select the user.
f Select Anyone can approve.
The request only needs one software manager to approve the request.
Click OK.
5Click OK.
You created the approval policies for virtual machines and for MySQL for Linux Virtual Machines Software
components. Until you apply the approval policies to an entitlement, no approvals are triggered.
Configuring vRealize Automation
VMware, Inc. 582

Scenario: Apply Approval Policies to CentOS with MySQL Components
As the tenant administrator, you can create approval policies and entitlements. You modify the Dev and
QE entitlement to apply the approval policies that you created so that approvals are triggered when a
service catalog user requests the item.
While it might be easier to entitle the entire catalog service to your business group, it does not allow you
to have the same control and governance as when you create individual entitlements for catalog items.
For example, if you entitle users to a service, they can request any catalog items that are in the service
and all items that are added to the service in the future. It also means that you can only use very high-
level approval policies that apply to every catalog item in the service, such as always requiring approval
from a manager. If you choose to entitle catalog items individually, you can create and apply very specific
approval policies for each item and tightly control who can request which items in the service. If you
choose to entitle the individual components of catalog items individually, you can have even greater
control.
If you do not know what approval policies you want to apply to items in an entitlement, you can return
later and apply them. In this scenario, you apply different approval policies to two components of the
same published application blueprint.
Procedure
1Select Administration > Catalog Management > Entitlements.
2Click the Dev and QE Entitlement.
3Click the Items and Approvals tab.
4Add the CentOS with MySQL machine and apply the approval policy.
aClick the Add Items icon ( ) beside the Entitled Items heading.
b Select the CentOS with MySQL check box.
c Click the Apply this policy to selected items drop-down arrow.
The CentOS on vSphere CPU and Memory policy is not in the list.
d Click Show all and click the down-arrow to view all approval policies.
e Select CentOS on vSphere CPU and Memory [Service Catalog - Catalog Item Request -
Virtual Machine].
The vSphere CentOS machine is a machine blueprint in an application blueprint. Review the
policy names so that you select the one that is appropriate to your catalog item type. If you apply
the wrong policy, the approval policy fails or triggers approval requests based on incorrect
conditions.
f Click OK.
Configuring vRealize Automation
VMware, Inc. 583
5Add the MySQL for Linux Virtual Machine software component as an item and apply an approval
policy to the MySQL item.
aClick the Add Catalog Items and Components icon ( ) beside the Entitled Catalog Items and
Components heading.
b In the Catalog Items and Components drop-down menu, select No.
Software components are always associated with a machine. They are not available to
individually request in the service catalog.
c Select the MySQL for Linux Virtual Machines check box.
d Click the Apply this policy to selected items drop-down arrow.
e Select MySQL tracking approval [Service Catalog - Catalog Item Request - Software
Component].
You do not need the advanced option because the approval policy was created for this specific
software component, which is added to a virtual machine.
f Click OK.
6Add actions that the users can run on the provisioned machine.
Approval policies are not applied to actions in this scenario.
aClick the Add Actions icon ( ) beside the Entitled Actions heading.
b Select the following actions.
Name / Type Description
Create Snapshot / Virtual Machine Creates a snapshot of the virtual machine, including the installed software.
Allows the developers to create snapshots to which they can revert during
development.
Destroy / Deployment Destroys the entire provisioned blueprint, not just the machine. Use this action
to avoid orphaned components.
Power Off / Machine Turns the virtual machine off.
Power On / Machine Turns the virtual machine on.
Revert to Snapshot / Virtual Machine Reverts to a previously created snapshot.
c Click OK.
7Click Finish.
This entitlement allows you to require different approvals on different blueprint components.
What to do next
Request the CentOS with MySQL item in the service catalog as a member of the business group to verify
that the entitlement and the approvals are behaving as expected.
Configuring vRealize Automation
VMware, Inc. 584
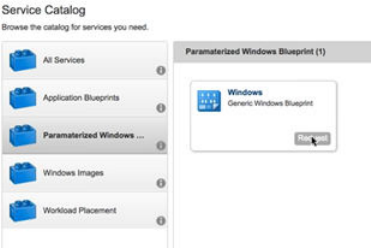
Request Machine Provisioning By Using a Parameterized Blueprint
When you request machine provisioning for a vSphere machine blueprint that has been designed to
include the size or image component profiles, you specify provisioning setting by selecting an available
value set.
When you request provisioning from the catalog, you can select from available value set choices for the
Size and Image component profiles. When you choose one of the value sets, its corresponding property
values are then bound to the request.
The component profile value set is applied to all vSphere machines in a cluster.
For information about component profile configuration, see Understanding and Using Blueprint
Parameterization.
Prerequisites
nDefine value sets for Size or Image component profiles. See and in Custom Properties Reference.
nCreate a blueprint that contains a vSphere machine component that contains an Image or Size
component profile. See Configure a Machine Blueprint and vSphere Machine Component Settings.
nPublish the blueprint to the catalog. See Publish a Blueprint.
nConfigure the blueprint in the catalog. See Checklist for Configuring the Service Catalog and
Examples of Approval Policies Based on the Virtual Machine Policy Type.
Procedure
1Click Catalog.
2Select the catalog service to request and click Request.
3Select the vSphere machine component to provision and specify the number of instances to
provision.
Configuring vRealize Automation
VMware, Inc. 585
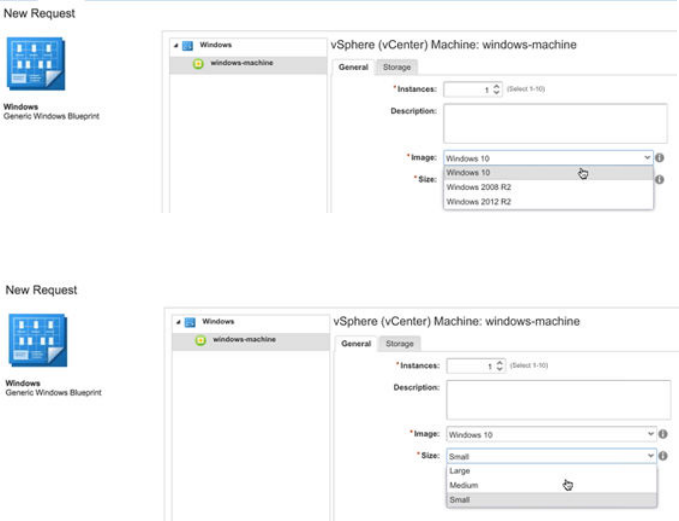
4Select an image value set option from the Image drop-down menu.
5Select a size value set option from the Size drop-down menu.
6Click Submit.
What to do next
The value sets that you defined for the Size and Image component profiles are now available on the
Image and Size drop-down menus on the Catalog tab in the catalog provisioning request form.
Scenario: Make the CentOS with MySQL Application Blueprint
Available in the Service Catalog
As the tenant administrator, you requested that your blueprint architects create a catalog item to deliver
MySQL on CentOS virtual machines for your development and quality engineering group to run test
cases. Your software architect has informed you that the catalog item is ready for users. To make the item
available to your business users, you need to associate the blueprints and Software component with a
catalog service and then entitle the business group members to request the catalog item.
Prerequisites
nLog in to vRealize Automation as a tenant administrator or catalog administrator.
nPublish a blueprint to deliver MySQL on vSphere CentOS virtual machines. See Installing and
Configuring vRealize Automation for the Rainpole Scenario.
nIf you create blueprints in a development environment, import your blueprint into your production
environment. See Exporting and Importing Blueprints and Content.
nCreate a reservation to allocate vSphere resources to your Dev and QE business group. See Create
a Reservation for Hyper-V, KVM, SCVMM, vSphere, or XenServer.
Configuring vRealize Automation
VMware, Inc. 586

Procedure
1Scenario: Create a Development and Quality Engineering Catalog Service
As the tenant administrator, you want to create a separate catalog service for your development and
quality engineering group so your other groups, such as finance and human resources, don't see the
specialized catalog items. You create a catalog service called Dev and QE Service to publish all the
catalog items development and engineering need to run their test cases.
2Scenario: Add CentOS with MySQL to Your Dev and QE Service
As the tenant administrator, you want to add the CentOS with MySQL catalog item to the Dev and
QE service.
3Scenario: Entitle Users to Request Dev and QE Service Items as a Catalog Item
As the tenant administrator, you create a Dev and QE entitlement and add the catalog items and
some relevant actions so your development and quality engineering users can request the CentOS
with MySQL catalog item, and run actions against the machine and the deployment.
Scenario: Create a Development and Quality Engineering Catalog Service
As the tenant administrator, you want to create a separate catalog service for your development and
quality engineering group so your other groups, such as finance and human resources, don't see the
specialized catalog items. You create a catalog service called Dev and QE Service to publish all the
catalog items development and engineering need to run their test cases.
Procedure
1Select Administration > Catalog Management > Services.
2Click the New icon ( ).
3Enter the name Dev and QE Service in the Name text box.
4Enter the description Dev and QE application catalog items for test cases in the
Description text box.
5Select Active from the Status drop-down menu.
6As the catalog administrator who is creating the service, use the search option to add your name as
the Owner.
7Add the Support Team custom user group.
For example, add a custom user group that includes the IaaS architects and software architects so
that you and the service catalog users have someone to contact if you encounter problems
provisioning the catalog items.
8Click OK.
You created and activated a Dev and QE catalog service, but it doesn't contain any catalog items yet.
Configuring vRealize Automation
VMware, Inc. 587

Scenario: Add CentOS with MySQL to Your Dev and QE Service
As the tenant administrator, you want to add the CentOS with MySQL catalog item to the Dev and QE
service.
Procedure
1Select Administration > Catalog Management > Services.
2Select the Dev and QE Service row in the Services list and click Manage Catalog Items.
3Click the New icon ( ).
4Select CentOS with MySQL.
Only published blueprints and components that are not yet associated with a service appear in the
list. If you do not see the blueprint, verify that it was published or that it is not included in another
service.
5Click OK.
6Click Close.
You published the CentOS with MySQL catalog item to the Dev and QE service, but until you entitle users
to the item or the service, no one can see or request the item.
Scenario: Entitle Users to Request Dev and QE Service Items as a Catalog
Item
As the tenant administrator, you create a Dev and QE entitlement and add the catalog items and some
relevant actions so your development and quality engineering users can request the CentOS with MySQL
catalog item, and run actions against the machine and the deployment.
In this scenario, you entitle the service because you want users to be entitled to any future catalog items
that are added to this service. You also want to allow your users to manage their provisioned deployment,
so you add actions like power on and off, snapshot, and destroy deployment to the entitlement.
Procedure
1Select Administration > Catalog Management > Entitlements.
2Click the New icon ( ).
3Configure the details.
a Enter the name Dev and QE Entitlement in the Name text box.
b In the Status drop-down menu, select Active.
c In the Business Group drop-down menu, select the Dev and QE group.
Configuring vRealize Automation
VMware, Inc. 588

d In the Users and Groups area, add one or more users.
Add yourself only, unless you are certain that the blueprint is working as intended. If it is, you can
add individual users and you can add custom user groups.
e Click Next.
4Add the service.
Although you are adding the CentOS and MySQL catalog items separately, adding the service
ensures that any addition items that you add to the service at a later date are available to the
business group members in the service catalog.
aClick the Add Services icon ( ) beside the Entitled Services heading.
b Select Dev and QE Service.
c Click OK.
Dev and QE service is added to the Entitled Services list.
5Add actions.
aClick the Add Actions icon ( ) beside the Entitled Actions heading.
b Click the Type column header to sort the list.
Select the following actions based on type. These actions are useful to the development and
quality engineering users working with their test case machines, and are the only actions that you
want these business group members to use.
Type Action Name
Machine Power On
Machine Power Off
Virtual Machine Create Snapshot
Virtual Machine Revert To Snapshot
Deployment Destroy
The deployment destroy action destroys the entire deployment and not just the virtual machine.
c Click OK.
The five actions are added to the Entitled Actions list.
6Click Finish.
You added the CentOS with MySQL catalog item to your new Dev and QE catalog service and entitled
your business group members to request and manage the item.
Configuring vRealize Automation
VMware, Inc. 589
What to do next
After you verify your work by provisioning the CentOS with MySQL catalog item, you can add additional
users to the entitlement to make the catalog item publicly available to your development and quality
engineering users. If you want to further govern the provisioning of resources in your environment, you
can create approval policies for the MySQL Software component and the CentOS for Software Testing
machine. See Scenario: Create and Apply CentOS with MySQL Approval Policies.
Managing Deployed Catalog Items
You can view and act on provisioned deployments, including machines, load balancers, networks, and
other deployment resources.
Running Actions for Provisioned Resources
The actions that are available for a provisioned resource depend on the type of resource, how the action
was configured and made available for provisioned items, and the operational state of the item.
The configured actions that are available for a provisioned machine or deployment appear in the Actions
menu for the selected resource on the Items tab.
If the item was provisioned by IaaS using an IaaS machine blueprint, the list of available actions is
determined by what was selected on the Actions tab for the machine type component when the blueprint
was created, and then by what is applicable based on machine type or state.
If the item was provisioned using an XaaS blueprint, the resource actions must be created, published,
and entitled in the same service that is used to provision the item. The list of available actions is
determined by the item type and the current state of the item.
The available actions for an item that was provisioned as an IaaS machine might also include XaaS
resource actions if the actions are mapped to the item.
Action Menu Commands for Provisioned Resources
Actions are changes that you can make to provisioned resources. The vRealize Automation actions are
used to manage the life cycle of the resources.
The commands on the Action menu for a provisioned resource include the actions specified on the
blueprint and might include custom menu operations created by your service architects. The available
actions depend on how your business group manager or tenant administrator configured the entitlement
that contains the resource on which the actions run.
You should not manage vRealize Automation-administered NSX objects outside of vRealize Automation.
For example, if you modify the member port of a deployed NSX load balancer in NSX, rather than in
vRealize Automation, then NSX data collection breaks association between the deployed machine and its
otherwise associated load balancer member pool. Scale in and scale out operations also produce
unexpected results if a deployed load balancer member port is changed outside of vRealize Automation.
Configuring vRealize Automation
VMware, Inc. 590

Table 3‑79. Action Menu Commands
Action Resource Type Description
Associate Floating IP Machine (OpenStack) Associate a floating IP address with an
OpenStack machine.
Cancel Reconfigure Machine Cancel a running reconfiguration action.
Change Lease Deployment and Machine Change the number of days remaining in the
lease for either a specific machine or for all
resources included in a deployment. If you do not
provide a value, the lease does not expire.
Change Owner Deployment Change the owner of the deployment and all the
included resources. Only Business group
managers and support users can change the
ownership of a deployment.
The machine must be in the On, Off, or Active
state when you initiate the change owner action or
the action fails with the following message:
The action is invalid for the machine.
Connect using VMRC Machine Connect to the virtual machine using a VMRC 8.x
application.
To use this action, the VMRC application must be
installed on the local system of the service catalog
user who is running the action.
For installation and user instructions, see VMware
Remote Console Documentation. To download,
see Download VMware Remote Console.
The VMRC 8.x replaces the previous VMware
Remote Console.
Connect to remote console Machine Connect to the selected machine using
VMware Remote Console.
The virtual machine console appears in the
browser. The VMRC 8.x replaces the VMware
Remote Console.
Connect using Console Ticket Machine (OpenStack and KVM) Connect to the OpenStack or KVM virtual machine
using a console ticket for a
VMware Remote Console connection.
Connect using ICA Machine (Citrix) Connect to the Citrix machine using the
Independent Computing Architecture.
Connect using RDP Machine Connect to the machine by using
Microsoft Remote Desktop Protocol.
Configuring vRealize Automation
VMware, Inc. 591

Table 3‑79. Action Menu Commands (Continued)
Action Resource Type Description
Connect using SSH Machine Connect to the selected machine by using SSH.
The Connect Using SSH option requires that
your browser has a plug-in that supports SSH, for
example the FireSSH SSH terminal client for
Mozilla Firefox and Google Chrome. When the
plug-in is present, selecting Connect Using SSH
displays an SSH console and prompts for your
administrator credentials.
To use this action, the Machine.SSH custom
property must be included and set to true in the
blueprint's machine component in either a
property group or individual custom property.
Connect using Virtual Desktop Machine Connect to the selected machine using Microsoft
virtual desktop.
Create Snapshot Virtual Machine Create a snapshot of the virtual machine. If you
are allowed only two snapshots and you already
have them, this command is not available until you
delete a snapshot.
Delete Snapshot Virtual Machine Delete a snapshot of the virtual machine.
Configuring vRealize Automation
VMware, Inc. 592

Table 3‑79. Action Menu Commands (Continued)
Action Resource Type Description
Destroy Cloud Machine, Deployment, Virtual
Machine, and NSX Edge
Immediately destroy a provisioned resource. You
must run this action to destroy XaaS resources,
even if they are part of a deployment you are
destroying. Other resources are destroyed when
their lease or their archival period ends.
Except for XaaS, destroying components of a
deployment is not a best practice. Use the scale in
action to reduce the number of machines in your
deployment, or destroy the entire deployment.
The Destroy action is not available for the
following deployment situations:
nphysical machine deployments
ndeployments with an NSX existing network or
NSX existing security resource
ndeployments with an NSX on-demand load
balancer resource
Because an NSX load balancer belongs to an
NSX edge, when an NSX edge is destroyed, the
load balancer resource is also destroyed and
resources are released. When a machine tier that
is load balanced is destroyed, it is removed from
the load balancer pool on the respective NSX
edge.
Note The Destroy action may return a success
message even if it cannot remove a machine
deployment from its endpoint, for example if a
vSphere machine is on a non-vSAN datastore and
its .vmx file contains corrupted or otherwise invalid
data. You should check the request log for
additional information even if the Destroy
message indicates success. Force-destroying a
machine in this state might leave it running on the
endpoint and cause IP conflicts. If the corruption is
corrected on the endpoint (outside of
vRealize Automation), you can retry the Destroy
action.
Business group administrators can choose to
force destroy a deployment after a failed destroy
request. Force destroy instructs
vRealize Automation to ignore failures to destroy
Configuring vRealize Automation
VMware, Inc. 593

Table 3‑79. Action Menu Commands (Continued)
Action Resource Type Description
individual resources while destroying the
deployment. For more information on using force
destroy, see Force Destroy a Deployment After a
Failed Destroy Request.
Note Storage and memory that are assigned to a
provisioned machine by a reservation are
released when the machine to which they are
assigned is deleted in vRealize Automation by the
Destroy action. The storage and memory are not
released if the machine is deleted in the
vCenter Server.
When destroying a deployment that contains an
Amazon machine component, all EBS volumes
that were added to the machine during its life
cycle are detached, rather than destroyed.
vRealize Automation does not provide an option
for destroying the EBS volumes.
Destroy Existing Network Existing Network Destroy the network.
Destroy VMWare NSX Load
Balancer
VMWare NSX Load Balancer Destroy the NSX load balancer.
Destroy VMWare NSX Network VMWare NSX Network Destroy the NSX network.
Destroy VMWare NSX Security
Group
VMWare NSX Security Group Destroy the NSX security group.
Destroy VMWare NSX Security Tag VMWare NSX Security Tag Destroy the NSX security tag.
Disassociate Floating IP Machine (Openstack) Remove the floating IP from the Openstack
machine.
Execute Reconfigure Machine Override a scheduled reconfiguration, or rerun or
reschedule a failed reconfiguration.
Expire Deployment and Machine Terminate the deployment or machine lease for all
resources included in the deployment.
Export Certificate Machine Export the certificate from a Cloud machine.
Get Expiration Reminder Machine Downloads a calendar event file for the current
lease expiration date.
Install Tools Machine Install VMware Tools on a vSphere virtual
machine.
Power Cycle Machine Power off the machine, then power it back on.
Power Off Machine Power off the machine without shutting down the
guest operating system.
Power On Machine Power on the machine. If the machine was
suspended, normal operation resumes from the
point at which the machine was suspended.
Configuring vRealize Automation
VMware, Inc. 594

Table 3‑79. Action Menu Commands (Continued)
Action Resource Type Description
Reboot Machine Reboot the guest operating system on a vSphere
virtual machine. VMware Tools must be installed
on the machine to use this action.
Reconfigure Machine A business group manager, support user, or
machine owner can perform the following
reconfigure actions for the selected vSphere
machine:
nChange description
nChange CPU, memory, network, and disk
settings
nAdd, edit, and delete custom properties and
property groups
nAdd, edit, or delete security tags and security
groups
nAdd, edit, reorder, or delete NAT port
forwarding rules
nReconfigure shutdown
nChange machine owner (available for
business group managers and support users
only)
You cannot change a storage reservation policy if
doing so would change the storage profile on a
disk.
If you selected the Propagate updates to
existing deployments option on the Blueprints
Settings page in the source blueprint, any
increase or broadening in the CPU, Memory, or
Storage minimum and maximum settings in the
blueprint are pushed to active deployments that
were provisioned from that blueprint. For more
information, see Blueprint Properties Settings.
Reconfigure Load Balancer An entitled machine owner, support user, tenant
administrator, or business group manager can
change any of the settings in a virtual server and
can add or remove virtual servers in the NSX load
balancer:
For information about virtual server settings in the
load balancer, see Add an On-Demand Load
Balancer Component.
Register VDI Virtual Machine (XenServer) Register the virtual disk image on XenServer
items.
Configuring vRealize Automation
VMware, Inc. 595

Table 3‑79. Action Menu Commands (Continued)
Action Resource Type Description
Reprovision Machine Destroys the machine, then initiates the
provisioning workflow to create a machine with the
same name.
When you request that a machine be
reprovisioned, a known issue might cause
vRealize Automation to display the reprovisioning
status as Complete in the catalog, when the actual
state is In Progress. After you submit a request to
reprovision a machine, you can use any of the
following sequences to check the status of the
reprovisioned machine:
nInfrastructure > Managed Machines
nItems > Item Details
nAdministration > Events > Event Logs
Note You cannot reprovision an Amazon
machine.
For related information, see the VMware
Knowledge Base article Reprovisioned machine
tasks ... (2065873) at
http://kb.vmware.com/kb/2065873.
Resume Deployment If a deployment fails, which can be due to
temporary environmental issues, infrastructure
issues, timeouts, or other local issues, you can
resume the provisioning process rather than
creating a new provisioning request.
Revert Snapshot Virtual Machine Revert to a previous snapshot of the machine. You
must have an existing snapshot to use this action.
Configuring vRealize Automation
VMware, Inc. 596

Table 3‑79. Action Menu Commands (Continued)
Action Resource Type Description
Scale In Deployment Destroy unneeded instances of machines in your
deployment to adjust to reduced capacity
requirements. Machine components and any
software components installed on them are
destroyed. Dependent software components and
networking and security components are updated
for the new deployment configuration. XaaS
components are not scalable and are not updated
during scale operations.
You can try to repair partially successful scale
operations by attempting to scale the deployment
again. However, you cannot scale a deployment to
its current size, and fixing a partially successful
scale this way does not deallocate the dangling
resources. You can view the request execution
details screen and find out which tasks failed on
which nodes to help you decide whether to fix the
partially successful scale with another scale
operation. Failed and partially successful scale
operations do not impact the functionality of your
original deployment, and you can continue to use
your catalog items while you troubleshoot any
failures.
Scale Out Deployment Provision additional instances of machines in your
deployment to adjust to expanding capacity
requirements. Machine components and any
software components installed on them are
provisioned. Dependent software components and
networking and security components are updated
for the new deployment configuration. XaaS
components are not scalable and are not updated
during scale operations.
You can try to repair partially successful scale
operations by attempting to scale the deployment
again. However, you cannot scale a deployment to
its current size, and fixing a partially successful
scale this way does not deallocate the dangling
resources. You can view the request execution
details screen and find out which tasks failed on
which nodes to help you decide whether to fix the
partially successful scale with another scale
operation. Failed and partially successful scale
operations do not impact the functionality of your
original deployment, and you can continue to use
your catalog items while you troubleshoot any
failures.
Shutdown Machine Shut down the guest operating system and power
off the machine. VMware Tools must be installed
on the machine to use this action.
Configuring vRealize Automation
VMware, Inc. 597

Table 3‑79. Action Menu Commands (Continued)
Action Resource Type Description
Suspend Machine Pause the machine so that it cannot be used and
does not consume any system resources other
than the storage it is using.
Unregister Machine Remove the machine from the inventory without
destroying it. Unregistered machines are not
usable.
Unregister VDI Virtual Machine (XenServer) Unregister the virtual disk image on XenServer
items.
Configure a Metrics Provider
You can configure vRealize Automation to use vRealize Operations Manager health and resource metrics
for vSphere virtual machines.
For more information about vRealize Operations Manager health badges and metrics, see the
vRealize Operations Manager documentation.
Prerequisites
nLog in to the vRealize Automation console as a tenant administrator, business group manager, or
machine owner.
nCreate a vRealize Operations Manager user account with view and resource metrics query privileges
for all vSphere servers that you integrate with vRealize Automation.
nCreate vRealize Operations Manager adapter instances for all vSphere servers you add as endpoints
in vRealize Automation. For information about creating adapter instances, see the
vRealize Operations Manager documentation.
Procedure
1Select Administration > Reclamation > Metrics Provider.
2Select a metrics provider.
Option Description
(Default) vRealize Automation metrics
provider
If you do not have a vRealize Operations Manager instance, vRealize Automation
provides basic machine metrics.
vRealize Operations Manager endpoint Provide connection information for the vRealize Operations Manager instance you
want to use as your metrics provider for vSphere virtual machines.
3Click Test Connection.
4Click Save.
Configuring vRealize Automation
VMware, Inc. 598
Tenant administrators, machine owners, and business group managers of the group in which the machine
resides can view health badges and health alerts on the item details pages for vSphere virtual machines.
They can also view vRealize Operations Manager metrics and health badges when they filter by the
platform type vSphere on the reclamations page.
What to do next
Send Reclamation Requests.
Send Reclamation Requests
You can view and manage deployments and send reclamation requests to deployment owners. A
reclamation request specifies a new lease length in days, the amount of time given for a deployment
owner’s response, and which machines to target for reclamation.
Prerequisites
nLog in to vRealize Automation as a tenant administrator.
n(Optional) To see health badges or view metrics provided by vRealize Operations Manager, see
Configure a Metrics Provider.
Procedure
1Select Administration > Reclamation > Deployments.
Configuring vRealize Automation
VMware, Inc. 599

2Find virtual machine deployments that match your search criteria.
You must select platform type vSphere to view metrics provided by vRealize Operations Manager.
a Click the Advanced Search down arrow to open the search box.
b Enter or select one or more search values.
Option Action
Virtual Machine name contains Enter one or more characters in the text box to find virtual machine names that
match.
Owner name contains Enter a name in the text box to find owner names that match.
Business group names contains Enter a name in the text box to find business group names that match.
Platform Type Select a platform type from the drop-down menu. Select vSphere to view
metrics provided by vRealize Operations Manager.
Required for vRealize Operations Manager.
Power State Select a power state value from the drop-down menu to find virtual machines
with a matching power state.
Expiration date between Click the calendar icons and select start and end dates to find expiration dates
inside the range.
CPU usage Select a value from the drop-down menu to find virtual machines with High
CPU use, above 80%, Low CPU use below 5%, or None, no value.
If you are querying vRealize Operations Manager metrics, you cannot use this
filter to query, and you cannot sort results by CPU usage.
Memory usage Select a value from the drop-down menu to find virtual machines with High
Memory use, above 80%, Low Memory use, below 10%, or None, no value.
If you are querying vRealize Operations Manager metrics, you cannot use this
filter to query, and you cannot sort results by memory usage.
Disk usage Select a value from the drop-down menu to find virtual machines with Low
Hard Disk use, less than 2 KBs per second or None, no value.
If you are querying vRealize Operations Manager metrics, you cannot use this
filter to query, and you cannot sort results by disk usage.
Network usage Select a value from the drop-down menu to find virtual machines with Low
Network use, less than 1 KB per second, or None, no value.
If you are querying vRealize Operations Manager metrics, you cannot use this
filter to query, and you cannot sort results by network usage.
Complex metric Select a value from the drop-down menu to find virtual machines based on
complex metrics. For example, select idle to find machines that have CPU,
network, memory, and disk usage values all under 20%.
You cannot use this filter if you are querying vRealize Operations Manager
metrics.
cClick the search icon ( ).
3From the Deployments page, select one or more machines whose parent deployment is to be
reclaimed.
Only selected machines that are visible on the current results page are reclaimed.
Configuring vRealize Automation
VMware, Inc. 600

4Click Reclaim.
The deployments that contain virtual machines that are selected on the current page are included in
the request.
Note The Reclaim Deployment page can list machines that are not available for reclamation, such
as machines for which the lease has expired. If you specify a machine that is not available for
reclamation, you receive the following error:
Selection Error: Virtual machine name is not in valid state for reclamation.
5Enter the duration of the new lease in the New lease length (days) text box.
The minimum is 1 day, the maximum is 365 days, and the default is 7 days.
6Enter how many days the deployment owner has to respond to the reclamation request in the Wait
before forcing lease (days) text box
At the end of that time, the deployment gets a new lease with the new lease length. The minimum
waiting period is 1 day, the maximum is 365 days, and the default is 3 days.
7Enter a reason for the request in the Reason for request text box.
8Click Submit.
9Click OK.
When you send a reclamation request, it appears in the Inbox of the deployment owner. If the owner does
not respond to the request in the required number of days, the deployment gets a new lease of the
specified length, unless its current lease is shorter. If the owner clicks Item in Use on the reclamation
request, the deployment's lease remains unchanged. If the owner clicks Release for Reclamation, the
deployment lease expires immediately.
What to do next
Track Reclamation Requests.
Track Reclamation Requests
You can track the current state of reclamation requests and other details.
The following alternative methods are available for checking a recent reclamation request:
nClick the Inbox tab and select Reclamation Requests to view reclamation request information.
nClick the Reclamation Requests tab and view the list of recent requests
nClick the Items tab and select Deployments to view recent deployment changes.
Prerequisites
Log in to vRealize Automation as a tenant administrator.
Configuring vRealize Automation
VMware, Inc. 601
Procedure
1Select Administration > Reclamation > Reclamation Requests.
2Find the virtual machines that match your search criteria.
a Click the Advanced Search down arrow to open the search box.
b Type or select one or more search values.
Option Action
Virtual Machine name contains Type one or more characters in the text box to find virtual machine names that
match.
Owner name contains Type one or more characters in the text box to find owner names that match.
Request Reason contains Type one or more characters in the text box to find a request reason that
matches.
Request State Select a request state value from the drop-down menu to find virtual machines
with a matching request state.
cClick the Search icon ( ) or press Enter to start the search.
d Click the Advanced Search up arrow to close the search box.
3(Optional) Click Refresh Data to update the display of reclamation requests.
Change the Reservation of a Managed Machine
You can change the reservation or storage setting for a managed machine. This ability is useful when a
machine moves to a new storage path that is not available in its current reservation. For a single machine
deployment, you can also change the business group for the machine.
You can move a machine in a single machine deployment to a different business group if the machine
owner is a member of the target business group. You must be a business group manager of the original
and the target business group to change the business group setting.
Note If there is a reservation policy assigned to the machine, you cannot change its business group.
You can create additional reservations for the associated compute resource by using the Administration
> Compute Resource menu options.
Storage and memory that are assigned to a provisioned machine by a reservation are released when the
machine to which they are assigned is deleted in vRealize Automation by the Destroy action. The storage
and memory are not released if the machine is deleted in the vCenter Server.
For example, you cannot delete a reservation that is associated with machines in an existing deployment.
If you move or delete deployed machines manually in the vCenter Server, vRealize Automation continues
to recognize the deployed machines as live and prevents you from deleting associated reservations.
If changing the reservation will move a machine in vCenter Server to a new storage path that is not part of
that machine's reservation in vRealize Automation, verify that the target or new storage path is selected in
the machine's target reservation before you change the machine's reservation.
Configuring vRealize Automation
VMware, Inc. 602
Prerequisites
Log in to vRealize Automation as a fabric administrator.
Procedure
1Select Infrastructure > Managed Machines.
2Locate the machine with the reservation to change.
3Click Change Reservation in the drop-down menu.
You can view information about the managed machine, such as its associated blueprint and compute
resource, by clicking View in the drop-down menu.
4(Optional) Select a business group from the Business group drop-down menu.
5(Optional) Select a reservation from the Reservation drop-down menu.
6(Optional) Select a storage policy from Storage drop-down menu.
7Click OK.
Create a Snapshot of Your Machine
Depending on how your administrators have configured your environment, you might be able to create a
snapshot of your virtual machine. A snapshot is an image of a virtual machine at a specific time. It is a
space-efficient copy of the original VM image. Snapshots are an easy way to recover a system from
damage, data loss, or security threats. After you create a snapshot of your virtual machine, you can apply
it and reset your system back to the point where the snapshot was taken.
When you create a memory snapshot, the snapshot captures the state of the virtual machine power
settings and, optionally, the virtual machine's memory. When you capture the virtual machine's memory
state, the snapshot operation takes longer to complete. You might also see a momentary lapse in
response over the network.
Prerequisites
nAn existing virtual machine that is powered on, off, or suspended.
nIf your virtual machine is configured for one or more independent disks, power off the machine before
creating a snapshot. You cannot create a snapshot when it is powered on. For disk configuration
information, see Custom Properties V Table.
nYour tenant administrator or business group manager entitled you to the snapshot action.
Procedure
1Select Items > Machines.
Alternatively you can select Items > Deployment and navigate to the machine in the deployment.
2Locate the machine to snapshot.
3In the Actions column, click the down arrow and click View Details.
4Click Create Snapshot in the Actions menu.
Configuring vRealize Automation
VMware, Inc. 603
5Enter a name and, optionally, a description.
6If you want to capture the memory and power settings of the machine, select Include memory.
7Click Submit.
Connect Remotely to a Machine
You can connect remotely to a machine from the vRealize Automation console.
Prerequisites
nLog in to vRealize Automation as a machine owner, tenant administrator, or business group
manager.
nVerify that VMware Tools is installed.
VMware Tools must be installed on your vRealize Automation client to support fully functioning
access when connecting with VMware Remote Console. If VMware Tools is not installed, problems
occur, such as the mouse pointer and mouse keys not working after connecting to the target machine.
For information about supported VMware Tools versions, see vRealize Automation Support Matrix.
nVerify that the provisioned machine is powered on.
Procedure
1Select Items > Deployment.
2Click Actions in the machine name row or select the machine and click Actions on its machine page.
3Select the remote connection method.
nSelect Connect Using RDP to connect by using RDP.
nSelect Connect to remote console to connect by using VMware Remote Console.
Respond to any prompts.
4Click Connect and log in to the machine as directed.
5When finished, log out and close the browser window.
Configuring Remote Consoles for vSphere with Untrusted SSL Certificates
If your vRealize Automation deployment uses untrusted certificates, before you can use remote consoles
with VMware Remote Console, you must configure your client browser to trust the certificate, The steps to
do this vary by browser.
If vRealize Automation is configured with a trusted SSL certificate for your environment, then
VMware Remote Console does not require additional configuration on client browsers. When a
vRealize Automation appliance certificate is replaced and is a trusted certificate, there is no need to
update certificate information for the Web browser client.
If you want to replace the certificate, see the topic on replacing a vRealize Automation appliance
certificate in the System Administration guide for vRealize Automation.
Configuring vRealize Automation
VMware, Inc. 604

Remote connections using VMware Remote Console for machines provisioned on vSphere are secured
by vRealize Automation appliance certificates through a proxy console. VMware Remote Console
requires WebSockets support in the browser and browsers must trust the vRealize Automation appliance
certificate. The certificate can be obtained by going to the root-level virtual appliance at an address of the
form https://vra-va.eng.mycompany.com/.
For information about support requirements for browsers and vSphere, see the vRealize Automation
Support Matrix.
Configure Firefox to Trust a Certificate for vRealize Automation
Untrusted vRealize Automation appliance certificates must be manually imported to client browsers to
support VMware Remote Console on clients provisioned on vSphere.
For information about supported versions of Firefox, see the VMware vRealize Support Matrix in the
vRealize Automation Information Center.
Note If vRealize Automation is configured with a trusted SSL certificate for your environment, then
VMware Remote Console does not require additional configuration on client browsers.
Procedure
1In a Firefox browser, log in to the vRealize Automation appliance.
A message appears saying that the certificate is not trusted.
2Choose the option to display the current connection information. Click View Certificate to display the
current SSL certificate and click Detail in the Certificate Viewer.
3Click More Information and click the Security tab on the Page Info page.
4Select a certificate from the Certificate Hierarchy pane.
Option Action
Certificate Authority issued certificates Select the top-level vRealize Automation certificate.
Self-signed certificates Select the vRealize Automation certificate.
5Click Export.
6Configure the certificate information in the Save Certificate To File text box.
a Enter a certificate name in the Save As text box. The certificate name must end in .crt, .cert,
or .cer.
b Select a location in which to save the file.
c Select X.509 Certificate (PEM) as the format.
7Click Save.
Configuring vRealize Automation
VMware, Inc. 605

8Click the Authorities tab in the Certificate Management text box.
Option Action
Windows Select Preference > Advanced > Certificates from the Firefox menu.
iOS Select Preference > Advanced > Certificates from the Firefox menu and click
View Certificates.
9Click the Authorities tab and click Import.
10 Select the certificate file you saved earlier and click Open in the text box.
11 Edit the trust settings.
Option Action
Self-signed certificates Select This certificate can identify websites.
Certificates issued by a Certificate
Authority
Select Trust this CA to identify websites.
12 Click OK and restart the browser.
You can connect to the remote console without certificate errors.
Configure Internet Explorer to Trust a Certificate for vRealize Automation Appliance
Untrusted vRealize Automation appliance certificates must be manually imported to client browsers to
support VMware Remote Console on clients provisioned on vSphere.
Note If vRealize Automation is configured with a trusted SSL certificate for your environment, then
VMware Remote Console does not require additional configuration on client browsers.
The steps in this procedure apply for self-signed certificates and certificates issued by a Certificate
Authority.
For information about supported versions of Internet Explorer, see the VMware vRealize Support Matrix
on the VMware Web site.
Procedure
1In an Internet Explorer browser, log in to the vRealize Automation appliance.
2Click View Certificate on the certificate error message that appears in the browser address bar.
3Click the General tab of the Certificate Information window..
4Verify that the information about the certificate is correct and click Install Certificate.
5Select Place all certificates in the following store in the Certificate Store dialog box.
6Click Browse to locate the certificate store.
7Select Trusted Root Certification Authority and click OK.
8Click Next on the Certificate Store dialog box.
Configuring vRealize Automation
VMware, Inc. 606

9Click Yes in the Security Warning dialog box to install the certificate.
10 Restart the browser.
You can connect to the remote console without certificate errors.
Configure Chrome to Trust a Certificate for vRealize Automation Appliance
Untrusted vRealize Automation appliance certificates must be manually imported to client browsers to
support VMware Remote Console on clients provisioned on vSphere.
For information about supported versions of Chrome, see the VMware vRealize Support Matrix on the
VMware Web site.
Note If vRealize Automation is configured with a trusted SSL certificate for your environment, then
VMware Remote Console does not require additional configuration on client browsers.
On Windows, Chrome and Internet Explorer use the same certificate store. This means that certificates
that are trusted by Internet Explorer are also trusted by Chrome. To establish trusted certificates for
Chrome, import them through Internet Explorer. For information about this procedure, see Configure
Internet Explorer to Trust a Certificate for vRealize Automation Appliance.
When you complete the procedure, restart Chrome.
To permanently trust a certificate on the Macintosh operating system, download the certificate file and
install the certificate as trusted in your certificate management tool.
Procedure
1In a Chrome browser, log in to the vRealize Automation appliance.
2Click the icon in the address bar.
3Click the certificate information link.
4Save the certificate by dragging the certificate icon to the desktop.
5Start the Keychain Access application.
6Select File > Import Items.
7On the Keychain Access screen, select the certificate file you saved earlier.
Set the value of Destination Key to System.
8Click Open to import the certificate.
9Restart the browser.
Force Destroy a Deployment After a Failed Destroy Request
You can force destroy a deployment that is in an inconsistent state as the result of a failed destroy
request.
Configuring vRealize Automation
VMware, Inc. 607
When vRealize Automation fails to destroy a deployment resource during a destroy deployment
operation, the destroy operation stops immediately without destroying the remaining deployment
resources. This failure leaves the deployment in an inconsistent state, using up resources with no obvious
way of destroying the deployment. Business group administrators can force destroy deployments that are
left in this inconsistent state.
Prerequisites
nVerify that you are logged in to vRealize Automation as a business group administrator.
nBefore you run the Force Destroy action, review the Destroy action description in Action Menu
Commands for Provisioned Resources.
Procedure
1On the Items tab, click Deployments and select the deployment to destroy.
2Click Actions and click Destroy.
3Enter a description for and reason for the request.
4Select Force destroy and click Submit.
vRealize Automation attempts to fully destroy the deployment, including all resources in the deployment.
If vRealize Automation is unable to destroy a deployment resource, it skips that resource and continues to
destroy the remaining resources in the deployment.
What to do next
Click the Requests tab and verify that all resources in the deployment have been successfully destroyed.
Any resources not destroyed during a force destroy operation must be manually destroyed. Also ensure
that any provisioned virtual machine objects are destroyed, as vRealize Automation may attempt to reuse
their hostnames, IP addresses, and other configuration details during subsequent provisioning
operations.
Troubleshooting Missing Actions in the Resource Actions Menu
As a machine or resource owner, you do not see all entitled actions for a provisioned item.
Problem
In an environment where you know that an action was entitled for your user or business group, you
expect to see all actions when you select an item in your Items list.
Cause
The availability of actions depends on the type of provisioned resource, operational state of the resource,
and how it was configured and made available. The following list provides some reasons why you do not
see all configured actions.
nThe action is not applicable based on the current state of the provisioned resource. For example,
Power Off is available only when the machine is powered on.
Configuring vRealize Automation
VMware, Inc. 608
nThe action is not applicable to the selected item type. If the item does not support the action, it does
not appear in the list. For example, the Create Snapshot action is not available for a physical
machine, and the Connect by Using RDP action is not available if the selected item is a Linux
machine.
nThe action is applicable for the provisioned resource type, but the action is disabled in the
Infrastructure blueprint. If the action is disabled, it never appears as an available action for any of the
items that were provisioned using the blueprint.
nThe action is not included in the entitlement used to provision the item on which you need to run the
action. Only entitled actions, either as part of an IaaS blueprint or as an XaaS resource action, can
appear in the Actions menu.
nThe action is created as an XaaS resource action but was not included in the entitlement used to
provision the item on which you need to run the action. Only entitled actions appear in the Actions
menu.
nThe action might be limited based on the configured target criteria for XaaS resource actions or
resource mappings to provisioned IaaS machines.
Solution
nVerify that the action is applicable to the provisioned item or the state of the provisioned item.
nVerify that the action is configured and included in the entitlement used to provision the item.
Troubleshooting a Failed Deployment That Includes a vRealize Orchestrator
Workflow
If a failed blueprint deployment includes a vRealize Orchestrator workflow, you can use the token ID to
troubleshoot problems with the workflow. You use the token ID to locate the logs in vRealize Orchestrator.
Solution
1Locate the token ID for the failed workflow.
a In vRealize Automation, click the Request tab.
b Click the number in the Request column.
The request can be a deployment or an action.
c Click the General tab.
If the blueprint is based on a vRealize Orchestrator workflow, the page title is
vRealize Orchestrator Workflow Execution Details.
d Locate the Token ID and copy it to your clipboard or a text file.
For example, ff8080815a685352015a6c8d450801ee.
Configuring vRealize Automation
VMware, Inc. 609
2Locate the workflow logs in vRealize Orchestrator using the Control Center
a Enter the base URL for vRealize Automation in a browser search box.
The VMware vRealize Automation Appliance page appears.
b Click vRealize Orchestrator Control Center.
c Log in as a user with root privileges.
d Click Inspect Workflows.
e Click Finished Workflows.
f Paste the workflow token in the Token ID text box.
The list displays on the workflow that matches the token ID.
g Click the row and inspect the logs for the cause of the failure.
Specify Machine Reconfiguration Settings and Considerations for
Reconfiguration
vSphere, vCloud Air, and vCloud Director platforms support reconfiguration of existing machines in a
deployment to modify specifications such as CPU, memory, and storage.
Reconfiguration requests are subject to approval based on entitlements, policies, and the actions enabled
for the machine component in the blueprint.
Reconfiguring a virtual machine that is assigned to an on-demand network is not supported. You cannot
reconfigure a NIC that is attached to an on-demand network. If you attempt to reconfigure an on-demand
NAT or routed network, the error 'Original network [<network>] is not selected in the
machine's reservation. is displayed, the networks on the machine remains intact, and IP addresses
on the machine are unchanged.
If you are entitled to the Cancel Reconfigure (Machine) and Execute Reconfigure (Machine) actions, you
can cancel a reconfiguration or retry a failed reconfiguration.
Expanding a disk on a VM that was provisioned from a linked clone blueprint is not supported.
You cannot reconfigure machines by using the Size or Image component profiles but the range of CPU,
memory, and storage that is calculated based on the profile remains available for reconfigure actions. For
example if you used a small (1 CPU, 1024MB memory, and 10 GB storage), medium (3 CPUs, 2048 MB
memory, 12 GB storage) and large (5 CPUs, 3072 MB memory, 15 GB storage) Size value set, the
available ranges during machine reconfiguration are 1-5 CPUs, 1024-3072 memory, and 1-15 GB
storage.
vRealize Automation takes a blueprint snapshot at deployment. If you encounter reconfigure problems
when updating machine properties such as CPU and RAM in a deployment, see Knowledge Base article
2150829 vRA 7.x Blueprint Snapshotting.
Configuring vRealize Automation
VMware, Inc. 610
Prerequisites
nLog in to vRealize Automation as a machine owner, support user, business group user with a
shared access role, or business group manager.
nThe machine you want to reconfigure must have the status On or Off with no active reconfigure
status.
nThe machine type must be vSphere, vCloud Air, or vCloud Director although the NSX settings apply
only to vSphere.
nVerify that you are entitled to reconfigure a machine.
Procedure
1Select Items > Machines.
Alternatively you can select Items > Deployment and navigate to the machine in the deployment.
2Select the machine to reconfigure.
3Select Reconfigure from the Actions menu.
4Select the tab appropriate to the settings that you want to reconfigure.
Table 3‑80. Request Reconfiguration Changes
Tab Topic
General Reconfigure CPUs and Memory
Storage Edit Storage Settings
Network Change Network Settings
To change NAT rules, see Change NAT Rules in a
Deployment.
Security To reconfigure security settings, see Add or Remove Security
Items in a Deployment.
Properties Change Custom Property and Property Group Settings
What to do next
Execute the Requested Machine Reconfiguration.
Reconfigure CPUs and Memory
You can change the number of CPUs or the amount of memory and storage used by the provisioned
machine, within the limits set by the provisioning blueprint.
For provisioned Amazon deployments, you can reconfigure all storage volumes in the deployment except
for the root volume.
Expanding a disk on a VM that was provisioned from a linked clone blueprint is not supported.
Configuring vRealize Automation
VMware, Inc. 611

Prerequisites
Specify Machine Reconfiguration Settings and Considerations for Reconfiguration.
Procedure
1Click the General tab.
2Enter the number of CPUs in the # CPUs text box.
3Enter the amount of memory in the Memory (MB) text box.
4Enter the amount of storage in the Storage (GB) text box.
What to do next
Specify additional machine reconfiguration settings. If you have finished changing machine settings, start
the machine reconfiguration request. See Execute the Requested Machine Reconfiguration.
Edit Storage Settings
You can add, delete, or change the size of a storage volume on a provisioned virtual machine.
You cannot reconfigure storage for the IDE disk type.
Storage and memory that are assigned to a provisioned machine by a reservation are released when the
machine to which they are assigned is deleted in vRealize Automation by the Destroy action. The storage
and memory are not released if the machine is deleted in the vCenter Server.
For example, you cannot delete a reservation that is associated with machines in an existing deployment.
If you move or delete deployed machines manually in the vCenter Server, vRealize Automation continues
to recognize the deployed machines as live and prevents you from deleting associated reservations.
Prerequisites
Specify Machine Reconfiguration Settings and Considerations for Reconfiguration.
For provisioned Amazon deployments, you can reconfigure all storage volumes in the deployment except
for the root volume.
Procedure
1Click the Storage tab.
The allowable range for storage appears below the Storage volumes table.
2Add or edit available storage volume settings.
a Click New Volume.
b Type the capacity in the Capacity (GB) text box.
c Select a storage reservation policy from the Storage reservation policy drop-down menu.
dClick the Save icon ( ).
Configuring vRealize Automation
VMware, Inc. 612

3Delete a volume.
a Locate the volume.
bClick the Delete icon ( ).
An unselectable icon indicates an undeletable volume such as one from a linked clone.
4Increase the size of a volume.
You cannot reduce the size of existing volumes. Volume size is limited by the total amount of storage
specified in the blueprint, less the amount allocated to other volumes.
a Locate the volume.
bClick the Edit icon ( ).
c Type the new size in the Capacity (GB) text box.
dClick the Save icon ( ).
What to do next
Specify additional machine reconfiguration settings. If you have finished changing machine settings, start
the machine reconfiguration request. See Execute the Requested Machine Reconfiguration.
Change Network Settings
You can add, remove, or edit a network adapter.
You can change the following network settings during the machine reconfiguration process:
nAdd or remove NICs.
nAllocate or release IP addresses for existing NICs.
nAssign new IP addresses to NICs, provided that the network is not an on-demand NAT or on-demand
routed network.
You cannot reconfigure an on-demand routed or on-demand NAT network.
Network reconfiguration requires that the source and target networks be selected in the reservation.
When you add NICs, IP addresses are allocated. When you remove NICs, IP addresses are released.
When you change network settings based on reservation and network profile information, the new
network IP is assigned in vRealize Automation but the deployed machine is not updated at the endpoint
with the new IP information. You must manually assign the IP to the machine after the reconfiguration
process is finished.
Reconfiguring a virtual machine that is assigned to an on-demand network is not supported. You cannot
reconfigure a NIC that is attached to an on-demand network. If you attempt to reconfigure an on-demand
NAT or routed network, the error 'Original network [<network>] is not selected in the
machine's reservation. is displayed, the networks on the machine remains intact, and IP addresses
on the machine are unchanged.
Configuring vRealize Automation
VMware, Inc. 613

Changing NSX network settings is not supported for deployments that were upgraded or migrated from
vRealize Automation 6.2.x to this vRealize Automation release.
Prerequisites
Specify Machine Reconfiguration Settings and Considerations for Reconfiguration.
Procedure
1Click the Network tab.
2(Optional) Add a network adapter.
a Click New Network Adapter.
b Select a network from the Network Path drop-down menu.
All networks selected on the machine’s reservation are available.
c Type a static IP address for the network in the Address text box.
The IP address must be unallocated in the network profile assigned in the reservation.
dClick the Save icon ( ).
3(Optional) Remove a network adapter.
a Locate the network adapter.
bClick the Delete icon ( ).
You cannot remove network adapter 0.
4(Optional) Edit a network adapter.
a Locate the network adapter.
bClick the Edit icon ( ).
c Select a network from the Network Path drop-down menu.
dClick the Save icon ( ).
What to do next
Specify additional machine reconfiguration settings. If you have finished changing machine settings, start
the machine reconfiguration request. See Execute the Requested Machine Reconfiguration.
Change Custom Property and Property Group Settings
You can edit, add, or delete custom properties in the deployed machine.
You cannot use custom properties to enter values for volume disk number, capacity, label, or storage
reservation policy. You must enter these values by adding or editing a volume in the Storage volumes
table. See Edit Storage Settings.
Configuring vRealize Automation
VMware, Inc. 614

Prerequisites
Specify Machine Reconfiguration Settings and Considerations for Reconfiguration.
Procedure
1Click the Properties tab.
2To add a property, click New Property.
3Enter the property name in the Name text box.
4Enter the property value in the Value text box.
5Select the Encrypted check box to encrypt the value.
6Select the Prompt user check box to prompt users for the value when they request the machine.
7Add another property, edit an existing property, or delete a property.
What to do next
Specify additional machine reconfiguration settings. If you have finished changing machine settings, start
the machine reconfiguration request. See Execute the Requested Machine Reconfiguration.
Execute the Requested Machine Reconfiguration
You can start the requested machine reconfiguration immediately or schedule it to start at a particular day
and time. You can also specify the power option for the machine before reconfiguring it.
Prerequisites
Specify Machine Reconfiguration Settings and Considerations for Reconfiguration.
Procedure
1If the Execution tab is visible, you can select it to specify additional reconfiguration settings. If it is not
visible, click Submit to start machine reconfiguration.
2If the Execution tab is visible, click Execution to schedule the reconfiguration action.
3(Optional) Select an option from the Execute request drop-down menu.
Option Description
Immediate Start reconfiguration as soon as possible after approval.
Scheduled Start reconfiguration at the specified date and time. Type or select the date and
time in the text boxes that appear.
The scheduled time is the local time where the vRealize Automation Web server is located. If
Execute request is not available, reconfiguration starts immediately.
Configuring vRealize Automation
VMware, Inc. 615

4(Optional) Select a power action from the Power action drop-down menu.
Option Description
Reboot if required (Default) If required, reboot the machine before reconfiguring it.
Reboot Reboot the machine before reconfiguring it, regardless of whether reboot is
required.
Do not reboot Do not reboot the machine before reconfiguring it, even if reboot is required.
The following conditions require that the machine be rebooted before reconfiguration:
nCPU change where hot add is not supported or is disabled
nMemory change where hot memory is not supported or is disabled
nStorage change where hot storage is disabled
If the machine is in the shutdown state, it is not rebooted.
Note You can disable the vSphere hot add option by using the
VirtualMachine.Reconfigure.DisableHotCpu custom property.
5Click OK.
What to do next
You can monitor the progress of the reconfiguration by observing the workflow states displayed in the
user interface. See Workflow States of Reconfigure Operations.
Workflow States of Reconfigure Operations
When reconfiguration starts and as it progresses through the workflow, you can monitor the progress from
the Edit page.
Table 3‑81. Workflow States of Reconfigure Operations
State Description
Reconfigure pending The State Operation was created.
Scheduled A scheduled workflow has been created for the Distributed Execution Manager (DEM).
Reconfiguring The interface-specific workflow is being executed.
Reconfigure failed, waiting to
retry
The reconfigure failed, waiting for the owner to request a retry. If the machine owner is entitled
to the actions execute reconfigure or cancel reconfigure, the owner can retry or cancel a
reconfiguration.
ReconfigureFailed The reconfigure failed, waiting for the RVG workflow to perform the next action.
ReconfigureSuccessful The reconfigure was successful, waiting for the RVG workflow to perform the next action.
Canceled The user has canceled the reconfiguration. Machine owners who are entitled to the cancel
reconfigure action can cancel a reconfiguration.
Complete The completion workflow sets this state after completing the cleanup, so that the RVG workflow
can proceed to clean up the state operations and approvals. A status of complete indicates that
the request from vRealize Automation is finished, but it does not indicate that the machine
reconfiguration completed successfully.
Configuring vRealize Automation
VMware, Inc. 616

Reconfigure a Load Balancer in a Deployment
You can add, edit, or delete a virtual server in a deployed NSX load balancer.
The following considerations apply to deployments that originated in vRealize Automation 7.2 or earlier:
nLoad balancer reconfiguration is limited to deployments that contain a single load balancer.
nThe Items detail page for any load balancer in a deployment displays the virtual servers that are used
by all the load balancers in the deployment. For more information, see Knowledge Base Article
2150276.
nThe Reconfigure Load Balancer operation is not supported for deployments that were upgraded or
migrated from vRealize Automation 6.2.x to this vRealize Automation release.
For upgraded load balancers and load balancers deployed in the current vRealize Automation release, do
not edit a virtual server and add a virtual server in the same request. For more information, see
Knowledge Base Article 2150240.
If you submit a request to reconfigure a load balancer while another action is being performed on the
deployment, for example when a scale out operation on the deployment is in progress, reconfiguration
fails with a supporting message. In this situation, you can wait until the action is finished and then submit
the reconfiguration request.
Note If the blueprint associated with the deployment is imported from a YAML file that contains an on-
demand load balancer with a value in the name field that is different from the value in the ID field, the
Reconfigure action fails. To enable the load balancer reconfiguration option for a deployment that is
based on an imported blueprint, perform the following steps in the blueprint to allow post-provisioning
actions for load balancer components in future deployments.
1 In the vRealize Automation consol, select the blueprint.
2 Click Edit and change the blueprint name. This sets the name and embedded ID to the same value.
3 Select the load balancer component in the blueprint.
4 Click Edit and re-enter the component name. This sets the name and embedded ID to the same
value.
5 Repeat for all load balancer components in the blueprint.
6 Save the blueprint.
When you provision a new deployment using the edited blueprint, the reconfigure load balancer action
works. To avoid this issue, ensure that all YAML files have identical name and ID values for all load
balancer, network, and security components prior to importing them.
You should not manage vRealize Automation-administered NSX objects outside of vRealize Automation.
For example, if you modify the member port of a deployed NSX load balancer in NSX, rather than in
vRealize Automation, then NSX data collection breaks association between the deployed machine and its
otherwise associated load balancer member pool. Scale in and scale out operations also produce
unexpected results if a deployed load balancer member port is changed outside of vRealize Automation.
Configuring vRealize Automation
VMware, Inc. 617
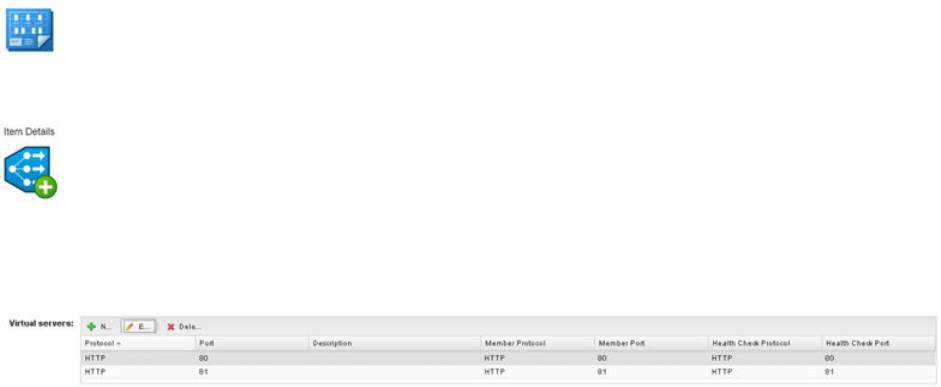
For information about the settings that are available when you add or edit a virtual server, see Add an On-
Demand Load Balancer Component.
When you reconfigure a load balancer in vRealize Automation, some of the settings that were configured
in NSX and that are not available as settings in vRealize Automation, are reverted back to their default
value. After you run the load balancer reconfigure action in vRealize Automation, verify and update as
needed the following settings in NSX:
nInsert-X-Forwarded for HTTP Header
nHTTP Redirect URL
nService Monitor Extension
Prerequisites
nLog in to vRealize Automation as a machine owner, support user, business group user with a
shared access role, or business group manager.
nVerify that you are entitled to reconfigure load balancers in a deployment. The required catalog
entitlement is Reconfigure (Load Balancer).
Procedure
1Select Items > Deployment.
2Locate the deployment and display its children components.
3Select the NSX load balancer to edit.
4Select Reconfigure from the Actions menu.
5Add, edit, or remove virtual servers.
6When you have finished adding, editing, or deleting virtual servers click Submit to submit the
reconfiguration request.
Change NAT Rules in a Deployment
You can add, edit, and delete existing NSX NAT rules in a deployed NAT one-to-many network.
Configuring vRealize Automation
VMware, Inc. 618

You can also change the order in which the NAT rules are processed.
Note If the deployment's source blueprint is imported from a YAML file that contains a NAT network
component, and the NAT network component's name and ID values are not identical, the Change NAT
Rules action fails. To allow the Change NAT Rules action for a deployment that is based on an imported
blueprint, perform the following steps in the blueprint before you provision a deployment.
1 Start vRealize Automation, click the Design tab, and open the blueprint.
2 Click Edit and change the blueprint name. This sets the name and embedded ID to the same value.
3 Select the NAT network component in the blueprint.
4 Click Edit and re-enter the component name. This sets the name and embedded ID to the same
value.
5 Repeat for all NAT network components in the blueprint.
6 Save the blueprint.
To avoid this issue, ensure that all YAML files have identical name and ID values for all blueprints and
load balancer, network, and security components prior to importing them.
For related information, see Creating and Using NAT Rules and Add an On-Demand NAT or On-Demand
Routed Network Component.
Prerequisites
nLog in to vRealize Automation as a machine owner, support user, business group user with a
shared access role, or business group manager.
nVerify that you are entitled to change NAT rules in a network.
nVerify that the NAT network is configured as a NAT one-to-many network. The action is not available
for NAT one-to-one networks.
Procedure
1Select Items > Deployment.
2Locate the deployment and display its children components.
3Select the NAT network component to edit.
For an on-demand NAT network associated with a third-party IPAM provider, you cannot edit the
component. However, you can manually add a new a destination IP address. When you add a new
destination IP address, the component value is nulled. The new destination IP address and the null
machine ID are processed when you submit the reconfiguration request.
Configuring vRealize Automation
VMware, Inc. 619

4Click Change NAT Rules from the Actions menu.
5Add new NAT port forwarding rules, reorder rules, edit existing rules, or delete rules.
6When you have finished making changes, click Save or Submit to submit the reconfiguration request.
Add or Remove Security Items in a Deployment
You can add or remove existing NSX security groups and security tags in a machine deployment. You
cannot add on-demand security groups but you can remove them.
The change security action is based on a machine component or cluster. For example, if security is
associated to a cluster named AppTier2 which consists of 2 machines, you perform the change security
operation on the AppTier2 cluster, not the individual machines within the cluster.
The Change Security operation is not supported for deployments that were upgraded or migrated from
vRealize Automation 6.2.x to this vRealize Automation release.
Prerequisites
nLog in to vRealize Automation as a machine owner, support user, business group user with a
shared access role, or business group manager.
nVerify that you are entitled to change security in a deployment. The required catalog entitlement is
Change Security (Deployment).
Procedure
1Select Items > Deployment.
2Locate the deployment and display its children components.
3Click Change Security from the Actions menu.
4Select the deployed machine component or cluster in which to add or remove security items.
5Add or remove existing security groups and security tags for each machine component or cluster in
the deployment as required.
6Remove on-demand security groups for each machine component or cluster in the deployment as
required.
7(Optional) Click the Reason tab and enter a reason for the request.
Configuring vRealize Automation
VMware, Inc. 620
8When you have finished making changes, click Save or click Submit to submit the change request.
Display All NAT Rules for an Existing NSX Edge
You can display NAT rule information about the NSX Edges that are used in active deployments.
The NAT rules are displayed in the Edge view as an aggregate of all the NAT rules that are used in the
deployment. In the Edge view, the rules are not necessarily displayed in the order in which they are
processed.
To see and optionally change the order in which the NAT rules are processed in a NAT one-to-many
network, see Change NAT Rules in a Deployment.
Prerequisites
nLog in to vRealize Automation as a machine owner, support user, business group user with a
shared access role, or business group manager.
Procedure
1Select Items > Deployment.
2Locate the deployment and display its children components.
3Select the NSX Edge that you want to view.
4Click Close when you are finished.
Configuring vRealize Automation
VMware, Inc. 621
