Managing VRealize Automation 7.4 V Realize 74 Management
User Manual: Pdf vRealize Automation - 7.4 - Managing User Guide for VMware vRealize Software, Free Instruction Manual
Open the PDF directly: View PDF ![]() .
.
Page Count: 85
- Managing vRealize Automation
- Contents
- Managing vRealize Automation
- Maintaining and Customizing vRealize Automation Components and Options
- Broadcast a Message on the Message Board Portlet
- Starting Up and Shutting Down vRealize Automation
- Updating vRealize Automation Certificates
- Extracting Certificates and Private Keys
- Replace Certificates in the vRealize Automation Appliance
- Replace the Infrastructure as a Service Certificate
- Replace the IaaS Manager Service Certificate
- Update Embedded vRealize Orchestrator to Trust vRealize Automation Certificates
- Update External vRealize Orchestrator to Trust vRealize Automation Certificates
- Updating the vRealize Automation Appliance Management Site Certificate
- Replace a Management Agent Certificate
- Change the Polling Method for Certificates
- Managing the vRealize Automation Postgres Appliance Database
- Backup and Recovery for vRealize Automation Installations
- The Customer Experience Improvement Program
- Adjusting System Settings
- Monitoring vRealize Automation
- Monitoring vRealize Automation Health
- Monitoring and Managing Resources
- Monitoring Containers
- Bulk Import, Update, or Migrate Virtual Machines

Managing vRealize
Automation
12 April 2018
vRealize Automation 7.4
Managing vRealize Automation
VMware, Inc. 2
You can find the most up-to-date technical documentation on the VMware website at:
https://docs.vmware.com/
If you have comments about this documentation, submit your feedback to
docfeedback@vmware.com
Copyright © 2015–2018 VMware, Inc. All rights reserved. Copyright and trademark information.
VMware, Inc.
3401 Hillview Ave.
Palo Alto, CA 94304
www.vmware.com
Contents
1Managing vRealize Automation 5
2Maintaining and Customizing vRealize Automation Components and Options 6
Broadcast a Message on the Message Board Portlet 6
Create a Message Board Portlet URL Whitelist 8
Starting Up and Shutting Down vRealize Automation 8
Start Up vRealize Automation 9
Restart vRealize Automation 10
Shut Down vRealize Automation 11
Updating vRealize Automation Certificates 12
Extracting Certificates and Private Keys 13
Replace Certificates in the vRealize Automation Appliance 13
Replace the Infrastructure as a Service Certificate 16
Replace the IaaS Manager Service Certificate 18
Update Embedded vRealize Orchestrator to Trust vRealize Automation Certificates 19
Update External vRealize Orchestrator to Trust vRealize Automation Certificates 21
Updating the vRealize Automation Appliance Management Site Certificate 22
Replace a Management Agent Certificate 26
Change the Polling Method for Certificates 29
Managing the vRealize Automation Postgres Appliance Database 29
Configure the Appliance Database 31
Scenario: Perform Manual vRealize Automation Appliance Database Failover 32
Scenario: Perform a Maintenance Database Failover 34
Manually Recover Appliance Database from Catastrophic Failure 35
Backup and Recovery for vRealize Automation Installations 37
The Customer Experience Improvement Program 37
Join or Leave the Customer Experience Improvement Program for vRealize Automation 37
Configure Data Collection Time 38
Adjusting System Settings 38
Modify the All Services Icon in the Service Catalog 38
Customize Data Rollover Settings 40
Adjusting Settings in the Manager Service Configuration File 41
Monitoring vRealize Automation 46
Monitoring Workflows and Viewing Logs 46
Monitoring Event Logs and Services 47
Using vRealize Automation Audit Logging 48
Viewing Host Information for Clusters in Distributed Deployments 50
VMware, Inc. 3
Monitoring vRealize Automation Health 52
Configure System Tests for vRealize Automation 53
Configure Tenant Tests For vRealize Automation 55
Configure Tests For vRealize Orchestrator 57
Custom Test Suite 58
View the vRealize Automation Health Service Test Suite Results 60
Troubleshooting the Health Service 61
Monitoring and Managing Resources 61
Choosing a Resource Monitoring Scenario 61
Resource Usage Terminology 65
Connecting to a Cloud Machine 66
Reducing Reservation Usage by Attrition 68
Decommissioning a Storage Path 69
Data Collection 70
Understanding vSwap Allocation Checking for vCenter Server Endpoints 73
Removing Datacenter Locations 74
Monitoring Containers 74
Bulk Import, Update, or Migrate Virtual Machines 74
Import a Virtual Machine to a vRealize Automation Environment 75
Update a Virtual Machine in a vRealize Automation Environment 79
Migrate a Virtual Machine to a Different vRealize Automation Environment 81
Managing vRealize Automation
VMware, Inc. 4
Managing vRealize Automation 1
Managing vRealize Automation provides information about maintaining VMware vRealize ™ Automation,
including how to start and stop a deployment, as well as manage certificates and the appliance database.
In addition, it contains information on backing up and restoring vRealize Automation.
Intended Audience
This information is intended for anyone who wants to manage a vRealize Automation deployment. The
information is written for experienced Windows or Linux system administrators who are familiar with
virtual machine technology and datacenter operations.
VMware Technical Publications Glossary
VMware Technical Publications provides a glossary of terms that might be unfamiliar to you. For
definitions of terms as they are used in VMware technical documentation, go to
http://www.vmware.com/support/pubs.
VMware, Inc. 5
Maintaining and Customizing
vRealize Automation
Components and Options 2
You can manage provisioned machines and other aspects of your vRealize Automation deployment.
This chapter includes the following topics:
nBroadcast a Message on the Message Board Portlet
nStarting Up and Shutting Down vRealize Automation
nUpdating vRealize Automation Certificates
nManaging the vRealize Automation Postgres Appliance Database
nBackup and Recovery for vRealize Automation Installations
nThe Customer Experience Improvement Program
nAdjusting System Settings
nMonitoring vRealize Automation
nMonitoring vRealize Automation Health
nMonitoring and Managing Resources
nMonitoring Containers
nBulk Import, Update, or Migrate Virtual Machines
Broadcast a Message on the Message Board Portlet
As the tenant administrator, you use the message board portlet to broadcast a message to all the users
who have the portlet on their Home tab.
Any new users that you add to vRealize Automation has the portlet on their Home tab by default. Existing
users must add the portlet to receive your messages.
You use the message board portlet to broadcast a text message or a Web page. Depending on the Web
page, your users can navigate through the Web site in the message board.
The message board has the following limitations.
VMware, Inc. 6

Table 2‑1. Message Board Portlet Limitations
Option Limitations
URL message limitations nThe target URL must be included in the message board
whitelist. See Create a Message Board Portlet URL
Whitelist.
nYou can only publish content that is hosted on an https site.
nYou cannot use self-signed certificates. The option to accept
the certificate does not appear in the message board.
nThe message board URL is embedded in an iframe. Some
Web sites do not work in iframe and an error appears. One
cause of the failure is the X-Frame-Options DENY or
SAMEORIGIN in the header on the target Web site. If your
target Web site is one that you control, you can set the X-
Frame-Options header to X-Frame-Options: ALLOW-FROM
https://<vRealizeAutomationApplicanceURL>.
nSome Web sites have a redirect to a top-level page that
might refresh entire vRealize Automation page. This type of
Web site does not work in the message board. The refresh
is suppressed and a Loading... message appears on the
message board.
nIf you display an internal HTML page, the page cannot have
the vRealize Automation host as the URL.
Custom message limitations nTo maintain security, the Custom Message does not support
HTML code. For example, you cannot use <href> to link to a
Web site. You must use the URL message option.
Prerequisites
Log in to vRealize Automation as a tenant administrator.
Procedure
1Select the Home tab.
2Click the Edit icon ( ) in the upper right corner.
3Select Add Portlets.
4Locate Message Board and click Add.
5Click Close.
The portlet is added to the top of the Home tab. If you are a user and a message is broadcast, you
see the message until the tenant administrator changes it or removes it. If you are the tenant
administrator, you configure the message.
6To configure the message as a tenant administrator, click Add New Message.
Managing vRealize Automation
VMware, Inc. 7

7Configure one of the following options.
Option Description
URL Enter the page URL.
Custom Message Enter the plain text message.
8Click Publish.
The message is broadcast to any tenant users who added the message board portlet to their Home tab.
To change or remove the message, you must be logged in as the tenant administrator. To change the
message, repeat the same steps. To remove the message, remove the URL or text and publish the blank
message.
Create a Message Board Portlet URL Whitelist
As the security administrator, you configure an allowed list of URLs that can be used in the message
board portlet so that you can ensure added security.
Prerequisites
Log in to vRealize Automation as a security administrator.
Procedure
1Select Administration > Message Board Whitelist.
2Click New.
3Add a URL and click OK.
The URL entries can include following content:
nIP address or FQDN of a site. For example, https://docs.vmware.com.
nIncludes https.
nCan include allowed ports. If a port is not specified, the allowed ports are 80 and 443.
4Repeat for each additional entry.
A tenant administrator cannot add a URL to the message board unless it is included in this list.
What to do next
Verify that you can add a URL included in your whitelist to the message board. See Broadcast a Message
on the Message Board Portlet.
Starting Up and Shutting Down vRealize Automation
A system administrator performs a controlled shutdown or startup of vRealize Automation to preserve
system and data integrity.
Managing vRealize Automation
VMware, Inc. 8
You can also use a controlled shutdown and startup to resolve performance or product behavior issues
that can result from an incorrect initial startup. Use the restart procedure when only some components of
your deployment fail.
Start Up vRealize Automation
When you start vRealize Automation from the beginning, such as after a power outage, a controlled
shutdown or after recovery, you must start its components in a specified order.
Prerequisites
Verify that the load balancers that your deployment uses are running.
Procedure
1Start the MS SQL database machine. If you are using a legacy PostgreSQL standalone database,
start that machine as well.
2(Optional) If you are running a deployment that uses load balancers with health checks, disable the
health check before you start the vRealize Automation appliance. Only ping health check should be
enabled.
3In vSphere, start the master vRealize Automation appliance.
4Wait until the licensing service is running and REGISTERED in the master appliance management
interface.
5Start the remaining vRealize Automation appliances at the same time.
6Wait for the appliances to start, and verify that services are running and listed as REGISTERED in the
appliance management interface.
It might take 15 or more minutes for appliances to start.
7Start the primary Web node and wait for the startup to finish.
8(Optional) If you are running a distributed deployment, start all secondary Web nodes and wait 5
minutes.
9Start the primary Manager Service machine and wait for 2 to 5 minutes, depending on your site
configuration.
10 (Optional) If you are running a distributed deployment, start secondary Manager Service machines
and wait 2 to 5 minutes.
On secondary machines, do not start or run the Windows service unless you are configured for
automatic Manager Service failover.
11 Start the Distributed Execution Manager Orchestrator and Workers and all vRealize Automation proxy
agents.
You can start these components in any order and you do not need to wait for one startup to finish
before you start another.
Managing vRealize Automation
VMware, Inc. 9
12 If you disabled health checks for your load balancers, reenable them.
13 Verify that the startup succeeded.
a Open a Web browser to the vRealize Automation appliance management interface URL.
b Click the Services tab.
c Click the Refresh tab to monitor the progress of service startup.
When all services are listed as registered, the system is ready to use.
Restart vRealize Automation
When you restart more than one vRealize Automation component, you must restart the components in a
specified order.
You might need to restart some components in your deployment to resolve anomalous product behavior.
If you are using vCenter Server to manage your virtual machines, use the Guest OS restart command
to restart vRealize Automation.
If you cannot restart a component or service, follow the instructions in Shut Down vRealize Automation
and Start Up vRealize Automation.
Prerequisites
Verify that load balancers that your deployment uses are running.
Ensure that your vRealize Automation appliance database is operating in asynchronous mode. If it is
operating in synchronous mode, use the Virtual Appliance Management Interface to change it to
asynchronous mode. See Managing the vRealize Automation Postgres Appliance Database for more
information.
If applicable, be sure to return the appliance database to synchronous mode after you complete the
procedure.
Procedure
1In vSphere, start the master vRealize Automation appliance.
2Wait until the licensing service is running and REGISTERED in the master appliance management
interface.
3Start the remaining vRealize Automation appliances at the same time.
4Wait for the appliances to start, and verify that services are running and listed as REGISTERED in the
appliance management interface.
It might take 15 or more minutes for appliances to start.
5Restart the primary Web node and wait for startup to finish.
6If you are running a distributed deployment, restart secondary Web nodes and wait for startup to
finish.
Managing vRealize Automation
VMware, Inc. 10
7Restart Manager Service nodes and wait for startup to finish.
If running automatic Manager Service failover, and you want to keep the active and passive nodes the
same, restart in the following order:
a Stop the passive Manager Service nodes without restarting them.
b Completely restart the active Manager Service node.
c Start the passive Manager Service nodes.
8Restart the Distributed Execution Manager Orchestrator and Workers and all vRealize Automation
agents, and wait for startup to finish for all components.
You can restart these components in any order.
9Verify that the service you restarted is registered.
a Open a Web browser to the vRealize Automation appliance management interface URL.
b Click the Services tab.
c Click the Refresh tab to monitor the progress of service startup.
When all services are listed as registered, the system is ready to use.
Shut Down vRealize Automation
To preserve data integrity, you must shut down vRealize Automation in a specified order.
If you are using vCenter Server to manage your virtual machines, use the guest shutdown command to
shut down vRealize Automation.
Procedure
1Shut down the Distributed Execution Manager Orchestrator and Workers and all vRealize Automation
agents in any order and wait for all components to finish shutting down.
2Shut down virtual machines that are running the Manager Service and wait for the shutdown to finish.
3(Optional) For distributed deployments, shut down all secondary Web nodes and wait for the
shutdown to finish.
4Shut down the primary Web node, and wait for the shutdown to finish.
5(Optional) For distributed deployments, shut down all secondary vRealize Automation appliance
instances and wait for the shutdown to finish.
6Shut down the primary vRealize Automation appliance and wait for the shutdown to finish.
If applicable, the primary vRealize Automation appliance is the one that contains the master, or
writeable, appliance database. Make a note of the name of the primary vRealize Automation
appliance. You use this information when you restart vRealize Automation.
7Shut down the MSSQL virtual machines in any order and wait for the shutdown to finish.
8If you are using a legacy standalone PostgreSQL database, also shut down that machine.
Managing vRealize Automation
VMware, Inc. 11

You shut down your vRealize Automation deployment.
Updating vRealize Automation Certificates
A system administrator can update or replace certificates for vRealize Automation components.
vRealize Automation contains three main components that use SSL certificates in order to facilitate
secure communication with each other. These components are as follows:
nvRealize Automation appliance
nIaaS website component
nIaaS manager service component
In addition, your deployment can have certificates for the vRealize Automation appliance management
site. Also, each IaaS machine runs a Management Agent that uses a certificate.
With one exception, changes to later components in this list do not affect earlier ones. The exception is
that an updated certificate for IaaS components must be registered with vRealize Automation appliance.
Typically, self-signed certificates are generated and applied to these components during product
installation. You might need to replace a certificate to switch from self-signed certificates to certificates
provided by a certificate authority or when a certificate expires. When you replace a certificate for a
vRealize Automation component, trust relationships for other vRealize Automation components are
updated automatically.
For instance, in a distributed system with multiple instances of a vRealize Automation appliance, if you
update a certificate for one vRealize Automation appliance all other related certificates are updated
automatically.
Note vRealize Automation supports SHA2 certificates. The self-signed certificates generated by the
system use SHA-256 With RSA Encryption. You may need to update to SHA2 certificates due to
operating system or browser requirements.
The vRealize Automation virtual appliance management console provides three options for updating or
replacing certificates for existing deployments:
nGenerate certificate - Use this option to have the system generate a self-signed certificate.
nImport certificate - Use this option if you have a certificate that you want to use.
nProvide certificate thumbprint - Use this option if you want to provide a certificate thumb print to
use a certificate that is already deployed in the certificate store on the IaaS servers. Using this option
will not transmit the certificate from the virtual appliance to the IaaS servers. It enables users to
deploy existing certificates on IaaS servers without uploading them in the vRealize Automation
management console.
Also, you can select the Keep Existing option to keep your existing certificate.
Note In a clustered deployment, you must initiate certificate changes from the virtual appliance
management interface on the master node.
Managing vRealize Automation
VMware, Inc. 12

Certificates for the vRealize Automation appliance management site do not have registration
requirements.
Note If your certificate uses a passphrase for encryption and you fail to enter it when replacing your
certificate on the virtual appliance, the certificate replacement fails and the message Unable to load
private key appears.
The vRealize Orchestrator component that is associated with your vRealize Automation deployment has
its own certificates, and it must also trust the vRealize Automation certificates. By default, the
vRealize Orchestrator component is embedded in vRealize Automation, but you can elect to use an
external vRealize Orchestrator. In either case, see the vRealize Orchestrator documentation for
information about updating vRealize Orchestrator certificates. If you update or replace the
vRealize Automation certificates, you must update vRealize Orchestrator to trust the new certificates.
Note If you use a multi-node vRealize Orchestrator deployment that is behind a load balancer, all
vRealize Orchestrator nodes must use the same certificate.
For important information about troubleshooting, supportability, and trust requirements for certificates, see
the VMware knowledge base article at http://kb.vmware.com/kb/2106583.
Extracting Certificates and Private Keys
Certificates that you use with the virtual appliances must be in the PEM file format.
The examples in the following table use Gnu openssl commands to extract the certificate information you
need to configure the virtual appliances.
Table 2‑2. Sample Certificate Values and Commands (openssl)
Certificate Authority Provides Command Virtual Appliance Entries
RSA Private Key openssl pkcs12 -in path _to_.pfx
certificate_file -nocerts -out key.pem
RSA Private Key
PEM File openssl pkcs12 -in path _to_.pfx
certificate_file -clcerts -nokeys -out
cert.pem
Certificate Chain
(Optional) Pass Phrase n/a Pass Phrase
Replace Certificates in the vRealize Automation Appliance
The system administrator can update or replace a self-signed certificate with a trusted one from a
certificate authority. You can use Subject Alternative Name (SAN) certificates, wildcard certificates, or any
other method of multi-use certification appropriate for your environment as long as you satisfy the trust
requirements.
When you update or replace the vRealize Automation appliance certificate, trust with other related
components is re-initiated automatically. See Updating vRealize Automation Certificates for more
information about updating certificates.
Managing vRealize Automation
VMware, Inc. 13

Procedure
1Open a Web browser to the vRealize Automation appliance management interface URL.
2Log in with user name root and the password you specified when deploying the vRealize Automation
appliance.
3Select vRA Settings > Host Settings.
4Select the certificate type from the Certificate Action menu.
If you are using a PEM-encoded certificate, for example for a distributed environment, select Import.
Certificates that you import must be trusted and must also be applicable to all instances of
vRealize Automation appliance and any load balancer through the use of Subject Alternative Name
(SAN) certificates.
If you want to generate a CSR request for a new certificate that you can submit to a certificate
authority, select Generate Signing Request. A CSR helps your CA create a certificate with the
correct values for you to import.
Note If you use certificate chains, specify the certificates in the following order:
a Client/server certificate signed by the intermediate CA certificate
b One or more intermediate certificates
c A root CA certificate
Option Action
Keep Existing Leave the current SSL configuration. Select this option to cancel your changes.
Generate Certificate a The value displayed in the Common Name text box is the Host Name as it
appears on the upper part of the page. If any additional instances of the
vRealize Automation appliance available, their FQDNs are included in the
SAN attribute of the certificate.
b Enter your organization name, such as your company name, in the
Organization text box.
c Enter your organizational unit, such as your department name or location, in
the Organizational Unit text box.
d Enter a two-letter ISO 3166 country code, such as US, in the Country text
box.
Managing vRealize Automation
VMware, Inc. 14

Option Action
Generate Signing Request a Select Generate Signing Request.
b Review the entries in the Organization, Organization Unit, Country Code,
and Common Name text boxes. These entries are populated from the
existing certificate. You can edit these entries if needed.
c Click Generate CSR to generate a certificate signing request, and then click
the Download the generated CSR here link to open a dialog that enables
you to save the CSR to a location where you can send it to a certificate
authority.
d When you receive the prepared certificate, click Import and follow
instructions for importing a certificate into vRealize Automation.
Import a Copy the certificate values from BEGIN PRIVATE KEY to END PRIVATE KEY,
including the header and footer, and paste them in the RSA Private Key text
box.
b Copy the certificate values from BEGIN CERTIFICATE to END
CERTIFICATE, including the header and footer, and paste them in the
Certificate Chain text box. For multiple certificate values, include a BEGIN
CERTIFICATE header and END CERTIFICATE footer for each certificate.
Note In the case of chained certificates, additional attributes may be
available.
c (Optional) If your certificate uses a pass phrase to encrypt the certificate key,
copy the pass phrase and paste it in the Passphrase text box.
5Click Save Settings.
After a few minutes, the certificate details for all applicable instances of the vRealize Automation
appliance appear on the page.
6If required by your network or load balancer, copy the imported or newly created certificate to the
virtual appliance load balancer.
You might need to enable root SSH access in order to export the certificate.
a If not already logged in, log in to the vRealize Automation appliance Management Console as
root.
b Click the Admin tab.
c Click the Admin sub menu.
d Select the SSH service enabled check box.
Deselect the check box to disable SSH when finished.
e Select the Administrator SSH login check box.
Deselect the check box to disable SSH when finished.
f Click Save Settings.
Managing vRealize Automation
VMware, Inc. 15
7Confirm that you can log in to vRealize Automation console.
a Open a browser and navigate to https://vcac-hostname.domain.name/vcac/.
If you are using a load balancer, the host name must be the fully qualified domain name of the
load balancer.
b If prompted, continue past the certificate warnings.
c Log in with administrator@vsphere.local and the password you specified when configuring
Directories Management.
The console opens to the Tenants page on the Administration tab. A single tenant named
vsphere.local appears in the list.
8If you are using a load balancer, configure and enable any applicable health checks.
The certificate is updated.
Replace the Infrastructure as a Service Certificate
The system administrator can replace an expired certificate or a self-signed certificate with one from a
certificate authority to ensure security in a distributed deployment environment.
You can use a Subject Alternative Name (SAN) certificate on multiple machines. Certificates used for the
IaaS components (Website and Manager Service) must be issued with SAN values including FQDNs of
all Windows hosts on which the corresponding component is installed and with the Load Balancer FQDN
for the same component.
There are three options for replacing a certificate:
nGenerate certificate - Use this option to have the system generate a self-signed certificate.
nImport certificate - Use this option if you have a certificate that you want to use.
nProvide certificate thumbprint - If you accept a certificate that is signed by a CA but that certificate is
not trusted by your system, you must determine whether to accept the certificate thumbprint. The
thumbprint is used to quickly determine if a presented certificate is the same as another certificate,
such as the certificate that was accepted previously.
Also, you can use Keep Existing to keep your existing certificate.
Procedure
1Open a Web browser to the vRealize Automation appliance management interface URL.
2Log in with user name root and the password you specified when deploying the vRealize Automation
appliance.
3Select vRA Settings > Certificates.
4Click IaaS Web on the Component Type menu.
5Go to the IaaS Web Certificate pane.
Managing vRealize Automation
VMware, Inc. 16

6Select the certificate replacement option from the Certificate Action menu.
If you are using a PEM-encoded certificate, for example for a distributed environment, select Import.
Certificates that you import must be trusted and must also be applicable to all instances of
vRealize Automation appliance and any load balancer through the use of Subject Alternative Name
(SAN) certificates.
Note If you use certificate chains, specify the certificates in the following order:
a Client/server certificate signed by the intermediate CA certificate
b One or more intermediate certificates
c A root CA certificate
Option Description
Keep Existing Leave the current SSL configuration. Choose this option to cancel your changes.
Generate Certificate a The value displayed in the Common Name text box is the Host Name as it
appears on the upper part of the page. If any additional instances of the
vRealize Automation appliance available, their FQDNs are included in the
SAN attribute of the certificate.
b Enter your organization name, such as your company name, in the
Organization text box.
c Enter your organizational unit, such as your department name or location, in
the Organizational Unit text box.
d Enter a two-letter ISO 3166 country code, such as US, in the Country text
box.
Import a Copy the certificate values from BEGIN PRIVATE KEY to END PRIVATE KEY,
including the header and footer, and paste them in the RSA Private Key text
box.
b Copy the certificate values from BEGIN CERTIFICATE to END
CERTIFICATE, including the header and footer, and paste them in the
Certificate Chain text box. For multiple certificate values, include a BEGIN
CERTIFICATE header and END CERTIFICATE footer for each certificate.
Note In the case of chained certificates, additional attributes may be
available.
c (Optional) If your certificate uses a pass phrase to encrypt the certificate key,
copy the pass phrase and paste it in the Passphrase text box.
Provide Certificate Thumbprint Use this option if you want to provide a certificate thumbprint to use a certificate
that is already deployed in the certificate store on the IaaS servers. Using this
option will not transmit the certificate from the virtual appliance to the IaaS
servers. It enables users to deploy existing certificates on IaaS servers without
uploading them in the management interface.
7Click Save Settings.
After a few minutes, the certificate details appear on the page.
Managing vRealize Automation
VMware, Inc. 17

Replace the IaaS Manager Service Certificate
A system administrator can replace an expired certificate or a self-signed certificate with one from a
certificate authority to ensure security in a distributed deployment environment.
You can use a Subject Alternative Name (SAN) certificate on multiple machines. Certificates used for the
IaaS components (Website and Manager Service) must be issued with SAN values including FQDNs of
all Windows hosts on which the corresponding component is installed and with the Load Balancer FQDN
for the same component.
The IaaS Manager Service and the IaaS Web Service share a single certificate.
Procedure
1Open a Web browser to the vRealize Automation appliance management interface URL.
2Log in with user name root and the password you specified when deploying the vRealize Automation
appliance.
3Select vRA Settings > Certificates.
4Click Manager Service from the Certificate Type menu.
5Select the certificate type from the Certificate Action menu.
If you are using a PEM-encoded certificate, for example for a distributed environment, select Import.
Certificates that you import must be trusted and must also be applicable to all instances of
vRealize Automation appliance and any load balancer through the use of Subject Alternative Name
(SAN) certificates.
Note If you use certificate chains, specify the certificates in the following order:
a Client/server certificate signed by the intermediate CA certificate
b One or more intermediate certificates
c A root CA certificate
Option Description
Keep Existing Leave the current SSL configuration. Choose this option to cancel your changes.
Generate Certificate a The value displayed in the Common Name text box is the Host Name as it
appears on the upper part of the page. If any additional instances of the
vRealize Automation appliance available, their FQDNs are included in the
SAN attribute of the certificate.
b Enter your organization name, such as your company name, in the
Organization text box.
c Enter your organizational unit, such as your department name or location, in
the Organizational Unit text box.
d Enter a two-letter ISO 3166 country code, such as US, in the Country text
box.
Managing vRealize Automation
VMware, Inc. 18

Option Description
Import a Copy the certificate values from BEGIN PRIVATE KEY to END PRIVATE KEY,
including the header and footer, and paste them in the RSA Private Key text
box.
b Copy the certificate values from BEGIN CERTIFICATE to END
CERTIFICATE, including the header and footer, and paste them in the
Certificate Chain text box. For multiple certificate values, include a BEGIN
CERTIFICATE header and END CERTIFICATE footer for each certificate.
Note In the case of chained certificates, additional attributes may be
available.
c (Optional) If your certificate uses a pass phrase to encrypt the certificate key,
copy the pass phrase and paste it in the Passphrase text box.
Provide Certificate Thumbprint Use this option if you want to provide a certificate thumbprint to use a certificate
that is already deployed in the certificate store on the IaaS servers. Using this
option will not transmit the certificate from the virtual appliance to the IaaS
servers. It enables users to deploy existing certificates on IaaS servers without
uploading them in the management interface.
6Click Save Settings.
After a few minutes, the certificate details appear on the page.
7If required by your network or load balancer, copy the imported or newly created certificate to the load
balancer.
8Open a browser and navigate to https://managerServiceAdddress/vmpsProvision/ from a
server that this running a DEM worker or agent.
If you are using a load balancer, the host name must be the fully qualified domain name of the load
balancer.
9If prompted, continue past the certificate warnings.
10 Validate that the new certificate is provided and is trusted.
11 If you are using a load balancer, configure and enable any applicable health checks.
Update Embedded vRealize Orchestrator to Trust
vRealize Automation Certificates
If you update or change vRealize Automation appliance or IaaS certificates, you must update
vRealize Orchestrator to trust the new or updated certificates.
This procedure applies to all vRealize Automation deployments that use an embedded
vRealize Orchestrator instance. If you use an external vRealize Orchestrator instance, see Update
External vRealize Orchestrator to Trust vRealize Automation Certificates.
Note This procedure resets tenant and group authentication back to the default settings. If you have
customized your authentication configuration, note your changes so that you can re-configure
authentication after completing the procedure.
Managing vRealize Automation
VMware, Inc. 19

See the vRealize Orchestrator documentation for information about updating and replacing
vRealize Orchestrator certificates.
If you replace or update vRealize Automation certificates without completing this procedure, the
vRealize Orchestrator Control Center may be inaccessible, and errors may appear in the vco-server and
vco-configurator log files.
Problems with updating certificates can also occur if vRealize Orchestrator is configured to authenticate
against a different tenant and group than vRealize Automation. See
https://kb.vmware.com/selfservice/microsites/search.do?
language=en_US&cmd=displayKC&externalId=2147612.
Procedure
1Stop the vRealize Orchestrator server and Control Center services.
service vco-server stop
service vco-configurator stop
2Reset the vRealize Orchestrator authentication provider by running the following command.
/var/lib/vco/tools/configuration-cli/bin/vro-configure.sh reset-authentication
ls -l /etc/vco/app-server/
mv /etc/vco/app-server/vco-registration-id /etc/vco/app-server/vco-registration-id.old
vcac-vami vco-service-reconfigure
3Check the trusted certificate for the vRealize Orchestrator trust store using the command line
interface utility located at /var/lib/vco/tools/configuration-cli/bin with the following
command:
/var/lib/vco/tools/configuration-cli/bin/vro-configure.sh list-trust
nCheck for the certificate with the following alias: vco.cafe.component-registry.ssl.certificate. This
should be the vRealize Automation certificate that the vRealize Orchestrator instance uses as an
authentication provider.
nThis certificate must match the newly configured vRealize Automation certificate. If it does not
match, it can be changed as follows
1 Copy your vRealize Automation signed appliance certificate PEM file to the /tmp folder on
the appliance.
2 Run the following command adding the appropriate certificate path:
./vro-configure.sh trust --registry-certificate path-to-the-certificate-file-in-PEM-format
See the following example command:
/var/lib/vco/tools/configuration-cli/bin/vro-configure.sh trust --registry-
certificate /tmp/certs/vra.pem
Managing vRealize Automation
VMware, Inc. 20

4You may need to run the following commands to trust the certificate:
/var/lib/vco/tools/configuration-cli/bin/vro-configure.sh trust --uri https://vra.domain.com
/var/lib/vco/tools/configuration-cli/bin/vro-configure.sh trust --registry-certificate --uri
https://vra.domain.com
5Ensure that the vRealize Automation certificate is now injected into the vRealize Orchestrator trust
store using the following command:
/var/lib/vco/tools/configuration-cli/bin/vro-configure.sh list-trust
6Start the vRealize Orchestrator server and control center services.
service vco-server start
service vco-configurator start
Update External vRealize Orchestrator to Trust
vRealize Automation Certificates
If you update or change vRealize Automation appliance or IaaS certificates, you must update
vRealize Orchestrator to trust the new or updated certificates.
This procedure applies to vRealize Automation deployments that use an external vRealize Orchestrator
instance.
Note This procedure resets tenant and group authentication back to the default settings. If you have
customized your authentication configuration, note your changes so that you can re-configure
authentication after completing the procedure.
See the vRealize Orchestrator documentation for information about updating and replacing
vRealize Orchestrator certificates.
If you replace or update vRealize Automation certificates without completing this procedure, the
vRealize Orchestrator Control Center may be inaccessible, and errors may appear in the vco-server and
vco-configurator log files.
Problems with updating certificates can also occur if vRealize Orchestrator is configured to authenticate
against a different tenant and group than vRealize Automation. See
https://kb.vmware.com/selfservice/microsites/search.do?
language=en_US&cmd=displayKC&externalId=2147612.
Procedure
1Stop the vRealize Orchestrator server and Control Center services.
service vco-configuration stop
Managing vRealize Automation
VMware, Inc. 21
2Reset the vRealize Orchestrator authentication provider.
/var/lib/vco/tools/configuration-cli/bin/vro-configure.sh reset-authentication
3Start the vRealize Orchestrator Control Center service.
service vco-configurator start
4Log in to the Control Center using virtual appliance management interface root credentials.
5Unregister and re-register the authentication provider.
Updating the vRealize Automation Appliance Management Site
Certificate
The system administrator can replace the SSL certificate of the management site service when it expires
or to replace a self-signed certificate with one issued by a certificate authority. You secure the
management site service on port 5480.
The vRealize Automation appliance uses lighttpd to run its own management site. When you replace a
management site certificate, you must also configure all Management Agents to recognize the new
certificate.
If you are running a distributed deployment, you can update management agents automatically or
manually. If you are running a minimal deployment, you must update the management agent manually.
See Manually Update Management Agent Certificate Recognition for more information.
Procedure
1Find the Management Agent Identifier
You use the Management Agent identifier when you create and register a new management site
server certificate.
2Replace the vRealize Automation Appliance Management Site Certificate
If the SSL certificate of the management site service expires, or you started with a self-signed
certificate and site policies require a different one, you can replace the certificate.
3Update Management Agent Certificate Recognition
After replacing a vRealize Automation appliance management site certificate, you must update all
management agents to recognize the new certificate and to reestablish trusted communications
between the virtual appliance management site and management agents on IaaS hosts.
Find the Management Agent Identifier
You use the Management Agent identifier when you create and register a new management site server
certificate.
Procedure
1Open the Management Agent configuration file located at <vra-installation-dir>\Management
Agent\VMware.IaaS.Management.Agent.exe.config.
Managing vRealize Automation
VMware, Inc. 22

2Record the value from the id attribute of the agentConfiguration element.
<agentConfiguration id="0E22046B-9D71-4A2B-BB5D-70817F901B27">
Replace the vRealize Automation Appliance Management Site Certificate
If the SSL certificate of the management site service expires, or you started with a self-signed certificate
and site policies require a different one, you can replace the certificate.
You are allowed to reuse the certificate used by the vRealize Automation service on port 443, or use a
different one. If you are requesting a new CA-issued certificate to update an existing certificate, a best
practice is to reuse the Common Name from the existing certificate.
Note The vRealize Automation appliance uses lighttpd to run its own management site. You secure the
management site service on port 5480.
Prerequisites
nThe certificate must be in PEM format.
nThe certificate must include both of the following, in order, together in one file:
a RSA private key
b Certificate chain
nThe private key cannot be encrypted.
nThe default location and file name is /opt/vmware/etc/lighttpd/server.pem.
See Extracting Certificates and Private Keys for more information about exporting a certificate and private
key from a Java keystore to a PEM file.
Procedure
1Log in by using the appliance console or SSH.
2Back up your current certificate file.
cp /opt/vmware/etc/lighttpd/server.pem /opt/vmware/etc/lighttpd/server.pem-bak
3Copy the new certificate to your appliance by replacing the content of the
file /opt/vmware/etc/lighttpd/server.pem with the new certificate information.
4Run the following command to restart the lighttpd server.
service vami-lighttp restart
5Run the following command to restart the haproxy service.
service haproxy restart
6Log in to the management console and validate that the certificate is replaced. You might need to
restart your browser.
Managing vRealize Automation
VMware, Inc. 23
What to do next
Update all management agents to recognize the new certificate.
For distributed deployments, you can update management agents manually or automatically. For minimal
installations, you must update agents manually.
nFor information about automatic update, see Automatically Update Management Agents in a
Distributed Environment to Recognize a vRealize Automation Appliance Management Site Certificate.
nFor information about manual update, see Manually Update Management Agent Certificate
Recognition.
Update Management Agent Certificate Recognition
After replacing a vRealize Automation appliance management site certificate, you must update all
management agents to recognize the new certificate and to reestablish trusted communications between
the virtual appliance management site and management agents on IaaS hosts.
Each IaaS host runs a management agent and each management agent must be updated. Minimal
deployments must be updated manually, while distributed deployments can be updated manually or by
using an automated process.
nManually Update Management Agent Certificate Recognition
After replacing a vRealize Automation appliance management site certificate, you must update
Management Agents manually to recognize the new certificate to reestablish trusted
communications between the virtual appliance management site and Management Agents on IaaS
hosts.
nAutomatically Update Management Agents in a Distributed Environment to Recognize a vRealize
Automation Appliance Management Site Certificate
After the management site certificate is updated in a high-availability deployment, the management
agent configuration must also be updated to recognize the new certificate and reestablish trusted
communication.
Manually Update Management Agent Certificate Recognition
After replacing a vRealize Automation appliance management site certificate, you must update
Management Agents manually to recognize the new certificate to reestablish trusted communications
between the virtual appliance management site and Management Agents on IaaS hosts.
Perform these steps for each Management Agent in your deployment after you replace a certificate for
the vRealize Automation appliance management site.
For distributed deployments, you can update Management Agents manually or automatically. For
information about automatic update, see Automatically Update Management Agents in a Distributed
Environment to Recognize a vRealize Automation Appliance Management Site Certificate.
Prerequisites
Obtain the SHA1 thumbprints of the new vRealize Automation appliance management site certificate.
Managing vRealize Automation
VMware, Inc. 24

Procedure
1Stop the VMware vCloud Automation Center Management Agent service.
2Navigate to the Management Agent configuration file located at
[vcac_installation_folder]\Management
Agent\VMware.IaaS.Management.Agent.exe.Config, typically C:\Program Files
(x86)\VMware\vCAC\Management Agent\VMware.IaaS.Management.Agent.exe.Config.
3Open the file for editing and locate the endpoint configuration setting for the old management site
certificate. which you can identify by the endpoint address.
For example:
<agentConfiguration id="C816CFBC-4830-4FD2-8951-C17429CEA291" pollingInterval="00:03:00">
<managementEndpoints>
<endpoint address="https://vra-va.local:5480"
thumbprint="D1542471C30A9CE694A512C5F0F19E45E6FA32E6" />
</managementEndpoints>
</agentConfiguration>
4Change the thumbprint to the SHA1 thumbprint of the new certificate.
For example:
<agentConfiguration id="C816CFBC-4830-4FD2-8951-C17429CEA291" pollingInterval="00:03:00">
<managementEndpoints>
<endpoint address="https://vra-va.local:5480"
thumbprint="8598B073359BAE7597F04D988AD2F083259F1201" />
</managementEndpoints>
</agentConfiguration>
5Start the VMware vCloud Automation Center Management Agent service.
6Login to the virtual appliance management site and go to vRA Settings > Cluster.
7Check the Distributed Deployment Information table to verify that the IaaS server has contacted the
virtual appliance recently, which confirms that the update is successful.
Automatically Update Management Agents in a Distributed Environment to Recognize a
vRealize Automation Appliance Management Site Certificate
After the management site certificate is updated in a high-availability deployment, the management agent
configuration must also be updated to recognize the new certificate and reestablish trusted
communication.
You can update vRealize Automation appliance management site certificate information for distributed
systems manually or automatically. For information about manually updating management agents, see
Manually Update Management Agent Certificate Recognition.
Use this procedure to update the certificate information automatically.
Managing vRealize Automation
VMware, Inc. 25

Procedure
1When Management Agents are running, replace the certificate on a single vRealize Automation
appliance management site in your deployment.
2Wait fifteen minutes for the management agent to synchronize with the new vRealize Automation
appliance management site certificate.
3Replace certificates on other vRealize Automation appliance management sites in your deployment.
Management agents are automatically updated with the new certificate information.
Replace a Management Agent Certificate
The system administrator can replace the Management Agent certificate when it expires or replace a self-
signed certificate with one issued by a certificate authority.
Each IaaS host runs its own Management Agent. Repeat this procedure on each IaaS node whose
Management Agent you want to update.
Prerequisites
nCopy the Management Agent identifier in the Node ID column before you remove the record. You use
this identifier when you create the new Management Agent certificate and when you register it.
nWhen you request a new certificate, ensure that the Common Name (CN) attribute in the certificate
subject field for the new certificate is typed in the following format:
VMware Management Agent 00000000-0000-0000-0000-000000000000
Use the string VMware Management Agent, followed by a single space and the GUID for the
Management Agent in the numerical format shown.
Procedure
1Stop the Management Agent service from your Windows Services snap-in.
a From your Windows machine, click Start.
b In the Windows Start Search box, enter services.msc and press Enter.
c Right-click VMware vCloud Automation Center Management Agent service and click Stop to
stop the service.
2Remove the current certificate from the machine. For information about managing certificates on
Windows Server 2008 R2, see the Microsoft Knowledge Base article at
http://technet.microsoft.com/en-us/library/cc772354.aspx or the Microsoft wiki article at
http://social.technet.microsoft.com/wiki/contents/articles/2167.how-to-use-the-certificates-
console.aspx.
a Open the Microsoft Management Console by entering the command mmc.exe.
b Press Ctrl + M to add a new snap-in to the console or select the option from the File drop-down
menu.
Managing vRealize Automation
VMware, Inc. 26
c Select Certificates and click Add.
d Select Computer account and click Next.
e Select Local computer: (the computer this console is running on).
f Click OK.
g Expand Certificates (Local Computer) on the left side of the console.
h Expand Personal and select the Certificates folder.
i Select the current Management Agent certificate and click Delete.
j Click Yes to confirm the delete action.
3Import the newly generated certificate into the local computer.personal store, or do not import
anything if you want the system to auto-generate a new self-signed certificate.
Managing vRealize Automation
VMware, Inc. 27

4Register the Management Agent certificate with the vRealize Automation appliance management site.
a Open a command prompt as an administrator and navigate to the Cafe directory on the machine
on which the Management Agent is installed at <vra-installation-dir>\Management
Agent\Tools\Cafe, typically C:\Program Files (x86)\VMware\vCAC\Management
Agent\Tools\Cafe.
b Enter the Vcac-Config.exe RegisterNode command with options to register the Management
Agent identifier and certificate in one step. Include the Management Agent identifier you recorded
earlier as the value for the -nd option.
Table 2‑3. Required Options and Arguments for Vcac-Config.exe RegisterNode
Option Argument Notes
-vamih "vra-va-hostname.domain.name:5480" The URL of the management site host,
including a port specification.
-cu "root" The user name, which must be the root
user.
-cp "password" Password for the root user as a quoted
string.
-hn "machine-hostname.domain.name" The machine name of the Management
Agent host, including domain
information.
This value must match the hostname that
the current node is registered with in the
vRealize Automation appliance. Can be
seen with option 1 specified above for
the node ID or in the VAMI - Distributed
Deployment Information table. If it is not
the same value, the following error is
returned when the command is
executed: Failure: Cannot add duplicate
node id
00000000-0000-0000-0000-0000000000
00.
-nd "00000000-0000-0000-0000-000000000000" Management Agent identifier.
-tp "0000000000000000000000000000000000000000 Thumb print of the SSL certificate of the
management site host, as defined in the
-vamih parameter.
The following example shows the command format:
Vcac-Config.exe RegisterNode -v -vamih "vra-va-hostname.domain.name:5480"
-cu "root" -cp "password" -hn "machine-hostname.domain.name"
-nd "00000000-0000-0000-0000-000000000000"
-tp "0000000000000000000000000000000000000000"
5Restart the Management Agent.
Managing vRealize Automation
VMware, Inc. 28

Example: Command to Register a Management Agent Certificate
Vcac-Config.exe RegisterNode -v -vamih "vra-va.eng.mycompany:5480" -cu "root" -cp
"secret" -hn "iaas.eng.mycompany" -nd "C816CFBX-4830-4FD2-8951-C17429CEA291" -tp
"70928851D5B72B206E4B1CF9F6ED953EE1103DED"
Change the Polling Method for Certificates
If there are commas in the OU section of the IaaS certificate, you might encounter STOMP WebSocket
errors in the Manager Service log files. In addition, virtual machine provisioning might fail. You can
remove the commas, or change the polling method from WebSocket to HTTP.
To change the polling method, take the following steps.
Procedure
1Open the following file in a text editor.
C:\\:Program FIles (x86)\VMware\vCAC\Server\Manager Service.exe.config.
2Add the following lines inside the <appSettings> section.
<add key="Extensibility.Client.RetrievalMethod" value="Polling"/>
<add key="Extensibility.Client.PollingInterval" value="2000"/>
<add key="Extensibility.Client.PollingMaxEvents" value="128"/>
3Save and close Manager Service.exe.config.
4Restart the Manager Service.
For more information about the Manager Service, see Installing vRealize Automation.
Managing the vRealize Automation Postgres Appliance
Database
vRealize Automation requires the appliance database for system operation. You can manage the
appliance database through the vRealize Automation Appliance Virtual Appliance Management Interface.
Note This information applies only to deployments that use an embedded appliance database. It does
not apply to deployments that use an external Postgres database.
Managing vRealize Automation
VMware, Inc. 29

You can configure the database as a single node or with multiple nodes to facilitate high availability
through failover. The vRealize Automation installer includes a database node on each vRealize
Automation appliance installation. So if you install three instances of a vRealize Automation appliance,
you have three database nodes. Automatic failover is implemented on applicable deployments. The
appliance database requires no maintenance unless a machine configuration changes or, if you use a
clustered configuration, you promote a different node for the master.
Note The database clustered configuration is set up automatically when you join a virtual appliance to
the cluster using the Join cluster operation. The database cluster is not directly dependent upon the
virtual appliance cluster. For instance, a virtual machine joined to a cluster can operate normally even if
the embedded appliance database is not started or has failed.
For high availability, vRealize Automation uses the PostgresSQL master-replica model to support data
replication. This means that all of the database nodes work in a cluster with one leading node, known as
the master, and several replicating nodes, known as replicas. The master node handles all database
requests and the replica nodes stream and replay transactions from the master locally.
A clustered configuration contains one master node and one or more replica nodes. The master node is
the vRealize Automation appliance node with the master database that supports system functionality.
Replica nodes contain copies of the database that can be pulled into service if the master node fails.
Several high availability appliance database options exist. Selecting the replication mode is the most
important database configuration option. The replication mode determines how your vRealize Automation
deployment maintains data integrity and, for high availability configurations, how it fails over if the master
or primary node fail. There are two available replication modes: synchronous and asynchronous.
Both replication modes support database failover, though each has advantages and disadvantages. To
support high availability database failover, asynchronous mode requires two nodes, whereas
synchronous mode requires three nodes. Synchronous mode also invokes automatic failover.
Replication Mode Advantages Disadvantages
Synchronous nMinimizes chance of data loss.
nInvokes automatic faiiover.
nMight affect system performance.
nRequires three nodes.
Asynchronous nRequires only two nodes.
nAffects system performance less
than synchronous mode.
Not as robust as synchronous mode in
preventing data loss.
vRealize Automation supports both modes, but operates in asynchronous mode by default and provides
high availability only if there are at least two appliance database nodes. The Database tab on the Virtual
Appliance Management Interface enables you to switch synchronization modes and to add database
nodes as needed.
When operating in synchronous mode, vRealize Automation invokes automatic failover.
If you begin with one node in a non-high-availability configuration, you can add nodes later as required to
enhance high availability. If you have the appropriate hardware and require maximum protection against
data loss, consider configuring your deployment to operate in synchronous mode.
Managing vRealize Automation
VMware, Inc. 30

Appliance Database Failover
In a high availability configuration, the master constantly streams transactions to the replica servers. If the
master fails, the active and working replica is ready to proceed with read-only requests. When the new
master is promoted, either manually or automatically, all of the upcoming requests are moved to it.
Configure the Appliance Database
You can use the Virtual Appliance Management Interface Database page to monitor or update the
configuration of the appliance database. You can also use it to change the master node designation and
the synchronization mode used by the database.
The appliance database is installed and configured during vRealize Automation system installation and
configuration, but you can monitor and change the configuration from the Database tab on the Virtual
Appliance Management Interface.
The Connection Status text box indicates whether the database is connected to the
vRealize Automation system and is functioning correctly.
If your appliance database uses multiple nodes to support failover, the table at the bottom of the page
displays the nodes, and their status and indicates which node is the master. The Replication mode text
box shows the currently configured operation mode for the system, either synchronous or asynchronous.
Use this page to update appliance database configuration.
The Sync State* column in the database nodes table shows the synchronization method for the cluster.
This column works with the Status column to show the state of cluster nodes. Potential status differs
depending on whether the cluster uses asynchronous or synchronous replication.
Table 2‑4. Sync State for Appliance Database Replication Modes
Mode Sync State Message
Synchronous replication Master node - no status
Replica node - sync
Other nodes - potential
Asynchronous replication Master node - no status
Other nodes - potential
The Valid column indicates whether replicas are synchronized with the master node. The master node is
always valid.
The Priority column shows the position of replica nodes in relation to the master node. The master node
has no priority value. When promoting a replica to become the master, select the node with the lowest
priority value.
When operating in synchronous mode, vRealize Automation invokes automatic failover. In the event of
master node failure the next available replica node will automatically become the new master. The
failover operation requires 10 to 30 seconds on a typical vRealize Automation deployment.
Managing vRealize Automation
VMware, Inc. 31

Prerequisites
nInstall and configure vRealize Automation according to appropriate instructions in Installing vRealize
Automation.
nLog in to vRealize Automation Appliance Management as root using the password you entered when
you deployed the vRealize Automation appliance.
nConfigure an appropriate embedded Postgres appliance database cluster as part of your
vRealize Automation deployment.
Procedure
1On the Virtual Appliance Management Interface, select vRA Settings > Database.
2If your database uses multiple nodes, review the table at the bottom of the page and ensure that the
system is operating appropriately.
nEnsure that all nodes are listed.
nEnsure that the appropriate node is the designated master node.
Note Do not click Sync Mode to change the synchronization mode of the database unless you are
certain that your data is secure. Changing the sync mode without preparation may cause data loss.
3To promote one of the nodes to be the master, click Promote in the appropriate column.
4Click Save Settings to save your configuration if you have made any changes.
Scenario: Perform Manual vRealize Automation Appliance
Database Failover
When there is a problem with the vRealize Automation appliance Postgres database, you manually fail
over to a replica vRealize Automation appliance node in the cluster.
Follow these steps when the Postgres database on the master vRealize Automation appliance node fails
or stops running.
Note Once a node goes into a unhealthy state, do not attempt to use its virtual appliance management
interface for any operations including failover.
Prerequisites
nConfigure a cluster of vRealize Automation appliance nodes. Each node hosts a copy of the
embedded Postgres appliance database.
Procedure
1Remove the master node IP address from the external load balancer.
2Log in to the vRealize Automation appliance management interface as root.
https://vrealize-automation-appliance-FQDN:5480
Managing vRealize Automation
VMware, Inc. 32

3Click vRA Settings > Database.
4From the list of database nodes, locate the replica node with the lowest priority.
Replica nodes appear in ascending priority order.
5Click Promote and wait for the operation to finish.
When finished, the replica node is listed as the new master node.
6Correct issues with the former master node and add it back to the cluster:
a Isolate the former master node.
Disconnect the node from its current network, the one that is routing to the remaining
vRealize Automation appliance nodes. Select another NIC for management, or manage it directly
from the virtual machine management console.
b Recover the former master node.
Power the node on or otherwise correct the issue. For example, you might reset the virtual
machine if it is unresponsive.
c From a console session as root, stop the vpostgres service.
service vpostgres stop
d Add the former master node back to its original network, the one that is routing to the other
vRealize Automation appliance nodes.
e From a console session as root, restart the haproxy service.
service haproxy restart
f Log in to the new vRealize Automation appliance master node management interface as root.
g Click vRA Settings > Database.
h Locate the former master node, and click Reset.
i After a successful reset, restart the former master node.
j With the former master powered on, verify that the following services are running.
haproxy
horizon-workspace
rabbitmq-server
vami-lighttp
vcac-server
vco-server
k Re-add the former master node to the external load balancer.
Note If a master node that was demoted to replica is still listed as master, you might need to
manually re-join it to the cluster to correct the problem.
Managing vRealize Automation
VMware, Inc. 33

Scenario: Perform a Maintenance Database Failover
As a vRealize Automation system administrator, you must perform an appliance database maintenance
failover operation.
This scenario assumes that the current master node is up and running normally. There are two database
failover maintenance steps: maintenance of the master and maintenance of a replica node. When a
master node has been replaced so that it becomes a replica, you should perform maintenance on it so
that it is suitable to become the master again should the need arise.
Note Do not stop or restart the HAProxy service on the applicable host machine while performing a
maintenance failover.
Prerequisites
nvRealize Automation is installed and configured according to appropriate instructions in the Installing
vRealize Automation.
nLog in to vRealize Automation Appliance Management as root using the password you entered when
you deployed the vRealize Automation appliance.
nInstall and configure an appropriate embedded Postgres appliance database cluster.
nIf your database uses synchronous replication mode, ensure that there are three active nodes in the
cluster.
Procedure
1Remove the master node IP address from the external load balancer.
2Isolate the master node.
Disconnect the node from its current network. This should be the network that is routing to the
remaining vRealize Automation appliance nodes.
3Select another NIC for management, or manage it directly from the Virtual Appliance Management
Interface.
4Select vRA Settings > Database on the Virtual Appliance Management Interface.
5Select the replica node with the lowest priority for promotion to the master, and click Promote.
Replica nodes appear in ascending priority order.
The old master is demoted to replica status, and the new master is promoted.
6Perform the appropriate replica maintenance.
Managing vRealize Automation
VMware, Inc. 34

7When the maintenance is complete, ensure that the virtual appliance is running with network
connectivity and that its HAProxy service is running.
a Log in to the vRealize Automation management console as root.
b Ensure that the replica node can be pinged, resolved by name, and has a recent status in the
Virtual Appliance Management Console Database tab.
8Click Reset for the replica node.
This operation resets the database so that it is configured to replicate to the current master and re-
synchronizes the replica node with the latest haproxy configuration from the master node.
9Following successful reset, return the replica virtual appliance node IP address to the external virtual
appliance load balancer IP address pool.
10 Ensure that the replica node appears healthy on the Configure Postgres vRA Database table and that
it can be pinged and resolved by name.
What to do next
Correct issues with the former master node and add it back to the cluster.
Manually Recover Appliance Database from Catastrophic Failure
If the appliance database fails, and no database nodes are up and running or all replica nodes are out of
sync when the master fails, use the following procedure to attempt to recover the database.
This procedure applies to situations in which no database nodes are operational across a cluster that is
running in asynchronous mode. In this scenario, you typically see errors similar to the following on the
Virtual Appliance Management Interface page when trying to load or refresh the page:
Error initializing the database service: Could not open JDBC Connection for transaction; nested
exception is org.postgresql.util.PSQLException: The connection attempt failed.
Procedure
1Try to recover the database using the Virtual Appliance Management Interface from one of the
database nodes.
a If possible, open the Virtual Appliance Management Interface database page of the node with the
most recent state. Typically, this node is the one that was the master node before the database
failed.
b If the Virtual Appliance Management Interface for the master node fails to open, try to open the
Interface for other replica nodes.
c If you can find a database node with a working Virtual Appliance Management Interface, try to
recover it by performing a manual failover.
See Scenario: Perform Manual vRealize Automation Appliance Database Failover.
Managing vRealize Automation
VMware, Inc. 35

2If the procedure in step 1 fails, start a shell session and try to determine the node with the most
recent state. Start a shell session to all the available cluster nodes and try to start their databases by
running the following shell command: service vpostgres start
3Use the following procedure for each node that has a running local database to determine the node
with the most recent state.
a Run the following command to determine the node with the most recent state. If the command
returns f, then it is the node with most recent state and you can proceed to step 4.
su - postgres
psql vcac
vcac=# select pg_is_in_recovery();
pg_is_in_recovery
nIf this command returns an f, then this node has the most recent state.
nIf the node returns a t, run the following command on the node:
SELECT pg_last_xlog_receive_location() as receive_loc, pg_last_xlog_replay_location() as
replay_loc, extract(epoch from pg_last_xact_replay_timestamp()) as replay_timestamp;
This command should return a result similar to the following.
vcac=# SELECT pg_last_xlog_receive_location() as receive_loc, pg_last_xlog_replay_location()
as replay_loc, extract(epoch from pg_last_xact_replay_timestamp()) as replay_timestamp;
receive_loc | replay_loc | replay_timestamp
-------------+------------+------------------
0/20000000 | 0/203228A0 | 1491577215.68858
(1 row)
4Compare the results for each node to determine which one has the most recent state.
Select the node with greatest value under the receive_loc column. If equal, select the greatest from
the replay_loc column and then, if again equal, select the node with greatest value of
replay_timestamp.
5Run the following command on the node with the most recent state: vcac-vami psql-promote-
master -force
6Open the /etc/haproxy/conf.d/10-psql.cfg file in a text editor and update the following line.
server masterserver sc-rdops-vm06-dhcp-170-156.eng.vmware.com:5432 check on-marked-up shutdown-
backup-sessions
To read as follows with the current node FQDN:
server masterserver current-node-fqdn:5432 check on-marked-up shutdown-backup-sessions
7Save the file.
8Run the service haproxy restart command.
Managing vRealize Automation
VMware, Inc. 36
9Open the Virtual Appliance Management Interface database page for the most recent node.
This node should appear as the master node with the other nodes as invalid replicas. In addition, the
Reset button for the replicas is enabled.
10 Click Reset and Refresh for each replica in succession until the cluster state is repaired.
Backup and Recovery for vRealize Automation
Installations
To minimize system downtime and data loss in the event of failures, administrators back up the entire
vRealize Automation installation on a regular basis. If your system fails, you can recover by restoring the
last known working backup and reinstalling some components.
To back up and restore vRealize Automation, see the following topics in the vRealize Suite
documentation:
nvRealize Automation Preparations for Backing Up
nvRealize Automation System Recovery
The Customer Experience Improvement Program
This product participates in VMware's Customer Experience Improvement Program (CEIP). The CEIP
provides VMware with information that enables VMware to improve its products and services, to fix
problems, and to advise you on how best to deploy and use our products. You can choose to join or leave
the CEIP for vRealize Automation at any time.
Details regarding the data collected through CEIP and the purposes for which it is used by VMware are
set forth at the Trust & Assurance Center at http://www.vmware.com/trustvmware/ceip.html.
Join or Leave the Customer Experience Improvement Program for
vRealize Automation
You can join or leave the Customer Experience Improvement Program (CEIP) for vRealize Automation at
any time.
vRealize Automation gives you the opportunity to join the Customer Experience Improvement Program
(CEIP) when you initially install and configure the product. After installation, you can join or leave the
CEIP by following these steps.
Procedure
1Log in as root to the vRealize Automation appliance management interface.
https://vrealize-automation-appliance-FQDN:5480
2Click the Telemetry tab.
3Check or uncheck the Join the VMware Customer Experience Improvement Program option.
When checked, the option activates the Program and sends data to https://vmware.com.
Managing vRealize Automation
VMware, Inc. 37

4Click Save Settings.
Configure Data Collection Time
You can set the day and time when the Customer Experience Improvement Program (CEIP) sends data
to VMware.
Procedure
1Log in to a console session on the vRealize Automation appliance as root.
2Open the following file in a text editor.
/etc/telemetry/telemetry-collector-vami.properties
3Edit the properties for day of week (dow) and hour of day (hod).
Property Description
frequency.dow=<day-of-week>Day when data collection occurs.
frequency.hod=<hour-of-day>Local time of day when data collection occurs. Possible
values are 0–23.
4Save and close telemetry-collector-vami.properties.
5Apply the settings by entering the following command.
vcac-config telemetry-config-update --update-info
Changes are applied to all nodes in your deployment.
Adjusting System Settings
As a system administrator, you adjust logging and customize IaaS email templates. You can also manage
settings that appear as defaults for each tenant, such as email servers to handle notifications. Tenant
administrators can choose to override these defaults if their tenant requires different settings.
Modify the All Services Icon in the Service Catalog
You can modify the default icon in the service catalog to display a custom image. When you modify the
icon, it changes for all tenants. You cannot configure tenant-specific icons for the catalog.
Commands are provided for Linux or Mac and Windows so that you can run the cURL commands on any
of those operating systems.
Prerequisites
nConvert the image to a base64 encoded string. You can use a conversion tool such as
www.dailycoding.com/UTILS/CONVERTER/IMAGETOBASE64.ASPX.
ncURL must be installed on the machine where you run the commands.
nYou must have the credentials for a vRealize Automation user with the system administrator role.
Managing vRealize Automation
VMware, Inc. 38

Procedure
1Set the VCAC variable in the terminal session for the cURL commands.
Operating System Command
Linux/Mac export VCAC=<VA URL>
Windows set VCAC=<VA URL>
2Retrieve the authentication token for the system administrator user.
Operating System Command
Linux/Mac curl https://$VCAC/identity/api/tokens --insecure -H "Accept:
application/json" -H 'Content-Type: application/json' --data
'{"username":"<Catalog Administrator
User>","password":"<password>","tenant":"vsphere.local"}'
Windows curl https://%VCAC%/identity/api/tokens --insecure -H
"Accept:application/json" -H "Content-Type:application/json" --
data "{\"username\":\"<Catalog Administrator
User>\",\"password\":\"<password>\",\"tenant\":\"vsphere.local\"}
"
An authentication token is generated.
3Set the authentication token variable by replacing <Auth Token> with the token string you generated
in the previous step.
Operating System Command
Linux/Mac export AUTH="Bearer <Auth Token>"
Windows set AUTH=Bearer <Auth Token>
4Add the base64 encoded string for the image.
Operating System Command
Linux/Mac curl https://$VCAC/catalog-service/api/icons --insecure -H
"Accept: application/json" -H 'Content-Type: application/json' -H
"Authorization: $AUTH" --data
'{"id":"cafe_default_icon_genericAllServices","fileName":"<filena
me>","contentType":"image/png","image":"<IMAGE DATA as base64
string>"}'
Windows curl https://%VCAC%/catalog-service/api/icons --insecure -H
"Accept: application/json" -H "Content-Type: application/json" -H
"Authorization: %AUTH%" --data
"{\"id\":\"cafe_default_icon_genericAllServices\",\"fileName\":\"
<filename>\",\"contentType\":\"image/png\",\"image\":\"<IMAGE
DATA as base64 string>\"}"
The new services icon appears in the service catalog after approximately five minutes.
If you want to revert to the default icon, you can run the following command after you follow steps 1-3..
Managing vRealize Automation
VMware, Inc. 39

Operating
System Command
Linux/Mac curl https://$VCAC/catalog-service/api/icons/cafe_default_icon_genericAllServices --
insecure -H "Authorization: $AUTH" --request DELETE
Windows curl https://%VCAC%/catalog-service/api/icons/cafe_default_icon_genericAllServices --
insecure -H "Authorization: %AUTH%" --request DELETE
Customize Data Rollover Settings
You can enable and configure vRealize Automation data rollover settings to control how your system
retains, archives, or deletes legacy data.
Use the data rollover feature to configure the maximum number of days for vRealize Automation to retain
data in the IaaS SQL Server database before archiving or deleting it. By default, this feature is disabled.
Configure data rollover settings on the vRealize Automation Global Settings page. When enabled, this
feature queries and removes data from the following SQL Server database tables:
nUserLog
nAudit
nCategoryLog
nVirtualMachineHistory
nVirtualMachineHistoryProp
nAuditLogItems
nAuditLogItemsProperties
nTrackingLogItems
nWorkflowHistoryInstances
nWorkflowHistoryResults
If you set DataRolloverIsArchiveEnabled to True, archive versions of the tables are created in the dbo
schema. For example, the archive version of UserLog would be UserLogArchive, and the archive
version of VirtualMachineHistory would be VirtualMachineHistoryArchive.
When enabled, the data rollover feature runs once a day at a predetermined time of 3 a.m. according to
the vRealize Automation appliance time zone configuration. Using the DataRollover
MaximumAgeInDays setting, you can set the maximum number of days that you want to retain the data.
Managing vRealize Automation
VMware, Inc. 40

If DataRollover IsArchiveEnabled is set to True, data older than that specified in the DataRollover
MaximumAgeInDays is moved to the archive tables. If DataRollover IsArchiveEnabled is set to False,
data is permanently deleted and no data archiving occurs. Deleted data is not recoverable.
Note Consider existing system data and the potential impact on system performance before enabling
data rollover. For example, if you enable this feature one year after vRealize Automation began running in
your environment, verify that you have set the value of DataRollover MaximumAgeInDays to 300 or
greater to ensure that enabling data rollover feature does not impact system performance.
Procedure
1Log in to the vRealize Automation console as a system administrator.
2Select Infrastructure > Administration > Global Settings.
3On the Global Settings page, locate the Data Rollover section of the table and review and configure
settings.
Setting Description
DataRollover IsArchiveEnabled Specifies whether to move rollover data to archive tables after
the maximum number of days is reached.
By default this value is set to True.
If you set this value to False, all data older than that specified
in the DataRollover MaximumAgeInDays setting is
permanently deleted.
DataRollover MaximumAgeInDays Specifies the maximum number of days that the system
retains data in the database before moving it to archive or
permanently deleting it.
By default this value is set to 90 days.
DataRollover Status Specifies whether to enable data rollover.
To enable data rollover, set the value to Enabled. By default
this value is set to Disabled.
If you disable this workflow while it is running, the current
workflow is not impacted, but the next workflow is disabled.
4Click the Edit icon ( ) in the first table column to edit a setting.
The Value field for the applicable setting becomes editable and you can place your cursor within it to
change the value.
5Click the Save icon ( ) in the first table column to save your changes.
Adjusting Settings in the Manager Service Configuration File
You can use the manager service configuration file (managerService.exe.config) to adjust common
settings for machine deployments.
The managerService.exe.config file is typically located in the %System-Drive%\Program Files
x86\VMware\vCAC\Server directory. You should always make a copy of the file before editing it.
Managing vRealize Automation
VMware, Inc. 41
You can use the following managerService.exe.config file settings to control various aspects of
machine deployments. Default values are shown.
n<add key="ProcessLeaseWorkflowTimerCallbackIntervalMilliseconds" value="600000"/>
n<add key="BulkRequestWorkflowTimerCallbackMilliseconds" value="10000"/>
n<add key="MachineRequestTimerCallbackMilliseconds" value="10000"/>
n<add key="MachineWorkflowCreationTimerCallbackMilliseconds" value="10000"/>
n<add key="RepositoryConnectionMaxRetryCount" value="100"/>
n<add key="MachineCatalogRegistrationRetryTimerCallbackMilliseconds"
value="120000"/>
n<add key="MachineCatalogUnregistrationRetryTimerCallbackMilliseconds"
value="120000"/>
n<add key="MachineCatalogUpdateMaxRetryCount" value="15"/>
Setting Resource-Intensive Concurrency Limits
To conserve resources, vRealize Automation limits the number of concurrently running instances of
machine provisioning and data collection. You can change the limits.
Configuring Concurrent Machine Provisioning
Multiple concurrent requests for machine provisioning can impact the performance of
vRealize Automation. You can make some changes to limits placed on proxy agents and workflow
activities to alter performance.
Depending on the needs of machine owners at your site, the vRealize Automation server may receive
multiple concurrent requests for machine provisioning. This can happen under the following
circumstances:
nA single user submits a request for multiple machines
nMany users request machines at the same time
nOne or more group managers approve multiple pending machine requests in close succession
The time required for vRealize Automation to provision a machine generally increases with larger
numbers of concurrent requests. The increase in provisioning time depends on three important factors:
nThe effect on performance of concurrent resource-intensive vRealize Automation workflow activities,
including the SetupOS activity (for machines created within the virtualization platform, as in WIM-
based provisioning) and the Clone activity (for machines cloned within the virtualization platform).
nThe configured vRealize Automation limit on the number of resource-intensive (typically lengthy)
provisioning activities that can be executed concurrently. By default this is eight. Concurrent activities
beyond the configured limit are queued.
Managing vRealize Automation
VMware, Inc. 42
nAny limit within the virtualization platform or cloud service account on the number of
vRealize Automation work items (resource-intensive or not) that can be executed concurrently. For
example, the default limit in vCenter Server is four, with work items beyond this limit being queued.
By default, vRealize Automation limits concurrent virtual provisioning activities for hypervisors that use
proxy agents to eight per endpoint. This ensures that the virtualization platform managed by a particular
agent never receives enough resource-intensive work items to prevent execution of other items. Plan to
carefully test the effects of changing the limit before making any changes. Determining the best limit for
your site may require that you investigate work item execution within the virtualization platform as well as
workflow activity execution within vRealize Automation.
If you do increase the configured vRealize Automation per-agent limit, you may have to make additional
configuration adjustments in vRealize Automation, as follows:
nThe default execution timeout intervals for the SetupOS and Clone workflow activities are two hours
for each. If the time required to execute one of these activities exceeds this limit, the activity is
cancelled and provisioning fails. To prevent this failure, increase one or both of these execution
timeout intervals.
nThe default delivery timeout intervals for the SetupOS and Clone workflow activities are 20 hours for
each. Once one of these activities is initiated, if the machine resulting from the activity has not been
provisioned within 20 hours, the activity is cancelled and provisioning fails. Therefore, if you have
increased the limit to the point at which this sometimes occurs, you will want to increase one or both
of these delivery timeout intervals.
Configuring Concurrent Data Collections
By default, vRealize Automation limits concurrent data collection activities. If you change this limit, you
can avoid unnecessary timeouts by changing the default execution timeout intervals for the different types
of data collection.
vRealize Automation regularly collects data from known virtualization compute resources through its
proxy agents and from cloud service accounts and physical machines through the endpoints that
represent them. Depending on the number of virtualization compute resources, agents, and endpoints in
your site, concurrent data collection operations may occur frequently.
Data collection running time depends on the number of objects on endpoints including virtual machines,
datastores, templates, and compute resources. Depending on many conditions, a single data collection
can require a significant amount of time. As with machine provisioning, concurrency increases the time
required to complete data collection.
By default, concurrent data collection activities are limited to two per agent, with those over the limit being
queued. This ensures that each data collection completes relatively quickly and that concurrent data
collection activities are unlikely to affect IaaS performance.
Depending on the resources and circumstances at your site, however, it may be possible to raise the
configured limit while maintaining fast enough performance to take advantage of concurrency in proxy
data collection. Although raising the limit can increase the time required for a single data collection, this
might be outweighed by the ability to collect more information from more compute resources and
machines at one time.
Managing vRealize Automation
VMware, Inc. 43

If you do increase the configured per-agent limit, you might have to adjust the default execution timeout
intervals for the different types of data collection that use a proxy agent—inventory, performance, state,
and WMI. If the time required to execute one of these activities exceeds the configured timeout intervals,
the activity is canceled and restarted. To prevent cancellation of the activity, increase one or more of
these execution timeout intervals.
Adjust Concurrency Limits and Timeout Intervals
You can change the per-agent limits on concurrent provisioning, data collection activities, and the default
timeout intervals.
When typing a time value for these variables, use the format hh:mm:ss (hh=hours, mm=minutes, and
ss=seconds).
Prerequisites
Log in as an administrator to the server hosting the IaaS Manager Service. For distributed installations,
this is the server on which the Manager Service was installed.
Procedure
1Open the ManagerService.exe.config file in an editor. The file is located in the
vRealize Automation server install directory, typically %SystemDrive%\Program Files
x86\VMware\vCAC\Server.
2Locate the section called workflowTimeoutConfigurationSection.
3Update the following variables, as required.
Parameter Description
MaxOutstandingResourceIntensiveWor
kItems
Concurrent provisioning limit (default is 8)
CloneExecutionTimeout Virtual provisioning execution timeout interval
SetupOSExecutionTimeout Virtual provisioning execution timeout interval
CloneTimeout Virtual provisioning clone delivery timeout interval
SetupOSTimeout Virtual provisioning setup OS delivery timeout interval
CloudInitializeProvisioning Cloud provisioning initialization timeout interval
MaxOutstandingDataCollectionWorkIte
ms
Concurrent data collection limit
InventoryTimeout Inventory data collection execution timeout interval
PerformanceTimeout Performance data collection execution timeout interval
StateTimeout State data collection execution timeout interval
4Save and close the file.
5Select Start > Administrative Tools > Services.
6Stop and then restart the vRealize Automation service.
Managing vRealize Automation
VMware, Inc. 44

7(Optional) If vRealize Automation is running in High Availability mode, any changes made to the
ManagerService.exe.config file after installation must be made on both the primary and failover
servers.
Adjust Execution Frequency of Machine Callbacks
You can change the frequency of several callback procedures, including the frequency that the
vRealize Automation callback procedure is run for changed machine leases.
vRealize Automation uses a configured time interval to run different callback procedures on the Model
Manager service, such as ProcessLeaseWorkflowTimerCallbackIntervalMiliSeconds which searches for
machines whose leases have changed. You can change these time intervals to check more or less
frequently.
When entering a time value for these variables, enter a value in milliseconds. For example, 10000
milliseconds = 10 seconds and 3600000 milliseconds = 60 minutes = 1 hour.
Prerequisites
Log in as an administrator to the server hosting the IaaS Manager Service. For distributed installations,
this is the server on which the Manager Service was installed.
Procedure
1Open the ManagerService.exe.config file in an editor. The file is located in the
vRealize Automation server install directory, typically %SystemDrive%\Program Files
x86\VMware\vCAC\Server.
2Update the following variables, as desired.
Parameter Description
RepositoryWorkflowTimerCallbackMili
Seconds
Checks the repository service, or Model Manager Web Service, for activity.
Default value is 10000.
ProcessLeaseWorkflowTimerCallbackI
ntervalMiliSeconds
Checks for expired machine leases. Default value is 3600000.
BulkRequestWorkflowTimerCallbackMi
liSeconds
Checks for bulk requests. Default value is 10000.
MachineRequestTimerCallbackMiliSec
onds
Checks for machine requests. Default value is 10000.
MachineWorkflowCreationTimerCallba
ckMiliSeconds
Checks for new machines. Default value is 10000.
3Save and close the file.
4Select Start > Administrative Tools > Services.
5Stop and then restart the vCloud Automation Center service.
6(Optional) If vRealize Automation is running in High Availability mode, any changes made to the
ManagerService.exe.config file after installation must be made on both the primary and failover
servers.
Managing vRealize Automation
VMware, Inc. 45

Adjust IaaS Log Settings
You can adjust vRealize Automation to log only the information you want to see in the Manager Service
log.
If vRealize Automation is running in high availability mode, and you make changes to the
ManagerService.exe.config file after installation, you must make the changes on the primary and the
failover vRealize Automation servers.
Procedure
1Log in to the vRealize Automation server by using credentials with administrative access.
2Edit the ManagerService.exe.config file in %SystemDrive%\Program Files
x86\VMware\vCAC\Server, or in the vRealize Automation server install directory, if it is in a different
location.
3Edit the RepositoryLogSeverity and RepositoryLogCategory keys to configure what types of
events get written to your log files.
Option Description
RepositoryLogSeverity Specify a severity level to ignore events below that severity.
nError logs only recoverable errors and higher
nWarning logs noncritical warnings and higher
nInformation logs all informative messages and higher
nVerbose logs a debugging trace and can impair performance
For example, <add key="RepositoryLogSeverity" value="Warning" />.
RepositoryLogCategory Specify a category to log all events for that category regardless of severity. For
example, <add key="RepositoryLogCategory"
value="MissingMachines,UnregisteredMachines,AcceptMachineRequest,
RejectMachineRequest" /> logs all events for missing or unregistered
machines, and every accepted or rejected machine request.
4Save and close the file.
5Select Start > Administrative Tools > Services and restart the vCloud Automation Center service.
You can see how your changes effect logging by viewing the Manager Service log file located in
%SystemDrive%\Program Files (x86)\VMware\vCAC\Server\Logs on the machine where the
Manager Service is installed, or in the vRealize Automation server install directory, if you installed it in a
different location.
Monitoring vRealize Automation
Depending on your role, you can monitor workflows or services, view event or audit logs, or collect logs
for all the hosts in a distributed deployment.
Monitoring Workflows and Viewing Logs
Depending on your role, you can monitor workflows and view activity logs.
Managing vRealize Automation
VMware, Inc. 46

Table 2‑5. Monitoring and Log Display Options
Objective Role Menu Sequence and Description
Display information about actions that
have occurred, such as the action type,
date and time of the action, and so on.
IaaS administrator Display default log information or control display content
using column and filter options.
Select Infrastructure > Monitoring > Audit Log.
The audit log provides details about the status of
managed virtual machines and activities performed on
these machines during reconfiguration. The log includes
information about machine provisioning, NSX,
reclamation, and reconfigure actions.
View the status of scheduled and
available Distributed Execution Manager
and other workflows.
IaaS administrator Display workflow status and optionally open a specific
workflow to display its details.
Select Infrastructure > Monitoring > DEM Status.
View and optionally export log data. IaaS administrator Display default log information or control display content
using column and filter options.
Select Infrastructure > Monitoring > Log.
View the status and history of executed
Distributed Execution Manager and other
workflows.
IaaS administrator Display workflow history and optionally open a specific
workflow to display its execution details.
Select Infrastructure > Monitoring > Workflow History.
Display a list of events, including event
type, time, user ID, and so on, and
optionally display an event details page.
System administrator View a list of events and their associated attributes, such
as run time, event description, tenant name, target type
and ID, and other characteristics.
Select Administration > Events > Event Logs.
Monitor the status of your requests and
view request details.
Tenant administrator or
business group manager
Display the status of requests that you are responsible for
or own.
Click Requests.
View information about recent events. IaaS administrator or
Tenant administrator
Display recent events for the currently logged in user.
Select Infrastructure > Recent Events
Monitoring Event Logs and Services
You can monitor vRealize Automation event logs and services to determine their current and historic
states.
For information about clearing logs by customizing data rollover settings, see Configuring vRealize
Automation.
vRealize Automation Services
A system administrator can view the status of vRealize Automation services from the Event Log on the
system administrator console.
Subsets of services are required to run individual product components. For example, identity services and
UI core services must be running before you can configure a tenant.
The following tables tell you which services are associated with areas of vRealize Automation
functionality.
Managing vRealize Automation
VMware, Inc. 47

Table 2‑6. Identity Service Group
Service Description
management-service Identity Service Group
sts-service Single Sign-on Appliance
authorization Authorization Service
authentication Authentication
eventlog-service Event log service
licensing-service Licensing service
Table 2‑7. UI Core services
Service Description
shel-ui-app Shell Service
branding-service Branding Service
plugin-service Extensibility (Plug-in) Service
portal-service Portal Service
All the following services are required to run the IaaS component.
Table 2‑8. Service Catalog Group (Governance Services)
Service Description
notification-service Notification service
workitem-service Work Item service
approval-service Approval Service
catalog-service Service Catalog
Table 2‑9. IaaS Services Group
Service Description
iaas-proxy-provider IaaS Proxy
iaas-server IaaS Windows machine
Table 2‑10. XaaS
Service Description
vco vRealize Orchestrator
advanced-designer-service XaaS blueprints and resource actions
Using vRealize Automation Audit Logging
vRealize Automation offers audit logging to support collection and retention of important system events.
Managing vRealize Automation
VMware, Inc. 48
Currently, vRealize Automation supports audit logging as an extension of event logging. This functionality
provides basic auditing information, and retention settings are configurable only using the appropriate
vRealize Automation REST API event broker service calls. Audit logging is currently available to tenant
administrators and system administrators who can log on to tenants. It provides search and filter
capabilities for events.
By default, vRealize Automation supports audit logging for workflow subscription, endpoint, and fabric
group create, update, and delete events. vRealize Automation also supports audit logging customization
for a variety of IaaS events as well.
vRealize Automation audit logging is disabled by default. You can switch it on or off by toggling the
Enabled check box in the Audit Log Integration section on the vRA Settings > Logs page of the virtual
appliance management interface.
Audit log information appears on the standard Event Logs page. As a tenant admin, select
Administration > Event Logs to view this page. Audit events are identified in the event log table with the
designation Audit in the Event Type field. Each entry shows an Event Description for each event as well
as the Tenant, Time, User, and related Service Name.
Enabling audit logging for any other IaaS events requires a custom configuration file and running the
appropriate commands on your IaaS host machine. Contact VMware Professional Services for
assistance.
You can configure vRealize Automation to export events to an external syslog server, specifically VMware
Log Insight.
Configure vRealize Automation for Log Insight Audit Logging
You can configure vRealize Automation to export audit events to VMware Log Insight to facilitate viewing
audit events.
Audit logging is disabled by default and you must enable it to generate and view audit logging events.
If used, SSL is configured on the vRealize Automation appliance where the Log Insight agent resides,
and it concerns the connection to the Log Insight Syslog server. To use SSL, you must configure the
appropriate certificates and connectivity between vRealize Automation and the Log Insight server
installed on your deployment.
Prerequisites
vRealize Automation uses the Log Insight Agent that is installed by default on a vRealize Automation
deployment to read log entries for viewing in Log Insight.
Procedure
1Log in to the Virtual Appliance Management Interface as a system administrator.
2Select vRA Settings > Logs.
3Verify that the Enabled check box for audit logging is selected under the Audit Log Integration
heading.
Managing vRealize Automation
VMware, Inc. 49
4Enter the Host machine name for the Log Insight server under the Log Insight Agent Configuration
heading.
a Enter the Host machine name for the Log Insight agent.
b Enter the Port to be used for communication with the Log Insight agent.
c Select the appropriate communication protocol.
d Use the SSL Enabled check box to indicate whether SSL will be used for communication
between the Log Insight agent and server.
If you choose not to use SSL, you can ignore the remainder of the settings on the page. If SSL is
used, you must configure these settings.
5Make the appropriate selections in the SSL Trusted Root Certificates section if you are using SSL.
By default, the vRealize Automation appliance uses a self-signed certificate. If you want to use a
Trusted Root certificate, you must import it.
a Select the appropriate check box to indicate whether you want to use a new certificate or an
existing certificate.
See the notes on the Virtual Appliance Management Interface Configure vRealize Automation
Logging page for more information.
6Click Save Settings.
7Make the appropriate selections in the SSL Server Certificates section.
8Use the Agent Behavior Configuration section to configure how the agent works with log files.
vRealize Automation audit log events are visible from the Log Insight interface.
Viewing Host Information for Clusters in Distributed Deployments
You can collect logs for all nodes that are clustered in a distributed deployment from the
vRealize Automation appliance management console.
You can also view information for each host in your deployment. The Cluster tab on the
vRealize Automation management console includes a Distributed Deployment Information table that
displays the following information:
nA list of all nodes in your deployment
nThe host name for the node. The host name is given as a fully qualified domain name.
nThe time since the host last replied to the management console. Nodes for IaaS components report
availability every three minutes and nodes for virtual appliances report every nine minutes.
nThe vRealize Automation component type. Identifies whether the node is a virtual appliance or an
IaaS server.
Managing vRealize Automation
VMware, Inc. 50
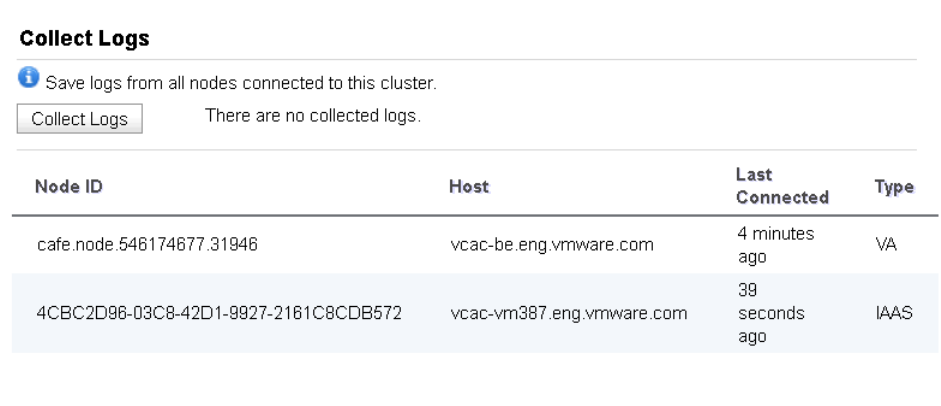
Figure 2‑1. Distributed Deployment Information table
You can use this table to monitor activity in your deployment. For example, if the Last Connected column
indicates a host has not connected recently, that can be an indication of a problem with the host server.
Log Collection
You can create a zip file that contains log files for all hosts in your deployment. For more information, see
Collect Logs for Clusters and Distributed Deployments.
Removing Nodes from the Table
When you remove a host from your deployment, remove the corresponding node from the Distributed
Deployment Information table to optimize log collection times.
Collect Logs for Clusters and Distributed Deployments
You can create a zip file that includes all log files for servers in your deployment.
The Distributed Deployment Information table lists the nodes from which log files are collected.
For related information about vRealize Automation appliance deployment configuration, see Installing
vRealize Automation.
Procedure
1Log in to the vRealize Automation appliance with user name root and the password you specified
when deploying the appliance.
2Click vRA Settings.
3Click the Cluster tab.
The Distributed Deployment Information table displays a list of nodes for the distributed deployment.
4Click Collect Logs.
Log files for each node are collected and copied to a zip file.
Managing vRealize Automation
VMware, Inc. 51

Remove a Node from the Distributed Deployment Information Table
You delete the entry for a node from the Distributed Deployment Information table when the node is
removed from your deployment cluster or when you are replacing a Management Agent certificate.
Procedure
1Log in to the vRealize Automation appliance by using the user name root and the password you
specified when you deployed the appliance.
2Click vRA Settings.
3Click the Cluster tab.
The Distributed Deployment Information table displays a list of nodes for the distributed deployment.
4Locate the node ID for the node to be deleted by opening a command prompt and running the
following command:
./vcac-config cluster-config-node --action list
5Locate the node ID, for example cafe.node.46686239.17144, in the JSON output.
6Open a command prompt and type a command of the following form, using the node ID that you
obtained in the previous step.
/usr/sbin/vcac-config cluster-config-node
--action delete --id node-UID
For example, enter the following command for the example node ID cafe.node.46686239.17144:
./vcac-config cluster-config-node --action delete --id cafe.node.46686239.17144
7Click Refresh.
The node no longer appears in the display.
Monitoring vRealize Automation Health
The vRealize Automation Health Service assesses the functional health of a vRealize Automation
environment.
IaaS administrators configure the Health Service to run test suites that determine if the components are
registered and the necessary resources are available. This table shows the test suites provided by the
Health Service and some example tests in each suite.
Managing vRealize Automation
VMware, Inc. 52

Health Service Test Suites Example Tests
System tests for vRealize Automation nSSO/Identity VA Connection Test
nvRealize Automation License Check - Is License Expired?
nvRealize Automation Virtual Appliance Root Password
Check - Is Password Expiring Soon?
Tenant tests for vRealize Automation nCheck vSphere Reservation Storage Paths
nCheck Reservation Policy to Reservation Assignments
nCheck the Portal Service Status
Tests for vRealize Orchestrator nCheck number of active vRO nodes
nCheck the utilization of the java memory heap in the vRO
nodes
nCheck the status of the vro-server service in the vRO nodes
After you run a test suite on a virtual machine, the Health Service reports the number of tests that passed
or failed. For each failed test, the Health Service provides these links:
Link Content
Cause Explanation of why the test failed.
Remediation Information that you can use to fix the problem.
You can configure the Health Service to run tests on a schedule or only on demand.
You can also use Python to create custom tests. See the vRealize Automation Health Service
Extensibility Guide.
Tenant administrators with a Health Consumer role can view test results for their tenancy but cannot
configure or run a test.
Configure System Tests for vRealize Automation
An IaaS administrator configures the Health Service to run system tests on a selected
vRealize Automation virtual appliance. These tests determine if components, such as the
vRealize Automation license, are registered and necessary resources, such as memory, are available on
the virtual appliance. When you configure the system tests, the Health page displays the tests as a test
card.
To configure the Health Service to run system tests for vRealize Automation, complete this procedure.
Prerequisites
Log in to vRealize Automation as an IaaS administrator.
Procedure
1Select Administration > Health.
2Click New Configuration.
Managing vRealize Automation
VMware, Inc. 53

3On the Configuration Details page, provide the requested information.
Option Description
Name Your title for this configuration. This title appears on the test
card.
Description A description of the test suite.
Product Select vRealize Automation.
Schedule Select how often the test suite runs.
4Click Next.
5On the Select Test Suites page, select System Tests for vRealize Automation.
6Click Next.
7On the Configure Parameters page, provide the requested information.
Table 2‑11. vRealize Automation Virtual Appliance
Option Description
Public Web Server Address nFor a minimal deployment, the base URL for the
vRealize Automation appliance host. For example,
https://va-host.domain/.
nFor a high-availability deployment, the base URL for the
vRealize Automation load balancer. For example,
https://load-balancer-host.domain/.
SSH Console Address Fully qualified domain name of the vRealize Automation
appliance. For example,va-host.domain.
SSH Console User root
SSH Console Password The root password.
Table 2‑12. vRealize Automation System Tenant
Option Description
System Tenant Administrator administrator
System Tenant Password The administrator password.
Table 2‑13. vRealize Automation Disk Space Monitoring
Option Description
Warning Threshold Percent Acceptable percent of virtual appliance disk space that is
used before the warning test fails.
Critical Threshold Percent Acceptable percent of virtual appliance disk space that is
used before the critical test fails.
8Click Next.
9On the Summary page, review the information.
Managing vRealize Automation
VMware, Inc. 54

10 Click Finish.
Tests run according to the selected schedule.
What to do next
View the vRealize Automation Health Service Test Suite Results
Configure Tenant Tests For vRealize Automation
An IaaS administrator configures the Health Service to run tenant tests on a selected
vRealize Automation virtual appliance. These tests determine if tenant-related components, such as
software-service, are registered and necessary resources, such as vSphere virtual machines, are
available on the virtual appliance. When you configure the tenant tests, the Health page displays the tests
as a test card.
To configure the Health Service to run tenant tests for vRealize Automation, complete this procedure.
Prerequisites
Log in to vRealize Automation as an IaaS administrator.
Procedure
1Select Administration > Health.
2Click New Configuration.
3On the Configuration Details page, provide the requested information.
Option Description
Name Your title for this configuration. This title appears on the test
card.
Description A description of the tests.
Product Select vRealize Automation.
Schedule Select how often these tests run.
4Click Next.
5On the Select Test Suites page, select Tenant Tests for vRealize Automation.
6Click Next.
Managing vRealize Automation
VMware, Inc. 55
7On the Configure Parameters page, provide the requested information.
Table 2‑14. vRealize Automation Virtual Appliance
Option Description
vRealize Automation Web Address nFor a minimal deployment, the base URL for the
vRealize Automation appliance host. For example,
https://va-host.domain/.
nFor a high-availability deployment, the base URL for the
vRealize Automation load balancer. For example,
https://load-balancer-host.domain/.
SSH Console Address Fully qualified domain name of the SSH host. For example,
ssh-host.domain.
SSH Console User root
SSH Console Password Password for root.
Max Service Response time (ms) Maximum amount of time in milliseconds the system waits for
a response.
Table 2‑15. vRealize Automation Tenant
Option Description
Tenant Under Test qe
Fabric Administrator Username Fabric administrator user name.
Note This fabric administrator must also have a tenant
administrator and an IaaS administrator role in order for all of
the tests to run.
Fabric Administrator Password Password for fabric administrator.
Table 2‑16. vRealize Automation System Tenant
Option Description
System Tenant Administrator administrator
System Tenant Password Password for administrator.
Table 2‑17. vRealize Automation Disk Space Monitoring
Option Description
Critical Threshold Percent Acceptable percent of virtual appliance disk space that is
used before the critical test fails.
8Click Next.
9On the Summary page, review the information.
10 Click Finish.
Tests run according to the selected schedule.
Managing vRealize Automation
VMware, Inc. 56

What to do next
View the vRealize Automation Health Service Test Suite Results
Configure Tests For vRealize Orchestrator
An IaaS administrator configures the health service to run tests for vRealize Orchestrator on the
vRealize Orchestrator host. These tests confirm that components, such as the vro-server service, are
registered and necessary resources, such as sufficient Java memory heap, are available are available on
the host machine. When you configure the vRealize Orchestrator tests, the Health page displays the tests
as a test card.
Prerequisites
Log in to vRealize Automation as an IaaS administrator.
Procedure
1Select Administration > Health.
2Click New Configuration.
3On the Configuration Details page, provide the requested information.
Option Description
Name Your title for this configuration. This title appears on the test
card.
Description A description of the tests.
Product Select vRealize Orchestrator.
Schedule Select how often the tests run.
4Click Next.
5On the Select Test Suites page, select Tests for vRealize Orchestrator.
6Click Next.
7On the Configure Parameters page, provide the requested information.
Table 2‑18. vRealize Orchestrator Host/Load Balancer
Option Description
Client Address nFor a minimal deployment, the fully qualified domain
name of the vRealize Orchestrator host. For example,
vro-host.domain.
nFor a high-availability deployment, the base URL for the
vRealize Orchestrator load balancer, https://load-
balancer-host.domain/.
Client Username administrator
Client Password The administrator password.
SSH Console Username root
Managing vRealize Automation
VMware, Inc. 57

Table 2‑18. vRealize Orchestrator Host/Load Balancer (Continued)
Option Description
SSH Console Password The root password.
Heap Utilization Threshold Acceptable percent of heap space that is used before the
warning test fails.
Table 2‑19. vRealize Orchestrator Instances Behind Load Balancer
Option Description
SSH Console Address IP address or URL of the vRealize Orchestrator instance
behind the load balancer.
SSH Console Username User name with access to this instance.
SSH Console Password The user name password.
nClick ADD to add another vRealize Orchestrator instance to the list.
nClick REMOVE to remove a selected vRealize Orchestrator instance from the list of instances
behind the load balancer.
8Click Next.
9On the Summary page, review the information.
10 Click Finish.
Tests run according to the selected schedule.
What to do next
View the vRealize Automation Health Service Test Suite Results
Custom Test Suite
You can use Python to create a custom test suite for vRealize Automation Health Service.
Creating a custom test suite allows you to extend the tests supplied for the health service by adding a test
suite to determine the health of additional vRealize Automation components. For information about
creating a custom test suite, see the vRealize Automation Health Service Extensibility Guide.
Add a Custom Test Suite
An IaaS administrator must add a custom test suite to vRealize Automation health service before you
run the test suite.
To add a custom test suite for a vRealize Automation asset, complete this procedure.
Prerequisites
nCreate a Python wheel for the custom test suite files. For information, see the vRealize Automation
Health Service Extensibility Guide.
nLog in to vRealize Automation as an IaaS administrator.
Managing vRealize Automation
VMware, Inc. 58

Procedure
1Click Administration > Health.
2In the upper right, click the gear icon and select Extensibility.
3Click New Asset.
4In the Add Asset dialog box, provide the requested information.
Option Description
Asset Title The name and version number of the test suite you are
running, for example, Infoblox 1.0.
Asset Description A description of the tests contained in the Python wheel.
Asset Version Test suite version number.
Asset File Click Choose File and select your custom test suite file.
5Click Add.
A new row is added to the asset table with the status UPLOADED. When the status changes to
INSTALLED, your test suite is ready to use. If the install process fails, you see a popup that provides
a reason.
Note If the page does not update, click the refresh icon.
What to do next
Run a Custom Test Suite.
Run a Custom Test Suite
An IaaS administrator configures the health service to run a custom test suite in the
vRealize Automation environment. When you configure the custom test suite, the Health page displays
the test suite as a test card.
To configure the health service to run a custom test suite for vRealize Automation, complete this
procedure.
Prerequisites
nAdd a Custom Test Suite.
nLog in to vRealize Automation as an IaaS administrator.
Procedure
1Select Administration > Health.
2Click New Configuration.
Managing vRealize Automation
VMware, Inc. 59

3On the Configuration Details page, provide the requested information.
Option Description
Name Your title for this configuration. This title appears on the test
card.
Description A description of the test suite.
Product Select the product you want to test from the Product drop-
down menu.
Schedule Select how often you want to run this test suite.
4Click Next.
5On the Select Test Suites page, select the custom test suite, and click Next.
6On the Configure Parameters page, enter the requested information, and click Next.
7On the Summary page, review the information, and click Finish.
The custom test suite runs according to the selected schedule.
What to do next
View the vRealize Automation Health Service Test Suite Results
View the vRealize Automation Health Service Test Suite Results
You can view the health service test results after you run the tests.
The Health page displays each configured test suite as a test card. When a test suite runs, the result
appears in the middle of the test card.
The test cards that you see on the Health page are filtered according to your privilege.
nIaaS administrators can see all test cards.
nTenant administrators with the Health Consumer role can see only the test card for their tenancy.
Prerequisites
nThe configured test suite has run on schedule.
nLog in to the vRealize Automation console as an IaaS administrator or as a tenant administrator.
Procedure
1Select Administration > Health.
2If a test is not scheduled to run, click Run on the test card.
3Click the center of a test card after the tests are finished.
A page appears that displays the status of each test. To see why a test failed, click Cause. To open a
topic that explains how to fix the problem, click the Remediation link if one is available.
Managing vRealize Automation
VMware, Inc. 60
Troubleshooting the Health Service
The Health Service troubleshooting topics provide solutions to problems you might experience when you
use the Health Service.
Service Status Test Fails
You can fix a failed service test by changing the test schedule setting.
Problem
If a service status test fails and you click Cause, you see this message: Cannot establish SSH
connection ; Exception message:[Auth fail].
Cause
When the test suite is scheduled to run every 15 minutes, the system login locks the root user account.
Solution
uChange the test schedule to None, wait 15 minutes, and run the test suite again.
After Upgrade the Health Page in the Appliance Console Is Empty
After you upgrade vRealize Automation, the Health page in the appliance console is empty.
Problem
The health service does not start after upgrade.
Solution
uOn each vRealize Automation virtual appliance, open a command prompt as root and run these
commands.
a To configure the health service to start automatically, run this command.
chkconfig vrhb-service on
b To start the health service on this virtual appliance, run this command.
service vrhb-service start
Monitoring and Managing Resources
Different vRealize Automation roles monitor resource usage and manage infrastructure in different ways.
Choosing a Resource Monitoring Scenario
Fabric administrators, tenant administrators, and business group managers have different concerns when
it comes to resource monitoring. Because of this, vRealize Automation allows you to monitor different
facets of resource usage.
Managing vRealize Automation
VMware, Inc. 61

For example, a fabric administrator is concerned with monitoring the resource consumption of
reservations and compute resources, whereas a tenant administrator is concerned with the resource
usage of the provisioning groups within a tenant. Depending on your role and the specific resource usage
you want to monitor, vRealize Automation allows you different ways to track resource consumption.
Table 2‑20. Choose a Resource Monitoring Scenario
Resource Monitoring Scenario Privileges Required Location
Monitor the amount of physical storage
and memory on your compute
resources that is currently being
consumed and determine what amount
remains free. You can also monitor the
number of reserved and allocated
machines provisioned on each
compute resource.
Fabric Administrator (monitor resource
usage on compute resources in your fabric
group)
Infrastructure > Compute Resources >
Compute Resources
Monitor machines that are currently
provisioned and under
vRealize Automation management.
Fabric Administrator Infrastructure > Machines > Managed
Machines
Monitor the amount of storage,
memory, and machine quota of your
reservation that is currently allocated
and determine the capacity that
remains available to the reservation.
Fabric Administrator (monitor resource
usage for reservations on your compute
resources and physical machines)
Infrastructure > Reservations >
Reservations
Monitor the amount of storage,
memory, and the machine quota that
your business groups are currently
consuming and determine the capacity
that remains on reserve for them.
nTenant Administrator (monitor
resource usage for all groups in your
tenant)
nBusiness Group Manager (monitor
resource usage for groups that you
manage)
Administration > Users & Groups >
Business Groups
You can also add resource monitoring portlets to your vRealize Automation homepage to monitor different
resource usage statistics.
Managing Resource Reports
You can add real-time resource reports to your Home page to monitor virtual, physical, and cloud
resource usage, change their layout, and export their data to other applications.
Add Reports to the Home Page
You can add one or more IaaS reports to your Home page. These real-time reports list your most recent
open tasks, catalog requests, provisioned items, and provisioned machines broken down by user,
blueprint, compute resource, and business group. Two reports also display updated summaries of
reclamation savings.
Prerequisites
Log in to vRealize Automation.
Managing vRealize Automation
VMware, Inc. 62

Procedure
1Navigate to the Home page.
2Click the Edit icon in the upper-right corner of the page and click Add Portlets in the drop-down
menu.
3Click Add for each report to add to your Home page.
A disabled Add button indicates an already added report.
4Click Close.
What to do next
Configure the Report Layout.
Configure the Report Layout
You can configure your Home page to display reports in one, two, three, or four columns. You can move a
report from one column to another.
Prerequisites
Log in to vRealize Automation.
Procedure
1Navigate to the Home page.
2Click the Edit icon ( ) in the upper-right corner of the page and click Change Layout in the drop-
down menu.
3Select a report layout.
Option Description
1 Column Lay out reports in one column.
2 Columns Lay out reports in two columns of equal or unequal widths.
3 Columns Lay out reports in three columns of equal or unequal widths.
4 Columns Lay out reports in four equal columns.
4Click Submit.
5Point to the title bar of a report.
The cursor changes to a four-headed cursor.
6Drag the report to its new location.
The width of the report changes to fit the new location.
Export Report Data
You can save IaaS reports located on your Home page to CSV files where you can customize the data.
Managing vRealize Automation
VMware, Inc. 63

Prerequisites
nLog in to vRealize Automation.
nAdd Reports to the Home Page.
Procedure
1Navigate to the Home page.
2Click Export as CSV in the report to save.
Some browsers save the file immediately. With Firefox, a dialog box appears with selections for
opening or saving the report with Microsoft Excel or another application.
3(Optional) Select whether to open or save the report data, and which application to use.
Resource Reports
Resource reports display data about machines and resources used and reclaimed according to owner,
compute resource, and group.
Name Description
My Inbox Displays a list of the most recent open tasks in your inbox. Click a row to view the detail page of a task.
Click More to open the complete list of inbox tasks.
My Open Requests Displays a list of your most recent catalog requests. Click a row to view the detail page of a request.
Click More to open the complete list of requests.
My Recent Requests Displays a list of your most recent catalog requests regardless of status. Click a row to view the detail
page of a request. Click More to open the complete list of requests.
My Items Displays a list of your most recently provisioned items. Click a row to view the detail page of an item.
Click More to open the complete list of items.
My Group Requests Displays a list of the most recent catalog requests for users in groups that you manage. Click a row to
view the detail page of a request. Click More to open the complete list of requests.
My Groups Items Displays a list of the most recently provisioned items for users in groups that you manage. Click a row
to view the detail page of an item. Click More to open the complete list of items.
New & Noteworthy Highlights catalog items that were recently made available in the catalog.
Calendar of Events Displays a calendar view of important events for catalog items that you own, such as lease expiration
and machine destruction.
Business Groups
Resource Allocation
Displays the resource allocations for business groups in a tenant. If you are a tenant administrator, the
portlet displays the resource allocations for all the tenant business groups. If you are business group
manager, the portlet displays the resource allocation for your business groups.
IaaS Capacity Usage by
Blueprint
Displays the number of machines provisioned from each blueprint and the total resources that those
machines used.
IaaS Capacity Usage by
Group
Displays the number of machines that users own in each business group and the total resources that
those machines use.
IaaS Capacity Usage by
Owner
Displays the number of machines that each user owns and the total resources that those machines
use.
IaaS Capacity Usage by
Compute Resource
Displays the number of machines provisioned on each compute resource and the total resources that
those machines use.
Managing vRealize Automation
VMware, Inc. 64

Name Description
My Trips Displays a sample consumer report.
Add the Business Groups Resource Allocation Portlet to the Home Tab
The Business Group Resource Allocation Portlet is a dashboard portlet that you add to your Home tab to
monitor resources for business groups.
If you are a tenant administrator, the portlet displays the resource allocations for all the tenant business
groups. If you are business group manager, the portlet displays the resource allocation for your business
groups.
If you are not a tenant administrator or business group manager, the portlet is not available to install on
your Home tab.
Prerequisites
Log in to vRealize Automation as a tenant administrator or business group manager.
Procedure
1Select Home.
2Click the Edit icon ( ) in the upper right corner.
3Select Add Portlets.
4Locate Business Groups Resource Allocation and click Add.
5Click Close.
The portlet is added to the top of the Home tab.
6Click and drag to portlet title bar to move to a different location.
Resource Usage Terminology
vRealize Automation uses explicit terminology to distinguish between resources that are available,
resources that have been set aside for specific usages, and resources that are actively being consumed
by provisioned machines.
The Resource Usage Terminology table explains the terminology vRealize Automation uses to display
resource usage.
Table 2‑21. Resource Usage Terminology
Term Description
Physical Indicates the actual memory or storage capacity of a compute resource.
Reserved Indicates the machine quota, memory, and storage capacity set aside for a reservation. For
example, if a compute resource has a physical capacity of 600 GB and there are three
reservations on it for 100 GB each, then the reserved storage of the compute resource is 300
GB and the storage reserved is 50 percent.
Managing vRealize Automation
VMware, Inc. 65

Table 2‑21. Resource Usage Terminology (Continued)
Term Description
Managed Indicates that the machine is provisioned and currently under vRealize Automation
management.
Allocated Indicates the machine quota, memory, or storage resources actively being consumed by
provisioned machines. For example, consider a reservation with a machine quota of 10. If there
are 15 provisioned machines on it, but only 6 of them are currently powered on, the machine
quota is 60 percent allocated.
Used The Used column value always equals the Allocated column value.
Free Indicates the unused physical capacity on a storage path.
Connecting to a Cloud Machine
The first time you connect to a cloud machine you must log in as Administrator.
You can then add the credentials under which you log in to the vRealize Automation console as a user on
the machine, and log in under your vRealize Automation credentials from that point on.
Important If you are using Amazon Web Services, RDP, or SSH must be enabled on the Amazon
machine instance and the machines must be in a security group in which the correct ports are open.
Collect User Credentials for an Amazon Machine
To log in to an Amazon machine as an administrator, you must discover the machine's administrator
password.
The administrator password is available on the Machine Information Details page. If the Amazon machine
image from which the machine was provisioned is not configured to generate the administrator password
on every boot, you will need to find the password using an alternate technique. For information about
otherwise obtaining the administrator password, search on Connect to Your Amazon EC2 Instance topics
in Amazon documentation.
If needed, you can create the necessary vRealize Automation user credentials. The user credentials are
then valid for subsequent logins to that machine.
Prerequisites
nThe Amazon machine has already been provisioned.
nLog in to the vRealize Automation as a machine owner, business group manager, or support user.
nRDP or SSH is active on the Amazon machine image that will be used for provisioning
nThe machines are in a security group in which the correct ports are open.
Procedure
1Navigate to the Items page and filter on the groups you manage or a specific group.
Managing vRealize Automation
VMware, Inc. 66
2Select the Amazon machine in the list of machines.
You can click View Details on the Actions drop-down menu to display details such as machine type.
3Select Edit in the Actions drop-down menu.
4Click Show Administrator Password to obtain the administrator password of the machine.
Alternatively, you can obtain the password using an external Amazon procedure.
5Click Connect Using RDP from the Actions drop-down menu.
6Click User another account when prompted for the login credentials.
7Type LOCAL\Administrator when prompted for the user name.
8Type the administrator password when prompted.
9Click OK.
You are now logged in to the machine as an administrator.
10 Add your vRealize Automation credentials as appropriate. For example, on a Windows server
machine, open the server manager and select Configuration > Local Users and Groups and add
your credentials, using a DOMAIN\username format, to the Remote Desktop Users group.
Your vRealize Automation user name and password are now valid credentials for subsequent login to
this machine.
11 Log out of the Amazon machine.
12 Click Connect Using RDP from the Actions drop-down menu.
13 When prompted to log in, type your vRealize Automation user name and password credentials to log
in to the machine.
Machine owners can now log in to the machine using their vRealize Automation credentials.
Collect User Credentials for a vCloud Machine
To log in to an vCloud Air or vCloud Director machine as an administrator, you must discover the
machine's administrator password.
The administrator password is available on the Machine Information Details page. If the machine image
from which the machine was provisioned is not configured to generate the administrator password on
every boot, you can find the password using an alternate technique. For information about otherwise
obtaining the administrator password, see vCloud Air or vCloud Director documentation.
If needed, you can create the necessary vRealize Automation user credentials. The user credentials are
then valid for subsequent logins to that machine.
Prerequisites
nThe vCloud Air or vCloud Director machine has already been provisioned.
nLog in to the vRealize Automation as a machine owner, business group manager, or support user.
Managing vRealize Automation
VMware, Inc. 67
nRDP or SSH is active on the vCloud Air or vCloud Director machine image that will be used for
provisioning
nThe machines are in a security group in which the correct ports are open.
Procedure
1Navigate to the Items page and filter on the groups you manage or a specific group.
2Select the vCloud Air or vCloud Director machine in the list of machines.
You can click View Details on the Actions drop-down menu to display details such as machine type.
3Select Edit in the Actions drop-down menu.
4Click Show Administrator Password to obtain the administrator password of the machine.
Alternatively, you can obtain the password using an external vCloud Air or vCloud Director procedure.
5Click Connect Using RDP from the Actions drop-down menu.
6Click User another account when prompted for the login credentials.
7Type LOCAL\Administrator when prompted for the user name.
8Type the administrator password when prompted.
9Click OK.
You are now logged in to the machine as an administrator.
10 Add your vRealize Automation credentials as appropriate. For example, on a Windows server
machine, open the server manager and select Configuration > Local Users and Groups and add
your credentials, using a DOMAIN\username format, to the Remote Desktop Users group.
Your vRealize Automation user name and password are now valid credentials for subsequent login to
this machine.
11 Log out of the vCloud Air or vCloud Director machine.
12 Click Connect Using RDP from the Actions drop-down menu.
13 When prompted to log in, type your vRealize Automation user name and password credentials to log
in to the machine.
Machine owners can now log in to the machine using their vRealize Automation credentials.
Reducing Reservation Usage by Attrition
Fabric administrators can reduce the number of machines on a particular reservation over the long term
while keeping the reservation and the existing machines provisioned on it active.
Managing vRealize Automation
VMware, Inc. 68

You can reduce the reserved machine quota, memory, and storage of a virtual reservation below the
amount currently allocated. This allows management of existing machines to continue without change
while preventing provisioning of new machines until allocation falls below the new reserved amount.
Note Because virtual machines that are powered off are not included in allocated memory and machine
quota totals, reducing the memory or machine allocation of a reservation might prevent machines that are
currently powered off from being powered back on.
For example, consider a business group with a reservation that contains 20 provisioned machines that
are set to expire over the next 90 days. If you want to reduce this reservation by attrition to no more than
15 machines, you can edit the reservation to reduce the quota from 20 machines to 15. No further
machines can be provisioned on the reservation until the number of machines on the reservation is
naturally reduced by the upcoming expirations.
Decommissioning a Storage Path
If you are decommissioning a storage path and moving machines to a new one, a fabric administrator
must disable the storage path in vRealize Automation.
The following is a high-level overview of the sequence of steps required to decommission a storage path:
1 A fabric administrator disables the storage path on all reservations that use it. See Disable a Storage
Path.
2 Move the machines to a new storage path outside of vRealize Automation.
3 Wait for vRealize Automation to automatically run inventory data collection or initiate inventory data
collection manually. See Configure Compute Resource Data Collection.
Disable a Storage Path
Fabric administrators can disable storage paths on reservations when storage paths are
decommissioned.
Note For each reservation where you disable a storage path, verify that there is sufficient space
remaining on other enabled storage paths.
Prerequisites
Log in to vRealize Automation as a fabric administrator.
Procedure
1Select Infrastructure > Reservations > Reservations.
2Point to the reservation on which the storage path you are decommissioning is used and click Edit.
3Click the Resouces tab.
4Locate the storage path you are decommissioning.
5Click the Edit icon ( ).
Managing vRealize Automation
VMware, Inc. 69

6Select the check box in the Disabled column to disable this storage path.
7Click the Save icon ( ).
8Click OK.
9Repeat this procedure for all reservations that use the storage path you are decommissioning.
Data Collection
vRealize Automation collects data from infrastructure source endpoints and their compute resources.
Data collection occurs at regular intervals. Each type of data collection has a default interval that you can
override or modify. Each type of data collection also has a default timeout interval that you can override or
modify.
IaaS administrators can manually initiate data collection for infrastructure source endpoints and fabric
administrators can manually initiate data collection for compute resources.
Table 2‑22. Data Collection Types
Data Collection Type Description
Infrastructure Source Endpoint Data Collection Updates information about virtualization hosts, templates, and
ISO images for virtualization environments. Updates virtual
datacenters and templates for vCloud Director. Updates
Amazon regions and machines provisioned on Amazon regions.
Endpoint data collection runs every 4 hours.
Inventory Data Collection Updates the record of the virtual machines whose resource use
is tied to a specific compute resource, including detailed
information about the networks, storage, and virtual machines.
This record also includes information about unmanaged virtual
machines, which are machines provisioned outside of
vRealize Automation.
Inventory data collection runs every 24 hours.
The default timeout interval for inventory data collection is 2
hours.
State Data Collection Updates the record of the power state of each machine
discovered through inventory data collection. State data
collection also records missing machines that
vRealize Automation manages but cannot be detected on the
virtualization compute resource or cloud endpoint.
State data collection runs every 15 minutes.
The default timeout interval for state data collection is 1 hour.
Performance Data Collection (vSphere compute resources only) Updates the record of the average CPU, storage, memory, and
network usage for each virtual machine discovered through
inventory data collection.
Performance data collection runs every 24 hours.
The default timeout interval for performance data collection is 2
hours.
Managing vRealize Automation
VMware, Inc. 70

Table 2‑22. Data Collection Types (Continued)
Data Collection Type Description
Network and security inventory data collection (vSphere
compute resources only)
Updates the record of network and security data related to
vCloud Networking and Security and NSX, particularly
information about security groups and load balancing, for each
machine following inventory data collection.
WMI data collection (Windows compute resources only) Updates the record of the management data for each Windows
machine. A WMI agent must be installed, typically on the
Manager Service host, and enabled to collect data from
Windows machines.
Start Endpoint Data Collection Manually
Endpoint data collection runs automatically every 4 hours, but IaaS administrators can manually start
endpoint data collection at any time for endpoints that do not require proxy agents.
The Data Collection page provides information on the status and age of data collections and allows you
to manually start a new endpoint data collection.
Prerequisites
Log in to vRealize Automation as an IaaS administrator.
Procedure
1Select Infrastructure > Endpoints > Endpoints.
2Point to the endpoint for which you want to run data collection and click Data Collection.
3Click Start.
4(Optional) Click Refresh to receive an updated message about the status of the data collection you
initiated.
5Click Cancel to return to the Endpoints page.
Configure Compute Resource Data Collection
You can enable or disable data collection, configure the frequency of data collection, or manually request
data collection.
The Data Collection page provides information on the status and age of data collections. It also allows
you to configure data collection for your compute resources.
Prerequisites
Log in to vRealize Automation as a fabric administrator.
Procedure
1Select Infrastructure > Compute Resources > Compute Resources.
2Point to the compute resource for which to configure data collection and click Data Collection.
Managing vRealize Automation
VMware, Inc. 71
3Configure Compute Resource data collection specifications.
nSelect On to enable data collection.
nSelect Off to disable data collection.
4Configure Inventory data collection.
nSelect On to enable data collection.
nSelect Off to disable data collection.
nEnter a number in the Frequency text box to configure the time interval (in hours) between
inventory data collections.
nClick Request Now to manually start data collection.
5Configure State data collection.
nSelect On to enable data collection.
nSelect Off to disable data collection.
nEnter a number in the Frequency text box to configure the time interval (in minutes) between
state data collections.
nClick Request Now to manually start data collection.
6Configure Performance data collection.
This is available only for vSphere integrations.
nSelect On to enable data collection.
nSelect Off to disable data collection.
nEnter a number in the Frequency text box to configure the time interval (in hours) between
performance data collections.
nClick Request Now to manually start data collection.
7Configure Snapshot Inventory data collection.
This is option is available for compute resources managed by vRealize Business for Cloud.
nSelect On to enable data collection.
nSelect Off to disable data collection.
nEnter a number in the Frequency text box to configure the time interval (in hours) between
snapshot data collections.
nClick Request Now to manually start data collection.
8Click OK.
Update Cost Data for All Compute Resources
Fabric administrators can manually update cost information for all compute resources managed by
vRealize Business for Cloud.
Managing vRealize Automation
VMware, Inc. 72
Prerequisites
Log in to vRealize Automation as a fabric administrator.
Procedure
1Select Infrastructure > Compute Resources > Compute Resources.
2Click Update Cost.
3Click Request Now.
When the cost update is complete, the status changes to successful.
Understanding vSwap Allocation Checking for vCenter Server
Endpoints
You can use vSwap to determine swap space availability for the maximum size swap file on a target
machine. The vSwap check occurs when you create or reconfigure a virtual machine from
vRealize Automation. vSwap allocation checking is only available for vCenter Server endpoints.
vRealize Automation storage allocation checks if there is sufficient space available on the datastore to
accommodate virtual machine disks during a create or reconfigure request. However, when the machine
is powered on, if enough space is not available to create swap files on the vCenter Server endpoint, the
machine fails to power on. When the power on operation fails, any customizations that depend on the
machine also fail. The machine may also be disposed of. Depending on the size of the request, feedback
that the machine is not powering on or not provisioning is not immediately obvious.
You can use the vSwap allocation check to help overcome these limitations by checking swap space
availability for the maximum size swap file as part of the vRealize Automation create and reconfigure
process for vCenter Server endpoints. To enable the vSwap allocation check, set the custom property
VirtualMachine.Storage.ReserveMemory to True in the machine component or overall blueprint.
Consider the following behaviors for vSwap allocation checks:
nThe swap file is located on the datastore that contains the virtual machine. Alternate vCenter Server
configurations for locating swap files on a dedicated or different datastore are not supported.
nSwap size is considered when creating or reconfiguring a virtual machine . The maximum swap size
is the size of the virtual machine's memory.
nReserved values for vRealize Automation storage reservations in a host must not exceed the physical
capacity of the compute resource.
nWhen creating a reservation, the sum of the reserved values must not exceed the available storage
space.
nResource pool or host level or virtual machine level memory reservations on vSphere are not
collected from the vSphere endpoint and not considered during the calculations on
vRealize Automation.
nvSwap does not validate the swap space that is available during power on operations for existing
machines.
Managing vRealize Automation
VMware, Inc. 73

nYou must re-run data collection to capture any changes made to the vSphere endpoint relative to
vSwap.
Removing Datacenter Locations
To remove a datacenter location from a user menu, a system administrator must remove the location
information from the locations file and a fabric administrator must remove location information from the
compute resource.
For example, if you add London to the locations file, associate ten compute resources with that location,
and then remove London from the file, the compute resources are still associated with the location
London and London is still included in the location drop-down list on the Confirm Machine Request page.
To remove the location from the drop-down list, a fabric administrator must edit the compute resource and
reset the Location to blank for all compute resources that are associated with the location.
The following is a high-level overview of the sequence of steps required to remove a datacenter location:
1 A system administrator removes the datacenter location information from the locations file.
2 A fabric administrator removes all the compute resource associations to the location by editing the
locations of each associated compute resource.
Monitoring Containers
You can monitor the status of a container that you create in Containers for vRealize Automation.
After you create your containers based on a template, you can monitor their state. By clicking Details on
a container, you can monitor the network bandwidth, CPU and memory usage, logs, and properties of that
container.
Bulk Import, Update, or Migrate Virtual Machines
You can use the Bulk Imports feature to import, update, or migrate virtual machines to
vRealize Automation. Bulk Imports streamlines the management of multiple machines in multiple
environments.
Bulk Imports creates a CSV file that contains defining virtual machine data such as reservation, storage
path, blueprint, owner, and any custom properties. You use the CSV file to import virtual machines to your
vRealize Automation environment. Bulk Imports supports the following administrative tasks:
nImport one or more unmanaged virtual machines so that they can be managed in a
vRealize Automation environment.
nMake a global change to a virtual machine property, such as a storage path.
nMigrate a virtual machine from one vRealize Automation environment to another.
Note Only vCloud Director and vSphere are supported for bulk import. Setting the filter to another
endpoint type does not generate data in the CSV file.
Managing vRealize Automation
VMware, Inc. 74
You can execute the Bulk Imports feature commands using either the vRealize Automation console or the
CloudUtil command-line interface. For more information about using the CloudUtil command-line
interface, see the Life Cycle Extensibility documentation.
Prerequisites
nLog in to vRealize Automation as a fabric administrator and as a business group manager.
nIf you are importing virtual machines that use static IP addresses, prepare a properly configured
address pool.
Import a Virtual Machine to a vRealize Automation Environment
You can import an unmanaged virtual machine to a vRealize Automation environment.
An unmanaged virtual machine exists in a hypervisor but is not managed in a vRealize Automation
environment and cannot be viewed in the console. After you import an unmanaged virtual machine, the
virtual machine is managed using the vRealize Automation management interface. Depending on your
privileges, you can see the virtual machine on the Managed Machines tab or the Items tab.
The bulk import option does not support deployments that are provisioned from a blueprint that contains
an NSX network and security component or a software component.
Prerequisites
nLog in to vRealize Automation as a fabric administrator and as a business group manager.
nIf you are importing virtual machines that use static IP addresses, prepare a properly configured
address pool. For more information about using a network profile to control IP address ranges, see
Configuring vRealize Automation.
nIf you use bulk import to import a virtual machine with a static IP address that is allocated to another
virtual machine, the import fails.
Procedure
1Generate a virtual machine CSV data file.
a Select Infrastructure > Administration > Bulk Imports.
b Click Generate CSV File.
c Select Unmanaged from the Machines drop-down menu.
d Select the Business group default value from the drop-down menu.
e Enter the Owner default value.
f Select the Blueprint default value from the drop-down menu.
The blueprint must be published and added to an entitlement for the import to be successful.
Managing vRealize Automation
VMware, Inc. 75

g Select the Component machine default value from the drop-down menu.
If you select a value for Business group and Blueprint, you might see the following results in
the CSV data file:
nHost Reservation (Name or ID) = INVALID_RESERVATION
nHost To Storage (Name or ID) = INVALID_HOST_RESERVATION_TO_STORAGE
These messages appear if you do not have a reservation in the selected business group for the
host virtual machine that also hosts the unmanaged virtual machine. If you have a reservation in
that business group for the unmanaged virtual machine host, the Host Reservation and Host to
Storage values fill in properly.
h Select one of the available resource types from the Resource drop-down menu.
Menu Item Description
Endpoint Information required to access a virtualization host.
Compute Resource Information required to access a group of virtual machines performing a
similar function.
i Select the name of the virtual machine resource from the Name drop-down menu.
j Click OK.
Managing vRealize Automation
VMware, Inc. 76

2Edit your virtual machine CSV data file.
a Open the CSV file, and edit the data categories to match existing categories in the target
vRealize Automation environment.
To import virtual machines contained in a CSV data file, each virtual machine must be associated
with the following items:
nReservation
nStorage location
nBlueprint
nVirtual machine component
nOwner that exists in the target deployment
All the values for each virtual machine must be present in the target vRealize Automation
environment for the import to succeed. You can change the values for reservation, storage
location, blueprint, and owner, or add a static IP address value to individual virtual machines by
editing the CSV file.
Heading Comment
# Import--Yes or No Change to No to prevent a particular virtual machine from being imported.
Virtual Machine Name Do not change.
Virtual Machine ID Do not change.
Host Reservation (Name
or ID)
Enter the name or ID of a reservation in the target vRealize Automation environment.
Host To Storage (Name
or ID)
Enter the name or ID of a storage location in the target vRealize Automation environment.
Deployment Name Enter a new name for the deployment, for example, the virtual machine name, you are
creating in the target vRealize Automation environment.
Note Each virtual machine must be imported to its own deployment. You cannot import a
single virtual machine to an existing deployment. You cannot import multiple virtual machines
to a single deployment.
Blueprint ID Enter the ID of the blueprint in the target vRealize Automation environment that you use to
import the virtual machine.
Note Make sure that you enter only the blueprint ID. Do not enter the blueprint name. You
must select a blueprint that contains only a single virtual machine component. The blueprint
must be published and added to an entitlement.
Component Machine ID Enter the name of a virtual machine component that is contained in the blueprint you
selected. You cannot import a virtual machine into a blueprint that has more than one
component.
Owner Name Enter a user in the target vRealize Automation environment who is entitled to the blueprint.
If you import a virtual machine with one or more custom properties, you identify each custom
property using three comma separated values appended to the line with the values for that
machine. Use this format for each custom property.
Managing vRealize Automation
VMware, Inc. 77
,Custom.Property.Name, Value, FLAGS
FLAGS are three characters that describe how the property is treated by vRealize Automation. In
their order of use, the flags are:
1 H or N = Hidden or Not Hidden
2 E or O = Encrypted or Not Encrypted
3 R or P = Runtime or Not Runtime
For example, you can append a custom property to configure a static IP address for a machine.
Using the following format, this custom property allocates an available static IP address from a
network profile.
,VirtualMachine.Network#.Address, w.x.y.z, HOP
You change the variables with the appropriate information for your virtual machine.
nChange # to the number of the network interface being configured with this static IP address.
For example, VirtualMachineNetwork0.Address.
nChange w.x.y.z to be the static IP address for the virtual machine. For example,
11.27.42.57.
The HOP flag string--Hidden, Not encrypted, Not Runtime--sets the visibility of the property.
Because this particular property is used only by bulk import, it is removed from the virtual
machine after a successful import.
In order for this custom property to work, the IP address must be available in a properly
configured address pool. If the address cannot be found or is already in use, the import succeeds
without the static IP address definition, and an error is logged.
b Save the CSV file.
3Use the vRealize Automation management interface to import your virtual machine to a
vRealize Automation environment.
a Select Infrastructure > Administration > Bulk Imports.
b Click New.
c Enter a unique name for this task in the Name text box, for example, unmanaged import 10.
d Enter the CSV filename in the CSV file text box by browsing to the CSV filename.
Managing vRealize Automation
VMware, Inc. 78

e Select import options.
Option Description
Start time Schedule a future start date. The chosen start time is the local server time and
not the local time of the user workstation.
Now Begin the import process immediately.
Delay (seconds) If you are importing many virtual machines, select the number of seconds to
delay each virtual machine registration. Selecting this menu item slows the
import process. Leave blank to select no delay.
Batch size If you are importing many virtual machines, select the total number of virtual
machines to register at a given time. Selecting this menu item slows the import
process. Leave blank to select no limit.
Ignore managed machines Leave unselected.
Skip user validation Selecting this menu item sets the virtual machine owner to the value listed in
the Owner column of the CSV data file without verifying that the user exists.
Selecting this menu item can decrease the import time.
Test import Test the import process without importing the virtual machines so you can test
your CSV file for errors.
f Click OK.
The progress of the operation appears on the Bulk Imports page.
Update a Virtual Machine in a vRealize Automation Environment
You can make a change to a virtual machine property, such as a storage path, to update one or more
managed virtual machines in a vRealize Automation environment.
A managed virtual machine is a machine that is managed in a vRealize Automation environment and can
be viewed in the console.
Prerequisites
nLog in to vRealize Automation as a fabric administrator and as a business group manager.
Procedure
1Generate a virtual machine CSV data file.
a Select Infrastructure > Administration > Bulk Imports.
b Click Generate CSV File.
c Select Managed from the Machines drop-down menu.
d Select one of the available resource types from the Resource drop-down menu.
Option Description
Endpoint Information required to access a virtualization host.
Compute Resource Information required to access a group of virtual machines performing a
similar function.
Managing vRealize Automation
VMware, Inc. 79
e Select the name of the virtual machine resource from the Name drop-down menu.
f (Optional) Select Include custom properties if you want to migrate the virtual machine custom
properties.
g Click OK.
2Edit your virtual machine CSV data file.
a Open the CSV file with a text editor and edit the data categories that you want to change globally.
To update virtual machines contained in a CSV data file, each machine must be associated with
the following items:
nReservation
nStorage location
nBlueprint
nMachine component
nOwner that exists in the target deployment
All of the values for each machine must be present in the target vRealize Automation
environment for the update to succeed. You can change the values for reservation, storage
location, blueprint, and owner, or add a static IP address value to individual machines by editing
the CSV file.
b If you are changing a virtual machine static IP address, append a command in the following form
to the CSV file.
,VirtualMachine.Network#.Address, w.x.y.z, HOP
Configure the command with the appropriate information for your virtual machine.
nChange the # to the number of the network interface being configured with this static IP
address. For example, VirtualMachineNetwork0.Address.
nChange w.x.y.z to be the static IP address for the virtual machine. For example,
11.27.42.57.
nThe HOP string, Hidden, Not encrypted, Not runtime, sets the visibility of the property. This
default property is removed from the virtual machine after a successful import.
For a successful update, the IP address must be available in a properly configured address pool.
If the address cannot be found or is already in use, the update succeeds without the static IP
address definition, and an error is logged.
c Save the CSV file and close your text editor.
3Use the vRealize Automation management interface to update one or more virtual machines in a
vRealize Automation environment.
a Select Infrastructure > Administration > Bulk Imports.
b Click New.
Managing vRealize Automation
VMware, Inc. 80

c Enter a unique name for this task in the Name text box, for example, managed global update 10.
d Enter the CSV file name in the CSV file text box by browsing to the CSV file name.
e Select import options.
Option Description
Start time Schedule a future start date. The specified start time is the local server time
and not the local time of the user workstation.
Now Begin the import process immediately.
Delay (seconds) If you are updating a large number of virtual machines, select the number of
seconds to delay each virtual machine update. Selecting this option slows the
update process. Leave blank to specify no delay.
Batch size If you are updating a large number of virtual machines, select the total number
of machines to update at a given time. Selecting this option slows the update
process. Leave blank to specify no limit.
Ignore managed machines Leave unselected.
Skip user validation Selecting this option sets the machine owner to the value listed in the Owner
column of the CSV data file without verifying that the user exists. Selecting this
option can decrease the update time.
Test import Leave unselected.
f Click OK.
The progress of the operation appears on the Bulk Imports page.
Migrate a Virtual Machine to a Dierent vRealize Automation
Environment
You can migrate one or more managed virtual machines in a VMware vRealize ™ Automation
environment to a different vRealize Automation environment.
A managed virtual machine is a virtual machine that is managed in a vRealize Automation environment
and can be viewed in the console.
Prerequisites
nLog in to vRealize Automation as a fabric administrator and as a business group manager.
nIf you are importing virtual machines that use static IP addresses, prepare a properly configured
address pool. For more information about using a network profile to control IP address ranges, see
Configuring vRealize Automation.
Procedure
1Generate a virtual machine CSV data file.
a Select Infrastructure > Administration > Bulk Imports.
b Click Generate CSV File.
c Select Managed from the Machines drop-down menu.
Managing vRealize Automation
VMware, Inc. 81

d Select one of the available resource types from the Resource drop-down menu.
Option Description
Endpoint Information required to access a virtualization host.
Compute Resource Information required to access a group of virtual machines performing a
similar function.
e Select the name of the virtual machine resource from the Name drop-down menu.
f (Optional) Select Include custom properties.
You include custom properties when you import a virtual machine into a new deployment with the
same properties.
g Click OK.
Managing vRealize Automation
VMware, Inc. 82

2Edit your virtual machine CSV data file.
Whether you must edit the CSV data file depends on the similarity of the source and target
environments. If the configuration values in the source environment do not match the values in the
target environment, you must edit the CSV data file so that the values match before you begin
migration.
a Open the CSV file, and edit the data categories to match existing categories in the target
vRealize Automation environment.
To migrate virtual machines contained in a CSV data file, each virtual machine must be
associated with a reservation, storage location, blueprint, machine component, and owner that
exists in the target vRealize Automation environment. All the values for each virtual machine must
be present in the target vRealize Automation environment for migration to succeed. You can
change the values for reservation, storage location, blueprint, and owner, or add a static IP
address value to individual virtual machines by editing the CSV file.
Heading Comment Example
# Import--Yes or No Change to No to prevent a particular virtual machine from being
imported.
Yes
Virtual Machine
Name
Do not change. MyMachine
Virtual Machine ID Do not change. a6e05812-0b06-4d4e-a84a-
fed242340426a
Host Reservation
(Name or ID)
Enter the name or ID of a reservation in the target
vRealize Automation environment.
DevReservation
Host To Storage
(Name or ID)
Enter the name or ID of a storage location in the target
vRealize Automation environment.
ce-san-1:custom-nfs-2
Deployment Name Enter a new name for the deployment you are creating in the
target vRealize Automation environment.
Each virtual machine must be migrated to its own deployment.
You cannot import a single virtual machine to an existing
deployment. You cannot import multiple virtual machines to a
single environment.
ImportedDeployment0001
Converged Blueprint
ID
Enter the ID of the blueprint in the target vRealize Automation
environment that you use to import the virtual machine.
Make sure that you enter only the blueprint ID. Do not enter the
blueprint name. You must select a blueprint that contains only a
single virtual machine component. The blueprint must be
published and added to an entitlement.
ImportBlueprint
Component Blueprint
ID
Enter the name of a virtual machine component that is
contained in the blueprint you selected. You cannot import a
virtual machine into a blueprint that has more than one
component.
ImportedMachine
Owner Name Enter a user in the target vRealize Automation environment. user@tenant
Managing vRealize Automation
VMware, Inc. 83
Example of a complete, properly formatted CSV line: Yes, MyMachine, a6e05812-0b06-4d4e-
a84a-fed242340426, DevReservation, ce-san-1:custom-nfs-2, Imported Deployment 0001,
ImportBlueprint, ImportedMachine, user@tenant
b If you are migrating a virtual machine with a static IP address, append a command in the
following form to the CSV file.
,VirtualMachine.Network#.Address, w.x.y.z, HOP
Configure the command with the appropriate information for your virtual machine.
nChange the # to the number of the network interface being configured with this static IP
address. For example, VirtualMachineNetwork0.Address.
nChange w.x.y.z to be the static IP address for the virtual machine. For example,
11.27.42.57.
nThe HOP string, Hidden, Not encrypted, Not runtime, sets the visibility of the property. This
default property is removed from the virtual machine after a successful import.
For a successful migration, the IP address must be available in a properly configured address
pool. If the address cannot be found or is already in use, the migration succeeds without the static
IP address definition, and an error is logged.
c Save the CSV file.
3Use the vRealize Automation management interface to migrate your virtual machine to a
vRealize Automation environment.
a Select Infrastructure > Administration > Bulk Imports.
b Click New.
c Enter a unique name for this task in the Name text box, for example, managed migration 10.
d Enter the CSV filename in the CSV file text box by browsing to the CSV filename.
Managing vRealize Automation
VMware, Inc. 84

e Select import options.
Option Description
Start time Schedule a future start date. The chosen start time is the local server time and
not the local time of the user workstation.
Now Begin the migration process immediately.
Delay (seconds) If you are migrating many virtual machines, select the number of seconds to
delay each virtual machine registration. Selecting this option slows the
migration process. Leave blank to select no delay.
Batch size If you are migrating many virtual machines, select the total number of virtual
machines to register at a given time. Selecting this option slows the migration
process. Leave blank to select no limit.
Ignore managed machines Leave unselected.
Skip user validation Selecting this option sets the virtual machine' owner to the value listed in the
Owner column of the CSV data file without verifying that the user exists.
Selecting this option can decrease the migration time.
Test import Test the migration process without migrating the virtual machines so you can
test your CSV file for errors.
f Click OK.
The progress of the operation appears on the Bulk Imports page.
Managing vRealize Automation
VMware, Inc. 85
