VSphere Security VMware. 6.7 V Center Server Esxi Vcenter 67 EN
User Manual: Pdf vCenter Server - 6.7 - Security User Guide for VMware vCenter Software, Free Instruction Manual
Open the PDF directly: View PDF ![]() .
.
Page Count: 278 [warning: Documents this large are best viewed by clicking the View PDF Link!]
- vSphere Security
- Contents
- About vSphere Security
- Security in the vSphere Environment
- vSphere Permissions and User Management Tasks
- Securing ESXi Hosts
- General ESXi Security Recommendations
- Configure ESXi Hosts with Host Profiles
- Use Scripts to Manage Host Configuration Settings
- ESXi Passwords and Account Lockout
- SSH Security
- PCI and PCIe Devices and ESXi
- Disable the Managed Object Browser
- ESXi Networking Security Recommendations
- Modifying ESXi Web Proxy Settings
- vSphere Auto Deploy Security Considerations
- Control Access for CIM-Based Hardware Monitoring Tools
- Certificate Management for ESXi Hosts
- Host Upgrades and Certificates
- Certificate Mode Switch Workflows
- ESXi Certificate Default Settings
- View Certificate Expiration Information for Multiple ESXi Hosts
- View Certificate Details for a Single ESXi Host
- Renew or Refresh ESXi Certificates
- Change the Certificate Mode
- Replacing ESXi SSL Certificates and Keys
- Use Custom Certificates With Auto Deploy
- Restore ESXi Certificate and Key Files
- Customizing Hosts with the Security Profile
- ESXi Firewall Configuration
- Customizing ESXi Services from the Security Profile
- Enable or Disable a Service in the Security Profile
- Lockdown Mode
- Manage the Acceptance Levels of Hosts and VIBs
- Assigning Privileges for ESXi Hosts
- Using Active Directory to Manage ESXi Users
- Using vSphere Authentication Proxy
- Enable vSphere Authentication Proxy
- Add a Domain to vSphere Authentication Proxy with the vSphere Web Client
- Add a Domain to vSphere Authentication Proxy with the camconfig Command
- Use vSphere Authentication Proxy to Add a Host to a Domain
- Enable Client Authentication for vSphere Authentication Proxy
- Import the vSphere Authentication Proxy Certificate to ESXi Host
- Generate a New Certificate for vSphere Authentication Proxy
- Set Up vSphere Authentication Proxy to Use Custom Certificates
- Configuring Smart Card Authentication for ESXi
- Using the ESXi Shell
- UEFI Secure Boot for ESXi Hosts
- Securing ESXi Hosts with Trusted Platform Module
- ESXi Log Files
- General ESXi Security Recommendations
- Securing vCenter Server Systems
- vCenter Server Security Best Practices
- Verify Thumbprints for Legacy ESXi Hosts
- Verify that SSL Certificate Validation Over Network File Copy Is Enabled
- Required Ports for vCenter Server and Platform Services Controller
- Additional vCenter Server TCP and UDP Ports
- Securing Virtual Machines
- Enable or Disable UEFI Secure Boot for a Virtual Machine
- Limit Informational Messages From Virtual Machines to VMX Files
- Prevent Virtual Disk Shrinking
- Virtual Machine Security Best Practices
- General Virtual Machine Protection
- Use Templates to Deploy Virtual Machines
- Minimize Use of the Virtual Machine Console
- Prevent Virtual Machines from Taking Over Resources
- Disable Unnecessary Functions Inside Virtual Machines
- Remove Unnecessary Hardware Devices
- Disable Unused Display Features
- Disable Unexposed Features
- Disable VMware Shared Folders Sharing Host Files to the Virtual Machine
- Disable Copy and Paste Operations Between Guest Operating System and Remote Console
- Limiting Exposure of Sensitive Data Copied to the Clipboard
- Restrict Users From Running Commands Within a Virtual Machine
- Prevent a Virtual Machine User or Process From Disconnecting Devices
- Prevent Guest Operating System Processes from Sending Configuration Messages to the Host
- Avoid Using Independent Nonpersistent Disks
- Virtual Machine Encryption
- Use Encryption in Your vSphere Environment
- Set up the Key Management Server Cluster
- Create an Encryption Storage Policy
- Enable Host Encryption Mode Explicitly
- Disable Host Encryption Mode
- Create an Encrypted Virtual Machine
- Clone an Encrypted Virtual Machine
- Encrypt an Existing Virtual Machine or Virtual Disk
- Decrypt an Encrypted Virtual Machine or Virtual Disk
- Change the Encryption Policy for Virtual Disks
- Resolve Missing Key Issues
- Unlock Locked Virtual Machines
- Resolve ESXi Host Encryption Mode Issues
- Re-Enable ESXi Host Encryption Mode
- Set Key Management Server Certificate Expiration Threshold
- vSphere Virtual Machine Encryption and Core Dumps
- Securing Virtual Machines with Virtual Trusted Platform Module
- Add a Virtual Trusted Platform Module to a Virtual Machine
- Enable Virtual Trusted Platform Module for an Existing Virtual Machine
- Remove Virtual Trusted Platform Module from a Virtual Machine
- Identify Virtual Trusted Platform Enabled Virtual Machines
- View vTPM Module Device Certificates
- Export and Replace vTPM Module Device Certificates
- Securing Windows Guest Operating Systems with Virtualization-based Security
- Virtualization-based Security Best Practices
- Enable Virtualization-based Security on a Virtual Machine
- Enable Virtualization-based Security on an Existing Virtual Machine
- Enable Virtualization-based Security on the Guest Operating System
- Disable Virtualization-based Security
- Identify VBS-Enabled Virtual Machines
- Securing vSphere Networking
- Introduction to vSphere Network Security
- Securing the Network With Firewalls
- Secure the Physical Switch
- Securing Standard Switch Ports with Security Policies
- Securing vSphere Standard Switches
- Standard Switch Protection and VLANs
- Secure vSphere Distributed Switches and Distributed Port Groups
- Securing Virtual Machines with VLANs
- Creating Multiple Networks Within a Single ESXi Host
- Internet Protocol Security
- Ensure Proper SNMP Configuration
- vSphere Networking Security Best Practices
- Best Practices Involving Multiple vSphere Components
- Synchronizing Clocks on the vSphere Network
- Storage Security Best Practices
- Verify That Sending Host Performance Data to Guests Is Disabled
- Setting Timeouts for the ESXi Shell and vSphere Web Client
- Managing TLS Protocol Configuration with the TLS Configurator Utility
- Ports That Support Disabling TLS Versions
- Enabling or Disabling TLS Versions in vSphere
- Perform an Optional Manual Backup
- Enable or Disable TLS Versions on vCenter Server Systems
- Enable or Disable TLS Versions on ESXi Hosts
- Enable or Disable TLS Versions on External Platform Services Controller Systems
- Scan vCenter Server for Enabled TLS Protocols
- Revert TLS Configuration Changes
- Enable or Disable TLS Versions on vSphere Update Manager on Windows
- Defined Privileges
- Alarms Privileges
- Auto Deploy and Image Profile Privileges
- Certificates Privileges
- Content Library Privileges
- Cryptographic Operations Privileges
- Datacenter Privileges
- Datastore Privileges
- Datastore Cluster Privileges
- Distributed Switch Privileges
- ESX Agent Manager Privileges
- Extension Privileges
- External Stats Provider Privileges
- Folder Privileges
- Global Privileges
- Health Update Provider Privileges
- Host CIM Privileges
- Host Configuration Privileges
- Host Inventory
- Host Local Operations Privileges
- Host vSphere Replication Privileges
- Host Profile Privileges
- Network Privileges
- Performance Privileges
- Permissions Privileges
- Profile-driven Storage Privileges
- Resource Privileges
- Scheduled Task Privileges
- Sessions Privileges
- Storage Views Privileges
- Tasks Privileges
- Transfer Service Privileges
- Virtual Machine Configuration Privileges
- Virtual Machine Guest Operations Privileges
- Virtual Machine Interaction Privileges
- Virtual Machine Inventory Privileges
- Virtual Machine Provisioning Privileges
- Virtual Machine Service Configuration Privileges
- Virtual Machine Snapshot Management Privileges
- Virtual Machine vSphere Replication Privileges
- dvPort Group Privileges
- vApp Privileges
- vServices Privileges
- vSphere Tagging Privileges

vSphere Security
17 APR 2018
VMware vSphere 6.7
VMware ESXi 6.7
vCenter Server 6.7
vSphere Security
VMware, Inc. 2
You can find the most up-to-date technical documentation on the VMware website at:
https://docs.vmware.com/
If you have comments about this documentation, submit your feedback to
docfeedback@vmware.com
Copyright © 2009–2018 VMware, Inc. All rights reserved. Copyright and trademark information.
VMware, Inc.
3401 Hillview Ave.
Palo Alto, CA 94304
www.vmware.com
Contents
About vSphere Security 7
1Security in the vSphere Environment 9
Securing the ESXi Hypervisor 9
Securing vCenter Server Systems and Associated Services 11
Securing Virtual Machines 12
Securing the Virtual Networking Layer 13
Passwords in Your vSphere Environment 15
Security Best Practices and Resources 16
2vSphere Permissions and User Management Tasks 18
Understanding Authorization in vSphere 19
Managing Permissions for vCenter Components 25
Global Permissions 28
Using Roles to Assign Privileges 31
Best Practices for Roles and Permissions 34
Required Privileges for Common Tasks 35
3Securing ESXi Hosts 39
General ESXi Security Recommendations 39
Certificate Management for ESXi Hosts 51
Customizing Hosts with the Security Profile 67
Assigning Privileges for ESXi Hosts 83
Using Active Directory to Manage ESXi Users 86
Using vSphere Authentication Proxy 88
Configuring Smart Card Authentication for ESXi 96
Using the ESXi Shell 98
UEFI Secure Boot for ESXi Hosts 102
Securing ESXi Hosts with Trusted Platform Module 105
ESXi Log Files 107
4Securing vCenter Server Systems 110
vCenter Server Security Best Practices 110
Verify Thumbprints for Legacy ESXi Hosts 116
Verify that SSL Certificate Validation Over Network File Copy Is Enabled 117
Required Ports for vCenter Server and Platform Services Controller 118
Additional vCenter Server TCP and UDP Ports 123
VMware, Inc. 3
5Securing Virtual Machines 126
Enable or Disable UEFI Secure Boot for a Virtual Machine 126
Limit Informational Messages From Virtual Machines to VMX Files 127
Prevent Virtual Disk Shrinking 128
Virtual Machine Security Best Practices 129
6Virtual Machine Encryption 139
How vSphere Virtual Machine Encryption Protects Your Environment 140
vSphere Virtual Machine Encryption Components 142
Encryption Process Flow 143
Virtual Disk Encryption 145
Prerequisites and Required Privileges for Encryption Tasks 146
Encrypted vSphere vMotion 147
Encryption Best Practices, Caveats, and Interoperability 148
7Use Encryption in Your vSphere Environment 154
Set up the Key Management Server Cluster 155
Create an Encryption Storage Policy 162
Enable Host Encryption Mode Explicitly 163
Disable Host Encryption Mode 164
Create an Encrypted Virtual Machine 164
Clone an Encrypted Virtual Machine 165
Encrypt an Existing Virtual Machine or Virtual Disk 166
Decrypt an Encrypted Virtual Machine or Virtual Disk 167
Change the Encryption Policy for Virtual Disks 169
Resolve Missing Key Issues 170
Unlock Locked Virtual Machines 172
Resolve ESXi Host Encryption Mode Issues 172
Re-Enable ESXi Host Encryption Mode 173
Set Key Management Server Certificate Expiration Threshold 174
vSphere Virtual Machine Encryption and Core Dumps 174
8Securing Virtual Machines with Virtual Trusted Platform Module 179
Add a Virtual Trusted Platform Module to a Virtual Machine 181
Enable Virtual Trusted Platform Module for an Existing Virtual Machine 182
Remove Virtual Trusted Platform Module from a Virtual Machine 182
Identify Virtual Trusted Platform Enabled Virtual Machines 183
View vTPM Module Device Certificates 183
Export and Replace vTPM Module Device Certificates 184
vSphere Security
VMware, Inc. 4
9Securing Windows Guest Operating Systems with Virtualization-based
Security 186
Virtualization-based Security Best Practices 186
Enable Virtualization-based Security on a Virtual Machine 187
Enable Virtualization-based Security on an Existing Virtual Machine 188
Enable Virtualization-based Security on the Guest Operating System 189
Disable Virtualization-based Security 190
Identify VBS-Enabled Virtual Machines 190
10 Securing vSphere Networking 192
Introduction to vSphere Network Security 192
Securing the Network With Firewalls 193
Secure the Physical Switch 197
Securing Standard Switch Ports with Security Policies 197
Securing vSphere Standard Switches 198
Standard Switch Protection and VLANs 200
Secure vSphere Distributed Switches and Distributed Port Groups 201
Securing Virtual Machines with VLANs 202
Creating Multiple Networks Within a Single ESXi Host 204
Internet Protocol Security 207
Ensure Proper SNMP Configuration 211
vSphere Networking Security Best Practices 211
11 Best Practices Involving Multiple vSphere Components 216
Synchronizing Clocks on the vSphere Network 216
Storage Security Best Practices 219
Verify That Sending Host Performance Data to Guests Is Disabled 223
Setting Timeouts for the ESXi Shell and vSphere Web Client 223
12 Managing TLS Protocol Configuration with the TLS Configurator Utility 225
Ports That Support Disabling TLS Versions 225
Enabling or Disabling TLS Versions in vSphere 227
Perform an Optional Manual Backup 227
Enable or Disable TLS Versions on vCenter Server Systems 229
Enable or Disable TLS Versions on ESXi Hosts 230
Enable or Disable TLS Versions on External Platform Services Controller Systems 232
Scan vCenter Server for Enabled TLS Protocols 233
Revert TLS Configuration Changes 234
Enable or Disable TLS Versions on vSphere Update Manager on Windows 236
13 Defined Privileges 240
Alarms Privileges 241
vSphere Security
VMware, Inc. 5
Auto Deploy and Image Profile Privileges 242
Certificates Privileges 243
Content Library Privileges 244
Cryptographic Operations Privileges 245
Datacenter Privileges 247
Datastore Privileges 247
Datastore Cluster Privileges 248
Distributed Switch Privileges 249
ESX Agent Manager Privileges 249
Extension Privileges 250
External Stats Provider Privileges 250
Folder Privileges 250
Global Privileges 251
Health Update Provider Privileges 252
Host CIM Privileges 252
Host Configuration Privileges 252
Host Inventory 253
Host Local Operations Privileges 254
Host vSphere Replication Privileges 255
Host Profile Privileges 255
Network Privileges 255
Performance Privileges 256
Permissions Privileges 256
Profile-driven Storage Privileges 257
Resource Privileges 257
Scheduled Task Privileges 258
Sessions Privileges 258
Storage Views Privileges 259
Tasks Privileges 259
Transfer Service Privileges 260
Virtual Machine Configuration Privileges 260
Virtual Machine Guest Operations Privileges 262
Virtual Machine Interaction Privileges 263
Virtual Machine Inventory Privileges 271
Virtual Machine Provisioning Privileges 272
Virtual Machine Service Configuration Privileges 273
Virtual Machine Snapshot Management Privileges 274
Virtual Machine vSphere Replication Privileges 274
dvPort Group Privileges 275
vApp Privileges 275
vServices Privileges 276
vSphere Tagging Privileges 277
vSphere Security
VMware, Inc. 6

About vSphere Security
vSphere Security provides information about securing your vSphere® environment for VMware® vCenter®
Server and VMware ESXi.
To help you protect your vSphere environment, this documentation describes available security features
and the measures that you can take to safeguard your environment from attack.
Table 1.
vSphere Security
Highlights
Topics Content Highlights
Permissions and User Management nPermissions model (roles, groups, objects).
nCreating custom roles.
nSetting permissions.
nManaging global permissions.
Host Security Features nLockdown mode and other security profile features.
nHost smart card authentication.
nvSphere Authentication Proxy.
nUEFI Secure Boot.
nTrusted Platform Module (TPM).
Virtual Machine Encryption nHow does VM encryption work?
nKMS setup.
nEncrypting and decrypting VMs.
nTroubleshooting and best practices.
Guest OS Security nVirtual Trusted Platform Module (vTPM).
nVirtualization Based Security (VBS).
Managing TLS Protocol Configuration Changing TLS protocol configuration using a command-line
utility.
Security Best Practices and Hardening Best practices and advice from VMware security experts.
nvCenter Server security
nHost security
nVirtual machine security
nNetworking security
vSphere Privileges Complete listing of all vSphere privileges supported in this
release.
VMware, Inc. 7

Related Documentation
A companion document, Platform Services Controller Administration, explains how you can use the
Platform Services Controller services, for example, to manage authentication with vCenter Single Sign-On
and to manage certificates in your vSphere environment.
In addition to these documents, VMware publishes a Hardening Guide for each release of vSphere,
accessible at http://www.vmware.com/security/hardening-guides.html. The Hardening Guide is a
spreadsheet with entries for different potential security issues. It includes items for three different risk
profiles. This vSphere Security document does not include information for Risk Profile 1 (highest security
environment such as top-secret government).
Intended Audience
This information is for experienced Windows or Linux system administrators who are familiar with virtual
machine technology and data center operations.
vSphere Web Client and vSphere Client (HTML5-Based
Client)
Task instructions in this guide are based on the vSphere Web Client. You can also perform most of the
tasks in this guide by using the vSphere Client. The vSphere Client user interface terminology, topology,
and workflow are closely aligned with the same aspects and elements of the vSphere Web Client user
interface. You can apply the vSphere Web Client instructions to the vSphere Client unless otherwise
instructed.
Note In vSphere 6.7, most of the vSphere Web Client functionality is implemented in the vSphere Client.
For an up-to-date list of the unsupported functionality, see Functionality Updates for the vSphere Client.
vSphere Security
VMware, Inc. 8
Security in the vSphere
Environment 1
The components of a vSphere environment are secured out of the box by several features such as
authentication, authorization, a firewall on each ESXi host, and so on. You can modify the default setup in
many ways. For example, you can set permissions on vCenter objects, open firewall ports, or change the
default certificates. You can take security measures for different objects in the vCenter object hierarchy,
for example, vCenter Server systems, ESXi hosts, virtual machines, and network and storage objects.
A high-level overview of different areas of vSphere that require attention helps you plan your security
strategy. You also benefit from other vSphere Security resources on the VMware Web site.
This chapter includes the following topics:
nSecuring the ESXi Hypervisor
nSecuring vCenter Server Systems and Associated Services
nSecuring Virtual Machines
nSecuring the Virtual Networking Layer
nPasswords in Your vSphere Environment
nSecurity Best Practices and Resources
Securing the ESXi Hypervisor
The ESXi hypervisor is secured out of the box. You can further protect ESXi hosts by using lockdown
mode and other built-in features. For consistency, you can set up a reference host and keep all hosts in
sync with the host profile of the reference host. You can also protect your environment by performing
scripted management, which ensures that changes apply to all hosts.
You can enhance protection of ESXi hosts that are managed by vCenter Server with the following actions.
See the Security of the VMware vSphere Hypervisor white paper for background and details.
Limit ESXi access By default, the ESXi Shell and SSH services are not running and only the
root user can log in to the Direct Console User Interface (DCUI). If you
decide to enable ESXi or SSH access, you can set timeouts to limit the risk
of unauthorized access.
VMware, Inc. 9
Users who can access the ESXi host must have permissions to manage
the host. You set permissions on the host object from the vCenter Server
system that manages the host.
Use named users and
least privilege
By default, the root user can perform many tasks. Do not allow
administrators to log in to the ESXi host using the root user account.
Instead, create named administrator users from vCenter Server and assign
those users the Administrator role. You can also assign those users a
custom role. See Create a Custom Role.
If you manage users directly on the host, role management options are
limited. See the vSphere Single Host Management - VMware Host Client
documentation.
Minimize the number of
open ESXi firewall
ports
By default, firewall ports on your ESXi host are opened only when you start
a corresponding service. You can use the vSphere Web Client or ESXCLI
or PowerCLI commands to check and manage firewall port status.
See ESXi Firewall Configuration.
Automate ESXi host
management
Because it is often important that different hosts in the same data center
are in sync, use scripted installation or vSphere Auto Deploy to provision
hosts. You can manage the hosts using scripts. Host profiles are an
alternative to scripted management. You set up a reference host, export the
host profile, and apply the host profile to all hosts. You can apply the host
profile directly or as part of provisioning with Auto Deploy.
See Use Scripts to Manage Host Configuration Settings and see the
vCenter Server Installation and Setup documentation for information about
vSphere Auto Deploy.
Take advantage of
lockdown mode
In lockdown mode, ESXi hosts can be accessed only through
vCenter Server by default. Starting with vSphere 6.0, you can select strict
lockdown mode or normal lockdown mode. You can define Exception Users
to allow direct access to service accounts such as backup agents.
See Lockdown Mode.
Check VIB package
integrity
Each VIB package has an associated acceptance level. You can add a VIB
to an ESXi host only if the VIB acceptance level is the same or better than
the acceptance level of the host. You cannot add a CommunitySupported or
PartnerSupported VIB to a host unless you explicitly change the host's
acceptance level.
See Manage the Acceptance Levels of Hosts and VIBs.
vSphere Security
VMware, Inc. 10

Manage ESXi
certificates
In vSphere 6.0 and later, the VMware Certificate Authority (VMCA)
provisions each ESXi host with a signed certificate that has VMCA as the
root certificate authority by default. If company policy requires it, you can
replace the existing certificates with certificates that are signed by a third-
party or an enterprise CA.
See Certificate Management for ESXi Hosts.
Consider Smart card
authentication
Starting with vSphere 6.0, ESXi supports the use of smart card
authentication instead of user name and password authentication. For
additional security, you can configure smart card authentication. Two-factor
authentication is also supported for vCenter Server.
See Configuring Smart Card Authentication for ESXi.
Consider ESXi account
lockout
Starting with vSphere 6.0, account locking is supported for access through
SSH and through the vSphere Web Services SDK. By default, a maximum
of 10 failed attempts is allowed before the account is locked. The account is
unlocked after two minutes by default.
Note The Direct Console Interface (DCUI) and the ESXi Shell do not
support account lockout.
See ESXi Passwords and Account Lockout.
Security considerations for standalone hosts are similar, though the management tasks might differ. See
the vSphere Single Host Management - VMware Host Client documentation.
Securing vCenter Server Systems and Associated Services
Your vCenter Server system and associated services are protected by authentication through vCenter
Single Sign-On and by authorization through the vCenter Server permissions model. You can modify the
default behavior, and you can take additional steps to limit access to your environment.
As you protect your vSphere environment, consider that all services that are associated with the
vCenter Server instances must be protected. In some environments, you might protect several
vCenter Server instances and one or more Platform Services Controller instances.
Harden all vCenter host
machines
The first step in protecting your vCenter environment is hardening each
machine on which vCenter Server or an associated service runs. Similar
considerations apply to a physical machine or a virtual machine. Always
install the latest security patches for your operating system and follow
industry standard best practices to protect the host machine.
Learn about the
vCenter certificate
model
By default, the VMware Certificate Authority provisions each ESXi host,
each machine in the environment, and each solution user with a certificate
signed by VMCA. The environment works out of the box, but if company
policy requires it, you can change the default behavior. See the Platform
Services Controller Administration documentation for details.
vSphere Security
VMware, Inc. 11
For additional protection, explicitly remove expired or revoked certificates
and failed installations.
Configure vCenter
Single Sign-On
vCenter Server and associated services are protected by the vCenter
Single Sign-On authentication framework. When you first install the
software, you specify a password for the administrator of the vCenter
Single Sign-On domain, administrator@vsphere.local by default. Only that
domain is initially available as an identity source. You can add other identity
sources, either Active Directory or LDAP, and set a default identity source.
Going forward, users who can authenticate to one of those identity sources
can view objects and perform tasks if they are authorized to do so. See the
Platform Services Controller Administration documentation for details.
Assign roles to named
users or groups
For better logging, associate each permission that you give on an object
with a named user or group and a predefined role or custom role. The
vSphere 6.0 permissions model allows great flexibility through multiple
ways of authorizing users or groups. See Understanding Authorization in
vSphere and Required Privileges for Common Tasks.
Restrict administrator privileges and the use of the administrator role. If
possible, do not use the anonymous Administrator user.
Set up NTP Set up NTP for each node in your environment. The certificate
infrastructure requires an accurate time stamp and does not work correctly
if the nodes are out of sync.
See Synchronizing Clocks on the vSphere Network.
Securing Virtual Machines
To secure your VMs, keep the guest operating systems patched and protect your environment just as you
protect your physical machine. Consider disabling unnecessary functionality, minimize the use of the VM
console, and follow other best practices.
Protect the guest
operating system
To protect your guest operating system, make sure that it uses the most
recent patches and, if appropriate, anti-spyware and anti-malware
applications. See the documentation from your guest operating system
vendor and, potentially, other information available in books or on the
Internet for that operating system.
Disable unnecessary
functionality
Check that unnecessary functionality is disabled to minimize potential
points of attack. Many of the features that are used infrequently are
disabled by default. Remove unnecessary hardware and disable certain
features such as host-guest filesystem (HGFS) or copy and paste between
the VM and a remote console.
See Disable Unnecessary Functions Inside Virtual Machines.
vSphere Security
VMware, Inc. 12
Use templates and
scripted management
VM templates enable you to set up the operating system so that it meets
your requirements, and to create other VMs with the same settings.
If you want to change VM settings after initial deployment, consider using
scripts, for example, PowerCLI. This documentation explains how to
perform tasks using the GUI. Consider using scripts instead of the GUI to
keep your environment consistent. In large environments, you can group
VMs into folders to optimize scripting.
For information on templates, see Use Templates to Deploy Virtual
Machines and the vSphere Virtual Machine Administration. For information
on PowerCLI, see the VMware PowerCLI documentation.
Minimize use of the
virtual machine console
The virtual machine console provides the same function for a VM that a
monitor on a physical server provides. Users with access to a virtual
machine console have access to VM power management and to removable
device connectivity controls. As a result, virtual machine console access
might allow a malicious attack on a VM.
Consider UEFI secure
boot
Starting with vSphere 6.5, you can configure your VM to use UEFI boot. If
the operating system supports secure UEFI boot, you can select that option
for your VMs for additional security. See Enable or Disable UEFI Secure
Boot for a Virtual Machine.
Securing the Virtual Networking Layer
The virtual networking layer includes virtual network adapters, virtual switches, distributed virtual
switches, and ports and port groups. ESXi relies on the virtual networking layer to support
communications between VMs and their users. In addition, ESXi uses the virtual networking layer to
communicate with iSCSI SANs, NAS storage, and so on.
vSphere includes the full array of features necessary for a secure networking infrastructure. You can
secure each element of the infrastructure, such as virtual switches, distributed virtual switches, and virtual
network adapters, separately. In addition, consider the following guidelines, discussed in more detail in
Chapter 10 Securing vSphere Networking.
Isolate network traffic Isolation of network traffic is essential to a secure ESXi environment.
Different networks require different access and level of isolation. A
management network isolates client traffic, command-line interface (CLI) or
API traffic, and third-party software traffic from normal traffic. Ensure that
the management network is accessible only by system, network, and
security administrators.
vSphere Security
VMware, Inc. 13
See ESXi Networking Security Recommendations.
Use firewalls to secure
virtual network
elements
You can open and close firewall ports and secure each element in the
virtual network separately. For ESXi hosts, firewall rules associate services
with corresponding firewalls and can open and close the firewall according
to the status of the service. See ESXi Firewall Configuration.
You can also open ports on Platform Services Controller and
vCenter Server instances explicitly. See Required Ports for vCenter Server
and Platform Services Controller and Additional vCenter Server TCP and
UDP Ports.
Consider network
security policies
Network security policies provide protection of traffic against MAC address
impersonation and unwanted port scanning. The security policy of a
standard or distributed switch is implemented in Layer 2 (Data Link Layer)
of the network protocol stack. The three elements of the security policy are
promiscuous mode, MAC address changes, and forged transmits.
See the vSphere Networking documentation for instructions.
Secure VM networking The methods that you use to secure VM networking depend on several
factors, including:
nThe guest operating system that is installed.
nWhether the VMs operate in a trusted environment
Virtual switches and distributed virtual switches provide significant
protection when used with other common security practices, such as
installing firewalls.
See Chapter 10 Securing vSphere Networking.
Consider VLANs to
protect your
environment
ESXi supports IEEE 802.1q VLANs. VLANs let you segment a physical
network. You can use VLANs to further protect the VM network or storage
configuration. When you use VLANS, two VMs on the same physical
network cannot send packets to or receive packets from each other unless
they are on the same VLAN.
See Securing Virtual Machines with VLANs.
Secure connections to
virtualized storage
A VM stores operating system files, program files, and other data on a
virtual disk. Each virtual disk appears to the VM as a SCSI drive that is
connected to a SCSI controller. A VM is isolated from storage details and
cannot access the information about the LUN where its virtual disk resides.
The Virtual Machine File System (VMFS) is a distributed file system and
volume manager that presents virtual volumes to the ESXi host. You are
responsible for securing the connection to storage. For example, if you are
using iSCSI storage, you can set up your environment to use CHAP. If
required by company policy, you can set up mutual CHAP. Use
vSphere Web Client or CLIs to set up CHAP.
vSphere Security
VMware, Inc. 14
See Storage Security Best Practices.
Evaluate the use of
IPSec
ESXi supports IPSec over IPv6. You cannot use IPSec over IPv4.
See Internet Protocol Security.
In addition, evaluate whether VMware NSX for vSphere is a good solution for securing the networking
layer in your environment.
Passwords in Your vSphere Environment
Password restrictions, password expiration, and account lockout in your vSphere environment depend on
the system that the user targets, who the user is, and how policies are set.
ESXi Passwords
ESXi password restrictions are determined by the Linux PAM module pam_passwdqc. See the Linux
manpage for pam_passwdqc and see ESXi Passwords and Account Lockout.
Passwords for vCenter Server and Other vCenter Services
vCenter Single Sign-On manages authentication for all users who log in to vCenter Server and other
vCenter services. The password restrictions, password expiration, and account lockout depend on the
user's domain and on who the user is.
vCenter Single Sign-On
Administrator
The password for the vCenter Single Sign-On administrator is
administrator@vsphere.local by default or administrator@mydomain if you
specified a different domain during installation. This password does not
expire. In all other regards, the password must follow the restrictions that
are set in the vCenter Single Sign-On password policy. See Platform
Services Controller Administration for details.
If you forget the password for this user, search the VMware Knowledge
Base system for information on resetting this password. The reset requires
additional privileges such as root access to the vCenter Server system.
Other Users of the
vCenter Single Sign-On
Domain
Passwords for other vsphere.local users, or users of the domain that you
specified during installation, must follow the restrictions that are set by the
vCenter Single Sign-On password policy and lockout policy. See Platform
Services Controller Administration for details. These passwords expire after
90 days by default. Administrators can change the expiration as part of the
password policy.
If you forget your vsphere.local password, an administrator user can reset
the password using the dir-cli command.
Other Users Password restrictions, password expiration, and account lockout for all
other users are determined by the domain (identity source) to which the
user can authenticate.
vSphere Security
VMware, Inc. 15

vCenter Single Sign-On supports one default identity source. Users can log
in to the corresponding domain with the vSphere Web Client with just their
user names. If users want to log in to a non-default domain, they can
include the domain name, that is, specify user@domain or domain\user.
The domain password parameters apply to each domain.
Passwords for vCenter Server Appliance Direct Console User
Interface Users
The vCenter Server Appliance is a preconfigured Linux-based virtual machine that is optimized for
running vCenter Server and the associated services on Linux.
When you deploy the vCenter Server Appliance, you specify these passwords.
nPassword for the root user of the appliance Linux operating system.
nPassword for the administrator of the vCenter Single Sign-On domain, administrator@vsphere.local
by default.
You can change the root user password and perform other vCenter Server Appliance local user
management tasks from the appliance console. See vCenter Server Appliance Configuration.
Security Best Practices and Resources
If you follow best practices, your ESXi and vCenter Server can be as secure as or even more secure than
an environment that does not include virtualization.
This manual includes best practices for the different components of your vSphere infrastructure.
Table 1‑1. Security Best Practices
vSphere component Resource
ESXi host Chapter 3 Securing ESXi Hosts
vCenter Server system vCenter Server Security Best Practices
Virtual machine Virtual Machine Security Best Practices
vSphere Networking vSphere Networking Security Best Practices
This manual is only one of the sources you need to ensure a secure environment.
VMware security resources, including security alerts and downloads, are available on the Web.
vSphere Security
VMware, Inc. 16

Table 1‑2. VMware Security Resources on the Web
Topic Resource
VMware security policy, up-to-date security alerts,
security downloads, and focus discussions of
security topics.
http://www.vmware.com/go/security
Corporate security response policy http://www.vmware.com/support/policies/security_response.html
VMware is committed to helping you maintain a secure environment. Security
issues are corrected in a timely manner. The VMware Security Response
Policy states our commitment to resolve possible vulnerabilities in our
products.
Third-party software support policy http://www.vmware.com/support/policies/
VMware supports a variety of storage systems, software agents such as
backup agents, system management agents, and so forth. You can find lists
of agents, tools, and other software that supports ESXi by searching
http://www.vmware.com/vmtn/resources/ for ESXi compatibility guides.
The industry offers more products and configurations than VMware can test.
If VMware does not list a product or configuration in a compatibility guide,
Technical Support will attempt to help you with any problems, but cannot
guarantee that the product or configuration can be used. Always evaluate
security risks for unsupported products or configurations carefully.
Compliance and security standards, as well as
partner solutions and in-depth content about
virtualization and compliance
http://www.vmware.com/go/compliance
Information on security certifications and validations
such as CCEVS and FIPS for different versions of
the components of vSphere.
https://www.vmware.com/support/support-resources/certifications.html
Hardening guides for different versions of vSphere
and other VMware products.
https://www.vmware.com/support/support-resources/hardening-guides.html
Security of the VMware vSphere Hypervisor white
paper
http://www.vmware.com/files/pdf/techpaper/vmw-wp-secrty-vsphr-hyprvsr-
uslet-101.pdf
vSphere Security
VMware, Inc. 17

vSphere Permissions and User
Management Tasks 2
Authentication and authorization govern access. vCenter Single Sign-On supports authentication, which
means it determines whether a user can access vSphere components at all. Each user must also be
authorized to view or manipulate vSphere objects.
vSphere supports several different authorization mechanisms, discussed in Understanding Authorization
in vSphere. The focus of the information in this section is how vCenter Server permission model works
and how to perform user management tasks.
vCenter Server allows fine-grained control over authorization with permissions and roles. When you
assign a permission to an object in the vCenter Server object hierarchy, you specify which user or group
has which privileges on that object. To specify the privileges, you use roles, which are sets of privileges.
Initially, only the administrator user for the vCenter Single Sign-On domain, administrator@vsphere.local
by default, is authorized to log in to the vCenter Server system. That user can then proceed as follows:
1 Add an identity source in which users and groups are defined to vCenter Single Sign-On. See the
Platform Services Controller Administration documentation.
2 Give privileges to a user or group by selecting an object such as a virtual machine or a
vCenter Server system and assigning a role on that object for the user or group.
Roles, Privileges, and Permissions
(http://link.brightcove.com/services/player/bcpid2296383276001?
bctid=ref:video_roles_privileges_permissions_vsphere_web_client)
This chapter includes the following topics:
nUnderstanding Authorization in vSphere
nManaging Permissions for vCenter Components
nGlobal Permissions
nUsing Roles to Assign Privileges
nBest Practices for Roles and Permissions
nRequired Privileges for Common Tasks
VMware, Inc. 18
Understanding Authorization in vSphere
vSphere supports several models with fine-grained control for determining whether a user is allowed to
perform a task. vCenter Single Sign-On uses group membership in a vCenter Single Sign-On group to
decide what you are allowed to do. Your role on an object or your global permission determines whether
you're allowed to perform other tasks in vSphere.
Authorization Overview
vSphere 6.0 and later allows privileged users to give other users permissions to perform tasks. You can
use global permissions, or you can use local vCenter Server permissions to authorize other users for
individual vCenter Server instances.
vCenter Server
Permissions
The permission model for vCenter Server systems relies on assigning
permissions to objects in the object hierarchy. Each permission gives one
user or group a set of privileges, that is, a role for a selected object. For
example, you can select a virtual machine and select Add Permission
assign a role to a group of users in a domain that you select. That role
gives those users the corresponding privileges on the VM.
Global Permissions Global permissions are applied to a global root object that spans solutions.
For example, if both vCenter Server and vRealize Orchestrator are
installed, you can use global permissions. For example, you can give a
group of users Read permissions to all objects in both object hierarchies.
Global permissions are replicated across the vsphere.local domain. Global
permissions do not provide authorization for services managed through
vsphere.local groups. See Global Permissions.
Group Membership in
vCenter Single Sign-On
Groups
Members of a vsphere.local group can perform certain tasks. For example,
you can perform license management if you are a member of the
LicenseService.Administrators group. See the Platform Services Controller
Administration documentation.
ESXi Local Host
Permissions
If you are managing a standalone ESXi host that is not managed by a
vCenter Server system, you can assign one of the predefined roles to
users. See the vSphere Single Host Management - VMware Host Client
documentation.
For managed hosts, assign roles to the ESXi host object in the
vCenter Server inventory.
vSphere Security
VMware, Inc. 19
Understanding the Object-Level Permission Model
You authorize a user or group to perform tasks on vCenter objects by using permissions on the object.
The vSphere permission model relies on assigning permissions to objects in the vSphere object
hierarchy. Each permission gives one user or group a set of privileges, that is, a role for the selected
object. For example, a group of users might have the ReadOnly role on one VM and the Administrator
role on another VM.
The following concepts are important.
Permissions Each object in the vCenter Server object hierarchy has associated
permissions. Each permission specifies for one group or user which
privileges that group or user has on the object.
Users and Groups On vCenter Server systems, you can assign privileges only to
authenticated users or groups of authenticated users. Users are
authenticated through vCenter Single Sign-On. Users and groups must be
defined in the identity source that vCenter Single Sign-On uses to
authenticate. Define users and groups using the tools in your identity
source, for example, Active Directory.
Privileges Privileges are fine-grained access controls. You can group those privileges
into roles, which you can then map to users or groups.
Roles Roles are sets of privileges. Roles allow you to assign permissions on an
object based on a typical set of tasks that users perform. Default roles,
such as Administrator, are predefined on vCenter Server and cannot be
changed. Other roles, such as Resource Pool Administrator, are predefined
sample roles. You can create custom roles either from scratch or by cloning
and modifying sample roles. See Create a Custom Role.
Figure 2‑1. vSphere Permissions
Permission
vSphere object
User or group
Role
Privilege
Privilege
Privilege
Privilege
To assign permissions to an object, you follow these steps:
1 Select the object to which you want to apply the permission in the vCenter object hierarchy.
vSphere Security
VMware, Inc. 20

2 Select the group or user that should have privileges on the object.
3 Select individual privileges or a role, that is a set of privileges, that the group or user should have on
the object.
By default, permissions propagate, that is the group or user has the selected role on the selected
object and its child objects.
vCenter Server offers predefined roles, which combine frequently used privilege sets. You can also create
custom roles by combining a set of roles.
Permissions must often be defined on both a source object and a destination object. For example, if you
move a virtual machine, you need privileges on that virtual machine, but also privileges on the destination
data center.
See the following information.
To find out about... See...
Creating custom roles. Create a Custom Role
All privileges and the objects to which you can apply the
privileges
Chapter 13 Defined Privileges
Sets of privileges that are required on different objects for
different tasks.
Required Privileges for Common Tasks
The permissions model for standalone ESXi hosts is simpler. See Assigning Privileges for ESXi Hosts.
Hierarchical Inheritance of Permissions
When you assign a permission to an object, you can choose whether the permission propagates down
the object hierarchy. You set propagation for each permission. Propagation is not universally applied.
Permissions defined for a child object always override the permissions that are propagated from parent
objects.
The figure illustrates the inventory hierarchy and the paths by which permissions can propagate.
Note Global permissions support assigning privileges across solutions from a global root object. See
Global Permissions.
vSphere Security
VMware, Inc. 21
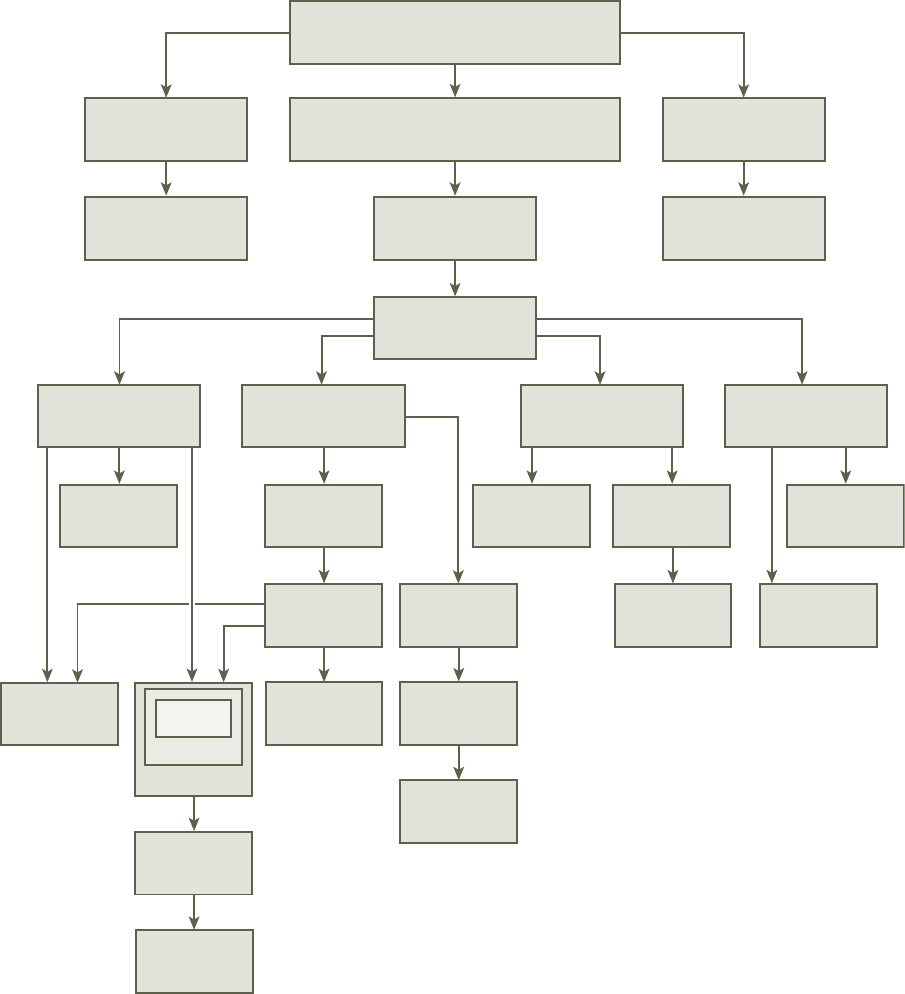
Figure 2‑2. vSphere Inventory Hierarchy
template host VDS datastore
cluster
vApp
vApp
vApp
virtual
machine
virtual
machine
resource
pool
resource
pool
virtual
machine
virtual
machine
resource
pool
standard
switch
datastore
cluster
distributed
port group
VM folder host folder
data center
vCenter Server
(vCenter Server instance level)
network
folder
datastore
folder
data center
folder
root object
(global permissions level)
tag category
tag
content library
library item
Most inventory objects inherit permissions from a single parent object in the hierarchy. For example, a
datastore inherits permissions from either its parent datastore folder or parent data center. Virtual
machines inherit permissions from both the parent virtual machine folder and the parent host, cluster, or
resource pool simultaneously.
For example, you can set permissions for a distributed switch and its associated distributed port groups,
by setting permissions on a parent object, such as a folder or data center. You must also select the option
to propagate these permissions to child objects.
vSphere Security
VMware, Inc. 22
Permissions take several forms in the hierarchy:
Managed entities Privileged users can define permissions on managed entities.
nClusters
nData centers
nDatastores
nDatastore clusters
nFolders
nHosts
nNetworks (except vSphere Distributed Switches)
nDistributed port groups
nResource pools
nTemplates
nVirtual machines
nvSphere vApps
Global entities You cannot modify permissions on entities that derive permissions from the
root vCenter Server system.
nCustom fields
nLicenses
nRoles
nStatistics intervals
nSessions
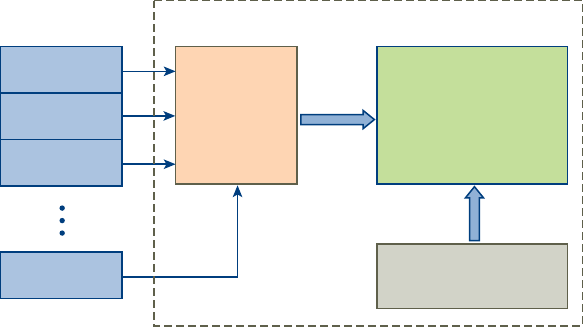
Multiple Permission Settings
Objects might have multiple permissions, but only one permission for each user or group. For example,
one permission might specify that Group A has Administrator privileges on an object. Another permission
might specify that Group B might have Virtual Machine Administrator privileges on the same object.
If an object inherits permissions from two parent objects, the permissions on one object are added to the
permissions on the other object. For example, assume that a virtual machine is in a virtual machine folder
and also belongs to a resource pool. That virtual machine inherits all permission settings from both the
virtual machine folder and the resource pool.
Permissions applied on a child object always override permissions that are applied on a parent object.
See Example 2: Child Permissions Overriding Parent Permissions.
vSphere Security
VMware, Inc. 23
If multiple group permissions are defined on the same object and a user belongs to two or more of those
groups, two situations are possible:
nNo permission for the user is defined directly on the object. In that case, the user has the privileges
that the groups have on that object.
nA permission for the user is defined directly on the object. In that case, the user's permission takes
precedence over all group permissions.
Example 1: Inheritance of Multiple Permissions
This example illustrates how an object can inherit multiple permissions from groups that are granted
permission on a parent object.
In this example, two permissions are assigned on the same object for two different groups.
nRole 1 can power on virtual machines.
nRole 2 can take snapshots of virtual machines.
nGroup A is granted Role 1 on VM Folder, with the permission set to propagate to child objects.
nGroup B is granted Role 2 on VM Folder, with the permission set to propagate to child objects.
nUser 1 is not assigned specific privileges.
User 1, who belongs to groups A and B, logs on. User 1 can both power on and take snapshots of VM A
and VM B.
Figure 2‑3. Example 1: Inheritance of Multiple Permissions
group B + role 2
user 1 has privileges
of role 1 and role 2
group A + role 1
VM A
VM B
VM Folder
Example 2: Child Permissions Overriding Parent Permissions
This example illustrates how permissions that are assigned on a child object can override permissions
that are assigned on a parent object. You can use this overriding behavior to restrict user access to
particular areas of the inventory.
In this example, permissions are defined on two different objects for two different groups.
nRole 1 can power on virtual machines.
nRole 2 can take snapshots of virtual machines.
nGroup A is granted Role 1 on VM Folder, with the permission set to propagate to child objects.
nGroup B is granted Role 2 on VM B.
vSphere Security
VMware, Inc. 24
User 1, who belongs to groups A and B, logs on. Because Role 2 is assigned at a lower point in the
hierarchy than Role 1, it overrides Role 1 on VM B. User 1 can power on VM A, but not take snapshots.
User 1 can take snapshots of VM B, but not power it on.
Figure 2‑4. Example 2: Child Permissions Overriding Parent Permissions
VM A
VM B
VM Folder
group B + role 2
user 1 has privileges
of role 1 only
user 1 has privileges
of role 2 only
group A + role 1
Example 3: User Role Overriding Group Role
This example illustrates how the role assigned directly to an individual user overrides the privileges
associated with a role assigned to a group.
In this example, permissions are defined on the same object. One permission associates a group with a
role, the other permission associates an individual user with a role. The user is a member of the group.
nRole 1 can power on virtual machines.
nGroup A is granted Role 1 on VM Folder.
nUser 1 is granted No Access role on VM Folder.
User 1, who belongs to group A, logs on. The No Access role granted to User 1 on VM Folder overrides
the role assigned to the group. User 1 has no access to VM Folder or VMs A and B.
Figure 2‑5. Example 3: User Permissions Overriding Group Permissions
VM A
VM B
VM Folder
user 1 + no access
user 1 has no access to the folder
or the virtual machines
group A + role 1
Managing Permissions for vCenter Components
A permission is set on an object in the vCenter object hierarchy. Each permission associates the object
with a group or user and the group's or user's access roles. For example, you can select a virtual machine
object, add one permission that gives the ReadOnly role to Group 1, and add a second permission that
gives the Administrator role to User 2.
By assigning a different role to a group of users on different objects, you control the tasks that those users
can perform in your vSphere environment. For example, to allow a group to configure memory for the
host, select that host and add a permission that grants a role to that group that includes the
Host.Configuration.Memory Configuration privilege.
vSphere Security
VMware, Inc. 25
To manage permissions from the vSphere Web Client, you need to understand the following concepts:
Permissions Each object in the vCenter Server object hierarchy has associated
permissions. Each permission specifies for one group or user which
privileges that group or user has on the object.
Users and Groups On vCenter Server systems, you can assign privileges only to
authenticated users or groups of authenticated users. Users are
authenticated through vCenter Single Sign-On. Users and groups must be
defined in the identity source that vCenter Single Sign-On uses to
authenticate. Define users and groups using the tools in your identity
source, for example, Active Directory.
Privileges Privileges are fine-grained access controls. You can group those privileges
into roles, which you can then map to users or groups.
Roles Roles are sets of privileges. Roles allow you to assign permissions on an
object based on a typical set of tasks that users perform. Default roles,
such as Administrator, are predefined on vCenter Server and cannot be
changed. Other roles, such as Resource Pool Administrator, are predefined
sample roles. You can create custom roles either from scratch or by cloning
and modifying sample roles. See Create a Custom Role.
You can assign permissions to objects at different levels of the hierarchy, for example, you can assign
permissions to a host object or to a folder object that includes all host objects. See Hierarchical
Inheritance of Permissions. You can also assign permissions to a global root object to apply the
permissions to all object in all solutions. See Global Permissions.
Add a Permission to an Inventory Object
After you create users and groups and define roles, you must assign the users and groups and their roles
to the relevant inventory objects. You can assign the same permissions to multiple objects simultaneously
by moving the objects into a folder and setting the permissions on the folder.
When you assign permissions from the vSphere Client, user and group names must match Active
Directory precisely, including case. If you upgraded from earlier versions of vSphere, check for case
inconsistencies if you experience problems with groups.
Prerequisites
On the object whose permissions you want to modify, you must have a role that includes the
Permissions.Modify permission privilege.
Procedure
1Browse to the object for which you want to assign permissions in the vSphere Client object navigator.
2Click the Permissions tab.
3Click the Add icon, and click Add.
vSphere Security
VMware, Inc. 26

4Select the user or group that will have the privileges defined by the selected role.
a From the Domain drop-down menu, select the domain for the user or group.
b Type a name in the Search box or select a name from the list.
The system searches user names, group names, and descriptions.
c Select the user or group and click Add.
The name is added to either the Users or Groups list.
d (Optional) Click Check Names to verify that the user or group exists in the identity source.
e Click OK.
5Select a role from the Assigned Role drop-down menu.
The roles that are assigned to the object appear in the menu. The privileges contained in the role are
listed in the section below the role title.
6(Optional) To limit propagation, deselect the Propagate to Child Objects check box.
The role is applied only to the selected object and does not propagate to the child objects.
7Click OK to add the permission.
Change or Remove Permissions
After a user or group and role pair is set for an inventory object, you can change the role paired with the
user or group or change the setting of the Propagate check box. You can also remove the permission
setting.
Procedure
1Browse to the object in the vSphere Web Client object navigator.
2Click the Permissions tab.
3Click a row to select a permission.
Task Steps
Change permissions a Click the Change role on permission icon.
b Select a role for the user or group from the Assigned Role drop-down menu.
c Toggle the Propagate to children check box if you want to make changes to
permission inheritance.
d Click OK
Remove permissions Click the Remove permission icon.
vSphere Security
VMware, Inc. 27

Change User Validation Settings
vCenter Server periodically validates its user and group lists against the users and groups in the user
directory. It then removes users or groups that no longer exist in the domain. You can disable validation or
change the interval between validations. If you have domains with thousands of users or groups, or if
searches take a long time to complete, consider adjusting the search settings.
For vCenter Server versions before vCenter Server 5.0, these settings apply to an Active Directory
associated with vCenter Server. For vCenter Server 5.0 and later, these settings apply to vCenter Single
Sign-On identity sources.
Note This procedure applies only to vCenter Server user lists. You cannot search ESXi user lists in the
same way.
Procedure
1Browse to the vCenter Server system in the vSphere Web Client object navigator.
2Select Configure and click Settings > General.
3Click Edit and select User directory.
4Change the values as needed and click OK.
Option Description
User directory timeout Timeout interval, in seconds, for connecting to the Active Directory server. This
value specifies the maximum amount of time vCenter Server allows a search to
run on the selected domain. Searching large domains can take a long time.
Query limit Select the check box to set a maximum number of users and groups that
vCenter Server displays.
Query limit size Maximum number of users and groups from the selected domain that
vCenter Server displays in the Select Users or Groups dialog box. If you enter 0
(zero), all users and groups appear.
Validation Deselect the check box to disable validation
Validation Period Specifies how often vCenter Server validates permissions, in minutes.
Global Permissions
Global permissions are applied to a global root object that spans solutions, for example, both
vCenter Server and vRealize Orchestrator. Use global permissions to give a user or group privileges for
all objects in all object hierarchies.
vSphere Security
VMware, Inc. 28

Each solution has a root object in its own object hierarchy. The global root object acts as a parent object
to the root objects for all solutions. You can assign global permissions to users or groups, and decide on
the role for each user or group. The role determines the set of privileges that the user or group has for all
objects in the hierarchy. You can assign a predefined role or create custom roles. See Using Roles to
Assign Privileges. It is important to distinguish between vCenter Server permissions and global
permissions.
vCenter Server
permissions
You usually apply a permission to a vCenter Server inventory object such
as an ESXi host or a virtual machine. When you do, you specify that a user
or group has a set of privileges, called a role, on the object.
Global permissions Global permissions give a user or group privileges to view or manage all
objects in each of the inventory hierarchies in your deployment.
If you assign a global permission and do not select Propagate, the users or
groups associated with this permission do not have access to the objects in
the hierarchy. They only have access to some global functionality such as
creating roles.
Important Use global permissions with care. Verify that you really want to assign permissions to all
objects in all inventory hierarchies.
Add a Global Permission
You can use global permissions to give a user or group privileges for all objects in all inventory
hierarchies in your deployment.
Important Use global permissions with care. Verify that you really want to assign permissions to all
objects in all inventory hierarchies.
Prerequisites
To perform this task, you must have Permissions.Modify permission privileges on the root object for all
inventory hierarchies.
Procedure
1Click Administration and select Global Permissions in the Access Control area.
2Click Manage, and click the Add permission icon.
3Select the user or group that will have the privileges defined by the selected role.
a From the Domain drop-down menu, select the domain for the user or group.
b Type a name in the Search box or select a name from the list.
The system searches user names, group names, and descriptions.
c Select the user or group and click Add.
The name is added to either the Users or Groups list.
vSphere Security
VMware, Inc. 29

d (Optional) Click Check Names to verify that the user or group exists in the identity source.
e Click OK.
4Select a role from the Assigned Role drop-down menu.
The roles that are assigned to the object appear in the menu. The privileges contained in the role are
listed in the section below the role title.
5Decide whether to leave the Propagate to children check box selected.
If you assign a global permission and do not select Propagate, the users or groups associated with
this permission do not have access to the objects in the hierarchy. They only have access to some
global functionality such as creating roles.
6Click OK.
Permissions on Tag Objects
In the vCenter Server object hierarchy, tag objects are not children of vCenter Server but are created at
the vCenter Server root level. In environments with multiple vCenter Server instances, tag objects are
shared across vCenter Server instances. Permissions for tag objects work differently than permissions for
other objects in the vCenter Server object hierarchy.
Only Global Permissions or Permissions Assigned to the Tag Object Apply
If you grant permissions to a user on a vCenter Server inventory object, such as a virtual machine, that
user can perform the tasks associated with the permission. However, the user cannot perform tag
operations on the object.
For example, if you grant the Assign vSphere Tag privilege to user Dana on host TPA, that permission
does not affect whether Dana can assign tags on host TPA. Dana must have the Assign vSphere Tag
privilege at the root level, that is, a global permission, or must have the privilege for the tag object.
Table 2‑1. How Global Permissions and Tag Object Permissions Aect What Users Can Do
Global Permission Tag-Level Permission
vCenter Server Object-
Level Permission Effective Permission
No tagging privileges assigned. Dana has Assign or
Unassign vSphere Tag
privileges for the tag.
Dana has Delete vSphere
Tag privileges on ESXi host
TPA.
Dana has Assign or Unassign
vSphere Tag privileges for the
tag.
Dana has Assign or Unassign
vSphere Tag privileges.
No privileges assigned for the
tag.
Dana has Delete vSphere
Tag privileges on ESXi host
TPA.
Dana has Assign or Unassign
vSphere Tag global privileges.
That includes privileges at the
tag level.
No tagging privileges assigned. No privileges assigned for the
tag.
Dana has Assign or
Unassign vSphere Tag
privileges on ESXi host TPA.
Dana does not have tagging
privileges on any object,
including host TPA.
vSphere Security
VMware, Inc. 30

Global Permissions Complement Tag Object Permissions
Global permissions, that is, permissions that are assigned on the root object, complement permissions on
tag objects when the permissions on the tag objects are more restrictive. The vCenter Server permissions
do not affect the tag objects.
For example, assume that you assign the Delete vSphere Tag privilege to user Robin at the root level by
using global permissions. For the tag Production, you do not assign the Delete vSphere Tag privilege to
Robin. In that case, Robin has the privilege for the tag Production because Robin has the global
permission. You cannot restrict privileges unless you modify the global permission.
Table 2‑2. Global Permissions Complement Tag-Level Permissions
Global Permission Tag-Level Permission Effective Permission
Robin has Delete vSphere Tag
privileges
Robin does not have Delete
vSphere Tag privileges for the
tag.
Robin has Delete vSphere Tag privileges.
No tagging privileges assigned Robin does not have Delete
vSphere Tag privileges assigned
for the tag.
Robin does not have Delete vSphere Tag privileges
Tag-Level Permissions Can Extend Global Permissions
You can use tag-level permissions to extend global permissions. That means users can have both a
global permission and a tag-level permission on a tag.
Table 2‑3. Global Permissions Extend Tag-Level Permissions
Global Permission Tag-Level Permission Effective Permission
Lee has Assign or Unassign
vSphere Tag privilege.
Lee has Delete vSphere Tag
privilege.
Lee has the Assign vSphere Tag privilege and the
Delete vSphere Tag privilege for the tag.
No tagging privileges assigned. Lee has Delete vSphere Tag
privilege assigned for the tag.
Lee has the Delete vSphere Tag privilege for the tag.
Using Roles to Assign Privileges
A role is a predefined set of privileges. Privileges define rights to perform actions and read properties. For
example, the Virtual Machine Administrator role allows a user to read and change virtual machine
attributes.
When you assign permissions, you pair a user or group with a role and associate that pairing with an
inventory object. A single user or group can have different roles for different objects in the inventory.
For example, assume that you have two resource pools in your inventory, Pool A and Pool B. You can
assign group Sales the Virtual Machine User role on Pool A, and the Read Only role on Pool B. With
these assignments, the users in group Sales can turn on virtual machines in Pool A, but can only view
virtual machines in Pool B.
vSphere Security
VMware, Inc. 31

vCenter Server provides system roles and sample roles by default.
System roles System roles are permanent. You cannot edit the privileges associated with
these roles.
Sample roles VMware provides sample roles for certain frequently performed
combination of tasks. You can clone, modify, or remove these roles.
Note To avoid losing the predefined settings in a sample role, clone the
role first and make modifications to the clone. You cannot reset the sample
to its default settings.
Users can schedule tasks only if they have a role that includes privileges to perform that task at the time
the task is created.
Note Changes to roles and privileges take effect immediately, even if the users involved are logged in.
The exception is searches, where changes take effect after the user has logged out and logged back in.
Custom Roles in vCenter Server and ESXi
You can create custom roles for vCenter Server and all objects that it manages, or for individual hosts.
vCenter Server Custom
Roles (Recommended)
Create custom roles by using the role-editing facilities in the
vSphere Web Client to create privilege sets that match your needs.
ESXi Custom Roles You can create custom roles for individual hosts by using a CLI or the
VMware Host Client. See the vSphere Single Host Management - VMware
Host Client documentation. Custom host roles are not accessible from
vCenter Server.
If you manage ESXi hosts through vCenter Server, do not maintain custom
roles in both the host and vCenter Server. Define roles at the
vCenter Server level.
When you manage a host using vCenter Server, the permissions associated with that host are created
through vCenter Server and stored on vCenter Server. If you connect directly to a host, only the roles that
are created directly on the host are available.
Note When you add a custom role and do not assign any privileges to it, the role is created as a Read
Only role with three system-defined privileges: System.Anonymous, System.View, and System.Read.
Creating Roles in the vSphere Web Client
(http://link.brightcove.com/services/player/bcpid2296383276001?
bctid=ref:video_creating_role_in_vsphere_webclient)
Create a Custom Role
You can create vCenter Server custom roles to suit the access control needs of your environment. You
can create a role from scratch or clone an existing role.
vSphere Security
VMware, Inc. 32

You can create or edit a role on a vCenter Server system that is part of the same vCenter Single Sign-On
domain as other vCenter Server systems. The VMware Directory Service (vmdir) propagates the role
changes that you make to all other vCenter Server systems in the group. Assignments of roles to specific
users and objects are not shared across vCenter Server systems.
Prerequisites
Verify that you are logged in as a user with Administrator privileges.
Procedure
1Log in to vCenter Server.
2Select Home and click Administration > Roles.
3Create the role:
Option Description
To create the role from scratch Click the Create role button.
To create the role by cloning Select a role, and click the Clone role button.
See vCenter Server System Roles for more information.
4Type a name for the new role.
5Select and deselect privileges for the role.
See Chapter 13 Defined Privileges for more information.
6Click OK.
What to do next
You can now create permissions by selecting an object and assigning the role to a user or group for that
object.
vCenter Server System Roles
A role is a predefined set of privileges. When you add permissions to an object, you pair a user or group
with a role. vCenter Server includes several system roles, which you cannot change.
vCenter Server provides a few default roles. You cannot change the privileges associated with the default
roles. The default roles are organized as a hierarchy. Each role inherits the privileges of the previous role.
For example, the Administrator role inherits the privileges of the Read Only role.
The vCenter Server role hierarchy also includes several sample roles. You can clone a sample role to
create a similar role.
vSphere Security
VMware, Inc. 33
If you create a rule, it does not inherit privileges from any of the system roles.
Administrator Role Users with the Administrator role for an object are allowed to view and
perform all actions on the object. This role also includes all privileges of the
Read Only role. If you have the Administrator role on an object, you can
assign privileges to individual users and groups.
If you are acting in the Administrator role in vCenter Server, you can assign
privileges to users and groups in the default vCenter Single Sign-On
identity source. Supported identity services include Windows Active
Directory and OpenLDAP 2.4.
By default, the administrator@vsphere.local user has the Administrator role
on both vCenter Single Sign-On and vCenter Server after installation. That
user can then associate other users with the Administrator role on
vCenter Server.
Read Only Role Users with the Read Only role for an object are allowed to view the state of
the object and details about the object. For example, users with this role
can view virtual machine, host, and resource pool attributes, but cannot
view the remote console for a host. All actions through the menus and
toolbars are disallowed.
No Access Role Users with the No Access role for an object cannot view or change the
object in any way. New users and groups are assigned this role by default.
You can change the role on an object-by-object basis.
The administrator of the vCenter Single Sign-On domain,
administrator@vsphere.local by default, the root user, and vpxuser are
assigned the Administrator role by default. Other users are assigned the No
Access role by default.
No Cryptography
Administrator Role
Users with the No cryptography administrator role for an object have the
same privileges as users with the Administrator role, except for
Cryptographic operations privileges. This role allows administrators to
designate other administrators that cannot encrypt or decrypt virtual
machines or access encrypted data, but that can perform all other
administrative tasks.
Best practice is to create a user at the root level and assign the Administrator role to that user. After
creating a named user with Administrator privileges, you can remove the root user from any permissions
or change its role to No Access.
Best Practices for Roles and Permissions
Follow best practices for roles and permissions to maximize the security and manageability of your
vCenter Server environment.
vSphere Security
VMware, Inc. 34
VMware recommends the following best practices when configuring roles and permissions in your
vCenter Server environment:
nWhere possible, assign a role to a group rather than individual users.
nGrant permissions only on the objects where they are needed, and assign privileges only to users or
groups that must have them. Use the minimum number of permissions to make it easier to
understand and manage your permissions structure.
nIf you assign a restrictive role to a group, check that the group does not contain the Administrator
user or other users with administrative privileges. Otherwise, you might unintentionally restrict
administrators' privileges in the parts of the inventory hierarchy where you have assigned that group
the restrictive role.
nUse folders to group objects. For example, to grant modify permission on one set of hosts and view
permission on another set of hosts, place each set of hosts in a folder.
nUse caution when adding a permission to the root vCenter Server objects. Users with privileges at the
root level have access to global data on vCenter Server, such as roles, custom attributes,
vCenter Server settings.
nConsider enabling propagation when you assign permissions to an object. Propagation ensures that
new objects in the object hierarchy inherit permissions. For example, you can assign a permission to
a virtual machine folder and enable propagation to ensure the permission applies to all VMs in the
folder.
nUse the No Access role to mask specific areas of the hierarchy. The No Access role restricts access
for the users or groups with that role.
nChanges to licenses propagate as follows:
nTo all vCenter Server systems that are linked to the same Platform Services Controller.
nTo Platform Services Controller instances in the same vCenter Single Sign-On domain.
nLicense propagation happens even if the user does not have privileges on all vCenter Server
systems.
Required Privileges for Common Tasks
Many tasks require permissions on multiple objects in the inventory. If the user who attempts to perform
the task only has privileges on one object, the task cannot complete successfully.
The following table lists common tasks that require more than one privilege. You can add permissions to
inventory objects by pairing a user with one of the predefined roles or with multiple privileges. If you
expect that you assign a set of privileges multiple times, create custom roles.
If the task that you want to perform is not in this table, the following rules explain where you must assign
permissions to allow particular operations:
nAny operation that consumes storage space requires the Datastore.Allocate Space privilege on the
target datastore, and the privilege to perform the operation itself. You must have these privileges, for
example, when creating a virtual disk or taking a snapshot.
vSphere Security
VMware, Inc. 35

nMoving an object in the inventory hierarchy requires appropriate privileges on the object itself, the
source parent object (such as a folder or cluster), and the destination parent object.
nEach host and cluster has its own implicit resource pool that contains all the resources of that host or
cluster. Deploying a virtual machine directly to a host or cluster requires the Resource.Assign
Virtual Machine to Resource Pool privilege.
Table 2‑4. Required Privileges for Common Tasks
Task Required Privileges Applicable Role
Create a virtual machine On the destination folder or data center:
nVirtual machine .Inventory.Create new
nVirtual machine.Configuration.Add new disk (if creating a new virtual
disk)
nVirtual machine.Configuration.Add existing disk (if using an existing
virtual disk)
nVirtual machine.Configuration.Raw device (if using an RDM or SCSI
pass-through device)
Administrator
On the destination host, cluster, or resource pool:
Resource.Assign virtual machine to resource pool
Resource pool
administrator or
Administrator
On the destination datastore or the folder that contains the datastore:
Datastore.Allocate space
Datastore
Consumer or
Administrator
On the network that the virtual machine will be assigned to:
Network.Assign network
Network
Consumer or
Administrator
Power on a virtual machine On the data center in which the virtual machine is deployed:
Virtual machine .Interaction .Power On
Virtual Machine
Power User or
Administrator
On the virtual machine or folder of virtual machines:
Virtual machine .Interaction .Power On
Deploy a virtual machine from a
template
On the destination folder or data center:
nVirtual machine .Inventory.Create from existing
nVirtual machine.Configuration.Add new disk
Administrator
On a template or folder of templates:
Virtual machine .Provisioning.Deploy template
Administrator
On the destination host, cluster or resource pool:
Resource.Assign virtual machine to resource pool
Administrator
On the destination datastore or folder of datastores:
Datastore.Allocate space
Datastore
Consumer or
Administrator
On the network that the virtual machine will be assigned to:
Network.Assign network
Network
Consumer or
Administrator
Take a virtual machine
snapshot
On the virtual machine or a folder of virtual machines:
Virtual machine .Snapshot management. Create snapshot
Virtual Machine
Power User or
Administrator
vSphere Security
VMware, Inc. 36

Table 2‑4. Required Privileges for Common Tasks (Continued)
Task Required Privileges Applicable Role
Move a virtual machine into a
resource pool
On the virtual machine or folder of virtual machines:
nResource.Assign virtual machine to resource pool
nVirtual machine .Inventory.Move
Administrator
On the destination resource pool:
Resource.Assign virtual machine to resource pool
Administrator
Install a guest operating system
on a virtual machine
On the virtual machine or folder of virtual machines:
nVirtual machine.Interaction .Answer question
nVirtual machine .Interaction .Console interaction
nVirtual machine .Interaction .Device connection
nVirtual machine .Interaction .Power Off
nVirtual machine .Interaction .Power On
nVirtual machine .Interaction .Reset
nVirtual machine .Interaction .Configure CD media (if installing from a
CD)
nVirtual machine .Interaction .Configure floppy media (if installing
from a floppy disk)
nVirtual machine .Interaction .VMware Tools install
Virtual Machine
Power User or
Administrator
On a datastore that contains the installation media ISO image:
Datastore.Browse datastore (if installing from an ISO image on a
datastore)
On the datastore to which you upload the installation media ISO image:
nDatastore.Browse datastore
nDatastore.Low level file operations
Virtual Machine
Power User or
Administrator
Migrate a virtual machine with
vMotion
On the virtual machine or folder of virtual machines:
nResource.Migrate powered on virtual machine
nResource.Assign Virtual Machine to Resource Pool (if destination is
a different resource pool from the source)
Resource Pool
Administrator or
Administrator
On the destination host, cluster, or resource pool (if different from the
source):
Resource.Assign virtual machine to resource pool
Resource Pool
Administrator or
Administrator
Cold migrate (relocate) a virtual
machine
On the virtual machine or folder of virtual machines:
nResource.Migrate powered off virtual machine
nResource.Assign virtual machine to resource pool (if destination is
a different resource pool from the source)
Resource Pool
Administrator or
Administrator
On the destination host, cluster, or resource pool (if different from the
source):
Resource.Assign virtual machine to resource pool
Resource Pool
Administrator or
Administrator
On the destination datastore (if different from the source):
Datastore.Allocate space
Datastore
Consumer or
Administrator
Migrate a virtual machine with
Storage vMotion
On the virtual machine or folder of virtual machines:
Resource.Migrate powered on virtual machine
Resource Pool
Administrator or
Administrator
vSphere Security
VMware, Inc. 37

Table 2‑4. Required Privileges for Common Tasks (Continued)
Task Required Privileges Applicable Role
On the destination datastore:
Datastore.Allocate space
Datastore
Consumer or
Administrator
Move a host into a cluster On the host:
Host.Inventory.Add host to cluster
Administrator
On the destination cluster:
Host.Inventory.Add host to cluster
Administrator
Encrypt a virtual machine Encryption tasks are possible only in environments that include
vCenter Server. In addition, the ESXi host must have encryption mode
enabled for most encryption tasks. The user who performs the task must
have the appropriate privileges. A set of Cryptographic Operations
privileges allows fine-grained control. See Prerequisites and Required
Privileges for Encryption Tasks.
Administrator
vSphere Security
VMware, Inc. 38
Securing ESXi Hosts 3
The ESXi hypervisor architecture has many built-in security features such as CPU isolation, memory
isolation, and device isolation. You can configure additional features such as lockdown mode, certificate
replacement, and smart card authentication for enhanced security.
An ESXi host is also protected with a firewall. You can open ports for incoming and outgoing traffic as
needed, but should restrict access to services and ports. Using the ESXi lockdown mode and limiting
access to the ESXi Shell can further contribute to a more secure environment. Starting with vSphere 6.0,
ESXi hosts participate in the certificate infrastructure. Hosts are provisioned with certificates that are
signed by the VMware Certificate Authority (VMCA) by default.
See the VMware white paper Security of the VMware vSphere Hypervisor for additional information on
ESXi security.
This chapter includes the following topics:
nGeneral ESXi Security Recommendations
nCertificate Management for ESXi Hosts
nCustomizing Hosts with the Security Profile
nAssigning Privileges for ESXi Hosts
nUsing Active Directory to Manage ESXi Users
nUsing vSphere Authentication Proxy
nConfiguring Smart Card Authentication for ESXi
nUsing the ESXi Shell
nUEFI Secure Boot for ESXi Hosts
nSecuring ESXi Hosts with Trusted Platform Module
nESXi Log Files
General ESXi Security Recommendations
To protect an ESXi host against unauthorized intrusion and misuse, VMware imposes constraints on
several parameters, settings, and activities. You can loosen the constraints to meet your configuration
needs. If you do, make sure that you are working in a trusted environment and take other security
measures.
VMware, Inc. 39
Built-In Security Features
Risks to the hosts are mitigated out of the box as follows:
nESXi Shell and SSH are disabled by default.
nOnly a limited number of firewall ports are open by default. You can explicitly open additional firewall
ports that are associated with specific services.
nESXi runs only services that are essential to managing its functions. The distribution is limited to the
features required to run ESXi.
nBy default, all ports that are not required for management access to the host are closed. Open ports if
you need additional services.
nBy default, weak ciphers are disabled and communications from clients are secured by SSL. The
exact algorithms used for securing the channel depend on the SSL handshake. Default certificates
created on ESXi use PKCS#1 SHA-256 with RSA encryption as the signature algorithm.
nA Tomcat Web service is used internally by ESXi to support access by Web clients. The service has
been modified to run only functions that a Web client requires for administration and monitoring. As a
result, ESXi is not vulnerable to the Tomcat security issues reported in broader use.
nVMware monitors all security alerts that can affect ESXi security and issues a security patch if
needed.
nInsecure services such as FTP and Telnet are not installed, and the ports for these services are
closed by default. Because more secure services such as SSH and SFTP are easily available, avoid
using these insecure services and use their safer alternatives. For example, use Telnet with SSL to
access virtual serial ports if SSH is unavailable and you must use Telnet.
If you must use insecure services and have implemented sufficient protection for the host, you can
explicitly open ports to support them.
nConsider using UEFI Secure Boot for your ESXi system. See UEFI Secure Boot for ESXi Hosts.
Additional Security Measures
Consider the following recommendations when evaluating host security and administration.
Limit access If you enable access to the Direct Console User Interface (DCUI) the
ESXi Shell, or SSH, enforce strict access security policies.
The ESXi Shell has privileged access to certain parts of the host. Provide
only trusted users with ESXi Shell login access.
Do not access
managed hosts directly
Use the vSphere Web Client to administer ESXi hosts that are managed by
a vCenter Server. Do not access managed hosts directly with the
VMware Host Client, and do not change managed hosts from the DCUI.
vSphere Security
VMware, Inc. 40

If you manage hosts with a scripting interface or API, do not target the host
directly. Instead, target the vCenter Server system that manages the host
and specify the host name.
Use DCUI only for
troubleshooting
Access the host from the DCUI or the ESXi Shell as the root user only for
troubleshooting. Use one of the GUI clients, or one of the VMware CLIs or
APIs to administer your ESXi hosts. If you use the ESXi Shell or SSH, limit
the accounts that have access and set timeouts.
Use only VMware
sources to upgrade
ESXi components
The host runs several third-party packages to support management
interfaces or tasks that you must perform. VMware only supports upgrades
to these packages that come from a VMware source. If you use a download
or patch from another source, you might compromise management
interface security or functions. Check third-party vendor sites and the
VMware knowledge base for security alerts.
Note Follow the VMware security advisories at http://www.vmware.com/security/.
Configure ESXi Hosts with Host Profiles
Host profiles allow you to set up standard configurations for your ESXi hosts and automate compliance to
these configuration settings. Host profiles allow you to control many aspects of host configuration
including memory, storage, networking, and so on.
You can configure host profiles for a reference host from the vSphere Web Client and apply the host
profile to all hosts that share the characteristics of the reference host. You can also use host profiles to
monitor hosts for host configuration changes. See the vSphere Host Profiles documentation.
You can attach the host profile to a cluster to apply it to all hosts in the cluster.
Procedure
1Set up the reference host to specification and create a host profile.
2Attach the profile to a host or cluster.
3Apply the host profile of the reference host to other hosts or clusters.
Use Scripts to Manage Host Configuration Settings
In environments with many hosts, managing hosts with scripts is faster and less error prone than
managing the hosts from the vSphere Web Client.
vSphere Security
VMware, Inc. 41
vSphere includes several scripting languages for host management. See the vSphere Command-Line
Documentation and the vSphere API/SDK Documentation for reference information and programming tips
and VMware Communities for additional tips about scripted management. The vSphere Administrator
documentation focuses on using the vSphere Web Client for management.
vSphere PowerCLI VMware vSphere PowerCLI is a Windows PowerShell interface to the
vSphere API. vSphere PowerCLI includes PowerShell cmdlets for
administering vSphere components.
vSphere PowerCLI includes more than 200 cmdlets, a set of sample
scripts, and a function library for management and automation. See the
vSphere PowerCLI Documentation.
vSphere Command-
Line Interface (vCLI)
vCLI includes a set of commands for managing ESXi hosts and virtual
machines. The installer, which also installs the vSphere SDK for Perl, runs
Windows or Linux systems and installs ESXCLI commands, vicfg-
commands, and a set of other vCLI commands. See vSphere Command-
Line Interface Documentation.
Starting with vSphere 6.0, you can also use one of the scripting interfaces to the vCloud Suite SDK such
as the vCloud Suite SDK for Python.
Procedure
1Create a custom role that has limited privileges.
For example, consider creating a role that has a set of privileges for managing hosts but no privileges
for managing virtual machines, storage, or networking. If the script you want to use only extracts
information, you can create a role with read-only privileges for the host.
2From the vSphere Web Client, create a service account and assign it the custom role.
You can create multiple custom roles with different levels of access if you want access to certain
hosts to be fairly limited.
vSphere Security
VMware, Inc. 42

3Write scripts to perform parameter checking or modification, and run them.
For example, you can check or set the shell interactive timeout of a host as follows:
Language Commands
vCLI (ESXCLI) esxcli <conn_options> system settings advanced
get /UserVars/ESXiShellTimeOut
esxcli --formatter=csv --format-param=fields="Path,Int Value"
system settings advanced list | grep /UserVars/ESXiShellTimeOut
PowerCLI #List UserVars.ESXiShellInteractiveTimeOut for each host
Get-VMHost | Select Name,
@{N="UserVars.ESXiShellInteractiveTimeOut";E={$_
| Get-AdvancedSetting -Name
UserVars.ESXiShellInteractiveTimeOut
| Select -ExpandProperty Value}}
# Set UserVars.ESXiShellTimeOut to 900 on all hosts
Get-VMHost
| Foreach { Get-AdvancedSetting -Entity $_ -Name
UserVars.ESXiShellInteractiveTimeOut | Set-AdvancedSetting -
Value 900 }
4In large environments, create roles with different access privileges and group hosts into folders
according to the tasks that you want to perform. You can then run scripts over different folders from
different service accounts.
5Verify that the changes happened after you run the command.
ESXi Passwords and Account Lockout
For ESXi hosts, you have to use a password with predefined requirements. You can change the required
length and character class requirement or allow pass phrases using the
Security.PasswordQualityControl advanced option.
ESXi uses the Linux PAM module pam_passwdqc for password management and control. See the man
page for pam_passwdqc for detailed information.
Note The default requirements for ESXi passwords can change from one release to the next. You can
check and change the default password restrictions using the Security.PasswordQualityControl
advanced option.
ESXi Passwords
ESXi enforces password requirements for access from the Direct Console User Interface, the ESXi Shell,
SSH, or the VMware Host Client.
nBy default, you have to include a mix of characters from four character classes: lowercase letters,
uppercase letters, numbers, and special characters such as underscore or dash when you create a
password.
vSphere Security
VMware, Inc. 43

nBy default, password length is more than 7 and less than 40.
nPasswords cannot contain a dictionary word or part of a dictionary word.
Note An uppercase character that begins a password does not count toward the number of character
classes used. A number that ends a password does not count toward the number of character classes
used.
Example ESXi Passwords
The following password candidates illustrate potential passwords if the option is set as follows.
retry=3 min=disabled,disabled,disabled,7,7
With this setting, passwords with one or two character classes and pass phrases are not allowed,
because the first three items are disabled. Passwords from three- and four-character classes require
seven characters. See the pam_passwdqc man page for details.
With these settings, the following passwords are allowed.
nxQaTEhb!: Contains eight characters from three character classes.
nxQaT3#A: Contains seven characters from four character classes.
The following password candidates do not meet requirements.
nXqat3hi: Begins with an uppercase character, reducing the effective number of character classes to
two. The minimum number of required character classes is three.
nxQaTEh2: Ends with a number, reducing the effective number of character classes to two. The
minimum number of required character classes is three.
ESXi Pass Phrase
Instead of a password, you can also use a pass phrase; however, pass phrases are disabled by default.
You can change this default or other settings, by using the Security.PasswordQualityControl
advanced option from the vSphere Web Client.
For example, you can change the option to the following.
retry=3 min=disabled,disabled,16,7,7
This example allows pass phrases of at least 16 characters and at least 3 words, separated by spaces.
For legacy hosts, changing the /etc/pamd/passwd file is still supported, but changing the file is
deprecated for future releases. Use the Security.PasswordQualityControl advanced option instead.
Changing Default Password Restrictions
You can change the default restriction on passwords or pass phrases by using the
Security.PasswordQualityControl advanced option for your ESXi host. See the vCenter Server and
Host Management documentation for information on setting ESXi advanced options.
vSphere Security
VMware, Inc. 44

You can change the default, for example, to require a minimum of 15 characters and a minimum number
of four words, as follows:
retry=3 min=disabled,disabled,15,7,7 passphrase=4
See the man page for pam_passwdqc for details.
Note Not all possible combinations of the options for pam_passwdqc have been tested. Perform
additional testing after you change the default password settings.
ESXi Account Lockout Behavior
Starting with vSphere 6.0, account locking is supported for access through SSH and through the vSphere
Web Services SDK. The Direct Console Interface (DCUI) and the ESXi Shell do not support account
lockout. By default, a maximum of ten failed attempts is allowed before the account is locked. The
account is unlocked after two minutes by default.
Configuring Login Behavior
You can configure the login behavior for your ESXi host with the following advanced options:
nSecurity.AccountLockFailures. Maximum number of failed login attempts before a user's
account is locked. Zero disables account locking.
nSecurity.AccountUnlockTime. Number of seconds that a user is locked out.
See the vCenter Server and Host Management documentation for information on setting ESXi advanced
options.
SSH Security
You can use SSH to remotely log in to the ESXi Shell and perform troubleshooting tasks for the host.
SSH configuration in ESXi is enhanced to provide a high security level.
Version 1 SSH protocol
disabled
VMware does not support Version 1 SSH protocol and uses Version 2
protocol exclusively. Version 2 eliminates certain security problems present
in Version 1 and provides you with a safe way to communicate with the
management interface.
Improved cipher
strength
SSH supports only 256-bit and 128-bit AES ciphers for your connections.
These settings are designed to provide solid protection for the data you transmit to the management
interface through SSH. You cannot change these settings.
ESXi SSH Keys
SSH keys can restrict, control, and secure access to an ESXi host. An SSH key can allow a trusted user
or script to log in to a host without specifying a password.
vSphere Security
VMware, Inc. 45

You can copy the SSH key to the host by using the vifs vSphere CLI command. See Getting Started
with vSphere Command-Line Interfaces for information on installing and using the vSphere CLI command
set. You can also use HTTPS PUT to copy the SSK key to the host.
Instead of generating the keys externally and uploading them, you can create the keys on the ESXi host
and download them. See VMware Knowledge Base article 1002866.
Enabling SSH and adding SSH keys to the host has inherent risks. Weigh the potential risk of exposing a
user name and password against the risk of intrusion by a user who has a trusted key.
Note For ESXi 5.0 and earlier, a user with an SSH key can access the host even when the host is in
lockdown mode. Starting with ESXi 5.1, a user with an SSH key can no longer access a host that is in
lockdown mode.
Upload an SSH Key Using a vifs Command
If you decide that you want to use authorized keys to log in to a host with SSH, you can upload authorized
keys with a vifs command.
Note Because authorized keys allow SSH access without requiring user authentication, consider
carefully whether you want to use SSH keys in your environment.
Authorized keys allow you to authenticate remote access to a host. When users or scripts try to access a
host with SSH, the key provides authentication without a password. With authorized keys, you can
automate authentication, which is useful when you write scripts to perform routine tasks.
You can upload the following types of SSH keys to a host.
nAuthorized keys file for the root user
nRSA key
nRSA public key
Starting with the vSphere 6.0 Update 2 release, DSS/DSA keys are no longer supported.
Important Do not modify the /etc/ssh/sshd_config file. If you do, you make a change that the host
daemon (hostd) knows nothing about.
vSphere Security
VMware, Inc. 46

Procedure
uAt the command line or an administration server, use the vifs command to upload the SSH key to an
appropriate location on the ESXi host.
vifs --server hostname --username username --put filename /host/ssh_host_dsa_key_pub
Type of key Location
Authorized key files for the root user /host/ssh_root_authorized keys
You must have full administrator privileges to upload this file.
RSA keys /host/ssh_host_rsa_key
RSA public keys /host/ssh_host_rsa_key_pub
Upload an SSH Key Using HTTPS PUT
You can use authorized keys to log in to a host with SSH. You can upload authorized keys with HTTPS
PUT.
Authorized keys allow you to authenticate remote access to a host. When users or scripts try to access a
host with SSH, the key provides authentication without a password. With authorized keys you can
automate authentication, which is useful when you write scripts to perform routine tasks.
You can upload the following types of SSH keys to a host using HTTPS PUT:
nAuthorized keys file for root user
nDSA key
nDSA public key
nRSA key
nRSA public key
Important Do not modify the /etc/ssh/sshd_config file.
Procedure
1In your upload application, open the key file.
2Publish the file to the following locations.
Type of key Location
Authorized key files for the root user https://hostname_or_IP_address/host/ssh_root_authorized_keys
You must have full administrator privileges on the host to upload this file.
DSA keys https://hostname_or_IP_address/host/ssh_host_dsa_key
DSA public keys https://hostname_or_IP_address/host/ssh_host_dsa_key_pub
RSA keys https://hostname_or_IP_address/host/ssh_host_rsa_key
RSA public keys https://hostname_or_IP_address/host/ssh_host_rsa_key_pub
vSphere Security
VMware, Inc. 47
PCI and PCIe Devices and ESXi
Using the VMware DirectPath I/O feature to pass through a PCI or PCIe device to a virtual machine
results in a potential security vulnerability. The vulnerability can be triggered when buggy or malicious
code, such as a device driver, is running in privileged mode in the guest OS. Industry-standard hardware
and firmware do not currently have sufficient error containment support to protect ESXi hosts from the
vulnerability.
Use PCI or PCIe passthrough to a virtual machine only if a trusted entity owns and administers the virtual
machine. You must be sure that this entity does not to attempt to crash or exploit the host from the virtual
machine.
Your host might be compromised in one of the following ways.
nThe guest OS might generate an unrecoverable PCI or PCIe error. Such an error does not corrupt
data, but can crash the ESXi host. Such errors might occur because of bugs or incompatibilities in the
hardware devices that are being passed through. Other reasons for errors include problems with
drivers in the guest OS.
nThe guest OS might generate a Direct Memory Access (DMA) operation that causes an IOMMU page
fault on the ESXi host. This operation might be the result of a DMA operation that targets an address
outside the virtual machine memory. On some machines, host firmware configures IOMMU faults to
report a fatal error through a non-maskable interrupt (NMI). This fatal error causes the ESXi host to
crash. This problem might occur because of problems with the drivers in the guest OS.
nIf the operating system on the ESXi host is not using interrupt remapping, the guest OS might inject a
spurious interrupt into the ESXi host on any vector. ESXi currently uses interrupt remapping on Intel
platforms where it is available. Interrupt mapping is part of the Intel VT-d feature set. ESXi does not
use interrupt mapping on AMD platforms. A false interrupt can result in a crash of the ESXi host.
Other ways to exploit these false interrupts might exist in theory.
Disable the Managed Object Browser
The managed object browser (MOB) provides a way to explore the VMkernel object model. However,
attackers can use this interface to perform malicious configuration changes or actions because it is
possible to change the host configuration by using the MOB. Use the MOB only for debugging, and
ensure that it is disabled in production systems.
Starting with vSphere 6.0, the MOB is disabled by default. However, for certain tasks, for example when
extracting the old certificate from a system, you have to use the MOB. You can enable and disable the
MOB as follows.
Procedure
1Select the host in the vSphere Web Client and go to Advanced System Settings.
2Check the value of Config.HostAgent.plugins.solo.enableMob, and change it as appropriate.
Do not use vim-cmd from the ESXi Shell.
vSphere Security
VMware, Inc. 48

ESXi Networking Security Recommendations
Isolation of network traffic is essential to a secure ESXi environment. Different networks require different
access and level of isolation.
Your ESXi host uses several networks. Use appropriate security measures for each network, and isolate
traffic for specific applications and functions. For example, ensure that VMware vSphere vMotion® traffic
does not travel over networks where virtual machines are located. Isolation prevents snooping. Having
separate networks is also recommended for performance reasons.
nvSphere infrastructure networks are used for features such as vSphere vMotion, VMware vSphere
Fault Tolerance, and storage. Isolate these networks for their specific functions. It is often not
necessary to route these networks outside a single physical server rack.
nA management network isolates client traffic, command-line interface (CLI) or API traffic, and third-
party software traffic from other traffic. This network should be accessible only by system, network,
and security administrators. Use jump box or virtual private network (VPN) to secure access to the
management network. Strictly control access within this network.
nVirtual machine traffic can flow over one or many networks. You can enhance the isolation of virtual
machines by using virtual firewall solutions that set firewall rules at the virtual network controller.
These settings travel with a virtual machine as it migrates from host to host within your vSphere
environment.
Modifying ESXi Web Proxy Settings
When you modify Web proxy settings, you have several encryption and user security guidelines to
consider.
Note Restart the host process after making any changes to host directories or authentication
mechanisms.
nDo not set up certificates that use a password or pass phrases. ESXi does not support Web proxies
that use passwords or pass phrases, also known as encrypted keys. If you set up a Web proxy that
requires a password or pass phrase, ESXi processes cannot start correctly.
nTo support encryption for user names, passwords, and packets, SSL is enabled by default for
vSphere Web Services SDK connections. If you want to configure these connections so that they do
not encrypt transmissions, disable SSL for your vSphere Web Services SDK connection by switching
the connection from HTTPS to HTTP.
Consider disabling SSL only if you created a fully trusted environment for these clients, where
firewalls are in place and transmissions to and from the host are fully isolated. Disabling SSL can
improve performance, because you avoid the overhead required to perform encryption.
vSphere Security
VMware, Inc. 49
nTo protect against misuse of ESXi services, most internal ESXi services are accessible only through
port 443, the port used for HTTPS transmission. Port 443 acts as a reverse proxy for ESXi. You can
see a list of services on ESXi through an HTTP welcome page, but you cannot directly access the
Storage Adapters services without proper authorization.
You can change this configuration so that individual services are directly accessible through HTTP
connections. Do not make this change unless you are using ESXi in a fully trusted environment.
nWhen you upgrade your environment, the certificate remains in place.
vSphere Auto Deploy Security Considerations
When you use vSphere Auto Deploy, pay careful attention to networking security, boot image security,
and potential password exposure through host profiles to protect your environment.
Networking Security
Secure your network just as you secure the network for any other PXE-based deployment method.
vSphere Auto Deploy transfers data over SSL to prevent casual interference and snooping. However, the
authenticity of the client or of the Auto Deploy server is not checked during a PXE boot.
You can greatly reduce the security risk of Auto Deploy by completely isolating the network where Auto
Deploy is used.
Boot Image and Host Profile Security
The boot image that the vSphere Auto Deploy server downloads to a machine can have the following
components.
nThe VIB packages that the image profile consists of are always included in the boot image.
nThe host profile and host customization are included in the boot image if Auto Deploy rules are set up
to provision the host with a host profile or host customization.
nThe administrator (root) password and user passwords that are included with host profile and
host customization are MD5 encrypted.
nAny other passwords associated with profiles are in the clear. If you set up Active Directory by
using host profiles, the passwords are not protected.
Use the vSphere Authentication Proxy to avoid exposing the Active Directory passwords. If you
set up Active Directory using host profiles, the passwords are not protected.
nThe host's public and private SSL key and certificate are included in the boot image.
Control Access for CIM-Based Hardware Monitoring Tools
The Common Information Model (CIM) system provides an interface that enables hardware-level
management from remote applications using a set of standard APIs. To ensure that the CIM interface is
secure, provide only the minimum access necessary to these remote applications. If you provision a
remote application with a root or Administrator account, and if the application is compromised, the virtual
environment can be compromised.
vSphere Security
VMware, Inc. 50
CIM is an open standard that defines a framework for agent-less, standards-based monitoring of
hardware resources for ESXi hosts. This framework consists of a CIM object manager, often called a CIM
broker, and a set of CIM providers.
CIM providers support management access to device drivers and underlying hardware. Hardware
vendors, including server manufacturers and hardware device vendors, can write providers that monitor
and manage their devices. VMware writes providers that monitor server hardware, ESXi storage
infrastructure, and virtualization-specific resources. These providers run inside the ESXi host and are
lightweight and focused on specific management tasks. The CIM broker takes information from all CIM
providers and presents it to the outside world using standard APIs. The most common API is WS-MAN.
Do not provide root credentials to remote applications that access the CIM interface. Instead, create a
service account for these applications. Grant read-only access to CIM information to any local account
defined on the ESXi system, and any role defined in vCenter Server.
Procedure
1Create a service account for CIM applications.
2Grant the service account read-only access to ESXi hosts that collect CIM information.
3(Optional) If the application requires write access, create a role with only two privileges.
nHost.Config.SystemManagement
nHost.CIM.CIMInteraction
4For each ESXi host that you are monitoring, create a permission that pairs the custom role with the
service account.
See Using Roles to Assign Privileges.
Certificate Management for ESXi Hosts
In vSphere 6.0 and later, the VMware Certificate Authority (VMCA) provisions each new ESXi host with a
signed certificate that has VMCA as the root certificate authority by default. Provisioning happens when
the host is added to vCenter Server explicitly or as part of installation or upgrade to ESXi 6.0 or later.
You can view and manage ESXi certificates from the vSphere Web Client and by using the
vim.CertificateManager API in the vSphere Web Services SDK. You cannot view or manage ESXi
certificates by using certificate management CLIs that are available for managing vCenter Server
certificates.
Certificates in vSphere 5.5 and in vSphere 6.x
When ESXi and vCenter Server communicate, they use TLS/SSL for almost all management traffic.
In vSphere 5.5 and earlier, the TLS/SSL endpoints are secured only by a combination of user name,
password, and thumbprint. Users can replace the corresponding self-signed certificates with their own
certificates. See the vSphere 5.5 Documentation Center.
In vSphere 6.0 and later, vCenter Server supports the following certificate modes for ESXi hosts.
vSphere Security
VMware, Inc. 51

Table 3‑1. Certificate Modes for ESXi Hosts
Certificate Mode Description
VMware Certificate Authority (default) Use this mode if VMCA provisions all ESXi hosts, either as the
top-level CA or as an intermediate CA.
By default, VMCA provisions ESXi hosts with certificates.
In this mode, you can refresh and renew certificates from the
vSphere Web Client.
Custom Certificate Authority Use this mode if you want to use only custom certificates that
are signed by a third-party or enterprise CA.
In this mode, you are responsible for managing the certificates.
You cannot refresh and renew certificates from the
vSphere Web Client.
Note Unless you change the certificate mode to Custom
Certificate Authority, VMCA might replace custom certificates,
for example, when you select Renew in the vSphere Web Client.
Thumbprint Mode vSphere 5.5 used thumbprint mode, and this mode is still
available as a fallback option for vSphere 6.x. In this mode,
vCenter Server checks that the certificate is formatted correctly,
but does not check the validity of the certificate. Even expired
certificates are accepted.
Do not use this mode unless you encounter problems that you
cannot resolve with one of the other two modes. Some vCenter
6.x and later services might not work correctly in thumbprint
mode.
Certificate Expiration
Starting with vSphere 6.0, you can view information about certificate expiration for certificates that are
signed by VMCA or a third-party CA in the vSphere Web Client. You can view the information for all hosts
that are managed by a vCenter Server or for individual hosts. A yellow alarm is raised if the certificate is
in the Expiring Shortly state (less than eight months). A red alarm is raised if the certificate is in the
Expiration Imminent state (less than two months).
ESXi Provisioning and VMCA
When you boot an ESXi host from installation media, the host initially has an autogenerated certificate.
When the host is added to the vCenter Server system, it is provisioned with a certificate that is signed by
VMCA as the root CA.
The process is similar for hosts that are provisioned with Auto Deploy. However, because those hosts do
not store any state, the signed certificate is stored by the Auto Deploy server in its local certificate store.
The certificate is reused during subsequent boots of the ESXi hosts. An Auto Deploy server is part of any
embedded deployment or vCenter Server system.
If VMCA is not available when an Auto Deploy host boots the first time, the host first attempts to connect.
If the host cannot connect, it cycles through shutdown and reboot until VMCA becomes available and the
host can be provisioned with a signed certificate.
vSphere Security
VMware, Inc. 52

Required Privileges for ESXi Certificate Management
For certificate management for ESXi hosts, you must have the Certificates.Manage Certificates
privilege. You can set that privilege from the vSphere Web Client.
Host Name and IP Address Changes
In vSphere 6.0 and later, a host name or IP address change might affect whether vCenter Server
considers a host certificate valid. How you added the host to vCenter Server affects whether manual
intervention is necessary. Manual intervention means that you either reconnect the host, or you remove
the host from vCenter Server and add it back.
Table 3‑2. When Host Name or IP Address Changes Require Manual Intervention
Host added to vCenter Server using... Host name changes IP address changes
Host name vCenter Server connectivity problem.
Manual intervention required.
No intervention required.
IP address No intervention required. vCenter Server connectivity problem.
Manual intervention required.
ESXi Certificate Management (http://link.brightcove.com/services/player/bcpid2296383276001?
bctid=ref:video_esxi_certs_in_vsphere)
Host Upgrades and Certificates
If you upgrade an ESXi host to ESXi 6.0 or later, the upgrade process replaces the self-signed
(thumbprint) certificates with VMCA-signed certificates. If the ESXi host uses custom certificates, the
upgrade process retains those certificates even if those certificates are expired or invalid.
If you decide not to upgrade your hosts to ESXi 6.0 or later, the hosts retain the certificates that they are
currently using even if the host is managed by a vCenter Server system that uses VMCA certificates.
vSphere Security
VMware, Inc. 53

The recommended upgrade workflow depends on the current certificates.
Host Provisioned with
Thumbprint Certificates
If your host is currently using thumbprint certificates, it is automatically
assigned VMCA certificates as part of the upgrade process.
Note You cannot provision legacy hosts with VMCA certificates. You must
upgrade those hosts to ESXi 6.0 later.
Host Provisioned with
Custom Certificates
If your host is provisioned with custom certificates, usually third-party CA-
signed certificates, those certificates remain in place during upgrade.
Change the certificate mode to Custom to ensure that the certificates are
not replaced accidentally during a certificate refresh later.
Note If your environment is in VMCA mode, and you refresh the
certificates from the vSphere Web Client, any existing certificates are
replaced with certificates that are signed by VMCA.
Going forward, vCenter Server monitors the certificates and displays
information, for example, about certificate expiration, in the
vSphere Web Client.
Hosts Provisioned with
Auto Deploy
Hosts that are being provisioned by Auto Deploy are always assigned new
certificates when they are first booted with ESXi 6.0 or later software. When
you upgrade a host that is provisioned by Auto Deploy, the Auto Deploy
server generates a certificate signing request (CSR) for the host and
submits it to VMCA. VMCA stores the signed certificate for the host. When
the Auto Deploy server provisions the host, it retrieves the certificate from
VMCA and includes it as part of the provisioning process.
You can use Auto Deploy with custom certificates.
See Use Custom Certificates With Auto Deploy.
Certificate Mode Switch Workflows
Starting with vSphere 6.0, ESXi hosts are provisioned with certificates by VMCA by default. You can
instead use custom certificate mode or, for debugging purposes, the legacy thumbprint mode. In most
cases, mode switches are disruptive and not necessary. If you do require a mode switch, review the
potential impact before you start.
In vSphere 6.0 and later, vCenter Server supports the following certificate modes for ESXi hosts.
vSphere Security
VMware, Inc. 54

Certificate Mode Description
VMware Certificate
Authority (default)
By default, the VMware Certificate Authority is used as the CA for ESXi host certificates. VMCA is the root
CA by default, but it can be set up as the intermediary CA to another CA. In this mode, users can manage
certificates from the vSphere Web Client. Also used if VMCA is a subordinate certificate.
Custom Certificate
Authority
Some customers might prefer to manage their own external certificate authority. In this mode, customers are
responsible for managing the certificates and cannot manage them from the vSphere Web Client.
Thumbprint Mode vSphere 5.5 used thumbprint mode, and this mode is still available as a fallback option for vSphere 6.0. Do
not use this mode unless you encounter problems with one of the other two modes that you cannot resolve.
Some vCenter 6.0 and later services might not work correctly in thumbprint mode.
Using Custom ESXi Certificates
If your company policy requires that you use a different root CA than VMCA, you can switch the certificate
mode in your environment after careful planning. The recommended workflow is as follows.
1 Obtain the certificates that you want to use.
2 Place the host or hosts into maintenance mode and disconnect them from vCenter Server.
3 Add the custom CA's root certificate to VECS.
4 Deploy the custom CA certificates to each host and restart services on that host.
5 Switch to Custom CA mode. See Change the Certificate Mode.
6 Connect the host or hosts to the vCenter Server system.
Switching from Custom CA Mode to VMCA Mode
If you are using custom CA mode and decide that using VMCA works better in your environment, you can
perform the mode switch after careful planning. The recommended workflow is as follows.
1 Remove all hosts from the vCenter Server system.
2 On the vCenter Server system, remove the third-party CA's root certificate from VECS.
3 Switch to VMCA mode. See Change the Certificate Mode.
4 Add the hosts to the vCenter Server system.
Note Any other workflow for this mode switch might result in unpredictable behavior.
Retaining Thumbprint Mode Certificates During Upgrade
The switch from VMCA mode to thumbprint mode might be necessary if you encounter problems with the
VMCA certificates. In thumbprint mode, the vCenter Server system checks only whether a certificate
exists and is formatted correctly, and does not check whether the certificate is valid. See Change the
Certificate Mode for instructions.
vSphere Security
VMware, Inc. 55

Switching from Thumbprint Mode to VMCA Mode
If you use thumbprint mode and you want to start using VMCA-signed certificates, the switch requires
some planning. The recommended workflow is as follows.
1 Remove all hosts from the vCenter Server system.
2 Switch to VMCA certificate mode. See Change the Certificate Mode.
3 Add the hosts to the vCenter Server system.
Note Any other workflow for this mode switch might result in unpredictable behavior.
Switching from Custom CA Mode to Thumbprint Mode
If you are encountering problems with your custom CA, consider switching to thumbprint mode
temporarily. The switch works seamlessly if you follow the instructions in Change the Certificate Mode.
After the mode switch, the vCenter Server system checks only the format of the certificate and no longer
checks the validity of the certificate itself.
Switching from Thumbprint Mode to Custom CA Mode
If you set your environment to thumbprint mode during troubleshooting, and you want to start using
custom CA mode, you must first generate the required certificates. The recommended workflow is as
follows.
1 Remove all hosts from the vCenter Server system.
2 Add the custom CA root certificate to TRUSTED_ROOTS store on VECS on the vCenter Server
system. See Update the vCenter Server TRUSTED_ROOTS Store (Custom Certificates).
3 For each ESXi host:
a Deploy the custom CA certificate and key.
b Restart services on the host.
4 Switch to custom mode. See Change the Certificate Mode.
5 Add the hosts to the vCenter Server system.
ESXi Certificate Default Settings
When a host is added to a vCenter Server system, vCenter Server sends a Certificate Signing Request
(CSR) for the host to VMCA. Most of the default values are well suited for many situations, but company-
specific information can be changed.
You can change many of the default settings using the vSphere Web Client. Consider changing the
organization, and location information. See Change Certificate Default Settings.
vSphere Security
VMware, Inc. 56

Table 3‑3. ESXi CSR Settings
Parameter Default Value Advanced Option
Key Size 2048 N.A.
Key Algorithm RSA N.A.
Certificate Signature Algorithm sha256WithRSAEncryption N.A.
Common Name Name of the host if the host was
added to vCenter Server by host
name.
IP address of the host if the host
was added to vCenter Server by
IP address.
N.A.
Country USA vpxd.certmgmt.certs.cn.country
Email address vmca@vmware.com vpxd.certmgmt.certs.cn.email
Locality (City) Palo Alto vpxd.certmgmt.certs.cn.localityName
Organization Unit Name VMware Engineering vpxd.certmgmt.certs.cn.organizationalUnitName
Organization Name VMware vpxd.certmgmt.certs.cn.organizationName
State or province California vpxd.certmgmt.certs.cn.state
Number of days the certificate is
valid.
1825 vpxd.certmgmt.certs.cn.daysValid
Hard threshold for certificate
expiration. vCenter Server raises a
red alarm when this threshold is
reached.
30 days vpxd.certmgmt.certs.cn.hardThreshold
Poll interval for vCenter Server
certificate validity checks.
5 days vpxd.certmgmt.certs.cn.pollIntervalDays
Soft Threshold for certificate
expiration. vCenter Server raises an
event when this threshold is
reached.
240 days vpxd.certmgmt.certs.cn.softThreshold
Mode that vCenter Server users to
determine whether existing
certificates are replaced. Change
this mode to retain custom
certificates during upgrade. See
Host Upgrades and Certificates.
Default is vmca
You can also specify thumbprint or
custom. See Change the
Certificate Mode.
vpxd.certmgmt.mode
Change Certificate Default Settings
When a host is added to a vCenter Server system, vCenter Server sends a Certificate Signing Request
(CSR) for the host to VMCA. You can change some of the default settings in the CSR using the
vCenter Server Advanced Settings in the vSphere Web Client.
See ESXi Certificate Default Settings for a list of default settings. Some of the defaults cannot be
changed.
vSphere Security
VMware, Inc. 57
Procedure
1In the vSphere Web Client, select the vCenter Server system that manages the hosts.
2Click Configure, and click Advanced Settings.
3In the Filter box, enter certmgmt to display only certificate management parameters.
4Change the value of the existing parameters to follow company policy and click OK.
The next time you add a host to vCenter Server, the new settings are used in the CSR that
vCenter Server sends to VMCA and in the certificate that is assigned to the host.
What to do next
Changes to certificate metadata only affect new certificates. If you want to change the certificates of hosts
that are already managed by the vCenter Server system, you can disconnect and reconnect the hosts or
renew the certificates.
View Certificate Expiration Information for Multiple ESXi Hosts
If you are using ESXi 6.0 and later, you can view the certificate status of all hosts that are managed by
your vCenter Server system. The display allows you to determine whether any of the certificates expire
soon.
You can view certificate status information for hosts that are using VMCA mode and for hosts that are
using custom mode in the vSphere Web Client. You cannot view certificate status information for hosts in
thumbprint mode.
Procedure
1Browse to the host in the vSphere Web Client inventory hierarchy.
By default, the Hosts display does not include the certificate status.
2Right-click the Name field and select Show/Hide Columns.
3Select Certificate Valid To, click OK, and scroll to the right if necessary.
The certificate information displays when the certificate expires.
If a host is added to vCenter Server or reconnected after a disconnect, vCenter Server renews the
certificate if the status is Expired, Expiring, Expiring shortly, or Expiration imminent. The status is
Expiring if the certificate is valid for less than eight months, Expiring shortly if the certificate is valid for
less than two months, and Expiration imminent if the certificate is valid for less than one month.
4(Optional) Deselect other columns to make it easier to see what you are interested in.
What to do next
Renew the certificates that are about to expire. See Renew or Refresh ESXi Certificates.
vSphere Security
VMware, Inc. 58

View Certificate Details for a Single ESXi Host
For ESXi 6.0 and later hosts that are in VMCA mode or custom mode, you can view certificate details
from the vSphere Web Client. The information about the certificate can be helpful for debugging.
Procedure
1Browse to the host in the vSphere Web Client inventory.
2Select Configure.
3Under System, click Certificate.
You can examine the following information. This information is available only in the single-host view.
Field Description
Subject The subject used during certificate generation.
Issuer The issuer of the certificate.
Valid From Date on which the certificate was generated.
Valid To Date on which the certificate expires.
Status Status of the certificate, one of the following.
Good Normal operation.
Expiring Certificate will expire soon.
Expiring shortly Certificate is 8 months or less away from expiration
(Default).
Expiration
imminent
Certificate is 2 months or less away from expiration
(Default).
Expired Certificate is not valid because it expired.
Renew or Refresh ESXi Certificates
If VMCA assigns certificates to your ESXi hosts (6.0 and later), you can renew those certificates from the
vSphere Web Client. You can also refresh all certificates from the TRUSTED_ROOTS store associated
with vCenter Server.
You can renew your certificates when they are about to expire, or if you want to provision the host with a
new certificate for other reasons. If the certificate is already expired, you must disconnect the host and
reconnect it.
By default, vCenter Server renews the certificates of a host with status Expired, Expiring immediately, or
Expiring each time the host is added to the inventory, or reconnected.
Procedure
1Browse to the host in the vSphere Web Client inventory.
2Select Configure.
vSphere Security
VMware, Inc. 59

3Under System, click Certificate.
You can view detailed information about the selected host's certificate.
4Click Renew or Refresh CA Certificates.
Option Description
Renew Retrieves a fresh signed certificate for the host from VMCA.
Refresh CA Certificates Pushes all certificates in the TRUSTED_ROOTS store in the vCenter Server
VECS store to the host.
5Click Yes to confirm.
Change the Certificate Mode
Use VMCA to provision the ESXi hosts in your environment unless corporate policy requires that you use
custom certificates. To use custom certificates with a different root CA, you can edit the vCenter Server
vpxd.certmgmt.mode advanced option. After the change, the hosts are no longer automatically
provisioned with VMCA certificates when you refresh certificates. You are responsible for the certificate
management in your environment.
You can use the vCenter Server advanced settings to change to thumbprint mode or to custom CA mode.
Use thumbprint mode only as a fallback option.
Procedure
1Select the vCenter Server that manages the hosts and click Configure.
2Click Advanced Settings, and click Edit.
3In the Filter box, enter certmgmt to display only certificate management keys.
4Change the value of vpxd.certmgmt.mode to custom if you intend to manage your own certificates,
and to thumbprint if you temporarily want to use thumbprint mode, and click OK.
5Restart the vCenter Server service.
Replacing ESXi SSL Certificates and Keys
Your company's security policy might require that you replace the default ESXi SSL certificate with a third-
party CA-signed certificate on each host.
By default, vSphere components use the VMCA-signed certificate and key that are created during
installation. If you accidentally delete the VMCA-signed certificate, remove the host from its
vCenter Server system, and add it back. When you add the host, vCenter Server requests a new
certificate from VMCA and provisions the host with it.
Replace VMCA-signed certificates with certificates from a trusted CA, either a commercial CA or an
organizational CA, if your company policy requires it.
vSphere Security
VMware, Inc. 60

The default certificates are in the same location as the vSphere 5.5 certificates. You can replace the
default certificates with trusted certificates in various ways.
Note You can also use the vim.CertificateManager and vim.host.CertificateManager managed
objects in the vSphere Web Services SDK. See the vSphere Web Services SDK documentation.
After you replace the certificate, you have to update the TRUSTED_ROOTS store in VECS on the
vCenter Server system that manages the host to ensure that the vCenter Server and the ESXi host have
a trust relationship.
For detailed instructions about using CA-signed certificates for ESXi hosts, see the VMware KB article
https://kb.vmware.com/s/article/2113926.
nRequirements for ESXi Certificate Signing Requests
If you want to use an enterprise or third-party CA-signed certificate, you have to send a Certificate
Signing Request (CSR) to the CA.
nReplace the Default Certificate and Key from the ESXi Shell
You can replace the default VMCA-signed ESXi certificates from the ESXi Shell.
nReplace a Default Certificate and Key with the vifs Command
You can replace the default VMCA-signed ESXi certificates by using the vifs command.
nReplace a Default Certificate Using HTTPS PUT
You can use third-party applications to upload certificates and key. Applications that support HTTPS
PUT operations work with the HTTPS interface that is included with ESXi.
nUpdate the vCenter Server TRUSTED_ROOTS Store (Custom Certificates)
If you set up your ESXi hosts to use custom certificates, you have to update the TRUSTED_ROOTS
store on the vCenter Server system that manages the hosts.
Requirements for ESXi Certificate Signing Requests
If you want to use an enterprise or third-party CA-signed certificate, you have to send a Certificate
Signing Request (CSR) to the CA.
Use a CSR with these characteristics:
nKey size: 2048 bits or more (PEM encoded)
nPEM format. VMware supports PKCS8 and PKCS1 (RSA keys). When keys are added to VECS, they
are converted to PKCS8
nx509 version 3
nFor root certificates, the CA extension must be set to true, and the cert sign must be in the list of
requirements.
nSubjectAltName must contain DNS Name=<machine_FQDN>
nCRT format
vSphere Security
VMware, Inc. 61

nContains the following Key Usages: Digital Signature, Non Repudiation, Key Encipherment
nStart time of one day before the current time
nCN (and SubjectAltName) set to the host name (or IP address) that the ESXi host has in the
vCenter Server inventory.
Replace the Default Certificate and Key from the ESXi Shell
You can replace the default VMCA-signed ESXi certificates from the ESXi Shell.
Prerequisites
nIf you want to use third-party CA-signed certificates, generate the certificate request, send it to the
certificate authority, and store the certificates on each ESXi host.
nIf necessary, enable the ESXi Shell or enable SSH traffic from the vSphere Web Client.
nAll file transfers and other communications occur over a secure HTTPS session. The user who is
used to authenticate the session must have the privilege Host.Config.AdvancedConfig on the host.
Procedure
1Log in to the ESXi Shell, either directly from the DCUI or from an SSH client, as a user with
administrator privileges.
2In the directory /etc/vmware/ssl, rename the existing certificates using the following commands.
mv rui.crt orig.rui.crt
mv rui.key orig.rui.key
3Copy the certificates that you want to use to /etc/vmware/ssl.
4Rename the new certificate and key to rui.crt and rui.key.
5Restart the host after you install the new certificate.
Alternatively, you can put the host into maintenance mode, install the new certificate, use the Direct
Console User Interface (DCUI) to restart the management agents, and set the host to exit
maintenance mode.
What to do next
Update the vCenter Server TRUSTED_ROOTS store.
Replace a Default Certificate and Key with the vifs Command
You can replace the default VMCA-signed ESXi certificates by using the vifs command.
You run vifs as a vCLI command. See the Getting Started with vSphere Command-Line Interfaces.
Prerequisites
nIf you want to use third-party CA-signed certificates, generate the certificate request, send it to the
certificate authority, and store the certificates on each ESXi host.
vSphere Security
VMware, Inc. 62
nIf necessary, enable the ESXi Shell or enable SSH traffic from the vSphere Web Client.
nAll file transfers and other communications occur over a secure HTTPS session. The user who is
used to authenticate the session must have the privilege Host.Config.AdvancedConfig on the host.
Procedure
1Back up the existing certificates.
2Generate a certificate request following the instructions from the certificate authority.
See Requirements for ESXi Certificate Signing Requests.
3When you have the certificate, use the vifs command to upload the certificate to the appropriate
location on the host from an SSH connection to the host.
vifs --server hostname --username username --put rui.crt /host/ssl_cert
vifs --server hostname --username username --put rui.key /host/ssl_key
4Restart the host.
What to do next
Update the vCenter Server TRUSTED_ROOTS store. See Update the vCenter Server
TRUSTED_ROOTS Store (Custom Certificates).
Replace a Default Certificate Using HTTPS PUT
You can use third-party applications to upload certificates and key. Applications that support HTTPS PUT
operations work with the HTTPS interface that is included with ESXi.
Prerequisites
nIf you want to use third-party CA-signed certificates, generate the certificate request, send it to the
certificate authority, and store the certificates on each ESXi host.
nIf necessary, enable the ESXi Shell or enable SSH traffic from the vSphere Web Client.
nAll file transfers and other communications occur over a secure HTTPS session. The user who is
used to authenticate the session must have the privilege Host.Config.AdvancedConfig on the host.
Procedure
1Back up the existing certificates.
vSphere Security
VMware, Inc. 63

2In your upload application, process each file as follows:
a Open the file.
b Publish the file to one of these locations.
Option Description
Certificates https://hostname/host/ssl_cert
Keys https://hostname/host/ssl_key
The location /host/ssl_cert and host/ssl_key link to the certificate files in /etc/vmware/ssl.
3Restart the host.
What to do next
Update the vCenter Server TRUSTED_ROOTS store. See Update the vCenter Server
TRUSTED_ROOTS Store (Custom Certificates).
Update the vCenter Server TRUSTED_ROOTS Store (Custom Certificates)
If you set up your ESXi hosts to use custom certificates, you have to update the TRUSTED_ROOTS store on
the vCenter Server system that manages the hosts.
Prerequisites
Replace the certificates on each host with custom certificates.
Procedure
1Log in to the vCenter Server system that manages the ESXi hosts.
Log in to the Windows system on which you installed the software, or log in to the
vCenter Server Appliance shell.
2Run vecs-cli to add the new certificates to the TRUSTED_ROOTS store, for example:
/usr/lib/vmware-vmafd/bin/vecs-cli entry create --store TRUSTED_ROOTS --alias custom1.crt --
cert /etc/vmware/ssl/custom1.crt
Option Description
Linux /usr/lib/vmware-vmafd/bin/vecs-cli entry create --store
TRUSTED_ROOTS --alias custom1.crt --
cert /etc/vmware/ssl/custom1.crt
Windows C:\Program Files\VMware\vCenter Server\vmafdd\vecs-cli entry
create --store TRUSTED_ROOTS --alias custom1.crt --cert
c:\ssl\custom1.crt
vSphere Security
VMware, Inc. 64
What to do next
Set certificate mode to Custom. If certificate mode is VMCA, the default, and you perform a certificate
refresh, your custom certificates are replaced with VMCA-signed certificates. See Change the Certificate
Mode.
Use Custom Certificates With Auto Deploy
By default, the Auto Deploy server provisions each host with certificates that are signed by VMCA. You
can set up the Auto Deploy server to provision all hosts with custom certificates that are not signed by
VMCA. In that scenario, the Auto Deploy server becomes a subordinate certificate authority of your third-
party CA.
Prerequisites
nRequest a certificate from your CA. The certificate must meet these requirements.
nKey size: 2048 bits or more (PEM encoded)
nPEM format. VMware supports PKCS8 and PKCS1 (RSA keys). When keys are added to VECS,
they are converted to PKCS8
nx509 version 3
nFor root certificates, the CA extension must be set to true, and the cert sign must be in the list of
requirements.
nSubjectAltName must contain DNS Name=<machine_FQDN>
nCRT format
nContains the following Key Usages: Digital Signature, Non Repudiation, Key Encipherment
nStart time of one day before the current time
nCN (and SubjectAltName) set to the host name (or IP address) that the ESXi host has in the
vCenter Server inventory.
nName the certificate and key files rbd-ca.crt and rbd-ca.key.
Procedure
1Back up the default ESXi certificates.
The certificates are located at /etc/vmware-rbd/ssl/.
2From the vSphere Web Client, stop the Auto Deploy service.
a Select Administration, and click System Configuration under Deployment.
b Click Services.
c Right-click the service you want to stop and select Stop.
3On the system where the Auto Deploy service runs, replace rbd-ca.crt and rbd-ca.key
in /etc/vmware-rbd/ssl/ with your custom certificate and key files.
vSphere Security
VMware, Inc. 65

4On the system where the Auto Deploy service runs, update the TRUSTED_ROOTS store in VECS to
use your new certificates.
Option Description
Windows cd C:\Program Files\VMware\vCenter Server\vmafdd\vecs-cli.exe
vecs-cli entry delete --store TRUSTED_ROOTS --alias rbd_cert
vecs-cli entry create --store TRUSTED_ROOTS --alias rbd_cert
--cert /etc/vmware-rbd/ssl/rbd-ca.crt
Linux cd /usr/lib/vmware-vmafd/bin/vecs-cli
vecs-cli entry delete --store TRUSTED_ROOTS --alias
rbd_cert
vecs-cli entry create --store TRUSTED_ROOTS --alias
rbd_cert
--cert /etc/vmware-rbd/ssl/rbd-ca.crt
5Create a castore.pem file that contains what's in TRUSTED_ROOTS and place the file in
the /etc/vmware-rbd/ssl/ directory.
In custom mode, you are responsible for maintaining this file.
6Change the ESXi certificate mode for the vCenter Server system to custom.
See Change the Certificate Mode.
7Restart the vCenter Server service and start the Auto Deploy service.
The next time you provision a host that is set up to use Auto Deploy, the Auto Deploy server generates a
certificate. The Auto Deploy server uses the root certificate that you just added to the TRUSTED_ROOTS
store.
Note If you encounter problems with Auto Deploy after certificate replacement, see VMware
Knowledgebase Article 2000988.
Restore ESXi Certificate and Key Files
When you replace a certificate on an ESXi host by using the vSphere Web Services SDK, the previous
certificate and key are appended to a .bak file. You can restore previous certificates by moving the
information in the .bak file to the current certificate and key files.
The host certificate and key are located in /etc/vmware/ssl/rui.crt
and /etc/vmware/ssl/rui.key. When you replace a host certificate and key by using the vSphere Web
Services SDK vim.CertificateManager managed object, the previous key and certificate are
appended to the file /etc/vmware/ssl/rui.bak.
Note If you replace the certificate by using HTTP PUT, vifs, or from the ESXi Shell, the existing
certificates are not appended to the .bak file.
vSphere Security
VMware, Inc. 66

Procedure
1On the ESXi host, locate the file /etc/vmware/ssl/rui.bak.
The file has the following format.
#
# Host private key and certificate backup from 2014-06-20 08:02:49.961
#
-----BEGIN PRIVATE KEY-----
previous key
-----END PRIVATE KEY-----
-----BEGIN CERTIFICATE-----
previous cert
-----END CERTIFICATE-----
2Copy the text starting with -----BEGIN PRIVATE KEY----- and ending with -----END PRIVATE
KEY----- into the /etc/vmware/ssl/rui.key file.
Include -----BEGIN PRIVATE KEY----- and -----END PRIVATE KEY-----.
3Copy the text between -----BEGIN CERTIFICATE----- and -----END CERTIFICATE----- into
the /etc/vmware/ssl/rui.crt file.
Include -----BEGIN CERTIFICATE----- and -----END CERTIFICATE-----.
4Restart the host or send ssl_reset events to all services that use the keys.
for s in /etc/init.d/*; do $s | grep ssl_reset > /dev/null; if [ $? == 0 ]; then
$s ssl_reset; fi; done
Customizing Hosts with the Security Profile
You can customize many of the essential security settings for your host through the Security Profile panel
available in the vSphere Web Client. The Security Profile is especially useful for single host management.
If you are managing multiple hosts, consider using one of the CLIs or SDKs and automating the
customization.
ESXi Firewall Configuration
ESXi includes a firewall that is enabled by default.
At installation time, the ESXi firewall is configured to block incoming and outgoing traffic, except traffic for
services that are enabled in the host's security profile.
vSphere Security
VMware, Inc. 67

As you open ports on the firewall, consider that unrestricted access to services running on an ESXi host
can expose a host to outside attacks and unauthorized access. Reduce the risk by configuring the ESXi
firewall to allow access only from authorized networks.
Note The firewall also allows Internet Control Message Protocol (ICMP) pings and communication with
DHCP and DNS (UDP only) clients.
You can manage ESXi firewall ports as follows:
nUse the security profile for each host in the vSphere Web Client. See Manage ESXi Firewall Settings
nUse ESXCLI commands from the command line or in scripts. See ESXi ESXCLI Firewall Commands.
nUse a custom VIB if the port you want to open is not included in the security profile.
You create custom VIBs with the vibauthor tool available from VMware Labs. To install the custom
VIB, you have to change the acceptance level of the ESXi host to CommunitySupported. See
VMware Knowledge Base Article 2007381.
Note If you engage VMware Technical Support to investigate a problem on an ESXi host with a
CommunitySupported VIB installed, VMware Support might request that this CommunitySupported
VIB be uninstalled as a troubleshooting step to determine if that VIB is related to the problem being
investigated.
ESXi Firewall Concepts (http://link.brightcove.com/services/player/bcpid2296383276001?
bctid=ref:video_esxi_firewall_concepts)
The behavior of the NFS Client rule set (nfsClient) is different from other rule sets. When the NFS
Client rule set is enabled, all outbound TCP ports are open for the destination hosts in the list of allowed
IP addresses. See NFS Client Firewall Behavior for more information.
Manage ESXi Firewall Settings
You can configure incoming and outgoing firewall connections for a service or a management agent from
the vSphere Web Client or at the command line.
Note If different services have overlapping port rules, enabling one service might implicitly enable other
services. You can specify which IP addresses are allowed to access each service on the host to avoid this
problem.
Procedure
1Browse to the host in the vSphere Web Client inventory.
2Click Configure.
3Under System, click Security Profile.
The vSphere Web Client displays a list of active incoming and outgoing connections with the
corresponding firewall ports.
vSphere Security
VMware, Inc. 68
4In the Firewall section, click Edit.
The display shows firewall rule sets, which include the name of the rule and the associated
information.
5Select the rule sets to enable, or deselect the rule sets to disable.
Column Description
Incoming Ports and Outgoing Ports The ports that the vSphere Web Client opens for the service
Protocol Protocol that a service uses.
Daemon Status of daemons associated with the service
6For some services, you can manage service details.
nUse the Start, Stop, or Restart buttons to change the status of a service temporarily.
nChange the Startup Policy to have the service start with the host or with port usage.
7For some services, you can explicitly specify IP addresses from which connections are allowed.
See Add Allowed IP Addresses for an ESXi Host.
8Click OK.
Add Allowed IP Addresses for an ESXi Host
By default, the firewall for each service allows access to all IP addresses. To restrict traffic, change each
service to allow traffic only from your management subnet. You might also deselect some services if your
environment does not use them.
You can use the vSphere Web Client, vCLI, or PowerCLI to update the Allowed IP list for a service. By
default, all IP addresses are allowed for a service.
Adding Allowed IP Addresses to the ESXi Firewall
(http://link.brightcove.com/services/player/bcpid2296383276001?
bctid=ref:video_adding_allowed_IP_to_esxi_firewall)
Procedure
1Browse to the host in the vSphere Web Client inventory.
2Click Configure.
3Under System, click Security Profile.
4In the Firewall section, click Edit and select a service from the list.
5In the Allowed IP Addresses section, deselect Allow connections from any IP address and enter
the IP addresses of networks that are allowed to connect to the host.
Separate IP addresses with commas. You can use the following address formats:
n192.168.0.0/24
n192.168.1.2, 2001::1/64
vSphere Security
VMware, Inc. 69

nfd3e:29a6:0a81:e478::/64
6Click OK.
Incoming and Outgoing Firewall Ports for ESXi Hosts
The vSphere Web Client and the VMware Host Client allow you to open and close firewall ports for each
service or to allow traffic from selected IP addresses.
The following table lists the firewalls for services that are installed by default. If you install other VIBs on
your host, additional services and firewall ports might become available. The information is primarily for
services that are visible in the vSphere Web Client but the table includes some other ports as well.
Table 3‑4. Incoming Firewall Connections
Port
Protoc
ol Service Description
5988 TCP CIM Server Server for CIM (Common Information Model).
5989 TCP CIM Secure Server Secure server for CIM.
427 TCP,
UDP
CIM SLP The CIM client uses the Service Location Protocol, version 2 (SLPv2) to find
CIM servers.
546 DHCPv6 DHCP client for IPv6.
8301, 8302 UDP DVSSync DVSSync ports are used for synchronizing states of distributed virtual ports
between hosts that have VMware FT record/replay enabled. Only hosts that
run primary or backup virtual machines must have these ports open. On hosts
that are not using VMware FT these ports do not have to be open.
902 TCP NFC Network File Copy (NFC) provides a file-type-aware FTP service for vSphere
components. ESXi uses NFC for operations such as copying and moving data
between datastores by default.
12345, 23451 UDP vSANClustering
Service
VMware vSAN Cluster Monitoring and Membership Directory Service. Uses
UDP-based IP multicast to establish cluster members and distribute vSAN
metadata to all cluster members. If disabled, vSAN does not work.
68 UDP DHCP Client DHCP client for IPv4.
53 UDP DNS Client DNS client.
8200, 8100,
8300
TCP,
UDP
Fault Tolerance Traffic between hosts for vSphere Fault Tolerance (FT).
6999 UDP NSX Distributed
Logical Router
Service
NSX Virtual Distributed Router service. The firewall port associated with this
service is opened when NSX VIBs are installed and the VDR module is
created. If no VDR instances are associated with the host, the port does not
have to be open.
This service was called NSX Distributed Logical Router in earlier versions of
the product.
2233 TCP vSAN Transport vSAN reliable datagram transport. Uses TCP and is used for vSAN storage
IO. If disabled, vSAN does not work.
161 UDP SNMP Server Allows the host to connect to an SNMP server.
22 TCP SSH Server Required for SSH access.
vSphere Security
VMware, Inc. 70

Table 3‑4. Incoming Firewall Connections (Continued)
Port
Protoc
ol Service Description
8000 TCP vMotion Required for virtual machine migration with vMotion. ESXi hosts listen on port
8000 for TCP connections from remote ESXi hosts for vMotion traffic.
902, 443 TCP vSphere Web Client Client connections
8080 TCP vsanvp vSAN VASA Vendor Provider. Used by the Storage Management Service
(SMS) that is part of vCenter to access information about vSAN storage
profiles, capabilities, and compliance. If disabled, vSAN Storage Profile Based
Management (SPBM) does not work.
80 TCP vSphere Web Access Welcome page, with download links for different interfaces.
5900 -5964 TCP RFB protocol
80, 9000 TCP vSphere Update
Manager
Table 3‑5. Outgoing Firewall Connections
Port Protocol Service Description
427 TCP, UDP CIM SLP The CIM client uses the Service Location Protocol, version 2
(SLPv2) to find CIM servers.
547 TCP, UDP DHCPv6 DHCP client for IPv6.
8301, 8302 UDP DVSSync DVSSync ports are used for synchronizing states of distributed
virtual ports between hosts that have VMware FT record/replay
enabled. Only hosts that run primary or backup virtual machines
must have these ports open. On hosts that are not using VMware
FT these ports do not have to be open.
44046, 31031 TCP HBR Used for ongoing replication traffic by vSphere Replication and
VMware Site Recovery Manager.
902 TCP NFC Network File Copy (NFC) provides a file-type-aware FTP service
for vSphere components. ESXi uses NFC for operations such as
copying and moving data between datastores by default.
9 UDP WOL Used by Wake on LAN.
12345 23451 UDP vSAN Clustering
Service
Cluster Monitoring, Membership, and Directory Service used by
vSAN.
68 UDP DHCP Client DHCP client.
53 TCP, UDP DNS Client DNS client.
80, 8200, 8100, 8300 TCP, UDP Fault Tolerance Supports VMware Fault Tolerance.
3260 TCP Software iSCSI Client Supports software iSCSI.
6999 UDP NSX Distributed
Logical Router
Service
The firewall port associated with this service is opened when NSX
VIBs are installed and the VDR module is created. If no VDR
instances are associated with the host, the port does not have to
be open.
vSphere Security
VMware, Inc. 71

Table 3‑5. Outgoing Firewall Connections (Continued)
Port Protocol Service Description
5671 TCP rabbitmqproxy A proxy running on the ESXi host. This proxy allows applications
that are running inside virtual machines to communicate with the
AMQP brokers that are running in the vCenter network domain.
The virtual machine does not have to be on the network, that is,
no NIC is required. Ensure that outgoing connection IP addresses
include at least the brokers in use or future. You can add brokers
later to scale up.
2233 TCP vSAN Transport Used for RDT traffic (Unicast peer to peer communication)
between vSAN nodes.
8000 TCP vMotion Required for virtual machine migration with vMotion.
902 UDP VMware vCenter
Agent
vCenter Server agent.
8080 TCP vsanvp Used for vSAN Vendor Provider traffic.
9080 TCP I/O Filter Service Used by the I/O Filters storage feature
Table 3‑6. Firewall Ports for Services That Are Not Visible in the UI by Default
Port
Proto
col Service Comment
5900 -5964 TCP RFB protocol The RFB protocol is a simple protocol for remote access to graphical user
interfaces.
8889 TCP OpenWSMAN
Daemon
Web Services Management (WS-Management is a DMTF open standard for
the management of servers, devices, applications, and Web services.
NFS Client Firewall Behavior
The NFS Client firewall rule set behaves differently than other ESXi firewall rule sets. ESXi configures
NFS Client settings when you mount or unmount an NFS datastore. The behavior differs for different
versions of NFS.
When you add, mount, or unmount an NFS datastore, the resulting behavior depends on the version of
NFS.
NFS v3 Firewall Behavior
When you add or mount an NFS v3 datastore, ESXi checks the state of the NFS Client (nfsClient)
firewall rule set.
nIf the nfsClient rule set is disabled, ESXi enables the rule set and disables the Allow All IP
Addresses policy by setting the allowedAll flag to FALSE. The IP address of the NFS server is
added to the allowed list of outgoing IP addresses.
vSphere Security
VMware, Inc. 72

nIf the nfsClient rule set is enabled, the state of the rule set and the allowed IP address policy are
not changed. The IP address of the NFS server is added to the allowed list of outgoing IP addresses.
Note If you manually enable the nfsClient rule set or manually set the Allow All IP Addresses policy,
either before or after you add an NFS v3 datastore to the system, your settings are overridden when the
last NFS v3 datastore is unmounted. The nfsClient rule set is disabled when all NFS v3 datastores are
unmounted.
When you remove or unmount an NFS v3 datastore, ESXi performs one of the following actions.
nIf none of the remaining NFS v3 datastores are mounted from the server of the datastore being
unmounted, ESXi removes the server's IP address from the list of outgoing IP addresses.
nIf no mounted NFS v3 datastores remain after the unmount operation, ESXi disables the nfsClient
firewall rule set.
NFS v4.1 Firewall Behavior
When you mount the first NFS v4.1 datastore, ESXi enables the nfs41client rule set and sets its
allowedAll flag to TRUE. This action opens port 2049 for all IP addresses. Unmounting an NFS v4.1
datastore does not affect the firewall state. That is, the first NFS v4.1 mount opens port 2049 and that port
remains enabled unless you close it explicitly.
ESXi ESXCLI Firewall Commands
If your environment includes multiple ESXi hosts, automating firewall configuration by using ESXCLI
commands or the vSphere Web Services SDK is recommended.
Firewall Command Reference
You can use the ESXi Shell or vSphere CLI commands to configure ESXi at the command line to
automate firewall configuration. See Getting Started with vSphere Command-Line Interfaces for an
introduction, and vSphere Command-Line Interface Concepts and Examples for examples of using
ESXCLI to manipulate firewalls and firewall rules.
Table 3‑7. Firewall Commands
Command Description
esxcli network firewall get Return the enabled or disabled status of the firewall and lists
default actions.
esxcli network firewall set --default-action Set to true to set the default action to pass. Set to false to set
the default action to drop.
esxcli network firewall set --enabled Enable or disable the ESXi firewall.
esxcli network firewall load Load the firewall module and rule set configuration files.
esxcli network firewall refresh Refresh the firewall configuration by reading the rule set files if
the firewall module is loaded.
esxcli network firewall unload Destroy filters and unload the firewall module.
esxcli network firewall ruleset list List rule sets information.
vSphere Security
VMware, Inc. 73

Table 3‑7. Firewall Commands (Continued)
Command Description
esxcli network firewall ruleset set --allowed-all Set to true to allow all access to all IPs. Set to false to use a list
of allowed IP addresses.
esxcli network firewall ruleset set --enabled --
ruleset-id=<string>
Set enabled to true to enable the specified ruleset. Set enabled
to false to disable the specified ruleset.
esxcli network firewall ruleset allowedip list List the allowed IP addresses of the specified rule set.
esxcli network firewall ruleset allowedip add Allow access to the rule set from the specified IP address or
range of IP addresses.
esxcli network firewall ruleset allowedip remove Remove access to the rule set from the specified IP address or
range of IP addresses.
esxcli network firewall ruleset rule list List the rules of each ruleset in the firewall.
Firewall Command Examples
The following examples are from a blog post on virtuallyGhetto.
1 Verify a new ruleset called virtuallyGhetto.
esxcli network firewall ruleset rule list | grep virtuallyGhetto
2 Specify specific IP Address or IP ranges to access a particular service. The following example disable
the allow all option and specifies a particular range for the virtuallyGhetto service.
esxcli network firewall ruleset set --allowed-all false --ruleset-id=virtuallyGhetto
esxcli network firewall ruleset allowedip add --ip-address=172.30.0.0/24 --ruleset-
id=virtuallyGhetto
Customizing ESXi Services from the Security Profile
An ESXi host includes several services that are running by default. You can disable services from the
security profile, or enable services a if company policy allows it.
Use the vSphere Web Client to Enable Access to the ESXi Shell is an example of how to enable a
service.
Note Enabling services affects the security of your host. Do not enable a service unless strictly
necessary.
Available services depend on the VIBs that are installed on the ESXi host. You cannot add services
without installing a VIB. Some VMware products, for example, vSphere HA, install VIBs on hosts and
make services and the corresponding firewall ports available.
In a default installation, you can modify the status of the following services from the vSphere Web Client.
vSphere Security
VMware, Inc. 74

Table 3‑8. ESXi Services in the Security Profile
Service Default Description
Direct Console UI Running The Direct Console User Interface (DCUI) service allows
you to interact with an ESXi host from the local console host
using text-based menus.
ESXi Shell Stopped The ESXi Shell is available from the Direct Console User
Interface and includes a set of fully supported commands
and a set of commands for troubleshooting and
remediation. You must enable access to theESXi Shell from
the direct console of each system. You can enable access
to the local ESXi Shell or access to the ESXi Shell with
SSH.
SSH Stopped The host's SSH client service that allows remote
connections through Secure Shell.
Load-Based Teaming Daemon Running Load-Based Teaming.
Active Directory Service Stopped When you configure ESXi for Active Directory, this service
is started.
NTP Daemon Stopped Network Time Protocol daemon.
PC/SC Smart Card Daemon Stopped When you enable the host for smart card authentication,
this service starts. See Configuring Smart Card
Authentication for ESXi.
CIM Server Running Service that can be used by Common Information Model
(CIM) applications.
SNMP Server Stopped SNMP daemon. See vSphere Monitoring and Performance
for information on configuring SNMP v1, v2, and v3.
Syslog Server Stopped Syslog daemon. You can enable syslog from the Advanced
System Settings in the vSphere Web Client. See vCenter
Server Installation and Setup.
VMware vCenter Agent Running vCenter Server agent. Allows a vCenter Server to connect
to an ESXi host. Specifically, vpxa is the communication
conduit to the host daemon, which in turn communicates
with the ESXi kernel.
X.Org Server Stopped X.Org Server. This optional feature is used internally for 3D
graphics for virtual machines.
Enable or Disable a Service in the Security Profile
You can enable or disable one of the services listed in the Security Profile from the vSphere Web Client.
After installation, certain services are running by default, while others are stopped. In some cases,
additional setup is necessary before a service becomes available in the vSphere Web Client UI. For
example, the NTP service is a way of getting accurate time information, but this service only works when
required ports are opened in the firewall.
Prerequisites
Connect to vCenter Server with the vSphere Web Client.
vSphere Security
VMware, Inc. 75

Procedure
1Browse to a host in the vSphere Web Client inventory, and select a host.
2Click Configure.
3Under System, select Security Profile and click Edit.
4Scroll to the service that you wish to change.
5In the Service Details pane, select Start, Stop, or Restart for a one-time change to the host's status,
or select from the Startup Policy menu to change the status of the host across reboots.
nStart automatically if any ports are open, and stop when all ports are closed: The default
setting for these services. If any port is open, the client attempts to contact the network resources
for the service. If some ports are open, but the port for a particular service is closed, the attempt
fails. If and when the applicable outgoing port is opened, the service begins completing its
startup.
nStart and stop with host: The service starts shortly after the host starts, and closes shortly
before the host shuts down. Much like Start automatically if any ports are open, and stop
when all ports are closed, this option means that the service regularly attempts to complete its
tasks, such as contacting the specified NTP server. If the port was closed but is subsequently
opened, the client begins completing its tasks shortly thereafter.
nStart and stop manually: The host preserves the user-determined service settings, regardless of
whether ports are open or not. When a user starts the NTP service, that service is kept running
as long as the host is powered on. If the service is started and the host is powered off, the service
is stopped as part of the shutdown process, but as soon as the host is powered on, the service is
started again, preserving the user-determined state.
Note These settings apply only to service settings that are configured through the
vSphere Web Client or to applications that are created with the vSphere Web Services SDK.
Configurations made through other means, such as from the ESXi Shell or with configuration files, are
not affected by these settings.
Lockdown Mode
To increase the security of your ESXi hosts, you can put them in lockdown mode. In lockdown mode,
operations must be performed through vCenter Server by default.
Starting with vSphere 6.0, you can select normal lockdown mode or strict lockdown mode, which offer
different degrees of lockdown. vSphere 6.0 also introduces the Exception User list. Exception users do
not lose their privileges when the host enters lockdown mode. Use the Exception User list to add the
accounts of third-party solutions and external applications that need to access the host directly when the
host is in lockdown mode. See Specify Lockdown Mode Exception Users.
Lockdown Mode in vSphere 6 (http://link.brightcove.com/services/player/bcpid2296383276001?
bctid=ref:video_lockdown_mode_vsphere)
vSphere Security
VMware, Inc. 76

Lockdown Mode Behavior
In lockdown mode, some services are disabled, and some services are accessible only to certain users.
Lockdown Mode Services for Dierent Users
When the host is running, available services depend on whether lockdown mode is enabled, and on the
type of lockdown mode.
nIn strict and normal lockdown mode, privileged users can access the host through vCenter Server,
either from the vSphere Web Client or by using the vSphere Web Services SDK.
nDirect Console Interface behavior differs for strict lockdown mode and normal lockdown mode.
nIn strict lockdown mode, the Direct Console User Interface (DCUI) service is disabled.
nIn normal lockdown mode, accounts on the Exception User list can access the DCUI if they have
administrator privileges. In addition, all users who are specified in the DCUI.Access advanced
system setting can access the DCUI.
nIf the ESXi Shell or SSH is enabled and the host is placed in lockdown mode, accounts on the
Exception Users list who have administrator privileges can use these services. For all other users,
ESXi Shell or SSH access is disabled. Starting with vSphere 6.0, ESXi or SSH sessions for users
who do not have administrator privileges are terminated.
All access is logged for both strict and normal lockdown mode.
Table 3‑9. Lockdown Mode Behavior
Service Normal Mode Normal Lockdown Mode Strict Lockdown Mode
vSphere Web Services API All users, based on
permissions
vCenter (vpxuser)
Exception users, based on
permissions
vCloud Director (vslauser, if
available)
vCenter (vpxuser)
Exception users, based on
permissions
vCloud Director (vslauser, if available)
CIM Providers Users with administrator
privileges on the host
vCenter (vpxuser)
Exception users, based on
permissions.
vCloud Director (vslauser, if
available)
vCenter (vpxuser)
Exception users, based on
permissions.
vCloud Director (vslauser, if available)
Direct Console UI (DCUI) Users with administrator
privileges on the host, and
users in the DCUI.Access
advanced option
Users defined in the
DCUI.Access advanced
option
Exception users with
administrator privileges on
the host
DCUI service is stopped
vSphere Security
VMware, Inc. 77

Table 3‑9. Lockdown Mode Behavior (Continued)
Service Normal Mode Normal Lockdown Mode Strict Lockdown Mode
ESXi Shell
(if enabled)
Users with administrator
privileges on the host
Users defined in the
DCUI.Access advanced
option
Exception users with
administrator privileges on
the host
Users defined in the DCUI.Access
advanced option
Exception users with administrator
privileges on the host
SSH
(if enabled)
Users with administrator
privileges on the host
Users defined in the
DCUI.Access advanced
option
Exception users with
administrator privileges on
the host
Users defined in the DCUI.Access
advanced option
Exception users with administrator
privileges on the host
Users Logged in to the ESXi Shell When Lockdown Mode Is Enabled
Users might log in to the ESXi Shell or access the host through SSH before lockdown mode is enabled. In
that case, users who are on the list of Exception Users and who have administrator privileges on the host
remain logged in. Starting with vSphere 6.0, the session is terminated for all other users. Termination
applies to both normal and strict lockdown mode.
Enable Lockdown Mode Using the vSphere Web Client
Enable lockdown mode to require that all configuration changes go through vCenter Server. vSphere 6.0
and later supports normal lockdown mode and strict lockdown mode.
If you want to disallow all direct access to a host completely, you can select strict lockdown mode. Strict
lockdown mode makes it impossible to access a host if the vCenter Server is unavailable and SSH and
the ESXi Shell are disabled. See Lockdown Mode Behavior.
Procedure
1Browse to the host in the vSphere Web Client inventory.
2Click Configure.
3Under System, select Security Profile.
4In the Lockdown Mode panel, click Edit.
vSphere Security
VMware, Inc. 78

5Click Lockdown Mode and select one of the lockdown mode options.
Option Description
Normal The host can be accessed through vCenter Server. Only users who are on the
Exception Users list and have administrator privileges can log in to the Direct
Console User Interface. If SSH or the ESXi Shell is enabled, access might be
possible.
Strict The host can only be accessed through vCenter Server. If SSH or the ESXi Shell
is enabled, running sessions for accounts in the DCUI.Access advanced option
and for Exception User accounts that have administrator privileges remain
enabled. All other sessions are terminated.
6Click OK.
Disable Lockdown Mode Using the vSphere Web Client
Disable lockdown mode to allow configuration changes from direct connections to the ESXi host. Leaving
lockdown mode enabled results in a more secure environment.
In vSphere 6.0 you can disable lockdown mode as follows:
From the
vSphere Web Client
Users can disable both normal lockdown mode and strict lockdown mode
from the vSphere Web Client.
From the Direct
Console User Interface
Users who can access the Direct Console User Interface on the ESXi host
can disable normal lockdown mode. In strict lockdown mode, the Direct
Console Interface service is stopped.
Procedure
1Browse to the host in the vSphere Web Client inventory.
2Click Configure.
3Under System, select Security Profile.
4In the Lockdown Mode panel, click Edit.
5Click Lockdown Mode and select Disabled to disable lockdown mode.
The system exits lockdown mode, vCenter Server displays an alarm, and an entry is added to the audit
log.
Enable or Disable Normal Lockdown Mode from the Direct Console User
Interface
You can enable and disable normal lockdown mode from the Direct Console User Interface (DCUI). You
can enable and disable strict lockdown mode only from the vSphere Web Client.
When the host is in normal lockdown mode, the following accounts can access the Direct Console User
Interface:
nAccounts in the Exception Users list who have administrator privileges on the host. The Exception
Users list is meant for service accounts such as a backup agent.
vSphere Security
VMware, Inc. 79

nUsers defined in the DCUI.Access advanced option for the host. This option can be used to enable
access in case of catastrophic failure.
For ESXi 6.0 and later, user permissions are preserved when you enable lockdown mode. User
permissions are restored when you disable lockdown mode from the Direct Console Interface.
Note If you upgrade a host that is in lockdown mode to ESXi version 6.0 without exiting lockdown mode,
and if you exit lockdown mode after the upgrade, all permissions defined before the host entered
lockdown mode are lost. The system assigns the administrator role to all users who are found in the
DCUI.Access advanced option to guarantee that the host remains accessible.
To retain permissions, disable lockdown mode for the host from the vSphere Web Client before the
upgrade.
Procedure
1At the Direct Console User Interface of the host, press F2 and log in.
2Scroll to the Configure Lockdown Mode setting and press Enter to toggle the current setting.
3Press Esc until you return to the main menu of the Direct Console User Interface.
Specifying Accounts with Access Privileges in Lockdown Mode
You can specify service accounts that can access the ESXi host directly by adding them to the Exception
Users list. You can specify a single user who can access the ESXi host in case of catastrophic
vCenter Server failure.
The vSphere version determines what different accounts can do by default when lockdown mode is
enabled, and how you can change the default behavior.
nIn vSphere 5.0 and earlier, only the root user can log in to the Direct Console User Interface on an
ESXi host that is in lockdown mode.
nIn vSphere 5.1 and later, you can add a user to the DCUI.Access advanced system setting for each
host. The option is meant for catastrophic failure of vCenter Server. Companies usually lock the
password for the user with this access into a safe. A user in the DCUI.Access list does not need to
have full administrative privileges on the host.
nIn vSphere 6.0 and later, the DCUI.Access advanced system setting is still supported. In addition,
vSphere 6.0 and later supports an Exception User list, which is for service accounts that have to log
in to the host directly. Accounts with administrator privileges that are on the Exception Users list can
log in to the ESXi Shell. In addition, those users can log in to a host's DCUI in normal lockdown mode
and can exit lockdown mode.
You specify Exception Users from the vSphere Web Client.
Note Exception users are host local users or Active Directory users with privileges defined locally for
the ESXi host. Users that are members of an Active Directory group lose their permissions when the
host is in lockdown mode.
vSphere Security
VMware, Inc. 80

Add Users to the DCUI.Access Advanced Option
If there is a catastrophic failure, the DCUI.Access advanced option allows you to exit lockdown mode
when you cannot access the host from vCenter Server. You add users to the list by editing the Advanced
Settings for the host from the vSphere Web Client.
Note Users in the DCUI.Access list can change lockdown mode settings regardless of their privileges.
The ability to change lockdown modes can impact the security of your host. For service accounts that
need direct access to the host, consider adding users to the Exception Users list instead. Exception users
can only perform tasks for which they have privileges. See Specify Lockdown Mode Exception Users.
Procedure
1Browse to the host in the vSphere Web Client object navigator.
2Click Configure.
3Under System, click Advanced System Settings, and click Edit.
4Filter for DCUI.
5In the DCUI.Access text box, enter the local ESXi user names, separated by commas.
By default, the root user is included. Consider removing the root user from the DCUI.Access list, and
specifying a named account for better auditability.
6Click OK.
Specify Lockdown Mode Exception Users
In vSphere 6.0 and later, you can add users to the Exception Users list from the vSphere Web Client.
These users do not lose their permissions when the host enters lockdown mode. It makes sense to add
service accounts such as a backup agent to the Exception Users list.
Exception users do not lose their privileges when the host enters lockdown mode. Usually these accounts
represent third-party solutions and external applications that need to continue to function in lockdown
mode.
Note The Exception Users list is meant for service accounts that perform very specific tasks, and not for
administrators. Adding administrator users to the Exception Users list defeats the purpose of lockdown
mode.
Exception users are host local users or Active Directory users with privileges defined locally for the ESXi
host. They are not members of an Active Directory group and are not vCenter Server users. These users
are allowed to perform operations on the host based on their privileges. That means, for example, that a
read-only user cannot disable lockdown mode on a host.
Procedure
1Browse to the host in the vSphere Web Client inventory.
2Click Configure.
3Under System, select Security Profile.
vSphere Security
VMware, Inc. 81
4In the Lockdown Mode panel, click Edit.
5Click Exception Users and click the plus icon to add exception users.
Manage the Acceptance Levels of Hosts and VIBs
The acceptance level of a VIB depends on the amount of certification of that VIB. The acceptance level of
the host depends on the level of the lowest VIB. You can change the acceptance level of the host if you
want to allow lower-level VIBs. You can remove CommunitySupported VIBs to be able to change the host
acceptance level.
VIBs are software packages that include a signature from VMware or a VMware partner. To protect the
integrity of the ESXi host, do not allow users to install unsigned (community-supported) VIBs. An
unsigned VIB contains code that is not certified by, accepted by, or supported by VMware or its partners.
Community-supported VIBs do not have a digital signature.
The host's acceptance level must be the same or less restrictive than the acceptance level of any VIB you
want to add to the host. For example, if the host acceptance level is VMwareAccepted, you cannot install
VIBs at the PartnerSupported level. You can use ESXCLI commands to set an acceptance level for a
host. To protect the security and integrity of your ESXi hosts, do not allow unsigned
(CommunitySupported) VIBs to be installed on hosts in production systems.
The acceptance level for an ESXi host is displayed in the Security Profile in the vSphere Web Client.
The following acceptance levels are supported.
VMwareCertified The VMwareCertified acceptance level has the most stringent
requirements. VIBs with this level go through thorough testing fully
equivalent to VMware in-house Quality Assurance testing for the same
technology. Today, only I/O Vendor Program (IOVP) program drivers are
published at this level. VMware takes support calls for VIBs with this
acceptance level.
VMwareAccepted VIBs with this acceptance level go through verification testing, but the tests
do not fully test every function of the software. The partner runs the tests
and VMware verifies the result. Today, CIM providers and PSA plug-ins are
among the VIBs published at this level. VMware directs support calls for
VIBs with this acceptance level to the partner's support organization.
vSphere Security
VMware, Inc. 82
PartnerSupported VIBs with the PartnerSupported acceptance level are published by a
partner that VMware trusts. The partner performs all testing. VMware does
not verify the results. This level is used for a new or nonmainstream
technology that partners want to enable for VMware systems. Today, driver
VIB technologies such as Infiniband, ATAoE, and SSD are at this level with
nonstandard hardware drivers. VMware directs support calls for VIBs with
this acceptance level to the partner's support organization.
CommunitySupported The CommunitySupported acceptance level is for VIBs created by
individuals or companies outside of VMware partner programs. VIBs at this
level have not gone through any VMware-approved testing program and
are not supported by VMware Technical Support or by a VMware partner.
Procedure
1Connect to each ESXi host and verify that the acceptance level is set to VMwareCertified,
VMwareAccepted, or PartnerSupported by running the following command.
esxcli software acceptance get
2If the host acceptance level is CommunitySupported, determine whether any of the VIBs are at the
CommunitySupported level by running the following commands.
esxcli software vib list
esxcli software vib get -n vibname
3Remove any CommunitySupported VIBs by running the following command.
esxcli software vib remove --vibname vib
4Change the acceptance level of the host by using one of the following methods.
Option Description
CLI command esxcli software acceptance set --level acceptance_level
vSphere Client (HTML5-based client) or
vSphere Web Client
a Select a host in the inventory.
b Select the Configure tab.
c Expand System and select Security Profile.
d Click the Edit button for Host Image Profile Acceptance Level and choose the
acceptance level.
Assigning Privileges for ESXi Hosts
In most cases, you give privileges to users by assigning permissions to ESXi host objects that are
managed by a vCenter Server system. If you are using a standalone ESXi host, you can assign privileges
directly.
vSphere Security
VMware, Inc. 83

Assigning Permissions to ESXi Hosts That Are Managed by
vCenter Server
If your ESXi host is managed by a vCenter Server, perform management tasks through the
vSphere Web Client.
You can select the ESXi host object in the vCenter Server object hierarchy and assign the administrator
role to a limited number of users. Those users can then perform direct management on the ESXi host.
See Using Roles to Assign Privileges.
Best practice is to create at least one named user account, assign it full administrative privileges on the
host, and use this account instead of the root account. Set a highly complex password for the root
account and limit the use of the root account. Do not remove the root account.
Assigning Permissions to Standalone ESXi Hosts
You can add local users and define custom roles from the Management tab of the VMware Host Client.
See the vSphere Single Host Management - VMware Host Client documentation.
For all versions of ESXi, you can see the list of predefined users in the /etc/passwd file.
The following roles are predefined.
Read Only Allows a user to view objects associated with the ESXi host but not to make
any changes to objects.
Administrator Administrator role.
No Access No access. This role is the default role. You can override the default role.
You can manage local users and groups and add local custom roles to an ESXi host using a
VMware Host Client connected directly to the ESXi host. See the vSphere Single Host Management -
VMware Host Client documentation.
Starting with vSphere 6.0, you can use ESXCLI account management commands for managing ESXi
local user accounts. You can use ESXCLI permission management commands for setting or removing
permissions on both Active Directory accounts (users and groups) and on ESXi local accounts (users
only).
Note If you define a user for the ESXi host by connecting to the host directly, and a user with the same
name also exists in vCenter Server, those users are different. If you assign a role to the ESXi user, the
vCenter Server user is not assigned the same role.
vSphere Security
VMware, Inc. 84

Predefined Privileges
If your environment does not include a vCenter Server system, the following users are predefined.
root User By default each ESXi host has a single root user account with the
Administrator role. That root user account can be used for local
administration and to connect the host to vCenter Server.
Assigning root user privileges can make it easier to break into an ESXi host
because the name is already known. Having a common root account also
makes it harder to match actions to users.
For better auditing, create individual accounts with Administrator privileges.
Set a highly complex password for the root account and limit the use of the
root account, for example, for use when adding a host to vCenter Server.
Do not remove the root account.
Best practice is to ensure that any account with the Administrator role on an
ESXi host is assigned to a specific user with a named account. Use ESXi
Active Directory capabilities, which allow you to manage Active Directory
credentials.
Important You can remove the access privileges for the root user.
However, you must first create another permission at the root level that has
a different user assigned to the Administrator role.
vpxuser User vCenter Server uses vpxuser privileges when managing activities for the
host.
The vCenter Server administrator can perform most of the same tasks on
the host as the root user and also schedule tasks, work with templates, and
so forth. However, the vCenter Server administrator cannot directly create,
delete, or edit local users and groups for hosts. Only a user with
Administrator privileges can perform these tasks directly on a host.
Note You cannot manage vpxuser using Active Directory.
Caution Do not change vpxuser in any way. Do not change its password.
Do not change its permissions. If you do so, you might experience
problems when working with hosts through vCenter Server.
dcui User The dcui user runs on hosts and acts with Administrator rights. This user’s
primary purpose is to configure hosts for lockdown mode from the Direct
Console User Interface (DCUI).
This user acts as an agent for the direct console and cannot be modified or
used by interactive users.
vSphere Security
VMware, Inc. 85

Using Active Directory to Manage ESXi Users
You can configure ESXi to use a directory service such as Active Directory to manage users.
Creating local user accounts on each host presents challenges with having to synchronize account
names and passwords across multiple hosts. Join ESXi hosts to an Active Directory domain to eliminate
the need to create and maintain local user accounts. Using Active Directory for user authentication
simplifies the ESXi host configuration and reduces the risk for configuration issues that could lead to
unauthorized access.
When you use Active Directory, users supply their Active Directory credentials and the domain name of
the Active Directory server when adding a host to a domain.
Configure a Host to Use Active Directory
You can configure a host to use a directory service such as Active Directory to manage users and groups.
When you add an ESXi host to Active Directory, the DOMAIN group ESX Admins is assigned full
administrative access to the host if it exists. If you do not want to make full administrative access
available, see VMware Knowledge Base article 1025569 for a workaround.
If a host is provisioned with Auto Deploy, Active Directory credentials cannot be stored on the hosts. You
can use the vSphere Authentication Proxy to join the host to an Active Directory domain. Because a trust
chain exists between the vSphere Authentication Proxy and the host, the Authentication Proxy can join
the host to the Active Directory domain. See Using vSphere Authentication Proxy.
Note When you define user account settings in Active Directory, you can limit the computers that a user
can log in to by the computer name. By default, no equivalent restrictions are set on a user account. If
you set this limitation, LDAP Bind requests for the user account fail with the message LDAP binding not
successful, even if the request is from a listed computer. You can avoid this issue by adding the
netBIOS name for the Active Directory server to the list of computers that the user account can log in to.
Prerequisites
nVerify that you have an Active Directory domain. See your directory server documentation.
nVerify that the host name of ESXi is fully qualified with the domain name of the Active Directory forest.
fully qualified domain name = host_name.domain_name
Procedure
1Synchronize the time between ESXi and the directory service system using NTP.
See Synchronize ESXi Clocks with a Network Time Server or the VMware Knowledge Base for
information about how to synchronize ESXi time with a Microsoft Domain Controller.
vSphere Security
VMware, Inc. 86
2Ensure that the DNS servers that you configured for the host can resolve the host names for the
Active Directory controllers.
a Browse to the host in the vSphere Web Client object navigator.
b Click Configure.
c Under Networking, click TCP/IP configuration.
d Under TCP/IP Stack: Default, click DNS and verify that the host name and DNS server
information for the host are correct.
What to do next
Use the vSphere Web Client to join a directory service domain. See Add a Host to a Directory Service
Domain. For hosts that are provisioned with Auto Deploy, set up the vSphere Authentication Proxy. See
Using vSphere Authentication Proxy.
Add a Host to a Directory Service Domain
To have your host use a directory service, you must join the host to the directory service domain.
You can enter the domain name in one of two ways:
nname.tld (for example, domain.com): The account is created under the default container.
nname.tld/container/path (for example, domain.com/OU1/OU2): The account is created under a
particular organizational unit (OU).
To use the vSphere Authentication Proxy service, see Using vSphere Authentication Proxy.
Procedure
1Browse to the host in the vSphere Web Client inventory.
2Click Configure.
3Under System, select Authentication Services.
4Click Join Domain.
5Enter a domain.
Use the form name.tld or name.tld/container/path.
6Enter the user name and password of a directory service user who has permissions to join the host to
the domain, and click OK.
7(Optional) If you intend to use an authentication proxy, enter the proxy server IP address.
8Click OK to close the Directory Services Configuration dialog box.
View Directory Service Settings
You can view the type of directory server, if any, that the host uses to authenticate users and the directory
server settings.
vSphere Security
VMware, Inc. 87

Procedure
1Browse to the host in the vSphere Web Client inventory.
2Click Configure.
3Under System, select Authentication Services.
The Authentication Services page displays the directory service and domain settings.
Using vSphere Authentication Proxy
You can add ESXi hosts to an Active Directory domain by using vSphere Authentication Proxy instead of
adding the hosts explicitly to the Active Directory domain.
You only have to set up the host so it knows about the domain name of the Active Directory server and
about the IP address of vSphere Authentication Proxy. When vSphere Authentication Proxy is enabled, it
automatically adds hosts that are being provisioned with Auto Deploy to the Active Directory domain. You
can also use vSphere Authentication Proxy with hosts that are not provisioned by using Auto Deploy.
Auto Deploy If you are provisioning hosts with Auto Deploy, you can set up a reference
host that points to Authentication Proxy. You then set up a rule that applies
the reference host's profile to any ESXi host that is provisioned with Auto
Deploy. vSphere Authentication Proxy stores the IP addresses of all hosts
that Auto Deploy provisions using PXE in its access control list. When the
host boots, it contacts vSphere Authentication Proxy, and vSphere
Authentication Proxy joins those hosts, which are already in its access
control list, to the Active Directory domain.
Even if you use vSphere Authentication Proxy in an environment that uses
certificates that are provisioned by VMCA or third-party certificates, the
process works seamlessly if you follow the instructions for using custom
certificates with Auto Deploy.
See Use Custom Certificates With Auto Deploy.
Other ESXi Hosts You can set up other hosts to use vSphere Authentication proxy if you want
to make it possible for the host to join the domain without using Active
Directory credentials. That means you do not need to transmit Active
Directory credentials to the host, and you do not save Active Directory
credentials in the host profile.
In that case, you add the host's IP address to the vSphere Authentication
Proxy access control list, and vSphere Authentication Proxy authorizes the
host based on its IP address by default. You can enable client
authentication to have vSphere Authentication Proxy check the host's
certificate.
Note You cannot use vSphere Authentication Proxy in an environment that supports only IPv6.
vSphere Security
VMware, Inc. 88
Enable vSphere Authentication Proxy
The vSphere Authentication Proxy service is available on each vCenter Server system. By default, the
service is not running. If you want to use vSphere Authentication Proxy in your environment, you can start
the service from the vSphere Web Client or from the command line.
The vSphere Authentication Proxy service binds to an IPv4 address for communication with
vCenter Server, and does not support IPv6. The vCenter Server instance can be on a host machine in an
IPv4-only or IPv4/IPv6 mixed-mode network environment. However, when you specify the address of
vSphere Authentication Proxy in the vSphere Web Client, you must specify an IPv4 address.
Prerequisites
Verify that you are using vCenter Server 6.5 or later. In earlier versions of vSphere, vSphere
Authentication Proxy is installed separately. See the documentation for the earlier version of the product
for instructions.
Procedure
1Connect to a vCenter Server system with the vSphere Web Client.
2Click Administration, and click System Configuration under Deployment.
3Click Services, and click the VMware vSphere Authentication Proxy service.
4Click the green Start the service icon in the menu bar at the top of the window.
5(Optional) After the service has started, click Actions > Edit Startup Type and click Automatic to
make startup automatic.
You can now set the vSphere Authentication Proxy domain. After that, vSphere Authentication Proxy
handles all hosts that are provisioned with Auto Deploy, and you can explicitly add hosts to vSphere
Authentication Proxy.
Add a Domain to vSphere Authentication Proxy with the
vSphere Web Client
You can add a domain to vSphere Authentication Proxy from the vSphere Web Client or by using the
camconfig command.
You can add a domain to vSphere Authentication Proxy only after you enable the proxy. After you add the
domain, vSphere Authentication Proxy adds all hosts that you provision with Auto Deploy to that domain.
For other hosts, you can also use vSphere Authentication Proxy if you do not want to give those hosts
domain privileges.
Procedure
1Connect to a vCenter Server system with the vSphere Web Client.
2Click Administration, and click System Configuration under Deployment.
3Click Services, click the VMware vSphere Authentication Proxy service, and click Edit.
vSphere Security
VMware, Inc. 89
4Enter the name of the domain that vSphere Authentication Proxy will add hosts to, and the name of a
user who has Active Directory privileges to add hosts to the domain.
The other fields in this dialog are for information only.
5Click the ellipsis icon to add and confirm the password for the user, and click OK.
Add a Domain to vSphere Authentication Proxy with the
camconfig Command
You can add a domain to vSphere Authentication from the vSphere Web Client or by using the
camconfig command.
You can add a domain to vSphere Authentication Proxy only after you enable the proxy. After you add the
domain, vSphere Authentication Proxy adds all hosts that you provision with Auto Deploy to that domain.
For other hosts, you can also use vSphere Authentication Proxy if you do not want to give those hosts
domain privileges.
Procedure
1Log in to the vCenter Server appliance or the vCenter Server Windows machine as a user with
administrator privileges.
2Run the command to enable access to the Bash shell.
shell
3Go to the directory where the camconfig script is located.
OS Location
vCenter Server Appliance /usr/lib/vmware-vmcam/bin/
vCenter Server Windows C:\Program Files\VMware\CIS\vmcamd\
4Run the following command to add the domain and user Active Directory credentials to the
Authentication Proxy configuration.
camconfig add-domain -d domain -u user
You are prompted for a password.
vSphere Authentication Proxy caches that username and password. You can remove and recreate
the user as needed. The domain must be reachable via DNS, but does not have to be a vCenter
Single Sign-On identity source.
vSphere Authentication Proxy will use the username specified by user to create the accounts for ESXi
hosts in Active Directory, so the user must have privileges to create accounts in the Active Directory
domain to which you are adding the hosts. At the time of writing of this information, Microsoft
Knowledge Base article 932455 had background information for account creation privileges.
vSphere Security
VMware, Inc. 90

5If you later want to remove the domain and user information from vSphere Authentication Proxy, run
the following command.
camconfig remove-domain -d domain
Use vSphere Authentication Proxy to Add a Host to a Domain
The Auto Deploy server adds all hosts that it provisions to vSphere Authentication Proxy, and vSphere
Authentication Proxy adds those hosts to the domain. If you want to add other hosts to a domain using
vSphere Authentication Proxy, you can add those hosts to vSphere Authentication Proxy explicitly.
Afterwards, the vSphere Authentication Proxy server adds those hosts to the domain. As a result, user-
supplied credentials no longer have to be transmitted to the vCenter Server system.
You can enter the domain name in one of two ways:
nname.tld (for example, domain.com): The account is created under the default container.
nname.tld/container/path (for example, domain.com/OU1/OU2): The account is created under a
particular organizational unit (OU).
Prerequisites
nIf the ESXi host is using a VMCA-signed certificate, verify that the host has been added to
vCenter Server. Otherwise, the Authentication Proxy service cannot trust the ESXi host.
nIf ESXi is using a CA-signed certificate, verify that the CA-signed certificate has been added to the
vCenter Server system. See Certificate Management for ESXi Hosts.
Procedure
1Connect to a vCenter Server system with the vSphere Web Client.
2Browse to the host in the vSphere Web Client and click Configure.
3Under Settings, select Authentication Services.
4Click Join Domain.
5Enter a domain.
Use the form name.tld, for example mydomain.com, or name.tld/container/path, for example,
mydomain.com/organizational_unit1/organizational_unit2.
6Select Using Proxy Server.
7Enter the IP address of the Authentication Proxy server, which is always the same as the IP address
of the vCenter Server system.
8Click OK.
vSphere Security
VMware, Inc. 91

Enable Client Authentication for vSphere Authentication Proxy
By default, vSphere Authentication Proxy adds any host if it has the IP address of that host in its access
control list. For additional security, you can enable client authentication. If client authentication is enabled,
vSphere Authentication Proxy also checks the certificate of the host.
Prerequisites
nVerify that the vCenter Server system trusts the host. By default, when you add a host to
vCenter Server, the host is assigned a certificate that is signed by a vCenter Server trusted root CA.
vSphere Authentication Proxy trusts vCenter Server trusted root CA.
nIf you plan on replacing ESXi certificates in your environment, perform the replacement before you
enable vSphere Authentication Proxy. The certificates on the ESXi host must match that of the host's
registration.
Procedure
1Log in to the vCenter Server appliance or the vCenter Server Windows machine as a user with
administrator privileges.
2Run the command to enable access to the Bash shell.
shell
3Go to the directory where the camconfig script is located.
OS Location
vCenter Server Appliance /usr/lib/vmware-vmcam/bin/
vCenter Server Windows C:\Program Files\VMware\CIS\vmcamd\
4Run the following command to enable client authentication.
camconfig ssl-cliAuth -e
Going forward, vSphere Authentication Proxy checks the certificate of each host that is added.
5If you later want to disable client authentication again, run the following command.
camconfig ssl-cliAuth -n
Import the vSphere Authentication Proxy Certificate to ESXi Host
By default, ESXi hosts require explicit verification of the vSphere Authentication Proxy certificate. If you
are using vSphere Auto Deploy, the Auto Deploy service takes care of adding the certificate to hosts that
it provisions. For other hosts, you have to add the certificate explicitly.
vSphere Security
VMware, Inc. 92

Prerequisites
nUpload the vSphere Authentication Proxy certificate to the ESXi host. You can find the certificate in
the following location.
vCenter Server
Appliance
/var/lib/vmware/vmcam/ssl/rui.crt
vCenter Server
Windows
C:\ProgramData\VMware\vCenterServer\data\vmcamd\ssl\rui.c
rt
nVerify that the UserVars.ActiveDirectoryVerifyCAMCertificate ESXi advanced setting is set to
1 (the default).
Procedure
1In the vSphere Web Client, select the ESXi host and click Configure.
2Under System, select Authentication Services.
3Click Import Certificate.
4Type the certificate file path following the format [datastore]/path/certname.crt, and click OK.
Generate a New Certificate for vSphere Authentication Proxy
If you want to generate a new certificate that is provisioned by VMCA, or a new certificate that includes
VMCA as a subordinate certificate, follow the steps in this topic.
See Set Up vSphere Authentication Proxy to Use Custom Certificates if you want to use a custom
certificate that is signed by a third-party or enterprise CA.
Prerequisites
You must have root or Administrator privileges on the system on which vSphere Authentication Proxy is
running.
Procedure
1Make a copy of certool.cfg.
cp /usr/lib/vmware-vmca/share/config/certool.cfg /var/lib/vmware/vmcam/ssl/vmcam.cfg
2Edit the copy with some information about your organization, as in the following example.
Country = IE
Name = vmcam
Organization = VMware
OrgUnit = vTSU
State = Cork
Locality = Cork
Hostname = test-cam-1.test1.vmware.com
vSphere Security
VMware, Inc. 93

3Generate the new private key in /var/lib/vmware/vmcam/ssl/.
/usr/lib/vmware-vmca/bin/certool --genkey --privkey=/var/lib/vmware/vmcam/ssl/rui.key --
pubkey=/tmp/vmcam.pub --server=localhost
For localhost, supply the FQDN of the Platform Services Controller.
4Generate the new certificate in /var/lib/vmware/vmcam/ssl/ using the key and vmcam.cfg file
that you created in Step 1 and Step 2.
/usr/lib/vmware-vmca/bin/certool --server=localhost --gencert --
privkey=/var/lib/vmware/vmcam/ssl/rui.key --cert=/var/lib/vmware/vmcam/ssl/rui.crt --
config=/var/lib/vmware/vmcam/ssl/vmcam.cfg
For localhost, supply the FQDN of the Platform Services Controller.
Set Up vSphere Authentication Proxy to Use Custom Certificates
Using custom certificates with vSphere Authentication Proxy consists of several steps. First you generate
a CSR and send it to your CA for signing. Then you place the signed certificate and key file in a location
that vSphere Authentication Proxy can access.
By default, vSphere Authentication Proxy generates a CSR during first boot and asks VMCA to sign that
CSR. vSphere Authentication Proxy registers with vCenter Server using that certificate. You can use
custom certificates in your environment, if you add those certificates to vCenter Server.
vSphere Security
VMware, Inc. 94

Procedure
1Generate a CSR for vSphere Authentication Proxy.
a Create a configuration file, /var/lib/vmware/vmcam/ssl/vmcam.cfg, as in the following
example.
[ req ]
distinguished_name = req_distinguished_name
encrypt_key = no
prompt = no
string_mask = nombstr
req_extensions = v3_req
[ v3_req ]
basicConstraints = CA:false
keyUsage = nonRepudiation, digitalSignature, keyEncipherment
subjectAltName = DNS:olearyf-static-1.csl.vmware.com
[ req_distinguished_name ]
countryName = IE
stateOrProvinceName = Cork
localityName = Cork
0.organizationName = VMware
organizationalUnitName = vTSU
commonName = test-cam-1.test1.vmware.com
b Run openssl to generate a CSR file and a key file, passing in the configuration file.
openssl req -new -nodes -out vmcam.csr -newkey rsa:2048 -
keyout /var/lib/vmware/vmcam/ssl/rui.key -config /var/lib/vmware/vmcam/ssl/vmcam.cfg
2Back up the rui.crt certificate and rui.key files, which are stored in the following location.
OS Location
vCenter Server Appliance /var/lib/vmware/vmcam/ssl/rui.crt
vCenter Server Windows C:\ProgramData\VMware\vCenterServer\data\vmcamd\ssl\rui.crt
3Unregister vSphere Authentication Proxy.
a Go to the directory where the camregister script is located.
OS Commands
vCenter Server Appliance /usr/lib/vmware-vmcam/bin
vCenter Server Windows C:\ProgramData\VMware\vCenterServer\data\vmcamd\ssl\rui.crt
b Run the following command.
camregister --unregister -a VC_address -u user
user must be a vCenter Single Sign-On user that has administrator permissions on
vCenter Server.
vSphere Security
VMware, Inc. 95

4Stop the vSphere Authentication Proxy service.
Tool Steps
vSphere Web Client a Click Administration, and click System Configuration under Deployment.
b Click Services, click the VMware vSphere Authentication Proxy service,
and stop the service.
CLI service-control --stop vmcam
5Replace the existing rui.crt certificate and rui.key files with the files that you received from your
CA.
6Restart the vSphere Authentication Proxy service.
7Reregister vSphere Authentication Proxy explicitly with vCenter Server by using the new certificate
and key.
camregister --register -a VC_address -u user -c full_path_to_rui.crt -k full_path_to_rui.key
Configuring Smart Card Authentication for ESXi
You can use smart card authentication to log in to the ESXi Direct Console User Interface (DCUI) by
using a Personal Identity Verification (PIV), Common Access Card (CAC) or SC650 smart card instead
specifying a user name and password.
A smart card is a small plastic card with an embedded integrated circuit chip. Many government agencies
and large enterprises use smart card based two-factor authentication to increase the security of their
systems and comply with security regulations.
When smart card authentication is enabled on an ESXi host, the DCUI prompts for a smart card and PIN
combination instead of the default prompt for a user name and password.
1 When you insert the smart card into the smart card reader, the ESXi host reads the credentials on it.
2 The ESXi DCUI displays your login ID, and prompts for your PIN.
3 After you enter your PIN, the ESXi host matches it with the PIN stored on the smart card and verifies
the certificate on the smart card with Active Directory.
4 After successful verification of the smart card certificate, ESXi logs you in to the DCUI.
You can switch to user name and password authentication from the DCUI by pressing F3.
The chip on the smart card locks after a few consecutive incorrect PIN entries, usually three. If a smart
card is locked, only selected personnel can unlock it.
Enable Smart Card Authentication
Enable smart card authentication to prompt for smart card and PIN combination to log in to the ESXi
DCUI.
vSphere Security
VMware, Inc. 96
Prerequisites
nSet up the infrastructure to handle smart card authentication, such as accounts in the Active Directory
domain, smart card readers, and smart cards.
nConfigure ESXi to join an Active Directory domain that supports smart card authentication. For more
information, see Using Active Directory to Manage ESXi Users.
nUse the vSphere Web Client to add root certificates. See Certificate Management for ESXi Hosts.
Procedure
1In the vSphere Web Client, browse to the host.
2Click Configure.
3Under System, select Authentication Services.
You see the current smart card authentication status and a list with imported certificates.
4In the Smart Card Authentication panel, click Edit.
5In the Edit Smart Card Authentication dialog box, select the Certificates page.
6Add trusted Certificate Authority (CA) certificates, for example, root and intermediary CA certificates.
7Open the Smart Card Authentication page, select the Enable Smart Card Authentication check
box, and click OK.
Disable Smart Card Authentication
Disable smart card authentication to return to the default user name and password authentication for
ESXi DCUI login.
Procedure
1In the vSphere Web Client, browse to the host.
2Click Configure.
3Under System, select Authentication Services.
You see the current smart card authentication status and a list with imported certificates.
4In the Smart Card Authentication panel, click Edit.
5On the Smart Card Authentication page, deselect the Enable Smart Card Authentication check
box, and click OK.
Authenticating With User Name and Password in Case of
Connectivity Problems
If the Active Directory (AD) domain server is not reachable, you can log in to the ESXi DCUI by using user
name and password authentication to perform emergency actions on the host.
vSphere Security
VMware, Inc. 97

In exceptional circumstances, the AD domain server is not reachable to authenticate the user credentials
on the smart card because of connectivity problems, network outage, or disasters. In that case, you can
log in to the ESXi DCUI by using the credentials of a local ESXi Administrator user. After logging in, you
can perform diagnostics or other emergency actions. The fallback to user name and password login is
logged. When the connectivity to AD is restored, smart card authentication is enabled again.
Note Loss of network connectivity to vCenter Server does not affect smart card authentication if the
Active Directory (AD) domain server is available.
Using Smart Card Authentication in Lockdown Mode
When enabled, lockdown mode on the ESXi host increases the security of the host and limits access to
the DCUI. Lockdown mode might disable the smart card authentication feature.
In normal lockdown mode, only users on the Exception Users list with administrator privileges can access
the DCUI. Exception users are host local users or Active Directory users with permissions defined locally
for the ESXi host. If you want to use smart card authentication in normal lockdown mode, you must add
users to the Exception Users list from the vSphere Web Client. These users do not lose their permissions
when the host enters normal lockdown mode and can log in to the DCUI. For more information, see
Specify Lockdown Mode Exception Users.
In strict lockdown mode, the DCUI service is stopped. As a result, you cannot access the host by using
smart card authentication.
Using the ESXi Shell
The ESXi Shell is disabled by default on ESXi hosts. You can enable local and remote access to the shell
if necessary.
To reduce the risk of unauthorized access, enable the ESXi Shell for troubleshooting only.
The ESXi Shell is independent of in lockdown mode. Even if the host is running in lockdown mode, you
can still log in to the ESXi Shell if it is enabled.
ESXi Shell Enable this service to access the ESXi Shell locally.
SSH Enable this service to access the ESXi Shell remotely by using SSH.
The root user and users with the Administrator role can access the ESXi Shell. Users who are in the
Active Directory group ESX Admins are automatically assigned the Administrator role. By default, only the
root user can run system commands (such as vmware -v) by using the ESXi Shell.
Note Do not enable the ESXi Shell unless you actually need access.
nUse the vSphere Web Client to Enable Access to the ESXi Shell
You can use the vSphere Web Client to enable local and remote (SSH) access to the ESXi Shell and
to set the idle timeout and availability timeout.
vSphere Security
VMware, Inc. 98

nUse the Direct Console User Interface (DCUI) to Enable Access to the ESXi Shell
The Direct Console User Interface (DCUI) allows you to interact with the host locally using text-
based menus. Evaluate carefully whether the security requirements of your environment support
enabling the Direct Console User Interface.
nLog in to the ESXi Shell for Troubleshooting
Perform ESXi configuration tasks with the vSphere Web Client, the vSphere CLI, or vSphere
PowerCLI. Log in to the ESXi Shell (formerly Tech Support Mode or TSM) for troubleshooting
purposes only.
Use the vSphere Web Client to Enable Access to the ESXi Shell
You can use the vSphere Web Client to enable local and remote (SSH) access to the ESXi Shell and to
set the idle timeout and availability timeout.
Note Access the host by using the vSphere Web Client, remote command-line tools (vCLI and
PowerCLI), and published APIs. Do not enable remote access to the host using SSH unless special
circumstances require that you enable SSH access.
Prerequisites
If you want to use an authorized SSH key, you can upload it. See ESXi SSH Keys.
Procedure
1Browse to the host in the vSphere Web Client inventory.
2Click Configure.
3Under System, select Security Profile.
4In the Services panel, click Edit.
5Select a service from the list.
nESXi Shell
nSSH
nDirect Console UI
6Click Service Details and select the startup policy Start and stop manually.
When you select Start and stop manually, the service does not start when you reboot the host. If
you want the service to start when you reboot the host, select Start and stop with host.
7Select Start to enable the service.
8Click OK.
What to do next
Set the availability and idle timeouts for the ESXi Shell. See Create a Timeout for ESXi Shell Availability
in the vSphere Web Client and Create a Timeout for Idle ESXi Shell Sessions in the vSphere Web Client
vSphere Security
VMware, Inc. 99
Create a Timeout for ESXi Shell Availability in the vSphere Web Client
The ESXi Shell is disabled by default. You can set an availability timeout for the ESXi Shell to increase
security when you enable the shell.
The availability timeout setting is the amount of time that can elapse before you must log in after the
ESXi Shell is enabled. After the timeout period, the service is disabled and users are not allowed to log in.
Procedure
1Browse to the host in the vSphere Web Client inventory.
2Click Configure.
3Under System, select Advanced System Settings.
4Select UserVars.ESXiShellTimeOut and click Edit.
5Enter the idle timeout setting.
You must restart the SSH service and the ESXi Shell service for the timeout to take effect.
6Click OK.
If you are logged in when the timeout period elapses, your session will persist. However, after you log out
or your session is terminated, users are not allowed to log in.
Create a Timeout for Idle ESXi Shell Sessions in the vSphere Web Client
If a user enables the ESXi Shell on a host, but forgets to log out of the session, the idle session remains
connected indefinitely. The open connection can increase the potential for someone to gain privileged
access to the host. You can prevent this by setting a timeout for idle sessions.
The idle timeout is the amount of time that can elapse before a user is logged out of an idle interactive
session. You can control the amount of time for both local and remote (SSH) session from the Direct
Console Interface (DCUI) or from the vSphere Web Client.
Procedure
1Browse to the host in the vSphere Web Client inventory.
2Click Configure.
3Under System, select Advanced System Settings.
4Select UserVars.ESXiShellInteractiveTimeOut, click the Edit icon, and enter the timeout setting.
5Restart the ESXi Shell service and the SSH service for the timeout to take effect.
If the session is idle, users are logged out after the timeout period elapses.
vSphere Security
VMware, Inc. 100

Use the Direct Console User Interface (DCUI) to Enable Access to
the ESXi Shell
The Direct Console User Interface (DCUI) allows you to interact with the host locally using text-based
menus. Evaluate carefully whether the security requirements of your environment support enabling the
Direct Console User Interface.
You can use the Direct Console User Interface to enable local and remote access to the ESXi Shell.
Note Changes made to the host using the Direct Console User Interface, the vSphere Web Client,
ESXCLI, or other administrative tools are committed to permanent storage every hour or upon graceful
shutdown. Changes might be lost if the host fails before they are committed.
Procedure
1From the Direct Console User Interface, press F2 to access the System Customization menu.
2Select Troubleshooting Options and press Enter.
3From the Troubleshooting Mode Options menu, select a service to enable.
nEnable ESXi Shell
nEnable SSH
4Press Enter to enable the service.
5Press Esc until you return to the main menu of the Direct Console User Interface.
What to do next
Set the availability and idle timeouts for the ESXi Shell. See Set Availability Timeout or Idle Timeout for
the ESXi Shell.
Set Availability Timeout or Idle Timeout for the ESXi Shell
The ESXi Shell is disabled by default. To increase security when you enable the shell, you can set an
availability timeout, an idle timeout, or both.
The two types of timeout apply in different situations.
Idle Timeout f a user enables the ESXi Shell on a host, but forgets to log out of the
session, the idle session remains connected indefinitely. The open
connection can increase the potential for someone to gain privileged
access to the host. You can prevent this by setting a timeout for idle
sessions.
Availability Timout The availability timeout determines how much time can elapse before you
log in after you initially enable the shell. If you wait longer, the service is
disabled and you cannot log in to the ESXi Shell.
vSphere Security
VMware, Inc. 101
Prerequisites
Enable the ESXi Shell. See Use the Direct Console User Interface (DCUI) to Enable Access to the ESXi
Shell.
Procedure
1Log in to the ESXi Shell.
2From the Troubleshooting Mode Options menu, select Modify ESXi Shell and SSH timeouts and
press Enter.
3Enter the idle timeout (in seconds) or the availability timeout.
You must restart the SSH service and the ESXi Shell service for the timeout to take effect.
4Press Enter and press Esc until you return to the main menu of the Direct Console User Interface.
5Click OK.
nIf you set the idle timeout, users are logged out after the session is idle for the specified time.
nIf you set the availability timeout, and you do not log in before that timeout elapses, logins become
disabled again.
Log in to the ESXi Shell for Troubleshooting
Perform ESXi configuration tasks with the vSphere Web Client, the vSphere CLI, or vSphere PowerCLI.
Log in to the ESXi Shell (formerly Tech Support Mode or TSM) for troubleshooting purposes only.
Procedure
1Log in to the ESXi Shell using one of the following methods.
nIf you have direct access to the host, press Alt+F1 to open the login page on the machine's
physical console.
nIf you are connecting to the host remotely, use SSH or another remote console connection to start
a session on the host.
2Enter a user name and password recognized by the host.
UEFI Secure Boot for ESXi Hosts
Secure boot is part of the UEFI firmware standard. With secure boot enabled, a machine refuses to load
any UEFI driver or app unless the operating system bootloader is cryptographically signed. Starting with
vSphere 6.5, ESXi supports secure boot if it is enabled in the hardware.
vSphere Security
VMware, Inc. 102
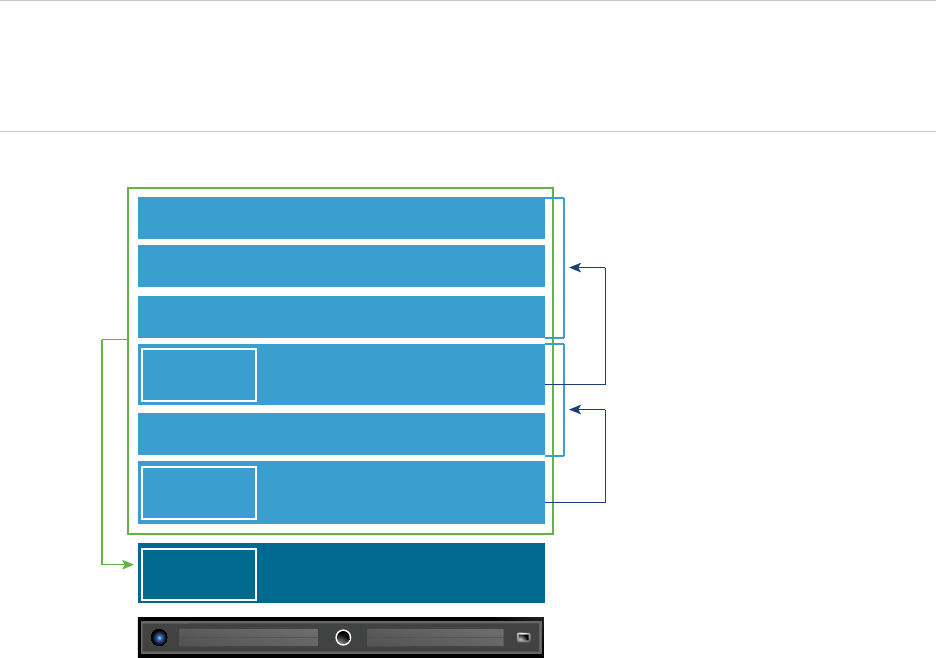
UEFI Secure Boot Overview
ESXi version 6.5 and later supports UEFI secure boot at each level of the boot stack.
Note Before you use UEFI Secure Boot on a host that was upgraded to ESXi 6.5, check for compatibility
by following the instructions in Run the Secure Boot Validation Script on an Upgraded ESXi Host. If you
upgrade an ESXi host by using esxcli commands, the upgrade does not update the bootloader. In that
case, you cannot perform a secure boot on that system.
Figure 3‑1. UEFI Secure Boot
UEFI firmware
Management apps (hostd, dcui, etc.)
Drivers and modules
ESXi base system
VMkernel
bootloader
Secure boot VIB verifier
VMware
public key
UEFI secure boot
enabled machine
UEFI CA
public key
Root
of trust
11
2
VMware
public key
With secure boot enabled, the boot sequence proceeds as follows.
1 Starting with vSphere 6.5, the ESXi bootloader contains a VMware public key. The bootloader uses
this key to verify the signature of the kernel and a small subset of the system that includes a secure
boot VIB verifier.
2 The VIB verifier verifies every VIB package that is installed on the system.
At this point, the entire system boots with the root of trust in certificates that are part of the UEFI firmware.
UEFI Secure Boot Troubleshooting
If secure boot does not succeed at any level of the boot sequence, an error results.
vSphere Security
VMware, Inc. 103

The error message depends on the hardware vendor and on the level at which verification did not
succeed.
nIf you attempt to boot with a bootloader that is unsigned or has been tampered with, an error during
the boot sequence results. The exact message depends on the hardware vendor. It might look like
the following error, but might look different.
UEFI0073: Unable to boot PXE Device...because of the Secure Boot policy
nIf the kernel has been tampered with, an error like the following results.
Fatal error: 39 (Secure Boot Failed)
nIf a package (VIB or driver) has been tampered with, a purple screen with the following message
appears.
UEFI Secure Boot failed:
Failed to verify signatures of the following vibs (XX)
To resolve issues with secure boot, follow these steps.
1 Reboot the host with secure boot disabled.
2 Run the secure boot verification script (see Run the Secure Boot Validation Script on an Upgraded
ESXi Host).
3 Examine the information in the /var/log/esxupdate.log file.
Run the Secure Boot Validation Script on an Upgraded ESXi Host
After you upgrade an ESXi host from an older version of ESXi that did not support UEFI secure boot, you
might be able to enable secure boot. Whether you can enable secure boot depends on how you
performed the upgrade and whether the upgrade replaced all the existing VIBs or left some VIBs
unchanged. You can run a validation script after you perform the upgrade to determine whether the
upgraded installation supports secure boot.
For secure boot to succeed, the signature of every installed VIB must be available on the system. Older
versions of ESXi do not save the signatures when installing VIBs.
nIf you upgrade using ESXCLI commands, the old version of ESXi performs the installation of the new
VIBs, so their signatures are not saved and secure boot is not possible.
nIf you upgrade using the ISO, new VIBs do have their signatures saved. This is true also for vSphere
Upgrade Manager upgrades that use the ISO.
nIf old VIBs remain on the system, the signatures of those VIBs are not available and secure boot is
not possible.
nIf the system uses a third-party driver, and the VMware upgrade does not include a new version
of the driver VIB, then the old VIB remains on the system after upgrade.
vSphere Security
VMware, Inc. 104

nIn rare cases, VMware might drop ongoing development of a specific VIB without providing a new
VIB that replaces or obsoletes it, so the old VIB remains on the system after upgrade.
Note UEFI secure boot also requires an up-to-date bootloader. This script does not check for an up-to-
date bootloader.
Prerequisites
nVerify that the hardware supports UEFI secure boot.
nVerify that all VIBs are signed with an acceptance level of at least PartnerSupported. If you include
VIBs at the CommunitySupported level, you cannot use secure boot.
Procedure
1Upgrade the ESXi and run the following command.
/usr/lib/vmware/secureboot/bin/secureBoot.py -c
2Check the output.
The output either includes Secure boot can be enabled or Secure boot CANNOT be enabled.
Securing ESXi Hosts with Trusted Platform Module
ESXi can use Trusted Platform Modules (TPM) chips, which are secure cryptoprocessors that enhance
host security by providing a trust assurance rooted in hardware as opposed to software.
TPM is an industry-wide standard for secure cryptoprocessors. TPM chips are found in most of today's
computers, from laptops, to desktops, to servers. vSphere 6.7 supports TPM version 2.0.
A TPM 2.0 chip attests to an ESXi host's identity. Host attestation is the process of authenticating and
attesting to the state of the host's software at a given point in time. UEFI secure boot, which ensures that
only signed software is loaded at boot time, is a requirement for successful attestation. The TPM 2.0 chip
records and securely stores measurements of the software modules booted in the system, which
vCenter Server remotely verifies.
The high-level steps of the remote attestation process are:
1 Establish the trustworthiness of the remote TPM and create an Attestation Key (AK) on it.
When an ESXi host is added to, rebooted from, or reconnected to vCenter Server, vCenter Server
requests an AK from the host. Part of the AK creation process also involves the verification of the
TPM hardware itself, to ensure that a known (and trusted) vendor has produced it.
2 Retrieve the Attestation Report from the host.
vCenter Server requests that the host sends an Attestation Report, which contains a quote of
Platform Configuration Registers (PCRs), signed by the TPM, and other signed host binary metadata.
By checking that the information corresponds to a configuration it deems trusted, a vCenter Server
identifies the platform on a previously untrusted host.
vSphere Security
VMware, Inc. 105
3 Verify the host's authenticity.
vCenter Server verifies the authenticity of the signed quote, infers the software versions, and
determines the trustworthiness of said software versions. If vCenter Server determines the signed
quote is invalid, remote attestation fails and the host is not trusted.
To use a TPM 2.0 chip, your vCenter Server environment must meet these requirements:
nvCenter Server 6.7
nESXi 6.7 host with TPM 2.0 chip installed and enabled in UEFI
nUEFI Secure Boot enabled
Review the TPM 2.0 chips certified by VMware at the following location:
https://www.vmware.com/resources/compatibility/search.php
When you boot an ESXi host with an installed TPM 2.0 chip, vCenter Server monitors the host's
attestation status. The vSphere Client displays the hardware trust status in the vCenter Server's
Summary tab under Security with the following alarms:
nGreen: Normal status, indicating full trust.
nRed: Attestation failed.
View ESXi Host Attestation Status
When added to an ESXi host, a Trusted Platform Module 2.0 compatible chip attests the integrity of the
platform. You can view the attestation status of the host in the vSphere Client.
Procedure
1Connect to vCenter Server by using the vSphere Client.
2Navigate to a data center and click the Monitor tab.
3Click Security.
4Review the host's status in the Attestation column and read the accompanying message in the
Message column.
What to do next
For a Failed or Warning attestation status, see Troubleshoot ESXi Host Attestation Problems.
Troubleshoot ESXi Host Attestation Problems
When you install a Trusted Platform Module (TPM) device on an ESXi host, the host might fail to pass
attestation. You can troubleshoot the potential causes of this problem.
Procedure
1View the ESXi host alarm status and accompanying error message. See View ESXi Host Attestation
Status.
vSphere Security
VMware, Inc. 106
2If the error message is Host secure boot was disabled, you must re-enable secure boot to
resolve the problem.
3For all other error messages, contact Customer Support.
ESXi Log Files
Log files are an important component of troubleshooting attacks and obtaining information about
breaches. Logging to a secure, centralized log server can help prevent log tampering. Remote logging
also provides a long-term audit record.
To increase the security of the host, take the following measures
nConfigure persistent logging to a datastore. By default, the logs on ESXi hosts are stored in the in-
memory file system. Therefore, they are lost when you reboot the host, and only 24 hours of log data
is stored. When you enable persistent logging, you have a dedicated activity record for the host.
nRemote logging to a central host allows you to gather log files on a central host. From that host, you
can monitor all hosts with a single tool, do aggregate analysis, and search log data. This approach
facilitates monitoring and reveals information about coordinated attacks on multiple hosts.
nConfigure the remote secure syslog on ESXi hosts by using a CLI such as vCLI or PowerCLI, or by
using an API client.
nQuery the syslog configuration to make sure that the syslog server and port are valid.
See the vSphere Monitoring and Performance documentation for information about syslog setup, and for
additional information on ESXi log files.
Configure Syslog on ESXi Hosts
You can use the vSphere Web Client or the esxcli system syslog vCLI command to configure the
syslog service.
For information about using the esxcli system syslog command and other vCLI commands, see
Getting Started with vSphere Command-Line Interfaces.
Procedure
1In the vSphere Web Client inventory, select the host.
2Click Configure.
3Under System, click Advanced System Settings.
4Filter for syslog.
vSphere Security
VMware, Inc. 107

5To set up logging globally, select the setting to change and click Edit.
Option Description
Syslog.global.defaultRotate Maximum number of archives to keep. You can set this number globally and for
individual subloggers.
Syslog.global.defaultSize Default size of the log, in KB, before the system rotates logs. You can set this
number globally and for individual subloggers.
Syslog.global.LogDir Directory where logs are stored. The directory can be on mounted NFS or VMFS
volumes. Only the /scratch directory on the local file system is persistent across
reboots. Specify the directory as [datastorename] path_to_file, where the path is
relative to the root of the volume backing the datastore. For example, the path
[storage1] /systemlogs maps to the
path /vmfs/volumes/storage1/systemlogs.
Syslog.global.logDirUnique Selecting this option creates a subdirectory with the name of the ESXi host under
the directory specified by Syslog.global.LogDir. A unique directory is useful if
the same NFS directory is used by multiple ESXi hosts.
Syslog.global.LogHost Remote host to which syslog messages are forwarded and port on which the
remote host receives syslog messages. You can include the protocol and the port,
for example, ssl://hostName1:1514. UDP (only on port 514), TCP, and SSL are
supported. The remote host must have syslog installed and correctly configured
to receive the forwarded syslog messages. See the documentation for the syslog
service installed on the remote host for information on configuration.
6(Optional) To overwrite the default log size and log rotation for any of the logs.
a Click the name of the log that you want to customize.
b Click Edit and enter the number of rotations and the log size you want.
7Click OK.
Changes to the syslog options take effect immediately.
ESXi Log File Locations
ESXi records host activity in log files, using a syslog facility.
Component Location Purpose
VMkernel /var/log/vmkernel.log Records activities related to virtual
machines and ESXi.
VMkernel warnings /var/log/vmkwarning.log Records activities related to virtual
machines.
VMkernel summary /var/log/vmksummary.log Used to determine uptime and availability
statistics for ESXi (comma separated).
ESXi host agent log /var/log/hostd.log Contains information about the agent that
manages and configures the ESXi host
and its virtual machines.
vCenter agent log /var/log/vpxa.log Contains information about the agent that
communicates with vCenter Server (if the
host is managed by vCenter Server).
vSphere Security
VMware, Inc. 108

Component Location Purpose
Shell log /var/log/shell.log Contains a record of all commands typed
into the ESXi Shell as well as shell events
(for example, when the shell was
enabled).
Authentication /var/log/auth.log Contains all events related to
authentication for the local system.
System messages /var/log/syslog.log Contains all general log messages and
can be used for troubleshooting. This
information was formerly located in the
messages log file.
Virtual machines The same directory as the affected
virtual machine's configuration files,
named vmware.log and vmware*.log. For
example, /vmfs/volumes/datastore/v
irtual machine/vwmare.log
Contains virtual machine power events,
system failure information, tools status
and activity, time sync, virtual hardware
changes, vMotion migrations, machine
clones, and so on.
Securing Fault Tolerance Logging Trac
VMware Fault Tolerance (FT) captures inputs and events that occur on a primary VM and sends them to
the secondary VM, which is running on another host.
This logging traffic between the primary and secondary VMs is unencrypted and contains guest network
and storage I/O data, as well as the memory contents of the guest operating system. This traffic might
include sensitive data such as passwords in plaintext. To avoid such data being divulged, ensure that this
network is secured, especially to avoid man-in-the-middle attacks. For example, use a private network for
FT logging traffic.
vSphere Security
VMware, Inc. 109

Securing vCenter Server
Systems 4
Securing vCenter Server includes ensuring security of the host where vCenter Server is running, following
best practices for assigning privileges and roles, and verifying the integrity of the clients that connect to
vCenter Server.
This chapter includes the following topics:
nvCenter Server Security Best Practices
nVerify Thumbprints for Legacy ESXi Hosts
nVerify that SSL Certificate Validation Over Network File Copy Is Enabled
nRequired Ports for vCenter Server and Platform Services Controller
nAdditional vCenter Server TCP and UDP Ports
vCenter Server Security Best Practices
Following vCenter Server security best practices helps you ensure the integrity of your vSphere
environment.
Best Practices for vCenter Server Access Control
Strictly control access to different vCenter Server components to increase security for the system.
The following guidelines help ensure security of your environment.
Use Named Accounts
nIf the local Windows administrator account currently has the Administrator role vCenter Server,
remove that role and assign the role to one or more named vCenter Server administrator accounts.
Grant the Administrator role only to those administrators who are required to have it. You can create
custom roles or use the No cryptography administrator role for administrators with more limited
privileges. Do not apply this role any group whose membership is not strictly controlled.
Note Starting with vSphere 6.0, the local administrator no longer has full administrative rights to
vCenter Server by default.
nInstall vCenter Server using a service account instead of a Windows account. The service account
must be an administrator on the local machine.
VMware, Inc. 110

nMake sure that applications use unique service accounts when connecting to a vCenter Server
system.
Monitor Privileges of vCenter Server Administrator Users
Not all administrator users must have the Administrator role. Instead, create a custom role with the
appropriate set of privileges and assign it to other administrators.
Users with the vCenter Server Administrator role have privileges on all objects in the hierarchy. For
example, by default the Administrator role allows users to interact with files and programs inside a virtual
machine's guest operating system. Assigning that role to too many users can lessen virtual machine data
confidentiality, availability, or integrity. Create a role that gives the administrators the privileges they need,
but remove some of the virtual machine management privileges.
Minimize Access
Do not allow users to log directly in to the vCenter Server host machine. Users who are logged in to the
vCenter Server host machine can cause harm, either intentionally or unintentionally, by altering settings
and modifying processes. Those users also have potential access to vCenter credentials, such as the
SSL certificate. Allow only users who have legitimate tasks to perform to log in to the system and ensure
that login events are audited.
Grant Minimal Privileges to vCenter Server Database Users
The database user requires only certain privileges specific to database access.
Some privileges are required only for installation and upgrade. You can remove these privileges from the
database administrator after vCenter Server is installed or upgraded.
Restrict Datastore Browser Access
Assign the Datastore.Browse datastore privilege only to users or groups who really need those
privileges. Users with the privilege can view, upload, or download files on datastores associated with the
vSphere deployment through the Web browser or the vSphere Web Client.
Restrict Users From Running Commands in a Virtual Machine
By default, a user with the vCenter Server Administrator role can interact with files and programs within a
virtual machine's guest operating system. To reduce the risk of breaching guest confidentiality, availability,
or integrity, create a custom nonguest access role without the Guest Operations privilege. See Restrict
Users From Running Commands Within a Virtual Machine.
Consider Modifying the Password Policy for vpxuser
By default, vCenter Server changes the vpxuser password automatically every 30 days. Ensure that this
setting meets company policy, or configure the vCenter Server password policy. See Set the vCenter
Server Password Policy.
Note Make sure that password aging policy is not too short.
vSphere Security
VMware, Inc. 111
Check Privileges After vCenter Server Restart
Check for privilege reassignment when you restart vCenter Server. If the user or group that has the
Administrator role on the root folder cannot be validated during a restart, the role is removed from that
user or group. In its place, vCenter Server grants the Administrator role to the vCenter Single Sign-On
administrator, administrator@vsphere.local by default. This account can then act as the vCenter Server
administrator.
Reestablish a named administrator account and assign the Administrator role to that account to avoid
using the anonymous vCenter Single Sign-On administrator account (administrator@vsphere.local by
default).
Use High RDP Encryption Levels
On each Windows computer in the infrastructure, ensure that Remote Desktop Host Configuration
settings are set to ensure the highest level of encryption appropriate for your environment.
Verify vSphere Web Client Certificates
Instruct users of one of the vSphere Web Client or other client applications to never ignore certificate
verification warnings. Without certificate verification, the user might be subject of a MiTM attack.
Set the vCenter Server Password Policy
By default, vCenter Server changes the vpxuser password automatically every 30 days. You can change
that value from the vSphere Web Client.
Procedure
1Log in to a vCenter Server system using the vSphere Web Client.
2Select the vCenter Server system in the object hierarchy.
3Click Configure.
4Click Advanced Settings and enter VimPasswordExpirationInDays in the filter box.
5Set VirtualCenter.VimPasswordExpirationInDays to comply with your requirements.
Removing Expired or Revoked Certificates and Logs from Failed Installations
Leaving expired or revoked certificates or leaving vCenter Server installation logs for failed installation on
your vCenter Server system can compromise your environment.
Removing expired or revoked certificates is required for the following reasons.
nIf expired or revoked certificates are not removed from the vCenter Server system, the environment
can be subject to a MiTM attack
nIn certain cases, a log file that contains the database password in plain text is created on the system
if vCenter Server installation fails. An attacker who breaks into the vCenter Server system, might gain
access to this password and, at the same time, access to the vCenter Server database.
vSphere Security
VMware, Inc. 112
Protecting the vCenter Server Windows Host
Protect the Windows host where vCenter Server is running against vulnerabilities and attacks by ensuring
that the host environment is as secure as possible.
nMaintain a supported operating system, database, and hardware for the vCenter Server system. If
vCenter Server is not running on a supported operating system, it might not run properly, making
vCenter Server vulnerable to attacks.
nKeep the vCenter Server system properly patched. By staying up-to-date with operating system
patches, the server is less vulnerable to attack.
nProvide operating system protection on the vCenter Server host. Protection includes antivirus and
anti-malware software.
nOn each Windows computer in the infrastructure, ensure that Remote Desktop (RDP) Host
Configuration settings are set to ensure the highest level of encryption according to industry-standard
guidelines or internal guidelines.
For operating system and database compatibility information, see the vSphere Compatibility Matrixes.
Limiting vCenter Server Network Connectivity
For improved security, avoid putting the vCenter Server system on any network other than a management
network, and ensure that vSphere management traffic is on a restricted network. By limiting network
connectivity, you limit certain types of attack.
vCenter Server requires access to a management network only. Avoid putting the vCenter Server system
on other networks such as your production network or storage network, or on any network with access to
the Internet. vCenter Server does not need access to the network where vMotion operates.
vCenter Server requires network connectivity to the following systems.
nAll ESXi hosts.
nThe vCenter Server database.
nOther vCenter Server systems (if the vCenter Server systems are part of a common vCenter Single
Sign-On domain for purposes of replicating tags, permissions, and so on).
nSystems that are authorized to run management clients. For example, the vSphere Web Client, a
Windows system where you use the PowerCLI, or any other SDK-based client.
nSystems that run add-on components such as VMware vSphere Update Manager.
nInfrastructure services such as DNS, Active Directory, and NTP.
nOther systems that run components that are essential to functionality of the vCenter Server system.
Use a local firewall on the Windows system where the vCenter Server system is running or use a network
firewall. Include IP-based access restrictions so that only necessary components can communicate with
the vCenter Server system.
vSphere Security
VMware, Inc. 113
Evaluate the Use of Linux Clients with CLIs and SDKs
Communications between client components and a vCenter Server system or ESXi hosts are protected
by SSL-based encryption by default. Linux versions of these components do not perform certificate
validation. Consider restricting the use of these clients.
To improve security, you can replace the VMCA-signed certificates on the vCenter Server system and on
the ESXi hosts with certificates that are signed by an enterprise or third-party CA. However, certain
communications with Linux clients might still be vulnerable to man-in-the-middle attacks. The following
components are vulnerable when they run on the Linux operating system.
nvCLI commands
nvSphere SDK for Perl scripts
nPrograms that are written using the vSphere Web Services SDK
You can relax the restriction against using Linux clients if you enforce proper controls.
nRestrict management network access to authorized systems only.
nUse firewalls to ensure that only authorized hosts are allowed to access vCenter Server.
nUse jump-box systems to ensure that Linux clients are behind the jump.
Examine vSphere Web Client Plug-Ins
vSphere Web Client extensions run at the same privilege level as the user who is logged in. A malicious
extension can masquerade as a useful plug-in and perform harmful operations such as stealing
credentials or changing the system configuration. To increase security, use a vSphere Web Client
installation that includes only authorized extensions from trusted sources.
A vCenter installation includes the vSphere Web Client extensibility framework. You can use this
framework to extend the vSphere Web Client with menu selections or toolbar icons. The extensions can
provide access to vCenter add-on components or external, Web-based functionality.
Using the extensibility framework results in a risk of introducing unintended capabilities. For example, if
an administrator installs a plug-in in an instance of the vSphere Web Client, the plug-in can execute
arbitrary commands with the privilege level of that administrator.
To protect against potential compromise of your vSphere Web Client, examine all installed plug-ins
periodically and make sure that each plug-in comes from a trusted source.
Prerequisites
You must have privileges to access the vCenter Single Sign-On service. These privileges differ from
vCenter Server privileges.
Procedure
1Log in to the vSphere Web Client as administrator@vsphere.local or a user with vCenter Single Sign-
On privileges.
2From the Home page, select Administration, and then select Client Plug-Ins under Solutions.
vSphere Security
VMware, Inc. 114
3Examine the list of client plug-ins.
vCenter Server Appliance Security Best Practices
Follow all best practices for securing a vCenter Server system to secure your vCenter Server Appliance.
Additional steps help you make your appliance more secure.
Configure NTP Ensure that all systems use the same relative time source. This time source
must be in sync with an agreed-upon time standard such as Coordinated
Universal Time (UTC). Synchronized systems are essential for certificate
validation. NTP also makes it easier to track an intruder in log files.
Incorrect time settings make it difficult to inspect and correlate log files to
detect attacks, and make auditing inaccurate. See Synchronize the Time in
the vCenter Server Appliance with an NTP Server.
Restrict
vCenter Server
Appliance network
access
Restrict access to components that are required to communicate with the
vCenter Server Appliance. Blocking access from unnecessary systems
reduces the potential for attacks on the operating system. See Required
Ports for vCenter Server and Platform Services Controller and Additional
vCenter Server TCP and UDP Ports. Follow the guidelines in VMware KB
article https://kb.vmware.com/s/article/2047585 to set up your environment
with firewall settings that are compliant with the DISA STIG.
vCenter Password Requirements and Lockout Behavior
To manage your vSphere environment, you must be aware of the vCenter Single Sign-On password
policy, of vCenter Server passwords, and of lockout behavior.
This section discusses vCenter Single Sign-On passwords. See ESXi Passwords and Account Lockout
for a discussion of passwords of ESXi local users.
vCenter Single Sign-On Administrator Password
The password for the administrator of vCenter Single Sign-On, administrator@vsphere.local by default, is
specified by the vCenter Single Sign-On password policy. By default, this password must meet the
following requirements:
nAt least 8 characters
nAt least one lowercase character
nAt least one numeric character
nAt least one special character
The password for this user cannot be more than 20 characters long. Starting with vSphere 6.0, non-ASCII
characters are allowed. Administrators can change the default password policy. See the Platform
Services Controller Administration documentation.
vSphere Security
VMware, Inc. 115

vCenter Server Passwords
In vCenter Server, password requirements are dictated by vCenter Single Sign-On or by the configured
identity source, which can be Active Directory, OpenLDAP.
vCenter Single Sign-On Lockout Behavior
Users are locked out after a preset number of consecutive failed attempts. By default, users are locked
out after five consecutive failed attempts in three minutes and a locked account is unlocked automatically
after five minutes. You can change these defaults using the vCenter Single Sign-On lockout policy. See
the Platform Services Controller Administration documentation.
Starting with vSphere 6.0, the vCenter Single Sign-On domain administrator, administrator@vsphere.local
by default, is not affected by the lockout policy. The user is affected by the password policy.
Password Changes
If you know your password, you can change the password by using the dir-cli password change
command. If you forget your password, a vCenter Single Sign-On administrator can reset your password
by using the dir-cli password reset command.
Search the VMware Knowledge Base for information on password expiration and related topics in
different versions of vSphere.
Verify Thumbprints for Legacy ESXi Hosts
In vSphere 6 and later, hosts are assigned VMCA certificates by default. If you change the certificate
mode to thumbprint, you can continue to use thumbprint mode for legacy hosts. You can verify the
thumbprints in the vSphere Web Client.
Note Certificates are preserved across upgrades by default.
Procedure
1Browse to the vCenter Server system in the vSphere Web Client object navigator.
2Click Configure.
3Under Settings, click General
4Click Edit.
5Click SSL settings.
vSphere Security
VMware, Inc. 116

6If any of your ESXi 5.5 or earlier hosts require manual validation, compare the thumbprints listed for
the hosts to the thumbprints in the host console.
To obtain the host thumbprint, use the Direct Console User Interface (DCUI).
a Log in to the direct console and press F2 to access the System Customization menu.
b Select View Support Information.
The host thumbprint appears in the column on the right.
7If the thumbprint matches, select the Verify check box next to the host.
Hosts that are not selected will be disconnected after you click OK.
8Click OK.
Verify that SSL Certificate Validation Over Network File
Copy Is Enabled
Network File Copy (NFC) provides a file-type-aware FTP service for vSphere components. Starting with
vSphere 5.5, ESXi uses NFC for operations such as copying and moving data between datastores by
default, but you might have to enable it if it is disabled.
When SSL over NFC is enabled, connections between vSphere components over NFC are secure. This
connection can help prevent man-in-the-middle attacks within a data center.
Because using NFC over SSL causes some performance degradation, you might consider disabling this
advanced setting in some development environments.
Note Set this value to true explicitly if you are using scripts to check the value.
Procedure
1Connect to the vCenter Server with the vSphere Web Client.
2Click Configure.
3Click Advanced Settings and enter the following Key and Value at the bottom of the dialog.
Field Value
Key config.nfc.useSSL
Value true
4Click OK.
vSphere Security
VMware, Inc. 117

Required Ports for vCenter Server and
Platform Services Controller
The vCenter Server system, both on Windows and in the appliance, must be able to send data to every
managed host and receive data from the vSphere Web Client and the Platform Services Controller
services. To enable migration and provisioning activities between managed hosts, the source and
destination hosts must be able to receive data from each other.
If a port is in use or is blacklisted, the vCenter Server installer displays an error message. You must use
another port number to proceed with the installation. There are internal ports that are used only for inter-
process communication.
VMware uses designated ports for communication. Additionally, the managed hosts monitor designated
ports for data from vCenter Server. If a built-in firewall exists between any of these elements, the installer
opens the ports during the installation or upgrade process. For custom firewalls, you must manually open
the required ports. If you have a firewall between two managed hosts and you want to perform source or
target activities, such as migration or cloning, you must configure a means for the managed hosts to
receive data.
Note In Microsoft Windows Server 2008 and later, firewall is enabled by default.
Table 4‑1. Ports Required for Communication Between Components
Port Protocol Description Required for
Used for Node-to-Node
Communication
22 TCP System port for SSHD. Appliance deployments
of
nvCenter Server
nPlatform Services
Controller
No
53 DNS service Windows installations
and appliance
deployments of
Platform Services
Controller
No
vSphere Security
VMware, Inc. 118

Table 4‑1. Ports Required for Communication Between Components (Continued)
Port Protocol Description Required for
Used for Node-to-Node
Communication
80 TCP vCenter Server requires port 80 for direct
HTTP connections. Port 80 redirects
requests to HTTPS port 443. This
redirection is useful if you accidentally
use http://server instead of https://server.
WS-Management (also requires port 443
to be open).
If you use a Microsoft SQL database that
is stored on the same virtual machine or
physical server as the vCenter Server,
port 80 is used by the SQL Reporting
Service. When you install or upgrade
vCenter Server, the installer prompts you
to change the HTTP port for
vCenter Server. Change the
vCenter Server HTTP port to a custom
value to ensure a successful installation
or upgrade.
Important You can change this port
number during the vCenter Server and
Platform Services Controller installations
on Windows.
Windows installations
and appliance
deployments of
nvCenter Server
nPlatform Services
Controller
No
88 TCP Active Directory server. This port must be
open for host to join Active Directory. If
you use native Active Directory, the port
must be open on both vCenter Server
and Platform Services Controller.
Windows installations
and appliance
deployments of
Platform Services
Controller
No
389 TCP/UDP This port must be open on the local and
all remote instances of vCenter Server.
This is the LDAP port number for the
Directory Services for the vCenter Server
group. If another service is running on
this port, it might be preferable to remove
it or change its port to a different port.
You can run the LDAP service on any
port from 1025 through 65535.
If this instance is serving as the Microsoft
Windows Active Directory, change the
port number from 389 to an available port
from 1025 through 65535.
Windows installations
and appliance
deployments of
Platform Services
Controller
nvCenter Server to
Platform Services
Controller
nPlatform Services
Controller to
Platform Services
Controller
vSphere Security
VMware, Inc. 119

Table 4‑1. Ports Required for Communication Between Components (Continued)
Port Protocol Description Required for
Used for Node-to-Node
Communication
443 TCP The default port that the vCenter Server
system uses to listen for connections
from the vSphere Web Client. To enable
the vCenter Server system to receive
data from the vSphere Web Client, open
port 443 in the firewall.
The vCenter Server system also uses
port 443 to monitor data transfer from
SDK clients.
This port is also used for the following
services:
nWS-Management (also requires port
80 to be open)
nThird-party network management
client connections to vCenter Server
nThird-party network management
clients access to hosts
Important You can change this port
number during the vCenter Server and
Platform Services Controller installations
on Windows.
Windows installations
and appliance
deployments of
nvCenter Server
nPlatform Services
Controller
nvCenter Server to
vCenter Server
nvCenter Server to
Platform Services
Controller
nPlatform Services
Controller to
vCenter Server
514 TCP/UDP vSphere Syslog Collector port for
vCenter Server on Windows and vSphere
Syslog Service port for
vCenter Server Appliance
Important You can change this port
number during the vCenter Server and
Platform Services Controller installations
on Windows.
Windows installations
and appliance
deployments of
nvCenter Server
nPlatform Services
Controller
No
636 TCP vCenter Single Sign-On LDAPS
For backward compatibility with vSphere
6.0 only.
Windows installations
and appliance
deployments of
Platform Services
Controller
During upgrade from
vSphere 6.0 only.
vCenter Server 6.0 to
Platform Services
Controller 6.5
vSphere Security
VMware, Inc. 120

Table 4‑1. Ports Required for Communication Between Components (Continued)
Port Protocol Description Required for
Used for Node-to-Node
Communication
902 TCP/UDP The default port that the vCenter Server
system uses to send data to managed
hosts. Managed hosts also send a
regular heartbeat over UDP port 902 to
the vCenter Server system. This port
must not be blocked by firewalls between
the server and the hosts or between
hosts.
Port 902 must not be blocked between
the VMware Host Client and the hosts.
The VMware Host Client uses this port to
display virtual machine consoles
Important You can change this port
number during the vCenter Server
installations on Windows.
Windows installations
and appliance
deployments of
vCenter Server
No
1514 TCP vSphere Syslog Collector TLS port for
vCenter Server on Windows and vSphere
Syslog Service TLS port for
vCenter Server Appliance
Important You can change this port
number during the vCenter Server and
Platform Services Controller installations
on Windows.
Windows installations
and appliance
deployments of
nvCenter Server
nPlatform Services
Controller
No
2012 TCP Control interface RPC for vCenter Single
Sign-On
Windows installations
and appliance
deployments of
Platform Services
Controller
nvCenter Server to
Platform Services
Controller
nPlatform Services
Controller to
vCenter Server
nPlatform Services
Controller to
Platform Services
Controller
2014 TCP RPC port for all VMCA (VMware
Certificate Authority) APIs
Important You can change this port
number during the
Platform Services Controller installations
on Windows.
Windows installations
and appliance
deployments of
Platform Services
Controller
nvCenter Server to
Platform Services
Controller
nPlatform Services
Controller to
vCenter Server
2015 TCP DNS management Windows installations
and appliance
deployments of
Platform Services
Controller
Platform Services
Controller to
Platform Services
Controller
vSphere Security
VMware, Inc. 121

Table 4‑1. Ports Required for Communication Between Components (Continued)
Port Protocol Description Required for
Used for Node-to-Node
Communication
2020 TCP/UDP Authentication framework management
Important You can change this port
number during the vCenter Server and
Platform Services Controller installations
on Windows.
Windows installations
and appliance
deployments of
nvCenter Server
nPlatform Services
Controller
nvCenter Server to
Platform Services
Controller
nPlatform Services
Controller to
vCenter Server
5480 TCP Appliance Management Interface
Open endpoint serving all HTTPS,
XMLRPS and JSON-RPC requests over
HTTPS.
Appliance deployments
of
nvCenter Server
nPlatform Services
Controller
No
6500 TCP/UDP ESXi Dump Collector port
Important You can change this port
number during the vCenter Server
installations on Windows.
Windows installations
and appliance
deployments of
vCenter Server
No
6501 TCP Auto Deploy service
Important You can change this port
number during the vCenter Server
installations on Windows.
Windows installations
and appliance
deployments of
vCenter Server
No
6502 TCP Auto Deploy management
Important You can change this port
number during the vCenter Server
installations on Windows.
Windows installations
and appliance
deployments of
vCenter Server
No
7080,
12721
TCP Secure Token Service
Note Internal ports
Windows installations
and appliance
deployments of
Platform Services
Controller
No
7081 TCP VMware Platform Services Controller
Web Client
Note Internal port
Windows installations
and appliance
deployments of
Platform Services
Controller
No
8200,
8201,
8300,
8301
TCP Appliance management
Note Internal ports
Appliance deployments
of
nvCenter Server
nPlatform Services
Controller
No
8084 TCP vSphere Update Manager SOAP port
The port used by vSphere Update
Manager client plug-in to connect to the
vSphere Update Manager SOAP server.
Appliance deployments
of vCenter Server
No
vSphere Security
VMware, Inc. 122

Table 4‑1. Ports Required for Communication Between Components (Continued)
Port Protocol Description Required for
Used for Node-to-Node
Communication
9084 TCP vSphere Update Manager Web Server
Port
The HTTP port used by ESXi hosts to
access host patch files from vSphere
Update Manager server.
Appliance deployments
of vCenter Server
No
9087 TCP vSphere Update Manager Web SSL Port
The HTTPS port used by vSphere
Update Manager client plug-in to upload
host upgrade files to vSphere Update
Manager server.
Appliance deployments
of vCenter Server
No
9443 TCP vSphere Web Client HTTPS Windows installations
and appliance
deployments of
vCenter Server
No
To configure the vCenter Server system to use a different port to receive vSphere Web Client data, see
the vCenter Server and Host Management documentation.
Additional vCenter Server TCP and UDP Ports
vCenter Server is accessed through predetermined TCP and UDP ports. If you manage network
components from outside a firewall, you might be required to reconfigure the firewall to allow access on
the appropriate ports.
Required Ports for vCenter Server and Platform Services Controller lists ports that are opened by the
installer as part of a default installation. Some additional ports are required for certain services, such as
NTP, or applications that are commonly installed with vCenter Server.
In addition to these ports, you can configure other ports depending on your needs.
Table 4‑2. vCenter Server TCP and UDP Ports
Port Protocol Description
123
(UDP)
UDP NTP Client. If you are deploying the vCenter Server Appliance on an ESXi host, the two must be time
synchronized, usually through an NTP server, and the corresponding port must be open.
135 UDP For the vCenter Server Appliance, this port is designated for Active Directory authentication.
For a vCenter Server Windows installation, this port is used for Linked Mode and port 88 is used for Active
Directory authentication.
161 UDP SNMP Server.
636 TCP vCenter Single Sign-On LDAPS (6.0 and later)
8084,
9084,
9087
TCP Used by vSphere Update Manager.
8109 TCP VMware Syslog Collector. This service is needed if you want to centralize log collection.
vSphere Security
VMware, Inc. 123

Table 4‑2. vCenter Server TCP and UDP Ports (Continued)
Port Protocol Description
15007,
15008
TCP vService Manager (VSM). This service registers vCenter Server extensions. Open this port only if required
by extensions that you intend to use.
31031,
44046
(Default)
TCP vSphere Replication.
5355 UDP The systemd-resolve process uses this port to resolve domain names, IPv4 and IPv6 addresses, DNS
resource records and services.
The following ports are used only internally.
Table 4‑3. vCenter Server TCP and UDP Ports
Port Description
5443 vCenter Server graphical user interface internal port.
5444,
5432
Internal port for monitoring of vPostgreSQL.
5090 vCenter Server graphical user interface internal port.
7080 Secure Token Service internal port.
7081 Platform Services Controller internal port.
8000 ESXi Dump Collector internal port.
8006 Used for Virtual SAN health monitoring.
8085 Internal ports used by the vCenter service (vpxd) SDK.
8095 VMware vCenter services feed port.
8098,
8099
Used by VMware Image Builder Manager.
8190,
8191,
22000,
22100,
21100
VMware vSphere Profile-Driven Storage Service.
8200,
8201,
5480
Appliance management internal ports.
8300,
8301
Appliance management reserved ports.
8900 Monitoring API internal port.
9090 Internal port for vSphere Web Client.
10080 Inventory service internal port
10201 Message Bus Configuration Service internal port.
11080 vCenter Server Appliance internal ports for HTTP and for splash screen.
12721 Secure Token Service internal port.
vSphere Security
VMware, Inc. 124

Table 4‑3. vCenter Server TCP and UDP Ports (Continued)
Port Description
12080 License service internal port.
12346,
12347,
4298
Internal port for VMware Cloud Management SDKs (vAPI).
13080,
6070
Used internally by the Performance Charts service.
14080 Used internally by the syslog service.
15005,
15006
ESX Agent Manager internal port.
16666,
16667
Content Library ports.
18090 Content Manager internal port.
18091 Component Manager internal port.
In addition, the vCenter Server Appliance uses ephemeral ports from 32768 through 60999 for vPostgres
services.
The following ports are required between vCenter High Availability (VCHA) nodes.
Table 4‑4. Firewall Port Requirement for VCHA Private IP
Port Protocol Nodes Description
22 TCP Between all three nodes Bidirectional. System port for SSHD
5432 TCP Between Primary and Secondary Bidirectional. Postgres
8182 TCP Between all three nodes Bidirectional. Fault Domain Manager
8182 UDP Between all three nodes Bidirectional. Fault Domain Manager
vSphere Security
VMware, Inc. 125
Securing Virtual Machines 5
The guest operating system that runs in the virtual machine is subject to the same security risks as a
physical system. Secure virtual machines just like physical machines, and follow best practices discussed
in this document and in the Hardening Guide.
This chapter includes the following topics:
nEnable or Disable UEFI Secure Boot for a Virtual Machine
nLimit Informational Messages From Virtual Machines to VMX Files
nPrevent Virtual Disk Shrinking
nVirtual Machine Security Best Practices
Enable or Disable UEFI Secure Boot for a Virtual Machine
UEFI Secure Boot is a security standard that helps ensure that your PC boots using only software that is
trusted by the PC manufacturer. For certain virtual machine hardware versions and operating systems,
you can enable secure boot just as you can for a physical machine.
In an operating system that supports UEFI secure boot, each piece of boot software is signed, including
the bootloader, the operating system kernel, and operating system drivers. The virtual machine's default
configuration includes several code signing certificates.
nA Microsoft certificate that is used only for booting Windows.
nA Microsoft certificate that is used for third-party code that is signed by Microsoft, such as Linux
bootloaders.
nA VMware certificate that is used only for booting ESXi inside a virtual machine.
The virtual machine's default configuration includes one certificate for authenticating requests to modify
the secure boot configuration, including the secure boot revocation list, from inside the virtual machine,
which is a Microsoft KEK (Key Exchange Key) certificate.
In almost all cases, it is not necessary to replace the existing certificates. If you do want to replace the
certificates, see the VMware Knowledge Base system.
VMware Tools version 10.1 or later is required for virtual machines that use UEFI secure boot. You can
upgrade those virtual machines to a later version of VMware Tools when it becomes available.
VMware, Inc. 126

For Linux virtual machines, VMware Host-Guest Filesystem is not supported in secure boot mode.
Remove VMware Host-Guest Filesystem from VMware Tools before you enable secure boot.
Note If you turn on secure boot for a virtual machine, you can load only signed drivers into that virtual
machine.
Prerequisites
You can enable secure boot only if all prerequisites are met. If prerequisites are not met, the check box is
not visible in the vSphere Client.
nVerify that the virtual machine operating system and firmware support UEFI boot.
nEFI firmware
nVirtual hardware version 13 or later.
nOperating system that supports UEFI secure boot.
Note You cannot upgrade a virtual machine that uses BIOS boot to a virtual machine that uses UEFI
boot. If you upgrade a virtual machine that already uses UEFI boot to an operating system that
supports UEFI secure boot, you can enable secure boot for that virtual machine.
nTurn off the virtual machine. If the virtual machine is running, the check box is dimmed.
Procedure
1Right-click a virtual machine in the inventory and select Edit Settings.
2Click the VM Options tab, and expand Boot Options.
3Under Boot Options, ensure that firmware is set to EFI.
4Select your task. Select the Secure Boot check box to enable secure boot. and click OK.
nSelect the Secure Boot check box to enable secure boot.
nDeselect the Secure Boot check box to disable secure boot.
When the virtual machine boots, only components with valid signatures are allowed. The boot process
stops with an error if it encounters a component with a missing or invalid signature.
Limit Informational Messages From Virtual Machines to
VMX Files
Limit informational messages from the virtual machine to the VMX file to avoid filling the datastore and
causing a Denial of Service (DoS). A DoS can occur when you do not control the size of a virtual
machine's VMX file and the amount of information exceeds datastore capacity.
vSphere Security
VMware, Inc. 127

The virtual machine configuration file (VMX file) limit is 1 MB by default. This capacity is usually sufficient,
but you can change this value if necessary. For example, you might increase the limit if you store large
amounts of custom information in the file.
Note Consider carefully how much information you require. If the amount of information exceeds
datastore capacity, a DoS can result.
The default limit of 1 MB is applied even when the tools.setInfo.sizeLimit parameter is not listed in
the advanced options.
Procedure
1Log in to a vCenter Server system using the vSphere Web Client and find the virtual machine.
a In the Navigator, select VMs and Templates.
b Find the virtual machine in the hierarchy.
2Right-click the virtual machine and click Edit Settings.
3Select VM Options.
4Click Advanced and click Edit Configuration.
5Add or edit the tools.setInfo.sizeLimit parameter.
Prevent Virtual Disk Shrinking
Nonadministrative users in the guest operating system can shrink virtual disks. Shrinking a virtual disk
reclaims the disk's unused space. However, if you shrink a virtual disk repeatedly, the disk can become
unavailable and cause a denial of service. To prevent this, disable the ability to shrink virtual disks.
Prerequisites
nTurn off the virtual machine.
nVerify that you have root or administrator privileges on the virtual machine.
Procedure
1Log in to a vCenter Server system using the vSphere Client.
2Right-click the virtual machine and click Edit Settings.
3Select VM Options.
4Click Advanced and click Edit Configuration.
5Add or edit the following parameters.
Name Value
isolation.tools.diskWiper.disable TRUE
isolation.tools.diskShrink.disabl
e
TRUE
vSphere Security
VMware, Inc. 128
6Click OK.
When you disable this feature, you cannot shrink virtual machine disks when a datastore runs out of
space.
Virtual Machine Security Best Practices
Following virtual machine security best practices helps ensure the integrity of your vSphere deployment.
nGeneral Virtual Machine Protection
A virtual machine is, in most respects, the equivalent of a physical server. Employ the same security
measures in virtual machines that you do for physical systems.
nUse Templates to Deploy Virtual Machines
When you manually install guest operating systems and applications on a virtual machine, you
introduce a risk of misconfiguration. By using a template to capture a hardened base operating
system image with no applications installed, you can ensure that all virtual machines are created
with a known baseline level of security.
nMinimize Use of the Virtual Machine Console
The virtual machine console provides the same function for a virtual machine that a monitor provides
on a physical server. Users with access to the virtual machine console have access to virtual
machine power management and removable device connectivity controls. Console access might
therefore allow a malicious attack on a virtual machine.
nPrevent Virtual Machines from Taking Over Resources
When one virtual machine consumes so much of the host resources that other virtual machines on
the host cannot perform their intended functions, a Denial of Service (DoS) might occur. To prevent a
virtual machine from causing a DoS, use host resource management features such as setting
Shares and using resource pools.
nDisable Unnecessary Functions Inside Virtual Machines
Any service that is running in a virtual machine provides the potential for attack. By disabling system
components that are not necessary to support the application or service that is running on the
system, you reduce the potential.
General Virtual Machine Protection
A virtual machine is, in most respects, the equivalent of a physical server. Employ the same security
measures in virtual machines that you do for physical systems.
vSphere Security
VMware, Inc. 129
Follow these best practices to protect your virtual machine:
Patches and other
protection
Keep all security measures up-to-date, including applying appropriate
patches. It is especially important to keep track of updates for dormant
virtual machines that are powered off, because it can be easy to overlook
them. For example, ensure that anti-virus software, anti-spy ware, intrusion
detection, and other protection are enabled for every virtual machine in
your virtual infrastructure. You should also ensure that you have enough
space for the virtual machine logs.
Anti-virus scans Because each virtual machine hosts a standard operating system, you
must protect it from viruses by installing anti-virus software. Depending on
how you are using the virtual machine, you might also want to install a
software firewall.
Stagger the schedule for virus scans, particularly in deployments with a
large number of virtual machines. Performance of systems in your
environment degrades significantly if you scan all virtual machines
simultaneously. Because software firewalls and antivirus software can be
virtualization-intensive, you can balance the need for these two security
measures against virtual machine performance, especially if you are
confident that your virtual machines are in a fully trusted environment.
Serial ports Serial ports are interfaces for connecting peripherals to the virtual machine.
They are often used on physical systems to provide a direct, low-level
connection to the console of a server, and a virtual serial port allows for the
same access to a virtual machine. Serial ports allow for low-level access,
which often does not have strong controls like logging or privileges.
Use Templates to Deploy Virtual Machines
When you manually install guest operating systems and applications on a virtual machine, you introduce
a risk of misconfiguration. By using a template to capture a hardened base operating system image with
no applications installed, you can ensure that all virtual machines are created with a known baseline level
of security.
You can use templates that can contain a hardened, patched, and properly configured operating system
to create other, application-specific templates, or you can use the application template to deploy virtual
machines.
Procedure
uProvide templates for virtual machine creation that contain hardened, patched, and properly
configured operating system deployments.
If possible, deploy applications in templates as well. Ensure that the applications do not depend on
information specific to the virtual machine to be deployed.
vSphere Security
VMware, Inc. 130
What to do next
For more information about templates, see the vSphere Virtual Machine Administration documentation.
Minimize Use of the Virtual Machine Console
The virtual machine console provides the same function for a virtual machine that a monitor provides on a
physical server. Users with access to the virtual machine console have access to virtual machine power
management and removable device connectivity controls. Console access might therefore allow a
malicious attack on a virtual machine.
Procedure
1Use native remote management services, such as terminal services and SSH, to interact with virtual
machines.
Grant access to the virtual machine console only when necessary.
2Limit the connections to the console.
For example, in a highly secure environment, limit the connection to one. In some environments, you
can increase the limit if several concurrent connections are necessary to accomplish normal tasks.
Prevent Virtual Machines from Taking Over Resources
When one virtual machine consumes so much of the host resources that other virtual machines on the
host cannot perform their intended functions, a Denial of Service (DoS) might occur. To prevent a virtual
machine from causing a DoS, use host resource management features such as setting Shares and using
resource pools.
By default, all virtual machines on an ESXi host share resources equally. You can use Shares and
resource pools to prevent a denial of service attack that causes one virtual machine to consume so much
of the host’s resources that other virtual machines on the same host cannot perform their intended
functions.
Do not use Limits unless you fully understand the impact.
Procedure
1Provision each virtual machine with just enough resources (CPU and memory) to function properly.
2Use Shares to guarantee resources to critical virtual machines.
3Group virtual machines with similar requirements into resource pools.
4In each resource pool, leave Shares set to the default to ensure that each virtual machine in the pool
receives approximately the same resource priority.
With this setting, a single virtual machine cannot use more than other virtual machines in the resource
pool.
What to do next
See the vSphere Resource Management documentation for information about shares and limits.
vSphere Security
VMware, Inc. 131
Disable Unnecessary Functions Inside Virtual Machines
Any service that is running in a virtual machine provides the potential for attack. By disabling system
components that are not necessary to support the application or service that is running on the system,
you reduce the potential.
Virtual machines do not usually require as many services or functions as physical servers. When you
virtualize a system, evaluate whether a particular service or function is necessary.
Procedure
nDisable unused services in the operating system.
For example, if the system runs a file server, turn off any Web services.
nDisconnect unused physical devices, such as CD/DVD drives, floppy drives, and USB adapters.
nDisable unused functionality, such as unused display features, or VMware Shared Folders, which
enables sharing of host files to the virtual machine (Host Guest File System).
nTurn off screen savers.
nDo not run the X Window system on top of Linux, BSD, or Solaris guest operating systems unless it is
necessary.
Remove Unnecessary Hardware Devices
Any enabled or connected device represents a potential attack channel. Users and processes with
privileges on a virtual machine can connect or disconnect hardware devices, such as network adapters
and CD-ROM drives. Attackers can use this capability to breach virtual machine security. Removing
unnecessary hardware devices can help prevent attacks.
An attacker with access to a virtual machine can connect a disconnected hardware device and access
sensitive information on media that is left in a hardware device. The attacker can potentially disconnect a
network adapter to isolate the virtual machine from its network, resulting in a denial of service.
nDo not connect unauthorized devices to the virtual machine.
nRemove unneeded or unused hardware devices.
nDisable unnecessary virtual devices from within a virtual machine.
nEnsure that only required devices are connected to a virtual machine. Virtual machines rarely use
serial or parallel ports. As a rule, CD/DVD drives are connected only temporarily during software
installation.
Procedure
1Log in to a vCenter Server system using the vSphere Web Client.
2Right-click the virtual machine and click Edit Settings.
vSphere Security
VMware, Inc. 132

3Disable hardware devices that are not required.
Include checks for the following devices:
nFloppy drives
nSerial ports
nParallel ports
nUSB controllers
nCD-ROM drives
Disable Unused Display Features
Attackers can use an unused display feature as a vector for inserting malicious code into your
environment. Disable features that are not in use in your environment.
Procedure
1Log in to a vCenter Server system using the vSphere Web Client and find the virtual machine.
a In the Navigator, select VMs and Templates.
b Find the virtual machine in the hierarchy.
2Right-click the virtual machine and click Edit Settings.
3Select VM Options.
4Click Advanced and click Edit Configuration.
5If appropriate, add or edit the following parameters.
Option Description
svga.vgaonly If you set this parameter to TRUE, advanced graphics functions no longer work.
Only character-cell console mode will be available. If you use this setting,
mks.enable3d has no effect.
Note Apply this setting only to virtual machines that do not need a virtualized
video card.
mks.enable3d Set this parameter to FALSE on virtual machines that do not require 3D
functionality.
Disable Unexposed Features
VMware virtual machines can work both in a vSphere environment and on hosted virtualization platforms
such as VMware Workstation and VMware Fusion. Certain virtual machine parameters do not need to be
enabled when you run a virtual machine in a vSphere environment. Disable these parameters to reduce
the potential for vulnerabilities.
Prerequisites
Turn off the virtual machine.
vSphere Security
VMware, Inc. 133
Procedure
1Log in to a vCenter Server system using the vSphere Web Client and find the virtual machine.
a In the Navigator, select VMs and Templates.
b Find the virtual machine in the hierarchy.
2Right-click the virtual machine and click Edit Settings.
3Select VM Options.
4Click Advanced and click Edit Configuration.
5Set the following parameters to TRUE by adding or editing them.
nisolation.tools.unity.push.update.disable
nisolation.tools.ghi.launchmenu.change
nisolation.tools.memSchedFakeSampleStats.disable
nisolation.tools.getCreds.disable
nisolation.tools.ghi.autologon.disable
nisolation.bios.bbs.disable
nisolation.tools.hgfsServerSet.disable
6Click OK.
Disable VMware Shared Folders Sharing Host Files to the Virtual Machine
In high-security environments, you can disable certain components to minimize the risk that an attacker
can use the host guest file system (HGFS) to transfer files inside the guest operating system.
Modifying the parameters described in this section affects only the Shared Folders feature and does not
affect the HGFS server running as part of tools in the guest virtual machines. Also, these parameters do
not affect the auto-upgrade and VIX commands that use the tools' file transfers.
Procedure
1Log in to a vCenter Server system using the vSphere Web Client and find the virtual machine.
a In the Navigator, select VMs and Templates.
b Find the virtual machine in the hierarchy.
2Right-click the virtual machine and click Edit Settings.
3Select VM Options.
4Click Advanced and click Edit Configuration.
5Verify that the isolation.tools.hgfsServerSet.disable parameter is set to TRUE.
A setting of TRUE prevents the VMX process from receiving a notification from each tool's service,
daemon, or upgrader processes of its HGFS server capability.
vSphere Security
VMware, Inc. 134

6(Optional) Verify that the isolation.tools.hgfs.disable parameter is set to TRUE.
A setting of TRUE disables the unused VMware Shared Folders feature for sharing host files to the
virtual machine.
Disable Copy and Paste Operations Between Guest Operating System and
Remote Console
Copy and paste operations between the guest operating system and remote console are disabled by
default. For a secure environment, retain the default setting. If you require copy and paste operations, you
must enable them using the vSphere Web Client.
These options are set to the recommended value by default. However, you must set them to true explicitly
if you want to enable audit tools to check that the setting is correct.
Prerequisites
Turn off the virtual machine.
Procedure
1Log in to a vCenter Server system using the vSphere Web Client.
2Right-click the virtual machine and click Edit Settings.
3Click VM Options, and click Edit Configuration.
4Ensure that the following values are in the Name and Value columns, or click Add Row to add them.
Name Recommended Value
isolation.tools.copy.disable true
isolation.tools.paste.disable true
isolation.tools.setGUIOptions.ena
ble
false
These options override any settings made in the guest operating system’s VMware Tools control
panel.
5Click OK.
6(Optional) If you made changes to the configuration parameters, restart the virtual machine.
Limiting Exposure of Sensitive Data Copied to the Clipboard
Copy and paste operations are disabled by default for hosts to prevent exposing sensitive data that has
been copied to the clipboard.
vSphere Security
VMware, Inc. 135
When copy and paste is enabled on a virtual machine running VMware Tools, you can copy and paste
between the guest operating system and remote console. When the console window gains focus,
processes running in the virtual machine and non-privileged users can access the virtual machine
console clipboard. If a user copies sensitive information to the clipboard before using the console, the use
might expose sensitive data to the virtual machine. To prevent this problem, copy and paste operations
for the guest operating system are disabled by default.
It is possible to enable copy and paste operations for virtual machines if necessary.
Restrict Users From Running Commands Within a Virtual Machine
By default, a user who has the vCenter Server Administrator role can interact with files and applications
within a virtual machine's guest operating system. To reduce the risk of breaching guest confidentiality,
availability, or integrity, create a nonguest access role without the Guest Operations privilege. Assign
that role to administrators who do not need virtual machine file access.
For security, be as restrictive about allowing access to the virtual data center as you are to the physical
data center. Apply a custom role that disables guest access to users who require administrator privileges,
but who are not authorized to interact with guest operating system files and applications.
For example, a configuration might include a virtual machine on the infrastructure that has sensitive
information on it.
If tasks such as migration with vMotion require that data center administrators can access the virtual
machine, disable some remote guest OS operations to ensure that those administrators cannot access
sensitive information.
Prerequisites
Verify that you have Administrator privileges on the vCenter Server system where you create the role.
Procedure
1Log in to the vSphere Web Client as a user who has Administrator privileges on the vCenter Server
system where you will create the role.
2Click Administration and select Roles.
3Click the Create role action icon and type a name for the role.
For example, type Administrator No Guest Access.
4Select All Privileges.
5Deselect All Privileges.Virtual machine.Guest Operations to remove the Guest Operations set of
privileges.
6Click OK.
What to do next
Select the vCenter Server system or the host and assign a permission that pairs the user or group that
should have the new privileges to the newly created role. Remove those users from the Administrator
role.
vSphere Security
VMware, Inc. 136

Prevent a Virtual Machine User or Process From Disconnecting Devices
Users and processes without root or Administrator privileges within virtual machines can connect or
disconnect devices, such as network adapters and CD-ROM drives, and can modify device settings. To
increase virtual machine security, remove these devices. If you do not want to remove a device, you can
change guest operating system settings to prevent virtual machine users or processes from changing the
device status.
Prerequisites
Turn off the virtual machine.
Procedure
1Log in to a vCenter Server system using the vSphere Web Client and find the virtual machine.
a In the Navigator, select VMs and Templates.
b Find the virtual machine in the hierarchy.
2Right-click the virtual machine and click Edit Settings.
3Select VM Options.
4Click Advanced and click Edit Configuration.
5Verify that the following values are in the Name and Value columns, or click Add Row to add them.
Name Value
isolation.device.connectable.disable true
isolation.device.edit.disable true
These options override any settings made in the guest operating system's VMware Tools control
panel.
6Click OK to close the Configuration Parameters dialog box, and click OK again.
Prevent Guest Operating System Processes from Sending Configuration
Messages to the Host
To ensure that the guest operating system does not modify configuration settings, you can prevent these
processes from writing any name-value pairs to the configuration file.
Prerequisites
Turn off the virtual machine.
Procedure
1Log in to a vCenter Server system using the vSphere Web Client and find the virtual machine.
a In the Navigator, select VMs and Templates.
b Find the virtual machine in the hierarchy.
vSphere Security
VMware, Inc. 137

2Right-click the virtual machine and click Edit Settings.
3Select VM Options.
4Click Advanced and click Edit Configuration.
5Click Add Row and type the following values in the Name and Value columns.
Column Value
Name isolation.tools.setinfo.disable
Value true
6Click OK to close the Configuration Parameters dialog box, and click OK again.
Avoid Using Independent Nonpersistent Disks
When you use independent nonpersistent disks, successful attackers can remove any evidence that the
machine was compromised by shutting down or rebooting the system. Without a persistent record of
activity on a virtual machine, administrators might be unaware of an attack. Therefore, you should avoid
using independent nonpersistent disks.
Procedure
uEnsure that virtual machine activity is logged remotely on a separate server, such as a syslog server
or equivalent Windows-based event collector.
If remote logging of events and activity is not configured for the guest, scsiX:Y.mode should be one of
the following settings:
nNot present
nNot set to independent nonpersistent
When nonpersistent mode is not enabled, you cannot roll a virtual machine back to a known state when
you reboot the system.
vSphere Security
VMware, Inc. 138

Virtual Machine Encryption 6
Starting with vSphere 6.5, you can take advantage of virtual machine encryption. Encryption protects not
only your virtual machine but also virtual machine disks and other files. You set up a trusted connection
between vCenter Server and a key management server (KMS). vCenter Server can then retrieve keys
from the KMS as needed.
You manage different aspects of virtual machine encryption in different ways.
nManage setup of the trusted connection with the KMS and perform most encryption workflows from
the vSphere Web Client.
nManage automation of some advanced features from the vSphere Web Services SDK. See vSphere
Web Services SDK Programming Guide and VMware vSphere API Reference.
nUse the crypto-util command-line tool directly on the ESXi host for some special cases, for
example, to decrypt the core dumps in a vm-support bundle.
vSphere Virtual Machine Encryption Overview
(http://link.brightcove.com/services/player/bcpid2296383276001?
bctid=ref:video_vsphere_virtual_machine_encryption_overview)
This chapter includes the following topics:
nHow vSphere Virtual Machine Encryption Protects Your Environment
nvSphere Virtual Machine Encryption Components
nEncryption Process Flow
nVirtual Disk Encryption
nPrerequisites and Required Privileges for Encryption Tasks
nEncrypted vSphere vMotion
nEncryption Best Practices, Caveats, and Interoperability
VMware, Inc. 139

How vSphere Virtual Machine Encryption Protects Your
Environment
With vSphere Virtual Machine Encryption, you can create encrypted virtual machines and encrypt existing
virtual machines. Because all virtual machine files with sensitive information are encrypted, the virtual
machine is protected. Only administrators with encryption privileges can perform encryption and
decryption tasks.
What Keys Are Used
Two types of keys are used for encryption.
nThe ESXi host generates and uses internal keys to encrypt virtual machines and disks. These keys
are used as data encryption keys (DEKs) and are XTS-AES-256 keys.
nvCenter Server requests keys from the KMS. These keys are used as the key encryption key (KEK)
and are AES-256 keys. vCenter Server stores only the ID of each KEK, but not the key itself.
nESXi uses the KEK to encrypt the internal keys, and stores the encrypted internal key on disk. ESXi
does not store the KEK on disk. If a host reboots, vCenter Server requests the KEK with the
corresponding ID from the KMS and makes it available to ESXi. ESXi can then decrypt the internal
keys as needed.
What Is Encrypted
vSphere Virtual Machine Encryption supports encryption of virtual machine files, virtual disk files, and
core dump files.
Virtual machine files Most virtual machine files, in particular, guest data that are not stored in the
VMDK file, are encrypted. This set of files includes but is not limited to the
NVRAM, VSWP, and VMSN files. The key that vCenter Server retrieves
from the KMS unlocks an encrypted bundle in the VMX file that contains
internal keys and other secrets.
If you are using the vSphere Web Client to create an encrypted virtual
machine, all virtual disks are encrypted by default. For other encryption
tasks, such as encrypting an existing virtual machine, you can encrypt and
decrypt virtual disks separate from virtual machine files.
Note You cannot associate an encrypted virtual disk with a virtual machine
that is not encrypted.
Virtual disk files Data in an encrypted virtual disk (VMDK) file is never written in cleartext to
storage or physical disk, and is never transmitted over the network in
cleartext. The VMDK descriptor file is mostly cleartext, but contains a key
ID for the KEK and the internal key (DEK) in the encrypted bundle.
vSphere Security
VMware, Inc. 140

You can use the vSphere API to perform either a shallow recrypt operation
with a new KEK or deep recrypt operation with a new internal key.
Core dumps Core dumps on an ESXi host that has encryption mode enabled are always
encrypted. See vSphere Virtual Machine Encryption and Core Dumps.
Note Core dumps on the vCenter Server system are not encrypted. Be
sure to protect access to the vCenter Server system.
Note For information on some limitations concerning devices and features that vSphere Virtual Machine
Encryption can interoperate with, see Virtual Machine Encryption Interoperability.
What Is Not Encrypted
Some of the files that are associated with a virtual machine are not encrypted or partially encrypted.
Log files Log files are not encrypted because they do not contain sensitive data.
Virtual machine
configuration files
Most of the virtual machine configuration information, stored in the VMX
and VMSD files, is not encrypted.
Virtual disk descriptor
file
To support disk management without a key, most of the virtual disk
descriptor file is not encrypted.
Who Can Perform Cryptographic Operations
Only users that are assigned the Cryptographic Operations privileges can perform cryptographic
operations. The privilege set is fine grained. See Cryptographic Operations Privileges. The default
Administrator system role includes all Cryptographic Operations privileges. A new role, No
Cryptography Administrator, supports all Administrator privileges except for the Cryptographic
Operations privileges.
You can create additional custom roles, for example, to allow a group of users to encrypt virtual machines
but to prevent them from decrypting virtual machines.
How Can I Perform Cryptographic Operations
The vSphere Web Client supports many of the cryptographic operations. For other tasks, you can use the
vSphere API.
vSphere Security
VMware, Inc. 141
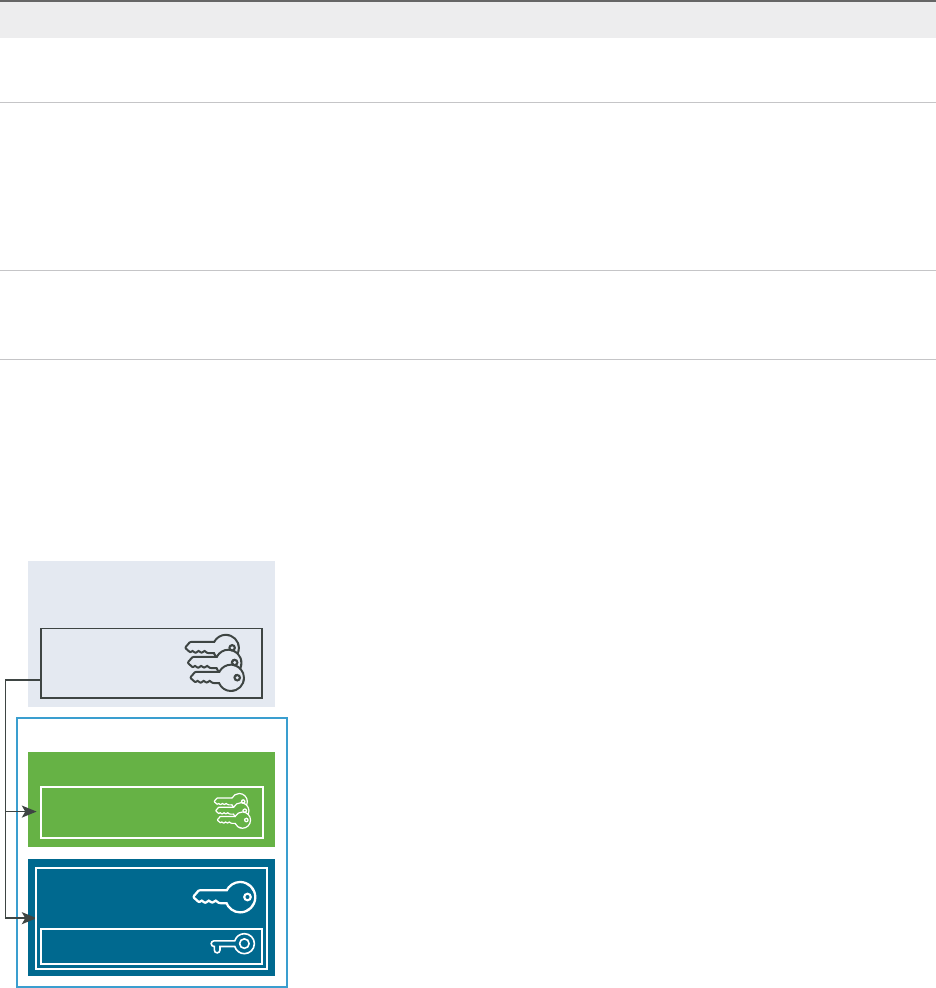
Table 6‑1. Interfaces for Performing Cryptographic Operations
Interface Operations Information
vSphere Web Client Create encrypted virtual machine
Encrypt and decrypt virtual machines
This book.
vSphere Web Services SDK Create encrypted virtual machine
Encrypt and decrypt virtual machines
Perform a deep recrypt of a virtual machine (use a
different DEK).
Perform a shallow recrypt of a virtual machine (use a
different KEK).
vSphere Web Services SDK
Programming Guide
VMware vSphere API Reference
crypto-util Decrypt encrypted core dumps, check whether files
are encrypted, and perform other management tasks
directly on the ESXi host.
Command-line help.
vSphere Virtual Machine Encryption
and Core Dumps
vSphere Virtual Machine Encryption Components
An external KMS, the vCenter Server system, and your ESXi hosts are contributing to the vSphere Virtual
Machine Encryption solution.
Figure 6‑1. vSphere Virtual Encryption Architecture
Third-Party Key
Management Server
vCenter Server
Managed
VM Keys
Managed VM
key IDs
ESXi
Encrypted VM
vSphere
Managed VM keys
protect internal
encryption keys
Key Management Server
vCenter Server requests keys from an external KMS. The KMS generates and stores the keys, and
passes them to vCenter Server for distribution.
You can use the vSphere Web Client or the vSphere API to add a cluster of KMS instances to the
vCenter Server system. If you use multiple KMS instances in a cluster, all instances must be from the
same vendor and must replicate keys.
vSphere Security
VMware, Inc. 142
If your environment uses different KMS vendors in different environments, you can add a KMS cluster for
each KMS and specify a default KMS cluster. The first cluster that you add becomes the default cluster.
You can explicitly specify the default later.
As a KMIP client, vCenter Server uses the Key Management Interoperability Protocol (KMIP) to make it
easy to use the KMS of your choice.
vCenter Server
Only vCenter Server has the credentials for logging in to the KMS. Your ESXi hosts do not have those
credentials. vCenter Server obtains keys from the KMS and pushes them to the ESXi hosts.
vCenter Server does not store the KMS keys, but keeps a list of key IDs.
vCenter Server checks the privileges of users who perform cryptographic operations. You can use the
vSphere Web Client to assign cryptographic operation privileges or to assign the No cryptography
administrator custom role to groups of users. See Prerequisites and Required Privileges for Encryption
Tasks.
vCenter Server adds cryptography events to the list of events that you can view and export from the
vSphere Web Client Event Console. Each event includes the user, time, key ID, and cryptographic
operation.
The keys that come from the KMS are used as key encryption keys (KEKs).
ESXi Hosts
ESXi hosts are responsible for several aspects of the encryption workflow.
nvCenter Server pushes keys to an ESXi host when the host needs a key. The host must have
encryption mode enabled. The current user's role must include cryptographic operation privileges.
See Prerequisites and Required Privileges for Encryption Tasks and Cryptographic Operations
Privileges.
nEnsuring that guest data for encrypted virtual machines is encrypted when stored on disk.
nEnsuring that guest data for encrypted virtual machines is not sent over the network without
encryption.
The keys that the ESXi host generates are called internal keys in this document. These keys typically act
as data encryption keys (DEKs).
Encryption Process Flow
After vCenter Server is connected to the KMS, users with the required privileges can create encrypted
virtual machines and disks. Those users can also perform other encryption tasks such as encrypting
existing virtual machines and decrypting encrypted virtual machines.
The process flow includes the KMS, the vCenter Server, and the ESXi host.
vSphere Security
VMware, Inc. 143
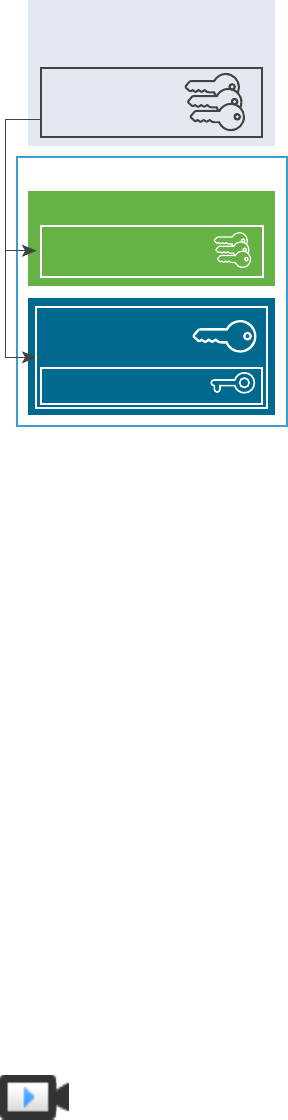
Figure 6‑2. vSphere Virtual Encryption Architecture
Third-Party Key
Management Server
vCenter Server
Managed
VM Keys
Managed VM
key IDs
ESXi
Encrypted VM
vSphere
Managed VM keys
protect internal
encryption keys
During the encryption process, different vSphere components interact as follows.
1 When the user performs an encryption task, for example, creating an encrypted virtual machine,
vCenter Server requests a new key from the default KMS. This key will be used as the KEK.
2 vCenter Server stores the key ID and passes the key to the ESXi host. If the ESXi host is part of a
cluster, vCenter Server sends the KEK to each host in the cluster.
The key itself is not stored on the vCenter Server system. Only the key ID is known.
3 The ESXi host generates internal keys (DEKs) for the virtual machine and its disks. It keeps the
internal keys in memory only, and uses the KEKs to encrypt internal keys.
Unencrypted internal keys are never stored on disk. Only encrypted data is stored. Because the
KEKs come from the KMS, the host continues to use the same KEKs.
4 The ESXi host encrypts the virtual machine with the encrypted internal key.
Any hosts that have the KEK and that can access the encrypted key file can perform operations on
the encrypted virtual machine or disk.
If you later want to decrypt a virtual machine, you change its storage policy. You can change the storage
policy for the virtual machine and all disks. If you want to decrypt individual components, decrypt selected
disks first, then decrypt the virtual machine by changing the storage policy for VM Home. Both keys are
required for decryption of each component.
Encrypting Virtual Machines and Disks
(http://link.brightcove.com/services/player/bcpid2296383276001?
bctid=ref:video_encrypting_vms_and_disks)
vSphere Security
VMware, Inc. 144

Virtual Disk Encryption
When you create an encrypted virtual machine from the vSphere Web Client, all virtual disks are
encrypted. You can later add disks and set their encryption policies. You cannot add an encrypted disk to
a virtual machine that is not encrypted, and you cannot encrypt a disk if the virtual machine is not
encrypted.
Encryption for a virtual machine and its disks is controlled through storage policies. The storage policy for
VM Home governs the virtual machine itself, and each virtual disk has an associated storage policy.
nSetting the storage policy of VM Home to an encryption policy encrypts only the virtual machine itself.
nSetting the storage policy of VM Home and all the disks to an encryption policy encrypts all
components.
Consider the following use cases.
Table 6‑2. Virtual Disk Encryption Use Cases
Use case Details
Create an encrypted virtual machine. If you add disks while creating an encrypted virtual machine, the
disks are encrypted by default. You can change the policy to not
encrypt one or more of the disks.
After virtual machine creation, you can explicitly change the
storage policy for each disk. See Change the Encryption Policy
for Virtual Disks.
Encrypt a virtual machine. To encrypt an existing virtual machine, you change its storage
policy. You can change the storage policy for the virtual machine
and all virtual disks. To encrypt just the virtual machine, you can
specify an encryption policy for VM Home and select a different
storage policy, such as Datastore Default, for each virtual disk.
Add an existing unencrypted disk to an encrypted virtual
machine (Encryption storage policy)
Fails with an error. You have to add the disk with the default
storage policy, but can later change the storage policy.
Add an existing unencrypted disk to an encrypted virtual
machine with a storage policy that does not include encryption,
for example Datastore Default.
The disk uses the default storage policy. You can explicitly
change the storage policy after adding the disk if you want an
encrypted disk.
Add an encrypted disk to an encrypted virtual machine. VM
Home storage policy is Encryption.
When you add the disk, it remains encrypted. The
vSphere Web Client displays the size and other attributes,
including encryption status but might not display the correct
storage policy. For consistency, change the storage policy.
Add an existing encrypted disk to an unencrypted virtual
machine
This use case is not supported.
vSphere Security
VMware, Inc. 145
Prerequisites and Required Privileges for Encryption
Tasks
Encryption tasks are possibly only in environments that include vCenter Server. In addition, the ESXi host
must have encryption mode enabled for most encryption tasks. The user who performs the task must
have the appropriate privileges. A set of Cryptographic Operations privileges allows fine-grained
control. If virtual machine encryption tasks require a change to the host encryption mode, additional
privileges are required.
Cryptography Privileges and Roles
By default, the user with the vCenter Server Administrator role has all privileges. The No cryptography
administrator role does not have the following privileges that are required for cryptographic operations.
nAdd Cryptographic Operations privileges.
nGlobal.Diagnostics
nHost.Inventory.Add host to cluster
nHost.Inventory.Add standalone host
nHost.Local operations.Manage user groups
You can assign the No cryptography administrator role to vCenter Server administrators that do not
need Cryptographic Operations privileges.
To further limit what users can do, you can clone the No cryptography administrator role and create a
custom role with only some of the Cryptographic Operations privileges. For example, you can create a
role that allows users to encrypt but not to decrypt virtual machines. See Using Roles to Assign
Privileges.
Host Encryption Mode
You can encrypt virtual machines only if host encryption mode is enabled for the ESXi host. Host
encryption mode is often enabled automatically, but it can be enabled explicitly. You can check and
explicitly set the current host encryption mode from the vSphere Web Client or by using the vSphere API.
For instructions, see Enable Host Encryption Mode Explicitly.
After Host encryption mode is enabled, it cannot be disabled easily. See Disable Host Encryption Mode.
Automatic changes occur when encryption operations attempt to enable host encryption mode. For
example, assume that you add an encrypted virtual machine to a standalone host. Host encryption mode
is not enabled. If you have the required privileges on the host, encryption mode changes to enabled
automatically.
vSphere Security
VMware, Inc. 146
Assume that a cluster has three ESXi hosts, host A, B, and C. You add an encrypted virtual machine to
host A. What happens depends on several factors.
nIf hosts A, B, and C already have encryption enabled, you need only Cryptographic
operations.Encrypt new privileges to create the virtual machine.
nIf hosts A and B are enabled for encryption and C is not enabled, the system proceeds as follows.
nAssume that you have both the Cryptographic operations.Encrypt new and the
Cryptographic operations.Register host privileges on each host. In that case, the virtual
machine creation process enables encryption on host C. The encryption process enables host
encryption mode on host C, and pushes the key to each host in the cluster.
For this case, you can also explicitly enable host encryption on host C.
nAssume that you have only Cryptographic operations.Encrypt new privileges on the virtual
machine or virtual machine folder. In that case, virtual machine creation succeeds and the key
becomes available on host A and host B. Host C remains disabled for encryption and does not
have the virtual machine key.
nIf none of the hosts has encryption enabled, and you have Cryptographic operations.Register host
privileges on host A, then the virtual machine creation process enables host encryption on that host.
Otherwise, an error results.
Disk Space Requirements
When you encrypt an existing virtual machine, you need at least twice the space that the virtual machine
is currently using.
Encrypted vSphere vMotion
Starting with vSphere 6.5, vSphere vMotion always uses encryption when migrating encrypted virtual
machines. For virtual machines that are not encrypted, you can select one of the encrypted vSphere
vMotion options.
Encrypted vSphere vMotion secures confidentiality, integrity, and authenticity of data that is transferred
with vSphere vMotion.
nFor unencrypted virtual machines, all variants of encrypted vSphere vMotion are supported. Shared
storage is required for migration across vCenter Server instances.
nFor encrypted virtual machines, migration across vCenter Server instances is not supported.
What is Encrypted
For encrypted disks, the data is transmitted encrypted. For disks that are not encrypted, Storage vMotion
encryption is not supported.
For virtual machines that are encrypted, migration with vSphere vMotion always uses encrypted vSphere
vMotion. You cannot turn off encrypted vSphere vMotion for encrypted virtual machines.
vSphere Security
VMware, Inc. 147
Encrypted vSphere vMotion States
For virtual machines that are not encrypted, you can set encrypted vSphere vMotion to one of the
following states. The default is Opportunistic.
Disabled Do not use encrypted vSphere vMotion.
Opportunistic Use encrypted vSphere vMotion if source and destination hosts support it.
Only ESXi versions 6.5 and later use encrypted vSphere vMotion.
Required Allow only encrypted vSphere vMotion. If the source or destination host
does not support encrypted vSphere vMotion, migration with vSphere
vMotion is not allowed.
When you encrypt a virtual machine, the virtual machine keeps a record of the current encrypted vSphere
vMotion setting. If you later disable encryption for the virtual machine, the encrypted vMotion setting
remains at Required until you change the setting explicitly. You can change the settings using Edit
Settings.
See the vCenter Server and Host Management documentation for information on enabling and disabling
encrypted vSphere vMotion for virtual machines that are not encrypted.
Encryption Best Practices, Caveats, and Interoperability
Any best practices and caveats that apply to the encryption of physical machines apply to virtual machine
encryption as well. The virtual machine encryption architecture results in some additional
recommendations. As you are planning your virtual machine encryption strategy, consider interoperability
limitations.
Virtual Machine Encryption Best Practices
Follow virtual machine encryption best practices to avoid problems later, for example, when you generate
a vm-support bundle.
General Best Practices
Follow these general best practices to avoid problems.
nDo not encrypt any vCenter Server Appliance virtual machines.
nIf your ESXi host crashes, retrieve the support bundle as soon as possible. The host key must be
available for generating a support bundle that uses a password, or for decrypting a core dump. If the
host is rebooted, it is possible that the host key changes. If that happens, you can no longer generate
a support bundle with a password or decrypt core dumps in the support bundle with the host key.
nManage KMS cluster names carefully. If the KMS cluster name changes for a KMS that is already in
use, a VM that is encrypted with keys from that KMS enters a locked state during power on or
register. In that case, remove the KMS from the vCenter Server and add it with the cluster name that
you used initially.
vSphere Security
VMware, Inc. 148
nDo not edit VMX files and VMDK descriptor files. These files contain the encryption bundle. It is
possible that your changes make the virtual machine unrecoverable, and that the recovery problem
cannot be fixed.
nThe encryption process encrypts data on the host before it is written to storage. Backend storage
features such as deduplication and compression might not be effective for encrypted virtual
machines. Consider storage tradeoffs when using vSphere Virtual Machine Encryption.
nEncryption is CPU intensive. AES-NI significantly improves encryption performance. Enable AES-NI
in your BIOS.
Best Practices for Encrypted Core Dumps
Follow these best practices to avoid having problems when you want to examine a core dump to
diagnose a problem.
nEstablish a policy regarding core dumps. Core dumps are encrypted because they can contain
sensitive information such as keys. If you decrypt a core dump, consider it sensitive information. ESXi
core dumps might contain keys for the ESXi host and for the virtual machines on it. Consider
changing the host key and recrypting encrypted virtual machines after you decrypt a core dump. You
can perform both tasks by using the vSphere API.
See vSphere Virtual Machine Encryption and Core Dumps for details.
nAlways use a password when you collect a vm-support bundle. You can specify the password when
you generate the support bundle from the vSphere Web Client or using the vm-support command.
The password recrypts core dumps that use internal keys to use keys that are based on the
password. You can later use the password to decrypt any encrypted core dumps that might be
included in the support bundle. Unencrypted core dumps and logs are not affected by using the
password option.
nThe password that you specify during vm-support bundle creation is not persisted in vSphere
components. You are responsible for keeping track of passwords for support bundles.
nBefore you change the host key, generate a vm-support bundle with a password. You can later use
the password to access any core dumps that might have been encrypted with the old host key.
Key Lifecycle Management Best Practices
Implement best practices that guarantee KMS availability and monitor keys on the KMS.
nYou are responsible for having policies in place that guarantee KMS availability.
If the KMS is not available, virtual machine operations that require that vCenter Server request the
key from the KMS are not possible. That means running virtual machines continue to run, and you
can power on, power off, and reconfigure those virtual machines. However, you cannot relocate the
virtual machine to a host that does not have the key information.
Most KMS solutions include high availability features. You can use the vSphere Web Client or the API
to specify a KMS cluster and the associated KMS servers.
vSphere Security
VMware, Inc. 149
nYou are responsible for keeping track of keys and for performing remediation if keys for existing
virtual machines are not in the Active state.
The KMIP standard defines the following states for keys.
nPre-Active
nActive
nDeactivated
nCompromised
nDestroyed
nDestroyed Compromised
vSphere Virtual Machine Encryption uses only Active keys for encryption. If a key is Pre-Active,
vSphere Virtual Machine Encryption activates it. If the key state is Deactivated, Compromised,
Destroyed, Destroyed Compromised, you cannot encrypt a virtual machine or disk with that key.
For keys that are in other states, virtual machines using those keys continue to work. Whether a clone
or migration operation succeeds depends on whether they key is already on the host.
nIf the key is on the destination host, the operation succeeds even if the key is not Active on the
KMS.
nIf the required virtual machine and virtual disk keys are not on the destination host,
vCenter Server has to fetch the keys from the KMS. If the key state is Deactivated,
Compromised, Destroyed, or Destroyed Compromised, vCenter Server displays an error and the
operation does not succeed.
A clone or migration operation succeeds if the key is already on the host. The operation fails if
vCenter Server has to pull the keys from the KMS.
If a key is not Active, perform a rekey operation using the API. See the vSphere Web Services SDK
Programming Guide.
Backup and Restore Best Practices
Set up policies on backup and restore operations.
nNot all backup architectures are supported. See Virtual Machine Encryption Interoperability.
nSet up policies for restore operations. Because backup is always in cleartext, plan to encrypt virtual
machines right after restore is complete. You can specify that the virtual machine is encrypted as part
of the restore operation. If possible, encrypt virtual machine as part of the restore process to avoid
exposing sensitive information. To change the encryption policy for any disks that are associated with
the virtual machine, change the storage policy for the disk.
nBecause the VM home files are encrypted, ensure that the encryption keys are available at the time
of a restore.
vSphere Security
VMware, Inc. 150

Performance Best Practices
nEncryption performance depends on the CPU and storage speed.
nEncrypting existing virtual machines is more time consuming than encrypting a virtual machine during
creation. Encrypt a virtual machine when you create it if possible.
Storage Policy Best Practices
Do not modify the bundled VM Encryption sample storage policy. Instead, clone the policy and edit the
clone.
Note No automated way of returning VM Encryption Policy to its original settings exists.
See the vSphere Storage documentation for details customizing storage policies.
Virtual Machine Encryption Caveats
Review Virtual Machine Encryption caveats to avoid problems later.
To understand which devices and features cannot be used with Virtual Machine Encryption, see Virtual
Machine Encryption Interoperability.
Limitations
Consider the following caveats when you plan your virtual machine encryption strategy.
nWhen you clone an encrypted virtual machine or perform a Storage vMotion operation, you can
attempt to change the disk format. Such conversions do not always succeed. For example, if you
clone a virtual machine and attempt to change the disk format from lazy-zeroed thick format to thin
format, the virtual machine disk keeps the lazy-zeroed thick format.
nWhen you detach a disk from a virtual machine, the storage policy information for the virtual disk is
not retained.
nIf the virtual disk is encrypted, you must explicitly set the storage policy to VM Encryption Policy
or to a storage policy that includes encryption.
nIf the virtual disk is not encrypted, you can change the storage policy when you add the disk to a
virtual machine.
See Virtual Disk Encryption for details.
nDecrypt core dumps before moving a virtual machine to a different cluster.
The vCenter Server does not store KMS keys but only tracks the key IDs. As a result, vCenter Server
does not store the ESXi host key persistently.
Under certain circumstances, for example, when you move the ESXi host to a different cluster and
reboot the host, vCenter Server assigns a new host key to the host. You cannot decrypt any existing
core dumps with the new host key.
vSphere Security
VMware, Inc. 151
nOVF Export is not supported for an encrypted virtual machine.
nUsing the VMware Host Client to register an encrypted virtual machine is not supported.
Virtual Machine Locked State
If the virtual machine key or one or more of the virtual disk keys are missing, the virtual machine enters a
locked state. In a locked state, you cannot perform virtual machine operations.
nWhen you encrypt both a virtual machine and its disks from the vSphere Client, the same key is used
for both.
nWhen you perform the encryption using the API, you can use different encryption keys for the virtual
machine and for disks. In that case, if you attempt to power on a virtual machine, and one of the disk
keys is missing, the power on operation fails. If you remove the virtual disk, you can power on the
virtual machine.
See Resolve Missing Key Issues for troubleshooting suggestions.
Virtual Machine Encryption Interoperability
vSphere Virtual Machine Encryption has some limitations regarding devices and features that it can
interoperate with in vSphere 6.5 and later releases.
You cannot perform certain tasks on an encrypted virtual machine.
nFor most virtual machine encryption operations, the virtual machine must be powered off. You can
clone an encrypted virtual machine and you can perform a shallow recrypt while the virtual machine is
powered on.
nYou cannot encrypt a virtual machine that has existing snapshots. Consolidate all existing snapshots
before you perform the encryption.
Starting with vSphere 6.7, you can resume from a suspended state of an encrypted virtual machine, or
revert to a memory snapshot of an encrypted machine. You can migrate an encrypted virtual machine
with memory snapshot and suspended state between ESXi hosts.
You can use vSphere Virtual Machine Encryption with pure IPv6 mode or in mixed mode. You can
configure the KMS with IPv6 addresses. Both vCenter Server and the KMS can be configured with only
IPv6 addresses.
Certain features do not work with vSphere Virtual Machine Encryption.
nvSphere Fault Tolerance
nCloning is supported conditionally.
nFull clones are supported. The clone inherits the parent encryption state including keys. You can
re-encrypt full clone to use new keys or decrypt the full clone.
Linked clones are supported and clone inherits the parent encryption state including keys. You
cannot decrypt the linked clone or re-encrypt a linked clone with different keys.
nvSphere ESXi Dump Collector
vSphere Security
VMware, Inc. 152
nMigration with vMotion of an encrypted virtual machine to a different vCenter Server instance.
Encrypted migration with vMotion of an unencrypted virtual machine is supported.
nvSphere Replication
nContent Library
nNot all backup solutions that use VMware vSphere Storage API - Data Protection (VADP) for virtual
disk backup are supported.
nVADP SAN backup solutions are not supported.
nVADP hot add backup solutions are supported if the vendor supports encryption of the proxy VM
that is created as part of the backup workflow. The vendor must have the privilege
Cryptographic Operations.Encrypt Virtual Machine.
nVADP NBD-SSL backup solutions are supported. The vendor application must have the privilege
Cryptographic Operations.Direct Access.
nYou cannot use vSphere Virtual Machine Encryption for encryption on other VMware products such
as VMware Workstation.
nYou cannot send output from an encrypted virtual machine to a serial port or parallel port. Even if the
configuration appears to succeed, output is sent to a file.
Certain types of virtual machine disk configurations are not supported with vSphere Virtual Machine
Encryption.
nVMware vSphere Flash Read Cache.
nA named virtual disk unassociated with a virtual machine, also called First Class Disk.
nRDM (Raw Device Mapping).
nMulti-writer or shared disks (MSCS, WSFC, or Oracle RAC). If a virtual disk is encrypted, and if you
attempt to select Multi-writer in the Edit Settings page of the virtual machine, the OK button is
disabled.
vSphere Security
VMware, Inc. 153
Use Encryption in Your vSphere
Environment 7
Using encryption in your vSphere environment requires some preparation. After your environment is set
up, you can create encrypted virtual machines and virtual disks and encrypt existing virtual machines and
disks.
You can perform additional tasks by using the API and by using the crypto-util CLI. See the vSphere
Web Services SDK Programming Guide for API documentation and the crypto-util command-line help
for details about that tool.
This chapter includes the following topics:
nSet up the Key Management Server Cluster
nCreate an Encryption Storage Policy
nEnable Host Encryption Mode Explicitly
nDisable Host Encryption Mode
nCreate an Encrypted Virtual Machine
nClone an Encrypted Virtual Machine
nEncrypt an Existing Virtual Machine or Virtual Disk
nDecrypt an Encrypted Virtual Machine or Virtual Disk
nChange the Encryption Policy for Virtual Disks
nResolve Missing Key Issues
nUnlock Locked Virtual Machines
nResolve ESXi Host Encryption Mode Issues
nRe-Enable ESXi Host Encryption Mode
nSet Key Management Server Certificate Expiration Threshold
nvSphere Virtual Machine Encryption and Core Dumps
VMware, Inc. 154

Set up the Key Management Server Cluster
Before you can start with virtual machine encryption tasks, you must set up the key management server
(KMS) cluster. That task includes adding the KMS and establishing trust with the KMS. When you add a
cluster, you are prompted to make it the default. You can explicitly change the default cluster.
vCenter Server provisions keys from the default cluster.
The KMS must support the Key Management Interoperability Protocol (KMIP) 1.1 standard. See the
vSphere Compatibility Matrixes for details.
You can find information about VMware certified KMS vendors in the VMware Compatibility Guide under
Platform and Compute. If you select Compatibility Guides, you can open the Key Management Server
(KMS) compatibility documentation. This documentation is updated frequently.
Virtual Machine Encryption Key Management Server Setup
(http://link.brightcove.com/services/player/bcpid2296383276001?
bctid=ref:video_vm_KMS_vsphere67)
Add a KMS to vCenter Server in the vSphere Client
You can add a Key Management Server (KMS) to your vCenter Server system from the vSphere Client
(HTML5-based client) or by using the public API.
The vSphere Client (HTML5-based client) provides a wizard to add a KMS to your vCenter Server
system, and establish trust between the KMS and vCenter Server.
vCenter Server creates a KMS cluster when you add the first KMS instance.
nAfter vCenter Server creates the first cluster, you can add KMS instances from the same vendor to
the cluster.
nYou can set up the cluster with only one KMS instance.
nIf your environment supports KMS solutions from different vendors, you can add multiple KMS
clusters.
nIf your environment includes multiple KMS clusters, and you delete the default cluster, you must set
another default explicitly.
Note The following steps apply to vCenter Server Appliance. For vCenter Server on Windows, you are
prompted to first make the KMS trust vCenter Server, then make vCenter Server trust the KMS.
Prerequisites
nVerify that the key server is in the VMware Compatibility Guide for Key Management Servers (KMS)
and is KMIP 1.1 compliant, and that it can be a symmetric key foundry and server.
nVerify that you have the required privileges: Cryptographic operations.Manage key servers.
nYou can configure the KMS with IPv6 addresses.
nBoth vCenter Server and the KMS can be configured with only IPv6 addresses.
vSphere Security
VMware, Inc. 155

Procedure
1Log in to the vCenter Server system with the vSphere Client (HTML5-based client).
2Browse the inventory list and select the vCenter Server instance.
3Click Configure and click Key Management Servers.
4Click Add, specify the KMS information in the wizard, and click OK.
5Click Trust.
The wizard displays that vCenter Server trusts the KMS with a green check mark.
6Click Make KMS Trust vCenter.
7Select the option appropriate for your server and complete the steps.
Option See
Root CA certificate Use the Root CA Certificate Option to Establish a Trusted Connection.
Certificate Use the Certificate Option to Establish a Trusted Connection.
New Certificate Signing Request Use the New Certificate Signing Request Option to Establish a Trusted
Connection.
Upload certificate and private key Use the Upload Certificate and Private Key Option to Establish a Trusted
Connection.
8Click Establish Trust.
The wizard displays that the KMS trusts vCenter Server with a green check mark.
9Set the default KMS.
a From the Actions menu, select Change Default Cluster.
b Select the KMS cluster and click Save.
The wizard displays the KMS cluster as the current default.
Add a KMS to vCenter Server in the vSphere Web Client
You add a KMS to your vCenter Server system from the vSphere Web Client or by using the public API.
vCenter Server creates a KMS cluster when you add the first KMS instance.
nWhen you add the KMS, you are prompted to set this cluster as a default. You can later change the
default cluster explicitly.
nAfter vCenter Server creates the first cluster, you can add KMS instances from the same vendor to
the cluster.
nYou can set up the cluster with only one KMS instance.
nIf your environment supports KMS solutions from different vendors, you can add multiple KMS
clusters.
vSphere Security
VMware, Inc. 156

nIf your environment includes multiple KMS clusters, and you delete the default cluster, you must set
the default explicitly. See Set the Default KMS Cluster.
Prerequisites
nVerify that the key server is in the vSphere Compatibility Matrixes and is KMIP 1.1 compliant, and that
it can be a symmetric key foundry and server.
nVerify that you have the required privileges: Cryptographic operations.Manage key servers.
nYou can configure the KMS with IPv6 addresses.
nBoth vCenter Server and the KMS can be configured with only IPv6 addresses.
Procedure
1Log in to the vCenter Server system with the vSphere Web Client.
2Browse the inventory list and select the vCenter Server instance.
3Click Configure and click Key Management Servers.
4Click Add KMS, specify the KMS information in the wizard, and click OK.
Option Value
KMS cluster Select Create new cluster for a new cluster. If a cluster exists, you can select
that cluster.
Cluster name Name for the KMS cluster. You might need this name to connect to the KMS if
your vCenter Server instance becomes unavailable.
Server alias Alias for the KMS. You might need this alias to connect to the KMS if your
vCenter Server instance becomes unavailable.
Server address IP address or FQDN of the KMS.
Server port Port on which vCenter Server connects to the KMS.
Proxy address Optional proxy address for connecting to the KMS.
Proxy port Optional proxy port for connecting to the KMS.
User name Some KMS vendors allow users to isolate encryption keys that are used by
different users or groups by specifying a user name and password. Specify a user
name only if your KMS supports this functionality, and if you intend to use it.
Password Some KMS vendors allow users to isolate encryption keys that are used by
different users or groups by specifying a user name and password. Specify a
password only if your KMS supports this functionality, and if you intend to use it.
Establish a Trusted Connection by Exchanging Certificates
After you add the KMS to the vCenter Server system, you can establish a trusted connection. The exact
process depends on the certificates that the KMS accepts, and on company policy.
Prerequisites
Add the KMS cluster.
vSphere Security
VMware, Inc. 157

Procedure
1Log in to the vSphere Web Client, and select a vCenter Server system.
2Click Configure and select Key Management Servers.
3Select the KMS instance with which you want to establish a trusted connection.
4Click Establish trust with KMS.
5Select the option appropriate for your server and complete the steps.
Option See
Root CA certificate Use the Root CA Certificate Option to Establish a Trusted Connection.
Certificate Use the Certificate Option to Establish a Trusted Connection.
New Certificate Signing Request Use the New Certificate Signing Request Option to Establish a Trusted
Connection.
Upload certificate and private key Use the Upload Certificate and Private Key Option to Establish a Trusted
Connection.
Use the Root CA Certificate Option to Establish a Trusted Connection
Some KMS vendors such as SafeNet require that you upload your root CA certificate to the KMS. All
certificates that are signed by your root CA are then trusted by this KMS.
The root CA certificate that vSphere Virtual Machine Encryption uses is a self-signed certificate that is
stored in a separate store in the VMware Endpoint Certificate Store (VECS) on the vCenter Server
system.
Note Generate a root CA certificate only if you want to replace existing certificates. If you do, other
certificates that are signed by that root CA become invalid. You can generate a new root CA certificate as
part of this workflow.
Procedure
1Log in to the vSphere Web Client, and select a vCenter Server system.
2Click Configure and select Key Management Servers.
3Select the KMS instance with which you want to establish a trusted connection.
4Select Root CA Certificate and click OK.
The Download Root CA Certificate dialog box is populated with the root certificate that
vCenter Server uses for encryption. This certificate is stored in VECS.
5Copy the certificate to the clipboard or download the certificate as a file.
6Follow the instructions from your KMS vendor to upload the certificate to their system.
Note Some KMS vendors, for example SafeNet, require that the KMS vendor restarts the KMS to
pick up the root certificate that you upload.
vSphere Security
VMware, Inc. 158

What to do next
Finalize the certificate exchange. See Complete the Trust Setup.
Use the Certificate Option to Establish a Trusted Connection
Some KMS vendors such as Vormetric require that you upload the vCenter Server certificate to the KMS.
After the upload, the KMS accepts traffic that comes from a system with that certificate.
vCenter Server generates a certificate to protect connections with the KMS. The certificate is stored in a
separate key store in the VMware Endpoint Certificate Store (VECS) on the vCenter Server system.
Procedure
1Log in to the vSphere Web Client, and select a vCenter Server system.
2Click Configure and select Key Management Servers.
3Select the KMS instance with which you want to establish a trusted connection.
4Select Certificate and click OK.
The Download Certificate dialog box is populated with the root certificate that vCenter Server uses for
encryption. This certificate is stored in VECS.
Note Do not generate a new certificate unless you want to replace existing certificates.
5Copy the certificate to the clipboard or download it as a file.
6Follow the instructions from your KMS vendor to upload the certificate to the KMS.
What to do next
Finalize the trust relationship. See Complete the Trust Setup.
Use the New Certificate Signing Request Option to Establish a Trusted
Connection
Some KMS vendors, for example Thales, require that vCenter Server generate a Certificate Signing
Request (CSR) and send that CSR to the KMS. The KMS signs the CSR and returns the signed
certificate. You can upload the signed certificate to vCenter Server.
Using the New Certificate Signing Request option is a two-step process. First you generate the CSR
and send it to the KMS vendor. Then you upload the signed certificate that you receive from the KMS
vendor to vCenter Server.
Procedure
1Log in to the vSphere Web Client, and select a vCenter Server system.
2Click Configure and select Key Management Servers.
3Select the KMS instance with which you want to establish a trusted connection.
4Select New Certificate Signing Request and click OK.
vSphere Security
VMware, Inc. 159
5In the dialog box, copy the full certificate in the text box to the clipboard or download it as a file, and
click OK.
Use the Generate new CSR button in the dialog box only if you explicitly want to generate a CSR.
Using that option makes any signed certificates that are based on the old CSR invalid.
6Follow the instructions from your KMS vendor to submit the CSR.
7When you receive the signed certificate from the KMS vendor, click Key Management Servers
again, and select New Certificate Signing Request again.
8Paste the signed certificate into the bottom text box or click Upload File and upload the file, and click
OK.
What to do next
Finalize the trust relationship. See Complete the Trust Setup.
Use the Upload Certificate and Private Key Option to Establish a Trusted
Connection
Some KMS vendors such as HyTrust require that you upload the KMS server certificate and private key to
the vCenter Server system.
Some KMS vendors generate a certificate and private key for the connection and make them available to
you. After you upload the files, the KMS trusts your vCenter Server instance.
Prerequisites
nRequest a certificate and private key from the KMS vendor. The files are X509 files in PEM format.
Procedure
1Log in to the vSphere Web Client, and select a vCenter Server system.
2Click Configure and select Key Management Servers.
3Select the KMS instance with which you want to establish a trusted connection.
4Select Upload certificate and private key and click OK.
5Paste the certificate that you received from the KMS vendor into the top text box or click Upload File
to upload the certificate file.
6Paste the key file into the bottom text box or click Upload File to upload the key file.
7Click OK.
What to do next
Finalize the trust relationship. See Complete the Trust Setup.
Set the Default KMS Cluster
You must set the default KMS cluster if you do not make the first cluster the default cluster, or if your
environment uses multiple clusters and you remove the default cluster.
vSphere Security
VMware, Inc. 160

Prerequisites
As a best practice, verify that the Connection Status in the Key Management Servers tab shows Normal
and a green check mark.
Procedure
1Log in to the vSphere Web Client and select a vCenter Server system.
2Click the Configure tab and click Key Management Servers under More.
3Select the cluster and click Set KMS cluster as default.
Do not select the server. The menu to set the default is available only for the cluster.
4Click Yes.
The word default appears next to the cluster name.
Complete the Trust Setup
Unless the Add Server dialog box prompted you to trust the KMS, you must explicitly establish trust after
certificate exchange is complete.
You can complete the trust setup, that is, make vCenter Server trust the KMS, either by trusting the KMS
or by uploading a KMS certificate. You have two options:
nTrust the certificate explicitly by using the Refresh KMS certificate option.
nUpload a KMS leaf certificate or the KMS CA certificate to vCenter Server by using the Upload KMS
certificate option.
Note If you upload the root CA certificate or the intermediate CA certificate, vCenter Server trusts all
certificates that are signed by that CA. For strong security, upload a leaf certificate or an intermediate CA
certificate that the KMS vendor controls.
Procedure
1Log in to the vSphere Web Client, and select a vCenter Server system.
2Click Configure and select Key Management Servers.
3Select the KMS instance with which you want to establish a trusted connection.
4To establish the trust relationship, refresh or upload the KMS certificate.
Option Action
Refresh KMS certificate a Click All Actions, and select Refresh KMS certificate.
b In the dialog box that appears, click Trust.
Upload KMS certificate a Click All Actions, and select Upload KMS Certificate.
b In the dialog box that appears, click Upload file, upload a certificate file, and
click OK.
vSphere Security
VMware, Inc. 161
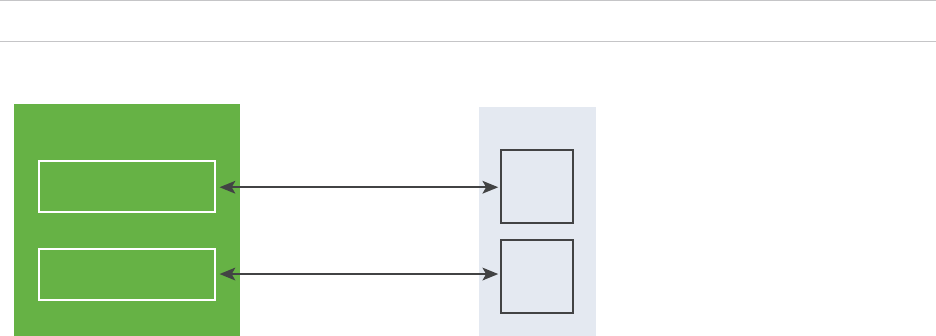
Set up Separate KMS Clusters for Dierent Users
You can set up your environment with different KMS connections for different users of the same KMS
instance. Having multiple KMS connections is helpful, for example, if you want to grant different
departments in your company access to different sets of KMS keys.
Using multiple KMS clusters allows you to use the same KMS to segregate keys. Having separate sets of
keys is essential for use cases like different BUs or different customers.
Note Not all KMS vendors support multiple users.
Figure 7‑1. Connecting from vCenter Server to the KMS for Two Dierent Users
vCenter Server
KMS Cluster C1
KMS Cluster C2
KMS
C1 username/pwd
C2 username/pwd
C1
keys
C2
keys
Prerequisites
Set up the connection with the KMS. See Set up the Key Management Server Cluster.
Procedure
1Create the two users with corresponding user names and passwords, for example C1 and C2, on the
KMS.
2Log in to vCenter Server and create the first KMS cluster.
3When prompted for a user name and password, give information that is unique to the first user.
4Create a second KMS cluster and add the same KMS, but use the second user name and password
(C2).
The two clusters have independent connections to the KMS and use a different set of keys.
Create an Encryption Storage Policy
Before you can create encrypted virtual machines, you must create an encryption storage policy. You
create the storage policy once, and assign it each time you encrypt a virtual machine or virtual disk.
If you want to use virtual machine encryption with other I/O filters, see the vSphere Storage
documentation for details.
vSphere Security
VMware, Inc. 162
Prerequisites
nSet up the connection to the KMS.
Although you can create a VM Encryption storage policy without the KMS connection in place, you
cannot perform encryption tasks until trusted connection with the KMS server is established.
nRequired privileges: Cryptographic operations.Manage encryption policies.
Procedure
1Log in to the vCenter Server by using the vSphere Web Client.
2Select Home, click Policies and Profiles, and click VM Storage Policies.
3Click Create VM Storage Policy.
4Specify the storage policy values.
a Enter a storage policy name and optional description and click Next.
b If you are new to this wizard, review the Policy structure information, and click Next.
c Select the Use common rules in the VM storage policy check box.
d Click Add component and select Encryption > Default Encryption Properties and click Next.
The default properties are appropriate in most cases. You need a custom policy only if you want
to combine encryption with other features such as caching or replication.
e Deselect the Use rule-sets in the storage policy check box and click Next.
f On the Storage compatibility page, leave Compatible selected, choose a datastore, and click
Next.
g Review the information and click Finish.
Enable Host Encryption Mode Explicitly
Host encryption mode must be enabled if you want to perform encryption tasks, such as creating an
encrypted virtual machine, on an ESXi host. In most cases, host encryption mode is enabled
automatically when you perform an encryption task.
In some cases, turning on encryption mode explicitly is necessary. See Prerequisites and Required
Privileges for Encryption Tasks.
Prerequisites
Required privilege: Cryptographic operations.Register host
Procedure
1To enable host encryption mode, follow these steps.
2Connect to vCenter Server by using the vSphere Web Client.
3Select the ESXi host and click Configure.
vSphere Security
VMware, Inc. 163

4Under System, click Security Profile.
5Scroll down to Host Encryption Mode and click Edit.
6Select Enabled and click OK.
Disable Host Encryption Mode
Host encryption mode is enabled automatically when you perform an encryption task. After host
encryption mode is enabled, all core dumps are encrypted to avoid the release of sensitive information to
support personnel. If you no longer use virtual machine encryption with an ESXi host, you can disable
encryption mode.
Procedure
1Unregister all encrypted virtual machines from the host
2Unregister the host from vCenter Server.
3Reboot the host.
4Register the host with vCenter Server again.
As long as you do not add encrypted virtual machines to the host, host encryption mode is disabled.
Create an Encrypted Virtual Machine
After you set up the KMS, you can create encrypted virtual machines.
This task describes how to create an encrypted virtual machine using either the vSphere Web Client or
the vSphere Client (HTML5-based client). The vSphere Client filters storage policies to those that include
virtual machine encryption, easing creation of encrypted virtual machines.
Note Creating an encrypted virtual machine is faster and uses fewer storage resources than encrypting
an existing virtual machine. If possible, encrypt virtual machine during the creation process.
Prerequisites
nEstablish a trusted connection with the KMS and select a default KMS.
nCreate an encryption storage policy, or use the bundled sample, VM Encryption Policy.
nEnsure that the virtual machine is powered off.
nVerify that you have the required privileges:
nCryptographic operations.Encrypt new
nIf the host encryption mode is not Enabled, you also need Cryptographic operations.Register
host.
Procedure
1Connect to vCenter Server by using either the vSphere Client (HTML5-based client) or the
vSphere Web Client.
vSphere Security
VMware, Inc. 164

2Select an object in the inventory that is a valid parent object of a virtual machine, for example, an
ESXi host or a cluster.
3Create the virtual machine.
nvSphere Client: Right-click the object and select New Virtual Machine.
nvSphere Web Client: Right-click the object, select New Virtual Machine > New Virtual Machine.
4Follow the prompts to create an encrypted virtual machine.
Option Action
Select a creation type Create a new virtual machine.
Select a name and folder Specify a unique name and target location for the virtual machine.
Select a compute resource Specify an object for which you have privileges to create encrypted virtual
machines. See Prerequisites and Required Privileges for Encryption Tasks.
Select storage vSphere Client: Select the Encrypt this virtual machine check box. Virtual
machine storage policies are filtered to those that include encryption. Select a VM
storage policy (the bundled sample is VM Encryption Policy), and select a
compatible datastore.
vSphere Web Client: Select a VM storage policy with encryption (the bundled
sample is VM Encryption Policy). Select a compatible datastore.
Select compatibility Select the compatibility. You can migrate an encrypted virtual machine only to
hosts with compatibility ESXi 6.5 and later.
Select a guest OS Select a guest OS that you plan to install on the virtual machine later.
Customize hardware Customize the hardware, for example, by changing disk size or CPU.
vSphere Client: (Optional) Select the VM Options tab, and open Encryption.
Choose which disks to exclude from encryption. When you deselect a disk, only
the VM Home and any other selected disks are encrypted.
Any New Hard disk that you add is encrypted. You can change the storage policy
for individual hard disks later.
Ready to complete Review the information and click Finish.
Clone an Encrypted Virtual Machine
When you clone an encrypted virtual machine, the clone is encrypted with the same keys. To change
keys for the clone, power off the VM and perform a recrypt of the clone using the API. See vSphere Web
Services SDK Programming Guide.
Prerequisites
nEstablish a trusted connection with the KMS and select a default KMS.
nCreate an encryption storage policy, or use the bundled sample, VM Encryption Policy.
nRequired privileges:
nCryptographic operations.Clone
nIf the host encryption mode is not Enabled, you also must have Cryptographic
operations.Register host privileges.
vSphere Security
VMware, Inc. 165

Procedure
1Connect to vCenter Server by using either the vSphere Client (HTML5-based client) or the
vSphere Web Client.
2Select an object in the inventory that is a valid parent object of a virtual machine, for example, an
ESXi host or a cluster.
3To create a clone of an encrypted machine, right-click the virtual machine, and follow the prompts.
Option Action
Select a name and folder Specify a name and target location for the clone.
Select a compute resource Specify an object for which you have privileges to create encrypted virtual
machines. See Prerequisites and Required Privileges for Encryption Tasks.
Select storage Make a selection in the Select virtual disk format menu and select a datastore.
You cannot change the storage policy as part of the clone operation.
Select clone options Select clone options, as discussed in the vSphere Virtual Machine Administration
documentation.
Ready to complete Review the information and click Finish.
4(Optional) Change the keys for the cloned virtual machine.
By default, the cloned virtual machine is created with the same keys as its parent. Best practice is to
change the cloned virtual machine's keys to ensure that multiple virtual machines do not have the
same keys.
a Power off the VM.
b Perform a recrypt of the clone using the API. See vSphere Web Services SDK Programming
Guide.
To use a different DEK and KEK, perform a deep recrypt of the cloned virtual machine. To use a
different KEK, perform a shallow recrypt of the cloned virtual machine. You can perform a shallow
recrypt operation while the VM is powered on, unless the VM has snapshots present.
Encrypt an Existing Virtual Machine or Virtual Disk
You can encrypt an existing virtual machine or virtual disk by changing its storage policy. You can encrypt
virtual disks only for encrypted virtual machines.
This task describes how to encrypt an existing virtual machine or virtual disk using either the
vSphere Client (HTML5-based client) or the vSphere Web Client.
Prerequisites
nEstablish a trusted connection with the KMS and select a default KMS.
nCreate an encryption storage policy, or use the bundled sample, VM Encryption Policy.
nEnsure that the virtual machine is powered off.
vSphere Security
VMware, Inc. 166
nVerify that you have the required privileges:
nCryptographic operations.Encrypt new
nIf the host encryption mode is not Enabled, you also need Cryptographic operations.Register
host.
Procedure
1Connect to vCenter Server by using either the vSphere Client (HTML5-based client) or the
vSphere Web Client.
2Right-click the virtual machine that you want to change and select VM Policies > Edit VM Storage
Policies.
You can set the storage policy for the virtual machine files, represented by VM home, and the storage
policy for virtual disks.
3Select the storage policy.
nvSphere Client (HTML5-based client):
nTo encrypt the VM and its hard disks, select an encryption storage policy and click OK.
nTo encrypt the VM but not the virtual disks, toggle on Configure per disk, select the
encryption storage policy for VM Home and other storage policies for the virtual disks, and
click OK.
nvSphere Web Client:
nTo encrypt the VM and its hard disks, select an encryption storage policy and click Apply to
all.
nTo encrypt the VM but not the virtual disks, select the encryption storage policy for VM Home
and other storage policies for the virtual disks, and click Apply.
You cannot encrypt the virtual disk of an unencrypted VM.
4If you prefer, you can encrypt the virtual machine, or both virtual machine and disks, from the Edit
Settings menu in the vSphere Client.
a Right-click the virtual machine and select Edit Settings.
b Select the VM Options tab, and open Encryption. Choose an encryption policy. If you deselect
all disks, only the VM home is encrypted.
c Click OK.
Decrypt an Encrypted Virtual Machine or Virtual Disk
You can decrypt a virtual machine, its disks, or both, by changing the storage policy.
This task describes how to decrypt an encrypted virtual machine using either the vSphere Client (HTML5-
based client) or the vSphere Web Client.
vSphere Security
VMware, Inc. 167
All encrypted virtual machines require encrypted vMotion. During virtual machine decryption, the
Encrypted vMotion setting remains. To change this setting so that Encrypted vMotion is no longer used,
change the setting explicitly.
This task explains how to perform decryption using storage policies. For virtual disks, you can also
perform decryption using the Edit Settings menu.
Prerequisites
nThe virtual machine must be encrypted.
nThe virtual machine must be powered off or in maintenance mode.
nRequired privileges: Cryptographic operations.Decrypt
Procedure
1Connect to vCenter Server by using either the vSphere Client (HTML5-based client) or the
vSphere Web Client.
2Right-click the virtual machine that you want to change and select VM Policies > Edit VM Storage
Policies.
You can set the storage policy for the virtual machine files, represented by VM home, and the storage
policy for virtual disks.
3Select a storage policy.
nvSphere Client (HTML5-based client):
nTo decrypt the VM and its hard disks, toggle off Configure per disk, select a storage policy
from the drop-down menu, and click OK.
nTo decrypt a virtual disk but not the virtual machine, toggle on Configure per disk, select the
encryption storage policy for VM Home and other storage policies for the virtual disks, and
click OK.
nvSphere Web Client:
nTo decrypt the virtual machine and its hard disks, select a storage policy from the drop-down
menu, click Apply to all, and click OK.
nTo decrypt a virtual disk but not the virtual machine, select a storage policy for the virtual disk
from the drop-down menu in the table. Do not change the policy for VM Home. Click OK.
You cannot decrypt the virtual machine and leave the disk encrypted.
4If you prefer, you can use the vSphere Client (HTML5-based client) to decrypt the virtual machine and
disks from the Edit Settings menu.
a Right-click the virtual machine and select Edit Settings.
b Select the VM Options tab and expand Encryption.
c To decrypt the VM and its hard disks, choose None from the Encrypt VM drop-down menu.
vSphere Security
VMware, Inc. 168

d To decrypt a virtual disk but not the virtual machine, deselect the disk.
e Click OK.
5(Optional) You can change the Encrypted vMotion setting.
a Right-click the virtual machine and click Edit Settings.
b Click VM Options, and open Encryption.
c Set the Encrypted vMotion value.
Change the Encryption Policy for Virtual Disks
When you create an encrypted virtual machine from the vSphere Web Client, any virtual disks that you
add during virtual machine creation are encrypted. You can decrypt virtual disks that are encrypted by
using the Edit VM Storage Policies option.
Note An encrypted virtual machine can have virtual disks that are not encrypted. However, an
unencrypted virtual machine cannot have encrypted virtual disks.
See Virtual Disk Encryption.
This task describes how to change the encryption policy using storage policies. You can use either the
vSphere Client (HTML5-based client) or the vSphere Web Client. You can also use the Edit Settings
menu to make this change.
Prerequisites
nYou must have the Cryptographic operations.Manage encryption policies privilege.
nEnsure that the virtual machine is powered off.
Procedure
1Connect to vCenter Server by using either the vSphere Client (HTML5-based client) or the
vSphere Web Client.
2Right-click the virtual machine and select VM Policies > Edit VM Storage Policies .
3Change the storage policy.
nvSphere Client (HTML5-based client):
nTo change the storage police for the VM and its hard disks, select an encryption storage
policy and click OK.
nTo encrypt the VM but not the virtual disks, toggle on Configure per disk, select the
encryption storage policy for VM Home and other storage policies for the virtual disks, and
click OK.
nvSphere Web Client:
nTo change the storage policy for the VM and its hard disks, select an encryption storage
policy and click Apply to all.
vSphere Security
VMware, Inc. 169

nTo encrypt the VM but not the virtual disks, select the encryption storage policy for VM Home
and other storage policies for the virtual disks, and click Apply.
You cannot encrypt the virtual disk of an unencrypted VM.
4If you prefer, you can change the storage policy from the Edit Settings menu.
a Right-click the virtual machine and select Edit Settings.
b Select the Virtual Hardware tab, expand a hard disk, and choose an encryption policy from the
drop-down menu.
c Click OK.
Resolve Missing Key Issues
Under certain circumstances, the ESXi host cannot get the key (KEK) for an encrypted virtual machine or
an encrypted virtual disk from vCenter Server. In that case, you can still unregister or reload the virtual
machine. However, you cannot perform other virtual machine operations such as powering on the virtual
machine or deleting the virtual machine. A vCenter Server alarm notifies you when an encrypted virtual
machine is in a locked state. You can unlock a locked encrypted virtual machine by using the
vSphere Client after taking the necessary steps to make the required keys available on the KMS.
If the virtual machine key is not available, the state of the virtual machine in the vSphere Web Client
displays as invalid. The virtual machine cannot power on. If the virtual machine key is available, but a key
for an encrypted disk is not available, the virtual machine state does not display as invalid. However, the
virtual machine cannot power on and the following error results:
The disk [/path/to/the/disk.vmdk] is encrypted and a required key was not found.
Note The following procedure illustrates the situations that can cause a virtual machine to become
locked, the corresponding alarms and event logs that appear, and what to do in each case.
Procedure
1If the problem is the connection between the vCenter Server system and the KMS, a virtual machine
alarm is generated and the following message appears in the event log:
Virtual machine is locked because of a KMS cluster error.
You must manually check the keys in the KMS cluster, and restore the connection to the KMS cluster.
When the KMS and keys become available, unlock the locked virtual machines. See Unlock Locked
Virtual Machines. You can also reboot the host and re-register the virtual machine to unlock it after
restoring the connection.
Losing the connection to the KMS does not automatically lock the virtual machine. The virtual
machine only enters a locked state if the following conditions are met:
nThe key is not available on the ESXi host.
nvCenter Server cannot retrieve keys from the KMS.
vSphere Security
VMware, Inc. 170
After each reboot, an ESXi host must be able to reach vCenter Server. vCenter Server requests the
key with the corresponding ID from the KMS and makes it available to ESXi.
If, after restoring connection to the KMS cluster, the virtual machine remains locked, see Unlock
Locked Virtual Machines.
2If the connection is restored, register the virtual machine. If an error results when you attempt to
register the virtual machine, verify that you have the Cryptographic operations.RegisterVM
privilege for the vCenter Server system.
This privilege is not required for powering on an encrypted virtual machine if the key is available. This
privilege is required for registering the virtual machine if the key has to be retrieved.
3If the key is no longer available on the KMS, a virtual machine alarm is generated and the following
message appears in the event log:
Virtual machine is locked because keys are missing on KMS cluster.
Ask the KMS administrator to restore the key. You might encounter an inactive key if you are
powering on a virtual machine that had been removed from the inventory and that had not been
registered for a long time. It also happens if you reboot the ESXi host, and the KMS is not available.
a Retrieve the key ID by using the Managed Object Browser (MOB) or the vSphere API.
Retrieve the keyId from VirtualMachine.config.keyId.keyId.
b Ask the KMS administrator to reactivate the key that is associated with that key ID.
c After restoring the key, see Unlock Locked Virtual Machines.
If the key can be restored on the KMS, vCenter Server retrieves it and pushes it to the ESXi host the
next time it is needed.
4If the KMS is accessible and the ESXi host is powered on, but the vCenter Server system is
unavailable, follow these steps to unlock virtual machines.
a Restore the vCenter Server system, or set up a different vCenter Server system, then establish
trust with the KMS.
You must use the same KMS cluster name, but the KMS IP address can be different.
b Reregister all virtual machines that are locked.
The new vCenter Server instance retrieves the keys from the KMS and the virtual machines are
unlocked.
5If the keys are missing only on the ESXi host, a virtual machine alarm is generated and the following
message appears in the event log:
Virtual machine is locked because keys are missing on host.
The vCenter Server system can retrieve the missing keys from the KMS cluster. No manual recovery
of keys is required. See Unlock Locked Virtual Machines.
vSphere Security
VMware, Inc. 171
Unlock Locked Virtual Machines
A vCenter Server alarm notifies you when an encrypted virtual machine is in a locked state. You can
unlock a locked encrypted virtual machine by using the vSphere Client (HTML5-based client) after taking
the necessary steps to make the required keys available on the KMS.
Prerequisites
nVerify that you have the required privileges: Cryptographic operations.RegisterVM
nOther privileges might be required for optional tasks such as enabling host encryption.
nBefore unlocking a locked virtual machine, troubleshoot the cause of the lock and attempt to fix the
problem manually. See Resolve Missing Key Issues.
Procedure
1Connect to vCenter Server by using the vSphere Client.
2Navigate to the virtual machine's Summary tab.
When a virtual machine is locked, the Virtual Machine Locked alarm appears.
3Decide if you want to either acknowledge the alarm, or reset the alarm to green but not unlock the
virtual machine now.
When you click either Acknowledge or Reset to green, the alarm goes away, but the virtual machine
remains locked until you unlock it.
4Navigate to the virtual machine's Monitor tab and click Events to get more information about why the
virtual machine is locked.
5Perform suggested troubleshooting before you unlock the virtual machine.
6Navigate to the virtual machine's Summary tab and click Unlock VM, located underneath the virtual
machine console.
A message appears, warning that encryption key data is transmitted to the host.
7Click Yes.
Resolve ESXi Host Encryption Mode Issues
Under certain circumstances, the ESXi host's encryption mode can become disabled.
An ESXi host requires that host encryption mode is enabled if it contains any encrypted virtual machines.
If the host detects it is missing its host key, or if the KMS cluster is unavailable, the host might fail to
enable the encryption mode. vCenter Server generates an alarm when the host encryption mode cannot
be enabled.
vSphere Security
VMware, Inc. 172
Procedure
1If the problem is the connection between the vCenter Server system and the KMS cluster, an alarm is
generated and the following message appears in the event log:
Host requires encryption mode enabled and the KMS cluster is not available.
You must manually check for the keys in the KMS cluster, and restore the connection to the KMS
cluster.
2If keys are missing, an alarm is generated and the following message appears in the event log:
Host requires encryption mode enabled and the key is not available on the KMS
cluster.
You must manually recover the missing keys to the KMS cluster.
What to do next
If, after restoring connection to the KMS cluster, or manually recovering keys to the KMS cluster, the
host's encryption mode remains disabled, re-enable the host encryption mode. See Re-Enable ESXi Host
Encryption Mode.
Re-Enable ESXi Host Encryption Mode
Starting with vSphere 6.7, a vCenter Server alarm notifies you when an ESXi host's encryption mode has
become disabled. In vSphere 6.7, you can re-enable the host encryption mode.
Prerequisites
nVerify that you have the required privileges: Cryptographic operations.Register host
nBefore re-enabling encryption mode, troubleshoot the cause and attempt to fix the problem manually.
Procedure
1Connect to vCenter Server by using the vSphere Client.
2Navigate to the ESXi host's Summary tab.
When the encryption mode is disabled, the Host Requires Encryption Mode Enabled alarm appears.
3Decide if you want to either acknowledge the alarm, or reset the alarm to green but not re-enable the
host encryption mode now.
When you click either Acknowledge or Reset to green, the alarm goes way, but the host's
encryption mode remains disabled until you re-enable it.
4Navigate to the ESXi host's Monitor tab and click Events to get more information on why encryption
mode is disabled.
Perform suggested troubleshooting before you re-enable the encryption mode.
5On the Summary tab, click Enable Host Encryption Mode to re-enable host encryption.
A message appears, warning that encryption key data is transmitted to the host.
vSphere Security
VMware, Inc. 173

6Click Yes.
Set Key Management Server Certificate Expiration
Threshold
By default, vCenter Server notifies you 30 days before your Key Management Server (KMS) certificates
expire. You can change this default value.
KMS certificates have an expiration date. When the threshold for the expiration date is reached, an alarm
notifies you.
vCenter Server and KMS clusters exchange two types of certificates: server and client. The VMware
Endpoint Certificate Store (VECS) on the vCenter Server system stores the server certificates and one
client certificate per KMS cluster. Because there are two certificate types, there are two alarms for each
certificate type (one for client, one for server).
Procedure
1Log in to the vSphere Web Client, and select a vCenter Server system.
2Click the Configure tab.
3Under Settings, click Advanced System Settings, and click Edit.
4Either filter for, or scroll to the vpxd.kmscert.threshold configuration parameter.
5Enter your value in days and click OK.
vSphere Virtual Machine Encryption and Core Dumps
If your environment uses vSphere Virtual Machine Encryption, and if an error occurs on the ESXi host, the
resulting core dump is encrypted to protect customer data. Core dumps that are included in the vm-
support package are also encrypted.
Note Core dumps can contain sensitive information. Follow your organization's data security and privacy
policy when handling core dumps.
Core Dumps on ESXi Hosts
When an ESXi host, a user world, or a virtual machine crashes, a core dump is generated, and the host
reboots. If the ESXi host has encryption mode enabled, the core dump is encrypted using a key that is in
the ESXi key cache. This key comes from the KMS. See How vSphere Virtual Machine Encryption
Protects Your Environment for background information.
The following table shows encryption keys used for each core dump type, by vSphere release.
vSphere Security
VMware, Inc. 174

Table 7‑1. Core Dump Encryption Keys
Core Dump Type Encryption Key (ESXi 6.5) Encryption Key (ESXi 6.7 and Later)
ESXi Kernel Host Key Host Key
User World (hostd) Host Key Host Key
Encrypted Virtual Machine (VM) Host Key Virtual Machine Key
What you can do after an ESXi host reboot depends on several factors.
nIn most cases, vCenter Server retrieves the key for the host from the KMS and attempts to push the
key to the ESXi host after reboot. If the operation is successful, you can generate the vm-support
package and you can decrypt or re-encrypt the core dump. See Decrypt or Re-Encrypt an Encrypted
Core Dump.
nIf vCenter Server cannot connect to the ESXi host, you might be able to retrieve the key from the
KMS. See Resolve Missing Key Issues.
nIf the host used a custom key, and that key differs from the key that vCenter Server pushes to the
host, you cannot manipulate the core dump. Avoid using custom keys.
Core Dumps and vm-support Packages
When you contact VMware Technical Support because of a serious error, your support representative
usually asks you to generate a vm-support package. The package includes log files and other
information, including core dumps. If your support representatives cannot resolve the issues by looking at
log files and other information, they might ask you to decrypt the core dumps and make relevant
information available. To protect sensitive information such as keys, follow your organization's security
and privacy policy. See Collect a vm-support Package for an ESXi Host That Uses Encryption.
Core Dumps on vCenter Server Systems
A core dump on a vCenter Server system is not encrypted. vCenter Server already contains potentially
sensitive information. At the minimum, ensure that the Windows system on which vCenter Server runs or
the vCenter Server Appliance is protected. See Chapter 4 Securing vCenter Server Systems. You might
also consider turning off core dumps for the vCenter Server system. Other information in log files can help
determine the problem.
Collect a vm-support Package for an ESXi Host That Uses
Encryption
If host encryption mode is enabled for the ESXi, any core dumps in the vm-support package are
encrypted. You can collect the package from the vSphere Web Client, and you can specify a password if
you expect to decrypt the core dump later.
The vm-support package includes log files, core dump files, and more.
vSphere Security
VMware, Inc. 175

Prerequisites
Inform your support representative that host encryption mode is enabled for the ESXi host. Your support
representative might ask you to decrypt core dumps and extract relevant information.
Note Core dumps can contain sensitive information. Follow your organization's security and privacy
policy to protect sensitive information such as host keys.
Procedure
1Log in to the vCenter Server system with the vSphere Web Client.
2Click Hosts and Clusters, and right-click the ESXi host.
3Select Export System Logs.
4In the dialog box, select Password for encrypted core dumps, and specify and confirm a password.
5Leave the defaults for other options or make changes if requested by VMware Technical Support, and
click Finish.
6Specify a location for the file.
7If your support representative asked you to decrypt the core dump in the vm-support package, log in
to any ESXi host and follow these steps.
a Log in to the ESXi and connect to the directory where the vm-support package is located.
The filename follows the pattern esx.date_and_time.tgz.
b Make sure that the directory has enough space for the package, the uncompressed package, and
the recompressed package, or move the package.
c Extract the package to the local directory.
vm-support -x *.tgz .
The resulting file hierarchy might contain core dump files for the ESXi host, usually in /var/core,
and might contain multiple core dump files for virtual machines.
d Decrypt each encrypted core dump file separately.
crypto-util envelope extract --offset 4096 --keyfile vm-support-incident-key-file
--password encryptedZdump decryptedZdump
vm-support-incident-key-file is the incident key file that you find at the top level in the directory.
encryptedZdump is the name of the encrypted core dump file.
decryptedZdump is the name for the file that the command generates. Make the name similar to
the encryptedZdump name.
vSphere Security
VMware, Inc. 176

e Provide the password that you specified when you created the vm-support package.
f Remove the encrypted core dumps, and compress the package again.
vm-support --reconstruct
8Remove any files that contain confidential information.
Exporting Host Support Bundles With Passwords
(http://link.brightcove.com/services/player/bcpid2296383276001?
bctid=ref:video_export_host_support_bundles_passwords)
Decrypt or Re-Encrypt an Encrypted Core Dump
You can decrypt or re-encrypt an encrypted core dump on your ESXi host by using the crypto-util CLI.
You can decrypt and examine the core dumps in the vm-support package yourself. Core dumps might
contain sensitive information. Follow your organization's security and privacy policy to protect sensitive
information such as keys.
For details about re-encrypting a core dump and other features of crypto-util, see the command-line
help.
Note crypto-util is for advanced users.
Prerequisites
The key that was used to encrypt the core dump must be available on the ESXi host that generated the
core dump.
Procedure
1Log directly in to the ESXi host on which the core dump happened.
If the ESXi host is in lockdown mode, or if SSH access is disabled, you might have to enable access
first.
2Determine whether the core dump is encrypted.
Option Description
Monitor core dump crypto-util envelope describe vmmcores.ve
zdump file crypto-util envelope describe
--offset 4096 zdumpFile
vSphere Security
VMware, Inc. 177

3Decrypt the core dump, depending on its type.
Option Description
Monitor core dump crypto-util envelope extract vmmcores.ve vmmcores
zdump file crypto-util envelope extract --offset 4096 zdumpEncrypted
zdumpUnencrypted
vSphere Security
VMware, Inc. 178

Securing Virtual Machines with
Virtual Trusted Platform Module 8
The Virtual Trusted Platform Module (vTPM) feature lets you add a TPM 2.0 virtual cryptoprocessor to a
virtual machine.
Virtual Trusted Platform Module Overview
vTPMs perform cryptographic coprocessor capabilities in software. When added to a virtual machine, a
vTPM enables the guest operating system to create and store keys that are private. These keys are not
exposed to the guest operating system itself. Therefore, the virtual machine attack surface is reduced.
Usually, compromising the guest operating system compromises its secrets, but enabling a vTPM greatly
reduces this risk. These keys can be used only by the guest operating system for encryption or signing.
With an attached vTPM, a third party can remotely attest to (validate) the identity of the firmware and the
guest operating system.
You can add a vTPM to either a new virtual machine or an existing virtual machine. A vTPM depends on
virtual machine encryption to secure vital TPM data. When you configure a vTPM, VM encryption
automatically encrypts the virtual machine files but not the disks. You can choose to add encryption
explicitly for the virtual machine and its disks.
You can also back up a virtual machine enabled with a vTPM. The backup must include all virtual
machine data, including the *.nvram file. If your backup does not include the *.nvram file, you cannot
restore a virtual machine with a vTPM. Also, because the VM home files of a vTPM-enabled virtual
machine are encrypted, ensure that the encryption keys are available at the time of a restore.
A vTPM does not require a physical Trusted Platform Module (TPM) 2.0 chip to be present on the ESXi
host. However, if you want to perform host attestation, an external entity, such as a TPM 2.0 physical
chip, is required. See Securing ESXi Hosts with Trusted Platform Module.
Note By default, no storage policy is associated with a virtual machine that has been enabled with a
vTPM. Only the virtual machine files (VM Home) are encrypted. If you prefer, you can choose to add
encryption explicitly for the virtual machine and its disks, but the virtual machine files would have already
been encrypted.
VMware, Inc. 179
Requirements for vTPM
To use a vTPM, your vSphere environment must meet these requirements:
nVirtual machine requirements:
nEFI firmware
nHardware version 14
nComponent requirements:
nvCenter Server 6.7.
nVirtual machine encryption (to encrypt the virtual machine home files).
nKey Management Server (KMS) configured for vCenter Server (virtual machine encryption
depends on KMS). See Set up the Key Management Server Cluster.
nGuest OS support:
nWindows Server 2016 (64 bit)
nWindows 10 (64 bit)
Dierences Between a Hardware TPM and a Virtual TPM
You use a hardware Trusted Platform Module (TPM) as a cryptographic coprocessor to provide secure
storage of credentials or keys. A vTPM performs the same functions as a TPM, but it performs
cryptographic coprocessor capabilities in software. A vTPM uses the .nvram file, which is encrypted
using virtual machine encryption, as its secure storage.
A hardware TPM includes a preloaded key called the Endorsement Key (EK). The EK has a private and
public key. The EK provides the TPM with a unique identity. For a vTPM, this key is provided either by the
VMware Certificate Authority (VMCA) or by a third-party Certificate Authority (CA). Once the vTPM uses a
key, it is typically not changed because doing so invalidates sensitive information stored in the vTPM. The
vTPM does not contact the CA at any time.
This chapter includes the following topics:
nAdd a Virtual Trusted Platform Module to a Virtual Machine
nEnable Virtual Trusted Platform Module for an Existing Virtual Machine
nRemove Virtual Trusted Platform Module from a Virtual Machine
nIdentify Virtual Trusted Platform Enabled Virtual Machines
nView vTPM Module Device Certificates
nExport and Replace vTPM Module Device Certificates
vSphere Security
VMware, Inc. 180

Add a Virtual Trusted Platform Module to a Virtual
Machine
You can add a Virtual Trusted Platform Module (vTPM) to a virtual machine to provide enhanced security
to the guest operating system. You must set up the KMS before you can add a vTPM.
You can enable a vTPM for virtual machines running on vSphere 6.7 and later. The VMware virtual TPM
is compatible with TPM 2.0 and creates a TPM-enabled virtual chip for use by the virtual machine and the
guest OS it hosts.
Prerequisites
nEnsure your vSphere environment is configured for virtual machine encryption. See Set up the Key
Management Server Cluster.
nThe guest OS you use must be either Windows Server 2016 (64 bit) or Windows 10 (64 bit).
nThe ESXi hosts running in your environment must be ESXi 6.7 or later.
nThe virtual machine must use EFI firmware.
Procedure
1Connect to vCenter Server by using the vSphere Client.
2Select an object in the inventory that is a valid parent object of a virtual machine, for example, an
ESXi host or a cluster.
3Right-click the object, select New Virtual Machine, and follow the prompts to create a virtual
machine.
Option Action
Select a creation type Create a new virtual machine.
Select a name and folder Specify a name and target location.
Select a compute resource Specify an object for which you have privileges to create a virtual machine. See
Prerequisites and Required Privileges for Encryption Tasks.
Select storage Select a compatible datastore.
Select compatibility Select ESXi 6.7 and later.
Select a guest OS Select Windows Server 2016 (64 bit) or Windows 10 (64 bit) for use as the guest
OS.
Customize hardware Click Add New Device and select Trusted Platform Module.
You can further customize the hardware, for example, by changing disk size or
CPU.
Ready to complete Review the information and click Finish.
The vTPM-enabled virtual machine appears in your inventory as specified.
vSphere Security
VMware, Inc. 181
Enable Virtual Trusted Platform Module for an Existing
Virtual Machine
You can add a Virtual Trusted Platform Module (vTPM) to an existing virtual machine to provide enhanced
security to the guest operating system. You must set up the KMS before you can add a vTPM.
You can enable a vTPM for virtual machines running on vSphere 6.7 and later. The VMware virtual TPM
is compatible with TPM 2.0, and creates a TPM-enabled virtual chip for use by the virtual machine and
the guest OS it hosts.
Prerequisites
nEnsure your vSphere environment is configured for virtual machine encryption. See Set up the Key
Management Server Cluster.
nThe guest OS you use must be either Windows Server 2016 (64 bit) or Windows 10 (64 bit).
nVerify that the virtual machine is turned off.
nThe ESXi hosts running in your environment must be ESXi 6.7 or later.
nThe virtual machine must use EFI firmware.
Procedure
1Connect to vCenter Server by using the vSphere Client.
2Right-click the virtual machine in the inventory that you want to modify and select Edit Settings.
3In the Edit Settings dialog box, click Add New Device and select Trusted Platform Module.
4Click OK.
The virtual machine Summary tab now includes Virtual Trusted Platform Module in the VM Hardware
pane.
Remove Virtual Trusted Platform Module from a Virtual
Machine
You can remove Virtual Trusted Platform Module (vTPM) security from a virtual machine.
Removing vTPM causes all encrypted information on the virtual machine to become unrecoverable. In
addition, removing a vTPM initiates an immediate reboot of the virtual machine. Before removing a vTPM
from a virtual machine, disable any applications in the Guest OS, such as BitLocker, that use vTPM.
Failure to do so can cause the virtual machine to not boot.
Procedure
1Connect to vCenter Server by using the vSphere Client.
2Right-click the virtual machine in the inventory that you want to modify and select Edit Settings.
vSphere Security
VMware, Inc. 182
3In the Edit Settings dialog box, locate the Trusted Platform Module entry in the Virtual Hardware
tab.
4Move your cursor over the device and click the Remove icon.
This icon appears only for virtual hardware that you can safely remove.
5Click Delete to confirm you want to remove the device.
The vTPM device is marked for removal.
6Click OK.
Verify that the Virtual Trusted Platform Module entry no longer appears in the virtual machine
Summary tab in the VM Hardware pane.
Identify Virtual Trusted Platform Enabled Virtual Machines
You can identify which of your virtual machines are enabled to use a Virtual Trusted Platform Module
(vTPM).
You can generate a list of all virtual machines in your inventory showing virtual machine name, operating
system, and vTPM status. You can also export this list to a CVS file for use in compliance audits.
Procedure
1Connect to vCenter Server by using the vSphere Client.
2Select a vCenter Server instance, a host, or a cluster.
3Click the VMs tab and click Virtual Machines.
4Click the menu bar for any virtual machine column, select Show/Hide Columns, and select TPM.
The TPM column displays present for all virtual machines on which TPM is enabled. Virtual machines
without a TPM are listed as not present.
5You can export the contents of an inventory list view to a CSV file.
a Click Export at the bottom right corner of a list view.
The Export List Contents dialog box opens and lists the available options for inclusion in the CSV
file.
b Select whether you want all rows or your current selection of rows to be listed in the CSV file.
c From the available options, select the columns you want listed in the CSV file.
d Click Export.
The CSV file is generated and available for download.
View vTPM Module Device Certificates
Virtual Trusted Platform Module (vTPM) devices come pre-configured with default certificates, which you
can review.
vSphere Security
VMware, Inc. 183
Prerequisites
You must have a vTPM-enabled virtual machine in your environment.
Procedure
1Connect to vCenter Server by using the vSphere Client.
2Select an object in the inventory that is a valid parent object of a virtual machine, for example, an
ESXi host or a cluster.
3Select the vTPM-enabled virtual machine whose certificate information you want to view.
4Click the Configure tab.
5Under TPM, select Certificates.
6Select the certificate to view its information.
7(Optional) To export the certificate information, click Export.
The certificate is saved to disk.
What to do next
You can replace the default certificate with a certificate issued by a third-party certificate authority (CA).
See Export and Replace vTPM Module Device Certificates.
Export and Replace vTPM Module Device Certificates
You can replace the default certificate that comes with a Virtual Trusted Platform Module (vTPM) device.
Prerequisites
You must have a vTPM-enabled virtual machine in your environment.
Procedure
1Connect to vCenter Server by using the vSphere Client.
2Select an object in the inventory that is a valid parent object of a virtual machine, for example, an
ESXi host or a cluster.
3Select the vTPM-enabled virtual machine in the inventory whose certificate information you want to
replace.
4Click the Configure tab.
5Under TPM select Signing Requests.
6Select a certificate.
7To export the certificate information, click Export.
The certificate is saved to disk.
vSphere Security
VMware, Inc. 184
8Get a certificate issued by a third-party certificate authority (CA) against the certificate signing request
(CSR) you exported.
You can use any test CA that you might have in your IT environment.
9When you have the new certificate, replace the existing certificate.
a Right-click the virtual machine in the inventory whose certificate you want to replace and select
Edit Settings.
b In the Edit Settings dialog box, expand Trusted Platform Module.
The certificates appear.
c Click Replace for the certificate you want to replace.
The File Upload dialog box appears.
d On your local machine, locate the new certificate and upload it.
The new certificate replaces the default certificate that came with your vTPM device.
e The certificate name is updated in the virtual machine Summary tab under the Virtual Trusted
Platform Module list.
vSphere Security
VMware, Inc. 185
Securing Windows Guest
Operating Systems with
Virtualization-based Security 9
Starting with vSphere 6.7, you can enable Microsoft virtualization-based security (VBS) on supported
Windows guest operating systems.
About Virtualization-based Security
Microsoft VBS, a feature of Windows 10 and Windows Server 2016 operating systems, uses hardware
and software virtualization to enhance system security by creating an isolated, hypervisor-restricted,
specialized subsystem.
VBS permits you to use the following Windows security features to harden your system and isolate key
system and user secrets from being compromised:
nCredential Guard: Aims to isolate and harden key system and user secrets against compromise.
nDevice Guard: Provides a set of features designed to work together to prevent and eliminate malware
from running on a Windows system.
nConfigurable Code Integrity: Ensures that only trusted code runs from the boot loader onwards.
See the topic on virtualization-based security in the Microsoft documentation for more information.
After you enable VBS for a virtual machine through vCenter Server, you enable VBS within the Windows
guest operating system.
This chapter includes the following topics:
nVirtualization-based Security Best Practices
nEnable Virtualization-based Security on a Virtual Machine
nEnable Virtualization-based Security on an Existing Virtual Machine
nEnable Virtualization-based Security on the Guest Operating System
nDisable Virtualization-based Security
nIdentify VBS-Enabled Virtual Machines
Virtualization-based Security Best Practices
Follow best practices for virtualization-based security (VBS) to maximize security and manageability of
your Windows guest operating system environment.
VMware, Inc. 186
Avoid problems by following these best practices.
VBS Hardware
Use the following Intel hardware for VBS:
nHaswell CPU or later. For best performance, use the Skylake-EP CPU or later.
nThe Ivybridge CPU is acceptable.
nThe Sandybridge CPU might cause some slow performance.
Not all VBS functionality is available on AMD CPUs. For more information, see the VMware KB article
https://kb.vmware.com/s/article/53003.
Windows Guest OS Compatibility
In vSphere 6.7, VBS is supported for Windows 10 and Server 2016 virtual machines, although versions
1607 and 1703 require patches. Check Microsoft documentation for ESXi host hardware compatibility.
VBS in Windows guest OSs RS1, RS2, and RS3 requires HyperV to be enabled in the guest OS. See
VMware vSphere Release Notes for more information.
Unsupported VMware Features on VBS
The following features are not supported in a virtual machine when VBS is enabled:
nFault tolerance
nPCI passthrough
nHot add of CPU or memory
Installation and Upgrade Caveats with VBS
Before you configure VBS, understand the following installation and upgrade caveats:
nNew virtual machines configured for Windows 10 and Windows Server 2016 on hardware versions
less than version 14 are created using Legacy BIOS by default. You must reinstall the guest operating
system after changing the virtual machine's firmware type from Legacy BIOS to UEFI.
nIf you plan to migrate your virtual machines from previous vSphere releases to vSphere 6.7 or
greater, and enable VBS on your virtual machines, use UEFI to avoid having to reinstall the operating
system.
Enable Virtualization-based Security on a Virtual Machine
You can enable Microsoft virtualization-based security (VBS) for supported Windows guest operating
systems at the same time you create a virtual machine.
Enabling VBS is a process that involves first enabling VBS in the virtual machine then enabling VBS in
the Windows guest OS.
vSphere Security
VMware, Inc. 187

Prerequisites
Intel hosts are recommended. See Virtualization-based Security Best Practices for acceptable CPUs.
Create a virtual machine that uses hardware version 14 or later and one of the following supported guest
operating systems:
nWindows 10 (64 bit)
nWindows Server 2016 (64 bit)
Procedure
1Connect to vCenter Server by using the vSphere Client.
2Select an object in the inventory that is a valid parent object of a virtual machine, for example, an
ESXi host or a cluster.
3Right-click the object, select New Virtual Machine, and follow the prompts to create a virtual
machine.
Option Action
Select a creation type Create a virtual machine.
Select a name and folder Specify a name and target location.
Select a compute resource Specify an object for which you have privileges to create virtual machines.
Select storage In the VM storage policy, select the storage policy. Select a compatible datastore.
Select compatibility Ensure that ESXi 6.7 and later is selected.
Select a guest OS Select either Windows 10 (64-bit) or Windows Server 2016 (64 bit). Select the
Enable Windows Virtualization Based Security check box.
Customize hardware Customize the hardware, for example, by changing disk size or CPU.
Ready to complete Review the information and click Finish.
Once the virtual machine is created, confirm that its Summary tab displays "VBS true" in the Guest OS
description.
What to do next
See Enable Virtualization-based Security on the Guest Operating System.
Enable Virtualization-based Security on an Existing
Virtual Machine
You can enable Microsoft virtualization-based security (VBS) on existing virtual machines for supported
Windows guest operating systems.
vSphere Security
VMware, Inc. 188

Enabling VBS is a process that involves first enabling VBS in the virtual machine then enabling VBS in
the guest OS.
Note New virtual machines configured for Windows 10 and Windows Server 2016 on hardware versions
less than version 14 are created using Legacy BIOS by default. If you change the virtual machine's
firmware type from Legacy BIOS to UEFI, you must reinstall the guest operating system.
Prerequisites
Intel hosts are recommended. See Virtualization-based Security Best Practices for acceptable CPUs.
The virtual machine must have been created using hardware version 14 or later, UEFI firmware, and one
of the following supported guest operating systems:
nWindows 10 (64 bit)
nWindows Server 2016 (64 bit)
Procedure
1In the vSphere Client, browse to the virtual machine.
2Right-click the virtual machine and select Edit Settings.
3Click the VM Options tab.
4Check the Enable check box for Virtualization Based Security.
5Click OK.
Confirm that the virtual machine's Summary tab displays "VBS true" in the Guest OS description.
What to do next
See Enable Virtualization-based Security on the Guest Operating System.
Enable Virtualization-based Security on the Guest
Operating System
You can enable Microsoft virtualization-based security (VBS) for supported Windows guest operating
systems.
You enable VBS from within the Windows Guest OS. Windows configures and enforces VBS through a
Group Policy Object (GPO). The GPO gives you the ability to turn off and on the various services, such as
Secure Boot, Device Guard, and Credential Guard, that VBS offers. Certain Windows versions also
require you to perform the additional step of enabling the Hyper-V platform.
See Microsoft's documentation about deploying Device Guard to enable virtualization-based security for
details.
Prerequisites
nEnsure that virtualization-based security has been enabled on the virtual machine.
vSphere Security
VMware, Inc. 189
Procedure
1In Microsoft Windows, edit the group policy to turn on VBS and choose other VBS-related security
options.
2(Optional) For Microsoft Windows versions less than Redstone 4, in the Windows Features control
panel, enable the Hyper-V platform.
3Reboot the guest operating system.
Disable Virtualization-based Security
If you no longer use virtualization-based security (VBS) with a virtual machine, you can disable VBS.
When you disable VBS for the virtual machine, the Windows VBS options remain unchanged but might
induce performance issues. Before disabling VBS on the virtual machine, disable VBS options within
Windows.
Prerequisites
Ensure that the virtual machine is powered off.
Procedure
1In the vSphere Client, browse to the VBS-enabled virtual machine.
See Identify VBS-Enabled Virtual Machines for help in locating VBS-enabled virtual machines.
2Right-click the virtual machine and select Edit Settings.
3Click VM Options.
4Deselect the Enable check box for Virtualization Based Security.
A message reminds you to disable VBS in the guest OS.
5Click OK.
6Verify that the virtual machine's Summary tab no longer displays "VBS true" in the Guest OS
description.
Identify VBS-Enabled Virtual Machines
You can identify which of your virtual machines have VBS enabled, for reporting and compliance
purposes.
Procedure
1Connect to vCenter Server by using the vSphere Client.
2Select a vCenter Server instance, a data center, or a host in the inventory.
3Click the VMs tab and click Virtual Machines.
vSphere Security
VMware, Inc. 190
4In the list of virtual machines, click the down arrow in a column header to show/hide columns, and
select the VBS check box.
The VBS column appears.
5Scan for Present in the VBS column.
vSphere Security
VMware, Inc. 191
Securing vSphere Networking 10
Securing vSphere Networking is an essential part of protecting your environment. You secure different
vSphere components in different ways. See the vSphere Networking documentation for detailed
information about networking in the vSphere environment.
This chapter includes the following topics:
nIntroduction to vSphere Network Security
nSecuring the Network With Firewalls
nSecure the Physical Switch
nSecuring Standard Switch Ports with Security Policies
nSecuring vSphere Standard Switches
nStandard Switch Protection and VLANs
nSecure vSphere Distributed Switches and Distributed Port Groups
nSecuring Virtual Machines with VLANs
nCreating Multiple Networks Within a Single ESXi Host
nInternet Protocol Security
nEnsure Proper SNMP Configuration
nvSphere Networking Security Best Practices
Introduction to vSphere Network Security
Network security in the vSphere environment shares many characteristics of securing a physical network
environment, but also includes some characteristics that apply only to virtual machines.
Firewalls
Add firewall protection to your virtual network by installing and configuring host-based firewalls on some
or all its VMs.
For efficiency, you can set up private virtual machine Ethernet networks or virtual networks. With virtual
networks, you install a host-based firewall on a VM at the head of the virtual network. This firewall serves
as a protective buffer between the physical network adapter and the remaining VMs in the virtual network.
VMware, Inc. 192
Host-based firewalls can slow performance. Balance your security needs against performance goals
before you install host-based firewalls on VMs elsewhere in the virtual network.
See Securing the Network With Firewalls.
Segmentation
Keep different virtual machine zones within a host on different network segments. If you isolate each
virtual machine zone on its own network segment, you minimize the risk of data leakage from one zone to
the next. Segmentation prevents various threats, including Address Resolution Protocol (ARP) spoofing.
With ARP spoofing, an attacker manipulates the ARP table to remap MAC and IP addresses, and gains
access to network traffic to and from a host. Attackers use ARP spoofing to generate man in the middle
(MITM) attacks, perform denial of service (DoS) attacks, hijack the target system, and otherwise disrupt
the virtual network.
Planning segmentation carefully lowers the chances of packet transmissions between virtual machine
zones. Segmentation therefore prevents sniffing attacks that require sending network traffic to the victim.
Also, an attacker cannot use a nonsecure service in one virtual machine zone to access other virtual
machine zones in the host. You can implement segmentation by using one of two approaches.
nUse separate physical network adapters for virtual machine zones to ensure that the zones are
isolated. Maintaining separate physical network adapters for virtual machine zones is probably the
most secure method. After the initial segment creation. This approach is less prone to
misconfiguration.
nSet up virtual local area networks (VLANs) to help safeguard your network. VLANs provide almost all
the security benefits inherent in implementing physically separate networks without the hardware
overhead. VLANs can save you the cost of deploying and maintaining additional devices, cabling, and
so on. See Securing Virtual Machines with VLANs.
Preventing Unauthorized Access
Requirements for securing VMs are often the same as requirements for securing physical machines.
nIf a virtual machine network is connected to a physical network, it can be subject to breaches just like
a network that consists of physical machines.
nEven if you do not connect a VM to the physical network, the VM can be attacked by other VMs.
VMs are isolated from each other. One VM cannot read or write another VM’s memory, access its data,
use its applications, and so forth. However, within the network, any VM or group of VMs can still be the
target of unauthorized access from other VMs. Protect your VMs from such unauthorized access.
Securing the Network With Firewalls
Security administrators use firewalls to safeguard the network or selected components in the network
from intrusion.
vSphere Security
VMware, Inc. 193

Firewalls control access to devices within their perimeter by closing all ports except for ports that the
administrator explicitly or implicitly designates as authorized. The ports that administrators open allow
traffic between devices on different sides of the firewall.
Important The ESXi firewall in ESXi 5.5 and later does not allow per-network filtering of vMotion traffic.
Therefore, you must install rules on your external firewall to ensure that no incoming connections can be
made to the vMotion socket.
In a virtual machine environment, you can plan the layout for firewalls between components.
nFirewalls between physical machines such as vCenter Server systems and ESXi hosts.
nFirewalls between one virtual machine and another, for example, between a virtual machine acting as
an external Web server and a virtual machine connected to your company’s internal network.
nFirewalls between a physical machine and a virtual machine, such as when you place a firewall
between a physical network adapter card and a virtual machine.
How you use firewalls in your ESXi configuration is based on how you plan to use the network and how
secure any given component has to be. For example, if you create a virtual network where each virtual
machine is dedicated to running a different benchmark test suite for the same department, the risk of
unwanted access from one virtual machine to the next is minimal. Therefore, a configuration where
firewalls are present between the virtual machines is not necessary. However, to prevent interruption of a
test run from an outside host, you can configure a firewall at the entry point of the virtual network to
protect the entire set of virtual machines.
For a diagram of firewall ports, see VMware Knowledge Base article 2131180.
Firewalls for Configurations With vCenter Server
If you access ESXi hosts through vCenter Server, you typically protect vCenter Server using a firewall.
Firewalls must be present at entry points. A firewall might lie between the clients and vCenter Server or
vCenter Server and the clients can both be behind a firewall.
For a comprehensive list of TCP and UDP ports, see Required Ports for vCenter Server and Platform
Services Controller and Additional vCenter Server TCP and UDP Ports.
Networks configured with vCenter Server can receive communications through the vSphere Web Client,
other UI clients, or clients that use the vSphere API. During normal operation, vCenter Server listens for
data from its managed hosts and clients on designated ports. vCenter Server also assumes that its
managed hosts listen for data from vCenter Server on designated ports. If a firewall is present between
any of these elements, you must ensure that the firewall has open ports to support data transfer.
You might also include firewalls at other access points in the network, depending on network usage and
on the level of security that clients require. Select the locations for your firewalls based on the security
risks for your network configuration. The following firewall locations are commonly used.
nBetween the vSphere Web Client or a third-party network-management client and vCenter Server.
vSphere Security
VMware, Inc. 194
nIf your users access virtual machines through a Web browser, between the Web browser and the
ESXi host.
nIf your users access virtual machines through the vSphere Web Client, between the
vSphere Web Client and the ESXi host. This connection is in addition to the connection between the
vSphere Web Client and vCenter Server, and it requires a different port.
nBetween vCenter Server and the ESXi hosts.
nBetween the ESXi hosts in your network. Although traffic between hosts is usually considered trusted,
you can add firewalls between them if you are concerned about security breaches from machine to
machine.
If you add firewalls between ESXi hosts and plan to migrate virtual machines between them, open
ports in any firewall that divides the source host from the target hosts.
nBetween the ESXi hosts and network storage such as NFS or iSCSI storage. These ports are not
specific to VMware. Configure them according to the specifications for your network.
Connecting to vCenter Server Through a Firewall
Open TCP port 443 in the firewall to enable vCenter Server to receive data. By default vCenter Server
uses TCP port 443 to listen for data from its clients. If you have a firewall between vCenter Server and its
clients, you must configure a connection through which vCenter Server can receive data from the clients.
Firewall configuration depends on what is used at your site, ask your local firewall system administrator
for information. How you open ports depends on whether you use a vCenter Server Appliance or a
vCenter Server Windows installation.
Connecting ESXi Hosts Through Firewalls
If you have a firewall between you ESXi hosts and vCenter Server, ensure that the managed hosts can
receive data.
To configure a connection for receiving data, open ports for traffic from services such as vSphere High
Availability, vMotion, and vSphere Fault Tolerance. See ESXi Firewall Configuration for a discussion of
configuration files, vSphere Web Client access, and firewall commands. See Incoming and Outgoing
Firewall Ports for ESXi Hosts for a list of ports.
Firewalls for Configurations Without vCenter Server
If your environment does not include vCenter Server, clients can connect directly to the ESXi network.
You can connect to a standalone ESXi host in several ways.
nVMware Host Client
nOne of the vSphere command-line interfaces
nvSphere Web Services SDK or vSphere Automation SDKs
nThird-party clients
vSphere Security
VMware, Inc. 195

The firewall requirements for standalone hosts are similar to requirements when a vCenter Server is
present.
nUse a firewall to protect your ESXi layer or, depending on your configuration, your clients, and the
ESXi layer. This firewall provides basic protection for your network.
nLicensing in this type of configuration is part of the ESXi package that you install on each of the hosts.
Because licensing is resident to ESXi, a separate License Server with a firewall is not required.
You can configure firewall ports using ESXCLI or using the VMware Host Client. See vSphere Single Host
Management - VMware Host Client.
Connecting to the Virtual Machine Console Through a Firewall
Certain ports must be open for user and administrator communication with the virtual machine console.
Which ports must be open depends on the type of virtual machine console, and on whether you connect
through vCenter Server with the vSphere Web Client or directly to the ESXi host from the
VMware Host Client.
Connecting to a Browser-Based Virtual Machine Console Through the
vSphere Web Client
When you are connecting with the vSphere Web Client, you always connect to the vCenter Server system
that manages the ESXi host, and access the virtual machine console from there.
If you are using the vSphere Web Client and connecting to a browser-based virtual machine console, the
following access must be possible:
nThe firewall must allow vSphere Web Client to access vCenter Server on port 9443.
nThe firewall must allow vCenter Server to access the ESXi host on port 902.
Connecting to a Standalone Virtual Machine Console Through the
vSphere Web Client
If you are using the vSphere Web Client and connecting to a standalone virtual machine console, the
following access must be possible:
nThe firewall must allow vSphere Web Client to access vCenter Server on port 9443.
nThe firewall must allow the standalone virtual machine console to access vCenter Server on port
9443 and to access the ESXi host on port 902.
Connecting to ESXi Hosts Directly with the VMware Host Client
You can use the VMware Host Client virtual machine console if you connect directly to an ESXi host.
Note Do not use the VMware Host Client to connect directly to hosts that are managed by a
vCenter Server system. If you make changes to such hosts from the VMware Host Client, instability in
your environment results.
The firewall must allow access to the ESXi host on ports 443 and 902
vSphere Security
VMware, Inc. 196
The VMware Host Client uses port 902 to provide a connection for guest operating system MKS activities
on virtual machines. It is through this port that users interact with the guest operating systems and
applications of the virtual machine. VMware does not support configuring a different port for this function.
Secure the Physical Switch
Secure the physical switch on each ESXi host to prevent attackers from gaining access to the host and its
virtual machines.
For best protection of your hosts, ensure that physical switch ports are configured with spanning tree
disabled and ensure that the non-negotiate option is configured for trunk links between external physical
switches and virtual switches in Virtual Switch Tagging (VST) mode.
Procedure
1Log in to the physical switch and ensure that spanning tree protocol is disabled or that Port Fast is
configured for all physical switch ports that are connected to ESXi hosts.
2For virtual machines that perform bridging or routing, check periodically that the first upstream
physical switch port is configured with BPDU Guard and Port Fast disabled and with spanning tree
protocol enabled.
In vSphere 5.1 and later, to prevent the physical switch from potential Denial of Service (DoS)
attacks, you can turn on the guest BPDU filter on the ESXi hosts.
3Log in to the physical switch and ensure that Dynamic Trunking Protocol (DTP) is not enabled on the
physical switch ports that are connected to the ESXi hosts.
4Routinely check physical switch ports to ensure that they are properly configured as trunk ports if
connected to virtual switch VLAN trunking ports.
Securing Standard Switch Ports with Security Policies
The VMkernel port group or virtual machine port group on a standard switch has a configurable security
policy. The security policy determines how strongly you enforce protection against impersonation and
interception attacks on VMs.
Just like physical network adapters, virtual machine network adapters can impersonate another VM.
Impersonation is a security risk.
nA VM can send frames that appear to be from a different machine so that it can receive network
frames that are intended for that machine.
nA virtual machine network adapter can be configured so that it receives frames targeted for other
machines
When you add a VMkernel port group or virtual machine port group to a standard switch, ESXi configures
a security policy for the ports in the group. You can use this security policy to ensure that the host
prevents the guest operating systems of its VMs from impersonating other machines on the network. The
guest operating system that might attempt impersonation does not detect that the impersonation was
prevented.
vSphere Security
VMware, Inc. 197
The security policy determines how strongly you enforce protection against impersonation and
interception attacks on VMs. To correctly use the settings in the security profile, see the Security Policy
section in the vSphere Networking publication. This section explains:
nHow VM network adapters control transmissions.
nHow attacks are staged at this level
Securing vSphere Standard Switches
You can secure standard switch traffic against Layer 2 attacks by restricting some of the MAC address
modes of the VM network adapters.
Each VM network adapter has an initial MAC address and an effective MAC address.
Initial MAC address The initial MAC address is assigned when the adapter is created. Although
the initial MAC address can be reconfigured from outside the guest
operating system, it cannot be changed by the guest operating system.
Effective MAC address Each adapter has an effective MAC address that filters out incoming
network traffic with a destination MAC address that is different from the
effective MAC address. The guest operating system is responsible for
setting the effective MAC address and typically matches the effective MAC
address to the initial MAC address.
Upon creating a VM network adapter, the effective MAC address and initial MAC address are the same.
The guest operating system can alter the effective MAC address to another value at any time. If an
operating system changes the effective MAC address, its network adapter receives network traffic that is
destined for the new MAC address.
When sending packets through a network adapter, the guest operating system typically places its own
adapter effective MAC address in the source MAC address field of the Ethernet frames. It places the MAC
address for the receiving network adapter in the destination MAC address field. The receiving adapter
accepts packets only if the destination MAC address in the packet matches its own effective MAC
address.
An operating system can send frames with an impersonated source MAC address. An operating system
can therefore impersonate a network adapter that the receiving network authorizes, and stage malicious
attacks on the devices in a network.
Protect virtual traffic against impersonation and interception Layer 2 attacks by configuring a security
policy on port groups or ports.
The security policy on distributed port groups and ports includes the following options:
nMAC address changes (see MAC Address Changes)
nPromiscuous mode (see Promiscuous Mode Operation)
nForged transmits (see Forged Transmits)
You can view and change the default settings by selecting the virtual switch associated with the host from
the vSphere Web Client. See the vSphere Networking documentation.
vSphere Security
VMware, Inc. 198

MAC Address Changes
The security policy of a virtual switch includes a MAC address changes option. This option affects traffic
that a virtual machine receives.
When the Mac address changes option is set to Accept, ESXi accepts requests to change the effective
MAC address to a different address than the initial MAC address.
When the Mac address changes option is set to Reject, ESXi does not honor requests to change the
effective MAC address to a different address than the initial MAC address. This setting protects the host
against MAC impersonation. The port that the virtual machine adapter used to send the request is
disabled and the virtual machine adapter does not receive any more frames until the effective MAC
address matches the initial MAC address. The guest operating system does not detect that the MAC
address change request was not honored.
Note The iSCSI initiator relies on being able to get MAC address changes from certain types of storage.
If you are using ESXi iSCSI with iSCSI storage, set the MAC address changes option to Accept.
In some situations, you might have a legitimate need for more than one adapter to have the same MAC
address on a network—for example, if you are using Microsoft Network Load Balancing in unicast mode.
When Microsoft Network Load Balancing is used in the standard multicast mode, adapters do not share
MAC addresses.
Forged Transmits
The Forged transmits option affects traffic that is transmitted from a virtual machine.
When the Forged transmits option is set to Accept, ESXi does not compare source and effective MAC
addresses.
To protect against MAC impersonation, you can set the Forged transmits option to Reject. If you do, the
host compares the source MAC address being transmitted by the guest operating system with the
effective MAC address for its virtual machine adapter to see if they match. If the addresses do not match,
the ESXi host drops the packet.
The guest operating system does not detect that its virtual machine adapter cannot send packets by
using the impersonated MAC address. The ESXi host intercepts any packets with impersonated
addresses before they are delivered, and the guest operating system might assume that the packets are
dropped.
Promiscuous Mode Operation
Promiscuous mode eliminates any reception filtering that the virtual machine adapter performs so that the
guest operating system receives all traffic observed on the wire. By default, the virtual machine adapter
cannot operate in promiscuous mode.
vSphere Security
VMware, Inc. 199

Although promiscuous mode can be useful for tracking network activity, it is an insecure mode of
operation, because any adapter in promiscuous mode has access to the packets even if some of the
packets are received only by a particular network adapter. This means that an administrator or root user
within a virtual machine can potentially view traffic destined for other guest or host operating systems.
See the vSphere Networking documentation for information about configuring the virtual machine adapter
for promiscuous mode.
Note In some situations, you might have a legitimate reason to configure a standard or a distributed
virtual switch to operate in promiscuous mode, for example, if you are running network intrusion detection
software or a packet sniffer.
Standard Switch Protection and VLANs
VMware standard switches provide safeguards against certain threats to VLAN security. Because of the
way that standard switches are designed, they protect VLANs against a variety of attacks, many of which
involve VLAN hopping.
Having this protection does not guarantee that your virtual machine configuration is invulnerable to other
types of attacks. For example, standard switches do not protect the physical network against these
attacks; they protect only the virtual network.
Standard switches and VLANs can protect against the following types of attacks.
MAC flooding Floods a switch with packets that contain MAC addresses tagged as having
come from different sources. Many switches use a content-addressable
memory table to learn and store the source address for each packet. When
the table is full, the switch can enter a fully open state in which every
incoming packet is broadcast on all ports, letting the attacker see all of the
switch’s traffic. This state might result in packet leakage across VLANs.
Although VMware standard switches store a MAC address table, they do
not get the MAC addresses from observable traffic and are not vulnerable
to this type of attack.
802.1q and ISL tagging
attacks
Force a switch to redirect frames from one VLAN to another by tricking the
switch into acting as a trunk and broadcasting the traffic to other VLANs.
VMware standard switches do not perform the dynamic trunking required
for this type of attack and, therefore, are not vulnerable.
Double-encapsulation
attacks
Occur when an attacker creates a double-encapsulated packet in which the
VLAN identifier in the inner tag is different from the VLAN identifier in the
outer tag. For backward compatibility, native VLANs strip the outer tag from
transmitted packets unless configured to do otherwise. When a native
VLAN switch strips the outer tag, only the inner tag is left, and that inner tag
routes the packet to a different VLAN than the one identified in the now-
missing outer tag.
vSphere Security
VMware, Inc. 200
VMware standard switches drop any double-encapsulated frames that a
virtual machine attempts to send on a port configured for a specific VLAN.
Therefore, they are not vulnerable to this type of attack.
Multicast brute-force
attacks
Involve sending large numbers of multicast frames to a known VLAN
almost simultaneously to overload the switch so that it mistakenly allows
some of the frames to broadcast to other VLANs.
VMware standard switches do not allow frames to leave their correct
broadcast domain (VLAN) and are not vulnerable to this type of attack.
Spanning-tree attacks Target Spanning-Tree Protocol (STP), which is used to control bridging
between parts of the LAN. The attacker sends Bridge Protocol Data Unit
(BPDU) packets that attempt to change the network topology, establishing
themselves as the root bridge. As the root bridge, the attacker can sniff the
contents of transmitted frames.
VMware standard switches do not support STP and are not vulnerable to
this type of attack.
Random frame attacks Involve sending large numbers of packets in which the source and
destination addresses stay the same, but in which fields are randomly
changed in length, type, or content. The goal of this attack is to force
packets to be mistakenly rerouted to a different VLAN.
VMware standard switches are not vulnerable to this type of attack.
Because new security threats develop over time, do not consider this an exhaustive list of attacks.
Regularly check VMware security resources on the Web to learn about security, recent security alerts,
and VMware security tactics.
Secure vSphere Distributed Switches and Distributed Port
Groups
Administrators have several options for securing a vSphere Distributed Switches in their vSphere
environment.
Procedure
1For distributed port groups with static binding, disable the Auto Expand feature.
Auto Expand is enabled by default in vSphere 5.1 and later.
To disable Auto Expand, configure the autoExpand property under the distributed port group with the
vSphere Web Services SDK or with a command-line interface. See the vSphere Web Services SDK
documentation.
2Ensure that all private VLAN IDs of any vSphere Distributed Switch are fully documented.
vSphere Security
VMware, Inc. 201
3If you are using VLAN tagging on a dvPortgroup, VLAN IDs must correspond to the IDs on external
VLAN-aware upstream switches. If VLAN IDs are not tracked correctly, mistaken reuse of IDs might
allow unintended traffic. Similarly, wrong or missing VLAN IDs might lead to traffic not passing
between physical and virtual machines.
4Ensure that no unused ports exist on a virtual port group associated with a vSphere Distributed
Switch.
5Label all vSphere Distributed Switches.
vSphere Distributed Switches associated with an ESXi host require a text box for the name of the
switch. This label serves as a functional descriptor for the switch, just like the host name associated
with a physical switch. The label on the vSphere Distributed Switch indicates the function or the IP
subnet of the switch. For example, you can label the switch as internal to indicate that it is only for
internal networking on a virtual machine’s private virtual switch. No traffic goes over physical network
adapters.
6Disable network health check for your vSphere Distributed Switches if you are not actively using it.
Network health check is disabled by default. Once enabled, the health check packets contain
information about the host, switch, and port that an attacker can potentially use. Use network health
check only for troubleshooting, and turn it off when troubleshooting is finished.
7Protect virtual traffic against impersonation and interception Layer 2 attacks by configuring a security
policy on port groups or ports.
The security policy on distributed port groups and ports includes the following options:
nMAC address changes (see MAC Address Changes)
nPromiscuous mode (see Promiscuous Mode Operation)
nForged transmits (see Forged Transmits)
You can view and change the current settings by selecting Manage Distributed Port Groups from
the right-button menu of the distributed switch and selecting Security in the wizard. See the vSphere
Networking documentation.
Securing Virtual Machines with VLANs
The network can be one of the most vulnerable parts of any system. Your virtual machine network
requires as much protection as your physical network. Using VLANs can improve networking security in
your environment.
VLANs are an IEEE standard networking scheme with specific tagging methods that allow routing of
packets to only those ports that are part of the VLAN. When properly configured, VLANs provide a
dependable means for you to protect a set of virtual machines from accidental or malicious intrusions.
vSphere Security
VMware, Inc. 202
VLANs let you segment a physical network so that two machines in the network are unable to transmit
packets back and forth unless they are part of the same VLAN. For example, accounting records and
transactions are among a company’s most sensitive internal information. In a company whose sales,
shipping, and accounting employees all use virtual machines in the same physical network, you might
protect the virtual machines for the accounting department by setting up VLANs.
Figure 10‑1. Sample VLAN Layout
Host 1
Standard Switch
Standard Switch
VM6 VM7 VM8
VM3 VM4 VM5
Standard Switch
VM9 VM10 VM11
Standard Switch
VM12
VLAN
B
VM13
VLAN
A
VM14
VLAN
B
VLAN A
VLAN B
Broadcast
Domain A
Broadcast
Domain B
Broadcast
Domain A and B
Multiple VLANs
on the same
virtual switch
Standard Switch
VM0 VM1 VM2
Host 3
Host 4
Host 2
Router
Switch 1
Switch 2
In this configuration, all employees in the accounting department use virtual machines in VLAN A and the
employees in sales use virtual machines in VLAN B.
The router forwards packets containing accounting data to the switches. These packets are tagged for
distribution to VLAN A only. Therefore, the data is confined to Broadcast Domain A and cannot be routed
to Broadcast Domain B unless the router is configured to do so.
This VLAN configuration prevents the sales force from intercepting packets destined for the accounting
department. It also prevents the accounting department from receiving packets intended for the sales
group. The virtual machines serviced by a single virtual switch can be in different VLANs.
Security Considerations for VLANs
The way you set up VLANs to secure parts of a network depends on factors such as the guest operating
system and the way your network equipment is configured.
vSphere Security
VMware, Inc. 203
ESXi features a complete IEEE 802.1q-compliant VLAN implementation. VMware cannot make specific
recommendations on how to set up VLANs, but there are factors to consider when using a VLAN
deployment as part of your security enforcement policy.
Secure VLANs
Administrators have several options for securing the VLANs in their vSphere environment.
Procedure
1Ensure that port groups are not configured to VLAN values that are reserved by upstream physical
switches
Do not set VLAN IDs to values reserved for the physical switch.
2Ensure that port groups are not configured to VLAN 4095 unless you are using for Virtual Guest
Tagging (VGT).
Three types of VLAN tagging exist in vSphere:
nExternal Switch Tagging (EST)
nVirtual Switch Tagging (VST) - The virtual switch tags with the configured VLAN ID the traffic that
is incoming to the attached virtual machines and removes the VLAN tag from the traffic that is
leaving them. To set up VST mode, assign a VLAN ID between 1 and 4095.
nVirtual Guest Tagging (VGT) - Virtual machines handle VLAN traffic. To activate VGT mode, set
the VLAN ID to 4095. On a distributed switch, you can also allow virtual machine traffic based on
its VLAN by using the VLAN Trunking option.
On a standard switch you can configure VLAN networking mode at switch or port group level, and on
a distributed switch at distributed port group or port level.
3Ensure that all VLANs on each virtual switch are fully documented and that each virtual switch has all
required VLANs and only required VLANs.
Creating Multiple Networks Within a Single ESXi Host
The ESXi system is designed so that you can connect some groups of virtual machines to the internal
network, others to the external network, and still others to both—all on the same host. This capability is
an outgrowth of basic virtual machine isolation coupled with a well-planned use of virtual networking
features.
vSphere Security
VMware, Inc. 204
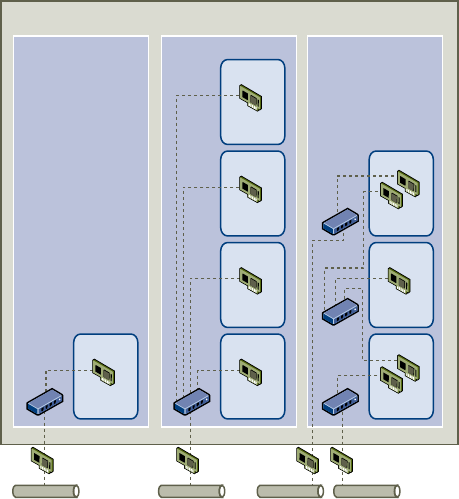
Figure 10‑2. External Networks, Internal Networks, and a DMZ Configured on a Single ESXi
Host
physical network
adapters
External
Network 1
Internal
Network 2
External
Network 2
Internal
Network 1
ESXi
VM 2
internal
user
VM 3
internal
user
VM 4
internal
user
VM 5
internal
user
VM 6
firewall
server
VM 7
Web
server
VM 8
firewall
server
VM 1
FTP
server
Internal NetworkExternal Network DMZ
In the figure, the system administrator configured a host into three distinct virtual machine zones: FTP
server, internal virtual machines, and DMZ. Each zone serves a unique function.
FTP server Virtual Machine 1 is configured with FTP software and acts as a holding
area for data sent to and from outside resources such as forms and
collateral localized by a vendor.
This virtual machine is associated with an external network only. It has its
own virtual switch and physical network adapter that connect it to External
Network 1. This network is dedicated to servers that the company uses to
receive data from outside sources. For example, the company uses
External Network 1 to receive FTP traffic from vendors and allow vendors
access to data stored on externally available servers though FTP. In
addition to servicing Virtual Machine 1, External Network 1 services FTP
servers configured on different ESXi hosts throughout the site.
vSphere Security
VMware, Inc. 205
Because Virtual Machine 1 does not share a virtual switch or physical
network adapter with any virtual machines in the host, the other resident
virtual machines cannot transmit packets to or receive packets from the
Virtual Machine 1 network. This restriction prevents sniffing attacks, which
require sending network traffic to the victim. More importantly, an attacker
cannot use the natural vulnerability of FTP to access any of the host’s other
virtual machines.
Internal virtual
machines
Virtual Machines 2 through 5 are reserved for internal use. These virtual
machines process and store company-private data such as medical
records, legal settlements, and fraud investigations. As a result, the system
administrators must ensure the highest level of protection for these virtual
machines.
These virtual machines connect to Internal Network 2 through their own
virtual switch and network adapter. Internal Network 2 is reserved for
internal use by personnel such as claims processors, in-house lawyers, or
adjustors.
Virtual Machines 2 through 5 can communicate with one another through
the virtual switch and with internal virtual machines elsewhere on Internal
Network 2 through the physical network adapter. They cannot communicate
with externally facing machines. As with the FTP server, these virtual
machines cannot send packets to or receive packets from the other virtual
machines’ networks. Similarly, the host’s other virtual machines cannot
send packets to or receive packets from Virtual Machines 2 through 5.
DMZ Virtual Machines 6 through 8 are configured as a DMZ that the marketing
group uses to publish the company’s external Web site.
This group of virtual machines is associated with External Network 2 and
Internal Network 1. The company uses External Network 2 to support the
Web servers that use the marketing and financial department to host the
corporate Web site and other Web facilities that it hosts to outside users.
Internal Network 1 is the conduit that the marketing department uses to
publish content to the corporate Web site, post downloads, and maintain
services like user forums.
Because these networks are separate from External Network 1 and Internal
Network 2, and the virtual machines have no shared points of contact
(switches or adapters), there is no risk of attack to or from the FTP server
or the internal virtual machine group.
By capitalizing on virtual machine isolation, correctly configuring virtual switches, and maintaining network
separation, the system administrator can house all three virtual machine zones in the same ESXi host
and be confident that there will be no data or resource breaches.
vSphere Security
VMware, Inc. 206
The company enforces isolation among the virtual machine groups by using multiple internal and external
networks and making sure that the virtual switches and physical network adapters for each group are
completely separate from those of other groups.
Because none of the virtual switches straddle virtual machine zones, the system administrator succeeds
in eliminating the risk of packet leakage from one zone to another. A virtual switch, by design, cannot leak
packets directly to another virtual switch. The only way for packets to travel from one virtual switch to
another is under the following circumstances:
nThe virtual switches are connected to the same physical LAN.
nThe virtual switches connect to a common virtual machine, which could be used to transmit packets.
Neither of these conditions occur in the sample configuration. If system administrators want to verify that
no common virtual switch paths exist, they can check for possible shared points of contact by reviewing
the network switch layout in the vSphere Web Client.
To safeguard the virtual machines’ resources, the system administrator lowers the risk of DoS and DDoS
attacks by configuring a resource reservation and a limit for each virtual machine. The system
administrator further protects the ESXi host and virtual machines by installing software firewalls at the
front and back ends of the DMZ, ensuring that the host is behind a physical firewall, and configuring the
networked storage resources so that each has its own virtual switch.
Internet Protocol Security
Internet Protocol Security (IPsec) secures IP communications coming from and arriving at a host. ESXi
hosts support IPsec using IPv6.
When you set up IPsec on a host, you enable authentication and encryption of incoming and outgoing
packets. When and how IP traffic is encrypted depends on how you set up the system's security
associations and security policies.
A security association determines how the system encrypts traffic. When you create a security
association, you specify the source and destination, encryption parameters, and a name for the security
association.
A security policy determines when the system should encrypt traffic. The security policy includes source
and destination information, the protocol and direction of traffic to be encrypted, the mode (transport or
tunnel) and the security association to use.
List Available Security Associations
ESXi can provide a list of all security associations available for use by security policies. The list includes
both user created security associations and any security associations the VMkernel installed using
Internet Key Exchange.
You can get a list of available security associations using the esxcli vSphere CLI command.
Procedure
uAt the command prompt, enter the command esxcli network ip ipsec sa list.
vSphere Security
VMware, Inc. 207

ESXi displays a list of all available security associations.
Add an IPsec Security Association
Add a security association to specify encryption parameters for associated IP traffic.
You can add a security association using the esxcli vSphere CLI command.
Procedure
uAt the command prompt, enter the command esxcli network ip ipsec sa add with one or more
of the following options.
Option Description
--sa-source= source address Required. Specify the source address.
--sa-destination= destination
address
Required. Specify the destination address.
--sa-mode= mode Required. Specify the mode, either transport or tunnel.
--sa-spi= security parameter index Required. Specify the security parameter index. The security parameter index
identifies the security association to the host. It must be a hexadecimal with a 0x
prefix. Each security association you create must have a unique combination of
protocol and security parameter index.
--encryption-algorithm= encryption
algorithm
Required. Specify the encryption algorithm using one of the following parameters.
n3des-cbc
naes128-cbc
nnull ( provides no encryption)
--encryption-key= encryption key Required when you specify an encryption algorithm. Specify the encryption key.
You can enter keys as ASCII text or as a hexadecimal with a 0x prefix.
--integrity-algorithm=
authentication algorithm
Required. Specify the authentication algorithm, either hmac-sha1 or hmac-
sha2-256.
--integrity-key= authentication key Required. Specify the authentication key. You can enter keys as ASCII text or as
a hexadecimal with a 0x prefix.
--sa-name=name Required. Provide a name for the security association.
Example: New Security Association Command
The following example contains extra line breaks for readability.
esxcli network ip ipsec sa add
--sa-source 3ffe:501:ffff:0::a
--sa-destination 3ffe:501:ffff:0001:0000:0000:0000:0001
--sa-mode transport
--sa-spi 0x1000
--encryption-algorithm 3des-cbc
--encryption-key 0x6970763672656164796c6f676f336465736362636f757432
--integrity-algorithm hmac-sha1
--integrity-key 0x6970763672656164796c6f67736861316f757432
--sa-name sa1
vSphere Security
VMware, Inc. 208

Remove an IPsec Security Association
You can remove a security association using the ESXCLI vSphere CLI command.
Prerequisites
Verify that the security association you want to use is not currently in use. If you try to remove a security
association that is in use, the removal operation fails.
Procedure
uAt the command prompt, enter the command
esxcli network ip ipsec sa remove --sa-name security_association_name
List Available IPsec Security Policies
You can list available security policies using the ESXCLI vSphere CLI command.
Procedure
uAt the command prompt, enter the command esxcli network ip ipsec sp list
The host displays a list of all available security policies.
Create an IPSec Security Policy
Create a security policy to determine when to use the authentication and encryption parameters set in a
security association. You can add a security policy using the ESXCLI vSphere CLI command.
Prerequisites
Before creating a security policy, add a security association with the appropriate authentication and
encryption parameters as described in Add an IPsec Security Association.
Procedure
uAt the command prompt, enter the command esxcli network ip ipsec sp add with one or more
of the following options.
Option Description
--sp-source= source address Required. Specify the source IP address and prefix length.
--sp-destination= destination
address
Required. Specify the destination address and prefix length.
--source-port= port Required. Specify the source port. The source port must be a number between 0
and 65535.
--destination-port= port Required. Specify the destination port. The source port must be a number
between 0 and 65535.
vSphere Security
VMware, Inc. 209

Option Description
--upper-layer-protocol= protocol Specify the upper layer protocol using one of the following parameters.
ntcp
nudp
nicmp6
nany
--flow-direction= direction Specify the direction in which you want to monitor traffic using either in or out.
--action= action Specify the action to take when traffic with the specified parameters is
encountered using one of the following parameters.
nnone: Take no action
ndiscard: Do not allow data in or out.
nipsec: Use the authentication and encryption information supplied in the
security association to determine whether the data comes from a trusted
source.
--sp-mode= mode Specify the mode, either tunnel or transport.
--sa-name=security association name Required. Provide the name of the security association for the security policy to
use.
--sp-name=name Required. Provide a name for the security policy.
Example: New Security Policy Command
The following example includes extra line breaks for readability.
esxcli network ip ipsec add
--sp-source=2001:db8:1::/64
--sp-destination=2002:db8:1::/64
--source-port=23
--destination-port=25
--upper-layer-protocol=tcp
--flow-direction=out
--action=ipsec
--sp-mode=transport
--sa-name=sa1
--sp-name=sp1
Remove an IPsec Security Policy
You can remove a security policy from the ESXi host using the ESXCLI vSphere CLI command.
Prerequisites
Verify that the security policy you want to use is not currently in use. If you try to remove a security policy
that is in use, the removal operation fails.
vSphere Security
VMware, Inc. 210
Procedure
uAt the command prompt, enter the command
esxcli network ip ipsec sp remove --sa-name security policy name.
To remove all security policies, enter the command
esxcli network ip ipsec sp remove --remove-all.
Ensure Proper SNMP Configuration
If SNMP is not properly configured, monitoring information can be sent to a malicious host. The malicious
host can then use this information to plan an attack.
SNMP must be configured on each ESXi host. You can use vCLI, PowerCLI, or the vSphere Web
Services SDK for configuration.
See the Monitoring and Performance publication for detailed setup information for SNMP 3.
Procedure
1Run the following command to determine whether SNMP is currently used.
esxcli system snmp get
2To enable SNMP, run the following command.
esxcli system snmp set --enable true
3To disable SNMP, run the following command.
esxcli system snmp set --disable true
vSphere Networking Security Best Practices
Following networking security best practices helps ensure the integrity of your vSphere deployment.
General Networking Security Recommendations
Following general network security recommendations is the first step in securing your networking
environment. You can then move on to special areas, such as securing the network with firewalls or using
IPsec.
nIf spanning tree is enabled, ensure that physical switch ports are configured with Portfast. Because
VMware virtual switches do not support STP, physical switch ports connected to an ESXi host must
have Portfast configured to avoid loops within the physical switch network. If Portfast is not set,
performance and connectivity issues might arise.
nEnsure that Netflow traffic for a Distributed Virtual Switch is only sent to authorized collector IP
addresses. Netflow exports are not encrypted and can contain information about the virtual network.
This information increases the potential for a successful man-in-the-middle attack. If Netflow export is
required, verify that all Netflow target IP addresses are correct.
vSphere Security
VMware, Inc. 211
nEnsure that only authorized administrators have access to virtual networking components by using
the role-based access controls. For example, give virtual machine administrators only access to port
groups in which their virtual machines reside. Give network administrators access to all virtual
networking components but no access to virtual machines. Limiting access reduces the risk of
misconfiguration, whether accidental or malicious, and enforces key security concepts of separation
of duties and least privilege.
nEnsure that port groups are not configured to the value of the native VLAN. Physical switches use
VLAN 1 as their native VLAN. Frames on a native VLAN are not tagged with a 1. ESXi does not have
a native VLAN. Frames with VLAN specified in the port group have a tag, but frames with VLAN not
specified in the port group are not tagged. This can cause an issue because virtual machines that are
tagged with a 1 end up belonging to native VLAN of the physical switch.
For example, frames on VLAN 1 from a Cisco physical switch are untagged because VLAN 1 is the
native VLAN on that physical switch. However, frames from the ESXi host that are specified as VLAN
1 are tagged with a 1. As a result, traffic from the ESXi host that is destined for the native VLAN is not
routed correctly because it is tagged with a 1 instead of being untagged. Traffic from the physical
switch that is coming from the native VLAN is not visible because it is not tagged. If the ESXi virtual
switch port group uses the native VLAN ID, traffic from virtual machines on that port is not visible to
the native VLAN on the switch because the switch is expecting untagged traffic.
nEnsure that port groups are not configured to VLAN values reserved by upstream physical switches.
Physical switches reserve certain VLAN IDs for internal purposes and often disallow traffic configured
to these values. For example, Cisco Catalyst switches typically reserve VLANs 1001–1024 and 4094.
Using a reserved VLAN might result in a denial of service on the network.
nEnsure that port groups are not configured to VLAN 4095 except for Virtual Guest Tagging (VGT).
Setting a port group to VLAN 4095 activates VGT mode. In this mode, the virtual switch passes all
network frames to the virtual machine without modifying the VLAN tags, leaving it to the virtual
machine to deal with them.
nRestrict port-level configuration overrides on a distributed virtual switch. Port-level configuration
overrides are disabled by default. When overrides are enabled, you can use different security settings
for a virtual machine than the port-group level settings. Certain virtual machines require unique
configurations, but monitoring is essential. If overrides are not monitored, anyone who gains access
to a virtual machine with a less secure distributed virtual switch configuration might attempt to exploit
that access.
nEnsure that distributed virtual switch port mirror traffic is sent only to authorized collector ports or
VLANs. A vSphere Distributed Switch can mirror traffic from one port to another to allow packet
capture devices to collect specific traffic flows. Port mirroring sends a copy of all specified traffic in
unencrypted format. This mirrored traffic contains the full data in the packets captured and can result
in total compromise of that data if misdirected. If port mirroring is required, verify that all port mirror
destination VLAN, port and uplink IDs are correct.
vSphere Security
VMware, Inc. 212
Labeling Networking Components
Identifying the different components of your networking architecture is critical and helps ensure that no
errors are introduced as your network grows.
Follow these best practices:
nEnsure that port groups are configured with a clear network label. These labels serve as a functional
descriptor for the port group and help you identify each port group's function as the network becomes
more complex.
nEnsure that each vSphere Distributed Switch has a clear network label that indicates the function or
IP subnet of the switch. This label serves as a functional descriptor for the switch, just as physical
switches require a host name. For example, you can label the switch as internal to show that it is for
internal networking. You cannot change the label for a standard virtual switch.
Document and Check the vSphere VLAN Environment
Check your VLAN environment regularly to avoid addressing problems. Fully document the VLAN
environment and ensure that VLAN IDs are used only once. Your documentation can help with
troubleshooting and is essential when you want to expand the environment.
Procedure
1Ensure that all vSwitch and VLANS IDs are fully documented
If you are using VLAN tagging on a virtual switch, the IDs must correspond to the IDs on external
VLAN-aware upstream switches. If VLAN IDs are not tracked completely, mistaken reuse of IDs might
allow for traffic between the wrong physical and virtual machines. Similarly, if VLAN IDs are wrong or
missing, traffic between physical and virtual machines might be blocked where you want traffic to
pass.
2Ensure that VLAN IDs for all distributed virtual port groups (dvPortgroup instances) are fully
documented.
If you are using VLAN tagging on a dvPortgroup the IDs must correspond to the IDs on external
VLAN-aware upstream switches. If VLAN IDs are not tracked completely, mistaken reuse of IDs might
allow for traffic between the wrong physical and virtual machines. Similarly, if VLAN IDs are wrong or
missing, traffic between physical and virtual machines might be blocked where you want traffic to
pass.
3Ensure that private VLAN IDs for all distributed virtual switches are fully documented.
Private VLANs (PVLANs) for distributed virtual switches require primary and secondary VLAN IDs.
These IDs must correspond to the IDs on external PVLAN-aware upstream switches. If VLAN IDs are
not tracked completely, mistaken reuse of IDs might allow for traffic between the wrong physical and
virtual machines. Similarly, if PVLAN IDs are wrong or missing, traffic between physical and virtual
machines might be blocked where you want traffic to pass.
vSphere Security
VMware, Inc. 213
4Verify that VLAN trunk links are connected only to physical switch ports that function as trunk links.
When connecting a virtual switch to a VLAN trunk port, you must properly configure both the virtual
switch and the physical switch at the uplink port. If the physical switch is not properly configured,
frames with the VLAN 802.1q header are forwarded to a switch that not expecting their arrival.
Adopting Network Isolation Practices
Network isolation practices significantly bolster network security in your vSphere environment.
Isolate the Management Network
The vSphere management network provides access to the vSphere management interface on each
component. Services running on the management interface provide an opportunity for an attacker to gain
privileged access to the systems. Remote attacks are likely to begin with gaining access to this network. If
an attacker gains access to the management network, it provides the staging ground for further intrusion.
Strictly control access to management network by protecting it at the security level of the most secure VM
running on an ESXi host or cluster. No matter how the management network is restricted, administrators
must have access to this network to configure the ESXi hosts and vCenter Server system.
Place the vSphere management port group in a dedicated VLAN on a common standard switch.
Production (VM) traffic can share the standard switch if the vSphere management port group's VLAN is
not used by production VMs.
Check that the network segment is not routed, except to networks where other management-related
entities are found. Routing a network segment might make sense for vSphere Replication. In particular,
make sure that production VM traffic cannot be routed to this network.
Strictly control access to management functionality by using one of the following approaches.
nFor especially sensitive environments, configure a controlled gateway or other controlled method to
access the management network. For example, require that administrators connect to the
management network through a VPN. Allow access to the management network only to trusted
administrators.
nConfigure jump boxes that run management clients.
Isolate Storage Trac
Ensure that IP-based storage traffic is isolated. IP-based storage includes iSCSI and NFS. VMs might
share virtual switches and VLANs with the IP-based storage configurations. This type of configuration
might expose IP-based storage traffic to unauthorized VM users.
IP-based storage frequently is not encrypted. Anyone with access to this network can view IP-based
storage traffic. To restrict unauthorized users from viewing IP-based storage traffic, logically separate the
IP-based storage network traffic from the production traffic. Configure the IP-based storage adapters on
separate VLANs or network segments from the VMkernel management network to limit unauthorized
users from viewing the traffic.
vSphere Security
VMware, Inc. 214
Isolate vMotion Trac
vMotion migration information is transmitted in plain text. Anyone with access to the network over which
this information flows can view it. Potential attackers can intercept vMotion traffic to obtain the memory
contents of a VM. They might also stage a MiTM attack in which the contents are modified during
migration.
Separate vMotion traffic from production traffic on an isolated network. Set up the network to be
nonroutable, that is, make sure that no layer-3 router is spanning this and other networks, to prevent
outside access to the network.
Use a dedicated VLAN on a common standard switch for the vMotion port group. Production (VM) traffic
can use the same standard switch if the vMotion port group’s VLAN is not used by production VMs.
Use Virtual Switches with the vSphere Network Appliance API
Only If Required
Do not configure your host to send network information to a virtual machine unless you are using
products that use the vSphere Network Appliance API (DvFilter). If the vSphere Network Appliance API is
enabled, an attacker might attempt to connect a virtual machine to the filter. This connection might
provide access to the network of other virtual machines on the host.
If you are using a product that uses this API, verify that the host is configured correctly. See the sections
on DvFilter in Developing and Deploying vSphere Solutions, vServices, and ESX Agents. If your host is
set up to use the API, make sure that the value of the Net.DVFilterBindIpAddress parameter matches
the product that uses the API.
Procedure
1Log in to the vSphere Web Client.
2Select the host and click Configure.
3Under System, select Advanced System Settings.
4Scroll down to Net.DVFilterBindIpAddress and verify that the parameter has an empty value.
The order of parameters is not strictly alphabetical. Type DVFilter in the Filter text box to display all
related parameters.
5Verify the setting.
nIf you are not using DvFilter settings, make sure that the value is blank.
nIf you are using DvFilter settings, make sure that the value of the parameter is correct. The value
must match the value that the product that uses the DvFilter is using.
vSphere Security
VMware, Inc. 215
Best Practices Involving Multiple
vSphere Components 11
Some security best practices, such as setting up NTP in your environment, affect more than one vSphere
component. Consider these recommendations when configuring your environment.
See Chapter 3 Securing ESXi Hosts and Chapter 5 Securing Virtual Machines for related information.
This chapter includes the following topics:
nSynchronizing Clocks on the vSphere Network
nStorage Security Best Practices
nVerify That Sending Host Performance Data to Guests Is Disabled
nSetting Timeouts for the ESXi Shell and vSphere Web Client
Synchronizing Clocks on the vSphere Network
Verify that all components on the vSphere network have their clocks synchronized. If the clocks on the
machines in your vSphere network are not synchronized, SSL certificates, which are time-sensitive, might
not be recognized as valid in communications between network machines.
Unsynchronized clocks can result in authentication problems, which can cause the installation to fail or
prevent the vCenter Server Appliance vpxd service from starting.
Verify that any Windows host machine on which vCenter Server runs is synchronized with the Network
Time Server (NTP) server. See the Knowledge Base article http://kb.vmware.com/kb/1318.
To synchronize ESXi clocks with an NTP server, you can use the VMware Host Client. For information
about editing the time configuration of an ESXi host, see vSphere Single Host Management.
nSynchronize ESXi Clocks with a Network Time Server
Before you install vCenter Server or deploy the vCenter Server Appliance, make sure all machines
on your vSphere network have their clocks synchronized.
nConfiguring Time Synchronization Settings in the vCenter Server Appliance
You can change the time synchronization settings in the vCenter Server Appliance after deployment.
Synchronize ESXi Clocks with a Network Time Server
Before you install vCenter Server or deploy the vCenter Server Appliance, make sure all machines on
your vSphere network have their clocks synchronized.
VMware, Inc. 216
This task explains how to set up NTP from the VMware Host Client. You can instead use the vicfg-ntp
vCLI command. See the vSphere Command-Line Interface Reference.
Procedure
1Start the VMware Host Client, and connect to the ESXi host.
2Click Configure.
3Under System, click Time Configuration, and click Edit.
4Select Use Network Time Protocol (Enable NTP client).
5In the Add NTP Server text box, enter the IP address or fully qualified domain name of one or more
NTP servers to synchronize with.
6(Optional) Set the startup policy and service status.
7Click OK.
The host synchronizes with the NTP server.
Configuring Time Synchronization Settings in the
vCenter Server Appliance
You can change the time synchronization settings in the vCenter Server Appliance after deployment.
When you deploy the vCenter Server Appliance, you can choose the time synchronization method to be
either by using an NTP server or by using VMware Tools. In case the time settings in your vSphere
network change, you can edit the vCenter Server Appliance and configure the time synchronization
settings by using the commands in the appliance shell.
When you enable periodic time synchronization, VMware Tools sets the time of the guest operating
system to be the same as the time of the host.
After time synchronization occurs, VMware Tools checks once every minute to determine whether the
clocks on the guest operating system and the host still match. If not, the clock on the guest operating
system is synchronized to match the clock on the host.
Native time synchronization software, such as Network Time Protocol (NTP), is typically more accurate
than VMware Tools periodic time synchronization and is therefore preferred. You can use only one form of
periodic time synchronization in the vCenter Server Appliance. If you decide to use native time
synchronization software, vCenter Server Appliance VMware Tools periodic time synchronization is
disabled, and the reverse.
Use VMware Tools Time Synchronization
You can set up the vCenter Server Appliance to use VMware Tools time synchronization.
Procedure
1Access the appliance shell and log in as a user who has the administrator or super administrator role.
The default user with super administrator role is root.
vSphere Security
VMware, Inc. 217

2Run the command to enable VMware Tools time synchronization.
timesync.set --mode host
3(Optional) Run the command to verify that you successfully applied the VMware Tools time
synchronization.
timesync.get
The command returns that the time synchronization is in host mode.
The time of the appliance is synchronized with the time of the ESXi host.
Add or Replace NTP Servers in the vCenter Server Appliance Configuration
To set up the vCenter Server Appliance to use NTP-based time synchronization, you must add the NTP
servers to the vCenter Server Appliance configuration.
Procedure
1Access the appliance shell and log in as a user who has the administrator or super administrator role.
The default user with super administrator role is root.
2Add NTP servers to the vCenter Server Appliance configuration by running the ntp.server.add
command.
For example, run the following command:
ntp.server.add --servers IP-addresses-or-host-names
Here IP-addresses-or-host-names is a comma-separated list of IP addresses or host names of the
NTP servers.
This command adds NTP servers to the configuration. If the time synchronization is based on an NTP
server, then the NTP daemon is restarted to reload the new NTP servers. Otherwise, this command
just adds the new NTP servers to the existing NTP configuration.
3(Optional) To delete old NTP servers and add new ones to the vCenter Server Appliance
configuration, run the ntp.server.set command.
For example, run the following command:
ntp.server.set --servers IP-addresses-or-host-names
Here IP-addresses-or-host-names is a comma-separated list of IP addresses or host names of the
NTP servers.
This command deletes old NTP servers from the configuration and sets the input NTP servers in the
configuration. If the time synchronization is based on an NTP server, the NTP daemon is restarted to
reload the new NTP configuration. Otherwise, this command just replaces the servers in NTP
configuration with the servers that you provide as input.
vSphere Security
VMware, Inc. 218

4(Optional) Run the command to verify that you successfully applied the new NTP configuration
settings.
ntp.get
The command returns a space-separated list of the servers configured for NTP synchronization. If the
NTP synchronization is enabled, the command returns that the NTP configuration is in Up status. If
the NTP synchronization is disabled, the command returns that the NTP configuration is in Down
status.
What to do next
If the NTP synchronization is disabled, you can configure the time synchronization settings in the
vCenter Server Appliance to be based on an NTP server. See Synchronize the Time in the vCenter
Server Appliance with an NTP Server.
Synchronize the Time in the vCenter Server Appliance with an NTP Server
You can configure the time synchronization settings in the vCenter Server Appliance to be based on an
NTP server.
Prerequisites
Set up one or more Network Time Protocol (NTP) servers in the vCenter Server Appliance configuration.
See Add or Replace NTP Servers in the vCenter Server Appliance Configuration.
Procedure
1Access the appliance shell and log in as a user who has the administrator or super administrator role.
The default user with super administrator role is root.
2Run the command to enable NTP-based time synchronization.
timesync.set --mode NTP
3(Optional) Run the command to verify that you successfully applied the NTP synchronization.
timesync.get
The command returns that the time synchronization is in NTP mode.
Storage Security Best Practices
Follow best practices for storage security, as outlined by your storage security provider. You can also take
advantage of CHAP and mutual CHAP to secure iSCSI storage, mask and zone SAN resources, and
configure Kerberos credentials for NFS 4.1.
See also the Administering VMware vSAN documentation.
vSphere Security
VMware, Inc. 219

Securing iSCSI Storage
The storage you configure for a host might include one or more storage area networks (SANs) that use
iSCSI. When you configure iSCSI on a host, you can take measures to minimize security risks.
iSCSI supports accessing SCSI devices and exchanging data by using TCP/IP over a network port rather
than through a direct connection to a SCSI device. An iSCSI transaction encapsulates blocks of raw SCSI
data in iSCSI records and transmits the data to the requesting device or user.
iSCSI SANs support efficient use of the existing Ethernet infrastructure to provide hosts access to storage
resources that they can dynamically share. iSCSI SANs are an economical storage solution for
environments that rely on a common storage pool to serve many users. As with any networked system,
your iSCSI SANs can be subject to security breaches.
Note The requirements and procedures for securing an iSCSI SAN are similar for hardware iSCSI
adapters associated with hosts and for iSCSI configured directly through the host.
Securing iSCSI Devices
To secure iSCSI devices, require that the ESXi host, or initiator, can authenticate to the iSCSI device, or
target, whenever the host attempts to access data on the target LUN.
Authentication ensures that the initiator has the right to access a target. You grant this right when you
configure authentication on the iSCSI device.
ESXi does not support Secure Remote Protocol (SRP), or public-key authentication methods for iSCSI.
You can use Kerberos only with NFS 4.1.
ESXi supports both CHAP and Mutual CHAP authentication. The vSphere Storage documentation
explains how to select the best authentication method for your iSCSI device and how to set up CHAP.
Ensure uniqueness of CHAP secrets. Set up a different mutual authentication secret for each host. If
possible, set up a different secret for each client that to the ESXi host. Unique secrets ensure that an
attacker cannot create another arbitrary host and authenticate to the storage device even if one host is
compromised. With a shared secret, compromise of one host might allow an attacker to authenticate to
the storage device.
Protecting an iSCSI SAN
When you plan your iSCSI configuration, take measures to improve the overall security of the iSCSI SAN.
Your iSCSI configuration is only as secure as your IP network, so by enforcing good security standards
when you set up your network, you help safeguard your iSCSI storage.
The following are some specific suggestions for enforcing good security standards.
Protect Transmitted Data
A primary security risk in iSCSI SANs is that an attacker might sniff transmitted storage data.
vSphere Security
VMware, Inc. 220
Take additional measures to prevent attackers from easily seeing iSCSI data. Neither the hardware iSCSI
adapter nor ESXi iSCSI initiator encrypts the data that they transmit to and from the targets, making the
data more vulnerable to sniffing attacks.
Allowing your virtual machines to share standard switches and VLANs with your iSCSI configuration
potentially exposes iSCSI traffic to misuse by a virtual machine attacker. To help ensure that intruders
cannot listen to iSCSI transmissions, make sure that none of your virtual machines can see the iSCSI
storage network.
If you use a hardware iSCSI adapter, you can accomplish this by making sure that the iSCSI adapter and
ESXi physical network adapter are not inadvertently connected outside the host by virtue of sharing a
switch or some other means. If you configure iSCSI directly through the ESXi host, you can accomplish
this by configuring iSCSI storage through a different standard switch than the one used by your virtual
machines.
In addition to protecting the iSCSI SAN by giving it a dedicated standard switch, you can configure your
iSCSI SAN on its own VLAN to improve performance and security. Placing your iSCSI configuration on a
separate VLAN ensures that no devices other than the iSCSI adapter have visibility into transmissions
within the iSCSI SAN. Also, network congestion from other sources cannot interfere with iSCSI traffic.
Secure iSCSI Ports
When you run iSCSI devices, ESXi does not open any ports that listen for network connections. This
measure reduces the chances that an intruder can break into ESXi through spare ports and gain control
over the host. Therefore, running iSCSI does not present any additional security risks at the ESXi end of
the connection.
Any iSCSI target device that you run must have one or more open TCP ports to listen for iSCSI
connections. If any security vulnerabilities exist in the iSCSI device software, your data can be at risk
through no fault of ESXi. To lower this risk, install all security patches that your storage equipment
manufacturer provides and limit the devices connected to the iSCSI network.
Masking and Zoning SAN Resources
You can use zoning and LUN masking to segregate SAN activity and restrict access to storage devices.
You can protect access to storage in your vSphere environment by using zoning and LUN masking with
your SAN resources. For example, you might manage zones defined for testing independently within the
SAN so they do not interfere with activity in the production zones. Similarly, you might set up different
zones for different departments.
When you set up zones, take into account any host groups that are set up on the SAN device.
Zoning and masking capabilities for each SAN switch and disk array and the tools for managing LUN
masking are vendor specific.
See your SAN vendor's documentation and the vSphere Storage documentation.
Using Kerberos for NFS 4.1
With NFS version 4.1, ESXi supports the Kerberos authentication mechanism.
vSphere Security
VMware, Inc. 221

The RPCSEC_GSS Kerberos mechanism is an authentication service. It allows an NFS 4.1 client
installed on ESXi to prove its identity to an NFS server before mounting an NFS share. The Kerberos
security uses cryptography to work across an insecure network connection.
The ESXi implementation of Kerberos for NFS 4.1 provides two security models, krb5 and krb5i, that offer
different levels of security.
nKerberos for authentication only (krb5) supports identity verification.
nKerberos for authentication and data integrity (krb5i), in addition to identity verification, provides data
integrity services. These services help to protect the NFS traffic from tampering by checking data
packets for any potential modifications.
Kerberos supports cryptographic algorithms that prevent unauthorized users from gaining access to NFS
traffic. The NFS 4.1 client on ESXi attempts to use either the AES256-CTS-HMAC-SHA1-96 or AES128-
CTS-HMAC-SHA1-96 algorithm to access a share on the NAS server. Before using your NFS 4.1
datastores, make sure that AES256-CTS-HMAC-SHA1-96 or AES128-CTS-HMAC-SHA1-96 are enabled
on the NAS server.
The following table compares Kerberos security levels that ESXi supports.
Table 11‑1. Types of Kerberos Security
ESXi 6.0 ESXi 6.5 and later
Kerberos for authentication
only (krb5)
Integrity checksum for RPC
header
Yes with DES Yes with AES
Integrity checksum for RPC
data
No No
Kerberos for authentication and
data integrity (krb5i)
Integrity checksum for RPC
header
No krb5i Yes with AES
Integrity checksum for RPC
data
Yes with AES
When you use Kerberos authentication, the following considerations apply:
nESXi uses Kerberos with the Active Directory domain.
nAs a vSphere administrator, you specify Active Directory credentials to provide access to NFS 4.1
Kerberos datastores for an NFS user. A single set of credentials is used to access all Kerberos
datastores mounted on that host.
nWhen multiple ESXi hosts share the NFS 4.1 datastore, you must use the same Active Directory
credentials for all hosts that access the shared datastore. To automate the assignment process, set
the user in host profiles and apply the profile to all ESXi hosts.
nYou cannot use two security mechanisms, AUTH_SYS and Kerberos, for the same NFS 4.1 datastore
shared by multiple hosts.
See the vSphere Storage documentation for step-by-step instructions.
vSphere Security
VMware, Inc. 222

Verify That Sending Host Performance Data to Guests Is
Disabled
vSphere includes virtual machine performance counters on Windows operating systems where VMware
Tools is installed. Performance counters allow virtual machine owners to do accurate performance
analysis within the guest operating system. By default, vSphere does not expose host information to the
guest virtual machine.
By default, the capability to send host performance data to a virtual machine is disabled. This default
setting prevents a virtual machine from obtaining detailed information about the physical host. If a security
breach of the virtual machine occurs, the setting does not make host data available to the attacker.
Note The procedure below illustrates the basic process. Consider using one of the vSphere command-
line interfaces (vCLI, PowerCLI, and so on) for performing this task on all hosts simultaneously.
Procedure
1On the ESXi system that hosts the virtual machine, browse to the VMX file.
Virtual machine configuration files are located in the /vmfs/volumes/datastore directory, where
datastore is the name of the storage device where the virtual machine files are stored.
2In the VMX file, verify that the following parameter is set.
tools.guestlib.enableHostInfo=FALSE
3Save and close the file.
You cannot retrieve performance information about the host from inside the guest virtual machine.
Setting Timeouts for the ESXi Shell and
vSphere Web Client
To prevent intruders from using an idle session, be sure to set timeouts for the ESXi Shell and
vSphere Web Client.
vSphere Security
VMware, Inc. 223
ESXi Shell Timeout
For the ESXi Shell, you can set the following timeouts from the vSphere Web Client and from the Direct
Console User Interface (DCUI).
Availability Timeout The availability timeout setting is the amount of time that can elapse before
you must log in after the ESXi Shell is enabled. After the timeout period, the
service is disabled and users are not allowed to log in.
Idle Timeout The idle timeout is the amount of time that can elapse before the user is
logged out of an idle interactive sessions. Changes to the idle timeout apply
the next time a user logs in to the ESXi Shell. Changes do not affect
existing sessions.
vSphere Web Client Timeout
vSphere Web Client sessions terminate after 120 minutes by default. You can change this default in the
webclient.properties file, as discussed in the vCenter Server and Host Management documentation.
vSphere Security
VMware, Inc. 224

Managing TLS Protocol
Configuration with the TLS
Configurator Utility 12
Starting with vSphere 6.7, only TLS 1.2 is enabled by default. TLS 1.0 and TLS 1.1 are disabled by
default. Whether you do a fresh install, upgrade, or migration, vSphere 6.7 disables TLS 1.0 and TLS 1.1.
You can use the TLS Configurator utility to enable older versions of the protocol temporarily on vSphere
6.7 systems. You can then disable the older less secure versions after all connections use TLS 1.2.
Note Starting with vSphere 6.7, the TLS Configurator utility is included in the product. You no longer
download it separately.
Before you perform a reconfiguration, consider your environment. Depending on your environmental
requirements and software versions, you might need to re-enable TLS 1.0 and TLS 1.1, in addition to TLS
1.2, to maintain interoperability. For VMware products, consult VMware Knowledge Base article 2145796
for a list of VMware products that support TLS 1.2. For third-party integration, consult your vendor's
documentation.
This chapter includes the following topics:
nPorts That Support Disabling TLS Versions
nEnabling or Disabling TLS Versions in vSphere
nPerform an Optional Manual Backup
nEnable or Disable TLS Versions on vCenter Server Systems
nEnable or Disable TLS Versions on ESXi Hosts
nEnable or Disable TLS Versions on External Platform Services Controller Systems
nScan vCenter Server for Enabled TLS Protocols
nRevert TLS Configuration Changes
nEnable or Disable TLS Versions on vSphere Update Manager on Windows
Ports That Support Disabling TLS Versions
When you run the TLS Configurator utility in the vSphere environment, you can disable TLS across ports
that use TLS on vCenter Server, Platform Services Controller, and ESXi hosts. You can disable TLS 1.0
or both TLS 1.0 and TLS 1.1.
The following table lists the ports. If a port is not included, the utility does not affect it.
VMware, Inc. 225

Table 12‑1. vCenter Server and Platform Services Controller Aected by the TLS Configurator
Utility
Service Windows-based vCenter Server
vCenter Server Virtual
Appliance Port
VMware HTTP Reverse Proxy rhttpproxy vmware-rhttpproxy 443
VMware vCenter Server Service vpxd vmware-vpxd 443
VMware Directory Service VMWareDirectoryService vmdird 636
VMware Syslog Collector vmwaresyslogcollector rsyslogd (*) 1514
VMware Appliance Management
Interface
N.A. vami-lighttp (*) 5480
vSphere Auto Deploy Waiter vmware-autodeploy-waiter vmware-rbd-watchdog 6501
6502
VMware Secure Token Service VMwareSTS vmware-stsd 7444
vSphere Authentication Proxy VMWareCAMService vmcam 7476
vSphere Update Manager Service vmware-ufad-vci vmware-updatemgr (*) 8084
9087
vSphere Web Client vspherewebclientsvc vsphere-client 9443
VMware vSphere Profile-Driven
Storage Service
vimPBSM vmware-sps Random
port greater
than 1024
(*) You can reconfigure these services only on vCenter Server Virtual Appliance. On vCenter Server on
Windows, you reconfigure TLS for Update Manager ports by editing configuration files. See Enable or
Disable TLS Versions on vSphere Update Manager on Windows.
Table 12‑2. ESXi Ports Aected by the TLS Configurator Utility
Service Service Name Port
VMware HTTP Reverse Proxy and Host Daemon Hostd 443
VMware vSAN VASA Vendor Provider vSANVP 8080
VMware Fault Domain Manager FDM 8182
VMware vSphere API for IO Filters ioFilterVPServer 9080
ESXi WBEM Service sfcbd-watchdog 5989
ESXi vVold Client Service vvold Random
port
greater
than
1024
Notes and Caveats
nStarting with vSphere 6.7, you can use TLS 1.2 to encrypt the connection between vCenter Server
and an external Microsoft SQL Server.
vSphere Security
VMware, Inc. 226
nYou cannot use a TLS 1.2 only connection to an external Oracle database. See VMware Knowledge
Base article 2149745.
nDo not disable TLS 1.0 on a vCenter Server or Platform Services Controller instance that is running
on Windows Server 2008. Windows 2008 supports only TLS 1.0. See the Microsoft TechNet Article
TLS/SSL Settings in the Server Roles and Technologies Guide.
nIf you change the TLS protocols, you must restart the ESXi host to apply the changes. You must
restart the host even if you apply the changes through cluster configuration by using host profiles. You
can choose to restart the host immediately, or postpone the restart to a more convenient time.
Enabling or Disabling TLS Versions in vSphere
Disabling TLS versions is a multi-phase process. Disabling TLS versions in the right order ensures that
your environment stays up and running during the process.
1 If your environment includes vSphere Update Manager on Windows, and vSphere Update Manager is
on a separate system, disable protocols explicitly by editing configuration files. See Enable or Disable
TLS Versions on vSphere Update Manager on Windows.
vSphere Update Manager on the vCenter Server Appliance is always included with the
vCenter Server system and the script updates the corresponding port.
2 Run the utility on vCenter Server.
3 Run the utility on each ESXi host that is managed by the vCenter Server. You can perform this task
for each host or for all hosts in a cluster.
4 If your environment uses one or more Platform Services Controller instances, run the utility on each
instance.
Prerequisites
You have two choices for using TLS in your environment.
nDisable TLS 1.0, and enable TLS 1.1 and TLS 1.2.
nDisable TLS 1.0 and TLS 1.1, and enable TLS 1.2.
Perform an Optional Manual Backup
The TLS Configuration utility performs a backup each time the script modifies vCenter Server,
Platform Services Controller, or vSphere Update Manager on the vCenter Server Appliance. If you need a
backup to a specific directory, you can perform a manual backup.
Backup of the ESXi configuration is not supported.
For vCenter Server or Platform Services Controller, the default directory differs for Windows and the
appliance.
vSphere Security
VMware, Inc. 227

OS Backup Directory
Windows c:\users\current_user\appdata\local\temp\yearmonthdayTtime
Linux /tmp/yearmonthdayTtime
Procedure
1Change directory to VcTlsReconfigurator.
OS Command
Windows cd %VMWARE_CIS_HOME%\TlsReconfigurator\VcTlsReconfigurator
Linux cd /usr/lib/vmware-TlsReconfigurator/VcTlsReconfigurator
2To make a backup to a specific directory, run the following command.
OS Command
Windows directory_path\VcTlsReconfigurator> reconfigureVc backup -d
backup_directory_path
Linux directory_path/VcTlsReconfigurator> ./reconfigureVc backup -d
backup_directory_path
3Verify that the backup was successful.
A successful backup looks similar to the following example.
vCenter Transport Layer Security reconfigurator, version=6.7.0, build=8070195
For more information refer to the following article: https://kb.vmware.com/kb/2147469
Log file: "/var/log/vmware/vSphere-TlsReconfigurator/VcTlsReconfigurator.log".
================= Backing up vCenter Server TLS configuration ==================
Using backup directory: /tmp/20180422T224804
Backing up: vmware-sps
Backing up: vmdird
Backing up: vmware-rbd-watchdog
Backing up: vmware-vpxd
Backing up: vmware-updatemgr
Backing up: vmcam
Backing up: vsphere-client
Backing up: vami-lighttp
Backing up: rsyslog
Backing up: vmware-rhttpproxy
Backing up: vmware-stsd
4(Optional) If you later have to perform a restore, you can run the following command.
reconfigureVc restore -d optional_custom_backup_directory_path
vSphere Security
VMware, Inc. 228

Enable or Disable TLS Versions on vCenter Server
Systems
You can use the TLS Configuration utility to enable or disable TLS versions on vCenter Server systems
with an external Platform Services Controller and on vCenter Server systems with an embedded
Platform Services Controller. As part of the process, you can disable TLS 1.0, and enable TLS 1.1 and
TLS 1.2. Or, you can disable TLS 1.0 and TLS 1.1, and enable only TLS 1.2.
Prerequisites
Ensure that the hosts and services that the vCenter Server manages can communicate using a version of
TLS that remains enabled. For products that communicate only using TLS 1.0, connectivity becomes
unavailable.
Procedure
1Log in to the vCenter Server system with the user name and password for
administrator@vsphere.local, or as another member of the vCenter Single Sign-On Administrators
group who can run scripts.
2Go to the directory where the script is located.
OS Command
Windows cd %VMWARE_CIS_HOME%\TlsReconfigurator\VcTlsReconfigurator
Linux cd /usr/lib/vmware-TlsReconfigurator/VcTlsReconfigurator
3Run the command, depending on your operating system and on which version of TLS you want to
use.
nTo disable TLS 1.0 and enable both TLS 1.1 and TLS 1.2, run the following command.
OS Command
Windows directory_path\VcTlsReconfigurator> reconfigureVc update -p TLSv1.1 TLSv1.2
Linux directory_path/VcTlsReconfigurator> ./reconfigureVc update -p TLSv1.1 TLSv1.2
nTo disable TLS 1.0 and TLS 1.1, and enable only TLS 1.2, run the following command.
OS Command
Windows directory_path\VcTlsReconfigurator> reconfigureVc update -p TLSv1.2
Linux directory_path/VcTlsReconfigurator> ./reconfigureVc update -p TLSv1.2
vSphere Security
VMware, Inc. 229

4If your environment includes other vCenter Server systems, repeat the process on each
vCenter Server system.
5Repeat the configuration on each ESXi host and each Platform Services Controller.
Enable or Disable TLS Versions on ESXi Hosts
You can use the TLS Configuration utility to enable or disable TLS versions on an ESXi host. As part of
the process, you can disable TLS 1.0, and enable TLS 1.1 and TLS 1.2. Or, you can disable TLS 1.0 and
TLS 1.1, and enable only TLS 1.2.
For ESXi hosts, you use a different utility than for the other components of your vSphere environment.
The utility is release-specific, and cannot be used on a previous release.
Prerequisites
Ensure that any products or services associated with the ESXi host can communicate using TLS 1.1 or
TLS 1.2. For products that communicate only using TLS 1.0, connectivity is lost.
This procedure explains how to perform the task on a single host. You can write a script to configure
multiple hosts.
Procedure
1Log in to the vCenter Server system with the user name and password of the vCenter Single Sign-On
user who can run scripts.
2Go to the directory where the script is located.
OS Command
Windows cd %VMWARE_CIS_HOME%\TlsReconfigurator\EsxTlsReconfigurator
Linux cd /usr/lib/vmware-TlsReconfigurator/EsxTlsReconfigurator
vSphere Security
VMware, Inc. 230

3On a host that is part of a cluster, run one of the following commands.
nTo disable TLS 1.0 and enable both TLS 1.1 and TLS 1.2 on all hosts in a cluster, run the
following command.
OS Command
Windows reconfigureEsx vCenterCluster -c Cluster_Name -u Administrative_User -p TLSv1.1
TLSv1.2
Linux ./reconfigureEsx vCenterCluster -c Cluster_Name -u Administrative_User -p TLSv1.1
TLSv1.2
nTo disable TLS 1.0 and TLS 1.1, and enable only TLS 1.2 on all hosts in a cluster, run the
following command.
OS Command
Windows reconfigureEsx vCenterCluster -c Cluster_Name -u Administrative_User -p TLSv1.2
Linux ./reconfigureEsx vCenterCluster -c Cluster_Name -u Administrative_User -p TLSv1.2
vSphere Security
VMware, Inc. 231

4On an individual host, run one of the following commands.
nTo disable TLS 1.0 and enable both TLS 1.1 and TLS 1.2 on an individual host, run the following
command.
OS Command
Windows reconfigureEsx vCenterHost -h ESXi_Host_Name -u Administrative_User -p TLSv1.1
TLSv1.2
Linux ./reconfigureEsx vCenterHost -h ESXi_Host_Name -u Administrative_User -p TLSv1.1
TLSv1.2
Note To reconfigure a standalone ESXi host (one that is not part of a vCenter Server system),
use the ESXiHost -h HOST -u ESXi_USER options. For the HOST option, you can specify the
IP address or FQDN of a single ESXi host, or a list of host IP addresses or FQDNs. For example,
to enable both TLS 1.1 and TLS 1.2 on two ESXi hosts:
reconfigureEsx ESXiHost -h 198.51.100.2 198.51.100.3 -u root -p TLSv1.1 TLSv1.2
nTo disable TLS 1.0 and TLS 1.1, and enable only TLS 1.2 on an individual host, run the following
command.
OS Command
Windows reconfigureEsx vCenterHost -h ESXi_Host_Name -u Administrative_User -p TLSv1.2
Linux ./reconfigureEsx vCenterHost -h ESXi_Host_Name -u Administrative_User -p TLSv1.2
5Reboot the ESXi host to complete the TLS protocol changes.
Enable or Disable TLS Versions on External Platform
Services Controller Systems
If your environment includes one or more Platform Services Controller systems, you can use the TLS
Configuration utility to change which versions of TLS are supported.
If your environment uses only an embedded Platform Services Controller, you previously completed this
task during the vCenter Server process. See Enable or Disable TLS Versions on vCenter Server
Systems.
Note Proceed with this task only after you confirm that each vCenter Server system is running a
compatible version of TLS.
As part of the process, you can disable TLS 1.0, and enable TLS 1.1 and TLS 1.2. Or, you can disable
TLS 1.0 and TLS 1.1, and enable only TLS 1.2.
vSphere Security
VMware, Inc. 232

Prerequisites
Ensure that the applications, hosts, and services that connect to the Platform Services Controller are
eligible or configured to communicate by using a version of TLS that remains enabled. Because the
Platform Services Controller handles authentication and certificate management, consider carefully which
services might be affected. For services that communicate only using unsupported protocols, connectivity
becomes unavailable.
Procedure
1Log in to the Platform Services Controller as a user who can run scripts and go to the directory where
the script is located.
OS Command
Windows cd %VMWARE_CIS_HOME%\TlsReconfigurator\VcTlsReconfigurator
Linux cd /usr/lib/vmware-TlsReconfigurator/VcTlsReconfigurator
2You can perform the task on Platform Services Controller on Windows or on the
Platform Services Controller appliance.
nTo disable TLS 1.0 and enable both TLS 1.1 and TLS 1.2, run the following command.
OS Command
Windows directory_path\VcTlsReconfigurator> reconfigureVc update -p TLSv1.1 TLSv1.2
Linux directory_path\VcTlsReconfigurator> ./reconfigureVc update -p TLSv1.1 TLSv1.2
nTo disable TLS 1.0 and TLS 1.1, and enable only TLS 1.2, run the following command.
OS Command
Windows directory_path\VcTlsReconfigurator> reconfigureVc update -p TLSv1.2
Linux directory_path\VcTlsReconfigurator> ./reconfigureVc update -p TLSv1.2
3If your environment includes other Platform Services Controller systems, repeat the process.
Scan vCenter Server for Enabled TLS Protocols
After you enable or disable TLS versions on vCenter Server, you can use the TLS Configuration utility to
view your changes.
The TLS Configuration utility scan option displays which versions of TLS are enabled for each service.
vSphere Security
VMware, Inc. 233

Procedure
1Log in to the vCenter Server system.
OS Procedure
Windows a Log in as a user with Administrator privileges.
b Go to the VcTlsReconfigurator directory.
cd %VMWARE_CIS_HOME%\TlsReconfigurator\VcTlsReconfigurator
Linux a Connect to the appliance using SSH and log in as a user who has privileges
to run scripts.
b If the Bash shell is not currently enabled, run the following commands.
shell.set --enabled true
shell
c Go to the VcTlsReconfigurator directory.
cd /usr/lib/vmware-TlsReconfigurator/VcTlsReconfigurator
2To display which services have TLS enabled, and the ports used, run the following command.
reconfigureVc scan
Revert TLS Configuration Changes
You can use the TLS Configuration utility to revert configuration changes. When you revert the changes,
the system enables protocols that you disabled using TLS Configurator utility.
You can only perform a recovery if you previously backed up the configuration. Reverting changes is not
supported for ESXi hosts.
Perform recovery in this order.
1 vSphere Update Manager.
If your environment runs a separate vSphere Update Manager instance on a Windows system, you
must update vSphere Update Manager first.
2 vCenter Server.
3 Platform Services Controller.
Prerequisites
Before reverting changes, use the vCenter Server Appliance interface to perform a backup of the
Windows machine or appliance.
Procedure
1Connect to the Windows machine or the appliance.
vSphere Security
VMware, Inc. 234

2Log in to the system where you want to revert changes.
Option Description
Windows a Log in as a user with Administrator privileges.
b Go to the VcTlsReconfigurator directory.
cd %VMWARE_CIS_HOME%\TlsReconfigurator\VcTlsReconfigurator
Linux a Connect to the appliance using SSH and log in as a user who has privileges
to run scripts.
b If the Bash shell is not currently enabled, run the following commands.
shell.set --enabled true
shell
c Go to the VcTlsReconfigurator directory.
cd /usr/lib/vmware-TlsReconfigurator/VcTlsReconfigurator
3Review the previous backup.
Option Description
Windows C:\ProgramData\VMware\vCenterServer\logs\vmware\vSphere-
TlsReconfigurator\VcTlsReconfigurator.log
The output looks like the following example.
c:\users\username\appdata\local\temp\20161108T161539
c:\users\username\appdata\local\temp\20161108T171539
Linux grep "backup directory" /var/log/vmware/vSphere-
TlsReconfigurator/VcTlsReconfigurator.log
The output looks like the following example.
2016-11-17T17:29:20.950Z INFO Using backup
directory: /tmp/20161117T172920
2016-11-17T17:32:59.019Z INFO Using backup
directory: /tmp/20161117T173259
vSphere Security
VMware, Inc. 235

4Run one of the following commands to perform a restore.
Option Description
Windows reconfigureVc restore -d Directory_path_from_previous_step
For example:
reconfigureVc restore -d
c:\users\username\appdata\local\temp\20161108T171539
Linux reconfigureVc restore -d Directory_path_from_previous_step
For example:
reconfigureVc restore -d /tmp/20161117T172920
5Repeat the procedure on any other vCenter Server instances.
6Repeat the procedure on any other Platform Services Controller instances.
Enable or Disable TLS Versions on vSphere Update
Manager on Windows
In vSphere Update Manager 6.7, TLS 1.2 is enabled by default. TLS 1.0 and TLS 1.1 are disabled by
default. You can enable TLS version 1.0 and TLS version 1.1, but you cannot disable TLS version 1.2.
You can manage the TLS protocol configuration for other services by using the TLS Configuration Utility.
For vSphere Update Manager on Windows, however, you must reconfigure the TLS protocol manually.
Modifying the TLS protocol configuration might involve any of the following tasks.
nDisabling TLS version 1.0 while leaving TLS version 1.1 and TLS version 1.2 enabled.
nDisabling TLS version 1.0 and TLS version 1.1 while leaving TLS version 1.2 enabled.
nRe-enabling a disabled TLS protocol version.
Disable Earlier TLS Versions for Update Manager Port 9087
You can disable earlier versions of TLS for port 9087 by modifying the jetty-vum-ssl.xml configuration
file. The process is different for Port 8084.
Note Before you disable a TLS version, make sure that none of the services that communicate with
vSphere Update Manager use that version.
Prerequisites
Stop the vSphere Update Manager service. See the Installing and Administering VMware vSphere
Update Manager documentation.
vSphere Security
VMware, Inc. 236

Procedure
1Stop the vSphere Update Manager service.
2Navigate to the Update Manager installation directory, which is different for vSphere 6.0 and vSphere
6.5 and later.
Version Location
vSphere 6.0 C:\Program Files (x86)\VMware\Infrastructure\Update Manager
vSphere 6.5 and later C:\Program Files\VMware\Infrastructure\Update Manager
3Make a backup of the jetty-vum-ssl.xml file and open the file.
4Disable earlier versions of TLS by changing the file.
Option Description
Disable TLS 1.0. Leave TLS 1.1 and
TLS 1.2 enabled. <Set name="ExcludeProtocols">
<Array type="java.lang.String">
<Item>TLSv1</Item>
</Array>
</Set>
Disable TLS 1.0 and TLS 1.1. Leave
TLS 1.2 enabled. <Set name="ExcludeProtocols">
<Array type="java.lang.String">
<Item>TLSv1</Item>
<Item>TLSv1.1</Item>
</Array>
</Set>
5Save the file.
6Restart the vSphere Update Manager service.
Disable Earlier TLS Versions for Update Manager Port 8084
You can disable earlier versions of TLS for port 8084 by modifying the vci-integrity.xmlconfiguration
file. The process is different for Port 9087.
Note Before you disable a TLS version, make sure that none of the services that communicate with
vSphere Update Manager use that version.
Prerequisites
Stop the vSphere Update Manager service. See the Installing and Administering VMware vSphere
Update Manager documentation.
Procedure
1Stop the vSphere Update Manager service.
vSphere Security
VMware, Inc. 237
2Navigate to the Update Manager installation directory, which is different for 6.0 and 6.5 and later.
Version Location
vSphere 6.0 C:\Program Files (x86)\VMware\Infrastructure\Update Manager
vSphere 6.5 and later C:\Program Files\VMware\Infrastructure\Update Manager
3Make a backup of the vci-integrity.xml file and open the file.
4Edit the vci-integrity.xml file and add a <protocols> tag.
<vmacore>
<ssl>
<handshakeTimeoutMs>120000</handshakeTimeoutMS>
<protocols>protocols_value</protocols>
</ssl>
</vmacore>
5Depending on the TLS version that you want to enable, use one of the following values in the
<procotols> tag.
TLS Versions to Enable Use...
All tls1.0,tls1.1,tls1.2.
Only TLSv1.1 and TLSv.1.2 tls.1.1,tls1.2.
Only TLSv1.2 tls1.2, or do not include a protocols tag. Because the default is TLS 1.2, no protocols tag
is present to start with in vmacore.
6(Optional) Starting from vSphere 6.0 Update 2, you might have an <sslOptions> tag.
If so, remove the <sslOptions> tag.
7Save the vci-integrity.xml file.
8Restart the vSphere Update Manager service.
Reenable Disabled TLS Versions for Update Manager Port 9087
If you disable a version of TLS for Update Manager Port 9087 and you encounter problems, you can
reenable the version. The process is different for reenabling port 8084.
Reenabling an earlier version of TLS has security implications.
Procedure
1Stop the vSphere Update Manager service.
2Navigate to the Update Manager installation directory which is different for 6.0 and 6.5 and later.
Version Location
vSphere 6.0 C:\Program Files (x86)\VMware\Infrastructure\Update Manager
vSphere 6.5 and later C:\Program Files\VMware\Infrastructure\Update Manager
vSphere Security
VMware, Inc. 238
3Make a backup of the jetty-vum-ssl.xml file and open the file.
4Remove the TLS tag that corresponds to the TLS protocol version that you want to enable.
For example, remove <Item>TLSv1.1</Item> in the jetty-vum-ssl.xml file to enable TLSv1.1.
5Save the file.
6Restart the vSphere Update Manager service.
Reenable Disabled TLS Versions for Update Manager Port 8084
If you disable a version of TLS for Update Manager Port 8084 and you encounter problems, you can
reenable the version. The process is different for port 9087.
Reenabling an earlier version of TLS has security implications.
Procedure
1Stop the vSphere Update Manager service.
2Navigate to the Update Manager installation directory, which is different for 6.0 and 6.5 and later.
Version Location
vSphere 6.0 C:\Program Files (x86)\VMware\Infrastructure\Update Manager
vSphere 6.5 and later C:\Program Files\VMware\Infrastructure\Update Manager
3Make a backup of the vci-integrity.xml file and open the file.
4Edit the <protocols> tag.
<vmacore>
<ssl>
<handshakeTimeoutMs>120000</handshakeTimeoutMS>
<protocols>protocols_value</protocols>
</ssl>
</vmacore>
5Depending on the TLS version that you want to enable, use one of the following values in the
<procotols> tag.
TLS Versions to Enable Use...
All tls1.0,tls1.1,tls1.2.
Only TLSv1.1 and TLSv.1.2 tls.1.1,tls1.2.
Only TLSv1.2 tls1.2, or do not include a protocols tag. Because the default is TLS 1.2, no protocols tag
is present to start with in vmacore.
6Save the vci-integrity.xml file.
7Restart the vSphere Update Manager service.
vSphere Security
VMware, Inc. 239
Defined Privileges 13
The following tables list the default privileges that, when selected for a role, can be paired with a user and
assigned to an object.
When setting permissions, verify all the object types are set with appropriate privileges for each particular
action. Some operations require access permission at the root folder or parent folder in addition to access
to the object being manipulated. Some operations require access or performance permission at a parent
folder and a related object.
vCenter Server extensions might define additional privileges not listed here. Refer to the documentation
for the extension for more information on those privileges.
This chapter includes the following topics:
nAlarms Privileges
nAuto Deploy and Image Profile Privileges
nCertificates Privileges
nContent Library Privileges
nCryptographic Operations Privileges
nDatacenter Privileges
nDatastore Privileges
nDatastore Cluster Privileges
nDistributed Switch Privileges
nESX Agent Manager Privileges
nExtension Privileges
nExternal Stats Provider Privileges
nFolder Privileges
nGlobal Privileges
nHealth Update Provider Privileges
nHost CIM Privileges
nHost Configuration Privileges
VMware, Inc. 240
nHost Inventory
nHost Local Operations Privileges
nHost vSphere Replication Privileges
nHost Profile Privileges
nNetwork Privileges
nPerformance Privileges
nPermissions Privileges
nProfile-driven Storage Privileges
nResource Privileges
nScheduled Task Privileges
nSessions Privileges
nStorage Views Privileges
nTasks Privileges
nTransfer Service Privileges
nVirtual Machine Configuration Privileges
nVirtual Machine Guest Operations Privileges
nVirtual Machine Interaction Privileges
nVirtual Machine Inventory Privileges
nVirtual Machine Provisioning Privileges
nVirtual Machine Service Configuration Privileges
nVirtual Machine Snapshot Management Privileges
nVirtual Machine vSphere Replication Privileges
ndvPort Group Privileges
nvApp Privileges
nvServices Privileges
nvSphere Tagging Privileges
Alarms Privileges
Alarms privileges control the ability to create, modify, and respond to alarms on inventory objects.
You can set this privilege at different levels in the hierarchy. For example, if you set a privilege at the
folder level, you can propagate the privilege to one or more objects within the folder. The object listed in
the Required On column must have the privilege set, either directly or inherited.
vSphere Security
VMware, Inc. 241

Table 13‑1. Alarms Privileges
Privilege Name Description Required On
Alarms.Acknowledge alarm Allows suppression of all alarm actions on
all triggered alarms.
Object on which an alarm is defined
Alarms.Create alarm Allows creation of a new alarm.
When creating alarms with a custom action,
privilege to perform the action is verified
when the user creates the alarm.
Object on which an alarm is defined
Alarms.Disable alarm action Allows stopping an alarm action from
occurring after an alarm has been triggered.
This does not disable the alarm.
Object on which an alarm is defined
Alarms.Modify alarm Allows changing the properties of an alarm. Object on which an alarm is defined
Alarms.Remove alarm Allows deletion of an alarm. Object on which an alarm is defined
Alarms.Set alarm status Allows changing the status of the configured
event alarm. The status can change to
Normal, Warning, or Alert.
Object on which an alarm is defined
Auto Deploy and Image Profile Privileges
Auto Deploy privileges control who can perform different tasks on Auto Deploy rules, and who can
associate a host. Auto Deploy privileges also allow you to control who can create or edit an image profile.
The table describes privileges that determine who can manage Auto Deploy rules and rule sets and who
can create and edit image profiles. See vCenter Server Installation and Setup.
You can set this privilege at different levels in the hierarchy. For example, if you set a privilege at the
folder level, you can propagate the privilege to one or more objects within the folder. The object listed in
the Required On column must have the privilege set, either directly or inherited.
Table 13‑2. Auto Deploy Privileges
Privilege Name
Descripti
on Required On
Auto Deploy.Host.AssociateMachine Allows
users to
associate
a host with
a
machine.
vCenter Server
Auto Deploy.Image Profile.Create Allows
creation of
image
profiles.
vCenter Server
Auto Deploy.Image Profile.Edit Allows
editing of
image
profiles.
vCenter Server
vSphere Security
VMware, Inc. 242

Table 13‑2. Auto Deploy Privileges (Continued)
Privilege Name
Descripti
on Required On
Auto Deploy.Rule.Create Allows
creation of
Auto
Deploy
rules.
vCenter Server
Auto Deploy.Rule.Delete Allows
deletion of
Auto
Deploy
rules.
vCenter Server
Auto Deploy.Rule.Edit Allows
editing of
Auto
Deploy
rules.
vCenter Server
Auto Deploy.RuleSet.Activate Allows
activation
of Auto
Deploy
rule sets.
vCenter Server
Auto Deploy.RuleSet.Edit Allows
editing of
Auto
Deploy
rule sets.
vCenter Server
Certificates Privileges
Certificates privileges control which users can manage ESXi certificates.
This privilege determines who can perform certificate management for ESXi hosts. See Required
Privileges for Certificate Management Operations in the Platform Services Controller Administration
documentation for information on vCenter Server certificate management.
You can set this privilege at different levels in the hierarchy. For example, if you set a privilege at the
folder level, you can propagate the privilege to one or more objects within the folder. The object listed in
the Required On column must have the privilege set, either directly or inherited.
Table 13‑3. Host Certificates Privileges
Privilege Name Description Required On
Certificates.Manage
Certificates
Allows certificate management for ESXi hosts. vCenter Server
vSphere Security
VMware, Inc. 243

Content Library Privileges
Content Libraries provide simple and effective management for virtual machine templates and vApps.
Content library privileges control who can view or manage different aspects of content libraries.
You can set this privilege at different levels in the hierarchy. For example, if you set a privilege at the
folder level, you can propagate the privilege to one or more objects within the folder. The object listed in
the Required On column must have the privilege set, either directly or inherited.
Table 13‑4. Content Library Privileges
Privilege Name Description Required On
Content library.Add library
item
Allows addition of items in a library. Library
Content library.Create
local library
Allows creation of local libraries on the specified vCenter Server
system.
vCenter Server
Content library.Create
subscribed library
Allows creation of subscribed libraries. vCenter Server
Content library.Delete
library item
Allows deletion of library items. Library. Set this
permission to propagate to
all library items.
Content library.Delete local
library
Allows deletion of a local library. Library
Content library.Delete
subscribed library
Allows deletion of a subscribed library. Library
Content library.Download
files
Allows download of files from the content library. Library
Content library.Evict
library item
Allows eviction of items. The content of a subscribed library can be
cached or not cached. If the content is cached, you can release a
library item by evicting it if you have this privilege.
Library. Set this
permission to propagate to
all library items.
Content library.Evict
subscribed library
Allows eviction of a subscribed library. The content of a subscribed
library can be cached or not cached. If the content is cached, you can
release a library by evicting it if you have this privilege.
Library
Content library.Import
Storage
Allows a user to import a library item if the source file URL starts with
ds:// or file://. This privilege is disabled for content library
administrator by default. Because an import from a storage URL
implies import of content, enable this privilege only if necessary and if
now security concern exists for the user who will perform the import.
Library
Content library.Probe
subscription information
This privilege allows solution users and APIs to probe a remote
library's subscription info including URL, SSL certificate, and
password. The resulting structure describes whether the subscription
configuration is successful or whether there are problems such as
SSL errors.
Library
Content library.Read
storage
Allows reading of content library storage. Library
vSphere Security
VMware, Inc. 244

Table 13‑4. Content Library Privileges (Continued)
Privilege Name Description Required On
Content library.Sync
library item
Allows synchronization of library items. Library. Set this
permission to propagate to
all library items.
Content library.Sync
subscribed library
Allows synchronization of subscribed libraries. Library
Content library.Type
introspection
Allows a solution user or API to introspect the type support plugins for
the content library service.
Library
Content library.Update
configuration settings
Allows you to update the configuration settings.
No vSphere Web Client user interface elements are associated with
this privilege.
Library
Content library.Update
files
Allows you to upload content into the content library. Also allows you
to remove files from a library item.
Library
Content library.Update
library
Allows updates to the content library. Library
Content library.Update
library item
Allows updates to library items. Library. Set this
permission to propagate to
all library items.
Content library.Update
local library
Allows updates of local libraries. Library
Content library.Update
subscribed library
Allows you to update the properties of a subscribed library. Library
Content library.View
configuration settings
Allows you to view the configuration settings.
No vSphere Web Client user interface elements are associated with
this privilege.
Library
Cryptographic Operations Privileges
Cryptographic operations privileges control who can perform which type of cryptographic operation on
which type of object.
You can set this privilege at different levels in the hierarchy. For example, if you set a privilege at the
folder level, you can propagate the privilege to one or more objects within the folder. The object listed in
the Required On column must have the privilege set, either directly or inherited.
Table 13‑5. Cryptographic Operations Privileges
Privilege Name Description Required On
Cryptographic operations.Direct Access Allows users access to encrypted
resources. For example, users can
export virtual machines, have NFC
access to virtual machines, and so
on.
Virtual machine, host, or
datastore
Cryptographic operations.Add disk Allows users to add a disk to an
encrypted virtual machine.
Virtual machine
vSphere Security
VMware, Inc. 245

Table 13‑5. Cryptographic Operations Privileges (Continued)
Privilege Name Description Required On
Cryptographic operations.Clone Allows users to clone an encrypted
virtual machine.
Virtual machine
Cryptographic operations.Decrypt Allows users to decrypt a virtual
machine or disk.
Virtual machine
Cryptographic operations.Encrypt Allows users to encrypt a virtual
machine or a virtual machine disk.
Virtual machine
Cryptographic operations.Encrypt new Allows users to encrypt a virtual
machine during virtual machine
creation or a disk during disk
creation.
Virtual machine folder
Cryptographic operations.Manage encryption policies Allows users to manage virtual
machine storage policies with
encryption IO filters. By default,
virtual machines that use the
Encryption storage policy do not use
other storage policies.
vCenter Server root folder
Cryptographic operations.Manage key servers Allows users to manage the Key
Management Server for the
vCenter Server system.
Management tasks include adding
and removing KMS instances, and
establishing a trust relationship with
the KMS.
vCenter Server system.
Cryptographic operations.Manage keys Allows users to perform key
management operations. These
operations are not supported from
the vSphere Web Client but can be
performed by using crypto-util or
the API.
vCenter Server root folder
Cryptographic operations.Migrate Allows users to migrate an encrypted
virtual machine to a different ESXi
host. Supports migration with or
without vMotion and storage
vMotion. Does not support migration
to a different vCenter Server
instance.
Virtual machine
Cryptographic operations.Recrypt Allows users to recrypt virtual
machines or disks with a different
key. This privilege is required for
both deep and shallow recrypt
operations.
Virtual machine
vSphere Security
VMware, Inc. 246

Table 13‑5. Cryptographic Operations Privileges (Continued)
Privilege Name Description Required On
Cryptographic operations.Register VM Allows users to register an encrypted
virtual machine with an ESXi host.
Virtual machine folder
Cryptographic operations.Register host Allows users to enable encryption on
a host. You can enable encryption
on a host explicitly, or the virtual
machine creation process can
enable it.
Host folder for standalone
hosts, cluster for hosts in
cluster
Datacenter Privileges
Datacenter privileges control the ability to create and edit data centers in the vSphere Web Client
inventory.
All data center privileges are used in vCenter Server only. The Create datacenter privilege is defined on
data center folders or the root object. All other data center privileges are pair with data centers, data
center folders, or the root object.
You can set this privilege at different levels in the hierarchy. For example, if you set a privilege at the
folder level, you can propagate the privilege to one or more objects within the folder. The object listed in
the Required On column must have the privilege set, either directly or inherited.
Table 13‑6. Datacenter Privileges
Privilege Name Description Required On
Datacenter.Create datacenter Allows creation of new data center. Data center folder or root
object
Datacenter.Move datacenter Allows moving a data center.
Privilege must be present at both the source and
destination.
Data center, source and
destination
Datacenter.Network protocol profile
configuration
Allows configuration of the network profile for a
data center.
Data center
Datacenter.Query IP pool allocation Allows configuration of a pool of IP addresses. Data center
Datacenter.Reconfigure datacenter Allows reconfiguration of a data center. Data center
Datacenter.Release IP allocation Allows releasing the assigned IP allocation for a
data center.
Data center
Datacenter.Remove datacenter Allows removal of a data center.
In order to have permission to perform this
operation, you must have this privilege assigned
to both the object and its parent object.
Data center plus parent
object
Datacenter.Rename datacenter Allows changing the name of a data center. Data center
Datastore Privileges
Datastore privileges control the ability to browse, manage, and allocate space on datastores.
vSphere Security
VMware, Inc. 247

You can set this privilege at different levels in the hierarchy. For example, if you set a privilege at the
folder level, you can propagate the privilege to one or more objects within the folder. The object listed in
the Required On column must have the privilege set, either directly or inherited.
Table 13‑7. Datastore Privileges
Privilege Name Description Required On
Datastore.Allocate space Allows allocating space on a datastore for a virtual machine,
snapshot, clone, or virtual disk.
Data stores
Datastore.Browse datastore Allows browsing files on a datastore. Data stores
Datastore.Configure datastore Allows configuration of a datastore. Data stores
Datastore.Low level file
operations
Allows performing read, write, delete, and rename operations in
the datastore browser.
Data stores
Datastore.Move datastore Allows moving a datastore between folders.
Privileges must be present at both the source and destination.
Datastore, source and
destination
Datastore.Remove datastore Allows removal of a datastore.
This privilege is deprecated.
To have permission to perform this operation, a user or group must
have this privilege assigned in both the object and its parent
object.
Data stores
Datastore.Remove file Allows deletion of files in the datastore.
This privilege is deprecated. Assign the Low level file operations
privilege.
Data stores
Datastore.Rename datastore Allows renaming a datastore. Data stores
Datastore.Update virtual
machine files
Allows updating file paths to virtual machine files on a datastore
after the datastore has been resignatured.
Data stores
Datastore.Update virtual
machine metadata
Allows updating virtual machine metadata associated with a
datastore.
Data stores
Datastore Cluster Privileges
Datastore cluster privileges control the configuration of datastore clusters for Storage DRS.
You can set this privilege at different levels in the hierarchy. For example, if you set a privilege at the
folder level, you can propagate the privilege to one or more objects within the folder. The object listed in
the Required On column must have the privilege set, either directly or inherited.
Table 13‑8. Datastore Cluster Privileges
Privilege Name Description Required On
Datastore
cluster.Configure a
datatstore cluster
Allows creation of and configuration of settings for datastore clusters
for Storage DRS.
Datastore clusters
vSphere Security
VMware, Inc. 248

Distributed Switch Privileges
Distributed Switch privileges control the ability to perform tasks related to the management of Distributed
Switch instances.
You can set this privilege at different levels in the hierarchy. For example, if you set a privilege at the
folder level, you can propagate the privilege to one or more objects within the folder. The object listed in
the Required On column must have the privilege set, either directly or inherited.
Table 13‑9. vSphere Distributed Switch Privileges
Privilege Name Description Required On
Distributed switch.Create Allows creation of a distributed switch. Data centers, Network
folders
Distributed switch.Delete Allows removal of a distributed switch.
To have permission to perform this operation, a user or group must have
this privilege assigned in both the object and its parent object.
Distributed switches
Distributed switch.Host
operation
Allows changing the host members of a distributed switch. Distributed switches
Distributed switch.Modify Allows changing the configuration of a distributed switch. Distributed switches
Distributed switch.Move Allows moving a vSphere Distributed Switch to another folder. Distributed switches
Distributed switch.Network
I/O control operation
Allow changing the resource settings for a vSphere Distributed Switch. Distributed switches
Distributed switch.Policy
operation
Allows changing the policy of a vSphere Distributed Switch. Distributed switches
Distributed switch .Port
configuration operation
Allow changing the configuration of a port in a vSphere Distributed
Switch.
Distributed switches
Distributed switch.Port
setting operation
Allows changing the setting of a port in a vSphere Distributed Switch. Distributed switches
Distributed switch.VSPAN
operation
Allows changing the VSPAN configuration of a vSphere Distributed
Switch.
Distributed switches
ESX Agent Manager Privileges
ESX Agent Manager privileges control operations related to ESX Agent Manager and agent virtual
machines. The ESX Agent Manager is a service that lets you install management virtual machines, which
are tied to a host and not affected by VMware DRS or other services that migrate virtual machines.
You can set this privilege at different levels in the hierarchy. For example, if you set a privilege at the
folder level, you can propagate the privilege to one or more objects within the folder. The object listed in
the Required On column must have the privilege set, either directly or inherited.
vSphere Security
VMware, Inc. 249

Table 13‑10. ESX Agent Manager
Privilege Name Description Required On
ESX Agent
Manager.Config
Allows deployment of an agent virtual machine on a host or cluster. Virtual machines
ESX Agent
Manager.Modify
Allows modifications to an agent virtual machine such as powering off or
deleting the virtual machine.
Virtual machines
ESX Agent View.View Allows viewing of an agent virtual machine. Virtual machines
Extension Privileges
Extension privileges control the ability to install and manage extensions.
You can set this privilege at different levels in the hierarchy. For example, if you set a privilege at the
folder level, you can propagate the privilege to one or more objects within the folder. The object listed in
the Required On column must have the privilege set, either directly or inherited.
Table 13‑11. Extension Privileges
Privilege Name Description Required On
Extension.Register
extension
Allows registration of an extension (plug-in). Root vCenter Server
Extension.Unregister
extension
Allows unregistering an extension (plug-in). Root vCenter Server
Extension.Update
extension
Allows updates to an extension (plug-in). Root vCenter Server
External Stats Provider Privileges
External stats provider privileges control the ability to notify vCenter Server of Proactive Distributed
Resource Scheduler (DRS) statistics.
These privileges apply to an API that is VMware-internal only.
Folder Privileges
Folder privileges control the ability to create and manage folders.
You can set this privilege at different levels in the hierarchy. For example, if you set a privilege at the
folder level, you can propagate the privilege to one or more objects within the folder. The object listed in
the Required On column must have the privilege set, either directly or inherited.
Table 13‑12. Folder Privileges
Privilege Name Description Required On
Folder.Create folder Allows creation of a new folder. Folders
Folder.Delete folder Allows deletion of a folder.
To have permission to perform this operation, a user or group must
have this privilege assigned in both the object and its parent object.
Folders
vSphere Security
VMware, Inc. 250

Table 13‑12. Folder Privileges (Continued)
Privilege Name Description Required On
Folder.Move folder Allows moving a folder.
Privilege must be present at both the source and destination.
Folders
Folder.Rename folder Allows changing the name of a folder. Folders
Global Privileges
Global privileges control global tasks related to tasks, scripts, and extensions.
You can set this privilege at different levels in the hierarchy. For example, if you set a privilege at the
folder level, you can propagate the privilege to one or more objects within the folder. The object listed in
the Required On column must have the privilege set, either directly or inherited.
Table 13‑13. Global Privileges
Privilege Name Description Required On
Global.Act as vCenter
Server
Allows preparation or initiation of a vMotion send operation or a
vMotion receive operation.
Root vCenter Server
Global.Cancel task Allows cancellation of a running or queued task. Inventory object related
to the task
Global.Capacity planning Allows enabling the use of capacity planning for planning consolidation
of physical machines to virtual machines.
Root vCenter Server
Global.Diagnostics Allows retrieval of a list of diagnostic files, log header, binary files, or
diagnostic bundle.
To avoid potential security breaches, limit this privilege to the vCenter
Server Administrator role.
Root vCenter Server
Global.Disable methods Allows servers for vCenter Server extensions to disable certain
operations on objects managed by vCenter Server.
Root vCenter Server
Global.Enable methods Allows servers for vCenter Server extensions to enable certain
operations on objects managed byvCenter Server.
Root vCenter Server
Global.Global tag Allows adding or removing global tags. Root host or vCenter
Server
Global.Health Allows viewing the health of vCenter Server components. Root vCenter Server
Global.Licenses Allows viewing installed licenses and adding or removing licenses. Root host or vCenter
Server
Global.Log event Allows logging a user-defined event against a particular managed
entity.
Any object
Global.Manage custom
attributes
Allows adding, removing, or renaming custom field definitions. Root vCenter Server
Global.Proxy Allows access to an internal interface for adding or removing endpoints
to or from the proxy.
Root vCenter Server
Global.Script action Allows scheduling a scripted action in conjunction with an alarm. Any object
Global.Service managers Allows use of the resxtop command in the vSphere CLI. Root host or vCenter
Server
vSphere Security
VMware, Inc. 251

Table 13‑13. Global Privileges (Continued)
Privilege Name Description Required On
Global.Set custom attribute Allows viewing, creating, or removing custom attributes for a managed
object.
Any object
Global.Settings Allows reading and modifying runtime vCenter Server configuration
settings.
Root vCenter Server
Global.System tag Allows adding or removing system tags. Root vCenter Server
Health Update Provider Privileges
Health update provider privileges control the ability for hardware vendors to notify vCenter Server of
Proactive HA events.
These privileges apply to an API that is VMware-internal only.
Host CIM Privileges
Host CIM privileges control the use of CIM for host health monitoring.
You can set this privilege at different levels in the hierarchy. For example, if you set a privilege at the
folder level, you can propagate the privilege to one or more objects within the folder. The object listed in
the Required On column must have the privilege set, either directly or inherited.
Table 13‑14. Host CIM Privileges
Privilege Name Description Required On
Host.CIM.CIM Interaction Allow a client to obtain a ticket to use for CIM services. Hosts
Host Configuration Privileges
Host configuration privileges control the ability to configure hosts.
You can set this privilege at different levels in the hierarchy. For example, if you set a privilege at the
folder level, you can propagate the privilege to one or more objects within the folder. The object listed in
the Required On column must have the privilege set, either directly or inherited.
Table 13‑15. Host Configuration Privileges
Privilege Name Description Required On
Host.Configuration.Advanced
Settings
Allows setting advanced host configuration options. Hosts
Host.Configuration.Authentication
Store
Allows configuring Active Directory authentication stores. Hosts
Host.Configuration.Change
PciPassthru settings
Allows changes to PciPassthru settings for a host. Hosts
Host.Configuration.Change SNMP
settings
Allows changes to SNMP settings for a host. Hosts
vSphere Security
VMware, Inc. 252

Table 13‑15. Host Configuration Privileges (Continued)
Privilege Name Description Required On
Host.Configuration.Change date
and time settings
Allows changes to date and time settings on the host. Hosts
Host.Configuration.Change
settings
Allows setting of lockdown mode on ESXi hosts. Hosts
Host.Configuration.Connection Allows changes to the connection status of a host
(connected or disconnected).
Hosts
Host.Configuration.Firmware Allows updates to the ESXi host's firmware. Hosts
Host.Configuration.Hyperthreadin
g
Allows enabling and disabling hyperthreading in a host CPU
scheduler.
Hosts
Host.Configuration.Image
configuration
Allows changes to the image associated with a host.
Host.Configuration.Maintenance Allows putting the host in and out of maintenance mode and
shutting down and restarting the host.
Hosts
Host.Configuration.Memory
configuration
Allows modifications to the host configuration. Hosts
Host.Configuration.Network
configuration
Allows configuration of network, firewall, and vMotion
network.
Hosts
Host.Configuration.Power Allows configuration of host power management settings. Hosts
Host.Configuration.Query patch Allows querying for installable patches and installing patches
on the host.
Hosts
Host.Configuration.Security
profile and firewall
Allows configuration of Internet services, such as SSH,
Telnet, SNMP, and of the host firewall.
Hosts
Host.Configuration.Storage
partition configuration
Allows VMFS datastore and diagnostic partition
management. Users with this privilege can scan for new
storage devices and manage iSCSI.
Hosts
Host.Configuration.System
Management
Allows extensions to manipulate the file system on the host. Hosts
Host.Configuration.System
resources
Allows updates to the configuration of the system resource
hierarchy.
Hosts
Host.Configuration.Virtual
machine autostart configuration
Allows changes to the auto-start and auto-stop order of
virtual machines on a single host.
Hosts
Host Inventory
Host inventory privileges control adding hosts to the inventory, adding hosts to clusters, and moving hosts
in the inventory.
The table describes the privileges required to add and move hosts and clusters in the inventory.
You can set this privilege at different levels in the hierarchy. For example, if you set a privilege at the
folder level, you can propagate the privilege to one or more objects within the folder. The object listed in
the Required On column must have the privilege set, either directly or inherited.
vSphere Security
VMware, Inc. 253

Table 13‑16. Host Inventory Privileges
Privilege Name Description Required On
Host.Inventory.Add host to
cluster
Allows addition of a host to an existing cluster. Clusters
Host.Inventory.Add
standalone host
Allows addition of a standalone host. Host folders
Host.Inventory.Create
cluster
Allows creation of a new cluster. Host folders
Host.Inventory.Modify
cluster
Allows changing the properties of a cluster. Clusters
Host.Inventory.Move
cluster or standalone host
Allows moving a cluster or standalone host between folders.
Privilege must be present at both the source and destination.
Clusters
Host.Inventory.Move host Allows moving a set of existing hosts into or out of a cluster.
Privilege must be present at both the source and destination.
Clusters
Host.Inventory.Remove
cluster
Allows deletion of a cluster or standalone host.
To have permission to perform this operation, a user or group must
have this privilege assigned in both the object and its parent object.
Clusters, Hosts
Host.Inventory.Remove
host
Allows removal of a host.
To have permission to perform this operation, a user or group must
have this privilege assigned in both the object and its parent object.
Hosts plus parent object
Host.Inventory.Rename
cluster
Allows renaming a a cluster. Clusters
Host Local Operations Privileges
Host local operations privileges control actions performed when the VMware Host Client is connected
directly to a host.
You can set this privilege at different levels in the hierarchy. For example, if you set a privilege at the
folder level, you can propagate the privilege to one or more objects within the folder. The object listed in
the Required On column must have the privilege set, either directly or inherited.
Table 13‑17. Host Local Operations Privileges
Privilege Name Description Required On
Host.Local operations.Add
host to vCenter
Allows installation and removal of vCenter agents, such as vpxa and
aam, on a host.
Root host
Host.Local
operations.Create virtual
machine
Allows creation of a new virtual machine from scratch on a disk
without registering it on the host.
Root host
Host.Local
operations.Delete virtual
machine
Allows deletion of a virtual machine on disk. Supported for registered
and unregistered virtual machines.
Root host
vSphere Security
VMware, Inc. 254

Table 13‑17. Host Local Operations Privileges (Continued)
Privilege Name Description Required On
Host.Local
operations.Manage user
groups
Allows management of local accounts on a host. Root host
Host.Local
operations.Reconfigure
virtual machine
Allows reconfiguring a virtual machine. Root host
Host vSphere Replication Privileges
Host vSphere replication privileges control the use of virtual machine replication by VMware vCenter Site
Recovery Manager™ for a host.
You can set this privilege at different levels in the hierarchy. For example, if you set a privilege at the
folder level, you can propagate the privilege to one or more objects within the folder. The object listed in
the Required On column must have the privilege set, either directly or inherited.
Table 13‑18. Host vSphere Replication Privileges
Privilege Name Description Required On
Host.vSphere
Replication.Manage
Replication
Allows management of virtual machine replication on this host. Hosts
Host Profile Privileges
Host Profile privileges control operations related to creating and modifying host profiles.
You can set this privilege at different levels in the hierarchy. For example, if you set a privilege at the
folder level, you can propagate the privilege to one or more objects within the folder. The object listed in
the Required On column must have the privilege set, either directly or inherited.
Table 13‑19. Host Profile Privileges
Privilege Name Description Required On
Host profile.Clear Allows clearing of profile related information. Root vCenter Server
Host profile.Create Allows creation of a host profile. Root vCenter Server
Host profile.Delete Allows deletion of a host profile. Root vCenter Server
Host profile.Edit Allows editing a host profile. Root vCenter Server
Host profile.Export Allows exporting a host profile Root vCenter Server
Host profile.View Allows viewing a host profile. Root vCenter Server
Network Privileges
Network privileges control tasks related to network management.
vSphere Security
VMware, Inc. 255

You can set this privilege at different levels in the hierarchy. For example, if you set a privilege at the
folder level, you can propagate the privilege to one or more objects within the folder. The object listed in
the Required On column must have the privilege set, either directly or inherited.
Table 13‑20. Network Privileges
Privilege Name Description Required On
Network.Assign network Allows assigning a network to a virtual machine. Networks, Virtual
Machines
Network.Configure Allows configuring a network. Networks, Virtual
Machines
Network.Move network Allows moving a network between folders.
Privilege must be present at both the source and destination.
Networks
Network.Remove Allows removal of a network.
This privilege is deprecated.
To have permission to perform this operation, a user or group must have
this privilege assigned in both the object and its parent object.
Networks
Performance Privileges
Performance privileges control modifying performance statistics settings.
You can set this privilege at different levels in the hierarchy. For example, if you set a privilege at the
folder level, you can propagate the privilege to one or more objects within the folder. The object listed in
the Required On column must have the privilege set, either directly or inherited.
Table 13‑21. Performance Privileges
Privilege Name Description Required On
Performance.Modify
intervals
Allows creating, removing, and updating performance data collection
intervals.
Root vCenter Server
Permissions Privileges
Permissions privileges control the assigning of roles and permissions.
You can set this privilege at different levels in the hierarchy. For example, if you set a privilege at the
folder level, you can propagate the privilege to one or more objects within the folder. The object listed in
the Required On column must have the privilege set, either directly or inherited.
vSphere Security
VMware, Inc. 256

Table 13‑22. Permissions Privileges
Privilege Name Description Required On
Permissions.Modify
permission
Allows defining one or more permission rules on an entity, or updating
rules if rules are already present for the given user or group on the
entity.
To have permission to perform this operation, a user or group must
have this privilege assigned in both the object and its parent object.
Any object plus parent
object
Permissions.Modify
privilege
Allows modifying a privilege's group or description.
No vSphere Web Client user interface elements are associated with
this privilege.
Permissions.Modify role Allows updating a role's name and the privileges that are associated
with the role.
Any object
Permissions.Reassign role
permissions
Allows reassigning all permissions of a role to another role. Any object
Profile-driven Storage Privileges
Profile-driven storage privileges control operations related to storage profiles.
You can set this privilege at different levels in the hierarchy. For example, if you set a privilege at the
folder level, you can propagate the privilege to one or more objects within the folder. The object listed in
the Required On column must have the privilege set, either directly or inherited.
Table 13‑23. Profile-driven Storage Privileges
Privilege Name Description Required On
Profile-driven storage.Profile-
driven storage update
Allows changes to be made to storage profiles,
such as creating and updating storage capabilities
and virtual machine storage profiles.
Root vCenter Server
Profile-driven storage.Profile-
driven storage view
Allows viewing of defined storage capabilities and
storage profiles.
Root vCenter Server
Resource Privileges
Resource privileges control the creation and management of resource pools, as well as the migration of
virtual machines.
You can set this privilege at different levels in the hierarchy. For example, if you set a privilege at the
folder level, you can propagate the privilege to one or more objects within the folder. The object listed in
the Required On column must have the privilege set, either directly or inherited.
Table 13‑24. Resource Privileges
Privilege Name Description Required On
Resource.Apply recommendation Allows accepting a suggestion by the server to perform
a migration with vMotion.
Clusters
Resource.Assign vApp to resource
pool
Allows assignment of a vApp to a resource pool. Resource pools
vSphere Security
VMware, Inc. 257

Table 13‑24. Resource Privileges (Continued)
Privilege Name Description Required On
Resource.Assign virtual machine to
resource pool
Allows assignment of a virtual machine to a resource
pool.
Resource pools
Resource.Create resource pool Allows creation of resource pools. Resource pools, clusters
Resource.Migrate powered off virtual
machine
Allows migration of a powered off virtual machine to a
different resource pool or host.
Virtual machines
Resource.Migrate powered on virtual
machine
Allows migration with vMotion of a powered on virtual
machine to a different resource pool or host.
Resource.Modify resource pool Allows changes to the allocations of a resource pool. Resource pools
Resource.Move resource pool Allows moving a resource pool.
Privilege must be present at both the source and
destination.
Resource pools
Resource.Query vMotion Allows querying the general vMotion compatibility of a
virtual machine with a set of hosts.
Root vCenter Server
Resource.Remove resource pool Allows deletion of a resource pool.
To have permission to perform this operation, a user or
group must have this privilege assigned in both the
object and its parent object.
Resource pools
Resource.Rename resource pool Allows renaming of a resource pool. Resource pools
Scheduled Task Privileges
Scheduled task privileges control creation, editing, and removal of scheduled tasks.
You can set this privilege at different levels in the hierarchy. For example, if you set a privilege at the
folder level, you can propagate the privilege to one or more objects within the folder. The object listed in
the Required On column must have the privilege set, either directly or inherited.
Table 13‑25. Scheduled Task Privileges
Privilege Name Description Required On
Scheduled task.Create
tasks
Allows scheduling of a task. Required in addition to the privileges to
perform the scheduled action at the time of scheduling.
Any object
Scheduled task.Modify
task
Allows reconfiguration of the scheduled task properties. Any object
Scheduled task.Remove
task
Allows removal of a scheduled task from the queue. Any object
Scheduled task.Run task Allows running the scheduled task immediately.
Creating and running a scheduled task also requires permission to
perform the associated action.
Any object
Sessions Privileges
Sessions privileges control the ability of extensions to open sessions on the vCenter Server system.
vSphere Security
VMware, Inc. 258

You can set this privilege at different levels in the hierarchy. For example, if you set a privilege at the
folder level, you can propagate the privilege to one or more objects within the folder. The object listed in
the Required On column must have the privilege set, either directly or inherited.
Table 13‑26. Session Privileges
Privilege Name Description Required On
Sessions.Impersonate user Allow impersonation of another user. This capability is used by
extensions.
Root vCenter Server
Sessions.Message Allow setting of the global login message. Root vCenter Server
Sessions.Validate session Allow verification of session validity. Root vCenter Server
Sessions.View and stop
sessions
Allow viewing sessions and forcing log out of one or more logged-on
users.
Root vCenter Server
Storage Views Privileges
Storage Views privileges control privileges for Storage Monitoring Service APIs. Starting with vSphere
6.0, storage views are deprecated and these privileges no longer apply to them.
You can set this privilege at different levels in the hierarchy. For example, if you set a privilege at the
folder level, you can propagate the privilege to one or more objects within the folder. The object listed in
the Required On column must have the privilege set, either directly or inherited.
Table 13‑27. Storage Views Privileges
Privilege Name Description Required On
Storage views.Configure service Allows privileged users to use all Storage Monitoring
Service APIs. Use Storage views.View for privileges to
read-only Storage Monitoring Service APIs.
Root vCenter Server
Storage views.View Allows privileged users to use read-only Storage
Monitoring Service APIs.
Root vCenter Server
Tasks Privileges
Tasks privileges control the ability of extensions to create and update tasks on the vCenter Server.
You can set this privilege at different levels in the hierarchy. For example, if you set a privilege at the
folder level, you can propagate the privilege to one or more objects within the folder. The object listed in
the Required On column must have the privilege set, either directly or inherited.
vSphere Security
VMware, Inc. 259

Table 13‑28. Tasks Privileges
Privilege Name Description Required On
Tasks.Create task Allows an extension to create a user-defined task.
No vSphere Web Client user interface elements are associated with
this privilege.
Root vCenter Server
Tasks.Update task Allows an extension to update a user-defined task.
No vSphere Web Client user interface elements are associated with
this privilege.
Root vCenter Server
Transfer Service Privileges
Transfer service privileges are VMware internal. Do not use these privileges.
Virtual Machine Configuration Privileges
Virtual Machine Configuration privileges control the ability to configure virtual machine options and
devices.
You can set this privilege at different levels in the hierarchy. For example, if you set a privilege at the
folder level, you can propagate the privilege to one or more objects within the folder. The object listed in
the Required On column must have the privilege set, either directly or inherited.
Table 13‑29. Virtual Machine Configuration Privileges
Privilege Name Description Required On
Virtual machine.Configuration.Add existing disk Allows adding an existing virtual
disk to a virtual machine.
Virtual machines
Virtual machine.Configuration.Add new disk Allows creation of a new virtual
disk to add to a virtual machine.
Virtual machines
Virtual machine.Configuration.Add or remove device Allows addition or removal of any
non-disk device.
Virtual machines
Virtual machine.Configuration.Advanced Allows addition or modification of
advanced parameters in the virtual
machine's configuration file.
Virtual machines
Virtual machine.Configuration.Change CPU count Allows changing the number of
virtual CPUs.
Virtual machines
Virtual machine.Configuration.Change resource Allows changing the resource
configuration of a set of virtual
machine nodes in a given resource
pool.
Virtual machines
Virtual machine.Configuration.Configure managedBy Allows an extension or solution to
mark a virtual machine as being
managed by that extension or
solution.
Virtual machines
Virtual machine.Configuration.Disk change tracking Allows enabling or disabling of
change tracking for the virtual
machine's disks.
Virtual machines
vSphere Security
VMware, Inc. 260

Table 13‑29. Virtual Machine Configuration Privileges (Continued)
Privilege Name Description Required On
Virtual machine.Configuration.Disk lease Allows disk lease operations for a
virtual machine.
Virtual machines
Virtual machine.Configuration.Display connection settings Allows configuration of virtual
machine remote console options.
Virtual machines
Virtual machine.Configuration.Extend virtual disk Allows expansion of the size of a
virtual disk.
Virtual machines
Virtual machine.Configuration.Host USB device Allows attaching a host-based USB
device to a virtual machine.
Virtual machines
Virtual machine.Configuration.Memory Allows changing the amount of
memory allocated to the virtual
machine.
Virtual machines
Virtual machine.Configuration.Modify device settings Allows changing the properties of
an existing device.
Virtual machines
Virtual machine.Configuration.Query Fault Tolerance
compatibility
Allows checking if a virtual
machine is compatible for Fault
Tolerance.
Virtual machines
Virtual machine.Configuration.Query unowned files Allows querying of unowned files. Virtual machines
Virtual machine.Configuration.Raw device Allows adding or removing a raw
disk mapping or SCSI pass
through device.
Setting this parameter overrides
any other privilege for modifying
raw devices, including connection
states.
Virtual machines
Virtual machine.Configuration.Reload from path Allows changing a virtual machine
configuration path while preserving
the identity of the virtual machine.
Solutions such as VMware vCenter
Site Recovery Manager use this
operation to maintain virtual
machine identity during failover
and failback.
Virtual machines
Virtual machine.Configuration.Remove disk Allows removal of a virtual disk
device.
Virtual machines
Virtual machine.Configuration.Rename Allows renaming a virtual machine
or modifying the associated notes
of a virtual machine.
Virtual machines
Virtual machine.Configuration.Reset guest information Allows editing the guest operating
system information for a virtual
machine.
Virtual machines
Virtual machine.Configuration.Set annotation Allows adding or editing a virtual
machine annotation.
Virtual machines
Virtual machine.Configuration.Settings Allows changing general virtual
machine settings.
Virtual machines
vSphere Security
VMware, Inc. 261

Table 13‑29. Virtual Machine Configuration Privileges (Continued)
Privilege Name Description Required On
Virtual machine.Configuration.Swapfile placement Allows changing the swapfile
placement policy for a virtual
machine.
Virtual machines
Virtual machine.Configuration.Toggle fork parent
Virtual machine.Configuration.Upgrade virtual machine
compatibility
Allows upgrade of the virtual
machine’s virtual machine
compatibility version.
Virtual machines
Virtual Machine Guest Operations Privileges
Virtual Machine Guest Operations privileges control the ability to interact with files and programs inside a
virtual machine's guest operating system with the API.
See the VMware vSphere API Reference documentation for more information on these operations.
You can set this privilege at different levels in the hierarchy. For example, if you set a privilege at the
folder level, you can propagate the privilege to one or more objects within the folder. The object listed in
the Required On column must have the privilege set, either directly or inherited.
Table 13‑30. Virtual Machine Guest Operations
Privilege Name Description Effective on Object
Virtual machine.Guest Operations.Guest Operation Alias
modification
Allows virtual machine guest
operations that involve
modifying the alias for the
virtual machine.
Virtual machines
Virtual machine.Guest Operations.Guest Operation Alias query Allows virtual machine guest
operations that involve
querying the alias for the
virtual machine.
Virtual machines
Virtual machine.Guest Operations.Guest Operation
Modifications
Allows virtual machine guest
operations that involve
modifications to a guest
operating system in a virtual
machine, such as transferring
a file to the virtual machine.
No vSphere Web Client user
interface elements are
associated with this privilege.
Virtual machines
vSphere Security
VMware, Inc. 262

Table 13‑30. Virtual Machine Guest Operations (Continued)
Privilege Name Description Effective on Object
Virtual machine.Guest Operations.Guest Operation Program
Execution
Allows virtual machine guest
operations that involve
executing a program in the
virtual machine.
No vSphere Web Client user
interface elements are
associated with this privilege.
Virtual machines
Virtual machine.Guest Operations.Guest Operation Queries Allows virtual machine guest
operations that involve
querying the guest operating
system, such as listing files in
the guest operating system.
No vSphere Web Client user
interface elements are
associated with this privilege.
Virtual machines
Virtual Machine Interaction Privileges
Virtual Machine Interaction privileges control the ability to interact with a virtual machine console,
configure media, perform power operations, and install VMware Tools.
You can set this privilege at different levels in the hierarchy. For example, if you set a privilege at the
folder level, you can propagate the privilege to one or more objects within the folder. The object listed in
the Required On column must have the privilege set, either directly or inherited.
vSphere Security
VMware, Inc. 263

Table 13‑31. Virtual Machine Interaction
Privilege Name
Descri
ption Required On
Virtual machine.Interaction .Answer question Allows
resoluti
on of
issues
with
virtual
machin
e state
transiti
ons or
runtime
errors.
Virtual machines
Virtual machine.Interaction .Backup operation on virtual machine Allows
perfor
mance
of
backup
operati
ons on
virtual
machin
es.
Virtual machines
Virtual machine .Interaction .Configure CD media Allows
configu
ration
of a
virtual
DVD or
CD-
ROM
device.
Virtual machines
Virtual machine .Interaction .Configure floppy media Allows
configu
ration
of a
virtual
floppy
device.
Virtual machines
vSphere Security
VMware, Inc. 264

Table 13‑31. Virtual Machine Interaction (Continued)
Privilege Name
Descri
ption Required On
Virtual machine .Interaction .Console interaction Allows
interact
ion
with
the
virtual
machin
e’s
virtual
mouse,
keyboa
rd, and
screen.
Virtual machines
Virtual machine .Interaction .Create screenshot Allows
creatio
n of a
virtual
machin
e
screen
shot.
Virtual machines
Virtual machine .Interaction .Defragment all disks Allows
defrag
ment
operati
ons on
all
disks
of the
virtual
machin
e.
Virtual machines
Virtual machine .Interaction .Device connection Allows
changi
ng the
connec
ted
state of
a
virtual
machin
e’s
discon
nectabl
e
virtual
device
s.
Virtual machines
vSphere Security
VMware, Inc. 265

Table 13‑31. Virtual Machine Interaction (Continued)
Privilege Name
Descri
ption Required On
Virtual machine .Interaction .Drag and Drop Allows
drag
and
drop of
files
betwee
n a
virtual
machin
e and a
remote
client.
Virtual machines
Virtual machine .Interaction .Guest operating system management by VIX API Allows
manag
ement
of the
virtual
machin
e's
operati
ng
system
throug
h the
VIX
API.
Virtual machines
Virtual machine .Interaction .Inject USB HID scan codes Allows
injectio
n of
USB
HID
scan
codes.
Virtual machines
Virtual machine .Interaction .Pause or Unpause Allows
pausin
g or
unpaus
ing of
the
virtual
machin
e.
Virtual machines
vSphere Security
VMware, Inc. 266

Table 13‑31. Virtual Machine Interaction (Continued)
Privilege Name
Descri
ption Required On
Virtual machine .Interaction .Perform wipe or shrink operations Allows
perfor
ming
wipe or
shrink
operati
ons on
the
virtual
machin
e.
Virtual machines
Virtual machine .Interaction .Power Off Allows
poweri
ng off a
powere
d-on
virtual
machin
e. This
operati
on
powers
down
the
guest
operati
ng
system
.
Virtual machines
Virtual machine .Interaction .Power On Allows
poweri
ng on a
powere
d-off
virtual
machin
e, and
resumi
ng a
suspen
ded
virtual
machin
e.
Virtual machines
vSphere Security
VMware, Inc. 267

Table 13‑31. Virtual Machine Interaction (Continued)
Privilege Name
Descri
ption Required On
Virtual machine .Interaction .Record session on Virtual Machine Allows
recordi
ng a
sessio
n on a
virtual
machin
e.
Virtual machines
Virtual machine .Interaction .Replay session on Virtual Machine Allows
replayi
ng of a
record
ed
sessio
n on a
virtual
machin
e.
Virtual machines
Virtual machine .Interaction .Reset Allows
resettin
g of a
virtual
machin
e and
reboots
the
guest
operati
ng
system
.
Virtual machines
Virtual machine .Interaction .Resume Fault Tolerance Allows
resumi
ng of
fault
toleran
ce for a
virtual
machin
e.
Virtual machines
vSphere Security
VMware, Inc. 268

Table 13‑31. Virtual Machine Interaction (Continued)
Privilege Name
Descri
ption Required On
Virtual machine .Interaction .Suspend Allows
suspen
ding a
powere
d-on
virtual
machin
e. This
operati
on puts
the
guest
in
standb
y
mode.
Virtual machines
Virtual machine .Interaction .Suspend Fault Tolerance Allows
suspen
sion of
fault
toleran
ce for a
virtual
machin
e.
Virtual machines
Virtual machine .Interaction .Test failover Allows
testing
of Fault
Toleran
ce
failover
by
making
the
Secon
dary
virtual
machin
e the
Primar
y
virtual
machin
e.
Virtual machines
vSphere Security
VMware, Inc. 269

Table 13‑31. Virtual Machine Interaction (Continued)
Privilege Name
Descri
ption Required On
Virtual machine .Interaction .Test restart Secondary VM Allows
termina
tion of
a
Secon
dary
virtual
machin
e for a
virtual
machin
e using
Fault
Toleran
ce.
Virtual machines
Virtual machine .Interaction .Turn Off Fault Tolerance Allows
turning
off
Fault
Toleran
ce for a
virtual
machin
e.
Virtual machines
vSphere Security
VMware, Inc. 270

Table 13‑31. Virtual Machine Interaction (Continued)
Privilege Name
Descri
ption Required On
Virtual machine .Interaction .Turn On Fault Tolerance Allows
turning
on
Fault
Toleran
ce for a
virtual
machin
e.
Virtual machines
Virtual machine .Interaction .VMware Tools install Allows
mounti
ng and
unmou
nting
the
VMwar
e Tools
CD
installe
r as a
CD-
ROM
for the
guest
operati
ng
system
.
Virtual machines
Virtual Machine Inventory Privileges
Virtual Machine Inventory privileges control adding, moving, and removing virtual machines.
You can set this privilege at different levels in the hierarchy. For example, if you set a privilege at the
folder level, you can propagate the privilege to one or more objects within the folder. The object listed in
the Required On column must have the privilege set, either directly or inherited.
Table 13‑32. Virtual Machine Inventory Privileges
Privilege Name Description Required On
Virtual
machine .Inventory.Create
from existing
Allows creation of a virtual machine based on an existing virtual
machine or template, by cloning or deploying from a template.
Clusters, Hosts, Virtual
machine folders
Virtual
machine .Inventory.Create
new
Allows creation of a virtual machine and allocation of resources for its
execution.
Clusters, Hosts, Virtual
machine folders
Virtual
machine .Inventory.Move
Allows relocating a virtual machine in the hierarchy.
The privilege must be present at both the source and destination.
Virtual machines
vSphere Security
VMware, Inc. 271

Table 13‑32. Virtual Machine Inventory Privileges (Continued)
Privilege Name Description Required On
Virtual
machine .Inventory.Registe
r
Allows adding an existing virtual machine to a vCenter Server or host
inventory.
Clusters, Hosts, Virtual
machine folders
Virtual
machine .Inventory.Remov
e
Allows deletion of a virtual machine. Deletion removes the virtual
machine's underlying files from disk.
To have permission to perform this operation, a user or group must
have this privilege assigned in both the object and its parent object.
Virtual machines
Virtual
machine .Inventory.Unregi
ster
Allows unregistering a virtual machine from a vCenter Server or host
inventory.
To have permission to perform this operation, a user or group must
have this privilege assigned in both the object and its parent object.
Virtual machines
Virtual Machine Provisioning Privileges
Virtual Machine Provisioning privileges control activities related to deploying and customizing virtual
machines.
You can set this privilege at different levels in the hierarchy. For example, if you set a privilege at the
folder level, you can propagate the privilege to one or more objects within the folder. The object listed in
the Required On column must have the privilege set, either directly or inherited.
Table 13‑33. Virtual Machine Provisioning Privileges
Privilege Name Description Required On
Virtual
machine .Provisioning.Allow
disk access
Allows opening a disk on a virtual machine for random read and
write access. Used mostly for remote disk mounting.
Virtual machines
Virtual
machine .Provisioning.Allow
file access
Allows operations on files associated with a virtual machine,
including vmx, disks, logs, and nvram.
Virtual machines
Virtual
machine .Provisioning.Allow
read-only disk access
Allows opening a disk on a virtual machine for random read access.
Used mostly for remote disk mounting.
Virtual machines
Virtual
machine .Provisioning.Allow
virtual machine download
Allows read operations on files associated with a virtual machine,
including vmx, disks, logs, and nvram.
Root host or vCenter
Server
Virtual
machine .Provisioning.Allow
virtual machine files upload
Allows write operations on files associated with a virtual machine,
including vmx, disks, logs, and nvram.
Root host or vCenter
Server
Virtual
machine .Provisioning.Clone
template
Allows cloning of a template. Templates
Virtual
machine .Provisioning.Clone
virtual machine
Allows cloning of an existing virtual machine and allocation of
resources.
Virtual machines
vSphere Security
VMware, Inc. 272

Table 13‑33. Virtual Machine Provisioning Privileges (Continued)
Privilege Name Description Required On
Virtual
machine .Provisioning.Create
template from virtual machine
Allows creation of a new template from a virtual machine. Virtual machines
Virtual
machine .Provisioning.Custo
mize
Allows customization of a virtual machine’s guest operating system
without moving the virtual machine.
Virtual machines
Virtual
machine .Provisioning.Deploy
template
Allows deployment of a virtual machine from a template. Templates
Virtual
machine .Provisioning.Mark
as template
Allows marking an existing powered off virtual machine as a
template.
Virtual machines
Virtual
machine .Provisioning.Mark
as virtual machine
Allows marking an existing template as a virtual machine. Templates
Virtual
machine .Provisioning.Modify
customization specification
Allows creation, modification, or deletion of customization
specifications.
Root vCenter Server
Virtual
machine .Provisioning.Promot
e disks
Allows promote operations on a virtual machine's disks. Virtual machines
Virtual
machine .Provisioning.Read
customization specifications
Allows reading a customization specification. Virtual machines
Virtual Machine Service Configuration Privileges
Virtual machine service configuration privileges control who can perform monitoring and management
task on service configuration.
You can set this privilege at different levels in the hierarchy. For example, if you set a privilege at the
folder level, you can propagate the privilege to one or more objects within the folder. The object listed in
the Required On column must have the privilege set, either directly or inherited.
Note In vSphere 6.0, do not assign or remove this privilege by using the vSphere Web Client.
Table 13‑34. Virtual machine Service Configuration Privileges
Privilege Name Description
Virtual Machine. Service
configuration. Allow notifications
Allows generating and consuming notification about service status.
Virtual Machine. Service
configuration. Allow polling of
global event notifications
Allows querying whether any notifications are present.
vSphere Security
VMware, Inc. 273

Table 13‑34. Virtual machine Service Configuration Privileges (Continued)
Privilege Name Description
Virtual Machine. Service
configuration. Manage service
configurations
Allows creating, modifying, and deleting virtual machine services.
Virtual Machine. Service
configuration. Modify service
configuration
Allows modification of existing virtual machine service configuration.
Virtual Machine. Service
configuration. Query service
configurations
Allows retrieval of list of virtual machine services.
Virtual Machine. Service
configuration. Read service
configuration
Allows retrieval of existing virtual machine service configuration.
Virtual Machine Snapshot Management Privileges
Virtual machine snapshot management privileges control the ability to take, delete, rename, and restore
snapshots.
You can set this privilege at different levels in the hierarchy. For example, if you set a privilege at the
folder level, you can propagate the privilege to one or more objects within the folder. The object listed in
the Required On column must have the privilege set, either directly or inherited.
Table 13‑35. Virtual Machine State Privileges
Privilege Name Description Required On
Virtual machine .Snapshot
management. Create
snapshot
Allows creation of a snapshot from the virtual machine’s current state. Virtual machines
Virtual machine .Snapshot
management.Remove
Snapshot
Allows removal of a snapshot from the snapshot history. Virtual machines
Virtual machine .Snapshot
management.Rename
Snapshot
Allows renaming a snapshot with a new name, a new description, or
both.
Virtual machines
Virtual machine .Snapshot
management.Revert to
snapshot
Allows setting the virtual machine to the state it was in at a given
snapshot.
Virtual machines
Virtual Machine vSphere Replication Privileges
Virtual Machine vSphere replication privileges control the use of replication by VMware vCenter Site
Recovery Manager™ for virtual machines.
vSphere Security
VMware, Inc. 274

You can set this privilege at different levels in the hierarchy. For example, if you set a privilege at the
folder level, you can propagate the privilege to one or more objects within the folder. The object listed in
the Required On column must have the privilege set, either directly or inherited.
Table 13‑36. Virtual Machine vSphere Replication
Privilege Name Description Required On
Virtual machine .vSphere
Replication.Configure
Replication
Allows configuration of replication for the virtual machine. Virtual machines
Virtual machine .vSphere
Replication.Manage
Replication
Allows triggering of full sync, online sync or offline sync on a
replication.
Virtual machines
Virtual machine .vSphere
Replication.Monitor
Replication
Allows monitoring of replication. Virtual machines
dvPort Group Privileges
Distributed virtual port group privileges control the ability to create, delete, and modify distributed virtual
port groups.
The table describes the privileges required to create and configure distributed virtual port groups.
You can set this privilege at different levels in the hierarchy. For example, if you set a privilege at the
folder level, you can propagate the privilege to one or more objects within the folder. The object listed in
the Required On column must have the privilege set, either directly or inherited.
Table 13‑37. Distributed Virtual Port Group Privileges
Privilege Name Description Required On
dvPort group.Create Allows creation of a distributed virtual port group. Virtual port groups
dvPort group.Delete Allows deletion of distributed virtual port group.
To have permission to perform this operation, a user or group must have
this privilege assigned in both the object and its parent object.
Virtual port groups
dvPort group.Modify Allows modification of a distributed virtual port group configuration. Virtual port groups
dvPort group.Policy
operation
Allows setting the policy of a distributed virtual port group. Virtual port groups
dvPort group.Scope
operation
Allows setting the scope of a distributed virtual port group. Virtual port groups
vApp Privileges
vApp privileges control operations related to deploying and configuring a vApp.
You can set this privilege at different levels in the hierarchy. For example, if you set a privilege at the
folder level, you can propagate the privilege to one or more objects within the folder. The object listed in
the Required On column must have the privilege set, either directly or inherited.
vSphere Security
VMware, Inc. 275

Table 13‑38. vApp Privileges
Privilege Name Description Required On
vApp.Add virtual machine Allows adding a virtual machine to a vApp. vApps
vApp.Assign resource pool Allows assigning a resource pool to a vApp. vApps
vApp.Assign vApp Allows assigning a vApp to another vApp vApps
vApp.Clone Allows cloning of a vApp. vApps
vApp.Create Allows creation of a vApp. vApps
vApp.Delete Allows deletion a vApp.
To have permission to perform this operation, a
user or group must have this privilege assigned in
both the object and its parent object.
vApps
vApp.Export Allows export of a vApp from vSphere. vApps
vApp.Import Allows import of a vApp into vSphere. vApps
vApp.Move Allows moving a vApp to a new inventory location. vApps
vApp.Power Off Allows power off operations on a vApp. vApps
vApp.Power On Allows power on operations on a vApp. vApps
vApp.Rename Allows renaming a vApp. vApps
vApp.Suspend Allows suspension of a vApp. vApps
vApp.Unregister Allows unregistering a vApp.
To have permission to perform this operation, a
user or group must have this privilege assigned in
both the object and its parent object.
vApps
vApp.View OVF Environment Allows viewing the OVF environment of a powered-
on virtual machine within a vApp.
vApps
vApp.vApp application
configuration
Allows modification of a vApp's internal structure,
such as product information and properties.
vApps
vApp.vApp instance configuration Allows modification of a vApp's instance
configuration, such as policies.
vApps
vApp.vApp managedBy
configuration
Allows an extension or solution to mark a vApp as
being managed by that extension or solution.
No vSphere Web Client user interface elements
are associated with this privilege.
vApps
vApp.vApp resource
configuration
Allows modification of a vApp's resource
configuration.
To have permission to perform this operation, a
user or group must have this privilege assigned in
both the object and its parent object.
vApps
vServices Privileges
vServices privileges control the ability to create, configure, and update vService dependencies for virtual
machines and vApps.
vSphere Security
VMware, Inc. 276

You can set this privilege at different levels in the hierarchy. For example, if you set a privilege at the
folder level, you can propagate the privilege to one or more objects within the folder. The object listed in
the Required On column must have the privilege set, either directly or inherited.
Table 13‑39. vServices
Privilege Name Description Required On
vService.Create
dependency
Allows creation of a vService dependency for a virtual machine or
vApp.
vApps and virtual
machines
vService.Destroy
dependency
Allows removal of a vService dependency for a virtual machine or
vApp.
vApps and virtual
machines
vService.Reconfigure
dependency configuration
Allows reconfiguration of a dependency to update the provider or
binding.
vApps and virtual
machines
vService.Update
dependency
Allows updates of a dependence to configure the name or description. vApps and virtual
machines
vSphere Tagging Privileges
vSphere Tagging privileges control the ability to create and delete tags and tag categories, and assign
and remove tags on vCenter Server inventory objects.
You can set this privilege at different levels in the hierarchy. For example, if you set a privilege at the
folder level, you can propagate the privilege to one or more objects within the folder. The object listed in
the Required On column must have the privilege set, either directly or inherited.
Table 13‑40. vSphere Tagging Privileges
Privilege Name Description Required On
vSphere Tagging.Assign or Unassign
vSphere Tag
Allows assignment or unassignment of a tag for an
object in the vCenter Server inventory.
Any object
vSphere Tagging.Create vSphere Tag Allows creation of a tag. Any object
vSphere Tagging.Create vSphere Tag
Category
Allows creation of a tag category. Any object
vSphere Tagging.Create vSphere Tag
Scope
Allows creation of a tag scope. Any object
vSphere Tagging.Delete vSphere Tag Allows deletion of a tag category. Any object
vSphere Tagging.Delete vSphere Tag
Category
Allows deletion of a tag category. Any object
vSphere Tagging.Delete vSphere Tag
Scope
Allows deletion of a tag scope. Any object
vSphere Tagging.Edit vSphere Tag Allows editing of a tag. Any object
vSphere Tagging.Edit vSphere Tag
Category
Allows editing of a tag category. Any object
vSphere Tagging.Edit vSphere Tag Scope Allows editing of a tag scope. Any object
vSphere Security
VMware, Inc. 277

Table 13‑40. vSphere Tagging Privileges (Continued)
Privilege Name Description Required On
vSphere Tagging.Modify UsedBy Field for
Category
Allows changing the UsedBy field for a tag category. Any object
vSphere Tagging.Modify UsedBy Field for
Tag
Allows changing the UsedBy field for a tag. Any object
vSphere Security
VMware, Inc. 278
