Web2py8.5plus3minus4plus24plus2minus2Full Stack Web Framework, 4th Edition Web2py Manual 4th.1
User Manual: Pdf
Open the PDF directly: View PDF ![]() .
.
Page Count: 583 [warning: Documents this large are best viewed by clicking the View PDF Link!]
- Introduction
- The Python language
- Overview
- The core
- The views
- The database abstraction layer
- Dependencies
- Connection strings
- Reserved keywords
- DAL, Table, Field
- Record representation
- Migrations
- Fixing broken migrations
- insert
- commit and rollback
- Raw sql
- drop
- Indexes
- Legacy databases and keyed tables
- Distributed transaction
- Manual uploads
- Query, Set, Rows
- select
- Other methods
- Computed fields
- Virtual fields
- One to many relation
- Many to many
- Many to many, list:<type>, and contains
- Other operators
- Generating raw sql
- Exporting and importing data
- Caching selects
- Self-Reference and aliases
- Advanced features
- Forms and validators
- Email and SMS
- Access Control
- Services
- jQuery and Ajax
- Components and plugins
- Deployment recipes
- Other recipes
- Bibliography
MASSIMO DI PIERRO
WEB2PY
FULL-STACK WEB FRAMEWORK, 4TH EDITION
EXPERTS4SOLUTIONS
Copyright 2008-2012 by Massimo Di Pierro. All rights reserved.
No part of this publication may be reproduced, stored in a retrieval system, or transmitted
in any form or by any means, electronic, mechanical, photocopying, recording, scanning,
or otherwise, except as permitted under Section 107 or 108 of the 1976 United States Copy-
right Act, without either the prior written permission of the Publisher, or authorization
through payment of the appropriate per-copy fee to the Copyright Clearance Center, Inc.,
222 Rosewood Drive, Danvers, MA 01923, (978)750-8400, fax (978)646-8600, or on the web at
www.copyright.com. Requests to the Copyright owner for permission should be addressed
to:
Massimo Di Pierro
School of Computing
DePaul University
243 S Wabash Ave
Chicago, IL 60604 (USA)
Email: massimo.dipierro@gmail.com
Limit of Liability/Disclaimer of Warranty: While the publisher and author have used their
best efforts in preparing this book, they make no representations or warranties with respect
to the accuracy or completeness of the contents of this book and specifically disclaim any
implied warranties of merchantability or fitness for a particular purpose. No warranty
may be created ore extended by sales representatives or written sales materials. The advice
and strategies contained herein may not be suitable for your situation. You should consult
with a professional where appropriate. Neither the publisher nor author shall be liable for
any loss of profit or any other commercial damages, including but not limited to special,
incidental, consequential, or other damages.
Library of Congress Cataloging-in-Publication Data:
ISBN: 978-0-578-09793-0
Build Date: December 9,2011
to my family
Contents
1Introduction 21
1.1Principles.............................. 23
1.2Webframeworks ......................... 24
1.3Model-View-Controller . . . . . . . . . . . . . . . . . . . . . . 26
1.4Why web2py............................ 29
1.5Security............................... 31
1.6Inthebox ............................. 34
1.7License............................... 35
1.8Acknowledgments ........................ 37
1.9Aboutthisbook.......................... 38
1.10 Elementsofstyle ......................... 40
2The Python language 43
2.1AboutPython ........................... 43
2.2Startingup............................. 44
2.3help,dir .............................. 45
2.4Types................................ 46
2.4.1str ............................. 46
2.4.2list ............................. 47
2.4.3tuple ............................ 49
2.4.4dict ............................. 50
2.5Aboutindentation ........................ 51
2.6for...in ............................... 52
2.7while ................................ 53
2.8if...elif...else .......................... 53
6
2.9try...except...else...finally .................. 54
2.10 def...return ............................ 56
2.10.1lambda ........................... 58
2.11 class ................................ 60
2.12 Special attributes, methods and operators . . . . . . . . . . . 62
2.13 Fileinput/output......................... 63
2.14 exec,eval .............................. 64
2.15 import ................................ 65
2.15.1os .............................. 65
2.15.2sys ............................. 66
2.15.3datetime .......................... 67
2.15.4time ............................. 67
2.15.5cPickle ........................... 68
3Overview 69
3.1Startup ............................... 69
3.2Sayhello .............................. 73
3.3Let’scount............................. 78
3.4Saymyname ........................... 79
3.5Postbacks.............................. 81
3.6Animageblog........................... 84
3.7AddingCRUD........................... 98
3.8Adding Authentication . . . . . . . . . . . . . . . . . . . . . . 99
3.8.1Addinggrids .......................102
3.9Configuringthelayout......................103
3.10 Awiki ...............................104
3.10.1On date,datetime and time format...........115
3.11 More on admin ..........................116
3.11.1site .............................116
3.11.2about ............................119
3.11.3edit .............................119
3.11.4errors ............................122
3.11.5Mercurial ..........................126
3.11.6Admin wizard (experimental) . . . . . . . . . . . . . 127
3.11.7Configuring admin ....................129
7
3.12 More on appadmin ........................130
4The core 133
4.1Commandlineoptions......................133
4.2Workflow..............................137
4.3Dispatching ............................139
4.4Libraries ..............................143
4.5Applications............................149
4.6API .................................151
4.6.1Accessing the API from Python modules . . . . . . . 152
4.7request ...............................155
4.8response ...............................160
4.9session ...............................164
4.9.1Separatesessions.....................166
4.10 cache ................................166
4.11 URL ..................................169
4.11.1Absoluteurls .......................172
4.11.2Digitally signed urls . . . . . . . . . . . . . . . . . . . 172
4.12 HTTP and redirect .........................173
4.13 Tand Internationalization . . . . . . . . . . . . . . . . . . . . 175
4.14 Cookies ...............................178
4.15 Application init ..........................179
4.16 URLrewrite ............................179
4.16.1Parameter-based system . . . . . . . . . . . . . . . . . 180
4.16.2Pattern-based system . . . . . . . . . . . . . . . . . . 182
4.17 Routesonerror ..........................186
4.18 Running tasks in the background . . . . . . . . . . . . . . . . 187
4.18.1Cron ............................188
4.18.2Homemade task queues . . . . . . . . . . . . . . . . . 191
4.18.3Scheduler (experimental) . . . . . . . . . . . . . . . . 192
4.19 Thirdpartymodules .......................195
4.20 Execution environment . . . . . . . . . . . . . . . . . . . . . . 197
4.21 Cooperation ............................198
4.22 Logging...............................199
4.23 WSGI ................................200
8
4.23.1External middleware . . . . . . . . . . . . . . . . . . . 201
4.23.2Internal middleware . . . . . . . . . . . . . . . . . . . 201
4.23.3Calling WSGI applications ...............202
5The views 203
5.1Basicsyntax ............................205
5.1.1for...in ..........................205
5.1.2while ............................206
5.1.3if...elif...else .....................206
5.1.4try...except...else...finally .............207
5.1.5def...return ........................208
5.2HTMLhelpers...........................209
5.2.1XML .............................211
5.2.2Built-inhelpers ......................212
5.2.3Customhelpers......................227
5.3BEAUTIFY ...............................229
5.4Server-side DOM andparsing..................229
5.4.1elements ..........................229
5.4.2components .........................231
5.4.3parent ...........................231
5.4.4flatten ...........................231
5.4.5Parsing...........................232
5.5Pagelayout.............................232
5.5.1Default page layout . . . . . . . . . . . . . . . . . . . 236
5.5.2Customizing the default layout . . . . . . . . . . . . . 240
5.5.3Mobile development . . . . . . . . . . . . . . . . . . . 240
5.6Functionsinviews ........................241
5.7Blocksinviews ..........................242
6The database abstraction layer 245
6.1Dependencies ...........................245
6.2Connectionstrings ........................247
6.2.1Connection pooling . . . . . . . . . . . . . . . . . . . 248
6.2.2Connection failures . . . . . . . . . . . . . . . . . . . . 249
6.2.3Replicated databases . . . . . . . . . . . . . . . . . . . 249
9
6.3Reservedkeywords........................249
6.4DAL,Table,Field ..........................250
6.5Record representation . . . . . . . . . . . . . . . . . . . . . . 251
6.6Migrations.............................257
6.7Fixing broken migrations . . . . . . . . . . . . . . . . . . . . 259
6.8insert ................................260
6.9commit and rollback ........................261
6.10 Rawsql...............................261
6.10.1Timingqueries ......................262
6.10.2executesql .........................262
6.10.3_lastsql ..........................262
6.11 drop .................................263
6.12 Indexes...............................263
6.13 Legacy databases and keyed tables . . . . . . . . . . . . . . . 263
6.14 Distributed transaction . . . . . . . . . . . . . . . . . . . . . . 264
6.15 Manualuploads..........................265
6.16 Query,Set,Rows ...........................266
6.17 select ................................266
6.17.1Shortcuts..........................268
6.17.2Fetching a Row .......................269
6.17.3Recursive selects.....................270
6.17.4Serializing Rows inviews.................271
6.17.5orderby,groupby,limitby,distinct ...........273
6.17.6Logicaloperators.....................275
6.17.7count,isempty,delete,update ..............275
6.17.8Expressions ........................276
6.17.9update_record .......................277
6.17.10 first and last .......................277
6.17.11 as_dict and as_list ....................277
6.17.12 find,exclude,sort .....................278
6.18 Othermethods ..........................279
6.18.1update_or_insert .....................279
6.18.2validate_and_insert,validate_and_update .......280
6.18.3smart_query (experimental) . . . . . . . . . . . . . . . 280
6.19 Computedfields .........................281
10
6.20 Virtualfields............................281
6.20.1Old style virtual fields . . . . . . . . . . . . . . . . . . 282
6.20.2New style virtual fields (experimental) . . . . . . . . 284
6.21 Onetomanyrelation.......................285
6.21.1Innerjoins.........................286
6.21.2Leftouterjoin.......................287
6.21.3Grouping and counting . . . . . . . . . . . . . . . . . 288
6.22 Manytomany...........................289
6.23 Many to many, list:<type>, and contains ...........290
6.24 Otheroperators ..........................292
6.24.1like,startswith,contains,upper,lower .........292
6.24.2year,month,day,hour,minutes,seconds .........293
6.24.3belongs ...........................294
6.24.4sum,min,max and len ...................294
6.24.5Substrings.........................295
6.24.6Default values with coalesce and coalesce_zero ...295
6.25 Generatingrawsql ........................296
6.26 Exporting and importing data . . . . . . . . . . . . . . . . . . 296
6.26.1CSV (one Table at a time) . . . . . . . . . . . . . . . . 297
6.26.2CSV (all tables at once) . . . . . . . . . . . . . . . . . 297
6.26.3CSV and remote database synchronization . . . . . . 298
6.26.4HTML and XML (one Table at a time) . . . . . . . . . 300
6.26.5Data representation . . . . . . . . . . . . . . . . . . . 301
6.27 Cachingselects ..........................302
6.28 Self-Reference and aliases . . . . . . . . . . . . . . . . . . . . 303
6.29 Advancedfeatures ........................304
6.29.1Tableinheritance .....................304
6.29.2Common fields and multi-tenancy . . . . . . . . . . . 305
6.29.3Commonfilters......................306
6.29.4Custom Field types (experimental) . . . . . . . . . . 307
6.29.5Using DAL without define tables . . . . . . . . . . . 307
6.29.6Copy data from one db into another . . . . . . . . . . 308
6.29.7Note on new DAL and adapters . . . . . . . . . . . . 309
6.29.8Gotchas ..........................312
11
7Forms and validators 315
7.1FORM .................................316
7.1.1The process and validate methods...........320
7.1.2Hiddenfields .......................321
7.1.3keepvalues .........................322
7.1.4onvalidation ........................323
7.1.5Detect record change . . . . . . . . . . . . . . . . . . . 323
7.1.6Forms and redirection . . . . . . . . . . . . . . . . . . 324
7.1.7Multiple forms per page . . . . . . . . . . . . . . . . . 325
7.1.8Sharingforms.......................326
7.2SQLFORM ...............................326
7.2.1SQLFORM and insert/update/delete ...........332
7.2.2SQLFORM inHTML.....................333
7.2.3SQLFORM anduploads ...................334
7.2.4Storing the original filename . . . . . . . . . . . . . . 337
7.2.5autodelete .........................338
7.2.6Links to referencing records . . . . . . . . . . . . . . . 338
7.2.7Pre-populating the form . . . . . . . . . . . . . . . . . 340
7.2.8Adding extra form elements to SQLFORM ........340
7.2.9SQLFORM without database IO . . . . . . . . . . . . . . 341
7.3SQLFORM.factory ..........................342
7.3.1One form for multiple tables . . . . . . . . . . . . . . 343
7.4CRUD................................344
7.4.1Settings ..........................345
7.4.2Messages..........................348
7.4.3Methods..........................349
7.4.4Recordversioning ....................351
7.5Customforms...........................352
7.5.1CSSconventions .....................354
7.5.2Hideerrors ........................354
7.6Validators .............................355
7.6.1Validators .........................357
7.6.2Database validators . . . . . . . . . . . . . . . . . . . 368
7.6.3Customvalidators ....................370
7.6.4Validators with dependencies . . . . . . . . . . . . . . 372
12
7.7Widgets...............................372
7.7.1Autocomplete widget . . . . . . . . . . . . . . . . . . 374
7.8SQLFORM.grid and SQLFORM.smartgrid (experimental) . . . . . . 375
8Email and SMS 383
8.1Settingupemail..........................383
8.1.1Configuring email for Google App Engine . . . . . . 384
8.1.2x509 and PGP Encryption . . . . . . . . . . . . . . . . 384
8.2Sendingemails ..........................384
8.2.1Simpletextemail.....................385
8.2.2HTMLemails.......................385
8.2.3Combining text and HTML emails . . . . . . . . . . . 385
8.2.4cc and bcc emails.....................386
8.2.5Attachments........................386
8.2.6Multiple attachments . . . . . . . . . . . . . . . . . . . 386
8.3SendingSMSmessages......................386
8.4Using the template system to generate messages . . . . . . . 387
8.5Sending messages using a background task . . . . . . . . . . 388
9Access Control 391
9.1Authentication...........................393
9.1.1Restrictions on registration . . . . . . . . . . . . . . . 396
9.1.2Integration with OpenID, Facebook, etc. . . . . . . . 397
9.1.3CAPTCHA and reCAPTCHA . . . . . . . . . . . . . . 399
9.1.4Customizing Auth .....................400
9.1.5Renaming Auth tables ..................402
9.1.6Other login methods and login forms . . . . . . . . . 402
9.2Mail and Auth ...........................409
9.3Authorization ...........................410
9.3.1Decorators.........................412
9.3.2Combining requirements . . . . . . . . . . . . . . . . 413
9.3.3Authorization and CRUD . . . . . . . . . . . . . . . . 414
9.3.4Authorization and downloads . . . . . . . . . . . . . 415
9.3.5Access Control and Basic Authentication . . . . . . . 416
9.3.6Manual Authentication . . . . . . . . . . . . . . . . . 416
13
9.3.7Settings and messages . . . . . . . . . . . . . . . . . . 417
9.4Central Authentication Service . . . . . . . . . . . . . . . . . 423
9.4.1Using web2py to authorize non-web2py apps . . . . 425
10 Services 427
10.1Rendering a dictionary . . . . . . . . . . . . . . . . . . . . . . 427
10.1.1HTML, XML, and JSON . . . . . . . . . . . . . . . . . 428
10.1.2Genericviews.......................429
10.1.3Rendering Rows ......................430
10.1.4Customformats......................431
10.1.5RSS.............................431
10.1.6CSV.............................433
10.2Remote procedure calls . . . . . . . . . . . . . . . . . . . . . 434
10.2.1XMLRPC..........................437
10.2.2JSONRPC .........................438
10.2.3JSONRPC and Pyjamas . . . . . . . . . . . . . . . . . 438
10.2.4Amfrpc...........................442
10.2.5SOAP............................444
10.3Low level API and other recipes . . . . . . . . . . . . . . . . 445
10.3.1simplejson.........................445
10.3.2PyRTF ...........................446
10.3.3ReportLabandPDF ...................447
10.4RestfulWebServices .......................448
10.4.1parse_as_rest (experimental) . . . . . . . . . . . . . . 451
10.4.2smart_query (experimental) . . . . . . . . . . . . . . . 456
10.4.3AccessControl ......................457
10.5Services and Authentication . . . . . . . . . . . . . . . . . . . 457
11 jQuery and Ajax 459
11.1web2py_ajax.html.........................459
11.2jQueryeffects ...........................463
11.2.1Conditional fields in forms . . . . . . . . . . . . . . . 467
11.2.2Confirmation on delete . . . . . . . . . . . . . . . . . 469
11.3The ajax function.........................470
11.3.1Evaltarget.........................471
14
11.3.2Auto-completion .....................471
11.3.3Ajax form submission . . . . . . . . . . . . . . . . . . 474
11.3.4Votingandrating.....................475
12 Components and plugins 479
12.1Components............................479
12.1.1Client-Server component communications . . . . . . 485
12.1.2TrappedAjaxlinks....................487
12.2Plugins...............................487
12.2.1Componentplugins ...................491
12.2.2Pluginmanager......................493
12.2.3Layoutplugins ......................494
12.3plugin_wiki .............................495
12.3.1MARKMIN syntax.......................498
12.3.2Pagepermissions.....................500
12.3.3Specialpages .......................501
12.3.4Configuring plugin_wiki . . . . . . . . . . . . . . . . 503
12.3.5Currentwidgets .....................503
12.3.6Extendingwidgets ....................510
13 Deployment recipes 513
13.0.7anyserver.py ........................516
13.1LinuxandUnix ..........................517
13.1.1One step production deployment . . . . . . . . . . . 517
13.1.2Apachesetup .......................517
13.1.3mod_wsgi.........................518
13.1.4mod_wsgiandSSL....................522
13.1.5mod_proxy ........................523
13.1.6Start as Linux daemon . . . . . . . . . . . . . . . . . . 525
13.1.7Lighttpd..........................526
13.1.8Shared hosting with mod_python . . . . . . . . . . . 527
13.1.9Cherokee with FastCGI . . . . . . . . . . . . . . . . . 528
13.1.10 Postgresql .........................530
13.2Windows..............................531
13.2.1Apache and mod_wsgi . . . . . . . . . . . . . . . . . 531
15
13.2.2Start as Windows service . . . . . . . . . . . . . . . . 534
13.3Securing sessions and admin ..................535
13.4Efficiency and scalability . . . . . . . . . . . . . . . . . . . . . 536
13.4.1Efficiencytricks......................537
13.4.2Sessions in database . . . . . . . . . . . . . . . . . . . 538
13.4.3HAProxy a high availability load balancer . . . . . . 538
13.4.4Cleaning up sessions . . . . . . . . . . . . . . . . . . . 540
13.4.5Uploading files in database . . . . . . . . . . . . . . . 541
13.4.6Collectingtickets.....................541
13.4.7Memcache.........................542
13.4.8Sessions in memcache . . . . . . . . . . . . . . . . . . 543
13.4.9CachingwithRedis ...................544
13.4.10 Removing applications . . . . . . . . . . . . . . . . . . 544
13.4.11 Using replicated databases . . . . . . . . . . . . . . . 544
13.5Deploying on Google App Engine . . . . . . . . . . . . . . . 545
13.5.1Configuration.......................547
13.5.2Running and deployment . . . . . . . . . . . . . . . . 548
13.5.3Configuring the handler . . . . . . . . . . . . . . . . . 550
13.5.4Avoid the filesystem . . . . . . . . . . . . . . . . . . . 550
13.5.5Memcache.........................551
13.5.6Datastoreissues......................551
13.5.7GAEandhttps ......................552
13.6Jython................................553
14 Other recipes 555
14.1Upgrading.............................555
14.2How to distribute your applications as binaries . . . . . . . 555
14.3Building a minimalist web2py..................556
14.4Fetching an external URL . . . . . . . . . . . . . . . . . . . . 557
14.5Prettydates ............................558
14.6Geocoding.............................558
14.7Pagination .............................558
14.8httpserver.log and the Log File Format . . . . . . . . . . . . 560
14.9Populating database with dummy data . . . . . . . . . . . . 561
14.10Accepting credit card payments . . . . . . . . . . . . . . . . . 561
16
14.10.1GoogleWallet.......................562
14.10.2Paypal ...........................564
14.10.3Stripe.com.........................564
14.10.4Authorize.Net.......................565
14.11DropboxAPI............................567
14.12TwitterAPI.............................568
14.13Streaming virtual files . . . . . . . . . . . . . . . . . . . . . . 568
Bibliography 571
CONTENTS 17
Preface
web2py was launched in 2007 and now, after four years of continuous
development, we have reached a very much needed fourth edition of this
book. During this time, web2py has managed to win the affection of thousands
of knowledgeable users and more than one hundred developers. Our
collective effort has created one of the most full-featured Open Source Web
Frameworks in existence.
I originally started web2py as a teaching tool because, I believe, the ability to
build high quality web applications is of critical importance for the growth
of a free and open society. It prevents the biggest players from monopolizing
the flow of information. This motivation continues to be valid and it is even
more important today.
In general, the purpose of any web framework is to make web development
easier, faster and prevent developers from making mistakes, especially in
matters related to security. In web2py we address these issues with our three
main goals:
Ease of use is the primary goal for web2py. For us, this means reducing the
learning and deployment time. This is why web2py is a full-stack framework
without dependencies. It requires no installation and has no configuration
files. Everything works out of the box, including a web server, database and a
web-based IDE that gives access to all the main features. The API includes
just 12 core objects, which are easy to work with and memorize. It can
interoperate with most web servers, database and all Python libraries.
Faster development is the secondary goal. Every function of web2py has a
20 web2py full-stack web framework,4th edition
default behavior (which can be overridden). For example, as soon as you have
specified your data models, you will have access to a web-based database
administration panel. web2py also generates automatically forms for your
data and it allows you to easily expose the data in HTML, XML, JSON, RSS,
etc.
Security is at the heart of web2py, and our goal here is to lock everything
down to keep your systems and data safe. Therefore, our database layer
eliminates SQL Injections. The template language prevents Cross Site
Scripting vulnerabilities. The forms generated by web2py provide field
validation and block Cross Site Request Forgeries. Passwords are always
stored hashed. Sessions are stored server-side by default to prevent Cookie
Tampering and session cookies are uuid to prevent Cookie Stealing.
web2py has always been built from the user perspective and is constantly
optimized internally to become faster and leaner, whilst always maintaining
backward compatibility.
web2py is free for you to use. If you benefit from it, we hope you will feel a
little more like contributing back to society in whatever form you choose.
In 2011 InfoWorld magazine reviewed six of the most popular full-stack
Python based web frameworks and raked web2py highest. Also in 2011,
web2py won the Bossie Award for best Open Source Development Software.
1
Introduction
web2py [1] is a free, open-source web framework for agile development
of secure database-driven web applications; it is written in Python [2]
and programmable in Python. web2py is a full-stack framework, meaning
that it contains all the components you need to build fully functional web
applications. web2py is designed to guide a web developer to follow good
software engineering practices, such as using the Model View Controller
(MVC) pattern. web2py separates the data representation (the model) from
the data presentation (the view) and also from the application logic and
workflow (the controller). web2py provides libraries to help the developer
design, implement, and test each of these three parts separately, and
makes them work together. web2py is built for security. This means that
it automatically addresses many of the issues that can lead to security
vulnerabilities, by following well established practices. For example, it
validates all input (to prevent injections), escapes all output (to prevent
cross-site scripting), renames uploaded files (to prevent directory traversal
attacks). web2py leaves little choice to application developers in matters
related to security. web2py includes a Database Abstraction Layer (DAL)
that writes SQL [3] dynamically so that you, the developer, don’t have
to. The DAL knows how to generate SQL transparently for SQLite [4],
MySQL [6], PostgreSQL [5], MSSQL [7], FireBird [8], Oracle [9], IBM DB2[10],
Informix [11], and Ingres [12]. The DAL can also generate function calls for
the Google Datastore when running on the Google App Engine (GAE) [13].

22 web2py full-stack web framework,4th edition
Experimentally we support more databases. Please check on the web2py
web site and mailing list for more recent adapters. Once one or more
database tables are defined, web2py also generates a fully functional web-
based database administration interface to access the database and the
tables. web2py differs from other web frameworks in that it is the only
framework to fully embrace the Web 2.0paradigm, where the web is the
computer. In fact, web2py does not require installation or configuration;
it runs on any architecture that can run Python (Windows, Windows CE,
Mac OS X, iOS, and Unix/Linux), and the development, deployment, and
maintenance phases for the applications can be done via a local or remote
web interface. web2py runs with CPython (the C implementation) and
Jython (the Java implementation), on Python versions 2.4,2.5,2.6, and 2.7,
although "officially" it only supports 2.5so that we can guarantee backward
compatibility for applications. web2py provides a ticketing system. If an
error occurs, a ticket is issued to the user, and the error is logged for the
administrator. web2py is open source and released under the LGPL version
3license.
Another feature of web2py is that we, its developers, commit to maintain
backward compatibility in future versions. We have done so since the first
release of web2py in October, 2007. New features have been added and bugs
have been fixed, but if a program worked with web2py 1.0, that program will
still work today.
Here are some examples of web2py statements that illustrate its power and
simplicity. The following code:
1db.define_table('person',Field('name'), Field('image','upload'))
creates a database table called "person" with two fields: "name", a string; and
"image", something that needs to be uploaded (the actual image). If the table
already exists but does not match this definition, it is altered appropriately.
Given the table defined above, the following code:
1form = crud.create(db.person)
creates an insert form for this table that allows users to upload images. It
also validates a submitted form, renames the uploaded image in a secure

introduction 23
way, stores the image in a file, inserts the corresponding record in the
database, prevents double submission, and eventually modifies the form
itself by adding error messages if the data submitted by the user does not
pass validation.
The following code:
1@auth.requires_permission('read','person')
2def f(): ....
prevents visitors from accessing the function funless the visitor is a member
of a group whose members have permissions to "read" records of table
"person". If the visitor is not logged in, he gets directed to a login page
(provided by default by web2py).
The following code embeds a page component.
1{{=LOAD('other_controller','function.load',ajax=True, ajax_trap=True)}}
This instructs web2py to load in a view the content generated by the other
controller function (this works with any function). It loads the content via
Ajax, embeds it into the current page (using the current layout, not the layout
of the other_controller function), and traps all forms contained in the loaded
content so that they are also submitted via Ajax without reloading the page.
It can also LOAD content from non-web2py applications.
The LOAD helper allows very modular design of applications; it is discussed
in some detail in the last chapter of this book.
1.1Principles
Python programming typically follows these basic principles:
• Don’t repeat yourself (DRY).
• There should be only one way of doing things.
• Explicit is better than implicit.
web2py fully embraces the first two principles by forcing the developer to
use sound software engineering practices that discourage repetition of code.
24 web2py full-stack web framework,4th edition
web2py guides the developer through almost all the tasks common in web
application development (creating and processing forms, managing sessions,
cookies, errors, etc.).
web2py differs from other frameworks with regard to the third principle,
which sometimes conflicts with the other two. In particular, web2py does
not import user applications, but executes them in a predefined context. This
context exposes the Python keywords, as well as the web2py keywords.
To some this may appear as magic, but it should not. Simply, in practice,
some modules are already imported without you doing so. web2py is
trying to avoid the annoying characteristic of other frameworks that force
the developer to import the same modules at the top of every model and
controller. web2py, by importing its own modules, saves time and prevents
mistakes, thus following the spirit of "don’t repeat yourself" and "there
should be only one way of doing things".
If the developer wishes to use other Python modules or third-party modules,
those modules must be imported explicitly, as in any other Python program.
1.2Web frameworks
At its most fundamental level, a web application consists of a set of programs
(or functions) that are executed when the corresponding URL is visited. The
output of the program is returned to the visitor and rendered by the browser.
The purpose of web frameworks is to allow developers to build new apps
quickly, easily and without mistakes. This is done by providing APIs and
tools that reduce and simplify the amount of coding that is required.
The two classic approaches for developing web applications are:
• Generating HTML [14,15] programmatically.
• Embedding code into HTML pages.
The first model is the one that was followed, for example, by early CGI
scripts. The second model is followed, for example, by PHP [16] (where the
code is in PHP, a C-like language), ASP (where the code is in Visual Basic),

introduction 25
and JSP (where the code is in Java).
Here is an example of a PHP program that, when executed, retrieves data
from a database and returns an HTML page showing the selected records:
1<html><body><h1>Records</h1><?
2mysql_connect(localhost,username,password);
3@mysql_select_db(database) or die( "Unable to select database");
4$query="SELECT *FROM contacts";
5$result=mysql_query($query);
6mysql_close();
7$i=0;
8while ($i < mysql_numrows($result)) {
9$name=mysql_result($result,$i,"name");
10 $phone=mysql_result($result,$i,"phone");
11 echo "<b>$name</b><br>Phone:$phone<br /><br /><hr /><br />";
12 $i++;
13 }
14 ?></body></html>
The problem with this approach is that code is embedded into HTML, but
the very same code also needs to generate additional HTML and to generate
SQL statements to query the database, entangling multiple layers of the
application and making it difficult to read and maintain. The situation is
even worse for Ajax applications, and the complexity grows with the number
of pages (files) that make up the application.
The functionality of the above example can be expressed in web2py with two
lines of Python code:
1def index():
2return HTML(BODY(H1('Records'), db().select(db.contacts.ALL)))
In this simple example, the HTML page structure is represented
programmatically by the HTML,BODY, and H1 objects; the database db is queried
by the select command; finally, everything is serialized into HTML. Notice
that db is not a keyword but a user defined variable. We will use this name
consistently to refer to a database connection to avoid confusion.
Web frameworks are typically categorized as one of two types: A "glued"
framework is built by assembling (gluing together) several third-party
components. A "full-stack" framework is built by creating components
designed specifically to be tightly integrated and work together. web2py is a
26 web2py full-stack web framework,4th edition
full-stack framework. Almost all of its components are built from scratch and
are designed to work together, but they function just as well outside of the
complete web2py framework. For example, the Database Abstraction Layer
(DAL) or the template language can be used independently of the web2py
framework by importing gluon.dal or gluon.template into your own Python
applications. gluon is the name of the web2py module that contains system
libraries. Some web2py libraries, such as building and processing forms from
database tables, have dependencies on other portions of web2py. web2py
can also work with third-party Python libraries, including other template
languages and DALs, but they will not be as tightly integrated as the original
components.
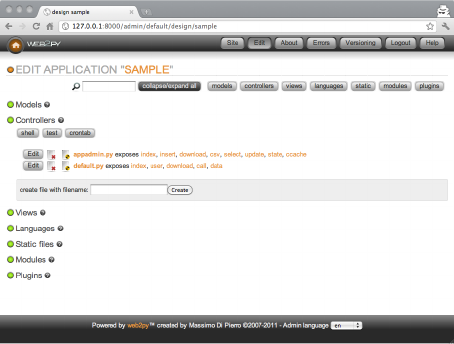
1.3Model-View-Controller
web2py encourages the developer to separate data representation (the
model), data presentation (the view) and the application workflow (the
controller). Let’s consider again the previous example and see how to build
a web2py application around it. Here is an example of the web2py MVC edit
interface:
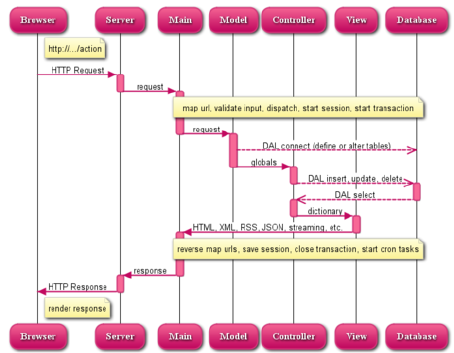
The typical workflow of a request in web2py is described in the following
diagram:
introduction 27
In the diagram:
• The Server can be the web2py built-in web server or a third-party server,
such as Apache. The Server handles multi-threading.
• "main" is the main WSGI application. It performs all common tasks and
wraps user applications. It deals with cookies, sessions, transactions, URL
routing and reverse routing, and dispatching.
It can serve and stream static files if the web server is not doing it already.
• The Models, Views and Controller components make up the user
application.
• Multiple applications can be hosted in the same web2py instance.
• The dashed arrows represent communication with the database engine(s).
The database queries can be written in raw SQL (discouraged) or by using
the web2py Database Abstraction Layer (recommended), so that web2py
application code is not dependent on the specific database engine.
• The dispatcher maps the requested URL to a function call in the controller.
The output of the function can be a string or a dictionary of symbols (a
hash table). The data in the dictionary is rendered by a view. If the visitor
requests an HTML page (the default), the dictionary is rendered into an
HTML page. If the visitor requests the same page in XML, web2py tries

28 web2py full-stack web framework,4th edition
to find a view that can render the dictionary in XML. The developer can
create views to render pages in any of the already supported protocols
(HTML, XML, JSON, RSS, CSV, RTF) or in additional custom protocols.
• All calls are wrapped into a transaction, and any uncaught exception
causes the transaction to be rolled back. If the request succeeds, the
transaction is committed.
• web2py also handles sessions and session cookies automatically, and when
a transaction is committed, the session is also stored, unless specified
otherwise.
• It is possible to register recurrent tasks (via cron) to run at scheduled times
and/or after the completion of certain actions. In this way it is possible to
run long and compute-intensive tasks in the background without slowing
down navigation.
Here is a minimal and complete MVC application, consisting of three files:
"db.py" is the model:
1db = DAL('sqlite://storage.sqlite')
2db.define_table('contact',
3Field('name'),
4Field('phone'))
It connects to the database (in this example a SQLite database stored in the
storage.sqlite file) and defines a table called contact. If the table does not
exist, web2py creates it and, transparently and in the background, generates
SQL code in the appropriate SQL dialect for the specific database engine
used. The developer can see the generated SQL but does not need to change
the code if the database back-end, which defaults to SQLite, is replaced with
MySQL, PostgreSQL, MSSQL, FireBird, Oracle, DB2, Informix, Interbase,
Ingres, and the Google App Engine (both SQL and NoSQL).
Once a table is defined and created, web2py also generates a fully functional
web-based database administration interface, called appadmin, to access the
database and the tables.
"default.py" is the controller:
1def contacts():

introduction 29
2grid=SQLFORM.grid(db.contact, user_signature=False)
3return locals()
In web2py, URLs are mapped to Python modules and function calls. In this
case, the controller contains a single function (or "action") called contacts. An
action may return a string (the returned web page) or a Python dictionary
(a set of key:value pairs) or the set of local variables (as in this example). If
the function returns a dictionary, it is passed to a view with the same name
as the controller/function, which in turn renders the page. In this example,
the function contacts generates a select/search/create/update/delete grid
for table db.contact and returns the grid to the view.
"default/contacts.html" is the view:
1{{extend 'layout.html'}}
2<h1>Manage My Contacts</h1>
3{{=grid}}
This view is called automatically by web2py after the associated controller
function (action) is executed. The purpose of this view is to render the
variables in the returned dictionary (in our case grid) into HTML. The view
file is written in HTML, but it embeds Python code delimited by the special
{{ and }} delimiters. This is quite different from the PHP code example,
because the only code embedded into the HTML is "presentation layer" code.
The "layout.html" file referenced at the top of the view is provided by web2py
and constitutes the basic layout for all web2py applications. The layout file
can easily be modified or replaced.
1.4Why web2py
web2py is one of many web application frameworks, but it has compelling
and unique features. web2py was originally developed as a teaching tool,
with the following primary motivations:
• Easy for users to learn server-side web development without
compromising functionality. For this reason, web2py requires no
installation and no configuration, has no dependencies (except for the
30 web2py full-stack web framework,4th edition
source code distribution, which requires Python 2.5and its standard
library modules), and exposes most of its functionality via a Web browser
interface.
• web2py has been stable from day one because it follows a top-down
design; i.e., its API was designed before it was implemented. Even as
new functionality has been added, web2py has never broken backwards
compatibility, and it will not break compatibility when additional
functionality is added in the future.
• web2py proactively addresses the most important security issues which
plague many modern web applications, as determined by OWASP [19]
below.
• web2py is lightweight. Its core libraries, including the Database
Abstraction Layer, the template language, and all the helpers amount to
1.4MB. The entire source code including sample applications and images
amounts to 10.4MB.
• web2py has a small footprint and is very fast. It uses the Rocket [22]
WSGI web server developed By Timothy Farrell. It is 30% faster than
Apache with mod_proxy. Our tests also indicate that, on an average PC,
it serves an average dynamic page without database access in about 10ms.
The DAL has very low overhead, typically less than 3%.
• web2py uses Python syntax for models, controllers, and views, but does
not import models and controllers (as all the other Python frameworks
do) - instead it executes them. This means that apps can be installed,
uninstalled, and modified without having to restart the web server (even
in production), and different apps can cohexist without their modules
interfering with one another.
• web2py uses a Database Abstraction Layer (DAL) instead of an Object
Relational Mapper (ORM). From a conceptual point of view, this means
that different database tables are mapped into different instances of one
Table class and not into different classes, while records are mapped into
instances of one Row class, not into instances of the corresponding table
class. From a practical point of view, it means that SQL syntax maps

introduction 31
almost one-to-one into DAL syntax, and there is no complex metaclass
programming going on under the hood as in popular ORMs, which would
add latency.
WSGI [17,18] (Web Server Gateway Interface) is an emerging Python
standard for communication between a web server and Python applications).
Here is a screenshot of the main web2py admin interface:
1.5Security
The Open Web Application Security Project [19] (OWASP) is a free and open
worldwide community focused on improving the security of application
software.
OWASP has listed the top ten security issues that put web applications at
risk. That list is reproduced here, along with a description of how each issue
is addressed by web2py:
• "Cross Site Scripting (XSS): XSS flaws occur whenever an application takes
user supplied data and sends it to a web browser without first validating
or encoding that content. XSS allows attackers to execute scripts in the
victim’s browser which can hijack user sessions, deface web sites, possibly
introduce worms, etc." web2py, by default, escapes all variables rendered in the
view, preventing XSS.
• "Injection Flaws: Injection flaws, particularly SQL injection, are common
in web applications. Injection occurs when user-supplied data is sent to
32 web2py full-stack web framework,4th edition
an interpreter as part of a command or query. The attacker’s hostile data
tricks the interpreter into executing unintended commands or changing
data." web2py includes a Database Abstraction Layer that makes SQL injection
impossible. Normally, SQL statements are not written by the developer. Instead,
SQL is generated dynamically by the DAL, ensuring that all inserted data is
properly escaped.
• "Malicious File Execution: Code vulnerable to remote file inclusion
(RFI) allows attackers to include hostile code and data, resulting in
devastating attacks, such as total server compromise." web2py allows only
exposed functions to be executed, preventing malicious file execution. Imported
functions are never exposed; only actions are exposed. web2py uses a Web-based
administration interface which makes it very easy to keep track of what is exposed
and what is not.
• "Insecure Direct Object Reference: A direct object reference occurs when a
developer exposes a reference to an internal implementation object, such
as a file, directory, database record, or key, as a URL or form parameter.
Attackers can manipulate those references to access other objects without
authorization." web2py does not expose any internal objects; moreover, web2py
validates all URLs, thus preventing directory traversal attacks. web2py also
provides a simple mechanism to create forms that automatically validate all input
values.
• "Cross Site Request Forgery (CSRF): A CSRF attack forces a logged-on
victim’s browser to send a pre-authenticated request to a vulnerable web
application, which then forces the victim’s browser to perform a hostile
action to the benefit of the attacker. CSRF can be as powerful as the web
application that it attacks." web2py prevents CSRF as well as accidental double
submission of forms by assigning a one-time random token to each form. Moreover
web2py uses UUID for session cookie.
• "Information Leakage and Improper Error Handling: Applications
can unintentionally leak information about their configuration, internal
workings, or violate privacy through a variety of application problems.
Attackers use this weakness to steal sensitive data, or conduct more
serious attacks." web2py includes a ticketing system. No error can result in
introduction 33
code being exposed to the users. All errors are logged and a ticket is issued to the
user that allows error tracking. But errors and source code are accessible only to
the administrator.
• "Broken Authentication and Session Management: Account credentials
and session tokens are often not properly protected. Attackers
compromise passwords, keys, or authentication tokens to assume other
users’ identities." web2py provides a built-in mechanism for administrator
authentication, and it manages sessions independently for each application. The
administrative interface also forces the use of secure session cookies when the client
is not "localhost". For applications, it includes a powerful Role Based Access
Control API.
• "Insecure Cryptographic Storage: Web applications rarely use
cryptographic functions properly to protect data and credentials.
Attackers use weakly protected data to conduct identity theft and other
crimes, such as credit card fraud." web2py uses the MD5or the HMAC+SHA-
512 hash algorithms to protect stored passwords. Other algorithms are also
available.
• "Insecure Communications: Applications frequently fail to encrypt
network traffic when it is necessary to protect sensitive communications."
web2py includes the SSL-enabled [21] Rocket WSGI server, but it can also use
Apache or Lighttpd and mod_ssl to provide SSL encryption of communications.
• "Failure to Restrict URL Access: Frequently an application only protects
sensitive functionality by preventing the display of links or URLs to
unauthorized users. Attackers can use this weakness to access and
perform unauthorized operations by accessing those URLs directly."
web2py maps URL requests to Python modules and functions. web2py provides
a mechanism for declaring which functions are public and which require
authentication and authorization. The included Role Based Access Control
API allow developers to restrict access to any function based on login, group
membership or group based permissions. The permissions are very granular and
can be combined with CRUD to allow, for example, to give access to specific tables
and/or records. web2py also allows digitally signed URL and provides API to
digitally sign ajax callbacks.

34 web2py full-stack web framework,4th edition
web2py was reviewed for security and you can find the result of the review
in ref. [20].
1.6In the box
You can download web2py from the official web site:
1http://www.web2py.com
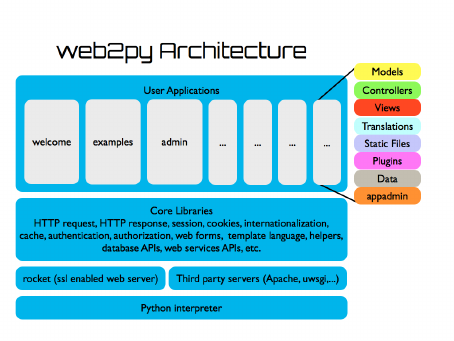
web2py is composed of the following components:
•libraries: provide core functionality of web2py and are accessible
programmatically.
•web server: the Rocket WSGI web server.
• the admin application: used to create, design, and manage other
web2py applications. admin provide a complete web-based Integrated
Development Environment (IDE) for building web2py applications. It also
includes other functionality, such as web-based testing and a web-based
shell.
• the examples application: contains documentation and interactive
examples. examples is a clone of the official web2py.com web site, and
includes epydoc documentation.
• the welcome application: the basic scaffolding template for any other
application. By default it includes a pure CSS cascading menu and user
authentication (discussed in Chapter 9).
web2py is distributed in source code, and in binary form for Microsoft
Windows and for Mac OS X.
The source code distribution can be used in any platform where Python
runs and includes the above-mentioned components. To run the source
code, you need Python 2.5pre-installed on the system. You also need one
of the supported database engines installed. For testing and light-demand
applications, you can use the SQLite database, included with Python 2.5.
introduction 35
The binary versions of web2py (for Windows and Mac OS X) include a
Python 2.5interpreter and the SQLite database. Technically, these two are not
components of web2py. Including them in the binary distributions enables
you to run web2py out of the box.
The following image depicts the overall web2py structure:
1.7License
web2py is licensed under the LGPL version 3License. The full text of the
license if available in ref. [31].
In accordance with LGPL you may:
• redistribute web2py with your apps (including official web2py binary
versions)
• release your applications which use official web2py libraries under any
license you wish
Yet you must:
• make clear in the documentation that your application uses web2py
• release any modification of the web2py libraries under the LGPLv3license
36 web2py full-stack web framework,4th edition
The license includes the usual disclaimer:
THERE IS NO WARRANTY FOR THE PROGRAM, TO THE EXTENT
PERMITTED BY APPLICABLE LAW. EXCEPT WHEN OTHERWISE
STATED IN WRITING THE COPYRIGHT HOLDERS AND/OR OTHER
PARTIES PROVIDE THE PROGRAM “AS IS” WITHOUT WARRANTY OF
ANY KIND, EITHER EXPRESSED OR IMPLIED, INCLUDING, BUT NOT
LIMITED TO, THE IMPLIED WARRANTIES OF MERCHANTABILITY AND
FITNESS FOR A PARTICULAR PURPOSE. THE ENTIRE RISK AS TO THE
QUALITY AND PERFORMANCE OF THE PROGRAM IS WITH YOU.
SHOULD THE PROGRAM PROVE DEFECTIVE, YOU ASSUME THE COST
OF ALL NECESSARY SERVICING, REPAIR OR CORRECTION.
IN NO EVENT UNLESS REQUIRED BY APPLICABLE LAW OR
AGREED TO IN WRITING WILL ANY COPYRIGHT HOLDER, OR
ANY OTHER PARTY WHO MODIFIES AND/OR CONVEYS THE
PROGRAM AS PERMITTED ABOVE, BE LIABLE TO YOU FOR
DAMAGES, INCLUDING ANY GENERAL, SPECIAL, INCIDENTAL OR
CONSEQUENTIAL DAMAGES ARISING OUT OF THE USE OR INABILITY
TO USE THE PROGRAM (INCLUDING BUT NOT LIMITED TO LOSS
OF DATA OR DATA BEING RENDERED INACCURATE OR LOSSES
SUSTAINED BY YOU OR THIRD PARTIES OR A FAILURE OF THE
PROGRAM TO OPERATE WITH ANY OTHER PROGRAMS), EVEN IF
SUCH HOLDER OR OTHER PARTY HAS BEEN ADVISED OF THE
POSSIBILITY OF SUCH DAMAGES.
Earlier versions
Earlier versions of web2py, 1.0.*-1.90.*, were released under the GPL2license
plus a commercial exception which, for practical purposes, was very similar
to the current LPGLv3.
Third party software distributed with web2py web2py contains third party
software under the gluon/contrib/ folder and various JavaScript and CSS
files. These files are distributed with web2py under their original licenses, as
stated in the files.
introduction 37
1.8Acknowledgments
web2py was originally developed by and copyrighted by Massimo Di Pierro.
The first version (1.0) was released in October, 2007. Since then it has been
adopted by many users, some of whom have also contributed bug reports,
testing, debugging, patches, and proofreading of this book.
Some of the major contributors are, in alphabetical order by first name:
Alexey Nezhdanov, Alvaro Justen, Andrew Willimott, Angelo Compagnucci,
Anthony Bastardi, Antonio Ramos, Arun K. Rajeevan, Attila Csipa, Bill
Ferret, Boris Manojlovic, Branko Vukelic, Brian Meredyk, Bruno Rocha,
Carlos Galindo, Carsten Haese, Chris Clark, Chris Steel, Christian Foster
Howes, Christopher Smiga, CJ Lazell, Cliff Kachinske, Craig Younkins,
Daniel Lin, David Harrison, David Wagner, Denes Lengyel, Douglas Soares
de Andrade, Eric Vicenti, Falko Krause, Farsheed Ashouri, Fran Boon,
Francisco Gama, Fred Yanowski, Gilson Filho, Graham Dumpleton, Gyuris
Szabolcs, Hamdy Abdel-Badeea, Hans Donner, Hans Murx, Hans C. v.
Stockhausen, Ian Reinhart Geiser, Ismael Serratos, Jan Beilicke, Jonathan
Benn, Jonathan Lundell, Josh Goldfoot, Jose Jachuf, Josh Jaques, José
Vicente de Sousa, Keith Yang, Kenji Hosoda, Kyle Smith, Limodou, Lucas
D’Ávila, Marcel Leuthi, Marcel Hellkamp, Marcello Della Longa, Mariano
Reingart, Mark Larsen, Mark Moore, Markus Gritsch, Martin Hufsky, Martin
Mulone, Mateusz Banach, Miguel Lopez, Michael Willis, Michele Comitini,
Nathan Freeze, Niall Sweeny, Niccolo Polo, Nicolas Bruxer, Olaf Ferger,
Omi Chiba, Ondrej Such, Ovidio Marinho Falcao Neto, Pai, Paolo Caruccio,
Patrick Breitenbach, Phyo Arkar Lwin, Pierre Thibault, Ramjee Ganti, Robin
Bhattacharyya, Ross Peoples, Ruijun Luo, Ryan Seto, Scott Roberts, Sergey
Podlesnyi, Sharriff Aina, Simone Bizzotto, Sriram Durbha, Sterling Hankins,
Stuart Rackham, Telman Yusupov, Thadeus Burgess, Tim Michelsen, Timothy
Farrell, Yair Eshel, Yarko Tymciurak, Younghyun Jo, Vidul Nikolaev Petrov,
Vinicius Assef, Zahariash.
I am sure I forgot somebody, so I apologize.
I particularly thank Jonathan, Mariano, Bruno, Martin, Nathan, Simone,
Thadeus, Tim, Iceberg, Denes, Hans, Christian, Fran and Patrick for
38 web2py full-stack web framework,4th edition
their major contributions to web2py and Anthony, Alvaro, Bruno, Denes,
Felipe, Graham, Jonathan, Hans, Kyle, Mark, Michele, Richard, Robin,
Roman, Scott, Shane, Sharriff, Sriram, Sterling, Stuart, Thadeus (and others)
for proofreading various versions of this book. Their contribution was
invaluable. If you find any errors in this book, they are exclusively my fault,
probably introduced by a last-minute edit. I also thank Ryan Steffen of Wiley
Custom Learning Solutions for help with publishing the first edition of this
book. web2py contains code from the following authors, whom I would like
to thank:
Guido van Rossum for Python [2], Peter Hunt, Richard Gordon, Timothy
Farrell for the Rocket [22] web server, Christopher Dolivet for EditArea [23],
Bob Ippolito for simplejson [25], Simon Cusack and Grant Edwards for
pyRTF [26], Dalke Scientific Software for pyRSS2Gen [27], Mark Pilgrim for
feedparser [28], Trent Mick for markdown2[29], Allan Saddi for fcgi.py, Evan
Martin for the Python memcache module [30], John Resig for jQuery [32].
The cover of this book was designed by Peter Kirchner at Young Designers.
I thank Helmut Epp (provost of DePaul University), David Miller (Dean of
the College of Computing and Digital Media of DePaul University), and
Estia Eichten (Member of MetaCryption LLC), for their continuous trust and
support.
Finally, I wish to thank my wife, Claudia, and my son, Marco, for putting up
with me during the many hours I have spent developing web2py, exchanging
emails with users and collaborators, and writing this book. This book is
dedicated to them.
1.9About this book
This book includes the following chapters, besides this introduction:
• Chapter 2is a minimalist introduction to Python. It assumes knowledge of
both procedural and object-oriented programming concepts such as loops,
conditions, function calls and classes, and covers basic Python syntax. It
also covers examples of Python modules that are used throughout the
introduction 39
book. If you already know Python, you may skip Chapter 2.
• Chapter 3shows how to start web2py, discusses the administrative
interface, and guides the reader through various examples of increasing
complexity: an application that returns a string, a counter application, an
image blog, and a full blown wiki application that allows image uploads
and comments, provides authentication, authorization, web services and
an RSS feed. While reading this chapter, you may need to refer to Chapter
2for general Python syntax and to the following chapters for a more
detailed reference about the functions that are used.
• Chapter 4covers more systematically the core structure and libraries: URL
mapping, request, response, sessions, caching, cron, internationalization
and general workflow.
• Chapter 5is a reference for the template language used to build views. It
shows how to embed Python code into HTML, and demonstrates the use
of helpers (objects that can generate HTML).
• Chapter 6covers the Database Abstraction Layer, or DAL. The syntax of
the DAL is presented through a series of examples.
• Chapter 7covers forms, form validation and form processing. FORM is
the low level helper for form building. SQLFORM is the high level form
builder. In Chapter 7we also discuss the Create/Read/Update/Delete
(CRUD) API.
• Chapter 8covers communication with as sending emails and SMSes.
• Chapter 9covers authentication, authorization and the extensible Role-
Based Access Control mechanism available in web2py. Mail configuration
and CAPTCHA are also discussed here, since they are used for
authentication. In the third edition of the book we have added extensive
coverage of integration with third-party authentication mechanisms such
as OpenID, OAuth, Google, Facebook, LinkedIn, etc.
• Chapter 10 is about creating web services in web2py. We provide examples
of integration with the Google Web Toolkit via Pyjamas, and with Adobe
Flash via PyAMF.
40 web2py full-stack web framework,4th edition
• Chapter 11 is about web2py and jQuery recipes. web2py is designed
mainly for server-side programming, but it includes jQuery, since we have
found it to be the best open-source JavaScript library available for effects
and Ajax. In this chapter, we discuss how to effectively use jQuery with
web2py.
• Chapter 12 discusses web2py components and plugins as a way to build
modular applications. We provide an example of a plugin that implements
many commonly used functionality, such as charting, comments, tagging,
and wiki.
• Chapter 13 is about production deployment of web2py applications. We
mainly address three possible production scenarios: on a Linux web
server or a set of servers (which we consider the main deployment
alternative), running as a service on a Microsoft Windows environment,
and deployment on the Google Applications Engine. In this chapter, we
also discuss security and scalability issues.
• Chapter 14 contains a variety of other recipes to solve specific tasks,
including upgrades, geocoding, pagination, the Twitter API, and more.
This book only covers basic web2py functionalities and the API that ships
with web2py. This book does not cover web2py appliances (i.e. ready made
applications).
You can download web2py appliances from the corresponding web site [34].
You can find additional topics discussed on AlterEgo [35], the interactive
web2py FAQ.
This book has been written using the markmin syntax and automatically
converted to HTML, LaTeX and PDF.
1.10 Elements of style
PEP8[36] contains good style practices when programming with Python.
You will find that web2py does not always follow these rules. This is not
because of omissions or negligence; it is our belief that the users of web2py
introduction 41
should follow these rules and we encourage it. We chose not to follow some
of those rules when defining web2py helper objects in order to minimize the
probability of name conflict with objects defined by the user.
For example, the class that represents a <div> is called DIV, while according
to the Python style reference it should have been called Div. We believe that,
for this specific example that using an all-upper-case "DIV" is a more natural
choice. Moreover, this approach leaves programmers free to create a class
called "Div" if they choose to do so. Our syntax also maps naturally into the
DOM notation of most browsers (including, for example, Firefox).
According to the Python style guide, all-upper-case strings should be
used for constants and not variables. Continuing with our example, even
considering that DIV is a class, it is a special class that should never
be modified by the user because doing so would break other web2py
applications. Hence, we believe this qualifies the DIV class as something that
should be treated as a constant, further justifying our choice of notation.
In summary, the following conventions are followed:
• HTML helpers and validators are all upper case for the reasons discussed
above (for example DIV,A,FORM,URL).
• The translator object Tis upper case despite the fact that it is an instance
of a class and not a class itself. Logically the translator object performs
an action similar to the HTML helpers, it affects rendering part of the
presentation. Also, Tneeds to be easy to locate in the code and must have
a short name.
• DAL classes follow the Python style guide (first letter capitalized), for
example Table,Field,Query,Row,Rows, etc.
In all other cases we believe we have followed, as much as possible, the
Python Style Guide (PEP8). For example all instance objects are lower-case
(request, response, session, cache), and all internal classes are capitalized.
In all the examples of this book, web2py keywords are shown in bold, while
strings and comments are shown in italic.
2
The Python language
2.1About Python
Python is a general-purpose high-level programming language. Its design
philosophy emphasizes programmer productivity and code readability. It
has a minimalist core syntax with very few basic commands and simple
semantics, but it also has a large and comprehensive standard library,
including an Application Programming Interface (API) to many of the
underlying operating system (OS) functions. Python code, while minimalist,
defines built-in objects such as linked lists (list), tuples (tuple), hash tables
(dict), and arbitrarily long integers (long).
Python supports multiple programming paradigms, including object-
oriented (class), imperative (def), and functional (lambda) programming.
Python has a dynamic type system and automatic memory management
using reference counting (similar to Perl, Ruby, and Scheme).
Python was first released by Guido van Rossum in 1991. The language has
an open, community-based development model managed by the non-profit
Python Software Foundation. There are many interpreters and compilers that
implement the Python language, including one in Java (Jython) but, in this
brief review, we refer to the reference C implementation created by Guido.
You can find many tutorials, the official documentation and library references

44 web2py full-stack web framework,4th edition
of the language on the official Python website. [2]
For additional Python references, we can recommend the books in ref. [37]
and ref. [38].
You may skip this chapter if you are already familiar with the Python
language.
2.2Starting up
The binary distributions of web2py for Microsoft Windows or Apple OS X
come packaged with the Python interpreter built into the distribution file
itself.
You can start it on Windows with the following command (type at the DOS
prompt):
1web2py.exe -S welcome
On Apple OS X, enter the following command type in a Terminal window
(assuming you’re in the same folder as web2py.app):
1./web2py.app/Contents/MacOS/web2py -S welcome
On a Linux or other Unix box, chances are that you have Python already
installed. If so, at a shell prompt type:
1python web2py.py -S welcome
If you do not have Python 2.5(or later 2.x) already installed, you will have to
download and install it before running web2py.
The -S welcome command line option instructs web2py to run the interactive
shell as if the commands were executed in a controller for the welcome
application, the web2py scaffolding application. This exposes almost all
web2py classes, objects and functions to you. This is the only difference
between the web2py interactive command line and the normal Python
command line.
The admin interface also provides a web-based shell for each application.
You can access the one for the "welcome" application at.
the python language 45
1http://127.0.0.1:8000/admin/shell/index/welcome
You can try all the examples in this chapter using the normal shell or the
web-based shell.
2.3help, dir
The Python language provides two commands to obtain documentation
about objects defined in the current scope, both built-in and user-defined.
We can ask for help about an object, for example "1":
1>>> help(1)
2Help on int object:
3
4class int(object)
5| int(x[, base]) -> integer
6|
7| Convert a string or number to an integer, if possible. Afloating point
8| argument will be truncated towards zero (this does not include a string
9| representation of a floating point number!) When converting a string, use
10 | the optional base. It is an error to supply a base when converting a
11 | non-string. If the argument is outside the integer range a long object
12 | will be returned instead.
13 |
14 | Methods defined here:
15 |
16 |__abs__(...)
17 | x.__abs__() <==> abs(x)
18 ...
and, since "1" is an integer, we get a description about the int class and all
its methods. Here the output has been truncated because it is very long and
detailed.
Similarly, we can obtain a list of methods of the object "1" with the command
dir:
1>>> dir(1)
2['__abs__','__add__','__and__','__class__','__cmp__','__coerce__',
3'__delattr__','__div__','__divmod__','__doc__','__float__',
4'__floordiv__','__getattribute__','__getnewargs__','__hash__','__hex__',
5'__index__','__init__','__int__','__invert__','__long__','__lshift__',
6'__mod__','__mul__','__neg__','__new__','__nonzero__','__oct__',

46 web2py full-stack web framework,4th edition
7'__or__','__pos__','__pow__','__radd__','__rand__','__rdiv__',
8'__rdivmod__','__reduce__','__reduce_ex__','__repr__','__rfloordiv__',
9'__rlshift__','__rmod__','__rmul__','__ror__','__rpow__','__rrshift__',
10 '__rshift__','__rsub__','__rtruediv__','__rxor__','__setattr__',
11 '__str__','__sub__','__truediv__','__xor__']
2.4Types
Python is a dynamically typed language, meaning that variables do not have
a type and therefore do not have to be declared. Values, on the other hand,
do have a type. You can query a variable for the type of value it contains:
1>>> a = 3
2>>> print type(a)
3<type 'int'>
4>>> a = 3.14
5>>> print type(a)
6<type 'float'>
7>>> a = 'hello python'
8>>> print type(a)
9<type 'str'>
Python also includes, natively, data structures such as lists and dictionaries.
2.4.1str
Python supports the use of two different types of strings: ASCII strings
and Unicode strings. ASCII strings are delimited by ’...’, "..." or by ’..’ or
"""...""". Triple quotes delimit multiline strings. Unicode strings start with a u
followed by the string containing Unicode characters. A Unicode string can
be converted into an ASCII string by choosing an encoding for example:
1>>> a = 'this is an ASCII string'
2>>> b = u'This is a Unicode string'
3>>> a = b.encode('utf8')
After executing these three commands, the resulting ais an ASCII string
storing UTF8encoded characters. By design, web2py uses UTF8encoded
strings internally.

the python language 47
It is also possible to write variables into strings in various ways:
1>>> print 'number is ' + str(3)
2number is 3
3>>> print 'number is %s' % (3)
4number is 3
5>>> print 'number is %(number)s' % dict(number=3)
6number is 3
The last notation is more explicit and less error prone, and is to be preferred.
Many Python objects, for example numbers, can be serialized into strings
using str or repr. These two commands are very similar but produce slightly
different output. For example:
1>>> for i in [3, 'hello']:
2print str(i), repr(i)
33 3
4hello 'hello'
For user-defined classes, str and repr can be defined/redefined using the
special operators __str__ and __repr__. These are briefly described later on;
for more, refer to the official Python documentation [39]. repr always has a
default value.
Another important characteristic of a Python string is that, like a list, it is an
iterable object.
1>>> for i in 'hello':
2print i
3h
4e
5l
6l
7o
2.4.2list
The main methods of a Python list are append, insert, and delete:
1>>> a = [1, 2, 3]
2>>> print type(a)
3<type 'list'>
4>>> a.append(8)

48 web2py full-stack web framework,4th edition
5>>> a.insert(2, 7)
6>>> del a[0]
7>>> print a
8[2, 7, 3, 8]
9>>> print len(a)
10 4
Lists can be sliced:
1>>> print a[:3]
2[2, 7, 3]
3>>> print a[1:]
4[7, 3, 8]
5>>> print a[-2:]
6[3, 8]
and concatenated:
1>>> a = [2, 3]
2>>> b = [5, 6]
3>>> print a + b
4[2, 3, 5, 6]
A list is iterable; you can loop over it:
1>>> a = [1, 2, 3]
2>>> for i in a:
3print i
41
52
63
The elements of a list do not have to be of the same type; they can be any
type of Python object.
There is a very common situation for which a list comprehension can be used.
Consider the following code:
1>>> a = [1,2,3,4,5]
2>>> b = []
3>>> for x in a:
4if x % 2 == 0:
5b.append(x *3)
6>>> b
7[6, 12]

the python language 49
This code clearly processes a list of items, selects and modifies a subset of the
input list, and creates a new result list, and this code can be entirely replaced
with the following list comprehension:
1>>> a = [1,2,3,4,5]
2>>> b = [x *3 for x in a if x % 2 == 0]
3>>> b
4[6, 12]
2.4.3tuple
A tuple is like a list, but its size and elements are immutable, while in a list
they are mutable. If a tuple element is an object, the object attributes are
mutable. A tuple is delimited by round brackets.
1>>> a = (1, 2, 3)
So while this works for a list:
1>>> a = [1, 2, 3]
2>>> a[1] = 5
3>>> print a
4[1, 5, 3]
the element assignment does not work for a tuple:
1>>> a = (1, 2, 3)
2>>> print a[1]
32
4>>> a[1] = 5
5Traceback (most recent call last):
6File "<stdin>", line 1, in <module>
7TypeError: 'tuple' object does not support item assignment
A tuple, like a list, is an iterable object. Notice that a tuple consisting of a
single element must include a trailing comma, as shown below:
1>>> a = (1)
2>>> print type(a)
3<type 'int'>
4>>> a = (1,)
5>>> print type(a)
6<type 'tuple'>

50 web2py full-stack web framework,4th edition
Tuples are very useful for efficient packing of objects because of their
immutability, and the brackets are often optional:
1>>> a = 2, 3, 'hello'
2>>> x, y, z = a
3>>> print x
42
5>>> print z
6hello
2.4.4dict
A Python dict-ionary is a hash table that maps a key object to a value object.
For example:
1>>> a = {'k':'v','k2':3}
2>>> a['k']
3v
4>>> a['k2']
53
6>>> a.has_key('k')
7True
8>>> a.has_key('v')
9False
Keys can be of any hashable type (int, string, or any object whose class
implements the __hash__ method). Values can be of any type. Different keys
and values in the same dictionary do not have to be of the same type. If the
keys are alphanumeric characters, a dictionary can also be declared with the
alternative syntax:
1>>> a = dict(k='v', h2=3)
2>>> a['k']
3v
4>>> print a
5{'k':'v','h2':3}
Useful methods are has_key,keys,values and items:
1>>> a = dict(k='v', k2=3)
2>>> print a.keys()
3['k','k2']
4>>> print a.values()
5['v', 3]

the python language 51
6>>> print a.items()
7[('k','v'), ('k2', 3)]
The items method produces a list of tuples, each containing a key and its
associated value.
Dictionary elements and list elements can be deleted with the command del:
1>>> a = [1, 2, 3]
2>>> del a[1]
3>>> print a
4[1, 3]
5>>> a = dict(k='v', h2=3)
6>>> del a['h2']
7>>> print a
8{'k':'v'}
Internally, Python uses the hash operator to convert objects into integers, and
uses that integer to determine where to store the value.
1>>> hash("hello world")
2-1500746465
2.5About indentation
Python uses indentation to delimit blocks of code. A block starts with a
line ending in colon, and continues for all lines that have a similar or higher
indentation as the next line. For example:
1>>> i = 0
2>>> while i < 3:
3>>> print i
4>>> i = i + 1
5>>>
60
71
82
It is common to use four spaces for each level of indentation. It is a good
policy not to mix tabs with spaces, which can result in (invisible) confusion.

52 web2py full-stack web framework,4th edition
2.6for...in
In Python, you can loop over iterable objects:
1>>> a = [0, 1, 'hello','python']
2>>> for i in a:
3print i
40
51
6hello
7python
One common shortcut is xrange, which generates an iterable range without
storing the entire list of elements.
1>>> for i in xrange(0, 4):
2print i
30
41
52
63
This is equivalent to the C/C++/C#/Java syntax:
1for(int i=0; i<4; i=i+1) { print(i); }
Another useful command is enumerate, which counts while looping:
1>>> a = [0, 1, 'hello','python']
2>>> for i, j in enumerate(a):
3print i, j
40 0
51 1
62 hello
73 python
There is also a keyword range(a, b, c) that returns a list of integers starting
with the value a, incrementing by c, and ending with the last value smaller
than b,adefaults to 0and cdefaults to 1.xrange is similar but does not
actually generate the list, only an iterator over the list; thus it is better for
looping.
You can jump out of a loop using break
1>>> for i in [1, 2, 3]:
2print i

the python language 53
3break
41
You can jump to the next loop iteration without executing the entire code
block with continue
1>>> for i in [1, 2, 3]:
2print i
3continue
4print 'test'
51
62
73
2.7while
The while loop in Python works much as it does in many other programming
languages, by looping an indefinite number of times and testing a condition
before each iteration. If the condition is False, the loop ends.
1>>> i = 0
2>>> while i < 10:
3i=i+1
4>>> print i
510
There is no loop...until construct in Python.
2.8if...elif...else
The use of conditionals in Python is intuitive:
1>>> for i in range(3):
2>>> if i == 0:
3>>> print 'zero'
4>>> elif i == 1:
5>>> print 'one'
6>>> else:
7>>> print 'other'
8zero
9one
10 other
54 web2py full-stack web framework,4th edition
"elif" means "else if". Both elif and else clauses are optional. There can be
more than one elif but only one else statement. Complex conditions can be
created using the not,and and or operators.
1>>> for i in range(3):
2>>> if i == 0 or (i == 1 and i + 1 == 2):
3>>> print '0 or 1'
2.9try...except...else...finally
Python can throw - pardon, raise - Exceptions:
1>>> try:
2>>> a = 1 / 0
3>>> except Exception, e:
4>>> print 'oops: %s' % e
5>>> else:
6>>> print 'no problem here'
7>>> finally:
8>>> print 'done'
9oops: integer division or modulo by zero
10 done
If the exception is raised, it is caught by the except clause, which is executed,
while the else clause is not. If no exception is raised, the except clause is not
executed, but the else one is. The finally clause is always executed.
There can be multiple except clauses for different possible exceptions:
1>>> try:
2>>> raise SyntaxError
3>>> except ValueError:
4>>> print 'value error'
5>>> except SyntaxError:
6>>> print 'syntax error'
7syntax error
The else and finally clauses are optional.
Here is a list of built-in Python exceptions + HTTP (defined by web2py)
1BaseException
2+-- HTTP (defined by web2py)
3+-- SystemExit

the python language 55
4+-- KeyboardInterrupt
5+-- Exception
6+-- GeneratorExit
7+-- StopIteration
8+-- StandardError
9| +-- ArithmeticError
10 | | +-- FloatingPointError
11 | | +-- OverflowError
12 | | +-- ZeroDivisionError
13 | +-- AssertionError
14 | +-- AttributeError
15 | +-- EnvironmentError
16 | | +-- IOError
17 | | +-- OSError
18 | | +-- WindowsError (Windows)
19 | | +-- VMSError (VMS)
20 | +-- EOFError
21 | +-- ImportError
22 | +-- LookupError
23 | | +-- IndexError
24 | | +-- KeyError
25 | +-- MemoryError
26 | +-- NameError
27 | | +-- UnboundLocalError
28 | +-- ReferenceError
29 | +-- RuntimeError
30 | | +-- NotImplementedError
31 | +-- SyntaxError
32 | | +-- IndentationError
33 | | +-- TabError
34 | +-- SystemError
35 | +-- TypeError
36 | +-- ValueError
37 | | +-- UnicodeError
38 | | +-- UnicodeDecodeError
39 | | +-- UnicodeEncodeError
40 | | +-- UnicodeTranslateError
41 +-- Warning
42 +-- DeprecationWarning
43 +-- PendingDeprecationWarning
44 +-- RuntimeWarning
45 +-- SyntaxWarning
46 +-- UserWarning
47 +-- FutureWarning
48 +-- ImportWarning
49 +-- UnicodeWarning

56 web2py full-stack web framework,4th edition
For a detailed description of each of them, refer to the official Python
documentation. web2py exposes only one new exception, called HTTP. When
raised, it causes the program to return an HTTP error page (for more on this
refer to Chapter 4).
Any object can be raised as an exception, but it is good practice to raise
objects that extend one of the built-in exception classes.
2.10 def...return
Functions are declared using def. Here is a typical Python function:
1>>> def f(a, b):
2return a + b
3>>> print f(4, 2)
46
There is no need (or way) to specify types of the arguments or the return
type(s). In this example, a function fis defined that can take two arguments.
Functions are the first code syntax feature described in this chapter to
introduce the concept of scope, or namespace. In the above example, the
identifiers aand bare undefined outside of the scope of function f:
1>>> def f(a):
2return a + 1
3>>> print f(1)
42
5>>> print a
6Traceback (most recent call last):
7File "<pyshell#22>", line 1, in <module>
8print a
9NameError: name 'a' is not defined
Identifiers defined outside of function scope are accessible within the
function; observe how the identifier ais handled in the following code:
1>>> a = 1
2>>> def f(b):
3return a + b
4>>> print f(1)
52
6>>> a = 2

the python language 57
7>>> print f(1) # new value of a is used
83
9>>> a = 1 # reset a
10 >>> def g(b):
11 a=2# creates a new local a
12 return a + b
13 >>> print g(2)
14 4
15 >>> print a # global a is unchanged
16 1
If ais modified, subsequent function calls will use the new value of the global
abecause the function definition binds the storage location of the identifier
a, not the value of aitself at the time of function declaration; however, if a
is assigned-to inside function g, the global ais unaffected because the new
local ahides the global value. The external-scope reference can be used in
the creation of closures:
1>>> def f(x):
2def g(y):
3return x *y
4return g
5>>> doubler = f(2) # doubler is a new function
6>>> tripler = f(3) # tripler is a new function
7>>> quadrupler = f(4) # quadrupler is a new function
8>>> print doubler(5)
910
10 >>> print tripler(5)
11 15
12 >>> print quadrupler(5)
13 20
Function fcreates new functions; and note that the scope of the name gis
entirely internal to f. Closures are extremely powerful.
Function arguments can have default values, and can return multiple results:
1>>> def f(a, b=2):
2return a + b, a - b
3>>> x, y = f(5)
4>>> print x
57
6>>> print y
73

58 web2py full-stack web framework,4th edition
Function arguments can be passed explicitly by name, and this means that
the order of arguments specified in the caller can be different than the order
of arguments with which the function was defined:
1>>> def f(a, b=2):
2return a + b, a - b
3>>> x, y = f(b=5, a=2)
4>>> print x
57
6>>> print y
7-3
Functions can also take a runtime-variable number of arguments:
1>>> def f(*a, **b):
2return a, b
3>>> x, y = f(3, 'hello', c=4, test='world')
4>>> print x
5(3, 'hello')
6>>> print y
7{'c':4, 'test':'world'}
Here arguments not passed by name (3, ’hello’) are stored in the tuple a, and
arguments passed by name (cand test) are stored in the dictionary b.
In the opposite case, a list or tuple can be passed to a function that requires
individual positional arguments by unpacking them:
1>>> def f(a, b):
2return a + b
3>>> c = (1, 2)
4>>> print f(*c)
53
and a dictionary can be unpacked to deliver keyword arguments:
1>>> def f(a, b):
2return a + b
3>>> c = {'a':1, 'b':2}
4>>> print f(**c)
53
2.10.1lambda
lambda provides a way to create a very short unnamed function very easily:

the python language 59
1>>> a = lambda b: b + 2
2>>> print a(3)
35
The expression "lambda [a]:[b]" literally reads as "a function with arguments
[a] that returns [b]". The lambda expression is itself unnamed, but the function
acquires a name by being assigned to identifier a. The scoping rules for def
apply to lambda equally, and in fact the code above, with respect to a, is
identical to the function declaration using def:
1>>> def a(b):
2return b + 2
3>>> print a(3)
45
The only benefit of lambda is brevity; however, brevity can be very convenient
in certain situations. Consider a function called map that applies a function to
all items in a list, creating a new list:
1>>> a = [1, 7, 2, 5, 4, 8]
2>>> map(lambda x: x + 2, a)
3[3, 9, 4, 7, 6, 10]
This code would have doubled in size had def been used instead of lambda.
The main drawback of lambda is that (in the Python implementation) the
syntax allows only for a single expression; however, for longer functions,
def can be used and the extra cost of providing a function name decreases as
the length of the function grows. Just like def,lambda can be used to curry
functions: new functions can be created by wrapping existing functions such
that the new function carries a different set of arguments:
1>>> def f(a, b): return a + b
2>>> g = lambda a: f(a, 3)
3>>> g(2)
45
There are many situations where currying is useful, but one of those is
directly useful in web2py: caching. Suppose you have an expensive function
that checks whether its argument is prime:
1def isprime(number):
2for p in range(2, number):
3if (number % p) == 0:

60 web2py full-stack web framework,4th edition
4return False
5return True
This function is obviously time consuming.
Suppose you have a caching function cache.ram that takes three arguments: a
key, a function and a number of seconds.
1value = cache.ram('key', f, 60)
The first time it is called, it calls the function f(), stores the output in a
dictionary in memory (let’s say "d"), and returns it so that value is:
1value = d['key']=f()
The second time it is called, if the key is in the dictionary and not older
than the number of seconds specified (60), it returns the corresponding value
without performing the function call.
1value = d['key']
How would you cache the output of the function isprime for any input? Here
is how:
1>>> number = 7
2>>> seconds = 60
3>>> print cache.ram(str(number), lambda: isprime(number), seconds)
4True
5>>> print cache.ram(str(number), lambda: isprime(number), seconds)
6True
The output is always the same, but the first time cache.ram is called, isprime
is called; the second time it is not.
Python functions, created with either def or lambda allow re-factoring existing
functions in terms of a different set of arguments. cache.ram and cache.disk
are web2py caching functions.
2.11 class
Because Python is dynamically typed, Python classes and objects may seem
odd. In fact, you do not need to define the member variables (attributes)

the python language 61
when declaring a class, and different instances of the same class can have
different attributes. Attributes are generally associated with the instance, not
the class (except when declared as "class attributes", which is the same as
"static member variables" in C++/Java).
Here is an example:
1>>> class MyClass(object): pass
2>>> myinstance = MyClass()
3>>> myinstance.myvariable = 3
4>>> print myinstance.myvariable
53
Notice that pass is a do-nothing command. In this case it is used to define a
class MyClass that contains nothing. MyClass() calls the constructor of the class
(in this case the default constructor) and returns an object, an instance of the
class. The (object) in the class definition indicates that our class extends the
built-in object class. This is not required, but it is good practice.
Here is a more complex class:
1>>> class MyClass(object):
2>>> z = 2
3>>> def __init__(self, a, b):
4>>> self.x = a, self.y = b
5>>> def add(self):
6>>> return self.x + self.y + self.z
7>>> myinstance = MyClass(3, 4)
8>>> print myinstance.add()
99
Functions declared inside the class are methods. Some methods have special
reserved names. For example, __init__ is the constructor. All variables are
local variables of the method except variables declared outside methods. For
example, zis a class variable, equivalent to a C++ static member variable that
holds the same value for all instances of the class.
Notice that __init__ takes 3arguments and add takes one, and yet we call
them with 2and 0arguments respectively. The first argument represents,
by convention, the local name used inside the method to refer to the current
object. Here we use self to refer to the current object, but we could have used
any other name. self plays the same role as *this in C++ or this in Java, but
self is not a reserved keyword.

62 web2py full-stack web framework,4th edition
This syntax is necessary to avoid ambiguity when declaring nested classes,
such as a class that is local to a method inside another class.
2.12 Special attributes, methods and operators
Class attributes, methods, and operators starting with a double underscore
are usually intended to be private (i.e. to be used internally but not exposed
outside the class) although this is a convention that is not enforced by the
interpreter.
Some of them are reserved keywords and have a special meaning.
Here, as an example, are three of them:
•__len__
•__getitem__
•__setitem__
They can be used, for example, to create a container object that acts like a list:
1>>> class MyList(object):
2>>> def __init__(self, *a): self.a = list(a)
3>>> def __len__(self): return len(self.a)
4>>> def __getitem__(self, i): return self.a[i]
5>>> def __setitem__(self, i, j): self.a[i] = j
6>>> b = MyList(3, 4, 5)
7>>> print b[1]
84
9>>> b.a[1] = 7
10 >>> print b.a
11 [3, 7, 5]
Other special operators include __getattr__ and __setattr__, which define the
get and set attributes for the class, and __sum__ and __sub__, which overload
arithmetic operators. For the use of these operators we refer the reader to
more advanced books on this topic. We have already mentioned the special
operators __str__ and __repr__.

the python language 63
2.13 File input/output
In Python you can open and write in a file with:
1>>> file = open('myfile.txt','w')
2>>> file.write('hello world')
3>>> file.close()
Similarly, you can read back from the file with:
1>>> file = open('myfile.txt','r')
2>>> print file.read()
3hello world
Alternatively, you can read in binary mode with "rb", write in binary mode
with "wb", and open the file in append mode "a", using standard C notation.
The read command takes an optional argument, which is the number of bytes.
You can also jump to any location in a file using seek.
You can read back from the file with read
1>>> print file.seek(6)
2>>> print file.read()
3world
and you can close the file with:
1>>> file.close()
In the standard distribution of Python, which is known as CPython, variables
are reference-counted, including those holding file handles, so CPython knows
that when the reference count of an open file handle decreases to zero, the file
may be closed and the variable disposed. However, in other implementations of
Python such as PyPy, garbage collection is used instead of reference counting,
and this means that it is possible that there may accumulate too many open file
handles at one time, resulting in an error before the gc has a chance to close
and dispose of them all. Therefore it is best to explicitly close file handles when
they are no longer needed. web2py provides two helper functions, read_file()
and write_file() inside the gluon.fileutils namespace that encapsulate the
file access and ensure that the file handles being used are properly closed.

64 web2py full-stack web framework,4th edition
When using web2py, you do not know where the current directory is, because
it depends on how web2py is configured. The variable request.folder contains
the path to the current application. Paths can be concatenated with the
command os.path.join, discussed below.
2.14 exec,eval
Unlike Java, Python is a truly interpreted language. This means it has the
ability to execute Python statements stored in strings. For example:
1>>> a = "print 'hello world'"
2>>> exec(a)
3'hello world'
What just happened? The function exec tells the interpreter to call itself and
execute the content of the string passed as argument. It is also possible to
execute the content of a string within a context defined by the symbols in a
dictionary:
1>>> a = "print b"
2>>> c = dict(b=3)
3>>> exec(a, {}, c)
43
Here the interpreter, when executing the string a, sees the symbols defined
in c(bin the example), but does not see cor athemselves. This is different
than a restricted environment, since exec does not limit what the inner code
can do; it just defines the set of variables visible to the code.
A related function is eval, which works very much like exec except that it
expects the argument to evaluate to a value, and it returns that value.
1>>> a = "3*4"
2>>> b = eval(a)
3>>> print b
412

the python language 65
2.15 import
The real power of Python is in its library modules. They provide a large and
consistent set of Application Programming Interfaces (APIs) to many system
libraries (often in a way independent of the operating system).
For example, if you need to use a random number generator, you can do:
1>>> import random
2>>> print random.randint(0, 9)
35
This prints a random integer between 0and 9(including 9), 5in the example.
The function randint is defined in the module random. It is also possible to
import an object from a module into the current namespace:
1>>> from random import randint
2>>> print randint(0, 9)
or import all objects from a module into the current namespace:
1>>> from random import *
2>>> print randint(0, 9)
or import everything in a newly defined namespace:
1>>> import random as myrand
2>>> print myrand.randint(0, 9)
In the rest of this book, we will mainly use objects defined in modules os,
sys,datetime,time and cPickle.
All of the web2py objects are accessible via a module called gluon, and that is
the subject of later chapters. Internally, web2py uses many Python modules
(for example thread), but you rarely need to access them directly.
In the following subsections we consider those modules that are most useful.
2.15.1os
This module provides an interface to the operating system API. For example:

66 web2py full-stack web framework,4th edition
1>>> import os
2>>> os.chdir('..')
3>>> os.unlink('filename_to_be_deleted')
Some of the os functions, such as chdir, MUST NOT be used in web2py
because they are not thread-safe.
os.path.join is very useful; it allows the concatenation of paths in an OS-
independent way:
1>>> import os
2>>> a = os.path.join('path','sub_path')
3>>> print a
4path/sub_path
System environment variables can be accessed via:
1>>> print os.environ
which is a read-only dictionary.
2.15.2sys
The sys module contains many variables and functions, but the one we use
the most is sys.path. It contains a list of paths where Python searches for
modules. When we try to import a module, Python looks for it in all the
folders listed in sys.path. If you install additional modules in some location
and want Python to find them, you need to append the path to that location
to sys.path.
1>>> import sys
2>>> sys.path.append('path/to/my/modules')
When running web2py, Python stays resident in memory, and there is only
one sys.path, while there are many threads servicing the HTTP requests. To
avoid a memory leak, it is best to check if a path is already present before
appending:
1>>> path = 'path/to/my/modules'
2>>> if not path in sys.path:
3sys.path.append(path)

the python language 67
2.15.3datetime
The use of the datetime module is best illustrated by some examples:
1>>> import datetime
2>>> print datetime.datetime.today()
32008-07-04 14:03:90
4>>> print datetime.date.today()
52008-07-04
Occasionally you may need to time-stamp data based on the UTC time as
opposed to local time. In this case you can use the following function:
1>>> import datetime
2>>> print datetime.datetime.utcnow()
32008-07-04 14:03:90
The datetime module contains various classes: date, datetime, time and
timedelta. The difference between two date or two datetime or two time
objects is a timedelta:
1>>> a = datetime.datetime(2008, 1, 1, 20, 30)
2>>> b = datetime.datetime(2008, 1, 2, 20, 30)
3>>> c = b - a
4>>> print c.days
51
In web2py, date and datetime are used to store the corresponding SQL types
when passed to or returned from the database.
2.15.4time
The time module differs from date and datetime because it represents time as
seconds from the epoch (beginning of 1970).
1>>> import time
2>>> t = time.time()
31215138737.571
Refer to the Python documentation for conversion functions between time in
seconds and time as a datetime.

68 web2py full-stack web framework,4th edition
2.15.5cPickle
This is a very powerful module. It provides functions that can serialize
almost any Python object, including self-referential objects. For example,
let’s build a weird object:
1>>> class MyClass(object): pass
2>>> myinstance = MyClass()
3>>> myinstance.x = 'something'
4>>> a = [1 ,2, {'hello':'world'}, [3, 4, [myinstance]]]
and now:
1>>> import cPickle
2>>> b = cPickle.dumps(a)
3>>> c = cPickle.loads(b)
In this example, bis a string representation of a, and cis a copy of agenerated
by de-serializing b. cPickle can also serialize to and de-serialize from a file:
1>>> cPickle.dump(a, open('myfile.pickle','wb'))
2>>> c = cPickle.load(open('myfile.pickle','rb'))

3
Overview
3.1Startup
web2py comes in binary packages for Windows and Mac OS X. They include
the Python interpreter so you do not need to have it pre-installed. There
is also a source code version that runs on Windows, Mac, Linux, and other
Unix systems. The Windows and OS X binary versions include the necessary
Python interpreter. The source code package assumes that Python is already
installed on the computer. web2py requires no installation. To get started,
unzip the downloaded zip file for your specific operating system and execute
the corresponding web2py file.
On Windows, run:
1web2py.exe
On OS X, run:
1open web2py.app
On Unix and Linux, run from source by typing:
1python2.5 web2py.py
To run web2py on Windows from source install first Mark Hammond’s "Python for
Windows extensions, then run:
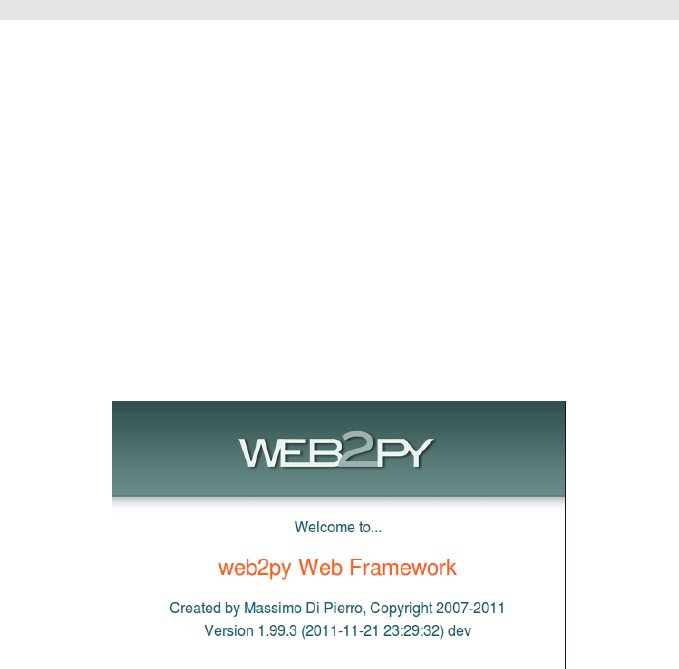
70 web2py full-stack web framework,4th edition
1python2.5 web2py.py
The web2py program accepts various command line options which are
discussed later.
By default, at startup, web2py displays a startup window and then displays
a GUI widget that asks you to choose a one-time administrator password,
the IP address of the network interface to be used for the web server, and a
port number from which to serve requests. By default, web2py runs its web
server on 127.0.0.1:8000 (port 8000 on localhost), but you can run it on any
available IP address and port. You can query the IP address of your network
interface by opening a command line and typing ipconfig on Windows or
ifconfig on OS X and Linux. From now on we assume web2py is running
on localhost (127.0.0.1:8000). Use 0.0.0.0:80 to run web2py publicly on any of
your network interfaces.
If you do not provide an administrator password, the administration interface
is disabled. This is a security measure to prevent publicly exposing the admin
interface.
The administrative interface, admin, is only accessible from localhost unless
you run web2py behind Apache with mod_proxy. If admin detects a proxy,
the session cookie is set to secure and admin login does not work unless the
communication between the client and the proxy goes over HTTPS; this is a
security measure. All communications between the client and admin must
always be local or encrypted; otherwise an attacker would be able to perform
a man-in-the middle attack or a replay attack and execute arbitrary code on
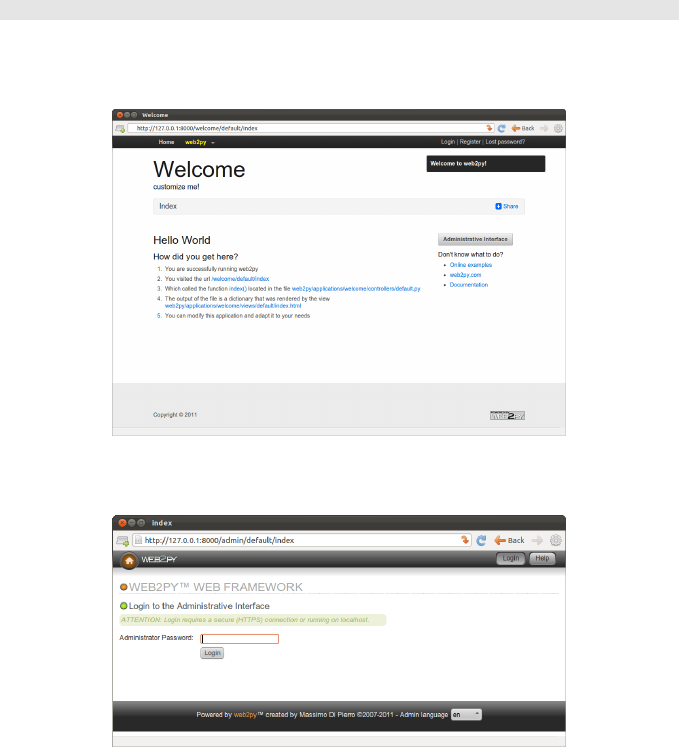
overview 71
the server.
After the administration password has been set, web2py starts up the web
browser at the page:
1http://127.0.0.1:8000/
If the computer does not have a default browser, open a web browser and
enter the URL.
Clicking on "administrative interface" takes you to the login page for the
administration interface.
The administrator password is the password you chose at startup. Notice
that there is only one administrator, and therefore only one administrator
password. For security reasons, the developer is asked to choose a new
password every time web2py starts unless the <recycle> option is specified.
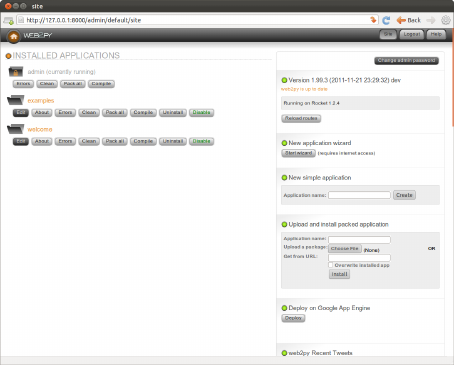
72 web2py full-stack web framework,4th edition
This is distinct from the authentication mechanism in web2py applications.
After the administrator logs into web2py, the browser is redirected to the
"site" page.
This page lists all installed web2py applications and allows the administrator
to manage them. web2py comes with three applications:
• An admin application, the one you are using right now.
• An examples application, with the online interactive documentation and
a replica of the web2py official website.
• A welcome application. This is the basic template for any other web2py
application. It is referred to as the scaffolding application. This is also the
application that welcomes a user at startup.
Ready-to-use web2py applications are referred to as web2py appliances. You
can download many freely available appliances from [34]. web2py users are
encouraged to submit new appliances, either in open-source or closed-source
(compiled and packed) form.
From the admin application’s site page, you can perform the following
operations:
•install an application by completing the form on the bottom right of the
overview 73
page. Give a name to the application, select the file containing a packaged
application or the URL where the application is located, and click "submit".
•uninstall an application by clicking the corresponding button. There is a
confirmation page.
•create a new application by choosing a name and clicking "create".
•package an application for distribution by clicking on the corresponding
button. A downloaded application is a tar file containing everything,
including the database. You should not untar this file; it is automatically
unpackaged by web2py when installed with admin.
•clean up an application’s temporary files, such as sessions, errors and
cache files.
•EDIT an application.
When you create a new application using admin, it starts as a clone of
the "welcome" scaffolding app with a "models/db.py" that creates a SQLite
database, connects to it, instantiates Auth, Crud and Service, configures
them. It also provides a "controller/default.py" which exposes actions "index",
"download", "user" for user management, and "call" for services. In the
following, we assume that these files have been removed; we will be creating
apps from scratch.
web2py also comes with a wizard, described later in this chapter, that can write
an alternate scaffolding code for you based on layouts and plugins available on
the web and based on high level description of the models.
3.2Say hello
Here, as an example, we create a simple web app that displays the message
"Hello from MyApp" to the user. We will call this application "myapp". We
will also add a counter that counts how many times the same user visits the
page.
You can create a new application simply by typing its name in the form on
the top right of the site page in admin.
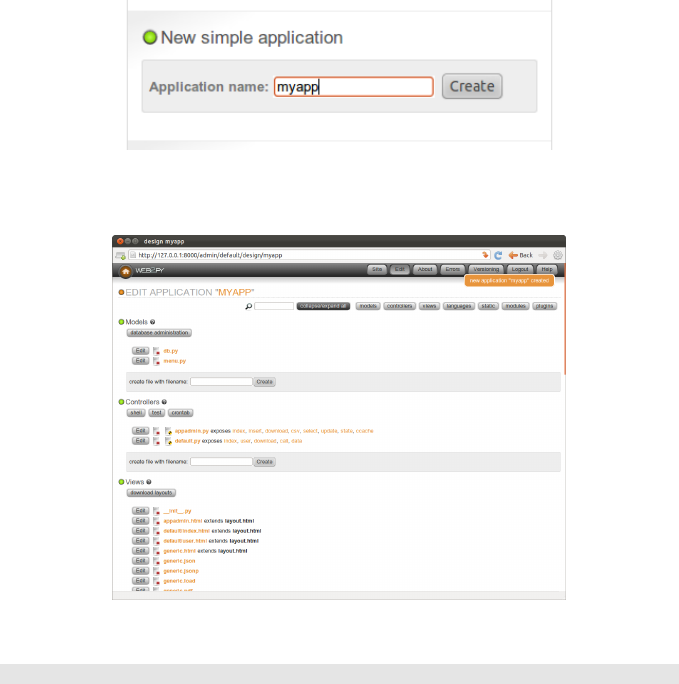
74 web2py full-stack web framework,4th edition
After you press [create], the application is created as a copy of the built-in
welcome application.
To run the new application, visit:
1http://127.0.0.1:8000/myapp
Now you have a copy of the welcome application.
To edit an application, click on the design button for the newly created
application.
The Edit page tells you what is inside the application. Every web2py
application consists of certain files, most of which fall into one of isx
categories:
•models: describe the data representation.
•controllers: describe the application logic and workflow.

overview 75
•views: describe the data presentation.
•languages: describe how to translate the application presentation to other
languages.
•modules: Python modules that belong to the application.
•static files: static images, CSS files [40,41,42], JavaScript files [43,44], etc.
•plugins: groups of files designed to work together.
Everything is neatly organized following the Model-View-Controller design
pattern. Each section in the edit page corresponds to a subfolder in the
application folder.
Notice that section headings will toggle their content. Folder names under
static files are also collapsible.
Each file listed in the section corresponds to a file physically located in the
subfolder. Any operation performed on a file via the admin interface (create,
edit, delete) can be performed directly from the shell using your favorite editor.
The application contains other types of files (database, session files, error
files, etc.), but they are not listed on the edit page because they are not
created or modified by the administrator; they are created and modified by
the application itself.
The controllers contain the logic and workflow of the application. Every
URL gets mapped into a call to one of the functions in the controllers
(actions). There are two default controllers: "appadmin.py" and "default.py".
appadmin provides the database administrative interface; we do not need
it now. "default.py" is the controller that you need to edit, the one that is
called by default when no controller is specified in the URL. Edit the "index"
function as follows:
1def index():
2return "Hello from MyApp"
Here is what the online editor looks like:
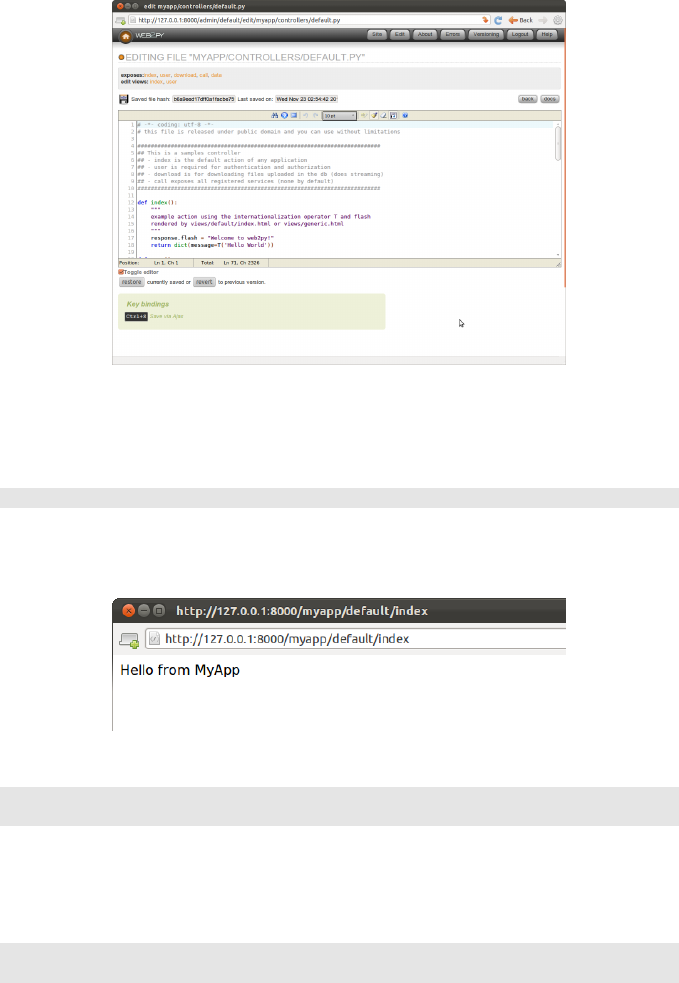
76 web2py full-stack web framework,4th edition
Save it and go back to the edit page. Click on the index link to visit the newly
created page.
When you visit the URL
1http://127.0.0.1:8000/myapp/default/index
the index action in the default controller of the myapp application is called.
It returns a string that the browser displays for us. It should look like this:
Now, edit the "index" function as follows:
1def index():
2return dict(message="Hello from MyApp")
Also from the edit page, edit the view "default/index.html" (the view file
associated with the action) and completely replace the existing contents of
that file with the following:
1<html>
2<head></head>

overview 77
3<body>
4<h1>{{=message}}</h1>
5</body>
6</html>
Now the action returns a dictionary defining a message. When an action
returns a dictionary, web2py looks for a view with the name
[controller]/[function].[extension] and executes it. Here [extension] is the
requested extension. If no extension is specified, it defaults to "html", and
that is what we will assume here. Under this assumption, the view is an
HTML file that embeds Python code using special {{ }} tags. In particular,
in the example, the {{=message}} instructs web2py to replace the tagged code
with the value of the message returned by the action. Notice that message here
is not a web2py keyword but is defined in the action. So far we have not used
any web2py keywords.
If web2py does not find the requested view, it uses the "generic.html" view
that comes with every application.
If an extension other than "html" is specified ("json" for example), and the
view file "[controller]/[function].json" is not found, web2py looks for the view
"generic.json". web2py comes with generic.html, generic.json, generic.xml,
and generic.rss. These generic views can be modified for each application
individually, and additional views can be added easily.
Generic views are a development tool. In production every action should have
its own view. In fact, by default, generic views are only enabled from localhost.
You can also specify a view with response.view = ’default/something.html’
Read more on this topic in Chapter 10.
If you go back to "EDIT" and click on index, you will now see the following
HTML page:

78 web2py full-stack web framework,4th edition
For debugging purposes you can always append
1{{=response.toolbar()}}
to the code in a view and it will show you some useful information, including
the request, response and session objects, and list all db queries with their
timing.
3.3Let’s count
Let’s now add a counter to this page that will count how many times the
same visitor displays the page. web2py automatically and transparently
tracks visitors using sessions and cookies. For each new visitor, it creates
a session and assigns a unique "session_id". The session is a container for
variables that are stored server-side. The unique id is sent to the browser via
a cookie. When the visitor requests another page from the same application,
the browser sends the cookie back, it is retrieved by web2py, and the
corresponding session is restored.
To use the session, modify the default controller:
1def index():
2if not session.counter:
3session.counter = 1
4else:
5session.counter += 1
6return dict(message="Hello from MyApp", counter=session.counter)
Notice that counter is not a web2py keyword but session is. We are asking
web2py to check whether there is a counter variable in the session and, if not,
to create one and set it to 1. If the counter is there, we ask web2py to increase
the counter by 1. Finally we pass the value of the counter to the view.
A more compact way to code the same function is this:
1def index():
2session.counter = (session.counter or 0) + 1
3return dict(message="Hello from MyApp", counter=session.counter)
Now modify the view to add a line that displays the value of the counter:

overview 79
1<html>
2<head></head>
3<body>
4<h1>{{=message}}</h1>
5<h2>Number of visits: {{=counter}}</h2>
6</body>
7</html>
When you visit the index page again (and again) you should get the following
HTML page:
The counter is associated with each visitor, and is incremented each time the
visitor reloads the page. Different visitors see different counters.
3.4Say my name
Now create two pages (first and second), where the first page creates a form,
asks the visitor’s name, and redirects to the second page, which greets the
visitor by name.
Write the corresponding actions in the default controller:
1def first():
2return dict()
3
4def second():
5return dict()
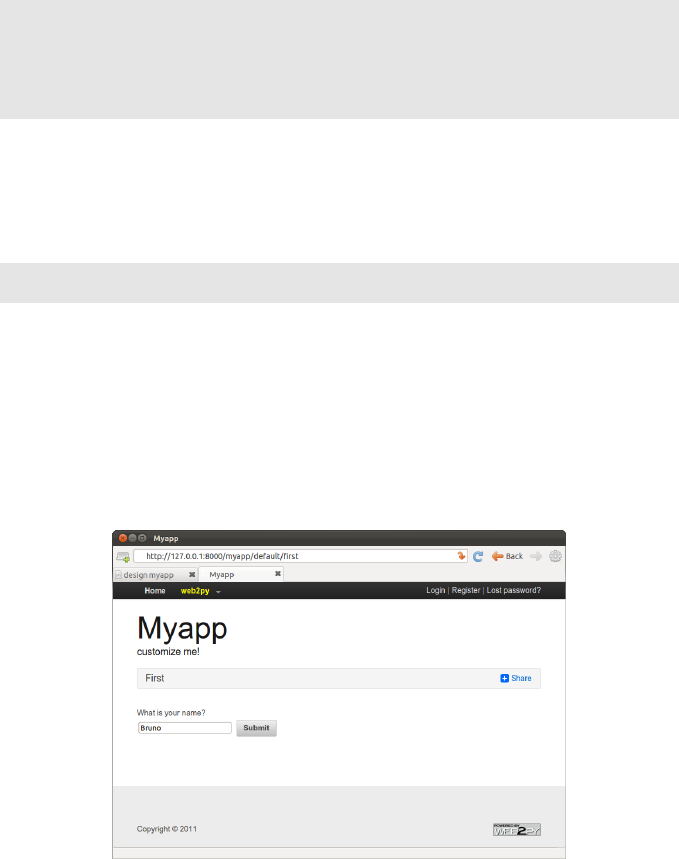
80 web2py full-stack web framework,4th edition
Then create a view "default/first.html" for the first action, and enter:
1{{extend 'layout.html'}}
2What is your name?
3<form action="second">
4<input name="visitor_name" />
5<input type="submit" />
6</form>
Finally, create a view "default/second.html" for the second action:
1{{extend 'layout.html'}}
2<h1>Hello {{=request.vars.visitor_name}}</h1>
In both views we have extended the basic "layout.html" view that comes with
web2py. The layout view keeps the look and feel of the two pages coherent.
The layout file can be edited and replaced easily, since it mainly contains
HTML code.
If you now visit the first page, type your name:
and submit the form, you will receive a greeting:

overview 81
3.5Postbacks
The mechanism for form submission that we used before is very common, but
it is not good programming practice. All input should be validated and, in
the above example, the burden of validation would fall on the second action.
Thus the action that performs the validation is different from the action that
generated the form. This tends to cause redundancy in the code.
A better pattern for form submission is to submit forms to the same action
that generated them, in our example the "first". The "first" action should
receive the variables, process them, store them server-side, and redirect the
visitor to the "second" page, which retrieves the variables. This mechanism
is called a postback.
Modify the default controller to implement self-submission:
1def first():

82 web2py full-stack web framework,4th edition
2if request.vars.visitor_name:
3session.visitor_name = request.vars.visitor_name
4redirect(URL('second'))
5return dict()
6
7def second():
8return dict()
Then modify the "default/first.html" view:
1{{extend 'layout.html'}}
2What is your name?
3<form>
4<input name="visitor_name" />
5<input type="submit" />
6</form>
and the "default/second.html" view needs to retrieve the data from the
session instead of from the request.vars:
1{{extend 'layout.html'}}
2<h1>Hello {{=session.visitor_name or "anonymous"}}</h1>
From the point of view of the visitor, the self-submission behaves exactly the
same as the previous implementation. We have not added validation yet, but
it is now clear that validation should be performed by the first action.
This approach is better also because the name of the visitor stays in the
session, and can be accessed by all actions and views in the applications
without having to be passed around explicitly.
Note that if the "second" action is ever called before a visitor name is set, it
will display "Hello anonymous" because session.visitor_name returns None.
Alternatively we could have added the following code in the controller
(inside the second function):
1if not request.function=='first' and not session.visitor_name:
2redirect(URL('first'))
This is a general mechanism that you can use to enforce authorization on
controllers, though see Chapter 9for a more powerful method.
With web2py we can move one step further and ask web2py to generate the
form for us, including validation. web2py provides helpers (FORM, INPUT,

overview 83
TEXTAREA, and SELECT/OPTION) with the same names as the equivalent
HTML tags. They can be used to build forms either in the controller or in the
view.
For example, here is one possible way to rewrite the first action:
1def first():
2form = FORM(INPUT(_name='visitor_name', requires=IS_NOT_EMPTY()),
3INPUT(_type='submit'))
4if form.process().accepted:
5session.visitor_name = form.vars.visitor_name
6redirect(URL('second'))
7return dict(form=form)
where we are saying that the FORM tag contains two INPUT tags. The
attributes of the input tags are specified by the named arguments starting
with underscore. The requires argument is not a tag attribute (because it does
not start by underscore) but it sets a validator for the value of visitor_name.
Here is yet another better wat to create the same form:
1def first():
2form = SQLFORM.factory(Field('visitor_name', requires=IS_NOT_EMPTY()))
3if form.process().accepted:
4session.visitor_name = form.vars.visitor_name
5redirect(URL('second'))
6return dict(form=form)
The form object can be easily serialized in HTML by embedding it in the
"default/first.html" view.
1{{extend 'layout.html'}}
2What is your name?
3{{=form}}
The form.process() method applies the validators and returns the form itself.
The form.accepted variable is set to True if the form was processed and passed
validation. If the self-submitted form passes validation, it stores the variables
in the session and redirects as before. If the form does not pass validation,
error messages are inserted into the form and shown to the user, as below:
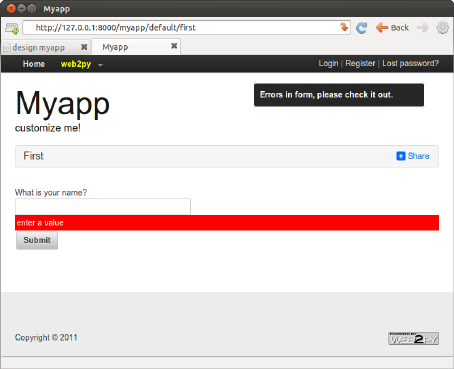
84 web2py full-stack web framework,4th edition
In the next section we will show how forms can be generated automatically
from a model.
3.6An image blog
Here, as another example, we wish to create a web application that allows the
administrator to post images and give them a name, and allows the visitors
of the web site to view the named images and submit comments.
As before, from the site page in admin, create a new application called images,
and navigate to the edit page:
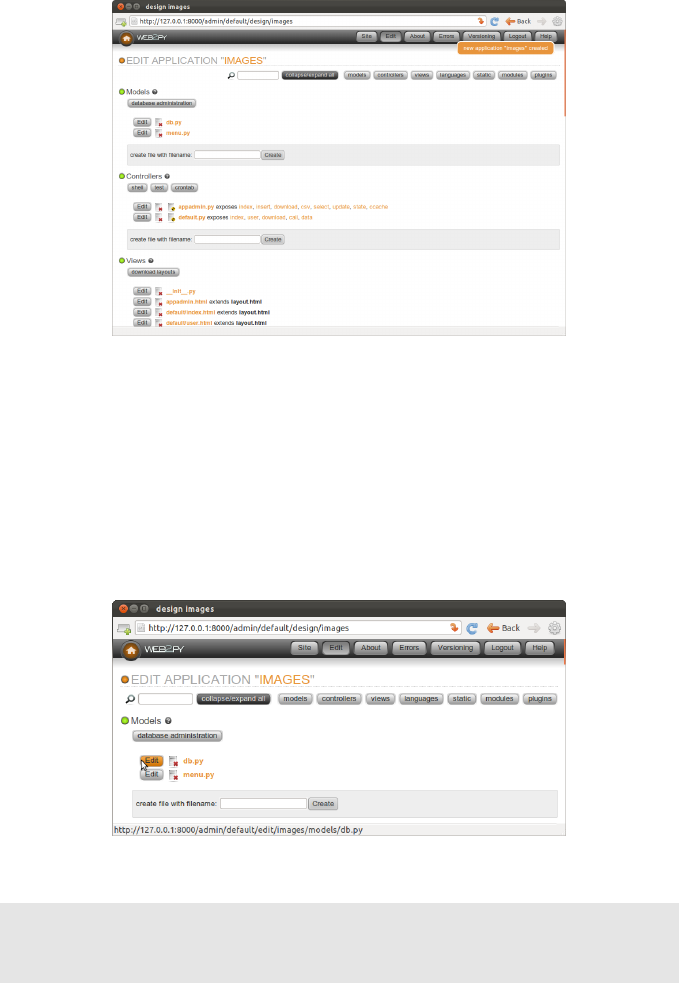
overview 85
We start by creating a model, a representation of the persistent data in the
application (the images to upload, their names, and the comments). First,
you need to create/edit a model file which, for lack of imagination, we call
"db.py". We assume the code below will replace any existing code in "db.py".
Models and controllers must have a .py extension since they are Python code.
If the extension is not provided, it is appended by web2py. Views instead
have a .html extension since they mainly contain HTML code.
Edit the "db.py" file by clicking the corresponding "edit" button:
and enter the following:
1db = DAL("sqlite://storage.sqlite")
2
3db.define_table('image',
4Field('title', unique=True),

86 web2py full-stack web framework,4th edition
5Field('file','upload'),
6format = '%(title)s')
7
8db.define_table('comment',
9Field('image_id', db.image),
10 Field('author'),
11 Field('email'),
12 Field('body','text'))
13
14 db.image.title.requires = IS_NOT_IN_DB(db, db.image.title)
15 db.comment.image_id.requires = IS_IN_DB(db, db.image.id, '%(title)s')
16 db.comment.author.requires = IS_NOT_EMPTY()
17 db.comment.email.requires = IS_EMAIL()
18 db.comment.body.requires = IS_NOT_EMPTY()
19
20 db.comment.image_id.writable = db.comment.image_id.readable = False
Let’s analyze this line by line.
Line 1defines a global variable called db that represents the database
connection. In this case it is a connection to a SQLite database stored in
the file "applications/images/databases/storage.sqlite". In the SQLite case,
if the database does not exist, it is created. You can change the name of the
file, as well as the name of the global variable db, but it is convenient to give
them the same name, to make it easy to remember.
Lines 3-5define a table "image". define_table is a method of the db object.
The first argument, "image", is the name of the table we are defining. The
other arguments are the fields belonging to that table. This table has a field
called "title", a field called "file", and a field called "id" that serves as the table
primary key ("id" is not explicitly declared because all tables have an id field
by default). The field "title" is a string, and the field "file" is of type "upload".
"upload" is a special type of field used by the web2py Data Abstraction Layer
(DAL) to store the names of uploaded files. web2py knows how to upload
files (via streaming if they are large), rename them safely, and store them.
When a table is defined, web2py takes one of several possible actions:
• if the table does not exist, the table is created;
• if the table exists and does not correspond to the definition, the table is
altered accordingly, and if a field has a different type, web2py tries to

overview 87
convert its contents;
• if the table exists and corresponds to the definition, web2py does nothing.
This behavior is called "migration". In web2py migrations are automatic, but
can be disabled for each table by passing migrate=False as the last argument
of define_table.
Line 6defines a format string for the table. It determines how a record
should be represented as a string. Notice that the format argument can also
be a function that takes a record and returns a string. For example:
1format=lambda row: row.title
Lines 8-12 define another table called "comment". A comment has an
"author", an "email" (we intend to store the email address of the author of
the comment), a "body" of type "text" (we intend to use it to store the actual
comment posted by the author), and an "image_id" field of type reference
that points to db.image via the "id" field.
In line 14,db.image.title represents the field "title" of table "image". The
attribute requires allows you to set requirements/constraints that will be
enforced by web2py forms. Here we require that the "title" is unique:
IS_NOT_IN_DB(db, db.image.title)
Notice this is optional because it is set automatically given that Field(’title’,
unique=True).
The objects representing these constraints are called validators. Multiple
validators can be grouped in a list. Validators are executed in the order they
appear. IS_NOT_IN_DB(a, b) is a special validator that checks that the value of
a field bfor a new record is not already in a.
Line 15 requires that the field "image_id" of table "comment" is in db.image.id.
As far as the database is concerned, we had already declared this when we
defined the table "comment". Now we are explicitly telling the model that
this condition should be enforced by web2py, too, at the form processing
level when a new comment is posted, so that invalid values do not propagate
from input forms to the database. We also require that the "image_id" be
represented by the "title", ’%(title)s’, of the corresponding record.

88 web2py full-stack web framework,4th edition
Line 20 indicates that the field "image_id" of table "comment" should
not be shown in forms, writable=False and not even in readonly forms,
readable=False.
The meaning of the validators in lines 15-17 should be obvious.
Notice that the validator
1db.comment.image_id.requires = IS_IN_DB(db, db.image.id, '%(title)s')
can be omitted (and would be automatic) if we specify a format for referenced
table:
1db.define_table('image', ..., format='%(title)s')
where the format can be a string or a function that takes a record and returns
a string.
Once a model is defined, if there are no errors, web2py creates an application
administration interface to manage the database. You access it via the
"database administration" link in the edit page or directly:
1http://127.0.0.1:8000/images/appadmin
Here is a screenshot of the appadmin interface:
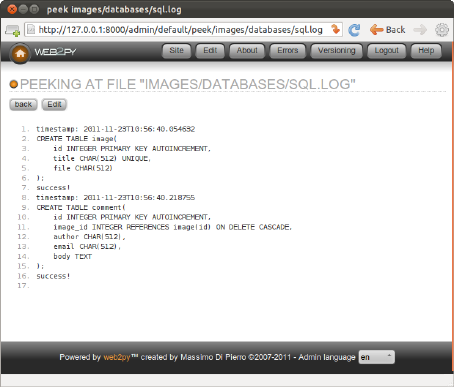
overview 89
This interface is coded in the controller called "appadmin.py" and the
corresponding view "appadmin.html". From now on, we will refer to this
interface simply as appadmin. It allows the administrator to insert new
database records, edit and delete existing records, browse tables, and perform
database joins.
The first time appadmin is accessed, the model is executed and the tables are
created. The web2py DAL translates Python code into SQL statements that
are specific to the selected database back-end (SQLite in this example). You
can see the generated SQL from the edit page by clicking on the "sql.log" link
under "models". Notice that the link is not present until the tables have been
created.
If you were to edit the model and access appadmin again, web2py would
generate SQL to alter the existing tables. The generated SQL is logged into
"sql.log".
Now go back to appadmin and try to insert a new image record:
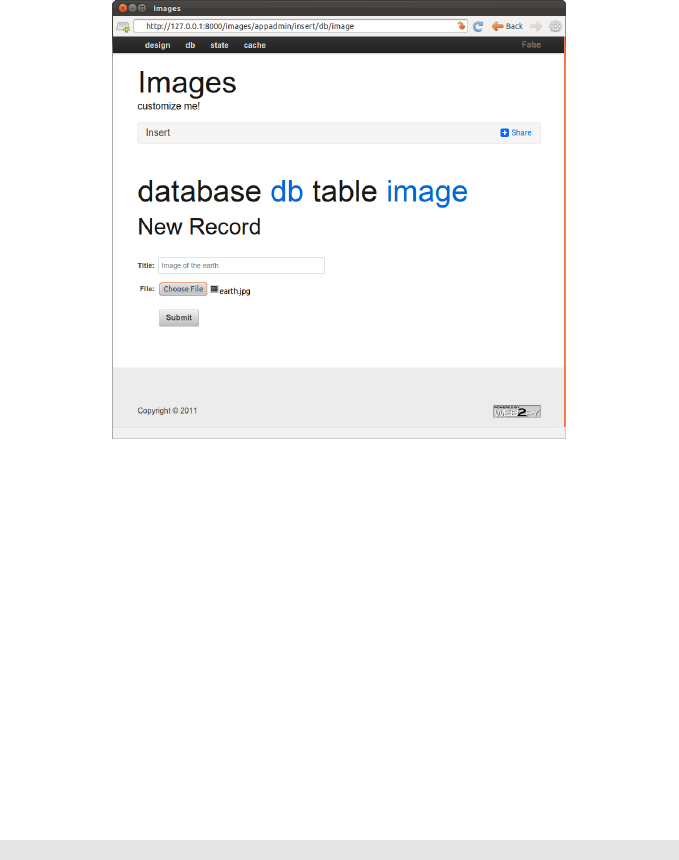
90 web2py full-stack web framework,4th edition
web2py has translated the db.image.file "upload" field into an upload form
for the file. When the form is submitted and an image file is uploaded, the
file is renamed in a secure way that preserves the extension, it is saved with
the new name under the application "uploads" folder, and the new name is
stored in the db.image.file field. This process is designed to prevent directory
traversal attacks.
Notice that each field type is rendered by a widget. Default widgets can be
overridden.
When you click on a table name in appadmin, web2py performs a select of
all records on the current table, identified by the DAL query
1db.image.id > 0
and renders the result.

overview 91
You can select a different set of records by editing the SQL query and pressing
[Submit].
To edit or delete a single record, click on the record id number.
Because of the IS_IN_DB validator, the reference field "image_id" is rendered
by a drop-down menu. The items in the drop-down are stored as keys
(db.image.id), but are represented by their db.image.title, as specified by
the validator.
Validators are powerful objects that know how to represent fields, filter field
values, generate errors, and format values extracted from the field.
The following figure shows what happens when you submit a form that does
not pass validation:
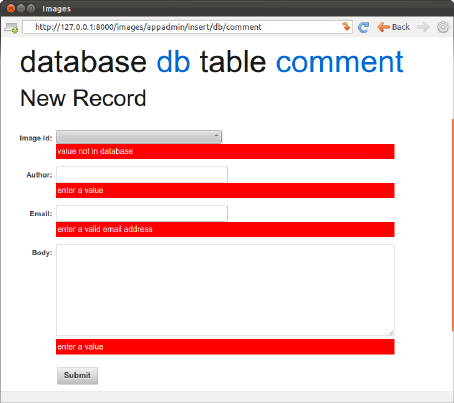
92 web2py full-stack web framework,4th edition
The same forms that are automatically generated by appadmin can also be
generated programmatically via the SQLFORM helper and embedded in user
applications. These forms are CSS-friendly, and can be customized.
Every application has its own appadmin; therefore, appadmin itself can be
modified without affecting other applications.
So far, the application knows how to store data, and we have seen how to
access the database via appadmin. Access to appadmin is restricted to the
administrator, and it is not intended as a production web interface for the
application; hence the next part of this walk-through. Specifically we want to
create:
• An "index" page that lists all available images sorted by title and links to
detail pages for the images.
• A "show/[id]" page that shows the visitor the requested image and allows
the visitor to view and post comments.
• A "download/[name]" action to download uploaded images.
This is represented schematically here:
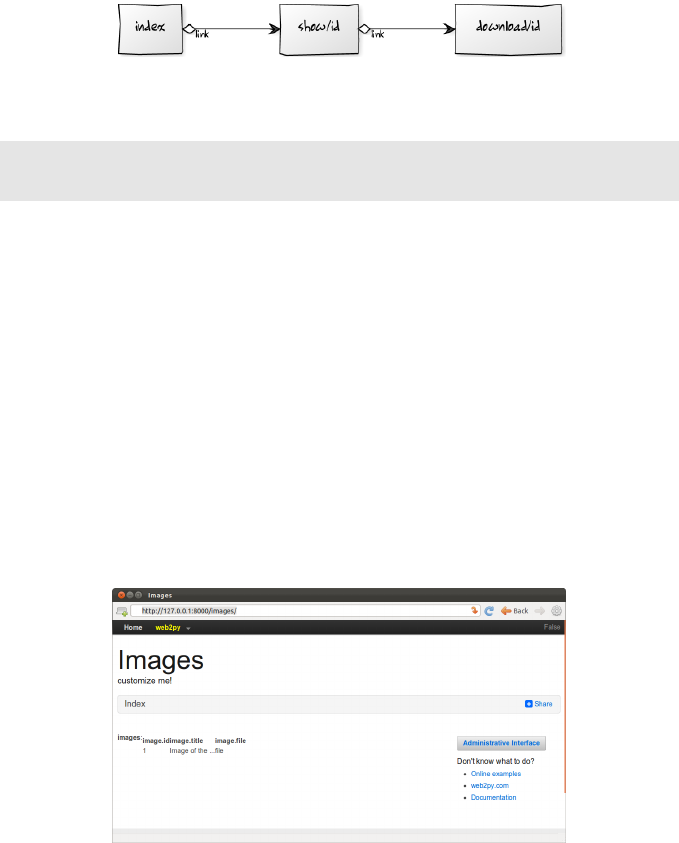
overview 93
Go back to the edit page and edit the "default.py" controller, replacing its
contents with the following:
1def index():
2images = db().select(db.image.ALL, orderby=db.image.title)
3return dict(images=images)
This action returns a dictionary. The keys of the items in the dictionary are
interpreted as variables passed to the view associated to the action. When
developing, if there is no view, the action is rendered by the "generic.html"
view that is provided with every web2py application.
The index action performs a select of all fields (db.image.ALL) from table
image, ordered by db.image.title. The result of the select is a Rows object
containing the records. Assign it to a local variable called images returned by
the action to the view. images is iterable and its elements are the selected rows.
For each row the columns can be accessed as dictionaries: images[0][’title’]
or equivalently as images[0].title.
If you do not write a view, the dictionary is rendered by "views/generic.html"
and a call to the index action would look like this:
You have not created a view for this action yet, so web2py renders the set of
records in plain tabular form.
Proceed to create a view for the index action. Return to admin, edit
"default/index.html" and replace its content with the following:

94 web2py full-stack web framework,4th edition
1{{extend 'layout.html'}}
2<h1>Current Images</h1>
3<ul>
4{{for image in images:}}
5{{=LI(A(image.title, _href=URL("show", args=image.id)))}}
6{{pass}}
7</ul>
The first thing to notice is that a view is pure HTML with special {{...}} tags.
The code embedded in {{...}} is pure Python code with one caveat: indentation
is irrelevant. Blocks of code start with lines ending in colon (:) and end in
lines beginning with the keyword pass. In some cases the end of a block is
obvious from context and the use of pass is not required.
Lines 5-7loop over the image rows and for each row image display:
1LI(A(image.title, _href=URL('show', args=image.id))
This is a <li>...</li> tag that contains an <a href="...">...</a> tag which
contains the image.title. The value of the hypertext reference (href attribute)
is:
1URL('show', args=image.id)
i.e., the URL within the same application and controller as the current
request that calls the function called "show", passing a single argument to
the function, args=image.id.LI,A, etc. are web2py helpers that map to
the corresponding HTML tags. Their unnamed arguments are interpreted
as objects to be serialized and inserted in the tag’s innerHTML. Named
arguments starting with an underscore (for example _href) are interpreted
as tag attributes but without the underscore. For example _href is the href
attribute, _class is the class attribute, etc.
As an example, the following statement:
1{{=LI(A('something',_href=URL('show', args=123))}}
is rendered as:
1<li><a href="/images/default/show/123">something</a></li>
A handful of helpers (INPUT,TEXTAREA,OPTION and SELECT) also support some
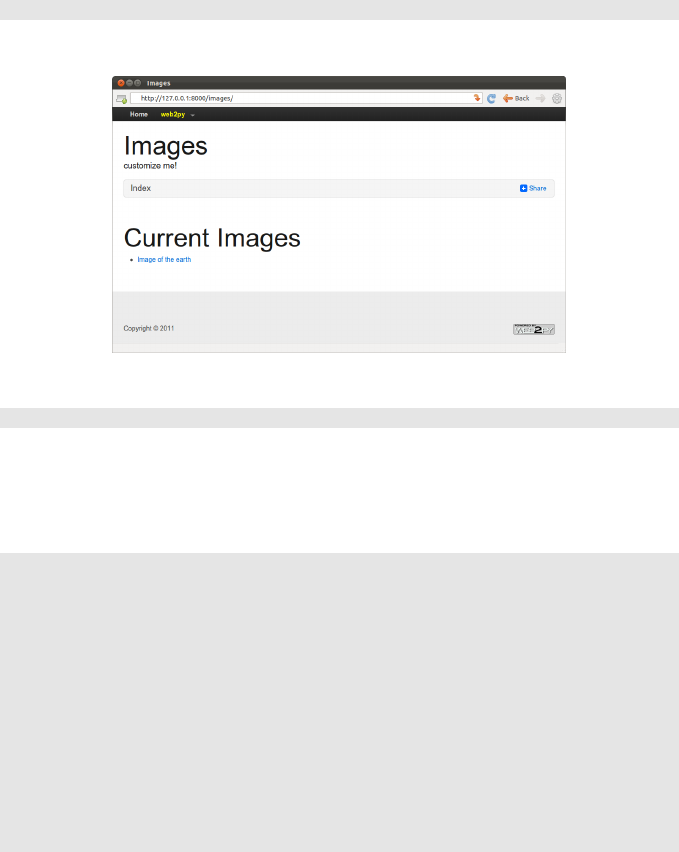
overview 95
special named attributes not starting with underscore (value, and requires).
They are important for building custom forms and will be discussed later.
Go back to the edit page. It now indicates that "default.py exposes index". By
clicking on "index", you can visit the newly created page:
1http://127.0.0.1:8000/images/default/index
which looks like:
If you click on the image name link, you are directed to:
1http://127.0.0.1:8000/images/default/show/1
and this results in an error, since you have not yet created an action called
"show" in controller "default.py".
Let’s edit the "default.py" controller and replace its content with:
1def index():
2images = db().select(db.image.ALL, orderby=db.image.title)
3return dict(images=images)
4
5def show():
6image = db(db.image.id==request.args(0)).select().first()
7db.comment.image_id.default = image.id
8form = SQLFORM(db.comment)
9if form.process().accepted:
10 response.flash = 'your comment is posted'
11 comments = db(db.comment.image_id==image.id).select()
12 return dict(image=image, comments=comments, form=form)
13
14 def download():
15 return response.download(request, db)

96 web2py full-stack web framework,4th edition
The controller contains two actions: "show" and "download". The "show"
action selects the image with the id parsed from the request args and all
comments related to the image. "show" then passes everything to the view
"default/show.html".
The image id referenced by:
1URL('show', args=image.id)
in "default/index.html", can be accessed as: request.args(0) from the "show"
action.
The "download" action expects a filename in request.args(0), builds a path
to the location where that file is supposed to be, and sends it back to the
client. If the file is too large, it streams the file without incurring any memory
overhead.
Notice the following statements:
• Line 7creates an insert form SQLFORM for the db.comment table using only
the specified fields.
• Line 8sets the value for the reference field, which is not part of the input
form because it is not in the list of fields specified above.
• Line 9processes the submitted form (the submitted form variables are in
request.vars) within the current session (the session is used to prevent
double submissions, and to enforce navigation). If the submitted form
variables are validated, the new comment is inserted in the db.comment
table; otherwise the form is modified to include error messages (for
example, if the author’s email address is invalid). This is all done in line
9!.
• Line 10 is only executed if the form is accepted, after the record is
inserted into the database table. response.flash is a web2py variable that
is displayed in the views and used to notify the visitor that something
happened.
• Line 11 selects all comments that reference the current image.
The "download" action is already defined in the "default.py" controller of the

overview 97
scaffolding application.
The "download" action does not return a dictionary, so it does not need a
view. The "show" action, though, should have a view, so return to admin
and create a new view called "default/show.html".
Edit this new file and replace its content with the following:
1{{extend 'layout.html'}}
2<h1>Image: {{=image.title}}</h1>
3<center>
4<img width="200px"
5src="{{=URL('download', args=image.file)}}" />
6</center>
7{{if len(comments):}}
8<h2>Comments</h2><br /><p>
9{{for comment in comments:}}
10 <p>{{=comment.author}} says <i>{{=comment.body}}</i></p>
11 {{pass}}</p>
12 {{else:}}
13 <h2>No comments posted yet</h2>
14 {{pass}}
15 <h2>Post a comment</h2>
16 {{=form}}
This view displays the image.file by calling the "download" action inside an
<img ... /> tag. If there are comments, it loops over them and displays each
one.
Here is how everything will appear to a visitor.
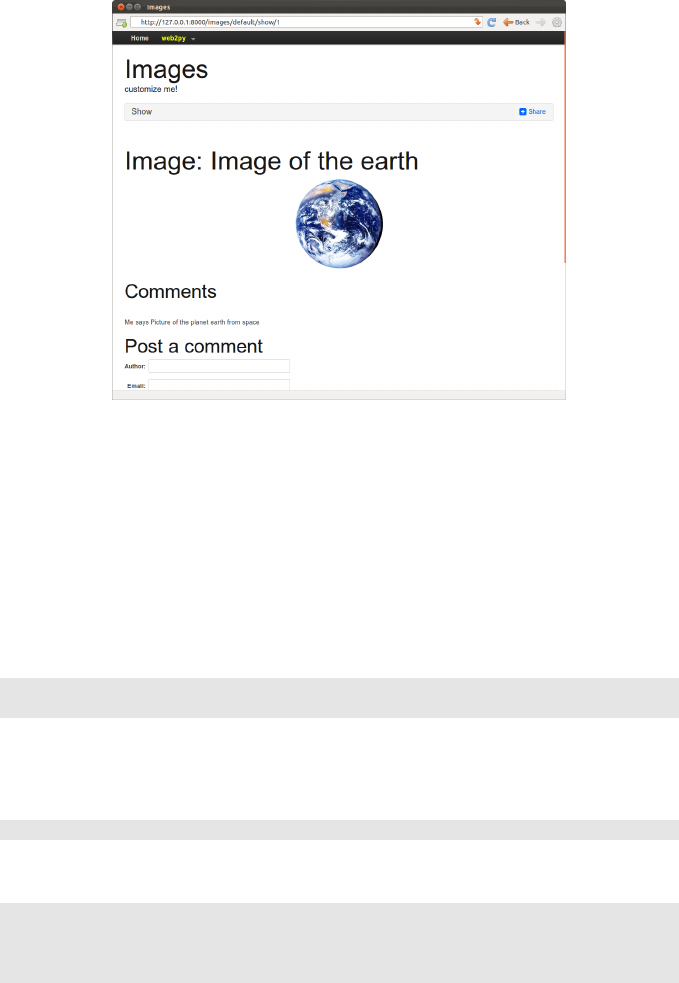
98 web2py full-stack web framework,4th edition
When a visitor submits a comment via this page, the comment is stored in
the database and appended at the bottom of the page.
3.7Adding CRUD
web2py also provides a CRUD (Create/Read/Update/Delete) API that
simplifies forms even more. To use CRUD it is necessary to define it
somewhere, such as in file "db.py":
1from gluon.tools import Crud
2crud = Crud(db)
These two lines are already in the scaffolding application.
The crud object provides high-level methods, for example:
1form = crud.create(table)
that can be used to replace the programming pattern:
1form = SQLFORM(table)
2if form.process().accepted:
3session.flash = '...'
4redirect('...')

overview 99
Here, we rewrite the previous "show" action using crud and making some
more improvements:
1def show():
2image = db.image(request.args(0)) or redirect(URL('index'))
3db.comment.image_id.default = image.id
4form = crud.create(db.comment,
5message='your comment is posted',
6next=URL(args=image.id))
7comments = db(db.comment.image_id==image.id).select()
8return dict(image=image, comments=comments, form=form)
First of all notice we have used the syntax
1db.image(request.args(0)) or redirect(...)
to fetch the required record. Since ‘table(id) returns None if the record is
not found, we can use or redirect(...) in this case in one line.
The next argument of crud.create is the URL to redirect to after the form is
accepted. The message argument is the one to be displayed upon acceptance.
You can read more about CRUD in Chapter 7.
3.8Adding Authentication
The web2py API for Role-Based Access Control is quite sophisticated, but
for now we will limit ourselves to restricting access to the show action to
authenticated users, deferring a more detailed discussion to Chapter 9.
To limit access to authenticated users, we need to complete three steps. In a
model, for example "db.py", we need to add:
1from gluon.tools import Auth
2auth = Auth(db)
3auth.define_tables()
In our controller, we need to add one action:
1def user():
2return dict(form=auth())
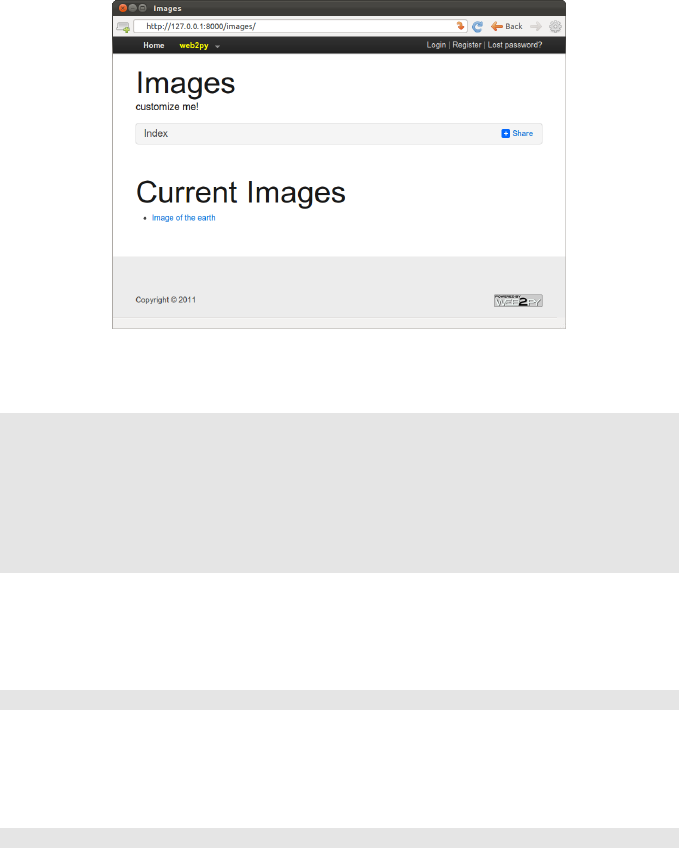
100 web2py full-stack web framework,4th edition
This is sufficient to enable login, register, logout, etc. pages. The default
layout will also show options to the corresponding pages in the top right
corner.
We can now decorate the functions that we want to restrict, for example:
1@auth.requires_login()
2def show():
3image = db.image(request.args(0)) or redirect(URL('index'))
4db.comment.image_id.default = image.id
5form = crud.create(db.comment, next=URL(args=image.id),
6message='your comment is posted')
7comments = db(db.comment.image_id==image.id).select()
8return dict(image=image, comments=comments, form=form)
Any attempt to access
1http://127.0.0.1:8000/images/default/show/[image_id]
will require login. If the user is not logged it, the user will be redirected to
1http://127.0.0.1:8000/images/default/user/login
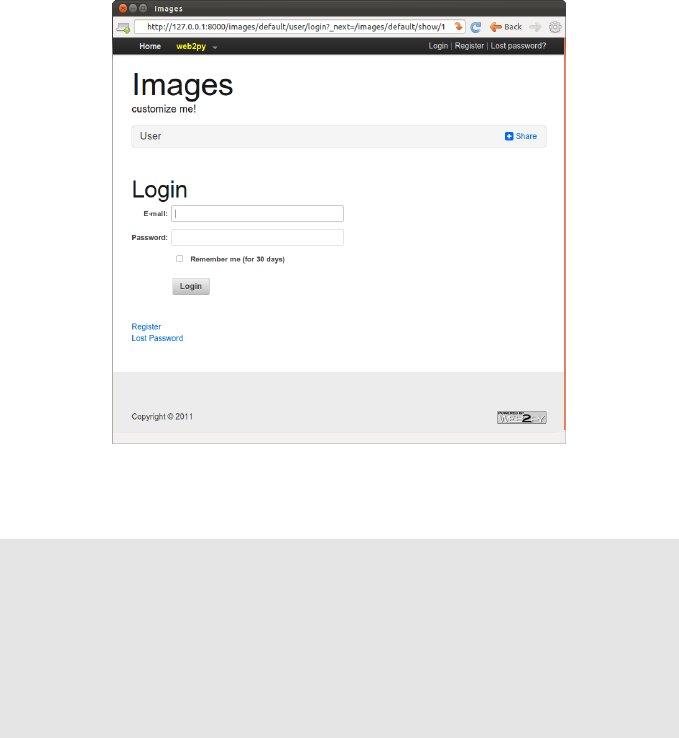
overview 101
The user function also exposes, among others, the following actions:
1http://127.0.0.1:8000/images/default/user/logout
2http://127.0.0.1:8000/images/default/user/register
3http://127.0.0.1:8000/images/default/user/profile
4http://127.0.0.1:8000/images/default/user/change_password
5http://127.0.0.1:8000/images/default/user/request_reset_password
6http://127.0.0.1:8000/images/default/user/retrieve_username
7http://127.0.0.1:8000/images/default/user/retrieve_password
8http://127.0.0.1:8000/images/default/user/verify_email
9http://127.0.0.1:8000/images/default/user/impersonate
10 http://127.0.0.1:8000/images/default/user/not_authorized
Now, a first-time user needs to register in order to be able to log in and read
or post comments.
Both the auth object and the user function are already defined in the scaffolding
application. The auth object is highly customizable and can deal with email
verification, registration approvals, CAPTCHA, and alternate login methods
via plugins.
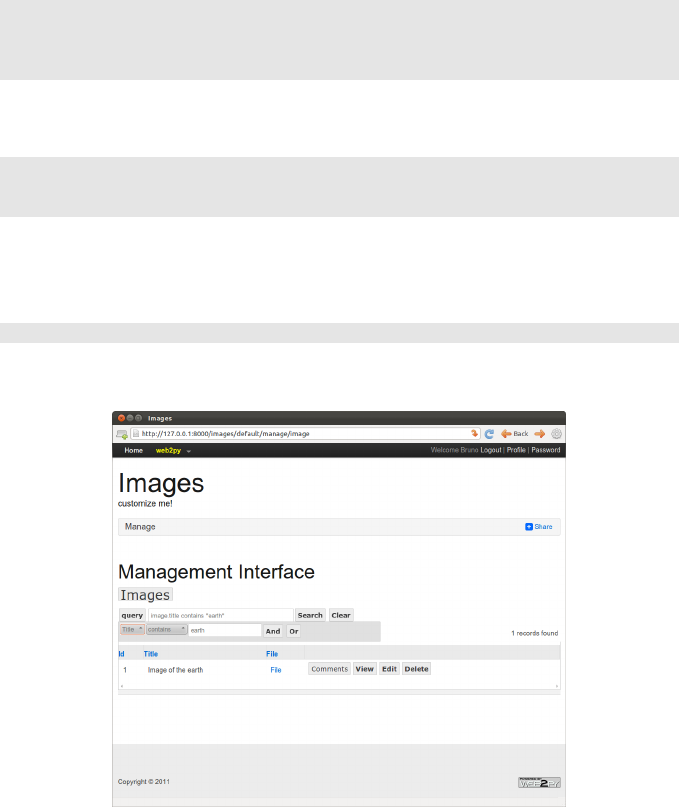
102 web2py full-stack web framework,4th edition
3.8.1Adding grids
We can improve this further using the SQLFORM.grid and SQLFORM.smartgrid
gadgets to create a management interface for our application:
1@auth.requires_membership('manager')
2def manage():
3grid = SQLFORM.smartgrid(db.image)
4return dict(grid=grid)
with associated "views/default/manage.html"
1{{extend 'layout.html'}}
2<h2>Management Interface</h2>
3{{=grid}}
Using appadmin create a group "manager" and make some users members
of the group. They will not be able to access
1http://127.0.0.1:8000/images/default/manage
and browse, search:
create, update and delete images and their comments:
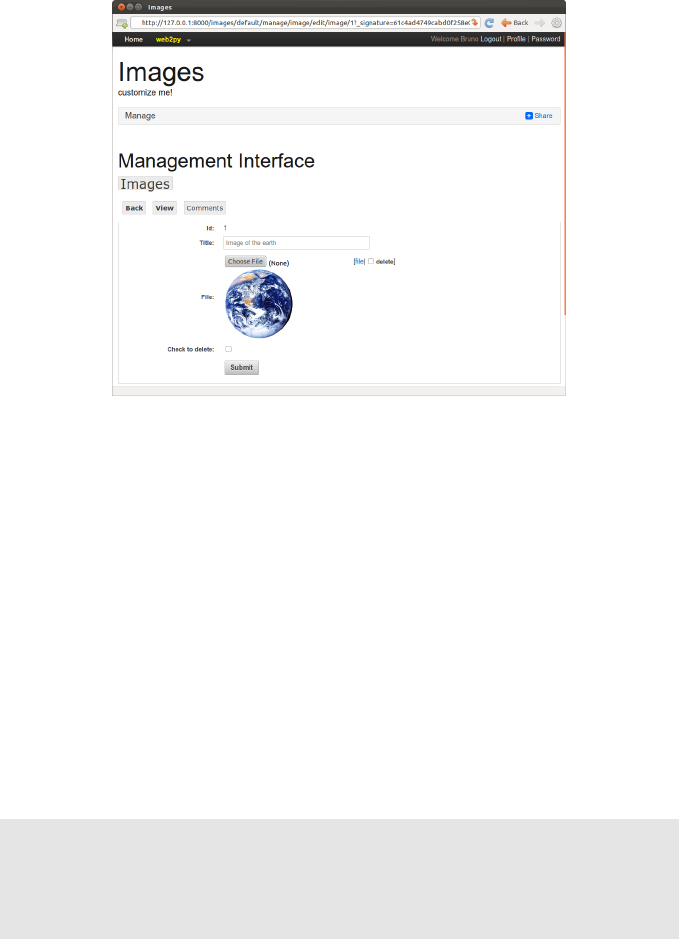
overview 103
3.9Configuring the layout
You can configure the default layout by editing "views/layout.html" but you
can also configure it without editing the HTML. In fact, the "static/base.css"
stylesheet is well documented and described in Chapter 5. You can change
color, columns, size, borders and background without editing the HTML. If
you want to edit the menu, the title or the subtitle, you can do so in any
model file. The scaffolding app, sets default values of these parameters in
the file "models/menu.py":
1response.title = request.application
2response.subtitle = T('customize me!')
3response.meta.author = 'you'
4response.meta.description = 'describe your app'
5response.meta.keywords = 'bla bla bla'
6response.menu = [ [ 'Index', False, URL('index')]]
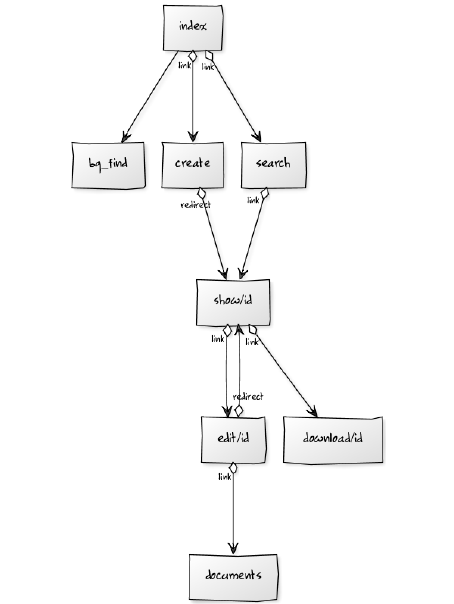
104 web2py full-stack web framework,4th edition
3.10 A wiki
In this section, we build a wiki, from scratch and without using the extended
functionality provided by plugin_wiki which is described in chapter 12. The
visitor will be able to create pages, search them (by title), and edit them.
The visitor will also be able to post comments (exactly as in the previous
applications), and also post documents (as attachments to the pages) and
link them from the pages. As a convention, we adopt the Markmin syntax
for our wiki syntax. We will also implement a search page with Ajax, an RSS
feed for the pages, and a handler to search the pages via XML-RPC [46].
The following diagram lists the actions that we need to implement and the
links we intend to build among them.

overview 105
Start by creating a new scaffolding app, naming it "mywiki".
The model must contain three tables: page, comment, and document. Both
comment and document reference page because they belong to page. A
document contains a file field of type upload as in the previous images
application.
Here is the complete model:
1db = DAL('sqlite://storage.sqlite')
2
3from gluon.tools import *
4auth = Auth(db)
5auth.define_tables()
6crud = Crud(db)
7
8db.define_table('page',
9Field('title'),
10 Field('body','text'),
11 Field('created_on','datetime', default=request.now),
12 Field('created_by', db.auth_user, default=auth.user_id),
13 format='%(title)s')
14
15 db.define_table('comment',
16 Field('page_id', db.page),
17 Field('body','text'),
18 Field('created_on','datetime', default=request.now),
19 Field('created_by', db.auth_user, default=auth.user_id))
20
21 db.define_table('document',
22 Field('page_id', db.page),
23 Field('name'),
24 Field('file','upload'),
25 Field('created_on','datetime', default=request.now),
26 Field('created_by', db.auth_user, default=auth.user_id),
27 format='%(name)s')
28
29 db.page.title.requires = IS_NOT_IN_DB(db, 'page.title')
30 db.page.body.requires = IS_NOT_EMPTY()
31 db.page.created_by.readable = db.page.created_by.writable = False
32 db.page.created_on.readable = db.page.created_on.writable = False
33
34 db.comment.body.requires = IS_NOT_EMPTY()
35 db.comment.page_id.readable = db.comment.page_id.writable = False
36 db.comment.created_by.readable = db.comment.created_by.writable = False
37 db.comment.created_on.readable = db.comment.created_on.writable = False
38
39 db.document.name.requires = IS_NOT_IN_DB(db, 'document.name')

106 web2py full-stack web framework,4th edition
40 db.document.page_id.readable = db.document.page_id.writable = False
41 db.document.created_by.readable = db.document.created_by.writable = False
42 db.document.created_on.readable = db.document.created_on.writable = False
Edit the controller "default.py" and create the following actions:
• index: list all wiki pages
• create: post another wiki page
• show: show a wiki page and its comments, and append comments
• edit: edit an existing page
• documents: manage the documents attached to a page
• download: download a document (as in the images example)
• search: display a search box and, via an Ajax callback, return all matching
titles as the visitor types
• callback: the Ajax callback function. It returns the HTML that gets
embedded in the search page while the visitor types.
Here is the "default.py" controller:
1def index():
2""" this controller returns a dictionary rendered by the view
3it lists all wiki pages
4>>> index().has_key('pages')
5True
6"""
7pages = db().select(db.page.id,db.page.title,orderby=db.page.title)
8return dict(pages=pages)
9
10 @auth.requires_login()
11 def create():
12 "creates a new empty wiki page"
13 form = crud.create(db.page, next=URL('index'))
14 return dict(form=form)
15
16 def show():
17 "shows a wiki page"
18 this_page = db.page(request.args(0)) or redirect(URL('index'))
19 db.comment.page_id.default = this_page.id
20 form = crud.create(db.comment) if auth.user else None
21 pagecomments = db(db.comment.page_id==this_page.id).select()
22 return dict(page=this_page, comments=pagecomments, form=form)

overview 107
23
24 @auth.requires_login()
25 def edit():
26 "edit an existing wiki page"
27 this_page = db.page(request.args(0)) or redirect(URL('index'))
28 form = crud.update(db.page, this_page,
29 next=URL('show',args=request.args))
30 return dict(form=form)
31
32 @auth.requires_login()
33 def documents():
34 "browser, edit all documents attached to a certain page"
35 page = db.page(request.args(0)) or redirect(URL('index'))
36 db.document.page_id.default = page.id
37 db.document.page_id.writable = False
38 grid = SQLFORM.grid(db.document.page_id==page.id,args=[page.id])
39 return dict(page=page, grid=grid)
40
41 def user():
42 return dict(form=auth())
43
44 def download():
45 "allows downloading of documents"
46 return response.download(request, db)
47
48 def search():
49 "an ajax wiki search page"
50 return dict(form=FORM(INPUT(_id='keyword',_name='keyword',
51 _onkeyup="ajax('callback', ['keyword'], 'target');")),
52 target_div=DIV(_id='target'))
53
54 def callback():
55 "an ajax callback that returns a <ul> of links to wiki pages"
56 query = db.page.title.contains(request.vars.keyword)
57 pages = db(query).select(orderby=db.page.title)
58 links = [A(p.title, _href=URL('show',args=p.id)) for p in pages]
59 return UL(*links)
Lines 2-6provide a comment for the index action. Lines 4-5inside the
comment are interpreted by python as test code (doctest). Tests can be run
via the admin interface. In this case the tests verify that the index action runs
without errors.
Lines 18,27, and 35 try to fetch a page record with the id in request.args(0).
Lines 13,20 define and process create forms for a new page and a new
comment and.

108 web2py full-stack web framework,4th edition
Line 28 defines and processes an update form for a wiki page.
Line 38 creates a grid object that allows to browser, add and update the
comments linked to a page.
Some magic happens in line 51. The onkeyup attribute of the INPUT tag
"keyword" is set. Every time the visitor releases a key, the JavaScript code
inside the onkeyup attribute is executed, client-side. Here is the JavaScript
code:
1ajax('callback', ['keyword'], 'target');
ajax is a JavaScript function defined in the file "web2py.js" which is included
by the default "layout.html". It takes three parameters: the URL of the action
that performs the synchronous callback, a list of the IDs of variables to be
sent to the callback (["keyword"]), and the ID where the response has to be
inserted ("target").
As soon as you type something in the search box and release a key, the
client calls the server and sends the content of the ’keyword’ field, and,
when the sever responds, the response is embedded in the page itself as
the innerHTML of the ’target’ tag.
The ’target’ tag is a DIV defined in line 52. It could have been defined in the
view as well.
Here is the code for the view "default/create.html":
1{{extend 'layout.html'}}
2<h1>Create new wiki page</h1>
3{{=form}}
If you visit the create page, you see the following:
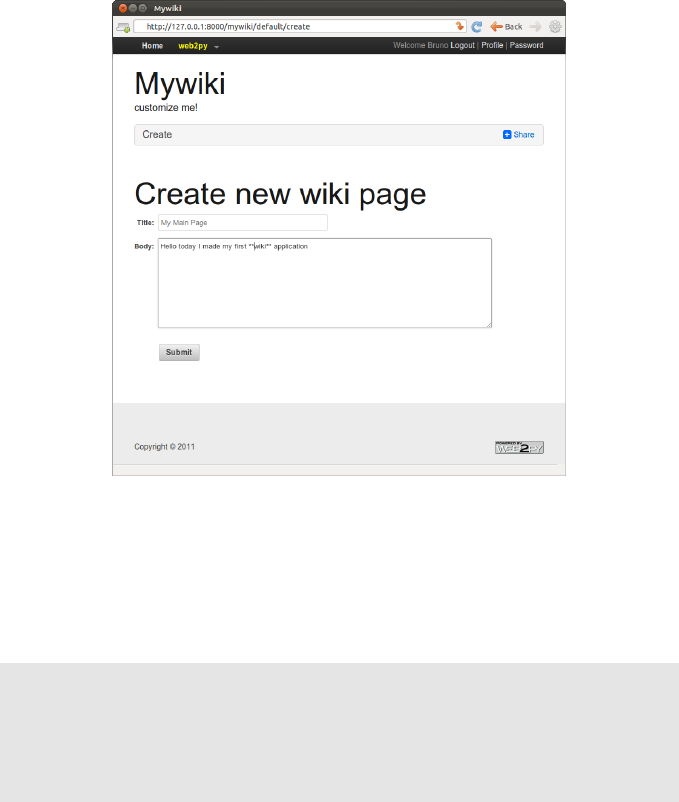
overview 109
Here is the code for the view "default/index.html":
1{{extend 'layout.html'}}
2<h1>Available wiki pages</h1>
3[ {{=A('search',_href=URL('search'))}} ]<br />
4<ul>{{for page in pages:}}
5{{=LI(A(page.title, _href=URL('show', args=page.id)))}}
6{{pass}}</ul>
7[ {{=A('create page',_href=URL('create'))}} ]
It generates the following page:
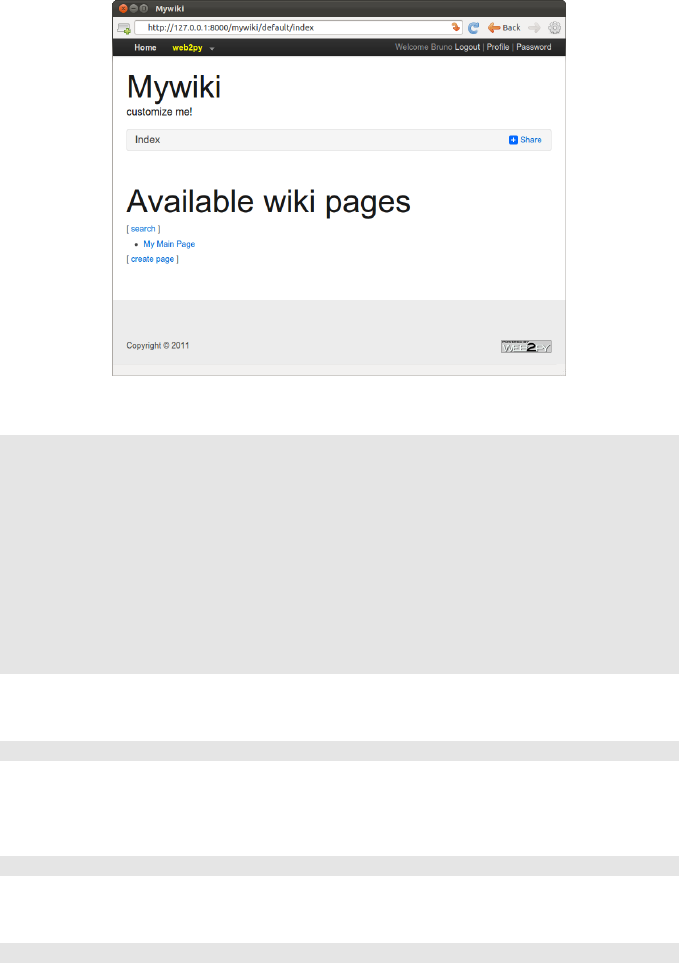
110 web2py full-stack web framework,4th edition
Here is the code for the view "default/show.html":
1{{extend 'layout.html'}}
2<h1>{{=page.title}}</h1>
3[ {{=A('edit',_href=URL('edit', args=request.args))}}
4| {{=A('documents',_href=URL('documents', args=request.args))}} ]<br />
5{{=MARKMIN(page.body)}}
6<h2>Comments</h2>
7{{for comment in comments:}}
8<p>{{=db.auth_user[comment.created_by].first_name}} on {{=comment.created_on}}
9says <I>{{=comment.body}}</i></p>
10 {{pass}}
11 <h2>Post a comment</h2>
12 {{=form}}
If you wish to use markdown syntax instead of markmin syntax:
1from gluon.contrib.markdown import WIKI
and use WIKI instead of the MARKMIN helper. Alternatively, you can choose to
accept raw HTML instead of markmin syntax. In this case you would replace:
1{{=MARKMIN(page.body)}}
with:
1{{=XML(page.body)}}
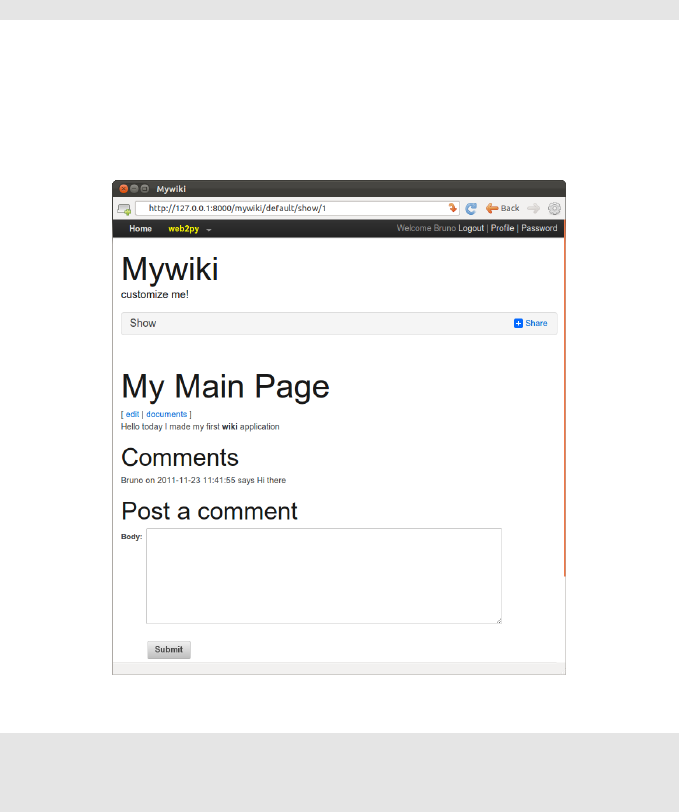
overview 111
(so that the XML does not get escaped, as by default web2py behavior).
This can be done better with:
1{{=XML(page.body, sanitize=True)}}
By setting sanitize=True, you tell web2py to escape unsafe XML tags such as
"<script>", and thus prevent XSS vulnerabilities.
Now if, from the index page, you click on a page title, you can see the page
that you have created:
Here is the code for the view "default/edit.html":
1{{extend 'layout.html'}}
2<h1>Edit wiki page</h1>
3[ {{=A('show',_href=URL('show', args=request.args))}} ]<br />
4{{=form}}
It generates a page that looks almost identical to the create page.
Here is the code for the view "default/documents.html":
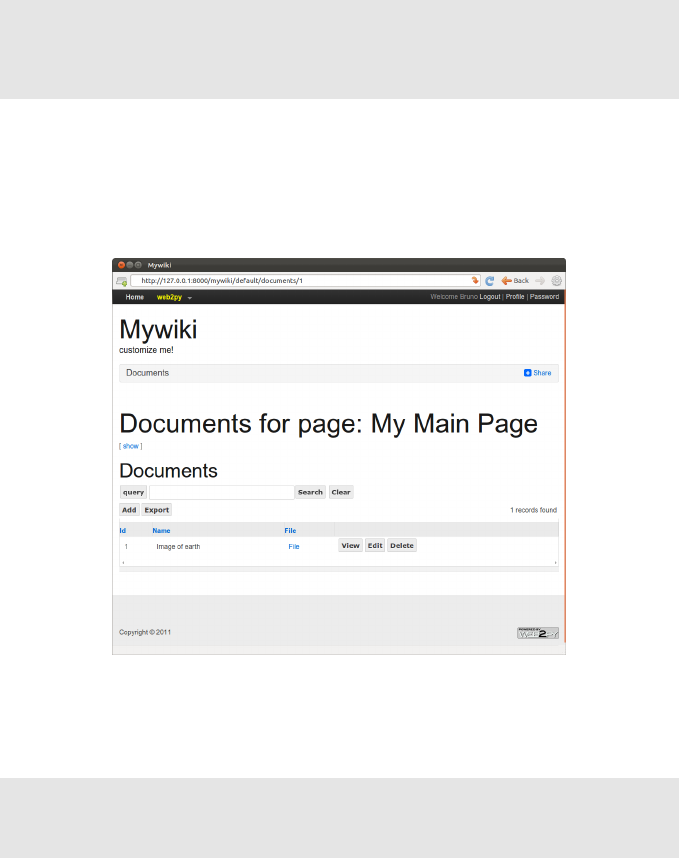
112 web2py full-stack web framework,4th edition
1{{extend 'layout.html'}}
2<h1>Documents for page: {{=page.title}}</h1>
3[ {{=A('show',_href=URL('show', args=request.args))}} ]<br />
4<h2>Documents</h2>
5{{=grid}}
If, from the "show" page, you click on documents, you can now manage the
documents attached to the page.
Finally here is the code for the view "default/search.html":
1{{extend 'layout.html'}}
2<h1>Search wiki pages</h1>
3[ {{=A('listall',_href=URL('index'))}}]<br />
4{{=form}}<br />{{=target_div}}
which generates the following Ajax search form:
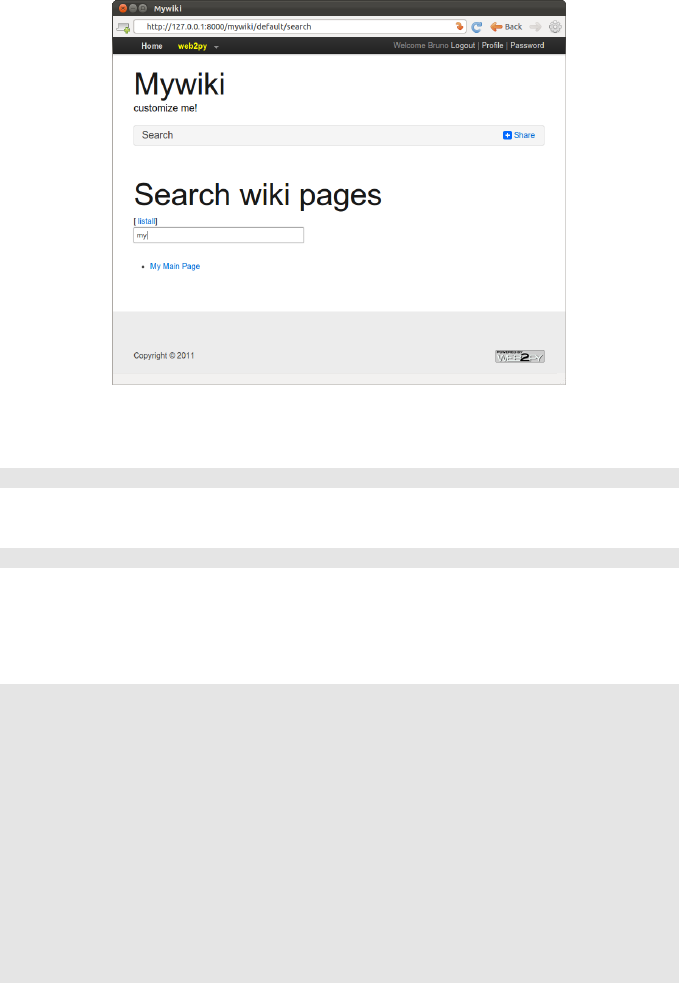
overview 113
You can also try to call the callback action directly by visiting, for example,
the following URL:
1http://127.0.0.1:8000/mywiki/default/callback?keyword=wiki
If you look at the page source you see the HTML returned by the callback:
1<ul><li><a href="/mywiki/default/show/4">I made a Wiki</a></li></ul>
Generating an RSS feed from the stored pages using web2py is easy because
web2py includes gluon.contrib.rss2. Just append the following action to the
default controller:
1def news():
2"generates rss feed form the wiki pages"
3reponse.generic_patterns = ['.rss']
4pages = db().select(db.page.ALL, orderby=db.page.title)
5return dict(
6title = 'mywiki rss feed',
7link = 'http://127.0.0.1:8000/mywiki/default/index',
8description = 'mywiki news',
9created_on = request.now,
10 items = [
11 dict(title = row.title,
12 link = URL('show', args=row.id),
13 description = MARKMIN(row.body).xml(),
14 created_on = row.created_on
15 ) for row in pages])
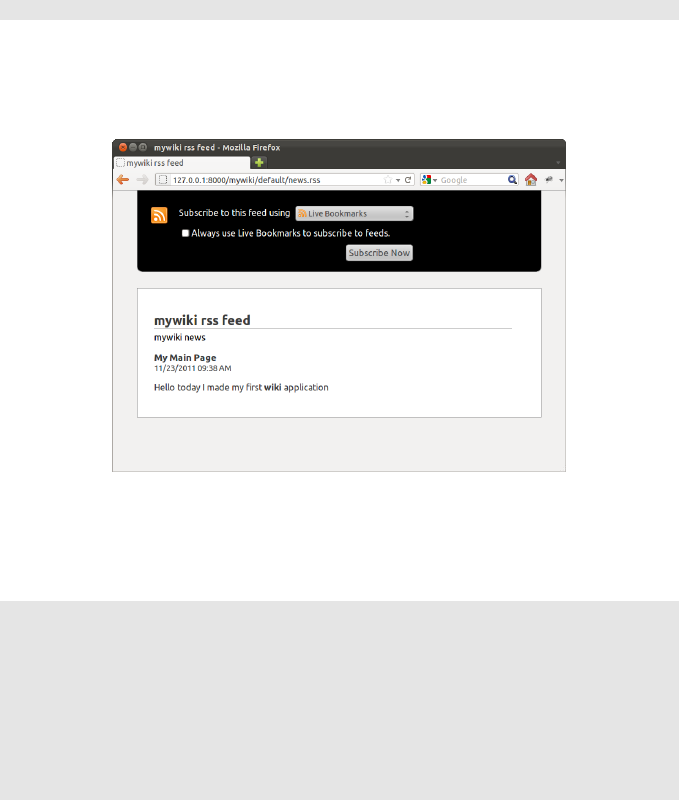
114 web2py full-stack web framework,4th edition
and when you visit the page
1http://127.0.0.1:8000/mywiki/default/news.rss
you see the feed (the exact output depends on the feed reader). Notice that
the dict is automatically converted to RSS, thanks to the.rss extension in the
URL.
web2py also includes feedparser to read third-party feeds.
Finally, let’s add an XML-RPC handler that allows searching the wiki
programmatically:
1service = Service()
2
3@service.xmlrpc
4def find_by(keyword):
5"finds pages that contain keyword for XML-RPC"
6return db(db.page.title.contains(keyword).select().as_list()
7
8def call():
9"exposes all registered services, including XML-RPC"
10 return service()
Here, the handler action simply publishes (via XML-RPC), the functions
specified in the list. In this case, find_by.find_by is not an action (because it
takes an argument). It queries the database with .select() and then extracts
the records as a list with .response and returns the list.

overview 115
Here is an example of how to access the XML-RPC handler from an external
Python program.
1>>> import xmlrpclib
2>>> server = xmlrpclib.ServerProxy(
3'http://127.0.0.1:8000/mywiki/default/call/xmlrpc')
4>>> for item in server.find_by('wiki'):
5print item['created_on'], item['title']
The handler can be accessed from many other programming languages that
understand XML-RPC, including C, C++, C# and Java.
3.10.1On date,datetime and time format
There are three different representation for each of the field types date,
datetime and time:
• the database representation
• the internal web2py prepresentation
• the string representation in forms and tables
The database representation is an internal issue and does not affect the
code. Internally, at the web2py level, they are stored as datetime.date,
datetime.datetime and datetime.time object respectively and they can be
manipulated as such:
1for page in db(db.page).select():
2print page.title, page.day, page.month, page.year
When dates are converted to strings in forms they are converted using the
ISO representation
1%Y-%m-%d %H:%M:%S
yet this representation in internationalized and you can use the admin
stranslation page to change the format to an alternate one. For example:
1%m/%b/%Y %H:%M:%S
Mind that by default English is not translated because web2py assumes the
applications is already written in English. If you want internationalization

116 web2py full-stack web framework,4th edition
to work for English you need to create the translation file (using admin) and
you need declare that the application current language is something other than
english, for example:
1T.current_languages = ['null']
3.11 More on admin
The administrative interface provides additional functionality that we briefly
review here.
3.11.1site
This page lists all installed applications. There are two forms at the bottom.
The first of them allows creating a new application by specifying its name.
The second form allows uploading an existing application from either a local
file or a remote URL. When you upload an application, you need to specify
a name for it. This can be its original name, but does not need to be. This
allows installing multiple copies of the same application. You can try, for
example, to upload the the Instant Press CMS created by Martin Mulone
from:
1http://code.google.com/p/instant-press/
Web2py files are packages as .w2p files. These ones are tar gzipped files.
Web2py uses the .w2p extension instead of the .tgz extension to prevent the
browser from unzipping on download. They can be uncompressed manually
with tar zxvf [filename] although this is never necessary.
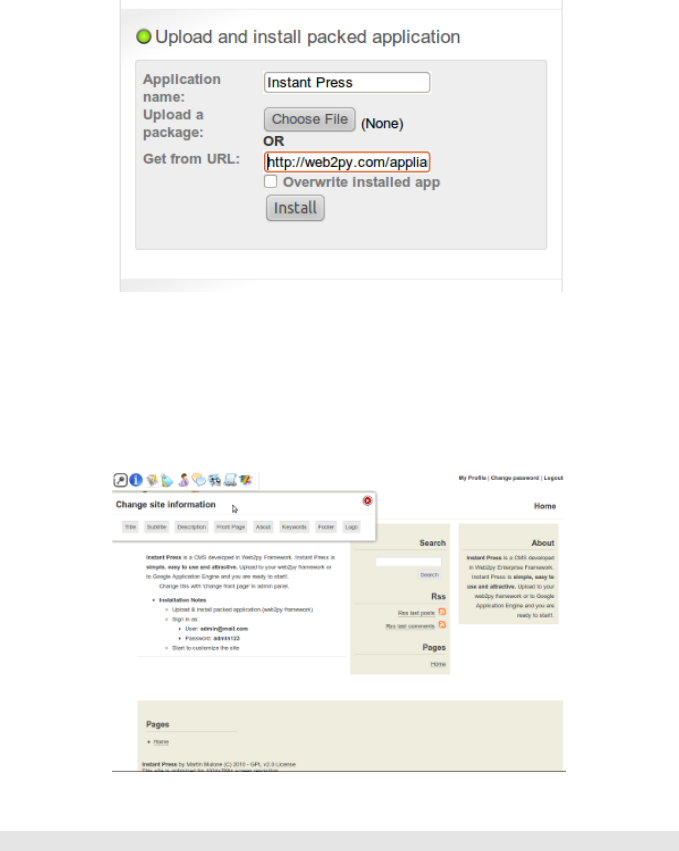
overview 117
Upon successful upload, web2py displays the MD5checksum of the
uploaded file. You can use it to verify that the file was not corrupted
during upload. The InstantPress name will appear in the list of installed
applications.
Click on the InstantPress name on admin to get it up and running.
You can read more about Instant Press at the following URL:
1http://code.google.com/p/instant-press/
For each application the site page allows you to:
• Uninstall the application.
• Jump to the about page (read below).
118 web2py full-stack web framework,4th edition
• Jump to the edit page (read below).
• Jump to the errors page (read below).
• Clean up temporary files (sessions, errors, and cache.disk files).
• Pack all. This returns a tar file containing a complete copy of the
application. We suggest that you clean up temporary files before packing
an application.
• Compile the application. If there are no errors, this option will bytecode-
compile all models, controllers and views. Because views can extend and
include other views in a tree, before bytecode compilation, the view tree
for every controller is collapsed into a single file. The net effect is that a
bytecode-compiled application is faster, because there is no more parsing
of templates or string substitutions occurring at runtime.
• Pack compiled. This option is only present for bytecode-compiled
applications. It allows packing the application without source code
for distribution as closed source. Note that Python (as any other
programming language) can technically be decompiled; therefore
compilation does not provide complete protection of the source code.
Nevertheless, decompilation can be difficult and can be illegal.
• Remove compiled. It simply removes the byte-code compiled models,
views and controllers from the application. If the application was
packaged with source code or edited locally, there is no harm in removing
the bytecode-compiled files, and the application will continue to work. If
the application was installed form a packed compiled file, then this is not
safe, because there is no source code to revert to, and the application will
no longer work.
All the functionality available from the web2py admin site page is also
accessible programmatically via the API defined in the module gluon/admin.py.
Simply open a python shell and import this module.
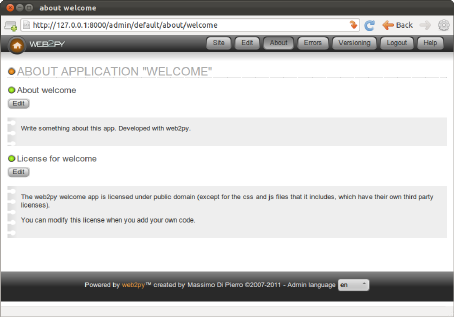
overview 119
3.11.2about
The about tab allows editing the description of the application and its license.
These are written respectively in the ABOUT and LICENSE files in the
application folder.
You can use MARKMIN, or gluon.contrib.markdown.WIKI syntax for these files as
described in ref. [29].
3.11.3edit
You have used the edit page already in this chapter. Here we want to point
out a few more functionalities of the edit page.
• If you click on any file name, you can see the contents of the file with
syntax highlighting.
• If you click on edit, you can edit the file via a web interface.
• If you click on delete, you can delete the file (permanently).
• If you click on test, web2py will run tests. Tests are written by the
developer using Python doctests, and each function should have its own
tests.
• You can add language files, scan the app to discover all strings, and edit
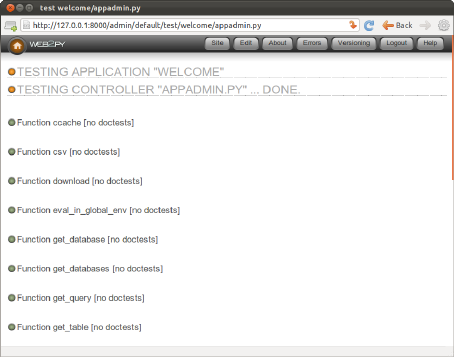
120 web2py full-stack web framework,4th edition
string translations via the web interface.
• If the static files are organized in folders and subfolders, the folder
hierarchy can be toggled by clicking on a folder name.
The image below shows the output of the test page for the welcome
application.
The image below show the languages tab for the welcome application.
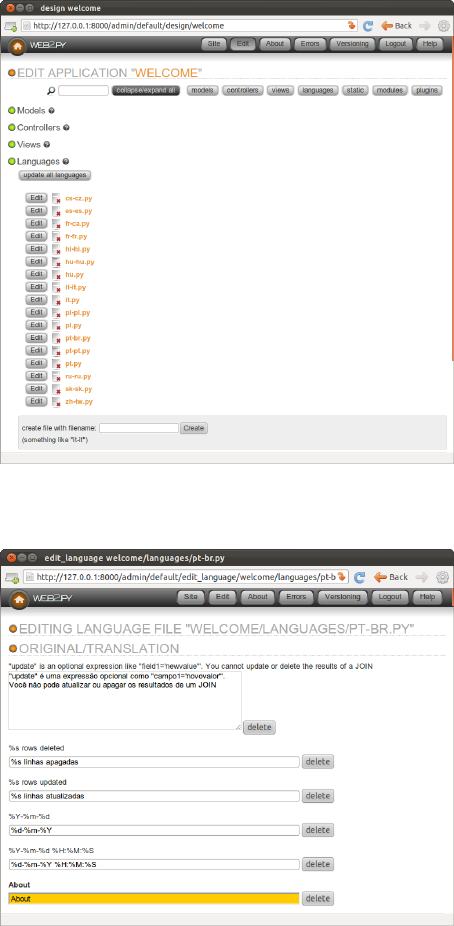
overview 121
The image below shows how to edit a language file, in this case the "it"
(Italian) language for the welcome application.
shell

122 web2py full-stack web framework,4th edition
If you click on the "shell" link under the controllers tab in edit, web2py will
open a web based Python shell and will execute the models for the current
application. This allows you to interactively talk to your application.
crontab
Also under the controllers tab in edit there is a "crontab" link. By clicking
on this link you will be able to edit the web2py crontab file. This follows
the same syntax as the unix crontab but does not rely on unix. In fact, it
only requires web2py, and it works on Windows. It allows you to register
actions that need to be executed in background at scheduled times. For more
information about this, see the next chapter.
3.11.4errors
When programming web2py, you will inevitably make mistakes and
introduce bugs. web2py helps in two ways: 1) it allows you to create tests
for every function that can be run in the browser from the edit page; and 2)
when an error manifests itself, a ticket is issued to the visitor and the error is
logged.
Intentionally introduce an error in the images application as shown below:
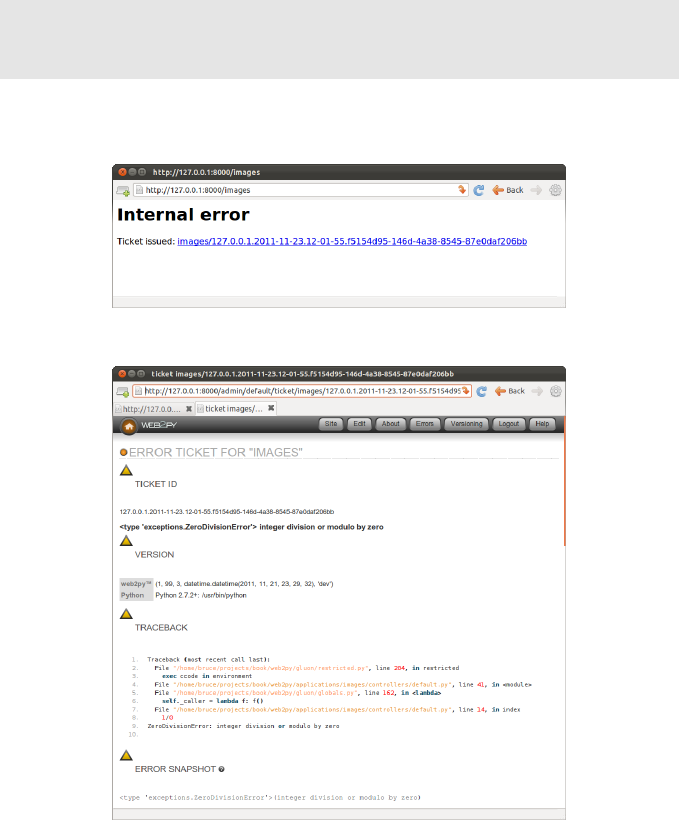
overview 123
1def index():
2images = db().select(db.image.ALL,orderby=db.image.title)
31/0
4return dict(images=images)
When you access the index action, you get the following ticket:
Only the administrator can access the ticket:
The ticket shows the traceback, and the content of the file that caused the
problem, and the complete state of system (variables, request, session, etc.)
If the error occurs in a view, web2py shows the view converted from HTML
into Python code. This allows to easily identify the logical structure of the
file.

124 web2py full-stack web framework,4th edition
By default tickets are stored on filesystem and group by traceback. The
administrative interface provides an aggregate views (type of traceback and
number of occurrence) and a detailed view (all tickets are listed by ticket id).
The administrator can switch between the two views.
Notice that everywhere admin shows syntax-highlighted code (for example,
in error reports, web2py keywords are shown in orange). If you click on
a web2py keyword, you are redirected to a documentation page about the
keyword.
If you fix the divide-by-zero bug in the index action and introduce one in the
index view:
1{{extend 'layout.html'}}
2
3<h1>Current Images</h1>
4<ul>
5{{for image in images:}}
6{{1/0}}
7{{=LI(A(image.title, _href=URL("show", args=image.id)))}}
8{{pass}}
9</ul>
you get the following ticket:
Note that web2py has converted the view from HTML into a Python file, and
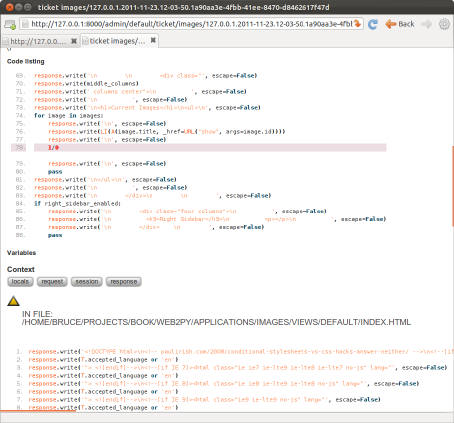
overview 125
the error described in the ticket refers to the generated Python code and NOT
to the original view file:
This may seem confusing at first, but in practice it makes debugging easier,
because the Python indentation highlights the logical structure of the code
that you embedded in the views.
The code is shown at the bottom of the same page.
All tickets are listed under admin in the errors page for each application:

126 web2py full-stack web framework,4th edition
3.11.5Mercurial
If you are running from source and you have the Mercurial version control
libraries installed:
1easy_install mercurial
then the administrative interface shows one more menu item called
"mercurial". It automatically creates a local Mercurial repository for the
application. Pressing the "commit" button in the page will commit the current
application. Mercurial creates and stores information about changes you
make in your code into a hidden folder ".hg" in your app subfolder. Every
app has its own ".hg" folder and its own ".hgignore" file (tells Mercurial which
files to ignore).
The Mercurial web interface does allow you to browse previous commit and
diff files but we do recommend you use Mercurial directly from the shell or
one of the may GUI-based Mercurial clients since they are more powerful. For
example they will allow you sync your app with a remote source repository:

overview 127
You can read more about Mercurial here:
1http://mercurial.selenic.com/
3.11.6Admin wizard (experimental)
The admin interface includes a Wizard that can help you create a new
applications. You can access the wizard from the "sites" page as shown in
the image below.
The wizard will guide you through a series of steps involved in creating a
new application:
• Chose a name for the application
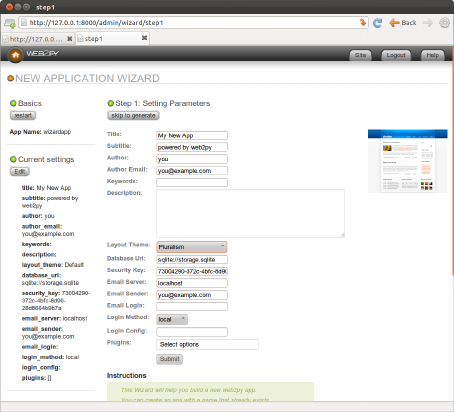
128 web2py full-stack web framework,4th edition
• Configure the application and choose required plugins
• Build required models (it will create CRUD pages for each model)
• Allow you to edit the views of those pages using MARKMIN syntax
The image below shows the second step of the process.
You can see a dropdown to select a layout plugin (from web2py.com/layouts),
a multiple choice dropdown to check other plugins (from web2py.com/plugins)
and a "login config" field where to put the Janrain "domain:key".
The other steps are pretty much self-explanatory.
The Wizard works well for what it does but it is considered an experimental
feature for two reasons:
• Applications created with the wizard and edited manually, cannot later be
modified by the wizard.
• The interface of the wizard will change over time to include support for
more features and easier visual development.
In any case the wizard is a handy tool for fast prototyping and it can be used
to bootstrap a new application with an alternate layout and optional plugins.

overview 129
3.11.7Configuring admin
Normally there is no need to perform any configuration of admin but a few
customizations are possible. After you login into admin you can edit the
admin configuration file via the URL:
1http://127.0.0.1:8000/admin/default/edit/admin/models/0.py
Notice that admin can be used to edit itself. In fact admin is an app as any
other one.
The file "0.py" is very much self documented and if you are opening
probably you already know what you are looking for. Anyway there a few
customizations that are more important than others:
1GAE_APPCFG = os.path.abspath(os.path.join('/usr/local/bin/appcfg.py'))
This should point to the location of the "appcfg.py" file that comes with the
Google App Engine SDK. If you have the SDK you may want to change this
config parameters to the correct value. It will allow you to deploy to GAE
from the admin interface.
You can also set web2py admin in demo mode:
1DEMO_MODE = True
2FILTER_APPS = ['welcome']
And only the apps listed in filter apps will be accessible and they will be only
accessible in read-only mode.
If you are a teacher and want to expose the administrative interface to
students so that students can share one administrative interface for their
projects (think of a virtual lab), can do it by setting:
1MULTI_USER_MODE = True
In this way students will be required to login and will only be able to access
their own apps via admin. You, as first user/teacher, will be able to access
them all.
Mind that this mechanism still assumes all users are trusted. All the apps
created under admin run under the same credentials on the same filesystem.

130 web2py full-stack web framework,4th edition
It is possible for an app created by a student to access the data and the source
of an app created by another student.
3.12 More on appadmin
appadmin is not intended to be exposed to the public. It is designed to help
you by providing an easy access to the database. It consists of only two files:
a controller "appadmin.py" and a view "appadmin.html" which are used by
all actions in the controller.
The appadmin controller is relatively small and readable; it provides an
example of designing a database interface.
appadmin shows which databases are available and which tables exist in
each database. You can insert records and list all records for each table
individually. appadmin paginates output 100 records at a time.
Once a set of records is selected, the header of the pages changes, allowing
you to update or delete the selected records.
To update the records, enter an SQL assignment in the Query string field:
1title = 'test'
where string values must be enclosed in single quotes. Multiple fields can be
separated by commas.
To delete a record, click the corresponding checkbox to confirm that you are
sure.
appadmin can also perform joins if the SQL FILTER contains a SQL condition
that involves two or more tables. For example, try:
1db.image.id == db.comment.image_id
web2py passes this along to the DAL, and it understands that the query links
two tables; hence, both tables are selected with an INNER JOIN. Here is the
output:
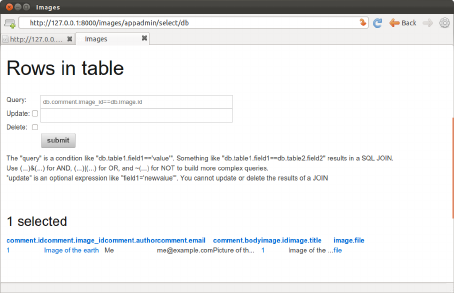
overview 131
If you click on the number of an id field, you get an edit page for the record
with the corresponding id.
If you click on the number of a reference field, you get an edit page for the
referenced record.
You cannot update or delete rows selected by a join, because they involve
records from multiple tables and this would be ambiguous.
In addition to its database administration capabilities, appadmin also
enables you to view details about the contents of the application’s cache
(at /yourapp/appadmin/ccache) as well as the contents of the current request,
response, and session objects (at /yourapp/appadmin/state).
appadmin replaces response.menu with its own menu, which provides links
to the application’s edit page in admin, the db (database administration)
page, the state page, and the cache page. If your application’s layout
does not generate a menu using response.menu, then you will not see the
appadmin menu. In that case, you can modify the appadmin.html file and
add {{=MENU(response.menu)}} to display the menu.

4
The core
4.1Command line options
It is possible to skip the GUI and start web2py directly from the command
line by typing something like:
1python web2py.py -a 'your password' -i 127.0.0.1 -p 8000
When web2py starts, it creates a file called "parameters_8000.py" where it
stores the hashed password. If you use "<ask>" as the password, web2py
prompts you for it.
For additional security, you can start web2py with:
1python web2py.py -a '<recycle>' -i 127.0.0.1 -p 8000
In this case web2py reuses the previously stored hashed password. If no
password is provided, or if the "parameters_8000.py" file is deleted, the web-
based administrative interface is disabled.
On some Unix/Linux systems, if the password is
1<pam_user:some_user>
web2py uses the PAM password of the Operating System account of
some_user to authenticate the administrator, unless blocked by the PAM
configuration.

134 web2py full-stack web framework,4th edition
web2py normally runs with CPython (the C implementation of the Python
interpreter created by Guido van Rossum), but it can also run with Jython
(the Java implementation of the interpreter). The latter possibility allows
the use of web2py in the context of a J2EE infrastructure. To use Jython,
simply replace "python web2py.py..." with "jython web2py.py". Details about
installing Jython, zxJDBC modules required to access the databases can be
found in Chapter 14.
The "web2py.py" script can take many command-line arguments specifying
the maximum number of threads, enabling of SSL, etc. For a complete list
type:
1>>> python web2py.py -h
2Usage: python web2py.py
3
4web2py Web Framework startup script. ATTENTION: unless a password
5is specified (-a 'passwd'), web2py will attempt to run a GUI.
6In this case command line options are ignored.
7
8Options:
9--version show program's version number and exit
10 -h, --help show this help message and exit
11 -i IP, --ip=IP ip address of the server (127.0.0.1)
12 -p PORT, --port=PORT port of server (8000)
13 -a PASSWORD, --password=PASSWORD
14 password to be used for administration (use -a
15 "<recycle>" to reuse the last password))
16 -c SSL_CERTIFICATE, --ssl_certificate=SSL_CERTIFICATE
17 file that contains ssl certificate
18 -k SSL_PRIVATE_KEY, --ssl_private_key=SSL_PRIVATE_KEY
19 file that contains ssl private key
20 -d PID_FILENAME, --pid_filename=PID_FILENAME
21 file to store the pid of the server
22 -l LOG_FILENAME, --log_filename=LOG_FILENAME
23 file to log connections
24 -n NUMTHREADS, --numthreads=NUMTHREADS
25 number of threads (deprecated)
26 --minthreads=MINTHREADS
27 minimum number of server threads
28 --maxthreads=MAXTHREADS
29 maximum number of server threads
30 -s SERVER_NAME, --server_name=SERVER_NAME
31 server name for the web server
32 -q REQUEST_QUEUE_SIZE, --request_queue_size=REQUEST_QUEUE_SIZE
33 max number of queued requests when server unavailable
34 -o TIMEOUT, --timeout=TIMEOUT

the core 135
35 timeout for individual request (10 seconds)
36 -z SHUTDOWN_TIMEOUT, --shutdown_timeout=SHUTDOWN_TIMEOUT
37 timeout on shutdown of server (5 seconds)
38 -f FOLDER, --folder=FOLDER
39 folder from which to run web2py
40 -v, --verbose increase --test verbosity
41 -Q, --quiet disable all output
42 -D DEBUGLEVEL, --debug=DEBUGLEVEL
43 set debug output level (0-100, 0 means all, 100 means
44 none; default is 30)
45 -S APPNAME, --shell=APPNAME
46 run web2py in interactive shell or IPython (if
47 installed) with specified appname (if app does not
48 exist it will be created). APPNAME like a/c/f (c,f
49 optional)
50 -B, --bpython run web2py in interactive shell or bpython (if
51 installed) with specified appname (if app does not
52 exist it will be created). Use combined with --shell
53 -P, --plain only use plain python shell; should be used with
54 --shell option
55 -M, --import_models auto import model files; default is False; should be
56 used with --shell option
57 -R PYTHON_FILE, --run=PYTHON_FILE
58 run PYTHON_FILE in web2py environment; should be used
59 with --shell option
60 -K SCHEDULER, --scheduler=SCHEDULER
61 run scheduled tasks for the specified apps
62 -K app1, app2, app3 requires a scheduler defined in the
63 models of the respective apps
64 -T TEST_PATH, --test=TEST_PATH
65 run doctests in web2py environment; TEST_PATH like
66 a/c/f (c,f optional)
67 -W WINSERVICE, --winservice=WINSERVICE
68 -W install|start|stop as Windows service
69 -C, --cron trigger a cron run manually; usually invoked from a
70 system crontab
71 --softcron triggers the use of softcron
72 -N, --no-cron do not start cron automatically
73 -J, --cronjob identify cron-initiated command
74 -L CONFIG, --config=CONFIG
75 config file
76 -F PROFILER_FILENAME, --profiler=PROFILER_FILENAME
77 profiler filename
78 -t, --taskbar use web2py gui and run in taskbar (system tray)
79 --nogui text-only, no GUI
80 -A ARGS, --args=ARGS should be followed by a list of arguments to be passed
81 to script, to be used with -S, -A must be the last
82 option
83 --no-banner Do not print header banner

136 web2py full-stack web framework,4th edition
84 --interfaces=INTERFACES
85 listen on multiple addresses:
86 "ip:port:cert:key;ip2:port2:cert2:key2;..." (:cert:key
87 optional; no spaces)
Lower-case options are used to configure the web server. The -L option tells
web2py to read configuration options from a file, -W installs web2py as a
windows service, while -S,-P and -M options start an interactive Python
shell. The -T option finds and runs controller doctests in a web2py execution
environment. For example, the following example runs doctests from all
controllers in the "welcome" application:
1python web2py.py -vT welcome
if you run web2py as Windows Service, -W, it is not convenient to pass the
configuration using command line arguments. For this reason, in the web2py
folder there is a sample "options_std.py" configuration file for the internal
web server:
1import socket
2import os
3
4ip = '0.0.0.0'
5port = 80
6interfaces=[('0.0.0.0',80)]
7#interfaces.append(('0.0.0.0',443,'ssl_private_key.pem','ssl_certificate.pem'))
8password = '<recycle>' # ## <recycle> means use the previous password
9pid_filename = 'httpserver.pid'
10 log_filename = 'httpserver.log'
11 profiler_filename = None
12 minthreads = None
13 maxthreads = None
14 server_name = socket.gethostname()
15 request_queue_size = 5
16 timeout = 30
17 shutdown_timeout = 5
18 folder = os.getcwd()
19 extcron = None
20 nocron = None
This file contains the web2py defaults. If you edit this file, you need to
import it explicitly with the -L command-line option. It only works if you
run web2py as a Windows Service.
the core 137
4.2Workflow
The web2py workflow is the following:
• An HTTP requests arrives to the web server (the built-in Rocket server or
a different server connected to web2py via WSGI or another adapter). The
web server handles each request in its own thread, in parallel.
• The HTTP request header is parsed and passed to the dispatcher
(explained later in this chapter).
• The dispatcher decides which of the installed application will handle the
request and maps the PATH_INFO in the URL into a function call. Each
URL corresponds to one function call.
• Requests for files in the static folder are handled directly, and large files
are automatically streamed to the client.
• Requests for anything but a static file are mapped into an action (i.e. a
function in a controller file, in the requested application).
• Before calling the action, a few things happen: if the request header
contains a session cookie for the app, the session object is retrieved; if
not, a session id is created (but the session file is not saved until later); an
execution environment for the request is created; models are executed in
this environment.
• Finally the controller action is executed in the pre-built environment.
• If the action returns a string, this is returned to the client (or if the action
returns a web2py HTML helper object, it is serialized and returned to the
client).
• If the action returns an iterable, this is used to loop and stream the data to
the client.
• If the action returns a dictionary, web2py tries to locate a view to
render the dictionary. The view must have the same name as the action
(unless specified otherwise) and the same extension as the requested page
(defaults to.html); on failure, web2py may pick up a generic view (if

138 web2py full-stack web framework,4th edition
available and if enabled). The view sees every variable defined in the
models as well as those in the dictionary returned by the action, but does
not see global variables defined in the controller.
• The entire user code is executed in a single transaction unless specified
otherwise.
• If the user code succeeds, the transaction is committed.
• If the user code fails, the traceback is stored in a ticket, and a ticket ID is
issued to the client. Only the system administrator can search and read
the tracebacks in tickets.
There are some caveats to keep in mind:
• Models in the same folder/subfolder are executed in alphabetical order.
• Any variable defined in a model will be visible to other models following
alphabetically, to the controllers, and to the views.
• Models in subfolders are executed conditionally. For example, if the user
has requested "/a/c/f" where "a" is the application, "c" is the controller,
and "f" is the function (action), then the following models are executed:
1applications/a/models/*.py
2applications/a/models/c/*.py
3applications/a/models/c/f/*.py
• The requested controller is executed and the requested function is called.
This means all top-level code in the controller is also executed at every
request for that controller.
• The view is only called if the action returns a dictionary.
• If a view is not found, web2py tries to use a generic view. By default,
generic views are disabled, although the ’welcome’ app includes a line in
/models/db.py to enable them on localhost only. They can be enabled
per extension type and per action (using response.generic_patterns). In
general, generic views are a development tool and typically should not be
used in production. If you want some actions to use a generic view, list
those actions in response.generic_patterns (discussed in more detail in the
chapter on Services).

the core 139
The possible behaviors of an action are the following:
Return a string
1def index(): return 'data'
Return a dictionary for a view:
1def index(): return dict(key='value')
Return all local variables:
1def index(): return locals()
Redirect the user to another page:
1def index(): redirect(URL('other_action'))
Return an HTTP page other than "200 OK":
1def index(): raise HTTP(404)
Return a helper (for example, a FORM):
1def index(): return FORM(INPUT(_name='test'))
(this is mostly used for Ajax callbacks and components, see chapter 12)
When an action returns a dictionary, it may contain code generated by
helpers, including forms based on database tables or forms from a factory,
for example:
1def index(): return dict(form=SQLFORM.factory(Field('name')).process())
(all forms generated by web2py use postbacks, see chapter 3)
4.3Dispatching
web2py maps a URL of the form:
1http://127.0.0.1:8000/a/c/f.html
to the function f() in controller "c.py" in application "a". If fis not present,
web2py defaults to the index controller function. If cis not present, web2py
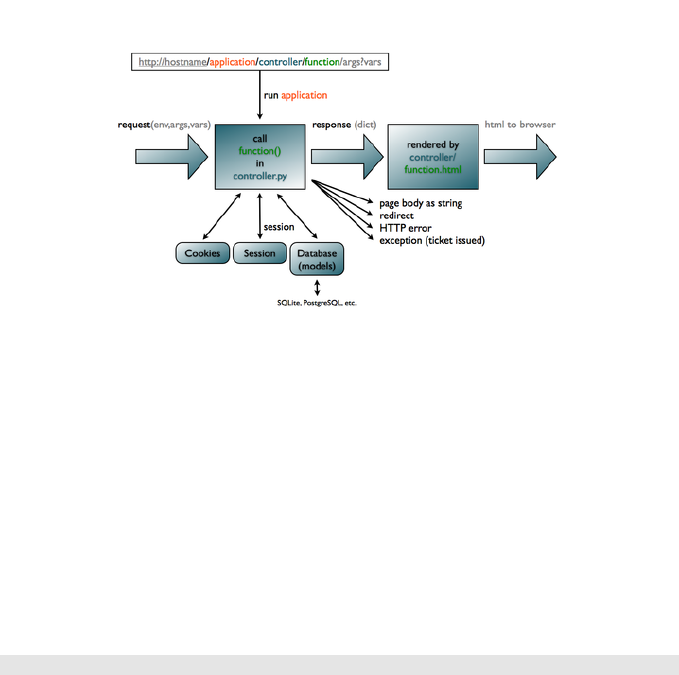
140 web2py full-stack web framework,4th edition
defaults to the "default.py" controller, and if ais not present, web2py defaults
to the init application. If there is no init application, web2py tries to run the
welcome application. This is shown schematically in the image below:
(The names of the default application, controller and function can be
overridden in routes.py; see Default Application, Controller and Function below.
By default, any new request also creates a new session. In addition, a session
cookie is returned to the client browser to keep track of the session.
The extension .html is optional; .html is assumed as default. The extension
determines the extension of the view that renders the output of the controller
function f(). It allows the same content to be served in multiple formats
(html, xml, json, rss, etc.).
Functions that take arguments or start with a double underscore are not
publicly exposed and can only be called by other functions.
There is an exception made for URLs of the form:
1http://127.0.0.1:8000/a/static/filename
There is no controller called "static". web2py interprets this as a request for
the file called "filename" in the subfolder "static" of the application "a".
When static files are downloaded, web2py does not create a session, nor
does it issue a cookie or execute the models. web2py always streams static

the core 141
files in chunks of 1MB, and sends PARTIAL CONTENT when the client
sends a RANGE request for a subset of the file. web2py also supports the
IF_MODIFIED_SINCE protocol, and does not send the file if it is already
stored in the browser’s cache and if the file has not changed since that
version.
When linking to an audio or video file in the static folder, if you want to
force the browser to download the file instead of streaming the audio/video
via a media player, add ?attachment to the URL. This tells web2py to set
the Content-Disposition header of the HTTP response to "attachment". For
example:
1<a href="/app/static/my_audio_file.mp3?attachment">Download</a>
When the above link is clicked, the browser will prompt the user to download
the MP3file rather than immediately streaming the audio. (As discussed
below, you can also set HTTP response headers directly by assigning a dict of
header names and their values to response.headers.)
web2py maps GET/POST requests of the form:
1http://127.0.0.1:8000/a/c/f.html/x/y/z?p=1&q=2
to function fin controller "c.py" in application a, and it stores the URL
parameters in the request variable as follows:
1request.args = ['x','y','z']
and:
1request.vars = {'p':1, 'q':2}
and:
1request.application = 'a'
2request.controller = 'c'
3request.function = 'f'
In the above example, both request.args[i] and request.args(i) can be used
to retrieve the i-th element of the request.args, but while the former raises an
exception if the list does not have such an index, the latter returns None in
this case.

142 web2py full-stack web framework,4th edition
1request.url
stores the full URL of the current request (not including GET variables).
1request.ajax
defaults False but it is True if web2py determines that the action was called
by an Ajax request.
If the request is an Ajax request and it is initiated by a web2py component,
the name of the component can be found in:
1request.cid
Components are discussed in more detail in Chapter 12.
If the HTTP request is a GET, then request.env.request_method is set to "GET";
if it is a POST, request.env.request_method is set to "POST". URL query
variables are stored in the request.vars Storage dictionary; they are also
stored in request.get_vars (following a GET request) or request.post_vars
(following a POST request). web2py stores WSGI and web2py environment
variables in request.env, for example:
1request.env.path_info = 'a/c/f'
and HTTP headers into environment variables, for example:
1request.env.http_host = '127.0.0.1:8000'
Notice that web2py validates all URLs to prevent directory traversal attacks.
URLs are only allowed to contain alphanumeric characters, underscores, and
slashes; the args may contain non-consecutive dots. Spaces are replaced by
underscores before validation. If the URL syntax is invalid, web2py returns
an HTTP 400 error message [47,48].
If the URL corresponds to a request for a static file, web2py simply reads and
returns (streams) the requested file.
If the URL does not request a static file, web2py processes the request in the
following order:
• Parses cookies.
the core 143
• Creates an environment in which to execute the function.
• Initializes request,response,cache.
• Opens the existing session or creates a new one.
• Executes the models belonging to the requested application.
• Executes the requested controller action function.
• If the function returns a dictionary, executes the associated view.
• On success, commits all open transactions.
• Saves the session.
• Returns an HTTP response.
Notice that the controller and the view are executed in different copies of
the same environment; therefore, the view does not see the controller, but
it sees the models and it sees the variables returned by the controller action
function.
If an exception (other than HTTP) is raised, web2py does the following:
• Stores the traceback in an error file and assigns a ticket number to it.
• Rolls back all open transactions.
• Returns an error page reporting the ticket number.
If the exception is an HTTP exception, this is assumed to be the intended
behavior (for example, an HTTP redirect), and all open database transactions
are committed. The behavior after that is specified by the HTTP exception
itself. The HTTP exception class is not a standard Python exception; it is
defined by web2py.
4.4Libraries
The web2py libraries are exposed to the user applications as global objects.
For example (request,response,session,cache), classes (helpers, validators,
DAL API), and functions (Tand redirect).

144 web2py full-stack web framework,4th edition
These objects are defined in the following core files:
1web2py.py
2gluon/__init__.py gluon/highlight.py gluon/restricted.py gluon/streamer.py
3gluon/admin.py gluon/html.py gluon/rewrite.py gluon/template.py
4gluon/cache.py gluon/http.py gluon/rocket.py gluon/storage.py
5gluon/cfs.py gluon/import_all.py gluon/sanitizer.py gluon/tools.py
6gluon/compileapp.py gluon/languages.py gluon/serializers.py gluon/utils.py
7gluon/contenttype.py gluon/main.py gluon/settings.py gluon/validators.py
8gluon/dal.py gluon/myregex.py gluon/shell.py gluon/widget.py
9gluon/decoder.py gluon/newcron.py gluon/sql.py gluon/winservice.py
10 gluon/fileutils.py gluon/portalocker.py gluon/sqlhtml.py gluon/xmlrpc.py
11 gluon/globals.py gluon/reserved_sql_keywords.py
The tar gzipped scaffolding app that ship with web2py is
1welcome.w2p
It is created upon installation and overwritten on upgrade.
The first time you start web2py, two new folders are created: deposit and
applications. The "welcome" app is zipped into a "welcome.w2p" file to be
used as a scaffolding app. The first time you start web2py, two new folders
are created: deposit and applications. The "welcome" app is zipped into a
"welcome.w2p" file to be used as scaffolding app. The deposit folder is used as
temporary storage for installing and uninstalling applications.
web2py unit-tests are in
1gluon/tests/
There are handlers for connecting with various web servers:
1cgihandler.py # discouraged
2gaehandler.py # for Google App Engine
3fcgihandler.py # for FastCGI
4wsgihandler.py # for WSGI
5isapiwsgihandler.py # for IIS
6modpythonhandler.py # deprecated
("fcgihandler" calls "gluon/contrib/gateways/fcgi.py" developed by Allan
Saddi) and
1anyserver.py

the core 145
which is a script to interface with many different web servers, described in
Chapter 13.
There are three example files:
1options_std.py
2routes.example.py
3router.example.py
The former is an optional configuration file that can be passed to web2py.py
with the -L option. The second is an example of a URL mapping file. It is
loaded automatically when renamed "routes.py". The third is an alternative
syntax for URL mapping, and can also be renamed (or copied to) "routes.py".
The files
1app.yaml
2index.yaml
3queue.yaml
are configuration files used for deployment on the Google App Engine. You
can read more about them in the Deployment Recipes chapter and on the
Google Documentation pages.
There are also additional libraries, usually developed by a third party:
feedparser [28] by Mark Pilgrim for reading RSS and Atom feeds:
1gluon/contrib/__init__.py
2gluon/contrib/feedparser.py
markdown2[29] by Trent Mick for wiki markup:
1gluon/contrib/markdown/__init__.py
2gluon/contrib/markdown/markdown2.py
markmin markup:
1gluon/contrib/markmin.py
pyfpdf created my Mariano Reingart for generating PDF documents:
1gluon/contrib/pyfpdf
This is not documented in this book but it is hosted and documented here:

146 web2py full-stack web framework,4th edition
1http://code.google.com/p/pyfpdf/
pysimplesoap is a lightweight SOAP server implementation created by
Mariano Reingart:
1gluon/contrib/pysimplesoap/
simplejsonrpc is a lightweight JSON-RPC client also created by Mariano
Reingart:
1gluon/contrib/simplejsonrpc.py
memcache [30] Python API by Evan Martin:
1gluon/contrib/memcache/__init__.py
2gluon/contrib/memcache/memcache.py
redis_cache is a module to store cache in the redis database:
1gluon/contrib/redis_cache.py
gql, a port of the DAL to the Google App Engine:
1gluon/contrib/gql.py
memdb, a port of the DAL on top of memcache:
1gluon/contrib/memdb.py
gae_memcache is an API to use memcache on the Google App Engine:
1gluon/contrib/gae_memcache.py
pyrtf [26] for generating Rich Text Format (RTF) documents, developed by
Simon Cusack and revised by Grant Edwards:
1gluon/contrib/pyrtf
2gluon/contrib/pyrtf/__init__.py
3gluon/contrib/pyrtf/Constants.py
4gluon/contrib/pyrtf/Elements.py
5gluon/contrib/pyrtf/PropertySets.py
6gluon/contrib/pyrtf/README
7gluon/contrib/pyrtf/Renderer.py
8gluon/contrib/pyrtf/Styles.py
PyRSS2Gen [27] developed by Dalke Scientific Software, to generate RSS
feeds:
the core 147
1gluon/contrib/rss2.py
simplejson [25] by Bob Ippolito, the standard library for parsing and writing
JSON objects:
1gluon/contrib/simplejson/__init__.py
2gluon/contrib/simplejson/decoder.py
3gluon/contrib/simplejson/encoder.py
4gluon/contrib/simplejson/jsonfilter.py
5gluon/contrib/simplejson/scanner.py
Google Wallet [96] provides "pay now" buttons which link Google as
payment processor:
1gluon/contrib/google_wallet.py
Stripe.com [98] provides a simple API for accepting credit card payments:
1gluon/contrib/stripe.py
AuthorizeNet [99] provides API to accept credit card payments via
Authorize.net network
1gluon/contrib/AuthorizeNet.py
Dowcommerce [100] is yet another credit cart processing API:
1gluon/contrib/DowCommerce.py
PAM [75] authentication API created by Chris AtLee:
1gluon/contrib/pam.py
A Bayesian classifier to populate the database with dummy data for testing
purposes:
1gluon/contrib/populate.py
A file that allows interaction with the taskbar in windows, when web2py is
running as a service:
1gluon/contrib/taskbar_widget.py
Optional login_methods and login_forms to be used for authentication:

148 web2py full-stack web framework,4th edition
1gluon/contrib/login_methods/__init__.py
2gluon/contrib/login_methods/basic_auth.py
3gluon/contrib/login_methods/cas_auth.py
4gluon/contrib/login_methods/dropbox_account.py
5gluon/contrib/login_methods/email_auth.py
6gluon/contrib/login_methods/extended_login_form.py
7gluon/contrib/login_methods/gae_google_account.py
8gluon/contrib/login_methods/ldap_auth.py
9gluon/contrib/login_methods/linkedin_account.py
10 gluon/contrib/login_methods/loginza.py
11 gluon/contrib/login_methods/oauth10a_account.py
12 gluon/contrib/login_methods/oauth20_account.py
13 gluon/contrib/login_methods/openid_auth.py
14 gluon/contrib/login_methods/pam_auth.py
15 gluon/contrib/login_methods/rpx_account.py
16 gluon/contrib/login_methods/x509_auth.py
web2py also contains a folder with useful scripts including
1scripts/setup-web2py-fedora.sh
2scripts/setup-web2py-ubuntu.sh
3scripts/setup-web2py-nginx-uwsgi-ubuntu.sh
4scripts/update-web2py.sh
5scripts/make_min_web2py.py
6...
7scripts/sessions2trash.py
8scripts/sync_languages.py
9scripts/tickets2db.py
10 scripts/tickets2email.py
11 ...
12 scripts/extract_mysql_models.py
13 scripts/extract_pgsql_models.py
14 ...
15 scripts/access.wsgi
16 scripts/cpdb.py
The first three are particularly useful because they attempt a complete
installation and setup of a web2py production environment from scratch.
Some of these are discussed in Chapter 14, but all of them contain a
documentation string inside that explains their purpose and usage.
Finally web2py includes these files required to build the binary distributions.
1Makefile
2setup_exe.py
3setup_app.py
the core 149
These are setup scripts for py2exe and py2app, respectively, and they are
only required to build the binary distributions of web2py. YOU SHOULD
NEVER NEED TO RUN THEM.
In summary, web2py libraries provide the following functionality:
• Map URLs into function calls.
• Handle passing and returning parameters via HTTP.
• Perform validation of those parameters.
• Protect the applications from most security issues.
• Handle data persistence (database, session, cache, cookies).
• Perform string translations for various supported languages.
• Generate HTML programmatically (e.g. from database tables).
• Generate SQL via a Database Abstraction Layer (DAL).
• Generate Rich Text Format (RTF) output.
• Generate Comma-Separated Value (CSV) output from database tables.
• Generate Really Simple Syndication (RSS) feeds.
• Generate JavaScript Object Notation (JSON) serialization strings for Ajax.
• Translate wiki markup (Markdown) to HTML.
• Expose XML-RPC web services.
• Upload and download large files via streaming.
web2py applications contain additional files, particularly third-party
JavaScript libraries, such as jQuery, calendar/datepicker, EditArea and
nicEdit. Their authors are acknowledged in the files themselves.
4.5Applications
Applications developed in web2py are composed of the following parts:

150 web2py full-stack web framework,4th edition
•models describe a representation of the data as database tables and
relations between tables.
•controllers describe the application logic and workflow.
•views describe how data should be presented to the user using HTML and
JavaScript.
•languages describe how to translate strings in the application into various
supported languages.
•static files do not require processing (e.g. images, CSS stylesheets, etc).
•ABOUT and README documents are self-explanatory.
•errors store error reports generated by the application.
•sessions store information related to each particular user.
•databases store SQLite databases and additional table information.
•cache store cached application items.
•modules are other optional Python modules.
•private files are accessed by the controllers but not directly by the
developer.
•uploads files are accessed by the models but not directly by the developer
(e.g., files uploaded by users of the application).
•tests is a directory for storing test scripts, fixtures and mocks.
Models, views, controllers, languages, and static files are accessible via the
web administration [design] interface. ABOUT, README, and errors are
also accessible via the administration interface through the corresponding
menu items. Sessions, cache, modules and private files are accessible to the
applications but not via the administration interface.
Everything is neatly organized in a clear directory structure that is replicated
for every installed web2py application, although the user never needs to
access the filesystem directly:
1__init__.py ABOUT LICENSE models views
2controllers modules private tests cron

the core 151
3cache errors upload sessions static
"__init__.py" is an empty file which is required in order to allow Python (and
web2py) to import the modules in the modules directory.
Notice that the admin application simply provides a web interface to web2py
applications on the server file system. web2py applications can also be
created and developed from the command-line; you don’t have to use the
browser admin interface. A new application can be created manually by
replicating the above directory structure under,e.g., "applications/newapp/"
(or simply untar the welcome.w2p file into your new application directory).
Application files can also be created and edited from the command-line
without having to use the web admin interface.
4.6API
Models, controllers, and views are executed in an environment where the
following objects are already imported for us:
Global Objects:
1request,response,session,cache
Internationalization:
1T
Navigation:
1redirect,HTTP
Helpers:
1XML,URL,BEAUTIFY
2
3A,B,BODY,BR,CENTER,CODE, COL, COLGROUP,
4DIV,EM,EMBED,FIELDSET,FORM,H1,H2,H3,H4,H5,H6,
5HEAD,HR,HTML,I,IFRAME,IMG,INPUT,LABEL,LEGEND,
6LI,LINK,OL,UL,META,OBJECT,OPTION,P,PRE,
7SCRIPT,OPTGROUP,SELECT,SPAN,STYLE,
8TABLE,TAG,TD,TEXTAREA,TH,THEAD,TBODY,TFOOT,
9TITLE,TR,TT,URL,XHTML,xmlescape,embed64

152 web2py full-stack web framework,4th edition
10
11 CAT, MARKMIN,MENU,ON
Forms and tables
1SQLFORM (SQLFORM.factory, SQLFORM.grid, SQLFORM.smartgrid)
Validators:
1CLEANUP,CRYPT,IS_ALPHANUMERIC,IS_DATE_IN_RANGE,IS_DATE,
2IS_DATETIME_IN_RANGE,IS_DATETIME,IS_DECIMAL_IN_RANGE,
3IS_EMAIL,IS_EMPTY_OR,IS_EXPR,IS_FLOAT_IN_RANGE,IS_IMAGE,
4IS_IN_DB,IS_IN_SET,IS_INT_IN_RANGE,IS_IPV4,IS_LENGTH,
5IS_LIST_OF,IS_LOWER,IS_MATCH,IS_EQUAL_TO,IS_NOT_EMPTY,
6IS_NOT_IN_DB,IS_NULL_OR,IS_SLUG,IS_STRONG,IS_TIME,
7IS_UPLOAD_FILENAME,IS_UPPER,IS_URL
Database:
1DAL,Field
For backward compatibility SQLDB=DAL and SQLField=Field. We encourage you
to use the new syntax DAL and Field, instead of the old syntax.
Other objects and modules are defined in the libraries, but they are not
automatically imported since they are not used as often.
The core API entities in the web2py execution environment are request,
response,session,cache,URL,HTTP,redirect and Tand are discussed below.
A few objects and functions, including Auth,Crud and Service, are defined
in "gluon/tools.py" and they need to be imported as necessary:
1from gluon.tools import Auth, Crud, Service
4.6.1Accessing the API from Python modules
Your models or controller may import python modules, and these may need
to use some of the web2py API. The way for them to do it is importing them:
1from gluon import *
In fact, any Python module, even if not imported by a web2py application,
can import the web2py API as long as web2py is in the sys.path.

the core 153
There is one caveat, though. Web2py defines some global objects (request,
response, session, cache, T) that can only exist when an HTTP request is
present (or is faked). Therefore, modules can access them only if they are
called from an application. For this reasons they are placed into a container
caller current, which is a thread local object. Here is an example.
Create a module "/myapp/modules/test.py" that contains:
1from gluon import *
2def ip(): return current.request.client
Now from a controller in "myapp" you can do
1import test
2def index():
3return "Your ip is " + test.ip()
Notice a few things:
•import test looks for the module first in the current app’s modules folder,
then in the folders listed in sys.path. Therefore, app-level modules always
take precendence over Python modules. This allows different apps to ship
with different versions of their modules, without conflicts.
• Different users can call the same action index concurrently, which calls the
function in the module, and yet there is no conflict because current.request
is a different object in different threads. Just be careful not to access
current.request outside of functions or classes (i.e., at the top level) in
the module.
•import test is a shortcut for from applications.appname.modules import
test. Using the longer syntax, it is possible to import modules from other
applications.
For uniformity with normal Python behavior, by default web2py does not
reload modules when changes are made. Yet this can be changed. To turn on
the auto-reload feature for modules, use the track_changes function as follows
(typically in a model file, before any imports):
1from gluon.custom_import import track_changes; track_changes(True)
From now on, every time a module is imported, the importer will check
if the Python source file (.py) has changed. If it has changed, the module

154 web2py full-stack web framework,4th edition
will be reloaded. This applies to all Python modules, even Python modules
outside web2py. The mode is global and applies to all applications. Changes
made to models, controllers, and views are always reloaded regardless of the
mode used. To turn the mode off, use the same function with False as the
argument. To know the actual tracking state, use the is_tracking_changes()
function, also from gluon.custom_import.
Modules that import current can access:
•current.request
•current.response
•current.session
•current.cache
•current.T
and any other variable your application chooses to store in current. For
example a model could do
1auth = Auth(db)
2from gluon import current
3current.auth = auth
and now all modules imported can access
•current.auth
current and import create a powerful mechanism to build extensible and
reusable modules for your applications.
There is one major caveat. Given from gluon import current, it is correct to
use current.request and any of the other thread local objects but one should
never assign them to global variables in the module, such as in
1request = current.request # WRONG! DANGER!
nor one should use it assign class attributes
1class MyClass:
2request = current.request # WRONG! DANGER!
This is because the thread local object must be extracted at runtime. Global
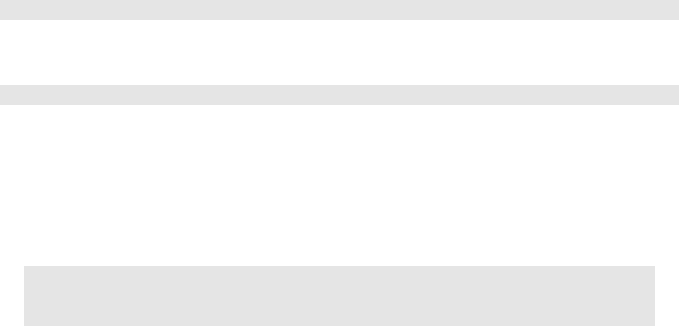
the core 155
variables instead are defined only once when the model is imported for the first
time.
4.7request
The request object is an instance of the ubiquitous web2py class that is called
gluon.storage.Storage, which extends the Python dict class. It is basically a
dictionary, but the item values can also be accessed as attributes:
1request.vars
is the same as:
1request['vars']
Unlike a dictionary, if an attribute (or key) does not exist, it does not raise an
exception. Instead, it returns None.
It is sometimes useful to create your own Storage objects. You can do so as
follows:
1from gluon.storage import Storage
2my_storage = Storage() # empty storage object
3my_other_storage = Storage(dict(a=1, b=2)) # convert dictionary to Storage
request has the following items/attributes, some of which are also an instance
of the Storage class:
•request.cookies: a Cookie.SimpleCookie() object containing the cookies
passed with the HTTP request. It acts like a dictionary of cookies. Each
cookie is a Morsel object.
•request.env: a Storage object containing the environment variables passed
to the controller, including HTTP header variables from the HTTP request
and standard WSGI parameters. The environment variables are all
converted to lower case, and dots are converted to underscores for easier
memorization.
•request.application: the name of the requested application (parsed from
request.env.path_info).
156 web2py full-stack web framework,4th edition
•request.controller: the name of the requested controller (parsed from the
request.env.path_info).
•request.function: the name of the requested function (parsed from the
request.env.path_info).
•request.extension: the extension of the requested action. It defaults to
"html". If the controller function returns a dictionary and does not specify
a view, this is used to determine the extension of the view file that will
render the dictionary (parsed from the request.env.path_info).
•request.folder: the application directory. For example if the application is
"welcome", request.folder is set to the absolute path "/path/to/welcome".
In your programs, you should always use this variable and the
os.path.join function to build paths to the files you need to access.
Although web2py always uses absolute paths, it is a good rule never to
explicitly change the current working folder (whatever that is) since this is
not a thread-safe practice.
•request.now: a datetime.datetime object storing the datetime of the current
request.
•request.utcnow: a datetime.datetime object storing the UTC datetime of the
current request.
•request.args: A list of the URL path components following the controller
function name; equivalent to request.env.path_info.split(’/’)[3:]
•request.vars: a gluon.storage.Storage object containing the HTTP GET and
HTTP POST query variables.
•request.get_vars: a gluon.storage.Storage object containing only the HTTP
GET query variables.
•request.post_vars: a gluon.storage.Storage object containing only the
HTTP POST query variables.
•request.client: The ip address of the client as determined by, if
present, request.env.http_x_forwarded_for or by request.env.remote_addr
otherwise. While this is useful it should not be trusted because the
http_x_forwarded_for can be spoofed.

the core 157
•request.is_local:True if the client is localhost, False otherwise. Should
work behind a proxy if the proxy supports http_x_forwarded_for.
•request.is_https:True if the request is using the HTTPS protocol, False
otherwise.
•request.body: a read-only file stream that contains the body of the HTTP
request. This is automatically parsed to get the request.post_vars and then
rewinded. It can be read with request.body.read().
•request.ajax is True if the function is being called via an Ajax request.
•request.cid is the id of the component that generated the Ajax request (if
any). You can read more about components in Chapter 12.
•request.restful this is a new and very useful decorator that can be
used to change the default behavior of web2py actions by separating
GET/POST/PUSH/DELETE requests. It will be discussed in some detail
in Chapter 10.
•request.user_agent() parses the user_agent field from the client and
returns the information in the form of a dictionary. It is useful to detect
mobile devices. It uses "gluon/contrib/user_agent_parser.py" created by
Ross Peoples. To see what it does, try to embed the following code in a
view:
1{{=BEAUTIFY(request.user_agent())}}
•request.wsgi is a hook that allows you to call third party WSGI applications
from inside actions
The latter includes:
•request.wsgi.environ
•request.wsgi.start_response
•request.wsgi.middleware
their usage is discussed at the end of this Chapter.
As an example, the following call on a typical system:
1http://127.0.0.1:8000/examples/default/status/x/y/z?p=1&q=2
158 web2py full-stack web framework,4th edition
results in the following request object:

the core 159
variable value
request.application examples
request.controller default
request.function index
request.extension html
request.view status
request.folder applications/examples/
request.args [’x’, ’y’, ’z’]
request.vars <Storage {’p’: 1, ’q’: 2}>
request.get_vars <Storage {’p’: 1, ’q’: 2}>
request.post_vars <Storage {}>
request.is_local False
request.is_https False
request.ajax False
request.cid None
request.wsgi hook
request.env.content_length 0
request.env.content_type
request.env.http_accept text/xml,text/html;
request.env.http_accept_encoding gzip, deflate
request.env.http_accept_language en
request.env.http_cookie session_id_examples=127.0.0.1.119725
request.env.http_host 127.0.0.1:8000
request.env.http_max_forwards 10
request.env.http_referer http://web2py.com/
request.env.http_user_agent Mozilla/5.0
request.env.http_via 1.1web2py.com
request.env.http_x_forwarded_for 76.224.34.5
request.env.http_x_forwarded_host web2py.com
request.env.http_x_forwarded_server 127.0.0.1
request.env.path_info /examples/simple_examples/status
request.env.query_string remote_addr:127.0.0.1
request.env.request_method GET
request.env.script_name
request.env.server_name 127.0.0.1
request.env.server_port 8000
request.env.server_protocol HTTP/1.1
request.env.web2py_path /Users/mdipierro/web2py
request.env.web2py_version Version 1.99.1
request.env.web2py_runtime_gae (optional, defined only if GAE detected)
request.env.wsgi_errors <open file, mode ’w’ at >
request.env.wsgi_input
request.env.wsgi_multiprocess False
request.env.wsgi_multithread True
request.env.wsgi_run_once False
request.env.wsgi_url_scheme http
request.env.wsgi_version 10
160 web2py full-stack web framework,4th edition
Which environment variables are actually defined depends on the web server.
Here we are assuming the built-in Rocket wsgi server. The set of variables is
not much different when using the Apache web server.
The request.env.http_*variables are parsed from the request HTTP header.
The request.env.web2py_*variables are not parsed from the web server
environment, but are created by web2py in case your applications need to
know about the web2py location and version, and whether it is running on
the Google App Engine (because specific optimizations may be necessary).
Also notice the request.env.wsgi_*variables. They are specific to the wsgi
adaptor.
4.8response
response is another instance of the Storage class. It contains the following:
response.body: a StringIO object into which web2py writes the output page
body. NEVER CHANGE THIS VARIABLE.
response.cookies: similar to request.cookies, but while the latter contains the
cookies sent from the client to the server, the former contains cookies sent by
the server to the client. The session cookie is handled automatically.
response.download(request, db): a method used to implement the controller
function that allows downloading of uploaded files. request.download expects
the last arg in request.args to be the encoded filename (i.e., the filename
generated at upload time and stored in the upload field). It extracts the
upload field name and table name as well as the original filename from
the encoded filename. response.download takes two optional arguments:
chunk_size sets the size in bytes for chunked streaming (defaults to 64K), and
attachments determines whether the downloaded file should be treated as an
attachment or not (default to True). Note, response.download is specifically for
downloading files associated with db upload fields. Use response.stream (see
below) for other types of file downloads and streaming. Also, note that it is
not necessary to use response.download to access files uploaded to the /static
folder – static files can (and generally should) be accessed directly via URL
the core 161
(e.g., /app/static/files/myfile.pdf).
response.files: a list of CSS and JS files required by the page. They will
automatically be linked in the head of the standard "layout.html" via the
included "web2py_ajax.html". To include a new CSS or JS file, just append it
to this list. It will handle duplicates. The order is significant.
response.include_files() generates html head tags to includes all
response.files (used in "views/web2py_ajax.html").
response.flash: optional parameter that may be included in the views.
Normally used to notify the user about something that happened.
response.headers: a dict for HTTP response headers. Web2py sets some
headers by default, including "Content-Length", "Content-Type", and "X-
Powered-By" (set equal to web2py). Web2py also sets the "Cache-Control",
"Expires", and "Pragma" headers to prevent client-side caching, except for
static file requests, for which client-side caching is enabled. The headers that
web2py sets can be overwritten or removed, and new headers can be added
(e.g., response.headers[’Cache-Control’] = ’private’).
response.menu: optional parameter that may be included in the views,
normally used to pass a navigation menu tree to the view. It can be rendered
by the MENU helper.
response.meta: a storage object (like a dict) that contains optional meta
information like response.meta.author,.description, and/or .keywords. The
content of each meta variable is automatically placed in the proper META tag
by the code in "views/web2py_ajax.html", which is included by default in
"views/layout.html".
response.include_meta() generates a string that includes all response.meta
headers serialized (used in "views/web2py_ajax.html").
response.postprocessing: this is a list of functions, empty by default. These
functions are used to filter the response object at the output of an action,
before the output is rendered by the view. It can be used to implement
support for other template languages.
162 web2py full-stack web framework,4th edition
response.render(view, vars): a method used to call the view explicitly inside
the controller. view is an optional parameter which is the name of the view
file, vars is a dictionary of named values passed to the view.
response.session_file: file stream containing the session.
response.session_file_name: name of the file where the session will be saved.
response.session_id: the id of the current session. It is determined
automatically. NEVER CHANGE THIS VARIABLE.
response.session_id_name: the name of the session cookie for this application.
NEVER CHANGE THIS VARIABLE.
response.status: the HTTP status code integer to be passed to the response.
Default is 200 (OK).
response.stream(file, chunk_size, request=request): when a controller
returns it, web2py streams the file content back to the client in blocks of
size chunk_size. The request parameter is required to use the chunk start
in the HTTP header. As noted above, response.download should be used to
retrieve files stored via an upload field. response.stream can be used in other
cases, such as returning a temporary file or StringIO object created by the
controller. Unlike response.download,response.stream does not automatically
set the Content-Disposition header, so you may need to do that manually
(e.g., to specify download as an attachment, and to provide a filename).
However, it does automatically set the Content-Type header (based on the
filename extension).
response.subtitle: optional parameter that may be included in the views. It
should contain the subtitle of the page.
response.title: optional parameter that may be included in the views. It
should contain the title of the page and should be rendered by the HTML
title TAG in the header.
response.toolbar: a function that allows you embed a toolbar into page form
debugging purposes {{=response.toolbar()}}. The toolbar displays request,
response, session variables and database access time for each query.

the core 163
response._vars: this variable is accessible only in a view, not in the action. It
contains the value returned by the action to the view.
response.optimize_css: if can be set to "concat,minify,inline" to concatenate,
minity and inline the CSS files included by web2py.
response.optimize_js: if can be set to "concat,minify,inline" to concatenate,
minity and inline the CSS files included by web2py.
response.view: the name of the view template that must render the page. This
is set by default to:
1"%s/%s.%s" % (request.controller, request.function, request.extension)
or, if the above file cannot be located, to
1"generic.%s" % (request.extension)
Change the value of this variable to modify the view file associated with a
particular action.
response.xmlrpc(request, methods): when a controller returns it, this function
exposes the methods via XML-RPC [46]. This function is deprecated since a
better mechanism is available and described in Chapter 10.
response.write(text): a method to write text into the output page body.
response.js can contain Javascript Code. This code will be executed if and
only if the response is received by a web2py component as discussed in
Chapter 12.
Since response is a gluon.storage.Storage object, it can be used to store other
attributes that you may want to pass to the view. While there is no technical
restriction, our recommendation is to store only variables that are to be
rendered by all pages in the overall layout ("layout.html").
Anyway, we strongly suggest to stick to the variables listed here:
1response.title
2response.subtitle
3response.flash
4response.menu
5response.meta.author
6response.meta.description
7response.meta.keywords

164 web2py full-stack web framework,4th edition
8response.meta.*
because this will make it easier for you to replace the standard "layout.html"
file that comes with web2py with another layout file, one that uses the same
set of variables.
Old versions of web2py user response.author instead of response.meta.author
and similar for the other meta attributes.
4.9session
session is another instance of the Storage class. Whatever is stored into
session for example:
1session.myvariable = "hello"
can be retrieved at a later time:
1a = session.myvariable
as long as the code is executed within the same session by the same user
(provided the user has not deleted session cookies and the session did not
expire). Because session is a Storage object, trying to access an attribute/key
that has not been set does not raise an exception; it returns None instead.
The session object has three important methods. One is forget:
1session.forget(response)
It tells web2py not to save the session. This should be used in those
controllers whose actions are called often and do not need to track user
activity. session.forget() prevents the session file from being written,
regardless of whether it has been modified. session.forget(response)
additionally unlocks and closes the session file. You rarely need to call this
method since sessions are not saved when they are not changed. However, if
the page makes multiple simultaneous Ajax requests, it is a good idea for the
actions called via Ajax to call session.forget(response) (assuming the session
is not needed by the action). Otherwise, each Ajax action will have to wait for
the previous one to complete (and unlock the session file) before proceeding,

the core 165
which will slow down the page loading. Notice that sessions are not locked
when stored in database.
Another method is:
1session.secure()
which tells web2py to set the session cookie to be a secure cookie. This
should be set if the app is going over https. By setting the session cookie
to be secure, the server is asking the browser not to send the session cookie
back to the server unless over an https connection.
The other method is connect:
1session.connect(request,response, db, masterapp=None)
where db is the name of an open database connection (as returned by the
DAL). It tells web2py that you want to store the sessions in the database
and not on the filesystem. session.connect must come after db=DAL(...), but
before any other logic that requires session, for example, setting up Auth.
web2py creates a table:
1db.define_table('web2py_session',
2Field('locked','boolean', default=False),
3Field('client_ip'),
4Field('created_datetime','datetime', default=now),
5Field('modified_datetime','datetime'),
6Field('unique_key'),
7Field('session_data','text'))
and stores cPickled sessions in the session_data field.
The option masterapp=None, by default, tells web2py to try to retrieve an
existing session for the application with name in request.application, in the
running application.
If you want two or more applications to share sessions, set masterapp to the
name of the master application.
You can check the state of your application at any time by printing the
request,session and response system variables. One way to do it is to create
a dedicated action:
1def status():

166 web2py full-stack web framework,4th edition
2return dict(request=request,session=session,response=response)
4.9.1Separate sessions
If you are storing sessions on filesystems and you have lots of them, the file
system access may become a bottle-neck. One solution is the following:
1session.connect(request,response, separate=True)
By setting separate=True web2py will store sessions not in the "sessions/"
folder but in subfolders of the "sessions/" folder. The subfolder will be
created automatically. Sessions with the same prefix will be in the same
subfolder. Again, note that the above must be called before any logic that
might require the session.
4.10 cache
cache a global object also available in the web2py execution environment. It
has two attributes:
•cache.ram: the application cache in main memory.
•cache.disk: the application cache on disk.
cache is callable, this allows it to be used as a decorator for caching actions
and views.
The following example caches the time.ctime() function in RAM:
1def cache_in_ram():
2import time
3t = cache.ram('time', lambda: time.ctime(), time_expire=5)
4return dict(time=t, link=A('click me',_href=request.url))
The output of lambda: time.ctime() is cached in RAM for 5seconds. The
string ’time’ is used as cache key.
The following example caches the time.ctime() function on disk:
1def cache_on_disk():

the core 167
2import time
3t = cache.disk('time', lambda: time.ctime(), time_expire=5)
4return dict(time=t, link=A('click me',_href=request.url))
The output of lambda: time.ctime() is cached on disk (using the shelve
module) for 5seconds.
Note, the second argument to cache.ram and cache.disk must be a function or
callable object. If you want to cache an existing object rather than the output
of a function, you can simply return it via a lambda function:
1cache.ram('myobject', lambda: myobject, time_expire=60*60*24)
The next example caches the time.ctime() function to both RAM and disk:
1def cache_in_ram_and_disk():
2import time
3t = cache.ram('time', lambda: cache.disk('time',
4lambda: time.ctime(), time_expire=5),
5time_expire=5)
6return dict(time=t, link=A('click me',_href=request.url))
The output of lambda: time.ctime() is cached on disk (using the shelve
module) and then in RAM for 5seconds. web2py looks in RAM first
and if not there it looks on disk. If it is not in RAM or on disk, lambda:
time.ctime() is executed and the cache is updated. This technique is useful
in a multiprocess environment. The two times do not have to be the same.
The following example is caching in RAM the output of the controller
function (but not the view):
1@cache(request.env.path_info, time_expire=5, cache_model=cache.ram)
2def cache_controller_in_ram():
3import time
4t = time.ctime()
5return dict(time=t, link=A('click me',_href=request.url))
The dictionary returned by cache_controller_in_ram is cached in RAM for 5
seconds. Note that the result of a database select cannot be cached without
first being serialized. A better way is to cache the database select directly
using the select method cache argument.
The following example is caching the output of the controller function on
disk (but not the view):

168 web2py full-stack web framework,4th edition
1@cache(request.env.path_info, time_expire=5, cache_model=cache.disk)
2def cache_controller_on_disk():
3import time
4t = time.ctime()
5return dict(time=t, link=A('click to reload',
6_href=request.url))
The dictionary returned by cache_controller_on_disk is cached on disk for
5seconds. Remember that web2py cannot cache a dictionary that contains
un-pickleable objects.
It is also possible to cache the view. The trick is to render the view in the
controller function, so that the controller returns a string. This is done by
returning response.render(d) where dis the dictionary we intended to pass to
the view. The following example caches the output of the controller function
in RAM (including the rendered view):
1@cache(request.env.path_info, time_expire=5, cache_model=cache.ram)
2def cache_controller_and_view():
3import time
4t = time.ctime()
5d = dict(time=t, link=A('click to reload',_href=request.url))
6return response.render(d)
response.render(d) returns the rendered view as a string, which is now
cached for 5seconds. This is the best and fastest way of caching.
Note, time_expire is used to compare the current time with the time the
requested object was last saved in the cache. It does not affect future requests.
This enables time_expire to be set dynamically when an object is requested
rather than being fixed when the object is saved. For example:
1message = cache.ram('message', lambda: 'Hello', time_expire=5)
Now, suppose the following call is made 10 seconds after the above call:
1message = cache.ram('message', lambda: 'Goodbye', time_expire=20)
Because time_expire is set to 20 seconds in the second call and only 10 seconds
has elapsed since the message was first saved, the value "Hello" will be
retrieved from the cache, and it will not be updated with "Goodbye". The
time_expire value of 5seconds in the first call has no impact on the second
call.

the core 169
Setting time_expire=0 (or a negative value) forces the cached item to be
refreshed (because the elapsed time since the last save will always be > 0),
and setting time_expire=None forces retrieval of the cached value, regardless of
the time elapsed since it was saved (if time_expire is always None, the cached
item will effectively never expire).
You can clear one or more cache variables with
1cache.ram.clear(regex='...')
where regex is a regular expression matching all the keys you want removed
from the cache. You can also clear an single item with:
1cache.ram(key, None)
where key is the key of the cached item.
It is also possible to define other caching mechanisms such as memcache.
Memcache is available via gluon.contrib.memcache and is discussed in more
details in Chapter 14.
Be careful when caching that caching is usually at the app-level not at the user
level. If you need, for eaxmple, to cache user specific content, choose a key that
includes the user id.
4.11 URL
The URL function is one of the most important functions in web2py. It
generates internal URL paths for the actions and the static files.
Here is an example:
1URL('f')
is mapped into
1/[application]/[controller]/f
Notice that the output of the URL function depends on the name of the
current application, the calling controller, and other parameters. web2py
supports URL mapping and reverse URL mapping. URL mapping allows

170 web2py full-stack web framework,4th edition
you to redefine the format of external URLs. If you use the URL function to
generate all the internal URLs, then additions or changes to URL mappings
will prevent broken links within the web2py application.
You can pass additional parameters to the URL function, i.e., extra terms in
the URL path (args) and URL query variables (vars):
1URL('f', args=['x','y'], vars=dict(z='t'))
is mapped into
1/[application]/[controller]/f/x/y?z=t
The args attributes are automatically parsed, decoded, and finally stored in
request.args by web2py. Similarly, the vars are parsed, decoded, and then
stored in request.vars.args and vars provide the basic mechanism by which
web2py exchanges information with the client’s browser.
If args contains only one element, there is no need to pass it in a list.
You can also use the URL function to generate URLs to actions in other
controllers and other applications:
1URL('a','c','f', args=['x','y'], vars=dict(z='t'))
is mapped into
1/a/c/f/x/y?z=t
It is also possible to specify application, controller and function using named
arguments:
1URL(a='a', c='c', f='f')
If the application name a is missing the current app is assumed.
1URL('c','f')
If the controller name is missing, the current one is assumed.
1URL('f')
Instead of passing the name of a controller function it is also possible to pass
the function itself

the core 171
1URL(f)
For the reasons mentioned above, you should always use the URL function to
generate URLs of static files for your applications. Static files are stored in the
application’s static subfolder (that’s where they go when uploaded using the
administrative interface). web2py provides a virtual ’static’ controller whose
job is to retrieve files from the static subfolder, determine their content-type,
and stream the file to the client. The following example generates the URL
for the static file "image.png":
1URL('static','image.png')
is mapped into
1/[application]/static/image.png
If the static file is in a subfolder within the static folder, you can include the
subfolder(s) as part of the filename. For example, to generate:
1/[application]/static/images/icons/arrow.png
one should use:
1URL('static','images/icons/arrow.png')
You do not need to encode/escape the args and vars arguments; this is done
automatically for you.
By default, the extension corresponding to the current request (which
can be found in request.extension) is appended to the function, unless
request.extension is html, the default. This can be overridden by explicitly
including an extension as part of the function name URL(f=’name.ext’) or with
the extension argument:
1URL(..., extension='css')
The current extension can be explicitly suppressed:
1URL(..., extension=False)

172 web2py full-stack web framework,4th edition
4.11.1Absolute urls
By default, URL generates relative URLs. However, you can also generate
absolute URLs by specifying the scheme and host arguments (this is useful,
for example, when inserting URLs in email messages):
1URL(..., scheme='http', host='www.mysite.com')
You can automatically include the scheme and host of the current request by
simply setting the arguments to True.
1URL(..., scheme=True, host=True)
The URL function also accepts a port argument to specify the server port if
necessary.
4.11.2Digitally signed urls
When generating a URL, you have the option to digitally sign it. This will
append a _signature GET variable that can be verified by the server. This can
be done in two ways.
You can pass to the URL function the following arguments:
•hmac_key: the key for signing the URL (a string)
•salt: an optional string to salt the data before signing
•hash_vars: an optional list of names of variables from the URL query string
(i.e., GET variables) to be included in the signature. It can also be set to
True (the default) to include all variables, or False to include none of the
variables.
Here is an example of usage:
1KEY = 'mykey'
2
3def one():
4return dict(link=URL('two', vars=dict(a=123), hmac_key=KEY)
5
6def two():
7if not URL.verify(hmac_key=KEY): raise HTTP(403)
8# do something
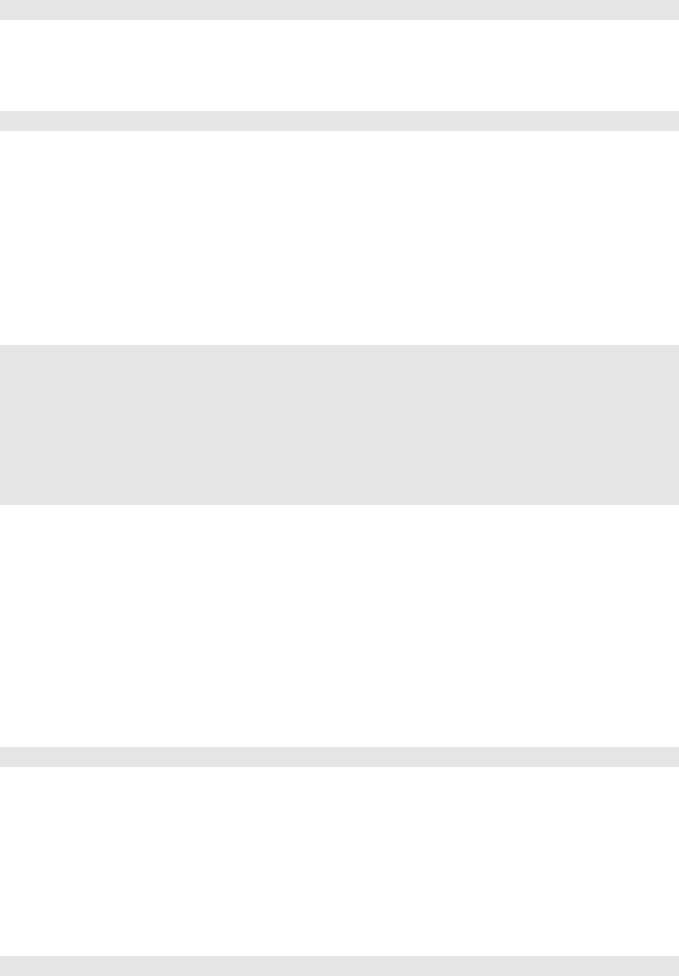
the core 173
9return locals()
This makes the action two accessible only via a digitally signed URL. A
digitally signed URL looks like this:
1'/welcome/default/two?a=123&_signature=4981bc70e13866bb60e52a09073560ae822224e9'
Note, the digital signature is verified via the URL.verify function. URL.verify
also takes the hmac_key,salt, and hash_vars arguments described above, and
their values must match the values that were passed to the URL function when
the digital signature was created in order to verify the URL.
A second and more sophisticated but more common use of digitally signed
URLs is in conjunction with Auth. This is best explained with an example:
1@auth.requires_login()
2def one():
3return dict(link=URL('two', vars=dict(a=123), user_signature=True)
4
5@auth.requires_signature()
6def two():
7# do something
8return locals()
In this case the hmac_key is automatically generated and shared within the
session. This allows action two to delegate any access control to action one. If
the link is generated and signed, it is valid; else it is not. If the link is stolen
by another user, the link will be invalid.
It is good practice to always digitally sign Ajax callbacks. If you use the
web2py LOAD function, it has a user_signature argument too that can be used
for this purpose:
1{{=LOAD('default','two', vars=dict(a=123), ajax=True, user_signature=True)}}
4.12 HTTP and redirect
web2py defines only one new exception called HTTP. This exception can be
raised anywhere in a model, a controller, or a view with the command:
1raise HTTP(400, "my message")

174 web2py full-stack web framework,4th edition
It causes the control flow to jump away from the user’s code, back to web2py,
and return an HTTP response like:
1HTTP/1.1 400 BAD REQUEST
2Date: Sat, 05 Jul 2008 19:36:22 GMT
3Server: Rocket WSGI Server
4Content-Type: text/html
5Via: 1.1 127.0.0.1:8000
6Connection: close
7Transfer-Encoding: chunked
8
9my message
The first argument of HTTP is the HTTP status code. The second argument
is the string that will be returned as the body of the response. Additional
optional named arguments are used to build the response HTTP header. For
example:
1raise HTTP(400, 'my message', test='hello')
generates:
1HTTP/1.1 400 BAD REQUEST
2Date: Sat, 05 Jul 2008 19:36:22 GMT
3Server: Rocket WSGI Server
4Content-Type: text/html
5Via: 1.1 127.0.0.1:8000
6Connection: close
7Transfer-Encoding: chunked
8test: hello
9
10 my message
If you do not want to commit the open database transaction, rollback before
raising the exception.
Any exception other than HTTP causes web2py to roll back any open database
transaction, log the error traceback, issue a ticket to the visitor, and return a
standard error page.
This means that only HTTP can be used for cross-page control flow. Other
exceptions must be caught by the application, otherwise they are ticketed by
web2py.
The command:

the core 175
1redirect('http://www.web2py.com')
is simply a shortcut for:
1raise HTTP(303,
2'You are being redirected <a href="%s">here</a>' % location,
3Location='http://www.web2py.com')
The named arguments of the HTTP initializer method are translated into
HTTP header directives, in this case, the redirection target location. redirect
takes an optional second argument, which is the HTTP status code for the
redirection (303 by default). Change this number to 307 for a temporary
redirect or to 301 for a permanent redirect.
The most common way to use redirect is to redirect to other pages in the
same app and (optionally) pass parameters:
1redirect(URL('index', args=(1,2,3), vars=dict(a='b')))
4.13 Tand Internationalization
The object Tis the language translator. It constitutes a single global instance
of the web2py class gluon.language.translator. All string constants (and only
string constants) should be marked by T, for example:
1a = T("hello world")
Strings that are marked with Tare identified by web2py as needing language
translation and they will be translated when the code (in the model,
controller, or view) is executed. If the string to be translated is not a constant
but a variable, it will be added to the translation file at runtime (except on
GAE) to be translated later.
The Tobject can also contain interpolated variables and support multiple
equivalent syntax:
1a = T("hello %s", ('Tim',))
2a = T("hello %(name)s", dict(name='Tim'))
3a = T("hello %s")%('Tim',)
4a = T("hello %(name)s") % dict(name='Tim')

176 web2py full-stack web framework,4th edition
The latter syntax is recommended because it makes translation easier. The
first string is translated according to the requested language file and the name
variable is replaced independently of the language.
Concatenating translation translated strings and normal strings is possible:
1T("blah ") + name + T(" blah")# invalid!
but the opposite no:
1name + T(" blah")# invalid!
The following code is also allowed and often preferable:
1T("blah %(name)s blah", dict(name='Tim'))
or the alternative syntax
1T("blah %(name)s blah") % dict(name='Tim')
In both cases the translation occurs before the variable name is substituted in
the "%(name)s" slot. The following alternative should NOT BE USED:
1T("blah %(name)s blah" % dict(name='Tim'))
because translation would occur after substitution.
The requested language is determined by the "Accept-Language" field in
the HTTP header, but this selection can be overwritten programmatically
by requesting a specific file, for example:
1T.force('it-it')
which reads the "languages/it-it.py" language file. Language files can be
created and edited via the administrative interface.
You can also force a per-string language:
1T("Hello World", language="it-it")
You can turn off translations completely via
1T.force(None)
Normally, string translation is evaluated lazily when the view is rendered;
hence, the translator force method should not be called inside a view.

the core 177
It is possible to disable lazy evaluation via
1T.lazy = False
In this way, strings are translated immediately by the Toperator based on the
currently accepted or forced language.
It is also possible to disable lazy evaluation for individual strings:
1T("Hello World", lazy=False)
A common issue is the following. The original application is in English.
Suppose that there is a translation file (for example Italian, "it-it.py") and the
HTTP client declares that it accepts both English (en) and Italian (it-it) in that
order. The following unwanted situation occurs: web2py does not know the
default is written in English (en). Therefore, it prefers translating everything
into Italian (it-it) because it only found the Italian translation file. If it had
not found the "it-it.py" file, it would have used the default language strings
(English).
There are two solutions for this problem: create a translation language for
English, which would be redundant and unnecessary, or better, tell web2py
which languages should use the default language strings (the strings coded
into the application). This can be done with:
1T.set_current_languages('en','en-en')
It stores in T.current_languages a list of languages that do not require
translation and forces a reload of the language files.
Notice that "it" and "it-it" are different languages from the point of view of
web2py. To support both of them, one would need two translation files,
always lower case. The same is true for all other languages.
The currently accepted language is stored in
1T.accepted_language
Mind that T(...) does not just translate strings but can also translated
variables:
1>>> a="test"
2>>> print T(a)

178 web2py full-stack web framework,4th edition
In this case the word "test" in translated but, if not found and if the filesystem
is writable, it will add it to the list of words to be translated in the language
file.
4.14 Cookies
web2py uses the Python cookies modules for handling cookies.
Cookies from the browser are in request.cookies and cookies sent by the
server are in response.cookies.
You can set a cookie as follows:
1response.cookies['mycookie'] = 'somevalue'
2response.cookies['mycookie']['expires'] = 24 *3600
3response.cookies['mycookie']['path'] = '/'
The second line tells the browser to keep the cookie for 24 hours. The third
line tells the browser to send the cookie back to any application (URL path)
at the current domain.
The cookie can be made secure with:
1response.cookies['mycookie']['secure'] = True
This tells the browser only to send the cookie back over HTTPS and not over
HTTP.
The cookie can be retrieved with:
1if request.cookies.has_key('mycookie'):
2value = request.cookies['mycookie'].value
Unless sessions are disabled, web2py, under the hood, sets the following
cookie and uses it to handle sessions:
1response.cookies[response.session_id_name] = response.session_id
2response.cookies[response.session_id_name]['path'] = "/"
Note, if a single application includes multiple subdomains, and you want
to share the session across those subdomains (e.g., sub1.yourdomain.com,
sub2.yourdomain.com, etc.), you must explicitly set the domain of the session
cookie as follows:

the core 179
1if not request.env.remote_addr in ['127.0.0.1','localhost']:
2response.cookies[response.session_id_name]['domain'] = ".yourdomain.com"
The above can be useful if, for example, you want to allow the user to remain
logged in across subdomains.
4.15 Application init
When you deploy web2py, you will want to set a default application, i.e., the
application that starts when there is an empty path in the URL, as in:
1http://127.0.0.1:8000
By default, when confronted with an empty path, web2py looks for an
application called init. If there is no init application it looks for an application
called welcome.
The name of the default application can be changed from init to another
name by setting default_application in routes.py:
1default_application = "myapp"
Note: default_application first appeared in web2py version 1.83.
Here are four ways to set the default application:
• Call your default application "init".
• Set default_application to your application’s name in routes.py
• Make a symbolic link from "applications/init" to your application’s folder.
• Use URL rewrite as discussed in the next section.
4.16 URL rewrite
web2py has the ability to rewrite the URL path of incoming requests prior
to calling the controller action (URL mapping), and conversely, web2py can
rewrite the URL path generated by the URL function (reverse URL mapping).

180 web2py full-stack web framework,4th edition
One reason to do this is for handling legacy URLs, another is to simplify
paths and make them shorter. web2py includes two distinct URL rewrite
systems: an easy-to-use parameter-based system for most use cases, and a
flexible pattern-based system for more complex cases. To specify the URL
rewrite rules, create a new file in the "web2py" folder called routes.py (the
contents of routes.py will depend on which of the two rewrite systems you
choose, as described in the next two sections). The two systems cannot be
mixed.
Notice that if you edit routes.py, you must reload it. This can be done in two
ways: by restarting the web server or by clicking on the routes reload button
in admin. If there is a bug in routes, they will not reload.
4.16.1Parameter-based system
The parameter-based (parametric) router provides easy access to several
"canned" URL-rewrite methods. Its capabilities include:
* Omitting default application, controller and function names from
externally-visible URLs (those created by the URL() function)
* Mapping domains (and/or ports) to applications or controllers
* Embedding a language selector in the URL
* Removing a fixed prefix from incoming URLs and adding it back to
outgoing URLs
* Mapping root files such as /robots.txt to an applications static directory
The parametric router also provides somewhat more flexible validation of
incoming URLs.
Suppose you’ve written an application called myapp and wish to make it the
default, so that the application name is no longer part of the URL as seen by
the user. Your default controller is still default, and you want to remove its
name from user-visible URLs as well. Here’s what you put in routes.py:
1routers = dict(
2BASE = dict(default_application='myapp'),
3)

the core 181
That’s it. The parametric router is smart enough to know how to do the right
thing with URLs such as:
1http://domain.com/myapp/default/myapp
or
1http://domain.com/myapp/myapp/index
where normal shortening would be ambiguous. If you have two applications,
myapp and myapp2, you’ll get the same effect, and additionally myapp2’s default
controller will be stripped from the URL whenever it’s safe (which is mostly
all the time).
Here is another case: suppose you want to support URL-based languages,
where your URLs look like this:
1http://myapp/en/some/path
or (rewritten)
1http://en/some/path
Here’s how:
1routers = dict(
2BASE = dict(default_application='myapp'),
3myapp = dict(languages=['en','it','jp'], default_language='en'),
4)
Now an incoming URL like this:
1http:/domain.com/it/some/path
will be routed to /myapp/some/path, and request.uri_language will be set to ’it’,
so you can force the translation. You can also have language-specific static
files.
1http://domain.com/it/static/filename
will be mapped to:
1applications/myapp/static/it/filename
if that file exists. If it doesn’t, then URLs like:
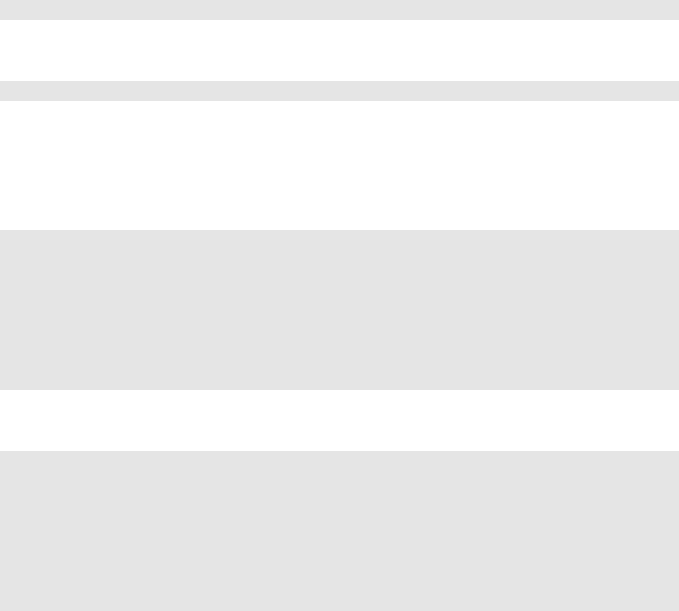
182 web2py full-stack web framework,4th edition
1http://domain.com/it/static/base.css
will still map to:
1applications/myapp/static/base.css
(because there is no static/it/base.css).
So you can now have language-specific static files, including images, if you
need to. Domain mapping is supported as well:
1routers = dict(
2BASE = dict(
3domains = {
4'domain1.com' :'app1',
5'domain2.com' :'app2',
6}
7),
8)
does what you’d expect.
1routers = dict(
2BASE = dict(
3domains = {
4'domain.com:80' :'app/insecure',
5'domain.com:443' :'app/secure',
6}
7),
8)
maps http://domain.com accesses to the controller named insecure, while
HTTPS accesses go to the secure controller. Alternatively, you can map different
ports to different apps, in the obvious way.
For further information, please consult the file router.example.py provided in
the base folder of the standard web2py distribution.
Note: The parameter-based system first appeared in web2py version 1.92.1.
4.16.2Pattern-based system
Although the parameter-based system just described should be sufficient for
most use cases, the alternative pattern-based system provides some additional

the core 183
flexibility for more complex cases. To use the pattern-based system, instead
of defining routers as dictionaries of routing parameters, you define two lists
(or tuples) of 2-tuples, routes_in and routes_out. Each tuple contains two
elements: the pattern to be replaced and the string that replaces it. For
example:
1routes_in = (
2('/testme','/examples/default/index'),
3)
4routes_out = (
5('/examples/default/index','/testme'),
6)
With these routes, the URL:
1http://127.0.0.1:8000/testme
is mapped into:
1http://127.0.0.1:8000/examples/default/index
To the visitor, all links to the page URL looks like /testme.
The patterns have the same syntax as Python regular expressions. For
example:
1('.*\.php','/init/default/index'),
maps all URLs ending in ".php" to the index page.
Sometimes you want to get rid of the application prefix from the URLs
because you plan to expose only one application. This can be achieved with:
1routes_in = (
2('/(?P<any>.*)','/init/\g<any>'),
3)
4routes_out = (
5('/init/(?P<any>.*)','/\g<any>'),
6)
There is also an alternative syntax that can be mixed with the regular
expression notation above. It consists of using $name instead of (?P<name>\w+)
or \g<name>. For example:
1routes_in = (

184 web2py full-stack web framework,4th edition
2('/$c/$f','/init/$c/$f'),
3)
4
5routes_out = (
6('/init/$c/$f','/$c/$f'),
7)
would also eliminate the "/example" application prefix in all URLs.
Using the $name notation, you can automatically map routes_in to routes_out,
provided you don’t use any regular expressions. For example:
1routes_in = (
2('/$c/$f','/init/$c/$f'),
3)
4
5routes_out = [(x, y) for (y, x) in routes_in]
If there are multiple routes, the first to match the URL is executed. If no
pattern matches, the path is left unchanged.
You can use $anything to match anything (.*) until the end of the line.
Here is a minimal "routes.py" for handling favicon and robots requests:
1routes_in = (
2('/favicon.ico','/examples/static/favicon.ico'),
3('/robots.txt','/examples/static/robots.txt'),
4)
5routes_out = ()
Here is a more complex example that exposes a single app "myapp" without
unnecessary prefixes but also exposes admin,appadmin and static:
1routes_in = (
2('/admin/$anything','/admin/$anything'),
3('/static/$anything','/myapp/static/$anything'),
4('/appadmin/$anything','/myapp/appadmin/$anything'),
5('/favicon.ico','/myapp/static/favicon.ico'),
6('/robots.txt','/myapp/static/robots.txt'),
7)
8routes_out = [(x, y) for (y, x) in routes_in[:-2]]
The general syntax for routes is more complex than the simple examples we
have seen so far. Here is a more general and representative example:
1routes_in = (

the core 185
2('140\.191\.\d+\.\d+:https://www.web2py.com:POST /(?P<any>.*)\.php',
3'/test/default/index?vars=\g<any>'),
4)
It maps https POST requests to host www.web2py.com from a remote IP matching
the regular expression
1'140\.191\.\d+\.\d+'
requesting a page matching the regular expression
1'/(?P<any>.*)\.php'
into
1'/test/default/index?vars=\g<any>'
where \g<any> is replaced by the matching regular expression.
The general syntax is
1'[remote address]:[protocol]://[host]:[method] [path]'
The entire expression is matched as a regular expression, so "." should
always be escaped and any matching subexpression can be captured using
(?P<...>...) according to Python regex syntax.
This allows to reroute requests based on the client IP address or domain,
based on the type of the request, on the method, and the path. It also
allows web2py to map different virtual hosts into different applications. Any
matched subexpression can be used to build the target URL and, eventually,
passed as a GET variable.
All major web servers, such as Apache and lighttpd, also have the ability to
rewrite URLs. In a production environment that may be an option instead of
routes.py. Whatever you decide to do we strongly suggest that you do not
hardcode internal URLs in your app and use the URL function to generate
them. This will make your application more portable in case routes should
change.
Application-Specific URL rewrite
When using the pattern-based system, an application can set its own routes
in an application-specific routes.py file located in the applications base folder.

186 web2py full-stack web framework,4th edition
This is enabled by configuring routes_app in the base routes.py to determine
from an incoming URL the name of the application to be selected. When
this happens, the application-specific routes.py is used in place of the base
routes.py.
The format of routes_app is identical to routes_in, except that the replacement
pattern is simply the application name. If applying routes_app to the
incoming URL does not result in an application name, or the resulting
application-specific routes.py is not found, the base routes.py is used as
usual.
Note: routes_app first appeared in web2py version 1.83.
Default application, controller, and function
When using the pattern-based system, the name of the default application,
controller, and function can be changed from init,default, and index
respectively to another name by setting the appropriate value in routes.py:
1default_application = "myapp"
2default_controller = "admin"
3default_function = "start"
Note: These items first appeared in web2py version 1.83.
4.17 Routes on error
You can also use routes.py to re-route requests to special actions in case there
is an error on the server. You can specify this mapping globally, for each app,
for each error code, or for each app and error code. Here is an example:
1routes_onerror = [
2('init/400','/init/default/login'),
3('init/*','/init/static/fail.html'),
4('*/404','/init/static/cantfind.html'),
5('*/*','/init/error/index')
6]
For each tuple, the first string is matched against "[app name]/[error code]".
If a match is found, the failed request is re-routed to the URL in the second

the core 187
string of the matching tuple. If the error handling URL is a not a static file,
the following GET variables will be passed to the error action:
•code: the HTTP status code (e.g., 404,500)
•ticket: in the form of "[app name]/[ticket number]" (or "None" if no ticket)
•requested_uri: equivalent to request.env.request_uri
•request_url: equivalent to request.url
These variables will be accessible to the error handling action via request.vars
and can be used in generating the error response. In particular, it is a good
idea for the error action to return the original HTTP error code instead of the
default 200 (OK) status code. This can be done by setting response.status =
request.vars.code. It is also possible to have the error action send (or queue)
an email to an administrator, including a link to the ticket in admin.
Unmatched errors display a default error page. This default error page can
also be customized here (see router.example.py and routes.example.py in the
root web2py folder):
1error_message = '<html><body><h1>%s</h1></body></html>'
2error_message_ticket = '''<html><body><h1>Internal error</h1>
3Ticket issued: <a href="/admin/default/ticket/%(ticket)s"
4target="_blank">%(ticket)s</a></body></html>'''
The first variable contains the error message when an invalid application or
function is requested. The second variable contains the error message when
a ticket is issued.
routes_onerror work with both routing mechanisms
4.18 Running tasks in the background
In web2py, every http request is served in its own thread. Threads are
recycled for efficiency and managed by the web server. For security, the
web server sets a time-out on each request. This means that actions should
not run tasks that take too long, should not create new threads, and should
not fork processes (it is possible but not recommended).

188 web2py full-stack web framework,4th edition
The proper way to run time-consuming tasks is doing it in the background.
There is not a single was of doing it, but here we describe three mechanisms
that are built into web2py: cron,homemade task queues, and scheduler.
By cron we refer to a web2py functionality not to the Unix Cron mechanism.
The web2py cron works on windows too. web2py cron is the way to go if
you need tasks in the background at scheduled times and these tasks take a
relatively short time compared to the time interval between two calls. Each
task runs in its own process, and multiple tasks can run concurrently, but
you have no control over how many tasks run. If accidentally one task
overlaps with itself, it can cause a database lock and a spike in memory
usage. web2py scheduler takes a different approach. The number of running
processes is fixed, and they can run on different machines. Each process
is called a worker. Each worker picks a task when available and executes
it as soon as possible after the time when it is scheduled to run, but not
necessarily at that exact time. There cannot be more processes running than
the number of scheduled tasks and therefore no memory spikes. Scheduler
tasks can be defined in models and are stored in the database. The web2py
scheduler does not implement a distributed queue since it assumes that the
time to distribute tasks is negligible compared with the time to run the tasks.
Workers pick up the task from the database.
Homemade tasks queues can be a simpler alternative to the web2py
scheduler in some cases.
4.18.1Cron
The web2py cron provides the ability for applications to execute tasks at
preset times, in a platform-independent manner.
For each application, cron functionality is defined by a crontab file:
1app/cron/crontab
It follows the syntax defined in ref. [45] (with some extensions that are
specific to web2py).
This means that every application can have a separate cron configuration and

the core 189
that cron config can be changed from within web2py without affecting the
host OS itself.
Here is an example:
10-59/1 ****root python /path/to/python/script.py
230 3 ***root *applications/admin/cron/db_vacuum.py
3*/30 ****root **applications/admin/cron/something.py
4@reboot root *mycontroller/myfunction
5@hourly root *applications/admin/cron/expire_sessions.py
The last two lines in this example use extensions to regular cron syntax to
provide additional web2py functionality.
The file "applications/admin/cron/expire_sessions.py" actually exists and ships
with the admin app. It checks for expired sessions and deletes them.
"applications/admin/cron/crontab" runs this task hourly.
If the task/script is prefixed with an asterisk (*) and ends with .py, it will
be executed in the web2py environment. This means you will have all the
controllers and models at your disposal. If you use two asterisks (**), the
MODELs will not be executed. This is the recommended way of calling, as it
has less overhead and avoids potential locking problems.
Notice that scripts/functions executed in the web2py environment require
a manual db.commit() at the end of the function or the transaction will be
reverted. web2py does not generate tickets or meaningful tracebacks in shell
mode, which is how cron is run, so make sure that your web2py code runs
without errors before you set it up as a cron task as you will likely not be able
to see those errors when run from cron. Moreover, be careful how you use
models: while the execution happens in a separate process, database locks
have to be taken into account in order to avoid pages waiting for cron tasks
that may be blocking the database. Use the ** syntax if you don’t need to use
the database in your cron task.
You can also call a controller function, in which case there is no need to
specify a path. The controller and function will be that of the invoking
application. Take special care about the caveats listed above. Example:
1*/30 ****root *mycontroller/myfunction

190 web2py full-stack web framework,4th edition
If you specify @reboot in the first field in the crontab file, the given task will be
executed only once, at web2py startup. You can use this feature if you want
to pre-cache, check, or initialize data for an application on web2py startup.
Note that cron tasks are executed in parallel with the application — if the
application is not ready to serve requests until the cron task is finished, you
should implement checks to reflect this. Example:
1@reboot ****root *mycontroller/myfunction
Depending on how you are invoking web2py, there are four modes of
operation for web2py cron.
•soft cron: available under all execution modes
•hard cron: available if using the built-in web server (either directly or via
Apache mod_proxy)
•external cron: available if you have access to the system’s own cron service
• No cron
The default is hard cron if you are using the built-in web server; in all other
cases, the default is soft cron. Soft cron is the default method if you are using
CGI, FASTCGI or WSGI (but note that soft cron is not enabled by default in
the standard wsgihandler.py file provided with web2py).
Your tasks will be executed on the first call (page load) to web2py after the
time specified in crontab; but only after processing the page, so no delay
will be observed by the user. Obviously, there is some uncertainty regarding
precisely when the task will be executed, depending on the traffic the site
receives. Also, the cron task may get interrupted if the web server has a page
load timeout set. If these limitations are not acceptable, see external cron.
Soft cron is a reasonable last resort, but if your web server allows other cron
methods, they should be preferred over soft cron.
Hard cron is the default if you are using the built-in web server (either
directly or via Apache mod_proxy). Hard cron is executed in a parallel
thread, so unlike soft cron, there are no limitations with regard to run time
or execution time precision.
External cron is not default in any scenario, but requires you to have access

the core 191
to the system cron facilities. It runs in a parallel process, so none of the
limitations of soft cron apply. This is the recommended way of using cron
under WSGI or FASTCGI.
Example of line to add to the system crontab, (usually /etc/crontab):
10-59/1 ****web2py cd /var/www/web2py/ && python web2py.py -J -C -D 1 >> /tmp/
cron.output 2>&1
If you are running external cron, make sure you add the -N command line
parameter to your web2py startup script or config so there is no collision of
multiple types of cron. Also, with external cron, make sure to add either -J
(or -cronjob, which is the same) as indicated above so that web2py knows
that task is executed by cron. Web2py sets this internally with soft and hard
cron.
In cases where you do not need any cron functionality within a particular
process, you can use the -N command line parameter to disable it. Note that
this might disable some maintenance tasks (like the automatic cleaning of
session folders). The most common use of this function is when you:
• have already set up external cron triggered from the system (most
common with WSGI setup).
• want to debug your application without cron interfering either with
actions or with output.
4.18.2Homemade task queues
While cron is useful to run tasks at regular time intervals, it is not always the
best solution to run a background task. For this purpose web2py provides
the ability to run any python script as if it were inside a controller:
1python web2py.py -S app -M -N -R applications/app/private/myscript.py -Aabc
where -S app tells web2py to run "myscript.py" as "app", -M tells web2py to
execute models, -N tells web2py not to run cron, and -Aabcpasses optional
command line arguments sys.args=[’a’,’b’,’c’] to "myscript.py".

192 web2py full-stack web framework,4th edition
This type of background process should not be executed via cron (except
perhaps for cron @reboot) because you need to be sure that no more than
one instance is running at the same time. With cron it is possible that a
process starts at cron iteration 1and is not completed by cron iteration 2, so
cron starts it again, and again, and again - thus jamming the mail server.
In chapter 8, we will provide an example of how to use the above method to
send emails.
4.18.3Scheduler (experimental)
The web2py scheduler works very much like the task queue described in the
previous sub-section with some differences:
• It provides a standard mechanism for creating and scheduling tasks.
• There is not a single background process but a set of workers processes.
• The job of worker nodes can be monitored because their state, as well as
the state of the tasks, is stored in the database.
• It works without web2py but that is not documented here.
The scheduler does not use cron, although one can use cron @reboot to start
the worker nodes.
In the scheduler, a task is simply a function defined in a model (or in a
module and imported by a model). For example:
1def task_add(a,b):
2return a+b
Tasks will always be called in the same environment seen by controllers
and therefore they see all the global variables defined in models, including
database connections (db). Tasks differ from a controller action because
they are not associated with an HTTP request and therefore there is no
request.env.
Once the tasks are defined, you need to enable the scheduler by adding the
following code to your model:
1myscheduler = Scheduler(db, dict(task_add=task_add))

the core 193
The first argument of the Scheduler class must be the database to be used by
the scheduler to communicate with the workers. This can be the db of the app
or another dedicated db, perhaps one shared by multiple apps. The Scheduler
creates the tables it needs. The second argument is a Python dictionary of
key:value pairs where key is the name you want to use to expose a task, and
value is the actual name of the function that defines the task.
Once the tasks are defined and the Scheduler is instantiated, all that is needed
to do is to start the workers:
1python web2py.py -K myapp
The -K option starts a worker. The argument of the -K option is a list of app
names, separated by commas. These are the apps that will be served by this
worker. One can start many workers.
Now we have the infrastructure in place: defined the tasks, told the scheduler
about them, started the worker(s). What remains is to actually schedule the
tasks:
Tasks can be scheduled programmatically or via appadmin. In fact, a task
is scheduled simply by adding an entry in the table "scheduler_task", which
you can access via appadmin:
1http://127.0.0.1:8000/scheduler/appadmin/insert/db/scheduler_task
The meaning of the fields in this table is obvious. The "args" and "vars""
fields are the values to be passed to the task in JSON format. In the case of
the "task_add" above, an example of "args" and "vars" could be:
1args = [3, 4]
2vars = {}
or
1args = []
2vars = {'a':3, 'b':4}
A task can be in one of the following states:
1QUEUED, RUNNING, COMPLETED, FAILED, TIMEOUT

194 web2py full-stack web framework,4th edition
Once a task exists (there is a record in the "scheduler_task" table), is QUEUED,
and is ready (meets all the conditions specified in the record), it can be
picked up by a worker. As soon as a worker is available, it picks the first
ready task scheduled to run. The worker creates an entry in a another table,
"scheduler_run" (also created by the scheduler).
The table "scheduler_run" stores the status of all running tasks. Each record
references a task that has been picked up by a worker. One task can have
multiple runs. For example, a task scheduled to repeat 10 times an hour will
probably have 10 runs (unless one fails or they take longer than 1hour).
Possible run statuses are:
1RUNNING, COMPLETED, FAILED, TIMEOUT
When a QUEUED task is picked up, it becomes a RUNNING task and its run status
is also RUNNING. If the run is completed, no exceptions are thrown, and there
is no task timeout, the run is marked as COMPLETED and the task is marked as
QUEUED or COMPLETED depending on whether it is supposed to run again at a
later time. The output of the task is serialized in JSON and stored in the run
record.
When a RUNNING task throws an exception, the run is mark as FAILED and the
task is marked as FAILED. The traceback is stored in the run record.
Similarly, when a run exceeds the timeout, it is stopped and marked as
TIMEOUT, and the task is marked as TIMEOUT.
In any case, the stdout is captured and also logged into the run record.
Using appadmin, one can check all RUNNING tasks, the output of COMPLETED
tasks, the error of FAILED tasks, etc.
The scheduler also creates one more table called "scheduler_worker", which
stores the workers’ heartbeat and their status. Possible worker statuses are:
1ACTIVE, INACTIVE, DISABLED
You can disable a worker by changing its status using appadmin.
Everything that one can do via appadmin one can do programmatically by
inserting and updating records in these tables.

the core 195
Anyway, one should not update records relative to RUNNING tasks as this may
create an un-expected behavior. The best practice is to queue tasks using
"insert". For example:
1db.scheduler_task.insert(
2status='QUEUED',
3application_name='myapp',
4task_name='my first task',
5function_name='task_add',
6args='[]',
7vars="{'a':3,'b':4}",
8enabled=True,
9start_time = request.now,
10 stop_time = request.now+datetime.timedelta(days=1),
11 repeats = 10, # run 10 times
12 period = 3600, # every 1h
13 timeout = 60, # should take less than 60 seconds
14 )
Notice that fields "times_run", "last_run_time" and "assigned_worker_name"
are not provided at schedule time but are filled automatically by the workers.
You can also retrieve the output of completed tasks:
1completed_runs = db(db.scheduler_run.status='COMPLETED').select()
The scheduler is experimental because it needs more extensive testing and
because the table structure may change as more features are added.
• We recommend having a separate model file for definindg the tasks and
instantiate Scheduler (after te tasks are defined).
• We recommend that use at least one worker per application so that you
have more control, although that is not strictly necessary.
• If your tasks are defined in a module (as opposed to a model) you may
have to restart the workers.
4.19 Third party modules
web2py is written in Python, so it can import and use any Python module,
including third party modules. It just needs to be able to find them. As with
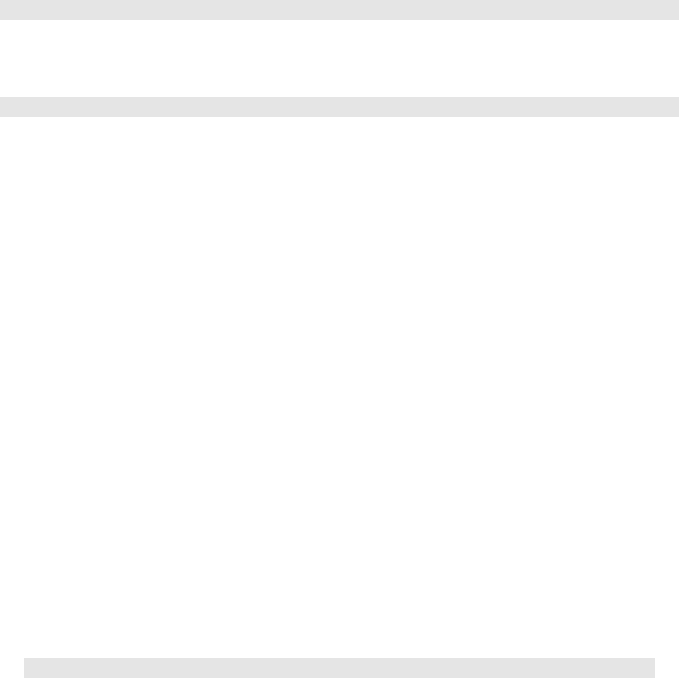
196 web2py full-stack web framework,4th edition
any Python application, modules can be installed in the official Python "site-
packages" directory, and they can then be imported from anywhere inside
your code.
Modules in the "site-packages" directory are, as the name suggests, site-level
packages. Applications requiring site-packages are not portable unless these
modules are installed separately. The advantage of having modules in "site-
packages" is that multiple applications can share them. Let’s consider, for
example, the plotting package called "matplotlib". You can install it from the
shell using the PEAK easy_install command:
1easy_install py-matplotlib
and then you can import it into any model/controller/view with:
1import matplotlib
The web2py source distribution, and the Windows binary distribution has
a site-packages in the top-level folder. The Mac binary distribution has a
site-packages folder in the folder:
web2py.app/Contents/Resources/site-packages
The problem with using site-packages is that it becomes difficult to use
different versions of a single module at the same time, for example there
could be two applications but each one uses a different version of the same
file. In this example, sys.path cannot be altered because it would affect both
applications.
For this kind of situation, web2py provides another way to import modules
in such a way that the global sys.path is not altered: by placing them in the
"modules" folder of an application. One side benefit is that the module will
be automatically copied and distributed with the application.
Once a module "mymodule.py" is placed into an app "modules/" folder, it can
be imported from anywhere inside a web2py application (without need to alter
sys.path with):
1import mymodule

the core 197
4.20 Execution environment
While everything discussed here works fine, we recommend instead building
your application using components, as described in chapter 12.
web2py model and controller files are not Python modules in that they
cannot be imported using the Python import statement. The reason for
this is that models and controllers are designed to be executed in a
prepared environment that has been pre-populated with web2py global
objects (request, response, session, cache and T) and helper functions. This is
necessary because Python is a statically (lexically) scoped language, whereas
the web2py environment is created dynamically. web2py provides the
exec_environment function to allow you to access models and controllers
directly. exec_environment creates a web2py execution environment, loads
the file into it and then returns a Storage object containing the environment.
The Storage object also serves as a namespace mechanism. Any Python file
designed to be executed in the execution environment can be loaded using
exec_environment. Uses for exec_environment include:
• Accessing data (models) from other applications.
• Accessing global objects from other models or controllers.
• Executing controller functions from other controllers.
• Loading site-wide helper libraries.
This example reads rows from the user table in the cas application:
1from gluon.shell import exec_environment
2cas = exec_environment('applications/cas/models/db.py')
3rows = cas.db().select(cas.db.user.ALL)
Another example: suppose you have a controller "other.py" that contains:
1def some_action():
2return dict(remote_addr=request.env.remote_addr)
Here is how you can call this action from another controller (or from the
web2py shell):
1from gluon.shell import exec_environment

198 web2py full-stack web framework,4th edition
2other = exec_environment('applications/app/controllers/other.py',request=request)
3result = other.some_action()
In line 2,request=request is optional. It has the effect of passing the
current request to the environment of "other". Without this argument, the
environment would contain a new and empty (apart from request.folder)
request object. It is also possible to pass a response and a session object
to exec_environment. Be careful when passing request, response and session
objects — modification by the called action or coding dependencies in the
called action could lead to unexpected side effects.
The function call in line 3does not execute the view; it simply returns the
dictionary unless response.render is called explicitly by "some_action".
One final caution: don’t use exec_environment inappropriately. If you want
the results of actions in another application, you probably should implement
an XML-RPC API (implementing an XML-RPC API with web2py is almost
trivial). Don’t use exec_environment as a redirection mechanism; use the
redirect helper.
4.21 Cooperation
There are many ways applications can cooperate:
• Applications can connect to the same database and thus share tables. It is
not necessary that all tables in the database are defined by all applications,
but they must be defined by those applications that use them. All
applications that use the same table, but one, must define the table with
migrate=False.
• Applications can embed components from other applications using the
LOAD helper (described in Chapter 12).
• Applications can share sessions.
• Applications can call each other’s actions remotely via XML-RPC.
• Applications can access each other’s files via the filesystem (assuming they
share the same filesystem).

the core 199
• Applications can call each other’s actions locally using exec_environment as
discussed above.
• Applications can import each other’s modules using the syntax:
1from applications.appname.modules import mymodule
• Applications can import any module in the PYTHONPATH search path,
sys.path.
One app can load the session of another app using the command:
1session.connect(request,response, masterapp='appname', db=db)
Here "appname" is the name of the master application, the one that sets the
initial session_id in the cookie. db is a database connection to the database
that contains the session table (web2py_session). All apps that share sessions
must use the same database for session storage.
One application can load a module from another app using
1import applications.otherapp.modules.othermodule
4.22 Logging
Python provides logging APIs. Web2py provides a mechanism to configure
it so that apps can use it.
In your application, you can create a logger, for example in a model:
1import logging
2logger = logging.getLogger("web2py.app.myapp")
3logger.setLevel(logging.DEBUG)
and you can use it to log messages of various importance
1logger.debug("Just checking that %s" % details)
2logger.info("You ought to know that %s" % details)
3logger.warn("Mind that %s" % details)
4logger.error("Oops, something bad happened %s" % details)
logging is a standard python module described here:
1http://docs.python.org/library/logging.html

200 web2py full-stack web framework,4th edition
The string "web2py.app.myapp" defines an app-level logger.
For this to work properly, you need a configuration file for the logger. One is
provided by web2py in the root web2py folder "logging.example.conf". You
need to rename the file "logging.conf" and customize it as necessary.
This file is self documenting, so you should open it and read it.
To create a configurable logger for application "myapp", you must add
myapp to the [loggers] keys list:
1[loggers]
2keys=root,rocket,markdown,web2py,rewrite,app,welcome,myapp
and you must add a [logger_myapp] section, using [logger_welcome] as a
starting point.
1[logger_myapp]
2level=WARNING
3qualname=web2py.app.myapp
4handlers=consoleHandler
5propagate=0
The "handlers" directive specifies the type of logging and here it is logging
"myapp" to the console.
4.23 WSGI
web2py and WSGI have a love-hate relationship. Our perspective is that
WSGI was developed as a protocol to connect web servers to web applications
in a portable way, and we use it for that purpose. web2py at its core is
a WSGI application: gluon.main.wsgibase. Some developers have pushed
WSGI to its limits as a protocol for middleware communications and develop
web applications as an onion with many layers (each layer being a WSGI
middleware developed independently of the entire framework). web2py
does not adopt this structure internally. This is because we feel the core
functionality of a frameworks (handling cookies, session, errors, transactions,
dispatching) can be better optimized for speed and security if they are
handled by a single comprehensive layer.

the core 201
Yet web2py allows you to use third party WSGI applications and middleware
in three ways (and their combinations):
• You can edit the file "wsgihandler.py" and include any third party WSGI
middleware.
• You can connect third party WSGI middleware to any specific action in
your apps.
• You can call a third party WSGI app from your actions.
The only limitation is that you cannot use third party middleware to replace
core web2py functions.
4.23.1External middleware
Consider the file "wsgibase.py":
1#...
2LOGGING = False
3#...
4if LOGGING:
5application = gluon.main.appfactory(wsgiapp=gluon.main.wsgibase,
6logfilename='httpserver.log',
7profilerfilename=None)
8else:
9application = gluon.main.wsgibase
When LOGGING is set to True,gluon.main.wsgibase is wrapped by the
middleware function gluon.main.appfactory. It provides logging to the
"httpserver.log" file. In a similar fashion you can add any third party
middleware. We refer to the official WSGI documentation for more details.
4.23.2Internal middleware
Given any action in your controllers (for example index) and any third party
middleware application (for example MyMiddleware, which converts output to
upper case), you can use a web2py decorator to apply the middleware to that
action. Here is an example:
1class MyMiddleware:
202 web2py full-stack web framework,4th edition
2"""converts output to upper case"""
3def __init__(self,app):
4self.app = app
5def __call__(self, environ, start_response):
6items = self.app(environ, start_response)
7return [item.upper() for item in items]
8
9@request.wsgi.middleware(MyMiddleware)
10 def index():
11 return 'hello world'
We cannot promise that all third party middleware will work with this
mechanism.
4.23.3Calling WSGI applications
It is easy to call WSGI app from a web2py action. Here is an example:
1def test_wsgi_app(environ, start_response):
2"""this is a test WSGI app"""
3status = '200 OK'
4response_headers = [('Content-type','text/plain'),
5('Content-Length','13')]
6start_response(status, response_headers)
7return ['hello world!\n']
8
9def index():
10 """a test action that calls the previous app and escapes output"""
11 items = test_wsgi_app(request.wsgi.environ,
12 request.wsgi.start_response)
13 for item in items:
14 response.write(item,escape=False)
15 return response.body.getvalue()
In this case, the index action calls test_wsgi_app and escapes the returned
value before returning it. Notice that index is not itself a WSGI app and
it must use the normal web2py API (such as response.write to write to the
socket).
5
The views
web2py uses Python for its models, controllers, and views, although it uses
a slightly modified Python syntax in the views to allow more readable code
without imposing any restrictions on proper Python usage.
The purpose of a view is to embed code (Python) in an HTML document. In
general, this poses some problems:
• How should embedded code be escaped?
• Should indenting be based on Python or HTML rules?
web2py uses {{ ... }} to escape Python code embedded in HTML. The
advantage of using curly brackets instead of angle brackets is that it’s
transparent to all common HTML editors. This allows the developer to use
those editors to create web2py views.
Since the developer is embedding Python code into HTML, the document
should be indented according to HTML rules, and not Python rules.
Therefore, we allow unindented Python inside the {{ ... }} tags. Since
Python normally uses indentation to delimit blocks of code, we need a
different way to delimit them; this is why the web2py template language
makes use of the Python keyword pass.
A code block starts with a line ending with a colon and ends with a line
beginning with pass. The keyword pass is not necessary when the end of

204 web2py full-stack web framework,4th edition
the block is obvious from the context.
Here is an example:
1{{
2if i == 0:
3response.write('i is 0')
4else:
5response.write('i is not 0')
6pass
7}}
Note that pass is a Python keyword, not a web2py keyword. Some Python
editors, such as Emacs, use the keyword pass to signify the division of blocks
and use it to re-indent code automatically.
The web2py template language does exactly the same. When it finds
something like:
1<html><body>
2{{for x in range(10):}}{{=x}}hello<br />{{pass}}
3</body></html>
it translates it into a program:
1response.write("""<html><body>""", escape=False)
2for x in range(10):
3response.write(x)
4response.write("""hello<br />""", escape=False)
5response.write("""</body></html>""", escape=False)
response.write writes to the response.body.
When there is an error in a web2py view, the error report shows the generated
view code, not the actual view as written by the developer. This helps the
developer debug the code by highlighting the actual code that is executed
(which is something that can be debugged with an HTML editor or the DOM
inspector of the browser).
Also note that:
1{{=x}}
generates
1response.write(x)

the views 205
Variables injected into the HTML in this way are escaped by default. The
escaping is ignored if xis an XML object, even if escape is set to True.
Here is an example that introduces the H1 helper:
1{{=H1(i)}}
which is translated to:
1response.write(H1(i))
upon evaluation, the H1 object and its components are recursively serialized,
escaped and written to the response body. The tags generated by H1 and
inner HTML are not escaped. This mechanism guarantees that all text — and
only text — displayed on the web page is always escaped, thus preventing
XSS vulnerabilities. At the same time, the code is simple and easy to debug.
The method response.write(obj, escape=True) takes two arguments, the
object to be written and whether it has to be escaped (set to True by default).
If obj has an .xml() method, it is called and the result written to the response
body (the escape argument is ignored). Otherwise it uses the object’s __str__
method to serialize it and, if the escape argument is True, escapes it. All built-
in helper objects (H1 in the example) are objects that know how to serialize
themselves via the .xml() method.
This is all done transparently. You never need to (and never should) call the
response.write method explicitly.
5.1Basic syntax
The web2py template language supports all Python control structures. Here
we provide some examples of each of them. They can be nested according to
usual programming practice.
5.1.1for...in
In templates you can loop over any iterable object:

206 web2py full-stack web framework,4th edition
1{{items = ['a','b','c']}}
2<ul>
3{{for item in items:}}<li>{{=item}}</li>{{pass}}
4</ul>
which produces:
1<ul>
2<li>a</li>
3<li>b</li>
4<li>c</li>
5</ul>
Here item is any iterable object such as a Python list, Python tuple, or
Rows object, or any object that is implemented as an iterator. The elements
displayed are first serialized and escaped.
5.1.2while
You can create a loop using the while keyword:
1{{k = 3}}
2<ul>
3{{while k > 0:}}<li>{{=k}}{{k = k - 1}}</li>{{pass}}
4</ul>
which produces:
1<ul>
2<li>3</li>
3<li>2</li>
4<li>1</li>
5</ul>
5.1.3if...elif...else
You can use conditional clauses:
1{{
2import random
3k = random.randint(0, 100)
4}}
5<h2>

the views 207
6{{=k}}
7{{if k % 2:}}is odd{{else:}}is even{{pass}}
8</h2>
which produces:
1<h2>
245 is odd
3</h2>
Since it is obvious that else closes the first if block, there is no need for a pass
statement, and using one would be incorrect. However, you must explicitly
close the else block with a pass.
Recall that in Python "else if" is written elif as in the following example:
1{{
2import random
3k = random.randint(0, 100)
4}}
5<h2>
6{{=k}}
7{{if k % 4 == 0:}}is divisible by 4
8{{elif k % 2 == 0:}}is even
9{{else:}}is odd
10 {{pass}}
11 </h2>
It produces:
1<h2>
264 is divisible by 4
3</h2>
5.1.4try...except...else...finally
It is also possible to use try...except statements in views with one caveat.
Consider the following example:
1{{try:}}
2Hello {{= 1 / 0}}
3{{except:}}
4division by zero
5{{else:}}
6no division by zero

208 web2py full-stack web framework,4th edition
7{{finally}}
8<br />
9{{pass}}
It will produce the following output:
1Hello
2division by zero
3<br />
This example illustrates that all output generated before an exception occurs
is rendered (including output that preceded the exception) inside the try
block. "Hello" is written because it precedes the exception.
5.1.5def...return
The web2py template language allows the developer to define and implement
functions that can return any Python object or a text/html string. Here we
consider two examples:
1{{def itemize1(link): return LI(A(link, _href="http://" + link))}}
2<ul>
3{{=itemize1('www.google.com')}}
4</ul>
produces the following output:
1<ul>
2<li><a href="http:/www.google.com">www.google.com</a></li>
3</ul>
The function itemize1 returns a helper object that is inserted at the location
where the function is called.
Consider now the following code:
1{{def itemize2(link):}}
2<li><a href="http://{{=link}}">{{=link}}</a></li>
3{{return}}
4<ul>
5{{itemize2('www.google.com')}}
6</ul>

the views 209
It produces exactly the same output as above. In this case, the function
itemize2 represents a piece of HTML that is going to replace the web2py
tag where the function is called. Notice that there is no ’=’ in front of the call
to itemize2, since the function does not return the text, but it writes it directly
into the response.
There is one caveat: functions defined inside a view must terminate with a
return statement, or the automatic indentation will fail.
5.2HTML helpers
Consider the following code in a view:
1{{=DIV('this','is','a','test',_id='123',_class='myclass')}}
it is rendered as:
1<div id="123" class="myclass">thisisatest</div>
DIV is a helper class, i.e., something that can be used to build HTML
programmatically. It corresponds to the HTML <div> tag.
Positional arguments are interpreted as objects contained between the
open and close tags. Named arguments that start with an underscore
are interpreted as HTML tag attributes (without the underscore). Some
helpers also have named arguments that do not start with underscore; these
arguments are tag-specific.
Instead of a set of unnamed arguments, a helper can also take a single list or
tuple as its set of components using the *notation and it can take a single
dictionary as its set of attributes using the **, for example:
1{{
2contents = ['this','is','a','test']
3attributes = {'_id':'123','_class':'myclass'}
4=DIV(*contents,**attributes)
5}}
(produces the same output as before).
The following set of helpers:

210 web2py full-stack web framework,4th edition
A,B,BEAUTIFY,BODY,BR,CAT,CENTER,CODE,COL,COLGROUP,DIV,EM,EMBED,FIELDSET,
FORM,H1,H2,H3,H4,H5,H6,HEAD,HR,HTML,I,IFRAME,IMG,INPUT,LABEL,LEGEND,LI,
LINK,MARKMIN,MENU,META,OBJECT,ON,OL,OPTGROUP,OPTION,P,PRE,SCRIPT,SELECT,
SPAN,STYLE,TABLE,TAG,TBODY,TD,TEXTAREA,TFOOT,TH,THEAD,TITLE,TR,TT,UL,URL,
XHTML,XML,embed64,xmlescape can be used to build complex expressions that
can then be serialized to XML [51] [52]. For example:
1{{=DIV(B(I("hello ","<world>"))), _class="myclass")}}
is rendered:
1<div class="myclass"><b><i>hello <world></i></b></div>
Helpers can also be serialized into strings, equivalently, with the __str__ and
the xml methods:
1>>> print str(DIV("hello world"))
2<div>hello world</div>
3>>> print DIV("hello world").xml()
4<div>hello world</div>
The helpers mechanism in web2py is more than a system to generate HTML
without concatenating strings. It provides a server-side representation of the
Document Object Model (DOM).
Components of helpers can be referenced via their position, and helpers act
as lists with respect to their components:
1>>> a = DIV(SPAN('a','b'), 'c')
2>>> print a
3<div><span>ab</span>c</div>
4>>> del a[1]
5>>> a.append(B('x'))
6>>> a[0][0] = 'y'
7>>> print a
8<div><span>yb</span><b>x</b></div>
Attributes of helpers can be referenced by name, and helpers act as
dictionaries with respect to their attributes:
1>>> a = DIV(SPAN('a','b'), 'c')
2>>> a['_class'] = 's'
3>>> a[0]['_class'] = 't'
4>>> print a
5<div class="s"><span class="t">ab</span>c</div>

the views 211
Note, the complete set of components can be accessed via a list called
a.components, and the complete set of attributes can be accessed via a
dictionary called a.attributes. So, a[i] is equivalent to a.components[i] when
iis an integer, and a[s] is equivalent to a.attributes[s] when sis a string.
Notice that helper attributes are passed as keyword arguments to the helper.
In some cases, however, attribute names include special characters that are
not allowed in Python identifiers (e.g., hyphens) and therefore cannot be used
as keyword argument names. For example:
1DIV('text',_data-role='collapsible')
will not work because "_data-role" includes a hyphen, which will produce a
Python syntax error.
In such cases, you can instead pass the attributes as a dictionary and make
use of Python’s ** function arguments notation, which map a dictionary of
(key:value) pairs into a set of keyword arguments:
1>>> print DIV('text',**{'_data-role':'collapsible'})
2<div data-role="collapsible">text</div>
You can also dynamically create special TAGs:
1>>> print TAG['soap:Body']('whatever',**{'_xmlns:m':'http://www.example.org'})
2<soap:Body xmlns:m="http://www.example.org">whatever</soap:Body>
5.2.1XML
XML is an object used to encapsulate text that should not be escaped. The text
may or may not contain valid XML. For example, it could contain JavaScript.
The text in this example is escaped:
1>>> print DIV("<b>hello</b>")
2<b>hello</b>
by using XML you can prevent escaping:
1>>> print DIV(XML("<b>hello</b>"))
2<b>hello</b>

212 web2py full-stack web framework,4th edition
Sometimes you want to render HTML stored in a variable, but the HTML
may contain unsafe tags such as scripts:
1>>> print XML('<script>alert("unsafe!")</script>')
2<script>alert("unsafe!")</script>
Un-escaped executable input such as this (for example, entered in the body
of a comment in a blog) is unsafe, because it can be used to generate Cross
Site Scripting (XSS) attacks against other visitors to the page.
The web2py XML helper can sanitize our text to prevent injections and escape
all tags except those that you explicitly allow. Here is an example:
1>>> print XML('<script>alert("unsafe!")</script>', sanitize=True)
2<script>alert("unsafe!")</script>
The XML constructors, by default, consider the content of some tags and some
of their attributes safe. You can override the defaults using the optional
permitted_tags and allowed_attributes arguments. Here are the default
values of the optional arguments of the XML helper.
1XML(text, sanitize=False,
2permitted_tags=['a','b','blockquote','br/','i','li',
3'ol','ul','p','cite','code','pre','img/'],
4allowed_attributes={'a':['href','title'],
5'img':['src','alt'], 'blockquote':['type']})
5.2.2Built-in helpers
A
This helper is used to build links.
1>>> print A('<click>',XML('<b>me</b>'),
2_href='http://www.web2py.com')
3<a href='http://www.web2py.com'><click><b>me/b></a>
Instead of _href you can pass the URL using the callback argument. For
example in a view:
1{{=A('click me', callback=URL('myaction'))}}

the views 213
and the effect of pressing the link will be an ajax call to "myaction" instead of
a redirection. In this case, optionally you can specify two more arguments:
target and delete:
1{{=A('click me', callback=URL('myaction'), target="t")}}
2<div id="t"><div>
and the response of the ajax callback will be stored in the DIV with id equal
to "t".
1<div id="b">{{=A('click me', callback=URL('myaction'), delete='div#b")}}</div>
and upon response, the closest tag matching "div#b" will be deleted. In this
case, the button will be deleted. A typical application is:
1{{=A('click me', callback=URL('myaction'), delete='tr")}}
in a table. Pressing the button will perform the callback and delete the table
row.
callback and delete can be combined.
Tha A helper takes a special argument called cid. It works as follows:
1{{=A('linked page',_href='http://example.com', cid='myid')}}
2<div id="myid"></div>
and a click on the link causes the content to be loaded in the div. This
is similar but more powerful than the above syntax since it is designed to
refresh page components. We discuss applications of cid in more detail in
Chapter 12, in the context of components.
These ajax features require jQuery and "static/js/web2py_ajax.js", which
are automatically included by placing {{include ’web2py_ajax.html’}} in the
layout head. "views/web2py_ajax.html" defines some variables based on
request and includes all necessary js and css files.
B
This helper makes its contents bold.
1>>> print B('<hello>',XML('<i>world</i>'), _class='test',_id=0)
2<b id="0" class="test"><hello><i>world</i></b>

214 web2py full-stack web framework,4th edition
BODY
This helper makes the body of a page.
1>>> print BODY('<hello>',XML('<b>world</b>'), _bgcolor='red')
2<body bgcolor="red"><hello><b>world</b></body>
BR
This helper creates a line break.
1>>> print BR()
2<br />
CAT (1.98.1and up)
This helper concatenates other helpers, same as TAG[”].
1>>> print CAT('Here is a ',A('link',_href=URL()), ', and here is some ',B('bold
text'), '.')
2Here is a <a href="/app/default/index">link</a>, and here is some <b>bold text</b>.
CENTER
This helper centers its content.
1>>> print CENTER('<hello>',XML('<b>world</b>'),
2>>> _class='test',_id=0)
3<center id="0" class="test"><hello><b>world</b></center>
CODE
This helper performs syntax highlighting for Python, C, C++, HTML and
web2py code, and is preferable to PRE for code listings. CODE also has the
ability to create links to the web2py API documentation.
Here is an example of highlighting sections of Python code.
1>>> print CODE('print "hello"', language='python').xml()
2<table><tr valign="top"><td style="width:40px; text-align: right;"><pre style="
3font-size: 11px;
4font-family: Bitstream Vera Sans Mono,monospace;
5background-color: transparent;
6margin: 0;
7padding: 5px;
8border: none;
9background-color: #E0E0E0;
10 color: #A0A0A0;

the views 215
11 ">1.</pre></td><td><pre style="
12 font-size: 11px;
13 font-family: Bitstream Vera Sans Mono,monospace;
14 background-color: transparent;
15 margin: 0;
16 padding: 5px;
17 border: none;
18 overflow: auto;
19 "><span style="color:#185369; font-weight: bold">print </span>
20 <span style="color: #FF9966">"hello"</span></pre></td></tr>
21 </table>
Here is a similar example for HTML
1>>> print CODE(
2>>> '<html><body>{{=request.env.remote_add}}</body></html>',
3>>> language='html')
1<table>...<code>...
2<html><body>{{=request.env.remote_add}}</body></html>
3...</code>...</table>
These are the default arguments for the CODE helper:
1CODE("print 'hello world'", language='python', link=None, counter=1, styles={})
Supported values for the language argument are "python", "html_plain", "c",
"cpp", "web2py", and "html". The "html" language interprets {{ and }} tags as
"web2py" code, while "html_plain" doesn’t.
If a link value is specified, for example "/examples/global/vars/", web2py
API references in the code are linked to documentation at the link URL.
For example "request" would be linked to "/examples/global/vars/request".
In the above example, the link URL is handled by the "vars" action in the
"global.py" controller that is distributed as part of the web2py "examples"
application.
The counter argument is used for line numbering. It can be set to any of
three different values. It can be None for no line numbers, a numerical value
specifying the start number, or a string. If the counter is set to a string, it is
interpreted as a prompt, and there are no line numbers.
The styles argument is a bit tricky. If you look at the generated HTML
above, it contains a table with two columns, and each column has its own

216 web2py full-stack web framework,4th edition
style declared inline using CSS. The styles attributes allows you to override
those two CSS styles. For example:
1{{=CODE(...,styles={'CODE':'margin: 0;padding: 5px;border: none;'})}}
The styles attribute must be a dictionary, and it allows two possible keys:
CODE for the style of the actual code, and LINENUMBERS for the style of the left
column, which contains the line numbers. Mind that these styles completely
replace the default styles and are not simply added to them.
COL
1>>> print COL('a','b')
2<col>ab</col>
COLGROUP
1>>> print COLGROUP('a','b')
2<colgroup>ab</colgroup>
DIV
All helpers apart from XML are derived from DIV and inherit its basic methods.
1>>> print DIV('<hello>',XML('<b>world</b>'), _class='test',_id=0)
2<div id="0" class="test"><hello><b>world</b></div>
EM
Emphasizes its content.
1>>> print EM('<hello>',XML('<b>world</b>'), _class='test',_id=0)
2<em id="0" class="test"><hello><b>world</b></em>
FIELDSET
This is used to create an input field together with its label.
1>>> print FIELDSET('Height:',INPUT(_name='height'), _class='test')
2<fieldset class="test">Height:<input name="height" /></fieldset>
FORM
This is one of the most important helpers. In its simple form, it just makes a
<form>...</form> tag, but because helpers are objects and have knowledge of
what they contain, they can process submitted forms (for example, perform
validation of the fields). This will be discussed in detail in Chapter 7.

the views 217
1>>> print FORM(INPUT(_type='submit'), _action='',_method='post')
2<form enctype="multipart/form-data" action="" method="post">
3<input type="submit" /></form>
The "enctype" is "multipart/form-data" by default.
The constructor of a FORM, and of SQLFORM, can also take a special argument
called . When a dictionary is passed as , its items are translated into "hidden"
INPUT fields. For example:
1>>> print FORM(hidden=dict(a='b'))
2<form enctype="multipart/form-data" action="" method="post">
3<input value="b" type="hidden" name="a" /></form>
H1,H2,H3,H4,H5,H6
These helpers are for paragraph headings and subheadings:
1>>> print H1('<hello>',XML('<b>world</b>'), _class='test',_id=0)
2<h1 id="0" class="test"><hello><b>world</b></h1>
HEAD
For tagging the HEAD of an HTML page.
1>>> print HEAD(TITLE('<hello>',XML('<b>world</b>')))
2<head><title><hello><b>world</b></title></head>
HTML
This helper is a little different. In addition to making the <html> tags, it
prepends the tag with a doctype string [54,55,56].
1>>> print HTML(BODY('<hello>',XML('<b>world</b>')))
2<!DOCTYPE HTML PUBLIC "-//W3C//DTD HTML 4.01 Transitional//EN"
3"http://www.w3.org/TR/html4/loose.dtd">
4<html><body><hello><b>world</b></body></html>
The HTML helper also takes some additional optional arguments that have
the following default:
1HTML(..., lang='en', doctype='transitional')
where doctype can be ’strict’, ’transitional’, ’frameset’, ’html5’, or a full
doctype string.

218 web2py full-stack web framework,4th edition
XHTML
XHTML is similar to HTML but it creates an XHTML doctype instead.
1XHTML(..., lang='en', doctype='transitional', xmlns='http://www.w3.org/1999/xhtml')
where doctype can be ’strict’, ’transitional’, ’frameset’, or a full doctype
string.
HR
This helper creates a horizontal line in an HTML page
1>>> print HR()
2<hr />
I
This helper makes its contents italic.
1>>> print I('<hello>',XML('<b>world</b>'), _class='test',_id=0)
2<i id="0" class="test"><hello><b>world</b></i>
INPUT
Creates an <input.../> tag. An input tag may not contain other tags, and is
closed by /> instead of >. The input tag has an optional attribute _type that
can be set to "text" (the default), "submit", "checkbox", or "radio".
1>>> print INPUT(_name='test',_value='a')
2<input value="a" name="test" />
It also takes an optional special argument called "value", distinct from
"_value". The latter sets the default value for the input field; the former
sets its current value. For an input of type "text", the former overrides the
latter:
1>>> print INPUT(_name='test',_value='a', value='b')
2<input value="b" name="test" />
For radio buttons, INPUT selectively sets the "checked" attribute:
1>>> for v in ['a','b','c']:
2>>> print INPUT(_type='radio',_name='test',_value=v, value='b'), v
3<input value="a" type="radio" name="test" /> a
4<input value="b" type="radio" checked="checked" name="test" /> b
5<input value="c" type="radio" name="test" /> c

the views 219
and similarly for checkboxes:
1>>> print INPUT(_type='checkbox',_name='test',_value='a', value=True)
2<input value="a" type="checkbox" checked="checked" name="test" />
3>>> print INPUT(_type='checkbox',_name='test',_value='a', value=False)
4<input value="a" type="checkbox" name="test" />
IFRAME
This helper includes another web page in the current page. The url of the
other page is specified via the "_src" attribute.
1>>> print IFRAME(_src='http://www.web2py.com')
2<iframe src="http://www.web2py.com"></iframe>
IMG
It can be used to embed images into HTML:
1>>> IMG(_src='http://example.com/image.png',_alt='test')
2<img src="http://example.com/image.ong" alt="rest" />
Here is a combination of A, IMG, and URL helpers for including a static
image with a link:
1>>> A(IMG(_src=URL('static','logo.png'), _alt="My Logo"),
2_href=URL('default','index'))
3<a href="/myapp/default/index">
4<img src="/myapp/static/logo.png" alt="My Logo" />
5</a>
LABEL
It is used to create a LABEL tag for an INPUT field.
1>>> print LABEL('<hello>',XML('<b>world</b>'), _class='test',_id=0)
2<label id="0" class="test"><hello><b>world</b></label>
LEGEND
It is used to create a legend tag for a field in a form.
1>>> print LEGEND('Name',_for='myfield')
2<legend for="myfield">Name</legend>
LI
It makes a list item and should be contained in a UL or OL tag.

220 web2py full-stack web framework,4th edition
1>>> print LI('<hello>',XML('<b>world</b>'), _class='test',_id=0)
2<li id="0" class="test"><hello><b>world</b></li>
META
To be used for building META tags in the HTML head. For example:
1>>> print META(_name='security',_content='high')
2<meta name="security" content="high" />
MARKMIN
Implements the markmin wiki syntax. It converts the input text into output
html according to the markmin rules described in the example below:
1>>> print MARKMIN("this is **bold** or ''italic'' and this [[a link http://web2py.
com]]")
2<p>this is <b>bold</b> or <i>italic</i> and
3this <a href="http://web2py.com">a link</a></p>
The markmin syntax is described in this file that ships with web2py:
1http://127.0.0.1:8000/examples/static/markmin.html
and some examples are shown in chapter 12 in the context of plugin_wiki,
which uses MARKMIN extensively.
You can use markmin to generate HTML, LaTeX and PDF documents:
1m = "Hello **world** [[link http://web2py.com]]"
2from gluon.contrib.markmin.markmin2html import markmin2html
3print markmin2html(m)
4from gluon.contrib.markmin.markmin2latex import markmin2latex
5print markmin2latex(m)
6from gluon.contrib.markmin.markmin2pdf import markmin2pdf
7print markmin2pdf(m) # requires pdflatex
(the MARKMIN helper is a shortcut for markmin2html)
Here is a basic syntax primer:
the views 221
SOURCE OUTPUT
# title title
## section section
### subsection subsection
**bold** bold
”italic” italic
“verbatim“ verbatim
http://google.com http://google.com
http://... <a href="http://...">http:...</a>
http://...png <img src="http://...png" />
http://...mp3 <audio src="http://...mp3"></audio>
http://...mp4 <video src="http://...mp4"></video>
qr:http://... <a href="http://..."><img src="qr code"/></a>
embed:http://... <iframe src="http://..."></iframe>
[[click me #myanchor]] click me
$$\int_aˆ
b sin(x)dx$$ Rb
asin(x)dx
Simply including a link to an image, a videos or an audio files without
markup result in the corresponding image, video or audio file beling
included automatically (for audio and video it uses html <audio> and
<video> tags).
Adding a link with the qr: prefix such as
1qr:http://web2py.com
results in the corresponding QR code being embedded and linking the said
URL.
Adding a link tith the embed: prefix such as
1embed:http://www.youtube.com/embed/x1w8hKTJ2Co
results in the page being embedded, in this case a youtube video is
embedded.
Images can also be embedded with the following syntax:
1[[image-description http://.../image.png right 200px]]
Unordered lists with:
1- one
2- two
3- three
Ordered lists with:

222 web2py full-stack web framework,4th edition
1+ one
2+ two
3+ three
and tables with:
1----------
2X|0|0
30|X|0
40|0|1
5----------
The MARKMIN syntax also supports blockquotes, HTML5audio and video
tags, image alignment, custom css, and it can be extended:
1MARKMIN("``abab``:custom", extra=dict(custom=lambda text: text.replace('a','c'))
generates
’cbcb’
Custom blocks are delimited by “...“:<key> and they are rendered by the
function passed as value for the corresponding key in the extra dictionary
argument of MARKMIN. Mind that the function may need to escape the
output to prevent XSS.
OBJECT
Used to embed objects (for example, a flash player) in the HTML.
1>>> print OBJECT('<hello>',XML('<b>world</b>'),
2>>> _src='http://www.web2py.com')
3<object src="http://www.web2py.com"><hello><b>world</b></object>
OL
It stands for Ordered List. The list should contain LI tags. OL arguments that
are not LI objects are automatically enclosed in <li>...</li> tags.
1>>> print OL('<hello>',XML('<b>world</b>'), _class='test',_id=0)
2<ol id="0" class="test"><li><hello></li><li><b>world</b></li></ol>
ON
This is here for backward compatibility and it is simply an alias for True. It is
used exclusively for checkboxes and deprecated since True is more Pythonic.
the views 223
1>>> print INPUT(_type='checkbox',_name='test',_checked=ON)
2<input checked="checked" type="checkbox" name="test" />
OPTGROUP
Allows you to group multiple options in a SELECT and it is useful to
customize the fields using CSS.
1>>> print SELECT('a',OPTGROUP('b','c'))
2<select>
3<option value="a">a</option>
4<optgroup>
5<option value="b">b</option>
6<option value="c">c</option>
7</optgroup>
8</select>
OPTION
This should only be used as part of a SELECT/OPTION combination.
1>>> print OPTION('<hello>',XML('<b>world</b>'), _value='a')
2<option value="a"><hello><b>world</b></option>
As in the case of INPUT, web2py make a distinction between "_value" (the
value of the OPTION), and "value" (the current value of the enclosing select).
If they are equal, the option is "selected".
1>>> print SELECT('a','b', value='b'):
2<select>
3<option value="a">a</option>
4<option value="b" selected="selected">b</option>
5</select>
P
This is for tagging a paragraph.
1>>> print P('<hello>',XML('<b>world</b>'), _class='test',_id=0)
2<p id="0" class="test"><hello><b>world</b></p>
PRE
Generates a <pre>...</pre> tag for displaying pre-formatted text. The CODE
helper is generally preferable for code listings.
1>>> print PRE('<hello>',XML('<b>world</b>'), _class='test',_id=0)
2<pre id="0" class="test"><hello><b>world</b></pre>

224 web2py full-stack web framework,4th edition
SCRIPT
This is include or link a script, such as JavaScript. The content between the
tags is rendered as an HTML comment, for the benefit of really old browsers.
1>>> print SCRIPT('alert("hello world");',_language='javascript')
2<script language="javascript"><!--
3alert("hello world");
4//--></script>
SELECT
Makes a <select>...</select> tag. This is used with the OPTION helper. Those
SELECT arguments that are not OPTION objects are automatically converted to
options.
1>>> print SELECT('<hello>',XML('<b>world</b>'), _class='test',_id=0)
2<select id="0" class="test">
3<option value="<hello>"><hello></option>
4<option value="<b>world</b>"><b>world</b></option>
5</select>
SPAN
Similar to DIV but used to tag inline (rather than block) content.
1>>> print SPAN('<hello>',XML('<b>world</b>'), _class='test',_id=0)
2<span id="0" class="test"><hello><b>world</b></span>
STYLE
Similar to script, but used to either include or link CSS code. Here the CSS is
included:
1>>> print STYLE(XML('body {color: white}'))
2<style><!--
3body { color: white }
4//--></style>
and here it is linked:
1>>> print STYLE(_src='style.css')
2<style src="style.css"><!--
3//--></style>
TABLE,TR,TD

the views 225
These tags (along with the optional THEAD,TBODY and TFOOTER helpers) are used
to build HTML tables.
1>>> print TABLE(TR(TD('a'), TD('b')), TR(TD('c'), TD('d')))
2<table><tr><td>a</td><td>b</td></tr><tr><td>c</td><td>d</td></tr></table>
TR expects TD content; arguments that are not TD objects are converted
automatically.
1>>> print TABLE(TR('a','b'), TR('c','d'))
2<table><tr><td>a</td><td>b</td></tr><tr><td>c</td><td>d</td></tr></table>
It is easy to convert a Python array into an HTML table using Python’s *
function arguments notation, which maps list elements to positional function
arguments.
Here, we will do it line by line:
1>>> table = [['a','b'], ['c','d']]
2>>> print TABLE(TR(*table[0]), TR(*table[1]))
3<table><tr><td>a</td><td>b</td></tr><tr><td>c</td><td>d</td></tr></table>
Here we do all lines at once:
1>>> table = [['a','b'], ['c','d']]
2>>> print TABLE(*[TR(*rows) for rows in table])
3<table><tr><td>a</td><td>b</td></tr><tr><td>c</td><td>d</td></tr></table>
TBODY
This is used to tag rows contained in the table body, as opposed to header or
footer rows. It is optional.
1>>> print TBODY(TR('<hello>'), _class='test',_id=0)
2<tbody id="0" class="test"><tr><td><hello></td></tr></tbody>
TEXTAREA
This helper makes a <textarea>...</textarea> tag.
1>>> print TEXTAREA('<hello>',XML('<b>world</b>'), _class='test')
2<textarea class="test" cols="40" rows="10"><hello><b>world</b></textarea>
The only caveat is that its optional "value" overrides its content (inner HTML)
1>>> print TEXTAREA(value="<hello world>",_class="test")
2<textarea class="test" cols="40" rows="10"><hello world></textarea>

226 web2py full-stack web framework,4th edition
TFOOT
This is used to tag table footer rows.
1>>> print TFOOT(TR(TD('<hello>')), _class='test',_id=0)
2<tfoot id="0" class="test"><tr><td><hello></td></tr></tfoot>
TH
This is used instead of TD in table headers.
1>>> print TH('<hello>',XML('<b>world</b>'), _class='test',_id=0)
2<th id="0" class="test"><hello><b>world</b></th>
THEAD
This is used to tag table header rows.
1>>> print THEAD(TR(TH('<hello>')), _class='test',_id=0)
2<thead id="0" class="test"><tr><th><hello></th></tr></thead>
TITLE
This is used to tag the title of a page in an HTML header.
1>>> print TITLE('<hello>',XML('<b>world</b>'))
2<title><hello><b>world</b></title>
TR
Tags a table row. It should be rendered inside a table and contain
<td>...</td> tags. TR arguments that are not TD objects will be automatically
converted.
1>>> print TR('<hello>',XML('<b>world</b>'), _class='test',_id=0)
2<tr id="0" class="test"><td><hello></td><td><b>world</b></td></tr>
TT
Tags text as typewriter (monospaced) text.
1>>> print TT('<hello>',XML('<b>world</b>'), _class='test',_id=0)
2<tt id="0" class="test"><hello><b>world</b></tt>
UL
Signifies an Unordered List and should contain LI items. If its content is not
tagged as LI, UL does it automatically.

the views 227
1>>> print UL('<hello>',XML('<b>world</b>'), _class='test',_id=0)
2<ul id="0" class="test"><li><hello></li><li><b>world</b></li></ul>
embed64
embed64(filename=None, file=None, data=None, extension=’image/gif’)
encodes the provided (binary) data into base64. filename: if provided,
opens and reads this file in ’rb’ mode. file: if provided, reads this file. data:
if provided, uses the provided data.
xmlescape
xmlescape(data, quote=True) returns an escaped string of the provided data.
1>>> print xmlescape('<hello>')
2<hello>
5.2.3Custom helpers
TAG
Sometimes you need to generate custom XML tags. web2py provides TAG, a
universal tag generator.
1{{=TAG.name('a','b',_c='d')}}
generates the following XML
1<name c="d">ab</name>
Arguments "a", "b", and "d" are automatically escaped; use the XML helper to
suppress this behavior. Using TAG you can generate HTML/XML tags not
already provided by the API. TAGs can be nested, and are serialized with
str(). An equivalent syntax is:
1{{=TAG['name']('a','b', c='d')}}
If the TAG object is created with an empty name, it can be used to concatenate
multiple strings and HTML helpers together without inserting them into a
surrounding tag, but this use is deprecated. Use the CAT helper instead.
Notice that TAG is an object, and TAG.name or TAG[’name’] is a function that
returns a temporary helper class.

228 web2py full-stack web framework,4th edition
MENU
The MENU helper takes a list of lists or of tuples of the form of response.menu
(as described in Chapter 4) and generates a tree-like structure using
unordered lists representing the menu. For example:
1>>> print MENU([['One', False, 'link1'], ['Two', False, 'link2']])
2<ul class="web2py-menu web2py-menu-vertical">
3<li><a href="link1">One</a></li>
4<li><a href="link2">Two</a></li>
5</ul>
Each menu item can have a fourth argument that is a nested submenu (and
so on recursively):
1>>> print MENU([['One', False, 'link1', [['Two', False, 'link2']]]])
2<ul class="web2py-menu web2py-menu-vertical">
3<li class="web2py-menu-expand">
4<a href="link1">One</a>
5<ul class="web2py-menu-vertical">
6<li><a href="link2">Two</a></li>
7</ul>
8</li>
9</ul>
The MENU helper takes the following optional arguments:
•_class: defaults to "web2py-menu web2py-menu-vertical" and sets the
class of the outer UL elements.
•ul_class: defaults to "web2py-menu-vertical" and sets the class of the inner
UL elements.
•li_class: defaults to "web2py-menu-expand" and sets the class of the inner
LI elements.
MENU takes an optional argument mobile. When set to True instead of building
a recursive UL menu structure it returns a SELECT dropdown with all the menu
options and a onchange attribute that redirects to the page corresponding to
the selected option. This is designed an an alterantive menu representation
that increases usability on small mobile devices such as phones.
Normally the menu is used in a layout with the following syntax:
1{{=MENU(response.menu, mobile=request.user_agent().is_mobile)}}

the views 229
In this way a mobile device is automatically detected and the menu is
rendered accordingly.
5.3BEAUTIFY
BEAUTIFY is used to build HTML representations of compound objects,
including lists, tuples and dictionaries:
1{{=BEAUTIFY({"a": ["hello", XML("world")], "b": (1, 2)})}}
BEAUTIFY returns an XML-like object serializable to XML, with a nice
looking representation of its constructor argument. In this case, the XML
representation of:
1{"a": ["hello",XML("world")], "b": (1, 2)}
will render as:
1<table>
2<tr><td>a</td><td>:</td><td>hello<br />world</td></tr>
3<tr><td>b</td><td>:</td><td>1<br />2</td></tr>
4</table>
5.4Server-side DOM and parsing
5.4.1elements
The DIV helper and all derived helpers provide the search methods element
and elements.
element returns the first child element matching a specified condition (or
None if no match).
elements returns a list of all matching children.
element and elements use the same syntax to specify the matching condition,
which allows for three possibilities that can be mixed and matched: jQuery-
like expressions, match by exact attribute value, match using regular
expressions.

230 web2py full-stack web framework,4th edition
Here is a simple example:
1>>> a = DIV(DIV(DIV('a',_id='target',_class='abc')))
2>>> d = a.elements('div#target')
3>>> d[0][0] = 'changed'
4>>> print a
5<div><div><div id="target" class="abc">changed</div></div></div>
The un-named argument of elements is a string, which may contain: the name
of a tag, the id of a tag preceded by a pound symbol, the class preceded by a
dot, the explicit value of an attribute in square brackets.
Here are 4equivalent ways to search the previous tag by id:
1>>> d = a.elements('#target')
2>>> d = a.elements('div#target')
3>>> d = a.elements('div[id=target]')
4>>> d = a.elements('div',_id='target')
Here are 4equivalent ways to search the previous tag by class:
1>>> d = a.elements('.abc')
2>>> d = a.elements('div.abc')
3>>> d = a.elements('div[class=abc]')
4>>> d = a.elements('div',_class='abc')
Any attribute can be used to locate an element (not just id and class),
including multiple attributes (the function element can take multiple named
arguments), but only the first matching element will be returned.
Using the jQuery syntax "div#target" it is possible to specify multiple search
criteria separated by a space:
1>>> a = DIV(SPAN('a',_id='t1'),DIV('b',_class='c2'))
2>>> d = a.elements('span#t1, div#c2')
or equivalently
1>>> a = DIV(SPAN('a',_id='t1'),DIV('b',_class='c2'))
2>>> d = a.elements('span#t1','div#c2')
If the value of an attribute is specified using a name argument, it can be a
string or a regular expression:
1>>> a = DIV(SPAN('a',_id='test123'), DIV('b',_class='c2'))
2>>> d = a.elements('span',_id=re.compile('test\d{3}')

the views 231
A special named argument of the DIV (and derived) helpers is find. It can
be used to specify a search value or a search regular expression in the text
content of the tag. For example:
1>>> a = DIV(SPAN('abcde'), DIV('fghij'))
2>>> d = a.elements(find='bcd')
3>>> print d[0]
4<span>abcde</span>
or
1>>> a = DIV(SPAN('abcde'), DIV('fghij'))
2>>> d = a.elements(find=re.compile('fg\w{3}'))
3>>> print d[0]
4<div>fghij</div>
5.4.2components
Here’s an example of listing all elements in an html string:
1html = TAG('<a>xxx</a><b>yyy</b>')
2for item in html.components: print item
5.4.3parent
parent returns the parent of the current element.
1>>> a = DIV(SPAN('a'),DIV('b'))
2>>> d = a.element('a').parent()
3>>> d['_class']='abc'
4>>> print a
5<div class="abc"><span>a</span><div>b</div></div>
5.4.4flatten
The flatten method recursively serializes the content of the children of a given
element into regular text (without tags):
1>>> a = DIV(SPAN('this',DIV('is',B('a'))), SPAN('test'))
2>>> print a.flatten()
3thisisatest

232 web2py full-stack web framework,4th edition
Flatten can be passed an optional argument, render, i.e. a function that
renders/flattens the content using a different protocol. Here is an example
to serialize some tags into Markmin wiki syntax:
1>>> a = DIV(H1('title'), P('example of a ',A('link',_href='#test')))
2>>> from gluon.html import markmin_serializer
3>>> print a.flatten(render=markmin_serializer)
4# titles
5
6example of [[a link #test]]
At the time of writing we provide markmin_serializer and
markdown_serializer.
5.4.5Parsing
The TAG object is also an XML/HTML parser. It can read text and convert
into a tree structure of helpers. This allows manipulation using the API
above:
1>>> html = '<h1>Title</h1><p>this is a <span>test</span></p>'
2>>> parsed_html = TAG(html)
3>>> parsed_html.element('span')[0]='TEST'
4>>> print parsed_html
5<h1>Title</h1><p>this is a <span>TEST</span></p>
5.5Page layout
Views can extend and include other views in a tree-like structure.
For example, we can think of a view "index.html" that extends "layout.html"
and includes "body.html". At the same time, "layout.html" may include
"header.html" and "footer.html".
The root of the tree is what we call a layout view. Just like any other HTML
template file, you can edit it using the web2py administrative interface. The
file name "layout.html" is just a convention.
Here is a minimalist page that extends the "layout.html" view and includes
the "page.html" view:

the views 233
1{{extend 'layout.html'}}
2<h1>Hello World</h1>
3{{include 'page.html'}}
The extended layout file must contain an {{include}} directive, something
like:
1<html>
2<head>
3<title>Page Title</title>
4</head>
5<body>
6{{include}}
7</body>
8</html>
When the view is called, the extended (layout) view is loaded, and the
calling view replaces the {{include}} directive inside the layout. Processing
continues recursively until all extend and include directives have been
processed. The resulting template is then translated into Python code. Note,
when an application is bytecode compiled, it is this Python code that is
compiled, not the original view files themselves. So, the bytecode compiled
version of a given view is a single.pyc file that includes the Python code not
just for the original view file, but for its entire tree of extended and included
views.
extend,include,block and super are special template directives, not Python
commands.
Any content or code that precedes the {{extend ...}} directive will be
inserted (and therefore executed) before the beginning of the extended view’s
content/code. Although this is not typically used to insert actual HTML
content before the extended view’s content, it can be useful as a means to
define variables or functions that you want to make available to the extended
view. For example, consider a view "index.html":
1{{sidebar_enabled=True}}
2{{extend 'layout.html'}}
3<h1>Home Page</h1>
and an excerpt from "layout.html":

234 web2py full-stack web framework,4th edition
1{{if sidebar_enabled:}}
2<div id="sidebar">
3Sidebar Content
4</div>
5{{pass}}
Because the sidebar_enabled assignment in "index.html" comes before the
extend, that line gets inserted before the beginning of "layout.html",
making sidebar_enabled available anywhere within the "layout.html" code (a
somewhat more sophisticated version of this is used in the welcome app).
It is also worth pointing out that the variables returned by the controller
function are available not only in the function’s main view, but in all of its
extended and included views as well.
The argument of an extend or include (i.e., the extended or included view
name) can be a python variable (though not a python expression). However,
this imposes a limitation – views that use variables in extend or include
statements cannot be bytecode compiled. As noted above, bytecode compiled
views include the entire tree of extended and included views, so the specific
extended and included views must be known at compile time, which is not
possible if the view names are variables (whose values are not determined
until run time). Because bytecode compiling views can provide a significant
speed boost, using variables in extend and include should generally be
avoided if possible.
In some cases, an alternative to using a variable in an include is simply to
place regular {{include ...}} directives inside an if...else block.
1{{if some_condition:}}
2{{include 'this_view.html'}}
3{{else:}}
4{{include 'that_view.html'}}
5{{pass}}
The above code does not present any problem for bytecode compilation
because no variables are involved. Note, however, that the bytecode compiled
view will actually include the Python code for both "this_view.html" and
"that_view.html", though only the code for one of those views will be
executed, depending on the value of some_condition.

the views 235
Keep in mind, this only works for include – you cannot place {{extend ...}}
directives inside if...else blocks.
Layouts are used to encapsulate page commonality (headers, footers, menus),
and though they are not mandatory, they will make your application easier
to write and maintain. In particular, we suggest writing layouts that take
advantage of the following variables that can be set in the controller. Using
these well known variables will help make your layouts interchangeable:
1response.title
2response.subtitle
3response.meta.author
4response.meta.keywords
5response.meta.description
6response.flash
7response.menu
8response.files
Except for menu and files, these are all strings and their meaning should be
obvious.
response.menu menu is a list of 3-tuples or 4-tuples. The three elements are:
the link name, a boolean representing whether the link is active (is the current
link), and the URL of the linked page. For example:
1response.menu = [('Google', False, 'http://www.google.com',[]),
2('Index', True, URL('index'), [])]
The fourth tuple element is an optional sub-menu.
response.files is a list of CSS and JS files that are needed by your page.
We also recommend that you use:
1{{include 'web2py_ajax.html'}}
in the HTML head, since this will include the jQuery libraries and define
some backward-compatible JavaScript functions for special effects and Ajax.
"web2py_ajax.html" includes the response.meta tags in the view, jQuery base,
the calendar datepicker, and all required CSS and JS response.files.

236 web2py full-stack web framework,4th edition
5.5.1Default page layout
Below is the "views/layout.html" that ships with the web2py scaffolding
application welcome (stripped down of some optional parts). Any new
application will have a similar default layout:
1<!DOCTYPE html>
2<head>
3<meta charset="utf-8" />
4<title>{{=response.title or request.application}}</title>
5
6<!-- http://dev.w3.org/html5/markup/meta.name.html -->
7<meta name="application-name" content="{{=request.application}}" />
8
9<script src="{{=URL('static','js/modernizr.custom.js')}}"></script>
10
11 <!-- include stylesheets -->
12 {{
13 response.files.append(URL('static','css/skeleton.css'))
14 response.files.append(URL('static','css/web2py.css'))
15 response.files.append(URL('static','css/superfish.css'))
16 response.files.append(URL('static','js/superfish.js'))
17 }}
18
19 {{include 'web2py_ajax.html'}}
20
21 <script type="text/javascript">
22 jQuery(function(){ jQuery('ul.sf-menu').supersubs({minWidth:12,maxWidth:30,
extraWidth:3}).superfish(); });
23 </script>
24
25 {{
26 # using sidebars need to know what sidebar you want to use
27 left_sidebar_enabled = globals().get('left_sidebar_enabled',False)
28 right_sidebar_enabled = globals().get('right_sidebar_enabled',False)
29 middle_columns = {0:'sixteen',1:'twelve',2:'eight'}[
30 (left_sidebar_enabled and 1 or 0)+(right_sidebar_enabled and 1 or 0)]
31 }}
32
33 </head>
34 <body>
35 <div class="wrapper"><!-- for sticky footer -->
36
37 <div class="topbar">
38 <div class="container">
39 <div class="sixteen columns">
40 <div id="navbar">
41 {{='auth' in globals() and auth.navbar(separators=(' ','|',''))}}

the views 237
42 </div>
43 <div id="menu">
44 {{=MENU(response.menu,
45 _class='mobile-menu' if is_mobile else 'sf-menu',
46 mobile=request.user_agent().is_mobile)}}
47 </div>
48 </div>
49 </div>
50 </div><!-- topbar -->
51
52 <div class="flash">{{=response.flash or ''}}</div>
53
54 <div class="header">
55 <div class="container">
56 <div class="sixteen columns">
57 <h1 class="remove-bottom" style="margin-top: .5em;">
58 {{=response.title or request.application}}
59 </h1>
60 <h5>{{=response.subtitle or ''}}</h5>
61 </div>
62
63 <div class="sixteen columns">
64 <div class="statusbar">
65 {{block statusbar}}
66 <span class="breadcrumbs">{{=request.function}}</span>
67 {{end}}
68 </div>
69 </div>
70 </div>
71 </div>
72
73 <div class="main">
74 <div class="container">
75 {{if left_sidebar_enabled:}}
76 <div class="four columns left-sidebar">
77 {{block left_sidebar}}
78 <h3>Left Sidebar</h3>
79 <p></p>
80 {{end}}
81 </div>
82 {{pass}}
83
84 <div class="{{=middle_columns}} columns center">
85 {{block center}}
86 {{include}}
87 {{end}}
88 </div>
89
90 {{if right_sidebar_enabled:}}

238 web2py full-stack web framework,4th edition
91 <div class="four columns">
92 {{block right_sidebar}}
93 <h3>Right Sidebar</h3>
94 <p></p>
95 {{end}}
96 </div>
97 {{pass}}
98
99 </div><!-- container -->
100 </div><!-- main -->
101
102 <div class="push"></div>
103 </div><!-- wrapper -->
104
105 <div class="footer">
106 <div class="container header">
107 <div class="sixteen columns">
108 {{block footer}} <!-- this is default footer -->
109 <div class="footer-content" >
110 {{=T('Copyright')}} © 2011
111 <div style="float: right;">
112 <a href="http://www.web2py.com/">
113 <img style="padding-bottom: 0;"
114 src="{{=URL('static','images/poweredby.png')}}"/>
115 </a>
116 </div>
117 </div>
118 {{end}}
119 </div>
120 </div><!-- container -->
121 </div><!-- footer -->
122
123 </body>
124 </html>
There are a few features of this default layout that make it very easy to use
and customize:
• It is written in HTML5and uses the "modernizr" [49] library for backward
compatibility. The actual layout include some extra conditional statements
required by IE and they are omitted for brevity.
• It displays both response.title and response.subtitle which can be set in
a model. If they are not set, it adopts the application name as title
• It includes the web2py_ajax.html file in the header which generated all the

the views 239
link and script import statements.
• It uses a modified version of "skeleton" [50] a library for flexible layouts
which works on mobile devices and re-arranges columns to fit small
screened.
• It uses "superfish.js" for dynamic cascading menus. There is an explicit
script to activate the superfish cascading menu and it can be removed if
not necessary.
• The {{=auth.navbar(...)}} displays a welcome to the current user
and links to auth functions like login, logout, register, change
password, etc. depending on context. It is a heler factory and its
output can be manipulated as any other helper. It is placed in a
{{try:}}...{{except:pass}} in case auth is undefined.
• The {{=MENU(response.menu) displays the menu structure as <ul>...</ul>.
•{{include}} is replaced by the content of the extending view when the
page is rendered.
• By default it uses a conditional three column (the left and right sidebars
can be turned off by the extending views)
• It uses the following classes: header, main, footer
• It contains the following blocks: statusbar, left_sidebar, center,
right_sidebar, footer.
Views can turn on and fill sidebars as follows:
1{{left_sidebar_enable=True}}
2{{extend 'layout.html'}}
3
4This text goes in center
5
6{{block left_sidebar}}
7This text goes in sidebar
8{{end}}

240 web2py full-stack web framework,4th edition
5.5.2Customizing the default layout
Customizing the default layout without editing is very easy because the CSS
files are documented:
• "skeleton.css" contains reset, grid layout and form styles
• "web2py.css" contains web2py specific styles
• "superfish.css" contains menu styles
To change colors and background images, simply append the following code
to "web2py.css":
1body { background: url('images/background.png') repeat-x #3A3A3A; }
2a { color: #349C01; }
3.header h1 { color: #349C01; }
4.header h2 { color: white; font-style: italic; font-size: 14px;}
5.statusbar { background: #333333; border-bottom: 5px #349C01 solid; }
6.statusbar a { color: white; }
7.footer { border-top: 5px #349C01 solid; }
The menu is built in a color-neutral way but you can change that too.
Of course you can also completely replace the "layout.html" and "web2py.css"
files with your own.
5.5.3Mobile development
The default layout.html is designed to be friendly to mobile devices but that
is not enought. One may need to use different views when a page is visited
by a mobile device.
To make developing for desktop and mobile devices easier, web2py includes
the @mobilize decorator. This decorator is applied to actions that should have
a normal view and a mobile view. This is demonstrated here:
1from gluon.contrib.user_agent_parser import mobilize
2@mobilize
3def index():
4return dict()
Notice that the decorator must be important once before using it in a

the views 241
controller. When the "index" function is called from a regular browser
(desktop computer), web2py will render the returned dictionary using the
view "[controller]/index.html". However, when it is called by a mobile
device, the dictionary will be rendered by "[controller]/index.mobile.html".
Notice that mobile views have the "mobile.html" extension.
Alternatively you can apply the following logic to make all views mobile
friendly:
1if request.user_agent().is_mobile:
2response.view.replace('.html','.mobile.html')
The task of creating the "*.mobile.html" views is left to the developer but we
strongly suggest using the "jQuery Mobile" plugin which makes the task very
easy.
5.6Functions in views
Consider this "layout.html":
1<html>
2<body>
3{{include}}
4<div class="sidebar">
5{{if 'mysidebar' in globals():}}{{mysidebar()}}{{else:}}
6my default sidebar
7{{pass}}
8</div>
9</body>
10 </html>
and this extending view
1{{def mysidebar():}}
2my new sidebar!!!
3{{return}}
4{{extend 'layout.html'}}
5Hello World!!!
Notice the function is defined before the {{extend...}} statement – this results
in the function being created before the "layout.html" code is executed, so
the function can be called anywhere within "layout.html", even before the

242 web2py full-stack web framework,4th edition
{{include}}. Also notice the function is included in the extended view
without the =prefix.
The code generates the following output:
1<html>
2<body>
3Hello World!!!
4<div class="sidebar">
5my new sidebar!!!
6</div>
7</body>
8</html>
Notice that the function is defined in HTML (although it could also contain
Python code) so that response.write is used to write its content (the function
does not return the content). This is why the layout calls the view function
using {{mysidebar()}} rather than {{=mysidebar()}}. Functions defined in this
way can take arguments.
5.7Blocks in views
Another way to make a view more modular is by using {{block...}}s and
this mechanism is an alternative to the mechanism discussed in the previous
section.
Consider this "layout.html":
1<html>
2<body>
3{{include}}
4<div class="sidebar">
5{{block mysidebar}}
6my default sidebar
7{{end}}
8</div>
9</body>
10 </html>
and this extending view
1{{extend 'layout.html'}}
2Hello World!!!

the views 243
3{{block mysidebar}}
4my new sidebar!!!
5{{end}}
It generates the following output:
1<html>
2<body>
3Hello World!!!
4<div class="sidebar">
5my new sidebar!!!
6</div>
7</body>
8</html>
You can have many blocks, and if a block is present in the extended view but
not in the extending view, the content of the extended view is used. Also,
notice that unlike with functions, it is not necessary to define blocks before
the {{extend ...}} – even if defined after the extend, they can be used to make
substitutions anywhere in the extended view.
Inside a block, you can use the expression {{super}} to include the content of
the parent. For example, if we replace the above extending view with:
1{{extend 'layout.html'}}
2Hello World!!!
3{{block mysidebar}}
4{{super}}
5my new sidebar!!!
6{{end}}
we get:
1<html>
2<body>
3Hello World!!!
4<div class="sidebar">
5my default sidebar
6my new sidebar!!!
7</div>
8</body>
9</html>
6
The database abstraction layer
6.1Dependencies
web2py comes with a Database Abstraction Layer (DAL), an API that maps
Python objects into database objects such as queries, tables, and records.
The DAL dynamically generates the SQL in real time using the specified
dialect for the database back end, so that you do not have to write SQL
code or learn different SQL dialects (the term SQL is used generically), and
the application will be portable among different types of databases. At the
time of this writing, the supported databases are SQLite (which comes with
Python and thus web2py), PostgreSQL, MySQL, Oracle, MSSQL, FireBird,
DB2, Informix, and Ingres and (partially) the Google App Engine (SQL and
NoSQL). Experimentally we support more databases. Please check on the
web2py web site and mailing list for more recent adapters. Google NoSQL is
treated as a particular case in Chapter 13.
The Windows binary distribution works out of the box with SQLite and
MySQL. The Mac binary distribution works out of the box with SQLite. To
use any other database back-end, run from the source distribution and install
the appropriate driver for the required back end.
Once the proper driver is installed, start web2py from source, and it will find
the driver. Here is a list of drivers:
246 web2py full-stack web framework,4th edition
database driver (source)
SQLite sqlite3or pysqlite2or zxJDBC [58] (on Jython)
PostgreSQL psycopg2[59] or zxJDBC [58] (on Jython)
MySQL pymysql [60] or MySQLdb [61]
Oracle cx_Oracle [62]
MSSQL pyodbc [63]
FireBird kinterbasdb [64]
DB2pyodbc [63]
Informix informixdb [65]
Ingres ingresdbi [66]
(pymysql ships with web2py) web2py defines the following classes that make
up the DAL:
DAL represents a database connection. For example:
1db = DAL('sqlite://storage.db')
Table represents a database table. You do not directly instantiate Table;
instead, DAL.define_table instantiates it.
1db.define_table('mytable',Field('myfield'))
The most important methods of a Table are: .insert,.truncate,.drop, and
.import_from_csv_file.
Field represents a database field. It can be instantiated and passed as an
argument to DAL.define_table.
DAL Rows is the object returned by a database select. It can be thought of
as a list of Row rows:
1rows = db(db.mytable.myfield!=None).select()
Row contains field values.
1for row in rows:
2print row.myfield
Query is an object that represents a SQL "where" clause:
1myquery = (db.mytable.myfield != None) | (db.mytable.myfield > 'A')
Set is an object that represents a set of records. Its most important methods
are count,select,update, and delete. For example:
the database abstraction layer 247
1myset = db(myquery)
2rows = myset.select()
3myset.update(myfield='somevalue')
4myset.delete()
Expression is something like an orderby or groupby expression. The Field
class is derived from the Expression. Here is an example.
1myorder = db.mytable.myfield.upper() | db.mytable.id
2db().select(db.table.ALL, orderby=myorder)
6.2Connection strings
A connection with the database is established by creating an instance of the
DAL object:
1>>> db = DAL('sqlite://storage.db', pool_size=0)
db is not a keyword; it is a local variable that stores the connection object DAL.
You are free to give it a different name. The constructor of DAL requires
a single argument, the connection string. The connection string is the
only web2py code that depends on a specific back-end database. Here
are examples of connection strings for specific types of supported back-end
databases (in all cases, we assume the database is running from localhost on
its default port and is named "test"):
SQLite sqlite://storage.db
MySQL mysql://username:password@localhost/test
PostgreSQL postgres://username:password@localhost/test
MSSQL mssql://username:password@localhost/test
FireBird firebird://username:password@localhost/test
Oracle oracle://username/password@test
DB2db2://username:password@test
Ingres ingres://username:password@localhost/test
Informix informix://username:password@test
Google App Engine/SQL google:sql
Google App Engine/NoSQL google:datastore
Notice that in SQLite the database consists of a single file. If it does not
exist, it is created. This file is locked every time it is accessed. In the case
of MySQL, PostgreSQL, MSSQL, FireBird, Oracle, DB2, Ingres and Informix
248 web2py full-stack web framework,4th edition
the database "test" must be created outside web2py. Once the connection is
established, web2py will create, alter, and drop tables appropriately.
It is also possible to set the connection string to None. In this case DAL will
not connect to any back-end database, but the API can still be accessed for
testing. Examples of this will be discussed in Chapter 7.
6.2.1Connection pooling
The second argument of the DAL constructor is the pool_size; it defaults to
0.
As it is rather slow to establish a new database connection for each request,
web2py implements a mechanism for connection pooling. Once a connection
is established and the page has been served and the transaction completed,
the connection is not closed but goes into a pool. When the next http request
arrives, web2py tries to obtain a connection from the pool and use that for
the new transaction. If there are no available connections in the pool, a new
connection is established.
The pool_size parameter is ignored by SQLite and Google App Engine.
Connections in the pools are shared sequentially among threads, in the sense
that they may be used by two different but not simultaneous threads. There
is only one pool for each web2py process.
When web2py starts, the pool is always empty. The pool grows up to the
minimum between the value of pool_size and the max number of concurrent
requests. This means that if pool_size=10 but our server never receives more
than 5concurrent requests, then the actual pool size will only grow to 5. If
pool_size=0 then connection pooling is not used.
Connection pooling is ignored for SQLite, since it would not yield any
benefit.

the database abstraction layer 249
6.2.2Connection failures
If web2py fails to connect to the database it waits 1seconds and tries again
up to 5times before declaring a failure. In case of connection pooling it is
possible that a pooled connection that stays open but unused for some time
is closed by the database end. Thanks to the retry feature web2py tries to
re-establish these dropped connections.
When using connection pooling a connection is used, put back in the pool
and then recycled. It is possible that while the connection is idle in pool
the connection is closed by the database server. This can be because of a
malfunction or a timeout. When this happens web2py detects it and re-
establish the connection.
6.2.3Replicated databases
The first argument of DAL(...) can be a list of URIs. In this case web2py
tries to connect to each of them. The main purpose for this is to deal with
multiple database servers and distribute the workload among them). Here is
a typical use case:
1db = DAL(['mysql://...1','mysql://...2','mysql://...3'])
In this case the DAL tries to connect to the first and, on failure, it will try the
second and the third. This can also be used to distribute load in a database
master-slave configuration. We will talk more about this in Chapter 13 in the
context of scalability.
6.3Reserved keywords
There is also another argument that can be passed to the DAL constructor
to check table names and column names against reserved SQL keywords in
target back-end databases.
This argument is check_reserved and it defaults to None.
This is a list of strings that contain the database back-end adapter names.

250 web2py full-stack web framework,4th edition
The adapter name is the same as used in the DAL connection string. So if you
want to check against PostgreSQL and MSSQL then your connection string
would look as follows:
1db = DAL('sqlite://storage.db',
2check_reserved=['postgres','mssql'])
The DAL will scan the keywords in the same order as of the list.
There are two extra options "all" and "common". If you specify all, it will
check against all known SQL keywords. If you specify common, it will only
check against common SQL keywords such as SELECT,INSERT,UPDATE, etc.
For supported back-ends you may also specify if you would like to check
against the non-reserved SQL keywords as well. In this case you would
append _nonreserved to the name. For example:
1check_reserved=['postgres','postgres_nonreserved']
The following database backends support reserved words checking.
PostgreSQL postgres(_nonreserved)
MySQL mysql
FireBird firebird(_nonreserved)
MSSQL mssql
Oracle oracle
6.4DAL,Table,Field
The best way to understand the DAL API is to try each function yourself.
This can be done interactively via the web2py shell, although ultimately, DAL
code goes in the models and controllers.
Start by creating a connection. For the sake of example, you can use SQLite.
Nothing in this discussion changes when you change the back-end engine.
1>>> db = DAL('sqlite://storage.db')
The database is now connected and the connection is stored in the global
variable db.
At any time you can retrieve the connection string.

the database abstraction layer 251
1>>> print db._uri
2sqlite://storage.db
and the database name
1>>> print db._dbname
2sqlite
The connection string is called a _uri because it is an instance of a Uniform
Resource Identifier.
The DAL allows multiple connections with the same database or with
different databases, even databases of different types. For now, we will
assume the presence of a single database since this is the most common
situation.
The most important method of a DAL is define_table:
1>>> db.define_table('person',Field('name'))
It defines, stores and returns a Table object called "person" containing a field
(column) "name". This object can also be accessed via db.person, so you do
not need to catch the return value.
Do not declare a field called "id", because one is created by web2py anyway.
Every table has a field called "id" by default. It is an auto-increment integer
field (starting at 1) used for cross-reference and for making every record
unique, so "id" is a primary key. (Note: the id’s starting at 1is back-end
specific. For example, this does not apply to the Google App Engine NoSQL.)
Optionally you can define a field of type=’id’ and web2py will use this field
as auto-increment id field. This is not recommended except when accessing
legacy database tables. With some limitation, you can also use different
primary keys and this is discussed in the section on "Legacy databases and
keyed tables".
6.5Record representation
It is optional but recommended to specify a format representation for records:

252 web2py full-stack web framework,4th edition
1>>> db.define_table('person',Field('name'), format='%(name)s')
or
1>>> db.define_table('person',Field('name'), format='%(name)s %(id)s')
or even more complex ones using a function:
1>>> db.define_table('person',Field('name'),
2format=lambda r: r.name or 'anonymous')
The format attribute will be used for two purposes:
• To represent referenced records in select/option drop-downs.
• To set the db.othertable.person.represent attribute for all fields referencing
this table. This means that SQLTABLE will not show references by id but
will use the format preferred representation instead.
These are the default values of a Field constructor:
1Field(name, 'string', length=None, default=None,
2required=False, requires='<default>',
3ondelete='CASCADE', notnull=False, unique=False,
4uploadfield=True, widget=None, label=None, comment=None,
5writable=True, readable=True, update=None, authorize=None,
6autodelete=False, represent=None, compute=None,
7uploadfolder=os.path.join(request.folder,'uploads'),
8uploadseparate=None)
Not all of them are relevant for every field. "length" is relevant only for fields
of type "string". "uploadfield" and "authorize" are relevant only for fields of
type "upload". "ondelete" is relevant only for fields of type "reference" and
"upload".
•length sets the maximum length of a "string", "password" or "upload" field.
If length is not specified a default value is used but the default value is not
guaranteed to be backward compatible. To avoid unwanted migrations on
upgrades, we recommend that you always specify the length for string, password
and upload fields.
•default sets the default value for the field. The default value is used when
performing an insert if a value is not explicitly specified. It is also used
to pre-populate forms built from the table using SQLFORM. Note, rather
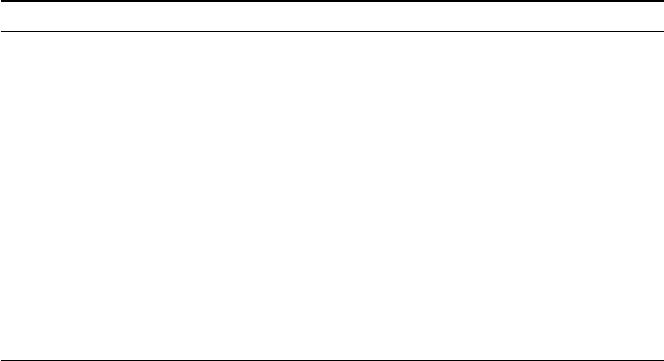
the database abstraction layer 253
than being a fixed value, the default can instead be a function (including a
lambda function) that returns a value of the appropriate type for the field.
In that case, the function is called once for each record inserted, even when
multiple records are inserted in a single transaction.
•required tells the DAL that no insert should be allowed on this table if a
value for this field is not explicitly specified.
•requires is a validator or a list of validators. This is not used by the DAL,
but it is used by SQLFORM. The default validators for the given types are
shown in the following table:
field type default field validators
string IS_LENGTH(length) default length is 512
text IS_LENGTH(65536)
blob None
boolean None
integer IS_INT_IN_RANGE(-1e100, 1e100)
double IS_FLOAT_IN_RANGE(-1e100, 1e100)
decimal(n,m) IS_DECIMAL_IN_RANGE(-1e100, 1e100)
date IS_DATE()
time IS_TIME()
datetime IS_DATETIME()
password None
upload None
reference <table> IS_IN_DB(db,table.field,format)
list:string None
list:integer None
list:reference <table> IS_IN_DB(db,table.field,format,multiple=True)
Decimal requires and returns values as Decimal objects, as defined in the
Python decimal module. SQLite does not handle the decimal type so internally
we treat it as a double. The (n,m) are the number of digits in total and the
number of digits after the decimal point respectively.
The list: fields are special because they are designed to take advantage
of certain denormalization features on NoSQL (in the case of Google App
Engine NoSQL, the field types ListProperty and StringListProperty) and
back-port them all the other supported relational databases. On relational
databases lists are stored as a text field. The items are separated by a |and
each |in string item is escaped as a ||. They are discussed in their own
section.
254 web2py full-stack web framework,4th edition
Notice that requires=... is enforced at the level of forms, required=True is
enforced at the level of the DAL (insert), while notnull,unique and ondelete
are enforced at the level of the database. While they sometimes may seem
redundant, it is important to maintain the distinction when programming with
the DAL.
•ondelete translates into the "ON DELETE" SQL statement. By default it is
set to "CASCADE". This tells the database that when it deletes a record,
it should also delete all records that refer to it. To disable this feature, set
ondelete to "NO ACTION" or "SET NULL".
•notnull=True translates into the "NOT NULL" SQL statement. It prevents
the database from inserting null values for the field.
•unique=True translates into the "UNIQUE" SQL statement and it makes sure
that values of this field are unique within the table. It is enforced at the
database level.
•uploadfield applies only to fields of type "upload". A field of type "upload"
stores the name of a file saved somewhere else, by default on the filesystem
under the application "uploads/" folder. If uploadfield is set, then the file
is stored in a blob field within the same table and the value of uploadfield
is the name of the blob field. This will be discussed in more detail later in
the context of SQLFORM.
•uploadfolder defaults to the application’s "uploads/" folder. If set to a
different path, files will uploaded to a different folder. For example,
uploadfolder=os.path.join(request.folder,’static/temp’) will upload files to
the web2py/applications/myapp/static/temp folder.
•uploadseparate if set to True will upload files under different subfolders
of the uploadfolder folder. This is optimized to avoid too many files under
the same folder/subfolder. ATTENTION: You cannot change the value of
uploadseparate from True to False without breaking the system. web2py
either uses the separate subfolders or it does not. Changing the behavior
after files have been uploaded will prevent web2py from being able to
retrieve those files. If this happens it is possible to move files and fix the
problem but this is not described here.

the database abstraction layer 255
•widget must be one of the available widget objects, including custom
widgets, for example: SQLFORM.widgets.string.widget. A list of available
widgets will be discussed later. Each field type has a default widget.
•label is a string (or something that can be serialized to a string) that
contains the label to be used for this field in autogenerated forms.
•comment is a string (or something that can be serialized to a string) that
contains a comment associated with this field, and will be displayed to the
right of the input field in the autogenerated forms.
•writable if a field is writable, it can be edited in autogenerated create and
update forms.
•readable if a field is readable, it will be visible in readonly forms. If a
field is neither readable nor writable, it will not be displayed in create and
update forms.
•update contains the default value for this field when the record is updated.
•compute is an optional function. If a record is inserted or updated, the
compute function will be executed and the field will be populated with
the function result. The record is passed to the compute function as a
dict, and the dict will not include the current value of that, or any other
compute field.
•authorize can be used to require access control on the corresponding field,
for "upload" fields only. It will be discussed more in detail in the context
of Authentication and Authorization.
•autodelete determines if the corresponding uploaded file should be
deleted when the record referencing the file is deleted. For "upload" fields
only.
•represent can be None or can point to a function that takes a field value
and returns an alternate representation for the field value. Examples:
1db.mytable.name.represent = lambda name,row: name.capitalize()
2db.mytable.other_id.represent = lambda id,row: row.myfield
3db.mytable.some_uploadfield.represent = lambda value,row: \
4A('get it',_href=URL('download', args=value))

256 web2py full-stack web framework,4th edition
"blob" fields are also special. By default, binary data is encoded in base64
before being stored into the actual database field, and it is decoded when
extracted. This has the negative effect of using 25% more storage space than
necessary in blob fields, but has two advantages. On average it reduces
the amount of data communicated between web2py and the database server,
and it makes the communication independent of back-end-specific escaping
conventions.
Most attributes of fields and tables can be modified after they are defined:
1db.define_table('person',Field('name',default=''),format='%(name)s')
2db.person._format = '%(name)s/%(id)s'
3db.person.name.default = 'anonymous'
(notice that attributes of tables are usually prefixed by an underscore to avoid
conflict with possible field names).
You can list the tables that have been defined for a given database connection:
1>>> print db.tables
2['person']
You can also list the fields that have been defined for a given table:
1>>> print db.person.fields
2['id','name']
You can query for the type of a table:
1>>> print type(db.person)
2<class 'gluon.sql.Table'>
and you can access a table from the DAL connection using:
1>>> print type(db['person'])
2<class 'gluon.sql.Table'>
Similarly you can access fields from their name in multiple equivalent ways:
1>>> print type(db.person.name)
2<class 'gluon.sql.Field'>
3>>> print type(db.person['name'])
4<class 'gluon.sql.Field'>
5>>> print type(db['person']['name'])
6<class 'gluon.sql.Field'>

the database abstraction layer 257
Given a field, you can access the attributes set in its definition:
1>>> print db.person.name.type
2string
3>>> print db.person.name.unique
4False
5>>> print db.person.name.notnull
6False
7>>> print db.person.name.length
832
including its parent table, tablename, and parent connection:
1>>> db.person.name._table == db.person
2True
3>>> db.person.name._tablename == 'person'
4True
5>>> db.person.name._db == db
6True
A field also has methods. Some of them are used to build queries and we
will seem them later. A special method of the field object is validate and it
calls the validators for the field.
1print db.person.name.validate('John')
which returns a tuple (value, error).error is None if the input passes
validation.
6.6Migrations
define_table checks whether or not the corresponding table exists. If it does
not, it generates the SQL to create it and executes the SQL. If the table does
exist but differs from the one being defined, it generates the SQL to alter the
table and executes it. If a field has changed type but not name, it will try
to convert the data(If you do not want this, you need to redefine the table
twice, the first time, letting web2py drop the field by removing it, and the
second time adding the newly defined field so that web2py can create it.). If
the table exists and matches the current definition, it will leave it alone. In
all cases it will create the db.person object that represents the table.

258 web2py full-stack web framework,4th edition
We refer to this behavior as a "migration". web2py logs all migrations and
migration attempts in the file "databases/sql.log".
The first argument of define_table is always the table name. The other
unnamed arguments are the fields (Field). The function also takes an optional
last argument called "migrate" which must be referred to explicitly by name
as in:
1>>> db.define_table('person',Field('name'), migrate='person.table')
The value of migrate is the filename (in the "databases" folder for the
application) where web2py stores internal migration information for this
table. These files are very important and should never be removed except
when the entire database is dropped. In this case, the ".table" files have to be
removed manually. By default, migrate is set to True. This causes web2py
to generate the filename from a hash of the connection string. If migrate
is set to False, the migration is not performed, and web2py assumes that
the table exists in the datastore and it contains (at least) the fields listed in
define_table. The best practice is to give an explicit name to the migrate
table.
There may not be two tables in the same application with the same migrate
filename.
The DAL class also takes a "migrate" argument, which determines the default
value of migrate for calls to define_table. For example,
1>>> db = DAL('sqlite://storage.db', migrate=False)
will set the default value of migrate to False whenever db.define_table is
called without a migrate argument.
Migrations can be disabled for all tables at the moment of connection:
1db = DAL(...,migrate_enabled=False)
This is the recommended behaviour when two apps share the same database.
Only one of the two apps should perform migrations, the other should
disabled them.

the database abstraction layer 259
6.7Fixing broken migrations
There are two common problems with migrations and there are ways to
recover from them.
One problem is specific with SQLite. SQLite does not enforce column
types and cannot drop columns. This means that if you have a column
of type string and you remove it, it is not really removed. If you add
the column again with a different type (for example datetime) you end up
with a datetime column that contains strings (junk for practical purposes).
web2py does not complain about this because it does not know what is in
the database, until it tries to retrieve records and fails.
If web2py returns an error in the gluon.sql.parse function when selecting
records, this is the problem: corrupted data in a column because of the above
issue.
The solution consists in updating all records of the table and updating the
values in the column in question with None.
The other problem is more generic but typical with MySQL. MySQL does not
allow more than one ALTER TABLE in a transaction. This means that web2py
must break complex transactions into smaller ones (one ALTER TABLE at the
time) and commit one piece at the time. It is therefore possible that part of a
complex transaction gets committed and one part fails, leaving web2py in a
corrupted state. Why would part of a transaction fail? Because, for example,
it involves altering a table and converting a string column into a datetime
column, web2py tries to convert the data, but the data cannot be converted.
What happens to web2py? It gets confused about what exactly is the table
structure actually stored in the database.
The solution consists of disabling migrations for all tables and enabling fake
migrations:
1db.define_table(....,migrate=False,fake_migrate=True)
This will rebuild web2py metadata about the table according to the table
definition. Try multiple table definitions to see which one works (the one
before the failed migration and the one after the failed migration). Once

260 web2py full-stack web framework,4th edition
successful remove the fake_migrate=True attribute.
Before attempting to fix migration problems it is prudent to make a copy of
"applications/yourapp/databases/*.table" files.
Migration problems can also be fixed for all tables at once:
1db = DAL(...,fake_migrate_all=True)
Although if this fails, it will not help in narrowing down the problem.
6.8insert
Given a table, you can insert records
1>>> db.person.insert(name="Alex")
21
3>>> db.person.insert(name="Bob")
42
Insert returns the unique "id" value of each record inserted.
You can truncate the table, i.e., delete all records and reset the counter of the
id.
1>>> db.person.truncate()
Now, if you insert a record again, the counter starts again at 1(this is back-
end specific and does not apply to Google NoSQL):
1>>> db.person.insert(name="Alex")
21
web2py also provides a bulk_insert method
1>>> db.person.bulk_insert([{'name':'Alex'}, {'name':'John'}, {'name':'Tim'}])
2[3,4,5]
It takes a list of dictionaries of fields to be inserted and performs multiple
inserts at once. It returns the IDs of the inserted records. On the supported
relational databases there is no advantage in using this function as opposed
to looping and performing individual inserts but on Google App Engine
NoSQL, there is a major speed advantage.

the database abstraction layer 261
6.9commit and rollback
No create, drop, insert, truncate, delete, or update operation is actually
committed until you issue the commit command
1>>> db.commit()
To check it let’s insert a new record:
1>>> db.person.insert(name="Bob")
22
and roll back, i.e., ignore all operations since the last commit:
1>>> db.rollback()
If you now insert again, the counter will again be set to 2, since the previous
insert was rolled back.
1>>> db.person.insert(name="Bob")
22
Code in models, views and controllers is enclosed in web2py code that looks
like this:
1try:
2execute models, controller function and view
3except:
4rollback all connections
5log the traceback
6send a ticket to the visitor
7else:
8commit all connections
9save cookies, sessions and return the page
There is no need to ever call commit or rollback explicitly in web2py unless
one needs more granular control.
6.10 Raw sql

262 web2py full-stack web framework,4th edition
6.10.1Timing queries
All queries are automatically timed by web2py. The variable db._timings is
a list of tuples. Each tuple contains the raw SQL query as passed to the
database driver and the time it took to execute in seconds. This variable can
be displayed in views using the toolbar:
1{{=response.toolbar()}}
6.10.2executesql
The DAL allows you to explicitly issue SQL statements.
1>>> print db.executesql('SELECT *FROM person;')
2[(1, u'Massimo'), (2, u'Massimo')]
In this case, the return values are not parsed or transformed by the DAL, and
the format depends on the specific database driver. This usage with selects is
normally not needed, but it is more common with indexes. executesql takes
two optional arguments: placeholders and as_dict placeholders is an optional
sequence of values to be substituted in or, if supported by the DB driver, a
dictionary with keys matching named placeholders in your SQL.
If as_dict is set to True, and the results cursor returned by the DB driver will
be converted to a sequence of dictionaries keyed with the db field names.
Results returned with as_dict = True are the same as those returned when
applying .as_list() to a normal select.
1[{field1: value1, field2: value2}, {field1: value1b, field2: value2b}]
6.10.3_lastsql
Whether SQL was executed manually using executesql or was SQL generated
by the DAL, you can always find the SQL code in db._lastsql. This is useful
for debugging purposes:
1>>> rows = db().select(db.person.ALL)
2>>> print db._lastsql
3SELECT person.id, person.name FROM person;

the database abstraction layer 263
web2py never generates queries using the "*" operator. web2py is always
explicit when selecting fields.
6.11 drop
Finally, you can drop tables and all data will be lost:
1>>> db.person.drop()
6.12 Indexes
Currently the DAL API does not provide a command to create indexes on
tables, but this can be done using the executesql command. This is because
the existence of indexes can make migrations complex, and it is better to deal
with them explicitly. Indexes may be needed for those fields that are used in
recurrent queries.
Here is an example of how to create an index using SQL in SQLite:
1>>> db = DAL('sqlite://storage.db')
2>>> db.define_table('person',Field('name'))
3>>> db.executesql('CREATE INDEX IF NOT EXISTS myidx ON person (name);')
Other database dialects have very similar syntaxes but may not support the
optional "IF NOT EXISTS" directive.
6.13 Legacy databases and keyed tables
web2py can connect to legacy databases under some conditions.
The easiest way is when these conditions are met:
• Each table must have a unique auto-increment integer field called "id"
• Records must be referenced exclusively using the "id" field.
When accessing an existing table, i.e., a table not created by web2py in the
current application, always set migrate=False.

264 web2py full-stack web framework,4th edition
If the legacy table has an auto-increment integer field but it is not called "id",
web2py can still access it but the table definition must contain explicitly as
Field(’....’,’id’) where... is the name of the auto-increment integer field.
Finally if the legacy table uses a primary key that is not an auto-increment id
field it is possible to use a "keyed table", for example:
1db.define_table('account',
2Field('accnum','integer'),
3Field('acctype'),
4Field('accdesc'),
5primarykey=['accnum','acctype'],
6migrate=False)
•primarykey is a list of the field names that make up the primary key.
• All primarykey fields have a NOT NULL set even if not specified.
• Keyed table can only refer are to other keyed tables.
• Referenceing fields must use the reference tablename.fieldname format.
• The update_record function is not available for Rows of keyed tables.
Note that currently this is only available for DB2, MS-SQL, Ingres and
Informix, but others can be easily added.
At the time of writing, we cannot guarantee that the primarykey attribute
works with every existing legacy table and every supported database
backend. For simplicity, we recommend, if possible, creating a database view
that has an auto-increment id field.
6.14 Distributed transaction
At the time of writing this feature is only supported by PostgreSQL, MySQL
and Firebird, since they expose API for two-phase commits.
Assuming you have two (or more) connections to distinct PostgreSQL
databases, for example:
1db_a = DAL('postgres://...')
2db_b = DAL('postgres://...')

the database abstraction layer 265
In your models or controllers, you can commit them concurrently with:
1DAL.distributed_transaction_commit(db_a, db_b)
On failure, this function rolls back and raises an Exception.
In controllers, when one action returns, if you have two distinct connections
and you do not call the above function, web2py commits them separately.
This means there is a possibility that one of the commits succeeds and one
fails. The distributed transaction prevents this from happening.
6.15 Manual uploads
Consider the following model:
1>>> db.define_table('myfile',Field('image','upload'))
Normally an insert is handled automatically via a SQLFORM or a crud form
(which is a SQLFORM) but occasionally you already have the file on the
filesystem and want to upload it programmatically. This can be done in this
way:
1>>> stream = open(filename,'rb')
2>>> db.myfile.insert(image=db.myfile.image.store(stream,filename))
The store method of the upload field object takes a file stream and a filename.
It uses the filename to determine the extension (type) of the file, creates a
new temp name for the file (according to web2py upload mechanism) and
loads the file content in this new temp file (under the uploads folder unless
specified otherwise). It returns the new temp name, which is then stored in
the image field of the db.myfile table.
The opposite of .store is .retrieve:
1>>> row = db(db.myfile).select().first()
2>>> (filename, stream) = db.myfile.image.retrieve(row.image)
3>>> import shutil
4>>> shutil.copyfileobj(stream,open(filename,'wb'))

266 web2py full-stack web framework,4th edition
6.16 Query,Set,Rows
Let’s consider again the table defined (and dropped) previously and insert
three records:
1>>> db.define_table('person',Field('name'))
2>>> db.person.insert(name="Alex")
31
4>>> db.person.insert(name="Bob")
52
6>>> db.person.insert(name="Carl")
73
You can store the table in a variable. For example, with variable person, you
could do:
1>>> person = db.person
You can also store a field in a variable such as name. For example, you could
also do:
1>>> name = person.name
You can even build a query (using operators like ==, !=, <, >, <=, >=, like,
belongs) and store the query in a variable qsuch as in:
1>>> q = name=='Alex'
When you call db with a query, you define a set of records. You can store it
in a variable sand write:
1>>> s = db(q)
Notice that no database query has been performed so far. DAL + Query
simply define a set of records in this db that match the query. web2py
determines from the query which table (or tables) are involved and, in fact,
there is no need to specify that.
6.17 select
Given a Set, s, you can fetch the records with the command select:

the database abstraction layer 267
1>>> rows = s.select()
It returns an iterable object of class gluon.sql.Rows whose elements are Row
objects. gluon.sql.Row objects act like dictionaries, but their elements can also
be accessed as attributes, like gluon.storage.Storage.The former differ from
the latter because its values are readonly.
The Rows object allows looping over the result of the select and printing the
selected field values for each row:
1>>> for row in rows:
2print row.id, row.name
31 Alex
You can do all the steps in one statement:
1>>> for row in db(db.person.name=='Alex').select():
2print row.name
3Alex
The select command can take arguments. All unnamed arguments are
interpreted as the names of the fields that you want to fetch. For example,
you can be explicit on fetching field "id" and field "name":
1>>> for row in db().select(db.person.id, db.person.name):
2print row.name
3Alex
4Bob
5Carl
The table attribute ALL allows you to specify all fields:
1>>> for row in db().select(db.person.ALL):
2print row.name
3Alex
4Bob
5Carl
Notice that there is no query string passed to db. web2py understands that
if you want all fields of the table person without additional information then
you want all records of the table person.
An equivalent alternative syntax is the following:
1>>> for row in db(db.person.id > 0).select():

268 web2py full-stack web framework,4th edition
2print row.name
3Alex
4Bob
5Carl
and web2py understands that if you ask for all records of the table person
(id > 0) without additional information, then you want all the fields of table
person.
Given one row
1row = rows[0]
you can extract its values using multiple equivalent expressions:
1>>> row.name
2Alex
3>>> row['name']
4Alex
5>>> row('person.name')
6Alex
The latter syntax is particularly handy when selecting en expression instead
of a column. We will show this later.
You can also do
1rows.compact = False
to disable the notation
1row[i].name
and enable, instead, the less compact notation:
1row[i].person.name
Yes this is unusual and not rarely needed.
6.17.1Shortcuts
The DAL supports various code-simplifying shortcuts. In particular:
1myrecord = db.mytable[id]

the database abstraction layer 269
returns the record with the given id if it exists. If the id does not exist, it
returns None. The above statement is equivalent to
1myrecord = db(db.mytable.id==id).select().first()
You can delete records by id:
1del db.mytable[id]
and this is equivalent to
1db(db.mytable.id==id).delete()
and deletes the record with the given id, if it exists.
You can insert records:
1db.mytable[0] = dict(myfield='somevalue')
It is equivalent to
1db.mytable.insert(myfield='somevalue')
and it creates a new record with field values specified by the dictionary on
the right hand side.
You can update records:
1db.mytable[id] = dict(myfield='somevalue')
which is equivalent to
1db(db.mytable.id==id).update(myfield='somevalue')
and it updates an existing record with field values specified by the dictionary
on the right hand side.
6.17.2Fetching a Row
Yet another convenient syntax is the following:
1record = db.mytable(id)
2record = db.mytable(db.mytable.id==id)
3record = db.mytable(id,myfield='somevalue')

270 web2py full-stack web framework,4th edition
Apparently similar to db.mytable[id] the above syntax is more flexible and
safer. First of all it checks whether id is an int (or str(id) is an int) and
returns None if not (it never raises an exception). It also allows to specify
multiple conditions that the record must meet. If they are not met, it also
returns None.
6.17.3Recursive selects
Consider the previous table person and a new table "dog" referencing a
"person":
1>>> db.define_table('dog',Field('name'), Field('owner',db.person))
and a simple select from this table:
1>>> dogs = db(db.dog).select()
which is equivalent to
1>>> dogs = db(db.dog._id>0).select()
where ._id is a reference to the primary key of the table. Normally db.dog._id
is the same as db.dog.id and we will assume that in most of this book.
For each Row of dogs it is possible to fetch not just fields from the selected
table (dog) but also from linked tables (recursively):
1>>> for dog in dogs: print dog.name, dog.owner.name
Here dog.owner.name requires one database select for each dog in dogs and it
is therefore inefficient. We suggest using joins whenever possible instead of
recursive selects, nevertheless this is convenient and practical when accessing
individual records.
You can also do it backwards, by selecting the dogs referenced by a person:
1person = db.person(id)
2for dog in person.dog.select(orderby=db.dog.name):
3print person.name, 'owns', dog.name
In this last expressions person.dog is a shortcut for
1db(db.dog.owner==person.id)

the database abstraction layer 271
i.e. the Set of dogs referenced by the current person. This syntax breaks down
if the referencing table has multiple references to the referenced table. In this
case one needs to be more explicit and use a full Query.
6.17.4Serializing Rows in views
Given the following action containing a query
1def index()
2return dict(rows = db(query).select())
The result of a select can be displayed in a view with the following syntax:
1{{extend 'layout.html'}}
2<h1>Records</h1>
3{{=rows}}
Which is equivalent to:
1{{extend 'layout.html'}}
2<h1>Records</h1>
3{{=SQLTABLE(rows)}}
SQLTABLE converts the rows into an HTML table with a header containing the
column names and one row per record. The rows are marked as alternating
class "even" and class "odd". Under the hood, Rows is first converted into
a SQLTABLE object (not to be confused with Table) and then serialized.
The values extracted from the database are also formatted by the validators
associated to the field and then escaped. (Note: Using a db in this way in a
view is usually not considered good MVC practice.)
Yet it is possible and sometimes convenient to call SQLTABLE explicitly.
The SQLTABLE constructor takes the following optional arguments:
•linkto the URL or an action to be used to link reference fields (default to
None)
•upload the URL or the download action to allow downloading of uploaded
files (default to None)

272 web2py full-stack web framework,4th edition
•headers a dictionary mapping field names to their labels to be used as
headers (default to {}). It can also be an instruction. Currently we support
headers=’fieldname:capitalize’.
•truncate the number of characters for truncating long values in the table
(default is 16)
•columns the list of fieldnames to be shown as columns (in
tablename.fieldname format).
Those not listed are not displayed (defaults to all).
•**attributes generic helper attributes to be passed to the most external
TABLE object.
Here is an example:
1{{extend 'layout.html'}}
2<h1>Records</h1>
3{{=SQLTABLE(rows,
4headers='fieldname:capitalize',
5truncate=100,
6upload=URL('download'))
7}}
SQLTABLE is useful but there are types when one needs more. SQLFORM.grid
is an extension of SQLTABLE that creates a table with search features and
pagination, as well as ability to open detailed records, create, edit and delete
records. SQLFORM.smartgrid is a further generalizaiton that allows all of the
above but also creates buttons to access referencing records.
Here is an example of usage of SQLFORM.grid:
1def index():
2return dict(grid=SQLFORM.grid(query))
and the corresponding view:
1{{extend 'layout.html'}}
2{{=grid}}
SQLFORM.grid and SQLFORM.smartgrid should be preferrable to SQLTABLE
because they are more powerful although higher level and therefore more
constraining. They will be explained in more detail in chapter 8.
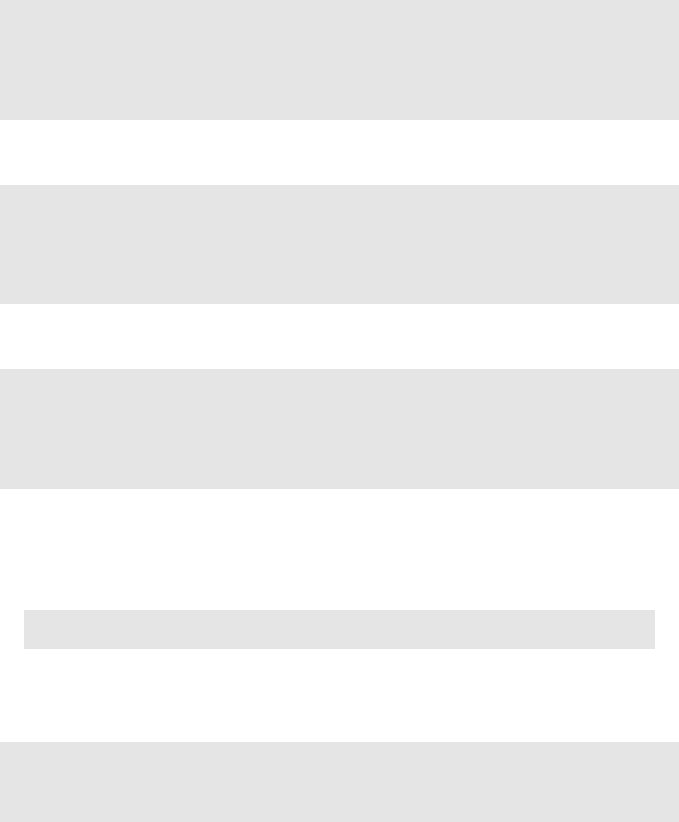
the database abstraction layer 273
6.17.5orderby,groupby,limitby,distinct
The select command takes five optional arguments: orderby, groupby,
limitby, left and cache. Here we discuss the first three.
You can fetch the records sorted by name:
1>>> for row in db().select(
2db.person.ALL, orderby=db.person.name):
3print row.name
4Alex
5Bob
6Carl
You can fetch the records sorted by name in reverse order (notice the tilde):
1>>> for row in db().select(
2db.person.ALL, orderby=~db.person.name):
3print row.name
4Carl
5Bob
6Alex
You can have the fetched records appear in random order:
1>>> for row in db().select(
2db.person.ALL, orderby='<random>'):
3print row.name
4Carl
5Alex
6Bob
The use of orderby=’<random>’ is not supported on Google NoSQL. However,
in this situation and likewise in many others where built-ins are insufficient,
imports can be used:
1import random
2rows=db(...).select().sort(lambda row: random.random())
And you can sort the records according to multiple fields by concatenating
them with a "|":
1>>> for row in db().select(
2db.person.ALL, orderby=db.person.name|db.person.id):
3print row.name
4Carl

274 web2py full-stack web framework,4th edition
5Bob
6Alex
Using groupby together with orderby, you can group records with the same
value for the specified field (this is back-end specific, and is not on the Google
NoSQL):
1>>> for row in db().select(
2db.person.ALL,
3orderby=db.person.name, groupby=db.person.name):
4print row.name
5Alex
6Bob
7Carl
With the argument distinct=True, you can specify that you only want to select
distinct records. This has the same effect as grouping using all specified fields
except that it does not require sorting. When using distinct it is important
not to select ALL fields, and in particular not to select the "id" field, else all
records will always be distinct.
Here is an example:
1>>> for row in db().select(db.person.name, distinct=True):
2print row.name
3Alex
4Bob
5Carl
Notice that distinct can also be an expression for example:
1>>> for row in db().select(db.person.name,distinct=db.person.name):
2print row.name
3Alex
4Bob
5Carl
With limitby, you can select a subset of the records (in this case, the first two
starting at zero):
1>>> for row in db().select(db.person.ALL, limitby=(0, 2)):
2print row.name
3Alex
4Bob

the database abstraction layer 275
6.17.6Logical operators
Queries can be combined using the binary AND operator "&":
1>>> rows = db((db.person.name=='Alex') & (db.person.id>3)).select()
2>>> for row in rows: print row.id, row.name
34 Alex
and the binary OR operator "|":
1>>> rows = db((db.person.name=='Alex') | (db.person.id>3)).select()
2>>> for row in rows: print row.id, row.name
31 Alex
You can negate a query (or sub-query) with the "!=" binary operator:
1>>> rows = db((db.person.name!='Alex') | (db.person.id>3)).select()
2>>> for row in rows: print row.id, row.name
32 Bob
43 Carl
or by explicit negation with the " " unary operator:
1>>> rows = db((~db.person.name=='Alex') | (db.person.id>3)).select()
2>>> for row in rows: print row.id, row.name
32 Bob
43 Carl
Due to Python restrictions in overloading "and" and "or" operators, these
cannot be used in forming queries. The binary operators must be used
instead.
It is also possible to build queries using in-place logical operators:
1>>> query = db.person.name!='Alex'
2>>> query &= db.person.id>3
3>>> query |= db.person.name=='John'
6.17.7count,isempty,delete,update
You can count records in a set:
1>>> print db(db.person.id > 0).count()
23

276 web2py full-stack web framework,4th edition
Notice that count takes an optional distinct argument which defaults to
False, and it works very much like the same argument for select.
Sometimes you may need to check is a table is empty. A more efficient way
than counting is using the isempty method:
1>>> print db(db.person.id > 0).isempty()
2False
or equivalently:
1>>> print db(db.person).isempty()
2False
You can delete records in a set:
1>>> db(db.person.id > 3).delete()
And you can update all records in a set by passing named arguments
corresponding to the fields that need to be updated:
1>>> db(db.person.id > 3).update(name='Ken')
6.17.8Expressions
The value assigned an update statement can be an expression. For example
consider this model
1>>> db.define_table('person',
2Field('name'),
3Field('visits','integer', default=0))
4>>> db(db.person.name == 'Massimo').update(
5visits = db.person.visits + 1)
The values used in queries can also be expressions
1>>> db.define_table('person',
2Field('name'),
3Field('visits','integer', default=0),
4Field('clicks','integer', default=0))
5>>> db(db.person.visits == db.person.clicks + 1).delete()

the database abstraction layer 277
6.17.9update_record
web2py also allows updating a single record that is already in memory using
update_record
1>>> row = db(db.person.id==2).select().first()
2>>> row.update_record(name='Curt')
update_record should not be confused with
1>>> row.update(name='Curt')
because for a single row, the method update updates the row object but not
the database record, as in the case of update_record.
It is also possible to change the attributes of a row (one at the time) and then
call update_record() without arguments to save the changes:
1>>> row = db(db.person.id > 2).select().first()
2>>> row.name = 'Curt'
3>>> row.update_record() # saves above change
6.17.10 first and last
Given a Rows object containing records:
1>>> rows = db(query).select()
2>>> first_row = rows.first()
3>>> last_row = rows.last()
are equivalent to
1>>> first_row = rows[0] if len(rows)>0 else None
2>>> last_row = rows[-1] if len(rows)>0 else None
6.17.11 as_dict and as_list
A Row object can be serialized into a regular dictionary using the as_dict()
method and a Rows object can be serialized into a list of dictionaries using
the as_list() method. Here are some examples:

278 web2py full-stack web framework,4th edition
1>>> rows = db(query).select()
2>>> rows_list = rows.as_list()
3>>> first_row_dict = rows.first().as_dict()
These methods are convenient for passing Rows to generic views and or to
store Rows in sessions (since Rows objects themselves cannot be serialized
since contain a reference to an open DB connection):
1>>> rows = db(query).select()
2>>> session.rows = rows # not allowed!
3>>> session.rows = rows.as_list() # allowed!
6.17.12 find,exclude,sort
There are times when one needs to perform two selects and one contains a
subset of a previous select. In this case it is pointless to access the database
again. The find,exclude and sort objects allow you to manipulate a Rows
objects and generate another one without accessing the database. More
specifically:
•find returns a new set of Rows filtered by a condition and leaves the
original unchanged.
•exclude returns a new set of Rows filtered by a condition and removes
them from the original Rows.
•sort returns a new set of Rows sorted by a condition and leaves the original
unchanged.
All these methods take a single argument, a function that acts on each
individual row.
Here is an example of usage:
1>>> db.define_table('person',Field('name'))
2>>> db.person.insert(name='John')
3>>> db.person.insert(name='Max')
4>>> db.person.insert(name='Alex')
5>>> rows = db(db.person).select()
6>>> for row in rows.find(lambda row: row.name[0]=='M'):
7print row.name
8Max

the database abstraction layer 279
9>>> print len(rows)
10 3
11 >>> for row in rows.exclude(lambda row: row.name[0]=='M'):
12 print row.name
13 Max
14 >>> print len(rows)
15 2
16 >>> for row in rows.sort(lambda row: row.name):
17 print row.name
18 Alex
19 John
They can be combined:
1>>> rows = db(db.person).select()
2>>> rows = rows.find(
3lambda row: 'x' in row.name).sort(
4lambda row: row.name)
5>>> for row in rows:
6print row.name
7Alex
8Max
6.18 Other methods
6.18.1update_or_insert
Some times you need to perform an insert only if there is no record with the
same values as those being inserted. This can be done with
1db.define_table('person',Field('name'),Field('birthplace'))
2db.person.update_or_insert(name='John',birthplace='Chicago')
The record will be inserted only of there is no other user called John born in
Chicago.
You can specify which values to use as a key to determine if the record exists.
For example:
1db.person.update_or_insert(db.person.name=='John',
2name='John',birthplace='Chicago')
and if there is John his birthplace will be updated else a new record will be
created.

280 web2py full-stack web framework,4th edition
6.18.2validate_and_insert,validate_and_update
The function
1ret = db.mytable.validate_and_insert(field='value')
works very much like
1id = db.mytable.insert(field='value')
except that it calls the validators for the fields before performing the insert
and bails out if the validation does not pass. If validation does not pass the
errors can be found in ret.error. If it passes, the id of the new record is in
ret.id. Mind that normally validation is done by the form processing logic
so this function is rarely needed.
Similarly
1ret = db(query).validate_and_update(field='value')
works very much the same as
1num = db(query).update(field='value')
except that it calls the validators for the fields before performing the update.
Notice that it only works if query involves a single table. The number of
updated records can be found in res.updated and errors will be ret.errors.
6.18.3smart_query (experimental)
There are times when you need to parse a query using natural language such
as
1name contain m and age greater than 18
The DAL provides a method to parse this type of queries:
1search = 'name contain m and age greater than 18'
2rows = db.smart_query([db.person],search).select()
The first argument must be a list of tables or fields that should be allowed
in the search. It raises a RuntimeError if the search string is invalid. This

the database abstraction layer 281
functionality can be used to build RESTful interfaces (see chapter 10) and it
is used internally by the SQLFORM.grid and SQLFORM.smartgrid.
In the smartquery search string, a field can be identified by fieldname only
and or by tablename.fieldname. Strings may be delimited by double quotes
if they contain spaces.
6.19 Computed fields
DAL fields may have a compute attribute. This must be a function (or lambda)
that takes a Row object and returns a value for the field. When a new record
is modified, including both insertions and updates, if a value for the field is
not provided, web2py tries to compute from the other field values using the
compute function. Here is an example:
1>>> db.define_table('item',
2Field('unit_price','double'),
3Field('quantity','integer'),
4Field('total_price',
5compute=lambda r: r['unit_price']*r['quantity']))
6>>> r = db.item.insert(unit_price=1.99, quantity=5)
7>>> print r.total_price
89.95
Notice that the computed value is stored in the db and it is not computed
on retrieval, as in the case of virtual fields, described later. Two typical
applications of computed fields are:
• in wiki applications, to store the processed input wiki text as HTML, to
avoid re-processing on every request
• for searching, to compute normalized values for a field, to be used for
searching.
6.20 Virtual fields

282 web2py full-stack web framework,4th edition
6.20.1Old style virtual fields
Virtual fields are also computed fields (as in the previous subsection) but
they differ from those because they are virtual in the sense that they are not
stored in the db and they are computed each time records are extracted from
the database. They can be used to simplify the user’s code without using
additional storage but they cannot be used for searching.
In order to define one or more virtual fields, you have to define a container
class, instantiate it and link it to a table or to a select. For example, consider
the following table:
1>>> db.define_table('item',
2Field('unit_price','double'),
3Field('quantity','integer'),
One can define a total_price virtual field as
1>>> class MyVirtualFields(object):
2def total_price(self):
3return self.item.unit_price*self.item.quantity
4>>> db.item.virtualfields.append(MyVirtualFields())
Notice that each method of the class that takes a single argument (self) is
a new virtual field. self refers to each one row of the select. Field values
are referred by full path as in self.item.unit_price. The table is linked to the
virtual fields by appending an instance of the class to the table’s virtualfields
attribute.
Virtual fields can also access recursive fields as in
1>>> db.define_table('item',
2Field('unit_price','double'))
3>>> db.define_table('order_item',
4Field('item',db.item),
5Field('quantity','integer'))
6>>> class MyVirtualFields(object):
7def total_price(self):
8return self.order_item.item.unit_price \
9*self.order_item.quantity
10 >>> db.order_item.virtualfields.append(MyVirtualFields())
Notice the recursive field access self.order_item.item.unit_price where self
is the looping record.
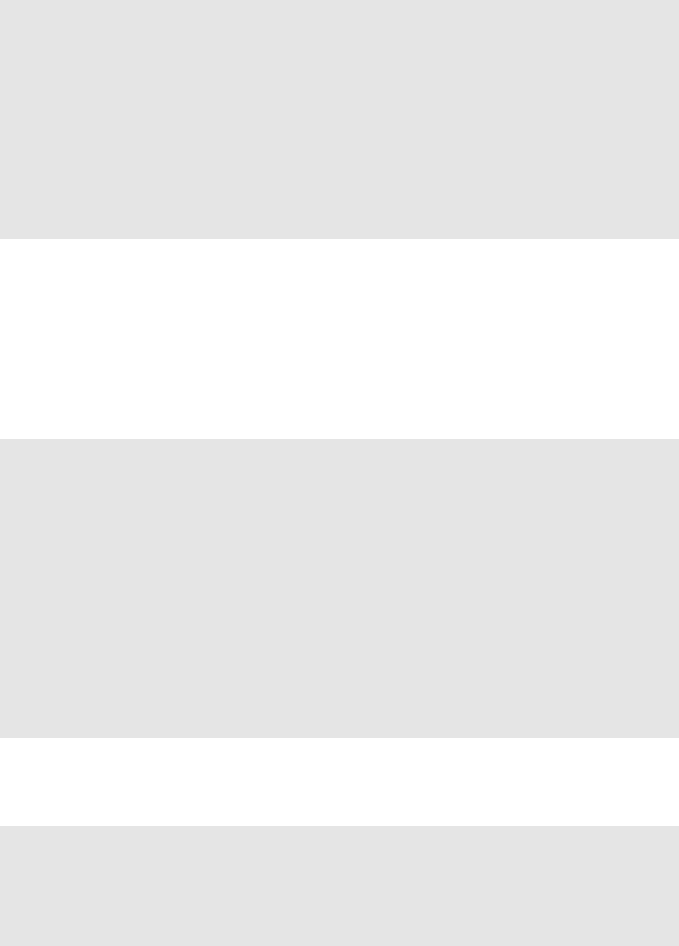
the database abstraction layer 283
They can also act on the result of a JOIN
1>>> db.define_table('item',
2Field('unit_price','double'))
3>>> db.define_table('order_item',
4Field('item',db.item),
5Field('quantity','integer'))
6>>> rows = db(db.order_item.item==db.item.id).select()
7>>> class MyVirtualFields(object):
8def total_price(self):
9return self.item.unit_price \
10 *self.order_item.quantity
11 >>> rows.setvirtualfields(order_item=MyVirtualFields())
12 >>> for row in rows: print row.order_item.total_price
Notice how in this case the syntax is different. The virtual field accesses
both self.item.unit_price and self.order_item.quantity which belong to the
join select. The virtual field is attached to the rows of the table using the
setvirtualfields method of the rows object. This method takes an arbitrary
number of named arguments and can be used to set multiple virtual fields,
defined in multiple classes, and attach them to multiple tables:
1>>> class MyVirtualFields1(object):
2def discounted_unit_price(self):
3return self.item.unit_price*0.90
4>>> class MyVirtualFields2(object):
5def total_price(self):
6return self.item.unit_price \
7*self.order_item.quantity
8def discounted_total_price(self):
9return self.item.discounted_unit_price \
10 *self.order_item.quantity
11 >>> rows.setvirtualfields(
12 item=MyVirtualFields1(),
13 order_item=MyVirtualFields2())
14 >>> for row in rows:
15 print row.order_item.discounted_total_price
Virtual fields can be lazy; all they need to do is return a function and access
it by calling the function:
1>>> db.define_table('item',
2Field('unit_price','double'),
3Field('quantity','integer'),
4>>> class MyVirtualFields(object):
5def lazy_total_price(self):
6def lazy(self=self):

284 web2py full-stack web framework,4th edition
7return self.item.unit_price \
8*self.item.quantity
9return lazy
10 >>> db.item.virtualfields.append(MyVirtualFields())
11 >>> for item in db(db.item).select():
12 print item.lazy_total_price()
or shorter using a lambda function:
1>>> class MyVirtualFields(object):
2def lazy_total_price(self):
3return lambda self=self: self.item.unit_price \
4*self.item.quantity
6.20.2New style virtual fields (experimental)
web2py provides a new and easier way to define virtual fields and lazy
virtual fields. This section is marked experimental because they APIs may
still change a little from what is described here.
Here we will consider the same example as in the previous subsection. In
particular we consider the following model:
1>>> db.define_table('item',
2Field('unit_price','double'),
3Field('quantity','integer'),
One can define a total_price virtual field as
1>>> db.item.total_price = Field.Virtual(lambda row: row.unit_price*row.quantity)
i.e. by simply defining a new field total_price to be a Field.Virtual. The
only argument of the constructor is a function that takes a row and returns
the computed values.
A virtual field defined as the one above is automatically computed for all
records when the records are selected:
1>>> for row in db(db.item).select(): print row.total_price
It is also possible to define lazy virtual fields which are calculated on-
demand, when called. For example:

the database abstraction layer 285
1>>> db.item.total_price = Field.Lazy(lambda row, discount=0.0: \
2row.unit_price*row.quantity*(1.0-discount/100))
In this case row.total_price is not a value but a function. The function takes
the same arguments as the function passed to the Lazy constructor except for
row which is implicit (think of it as self for rows objects).
The lazy field in the example above allows one to compute the total price for
each item:
1>>> for row in db(db.item).select(): print row.total_price()
And it also allows to pass an optional discount percentage (15%):
1>>> for row in db(db.item).select(): print row.total_price(15)
Mind that virtual fields do not have the same attributes as the other fields
(default, readable, requires, etc) and they do not appear in the list of
db.table.fields and are not visualized by default in tables (TABLE) and grids
(SQLFORM.grid, SQLFORM.smartgrid).
6.21 One to many relation
To illustrate how to implement one to many relations with the web2py DAL,
define another table "dog" that refers to the table "person" which we redefine
here:
1>>> db.define_table('person',
2Field('name'),
3format='%(name)s')
4>>> db.define_table('dog',
5Field('name'),
6Field('owner', db.person),
7format='%(name)s')
Table "dog" has two fields, the name of the dog and the owner of the dog.
When a field type is another table, it is intended that the field reference the
other table by its id. In fact, you can print the actual type value and get:
1>>> print db.dog.owner.type
2reference person

286 web2py full-stack web framework,4th edition
Now, insert three dogs, two owned by Alex and one by Bob:
1>>> db.dog.insert(name='Skipper', owner=1)
21
3>>> db.dog.insert(name='Snoopy', owner=1)
42
5>>> db.dog.insert(name='Puppy', owner=2)
63
You can select as you did for any other table:
1>>> for row in db(db.dog.owner==1).select():
2print row.name
3Skipper
4Snoopy
Because a dog has a reference to a person, a person can have many dogs, so
a record of table person now acquires a new attribute dog, which is a Set,
that defines the dogs of that person. This allows looping over all persons and
fetching their dogs easily:
1>>> for person in db().select(db.person.ALL):
2print person.name
3for dog in person.dog.select():
4print ' ', dog.name
5Alex
6Skipper
7Snoopy
8Bob
9Puppy
10 Carl
6.21.1Inner joins
Another way to achieve a similar result is by using a join, specifically an
INNER JOIN. web2py performs joins automatically and transparently when
the query links two or more tables as in the following example:
1>>> rows = db(db.person.id==db.dog.owner).select()
2>>> for row in rows:
3print row.person.name, 'has', row.dog.name
4Alex has Skipper
5Alex has Snoopy
6Bob has Puppy
the database abstraction layer 287
Observe that web2py did a join, so the rows now contain two records, one
from each table, linked together. Because the two records may have fields
with conflicting names, you need to specify the table when extracting a field
value from a row. This means that while before you could do:
1row.name
and it was obvious whether this was the name of a person or a dog, in the
result of a join you have to be more explicit and say:
1row.person.name
or:
1row.dog.name
There is an alterantive syntax for INNER JOINS:
1>>> rows = db(db.person).select(join=db.dog.on(db.person.id==db.dog.owner))
2>>> for row in rows:
3print row.person.name, 'has', row.dog.name
4Alex has Skipper
5Alex has Snoopy
6Bob has Puppy
While the output is the same, the generated SQL in the two cases can be
different. The latter syntax removes possible ambiguities when the same
table is joined twice and aliased:
1>>> db.define_table('dog',
2Field('name'),
3Field('owner1',db.person),
4Field('owner2',db.person))
5>>> rows = db(db.person).select(
6join=[db.person.with_alias('owner1').on(db.person.id==db.dog.owner1).
7db.person.with_alias('owner2').on(db.person.id==db.dog.owner2)])
The value of join can be list of db.table.on(...) to join.
6.21.2Left outer join
Notice that Carl did not appear in the list above because he has no dogs. If
you intend to select on persons (whether they have dogs or not) and their

288 web2py full-stack web framework,4th edition
dogs (if they have any), then you need to perform a LEFT OUTER JOIN. This
is done using the argument "left" of the select command. Here is an example:
1>>> rows=db().select(
2db.person.ALL, db.dog.ALL,
3left=db.dog.on(db.person.id==db.dog.owner))
4>>> for row in rows:
5print row.person.name, 'has', row.dog.name
6Alex has Skipper
7Alex has Snoopy
8Bob has Puppy
9Carl has None
where:
1left = db.dog.on(...)
does the left join query. Here the argument of db.dog.on is the condition
required for the join (the same used above for the inner join). In the case of a
left join, it is necessary to be explicit about which fields to select.
Multiple left joins can be combined by passing a list or tuple of
db.mytable.on(...) to the left attribute.
6.21.3Grouping and counting
When doing joins, sometimes you want to group rows according to certain
criteria and count them. For example, count the number of dogs owned by
every person. web2py allows this as well. First, you need a count operator.
Second, you want to join the person table with the dog table by owner. Third,
you want to select all rows (person + dog), group them by person, and count
them while grouping:
1>>> count = db.person.id.count()
2>>> for row in db(db.person.id==db.dog.owner).select(
3db.person.name, count, groupby=db.person.name):
4print row.person.name, row[count]
5Alex 2
6Bob 1
Notice the count operator (which is built-in) is used as a field. The only issue
here is in how to retrieve the information. Each row clearly contains a person

the database abstraction layer 289
and the count, but the count is not a field of a person nor is it a table. So
where does it go? It goes into the storage object representing the record with
a key equal to the query expression itself.
6.22 Many to many
In the previous examples, we allowed a dog to have one owner but one
person could have many dogs. What if Skipper was owned by Alex and Curt?
This requires a many-to-many relation, and it is realized via an intermediate
table that links a person to a dog via an ownership relation.
Here is how to do it:
1>>> db.define_table('person',
2Field('name'))
3>>> db.define_table('dog',
4Field('name'))
5>>> db.define_table('ownership',
6Field('person', db.person),
7Field('dog', db.dog))
the existing ownership relationship can now be rewritten as:
1>>> db.ownership.insert(person=1, dog=1) # Alex owns Skipper
2>>> db.ownership.insert(person=1, dog=2) # Alex owns Snoopy
3>>> db.ownership.insert(person=2, dog=3) # Bob owns Puppy
Now you can add the new relation that Curt co-owns Skipper:
1>>> db.ownership.insert(person=3, dog=1) # Curt owns Skipper too
Because you now have a three-way relation between tables, it may be
convenient to define a new set on which to perform operations:
1>>> persons_and_dogs = db(
2(db.person.id==db.ownership.person) \
3& (db.dog.id==db.ownership.dog))
Now it is easy to select all persons and their dogs from the new Set:
1>>> for row in persons_and_dogs.select():
2print row.person.name, row.dog.name
3Alex Skipper

290 web2py full-stack web framework,4th edition
4Alex Snoopy
5Bob Puppy
6Curt Skipper
Similarly, you can search for all dogs owned by Alex:
1>>> for row in persons_and_dogs(db.person.name=='Alex').select():
2print row.dog.name
3Skipper
4Snoopy
and all owners of Skipper:
1>>> for row in persons_and_dogs(db.dog.name=='Skipper').select():
2print row.person.name
3Alex
4Curt
A lighter alternative to Many 2Many relations is tagging. Tagging is
discussed in the context of the IS_IN_DB validator. Tagging works even on
database backends that do not support JOINs like the Google App Engine
NoSQL.
6.23 Many to many, list:<type>, and contains
web2py provides the following special field types:
1list:string
2list:integer
3list:reference <table>
They can contain lists of strings, of integers and of references respectively.
On Google App Engine NoSQL list:string is mapped into
StringListProperty, the other two are mapped into ListProperty(int).
On relational databases they all mapped into text fields which contain the
list of items separated by |. For example [1,2,3] is mapped into |1|2|3|.
For lists of string the items are escaped so that any |in the item is replaced
by a ||. Anyway this is an internal representation and it is transparent to the
user.
You can use list:string, for example, in the following way:
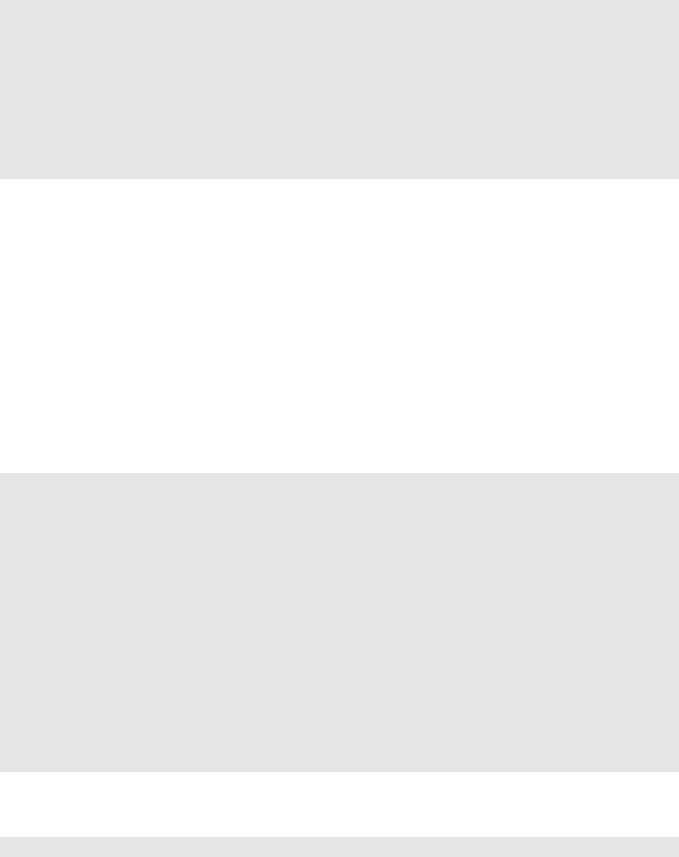
the database abstraction layer 291
1>>> db.define_table('product',
2Field('name'),
3Field('colors','list:string'))
4>>> db.product.colors.requires=IS_IN_SET(('red','blue','green'))
5>>> db.product.insert(name='Toy Car',colors=['red','green'])
6>>> products = db(db.product.colors.contains('red')).select()
7>>> for item in products:
8print item.name, item.colors
9Toy Car ['red','green']
list:integer works in the same way but the items must be integers.
As usual the requirements are enforced at the level of forms, not at the level
of insert.
For list:<type> fields the contains(value) operator maps into a non trivial
query that checks for lists containing the value. The contains operator also
works for regular string and text fields and it maps into a LIKE ’%value%’.
The list:reference and the contains(value) operator are particularly useful
to de-normalize many-to-many relations. Here is an example:
1>>> db.define_table('tag',Field('name'),format='%(name)s')
2>>> db.define_table('product',
3Field('name'),
4Field('tags','list:reference tag'))
5>>> a = db.tag.insert(name='red')
6>>> b = db.tag.insert(name='green')
7>>> c = db.tag.insert(name='blue')
8>>> db.product.insert(name='Toy Car',tags=[a, b, c])
9>>> products = db(db.product.tags.contains(b)).select()
10 >>> for item in products:
11 print item.name, item.tags
12 Toy Car [1, 2, 3]
13 >>> for item in products:
14 print item.name, db.product.tags.represent(item.tags)
15 Toy Car red, green, blue
Notice that a list:reference tag field get a default constraint
1requires = IS_IN_DB(db,'tag.id',db.tag._format,multiple=True)
that produces a SELECT/OPTION multiple drop-box in forms.
Also notice that this field gets a default represent attribute which represents
the list of references as a comma-separated list of formatted references. This

292 web2py full-stack web framework,4th edition
is used in read forms and SQLTABLEs.
While list:reference has a default validator and a default representation,
list:integer and list:string do not. So these two need an IS_IN_SET or an
IS_IN_DB validator if you want to use them in forms.
6.24 Other operators
web2py has other operators that provide an API to access equivalent SQL
operators. Let’s define another table "log" to store security events, their
event_time and severity, where the severity is an integer number.
1>>> db.define_table('log',Field('event'),
2Field('event_time','datetime'),
3Field('severity','integer'))
As before, insert a few events, a "port scan", an "xss injection" and an
"unauthorized login". For the sake of the example, you can log events with
the same event_time but with different severities (1,2,3respectively).
1>>> import datetime
2>>> now = datetime.datetime.now()
3>>> print db.log.insert(
4event='port scan', event_time=now, severity=1)
51
6>>> print db.log.insert(
7event='xss injection', event_time=now, severity=2)
82
9>>> print db.log.insert(
10 event='unauthorized login', event_time=now, severity=3)
11 3
6.24.1like,startswith,contains,upper,lower
Fields have a like operator that you can use to match strings:
1>>> for row in db(db.log.event.like('port%')).select():
2print row.event
3port scan

the database abstraction layer 293
Here "port%" indicates a string starting with "port". The percent sign
character, "%", is a wild-card character that means "any sequence of
characters". web2py also provides some shortcuts:
1db.mytable.myfield.startswith('value')
2db.mytable.myfield.contains('value')
which are equivalent respectively to
1db.mytable.myfield.like('value%')
2db.mytable.myfield.like('%value%')
Notice that contains has a special meaning for list:<type> fields and it was
discussed in a previous section.
The contains method can also be passed a list of values and an optional
boolean argument all to search for records that contain all values:
1db.mytable.myfield.contains(['value1','value2'], all=True)
or any value from the list
1db.mytable.myfield.contains(['value1','value2'], all=false)
The upper and lower methods allow you to convert the value of the field to
upper or lower case, and you can also combine them with the like operator:
1>>> for row in db(db.log.event.upper().like('PORT%')).select():
2print row.event
3port scan
6.24.2year,month,day,hour,minutes,seconds
The date and datetime fields have day, month and year methods. The
datetime and time fields have hour, minutes and seconds methods. Here
is an example:
1>>> for row in db(db.log.event_time.year()==2009).select():
2print row.event
3port scan
4xss injection
5unauthorized login

294 web2py full-stack web framework,4th edition
6.24.3belongs
The SQL IN operator is realized via the belongs method which returns true
when the field value belongs to the specified set (list of tuples):
1>>> for row in db(db.log.severity.belongs((1, 2))).select():
2print row.event
3port scan
4xss injection
The DAL also allows a nested select as the argument of the belongs operator.
The only caveat is that the nested select has to be a _select, not a select, and
only one field has to be selected explicitly, the one that defines the set.
1>>> bad_days = db(db.log.severity==3)._select(db.log.event_time)
2>>> for row in db(db.log.event_time.belongs(bad_days)).select():
3print row.event
4port scan
5xss injection
6unauthorized login
6.24.4sum,min,max and len
Previously, you have used the count operator to count records. Similarly, you
can use the sum operator to add (sum) the values of a specific field from a
group of records. As in the case of count, the result of a sum is retrieved via
the store object:
1>>> sum = db.log.severity.sum()
2>>> print db().select(sum).first()[sum]
36
You can also use min and max to the mininum and maximum value for the
selected records
1>>> max = db.log.severity.max()
2>>> print db().select(max).first()[max]
33
.len() computes the length of a string, text or boolean fields.

the database abstraction layer 295
Expressions can be combined to form more complex expressions. For
example here we are computing the sum of the length of all the severity
strings in the logs, increased of one:
1>>> sum = (db.log.severity.len()+1).sum()
2>>> print db().select(sum).first()[sum]
6.24.5Substrings
One can build an expression to refer to a substring. For example, we can
group dogs whose name starts with the same three characters and select
only one from each group:
1db(db.dog).select(dictinct = db.dog.name[:3])
6.24.6Default values with coalesce and coalesce_zero
There are times when you need to pull a value from database but also need
a default values if the value for a record is set to NULL. In SQL there is a
keyword, COALESCE, for this. web2py has an equivalent coalesce method:
1>>> db.define_table('sysuser',Field('username'),Field('fullname'))
2>>> db.sysuser.insert(username='max',fullname='Max Power')
3>>> db.sysuser.insert(username='tim',fullname=None)
4print db(db.sysuser).select(db.sysuser.fullname.coalesce(db.sysuser.username))
5"COALESCE(sysuser.fullname,sysuser.username)"
6Max Power
7tim
Other times you need to compute a mathematical expression but some fields
have a value set to None while it should be zero. coalesce_zero comes to the
rescue by defaulting None to zero in the query:
1>>> db.define_table('sysuser',Field('username'),Field('points'))
2>>> db.sysuser.insert(username='max',points=10)
3>>> db.sysuser.insert(username='tim',points=None)
4>>> print db(db.sysuser).select(db.sysuser.points.coalesce_zero().sum())
5"SUM(COALESCE(sysuser.points,0))"
610

296 web2py full-stack web framework,4th edition
6.25 Generating raw sql
Sometimes you need to generate the SQL but not execute it. This is easy
to do with web2py since every command that performs database IO has an
equivalent command that does not, and simply returns the SQL that would
have been executed. These commands have the same names and syntax as
the functional ones, but they start with an underscore:
Here is _insert
1>>> print db.person._insert(name='Alex')
2INSERT INTO person(name) VALUES ('Alex');
Here is _count
1>>> print db(db.person.name=='Alex')._count()
2SELECT count(*) FROM person WHERE person.name='Alex';
Here is _select
1>>> print db(db.person.name=='Alex')._select()
2SELECT person.id, person.name FROM person WHERE person.name='Alex';
Here is _delete
1>>> print db(db.person.name=='Alex')._delete()
2DELETE FROM person WHERE person.name='Alex';
And finally, here is _update
1>>> print db(db.person.name=='Alex')._update()
2UPDATE person SET WHERE person.name='Alex';
Moreover you can always use db._lastsql to return the most recent SQL code,
whether it was executed manually using executesql or was SQL generated by
the DAL.
6.26 Exporting and importing data

the database abstraction layer 297
6.26.1CSV (one Table at a time)
When a DALRows object is converted to a string it is automatically serialized
in CSV:
1>>> rows = db(db.person.id==db.dog.owner).select()
2>>> print rows
3person.id,person.name,dog.id,dog.name,dog.owner
41,Alex,1,Skipper,1
51,Alex,2,Snoopy,1
62,Bob,3,Puppy,2
You can serialize a single table in CSV and store it in a file "test.csv":
1>>> open('test.csv','w').write(str(db(db.person.id).select()))
and you can easily read it back with:
1>>> db.person.import_from_csv_file(open('test.csv','r'))
When importing, web2py looks for the field names in the CSV header. In this
example, it finds two columns: "person.id" and "person.name". It ignores the
"person." prefix, and it ignores the "id" fields. Then all records are appended
and assigned new ids. Both of these operations can be performed via the
appadmin web interface.
6.26.2CSV (all tables at once)
In web2py, you can backup/restore an entire database with two commands:
To export:
1>>> db.export_to_csv_file(open('somefile.csv','wb'))
To import:
1>>> db.import_from_csv_file(open('somefile.csv','rb'))
This mechanism can be used even if the importing database is of a different
type than the exporting database. The data is stored in "somefile.csv" as a
CSV file where each table starts with one line that indicates the tablename,
and another line with the fieldnames:

298 web2py full-stack web framework,4th edition
1TABLE tablename
2field1, field2, field3, ...
Two tables are separated \r\n\r\n. The file ends with the line
1END
The file does not include uploaded files if these are not stored in the database.
In any case it is easy enough to zip the "uploads" folder separately.
When importing, the new records will be appended to the database if it is not
empty. In general the new imported records will not have the same record id
as the original (saved) records but web2py will restore references so they are
not broken, even if the id values may change.
If a table contains a field called "uuid", this field will be used to identify
duplicates. Also, if an imported record has the same "uuid" as an existing
record, the previous record will be updated.
6.26.3CSV and remote database synchronization
Consider the following model:
1db = DAL('sqlite:memory:')
2db.define_table('person',
3Field('name'),
4format='%(name)s')
5db.define_table('dog',
6Field('owner', db.person),
7Field('name'),
8format='%(name)s')
9
10 if not db(db.person).count():
11 id = db.person.insert(name="Massimo")
12 db.dog.insert(owner=id, name="Snoopy")
Each record is identified by an ID and referenced by that ID. If you have two
copies of the database used by distinct web2py installations, the ID is unique
only within each database and not across the databases. This is a problem
when merging records from different databases.
In order to make a record uniquely identifiable across databases, they must:
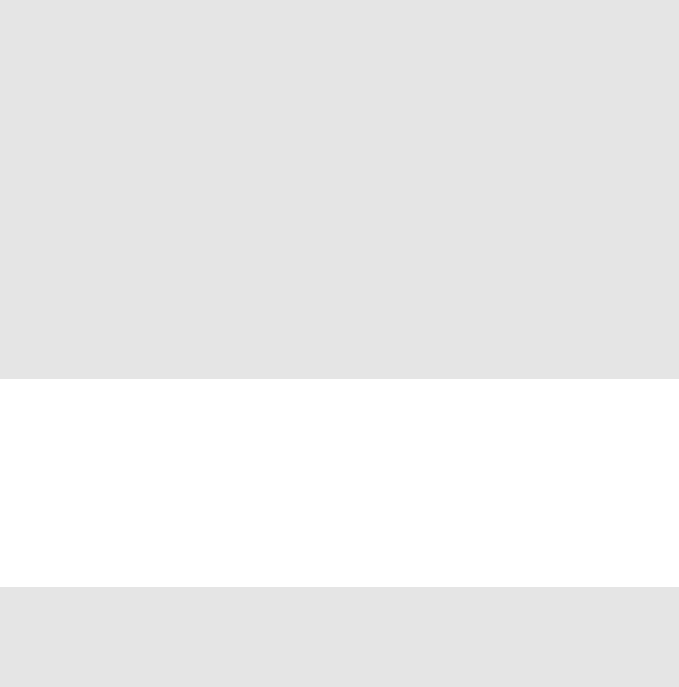
the database abstraction layer 299
• have a unique id (UUID),
• have an event_time (to figure out which one is more recent if multiple
copies),
• reference the UUID instead of the id.
This can be achieved without modifying web2py. Here is what to do:
1.Change the above model into:
1db.define_table('person',
2Field('uuid', length=64, default=lambda:str(uuid.uuid4())),
3Field('modified_on','datetime', default=now),
4Field('name'),
5format='%(name)s')
6
7db.define_table('dog',
8Field('uuid', length=64, default=lambda:str(uuid.uuid4())),
9Field('modified_on','datetime', default=now),
10 Field('owner', length=64),
11 Field('name'),
12 format='%(name)s')
13
14 db.dog.owner.requires = IS_IN_DB(db,'person.uuid','%(name)s')
15
16 if not db(db.person.id).count():
17 id = uuid.uuid4()
18 db.person.insert(name="Massimo", uuid=id)
19 db.dog.insert(owner=id, name="Snoopy")
Note, in the above table definitions, the default value for the two ’uuid’ fields
is set to a lambda function, which returns a UUID (converted to a string).
The lambda function is called once for each record inserted, ensuring that each
record gets a unique UUID, even if multiple records are inserted in a single
transaction.
2.Create a controller action to export the database:
1def export():
2s = StringIO.StringIO()
3db.export_to_csv_file(s)
4response.headers['Content-Type'] = 'text/csv'
5return s.getvalue()
3.Create a controller action to import a saved copy of the other database and
sync records:

300 web2py full-stack web framework,4th edition
1def import_and_sync():
2form = FORM(INPUT(_type='file',_name='data'), INPUT(_type='submit'))
3if form.process(session=None).accepted:
4db.import_from_csv_file(form.vars.data.file,unique=False)
5# for every table
6for table in db.tables:
7# for every uuid, delete all but the latest
8items = db(db[table]).select(db[table].id,
9db[table].uuid,
10 orderby=db[table].modified_on,
11 groupby=db[table].uuid)
12 for item in items:
13 db((db[table].uuid==item.uuid)&\
14 (db[table].id!=item.id)).delete()
15 return dict(form=form)
Notice that session=None disables the CSRF protection since this URL is
intended to be accessed from outside.
4.Create an index manually to make the search by uuid faster.
Notice that steps 2and 3work for every database model; they are not specific
for this example.
Alternatively, you can use XML-RPC to export/import the file.
If the records reference uploaded files, you also need to export/import the
content of the uploads folder. Notice that files therein are already labeled by
UUIDs so you do not need to worry about naming conflicts and references.
6.26.4HTML and XML (one Table at a time)
DALRows objects also have an xml method (like helpers) that serializes it to
XML/HTML:
1>>> rows = db(db.person.id > 0).select()
2>>> print rows.xml()
3<table>
4<thead>
5<tr>
6<th>person.id</th>
7<th>person.name</th>
8<th>dog.id</th>
9<th>dog.name</th>
10 <th>dog.owner</th>

the database abstraction layer 301
11 </tr>
12 </thead>
13 <tbody>
14 <tr class="even">
15 <td>1</td>
16 <td>Alex</td>
17 <td>1</td>
18 <td>Skipper</td>
19 <td>1</td>
20 </tr>
21 ...
22 </tbody>
23 </table>
If you need to serialize the DALRows in any other XML format with custom
tags, you can easily do that using the universal TAG helper and the * notation:
1>>> rows = db(db.person.id > 0).select()
2>>> print TAG.result(*[TAG.row(*[TAG.field(r[f], _name=f) \
3for f in db.person.fields]) for r in rows])
4<result>
5<row>
6<field name="id">1</field>
7<field name="name">Alex</field>
8</row>
9...
10 </result>
6.26.5Data representation
The export_to_csv_file function accepts a keyword argument named
represent. When True it will use the columns represent function while
exporting the data instead of the raw data.
The function also accepts a keyword argument named colnames that should
contain a list of column names one wish to export. It defaults to all columns.
Both export_to_csv_file and import_from_csv_file accept keyword arguments
that tell the csv parser the format to save/load the files:
•delimiter: delimiter to separate values (default ’,’)
•quotechar: character to use to quote string values (default to double quotes)

302 web2py full-stack web framework,4th edition
•quoting: quote system (default csv.QUOTE_MINIMAL)
Here is some example usage:
1>>> import csv
2>>> db.export_to_csv_file(open('/tmp/test.txt','w'),
3delimiter='|',
4quotechar='"',
5quoting=csv.QUOTE_NONNUMERIC)
Which would render something similar to
1"hello"|35|"this is the text description"|"2009-03-03"
For more information consult the official Python documentation [67]
6.27 Caching selects
The select method also takes a cache argument, which defaults to None.
For caching purposes, it should be set to a tuple where the first element is
the cache model (cache.ram, cache.disk, etc.), and the second element is the
expiration time in seconds.
In the following example, you see a controller that caches a select on the
previously defined db.log table. The actual select fetches data from the back-
end database no more frequently than once every 60 seconds and stores the
result in cache.ram. If the next call to this controller occurs in less than 60
seconds since the last database IO, it simply fetches the previous data from
cache.ram.
1def cache_db_select():
2logs = db().select(db.log.ALL, cache=(cache.ram, 60))
3return dict(logs=logs)
The results of a select are complex, un-pickleable objects; they cannot be stored
in a session and cannot be cached in any other way than the one explained here.

the database abstraction layer 303
6.28 Self-Reference and aliases
It is possible to define tables with fields that refer to themselves although the
usual notation may fail. The following code would be wrong because it uses
a variable db.person before it is defined:
1db.define_table('person',
2Field('name'),
3Field('father_id', db.person),
4Field('mother_id', db.person))
The solution consists of using an alternate notation
1db.define_table('person',
2Field('name'),
3Field('father_id','reference person'),
4Field('mother_id','reference person'))
In fact db.tablename and "reference tablename" are equivalent field types.
If the table refers to itself, then it is not possible to perform a JOIN to select a
person and its parents without use of the SQL "AS" keyword. This is achieved
in web2py using the with_alias. Here is an example:
1>>> Father = db.person.with_alias('father')
2>>> Mother = db.person.with_alias('mother')
3>>> db.person.insert(name='Massimo')
41
5>>> db.person.insert(name='Claudia')
62
7>>> db.person.insert(name='Marco', father_id=1, mother_id=2)
83
9>>> rows = db().select(db.person.name, Father.name, Mother.name,
10 left=(Father.on(Father.id==db.person.father_id),
11 Mother.on(Mother.id==db.person.mother_id)))
12 >>> for row in rows:
13 print row.person.name, row.father.name, row.mother.name
14 Massimo None None
15 Claudia None None
16 Marco Massimo Claudia
Notice that we have chosen to make a distinction between:
• "father_id": the field name used in the table "person";

304 web2py full-stack web framework,4th edition
• "father": the alias we want to use for the table referenced by the above
field; this is communicated to the database;
• "Father": the variable used by web2py to refer to that alias.
The difference is subtle, and there is nothing wrong in using the same name
for the three of them:
1db.define_table('person',
2Field('name'),
3Field('father','reference person'),
4Field('mother','reference person'))
5>>> father = db.person.with_alias('father')
6>>> mother = db.person.with_alias('mother')
7>>> db.person.insert(name='Massimo')
81
9>>> db.person.insert(name='Claudia')
10 2
11 >>> db.person.insert(name='Marco', father=1, mother=2)
12 3
13 >>> rows = db().select(db.person.name, father.name, mother.name,
14 left=(father.on(father.id==db.person.father),
15 mother.on(mother.id==db.person.mother)))
16 >>> for row in rows:
17 print row.person.name, row.father.name, row.mother.name
18 Massimo None None
19 Claudia None None
20 Marco Massimo Claudia
But it is important to have the distinction clear in order to build correct
queries.
6.29 Advanced features
6.29.1Table inheritance
It is possible to create a table that contains all the fields from another table.
It is sufficient to pass the other table in place of a field to define_table. For
example
1db.define_table('person',Field('name'))
2db.define_table('doctor', db.person, Field('specialization'))

the database abstraction layer 305
It is also possible to define a dummy table that is not stored in a database in
order to reuse it in multiple other places. For example:
1signature = db.Table(db, 'signature',
2Field('created_on','datetime', default=request.now),
3Field('created_by', db.auth_user, default=auth.user_id),
4Field('updated_on','datetime', update=request.now),
5Field('updated_by', db.auth_user, update=auth.user_id))
6
7db.define_table('payment',Field('amount','double'), signature)
This example assumes that standard web2py authentication is enabled.
Notice that if you user Auth web2py already creates one such table for you:
1auth = Auth(db)
2db.define_table('payment',Field('amount','double'), auth.signature)
When using table inheritance, if you want the inheriting table to inherit
validators, be sure to define the validators of the parent table before defining
the inheriting table.
6.29.2Common fields and multi-tenancy
db._common_fields is a list of fields that should belong to all the tables. This
list can also contain tables and it it is understood as all fields from the table.
For example occasionally you find yourself in need to add a signature to all
your tables but the ‘auth tables. In this case, after you db.define_tables() but
before defining any other table, insert
1db._common_fields.append(auth.signature)
One field is special: "request_tenant". This field does not exist but you can
create it and add it to any of your tables (or them all):
1db._common_fields.append(Field('request_tenant',
2default=request.env.http_host,writable=False))
For every table with a field called db._request_tenant, all records for all
queries are always automatically filtered by:
1db.table.request_tenant == db.table.request_tenant.default
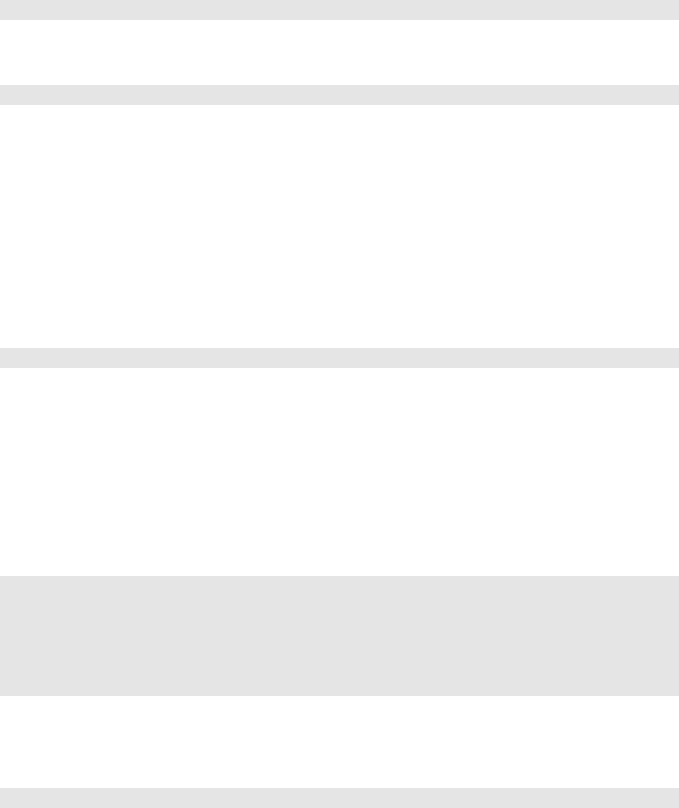
306 web2py full-stack web framework,4th edition
and for every record insert, this field is set to the default value. In the
example above we have chosen
1default = request.env.http_host
i.e. we have chose to ask our app to filter all tables in all queries with
1db.table.request_tenant == request.env.http_host
This simple trick allow us to turn any application into a multi-tenant
application. i.e. even if we run one instance of the app and we use one single
database, if the app is accessed under two or more domains (in the example
the domain name is retrieved from request.env.http_host) the visitors will
see different data depending on the domain. Think of running multiple web
stores under different domains with one app and one database.
You can turn off multi tenancy filters using:
1rows = db(query, ignore_common_filters=True).select()
6.29.3Common filters
A common filter is a generalization of the above multi-tenancy idea. It
provides an easy way to prevent repeating of the same query. Consider for
example the following table:
1db.define_table('blog_post',
2Field('subject'),
3Field('post_text','text'),
4Field('is_public','boolean'),
5common_filter = lambda query: db.blog_post.is_public==True
6)
Any select, delete or update in this table, will include only public blog posts.
The attribute can also be changed in controllers:
1db.blog_post._common_filter = lambda query: db.blog_post.is_public == True
It serves both as a way to avoid repeating the "db.blog_post.is_public==True"
phrase in each blog post search, and also as a security enhancement, that
prevents you from forgetting to disallow viewing of none public posts.

the database abstraction layer 307
In case you actually do want items left out by the common filter (for example,
allowing the admin to see none public posts), you can either remove the filter:
1db.blog_post._common_filter = None
or ignore it:
1db(query, ignore_common_filters=True).select(...)
6.29.4Custom Field types (experimental)
It is possible to define new/custom field types. For example we consider
here the example if a field that contains binary data in compressed form:
1from gluon.dal import SQLCustomType
2import zlib
3
4compressed = SQLCustomType(
5type ='text',
6native='text',
7encoder =(lambda x: zlib.compress(x or '')),
8decoder = (lambda x: zlib.decompress(x))
9)
10
11 db.define_table('example',Field('data',type=compressed))
SQLCustomType is a field type factory. Its type argument must be one of the
standard web2py types. It tells web2py how to treat the field values at
the web2py level. native is the name of the field as far as the database is
concerned. Allowed names depend on the database engine. encoder is an
optional transformation function applied when the data is stored and decoder
is the optional reversed transformation function.
This feature is marked as experimental. In practice is has been in web2py for
a long time and it works but it can make the code not portable, for example
when the native type is database specific. It does not work on Google App
Engine NoSQL.
6.29.5Using DAL without define tables
The DAL can be used from any Python program simply by doing this:

308 web2py full-stack web framework,4th edition
1from gluon import DAL,Field
2db = DAL('sqlite://storage.sqlite',folder='path/to/app/databases')
i.e. import the DAL, Field, connect and specify the folder which contains
the.table files (the app/databases folder).
To access the data and its attributes we still have to define all the tables we
are going to access with db.define_tables(...).
If we just need access to the data but not to the web2py table attributes, we
get away without re-defining the tables but simply asking web2py to read
the necessary info from the metadata in the.table files:
1from gluon import DAL,Field
2db = DAL('sqlite://storage.sqlite',folder='path/to/app/databases',
3auto_import=True))
This allows us to access any db.table without need to re-define it.
6.29.6Copy data from one db into another
Consider the situation in which you have been using the following database:
1db = DAL('sqlite://storage.sqlite')
and you wish to move to another database using a different connection string:
1db = DAL('postgresql://username:password@hocalhost/mydb')
Before you switch, you want to move the data and rebuild all the metadata
for the new database. We assume the new database to exist but we also
assume it is empty.
Web2py provides a script that does this work for you:
1cd web2py
2python scripts/cpdb.py \
3-f applications/app/databases \
4-y 'sqlite://storage.sqlite' \
5-Y 'postgresql://username:password@hocalhost/mydb'
After running the script you can simply switch the connection string in the
model and everything should work out of the box. The new data should be
there.

the database abstraction layer 309
This script provides various command line options that allows you to move
data from one application to another, move all tables or only some tables,
clear the data in the tables. for more info try:
1python scripts/cpdb.py -h
6.29.7Note on new DAL and adapters
The source code of the Database Abstraction Layer was completely rewritten
in 2010. While it stays backward compatible, the rewrite made it more
modular and easier to extend. Here we explain the main logic.
The file "gluon/dal.py" defines, among other, the following classes.
1ConnectionPool
2BaseAdapter extends ConnectionPool
3Row
4DAL
5Reference
6Table
7Expression
8Field
9Query
10 Set
11 Rows
Their use has been explained in the previous sections, except for BaseAdapter.
When the methods of a Table or Set object need to communicate with the
database they delegate to methods of the adapter the task to generate the
SQL and or the function call.
For example:
1db.myable.insert(myfield='myvalue')
calls
1Table.insert(myfield='myvalue')
which delegates the adapter by returning:
1db._adapter.insert(db.mytable,db.mytable._listify(dict(myfield='myvalue')))
310 web2py full-stack web framework,4th edition
Here db.mytable._listify converts the dict of arguments into a list of
(field,value) and calls the insert method of the adapter.db._adapter does
more or less the following:
1query = db._adapter._insert(db.mytable,list_of_fields)
2db._adapter.execute(query)
where the first line builds the query and the second executes it.
BaseAdapter define the interface for all adapters.
"gluon/dal.py" at the moment of writing this book, contains the following
adapters:
1SQLiteAdapter extends BaseAdapter
2JDBCSQLiteAdapter extends SQLiteAdapter
3MySQLAdapter extends BaseAdapter
4PostgreSQLAdapter extends BaseAdapter
5JDBCPostgreSQLAdapter extends PostgreSQLAdapter
6OracleAdapter extends BaseAdapter
7MSSQLAdapter extends BaseAdapter
8MSSQL2Adapter extends MSSQLAdapter
9FireBirdAdapter extends BaseAdapter
10 FireBirdEmbeddedAdapter extends FireBirdAdapter
11 InformixAdapter extends BaseAdapter
12 DB2Adapter extends BaseAdapter
13 IngresAdapter extends BaseAdapter
14 IngresUnicodeAdapter extends IngresAdapter
15 GoogleSQLAdapter extends MySQLAdapter
16 NoSQLAdapter extends BaseAdapter
17 GoogleDatastoreAdapter extends NoSQLAdapter
18 CubridAdapter extends MySQLAdapter (experimental)
19 TeradataAdapter extends DB2Adapter (experimental)
20 SAPDBAdapter extends BaseAdapter (experimental)
21 CouchDBAdapter extends NoSQLAdapter (experimental)
22 MongoDBAdapter extends NoSQLAdapter (experimental)
which override the behavior of the BaseAdapter.
Each adapter has more or less this structure:
1class MySQLAdapter(BaseAdapter):
2
3# specify a diver to use
4driver = globals().get('pymysql',None)
5
6# map web2py types into database types
7types = {

the database abstraction layer 311
8'boolean':'CHAR(1)',
9'string':'VARCHAR(%(length)s)',
10 'text':'LONGTEXT',
11 ...
12 }
13
14 # connect to the database using driver
15 def __init__(self,db,uri,pool_size=0,folder=None,db_codec ='UTF-8',
16 credential_decoder=lambda x:x, driver_args={},
17 adapter_args={}):
18 # parse uri string and store parameters in driver_args
19 ...
20 # define a connection function
21 def connect(driver_args=driver_args):
22 return self.driver.connect(**driver_args)
23 # place it in the pool
24 self.pool_connection(connect)
25 # set optional parameters (after connection)
26 self.execute('SET FOREIGN_KEY_CHECKS=1;')
27 self.execute("SET sql_mode='NO_BACKSLASH_ESCAPES';")
28
29 # override BaseAdapter methods as needed
30 def lastrowid(self,table):
31 self.execute('select last_insert_id();')
32 return int(self.cursor.fetchone()[0])
Looking at the various adapters as examples should be easy to write new
ones.
When db instance is created:
1db = DAL('mysql://...')
the prefix in the uri string defines the adapter. The mapping is defined in the
following dictionary also in "gluon/dal.py":
1ADAPTERS = {
2'sqlite': SQLiteAdapter,
3'sqlite:memory': SQLiteAdapter,
4'mysql': MySQLAdapter,
5'postgres': PostgreSQLAdapter,
6'oracle': OracleAdapter,
7'mssql': MSSQLAdapter,
8'mssql2': MSSQL2Adapter,
9'db2': DB2Adapter,
10 'teradata': TeradataAdapter,
11 'informix': InformixAdapter,
12 'firebird': FireBirdAdapter,

312 web2py full-stack web framework,4th edition
13 'firebird_embedded': FireBirdAdapter,
14 'ingres': IngresAdapter,
15 'ingresu': IngresUnicodeAdapter,
16 'sapdb': SAPDBAdapter,
17 'cubrid': CubridAdapter,
18 'jdbc:sqlite': JDBCSQLiteAdapter,
19 'jdbc:sqlite:memory': JDBCSQLiteAdapter,
20 'jdbc:postgres': JDBCPostgreSQLAdapter,
21 'gae': GoogleDatastoreAdapter, # discouraged, for backward compatibility
22 'google:datastore': GoogleDatastoreAdapter,
23 'google:sql': GoogleSQLAdapter,
24 'couchdb': CouchDBAdapter,
25 'mongodb': MongoDBAdapter,
26 }
the uri string is then parsed in more detail by the adapter itself.
For any adapter you can replace the driver with a different one:
1from gluon.dal import MySQLAdapter
2MySQLAdapter.driver = mysqldb
and you can specify optional driver arguments and adapter arguments:
1db =DAL(..., driver_args={}, adapter_args={})
6.29.8Gotchas
SQLite does not support dropping and altering columns. That means that
web2py migrations will work up to a point. If you delete a field from a
table, the column will remain in the database but be invisible to web2py. If
you decide to re-instate the column, web2py will try re-create it and fail. In
this case you must set fake_migrate=True so that metadata is rebuilt without
attempting to add the column again. Also, for the same reason, SQLite is
not aware of any change of column type. If you insert a number in a string
field, it will be stored as string. If you later change the model and replace the
type "string" with type "integer", SQLite will continue to keep the number as
a string and this may cause problem when you try to extract the data.
MySQL does not support multiple ALTER TABLE within a single
transaction. This means that any migration process is broken into multiple
commits. If something happens that causes a failure it is possible to

the database abstraction layer 313
break a migration (the web2py metadata are no-longer in sync with the
actual table structure in the database). This is unfortunate but it can be
prevented (migrate one table at the time) or it can be fixed a posteriori
(revert the web2py model to what corresponds to the table structure in
database, set fake_migrate=True and after the metadata has been rebuilt, set
fake_migrate=False and migrate the table again).
Google SQL has the same problems as MySQL and some more. In particular
table metadata itself must be stored in the database in a table that is not
migrated by web2py. This is because Google App Engine has a readonly
file system. Web2py migrations in Google:SQL combined with the MySQL
issue described above can result in metadata corruption. Again this can be
prevented (my migrating the table at once and then setting migrate=False so
that the metadata table is not accessed any more) or it can fixed a posteriori
(my accessing the database using the Google dashboard and deleting any
corrupted entry from the table called web2py_filesystem.
MSSQL does not support the SQL OFFSET keyword. Therefore the database
cannot do pagination. When doing a limitby=(a,b) web2py will fetch the first
brows and discard the first the a. This may result in a considerable overhead
when compared with other database engines.
Oracle also does not support pagination. It does not support neither
the OFFSET nor the LIMIT keywords. Web2py achieves pagination but
translating a db(...).select(limitby=(a,b)) into a complex three-way nested
select (as suggested by official Oracle documentation). This works for simple
select but may break for complex selects involving alised fields and or joins.
MSSQL has problems with circular references in tables that have ONDELETE
CASCADE. This is MSSSQL bug and you work around it by setting the
ondelete attribute for all reference fields to "NO ACTION". You can also
do it once for all before you define tables:
1db = DAL('mssql://....')
2for key in ['reference','reference FK']:
3db._adapter.types[key]=db._adapter.types[key].replace(
4'%(on_delete_action)s','NO ACTION')
MSSQL also has problems with arguments passed to the DISTINCT keyword

314 web2py full-stack web framework,4th edition
and therefore while this works,
1db(query).select(distinct=True)
this does not
1db(query).select(distinct=db.mytable.myfield)
Google NoSQL (Datastore) does not allow joins, left joins, aggregates,
expression, OR involving more than one table, the like operator and search
in "text"" fields. Transactions are limited and not provided automatically by
web2py (you need to use the Google API run_in_transaction which you can
look up in the Google App Engine documentation online). Google also limits
the number of records you can retrieve in each one query (1000 at the time
of writing). On the Google datastore record IDs are integer but they are not
sequential. While on SQL the "list:string" type is mapped into a "text" type,
on the Google Datastore it is mapped into a ListStringProperty. Similarly
"list:integer" and "list:reference" are mapped into "ListProperty". This makes
that searches for content inside these fields types are more efficient on Google
NoSQL than on SQL databases.
7
Forms and validators
There are four distinct ways to build forms in web2py:
•FORM provides a low-level implementation in terms of HTML helpers. A
FORM object can be serialized into HTML and is aware of the fields it
contains. A FORM object knows how to validate submitted form values.
•SQLFORM provides a high-level API for building create, update and delete
forms from an existing database table.
•SQLFORM.factory is an abstraction layer on top of SQLFORM in order to take
advantage of the form generation features even if there is no database
present. It generates a form very similar to SQLFORM from the description
of a table but without the need to create the database table.
•CRUD methods. These are functionally equivalent to SQLFORM and are
based on SQLFORM, but provide a more compact notation.
All these forms are self-aware and, if the input does not pass validation, they
can modify themselves and add error messages. The forms can be queried
for the validated variables and for error messages that have been generated
by validation.
Arbitrary HTML code can be inserted into or extracted from the form using
helpers.
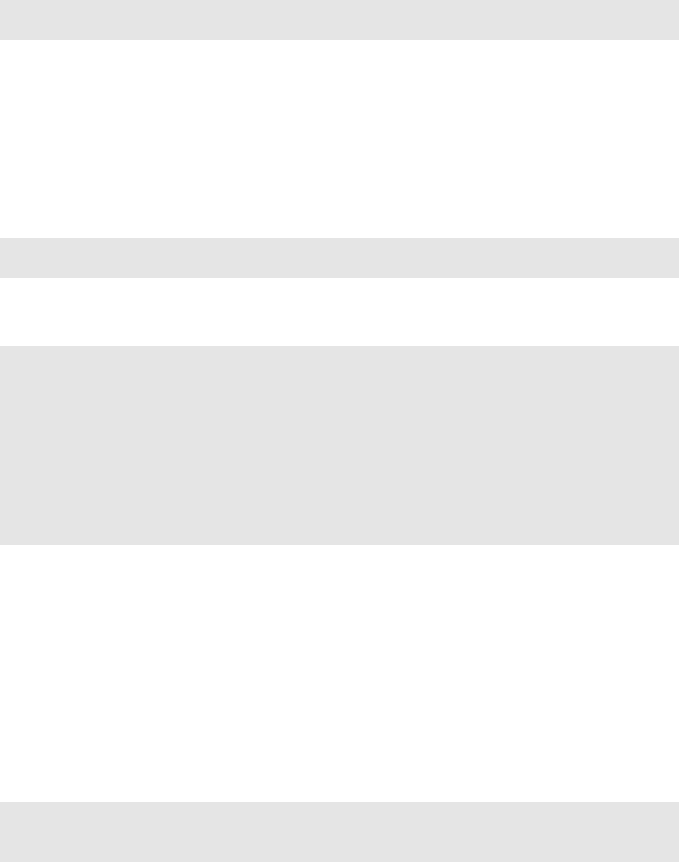
316 web2py full-stack web framework,4th edition
FORM and SQLFORM are helpers and they can be manipulated in as similar way
as the DIV. For example you can set a form style:
1form = SQLFORM(..)
2form['_style']='border:1px solid black'
7.1FORM
Consider as an example a test application with the following "default.py"
controller:
1def display_form():
2return dict()
and the associated "default/display_form.html" view:
1{{extend 'layout.html'}}
2<h2>Input form</h2>
3<form enctype="multipart/form-data"
4action="{{=URL()}}" method="post">
5Your name:
6<input name="name" />
7<input type="submit" />
8</form>
9<h2>Submitted variables</h2>
10 {{=BEAUTIFY(request.vars)}}
This is a regular HTML form that asks for the user’s name. When you fill
the form and click the submit button, the form self-submits, and the variable
request.vars.name and its value is displayed at the bottom.
You can generate the same form using helpers. This can be done in the view
or in the action. Since web2py processed the form in the action, it is OK to
define the form in the action.
Here is the new controller:
1def display_form():
2form=FORM('Your name:',INPUT(_name='name'), INPUT(_type='submit'))
3return dict(form=form)
and the associated "default/display_form.html" view:

forms and validators 317
1{{extend 'layout.html'}}
2<h2>Input form</h2>
3{{=form}}
4<h2>Submitted variables</h2>
5{{=BEAUTIFY(request.vars)}}
The code so far is equivalent to the previous code, but the form is generated
by the statement {{=form}} which serializes the FORM object.
Now we add one level of complexity by adding form validation and
processing.
Change the controller as follows:
1def display_form():
2form=FORM('Your name:',
3INPUT(_name='name', requires=IS_NOT_EMPTY()),
4INPUT(_type='submit'))
5if form.accepts(request,session):
6response.flash = 'form accepted'
7elif form.errors:
8response.flash = 'form has errors'
9else:
10 response.flash = 'please fill the form'
11 return dict(form=form)
and the associated "default/display_form.html" view:
1{{extend 'layout.html'}}
2<h2>Input form</h2>
3{{=form}}
4<h2>Submitted variables</h2>
5{{=BEAUTIFY(request.vars)}}
6<h2>Accepted variables</h2>
7{{=BEAUTIFY(form.vars)}}
8<h2>Errors in form</h2>
9{{=BEAUTIFY(form.errors)}}
Notice that:
• In the action, we added the requires=IS_NOT_EMPTY() validator for the input
field "name".
• In the action, we added a call to form.accepts(..)
• In the view, we are printing form.vars and form.errors as well as the form
and request.vars.

318 web2py full-stack web framework,4th edition
All the work is done by the accepts method of the form object. It filters
the request.vars according to the declared requirements (expressed by
validators). accepts stores those variables that pass validation into form.vars.
If a field value does not meet a requirement, the failing validator returns an
error and the error is stored in form.errors. Both form.vars and form.errors
are gluon.storage.Storage objects similar to request.vars. The former contains
the values that passed validation, for example:
1form.vars.name = "Max"
The latter contains the errors, for example:
1form.errors.name = "Cannot be empty!"
The full signature of the accepts method is the following:
1form.accepts(vars, session=None, formname='default',
2keepvalues=False, onvalidation=None,
3dbio=True, hideerror=False):
The meaning of the optional parameters is explained in the next sub-sections.
The first argument can be request.vars or request.get_vars or
request.post_vars or simply request. The latter is equivalent to accepting as
input the request.post_vars.
The accepts function returns True if the form is accepted and False otherwise.
A form is not accepted if it has errors or when it has not been submitted (for
example, the first time it is shown).
Here is how this page looks the first time it is displayed:
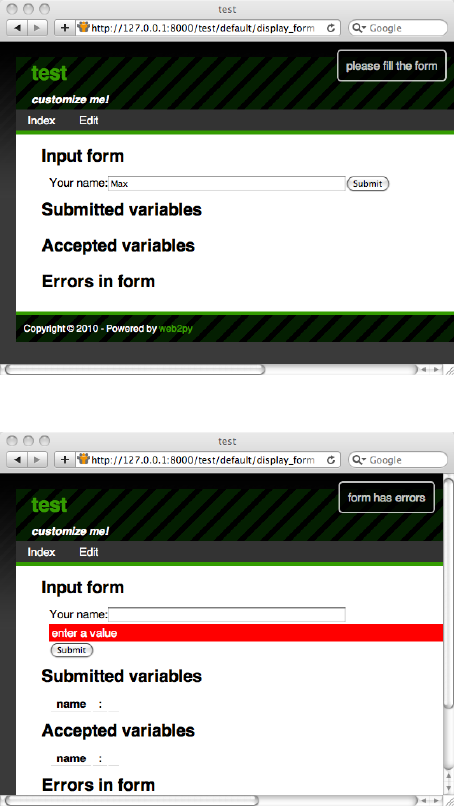
forms and validators 319
Here is how it looks upon invalid submission:
Here is how it looks upon a valid submission:
320 web2py full-stack web framework,4th edition
7.1.1The process and validate methods
A shortcut for
1form.accepts(request.post_vars,session,...)
is
1form.process(...).accepted
the latter does not need the request and session arguments (although you
can specify them optionally). it also differs from accepts because it returns
the form itself. Internally process calls accepts and passes its arguments to it.
The value returned by accepts is stored in form.accepted.
The process function takes some extra argument that accepts does not take:
•message_onsuccess
•onsuccess: if equal to ’flash’ (default) and the form is accepted it will flash
the above ‘message_onsuccess
1-
message_onfailure
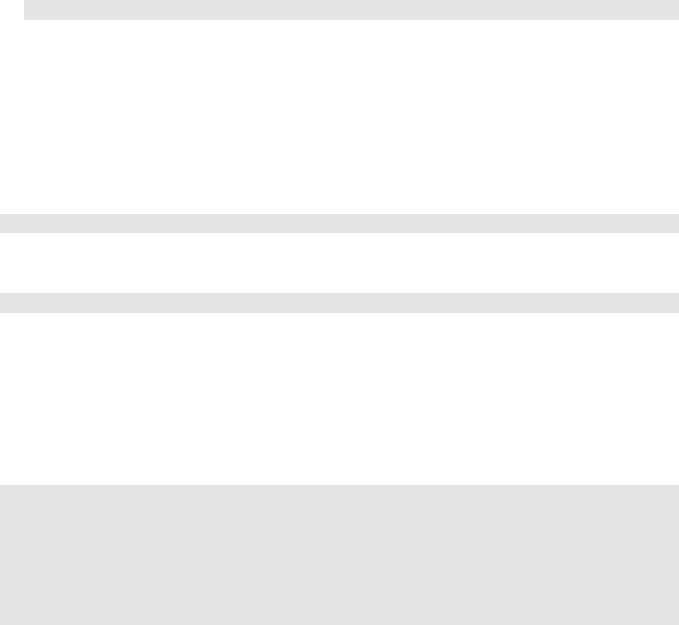
forms and validators 321
1-
onfailure: if equal to ’flash’ (default) and the form fails
validation, it will flash the above ‘message_onfailure
•next the user to redirect after the form is accepted.
onsuccess and onfailure can be functions like lambda form:
do_something(form).
1form.validate(...)
is a shortcut for
1form.process(...,dbio=False).accepted
7.1.2Hidden fields
When the above form object is serialized by {{=form}}, and because of the
previous call to the accepts method, it now looks like this:
1<form enctype="multipart/form-data" action="" method="post">
2your name:
3<input name="name" />
4<input type="submit" />
5<input value="783531473471" type="hidden" name="_formkey" />
6<input value="default" type="hidden" name="_formname" />
7</form>
Notice the presence of two hidden fields: "_formkey" and "_formname".
Their presence is triggered by the call to accepts and they play two different
and important roles:
• The hidden field called "_formkey" is a one-time token that web2py uses
to prevent double submission of forms. The value of this key is generated
when the form is serialized and stored in the session. When the form is
submitted this value must match, or else accepts returns False without
errors as if the form was not submitted at all. This is because web2py
cannot determine whether the form was submitted correctly.
• The hidden field called "_formname" is generated by web2py as a name for
the form, but the name can be overridden. This field is necessary to allow

322 web2py full-stack web framework,4th edition
pages that contain and process multiple forms. web2py distinguishes the
different submitted forms by their names.
• Optional hidden fields specified as FORM(..,hidden=dict(...)).
The role of these hidden fields and their usage in custom forms and pages
with multiple forms is discussed in more detail later in the chapter.
If the form above is submitted with an empty "name" field, the form does not
pass validation. When the form is serialized again it appears as:
1<form enctype="multipart/form-data" action="" method="post">
2your name:
3<input value="" name="name" />
4<div class="error">cannot be empty!</div>
5<input type="submit" />
6<input value="783531473471" type="hidden" name="_formkey" />
7<input value="default" type="hidden" name="_formname" />
8</form>
Notice the presence of a DIV of class "error" in the serialized form. web2py
inserts this error message in the form to notify the visitor about the field that
did not pass validation. The accepts method, upon submission, determines
that the form is submitted, checks whether the field "name" is empty and
whether it is required, and eventually inserts the error message from the
validator into the form.
The base "layout.html" view is expected to handle DIVs of class "error". The
default layout uses jQuery effects to make errors appear and slide down with
a red background. See Chapter 11 for more details.
7.1.3keepvalues
The optional argument keepvalues tells web2py what to do when a form is
accepted and there is no redirection, so the same form is displayed again.
By default the form is cleared. If keepvalues is set to True, the form is pre-
populated with the previously inserted values. This is useful when you
have a form that is supposed to be used repeatedly to insert multiple similar
records. If the dbio argument is set to False, web2py will not perform any DB
insert/update after accepting form. If hideerror is set to True and the form

forms and validators 323
contains errors, these will not be displayed when the form is rendered (it will
be up to you to display them from form.errors somehow. The onvalidation
argument is explained below.
7.1.4onvalidation
The onvalidation argument can be None or can be a function that takes the
form and returns nothing. Such a function would be called and passed the
form, immediately after validation (if validation passes) and before anything
else happens. The purpose of this function is multifold. It can be used, for
example, to perform additional checks on the form and eventually add errors
to the form. It can also be used to compute the values of some fields based on
the values of other fields. It can be used to trigger some action (like sending
an email) before a record is created/updated.
Here is an example:
1db.define_table('numbers',
2Field('a','integer'),
3Field('b','integer'),
4Field('c','integer', readable=False, writable=False))
5
6def my_form_processing(form):
7c = form.vars.a *form.vars.b
8if c < 0:
9form.errors.b = 'a*b cannot be negative'
10 else:
11 form.vars.c = c
12
13 def insert_numbers():
14 form = SQLFORM(db.numbers)
15 if form.process(onvalidation=my_form_processing).accepted:
16 session.flash = 'record inserted'
17 redirect(URL())
18 return dict(form=form)
7.1.5Detect record change
When filling a form to edit a record there is a small probability that another
user may concurrently be editing the same record. So when we save the

324 web2py full-stack web framework,4th edition
record we want to check for possible conflicts. This can be done:
1db.define_table('dog',Field('name'))
2
3def edit_dog():
4dog = db.dog(request.args(0)) or redirect(URL('error'))
5form=SQLFORM(db.dog,dog)
6form.process(detect_record_change=True)
7if form.record_changed:
8# do something
9elif form.accepted:
10 # do something else
11 else:
12 # do nothing
13 return dict(form=form)
7.1.6Forms and redirection
The most common way to use forms is via self-submission, so that the
submitted field variables are processed by the same action that generated
the form. Once the form is accepted, it is unusual to display the current page
again (something we are doing here only to keep things simple). It is more
common to redirect the visitor to a "next" page.
Here is the new example controller:
1def display_form():
2form = FORM('Your name:',
3INPUT(_name='name', requires=IS_NOT_EMPTY()),
4INPUT(_type='submit'))
5if form.process().accepted:
6session.flash = 'form accepted'
7redirect(URL('next'))
8elif form.errors:
9response.flash = 'form has errors'
10 else:
11 response.flash = 'please fill the form'
12 return dict(form=form)
13
14 def next():
15 return dict()
In order to set a flash on the next page instead of the current page you must
use session.flash instead of response.flash. web2py moves the former into
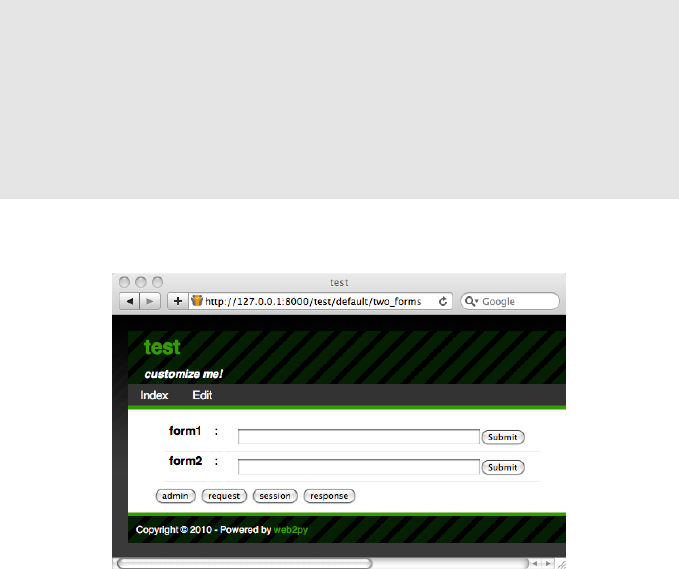
forms and validators 325
the latter after redirection. Note that using session.flash requires that you
do not session.forget().
7.1.7Multiple forms per page
The content of this section applies to both FORM and SQLFORM objects. It is
possible to have multiple forms per page, but you must allow web2py to
distinguish them. If these are derived by SQLFORM from different tables, then
web2py gives them different names automatically; otherwise you need to
explicitly give them different form names. Here is an example:
1def two_forms():
2form1 = FORM(INPUT(_name='name', requires=IS_NOT_EMPTY()),
3INPUT(_type='submit'))
4form2 = FORM(INPUT(_name='name', requires=IS_NOT_EMPTY()),
5INPUT(_type='submit'))
6if form1.process(formname='form_one').accepted:
7response.flash = 'form one accepted'
8if form2.process(formname='form_two').accepted:
9response.flash = 'form two accepted'
10 return dict(form1=form1, form2=form2)
and here is the output it produces:
When the visitor submits an empty form1, only form1displays an error; if
the visitor submits an empty form2, only form2displays an error message.

326 web2py full-stack web framework,4th edition
7.1.8Sharing forms
The content of this section applies to both FORM and SQLFORM objects. What
we discuss here is possible but not recommended, since it is always good
practice to have forms that self-submit. Sometimes, though, you don’t have
a choice, because the action that sends the form and the action that receives
it belong to different applications.
It is possible to generate a form that submits to a different action. This is
done by specifying the URL of the processing action in the attributes of the
FORM or SQLFORM object. For example:
1form = FORM(INPUT(_name='name', requires=IS_NOT_EMPTY()),
2INPUT(_type='submit'), _action=URL('page_two'))
3
4def page_one():
5return dict(form=form)
6
7def page_two():
8if form.process(session=None, formname=None).accepted:
9response.flash = 'form accepted'
10 else:
11 response.flash = 'there was an error in the form'
12 return dict()
Notice that since both "page_one" and "page_two" use the same form, we
have defined it only once by placing it outside of all the actions, in order
not to repeat ourselves. The common portion of code at the beginning of a
controller gets executed every time before giving control to the called action.
Since "page_one" does not call process (nor accepts), the form has no name
and no key, so you must pass session=None and set formname=None in process,
or the form will not validate when "page_two" receives it.
7.2SQLFORM
We now move to the next level by providing the application with a model
file:
1db = DAL('sqlite://storage.sqlite')
2db.define_table('person',Field('name', requires=IS_NOT_EMPTY()))

forms and validators 327
Modify the controller as follows:
1def display_form():
2form = SQLFORM(db.person)
3if form.process().accepted:
4response.flash = 'form accepted'
5elif form.errors:
6response.flash = 'form has errors'
7else:
8response.flash = 'please fill out the form'
9return dict(form=form)
The view does not need to be changed.
In the new controller, you do not need to build a FORM, since the SQLFORM
constructor built one from the table db.person defined in the model. This
new form, when serialized, appears as:
1<form enctype="multipart/form-data" action="" method="post">
2<table>
3<tr id="person_name__row">
4<td><label id="person_name__label"
5for="person_name">Your name: </label></td>
6<td><input type="text" class="string"
7name="name" value="" id="person_name" /></td>
8<td></td>
9</tr>
10 <tr id="submit_record__row">
11 <td></td>
12 <td><input value="Submit" type="submit" /></td>
13 <td></td>
14 </tr>
15 </table>
16 <input value="9038845529" type="hidden" name="_formkey" />
17 <input value="person" type="hidden" name="_formname" />
18 </form>
The automatically generated form is more complex than the previous low-
level form. First of all, it contains a table of rows, and each row has three
columns. The first column contains the field labels (as determined from the
db.person), the second column contains the input fields (and eventually error
messages), and the third column is optional and therefore empty (it can be
populated with the fields in the SQLFORM constructor).
All tags in the form have names derived from the table and field name.
This allows easy customization of the form using CSS and JavaScript. This

328 web2py full-stack web framework,4th edition
capability is discussed in more detail in Chapter 11.
More important is that now the accepts method does a lot more work for you.
As in the previous case, it performs validation of the input, but additionally,
if the input passes validation, it also performs a database insert of the new
record and stores in form.vars.id the unique "id" of the new record.
ASQLFORM object also deals automatically with "upload" fields by saving
uploaded files in the "uploads" folder (after having them renamed safely to
avoid conflicts and prevent directory traversal attacks) and stores their names
(their new names) into the appropriate field in the database. After the form
has been processed, the new filename is available in form.vars.fieldname (i.e.,
it replaces the cgi.FieldStorage object in request.vars.fieldname), so you can
easily reference the new name right after upload.
ASQLFORM displays "boolean" values with checkboxes, "text" values with
textareas, values required to be in a definite set or a database with drop-
boxes, and "upload" fields with links that allow users to download the
uploaded files. It hides "blob" fields, since they are supposed to be handled
differently, as discussed later.
For example, consider the following model:
1db.define_table('person',
2Field('name', requires=IS_NOT_EMPTY()),
3Field('married','boolean'),
4Field('gender', requires=IS_IN_SET(['Male','Female','Other'])),
5Field('profile','text'),
6Field('image','upload'))
In this case, SQLFORM(db.person) generates the form shown below:
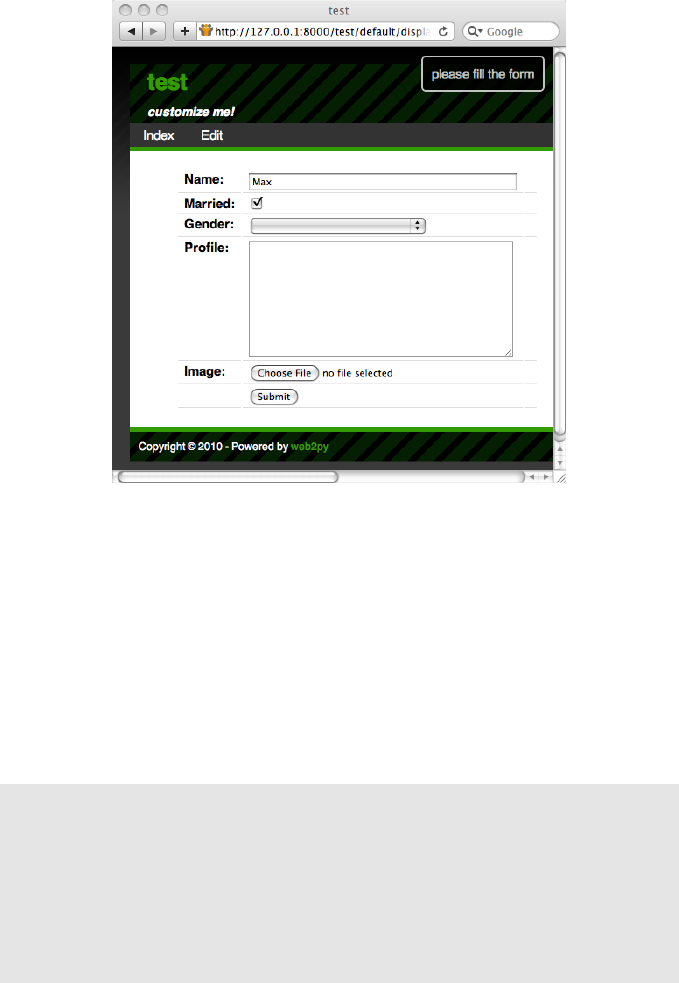
forms and validators 329
The SQLFORM constructor allows various customizations, such as displaying
only a subset of the fields, changing the labels, adding values to the optional
third column, or creating UPDATE and DELETE forms, as opposed to
INSERT forms like the current one. SQLFORM is the single biggest time-saver
object in web2py.
The class SQLFORM is defined in "gluon/sqlhtml.py". It can be easily extended
by overriding its xml method, the method that serializes the objects, to change
its output.
The signature for the SQLFORM constructor is the following:
1SQLFORM(table, record = None,
2deletable = False, linkto = None,
3upload = None, fields = None, labels = None,
4col3 = {}, submit_button = 'Submit',
5delete_label = 'Check to delete:',
6showid = True, readonly = False,
7comments = True, keepopts = [],
8ignore_rw = False, record_id = None,
9formstyle = 'table3cols',
10 buttons = ['submit'], separator = ': ',

330 web2py full-stack web framework,4th edition
11 **attributes)
• The optional second argument turns the INSERT form into an UPDATE
form for the specified record (see next subsection).
• If deletable is set to True, the UPDATE form displays a "Check to delete"
checkbox. The value of the label if this field is set via the delete_label
argument.
•submit_button sets the value of the submit button.
•id_label sets the label of the record "id"
• The "id" of the record is not shown if showid is set to False.
•fields is an optional list of field names that you want to display. If a list is
provided, only fields in the list are displayed. For example:
1fields = ['name']
•labels is a dictionary of field labels. The dictionary key is a field name and
the corresponding value is what gets displayed as its label. If a label is not
provided, web2py derives the label from the field name (it capitalizes the
field name and replaces underscores with spaces). For example:
1labels = {'name':'Your Full Name:'}
•col3 is a dictionary of values for the third column. For example:
1col3 = {'name':A('what is this?',
2_href='http://www.google.com/search?q=define:name')}
•linkto and upload are optional URLs to user-defined controllers that allow
the form to deal with reference fields. This is discussed in more detail
later in the section.
•readonly. If set to True, displays the form as readonly
•comments. If set to False, does not display the col3comments
•ignore_rw. Normally, for a create/update form, only fields marked as
writable=True are shown, and for readonly forms, only fields marked as
readable=True are shown. Setting ignore_rw=True causes those constraints
to be ignored, and all fields are displayed. This is mostly used in the

forms and validators 331
appadmin interface to display all fields for each table, overriding what the
model indicates.
•formstyle determines the style to be used when serializing the form in
html. It can be "table3cols" (default), "table2cols" (one row for label and
comment, and one row for input), "ul" (makes an unordered list of input
fields), "divs" (represents the form using css friendly divs, for arbitrary
customization). formstyle can also be a function that takes (record_id,
field_label, field_widget, field_comment) as attributes and returns a TR()
object.
• is a list of INPUTs or TAG.BUTTONs (though technically could be any
combination of helpers) that will be added to a DIV where the submit
button would go.
•separator sets the string that separates form labels from form input fields.
• Optional attributes are arguments starting with underscore that you want
to pass to the FORM tag that renders the SQLFORM object. Examples are:
1_action = '.'
2_method = 'POST'
There is a special attribute. When a dictionary is passed as , its items are
translated into "hidden" INPUT fields (see the example for the FORM helper in
Chapter 5).
1form = SQLFORM(....,hidden=...)
causes the hidden fields to be passed with the submission, no more, no less.
form.accepts(...) is not intended to read the received hidden fields and
move them into form.vars. The reason is security. hidden fields can be
tampered with. So you have to do explicitly move hidden fields from the
request to the form:
1form.vars.a = request.vars.a
2form = SQLFORM(..., hidden=dict(a='b'))

332 web2py full-stack web framework,4th edition
7.2.1SQLFORM and insert/update/delete
SQLFORM creates a new db record when the form is accepted. Assuming
form=SQLFORM(db.test), then the id of the last-created record will be accessible
in myform.vars.id.
If you pass a record as the optional second argument to the SQLFORM
constructor, the form becomes an UPDATE form for that record. This means
that when the form is submitted the existing record is updated and no new
record is inserted. If you set the argument deletable=True, the UPDATE form
displays a "check to delete" checkbox. If checked, the record is deleted.
If a form is submitted and the delete checkbox is checked the attribute
form.deleted is set to True.
You can modify the controller of the previous example so that when we pass
an additional integer argument in the URL path, as in:
1/test/default/display_form/2
and if there is a record with the corresponding id, the SQLFORM generates an
UPDATE/DELETE form for the record:
1def display_form():
2record = db.person(request.args(0)) or redirect(URL('index'))
3form = SQLFORM(db.person, record)
4if form.process().accepted:
5response.flash = 'form accepted'
6elif form.errors:
7response.flash = 'form has errors'
8return dict(form=form)
Line 2finds the record and line 3makes an UPDATE/DELETE form. Line 4
does all the corresponding form processing.
An update form is very similar to a create form except that it is pre-populated
with the current record and it previews images. By default deletable = True
which means the update form will display a "delete record" option.
Edit forms also contain a hidden INPUT field with name="id" which is used to
identify the record. This id is also stored server-side for additional security
and, if the visitor tampers with the value of this field, the UPDATE is not

forms and validators 333
performed and web2py raises a SyntaxError, "user is tampering with form".
When a Field is marked with writable=False, the field is not shown in create
forms, and it is shown readonly in update forms. If a field is marked as
writable=False and readable=False, then the field is not shown at all, not even
in update forms.
Forms created with
1form = SQLFORM(...,ignore_rw=True)
ignore the readable and writable attributes and always show all fields. Forms
in appadmin ignore them by default.
Forms created with
1form = SQLFORM(table,record_id,readonly=True)
always show all fields in readonly mode, and they cannot be accepted.
7.2.2SQLFORM in HTML
There are times when you want to use SQLFORM to benefit from its form
generation and processing, but you need a level of customization of the form
in HTML that you cannot achieve with the parameters of the SQLFORM object,
so you have to design the form using HTML.
Now, edit the previous controller and add a new action:
1def display_manual_form():
2form = SQLFORM(db.person)
3if form.process(session=None, formname='test').accepted:
4response.flash = 'form accepted'
5elif form.errors:
6response.flash = 'form has errors'
7else:
8response.flash = 'please fill the form'
9# Note: no form instance is passed to the view
10 return dict()
and insert the form in the associated "default/display_manual_form.html"
view:

334 web2py full-stack web framework,4th edition
1{{extend 'layout.html'}}
2<form>
3<ul>
4<li>Your name is <input name="name" /></li>
5</ul>
6<input type="submit" />
7<input type="hidden" name="_formname" value="test" />
8</form>
Notice that the action does not return the form because it does not need
to pass it to the view. The view contains a form created manually in HTML.
The form contains a hidden field "_formname" that must be the same formname
specified as an argument of accepts in the action. web2py uses the form name
in case there are multiple forms on the same page, to determine which one
was submitted. If the page contains a single form, you can set formname=None
and omit the hidden field in the view.
form.accepts will look inside response.vars for data that matches fields in the
database table db.person. These fields are declared in the HTML in the format
<input name="field_name_goes_here" />
Note that in the example given, the form variables will be passed on the URL
as arguments. If this is not desired, the POST protocol will have to be specified.
Note furthermore, that if upload fields are specified, the form will have to be
set up to allow this. Here, both options are shown:
1<form enctype="multipart/form-data" method="post">
7.2.3SQLFORM and uploads
Fields of type "upload" are special. They are rendered as INPUT fields of
type="file". Unless otherwise specified, the uploaded file is streamed in
using a buffer, and stored under the "uploads" folder of the application using
a new safe name, assigned automatically. The name of this file is then saved
into the field of type uploads.
As an example, consider the following model:
1db.define_table('person',
2Field('name', requires=IS_NOT_EMPTY()),
3Field('image','upload'))

forms and validators 335
You can use the same controller action "display_form" shown above.
When you insert a new record, the form allows you to browse for a file.
Choose, for example, a jpg image. The file is uploaded and stored as:
1applications/test/uploads/person.image.XXXXX.jpg
"XXXXXX" is a random identifier for the file assigned by web2py.
Notice that, by default, the original filename of an uploaded file is b16encoded
and used to build the new name for the file. This name is retrieved by the
default "download" action and used to set the content disposition header to the
original filename.
Only its extension is preserved. This is a security requirement since the
filename may contain special characters that could allow a visitor to perform
directory traversal attacks or other malicious operations.
The new filename is also stored in form.vars.image.
When editing the record using an UPDATE form, it would be nice to display
a link to the existing uploaded file, and web2py provides a way to do it.
If you pass a URL to the SQLFORM constructor via the upload argument,
web2py uses the action at that URL to download the file. Consider the
following actions:
1def display_form():
2record = db.person(request.args(0)) or redirect(URL('index'))
3form = SQLFORM(db.person, record, deletable=True,
4upload=URL('download'))
5if form.process().accepted:
6response.flash = 'form accepted'
7elif form.errors:
8response.flash = 'form has errors'
9return dict(form=form)
10
11 def download():
12 return response.download(request, db)
Now, insert a new record at the URL:
1http://127.0.0.1:8000/test/default/display_form
Upload an image, submit the form, and then edit the newly created record
336 web2py full-stack web framework,4th edition
by visiting:
1http://127.0.0.1:8000/test/default/display_form/3
(here we assume the latest record has id=3). The form will display an image
preview as shown below:
This form, when serialized, generates the following HTML:
1<td><label id="person_image__label" for="person_image">Image: </label></td>
2<td><div><input type="file" id="person_image" class="upload" name="image"
3/>[<a href="/test/default/download/person.image.0246683463831.jpg">file</a>|
4<input type="checkbox" name="image__delete" />delete]</div></td><td></td></tr>
5<tr id="delete_record__row"><td><label id="delete_record__label" for="delete_record
"
6>Check to delete:</label></td><td><input type="checkbox" id="delete_record"
7class="delete" name="delete_this_record" /></td>
which contains a link to allow downloading of the uploaded file, and a
checkbox to remove the file from the database record, thus storing NULL
in the "image" field.

forms and validators 337
Why is this mechanism exposed? Why do you need to write the download
function? Because you may want to enforce some authorization mechanism
in the download function. See Chapter 9for an example.
Normally uploaded files are stored into "app/uploads" but you can specify
an alternate location:
1Field('image','upload', uploadfolder='...')
In most operating system, accessig the file system can become slow when
there are many files in the same folder. If you plan to upload more than 1000
files you can ask web2py to organize the uploads in subfolders:
1Field('image','upload', uploadseparate=True)
7.2.4Storing the original filename
web2py automatically stores the original filename inside the new UUID
filename and retrieves it when the file is downloaded. Upon download, the
original filename is stored in the content-disposition header of the HTTP
response. This is all done transparently without the need for programming.
Occasionally you may want to store the original filename in a database field.
In this case, you need to modify the model and add a field to store it in:
1db.define_table('person',
2Field('name', requires=IS_NOT_EMPTY()),
3Field('image_filename'),
4Field('image','upload'))
then you need to modify the controller to handle it:
1def display_form():
2record = db.person(request.args(0)) or redirect(URL('index'))
3url = URL('download')
4form = SQLFORM(db.person, record, deletable=True,
5upload=url, fields=['name','image'])
6if request.vars.image!=None:
7form.vars.image_filename = request.vars.image.filename
8if form.process().accepted:
9response.flash = 'form accepted'
10 elif form.errors:
11 response.flash = 'form has errors'
12 return dict(form=form)

338 web2py full-stack web framework,4th edition
Notice that the SQLFORM does not display the "image_filename" field. The
"display_form" action moves the filename of the request.vars.image into the
form.vars.image_filename, so that it gets processed by accepts and stored
in the database. The download function, before serving the file, checks in
the database for the original filename and uses it in the content-disposition
header.
7.2.5autodelete
The SQLFORM, upon deleting a record, does not delete the physical uploaded
file(s) referenced by the record. The reason is that web2py does not
know whether the same file is used/linked by other tables or used for
other purpose. If you know it is safe to delete the actual file when the
corresponding record is deleted, you can do the following:
1db.define_table('image',
2Field('name', requires=IS_NOT_EMPTY()),
3Field('file','upload',autodelete=True))
The autodelete attribute is False by default. When set to True is makes sure
the file is deleted when the record is deleted.
7.2.6Links to referencing records
Now consider the case of two tables linked by a reference field. For example:
1db.define_table('person',
2Field('name', requires=IS_NOT_EMPTY()))
3db.define_table('dog',
4Field('owner', db.person),
5Field('name', requires=IS_NOT_EMPTY()))
6db.dog.owner.requires = IS_IN_DB(db,db.person.id,'%(name)s')
A person has dogs, and each dog belongs to an owner, which is a person.
The dog owner is required to reference a valid db.person.id by ’%(name)s’.
Let’s use the appadmin interface for this application to add a few persons
and their dogs.
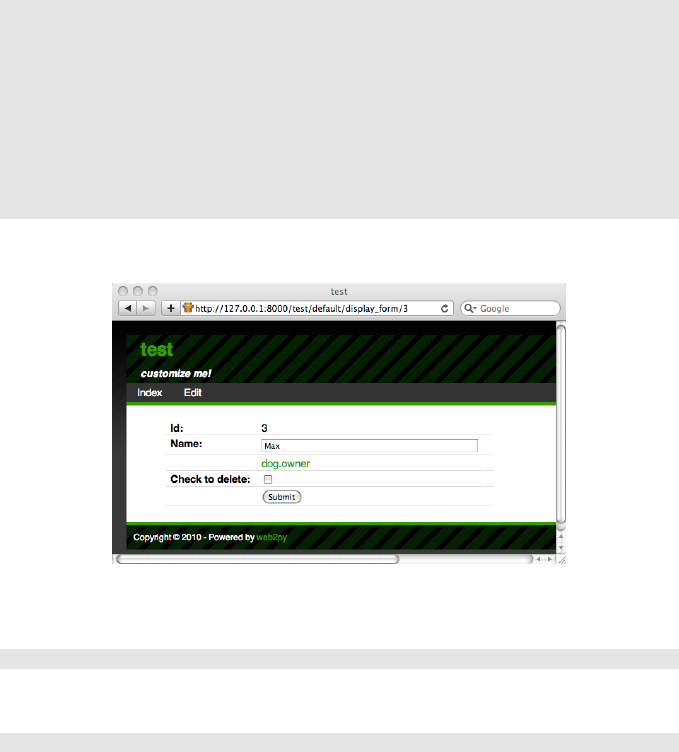
forms and validators 339
When editing an existing person, the appadmin UPDATE form shows a link
to a page that lists the dogs that belong to the person. This behavior can be
replicated using the linkto argument of the SQLFORM.linkto has to point to the
URL of a new action that receives a query string from the SQLFORM and lists
the corresponding records. Here is an example:
1def display_form():
2record = db.person(request.args(0)) or redirect(URL('index'))
3url = URL('download')
4link = URL('list_records', args='db')
5form = SQLFORM(db.person, record, deletable=True,
6upload=url, linkto=link)
7if form.process().accepted:
8response.flash = 'form accepted'
9elif form.errors:
10 response.flash = 'form has errors'
11 return dict(form=form)
Here is the page:
There is a link called "dog.owner". The name of this link can be changed via
the labels argument of the SQLFORM, for example:
1labels = {'dog.owner':"This person's dogs"}
If you click on the link you get directed to:
1/test/default/list_records/dog?query=dog.owner%3D5
"list_records" is the specified action, with request.args(0) set to the name
of the referencing table and request.vars.query set to the SQL query string.

340 web2py full-stack web framework,4th edition
The query string in the URL contains the value "dog.owner=5" appropriately
url-encoded (web2py decodes this automatically when the URL is parsed).
You can easily implement a very general "list_records" action as follows:
1def list_records():
2table = request.args(0)
3query = request.vars.query
4records = db(query).select(db[table].ALL)
5return dict(records=records)
with the associated "default/list_records.html" view:
1{{extend 'layout.html'}}
2{{=records}}
When a set of records is returned by a select and serialized in a view, it
is first converted into a SQLTABLE object (not the same as a Table) and
then serialized into an HTML table, where each field corresponds to a table
column.
7.2.7Pre-populating the form
It is always possible to pre-populate a form using the syntax:
1form.vars.name = 'fieldvalue'
Statements like the one above must be inserted after the form declaration and
before the form is accepted, whether or not the field ("name" in the example)
is explicitly visualized in the form.
7.2.8Adding extra form elements to SQLFORM
Sometimes you may wish to add an extra element to your form after it has
been created. For example, you may wish to add a checkbox which confirms
the user agrees with the terms and conditions of your website:
1form = SQLFORM(db.yourtable)
2my_extra_element = TR(LABEL('I agree to the terms and conditions'), \
3INPUT(_name='agree',value=True,_type='checkbox'))
4form[0].insert(-1,my_extra_element)

forms and validators 341
The variable my_extra_element should be adapted to the formstyle. In this
example, the default formstyle=’table3cols’ has been assumed.
After submission, form.vars.agree will contain the status of the checkbox,
which could then be used in an onvalidation function, for instance.
7.2.9SQLFORM without database IO
There are times when you want to generate a form from a database table
using SQLFORM and you want to validate a submitted form accordingly, but
you do not want any automatic INSERT/UPDATE/DELETE in the database.
This is the case, for example, when one of the fields needs to be computed
from the value of other input fields. This is also the case when you need to
perform additional validation on the inserted data that cannot be achieved
via standard validators.
This can be done easily by breaking:
1form = SQLFORM(db.person)
2if form.process().accepted:
3response.flash = 'record inserted'
into:
1form = SQLFORM(db.person)
2if form.validate():
3### deal with uploads explicitly
4form.vars.id = db.person.insert(**dict(form.vars))
5response.flash = 'record inserted'
The same can be done for UPDATE/DELETE forms by breaking:
1form = SQLFORM(db.person,record)
2if form.process().accepted:
3response.flash = 'record updated'
into:
1form = SQLFORM(db.person,record)
2if form.validate():
3if form.deleted:
4db(db.person.id==record.id).delete()
5else:

342 web2py full-stack web framework,4th edition
6record.update_record(**dict(form.vars))
7response.flash = 'record updated'
In the case of a table including an "upload"-type field ("fieldname"), both
process(dbio=False) and validate() deal with the storage of the uploaded file
as if process(dbio=True), the default behavior.
The name assigned by web2py to the uploaded file can be found in:
1form.vars.fieldname
7.3SQLFORM.factory
There are cases when you want to generate forms as if you had a database
table but you do not want the database table. You simply want to take
advantage of the SQLFORM capability to generate a nice looking CSS-friendly
form and perhaps perform file upload and renaming.
This can be done via a form_factory. Here is an example where you generate
the form, perform validation, upload a file and store everything in the session
:
1def form_from_factory():
2form = SQLFORM.factory(
3Field('your_name', requires=IS_NOT_EMPTY()),
4Field('your_image','upload'))
5if form.process().accepted:
6response.flash = 'form accepted'
7session.your_name = form.vars.your_name
8session.filename = form.vars.your_image
9elif form.errors:
10 response.flash = 'form has errors'
11 return dict(form=form)
Here is the "default/form_from_factory.html" view:
1{{extend 'layout.html'}}
2{{=form}}
You need to use an underscore instead of a space for field labels, or explicitly
pass a dictionary of labels to form_factory, as you would for a SQLFORM.
By default SQLFORM.factory generates the form using html "id" attributes

forms and validators 343
generated as if the form was generated from a table called "no_table". To
change this dummy table name, use the table_name attribute for the factory:
1form = SQLFORM.factory(...,table_name='other_dummy_name')
Changing the table_name is necessary if you need to place two factory
generated forms in the same table and want to avoid CSS conflicts.
7.3.1One form for multiple tables
It often happens that you have two tables (for example ’client’ and ’address’
which are linked together by a reference and you want to create a single
form that allows to insert info about one client and its default address. Here
is how: model:
1db.define_table('client',
2Field('name'))
3db.define_table('address',
4Field('client',db.client,writable=False,readable=False),
5Field('street'),Field('city'))
controller:
1def register():
2form=SQLFORM.factory(db.client,db.address)
3if form.process().accepted:
4id = db.client.insert(**db.client._filter_fields(form.vars))
5form.vars.client=id
6id = db.address.insert(**db.address._filter_fields(form.vars))
7response.flash='Thanks for filling the form'
8return dict(form=form)
Notice the SQLFORM.factory (it makes ONE form using public fields from
both tables and inherits their validators too). On form accepts this does two
inserts, some data in one table and some data in the other.
This only works when the tables don’t have field names in common.

344 web2py full-stack web framework,4th edition
7.4CRUD
One of the recent additions to web2py is the Create/Read/Update/Delete
(CRUD) API on top of SQLFORM. CRUD creates an SQLFORM, but it
simplifies the coding because it incorporates the creation of the form, the
processing of the form, the notification, and the redirection, all in one single
function.
The first thing to notice is that CRUD differs from the other web2py APIs we
have used so far because it is not already exposed. It must be imported. It
also must be linked to a specific database. For example:
1from gluon.tools import Crud
2crud = Crud(db)
The crud object defined above provides the following API:
.
•crud.tables() returns a list of tables defined in the database.
•crud.create(db.tablename) returns a create form for table tablename.
•crud.read(db.tablename, id) returns a readonly form for tablename and
record id.
•crud.update(db.tablename, id) returns an update form for tablename and
record id.
•crud.delete(db.tablename, id) deletes the record.
•crud.select(db.tablename, query) returns a list of records selected from the
table.
•crud.search(db.tablename) returns a tuple (form, records) where form is a
search form and records is a list of records based on the submitted search
form.
•crud() returns one of the above based on the request.args().
For example, the following action:
1def data(): return dict(form=crud())

forms and validators 345
would expose the following URLs:
1http://.../[app]/[controller]/data/tables
2http://.../[app]/[controller]/data/create/[tablename]
3http://.../[app]/[controller]/data/read/[tablename]/[id]
4http://.../[app]/[controller]/data/update/[tablename]/[id]
5http://.../[app]/[controller]/data/delete/[tablename]/[id]
6http://.../[app]/[controller]/data/select/[tablename]
7http://.../[app]/[controller]/data/search/[tablename]
However, the following action:
1def create_tablename():
2return dict(form=crud.create(db.tablename))
would only expose the create method
1http://.../[app]/[controller]/create_tablename
While the following action:
1def update_tablename():
2return dict(form=crud.update(db.tablename, request.args(0)))
would only expose the update method
1http://.../[app]/[controller]/update_tablename/[id]
and so on.
The behavior of CRUD can be customized in two ways: by setting some
attributes of the crud object or by passing extra parameters to each of its
methods.
7.4.1Settings
Here is a complete list of current CRUD attributes, their default values, and
meaning:
To enforce authentication on all crud forms:
1crud.settings.auth = auth
The use is explained in chapter 9.

346 web2py full-stack web framework,4th edition
To specify the controller that defines the data function which returns the crud
object
1crud.settings.controller = 'default'
To specify the URL to redirect to after a successful "create" record:
1crud.settings.create_next = URL('index')
To specify the URL to redirect to after a successful "update" record:
1crud.settings.update_next = URL('index')
To specify the URL to redirect to after a successful "delete" record:
1crud.settings.delete_next = URL('index')
To specify the URL to be used for linking uploaded files:
1crud.settings.download_url = URL('download')
To specify extra functions to be executed after standard validation procedures
for crud.create forms:
1crud.settings.create_onvalidation = StorageList()
StorageList is the same as a Storage object, they are both defined in the file
"gluon/storage.py", but it defaults to [] as opposed to None. It allows the
following syntax:
1crud.settings.create_onvalidation.mytablename.append(lambda form:....)
To specify extra functions to be executed after standard validation procedures
for crud.update forms:
1crud.settings.update_onvalidation = StorageList()
To specify extra functions to be executed after completion of crud.create
forms:
1crud.settings.create_onaccept = StorageList()
To specify extra functions to be executed after completion of crud.update
forms:
1crud.settings.update_onaccept = StorageList()

forms and validators 347
To specify extra functions to be executed after completion of crud.update if
record is deleted:
1crud.settings.update_ondelete = StorageList()
To specify extra functions to be executed after completion of crud.delete:
1crud.settings.delete_onaccept = StorageList()
To determine whether the "update" forms should have a "delete" button:
1crud.settings.update_deletable = True
To determine whether the "update" forms should show the id of the edited
record:
1crud.settings.showid = False
To determine whether forms should keep the previously inserted values or
reset to default after successful submission:
1crud.settings.keepvalues = False
Crud always detects whether a record being edited has been modified by a
third party in the time between the time when the form is displayed and the
time when it is submitted. This behavior is equivalent to
1form.process(detect_record_change=True)
and it is set in:
1crud.settings.detect_record_change = True
and it can be changed/disabled by setting the variable to False.
You can change the form style by
1crud.settings.formstyle = 'table3cols' or 'table2cols' or 'divs' or 'ul'
You can set the separator in all crud forms:
1crud.settings.label_separator = ':'
You can add captcha to forms, using the same convention explained for auth,
with:

348 web2py full-stack web framework,4th edition
1crud.settings.create_captcha = None
2crud.settings.update_captcha = None
3crud.settings.captcha = None
7.4.2Messages
Here is a list of customizable messages:
1crud.messages.submit_button = 'Submit'
sets the text of the "submit" button for both create and update forms.
1crud.messages.delete_label = 'Check to delete:'
sets the label of the "delete" button in "update" forms.
1crud.messages.record_created = 'Record Created'
sets the flash message on successful record creation.
1crud.messages.record_updated = 'Record Updated'
sets the flash message on successful record update.
1crud.messages.record_deleted = 'Record Deleted'
sets the flash message on successful record deletion.
1crud.messages.update_log = 'Record %(id)s updated'
sets the log message on successful record update.
1crud.messages.create_log = 'Record %(id)s created'
sets the log message on successful record creation.
1crud.messages.read_log = 'Record %(id)s read'
sets the log message on successful record read access.
1crud.messages.delete_log = 'Record %(id)s deleted'
sets the log message on successful record deletion.

forms and validators 349
Notice that crud.messages belongs to the class gluon.storage.Message which
is similar to gluon.storage.Storage but it automatically translates its values,
without need for the Toperator.
Log messages are used if and only if CRUD is connected to Auth as discussed
in Chapter 9. The events are logged in the Auth table "auth_events".
7.4.3Methods
The behavior of CRUD methods can also be customized on a per call basis.
Here are their signatures:
1crud.tables()
2crud.create(table, next, onvalidation, onaccept, log, message)
3crud.read(table, record)
4crud.update(table, record, next, onvalidation, onaccept, ondelete, log, message,
deletable)
5crud.delete(table, record_id, next, message)
6crud.select(table, query, fields, orderby, limitby, headers, **attr)
7crud.search(table, query, queries, query_labels, fields, field_labels, zero,
showall, chkall)
•table is a DAL table or a tablename the method should act on.
•record and record_id are the id of the record the method should act on.
•next is the URL to redirect to after success. If the URL contains the
substring "[id]" this will be replaced by the id of the record currently
created/updated.
•onvalidation has the same function as SQLFORM(..., onvalidation)
•onaccept is a function to be called after the form submission is accepted
and acted upon, but before redirection.
•log is the log message. Log messages in CRUD see variables in the
form.vars dictionary such as "%(id)s".
•message is the flash message upon form acceptance.
•ondelete is called in place of onaccept when a record is deleted via an
"update" form.

350 web2py full-stack web framework,4th edition
•deletable determines whether the "update" form should have a delete
option.
•query is the query to be used to select records.
•fields is a list of fields to be selected.
•orderby determines the order in which records should be selected (see
Chapter 6).
•limitby determines the range of selected records that should be displayed
(see Chapter 6).
•headers is a dictionary with the table header names.
•queries a list like [’equals’, ’not equal’, ’contains’] containing the
allowed methods in the search form.
•query_labels a dictionary like query_labels=dict(equals=’Equals’) giving
names to search methods.
•fields a list of fields to be listed in the search widget.
•field_labels a dictionary mapping field names into labels.
•zero defaults to "choose one" is used as default option for the drop-down
in the search widget.
•showall set it to True if you want rows returned as per the query in the
first call (added after 1.98.2).
•chkall set it to True to turn on all the checkboxes in the search form (added
after 1.98.2).
Here is an example of usage in a single controller function:
1# assuming db.define_table('person', Field('name'))
2def people():
3form = crud.create(db.person, next=URL('index'),
4message=T("record created"))
5persons = crud.select(db.person, fields=['name'],
6headers={'person.name':'Name'})
7return dict(form=form, persons=persons)
Here is another very generic controller function that lets you search,
create and edit any records from any table where the tablename is passed

forms and validators 351
request.args(0):
1def manage():
2table=db[request.args(0)]
3form = crud.update(table,request.args(1))
4table.id.represent = lambda id, row: \
5A('edit:',id,_href=URL(args=(request.args(0),id)))
6search, rows = crud.search(table)
7return dict(form=form,search=search,rows=rows)
Notice the line table.id.represent=... that tells web2py to change the
representation of the id field and display a link instead to the page itself and
passes the id as request.args(1) which turns the create page into an update
page.
7.4.4Record versioning
Both SQLFORM and CRUD provides a utility to version database records:
If you have a table (db.mytable) that needs full revision history you can just
do:
1form = SQLFORM(db.mytable, myrecord).process(onsuccess=auth.archive)
1form = crud.update(db.mytable, myrecord, onaccept=auth.archive)
auth.archive defines a new table called db.mytable_archive (the name is
derived from the name of the table to which it refers) and on updating, it
stores a copy of the record (as it was before the update) in the created archive
table, including a reference to the current record.
Because the record is actually updated (only its previous state is archived),
references are never broken.
This is all done under the hood. Should you wish to access the archive table
you should define it in a model:
1db.define_table('mytable_archive',
2Field('current_record',db.mytable),
3db.mytable)
Notice the table extends db.mytable (including all its fields), and adds a
reference to the current_record.

352 web2py full-stack web framework,4th edition
auth.archive does not timestamp the stored record unless your original table
has timestamp fields, for example:
1db.define_table('mytable',
2Field('created_on','datetime',
3default=request.now,update=request.now,writable=False),
4Field('created_by',auth.user,
5default=auth.user_id,update=auth.user_id,writable=False),
There is nothing special about these fields and you may give them any name
you like. They are filled before the record is archived and are archived with
each copy of the record. The archive table name and/or reference field name
can be changed like this:
1db.define_table('myhistory',
2Field('parent_record',db.mytable),
3db.mytable)
4# ...
5form = SQLFORM(db.mytable,myrecord)
6form.process(onsuccess = lambda form:auth.archive(form,
7archive_table=db.myhistory,
8current_record='parent_record'))
7.5Custom forms
If a form is created with SQLFORM, SQLFORM.factory or CRUD, there are
multiple ways it can be embedded in a view allowing multiple degrees of
customization. Consider for example the following model:
1db.define_table('image',
2Field('name'),
3Field('file','upload'))
and upload action
1def upload_image():
2return dict(form=crud.create(db.image))
The simplest way to embed the form in the view for upload_image is
1{{=form}}
This results in a standard table layout. If you wish to use a different layout,
you can break the form into components
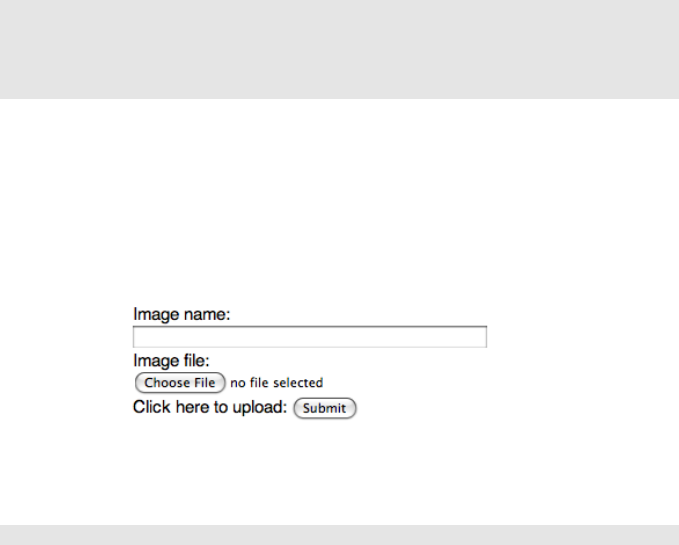
forms and validators 353
1{{=form.custom.begin}}
2Image name: <div>{{=form.custom.widget.name}}</div>
3Image file: <div>{{=form.custom.widget.file}}</div>
4Click here to upload: {{=form.custom.submit}}
5{{=form.custom.end}}
where form.custom.widget[fieldname] gets serialized into the proper widget
for the field. If the form is submitted and it contains errors, they are
appended below the widgets, as usual.
The above sample form is show in the image below.
Notice that a similar result could have been obtained with:
1crud.settings.formstyle='table2cols'
without using a custom form. Other possible formstyles are "table3cols" (the
default), "divs" and "ul".
If you do not wish to use the widgets serialized by web2py, you can replace
them with HTML. There are some variables that will be useful for this:
•form.custom.label[fieldname] contains the label for the field.
•form.custom.comment[fieldname] contains the comment for the field.
•form.custom.dspval[fieldname] form-type and field-type dependent
display representation of the field.
•form.custom.inpval[fieldname] form-type and field-type dependent values
to be used in field code.
It is important to follow the conventions described below.

354 web2py full-stack web framework,4th edition
7.5.1CSS conventions
Tags in forms generated by SQLFORM, SQLFORM.factory and CRUD follow
a strict CSS naming convention that can be used to further customize the
forms.
Given a table "mytable", and a field "myfield" of type "string", it is rendered
by default by a
1SQLFORM.widgets.string.widget
that looks like this:
1<input type="text" name="myfield" id="mytable_myfield"
2class="string" />
Notice that:
• the class of the INPUT tag is the same as the type of the field. This is
very important for the jQuery code in "web2py_ajax.html" to work. It
makes sure that you can only have numbers in "integer" and "double"
fields, and that "time", "date" and "datetime" fields display the popup
calendar/datepicker.
• the id is the name of the class plus the name of the field, joined by one
underscore. This allows you to uniquely refer to the field via, for example,
jQuery(’#mytable_myfield’) and manipulate the stylesheet of the field or
bind actions associated to the field events (focus, blur, keyup, etc.).
• the name is, as you would expect, the field name.
7.5.2Hide errors
Occasionally, you may want to disable the automatic error placement and
display form error messages in some place other than the default. That can
be done easily.
• In the case of FORM or SQLFORM, pass hideerror=True to the accepts
method.
• In the case of CRUD, set crud.settings.hideerror=True

forms and validators 355
You may also want to modify the views to display the error (since they are
no longer displayed automatically).
Here is an example where the errors are displayed above the form and not in
the form.
1{{if form.errors:}}
2Your submitted form contains the following errors:
3<ul>
4{{for fieldname in form.errors:}}
5<li>{{=fieldname}} error: {{=form.errors[fieldname]}}</li>
6{{pass}}
7</ul>
8{{form.errors.clear()}}
9{{pass}}
10 {{=form}}
The errors will displayed as in the image shown below.
This mechanism also works for custom forms.
7.6Validators
Validators are classes used to validate input fields (including forms generated
from database tables).
Here is an example of using a validator with a FORM:
1INPUT(_name='a', requires=IS_INT_IN_RANGE(0, 10))
Here is an example of how to require a validator for a table field:
1db.define_table('person',Field('name'))
2db.person.name.requires = IS_NOT_EMPTY()

356 web2py full-stack web framework,4th edition
Validators are always assigned using the requires attribute of a field. A field
can have a single validator or multiple validators. Multiple validators are
made part of a list:
1db.person.name.requires = [IS_NOT_EMPTY(),
2IS_NOT_IN_DB(db, 'person.name')]
Normally validators are called automatically by the function accepts and
process of a FORM or other HTML helper object that contains a form. They
are called in the order in which they are listed.
One can also call validators explicitly for a field:
1db.person.name.validate(value)
which returns a tuple (value,error) and error is None if no the value validates.
Built-in validators have constructors that take an optional argument:
1IS_NOT_EMPTY(error_message='cannot be empty')
error_message allows you to override the default error message for any
validator.
Here is an example of a validator on a database table:
1db.person.name.requires = IS_NOT_EMPTY(error_message='fill this!')
where we have used the translation operator Tto allow for
internationalization. Notice that default error messages are not translated.
Mind that the only validators that can be used with list: type fields are:
•IS_IN_DB(...,multiple=True)
•IS_IN_SET(...,multiple=True)
•IS_NOT_EMPTY()
•IS_LIST_OF(...)
The latter can be used to apply any validator to the individual items in the
list.

forms and validators 357
7.6.1Validators
IS_ALPHANUMERIC
This validator checks that a field value contains only characters in the ranges
a-z, A-Z, or 0-9.
1requires = IS_ALPHANUMERIC(error_message='must be alphanumeric!')
IS_DATE
This validator checks that a field value contains a valid date in the specified
format. It is good practice to specify the format using the translation
operator, in order to support different formats in different locales.
1requires = IS_DATE(format=T('%Y-%m-%d'),
2error_message='must be YYYY-MM-DD!')
For the full description on % directives look under the IS_DATETIME
validator.
IS_DATE_IN_RANGE
Works very much like the previous validator but allows to specify a range:
1requires = IS_DATE_IN_RANGE(format=T('%Y-%m-%d'),
2minimum=datetime.date(2008,1,1),
3maximum=datetime.date(2009,12,31),
4error_message='must be YYYY-MM-DD!')
For the full description on % directives look under the IS_DATETIME
validator.
IS_DATETIME
This validator checks that a field value contains a valid datetime in the
specified format. It is good practice to specify the format using the translation
operator, in order to support different formats in different locales.
1requires = IS_DATETIME(format=T('%Y-%m-%d %H:%M:%S'),
2error_message='must be YYYY-MM-DD HH:MM:SS!')
The following symbols can be used for the format string (this shows the
symbol and an example string):

358 web2py full-stack web framework,4th edition
1%Y '1963'
2%y '63'
3%d '28'
4%m '08'
5%b 'Aug'
6%b 'August'
7%H '14'
8%I'02'
9%p 'PM'
10 %M '30'
11 %S '59'
IS_DATETIME_IN_RANGE
Works very much like the previous validator but allows to specify a range:
1requires = IS_DATETIME_IN_RANGE(format=T('%Y-%m-%d %H:%M:%S'),
2minimum=datetime.datetime(2008,1,1,10,30),
3maximum=datetime.datetime(2009,12,31,11,45),
4error_message='must be YYYY-MM-DD HH:MM::SS!')
For the full description on % directives look under the IS_DATETIME
validator.
IS_DECIMAL_IN_RANGE
1INPUT(_type='text',_name='name', requires=IS_DECIMAL_IN_RANGE(0, 10, dot="."))
It converts the input into a Python Decimal or generates an error if the
decimal does not fall within the specified inclusive range. The comparison is
made with Python Decimal arithmetic.
The minimum and maximum limits can be None, meaning no lower or upper
limit, respectively.
The dot argument is optional and allows you to internationalize the symbol
used to separate the decimals.
IS_EMAIL
It checks that the field value looks like an email address. It does not try to
send email to confirm.
1requires = IS_EMAIL(error_message='invalid email!')
IS_EQUAL_TO

forms and validators 359
Checks whether the validated value is equal to a given value (which can be
a variable):
1requires = IS_EQUAL_TO(request.vars.password,
2error_message='passwords do not match')
IS_EXPR
Its first argument is a string containing a logical expression in terms of a
variable value. It validates a field value if the expression evaluates to True.
For example:
1requires = IS_EXPR('int(value)%3==0',
2error_message='not divisible by 3')
One should first check that the value is an integer so that an exception will
not occur.
1requires = [IS_INT_IN_RANGE(0, 100), IS_EXPR('value%3==0')]
IS_FLOAT_IN_RANGE
Checks that the field value is a floating point number within a definite range,
0 <= value <= 100 in the following example:
1requires = IS_FLOAT_IN_RANGE(0, 100, dot=".",
2error_message='too small or too large!')
The dot argument is optional and allows you to internationalize the symbol
used to separate the decimals.
IS_INT_IN_RANGE
Checks that the field value is an integer number within a definite range, 0 <=
value < 100 in the following example:
1requires = IS_INT_IN_RANGE(0, 100,
2error_message='too small or too large!')
IS_IN_SET
Checks that the field values are in a set:
1requires = IS_IN_SET(['a','b','c'],zero=T('choose one'),
2error_message='must be a or b or c')

360 web2py full-stack web framework,4th edition
The zero argument is optional and it determines the text of the option
selected by default, an option which is not accepted by the IS_IN_SET validator
itself. If you do not want a "choose one" option, set zero=None.
The zero option was introduced in revision (1.67.1). It did not break backward
compatibility in the sense that it did not break applications but it did change
their behavior since, before, there was no zero option.
The elements of the set must always be strings unless this validator
is preceded by IS_INT_IN_RANGE (which converts the value to int) or
IS_FLOAT_IN_RANGE (which converts the value to float). For example:
1requires = [IS_INT_IN_RANGE(0, 8), IS_IN_SET([2, 3, 5, 7],
2error_message='must be prime and less than 10')]
You may also use a dictionary or a list of tuples to make the drop down list
more descriptive:
1### Dictionary example:
2requires = IS_IN_SET({'A':'Apple','B':'Banana','C':'Cherry'},zero=None)
3### List of tuples example:
4requires = IS_IN_SET([('A','Apple'),('B','Banana'),('C','Cherry')])
IS_IN_SET and Tagging
The IS_IN_SET validator has an optional attribute multiple=False. If set to
True, multiple values can be stored in one field. The field should be of type
list:integer or list:string.multiple references are handled automatically in
create and update forms, but they are transparent to the DAL. We strongly
suggest using the jQuery multiselect plugin to render multiple fields.
Note that when multiple=True,IS_IN_SET will accept zero or more values,
i.e. it will accept the field when nothing has been selected. multiple can also
be a tuple of the form (a,b) where aand bare the minimum and (exclusive)
maximum number of items that can be selected respectively.
IS_LENGTH
Checks if length of field’s value fits between given boundaries. Works for
both text and file inputs.
Its arguments are:

forms and validators 361
• maxsize: the maximum allowed length / size (has default = 255)
• minsize: the minimum allowed length / size
Examples: Check if text string is shorter than 33 characters:
1INPUT(_type='text',_name='name', requires=IS_LENGTH(32))
Check if password string is longer than 5characters:
1INPUT(_type='password',_name='name', requires=IS_LENGTH(minsize=6))
Check if uploaded file has size between 1KB and 1MB:
1INPUT(_type='file',_name='name', requires=IS_LENGTH(1048576, 1024))
For all field types except for files, it checks the length of the value. In the
case of files, the value is a cookie.FieldStorage, so it validates the length of
the data in the file, which is the behavior one might intuitively expect.
IS_LIST_OF
This is not properly a validator. Its intended use is to allow validations
of fields that return multiple values. It is used in those rare cases when a
form contains multiple fields with the same name or a multiple selection box.
Its only argument is another validator, and all it does is to apply the other
validator to each element of the list. For example, the following expression
checks that every item in a list is an integer in the range 0-10:
1requires = IS_LIST_OF(IS_INT_IN_RANGE(0, 10))
It never returns an error and does not contain an error message. The inner
validator controls the error generation.
IS_LOWER
This validator never returns an error. It just converts the value to lower case.
1requires = IS_LOWER()
IS_MATCH
This validator matches the value against a regular expression and returns an
error if it does not match. Here is an example of usage to validate a US zip
code:

362 web2py full-stack web framework,4th edition
1requires = IS_MATCH('^\d{5}(-\d{4})?$',
2error_message='not a zip code')
Here is an example of usage to validate an IPv4address (note: the IS_IPV4
validator is more appropriate for this purpose):
1requires = IS_MATCH('^\d{1,3}(\.\d{1,3}){3}$',
2error_message='not an IP address')
Here is an example of usage to validate a US phone number:
1requires = IS_MATCH('^1?((-)\d{3}-?|\(\d{3}\))\d{3}-?\d{4}$',
2error_message='not a phone number')
For more information on Python regular expressions, refer to the official
Python documentation.
IS_MATCH takes an optional argument strict which defaults to False. When
set to True it only matches the beginning of the string:
1>>> IS_MATCH('a')('ba')
2('ba', <lazyT 'invalid expression'>) # no pass
3>>> IS_MATCH('a',strict=False)('ab')
4('a', None) # pass!
IS_MATCH takes an other optional argument search which defaults to False.
When set to True, it uses regex method search instead of method match to
validate the string.
IS_NOT_EMPTY
This validator checks that the content of the field value is not an empty string.
1requires = IS_NOT_EMPTY(error_message='cannot be empty!')
IS_TIME
This validator checks that a field value contains a valid time in the specified
format.
1requires = IS_TIME(error_message='must be HH:MM:SS!')
IS_URL
Rejects a URL string if any of the following is true:
forms and validators 363
• The string is empty or None
• The string uses characters that are not allowed in a URL
• The string breaks any of the HTTP syntactic rules
• The URL scheme specified (if one is specified) is not ’http’ or ’https’
• The top-level domain (if a host name is specified) does not exist
(These rules are based on RFC 2616 [68] )
This function only checks the URL’s syntax. It does not check that the URL
points to a real document, for example, or that it otherwise makes semantic
sense. This function does automatically prepend ’http://’ in front of a URL
in the case of an abbreviated URL (e.g. ’google.ca’).
If the parameter mode=’generic’ is used, then this function’s behavior
changes. It then rejects a URL string if any of the following is true:
• The string is empty or None
• The string uses characters that are not allowed in a URL
• The URL scheme specified (if one is specified) is not valid
(These rules are based on RFC 2396 [69] )
The list of allowed schemes is customizable with the allowed_schemes
parameter. If you exclude None from the list, then abbreviated URLs (lacking
a scheme such as ’http’) will be rejected.
The default prepended scheme is customizable with the prepend_scheme
parameter. If you set prepend_scheme to None, then prepending will be
disabled. URLs that require prepending to parse will still be accepted, but
the return value will not be modified.
IS_URL is compatible with the Internationalized Domain Name (IDN)
standard specified in RFC 3490 [70] ). As a result, URLs can be regular strings
or unicode strings. If the URL’s domain component (e.g. google.ca) contains
non-US-ASCII letters, then the domain will be converted into Punycode
(defined in RFC 3492 [71] ). IS_URL goes a bit beyond the standards,
and allows non-US-ASCII characters to be present in the path and query

364 web2py full-stack web framework,4th edition
components of the URL as well. These non-US-ASCII characters will be
encoded. For example, space will be encoded as’%20’. The unicode character
with hex code 0x4e86 will become ’%4e%86’.
Examples:
1requires = IS_URL())
2requires = IS_URL(mode='generic')
3requires = IS_URL(allowed_schemes=['https'])
4requires = IS_URL(prepend_scheme='https')
5requires = IS_URL(mode='generic',
6allowed_schemes=['ftps','https'],
7prepend_scheme='https')
IS_SLUG
1requires = IS_SLUG(maxlen=80, check=False, error_message='must be slug')
If check is set to True it check whether the validated value is a slug (allowing
only alphanumeric characters and non-repeated dashes).
If check is set to False (default) it converts the input value to a slug.
IS_STRONG
Enforces complexity requirements on a field (usually a password field)
Example:
1requires = IS_STRONG(min=10, special=2, upper=2)
where
• min is minimum length of the value
• special is the minimum number of required special characters special
characters are any of the following !@#$%ˆ
&*(){}[]-+
• upper is the minimum number of upper case characters
IS_IMAGE
This validator checks if a file uploaded through the file input was saved in
one of the selected image formats and has dimensions (width and height)
within given limits.

forms and validators 365
It does not check for maximum file size (use IS_LENGTH for that). It returns
a validation failure if no data was uploaded. It supports the file formats BMP,
GIF, JPEG, PNG, and it does not require the Python Imaging Library.
Code parts taken from ref. [72]
It takes the following arguments:
• extensions: iterable containing allowed image file extensions in lowercase
• maxsize: iterable containing maximum width and height of the image
• minsize: iterable containing minimum width and height of the image
Use (-1, -1) as minsize to bypass the image-size check.
Here are some Examples:
• Check if uploaded file is in any of supported image formats:
1requires = IS_IMAGE()
• Check if uploaded file is either JPEG or PNG:
1requires = IS_IMAGE(extensions=('jpeg','png'))
• Check if uploaded file is PNG with maximum size of 200x200 pixels:
1requires = IS_IMAGE(extensions=('png'), maxsize=(200, 200))
• Note: on displaying an edit form for a table including requires =
IS_IMAGE(), a delete checkbox will NOT appear because to delete the file
would cause the validation to fail. To display the delete checkbox use this
validation:
1requires = IS_EMPTY_OR(IS_IMAGE())
IS_UPLOAD_FILENAME
This validator checks if the name and extension of a file uploaded through
the file input matches the given criteria.
It does not ensure the file type in any way. Returns validation failure if no
data was uploaded.
Its arguments are:

366 web2py full-stack web framework,4th edition
• filename: filename (before dot) regex.
• extension: extension (after dot) regex.
• lastdot: which dot should be used as a filename / extension separator:
True indicates last dot (e.g., "file.tar.gz" will be broken in "file.tar" + "gz")
while False means first dot (e.g., "file.tar.gz" will be broken into "file" +
"tar.gz").
• case: 0means keep the case; 1means transform the string into lowercase
(default); 2means transform the string into uppercase.
If there is no dot present, extension checks will be done against an empty
string and filename checks will be done against the whole value.
Examples:
Check if file has a pdf extension (case insensitive):
1requires = IS_UPLOAD_FILENAME(extension='pdf')
Check if file has a tar.gz extension and name starting with backup:
1requires = IS_UPLOAD_FILENAME(filename='backup.*', extension='tar.gz', lastdot=
False)
Check if file has no extension and name matching README (case sensitive):
1requires = IS_UPLOAD_FILENAME(filename='^README$', extension='^$', case=0)
IS_IPV4
This validator checks if a field’s value is an IP version 4address in decimal
form. Can be set to force addresses from a certain range.
IPv4regex taken from ref. [73] Its arguments are:
•minip lowest allowed address; accepts: str, e.g., 192.168.0.1;iterable of
numbers, e.g., [192,168,0,1]; int, e.g., 3232235521
•maxip highest allowed address; same as above
All three example values are equal, since addresses are converted to integers
for inclusion check with following function:
1number = 16777216 *IP[0] + 65536 *IP[1] + 256 *IP[2] + IP[3]

forms and validators 367
Examples:
Check for valid IPv4address:
1requires = IS_IPV4()
Check for valid private network IPv4address:
1requires = IS_IPV4(minip='192.168.0.1', maxip='192.168.255.255')
IS_LOWER
This validator never returns an error. It converts the value to lower case.
1requires = IS_LOWER()
IS_UPPER
This validator never returns an error. It converts the value to upper case.
1requires = IS_UPPER()
IS_NULL_OR
Deprecated, an alias for IS_EMPTY_OR described below.
IS_EMPTY_OR
Sometimes you need to allow empty values on a field along with other
requirements. For example a field may be a date but it can also be empty.
The IS_EMPTY_OR validator allows this:
1requires = IS_EMPTY_OR(IS_DATE())
CLEANUP
This is a filter. It never fails. It just removes all characters whose decimal
ASCII codes are not in the list [10,13,32-127].
1requires = CLEANUP()
CRYPT
This is also a filter. It performs a secure hash on the input and it is used to
prevent passwords from being passed in the clear to the database.
1requires = CRYPT()

368 web2py full-stack web framework,4th edition
If a key is not specified, it uses the MD5algorithm. If a key is specified
CRYPT uses the HMAC algorithm. The key may contain a prefix that
determines the algorithm to use with HMAC, for example SHA512:
1requires = CRYPT(key='sha512:thisisthekey')
This is the recommended syntax. The key has to be a unique string associated
to the database used. The key can never be changed. If you lose the key the
previously hashed values become useless.
The CRYPT validator hashed the input and this makes it somewhat special.
If you need to validate a password field, before it is hash, you can use CRYPT
in a list of validators but must make sure it is the last of the list so that it is
called last. For example:
1requires = [IS_STRONG(),CRYPT(key='sha512:thisisthekey')]
CRYPT also takes a min_length argument which defaults to zero.
7.6.2Database validators
IS_NOT_IN_DB
Consider the following example:
1db.define_table('person',Field('name'))
2db.person.name.requires = IS_NOT_IN_DB(db, 'person.name')
It requires that when you insert a new person, his/her name is not already
in the database, db, in the field person.name. As with all other validators
this requirement is enforced at the form processing level, not at the database
level. This means that there is a small probability that, if two visitors try to
concurrently insert records with the same person.name, this results in a race
condition and both records are accepted. It is therefore safer to also inform
the database that this field should have a unique value:
1db.define_table('person',Field('name', unique=True))
2db.person.name.requires = IS_NOT_IN_DB(db, 'person.name')
Now if a race condition occurs, the database raises an OperationalError and
one of the two inserts is rejected.

forms and validators 369
The first argument of IS_NOT_IN_DB can be a database connection or a Set. In
the latter case, you would be checking only the set defined by the Set.
The following code, for example, does not allow registration of two persons
with the same name within 10 days of each other:
1import datetime
2now = datetime.datetime.today()
3db.define_table('person',
4Field('name'),
5Field('registration_stamp','datetime', default=now))
6recent = db(db.person.registration_stamp>now-datetime.timedelta(10))
7db.person.name.requires = IS_NOT_IN_DB(recent, 'person.name')
IS_IN_DB
Consider the following tables and requirement:
1db.define_table('person',Field('name', unique=True))
2db.define_table('dog',Field('name'), Field('owner', db.person)
3db.dog.owner.requires = IS_IN_DB(db, 'person.id','%(name)s',
4zero=T('choose one'))
It is enforced at the level of dog INSERT/UPDATE/DELETE forms. It
requires that a dog.owner be a valid id in the field person.id in the database
db. Because of this validator, the dog.owner field is represented as a dropbox.
The third argument of the validator is a string that describes the elements in
the dropbox. In the example you want to see the person %(name)s instead of
the person %(id)s.%(...)s is replaced by the value of the field in brackets for
each record.
The zero option works very much like for the IS_IN_SET validator.
The first argument of the validator can be a database connection or a DAL
Set, as in IS_NOT_IN_DB. This can be useful for example when wishing to limit
the records in the drop-down box. In this example, we use IS_IN_DB in a
controller to limit the records dynamically each time the controller is called:
1def index():
2(...)
3query = (db.table.field == 'xyz')#in practice 'xyz' would be a variable
4db.table.field.requires=IS_IN_DB(db(query),....)
5form=SQLFORM(...)
6if form.process().accepted: ...
7(...)
370 web2py full-stack web framework,4th edition
If you want the field validated, but you do not want a dropbox, you must put
the validator in a list.
1db.dog.owner.requires = [IS_IN_DB(db, 'person.id','%(name)s')]
Occasionally you want the drop-box (so you do not want to use the list
syntax above) yet you want to use additional validators. For this purpose
the IS_IN_DB validator takes an extra argument _and that can point to a list of
other validators applied if the validated value passes the IS_IN_DB validation.
For example to validate all dog owners in db that are not in a subset:
1subset=db(db.person.id>100)
2db.dog.owner.requires = IS_IN_DB(db, 'person.id','%(name)s',
3_and=IS_NOT_IN_DB(subset,'person.id'))
IS_IN_DB also takes a cache argument that works like the cache argument of
select.
IS_IN_DB and Tagging
The IS_IN_DB validator has an optional attribute multiple=False. If set to True
multiple values can be stored in one field. This field should be of type
list:reference as discussed in Chapter 6. An explicit example of tagging
is discussed there. multiple references are handled automatically in create
and update forms, but they are transparent to the DAL. We strongly suggest
using the jQuery multiselect plugin to render multiple fields.
7.6.3Custom validators
All validators follow the prototype below:
1class sample_validator:
2def __init__(self, *a, error_message='error'):
3self.a = a
4self.e = error_message
5def __call__(self, value):
6if validate(value):
7return (parsed(value), None)
8return (value, self.e)
9def formatter(self, value):
10 return format(value)

forms and validators 371
i.e., when called to validate a value, a validator returns a tuple (x, y). If y
is None, then the value passed validation and xcontains a parsed value. For
example, if the validator requires the value to be an integer, xis converted
to int(value). If the value did not pass validation, then xcontains the input
value and ycontains an error message that explains the failed validation.
This error message is used to report the error in forms that do not validate.
The validator may also contain a formatter method. It must perform the
opposite conversion to the one the __call__ does. For example, consider the
source code for IS_DATE:
1class IS_DATE(object):
2def __init__(self, format='%Y-%m-%d', error_message='must be YYYY-MM-DD!'):
3self.format = format
4self.error_message = error_message
5def __call__(self, value):
6try:
7y, m, d, hh, mm, ss, t0, t1, t2 = time.strptime(value, str(self.format)
)
8value = datetime.date(y, m, d)
9return (value, None)
10 except:
11 return (value, self.error_message)
12 def formatter(self, value):
13 return value.strftime(str(self.format))
On success, the __call__ method reads a date string from the form and
converts it into a datetime.date object using the format string specified in the
constructor. The formatter object takes a datetime.date object and converts
it to a string representation using the same format. The formatter is called
automatically in forms, but you can also call it explicitly to convert objects
into their proper representation. For example:
1>>> db = DAL()
2>>> db.define_table('atable',
3Field('birth','date', requires=IS_DATE('%m/%d/%Y')))
4>>> id = db.atable.insert(birth=datetime.date(2008, 1, 1))
5>>> row = db.atable[id]
6>>> print db.atable.formatter(row.birth)
701/01/2008
When multiple validators are required (and stored in a list), they are executed
in order and the output of one is passed as input to the next. The chain breaks

372 web2py full-stack web framework,4th edition
when one of the validators fails.
Conversely, when we call the formatter method of a field, the formatters of
the associated validators are also chained, but in reverse order.
Notice that as alternative to custom validators, you can also use the
onvalidate argument of form.accepts(...),form.process(...) and
form.validate(...).
7.6.4Validators with dependencies
Usually validators are set once for all in models.
Occasionally, you need to validate a field and the validator depends on the
value of another field. This can be done in various ways. It can be done in
the model or in the controller.
For example, here is a page that generates a registration form that asks for
username and password twice. None of the fields can be empty, and both
passwords must match:
1def index():
2form = SQLFORM.factory(
3Field('username', requires=IS_NOT_EMPTY()),
4Field('password', requires=IS_NOT_EMPTY()),
5Field('password_again',
6requires=IS_EQUAL_TO(request.vars.password)))
7if form.process().accepted:
8pass # or take some action
9return dict(form=form)
The same mechanism can be applied to FORM and SQLFORM objects.
7.7Widgets
Here is a list of available web2py widgets:
1SQLFORM.widgets.string.widget
2SQLFORM.widgets.text.widget
3SQLFORM.widgets.password.widget
4SQLFORM.widgets.integer.widget
forms and validators 373
5SQLFORM.widgets.double.widget
6SQLFORM.widgets.time.widget
7SQLFORM.widgets.date.widget
8SQLFORM.widgets.datetime.widget
9SQLFORM.widgets.upload.widget
10 SQLFORM.widgets.boolean.widget
11 SQLFORM.widgets.options.widget
12 SQLFORM.widgets.multiple.widget
13 SQLFORM.widgets.radio.widget
14 SQLFORM.widgets.checkboxes.widget
15 SQLFORM.widgets.autocomplete
The first ten of them are the defaults for the corresponding field types. The
"options" widget is used when a field’s requires is IS_IN_SET or IS_IN_DB with
multiple=False (default behavior). The "multiple" widget is used when a
field’s requires is IS_IN_SET or IS_IN_DB with multiple=True. The "radio" and
"checkboxes" widgets are never used by default, but can be set manually. The
autocomplete widget is special and discussed in its own section.
For example, to have a "string" field represented by a textarea:
1Field('comment','string', widget=SQLFORM.widgets.text.widget)
Widgets can also be assigned to fields a posteriori:
1db.mytable.myfield.widget = SQLFORM.widgets.string.widget
Sometimes widgets take additional arguments and one needs to specify their
values. In this case one can use lambda
1db.mytable.myfield.widget = lambda field,value: \
2SQLFORM.widgets.string.widget(field,value,_style='color:blue')
Widgets are helper factories and their first two arguments are always field
and value. The other arguments can include normal helper attributes such as
_style,_class, etc. Some widgets also take special arguments. In particular
SQLFORM.widgets.radio and SQLFORM.widgets.checkboxes take a style argument
(not to be confused with _style) which can be set to "table", "ul", or "divs" in
order to match the formstyle of the containing form.
You can create new widgets or extend existing widgets.
SQLFORM.widgets[type] is a class and SQLFORM.widgets[type].widget is a static
member function of the corresponding class. Each widget function takes two

374 web2py full-stack web framework,4th edition
arguments: the field object, and the current value of that field. It returns
a representation of the widget. As an example, the string widget could be
recoded as follows:
1def my_string_widget(field, value):
2return INPUT(_name=field.name,
3_id="%s_%s" % (field._tablename, field.name),
4_class=field.type,
5_value=value,
6requires=field.requires)
7
8Field('comment','string', widget=my_string_widget)
The id and class values must follow the convention described later in this
chapter. A widget may contain its own validators, but it is good practice to
associate the validators to the "requires" attribute of the field and have the
widget get them from there.
7.7.1Autocomplete widget
There are two possible uses for the autocomplete widget: to autocomplete a
field that takes a value from a list or to autocomplete a reference field (where
the string to be autocompleted is a representation of the reference which is
implemented as an id).
The first case is easy:
1db.define_table('category',Field('name'))
2db.define_table('product',Field('name'),Field('category'))
3db.product.category.widget = SQLFORM.widgets.autocomplete(
4request, db.category.name, limitby=(0,10), min_length=2)
Where limitby instructs the widget to display no more than 10 suggestions
at the time, and min_length instructs the widget to perform an Ajax callback
to fetch suggestions only after the user has typed at least 2characters in the
search box.
The second case is more complex:
1db.define_table('category',Field('name'))
2db.define_table('product',Field('name'),Field('category'))
3db.product.category.widget = SQLFORM.widgets.autocomplete(
4request, db.category.name, id_field=db.category.id)

forms and validators 375
In this case the value of id_field tells the widget that even if the value
to be autocompleted is a db.category.name, the value to be stored is
the corresponding db.category.id. An optional parameter is orderby that
instructs the widget on how to sort the suggestions (alphabetical by default).
This widget works via Ajax. Where is the Ajax callback? Some magic is going
on in this widget. The callback is a method of the widget object itself. How is
it exposed? In web2py any piece of code can generate a response by raising
an HTTP exception. This widget exploits this possibility in the following way:
the widget sends the Ajax call to the same URL that generated the widget in
the first place and puts a special token in the request.vars. Should the widget
get instantiated again, it finds the token and raises an HTTP exception that
responds to the request. All of this is done under the hood and hidden to the
developer.
7.8SQLFORM.grid and SQLFORM.smartgrid (experimental)
These are two high level gadgets that create complex CRUD controls. They
provide pagination, the ability to browser, search, sort, create, update and
delete records from a single gadgets.
The simplest of the two is SQLFORM.grid. Here is an example of usage:
1@auth.requires_login()
2def manage_users():
3grid = SQLFORM.grid(db.auth_user)
4return locals()
which produces the following page:
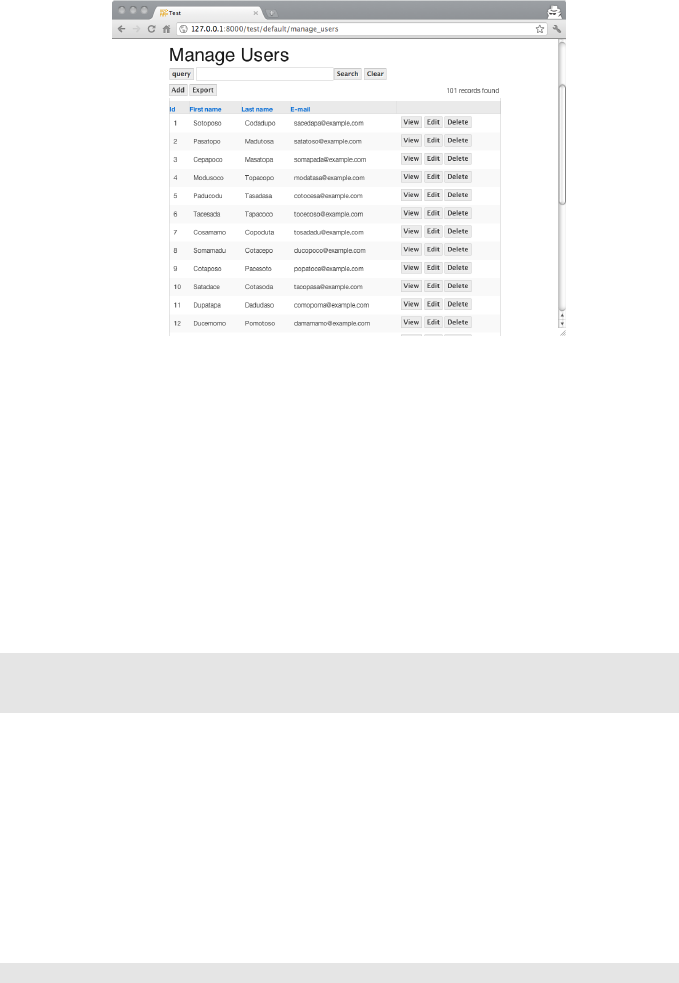
376 web2py full-stack web framework,4th edition
The first argument of SQLFORM.grid can be a table or a query. The grid gadget
will provide access to records matching the query.
Before we dive into the long list of arguments of the grid gadget we need to
understand how it works. The gadget looks at request.args in order to decide
what to do (browse, search, create, update, delete, etc.). Each button created
by the gadget links the same function (manage_users in the above case) but
passes different request.args. By default all the URL generated by the grid
are digitally signed and verified. This means one cannot perform certain
actions (create, update, delete) without being logged-in. These restrictions
can be relaxed:
1def manage_users():
2grid = SQLFORM.grid(db.auth_user,user_signature=False)
3return locals()
but we do not recommend it.
Because of the way grid works one can only have one grid per controller
function, unless they are embedded as components via LOAD.
Because the function that contains the grid may itself manipulate the
command line arguments, the grid needs to know which args should be
handled by the grid and which not. For example here is an example of code
that allows one to manage any table:
1@auth.requires_login()

forms and validators 377
2def manage():
3table = request.args(0)
4if not table in db.tables(): redirect(URL('error'))
5grid = SQLFORM.grid(db[table],args=request.args[:1])
6return locals()
the args argument of the grid specifies which request.args should be passed
along and ignored by the gadget. In our case request.args[:1] is the name of
the table we want to manage and it is handled by the manage function itself,
not by the gadget.
The complete signature for the grid is the following:
1SQLFORM.grid(query,
2fields=None,
3field_id=None,
4left=None,
5headers={},
6orderby=None,
7searchable=True,
8sortable=True,
9deletable=True,
10 editable=True,
11 details=True,
12 create=True,
13 csv=True,
14 paginate=20,
15 selectable=None,
16 links=None,
17 upload = '<default>',
18 args=[],
19 user_signature = True,
20 maxtextlengths={},
21 maxtextlength=20,
22 onvalidation=None,
23 oncreate=None,
24 onupdate=None,
25 ondelete=None,
26 sorter_icons=('[^]','[v]'),
27 ui = 'web2py',
28 showbuttontext=True,
29 search_widget='default',
30 _class="web2py_grid",
31 formname='web2py_grid',
32 ignore_rw = False,
33 formstyle = 'table3cols'):

378 web2py full-stack web framework,4th edition
•fields is a list of fields to be fetched from the database. It is also used to
determine which fields to be shown in the grid view.
•field_id must be the field of the table to be used as ID, for example
db.mytable.id.
•headers is a dictionary that maps ’tablename.fieldname’ into the
corresponding header label.
•left is an optional left join expressions used to build ...select(left=...).
•orderby is used as default ordering for the rows.
•searchable,sortable,deletable,details,create determine whether one can
search, sort, delete, view details, and create new records respectively.
•csv if set to true allows to download the grid in CSV.
•paginate sets the max number of rows per page.
•links is used to display new columns which can be links to other pages.
The links argument must be a list of dict(header=’name’,body=lambda row:
A(...)) where header is the header of the new column and body is a
function that takes a row and returns a value. In the example, the value is
aA(...) helper.
•maxtextlength sets the maximum length of text to be displayed for each
field value, in the grid view. This value can be overwritten for each field
using maxtextlengths, a dictionary of ’tablename.fieldname’:length.
•onvalidation,oncreate,onupdate and ondelete are callback functions. All
but ondelete take a form object as input.
•sorter_icons is a list of two strings (or helpers) that will be used to
represent the up and down sorting options for each field.
•ui can be set equal to ’web2py’ and will generate web2py friendly class
names, can be set equal to jquery-ui and will generate jquery UI friendly
class names, but it can also be its own set of class names for the various
grid components:
1ui = dict(widget='',
2header='',

forms and validators 379
3content='',
4default='',
5cornerall='',
6cornertop='',
7cornerbottom='',
8button='button',
9buttontext='buttontext button',
10 buttonadd='icon plus',
11 buttonback='icon leftarrow',
12 buttonexport='icon downarrow',
13 buttondelete='icon trash',
14 buttonedit='icon pen',
15 buttontable='icon rightarrow',
16 buttonview='icon magnifier')
•search_widget allows to override the default search widget and we refer
the reader the source code in "gluon/sqlhtml.py" for details.
•showbutton allows to turn off all buttons.
•_class is the class for the grid container.
•formname,ignore_rw and formstyle are passed to the SQLFORM objects used
by the grid for create/update forms.
deletable,editable and details are usually boolean values but they can
be functions which take the row object and decide whether to display the
corrsponding button or not.
ASQLFORM.smartgrid looks a lot like a grid, in fact it contains a grid but it is
designed to take as input not a query but only one table and to browse said
table and selected referencing tables.
For example consider the following table structure:
1db.define_table('parent',Field('name'))
2db.define_table('child',Field('name'),Field('parent','reference parent'))
With SQLFORM.grid you can list all parents:
1SQLFORM.grid(db.parent)
all children:
1SQLFORM.grid(db.child)
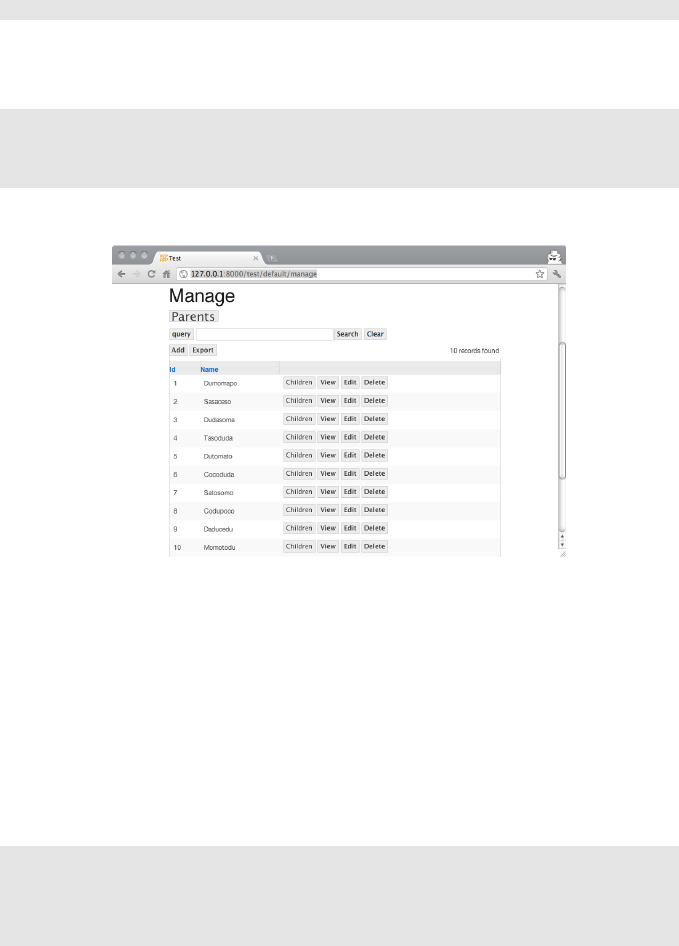
380 web2py full-stack web framework,4th edition
and all parents and children in one table:
1SQLFORM.grid(db.parent,left=db.child.on(db.child.parent=db.parent.id))
With SQLFORM.smartgrid you can put all the data in one gadget that spawns
both tables:
1@auth.requires_login():
2def manage():
3grid = SQLFORM.smartgrid(db.parent,linked_tables=['child'])
4return locals()
which looks like this:
Notice the extra "children" links. One could create the extra links using a
regular grid but they would point to a different action. With a smartgrid they
are created automatically and handled by the same gadget.
Also notice that when clicking on the "children" link for a given parent one
only gets the list of children for that parent (and that is obvious) but also
notice that if one now tried to add a new child, the parent value for the new
child is automatically set to the selected parent (displayed in the breadcrumbs
associated to the gadget). The value of this field can be overwritten. We can
prevent this by making it readonly:
1@auth.requires_login():
2def manage():
3db.child.parent.writable = False
4grid = SQLFORM.smartgrid(db.parent,linked_tables=['child'])
5return locals()

forms and validators 381
If the linked_tables argument is not specified all referencing tables are
automatically linked. Anyway, to avoid accidentally exposing data we
recommend explicitly listing tables that should be linked.
The following code creates a very powerful management interface for all
tables in the system:
1@auth.requires_membership('managers'):
2def manage():
3table = request.args(0) or 'auth_user'
4if not table in db.tables(): redirect(URL('error'))
5grid = SQLFORM.smartgrid(db[table],args=request.args[:1])
6return locals()
The smartgrid takes the same arguments as a grid and some more with some
caveats:
• The first argument is a table, not a query
• There is a extra argument constraints which is a dictionary of
’tablename’:query which can be used to further restrict access to the
records displayed in the ’tablename’ grid.
• There is a extra argument linked_tables which is a list of tablenames of
tables that should be accessible via the smartgrid.
• All the arguments but the table, args,linked_tables and user_signatures
can be dictionaries as explained below.
Consider the previous grid:
1grid = SQLFORM.smartgrid(db.parent,linked_tables=['child'])
It allows one to access both a db.parent and a db.child. Apart for navigation
controls, for each one table, a smarttable is nothing but a grid. This means
that, in this case, one smartgrid can create a grid for parent and one grid for
child. We may want to pass different sets of parameters to these grids. For
example different sets of searchable parameters.
While for a grid we would pass a boolean:
1grid = SQLFORM.grid(db.parent,searchable=True)
for a smartgrid we would pass a dictionary of booleans:

382 web2py full-stack web framework,4th edition
1grid = SQLFORM.smartgrid(db.parent,linked_tables=['child'],
2searchable= dict(parent=True, child=False))
In this way we made parents searchable but children for each parent not
searchable (there should not be that many to need the search widget).
The grid and smartgrid gadgets are here to stay but they are marked
experimental because the actual html layout of what they return and the exact
set of parameters one can pass to them may be subject to change as new
functionalities are added.
grid and smartgrid do not automatically enforce access control like crud does
but you can integrate it with auth using explicit permission checking:
1grid = SQLFORM.grid(db.auth_user,
2editable = auth.has_membership('managers'),
3deletable = auth.has_membership('managers'))
or
1grid = SQLFORM.grid(db.auth_user,
2editable = auth.has_permission('edit','auth_user'),
3deletable = auth.has_permission('delete','auth_user'))
The smartgrid is the only gadget in web2py that displays the table name and
it need both the singular and the plural. For example one parent can have
one "Child" or many "Children". Therefore a table object needs to know its
own singular and plural names. web2py normally guesses them but you can
set the explicitly:
1db.define_table('child', ..., singular="Child", plural="Children")
or with:
1db.define_table('child', ...)
2db.child._singular = "Child"
3db.child._plural = "Children"
They should also be internationalized using the Toperator.
The plural and singular values are then used by smartgrid to provide correct
names for headers and links.
8
Email and SMS
8.1Setting up email
Web2py provides the gluon.tools.Mail class to make it easy to send emails
using web2py. One can define a mailer with
1from gluon.tools import Mail
2mail = Mail()
3mail.settings.server = 'smtp.example.com:25'
4mail.settings.sender = 'you@example.com'
5mail.settings.login = 'username:password'
Note, if your application uses Auth (discussed in the next chapter), the auth
object will include its own mailer in auth.settings.mailer, so you can use that
instead as follows:
1mail = auth.settings.mailer
2mail.settings.server = 'smtp.example.com:25'
3mail.settings.sender = 'you@example.com'
4mail.settings.login = 'username:password'
You need to replace the mail.settings with the proper parameters for your
SMTP server. Set mail.settings.login=False if the SMTP server does not
require authentication.
For debugging purposes you can set
1mail.settings.server = 'logging'
384 web2py full-stack web framework,4th edition
and emails will not be sent but logged to the console instead.
8.1.1Configuring email for Google App Engine
For sending emails from Google App Engine account:
1mail.settings.server = 'gae'
At the time of writing web2py does not support attachments and encrypted
emails on Google App Engine.
8.1.2x509 and PGP Encryption
It is possible to send x509 (SMIME) encrypted emails using the following
settings:
1mail.settings.cipher_type = 'x509'
2mail.settings.sign = True
3mail.settings.sign_passphrase = 'your passphrase'
4mail.settings.encrypt = True
5mail.settings.x509_sign_keyfile = 'filename.key'
6mail.settings.x509_sign_certfile = 'filename.cert'
7mail.settings.x509_crypt_certfiles = 'filename.cert'
It is possible to send PGP encrypted emails using the following settings:
1from gpgme import pgp
2mail.settings.cipher_type = 'gpg'
3mail.settings.sign = True
4mail.settings.sign_passphrase = 'your passphrase'
5mail.settings.encrypt = True
The latter requires the python-pyme package.
8.2Sending emails
Once mail is defined, it can be used to send email via:
1mail.send(to=['somebody@example.com'],
2subject='hello',
3# If reply_to is omitted, then mail.settings.sender is used

email and sms 385
4reply_to='us@example.com',
5message='hi there')
Mail returns True if it succeeds in sending the email and False otherwise. A
complete argument list for mail.send() is as follows:
1send(self, to, subject='None', message='None', attachments=1,
2cc=1, bcc=1, reply_to=1, encoding='utf-8',headers={})
Note, to,cc, and bcc each take a list of email addresses.
headers is dictionary of headers to refine the headers just before sending the
email. For example:
1headers = {'Return-Path' :'bounces@example.org'}
Following are some additional examples demonstrating the use of
mail.send().
8.2.1Simple text email
1mail.send('you@example.com',
2'Message subject',
3'Plain text body of the message')
8.2.2HTML emails
1mail.send('you@example.com',
2'Message subject',
3'<html>html body</html>')
If the email body starts with <html> and ends with </html>, it will be sent as
a HTML email.
8.2.3Combining text and HTML emails
The email message can be a tuple (text, html):
1mail.send('you@example.com',
2'Message subject',
3('Plain text body','<html>html body</html>'))

386 web2py full-stack web framework,4th edition
8.2.4cc and bcc emails
1mail.send('you@example.com',
2'Message subject',
3'Plain text body',
4cc=['other1@example.com','other2@example.com'],
5bcc=['other3@example.com','other4@example.com'])
8.2.5Attachments
1mail.send('you@example.com',
2'Message subject',
3'<html><img src="cid:photo" /></html>',
4attachments = Mail.Attachment('/path/to/photo.jpg', content_id='photo'))
8.2.6Multiple attachments
1mail.send('you@example.com',
2'Message subject',
3'Message body',
4attachments = [Mail.Attachment('/path/to/fist.file'),
5Mail.Attachment('/path/to/second.file')])
8.3Sending SMS messages
Sending SMS messages from a web2py application requires a third party
service that can relay the messages to the receiver. Usually this is not a free
service, but it differs from country to country. We have tried a few of these
services with little success. Phone companies block emails originating from
these services since they are eventually used as a source of spam.
A better way is to use the phone companies themselves to relay the SMS.
Each phone company has an email address uniquely associated with every
cell-phone number, so SMS messages can be sent as emails to the phone
number. web2py comes with a module to help in this process:
1from gluon.contrib.sms_utils import SMSCODES, sms_email
2email = sms_email('1 (111) 111-1111','T-Mobile USA (tmail)')
3mail.sent(to=email, subject='test', message='test')
SMSCODES is a dictionary that maps names of major phone companies to
the email address postfix. The sms_email function takes a phone number (as
email and sms 387
a string) and the name of a phone company and returns the email address of
the phone.
8.4Using the template system to generate messages
It is possible to use the template system to generate emails. For example,
consider the database table
1db.define_table('person',Field('name'))
where you want to send to every person in the database the following
message, stored in a view file "message.html":
1Dear {{=person.name}},
2You have won the second prize, a set of steak knives.
You can achieve this in the following way
1for person in db(db.person).select():
2context = dict(person=person)
3message = response.render('message.html', context)
4mail.send(to=['who@example.com'],
5subject='None',
6message=message)
Most of the work is done in the statement
1response.render('message.html', context)
It renders the view "message.html" with the variables defined in the
dictionary "context", and it returns a string with the rendered email text.
The context is a dictionary that contains variables that will be visible to the
template file.
If the message starts with <html> and ends with </html>, the email will be an
HTML email.
Note, if you want to include a link back to your website in an HTML email,
you can use the URL function. However, by default, the URL function generates
a relative URL, which will not work from an email. To generate an absolute
URL, you need to specify the scheme and host arguments to the URL function.
For example:

388 web2py full-stack web framework,4th edition
1<a href="{{=URL(..., scheme=True, host=True)}}">Click here</a>
or
1<a href="{{=URL(..., scheme='http', host='www.site.com')}}">Click here</a>
The same mechanism that is used to generate email text can also be used to
generate SMS messages or any other type of message based on a template.
8.5Sending messages using a background task
The operation of sending an email message can take up to several seconds
because of the need to log into and communicate with a potentially remote
SMTP server. To keep the user from having to wait for the send operation
to complete, it is sometimes desirable to queue the email to be sent at a later
time via a background task. As described in Chapter 4, this can be done by
setting up a homemade task queue or using the web2py scheduler. Here we
provide an example using a homemade task queue.
First, in a model file within our application, we set up a database model to
store our email queue:
1db.define_table('queue',
2Field('status'),
3Field('email'),
4Field('subject'),
5Field('message'))
From a controller, we can then enqueue messages to be sent by:
1db.queue.insert(status='pending',
2email='you@example.com',
3subject='test',
4message='test')
Next, we need a background processing script that reads the queue and sends
the emails:
1# in file /app/private/mail_queue.py
2import time
3while True:
4rows = db(db.queue.status=='pending').select()

email and sms 389
5for row in rows:
6if mail.send(to=row.email,
7subject=row.subject,
8message=row.message):
9row.update_record(status='sent')
10 else:
11 row.update_record(status='failed')
12 db.commit()
13 time.sleep(60) # check every minute
Finally, as described in Chapter 4, we need to run the mail_queue.py script
as if it were inside a controller in our app:
1python web2py.py -S app -M -N -R applications/app/private/mail_queue.py
where -S app tells web2py to run "mail_queue.py" as "app", -M tells web2py
to execute models, and -N tells web2py not to run cron.
Here we assume that the mail object referenced in "mail_queue.py" is defined
in a model file in our app and is therefore available in the "mail_queue.py"
script because of the -M option. Also notice that it is important to commit
any change as soon as possible in order not to lock the database to other
concurrent processes.
As noted in Chapter 4, this type of background process should not be
executed via cron (except perhaps for cron @reboot) because you need to
be sure that no more than one instance is running at the same time.
Note, one drawback to sending email via a background process is that it
makes it difficult to provide feedback to the user in case the email fails. If
email is sent directly from the controller action, you can catch any errors
and immediately return an error message to the user. With a background
process, however, the email is sent asynchronously, after the controller action
has already returned its response, so it becomes more complex to notify the
user of a failure.
9
Access Control
web2py includes a powerful and customizable Role Based Access Control
mechanism (RBAC).
Here is a definition from Wikipedia:
"Role-Based Access Control (RBAC) is an approach to restricting system
access to authorized users. It is a newer alternative approach to mandatory
access control (MAC) and discretionary access control (DAC). RBAC is
sometimes referred to as role-based security.
RBAC is a policy neutral and flexible access control technology sufficiently
powerful to simulate DAC and MAC. Conversely, MAC can simulate RBAC
if the role graph is restricted to a tree rather than a partially ordered set.
Prior to the development of RBAC, MAC and DAC were considered to be
the only known models for access control: if a model was not MAC, it was
considered to be a DAC model, and vice versa. Research in the late 1990s
demonstrated that RBAC falls in neither category.
Within an organization, roles are created for various job functions. The
permissions to perform certain operations are assigned to specific roles.
Members of staff (or other system users) are assigned particular roles, and
through those role assignments acquire the permissions to perform particular
system functions. Unlike context-based access control (CBAC), RBAC does
not look at the message context (such as a connection’s source).
392 web2py full-stack web framework,4th edition
Since users are not assigned permissions directly, but only acquire them
through their role (or roles), management of individual user rights becomes
a matter of simply assigning appropriate roles to the user; this simplifies
common operations, such as adding a user, or changing a user’s department.
RBAC differs from access control lists (ACLs) used in traditional
discretionary access control systems in that it assigns permissions to specific
operations with meaning in the organization, rather than to low level data
objects. For example, an access control list could be used to grant or deny
write access to a particular system file, but it would not dictate how that file
could be changed."
The web2py class that implements RBAC is called Auth.
Auth needs (and defines) the following tables:
•auth_user stores users’ name, email address, password, and status
(registration pending, accepted, blocked)
•auth_group stores groups or roles for users in a many-to-many structure.
By default, each user is in its own group, but a user can be in multiple
groups, and each group can contain multiple users. A group is identified
by a role and a description.
•auth_membership links users and groups in a many-to-many structure.
•auth_permission links groups and permissions. A permission is identified
by a name and, optionally, a table and a record. For example, members
of a certain group can have "update" permissions on a specific record of a
specific table.
•auth_event logs changes in the other tables and successful access via CRUD
to objects controlled by the RBAC.
In principle, there is no restriction on the names of the roles and the
names of the permissions; the developer can create them to fix the roles
and permissions in the organization. Once they have been created, web2py
provides an API to check if a user is logged in, if a user is a member of a
given group, and/or if the user is a member of any group that has a given
required permission. web2py also provides decorators to restrict access to

access control 393
any function based on login, membership and permissions. web2py also
understands some specific permissions, i.e., those that have a name that
correspond to the CRUD methods (create, read, update, delete) and can
enforce them automatically without the need to use decorators.
In this chapter, we are going to discuss different parts of RBAC one by one.
9.1Authentication
In order to use RBAC, users need to be identified. This means that they need
to register (or be registered) and log in.
Auth provides multiple login methods. The default one consists of
identifying users based on the local auth_user table. Alternatively, it can log in
users against third-party authentication systems and single sign on providers
such as Google, PAM, LDAP, Facebook, LinkedIn, Dropbox, OpenID, OAuth,
etc..
To start using Auth, you need at least this code in a model file, which is
also provided with the web2py "welcome" application and assumes a db
connection object:
1from gluon.tools import Auth
2auth = Auth(db, hmac_key=Auth.get_or_create_key())
3auth.define_tables()
The password field of the db.auth_user table defaults to a CRYPT validator, which
needs and hmac_key. The Auth.get_or_create_key() is a function that read the
hmac kay from a file "private/auth.key" within the application folder. If the file
does not exist it creates a random hmac_key. If multiple apps share the same
auth database, make sure they also use the same hmac_key.
By default, web2py uses email for login. If instead you want to log in using
username set auth.define_tables(username=True)
If multiple apps share the same auth database you may want to disable
migrations: auth.define_tables(migrate=False).
To expose Auth, you also need the following function in a controller (for

394 web2py full-stack web framework,4th edition
example in "default.py"):
1def user(): return dict(form=auth())
The auth object and the user action are already defined in the scaffolding
application.
web2py also includes a sample view "welcome/views/default/user.html" to
render this function properly that looks like this:
1{{extend 'layout.html'}}
2<h2>{{=T( request.args(0).replace('_',' ').capitalize() )}}</h2>
3<div id="web2py_user_form">
4{{=form}}
5{{if request.args(0)=='login':}}
6{{if not 'register' in auth.settings.actions_disabled:}}
7<br/><a href="{{=URL(args='register')}}">register</a>
8{{pass}}
9{{if not 'request_reset_password' in auth.settings.actions_disabled:}}
10 <br/>
11 <a href="{{=URL(args='request_reset_password')}}">lost password</a>
12 {{pass}}
13 {{pass}}
14 </div>
Notice that this function simply displays a form and therefore it can be
customized using normal custom form syntax. The only caveat is that the
form displayed by form=auth() depends on request.args(0); therefore, if you
replace the default auth() login form with a custom login form, you may
need an if statement like this in the view:
1{{if request.args(0)=='login':}}...custom login form...{{pass}}
The controller above exposes multiple actions:
1http://.../[app]/default/user/register
2http://.../[app]/default/user/login
3http://.../[app]/default/user/logout
4http://.../[app]/default/user/profile
5http://.../[app]/default/user/change_password
6http://.../[app]/default/user/verify_email
7http://.../[app]/default/user/retrieve_username
8http://.../[app]/default/user/request_reset_password
9http://.../[app]/default/user/reset_password
10 http://.../[app]/default/user/impersonate
11 http://.../[app]/default/user/groups
12 http://.../[app]/default/user/not_authorized
access control 395
•register allows users to register. It is integrated with CAPTCHA, although
this is disabled by default.
•login allows users who are registered to log in (if the registration is
verified or does not require verification, if it has been approved or does
not require approval, and if it has not been blocked).
•logout does what you would expect but also, as the other methods, logs
the event and can be used to trigger some event.
•profile allows users to edit their profile, i.e. the content of the auth_user
table. Notice that this table does not have a fixed structure and can be
customized.
•change_password allows users to change their password in a fail-safe way.
•verify_email. If email verification is turned on, then visitors, upon
registration, receive an email with a link to verify their email information.
The link points to this action.
•retrieve_username. By default, Auth uses email and password for login,
but it can, optionally, use username instead of email. In this latter case, if
a user forgets his/her username, the retrieve_username method allows the
user to type the email address and retrieve the username by email.
•request_reset_password. Allows users who forgot their password to
request a new password. They will get a confirmation email pointing
to reset_password.
•impersonate allows a user to "impersonate" another user. This is
important for debugging and for support purposes. request.args[0] is
the id of the user to be impersonated. This is only allowed if the logged in
user has_permission(’impersonate’, db.auth_user, user_id).
•groups lists the groups of which the current logged in user is a member.
•not_authorized displays an error message when the visitor tried to do
something that he/she is not authorized to do
•navbar is a helper that generates a bar with login/register/etc. links.
Logout, profile, change_password, impersonate, and groups require login.

396 web2py full-stack web framework,4th edition
By default they are all exposed, but it is possible to restrict access to only
some of these actions.
All of the methods above can be extended or replaced by subclassing Auth.
All of the methods above can be used in separate actions. For example:
1def mylogin(): return dict(form=auth.login())
2def myregister(): return dict(form=auth.register())
3def myprofile(): return dict(form=auth.profile())
4...
To restrict access to functions to only logged in visitors, decorate the function
as in the following example
1@auth.requires_login()
2def hello():
3return dict(message='hello %(first_name)s' % auth.user)
Any function can be decorated, not just exposed actions. Of course this is
still only a very simple example of access control. More complex examples
will be discussed later.
auth.user contains a copy of the db.auth_user records for the current logged
in user or None otherwise. There is also a auth.user_id which is the same as
auth.user.id (i.e. the id of the current logger in user) or None.
9.1.1Restrictions on registration
If you want to allow visitors to register but not to log in until registration has
been approved by the administrator:
1auth.settings.registration_requires_approval = True
You can approve a registration via the appadmin interface. Look into the
table auth_user. Pending registrations have a registration_key field set to
"pending". A registration is approved when this field is set to blank.
Via the appadmin interface, you can also block a user from logging in. Locate
the user in the table auth_user and set the registration_key to "blocked".
"blocked" users are not allowed to log in. Notice that this will prevent a
visitor from logging in but it will not force a visitor who is already logged in

access control 397
to log out. The word "disabled" may be used instead of "blocked" if preferred,
with exactly the same behavior.
You can also block access to the "register" page completely with this
statement:
1auth.settings.actions_disabled.append('register')
If you want to allow people to register and automatically log them in after
registration but still want to send an email for verification so that they cannot
login again after logout, unless they completed the instructions in the email,
you can accomplish it as follows:
1auth.settings.registration_requires_approval = True
2auth.settings.login_after_registration = True
Other methods of Auth can be restricted in the same way.
9.1.2Integration with OpenID, Facebook, etc.
You can use the web2py Role Base Access Control and authenticate with
other services like OpenID, Facebook, LinkedIn, Google, Dropbox, MySpace,
Flickr, etc. The easiest way is to use Janrain Engage (formerly RPX)
(Janrain.com).
Dropbox is discussed as a special case in Chapter 14 since it allows more than
just login, it also provides storage services for the logged in users.
Janrain Engage is a service that provides middleware authentication. You
can register with Janrain.com, register a domain (the name of your app) and
set of URLs you will be using, and they will provide you with an API key.
Now edit the model of your web2py application and place the following lines
somewhere after the definition of the auth object :
1from gluon.contrib.login_methods.rpx_account import RPXAccount
2auth.settings.actions_disabled=['register','change_password','
request_reset_password']
3auth.settings.login_form = RPXAccount(request,
4api_key='...',
5domain='...',
6url = "http://localhost:8000/%s/default/user/login" %request.application)
398 web2py full-stack web framework,4th edition
The first line imports the new login method, the second line disables local
registration, and the third line asks web2py to use the RPX login method.
You must insert your own api_key provided by Janrain.com, the domain you
choose upon registration and the external url of your login page.
When a new user logins for the first time, web2py creates a new db.auth_user
record associated to the user. It will use the registration_id field to store
a unique id for the user. Most authentication methods will also provide
a username, email, first_name and last_name but that is not guaranteed.
Which fields are provided depends on the login method selected by the user.
If the same user logs in twice using different authentication mechanisms
(for example once with OpenID and once with Facebook), Janrain may not
recognize his/her as the same user and issue different registration_id.
You can customize the mapping between the data provided by Janrain and
the data stored in db.auth_user. Here is an example for Facebook:
1auth.settings.login_form.mappings.Facebook = lambda profile:\
2dict(registration_id = profile["identifier"],
3username = profile["preferredUsername"],
4email = profile["email"],
5first_name = profile["name"]["givenName"],
6last_name = profile["name"]["familyName"])
The keys in the dictionary are fields in db.auth_user and the values are data

access control 399
entries in the profile object provided by Janrain. Look at the online Janrain
documentation for details on the latter.
Janrain will also keep statistics about your users’ login.
This login form is fully integrated with web2py Role Based Access Control
and you can still create groups, make users members of groups, assign
permissions, block users, etc.
Janrain’s free Basic service allows up to 2500 unique registered users to sign in
annually. Accommodating more users requires an upgrade to one of their paid
service tiers.
If you prefer not to use Janrain and want to use a different login method (LDAP,
PAM, Google, OpenID, OAuth/Facebook, LinkedIn, etc.) you can do so. The
API to do so is described later in the chapter.
9.1.3CAPTCHA and reCAPTCHA
To prevent spammers and bots registering on your site, you may require a
registration CAPTCHA. web2py supports reCAPTCHA [74] out of the box.
This is because reCAPTCHA is very well designed, free, accessible (it can
read the words to the visitors), easy to set up, and does not require installing
any third-party libraries.
This is what you need to do to use reCAPTCHA:
• Register with reCAPTCHA [74] and obtain a (PUBLIC_KEY,
PRIVATE_KEY) couple for your account. These are just two strings.
• Append the following code to your model after the auth object is defined:
1from gluon.tools import Recaptcha
2auth.settings.captcha = Recaptcha(request,
3'PUBLIC_KEY','PRIVATE_KEY')
reCAPTCHA may not work if you access the web site as ’localhost’ or
’127.0.0.1’, because it is registered to work with publicly visible web sites
only.
The Recaptcha constructor takes some optional arguments:

400 web2py full-stack web framework,4th edition
1Recaptcha(..., use_ssl=True, error_message='invalid', label='Verify:', options='')
Notice that use_ssl=False by default.
options may be a configuration string, e.g. options="theme:’white’,
lang:’fr’"
More details: reCAPTCHA [?] and customizing [?].
If you do not want to use reCAPTCHA, look into the definition of the
Recaptcha class in "gluon/tools.py", since it is easy to use other CAPTCHA
systems.
Notice that Recaptcha is just a helper that extends DIV. It generates a dummy
field that validates using the reCaptcha service and, therefore, it can be used
in any form, including used defined FORMs:
1form = FORM(INPUT(...),Recaptcha(...),INPUT(_type='submit'))
You can use it in all types of SQLFORM by injection:
1form = SQLFORM(...) or SQLFORM.factory(...)
2form.element('table').insert(-1,TR('',Recaptcha(...),''))
9.1.4Customizing Auth
The call to
1auth.define_tables()
defines all Auth tables that have not been defined already. This means that if
you wish to do so, you can define your own auth_user table.
There are a number of ways to customize auth. The simplest way is to add
extra fields:
1# after auth = Auth(db)
2auth.settings.extra_fields['auth_user']= [
3Field('address'),
4Field('city'),
5Field('zip'),
6Field('phone')]
7# before auth.define_tables(username=True)

access control 401
You can declare extra fields not just for table "auth_user" but also for other
"auth_" tables. Using extra_fields is the recommended way as it will not
break any internal mechanism.
Another way to do (for experts!) consists of defining your auth tables youself.
If a table is declared before auth.define_tables() it is used instead of the
default one. Here is how to do it:
1# after auth = Auth(db)
2db.define_table(
3auth.settings.table_user_name,
4Field('first_name', length=128, default=''),
5Field('last_name', length=128, default=''),
6Field('email', length=128, default='', unique=True), # required
7Field('password','password', length=512, # required
8readable=False, label='Password'),
9Field('address'),
10 Field('city'),
11 Field('zip'),
12 Field('phone'),
13 Field('registration_key', length=512, # required
14 writable=False, readable=False, default=''),
15 Field('reset_password_key', length=512, # required
16 writable=False, readable=False, default=''),
17 Field('registration_id', length=512, # required
18 writable=False, readable=False, default=''))
19
20 # do not forget validators
21 custom_auth_table = db[auth.settings.table_user_name] # get the custom_auth_table
22 custom_auth_table.first_name.requires = \
23 IS_NOT_EMPTY(error_message=auth.messages.is_empty)
24 custom_auth_table.last_name.requires = \
25 IS_NOT_EMPTY(error_message=auth.messages.is_empty)
26 custom_auth_table.password.requires = [IS_STRONG(), CRYPT()]
27 custom_auth_table.email.requires = [
28 IS_EMAIL(error_message=auth.messages.invalid_email),
29 IS_NOT_IN_DB(db, custom_auth_table.email)]
30
31 auth.settings.table_user = custom_auth_table # tell auth to use custom_auth_table
32
33 # before auth.define_tables()
You can add any field you wish, and you can change validators but you
cannot remove the fields marked as "required" in this example.

402 web2py full-stack web framework,4th edition
It is important to make "password", "registration_key", "reset_password_key"
and "registration_id" fields readable=False and writable=False, since a visitor
must not be allowed to tamper with them.
If you add a field called "username", it will be used in place of "email" for
login. If you do, you will need to add a validator as well:
1auth_table.username.requires = IS_NOT_IN_DB(db, auth_table.username)
9.1.5Renaming Auth tables
The actual names of the Auth tables are stored in
1auth.settings.table_user_name = 'auth_user'
2auth.settings.table_group_name = 'auth_group'
3auth.settings.table_membership_name = 'auth_membership'
4auth.settings.table_permission_name = 'auth_permission'
5auth.settings.table_event_name = 'auth_event'
The names of the table can be changed by reassigning the above variables
after the auth object is defined and before the Auth tables are defined. For
example:
1auth = Auth(db)
2auth.settings.table_user_name = 'person'
3#...
4auth.define_tables()
The actual tables can also be referenced, independently of their actual names,
by
1auth.settings.table_user
2auth.settings.table_group
3auth.settings.table_membership
4auth.settings.table_permission
5auth.settings.table_event
9.1.6Other login methods and login forms
Auth provides multiple login methods and hooks to create new login
methods. Each supported login method corresponds to a file in the folder

access control 403
1gluon/contrib/login_methods/
Refer to the documentation in the files themselves for each login method, but
here are some examples.
First of all, we need to make a distinction between two types of alternate
login methods:
• login methods that use a web2py login form (although the credentials are
verified outside web2py). An example is LDAP.
• login methods that require an external single-sign-on form (an example is
Google and Facebook).
In the latter case, web2py never gets the login credentials, only a
login token issued by the service provider. The token is stored in
db.auth_user.registration_id.
Let’s consider examples of the first case:
Basic
Let’s say you have an authentication service, for example at the url
1https://basic.example.com
that accepts basic access authentication. That means the server accepts HTTP
requests with a header of the form:
1GET /index.html HTTP/1.0
2Host: basic.example.com
3Authorization: Basic QWxhZGRpbjpvcGVuIHNlc2FtZQ==
where the latter string is the base64 encoding of the string
username:password. The service responds 200 OK if the user is authorized
and 400,401,402,403 or 404 otherwise.
You want to enter username and password using the standard Auth login
form and verify the credentials against such a service. All you need to do is
add the following code to your application
1from gluon.contrib.login_methods.basic_auth import basic_auth
2auth.settings.login_methods.append(
3basic_auth('https://basic.example.com'))

404 web2py full-stack web framework,4th edition
Notice that auth.settings.login_methods is a list of authentication methods
that are executed sequentially. By default it is set to
1auth.settings.login_methods = [auth]
When an alternate method is appended, for example basic_auth,Auth first
tries to log in the visitor based on the content of auth_user, and when this
fails, it tries the next method in the list. If a method succeeds in logging in the
visitor, and if auth.settings.login_methods[0]==auth,Auth takes the following
actions:
• if the user does not exist in auth_user, a new user is created and the
username/email and passwords are stored.
• if the user does exist in auth_user but the new accepted password does
not match the old stored password, the old password is replaced with the
new one (notice that passwords are always stored hashed unless specified
otherwise).
If you do not wish to store the new password in auth_user, then it is sufficient
to change the order of login methods, or remove auth from the list. For
example:
1from gluon.contrib.login_methods.basic_auth import basic_auth
2auth.settings.login_methods = \
3[basic_auth('https://basic.example.com')]
The same applies for any other login method described here.
SMTP and Gmail
You can verify login credentials using a remote SMTP server, for example
Gmail; i.e., you log the user in if the email and password they provide are
valid credentials to access the Gmail SMTP server (smtp.gmail.com:587). All
that is needed is the following code:
1from gluon.contrib.login_methods.email_auth import email_auth
2auth.settings.login_methods.append(
3email_auth("smtp.gmail.com:587","@gmail.com"))
The first argument of email_auth is the address:port of the SMTP server. The
second argument is the email domain.

access control 405
This works with any SMTP server that requires TLS authentication.
PAM
Authentication using Pluggable Authentication Modules (PAM) works as in
the previous cases. It allows web2py to authenticate users using the operating
system accounts:
1from gluon.contrib.login_methods.pam_auth import pam_auth
2auth.settings.login_methods.append(pam_auth())
LDAP
Authentication using LDAP works very much as in the previous cases.
To use LDAP login with MS Active Directory:
1from gluon.contrib.login_methods.ldap_auth import ldap_auth
2auth.settings.login_methods.append(ldap_auth(mode='ad',
3server='my.domain.controller',
4base_dn='ou=Users,dc=domain,dc=com'))
To use LDAP login with Lotus Notes and Domino:
1auth.settings.login_methods.append(ldap_auth(mode='domino',
2server='my.domino.server'))
To use LDAP login with OpenLDAP (with UID):
1auth.settings.login_methods.append(ldap_auth(server='my.ldap.server',
2base_dn='ou=Users,dc=domain,dc=com'))
To use LDAP login with OpenLDAP (with CN):
1auth.settings.login_methods.append(ldap_auth(mode='cn',
2server='my.ldap.server', base_dn='ou=Users,dc=domain,dc=com'))
Google App Engine
Authentication using Google when running on Google App Engine requires
skipping the web2py login form, being redirected to the Google login page,
and back upon success. Because the behavior is different than in the previous
examples, the API is a little different.
1from gluon.contrib.login_methods.gae_google_login import GaeGoogleAccount
2auth.settings.login_form = GaeGoogleAccount()

406 web2py full-stack web framework,4th edition
OpenID
We have previously discussed integration with Janrain (which has OpenID
support) and that is the easiest way to use OpenID. Yet sometimes you do
not want to rely on a third party service and you want to access the OpenID
provider directly from the consumer (your app).
Here is an example:
1from gluon.contrib.login_methods.openid_auth import OpenIDAuth
2auth.settings.login_form = OpenIDAuth(auth)
OpenIDAuth requires the python-openid module to be installed separately.
Under the hood, this login method defines the following table:
1db.define_table('alt_logins',
2Field('username', length=512, default=''),
3Field('type', length =128, default='openid', readable=False),
4Field('user', self.table_user, readable=False))
which stores the openid usernames for each user. If you want to display the
openids for the current logged in user:
1{{=auth.settings.login_form.list_user_openids()}}
OAuth2.0and Facebook
We have previously discussed integration with Janrain (which has Facebook
support), yet sometimes you do not want to rely on a third party service
and you want to access a OAuth2.0provider directly; for example, Facebook.
Here is how:
1from gluon.contrib.login_methods.oauth20_account import OAuthAccount
2auth.settings.login_form=OAuthAccount(YOUR_CLIENT_ID,YOUR_CLIENT_SECRET)
Things get a little more complex if you want to use Facebook OAuth2.0to
login into a specific Facebook app to access its API, instead of your own app.
Here is an example for accessing the Facebook Graph API.
First of all you must install the Facebook Python SDK.
Second, you need the following code in your model:
1# import required modules
2from facebook import GraphAPI

access control 407
3from gluon.contrib.login_methods.oauth20_account import OAuthAccount
4# extend the OAUthAccount class
5class FaceBookAccount(OAuthAccount):
6"""OAuth impl for Facebook"""
7AUTH_URL="https://graph.facebook.com/oauth/authorize"
8TOKEN_URL="https://graph.facebook.com/oauth/access_token"
9def __init__(self, g):
10 OAuthAccount.__init__(self, g,
11 YOUR_CLIENT_ID,
12 YOUR_CLIENT_SECRET,
13 self.AUTH_URL,
14 self.TOKEN_URL)
15 self.graph = None
16 # override function that fetches user info
17 def get_user(self):
18 "Returns the user using the Graph API"
19 if not self.accessToken():
20 return None
21 if not self.graph:
22 self.graph = GraphAPI((self.accessToken()))
23 try:
24 user = self.graph.get_object("me")
25 return dict(first_name = user['first_name'],
26 last_name = user['last_name'],
27 username = user['id'])
28 except GraphAPIError:
29 self.session.token = None
30 self.graph = None
31 return None
32 # use the above class to build a new login form
33 auth.settings.login_form=FaceBookAccount()
LinkedIn
We have previously discussed integration with Janrain (which has LinkedIn
support) and that is the easiest way to use OAuth. Yet sometime you do not
want to rely on a third party service or you may want to access LinkedIn
directly to get more information than Janrain provides.
Here is an example:
1from gluon.contrib.login_methods.linkedin_account import LinkedInAccount
2auth.settings.login_form=LinkedInAccount(request,KEY,SECRET,RETURN_URL)
LinkedInAccount requires the "python-linkedin" module installed separately.
X509

408 web2py full-stack web framework,4th edition
You can also login by passing to the page an x509 certificate and your
credential will be extracted from the certificate. This requires M2Crypto
installed from
1http://chandlerproject.org/bin/view/Projects/MeTooCrypto
Once you have M2Cryption installed you can do:
1from gluon.contrib.login_methods.x509_auth import X509Account
2auth.settings.actions_disabled=['register','change_password','
request_reset_password']
3auth.settings.login_form = X509Account()
You can now authenticate into web2py passing your x509 certificate. How
to do this is browser dependant but probably you are more likely to use
certificates for web services. In this case you can use for example cURL to try
out your authentication:
1curl -d "firstName=John&lastName=Smith" -G -v --key private.key \
2--cert server.crt https://example/app/default/user/profile
This works out of the box with Rocket (the web2py built-in web server) but
you may need some extra configuration work on the web server side if you
are using a different web server. In particular you need to tell your web server
where the certificates are located on local host and that it needs to verify
certificates coming from the clients. How to do it is web server dependent
and therefore omitted here.
Multiple login forms
Some login methods modify the login_form, some do not. When they do
that, they may not be able to coexist. Yet some coexist by providing multiple
login forms in the same page. web2py provides a way to do it. Here is an
example mixing normal login (auth) and RPX login (janrain.com):
1from gluon.contrib.login_methods.extended_login_form import ExtendedLoginForm
2other_form = RPXAccount(request, api_key='...', domain='...', url='...')
3auth.settings.login_form = ExtendedLoginForm(request,
4auth, other_form, signals=['token'])
If signals are set and a parameter in request matches any signals, it will
return the call of other_form.login_form instead. other_form can handle some

access control 409
particular situations, for example, multiple steps of OpenID login inside
other_form.login_form.
Otherwise it will render the normal login form together with the other_form.
9.2Mail and Auth
One can define a mailer with
1from gluon.tools import Mail
2mail = Mail()
3mail.settings.server = 'smtp.example.com:25'
4mail.settings.sender = 'you@example.com'
5mail.settings.login = 'username:password'
or simply use the mailer provided by auth:
1mail = auth.settings.mailer
2mail.settings.server = 'smtp.example.com:25'
3mail.settings.sender = 'you@example.com'
4mail.settings.login = 'username:password'
You need to replace the mail.settings with the proper parameters for your
SMTP server. Set mail.settings.login=False if the SMTP server does not
require authentication.
You can read more about web2py API for emails and email configuration in
Chapter 8. Here we limit the discussion to the interaction between Mail and
Auth.
In Auth, by default, email verification is disabled. To enable email, append
the following lines in the model where auth is defined:
1auth.settings.registration_requires_verification = False
2auth.settings.registration_requires_approval = False
3auth.settings.reset_password_requires_verification = True
4auth.messages.verify_email = 'Click on the link http://' + \
5request.env.http_host + \
6URL(r=request,c='default',f='user',args=['verify_email']) + \
7'/%(key)s to verify your email'
8auth.messages.reset_password = 'Click on the link http://' + \
9request.env.http_host + \
10 URL(r=request,c='default',f='user',args=['reset_password']) + \
11 '/%(key)s to reset your password'

410 web2py full-stack web framework,4th edition
You need to replace the string
1'Click on the link ...'
in auth.messages.verify_email with the proper complete URL of the action
verify_email. This is necessary because web2py may be installed behind a
proxy, and it cannot determine its own public URLs with absolute certainty.
9.3Authorization
Once a new user is registered, a new group is created to contain the user.
The role of the new user is conventionally "user_[id]" where [id] is the id of
the newly created id. The creation of the group can be disabled with
1auth.settings.create_user_groups = False
although we do not suggest doing so.
Users have membership in groups. Each group is identified by a name/role.
Groups have permissions. Users have permissions because of the groups
they belong to.
You can create groups, give membership and permissions via appadmin or
programmatically using the following methods:
1auth.add_group('role','description')
returns the id of the newly created group.
1auth.del_group(group_id)
deletes the group with group_id.
1auth.del_group(auth.id_group('user_7'))
deletes the group with role "user_7", i.e., the group uniquely associated to
user number 7.
1auth.user_group(user_id)
returns the id of the group uniquely associated to the user identified by
user_id.

access control 411
1auth.add_membership(group_id, user_id)
gives user_id membership of the group group_id. If the user_id is not
specified, then web2py assumes the current logged-in user.
1auth.del_membership(group_id, user_id)
revokes user_id membership of the group group_id. If the user_id is not
specified, then web2py assumes the current logged-in user.
1auth.has_membership(group_id, user_id, role)
checks whether user_id has membership of the group group_id or the group
with the specified role. Only group_id or role should be passed to the
function, not both. If the user_id is not specified, then web2py assumes the
current logged-in user.
1auth.add_permission(group_id, 'name','object', record_id)
gives permission "name" (user defined) on the object "object" (also user
defined) to members of the group group_id. If "object" is a tablename then
the permission can refer to the entire table by setting record_id to a value of
zero, or the permission can refer to a specific record by specifying a record_id
value greater than zero. When giving permissions on tables, it is common to
use a permission name in the set (’create’, ’read’, ’update’, ’delete’, ’select’)
since these permissions are understood and can be enforced by CRUD.
If group_id is zero, web2py uses the group uniquely associated to the current
logged-in user.
You can also use auth.id_group(role="...") to get the id of a group given its
name.
1auth.del_permission(group_id, 'name','object', record_id)
revokes the permission.
1auth.has_permission('name','object', record_id, user_id)
checks whether the user identified by user_id has membership in a group
with the requested permission.

412 web2py full-stack web framework,4th edition
1rows = db(auth.accessible_query('read', db.mytable, user_id))\
2.select(db.mytable.ALL)
returns all rows of table "mytable" that user user_id has "read" permission
on. If the user_id is not specified, then web2py assumes the current logged-
in user. The accessible_query(...) can be combined with other queries to
make more complex ones. accessible_query(...) is the only Auth method to
require a JOIN, so it does not work on the Google App Engine.
Assuming the following definitions:
1>>> from gluon.tools import Auth
2>>> auth = Auth(db)
3>>> auth.define_tables()
4>>> secrets = db.define_table('document',Field('body'))
5>>> james_bond = db.auth_user.insert(first_name='James',
6last_name='Bond')
Here is an example:
1>>> doc_id = db.document.insert(body = 'top secret')
2>>> agents = auth.add_group(role = 'Secret Agent')
3>>> auth.add_membership(agents, james_bond)
4>>> auth.add_permission(agents, 'read', secrets)
5>>> print auth.has_permission('read', secrets, doc_id, james_bond)
6True
7>>> print auth.has_permission('update', secrets, doc_id, james_bond)
8False
9.3.1Decorators
The most common way to check permission is not by explicit calls to the
above methods, but by decorating functions so that permissions are checked
relative to the logged-in visitor. Here are some examples:
1def function_one():
2return 'this is a public function'
3
4@auth.requires_login()
5def function_two():
6return 'this requires login'
7
8@auth.requires_membership('agents')
9def function_three():

access control 413
10 return 'you are a secret agent'
11
12 @auth.requires_permission('read', secrets)
13 def function_four():
14 return 'you can read secret documents'
15
16 @auth.requires_permission('delete','any file')
17 def function_five():
18 import os
19 for file in os.listdir('./'):
20 os.unlink(file)
21 return 'all files deleted'
22
23 @auth.requires(auth.user_id==1 or request.client=='127.0.0.1', requires_login=True)
24 def function_six():
25 return 'you can read secret documents'
26
27 @auth.requires_permission('add','number')
28 def add(a, b):
29 return a + b
30
31 def function_seven():
32 return add(3, 4)
The condition argument of @auth.requires(condition) can be a callable.
@auth.requires also takes an optional argument requires_login which defaults
to True. If set to False, it does not require login before evaluating the condition
as true/false. The condition can be a boolean value or a function evaluating
to boolean.
Note that access to all functions apart from the first one is restricted based
on permissions that the visitor may or may not have.
If the visitor is not logged in, then the permission cannot be checked; the
visitor is redirected to the login page and then back to the page that requires
permissions.
9.3.2Combining requirements
Occasionally, it is necessary to combine requirements. This can be done via
a generic requires decorator which takes a single argument, a true or false
condition. For example, to give access to agents, but only on Tuesday:

414 web2py full-stack web framework,4th edition
1@auth.requires(auth.has_membership(group_id=agents) \
2and request.now.weekday()==1)
3def function_seven():
4return 'Hello agent, it must be Tuesday!'
or equivalently:
1@auth.requires(auth.has_membership(role='Secret Agent') \
2and request.now.weekday()==1)
3def function_seven():
4return 'Hello agent, it must be Tuesday!'
9.3.3Authorization and CRUD
Using decorators and/or explicit checks provides one way to implement
access control.
Another way to implement access control is to always use CRUD (as opposed
to SQLFORM) to access the database and to ask CRUD to enforce access control
on database tables and records. This is done by linking Auth and CRUD with
the following statement:
1crud.settings.auth = auth
This will prevent the visitor from accessing any of the CRUD functions unless
the visitor is logged in and has explicit access. For example, to allow a visitor
to post comments, but only update their own comments (assuming crud,
auth and db.comment are defined):
1def give_create_permission(form):
2group_id = auth.id_group('user_%s' % auth.user.id)
3auth.add_permission(group_id, 'read', db.comment)
4auth.add_permission(group_id, 'create', db.comment)
5auth.add_permission(group_id, 'select', db.comment)
6
7def give_update_permission(form):
8comment_id = form.vars.id
9group_id = auth.id_group('user_%s' % auth.user.id)
10 auth.add_permission(group_id, 'update', db.comment, comment_id)
11 auth.add_permission(group_id, 'delete', db.comment, comment_id)
12
13 auth.settings.register_onaccept = give_create_permission
14 crud.settings.auth = auth

access control 415
15
16 def post_comment():
17 form = crud.create(db.comment, onaccept=give_update_permission)
18 comments = db(db.comment).select()
19 return dict(form=form, comments=comments)
20
21 def update_comment():
22 form = crud.update(db.comment, request.args(0))
23 return dict(form=form)
You can also select specific records (those you have ’read’ access to):
1def post_comment():
2form = crud.create(db.comment, onaccept=give_update_permission)
3query = auth.accessible_query('read', db.comment, auth.user.id)
4comments = db(query).select(db.comment.ALL)
5return dict(form=form, comments=comments)
The permissions names enforced by :
1crud.settings.auth = auth
are "read", "create", "update", "delete", "select", "impersonate".
9.3.4Authorization and downloads
The use of decorators and the use of crud.settings.auth do not enforce
authorization on files downloaded by the usual download function
1def download(): return response.download(request, db)
If one wishes to do so, one must declare explicitly which "upload" fields
contain files that need access control upon download. For example:
1db.define_table('dog',
2Field('small_image','upload'),
3Field('large_image','upload'))
4
5db.dog.large_image.authorization = lambda record: \
6auth.is_logged_in() and \
7auth.has_permission('read', db.dog, record.id, auth.user.id)
The attribute authorization of upload field can be None (the default) or a
function that decides whether the user is logged in and has permission

416 web2py full-stack web framework,4th edition
to ’read’ the current record. In this example, there is no restriction on
downloading images linked by the "small_image" field, but we require access
control on images linked by the "large_image" field.
9.3.5Access Control and Basic Authentication
Occasionally, it may be necessary to expose actions that have decorators that
require access control as services; i.e., to call them from a program or script
and still be able to use authentication to check for authorization.
Auth enables login via basic authentication:
1auth.settings.allow_basic_login = False
With this set, an action like
1@auth.requires_login()
2def give_me_time():
3import time
4return time.ctime()
can be called, for example, from a shell command:
1wget --user=[username] --password=[password]
2http://.../[app]/[controller]/give_me_time
Basic login is often the only option for services (described in the next
chapter), but it is disabled by default.
9.3.6Manual Authentication
Some times you want to implement your own logic and do "manual" user
login. This can also be done by calling the function:
1user = auth.login_bare(username,password)
login_bare returns user if the user exists and the password is valid, else it
returns None.username is the email if the "auth_user" table does not have a
"username" field.

access control 417
9.3.7Settings and messages
Here is a list of all parameters that can be customized for Auth
The following must point to a gluon.tools.Mail object to allow auth to send
emails:
1auth.settings.mailer = None
The following must be the name of the controller that defined the user action:
1auth.settings.controller = 'default'
The following is a very important setting:
1auth.settings.hmac_key = None
It must be set to something like "sha512:a-pass-phrase" and it will be passed
to the CRYPT validator for the "password" field of the auth_user table. It will
be the algorithm and a-pass-phrase used to hash the passwords.
By default, auth also requires a minimum password length of 4. This can be
changed:
1auth.settings.password_min_length = 4
To disabled an action append its name to this list:
1auth.settings.actions_disabled = []
For example:
1auth.settings.actions_disabled.append('register')
will disable registration.
If you want to receive an email to verify registration set this to True:
1auth.settings.registration_requires_verification = False
To automatically login people after registration, even if they have not
completed the email verification process, set the following to True:
1auth.settings.login_after_registration = False

418 web2py full-stack web framework,4th edition
If new registrants must wait for approval before being able to login set this
to True:
1auth.settings.registration_requires_approval = False
Approval consists of setting registration_key==” via appadmin or
programmatically.
If you do not want a new group for each new user set the following to False:
1auth.settings.create_user_groups = True
The following settings determine alternative login methods and login forms,
as discussed previously:
1auth.settings.login_methods = [auth]
2auth.settings.login_form = auth
Do you want to allow basic login?
1auth.settings.allows_basic_login = False
The following is the URL of the login action:
1auth.settings.login_url = URL('user', args='login')
If the user tried to access the register page but is already logged in, he will
be redirected to this URL:
1auth.settings.logged_url = URL('user', args='profile')
This must point to the URL of the download action, in case the profile
contains images:
1auth.settings.download_url = URL('download')
These must point to the URL you want to redirect your users to after the
various possible auth actions (in case there is no referrer):
1auth.settings.login_next = URL('index')
2auth.settings.logout_next = URL('index')
3auth.settings.profile_next = URL('index')
4auth.settings.register_next = URL('user', args='login')
5auth.settings.retrieve_username_next = URL('index')
6auth.settings.retrieve_password_next = URL('index')
7auth.settings.change_password_next = URL('index')

access control 419
8auth.settings.request_reset_password_next = URL('user', args='login')
9auth.settings.reset_password_next = URL('user', args='login')
10 auth.settings.verify_email_next = URL('user', args='login')
If the visitor is not logger in, and calls a function that requires
authentication, the user is redirected to auth.settings.login_url which
defaults to URL(’default’,’user/login’). One can replace this behavior by
redefining:
1auth.settings.on_failed_authentication = lambda url: redirect(url)
This is the function called for the redirection. The argument url‘ passed to
this function is the url for the login page.
If the visitor does not have permission to access a given function, the visitor
is redirect to the URL defined by
1auth.settings.on_failed_authorization = \
2URL('user',args='on_failed_authorization')
You can change this variable and redirect the user elsewhere.
Often on_failed_authorization is a URL but it can be a function that returns
the URL and it will be called on failed authorization.
These are lists of callbacks that should be executed after form validation for
each of the corresponding action before any database IO:
1auth.settings.login_onvalidation = []
2auth.settings.register_onvalidation = []
3auth.settings.profile_onvalidation = []
4auth.settings.retrieve_password_onvalidation = []
5auth.settings.reset_password_onvalidation = []
Each callback must be a function that takes the form object and it can modify
the attributes of the form object before database IO is performed.
These are lists of callbacks that should be executed after the database IO is
performed and before redirection:
1auth.settings.login_onaccept = []
2auth.settings.register_onaccept = []
3auth.settings.profile_onaccept = []
4auth.settings.verify_email_onaccept = []

420 web2py full-stack web framework,4th edition
Here is an example:
1auth.settings.register_onaccept.append(lambda form:\
2mail.send(to='you@example.com',subject='new user',
3message="new user email is %s'%form.vars.email))
You can enable captcha for any of the auth actions:
1auth.settings.captcha = None
2auth.settings.login_captcha = None
3auth.settings.register_captcha = None
4auth.settings.retrieve_username_captcha = None
5auth.settings.retrieve_password_captcha = None
If the .captcha settings points to a gluon.tools.Recaptcha, all forms for which
the corresponding option (like .login_captcha) is set to None will have a
captcha, while those for which the corresponding option is set to False
will not. If, instead, .captcha is set to None, only those form who have a
corresponding option set to a gluon.tools.Recaptcha object will have captcha
and the others will not.
This is the login session expiration time:
1auth.settings.expiration = 3600 # seconds
You can change the name of the password field (in Firebird for example
"password" is a keyword and cannot be used to name a field):
1auth.settings.password_field = 'password'
Normally the login form tries to validate an email. This can be disabled by
changing this setting:
1auth.settings.login_email_validate = True
Do you want to show the record id in the edit profile page?
1auth.settings.showid = False
For custom forms you may want to disable automatic error notification in
forms:
1auth.settings.hideerror = False
Also for custom forms you can change the style:
access control 421
1auth.settings.formstyle = 'table3cols'
(it can be "table2cols", "divs" and "ul")
And you can set the separator for auth-generated forms:
1auth.settings.label_separator = ':'
By default the login form gives the option to extend the login via "remember
me" option. The expiration time can be changed or the option disabled via
these settings:
1auth.settings.long_expiration = 3600*24*30 # one month
2auth.settings.remember_me_form = True
You can also customize the following messages whose use and context should
be obvious:
1auth.messages.submit_button = 'Submit'
2auth.messages.verify_password = 'Verify Password'
3auth.messages.delete_label = 'Check to delete:'
4auth.messages.function_disabled = 'Function disabled'
5auth.messages.access_denied = 'Insufficient privileges'
6auth.messages.registration_verifying = 'Registration needs verification'
7auth.messages.registration_pending = 'Registration is pending approval'
8auth.messages.login_disabled = 'Login disabled by administrator'
9auth.messages.logged_in = 'Logged in'
10 auth.messages.email_sent = 'Email sent'
11 auth.messages.unable_to_send_email = 'Unable to send email'
12 auth.messages.email_verified = 'Email verified'
13 auth.messages.logged_out = 'Logged out'
14 auth.messages.registration_successful = 'Registration successful'
15 auth.messages.invalid_email = 'Invalid email'
16 auth.messages.unable_send_email = 'Unable to send email'
17 auth.messages.invalid_login = 'Invalid login'
18 auth.messages.invalid_user = 'Invalid user'
19 auth.messages.is_empty = "Cannot be empty"
20 auth.messages.mismatched_password = "Password fields don't match"
21 auth.messages.verify_email = ...
22 auth.messages.verify_email_subject = 'Password verify'
23 auth.messages.username_sent = 'Your username was emailed to you'
24 auth.messages.new_password_sent = 'A new password was emailed to you'
25 auth.messages.password_changed = 'Password changed'
26 auth.messages.retrieve_username = 'Your username is: %(username)s'
27 auth.messages.retrieve_username_subject = 'Username retrieve'
28 auth.messages.retrieve_password = 'Your password is: %(password)s'
29 auth.messages.retrieve_password_subject = 'Password retrieve'

422 web2py full-stack web framework,4th edition
30 auth.messages.reset_password = ...
31 auth.messages.reset_password_subject = 'Password reset'
32 auth.messages.invalid_reset_password = 'Invalid reset password'
33 auth.messages.profile_updated = 'Profile updated'
34 auth.messages.new_password = 'New password'
35 auth.messages.old_password = 'Old password'
36 auth.messages.group_description = \
37 'Group uniquely assigned to user %(id)s'
38 auth.messages.register_log = 'User %(id)s Registered'
39 auth.messages.login_log = 'User %(id)s Logged-in'
40 auth.messages.logout_log = 'User %(id)s Logged-out'
41 auth.messages.profile_log = 'User %(id)s Profile updated'
42 auth.messages.verify_email_log = 'User %(id)s Verification email sent'
43 auth.messages.retrieve_username_log = 'User %(id)s Username retrieved'
44 auth.messages.retrieve_password_log = 'User %(id)s Password retrieved'
45 auth.messages.reset_password_log = 'User %(id)s Password reset'
46 auth.messages.change_password_log = 'User %(id)s Password changed'
47 auth.messages.add_group_log = 'Group %(group_id)s created'
48 auth.messages.del_group_log = 'Group %(group_id)s deleted'
49 auth.messages.add_membership_log = None
50 auth.messages.del_membership_log = None
51 auth.messages.has_membership_log = None
52 auth.messages.add_permission_log = None
53 auth.messages.del_permission_log = None
54 auth.messages.has_permission_log = None
55 auth.messages.label_first_name = 'First name'
56 auth.messages.label_last_name = 'Last name'
57 auth.messages.label_username = 'Username'
58 auth.messages.label_email = 'E-mail'
59 auth.messages.label_password = 'Password'
60 auth.messages.label_registration_key = 'Registration key'
61 auth.messages.label_reset_password_key = 'Reset Password key'
62 auth.messages.label_registration_id = 'Registration identifier'
63 auth.messages.label_role = 'Role'
64 auth.messages.label_description = 'Description'
65 auth.messages.label_user_id = 'User ID'
66 auth.messages.label_group_id = 'Group ID'
67 auth.messages.label_name = 'Name'
68 auth.messages.label_table_name = 'Table name'
69 auth.messages.label_record_id = 'Record ID'
70 auth.messages.label_time_stamp = 'Timestamp'
71 auth.messages.label_client_ip = 'Client IP'
72 auth.messages.label_origin = 'Origin'
73 auth.messages.label_remember_me = "Remember me (for 30 days)"
add|del|has membership logs allow the use of "%(user_id)s" and
"%(group_id)s". add|del|has permission logs allow the use of "%(user_id)s",

access control 423
"%(name)s", "%(table_name)s", and "%(record_id)s".
9.4Central Authentication Service
web2py provides support for third party authentication and single sign
on. Here we discuss the Central Authentication Service (CAS) which is an
industry standard and both client and server are built-into web2py.
CAS is an open protocol for distributed authentication and it works in the
following way: When a visitor arrives at our web site, our application
check in the session if the user is already authenticated (for example via a
session.token object). If the user is not authenticated, the controller redirects
the visitor from the CAS appliance, where the user can log in, register, and
manage his credentials (name, email and password). If the user registers, he
receives an email, and registration is not complete until he responds to the
email. Once the user has successfully registered and logged in, the CAS
appliance redirects the user to our application together with a key. Our
application uses the key to get the credentials of the user via an HTTP request
in the background to the CAS server.
Using this mechanism, multiple applications can use a single sign-on via a
single CAS server. The server providing authentication is called a service
provider. Applications seeking to authenticate visitors are called service
consumers.
CAS is similar to OpenID, with one main difference. In the case of OpenID,
the visitor chooses the service provider. In the case of CAS, our application
makes this choice, making CAS more secure.
Running a web2py CAS provider is as easy as copying the scaffolding app.
In fact any web2py app that exposes the action
1# in provider app
2def user(): return dict(form=auth())
is a CAS 2.0provider and its services can be accessed at the URL
1http://.../provider/default/user/cas/login
2http://.../provider/default/user/cas/validate

424 web2py full-stack web framework,4th edition
3http://.../provider/default/user/cas/logout
(we assume the app to be called "provider").
You can access this service from any other web application (the consumer)
by simply delegating authentication to the provider:
1# in consumer app
2auth = Auth(db,cas_provider = 'http://127.0.0.1:8000/provider/default/user/cas')
When you visit the login url the consumer app, it will redirect you to the
provider app which will perform authentication and will redirect back to the
consumer. All processes of registration, logout, change password, retrieve
password, have to be completed on the provider app. An entry about the
logged-in user will be created on the consumer side so that you add extra
fields and have a local profile. Thanks to CAS 2.0all fields that are readable
on the provider and have a corresponding field in the auth_user table of the
consumer will be copied automatically.
Auth(...,cas_provider=’...’) works with third party providers and supports
CAS 1.0and 2.0. The version is detected automatically. By default it
builds the URLs of the provider from a base (the cas_provider url above)
by appending
1/login
2/validate
3/logout
These can be changed in consumer and in provider
1# in consumer or provider app (must match)
2auth.settings.cas_actions['login']='login'
3auth.settings.cas_actions['validate']='validate'
4auth.settings.cas_actions['logout']='logout'
If you want to connect to a web2py CAS provider from a different domain,
you must enable them by attending to the list of allowed domain:
1# in provider app
2auth.settings.cas_domains.append('example.com')

access control 425
9.4.1Using web2py to authorize non-web2py apps
This is possible but dependent on the web server. here we assume two
applications running under the same web server: Apache with mod_wsgi. One
of the applications is web2py with an app proving access control via Auth.
The other can be a CGI script, a PHP program or anything else. We want to
instruct the web server to ask permission to the former application when a
client requests access to the latter.
First of all we need to modify the web2py application and add the following
controller:
1def check_access():
2return 'true' if auth.is_logged_in() else 'false'
which returns true if the user is logged in and false otherwise. Now run a
web2py process in background:
1nohup python web2py.py -a '' -p 8002
Port 8002 is a must and there is no need to enable admin so no admin
password.
Then we need to edit the Apache config file (for example
"/etc/apache2/sites-available/default") and instruct apache so that when
the non-web2py program is called, it should call the above check action
instead and only if it returns true it should proceed and respond to the
request, else if should deny access.
Because web2py and the non-web2py application run under the same
domain, if the user is logged into the web2py app, the web2py session cookie
will be passed to Apache even when the other app is requested and will
allow credential verification.
In order to achieve this we need a script, "web2py/scripts/access.wsgi" that
can play this trick. The script ships with web2py. All we need to do it tell
apache to call this script, the URL of the application needing access control,
and the location of the script:
1<VirtualHost *:80>
2WSGIDaemonProcess web2py user=www-data group=www-data

426 web2py full-stack web framework,4th edition
3WSGIProcessGroup web2py
4WSGIScriptAlias / /home/www-data/web2py/wsgihandler.py
5
6AliasMatch ^myapp/path/needing/authentication/myfile /path/to/myfile
7<Directory /path/to/>
8WSGIAccessScript /path/to/web2py/scripts/access.wsgi
9</Directory>
10 </VirtualHost>
Here " ˆ
myapp/path/needing/authentication/myfile" is the regular
expression that should match the incoming request and "/path/to/" is
the absolute location of the web2py folder.
The "access.wsgi" script contains the following line:
1URL_CHECK_ACCESS = 'http://127.0.0.1:8002/%(app)s/default/check_access'
which points to the web2py application we have requested but you can edit
it to point to a specific application, running on a port other than 8002.
You can also change the check_access() action and make its logic more
complex. This action can retrieve the URL that was originally requested
using the environment variable
1request.env.request_uri
and you can implement more complex rules:
1def check_access():
2if not auth.is_logged_in():
3return 'false'
4elif not user_has_access(request.env.request_uri):
5return 'false'
6else:
7return 'true'
10
Services
The W3C defines a web service as "a software system designed to support
interoperable machine-to-machine interaction over a network". This is a
broad definition, and it encompasses a large number of protocols designed
not for machine-to-human communication, but for machine-to-machine
communication such as XML, JSON, RSS, etc.
In this chapter we discuss how to expose web services using web2py. If
you are interested in examples of consuming third party services (Twitter,
Dropbox, etc.) you should look into Chapter 9and Chapter 14. web2py
provides, out of the box, support for many protocols, including XML, JSON,
RSS, CSV, XMLRPC, JSONRPC, AMFRPC, and SOAP. web2py can also be
extended to support additional protocols.
Each of those protocols is supported in multiple ways, and we make a
distinction between:
• Rendering the output of a function in a given format (for example XML,
JSON, RSS, CSV)
• Remote Procedure Calls (for example XMLRPC, JSONRPC, AMFRPC)
10.1Rendering a dictionary

428 web2py full-stack web framework,4th edition
10.1.1HTML, XML, and JSON
Consider the following action:
1def count():
2session.counter = (session.counter or 0) + 1
3return dict(counter=session.counter, now=request.now)
This action returns a counter that is increased by one when a visitor reloads
the page, and the timestamp of the current page request.
Normally this page would be requested via:
1http://127.0.0.1:8000/app/default/count
and rendered in HTML. Without writing one line of code, we can ask web2py
to render this page using different protocols by adding an extension to the
URL:
1http://127.0.0.1:8000/app/default/count.html
2http://127.0.0.1:8000/app/default/count.xml
3http://127.0.0.1:8000/app/default/count.json
The dictionary returned by the action will be rendered in HTML, XML and
JSON, respectively.
Here is the XML output:
1<document>
2<counter>3</counter>
3<now>2009-08-01 13:00:00</now>
4</document>
Here is the JSON output:
1{'counter':3, 'now':'2009-08-01 13:00:00' }
Notice that date, time, and datetime objects are rendered as strings in
ISO format. This is not part of the JSON standard, but rather a web2py
convention.

services 429
10.1.2Generic views
When, for example, the ".xml" extension is called, web2py looks for a
template file called "default/count.xml", and if it does not find it, looks
for a template called "generic.xml". The files "generic.html", "generic.xml",
"generic.json" are provided with the current scaffolding application. Other
extensions can be easily defined by the user.
For security reasons the generic views are only allowed to be accessed on
localhost. In order to enable the access from remote clients you may need to
set the response.generic_patterns.
Assuming you are using a copy of scaffold app edit the following line in
models/db.py
• restrict access only to localhost
1response.generic_patterns = ['*'] if request.is_local else []
• to allow all generic views
1response.generic_patterns = ['*']
• to allow only.json
1response.generic_patterns = ['*.json']
The generic_patterns is a glob pattern, it means you can use any patterns that
matches with your app actions or pass a list of patterns.
1response.generic_patterns = ['*.json','*.xml']
To use it in an older web2py app, you may need to copy the "generic.*" files
from a later scaffolding app (after version 1.60).
Here is the code for "generic.html"
1{{extend 'layout.html'}}
2
3{{=BEAUTIFY(response._vars)}}
4
5<button onclick="document.location='{{=URL("admin","default","design",
6args=request.application)}}'">admin</button>
7<button onclick="jQuery('#request').slideToggle()">request</button>
8<div class="hidden" id="request"><h2>request</h2>{{=BEAUTIFY(request)}}</div>
430 web2py full-stack web framework,4th edition
9<button onclick="jQuery('#session').slideToggle()">session</button>
10 <div class="hidden" id="session"><h2>session</h2>{{=BEAUTIFY(session)}}</div>
11 <button onclick="jQuery('#response').slideToggle()">response</button>
12 <div class="hidden" id="response"><h2>response</h2>{{=BEAUTIFY(response)}}</div>
13 <script>jQuery('.hidden').hide();</script>
Here is the code for "generic.xml"
1{{
2try:
3from gluon.serializers import xml
4response.write(xml(response._vars),escape=False)
5response.headers['Content-Type']='text/xml'
6except:
7raise HTTP(405,'no xml')
8}}
And here is the code for "generic.json"
1{{
2try:
3from gluon.serializers import json
4response.write(json(response._vars),escape=False)
5response.headers['Content-Type']='text/json'
6except:
7raise HTTP(405,'no json')
8}}
Any dictionary can be rendered in HTML, XML and JSON as long as it
only contains python primitive types (int, float, string, list, tuple, dictionary).
response._vars contains the dictionary returned by the action.
If the dictionary contains other user-defined or web2py-specific objects, they
must be rendered by a custom view.
10.1.3Rendering Rows
If you need to render a set of Rows as returned by a select in XML or JSON
or another format, first transform the Rows object into a list of dictionaries
using the as_list() method.
Consider for example the following mode:
1db.define_table('person',Field('name'))

services 431
The following action can be rendered in HTML, but not in XML or JSON:
1def everybody():
2people = db().select(db.person.ALL)
3return dict(people=people)
while the following action can rendered in XML and JSON:
1def everybody():
2people = db().select(db.person.ALL).as_list()
3return dict(people=people)
10.1.4Custom formats
If, for example, you want to render an action as a Python pickle:
1http://127.0.0.1:8000/app/default/count.pickle
you just need to create a new view file "default/count.pickle" that contains:
1{{
2import cPickle
3response.headers['Content-Type'] = 'application/python.pickle'
4response.write(cPickle.dumps(response._vars),escape=False)
5}}
If you want to be able to render any action as a pickled file, you need only to
save the above file with the name "generic.pickle".
Not all objects are pickleable, and not all pickled objects can be un-pickled. It
is safe to stick to primitive Python objects and combinations of them. Objects
that do not contain references to file streams or database connections are
usually pickleable, but they can only be un-pickled in an environment where
the classes of all pickled objects are already defined.
10.1.5RSS
web2py includes a "generic.rss" view that can render the dictionary returned
by the action as an RSS feed.

432 web2py full-stack web framework,4th edition
Because the RSS feeds have a fixed structure (title, link, description, items,
etc.) then for this to work, the dictionary returned by the action must have
the proper structure:
1{'title' :'',
2'link' :'',
3'description':'',
4'created_on' :'',
5'entries' : []}
and each entry in entries must have the same similar structure:
1{'title' :'',
2'link' :'',
3'description':'',
4'created_on' :''}
For example the following action can be rendered as an RSS feed:
1def feed():
2return dict(title="my feed",
3link="http://feed.example.com",
4description="my first feed",
5entries=[
6dict(title="my feed",
7link="http://feed.example.com",
8description="my first feed")
9])
by simply visiting the URL:
1http://127.0.0.1:8000/app/default/feed.rss
Alternatively, assuming the following model:
1db.define_table('rss_entry',
2Field('title'),
3Field('link'),
4Field('created_on','datetime'),
5Field('description'))
the following action can also be rendered as an RSS feed:
1def feed():
2return dict(title="my feed",
3link="http://feed.example.com",
4description="my first feed",
5entries=db().select(db.rss_entry.ALL).as_list())
services 433
The as_list() method of a Rows object converts the rows into a list of
dictionaries.
If additional dictionary items are found with key names not explicitly listed
here, they are ignored.
Here is the "generic.rss" view provided by web2py:
1{{
2try:
3from gluon.serializers import rss
4response.write(rss(response._vars),escape=False)
5response.headers['Content-Type']='application/rss+xml'
6except:
7raise HTTP(405,'no rss')
8}}
As one more example of an RSS application, we consider an RSS aggregator
that collects data from the "slashdot" feed and returns a new web2py rss feed.
1def aggregator():
2import gluon.contrib.feedparser as feedparser
3d = feedparser.parse(
4"http://rss.slashdot.org/Slashdot/slashdot/to")
5return dict(title=d.channel.title,
6link = d.channel.link,
7description = d.channel.description,
8created_on = request.now,
9entries = [
10 dict(title = entry.title,
11 link = entry.link,
12 description = entry.description,
13 created_on = request.now) for entry in d.entries])
It can be accessed at:
1http://127.0.0.1:8000/app/default/aggregator.rss
10.1.6CSV
The Comma Separated Values (CSV) format is a protocol to represent tabular
data.
Consider the following model:

434 web2py full-stack web framework,4th edition
1db.define_model('animal',
2Field('species'),
3Field('genus'),
4Field('family'))
and the following action:
1def animals():
2animals = db().select(db.animal.ALL)
3return dict(animals=animals)
web2py does not provide a "generic.csv"; you must define a custom view
"default/animals.csv" that serializes the animals into CSV. Here is a possible
implementation:
1{{
2import cStringIO
3stream=cStringIO.StringIO()
4animals.export_to_csv_file(stream)
5response.headers['Content-Type']='application/vnd.ms-excel'
6response.write(stream.getvalue(), escape=False)
7}}
Notice that one could also define a "generic.csv" file, but one would have to
specify the name of the object to be serialized ("animals" in the example).
This is why we do not provide a "generic.csv" file.
10.2Remote procedure calls
web2py provides a mechanism to turn any function into a web service.
The mechanism described here differs from the mechanism described before
because:
• The function may take arguments
• The function may be defined in a model or a module instead of controller
• You may want to specify in detail which RPC method should be supported
• It enforces a more strict URL naming convention
• It is smarter than the previous methods because it works for a fixed set of
protocols. For the same reason it is not as easily extensible.
services 435
To use this feature:
First, you must import and instantiate a service object.
1from gluon.tools import Service
2service = Service()
This is already done in the "db.py" model file in the scaffolding application.
Second, you must expose the service handler in the controller:
1def call():
2session.forget()
3return service()
This is already done in the "default.py" controller of the scaffolding application.
Remove session.forget() if you plan to use session cookies with the services.
Third, you must decorate those functions you want to expose as a service.
Here is a list of currently supported decorators:
1@service.run
2@service.xml
3@service.json
4@service.rss
5@service.csv
6@service.xmlrpc
7@service.jsonrpc
8@service.amfrpc3('domain')
9@service.soap('FunctionName',returns={'result':type},args={'param1':type,})
As an example, consider the following decorated function:
1@service.run
2def concat(a,b):
3return a+b
This function can be defined in a model or in the controller where the call
action is defined. This function can now be called remotely in two ways:
1http://127.0.0.1:8000/app/default/call/run/concat?a=hello&b=world
2http://127.0.0.1:8000/app/default/call/run/concat/hello/world
In both cases the http request returns:
1helloworld
If the @service.xml decorator is used, the function can be called via:

436 web2py full-stack web framework,4th edition
1http://127.0.0.1:8000/app/default/call/xml/concat?a=hello&b=world
2http://127.0.0.1:8000/app/default/call/xml/concat/hello/world
and the output is returned as XML:
1<document>
2<result>helloworld</result>
3</document>
It can serialize the output of the function even if this is a DAL Rows object.
In this case, in fact, it will call as_list() automatically.
If the @service.json decorator is used, the function can be called via:
1http://127.0.0.1:8000/app/default/call/json/concat?a=hello&b=world
2http://127.0.0.1:8000/app/default/call/json/concat/hello/world
and the output returned as JSON.
If the @service.csv decorator is used, the service handler requires, as the
return value, an iterable object of iterable objects, such as a list of lists. Here
is an example:
1@service.csv
2def table1(a,b):
3return [[a,b],[1,2]]
This service can be called by visiting one of the following URLs:
1http://127.0.0.1:8000/app/default/call/csv/table1?a=hello&b=world
2http://127.0.0.1:8000/app/default/call/csv/table1/hello/world
and it returns:
1hello,world
21,2
The @service.rss decorator expects a return value in the same format as the
"generic.rss" view discussed in the previous section.
Multiple decorators are allowed for each function.
So far, everything discussed in this section is simply an alternative to the
method described in the previous section. The real power of the service
object comes with XMLRPC, JSONRPC and AMFRPC, as discussed below.
services 437
10.2.1XMLRPC
Consider the following code, for example, in the "default.py" controller:
1@service.xmlrpc
2def add(a,b):
3return a+b
4
5@service.xmlrpc
6def div(a,b):
7return a/b
Now in a python shell you can do
1>>> from xmlrpclib import ServerProxy
2>>> server = ServerProxy(
3'http://127.0.0.1:8000/app/default/call/xmlrpc')
4>>> print server.add(3,4)
57
6>>> print server.add('hello','world')
7'helloworld'
8>>> print server.div(12,4)
93
10 >>> print server.div(1,0)
11 ZeroDivisionError: integer division or modulo by zero
The Python xmlrpclib module provides a client for the XMLRPC protocol.
web2py acts as the server.
The client connects to the server via ServerProxy and can remotely call
decorated functions in the server. The data (a,b) is passed to the function(s),
not via GET/POST variables, but properly encoded in the request body using
the XMLPRC protocol, and thus it carries with itself type information (int or
string or other). The same is true for the return value(s). Moreover, any
exception raised on the server propagates back to the client.
There are XMLRPC libraries for many programming languages (including C,
C++, Java, C#, Ruby, and Perl), and they can interoperate with each other.
This is one the best methods to create applications that talk to each other
independent of the programming language.
The XMLRPC client can also be implemented inside a web2py action, so that
one action can talk to another web2py application (even within the same
installation) using XMLRPC. Beware of session deadlocks in this case. If an
438 web2py full-stack web framework,4th edition
action calls via XMLRPC a function in the same app, the caller must release
the session lock before the call:
1session.forget(response)
10.2.2JSONRPC
In this section we are going to use the same code example as for XMLRPC
but we will expose the service using JSONRPC instead:
1@service.jsonrpc
2def add(a,b):
3return a+b
4
5def call():
6return service()
JSONRPC is very similar to XMLRPC but uses JSON instead of XML as data
serialization protocol.
Of course we can call the service from any program in any language
but here we will do it in Python. web2py ships with a module
"gluon/contrib/simplejsonrpc.py" created by Mariano Reingart. Here is an
example of how to use to call the above service:
1>>> from gluon.contrib.simplejsonrpc import
2>>> URL ="http://127.0.0.1:8000/app/default/call/jsonrpc"
3>>> service = ServerProxy(URL, verbose=True)
4>>> print service.add(1, 2)
10.2.3JSONRPC and Pyjamas
JSONRPC is very similar to XMLRPC, but uses the JSON-based protocol
instead of XML to encode the data. As an example of application here, we
discuss its usage with Pyjamas. Pyjamas is a Python port of the Google
Web Toolkit (originally written in Java). Pyjamas allows writing a client
application in Python. Pyjamas translates this code into JavaScript. web2py
serves the JavaScript and communicates with it via AJAX requests originating
from the client and triggered by user actions.

services 439
Here we describe how to make Pyjamas work with web2py. It does not
require any additional libraries other than web2py and Pyjamas.
We are going to build a simple "todo" application with a Pyjamas client (all
JavaScript) that talks to the server exclusively via JSONRPC.
First, create a new application called "todo".
Second, in "models/db.py", enter the following code:
1db=DAL('sqlite://storage.sqlite')
2db.define_table('todo',Field('task'))
3service = Service()
(Note: Service class is from gluon.tools).
Third, in "controllers/default.py", enter the following code:
1def index():
2redirect(URL('todoApp'))
3
4@service.jsonrpc
5def getTasks():
6todos = db(db.todo).select()
7return [(todo.task,todo.id) for todo in todos]
8
9@service.jsonrpc
10 def addTask(taskFromJson):
11 db.todo.insert(task= taskFromJson)
12 return getTasks()
13
14 @service.jsonrpc
15 def deleteTask (idFromJson):
16 del db.todo[idFromJson]
17 return getTasks()
18
19 def call():
20 session.forget()
21 return service()
22
23 def todoApp():
24 return dict()
The purpose of each function should be obvious.
Fourth, in "views/default/todoApp.html", enter the following code:
1<html>

440 web2py full-stack web framework,4th edition
2<head>
3<meta name="pygwt:module"
4content="{{=URL('static','output/TodoApp')}}" />
5<title>
6simple todo application
7</title>
8</head>
9<body bgcolor="white">
10 <h1>
11 simple todo application
12 </h1>
13 <i>
14 type a new task to insert in db,
15 click on existing task to delete it
16 </i>
17 <script language="javascript"
18 src="{{=URL('static','output/pygwt.js')}}">
19 </script>
20 </body>
21 </html>
This view just executes the Pyjamas code in "static/output/todoapp" - code
that we have not yet created.
Fifth, in "static/TodoApp.py" (notice it is TodoApp, not todoApp!), enter the
following client code:
1from pyjamas.ui.RootPanel import RootPanel
2from pyjamas.ui.Label import Label
3from pyjamas.ui.VerticalPanel import VerticalPanel
4from pyjamas.ui.TextBox import TextBox
5import pyjamas.ui.KeyboardListener
6from pyjamas.ui.ListBox import ListBox
7from pyjamas.ui.HTML import HTML
8from pyjamas.JSONService import JSONProxy
9
10 class TodoApp:
11 def onModuleLoad(self):
12 self.remote = DataService()
13 panel = VerticalPanel()
14
15 self.todoTextBox = TextBox()
16 self.todoTextBox.addKeyboardListener(self)
17
18 self.todoList = ListBox()
19 self.todoList.setVisibleItemCount(7)
20 self.todoList.setWidth("200px")
21 self.todoList.addClickListener(self)

services 441
22 self.Status = Label("")
23
24 panel.add(Label("Add New Todo:"))
25 panel.add(self.todoTextBox)
26 panel.add(Label("Click to Remove:"))
27 panel.add(self.todoList)
28 panel.add(self.Status)
29 self.remote.getTasks(self)
30
31 RootPanel().add(panel)
32
33 def onKeyUp(self, sender, keyCode, modifiers):
34 pass
35
36 def onKeyDown(self, sender, keyCode, modifiers):
37 pass
38
39 def onKeyPress(self, sender, keyCode, modifiers):
40 """
41 This function handles the onKeyPress event, and will add the
42 item in the text box to the list when the user presses the
43 enter key. In the future, this method will also handle the
44 auto complete feature.
45 """
46 if keyCode == KeyboardListener.KEY_ENTER and \
47 sender == self.todoTextBox:
48 id = self.remote.addTask(sender.getText(),self)
49 sender.setText("")
50 if id<0:
51 RootPanel().add(HTML("Server Error or Invalid Response"))
52
53 def onClick(self, sender):
54 id = self.remote.deleteTask(
55 sender.getValue(sender.getSelectedIndex()),self)
56 if id<0:
57 RootPanel().add(
58 HTML("Server Error or Invalid Response"))
59
60 def onRemoteResponse(self, response, request_info):
61 self.todoList.clear()
62 for task in response:
63 self.todoList.addItem(task[0])
64 self.todoList.setValue(self.todoList.getItemCount()-1,
65 task[1])
66
67 def onRemoteError(self, code, message, request_info):
68 self.Status.setText("Server Error or Invalid Response: " \
69 +"ERROR " + code + "-"+ message)
70

442 web2py full-stack web framework,4th edition
71 class DataService(JSONProxy):
72 def __init__(self):
73 JSONProxy.__init__(self, "../../default/call/jsonrpc",
74 ["getTasks","addTask","deleteTask"])
75
76 if __name__ == '__main__':
77 app = TodoApp()
78 app.onModuleLoad()
Sixth, run Pyjamas before serving the application:
1cd /path/to/todo/static/
2python /python/pyjamas-0.5p1/bin/pyjsbuild TodoApp.py
This will translate the Python code into JavaScript so that it can be executed
in the browser.
To access this application, visit the URL:
1http://127.0.0.1:8000/todo/default/todoApp
This subsection was created by Chris Prinos with help from Luke Kenneth
Casson Leighton (creators of Pyjamas), updated by Alexei Vinidiktov. It has
been tested with Pyjamas 0.5p1. The example was inspired by this Django
page in ref. [77].
10.2.4Amfrpc
AMFRPC is the Remote Procedure Call protocol used by Flash clients to
communicate with a server. web2py supports AMFRPC, but it requires that
you run web2py from source and that you preinstall the PyAMF library. This
can be installed from the Linux or Windows shell by typing:
1easy_install pyamf
(please consult the PyAMF documentation for more details).
In this subsection we assume that you are already familiar with ActionScript
programming.
We will create a simple service that takes two numerical values, adds
them together, and returns the sum. We will call our web2py application
"pyamf_test", and we will call the service addNumbers.

services 443
First, using Adobe Flash (any version starting from MX 2004), create the Flash
client application by starting with a new Flash FLA file. In the first frame of
the file, add these lines:
1import mx.remoting.Service;
2import mx.rpc.RelayResponder;
3import mx.rpc.FaultEvent;
4import mx.rpc.ResultEvent;
5import mx.remoting.PendingCall;
6
7var val1 = 23;
8var val2 = 86;
9
10 service = new Service(
11 "http://127.0.0.1:8000/pyamf_test/default/call/amfrpc3",
12 null, "mydomain", null, null);
13
14 var pc:PendingCall = service.addNumbers(val1, val2);
15 pc.responder = new RelayResponder(this, "onResult","onFault");
16
17 function onResult(re:ResultEvent):Void {
18 trace("Result : " + re.result);
19 txt_result.text = re.result;
20 }
21
22 function onFault(fault:FaultEvent):Void {
23 trace("Fault: " + fault.fault.faultstring);
24 }
25
26 stop();
This code allows the Flash client to connect to a service that corresponds to
a function called "addNumbers" in the file "/pyamf_test/default/gateway".
You must also import ActionScript version 2MX remoting classes to enable
Remoting in Flash. Add the path to these classes to the classpath settings in
the Adobe Flash IDE, or just place the "mx" folder next to the newly created
file.
Notice the arguments of the Service constructor. The first argument is
the URL corresponding to the service that we want will create. The third
argument is the domain of the service. We choose to call this domain
"mydomain".

444 web2py full-stack web framework,4th edition
Second, create a dynamic text field called "txt_result" and place it on the
stage.
Third, you need to set up a web2py gateway that can communicate with the
Flash client defined above.
Proceed by creating a new web2py app called pyamf_test that will host the
new service and the AMF gateway for the flash client. Edit the "default.py"
controller and make sure it contains
1@service.amfrpc3('mydomain')
2def addNumbers(val1, val2):
3return val1 + val2
4
5def call(): return service()
Fourth, compile and export/publish the SWF flash client as pyamf_test.swf,
place the "pyamf_test.amf", "pyamf_test.html", "AC_RunActiveContent.js",
and "crossdomain.xml" files in the "static" folder of the newly created
appliance that is hosting the gateway, "pyamf_test".
You can now test the client by visiting:
1http://127.0.0.1:8000/pyamf_test/static/pyamf_test.html
The gateway is called in the background when the client connects to
addNumbers.
If you are using AMF0instead of AMF3you can also use the decorator:
1@service.amfrpc
instead of:
1@service.amfrpc3('mydomain')
In this case you also need to change the service URL to:
1http://127.0.0.1:8000/pyamf_test/default/call/amfrpc
10.2.5SOAP
web2py includes a SOAP client and server created by Mariano Reingart. It
can be used very much like XML-RPC:

services 445
Consider the following code, for example, in the "default.py" controller:
1@service.soap('MyAdd',returns={'result':int},args={'a':int,'b':int,})
2def add(a,b):
3return a+b
Now in a python shell you can do:
1>>> from gluon.contrib.pysimplesoap.client import SoapClient
2>>> client = SoapClient(wsdl="http://localhost:8000/app/default/call/soap?WSDL")
3>>> print client.MyAdd(a=1,b=2)
4{'result': 3}
To get proper encoding when returning a text values, specify string as
u’proper utf8text’.
You can obtain the WSDL for the service at
1http://127.0.0.1:8000/app/default/call/soap?WSDL
And you can obtain documentation for any of the exposed methods:
1http://127.0.0.1:8000/app/default/call/soap
10.3Low level API and other recipes
10.3.1simplejson
web2py includes gluon.contrib.simplejson, developed by Bob Ippolito. This
module provides the most standard Python-JSON encoder-decoder.
SimpleJSON consists of two functions:
•gluon.contrib.simplesjson.dumps(a) encodes a Python object ainto JSON.
•gluon.contrib.simplejson.loads(b) decodes a JavaScript object binto a
Python object.
Object types that can be serialized include primitive types, lists, and
dictionaries. Compound objects can be serialized with the exception of user
defined classes.

446 web2py full-stack web framework,4th edition
Here is a sample action (for example in controller "default.py") that serializes
the Python list containing weekdays using this low level API:
1def weekdays():
2names=['Sunday','Monday','Tuesday','Wednesday',
3'Thursday','Friday','Saturday']
4import gluon.contrib.simplejson
5return gluon.contrib.simplejson.dumps(names)
Below is a sample HTML page that sends an Ajax request to the above action,
receives the JSON message and stores the list in a corresponding JavaScript
variable:
1{{extend 'layout.html'}}
2<script>
3$.getJSON('/application/default/weekdays',
4function(data){ alert(data); });
5</script>
The code uses the jQuery function $.getJSON, which performs the Ajax call
and, on response, stores the weekdays names in a local JavaScript variable
data and passes the variable to the callback function. In the example the
callback function simply alerts the visitor that the data has been received.
10.3.2PyRTF
Another common need of web sites is that of generating Word-readable
text documents. The simplest way to do so is using the Rich Text Format
(RTF) document format. This format was invented by Microsoft and it has
since become a standard. web2py includes gluon.contrib.pyrtf, developed by
Simon Cusack and revised by Grant Edwards. This module allows you to
generate RTF documents programmatically including colored formatted text
and pictures.
In the following example we instantiate two basic RTF classes, Document and
Section, append the latter to the former and insert some dummy text in the
latter:
1def makertf():
2import gluon.contrib.pyrtf as q
3doc=q.Document()

services 447
4section=q.Section()
5doc.Sections.append(section)
6section.append('Section Title')
7section.append('web2py is great. '*100)
8response.headers['Content-Type']='text/rtf'
9return q.dumps(doc)
In the end the Document is serialized by q.dumps(doc). Notice that before
returning an RTF document it is necessary to specify the content-type in the
header else the browser does not know how to handle the file.
Depending on the configuration, the browser may ask you whether to save
this file or open it using a text editor.
10.3.3ReportLab and PDF
web2py can also generate PDF documents, with an additional library called
"ReportLab" [76].
If you are running web2py from source, it is sufficient to have ReportLab
installed. If you are running the Windows binary distribution, you need to
unzip ReportLab in the "web2py/" folder. If you are running the Mac binary
distribution, you need to unzip ReportLab in the folder:
1web2py.app/Contents/Resources/
From now on we assume ReportLab is installed and that web2py can find it.
We will create a simple action called "get_me_a_pdf" that generates a PDF
document.
1from reportlab.platypus import *
2from reportlab.lib.styles import getSampleStyleSheet
3from reportlab.rl_config import defaultPageSize
4from reportlab.lib.units import inch, mm
5from reportlab.lib.enums import TA_LEFT, TA_RIGHT, TA_CENTER, TA_JUSTIFY
6from reportlab.lib import colors
7from uuid import uuid4
8from cgi import escape
9import os
10
11 def get_me_a_pdf():
12 title = "This The Doc Title"
13 heading = "First Paragraph"

448 web2py full-stack web framework,4th edition
14 text = 'bla '*10000
15
16 styles = getSampleStyleSheet()
17 tmpfilename=os.path.join(request.folder,'private',str(uuid4()))
18 doc = SimpleDocTemplate(tmpfilename)
19 story = []
20 story.append(Paragraph(escape(title),styles["Title"]))
21 story.append(Paragraph(escape(heading),styles["Heading2"]))
22 story.append(Paragraph(escape(text),styles["Normal"]))
23 story.append(Spacer(1,2*inch))
24 doc.build(story)
25 data = open(tmpfilename,"rb").read()
26 os.unlink(tmpfilename)
27 response.headers['Content-Type']='application/pdf'
28 return data
Notice how we generate the PDF into a unique temporary file, tmpfilename,
we read the generated PDF from the file, then we deleted the file.
For more information about the ReportLab API, refer to the ReportLab
documentation. We strongly recommend using the Platypus API of
ReportLab, such as Paragraph,Spacer, etc.
10.4Restful Web Services
REST stands for "REpresentational State Transfer" and it is a type of web
service architecture and not, like SOAP, a protocol. In fact there is no
standard for REST.
Loosely speaking REST says that a service can be thought of as a collection
of resources. Each resource should be identified by a URL. There are four
methods actions on a resource and they are POST (create), GET (read), PUT
(update) and DELETE, from which the acronym CRUD (create-read-update-
delete) stands for. A client communicates with the resource by making an
HTTP request to the URL that identifies the resource and using the HTTP
method POST/PUT/GET/DELETE to pass instructions to the resource. The
URL may have an extension, for example json that specify how the protocol
for encoding the data.
So for example a POST request to

services 449
1http://127.0.0.1/myapp/default/api/person
means that you want to create a new person. In this case a person may
correspond to a record in table person but may also be some other type of
resource (for example a file).
Similarly a GET request to
1http://127.0.0.1/myapp/default/api/persons.json
indicates a request for a list of persons (records from the data person) in json
format.
A GET request to
1http://127.0.0.1/myapp/default/api/person/1.json
indicates a request for the information associated to person/1 (the record with
id==1) and in json format.
In the case of web2py each request can be split into three parts:
• A first part that identify the location of the service, i.e. the action that
exposes the service:
1http://127.0.0.1/myapp/default/api/
• The name of the resource (person,persons,person/1, etc.)
• The communication protocol specified y the extension.
Notice that we can always use the router to eliminate any unwanted prefix
in the URL and for example simplify this:
1http://127.0.0.1/myapp/default/api/person/1.json
into this:
1http://127.0.0.1/api/person/1.json
yet this is a matter of test and we have already discussed it at length in
chapter 4.
In our example we used an action called api but this is not a requirement. We
can in fact name the action that exposes the RESTful service any way we like
450 web2py full-stack web framework,4th edition
and we can in fact even create more than one. For the same of the argument
we will continue to assume that our RESTful action is called api.
We will also assume we have defined the following two tables:
1db.define_table('person',Field('name'),Field('info'))
2db.define_table('pet',Field('owner',db.person),Field('name'),Field('info'))
and they are the resources we want to expose.
The first thing we do is create the RESTful action:
1def api():
2return locals()
Now we modify it so that the extension is filtered out of the request args
(so that request.args can be used to identify the resource) and so that it can
handle the different methods separately:
1@request.restful()
2def api():
3def GET(*args,**vars):
4return dict()
5def POST(*args,**vars):
6return dict()
7def PUT(*args,**vars):
8return dict()
9def DELETE(*args,**vars):
10 return dict()
11 return locals()
Now when we make a GET http request to
1http://127.0.0.1:8000/myapp/default/api/person/1.json
it calls and returns GET(’person’,’1’) where GET is the function defined
inside the action. Notice that:
• we do not need to define all four methods, only those that we wish to
expose.
• the method function can take named arguments
• the extension is stored in request.extension and the content type is set
automatically.

services 451
The @request.restful() decorator makes sure that the extension in the path
info is stored into request.extension, maps the request method into the
corresponding function within the action (POST, GET, PUT, DELETE), and
passes request.args and request.vars to the selected function.
Now we build a service to POST and GET individual records:
1@request.restful()
2def api():
3response.view = 'generic.json'
4def GET(tablename,id):
5if not tablename=='person': raise HTTP(400)
6return dict(person = db.person(id))
7def POST(tablename,**fields):
8if not tablename=='person': raise HTTP(400)
9return db.person.validate_and_insert(**fields)
10 return locals()
Notice that:
• the GET and POST are dealt with by different functions
• the function expect the correct arguments (un-named arguments parsed
by request.args and named arguments are from request.vars)
• they check the input is correct and eventually raise an exception
• GET perform a select and returns the record, db.person(id). The output is
automatically converted to JSON because the generic view is called.
• POST performs a validate_and_insert(..) and returns the id of the new
record or, alternatively, validation errors. The POST variables, **fields,
are the post variables.
10.4.1parse_as_rest (experimental)
The logic explained so far is sufficient to create any type of RESTful web
service yet web2py helps us even more.
In fact, web2py provides a syntax to describe which database tables we want
to expose and how to map resource into URLs and vice versa.
This is done using URL patterns. A pattern is a string that maps the request
452 web2py full-stack web framework,4th edition
args from a URL into a database query. There 4types of atomic patterns:
• String constants for example "friend"
• String constant corresponding to a table. For example "friend[person]"
will match "friends" in the URL to the "person" table.
• Variables to be used to filter. For example "{person.id}" will apply a
db.person.name=={person.id} filter.
• Names of fields, represented by ":field"
Atomic patters can be combined into complex URL patters using "/" such as
in
1"/friend[person]/{person.id}/:field"
which gives a url of the form
1http://..../friend/1/name
Into a query for a person.id that returns the name of the person. Here
"friend[person]" matches "friend" and filters the table "person". "{person.id}"
matches "1" and filters "person.id==1". ":field" matches "name" and returns:
1db(db.person.id==1).select().first().name
Multiple URL patters can be combined into a list so that one single RESTful
action can serve different types of requests.
The DAL has a method parse_as_rest(pattern,args,vars) that given a list
of patterns, the request.args and the request.vars matches the pattern and
returns a response (GET only).
So here is a more complex example:
1
2@request.restful()
3def api():
4response.view = 'generic.'+request.extension
5def GET(*args,**vars):
6patterns = [
7"/friends[person]",
8"/friend/{person.name.startswith}",
9"/friend/{person.name}/:field",
10 "/friend/{person.name}/pets[pet.owner]",

services 453
11 "/friend/{person.name}/pet[pet.owner]/{pet.name}",
12 "/friend/{person.name}/pet[pet.owner]/{pet.name}/:field"
13 ]
14 parser = db.parse_as_rest(patterns,args,vars)
15 if parser.status == 200:
16 return dict(content=parser.response)
17 else:
18 raise HTTP(parser.status,parser.error)
19 def POST(table_name,**vars):
20 if table_name == 'person':
21 return db.person.validate_and_insert(**vars)
22 elif table_name == 'pet':
23 return db.pet.validate_and_insert(**vars)
24 else:
25 raise HTTP(400)
26 return locals()
Which understands the following URLs that correspond to the listed patters:
• GET all persons
1http://.../api/friends
• GET one person with name starting with "t"
1http://.../api/friend/t
• GET the "info" field value of the first person with name equal to "Tim"
1http://.../api/friend/Tim/info
• GET a list of pets of the person (friend) above
1http://.../api/friend/Tim/pets
• GET the pet with name "Snoopy of person with name "Tim"
1http://.../api/friend/Tim/pet/Snoopy
• GET the "info" field value for the pet
1http://.../api/friend/Tim/pet/Snoopy/info
The action also exposes two POST urls:
• POST a new friend
• POST a new pet

454 web2py full-stack web framework,4th edition
If you have the "curl" utility installed you can try:
1$ curl -d "name=Tim" http://127.0.0.1:8000/myapp/default/api/friend.json
2{"errors": {}, "id": 1}
3$ curl http://127.0.0.1:8000/myapp/default/api/friends.json
4{"content": [{"info": null, "name":"Tim","id": 1}]}
5$ curl -d "name=Snoopy&owner=1" http://127.0.0.1:8000/myapp/default/api/pet.json
6{"errors": {}, "id": 1}
7$ curl http://127.0.0.1:8000/myapp/default/api/friend/Tim/pet/Snoopy.json
8{"content": [{"info": null, "owner": 1, "name":"Snoopy","id": 1}]}
It is possible to declare more complex queries such where a value in the URL
is used to build a query not involving equality. For example
patterns = [’friends/{person.name.contains}’ maps
1http://..../friends/i
into
1db.person.name.contains('i')
And similarly:
patterns = [’friends/{person.name.ge}/{person.name.gt.not}’ maps
1http://..../friends/aa/uu
into
1(db.person.name>='aa')&(~(db.person.name>'uu'))
valid attributes for a field in a pattern are: contains,startswith,le,ge,lt,gt,
eq (equal, default), ne (not equal). Other attributes specifically for date and
datetime fields are day,month,year,hour,minute,second.
Notice that this pattern syntax is not designed to be general. Not every
possible query can be described via a pattern but a lot of them are. The
syntax may be extended in the future.
Often you want to expose some RESTful URLs but you want to restrict the
possible queries. This can be done by passing an extra argument queries to
the parse_as_rest method. queries is a dictionary of (tablename,query) where
query is a DAL query to restrict access to table tablename.
We can also order results using the order GET variables
services 455
1http://..../api/friends?order=name|~info
which order alphabetically (name) and then by reversed info order.
We can also limit the number of records by specifying a limit and offset GET
variables
1http://..../api/friends?offset=10&limit=1000
which will return up to 1000 friends (persons) and skip the first 10.limit
defaults to 1000 and offset default to 0.
Let’s now consider an extreme case. We want to build all possible patterns
for all tables (except auth_tables). We want to be able to search by any text
field, any integer field, any double field (by range) and any date (also by
range). We also want to be able to POST into any table:
In the general case this requires a lot of patterns. Web2py makes it simple:
1@request.restful()
2def api():
3response.view = 'generic.'+request.extension
4def GET(*args,**vars):
5patterns = 'auto'
6parser = db.parse_as_rest(patterns,args,vars)
7if parser.status == 200:
8return dict(content=parser.response)
9else:
10 raise HTTP(parser.status,parser.error)
11 def POST(table_name,**vars):
12 return db[table_name].validate_and_insert(**vars)
13 return locals()
Settings patterns=’auto’ results in web2py generating all possible patterns
for all non-auth tables. There is even a pattern for querying about patterns:
1http://..../api/patterns.json
which for out person and pet tables results in:
1{"content": [
2"/person[person]",
3"/person/id/{person.id}",
4"/person/id/{person.id}/:field",
5"/person/id/{person.id}/pet[pet.owner]",
6"/person/id/{person.id}/pet[pet.owner]/id/{pet.id}",

456 web2py full-stack web framework,4th edition
7"/person/id/{person.id}/pet[pet.owner]/id/{pet.id}/:field",
8"/person/id/{person.id}/pet[pet.owner]/owner/{pet.owner}",
9"/person/id/{person.id}/pet[pet.owner]/owner/{pet.owner}/:field",
10 "/person/name/pet[pet.owner]",
11 "/person/name/pet[pet.owner]/id/{pet.id}",
12 "/person/name/pet[pet.owner]/id/{pet.id}/:field",
13 "/person/name/pet[pet.owner]/owner/{pet.owner}",
14 "/person/name/pet[pet.owner]/owner/{pet.owner}/:field",
15 "/person/info/pet[pet.owner]",
16 "/person/info/pet[pet.owner]/id/{pet.id}",
17 "/person/info/pet[pet.owner]/id/{pet.id}/:field",
18 "/person/info/pet[pet.owner]/owner/{pet.owner}",
19 "/person/info/pet[pet.owner]/owner/{pet.owner}/:field",
20 "/pet[pet]",
21 "/pet/id/{pet.id}",
22 "/pet/id/{pet.id}/:field",
23 "/pet/owner/{pet.owner}",
24 "/pet/owner/{pet.owner}/:field"
25 ]}
You can specify auto patterns for some tables only:
1patterns = [':auto[person]',':auto[pet]']
10.4.2smart_query (experimental)
There are time when you need more flexibility and you want to be able to
pass to a RESTful service an arbitrary query like
1http://.../api.json?search=person.name starts with 'T' and person.name contains 'm'
You can do this using
1@request.restful()
2def api():
3response.view = 'generic.'+request.extension
4def GET(search):
5try:
6rows = db.smart_query([db.person,db.pet],search).select()
7return dict(result=rows)
8except RuntimeError:
9raise HTTP(400,"Invalid search string")
10 def POST(table_name,**vars):
11 return db[table_name].validate_and_insert(**vars)
12 return locals()

services 457
The method db.smart_query takes two arguments:
• a list of field or table that should be allowed in the query
• a string containing the query expressed in natural language
and it returns a db.set object with the records that have been found.
Notice that the search string is parsed, not evaluated or executed and
therefore it provides no security risk.
10.4.3Access Control
Access to the API can be restricted as usual by using decorators. So, for
example
1auth.settings.allow_basic_login = True
2
3@auth.requires_login()
4@request.restful()
5def api():
6def GET(s):
7return 'access granted, you said %s' % s
8return locals()
can now be accessed with
1$ curl --user name:password http://127.0.0.1:8000/myapp/default/api/hello
2access granted, you said hello
10.5Services and Authentication
In the previous chapter we have discussed the use of the following
decorators:
1@auth.requires_login()
2@auth.requires_membership(...)
3@auth.requires_permission(...)
For normal actions (not decorated as services), these decorators can be used
even if the output is rendered in a format other than HTML.

458 web2py full-stack web framework,4th edition
For functions defined as services and decorated using the @service...
decorators, the @auth... decorators should not be used. The two types of
decorators cannot be mixed. If authentication is to be performed, it is the
call actions that needs to be decorated:
1@auth.requires_login()
2def call(): return service()
Notice that it also possible to instantiate multiple service objects, register
the same different functions with them, and expose some of them with
authentication and some not:
1public_services=Service()
2private_services=Service()
3
4@public_service.jsonrpc
5@private_service.jsonrpc
6def f(): return 'public'
7
8@private_service.jsonrpc
9def g(): return 'private'
10
11 def public_call(): return public_service()
12
13 @auth.requires_login()
14 def private_call(): return private_service()
This assumes that the caller is passing credentials in the HTTP header (a valid
session cookie or using basic authentication, as discussed in the previous
section). The client must support it; not all clients do.

11
jQuery and Ajax
While web2py is mainly for server-side development, the welcome
scaffolding app comes with the base jQuery library [32], jQuery calendars
(date picker, datetime picker and clock), the "superfish.js" menu, and some
additional JavaScript functions based on jQuery.
Nothing in web2py prevents you from using other Ajax [78] libraries such as
Prototype, ExtJS, or YUI, but we decided to package jQuery because we find
it to be easier to use and more powerful than other equivalent libraries. We
also find that it captures the web2py spirit of being functional and concise.
11.1web2py_ajax.html
The scaffolding web2py application "welcome" includes a file called
1views/web2py_ajax.html
which looks like this:
1{{
2response.files.insert(0,URL('static','js/jquery.js'))
3response.files.insert(1,URL('static','css/calenadar.css'))
4response.files.insert(2,URL('static','js/calendar.js'))
5response.include_meta()
6response.include_files()
7}}

460 web2py full-stack web framework,4th edition
8<script type="text/javascript"><!--
9// These variables are used by the web2py_ajax_init
10 // function in web2py.js (which is loaded below).
11 var w2p_ajax_confirm_message =
12 "{{=T('Are you sure you want to delete this object?')}}";
13 var w2p_ajax_date_format = "{{=T('%Y-%m-%d')}}";
14 var w2p_ajax_datetime_format = "{{=T('%Y-%m-%d %H:%M:%S')}}";
15 //--></script>
16 <script src="{{=URL('static','js/web2py.js')}}"
17 type="text/javascript"></script>
This file is included in the HEAD of the default "layout.html" and it provides
the following services:
• Includes "static/jquery.js".
• Includes "static/calendar.js" and "static/calendar.css", which are used for
the popup calendar.
• Includes all response.meta headers
• Includes all response.files (requires CSS and JS, as declared in the code)
• Sets form variables and includes "static/js/web2y.js"
"web2py.js" does the following:
• Defines an ajax function (based on jQuery $.ajax).
• Makes any DIV of class "error" or any tag object of class "flash" slide down.
• Prevents typing invalid integers in INPUT fields of class "integer".
• Prevents typing invalid floats in INPUT fields of class "double".
• Connects INPUT fields of type "date" with a popup date picker.
• Connects INPUT fields of type "datetime" with a popup datetime picker.
• Connects INPUT fields of type "time" with a popup time picker.
• Defines web2py_ajax_component, a very important tool that will be described
in Chapter 12.
• Defines web2py_comet, a function that can be used for HTML5websockets
(not described in this book but read the examples in the source of
"gluon/contrib/comet_messaging.py").
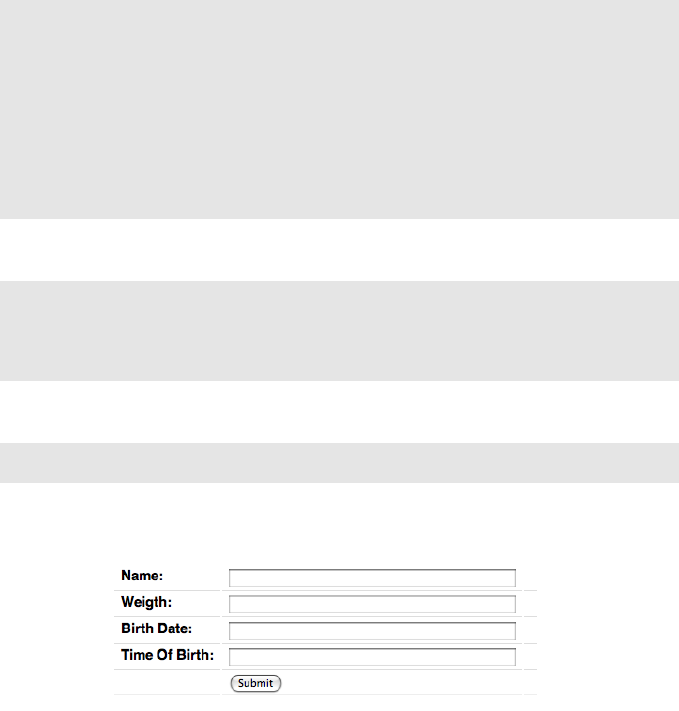
jquery and ajax 461
It also includes popup,collapse, and fade functions for backward
compatibility.
Here is an an example of how the other effects play well together.
Consider a test app with the following model:
1db = DAL("sqlite://db.db")
2db.define_table('child',
3Field('name'),
4Field('weight','double'),
5Field('birth_date','date'),
6Field('time_of_birth','time'))
7
8db.child.name.requires=IS_NOT_EMPTY()
9db.child.weight.requires=IS_FLOAT_IN_RANGE(0,100)
10 db.child.birth_date.requires=IS_DATE()
11 db.child.time_of_birth.requires=IS_TIME()
with this "default.py" controller:
1def index():
2form = SQLFORM(db.child)
3if form.process().accepted:
4response.flash = 'record inserted'
5return dict(form=form)
and the following "default/index.html" view:
1{{extend 'layout.html}}
2{{=form}}
The "index" action generates the following form:
If an invalid form is submitted, the server returns the page with a modified
form containing error messages. The error messages are DIVs of class "error",
and because of the above web2py.js code, the errors appears with a slide-
down effect:

462 web2py full-stack web framework,4th edition
The color of the errors is given in the CSS code in "layout.html".
The web2py.js code prevents you from typing an invalid value in the input
field. This is done before and in addition to, not as a substitute for, the
server-side validation.
The web2py.js code displays a date picker when you enter an INPUT field of
class "date", and it displays a datetime picker when you enter an INPUT field
of class "datetime". Here is an example:
The web2py.js code also displays the following time picker when you try to
edit an INPUT field of class "time":
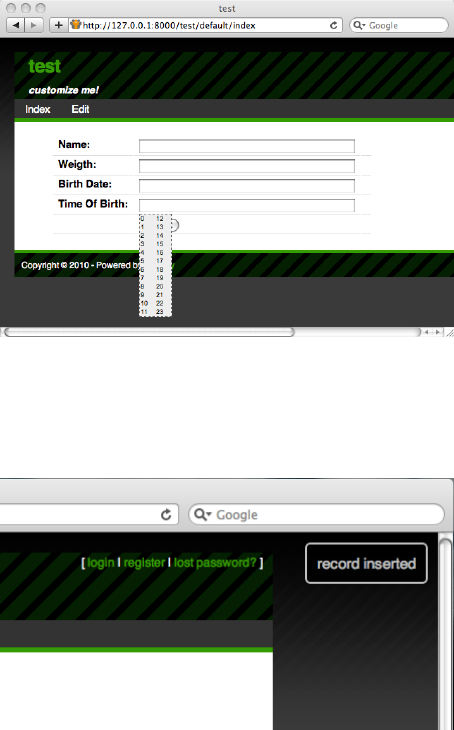
jquery and ajax 463
Upon submission, the controller action sets the response flash to the message
"record inserted". The default layout renders this message in a DIV with
id="flash". The web2py.js code is responsible for making this DIV appear
and making it disappear when you click on it:
These and other effects are accessible programmatically in the views and via
helpers in controllers.
11.2jQuery effects
The basic effects described here do not require any additional files;
everything you need is already included in web2py_ajax.html.

464 web2py full-stack web framework,4th edition
HTML/XHTML objects can be identified by their type (for example a DIV),
their classes, or their id. For example:
1<div class="one" id="a">Hello</div>
2<div class="two" id="b">World</div>
They belong to class "one" and "two" respectively. They have ids equal to "a"
and "b" respectively.
In jQuery you can refer to the former with the following a CSS-like equivalent
notations
1jQuery('.one') // address object by class "one"
2jQuery('#a') // address object by id "a"
3jQuery('DIV.one') // address by object of type "DIV" with class "one"
4jQuery('DIV #a') // address by object of type "DIV" with id "a"
and to the latter with
1jQuery('.two')
2jQuery('#b')
3jQuery('DIV.two')
4jQuery('DIV #b')
or you can refer to both with
1jQuery('DIV')
Tag objects are associated to events, such as "onclick". jQuery allows linking
these events to effects, for example "slideToggle":
1<div class="one" id="a" onclick="jQuery('.two').slideToggle()">Hello</div>
2<div class="two" id="b">World</div>
Now if you click on "Hello", "World" disappears. If you click again, "World"
reappears. You can make a tag hidden by default by giving it a hidden class:
1<div class="one" id="a" onclick="jQuery('.two').slideToggle()">Hello</div>
2<div class="two hidden" id="b">World</div>
You can also link actions to events outside the tag itself. The previous code
can be rewritten as follows:
1<div class="one" id="a">Hello</div>
2<div class="two" id="b">World</div>
3<script>
4jQuery('.one').click(function(){jQuery('.two').slideToggle()});
5</script>

jquery and ajax 465
Effects return the calling object, so they can be chained.
When the click sets the callback function to be called on click. Similarly for
change,keyup,keydown,mouseover, etc.
A common situation is the need to execute some JavaScript code only after
the entire document has been loaded. This is usually done by the onload
attribute of BODY but jQuery provides an alternative way that does not
require editing the layout:
1<div class="one" id="a">Hello</div>
2<div class="two" id="b">World</div>
3<script>
4jQuery(document).ready(function(){
5jQuery('.one').click(function(){jQuery('.two').slideToggle()});
6});
7</script>
The body of the unnamed function is executed only when the document is
ready, after it has been fully loaded.
Here is a list of useful event names:
Form events
• onchange: Script to be run when the element changes
• onsubmit: Script to be run when the form is submitted
• onreset: Script to be run when the form is reset
• onselect: Script to be run when the element is selected
• onblur: Script to be run when the element loses focus
• onfocus: Script to be run when the element gets focus
Keyboard events
• onkeydown: Script to be run when key is pressed
• onkeypress: Script to be run when key is pressed and released
• onkeyup: Script to be run when key is released
Mouse events

466 web2py full-stack web framework,4th edition
• onclick: Script to be run on a mouse click
• ondblclick: Script to be run on a mouse double-click
• onmousedown: Script to be run when mouse button is pressed
• onmousemove: Script to be run when mouse pointer moves
• onmouseout: Script to be run when mouse pointer moves out of an
element
• onmouseover: Script to be run when mouse pointer moves over an element
• onmouseup: Script to be run when mouse button is released
Here is a list of useful effects defined by jQuery:
Effects
• jQuery(...).attr(name): Returns the name of the attribute value
• jQuery(...).attr(name, value): Sets the attribute name to value
• jQuery(...).show(): Makes the object visible
• jQuery(...).hide(): Makes the object hidden
• jQuery(...).slideToggle(speed, callback): Makes the object slide up or down
• jQuery(...).slideUp(speed, callback): Makes the object slide up
• jQuery(...).slideDown(speed, callback): Makes the object slide down
• jQuery(...).fadeIn(speed, callback): Makes the object fade in
• jQuery(...).fadeOut(speed, callback): Makes the object fade out
The speed argument is usually "slow", "fast" or omitted (the default). The
callback is an optional function that is called when the effect is completed.
jQuery effects can also easily be embedded in helpers, for example, in a view:
1{{=DIV('click me!',_onclick="jQuery(this).fadeOut()")}}
jQuery is a very compact and concise Ajax library; therefore web2py does
not need an additional abstraction layer on top of jQuery (except for the
ajax function discussed below). The jQuery APIs are accessible and readily
available in their native form when needed.

jquery and ajax 467
Consult the documentation for more information about these effects and
other jQuery APIs.
The jQuery library can also be extended using plugins and User Interface
Widgets. This topic is not covered here; see ref. [80] for details.
11.2.1Conditional fields in forms
A typical application of jQuery effects is a form that changes its appearance
based on the value of its fields.
This is easy in web2py because the SQLFORM helper generates forms that
are "CSS friendly". The form contains a table with rows. Each row contains
a label, an input field, and an optional third column. The items have ids
derived strictly from the name of the table and names of the fields.
The convention is that every INPUT field has an id tablename_fieldname and
is contained in a row with id tablename_fieldname__row.
As an example, create an input form that asks for a taxpayer’s name and for
the name of the taxpayer’s spouse, but only if he/she is married.
Create a test application with the following model:
1db = DAL('sqlite://db.db')
2db.define_table('taxpayer',
3Field('name'),
4Field('married','boolean'),
5Field('spouse_name'))
the following "default.py" controller:
1def index():
2form = SQLFORM(db.taxpayer)
3if form.process().accepted:
4response.flash = 'record inserted'
5return dict(form=form)
and the following "default/index.html" view:
1{{extend 'layout.html'}}
2{{=form}}
3<script>
4jQuery(document).ready(function(){
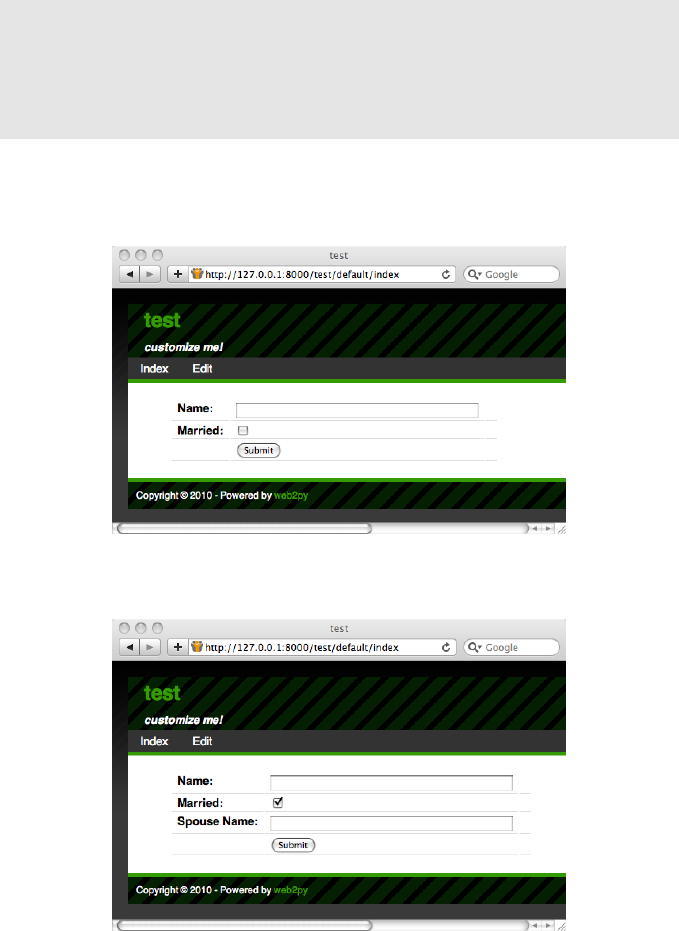
468 web2py full-stack web framework,4th edition
5jQuery('#taxpayer_spouse_name__row').hide();
6jQuery('#taxpayer_married').change(function(){
7if(jQuery('#taxpayer_married').attr('checked'))
8jQuery('#taxpayer_spouse_name__row').show();
9else jQuery('#taxpayer_spouse_name__row').hide();});
10 });
11 </script>
The script in the view has the effect of hiding the row containing the spouse’s
name:
When the taxpayer checks the "married" checkbox, the spouse’s name field
reappears:
Here "taxpayer_married" is the checkbox associated to the "boolean" field
jquery and ajax 469
"married" of table "taxpayer". "taxpayer_spouse_name__row" is the row
containing the input field for "spouse_name" of table "taxpayer".
11.2.2Confirmation on delete
Another useful application is requiring confirmation when checking a
"delete" checkbox such as the delete checkbox that appears in edit forms.
Consider the above example and add the following controller action:
1def edit():
2row = db.taxpayer[request.args(0)]
3form = SQLFORM(db.taxpayer, row, deletable=True)
4if form.process().accepted:
5response.flash = 'record updated'
6return dict(form=form)
and the corresponding view "default/edit.html"
1{{extend 'layout.html'}}
2{{=form}}
The deletable=True argument in the SQLFORM constructor instructs web2py
to display a "delete" checkbox in the edit form. It is False by default.
web2py’s "web2py.js" includes the following code:
1jQuery(document).ready(function(){
2jQuery('input.delete').attr('onclick',
3'if(this.checked) if(!confirm(
4"{{=T('Sure you want to delete this object?')}}"))
5this.checked=false;');
6});
By convention this checkbox has a class equal to "delete". The jQuery code
above connects the onclick event of this checkbox with a confirmation dialog
(standard in JavaScript) and unchecks the checkbox if the taxpayer does not
confirm:
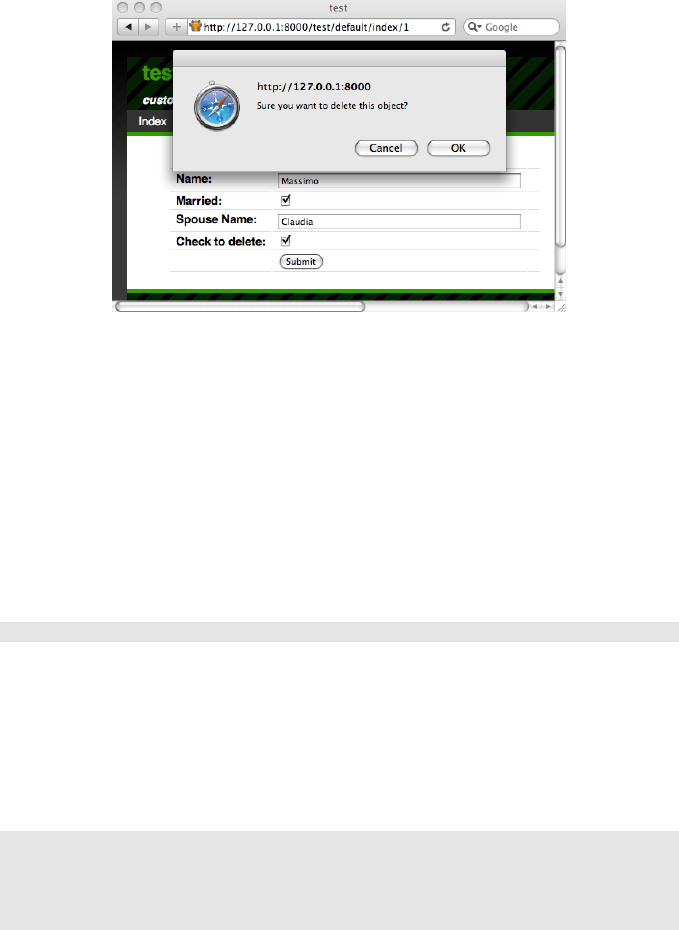
470 web2py full-stack web framework,4th edition
11.3The ajax function
In web2py.js, web2py defines a function called ajax which is based on, but
should not be confused with, the jQuery function $.ajax. The latter is much
more powerful than the former, and for its usage, we refer you to ref. [32]
and ref. [79]. However, the former function is sufficient for many complex
tasks, and is easier to use.
The ajax function is a JavaScript function that has the following syntax:
1ajax(url, [name1, name2, ...], target)
It asynchronously calls the url (first argument), passes the values of the field
inputs withthe name equal to one of the names in the list (second argument),
then stores the response in the innerHTML of the tag with the id equal to
target (the third argument).
Here is an example of a default controller:
1def one():
2return dict()
3
4def echo():
5return request.vars.name
and the associated "default/one.html" view:

jquery and ajax 471
1{{extend 'layout.html'}}
2<form>
3<input name="name" onkeyup="ajax('echo', ['name'], 'target')" />
4</form>
5<div id="target"></div>
When you type something in the INPUT field, as soon as you release a key
(onkeyup), the ajax function is called, and the value of the name="name" field
is passed to the action "echo", which sends the text back to the view. The ajax
function receives the response and displays the echo response in the "target"
DIV.
11.3.1Eval target
The third argument of the ajax function can be the string ":eval". This means
that the string returned by server will not be embedded in the document but
it will be evaluated instead.
Here is an example of a default controller:
1def one():
2return dict()
3
4def echo():
5return "jQuery('#target').html(%s);" % repr(request.vars.name)
and the associated "default/one.html" view:
1{{extend 'layout.html'}}
2<form>
3<input name="name" onkeyup="ajax('echo', ['name'], ':eval')" />
4</form>
5<div id="target"></div>
This allows for more complex responses that can update multiple targets.
11.3.2Auto-completion
Web2py contains a built-in autocomplete widget, described in the Forms
chapter. Here we will build a simpler one from scratch.

472 web2py full-stack web framework,4th edition
Another application of the above ajax function is auto-completion. Here we
wish to create an input field that expects a month name and, when the visitor
types an incomplete name, performs auto-completion via an Ajax request. In
response, an auto-completion drop-box appears below the input field.
This can be achieved via the following default controller:
1def month_input():
2return dict()
3
4def month_selector():
5if not request.vars.month: return ''
6months = ['January','February','March','April','May',
7'June','July','August','September' ,'October',
8'November','December']
9month_start = request.vars.month.capitalize()
10 selected = [m for m in months if m.startswith(month_start)]
11 return DIV(*[DIV(k,
12 _onclick="jQuery('#month').val('%s')" % k,
13 _onmouseover="this.style.backgroundColor='yellow'",
14 _onmouseout="this.style.backgroundColor='white'"
15 ) for k in selected])
and the corresponding "default/month_input.html" view:
1{{extend 'layout.html'}}
2<style>
3#suggestions { position: relative; }
4.suggestions { background: white; border: solid 1px #55A6C8; }
5.suggestions DIV { padding: 2px 4px 2px 4px; }
6</style>
7
8<form>
9<input type="text" id="month" name="month" style="width: 250px" /><br />
10 <div style="position: absolute;" id="suggestions"
11 class="suggestions"></div>
12 </form>
13 <script>
14 jQuery("#month").keyup(function(){
15 ajax('month_selector', ['month'], 'suggestions')});
16 </script>
The jQuery script in the view triggers the Ajax request each time the visitor
types something in the "month" input field. The value of the input field is
submitted with the Ajax request to the "month_selector" action. This action
finds a list of month names that start with the submitted text (selected),
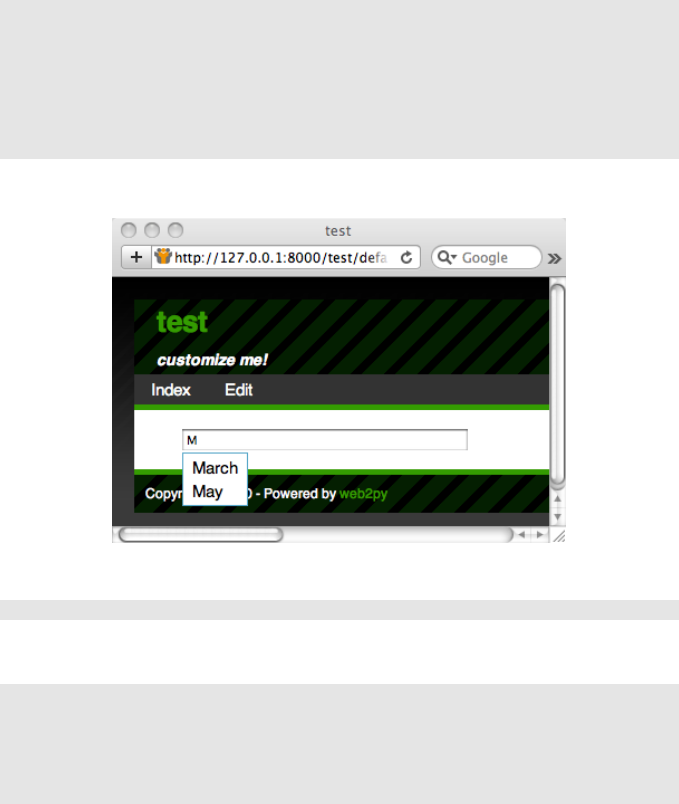
jquery and ajax 473
builds a list of DIVs (each one containing a suggested month name), and
returns a string with the serialized DIVs. The view displays the response
HTML in the "suggestions" DIV. The "month_selector" action generates both
the suggestions and the JavaScript code embedded in the DIVs that must be
executed when the visitor clicks on each suggestion. For example when the
visitor types "M" the callback action returns:
1<div>
2<div onclick="jQuery('#month').val('March')"
3onmouseout="this.style.backgroundColor='white'"
4onmouseover="this.style.backgroundColor='yellow'">March</div>
5<div onclick="jQuery('#month').val('May')"
6onmouseout="this.style.backgroundColor='white'"
7onmouseover="this.style.backgroundColor='yellow'">May</div>
8</div>
Here is the final effect:
If the months are stored in a database table such as:
1db.define_table('month',Field('name'))
then simply replace the month_selector action with:
1def month_input():
2return dict()
3
4def month_selector():
5if not request.vars.month:
6return ''

474 web2py full-stack web framework,4th edition
7pattern = request.vars.month.capitalize() + '%'
8selected = [row.name for row in db(db.month.name.like(pattern)).select()]
9return ''.join([DIV(k,
10 _onclick="jQuery('#month').val('%s')" % k,
11 _onmouseover="this.style.backgroundColor='yellow'",
12 _onmouseout="this.style.backgroundColor='white'"
13 ).xml() for k in selected])
jQuery provides an optional Auto-complete Plugin with additional
functionalities, but that is not discussed here.
11.3.3Ajax form submission
Here we consider a page that allows the visitor to submit messages using
Ajax without reloading the entire page. Using the LOAD helper, web2py
provides a better mechanism for doing it than described here, which will be
described in Chapter 12. Here we want to show you how to do it simply
using jQuery.
It contains a form "myform" and a "target" DIV. When the form is submitted,
the server may accept it (and perform a database insert) or reject it (because
it did not pass validation). The corresponding notification is returned with
the Ajax response and displayed in the "target" DIV.
Build a test application with the following model:
1db = DAL('sqlite://db.db')
2db.define_table('post',Field('your_message','text'))
3db.post.your_message.requires = IS_NOT_EMPTY()
Notice that each post has a single field "your_message" that is required to be
not-empty.
Edit the default.py controller and write two actions:
1def index():
2return dict()
3
4def new_post():
5form = SQLFORM(db.post)
6if form.accepts(request, formname=None):
7return DIV("Message posted")
8elif form.errors:

jquery and ajax 475
9return TABLE(*[TR(k, v) for k, v in form.errors.items()])
The first action does nothing other than return a view.
The second action is the Ajax callback. It expects the form variables in
request.vars, processes them and returns DIV("Message posted") upon success
or a TABLE of error messages upon failure.
Now edit the "default/index.html" view:
1{{extend 'layout.html'}}
2
3<div id="target"></div>
4
5<form id="myform">
6<input name="your_message" id="your_message" />
7<input type="submit" />
8</form>
9
10 <script>
11 jQuery('#myform').submit(function() {
12 ajax('{{=URL('new_post')}}',
13 ['your_message'], 'target');
14 return false;
15 });
16 </script>
Notice how in this example the form is created manually using HTML, but it
is processed by the SQLFORM in a different action than the one that displays
the form. The SQLFORM object is never serialized in HTML. SQLFORM.accepts
in this case does not take a session and sets formname=None, because we chose
not to set the form name and a form key in the manual HTML form.
The script at the bottom of the view connects the "myform" submit button to
an inline function which submits the INPUT with id="your_message" using
the web2py ajax function, and displays the answer inside the DIV with
id="target".
11.3.4Voting and rating
Another Ajax application is voting or rating items in a page. Here we
consider an application that allows visitors to vote on posted images. The
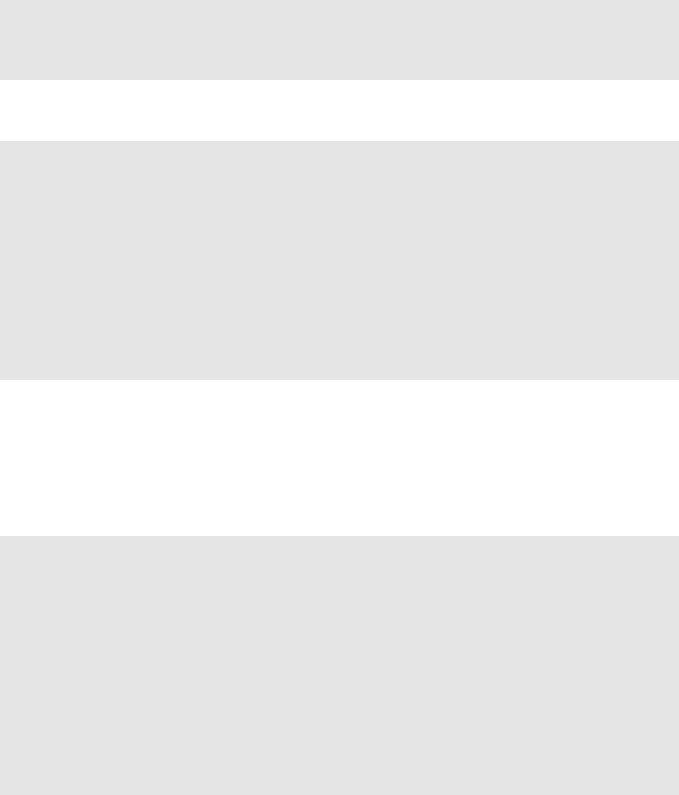
476 web2py full-stack web framework,4th edition
application consists of a single page that displays the images sorted according
to their vote. We will allow visitors to vote multiple times, although it
is easy to change this behavior if visitors are authenticated, by keeping
track of the individual votes in the database and associating them with the
request.env.remote_addr of the voter.
Here is a sample model:
1db = DAL('sqlite://images.db')
2db.define_table('item',
3Field('image','upload'),
4Field('votes','integer', default=0))
Here is the default controller:
1def list_items():
2items = db().select(db.item.ALL, orderby=db.item.votes)
3return dict(items=items)
4
5def download():
6return response.download(request, db)
7
8def vote():
9item = db.item[request.vars.id]
10 new_votes = item.votes + 1
11 item.update_record(votes=new_votes)
12 return str(new_votes)
The download action is necessary to allow the list_items view to download
images stored in the "uploads" folder. The votes action is used for the Ajax
callback.
Here is the "default/list_items.html" view:
1{{extend 'layout.html'}}
2
3<form><input type="hidden" id="id" name="id" value="" /></form>
4{{for item in items:}}
5<p>
6<img src="{{=URL('download', args=item.image)}}"
7width="200px" />
8<br />
9Votes=<span id="item{{=item.id}}">{{=item.votes}}</span>
10 [<span onclick="jQuery('#id').val('{{=item.id}}');
11 ajax('vote', ['id'], 'item{{=item.id}}');">vote up</span>]
12 </p>
13 {{pass}}
jquery and ajax 477
When the visitor clicks on "[vote up]" the JavaScript code stores the item.id in
the hidden "id" INPUT field and submits this value to the server via an Ajax
request. The server increases the votes counter for the corresponding record
and returns the new vote count as a string. This value is then inserted in the
target item{{=item.id}} SPAN.
Ajax callbacks can be used to perform computations in the background, but we
recommend using cron or a background process instead (discussed in chapter
4), since the web server enforces a timeout on threads. If the computation takes
too long, the web server kills it. Refer to your web server parameters to set the
timeout value.
12
Components and plugins
Components and plugins are relatively new features of web2py, and there is
some disagreement between developers about what they are and what they
should be. Most of the confusion stems from the different uses of these terms
in other software projects and from the fact that developers are still working
to finalize the specifications.
However, plugin support is an important feature and we need to provide
some definitions. These definitions are not meant to be final, just consistent
with the programming patterns we want to discuss in this chapter.
We will try to address two issues here:
• How can we build modular applications that minimize server load and
maximize code reuse?
• How can we distribute pieces of code in a more or less plugin-and-play
fashion?
Components address the first issue; plugins address the second.
12.1Components
Acomponent is a functionally autonomous part of a web page.

480 web2py full-stack web framework,4th edition
A component may be composed of modules, controllers and views, but there
is no strict requirement other than, when embedded in a web page, it must
be localized within an html tag (for example a DIV, a SPAN, or an IFRAME)
and it must perform its task independently of the rest of the page. We
are specifically interested in components that are loaded in the page and
communicate with the component controller function via Ajax.
An example of a component is a "comments component" that is contained
into a DIV and shows users’ comments and a post-new-comment form.
When the form is submitted, it is sent to the server via Ajax, the list is
updated, and the comment is stored server-side in the database. The DIV
content is refreshed without reloading the rest of the page.
The web2py LOAD function makes this easy to do without explicit
JavaScript/Ajax knowledge or programming.
Our goal is to be able to develop web applications by assembling components
into page layouts.
Consider a simple web2py app "test" that extends the default scaffolding app
with a custom model in file "models/db_comments.py":
1db.define_table('comment',
2Field('body','text',label='Your comment'),
3Field('posted_on','datetime',default=request.now),
4Field('posted_by',db.auth_user,default=auth.user_id))
5db.comment.posted_on.writable=db.comment.posted_on.readable=False
6db.comment.posted_by.writable=db.comment.posted_by.readable=False
one action in "controllers/comments.py"
1@auth.requires_login()
2def post():
3return dict(form=crud.create(db.comment),
4comments=db(db.comment).select())
and the corresponding "views/comments/post.html"
1{{extend 'layout.html'}}
2{{for comment in comments:}}
3<div class="comment">
4on {{=comment.posted_on}} {{=comment.posted_by.first_name}}
5says <span class="comment_body">{{=comment.body}}</span>
6</div>
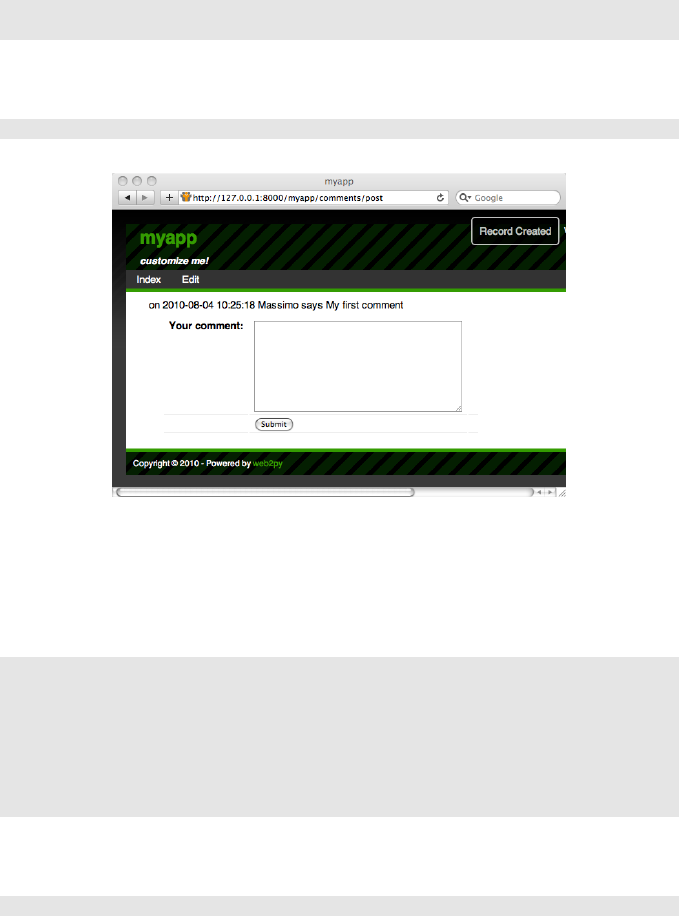
components and plugins 481
7{{pass}}
8{{=form}}
You can access it as usual at:
1http://127.0.0.1:8000/test/comments/post
So far there is nothing special in this action, but we can turn it into a
component by defining a new view with extension ".load" that does not
extend the layout.
Hence we create a "views/comments/post.load":
1{{#extend 'layout.html' <- notice this is commented out!}}
2{{for comment in comments:}}
3<div class="comment">
4on {{=comment.posted_on}} {{=comment.posted_by.first_name}}
5says <span class="comment_body">{{=comment.body}}</span>
6</div>
7{{pass}}
8{{=form}}
We can access it at the URL
1http://127.0.0.1:8000/test/comments/post.load
and it will look like this:
482 web2py full-stack web framework,4th edition
This is a component that we can embed into any other page by simply doing
1{{=LOAD('comments','post.load',ajax=True)}}
For example in "controllers/default.py" we can edit
1def index():
2return dict()
and in the corresponding view add the component:
1{{extend 'layout.html'}}
2<p>{{='bla '*100}}</p>
3{{=LOAD('comments','post.load',ajax=True)}}
Visiting the page
1http://127.0.0.1:8000/test/default/index
will show the normal content and the comments component:
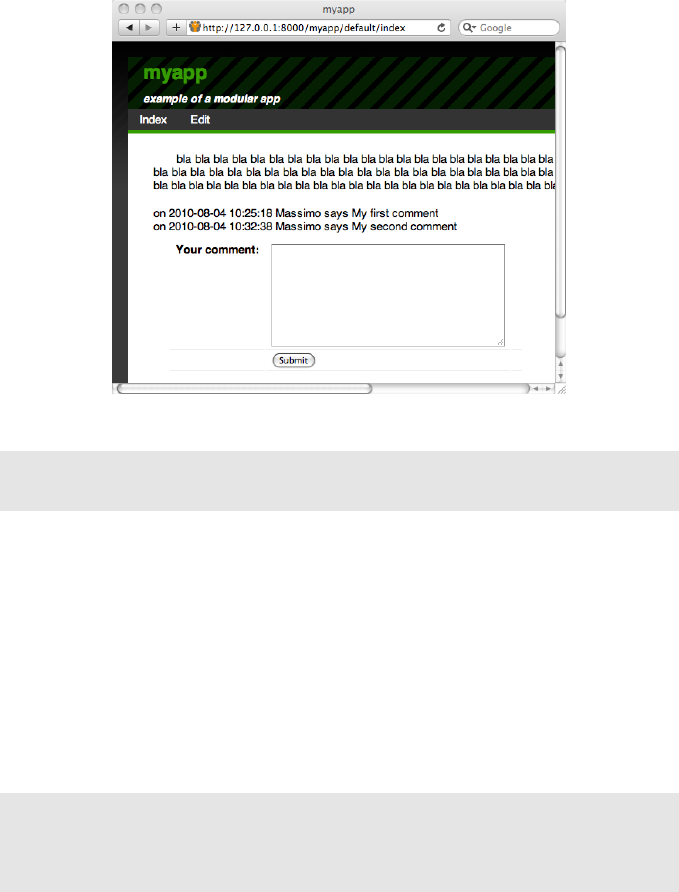
components and plugins 483
The {{=LOAD(...)}} component is rendered as follows:
1<script type="text/javascript"><!--
2web2py_component("/test/comment/post.load","c282718984176")
3//--></script><div id="c282718984176">loading...</div>
(the actual generated code depends on the options passed to the LOAD
function).
The web2py_component(url,id) function is defined in "web2py_ajax.html" and
it performs all the magic: it calls the url via Ajax and embeds the response
into the DIV with corresponding id; it traps every form submission into the
DIV and submits those forms via Ajax. The Ajax target is always the DIV
itself.
The full signature of the LOAD helper is the following:
1LOAD(c=None, f='index', args=[], vars={},
2extension=None, target=None,
3ajax=False, ajax_trap=False,
4url=None,user_signature=False,
5content='loading...',**attr):
Here:
• the first two arguments cand fare the controller and the function that we
484 web2py full-stack web framework,4th edition
want to call respectively.
•args and vars are the arguments and variables that we want to pass to the
function. The former is a list, the latter is a dictionary.
•extension is an optional extension. Notice that the extension can also be
passed as part of the function as in f=’index.load’.
•target is the id of the target DIV. If it is not specified a random target id is
generated.
•ajax should be set to True if the DIV has to be filled via Ajax and to False if
the DIV has to be filled before the current page is returned (thus avoiding
the Ajax call).
•ajax_trap=True means that any form submission in the DIV must be
captured and submitted via Ajax, and the response must be rendered
inside the DIV. ajax_trap=False indicates that forms must be submitted
normally, thus reloading the entire page. ajax_trap is ignored and
assumed to be True if ajax=True.
•url, if specified, overrides the values of c,f,args,vars, and extension
and loads the component at the url. It is used to load as components
pages served by other applications (which my or may not be created with
web2py).
•user_signature defaults to False but, if you are logged in, it should be set
to True. This will make sure the ajax callback is digitally signed. This is
documented in chapter 4.
•content is the content to be displayed while performing the ajax call. It can
be a helper as in content=IMG(..).
• optional **attr (attributes) can be passed to the contained DIV.
If no .load view is specified, there is a generic.load that renders the dictionary
returned by the action without layout. It works best if the dictionary contains
a single item.
If you LOAD a component having the .load extension and the corresponding
controller function redirects to another action (for example a login form), the

components and plugins 485
.load extension propagates and the new url (the one to redirect too) is also
loaded with a .load extension.
*Please note:* Because Ajax post does not support multipart forms, i.e. file
uploads, upload fields will not work with the LOAD component. You
could be fooled into thinking it would work because upload fields will
function normally if POST is done from the individual component’s.load
view. Instead, uploads are done with ajax-compatible 3rd-party widgets and
web2py manual upload store commands.
12.1.1Client-Server component communications
When the action of a component is called via Ajax, web2py passes two HTTP
headers with the request:
1web2py-component-location
2web2py-component-element
which can be accessed by the action via the variables:
1request.env.http_web2py_component_location
2request.env.http_web2py_component_element
The latter is also accessible via:
1request.cid
The former contains the URL of the page that called the component action.
The latter contains the id of the DIV that will contain the response.
The component action can also store data in two special HTTP response
headers that will be interpreted by the full page upon response. They are:
1web2py-component-flash
2web2py-component-command
and they can be set via:
1response.headers['web2py-component-flash']='....'
2response.headers['web2py-component-command']='...'
or (if the action is called by a component) automatically via:
486 web2py full-stack web framework,4th edition
1response.flash='...'
2response.js='...'
The former contains text that you want to be flashed upon response. The
latter contains JavaScript code that you want to be executed upon response.
It cannot contain newlines.
As an example, let’s define a contact form component in
"controllers/contact/ask.py" that allows the user to ask a question.
The component will email the question to the system administrator, flash a
"thank you" message, and remove the component from the page:
1def ask():
2form=SQLFORM.factory(
3Field('your_email',requires=IS_EMAIL()),
4Field('question',requires=IS_NOT_EMPTY()))
5if form.process().accepted:
6if mail.send(to='admin@example.com',
7subject='from %s' % form.vars.your_email,
8message = form.vars.question):
9response.flash = 'Thank you'
10 response.js = "jQuery('#%s').hide()" %request.cid
11 else:
12 form.errors.your_email = "Unable to send the email"
13 return dict(form=form)
The first four lines define the form and accept it. The mail object used for
sending is defined in the default scaffolding application. The last four lines
implement all the component-specific logic by getting data from the HTTP
request headers and setting the HTTP response headers.
Now you can embed this contact form in any page via
1{{=LOAD('contact','ask.load',ajax=True)}}
Notice that we did not define a .load view for our ask component. We
do not have to because it returns a single object (form) and therefore
the "generic.load" will do just fine. Remember that generic views are a
development tool. In production you should copy "views/generic.load" into
"views/contact/ask.load".
We can block access to a function called via Ajax by digitally signing the URL
using the user_signature argument:

components and plugins 487
1{{=LOAD('contact','ask.load',ajax=True,user_signature=True)}}
which add a digital signature to the URL. The digital signature must then be
validated using a decorator in the callback function:
1@auth.requires_signature()
2def ask(): ...
12.1.2Trapped Ajax links
Normally a link is not trapped, and by clicking in a link inside a component,
the entire linked page is loaded. Sometimes you want the linked page to be
loaded inside the component. This can be achieved using the Ahelper:
1{{=A('linked page',_href='http://example.com',cid=request.cid)}}
If cid is specified, the linked page is loaded via Ajax. The cid is the id of
the html element where to place the loaded page content. In this case we set
it to request.cid, i.e. the id of the component that generates the link. The
linked page can be and usually is an internal URL generated using the URL
command.
12.2Plugins
Aplugin is any subset of the files of an application.
and we really mean any:
• A plugin is not a module, is not a model, it is not a controller, is not a
view, yet it may contain modules, models, controllers and/or views.
• A plugin does not need to be functionally autonomous and it may depend
on other plugins or specific user code.
• A plugin is not a plugins system and therefore has no concept of registration
nor isolation, although we will give rules to try to achieve some isolation.
• We are talking about a plugin for your app, not a plugin for web2py.
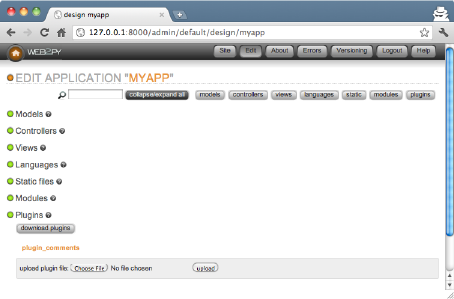
488 web2py full-stack web framework,4th edition
So why is it called a plugin? Because it provides a mechanism for packing a
subset of an app and unpacking it over another app (i.e. plug-in). Under this
definition, any file in your app can be treated as a plugin.
When the app is distributed, its plugins are packed and distributed with it.
In practice, the admin provides an interface for packing and unpacking
plugins separately from your app. Files and folder of your application that
have names with the prefix plugin_name can be packed together into a file
called:
web2py.plugin.name.w2p and distributed together.
The files that compose a plugin are not treated by web2py any differently
than other files except that admin understands from their names that they
are meant to be distributed together, and it displays them in a separate page:
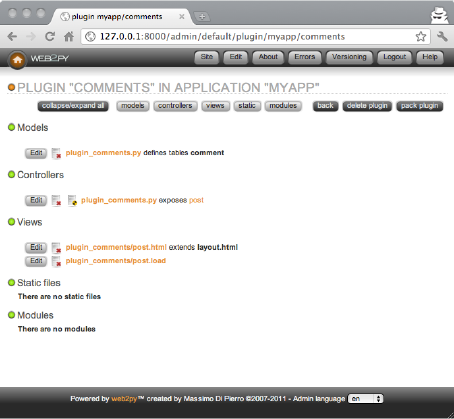
components and plugins 489
Yet as a matter of fact, by the definition above, these plugins are more general
than those recognized as such by admin.
In practice we will only be concerned with two types of plugins:
•Component Plugins. These are plugins that contain components as defined
in the previous section. A component plugin can contain one or
more components. We can think for example of a plugin_comments that
contains the comments component proposed above. Another example
could be plugin_tagging that contains a tagging component and a tag-cloud
component that share some database tables also defined by the plugin.
•Layout Plugins. These are plugins that contain a layout view and the static
files required by such layout. When the plugin is applied it gives the app
a new look and feel.
By the above definitions, the components created in the previous section, for
example "controllers/contact.py", are already plugins. We can move them
from one app to another and use the components they define. Yet they are
not recognized as such by admin because there is nothing that labels them
as plugins. So there are two problems we need to solve:
490 web2py full-stack web framework,4th edition
• Name the plugin files using a convention, so that admin can recognize
them as belonging to the same plugin
• If the plugin has model files, establish a convention so that the objects it
defines do not pollute the namespace and do not conflict with each other.
Let’s assume a plugin is called name. Here are the rules that should be
followed:
Rule 1: Plugin models and controllers should be called, respectively
•models/plugin_name.py
•controllers/plugin_name.py
and plugin views, modules, static, and private files should be in folders
called, respectively:
•views/plugin_name/
•modules/plugin_name/
•static/plugin_name/
•private/plugin_name/
Rule 2: Plugin models can only define objects with names that start with
•plugin_name
•PluginName
•_
Rule 3: Plugin models can only define session variables with names that start
with
•session.plugin_name
•session.PluginName
Rule 4: Plugins should include license and documentation. These should be
placed in:
•static/plugin_name/license.html
•static/plugin_name/about.html

components and plugins 491
Rule 5: The plugin can only rely on the existence of the global objects defined
in scaffolding "db.py", i.e.
• a database connection called db
• an Auth instance called auth
• a Crud instance called crud
• a Service instance called service
Some plugins may be more sophisticated and have a configuration parameter
in case more than one db instance exists.
Rule 6: If a plugin needs configuration parameters, these should be set via a
PluginManager as described below.
By following the above rules we can make sure that:
•admin recognizes all the plugin_name files and folder as part of a single
entity.
• plugins do not interfere with each other.
The rules above do not solve the problem of plugin versions and
dependencies. That is beyond our scope.
12.2.1Component plugins
Component plugins are plugins that define components. Components
usually access the database and define with their own models.
Here we turn the previous comments component into a comments_plugin by
using the same code we wrote before, but following all of the previous rules.
First, we create a model called "models/plugin_comments.py":
1db.define_table('plugin_comments_comment',
2Field('body','text', label='Your comment'),
3Field('posted_on','datetime', default=request.now),
4Field('posted_by', db.auth_user, default=auth.user_id))
5db.plugin_comments_comment.posted_on.writable=False
6db.plugin_comments_comment.posted_on.readable=False
7db.plugin_comments_comment.posted_by.writable=False

492 web2py full-stack web framework,4th edition
8db.plugin_comments_comment.posted_by.readable=False
9
10 def plugin_comments():
11 return LOAD('plugin_comments','post',ajax=True)
(notice the last two lines define a function that will simplify the embedding
of the plugin)
Second, we define a "controllers/plugin_comments.py"
1@auth.requires_login()
2def post():
3comment = db.plugin_comments_comment
4return dict(form=crud.create(comment),
5comments=db(comment).select())
Third, we create a view called "views/plugin_comments/post.load":
1{{for comment in comments:}}
2<div class="comment">
3on {{=comment.posted_on}} {{=comment.posted_by.first_name}}
4says <span class="comment_body">{{=comment.body}}</span>
5</div>
6{{pass}}
7{{=form}}
Now we can use admin to pack the plugin for distribution. Admin will save
this plugin as:
1web2py.plugin.comments.w2p
We can use the plugin in any view by simply installing the plugin via the
edit page in admin and adding this to our own views
1{{=plugin_comments()}}
Of course we can make the plugin more sophisticated by having components
that take parameters and configuration options. The more complex the
components, the more difficult it becomes to avoid name collisions. The
Plugin Manager described below is designed to avoid this problem.

components and plugins 493
12.2.2Plugin manager
The PluginManager is a class defined in gluon.tools. Before we explain how it
works inside, we will explain how to use it.
Here we consider the previous comments_plugin and we make it better. We
want to be able to customize:
1db.plugin_comments_comment.body.label
without having to edit the plugin code itself.
Here is how we can do it:
First, rewrite the plugin "models/plugin_comments.py" in this way:
1db.define_table('plugin_comments_comment',
2Field('body','text',label=plugin_comments.comments.body_label),
3Field('posted_on','datetime', default=request.now),
4Field('posted_by', db.auth_user, default=auth.user_id))
5
6def plugin_comments()
7from gluon.tools import PluginManager
8plugins = PluginManager('comments', body_label='Your comment')
9
10 comment = db.plugin_comments_comment
11 comment.label=plugins.comments.body_label
12 comment.posted_on.writable=False
13 comment.posted_on.readable=False
14 comment.posted_by.writable=False
15 comment.posted_by.readable=False
16 return LOAD('plugin_comments','post.load',ajax=True)
Notice how all the code except the table definition is encapsulated in a single
function. Also notice how the function creates an instance of a PluginManager.
Now in any other model in your app, for example in "models/db.py", you
can configure this plugin as follows:
1from gluon.tools import PluginManager
2plugins = PluginManager()
3plugins.comments.body_label = T('Post a comment')
The plugins object is already instantiated in the default scaffolding app in
"models/db.py"

494 web2py full-stack web framework,4th edition
The PluginManager object is a thread-level singleton Storage object of Storage
objects. That means you can instantiate as many as you like within the same
application but (whether they have the same name or not) they act as if there
were a single PluginManager instance.
In particular each plugin file can make its own PluginManager object and
register itself and its default parameters with it:
1plugins = PluginManager('name', param1='value', param2='value')
You can override these parameters elsewhere (for example in
"models/db.py") with the code:
1plugins = PluginManager()
2plugins.name.param1 = 'other value'
You can configure multiple plugins in one place.
1plugins = PluginManager()
2plugins.name.param1 = '...'
3plugins.name.param2 = '...'
4plugins.name1.param3 = '...'
5plugins.name2.param4 = '...'
6plugins.name3.param5 = '...'
When the plugin is defined, the PluginManager must take arguments: the
plugin name and optional named arguments which are default parameters.
However, when the plugins are configured, the PluginManager constructor
must take no arguments. The configuration must precede the definition of the
plugin (i.e. it must be in a model file that comes first alphabetically).
12.2.3Layout plugins
Layout plugins are simpler than component plugins because usually they do
not contain code, but only views and static files. Yet you should still follow
good practice:
First, create a folder called "static/plugin_layout_name/" (where name is the
name of your layout) and place all your static files there.
Second, create a layout file called "views/plugin_layout_name/layout.html"

components and plugins 495
that contains your layout and links the images, CSS and JavaScript files in
"static/plugin_layout_name/"
Third, modify the "views/layout.html" so that it simply reads:
1{{extend 'plugin_layout_name/layout.html'}}
2{{include}}
The benefit of this design is that users of this plugin can install
multiple layouts and choose which one to apply simply by editing
"views/layout.html". Moreover, "views/layout.html" will not be packed by
admin together with the plugin, so there is no risk that the plugin will
override the user’s code in the previously installed layout.
12.3plugin_wiki
DISCLAIMER: plugin_wiki is still very much under development and
therefore we do not promise backward compatibility to the same level as for
web2py core functions.
plugin_wiki is a plugin on steroids. What we mean is that it defines multiple
useful components and it may change the way you develop your applications:
You can download it from
1http://web2py.com/examples/static/web2py.plugin.wiki.w2p
The idea behind plugin_wiki is that most applications include pages that
are semi-static. These are pages that do not include complex custom logic.
They contain structured text (think of a help page), images, audio, video,
crud forms, or a set of standard components (comments, tags, charts, maps),
etc. These pages may be public, require login or have other authorization
restrictions. These pages may be linked by a menu or only be reachable via
wizard form. plugin_wiki provides an easy way to add pages that fit in this
category to your regular web2py applications.
In particular plugin_wiki provides:
• A wiki-like interface that allows to add pages to your app and reference
them by a slug. These pages (which we will refer to as wiki pages) have

496 web2py full-stack web framework,4th edition
versions and are stored in the database.
• Public and private pages (require login). If a page requires login, it may
also require that the user have a particular group membership.
• Three levels: 1,2,3. At level 1, pages can only include text, images,
audio and video. At level 2, pages can also include widgets (these are
components as defined in the previous section that can be embedded in
wiki pages). At level 3, pages can also include web2py template code.
• A choice of editing pages with the markmin syntax or in HTML using a
WYSIWYG editor.
• A collection of widgets: implemented as components. They are self
documenting and they can be embedded as regular components in normal
web2py views or, using a simplified syntax, into wiki pages.
• A set of special pages (meta-code,meta-menu, etc.) that can be used to
customize the plugin (for example define code the plugin should run,
customize the menu, etc.)
The welcome app plus the plugin_wiki can be thought of as a development
environment in itself that is suitable for building simple web applications such
as a blog.
From here on we will assume the plugin_wiki is applied to a copy of the
welcome scaffolding app.
The first thing you notice after installing the plugin is that it adds a new
menu item called pages.
Click on the pages menu item and you will be redirected to the plugin action:
1http://127.0.0.1:8000/myapp/plugin_wiki/index

components and plugins 497
The plugin index page lists the pages created using the plugin itself and
allows you to create new ones by choosing a slug. Try creating a home page.
You will be redirected to
1http://127.0.0.1:8000/myapp/plugin_wiki/page/home
Click on create page to edit its content.
By default, the plugin is at level 3, which means you can insert widgets as well
as code in pages. By default it uses the markmin syntax to describe the page
content.
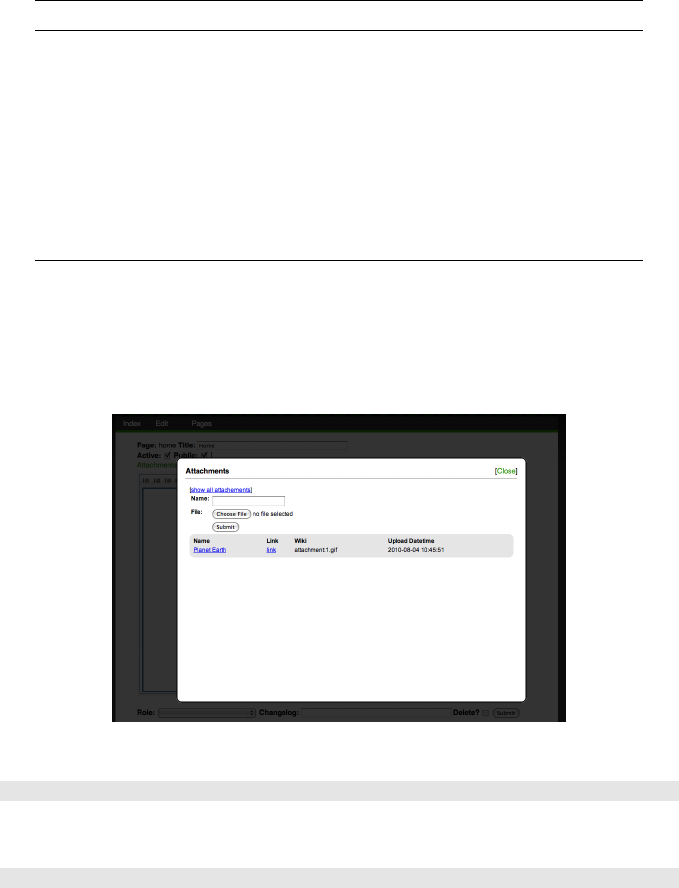
498 web2py full-stack web framework,4th edition
12.3.1MARKMIN syntax
Here is a primer for the markmin syntax:
markmin html
# title <h1>title</h1>
## subtitle <h2>subtitle</h2>
### subsubtitle <h3>subsubtitle</h3>
**bold** <strong>bold</strong>
”italic” <i>italic</i>
http://... <a href="http://...com">http:...</a>
http://...png <img src="http://...png" />
http://...mp3 <audio src="http://...mp3"></audio>
http://...mp4 <video src="http://...mp4"></video>
qr:http://... <a href="http://..."><img src="qr code"/></a>
embed:http://... <iframe src="http://..."></iframe>
Notice that links, images, audio, and video files are embedded automatically.
For more information on MARKMIN syntax, please refer to Chapter 5.
If the page does not exist, you will be asked to create one.
The edit page allows you to add attachments to pages (i.e. static files)
and you can link to them as
1[[mylink name attachment:3.png]]
or embed them with
1[[myimage attachment:3.png center 200px]]

components and plugins 499
The size (200px) is optional. center is not optional but it may be replaced by
left or right.
You can embed blockquoted text with
1-----
2this is blockquoted
3-----
as well as tables
1-----
20|0|X
30|X|0
4X|0|0
5-----
and verbatim text
1``
2verbatim text
3``
You can also prepend an optional :class to the final --- or the final “. For
blockquoted text and tables it will be translated in the class of the tag, for
example:
1-----
2test
3-----:abc
renders as
1<blockquote class="abc">test</blockquote>
For verbatim text the class can be used to embed content of different types.
You can, for example, embed code with syntax highlighting by specifying the
language with :code_language
1``
2def index(): return 'hello world'
3``:code_python
You can embed widgets:
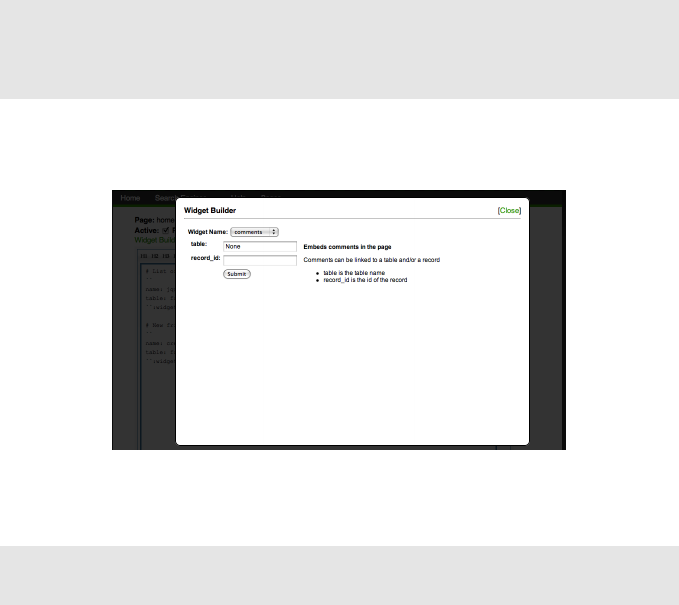
500 web2py full-stack web framework,4th edition
1``
2name: widget_name
3attribute1: value1
4attribute2: value2
5``:widget
From the edit page you can click on "widget builder" to insert widgets from
a list, interactively:
(for a list of widgets see the next subsection).
You can also embed web2py template language code:
1``
2{{for i in range(10):}}<h1>{{=i}}</h1>{{pass}}
3``:template
12.3.2Page permissions
When editing a page you will find the following fields:
•active (defaults to True). If a page is not active, it will not be accessible to
visitors (even if public).
•public (defaults to True). If a page is public, it can be accessed by visitors
without logging in.
•role (defaults to None). If a page has a role, the page can be accessed
only by visitors who are logged in and are members of the group with the
corresponding role.
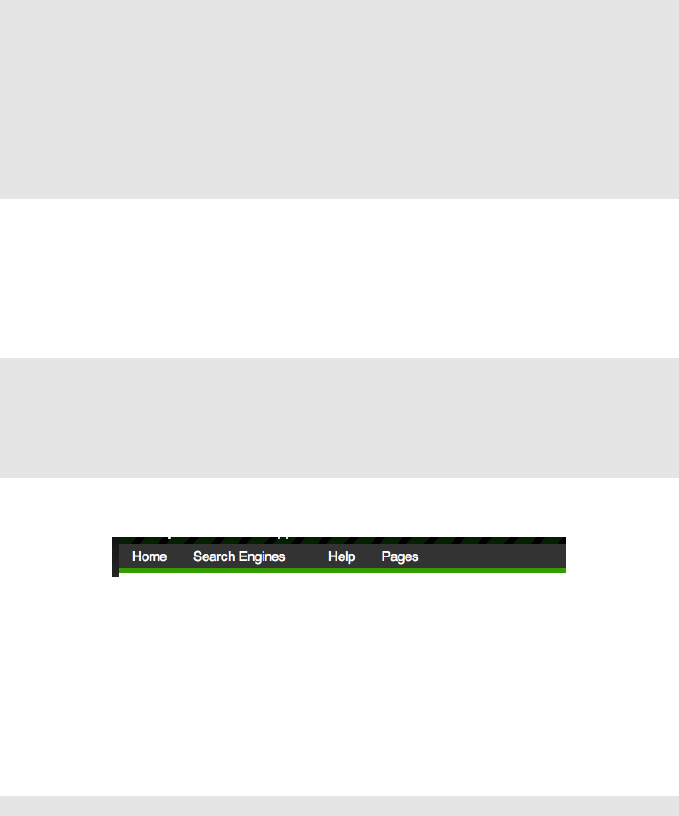
components and plugins 501
12.3.3Special pages
meta-menu contains the menu. If this page does not exist, web2py uses the
response.menu defined in "models/menu.py". The content of the meta-menu
page overrides the menu. The syntax is the following:
1Item 1 Name http://link1.com
2Submenu Item 11 Name http://link11.com
3Submenu Item 12 Name http://link12.com
4Submenu Item 13 Name http://link13.com
5Item 2 Name http://link1.com
6Submenu Item 21 Name http://link21.com
7Submenu Item 211 Name http://link211.com
8Submenu Item 212 Name http://link212.com
9Submenu Item 22 Name http://link22.com
10 Submenu Item 23 Name http://link23.com
where the indentation determines the submenu structure. Each item is
composed of the text of the menu item followed by a link. A link can be
page:slug. A link None does not link to any page. Extra spaces are ignored.
Here is another example:
1Home page:home
2Search Engines None
3Yahoo http://yahoo.com
4Google http://google.com
5Bing http://bing.com
6Help page:help
This renders as follows:
meta-code is another special page and it must contain web2py code. This is
an extension of your models, and in fact you can put model code here. It is
executed when "models/plugin_wiki.py" code is executed.
You can define tables in meta-code.
For example, you can create a simple table "friends" by placing this in
meta-code:
1db.define_table('friend',Field('name',requires=IS_NOT_EMPTY()))
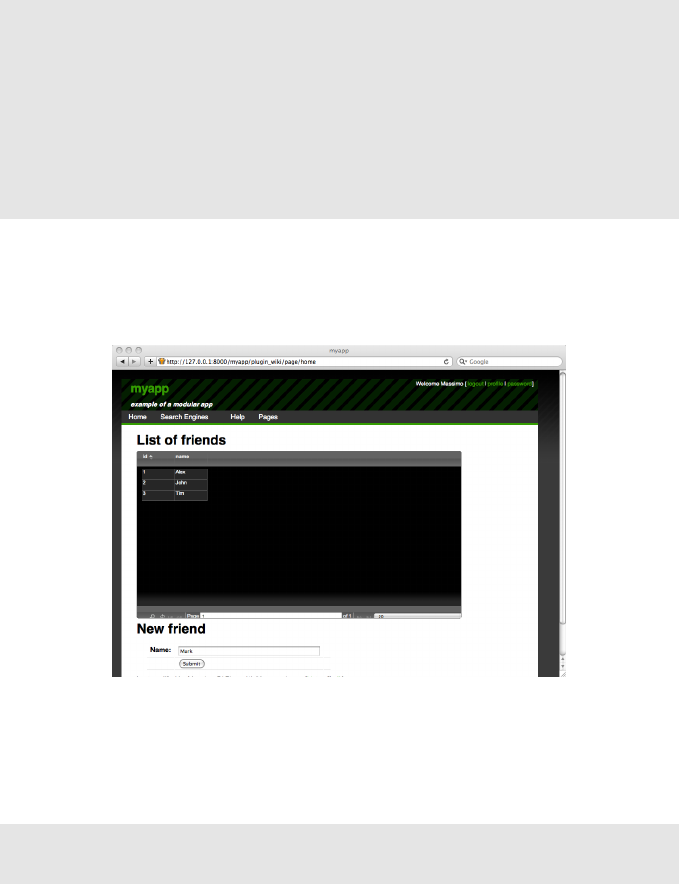
502 web2py full-stack web framework,4th edition
and you can create a friend-management interface by embedding in a page
of your choice the following code:
1# List of friends
2``
3name: jqgrid
4table: friend
5``:widget
6
7# New friend
8``
9name: create
10 table: friend
11 ``:widget
The page has two headers (starting with #): "List of friends" and "New
friend". The page contains two widgets (under the corresponding headers): a
jqgrid widget that lists friends and a crud create widget to add a new friend.
meta-header,meta-footer,meta-sidebar are not used by the default layout in
"welcome/views/layout.html". If you want to use them, edit "layout.html"
using admin (or the shell) and place the following tags in the appropriate
places:
1{{=plugin_wiki.embed_page('meta-header') or ''}}
2{{=plugin_wiki.embed_page('meta-sidebar') or ''}}
3{{=plugin_wiki.embed_page('meta-footer') or ''}}

components and plugins 503
In this way, the content of those pages will show up in the header, sidebar
and footer in the layout.
12.3.4Configuring plugin_wiki
As with any other plugins in "models/db.py" you can do
1from gluon.tools import PluginManager
2plugins = PluginManager()
3plugins.wiki.editor = auth.user.email == mail.settings.sender
4plugins.wiki.level = 3
5plugins.wiki.mode = 'markmin' or 'html'
6plugins.wiki.theme = 'ui-darkness'
where
•editor is true if the current logged-in user is authorized to edit plugin_wiki
pages
•level is the permission: 1to edit regular pages, 2to embed widgets in
pages, 3to embed code
•mode determines whether to use a "markmin" editor or a WYSIWYG
"html" editor.
•theme is the name of the required jQuery UI Theme. By default only the
color-neutral "ui-darkness" is installed.
You can add themes here:
1static/plugin_wiki/ui/%(theme)s/jquery-ui-1.8.1.custom.css
12.3.5Current widgets
Each widget can be embedded both in plugin_wiki pages and in normal
web2py templates.
For example, to embed a YouTube video in a plugin_wiki page, you can do
1``
2name: youtube
3code: l7AWnfFRc7g
4``:widget

504 web2py full-stack web framework,4th edition
or to embed the same widget in a web2py view, you can do:
1{{=plugin_wiki.widget('youtube',code='l7AWnfFRc7g')}}
In either case, this is the output:
Widget arguments that do not have a default value are required.
Here is a list of all current widgets:
read
1read(table,record_id=None)
Reads and displays a record
•table is the name of a table
•record_id is a record number
create
1create(table,message='',next='',readonly_fields='',
2hidden_fields='',default_fields='')

components and plugins 505
Displays a record create form
•table is the name of a table
•message is a the message to be displayed after record is created
•next is where to redirect, example "page/index/[id]"
•readonly_fields is a list of comma separated fields
•hidden_fields is a list of comma separated fields
•default_fields is a list of comma separated fieldname=value
update
1update(table,record_id='',message='',next='',
2readonly_fields='',hidden_fields='',default_fields='')
Displays a record update form
•table is the name of a table
•record_id is he record to be updated or {{=request.args(-1)}}
•message is a the message to be displayed after record is created
•next is where to redirect, example "page/index/[id]"
•readonly_fields is a list of comma separated fields
•hidden_fields is a list of comma separated fields
•default_fields is a list of comma separated fieldname=value
select
1select(table,query_field='',query_value='',fields='')
Lists all records in the table
•table is the name of a table
•query_field and query_value if present will filter records by according to
the query query_field == query_value
•fields is a list of comma separate fields to be displayed
search
506 web2py full-stack web framework,4th edition
1search(table,fields='')
Widgets for selecting records
•table is the name of a table
•fields is a list of comma separated fields to be displayed
jqgrid
1jqgrid(table,fieldname=None,fieldvalue=None,col_widths='',
2colnames=None,_id=None,fields='',col_width=80,width=700,height=300)
Embeds a jqGrid plugin
•table is the table name
•fieldname,fieldvalue are an optional filter: fieldname==fieldvalue
•col_widths is the width of each column
•colnames is a list of column names that are displayed
•_id is the "id" of the TABLE that contains the jqGrid
•fields is a list of columns to be displayed
•col_width is the default width of columns
•height is the height of the jqGrid
•width is the width of the jqGrid
Once you have the plugin_wiki installed, you can easily use the jqGrid
in your other views too. Example usage (displays yourtable filtered by
fk_id==47):
1{{=plugin_wiki.widget('jqgrid','yourtable','fk_id',47,'70,150',
2'Id,Comments',None,'id,notes',80,300,200)}}
latex
1latex(expression)
Uses Google charting API to embed LaTeX
pie_chart

components and plugins 507
1pie_chart(data='1,2,3',names='a,b,c',width=300,height=150,align='center')
Embed a pie chart
•data is a list of comma separated values
•names is a list of comma separated labels (one for data item)
•width is the width of the image
•height is the height of the image
•align determines the alignment of the image
bar_chart
1bar_chart(data='1,2,3',names='a,b,c',width=300,height=150,align='center')
Uses Google charting API to embed a bar chart
•data is a list of comma separated values
•names is a list of comma separated labels (one for data item)
•width is the width of the image
•height is the height of the image
•align determines the alignment of the image
slideshow
1slideshow(table, field='image', transition='fade', width=200, height=200)
Embeds a slideshow. It gets the images from a table.
•table is the table name
•field is the upload field in the table that contains images
•transition determines the type of transition, e.g. fade, etc.
•width is the width of the image
•height is the height of the image
youtube
1youtube(code, width=400, height=250)

508 web2py full-stack web framework,4th edition
Embeds a YouTube video (by code)
•code is the code of the video
•width is the width of the image
•height is the height of the image
vimeo
1vimeo(code, width=400, height=250)
Embeds a Vimeo video (by code)
•code is the code of the video
•width is the width of the image
•height is the height of the image
mediaplayer
1mediaplayer(src, width=400, height=250)
Embeds a media file (such as Flash video or an mp3file)
•src is the src of the video
•width is the width of the image
•height is the height of the image
comments
1comments(table='None', record_id=None)
Embeds comments in the page
Comments can be linked to a table and/or a record
•table is the table name
•record_id is the id of the record
tags
1tags(table='None', record_id=None)
Embeds tags in the page tags can be linked to a table and/or a record

components and plugins 509
•table is the table name
•record_id is the id of the record
tag_cloud
1tag_cloud()
Embeds a tag cloud
map
1map(key='....', table='auth_user', width=400, height=200)
Embeds a Google map.
It gets points on the map from a table
•key is the google map api key (default works for 127.0.0.1)
•table is the table name
•width is the map width
•height is the map height
The table must have columns: latitude,longitude and map_popup. When
clicking on a dot, the map_popup message will appear.
iframe
1iframe(src, width=400, height=300)
Embeds a page in an <iframe></iframe>
load_url
1load_url(src)
Loads the content of the url using the LOAD function
load_action
1load_action(action, controller='', ajax=True)
Loads the content of URL(request.application, controller, action) using the
LOAD function

510 web2py full-stack web framework,4th edition
12.3.6Extending widgets
Widgets to plugin_wiki can be added by creating a new model file called
"models/plugin_wiki_"name where name is arbitrary and the file contains
something like:
1class PluginWikiWidgets(PluginWikiWidgets):
2@staticmethod
3def my_new_widget(arg1, arg2='value', arg3='value'):
4"""
5document the widget
6"""
7return "body of the widget"
The first line states that you are extending the list of widgets. Inside the
class, you can define as many functions as needed. Each static function is a
new widget, except for functions that start with underscores. The function
can take an arbitrary number of arguments which may or not have default
values. The docstring of the function must document the function using the
markmin syntax itself.
When widgets are embedded into plugin_wiki pages, arguments will be
passed to the widget as strings. This means the widget function must be
able to accept strings for every argument and eventually convert them into
the required representation. You can decide what the string representation
must be - just make sure this is documented in the docstring.
The widget can return a string of web2py helpers. In this latter case they will
be serialized using .xml().
Notice how the new widget can access any variable declared in the global
namespace.
As an example, we are going to create a new widget that display the
"contact/ask" form created at the beginning of this chapter. This can be done
by creating a file "models/plugin_wiki_contact" that contains:
1class PluginWikiWidgets(PluginWikiWidgets):
2@staticmethod
3def ask(email_label='Your email', question_label='question'):
4"""
5This plugin will display a contact us form that allows
6the visitor to ask a question.

components and plugins 511
7The question will be emailed to you and the widget will
8disappear from the page.
9The arguments are
10
11 - email_label: the label of the visitor email field
12 - question_label: the label of the question field
13
14 """
15 form=SQLFORM.factory(
16 Field('your_email', requires=IS_EMAIL(), label=email_label),
17 Field('question', requires=IS_NOT_EMPTY()), label=question_label)
18 if form.process().accepted:
19 if mail.send(to='admin@example.com',
20 subject='from %s' % form.vars.your_email,
21 message = form.vars.question):
22 command="jQuery('#%s').hide()" % div_id
23 response.flash = 'Thank you'
24 response.js = "jQuery('#%s').hide()" %request.cid
25 else:
26 form.errors.your_email="Unable to send the email"
27 return form.xml()
plugin_wiki widgets are not rendered by a view unless the
response.render(...) function is called explicitly by the widget.
13
Deployment recipes
There are multiple ways to deploy web2py in a production environment. The
details depend on the configuration and the services provided by the host.
In this chapter we consider the following issues:
• Production deployment (Apache, Lighttpd, Cherokee)
• Security
• Scalability
• Deployment on the Google App Engine platform(GAE [13] )
web2py comes with an SSL [21] enabled web server, the Rocket
wsgiserver [22]. While this is a fast web server, it has limited configuration
capabilities. For this reason it is best to deploy web2py behind Apache [82],
Lighttpd [89] or Cherokee [90]. These are free and open-source web servers
that are customizable and have been proven to be reliable in high traffic
production environments. They can be configured to serve static files directly,
deal with HTTPS, and pass control to web2py for dynamic content.
Until a few years ago, the standard interface for communication between
web servers and web applications was the Common Gateway Interface
(CGI) [81]. The main problem with CGI is that it creates a new process
for each HTTP request. If the web application is written in an interpreted
language, each HTTP request served by the CGI scripts starts a new instance
514 web2py full-stack web framework,4th edition
of the interpreter. This is slow, and it should be avoided in a production
environment. Moreover, CGI can only handle simple responses. It cannot
handle, for example, file streaming. web2py provides a file cgihandler.py to
interface to CGI.
One solution to this problem is to use the mod_python module for Apache.
We discuss it here because its use is still very common, though the
mod_python project has officially been abandoned by the Apache Software
Foundation. mod_python starts one instance of the Python interpreter when
Apache starts, and serves each HTTP request in its own thread without
having to restart Python each time. This is a better solution than CGI,
but it is not an optimal solution, since mod_python uses its own interface
for communication between the web server and the web application. In
mod_python, all hosted applications run under the same user-id/group-id,
which presents security issues. web2py provides a file modpythonhandler.py to
interface to mod_python.
In the last few years, the Python community has come together behind a
new standard interface for communication between web servers and web
applications written in Python. It is called Web Server Gateway Interface
(WSGI) [17,18]. web2py was built on WSGI, and it provides handlers for
using other interfaces when WSGI is not available.
Apache supports WSGI via the module mod_wsgi [88] developed by Graham
Dumpleton. web2py provides a file wsgihandler.py to interface to WSGI.
Some web hosting services do not support mod_wsgi. In this case, we must
use Apache as a proxy and forward all incoming requests to the web2py
built-in web server (running for example on localhost:8000).
In both cases, with mod_wsgi and/or mod_proxy, Apache can be configured
to serve static files and deal with SSL encryption directly, taking the burden
off web2py.
The Lighttpd web server does not currently support the WSGI interface, but it
does support the FastCGI [91] interface, which is an improvement over CGI.
FastCGI’s main aim is to reduce the overhead associated with interfacing
the web server and CGI programs, allowing a server to handle more HTTP
deployment recipes 515
requests at once.
According to the Lighttpd web site, "Lighttpd powers several popular Web
2.0sites such as YouTube and Wikipedia. Its high speed IO-infrastructure
allows them to scale several times better with the same hardware than
with alternative web-servers". Lighttpd with FastCGI is, in fact, faster than
Apache with mod_wsgi. web2py provides a file fcgihandler.py to interface to
FastCGI. web2py also includes a gaehandler.py to interface with the Google
App Engine (GAE). On GAE, web applications run "in the cloud". This means
that the framework completely abstracts any hardware details. The web
application is automatically replicated as many times as necessary to serve
all concurrent requests. Replication in this case means more than multiple
threads on a single server; it also means multiple processes on different
servers. GAE achieves this level of scalability by blocking write access to
the file system, and all persistent information must be stored in the Google
BigTable datastore or in memcache.
On non-GAE platforms, scalability is an issue that needs to be addressed, and
it may require some tweaks in the web2py applications. The most common
way to achieve scalability is by using multiple web servers behind a load-
balancer (a simple round robin, or something more sophisticated, receiving
heartbeat feedback from the servers).
Even if there are multiple web servers, there must be one, and only one,
database server. By default, web2py uses the file system for storing sessions,
error tickets, uploaded files, and the cache. This means that in the default
configuration, the corresponding folders have to be shared folders:

516 web2py full-stack web framework,4th edition
In the rest of the chapter, we consider various recipes that may provide an
improvement over this naive approach, including:
• Store sessions in the database, in cache or do not store sessions at all.
• Store tickets on local filesystems and move them into the database in
batches.
• Use memcache instead of cache.ram and cache.disk.
• Store uploaded files in the database instead of the shared filesystem.
While we recommend following the first three recipes, the fourth recipe
may provide an advantage mainly in the case of small files, but may be
counterproductive for large files.
13.0.7anyserver.py
tornado:inxx twisted:inxx wsgiref
Web2py comes with a file called anyserver.py that implements WSGI
interfaces to the following popular servers: bjoern, cgi, cherrypy, diesel,
eventlet, fapws, flup, gevent, gnuicorn, mongrel2, paste, rocket, tornado,
twisted, wsgiref
You can use any of these servers, for example Tornado, simply by doing:
deployment recipes 517
1python anyserver.py -s tornado -i 127.0.0.1 -p 8000 -l -P
(-l for logging and -P for profiler. For information on all the command line
options use "-h":
1python anyserver.py -h
13.1Linux and Unix
13.1.1One step production deployment
Here are some steps to install apache+python+mod_wsgi+web2py+postgresql
from scratch.
On Ubuntu:
1wget http://web2py.googlecode.com/hg/scripts/setup-web2py-ubuntu.sh
2chmod +x setup-web2py-ubuntu.sh
3sudo ./setup-web2py-ubuntu.sh
On Fedora:
1wget http://web2py.googlecode.com/hg/scripts/setup-web2py-fedora.sh
2chmod +x setup-web2py-fedora.sh
3sudo ./setup-web2py-fedora.sh
Both of these scripts should run out of the box, but every Linux installation is
a bit different, so make sure you check the source code of these scripts before
you run them. In the case of Ubuntu, most of what they do is explained
below. They do not implement the scalability optimizations discussed below.
13.1.2Apache setup
In this section, we use Ubuntu 8.04 Server Edition as the reference platform.
The configuration commands are very similar on other Debian-based Linux
distribution, but they may differ for Fedora-based systems (which uses yum
instead of apt-get).

518 web2py full-stack web framework,4th edition
First, make sure all the necessary Python and Apache packages are installed
by typing the following shell commands:
1sudo apt-get update
2sudo apt-get -y upgrade
3sudo apt-get -y install openssh-server
4sudo apt-get -y install python
5sudo apt-get -y install python-dev
6sudo apt-get -y install apache2
7sudo apt-get -y install libapache2-mod-wsgi
8sudo apt-get -y install libapache2-mod-proxy-html
Then, enable the SSL module, the proxy module, and the WSGI module in
Apache:
1sudo ln -s /etc/apache2/mods-available/proxy_http.load \
2/etc/apache2/mods-enabled/proxy_http.load
3sudo a2enmod ssl
4sudo a2enmod proxy
5sudo a2enmod proxy_http
6sudo a2enmod wsgi
Create the SSL folder, and put the SSL certificates inside it:
1sudo mkdir /etc/apache2/ssl
You should obtain your SSL certificates from a trusted Certificate Authority
such as verisign.com, but, for testing purposes, you can generate your own
self-signed certificates following the instructions in ref. [87]
Then restart the web server:
1sudo /etc/init.d/apache2 restart
The Apache configuration file is:
1/etc/apache2/sites-available/default
The Apache logs are in:
1/var/log/apache2/
13.1.3mod_wsgi
Download and unzip web2py source on the machine where you installed the
web server above.

deployment recipes 519
Install web2py under /users/www-data/, for example, and give ownership to
user www-data and group www-data. These steps can be performed with
the following shell commands:
1cd /users/www-data/
2sudo wget http://web2py.com/examples/static/web2py_src.zip
3sudo unzip web2py_src.zip
4sudo chown -R www-data:www-data /user/www-data/web2py
To set up web2py with mod_wsgi, create a new Apache configuration file:
1/etc/apache2/sites-available/web2py
and include the following code:
1<VirtualHost *:80>
2ServerName web2py.example.com
3WSGIDaemonProcess web2py user=www-data group=www-data \
4display-name=%{GROUP}
5WSGIProcessGroup web2py
6WSGIScriptAlias / /users/www-data/web2py/wsgihandler.py
7
8<Directory /users/www-data/web2py>
9AllowOverride None
10 Order Allow,Deny
11 Deny from all
12 <Files wsgihandler.py>
13 Allow from all
14 </Files>
15 </Directory>
16
17 AliasMatch ^/([^/]+)/static/(.*) \
18 /users/www-data/web2py/applications/$1/static/$2
19 <Directory /users/www-data/web2py/applications/*/static/>
20 Order Allow,Deny
21 Allow from all
22 </Directory>
23
24 <Location /admin>
25 Deny from all
26 </Location>
27
28 <LocationMatch ^/([^/]+)/appadmin>
29 Deny from all
30 </LocationMatch>
31
32 CustomLog /private/var/log/apache2/access.log common
33 ErrorLog /private/var/log/apache2/error.log
34 </VirtualHost>

520 web2py full-stack web framework,4th edition
When you restart Apache, it should pass all the requests to web2py without
going through the Rocket wsgiserver.
Here are some explanations:
1WSGIDaemonProcess web2py user=www-data group=www-data
2display-name=%{GROUP}
defines a daemon process group in context of "web2py.example.com". By
defining this inside of the virtual host, only this virtual host can access this
using WSGIProcessGroup, including any virtual host with the same server
name but on a different port. The "user" and "group" options should be
set to the user who has write access to the directory where web2py was
setup. You do not need to set "user" and "group" if you made the web2py
installation directory writable by the default user that Apache runs as. The
"display-name" option makes the process name appears in ps output as
"(wsgi:web2py)" instead of as name of Apache web server executable. As
no "processes" or "threads" options are specified, the daemon process group
will have a single process with 15 threads running within that process. This
is usually more than adequate for most sites and should be left as is. If
overriding it, do not use "processes=1" as doing so will disable any in-
browser WSGI debugging tools that check the "wsgi.multiprocess" flag. This
is because any use of the "processes" option will cause that flag to be set to
true, even a single process, and such tools expect that it be set to false. Note:
if your application code or third party extension module is not thread safe,
use options "processes=5threads=1" instead. This will create five processes in
the daemon process group where each process is single threaded. You might
consider using "maximum-requests=1000" if your application leaks Python
objects because it is unable to garbage collect properly.
1WSGIProcessGroup web2py
delegates running of all WSGI applications to the daemon process group that
was configured using the WSGIDaemonProcess directive.
1WSGIScriptAlias / /users/www-data/web2py/wsgihandler.py
mounts the web2py application. In this case it is mounted at the root of the
web site.

deployment recipes 521
1<Directory /users/www-data/web2py>
2...
3</Directory>
gives Apache permission to access the WSGI script file.
1<Directory /users/www-data/web2py/applications/*/static/>
2Order Allow,Deny
3Allow from all
4</Directory>
Instructs Apache to bypass web2py when searching static files.
1<Location /admin>
2Deny from all
3</Location>
and
1<LocationMatch ^/([^/]+)/appadmin>
2Deny from all
3</LocationMatch>
blocks public access to admin and appadmin
Normally we would just allow permission to the whole directory where
the WSGI script file is located, but web2py places the WSGI script file in
a directory which contains other source code, including the admin interface
password. Opening up the whole directory would cause security issues,
because technically Apache would be given permission to serve all the files
up to any user who traversed to that directory via a mapped URL. To avoid
security problems, explicitly deny access to the contents of the directory,
except for the WSGI script file, and prohibit a user from doing any overrides
from a.htaccess file to be extra safe.
You can find a completed, commented, Apache wsgi configuration file in:
1scripts/web2py-wsgi.conf
This section was created with help from Graham Dumpleton, developer of
mod_wsgi.

522 web2py full-stack web framework,4th edition
13.1.4mod_wsgi and SSL
To force some applications (for example admin and appadmin) to go over
HTTPS, store the SSL certificate and key files:
1/etc/apache2/ssl/server.crt
2/etc/apache2/ssl/server.key
and edit the Apache configuration file web2py.conf and append:
1<VirtualHost *:443>
2ServerName web2py.example.com
3SSLEngine on
4SSLCertificateFile /etc/apache2/ssl/server.crt
5SSLCertificateKeyFile /etc/apache2/ssl/server.key
6
7WSGIProcessGroup web2py
8
9WSGIScriptAlias / /users/www-data/web2py/wsgihandler.py
10
11 <Directory /users/www-data/web2py>
12 AllowOverride None
13 Order Allow,Deny
14 Deny from all
15 <Files wsgihandler.py>
16 Allow from all
17 </Files>
18 </Directory>
19
20 AliasMatch ^/([^/]+)/static/(.*) \
21 /users/www-data/web2py/applications/$1/static/$2
22
23 <Directory /users/www-data/web2py/applications/*/static/>
24 Order Allow,Deny
25 Allow from all
26 </Directory>
27
28 CustomLog /private/var/log/apache2/access.log common
29 ErrorLog /private/var/log/apache2/error.log
30
31 </VirtualHost>
Restart Apache and you should be able to access:
1https://www.example.com/admin
2https://www.example.com/examples/appadmin
3http://www.example.com/examples

deployment recipes 523
but not:
1http://www.example.com/admin
2http://www.example.com/examples/appadmin
13.1.5mod_proxy
Some Unix/Linux distributions can run Apache, but do not support
mod_wsgi. In this case, the simplest solution is to run Apache as a proxy
and have Apache deal with static files only.
Here is a minimalist Apache configuration:
1NameVirtualHost *:80
2### deal with requests on port 80
3<VirtualHost *:80>
4Alias / /users/www-data/web2py/applications
5### serve static files directly
6<LocationMatch "^/welcome/static/.*">
7Order Allow, Deny
8Allow from all
9</LocationMatch>
10 ### proxy all the other requests
11 <Location "/welcome">
12 Order deny,allow
13 Allow from all
14 ProxyRequests off
15 ProxyPass http://localhost:8000/welcome
16 ProxyPassReverse http://localhost:8000/
17 ProxyHTMLURLMap http://127.0.0.1:8000/welcome/ /welcome
18 </Location>
19 LogFormat "%h %l %u %t "%r" %>s %b" common
20 CustomLog /var/log/apache2/access.log common
21 </VirtualHost>
The above script exposes only the "welcome" application. To expose other
applications, you need to add the corresponding <Location>...</Location>
with the same syntax as done for the "welcome" app.
The script assumes there is a web2py server running on port 8000. Before
restarting Apache, make sure this is the case:
1nohup python web2py.py -a '<recycle>' -i 127.0.0.1 -p 8000 &

524 web2py full-stack web framework,4th edition
You can specify a password with the -a option or use the "<recycle>"
parameter instead of a password. In the latter case, the previously stored
password is reused and the password is not stored in the shell history.
You can also use the parameter "<ask>", to be prompted for a password.
The nohup commands makes sure the server does not die when you close the
shell. nohup logs all output into nohup.out.
To force admin and appadmin over HTTPS use the following Apache
configuration file instead:
1NameVirtualHost *:80
2NameVirtualHost *:443
3### deal with requests on port 80
4<VirtualHost *:80>
5Alias / /usres/www-data/web2py/applications
6### admin requires SSL
7<LocationMatch "^/admin">
8SSLRequireSSL
9</LocationMatch>
10 ### appadmin requires SSL
11 <LocationMatch "^/welcome/appadmin/.*">
12 SSLRequireSSL
13 </LocationMatch>
14 ### serve static files directly
15 <LocationMatch "^/welcome/static/.*">
16 Order Allow,Deny
17 Allow from all
18 </LocationMatch>
19 ### proxy all the other requests
20 <Location "/welcome">
21 Order deny,allow
22 Allow from all
23 ProxyPass http://localhost:8000/welcome
24 ProxyPassReverse http://localhost:8000/
25 </Location>
26 LogFormat "%h %l %u %t "%r" %>s %b" common
27 CustomLog /var/log/apache2/access.log common
28 </VirtualHost>
29 <VirtualHost *:443>
30 SSLEngine On
31 SSLCertificateFile /etc/apache2/ssl/server.crt
32 SSLCertificateKeyFile /etc/apache2/ssl/server.key
33 <Location "/">
34 Order deny,allow
35 Allow from all
36 ProxyPass http://localhost:8000/

deployment recipes 525
37 ProxyPassReverse http://localhost:8000/
38 </Location>
39 LogFormat "%h %l %u %t "%r" %>s %b" common
40 CustomLog /var/log/apache2/access.log common
41 </VirtualHost>
The administrative interface must be disabled when web2py runs on a shared
host with mod_proxy, or it will be exposed to other users.
13.1.6Start as Linux daemon
Unless you are using mod_wsgi, you should setup the web2py server so that
it can be started/stopped/restarted as any other Linux daemon, and so it can
start automatically at the computer boot stage.
The process to set this up is specific to various Linux/Unix distributions.
In the web2py folder, there are two scripts which can be used for this
purpose:
1scripts/web2py.ubuntu.sh
2scripts/web2py.fedora.sh
On Ubuntu, or other Debian-based Linux distribution, edit
"web2py.ubuntu.sh" and replace the "/usr/lib/web2py" path with the
path of your web2py installation, then type the following shell commands to
move the file into the proper folder, register it as a startup service, and start
it:
1sudo cp scripts/web2py.ubuntu.sh /etc/init.d/web2py
2sudo update-rc.d web2py defaults
3sudo /etc/init.d/web2py start
On Fedora, or any other distributions based on Fedora, edit
"web2py.fedora.sh" and replace the "/usr/lib/web2py" path with the
path of your web2py installation, then type the following shell commands to
move the file into the proper folder, register it as a startup service and start
it:
1sudo cp scripts/web2py.fedora.sh /etc/rc.d/init.d/web2pyd
2sudo chkconfig --add web2pyd
3sudo service web2py start

526 web2py full-stack web framework,4th edition
13.1.7Lighttpd
You can install Lighttpd on a Ubuntu or other Debian-based Linux
distribution with the following shell command:
1apt-get -y install lighttpd
Once installed, edit /etc/rc.local and create a fcgi web2py background
process
1cd /var/www/web2py && sudo -u www-data nohup python fcgihandler.py &
Then, you need to edit the Lighttpd configuration file
1/etc/lighttpd/lighttpd.conf
so that it can find the socket created by the above process. In the config file,
write something like:
1server.modules = (
2"mod_access",
3"mod_alias",
4"mod_compress",
5"mod_rewrite",
6"mod_fastcgi",
7"mod_redirect",
8"mod_accesslog",
9"mod_status",
10 )
11
12 server.port = 80
13 server.bind = "0.0.0.0"
14 server.event-handler = "freebsd-kqueue"
15 server.error-handler-404 = "/test.fcgi"
16 server.document-root = "/users/www-data/web2py/"
17 server.errorlog = "/tmp/error.log"
18
19 fastcgi.server = (
20 "/handler_web2py.fcgi" => (
21 "handler_web2py" => ( #name for logs
22 "check-local" => "disable",
23 "socket" => "/tmp/fcgi.sock"
24 )
25 ),
26 )
27
28 $HTTP["host"] = "(^|\.)example\.com$" {

deployment recipes 527
29 server.document-root="/var/www/web2py"
30 url.rewrite-once = (
31 "^(/.+?/static/.+)$" => "/applications$1",
32 "(^|/.*)$" => "/handler_web2py.fcgi$1",
33 )
34 }
Now check for syntax errors:
1lighttpd -t -f /etc/lighttpd/lighttpd.conf
and (re)start the web server with:
1/etc/init.d/lighttpd restart
Notice that FastCGI binds the web2py server to a Unix socket, not to an IP
socket:
1/tmp/fcgi.sock
This is where Lighttpd forwards the HTTP requests to and receives responses
from. Unix sockets are lighter than Internet sockets, and this is one of the
reasons Lighttpd+FastCGI+web2py is fast. As in the case of Apache, it is
possible to setup Lighttpd to deal with static files directly, and to force some
applications over HTTPS. Refer to the Lighttpd documentation for details.
Examples in this section were taken from John Heenan’s post in web2pyslices.
The administrative interface must be disabled when web2py runs on a shared
host with FastCGI, or it will be exposed to the other users.
13.1.8Shared hosting with mod_python
There are times, specifically on shared hosts, when one does not have the
permission to configure the Apache config files directly. At the time of
writing most of these hosts still run mod_python even if it is not maintained
any more in favor of mod_wsgi.
You can still run web2py. Here we show an example of how to set it up.
Place contents of web2py into the "htdocs" folder.

528 web2py full-stack web framework,4th edition
In the web2py folder, create a file "web2py_modpython.py" file with the
following contents:
1from mod_python import apache
2import modpythonhandler
3
4def handler(req):
5req.subprocess_env['PATH_INFO'] = req.subprocess_env['SCRIPT_URL']
6return modpythonhandler.handler(req)
Create/update the file ".htaccess" with the following contents:
1SetHandler python-program
2PythonHandler web2py_modpython
3#PythonDebug On
This example was provided by Niktar.
13.1.9Cherokee with FastCGI
Cherokee is a very fast web server and, like web2py, it provides an AJAX-
enabled web-based interface for its configuration. Its web interface is written
in Python. In addition, there is no restart required for most of the changes.
Here are the steps required to setup web2py with Cherokee:
Download Cherokee [90]
Untar, build, and install:
1tar -xzf cherokee-0.9.4.tar.gz
2cd cherokee-0.9.4
3./configure --enable-fcgi && make
4make install
Start web2py normally at least once to make sure it creates the "applications"
folder.
Write a shell script named "startweb2py.sh" with the following code:
1#!/bin/bash
2cd /var/web2py
3python /var/web2py/fcgihandler.py &

deployment recipes 529
and give the script execute privileges and run it. This will start web2py under
FastCGI handler.
Start Cherokee and cherokee-admin:
1sudo nohup cherokee &
2sudo nohup cherokee-admin &
By default, cherokee-admin only listens at local interface on port 9090. This
is not a problem if you have full, physical access on that machine. If this is
not the case, you can force it to bind to an IP address and port by using the
following options:
1-b, --bind[=IP]
2-p, --port=NUM
or do an SSH port-forward (more secure, recommended):
1ssh -L 9090:localhost:9090 remotehost
Open "http://localhost:9090" in your browser. If everything is ok, you will
get cherokee-admin.
In cherokee-admin web interface, click "info sources". Choose "Local
Interpreter". Write in the following code, then click "Add New".
1Nick: web2py
2Connection: /tmp/fcgi.sock
3Interpreter: /var/web2py/startweb2py.sh
Finally, perform the following remaining steps:
• Click "Virtual Servers", then click "Default".
• Click "Behavior", then, under that, click "default".
• Choose "FastCGI" instead of "List and Send" from the list box.
• At the bottom, select "web2py" as "Application Server"
• Put a check in all the checkboxes (you can leave Allow-x-sendfile). If there
is a warning displayed, disable and enable one of the checkboxes. (It will
automatically re-submit the application server parameter. Sometimes it
doesn’t, which is a bug).

530 web2py full-stack web framework,4th edition
• Point your browser to "http://yoursite", and "Welcome to web2py" will
appear.
13.1.10 Postgresql
PostgreSQL is a free and open source database which is used in demanding
production environments, for example, to store the.org domain name
database, and has been proven to scale well into hundreds of terabytes of
data. It has very fast and solid transaction support, and provides an auto-
vacuum feature that frees the administrator from most database maintenance
tasks.
On an Ubuntu or other Debian-based Linux distribution, it is easy to install
PostgreSQL and its Python API with:
1sudo apt-get -y install postgresql
2sudo apt-get -y install python-psycopg2
It is wise to run the web server(s) and the database server on different
machines. In this case, the machines running the web servers should be
connected with a secure internal (physical) network, or should establish SSL
tunnels to securely connect with the database server.
Edit the PostgreSQL configuration file
1sudo nano /etc/postgresql/8.4/main/postgresql.conf
and make sure it contains these two lines
1...
2track_counts = on
3...
4autovacuum = on # Enable autovacuum subprocess? 'on'
5...
Start the database server with:
1sudo /etc/init.d/postgresql restart
When restarting the PostgreSQL server, it should notify which port it is
running on. Unless you have multiple database servers, it should be 5432.
The PostgreSQL logs are in:

deployment recipes 531
1/var/log/postgresql/
Once the database server is up and running, create a user and a database so
that web2py applications can use it:
1sudo -u postgres createuser -PE -s myuser
2postgresql> createdb -O myself -E UTF8 mydb
3postgresql> echo 'The following databases have been created:'
4postgresql> psql -l
5postgresql> psql mydb
The first of the commands will grant superuser-access to the new user, called
myuser. It will prompt you for a password.
Any web2py application can connect to this database with the command:
1db = DAL("postgres://myuser:mypassword@localhost:5432/mydb")
where mypassword is the password you entered when prompted, and 5432 is
the port where the database server is running.
Normally you use one database for each application, and multiple instances
of the same application connect to the same database. It is also possible for
different applications to share the same database.
For database backup details, read the PostgreSQL documentation;
specifically the commands pg_dump and pg_restore.
13.2Windows
13.2.1Apache and mod_wsgi
Installing Apache, and mod_wsgi under Windows requires a different
procedure. Here are assuming Python 2.5is installed, you are running from
source and web2py is located at c:/web2py.
First download the requires packages:
• Apache apache_2.2.11-win32-x86-openssl-0.9.8i.msi from [83]
• mod_wsgi from [84]
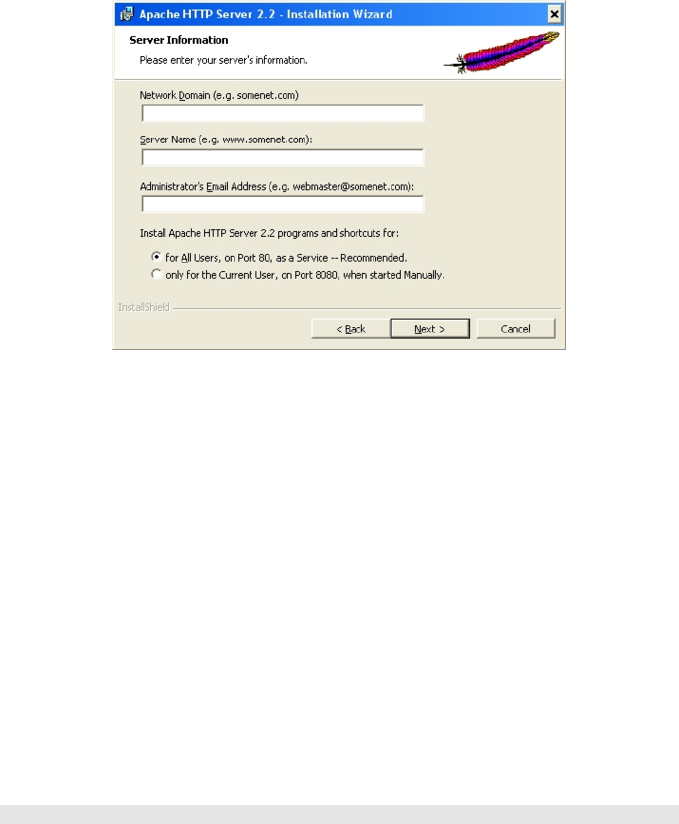
532 web2py full-stack web framework,4th edition
Second, run apache...msi and follow the wizard screens. On the server
information screen
enter all requested values:
•Network Domain: enter the DNS domain in which your server is or
will be registered in. For example, if your server’s full DNS name is
server.mydomain.net, you would type mydomain.net here
•ServerName: Your server’s full DNS name. From the example above,
you would type server.mydomain.net here. Enter a fully qualified domain
name or IP address from the web2py install, not a shortcut, for more
information see [86].
•Administrator’s Email Address. Enter the server administrator’s or
webmaster’s email address here. This address will be displayed along
with error messages to the client by default.
Continue with a typical install to the end unless otherwise required
The wizard, by default, installed Apache in the folder:
1C:/Program Files/Apache Software Foundation/Apache2.2/
From now on we refer to this folder simply as Apache2.2.
Third, copy the downloaded mod_wsgi.so to Apache2.2/modules written by
deployment recipes 533
Chris Travers, published by the Open Source Software Lab at Microsoft,
December 2007.
Fourth, create server.crt and server.key certificates (as discussed in the
previous section) and place them in the folder Apache2.2/conf. Notice the
cnf file is in Apache2.2/conf/openssl.cnf.
Fifth, edit Apache2.2/conf/httpd.conf, remove the comment mark (the #
character) from the line
1LoadModule ssl_module modules/mod_ssl.so
add the following line after all the other LoadModule lines
1LoadModule wsgi_module modules/mod_wsgi.so
look for "Listen 80" and add this line after it
1Listen 443
append the following lines at the end changing drive letter, port number,
ServerName according to your values
1NameVirtualHost *:443
2<VirtualHost *:443>
3DocumentRoot "C:/web2py/applications"
4ServerName server1
5
6<Directory "C:/web2py">
7Order allow,deny
8Deny from all
9</Directory>
10
11 <Location "/">
12 Order deny,allow
13 Allow from all
14 </Location>
15
16 <LocationMatch "^(/[\w_]*/static/.*)">
17 Order Allow,Deny
18 Allow from all
19 </LocationMatch>
20
21 WSGIScriptAlias / "C:/web2py/wsgihandler.py"
22
23 SSLEngine On
24 SSLCertificateFile conf/server.crt

534 web2py full-stack web framework,4th edition
25 SSLCertificateKeyFile conf/server.key
26
27 LogFormat "%h %l %u %t "%r" %>s %b" common
28 CustomLog logs/access.log common
29 </VirtualHost>
Save and check the config using: [Start > Program > Apache HTTP Server 2.2
> Configure Apache Server > Test Configuration]
If there are no problems you will see a command screen open and close. Now
you can start Apache:
[Start > Program > Apache HTTP Server 2.2> Control Apache Server > Start]
or better yet start the taskbar monitor
[Start > Program > Apache HTTP Server 2.2 > Control Apache Server]
Now you can right-click on the red feather-like taskbar icon to "Open Apache
Monitor" and then start, stop and restart Apache as required.
This section was created by Jonathan Lundell.
13.2.2Start as Windows service
What Linux calls a daemon, Windows calls a service. The web2py server can
easily be installed/started/stopped as a Windows service.
In order to use web2py as a Windows service, you must create a file
"options.py" with startup parameters:
1import socket, os
2ip = socket.gethostname()
3port = 80
4password = '<recycle>'
5pid_filename = 'httpserver.pid'
6log_filename = 'httpserver.log'
7ssl_certificate = "
8ssl_private_key = "
9numthreads = 10
10 server_name = socket.gethostname()
11 request_queue_size = 5
12 timeout = 10
13 shutdown_timeout = 5
14 folder = os.getcwd()

deployment recipes 535
You don’t need to create "options.py" from scratch since there is already an
"options_std.py" in the web2py folder that you can use as a model.
After creating "options.py" in the web2py installation folder, you can install
web2py as a service with:
1python web2py.py -W install
and start/stop the service with:
1python web2py.py -W start
2python web2py.py -W stop
13.3Securing sessions and admin
It is very dangerous to publicly expose the admin application and the
appadmin controllers unless they run over HTTPS. Moreover, your password
and credentials should never be transmitted unencrypted. This is true for
web2py and any other web application.
In your applications, if they require authentication, you should make the
session cookies secure with:
1session.secure()
An easy way to setup a secure production environment on a server is to
first stop web2py and then remove all the parameters_*.py files from the
web2py installation folder. Then start web2py without a password. This
will completely disable admin and appadmin.
1nohup python web2py --nogui -p 8001 -i 127.0.0.1 -a '' &
Next, start a second web2py instance accessible only from localhost:
1nohup python web2py --nogui -p 8002 -i 127.0.0.1 -a '<ask>' &
and create an SSH tunnel from the local machine (the one from which you
wish to access the administrative interface) to the server (the one where
web2py is running, example.com), using:
1ssh -L 8002:127.0.0.1:8002 username@example.com

536 web2py full-stack web framework,4th edition
Now you can access the administrative interface locally via the web browser
at localhost:8002.
This configuration is secure because admin is not reachable when the tunnel
is closed (the user is logged out).
This solution is secure on shared hosts if and only if other users do not have
read access to the folder that contains web2py; otherwise users may be able to
steal session cookies directly from the server.
13.4Efficiency and scalability
web2py is designed to be easy to deploy and to setup. This does not mean
that it compromises on efficiency or scalability, but it means you may need
to tweak it to make it scalable.
In this section we assume multiple web2py installations behind a NAT server
that provides local load-balancing.
In this case, web2py works out-of-the-box if some conditions are met. In
particular, all instances of each web2py application must access the same
database servers and must see the same files. This latter condition can be
implemented by making the following folders shared:
1applications/myapp/sessions
2applications/myapp/errors
3applications/myapp/uploads
4applications/myapp/cache
The shared folders must support file locking. Possible solutions are ZFS
(ZFS was developed by Sun Microsystems and is the preferred choice.), NFS
(With NFS you may need to run thenlockmgr daemon to allow file locking.),
or Samba (SMB).
It is possible to share the entire web2py folder or the entire applications
folder, but this is not a good idea because this would cause a needless
increase of network bandwidth usage.
We believe the configuration discussed above to be very scalable because
it reduces the database load by moving to the shared filesystems those
deployment recipes 537
resources that need to be shared but do not need transactional safety (only
one client at a time is supposed to access a session file, cache always needs a
global lock, uploads and errors are write once/read many files).
Ideally, both the database and the shared storage should have RAID
capability. Do not make the mistake of storing the database on the same
storage as the shared folders, or you will create a new bottleneck there.
On a case-by-case basis, you may need to perform additional optimizations
and we will discuss them below. In particular, we will discuss how to get
rid of these shared folders one-by-one, and how to store the associated data
in the database instead. While this is possible, it is not necessarily a good
solution. Nevertheless, there may be reasons to do so. One such reason is
that sometimes we do not have the freedom to set up shared folders.
13.4.1Efficiency tricks
web2py application code is executed on every request, so you want to
minimize this amount of code. Here is what you can do:
• Run once with migrate=True then set all your tables to migrate=False.
• Bytecode compile your app using admin.
• Use cache.ram as much as you can but make sure to use a finite set of keys,
or else the amount of cache used will grow arbitrarily.
• Minimize the code in models: do not define functions there, define
functions in the controllers that need them or - even better - define
functions in modules, import them and use those functions as needed.
• Do not put many functions in the same controller but use many controllers
with few functions.
• Call session.forget(response) in all controllers and/or functions that do
not change the session.
• Try to avoid web2py cron, and use a background process instead. web2py
cron can start too many Python instances and cause excessive memory
usage.

538 web2py full-stack web framework,4th edition
13.4.2Sessions in database
It is possible to instruct web2py to store sessions in a database instead of
in the sessions folder. This has to be done for each individual web2py
application, although they may all use the same database to store sessions.
Given a database connection
1db = DAL(...)
you can store the sessions in this database (db) by simply stating the
following, in the same model file that establishes the connection:
1session.connect(request,response, db)
If it does not exist already, web2py creates, under the hood, a table in the
database called web2py_session_appname containing the following fields:
1Field('locked','boolean', default=False),
2Field('client_ip'),
3Field('created_datetime','datetime', default=now),
4Field('modified_datetime','datetime'),
5Field('unique_key'),
6Field('session_data','text')
"unique_key" is a uuid key used to identify the session in the cookie.
"session_data" is the cPickled session data.
To minimize database access, you should avoid storing sessions when they
are not needed with:
1session.forget()
With this tweak the "sessions" folder does not need to be a shared folder
because it will no longer be accessed.
Notice that, if sessions are disabled, you must not pass the session to
form.accepts and you cannot use session.flash nor CRUD.
13.4.3HAProxy a high availability load balancer
If you need multiple web2py processes running on multiple machines,
instead of storing sessions in the database or in cache, you have the option to
deployment recipes 539
use a load balancer with sticky sessions.
Pound [92] and HAProxy [93] are two HTTP load balancers and Reverse
proxies that provides sticky sessions. Here we discuss the latter because it
seems to be more common on commercial VPS hosting.
By sticky sessions, we mean that once a session cookie has been issued, the
load balancer will always route requests from the client associated to the
session, to the same server. This allows you to store the session in the local
filesystem without need for a shared filesystem.
To use HAProxy:
First, install it, on out Ubuntu test machine:
1sudo apt-get -y install haproxy
Second edit the configuration file "/etc/haproxy.cfg" to something like this:
1# this config needs haproxy-1.1.28 or haproxy-1.2.1
2
3global
4log 127.0.0.1 local0
5maxconn 1024
6daemon
7
8defaults
9log global
10 mode http
11 option httplog
12 option httpchk
13 option httpclose
14 retries 3
15 option redispatch
16 contimeout 5000
17 clitimeout 50000
18 srvtimeout 50000
19
20 listen 0.0.0.0:80
21 balance url_param WEB2PYSTICKY
22 balance roundrobin
23 server L1_1 10.211.55.1:7003 check
24 server L1_2 10.211.55.2:7004 check
25 server L1_3 10.211.55.3:7004 check
26 appsession WEB2PYSTICKY len 52 timeout 1h
The listen directive tells HAProxy, which port to wait for connection from.

540 web2py full-stack web framework,4th edition
The server directive tells HAProxy where to find the proxyed servers. The
appsession directory makes a sticky session and uses the a cookie called
WEB2PYSTICKY for this purpose.
Third, enable this config file and start HAProxy:
1/etc/init.d/haproxy restart
You can find similar instructions to setup Pound at the URL
1http://web2pyslices.com/main/slices/take_slice/33
13.4.4Cleaning up sessions
You should be aware that on a production environment, sessions pile up fast.
web2py provides a script called:
1scripts/sessions2trash.py
that when run in the background, periodically deletes all sessions that have
not been accessed for a certain amount of time. Web2py provides a script
to cleanup these sessions (it works for both file-based sessions and database
sessions).
Here are some typical use cases:
• Delete expired sessions every 5minutes:
1nohup python web2py.py -S app -M -R scripts/sessions2trash.py &
• Delete sessions older than 60 minutes regardless of expiration, with
verbose output, then exit:
1python web2py.py -S app -M -R scripts/sessions2trash.py -A-o -x 3600 -f -v
• Delete all sessions regardless of expiry and exit:
1python web2py.py -S app -M -R scripts/sessions2trash.py -A-o -x 0
Here app is the name of your application.

deployment recipes 541
13.4.5Uploading files in database
By default, all uploaded files handled by SQLFORMs are safely renamed and
stored in the filesystem under the "uploads" folder. It is possible to instruct
web2py to store uploaded files in the database instead.
Now, consider the following table:
1db.define_table('dog',
2Field('name')
3Field('image','upload'))
where dog.image is of type upload. To make the uploaded image go in the
same record as the name of the dog, you must modify the table definition by
adding a blob field and link it to the upload field:
1db.define_table('dog',
2Field('name')
3Field('image','upload', uploadfield='image_data'),
4Field('image_data','blob'))
Here "image_data" is just an arbitrary name for the new blob field.
Line 3instructs web2py to safely rename uploaded images as usual, store
the new name in the image field, and store the data in the uploadfield called
"image_data" instead of storing the data on the filesystem. All of this is be
done automatically by SQLFORMs and no other code needs to be changed.
With this tweak, the "uploads" folder is no longer needed.
On Google App Engine, files are stored by default in the database without
the need to define an uploadfield, since one is created by default.
13.4.6Collecting tickets
By default, web2py stores tickets (errors) on the local file system. It would
not make sense to store tickets directly in the database, because the most
common origin of error in a production environment is database failure.
Storing tickets is never a bottleneck, because this is ordinarily a rare event.
Hence, in a production environment with multiple concurrent servers, it is

542 web2py full-stack web framework,4th edition
more than adequate to store them in a shared folder. Nevertheless, since only
the administrator needs to retrieve tickets, it is also OK to store tickets in a
non-shared local "errors" folder and periodically collect them and/or clear
them.
One possibility is to periodically move all local tickets to the database.
For this purpose, web2py provides the following script:
1scripts/tickets2db.py
By default the script gets the db uri from a file saved into the private folder,
ticket_storage.txt. This file should contain a string that is passed directly to
aDAL instance, like:
1mysql://username:password@localhost/test
2postgres://username:password@localhost/test
3...
This allows to leave the script as it is: if you have multiple applications, it
will dynamically choose the right connection for every application. If you
want to hardcode the uri in it, edit the second reference to db_string, right
after the except line. You can run the script with the command:
1nohup python web2py.py -S myapp -M -R scripts/tickets2db.py &
where myapp is the name of your application.
This script runs in the background and moves all tickets every 5minutes to
a table and removes the local tickets. You can later view the errors using the
admin app, clicking on the "switch to: db" button at the top, with the same
exact functionality as if they were stored on the file system.
With this tweak, the "errors" folder does not need to be a shared folder any
more, since errors will be stored into the database.
13.4.7Memcache
We have shown that web2py provides two types of cache: cache.ram and
cache.disk. They both work on a distributed environment with multiple
concurrent servers, but they do not work as expected. In particular, cache.ram

deployment recipes 543
will only cache at the server level; thus it becomes useless. cache.disk will
also cache at the server level unless the "cache" folder is a shared folder that
supports locking; thus, instead of speeding things up, it becomes a major
bottleneck.
The solution is not to use them, but to use memcache instead. web2py comes
with a memcache API.
To use memcache, create a new model file, for example 0_memcache.py, and in
this file write (or append) the following code:
1from gluon.contrib.memcache import MemcacheClient
2memcache_servers = ['127.0.0.1:11211']
3cache.memcache = MemcacheClient(request, memcache_servers)
4cache.ram = cache.disk = cache.memcache
The first line imports memcache. The second line has to be a list of memcache
sockets (server:port). The third line defines cache.memcache. The fourth line
redefines cache.ram and cache.disk in terms of memcache.
You could choose to redefine only one of them to define a totally new cache
object pointing to the Memcache object.
With this tweak the "cache" folder does not need to be a shared folder any
more, since it will no longer be accessed.
This code requires having memcache servers running on the local network.
You should consult the memcache documentation for information on how to
setup those servers.
13.4.8Sessions in memcache
If you do need sessions and you do not want to use a load balancer with
sticky sessions, you have the option to store sessions in memcache:
1from gluon.contrib.memdb import MEMDB
2session.connect(request,response,db=MEMDB(cache.memcache))

544 web2py full-stack web framework,4th edition
13.4.9Caching with Redis
[103] An alternative to Memcache is use Redis.
Assuming we have Redis installed and running on localhost at port 6379, we
can connect to it using the following code (in a model):
1from gluon.contrib.redis import RedisCache
2cache.redis = RedisCache('localhost:6379',db=None, debug=True)
where ’localhost:6379’ is the connection string and db is not a DAL object but
a Redis database name.
We can now use cache.redis in place of (or along with) cache.ram and
cache.disk.
We can also obtain Redis statistcs by calling:
1cache.redis.stats()
13.4.10 Removing applications
In a production setting, it may be better not to install the default applications:
admin,examples and welcome. Although these applications are quite small,
they are not necessary.
Removing these applications is as easy as deleting the corresponding folders
under the applications folder.
13.4.11 Using replicated databases
In a high performance environment you may have a master-slave database
architecture with many replicated slaves and perhaps a couple of replicated
servers. The DAL can handle this situation and conditionally connect to
different servers depending on the request parameters. The API to do this
was described in Chapter 6. Here is an example:
1from random import sample
2db = DAL(sample(['mysql://...1','mysql://...2','mysql://...3'], 3))

deployment recipes 545
In this case, different HTTP requests will be served by different databases at
random, and each DB will be hit more or less with the same probability.
We can also implement a simple Round-Robin
1def fail_safe_round_robin(*uris):
2i = cache.ram('round-robin', lambda: 0, None)
3uris = uris[i:]+uris[:i] # rotate the list of uris
4cache.ram('round-robin', lambda: (i+1)%len(uris), 0)
5return uris
6db = DAL(fail_safe_round_robin('mysql://...1','mysql://...2','mysql://...3'))
This is fail-safe in the sense that if the database server assigned to the request
fails to connect, DAL will try the next one in the order.
It is also possible to connect to different databases depending on the
requested action or controller. In a master-slave database configuration, some
action performs only a read and some person both read/write. The former
can safely connect to a slave db server, while the latter should connect to a
master. So you can do:
1if request.function in read_only_actions:
2db = DAL(sample(['mysql://...1','mysql://...2','mysql://...3'], 3))
3if request.action in read_only_actions:
4db = DAL(shuffle(['mysql://...1','mysql://...2','mysql://...3']))
5else:
6db = DAL(sample(['mysql://...3','mysql://...4','mysql://...5'], 3))
where 1,2,3are slaves and 3,4,5are masters.
13.5Deploying on Google App Engine
It is possible to run web2py code on Google App Engine (GAE) [13],
including DAL code.
GAE supports two versions of Python: 2.5(default) and 2.7(beta). web2y
supports both but uses 2.5by default (this may change in the future). Look
into the "app.yaml" file described below for configration details.
GAE also supports a Google SQL database (compatible with MySQL) and a
Google NoSQL (referred to as "Datastore"). web2py supports both. If you
546 web2py full-stack web framework,4th edition
wish to use Google SQL database follow the instructions on Chapter 6. This
section assues you will be using the Google Datastore.
The GAE platform provides several advantages over normal hosting
solutions:
• Ease of deployment. Google completely abstracts the underlying
architecture.
• Scalability. Google will replicate your app as many times as it takes to
serve all concurrent requests.
• One can choose between a SQL and a NoSQL database (or both together).
But also some disadvantages:
• No read or write access to the file system.
• No HTTPS unless you use the appspot.com domain with a Google
certificate.
and some Datastore specific disadvantages:
• No typical transactions.
• No complex datastore queries. In particular there are no JOIN,LIKE, and
DATE/DATETIME operators.
• No multiple OR sub-queries unless they involve one and the same field.
Because of the readonly filesystem, web2py cannot store sessions, error
tickets, cache files and uploaded files in the filesystem; they must be stored
in the datastore and not in the filesystem.
Here we provide a quick overview of GAE and we focus on web2py specific
issues, we refer you to the official GAE documentation online for details.
Attention: At the time of writing, GAE supports only Python 2.5. Any other
version will cause problems. You also must run the web2py source distribution,
not a binary distribution.

deployment recipes 547
13.5.1Configuration
There are three configuration files to be aware of:
1web2py/app.yaml
2web2py/queue.yaml
3web2py/index.yaml
app.yaml and queue.yaml are most easily created by using the template files
app.example.yaml and queue.example.yaml as starting points. index.yaml is
created automatically by the Google deployment software.
app.yaml has the following structure (it has been shortened using...):
1application: web2py
2version: 1
3api_version: 1
4runtime: python
5handlers:
6- url: /_ah/stats.*
7...
8- url: /(?P<a>.+?)/static/(?P<b>.+)
9...
10 - url: /_ah/admin/.*
11 ...
12 - url: /_ah/queue/default
13 ...
14 - url: .*
15 ...
16 skip_files:
17 ...
app.example.yaml (when copied to app.yaml) is configured to deploy the
web2py welcome application, but not the admin or example applications. You
must replace web2py with the application id that you used when registering
with Google App Engine.
url: /(.+?)/static/(.+) instructs GAE to serve your app static files directly,
without calling web2py logic, for speed.
url:.*instructs web2py to use the gaehandler.py for every other request.
The skip_files: session is list of regular expressions for files that do not need
to deployed on GAE. In particular the lines:
1(applications/(admin|examples)/.*)|

548 web2py full-stack web framework,4th edition
2((admin|examples|welcome)\.(w2p|tar))|
tell GAE not to deploy the default applications, except for the unpacked
welcome scaffolding application. You can add more applications to be
ignored here.
Except for the application id and version, you probably do not need to edit
app.yaml, though you may wish to exclude the welcome application.
The file queue.yaml is used to configure GAE task queues.
The file index.yaml is automatically generated when you run your application
locally using the GAE appserver (the web server that comes with the Google
SDK). It contains something like this:
1indexes:
2- kind: person
3properties:
4- name: name
5direction: desc
In this example it tells GAE to create an index for table "person" that will be
used to sort by "name" in reversed alphabetical order. You will not be able to
search and sort records in your app without corresponding indexes.
It is important to always run your apps locally with the appserver and try
every functionality of your app, before deployment. This will be important
for testing purposes, but also to automatically generate the "index.yaml" file.
Occasionally you may want to edit this file and perform cleanup, such as
removing duplicate entries.
13.5.2Running and deployment
Linux
Here we assume you have installed the GAE SDK. At the time of writing,
GAE runs on Python 2.5.2. You can run your app from inside the "web2py"
folder by using the appserver command:
1python2.5 dev_appserver.py ../web2py
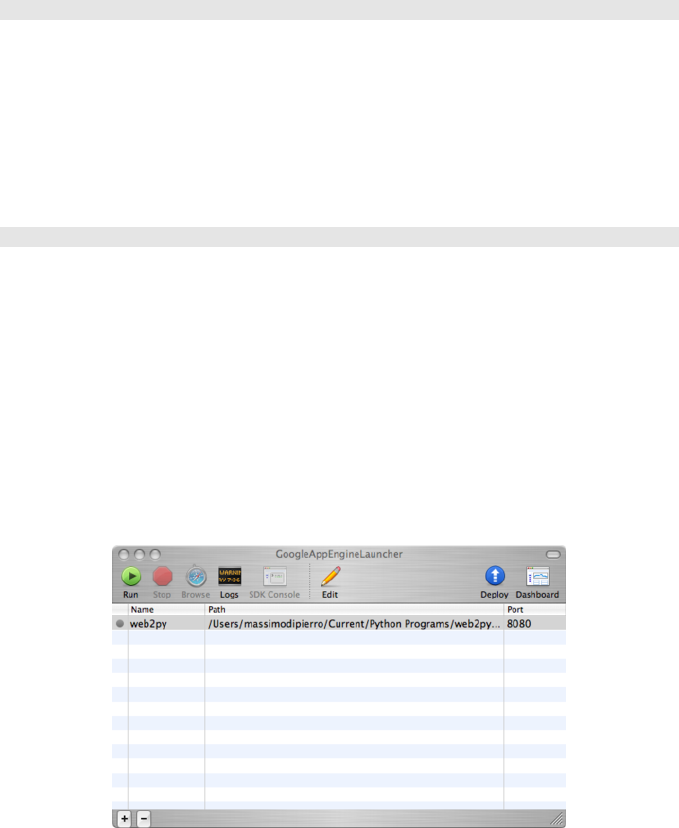
deployment recipes 549
This will start the appserver and you can run your application at the URL:
1http://127.0.0.1:8080/
In order to upload your app on GAE, make sure you have edited the
"app.yaml" file as explained before and set the proper application id, then
run:
1python2.5 appcfg.py update ../web2py
Mac, Windows
On Mac and Windows, you can also use the Google App Engine Launcher.
You can download the software from ref. [13].
Choose [File][Add Existing Application], set the path to the path of the top-
level web2py folder, and press the [Run] button in the toolbar. After you have
tested that it works locally, you can deploy it on GAE by simply clicking on
the [Deploy] button on the toolbar (assuming you have an account).
On GAE, the web2py tickets/errors are also logged into the GAE
administration console where logs can be accessed and searched online.
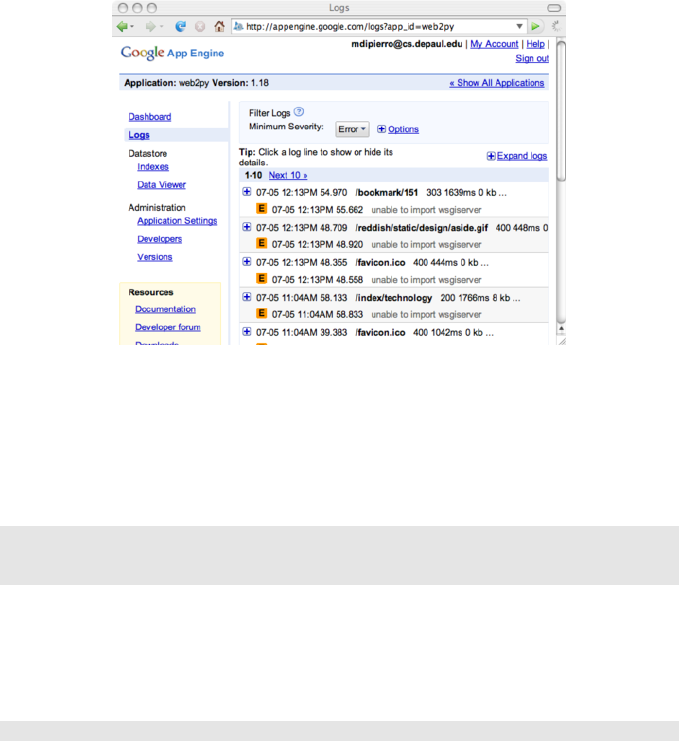
550 web2py full-stack web framework,4th edition
13.5.3Configuring the handler
The file gaehandler.py is responsible for serving files on GAE and it has a few
options. Here are their default values:
1LOG_STATS = False
2APPSTATS = True
3DEBUG = False
LOG_STATS will log the time to serve pages in the GAE logs.
APPSTATS will enable GAE appstats which provides profiling statistics. They
will be made available at the URL:
1http://localhost:8080/_ah/stats
DEBUG sets debug mode. It make no difference in practice unless checked
explicitly in your code via gluon.settings.web2py_runtime.
13.5.4Avoid the filesystem
On GAE you have no access to the filesystem. You cannot open any file for
writing.

deployment recipes 551
For this purpose, on GAE, web2py automatically stores all uploaded files in
the datastore, whether or not "upload" Field(s) have a uploadfield attribute.
You also should store sessions and tickets in the database and you have to be
explicit:
1if request.env.web2py_runtime_gae
2db = DAL('gae')
3session.connect(request,response,db)
4else:
5db = DAL('sqlite://storage.sqlite')
The above code checks whether you are running on GAE, connects to
BigTable, and instructs web2py to store sessions and tickets in there. It
connects to a sqlite database otherwise. This code is already in the scaffolding
app in the file "db.py".
13.5.5Memcache
If you prefer, you can store sessions in memcache:
1from gluon.contrib.gae_memcache import MemcacheClient
2from gluon.contrib.memdb import MEMDB
3cache.memcache = MemcacheClient(request)
4cache.ram = cache.disk = cache.memcache
5
6db = DAL('gae')
7session.connect(request,response,MEMDB(cache.memcache))
Notice that on GAE cache.ram and cache.disk should not be used, so we
make them point to cache.memcache.
13.5.6Datastore issues
The absence of multi-entity transactions and typical functionalities of
relational databases are what sets GAE apart from other hosting
environment. This is the price to pay for high scalability. GAE is an excellent
platform if these limitations are tolerable; if not, then a regular hosting
platform with a relational database should be considered instead.

552 web2py full-stack web framework,4th edition
If a web2py application does not run on GAE, it is because of one of the
limitations discussed above. Most issues can be resolved by removing JOINs
from web2py queries and de-normalizing the database.
Google App Engine supports some special field types, such as ListProperty
and StringListProperty. You can use these types with web2py using the
following old syntax:
1from gluon.dal import gae
2db.define_table('product',
3Field('name'),
4Field('tags', type=gae.StringListProperty())
or the equivalent new syntax:
1db.define_table('product',
2Field('name'),
3Field('tags','list:string')
In both cases the "tags" field is a StringListProperty therefore its values must
be lists of strings, compatibly with the GAE documentation. The second
notation is to be preferred because web2py will treat the field in a smarter
way in the context of forms and because it will work with relational databases
too.
Similarly, web2py supports list:integer and list:reference which map into
aListProperty(int).
list types are discussed in more detail in Chapter 6.
13.5.7GAE and https
If you application has id "myapp" your GAE domain is
1http://myapp.appspot.com/
and it can also be accessed via HTTPS
1https://myapp.appspot.com/
In this case it will use an "appspot.com" certificate provided by Google.

deployment recipes 553
You can register a DNS entry and use any other domain name you own for
your app but you will not be able to use HTTPS on it. At the time of writing,
this is a GAE limitation.
13.6Jython
web2py normally runs on CPython (the Python interpreter coded in C), but
it can also run on Jython (the Python interpreter coded in Java). This allows
web2py to run in a Java infrastructure.
Even though web2py runs with Jython out of the box, there is some trickery
involved in setting up Jython and in setting up zxJDBC (the Jython database
adaptor). Here are the instructions:
• Download the file "jython_installer-2.5.0.jar" (or 2.5.x) from Jython.org
• Install it:
1java -jar jython_installer-2.5.0.jar
• Download and install "zxJDBC.jar" from [101]
• Download and install the file "sqlitejdbc-v056.jar" from [102]
• Add zxJDBC and sqlitejdbc to the java CLASSPATH
• Start web2py with Jython
1/path/to/jython web2py.py
At the time of writing we only support sqlite and postgres on Jython.
14
Other recipes
14.1Upgrading
In the "site" page of the administrative interface there is an "upgrade now"
button. In case this is not feasible or does not work (for example because of
a file locking issue), upgrading web2py manually is very easy.
Simply unzip the latest version of web2py over the old installation.
This will upgrade all the libraries as well as the applications admin,
examples,welcome. It will also create a new empty file "NEWINSTALL".
Upon restarting, web2py will delete the empty file and package the welcome
app into "welcome.w2p" that will be used as the new scaffolding app.
web2py does not upgrade any file in other existing applications.
14.2How to distribute your applications as binaries
It is possible to bundle your app with the web2py binary distribution and
distribute them together. The license allows this as long you make clear in
the license of your app that you are bundling with web2py and add a link to
the web2py.com.
Here we explain how to do it for Windows:

556 web2py full-stack web framework,4th edition
• Create your app as usual
• Using admin, bytecode compile your app (one click)
• Using admin, pack your app compiled (another click)
• Create a folder "myapp"
• Download a web2py windows binary distribution
• Unzip it in folder "myapp" and start it (two clicks)
• Upload using admin the previously packed and compiled app with the
name "init" (one click)
• Create a file "myapp/start.bat" that contains "cd web2py; web2py.exe"
• Create a file "myapp/license" that contains a license for your app and
make sure it states that it is being "distributed with an unmodified copy
of web2py from web2py.com"
• Zip the myapp folder into a file "myapp.zip"
• Distribute and/or sell "myapp.zip"
When users will unzip "myapp.zip" and click "run" they will see your app
instead of the "welcome" app. There is no requirement on the user side, not
even Python pre-installed.
For Mac binaries the process is the same but there is no need for the "bat"
file.
14.3Building a minimalist web2py
Some times we need to deploy web2py in a server with very small memory
footprint. In this case we want to strip down web2py to its bare minimum.
An easy way to do it is the following:
• On a production machine, install the full web2py from source
• From inside the main web2py folder run
1python scripts/make_min_web2py.py /path/to/minweb2py

other recipes 557
• Now copy under "/path/to/minweb2py/applications" the applications
you want to deploy
• Deploy "/path/to/minweb2py" to the small footprint server
The script "make_min_web2py.py" builds a minimalist web2py distribution
that does not include:
• admin
• examples
• welcome
• scripts
• rarely used contrib modules
It does include a "welcome" app consisting of a single file to allow testing
deployment. Look into this script. At the top it contains a detailed list of
what is included and what is ignored. You can easily modify it and tailor to
your needs.
14.4Fetching an external URL
Python includes the urllib library for fetching urls:
1import urllib
2page = urllib.urlopen('http://www.web2py.com').read()
This is often fine, but the urllib module does not work on the Google App
Engine. Google provides a different API for downloading URLs that works
on GAE only. In order to make your code portable, web2py includes a fetch
function that works on GAE as well as other Python installations:
1from google.tools import fetch
2page = fetch('http://www.web2py.com')

558 web2py full-stack web framework,4th edition
14.5Pretty dates
It is often useful to represent a datetime not as "2009-07-25 14:34:56" but as
"one year ago". web2py provides a utility function for this:
1import datetime
2d = datetime.datetime(2009,7,25,14,34,56)
3from gluon.tools import prettydate
4pretty_d = prettydate(d,T)
The second argument (T) must be passed to allow internationalization for the
output.
14.6Geocoding
If you need to convert an address (for example: "243 S Wabash Ave, Chicago,
IL, USA") into geographical coordinates (latitude and longitude), web2py
provides a function to do so.
1from gluon.tools import geocode
2address = '243 S Wabash Ave, Chicago, IL, USA'
3(latitude, longitude) = geocode(address)
The function geocode requires a network connection and it connects to the
Google geocoding service for the geocoding. The function returns (0,0) in
case of failure. Notice that the Google geocoding service caps the number of
requests, so you should check their service agreement. The geocode function
is built on top of the fetch function and thus it works on GAE.
14.7Pagination
This recipe is a useful trick to minimize database access in case of pagination,
e.g., when you need to display a list of rows from a database but you want
to distribute the rows over multiple pages.
Start by creating a primes application that stores the first 1000 prime numbers
in a database.

other recipes 559
Here is the model db.py:
1db = DAL('sqlite://primes.db')
2db.define_table('prime',Field('value','integer'))
3def isprime(p):
4for i in range(2,p):
5if p%i==0: return False
6return True
7if len(db().select(db.prime.id))==0:
8p=2
9for i in range(1000):
10 while not isprime(p): p+=1
11 db.prime.insert(value=p)
12 p+=1
Now create an action list_items in the "default.py" controller that reads like
this:
1def list_items():
2if len(request.args): page=int(request.args[0])
3else: page=0
4items_per_page=20
5limitby=(page*items_per_page,(page+1)*items_per_page+1)
6rows=db().select(db.prime.ALL,limitby=limitby)
7return dict(rows=rows,page=page,items_per_page=items_per_page)
Notice that this code selects one more item than is needed, 20+1. The extra
element tells the view whether there is a next page.
Here is the "default/list_items.html" view:
1{{extend 'layout.html'}}
2
3{{for i,row in enumerate(rows):}}
4{{if i==items_per_page: break}}
5{{=row.value}}<br />
6{{pass}}
7
8{{if page:}}
9<a href="{{=URL(args=[page-1])}}">previous</a>
10 {{pass}}
11
12 {{if len(rows)>items_per_page:}}
13 <a href="{{=URL(args=[page+1])}}">next</a>
14 {{pass}}
In this way we have obtained pagination with one single select per action,
and that one select only selects one row more then we need.

560 web2py full-stack web framework,4th edition
14.8httpserver.log and the Log File Format
The web2py web server logs all requests to a file called:
1httpserver.log
in the root web2py directory. An alternative filename and location can be
specified via web2py command-line options.
New entries are appended to the end of the file each time a request is made.
Each line looks like this:
1127.0.0.1, 2008-01-12 10:41:20, GET, /admin/default/site, HTTP/1.1, 200, 0.270000
The format is:
1ip, timestamp, method, path, protocol, status, time_taken
Where
• ip is the IP address of the client who made the request
• timestamp is the date and time of the request in ISO 8601 format, YYYY-
MM-DDT HH:MM:SS
• method is either GET or POST
• path is the path requested by the client
• protocol is the HTTP protocol used to send to the client, usually HTTP/1.1
• status is the one of the HTTP status codes [95]
• time_taken is the amount of time the server took to process the request, in
seconds, not including upload/download time.
In the appliances repository [34], you will find an appliance for log analysis.
This logging is disabled by default when using mod_wsgi since it would be
the same as the Apache log.

other recipes 561
14.9Populating database with dummy data
For testing purposes it is convenient to be able to populate database tables
with dummy data. web2py includes a Bayesian classifier already trained to
generate dummy but readable text for this purpose.
Here is the simplest way to use it:
1from gluon.contrib.populate import populate
2populate(db.mytable,100)
It will insert 100 dummy records into db.mytable. It will try to do
intelligently by generating short text for string fields, longer text for text
fields, integers, doubles, dates, datetimes, times, booleans, etc. for the
corresponding fields. It will try to respect requirements imposed by
validators. For fields containing the word "name" it will try to generate
dummy names. For reference fields it will generate valid references.
If you have two tables (A and B) where B references A, make sure to populate
A first and B second.
Because population is done in a transaction, do not attempt to populate
too many records at once, particularly if references are involved. Instead,
populate 100 at a time, commit, loop.
1for i in range(10):
2populate(db.mytable,100)
3db.commit()
You can use the Bayesian classifier to learn some text and generate dummy
text that sounds similar but should not make sense:
1from gluon.contrib.populate import Learner, IUP
2ell=Learner()
3ell.learn('some very long input text ...')
4print ell.generate(1000,prefix=None)
14.10 Accepting credit card payments
There are multiple ways to accept credit card payments online. web2py
provides specific APIs for some of the most popular and practical ones:
562 web2py full-stack web framework,4th edition
• Google Wallet [96]
• PayPal paypalcite
• Stripe.com [98]
• Authorize.net [99]
• DowCommerece [100]
The first two mechanisms above delegate the process of authenticating the
payee to an external service. While this is the best solution for security (your
app does not handle any credit card information at all) it makes the process
cumbersome (the user must login twice; for example, once with your app,
and once with Google) and does not allow your app to handle recurrent
payments in an automated way.
There are times when you need more control and you want to generate
yourself the entry form for the credit card info and than programmatically
ask the processor to transfer money from the credit card to your account.
For this reason web2py provide integration out of the box with Stripe,
Authorize.net (the module was developed by John Conde and slightly
modified) and DowCommerce. Stripe is the simplest to use and also the
cheapest for low volume of transactions (they charge no fix cost but charge
about 3% per transaction). Authorize.net is better for high volumes (has a
fixed yearly costs plus a lower cost per transaction).
Mind that in the case of Stripe and Authorize.net your program will be
accepting credit cards information. You do not have to store this information
and we advice you not to because of the legal requirements involved (check
with Visa or Mastercard) but there are times when you may want to store the
information for recurrent payments or to reproduce the Amazon one-click
pay button.
14.10.1Google Wallet
The simplest way to use Google Wallet (Level 1) consists of embedding a
button on your page that, when clicked, redirects your visitor to a payment

other recipes 563
page provided by Google.
First of all you need to register a Google Merchant Account at the url:
1https://checkout.google.com/sell
You will need to provide Google with your bank information. Google will
assign you a merchant_id and a merchant_key (do not confuse them, keep them
secret).
Then you simply need to create the following code in your view:
1{{from gluon.contrib.google_wallet import button}}
2{{=button(merchant_id="123456789012345",
3products=[dict(name="shoes",
4quantity=1,
5price=23.5,
6currency='USD',
7description="running shoes black")])}}
When a visitor clicks on the button, the visitor will be redirected to the
Google page where he/she can pay for the items. Here products is a list
of products and each product is a dictionary of parameters that you want
to pass describing your items (name, quantity, price, currency, description,
and other optional ones which you can find described in the Google Wallet
documentation).
If you choose to use this mechanism you may want to generate the values
passed to the button programmatically based on your inventory and the
visitor shopping chart.
All the tax and shipping information will be handled on the Google side.
Same for accounting information. By default your application is not notified
that the transaction has been completed therefore you will have to visit your
Google Merchant site to see which products have been purchased and paid
for, and which products you need to ship to your buyers there. Google will
also send you an email with the information.
If you want a tighter integration you have to use the Level 2notification API.
In that case you can pass more information to Google and Google will call
your API to notify about purchases. This allows you to keep accounting
information within your application but it requires you expose web services

564 web2py full-stack web framework,4th edition
that can talk to Google Wallet.
This is a considerable more difficult problem but such API has already been
implemented and it is available as plugin from
1http://web2py.com/plugins/static/web2py.plugin.google_checkout.w2p
You can find the documentation of the plugin in the plugin itself.
14.10.2Paypal
Paypal integration is not described here but you can find more information
about it at this resource:
1http://www.web2pyslices.com/main/slices/take_slice/9
14.10.3Stripe.com
This is probably one of the easiest way and flexible ways to accept credit card
payments.
You need to register with Stripe.com and that is a very easy process, in
fact Stripe will assign you an API key to try even before you create any
credentials.
Once you have the API key you can accept credit cards with the following
code:
1from gluon.contrib.stripe import Stripe
2stripe = Stripe(api_key)
3d = stripe.charge(amount=100,
4currency='usd',
5card_number='4242424242424242',
6card_exp_month='5',
7card_exp_year='2012',
8card_cvc_check='123',
9description='the usual black shoes')
10 if d.get('paid',False):
11 # payment accepted
12 elif:
13 # error is in d.get('error','unknown')
other recipes 565
The response, d, is a dictionary which you can explore yourself. The card
number used in the example is a sandbox and it will always succeed. Each
transaction is associated to a transaction id stored in d[’id’].
Stripe also allows you verify a transaction at a later time:
1d = Stripe(key).check(d['id'])
and refund a transaction:
1r = Stripe(key).refund(d['id'])
2if r.get('refunded',False):
3# refund was successful
4elif:
5# error is in d.get('error','unkown')
Stripe makes very easy to keep the accounting within your application.
All the communications between your app and Stripe go over RESTful web
services. Stripe actually exposes even more services and provides a larger set
of Python API. You can read more on their web site.
14.10.4Authorize.Net
Another simple way to accept credit cards is to use Authorize.Net. As
usual you need to register and you will obtain a login and a transaction
key (transkey. Once you have them it works very much like Stripe does:
1from gluon.contrib.AuthorizeNet import process
2if process(creditcard='4427802641004797',
3expiration="122012,
4total=100.0,cvv='123',tax=None,invoice=None,
5login='cnpdev4289', transkey='SR2P8g4jdEn7vFLQ',testmode=True):
6# payment was processed
7else:
8# payment was rejected
If you have a valid Authorize.Net account you should replace the sandbox
login and transkey with those of your account, set testmode=False to run on
the real platform instead of the sandbox, and use credit card information
provided by the visitor.

566 web2py full-stack web framework,4th edition
If process returns True, the money has been transferred from the visitor credit
card account to your Authorize.Net account. invoice is just a string that you
can set and will be store by Authorize.Net with this transaction so that you
can reconcile the data with the information in your application.
Here is a more complex example of workflow where more variables are
exposed:
1from gluon.contrib.AuthorizeNet import AIM
2payment = AIM(login='cnpdev4289',
3transkey='SR2P8g4jdEn7vFLQ',
4testmod=True)
5payment.setTransaction(creditcard, expiration, total, cvv, tax, invoice)
6payment.setParameter('x_duplicate_window', 180) # three minutes duplicate windows
7payment.setParameter('x_cust_id','1324')# customer ID
8payment.setParameter('x_first_name','Agent')
9payment.setParameter('x_last_name','Smith')
10 payment.setParameter('x_company','Test Company')
11 payment.setParameter('x_address','1234 Main Street')
12 payment.setParameter('x_city','Townsville')
13 payment.setParameter('x_state','NJ')
14 payment.setParameter('x_zip','12345')
15 payment.setParameter('x_country','US')
16 payment.setParameter('x_phone','800-555-1234')
17 payment.setParameter('x_description','Test Transaction')
18 payment.setParameter('x_customer_ip', socket.gethostbyname(socket.gethostname()))
19 payment.setParameter('x_email','you@example.com')
20 payment.setParameter('x_email_customer', False)
21
22 payment.process()
23 if payment.isApproved():
24 print 'Response Code: ', payment.response.ResponseCode
25 print 'Response Text: ', payment.response.ResponseText
26 print 'Response: ', payment.getResultResponseFull()
27 print 'Transaction ID: ', payment.response.TransactionID
28 print 'CVV Result: ', payment.response.CVVResponse
29 print 'Approval Code: ', payment.response.AuthCode
30 print 'AVS Result: ', payment.response.AVSResponse
31 elif payment.isDeclined():
32 print 'Your credit card was declined by your bank'
33 elif payment.isError():
34 print 'It did not work'
35 print 'approved',payment.isApproved()
36 print 'declined',payment.isDeclined()
37 print 'error',payment.isError()

other recipes 567
Notice the code above uses a dummy test account. You need to register with
Authorize.Net (it is not a free service) and provide your own login, transkey,
testmode=True or False to the AIM constructor.
14.11 Dropbox API
Dropbox is a very popular storage service. It not only stores your files but
it keeps the cloud storage in sync with all your machines. It allows you
to create groups and give read/write permissions to the various folders to
individual users or groups. It also keeps version history of all your files. It
includes a folder called "Public" and each file you put in there will have its
own public URL. Dropbox is a great way to collaborate.
You can access dropbox easily by registering at
1https://www.dropbox.com/developers
you will get an APP_KEY and an APP_SECRET. Once you have them you can use
Dropbox to authenticate your users.
Create a file called "yourapp/private/dropbox.key" and in it write
1<APP_KEY>:<APP_SECERT>:app_folder
where <APP_KEY> and APP_SECRET are your key and secret.
Then in "models/db.py" do:
1from gluon.contrib.login_methods.dropbox_account import use_dropbox
2use_janrain(auth,filename='private/dropbox.key')
3mydropbox = auth.settings.login_form
This will allow users to login into your app using their dropbox credentials,
and your program will be able to upload files into their dropbox account:
1stream = open('localfile.txt','rb')
2mydropbox.put('destfile.txt',stream)
download files:
1stream = mydropbox.get('destfile.txt')
2open('localfile.txt','wb').write(read)

568 web2py full-stack web framework,4th edition
and get directory listings:
1contents = mydropbox.dir(path = '/')['contents']
14.12 Twitter API
Here are some quick examples on how to post/get tweets. No third-party
libraries are required, since Twitter uses simple RESTful APIs.
Here is an example of how to post a tweet:
1def post_tweet(username,password,message):
2import urllib, urllib2, base64
3import gluon.contrib.simplejson as sj
4args= urllib.urlencode([('status',message)])
5headers={}
6headers['Authorization'] = 'Basic '+base64.b64encode(
7username+':'+password)
8req = urllib2.Request(
9'http://twitter.com/statuses/update.json',
10 args, headers)
11 return sj.loads(urllib2.urlopen(req).read())
Here is an example of how to receive tweets:
1def get_tweets():
2user='web2py'
3import urllib
4import gluon.contrib.simplejson as sj
5page = urllib.urlopen('http://twitter.com/%s?format=json' % user).read()
6tweets=XML(sj.loads(page)['#timeline'])
7return dict(tweets=tweets)
For more complex operations, refer to the Twitter API documentation.
14.13 Streaming virtual files
It is common for malicious attackers to scan web sites for vulnerabilities.
They use security scanners like Nessus to explore the target web sites for
scripts that are known to have vulnerabilities. An analysis of web server
logs from a scanned machine or directly in the Nessus database reveals that

other recipes 569
most of the known vulnerabilities are in PHP scripts and ASP scripts. Since
we are running web2py, we do not have those vulnerabilities, but we will
still be scanned for them. This is annoying, so we like to respond to those
vulnerability scans and make the attacker understand their time is being
wasted.
One possibility is to redirect all requests for.php,.asp, and anything
suspicious to a dummy action that will respond to the attack by keeping
the attacker busy for a large amount of time. Eventually the attacker will
give up and will not scan us again.
This recipe requires two parts.
A dedicated application called jammer with a "default.py" controller as
follows:
1class Jammer():
2def read(self,n): return 'x'*n
3def jam(): return response.stream(Jammer(),40000)
When this action is called, it responds with an infinite data stream full of
"x"-es. 40000 characters at a time.
The second ingredient is a "route.py" file that redirects any request ending
in.php,.asp, etc. (both upper case and lower case) to this controller.
1route_in=(
2('.*\.(php|PHP|asp|ASP|jsp|JSP)','jammer/default/jam'),
3)
The first time you are attacked you may incur a small overhead, but our
experience is that the same attacker will not try twice.
other recipes 571
Index
__init__.py, 150
_and, 370
_count, 296
_dbname, 251
_delete, 296
_id, 270
_insert, 296
_lastdb, 262
_select, 296
_update, 296
_uri, 250
A, 212,487
about, 119,150
accepts, 82,95,316
Access Control, 391
access restriction, 33
Active Directory, 405
admin, 72,116,535
admin.py, 118
Adobe Flash, 442
Ajax, 104,459,479
Ajax links, 487
alias, 303
ALL, 267
and, 275
anyserver, 516
Apache, 513
API, 43,427,557
appadmin, 88,130
appliances, 72
as_dict, 277
as_list, 277,430
ASCII, 46
ASP, 24
asynchronous, 474
Auth, 391
auth.user, 396
auth.user_id, 396
Authentication, 457
authentication, 423
Authorize.net, 561
autocomplete, 374
autodelete, 338
B, 213
bar chart, 507
belongs, 294
bjoern, 516
blob, 255
block, 242
BODY, 214
BR, 214
bulk_insert, 260
buttons, 331
cache, 150,151,166
cache clear, 169
cache controller, 167
cache select, 302
cache view, 168
cache.disk, 166
cache.ram, 166
CAPTCHA, 399
CAS, 423
CAT, 214
CENTER, 214
CGI, 513
cgi, 516
checkbox, 219
Cherokee, 528
cherrypy, 516
class, 60
CLEANUP, 367
CODE, 214
COL, 216
COLGROUP, 216
colnames, 301
command line, 134
comments, 508
commit, 261
common fields, 305
component, 479
component plugin, 491
574 web2py full-stack web framework,4th edition
compute, 281
confirmation, 469
connection pooling, 248
connection strings, 247
contains, 290,292
content-disposition, 335
controllers, 150
cookies, 178
cooperation, 198
count, 246,275
cPickle, 68
cron, 188
cross site scripting, 31
CRUD, 344,502
crud.create, 344
crud.delete, 344
crud.read, 344
crud.search, 344
crud.select, 344
crud.tables, 344
crud.update, 344
CRYPT, 367
cryptographic store, 33
CSRF, 32
CSS, 240
CSV, 433
csv, 297
custom validator, 370
DAC, 391
DAL, 152,245,250
DAL shortcuts, 268
DALRows custom tags,
301
DALRows objects, 300
database drivers, 245
databases, 150
date, 67,292
datetime, 67,292
day, 293
DB2,250
def, 56,208
default, 251
default_application, 179,
186
default_controller, 186
default_function, 186
define_table, 246,251
deletable, 469
delete, 276
delete record, 332
delete_label, 330
DEMO_MODE, 129
dict, 50
diesel, 516
digitally signed URL, 172
dir, 45
dispatching, 139
distinct, 274
distributed transactions,
264
DIV, 216
Document Object Model
(DOM), 210
Domino, 405
DowCommerce, 561
drop, 246,263
Dropbox.com, 567
dummy table, 304
EDIT, 119
effects, 463
element, 229
elements, 229
elif, 53,206
else, 53,206,207
EM, 216
email attachments, 384
email from GAE, 384
email html, 384
email logging, 383
emails, 387
embed64,227
encode, 46
env, 158
errors, 122,150
escape, 204
eval, 64
eventlet, 516
examples, 72
except, 54,207
Exception, 54
exclude, 278
exec, 64
exec_environment, 197
executesql, 262
export, 296
export_to_csv_file, 301
Expression, 247
extent, 232
ez.css, 236
Facebook, 397,406
fake_migrate, 259
fapws, 516
FastCGI, 526,528
favicon, 184
fcgihandler, 526
fetch, 557
Field, 246,251,266
Field constructor, 252
fields, 256,329
FIELDSET, 216
file.read, 63
file.seek, 63
file.write, 63
finally, 54,207
find, 278
FireBird, 250
first, 277
flash mediaplayer, 508
Flickr, 397
flup, 516
index 575
for, 52,205
FORM, 82,216
form, 79,316
format, 88
formname, 316
formstyle, 331
GAE login, 405
geocode, 558
GET, 141
gevent, 516
Gmail, 404
gnuicorn, 516
Google, 397
Google App Engine, 545
Google map, 509
Google Wallet, 561
grouping, 288
H1,217
HAProxy, 538
HEAD, 217
help, 45
helpers, 151,209
hideerror, 354
hour, 293
HR, 218
HTML, 203,217,300,428
HTTP, 151,173
httpserver.log, 560
I, 218
id_group, 411
id_label, 330
if, 53,206
IF_MODIFIED_SINCE,
140
IFRAME, 219
iframe, 509
ignore_common_filters,
306
IMG, 219
import, 65,195,296
import_from_csv_file, 246
improper error handling,
32
include, 232
index, 73
information leakage, 32
Informix, 250
inheritance, 304
init, 179
injection flaws, 31
inner join, 286
INPUT, 82,218
insecure object reference,
32
insert, 246,260
Instant Press, 116
internationalization, 151,
175
IS_ALPHANUMERIC, 357
IS_DATE, 357
IS_DATE_IN_RANGE, 357
IS_DATETIME, 357
IS_DATETIME_IN_RANGE,
358
IS_DECIMAL_IN_RANGE,
358
IS_EMAIL, 85,358
IS_EMPTY_OR, 367
IS_EQUEL_TO, 358
IS_EXPR, 359
IS_FLOAT_IN_RANGE,
359
IS_IMAGE, 364
IS_IN_DB, 85,369
IS_IN_SET, 359
IS_INT_IN_RANGE, 359
IS_IPV4,366
IS_LENGTH, 360
IS_LIST_OF, 361
IS_LOWER, 361,367
IS_MATCH, 361
IS_NOT_EMPTY, 82,85,
362
IS_NOT_IN_DB, 368
IS_NULL_OR, 367
IS_SLUG, 364
IS_STRONG, 364
IS_TIME, 362
IS_UPLOAD_FILENAME,
365
IS_UPPER, 367
IS_URL, 362
isempty, 275
Janrain, 397
join, 286
jqGrid, 502,506
JSON, 428,445
JSONRPC, 438
jsonrpc, 146
JSP, 24
Jython, 553
keepvalues, 322
keyed table, 264
LABEL, 219
labels, 329
lambda, 58
languages, 150
last, 277
latex, 506
layout, 80
layout plugin, 494
layout.html, 232
LDAP, 402,405
left outer join, 288
LEGEND, 219
length, 251
LI, 219
576 web2py full-stack web framework,4th edition
license, 35,119,150
Lighttpd, 526
like, 292
limitby, 274
LinkedIn, 397,407
Linux, 69
list, 47
list:integer, 290
list:reference, 290
list:string, 290
LOAD, 479
load, 479
load_action, 509
load_url, 509
Lotus Notes, 405
lower, 292,293
MAC, 391
Mac, 69
Mail, 383
mail.send, 384
malicious file execution, 32
many-to-many, 289
markdown, 110
MARKMIN, 40,110,220
MARKMIN syntax, 498
max, 294
memcache, 542
MENU, 228
menu, 235
menu in plugin_wiki, 501
Mercurial, 126
META, 220
meta, 235
meta-code, 501
meta-footer, 501
meta-header, 501
meta-menu, 501
meta-sidebar, 501
migrate, 251
migrations, 257
min, 294
minutes, 293
mobile, 228
mod_proxy, 513
mod_python, 513
mod_wsgi, 513
Model-View-Controller, 26
models, 150
modules, 150
mongrel2,516
month, 293
MSSQL, 250
multi tenancy, 305
MULTI_USER_MODE, 129
multiple, 290,359,370
MySpace, 397
MySQL, 250
named id field, 251
nested select, 294
not, 275
notnull, 251
OAuth, 406
OBJECT, 222
OL, 222
ON, 222
on_failed_authentication,
419
on_failed_authorization,
419
ondelete, 251,254
one to many, 285
onvalidation, 318
OpenID, 397,406
OpenLDAP, 405
OPTGROUP, 223
OPTION, 223
or, 275
Oracle, 250
orderby, 273
os, 65
os.path.join, 65
os.unlink, 65
outer join, 288
P, 223
page layout, 232
pagination, 558
PAM, 133,402,405
parse_as_rest, 451
PARTIAL CONTENT, 140
password, 133
paste, 516
Paypal, 561
PDF, 447
PGP, 384
PHP, 24
pie chart, 506
PIL, 399
plugin, 479
plugin_wiki, 495
PluginManager, 491
plural, 382
POST, 141
postback, 81
PostgresSQL, 250
PRE, 223
prettydate, 558
private, 150
PyAMF, 442
Pyjamas, 438
PyRTF, 446
Python, 43
Query, 246,266
radio, 218
random, 65
raw SQL, 296
RBAC, 391
reCAPTCHA, 399
index 577
recursive selects, 270
redirect, 81,151,173
Redis, 544
redis, 146
reference table, 303
referencing, 286
removing application, 544
ReportLab, 447
request, 24,151,155,158
request.ajax, 142
request.application, 141
request.args, 95,141
request.cid, 142,485
request.controller, 141
request.cookies, 155
request.function, 141
request.get_vars, 142
request.post_vars, 142
request.url, 141
request.vars, 79,142
required, 251
requires, 82,251
requires_signature, 486
reserved Keywords, 249
response, 151,160
response.body, 160
response.cookies, 160
response.download, 95,
160
response.files, 160
response.flash, 95,160
response.headers, 160
response.include_files, 160
response.include_meta,
160
response.js, 160
response.menu, 160,235
response.meta, 160,235
response.optimize_css, 160
response.optimize_js, 160
response.postprocessing,
160
response.render, 160
response.status, 160
response.stream, 160
response.subtitle, 160
response.title, 160
response.toolbar, 160
response.view, 160
response.write, 160,204
REST, 448
return, 56,208
robots, 184
rollback, 261
routes_app, 185
routes_in, 179
routes_onerror, 186
routes_out, 179
Row, 246,267
Rows, 246,266,286,288
RPC, 434
RSS, 104,431
rss, 113
RTF, 446
sanitize, 110,212
scaffolding, 72
scalability, 536
SCRIPT, 224
seconds, 293
secure communications, 33
security, 31,535
SELECT, 224
select, 93,266
selected, 223
self reference, 303
separator, 331
session, 78,150,151,164
session.connect, 164
session.forget, 164
session.secure, 164
Set, 246,266
shell, 44
showid, 330
simplejson, 445
singular, 382
site, 116
slideshow, 507
smart_query, 456
SMS, 386
SMTP, 404
SOAP, 444
sort, 278
SPAN, 224
sql.log, 251
SQLCustomType, 307
SQLFORM, 95
SQLFORM.grid, 272
SQLFORM.smartgrid, 272
SQLite, 250
sqlite, 246
SQLTABLE, 271
startswith, 292
static, 150
static files, 140
Storage, 155
str, 46
streaming, 568
Stripe.com, 561
STYLE, 224
sub-menu, 235
submit_button, 330
sum, 294
super, 243
superfish, 236
sys, 66
sys.path, 66
T, 151,175
TABLE, 224
Table, 256,266
tables, 256
TAG, 227
578 web2py full-stack web framework,4th edition
tag cloud, 509
tags, 290,370,508
TBODY, 225
TD, 224
template language, 203
tests, 150
TEXTAREA, 225
TFOOT, 226
TH, 226
THEAD, 226
time, 67,292
TITLE, 226
TLS, 405
TR, 224,226
truncate, 246,260
try, 54,207
TT, 226
tuple, 49
type, 46,251
UL, 226
Unicode, 46
unique, 251
update, 276
update_or_insert, 279
update_record, 277
upgrades, 555
upload, 84
uploadfield, 251
uploads, 150
uploadseparate, 251
upper, 292,293
URL, 81,169
url mapping, 139
url rewrite, 179
user_agent, 155
user_signature, 486
UTF8,46
validate_and_insert, 280
validate_and_update, 280
validators, 152,355
views, 150,203
Vimeo, 508
virtual laboratory, 129
virtualfields, 282
Web Services, 427
websockets, 460
welcome, 72
while, 53,206
widget in plugin_wiki, 495
wiki, 104,495
Windows, 69
Windows service, 534
with_alias, 303
WSGI, 200,513
WYSIWYG, 503
x509,384
XHTML, 217,218
XML, 211,301,428
XML-RPC, 300
xmlescape, 227
XMLRPC, 104,114,437
year, 293
YouTube, 507
Bibliography
[1]http://www.web2py.com
[2]http://www.python.org
[3]http://en.wikipedia.org/wiki/SQL
[4]http://www.sqlite.org/
[5]http://www.postgresql.org/
[6]http://www.mysql.com/
[7]http://www.microsoft.com/sqlserver
[8]http://www.firebirdsql.org/
[9]http://www.oracle.com/database/index.html
[10]http://www-01.ibm.com/software/data/db2/
[11]http://www-01.ibm.com/software/data/informix/
[12]http://www.ingres.com/
[13]http://code.google.com/appengine/
[14]http://en.wikipedia.org/wiki/HTML
[15]http://www.w3.org/TR/REC-html40/
[16]http://www.php.net/
[17]http://en.wikipedia.org/wiki/Web_Server_Gateway_Interface
580 web2py full-stack web framework,4th edition
[18]http://www.python.org/dev/peps/pep-0333/
[19]http://www.owasp.org
[20]http://www.pythonsecurity.org
[21]http://en.wikipedia.org/wiki/Secure_Sockets_Layer
[22]https://launchpad.net/rocket
[23]http://www.cdolivet.net/editarea/
[24]http://nicedit.com/
[25]http://pypi.python.org/pypi/simplejson
[26]http://pyrtf.sourceforge.net/
[27]http://www.dalkescientific.com/Python/PyRSS2Gen.html
[28]http://www.feedparser.org/
[29]http://code.google.com/p/python-markdown2/
[30]http://www.tummy.com/Community/software/python-memcached/
[31]http://www.gnu.org/licenses/lgpl.html
[32]http://jquery.com/
[33]https://www.web2py.com/cas
[34]http://www.web2py.com/appliances
[35]http://www.web2py.com/AlterEgo
[36]http://www.python.org/dev/peps/pep-0008/
[37]http://www.network-theory.co.uk/docs/pytut/
[38]http://oreilly.com/catalog/9780596158071
[39]http://www.python.org/doc/
[40]http://en.wikipedia.org/wiki/Cascading_Style_Sheets
[41]http://www.w3.org/Style/CSS/
[42]http://www.w3schools.com/css/
bibliography 581
[43]http://en.wikipedia.org/wiki/JavaScript
[44]http://www.amazon.com/dp/0596000480
[45]http://en.wikipedia.org/wiki/Cron#crontab_syntax
[46]http://www.xmlrpc.com/
[47]http://en.wikipedia.org/wiki/Hypertext_Transfer_Protocol
[48]http://www.w3.org/Protocols/rfc2616/rfc2616.html
[49]http://www.modernizr.com/
[50]http://getskeleton.com/
[51]http://en.wikipedia.org/wiki/XML
[52]http://www.w3.org/XML/
[53]http://www.ez-css.org
[54]http://en.wikipedia.org/wiki/XHTML
[55]http://www.w3.org/TR/xhtml1/
[56]http://www.w3schools.com/xhtml/
[57]http://www.web2py.com/layouts
[58]http://sourceforge.net/projects/zxjdbc/
[59]http://pypi.python.org/pypi/psycopg2
[60]https://github.com/petehunt/PyMySQL
[61]http://sourceforge.net/projects/mysql-python
[62]http://python.net/crew/atuining/cx_Oracle/
[63]http://pyodbc.sourceforge.net/
[64]http://kinterbasdb.sourceforge.net/
[65]http://informixdb.sourceforge.net/
[66]http://pypi.python.org/simple/ingresdbi/
[67]http://docs.python.org/library/csv.html#csv.QUOTE_ALL
582 web2py full-stack web framework,4th edition
[68]http://www.faqs.org/rfcs/rfc2616.html
[69]http://www.faqs.org/rfcs/rfc2396.html
[70]http://tools.ietf.org/html/rfc3490
[71]http://tools.ietf.org/html/rfc3492
[72]ttp://mail.python.org/pipermail/python-list/2007-June/
617126.html
[73]ttp://mail.python.org/pipermail/python-list/2007-June/
617126.html
[74]http://www.recaptcha.net
[75]http://en.wikipedia.org/wiki/Pluggable_Authentication_
Modules
[76]http://www.reportlab.org
[77]http://gdwarner.blogspot.com/2008/10/
brief-pyjamas-django-tutorial.html
[78]http://en.wikipedia.org/wiki/AJAX
[79]http://www.learningjquery.com/
[80]http://ui.jquery.com/
[81]http://en.wikipedia.org/wiki/Common_Gateway_Interface
[82]http://www.apache.org/
[83]http://httpd.apache.org/download.cgi
[84]http://adal.chiriliuc.com/mod_wsgi/revision_1018_2.3/mod_
wsgi_py25_apache22/mod_wsgi.so
[85]http://httpd.apache.org/docs/2.0/mod/mod_proxy.html
[86]http://httpd.apache.org/docs/2.2/mod/core.html
[87]http://sial.org/howto/openssl/self-signed
[88]http://code.google.com/p/modwsgi/
bibliography 583
[89]http://www.lighttpd.net/
[90]http://www.cherokee-project.com/download/
[91]http://www.fastcgi.com/
[92]http://www.apsis.ch/pound/
[93]http://haproxy.1wt.eu/
[94]http://pyamf.org/
[95]http://en.wikipedia.org/wiki/List_of_HTTP_status_codes
[96]https://wallet.google.com/manage
[97]https://www.paypal.com/
[98]https://stripe.com/
[99]http://www.authorize.net/
[100]http://www.dowcommerce.com/
[101]http://sourceforge.net/projects/zxjdbc/
[102]http://www.zentus.com/sqlitejdbc/
[103]http://redis.io/
